Posted on Leave a comment

Making Roti Dough with a KitchenAid Mixer: A Quick and Easy Guide

yellow kitchenaid stand mixer

Hello, home cooks! 🍽️💕 Today, we’re exploring a quick and easy method to prepare roti dough using a KitchenAid Mixer. This fantastic guide comes from the YouTube channel Cook with Kash and Manish, a wonderful resource for anyone looking for simple yet efficient cooking techniques. This video has garnered over a million views, proving its popularity among home cooks worldwide.

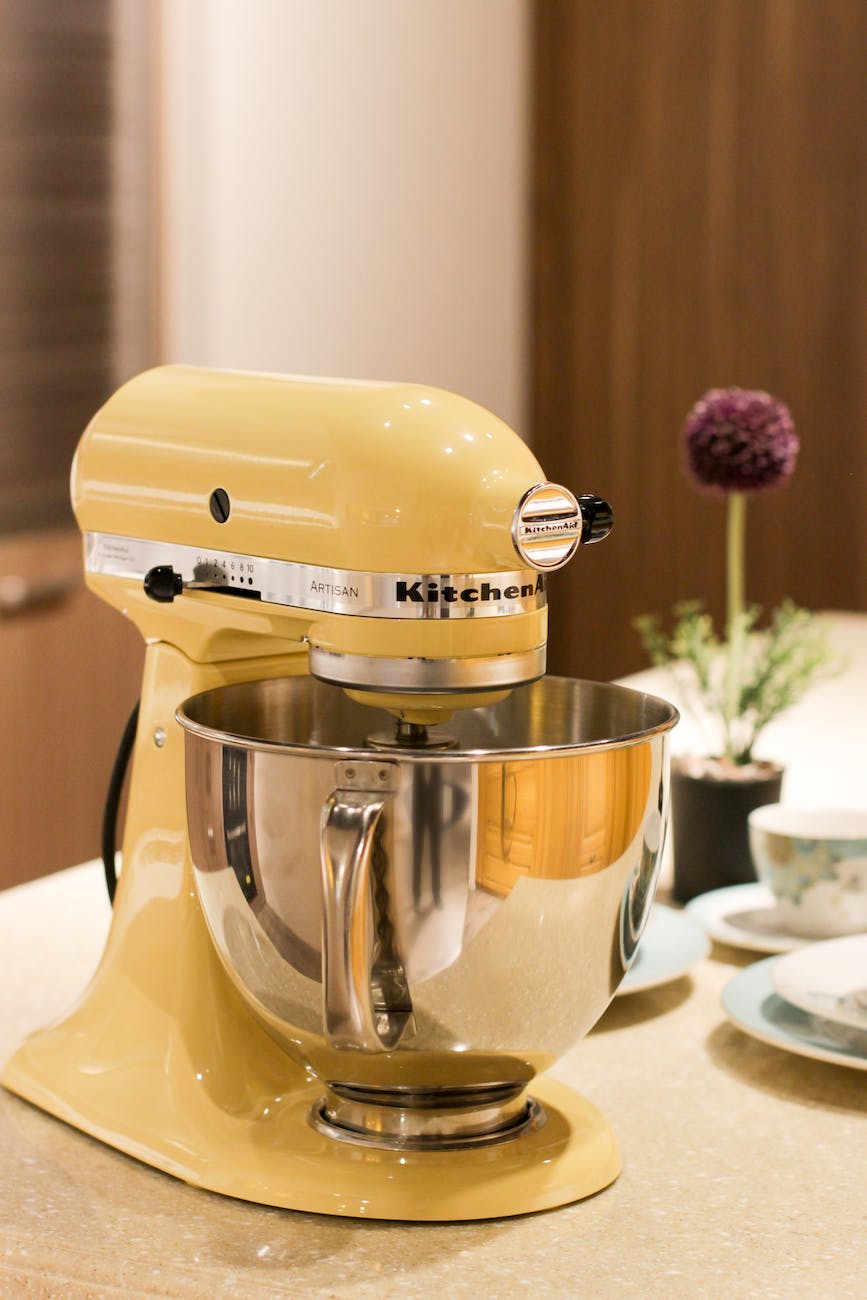
🍞 The Magic of KitchenAid Mixer 🥖

A KitchenAid Mixer is a versatile kitchen appliance that can be used for a variety of tasks, from mixing cake batter to kneading dough. In this guide, we’ll be using it to prepare roti dough, a staple in many cuisines around the world. The best part is that it takes only 3 minutes to make a beautiful soft dough, and anyone can do it, even kids (under adult supervision, of course)!

🍽️ The Guide: How to Make Roti Dough Using a KitchenAid Mixer 🍞

Unfortunately, the video doesn’t provide a detailed step-by-step process in the transcript. However, based on the video description and common practices, here’s a general guide on how to make roti dough using a KitchenAid Mixer:

  1. Attach the dough hook to your KitchenAid Mixer.
  2. Add your flour to the mixing bowl. The quantity would depend on how many rotis you plan to make.
  3. Start the mixer on a low speed to avoid flour dust.
  4. Gradually add water to the bowl while the mixer is running. The amount of water will depend on the type of flour and the desired consistency of the dough.
  5. Increase the speed of the mixer as the dough starts to form.
  6. Continue mixing until the dough is soft and pliable. This should take about 3 minutes.

And there you have it, a quick and easy way to make roti dough using a KitchenAid Mixer!

🍴 Enjoying Your Homemade Roti 🍽️

Once you have your roti dough ready, you can roll it out and cook it on a hot griddle or tawa. Serve your homemade roti with your favorite curry or use it to make wraps and sandwiches. The possibilities are endless!

🎉 Join the Foodie Community! 🍽️

If you try this method or have other cooking techniques to share, join the vibrant and engaging food lovers community on Facebook. It’s a place where you can share your culinary experiments, discover new recipes, and connect with fellow food enthusiasts.

🙏 Credits 🙏

A big thank you to Cook with Kash and Manish for sharing this fantastic guide on making roti dough using a KitchenAid Mixer. Their channel is a treasure trove of culinary delights, with recipes and techniques that are not only delicious but also easy to follow. So, if you’re looking for more culinary inspiration, do check out their channel.

And remember, as they say, “Cooking life is more easier with a KitchenAid Mixer!” 🍽️💕

Posted on Leave a comment

Just Need Chocolate and Milk: Make This Delicious Dessert in No Time

Chocolate Hazelnut Fathers day Campaign Masala Monk-min

Hello, dessert lovers! 🍽️💕 Today, we’re exploring a delightful dessert that’s not only incredibly flavorful but also quick to make. We’re talking about a Chocolate and Milk dessert, a treat that’s a hit with everyone and can be prepared in just a few minutes! This fantastic recipe comes from the YouTube channel Nino’s Home, a wonderful resource for anyone looking for simple yet tasty meal ideas. This recipe has garnered over 30 million views, proving its popularity among food enthusiasts worldwide. 🥛🍮

🍫 The Magic of Chocolate and Milk Dessert 🥛🍮

This dessert is a simple yet delicious treat that combines the creamy richness of milk with the sweet, chocolaty flavor of dark chocolate. The result is a dessert that’s not only delicious but also easy to make. Plus, it’s a versatile snack that can be enjoyed at any time of the day, from a quick breakfast to a mid-afternoon pick-me-up.

🍽️ The Recipe: How to Make Chocolate and Milk Dessert 🍫

The recipe starts with 500ml of milk, to which 100g of sugar and 7g of Agar agar powder are added. This mixture is then left to sit for 15 minutes.

Next, 150g of dark chocolate is added to the mixture. The ingredients are mixed together until smooth and then refrigerated for 3 hours.

🍴 Enjoying Chocolate and Milk Dessert: Tips and Suggestions 🍽️

When enjoying this dessert, here are a few tips and suggestions:

  • Feel free to adjust the amount of sugar to suit your taste. If you prefer a less sweet dessert, you can reduce the amount of sugar.
  • This dessert is best served chilled, so consider making it a day ahead and storing it in the refrigerator overnight.
  • This dessert makes a great snack for any time of the day. Serve it after a meal for a delightful end to your dining experience.

🎉 Join the Foodie Community! 🍽️

If you try this recipe or have other delicious recipes to share, join the vibrant and engaging food lovers community on Facebook. It’s a place where you can share your culinary experiments, discover new recipes, and connect with fellow food enthusiasts.

🙏 Credits 🙏

A big thank you to Nino’s Home for sharing this fantastic Chocolate and Milk dessert recipe. Their channel is a treasure trove of culinary delights, with recipes that are not only delicious but also easy to follow. So, if you’re looking for more culinary inspiration, do check out their channel.

Posted on Leave a comment

Why OATBARS are Amazing as a Snack or Breakfast!

oat bars on a tray

Hello, food lovers! 🍽️💕 Today, we’re diving into a delightful snack or breakfast recipe that’s sure to impress everyone at your next gathering. We’re talking about Oatbars, a snack that’s not only incredibly flavorful but also easy to make and packed with protein! This fantastic recipe comes from the YouTube channel Felu – Fit by Cooking, a wonderful resource for anyone looking for simple yet tasty meal ideas.

🍫 The Magic of Oatbars 🍽️

Oatbars are a snack that combines the wholesome goodness of oats with the creamy richness of peanut butter and the sweet, chocolaty flavor of cocoa. The result is a snack that’s not only delicious but also packed with nutrients. Plus, it’s a versatile snack that can be enjoyed at any time of the day, from a quick breakfast to a mid-afternoon pick-me-up.

🍽️ The Recipe: How to Make Oatbars 🍫

The recipe starts with 150g of rolled oats, which are preferred for their thicker and chewy texture. However, quick oats, which are softer and smaller, can also be used and will work perfectly fine.

Next, 30g of cocoa powder is added. You can use natural or Dutch cocoa, also known as baking cocoa. Dutch cocoa is a more processed version that removes the acidity and makes it sweeter and mild.

Then, 50g of creamy peanut butter is added. If you want to add more protein, you can also use the same amount of powdered peanuts, which has double the amount of protein.

Next, 60g of casein vanilla protein powder is added. If you don’t have casein, you can use a blend or pure whey protein. Just keep in mind that with whey protein, baked goods always get a bit drier than with casein or blends.

The last ingredient is a pinch of salt. Then, 150g of skimmed milk is added as a sweetener instead of sugar. The lactose in milk is quite sweet, so it’s perfect for this recipe.

The ingredients are mixed together until smooth and then cooked on low heat until thickened. The mixture is then transferred into a baking tin and baked in a preheated oven at 200 degrees Celsius or 400 F for 25 minutes.

🍴 Enjoying Oatbars: Tips and Suggestions 🍽️

When enjoying Oatbars, here are a few tips and suggestions:

  • Feel free to adjust the amount of sugar to suit your taste. If you prefer a less sweet dessert, you can reduce the amount of sugar.
  • This snack is best served chilled, so consider making it a day ahead and storing it in the refrigerator overnight.
  • Oatbars make a great snack for any time of the day. Serve it with a cup of coffee or tea for a delightful afternoon treat.

🎉 Join the Foodie Community! 🍽️

If you try this recipe or have other delicious recipes to share, join the vibrant and engaging food lovers community on Facebook. It’s a place where you can share your culinary experiments, discover new recipes, and connect with fellow food enthusiasts.

🙏 Credits 🙏

A big thank you to Felu – Fit by cooking for sharing this fantastic Oatbars recipe. Their channel is a treasure trove of delicious recipes that are easy to follow and absolutely delightful to taste : Felu – Fit by cooking on youtube.com

Posted on Leave a comment

How to make Peach Cobbler Pudding? Most Popular Recipe on Youtube

fresh ripe fruits in bowl on table

Hello, food lovers! 🍽️💕 Today, we’re diving into a delightful dessert recipe that’s sure to impress everyone at your next gathering. We’re talking about a Peach Cobbler Pudding, a dessert that’s not only incredibly flavorful but also easy to make! This fantastic recipe comes from the YouTube channel Kimmy’s Kreations, a wonderful resource for anyone looking for simple yet tasty meal ideas.

🍑 The Magic of Peach Cobbler Pudding 🍰

Peach Cobbler Pudding is a dessert that combines the sweet and tangy flavor of peaches with the creamy richness of homemade pudding and whipped cream. The result is a dessert that’s moist, flavorful, and absolutely delicious. Plus, it’s a versatile dessert that can be served at any occasion, from a casual family dinner to a special celebration.

🍽️ The Recipe: How to Make Peach Cobbler Pudding 🍑

The recipe starts with the homemade pudding, which is made from 4 egg yolks, 3.5 cups of whole milk, 1 cup of granulated sugar, 1 cup of brown sugar, 1 tsp of vanilla extract or vanilla bean gel, and 3 tablespoons of corn starch. The ingredients are mixed together until smooth and then cooked on low heat until thickened.

Next, the peaches are prepared. Three cans of peaches (one with juice and two without) are combined with 1 cup of brown sugar, 1/2 cup of white sugar, 2 tsp of vanilla bean gel, 2 tsp of ground cinnamon, and 1/2 tsp of nutmeg. The peaches are cooked for 5-10 minutes and then cooled in the fridge for 3 hours.

The homemade whipped cream is made by mixing 3 cups of heavy cream and 1 tsp of vanilla extract for 5 minutes until soft peaks form. Then, 1 cup of powdered sugar is added and mixed until the whipped cream is thick.

The final layer of the Peach Cobbler Pudding is made from 2 packs of Bordeaux Caramelized cookies, which are crushed up finely.

The Peach Cobbler Pudding is then assembled by layering the pudding, peaches, whipped cream, and crushed cookies. The pudding is refrigerated for a few hours before serving.

🍴 Enjoying Peach Cobbler Pudding: Tips and Suggestions 🍽️

When enjoying Peach Cobbler Pudding, here are a few tips and suggestions:

  • Feel free to adjust the amount of sugar to suit your taste. If you prefer a less sweet dessert, you can reduce the amount of sugar.
  • This dessert is best served chilled, so consider making it a day ahead and storing it in the refrigerator overnight.
  • Peach Cobbler Pudding makes a great dessert for any meal. Serve it with a cup of coffee or tea for a delightful afternoon treat.

🎉 Join the Foodie Community! 🍽️

If you try this recipe or have other delicious recipes to share, join the vibrant and engaging food lovers community on Facebook. It’s a place where you can share your culinary experiments, discover new recipes, and connect with fellow food enthusiasts.

🙏 Credits 🙏

A big thank you to Kimmy’s Kreations for sharing this fantastic Peach Cobbler Pudding recipe. Their channel is a treasure trove of delicious recipes that are easy to follow Kimmy’s Kreations on youtube.com