Posted on Leave a comment

Slow Cooker Sausage Casserole Recipe

Slow cooker sausage casserole recipe with browned sausages, white beans, carrots and thick tomato gravy in a dark bowl.

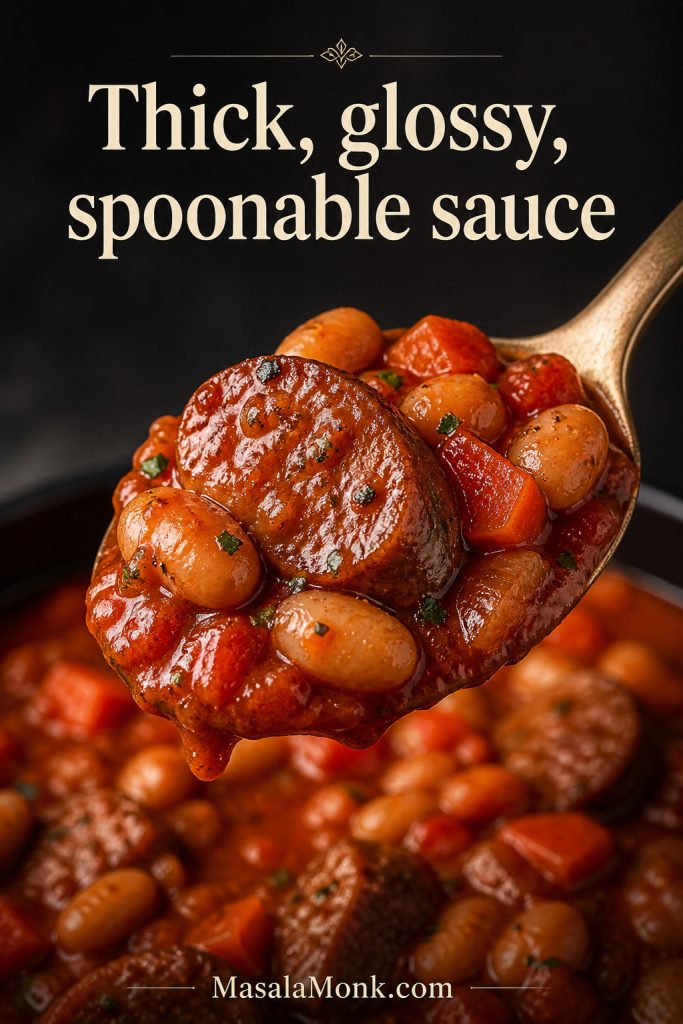
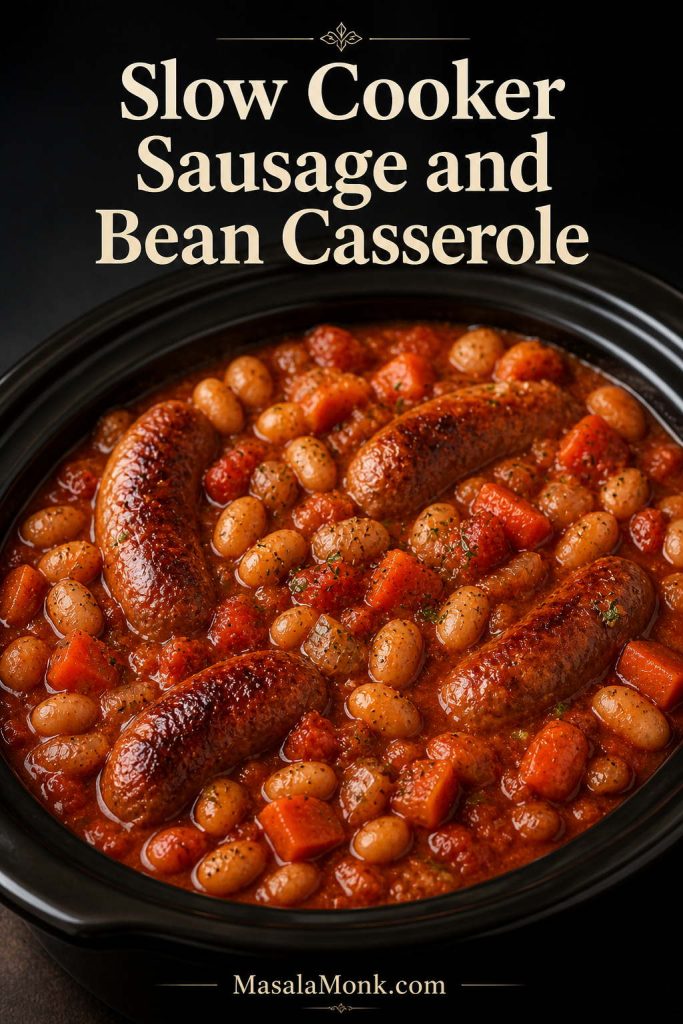
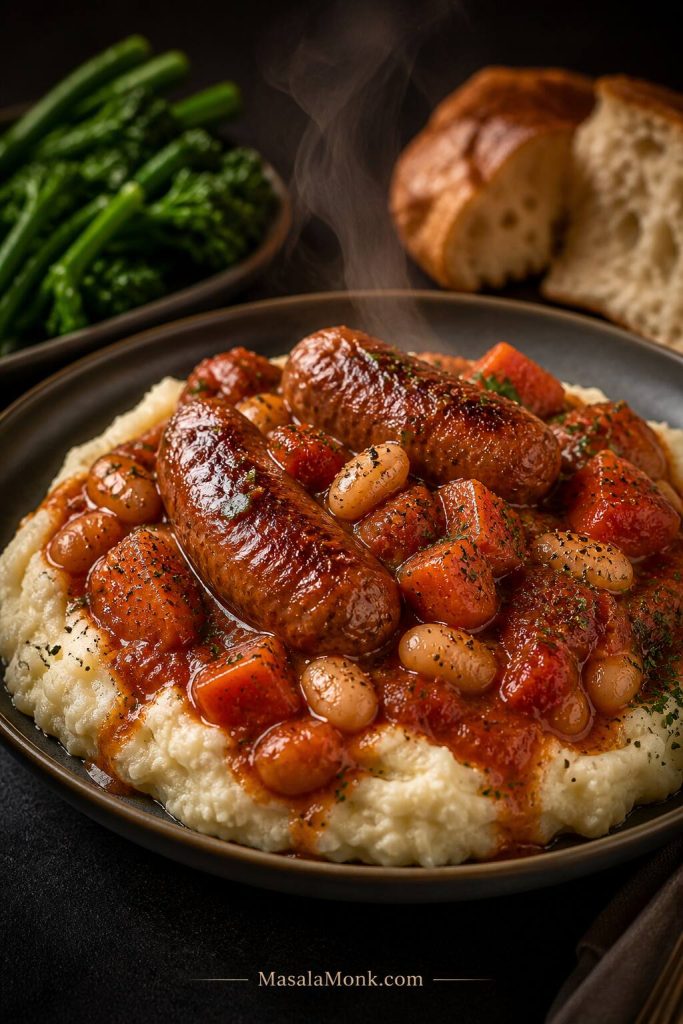
A good slow cooker sausage casserole recipe should give you tender sausages, soft vegetables, creamy beans and a thick sauce that feels like proper comfort food — not a watery tomato stew. This version uses browned sausages, carrots, onions, beans, chopped tomatoes, stock, Worcestershire sauce and herbs to make a rich tomato-gravy casserole that is made for mashed potatoes, rice, baked potatoes or crusty bread.

If you call it a crock pot sausage casserole, the method is the same. You build the sauce, add the sausages and vegetables, let everything cook slowly, then thicken the gravy near the end so it coats the sausages instead of pooling at the bottom of the bowl.

Because a sausage casserole recipe can turn thin in the slow cooker if the liquid is not controlled, this guide also covers the details that make it reliable: whether to brown the sausages, how long to cook it on HIGH or LOW, how to thicken the sauce, which beans work best, how to make it without tomatoes, and how to add dumplings without making them heavy.

At a glance: Serves 4 • Prep 15 minutes • Cook 4–5 hours on HIGH or 6–8 hours on LOW • Best in a 4–6 litre / 4–6 quart slow cooker • Start with 250 ml / 1 cup stock to avoid watery sauce • Thicken at the end if needed.

Slow Cooker Sausage Casserole Recipe: Quick Answer

To make slow cooker sausage casserole, brown the sausages for 5–7 minutes if you have time, then add them to the slow cooker with onion, carrots, beans, chopped tomatoes, stock, tomato purée, Worcestershire sauce, garlic, smoked paprika and herbs. Cook on LOW for 6–8 hours or HIGH for 4–5 hours, depending on your slow cooker and sausage size. By the end, the vegetables should be tender, the sausages should be cooked through, and the sauce should look rich and spoonable.

When the sauce still looks loose, stir in a cornflour slurry and cook uncovered on HIGH for 15–30 minutes. Serve the casserole with mashed potatoes, rice, pasta, baked potatoes, steamed greens or bread for soaking up the gravy.

For a sausage casserole slow cooker method that stays thick, follow one simple rule: brown the sausages for deeper flavor when you can, start with less stock than an oven casserole, and thicken only after the slow cooker has done its work.

Spoon lifting thick sausage casserole with sausage, white beans, carrots and glossy tomato sauce.
A slow cooker sausage casserole should look glossy and spoonable rather than thin. If the sauce slides off the spoon like broth, it still needs finishing.

Crock Pot Sausage Casserole

If you call this a crock pot sausage casserole, you do not need a different method. Many readers use crock pot as shorthand for a slow cooker, especially in the US, so the same timing, liquid control and thickening steps apply.

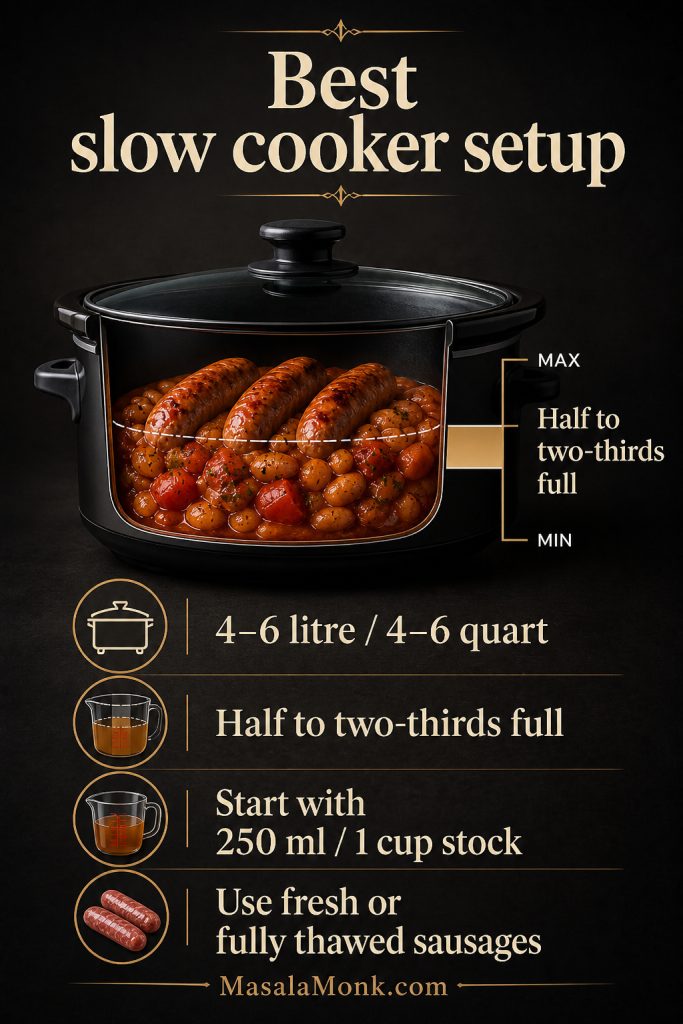
If you need a reliable sausage casserole recipe in a slow cooker, the main thing is to use less liquid than you would in an oven casserole. Because the lid traps steam, start with 250 ml / 1 cup stock, let the sausages and vegetables cook slowly, then thicken the sauce near the end if it needs more body.

Crock pot sausage casserole guide showing less stock, trapped steam and cornflour slurry for thickening.
Crock pot sausage casserole follows the same method as slow cooker sausage casserole; however, the liquid needs tighter control because the lid traps moisture instead of letting it reduce away.

Why This Slow Cooker Sausage Casserole Works

This works because it gives the sausages time to become savory, the vegetables time to soften, and the sauce time to turn rich instead of thin. The beans make the dish more filling, while the carrots and onions slowly melt into the tomato-gravy base.

Meanwhile, the tomato purée, stock, Worcestershire sauce, smoked paprika and herbs create a deeper casserole base than tomatoes alone. Since slow cookers trap moisture, the sauce is thickened near the end rather than overloaded with flour at the beginning. That way, the gravy stays glossy and spoonable instead of dull or pasty.

In this recipe, the slow cooker gives the sausage casserole time to soften, deepen and thicken without needing much hands-on cooking. The appeal is similar to making a whole chicken in a crock pot: you do a little prep up front, then the cooker turns simple ingredients into a complete dinner.

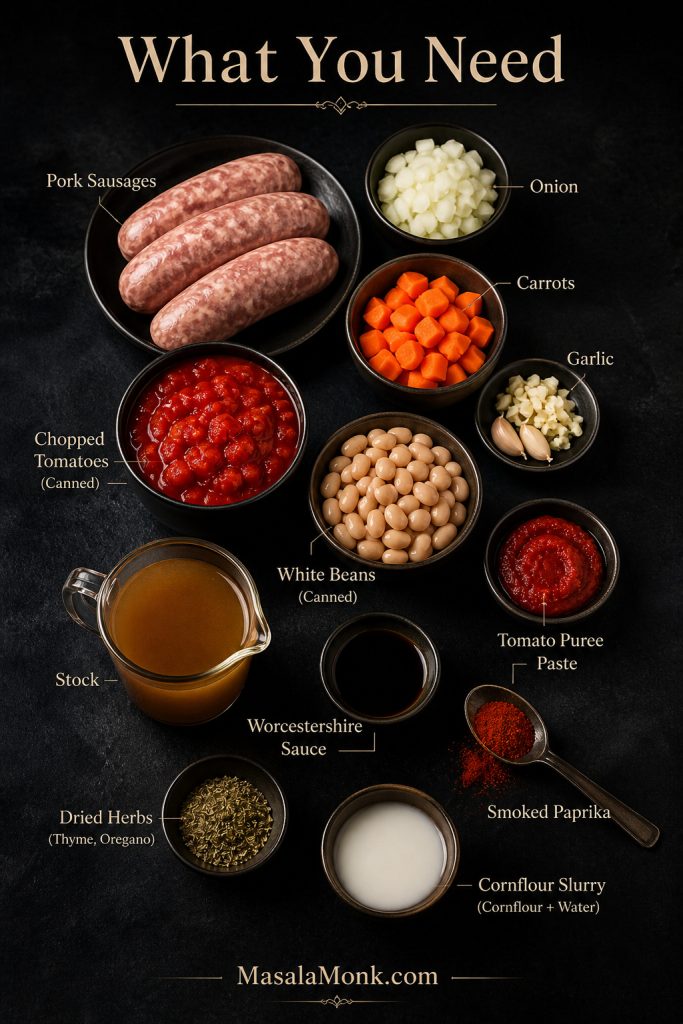
Ingredients You Need

The best slow cooker sausage casserole starts with everyday ingredients, but each one has a job. Pork sausages give the casserole its main flavor. From there, the beans make the dish more filling, while the carrots and onions slowly soften into the sauce and add natural sweetness.

That balance is what keeps this recipe from tasting like plain sausages in sauce; the slow cooker turns it into a proper casserole with body, warmth and enough sauce to spoon over a side.

Ingredients for slow cooker sausage casserole including sausages, carrots, onion, garlic, tomatoes, beans, stock, herbs and cornflour slurry.
This ingredient list works because each part earns its place: sausages build flavor, beans add body, vegetables soften gently, and cornflour helps turn the cooking liquid into a proper gravy.

Sausages

Use 8 pork sausages, about 600–700 g / 1.3–1.5 lb, for the classic version. A good everyday pork sausage works well, especially one with enough fat to stay juicy through slow cooking. Chipolatas also work, though they may finish closer to the shorter end of the cooking time.

Cumberland-style or herby sausages can be excellent, but reduce the added herbs slightly so the casserole does not become overpowering. Chicken or turkey sausages make a lighter version, although they are leaner and can dry out if cooked too long. For a meat-free version, use firm vegetarian sausages and handle them gently because some soften quickly in sauce.

Beans

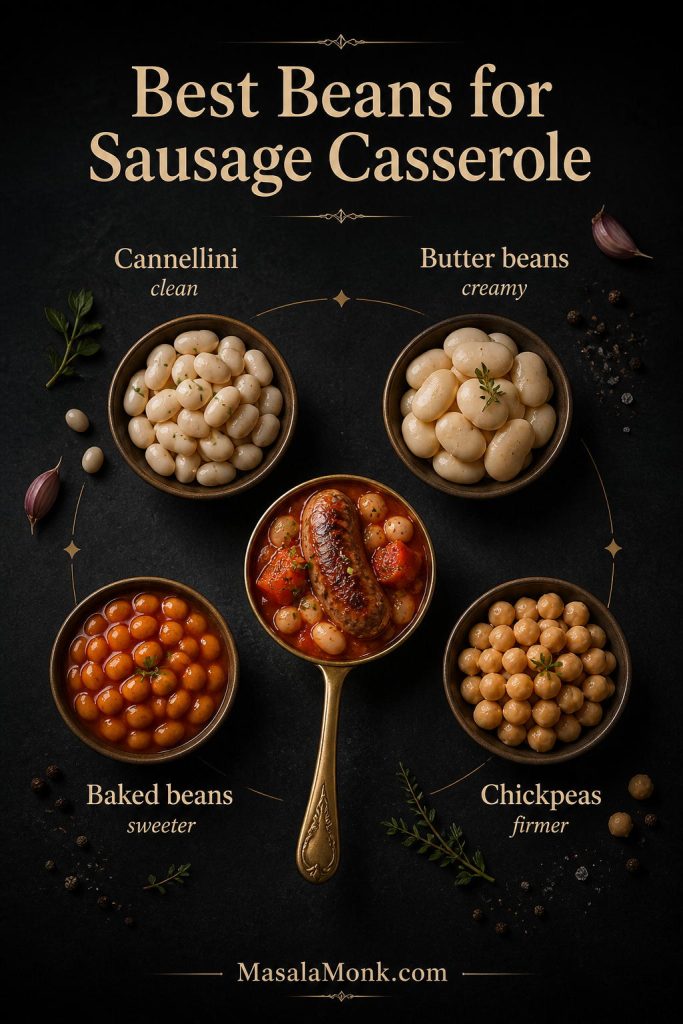
Cannellini beans are the cleanest all-round choice because they hold their shape and make the casserole more filling without adding much sweetness. Butter beans make the dish softer and creamier, while haricot beans keep it classic. For a sweeter family-style sausage and bean casserole, baked beans are useful too.

Use one 400 g / 14 oz can of beans, drained and rinsed. The drained weight is usually about 235–250 g / 8–9 oz. For a heartier bean-heavy version, use two cans and reduce the stock slightly.

When the sausage-and-bean combination is what you love most, you may also like red beans and rice with sausage for a smokier, Louisiana-style comfort meal.

Vegetables

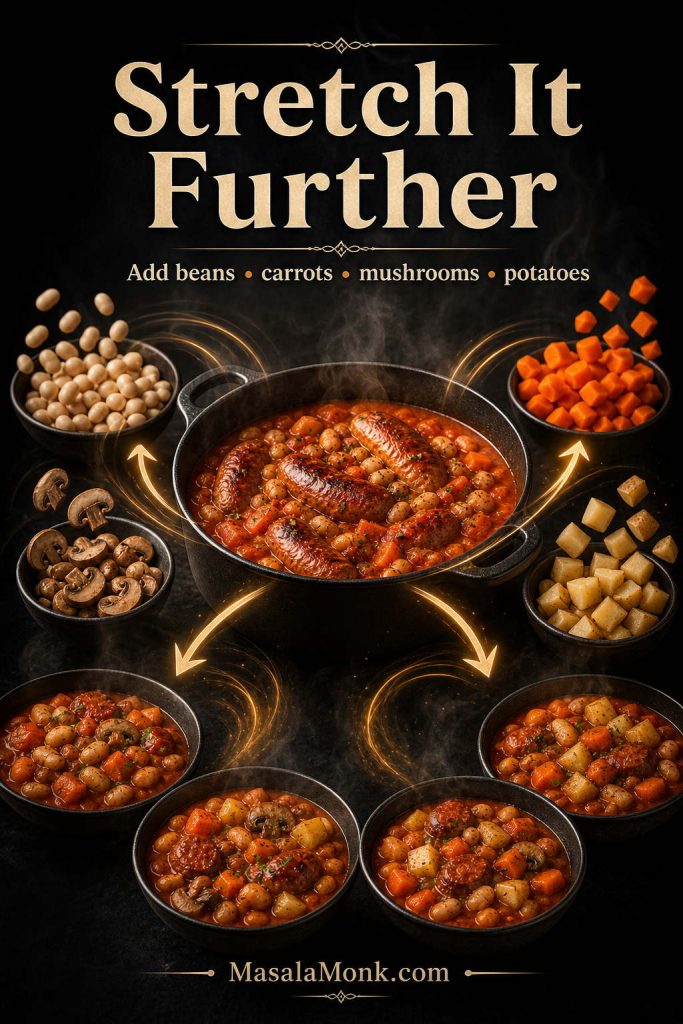
Onion and carrots are the base. Use one large onion, about 180–200 g / 6–7 oz, and two medium carrots, about 150–180 g / 5–6 oz. Celery, mushrooms, peppers, potatoes or sweet potatoes can also be added, depending on how full and chunky you want the casserole to be.

Cut firm vegetables into similar-sized pieces so they cook evenly. Potatoes and sweet potatoes should be kept chunky enough to hold their shape. Smaller pieces will break down more and naturally thicken the sauce, which can be useful, but they will not stay neat.

Sauce Base

The sauce uses one 400 g / 14 oz can of chopped tomatoes, 2 tablespoons / 30 g tomato purée, 250 ml / 1 cup stock, Worcestershire sauce, garlic, smoked paprika, mixed herbs and black pepper. Together, these create a tomato-gravy base rather than a plain red sauce.

For a deeper casserole sauce, keep the stock, Worcestershire sauce, smoked paprika and herbs in the mix. They make the tomatoes taste rounder and more savory, which is what keeps the finished dish from feeling like plain sausages in tomato sauce.

Thickener

Cornflour, also called cornstarch, is the easiest thickener. Mix 1 tablespoon / 8 g cornflour with 1 tablespoon / 15 ml cold water first, then stir the slurry into the hot casserole near the end. Gravy granules or slow cooker thickening granules can also work, although they change the flavor more than cornflour does.

Important: Do not sprinkle dry cornflour directly into the slow cooker. It can clump. Always mix it with cold water first, then stir the slurry into the hot sauce.

Best Sausages for Slow Cooker Sausage Casserole

The best sausages depend on the style of casserole you want. Pork sausages with enough fat and seasoning give the most classic result and stay juicy as they slow cook. Chipolatas are a good choice for a milder family dinner because they brown quickly and portion easily. Herby sausages, meanwhile, bring a stronger savory flavor that works especially well with mashed potatoes or crusty bread.
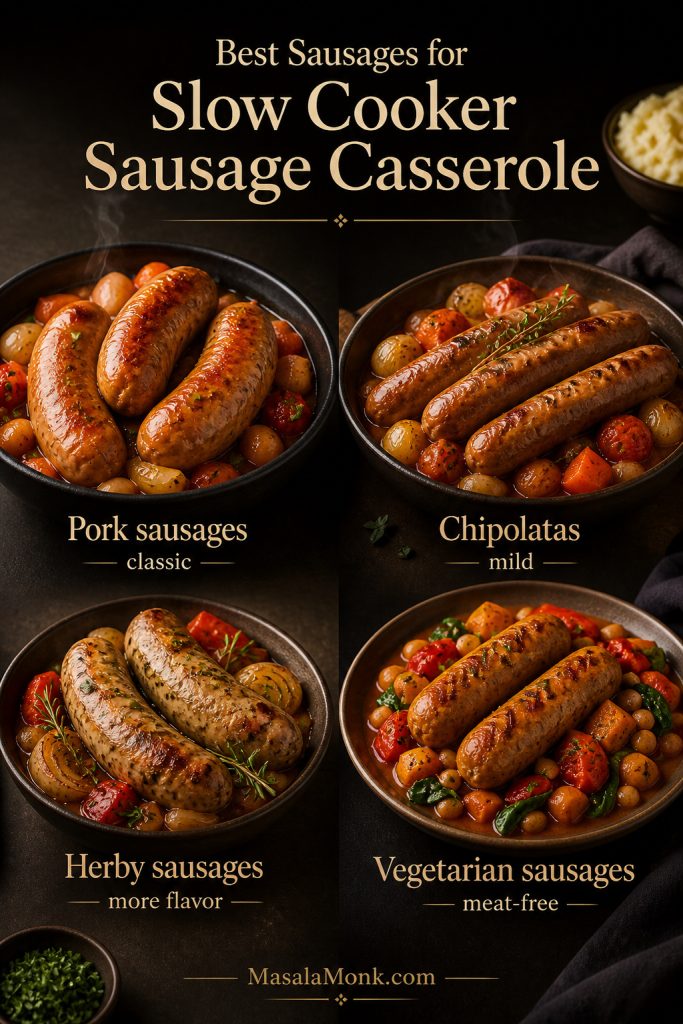
Sausage choices for slow cooker sausage casserole including pork sausages, chipolatas, herby sausages and vegetarian sausages.
Pork sausages give the most classic result, chipolatas suit a milder family dinner, and herby sausages bring a stronger savory note. Vegetarian sausages can work too, provided they are firm enough to hold their shape.
Sausage Type Best For Note
Pork sausages Classic sausage casserole Best all-round flavor and texture.
Chipolatas Quicker family dinners Brown easily and cook evenly; start checking earlier.
Cumberland or herby sausages Deeper savory flavor Reduce extra herbs slightly.
Chicken or turkey sausages Lighter casserole Can dry out if cooked too long.
Vegetarian sausages Meat-free version Choose firm sausages and handle gently.
Smoked sausage or kielbasa A different style of slow cooker meal Works, but changes the dish away from classic sausage casserole.

Smoked sausage and kielbasa are delicious in a slow cooker, but they create a different kind of dish. For this slow cooker sausage casserole recipe, fresh sausages give the most traditional comfort-food result.

Do You Have to Brown Sausages Before Slow Cooking?

You do not have to brown sausages before slow cooking, but browning gives the best flavor and appearance. It adds color, renders a little fat, and stops the sausages from looking pale after several hours in sauce.

For this recipe, browning is the step that makes a slow cooker sausage casserole taste more rounded, even though the casserole will still cook without it. Use a large frying pan over medium to medium-high heat, then brown the sausages in one layer for 5–7 minutes, turning until they have color on most sides. They do not need to cook through in the pan because they will finish in the slow cooker.
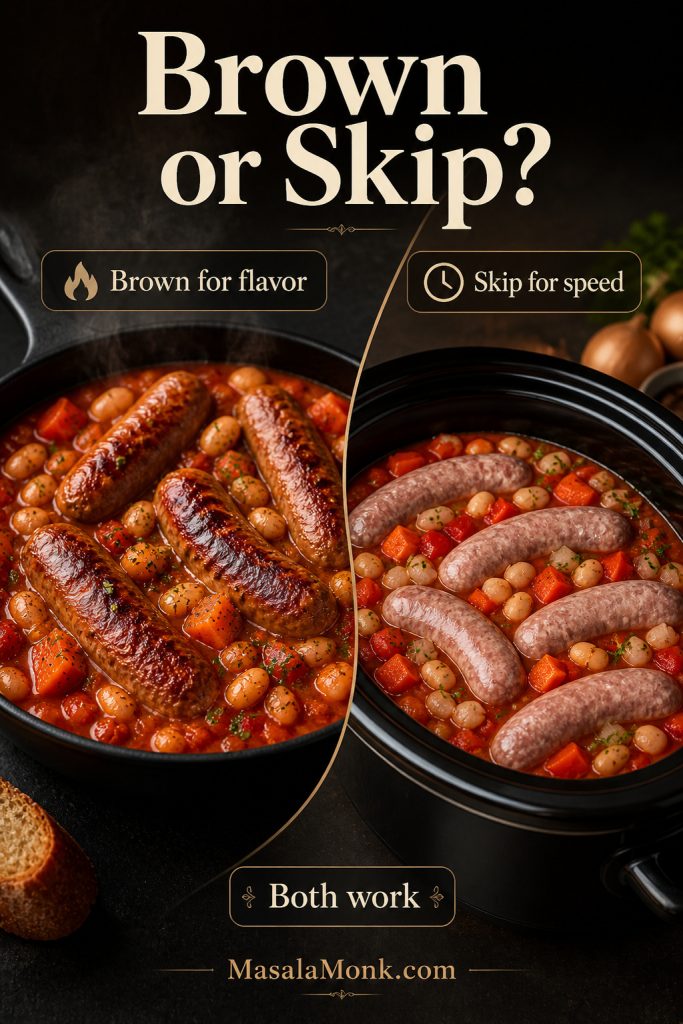
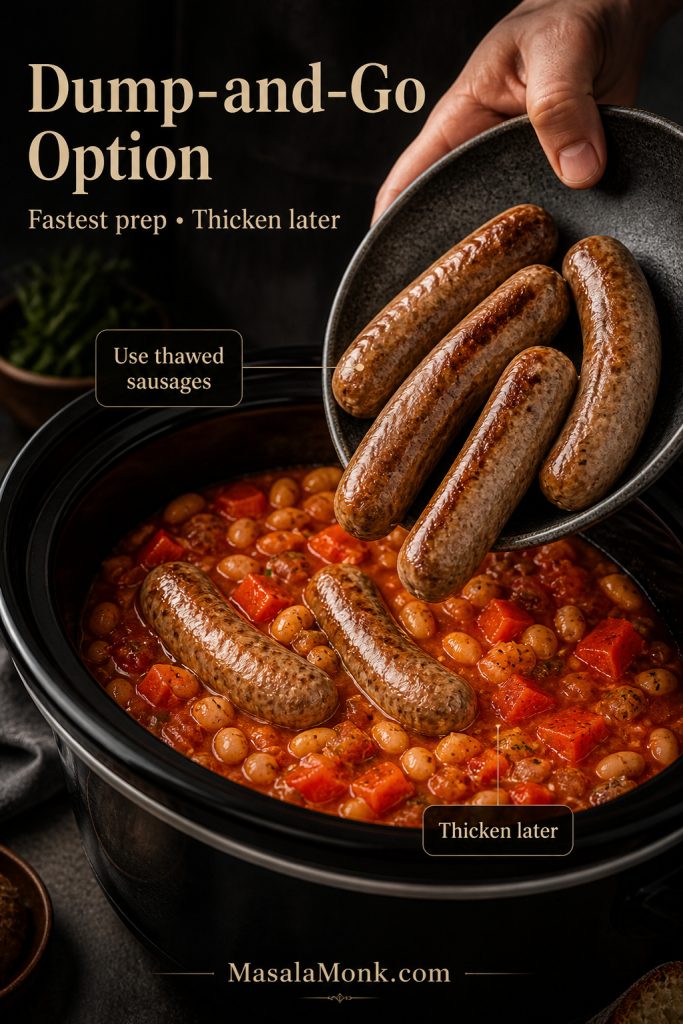
Comparison showing browned sausages in a pan and thawed sausages added directly to a slow cooker.
Browning first adds color and deeper flavor, whereas skipping that step saves time. Both methods work, so the better choice depends on whether you want maximum flavor or maximum convenience.

Dump-and-Go Option

For the quickest version, skip the browning and add the thawed sausages straight to the slow cooker with the vegetables, beans and sauce. The casserole will still cook, but the sausages will be softer and paler. For the best dump-and-go result, use good-quality sausages, avoid adding too much stock, and thicken the sauce near the end.

Thawed sausages being added to a slow cooker with beans, carrots and tomato sauce for a dump-and-go casserole.
A dump-and-go slow cooker sausage casserole can still turn out well, but it helps to start with thawed sausages and a restrained amount of stock so the finished sauce does not turn watery.
Method Best For Result
Brown the sausages first Best flavor and color Richer, more savory casserole.
Skip browning Fastest prep Softer, paler sausages but still convenient.
Brown sausages only Best compromise Good flavor without extra vegetable sautéing.

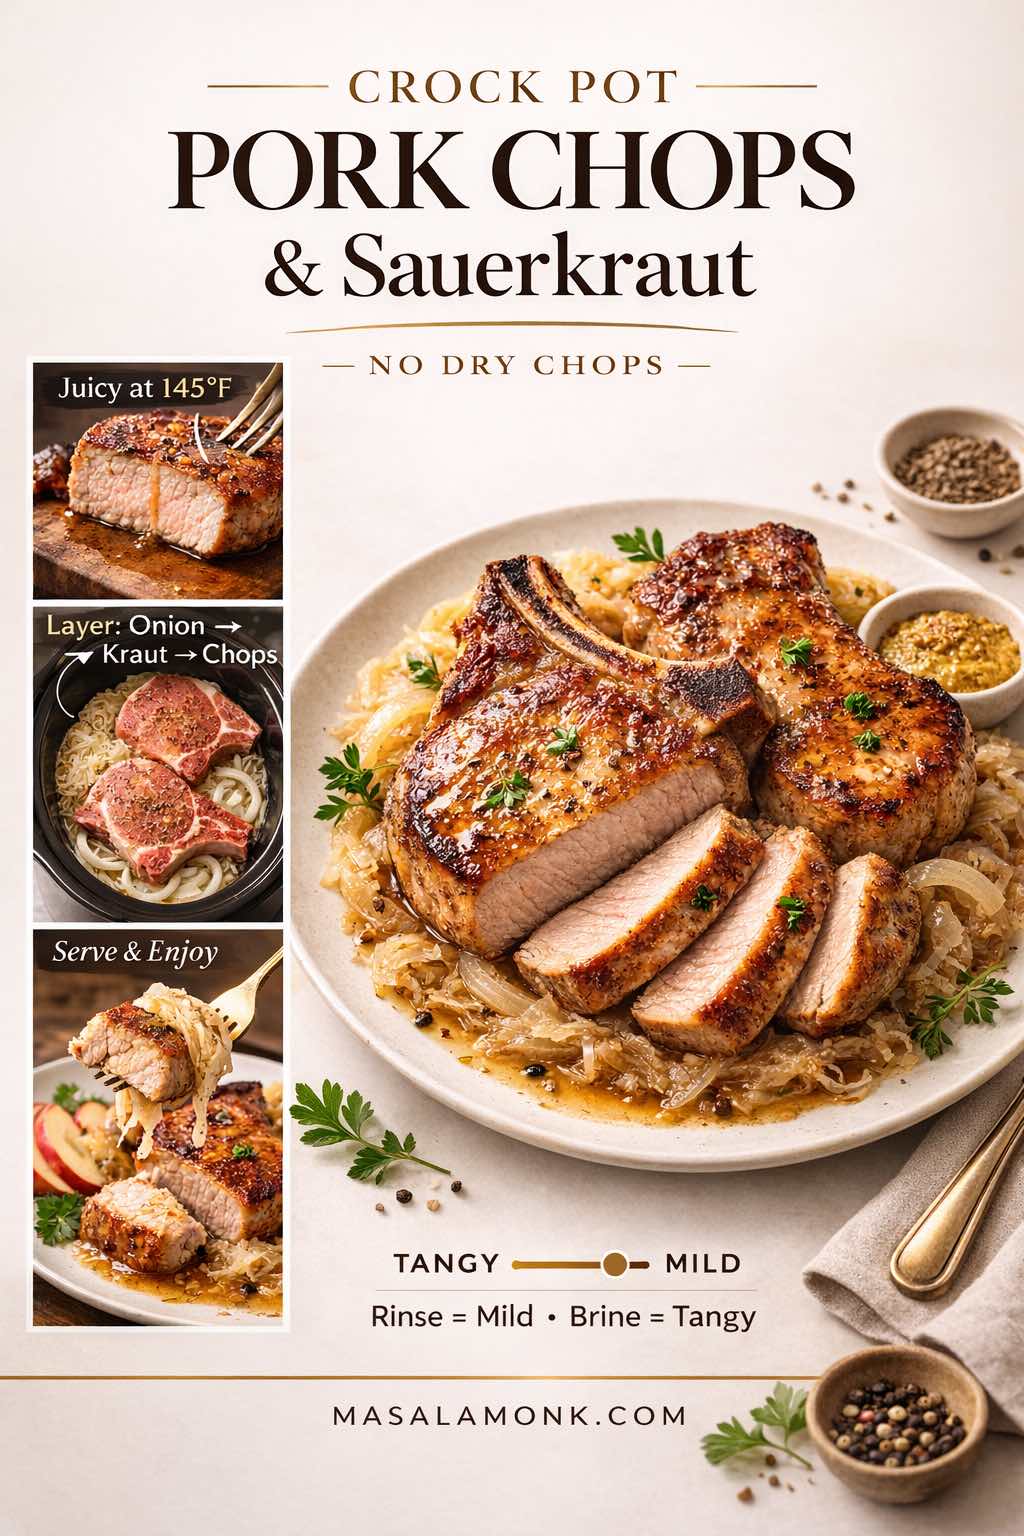
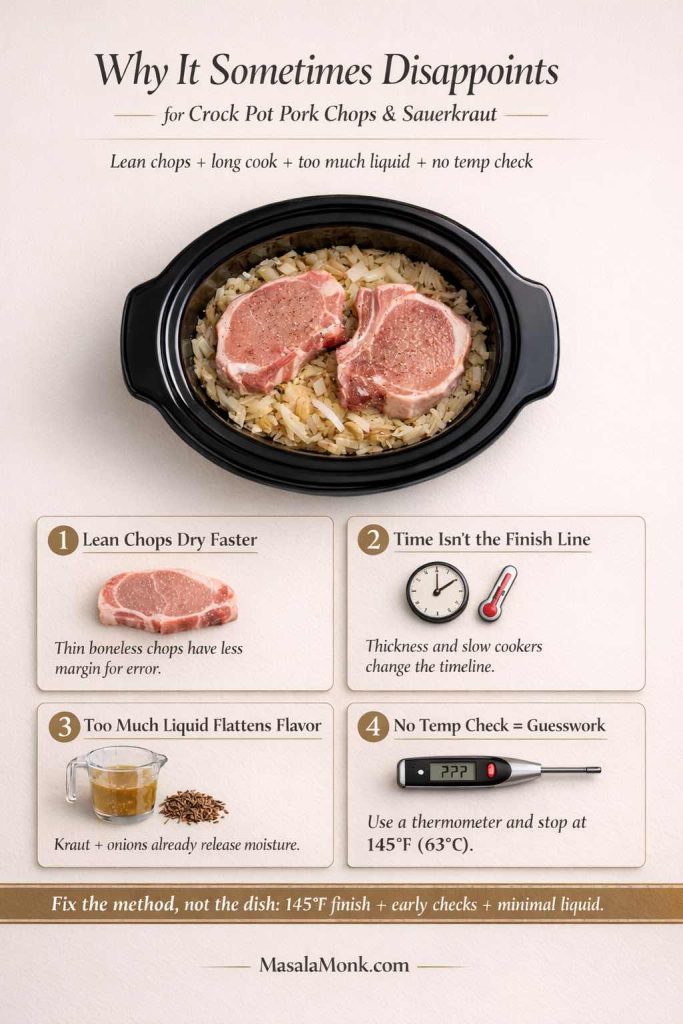
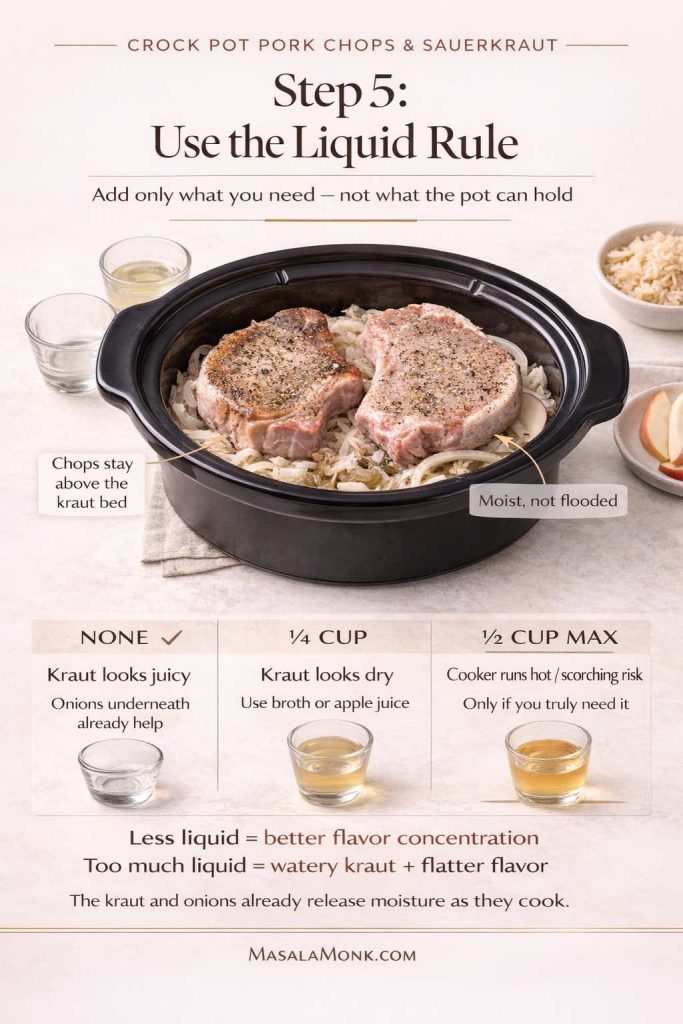
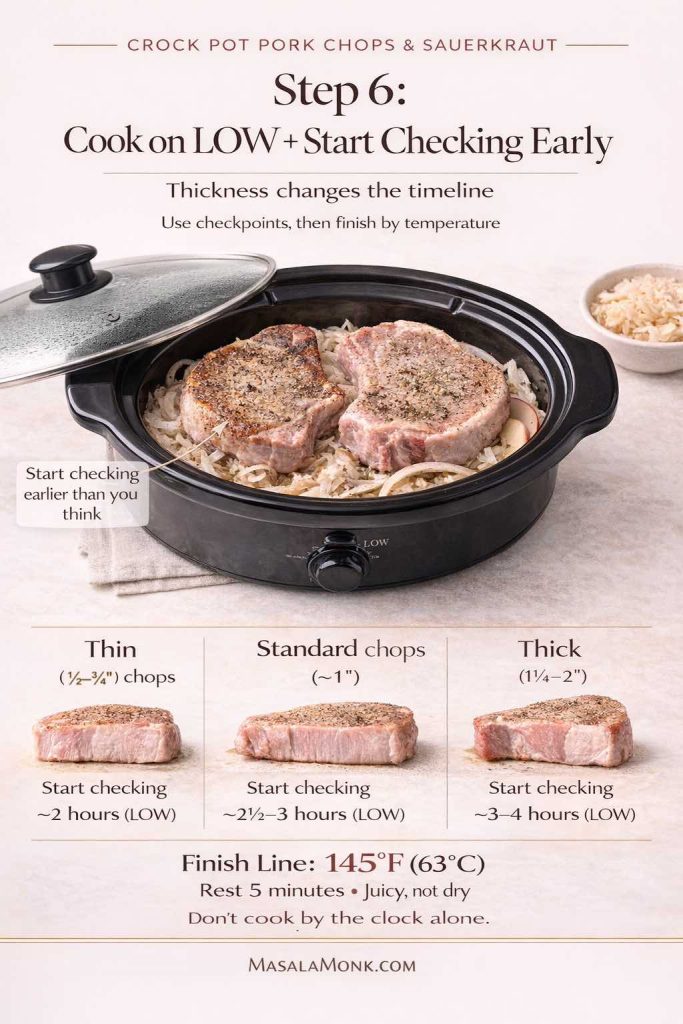
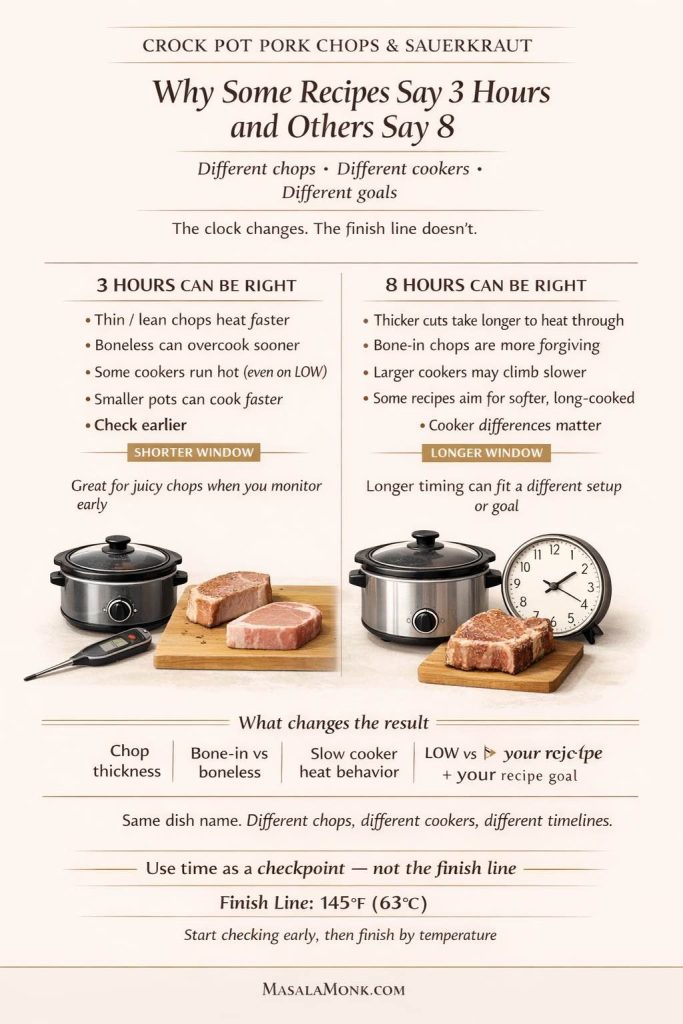
For the best balance, brown only the sausages, then let the slow cooker handle the vegetables and sauce. The same timing-first mindset matters in other slow cooker pork dinners too, especially when you want tender meat rather than dry results, as in crock pot pork chops and sauerkraut.

How to Make Sausage Casserole in a Slow Cooker

Once the sausages are browned, the rest is mostly hands-off. The slow cooker does the heavy lifting while the vegetables soften, the beans absorb flavor, and the sauce turns rich and savory.

Method snapshot: Brown sausages → add vegetables and beans → pour over tomato-gravy sauce → cook LOW or HIGH → thicken if needed → rest and serve.
Step-by-step method for slow cooker sausage casserole showing browning, adding vegetables and beans, slow cooking, thickening and resting.
The method is simple once you see the flow: build flavor first, let the slow cooker do the gentle cooking, and then finish the sauce only after the sausages and vegetables are tender.

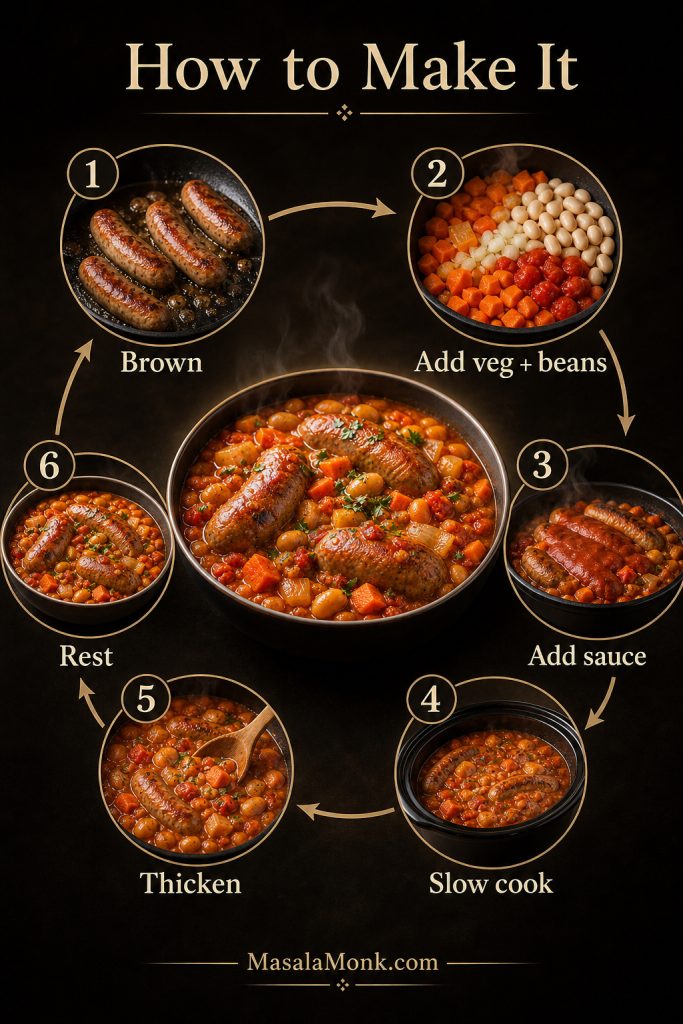
Step 1: Brown the sausages

Heat 1 tablespoon / 15 ml oil in a large frying pan over medium to medium-high heat. Brown the sausages for 5–7 minutes, turning until colored on most sides. They only need color on the outside at this stage.

Step 2: Add the vegetables

Add the sliced onion, chopped carrots, garlic and celery, if using, to the slow cooker. Mushrooms, peppers, potatoes or sweet potatoes can go in now too. Try to keep the pieces fairly even so everything softens at the same pace.

Step 3: Add the beans

Drain and rinse the cannellini beans or butter beans, then add them to the slow cooker. Baked beans can be added with their sauce, but reduce the stock slightly because they already bring liquid and sweetness.

Step 4: Mix the sauce

In a jug or bowl, mix the chopped tomatoes, tomato purée, stock, Worcestershire sauce, smoked paprika, mixed herbs, bay leaf if using, and black pepper. Pour the sauce over the vegetables and beans, then nestle the browned sausages into the mixture.

Step 5: Slow cook

Cook on LOW for 6–8 hours or HIGH for 4–5 hours. Try not to lift the lid repeatedly because slow cookers lose heat quickly when opened. Instead, check near the end, when the vegetables should be tender, the carrots should pierce easily with a fork, and the sausages should be cooked through.

Step 6: Thicken the sauce

By the end of cooking, the sauce may already be thick and glossy. In that case, leave it alone. When it looks thin, stir together 1 tablespoon / 8 g cornflour and 1 tablespoon / 15 ml cold water, then mix the slurry into the casserole. Cook uncovered, or with the lid slightly ajar, on HIGH for 15–30 minutes.

Step 7: Rest, taste and serve

Let the casserole sit for 5–10 minutes before serving. As it rests, the sauce settles and thickens slightly. Taste before adding salt because sausages, stock cubes, Worcestershire sauce and packet mixes can already be salty.

Slow Cooker Sausage Casserole Cook Times

Slow cooker sausage casserole is forgiving, but timing still matters. Small chipolatas, finely chopped vegetables or a hotter slow cooker may finish earlier. Larger sausages, chunky carrots, potatoes or a very full pot may need the longer end of the range.

Setting or Step Time Best For
Browning sausages 5–7 minutes Better color and flavor before slow cooking.
LOW 6–8 hours Best texture, deeper sauce, easiest hands-off option.
HIGH 4–5 hours Faster dinner when you start later in the day.
Thickening after slurry 15–30 minutes on HIGH Finishing a loose sauce.
Resting before serving 5–10 minutes Lets the sauce settle and thicken slightly.
Keep warm 1–2 hours after cooking Holding only after the casserole is fully cooked.
Cook time chart for slow cooker sausage casserole showing low 6 to 8 hours, high 4 to 5 hours, thickening time and resting time.
LOW gives the fullest flavor and softest texture, while HIGH is useful when time is tighter. Either way, the last few minutes matter because thickening and resting improve the final casserole.

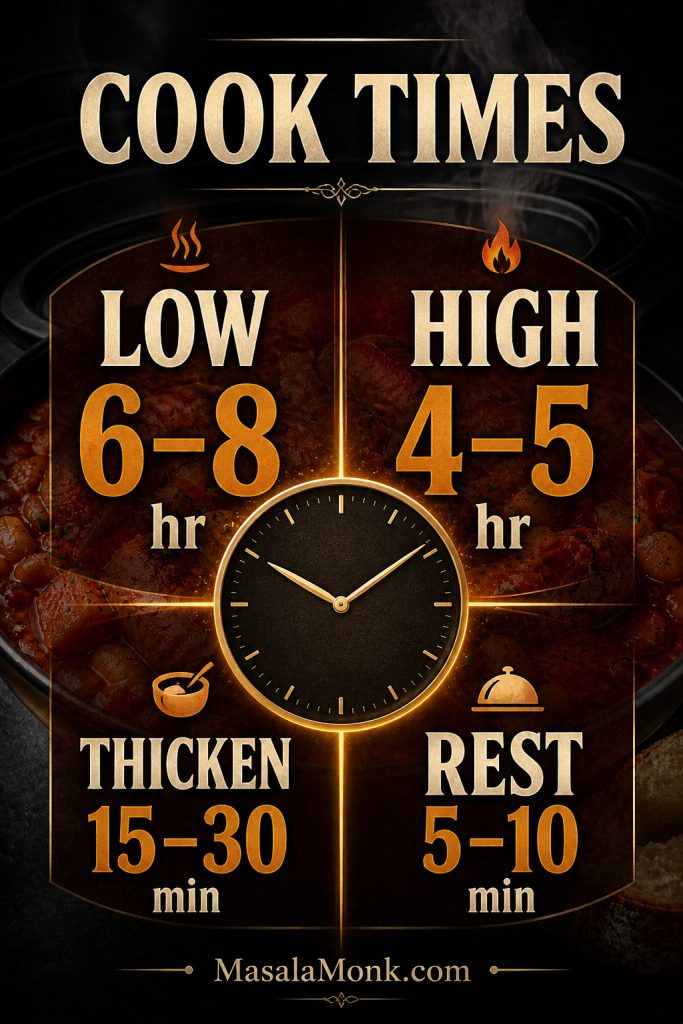
LOW gives the best texture because the sauce has more time to mellow and the vegetables soften gently. HIGH is still useful for weeknights, but start checking near the 4-hour mark so the sausages do not overcook.

Slow cooker size: This recipe fits best in a 4–6 litre / 4–6 quart slow cooker. For even cooking, aim for the slow cooker to be about half to two-thirds full once everything is added.
Food safety note: Do not use the “keep warm” setting to cook raw sausages. Use LOW or HIGH to cook the casserole, then use keep warm only after the sausages are fully cooked.
Slow cooker setup guide showing a 4 to 6 litre cooker, half to two-thirds fill level, 250 millilitres of stock and thawed sausages.
Getting the setup right prevents most texture problems. A 4–6 litre slow cooker, a moderate fill level and just 250 ml stock give the casserole room to cook without flooding the sauce.

How to Thicken Slow Cooker Sausage Casserole

Slow cooker casseroles often turn watery because the lid traps steam. Unlike oven casseroles, the liquid does not reduce quickly. Therefore, start with 250 ml / 1 cup stock and avoid adding extra liquid at the beginning unless your slow cooker runs dry.

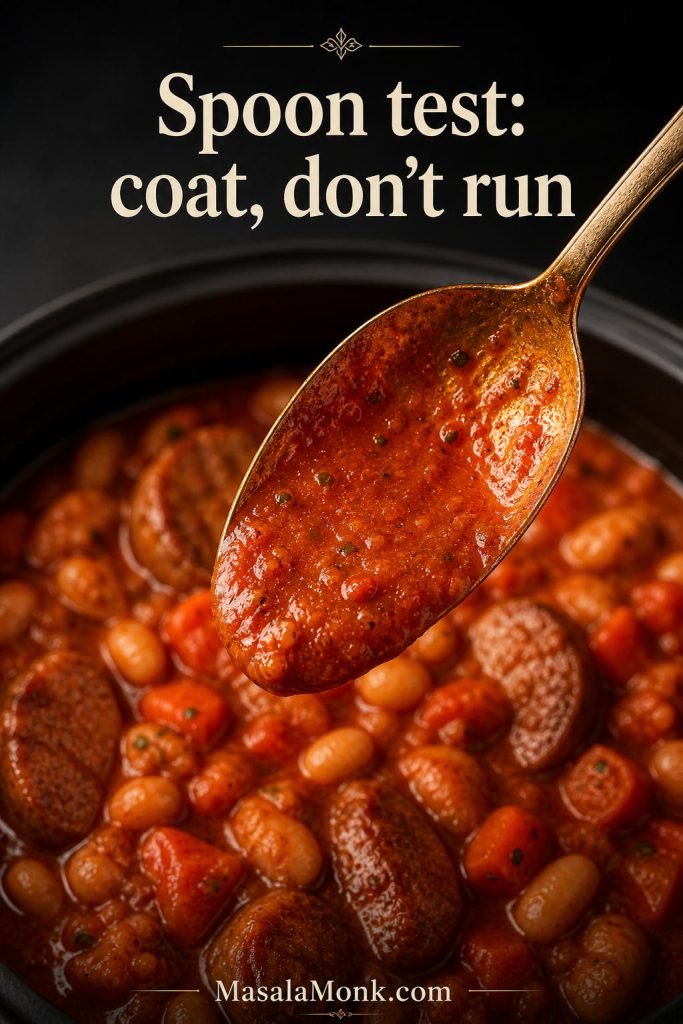
This is one of the most important parts of the recipe because a sausage casserole in the slow cooker often looks thinner than expected until it is finished properly. The target is a glossy gravy texture: thick enough to coat the sausages and vegetables, but still loose enough to spoon over mashed potatoes, rice or bread.

Guide to thickening slow cooker sausage casserole with cornflour slurry, lid ajar, mashed beans and reduced stock.
When a sausage casserole looks thin, small fixes usually work better than drastic ones. A cornflour slurry, a slightly open lid or a few mashed beans can thicken the gravy without changing the whole recipe.

Best thickening method: cornflour slurry

Mix 1 tablespoon / 8 g cornflour with 1 tablespoon / 15 ml cold water until smooth. Stir it into the hot casserole, then cook uncovered, or with the lid slightly ajar, on HIGH for 15–30 minutes. Add more slurry only if the sauce still looks too thin after that.

When the sauce is ready, it should coat the back of a spoon and cling lightly to the sausages and vegetables. It should not look like soup, but it should still be loose enough to spoon over mash, rice or bread.

Spoon coated with thick sausage casserole sauce above a slow cooker filled with sausages, beans and carrots.
Use the spoon test before serving: the sauce should coat the spoon in a glossy layer instead of running off immediately. That is the easiest visual check for the right casserole texture.

Other ways to thicken the sauce

  • Cook with the lid slightly ajar: this helps steam escape near the end.
  • Mash a few beans: this adds body without extra thickener.
  • Use gravy granules: helpful for a darker gravy-style casserole, but they can add salt.
  • Use less stock next time: especially if your slow cooker always makes sauces watery.
  • Add potatoes or sweet potatoes: they release starch and naturally thicken the sauce.

Rather than adding lots of flour at the beginning, let the casserole cook first. At that point, you can see how much liquid your slow cooker has created and adjust the texture properly.

Do This Not This
Start with 250 ml / 1 cup stock. Do not flood the slow cooker with extra liquid early.
Brown the sausages if you want better flavor. Do not expect unbrowned sausages to look golden later.
Thicken near the end with cornflour slurry. Do not add dry cornflour straight into the sauce.
Add dumplings only when the casserole is hot. Do not add dumplings at the beginning of the cook.

Slow Cooker Sausage Casserole Variations

The main recipe gives you a tomato-gravy sausage and bean casserole, but the slow cooker method is flexible. From there, you can make it sweeter, darker, spicier, meat-free or more old-fashioned without changing the whole method.

Slow Cooker Sausage and Bean Casserole

For a stronger slow cooker sausage and bean casserole, use two tins of beans and reduce the stock slightly. Cannellini beans give the cleanest result, butter beans make the sauce softer and richer, and baked beans make the dish sweeter and more family-style.

Slow cooker sausage and bean casserole with browned sausages, white beans, carrots and thick tomato gravy.
Adding extra beans turns this into a fuller sausage and bean casserole, and it also helps the sauce feel naturally thicker. That makes it especially useful for a hearty, budget-friendly dinner.

Baked beans already bring sauce and sweetness, so start with less stock and adjust near the end. They are especially useful when you want a kid-friendly casserole with a softer tomato flavor.

Bean options for sausage casserole including cannellini beans, butter beans, baked beans and chickpeas.
Bean choice changes the character of the dish more than many people expect: cannellini beans stay neutral, butter beans feel creamier, baked beans add sweetness, and chickpeas hold the firmest bite.

No-Tomato / Gravy-Style Sausage Casserole

For a no-tomato slow cooker sausage casserole, skip the chopped tomatoes and use extra stock instead. Add mushrooms, onions, Worcestershire sauce, black pepper and a little mustard if you like. Then thicken at the end with cornflour slurry so the sauce becomes more like sausage gravy than tomato stew.

No-tomato sausage casserole with sausages, mushrooms, onions and rich brown gravy.
A no-tomato sausage casserole leans on stock, mushrooms, onions and Worcestershire sauce for depth. As a result, the flavor feels darker and more gravy-led than the usual tomato version.

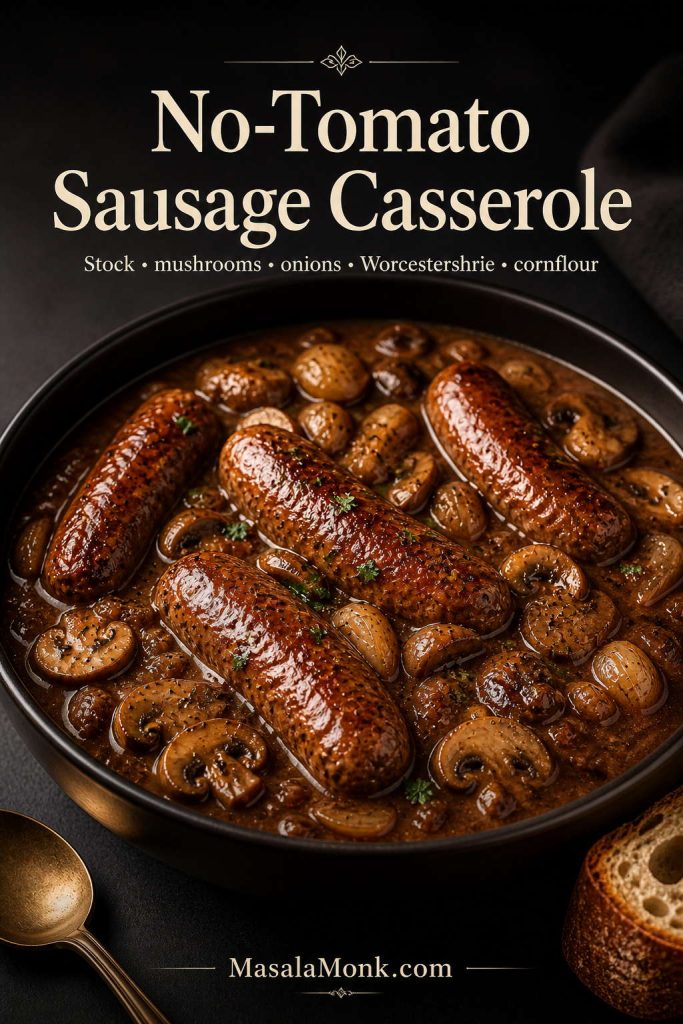
A small spoon of tomato purée can still be useful for depth, even in a gravy-style version. It will not make the casserole taste tomato-heavy, but it helps the sauce feel rounder.

How to Stretch the Casserole Further

To stretch the casserole further, add a second tin of beans, extra carrots, mushrooms, peppers or diced potatoes. Keep the stock at 250 ml / 1 cup to start, then add more only if the sauce looks too thick near the end. This keeps the casserole hearty without turning it watery.

Sausage casserole being extended into more portions with beans, carrots, mushrooms and potatoes.
Stretching sausage casserole works best when you add body before you add liquid. Beans, potatoes, mushrooms and carrots all help create extra servings without diluting the flavor.

Packet Mix vs Homemade Seasoning

You can use a sausage casserole packet mix in the slow cooker, but treat it as both seasoning and sauce body. Packet mixes often contain salt and thickener, so reduce extra salt and check the liquid before adding more stock.
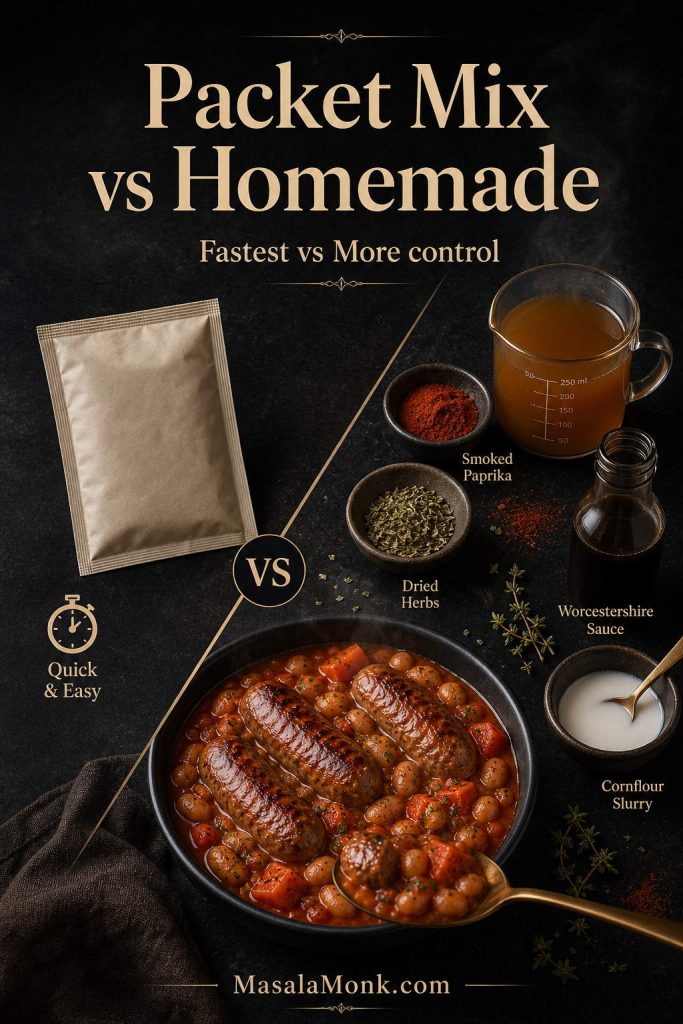
Comparison of packet mix and homemade seasoning for sausage casserole using herbs, stock, paprika and cornflour slurry.
A packet mix is the faster route, yet homemade seasoning gives you far more control over salt, thickness and flavor. That is especially helpful if you want a richer slow cooker sausage casserole without guesswork.
Option Best For Watch Out For
Homemade seasoning Best flavor control Needs a few pantry spices.
Packet mix Fastest prep Can be salty or overly thick.
Stock cube + herbs + paprika Best middle ground May still need thickening at the end.
Gravy granules Darker gravy-style casserole Can overpower the tomato base.

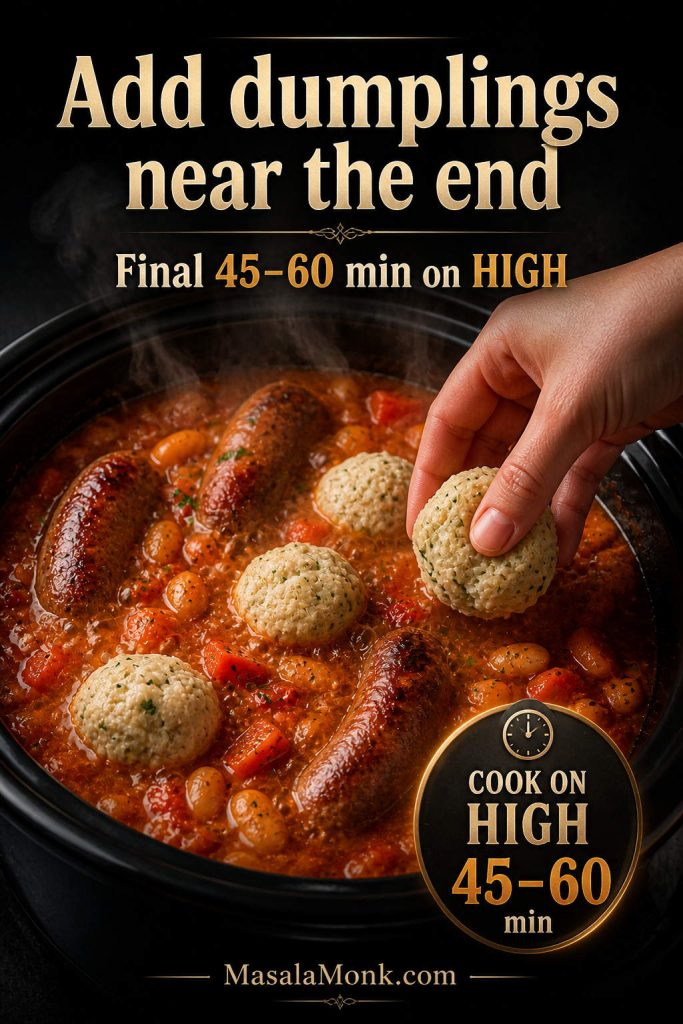
Slow Cooker Sausage Casserole with Dumplings

To make slow cooker sausage casserole with dumplings, add the dumplings near the end, not at the beginning. The casserole should already be hot, the sauce should be bubbling around the edges, and the slow cooker should be set to HIGH.

Slow cooker sausage casserole topped with puffed dumplings and visible sausages in thick tomato gravy.
Dumplings turn sausage casserole into an even more comforting dinner, although they work best when the base underneath is already thick enough to support them.

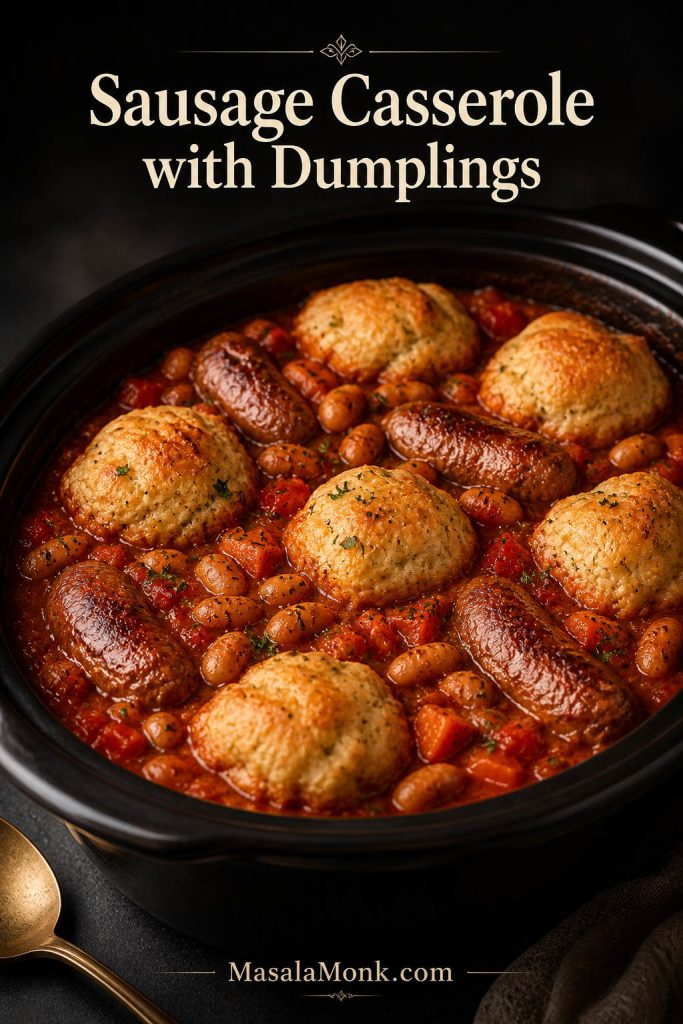
Use small dumplings, about 35–45 g / 1.2–1.6 oz each, and leave space between them so they can expand. Place them on top of the casserole, keep the lid on, and cook for 45–60 minutes on HIGH, or until puffed and cooked through. For the best result, thicken a watery sauce before adding dumplings so they do not sink into loose liquid.

Dumplings being added to hot slow cooker sausage casserole during the final 45 to 60 minutes on high.
Add dumplings near the end, once the casserole is hot and bubbling. Otherwise, they can sit too long in the sauce and lose the light, fluffy texture you want.

Spicy Sausage Casserole

For a spicier casserole, add chilli flakes, cayenne, hot smoked paprika or a spoon of chilli sauce. Start small because sausages can already be salty and seasoned. A little heat works especially well when you are serving the casserole with rice or baked potatoes.

Spicy slow cooker sausage casserole with browned sausages, white beans, carrots, chilli flakes and glossy tomato sauce.
A spicy sausage casserole should add warmth without overwhelming the base flavor. Start modestly with chilli flakes or hot smoked paprika, then build the heat only after tasting the sauce.

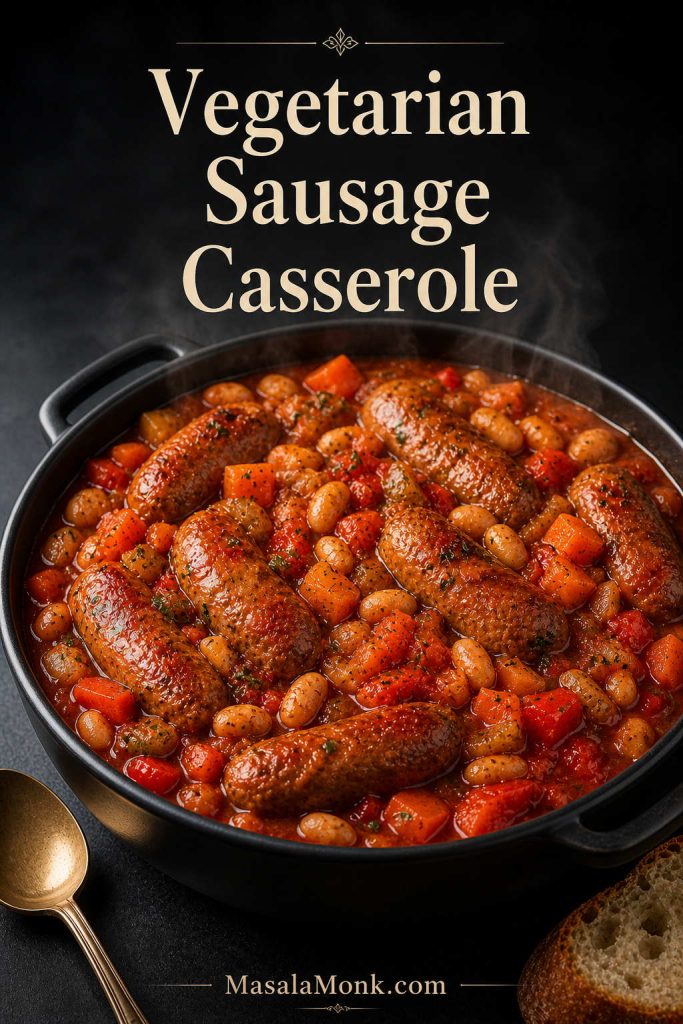
Vegetarian Sausage Casserole

For a vegetarian version, use firm vegetarian sausages, vegetable stock, and a Worcestershire-style sauce that is suitable for vegetarians. Brown the sausages gently if the package allows it. When the sausages are delicate, add them later in the cooking time so they do not break apart.

Vegetarian slow cooker sausage casserole with meat-free sausages, beans, carrots and thick tomato gravy.
A vegetarian slow cooker sausage casserole still needs structure, so firmer meat-free sausages are the safest choice. Softer ones can work, but they are more likely to break during long cooking.

What to Serve with Slow Cooker Sausage Casserole

Mashed potatoes are the classic choice because they catch the sauce and turn the casserole into a proper comfort-food plate. However, you have plenty of options depending on how rich, light or casual you want the meal to feel.

  • Mashed potatoes: the best classic pairing.
  • Baked potatoes: easy, filling and good for leftovers.
  • Rice: useful when the casserole is extra saucy.
  • Pasta: good for a tomato-forward version.
  • Crusty bread: simple and excellent for soaking up sauce.
  • Steamed greens: peas, broccoli, cabbage or green beans balance the richness.
  • Cauliflower mash: lighter than potato mash but still sauce-friendly.
Serving suggestions for sausage casserole including mashed potatoes, rice, baked potato, crusty bread and steamed greens.
The best side depends on how you want to eat the gravy: mash and bread catch the most sauce, rice keeps things lighter, and greens balance the richness of the casserole.

Crusty bread works beautifully, especially if you make homemade garlic bread. For a simple plate, serve the casserole over mash or rice; for a more filling meal, spoon it over baked potatoes with greens on the side.

Storage, Freezing and Reheating

Slow cooker sausage casserole keeps well, which makes it useful for meal prep. Once the casserole has cooled, portion it into airtight containers. Keep it in the fridge for 3–4 days or freeze it for up to 3 months for best quality.

Storage guide for sausage casserole showing chilled container, freezer portions and reheated steaming serving.
Sausage casserole is excellent for leftovers because the flavor settles well overnight. Once cooled, refrigerate portions for 3–4 days or freeze them for longer meal-prep use.

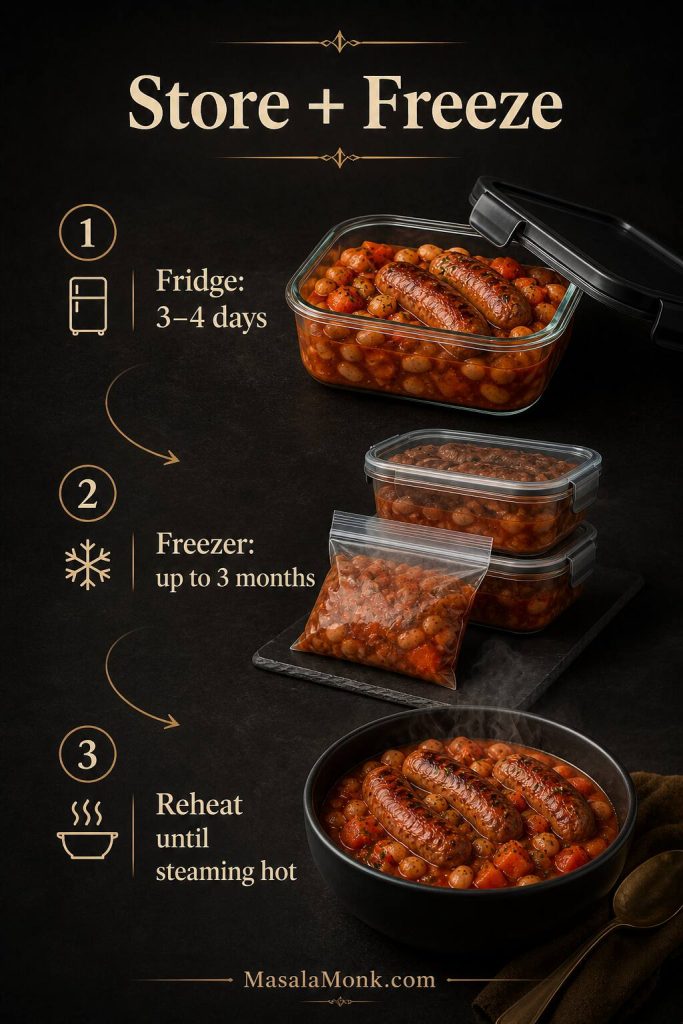
To reheat, thaw frozen portions overnight in the fridge when possible. Reheat gently on the stovetop or in the microwave until steaming hot throughout. The sauce will thicken in the fridge, so add a splash of stock or water when reheating if needed.

For even reheating, stir halfway through, especially when using the microwave. As a general rule, reheat leftovers only once when possible and make sure the centre is hot before serving.

For thermometer checks, FoodSafety.gov’s safe minimum internal temperature chart lists ground meat and sausage at 160°F / 71°C and casseroles at 165°F / 74°C.

Leftover mash or extra cooked potatoes beside the casserole can also become something new. A croquettes recipe is a smart way to turn the next meal into something crisp instead of simply reheated.

Troubleshooting Slow Cooker Sausage Casserole

If your casserole looks a little thin or tastes a bit flat at the end, do not worry. Most slow cooker sausage casserole problems are easy to fix before serving.
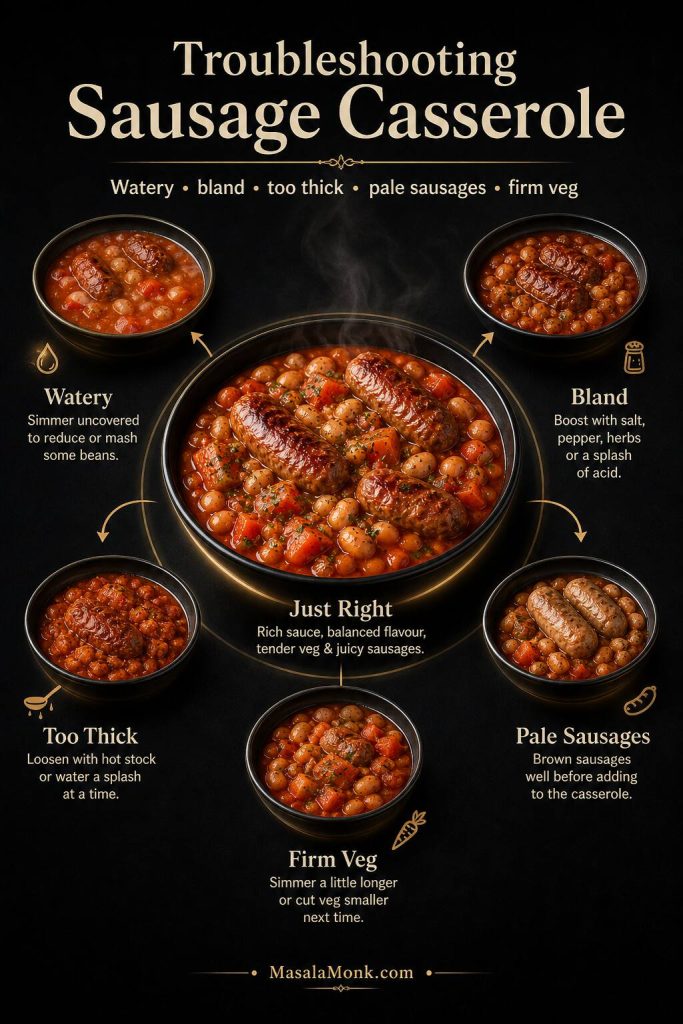
Troubleshooting chart for sausage casserole showing watery sauce, bland flavor, overly thick sauce, pale sausages and firm vegetables.
Most slow cooker sausage casserole problems can be fixed with one targeted adjustment. Thin sauce, flat flavor, pale sausages and firm vegetables each point to a different next step rather than a failed recipe.
Problem Why It Happened Fix
Sauce is watery Slow cooker trapped moisture. Add cornflour slurry and cook uncovered on HIGH.
Sauce is too thick Too much thickener or too many beans. Add hot stock or water a little at a time.
Sausages look pale They were not browned first. Brown them next time for better color.
Casserole tastes bland Weak stock, mild sausages or under-seasoning. Add Worcestershire sauce, smoked paprika, pepper or a stock cube.
Sauce tastes sharp Tomatoes are acidic. Add a pinch of sugar or use baked beans for a sweeter variation.
Vegetables are too firm Pieces were too large or the slow cooker runs cool. Cook longer and cut vegetables smaller next time.
Beans are mushy Soft beans cooked for too long. Use firmer beans or add them later.
Sausages split Heat was too aggressive or sausages were browned too hard. Brown gently and avoid overcooking.

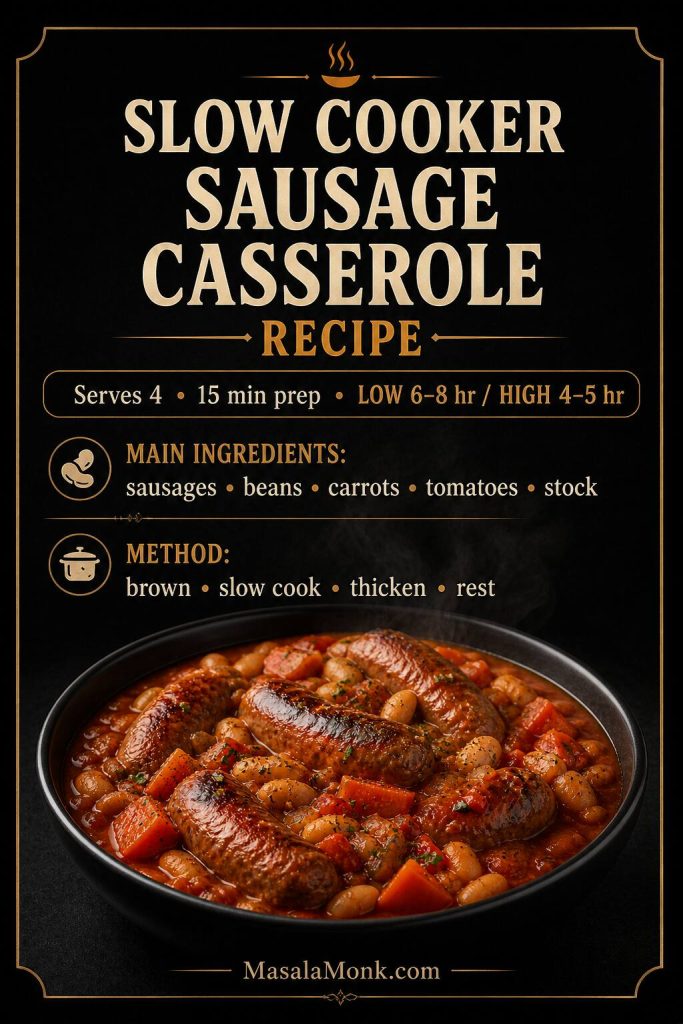
Slow Cooker Sausage Casserole Recipe Card

Slow Cooker Sausage Casserole Recipe

This easy slow cooker sausage casserole recipe gives you browned sausages, tender carrots, beans and a rich tomato-gravy sauce that is made for mashed potatoes, rice, baked potatoes or crusty bread.

Servings4
Prep Time15 minutes
Cook Time4–8 hours
Slow Cooker4–6 litre / 4–6 quart

Best served with: mashed potatoes, rice, baked potatoes, pasta, steamed greens or crusty bread.

Ingredients

  • 8 pork sausages, about 600–700 g / 1.3–1.5 lb
  • 1 tablespoon / 15 ml oil, for browning
  • 1 large onion, about 180–200 g / 6–7 oz, sliced
  • 2 medium carrots, about 150–180 g / 5–6 oz, chopped
  • 2 garlic cloves, about 6 g, minced
  • 1 celery stick, about 40–50 g / 1.5–2 oz, chopped, optional
  • 1 x 400 g / 14 oz can chopped tomatoes
  • 1 x 400 g / 14 oz can cannellini beans or butter beans, drained and rinsed, about 235–250 g / 8–9 oz drained weight
  • 2 tablespoons / 30 g tomato purée / tomato paste
  • 250 ml / 1 cup chicken, beef or vegetable stock
  • 1 tablespoon / 15 ml Worcestershire sauce
  • 1 teaspoon / 2–3 g smoked paprika
  • 1 teaspoon / about 1 g mixed herbs or dried thyme
  • 1 bay leaf, optional
  • Black pepper, to taste
  • Salt, only if needed after cooking
  • 1 tablespoon / 8 g cornflour / cornstarch mixed with 1 tablespoon / 15 ml cold water, optional for thickening

Instructions

  1. Heat the oil in a large frying pan over medium to medium-high heat. Brown the sausages for 5–7 minutes, turning until colored on most sides. They do not need to be cooked through.
  2. Add the onion, carrots, garlic, celery if using, and drained beans to the slow cooker.
  3. In a jug, mix the chopped tomatoes, tomato purée, stock, Worcestershire sauce, smoked paprika, herbs, bay leaf if using, and black pepper.
  4. Pour the sauce into the slow cooker and stir gently.
  5. Nestle the browned sausages into the sauce.
  6. Cook on LOW for 6–8 hours or HIGH for 4–5 hours, until the vegetables are tender and the sausages are cooked through.
  7. If the sauce is thin, stir in the cornflour slurry. Cook uncovered, or with the lid slightly ajar, on HIGH for 15–30 minutes, until thickened.
  8. Rest for 5–10 minutes, remove the bay leaf, taste, adjust seasoning, and serve.

Notes

  • This recipe fits best in a 4–6 litre / 4–6 quart slow cooker. Aim for the cooker to be about half to two-thirds full once everything is added.
  • Browning is optional but recommended for better flavor and color.
  • Use 250 ml / 1 cup stock to start. Slow cookers trap steam, so avoid adding extra liquid early unless your cooker runs dry.
  • The sausages should be cooked through and the casserole should be bubbling hot. For thermometer checks, sausage should reach 160°F / 71°C and casseroles or reheated leftovers should reach 165°F / 74°C.
  • For baked bean sausage casserole, replace the cannellini beans with baked beans and reduce the stock slightly.
  • For a no-tomato version, replace chopped tomatoes with extra stock, mushrooms, onions and Worcestershire sauce, then thicken at the end.
  • For dumplings, use small dumplings of about 35–45 g / 1.2–1.6 oz each and add them for the final 45–60 minutes on HIGH.
  • Do not slow cook frozen sausages; thaw them safely first.
  • When reheating, stir halfway through and reheat until steaming hot throughout.
Recipe card for slow cooker sausage casserole showing serving size, prep time, cook time, main ingredients and short method.
This recipe works best when you think in stages: brown for flavor, slow cook until tender, thicken only at the end, and give the casserole a short rest before serving.

More Slow Cooker Sausage Recipes and Ideas

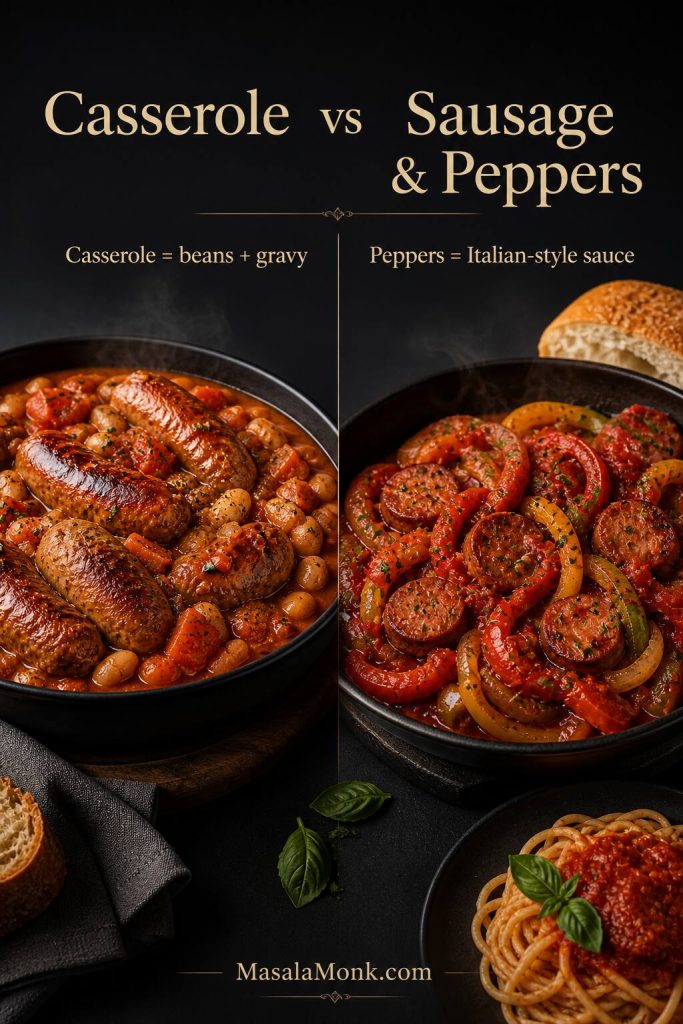
If you came here looking for more slow cooker sausage recipes, this casserole is the best place to start because it covers the classic tomato-gravy version. Other useful sausage crock pot ideas include slow cooker sausage and peppers, cabbage and sausage, crock pot kielbasa, curried sausages, sausage hot pot and slow cooker sausage gravy. Those are related meals, but they are different enough to deserve their own recipes instead of being forced into one casserole.

Slow cooker sausage meal ideas including sausage and peppers, kielbasa and cabbage, curried sausages and sausage hot pot.
Once you have mastered sausage casserole, other slow cooker sausage ideas open up naturally. Sausage and peppers, kielbasa with cabbage, curried sausages and hot pot each deserve their own flavor direction.

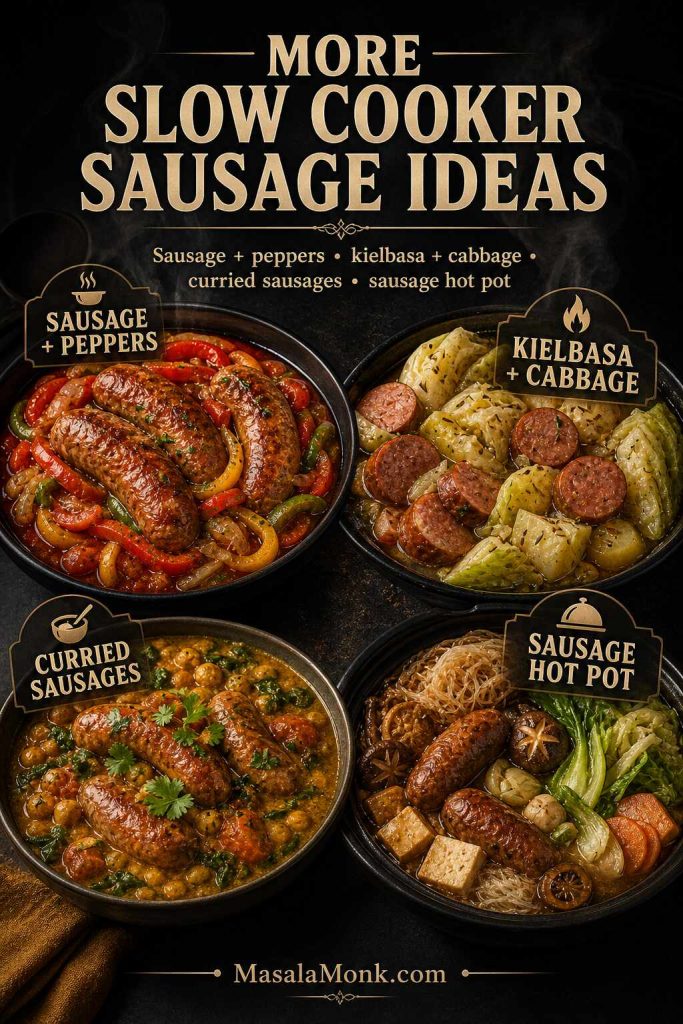
If you want slow cooker sausage and peppers, use Italian sausages, sliced peppers, onions and a marinara-style sauce instead. That is a related crock pot sausage dinner, but it eats more like a sausage-and-pepper sandwich or pasta sauce than a classic sausage casserole.

Comparison of sausage casserole with beans and gravy beside sausage and peppers in Italian-style sauce.
These dishes may sound similar, but they serve different cravings. Sausage casserole is a bean-and-gravy comfort meal, whereas sausage and peppers is more of an Italian-style sauce dish.

For now, try easy crock pot chicken breast recipes when you want another hands-off dinner. For faster comfort food outside the slow cooker, air fryer burgers and ground pork recipes are useful backups.

Plated serving of sausage casserole over mashed potatoes with beans, carrots, thick tomato gravy, greens and bread.
Serving sausage casserole over mash turns the gravy into part of the meal rather than just a sauce. Add greens or bread on the side, and the result feels complete and properly comforting.

FAQs About Slow Cooker Sausage Casserole

Can you put raw sausages in a slow cooker?

Yes, you can put raw thawed sausages in a slow cooker as long as they cook fully and reach a safe internal temperature. Browning them first gives better color and flavor, but it is not required. Without browning, the sausages will be softer and paler.

Do you have to brown sausages before slow cooking?

No, browning is not compulsory. However, it is recommended because it adds savory flavor and makes the sausages look more appetizing. The best shortcut is to brown only the sausages, then add everything else straight to the slow cooker.

Can you put frozen sausages in a slow cooker?

No. Thaw sausages before adding them to the slow cooker. The USDA slow cooker food safety guidance recommends thawing meat or poultry before putting it into a slow cooker.

How long does sausage casserole take in the slow cooker?

Most slow cooker sausage casserole recipes take 6–8 hours on LOW or 4–5 hours on HIGH. The exact timing depends on sausage size, vegetable size, how full the pot is, and how hot your slow cooker runs.

Can I cook sausage casserole on HIGH?

Yes. Cook sausage casserole on HIGH for about 4–5 hours. LOW gives a slightly deeper, softer result, but HIGH is useful when you need dinner sooner.

How do you thicken slow cooker sausage casserole?

The easiest way is to stir in a cornflour slurry near the end. Mix 1 tablespoon / 8 g cornflour with 1 tablespoon / 15 ml cold water, stir it into the hot casserole, then cook uncovered on HIGH for 15–30 minutes until the sauce thickens.

Why is my slow cooker sausage casserole watery?

Slow cookers trap moisture, so sauces often look thinner than oven casseroles. Start with only 250 ml / 1 cup stock, then thicken at the end with cornflour slurry or by cooking uncovered on HIGH.

Can I make sausage casserole without tomatoes?

Yes. Replace the chopped tomatoes with extra stock, mushrooms, onions, Worcestershire sauce and a little mustard if you like. Then thicken the sauce at the end to make a gravy-style sausage casserole.

Can I add baked beans?

Yes. Baked beans make a sweeter, family-style slow cooker sausage and bean casserole. Because baked beans already include sauce, reduce the stock slightly and taste before adding extra salt.

Can I add dumplings?

Yes, but add dumplings near the end. Put small dumplings on top of the hot casserole, set the slow cooker to HIGH, keep the lid on, and cook for 45–60 minutes until the dumplings are cooked through.

What beans are best in sausage casserole?

Cannellini beans are the best all-round option because they hold their shape and taste clean. Butter beans make the casserole softer and creamier. Baked beans make it sweeter, while chickpeas give a firmer texture.

Can I use vegetarian sausages?

Yes, but use firm vegetarian sausages and handle them gently. Some meat-free sausages soften quickly, so you may prefer to brown them separately and add them later in the cooking time.

Can I cook this sausage casserole in the oven instead?

Yes. Brown the sausages, combine everything in a covered casserole dish, and bake at 180°C / 350°F for about 60–75 minutes, or until the vegetables are tender and the sausages are cooked through. Check the liquid halfway through and add a splash of stock if the sauce looks too thick.

Can I freeze slow cooker sausage casserole?

Yes. Cool the casserole fully, portion it into airtight containers, and freeze for up to 3 months for best quality. Thaw overnight in the fridge before reheating.

How long does it last in the fridge?

Slow cooker sausage casserole keeps in the fridge for 3–4 days in an airtight container. Reheat until steaming hot throughout, adding a splash of stock or water if the sauce has thickened.

Is crock pot sausage casserole the same as slow cooker sausage casserole?

Yes. Crock pot sausage casserole and slow cooker sausage casserole usually mean the same style of recipe. Crock pot is often used as shorthand for a slow cooker, especially in the US, while slow cooker is the broader term.

Posted on 1 Comment

Easy Cheese Ball Recipe

Close-up of a pecan-coated cheese ball on a dark plate with round crackers and a spreader, with a scoop taken out to show the creamy cheddar and green onion filling inside.

This easy cheese ball recipe is the classic no-cook party appetizer you want when you need something creamy, savory, make-ahead friendly, and reliable. It starts with cream cheese, sharp cheddar, green onion, simple seasonings, and a crunchy pecan coating, then chills into a firm but spreadable ball that works with crackers, pretzels, vegetables, holiday boards, game day snacks, and party platters.

A good cheese ball should not taste like plain cream cheese with nuts stuck to the outside. Instead, the filling should be creamy, savory, a little sharp from the cheddar, fresh from the green onion, and easy to scoop once it softens slightly on the platter. Since the base recipe is simple, you can also turn the same cheese mixture into a bacon ranch cheese ball, dried beef cheese ball, pineapple cheese ball, cranberry pecan cheese ball, mini cheese ball bites, cheese ball dip, or a no-nut version without starting over.

This is the chilled cream cheese appetizer, not the crispy fried snack. If you are looking for hot, fried cheese balls with an Indian-inspired flavor profile, MasalaMonk already has a guide to crispy Indian-inspired cheese balls. Here, we are making the classic cheese ball served with crackers, vegetables, and party boards.

Active prep is only about 15 minutes. The rest of the time is chilling, which makes this an easy make-ahead appetizer rather than a last-minute kitchen project.

Quick Answer: What Is a Cheese Ball?

A cheese ball is a chilled, spreadable appetizer made with cream cheese, shredded cheese, seasonings, and an outer coating such as chopped pecans, walnuts, herbs, bacon, crushed pretzels, or dried cranberries. Once the filling is mixed, it is shaped into a ball, chilled until firm, rolled in the coating, and served with crackers, vegetables, pretzels, crostini, or a party board.

Unlike fried cheese balls, this version is creamy, cold, and spreadable rather than hot, breaded, or crisp. First, the cream cheese makes it smooth. Then, the cheddar gives it sharper flavor, the seasonings keep it from tasting flat, and the coating adds crunch and color. After chilling, the ball should hold its shape on the platter; however, this recipe should still soften enough to spread after 15 to 20 minutes at room temperature.

Quick answer: Mix 16 oz / 450 g softened cream cheese with 1½ to 2 cups / 170 to 225 g shredded cheddar, green onion, Worcestershire sauce, garlic powder, onion powder, and black pepper. Then shape, chill for 1 to 2 hours, and roll in chopped pecans, herbs, bacon, pretzels, or another coating.
Annotated guide showing a finished cheese ball with crackers, celery, cucumber, pretzel crisps, and a spreader, with labels noting the creamy center, crunchy coating, chilled serving style, and sturdy dippers.
A cheese ball is a chilled, spreadable appetizer with a creamy center and a textured outer coating. Because it is easier to serve once slightly softened, sturdy dippers like crackers, pretzel crisps, and crisp vegetables work especially well.

Cheese Ball Ingredients at a Glance

If you only remember one thing, remember this: cream cheese gives the ball body, cheddar gives this recipe sharper flavor, seasonings make it taste complete, and the coating makes it party-ready. Once those jobs are clear, it becomes much easier to adjust the recipe without making the filling too soft, salty, or bland.

Ingredient What It Does Best Tip
Cream cheese Creamy base and structure Use softened block-style cream cheese, not melted cream cheese
Sharp cheddar Real cheese flavor Freshly shredded cheddar blends best, although pre-shredded works in a pinch
Green onion Freshness and mild onion bite Slice it finely so every bite gets a little
Worcestershire sauce Savory depth Start with 1 teaspoon / 5 ml, then taste before adding more
Garlic and onion powder Even seasoning Use powders because they spread smoothly through the cream cheese
Pecans, herbs, bacon, or pretzels Crunch, color, and finish Roll the cheese ball in crunchy coatings close to serving
Ingredient guide for a cheese ball recipe showing cream cheese, shredded sharp cheddar, green onions, Worcestershire sauce, garlic powder, onion powder, black pepper, chopped pecans, herbs, and optional bacon arranged on a dark background.
The base of a classic cheese ball recipe is simple, but each ingredient has a job. Cream cheese gives structure, sharp cheddar adds flavor, Worcestershire brings savory depth, and pecans or herbs finish the outside with crunch and contrast.

How to Make a Cheese Ball

The method is easy, but the order matters. First, beat the cream cheese until smooth. Next, mix in the flavorings, shape the filling before it gets too warm, chill until firm, and add the coating close enough to serving that it stays fresh. That way, the cheese ball recipe stays simple without turning soft, lumpy, or messy.

Six-step visual guide showing how to make a cheese ball: soften cream cheese, mix in cheddar and seasonings, shape into a ball, chill until firm, roll in coating, and serve with crackers.
How to make a cheese ball is easier than it looks: soften, mix, shape, chill, coat, and serve. Most important, do not skip the chilling step, because that is what helps the cheese ball hold its shape and coat cleanly.

Step 1: Soften the Cream Cheese

Start with softened cream cheese. Leave it at room temperature until it is easy to press with a spoon. If the cream cheese is too cold, it will not mix smoothly. If it is melted, the filling may become loose and harder to shape. For that reason, softened but still-cool cream cheese gives you the best balance.

Step 2: Mix the Filling

Beat the cream cheese until smooth. Then mix in shredded cheddar, green onion, Worcestershire sauce, garlic powder, onion powder, black pepper, and any add-ins. Scrape the bowl well so the seasoning is evenly spread through the filling.

Before shaping, taste the mixture. It should taste slightly bold because crackers and vegetables will soften the flavor. If it tastes flat, add a little more green onion, black pepper, garlic powder, onion powder, or Worcestershire sauce. At this stage, the recipe is easier to fix because the cheese has not yet been shaped into a ball.

Step 3: Shape and Chill

Spoon the filling onto a large piece of plastic wrap or parchment. Then, gather the wrap around the mixture and shape it into a ball. It does not need to be perfect yet because chilling will make it easier to smooth and coat. After the first chill, you can gently reshape it if needed.

Refrigerate for at least 1 hour. For a cleaner shape, chill for 2 hours. If you are making the cheese ball ahead, stop here and keep it wrapped until the day you plan to serve it.

Step 4: Roll in the Coating

Spread chopped pecans, herbs, bacon, pretzels, or your chosen coating on a plate. After that, unwrap the chilled cheese ball, then roll and press it gently into the coating until the outside is covered.

Nuts hold up better than most coatings. However, bacon, pretzels, crackers, and fresh herbs are best added closer to serving. That keeps the outside crisp, fresh, and more appetizing. The cheese ball also looks cleaner when the final coating is added after the recipe has had time to chill.

Step 5: Serve Slightly Softened

A cheese ball is usually too firm right from the refrigerator. So, let it sit for 15 to 20 minutes before serving so it becomes easier to spread. It should soften slightly, but it should not sit out for the entire party. Instead, serve it in a planned window and keep extra portions chilled if the gathering will last longer.

Texture target: Before chilling, the mixture should look thick, creamy, and scoopable. It should not be runny, greasy, or crumbly. After chilling, it should be firm enough to roll in coating, but it should still soften enough to spread after 15 to 20 minutes at room temperature. If it feels loose before chilling, add a little more cheddar; if it feels dry, let it rest briefly and mix again.

Easy Cheese Ball Recipe

Easy Cheese Ball Recipe with Cream Cheese

This classic cheese ball recipe is creamy, savory, make-ahead friendly, and perfect with crackers, vegetables, pretzels, and party boards.

YieldAbout 3 to 3½ cups
Servings16 to 20 appetizer servings
Prep Time15 minutes
Chill Time1 to 2 hours
Total Time1 hour 15 minutes to 2 hours 15 minutes
Cook Time0 minutes

Ingredients

  • 16 oz / 450 g cream cheese, softened
  • 1½ to 2 cups / about 170 to 225 g shredded sharp cheddar cheese
  • 2 to 3 green onions, finely sliced, about 20 to 30 g
  • 1 teaspoon / 5 ml Worcestershire sauce
  • ½ teaspoon garlic powder
  • ½ teaspoon onion powder
  • ¼ teaspoon black pepper
  • Pinch of salt, only if needed

For the Coating

  • ¾ to 1 cup / about 85 to 115 g finely chopped pecans or walnuts
  • 2 tablespoons chopped parsley, chives, or green onion
  • Optional: ¼ to ½ cup / about 25 to 50 g cooked crumbled bacon

Instructions

  1. Add softened cream cheese to a mixing bowl and beat until smooth
  2. Add shredded cheddar, green onion, Worcestershire sauce, garlic powder, onion powder, black pepper, and a small pinch of salt if needed
  3. Mix until evenly combined, then taste and adjust the seasoning before shaping
  4. Spoon the mixture onto plastic wrap or parchment and shape it into a ball
  5. Wrap tightly and refrigerate for at least 1 hour, or 2 hours for a firmer, cleaner shape
  6. Spread chopped pecans, herbs, and optional bacon on a plate
  7. Unwrap the chilled cheese ball and roll it in the coating, pressing gently so the outside is covered
  8. Let it sit for 15 to 20 minutes before serving with crackers, pretzels, vegetables, or crostini

Recipe Notes

  • Taste the filling before shaping. It should taste slightly bold because crackers, vegetables, and pretzels soften the flavor once served
  • For a softer spread, use 1½ cups / 170 g cheddar instead of 2 cups / 225 g
  • For a firmer cheese ball, chill longer or mix in a little more shredded cheddar
  • For a no-nut cheese ball, coat it with herbs, bacon, crushed pretzels, crushed crackers, everything seasoning, or toasted breadcrumbs
  • For mini cheese ball bites, chill the mixture, scoop into 1-tablespoon portions, roll each one in coating, and add pretzel sticks right before serving
Recipe card graphic for an easy cheese ball recipe with a photo of the finished cheese ball, yield and timing details, an ingredient list including cream cheese, sharp cheddar, green onions, Worcestershire, seasonings, and pecans, plus a short method.
This easy cheese ball recipe uses a classic formula: cream cheese, sharp cheddar, green onions, Worcestershire, simple seasonings, and chopped pecans. Since it is make-ahead friendly, it is a strong choice for holidays, parties, and snack boards.

Why This Cheese Ball Recipe Works

This cheese ball recipe works because it keeps the base firm, flavorful, and easy to spread. Instead of adding too many wet ingredients, it uses full-fat block cream cheese for structure, sharp cheddar for stronger cheese flavor, and dry seasonings that blend smoothly through the filling.

Also, the coating goes on after the ball has chilled. That timing matters because the outside stays cleaner, the nuts or herbs stick better, and the finished appetizer looks fresher on the platter. That way, the cheese ball stays make-ahead friendly without tasting flat or turning messy.

Recipe Choice Why It Helps
Full-fat block cream cheese Firms up enough to shape into a ball
Sharp cheddar Adds enough flavor to stand up to crackers and vegetables
Garlic powder and onion powder Season evenly without harsh raw pieces
Worcestershire sauce Adds savory depth so the filling does not taste one-note
Coating after chilling Keeps the outside fresher, cleaner, and crunchier
Explainer board showing why a cheese ball recipe works, with callouts for block cream cheese for structure, sharp cheddar for flavor, Worcestershire for savory depth, dry seasonings for even flavor, and coating after chilling for a cleaner finish.
A good cheese ball recipe works because the structure and flavor stay balanced. Block cream cheese keeps it firm, sharp cheddar keeps it from tasting flat, and coating the ball after chilling helps the outside stay cleaner and more defined.

That is what keeps the recipe flexible without making it vague. You can change the coating, the add-ins, or the serving style, while the cream cheese and cheddar base still keeps the ball structured enough to slice, scoop, and spread.

Cheese Ball Ingredient Notes

The base is simple, but each ingredient matters. Because the recipe is no-cook, the flavor comes from good cheese, proper seasoning, and the contrast between the creamy inside and the textured coating. That is why bland cheese, cold cream cheese, and watery add-ins can make the whole appetizer fall flat.

Cream Cheese

Use full-fat block-style cream cheese for the best structure. Because this is a chilled recipe, the cheese needs to firm up around the ball without turning stiff or crumbly. Block-style cream cheese softens smoothly, firms up well in the refrigerator, and gives the finished cheese ball a rich but spreadable texture. By contrast, whipped cream cheese can make the mixture looser, while cold cream cheese can leave small lumps in the filling.

Let the cream cheese soften at room temperature until it presses easily with a spoon. It should be soft enough to beat, but not melted or greasy. If it melts, the cheese mixture can become loose, and the ball may take much longer to firm up in the refrigerator. On the other hand, if it is too cold, the filling can stay lumpy even after mixing.

If your kitchen is cool, cream cheese may need 45 to 60 minutes to soften. If your kitchen is warm, check it sooner so it softens without turning greasy.

Sharp Cheddar

Sharp cheddar is the easiest choice because it brings more flavor than mild cheddar. Also, it balances the cream cheese, so the finished appetizer tastes like a proper cheddar cheese ball instead of a plain cream cheese spread. For this recipe, the cheese should be bold enough that the ball still tastes savory after it is spread onto crackers.

Whenever possible, shred the cheddar fresh because it blends more smoothly into the cream cheese base. Still, pre-shredded cheddar can work when convenience matters. If the mixture feels dry after using packaged shredded cheese, let it sit for a few minutes and mix again before shaping. In practice, the recipe is forgiving as long as the cheese tastes bold and the ball still holds together after chilling.

Best Cheese for a Cheese Ball

For most versions, sharp cheddar is the best first choice because it has enough flavor to balance the cream cheese. However, this recipe can move in different directions depending on the cheese you choose. If you want the ball to taste milder, sharper, smokier, or spicier, start with the guide below.

Cheese Best For How to Use It
Sharp cheddar Classic cheese ball recipe Main shredded cheese for the strongest everyday version
White cheddar Holiday boards Use like yellow cheddar for a sharper but cleaner-looking ball
Colby Jack Milder family-style cheese ball Use when you want a softer flavor
Pepper Jack Spicy cheese ball Use half pepper Jack and half cheddar
Smoked gouda Smoky party flavor Use a small amount with cheddar rather than replacing all the cheese
Blue cheese Bold retro appetizer Use a little because the flavor is strong
Goat cheese Tangier variation Use as a partial swap, but expect a softer ball
Chooser guide comparing cheeses for a cheese ball recipe, including sharp cheddar, white cheddar, Colby Jack, Pepper Jack, smoked gouda, blue cheese, and goat cheese, each labeled with its flavor style.
Sharp cheddar is the best first choice for a cheese ball because it gives strong flavor without making the filling complicated. However, white cheddar, Pepper Jack, smoked gouda, or even a little blue cheese can shift the recipe in a different direction.

When in doubt, start with sharp cheddar. After that, use the table as a flavor guide rather than a strict rule. For example, pepper Jack makes sense for a spicy cheese ball, while white cheddar looks cleaner on a holiday board.

Green Onion, Garlic, Onion, and Worcestershire

Green onion adds freshness, while garlic powder and onion powder season the filling evenly. Meanwhile, Worcestershire sauce adds a savory note that makes the cheese ball taste fuller and less one-dimensional. Together, they make the recipe taste seasoned without adding extra moisture.

Because crackers, pretzels, bacon, dried beef, and seasoning blends can all be salty, add salt carefully. Before shaping the ball, taste the cheese filling; then decide if the recipe needs even a small pinch.

Pecans, Walnuts, Herbs, Bacon, or Pretzels

Although chopped pecans are the classic coating, walnuts, herbs, bacon, and crushed pretzels can all work depending on the flavor you want. Pecans add crunch and a slightly sweet nuttiness, while herbs such as parsley, chives, and green onion make the outside fresher and brighter.

For a game-day cheese ball, add cooked crumbled bacon to the coating. For a no-nut cheese ball, use herbs, bacon, crushed pretzels, crushed crackers, everything seasoning, or toasted breadcrumbs instead.

Do You Need Sour Cream, Mayo, or Butter?

You do not need sour cream, mayo, or butter for this classic shaped cheese ball recipe. In fact, keeping them out makes the ball easier to shape because the filling stays thicker and cleaner. Full-fat cream cheese already gives the recipe enough richness, while cheddar and seasonings bring the flavor.

That said, sour cream or mayo can be useful if you are making cheese ball dip instead of a shaped appetizer. In that case, add only 1 to 2 tablespoons at first, then check the texture before adding more. Otherwise, the dip can move from creamy to loose very quickly.

Warm cheese option: If you want a pourable cheese dip instead of a chilled cream cheese appetizer, try MasalaMonk’s easy cheese sauce recipe for nachos, fries, broccoli, pasta, and dipping.

Equipment You Need

You do not need special equipment for this recipe, but a few basic tools make the cheese mixture smoother and the final ball easier to shape. If the cream cheese is properly softened, even a sturdy spatula can work. However, a hand mixer makes the filling smoother faster, especially when you are doubling the recipe.

Tool Why It Helps
Mixing bowl For beating the cream cheese and folding in cheddar
Hand mixer or sturdy spatula For a smoother filling
Box grater For freshly shredded cheddar
Plastic wrap or parchment For shaping the filling into a clean ball
Plate or shallow tray For rolling the chilled cheese ball in coating
Serving knife or spreader For easier spreading without breaking crackers

Common Mistakes to Avoid

Before you start mixing, it helps to know what can go wrong. Most cheese ball problems come from cream cheese that is too cold, add-ins that are too wet, or coatings that are added too early. Fortunately, each problem is easy to avoid if you build the recipe in the right order. More importantly, fixing the filling before shaping is much easier than fixing a finished ball after the coating is already on.

Mistake What Happens Better Move
Melting the cream cheese Loose or greasy filling Soften at room temperature instead
Using cold cream cheese Lumpy cheese ball mixture Let it soften until it presses easily
Adding wet pineapple, pickles, or jalapeños Soft or watery filling Drain and blot before mixing
Coating with pretzels or bacon too early Soft outside layer Add crunchy coatings closer to serving
Adding salt too soon Overly salty cheese ball Taste first, then salt only if needed
Serving straight from the fridge Firm texture and broken crackers Rest 15 to 20 minutes before serving
Mistake-and-fix guide for a cheese ball recipe showing six common problems: cream cheese too cold, cream cheese melted, wet add-ins, coating too early, too much salt, and serving straight from the fridge.
Most cheese ball recipe problems are easy to avoid once you know what to watch for. For example, cold cream cheese causes lumps, wet add-ins can loosen the mixture, and serving the ball straight from the fridge makes it harder to spread.

How Much Cheese Ball to Make

Because this cheese ball recipe is usually served as part of a snack table, the right amount depends on what else you are serving. If the ball is the main appetizer, plan more. However, if it sits on a board with dips, crackers, vegetables, fruit, and hot snacks, one batch can stretch further. In that case, variety matters more than making one oversized cheese ball.

Crowd Size Amount to Make Best Plan
6 to 8 people Half batch Smaller ball or full recipe as dip with leftovers planned
12 to 20 people 1 full cheese ball Crackers, vegetables, pretzels, and at least one fresh side
25 to 35 people 2 cheese balls Two flavors, such as classic pecan and bacon ranch
Large party board 1 cheese ball plus other appetizers Warm dip, crunchy snack, fruit, pickles, olives, and sturdy crackers
Individual portions 36 to 48 mini cheese ball bites 1-tablespoon portions with pretzel sticks added right before serving
Serving guide showing how much cheese ball to make for different group sizes, including half a batch for 6 to 8 people, one cheese ball for 12 to 20, two cheese balls for 25 to 35, one ball plus other appetizers for a large board, and mini bites as another option.
How much cheese ball to make depends on how you are serving it. If it is one appetizer among several, one batch goes further; however, for larger gatherings, two cheese balls or a tray of mini bites makes hosting much easier.

Cheese Ball Dip: How to Serve This Without Shaping It

If you want the flavor of a cheese ball without shaping it, turn the mixture into cheese ball dip. This is useful for casual parties, snack boards, and smaller gatherings where a bowl of spread is easier than a shaped appetizer. Instead of changing the whole recipe, you only need to adjust the cheese slightly so the ball mixture becomes softer and more scoopable.

To make cheese ball dip, use the same base recipe but reduce the cheddar to 1½ cups / about 170 g so the texture stays softer. Then, mix the filling, spoon it into a shallow serving bowl, smooth the top, and sprinkle the coating over the surface. Chill for 30 to 60 minutes if making it ahead; afterward, let it soften slightly before serving so you get the same flavor with less shaping and easier scooping.

For Cheese Ball Dip Use This Adjustment
Softer texture Use 1½ cups / 170 g cheddar instead of 2 cups / 225 g
Easy serving Spoon into a shallow bowl instead of shaping into a ball
Better topping Add pecans, herbs, bacon, or pretzels right before serving
Best dippers Crackers, pretzel crisps, celery, cucumber, bell pepper, crostini, or pita chips
Side-by-side comparison showing a shaped cheese ball on a platter and a bowl of cheese ball dip, with notes that the cheese ball is firmer and better for boards while the dip is softer and easier to scoop.
Cheese ball dip vs cheese ball comes down to texture and serving style. Both use a similar flavor base, yet the dip is softer and easier to scoop, while the shaped cheese ball feels more polished for a party platter or snack board.

3 Ingredient Cheese Ball

A 3 ingredient cheese ball is useful when you need the fastest possible appetizer. However, it will not have the same depth as the full recipe because garlic, onion, pepper, and Worcestershire add much of the savory background flavor. Still, when time is short, cream cheese, cheddar, and one strong seasoning can form a simple ball that works with crackers and pretzels.

Version Ingredients Best Use
Classic shortcut 16 oz / 450 g cream cheese + 1½ cups / 170 g cheddar + 1 packet / about 28 g ranch seasoning Fast game-day cheese ball
No-ranch shortcut 16 oz / 450 g cream cheese + 1½ cups / 170 g cheddar + 3 sliced green onions Milder cheese ball for simple crackers
Coated shortcut 16 oz / 450 g cream cheese + 1½ cups / 170 g cheddar + ¾ cup / 85 g chopped pecans Basic party cheese ball with crunch
Guide image for a 3 ingredient cheese ball showing cream cheese, shredded cheddar, ranch seasoning or green onion, plus a finished cheese ball served with crackers and pretzels, with the steps mix, shape, and chill.
A 3 ingredient cheese ball is the fastest shortcut version when you need a party appetizer quickly. However, the full cheese ball recipe gives you better depth because Worcestershire, garlic powder, onion powder, pepper, and green onion round out the flavor.

For the best flavor, though, use the full recipe. Worcestershire sauce, garlic powder, onion powder, black pepper, and green onion make the cheese ball taste more complete without making the method harder. Still, the shortcut version is useful when speed matters more than building the most layered flavor.

What to Roll a Cheese Ball In

The coating does more than make the cheese ball look finished. It adds texture, controls richness, and tells people what kind of flavor to expect. Although pecans are classic, there are plenty of good nut-free and holiday-friendly options. For example, this recipe can move from a classic cheese ball to a game-day ball or holiday cheese board centerpiece just by changing the outside layer.

Coating Best For Notes
Chopped pecans Classic cheese ball Toast lightly, then cool before using
Chopped walnuts Earthier flavor Chop finely so the pieces stick well
Parsley, chives, or green onion Fresh green finish Good for a lighter-looking or no-nut version
Bacon and chives Game day Add close to serving so the bacon stays crisp
Crushed pretzels No-nut crunch Add shortly before serving because pretzels soften
Crushed crackers Simple no-nut coating Use sturdy crackers and crush finely
Everything seasoning Bagel-style flavor Use lightly because it can be salty
Dried cranberries and pecans Holiday cheese ball Sweet, salty, colorful, and festive
Toasted breadcrumbs Nut-free coating Use dry crumbs and add close to serving
Coating guide showing cheese balls rolled in chopped pecans, walnuts, herbs, bacon and chives, crushed pretzels, crushed crackers, everything seasoning, cranberries and pecans, and toasted breadcrumbs.
What you roll a cheese ball in changes both texture and flavor. For example, pecans give the classic crunch, bacon and chives make it more savory, while crushed pretzels or crackers work well when you want a no-fuss party coating.

No-Nut Cheese Ball Coatings

For a cheese ball without nuts, use chopped herbs, cooked bacon, crushed pretzels, crushed crackers, everything seasoning, toasted breadcrumbs, sesame seeds, or a mix of herbs and shredded cheddar. If allergies are a concern, avoid using nut coatings anywhere near the same platter, utensils, or serving board. In that case, keep the whole platter nut-free rather than relying on separate corners of the same board.

No-nut cheese ball coating guide showing a finished no-nut cheese ball with coating options including fresh herbs, bacon, crushed pretzels, crushed crackers, everything seasoning, sesame seeds, toasted breadcrumbs, and shredded cheddar.
A no-nut cheese ball can still look colorful and taste crunchy. Instead of pecans or walnuts, use fresh herbs, bacon, crushed pretzels, cracker crumbs, sesame seeds, toasted breadcrumbs, or shredded cheddar for a safer party-board option.

What to Serve With a Cheese Ball

A cheese ball works best with dippers that can handle a creamy spread. So, put out a mix of crackers, vegetables, pretzels, and a few fresh or tangy sides so the platter does not feel too heavy. Since this recipe is rich, the best cheese board pairings usually include something crisp, something salty, and something fresh. That balance keeps guests coming back without making every bite feel the same.

Best Crackers for a Cheese Ball

Cracker or Dipper Why It Works Best Pairing
Buttery crackers Classic party flavor and easy crunch Classic pecan or cranberry pecan
Wheat crackers Sturdy, nutty, and less fragile Dried beef or bacon ranch
Seeded crackers More texture and grown-up flavor Herb or no-nut cheese ball
Water crackers Clean flavor that lets the cheese stand out Classic cheddar once slightly softened
Pretzel crisps Salty, crunchy, and strong enough for scooping Bacon ranch, jalapeño, or dill pickle
Crostini or baguette slices Strongest option for a firmer cheese ball Party boards and holiday platters
Celery, cucumber, and bell pepper Fresh, lighter, and crisp Rich cheese balls and game-day spreads
Apple slices and grapes Sweet and fresh against savory cheese Cranberry pecan, pineapple, or classic pecan
Serving guide showing a cheese ball with buttery crackers, wheat crackers, seeded crackers, water crackers, pretzel crisps, crostini, celery, cucumber, bell pepper, apple slices, and grapes.
The best crackers and dippers for a cheese ball are sturdy enough to scoop without breaking. Since the filling is rich, a mix of crackers, pretzel crisps, fresh vegetables, apple slices, and grapes keeps the platter balanced.

Because the cheese ball can be firm when it first comes out of the fridge, sturdy crackers work better than very thin ones. So let it soften for 15 to 20 minutes before serving, or include a small spreading knife on the platter.

For a low-carb platter, serve the cheese ball with celery, cucumber rounds, bell pepper strips, cheese crisps, pork rinds, or other sturdy options from MasalaMonk’s guide to keto chips for dips. This works especially well when the cheese ball is part of a heavier game-day table and you want a few lighter, crunchier options.

Turn It Into a Party Board

For a fuller spread, place the cheese ball on a board with crackers, pretzels, fruit, nuts, pickles, olives, cured meats, and a small bowl of jam or chutney. If you want a simple layout formula, MasalaMonk’s guide to charcuterie board ideas gives you an easy structure for building a balanced board. From there, add one crunchy item, one fresh item, and one sweet or tangy item around the cheese ball.

For a game-day table, pair this cheese ball with buffalo chicken dip, crispy mozzarella sticks, or a tray of potato appetizers. That gives guests a mix of cold, creamy, hot, crispy, salty, and fresh bites.

Close-up of a cheese ball party board with a nut-coated cheese ball surrounded by crackers, pretzels, grapes, apple slices, celery, cucumber slices, olives, and folded cured meat on a dark platter.
A cheese ball party board works best when it has contrast. Add salty crackers, crisp vegetables, fresh fruit, and a few briny sides so the creamy cheese ball feels like the centerpiece instead of the only thing on the platter.

Make Ahead, Storage, and Freezing

A cheese ball is one of the easiest make-ahead appetizers because chilling helps it firm up. In fact, the recipe often tastes better after a few hours because the cheese, onion, and seasonings have time to settle. The best approach is to make and shape the filling ahead, then add the coating closer to serving. That way, the inside gets time to develop flavor while the outside still tastes fresh.

Best make-ahead method: Mix and shape the cheese ball 1 day ahead, wrap tightly, and refrigerate. Then roll it in pecans, herbs, bacon, pretzels, or crumbs closer to serving so the outside stays fresh and crisp.

Make-Ahead Timeline

When You Are Serving What to Do Best Coating Timing
Same day Mix, shape, chill for 1 to 2 hours Coat after chilling
1 day ahead Mix, shape, wrap tightly, and refrigerate Coat the day you serve
2 to 3 days ahead Shape uncoated and keep tightly wrapped Coat shortly before serving
Freezer prep Freeze the shaped, uncoated cheese ball Thaw overnight, then coat fresh
Make-ahead storage and freezing guide for a cheese ball showing steps for same-day prep, making it 1 day ahead, keeping it uncoated for 2 to 3 days, freezing it uncoated, thawing overnight in the fridge, and coating fresh before serving.
For the cleanest make-ahead cheese ball, shape and chill the filling first, then add the coating close to serving. That way, the inside has time to firm up while the outside stays fresh, crisp, and party-ready.

How to Store a Cheese Ball

After shaping, wrap the cheese ball tightly in plastic wrap or store it in an airtight container in the refrigerator. If it has already been coated, use a container large enough that the outside does not get crushed.

For best texture, keep a shaped, uncoated cheese ball refrigerated for up to 3 days before serving. Once the cheese ball has been coated or served, store leftovers tightly covered in the refrigerator and use them within 3 to 4 days. For freezing, freeze the shaped, uncoated cheese ball for up to 1 month, then thaw it overnight in the refrigerator and coat it fresh before serving.

Keep the cheese ball refrigerated at 40°F / 4°C or colder. For the cleanest presentation, store the shaped cheese ball uncoated, then roll it in pecans, herbs, bacon, or crumbs shortly before serving.

Can You Freeze a Cheese Ball?

If you need to make it further ahead, freeze the cheese ball before adding the coating so the outside stays fresher after thawing. Wrap the shaped cheese ball tightly, place it in a freezer-safe bag or container, and freeze at 0°F / -18°C. Then thaw it overnight in the refrigerator and roll it in a fresh coating before serving.

Freezing works best with the plain cream cheese, cheddar, green onion, and seasoning base. Wet add-ins such as pineapple, pickles, or jalapeños can release moisture after thawing, so those versions are better made fresh or only 1 to 2 days ahead. After thawing, always add a fresh coating so the outside tastes crisp instead of stale or soft.

How Long Can a Cheese Ball Sit Out?

Because a cheese ball is made with cream cheese and shredded cheese, treat it like a perishable appetizer. According to USDA food safety guidance, perishable food should not be left out for more than 2 hours at room temperature, or more than 1 hour when the temperature is above 90°F / 32°C.

For a long party, serve a smaller cheese ball first and keep the backup chilled. Then, if the platter runs low, bring out a fresh one instead of letting the same ball sit for hours. If the cheese ball has been sitting out too long, do not wrap it back up for later. Instead, refrigerate safe leftovers promptly and discard anything that has been left out beyond the safe window.

Food safety guide showing a cheese ball platter with a clock and chilled backup container, explaining that a cheese ball can sit out up to 2 hours at room temperature or 1 hour above 90°F or 32°C.
A cheese ball should not sit out all day just because it is served chilled. For safer entertaining, serve a smaller portion first, keep the backup refrigerated, and replace the platter when needed instead of leaving one ball out for hours.

Cheese Ball Variations

Once the base recipe works, the variations are easy. Instead of rebuilding the appetizer from scratch, keep the cream cheese structure, then change the cheese, seasonings, add-ins, and coating. The formulas below are designed as practical starting points, so you do not have to guess how much bacon, dried beef, pineapple, jalapeño, or cranberry to add to each ball. After that, you can adjust salt, heat, sweetness, or crunch to match the occasion.

Which Cheese Ball Variation Should You Make?

Choose This Version Best For Flavor Direction
Classic pecan Safest party version Creamy, savory, nutty, familiar
Bacon ranch Game day Salty, herby, bold, snacky
Dried beef or chipped beef Old-school party flavor Salty, savory, retro
Cranberry pecan Thanksgiving or Christmas Sweet-salty, colorful, festive
Pineapple Retro sweet-savory spread Creamy, tangy, slightly sweet
Jalapeño Spicy snack table Cheesy, peppery, fresh heat
Mini bites Easy individual serving Party-friendly and mess-light
Variation guide showing eight cheese ball ideas: classic pecan, bacon ranch, dried beef, cranberry pecan, pineapple, jalapeño, dill pickle, and mini cheese ball bites with pretzel sticks.
Once the base cheese ball recipe is right, the variations are easy. Keep the cream cheese structure, then change the coating and add-ins for bacon ranch, dried beef, cranberry pecan, pineapple, jalapeño, dill pickle, or mini cheese ball bites.

Bacon Ranch Cheese Ball

For a bacon ranch cheese ball, use 16 oz / 450 g cream cheese, 1½ cups / 170 g shredded cheddar, 1 packet / about 28 g ranch seasoning, ½ cup / about 50 g cooked crumbled bacon, and 2 sliced green onions. Then roll the outside in more bacon, chopped chives, and pecans or crushed pretzels.

Because ranch seasoning and bacon are both salty, do not add extra salt until you taste the filling. If the cheese ball tastes strong on its own, serve it with celery, bell pepper strips, or unsalted crackers for balance. Otherwise, pretzel crisps, wheat crackers, and sturdy buttery crackers all work well.

Close-up of a bacon ranch cheese ball coated with chopped bacon, chives, and crunchy bits, served with pretzels, celery sticks, and crackers on a dark platter.
A bacon ranch cheese ball is ideal for game day because it is salty, creamy, and easy to serve with pretzels, celery, and sturdy crackers. Since bacon and ranch seasoning are already flavorful, taste before adding extra salt.

Dried Beef Cheese Ball or Chipped Beef Cheese Ball

For a dried beef cheese ball, use 16 oz / 450 g cream cheese, 1½ cups / 170 g shredded cheddar, 4 to 5 oz / 115 to 140 g finely chopped dried beef or chipped beef, 2 sliced green onions, 1 teaspoon / 5 ml Worcestershire sauce, ½ teaspoon onion powder, and ½ teaspoon garlic powder.

Because dried beef is already salty, skip the added salt. Then roll the outside in chopped pecans, herbs, more finely chopped dried beef, or a mix of all three. If you like a sharper old-school flavor, add 1 to 2 teaspoons prepared horseradish, but blot any extra moisture first.

Old-school party version: Since dried beef is salty, chop it very finely and reserve a little for the outside coating. That way, the cheese ball recipe gets flavor inside and a clear visual cue outside.
Close-up of a dried beef cheese ball, also called a chipped beef cheese ball, coated with finely chopped dried beef and green onion, with crackers and a scoop of the creamy filling visible.
A dried beef cheese ball brings an old-school party flavor into a modern appetizer board. Because dried beef is naturally salty, chop it finely, skip extra salt at first, and balance the cheese ball with crackers, green onion, and fresh dippers.

Cranberry Pecan Cheese Ball

For a cranberry pecan cheese ball, use the base recipe and mix in ½ cup / about 60 g chopped dried cranberries. Then roll the outside in ½ cup / 55 g chopped pecans, ¼ cup / 30 g chopped dried cranberries, and 2 tablespoons chopped parsley or chives.

A little orange zest makes this version brighter, especially for Thanksgiving or Christmas. Because this version already has sweetness from the cranberries, salty or buttery crackers usually work better than sweet dippers. For that reason, it is especially good with apple slices, grapes, and a small bowl of pepper jelly or chutney.

Cranberry pecan cheese ball with a creamy center, coated in chopped pecans, dried cranberries, and herbs, served with crackers, apple slices, grapes, and a small bowl of red chutney.
A cranberry pecan cheese ball is the best holiday-style variation when you want sweet, savory, creamy, and crunchy in one appetizer. Because the cranberries add sweetness, serve it with salty crackers, apple slices, grapes, or a tangy chutney for balance.

Jalapeño Cheese Ball

For a jalapeño cheese ball, add 1 to 2 finely chopped jalapeños to the base recipe. Fresh jalapeño tastes brighter, while pickled jalapeño adds tang. Either way, blot the pieces dry before mixing so the filling does not become watery.

Cheddar, bacon, smoked paprika, and chives all work well here. For more heat, add a pinch of cayenne instead of adding too much hot sauce, which can loosen the texture. If your crowd likes creamy heat, this jalapeño version also pairs well with baked jalapeño poppers on the same snack table. Meanwhile, celery and cucumber help cool the heat without making the platter boring.

Jalapeño cheese ball with a creamy filling, chopped jalapeños, green herbs, and cheddar flecks, served with pretzels, cucumber slices, celery sticks, and crackers.
A jalapeño cheese ball should taste creamy first and spicy second. Since fresh jalapeños can vary in heat, start with a modest amount, then add more only after tasting the filling so the cheese ball stays balanced.

Pineapple Cheese Ball

For a pineapple cheese ball, use 16 oz / 450 g cream cheese, 1 to 1½ cups / 115 to 170 g shredded cheddar, ¾ cup / about 180 g crushed pineapple that has been drained and blotted very well, 2 sliced green onions, and ½ cup / about 55 g chopped pecans.

The pineapple must be very dry before it goes into the filling. If it is watery, the cheese ball will turn soft and loose. Therefore, drain it well, press out extra juice, and blot it before mixing. Since this version is sweet-savory, it works especially well with salty crackers, pretzels, and toasted baguette slices.

Pineapple cheese ball coated with chopped pecans and green onion, with a creamy filling and pineapple pieces inside, served with crackers, pretzels, toasted bread slices, and a small bowl of pineapple.
A pineapple cheese ball works best when the pineapple is drained very well before mixing. Otherwise, the filling can turn loose; however, when the pineapple is dry, it adds a sweet-savory flavor that pairs beautifully with salty crackers and pretzels.

Dill Pickle Cheese Ball

For a dill pickle cheese ball, add ½ cup / about 75 g finely chopped pickles, 1 to 2 teaspoons dill, 1½ cups / 170 g cheddar, garlic powder, and green onion to the cream cheese base. Before mixing, blot the chopped pickles very well so the filling stays thick.

After chilling, roll the outside in chopped herbs, crushed pretzels, or a mix of herbs and shredded cheddar. Since pickles add both salt and moisture, taste before adding extra salt and serve this version with pretzel crisps, celery, cucumber rounds, and sturdy crackers.

Dill pickle cheese ball with chopped pickles, dill, herbs, and a creamy center, served with pretzels, cucumber slices, celery sticks, and seeded crackers.
A dill pickle cheese ball should taste tangy and fresh without becoming watery. For that reason, blot chopped pickles before mixing them into the cream cheese base, then serve the finished ball with pretzels, celery, cucumber, or sturdy crackers.

Mini Cheese Ball Bites

Mini cheese ball bites are ideal when you want individual party portions instead of one large cheese ball. After the filling chills until firm, scoop it into generous 1-tablespoon portions. A full batch usually makes about 36 to 48 mini cheese ball bites, depending on how generously you scoop and how much coating you use.

From there, roll each mini cheese ball in chopped pecans, herbs, bacon, crushed pretzels, or dried cranberries. Then add pretzel sticks right before serving so they stay crisp and do not soften in the cheese mixture. If you are making this recipe ahead, chill the coated bites without the sticks and add the pretzels only when the platter is ready.

Tray of mini cheese ball bites in different coatings, including herbs, bacon, pecans, crushed pretzels, and dried cranberries, with some bites topped with pretzel sticks.
Mini cheese ball bites are ideal when guests need an easy one-bite appetizer. Once the mixture is chilled, scoop it into 1-tablespoon portions, roll each bite in coating, and add pretzel sticks last so they stay crisp.

Christmas Cheese Ball

For a Christmas cheese ball, use the cranberry pecan version or roll the outside in a red-and-green mix of dried cranberries, pecans, parsley, and chives. You can keep it round, shape it into a wreath, or make a simple ornament-style cheese ball for a holiday board.

Still, flavor should come first. A simple round cheese ball with cranberries, pecans, herbs, crackers, grapes, and apple slices usually looks festive without needing a complicated shape. Plus, it is easier to chill, coat, transport, and serve.

Pumpkin Cheese Ball

For Halloween or Thanksgiving, shape the cheese ball into a pumpkin. After wrapping the cheese ball, use rubber bands or kitchen twine around the outside to create pumpkin-like ridges while it chills. Once firm, remove the wrap and add a bell pepper stem or pretzel rod on top.

For a more orange look, use a cheddar-heavy filling or press finely shredded cheddar onto the outside. Since this is mostly a shaping idea, keep the flavor familiar and serve it with crackers, pretzels, and vegetables for a seasonal appetizer board.

Holiday Cheese Ball Shapes

If you want the cheese ball to match a holiday or party theme, change the shape without changing the whole recipe. The easiest approach is to keep the same cream cheese base, chill it well, and shape the ball before adding the final coating. That way, the design changes but the flavor stays reliable.

Shape Best Season How to Do It
Pumpkin Halloween or Thanksgiving Wrap, tie with twine or rubber bands, chill, then add a pepper stem or pretzel rod
Christmas wreath Christmas Shape into a ring, chill, then coat with herbs, pecans, and dried cranberries
Ornament Christmas Keep round and use a cranberry-herb coating
Football Game day Shape into an oval, coat with bacon or nuts, then add thin cheese strips as laces
Mini bites Any party Scoop into 1-tablespoon balls and serve with pretzel sticks
Holiday cheese ball shapes guide showing a pumpkin-shaped cheese ball, Christmas wreath cheese ball, ornament cheese ball, football cheese ball, and mini cheese ball bites.
Holiday cheese ball shapes let you use the same base recipe in different party styles. For example, shape it into a pumpkin for fall, a wreath or ornament for Christmas, a football for game day, or mini cheese ball bites for easy serving.

How to Fix a Cheese Ball

Most cheese ball problems are easy to fix before the coating goes on. So, taste and adjust the filling first, then shape, chill, and roll it once the texture is right. If the recipe feels off after the ball is coated, the fix usually gets messier. Use the troubleshooting table as a quick check before the cheese ball goes on the platter.

Problem Why It Happened How to Fix It
Too soft Warm cream cheese, short chill, or wet add-ins Chill longer; if needed, mix in more shredded cheddar
Too firm Too much shredded cheese or very cold serving temperature Let it sit for 15 to 20 minutes before serving
Bland Not enough seasoning Add garlic powder, onion powder, Worcestershire, pepper, herbs, or sharper cheddar
Too salty Bacon, dried beef, ranch seasoning, or everything seasoning Add more cream cheese if possible and serve with unsalted crackers or vegetables
Coating falls off Outside too cold, dry, or loosely pressed Let the cheese ball soften slightly, then press the coating on gently
Nuts, pretzels, or crumbs get soft Coated too far ahead Roll in crunchy coatings closer to serving time
Lumpy filling Cream cheese was too cold Soften fully and beat smooth before adding cheddar
Watery filling Pineapple, pickles, or jalapeños were not drained enough Blot wet add-ins well, chill longer, and mix in more cheddar if needed
Troubleshooting guide for how to fix a cheese ball, showing a cut pecan-coated cheese ball with crackers and tips for fixing a cheese ball that is too soft, too firm, bland, too salty, lumpy, watery, or has coating that falls off.
Most cheese ball problems are easiest to fix before the coating goes on. Taste and adjust the filling first, then chill, shape, and roll it once the texture is right.

More Cheese Appetizers and Party Snacks

If you are building a larger party table, this chilled cheese ball can anchor the cold, creamy side while hot appetizers bring crunch. For more cheese-forward snacks, try MasalaMonk’s mozzarella sticks or Indian-inspired cheese balls. For a broader small-plates spread, add croquettes or build an Indian-inspired tapas night. Together, those options give the table contrast instead of making everything soft, cold, or cheese-heavy.

FAQs

What is a cheese ball made of?

A classic cheese ball is usually made with cream cheese, shredded cheese, seasonings, and an outer coating. In this recipe, cream cheese gives the ball structure, while sharp cheddar, green onion, Worcestershire sauce, garlic powder, onion powder, black pepper, and pecans add flavor and texture.

What cheese is best for a cheese ball?

Because sharp cheddar has strong flavor without making the recipe complicated, it is the best first choice. However, white cheddar, Colby Jack, pepper Jack, smoked gouda, blue cheese, or goat cheese can work if you want the cheese ball to taste milder, smokier, spicier, or tangier.

How long should a cheese ball chill?

At minimum, chill a cheese ball for 1 hour. However, 2 hours is better if you want a cleaner shape and easier coating. If you make it the night before, let it soften for 15 to 20 minutes before serving so crackers do not break as easily.

Can I make a cheese ball the night before?

Yes. For the freshest texture, shape and wrap the cheese ball the night before, then refrigerate it. After that, roll it in the coating closer to serving, especially if the coating includes bacon, pretzels, crackers, or herbs.

Can you freeze a cheese ball?

Yes, but freeze it before adding the coating. That way, the outside tastes fresher after thawing. Wrap the shaped cheese ball tightly, freeze it in a freezer-safe container, thaw it overnight in the refrigerator, and then roll it in a fresh coating before serving.

How long can a cheese ball sit out?

Because it is made with cream cheese and shredded cheese, a cheese ball should not sit out for more than 2 hours at room temperature. If the temperature is above 90°F / 32°C, keep that window to 1 hour. After that, refrigerate safe leftovers promptly or discard anything that has been sitting out too long.

What crackers are best for a cheese ball?

Because the cheese ball firms up in the fridge, sturdy crackers work better than very thin ones. Buttery crackers, wheat crackers, seeded crackers, pretzel crisps, pita chips, crostini, and baguette slices all work well. If the ball is still very firm, let it soften briefly or add a small spreading knife.

Can I make a cheese ball without nuts?

Yes. Instead of pecans or walnuts, use chopped herbs, bacon, crushed pretzels, crushed crackers, everything seasoning, sesame seeds, or toasted breadcrumbs. If allergies are a concern, keep the whole platter nut-free rather than using separate sections of the same board.

Do I need sour cream or mayo in a cheese ball?

No, not for a classic shaped cheese ball recipe. Sour cream and mayo can loosen the mixture, which makes the ball harder to shape. If you are making cheese ball dip, though, a small spoonful can help make the texture softer.

Why is my cheese ball too soft?

A cheese ball is usually too soft because the cream cheese was too warm, the mixture did not chill long enough, or there were too many wet add-ins. First, chill it longer. If it is still too loose, mix in more shredded cheddar before adding the coating.

Can I serve this as cheese ball dip?

Yes. If you want cheese ball dip, use slightly less cheddar for a softer texture, spoon the mixture into a shallow bowl, and add the coating on top instead of shaping it into a ball. This works especially well for casual parties where easy scooping matters more than presentation.

Is this the same as fried cheese balls?

No. This is a chilled cream cheese appetizer served with crackers and vegetables. Fried cheese balls are a different snack style, often made with potato, cheese, breadcrumbs, and frying or baking. So, if you want a hot crispy snack, use a fried cheese ball recipe instead.

Can I make mini cheese ball bites?

Yes. After the cheese mixture chills until firm, scoop it into 1-tablespoon portions, roll each one in coating, and add pretzel sticks right before serving. A full batch usually makes about 36 to 48 mini cheese ball bites.

A classic cheese ball recipe is simple, but the small details make it better. First, soften the cream cheese properly. Then, season the filling before shaping, chill it until firm, and add the coating at the right time. Once the base is right, you can keep it classic with pecans, make it festive with cranberries, turn it bold with bacon ranch, add old-school flavor with dried beef, or serve it as mini cheese ball bites for an easy party platter. In the end, the best version is the one that tastes good, spreads easily, and fits the way you are serving it.

Posted on Leave a comment

Homemade Ketchup Recipe

Thick glossy homemade ketchup in a bowl with a spoon, fresh tomatoes, and tomato paste nearby.

A good homemade ketchup recipe should taste bright, tangy, lightly sweet, deeply tomato-forward, and smooth enough for dipping, spreading, spooning, or squeezing. It should be thicker than tomato sauce, sharper than tomato chutney, and balanced enough for fries, burgers, sandwiches, wraps, pakoras, grilled snacks, and quick dipping sauces. You can also use it as a simple meatloaf glaze or a base for burger sauce.

This homemade tomato ketchup gives you the full fresh tomato method first: ripe tomatoes cooked down with onion, garlic, vinegar, sweetener, salt, mustard, and warm spices until glossy and thick. Then, because real kitchens are not always full of perfect summer tomatoes, you also get a quick tomato paste ketchup recipe, a sugar-free option, texture fixes, storage guidance, and clear canning notes.

In many kitchens, especially in India, this would simply be called a tomato ketchup recipe or homemade tomato sauce. Here, though, the goal is classic ketchup texture: smooth, glossy, thick, tangy-sweet, and easy to dip.

Most importantly, this is a recipe about control. Once you understand the tomato-to-vinegar-to-sweetener balance, you can make ketchup sweeter, tangier, smoother, thicker, spicier, lower in sugar, or closer to bottled ketchup without guessing. That way, the same base can work for fries, burgers, wraps, snacks, and quick sauces without needing a separate recipe every time.

For that reason, the recipe below does not force one version on every kitchen. Instead, it shows you when fresh tomatoes are worth the longer simmer and when tomato paste is the smarter shortcut.

At-a-glance guide summarizing homemade ketchup options, flavor target, texture goal, and storage guidance.
If you want the short version first, this guide shows the key homemade ketchup decisions: which method to choose, how it should taste, and how to store it safely.

Before you start: choose the version based on your tomatoes. If they are ripe and flavorful, use the fresh tomato method. However, if they are watery or bland, use the tomato paste shortcut instead. That way, you get a thick, balanced ketchup without fighting the ingredients.

Quick Answer: The Best Homemade Ketchup Recipe Ratio

Fresh Tomato Ketchup Ratio

To make homemade ketchup with fresh tomatoes, first cook ripe tomatoes with onion and garlic until soft. Next, blend them smooth and strain them for a finer texture. From there, simmer the tomato puree with vinegar, sugar or jaggery, salt, mustard powder, and warm spices until thick and glossy.

Tomato Paste Ketchup Ratio

For a faster version, whisk tomato paste with water, vinegar, sweetener, salt, onion powder, garlic powder, mustard powder, and a tiny pinch of warm spice. Then, simmer it for 5–8 minutes. Compared with the fresh tomato version, tomato paste ketchup is quicker, smoother, and more predictable, although it tastes less seasonal.

As a starting point, use the fresh tomato ratio when flavor matters most and the tomato paste ratio when speed and smoothness matter more.

Version Quick Ratio Best For
Fresh tomato ketchup 1 kg tomatoes + 75–90 ml vinegar + 50–75 g sweetener + 8–10 g salt Ripe summer tomatoes, fresh flavor, and from-scratch ketchup
Tomato paste ketchup 170 g tomato paste + 120–150 ml water + 45 ml vinegar + 20–35 g sweetener Quick ketchup, smooth texture, burgers, fries, and weeknight meals
Ratio guide comparing homemade ketchup made with fresh tomatoes and ketchup made with tomato paste.
Use the fresh tomato ratio when flavor matters most, and the tomato paste ratio when speed, smoothness, and consistency matter more.

That is why this ketchup recipe gives you two practical paths: a fresh tomato version for deeper flavor and a quick tomato paste version for speed.

Because this ketchup recipe is homemade, you can adjust the vinegar, sweetener, salt, and spices near the end instead of being locked into one fixed bottled flavor.

How the Ketchup Should Taste

Flavor target: good ketchup should taste tomato-rich first, then tangy, lightly sweet, salty enough to pop, and only gently spiced. If you can clearly taste cinnamon, clove, or allspice, the warm spice is too strong.

That flexibility is what makes a homemade ketchup recipe useful: the method gives you a starting point, but the final balance comes from tasting and adjusting.

The finished ketchup should taste tomato-rich, tangy-sweet, savory, and gently spiced in the background. When it tastes like plain tomato sauce, it needs more vinegar, sweetener, salt, mustard, or a tiny pinch of warm spice. However, when it tastes like chutney, the warm spices or sweetener are probably too strong.

Which Homemade Ketchup Version Should You Make?

Before you start cooking, decide what problem you are solving. Fresh tomatoes give the best homemade flavor when they are ripe, while tomato paste gives better control when the tomatoes are watery, pale, or out of season.

The easiest way to choose is to look at your tomatoes, your time, and how you plan to store the ketchup. When the tomatoes are ripe and red, fresh tomatoes give the best homemade flavor. On the other hand, when the tomatoes are watery, pale, or out of season, tomato paste gives the fastest, smoothest, most predictable result. If you are reducing sugar, however, the ketchup needs a little more balancing so it still tastes like ketchup instead of plain tomato sauce.

Decision guide showing when to make homemade ketchup with fresh tomatoes and when to use tomato paste.
Fresh tomatoes are best when they are ripe and flavorful, while tomato paste is the smarter shortcut when you want faster, smoother, more predictable ketchup.

In other words, the best homemade version is not always the longest ketchup recipe. It is the version that fits your tomatoes, your time, and the way you want to serve it.

Situation Best Version Why It Works
Ripe summer tomatoes Fresh tomato ketchup This gives the best flavor and the most homemade character.
Watery, pale, or bland tomatoes Tomato paste ketchup The paste gives more predictable color, body, and flavor.
Ketchup needed in about 10 minutes Quick tomato paste ketchup recipe No long reduction is needed.
Lower-sugar ketchup Sugar-free ketchup option This lets you control the sweetener while keeping the sauce balanced.
Pantry-stable jars Tested canning recipe only A flexible fridge ketchup should not be canned casually.

Why This Recipe Works

This recipe works because it treats ketchup as a balance problem, not just a tomato puree. The tomatoes soften first so their flavor turns rounded, the mixture is blended and strained for texture, and the seasoned puree reduces slowly until the vinegar, sweetener, salt, mustard, and spices taste like one glossy sauce.

The fresh tomato version gives deeper homemade flavor, while the tomato paste version gives speed and consistency. Together, they cover both real kitchen situations: good ripe tomatoes and the nights when you need a quick ketchup for fries, burgers, wraps, or snacks. Because both versions use the same sweet-acid-salt logic, you can adjust them in the same way near the end.

Homemade Ketchup Ingredients: Tomatoes, Vinegar, Sugar, Salt and Spices

Ketchup tastes simple, but it depends on balance. Tomatoes give the sauce body, while vinegar adds the sharp tang. Sweetener rounds the acidity, and salt makes the tomato flavor pop. Finally, onion, garlic, mustard, and warm spices turn cooked tomato into ketchup instead of plain tomato sauce.

Because the sauce reduces as it cooks, the balance of vinegar, salt, and sweetener becomes more concentrated near the end. Therefore, it is better to start slightly cautious and adjust after the sauce thickens.

What Is Ketchup Made Of?

Ketchup is usually made from tomatoes or tomato paste, vinegar, sugar or another sweetener, salt, onion, garlic, mustard, and warm spices. The main ingredient is tomato, but the familiar ketchup flavor comes from the balance of tomato, vinegar, sweetness, salt, and spice.

Compared with many bottled ketchup ingredients lists, homemade ketchup gives you more control. You can choose fresh tomatoes or tomato paste, adjust the sugar, use 5% acidity vinegar, control the salt, and keep the spice level gentle.

Ingredients for homemade ketchup including tomatoes, vinegar, sweetener, salt, onion, garlic, mustard powder, and warm spices.
Homemade ketchup gets its classic flavor from balance: tomatoes for body, vinegar for tang, sweetener for roundness, salt for depth, and spices for warmth.

Tomatoes and Vinegar

Tomatoes give the ketchup body, color, and fresh flavor. Meanwhile, vinegar gives the sauce its sharp ketchup tang. For this small-batch fridge version, apple cider vinegar gives a rounder flavor, while white vinegar tastes cleaner and sharper.

Sweetener, Salt and Spices

Sweetener balances tomato acidity, salt sharpens the flavor, and spices make the sauce taste like ketchup instead of plain tomato sauce. In this ketchup recipe, the homemade flavor comes from restraint: mustard powder, cinnamon, and a tiny pinch of clove or allspice are enough. Too much warm spice can push the sauce toward chutney.

Once you understand what each ingredient does, the recipe becomes easier to adjust. The table below shows the fresh tomato amounts first because that version depends most on balance and reduction.

Measurement note: metric weights are more accurate for tomatoes, onion, sweetener, and salt. The US cup and spoon measures are included for convenience, but final yield can vary because tomatoes contain different amounts of water.

Fresh Tomato Ketchup Ingredient Amounts

Ingredient Amount for Fresh Tomato Ketchup Why It Matters
Ripe red tomatoes 1 kg / 2.2 lb Tomatoes form the body, color, and main flavor. Roma, plum, San Marzano-style, or other meaty tomatoes reduce faster and taste richer.
Onion 80–100 g / 3–3.5 oz / 1 small onion Onion builds a savory base and helps the ketchup taste rounded.
Garlic 8–12 g / 2–3 cloves Garlic deepens the flavor. Use less if you want a cleaner bottled-style ketchup.
5% acidity vinegar 75–90 ml / 5–6 tbsp Vinegar gives ketchup its sharp tang. Apple cider vinegar tastes rounder; white vinegar tastes cleaner and sharper.
Sugar, jaggery, or brown sugar 50–75 g / 1.75–2.6 oz / about ¼–⅓ cup packed Sweetener balances tomato acidity and keeps the sauce from tasting like sour tomato puree.
Fine salt 8–10 g / about 1½ tsp Salt sharpens the tomato flavor. Add it carefully because reduction concentrates the sauce.
Mustard powder 1–2 g / ½–1 tsp Mustard powder brings the classic ketchup sharpness without making the sauce taste mustardy.
Cinnamon Pinch to ⅛ tsp A small amount adds warmth. Too much can push the ketchup toward chutney.
Clove or allspice Tiny pinch / 1/16 tsp or less This gives the familiar background spice, but it becomes overpowering quickly.
Cayenne or chili powder Optional, ⅛–¼ tsp Use this for mild heat without turning the ketchup into hot sauce.

How Much Sugar Is in This Homemade Ketchup?

This ketchup recipe uses 50–75 g added sugar, jaggery, or brown sugar for a homemade batch that finishes at about 2–2½ cups. That works out to roughly 1.25–2.3 g added sweetener per tablespoon, depending on your final yield and how much sweetener you use.

For a less sweet ketchup, start with 50 g sweetener and adjust only after the sauce has reduced. Because reduction concentrates flavor, the ketchup may taste sweeter and saltier near the end than it did at the start. Still, do not remove all sweetness unless you want a sharper tomato-sauce-style condiment. Instead, reduce the sweetener gradually and taste again after the ketchup cools.

It is also useful when you want a no-corn-syrup ketchup and prefer to choose the sweetener yourself. For a lighter or more controlled version, homemade ketchup lets you adjust the sugar, salt, and vinegar instead of relying on a fixed bottled formula.

Use 5% acidity vinegar for this recipe, especially when you are also reading the canning section. For regular fridge ketchup, apple cider vinegar, white vinegar, or a mix of the two all work. Apple cider vinegar gives a slightly fruitier ketchup; by contrast, white vinegar gives a cleaner, sharper ketchup.

Important: this flexible recipe is for fridge and freezer storage. If you want shelf-stable canned ketchup, use a tested canning formula and do not casually change vinegar, tomato, onion, vegetable, jar, or processing-time ratios.

Homemade Ketchup Recipe with Fresh Tomatoes

This is the main ketchup-from-scratch version to make when tomatoes are ripe, red, and flavorful. In practice, it starts with 1 kg / 2.2 lb fresh tomatoes and reduces into about 500–600 g / 17.5–21 oz / 2–2½ cups of ketchup, depending on the tomato variety and how thick you cook it.

The method is simple, even though the simmer takes time: soften the tomatoes, blend, strain if needed, season, then reduce until the sauce turns glossy and spoonable.

Step-by-step guide showing how to make homemade ketchup with fresh tomatoes by softening, blending, straining, seasoning, and reducing.
The fresh tomato method is simple: soften the tomatoes, blend them smooth, strain if needed, season, and reduce until the ketchup turns glossy and spoonable.

Best Tomatoes for Homemade Ketchup

The best tomatoes for homemade ketchup are meaty, ripe, and deeply red. For example, Roma, plum, San Marzano-style, and other paste tomatoes are ideal because they have more flesh and less water. Regular round tomatoes also work; however, they usually take longer to reduce. In addition, cherry tomatoes can make a sweet ketchup, although they are often seedier and may need straining.

Homemade ketchup may look slightly darker or softer red than bottled ketchup, especially if you use brown sugar, jaggery, apple cider vinegar, or long cooking. For the brightest color, use ripe red paste tomatoes, white vinegar, white sugar, and gentle heat.

Guide to tomato types for homemade ketchup, including Roma tomatoes, plum tomatoes, San Marzano-style tomatoes, round tomatoes, cherry tomatoes, and pale tomatoes.
Meaty, ripe, deeply red tomatoes make the best homemade ketchup because they reduce faster, taste richer, and give the sauce better color.
Tomato Type How It Works in Ketchup Adjustment
Roma / plum tomatoes Best balance of flesh, flavor, and low water Follow the main formula.
San Marzano-style tomatoes Excellent for smooth, rich ketchup Use the recipe as written.
Regular round tomatoes Good flavor but often watery Give them extra simmering time in a wide pan.
Cherry tomatoes Sweet and bright but more skins/seeds Blend thoroughly, then strain for a smoother finish.
Pale or underripe tomatoes Sharper, less sweet, less red Increase the sweetener slightly or switch to tomato paste.

Step 1: Cook the Tomatoes, Onion, and Garlic

Wash and roughly chop 1 kg / 2.2 lb ripe tomatoes. Then, add them to a wide heavy-bottomed pan with 80–100 g chopped onion and 2–3 garlic cloves. Once everything is in the pan, cover and cook over medium-low heat for 15–20 minutes, until the tomatoes collapse, release their juices, and soften completely.

At this stage, do not add the vinegar, sugar, or salt yet. Starting with just the tomatoes, onion, and garlic lets the vegetables soften evenly before the final reduction.

Step 2: Blend and Strain

After the tomatoes soften, blend the mixture until smooth. An immersion blender is easiest, but a countertop blender gives a finer texture. When using a countertop blender, work in batches and let steam escape safely.

Texture Goal What to Do
Rustic homemade ketchup Blend only, leaving a little skin and seed texture.
Smooth ketchup Pass the blended mixture through a coarse sieve.
Bottled-style ketchup Use a food mill or fine sieve, then blend again after reducing.

For a smoother finish, strain the puree before the final reduction. If you are new to reducing fresh tomatoes, MasalaMonk’s guide to tomato sauce from fresh tomatoes is useful because it explains the food mill method, the no-food-mill path, and why tomato reduction changes texture.

Step 3: Add Vinegar, Sweetener, Salt, and Spices

From there, return the blended and strained tomato puree to the pan. Add:

  • 75–90 ml / 5–6 tbsp 5% acidity vinegar
  • 50–75 g sugar, brown sugar, or jaggery
  • 8–10 g fine salt, or about 1½ tsp
  • ½–1 tsp mustard powder
  • Pinch to ⅛ tsp cinnamon
  • Tiny pinch clove or allspice
  • Optional ⅛–¼ tsp cayenne or chili powder

Start with the lower amount of sugar and vinegar when your tomatoes are already sweet and flavorful. If the tomatoes taste flat, watery, or very acidic, use the higher amount instead. Either way, taste again near the end because the flavor changes as the ketchup reduces.

Step 4: Simmer Until Thick and Glossy

Simmer the ketchup uncovered over low to medium-low heat for 45–70 minutes after blending and seasoning, stirring more often as it thickens. The total cook time is usually 60–90 minutes including the first tomato-softening stage, but watery tomatoes can take longer.

The pan should show small, steady bubbles, not an aggressive boil. Near the end of cooking, the ketchup can catch on the bottom quickly, so use a splatter screen when needed and stir more often as it thickens. Instead of rushing the heat, give the sauce time to reduce slowly; that way, it stays brighter, smoother, and less bitter.

Heat cue: keep the ketchup at a gentle simmer with small, steady bubbles, not a rolling boil. If the sauce spits aggressively, darkens quickly, or sticks to the bottom, lower the heat and stir more often. Gentle reduction gives you brighter flavor, smoother texture, and better color.

Stage Approximate Amount Visual Cue
Fresh chopped tomatoes 1 kg / 2.2 lb Chunky, raw, watery
After softening and blending About 900 ml–1.1 L Loose tomato puree
After straining About 750–950 ml Smoother but still thin
Final ketchup About 500–600 g / 2–2½ cups Glossy, thick, spoonable

Step 5: Test the Thickness

Rather than relying only on time, use the texture as your guide. Because tomatoes vary so much, the exact cook time can shift from batch to batch. Near the end of cooking, check the ketchup with one or more of these doneness tests:

Test What You Should See
Spoon mound test The ketchup should mound slightly on a spoon instead of running off like tomato juice.
Trail test Drag a spatula through the pan; the trail should close slowly, not immediately flood back.
Cold plate test Drop a little ketchup on a chilled plate. After 30 seconds, it should hold shape instead of spreading into a watery puddle.

When in doubt, stop slightly before it looks perfect because ketchup thickens as it cools.

Step 6: Taste and Adjust

Once the ketchup is thick, taste it before you store it. A flat flavor usually needs a little salt first. When the sauce tastes too sweet, add vinegar 1 teaspoon at a time. If the flavor leans too sour, balance it with sweetener in small amounts. When it tastes like plain tomato sauce instead of ketchup, add vinegar, sweetener, salt, mustard, and a very tiny pinch of clove or cinnamon until the flavor tastes rounded.

Do not worry if the ketchup tastes slightly sharp while hot. After cooling, the vinegar softens, the sweetness feels rounder, and the texture becomes thicker.

Step 7: Cool and Store

Before you store it, let the ketchup cool fully. Then, transfer it to a clean glass jar. Refrigerate and use within 2 weeks for best quality, or freeze for longer storage.

For the best flavor, chill the ketchup for at least 2 hours before serving. While it is hot, freshly cooked ketchup can taste sharper than expected. After cooling, the sweetness, acidity, salt, and spices settle into a rounder flavor.

Quick Tomato Paste Ketchup: How to Make Ketchup from Tomato Paste

When fresh tomatoes are weak or you need ketchup quickly, tomato paste is the better starting point. Because it has already been cooked down, this version thickens in minutes, needs less guesswork, and gives you a smoother, more predictable ketchup. It is not as fresh-tasting as the fresh tomato version, but it is much faster.

A standard 6 oz / 170 g can of tomato paste is the easiest starting point for this shortcut. If your paste is very thick or double-concentrated, start with the higher amount of water and adjust after simmering.

Step-by-step guide showing how to make ketchup from tomato paste with water, vinegar, sweetener, salt, onion powder, garlic powder, mustard, and warm spice.
Tomato paste ketchup is the fast route: whisk the ingredients smooth, simmer for a few minutes, cool, and adjust the thickness or tang before serving.
Detail Spec
Yield About 300–350 g / 10.5–12 oz / 1¼–1½ cups
Prep time 3 minutes
Cook time 5–8 minutes
Total time 8–12 minutes
Best for Fries, burgers, sandwiches, dips, and weeknight meals

Tomato Paste Ketchup Ingredients

Ingredient Metric US / Imperial
Tomato paste 170 g 6 oz can
Water 120–150 ml ½–⅔ cup
5% acidity vinegar 45 ml 3 tbsp
Sugar, honey, jaggery, or maple syrup 20–35 g 1½–2½ tbsp
Fine salt 4–5 g About ¾ tsp
Onion powder ½ tsp
Garlic powder ¼–½ tsp
Mustard powder ¼–½ tsp
Cinnamon, clove, or allspice Tiny pinch

How to Make Ketchup from Tomato Paste

  1. Add tomato paste, water, vinegar, sweetener, salt, onion powder, garlic powder, mustard powder, and spices to a small saucepan.
  2. Whisk until the mixture is completely smooth.
  3. Simmer over low heat for 5–8 minutes, stirring often.
  4. If it is too thick, add more water 1 tablespoon at a time.
  5. For more tang, add vinegar 1 teaspoon at a time.
  6. Cool before judging the final thickness.

Best use: tomato paste ketchup is the easiest version for burgers, fries, sandwiches, wraps, and quick mayo-ketchup sauce. It is not as fresh-tasting as the fresh tomato version, but it is smoother and faster.

Sugar-Free, No-Sugar and Keto Homemade Ketchup Option

Classic ketchup needs sweetness to balance tomato acidity. Without any sweetness, the sauce will not taste like familiar bottled ketchup. Instead, it will taste sharper, more acidic, and more like seasoned tomato sauce. However, you still have several good options depending on what “sugar-free” means for you.

This section is for readers looking for ketchup without sugar, no-sugar tomato ketchup, zero-sugar ketchup, or a lower-carb ketchup option. The key point is that ketchup still needs sweetness for balance, so the best sugar-free version uses a low-carb sweetener instead of removing sweetness completely.

Guide comparing no refined sugar, keto low-carb, and no-sweetener options for homemade ketchup.
Ketchup still needs some sweetness for balance, so the best sugar-free version replaces sweetness thoughtfully instead of removing it completely.

Once the basic ketchup tastes balanced, you can lower the sugar more safely. The important thing is to replace sweetness thoughtfully instead of removing it all at once.

Sweetener Options for Sugar-Free Ketchup

Version What to Use Flavor Result
No refined sugar Dates, raisins, apple, jaggery, honey, or maple syrup Still rounded and ketchup-like, but not strictly sugar-free
Keto / low-carb Allulose, monk fruit, or a tiny amount of stevia Closest low-carb option, especially with tomato paste ketchup
No sweetener Skip sweetener Sharper, tangier, more like tomato sauce than ketchup

How to Adjust the Sweetness

In the fresh tomato recipe, replace the 50–75 g sugar with 40–60 g chopped dates or raisins and blend very thoroughly. For keto ketchup, the tomato paste version is easier because it is already thick and consistent. Start with 1–2 tablespoons allulose or monk fruit sweetener, then adjust after simmering.

The best sugar-free ketchup still tastes slightly sweet. If you remove sweetness completely, the sauce becomes tangy tomato sauce, not classic ketchup.

If you are building low-carb burger plates or bowls, this sugar-free ketchup variation fits better than sugary bottled sauces. MasalaMonk’s keto hamburger recipes also explain why ketchup-heavy sauces can become a hidden carb trap.

Fresh Tomato Ketchup vs Tomato Paste Ketchup

Neither version is automatically better. Instead, the right choice depends on your tomatoes and your timing. When tomatoes are ripe and flavorful, fresh tomato ketchup gives the best flavor. By contrast, tomato paste ketchup works better when you want speed, smoothness, and consistency.

In short, the best homemade ketchup recipe for you depends on whether you care more about fresh tomato flavor, speed, smoothness, or consistency.

Need Fresh Tomato Ketchup Tomato Paste Ketchup
Fresh flavor Best when tomatoes are ripe and sweet Good, although less fresh
Speed Slower because it needs reduction Fastest option because paste is already concentrated
Texture Smooth only after careful straining Usually smooth and consistent
Predictability Depends on the tomatoes More predictable because the base is concentrated
Summer tomatoes Ideal choice when tomatoes are in season Useful when fresh tomatoes are weak
Beginner-friendliness Good, although slower Easiest because it skips long reduction
Canning suitability Only with a tested canning recipe Only with a tested canning recipe

How to Make Homemade Ketchup Smooth and Thick

In practice, the two biggest homemade ketchup problems are texture and thickness. Because fresh tomatoes contain a lot of water, ketchup needs reduction. If you stop too early, it tastes like thin tomato sauce. However, if you cook it too hard or too long, it can scorch, darken, or become pasty. Therefore, the goal is slow reduction, not aggressive boiling.

The texture goal is glossy and spoonable, not watery like tomato puree and not stiff like tomato paste.

Texture guide for homemade ketchup showing a spoon mound test, slow-closing trail test, and chilled plate test.
Good homemade ketchup should look glossy, mound slightly on a spoon, leave a slow-closing trail in the pan, and hold shape on a chilled plate.

Use a Wide Pan

A wide pan helps water evaporate faster. By contrast, a tall narrow pot traps steam and makes the ketchup take longer to thicken. For a 1 kg tomato batch, a 26–30 cm / 10–12 inch wide pan is ideal.

Strain for a Smoother Finish

Tomato skins and seeds can make homemade ketchup feel rough. For a smoother finish, blend the softened tomatoes, then pass them through a sieve or food mill before the final reduction.

Reduce Slowly

Keep the ketchup at a gentle simmer. As it thickens, stir more often and scrape the bottom of the pan. The sauce should look glossy, not dry or scorched.

Cool Before Judging Thickness

Hot ketchup looks thinner than cooled ketchup. Therefore, stop when it is slightly looser than your ideal final texture, then let it cool before deciding whether it needs more reduction.

Texture reminder: after cooling, ketchup becomes thicker and smoother. Because of that, stop a little early rather than reducing it until it looks perfect in the hot pan.

How to Fix Homemade Ketchup

Homemade ketchup is easy to adjust when you know what is wrong. First, decide whether the problem is texture, flavor, or color. Then, make small changes and taste again after the ketchup cools slightly on a spoon.

Troubleshooting guide for homemade ketchup showing fixes for ketchup that is too thin, too thick, too sour, too sweet, too salty, bland, spicy, or rough.
Most homemade ketchup problems are easy to fix once you know whether the issue is texture, acidity, sweetness, salt, or spice.

Texture Fixes

Problem Likely Cause Fix
Runny or thin Watery tomatoes or not enough reduction Simmer uncovered in a wide pan until the ketchup thickens and the extra water cooks off.
Stiff or pasty Over-reduced sauce or too much tomato paste Loosen it with water, tomato juice, or vinegar 1 tablespoon at a time.
Rough or seedy Skins or seeds remain Blend longer, then strain through a sieve or food mill for a smoother texture.

Flavor and Color Fixes

Problem Likely Cause Fix
Sharp or sour Too much vinegar or underripe tomatoes Add sugar, jaggery, honey, dates, or raisins in small amounts until the acidity tastes rounded.
Overly sweet Too much sweetener Add vinegar 1 teaspoon at a time. Afterward, add a small pinch of salt or mustard powder if the flavor still feels flat.
Salty or harsh Salt added early or sauce reduced too far Dilute the flavor with unsalted tomato paste, tomato puree, or a little water, then simmer briefly.
Flat or bland Not enough salt, vinegar, or spice Start with salt. Then add vinegar, mustard powder, or warm spice in small amounts.
Too spicy Too much cayenne or chili Round out the heat with tomato paste and a little sweetener.
Brown or dull Overcooking, burning, dark sugar, or dull tomatoes Next time, use ripe red tomatoes, lower the heat, stir more often, and avoid scorching.
Tomato-sauce flavor Missing ketchup’s sweet-acid-spice balance Build ketchup flavor with vinegar, sweetener, salt, mustard powder, and a tiny pinch of clove or cinnamon.

How to Store Homemade Ketchup

After the ketchup tastes right, storage matters as much as flavor. This is especially true for small-batch homemade ketchup because it does not have commercial stabilizers or a tested shelf-stable process.

Store it in a clean glass jar, use a clean spoon, and keep it refrigerated. After serving, return the jar to the fridge rather than leaving it on the counter.

Storage guide for homemade ketchup showing fridge storage, freezer storage, and tested canning safety information.
This small-batch ketchup is best treated as a fridge or freezer condiment unless you follow a tested canning recipe exactly.

Fridge, Freezer and Room Temperature Storage

Storage Method Recommendation
Fridge For best quality, use within 2 weeks.
Freezer For longer storage, freeze for 4–6 months in small portions.
Room temperature Only keep ketchup at room temperature when it has been properly canned with a tested recipe.
After thawing After thawing, stir well; if watery, simmer briefly to bring the texture back.
Jar hygiene Because homemade ketchup has no commercial stabilizers, use clean jars and clean spoons every time.

Can You Can Homemade Ketchup?

Think of this recipe as a fridge ketchup, not a pantry ketchup. You can freeze it safely, but do not treat it like a shelf-stable jarred product unless you follow a tested canning recipe.

For that reason, this flexible MasalaMonk ketchup recipe is not a shelf-stable canning formula.

For canning ketchup, use a tested canning formula from a reliable source such as the National Center for Home Food Preservation tomato ketchup recipe. Do not casually reduce vinegar, increase tomatoes, add extra onion, add extra vegetables, change jar size, change headspace, or shorten processing time.

For context, the NCHFP tomato ketchup formula is a large tested batch using 24 lb ripe tomatoes, 3 cups chopped onions, 3 cups 5% acidity cider vinegar, sugar, salt, and whole spices, with a yield of 6–7 pints. That is a different type of recipe from this flexible small-batch fridge ketchup.

Canning safety note: fridge ketchup is flexible. Canning ketchup is not. For shelf-stable jars, follow a tested recipe exactly, use vinegar with 5% acidity, and process jars according to the tested time for your altitude.

Healthy Canning’s quick ketchup guidance explains the same principle clearly: sweetness, salt, and dry spices are more flexible, but vinegar and low-acid vegetable ratios should not be casually changed in a water-bath canning recipe. If you want a pantry-stable ketchup, use tested canning instructions instead of adapting this small-batch fridge recipe.

Homemade Catsup vs Ketchup: Are They the Same?

Catsup and ketchup usually refer to the same sweet-tangy tomato condiment. “Ketchup” is the dominant modern spelling, but some readers still search for homemade catsup, homemade tomato catsup, or a recipe for tomato catsup.

If you came here looking for catsup, you are in the right place. The spelling changes, but the method is the same: tomatoes are reduced with vinegar, sweetener, salt, mustard, and spices until the sauce becomes thick, glossy, tangy, and balanced.

Close-up of thick glossy homemade ketchup in a bowl with a spoon, with fries in the background.
Homemade ketchup should look smooth, glossy, and spoonable, with enough body to coat fries and burgers without tasting heavy.

Ways to Use Homemade Ketchup

Homemade ketchup is more than a dip for fries. Once you have a jar in the fridge, it becomes a quick base for sauces, glazes, spreads, marinades, and snack plates. For everyday meals, that means one batch can cover burgers, wraps, fries, bowls, and quick dipping sauces.

Guide showing ways to use homemade ketchup with fries, burgers, mayo-ketchup sauce, meatloaf glaze, barbecue sauce, pakoras, wraps, and rice bowls.
A jar of homemade ketchup can do much more than dip fries — it also works in burger sauce, glazes, barbecue-style sauces, and snack platters.
Use How to Use the Ketchup
Fries Pair chilled ketchup with hot crispy homemade French fries.
Burgers Use it on burger buns or fold it into mayo for a creamy burger sauce.
Mayo ketchup sauce Stir 2 parts mayo with 1 part ketchup for a quick fry sauce. MasalaMonk’s homemade mayonnaise guide already covers mayo-ketchup sauce as a useful variation.
Meatloaf glaze Blend ketchup with brown sugar or honey and a splash of vinegar, then brush it over meatloaf.
BBQ sauce base Turn it into a quick barbecue-style sauce with vinegar, brown sugar, smoked paprika, black pepper, and Worcestershire-style seasoning.
Pakoras and snacks Serve it as a tangy-sweet dip when chutney feels too sharp.
Wraps and sandwiches Add a thin layer inside grilled cheese, paneer rolls, tofu wraps, or egg sandwiches.
Rice bowls Spoon it into spicy tomato rice, fried rice-style bowls, or quick sauce bases.

For a fruitier, hotter homemade sauce, try MasalaMonk’s mango habanero sauce. For a sharper fruit-and-mustard dip, try the mango mustard sauce. Both fit naturally into the same homemade sauce and condiment family.

Recipe recap board for homemade ketchup showing fresh tomato and tomato paste versions with a short method summary.
This quick visual recap summarizes both homemade ketchup routes, while the full recipe card below gives the detailed method and ingredient options.

Before you jump to the recipe card: choose the fresh tomato version when tomatoes are ripe and flavorful. However, choose the tomato paste shortcut when you want a faster, smoother, more predictable ketchup. Either way, taste again after cooling because ketchup thickens and mellows in the fridge.

Homemade Ketchup Recipe with Fresh Tomatoes or Tomato Paste

A smooth, tangy homemade ketchup made with ripe fresh tomatoes, vinegar, sweetener, salt, onion, garlic, mustard, and warm spices. This small-batch recipe includes a tomato paste shortcut, sugar-free notes, storage guidance, and texture fixes.

Prep Time15 minutes
Cook Time60–90 minutes
Total Time1 hr 15 min–1 hr 45 min
Yield500–600 g / 2–2½ cups

Equipment

  • Wide heavy-bottomed pan or Dutch oven
  • Immersion blender or countertop blender
  • Sieve or food mill, optional but recommended
  • Spatula
  • Clean glass jar

Ingredients

  • 1 kg / 2.2 lb ripe red tomatoes, roughly chopped
  • 80–100 g / 3–3.5 oz onion, chopped
  • 2–3 garlic cloves, about 8–12 g
  • 75–90 ml / 5–6 tbsp 5% acidity vinegar, apple cider or white vinegar
  • 50–75 g / about ¼–⅓ cup packed brown sugar, jaggery, or sugar
  • 8–10 g fine salt, about 1½ tsp
  • ½–1 tsp mustard powder
  • Pinch to ⅛ tsp ground cinnamon
  • Tiny pinch ground clove or allspice, 1/16 tsp or less
  • Optional: ⅛–¼ tsp cayenne or chili powder
  • Optional: ¼ tsp black pepper

Method

  1. Prep the tomatoes. Wash and roughly chop the tomatoes. Chop the onion and garlic.
  2. Soften. Place the tomatoes, onion, and garlic in a wide pot. Cover and cook over medium-low heat for 15–20 minutes, until the tomatoes collapse and release their juices.
  3. Blend. Blend the mixture until smooth with an immersion blender or countertop blender.
  4. Strain, optional. For smoother ketchup, pass the blended mixture through a sieve or food mill. For rustic ketchup, skip this step.
  5. Season. Return the tomato puree to the pot. Stir in vinegar, sweetener, salt, mustard powder, cinnamon, clove or allspice, and optional cayenne or black pepper.
  6. Reduce. Simmer uncovered over low to medium-low heat for 45–70 minutes. Stir more often as the ketchup thickens so it does not catch on the bottom.
  7. Test. Check that the ketchup mounds slightly on a spoon, leaves a slow-closing trail in the pan, and holds shape on a chilled plate.
  8. Adjust. Taste before storing. Add sweetener if sour, vinegar if sweet, salt if flat, or water if too thick.
  9. Cool and store. Cool the ketchup, transfer it to a clean jar, and refrigerate. Use within 2 weeks for best quality.

Quick Tomato Paste Option

Whisk together 170 g / 6 oz tomato paste, 120–150 ml / ½–⅔ cup water, 45 ml / 3 tbsp vinegar, 20–35 g sweetener, 4–5 g salt, ½ tsp onion powder, ¼–½ tsp garlic powder, ¼–½ tsp mustard powder, and a tiny pinch of cinnamon or clove. Simmer 5–8 minutes, then cool.

Notes

  • For faster thickening and better color, use ripe, meaty tomatoes.
  • A 26–30 cm / 10–12 inch pan works best for a 1 kg tomato batch because it evaporates water faster.
  • Ketchup thickens as it cools, so stop reducing slightly before it looks perfect.
  • For the best flavor, chill the ketchup for at least 2 hours before serving.
  • If you want a smoother bottled-style finish, strain the tomato mixture before the final reduction.
  • If using a countertop blender, blend hot tomatoes in batches and vent the lid so steam can escape safely.
  • Reduction concentrates flavor, so add salt carefully.
  • When doubling the recipe, use a wider pan or expect a longer reduction time. A double batch will not thicken in the same time.
  • For a lower-sugar or sugar-free variation, use allulose, monk fruit, dates, or raisins.
  • This homemade ketchup recipe is flexible for fridge and freezer storage, but it should not be used as a canning formula. For shelf-stable jars, follow a tested canning recipe exactly.

FAQs About Homemade Ketchup

How do I make homemade ketchup from fresh tomatoes?

Fresh tomatoes make excellent homemade ketchup when they are ripe, red, and flavorful. To make it, cook them with onion and garlic, then blend, strain if needed, and reduce with vinegar, sweetener, salt, mustard, and spices until thick.

How do I make ketchup from tomato paste?

Tomato paste ketchup is the fastest version because the tomato base is already concentrated. To make it, whisk tomato paste with water, vinegar, sweetener, salt, onion powder, garlic powder, mustard powder, and a tiny pinch of spice. Then simmer for 5–8 minutes.

Why is my homemade ketchup too thin?

Thin ketchup usually means the tomatoes were watery or the sauce has not reduced enough. To fix it, simmer the ketchup uncovered in a wide pan and stir often as it thickens. The sauce is ready when it mounds slightly on a spoon and holds shape on a chilled plate.

Why does my ketchup taste too sour?

Too much vinegar, underripe tomatoes, or not enough sweetener can make ketchup taste sour. To balance it, gradually add sugar, jaggery, honey, dates, raisins, or a low-carb sweetener until the acidity tastes rounded.

Why does my homemade ketchup taste like tomato sauce?

Your ketchup can taste like tomato sauce when it does not have enough sweet-acid-spice balance. To fix that, add a little vinegar for tang, sweetener for roundness, salt for depth, mustard powder for sharpness, and a tiny pinch of clove, cinnamon, or allspice for classic ketchup flavor. After that, chill it briefly and taste again.

Is homemade ketchup good without sugar?

You can make homemade ketchup without refined sugar, but the flavor changes. For a no-refined-sugar version, use dates, raisins, apple, honey, maple, or jaggery. Meanwhile, keto ketchup works better with allulose, monk fruit, or a very small amount of stevia. Without any sweetener, however, the sauce will taste more like tangy tomato sauce than classic ketchup.

How long does homemade ketchup last?

This small-batch fridge ketchup is best within 2 weeks. For that reason, keep it refrigerated in a clean jar and use a clean spoon. For longer storage, freeze it in small portions for 4–6 months. After thawing, stir before serving.

Does homemade ketchup freeze well?

Freezing works well for homemade ketchup. After cooling, use small containers or ice cube trays. Then, after thawing, stir well. If it separates or turns watery, simmer it briefly to bring the texture back.

Is this homemade ketchup recipe safe for canning?

Do not can this flexible recipe as written. Instead, use it for fridge and freezer storage. For shelf-stable canning, use a tested ketchup canning recipe from a reliable source and follow the vinegar, jar size, headspace, and processing-time instructions exactly.

Is catsup the same as ketchup?

Usually, yes. Catsup and ketchup are alternate names for the same sweet-tangy tomato condiment. Today, ketchup is the more common spelling; however, homemade catsup and homemade tomato catsup usually refer to the same type of recipe.

What makes this a homemade ketchup recipe instead of tomato sauce?

A homemade ketchup recipe uses tomato, vinegar, sweetener, salt, mustard, and warm spices in a tighter balance than tomato sauce. As a result, the finished ketchup tastes tangy-sweet, glossy, concentrated, and dip-friendly.

What is ketchup made of?

Ketchup is usually made from tomatoes, vinegar, sugar or another sweetener, salt, onion or onion powder, garlic or garlic powder, mustard, and warm spices. For homemade ketchup, cinnamon, clove, allspice, or celery seed should stay in the background rather than dominate the sauce. Otherwise, the ketchup can start tasting like chutney instead of a classic dip.

Back to top

Posted on 2 Comments

Crock Pot Pork Chops and Sauerkraut (No Dry Chops Recipe)

Magazine-style cover image for crock pot pork chops and sauerkraut: two bone-in pork chops on a bed of sauerkraut and onions, one sliced to show juicy interior, with a left filmstrip showing “Juicy at 145°F,” crock pot layering (onion → kraut → chops), and a fork bite. Includes a tangy-to-mild dial note: “Rinse = mild • Brine = tangy,” and MasalaMonk.com branding.

There’s something quietly magical about crock pot pork chops and sauerkraut on a slow day. The kitchen smells warm and familiar, the tang settles into something rounder, and dinner feels like it’s been gently cooking in the background of your life—because it has. Even so, if you’ve ever lifted the lid and found pork chops that look perfect but chew dry, you already know the catch: pork chops aren’t one of those “leave it forever and it only gets better” cuts.

That’s exactly why this version is built around two things that actually matter: the chop you choose and when you stop cooking. Once you get those right, everything else becomes straightforward—whether you keep it classic, lean into apples and onions, or go simple and old fashioned with nothing more than onion, pepper, and kraut.

At the same time, you’ll learn how to steer the sauerkraut so it lands where you want it—bright and tangy, mellow and savory, or somewhere comfortably in between—without masking it under sugar. Plus, because pork and sauerkraut is often a meal people come back to for comfort or a New Year’s Day table, you’ll have options that scale beautifully without turning your slow cooker into a pot of boiled pork.

For doneness, we’ll stick to a clear, widely accepted standard: cook the pork to 145°F (63°C) and let it rest briefly, as outlined in the USDA safe temperature chart and echoed in the safe minimum internal temperature guidance at FoodSafety.gov. In other words, we’ll cook with confidence—then stop at exactly the right time.


Why pork chops and sauerkraut in a crock pot sometimes disappoint

A slow cooker is brilliant at turning tougher cuts into tenderness, because collagen has time to soften and melt. However, many pork chops—especially lean loin chops—don’t contain much collagen to begin with. So instead of improving endlessly, they can slide from tender to firm to dry if they sit too long.

On top of that, sauerkraut is a tricky companion. It’s salty, acidic, and wet. Those are not bad things—far from it—but they do change how pork behaves, and they can make the difference between “juicy and savory” and “tight and stringy.”

Infographic for crock pot pork chops and sauerkraut explaining why the dish sometimes turns out dry or disappointing, with four common mistakes: lean chops dry faster, time is not the finish line, too much liquid flattens flavor, and no thermometer check leads to guesswork. Includes a 145°F (63°C) finish reminder.
If crock pot pork chops and sauerkraut has ever come out dry, watery, or inconsistent, this is usually why. This prevention guide breaks down the 4 biggest mistakes—lean chops, over-relying on time, too much liquid, and skipping the thermometer—so you can fix the method before you start cooking. Save this visual, then use the step-by-step method below with LOW heat, early checks, and a 145°F (63°C) finish for tender chops and balanced kraut.

That’s why this method avoids the common trap of treating every chop the same. Rather than setting a long timer and hoping for the best, you’ll start checking earlier based on thickness, then pull at temperature. You’ll also manage the sauerkraut so it supports the pork instead of overwhelming it.

If you like this temperature-first approach, you’ll recognize the same logic used in our oven method for pork—especially the emphasis on stopping at the right moment rather than cooking “until it’s definitely done.” It’s the same idea you’ll see in pork tenderloin in oven, where the goal is juicy meat that slices cleanly without drying out.

Also Read: Keto Mocktails: 10 Low Carb, Sugar Free Recipes


Choosing the best pork chops for crock pot pork chops and sauerkraut

Before you open a jar of kraut, choose your chops. It sounds basic, yet it’s the difference between a meal that feels effortless and a meal you swear you’ll never make again.

Buyer guide infographic for crock pot pork chops and sauerkraut showing three pork chop options—thin boneless, standard chop, and thick bone-in—with notes on which cuts are most forgiving, plus a kraut-friendly chop checklist and a tip to use thicker cuts, early checks, and a 145°F finish for juicy pork chops.
Before you build the crock pot, choose the right chop. This quick buyer guide shows why thickness matters more than almost anything else for crock pot pork chops and sauerkraut—thin boneless chops cook fast and can dry out, while thicker bone-in chops give you a bigger margin for error. Save this visual as your store-side reference, then use the method below (LOW heat + early checks + 145°F / 63°C) for juicy chops.

Bone-in vs boneless for crock pot pork chops and sauerkraut

Bone-in chops are often thicker and slightly more forgiving. They also tend to stay juicier in slow-cooker cooking because they’re less likely to be ultra-lean.

Boneless chops, especially boneless loin chops, can still work beautifully—provided you treat them gently and don’t let them run long. If you’re aiming for a reliable, no-drama dinner, bone-in gives you a little extra cushion. Even so, boneless can be fantastic when you want faster cooking or a cleaner slice.

Thickness matters more than almost everything else

If you take one idea from this entire post, let it be this: thickness changes the timeline.

  • Thin chops (½–¾ inch): cook quickly and can overcook quickly.
  • Standard chops (about 1 inch): the easiest middle ground.
  • Thick chops (1¼–2 inches): the best insurance policy for tenderness.

If you’re using thin chops, you can still win—yet you’ll want to start checking earlier and keep the heat gentle. Meanwhile, thick chops buy you time and keep the odds in your favor.

The “kraut-friendly” chop profile

Pork and sauerkraut is happiest when the pork has at least a little fat or marbling to balance the tang. So, if you have choices:

  • pick chops that are not paper-thin
  • avoid the leanest “extra trimmed” versions when possible
  • lean toward bone-in or thicker cuts

Also Read: Slow Cooker Pork Tenderloin (Crock Pot Recipe) — 3 Easy Ways


Which pork chops stay juiciest with sauerkraut (a quick buyer’s guide)

If you’ve ever had pork chops that came out oddly firm even though they were “done,” the cut is often the reason. Sauerkraut is tangy and salty, so it pairs best with chops that have a little natural richness.

If you can choose, look for chops that fall into one of these categories:

  • Shoulder or sirloin chops: these are usually a bit fattier and more forgiving, which makes them a great match for crock pot pork chops and sauerkraut. They’re the kind of chop that can handle slow heat without turning dry as easily.
  • Rib chops or center-cut bone-in chops: these are often thicker and stay tender well, especially when you pull at temperature.
  • Boneless loin chops: these are lean and can still be delicious, yet they need a shorter cook and earlier checking to avoid that dry, tight bite.

If all you have are lean boneless chops, don’t worry—just treat them gently. Keep the liquid minimal, cook on LOW, and consider the apple-and-onion variation so the dish feels balanced even with a leaner cut.

Also Read: Chicken Pesto Pasta (Easy Base Recipe + Creamy, One-Pot, Baked & More)


Ingredients for pork chops and sauerkraut crock pot style

This dish can be as spare as you want or as layered as you want. Still, the best version is always the one that tastes balanced. The ingredient list below keeps the classic soul while giving you a few optional add-ons that make it feel special without feeling sweet.

Ingredients blueprint infographic for crock pot pork chops and sauerkraut showing the core ingredients and optional upgrades, including pork chops, sauerkraut, onion, black pepper, garlic, apple, caraway, Dijon mustard, bay leaf, and a note to use fermented kraut instead of sweetened salad-style kraut.
This ingredient blueprint for crock pot pork chops and sauerkraut makes the recipe easier to shop and prep: it separates the true essentials (pork chops, sauerkraut, onion, pepper) from the optional upgrades that improve flavor without overcomplicating the pot (apple, caraway, Dijon, bay leaf). Use it as a quick visual checklist before you start, especially if you want a balanced, not-too-sour kraut and juicy chops.

Core ingredients

  • Pork chops (bone-in or boneless; thicker is better)
  • Sauerkraut (fermented kraut, not sweetened salad-style)
  • Onion, sliced (one medium onion is enough)
  • Black pepper
  • Garlic (optional, but lovely)
  • Caraway seeds (optional, classic, and surprisingly impactful)

Optional, highly recommended additions

  • One apple, sliced (for pork and sauerkraut with apples)
  • A small splash of apple juice or broth (only if needed; we’ll keep this measured)
  • Dijon mustard (for a bright finish)
  • A bay leaf (subtle, but it rounds the pot)

If you’re curious about what makes sauerkraut taste the way it does—salt levels, brine, and that sharp-tang backbone—this fermentation resource is genuinely useful: NCHFP’s sauerkraut guide. You don’t need to make homemade kraut for dinner tonight, but understanding the brine helps you adjust flavor with intention.

Also Read: Pork Tenderloin in Oven (Juicy, Easy, 350°F or 400°F) Recipe


Sauerkraut in crockpot: the “tangy vs mild” dial

Different jars and bags of sauerkraut can taste wildly different. Some are bright and briny; others are mellow and soft; a few are downright salty. Rather than guessing, you can steer it.

Different jars of sauerkraut can taste completely different—so don’t guess. Use this tangy vs mild dial to steer your flavor before the pork goes in: brine = tangier, quick rinse + gentle squeeze = milder. If your kraut tastes too salty, rinse and skip extra salt. If it tastes sharp, lean on onion + apple to soften the edges without turning dinner sweet. This one small adjustment makes crock pot pork chops and sauerkraut taste balanced every time.
Sauerkraut in crockpot “tangy vs mild” dial showing brine for tangier flavor and quick rinse + gentle squeeze for milder flavor, plus notes: rinse if salty, add onion and apple if the kraut tastes too sharp.

If you want it bold and tangy

Use sauerkraut with some of its brine. Keep seasoning simple. Then lean on onion and pepper to round it out.

If you want it mild and mellow

Rinse the sauerkraut quickly in a colander, then squeeze it gently. It’ll still taste like kraut—just less sharp. After that, add onion, and consider adding apple for an easy, natural balance.

If your sauerkraut is salty

Rinse and squeeze, then skip adding any extra salt. In fact, pepper and aromatics will often be enough.

If your sauerkraut tastes sharp in a way you don’t love

Add onion and apple. They soften the edges without turning dinner into something sugary. A tiny bit of sweetness is fine; a heavy hand isn’t necessary.

Because many people also cook sauerkraut in a slow cooker as a standalone side, you’ll sometimes see phrases like “sauerkraut in slow cooker” or “sauerkraut in crockpot.” In this dish, though, the sauerkraut isn’t just a side—it becomes the flavor bed that seasons the pork and carries the juices.

Also Read: How to Make a Flax Egg (Recipe & Ratio for Vegan Baking)


Step-by-step: crock pot pork chops & sauerkraut

The method is simple, yet it’s worth doing in a specific order. That way, the bottom of the slow cooker becomes a flavor base and the pork stays tender.

Method card for crock pot pork chops and sauerkraut showing the 145°F (63°C) finish line. A digital instant-read thermometer probes a pork chop from the side into the thickest center, with notes to avoid touching the bone or poking into the hot crock. A thickness timing strip compares thin chops (½–¾ inch, start checking ~2 hours on LOW) vs thick chops (1¼–2 inches, start checking ~3–4 hours on LOW). Bottom note: rest 5 minutes for juicy chops.
Don’t let crock pot pork chops and sauerkraut turn dry—use temperature as your finish line. Thickness changes the timeline (thin chops need earlier checks; thick chops buy you time), and a quick side-angle thermometer probe into the thickest center keeps you from overshooting. Aim for 145°F (63°C), then rest 5 minutes so the juices stay in the meat—not on the plate. This one habit is the difference between ‘perfect’ and ‘overcooked.’

Step 1: Build the base

Scatter sliced onions across the bottom of your slow cooker. Then add the sauerkraut on top of the onions. This matters more than it seems because onions release moisture and sweetness, which helps the kraut mellow out as it cooks.

If you’re using apple, tuck slices through the kraut so they soften gently and perfume the pot. If you place apples directly on top, they can over-soften and feel like a separate layer. When they’re nestled in, they disappear in the best way—like you can taste the balance, but you don’t feel like you’re eating fruit for dinner.

Step 1 method card for crock pot pork chops and sauerkraut showing how to build the base in a slow cooker: sliced onions on the bottom, sauerkraut layered on top, and optional apple slices tucked into the kraut to soften tang without making the dish sweet.
Step 1: Build the flavor bed for crock pot pork chops and sauerkraut — onions go on the bottom, sauerkraut goes on top, and apple slices (optional) get tucked into the kraut to mellow sharpness without turning the dish sweet. This one layering move helps the kraut cook softer and more balanced while protecting the chops from sitting too deep in liquid. Save this step card, then read the full method here in this blog post.

Step 2: Season the pork chops

Season pork chops with black pepper. Add garlic powder if you like. Caraway is optional; if you love the deli-style character of sauerkraut dishes, you’ll appreciate it.

Go light on salt. In most cases, the sauerkraut brings enough salinity on its own.

Step 2 method card for crock pot pork chops and sauerkraut showing two raw pork chops on a tray seasoned with black pepper, with optional garlic powder and caraway, and a reminder to go light on salt because sauerkraut is already salty.
Step 2: Season the pork chops for crock pot pork chops and sauerkraut — use black pepper as the main seasoning, add garlic powder and caraway if you like that classic deli-style kraut flavor, and go light on salt since sauerkraut already brings plenty of salinity. This small step keeps the final dish balanced instead of overly salty. Save this method card and read the full recipe here in this post.

Step 3: Decide whether to sear

Searing is not required. Still, it adds depth and a richer pork flavor. If you have time, sear the chops quickly in a hot skillet for 60–90 seconds per side.

If you don’t have time, skip it. The dish will still be comforting and delicious. Nevertheless, searing can be the difference between “soft-cooked” and “deeper, roastier flavor.” Both are good; pick what suits your day.

Step 3 method card for crock pot pork chops and sauerkraut showing a side-by-side sear vs no sear comparison. Left panel shows a browned pork chop in a skillet labeled sear optional for deeper roastier flavor. Right panel shows seasoned raw pork chops ready for the slow cooker labeled no sear also fine. The graphic explains that searing adds flavor depth, not tenderness, and reminds cooks to use LOW heat and pull at 145°F (63°C).
Step 3 in our crock pot pork chops and sauerkraut method: decide whether to sear. This visual shows the real tradeoff clearly—searing is optional and adds deeper, roastier flavor, but skipping it still gives you a cozy, delicious result. The key is what stays the same: cook on LOW, check early, and pull at 145°F (63°C) so the chops stay juicy. Save this step card for the next time you make pork chops and sauerkraut in the slow cooker, and read the full recipe + timing guide on MasalaMonk.

Step 4: Place the chops on top

Lay the pork chops on top of the sauerkraut mixture. Keeping them above the densest part of the kraut helps them cook more evenly and keeps the pork from sitting too deep in liquid.

At this point, you’ll see some recipes that add lots of water or broth. Instead, we’ll use a measured approach.

Infographic for crock pot pork chops and sauerkraut step 4, showing two seasoned pork chops placed on top of a sauerkraut and onion bed in a slow cooker, with optional apple slices tucked into the kraut and notes explaining why keeping chops above the kraut helps even cooking and prevents a watery texture.
Step 4 of crock pot pork chops and sauerkraut: place the pork chops on top of the kraut and onion bed (not buried in liquid). This simple placement helps the chops cook more evenly, keeps the texture tender, and lets the sauerkraut season the pork without turning it watery. Optional apple slices can be tucked into the kraut for balance. Save this step-by-step method card for your next pork and sauerkraut slow cooker dinner, and follow the full recipe in this blog post.

Step 5: Use the liquid rule

Here’s the clean rule: add only what you need.

  • If the sauerkraut looks juicy and you have onions underneath, you may not need any additional liquid.
  • If the kraut looks dry, add ¼ cup broth or apple juice.
  • If you’re worried your slow cooker runs hot or you’ve seen scorching before, you can go up to ½ cup—yet try not to exceed that unless you truly need to.

More liquid isn’t automatically better. Too much can flatten the flavor and leave you with watery kraut.

Step 5 (the liquid rule) is where a lot of crock pot pork chops and sauerkraut recipes go wrong. This method card shows exactly how much liquid to add based on what your kraut looks like: none if it’s already juicy, 1/4 cup if it looks dry, and 1/2 cup max only if your slow cooker runs hot. Keeping the pot moist—not flooded—helps prevent watery sauerkraut and protects flavor. Read the full recipe for the complete step-by-step method, timing, and temperature guide (145°F finish line), then save this to Pinterest so you can use it while cooking.

Step 6: Cook low and stop at the right time

Cover the slow cooker and cook on LOW. While timing varies by slow cooker, chop thickness and whether they’re bone-in, you can use these checkpoints as your guide.

  • Thin chops (½–¾ inch): start checking around 2 hours on LOW
  • About 1 inch: start checking around 2½–3 hours on LOW
  • Thick chops (1¼–2 inches): start checking around 3–4 hours on LOW

When the thickest part hits 145°F (63°C), pull them and rest briefly. The safe temperature guidance is supported in the embedded resources: USDA safe temperature chart and FoodSafety.gov’s safe minimum internal temperature chart.

From here, let the chops rest a few minutes before serving. That short pause helps the juices settle so the pork feels tender and moist.

Step 6 method card for crock pot pork chops and sauerkraut showing pork chops on a sauerkraut and onion bed in a slow cooker, with timing checkpoints by chop thickness: thin chops start checking around 2 hours on LOW, standard chops around 2.5 to 3 hours, and thick chops around 3 to 4 hours. The card emphasizes cooking on LOW, checking early, and finishing at 145°F (63°C) with a 5-minute rest to keep pork chops juicy.
Step 6 is the part that saves this dish: cook on LOW, start checking early, and use chop thickness as your timeline. Thin pork chops finish much faster than thick ones, so this quick timing guide helps you avoid dry, overcooked meat in your crock pot pork chops and sauerkraut. Save this chart for your next slow cooker dinner, and pin/share it if you want an easy visual reminder while cooking.

How to check doneness so you don’t overcook the pork chops in crock pot

When you’re cooking pork chops with kraut, the simplest way to keep them tender is to check the thickest part of the chop—not near the bone and not poking straight through into the hot crock.

Angle the thermometer into the center from the side, aiming for the thickest spot. Once it reads 145°F (63°C, then a brief rest), you’re done. If the chop is bone-in, keep the tip slightly away from the bone, because the bone can give a misleading reading.

How to check doneness for crock pot pork chops and sauerkraut using an instant-read thermometer. The graphic shows the correct way to probe a pork chop from the side into the thickest center, plus two common mistakes to avoid: touching the bone and reading near the edge or hot crock. It highlights the safe finish line of 145°F (63°C) with a short rest for juicy pork chops.
Don’t guess doneness—probe the thickest center of the pork chop and finish at 145°F (63°C), then rest briefly for juicy results. This quick guide shows the correct thermometer angle (from the side) and the most common mistakes that cause bad readings, like touching the bone or checking too close to the edge/hot crock. If your crock pot pork chops and sauerkraut have ever turned dry, this is the one technique that fixes it. Save this guide, pin it for later, and read the full MasalaMonk recipe for timings, layering, and the tangy-vs-mild sauerkraut method.

Also, try to start checking a little earlier than you think you need to. It’s easy to cook longer; it’s impossible to “uncook” a chop that’s gone a little too far.

Also Read: Croquettes Recipe: One Master Method + 10 Popular Variations


Pork chop sauerkraut crock pot timing: what actually changes the result

You’ll see wildly different cook times for pork chops and sauerkraut in a slow cooker. Some versions run 6–8 hours and swear it’s “tender.” Others keep it shorter and insist longer is a mistake. The truth sits in the middle because different chops behave differently.

Why do some crock pot pork chops and sauerkraut recipes say 3 hours while others say 8? This visual breaks down the real factors: chop thickness, bone-in vs boneless cuts, slow cooker heat differences, and why LOW gives better control. Use the clock as a checkpoint, then finish by internal temperature (145°F / 63°C) for juicy pork chops instead of dry ones. Save this guide, pin it for later, and click through to the full MasalaMonk recipe for the complete step-by-step method, timing checkpoints, and doneness tips.
Why do some crock pot pork chops and sauerkraut recipes say 3 hours while others say 8? This visual breaks down the real factors: chop thickness, bone-in vs boneless cuts, slow cooker heat differences, and why LOW gives better control. Use the clock as a checkpoint, then finish by internal temperature (145°F / 63°C) for juicy pork chops instead of dry ones. Save this guide, pin it for later, and follow full recipe for the complete step-by-step method, timing checkpoints, and doneness tips.

Why thin pork chops don’t want a long cook in crock pot

Lean, thin chops can cook through quickly. If they keep going, they tighten, then dry out. So, for thin chops, shorter is almost always safer.

Why thick pork chops can handle more time in crock pot

Thicker chops have more thermal buffer. They don’t spike in temperature as quickly, and they’re often slightly fattier. That buys you time and makes them more forgiving.

Why bone-in chops feel different

Bone-in chops usually cook more gently and stay juicier. They can still dry out if ignored all day, yet they’re more forgiving than thin boneless chops.

Why LOW is the safer setting here

HIGH can push the outside of pork chops past the ideal point before the center is ready, especially in small slow cookers. LOW gives you a gentler climb and a more consistent result. Even if you’re in a rush, LOW plus earlier checking tends to produce a better bite than blasting it and hoping.

Also Read: Ravioli Recipe Reinvented: 5 Indian-Inspired Twists on the Italian Classic


Why some recipes say 3 hours and others say 8 hours (and both can be “right”)

It’s confusing when one version of pork chop and sauerkraut slow cooker dinner says to cook for three hours, while another insists on eight. The difference usually isn’t the sauerkraut—it’s the chop and the slow cooker itself.

Infographic for crock pot pork chops and sauerkraut explaining why some recipes say 3 hours and others say 8 hours. The card compares thin lean chops vs thicker bone-in chops, smaller vs larger slow cookers, and different recipe goals, then reinforces that time is a checkpoint and the finish line is 145°F (63°C).
Why do some crock pot pork chops and sauerkraut recipes finish in 3 hours while others take 8? This visual breaks it down: chop thickness, bone-in vs boneless, slow cooker heat behavior, and recipe goals all change the timeline. The key rule stays the same—use time as a checkpoint, then finish by internal temperature (145°F / 63°C) for juicy pork chops. Save this guide for the next time you make pork chops and kraut, and bookmark this post for the full method, timing checkpoints, and doneness tips.

First, pork chops vary wildly in thickness and leanness. A thin boneless loin chop can be cooked through quickly, then spend the rest of the time drying out. Meanwhile, a thicker bone-in chop might still feel tender after a longer cook because it warms more slowly and has a little more fat to cushion the texture.

Second, slow cookers don’t run at the same heat. Some “LOW” settings run surprisingly hot, especially smaller units that fill up quickly. On the other hand, a large slow cooker that’s only half full can heat more slowly and take longer to reach the same internal temperature.

Finally, some recipes are written around a different goal. Long cook times often assume you’re cooking a fattier cut until it’s very soft, then serving it as a fall-apart comfort dish. Pork chops don’t always benefit from that approach, so if you want juicy chops that still feel like chops, you’re better off checking early and stopping at the right internal temperature instead of riding the clock.

Also Read: Fish and Chips Reimagined: 5 Indian Twists (Recipe + Method)


Crock pot pork chops and kraut: three variations that still taste classic

One of the joys of pork and sauerkraut is how easily it adapts. With only a few small changes, you can make it feel like a different dinner—yet it will still be the same comforting dish at heart.

Not sure which flavor direction to choose? This quick visual guide shows 3 classic ways to make crock pot pork chops and sauerkraut: a traditional deli-style version, an apple + onion version for a softer tang, and a mustard finish for a brighter savory finish. All three use the same base method, so you can pick the version that fits your mood (or what you have on hand). Save this card before you cook, and pin it for later so you can try all three.

1) Old fashioned pork and sauerkraut, classic style

This is the version you make when you want that traditional taste without extra sweetness.

  • Onion
  • Sauerkraut (rinsed or not, depending on your dial)
  • Caraway seeds (optional but classic)
  • Black pepper

If you want to amplify the aroma, add a bay leaf. It doesn’t scream “bay leaf,” but it smooths everything out.

2) Crock Pot Pork Chops & sauerkraut with apples (balanced, not sugary)

This variation is subtle and cozy, not dessert-like.

Add one sliced apple and keep everything else the same. If your sauerkraut is extremely sharp, you can add a teaspoon of brown sugar, but keep it restrained. The apple already does the job.

This apple-forward style also pairs beautifully with mashed potatoes or a potato salad side.

3) Mustard finish (bright and savory crock pot pork chops)

For a tangy-savory finish, stir a spoon of Dijon mustard into a small amount of hot cooking liquid, then spoon it over the chops at serving.

This works particularly well when you’ve rinsed the kraut to keep it mild. The mustard adds lift without making the dish heavy.

If you like sauces that bring freshness to rich food, an herb-forward option like chimichurri can also be a fun contrast, especially if you’re serving the pork chops with starchy sides that appreciate a bright accent.

Also Read: Sourdough Recipe: 10 Easy Bread Bakes (Loaves, Rolls & Bagels)


Crock pot pork chops & sauerkraut: serving ideas that make it feel like a full meal

Pork chops with kraut can be satisfying on its own, yet it shines even more when you pair it with the right side. Because the main dish is tangy and savory, sides that absorb juices or offer clean contrast work best.

Not sure what to serve with crock pot pork chops and sauerkraut? This pairing guide shows 3 easy ways to plate it: creamy mashed potatoes (classic comfort), potato salad (bright and traditional), or crispy croquettes (great for a leftover upgrade). Same pork + kraut base, three completely different dinner vibes. Save this for meal planning, and click through for the full recipe, timing, and doneness guide on MasalaMonk.com.

Classic comfort with Crock pot pork chops: mashed potatoes

If you want that “Sunday dinner” feeling, mashed potatoes are the obvious choice. They soak up the juices and soften the acidity.

A creamy mash option like perfect mashed potatoes turns the plate into something you’ll want to eat slowly.

Bright and traditional: potato salad with Crock pot pork chops

German-style potato salad and sauerkraut are old friends. It’s a natural pairing, especially if you want something that feels traditional but not heavy.

A collection like potato salad recipes gives you room to choose—creamy, vinegar-based, herby—depending on whether your kraut is tangy or mild.

Crispy leftover upgrade: croquettes

If you end up with leftover mash, don’t just reheat it and call it a day. Turn it into something crunchy and satisfying. Croquettes are especially good next to leftover pork and kraut because you get creamy inside, crisp outside, and tangy-salty alongside.

Build a weeknight rotation

If this dinner hits the spot and you want more slow cooker ideas that feel similarly low effort, keep the momentum going with crock pot chicken breast recipes. Different protein, same “dinner cooks itself” energy.

Also Read: Sweetened Condensed Milk Fudge: 10 Easy Recipes


Simple pork and sauerkraut recipe: quick fixes when something feels off

Even a great crock pot pork chops and sauerkraut setup can vary slightly depending on the slow cooker and the chops. So if dinner isn’t landing perfectly, these quick adjustments usually solve it.

Troubleshooting infographic for crock pot pork chops and sauerkraut showing quick fixes for dry chops, tough chops, sour kraut, salty kraut, watery kraut, and flat flavor, with simple rescue tips like checking temperature, adding juices, rinsing sauerkraut, reducing liquid, and finishing with Dijon or pepper.
Made crock pot pork chops and sauerkraut and something tastes “off”? This quick-fixes guide helps you troubleshoot the most common issues fast—dry pork chops, tough texture, kraut that’s too sour or salty, watery kraut, or flat flavor. Use it as a save-worthy reference while cooking, then finish by temperature (145°F) instead of guessing. Full recipe, timing tips, and doneness guidance on MasalaMonk.com — save this pin, share it, and come back when you need a fast fix.

If the pork chops are dry

Dry almost always means they went too long or the chops were too lean for the cook time. Next time, start checking earlier and pull at temperature. For tonight, slice the chops and spoon more of the warm kraut and juices over them, then serve with something that absorbs moisture—mashed potatoes are perfect for that.

If the pork chops cooked in crock pot are tough

“Tough” can mean two different things, so take a quick temperature reading:

  • If they’re under 145°F, they simply need more time—keep cooking in short bursts and re-check.
  • If they’re already past it and still feel tough, they’re likely lean chops that tightened from cooking too long. In that case, serve with extra juices, and plan a shorter cook next time.

If the sauerkraut is too sour

Next time, rinse the kraut quickly and squeeze it. For now, add apple slices (even late), let them warm through, and lean on onion and pepper to round it out.

If the sauerkraut is too salty

Rinse the kraut next time and skip added salt altogether. For tonight, add extra onion (or a few apple slices) to soften the salty edge.

If the sauerkraut is watery

Remove the chops, then reduce the kraut and liquid briefly until it tastes concentrated again. Even a short simmer makes the flavor feel fuller and less diluted.

If the flavor tastes flat

A spoon of mustard stirred into a little hot cooking liquid, extra black pepper, or a bright finish like an herb sauce can wake everything up without changing the dish into something else.

Also Read: Chicken Adobo — Step-by-Step Recipe — Classic Filipino Adobong Manok


Crock pot pork loin & sauerkraut vs pork chops (a quick comparison)

Once you get comfortable with pork chops and sauerkraut in a slow cooker, it’s natural to wonder how this changes with other cuts—especially pork roast, pork loin, or tenderloin.

Cut comparison infographic for crock pot pork chops and sauerkraut showing how pork chops, pork loin or tenderloin, and pork shoulder or butt behave differently in a slow cooker. The guide explains which cuts are best for juicy slices vs shreddable texture and emphasizes that chops and loin should be cooked to doneness while shoulder is cooked to texture.
Not all pork cuts behave the same in a slow cooker—and this quick guide makes the difference clear. For crock pot pork chops and sauerkraut, pork chops and loin/tenderloin are best cooked to doneness, while pork shoulder/butt is cooked to texture for shreddable results. Use this visual to choose the right cut for the result you want before you start, then follow the timing and temperature guidance in the post so the pork stays juicy instead of overcooked.
  • Pork loin and tenderloin are leaner and more sensitive to overcooking, much like chops. The “stop at the right temp” approach matters even more.
  • Pork shoulder or pork butt has more collagen and fat, so it behaves differently. It can handle longer cooking and becomes shreddable.

If you want to explore pork in other formats, the same “cook to temp” idea plays out in a different way in pork tenderloin in oven. Meanwhile, if you want a slow cooker pork method that’s built for tenderness and easy slicing, slow cooker pork tenderloin gives you a parallel approach that’s designed to stay juicy rather than stringy.

Also Read: How to make No-Bake Banana Pudding: No Oven Required Recipe


Pork and sauerkraut meal: making it feel special without making it complicated

Sometimes you want this dish to feel like more than a Tuesday dinner. Fortunately, the same ingredients can feel elevated with a few small touches.

Infographic for crock pot pork chops and sauerkraut showing how to make the meal feel special without extra work: build a flavor bed with onion, garlic, caraway, and optional apple, finish with Dijon and herbs, and plate with mashed potatoes, sauerkraut, pork chops, and pan juices.
Want your crock pot pork chops and sauerkraut to feel a little more special without making the recipe harder? This visual shows 3 easy upgrades that change the final result: build a better flavor bed (onion, garlic, caraway, optional apple), add a quick bright finish (Dijon-in-juices + herbs), and plate it with intention (mash → kraut → chop → juices). Same slow-cooker method, but a much more “planned” dinner feel. Save this for the next time you make pork and kraut, and use it alongside the full MasalaMonk recipe for timing, doneness, and troubleshooting.

Add a “flavor bed” moment

Instead of just onion and kraut, add:

  • onion
  • a few smashed garlic cloves
  • a pinch of caraway
  • optional apple slices

It still looks simple, but it tastes layered.

Finish Crock Pot Pork Chops with something fresh

A bright finish helps tangy foods feel vibrant rather than heavy. Even a spoon of mustard stirred into juices counts. Alternatively, a fresh herb sauce can be fun—something like chimichurri adds a clean, lively note when you want contrast.

Serve it in a way that feels intentional

Instead of just scooping everything into a bowl, plate it:

  • a bed of mashed potatoes
  • a mound of sauerkraut and onions
  • chops on top
  • a final spoon of reduced juices

It looks like you cared, even though the slow cooker did most of the work.

Also Read: Mozzarella Sticks Recipe (Air Fryer, Oven, or Fried): String Cheese, Shredded Cheese, and Every Crunchy Variation


Sauerkraut and pork chops in oven vs crock pot (when to choose which)

Slow cooker pork chops & sauerkraut is comfort-forward and forgiving when you manage time. The oven version tends to give more browning and a roasted character. If you crave caramelized edges, the oven is often the better fit. If you want hands-off cooking and mellowed kraut, the crock pot wins.

Comparison infographic for pork chops and sauerkraut showing oven vs crock pot cooking methods. The image compares flavor, texture, effort, and best use, with oven results labeled roastier and more browned, and crock pot results labeled mellow and hands-off. Includes a reminder to finish both methods at 145°F (63°C).
Not sure whether to make pork chops and sauerkraut in the oven or crock pot? This side-by-side comparison shows the difference in flavor, texture, effort, and best use so you can choose the version that fits your day: oven for more browning and roastier flavor, or crock pot for a hands-off, mellow finish. Either way, the same rule protects the pork from drying out—finish at 145°F (63°C) and rest briefly.

Still, the same doneness principle holds. Whether you cook pork in the oven or slow cooker, stopping at the right internal temperature is what protects the meat from drying out. That’s also why the safety guidance is helpful: FoodSafety.gov’s safe minimum internal temperature chart and the USDA safe temperature chart give you a clear, consistent endpoint.

Also Read: Crock Pot Chicken Breast Recipes: 10 Easy Slow Cooker Dinners (Juicy Every Time)


Recipe recap: crock pot pork chops and kraut, the reliable way

To make this feel simple again, here’s the flow you can keep in your head:

  1. Onion on the bottom
  2. Sauerkraut on top (rinsed or not, depending on how tangy you want it)
  3. Optional apple slices tucked in
  4. Pork chops on top
  5. Minimal liquid (none, ¼ cup, or ½ cup max)
  6. Cook on LOW, start checking early based on thickness
  7. Pull at 145°F, rest a few minutes, serve with the juices
Step-by-step infographic for crock pot pork chops and sauerkraut showing the reliable cooking flow: onion on the bottom, sauerkraut on top, optional apple and seasonings, pork chops placed on top, minimal liquid, cook on LOW and check early, then pull at 145°F (63°C) and rest. Includes a thickness timing reminder and thermometer finish-line note.
This reliable flow guide for crock pot pork chops and sauerkraut turns the whole method into one quick visual: layer onions, add kraut, tuck in optional upgrades, place the chops on top, use minimal liquid, cook on LOW, and finish at 145°F (63°C). It’s the save-and-cook version of the recipe recap, with a thickness reminder so you know when to start checking early. Save it now, then use the full post for timing details, variations, and troubleshooting.

That’s it. Everything else is seasoning and personality.

Also Read: Eggless Yorkshire Pudding (No Milk) Recipe


Storing and reheating crock pot pork chops & sauerkraut

Pork chops can reheat beautifully if you keep it gentle. Since sauerkraut holds moisture, storing the chops with the kraut actually helps.

Infographic showing how to store and reheat crock pot pork chops and sauerkraut without drying out the pork, including storing pork with sauerkraut and juices, gentle skillet reheating with a splash of broth, and microwave reheating in short bursts on medium power.
Leftovers don’t have to turn dry. This quick guide shows the best way to store and reheat crock pot pork chops & sauerkraut: keep the pork with the kraut and juices, then reheat gently (covered skillet or short microwave bursts) so the chops stay tender. Save this for leftover night, and bookmark for full recipe, timing tips, and doneness guide on MasalaMonk.com. Pin it, share it, and keep it handy the next time you make a batch.
  • Cool leftovers, then store pork and kraut together in an airtight container.
  • Reheat slowly: a covered skillet with a splash of water or broth works well.
  • If microwaving, use medium power and shorter bursts so the pork warms without tightening.

The next day, this dish often tastes even better because the flavors settle.

If you’re building a comfort-food rotation, keep a few slow cooker staples in your back pocket too. On a different day, something like whole chicken in crock pot gives you the same ease with a different flavor payoff, and it fits naturally into the same kind of weeknight schedule.

Also Read: Garlic & Paprika Cabbage Rolls (Keto-Friendly Recipes) – 5 Bold Savory Twists


A gentle New Year’s nod (without turning this into a holiday-only dinner)

Pork and sauerkraut has a well-known New Year’s Day tradition in many households, and it’s easy to see why: it’s hearty, it serves a crowd, and it tastes like something you’d make on purpose. Even if you’re not cooking it for a New Year’s pork recipe moment, the same idea still applies—this is a meal that feels lucky because it’s reliable.

Infographic titled “Crock Pot Pork Chops & Sauerkraut New Year’s Crowd Guide” showing tips for scaling the recipe for a holiday meal: choose thicker bone-in chops, layer onions and sauerkraut (with optional apples), keep liquid minimal, cook by temperature not time, and finish pork at 145°F (63°C) with a short rest. Includes serving ideas like mashed potatoes, potato salad, and rye bread.
Making crock pot pork chops and sauerkraut for New Year’s or a bigger family dinner? This crowd guide keeps the method simple: choose thicker chops (bone-in if possible), scale the onion + sauerkraut flavor bed, keep extra liquid minimal, and cook to temperature (145°F / 63°C) instead of relying on the clock. It’s the easiest way to keep the pork juicy and the kraut flavorful when cooking for a group. Save this guide for holiday planning, and use the full recipe below for step-by-step timing, layering, and doneness tips.

If you want to lean into that tradition, you can make it “holiday-ready” by scaling up, choosing thicker chops, and adding apples and onions for extra depth. Then serve it with mashed potatoes or potato salad and let the table do the rest.

Also Read: 10 Low Carb Chia Pudding Recipes for Weight Loss (Keto, High-Protein, Dairy-Free)


Final thoughts

Crock pot pork chops and sauerkraut doesn’t need to be a gamble. Once you treat chop thickness as the timeline and temperature as the finish line, the dish becomes what it was always meant to be: comforting, hands-off, and surprisingly satisfying.

Closing recap infographic for crock pot pork chops and sauerkraut showing a plated pork chop and kraut dish plus 5 key steps: choose thicker chops, build onion and sauerkraut base, use minimal liquid, cook on LOW and check early, and finish at 145°F (63°C) with a short rest.
Save this recap before you cook: this closing guide for crock pot pork chops and sauerkraut sums up the full method in one glance—choose the right chop, build the onion + kraut base, keep liquid minimal, cook on LOW, and finish at 145°F (63°C) with a short rest. It’s the quick-reference version of the recipe for juicy pork chops and balanced sauerkraut every time. Pin it, save it, and use it while cooking.

Start simple, learn your sauerkraut dial, and keep your liquid minimal. Then, as you get comfortable, play with apples, mustard, or caraway until the flavor lands exactly where you want it. After all, the best version is the one you’ll actually want to make again.

And if you’re in the mood to keep building your slow cooker rotation, you’ll find plenty of weeknight-friendly ideas in crock pot chicken breast recipes, plus pork technique continuity through slow cooker pork tenderloin and pork tenderloin in oven.

Also Read: How to Cook Tortellini (Fresh, Frozen, Dried) + Easy Dinner Ideas


FAQs

1) Can I make crock pot pork chops and sauerkraut without searing the chops first?

Yes. Searing adds deeper flavor and a nicer “roasty” note, yet it isn’t required for tender results. If you skip it, focus on good seasoning, smart layering, and stopping the cook once the chops hit the right internal temperature.

2) What are the best pork chops for pork chop and sauerkraut slow cooker recipes?

Thicker chops usually win. Bone-in chops tend to stay juicier, while very lean boneless loin chops can dry out if they run too long. If you’re choosing at the store, look for chops that are at least about an inch thick for more forgiveness.

3) How long do pork chops and sauerkraut in a slow cooker usually take?

It depends on thickness, whether they’re bone-in, and how hot your slow cooker runs. In general, thinner chops finish sooner, while thicker chops take longer. Rather than relying on a single fixed time, start checking earlier than you think you need to and pull when the chops are done.

4) Can I cook pork chops and sauerkraut on HIGH instead of LOW?

You can, although LOW is more reliable for tender pork chops with kraut. HIGH can push the outside of lean chops too far before the center settles, which increases the chance of dryness. If you must use HIGH, check sooner and don’t let the chops coast once they’re done.

5) Should sauerkraut go on the bottom or the top in crock pot pork chops and sauerkraut?

Typically, sauerkraut works best on the bottom with onions underneath, then pork chops on top. This setup lets the kraut mellow as it cooks while the chops heat more evenly, instead of sitting submerged in liquid.

6) Do I drain sauerkraut for a sauerkraut crock pot recipe, or use the brine?

Either works—choose based on flavor. Using some brine makes the dish tangier. Draining keeps it more moderate. If your kraut is very salty or sharp, rinsing and squeezing it lightly can make the final pork and sauerkraut meal taste smoother.

7) How do I make crock pot pork and kraut taste less sour?

First, rinse the sauerkraut quickly and squeeze it. Next, add onions, and consider apples for natural balance. Finally, keep extra liquid to a minimum so the flavor stays concentrated rather than harsh and watery.

8) Can I make pork and sauerkraut with apples in the slow cooker?

Absolutely. Apples are one of the easiest ways to soften the tang without turning the dish sweet. Slice a crisp apple and tuck it into the kraut layer so it cooks gently and blends into the overall flavor.

9) What’s the difference between pork roast and sauerkraut in slow cooker and pork chops with sauerkraut?

A pork roast (like shoulder or butt) can handle longer cooking and can become shreddable, while pork chops are leaner and can dry out if they cook too long. So, pork roast and sauerkraut in a slow cooker is more forgiving, whereas pork chop and sauerkraut slow cooker recipes benefit from earlier checking and a shorter window.

10) Can I make crock pot pork loin and sauerkraut the same way as chops?

The layering is similar, but pork loin behaves more like chops than like shoulder—it’s lean and can dry out if it runs too long. Therefore, it’s best to treat pork loin and sauerkraut in slow cooker cooking with the same “check early and stop on time” approach.

11) Can I use pork tenderloin and sauerkraut in slow cooker recipes?

Yes, although tenderloin is very lean, so it needs an even shorter cook than most chops or loin. For pork tenderloin and sauerkraut in slow cooker cooking, plan to start checking early and avoid extended cooking times.

12) Is “pork and kraut” the same thing as pork and sauerkraut?

Yes. “Kraut” is simply shorthand for sauerkraut, so crock pot pork and kraut, pork & kraut, and pork and sauerkraut recipes often describe the same classic dish.

13) Why are my pork chops tough in a pork chop sauerkraut slow cooker dinner?

Toughness usually comes from one of two things: they’re not finished yet, or they cooked too long while being very lean. A quick temperature check helps you decide which problem you’re dealing with, and from there you can adjust with short additional cooking or serve with extra juices.

14) Why did my pork chops turn dry in crock pot pork chops and sauerkraut?

Dry chops typically mean they cooked past the ideal point, especially if they were thin or very lean. Next time, choose thicker chops, cook on LOW, and begin checking sooner so you can pull them as soon as they’re done.

15) How do I stop pork chops from tasting boiled when making pork & sauerkraut in crock pot?

The easiest fix is controlling liquid. Sauerkraut and onions already contribute moisture, so you rarely need much added broth. Keeping extra liquid minimal helps the flavor stay rich and prevents that boiled, diluted taste.

16) Can I cook pork and sauerkraut in crock pot overnight?

You can, but pork chops aren’t the best cut for very long holds. Overnight cooking works better with a pork roast (shoulder/butt) than with chops. If you want overnight timing, consider switching to a roast-focused recipe for pork roast and sauerkraut slow cooker cooking.

17) What are the best side dishes for pork and sauerkraut?

Potatoes are the classic partner—mashed, roasted, or boiled—because they absorb the tangy juices. In addition, cabbage-friendly sides like simple salads, rye bread, or dumplings pair well depending on how hearty you want the pork and sauerkraut meal to feel.

18) Can I make baked pork chop and sauerkraut instead of slow cooker?

Yes. If you prefer more browning and a roastier flavor, baked pork chop and sauerkraut in the oven can be a great alternative. That said, the slow cooker version is ideal when you want hands-off cooking and a softer, mellowed kraut.

19) Can I use ribs and sauerkraut instead of chops?

You can. Ribs tend to be fattier and can handle longer cooking times, so they often stay tender even if the cook runs longer. If you enjoy this flavor profile, recipes for ribs and sauerkraut are a natural next step.

20) How do I store and reheat pork chops with kraut without drying them out?

Cool leftovers, store chops with the sauerkraut, and reheat gently. A covered pan with a small splash of water works well, and medium microwave power prevents the pork from tightening. As a result, leftovers stay tender instead of turning dry and stringy.

Posted on 8 Comments

Chicken Pesto Pasta (Easy Base Recipe + Creamy, One-Pot, Baked & More)

Dark, luxe magazine-style cover showing chicken pesto pasta on a black plate with basil, parmesan, and pine nuts, with text overlay “Chicken Pesto Pasta” and “Easy base recipe + creamy, one-pot, baked & more,” plus MasalaMonk.com footer.

Some dinners earn a permanent spot in your rotation because they’re both effortless and deeply satisfying. Chicken pesto pasta is exactly that kind of meal. It’s bright without feeling “light,” comforting without being heavy, and flexible enough to match whatever’s in your fridge—mushrooms you need to use up, a handful of tomatoes getting soft, leftover grilled chicken, or a craving for something creamy and cozy.

Even better, once you understand one dependable base method, everything else becomes a variation you can steer with tiny choices. Want a weeknight sprint? Make the fast version with a quick sauté and a splash of starchy water. Prefer a richer plate? Turn it creamy with a gentle swirl of dairy (or a lighter trick that still feels lush). Need fewer dishes? A one-pan finish gives you the same restaurant-style gloss with less mess. Feeding a crowd? A baked version becomes a bubbling, golden pasta bake with almost no extra effort.

So instead of treating each version like a different recipe, this guide gives you one reliable foundation—then shows you how to pivot into the best version for the mood you’re in.


Chicken Pesto Pasta (Easy Base Recipe)

This is the anchor—the version you’ll make on repeat. Whether you’re using basil pesto from the store or pulling a jar of homemade pesto from the fridge, the method stays the same. Nail this once, and every other variation becomes a simple, confident detour rather than a whole new recipe.

If you want pesto that tastes vivid and fresh, homemade is worth it whenever you have ten minutes. MasalaMonk’s guide to classic basil pesto sauce plus easy variations is a handy starting point, especially when you want to change the personality of the sauce without changing dinner. If you’re aiming for a dairy-free approach, this fresh basil vegan pesto gives you a bold base that still feels lush.

And if you’re the kind of cook who likes understanding ingredients a little more deeply, it’s surprisingly useful to know what Parmesan brings to a dish beyond “salty cheese.” MasalaMonk’s Parmesan guide and varieties helps you pick the right style and use it well—especially when you’re finishing a sauce.

Four-step Chicken Pesto Pasta base method infographic showing: cook pasta and reserve pasta water, sear chicken until golden, toss pasta with pesto and pasta water until glossy, then finish with parmesan and basil; MasalaMonk.com footer.
Chicken pesto pasta, made simple: follow this 4-step base method (pasta water + pesto = glossy sauce) and you’ll be able to turn the same foundation into creamy, one-pot, baked, mushroom, or tomato variations without starting from scratch.

Base Recipe Card: Chicken Pesto Pasta (Serves 4)

Time: 25–35 minutes
Best for: weeknights, meal prep, “I want something comforting but not heavy” nights

Ingredients

  • 400 g pasta (penne, linguine, spaghetti, fettuccine—choose what you love)
  • 450–500 g chicken breast or chicken thighs, cut into bite-size pieces
  • 2–3 tablespoons olive oil
  • 3–4 garlic cloves, finely chopped (optional, but excellent)
  • ½ cup pesto, plus more to taste
  • ½ cup reserved pasta water, plus more as needed
  • ¼–½ cup grated Parmesan (optional, but helps everything cling)
  • Black pepper
  • Lemon wedge (optional, but often perfect)
  • Chili flakes (optional)
Chicken pesto pasta recipe card showing a bowl of pesto-coated penne with browned chicken, pesto ramekin, and lemon wedge, plus an ingredient list, step-by-step method, and pro tips for glossy sauce using reserved pasta water and low heat.
This Chicken Pesto Pasta “easy base recipe” card is your quick, no-scroll guide: ingredients, simple steps, and the three small moves that make it taste restaurant-level—brown the chicken, keep pesto on low heat, and use reserved pasta water to turn it glossy and clingy. Save it for busy nights, then scroll for creamy, one-pan, one-pot, baked, mushroom, and tomato variations.

The one move that changes everything

Keep pesto bright. It tastes best when it’s warmed gently, not cooked aggressively. In other words, pesto goes in at the end, on low heat.

How to cook chicken for pesto pasta (juicy, browned, not dry)

Start with a simple truth: if the chicken is dry, the whole bowl feels dry—no matter how good the pesto is. Fortunately, the fix is straightforward, and it’s more about timing than fancy technique.

Infographic titled “Juicy Chicken for Pesto Pasta” showing three steps to keep chicken tender: brown chicken in a single layer, cook in two batches if needed, and remove as soon as cooked before adding back at the end. Includes a do/don’t box about avoiding steaming or crowding the pan and a note to cook chicken to 165°F internal.
Dry chicken can make even great pesto pasta feel disappointing—this quick guide fixes it. Brown chicken in a single layer (so it sears instead of steaming), cook in batches if the pan feels crowded, and pull it as soon as it’s cooked through—then add it back only at the end so it stays juicy. Save this technique card for chicken pesto pasta, creamy versions, and pasta salad meal prep, and scroll the post for the full base recipe plus one-pan, one-pot, baked, mushroom, tomato, grilled, and BBQ variations.
  1. Pat the chicken dry. This sounds minor, yet it’s the difference between browning and steaming. Dry surface browns; wet surface turns pale and watery.
  2. Season lightly. Pesto is often salty, so go easy with salt at first. Add black pepper generously.
  3. Brown, don’t crowd. Heat a large skillet until it’s properly hot, then add olive oil. Spread the chicken in a single layer. If the pan looks crowded, cook in two batches. That small bit of patience pays off because you’ll get color, and color equals flavor.
  4. Pull it early rather than late. As soon as the pieces are cooked through, move them to a plate. They’ll get a gentle warm-up later, and that’s how they stay tender instead of turning tough.

For a clear safety reference, chicken should reach a safe internal temperature of 165°F / 74°C. If you like referring to an authoritative standard, the USDA’s Safe Minimum Internal Temperature Chart is the one many cooks rely on.

How to make chicken pesto pasta (base method)

  1. Cook the pasta. Bring a large pot of water to a boil and salt it well. Cook pasta until al dente. Before draining, scoop out ½ cup of pasta water and keep it nearby.
  2. Build flavor in the pan. While the pasta cooks, brown the chicken as described above. Once it’s done, remove it to a plate. If you’re using garlic, add it to the same pan for about 20–30 seconds—just until fragrant.
  3. Combine pasta + chicken. Add drained pasta to the skillet, followed by the chicken and any juices on the plate (those juices are flavor).
  4. Add pesto, then loosen with pasta water. Turn the heat low. Stir in pesto, then immediately add a splash of pasta water and toss. Keep adding small splashes as you toss until the sauce turns glossy and clings to every bite.
  5. Finish with Parmesan if using. Sprinkle in Parmesan and toss again. If it thickens too much, add another spoonful of pasta water.
  6. Taste and adjust. A squeeze of lemon can brighten everything if the pesto tastes heavy. Chili flakes wake up the bowl. Black pepper almost always helps.

That pasta-water step is not optional if you want the sauce to behave. It’s what keeps pesto chicken pasta from turning into oily noodles with green streaks. For those who enjoy technique writing, Serious Eats explains the logic beautifully in The Right Way to Sauce Pasta—and once you “get it,” you’ll use the same idea in countless dishes.

Side-by-side infographic showing pesto pasta sauce texture: left panel “oily/separated” pesto on noodles and right panel “glossy/clings” pesto coating pasta, with instruction to add pasta water 1–2 tablespoons at a time and toss on low heat; MasalaMonk.com footer.
If your chicken pesto pasta looks oily instead of silky, this is the fix: add reserved pasta water a tablespoon at a time and toss on low heat until the pesto turns glossy and clings to the noodles—no extra cream needed.
Step-by-step infographic showing how to make pesto coat pasta without turning oily: add pesto on low heat, splash in reserved pasta water while tossing, and stop when the sauce looks glossy and clings. Includes a simple do-and-don’t list, plus photos of pesto pasta in a pan and on a spoon.
If your pesto pasta ever turns into oily noodles with green streaks, this is the fix. Keep the heat low, stir pesto in gently, then add reserved pasta water splash-by-splash while you toss until the sauce turns glossy and clings to every bite. Use the quick “cling test” on a fork to know when to stop. Save this technique card—you’ll use it for chicken pesto pasta, creamy versions, and even pasta salad.

Simple swaps that keep it delicious

Even a “basic” pesto chicken pasta becomes more interesting when you know what swaps play nicely:

  • Chicken thighs stay tender and forgiving, which makes them ideal for quick pasta on busy nights.
  • A small spoon of butter added at the end can soften sharp edges if your pesto is very garlicky.
  • Extra Parmesan helps emulsify if your pesto is oily.
  • A squeeze of lemon balances rich pesto, especially when you turn it creamy.

Easy Chicken Pesto Pasta (Weeknight Fast)

There are nights when you want dinner to land quickly without losing its charm. This version is the fast route—minimal fuss, still full flavor, and it proves that “easy” doesn’t have to mean “meh.”

Recipe card for “Easy Chicken Pesto Pasta — Weeknight Fast (20–25 minutes)” showing a bowl of pesto penne topped with sliced chicken, plus a fast-version ingredients list, quick method steps (reserve pasta water, sear thin chicken, toss pesto on low heat until glossy), three speed moves, and a pro tip to toss with pasta water so the sauce clings instead of turning oily.
Need dinner fast without sacrificing flavor? This easy chicken pesto pasta recipe card is built for weeknights: thin-slice the chicken so it sears in minutes, cook penne or fusilli for reliable sauce cling, then finish everything in one skillet with pesto on low heat and a splash of reserved pasta water until glossy. The “3 speed moves” keep it effortless, but the real upgrade is the toss—so it tastes cohesive, not “assembled.” Save this for busy nights and scroll for creamy options, one-pan/one-pot methods, baked pasta, and the mushroom/tomato twists.

Recipe Card: Weeknight Fast Version (Serves 4)

Time: 20–25 minutes
Best for: busy nights, “I need dinner now,” last-minute guests

Do these three things to make it faster:

  • Slice chicken thinly so it cooks quickly.
  • Choose a pasta shape that cooks evenly and holds sauce well (penne, fusilli).
  • Skip extra add-ins and let pesto + pasta water do the heavy lifting.

Even then, don’t rush the finish. Tossing pasta and sauce together until glossy is what makes an easy bowl feel like something you’d happily serve to company—because it tastes cohesive, not “assembled.”


Creamy Chicken Pesto Pasta (Three Ways)

Some evenings are calling for something richer. The creamy version is still bright and herbal, yet it has that soft, comforting body that makes everyone go quiet after the first bite. Importantly, “creamy” doesn’t have to mean heavy—so you can choose your lane.

Creamy chicken pesto pasta infographic comparing 3 methods—heavy cream, cream cheese, and Greek yogurt—with amounts, when to add each one, and tips to prevent splitting, plus a bowl of pesto chicken pasta and “low heat, no boil” guidance.
Want creamy chicken pesto pasta without guesswork? This “3 ways” guide shows the exact amounts and timing for heavy cream (classic), cream cheese (stable), or Greek yogurt (lighter—stir in off heat). Keep the heat low, add dairy last, and use a splash of pasta water so the sauce turns silky instead of splitting. Save this for cozy nights, then scroll for one-pan, one-pot, baked, mushroom, and tomato variations.

Recipe Card: Creamy Chicken Pesto Pasta (Core Method)

Start with the base recipe. Once pasta and chicken are in the pan and pesto is added, choose one of these creamy paths:

1) Chicken pesto pasta with cream (classic)

  • Add ¼ cup heavy cream (or cooking cream).
  • Add a small splash of pasta water.
  • Toss gently over low heat for about a minute, just until silky.

Key point: Keep the heat gentle. Pesto tastes freshest when it isn’t cooked hard, and cream behaves best when it’s warmed rather than boiled.

2) Creamy without heavy cream (lighter but still lush)

If you want creamy texture without leaning hard on cream, these options work beautifully:

  • Greek yogurt (bright and light): Remove the pan from heat. Add a splash of pasta water first (so the pan cools slightly), then stir in 2–3 tablespoons yogurt until smooth.
  • Cream cheese (cozy and stable): Stir 1–2 tablespoons cream cheese into warm pasta water first, then toss it through. This is especially good with penne or “noodlier” shapes.
  • Milk + Parmesan (simple and classic): Add a small splash of milk, then use Parmesan as your thickener while you toss until glossy.

Each version still tastes unmistakably like pesto chicken pasta—just softer around the edges.

3) Chicken pesto Alfredo pasta (comfort-forward)

If you love the idea of pesto Alfredo, treat it as a direction rather than a separate universe. Use the creamy method above, then increase Parmesan slightly and finish with a tiny knob of butter. Suddenly you’re in the territory of pesto Alfredo without turning dinner into a long project.

If you want to explore creamy pasta beyond this dish, MasalaMonk’s Alfredo twists make a fun companion read—especially if you enjoy playing with flavors.


One Pan Chicken Pesto Pasta (Skillet Style)

One-pan pesto chicken pasta is the version you make when you want the “real” result with fewer steps and less cleanup. It’s not a totally different dish—it’s the same idea, just streamlined.

One-pan chicken pesto pasta recipe card showing a skillet of pesto-coated pasta with browned chicken, Parmesan, basil, pesto ramekin, and lemon wedge, plus an ingredient list, step-by-step skillet method, and pro tips to use reserved pasta water and keep pesto on low heat for a glossy sauce.
This one-pan chicken pesto pasta recipe card is the fastest way to get a glossy, restaurant-style bowl with minimal cleanup. Boil pasta al dente, brown the chicken (don’t crowd the pan), then toss everything together in the skillet with pesto on low heat and reserved pasta water splash-by-splash until it clings. Save this for busy nights—and scroll for the one-pot version, creamy options, baked pasta, and add-ins like mushrooms and tomatoes.

Recipe Card: One-Pan Finish (Serves 4)

How it works:

  • Boil pasta in a pot as usual (because it’s faster and more reliable).
  • Brown chicken in the skillet.
  • Add drained pasta directly to the chicken pan.
  • Stir in pesto on low heat, then finish with pasta water right there.

Because the skillet still holds those browned chicken bits, the flavor is deeper than you’d expect from such a simple method. Additionally, it’s the easiest way to control sauce texture because everything is already in one hot, wide surface where tossing is natural.


One Pot Chicken Pesto Pasta (Minimal Dishes, Big Reward)

One-pot pesto chicken pasta is a different style altogether. It’s not “pasta + sauce,” it’s a single-simmer approach where the cooking liquid turns into sauce. Done well, it tastes like a clever shortcut; done poorly, it can turn sticky. The good news? A few small rules keep it perfect.

One-pot chicken pesto pasta recipe card showing a wide pot of pesto-coated pasta with browned chicken, Parmesan, basil, and a pesto ramekin, plus ingredients, step-by-step one-pot simmer instructions, and pro tips to stir often, add pesto at the end on low heat, and loosen the sauce with a splash of water if needed.
This one-pot chicken pesto pasta recipe card is for nights when you want big flavor with minimal dishes. Brown the chicken, simmer pasta in just enough water or light stock until it turns saucy, then add pesto at the end on low heat so it stays bright. Stir often, stop at al dente, and loosen with a splash of water if the sauce tightens. Save this for weeknights—and scroll for creamy options, baked pesto pasta, mushroom and tomato add-ins, plus storage and reheating tips.

Recipe Card: One-Pot Method (Serves 4)

  1. Brown chicken in a wide pot or deep skillet. Remove it if you want more control, or leave it in for maximum convenience.
  2. Add garlic (optional) for 20–30 seconds.
  3. Add pasta and enough water (or light stock) to just cover.
  4. Simmer, stirring often, until pasta is al dente and the liquid is reduced.
  5. Turn heat down low, then stir pesto in at the end.
  6. Loosen with a splash of water until glossy.
  7. Add chicken back (if removed), then finish with Parmesan if you like.

Why it works: The starch that normally goes down the drain stays in the pot, which helps everything cling.

Top-down one-pot chicken pesto pasta infographic showing a pot of pesto pasta with chicken and basil, with callouts for liquid ratio (about 3 cups broth or water per 8 oz pasta), adding chicken early, stirring pesto in at the end on low heat, and finishing with pasta water plus parmesan; MasalaMonk.com footer.
One-pot chicken pesto pasta made foolproof: follow this simple ratio and timing—add chicken early, stir pesto in at the end on low heat, and finish with a splash of pasta water plus parmesan for a glossy sauce that coats every noodle.

One-pot creamy pesto chicken pasta

Once pesto is stirred in, add one of these:

  • 2–4 tablespoons cream, or
  • a spoon of cream cheese, or
  • Greek yogurt off heat (with a splash of water first)

Then toss until silky. That’s how the one-pot creamy version becomes something you’ll crave—not just a shortcut.


Chicken Pesto Pasta with Mushrooms (Deep, Savory, Balanced)

Mushrooms are the easiest way to make this pasta taste more “restaurant” without making it complicated. They add depth and make the pesto feel rounder, almost like the dish has been simmering longer than it has.

Chicken pesto pasta with mushrooms recipe card showing a skillet of pesto-coated penne with browned chicken, sautéed mushrooms, Parmesan, and basil, plus an ingredient list, step-by-step method, and pro tips to brown mushrooms in a single layer, avoid stirring early, and season after browning.
This chicken pesto pasta with mushrooms recipe card is the “restaurant-depth” upgrade—without extra work. The key is browning mushrooms in a single layer first (don’t stir early), then tossing everything with pesto on low heat and a splash of reserved pasta water so the sauce clings instead of turning oily. Save this for cozy weeknights, then scroll for the tomato version, grilled chicken option, pasta bake, creamy variations, and the one-pan/one-pot methods.

Recipe Card: Mushroom Add-In (Serves 4)

The essential rule: Don’t steam mushrooms. Brown them.

  • Heat the pan properly.
  • Add mushrooms and let them sit until they pick up color.
  • Only then stir. Once they’re browned, they taste nutty and savory rather than watery.

From there, the flow stays familiar:

  • Brown chicken (or brown it first and set aside).
  • Cook pasta.
  • Toss together with pesto and pasta water.

If you want a cozier bowl, this version transforms beautifully into a creamy mushroom pesto chicken pasta with a small splash of cream—no separate recipe required.


Chicken Tomato Pesto Pasta (Bright and Slightly Jammy)

Tomato and pesto can be magic together if you keep the balance right. Tomatoes bring sweetness and acidity, pesto brings richness and salt. When the two meet in the pan, you get a sauce that feels bright, not heavy.

Chicken tomato pesto pasta recipe card showing a bowl of pesto-coated penne with browned chicken and blistered cherry tomatoes, plus a clear ingredient list, step-by-step instructions, and pro tips to blister tomatoes until they burst, add pesto at the end on low heat, and balance the sauce with lemon or Parmesan.
This chicken tomato pesto pasta recipe card is the bright, slightly jammy twist that makes pesto feel lighter and fresher. Blister cherry tomatoes until they burst, brown the chicken, then toss everything with pesto on low heat and reserved pasta water so the sauce turns glossy and clings. If the flavor needs balance, lemon brightens while Parmesan rounds it out. Save this for weeknights—then scroll for creamy options, one-pan and one-pot methods, the baked pesto pasta version, and the mushroom variation.

Recipe Card: Tomato Options

Option 1: Blistered cherry tomatoes (best flavor, easiest)
After browning the chicken, add cherry tomatoes to the same pan. Let them blister until they burst and soften. Then add pasta, pesto (on low heat), and pasta water.

Option 2: A little canned tomato (use as an accent)
If you’re using canned, think “accent,” not “marinara.” A few spoonfuls of crushed tomato simmered briefly is enough. Then turn the heat low before adding pesto so basil stays bright.

Balancing tomato + pesto

  • If it tastes flat, lemon helps.
  • If it tastes too sharp, Parmesan rounds it out.
  • If it tastes too salty, more pasta water (and an extra handful of pasta or veg) fixes it quickly.

If you’d like another dinner idea that leans into the same flavor family, MasalaMonk’s tortellini cooking guide includes a pesto direction with tomatoes that adapts easily to this style.


Grilled Chicken Pesto Pasta (Smoky, Fast, Summery)

When grilling is already happening—or you have leftover grilled chicken—this becomes one of the best “second dinners” you can make. It tastes like you planned it, even if it was born from leftovers.

Grilled chicken pesto pasta recipe card showing a bowl of pesto-coated linguine topped with sliced grilled chicken, basil, and Parmesan, with a pesto ramekin and lemon wedges beside it. The card includes ingredients, quick steps to warm leftover grilled chicken gently, toss pesto with reserved pasta water on low heat until glossy, and pro tips to avoid overcooking the chicken.
This grilled chicken pesto pasta recipe card is the perfect “second dinner” when you already have leftover grilled chicken. Cook pasta al dente, warm the chicken gently (don’t re-grill it), then toss everything with pesto on low heat and reserved pasta water until the sauce turns glossy and clings. Finish with lemon, black pepper, and fresh Parmesan for a bright, smoky bowl that tastes like summer—even on a weeknight. Save this for busy nights, then scroll for creamy options, one-pan/one-pot methods, the baked pasta version, plus mushroom and tomato twists.

Recipe Card: Leftover Grilled Chicken Version

  • Cook pasta.
  • Make the sauce in the skillet with pesto + pasta water on low heat.
  • Add sliced grilled chicken at the end and warm it gently.

Because grilled chicken already has smoke and char, keep the rest simple: lemon, black pepper, and a glossy toss. The result tastes like summer even on a random Tuesday.


BBQ Chicken Pesto Pasta (Sweet-Smoky Twist)

BBQ chicken pesto pasta sounds unusual until you remember that pesto loves sweet tomato notes and smoky flavors. The trick is keeping barbecue as a supporting actor—more glaze than sauce—so the pesto still tastes like pesto.

BBQ chicken pesto pasta recipe card showing a bowl of pesto-coated noodles topped with BBQ-glazed chicken, basil, Parmesan, a pesto ramekin, and lemon wedges. The card lists ingredients, 4 quick steps, and pro tips to use only 1–2 tablespoons BBQ sauce, add pesto at the end on low heat, and use reserved pasta water for a glossy sauce.
This BBQ chicken pesto pasta recipe card is a sweet-smoky twist that still tastes like pesto—not barbecue pasta. The trick is restraint: coat the chicken with just 1–2 tablespoons BBQ sauce, then toss everything with pesto on low heat and reserved pasta water until glossy. Finish with lemon, black pepper, and Parmesan to keep the bowl bright and balanced. Save this for weeknights when you want something different, then scroll for the base recipe, creamy options, one-pan and one-pot methods, the baked pesto pasta version, plus mushroom, tomato, grilled, and pasta-salad variations.

Recipe Card: BBQ Twist (Serves 4)

  • Toss cooked chicken lightly with 1–2 tablespoons barbecue sauce.
  • Add it to pasta and pesto at the end.
  • Use pasta water to keep everything cohesive and glossy.

The result is a sweet-smoky bowl that’s surprisingly addictive, especially with penne or fusilli.


Baked Chicken Pesto Pasta (Pasta Bake)

When you want a dish that feels generous—something you can spoon into bowls and watch people go back for seconds—baked chicken pesto pasta delivers. It’s also one of the easiest ways to make dinner feel like an event without extra work.

Baked chicken pesto pasta recipe card showing a white baking dish of pesto pasta with browned chicken, melted cheese, Parmesan, and basil, plus ingredients, oven temperature, bake time, step-by-step instructions, and “moisture insurance” tips to keep the pasta bake juicy and saucy.
This baked chicken pesto pasta recipe card is your no-fail pasta bake guide: keep the pasta slightly underdone, mix in enough sauce so it stays juicy, then bake until bubbly and lightly golden. The “moisture insurance” tips (cover first, don’t overbake, stir in a spoon of pesto after baking) make the top taste fresh instead of dull. Save this for cozy dinners, then scroll for the base method, creamy options, one-pan and one-pot versions, plus mushroom and tomato variations.

Recipe Card: Baked Pesto Chicken Pasta (Serves 6–8)

Time: 40–55 minutes
Oven: 200°C / 400°F

  1. Make the base chicken pesto pasta, but keep it slightly saucier than usual. That means extra pasta water and, if you like, a small splash of cream.
  2. Stir in cheese: mozzarella for melt, Parmesan for flavor.
  3. Transfer to a baking dish.
  4. Bake until bubbling and lightly golden.

Because pesto can lose its brightness under high heat, reserve a tablespoon of pesto and stir it in right after baking. That simple move makes the whole dish taste fresher instantly.

If you want extra baked-pasta technique—make-ahead tricks, moisture management, and how to keep a bake from turning dry—MasalaMonk’s baked ziti variations are a surprisingly relevant reference even when you’re not making ziti.


Best Pasta Shapes for Chicken Pesto Pasta

Pasta shape isn’t just aesthetics. It changes how sauce clings, how bites feel, and whether the dish reads “light and glossy” or “thick and cozy.” Once you notice this, you start choosing shapes with intention.

Infographic titled “Best Pasta Shapes for Chicken Pesto Pasta” showing six options—penne, fusilli, linguine, spaghetti, fettuccine, and angel hair—with notes on which is best for weeknights, creamy sauce, baked pasta, or one-pot methods, plus quick tips for sauce cling and using extra pasta water.
Not all pasta shapes behave the same with pesto. This cheat sheet shows the best pasta for chicken pesto pasta—whether you want a glossy one-pan bowl, a true one-pot method, or a creamier, cozier finish. Penne and fusilli grab sauce, linguine and spaghetti feel sleek, fettuccine shines in creamy versions, and angel hair needs extra pasta water to avoid clumping. Save this for later, then scroll for the base recipe card, creamy options, one-pan and one-pot methods, baked pasta, and add-ins like mushrooms and tomatoes.

Penne (weeknight MVP)

Penne holds pesto in the tubes, which makes it ideal for pesto penne chicken pasta. It also holds up well to baking, so if you’re making a pasta bake, penne is a safe bet.

Linguine (silky and polished)

Linguine makes the sauce feel sleek. It’s especially good when you’re chasing that glossy finish and want the pesto to coat each strand evenly.

Spaghetti (simple and fast)

Spaghetti shines when you keep it clean—pesto, chicken, pasta water, Parmesan. It’s also a great “starter” shape because it shows off the base method without distractions.

Fettuccine (best for creamy)

Fettuccine is at its best when the sauce is slightly thicker. That’s why it feels so satisfying in creamy versions.

Angel hair (quick cook notes)

Angel hair cooks quickly, which makes it tempting on busy nights. However, it clumps if you don’t toss immediately with enough pasta water. Go generous with water and keep tossing until glossy.


Chicken Pesto Noodles (When You Want Comfort in a Bowl)

Sometimes you’re not craving “pasta” in the classic sense—you’re craving noodles and sauce. Chicken pesto noodles are perfect for that, especially with egg noodles or a thinner pasta shape.

Recipe card for “Chicken Pesto Noodles — Comfort Bowl (cozy, not heavy)” showing a bowl of pesto-coated egg noodles topped with sliced chicken, basil, Parmesan, and lemon wedges, plus ingredients and quick steps to warm chicken gently, add pesto on low heat, and splash hot water or reserved pasta water until the noodles turn silky, then finish with lemon and black pepper.
Craving comfort without the heaviness? This chicken pesto noodles recipe card keeps it cozy and bright: start with egg noodles (or thin pasta), use a little less pesto, and loosen everything with hot water (or reserved pasta water) until silky. Warm the chicken gently, keep the heat low once pesto goes in, then finish with lemon + black pepper (and Parmesan if you want). Save this for quick dinners and scroll the post for the weeknight-fast pasta card, creamy options, one-pan/one-pot methods, baked pasta, plus mushroom and tomato twists.

Recipe Card: Noodle-Style Bowl

To keep it from feeling heavy:

  • Use a little less pesto than usual.
  • Add extra hot water (or reserved pasta water if you’re using pasta).
  • Finish with lemon and pepper.

That combination makes the bowl feel bright again, even when the noodles are cozy.


Basil Pasta Chicken (A Fresh Finish That Changes Everything)

Even if your pesto is basil-based, an extra handful of basil at the end can make the dish smell brand-new. This isn’t a different recipe; it’s the same pasta, simply finished with fresh basil ribbons and, if you like, a tiny drizzle of olive oil.

It’s a small flourish, yet it makes the bowl feel intentional—like you planned it, even if you didn’t.


Healthy Chicken Pesto Pasta (Without Losing What Makes It Great)

“Healthy” is easiest to sustain when it still tastes indulgent. Fortunately, you can make this dish lighter and more balanced without stripping away what makes it comforting.

Healthy chicken pesto pasta bowl builder infographic showing a pesto chicken pasta bowl with zucchini and spinach, plus a “Build Your Bowl” plate formula (½ veggies, ¼ pasta, ¼ chicken), a list of best vegetable add-ins (asparagus, spinach, zucchini, broccoli, peppers), higher-protein pasta swaps (lentil, chickpea), and a flavor finish tip (lemon, black pepper, optional Parmesan) with a pasta-water pro tip.
Want healthy chicken pesto pasta that still tastes satisfying? Use this bowl-builder: fill half your bowl with veggies, then add pasta and chicken for balance. The quick add-ins (asparagus, spinach, zucchini, broccoli, peppers) boost volume without dulling pesto, while lentil or chickpea pasta adds extra protein and fiber. Finish with lemon + black pepper (and a little Parmesan if you want), then use reserved pasta water to keep the pesto glossy—not oily. Save this for meal-prep nights and scroll the post for the base recipe, creamy options, one-pan/one-pot methods, baked pasta, and mushroom/tomato twists.

Healthy upgrades that actually stick

  • Add vegetables for volume: asparagus, spinach, zucchini, peppers, broccoli.
  • Choose chicken breast if you want leaner protein, but cook it carefully so it stays tender.
  • Use pesto confidently, then stretch it with pasta water and brightness (lemon, pepper).
  • Finish with a smaller amount of Parmesan rather than removing it entirely—flavor helps you stay satisfied.

If you want a simple portion strategy that still feels generous, build the bowl like this: half vegetables, a quarter pasta, a quarter chicken—then sauce everything with pesto + pasta water so it tastes cohesive.

Asparagus (easy add-in)

Asparagus is made for pesto. Add chopped asparagus to boiling pasta water during the last 2–3 minutes. Drain, then toss into the base recipe. The asparagus stays vibrant, and the bowl feels lighter without feeling “diet.”

Higher-protein pasta swaps

If you want extra protein and fiber, lentil pasta is a strong option. MasalaMonk’s lentil pasta guide goes deeper into how it behaves and what to pair it with, which is helpful when you’re experimenting.


The Small Moves That Make This Pasta Outstanding

A great pasta dish isn’t about complicated ingredients. It’s about a few small moves that keep everything balanced, especially when pesto is involved.

Infographic titled “The Small Moves That Make Pesto Pasta Outstanding” with three technique panels: keep pesto bright by adding it at the end on low heat, make the sauce cling by using reserved pasta water splash-by-splash until glossy, and balance salt and richness by tasting late and adjusting with lemon, Parmesan, or more water and vegetables. Includes a quick fixes strip at the bottom and MasalaMonk.com.
These are the small moves that make chicken pesto pasta taste restaurant-level. Add pesto at the end and keep the heat low so it stays bright. Use reserved pasta water splash-by-splash while tossing until the sauce turns glossy and clings (not oily). Then taste late—pesto is salty—and balance fast with lemon for freshness, Parmesan for roundness, or a little more water + veg if it’s too salty. Save this technique card for every pesto pasta you make, then scroll the post for the fast, creamy, one-pan, one-pot, baked, mushroom, tomato, grilled, BBQ, and pasta-salad versions.

Keep pesto bright

Pesto tastes best when it’s warmed gently rather than cooked hard. So, whether you’re making a clean spaghetti version or a creamy bowl, stir in pesto at the end and keep the heat low.

Make the sauce cling

Pasta water isn’t a garnish—it’s structure. Add it gradually while tossing until the pesto becomes a silky coating. That’s how the sauce goes from “thin” to “glossy.”

Balance salt and richness

Because pesto can be salty, taste late and adjust carefully. If it’s too salty, loosen with water and add a handful of vegetables. If it feels heavy, lemon fixes it fast. And if it tastes sharp, Parmesan softens it.


Chicken Pesto Pasta Salad (A Cold Version That Actually Works)

Even though this post focuses on hot versions, chicken pesto pasta salad deserves a spot because it’s one of the smartest ways to turn leftovers into tomorrow’s lunch. Better still, it’s genuinely delicious when you build it the right way.

Chicken pesto pasta salad recipe card showing a bowl of cold pesto pasta with grilled chicken pieces, cucumber, cherry tomatoes, basil, Parmesan shavings, a pesto ramekin, and lemon wedges, plus ingredients, step-by-step instructions to rinse pasta and toss with pesto first, and meal-prep tips like using crunchy vegetables and adding Parmesan only when serving.
This chicken pesto pasta salad recipe card is the meal-prep version that actually stays good. Rinse and drain the pasta, toss it with pesto first, then add chicken and crunchy veg like cucumber, bell pepper, and celery so the salad stays fresh—not soggy. Chill for the best flavor, then finish with lemon, black pepper, and Parmesan right before serving (it keeps the texture better). Save this for quick lunches, and scroll the post for the hot base recipe, creamy options, one-pan and one-pot methods, the baked pasta version, plus mushroom and tomato twists.

Recipe Card: Pesto Pasta Salad with Chicken

  • Cook pasta, then rinse briefly under cool water and drain well.
  • Toss pasta with pesto first, then add chicken.
  • Add crunchy vegetables like cucumber, bell pepper, or celery.
  • Finish with lemon and pepper.
  • Add Parmesan right before serving.

Because cold pasta absorbs sauce, you’ll often want a little extra pesto or a drizzle of olive oil plus lemon to keep it lively.

If you plan to meal prep, it’s useful to keep safe storage windows in mind. FoodSafety.gov’s Cold Food Storage Charts is a strong reference, especially when you’re storing mixed dishes.


Storage and Reheating (So It Still Tastes Like Pesto)

Chicken pesto pasta tends to thicken in the fridge. The good news is the fix is easy, and you can bring back the glossy texture without turning the chicken rubbery.

Infographic titled “How to Store & Reheat Chicken Pesto Pasta (So It Stays Glossy)” showing storage steps, fridge time (3–4 days), the best skillet reheat method with added water or milk for creamy versions, quick fixes for dry or oily sauce, and do/don’t tips like avoiding boiling pesto and microwaving on high.
Leftover chicken pesto pasta doesn’t have to taste dry or clumpy. This quick guide shows how to store it properly, then reheat it in a skillet with a splash of water (or milk if creamy) until the sauce turns glossy again. Use the “fix it fast” tips if it looks oily, tastes flat, or starts to split—then finish with lemon and black pepper (or a tiny spoon of pesto) to bring everything back to life. Save this for meal prep nights, and scroll for the base recipe, creamy options, one-pan/one-pot methods, baked pasta, and mushroom/tomato variations.

How to reheat without ruining it

  • Reheat gently in a skillet (low to medium-low).
  • Add a splash of water (or milk if it’s creamy).
  • Toss until glossy again.
  • If it tastes muted, add a tiny spoon of pesto or a squeeze of lemon at the end.

For general leftovers safety guidance, the USDA’s Leftovers and Food Safety page is a trustworthy reference worth bookmarking.


Pesto Storage (If You Make It in Batches)

If you start making pesto at home, you’ll quickly realize the real joy is batch-making and freezing portions. When pesto is ready in the freezer, dinner becomes a toss-and-go situation.

Step-by-step infographic titled “Pesto Storage: Freeze in Cubes” showing pesto spooned into an ice cube tray, frozen until solid, popped into a container, and added to hot pasta. Includes a pro tip that a thin layer of olive oil on top can help protect pesto color, and the footer MasalaMonk.com.
Make pesto once, then make weeknight chicken pesto pasta in minutes. This “freeze pesto in cubes” guide shows the easiest method: spoon pesto into an ice tray, freeze until solid, then store cubes in a container so you can grab 1–2 cubes per serving anytime. It’s the simplest way to keep pesto tasting fresh without wasting basil, and the optional olive-oil tip helps protect color. Save this for meal prep—then use those cubes for the base chicken pesto pasta recipe, creamy versions, one-pan/one-pot methods, pasta salad, and more.

For specific guidance on freezing pesto safely, the National Center for Home Food Preservation’s page on freezing pesto is excellent—especially if you like freezing pesto in cubes, then transferring them to a container once solid.


A Few Delicious Next Steps (If You Want More Ideas)

If you’re in a pesto mood and want to keep the momentum going:


Closing thought

Chicken pesto pasta is the kind of recipe that rewards you every time you make it. Once you’ve cooked it a couple of ways—maybe the fast version on a rushed weeknight, the creamy version on a cozy evening, and a baked one when friends come over—you’ll notice something: it stops being “a recipe” and becomes a flexible dinner you can steer on instinct.

So start with the base. Then pick a direction. A handful of mushrooms, a few tomatoes, a splash of cream, or a one-pot shortcut can take you somewhere new—while still tasting unmistakably like pesto, chicken, and comfort in a bowl.

Closing summary infographic titled “Closing Thought: Make It Once, Then Make It Yours” showing a bowl of chicken pesto pasta and a “pick a direction” grid with six variations: Weeknight Fast, Creamy & Cozy, One-Pan Skillet, One-Pot Shortcut, Mushrooms (Savory Depth), and Tomatoes (Bright & Jammy). Includes a closing line about choosing mushrooms, tomatoes, a splash of cream, or a one-pot shortcut, with MasalaMonk.com at the bottom.
Chicken pesto pasta is the kind of dinner that gets better the more you make it—because once you learn the base, you can steer it on instinct. Use this “choose your path” guide to match the mood: go Weeknight Fast, turn it Creamy & Cozy, keep it One-Pan Skillet, simplify with a One-Pot Shortcut, or pivot into Mushrooms for savory depth or Tomatoes for a bright, jammy finish. Save this as your quick decision map, then scroll the post for the full base method and every variation in detail.

Chicken Pesto Pasta FAQs

1) How do I keep chicken juicy?

Pat it dry, cook it in a hot pan without crowding, and pull it as soon as it’s cooked through. Then add it back at the end so it warms up without overcooking.

2) What’s the best way to cook chicken breast so it doesn’t dry out?

Slice it thinner (or butterfly it), then cook quickly over medium-high heat. Because breast cooks fast, pulling it a minute early and letting carryover heat finish it prevents dryness.

3) Why does my pesto sauce look oily instead of coating the pasta?

This usually happens when there isn’t enough starchy water in the pan. Add reserved pasta water a splash at a time while tossing until the sauce turns glossy and clings. Also, keep the heat gentle once pesto goes in.

4) Which pasta shapes work best here?

Penne and fusilli grab sauce easily and hold up well to mix-ins. Linguine and spaghetti give a silkier feel. If you’re making a creamier version, fettuccine is especially satisfying.

5) How can I make this in under 25 minutes?

Use a fast-cooking pasta, cut chicken smaller, and cook both at the same time. Once the pasta drains, toss everything with pesto and a splash of reserved water right in the skillet for a quick finish.

6) Can I make a creamy version without heavy cream?

Yes. Stir in Greek yogurt off heat (with a splash of water first), add a spoon of cream cheese melted with pasta water, or use a small splash of milk plus Parmesan for body.

7) How do I keep a creamy sauce from splitting?

Lower the heat before adding dairy and avoid boiling once it’s in the pan. If using yogurt, add it off heat. If it starts to look grainy, add a little more pasta water and toss gently to bring it back together.

8) What’s the difference between one-pan and one-pot versions?

One-pan usually means pasta is boiled separately, then tossed in a skillet with chicken and pesto. One-pot means pasta simmers in the same pot as the chicken so the cooking liquid becomes part of the sauce.

9) How do I avoid gummy pasta in the one-pot method?

Stir often, keep enough liquid so the pasta can move freely, and stop cooking as soon as it reaches al dente. Then add pesto at the end and loosen with a splash of water if needed.

10) How do I cook mushrooms so they don’t turn watery?

Start with a hot pan, spread mushrooms out, and let them brown before stirring. Once they’ve released moisture and picked up color, they’ll taste deeper and won’t dilute the sauce.

11) What’s the easiest way to add tomatoes without making it too acidic?

Blister cherry tomatoes until they burst for natural sweetness. If using canned tomatoes, keep the amount small and simmer briefly before adding pesto at the end on low heat.

12) Can I turn it into a baked pasta dish?

Absolutely. Make the skillet version slightly saucier, mix in cheese, then bake until bubbling and lightly golden. For extra freshness, stir in a spoon of pesto right after baking.

13) How do I keep a pasta bake from drying out?

Add extra pasta water before baking and include enough cheese or a small splash of cream. If your oven runs hot, cover for part of the bake time, then uncover briefly to brown.

14) Can I use leftover grilled chicken?

Definitely. Slice it and warm it gently at the end. Since it’s already cooked, it only needs a brief heat-through to stay tender.

15) Does a BBQ twist work with pesto?

It can, as long as you use barbecue sauce lightly. Think of it as a glaze on the chicken, then combine with pesto and pasta water so the flavors stay balanced.

16) How do I store and reheat leftovers so it still tastes fresh?

Store in a sealed container in the fridge. Reheat gently with a splash of water (or milk for creamy versions), then finish with black pepper and a squeeze of lemon if it tastes muted.

17) Why does pesto sometimes taste bitter?

Bitterness can come from old basil, too much raw garlic, or overheating. Add pesto on low heat and avoid boiling it. If it still tastes sharp, Parmesan and a touch of lemon balance it quickly.

18) What should I serve on the side?

Go simple: a crisp salad, roasted vegetables, sautéed greens, or garlic bread. If your pasta is creamy, something bright and lemony on the side pairs especially well.