Posted on — 7 Comments

Low Carb Chia Pudding Recipes

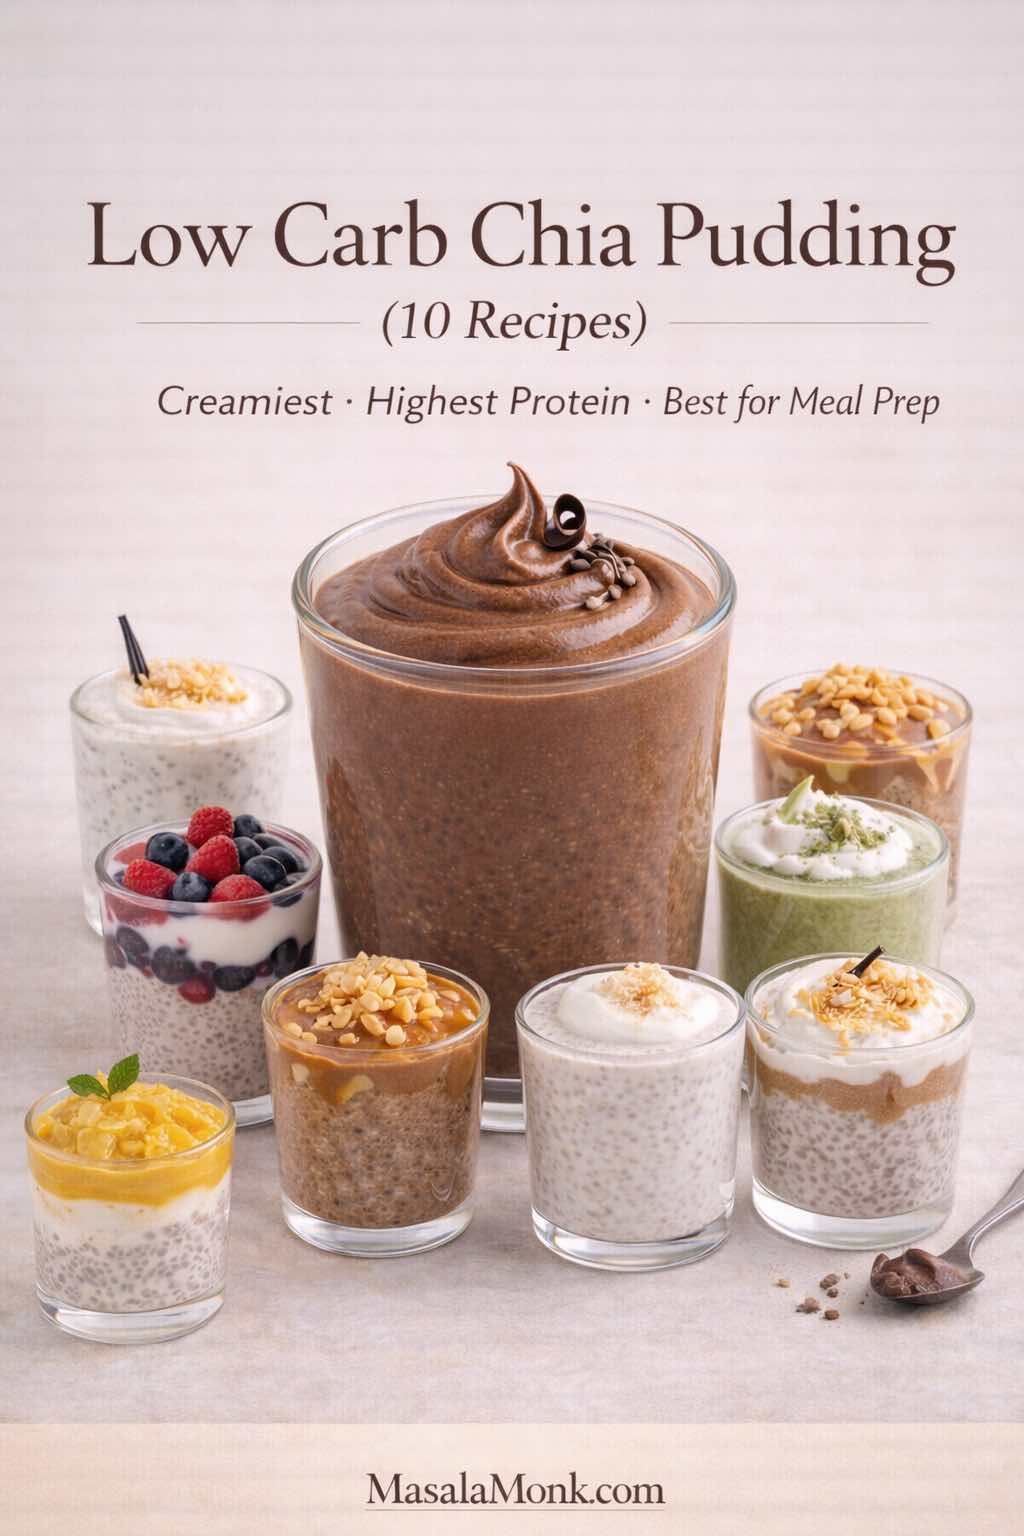
Cover image showing a premium glass jar of low carb chia pudding with a smooth whipped topping on a warm-cream seamless background. Editorial food photography style for “Low Carb Chia Pudding” featuring 10 recipes including keto, high protein, dairy-free, and blended options, with MasalaMonk.com branding.

This post was last updated on

Looking for low carb chia pudding recipes for weight loss? The most useful place to start is the pudding itself. Chia is not a fat burner, but a make-ahead serving can be easy to portion, simple to build with protein, and satisfying without relying on much added sugar. Here you can make it light with almond milk, thick and tangy with Greek yogurt, rich with coconut milk, chocolatey with protein powder, or completely smooth after blending.

Here for the thick Greek-yogurt chia pudding? Start with ¾ cup plain Greek yogurt + 3 tablespoons chia seeds + ¼ cup / 60 ml unsweetened almond milk or water. Stir again after 10 minutes, then chill for at least 2 hours. Jump to the full Greek yogurt chia pudding recipe ↓
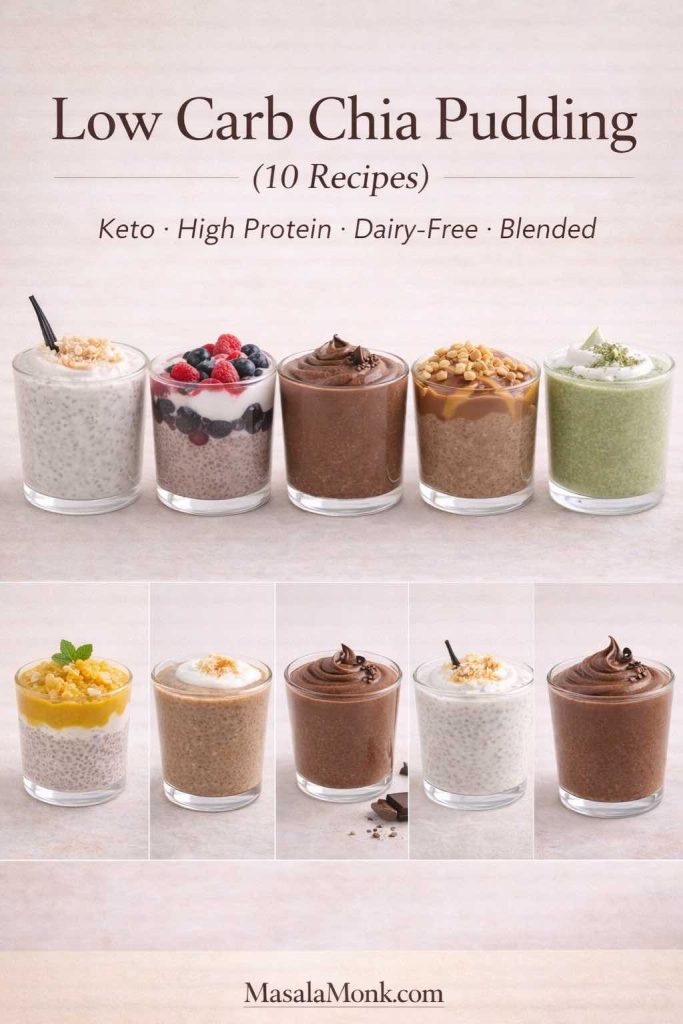
Collage showing ten low carb chia pudding cups including vanilla, Greek yogurt, chocolate, peanut butter, matcha, mango, coconut and blended mousse variations.
All 10 chia pudding recipes at a glance—from thick Greek yogurt and keto coconut milk to chocolate protein pudding, fruit layers and smooth blended mousse.

You do not need to read this guide from top to bottom. Use the jumps above if you already know what you want, or use the table of contents to solve the ratio, liquid, protein, meal-prep, or troubleshooting question that brought you here.


Low Carb Chia Pudding for Weight Loss: What Actually Matters

Chia pudding is not a fat burner, and a jar does not cause weight loss by itself. What makes it useful in a weight-management routine is practical: chia is easy to portion ahead, it creates a substantial gel-like texture when hydrated, and it can be paired with protein-rich ingredients such as Greek yogurt or protein powder.

The rest of the jar matters just as much. Canned coconut milk, nut butter, nuts, granola, fruit, sweeteners, and large portions can quickly change both calories and carbohydrates. A chia pudding that replaces a less satisfying breakfast is a different situation from adding a rich pudding on top of everything else you already eat.

  • Start unsweetened: choose unsweetened almond milk, plain Greek yogurt, or an unsweetened coconut base when keeping added sugar low matters.
  • Add protein when the jar needs to function as a meal: Greek yogurt or a protein powder you already tolerate well are the easiest routes.
  • Measure calorie-dense toppings: nut butter, nuts, seeds, coconut and granola are easy to overserve.
  • Use fruit deliberately: berries are easy to portion; mango and apple work better as measured flavor accents when carbs matter.
  • Do not confuse “keto” or “low carb” with automatically low-calorie: coconut milk and nut butter can make an excellent low-carb pudding while still creating a very energy-dense jar.

That is the reason this guide includes several styles rather than one “perfect” weight-loss pudding: the best jar is the one whose portion, protein, texture, and toppings fit the rest of your day.


Why Chia Pudding Works So Well as a Breakfast

A good chia pudding does two practical things well: it gives you a breakfast you can prepare ahead, and it creates a thick, substantial texture from very little morning work. Chia seeds absorb liquid as they hydrate, while Greek yogurt, protein powder, nuts, or richer milks can make the finished jar feel more complete.
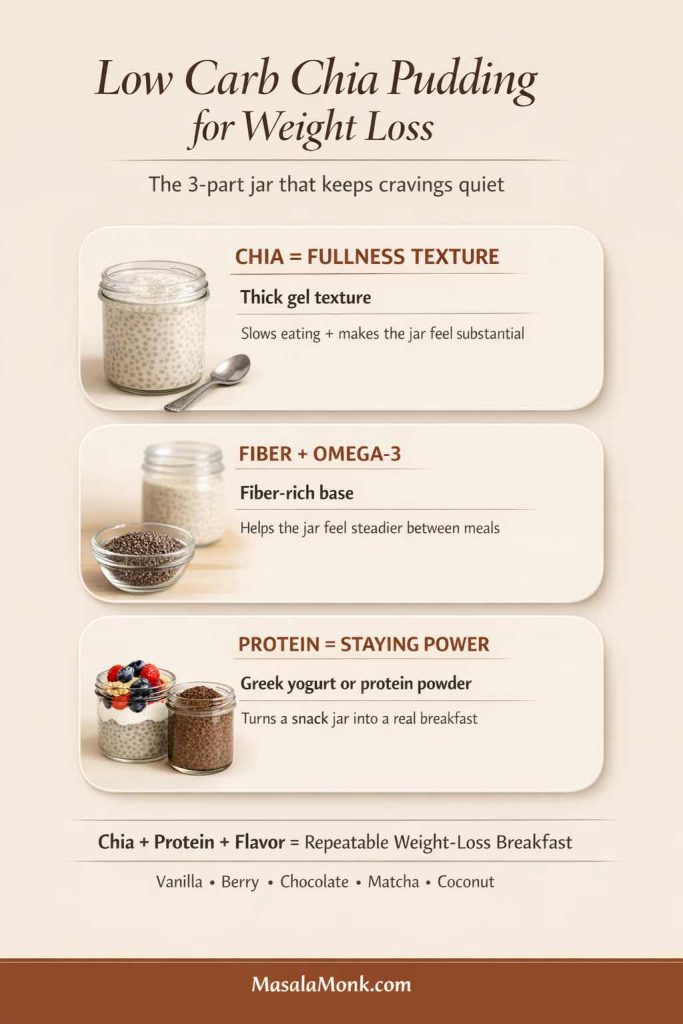
Infographic explaining how chia creates a thick gel texture and can be combined with protein such as Greek yogurt or protein powder.
Chia supplies the pudding structure; protein and the rest of the ingredients determine whether the jar behaves more like a snack or a full breakfast.

Chia seeds are naturally rich in fiber and contain alpha-linolenic acid, a plant-based omega-3 fat. For a useful evidence-based overview rather than exaggerated claims, see the Harvard Nutrition Source guide to chia seeds.

Protein is the easiest way to make the jar feel more meal-like

Plain chia and milk can work perfectly well as a snack, but Greek yogurt or protein powder gives you another lever when you want the jar to function as breakfast. Greek yogurt also changes the texture immediately: instead of waiting for milk alone to become pudding-like, you start with a thick, creamy base.
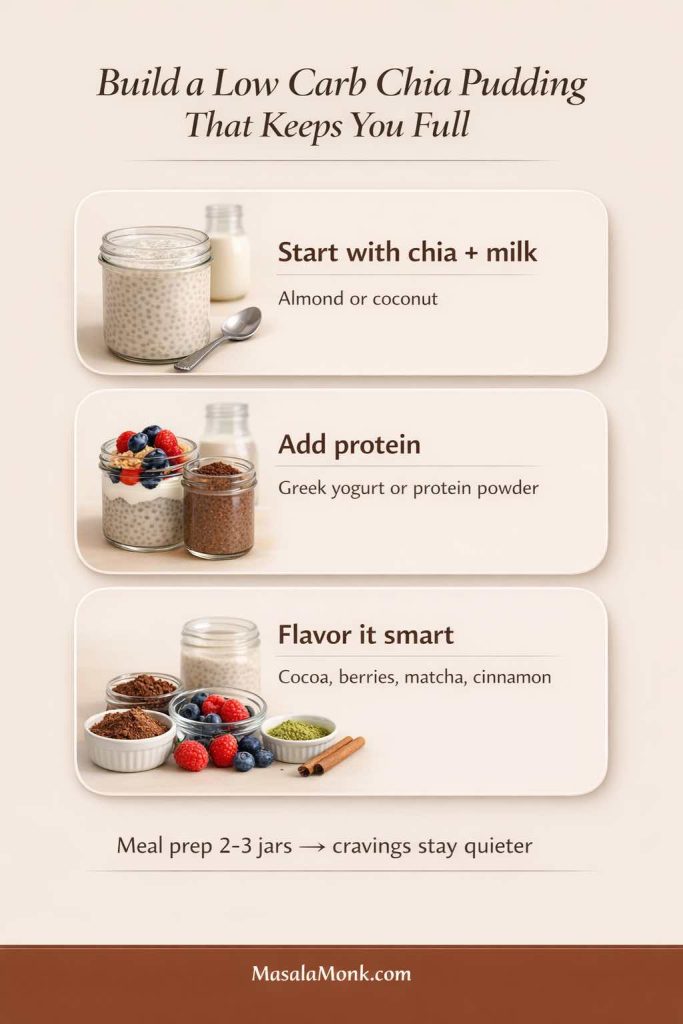
Three-step low carb chia pudding builder showing chia and milk, an optional protein addition, and flavor options such as cocoa, berries, matcha and cinnamon.
Think of the jar in three layers: chia + liquid for structure, an optional protein source for a more substantial breakfast, then flavors you genuinely want to eat.

Low Carb Chia Pudding Ratio: The Base Recipe That Prevents Clumps

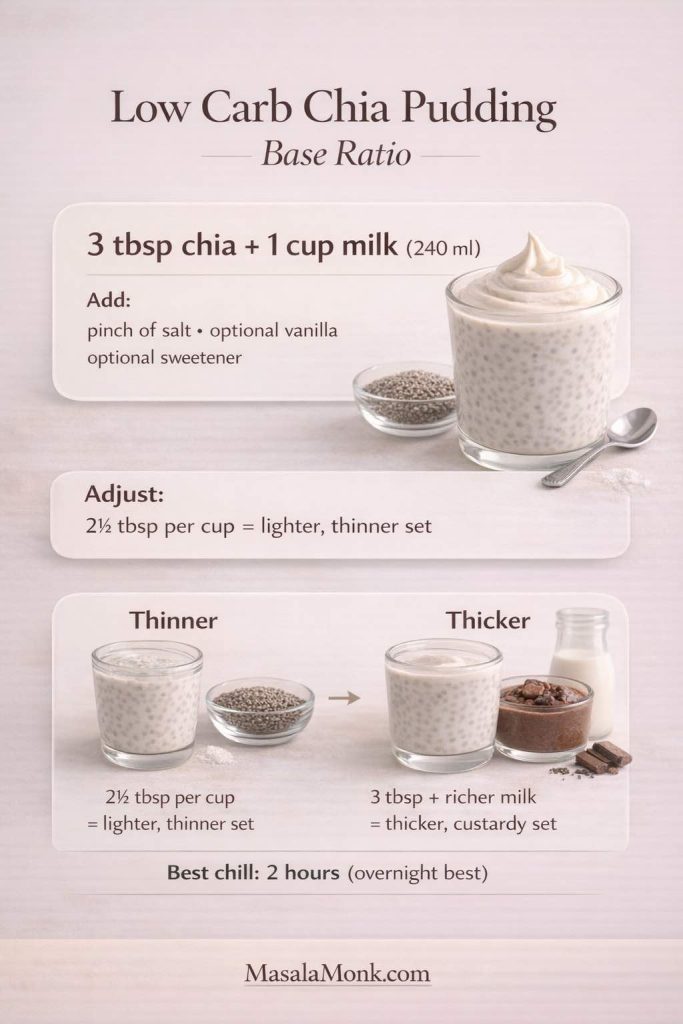
For a classic milk-based chia pudding, this is the dependable starting point:

  • 3 tablespoons chia seeds (roughly 30–35 g, depending on how you measure)
  • 1 cup / 240 ml liquid
  • Pinch of salt
  • ½ teaspoon vanilla, optional
  • Sweetener to taste, optional
Chia pudding ratio infographic showing 3 tablespoons chia seeds to 1 cup or 240 ml milk, with adjustments for thinner or thicker pudding.
Start with 3 tablespoons chia to 1 cup / 240 ml liquid. Use a little less chia for a softer set, or keep the full amount and use a richer liquid for a denser pudding.

The exact result changes with your liquid. Thin almond milk gives a lighter pudding, while canned coconut milk sets much richer. Greek yogurt needs far less added liquid because the yogurt already provides most of the body.

The stir-rest-stir method

  1. Whisk the liquid with vanilla, salt, sweetener, cocoa, protein powder, or other smooth flavorings first.
  2. Add the chia and whisk vigorously for 20–30 seconds.
  3. Let the mixture stand for 10 minutes.
  4. Whisk or stir thoroughly a second time.
  5. Cover and refrigerate for at least 2 hours; overnight gives the most settled texture.
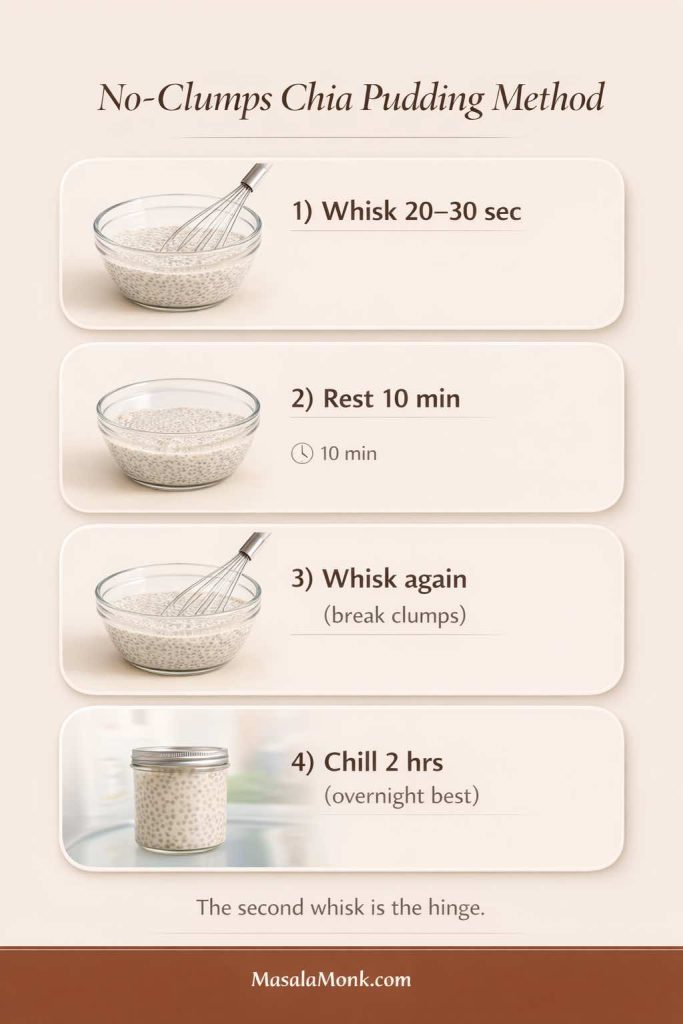
No-clumps chia pudding method showing whisking, a 10-minute rest, a second whisk and a final chill.
The second stir is the important one: the seeds have started hydrating but have not fully set, so this is your chance to break up clusters before they become permanent.

Can you make quick chia pudding?

Yes, although “quick” still means giving chia time to hydrate. Follow the same method and chill for 30–45 minutes. The texture will be softer than an overnight jar. Greek yogurt is particularly useful when you want a thick pudding sooner because much of the thickness is already present before the chia sets.

Give the chia enough time to hydrate

Chia thickens because the seeds absorb liquid over time. For pudding, use them fully hydrated rather than judging the mixture immediately after stirring. If the texture still seems thin after 30 minutes, give it more time before adding extra seeds; the biggest change usually happens during the longer refrigerator rest.


Choosing Your Liquid: Almond Milk, Coconut Milk, Yogurt, Oat Milk & More

Your liquid controls far more than flavor. It changes thickness, richness, carbohydrate content, and how much additional chia you may need. Choose the liquid first, then fine-tune the jar.
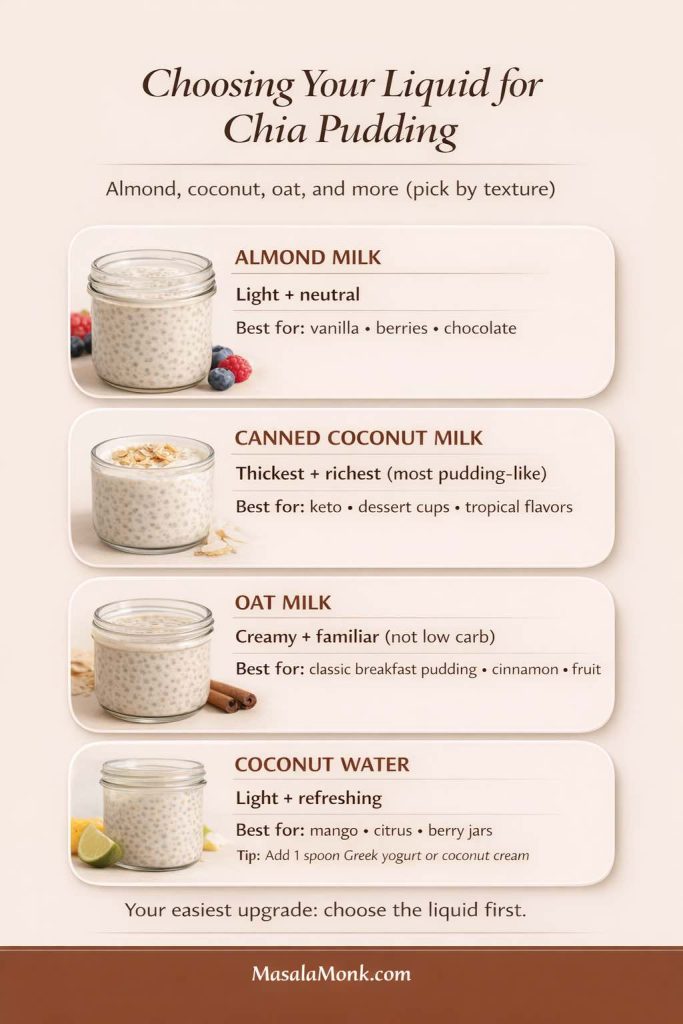
Guide comparing almond milk, canned coconut milk, oat milk and coconut water for chia pudding, including texture and best-use notes.
Almond milk stays light, canned coconut milk gives the richest set, oat milk is creamy but usually higher in carbohydrate, and coconut water creates a lighter fruit-friendly chia gel.

Almond milk: light and versatile

Unsweetened almond milk is an easy low-carb base because its flavor stays out of the way. It works especially well with vanilla, chocolate, cinnamon, berries, matcha, and nut butter.

Canned coconut milk: richest and thickest

If you want a pudding that feels especially rich, canned coconut milk is hard to beat. Because brands vary in thickness, whisk in enough water to make the mixture comfortably pourable before adding chia. Very thick coconut milk can otherwise produce dense pockets before the seeds hydrate evenly.

Greek yogurt: thick before it even chills

Greek yogurt works differently from milk. Instead of using a full cup of liquid, start with yogurt and loosen it gradually. For our full high-protein version, ¾ cup Greek yogurt + ¼ cup / 60 ml water or unsweetened almond milk creates a creamy starting mixture before the chia goes in.

Jump to the Greek yogurt chia pudding recipe →

Oat milk: creamy, but usually not low carb

Oat milk produces a mild, familiar breakfast-pudding flavor. It can still be used with any of the methods in this guide, but check the nutrition label if keeping carbohydrates low is an important part of your goal.

Coconut water: light and fruit-friendly

Coconut water produces a much lighter gel than milk. It pairs particularly well with mango, lime and berries, but it will not taste as creamy unless you add a spoonful of Greek yogurt or coconut cream. If you would rather drink your chia than turn it into pudding, our Chia Seed Water guide uses a much lighter chia-to-liquid ratio and covers plain, lemon, coconut-water and overnight versions.

Dairy-Free Chia Pudding: The Easiest Swaps

Several recipes in this collection are naturally dairy-free when you use plant milk and skip optional Greek yogurt. Unsweetened almond milk is the lightest neutral base; canned coconut milk gives the richest dairy-free texture; and a lighter coconut-milk beverage works well for matcha, mango, apple-cinnamon, and gingerbread.

If you use protein powder in a dairy-free jar, check the ingredient label: whey and casein are dairy proteins, while many pea, soy, rice, and blended plant proteins are dairy-free.


High Protein Chia Pudding: Greek Yogurt, Protein Powder & Collagen

There are three straightforward ways to increase the protein in a chia jar. Greek yogurt gives you protein and immediate thickness. Protein powder can add more protein and flavor but needs to be dissolved well. Collagen peptides dissolve easily, although they do not thicken the pudding the way yogurt does. If collagen is part of your routine, Harvard Health has a measured overview of what collagen supplements can and cannot reasonably claim.
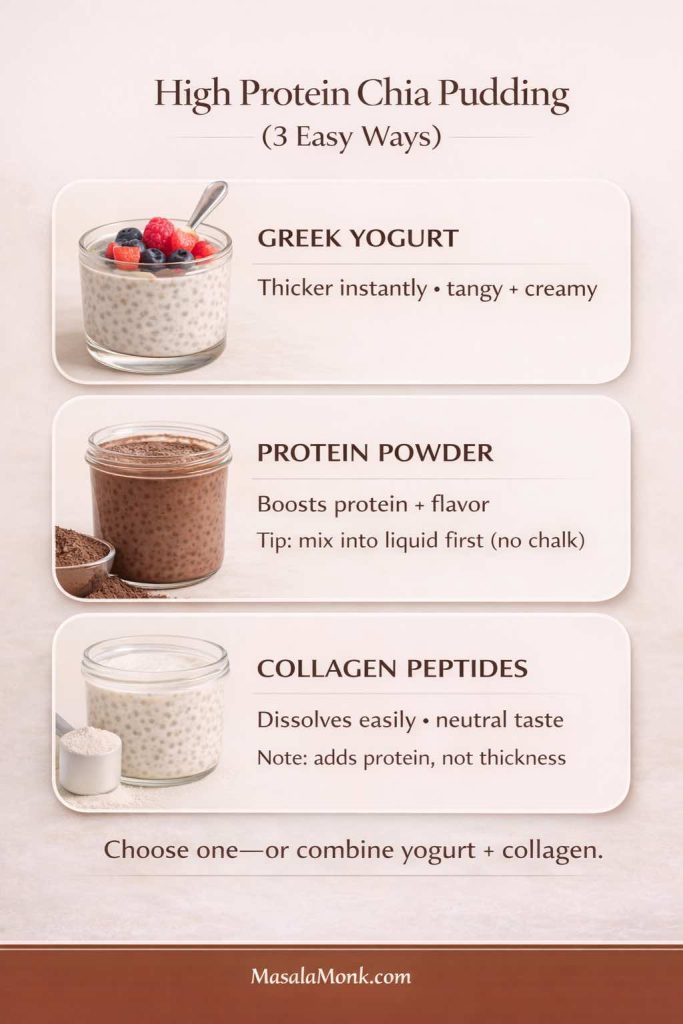
High protein chia pudding comparison showing Greek yogurt, protein powder and collagen peptides as three ways to add protein.
Greek yogurt changes both protein and texture; protein powder is a bigger flavor lever; collagen dissolves easily but contributes little to thickness.

How to add protein powder without a chalky texture

Do not dump dry protein powder into a finished chia pudding. Whisk it completely into the milk first, then add the chia. If your powder is stubborn, make a smooth paste with a small amount of liquid before gradually whisking in the rest.

Keep extra liquid nearby: protein powders absorb liquid very differently. After the 10-minute rest, add 2–4 tablespoons milk if the mixture has become unusually thick before it goes into the refrigerator.
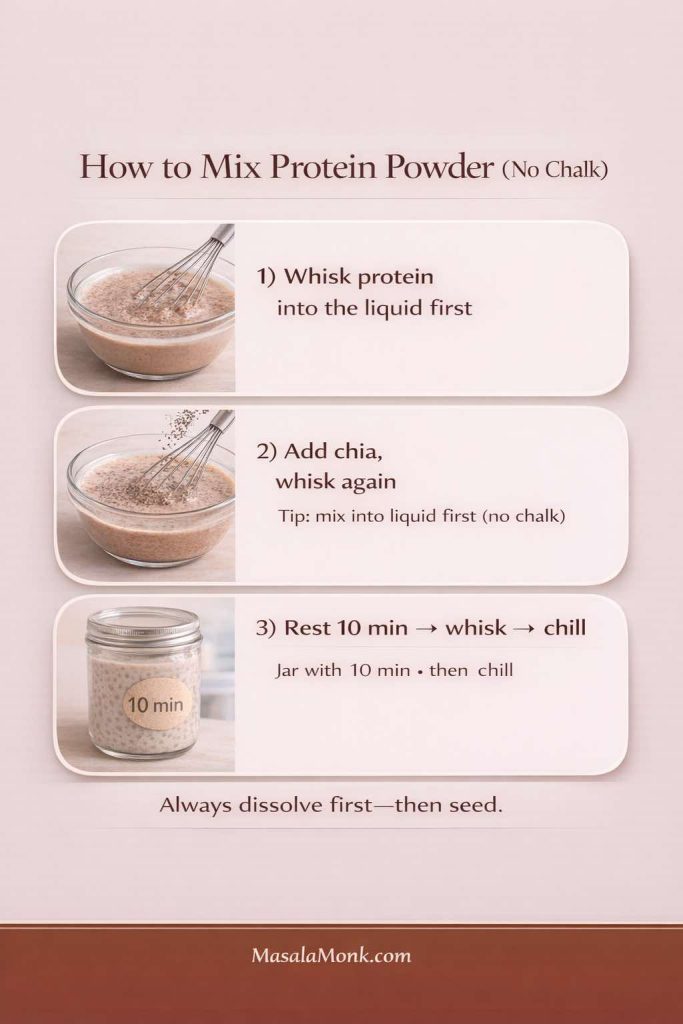
Three-step guide showing protein powder whisked into liquid first, followed by chia seeds and a final 10-minute rest and second stir.
For smooth protein chia pudding: dissolve the powder first, add the seeds second, then use the same 10-minute rest and second-stir method.

10 Low Carb Chia Pudding Recipes

Each recipe below makes roughly 2 small servings or 1 generous serving, depending on appetite and toppings. For meal prep, multiply the ingredients and portion the finished mixture into individual jars.

Low-carb vs keto: these recipes are not all equally low in carbohydrate. The unsweetened almond-milk, Greek-yogurt, chocolate, and coconut versions are the easiest to keep very low carb. Mango and apple are fruit-forward options; use the fruit as a measured accent if carbohydrate intake is a priority.
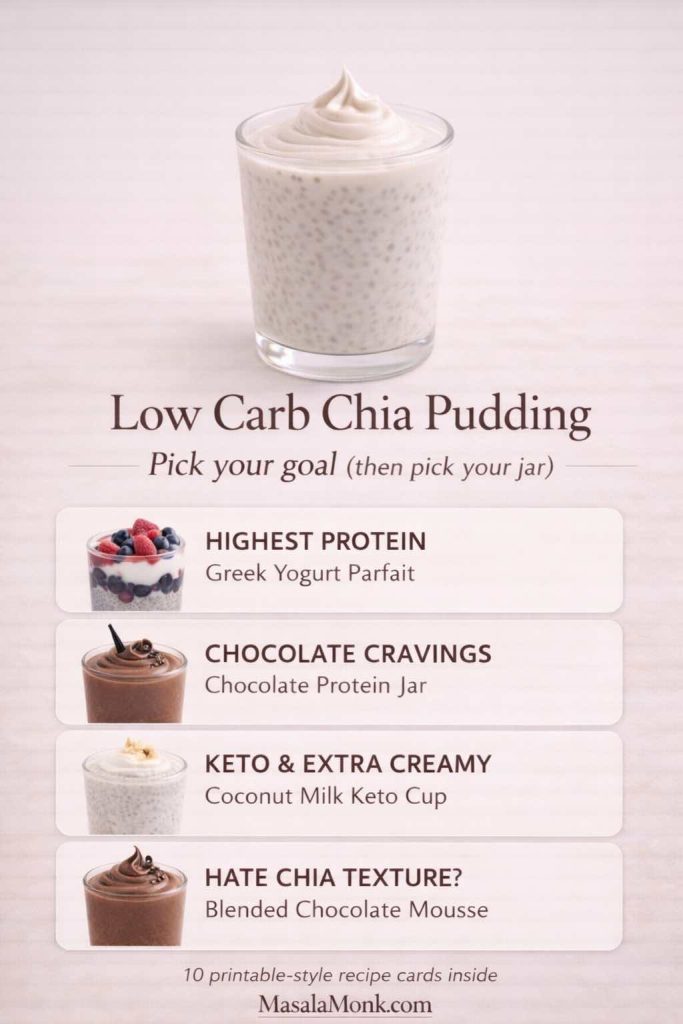
Goal-based chia pudding chooser showing Greek yogurt for highest protein, chocolate protein pudding for chocolate cravings, coconut milk for extra-creamy keto pudding and blended chocolate mousse for people who dislike whole chia texture.
Start with the result you want: Greek yogurt for thick and protein-forward, chocolate protein for cocoa cravings, coconut milk for the richest keto texture, or blended mousse if whole chia seeds are the problem.
If you want…Make this one
Thickest high-protein jarGreek Yogurt Chia Pudding
Simple everyday keto baseVanilla Almond Milk
Chocolate + proteinChocolate Protein
Chocolate dessert feelChocolate Peanut Butter
Fresh café-style flavorMatcha
Fruit-forwardMango
Cozy breakfastApple Cinnamon
Warm-spice dessert flavorGingerbread
Richest keto textureCoconut Milk
No whole-seed textureBlended Chocolate Mousse

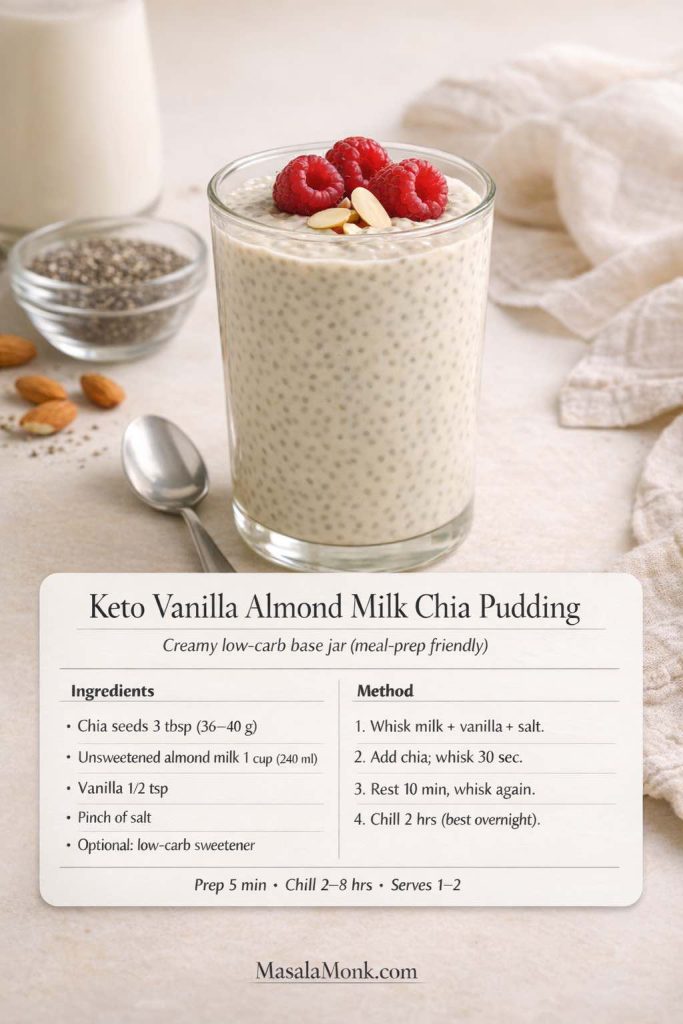
1) Keto Chia Pudding with Almond Milk

This is the easiest everyday low carb chia pudding to memorize. Vanilla keeps it neutral enough for berries, nuts, cocoa, cinnamon, or nut butter later.

Ingredients

  • 3 tablespoons chia seeds
  • 1 cup / 240 ml unsweetened almond milk
  • ½ teaspoon vanilla extract
  • Pinch of salt
  • Optional low-carb sweetener, to taste
Keto vanilla almond milk chia pudding topped with raspberries and sliced almonds.
The almond-milk jar is the useful blank canvas of the collection: light enough for fruit, but easy to make richer with yogurt, nuts or nut butter.

Method

  1. Whisk almond milk, vanilla, salt and sweetener, if using.
  2. Add the chia and whisk vigorously for 20–30 seconds.
  3. Rest 10 minutes, then whisk again.
  4. Cover and refrigerate for at least 2 hours or overnight.

Easy variations: add ½ teaspoon cinnamon; stir in 1 tablespoon unsweetened shredded coconut; or add 1–2 tablespoons Greek yogurt at serving time for a creamier finish.

For a deeper single-recipe treatment, see the keto chia pudding with almond milk.


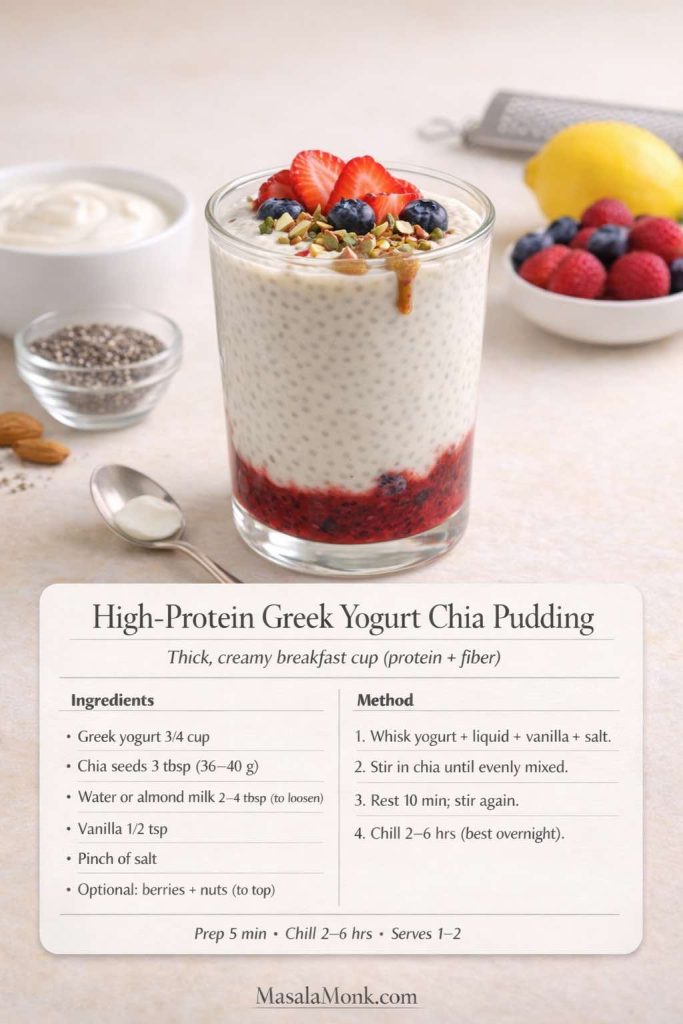
2) Chia Pudding with Greek Yogurt: High Protein & Ultra Creamy

If the chia pudding you want is thick, creamy and closer to cheesecake filling than a glass of soaked seeds, start here. Greek yogurt gives the jar body before the chia has even finished hydrating, while a small amount of liquid keeps the mixture creamy rather than pasty.

Ingredients

  • ¾ cup plain Greek yogurt
  • 3 tablespoons chia seeds
  • ¼ cup / 60 ml unsweetened almond milk or water, plus 1–2 tablespoons more after chilling if needed
  • ½ teaspoon vanilla extract
  • Pinch of salt
  • Optional sweetener, to taste
Thick high-protein Greek yogurt chia pudding layered with berries and topped with strawberries, blueberries, nuts and a small nut-butter drizzle.
This is the thickest protein-forward version in the collection: tangy Greek yogurt, hydrated chia and enough added liquid to keep the pudding creamy rather than stiff.

Method

  1. Whisk the Greek yogurt, vanilla, salt and ¼ cup / 60 ml water or almond milk until completely smooth.
  2. Stir in the chia seeds until evenly distributed.
  3. Rest for 10 minutes, then stir again so no dense chia pockets remain.
  4. Refrigerate for at least 2 hours. Overnight is fine.
  5. Stir before serving and add another 1–2 tablespoons liquid if you want it looser.

How thick should it look before chilling?

It should already be thick, but it should still move easily when stirred. If it looks like a stiff paste before going into the refrigerator, add another tablespoon or two of liquid. The chia will absorb more as it sits.

Can you use nonfat or regular yogurt?

Yes. Nonfat Greek yogurt works, although the finished pudding can taste a little sharper and less rich. Regular yogurt is thinner, so start with less added liquid and check the texture after hydration. Different yogurts vary enough that the final splash of liquid should be adjusted by texture rather than treated as an exact requirement.

Can you add protein powder too?

Yes. Whisk the protein powder into the yogurt and loosening liquid before adding chia. Protein powders absorb liquid differently, so expect to add another 1–3 tablespoons milk if the mixture becomes unusually stiff after the 10-minute rest.

Best toppings and variations

For a cheesecake-style jar, use vanilla, berries and a little lemon zest. For chocolate, whisk cocoa into the yogurt before adding chia. Peanut butter, chopped nuts, cacao nibs and a small berry layer all work well because they add contrast without turning the pudding watery.

If this thick, tangy, almost-cheesecake style is the chia pudding you actually want, keep going with our 10 Creative Chia Pudding Recipes. That collection branches into Greek-yogurt, cheesecake, chocolate, blueberry-lemon, mango and coconut-cream directions, so you can keep the texture you like and change the flavor.


3) Chocolate Protein Chia Pudding

This is the jar to make when you want chocolate flavor without turning breakfast into a sugar-heavy dessert. The important technique is dissolving the protein powder and cocoa before the chia goes in.

  • 1 cup / 240 ml unsweetened almond milk or dairy milk
  • 1 scoop chocolate protein powder, or vanilla protein plus extra cocoa
  • 2 tablespoons cocoa or cacao powder
  • 3 tablespoons chia seeds
  • Pinch of salt
  • Optional sweetener, to taste
  • Optional: 1 tablespoon Greek yogurt for extra creaminess
  • 2–4 tablespoons extra milk, only if your protein powder makes the mixture unusually thick
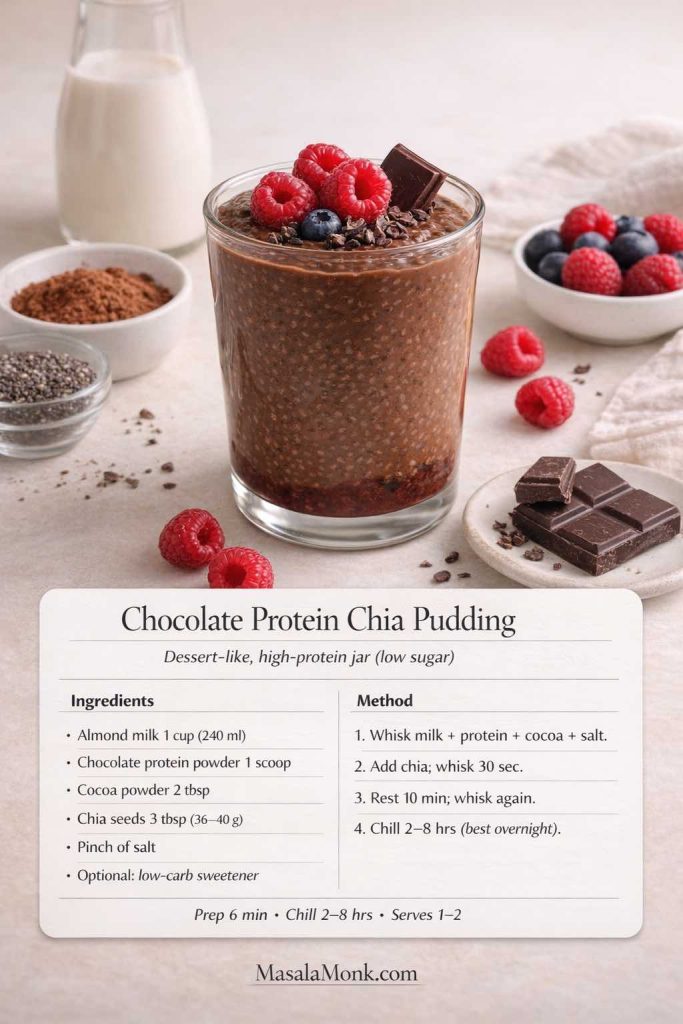
Chocolate protein chia pudding topped with raspberries, cacao nibs and dark chocolate.
Cocoa and protein powder make this the most direct chocolate-for-breakfast jar in the collection.
  1. Whisk the milk, protein powder, cocoa, salt and sweetener until completely smooth.
  2. Add chia and whisk again.
  3. Rest 10 minutes, then stir thoroughly. If it already looks very thick, add 2–4 tablespoons extra milk.
  4. Refrigerate for at least 2 hours; overnight gives the most settled texture.

If it tastes chalky: whisk the protein powder with a small amount of milk into a smooth paste first, then gradually add the rest of the milk.


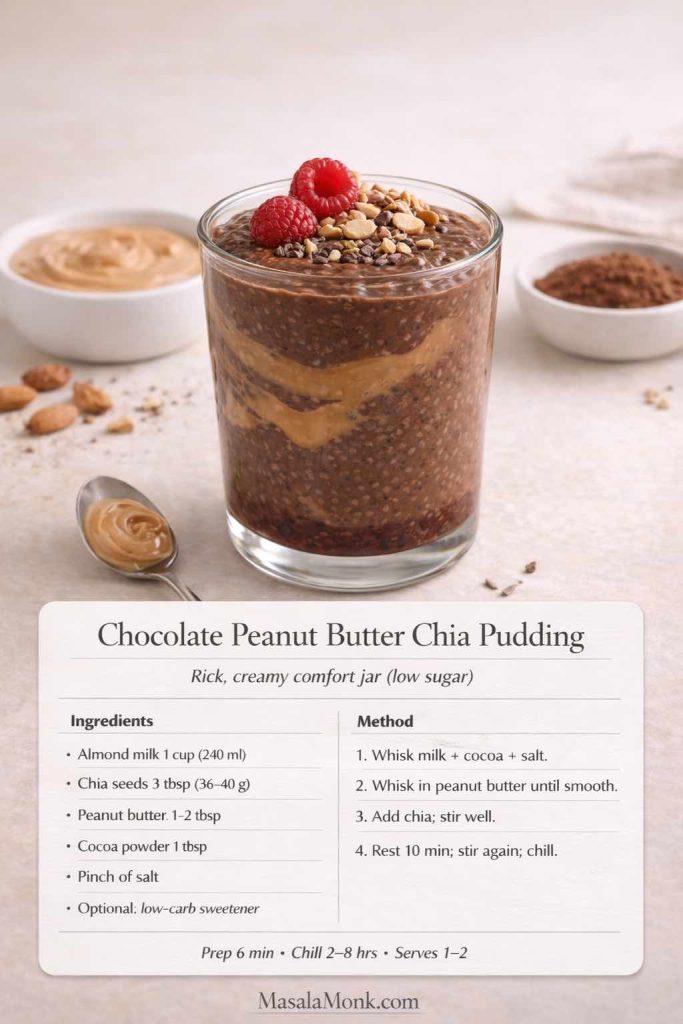
4) Chocolate Peanut Butter Chia Pudding

Peanut butter supplies richness and makes chocolate taste fuller even when you keep the pudding only lightly sweetened.

  • 1 cup / 240 ml almond milk or dairy milk
  • 3 tablespoons chia seeds
  • 1–2 tablespoons peanut butter
  • 1 tablespoon cocoa powder
  • Pinch of salt
  • Optional sweetener
Chocolate peanut butter chia pudding with a peanut butter swirl, raspberries, chopped peanuts and cacao nibs.
Chocolate and peanut butter create a richer dessert-style jar without needing much additional sweetness.
  1. Whisk milk, cocoa, salt and sweetener until smooth.
  2. Whisk in the peanut butter until evenly incorporated.
  3. Add chia, rest 10 minutes and stir again.
  4. Refrigerate for at least 2 hours.

A tiny splash of vanilla or pinch of cinnamon can make the cocoa taste deeper. Top with berries, roasted nuts or a few cacao nibs.


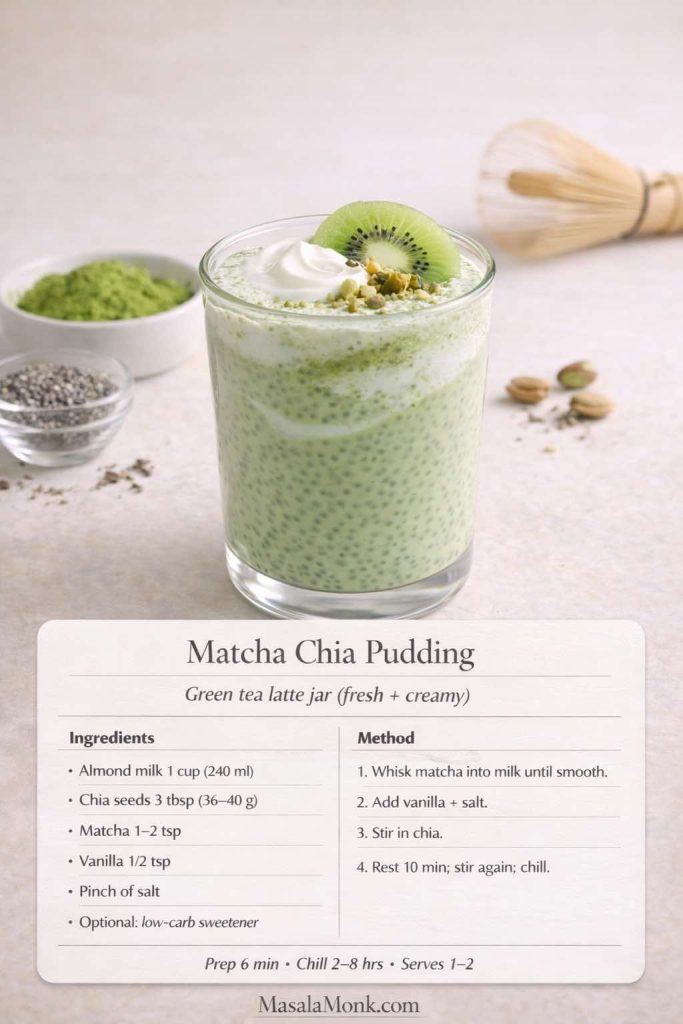
5) Matcha Chia Pudding

Matcha gives chia pudding a clean green-tea flavor that works especially well with vanilla and a small pinch of salt.

  • 1 cup / 240 ml unsweetened almond milk or light coconut-milk beverage
  • 3 tablespoons chia seeds
  • 1–2 teaspoons matcha powder
  • ½ teaspoon vanilla
  • Pinch of salt
  • Optional sweetener
Creamy matcha chia pudding topped with kiwi, pistachio and a small spoonful of yogurt.
Matcha creates a lighter, café-style change of pace between the richer chocolate and coconut puddings.
  1. Whisk or sift matcha into the milk until smooth.
  2. Add vanilla, salt and sweetener, if using.
  3. Add chia, rest 10 minutes, stir again and refrigerate.

If your matcha clumps, whisk it first with 1–2 tablespoons warm water to form a smooth paste. Matcha contains caffeine, so use less or enjoy it earlier in the day if you are sensitive to it.


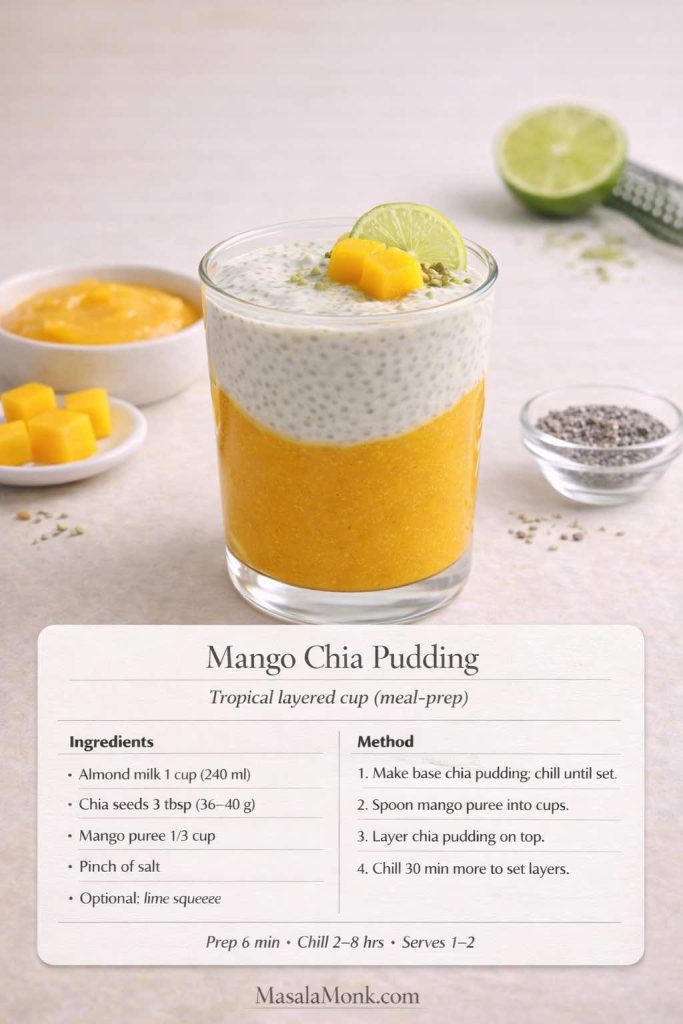
6) Mango Chia Pudding

Mango gives you plenty of flavor from a relatively small amount of fruit. Lime and a pinch of salt help the mango taste brighter, so you do not need to turn the whole jar into mango puree.

  • 1 cup / 240 ml almond milk or coconut-milk beverage
  • 3 tablespoons chia seeds
  • ⅓ cup mango puree or finely diced mango
  • Pinch of salt
  • Optional squeeze of lime
Layered mango chia pudding with bright mango puree, creamy chia pudding, mango pieces and lime.
Layering the mango rather than mixing a large quantity through the whole jar gives you strong tropical flavor without overwhelming the chia base.
  1. Make the chia base with milk, chia and salt.
  2. Chill until set.
  3. Fold in the mango just before eating, or layer the puree at the bottom of the jar.
  4. Finish with lime, if using.

If the tropical-fruit direction is what you like, try our pineapple chia pudding next. It uses the same two-stir logic but goes deeper on pineapple, yogurt, texture, and how to keep the pudding spoonable rather than watery.


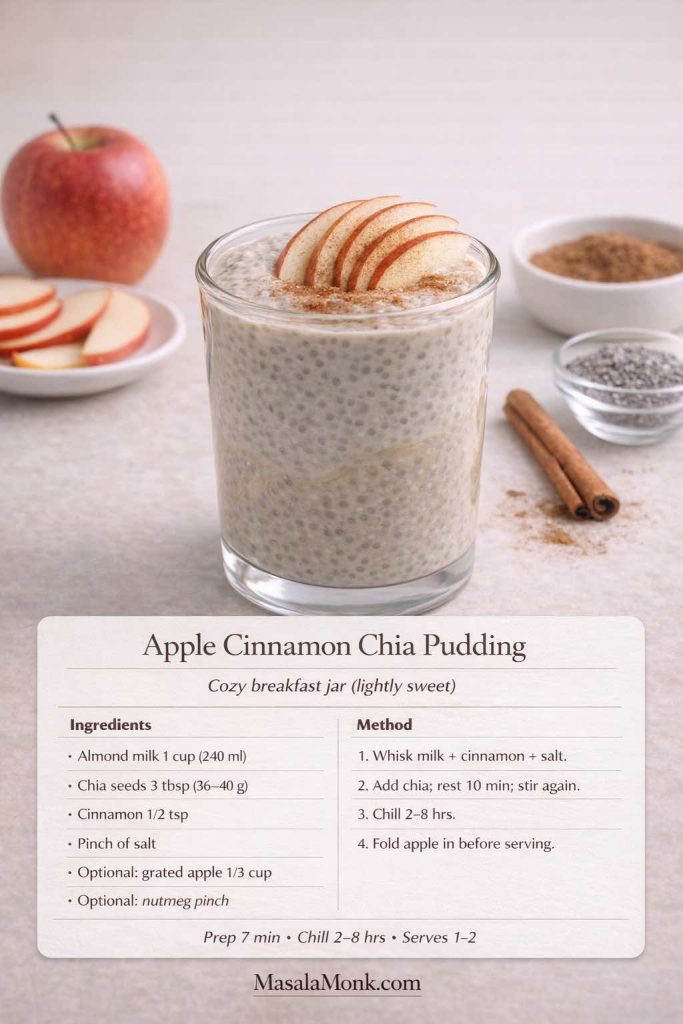
7) Apple Cinnamon Chia Pudding

This version gets most of its cozy character from cinnamon, vanilla and nutmeg, so the apple can stay a relatively small accent.

  • 1 cup / 240 ml unsweetened almond milk
  • 3 tablespoons chia seeds
  • ½ teaspoon cinnamon
  • Pinch of salt
  • Optional: ⅓ cup grated apple
  • Optional: pinch of nutmeg
Apple cinnamon chia pudding topped with thin apple slices and cinnamon.
For the freshest texture, add grated apple shortly before serving rather than letting it sit in the pudding for several days.
  1. Whisk milk, cinnamon, salt and nutmeg.
  2. Add chia, rest 10 minutes, stir again and chill.
  3. Fold in grated apple shortly before serving.

Stricter low-carb version: skip the apple and use cinnamon, vanilla and chopped pecans for a cinnamon-pecan jar.


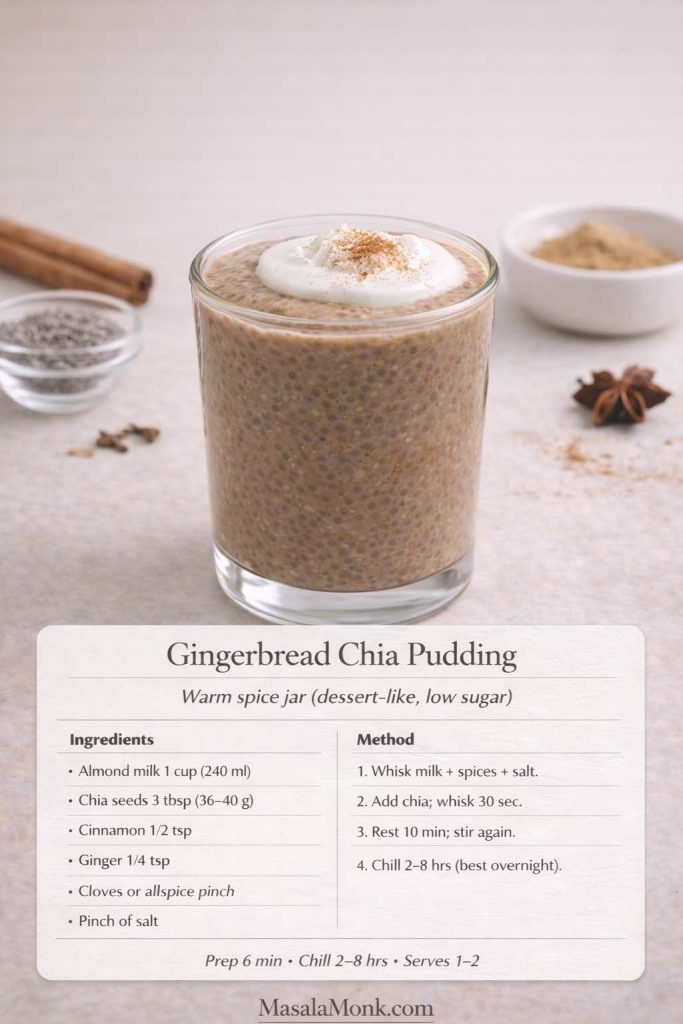
8) Gingerbread Chia Pudding

Gingerbread chia pudding is about warm-spice flavor rather than a health halo: cinnamon, ginger and cloves turn the same neutral base into something that feels much more dessert-like.

  • 1 cup / 240 ml almond milk or coconut-milk beverage
  • 3 tablespoons chia seeds
  • ½ teaspoon cinnamon
  • ¼ teaspoon ground ginger
  • Pinch of cloves or allspice
  • Pinch of salt
  • Optional sweetener
Gingerbread chia pudding topped with yogurt and cinnamon.
Warm spices transform a basic chia-and-milk jar without needing a complicated ingredient list.
  1. Whisk the spices, salt and sweetener into the milk.
  2. Add chia, rest 10 minutes, stir again and refrigerate.
  3. Serve with chopped nuts, Greek yogurt or coconut cream.

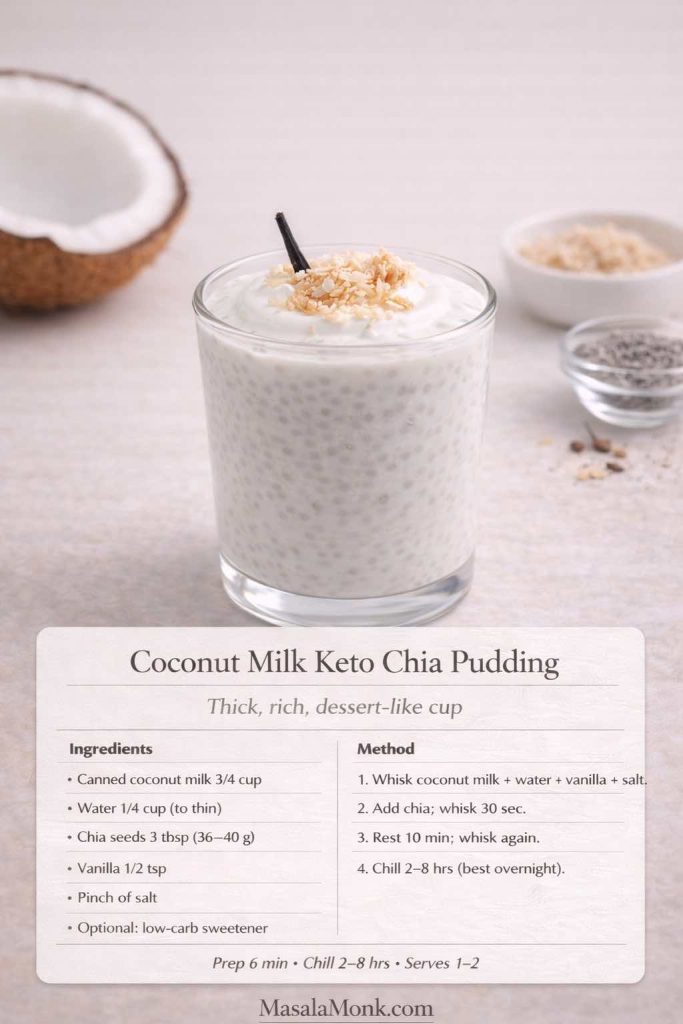
9) Keto Chia Pudding with Coconut Milk

This is the richest milk-based pudding in the collection. Canned coconut milk gives you much more body than almond milk, but thinning it slightly helps the chia hydrate evenly.

  • 3 tablespoons chia seeds
  • ¾ cup / 180 ml canned coconut milk
  • ¼ cup / 60 ml water, plus more if needed
  • ½ teaspoon vanilla
  • Pinch of salt
  • Optional sweetener
Rich coconut milk keto chia pudding topped with toasted coconut and vanilla.
Canned coconut milk produces the densest, richest milk-based chia pudding in this collection.
  1. Whisk coconut milk, water, vanilla, salt and sweetener until smooth.
  2. Add chia, rest 10 minutes and stir again.
  3. Refrigerate for at least 2 hours.
  4. If it becomes extremely thick overnight, loosen it with a splash of water before serving.

10) Blended Chia Pudding: Smooth Chocolate Mousse

If the idea of chia appeals to you but the whole-seed texture does not, this is the recipe worth trying. Let the chia hydrate first, then blend the finished pudding until glossy and smooth.

  • 1 cup / 240 ml almond milk or dairy milk
  • 3 tablespoons chia seeds
  • 1–2 tablespoons cocoa or cacao powder
  • Pinch of salt
  • Optional sweetener
  • Optional: 1 tablespoon peanut butter or 2 tablespoons Greek yogurt
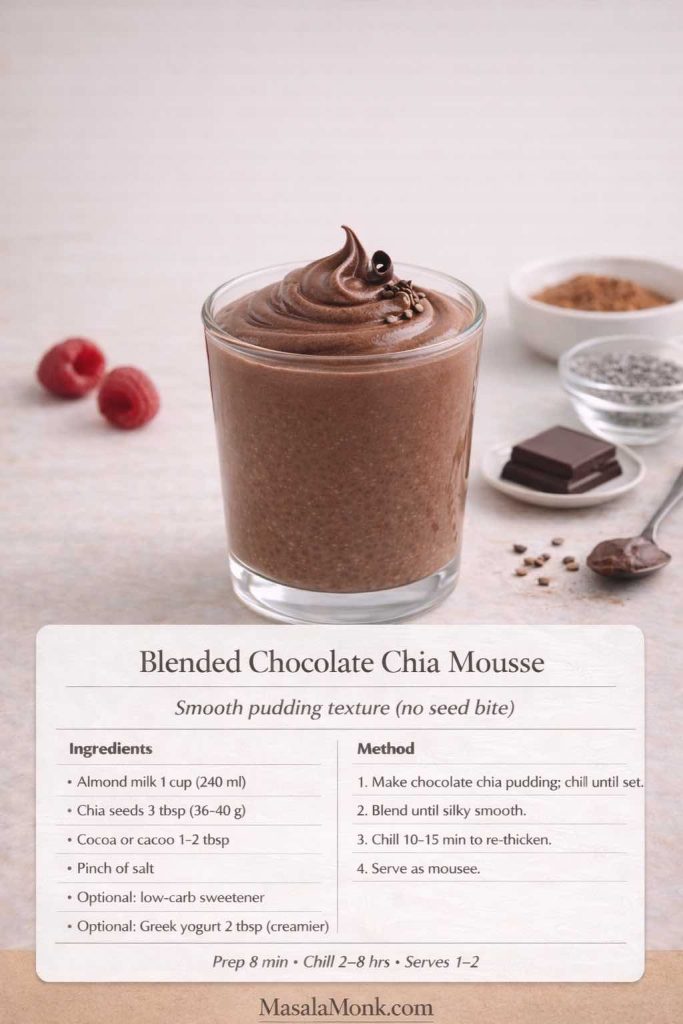
Silky blended chocolate chia mousse topped with dark chocolate and cacao nibs.
Hydrate first and blend second: that is what changes chia from a seedy pudding into a much smoother mousse-like texture.
  1. Make a standard chocolate chia pudding and refrigerate it for at least 2 hours.
  2. Blend until completely smooth and glossy.
  3. Add Greek yogurt or peanut butter if you want a richer finish.
  4. Chill for another 10–15 minutes before serving.

If protein powder is part of the recipe, blending after the chia has set can also smooth out small powdery pockets.

Whichever flavor you choose, texture is the part most likely to need adjusting. The fixes below are designed so you can rescue the pudding you already made instead of starting over.


Chia Pudding Troubleshooting: Runny, Too Thick, Lumpy or Bland

Most disappointing chia pudding can be traced to the ratio, hydration time, stirring pattern, or the thickness of the liquid you started with. Fix the texture before abandoning the jar.

ProblemWhat probably happenedWhat to do now
Runny after 2+ hoursToo much liquid, too little chia, or very thin milkAdd 1 teaspoon chia at a time, stir well and chill another 30–60 minutes.
Too thick or pastyRich coconut milk, thick yogurt, extra protein powder, or too much chiaStir in milk or water 1 tablespoon at a time until creamy.
Large chia clumpsThe seeds settled together before fully hydratingBreak them up thoroughly; next time use the 10-minute second stir.
Seeds still crunchyNot enough hydration time or liquidAdd a small splash of liquid and give the pudding more time.
Protein powder tastes chalkyPowder was added after the chia or not dissolved firstBlend the pudding, or next time dissolve powder completely before adding seeds.
Watery fruit layerJuicy fruit sat in the jar too longKeep berries and other watery toppings separate until serving.
Flavor is flatNot enough salt, aroma, richness or acidityAdd a pinch of salt plus vanilla, cinnamon, cocoa, nut butter, citrus zest or berries.
You hate the seed textureThe pudding may be fine; the texture simply is not for youBlend it into chocolate chia mousse.

One important correction: if a milk-based pudding is only slightly soft at the 30-minute mark, do not keep throwing chia into it. Give it the full two hours first. Chia continues absorbing liquid as it rests.


Chia Pudding Meal Prep & Storage

The easiest way to meal prep chia is to make one plain base and create several flavors from it rather than mixing four completely separate recipes.

  • Whisk the base in a bowl where you can easily break up clumps.
  • Do the 10-minute second stir.
  • Portion into three or four jars.
  • Flavor the jars in different directions—vanilla, cocoa, matcha, cinnamon, yogurt.
  • Keep crunchy toppings and watery fruit separate until serving.
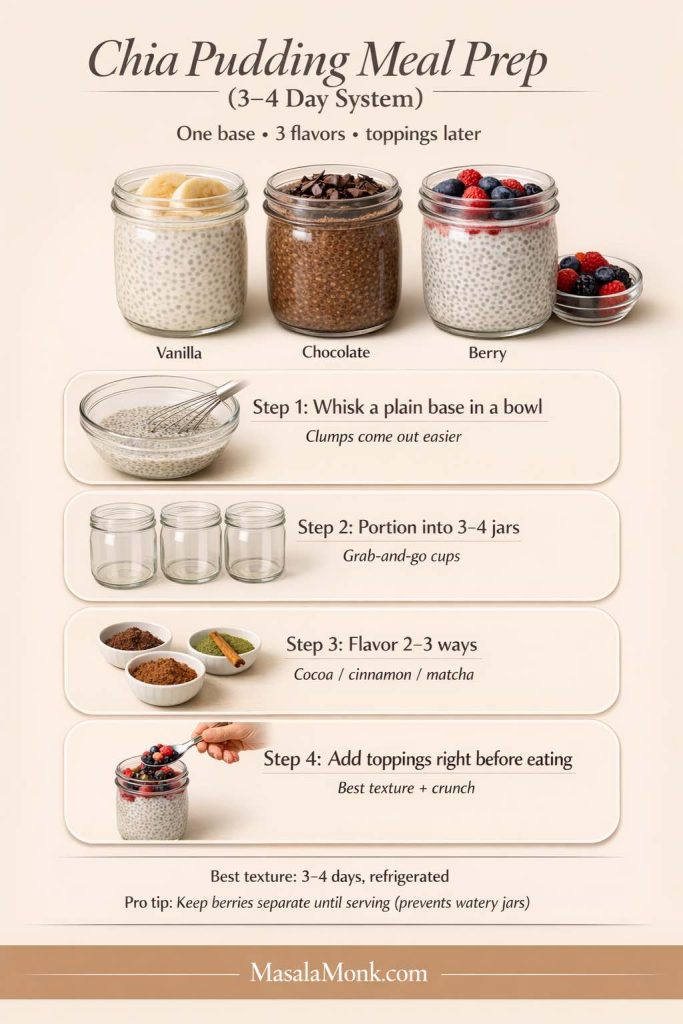
Chia pudding meal-prep system showing one base divided into several jars and flavored with vanilla, chocolate and berries, with toppings kept separate until serving.
One base, several flavors, toppings added later: this is much easier to repeat than making a completely different pudding every morning.

For quality, most chia puddings are best eaten within about 3–4 days when refrigerated. Yogurt- and milk-based versions should stay cold, and fruit is usually best added closer to serving. Follow normal refrigerated food-safety practices and discard anything that develops an unusual smell, appearance or signs of spoilage.

If what you really enjoy is the make-it-tonight, grab-it-tomorrow routine rather than chia specifically, our high protein overnight oats give you the same fridge-ready breakfast rhythm with oats, yogurt, protein-powder and dairy-free routes.


How to Make Chia Pudding Taste Better

If chia pudding tastes like a health chore, the problem is usually not the chia. A plain mixture of seeds and unsweetened milk needs flavor structure just like any other pudding.

  • Salt: a small pinch makes chocolate, vanilla, fruit and nut butter taste fuller.
  • Vanilla or warm spice: vanilla, cinnamon, ginger or nutmeg give the jar aroma without requiring much sweetness.
  • Depth: cocoa, cacao or matcha create a strong flavor identity.
  • Creaminess: Greek yogurt, canned coconut milk or nut butter changes both flavor and mouthfeel.
  • Contrast: berries, chopped nuts, toasted coconut and cacao nibs stop every spoonful feeling the same.
  • Acidity: lemon or lime zest can make fruit flavors brighter.
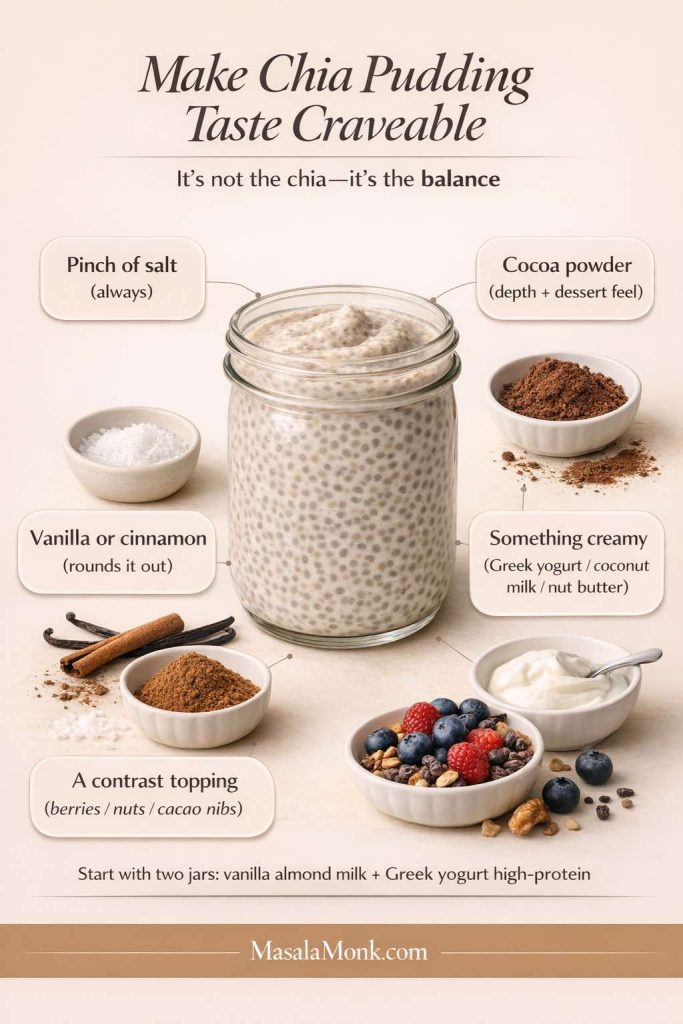
Flavor-balance guide for chia pudding showing salt, vanilla or cinnamon, cocoa, creamy ingredients and contrasting toppings.
Good chia pudding needs the same things other desserts do: seasoning, aroma, richness and contrast.

If you are making chia pudding for the first time, a useful two-jar experiment is one vanilla almond-milk jar and one Greek-yogurt jar. You will immediately learn whether you prefer a lighter gel-style pudding or a thicker, tangier texture.


Frequently Asked Questions

1) What is the best chia pudding ratio?

For a milk-based pudding, start with 3 tablespoons chia seeds to 1 cup / 240 ml liquid. Use a little less chia for a softer pudding. Greek-yogurt chia pudding uses a different ratio because yogurt already supplies most of the thickness.

2) How long does chia pudding need to set?

Give it at least 2 hours for a dependable set. A 30–45 minute quick version is possible but softer. Overnight works especially well for meal prep.

3) Why is my chia pudding watery?

It may need more time, more chia, or a better second stir. If it is still runny after at least two hours, add about 1 teaspoon chia, stir thoroughly and chill for another 30–60 minutes.

4) Why is my chia pudding too thick?

Thick Greek yogurt, canned coconut milk, protein powder and slightly heavy chia measurements can all produce an unexpectedly dense pudding. Stir in water or milk a tablespoon at a time until it becomes creamy again.

5) How do I stop chia seeds clumping together?

Whisk immediately after adding the seeds, then stir or whisk again after about 10 minutes. That second stir redistributes the seeds just as they begin to gel.

6) Can I make chia pudding with Greek yogurt and no milk?

Yes. Use water instead of milk to loosen the yogurt. Start with ¾ cup Greek yogurt, 3 tablespoons chia and ¼ cup / 60 ml water, then add another tablespoon or two after chilling if the pudding is too stiff.

7) Is Greek yogurt better than regular yogurt for chia pudding?

Neither is inherently better, but they behave differently. Greek yogurt is thicker and generally higher in protein, so it gives a firmer pudding. Regular yogurt starts looser, meaning you may need less added liquid or slightly more chia.

8) Can I add protein powder to chia pudding?

Yes. For the smoothest texture, dissolve the protein powder in the milk or yogurt mixture before adding the chia seeds. Because powders absorb liquid differently, keep a little extra milk nearby and adjust after the 10-minute rest.

9) Can I make chia pudding with almond milk?

Yes. Unsweetened almond milk is one of the easiest bases for low carb chia pudding because its flavor is mild and it works well with vanilla, cocoa, cinnamon, berries, matcha and nut butter.

10) Can I make chia pudding with coconut milk?

Yes. Canned coconut milk makes an especially rich pudding. If the coconut milk is very thick, dilute it with a little water before adding chia so the seeds hydrate evenly.

11) Can I make chia pudding with oat milk?

Yes. Oat milk creates a mild, creamy pudding, although many oat milks contain substantially more carbohydrate than unsweetened almond milk, so check the label if low carb is your priority.

12) Can I make dairy-free chia pudding?

Yes. Use unsweetened almond milk, coconut milk, or another dairy-free milk you enjoy. If adding protein powder, check whether it contains whey or casein; those are dairy proteins.

13) Can I make blended chia pudding?

Yes, and it is one of the best solutions if you dislike whole chia seeds. Let the pudding hydrate first, then blend until smooth. Cocoa, peanut butter or Greek yogurt can make the result even more mousse-like.

14) What is the easiest three-ingredient chia pudding?

A simple version is chia seeds + unsweetened almond milk + vanilla. Another is chia + coconut milk + cocoa. Add a pinch of salt if possible; it makes a surprisingly large difference to the finished flavor.

15) Can I use frozen berries in chia pudding?

Yes. Thawed berries release juice, which can be useful as a swirl or compote-style layer. For meal prep, keep very juicy berries separate until serving if you do not want them loosening the pudding.

16) How can I sweeten chia pudding without much sugar?

Start by improving flavor before simply increasing sweetness. Vanilla, cinnamon, cocoa, nut butter, coconut milk, berries, citrus zest and a pinch of salt can all make the pudding taste more complete. If you use a low-carb sweetener, add only enough to suit your taste.

17) Is chia pudding keto-friendly?

It can fit many low-carb or ketogenic eating patterns when made with ingredients such as unsweetened almond milk or coconut milk and appropriate toppings. The final carbohydrate content depends on your milk, yogurt, fruit, sweetener and serving size, so check the ingredients you actually use rather than relying on the word “keto” alone.

18) How long does chia pudding last in the fridge?

For quality, aim to eat most homemade chia pudding within about 3–4 days, refrigerated. Keep toppings such as nuts separate for crunch and add juicy fruit later if you want the pudding to stay thick.

19) Which chia pudding should I make first?

If you want the simplest base, start with vanilla almond milk chia pudding. If you came for the thick, creamy version, make the Greek yogurt chia pudding. And if chia’s seed texture has always bothered you, go directly to the blended chocolate mousse.
Posted on — 7 Comments

10 Vegan Chocolate Cake Recipes (Easy, Moist, & Dairy-Free)

Slice of vegan chocolate cake with glossy ganache, cocoa dusting, and coffee—cover image for 10 vegan chocolate cake recipes (easy, moist, dairy-free).

If you want vegan chocolate cake that tastes like the real thing—deep cocoa aroma, soft crumb, and a finish that feels genuinely indulgent—this roundup of Vegan Chocolate Cake Recipes is for you. Not “good for vegan,” not “surprisingly decent,” but the kind of cake you’d happily serve to anyone who loves chocolate. Better still, these recipes are built to be repeatable, so you can bake a simple vegan chocolate cake on a quiet evening, then turn around and make a party-ready vegan chocolate layer cake the next weekend without relearning everything from scratch.

Chocolate cake has a strange superpower: it can be both nostalgic and endlessly new. On one day, you want a plush slice with frosting and candles. On another, you want a quick vegan chocolate mug cake with a spoon straight from the cup. Meanwhile, when you’re feeding a crowd, a vegan chocolate sheet cake is often the most sensible move—easy to transport, easy to portion, and still every bit as satisfying. And then there are the cakes that feel like a dessert menu finale: a flourless vegan chocolate cake that slices like a torte, or vegan chocolate lava cakes that spill molten chocolate onto a plate.

Because each craving has its own logic, the ten recipes below cover a range of textures and formats—layer, sheet, bundt, loaf, flourless, molten, gluten-free, mug, beetroot, and avocado—while staying anchored in the same promise: strong chocolate flavour, reliable structure, and a moist crumb that doesn’t dry out by tomorrow.

Before we start baking, though, it’s worth getting a few fundamentals in place. Once those are clear, every recipe becomes easier, and every variation feels less like guesswork and more like cooking.


Vegan chocolate cake basics that make everything easier

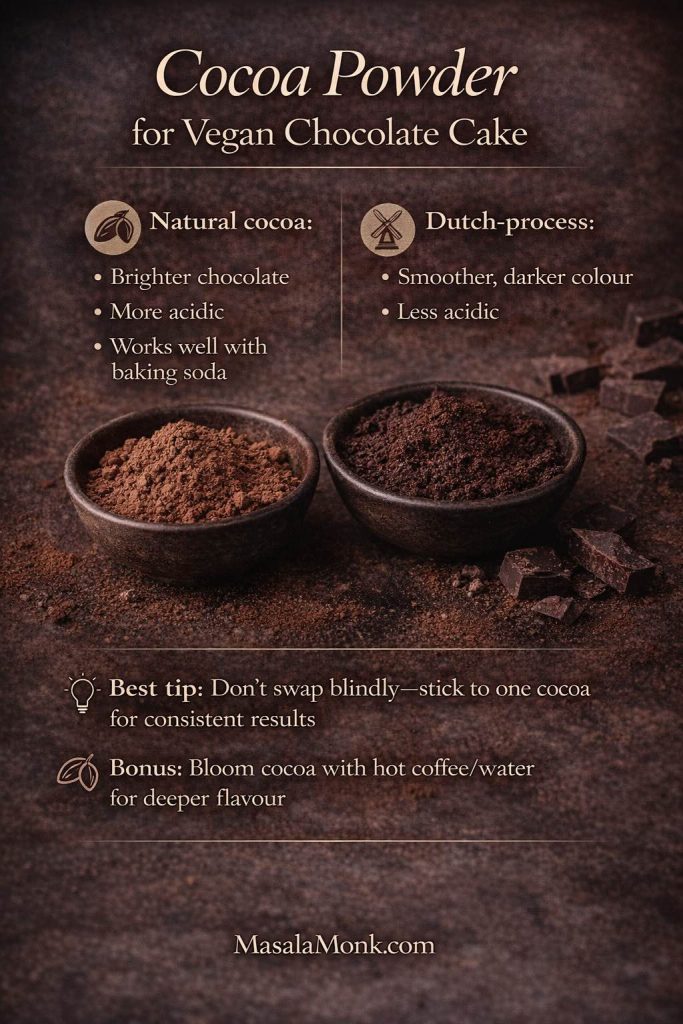
1) Cocoa powder: the flavour choice that also affects rise

Cocoa powder isn’t just flavour. It changes how a cake behaves, especially when baking soda is involved.

  • Natural cocoa is typically more acidic. It can taste brighter, sometimes slightly sharper, and it often plays very nicely with baking soda.
  • Dutch-process cocoa is alkalised. It tends to taste smoother and darker, and it can make cakes look deeper in colour.
Natural cocoa vs Dutch-process cocoa infographic for vegan chocolate cake, explaining flavour and acidity differences plus tips for consistent results and blooming cocoa with hot coffee or water.
Natural vs Dutch-process cocoa for vegan chocolate cake: use this quick guide to choose the flavour you want—and bloom cocoa with hot coffee or water for deeper chocolate.

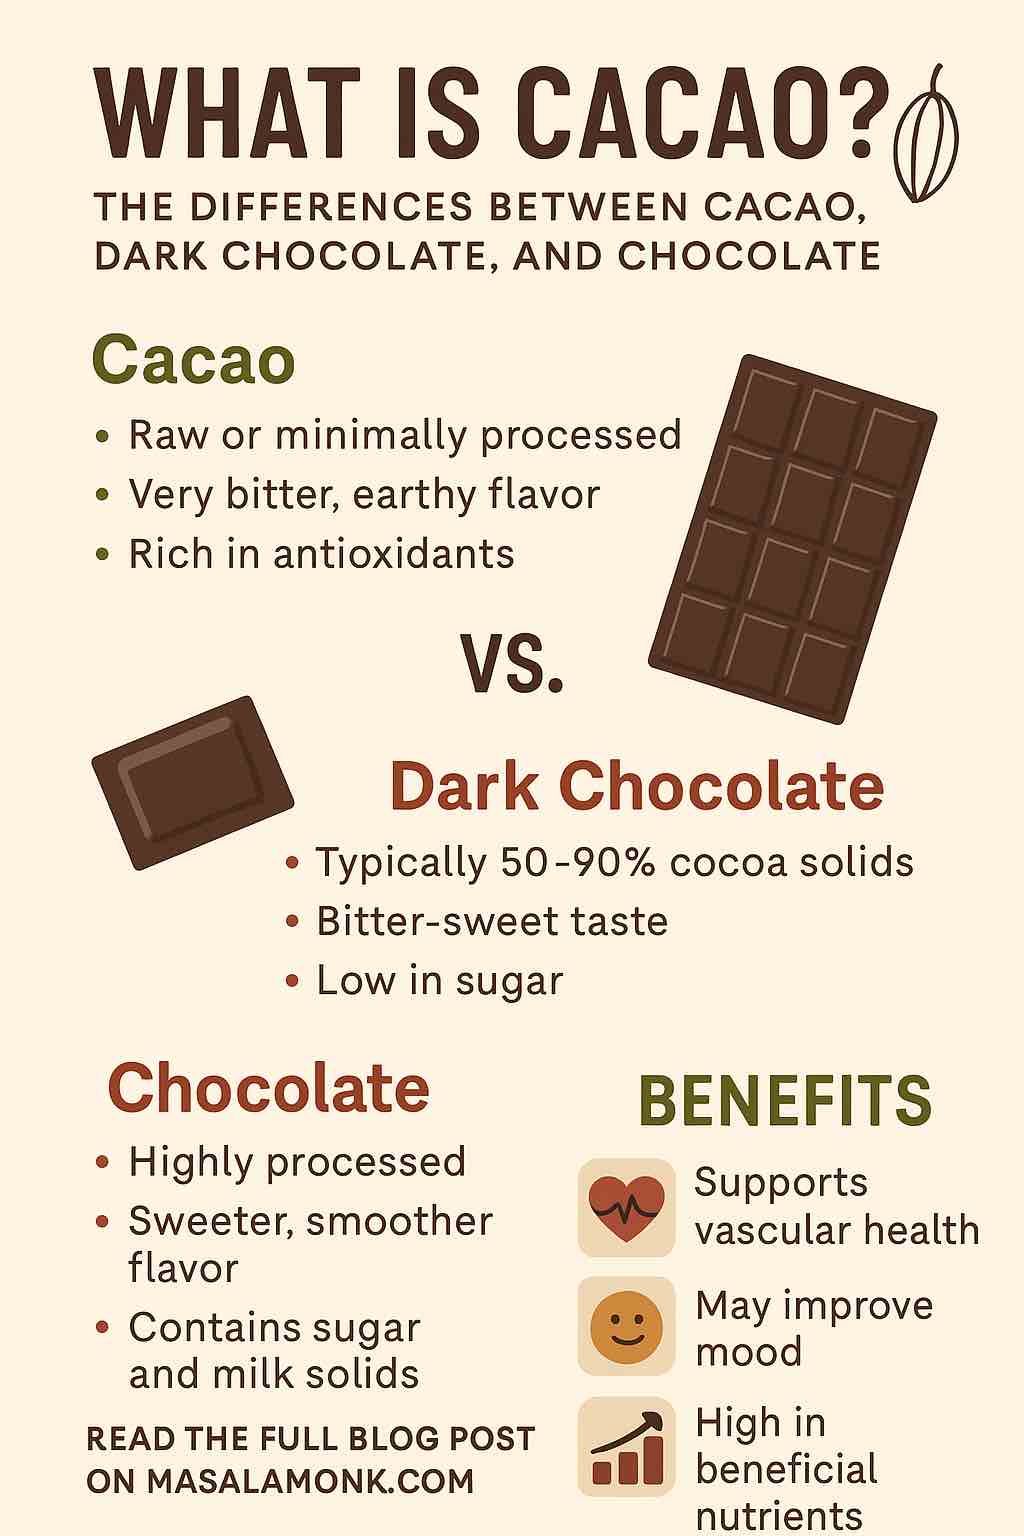
Both are excellent, yet they don’t always perform identically if you swap one for the other without adjusting anything else. If you enjoy knowing the “why” (without it turning into a science lesson), these two guides are genuinely helpful: Dutch-process vs. natural cocoa and The A-B-C’s of cocoa. If you want a broader, easy read on cacao vs cocoa vs chocolate, MasalaMonk’s breakdown is a great companion: What is Cacao?: Cacao vs. Chocolate vs. Dark Chocolate.

Practical way to think about it: pick a cocoa you love, then bake with it consistently. Once you know how that cocoa behaves in your oven, you’ll get “your” signature vegan chocolate cake every time.


2) Plant milk: use what you like, but know what it nudges

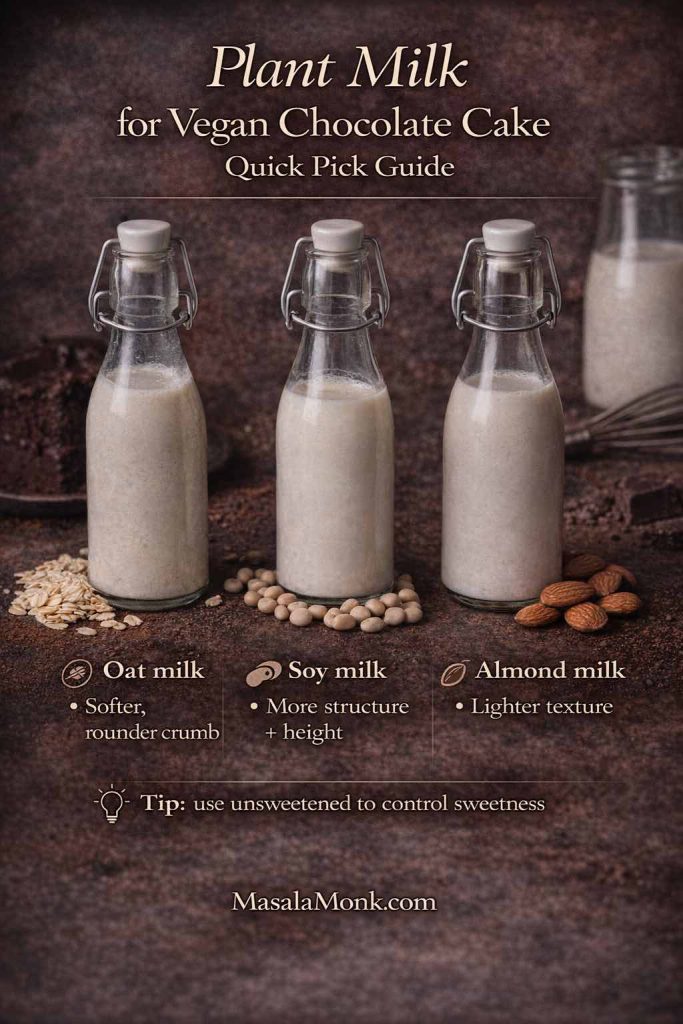
Most plant milks will work. Still, they can push texture subtly:

  • Oat milk often gives a softer, rounder crumb.
  • Soy milk can build structure and height.
  • Almond milk is lighter, so cakes may feel a touch less plush (not bad—just different).
Plant milk guide for vegan chocolate cake comparing oat milk, soy milk, and almond milk, with notes on crumb texture, structure, and a tip to use unsweetened milk.
Best plant milk for vegan chocolate cake: choose oat for a softer crumb, soy for more structure and height, or almond for a lighter texture—then use unsweetened to control sweetness.

If you like making basics at home, Easy Homemade Oats Milk is a handy internal reference, especially when you want a neutral, budget-friendly baking milk.


3) Oil vs vegan butter: choose based on the texture you want

For many vegan chocolate cake recipes, oil is the shortcut to moisture. Cakes stay tender longer, they resist drying out, and they’re forgiving if you slightly overbake. Vegan butter can be lovely too; however, it firms up in the fridge, so butter-based cakes can feel denser when cold.

If you’ve ever noticed how oil-based cakes stay moist, you’ll see that principle clearly in Orange Olive Oil Cake – Ridiculously Easy and Super Moist. Even though it’s citrus rather than chocolate, the crumb logic carries over perfectly.


4) The acid trick: why vinegar appears in so many dairy-free chocolate cake recipes

A small amount of vinegar (or lemon juice) shows up in vegan baking because it helps baking soda do its job. It isn’t there to make cake taste sour; rather, it supports lift and tenderness. As a result, cakes rise more evenly and feel lighter.


5) “Blooming” cocoa: the easiest way to make chocolate taste bigger

You’ll notice several recipes use hot coffee or hot water. This is one of the simplest upgrades in chocolate baking: hot liquid helps cocoa dissolve and intensifies aroma.

  • If you love deep chocolate, use coffee.
  • If you don’t like coffee, use hot water. You’ll still get the cocoa bloom effect; you just won’t add coffee’s roast notes.

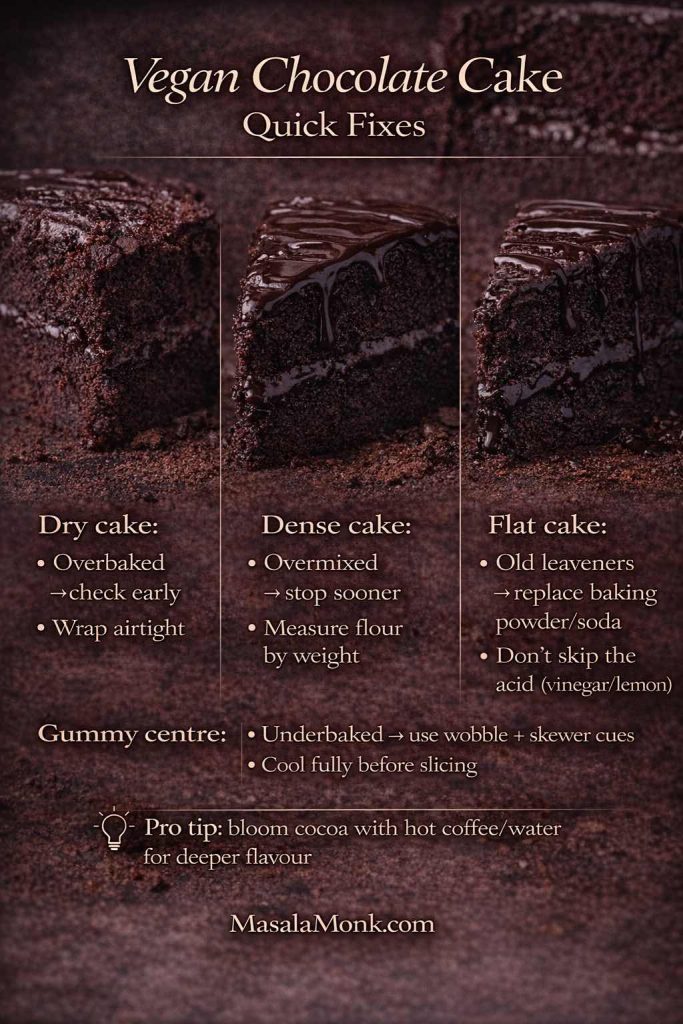
6) Mixing: stop sooner than your instincts suggest

Chocolate batter often looks gorgeous long before it’s actually mixed evenly, which is why it tempts you to keep going. Nevertheless, overmixing can tighten crumb. Instead, aim for smooth and combined, then stop.

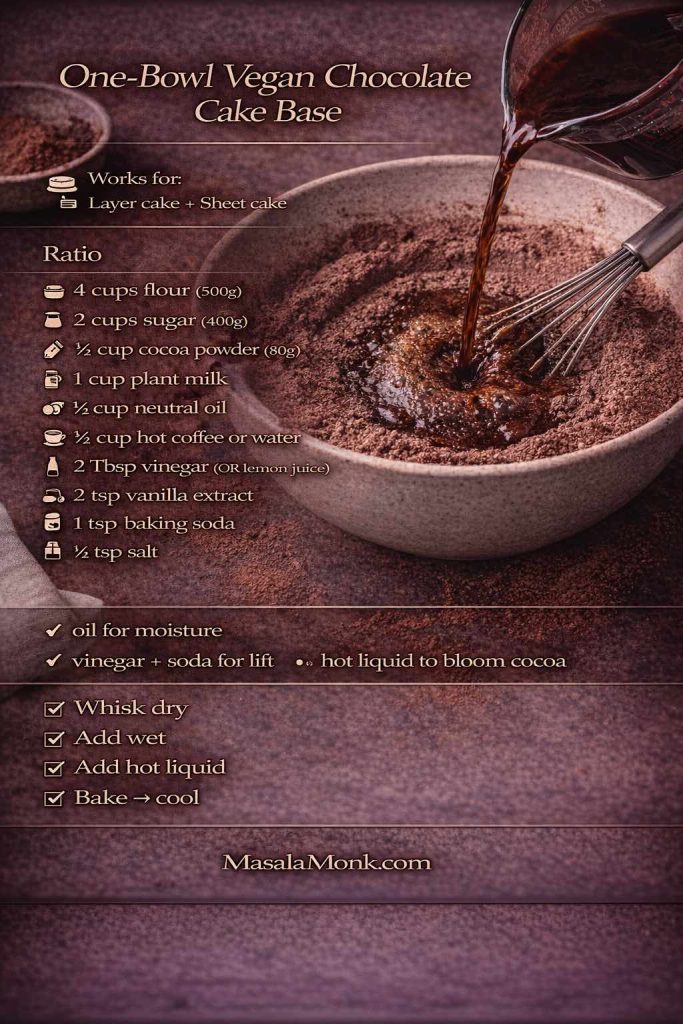
One-bowl vegan chocolate cake base recipe card showing a mixing bowl with cocoa and hot coffee being poured in, plus ingredient ratios, quick steps, and tips for moisture and lift.
One-bowl vegan chocolate cake base you can reuse: this quick ratios card works for layer cake or sheet cake, with the simple ‘hot liquid to bloom cocoa’ step for deeper chocolate flavour.

A calm sequence helps:

  1. Whisk dry ingredients thoroughly (especially cocoa).
  2. Whisk wet ingredients thoroughly.
  3. Combine wet into dry until smooth.
  4. Add hot liquid last, then mix briefly.

7) Baking cues: what “done” looks like in chocolate cake

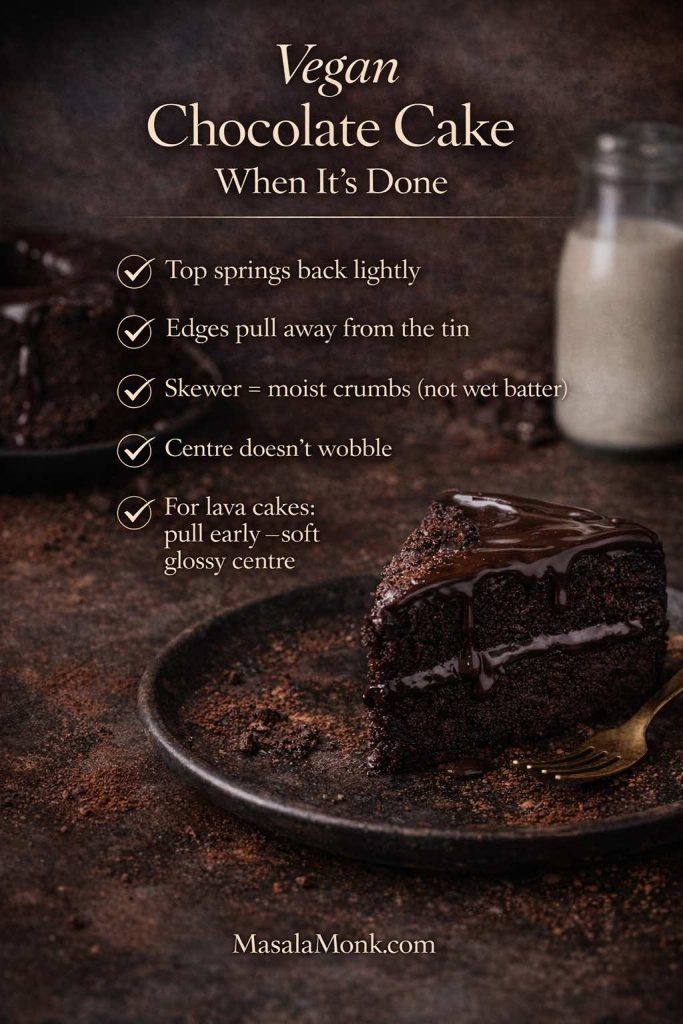
Because chocolate cakes are dark, they can hide underbaking. Use multiple cues:

  • The top springs back lightly when pressed.
  • The edges pull slightly away from the tin.
  • A skewer comes out with a few moist crumbs (not wet batter).
  • The centre doesn’t wobble like liquid.
Vegan chocolate cake doneness checklist graphic showing baking cues: top springs back, edges pull away, skewer has moist crumbs, centre doesn’t wobble, plus a lava cake timing note.
How to tell when vegan chocolate cake is done: use these quick baking cues for a moist crumb—and pull lava cakes early for that soft, glossy centre.

Molten cakes are different—there, you want underdone centres. We’ll cover that later.


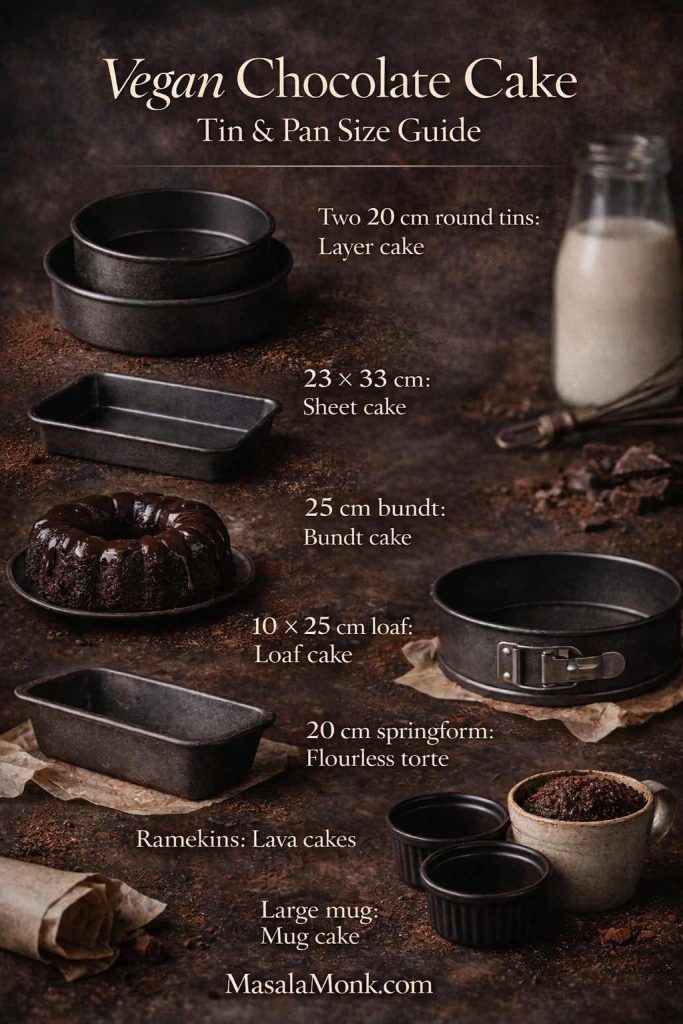
8) Tin guide: choose the format that fits your day

Sometimes the best cake is the one that matches your schedule:

  • Layer cake (20 cm rounds): celebration vibe, frosting-friendly.
  • Sheet cake (23 × 33 cm): effortless portions, travel-friendly.
  • Bundt cake (25 cm bundt pan): looks fancy with minimal decorating.
  • Loaf cake (10 × 25 cm): sliceable, giftable, everyday perfect.
  • Torte (20 cm springform): intense, truffle-like, small slices.
  • Mug cake: instant comfort.
Vegan chocolate cake tin and pan size guide showing two 20 cm round tins for layer cake, 23 × 33 cm for sheet cake, 25 cm bundt, 10 × 25 cm loaf, 20 cm springform, ramekins for lava cakes, and a large mug for mug cake.
Baking pan confusion solved: use this tin-size guide to pick the right format for your vegan chocolate cake—layers, sheet cake, bundt, loaf, flourless torte, lava cakes, or a quick mug cake.

9) A note on “eggless” and “dairy-free”

Every cake here is vegan, which means it’s inherently eggless and dairy-free. That said, textures can vary depending on which binder you use (if any). Some recipes rely purely on flour structure and leavening; others use starch or purée for a fudgier crumb. Either way, the outcome is meant to feel like cake—not a compromise.

If you want a clear, trustworthy overview of vegan egg replacers and what each one is best at, this guide is a useful reference: Egg substitutes for baking.

Also Read: Strawberry Smoothie Recipes (12 Easy Blends + Bowls & Protein Shakes)


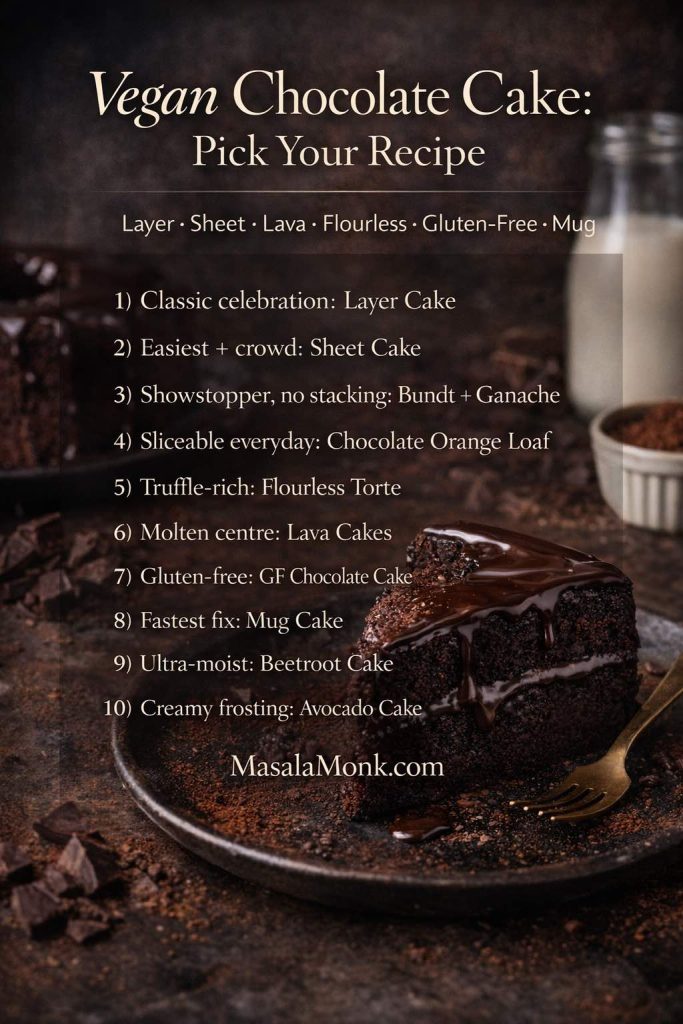
A quick way to choose your recipe today

If you’d rather not overthink it, start here:

  • Want the classic? Make the vegan chocolate layer cake (#1).
  • Want the easiest? Make the easy vegan chocolate sheet cake (#2).
  • Want “wow” without stacking? Make the vegan chocolate bundt cake (#3).
  • Want bright flavour? Make the chocolate orange vegan chocolate loaf (#4).
  • Want truffle intensity? Make the flourless vegan chocolate cake (#5).
  • Want molten drama? Make the vegan chocolate lava cakes (#6).
  • Need gluten-free? Make the vegan gluten-free chocolate cake (#7).
  • Want instant comfort? Make the vegan chocolate mug cake (#8).
  • Want ultra-moist? Make the beetroot vegan chocolate cake (#9).
  • Want creamy frosting that isn’t sugar-bomb sweet? Make the avocado vegan chocolate cake (#10).
Vegan chocolate cake recipes guide card showing how to pick the right recipe—layer, sheet, bundt, loaf, flourless, lava, gluten-free, mug, beetroot, and avocado.
Not sure which vegan chocolate cake to bake? Use this quick picker to match your craving—classic layers, easiest sheet cake, molten lava, flourless torte, gluten-free, or a fast mug cake.

Now, let’s bake.


1) Vegan Chocolate Layer Cake Recipe (Classic, Moist, Celebration-Ready)

This is the cake you bake when you want that unmistakable “proper chocolate cake” moment: soft crumb, even rise, and enough structure to stack confidently. At the same time, it’s forgiving—so even if you’re not a frequent layer-cake maker, you’ll still land somewhere delicious.

What makes it work so well

To begin with, oil keeps the crumb tender for longer than butter typically does. In addition, a small amount of vinegar supports lift and keeps the flavour clean. Finally, hot coffee (or hot water) blooms cocoa, so the chocolate aroma feels bigger without adding extra sweetness.

If you ever want the quick explanation of cocoa differences—especially if you’re deciding between natural cocoa and Dutch-process—the two clearest guides are Dutch-process vs. natural cocoa and The A-B-C’s of cocoa. For a broader foundation, MasalaMonk’s What is Cacao?: Cacao vs. Chocolate vs. Dark Chocolate is a satisfying read.

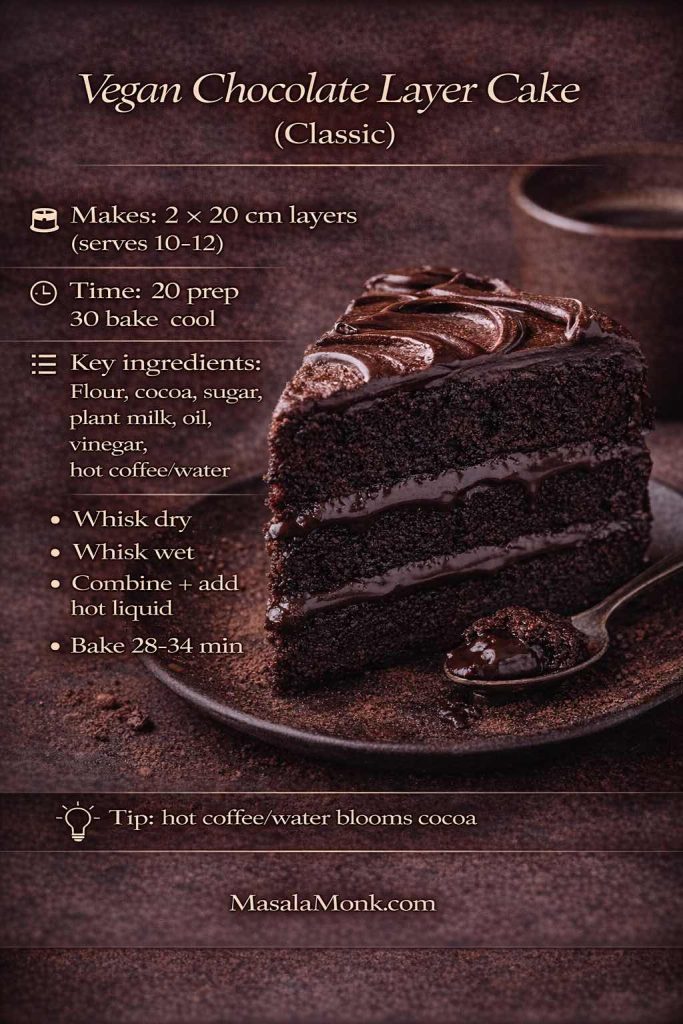
Makes: 1 layer cake (two 20 cm rounds) | Serves: 10–12
Time: 20 mins prep + 28–34 mins bake + 60–90 mins cooling | Difficulty: Easy–Medium
Oven/Tin: 175°C | two 20 cm round tins

Dry

  • 250 g plain flour
  • 300 g caster sugar
  • 70 g cocoa powder
  • 10 g baking powder
  • 5 g bicarbonate of soda
  • 3 g fine salt

Wet

  • 420 ml plant milk
  • 120 ml neutral oil
  • 15 ml vinegar (apple cider or white)
  • 10 ml vanilla extract

Bloom

  • 180 ml hot coffee or hot water
Vegan chocolate layer cake recipe card showing a sliced chocolate layer cake with frosting, plus key ingredients, simple steps, bake time, and a tip to bloom cocoa with hot coffee or water.
Classic vegan chocolate layer cake, made repeatable: this quick recipe card covers the essentials—key ingredients, simple steps, and bake time—for a moist, dairy-free celebration cake.

Method (detailed, step-by-step)

  1. Prep your tins before anything else. Heat the oven to 175°C. Line two 20 cm tins with baking paper on the base, then lightly oil the sides. If you want extra insurance against sticking, dust the oiled sides with a teaspoon of cocoa powder and tap out the excess.
  2. Make cocoa behave. In a large bowl, whisk the flour, sugar, cocoa powder, baking powder, bicarbonate of soda, and salt for a full 30–45 seconds. This isn’t busywork—cocoa clumps are stubborn, and thorough whisking prevents bitter pockets.
  3. Mix your wet ingredients until they look unified. In a jug, whisk plant milk, oil, vinegar, and vanilla until the mixture looks uniform rather than separated. That little bit of emulsifying up front helps the batter come together quickly.
  4. Combine without overworking. Pour the wet mixture into the dry. Whisk gently—just until the batter looks smooth and you don’t see dry flour at the bottom. If you’re tempted to keep whisking because the batter looks glossy, pause and check the bowl instead: scrape down the sides, then stop.
  5. Bloom the cocoa at the end. Pour in the hot coffee (or hot water) and whisk briefly until the batter turns evenly silky and slightly looser. Thin batter is normal here, and it bakes up surprisingly plush.
  6. Divide evenly for level layers. Split the batter between tins. If you have a kitchen scale, weigh the tins so the layers bake to the same height. Next, tap each tin once on the counter to release large air bubbles.
  7. Bake with cues, not only time. Bake 28–34 minutes. Start checking at 28 minutes:
    • The centre should spring back lightly when pressed.
    • The edges should pull away slightly from the tin.
    • A skewer should come out with moist crumbs, not wet batter.
  8. Cool in stages (this matters for texture). Let the cakes cool in the tins for 10 minutes. Then turn them out onto a rack, peel off the base paper, and cool completely before frosting. If you frost while warm, you’ll get melting and sliding instead of clean layers.

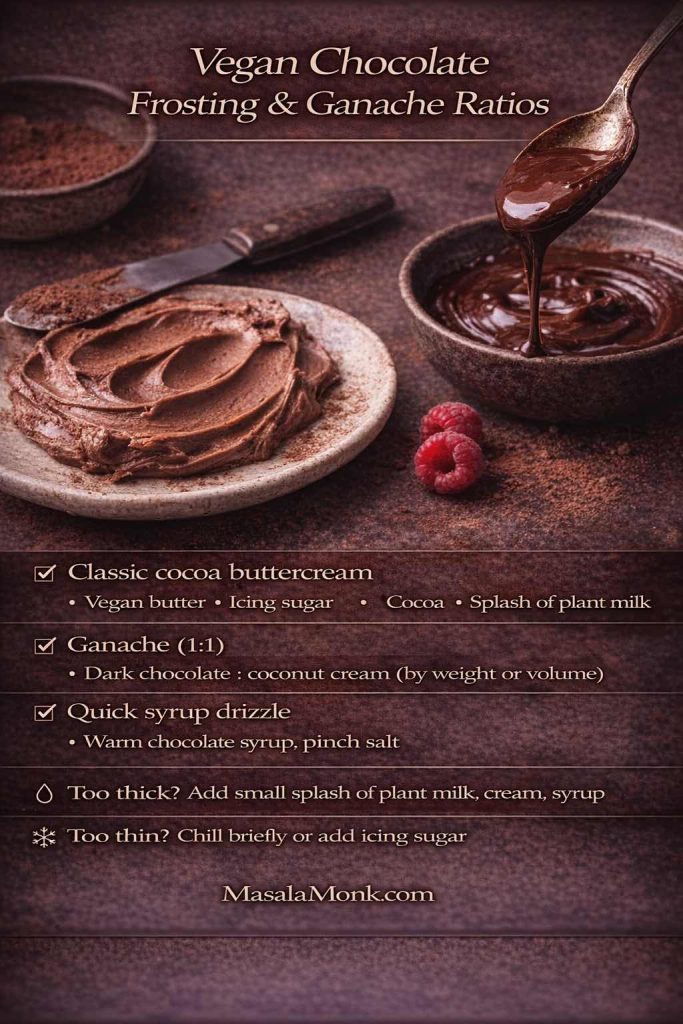
Vegan chocolate cake frosting (classic cocoa buttercream)

This buttercream is dependable and not overly fussy. It also holds its shape well, which helps if you’re doing swirls or a slightly thicker coat.

  • 115 g vegan butter, softened
  • 300 g icing sugar, sifted
  • 50 g cocoa powder, sifted
  • 10 ml vanilla extract
  • 30–60 ml plant milk (as needed)
  • 1–2 g salt (to taste)

How to make it smoothly

  1. Beat vegan butter for 2–3 minutes until creamy and lighter in colour.
  2. Add cocoa and icing sugar in 3 additions, mixing gently at first so you don’t get a sugar cloud.
  3. Add vanilla and salt.
  4. Add plant milk gradually until spreadable. Stop when it feels soft and swoopy, not runny.

Assemble like a pro (without overthinking it)

  • If your layers have a dome, trim the top lightly with a serrated knife for a stable stack.
  • Spread a thin layer of frosting on the first layer, add the second layer, then cover the cake.
  • For cleaner slices, chill the frosted cake 20–30 minutes before cutting.

Optional upgrade: glossy ganache finish

If you want a more “gateau” look, skip buttercream and use the ganache from recipe #3 instead.

A gentle internal detour (if you love moist oil-based cakes)

If this cake’s tenderness makes you happy, you’ll probably enjoy MasalaMonk’s Orange Olive Oil Cake – Ridiculously Easy and Super Moist. Different flavour, same kind of soft crumb logic.

Notes / substitutions for Vegan Chocolate Layer Cake Recipe

  • Plant milk: soy = tallest structure; oat = softer crumb; almond = lighter texture.
  • Coffee: hot water works if you don’t want coffee flavour (still blooms cocoa).
  • Cocoa: natural cocoa gives brighter chocolate; Dutch-process tastes smoother/darker (either works—stick to one for consistency).
  • No 2 tins? Bake in one 20 cm tin longer (expect ~45–55 mins), then slice into layers once fully cool.

Also Read: 7 Pizza Sauce Recipes | Marinara, White Garlic, Alfredo, Buffalo, BBQ, Vodka & Ranch


2) Easy Vegan Chocolate Sheet Cake Recipe (One Bowl, Crowd-Friendly)

This is the unfussy hero: mix, pour, bake, slice. It’s the kind of cake that makes you look organised even if you aren’t. Because it bakes in one layer, you get even doneness, easy portions, and less risk of drying out. Furthermore, it’s perfect for quick toppings—drizzle, glaze, or syrup.

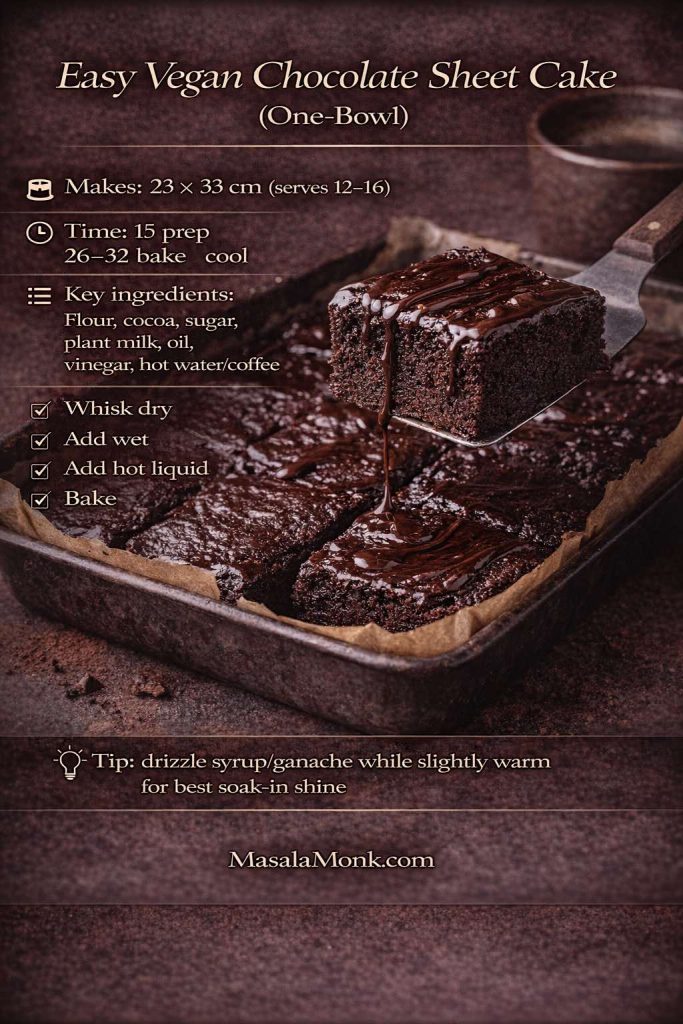
Makes: 1 sheet cake (23 × 33 cm) | Serves: 12–16
Time: 15 mins prep + 26–32 mins bake + 45–60 mins cooling | Difficulty: Easy
Oven/Tin: 175°C | 23 × 33 cm tin

Ingredients

  • 250 g plain flour
  • 250 g caster sugar
  • 55 g cocoa powder
  • 10 g baking powder
  • 3 g bicarbonate of soda
  • 3 g fine salt
  • 360 ml plant milk
  • 120 ml neutral oil
  • 15 ml vinegar
  • 10 ml vanilla extract
  • 120 ml hot water or hot coffee
Easy vegan chocolate sheet cake recipe card showing moist chocolate cake squares with glossy drizzle, plus pan size, bake time, key ingredients, simple steps, and a tip to drizzle ganache or syrup while warm.
Easy vegan chocolate sheet cake (one-bowl): this recipe card gives the essentials—pan size, timing, and quick steps—for a moist, dairy-free cake that slices beautifully for a crowd.

Method (Eggless Cake Recipe with extra clarity)

  1. Set up first. Heat oven to 175°C. Line a 23 × 33 cm tin with baking paper, leaving a bit of overhang on the long sides so you can lift the cake out later.
  2. Whisk dry ingredients thoroughly. In a large bowl, whisk flour, sugar, cocoa, baking powder, bicarbonate of soda, and salt. Keep going until the cocoa looks evenly dispersed; that’s the difference between “good” and “wow” in a sheet cake.
  3. Add wet ingredients in one go. Pour in plant milk, oil, vinegar, and vanilla. Whisk until smooth. If the batter looks a little thick at this stage, that’s fine.
  4. Finish with hot liquid. Add hot water or coffee and whisk briefly. The batter will loosen and look glossy.
  5. Bake and check the centre. Pour into the tin and bake 26–32 minutes. Start checking at 26 minutes; the middle should spring back lightly and a skewer should show moist crumbs.
  6. Cool for clean slices. Cool in the tin for at least 20 minutes. If you want very neat squares, let it cool fully before cutting.

Fast topping that makes it feel finished

A simple drizzle can transform the whole cake. MasalaMonk’s 3 Minutes Homemade Chocolate Syrup is ideal here—especially if you drizzle it over slightly warm cake so it sinks in just a little.

Variations (easy changes to Vegan Chocolate Sheet Cake, big payoff)

  • Fudgier sheet cake: fold in 150 g chopped dark chocolate before baking.
  • Chocolate oat cake direction: swap 50 g flour for 50 g oat flour for a softer, warmer crumb.
  • Quick party finish: sprinkle chopped toasted nuts or cocoa nibs over syrup while it’s still tacky.

If you enjoy the “one base, multiple personalities” style, MasalaMonk’s Double Chocolate Chip Cookies – One Dough, 7 Ways scratches the same itch.

Notes / substitutions for Vegan Chocolate Sheet Cake Recipe

  • Tin size: if smaller/deeper, bake longer; start checking +5 mins and use skewer cues.
  • Sweeter/fudgier: fold in 150 g chopped dark chocolate.
  • Oil: any neutral oil works; olive oil gives a noticeable flavour (nice if you want it).
  • Topping: syrup drizzle for fastest finish; ganache if you want “party cake” vibes.

Also Read: Sandwich for Breakfast: Breakfast Sandwich Recipe + 10 Variations


3) Vegan Chocolate Bundt Cake (With Glossy Vegan Chocolate Ganache)

Bundt cakes feel festive without asking you to frost and stack. As long as you grease the pan properly, the rest is straightforward. Afterwards, ganache does the styling for you—no piping bag required.

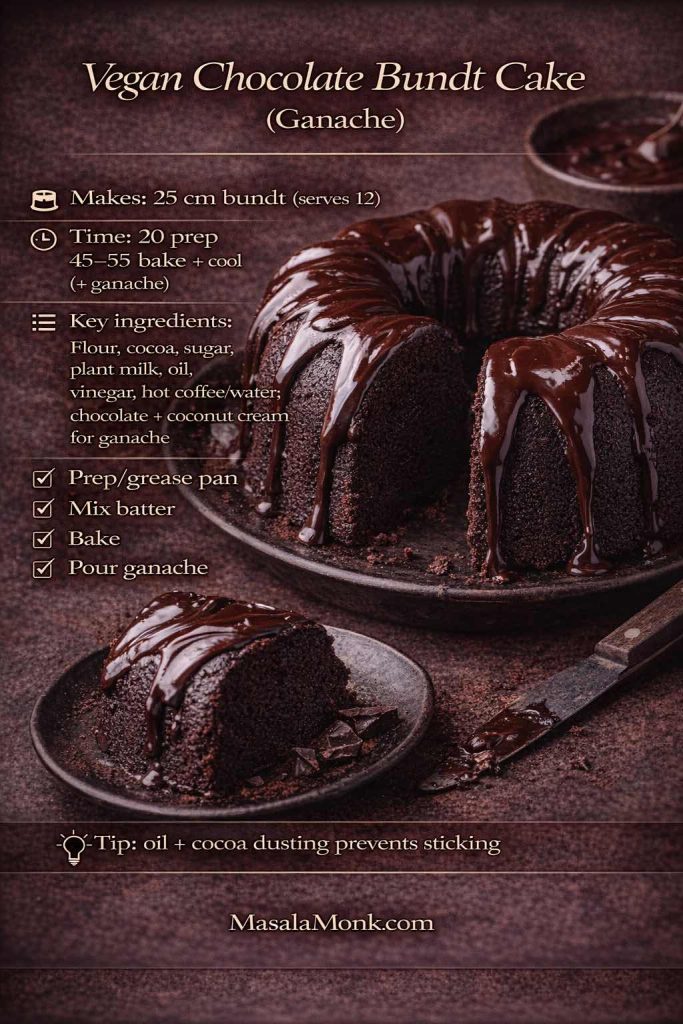
Makes: 1 bundt cake (25 cm bundt pan) | Serves: 12
Time: 20 mins prep + 45–55 mins bake + 60–90 mins cooling (+ 10 mins ganache) | Difficulty: Easy–Medium
Oven/Tin: 175°C | 25 cm bundt pan

Ingredients

Cake

  • 310 g plain flour
  • 350 g caster sugar
  • 75 g cocoa powder
  • 10 g baking powder
  • 5 g bicarbonate of soda
  • 4 g fine salt
  • 480 ml plant milk
  • 180 ml neutral oil
  • 15 ml vinegar
  • 10 ml vanilla extract
  • 120 ml hot coffee or hot water

Ganache

  • 200 g dark chocolate, chopped
  • 200 ml coconut cream (or thick plant cream)
Vegan chocolate bundt cake with ganache recipe card showing a sliced bundt cake with glossy chocolate ganache, plus pan size, timing, key ingredients, simple steps, and a tip to oil and cocoa-dust the pan to prevent sticking.
Vegan chocolate bundt cake with ganache, made stress-free: this recipe card covers pan size, timing, and the no-stick tip (oil + cocoa dusting) for clean release and a glossy finish.

Method (Dairy-Free & Eggless with bundt-specific detail)

  1. Grease like you mean it. Heat oven to 175°C. Coat every ridge of the bundt pan with oil. Then dust lightly with cocoa powder and tap out the excess. This two-step is worth it.
  2. Whisk the dry ingredients. Combine flour, sugar, cocoa, baking powder, bicarbonate of soda, and salt. Whisk well so cocoa is evenly distributed.
  3. Add wet, then bloom. Add plant milk, oil, vinegar, and vanilla. Whisk until smooth. Then pour in hot coffee/water and whisk briefly again.
  4. Bake until the cake tells you it’s ready. Bake 45–55 minutes. Start checking at 45:
    • The cake should spring back when pressed.
    • A skewer should come out with moist crumbs.
    • The edges often pull away slightly from the pan.
  5. Cool in the pan, but not forever. Let the bundt cool 15 minutes, then invert onto a rack. Too soon and it can tear; too late and it may stick.

Ganache Recipe (silky, shiny, not grainy)

  1. Chop the chocolate finely; smaller pieces melt more evenly.
  2. Warm the coconut cream until steaming (not boiling).
  3. Pour over chocolate, wait 2 minutes, then stir gently from the centre outward.
  4. Let it thicken slightly, then pour over the cooled cake.

If you like understanding how cocoa type shifts colour and flavour, this is a good companion: Types of cocoa, explained.

Variations of Vegan Chocolate Bundt Cake

  • Add orange zest for a chocolate-orange bundt mood.
  • Add espresso powder for a darker, roastier finish.
  • Sprinkle chopped nuts on the ganache before it sets for texture.

Notes / substitutions for Vegan Chocolate Bundt Cake Recipe

  • Pan release is everything: oil + cocoa dusting prevents sticking better than flour for chocolate cakes.
  • Coconut cream: use thick plant cream if preferred; thinner milks won’t set ganache as well.
  • No bundt pan? Bake as a 23 × 33 cm sheet (reduce bake time; check at ~30 mins).
  • Chocolate: choose one you’d happily eat straight—ganache shows quality.

Also Read: Vodka Pasta (Penne alla Vodka) + Spicy Rigatoni, Chicken, and Gigi Recipes


4) Chocolate Orange Vegan Chocolate Loaf Cake (Bright, Sliceable)

This loaf is for the days you want chocolate but also want lift—something fragrant and slightly fresh. Orange zest does that beautifully. Because it’s a loaf, it slices neatly and travels well, which makes it a great “bring along” cake.

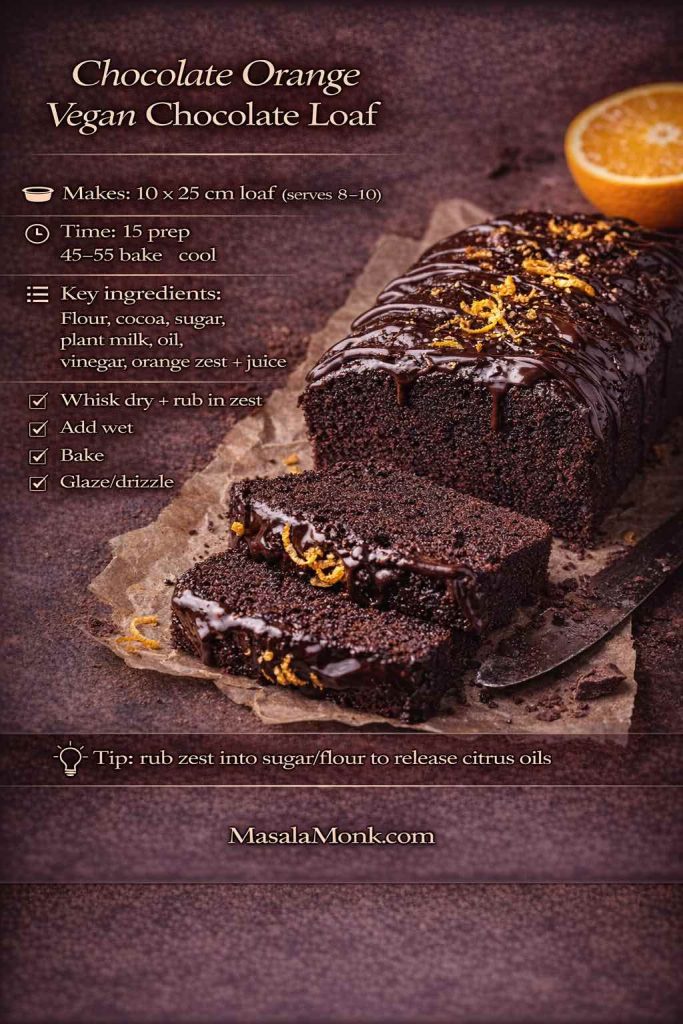
Makes: 1 loaf (10 × 25 cm) | Serves: 8–10
Time: 15 mins prep + 45–55 mins bake + 60 mins cooling | Difficulty: Easy
Oven/Tin: 175°C | 10 × 25 cm loaf tin

Ingredients

  • 220 g plain flour
  • 200 g caster sugar
  • 55 g cocoa powder
  • 10 g baking powder
  • 3 g bicarbonate of soda
  • 3 g fine salt
  • Zest of 2 oranges
  • 300 ml plant milk
  • 120 ml neutral oil
  • 30 ml orange juice
  • 15 ml vinegar
  • 10 ml vanilla extract
Chocolate orange vegan chocolate loaf recipe card showing a sliced chocolate loaf with glossy drizzle and orange zest, plus loaf tin size, timing, key ingredients, quick steps, and a tip to rub zest into sugar or flour.
Chocolate orange vegan chocolate loaf, simplified: this recipe card includes the loaf tin size, timing, and quick steps—plus the zest-rubbing tip that makes the citrus flavour pop.

Method (extra loaf guidance that is Eggless & Dairy Free)

  1. Heat oven to 175°C. Line the loaf tin with baking paper, leaving overhang for easy lifting.
  2. Whisk flour, sugar, cocoa, baking powder, bicarbonate of soda, and salt. Then rub the orange zest into the dry mixture with your fingertips. This small step releases citrus oils and makes the loaf smell incredible.
  3. Whisk plant milk, oil, orange juice, vinegar, and vanilla. Pour into the dry ingredients and whisk just until smooth.
  4. Pour batter into the tin and level the top. Bake 45–55 minutes. Start checking at 45 minutes; loaf cakes often need the full time.
  5. Cool in the tin for 15 minutes, then lift out and cool fully before glazing.

Finish options for Chocolate Orange Vegan Chocolate Loaf Cake

  • Orange glaze: 180 g icing sugar + 25–35 ml orange juice + zest.
  • Chocolate drizzle: a spoonful of MasalaMonk’s homemade chocolate syrup over slices.

If you love citrus bakes in general, MasalaMonk’s Wholewheat Carrot Orange Tea Cake is another bright, cosy option.

Notes / substitutions for Chocolate Orange Vegan Chocolate Loaf Cake

  • Orange intensity: use zest + a little juice; for extra punch, add ½ tsp orange extract (optional).
  • Loaf pan sizes vary: if your pan is smaller/deeper, bake longer; tent with foil if top browns early.
  • Chocolate chips: 100–150 g chips make it more “dessert loaf.”
  • Glaze options: orange glaze = bright; chocolate drizzle = richer.

Also Read: Tomato Sauce From Fresh Tomatoes (Food Mill Method & Recipe)


5) Flourless Vegan Chocolate Cake (Torte-Style, Truffle-Rich)

This is the “dessert menu” cake: dense, glossy, and intensely chocolatey. Since it’s so rich, smaller slices feel generous. Additionally, it’s great for hosting because you can make it ahead, chill it, then slice cleanly when guests arrive.

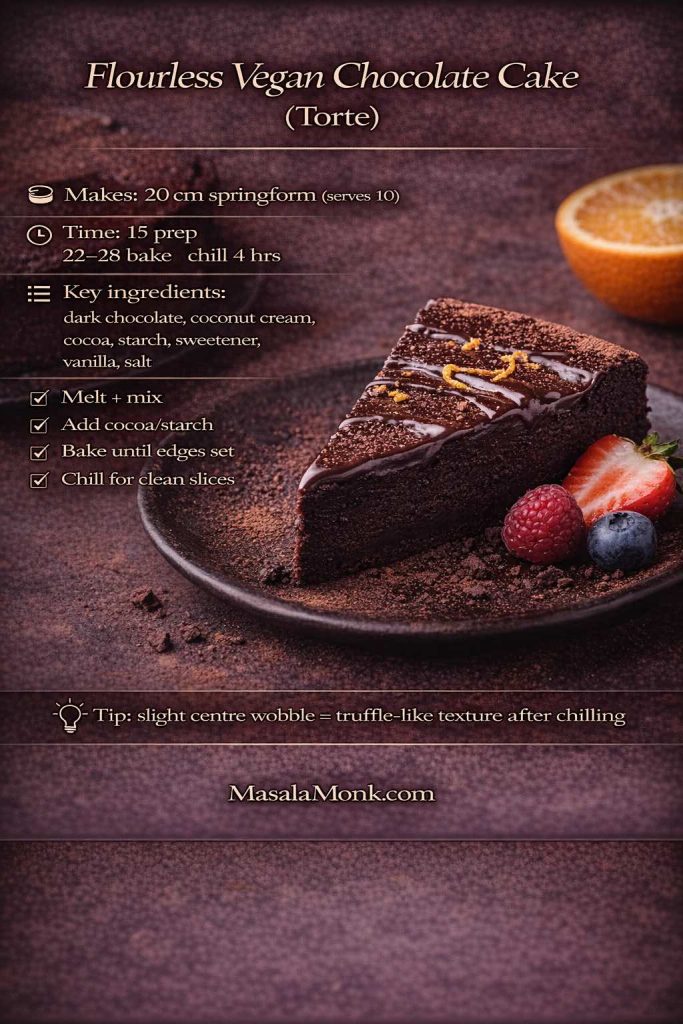
Makes: 1 torte (20 cm springform) | Serves: 10
Time: 15 mins prep + 22–28 mins bake + 4 hrs chilling | Difficulty: Easy–Medium
Oven/Tin: 165°C | 20 cm springform tin

Ingredients

  • 300 g dark chocolate, chopped
  • 180 ml coconut cream
  • 60 ml maple syrup (or 70 g caster sugar)
  • 20 g cocoa powder
  • 20 g cornflour (cornstarch) or potato starch
  • 10 ml vanilla extract
  • 2 g fine salt
Flourless vegan chocolate cake torte recipe card showing a glossy chocolate torte slice with berries, plus springform size, timing, key ingredients, quick steps, and a tip to chill for clean truffle-like slices.
Flourless vegan chocolate cake (torte) made simple: this recipe card highlights the chill-and-slice method for a truffle-rich, dairy-free dessert with clean, glossy slices.

Method (with torte cues)

  1. Heat oven to 165°C. Line the base of a 20 cm springform tin and lightly oil the sides.
  2. Melt the chocolate and coconut cream gently. Stir until smooth and glossy, then remove from heat.
  3. Whisk in maple syrup (or sugar) while the mixture is still warm. Then whisk in cocoa powder, starch, vanilla, and salt until fully smooth. If you see tiny lumps, whisk a little more—but avoid vigorous beating.
  4. Pour into the tin and smooth the top. Bake 22–28 minutes. The edges should look set while the centre can still wobble slightly.
  5. Cool at room temperature, then chill at least 4 hours. This chilling step is what turns it into clean, truffle-like slices.

Serving ideas for Egg & Flourless Vegan Chocolate Cake

Notes / substitutions for Flourless Vegan Chocolate Cake

  • Sweetener: maple syrup or sugar both work—maple adds a gentle caramel note.
  • Starch: cornflour/cornstarch or potato starch works; it helps slice cleanly.
  • Texture control: slightly underbake (wobbly centre) for truffle-soft slices after chilling.
  • Serving: bring to room temp 15–20 mins for best flavour.

Also Read: Green Chutney Recipe (Coriander–Mint / Cilantro Chutney)


6) Vegan Chocolate Lava Cakes (Molten Centres)

These are dramatic in the best way: warm edges, molten centres, and a spoon-breaking moment that feels like a reward. Even though lava cakes look fancy, the batter is straightforward. The real skill is pulling them at the right moment.

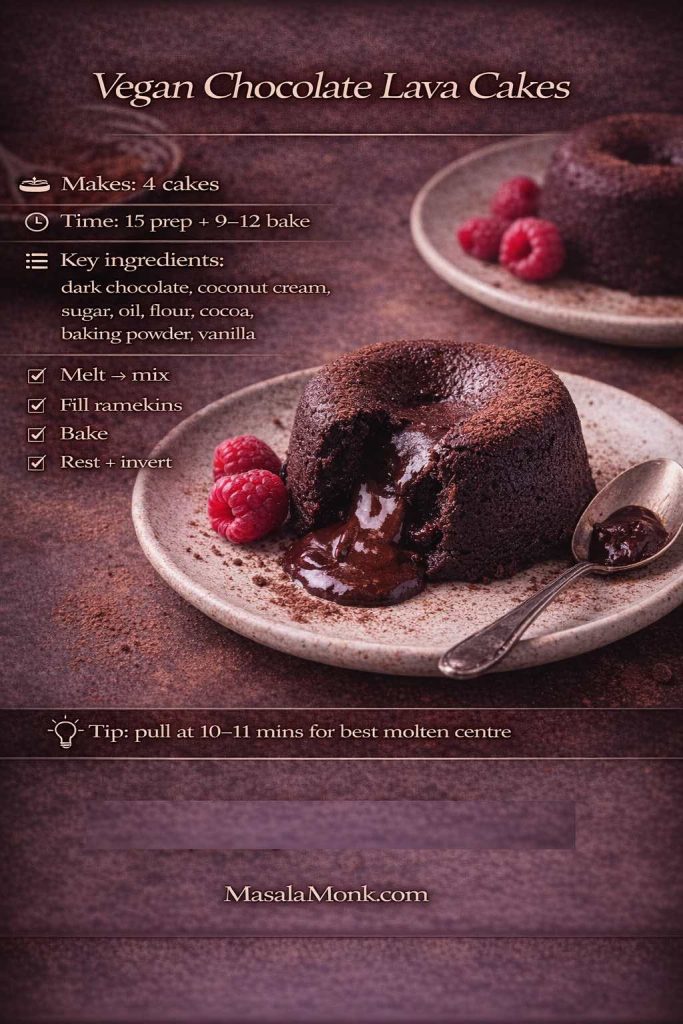
Makes: 4 lava cakes | Serves: 4
Time: 15 mins prep + 9–12 mins bake | Difficulty: Easy–Medium
Oven/Tin: 220°C | 4 ramekins

  • 120 g dark chocolate
  • 80 ml coconut cream
  • 50 g caster sugar
  • 60 ml neutral oil
  • 65 g plain flour
  • 15 g cocoa powder
  • 5 g baking powder
  • 1 g fine salt
  • 5 ml vanilla extract
Vegan chocolate lava cakes recipe card showing a molten-centre lava cake with raspberries, plus makes 4, bake time 9–12 minutes, key ingredients, quick steps, and a tip to pull at 10–11 minutes for best molten centre.
Vegan chocolate lava cakes with a molten centre: this recipe card gives the essentials—ingredients, timing, and the 10–11 minute cue—for a reliable lava moment every time.

Method (timing-focused Recipe for Vegan Chocolate Lava Cakes)

  1. Heat oven to 220°C. Grease four ramekins thoroughly. For extra release, dust with cocoa powder and tap out excess.
  2. Melt chocolate and coconut cream until smooth. Let it cool for 2–3 minutes so it doesn’t overheat the flour later.
  3. Whisk in sugar, oil, and vanilla. Then add flour, cocoa, baking powder, and salt. Whisk until smooth and thick.
  4. Divide batter evenly between ramekins. Place ramekins on a tray for easy movement.
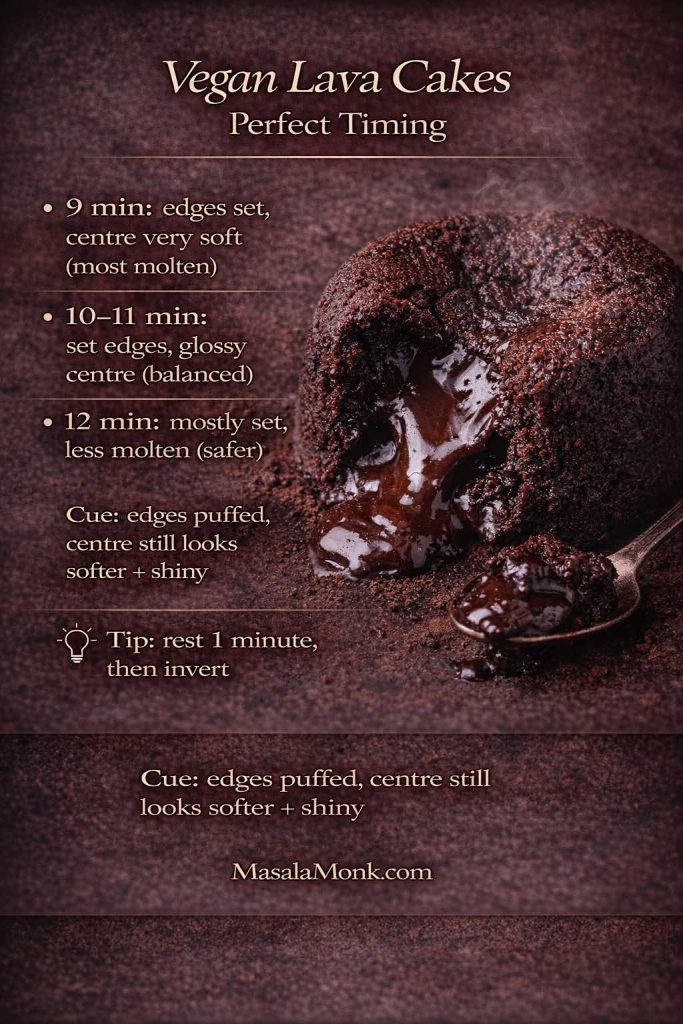
  5. Bake 9–12 minutes. Start checking at 9 minutes:
    • Edges should look set and slightly puffed.
    • Centres should still look softer and a little glossy.
  6. Rest 1 minute. Run a thin knife around the edge, invert onto a plate, then lift off the ramekin.

If you like understanding vegan structure tricks, Serious Eats has excellent aquafaba resources: The Science Behind Vegan Meringues and Aquafaba meringue frosting.

Vegan chocolate lava cakes perfect timing guide showing 9 minutes for most molten, 10–11 minutes balanced, 12 minutes safer, plus doneness cues and a rest-then-invert tip.
Vegan chocolate lava cakes made predictable: use this timing guide and visual cues to get a molten centre every time—then rest 1 minute before inverting.

Notes / substitutions for Dairy & Egg Free Vegan Chocolate Lava Cakes

  • Molten centre depends on timing: start checking at 9 mins; pull when edges set but centre looks softer/glossy.
  • Ramekins: grease thoroughly + cocoa dusting = clean unmoulding.
  • Make-ahead: chill filled ramekins 30 mins; add ~1 minute bake time.
  • No ramekins: use a muffin tray (grease well); bake time usually similar—watch cues.

Also Read: Iced Coffee: 15 Drink Recipes—Latte, Cold Brew, Frappe & More


7) Vegan Gluten-Free Chocolate Cake (Tender, Balanced)

Gluten-free cakes can be gorgeous when they’re built intentionally. Here, a 1:1 blend handles most of the work, while careful mixing and cooling ensure the crumb stays cohesive.

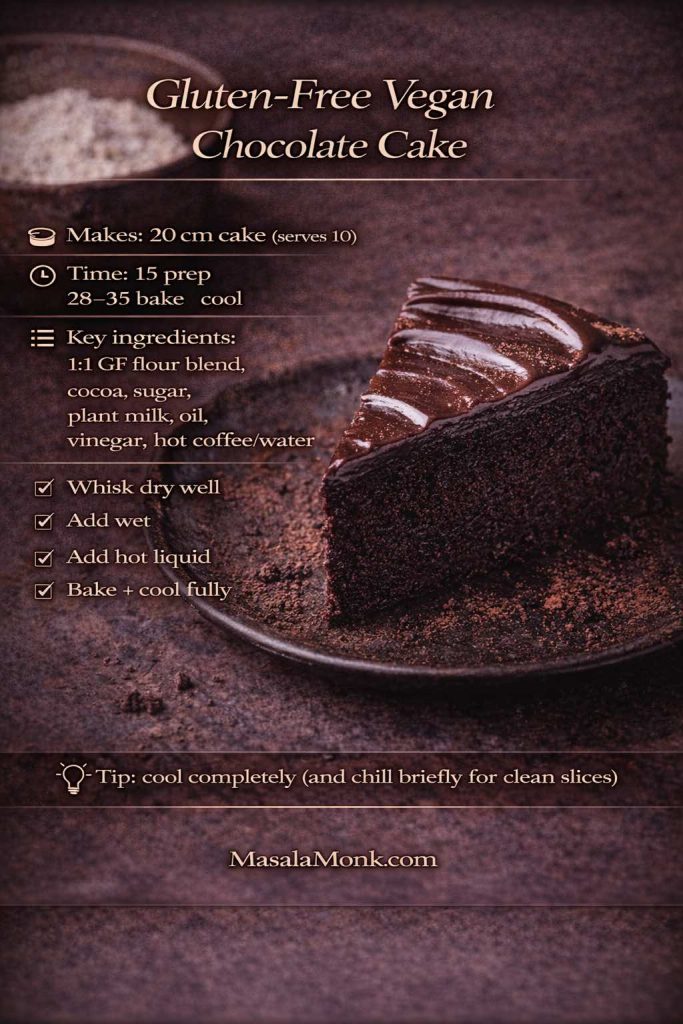
Makes: 1 cake (20 cm) | Serves: 10
Time: 15 mins prep + 28–35 mins bake + 60–90 mins cooling | Difficulty: Easy
Oven/Tin: 175°C | 20 cm round tin

Ingredients

  • 245 g gluten-free 1:1 flour blend
  • 200 g caster sugar
  • 55 g cocoa powder
  • 10 g baking powder
  • 3 g bicarbonate of soda
  • 3 g fine salt
  • 1 g xanthan gum (skip if blend already contains it)
  • 300 ml plant milk
  • 80 ml neutral oil
  • 15 ml vinegar
  • 10 ml vanilla extract
  • 120 ml hot coffee or hot water
Gluten-free vegan chocolate cake recipe card showing a frosted chocolate cake slice with cocoa dusting, plus makes/serves, bake time, key ingredients, quick method steps, and a tip to cool completely for clean slices.
Gluten-free vegan chocolate cake, made reliable: this recipe card includes the 20 cm cake size, timing, and the key cooling tip so slices stay neat, tender, and moist.

Method (gluten-free friendly)

  1. Heat oven to 175°C. Line a 20 cm tin.
  2. Whisk dry ingredients thoroughly. With gluten-free flour, this step matters even more because you want the leaveners and cocoa evenly distributed.
  3. Add plant milk, oil, vinegar, and vanilla. Whisk smooth. Then add hot coffee/water and mix briefly.
  4. Bake 28–35 minutes. Cool fully in the tin for 15 minutes, then transfer to a rack and cool completely before slicing.

Gluten-free Vegan Chocolate Cake success cues

  • Let it cool fully before cutting; warm gluten-free cake is more fragile.
  • If you want extra security, chill the cooled cake briefly before slicing.

For clear guidance on conversions and xanthan gum, these are helpful: Gluten-free baking conversion conundrum and A guide to xanthan gum.

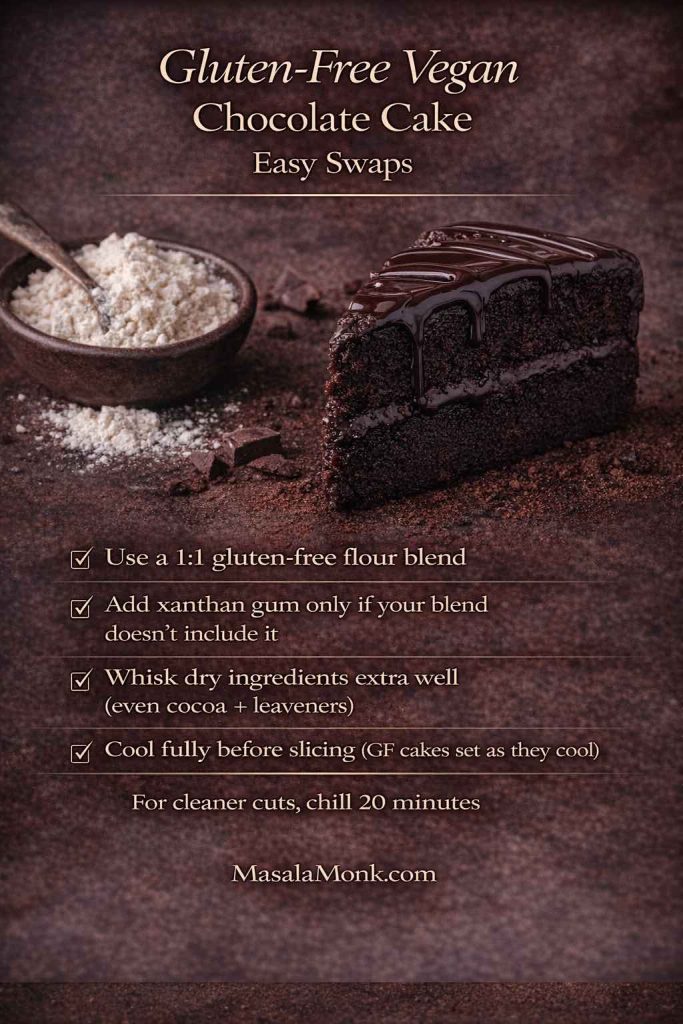
Gluten-free vegan chocolate cake swaps graphic showing tips to use a 1:1 gluten-free flour blend, add xanthan gum only if needed, whisk dry ingredients well, and cool fully before slicing.
Gluten-free vegan chocolate cake made easier: use a 1:1 flour blend, add xanthan gum only if your mix needs it, and let the cake cool completely for neat, tender slices.

Notes / substitutions fo Vegan Gluten-Free Chocolate Cake

  • GF flour blend: use a 1:1 blend; if it already has xanthan gum, skip extra.
  • Cooling matters: GF cakes slice best fully cool (even chilled 20 mins for neat cuts).
  • Plant milk: soy helps structure; oat keeps it softer.
  • Pan swap: works as cupcakes too—start checking at ~18 mins.

Also Read: Cold Brew Espresso Martini: How to Make It (Step-by-Step Recipe)


8) Vegan Chocolate Mug Cake Recipe (Microwave Comfort)

This is warm, quick comfort—nothing more and nothing less. It’s also the easiest way to experiment with cocoa, sweetness, or add-ins without committing to an entire cake.

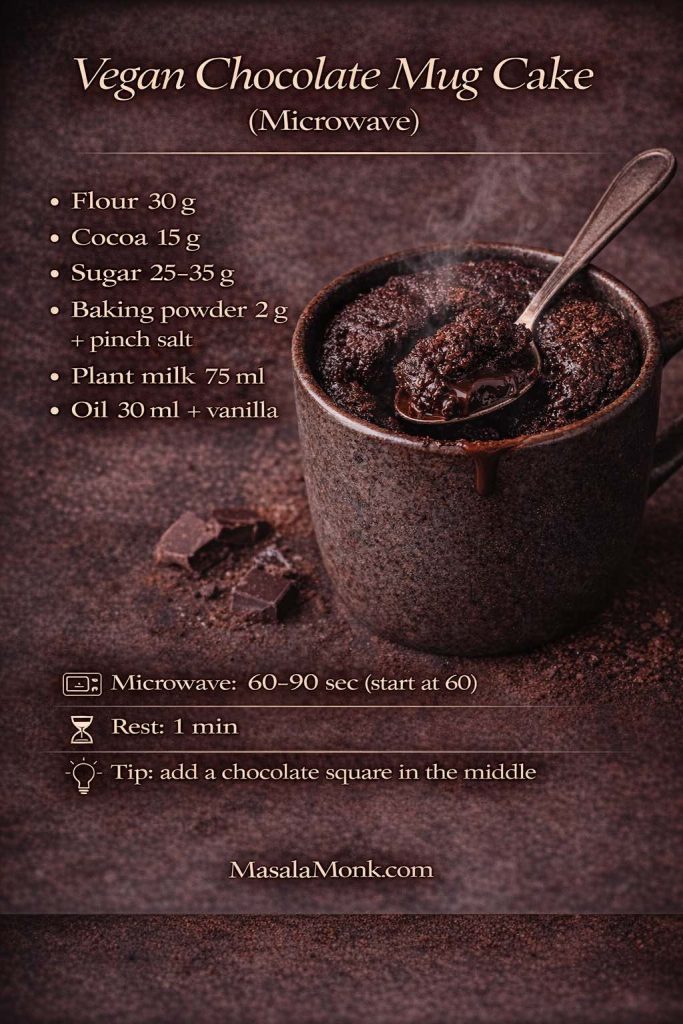
Makes: 1 mug cake | Serves: 1
Time: 5 mins prep + 60–90 secs cook + 1 min rest | Difficulty: Easy
Microwave/Mug: 1 large microwave-safe mug (350–400 ml)

Ingredients

  • 30 g plain flour
  • 15 g cocoa powder
  • 25–35 g caster sugar (to taste)
  • 2 g baking powder
  • 1 g fine salt
  • 75 ml plant milk
  • 30 ml neutral oil
  • 5 ml vanilla extract
Vegan chocolate mug cake recipe card for the microwave showing ingredients, 60–90 second cook time, 1 minute rest, and a tip to add a chocolate square for a molten centre.
Vegan chocolate mug cake in minutes: this microwave recipe card gives the exact ratios, cook time, and a molten-centre tip for a quick dairy-free chocolate fix.

Method (so it stays tender, eggless and dairy free)

  1. Whisk flour, cocoa, sugar, baking powder, and salt in a microwave-safe mug.
  2. Add plant milk, oil, and vanilla. Stir until smooth, scraping the bottom so no flour hides.
  3. Microwave 60–90 seconds. Start at 60 seconds, then add 10-second bursts as needed. Overcooking is the fastest route to a rubbery mug cake.
  4. Rest 1 minute. This short rest helps the crumb settle and stay softer.

Upgrades for Vegan Chocolate Mug Cake

  • Add a square of dark chocolate in the middle for a molten pocket.
  • Drizzle with homemade chocolate syrup and finish with a pinch of salt.
  • Add orange zest for a brighter aroma.

Notes / substitutions Vegan Chocolate Mug Cake Recipe

  • Microwave power varies: start at 60 secs; add 10-sec bursts—overcooking makes it rubbery.
  • Oil: keeps it tender; melted vegan butter works but firms as it cools.
  • Add-ins: chocolate square in the middle = molten pocket.
  • Mug size: use a large mug (at least 350–400 ml) to prevent overflow.

Also Read: Manhattan Cocktail Recipe (Classic + 6 Variations)


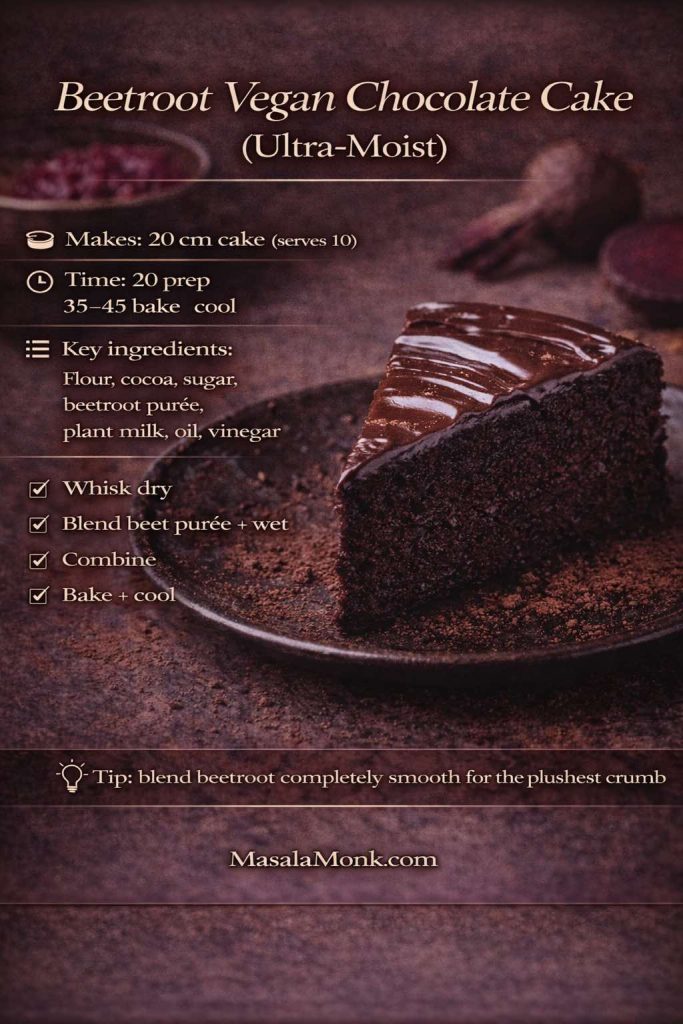
9) Beetroot Vegan Chocolate Cake (Ultra-Moist)

Beetroot adds moisture and depth, so this cake stays tender for days. In other words, it’s ideal when you’re baking ahead. The key is blending the beetroot purée until silky smooth so the crumb feels plush rather than fibrous.

Makes: 1 cake (20 cm) | Serves: 10
Time: 20 mins prep + 35–45 mins bake + 60–90 mins cooling | Difficulty: Easy
Oven/Tin: 175°C | 20 cm round tin

Ingredients

  • 220 g plain flour
  • 180 g caster sugar
  • 55 g cocoa powder
  • 10 g baking powder
  • 3 g bicarbonate of soda
  • 3 g fine salt
  • 250 g beetroot purée (cooked beetroot, blended smooth)
  • 180 ml plant milk
  • 80 ml neutral oil
  • 15 ml vinegar
  • 5 ml vanilla extract
Beetroot vegan chocolate cake recipe card showing a glossy ganache-topped chocolate cake slice, with makes/serves, timing, key ingredients including beetroot purée, quick steps, and a tip to blend beetroot smooth for a plush crumb.
Beetroot vegan chocolate cake, ultra-moist and surprisingly chocolate-forward: this recipe card gives the key ratios, bake time, and the blend-it-smooth tip for the plushest crumb.

Method

  1. Heat oven to 175°C. Line a 20 cm tin.
  2. Whisk dry ingredients thoroughly so cocoa disperses evenly.
  3. Whisk beetroot purée, plant milk, oil, vinegar, and vanilla until smooth. If the purée is thick, whisk a little longer to loosen it.
  4. Combine wet and dry until the batter is smooth, then pour into the tin.
  5. Bake 35–45 minutes. Cool fully before slicing.

Beetroot-specific cues for Vegan Chocolate Cake

  • If you want the cake to read “pure chocolate,” use a darker cocoa and consider adding 2 g espresso powder.
  • For a brighter edge, add orange zest—especially lovely if you glaze it.

If you want more cozy baking ideas after this, MasalaMonk’s Baking category is a great place to keep exploring.

Notes / substitutions for Beetroot Vegan Chocolate Cake

  • Beetroot prep: blend until completely smooth; texture depends on a silky purée.
  • Flavour balance: add ½ tsp espresso powder for deeper chocolate (optional).
  • Moisture: beetroot varies—if batter seems very thick, add a splash more plant milk.
  • Make-ahead: this one stays moist for days; great for baking ahead.

Also Read: Cappuccino Recipe: How to Make a Perfect Cappuccino at Home


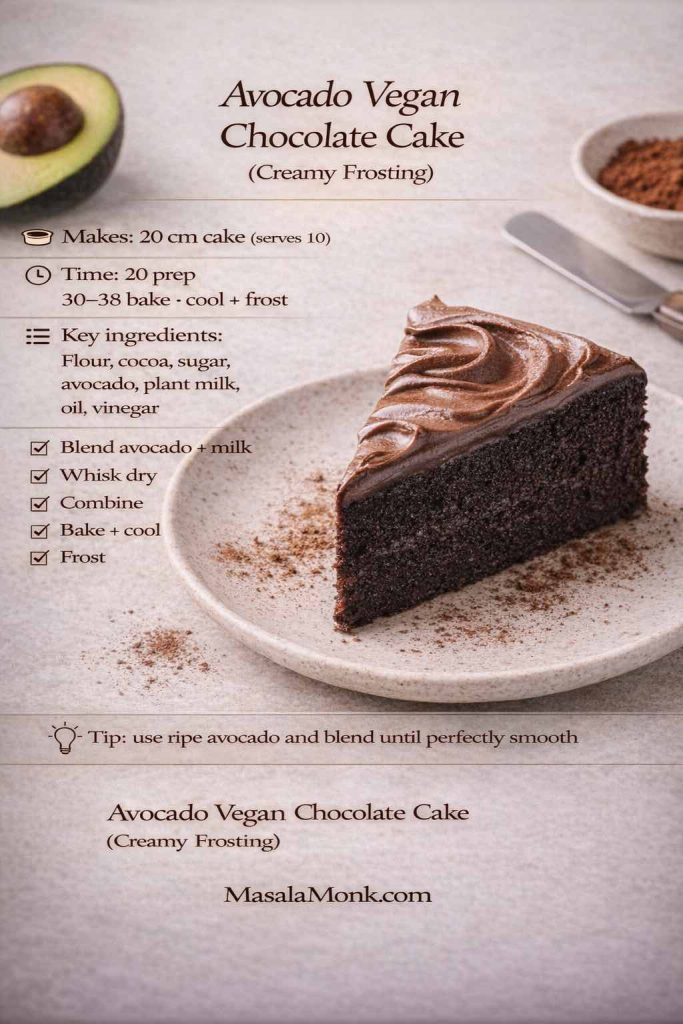
10) Avocado Vegan Chocolate Cake (Recipe With Creamy Chocolate Frosting)

Avocado brings softness and a creamy mouthfeel. Done well, it doesn’t dominate the flavour—it simply makes the cake feel richer. In addition, the frosting can be silky without relying heavily on icing sugar.

Makes: 1 cake (20 cm) | Serves: 10
Time: 20 mins prep + 30–38 mins bake + 60–90 mins cooling (+ 10 mins frosting) | Difficulty: Easy
Oven/Tin: 175°C | 20 cm round tin

Cake

  • 220 g plain flour
  • 200 g caster sugar
  • 55 g cocoa powder
  • 10 g baking powder
  • 3 g bicarbonate of soda
  • 3 g fine salt
  • 150 g ripe avocado flesh
  • 300 ml plant milk
  • 80 ml neutral oil
  • 15 ml vinegar
  • 10 ml vanilla extract

Creamy avocado frosting

  • 150 g ripe avocado flesh
  • 25 g cocoa powder
  • 60 ml maple syrup (to taste)
  • 5 ml vanilla extract
  • 1–2 g fine salt
Avocado vegan chocolate cake recipe card showing a slice of chocolate cake with creamy chocolate frosting, plus makes/serves, bake time, key ingredients including avocado and plant milk, quick steps, and a tip to blend avocado until perfectly smooth.
Avocado vegan chocolate cake with creamy frosting: this recipe card gives the quick steps and timing for a moist dairy-free cake—plus the key tip for silky-smooth avocado frosting.

Method

  1. Heat oven to 175°C. Line a 20 cm tin.
  2. Blend avocado with plant milk until completely smooth. This matters—any lumps will show up in texture.
  3. Whisk dry ingredients in a bowl.
  4. Whisk the avocado mixture with oil, vinegar, and vanilla. Then pour into dry ingredients and whisk until smooth.
  5. Bake 30–38 minutes. Cool completely before frosting.

Frosting

Blend avocado, cocoa, maple syrup, vanilla, and salt until silky. Chill 10–15 minutes to thicken. Spread over cooled cake.

Serving ideas

  • Finish with cocoa dusting for a clean look.
  • Add orange zest for brightness.
  • Add chopped toasted nuts for crunch.

If you like making plant milk at home for baking, MasalaMonk’s Easy Homemade Oats Milk is a handy reference.

Notes / substitutions for Avocado Vegan Chocolate Cake Recipe

  • Avocado must be ripe: blend until totally smooth or you’ll feel lumps.
  • Frosting storage: because it’s fresh avocado, keep frosted cake refrigerated; bring slices to room temp before serving.
  • Sweetness: maple syrup in frosting is adjustable—start lower, then add to taste.
  • No avocado frosting? Use ganache (from #3) or the buttercream (from #1).

Also Read: Baked Ziti Recipe Collection: 15 Easy Variations


Before you go: serving ideas that keep vegan chocolate cake feeling new

Even a truly excellent vegan chocolate cake can start to feel familiar if it always shows up the same way. Fortunately, you don’t need a new recipe to make it feel different—you just need a new finish. With that in mind, rotate your toppings and pairings so each bake has its own personality, even when the cake underneath is a repeat favourite.

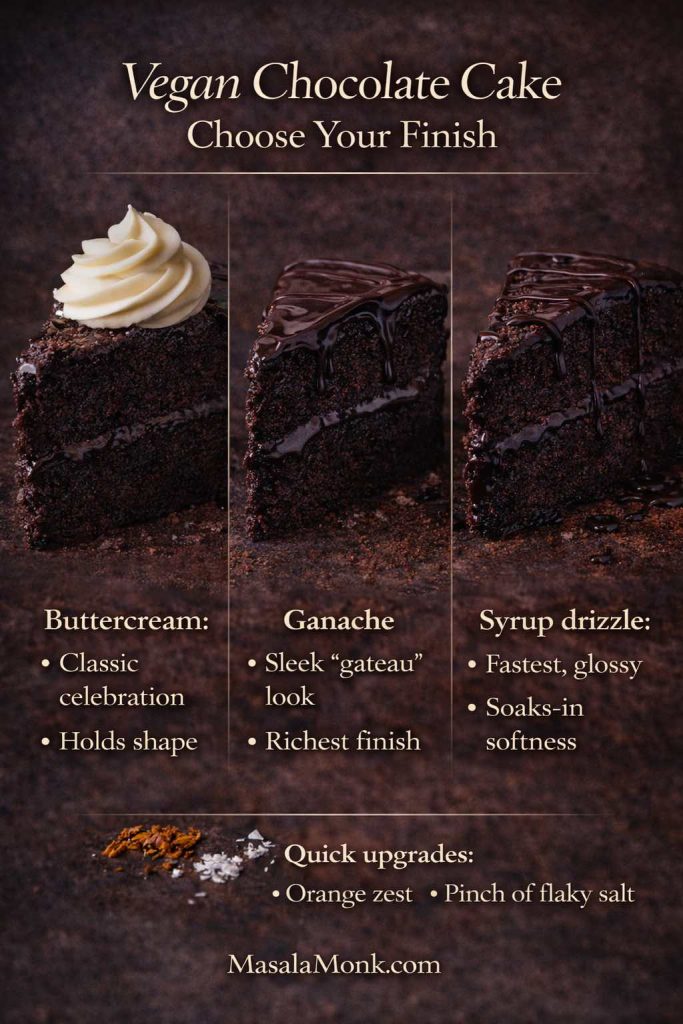
Switch the finish, change the whole vibe

  • Syrup drizzle (quick, glossy, instantly dessert-like): Warm a spoonful of 3 Minutes Homemade Chocolate Syrup and let it ribbon over slices. As it cools, it clings beautifully, so every bite gets a little shine.
  • Ganache pour (sleek, dramatic, surprisingly easy): If you’ve made the bundt ganache, you’re already set. Instead of saving it only for bundt cakes, pour it over sheet cake, loaf cake, or even a simple single-layer round. Better still, if you let the ganache thicken slightly before pouring, you’ll get a slow, elegant drape rather than a runaway puddle.
  • Citrus lift (bright, fragrant, not overly sweet): Orange zest over chocolate is a small move with a big payoff. It’s particularly lovely on beetroot cake, where the zest adds sparkle and keeps the chocolate tasting lively rather than heavy.
  • Salt finish (tiny detail, big flavour shift): A pinch of flaky salt over warm slices doesn’t make the cake salty—it makes the chocolate taste clearer. In the same way that salt sharpens caramel, it pulls chocolate into focus.

Add texture and contrast without extra work

If you want a little more than a topping, a few low-effort contrasts can make the plate feel complete:

  • Crunch: chopped toasted nuts or cocoa nibs scattered over syrup or ganache while it’s still tacky.
  • Creamy + cool: a spoon of thick coconut yoghurt or a scoop of dairy-free ice cream next to warm cake.
  • Fresh: berries or orange segments to lighten the richness, especially with flourless torte or lava cakes.

Building a dessert table that complements chocolate

When you’re putting together a dessert spread, variety matters more than quantity. So instead of adding another cake, choose one contrasting sweet that brings a different texture—creamy, crisp, or bite-sized.


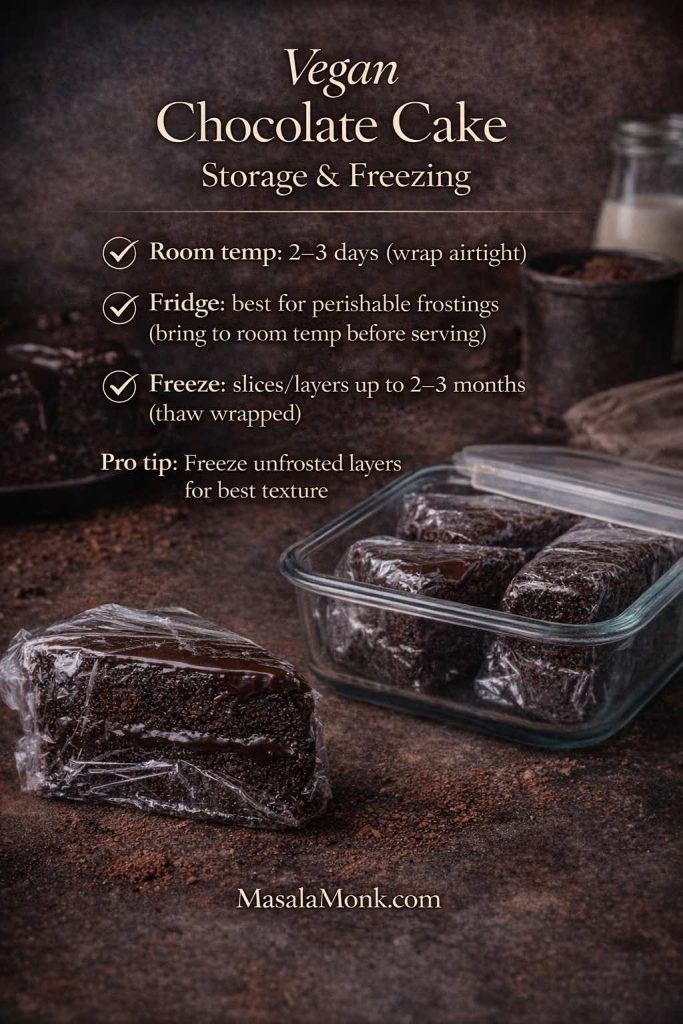
Storage, chilling, and freezing vegan chocolate cake

Because most of these cakes lean on oil for tenderness, they keep beautifully. Even so, storage still makes a difference—especially once frosting enters the picture. The goal is simple: protect moisture, prevent off-flavours, and keep texture as close to fresh-baked as possible.

Vegan chocolate cake storage and freezing guide showing how long it keeps at room temperature, when to refrigerate for perishable frostings, and how to freeze slices or layers for later.
Store vegan chocolate cake the smart way: keep it wrapped airtight at room temp for 2–3 days, chill cakes with perishable frostings, or freeze slices/layers for an anytime chocolate fix.

Room temperature (best for most unfrosted cakes)

If the cake is unfrosted—or topped with something stable like a syrup drizzle—wrap it tightly and store it at room temperature for 2–3 days. For loaf and sheet cakes in particular, this often preserves softness better than refrigeration.

How to wrap it well: once the cake is fully cool, wrap it snugly so air can’t circulate. If you’ve sliced it, press a piece of baking paper against the cut side first, then wrap.

Refrigeration (best for perishable toppings)

If you’ve used avocado frosting or you simply prefer a chilled finish, refrigerate the cake. However, for the best flavour and texture, bring slices back to room temperature before serving. Otherwise, the crumb can feel firmer and the chocolate can taste muted.

A good rhythm: slice what you need, then let those pieces sit out for 20–30 minutes before eating.

Freezing (best for planning ahead)

If you like having cake “on standby,” freezing is your friend. Wrap slices or layers tightly, then seal in an airtight container. When you’re ready, thaw at room temperature while still wrapped; that way, condensation forms on the wrap instead of soaking into the cake.

If you want clear, official guidance, here are the references that keep things straightforward: USDA Freezing and Food Safety, the UK’s How to chill, freeze and defrost food safely, and the FDA’s Refrigerator & Freezer Storage Chart (PDF).

Also Read: Hot Chocolate Coffee: 3 Easy Recipes (Cocoa, Mix, or Espresso)


A simple “choose your finish” guide

If you’re ever unsure what topping fits which cake, this quick guide helps you decide without overthinking:

Vegan chocolate frosting and ganache ratios guide showing classic cocoa buttercream, 1:1 chocolate ganache with coconut cream, and a quick chocolate syrup drizzle, with tips for fixing too-thick or too-thin toppings.
Vegan chocolate frosting made easy: use this quick ratios card for cocoa buttercream, 1:1 ganache, or a fast syrup drizzle—plus simple fixes if your topping turns out too thick or too thin.
Vegan chocolate cake finish guide comparing buttercream frosting, chocolate ganache, and syrup drizzle, with quick upgrades like orange zest and flaky salt.
Not sure how to finish vegan chocolate cake? Choose buttercream for a classic celebration look, ganache for a sleek rich finish, or a syrup drizzle for the fastest glossy upgrade.
  • Layer cake: buttercream for classic celebration, ganache for a sleek “gateau” mood.
  • Sheet cake: syrup drizzle for speed, quick glaze for neat slices, ganache if you want it to feel more formal.
  • Bundt cake: ganache is the easiest way to make the shape look intentional; meanwhile, a light dusting of cocoa keeps it elegant.
  • Loaf cake: citrus glaze or syrup drizzle for simple charm; ganache if you want it to look like a gift cake.
  • Flourless torte: cocoa dusting plus berries keeps it refined; alternatively, a thin ganache layer makes it feel ultra-luxurious.
  • Lava cakes: keep toppings minimal—syrup, berries, or a pinch of salt—so the molten centre stays the star.
  • Mug cake: syrup and salt are all you need; if you want more, add a square of chocolate inside next time.

Also Read: Cranberry Moscow Mule Recipe: A Festive Holiday Cocktail With Easy Variations


One last nudge (because variations are the fun part)

Once you’ve baked one of these cakes, it’s surprisingly satisfying to remix it. Swap the shape. Change the topping. Add orange zest one time and espresso the next. Suddenly, you’re not repeating yourself—you’re building a repertoire.

If you enjoy that “one dependable base, then smart variations” energy, you might also like Double Chocolate Chip Cookies – One Dough, 7 Ways. It’s the same spirit: familiar comfort first, then playful twists that keep baking exciting.

Also Read: Kahlua Drinks: 10 Easy Cocktail Recipes (Milk, Vodka, Coffee)

Vegan chocolate cake troubleshooting graphic with quick fixes for dry cake, dense cake, flat cake, and gummy centre, including tips on mixing, leaveners, baking cues, and blooming cocoa.
Vegan chocolate cake troubleshooting made simple: fix dry cake, dense crumb, flat rise, or gummy centres with these quick checks—so your next bake stays moist and reliable.

Vegan Chocolate Cake FAQ

1) What’s the best vegan chocolate cake recipe if I want it truly moist?

Go for an oil-based batter and a “bloom” step with hot coffee or hot water. Oil keeps the crumb tender for longer, while hot liquid wakes up cocoa so the chocolate tastes bigger. Also, bake to cues: stop when a skewer shows moist crumbs rather than waiting for it to come out completely clean.

2) Are vegan chocolate cake recipes automatically dairy-free and eggless?

Yes—vegan means no dairy and no eggs by definition. Still, “eggless” texture can vary because structure comes from different places: sometimes it’s mostly flour + leavening, while other recipes add starch, avocado, or beetroot for a fudgier, denser feel.

3) What’s the easiest vegan chocolate cake for beginners?

A one-bowl sheet cake is usually the simplest starting point. Because it bakes in a single layer, you get more even doneness, fewer steps, and less risk of overhandling. Plus, you can finish it with a quick drizzle or ganache and it still feels special.

4) Can I make a vegan chocolate cake without coffee?

Definitely. Coffee intensifies cocoa, yet hot water gives you the same “blooming” effect without any coffee notes. In other words, you’ll still get a deep chocolate aroma—just cleaner and more neutral.

5) Which cocoa powder should I use: natural or Dutch-process?

Natural cocoa tends to taste brighter and slightly sharper, while Dutch-process usually tastes smoother and looks darker. Either can work, although results won’t be identical. Consequently, once you find a cocoa you love, stick with it so your cake becomes consistent from bake to bake.

6) What plant milk is best for vegan chocolate cake?

Soy milk often gives a bit more structure and height, oat milk tends to make the crumb softer and rounder, and almond milk is lighter and can feel slightly less plush. That said, any unsweetened plant milk will generally work—choose based on what you keep in the fridge.

7) How do I make a vegan chocolate cake more “fudgy” instead of fluffy?

Use more melted chocolate or add chopped dark chocolate to the batter, then avoid overbaking. Additionally, choose a sheet cake format or a flourless/torte-style recipe, since both naturally lean richer and denser. Finally, let the cake cool fully—fudgy texture often sets as it rests.

8) Can I make vegan chocolate cake gluten-free and still keep it tender?

Yes, especially with a good 1:1 gluten-free flour blend. Because gluten-free cakes are more fragile when warm, let it cool completely before slicing. If you want extra neat slices, chill the cooled cake briefly—texture tightens and cuts cleaner.

9) Why do so many dairy-free chocolate cake recipes use vinegar?

Vinegar (or lemon juice) reacts with baking soda, which helps the cake rise and keeps the crumb lighter. Importantly, it shouldn’t make the cake taste sour—the amount is small and it disappears into the chocolate.

10) Why is my vegan chocolate cake dry, and how do I prevent it next time?

Dryness usually comes from overbaking or measuring too much flour. Next time, weigh ingredients if you can, start checking earlier, and pull the cake when the centre springs back and the skewer shows moist crumbs. Moreover, wrap the cooled cake well—air is what steals softness fastest.

11) Can I bake vegan chocolate cake as cupcakes, a loaf, or a bundt?

Yes—this batter family is flexible. Cupcakes bake faster (start checking around 18–22 minutes), loaf cakes need longer and benefit from a foil tent if the top browns early, and bundt cakes demand thorough greasing for clean release. As a result, the format you choose should match your time and how you plan to serve it.

12) How long does vegan chocolate cake last, and can I freeze it?

Most oil-based vegan chocolate cakes keep well at room temperature for 2–3 days if wrapped tightly. For frosted cakes—especially avocado frosting—refrigerate, then bring slices back to room temp for the best flavour. For longer storage, freeze slices or layers tightly wrapped; thaw while still wrapped so condensation stays on the wrap, not in the cake.

13) What’s the quickest vegan chocolate dessert when I want chocolate right now?

A vegan chocolate mug cake is the fastest option. It’s ready in minutes, and you can adjust sweetness or add a chocolate square in the centre for a molten pocket. Just microwave in short bursts, since overcooking is the main reason mug cakes turn rubbery.

14) Which vegan chocolate cake is best for birthdays and celebrations?

A classic vegan chocolate layer cake is the most “party-ready” because it stacks well and holds frosting cleanly. Alternatively, a bundt cake looks festive with almost no decorating—ganache does the work and the shape carries the drama.

Posted on — Leave a comment

Foods to Avoid with Diverticulitis: Flare Diet + What to Eat After

Magazine-style portrait cover showing bowls of popcorn, nuts, chia, coffee and sauces with title “Foods to Avoid with Diverticulitis” and MasalaMonk.com footer

Foods to avoid with diverticulitis is the question everyone asks first, especially during a painful flare. Because the colon is inflamed, the safest route is to reduce roughage short-term, then step back up to a sustainable eating pattern as symptoms settle. To keep this both practical and evidence-based, the plan below follows the clinical arc you’ll see in the diverticulitis diet guidance from Mayo Clinic and the patient-friendly lists on the low-fiber diet page at MedlinePlus.

Free download: Grab the foods to avoid with diverticulitis printable guide (clear → low fiber → reintroduce) — download the PDF here.

However, before we map your meals, it helps to define the playing field. Diverticulosis refers to small pouches in the colon; diverticulitis is when those pouches become inflamed or infected. The day-to-day diet changes more with diverticulitis than with diverticulosis, because a flare typically needs gentler textures and lower fiber for a short time. For a quick overview of both conditions, bookmark diverticulosis and diverticulitis at MedlinePlus, then come back here to put the plan into action.

⚠️ Educational information — not medical advice.
This article is for general education only and does not replace advice from your own clinician. Do not start, stop, or delay medical care because of what you read here. If you have a flare, worsening pain, fever, vomiting, or other urgent symptoms, contact your healthcare provider or local emergency services.


The 3-Phase Path That Makes Eating Simpler (and Safer)

Because the bowel needs rest first and fiber later, think in phases. This structure reduces guesswork, prevents “forever bans,” and gives you a clear way to reintroduce foods after the worst has passed. Before you start, save the foods to avoid with diverticulitis one-page checklist for quick reference — FREE PDF download.

Phase 1: Clear Liquids (Short and Purposeful)

At the peak of pain, you’ll start with clear liquids so your gut can calm down. That means broth, strained soups, gelatin, pulp-free juices, oral rehydration solution, tea, and water. Use the official clear-liquid diet list at MedlinePlus when you’re unsure what “counts” as clear. Because this stage is only to reduce irritation, keep it brief unless your clinician advises otherwise.

Pptional “full liquids” bridge (if solids still feel rough) : A short, clinician-guided step on full liquids (strained creamy soups, milkshakes, puddings) can help some people between Phases 1 and 2. MedlinePlus

Phase 2: Low-Fiber (48–72 Hours for Many People)

As soon as symptoms begin easing, transition to low-fiber choices: eggs, poached fish, tender chicken, white toast, plain pasta, white rice, peeled/cooked vegetables, applesauce, and yogurt or cottage cheese if tolerated. The aim here is small, gentle meals, typically five to six times per day, so you’re nourished without overloading the bowel. For precise “allowed/avoid” lists, rely on the low-fiber diet guide at MedlinePlus.

Phase 3: Step-Up and Reintroduce (Bridge Back to Normal)

Once pain and tenderness subside, begin adding fiber back—slowly. Start with soft fruits (for instance, a ripe banana), oatmeal, well-cooked vegetables, and lighter grains. As you feel more normal, scale toward your long-term pattern. If you want a quick reassurance that this progression is standard, skim the Mayo Clinic overview of the diverticulitis diet.

Also Read: Fiber in Food.

⚠️ Educational information only — not medical advice. Always consult your clinician for diagnosis, treatment, and personalized diet guidance.


Foods to Avoid with Diverticulitis During a Flare (Temporary List)

This is the section most readers jump to, so let’s be direct. The following foods to avoid with diverticulitis apply during an active flare and early recovery. They are not permanent bans; they’re temporary guardrails that reduce irritation while the colon heals. Prefer a quick checklist? Download the FREE PDF and keep it handy during your flare.

Foods to Avoid with Diverticulitis: Whole Grains and Bran

Although whole grains are fantastic after recovery, they’re too fibrous during a flare. Replace brown rice, whole-wheat breads, bran cereals, and quinoa with refined grains—white rice, white toast, plain pasta—for a short stretch. The low-fiber diet list at MedlinePlus shows the exact swaps.

Foods to Avoid with Diverticulitis: Raw Skins, Tough Salads, and Corn

Raw skins and hearty salads add texture you don’t want right now. Choose peeled, cooked, or canned fruit/veg (packed in water or juice). If you want help picking fruit by phase and texture, use our internal explainer Fruits and Diverticulitis: What You Can and Can’t Eat to make practical choices you’ll actually enjoy.

Foods to Avoid with Diverticulitis: Beans and Legumes (For Now)

Legumes are high-fiber and often gas-forming, so press pause during the flare. Later, when you’re stepping up, you can reintroduce in small portions—for example, puréed lentil soup—and gauge comfort.

Foods to Avoid with Diverticulitis: Nuts, Seeds, and Popcorn (During the Flare)

This one causes the most confusion. During the flare, skip rough, seedy textures; nevertheless, the old instruction to avoid these forever is outdated. Current gastroenterology guidance does not recommend routine avoidance between flares. For clarity and confidence, do read the AGA clinical guidance on acute diverticulitis and a simple myth explainer from Cleveland Clinic.

Foods to Avoid with Diverticulitis: Very Spicy Sauces (If They Aggravate Symptoms)

Capsaicin tolerance is individual. If hot sauces, red-chile curries, or extra-spicy pickles worsen cramping or urgency, shelve them for now. Later, re-introduce gradually.

Foods to Avoid with Diverticulitis: Carbonated Drinks and Alcohol (If They Bloat or Hurt)

Some people feel fine; others notice more gas or discomfort. Treat these as optional avoids during the flare and early recovery. Then, test small reintroductions.

Foods to Avoid with Diverticulitis: Tough, Fatty, or Fried Foods

Heavily fried items and tough cuts of meat can linger and irritate. Choose poached fish, omelets, soft tofu, or tender chicken prepared simply. For small meal frameworks, see the diverticulitis diet overview at Mayo Clinic.

If you want a second perspective while you’re still in the flare, our related article What Are the 10 Foods to Avoid with Diverticulitis? acts as a quick reminder list you can consult when your energy is low.

⚠️ Educational information only — not medical advice. Always consult your clinician for diagnosis, treatment, and personalized diet guidance.


The Big Myth: “No Nuts, Seeds, or Popcorn Ever Again”

Because this myth is so persistent, it deserves its own short section. For years, people were told that nuts, seeds, and popcorn could lodge in diverticula and cause attacks. However, modern guidance and prospective data do not support this. After a flare has resolved, there is no need for routine avoidance. To understand the shift in thinking, here are two straightforward references:

Practically, that means treat nuts, seeds, and popcorn as foods to avoid with diverticulitis only during an active flare, then reintroduce them cautiously once you’re well.


Building Flare-Friendly Plates (Then Stepping Back Up)

Now that you know the foods to avoid with diverticulitis in the heat of the moment, here’s how to build real meals and move forward without guesswork.

Day 0–1: Clear Liquids with Purpose

Sip broth, pulp-free juices, oral rehydration solution, tea, gelatin, and water. Space fluids evenly, and don’t push this phase longer than advised. If you need a simple checkpoint, the clear-liquid diet list from MedlinePlus is easy to scan when you’re tired.

Day 2–3: Low-Fiber Meals in Small, Frequent Portions

Think two ounces of protein + one low-fiber side, several times a day:

  • Soft scrambled eggs with white toast
  • Poached fish with white rice and peeled, cooked carrots
  • Lactose-free yogurt or cottage cheese if tolerated
  • Applesauce or plain custard for easy dessert

When in doubt, recheck the low-fiber diet page at MedlinePlus for examples. Do read out post on How to Eat 100 Grams of Protein a Day.

Day 4–6: Step-Up Starts

Add ripe banana, oatmeal (if comfortable), well-cooked vegetables, and lighter grain swaps (for instance, part white/part brown). The Mayo Clinic diverticulitis diet overview is a helpful reassurance that you’re on the expected path.

Day 7–10: Toward Maintenance

Reintroduce beans via puréed soups first, then small portions of whole beans; add soft salads and raw fruit skins only when comfortable. If spicy food, carbonated drinks, or alcohol seem irritating, rein them in and try again later. For a balanced perspective on individual “trigger” stories, have a look at the short Q&A on no universal trigger foods in the Mayo Clinic expert answers.

⚠️ Educational information only — not medical advice. Always consult your clinician for diagnosis, treatment, and personalized diet guidance.


Between Flares: Fiber, Fluids, and a Pattern You Can Live With

After you recover, shift your focus from foods to avoid with diverticulitis to foods that keep you regular and comfortable: whole grains, beans, fruits, vegetables, and nuts and seeds—added gradually, with plenty of water. For a quick primer on why fiber matters (and how different types act), use The Nutrition Source by Harvard’s explanation of Fiber and its types.

Because readers often ask about produce first, it helps to provide a guided path. If you want a practical, food-by-food tour that slots into everyday Indian meals and snacks, do read our internal article Fruits and Diverticulitis: What You Can and Can’t Eat. That piece shows how to move from cooked/peeled items back to crunchy, raw, high-fiber favorites without a panic spiral every time you crave a salad.


Fiber Supplements: When (and How) to Use Them

Food first is ideal; nevertheless, some people benefit from a soluble fiber supplement after symptoms settle. Psyllium is often best tolerated. Crucially, go low and slow:

  • Start with 1 rounded teaspoon daily for 3–4 days
  • Increase to 2 teaspoons if comfortable
  • Then move to 1 tablespoon, paired with a full glass of water each time

Talking about Psyllium, do read Psyllium Husk (Isabgol/Ispaghula) Side Effects: Risks, Benefits & How to Take It Safely.

This dovetails with a gentle food reintroduction. It’s also consistent with individualized recovery advice in the AGA guidance on acute diverticulitis.

Readers also ask about flax and chia. During a flare, they’re simply too fibrous. Later, they can be excellent additions—especially ground flax for its soluble fraction. If you want approachable, phase-aware ideas, link to our how-to with recipes: How to Incorporate Flax Seeds. Moreover, if you enjoy chia puddings, wait until you’re clearly in remission, then begin with half portions and extra fluids. In the meantime, do explore our post on 10 Creative Chia Pudding Recipes for Every Taste.


Specific Foods People Ask About

Bananas (A Gentle Bridge Food)

A ripe banana is often a friendly step-up fruit once you leave strict low-fiber eating. Because texture and tolerance both matter, advance at your comfort speed. Do read more about How Much Potassium Is in a Banana? Nutrition Facts, Comparisons & Benefits.

Leafy Salads, Cabbage, Lettuce, and Corn

These can be later-phase reintroductions. Start with cooked, finely chopped cabbage or soft lettuce blends, keep portions small, and observe your response before scaling up.

Coffee, Chocolate, Very Spicy Food, Carbonation, and Alcohol

Because individual tolerance varies so much, the best approach is limit if they aggravate symptoms, then retest in small amounts. This avoids needless permanent bans while respecting what your body tells you. For balance and clarity, you can link readers to the concise reminder of “no universal trigger foods” in Mayo Clinic’s expert answers.

Nuts, Seeds, and Popcorn (After Recovery)

Again, they are foods to avoid with diverticulitis during a flare, not forever. In remission, no routine avoidance is advised. Provide readers with confidence by linking to AGA guidance and Cleveland Clinic’s myth explainer.

⚠️ Educational information only — not medical advice. Always consult your clinician for diagnosis, treatment, and personalized diet guidance.


Why This Approach Beats Rigid “Never” Lists

First, the phase model is how major institutions guide patients to calm a flare and transition safely. A short stint on clear liquids, a handful of days on low-fiber, then a gradual climb back to fiber is exactly what you’ll see outlined in the Mayo Clinic diverticulitis diet and the MedlinePlus low-fiber diet.

Second, permanent bans on nuts, seeds, and popcorn aren’t supported by current evidence. After recovery, no routine avoidance is recommended—show readers the shift with the AGA management guidance and the plain-English overview from Cleveland Clinic.

Finally, personalization matters. There is no single list of foods that prevents attacks in everyone. A balanced message—limit what bothers you, progress slowly, hydrate well—is more realistic and more humane. If someone needs a succinct reminder of that point, link to Mayo Clinic’s expert Q&A on trigger foods.


When to Call Your Clinician (and What to Watch)

Diet helps, but medical care is critical if you have fever, severe pain, vomiting, or worsening symptoms, or if things don’t improve after a few days of the clear-to-low-fiber approach. A plain-language condition overview is here: Diverticulitis at MedlinePlus. Use it as your “when in doubt” reference. After the immediate problem is under control, shift focus to daily habits—fiber (added slowly), fluids, movement, sleep, and stress regulation—because those patterns usually matter more than any single food.


Free download: Grab the foods to avoid with diverticulitis printable guide (clear → low fiber → reintroduce) — download the PDF here.


Recap You Can Act On Today

⚠️ Education only. This article is not a substitute for professional medical advice, diagnosis, or treatment. Always speak with your healthcare provider about your specific situation.


FAQs

1) What are the top foods to avoid with diverticulitis during a flare?

During an active flare, temporarily avoid high-roughage items such as whole grains and bran cereals; raw fruit and vegetable skins; large raw salads and corn; beans and lentils; nuts, seeds, and popcorn; very spicy, capsaicin-heavy sauces; carbonated drinks and alcohol if they aggravate you; and tough, fatty, or heavily fried foods. Then, as symptoms settle, reintroduce fiber gradually.

2) How long should I follow a clear-liquid phase before moving on?

Briefly. Use clear liquids for a short window—typically one to two days—until severe pain eases and you can tolerate more. Next, progress to a low-fiber phase for a few days, and finally transition back toward your usual, higher-fiber pattern as comfort returns.

3) What does a low-fiber day actually look like?

Think small, gentle meals 5–6 times per day: soft scrambled eggs with white toast, poached fish with white rice and well-cooked peeled vegetables, yogurt or cottage cheese if tolerated, and simple desserts like applesauce or custard. Portion control plus hydration helps you advance smoothly.

4) Are nuts, seeds, and popcorn permanently foods to avoid with diverticulitis?

No. During a flare, yes—skip rough, seedy textures. However, after symptoms resolve, routine long-term avoidance isn’t generally recommended. Instead, reintroduce slowly, note your tolerance, and drink plenty of fluids as you bring back fiber.

5) Is coffee one of the foods to avoid with diverticulitis?

It depends. Caffeine can stimulate the gut in some people. During a flare, you might limit or pause coffee; afterwards, reintroduce gradually and observe your body’s response. Similarly, chocolate can be stimulating for some but well tolerated by others—personalization is key.

6) Are bananas okay, or should they go on my list of foods to avoid with diverticulitis?

Ripe bananas are often gentle during the step-up phase after clears and low-fiber. Start with small portions, then scale as tolerated. Green or very firm bananas can be more fibrous, so add those later in recovery.

7) What about chia or flax seeds?

During a flare, avoid them—they’re very high in fiber. Later, introduce small amounts (e.g., a teaspoon of ground flax) with additional fluids. Increase slowly over several days; if gas or discomfort occurs, pause and retry later.

8) Are dairy products safe during a flare?

Many people tolerate simple, lower-lactose options such as yogurt or cottage cheese during the low-fiber phase. Nevertheless, if dairy worsens bloating or cramps for you, skip it temporarily and use other protein sources like eggs, tofu, or tender chicken.

9) Which grains are best right after a flare?

Begin with refined grains—white rice, plain pasta, white toast, cream of wheat—because they’re lower in fiber and gentler on an irritated bowel. Then, step up to oats, blended grains, and eventually whole grains as you feel better.

10) Are beans always foods to avoid with diverticulitis?

Only during the flare. Beans and lentils are fiber-rich and can cause gas early on. Later, consider puréed legume soups in small servings before returning to intact beans; go slowly to limit discomfort.

11) Do carbonated drinks and alcohol belong on my personal “avoid” list?

Sometimes. Bubbles may increase bloating; alcohol may aggravate symptoms for some. During a flare, it’s reasonable to limit both. Subsequently, reintroduce cautiously—try smaller portions, sip with food, and monitor how you feel.

12) Should I worry about black pepper or spices?

Milder seasonings and black pepper are often fine. Very spicy, capsaicin-heavy dishes can bother an irritable gut, especially during a flare. Therefore, reduce heat temporarily; then, as you improve, titrate spice back to taste.

13) What’s a simple 10-day progression I can follow?

  • Days 0–1: clear liquids.
  • Days 2–3: low-fiber meals in small, frequent portions.
  • Days 4–6: step-up foods such as ripe banana, oatmeal (if tolerated), and well-cooked vegetables.
  • Days 7–10: begin transitioning toward maintenance—gradually add whole grains, small portions of beans, and raw textures as comfortable.

14) How much water should I drink while I reintroduce fiber?

Hydration matters. As you add fiber, increase fluids to help stool move comfortably. A steady intake spread through the day generally works better than large, infrequent gulps.

15) Which fiber supplements are best after recovery?

Many people find soluble fiber—especially psyllium—well tolerated once symptoms resolve. Start low (e.g., a teaspoon daily), increase slowly over several days, and always pair with a full glass of water. Avoid starting supplements during an acute flare.

16) Can I follow a low FODMAP diet for diverticulitis?

Low FODMAP is designed for IBS symptom management, not specifically for diverticulitis. Even so, some individuals use it in remission to troubleshoot gas and bloating. If you try it, do so with professional guidance and still aim for adequate fiber over time.

17) Are leafy salads, cabbage, and corn automatically foods to avoid with diverticulitis?

During the flare, yes—because raw, high-fiber, or tough textures can irritate. However, after you improve, you can reintroduce these foods—first cooked and finely chopped, then gradually less processed—as your tolerance allows.

18) Do oats and oatmeal help or hurt?

It varies. Oatmeal is often a friendly bridge food in the step-up phase; it contains soluble fiber that can be soothing for some. Nonetheless, if it causes bloating, try smaller portions or wait a few days before trying again.

19) What about cheese, butter, and ghee?

Butter and ghee are fats without fiber; a little may be fine, though large amounts or very greasy meals can feel heavy. Many cheeses are tolerable in the low-fiber phase, but if you experience cramping or loose stools, reduce or pause and reassess later.

20) Are potatoes, crackers, or plain toast acceptable early on?

Yes—plain, low-fiber versions are common in the low-fiber phase. For instance, peeled mashed potatoes, plain salted crackers, and white toast often work well. Later, shift to higher-fiber choices as you recover.

21) Are foods to avoid with diverticulitis different from foods to avoid with diverticulosis?

Yes. Diverticulitis (active inflammation) calls for temporary low-fiber eating. Diverticulosis (no active inflammation) usually benefits from a higher-fiber pattern to support regularity and stool form. In short: flare = gentler textures; remission = fiber forward.

22) Do I need a “printable list of foods to avoid with diverticulitis” for the fridge?

It can help. A one-page checklist that separates flare foods (temporary avoids and allowed items) from remission foods (fiber-forward staples) reduces decision fatigue and makes shopping easier—especially when you’re not feeling your best.

23) How can I personalize the list of foods to avoid with diverticulitis?

Track your response. Keep a brief notes app or card for two weeks as you reintroduce foods. Record what you ate, portion size, timing, water intake, and how you felt. Because sensitivity is individual, your personal “avoid for now” list may be shorter—or longer—than someone else’s.

24) What’s the single biggest mistake people make?

Staying on clear liquids or ultra-low-fiber foods too long. That can leave you fatigued and constipated once the flare settles. Progress—cautiously but consistently—through the phases so you’re moving toward a sustainable, fiber-inclusive pattern.

25) When should I call my clinician instead of tweaking food?

Immediately seek medical advice if pain worsens, fever develops, you’re vomiting, you cannot keep fluids down, or you’re not improving after a few days of phased eating. Diet is supportive, but medical care comes first when red flags appear.

26) Can I exercise while advancing my diet?

Light movement—gentle walks, easy stretching—often aids regularity and comfort once acute pain decreases. Nevertheless, avoid strenuous core work during a flare. Resume normal activity gradually as you feel better.

27) Will probiotics help, or are they on the list of foods to avoid with diverticulitis?

They’re not foods, and evidence is mixed. Some people feel better with a simple probiotic in remission; others notice no change. If you experiment, introduce one product at a time, keep notes, and stop if symptoms worsen.

28) How do I bring back flavor without triggering symptoms?

Start with mild seasonings—ginger, turmeric, cumin, fresh herbs, a squeeze of lemon—rather than very hot chilies. Additionally, choose moist cooking methods (poaching, braising, steaming) to keep proteins tender and easy to digest.

29) What’s a smart “first grocery list” after a flare?

White rice, plain pasta, white bread, eggs, tender fish or chicken, yogurt or lactose-free alternatives, peeled/cooked vegetables, applesauce, ripe bananas, oatmeal (if tolerated), broth, oral rehydration solution, and plenty of still water. Next, add higher-fiber staples as you step up.

30) Bottom line: what should I remember about foods to avoid with diverticulitis?

During a flare, prioritize gentle textures and temporarily avoid roughage; then, as symptoms ease, reintroduce fiber slowly with solid hydration. Over time, aim for a balanced, higher-fiber pattern that you can maintain—always guided by your own tolerance and your clinician’s advice.

Posted on — 5 Comments

What is Cacao?: Cacao vs. Chocolate vs. Dark Chocolate

DIFFERENCES BETWEEN CACAO, DARK CHOCOLATE, AND CHOCOLATE

If you’ve ever stood in the chocolate aisle wondering what “raw cacao” is or whether dark chocolate is actually healthy—this guide is for you.
We’ll decode the differences between cacao, chocolate, and dark chocolate, explore the latest science on their health benefits, and help you make smarter, more delicious choices.


🌱 What Exactly Is Cacao?

Cacao is the raw, unprocessed form of chocolate.

It comes from the seeds of the Theobroma cacao tree—a tropical plant native to Central and South America whose name means “food of the gods.” These seeds (commonly called cacao beans) are fermented, dried, and sometimes gently roasted, depending on the intended product.

🍃 Types of Cacao Products:

  • Cacao Nibs: Crushed cacao beans—crunchy, bitter, rich in antioxidants.
  • Cacao Powder: Cold-pressed cacao beans with the fat (cacao butter) removed.
  • Cacao Butter: The creamy fat extracted from the beans—used in both chocolate and cosmetics.

Unlike conventional cocoa, cacao is minimally processed, preserving much of its natural nutrient content.


🍫 Chocolate: A Delicious Evolution

Chocolate is what most people think of when they see candy bars or desserts. It’s a processed food made from cocoa (roasted cacao), cocoa butter, sugar, and often milk solids or emulsifiers.

There are three main types:

  1. Milk Chocolate – Contains milk powder, sugar, and 10–25% cocoa solids.
  2. Dark Chocolate – Contains 50–90% cocoa solids and little or no milk.
  3. White Chocolate – Contains cocoa butter, sugar, and milk solids—but no cocoa solids (so it’s technically not “chocolate” at all!).

🥊 Cacao vs. Chocolate vs. Dark Chocolate: What’s the Difference?

FeatureRaw CacaoDark ChocolateRegular Chocolate
Processing LevelMinimal or rawRoasted, conched, temperedHighly processed, more sugar/milk additives
Flavor ProfileEarthy, bitter, nuttyBitter-sweet, complexSweet, creamy, less intense
Sugar ContentNoneLow to moderateHigh
AntioxidantsHighest (flavanols, polyphenols)Medium–high depending on %Low due to processing
Nutritional ValueMagnesium, iron, flavonoids, theobromineSimilar nutrients, reduced by heat/sugarMostly fats and sugar
Best UseSmoothies, granola, raw dessertsHealthy indulgence, baking, snackingCandy, sweets

🧬 What the Science Says (2024–2025 Research Updates)

Recent studies reveal compelling health benefits of cacao and dark chocolate—when consumed wisely:

❤️ Cardiovascular Support

  • Flavanols in cacao and high-quality dark chocolate improve blood flow, reduce blood pressure, and enhance arterial function.
  • A May 2025 meta-analysis (University of Surrey) found cocoa flavanols as effective as some BP medications in supporting vascular health.

🧠 Brain Boost & Mood

  • Theobromine and phenylethylamine (in cacao) stimulate the central nervous system, elevating mood and focus.
  • Dark chocolate may trigger endorphin release and serotonin production, helping relieve stress.

💪 Antioxidant Power

  • Raw cacao contains 40x more antioxidants than blueberries. Its ORAC score (oxygen radical absorbance capacity) is among the highest of any food.

⚖️ Weight & Blood Sugar

  • In moderation, cacao and 70–90% dark chocolate can help regulate insulin, reduce appetite, and even improve lipid profiles (lower LDL).

⚠️ But Wait… What About Heavy Metals?

This part matters.

Recent lab tests (Consumer Reports, 2023–2024) found that 43% of dark chocolate bars tested exceeded California Prop 65 limits for lead, and 35% for cadmium—especially in brands using beans from Latin America.

Tips to reduce risk:

  • Rotate brands (don’t eat the same bar daily).
  • Favor companies who publish heavy metal testing (e.g., Alter Eco, Taza, Thrive Market).
  • Limit daily intake (1 oz / 28g or less).

🥗 How to Use Cacao in Everyday Life (Practical Tips)

🥣 Morning Power Boost

  • Add 1–2 tsp raw cacao powder to your smoothie, oatmeal, or yogurt for a flavonoid kick.

🍫 Smart Snacking

  • Choose dark chocolate with ≥70% cocoa, minimal ingredients (avoid added oils, milk, or artificial flavors).
  • Look for organic, fair trade, and ideally bean-to-bar products.

🧁 Bake Better

  • Use natural cacao powder instead of Dutch-processed cocoa in baking to retain antioxidants.
  • Try cacao nibs as a crunchy topping for muffins, pancakes, or trail mix.

🌍 Sustainable Chocolate: The Bigger Picture

Cacao farming can either degrade or regenerate the planet.

  • Traditional cacao farming in West Africa is linked to deforestation, child labor, and soil depletion.
  • Regenerative cacao (e.g., shade-grown, agroforestry methods) supports biodiversity, carbon capture, and farmer well-being.

Look for certifications like:

  • Rainforest Alliance
  • Fair Trade
  • Direct Trade or Regenerative Organic Certified

Brands supporting ethical sourcing include:

  • Tony’s Chocolonely
  • Alter Eco
  • Beyond Good
  • Moka Origins
  • Original Beans

🧠 TL;DR – The Smart Cacao Takeaways

✅ Raw cacao = superfood packed with minerals and antioxidants
✅ Dark chocolate (70–90%) = healthy treat, if low in sugar and heavy metals
❌ Milk chocolate = dessert, not health food
✅ Limit intake to 1 oz/day, rotate brands
✅ Choose organic, ethical chocolate for your health and the planet


🔎 Final Thought

Chocolate doesn’t have to be a guilty pleasure. With a little label reading and knowledge of how it’s made, you can enjoy cacao in its most powerful, pure form—or indulge in a quality dark chocolate bar that actually supports your health.

🙋‍♀️ FAQs: Cacao vs. Chocolate vs. Dark Chocolate

1. What’s the difference between cacao and cocoa?

Cacao refers to the raw or minimally processed beans of the Theobroma cacao tree, while cocoa is cacao that has been roasted—often at high temperatures, which reduces antioxidant content.


2. Is raw cacao healthier than dark chocolate?

Yes—raw cacao retains more antioxidants and nutrients because it isn’t exposed to high heat. However, high-quality dark chocolate (70% or more) still offers many health benefits.


3. What percentage of cocoa should I look for in dark chocolate?

Aim for at least 70% cocoa solids. The higher the percentage, the more flavonoids and less sugar you’ll get.


4. Can cacao help with mood and stress?

Yes. Cacao contains compounds like theobromine, phenylethylamine, and magnesium, which may boost mood, focus, and relaxation.


5. How much cacao or dark chocolate should I eat daily?

Moderation is key. Most studies suggest 1 oz (28g) per day of dark chocolate or 1–2 tsp of cacao powder.


6. What are the risks of heavy metals in chocolate?

Some dark chocolate products contain elevated levels of lead and cadmium, especially from certain regions. Rotate brands and look for those that test and disclose heavy metal levels.


7. Is white chocolate considered chocolate?

No. White chocolate contains cocoa butter but no cocoa solids, so it lacks the flavonoids and antioxidants found in dark or raw chocolate.


8. Can I use cacao powder in baking instead of cocoa powder?

Yes, but note that cacao powder has a stronger, more bitter taste and is more heat-sensitive. Use it in lower-heat recipes or add after cooking when possible.


9. Is chocolate vegan?

Raw cacao and many dark chocolates are naturally vegan, but always check the label for milk solids, whey, or butterfat in conventional products.


10. What’s the most sustainable kind of chocolate to buy?

Look for fair trade, organic, and regenerative cacao brands. Ethical chocolate supports environmental health and protects labor rights.

Posted on — Leave a comment

Chocolate is Healthy!

Yes, you read that right! For all you chocolate lovers out there, here’s some good news: research has shown that moderate consumption of dark chocolate can be incredibly beneficial for your overall health. It’s time to debunk the childhood myths about chocolate causing acne, obesity, high blood pressure, coronary artery disease, and diabetes. The key here is to choose the right kind of chocolate, specifically dark chocolate, which offers a myriad of health benefits that other variants simply can’t match.

Theobroma Cacao: The Food of the Gods 😇

Did you know that the Latin name for chocolate, Theobroma Cacao, actually means ‘Food of the Gods’? When it comes to chocolate, a small amount of high-quality dark chocolate with at least 70 percent cocoa content can truly live up to that name. Beyond its heavenly taste, dark chocolate is packed with essential nutrients that your body craves.

Boost Cognitive Function with Dark Chocolate 🧠

The right dose of dark chocolate can do wonders for your memory, reasoning, and attention. Unlike milk chocolate, dark chocolate contains cocoa flavanols, which have been shown to enhance cognitive abilities. Additionally, dark chocolate has protective properties against mood disorders, thanks to its rich content of polyphenols, flavanols, and catechins. Consider it one of the best sources of antioxidants that your body needs for optimal brain health.

A Heart-Healthy Indulgence ❤️

Dark chocolate can also lower the risk of heart disease. The flavanols present in dark chocolate stimulate the endothelium to produce nitric oxide, which helps in maintaining healthy blood vessels and improving blood flow. Lowering blood pressure is an additional benefit derived from consuming dark chocolate. Fitness enthusiasts, take note: dark chocolate enhances oxygen availability during training sessions, further enhancing the release of nitric oxide in the body and promoting cardiovascular health.

Nourish Your Skin with Dark Chocolate 🌟

The benefits of dark chocolate extend to your skin as well. The bioactive compounds found in dark chocolate increase skin density and hydration, protecting against sun damage and promoting healthy blood flow to the skin. Moreover, the cacao content in dark chocolate enhances mitochondrial biogenesis, acting as an anti-aging element for the body and supporting youthful-looking skin.

The Guilt-Free Indulgence 🍫

Next time someone warns you about chocolate causing acne, you can confidently hand them a bar of dark chocolate. It’s important to note that dark chocolate does contain fat, but the fats are mostly saturated and monounsaturated, with small amounts of polyunsaturated fat. Enjoying dark chocolate in moderation is no reason to worry about obesity. In fact, dark chocolate offers numerous benefits, including appetite reduction for a healthy diet, reduction in complications during pregnancy, and protection against damaged cells to help ward off cancer.

5 Incredible Health Benefits of Dark Chocolate

  1. Improves memory, reasoning, and attention capability.
  2. Protects against mood disorders.
  3. Lowers the risk of heart disease, improves blood flow, and maintains blood pressure.
  4. Boosts oxygen availability during fitness training.
  5. Protects against sun damage, improves blood flow to the skin, and acts as an anti-aging element.

Feeling tempted by the thought of chocolate? Now that you’re aware of the remarkable benefits of dark chocolate, take a guilt-free journey through our range of indulgent chocolate products and choose your favorite. Your taste buds and your health will both thank you for it!

Blog Tags: dark chocolate, health benefits, cognitive function, heart health, skincare, guilt-free indulgence

Drooling already thinking of chocolate? Now that you know the benefits of dark chocolate, take a guilt-free trip across our range of chocolaty products and pick your favorite.

http:///64.227.165.57/product/vegan-hot-chocolate-mix/
http:///64.227.165.57/product/dark-chocolate-almond-butter/