Posted on — 1 Comment

Scrambled Eggs with Cottage Cheese Recipe

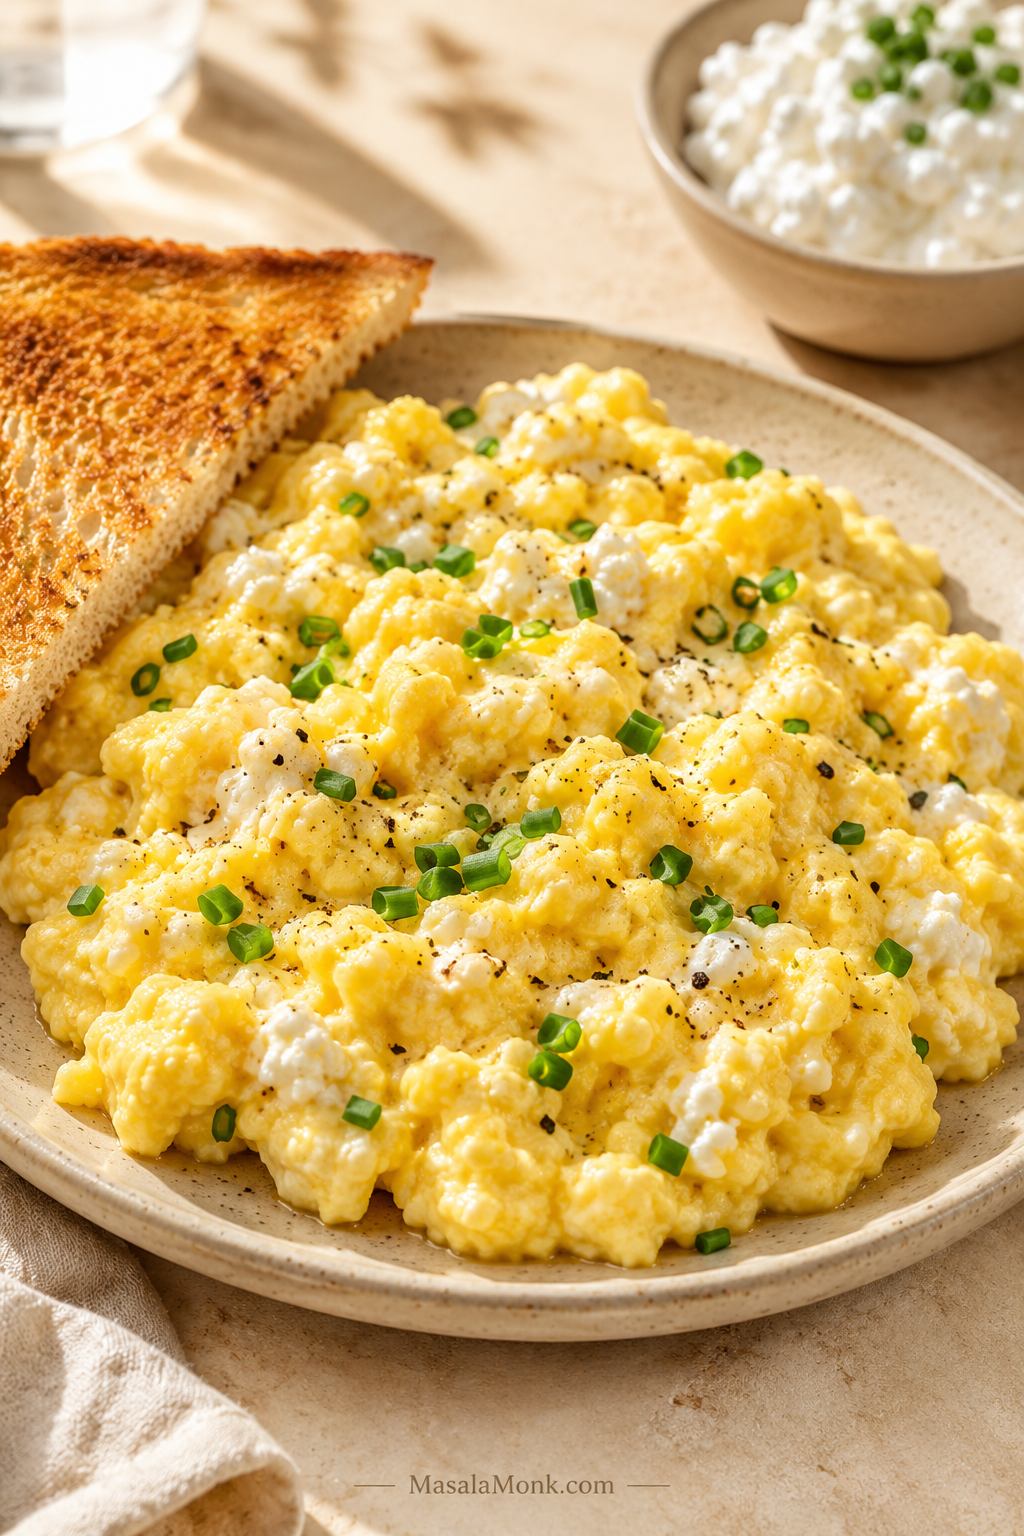
Scrambled eggs with cottage cheese served on a plate with toast, chives, and black pepper.

Scrambled eggs with cottage cheese can go one of two ways: creamy, soft, and surprisingly good, or loose and a little strange. The difference is not luck. It is the ratio, the cottage cheese you use, and how gently you cook the eggs.

This recipe is built for the good version: high-protein scrambled eggs that stay tender, creamy, and satisfying without turning wet or rubbery. It walks you through the ratio, the smoother blended option, the egg-white version, microwave method, add-ins, and the fixes that keep cottage cheese eggs from turning watery.

This is especially useful if you want a higher-protein breakfast but still want food that feels warm, familiar, and satisfying. It is not trying to turn eggs into a diet trick; it is just a better, creamier scramble with more staying power.

Quick Answer: How to Make Scrambled Eggs with Cottage Cheese

To make scrambled eggs with cottage cheese, whisk 2 large eggs with 1/4 cup cottage cheese, then cook the mixture gently in a nonstick skillet over medium-low heat. Push the eggs slowly with a silicone spatula until they are thickened, creamy, and just set through.

Best Starting Ratio

The best starting ratio is 1/4 cup cottage cheese for every 2 eggs. Small-curd 2% cottage cheese gives the most reliable texture, while full-fat cottage cheese tastes richer. If the eggs look loose in the pan, use less cottage cheese next time, drain very liquid cottage cheese, avoid high heat, and cook gently long enough for extra moisture to evaporate.

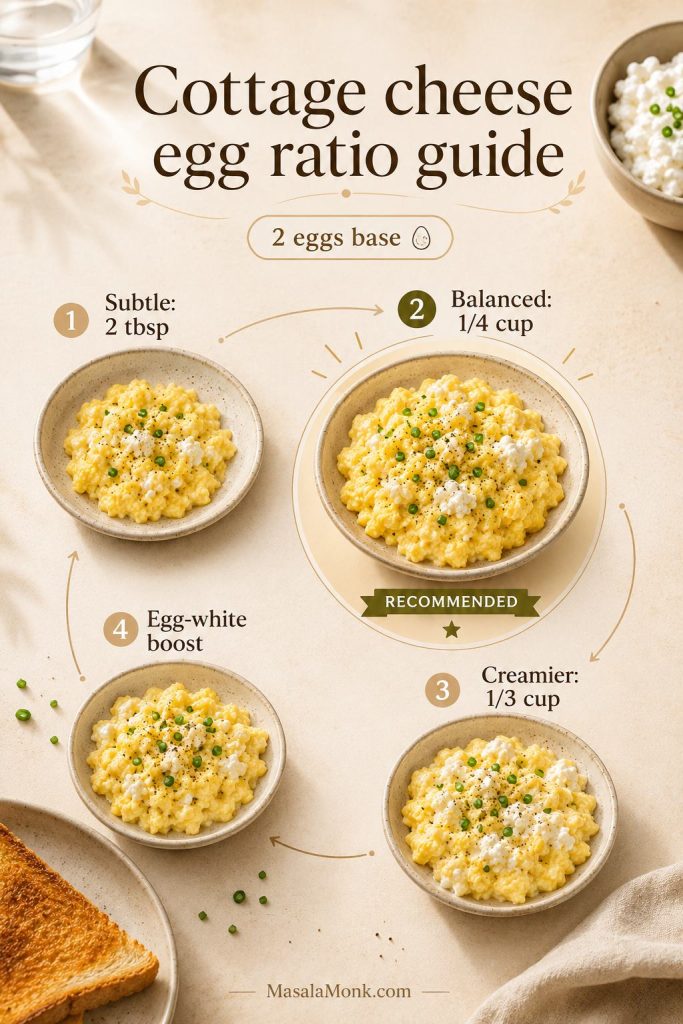
The full cottage cheese egg ratio guide below shows how to make the eggs subtler, creamier, or better suited to egg whites.

You do not need milk here. Cottage cheese already adds moisture and body, so milk can push the eggs toward watery instead of creamy.

If your last batch turned loose or watery, skip ahead to the watery cottage cheese egg fixes before you cook again.

At a glance: Use 4 large eggs, 1/2 cup / 110–120g cottage cheese, and 1 tablespoon / 14g butter for 2 servings. Cook in a nonstick skillet over medium-low heat for 4–5 minutes. Most reliable cottage cheese: small-curd 2% or full-fat. Texture goal: creamy, soft, and fully set, not runny.
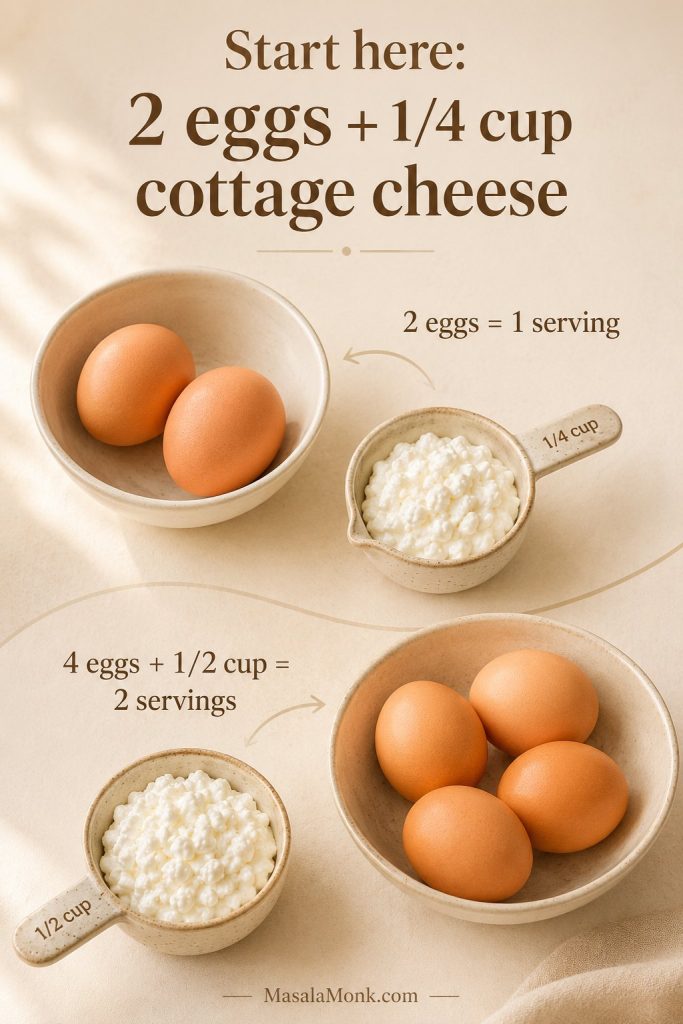
Ratio guide showing 2 eggs with 1/4 cup cottage cheese and 4 eggs with 1/2 cup cottage cheese.
For the easiest cottage cheese egg ratio, start with 1/4 cup cottage cheese for every 2 large eggs. Then adjust slightly if your cottage cheese is extra thick or watery.

What the Texture Should Look Like

The goal is not a runny protein hack or a rubbery diet scramble. The best version should taste like soft scrambled eggs with a little extra creaminess, body, and staying power.

Done right, the eggs taste creamy and lightly savory, not aggressively cheesy. The curds soften into the scramble, the pepper gives it a little lift, and a handful of chives or scallions makes the whole plate feel fresher.

A good plate feels simple but a little upgraded: soft eggs, gentle creaminess from the cottage cheese, enough protein to hold you over, and a texture that still feels like breakfast instead of a food trend.
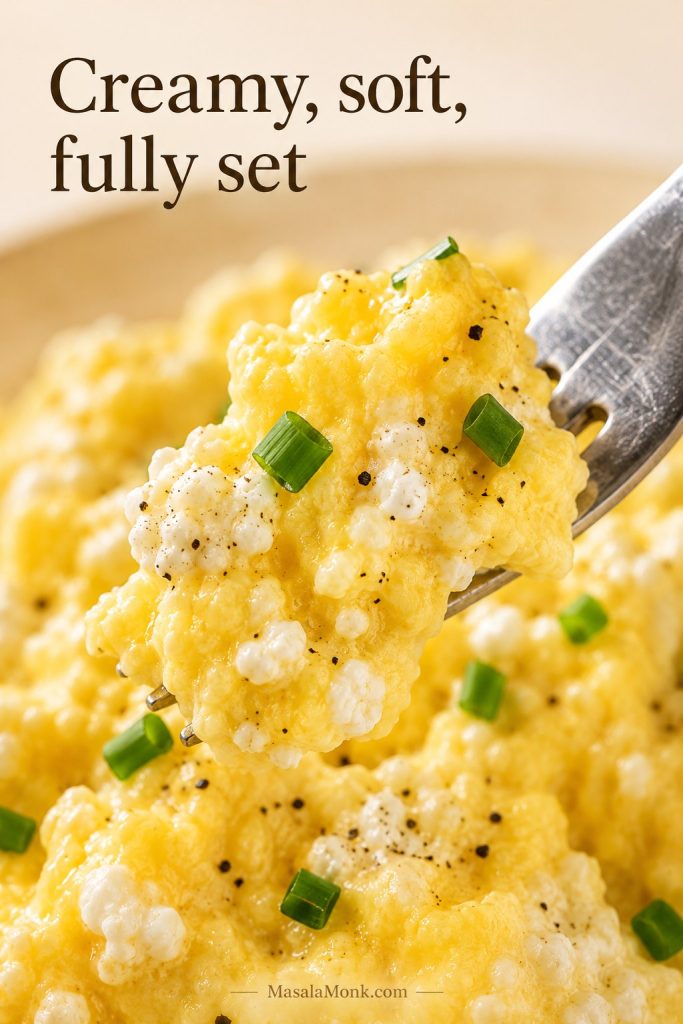
Close-up of creamy scrambled eggs with cottage cheese showing soft folds, chives, pepper, and no pooling liquid.
Look for soft folds that hold together on the fork. That texture means the eggs are creamy and set, rather than loose, wet, or overcooked.

Why Add Cottage Cheese to Scrambled Eggs?

Cottage cheese changes scrambled eggs in three useful ways: it adds protein, makes the eggs more satisfying, and gives them a creamy texture when cooked gently. It is also mild enough that the eggs still taste like eggs, especially if you use a balanced ratio and season them well.

More Protein Without Protein Powder

Eggs are already a strong breakfast ingredient, but cottage cheese makes them more filling. That is why cottage cheese eggs are popular with people looking for high-protein breakfasts, lighter brunch ideas, and quick post-workout meals.

The exact protein will depend on your eggs and cottage cheese brand. If you are tracking closely, use the nutrition label on your cottage cheese and a food database such as USDA FoodData Central.

For another breakfast built around everyday protein-rich ingredients, this protein oatmeal guide uses options like eggs, yogurt, cottage cheese, paneer, nuts, and seeds without relying only on protein powder.

Creamier Texture When Cooked Gently

Cottage cheese adds moisture and body to the eggs. With medium-low heat, the curds soften into the scramble and help the eggs stay tender. With high heat, the eggs can tighten too quickly and turn rubbery before the cottage cheese has a chance to settle into the mixture.

Mild Flavor, Easy Add-Ins

These eggs do not have to taste strongly of cottage cheese. If you use small-curd cottage cheese and whisk it in well, the flavor is mild, creamy, and lightly savory. Chives, scallions, black pepper, hot sauce, chili crisp, avocado, spinach, and toast all work well with the flavor.

Ingredients for Scrambled Eggs with Cottage Cheese

You only need a few ingredients, but each one affects the final texture. In a simple recipe like this, small choices matter: the cottage cheese style, pan heat, and amount of salt all change the result.
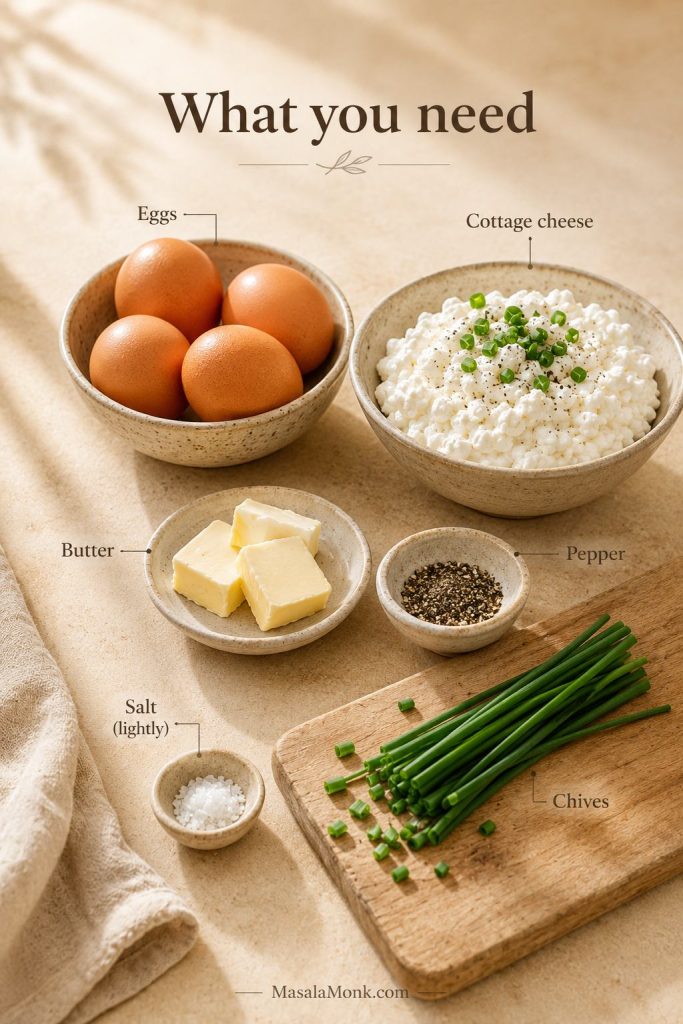
Ingredients for scrambled eggs with cottage cheese including eggs, cottage cheese, butter, pepper, salt, and chives.
Because this recipe uses only a few ingredients, each choice matters. Thick cottage cheese, light salt, black pepper, and fresh chives help the scramble taste balanced.

Eggs

Use large eggs. Four large eggs make two servings, while two large eggs plus 1/4 cup cottage cheese make a good single serving. Whole eggs give the best flavor, color, and structure. You can add egg whites for more protein, but an all-egg-white cottage cheese scramble is easier to overcook and can turn thin if the ratio is not controlled.

Cottage Cheese

Use 1/2 cup / about 4 oz / 110–120g cottage cheese for 4 eggs, or 1/4 cup / 55–60g cottage cheese for 2 eggs. Small-curd cottage cheese is the easiest choice because it blends into the eggs more naturally. Large-curd cottage cheese works, but the curds stay more visible.

For the most reliable texture, use 2% cottage cheese. Full-fat cottage cheese gives richer eggs. Fat-free cottage cheese can work, but it often contains more moisture, so it can make the eggs wetter if you use too much.

Butter, Oil, or Cooking Spray

Butter gives the richest flavor and helps the eggs cook into soft folds. Use 1 tablespoon / 1/2 oz / 14g butter for 4 eggs. Olive oil works well if you want something lighter; use 1–2 teaspoons / 5–10ml. Cooking spray is fine for a lower-calorie version, but use a truly nonstick pan and keep the heat gentle.

Salt, Pepper, and Herbs

Cottage cheese is already salty, so season carefully. Start with black pepper and only a tiny pinch of salt, then taste after cooking. Chives, scallions, dill, parsley, and cracked black pepper are especially good here.

Best Cottage Cheese for Scrambled Eggs

The most reliable cottage cheese for scrambled eggs is small-curd 2% cottage cheese. It is creamy enough to soften into the eggs but not so rich that the scramble feels heavy. It also tends to behave better in the pan than watery fat-free cottage cheese.
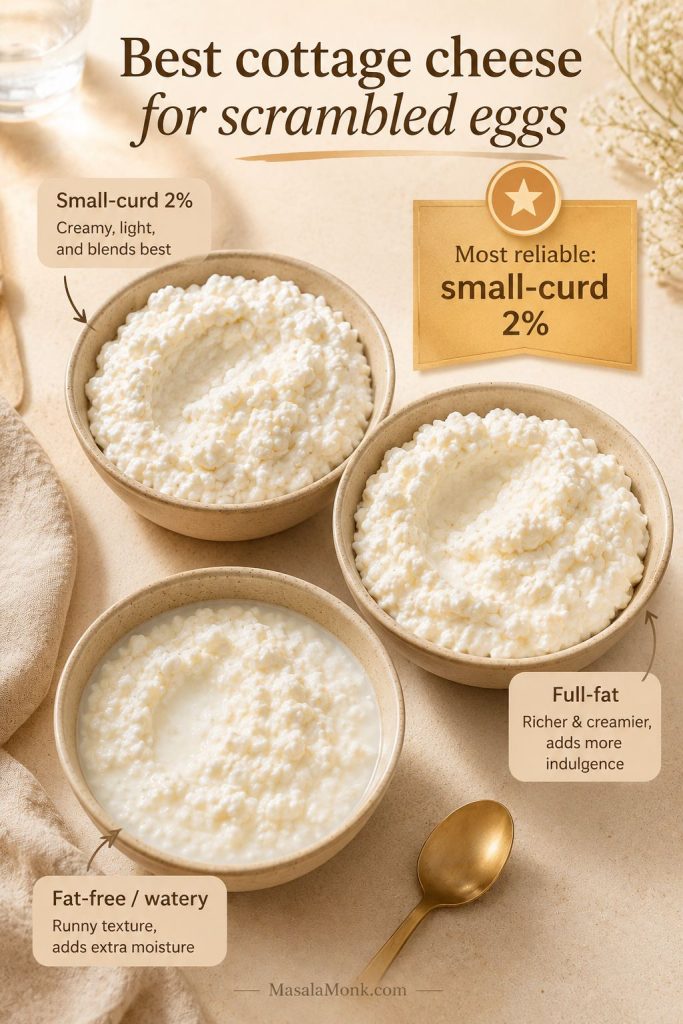
Three bowls comparing small-curd, full-fat, and watery fat-free cottage cheese for scrambled eggs.
For most batches, 2% small-curd cottage cheese is the safest starting point because it softens into the eggs more evenly, while watery cottage cheese can loosen the scramble.

Small-Curd vs Large-Curd Cottage Cheese

The smaller curd disperses more evenly and gives a softer texture. Large-curd cottage cheese is fine if you like visible curds, but it can make the eggs look more uneven.
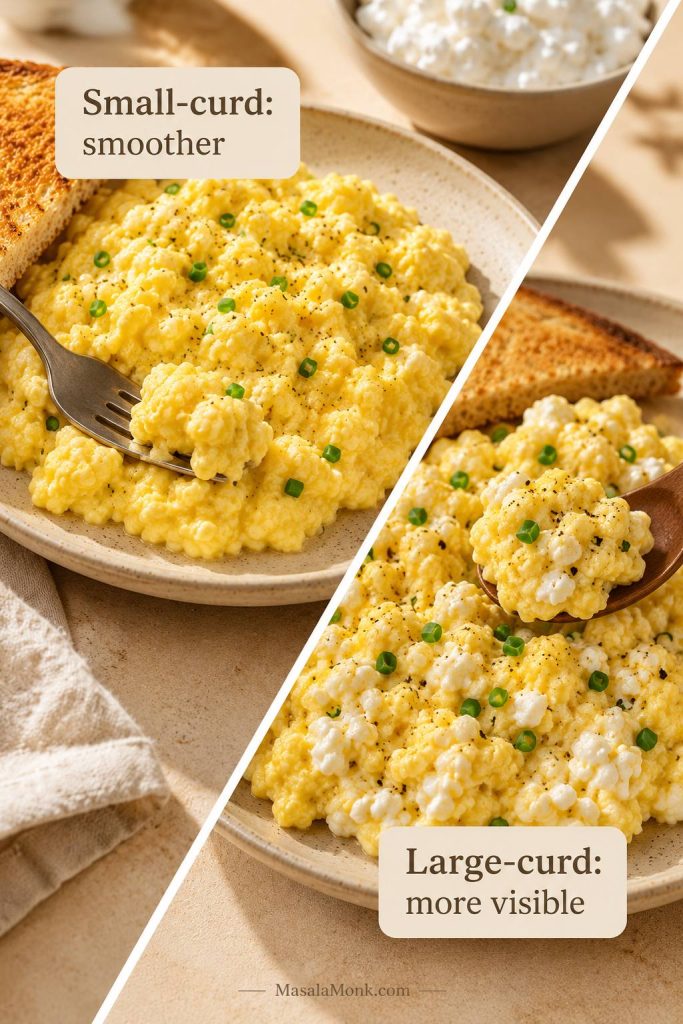
Small-curd and large-curd cottage cheese scrambled eggs compared side by side.
A smaller curd gives smoother scrambled eggs, while large-curd cottage cheese keeps more visible texture. Choose the one that matches how much curd you want to notice.

If you are cooking for someone who is skeptical of cottage cheese, use small-curd cottage cheese or blend the eggs and cottage cheese together for a smoother scramble.

For the full texture breakdown, compare the whisk, blend, and fold methods.

2%, Full-Fat, or Fat-Free?

Cottage Cheese Type Result in Scrambled Eggs Best Use
2% Creamy, balanced, reliable Best everyday choice
Full-fat Richest and softest Best for extra-creamy eggs
Low-fat Can work well, depending on brand Good if it is thick, not watery
Fat-free More likely to release moisture Use less and cook gently

If your cottage cheese looks especially liquidy, spoon off a little of the excess before adding it to the eggs. Thick, creamy cottage cheese gives you a much easier path to a soft scramble.

Should You Blend the Cottage Cheese First?

Blend the cottage cheese with the eggs if you want a smooth texture with no visible curds. Do not blend if you like the soft, slightly cheesy texture of cottage cheese eggs. For most people, whisking small-curd cottage cheese directly into the eggs is enough.

Scrambled Eggs with Cottage Cheese Ratio Guide

Start with the Balanced Ratio

The safest starting ratio is 1/4 cup cottage cheese for every 2 large eggs. Another way to think of it is about 1–2 tablespoons cottage cheese per egg, depending on how creamy or subtle you want the scramble.

If you are nervous about curds or wateriness, start with 2 tablespoons cottage cheese for 2 eggs. Then, if you love cottage cheese and want a creamier, more filling scramble, increase slightly without overloading the eggs.

Ratio Options by Texture

Style Eggs Cottage Cheese Metric Best For
Subtle / beginner 2 large eggs 2 tbsp 25–30g Less curdy, safer first try
Balanced default 2 large eggs 1/4 cup 55–60g Creamy, high-protein everyday eggs
Family batch 4 large eggs 1/2 cup / about 4 oz 110–120g Main recipe-card version
Extra creamy 2 large eggs 1/3 cup 75–80g More cottage-cheese-forward
Egg-white boosted 2 eggs + 1/4–1/3 cup egg whites 1/4 cup 60–80ml egg whites + 55–60g cottage cheese Higher-protein version
Cottage cheese scrambled eggs ratio guide showing subtle, balanced, extra creamy, and egg-white boosted versions.
The ratio changes the whole scramble. Start balanced, then go lighter for subtle cottage cheese flavor or creamier when you want a more filling breakfast.

What Testing Showed

After testing the whisked, blended, and folded versions, the tradeoff is simple: the whisked 2-eggs-to-1/4-cup cottage cheese ratio is the most reliable everyday balance. Blending makes the smoothest scramble, but it tastes a little less like classic soft eggs. Folding the cottage cheese in near the end gives the most visible curds and works only when the cottage cheese is thick, not watery.

For your first try, choose the balanced default. Once you know how your cottage cheese behaves in the pan, you can go lighter, smoother, or more cottage-cheese-forward next time.

Make this first: If this is your first time making scrambled eggs with cottage cheese, use 2 eggs, 1/4 cup / 55–60g cottage cheese, 1/2 tablespoon butter, black pepper, and medium-low heat. It is the safest balance of creamy, high-protein, and not too wet.

Once the ratio is set, use the gentle stovetop method to keep the eggs creamy instead of dry.

How to Make Scrambled Eggs with Cottage Cheese

The whole recipe comes down to gentle heat and patience. A few quiet minutes in the pan can turn the eggs into soft, creamy folds instead of dry curds or a loose scramble.
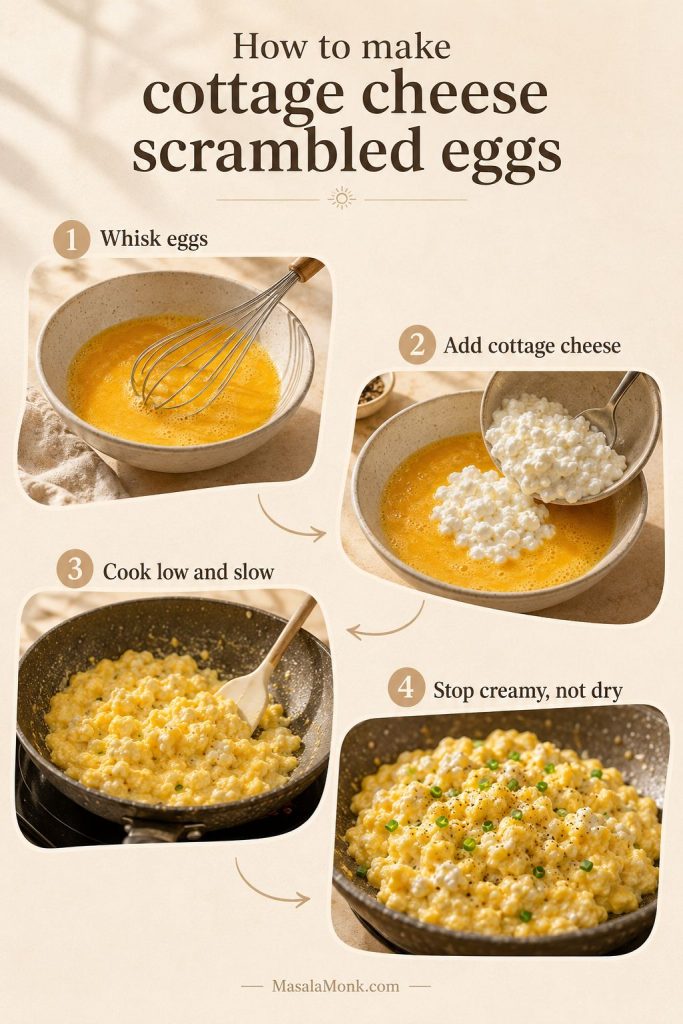
Step-by-step guide showing eggs being whisked, cottage cheese being added, eggs cooking gently, and the finished scramble.
The steps are simple, but the heat does the real work. Cook slowly so the eggs gather into soft folds instead of tightening into dry curds.

Step 1: Whisk the Eggs

Crack the eggs into a mixing bowl and whisk until the yolks and whites are fully combined. This helps the cottage cheese distribute evenly instead of sitting in pockets.

Step 2: Add the Cottage Cheese

Whisk in the cottage cheese, black pepper, and only a small pinch of salt. If you want smoother eggs, blend the eggs and cottage cheese for a few seconds instead of whisking by hand.

Step 3: Heat the Pan Gently

Warm a nonstick skillet over medium-low heat. For 2 eggs, an 8-inch skillet works well. For 4 eggs, use a 10-inch skillet. Add butter or oil and let it melt without browning.

Step 4: Cook Slowly Into Soft Folds

Pour in the egg mixture. Let the edges set for 10–20 seconds, then use a silicone spatula to slowly push the eggs from the outside of the pan toward the center. Keep moving gently so the eggs gather into soft, creamy folds instead of breaking into tiny dry curds. The pan should look calm, not sizzling.
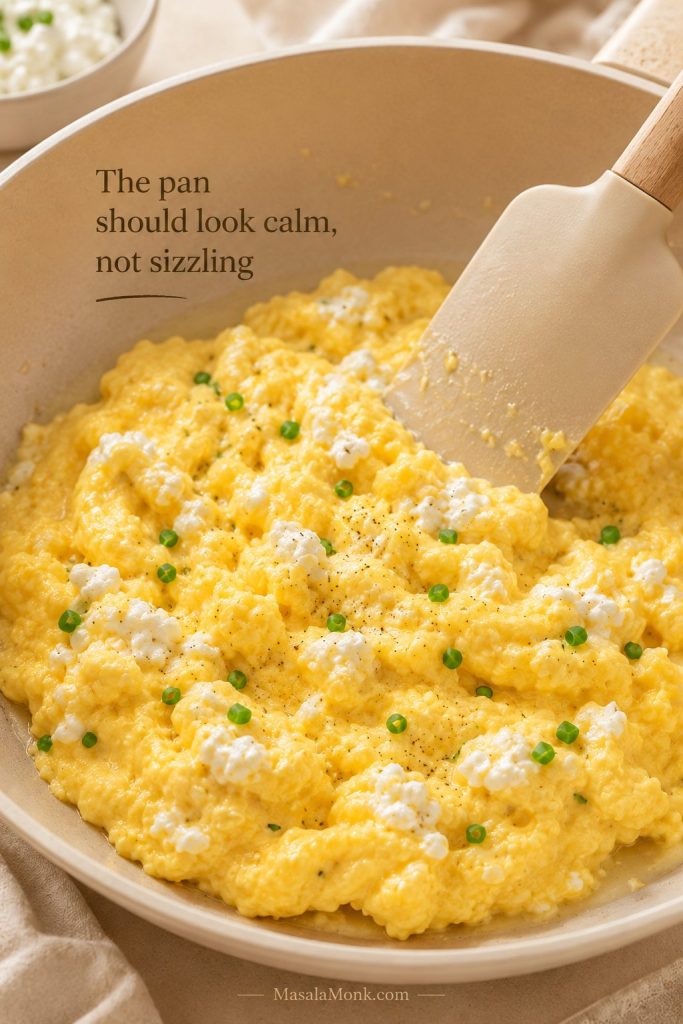
Scrambled eggs with cottage cheese cooking gently in a nonstick pan with a silicone spatula.
A quiet pan is a good sign. When the eggs move slowly under the spatula, they have time to turn creamy before they dry out.

Step 5: Stop While Creamy, Not Runny

Remove the eggs from the heat when they are thickened, creamy, and set through. They will keep cooking slightly from residual heat, so do not wait until they look completely dry in the pan.

You will know they are ready when the eggs hold soft folds on the spatula, look creamy instead of shiny-wet, and slide onto the plate without liquid pooling behind them. If the eggs look glossy but hold together, they are usually ready; if liquid runs around them, give them a little more time over gentle heat.
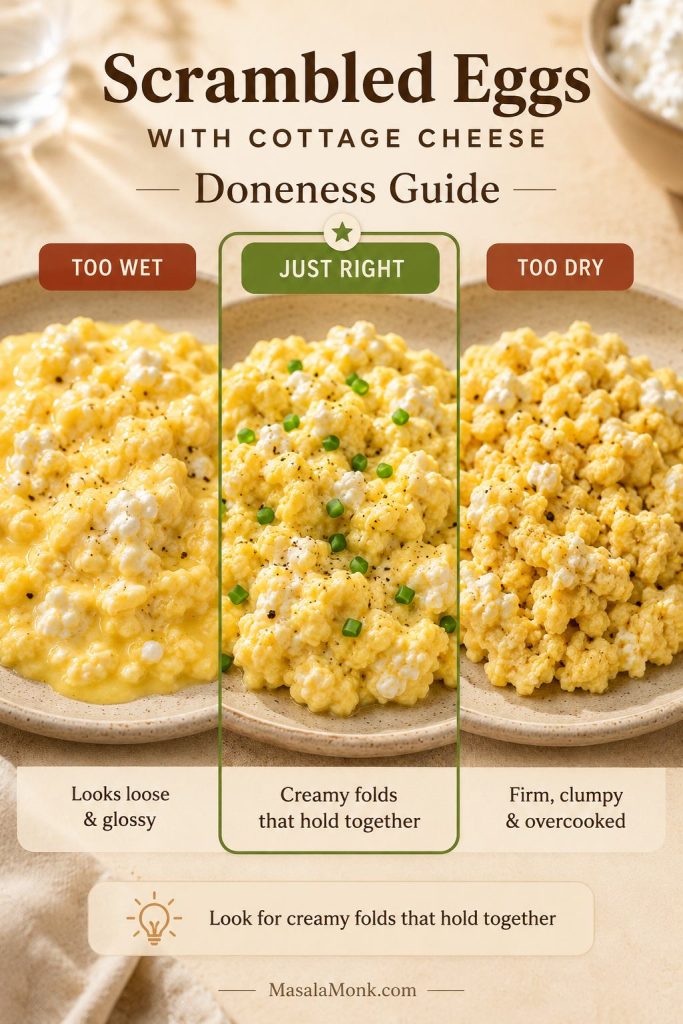
Doneness guide for cottage cheese scrambled eggs showing too wet, just right, and too dry textures.
“Just right” is creamy but not runny. If the eggs still slide apart with liquid around them, keep them on gentle heat a little longer.

If the eggs still look shiny, separated, or loose, the troubleshooting section will help you fix the next batch.

For food safety, scrambled eggs should be cooked until they are not runny. The FDA’s egg safety guidance recommends cooking egg dishes thoroughly, especially when serving children, older adults, pregnant people, or anyone with a weakened immune system.

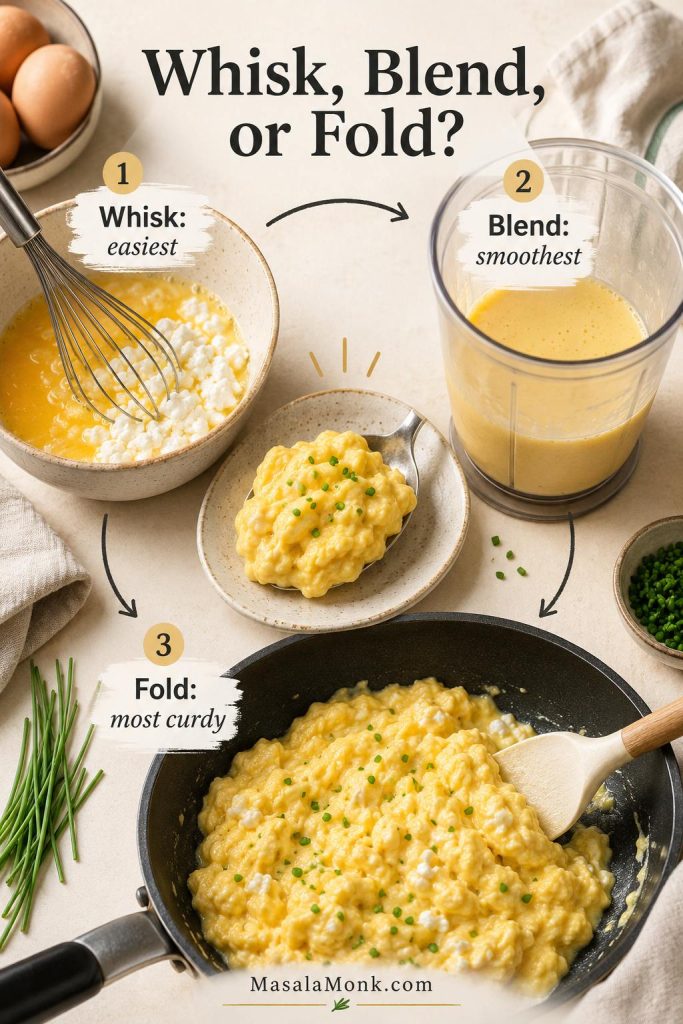
Whisk, Blend, or Fold? Three Texture Options

There is more than one way to add cottage cheese to scrambled eggs. The best method depends on whether you want the cottage cheese to disappear into the eggs or stay slightly visible.

Method How to Do It Texture Best For
Whisk Whisk cottage cheese into raw eggs Soft, lightly curdy, fluffy Best everyday version
Blend Blend eggs and cottage cheese briefly Smooth and creamy Cottage-cheese skeptics
Fold Cook eggs first, then fold cottage cheese near the end More visible curds People who like cottage cheese texture
Whisk, blend, and fold methods for adding cottage cheese to scrambled eggs.
Whisking is the everyday method, blending makes the smoothest cottage cheese eggs, and folding gives the most noticeable curd texture.

Choose blended if visible curds bother you, whisked for the easiest weekday scramble, and folded only if you actually enjoy the cottage cheese texture.

Using egg whites changes the texture, so check the egg-white version before swapping out too many yolks.

When Should You Add the Cottage Cheese?

Add cottage cheese before cooking for the whisked or blended versions. Fold it in near the end only if you want a more visible cottage cheese texture and your cottage cheese is thick enough not to loosen the eggs.

Egg Whites with Cottage Cheese

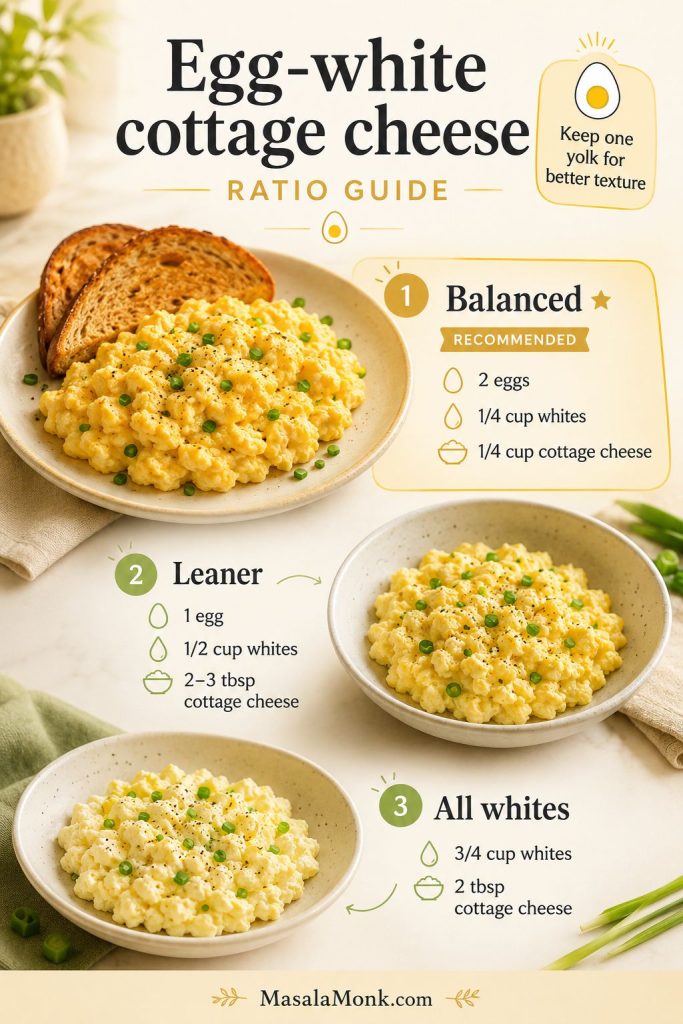
Egg whites with cottage cheese are useful if you want a lighter, higher-protein scramble, but the ratio matters. Because they contain more water than yolks, they need a little more care in the pan. Use too many whites with too much cottage cheese, and the eggs can turn thin.

Best Egg-White Ratio

For the creamiest texture, keep at least some whole egg in the scramble. The yolk adds flavor, color, and a little structure, which helps the egg whites feel less flat.

Version Use This Ratio Texture
Balanced egg-white boost 2 eggs + 1/4 cup / 60ml egg whites + 1/4 cup / 55–60g cottage cheese Creamy, lighter, still flavorful
Leaner version 1 egg + 1/2 cup / 120ml egg whites + 2–3 tbsp cottage cheese Lighter, less rich, more delicate
All egg whites 3/4 cup / 180ml egg whites + 2 tbsp cottage cheese Leanest, but easiest to overcook or make watery
Egg-white cottage cheese scrambled eggs ratio guide with balanced, leaner, and all-egg-white versions.
Egg whites add protein, but they also add water. Keeping one yolk in the mix helps cottage cheese eggs stay creamy, structured, and less likely to turn thin.

If your egg-white scramble turns thin, the watery egg fixes explain how to adjust the cottage cheese and heat.

Lighter High-Protein Version

For a lighter plate, use 1 whole egg, 1/2 cup / 120ml egg whites, and 2–3 tablespoons cottage cheese. Serve it with spinach, tomatoes on the side, or avocado toast depending on whether you want a lower-calorie breakfast or a more filling meal. It is not a shortcut or a promise; it is simply a protein-rich breakfast that can fit into many eating styles depending on what you serve with it.

How to Keep Egg-White Cottage Cheese Eggs from Getting Watery

Use a thick cottage cheese, skip the milk, and cook over medium-low heat until the eggs are set through. If liquid starts pooling in the pan, keep the heat gentle and give the eggs a little more time. Do not crank the heat up to rush them; that usually makes the eggs rubbery before the moisture cooks off.

Macro-Friendly Add-Ins

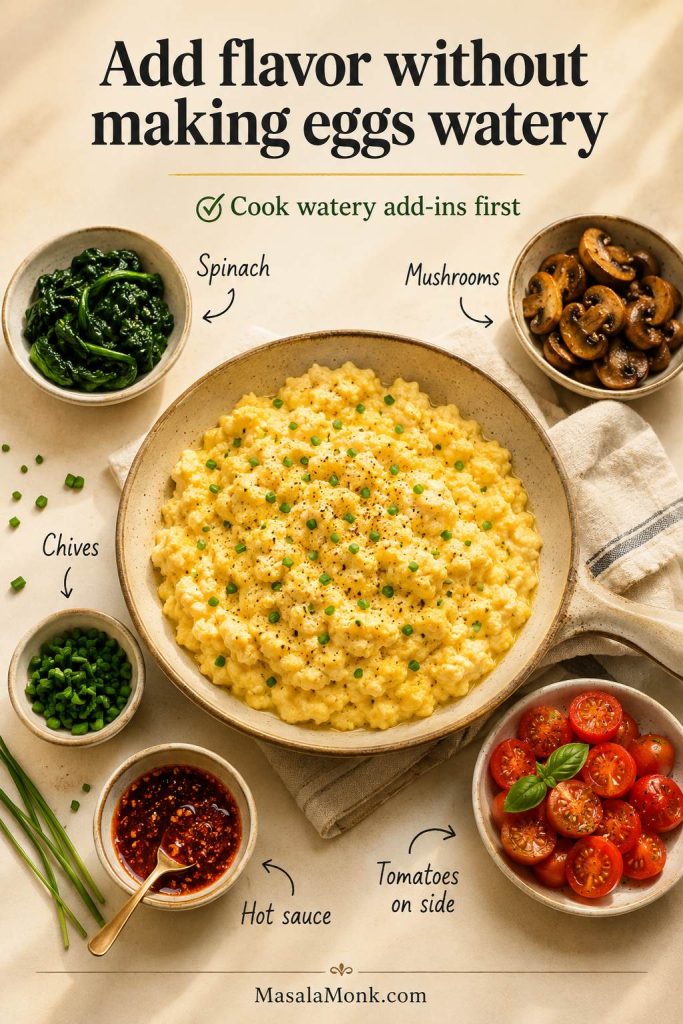
Spinach, mushrooms, scallions, tomatoes on the side, hot sauce, and herbs all work well. If you are adding mushrooms, peppers, or vegetables that release moisture, cook them first so they do not loosen the eggs.

Microwave Cottage Cheese Scrambled Eggs

The skillet version tastes best, but microwave cottage cheese eggs are useful for busy mornings, office breakfasts, and quick solo meals. The texture will be firmer than stovetop scrambled eggs, so cook in short bursts and stir often.

Mug Method for One

Whisk 1 large egg with 1 tablespoon / about 15g cottage cheese in a large microwave-safe mug. Add black pepper and a tiny pinch of salt if needed. Microwave for 30 seconds, stir, then microwave in 15–30 second bursts until the egg is just set through.
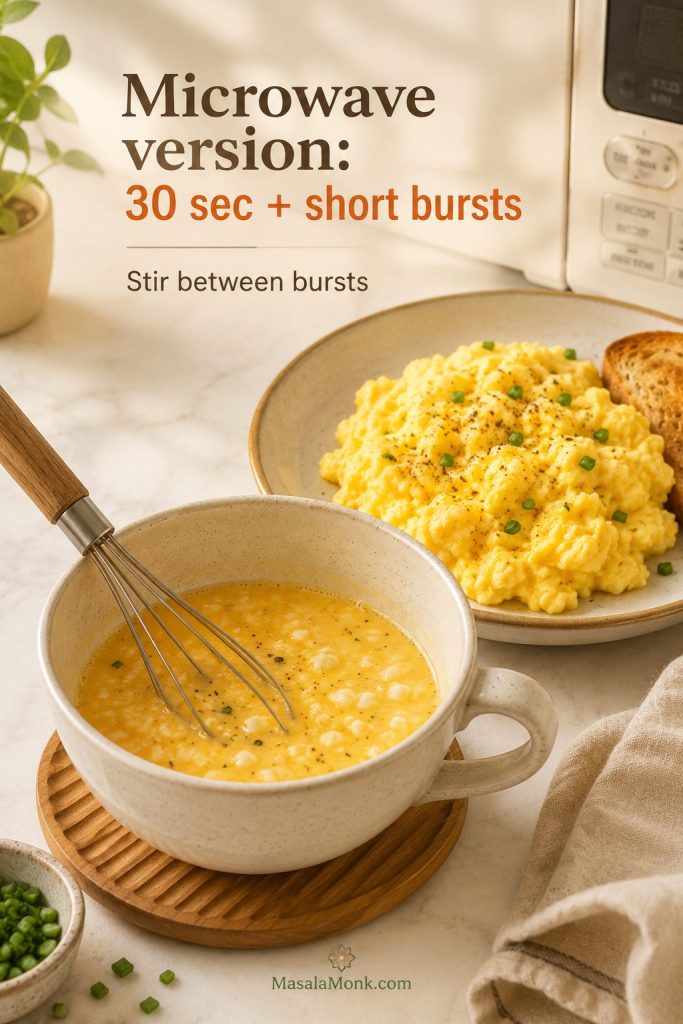
Microwave cottage cheese scrambled eggs made in a mug with a whisked egg mixture and a finished bowl of eggs.
For microwave cottage cheese eggs, short bursts are safer than one long cook. Stirring between rounds helps the center set without turning spongy.

Microwave Texture Tips

  • Use a bigger mug than you think you need.
  • Stir between bursts so the egg cooks evenly.
  • Microwave power varies, so treat the final 15–30 seconds as flexible.
  • Stop when the egg is just set, then let it stand for 20–30 seconds before eating.
  • Add herbs, hot sauce, or chives after cooking.
  • For 2 eggs, use a small microwave-safe bowl instead of a narrow mug.

Add-Ins and Serving Ideas

Scrambled eggs with cottage cheese are mild enough to go savory, spicy, herby, or brunch-style. Avoid adding raw vegetables that release a lot of water directly to the pan in large amounts. Instead, cook them first or serve them on the side.

Best Add-Ins for the Eggs

Add-In How to Use It Notes
Spinach Wilt before or during cooking Adds volume and color
Mushrooms Cook first Prevents loose eggs
Bell pepper Dice small and sauté first Good for veggie scrambles
Scallions or chives Add near the end Fresh, simple, and not watery
Tomatoes Serve on the side or add cooked Raw tomatoes can release water
Chili crisp or hot sauce Add after cooking Best for flavor contrast
Everything bagel seasoning Sprinkle after cooking Use lightly because it is salty
Add-ins for cottage cheese scrambled eggs including cooked spinach, mushrooms, chives, tomatoes, and hot sauce.
Add-ins work best after the moisture is under control. Cook mushrooms, spinach, and peppers first, then finish with herbs, hot sauce, or chili crisp.

Three Easy Ways to Serve Them

  • Simple weekday plate: cottage cheese eggs, buttered toast, black pepper, and chives.
  • Avocado toast version: mashed avocado, creamy eggs, chili crisp, and scallions on sourdough.
  • Breakfast taco version: warm tortilla, cottage cheese eggs, potatoes, salsa, and hot sauce.
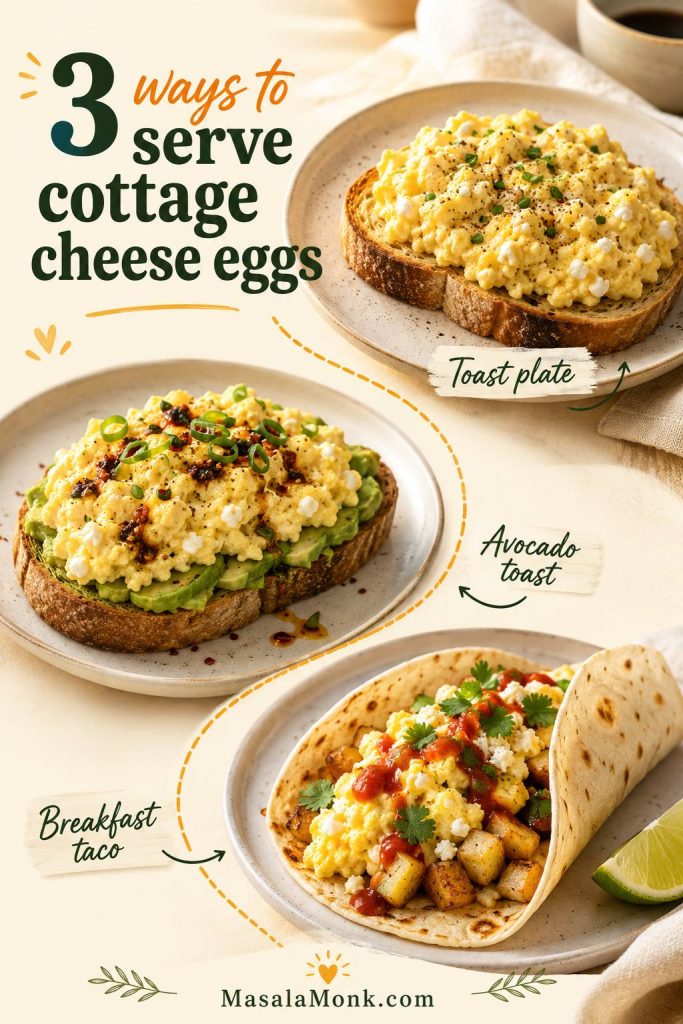
Three serving ideas for cottage cheese scrambled eggs with toast, avocado toast, and a breakfast taco.
Once the base scramble is right, it can go three ways: a simple toast plate, creamy avocado toast, or a breakfast taco with potatoes and salsa.

What to Serve with Cottage Cheese Eggs

  • Buttered sourdough toast
  • Avocado toast
  • Breakfast tacos
  • Roasted potatoes or air fryer hash browns
  • Sautéed spinach or mushrooms
  • Fresh tomatoes
  • Fruit on the side
  • Hot sauce, chili crisp, or salsa

For the easiest plate, keep it simple: creamy eggs, crisp toast, something fresh, and something sharp or spicy. A little hot sauce, salsa, chili crisp, or black pepper keeps the cottage cheese from making the plate taste too mild.
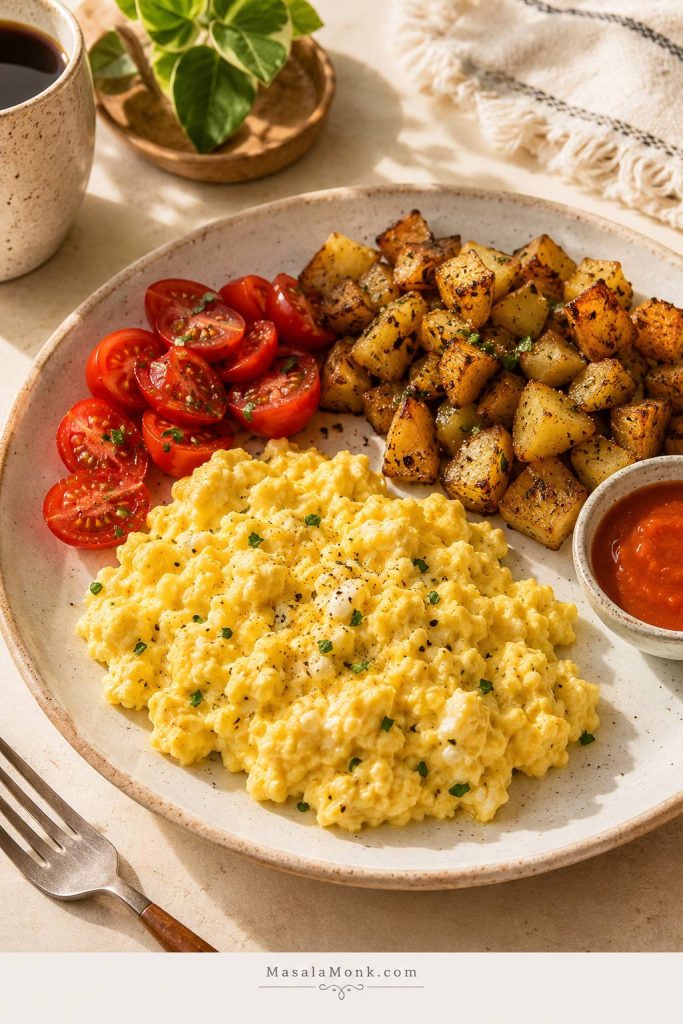
Cottage cheese scrambled eggs served with crispy potatoes, fresh tomatoes, and hot sauce.
A few sides make the eggs feel complete. Crisp potatoes add contrast, tomatoes add freshness, and hot sauce cuts through the creamy cottage cheese.

If you want to turn the eggs into a handheld breakfast, tuck them into a tortilla with potatoes, peppers, salsa, or avocado. This breakfast burrito recipe has more ideas for building a filling wrap without making it soggy.

How to Fix Watery or Loose Cottage Cheese Eggs

If your first batch is not perfect, do not write off the recipe. Cottage cheese brands vary a lot, and one small ratio or heat adjustment usually fixes it.

This is the section to read if you tried cottage cheese eggs once and wondered why everyone else seemed to be getting a creamy scramble while yours looked loose, shiny, or separated.

If your eggs tasted good but looked loose, shiny, or a little separated, the recipe probably does not need to be abandoned. It usually just needs less liquid, thicker cottage cheese, or gentler heat.
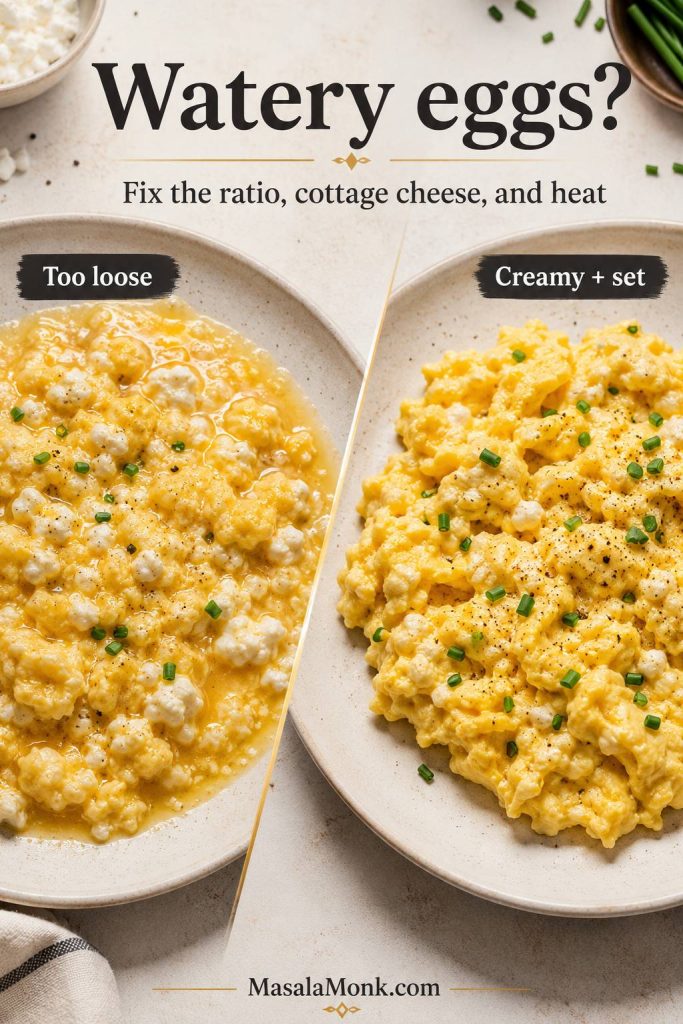
Watery cottage cheese scrambled eggs compared with creamy set eggs in a troubleshooting guide.
Watery cottage cheese eggs usually come from too much liquid, high heat, or a loose cottage cheese brand. Fix those first before changing the whole recipe.

Why Cottage Cheese Eggs Turn Watery

  • Too much cottage cheese
  • Very liquid cottage cheese
  • Watery fat-free or low-fat cottage cheese
  • Heat that was too high
  • Not enough gentle cooking time
  • Raw mushrooms, tomatoes, or peppers
  • Too many egg whites
  • Added milk

Troubleshooting Watery Cottage Cheese Eggs

What Happened Most Likely Cause Next Batch Fix
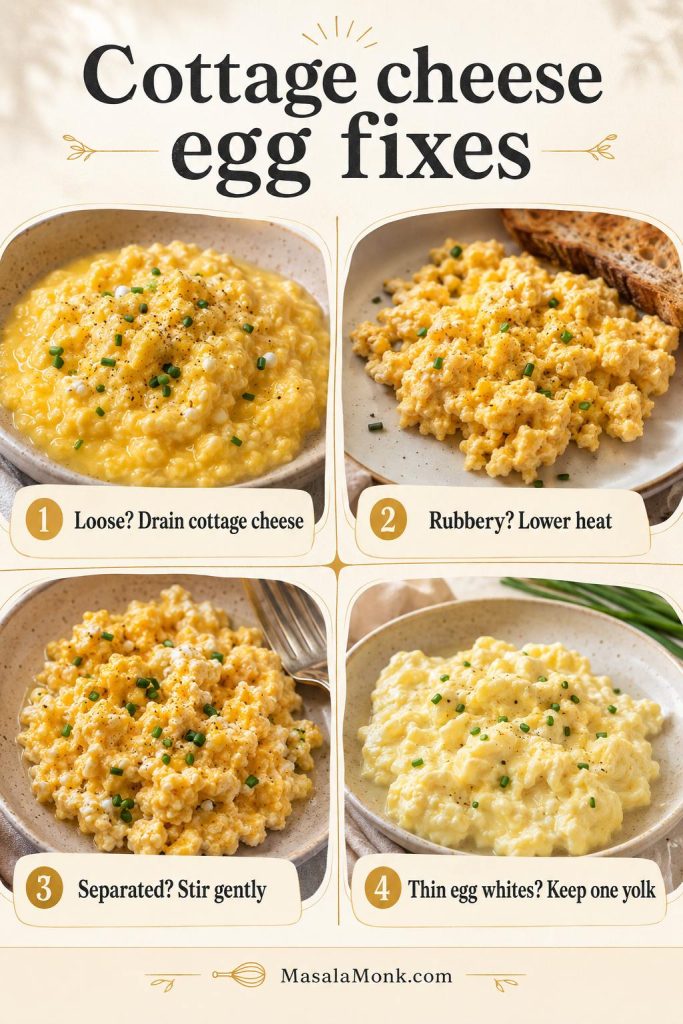
Eggs tasted good but looked loose Too much liquid in the cottage cheese Drain the cottage cheese or use 2 tbsp per 2 eggs
Eggs turned rubbery and wet Heat was too high Use medium-low heat and cook a little longer
Eggs looked separated Curds released moisture before the eggs set Whisk better, use thicker cottage cheese, and stir gently
Egg-white version turned thin Too much water from whites plus cottage cheese Keep one yolk or reduce cottage cheese to 2 tbsp
Diagnostic guide showing fixes for loose, rubbery, separated, and thin egg-white cottage cheese eggs.
Use the pan clues to fix the next batch: drain liquidy cottage cheese, lower the heat, stir gently, or keep one yolk when using egg whites.

Fixes Before Cooking

Problem to Prevent What to Do
Cottage cheese looks liquidy Spoon off excess liquid or use slightly less cottage cheese
You dislike curds Blend the cottage cheese with the eggs
You want less moisture Use 2 tbsp cottage cheese per 2 eggs
Using vegetables Cook moisture-heavy vegetables first
Using egg whites Keep at least one yolk or cook gently a little longer

Fixes While Cooking

What You See Fix
Liquid pooling in the pan Keep cooking gently and fold slowly until the extra moisture evaporates
Eggs setting too fast Lower the heat or remove the pan briefly
Curds separating Stir less aggressively and use lower heat
Eggs getting rubbery Pull from the heat sooner next time and use medium-low heat

What Not to Do

  • Skip the milk; cottage cheese already brings moisture.
  • Avoid high heat, which can make the eggs tighten before the moisture cooks off.
  • Do not start with an extra-heavy cottage cheese ratio on your first try.
  • Cook mushrooms, tomatoes, or peppers first if you are adding more than a small handful.
  • Once soft folds form, stir gently instead of aggressively breaking the eggs apart.

Once the ratio and heat are right, the recipe is simple: whisk, cook gently, stop while creamy, and serve while the eggs are still soft and warm.

Scrambled Eggs with Cottage Cheese Recipe

Soft, creamy scrambled eggs with cottage cheese for a protein-rich breakfast that feels cozy, filling, and ready in about 10 minutes.

Prep Time5 minutes
Cook Time4–5 minutes
Total Time10 minutes
Yield2 servings

Approximate nutrition: One serving, made with 2 large eggs, 1/4 cup cottage cheese, and 1/2 tablespoon butter, is usually around 220–270 calories with about 18–22g protein. Exact numbers depend on your cottage cheese brand and cooking fat. Because cottage cheese brands vary widely in protein, sodium, and moisture, treat these numbers as an estimate unless you calculate with your exact label.

Equipment

  • Mixing bowl
  • Whisk or fork
  • 10-inch nonstick skillet
  • Silicone spatula

Ingredients

  • 4 large eggs
  • 1/2 cup cottage cheese, about 4 oz / 110–120g, preferably small-curd 2% or full-fat
  • 1 tablespoon butter, about 1/2 oz / 14g, or 1–2 teaspoons / 5–10ml olive oil
  • 1/8 teaspoon fine salt, optional
  • Black pepper, to taste
  • 1 tablespoon chopped chives or scallions, optional

Method

  1. Crack the eggs into a mixing bowl and whisk until the yolks and whites are fully combined.
  2. Whisk in the cottage cheese, black pepper, and a tiny pinch of salt if using.
  3. Place a nonstick skillet over medium-low heat. Add the butter or oil and let it melt without browning.
  4. Pour in the egg mixture and let the edges begin to set for 10–20 seconds.
  5. Use a silicone spatula to slowly push the eggs from the outside of the pan toward the center, forming soft folds. The pan should look calm, not sizzling.
  6. Keep cooking gently until the eggs are thickened, creamy, and set through. If liquid runs around the eggs, give them another minute over gentle heat.
  7. Remove from the heat, sprinkle with chives or scallions if using, and serve immediately.

Notes

  • Blend the cottage cheese with the eggs first for a smoother texture.
  • Use 2 tablespoons cottage cheese per 2 eggs if you want less cottage cheese texture.
  • For an egg-white boosted version, use 2 eggs, 1/4 cup / 60ml egg whites, and 1/4 cup / 55–60g cottage cheese.
  • Salt lightly because cottage cheese is already salty.
  • Use medium-low heat. High heat can make the eggs rubbery.
  • Do not add milk; cottage cheese already adds moisture.
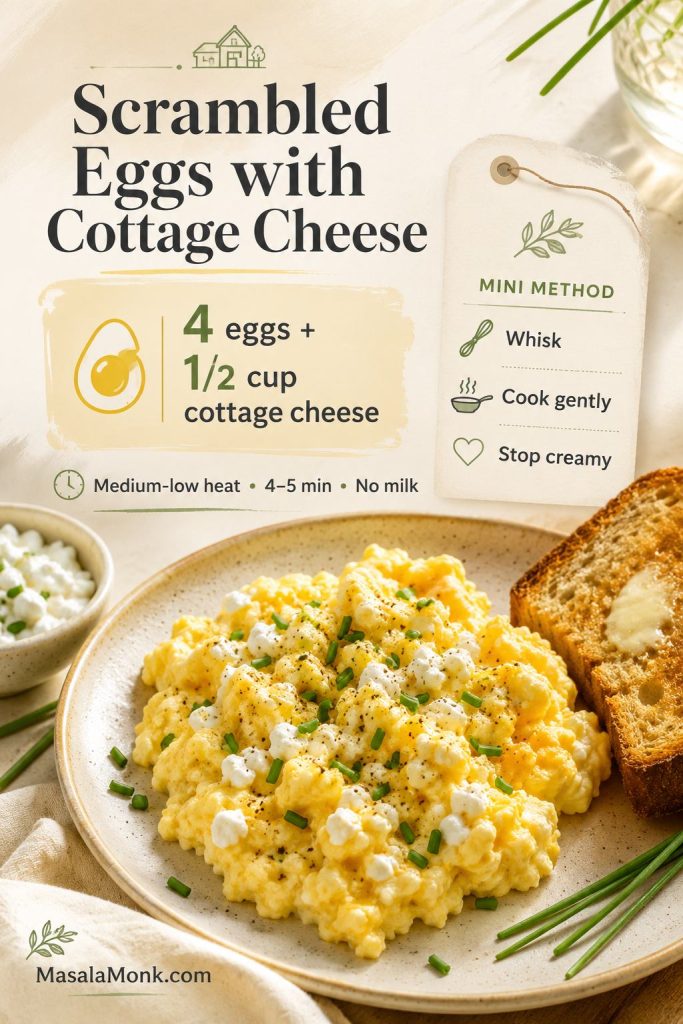
Saveable recipe card for scrambled eggs with cottage cheese showing the main ratio, cooking time, and method notes.
This saveable version keeps the formula simple: four eggs, half a cup of cottage cheese, medium-low heat, and no milk for a creamy two-serving scramble.

Once you make it once, adjust the ratio to match your cottage cheese and your pan. Some brands melt in softly, some release more liquid, and some taste saltier than others. The recipe gets easier after the first batch.

Storage and Reheating

These are absolutely best right from the pan, so treat leftovers as a backup breakfast rather than the main plan. Still, if you have extra, they can work if you cool and reheat them gently.

For the freshest texture, make the main recipe card version right before serving.

How Long Do They Keep?

Store leftover cottage cheese scrambled eggs in an airtight container in the refrigerator for up to 2 days. Let them cool before closing the container so steam does not create extra moisture.

How to Reheat Without Making Them Rubbery

Reheat in the microwave at reduced power in 15–30 second bursts, stirring gently between bursts. Stop as soon as the eggs are warm. You can also reheat them in a nonstick skillet over low heat.

For a freezer-friendly breakfast instead of fresh scrambled eggs, use the same soft-cooked egg logic in meal prep breakfast burritos, where the eggs need to stay tender without making the tortilla soggy.

Can You Freeze Cottage Cheese Scrambled Eggs?

I would not freeze them. Eggs and cottage cheese can both release moisture after thawing, so the texture usually suffers. For a better make-ahead breakfast, try egg muffins or a sliceable frittata instead.

When you need breakfast for a table instead of one skillet, a breakfast casserole with hash browns is a better make-ahead option than stovetop scrambled eggs.

Final Serving Texture Cue

Before you leave the recipe, remember the main visual cue: the eggs should look creamy, softly folded, and set enough to hold together on the plate.
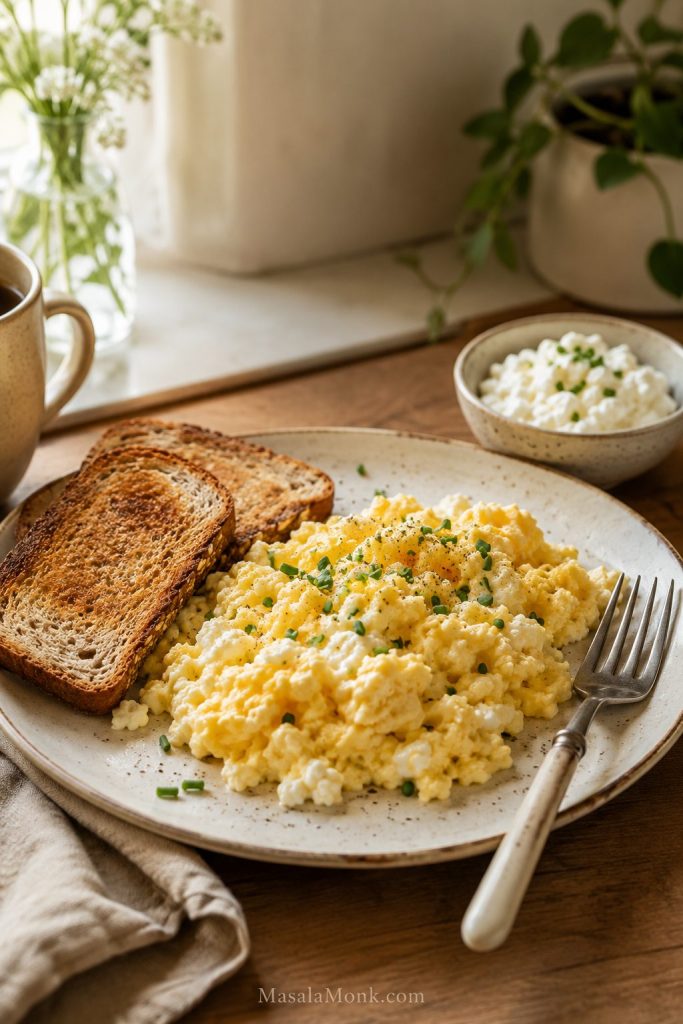
Final serving of scrambled eggs with cottage cheese with toast, a fork, cottage cheese, and a warm breakfast table setting.
A good cottage cheese scramble should feel warm and familiar, with enough protein and creaminess to make breakfast last longer than plain eggs.

FAQs About Scrambled Eggs with Cottage Cheese

What does cottage cheese do to scrambled eggs?

Cottage cheese adds protein, creaminess, and a mild savory flavor. When cooked gently, it softens into the eggs and makes them more filling without needing milk or cream.

Do scrambled eggs with cottage cheese taste like cottage cheese?

They taste creamy, lightly savory, and only a little tangy. With the balanced ratio, the eggs still taste like eggs; the cottage cheese mostly adds body and richness.

Is it better to blend cottage cheese into eggs?

Blend it if you want smooth eggs with no visible curds. This is the best choice for anyone who likes the protein boost but does not want the cottage cheese texture. Whisk it in if you like a soft, lightly curdy scramble.

Why did my cottage cheese scrambled eggs turn watery?

They probably had too much cottage cheese, a very liquidy brand, too many egg whites, raw watery vegetables, milk, or not enough gentle cooking time. Use 1/4 cup cottage cheese per 2 eggs, choose a thicker cottage cheese, and cook over medium-low heat until the eggs are set through.

What type of cottage cheese works best?

Small-curd 2% cottage cheese is the most reliable everyday choice. Full-fat cottage cheese gives richer eggs. Fat-free cottage cheese can work, but it is more likely to release moisture.

Should I add milk to cottage cheese scrambled eggs?

Skip the milk here. Cottage cheese already brings moisture and body, and adding milk can push the scramble from creamy into loose or wet.

Are cottage cheese eggs good for a high-protein breakfast?

They are a strong high-protein breakfast, especially if you use the balanced ratio of eggs plus cottage cheese instead of stretching the scramble with milk. The exact protein depends on your egg size and cottage cheese label.

Do egg whites work with cottage cheese?

Egg whites work, but the best texture usually comes from keeping at least one whole egg in the mixture. The yolk adds flavor, color, and structure, so the scramble feels creamy instead of thin.

Can I make cottage cheese scrambled eggs in the microwave?

Yes. For one serving, whisk 1 large egg with 1 tablespoon cottage cheese in a large microwave-safe mug. Microwave for 30 seconds, stir, then cook in 15–30 second bursts until set. Let it stand briefly before eating so the center finishes without becoming spongy.

What is the best ratio of cottage cheese to eggs?

The best balanced ratio is 1/4 cup cottage cheese for every 2 large eggs. Use 2 tablespoons for a subtler version, or up to 1/3 cup if you want a richer cottage-cheese-forward scramble.

Can I use boiled eggs with cottage cheese instead?

Yes, but that becomes a different kind of meal. Boiled eggs with cottage cheese work as a quick snack plate, while chopped boiled eggs mixed with blended cottage cheese become a high-protein cottage cheese egg salad.
Back to top

Posted on — 4 Comments

Easy English Scone Recipe

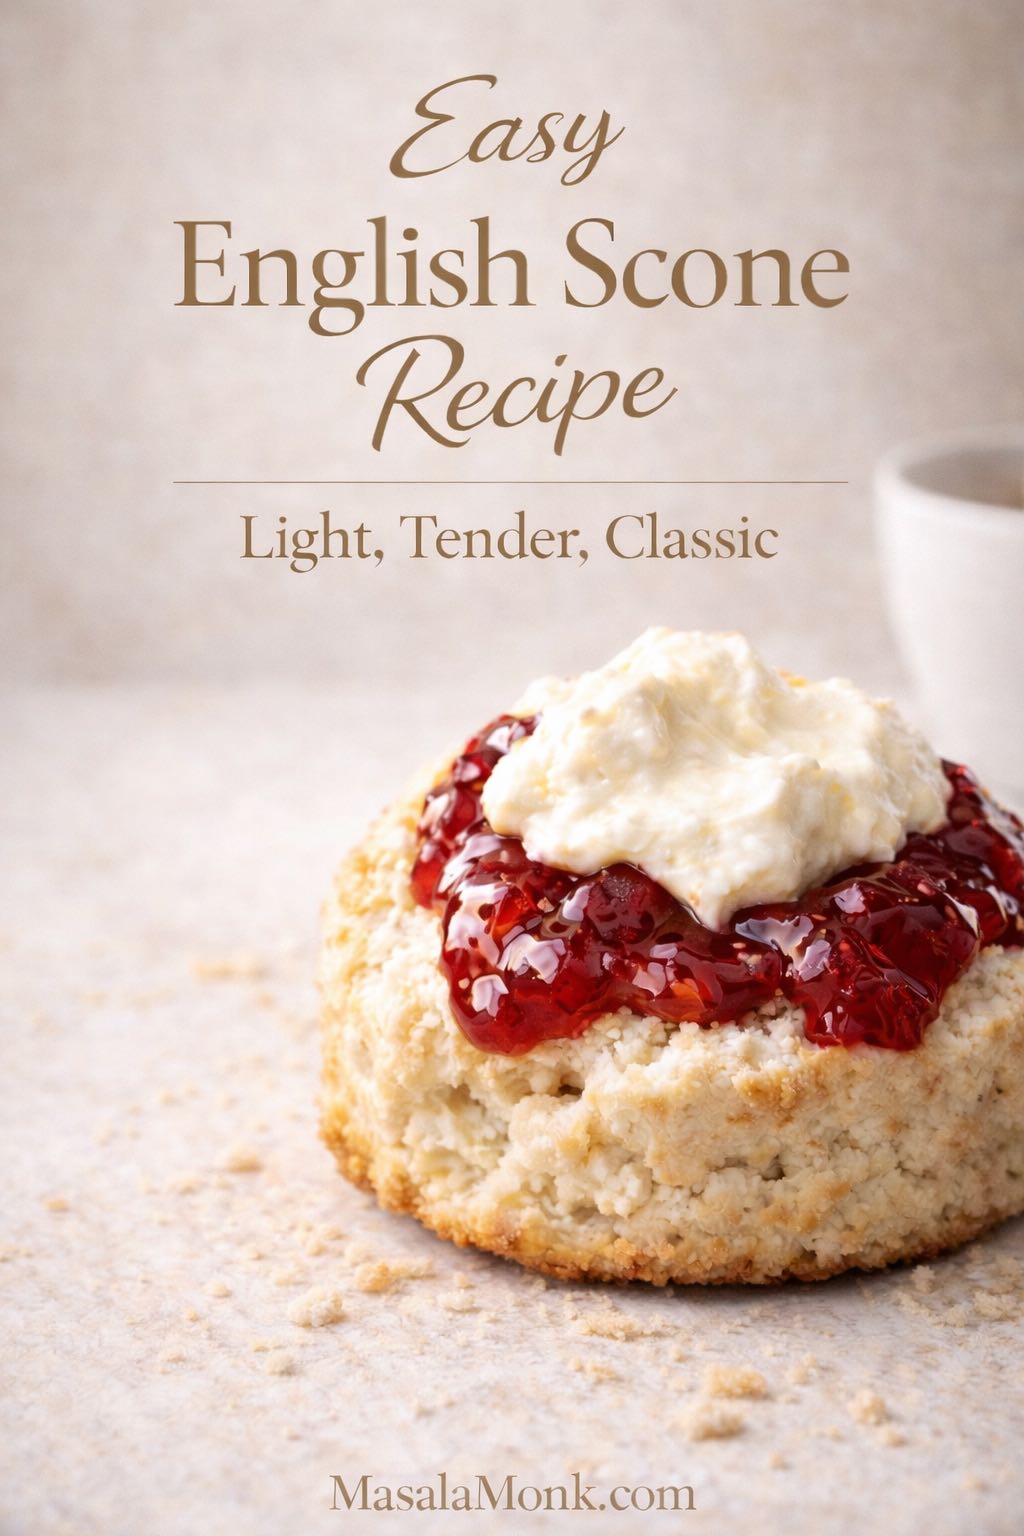
Split English scone topped with strawberry jam and clotted cream for an easy English scone recipe cover image.

This English scone recipe is built for the classic result: round scones with a light, tender crumb, gently golden tops, and just enough sweetness to work beautifully with jam and clotted cream. If you want an easy English scone recipe that stays close to the traditional style, this is the version to make.

The charm of English scones is that they do not ask for much. They ask for a dough that stays soft, handling that stays light, and shaping that gives them enough height to rise properly in the oven. Get those choices right, and the result feels balanced, familiar, and unmistakably classic.

Served warm or at room temperature with strawberry jam and clotted cream, these scones feel instantly at home on an afternoon tea table. They are especially lovely with masala chai recipes if you want a warmer spiced pairing, or with a cappuccino recipe if you are serving them for breakfast or brunch.

English Scone Recipe Ingredients

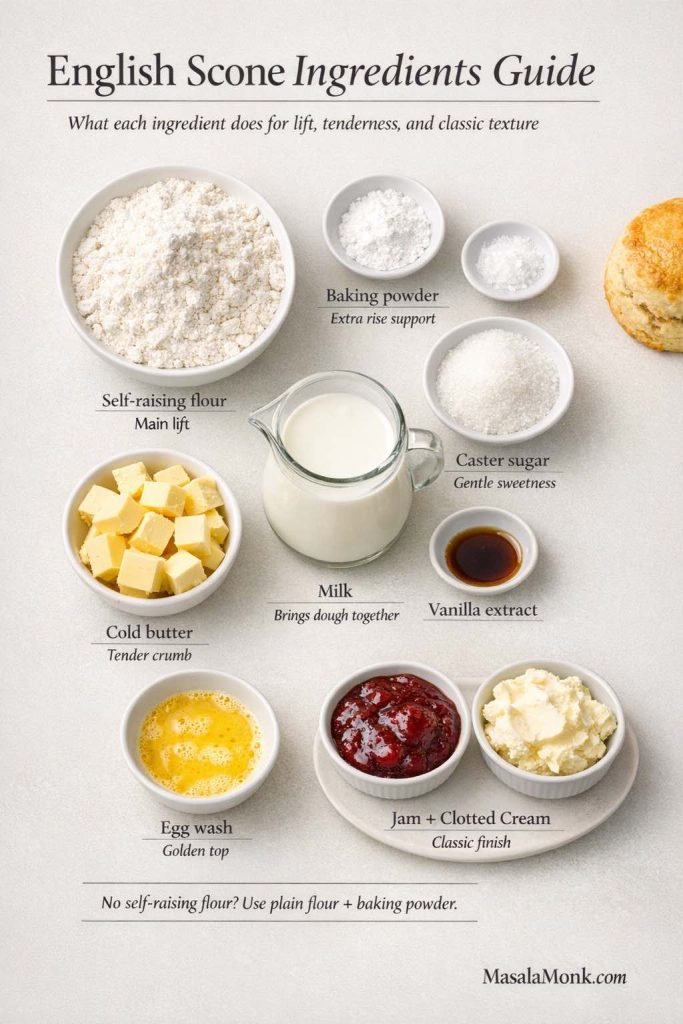
The ingredient list is short on purpose. Nothing here is decorative, and each ingredient has a clear job in the finished bake.

Dry Ingredients for English Scones

You will need:

  • 250 g self-raising flour
  • 1 tsp baking powder
  • 30 g caster sugar
  • 1 pinch salt

Self-raising flour keeps the method simple and gives the dough the kind of lift that suits classic English scones especially well. The extra baking powder adds support and helps keep the rise reliable. The sugar stays modest because this is not meant to be a sugary café pastry. It is meant to leave room for jam and cream at the table.

If you do not have self-raising flour, use 250 g plain flour plus 3 tsp baking powder in total for a close substitute. That will get you much nearer the intended texture than trying to improvise the swap.

English scone ingredients guide showing self-raising flour baking powder sugar butter milk egg wash jam and clotted cream with ingredient role notes.
The structure of a good English scone starts here: flour and baking powder for lift, cold butter for tenderness, milk for a soft dough, and a finishing setup built around jam and clotted cream rather than extra sweetness in the base.

Butter, Milk, and Egg

You will need:

  • 60 g cold unsalted butter, cubed
  • 150 to 170 ml whole milk
  • 1 tsp vanilla extract, optional
  • 1 egg, beaten, for egg wash

Cold butter helps create the tender crumb that makes a good scone feel light rather than heavy. It should be rubbed into the flour until the mixture looks airy and crumbly, not greasy or paste-like. The milk brings the dough together, though the exact amount can vary slightly depending on your flour and your kitchen conditions. The egg does not go into the dough here. Instead, it is brushed over the tops so the scones bake with a soft shine and a gentle golden finish.

Classic English Scone Toppings: Jam and Clotted Cream

For the classic serving style, use:

  • strawberry jam
  • clotted cream

That pairing is not just a serving suggestion. It is part of the logic of the bake itself. English scones stay plainer and less sweet because they are designed to be completed at the table rather than to carry all the richness on their own.

Traditional cream tea is built around scones, jam, clotted cream, and tea, which is one reason this style remains so restrained and balanced. For a more useful reference point than a generic explainer, the protected Cornish clotted cream specification shows why it is treated as a distinct product, while the National Trust’s fruit scones recipe reflects the same classic jam-and-clotted-cream serving tradition.

If clotted cream is difficult to find where you live, mascarpone is the neatest substitute. Thick lightly whipped cream also works, though it gives a looser and less traditional finish.

Small Variations That Still Keep Them English-Style

If you want a little variation without changing the character of the recipe too much, keep it restrained. A small handful of currants or sultanas fits naturally, and a little lemon zest can work well too.

What does not belong in this version is a heavy fruit load, thick glaze, chocolate chips, or any shortcut that turns the bake into something else altogether.

Also Read: Punjabi Mutton Bhuna – Amritsari Village-Style Gosht Recipe

Easy English Scones Recipe Card

Yield: 8 scones
Prep time: 15 minutes
Bake time: 12 to 15 minutes
Total time: about 30 minutes
Oven temperature: 220°C / 425°F

Ingredients

  • 250 g self-raising flour
  • 1 tsp baking powder
  • 30 g caster sugar
  • 1 pinch salt
  • 60 g cold unsalted butter, cubed
  • 150 to 170 ml whole milk
  • 1 tsp vanilla extract, optional
  • 1 egg, beaten, for egg wash
  • strawberry jam, for serving
  • clotted cream, for serving
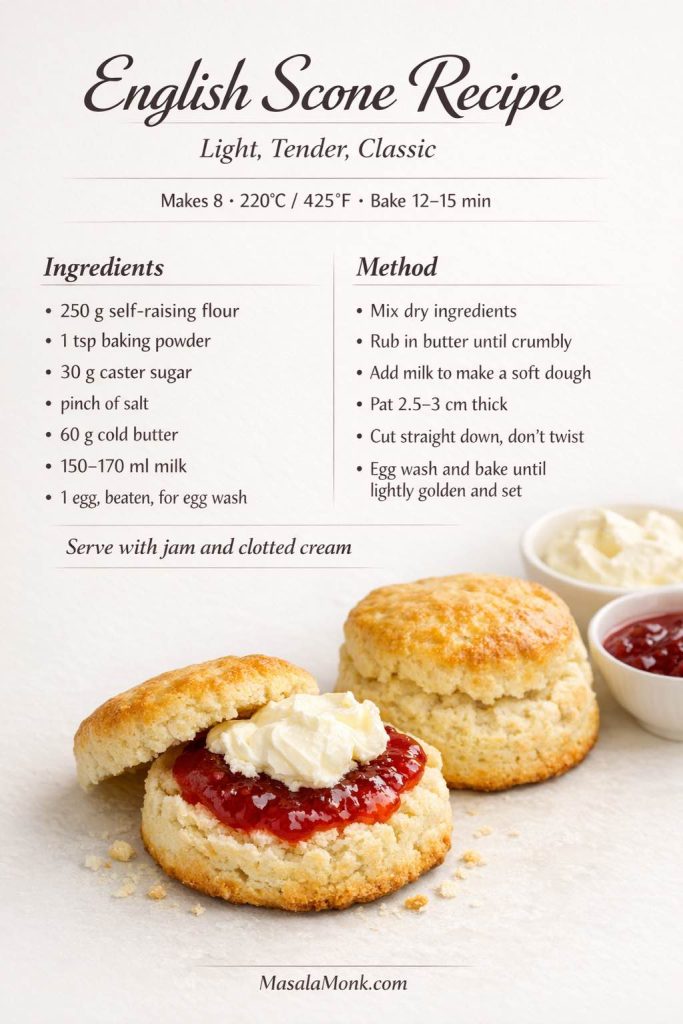
English scone recipe card showing ingredients, quick method, and classic scones served with jam and clotted cream.
Use this recipe card when you want the ingredient list, bake temperature, and quick method in one place. It is most useful once you know the flow and want to make a batch without scrolling through the full guide.

How to Make English Scones Step by Step

The method is simple, but the small cues matter. Most disappointing batches trace back to dough that was too dry, too heavily handled, or shaped too thin before baking.

1. Heat the Oven and Prepare the Tray

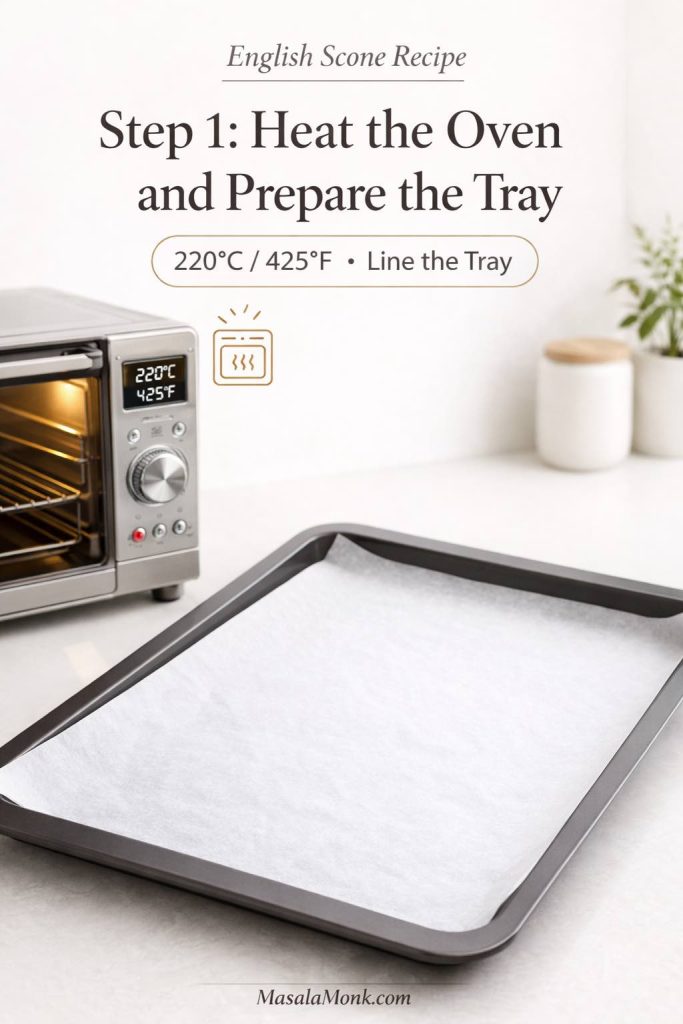
Heat the oven to 220°C / 425°F and line a baking tray with parchment paper. A fully preheated oven matters here because the scones need strong early heat to rise before the structure sets.

Step 1 English scone recipe graphic showing a lined baking tray and oven preheated to 220C 425F before baking.
Starting with a fully heated oven gives English scones a better chance of rising quickly before the structure sets. That early burst of heat matters more than many people expect when the goal is a lighter, taller result.

Use a middle rack unless your oven runs unusually hot at the top.

2. Mix the Dry Ingredients

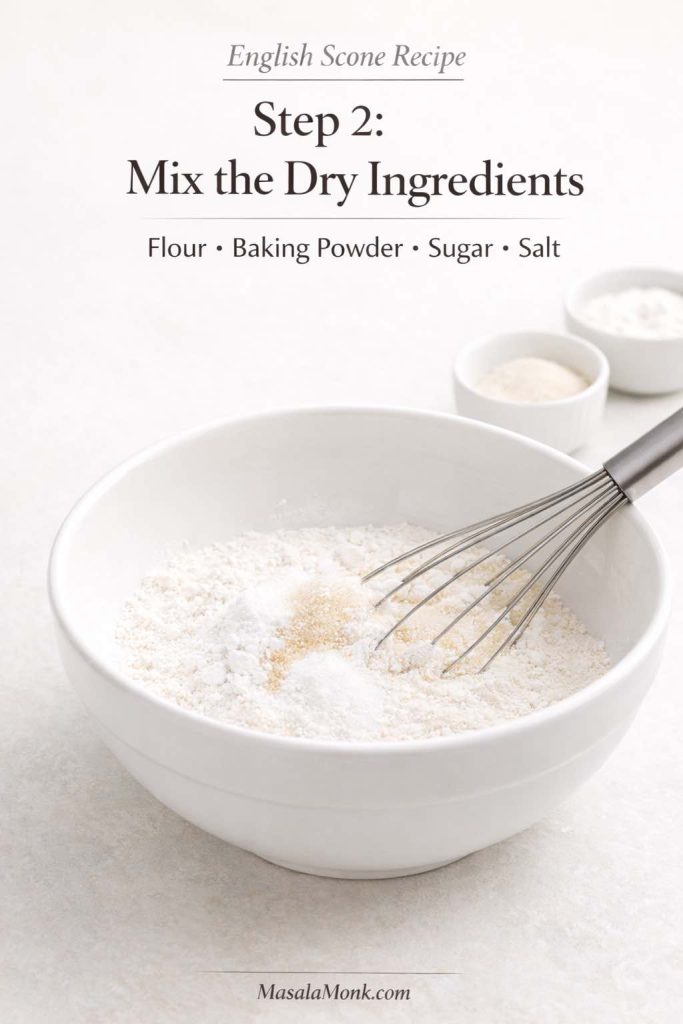
In a large bowl, whisk together the self-raising flour, baking powder, caster sugar, and salt. This takes almost no time, but it helps distribute the lift evenly before the butter goes in.

Step 2 English scone recipe graphic showing flour, baking powder, sugar, and salt being mixed in a bowl before the butter is added
A quick whisk here helps distribute the baking powder, sugar, and salt more evenly through the dough, which gives the scones a more consistent start.

3. Rub in the Butter

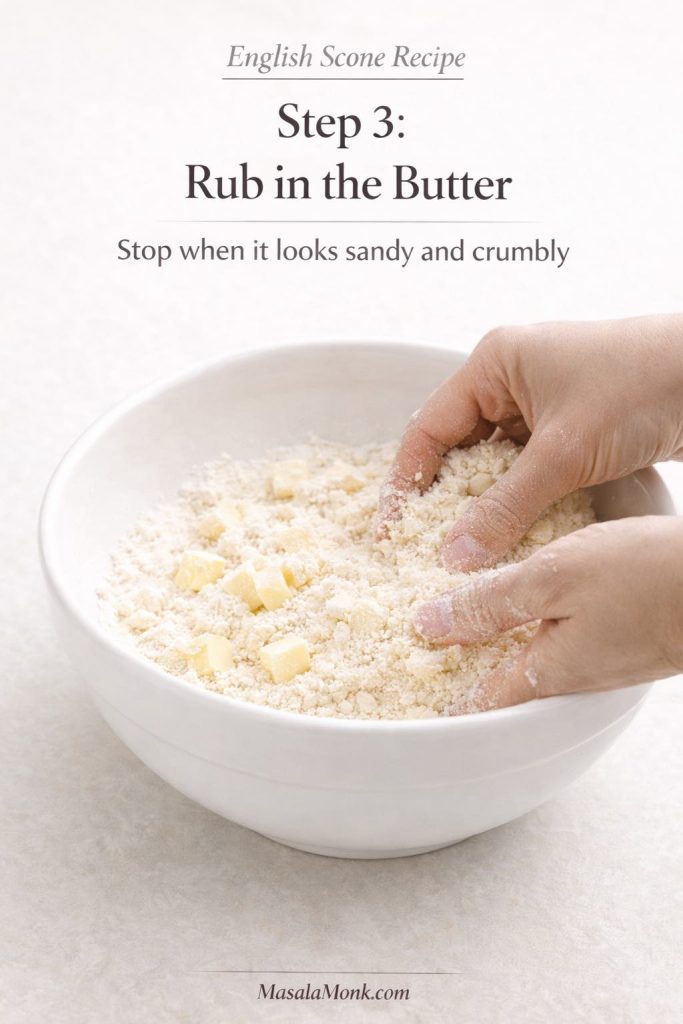
Add the cold butter cubes and rub them into the flour mixture with your fingertips until the texture looks like coarse crumbs.

You want a mixture that feels sandy and airy, with a few tiny buttery pieces still visible. If you squeeze a little in your hand, it should briefly clump, then fall apart again. Once the butter turns greasy or starts smearing into the flour, you have gone too far. If large cubes remain untouched, keep working a little longer.

Step 3 English scone recipe graphic showing cold butter being rubbed into flour until the mixture looks sandy and crumbly.
The butter should be rubbed in only until the mixture looks sandy and crumbly, with a few tiny buttery pieces still visible. That is what helps the finished scones stay tender instead of turning heavy or tight.

4. Add the Milk and Bring the Dough Together Gently

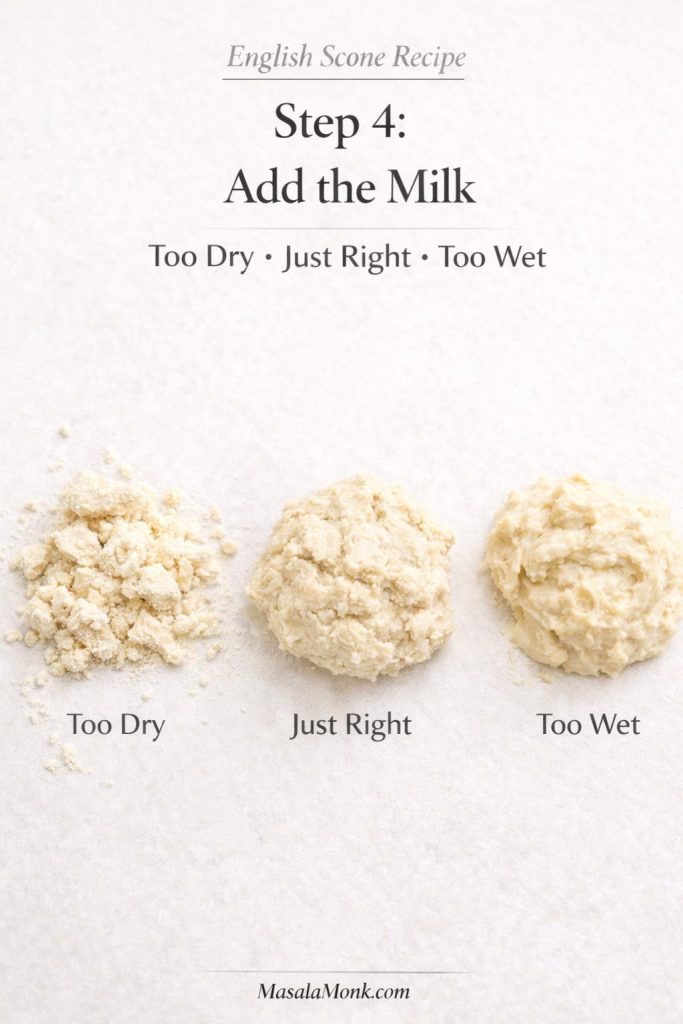
Pour in 150 ml milk and the vanilla, if using. Stir with a butter knife, fork, or spatula until the mixture starts to gather into a dough. Add more milk only if needed, a little at a time.

The dough should feel soft, slightly tacky, and easy to press together. It should not feel dry and stubborn, and it should not slump like batter either.

Step 4 English scone recipe dough guide showing too dry, just right, and too wet dough after adding milk.
This is the most important texture check in the recipe. The dough should look soft, rough, and cohesive enough to hold together without becoming sticky or slumped.

This is where many batches go wrong. People often stop early because they are nervous about stickiness, then end up with a dough that seems tidy but bakes up heavier than it should. In practice, slightly softer is usually safer than slightly dry.

5. Pat the Dough Thick Without Kneading

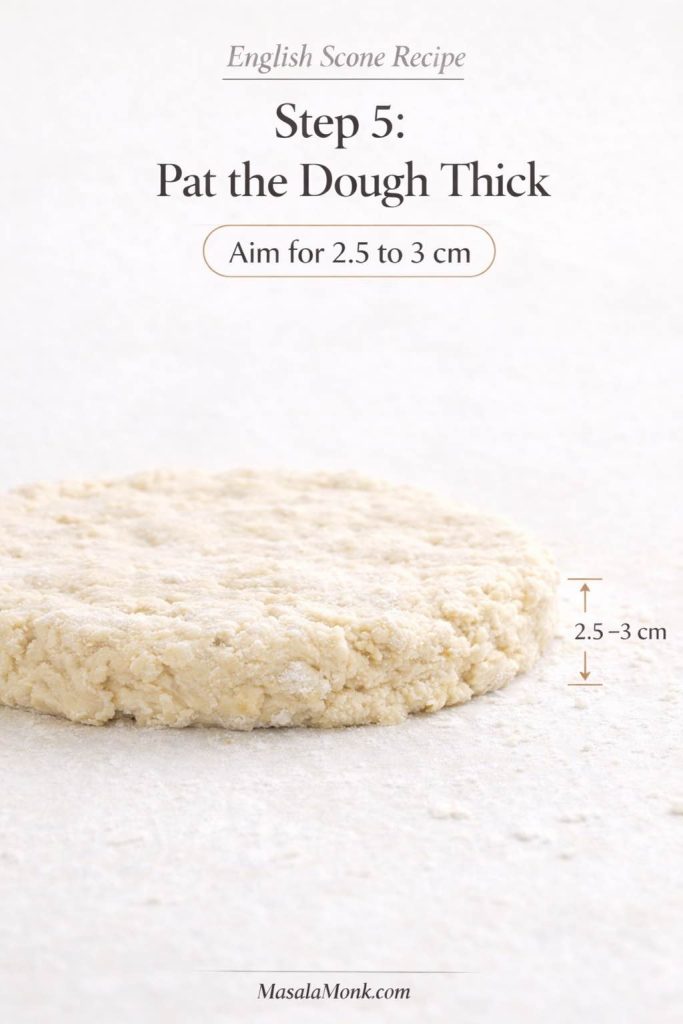
Turn the dough onto a lightly floured surface. With lightly floured hands, bring it together with a few gentle presses, then pat it into a round or rectangle about 2.5 to 3 cm thick.

Step 5 English scone recipe graphic showing dough patted 2.5 to 3 cm thick before cutting the scones.
Patting the dough thick gives the scones room to rise upward instead of baking flatter than you want. That one choice changes the final look more than many people expect.

Do not knead the dough like bread. Do not press it into a smooth, tight disc. It only needs to come together neatly enough to cut.

6. Cut Out the Scones

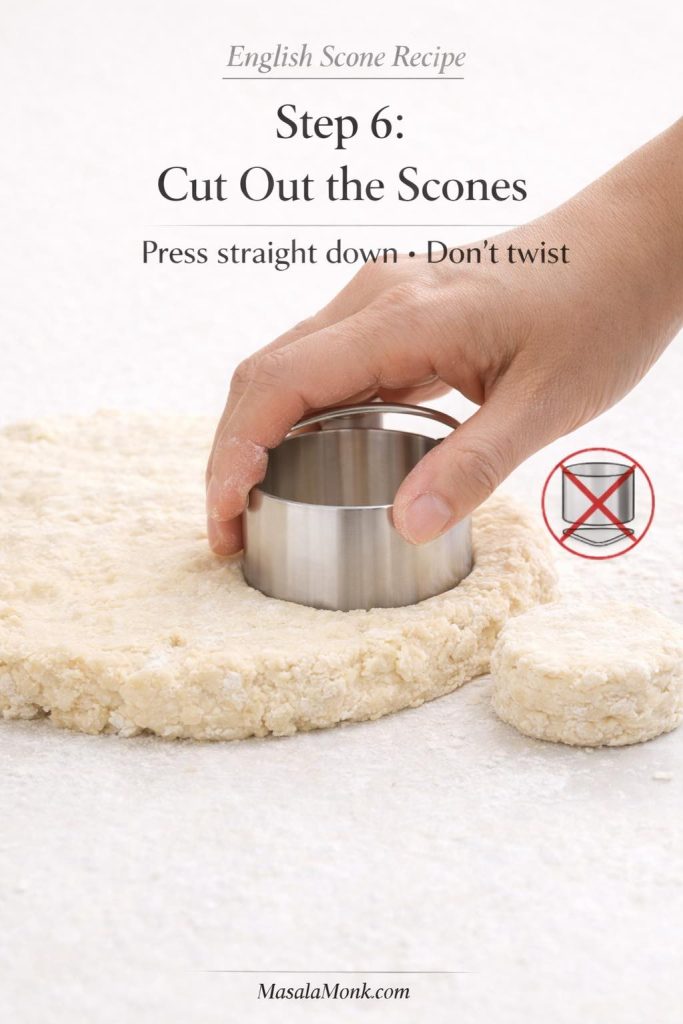
Use a 5 to 6 cm round cutter dipped lightly in flour. Press straight down, then lift cleanly.

Do not twist the cutter. Twisting compresses the edge and makes a clean rise harder. It seems like a small detail, but it shows up clearly in the oven.

Step 6 English scone recipe graphic showing a round cutter pressed straight down into thick dough without twisting.
A straight downward cut keeps the edges cleaner than a twisting motion, which gives the scones a better chance of rising neatly in the oven.

Place the cut scones on the lined tray with a little space between them. Gather the scraps gently, pat them together once, and cut again. The last few may look slightly less neat than the first ones, but they will still bake well if you do not keep reworking the dough.

If the cut rounds look soft or slightly slack at this stage, chill them for 10 minutes before baking. That short rest can help them hold their shape better.

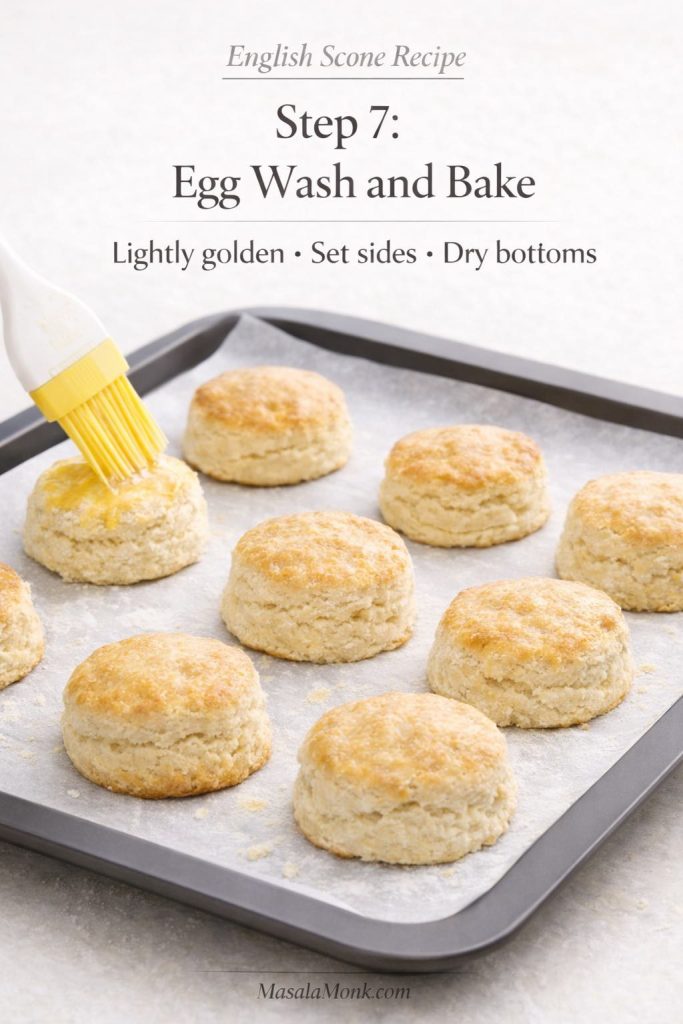
7. Egg Wash and Bake

Brush only the tops with beaten egg. Try not to let the egg wash run down the sides, because that can limit the rise by sealing the edges.

Step 7 English scone recipe graphic showing scones on a lined tray with egg wash and the correct lightly golden baked finish.
Do not judge doneness by color alone. The best batch should have lightly golden tops, sides that look set rather than damp, and bottoms that feel dry and baked through without turning hard.

Bake for 12 to 15 minutes. They are done when the tops are lightly golden, the sides look set rather than damp, and the bottoms look dry and lightly colored rather than pale and wet.

If they still look slightly heavy after 12 minutes, give them another minute or two and check again. When in doubt, break open the least tidy one from the batch. The center should look tender and set, not wet or gummy.

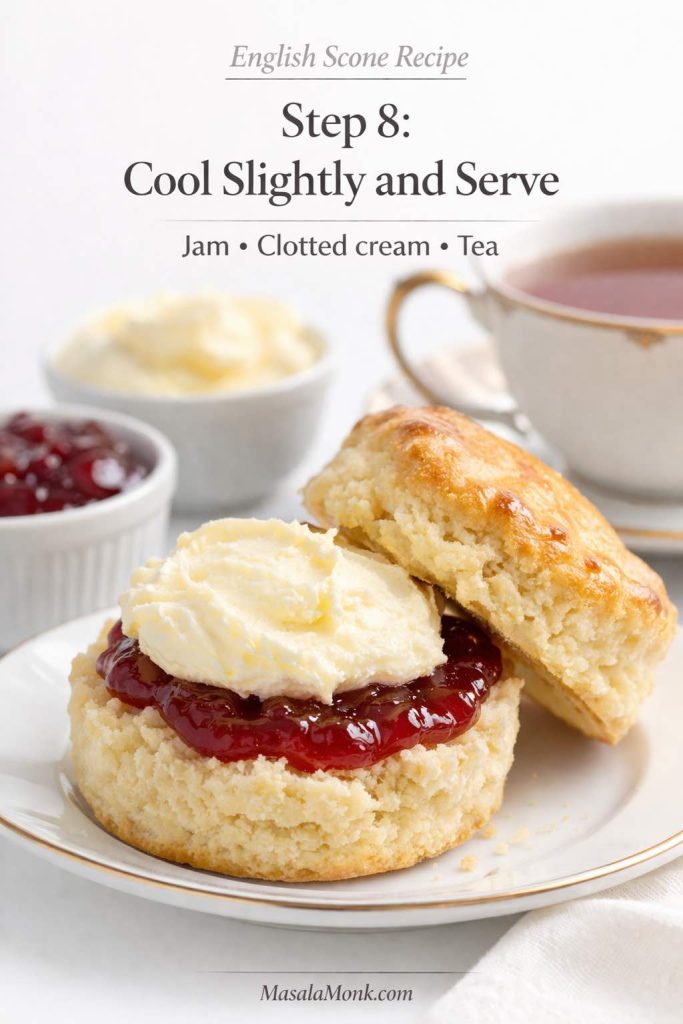
8. Cool Slightly and Serve

Let the scones cool for about 10 minutes before splitting and serving. They are excellent still slightly warm, when the crumb feels especially soft and the contrast with jam and clotted cream is at its best.

Step 8 English scone recipe graphic showing a split scone served with jam clotted cream and tea.
A short cooling time helps the crumb settle before serving, and it also keeps the jam and clotted cream from sliding around too much on a steaming-hot scone. This last pause improves the final experience more than it seems.

For a colder-day pairing, they also work beautifully with homemade hot chocolate with cocoa powder.

Why These English Scones Stay Light and Tender

The result stays light because the method avoids the three mistakes that most often drag scones down: dry dough, heavy handling, and shaping that is too thin.

A dough that feels slightly soft will usually bake better than one that feels overly tidy and controlled. Extra pressing and rerolling tighten the crumb. Thin shaping leaves less room for upward lift. Add those problems together, and even a good ingredient list can still produce a disappointing batch.

That is why the method stays restrained. It gives the dough enough structure to hold shape, but not so much handling that the finished scones lose their tenderness.

English Scones vs American Scones

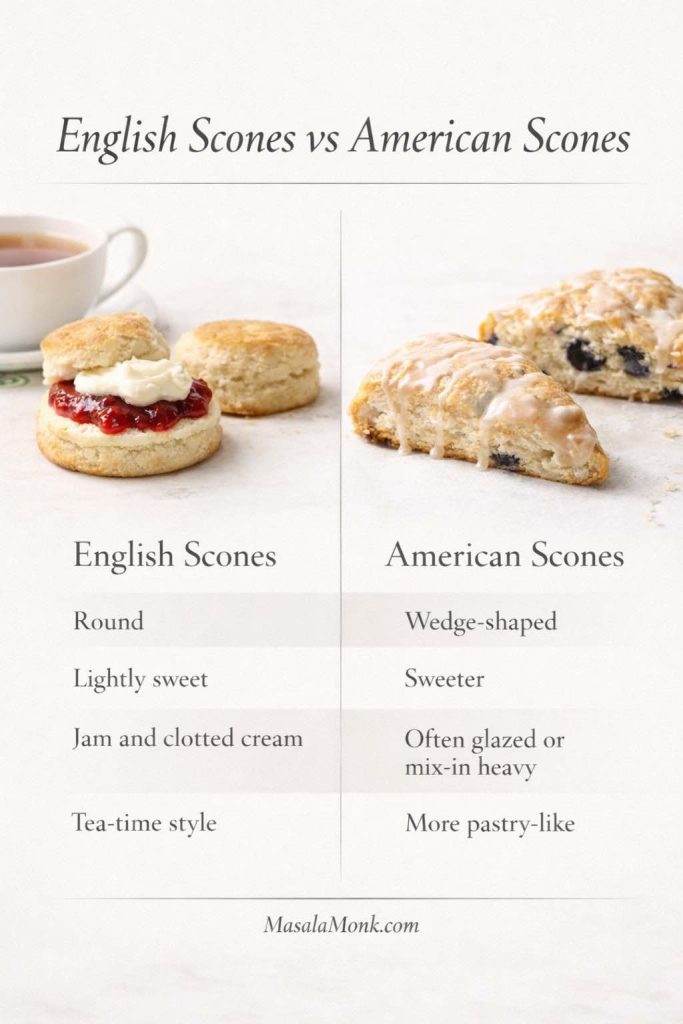
Although they share a name, English scones and American scones usually aim for very different results. English scones are typically round, lightly sweet, and softer in character, while American scones are often larger, richer, more heavily flavored, and shaped in wedges.

In the English style, the scones are usually served as part of afternoon tea, split and spread with jam and clotted cream. On their own, they are modest by design.

Comparison graphic showing English scones with jam and clotted cream beside sweeter glazed American scones with key differences in shape texture and serving style.
This side-by-side guide shows why this post stays firmly in the English-scone lane. English scones are rounder, lighter, and built for jam and clotted cream, while American scones are usually sweeter, wedge-shaped, and more pastry-like.

American scones, by contrast, tend to be larger, sweeter, and richer. They are more likely to include chocolate, berries, glaze, nuts, citrus, or stronger mix-ins, and they are often treated as a standalone pastry to eat with coffee rather than as part of a cream-tea table.

That difference is exactly why this recipe stays deliberately restrained. The goal is not to make the richest or most dramatic scone possible. The goal is to make one that feels unmistakably English-style and succeeds on those terms.

Also Read: Cookie Pie Recipe: 10 Best Flavors, Fillings and Variations

How to Serve English Scones with Jam and Clotted Cream

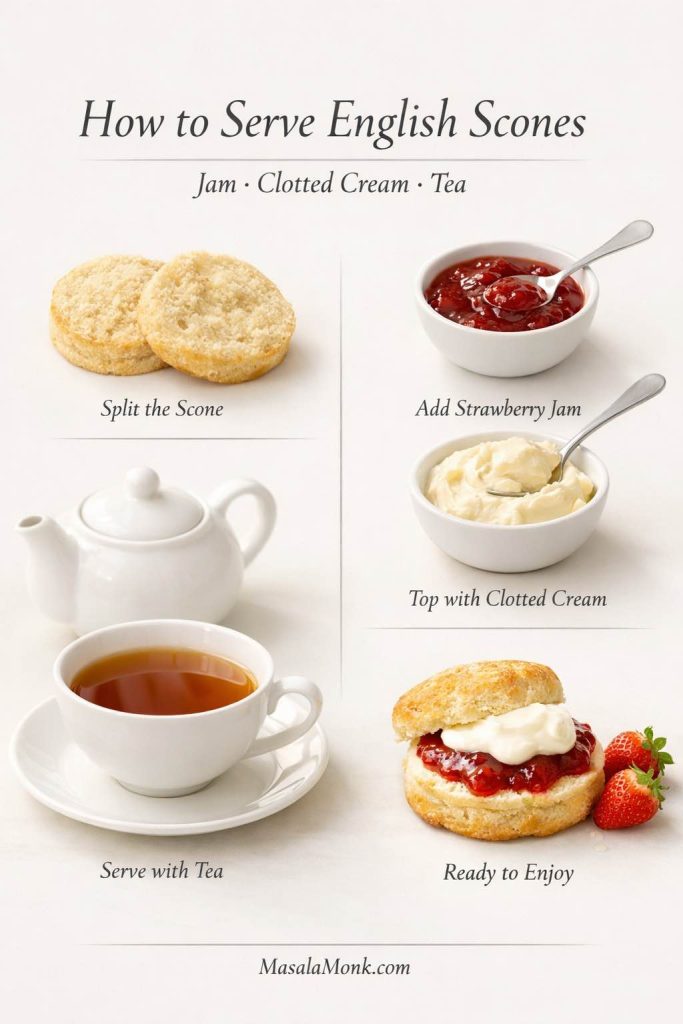
The classic serving style is part of the point, not an afterthought. These scones feel most like themselves when they are split and served with strawberry jam and clotted cream, whether you arrange them before serving or set everything out so people can build their own.

Serving guide for English scones showing how to split the scone, add strawberry jam, top with clotted cream, and serve with tea.
Classic English scones are meant to be finished at the table, not treated like a sweeter standalone pastry. Use this guide to see the traditional flow clearly: split the scone, add jam, top with clotted cream, and serve with tea.

Split them gently rather than crushing them flat, then add the jam and clotted cream just before serving. If you are building a full cream-tea setup, keep the tea hot and the scones lightly warm or fully cooled rather than steaming, so the toppings sit neatly instead of sliding off.

Slightly warm scones are often the most satisfying because the crumb feels softer and the butteriness comes through more clearly. Room-temperature scones are just as traditional and often more practical for a fuller afternoon tea spread. What matters most is that they still feel fresh enough to split cleanly and tender enough inside to welcome jam and cream.

This is also where the restrained sweetness of the dough proves its value. A heavily sweetened scone would compete with the toppings, while a classic English scone leaves room for them and lets the full serving feel balanced rather than overdone. For a more heritage-led British reference point, the National Trust’s traditional fruit scones recipe follows the same broader jam-and-clotted-cream serving direction.

Tea is the obvious partner, though coffee works beautifully too. If you want something warm alongside them, masala chai recipes and a cappuccino recipe both fit naturally.

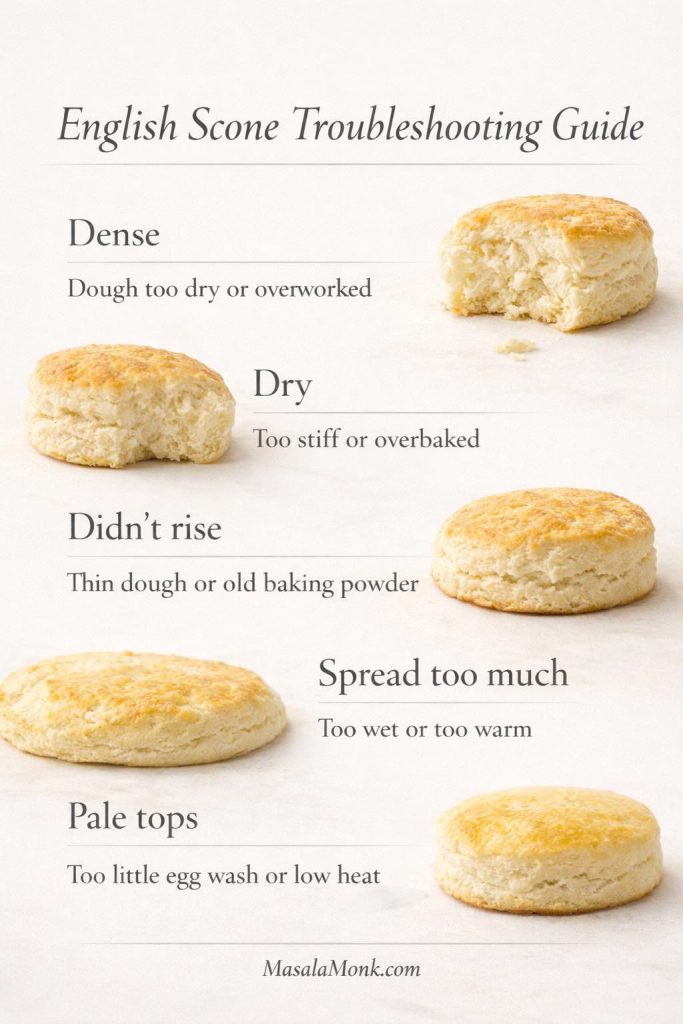
English Scone Troubleshooting Guide

If your batch turns out dense, dry, flat, or uneven, the cause is usually easier to trace than it first seems.

English scone troubleshooting guide showing common problems like dense dry flat and pale scones with quick causes and fixes.
Keep this troubleshooting guide nearby when a batch turns out dense, dry, flat, or pale. Most problems trace back to dough texture, thickness, cutter technique, or baking cues, so spotting the likely cause makes the next batch much easier to fix.

Why Did My Scones Turn Out Dense?

Dense scones usually come from dough that was too dry or too heavily worked. If the mixture felt stiff before baking, cracked when pressed, or needed force to come together, that is the clearest clue.

Keep the dough softer next time, stop mixing earlier, and handle the scraps as little as possible. Also make sure the oven is fully hot before the tray goes in.

Why Are My English Scones Dry?

Dry scones are usually the result of dough that began too stiff or baking that ran too long. If the tops went deeper brown than intended, the crumb may have dried out before you pulled them.

Use enough milk to keep the dough soft, and take them out when they are lightly golden rather than deeply browned. Once they are fully cool, store them promptly instead of leaving them exposed on the counter.

Why Didn’t My Scones Rise Properly?

Poor rise usually points to one of four things: old baking powder, dough patted too thin, a cutter twisted instead of pressed straight down, or an oven that was not fully hot.

Use fresh raising ingredients, keep the dough thick, cut cleanly, and bake in a properly preheated oven.

Why Did They Spread Instead of Rising Tall?

Spreading is usually a sign that the dough was too warm, too wet, or too thin. If the cut rounds looked soft and a little slack on the tray before baking, that is your clue.

Hold back some of the milk until you know the dough needs it, keep the thickness at 2.5 to 3 cm, and chill the cut scones briefly if they seem very soft.

Why Are the Tops Pale or Uneven?

Pale tops usually mean the egg wash was too light, the oven heat was a little low, or the dough thickness varied across the batch. Uneven tops can also happen when the scraps are handled more roughly than the first cuts.

Brush the tops carefully, keep the dough even, and make sure the oven is fully hot.

How Do I Keep English Scones Soft After Baking?

Do not overbake them, let them cool only as long as needed, then store them airtight once fully cool. A brief reheat before serving helps a lot.

Also Read: White Russian Recipe: 7 Variants to Try, From Classic to Frozen

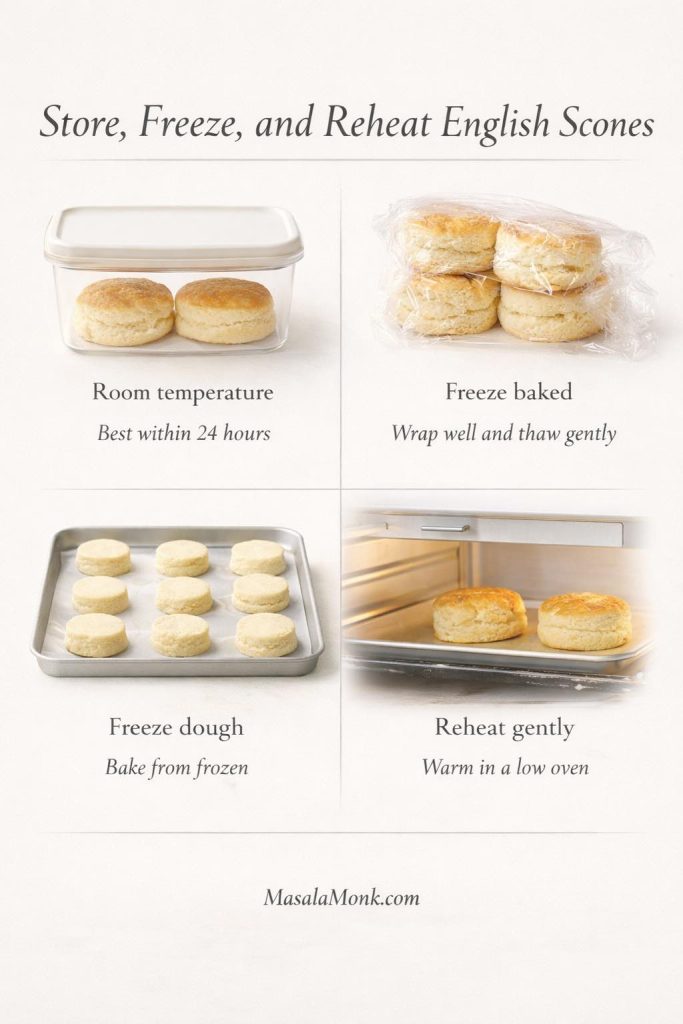
How to Store, Freeze, and Reheat English Scones

English scones are best the day they are baked, when the crumb is softest and the structure still feels freshest. Even so, they store and freeze better than many people expect if you handle them properly.

If freshness matters most to you, freezing shaped unbaked scones is usually the better move than storing baked ones for too long. That way you keep more of the just-baked texture and get much closer to the original result.

Storage guide for English scones showing room temperature storage, freezing baked scones, freezing dough, and reheating in a low oven.
Use this guide to keep English scones worth eating after the first bake. Room-temperature storage works best for the short term, freezing baked scones helps with leftovers, freezing shaped dough gives you the freshest later result, and gentle reheating brings back more of the soft crumb.

Room-Temperature Storage for English Scones

Once fully cool, store the scones in an airtight container at room temperature. They are best within 24 hours and still pleasant on day two if gently rewarmed.

Should You Refrigerate Them?

Refrigeration is usually not the best choice for plain baked scones because it can make them feel firmer and less fresh. Room temperature for a short window or freezing for longer storage is usually the better route.

How to Freeze a Baked English Scone

Let the baked scones cool completely, then wrap them well and freeze them in an airtight container or freezer bag. Thaw them, then warm them gently until just heated through.

How to Freeze Unbaked English Scone Dough

Freezing shaped dough is often the better option if you want fresh-baked scones later. Cut the scones, place them on a tray until firm, then transfer them to a freezer-safe container or bag. Bake from frozen, giving them about 2 to 4 extra minutes as needed.

How to Reheat English Scones Without Drying Them Out

Warm the scones in a low oven just until heated through. Do not blast them with high heat or leave them in too long. Gentle reheating brings back some softness without drying out the crumb.

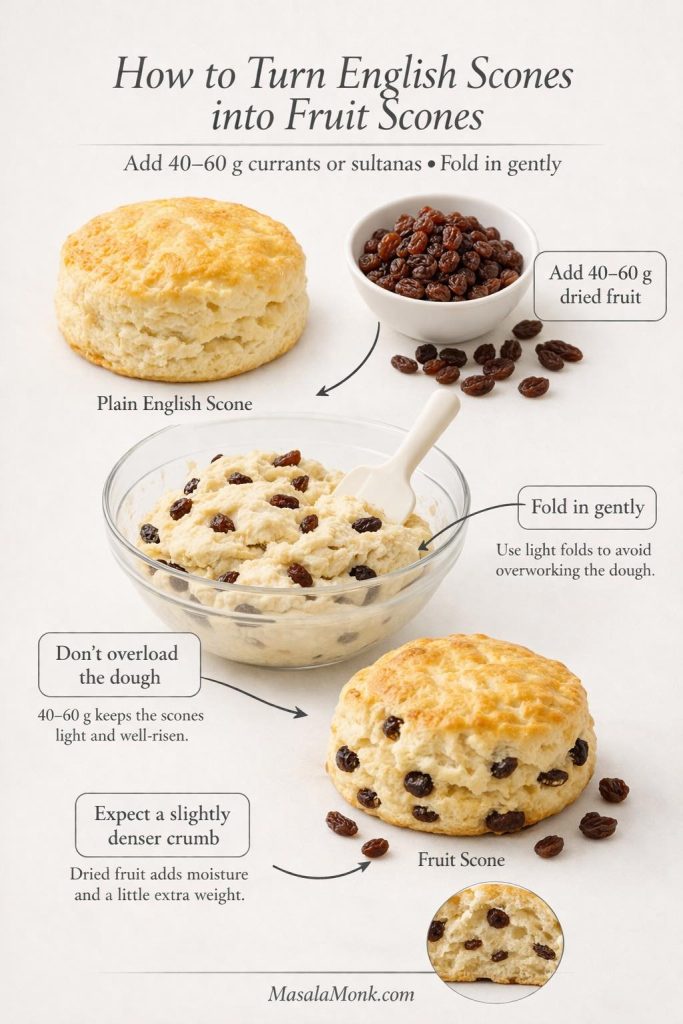
How to Turn These English Scones Into Fruit Scones

If you want to adapt this recipe into a fruit version, fold in a small handful of currants or sultanas after the butter has been rubbed in and before the milk goes in. If you enjoy bakes that lean more fruit-forward and comforting, peach cobbler with canned peaches is another good one to bookmark.

Variation guide showing how to turn English scones into fruit scones with currants or sultanas without overloading the dough.
A fruit-scone variation works best when it stays restrained. Adding about 40 to 60 grams of currants or sultanas gives the dough a classic fruit note without weighing it down too much, though the crumb will be slightly denser than the plain version.

The key is restraint. A little dried fruit works beautifully. Too much starts to weigh the dough down and changes the balance of the bake. As a guide, around 40 to 60 g is enough for this quantity of dough.

Fold the fruit through gently so it spreads evenly without overworking the dough. You want enough in each scone to taste it, but not so much that the mixture turns heavy, patchy, or harder to cut cleanly.

Final Thoughts

A good English scone recipe does not need extra drama. It needs the right decisions at the right moments.

Keep the dough soft, shape it thick enough to rise well, cut it cleanly, and bake it in a properly heated oven. Do that, and you end up with the kind of scone people actually want: tender, gently risen, lightly sweet, and ready for jam and clotted cream.

That is why this version stays so focused. It is not trying to cover every possible style. It is trying to help you make one classic batch well, and that clarity is what makes a recipe worth returning to. If you enjoy classic bakes that reward small technique choices, sourdough English muffins are another strong next bake.

Also Read: White Russian Recipe: 7 Variants to Try, From Classic to Frozen

English Scone FAQs

1. Can I make English scones without self-raising flour?

Yes. For this recipe, use 250 g plain flour plus 3 tsp baking powder in total for the closest substitute. That will get you much nearer the intended texture than trying to guess the swap.

2. What can I use instead of clotted cream?

Mascarpone is the neatest substitute if clotted cream is hard to find. Thick lightly whipped cream also works, though it gives a softer, looser, and less traditional finish.

3. Why didn’t my English scones rise properly?

The most common causes are dough that was patted too thin, old baking powder, twisting the cutter instead of pressing straight down, or putting the tray into an oven that was not fully preheated. Keeping the dough thick and the oven properly hot makes a big difference.

4. Can I freeze English scone dough?

Yes. Shape and cut the scones first, freeze them until firm, then transfer them to a freezer-safe container or bag. Bake them from frozen and add about 2 to 4 extra minutes as needed.

Posted on — 15 Comments

Sandwich for Breakfast: Breakfast Sandwich Recipe + 10 Variations

Breakfast sandwich recipe cover image showing an English muffin egg and cheese sandwich with sausage, melted cheddar, and a fried egg.

A really good breakfast sandwich does two things at once. First, it tastes like you treated yourself—melty cheese, a warm egg, something crisp, something creamy. Then, almost secretly, it makes your morning easier because you can build it with whatever bread you already have: an English muffin, a croissant, a bagel, even waffles.

That’s the heart of this breakfast sandwich recipe. Instead of giving you one rigid version, we’ll start with a simple master build you can repeat, and then we’ll branch into the most-loved styles people actually search for and crave: egg and cheese, English muffin breakfast sandwich, breakfast croissant, croissant sandwiches, bagel with egg and cheese, scrambled egg sandwich, fried egg sandwich, high protein breakfast sandwich, vegetarian breakfast sandwich, gluten free breakfast sandwich, plus make-ahead frozen breakfast sandwiches for meal prep.

Along the way, we’ll lean on sauces and spreads that make a sandwich feel “finished” without being fussy—like a quick homemade mayo, a punchy pepper sauce, a bright pesto, or a thick tzatziki-style yogurt sauce—so every bite stays balanced instead of flat.


Breakfast sandwich: the master formula that works every time

Before we get into variations, it helps to have a dependable “base.” Think of it as a choose-your-own-adventure breakfast sandwich where each layer has a job.

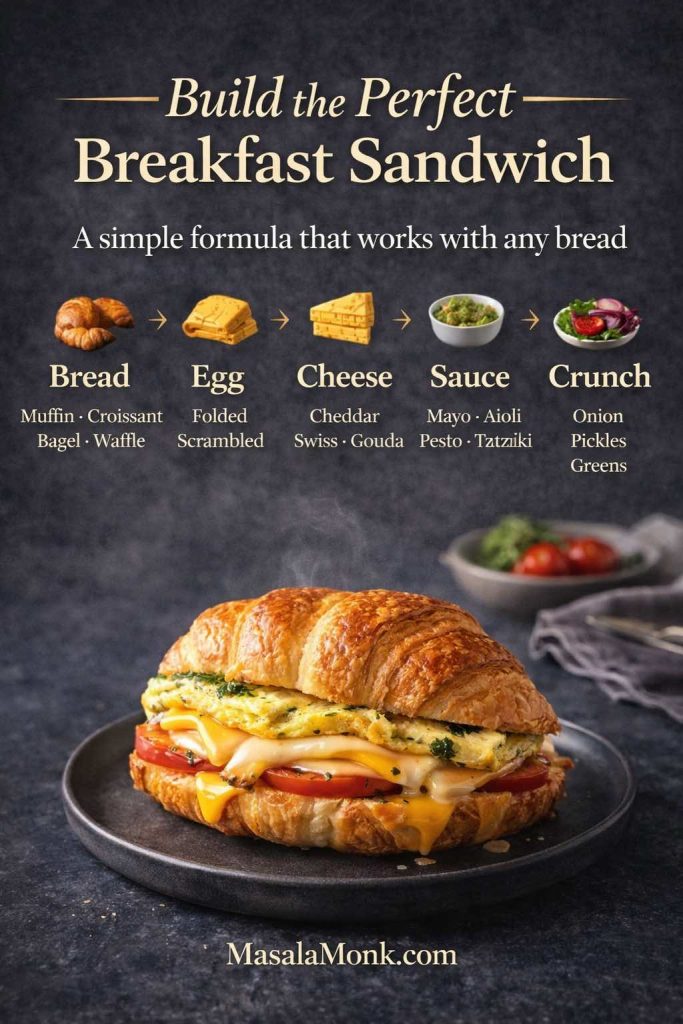
Infographic showing the breakfast sandwich formula—bread, egg, cheese, sauce, and crunch—with a croissant egg and cheese sandwich on a plate.
Use this breakfast sandwich formula to mix and match your favorites—choose a bread base, add eggs and cheese, finish with a sauce, then layer on crunch for the perfect bite every time.

The five layers

  1. Bread (or bread substitute)
    English muffin, croissant, bagel, biscuit, sliced bread, waffles, or an egg-based “eggwich.”
  2. Eggs for sandwiches (the engine)
    Fried egg, scrambled egg, folded omelet, baked egg patty, or boiled eggs turned into a spread.
  3. Cheese (the glue)
    Cheddar, mozzarella, gouda, pepper jack, or whatever melts well.
  4. Sauce or spread (the comfort layer)
    Mayo, eggless mayo, vegan mayo, pesto, tzatziki, or a quick chili-mayo.
  5. Texture + freshness (the wake-up layer)
    Crisp veggies, pickles, herbs, peppery greens, onions, tomatoes, even a little crunchy spice mix.

Once you understand those roles, breakfast sandwich ideas become effortless: swap the bread, switch the egg style, keep the sauce, change the crunch—suddenly you have a new breakfast without starting over.

Also Read: 10 Best Chicken Sandwich Recipes (BBQ, Parm, Buffalo & More)


Breakfast sandwich recipe: the base method (one sandwich)

Ingredients (flexible, not fussy)

  • Bread of choice (English muffin / croissant / bagel / waffles / 2 slices bread)
  • 1–2 eggs
  • 1 slice cheese (or a small handful grated)
  • 1–2 tablespoons spread or sauce
  • Salt and pepper
  • Optional add-ons: tomato, onion, spinach, cucumber, avocado, herbs, hot sauce, pickles

Method

First, toast or warm your bread. You’re not just adding crunch—you’re building a barrier so the sandwich doesn’t go soggy.

Next, cook your eggs in the style you want (fried or scrambled sections are coming up). While they’re still hot, add cheese and let it melt.

Then, spread sauce on the bread while it’s warm. That small detail matters: warm bread helps spreads cling instead of sliding.

After that, stack egg + cheese, add your texture layer, close the sandwich, and press gently for a few seconds so everything holds together.

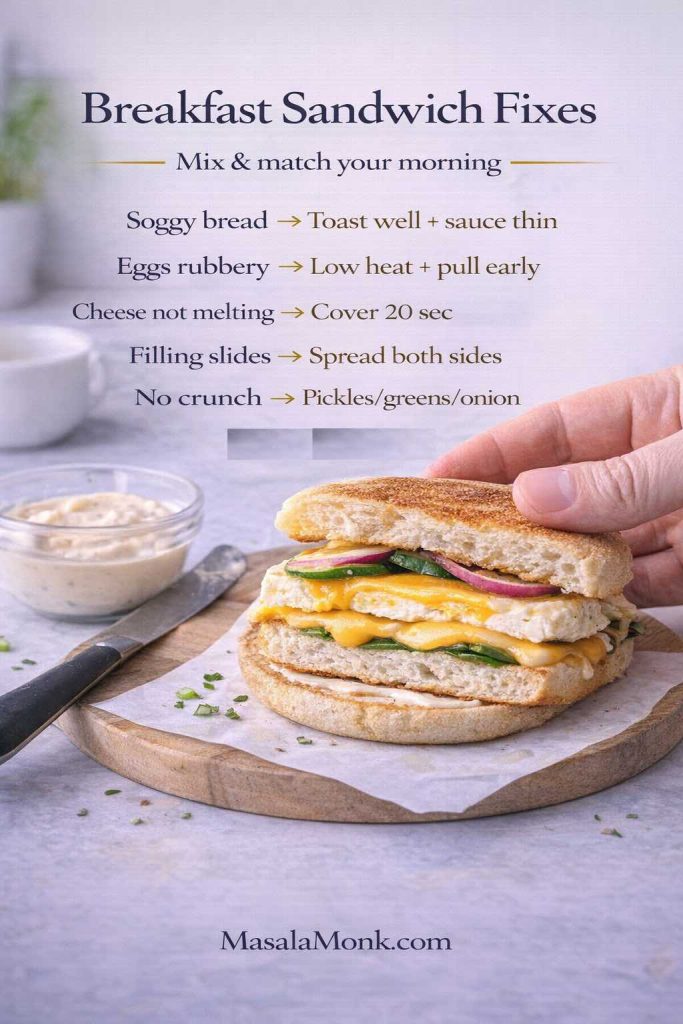
Breakfast sandwich fixes infographic showing quick solutions for soggy bread, rubbery eggs, cheese not melting, fillings sliding, and adding crunch, with an English muffin egg and cheese sandwich on a cutting board.
Save this breakfast sandwich fixes guide: toast bread well to prevent sogginess, cook eggs low and pull early for softness, cover briefly to melt cheese fast, spread sauce on both sides to stop slipping, and add pickles/greens/onion for crunch.

If you like checking food safety temps (especially when you’re batch-cooking), egg dishes are commonly cooked to 160°F / 71°C, and leftovers reheated to 165°F / 74°C—guidance you can see on the USDA safe temperature chart and on FoodSafety.gov’s chart.

Also Read: Food for Constipation Relief & Gut Health : 6 High-Fiber Sandwiches


Egg and cheese: the classic egg & cheese breakfast sandwich

Sometimes you don’t want a “creative” breakfast. You want the one that always works: egg and cheese, warm bread, a little seasoning, done.

Fried egg sandwich recipe (crispy edges, runny or set yolk)

Heat a pan, add butter or oil, crack in an egg, season it. Let the edges crisp; cover briefly if you want the top to set faster. Once it’s nearly where you want it, lay cheese on top and cover for 20–30 seconds so it melts smoothly.

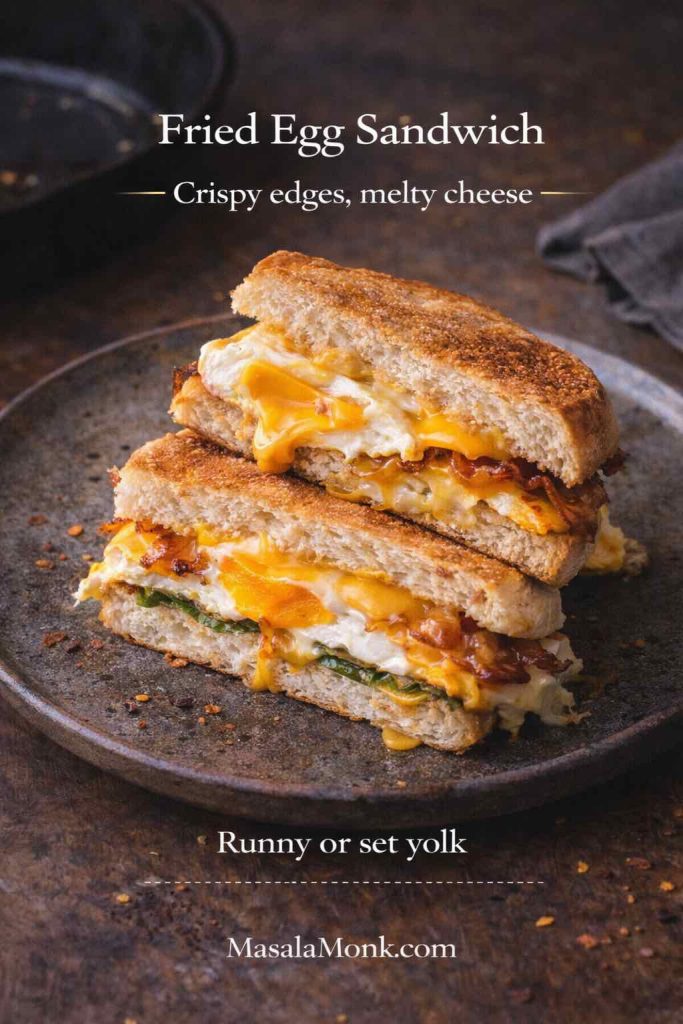
Fried egg sandwich recipe card showing a toasted sandwich cut in half with crispy-edged fried egg, melted cheese, and optional runny or set yolk, with MasalaMonk.com branding.
For the best fried egg sandwich, aim for crispy edges and melted cheese—choose a runny yolk for richness or cover the pan briefly for a set yolk that travels better.

This version is ideal when you want a clean, structured bite—especially on an English muffin or bagel.

Scrambled egg sandwich (soft, fluffy, and forgiving)

Whisk 2 eggs with salt and pepper. Cook on low heat, stirring slowly. Pull the eggs off the heat while they’re still slightly glossy; the residual heat finishes them.

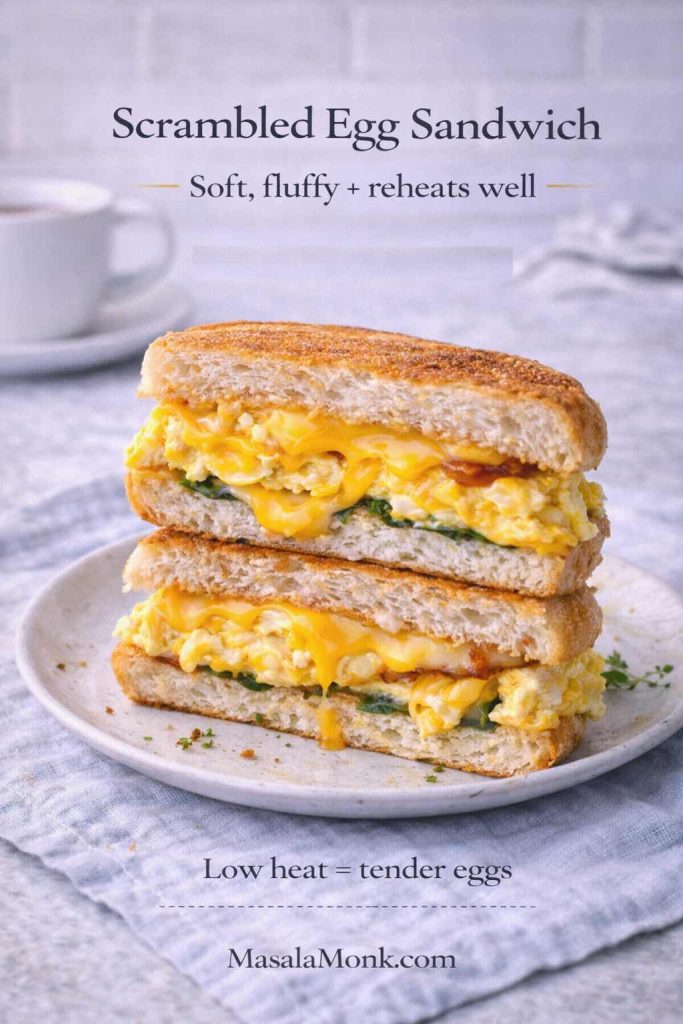
A scrambled egg sandwich is the best make-ahead egg sandwich—cook low and slow for soft, fluffy eggs that reheat well, then melt the cheese onto the eggs so every bite stays creamy instead of dry.

Scrambled egg sandwiches are particularly good when you’re packing breakfast for later, because the eggs stay tender instead of turning rubbery.

Also Read: Cottage Cheese Lasagna Recipe | Chicken, Spinach, & Ricotta


Choose Your Bread Base for the Perfect Breakfast Sandwich

Before you cook a single egg, pick the bread. It decides almost everything: how tidy the sandwich feels, how rich the bite is, and whether it holds up for meal prep or needs to be eaten right away. Once the base is locked in, the “best” egg and sauce choices become obvious—so you’re not building a great filling on the wrong foundation.

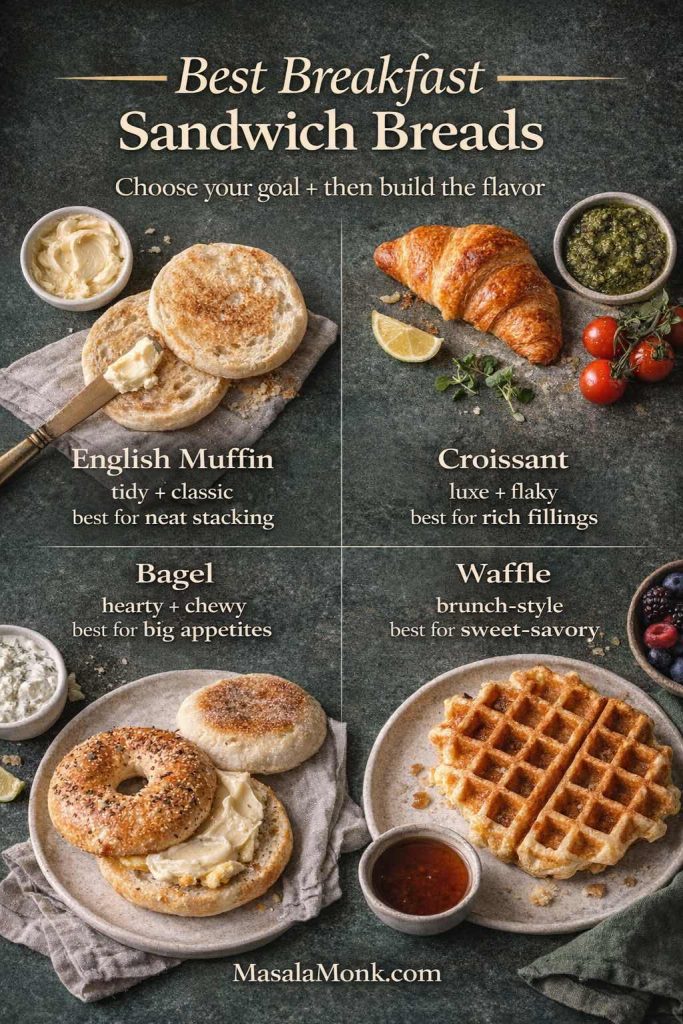
Best breakfast sandwich breads infographic showing an English muffin, croissant, bagel, and waffle with notes on what each bread is best for.
Pick your base first: English muffin for tidy stacking, croissant for a flaky breakfast croissant, bagel for a hearty breakfast bagel sandwich, or waffle for sweet-savory brunch sandwiches.

English muffin: the neat, classic breakfast sandwich

If you want a café-style breakfast sandwich that’s easy to hold and doesn’t slide around, the English muffin is the safest bet. It toasts beautifully, stays sturdy under egg and cheese, and naturally supports the “stacked” look most people want in an English muffin breakfast sandwich.

Croissant: the premium, flaky breakfast croissant

A croissant makes breakfast feel like a treat. It’s buttery and delicate, so it works best when your fillings are bold but not watery. Choose it when you want croissant sandwiches with a “bakery morning” vibe—just keep sauces and fresh veggies controlled so it doesn’t turn soft.

Bagel: the hearty breakfast bagel sandwich

Bagels are dense and satisfying, which is why a bagel with egg and cheese can feel like a full meal. They shine when you want contrast—soft egg, melty cheese, plus something bright and crunchy like onion, cucumber, or pickles. If you’re hungry-hungry, this is the base that delivers.

Waffles: sweet-savory waffle breakfast sandwich energy

Waffles turn the same ingredients into brunch. Because waffles carry a gentle sweetness, they pair especially well with salty cheese, peppery sauces, and savory fillings. Pick this base when you want a waffle breakfast sandwich that feels fun, dramatic, and very shareable.

Quick rule to decide in 5 seconds

For a tidy, classic bite, choose an English muffin. For luxury and flaky layers, reach for a croissant. When you want something big and seriously filling, go with a bagel. And if you’re craving brunch-style sweet-savory energy, waffles are the move.


English muffin breakfast sandwich (café-style, sturdy, and easy to hold)

The English muffin breakfast sandwich is popular for a reason: it’s compact, it toasts beautifully, and it doesn’t fall apart mid-commute.

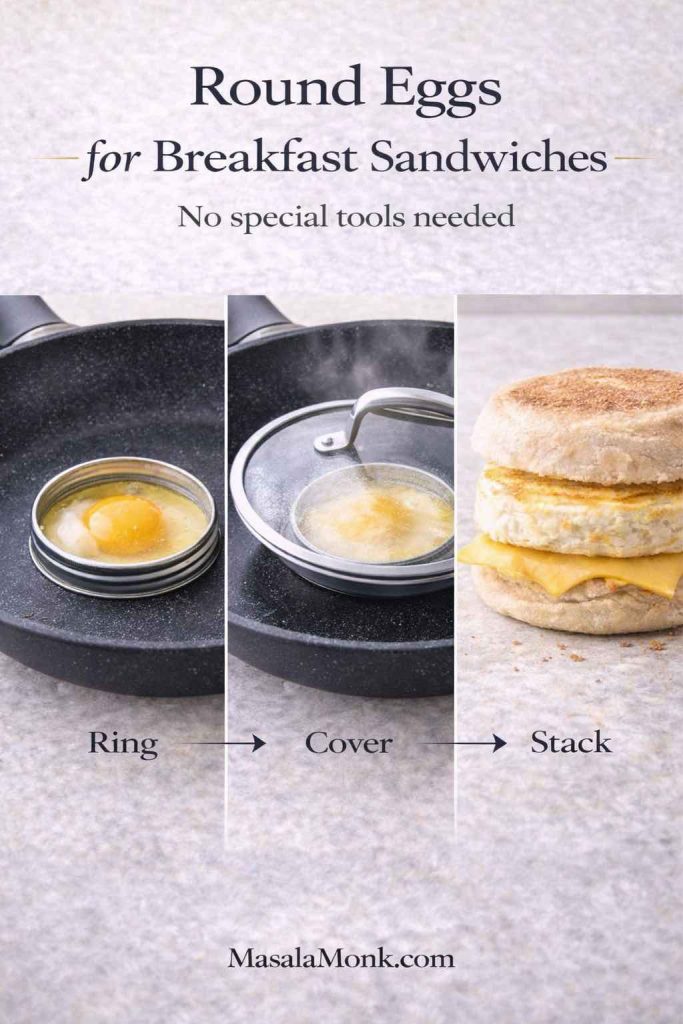
How to make round eggs for breakfast sandwiches (without special gear)

If you want that neat “egg patty” look, you don’t need a fancy ring. A wide mason jar lid ring, a cleaned metal cookie cutter, or even a DIY foil ring works.

Step-by-step guide showing how to make round eggs for breakfast sandwiches using a mason jar lid ring, covering the pan, and stacking the egg patty on an English muffin with cheese.
Want café-style egg patties? This quick method shows how to make round eggs for breakfast sandwiches using a simple jar-lid ring—perfect for an English muffin breakfast sandwich that stacks neatly and stays easy to hold.

Warm the ring in the pan, grease it lightly, crack in the egg, and cover. As the egg sets, it becomes the perfect shape for English muffins.

Build: egg and cheese on English muffin

  • Toast muffin halves until crisp
  • Spread sauce on both sides
  • Add egg + cheese
  • Add one crisp layer (thin onion, tomato slice, spinach, or pickles)
  • Close, press gently, eat
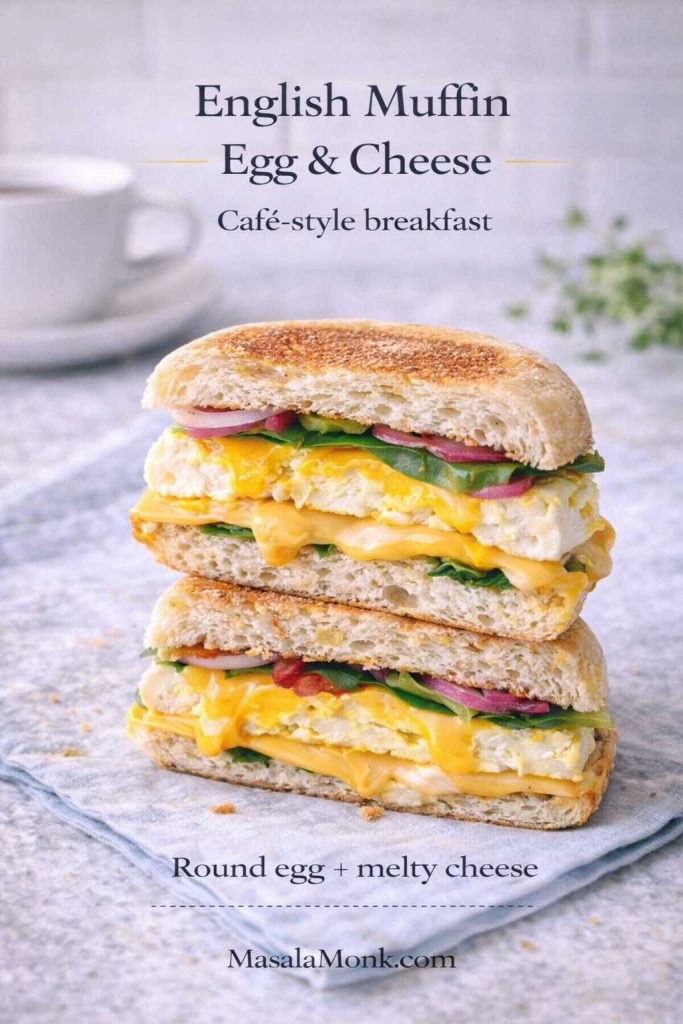
English muffin egg and cheese breakfast sandwich recipe card, cut in half to show a round egg patty, melted cheese, spinach, and red onion, with café-style text overlay and MasalaMonk.com footer.
This English muffin egg and cheese breakfast sandwich stacks neatly with a round egg patty and melty cheese—add a thin layer of spinach and onion for crunch and freshness without making the muffin soggy.

For a creamy base that can swing classic or spicy, a simple homemade mayo is hard to beat. If you want a versatile one with a lot of variations you can reuse for other sandwiches too, this guide is handy: homemade mayonnaise with 15+ easy variations.

If you’re feeding a mixed crowd—some people avoiding eggs in spreads or preferring egg-free condiments—you can also keep a jar of eggless mayonnaise or a fully dairy-free vegan mayo in rotation.


Breakfast croissant: when you want croissant sandwiches that feel like a treat

A breakfast croissant sandwich is the “I went out for breakfast” vibe—without leaving home. Because croissants are rich and flaky, the best versions keep fillings bold but not watery.

Croissant egg and cheese (the simple starter)

  • Warm the croissant (don’t over-toast—just warm and lightly crisp)
  • Add a soft scrambled egg layer
  • Add cheese while eggs are hot
  • Finish with pepper or chili flakes

Bacon egg and cheese croissant

Crisp bacon, melt cheese onto the egg, then add something fresh so it doesn’t feel heavy: a thin tomato slice, peppery greens, or even quick-pickled onions.

Bacon egg and cheese croissant breakfast sandwich recipe card showing a flaky croissant filled with egg, melted cheese, and crispy bacon, with “Bakery-style breakfast” text overlay and MasalaMonk.com footer.
This bacon egg and cheese croissant delivers the classic breakfast croissant vibe at home—keep the croissant lightly warmed (not over-toasted), melt the cheese onto the eggs, then add crisp bacon and one fresh layer so it stays rich but balanced.

Sausage egg and cheese croissant

Sausage + egg + cheese is a classic breakfast sandwich trio for a reason. The croissant turns it into a weekend-level meal. If your sausage is strongly seasoned, keep the sauce simple—mayo or a yogurt-based spread—so it doesn’t clash.

Ham egg and cheese croissant

Ham loves mustard-mayo or herby mayo. Even a thin swipe makes the whole sandwich taste “designed,” not accidental.

If you want a sandwich spread that’s creamy yet tangy, Greek yogurt-style sauces are perfect on croissants too. This Greek tzatziki sauce recipe with variations gives you a thick, garlicky option that stays put instead of leaking out the sides.

Also Read: Strawberry Smoothie Recipes (12 Easy Blends + Bowls & Protein Shakes)


Bagel with egg and cheese: the breakfast bagel sandwich that actually feels balanced

A bagel with egg and cheese is dense and satisfying, so it helps to build contrast—soft + crisp, rich + fresh, salty + bright.

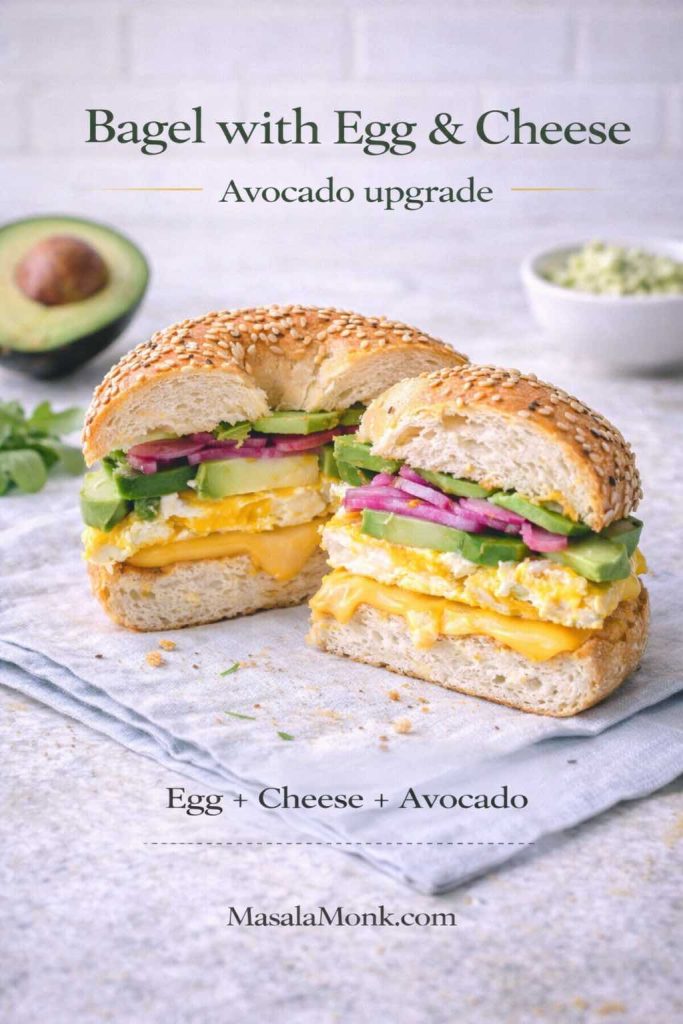
This bagel with egg and cheese gets an easy avocado upgrade—add creamy avocado plus a sharp, crunchy layer like pickled onions to balance the richness and make a more satisfying breakfast bagel sandwich.

Bagel with egg and cheese (the core build)

Toast the bagel cut sides well. Spread sauce on both halves. Add egg + cheese, then add one “fresh” element: tomato, cucumber, avocado, or herbs.

Avocado egg sandwich on a bagel

Avocado and egg are a natural pair. Add black pepper, a squeeze of lemon, and something crunchy (onion or cucumber). The result feels like a healthy breakfast sandwich, even though it’s still comforting.

For a flavor blueprint you can borrow directly, this one is built for mornings: avocado, basil, and grilled tomato sandwich. You can adapt the same idea onto a bagel and add egg + cheese to turn it into a bigger breakfast.

Egg sandwich spread for bagels (when you want it creamy)

Instead of a whole egg, use a spreadable egg layer (egg mayo / egg salad style). It’s easier to eat, especially if you’re walking out the door.

We’ll do that properly in the egg mayo sandwich recipe section below.

Also Read: Classic Deviled Eggs (Easy) + 8 Flavorful Variations


Breakfast muffin sandwich: egg, cheese, and a sturdy base

“Breakfast muffin sandwich” can mean an English muffin sandwich, or it can mean a muffin-shaped bread base you toast and fill. Either way, the goal is the same: structure.

Egg and cheese muffin-style sandwich

Toast the base, add a folded omelet or egg patty, add cheese, then add a little sauce. Because this style is compact, it’s great for meal prep breakfast sandwiches as well.

If you’re making eggs in bulk for this, an easy workflow is to cook and peel a batch of eggs quickly. An air fryer is surprisingly effective for that—here’s a reliable method: air fryer hard boiled eggs.

Also Read: How to Make Pineapple Chia Pudding: A Refreshing Low-Carb Breakfast Option


Waffle breakfast sandwich: sweet-savory brunch energy

A waffle breakfast sandwich is where brunch gets playful. The key is using waffles that are crisp enough to hold fillings.

If you want to make waffles that stay golden and crisp even without dairy, this is a solid base: waffle recipe without milk. For more adventurous directions (including Indian twists that still feel natural), this is fun inspiration: Belgian waffle recipe + Indian twists.

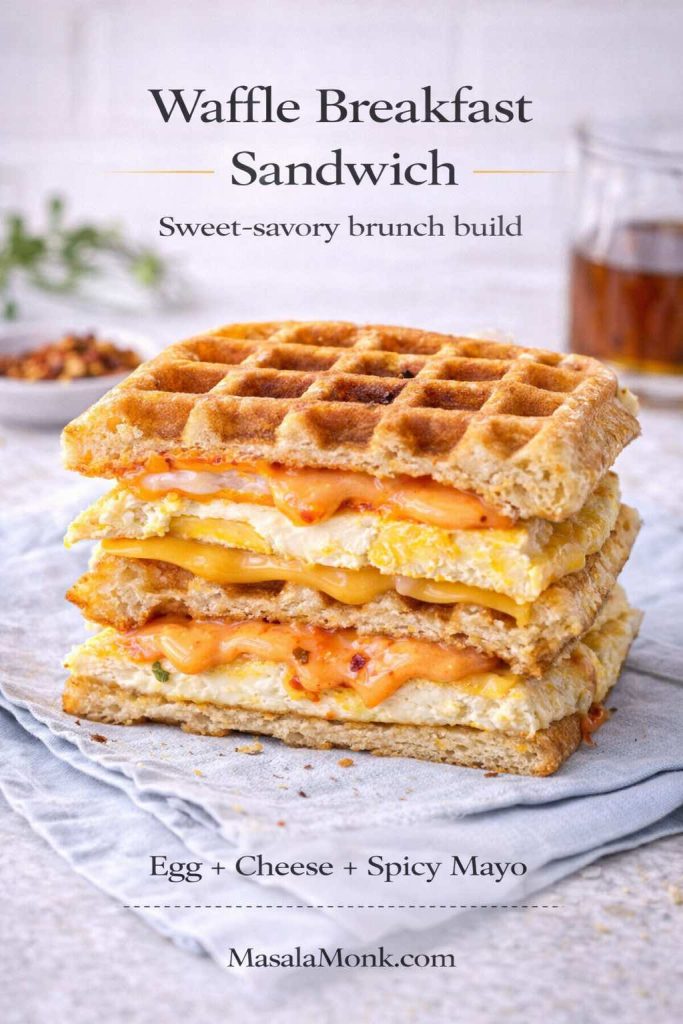
Waffle breakfast sandwich recipe card showing a stacked waffle sandwich with egg, melted cheese, and spicy mayo, plus text overlay for a sweet-savory brunch build.
This waffle breakfast sandwich turns a simple egg and cheese into a sweet-savory brunch—keep the waffles crisp, add melty cheese, then finish with spicy mayo for a bold contrast that still feels breakfast-friendly.

Waffle sandwich build ideas

  • Egg + cheese + spicy mayo
  • Scrambled egg + herbs + pepper sauce
  • Egg + cheese + avocado for a more “healthy breakfast sandwich” feel

Because waffles lean slightly sweet, a bright sauce works especially well. If you like heat, a pepper sauce can turn waffles and eggs into something unforgettable. This is a deep rabbit hole if you want options: pepper sauce recipe guide.


Egg sandwiches recipes: choosing the egg style that matches your morning

It’s easy to treat eggs like “one ingredient,” yet the cooking method changes the entire sandwich. So, instead of guessing, pick based on the kind of morning you’re having.

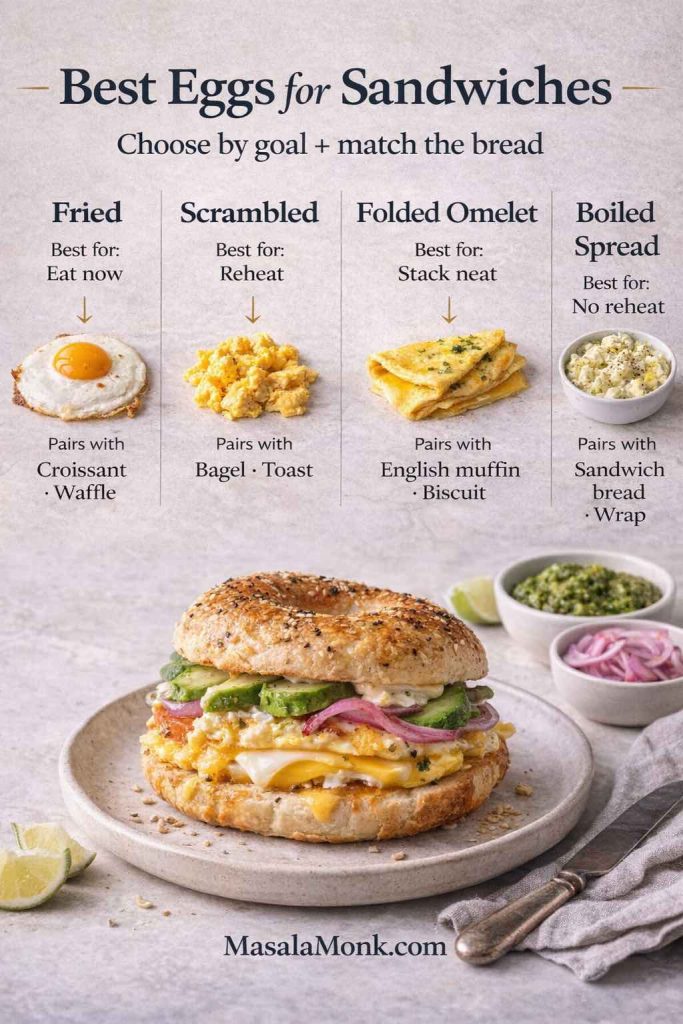
Best eggs for sandwiches infographic comparing fried, scrambled, folded omelet, and boiled egg spread with suggested bread pairings and a bagel egg and cheese sandwich.
Not all egg sandwiches eat the same—use this guide to pick the best eggs for sandwiches (fried, scrambled, folded omelet, or boiled spread) and match them to the right bread for a better breakfast sandwich every time.

Fried egg sandwich (best for immediate eating)

Fried eggs are at their peak right out of the pan. That’s when the edges stay crisp and the yolk is still luscious. Consequently, this version shines for weekends or slow mornings.

Scrambled egg sandwich (best for reheating)

Scrambled eggs hold better than fried eggs in the fridge and reheat more evenly. Therefore, if you’re thinking meal prep, scrambled is your friend.

Folded omelet-style egg (best for neat layers)

Beat eggs, cook into a thin sheet, fold into a rectangle. This makes a tidy “egg patty” without tools. It’s also ideal for breakfast slider sandwiches because the pieces cut cleanly.

Boiled eggs for sandwiches (best for cold breakfast)

Boiled eggs can become a spread, which means you can eat your breakfast sandwich cold and still enjoy it. This is where egg mayo sandwich recipes, egg salad sandwiches, and even tuna egg sandwich variations come in.

If you want a broader set of ideas for using small egg counts creatively, this list can spark options: egg dishes with 2 eggs.

Also Read: Top 10 Foods for Gut Health (+ Pre/Probiotics, Best Drinks, Gut-Reset Plan)


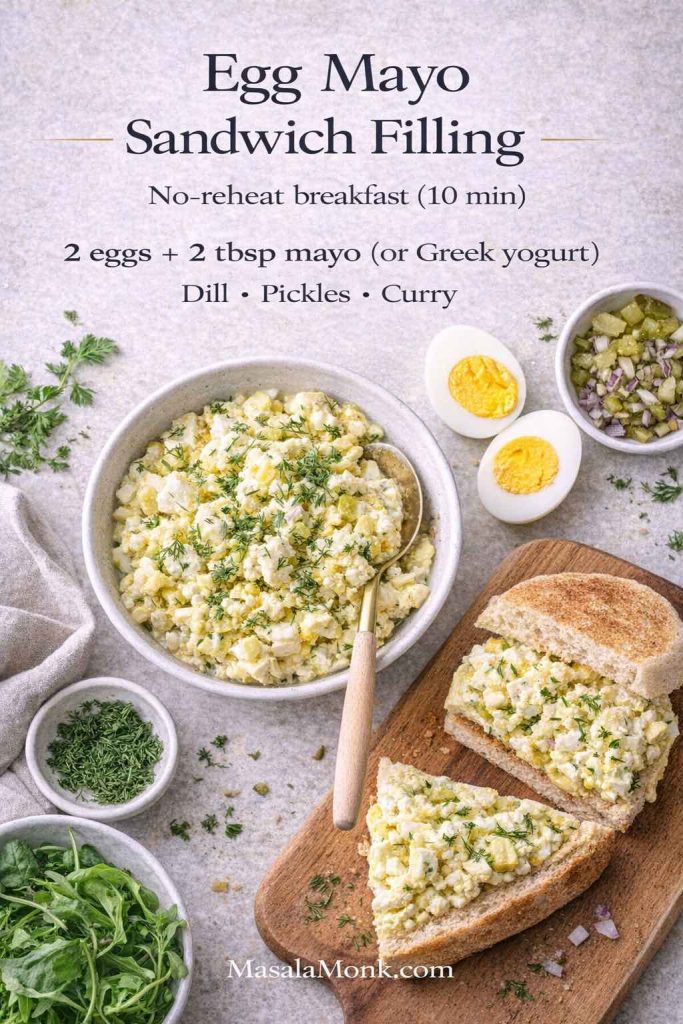
Egg mayo sandwich recipe: creamy, fast, and surprisingly breakfast-friendly

Egg mayo often gets treated as “lunch food,” yet it’s one of the best solutions for busy mornings. It’s fast, it’s filling, and it turns into a portable sandwich without needing to reheat anything.

Ingredients (2 sandwiches)

  • 2 hard-boiled eggs, chopped
  • 2–3 tablespoons mayo
    (or use eggless mayo or vegan mayo if that fits your needs)
  • Salt and pepper
  • Optional: chopped onion, dill, cucumber, chili flakes, a squeeze of lemon
This egg mayo sandwich filling doubles as a simple egg salad sandwich recipe—mix chopped boiled eggs with mayo (or Greek yogurt), then add dill and pickles for crunch and a fresher, lighter bite.

Method

Mash the eggs lightly, stir in mayo, season, then adjust texture. If you want it looser, add a tiny splash of milk or lemon. If you want it thicker, add more egg or a little grated cheese.

Turn egg mayo into egg salad sandwich recipe territory

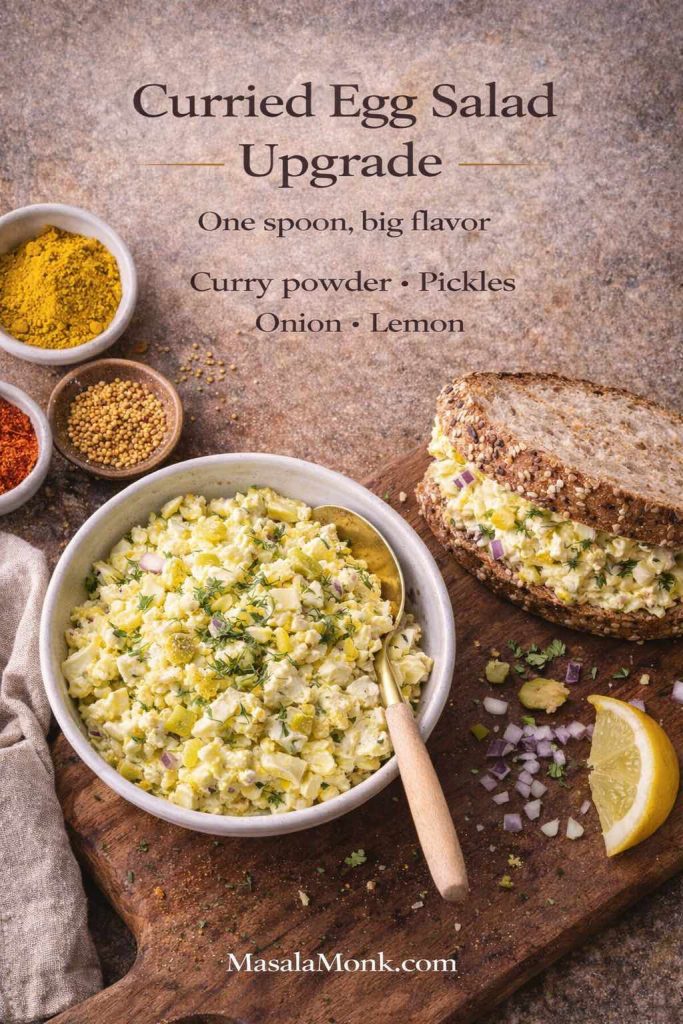
If you want the “egg salad” vibe, fold in crunch: finely chopped celery (if you like), onion, pickles, or cucumber. Add a pinch of curry powder for a curried egg sandwich direction, or add paprika for a classic style.

Curried egg salad upgrade recipe card showing a bowl of curried egg salad with pickles, onion, and lemon, plus a seeded bread egg salad sandwich; text overlay lists curry powder, pickles, onion, and lemon.
Turn a basic egg mayo sandwich into a curried egg sandwich by stirring in curry powder, chopped pickles, onion, and a squeeze of lemon—an easy upgrade that adds brightness, crunch, and bold flavor.

Egg salad with greek yogurt (lighter, tangier)

Instead of all mayo, use thick yogurt or hung curd for part of the spread. It stays creamy, tastes fresher, and feels closer to a healthy breakfast sandwich.

If you like the flavor logic of yogurt-based fillings, this is a great reference point: healthy hung curd spinach cheese sandwich.

Also Read: Vodka Pasta (Penne alla Vodka) + Spicy Rigatoni, Chicken, and Gigi Recipes


Breakfast sandwich ideas that borrow from “real sandwich culture”

A breakfast sandwich doesn’t have to be only egg + cheese + meat. It can borrow from classic sandwich styles and still feel totally breakfast-appropriate.

The Bombay-inspired breakfast sandwich

If you’ve ever loved a spicy, chutney-forward sandwich, you can bring that energy to breakfast: toast bread, add green chutney or herby mayo, add egg + cheese, then add thin-sliced onion and tomato.

For a full flavor blueprint, this is the classic: authentic grilled Bombay sandwich recipe. Use the same “layering logic,” then make the egg the star.

The mushroom-and-cheese breakfast upgrade

Sauté mushrooms, add pepper, add cheese, then add egg. It turns basic egg sandwiches into something deeper and more savory.

If you want the mushroom direction fully mapped out, this is a great base: mushroom cheese sandwich recipe.

The hummus-and-veg morning sandwich (egg optional)

Some mornings you want breakfast without eggs. A hummus-based sandwich gives you protein and staying power while keeping things fresh.

Here’s a straightforward build to borrow: hummus veggie sandwich. Add a fried egg if you want it heartier, or keep it egg-free for a vegetarian breakfast sandwich that still satisfies.

Also Read: Protein Oatmeal: Turn Plain Oats into a High-Protein Meal


Healthy breakfast sandwich and high protein breakfast sandwich variations

“Healthy” can mean a lot of things. For some people it means higher protein; for others it means lighter sauces; for many it means fewer ultra-processed ingredients. Thankfully, breakfast sandwiches can adapt without losing their comfort-food soul.

Healthy high-protein breakfast sandwich swaps infographic showing mayo swapped for tzatziki, one egg swapped for a folded omelet with two eggs, plain cheese swapped for higher-protein cheese, and crunch added with pickles, greens, and onions.
Build a healthy high-protein breakfast sandwich with simple swaps—use tzatziki or Greek yogurt sauce instead of mayo, double the eggs with a folded omelet layer, choose a more filling cheese, and add crunch with pickles, greens, or onions.

High protein breakfast sandwich (simple ways to level up)

  • Use 2 eggs instead of 1
  • Add an extra slice of cheese or use a higher-protein cheese
  • Add thick yogurt-based sauce (like tzatziki)
  • Add paneer or tofu as an additional filling

If you’re curious about egg protein numbers, this breakdown is a useful reference: how much protein in two boiled eggs.

Healthy breakfast sandwich (lighter sauces that still taste rich)

Instead of drowning the sandwich in mayo, try:

  • A thin layer of pesto
  • Thick yogurt sauce
  • A small swipe of mayo plus lemon juice for brightness

For pesto options you can tweak to your taste, this is a strong starting point: pesto recipe guide with variations. If you want a specific dairy-free pesto, this one is fast and flavorful: fresh basil pesto vegan recipe.


Vegetarian breakfast sandwich: options that don’t feel like “second place”

A vegetarian breakfast sandwich can be just as craveable as any meat-based version—provided you build for texture and seasoning.

Save these vegetarian breakfast sandwich ideas for easy morning variety—mushroom and cheese with egg, spinach pesto with egg, paneer with chutney, or hummus with crunchy veggies (egg optional) for a satisfying vegetarian breakfast sandwich.

Vegetarian breakfast sandwich (easy templates)

  • Egg + cheese + mushrooms + pepper sauce
  • Egg + cheese + spinach + pesto
  • Hummus + veggies + cheese (egg optional)
  • Paneer + egg + chutney (if you like a bigger, spiced bite)

If you want a leftover-friendly option that turns dinner into breakfast, this is a smart template: paneer sabji sandwich recipe. Add a fried egg and it becomes a powerful breakfast sandwich meal prep option.

Also Read: Classic Rum Punch + 9 Recipes (Pitcher & Party-Friendly)


Gluten free breakfast sandwich: easy swaps that still feel satisfying

Going gluten free doesn’t mean giving up the breakfast sandwich experience. It simply means switching the base while keeping the same layers.

Gluten-free breakfast sandwich bases guide showing GF muffin or bagel, hash brown buns, waffles, and an eggwich, with a simple build formula and MasalaMonk.com footer.
For a gluten free breakfast sandwich, swap the base—not the whole idea: use a gluten-free muffin or bagel, crispy hash brown “buns,” gluten-free waffles, or an eggwich, then build with egg, cheese, sauce, and crunch.

Gluten free breakfast sandwich bases

  • Gluten-free English muffins or bagels
  • Hash brown “buns” (crispy potato rounds)
  • Waffles made with a gluten-free mix
  • Egg “buns” (eggwich style)

Once you pick the base, the rest is identical: egg + cheese + sauce + crunch. In other words, you’re not learning a new recipe—you’re just changing the vehicle.

Also Read: Moscow Mule Recipe (Vodka Mule): The Master Formula + 9 Variations


Eggwich: a breakfast sandwich without bread

An eggwich is essentially an egg sandwich where eggs replace bread. If you want a lower-carb or gluten-free breakfast sandwich that still feels indulgent, this is a strong move.

Eggwich no-bread breakfast sandwich guide showing egg “buns” with melted cheese, veggies, and sauce on a dark slate background, labeled as a gluten-free breakfast sandwich.
An eggwich is the easiest no-bread breakfast sandwich—use two thin egg “buns,” add melty cheese and a crunchy veggie layer, then finish with a sauce so it eats like a real breakfast sandwich while staying gluten-free.

How to build it

Cook two thin omelet “rounds,” let them cool slightly so they firm up, then use them as top and bottom. Add cheese, add filling, add sauce, press gently, and eat with a napkin because it’s joyfully messy.

Also Read: 7 Pizza Sauce Recipes | Marinara, White Garlic, Alfredo, Buffalo, BBQ, Vodka & Ranch


Breakfast sandwich homemade sauces that make everything taste intentional

A sandwich can have perfect eggs and still taste “unfinished” without a good spread. Sauce isn’t extra; it’s the layer that ties everything together.

Breakfast sandwich sauce pairings infographic with bowls of mayo, pesto, tzatziki, and pepper sauce and quick notes on which breakfast sandwiches each spread suits.
Use these breakfast sandwich sauce pairings to change the flavor fast—mayo for classic egg and cheese, pesto for a herby café-style sandwich, tzatziki for a fresh high-protein feel, and pepper sauce for a spicy, craveable bite.

Mayo: classic, versatile, and endlessly adaptable

If you want one foundational sauce that can become spicy mayo, garlic mayo, herby mayo, and more, start here: homemade mayonnaise with 15+ variations.

Eggless mayo and vegan mayo: inclusive options without compromise

If you’d rather avoid raw eggs in homemade spreads, or you’re serving someone who prefers egg-free condiments, these are useful:

If you’re cooking for pregnancy or generally avoiding raw-egg preparations, the FDA’s guidance for higher-risk groups is worth reading: Food Safety for Moms-to-Be.

Pepper sauce: the fastest way to make breakfast taste exciting

A little heat transforms egg and cheese into something you crave instead of something you tolerate. If you want options ranging from tangy vinegar hot sauces to creamy peppercorn-style sauces, this is a complete guide: pepper sauce recipe guide.

Tzatziki: cooling, thick, and perfect for breakfast sandwiches

Yogurt-based sauces are especially good when you’re building a healthy breakfast sandwich. They add creaminess without feeling heavy, and they pair beautifully with herbs and cucumbers: Greek tzatziki sauce recipe with variations.

Also Read: Pesto Recipe: Classic Basil Pesto Sauce & 10 Variations


Frozen breakfast sandwiches: make-ahead meal prep you’ll actually use

Frozen breakfast sandwiches have one job: save your morning when you have no time. The secret is building them in a way that reheats well. That means slightly drier eggs, sturdy bread, and sauces added after reheating.

Frozen breakfast sandwiches meal prep infographic showing wrapped make-ahead egg and cheese sandwiches with freezer-friendly ingredients, what to add later, and a reheat method for crisp bread.
Make-ahead frozen breakfast sandwiches work best when you freeze sturdy bread with a folded omelet or scrambled patty and melty cheese, then add fresh veggies and creamy sauces after reheating for the best texture.

What freezes well

  • English muffin breakfast sandwich builds
  • Bagel breakfast sandwich builds (slice thin so it reheats faster)
  • Biscuit-style builds (best reheated in oven/air fryer)
  • Folded omelet egg layers (they hold shape beautifully)

What to add later

Fresh tomato, cucumber, lettuce, delicate herbs, and most creamy sauces are better after reheating. Otherwise, you risk soggy bread or watery textures.

How to assemble frozen breakfast sandwiches

Cook eggs (scrambled patties or folded omelets work best). Melt cheese onto the eggs. Assemble on toasted bread. Wrap tightly. Freeze.

How to reheat

  • Microwave for speed, then finish in a pan or toaster oven for texture
  • Oven/toaster oven for the best overall result
  • Air fryer for crisp edges (especially on biscuits and croissants)
Reheat breakfast sandwiches without rubbery bread infographic showing a three-step method: microwave to warm, pan/oven/air fryer to crisp, then add fresh crunch.
Reheat frozen breakfast sandwiches the café way: warm the center first in the microwave, crisp the outside in a pan or oven/air fryer, then finish with fresh toppings like pickled onions or greens for the best texture.

If you ever want a quick reference on storage timelines beyond “it seems fine,” the FoodKeeper app is a practical tool developed with USDA FSIS partners to help with fridge/freezer guidance.

For egg-specific safety basics, USFDA’s guidelines are clear and straightforward, including: methods for cooking eggs safely.

Also Read: Oat Pancakes Recipe (Healthy Oatmeal Pancakes)


Meal prep breakfast sandwiches: a one-hour batch that changes your week

If you’re doing sandwich meal prep, it helps to commit to a single batch session. The goal isn’t perfection—it’s making weekday mornings almost automatic.

A simple batch plan

  • Toast a stack of English muffins or bagels
  • Cook eggs as folded omelets (fast, neat, scalable)
  • Melt cheese on top of eggs in the pan
  • Assemble and wrap
  • Freeze what you won’t eat within a day or two

If you like a broader framework for planning and portioning without stress, this guide is a solid foundation: Mastering Meal Prep: a beginner’s guide.


Breakfast sandwiches for a crowd: the easiest way to feed everyone without chaos

Sometimes you’re not making one breakfast sandwich. You’re making breakfast sandwiches—plural—because family is hungry, guests are over, or you want leftovers that actually feel useful.

Breakfast sandwiches for a crowd infographic showing sheet-pan eggs cut into squares and slider rolls assembled with egg and cheese using a bake-slice-stack method.
Feeding a group? Use sheet-pan eggs for sandwiches: bake one large egg slab, slice into squares, then stack into slider rolls with cheese and warm—fast, tidy, and perfect for breakfast slider sandwiches.

Breakfast slider sandwiches (the party-friendly move)

Use a sheet of rolls, slice horizontally, layer eggs and cheese across the whole surface, add fillings, close, and bake until warm.

Sheet-pan eggs for sandwiches guide showing a baked egg slab cut into squares in a tray with a knife slicing portions, plus a whisk-bake-slice-stack timeline and MasalaMonk.com footer.
Sheet-pan eggs for sandwiches are the fastest way to prep a crowd—bake one tray, slice into tidy squares, then stack into breakfast sliders or meal prep breakfast sandwiches without the mess of cooking eggs one-by-one.

Sheet pan eggs for sandwiches (the cleanest bulk method)

Whisk eggs, season, pour into a sheet pan, bake until set, then cut into squares. This gives you uniform pieces that stack easily into every sandwich format: croissants, bagels, English muffins, and even waffles.

Also Read: Mimosa Recipe: 10 Easy Versions from Classic to Caramel Apple


Bringing it all together

The reason breakfast sandwiches stay popular isn’t just convenience. It’s the way they adapt. On a slow day, you can make a fried egg sandwich with crisp edges and melty cheese. On a packed morning, you can grab a frozen breakfast sandwich, reheat it, and still feel like you ate something real. When you’re trying to eat lighter, you can pivot to yogurt sauces and veggie layers. When you’re craving comfort, you can go full breakfast croissant mode and lean into it.

If you take only one thing from this: build your breakfast sandwich recipe around layers with purpose—bread for structure, eggs for richness, cheese for glue, sauce for harmony, and crunch for contrast. Once that clicks, the rest becomes a rotation you can enjoy all year.

Also Read: 10 Best Espresso Martini Recipe Variations (Bar-Tested)

FAQs about Sandwich for Breakfast

1) What is the best breakfast sandwich recipe for beginners?

The best breakfast sandwich recipe for beginners is a simple egg and cheese sandwich on toasted bread. Start with one fried or scrambled egg, add a slice of cheese while the egg is still hot, and finish with a light spread so the sandwich stays moist without turning soggy.

2) How do I make egg sandwiches that don’t fall apart?

To keep egg sandwiches from falling apart, toast the bread well, use cheese as a “glue” layer, and avoid overfilling with watery ingredients. If you’re adding tomato or cucumber, blot them first and keep the slices thin so the sandwich holds its shape.

3) What’s the easiest way to make round eggs for an English muffin breakfast sandwich?

For an English muffin breakfast sandwich, crack an egg into a lightly greased ring (a mason jar ring or cookie cutter works) and cover the pan so the top sets quickly. In this way, the egg cooks into a neat patty that matches the muffin size.

4) Which egg style works best for a breakfast sandwich: fried egg or scrambled egg?

A fried egg sandwich is ideal when you’re eating right away and want crisp edges or a runny yolk. By contrast, a scrambled egg sandwich is better for reheating and meal prep because the texture stays softer after warming.

5) Can I use boiled eggs for sandwiches?

Yes—boiled eggs for sandwiches are great when you want a no-reheat option. Simply chop or mash the eggs and mix with a spread to make an egg sandwich filling that’s easy to pack and quick to assemble.

6) What is an eggwich, and how is it different from an egg sandwich?

An eggwich is a breakfast sandwich made without bread, where eggs act as the “bun.” In other words, it’s a gluten free breakfast sandwich option that still includes classic fillings like cheese, veggies, and a sauce layer.

7) How do I make a high protein breakfast sandwich without changing the flavor too much?

A high protein breakfast sandwich can be made by using two eggs instead of one, adding an extra slice of cheese, or including a protein-forward filling like paneer or a thick yogurt-based spread. As a result, you get more staying power while keeping the taste familiar.

8) What’s the best bread for a breakfast sandwich?

The best bread depends on the texture you want. English muffins create a tidy breakfast muffin sandwich feel, croissants make a rich breakfast croissant, bagels give a chewy bite for a breakfast bagel sandwich, and waffles create a crisp-sweet waffle breakfast sandwich.

9) How do I keep croissant sandwiches from getting soggy?

Because croissants are delicate, warm them lightly, avoid watery fillings, and keep spreads thin. Additionally, add fresh items like tomato only right before eating so the layers stay flaky instead of soft.

10) What’s the simplest bagel with egg and cheese build?

Toast the bagel cut sides, spread a small amount of sauce, add egg and cheese, then finish with one fresh layer like tomato, cucumber, or avocado. Consequently, you get a bagel breakfast sandwich that feels balanced rather than heavy.

11) How can I make a healthy breakfast sandwich that still tastes satisfying?

A healthy breakfast sandwich can stay satisfying by focusing on texture and seasoning rather than extra fat. For example, use toasted bread, a well-seasoned egg, plenty of crunchy veggies, and a tangy spread such as yogurt-style sauce or a lighter mayo blend.

12) What are easy vegetarian breakfast sandwich options?

Vegetarian breakfast sandwich options include egg and cheese with sautéed mushrooms, egg with spinach and herbs, hummus with veggies (with or without egg), or paneer with onions and spices. Likewise, adding a crisp layer keeps it lively.

13) How do I make a gluten free breakfast sandwich at home?

For a gluten free breakfast sandwich, use gluten-free bread, a gluten-free bagel, or swap bread entirely by making an eggwich. Alternatively, you can use waffles made with a gluten-free mix for a sturdier base.

14) What are the best breakfast sandwich ideas when I’m bored of egg and cheese?

If you’re bored of egg and cheese, switch just one layer: try pesto instead of mayo, add mushrooms instead of bacon, use a croissant instead of an English muffin, or add avocado for a creamy contrast. Similarly, a peppery sauce can change the flavor without changing the structure.

15) Can I make frozen breakfast sandwiches for busy mornings?

Yes—frozen breakfast sandwiches are one of the easiest meal prep wins. Assemble sandwiches with egg and cheese, skip watery vegetables, wrap tightly, and freeze. Then reheat and add fresh toppings afterward for better texture.

16) What’s the best method for meal prep breakfast sandwiches that reheat well?

For meal prep breakfast sandwiches, use scrambled eggs or a folded omelet layer because they reheat evenly. Furthermore, toast the bread first, keep sauce minimal before freezing, and wrap each sandwich tightly to reduce freezer burn.

17) How long do frozen breakfast sandwiches last in the freezer?

Frozen breakfast sandwiches typically keep their best quality for about 1–2 months, although they can remain safe longer if stored properly. Even so, using airtight wrapping helps prevent dry edges and off flavors.

18) How do I reheat frozen breakfast sandwiches without making the bread rubbery?

To avoid rubbery bread, thaw slightly, microwave briefly to warm the center, then finish in a pan, toaster oven, or air fryer to crisp the outside. In short, heat for speed first, then crisp for texture.

19) What’s the difference between breakfast sandwich ideas and breakfast sandwich recipes?

Breakfast sandwich ideas are quick combinations or swaps you can try, whereas breakfast sandwich recipes include clear steps, timings, and a method you can repeat. Consequently, recipes are better when you want consistent results.

20) How do I make breakfast sandwiches for a crowd?

To make breakfast sandwiches for a crowd, cook eggs in a larger batch (scrambled or sheet-pan style), lay out bread bases, and assemble an assembly line. Afterwards, keep sandwiches warm in a low oven so everyone can eat together.

Posted on — 5 Comments

Mimosa Recipe: 10 Easy Versions from Classic to Caramel Apple

Tall mimosa cocktail in a champagne flute on an outdoor brunch table, with oranges, pastries and flowers, promoting a mimosa recipe with 10 variations from classic to caramel apple.

There are very few drinks that say “slow, happy morning” as clearly as a glass of mimosa. It looks sunny, tastes bright, and somehow makes even a regular Sunday feel like a small celebration. At the same time, a good mimosa recipe is almost ridiculously simple: chilled sparkling wine, chilled juice, and a moment’s care when you pour.

Yet once you start playing with that basic formula, things get interesting fast. A splash of orange liqueur suddenly turns your drink into something restaurant-worthy. A bit of pineapple or strawberry purée sends it straight to the tropics. Apple cider and caramel transform it into a cosy fall treat. In other words, there isn’t just one mimosa recipe—there are dozens, and most of them are only a tiny tweak away from the classic.

Before we jump into all the fun twists, it’s worth grounding ourselves in what a mimosa actually is and where it came from. That way, every variation feels like part of a story rather than just a random splash of juice.


What Is a Mimosa?

At its core, a mimosa is a simple mixed drink made with sparkling wine and orange juice, usually served in a champagne flute. Most sources agree that it’s closely related to the Buck’s Fizz, a drink created in the 1920s at Buck’s Club in London. The Buck’s Fizz tends to use more Champagne and less juice, whereas the mimosa often leans toward equal parts. Over the years, the mimosa has become tightly linked with brunch, weddings, and leisurely daytime events.

Consequently, the mimosa picked up a reputation as the “acceptable” morning drink. Because the orange juice feels familiar and breakfast-y, the bubbles don’t come across as heavy or “too much.” This combination of freshness and festivity is why the mimosa recipe remains such a favourite.

However, there’s nothing in the original idea that says the juice must be orange, or that you can’t add a small splash of something extra. Once you accept that, a whole world of variations opens up. Still, everything begins with one foundational drink.

Also Read: 10 Best Chicken Sandwich Recipes (BBQ, Parm, Buffalo & More)


Classic Mimosa Recipe (Champagne and Orange Juice)

Think of this as the blueprint. Once you can make this with your eyes half-closed, every other version will feel easy and natural.

Ingredients (Per Glass)

  • 2 ounces (60 ml) chilled orange juice
    • Freshly squeezed is wonderful; good-quality not-from-concentrate works too.
  • 4 ounces (120 ml) chilled dry sparkling wine
    • Brut Champagne, cava, or prosecco are all excellent choices.
  • 1 thin orange slice or twist, to garnish (optional)
Classic mimosa recipe card with two champagne flutes of orange juice and brut sparkling wine on a vibrant brunch table, MasalaMonk.com branding.
Classic Mimosa – 2 oz chilled orange juice topped with 4 oz brut sparkling wine. This simple 1:2 ratio is the base recipe for all the mimosa variations below, perfect to save or pin for your next brunch.

Step-by-Step Method

  1. Chill everything thoroughly
    First of all, get the temperature right. Pop the orange juice and sparkling wine into the fridge for several hours, or even overnight, so they’re properly cold. If you have room, you can even chill the glasses. A cold base means the bubbles last longer and the drink tastes much cleaner.
  2. Pour the orange juice first
    Next, pour the orange juice into the flute. Beginning with juice gives you more control and keeps the carbonation from going wild right away.
  3. Top with sparkling wine
    After that, tilt the glass slightly and pour the sparkling wine in a thin stream down the side. Many detailed guides, such as this classic mimosa recipe from Love & Lemons, recommend this order for exactly that reason—it preserves the delicate fizz.
  4. Garnish and serve immediately
    Finally, garnish with an orange slice or twist if you like, and serve right away. Mimosas aren’t meant to sit around; they’re brightest and most effervescent in the first 10–15 minutes.

What’s the Best Ratio for a Mimosa Recipe?

Although plenty of traditional recipes suggest a 1:1 ratio of orange juice to sparkling wine, modern tastes often drift toward a slightly drier drink. For that reason, a lot of bartenders and home hosts now prefer 1 part juice to 2 parts bubbly. It still tastes familiar and citrusy, yet it doesn’t feel heavy or overly sweet.

That said, the “best” ratio depends on your guests:

  • Equal parts for people who like a juicier, softer drink
  • 1:2 juice-to-wine for a crisper, more Champagne-forward profile
  • Just a splash of juice in a tall glass of bubbles for those who mainly want sparkling wine with a hint of orange

You can even set up a small card at your brunch that suggests all three options, then let people choose their style.

Choosing Sparkling Wine for a Mimosa Recipe

Because you’re mixing the wine with juice, there’s no need to splurge. In fact, a number of tastings suggest that an affordable, well-made cava or similar sparkling wine beats expensive Champagne once you add orange juice. Pieces like the roundup on The Kitchn’s best Champagne for mimosas and the expert picks in Simply Recipes’ guide to sparkling wines for mimosas both lean toward dry, budget-friendly options.

As a rule of thumb:

  • Look for “brut” or “extra dry” to balance the sweetness of the juice.
  • Choose bottles with good acidity; they cut through the fruit and keep each sip refreshing.
  • Save vintage Champagne for drinking on its own, where all those subtle flavours can shine.

Once you’re comfortable with this classic mimosa recipe, you’re ready to branch out into more playful territory.

Also Read: Chicken Alfredo Pasta, 5 Ways (Classic to Cajun, Veg, 15-Minute Jar, Healthy)


10 Easy Mimosa Recipe Variations from Classic to Caramel Apple

The beauty of a mimosa is that you can change its personality just by switching juices or adding a small splash of liqueur. Nevertheless, the basic technique stays the same, so you never have to relearn the whole process.

Below you’ll find ten versions that cover everything from summer pool days to winter holidays, from soft and fruity to stronger, cocktail-style flavours. You can serve them one at a time, or mix and match several as part of a mimosa bar.


1. Classic Mimosa Recipe for Laid-Back Weekends

The very first variation is the one you’ve already seen, yet it deserves a spot in the lineup. Sometimes you just want the original.

Per glass:

  • 2 oz orange juice
  • 4 oz dry sparkling wine

Pour the juice, then the wine, garnish, and you’re done. You can make a whole tray of these to greet guests as they come in, and then move on to other mimosa recipe experiments once everyone’s settled.

If you’re planning a whole range of Champagne-style drinks, you might later enjoy stepping up to something slightly stronger and more sophisticated, such as the French 75 cocktail recipe on MasalaMonk, which blends gin, lemon, and bubbly in a beautifully balanced way.


2. Grand Marnier Mimosa Recipe (Grand Mimosa)

Now let’s upgrade that simple base. By adding a little orange liqueur, you create a “grand” mimosa that feels like it belongs on a hotel brunch menu.

Ingredients (per glass):

  • 2 oz orange juice
  • ½–1 oz Grand Marnier or Cointreau
  • 3–4 oz dry sparkling wine
  • Orange twist, to garnish
Grand Marnier mimosa recipe card with an elegant Champagne flute filled with a golden orange cocktail made from 60 ml orange juice, 30 ml Grand Marnier and 90 ml brut sparkling wine, MasalaMonk.com branding.
Grand Marnier Mimosa – 60 ml orange juice, 30 ml Grand Marnier and 90 ml brut sparkling wine for a richer, hotel-style brunch mimosa.

How to build it:

  1. Start by pouring orange juice into your glass.
  2. Then add Grand Marnier. If you’d like more warmth and depth, go closer to 1 ounce; for a gentler effect, ½ ounce is plenty.
  3. Next, pour in the sparkling wine, slowly and at an angle.
  4. Finally, garnish with a twist of orange peel.

Because Grand Marnier brings both orange and a subtle cognac base, this mimosa recipe feels richer and more layered than the original. On the other hand, if you prefer a cleaner citrus profile, you might swap Grand Marnier for Cointreau. Either way, this is an effortless way to impress guests without making your life harder.

Also Read: Béchamel Sauce for Lasagna: Classic, Vegan & Ricotta Sauce Recipe


3. Vodka Mimosa Recipe (Playful Manmosa)

Occasionally, the table wants something a little stronger. That’s where a vodka mimosa recipe comes in. It’s still bubbly and citrusy, yet it carries more of a cocktail-style punch.

You’ll need:

  • 2 oz orange juice
  • 1 oz vodka
  • 3–4 oz sparkling wine
Vodka mimosa recipe card showing a bright orange Champagne flute cocktail made with 60 ml orange juice, 30 ml vodka and 90 ml brut sparkling wine on a modern brunch table, MasalaMonk.com branding.
Vodka Mimosa – 60 ml orange juice, 30 ml vodka and 90 ml brut sparkling wine. A stronger, cocktail-style mimosa for guests who like a little extra kick with their brunch.

Method:

  1. Pour orange juice and vodka into the flute.
  2. Stir briefly to blend the vodka into the juice.
  3. Top with sparkling wine and serve at once.

Some people call this a “manmosa,” although the name is more joke than rule. It’s simply a bright, easy-drinking cocktail with added backbone from the vodka. If you have guests who enjoy vodka-based drinks, you could, later on, direct them toward more complex options like the vodka with lemon cocktails or the mango vodka cocktail drinks on MasalaMonk for after-brunch sipping.


4. Pineapple Mimosa Recipe with Malibu Option

As soon as the weather warms up, a pineapple mimosa recipe feels almost essential. It’s juicy, sunny, and incredibly refreshing.

Classic Pineapple Mimosa

Per glass:

  • 2 oz pineapple juice
  • 4 oz prosecco or cava
  • Pineapple wedge or lime wheel, for garnish

Pour the pineapple juice, then add the sparkling wine. A squeeze of lime over the top lifts the flavour beautifully.

Pineapple mimosa recipe card with a bright yellow Champagne flute cocktail made from 60 ml pineapple juice and 120 ml prosecco, garnished with a pineapple wedge on a sunny tropical-style brunch table, MasalaMonk.com branding.
Pineapple Mimosa – 60 ml pineapple juice topped with 120 ml prosecco or cava and a squeeze of lime. A sunny, tropical twist on the classic mimosa that’s perfect for warm-weather brunches.

Pineapple Mimosa with Malibu

For a more tropical twist, add a bit of coconut rum:

  • 2 oz pineapple juice
  • 1 oz Malibu or another coconut rum
  • 3 oz sparkling wine

Mix the juice and Malibu first, then top with bubbly and garnish with pineapple. Suddenly, your mimosa recipe tastes like a tiny vacation in a glass.

Pineapple coconut mimosa recipe card with an elegant Champagne flute filled with a tropical yellow cocktail made from 60 ml pineapple juice, 30 ml coconut rum and 90 ml brut sparkling wine, garnished with pineapple and coconut on a bright brunch table, MasalaMonk.com branding.
Pineapple Coconut Mimosa – 60 ml pineapple juice, 30 ml coconut rum and 90 ml brut sparkling wine. A Malibu-style tropical mimosa that tastes like a beach holiday in a Champagne flute.

If you’d like to build a full tropical-themed drinks menu, you can easily combine these pineapple mimosas with coconut water cocktails and some playful piña colada variations as the day goes on.


5. Cranberry Mimosa Recipe (Holiday Pink Mimosa)

When autumn and winter roll around, a cranberry mimosa recipe fits the mood perfectly. It’s tart, jewel-toned, and very festive.

Ingredients:

  • 2 oz cranberry juice (100% juice if possible)
  • 4 oz sparkling wine
  • Optional: ¼ oz orange liqueur
  • Fresh cranberries and orange slice, to garnish
Cranberry mimosa recipe card with a festive pink Champagne flute cocktail made from 60 ml cranberry juice, 120 ml brut sparkling wine and an optional 15 ml orange liqueur, garnished with cranberries and orange on a holiday-style table, MasalaMonk.com branding.
Cranberry Mimosa – 60 ml cranberry juice, 120 ml brut sparkling wine and an optional 15 ml orange liqueur. A jewel-toned holiday mimosa that’s perfect for Christmas morning, New Year’s brunch or any winter celebration.

How to make it:

  1. Pour cranberry juice into the flute.
  2. Add the orange liqueur if you like a slightly richer profile.
  3. Top with sparkling wine.
  4. Drop a few cranberries into the glass and hang an orange slice on the rim.

Because of its colour, this mimosa recipe works beautifully for Christmas morning, holiday brunch, or even New Year’s Day. If you blend equal parts cranberry and orange juice instead, you’ll get a softer pink mimosa that still looks glamorous but tastes a bit less sharp.

Also Read: Natural Detoxification: Cranberry Juice and Apple Cider Vinegar for Weight Loss


6. Strawberry Mimosa Recipe (Plus Watermelon Twist)

Next, we turn to strawberries. A strawberry mimosa recipe feels romantic and celebratory—ideal for Mother’s Day, birthdays, or any spring gathering.

Strawberry Purée

To begin with, make a simple purée:

  • 1 cup strawberries (fresh or thawed frozen)
  • 1–2 tablespoons sugar or honey, to taste
  • 1–2 teaspoons lemon juice

Blend everything until smooth. If you prefer a very silky drink, strain the mixture to remove seeds.

Strawberry Mimosa

Per glass:

  • 1½–2 oz strawberry purée
  • 3–4 oz sparkling wine

Spoon the purée into your glass, then add the sparkling wine carefully. If the purée is thick, you might stir once, gently, to combine.

Strawberry mimosa recipe card with a blush pink Champagne flute cocktail made from 45 ml strawberry purée and 120 ml brut sparkling wine, garnished with fresh strawberries on an elegant brunch table, MasalaMonk.com branding.
Strawberry Mimosa – 45 ml strawberry purée topped with 120 ml brut sparkling wine and an optional splash of orange juice. A soft, pink mimosa that’s perfect for spring brunches, Mother’s Day and romantic celebrations.

For extra brightness, feel free to add a small splash of orange juice or lemonade between the purée and the sparkling wine.

Watermelon Variation

If you’re craving something even more summery, you can adapt this mimosa recipe to watermelon. Simply blend cubes of seedless watermelon, strain the juice, and use that instead of the strawberry purée. A touch of lime juice makes the flavour pop.

Later on, if your guests fall in love with watermelon in their drinks, you can steer them toward a whole set of watermelon margarita variations for evening cocktails.

Watermelon mimosa recipe card with a coral pink Champagne flute cocktail made from 60 ml fresh watermelon juice and 120 ml brut sparkling wine, garnished with a watermelon wedge and lime on a sunny summer brunch table, MasalaMonk.com branding.
Watermelon Mimosa – 60 ml fresh watermelon juice topped with 120 ml brut sparkling wine and a squeeze of lime. A super-refreshing, summery twist that’s perfect for hot-weather brunches and pool parties.

7. Peach Mimosa Recipe (Bellini-Style)

This peach mimosa recipe slides very close to the classic Bellini, and that’s exactly why people adore it. It’s soft, fragrant, and just a little decadent.

Ingredients:

  • 2 oz peach nectar or peach purée
  • 4 oz prosecco
  • Peach slice, to garnish
Peach mimosa recipe card with an elegant Champagne flute filled with a pastel peach Bellini-style cocktail made from 60 ml peach nectar and 120 ml prosecco, garnished with a peach slice on a light marble brunch table, MasalaMonk.com branding.
Peach Mimosa – 60 ml peach nectar or purée topped with 120 ml prosecco and finished with a peach slice. A Bellini-style mimosa that’s perfect for bridal showers, engagement brunches and any soft, romantic celebration.

Instructions:

  1. Pour the peach nectar or purée into the flute.
  2. Top slowly with prosecco so it foams gently rather than exploding over the rim.
  3. Garnish with a thin peach slice.

Because it feels so elegant, this mimosa recipe is lovely for bridal showers, engagement brunches, or any gathering where you want something a bit special. It also pairs nicely with light desserts and fruit-forward sweets, especially something creamy like a tres leches cake.


8. Grapefruit Paloma Mimosa Recipe

If you enjoy a slightly bitter edge in your drinks, this grapefruit Paloma mimosa recipe will be right up your street. It’s bright, zesty, and just bold enough to wake everyone up.

Per glass:

  • 2 oz pink grapefruit juice
  • ½–1 oz blanco tequila (optional)
  • 3 oz sparkling wine
  • Salt or Tajín, for the rim
  • Grapefruit wedge, to garnish
Grapefruit Paloma mimosa recipe card with a pale pink Champagne flute cocktail made from 60 ml pink grapefruit juice, 90 ml brut sparkling wine and optional 15–30 ml tequila, served with a salted Tajín rim and grapefruit wedge on a modern brunch table, MasalaMonk.com branding.
Grapefruit Paloma Mimosa – 60 ml pink grapefruit juice, 90 ml brut sparkling wine and an optional 15–30 ml tequila with a salted or Tajín rim. A bright, slightly bitter mimosa that bridges brunch and taco-hour perfectly.

How to assemble:

  1. First, run a grapefruit wedge around the rim of the glass, then dip it in salt or Tajín.
  2. Next, pour grapefruit juice and tequila into the prepared flute.
  3. After that, top with sparkling wine.
  4. Finally, garnish with a small grapefruit wedge.

This mimosa recipe straddles the line between breakfast drink and cocktail, so it’s ideal for brunch that stretches into an afternoon filled with snacks and tacos. Later in the day, once people are in a more “cocktail hour” mood, you might bring out classics such as a Negroni recipe for those who love bitters.


9. Caramel Apple Cider Mimosa Recipe (Cozy Fall Favourite)

As soon as the air turns chilly, it’s time for a caramel apple mimosa recipe. It tastes like dessert but looks just as elegant as the classic.

Ingredients:

  • Cinnamon sugar, for rimming the glass
  • 2 oz chilled apple cider
  • 1 oz caramel vodka
  • 3 oz sparkling wine
  • Thin apple slice, for garnish
Caramel apple cider mimosa recipe card with a golden Champagne flute cocktail made from 60 ml apple cider, 30 ml caramel vodka and 90 ml brut sparkling wine, served with a cinnamon sugar rim and apple slice on a cozy fall brunch table, MasalaMonk.com branding.
Caramel Apple Cider Mimosa – 60 ml chilled apple cider, 30 ml caramel vodka and 90 ml brut sparkling wine with a cinnamon sugar rim. A dessert-like fall mimosa that’s perfect for chilly weekend brunches and holiday mornings.

Method:

  1. Pour a little apple cider onto a plate and dip the rim of the glass in it. Then roll the rim in cinnamon sugar.
  2. Add the apple cider and caramel vodka to the glass.
  3. Top gently with sparkling wine.
  4. Add a thin apple slice as garnish.

If you’d like a lighter apple cider mimosa recipe, you can skip the vodka and simply enjoy the cider and bubbles with that fragrant cinnamon rim. Alongside this drink, you could serve dishes leaning into the same cosy mood: maybe something seasoned with homemade pumpkin pie spice, or a warm side like green bean casserole or crock pot lasagna soup.


10. Non-Alcoholic Mimosa Recipe (Sparkling Mock Mimosa)

Lastly, no mimosa collection feels complete without a non-alcoholic mimosa recipe. Everyone deserves a pretty, bubbly drink, whether they’re drinking alcohol or not.

Mock mimosa (per glass):

  • 2 oz orange juice
  • 2–3 oz sparkling water, club soda, or non-alcoholic sparkling wine
  • Optional: splash of pineapple juice or white grape juice
  • Orange slice, to garnish
Non-alcoholic sparkling mock mimosa recipe card with a bright orange Champagne flute drink made from 60 ml orange juice and 90 ml sparkling water or alcohol-free bubbly, garnished with an orange slice on a light brunch table, MasalaMonk.com branding.
Sparkling Mock Mimosa – 60 ml orange juice topped with 90 ml sparkling water or alcohol-free bubbly and an optional splash of pineapple juice. A zero-proof mimosa that looks just as festive as the classic so everyone can join the toast.

Instructions:

  1. Pour orange juice into the flute.
  2. Add the optional extra juice if you’d like more complexity.
  3. Top with sparkling water or alcohol-free bubbly.
  4. Garnish and serve.

Some mocktail versions use ginger ale and citrus-flavoured sparkling water, as in this mimosa mocktail idea, while others mix several juices and flavoured sparkling water, as in this non alcoholic mimosa version.

Meanwhile, if you’d like to round out your zero-proof options, you can add a margarita mocktail or a few keto mocktails to keep everyone happy all day.


How to Make Any Mimosa Recipe Taste Its Best

Although the recipes above give you plenty to play with, a few general habits will make every mimosa recipe you pour taste better, no matter which variation you choose.

Keep Everything Cold, Not Just the Wine

To begin with, treat the juice with as much respect as the bubbly. Store juices and purées in the coldest part of the fridge, and don’t leave them on the counter too long while you set up. Cold ingredients:

  • Preserve the fizz in the sparkling wine
  • Keep flavours bright and refreshing
  • Make each mimosa recipe feel more polished and intentional

If you can, chill the glassware too. Even a quick 20 minutes in the fridge or freezer helps.

Use the Right Order and Gentle Pours

Furthermore, the sequence in which you pour makes a noticeable difference. Juice goes in first, then any spirit or liqueur, then sparkling wine. This order:

  • Stops the fizz from erupting and overflowing
  • Makes it easier to estimate your ratio
  • Keeps the drink visually neat

Moreover, always pour the sparkling wine slowly and at an angle. You’re not just filling a glass; you’re preserving bubbles.

Choose Good, Not Fancy, Sparkling Wine

As mentioned earlier, there’s broad agreement that you don’t need expensive bottles for a mimosa recipe. Guides such as the mimosa-focused tasting on The Kitchn and expert opinions on Simply Recipes consistently favour dry, affordable options.

Therefore, you can happily:

  • Reach for cava, a dry prosecco, or any well-made brut sparkling wine
  • Keep a couple of different bottles on hand for variety
  • Save the top-shelf Champagne for sipping later in the day

Add Spirits Sparingly

Because it’s tempting to think “more is more,” it’s easy to overdo vodka, bourbon, or tequila. However, the charm of a mimosa recipe lies in its gentle nature. For that reason:

  • ½ ounce of spirit is enough for a subtle twist
  • 1 ounce is plenty for a stronger brunch cocktail
  • Anything beyond that risks turning the drink into something harsh and unbalanced

Think of the spirit as seasoning—just a touch to shift the mood, not the main feature.

Also Read: How to Cook Perfect Rice Every Time (Recipe)


Building a Mimosa Bar Around Your Favourite Mimosa Recipe

Once you’ve tried a few variations, you might feel inspired to put it all together into a full mimosa bar. That way, guests can customise their own drinks, and you can relax and enjoy your own glass.

Step 1: Arrange the Juices

Start with a few chilled carafes or jugs. At minimum, you might offer:

  • Orange juice
  • Pineapple juice
  • Cranberry juice

In addition, if you’d like more variety, you can add:

  • Pink grapefruit juice
  • Peach nectar
  • Apple cider (especially in autumn)
  • Strawberry or watermelon purée in small bottles or jugs

Label each one clearly so people know what they’re choosing. You can also add a small sign with suggested combinations, such as “cranberry + orange,” “peach + prosecco,” or “apple cider + caramel vodka.”

Step 2: Offer a Couple of Bubbly Options

Next, set out the sparkling choices in an ice bucket or large bowl filled with ice and water. You don’t need a huge lineup. Two or three options are plenty:

  • One dry cava
  • One prosecco
  • One non-alcoholic sparkling wine or citrus-flavoured sparkling water

That way, people can create an alcoholic or non-alcoholic mimosa recipe with exactly the same flavours.

If you’re expecting a large crowd, you might also mix a big pitcher of pineapple-based punch to sit alongside the mimosa bar. The ideas in these punch recipes with pineapple juice give you easy ways to extend the menu without much extra work.

Step 3: Add Spirits and Liqueurs as “Upgrades”

After that, you can create a small “upgrade station” with a few carefully chosen bottles:

  • Grand Marnier or Cointreau, for a grand mimosa
  • Vodka, for stronger orange or cranberry mimosa recipes
  • Malibu or another coconut rum, for tropical pineapple mimosas
  • Blanco tequila, for grapefruit Paloma mimosas
  • Bourbon, for cosy apple or orange-bourbon variations

Place tiny jiggers or measuring spoons nearby to encourage moderation. A small card can list combinations like “orange + Grand Marnier + bubbles,” “grapefruit + tequila + bubbles,” or “apple cider + bourbon + bubbles.”

Step 4: Finish with Garnishes and Glassware

Finally, add the finishing touches that make everything feel polished:

  • Orange slices, wedges, and twists
  • Lemon and lime wheels
  • Pineapple wedges
  • Strawberry halves and raspberries
  • Fresh cranberries in a little bowl during the holidays
  • Herbs such as mint or rosemary
  • Dishes of cinnamon sugar and Tajín for rimming glasses

Set out plenty of flutes, coupes, or even sturdy wine glasses if you expect people to be moving around. A small tray for used garnishes or toothpicks helps keep the table tidy.

Also Read: Homemade Hot Chocolate with Cocoa Powder Recipe


What to Serve with Any Mimosa Recipe

A great mimosa recipe becomes even more memorable when you serve it alongside simple, comforting food. Furthermore, you don’t need restaurant-level skills to create a spread that feels thoughtful and generous.

Classic Brunch Companions

To start, think about familiar breakfast favourites and lean into those.

  • French toast sticks
    They’re easy to eat with your hands and always a hit. A batch of French toast sticks with maple syrup on the side works beautifully with citrusy drinks.
  • Crispy oven bacon
    Instead of standing over a pan, bake your bacon. A tray of oven-cooked bacon gives you crisp, evenly cooked strips with almost no mess.
  • Fluffy pancakes
    For something sweet and soft, serve a stack of fluffy buttermilk pancakes with stewed cinnamon apples. The cinnamon and apple flavours mirror the caramel apple mimosa recipe wonderfully.
  • Mediterranean-inspired plates
    If you’d rather go a little lighter, create brunch boards inspired by these popular Mediterranean breakfasts: think eggs, olives, tomatoes, cucumbers, cheese, and good bread. These flavours are vibrant but not too rich, which makes them ideal partners for all kinds of mimosas.

Heartier Party and Holiday Ideas

On the other hand, if your mimosa recipe is showing up at a party or holiday gathering rather than a pure breakfast, you can reach for more substantial dishes.

  • Potato appetisers
    Little bites always disappear quickly when people have a glass in hand. A selection of snacks inspired by these easy potato appetizers pairs nicely with both classic and fruity mimosas.
  • Mac and cheese
    A bubbling baking dish of macaroni and cheese feels comforting and familiar. Guests can spoon out a scoop whenever they need something hearty between refills.
  • Casseroles and soups
    Especially in cooler months, dishes like green bean casserole, cottage cheese lasagna, or crock pot lasagna soup work beautifully alongside richer mimosa recipes like the caramel apple or bourbon twists.
  • Sweet finishes
    Once people are ready to move from mimosas to coffee, desserts such as tres leches cake or a plate piled with homemade churros round off the gathering in a very satisfying way.

Bringing It All Together

In the end, a mimosa recipe is one of the most forgiving and flexible things you can make for guests. At its simplest, it’s just orange juice and sparkling wine in a cold glass. However, with a little curiosity and a few extra ingredients, that same idea can stretch into Grand Marnier mimosas, vodka manmosas, pineapple and strawberry spins, grapefruit Paloma mashups, caramel apple cider creations, and even non-alcoholic mock mimosas that look just as celebratory.

Because the method hardly changes—chill, pour juice, add spirit if using, top with bubbles—you can focus on enjoying the process rather than worrying about perfection. Meanwhile, a small selection of brunch dishes or party snacks turns those drinks into a full experience, whether you’re hosting a quiet weekend breakfast, a loud holiday brunch, or a relaxed evening get-together.

So the next time you reach for a bottle of sparkling wine, you don’t have to stop at one standard mimosa. Instead, you can choose any mimosa recipe from this collection, set out a few juices and garnishes, and let the people you care about mix, sip, and linger as long as they like.

Also Read: Peanut Butter Cookies (Classic Recipe & 3 Variations)

FAQs

1. What is the classic mimosa recipe ratio?

To begin with, the most popular mimosa recipe ratio is 1 part orange juice to 2 parts sparkling wine. This gives you a drink that tastes bright and citrusy without becoming too sweet or heavy. However, if you prefer a softer, more juice-forward mimosa recipe, you can absolutely go for a 1:1 ratio instead. Conversely, if you like your drink drier, use just a splash of juice in a flute mostly filled with bubbles.


2. How are mimosas made, step by step?

Firstly, chill your orange juice, sparkling wine, and glasses thoroughly. Next, pour the juice into the glass so you can easily control the amount. After that, add any optional liqueur or spirit if you’re upgrading your mimosa recipe. Finally, tilt the flute slightly and slowly top it with sparkling wine to preserve the fizz. Serve right away, because mimosas are at their best when they’re freshly poured and still dancing with bubbles.


3. What is the best champagne or sparkling wine for a mimosa recipe?

Generally, the best choice is a dry, affordable sparkling wine rather than an expensive bottle. In particular, brut cava, dry prosecco, and other brut “champagne-style” wines work brilliantly in a mimosa recipe. They bring crisp acidity and subtle fruit without clashing with the sweetness of the juice. On the other hand, very sweet sparkling wines can make the drink taste cloying, so it’s wiser to keep those for desserts.


4. Can I make a mimosa recipe ahead of time?

Strictly speaking, you shouldn’t fully assemble mimosas in advance, because the bubbles will fade. Instead, prepare everything except the sparkling wine beforehand. For example, you can chill juices, mix juice blends (like cranberry–orange or pineapple–orange), and even rim glasses with sugar or cinnamon. Then, just before serving, you pour the juice and top each glass with bubbly. That way, your mimosa recipe still tastes fresh but your prep work is mostly done.


5. How do I make a pitcher of mimosas for a crowd?

For a pitcher, it’s usually easiest to start with the juice. As a guideline, combine about 3 cups of chilled juice in a large jug (plain orange or a mix) and keep it in the fridge. When guests arrive, gently pour in one 750 ml bottle of chilled sparkling wine, taste, and adjust if you want more bubbles or more juice. Alternatively, you can keep the pitcher filled just with juice and let everyone top their glass with sparkling wine individually, which keeps every mimosa recipe fizzy from first pour to last.


6. What juices work best for different mimosa recipes?

In most cases, orange juice is the classic starting point. Nevertheless, many other juices make fantastic variations. For instance, pineapple is perfect for tropical mimosas, cranberry suits holidays and “pink mimosa recipe” versions, grapefruit creates a slightly bitter, grown-up twist, peach nectar gives Bellini-style vibes, and apple cider turns a mimosa recipe into a cosy fall drink. Additionally, purées like strawberry or watermelon add colour, texture, and a dessert-like feel without needing much extra effort.


7. How do I make a stronger “manmosa” or vodka mimosa recipe?

If you’d like something a bit bolder, you can build a vodka mimosa recipe very easily. Simply start with 2 ounces of orange juice, then add about 1 ounce of vodka. Afterward, top the glass with 3–4 ounces of sparkling wine. This variation is sometimes called a “manmosa,” although anyone who enjoys a stronger brunch drink can absolutely order it. Just remember, because the spirit adds extra alcohol, it’s wise to sip slowly and serve some food alongside.


8. How do I set up a simple mimosa bar at home?

To create a mimosa bar, first arrange several chilled juices in labelled carafes—orange, pineapple, cranberry, grapefruit, peach nectar, and perhaps apple cider. Next, place two or three bottles of chilled sparkling wine in an ice bucket, including at least one dry option and one non-alcoholic bubbly or sparkling water. Then, add a few optional spirits like Grand Marnier, vodka, Malibu, or tequila for guests who want to upgrade their mimosa recipe. Finally, provide garnishes such as orange slices, berries, pineapple wedges, herbs, and rimming mixes like sugar or Tajín. Guests can then pick a juice, add bubbles, and customise their own glass.


9. Can I make a non-alcoholic mimosa recipe?

Absolutely, and it’s kinder to include one. For a mock mimosa, simply combine 2 ounces of chilled orange juice with 2–3 ounces of sparkling water, club soda, or alcohol-free sparkling wine in a flute. Optionally, you can also introduce pineapple juice, white grape juice, or cranberry juice for extra flavour. This non-alcoholic mimosa recipe still looks festive and bubbly, so everyone at the table can join in the toast without feeling left out.


10. Is prosecco or cava better for a mimosa recipe?

Both options work extremely well, although they offer slightly different personalities. Prosecco often tastes fruitier and softer, which suits lighter, fruit-forward variations such as strawberry or peach. Cava, by contrast, usually brings higher acidity and a more “Champagne-like” structure, making it ideal for a very classic mimosa recipe or anything with sweeter juice like orange or pineapple. Ultimately, you can keep one bottle of each and experiment to see which style your guests prefer.


11. How sweet should a mimosa recipe be?

Ideally, a mimosa should taste refreshing rather than sugary. Consequently, you want the sweetness of the juice balanced by the dryness of the sparkling wine. If your drink feels too sweet, try one of these quick fixes: add more brut sparkling wine, squeeze in a bit of lemon or lime, or switch to a less sugary juice blend. Conversely, if the drink seems too sharp, a tiny extra splash of juice will soften it. Over time, you’ll find a personal sweet spot that makes your favourite mimosa recipe feel just right.


12. How many mimosas can I get from one bottle of sparkling wine?

Roughly speaking, a 750 ml bottle of sparkling wine will pour about five to six standard mimosas, depending on your ratio and glass size. For example, if you use 4 ounces of sparkling wine and 2 ounces of juice per glass, you usually get six servings. Therefore, if you’re hosting, it helps to estimate one bottle for every two to three guests, especially when you’re planning multiple mimosa recipe variations and expect people to try more than one flavour.


13. What food goes best with a mimosa recipe?

Generally, mimosas pair beautifully with classic brunch dishes. Soft scrambled eggs, crispy bacon, French toast, pancakes, and breakfast casseroles all work wonderfully. Additionally, fresh fruit, yoghurt parfaits, and pastry baskets give people something light to snack on between sips. For heartier occasions, you can also serve potato appetisers, small sandwiches, or even pasta bakes. As long as the food isn’t overwhelmingly spicy or smoky, it will usually play nicely with a citrusy, sparkling mimosa recipe.


14. Can I use rosé or red wine in a mimosa-style drink?

Yes, although the drink will feel a bit different. A rosé mimosa recipe can be delightful: just replace the usual sparkling wine with dry sparkling rosé and pair it with juices such as orange, cranberry, or pomegranate. In contrast, red wine generally isn’t used in traditional mimosas, yet you could experiment with light, chilled reds in sangria-style brunch cocktails instead. If you do try rosé in place of white bubbly, keep the juice ratio similar so the drink stays balanced and refreshing.

Posted on — 9 Comments

10 Examples of Egg Dishes, with 2 Eggs

10 Irresistible Egg Dishes With Just 2 Eggs

Let’s be honest: Sometimes, the most magical things in the kitchen happen when you have just a couple of eggs left in the fridge, a growling stomach, and a spark of curiosity. Eggs are like little edible treasures—packed with protein, affordable, and capable of starring in dishes from every corner of the world.

But what if you only have two? Is that enough? The answer: Absolutely! From quick weekday breakfasts to cozy solo dinners, here are 10 detailed, creative ways to transform just two eggs into something wonderful. We’ll sprinkle in tips, flavor twists, and point you to more deep-dives on MasalaMonk.com along the way!


1. Creamy Classic Scrambled Eggs

There’s a reason every culture has its own version of scrambled eggs. They’re soothing, reliable, and quick to make—plus, they’re a blank canvas for your favorite flavors.

How to Make (the Right Way):
Crack 2 eggs into a bowl, add a generous pinch of salt, a grind of black pepper, and just a tiny splash of milk or cream (totally optional, but adds a lovely softness). Whisk with a fork or small whisk until everything is smoothly combined and a little frothy.

Classic Scrambled Eggs
Fluffy scrambled eggs made with just 2 eggs, butter, and a hint of chives—perfect for a quick, protein-packed breakfast or brunch.

Melt a pat of butter in a nonstick pan over gentle heat (don’t rush it—good scrambled eggs are all about patience). Pour in your eggs, and with a silicone spatula, slowly stir from the edges to the center, letting soft curds form. The moment they look barely set, remove from heat—they’ll keep cooking from residual warmth.

Flavor Upgrade:
A handful of chopped chives or coriander, a sprinkle of grated cheddar, or a dusting of smoked paprika can work wonders. For even more ways to amp up your eggs, visit Egg-cellent Seasoning Options for Flavorful Eggs.

Personal Touch:
Serve with buttered sourdough or even spoon them onto hot rice, Japanese-style. Some days, it’s the simplest things that feel like a big, warm hug.


2. Soft or Hard-Boiled Eggs (the Anytime Snack)

Eggs don’t need much to be a satisfying snack or lunch. Boiled eggs are portable, filling, and can be dressed up in countless ways.

How to Make (Foolproof):
Place 2 eggs in a saucepan, cover with cold water by about an inch, and bring to a gentle boil. For soft-boiled (runny yolk, firm white), cook for 6-7 minutes. For hard-boiled (set all the way through), go for 10-12 minutes. Immediately transfer eggs to a bowl of ice water (or run under cold water) to stop cooking and make peeling a breeze.

Perfect Boiled Eggs
Soft or hard-boiled eggs done right—enjoy these easy, protein-rich boiled eggs on toast, salads, or as a healthy snack.

Slice them over salads, nestle into a bento box, or sprinkle with flaky salt and a little chili powder for a quick snack.

Egg Nutrition:
Curious about how much nutrition you’re actually getting? Check out How Much Protein in Two Boiled Eggs? for the details on protein, calories, and why boiled eggs are a dietitian’s favorite.

Pro Tip:
Experiment with flavor: Try marinating peeled eggs in soy sauce and garlic for “ramen eggs,” or toss slices with a bit of chaat masala for an Indian twist.


3. Masala Omelette (Spicy Indian Comfort Food)

If you’ve ever visited an Indian railway station or a roadside dhaba, you’ve probably spotted someone expertly flipping a masala omelette on a sizzling tawa. Two eggs, a few chopped veggies, and a handful of spices make for a breakfast that’s bursting with flavor and memories.

How to Make:
Whisk 2 eggs with salt. Add finely chopped onion, tomato, green chili, and fresh coriander. Toss in a pinch each of turmeric, red chilli powder, and black pepper. Heat oil or ghee in a pan, pour in the mixture, and cook on medium heat, swirling to spread evenly. Flip to brown both sides, then serve hot.

Masala Omelette
Spicy Indian masala omelette loaded with onions, tomatoes, green chilies, and fresh coriander—ready in minutes with just 2 eggs.

Level It Up:
Stuff with cheese, leftover sabzi, or even crumbled paneer for extra richness. For a truly “desi” twist, pair with pav or tuck inside buttered bread for a street-style sandwich.
Want to explore even more Indian-inspired egg fusion? Head over to Eggs Benedict: Desi Twist Challenge.


4. Shakshuka (Eggs Poached in Spicy Tomato Sauce)

Shakshuka is the kind of breakfast (or dinner!) that makes you want to mop the bowl clean with a hunk of bread. Originating from North Africa and wildly popular across the Middle East, it’s a celebration of eggs and bold, tangy-sweet flavors.

How to Make:
In a skillet, sauté chopped onion, bell pepper, and garlic in olive oil until soft. Add a can of diced tomatoes (or fresh if you have), a teaspoon of cumin, paprika, and a pinch of cayenne. Simmer until thickened, then make two small wells and gently crack your eggs into them. Cover and cook on low heat until the whites are set but yolks remain runny.

Shakshuka
A single-serve shakshuka with two eggs poached in a flavorful tomato and pepper sauce—bring Middle Eastern breakfast to your table.

Serving Suggestion:
Finish with a sprinkle of feta, a handful of parsley, and serve straight from the pan with toasted sourdough or warm pita.

Want to know where this dish fits into Mediterranean mornings? See 10 Most Popular Mediterranean Breakfasts.


5. Cloud Eggs (For When You Feel Fancy)

Cloud eggs are part breakfast, part magic trick. They’re fluffy, photogenic, and taste like a cross between a soufflé and a poached egg. Perfect for impressing guests—or just brightening a grey morning.

How to Make:
Separate your 2 eggs, placing whites and yolks in different bowls. Whip the whites until stiff peaks form (electric beaters are your friend). On a lined baking tray, dollop the whipped whites into two mounds and create a small nest in each. Bake at 190°C (375°F) for 3 minutes, then add a yolk to each nest and bake for another 2 minutes until just set.

Cloud Eggs
Whip up Instagram-worthy cloud eggs with just two eggs—fluffy whites, golden yolks, and a sprinkle of herbs for a show-stopping brunch.

Science Corner:
Curious why egg whites whip so dramatically? Find out in Can You Really Not Whip Egg Whites if There’s Yolk in Them? Let’s Crack This Myth.

Garnish:
A little parmesan, chives, or smoked paprika on top and you’re set for an Instagram post.


6. Mini Frittata (Eggs for Dinner, or Anytime)

A frittata is essentially an Italian open-faced omelette—thick, fluffy, and endlessly adaptable. With two eggs, you can create a mini version perfect for solo meals or meal prep.

How to Make:
Beat 2 eggs with salt, pepper, and a tablespoon of milk or cream. Pour into a small, greased oven-safe dish or a muffin tin. Scatter over whatever you have: sautéed spinach, chopped tomatoes, cooked potato, cheese, or herbs. Bake at 180°C (350°F) until puffed and golden, about 12–15 minutes.

Mini Frittata
Easy mini frittata baked with vegetables and cheese—healthy, customizable, and perfect for meal prep or quick dinners with 2 eggs.

Why You’ll Love It:
Frittatas are brilliant for using up leftovers and sneaking extra veggies into your diet. Serve warm or at room temperature with a fresh salad.
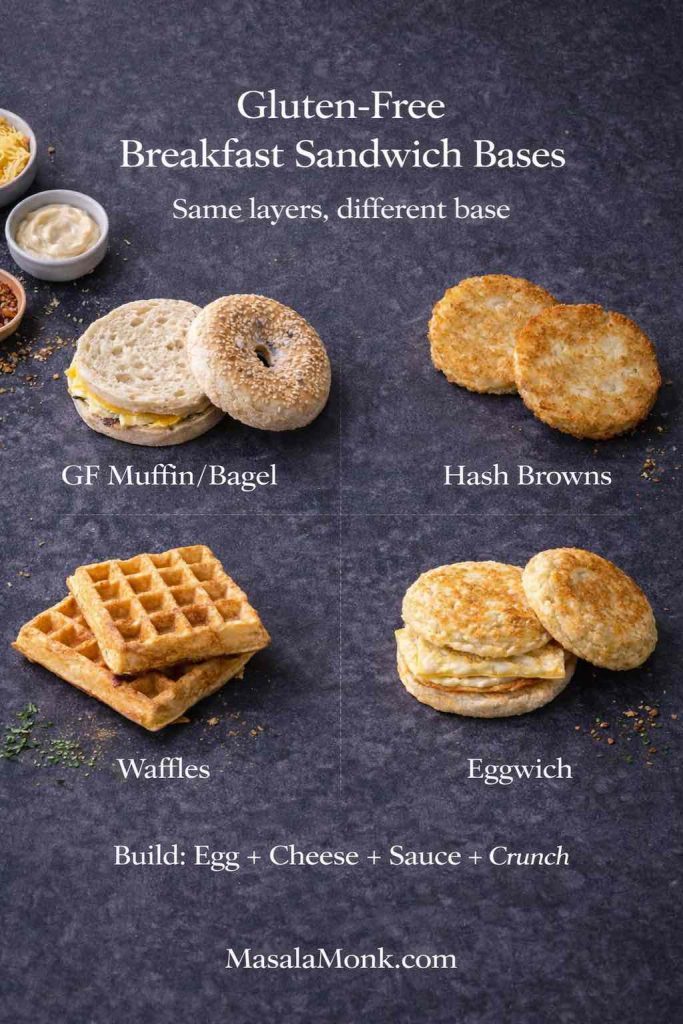

7. Egg Drop Soup (For Rainy Evenings or Sick Days)

Egg drop soup is Chinese comfort in a bowl—warm, soothing, and ready in minutes. If you love silky, ribbon-like egg textures, this one’s for you.

Egg Drop Soup
Classic Chinese egg drop soup made from scratch with two eggs—silky egg ribbons in savory broth, ideal for a light meal or appetizer.

How to Make:
Bring 2 cups of chicken or vegetable broth to a gentle simmer. Beat 2 eggs in a small bowl. With a fork or chopsticks, swirl the broth in one direction, then slowly drizzle in the eggs. Watch as soft egg “ribbons” form instantly. Add a splash of soy sauce, white pepper, and finish with chopped scallions.

Plant-Based Twist:
Eggs not your thing today? Try a tofu scramble instead—see Tofu Instead of Eggs: 5 High-Protein Plant-Based Breakfast Ideas.

Optional:
Toss in a handful of spinach or a few drops of sesame oil for depth.


8. Classic Egg Salad (Perfect for Sandwiches and Snacks)

Egg salad is a retro lunchbox hero and comes together in no time with just two eggs. It’s creamy, tangy, and perfect for spreading on toast or spooning into lettuce wraps.

How to Make:
Boil 2 eggs until firm, peel, and chop them up. In a bowl, mix with a spoonful of mayonnaise, a dash of mustard, salt, pepper, and fresh herbs like dill or parsley. Want to spice it up? Add a little chopped celery, onion, or even a pinch of curry powder.

Egg Salad
Creamy, tangy egg salad made from just two eggs—great for sandwiches, wraps, or as a low-carb, protein-rich lunch.

Health Note:
Egg yolks are packed with nutrients and healthy fats. If you’re curious about what makes them so good for you, read Egg Yolks or Yellow: Nutritional & Protein Profile.

Serving Suggestion:
Slather on toast, stuff into pita bread, or serve as a dip with crackers.


9. Mini Spanish Tortilla (Tortilla Española)

Don’t let the name fool you—a Spanish tortilla is not a wrap, but a tender, thick omelette loaded with potatoes and onions. Making a mini version with just two eggs is perfect for a hearty meal-for-one.

How to Make:
Thinly slice a small potato and half an onion. Sauté in olive oil over low heat until golden and soft (patience pays off here). Beat 2 eggs, season, and combine with the veggies. Pour back into the pan, smooth the top, and cook gently until the bottom is golden. Carefully flip (use a plate if you must) and finish cooking the other side.

Mini Spanish Tortilla
Spanish tortilla for one: thin-sliced potato and onion cooked with two eggs for an authentic, satisfying tapa or breakfast.

Variations:
Try adding red peppers, cooked chorizo, or a sprinkle of smoked paprika for a twist. Serve warm or at room temperature with a tomato salad.
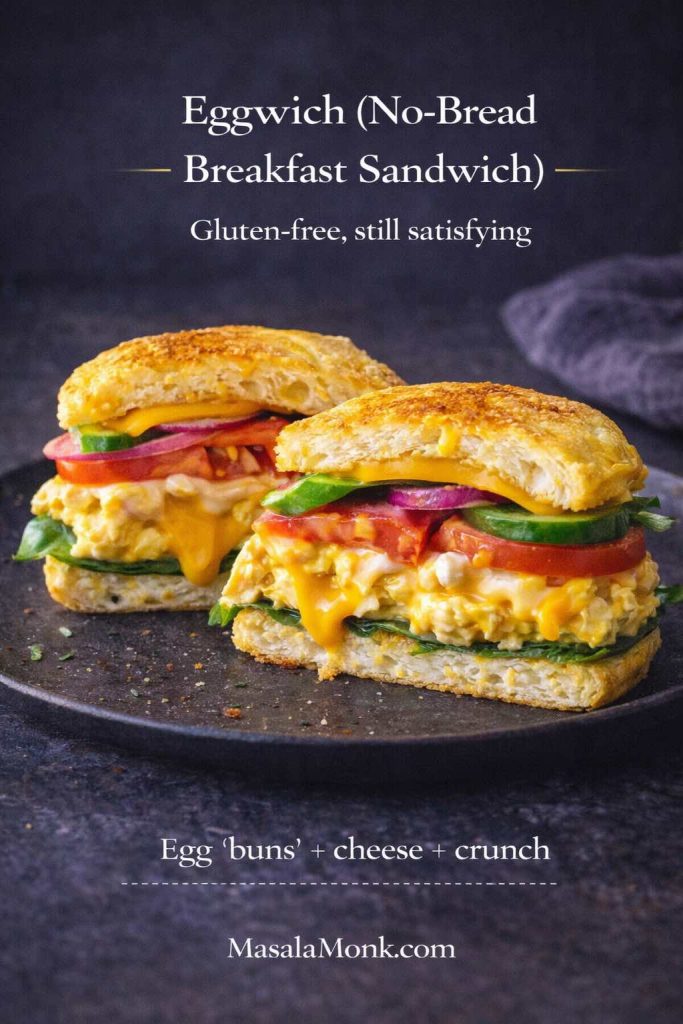

10. Eggs Kejriwal (Mumbai’s Spicy Toasted Egg & Cheese)

Eggs Kejriwal is a cult favorite from Mumbai’s old Irani cafés—a spicy, cheesy open-faced sandwich that’s so much more than “egg on toast.”

How to Make:
Toast a slice of bread, slather with a little butter, then add grated cheese (cheddar works well) and a finely chopped green chilli for heat. Place under the broiler or in a hot pan until the cheese bubbles. Then, top with a fried egg (or even a soft-boiled one split open) and a sprinkle of black pepper.

Eggs Kejriwal
Iconic Mumbai-style Eggs Kejriwal—crisp toast topped with cheese, green chilies, and a runny fried egg for a spicy, satisfying treat.

Pro Tip:
Serve with ketchup, chutney, or a cup of strong chai for the full experience.


Final Thoughts: Two Eggs, Endless Possibilities

Next time you peer into your fridge and see just two eggs, remember this list. Whether you’re feeling classic, creative, healthy, or indulgent, there’s a two-egg recipe waiting to make your day better.
Experiment, taste, and make it your own—eggs are forgiving and open to nearly infinite flavor combinations.

Eggs are also a nutritional powerhouse:
Rich in protein, vitamins, and healthy fats, they’re ideal for building muscle, fueling your brain, or simply starting your day on a happy note.


Pro Tips for the Best Egg Dishes

  • Always season eggs before cooking—it makes a world of difference in texture and flavor.
  • Cook on low heat for tender results—high heat toughens eggs.
  • Get creative with toppings and sides: Chutneys, salsas, and pickles all love eggs.
  • Don’t waste the yolk! That’s where much of the nutrition and flavor live.

For more tips, inspiration, and the latest egg trends, keep browsing MasalaMonk.com. Your kitchen, your rules—happy cooking!

FAQs for 10 Egg Dishes with 2 Eggs

1. Can I double these recipes if I have more eggs?

Absolutely! Each recipe is designed for two eggs but can be scaled up easily. Just multiply the ingredient quantities by the number of eggs you’re using, and adjust the pan size and cooking time as needed.
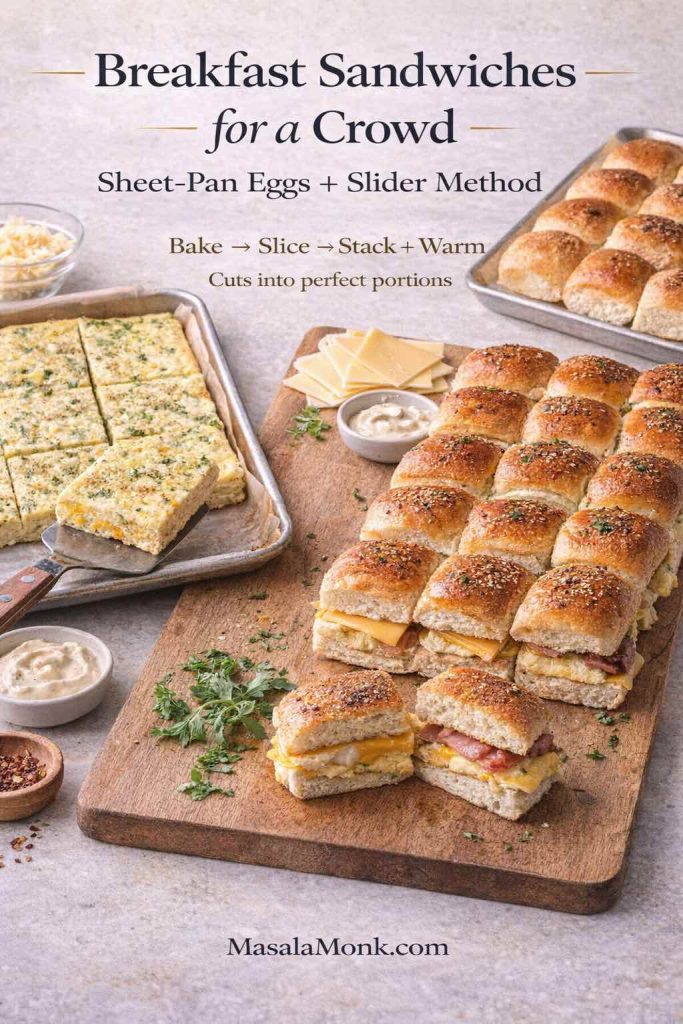

2. What are the health benefits of eating two eggs a day?
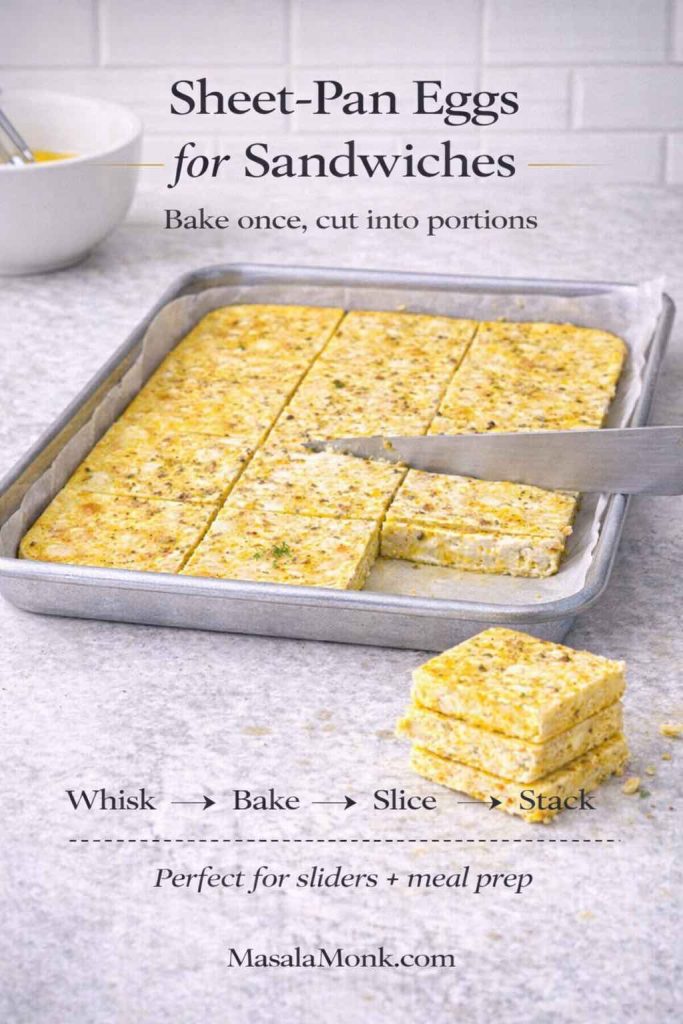
Two eggs provide about 12–14 grams of high-quality protein, healthy fats, vitamin D, choline, and a host of other nutrients. They keep you full, support muscle health, and are generally considered safe for most people as part of a balanced diet. For more on nutrition, see How Much Protein in Two Boiled Eggs?.


3. Can I use egg substitutes in these recipes?

Yes! For plant-based options, use tofu scramble in place of scrambled eggs, or try commercially available vegan egg replacers for frittatas and omelettes. For more ideas, check Tofu Instead of Eggs: 5 High-Protein Plant-Based Breakfast Ideas.


4. How do I keep my scrambled eggs soft and creamy, not rubbery?

Cook on low heat, stir gently, and remove the eggs from heat just before they’re fully set. They’ll finish cooking with residual warmth. Adding a splash of milk or cream helps too.


5. What are some good side dishes to serve with these egg recipes?

Pair eggs with toasted bread, parathas, rice, sautéed greens, roasted potatoes, or fresh salads. Chutneys, salsas, and pickles also make excellent accompaniments.


6. Are brown eggs healthier than white eggs?

No—brown and white eggs have virtually the same nutritional value. The color difference comes from the breed of chicken, not the nutritional content.


7. Can I prepare these egg dishes ahead of time?

Some dishes, like boiled eggs, egg salad, and mini frittatas, store well in the fridge for up to 3 days. Scrambled eggs and omelettes are best enjoyed fresh.


8. What’s the best way to peel hard-boiled eggs?

Cool eggs in ice water immediately after boiling. Crack the shell all over and peel gently under running water. Older eggs often peel more easily than very fresh ones.


9. How can I make my egg dishes more flavorful?

Use fresh herbs, spices, or seasoned salts. Try flavor boosters like garlic, onions, cheese, or even a drizzle of chili oil. For more ideas, read Egg-cellent Seasoning Options for Flavorful Eggs.


10. Can I make these dishes if I don’t have a nonstick pan?

Yes. Use a well-seasoned cast iron pan or a stainless steel pan with enough oil or butter to prevent sticking. For oven-baked dishes like frittatas, line your baking dish with parchment or grease it well.