Posted on 2 Comments

Easy English Scone Recipe

Split English scone topped with strawberry jam and clotted cream for an easy English scone recipe cover image.

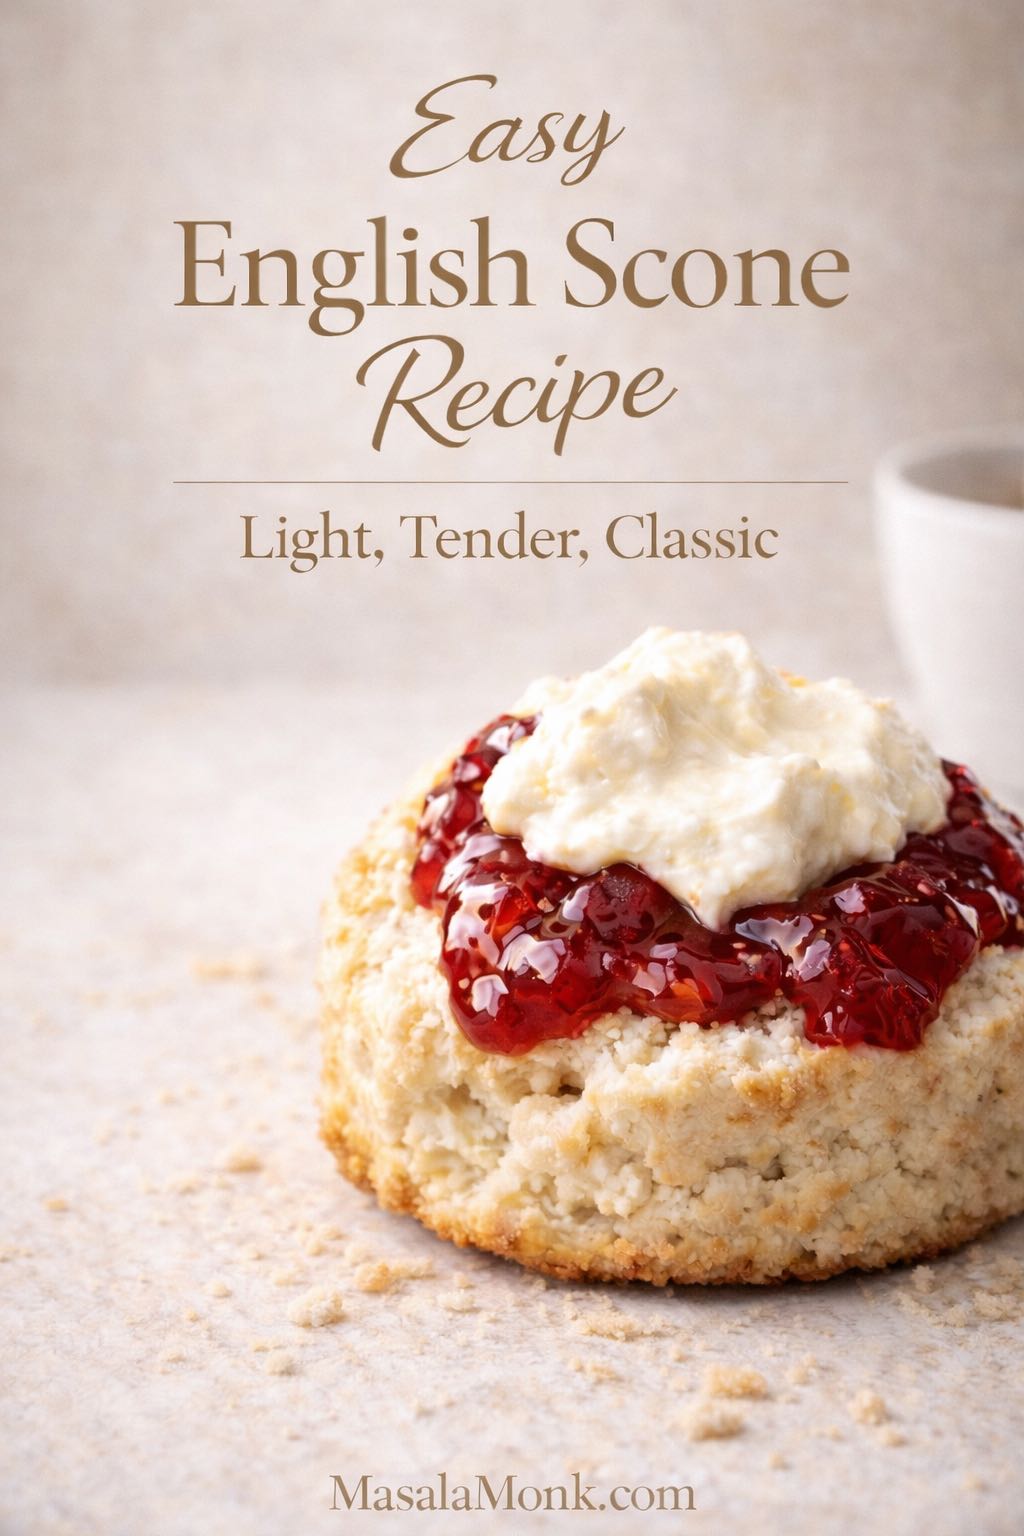
This English scone recipe is built for the classic result: round scones with a light, tender crumb, gently golden tops, and just enough sweetness to work beautifully with jam and clotted cream. If you want an easy English scone recipe that stays close to the traditional style, this is the version to make.

The charm of English scones is that they do not ask for much. They ask for a dough that stays soft, handling that stays light, and shaping that gives them enough height to rise properly in the oven. Get those choices right, and the result feels balanced, familiar, and unmistakably classic.

Served warm or at room temperature with strawberry jam and clotted cream, these scones feel instantly at home on an afternoon tea table. They are especially lovely with masala chai recipes if you want a warmer spiced pairing, or with a cappuccino recipe if you are serving them for breakfast or brunch.

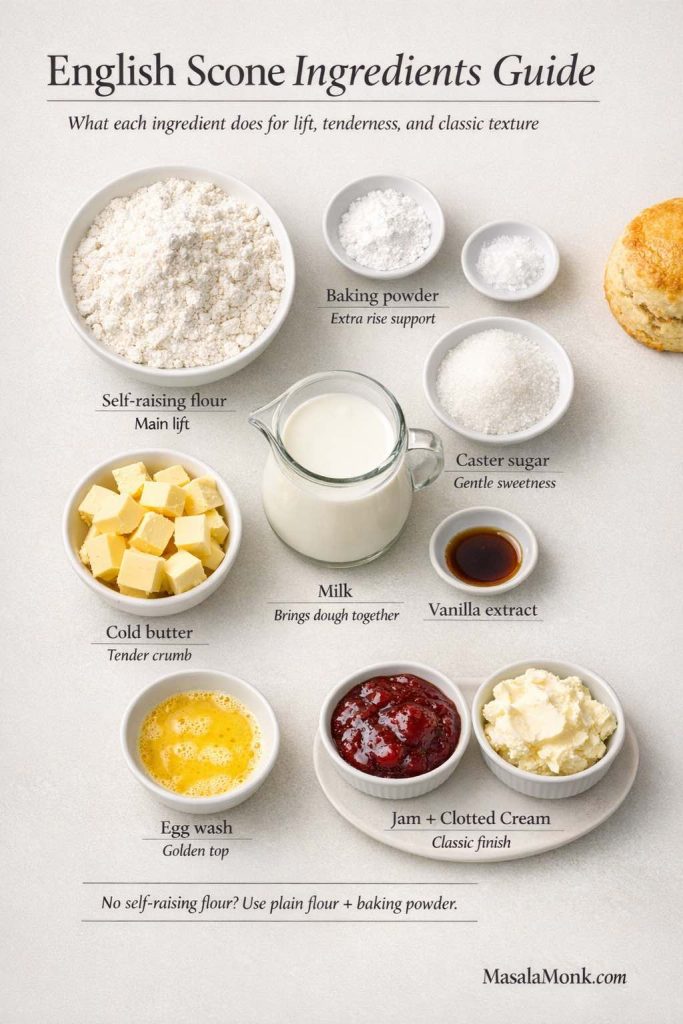
English Scone Recipe Ingredients

The ingredient list is short on purpose. Nothing here is decorative, and each ingredient has a clear job in the finished bake.

Dry Ingredients for English Scones

You will need:

  • 250 g self-raising flour
  • 1 tsp baking powder
  • 30 g caster sugar
  • 1 pinch salt

Self-raising flour keeps the method simple and gives the dough the kind of lift that suits classic English scones especially well. The extra baking powder adds support and helps keep the rise reliable. The sugar stays modest because this is not meant to be a sugary café pastry. It is meant to leave room for jam and cream at the table.

If you do not have self-raising flour, use 250 g plain flour plus 3 tsp baking powder in total for a close substitute. That will get you much nearer the intended texture than trying to improvise the swap.

English scone ingredients guide showing self-raising flour baking powder sugar butter milk egg wash jam and clotted cream with ingredient role notes.
The structure of a good English scone starts here: flour and baking powder for lift, cold butter for tenderness, milk for a soft dough, and a finishing setup built around jam and clotted cream rather than extra sweetness in the base.

Butter, Milk, and Egg

You will need:

  • 60 g cold unsalted butter, cubed
  • 150 to 170 ml whole milk
  • 1 tsp vanilla extract, optional
  • 1 egg, beaten, for egg wash

Cold butter helps create the tender crumb that makes a good scone feel light rather than heavy. It should be rubbed into the flour until the mixture looks airy and crumbly, not greasy or paste-like. The milk brings the dough together, though the exact amount can vary slightly depending on your flour and your kitchen conditions. The egg does not go into the dough here. Instead, it is brushed over the tops so the scones bake with a soft shine and a gentle golden finish.

Classic English Scone Toppings: Jam and Clotted Cream

For the classic serving style, use:

  • strawberry jam
  • clotted cream

That pairing is not just a serving suggestion. It is part of the logic of the bake itself. English scones stay plainer and less sweet because they are designed to be completed at the table rather than to carry all the richness on their own.

Traditional cream tea is built around scones, jam, clotted cream, and tea, which is one reason this style remains so restrained and balanced. For a more useful reference point than a generic explainer, the protected Cornish clotted cream specification shows why it is treated as a distinct product, while the National Trust’s fruit scones recipe reflects the same classic jam-and-clotted-cream serving tradition.

If clotted cream is difficult to find where you live, mascarpone is the neatest substitute. Thick lightly whipped cream also works, though it gives a looser and less traditional finish.

Small Variations That Still Keep Them English-Style

If you want a little variation without changing the character of the recipe too much, keep it restrained. A small handful of currants or sultanas fits naturally, and a little lemon zest can work well too.

What does not belong in this version is a heavy fruit load, thick glaze, chocolate chips, or any shortcut that turns the bake into something else altogether.

Also Read: Punjabi Mutton Bhuna – Amritsari Village-Style Gosht Recipe

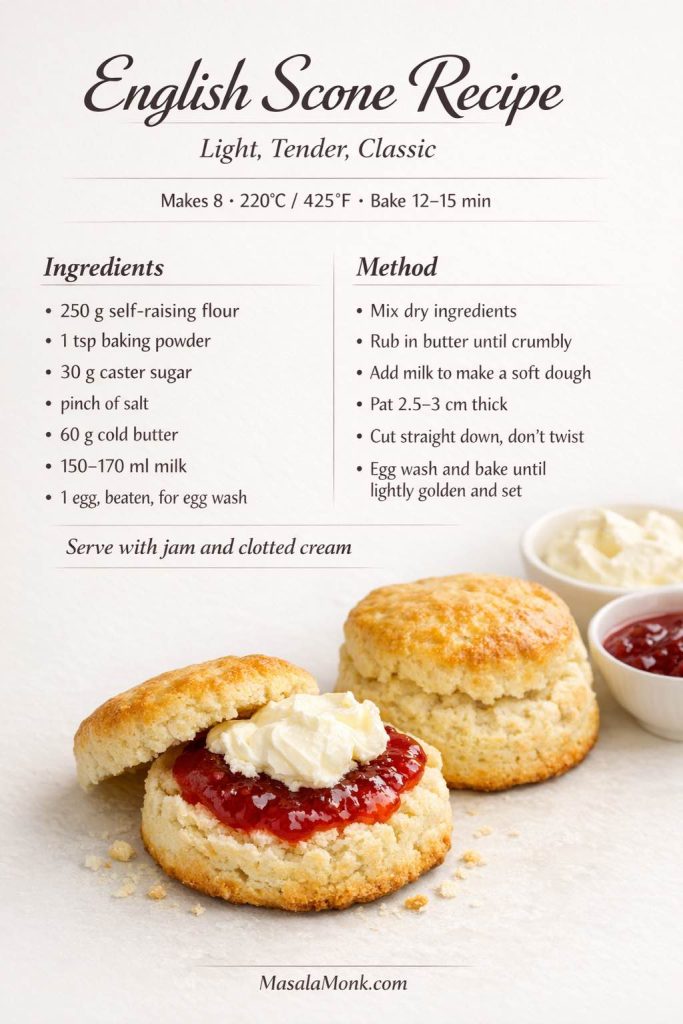
Easy English Scones Recipe Card

Yield: 8 scones
Prep time: 15 minutes
Bake time: 12 to 15 minutes
Total time: about 30 minutes
Oven temperature: 220°C / 425°F

Ingredients

  • 250 g self-raising flour
  • 1 tsp baking powder
  • 30 g caster sugar
  • 1 pinch salt
  • 60 g cold unsalted butter, cubed
  • 150 to 170 ml whole milk
  • 1 tsp vanilla extract, optional
  • 1 egg, beaten, for egg wash
  • strawberry jam, for serving
  • clotted cream, for serving
English scone recipe card showing ingredients, quick method, and classic scones served with jam and clotted cream.
Use this recipe card when you want the ingredient list, bake temperature, and quick method in one place. It is most useful once you know the flow and want to make a batch without scrolling through the full guide.

How to Make English Scones Step by Step

The method is simple, but the small cues matter. Most disappointing batches trace back to dough that was too dry, too heavily handled, or shaped too thin before baking.

1. Heat the Oven and Prepare the Tray

Heat the oven to 220°C / 425°F and line a baking tray with parchment paper. A fully preheated oven matters here because the scones need strong early heat to rise before the structure sets.

Step 1 English scone recipe graphic showing a lined baking tray and oven preheated to 220C 425F before baking.
Starting with a fully heated oven gives English scones a better chance of rising quickly before the structure sets. That early burst of heat matters more than many people expect when the goal is a lighter, taller result.

Use a middle rack unless your oven runs unusually hot at the top.

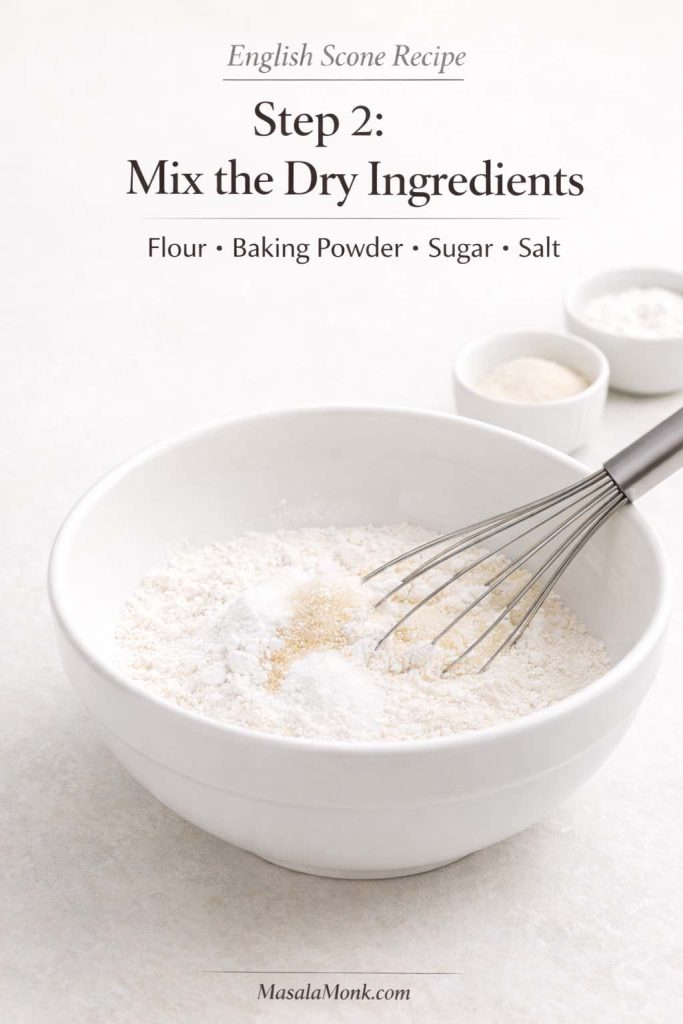
2. Mix the Dry Ingredients

In a large bowl, whisk together the self-raising flour, baking powder, caster sugar, and salt. This takes almost no time, but it helps distribute the lift evenly before the butter goes in.

Step 2 English scone recipe graphic showing flour, baking powder, sugar, and salt being mixed in a bowl before the butter is added
A quick whisk here helps distribute the baking powder, sugar, and salt more evenly through the dough, which gives the scones a more consistent start.

3. Rub in the Butter

Add the cold butter cubes and rub them into the flour mixture with your fingertips until the texture looks like coarse crumbs.

You want a mixture that feels sandy and airy, with a few tiny buttery pieces still visible. If you squeeze a little in your hand, it should briefly clump, then fall apart again. Once the butter turns greasy or starts smearing into the flour, you have gone too far. If large cubes remain untouched, keep working a little longer.

Step 3 English scone recipe graphic showing cold butter being rubbed into flour until the mixture looks sandy and crumbly.
The butter should be rubbed in only until the mixture looks sandy and crumbly, with a few tiny buttery pieces still visible. That is what helps the finished scones stay tender instead of turning heavy or tight.

4. Add the Milk and Bring the Dough Together Gently

Pour in 150 ml milk and the vanilla, if using. Stir with a butter knife, fork, or spatula until the mixture starts to gather into a dough. Add more milk only if needed, a little at a time.

The dough should feel soft, slightly tacky, and easy to press together. It should not feel dry and stubborn, and it should not slump like batter either.

Step 4 English scone recipe dough guide showing too dry, just right, and too wet dough after adding milk.
This is the most important texture check in the recipe. The dough should look soft, rough, and cohesive enough to hold together without becoming sticky or slumped.

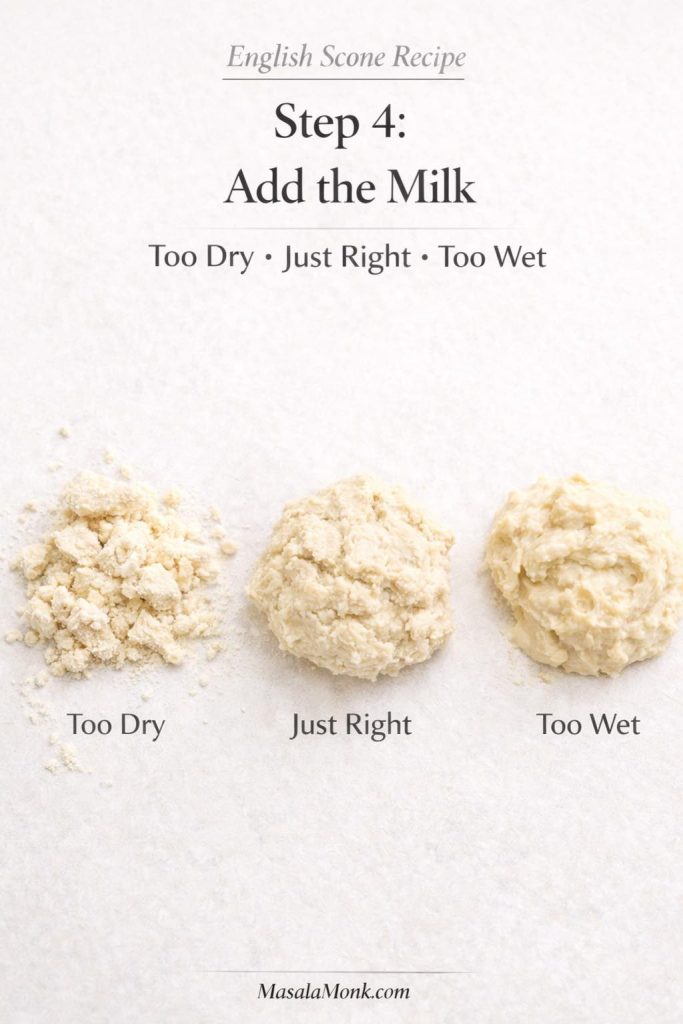
This is where many batches go wrong. People often stop early because they are nervous about stickiness, then end up with a dough that seems tidy but bakes up heavier than it should. In practice, slightly softer is usually safer than slightly dry.

5. Pat the Dough Thick Without Kneading

Turn the dough onto a lightly floured surface. With lightly floured hands, bring it together with a few gentle presses, then pat it into a round or rectangle about 2.5 to 3 cm thick.

Step 5 English scone recipe graphic showing dough patted 2.5 to 3 cm thick before cutting the scones.
Patting the dough thick gives the scones room to rise upward instead of baking flatter than you want. That one choice changes the final look more than many people expect.

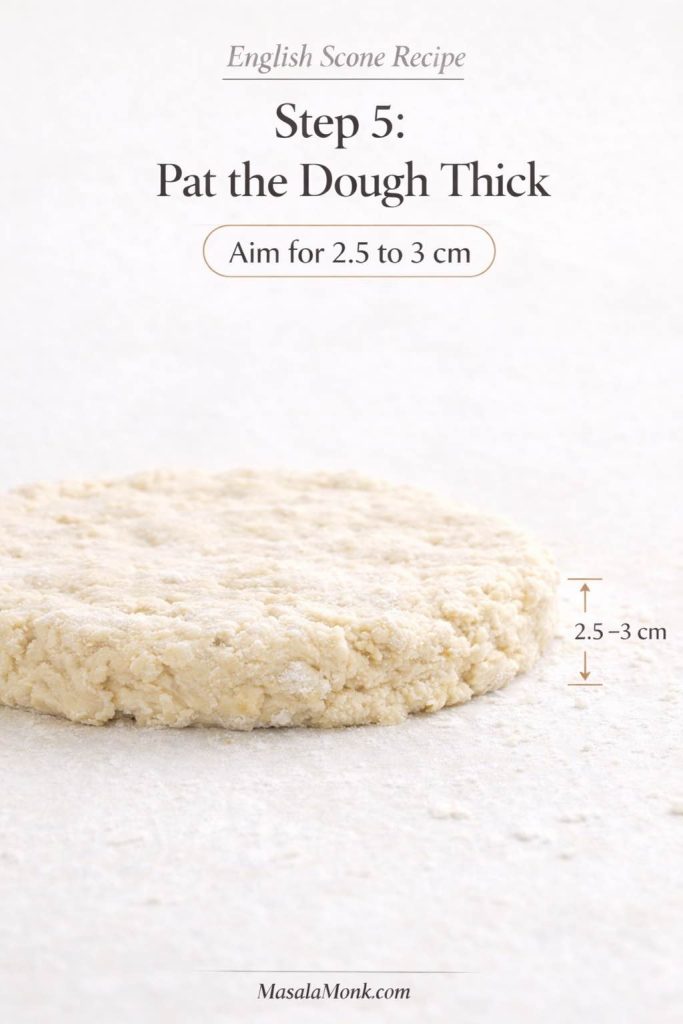
Do not knead the dough like bread. Do not press it into a smooth, tight disc. It only needs to come together neatly enough to cut.

6. Cut Out the Scones

Use a 5 to 6 cm round cutter dipped lightly in flour. Press straight down, then lift cleanly.

Do not twist the cutter. Twisting compresses the edge and makes a clean rise harder. It seems like a small detail, but it shows up clearly in the oven.

Step 6 English scone recipe graphic showing a round cutter pressed straight down into thick dough without twisting.
A straight downward cut keeps the edges cleaner than a twisting motion, which gives the scones a better chance of rising neatly in the oven.

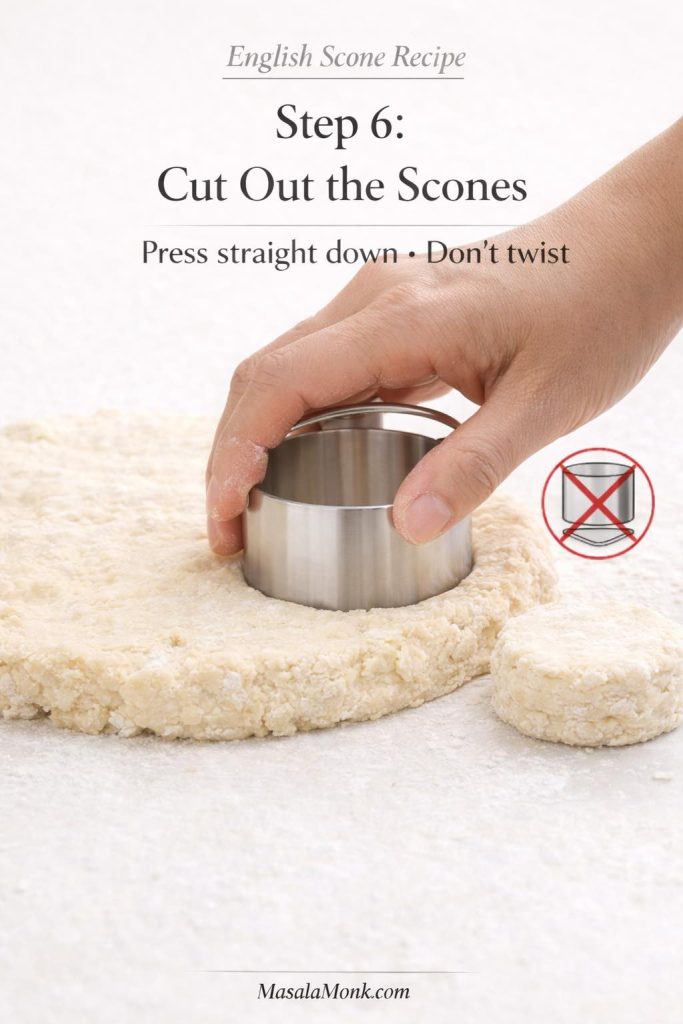
Place the cut scones on the lined tray with a little space between them. Gather the scraps gently, pat them together once, and cut again. The last few may look slightly less neat than the first ones, but they will still bake well if you do not keep reworking the dough.

If the cut rounds look soft or slightly slack at this stage, chill them for 10 minutes before baking. That short rest can help them hold their shape better.

7. Egg Wash and Bake

Brush only the tops with beaten egg. Try not to let the egg wash run down the sides, because that can limit the rise by sealing the edges.

Step 7 English scone recipe graphic showing scones on a lined tray with egg wash and the correct lightly golden baked finish.
Do not judge doneness by color alone. The best batch should have lightly golden tops, sides that look set rather than damp, and bottoms that feel dry and baked through without turning hard.

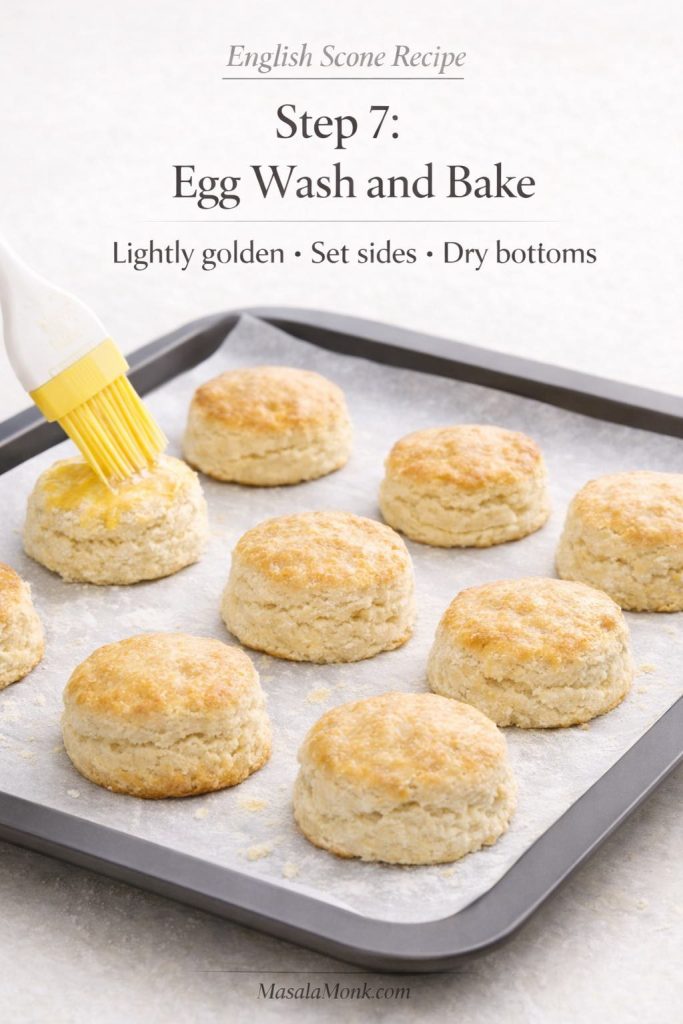
Bake for 12 to 15 minutes. They are done when the tops are lightly golden, the sides look set rather than damp, and the bottoms look dry and lightly colored rather than pale and wet.

If they still look slightly heavy after 12 minutes, give them another minute or two and check again. When in doubt, break open the least tidy one from the batch. The center should look tender and set, not wet or gummy.

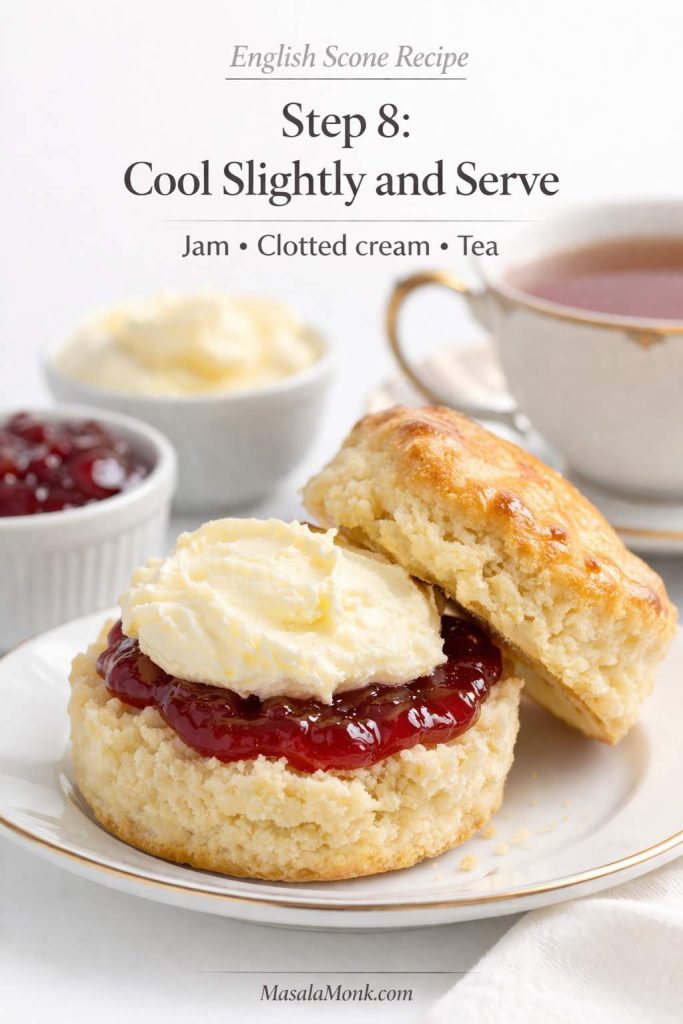
8. Cool Slightly and Serve

Let the scones cool for about 10 minutes before splitting and serving. They are excellent still slightly warm, when the crumb feels especially soft and the contrast with jam and clotted cream is at its best.

Step 8 English scone recipe graphic showing a split scone served with jam clotted cream and tea.
A short cooling time helps the crumb settle before serving, and it also keeps the jam and clotted cream from sliding around too much on a steaming-hot scone. This last pause improves the final experience more than it seems.

For a colder-day pairing, they also work beautifully with homemade hot chocolate with cocoa powder.

Why These English Scones Stay Light and Tender

The result stays light because the method avoids the three mistakes that most often drag scones down: dry dough, heavy handling, and shaping that is too thin.

A dough that feels slightly soft will usually bake better than one that feels overly tidy and controlled. Extra pressing and rerolling tighten the crumb. Thin shaping leaves less room for upward lift. Add those problems together, and even a good ingredient list can still produce a disappointing batch.

That is why the method stays restrained. It gives the dough enough structure to hold shape, but not so much handling that the finished scones lose their tenderness.

English Scones vs American Scones

Although they share a name, English scones and American scones usually aim for very different results. English scones are typically round, lightly sweet, and softer in character, while American scones are often larger, richer, more heavily flavored, and shaped in wedges.

In the English style, the scones are usually served as part of afternoon tea, split and spread with jam and clotted cream. On their own, they are modest by design.

Comparison graphic showing English scones with jam and clotted cream beside sweeter glazed American scones with key differences in shape texture and serving style.
This side-by-side guide shows why this post stays firmly in the English-scone lane. English scones are rounder, lighter, and built for jam and clotted cream, while American scones are usually sweeter, wedge-shaped, and more pastry-like.

American scones, by contrast, tend to be larger, sweeter, and richer. They are more likely to include chocolate, berries, glaze, nuts, citrus, or stronger mix-ins, and they are often treated as a standalone pastry to eat with coffee rather than as part of a cream-tea table.

That difference is exactly why this recipe stays deliberately restrained. The goal is not to make the richest or most dramatic scone possible. The goal is to make one that feels unmistakably English-style and succeeds on those terms.

Also Read: Cookie Pie Recipe: 10 Best Flavors, Fillings and Variations

How to Serve English Scones with Jam and Clotted Cream

The classic serving style is part of the point, not an afterthought. These scones feel most like themselves when they are split and served with strawberry jam and clotted cream, whether you arrange them before serving or set everything out so people can build their own.

Serving guide for English scones showing how to split the scone, add strawberry jam, top with clotted cream, and serve with tea.
Classic English scones are meant to be finished at the table, not treated like a sweeter standalone pastry. Use this guide to see the traditional flow clearly: split the scone, add jam, top with clotted cream, and serve with tea.

Split them gently rather than crushing them flat, then add the jam and clotted cream just before serving. If you are building a full cream-tea setup, keep the tea hot and the scones lightly warm or fully cooled rather than steaming, so the toppings sit neatly instead of sliding off.

Slightly warm scones are often the most satisfying because the crumb feels softer and the butteriness comes through more clearly. Room-temperature scones are just as traditional and often more practical for a fuller afternoon tea spread. What matters most is that they still feel fresh enough to split cleanly and tender enough inside to welcome jam and cream.

This is also where the restrained sweetness of the dough proves its value. A heavily sweetened scone would compete with the toppings, while a classic English scone leaves room for them and lets the full serving feel balanced rather than overdone. For a more heritage-led British reference point, the National Trust’s traditional fruit scones recipe follows the same broader jam-and-clotted-cream serving direction.

Tea is the obvious partner, though coffee works beautifully too. If you want something warm alongside them, masala chai recipes and a cappuccino recipe both fit naturally.

English Scone Troubleshooting Guide

If your batch turns out dense, dry, flat, or uneven, the cause is usually easier to trace than it first seems.

English scone troubleshooting guide showing common problems like dense dry flat and pale scones with quick causes and fixes.
Keep this troubleshooting guide nearby when a batch turns out dense, dry, flat, or pale. Most problems trace back to dough texture, thickness, cutter technique, or baking cues, so spotting the likely cause makes the next batch much easier to fix.

Why Did My Scones Turn Out Dense?

Dense scones usually come from dough that was too dry or too heavily worked. If the mixture felt stiff before baking, cracked when pressed, or needed force to come together, that is the clearest clue.

Keep the dough softer next time, stop mixing earlier, and handle the scraps as little as possible. Also make sure the oven is fully hot before the tray goes in.

Why Are My English Scones Dry?

Dry scones are usually the result of dough that began too stiff or baking that ran too long. If the tops went deeper brown than intended, the crumb may have dried out before you pulled them.

Use enough milk to keep the dough soft, and take them out when they are lightly golden rather than deeply browned. Once they are fully cool, store them promptly instead of leaving them exposed on the counter.

Why Didn’t My Scones Rise Properly?

Poor rise usually points to one of four things: old baking powder, dough patted too thin, a cutter twisted instead of pressed straight down, or an oven that was not fully hot.

Use fresh raising ingredients, keep the dough thick, cut cleanly, and bake in a properly preheated oven.

Why Did They Spread Instead of Rising Tall?

Spreading is usually a sign that the dough was too warm, too wet, or too thin. If the cut rounds looked soft and a little slack on the tray before baking, that is your clue.

Hold back some of the milk until you know the dough needs it, keep the thickness at 2.5 to 3 cm, and chill the cut scones briefly if they seem very soft.

Why Are the Tops Pale or Uneven?

Pale tops usually mean the egg wash was too light, the oven heat was a little low, or the dough thickness varied across the batch. Uneven tops can also happen when the scraps are handled more roughly than the first cuts.

Brush the tops carefully, keep the dough even, and make sure the oven is fully hot.

How Do I Keep English Scones Soft After Baking?

Do not overbake them, let them cool only as long as needed, then store them airtight once fully cool. A brief reheat before serving helps a lot.

Also Read: White Russian Recipe: 7 Variants to Try, From Classic to Frozen

How to Store, Freeze, and Reheat English Scones

English scones are best the day they are baked, when the crumb is softest and the structure still feels freshest. Even so, they store and freeze better than many people expect if you handle them properly.

If freshness matters most to you, freezing shaped unbaked scones is usually the better move than storing baked ones for too long. That way you keep more of the just-baked texture and get much closer to the original result.

Storage guide for English scones showing room temperature storage, freezing baked scones, freezing dough, and reheating in a low oven.
Use this guide to keep English scones worth eating after the first bake. Room-temperature storage works best for the short term, freezing baked scones helps with leftovers, freezing shaped dough gives you the freshest later result, and gentle reheating brings back more of the soft crumb.

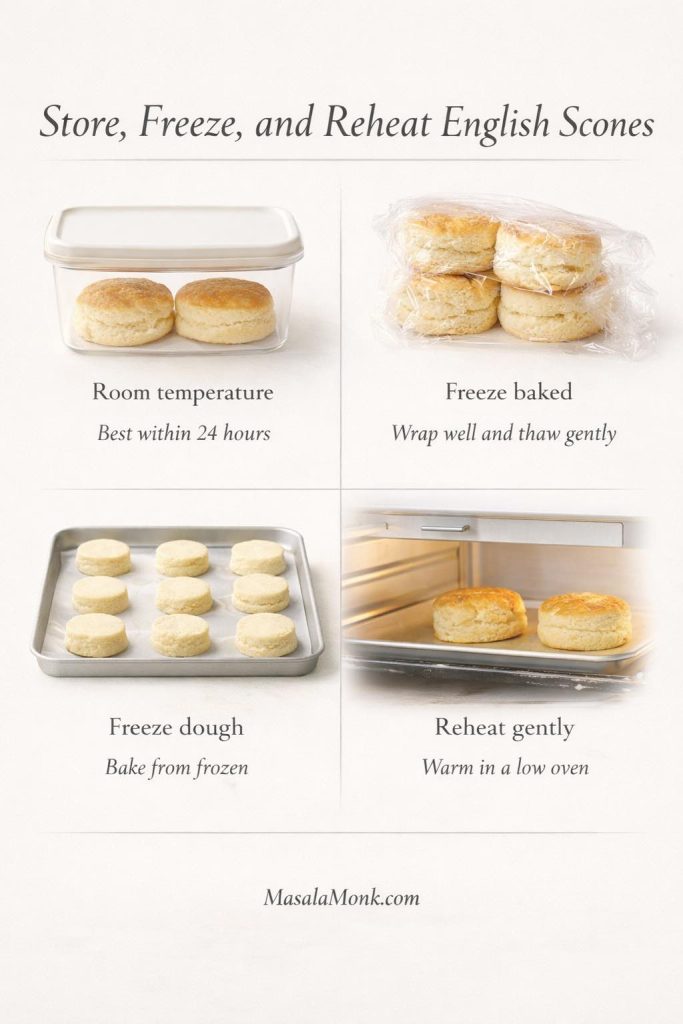
Room-Temperature Storage for English Scones

Once fully cool, store the scones in an airtight container at room temperature. They are best within 24 hours and still pleasant on day two if gently rewarmed.

Should You Refrigerate Them?

Refrigeration is usually not the best choice for plain baked scones because it can make them feel firmer and less fresh. Room temperature for a short window or freezing for longer storage is usually the better route.

How to Freeze a Baked English Scone

Let the baked scones cool completely, then wrap them well and freeze them in an airtight container or freezer bag. Thaw them, then warm them gently until just heated through.

How to Freeze Unbaked English Scone Dough

Freezing shaped dough is often the better option if you want fresh-baked scones later. Cut the scones, place them on a tray until firm, then transfer them to a freezer-safe container or bag. Bake from frozen, giving them about 2 to 4 extra minutes as needed.

How to Reheat English Scones Without Drying Them Out

Warm the scones in a low oven just until heated through. Do not blast them with high heat or leave them in too long. Gentle reheating brings back some softness without drying out the crumb.

How to Turn These English Scones Into Fruit Scones

If you want to adapt this recipe into a fruit version, fold in a small handful of currants or sultanas after the butter has been rubbed in and before the milk goes in. If you enjoy bakes that lean more fruit-forward and comforting, peach cobbler with canned peaches is another good one to bookmark.

Variation guide showing how to turn English scones into fruit scones with currants or sultanas without overloading the dough.
A fruit-scone variation works best when it stays restrained. Adding about 40 to 60 grams of currants or sultanas gives the dough a classic fruit note without weighing it down too much, though the crumb will be slightly denser than the plain version.

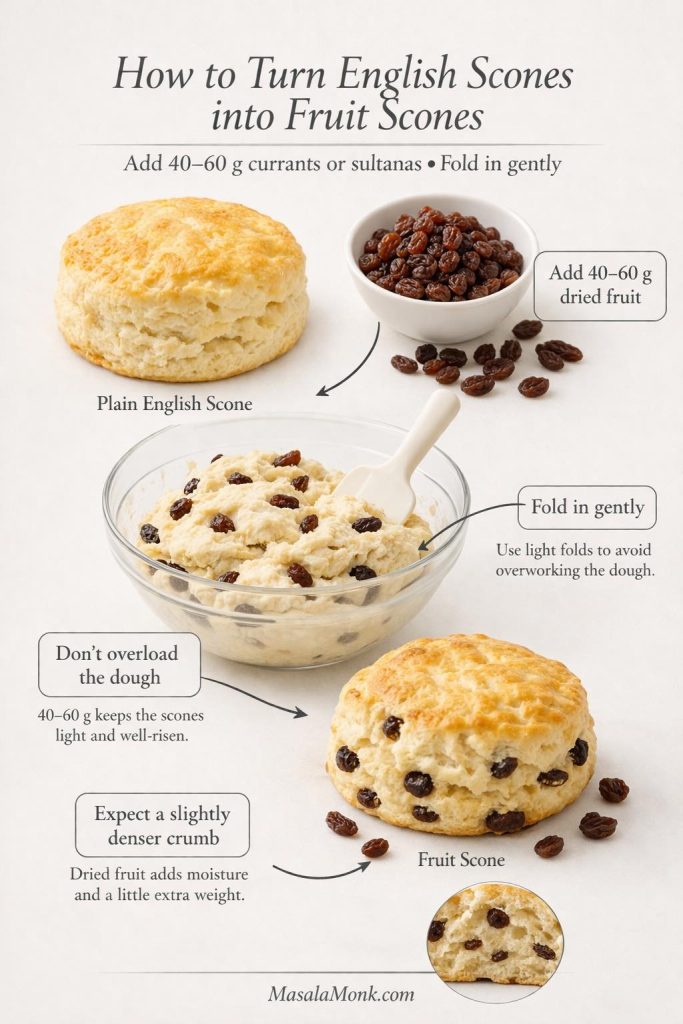
The key is restraint. A little dried fruit works beautifully. Too much starts to weigh the dough down and changes the balance of the bake. As a guide, around 40 to 60 g is enough for this quantity of dough.

Fold the fruit through gently so it spreads evenly without overworking the dough. You want enough in each scone to taste it, but not so much that the mixture turns heavy, patchy, or harder to cut cleanly.

Final Thoughts

A good English scone recipe does not need extra drama. It needs the right decisions at the right moments.

Keep the dough soft, shape it thick enough to rise well, cut it cleanly, and bake it in a properly heated oven. Do that, and you end up with the kind of scone people actually want: tender, gently risen, lightly sweet, and ready for jam and clotted cream.

That is why this version stays so focused. It is not trying to cover every possible style. It is trying to help you make one classic batch well, and that clarity is what makes a recipe worth returning to. If you enjoy classic bakes that reward small technique choices, sourdough English muffins are another strong next bake.

Also Read: White Russian Recipe: 7 Variants to Try, From Classic to Frozen

English Scone FAQs

1. Can I make English scones without self-raising flour?

Yes. For this recipe, use 250 g plain flour plus 3 tsp baking powder in total for the closest substitute. That will get you much nearer the intended texture than trying to guess the swap.

2. What can I use instead of clotted cream?

Mascarpone is the neatest substitute if clotted cream is hard to find. Thick lightly whipped cream also works, though it gives a softer, looser, and less traditional finish.

3. Why didn’t my English scones rise properly?

The most common causes are dough that was patted too thin, old baking powder, twisting the cutter instead of pressing straight down, or putting the tray into an oven that was not fully preheated. Keeping the dough thick and the oven properly hot makes a big difference.

4. Can I freeze English scone dough?

Yes. Shape and cut the scones first, freeze them until firm, then transfer them to a freezer-safe container or bag. Bake them from frozen and add about 2 to 4 extra minutes as needed.

Posted on 6 Comments

5 Natural Alternatives for Commercial Processed Drinks this Summer

Natural Summer Drinks

Summer in India (and much of the world) means intense heat, rising humidity, and a constant search for something cool, satisfying, and hydrating. Yet most commercial processed drinks—think sodas, bottled iced teas, energy drinks, and “fruit” beverages—are loaded with refined sugar, artificial flavors, and preservatives that often leave you feeling sluggish, not refreshed.

This year, we challenge you to #ReimagineRefreshment. Skip the processed, and turn to natural, wholesome, and on-trend alternatives—each carefully chosen for taste, nutrition, and practicality in your everyday routine. Let’s discover the top 5, why they work, how you can make them at home, and how each fits with a modern wellness lifestyle.


1. Cortisol Cocktail: Social Media’s Favorite Stress‑Busting Summer Sipper

What is it?
A “cortisol cocktail” is a hydrating, mineral-rich, non-alcoholic drink trending everywhere from TikTok to wellness podcasts. Despite the name, it contains no hormones—just a combination of natural ingredients that support hydration, electrolytes, and calm.

Key Ingredients:

  • Coconut water (natural electrolytes & potassium)
  • Citrus juice (vitamin C boost)
  • Magnesium powder (supports calm, sleep, and nerve function)
  • Sea salt (mineral replenishment)
  • Sparkling water (just for fizz!)

How to Make It (1 glass):

  1. Pour 200ml coconut water into a tall glass.
  2. Squeeze in the juice of half an orange or lime.
  3. Stir in 1/4 tsp magnesium powder (or as per supplement label).
  4. Add a small pinch of sea salt.
  5. Top with sparkling water and a few ice cubes. Garnish with mint or orange wedge.

Why you’ll love it:
It’s lightly sweet, super hydrating, has no added sugar, and the minerals help with both energy and relaxation—a perfect afternoon pick-me-up or post-workout cooler.

Pro Tip: If you take medication or have kidney issues, check with your doctor before using magnesium supplements.


2. Prebiotic Soda: Gut-Friendly, Fizzy, and Fun

What’s new in 2025?
Big beverage brands and indie startups are rolling out “prebiotic sodas”—fiber-infused, naturally sweetened fizzy drinks made for gut health and a lighter summer vibe.

What makes it different?

  • Contains plant-based prebiotic fiber (like inulin) for digestion.
  • Lower in sugar than regular sodas.
  • Naturally flavored with real fruit.
  • Some use stevia or monk fruit for sweetness.

How to Make Your Own:

  1. Add a few fresh orange and strawberry slices to a glass.
  2. Pour chilled sparkling water over.
  3. Stir in 1 tsp inulin powder (available online/health stores).
  4. Add a tiny pinch of sea salt and a dash of stevia or honey if desired.

Why it’s great:
You get the satisfaction of bubbles without the sugar crash. Prebiotics feed the good bacteria in your gut, supporting overall digestion and wellness.

Pro Tip: Start with a small amount of inulin to let your system adjust.


3. Matcha Cooler: Energize with Antioxidants

Why matcha?
Matcha is a finely ground green tea powder rich in antioxidants, L-theanine (for calm focus), and a mild caffeine lift—ideal for summer afternoons or a healthy “mocktail hour.”

Trendy variations:

  • Classic Iced Matcha: Whisk 1 tsp matcha powder with a splash of cold water until frothy. Pour over ice, top with more cold water, and add honey or maple syrup if needed.
  • Pineapple Matcha Fizz: Whisk matcha, add pineapple juice, sparkling water, and ice for a tropical green twist.
  • Matcha Lemonade: Mix matcha with lemon juice, a touch of agave, and plenty of ice.

Why you’ll love it:
Matcha is naturally energizing but gentle on the system—no jitters. It looks beautiful in the glass and tastes bright and grassy.

Pro Tip: Use ceremonial-grade matcha for best color and flavor.


4. Chaas / Buttermilk: India’s Traditional Summer Hero

Why is chaas a classic?
This yogurt-based drink, known as chaas, is the ultimate Indian cooler—full of probiotics, protein, minerals, and natural cooling properties. It’s the perfect digestif after a heavy meal or a sweltering day.

Simple recipe:

  1. Blend 1 cup plain dahi (curd/yogurt) with 1.5 cups cold water.
  2. Add 1/2 tsp roasted cumin powder, a pinch of black salt, and a handful of fresh mint or coriander.
  3. Pour over ice and serve immediately.

Why you’ll love it:
Chaas hydrates, replenishes lost electrolytes, and is ultra-satisfying after spicy food or long hours outside.

Pro Tip:
Add grated ginger, chopped cucumber, or even a dash of chaat masala for variety.


5. Turmeric & Ginger Tonic: Anti-Inflammatory and Zesty

Why this tonic?
Both turmeric and ginger are scientifically proven to fight inflammation, boost immunity, and aid digestion—plus, they make a beautifully golden, Instagram-ready drink.

How to Make:

  1. Boil a 2-inch piece of ginger in 2 cups water for 5 minutes.
  2. Stir in 1 tsp turmeric powder, juice of half a lemon, and 1 tbsp honey or jaggery.
  3. Add a pinch of black pepper (boosts turmeric’s benefits), strain, and chill.
  4. Serve over ice with lemon slices.

Why you’ll love it:
This drink delivers a vibrant flavor punch, supports your health, and looks gorgeous. Perfect as a midday refreshment or post-dinner “digestive.”

Pro Tip:
Make a batch ahead and store in the fridge—it’s even better cold!


Conclusion: Hydrate Smarter, Live Better

This summer, skip the commercial drinks aisle and embrace these natural, practical, and deeply satisfying alternatives. Whether you’re after hydration, gut health, energy, tradition, or an immune boost, there’s a perfect glass waiting for you.

Try them at home, share with family and friends, and tag your creations with #MasalaMonkDrinks for a chance to get featured!


Share Your Favorite

Which drink will you try first? Have your own healthy summer sipper?
Drop your recipes, questions, and reviews in the comments below.


Stay cool, stay hydrated, and enjoy every sip—naturally.
MasalaMonk.com

10 FAQs for Natural Summer Drinks

1. Are these drinks suitable for kids and seniors?
Yes, all drinks can be enjoyed by kids and seniors, but adjust the amount of added salt, spices, or supplements (like magnesium) for age and dietary needs. Always consult a doctor for any chronic health issues.

2. Can I prepare these drinks ahead of time?
Absolutely! Drinks like chaas, turmeric & ginger tonic, and infused prebiotic soda can be refrigerated for up to 24–48 hours. Just stir before serving and add fresh herbs/ice at the end.

3. Are these drinks vegan?
Most are vegan by default. For chaas, use plant-based yogurt. For sweeteners, replace honey with agave or maple syrup.

4. Do I need special equipment to make these drinks?
No special equipment needed! A blender or whisk is helpful for chaas and matcha, but all drinks can be made with basic kitchen tools like a pitcher, knife, and glass.

5. Where can I find inulin powder or magnesium powder?
These are available at health food stores, large supermarkets, or online. Choose a reputable brand and start with small quantities.

6. Can I use bottled coconut water or does it have to be fresh?
Bottled coconut water is fine—just choose unsweetened and no-added-flavor versions for the healthiest option.

7. How much sugar do these drinks contain?
Most drinks are naturally low in sugar. You control sweetness—add fruits, stevia, or minimal natural sweeteners if desired.

8. Are these drinks safe for people with diabetes?
Most are safe in moderation, but always check with your doctor. Use unsweetened versions and low-GI sweeteners if needed.

9. Can I make a big batch for a party or picnic?
Definitely! All recipes can be multiplied, made in pitchers, and served chilled. Add ice and herbs just before serving for freshness.

10. How do I store leftovers?
Store in a covered container or bottle in the fridge for 24–48 hours. Shake or stir well before pouring.

Posted on Leave a comment

Ever Wondered Why Your Grandma’s Pizza Tastes Different? The Ancient Secrets of Modern Foods Unveiled!

Have you ever taken a bite of your favorite dish and wondered, “What did this taste like a hundred years ago?” Our culinary journey today takes us back in time to explore the original flavors of some of the world’s most beloved foods. From the humble beginnings of pizza to the ancient roots of tea, let’s embark on a gastronomic voyage to discover “What Popular Foods Originally Tasted Like.”

Pizza: From Flatbread to Feast

Imagine a world where pizza is devoid of tomato sauce, cheese, and toppings. Hard to swallow? That was the reality for ancient civilizations. The pizza we idolize today began as a simple flatbread in the Mediterranean belt. It wasn’t until the late 19th century in Naples that pizza found its soulmate in tomato sauce, transforming it from a peasant’s snack to a culinary masterpiece. Today’s challenge: try making a pizza using only ingredients available in the 18th century – if you dare.

Tea: An Emperor’s Accidental Discovery

A leaf falls into boiling water, and a beverage for the ages is born. This serendipitous event, experienced by Chinese Emperor Shen Nong, gave us tea. Originally consumed for medicinal purposes, tea has undergone minimal changes in flavor over the millennia. For a sip of history, brew a cup of tea using traditional methods, like sun-drying the leaves or aging them, to taste the ancient flavors cherished by emperors and monks.

Mac and Cheese: A Dish Fit for a King

Long before boxed versions and gourmet truffle adaptations, mac and cheese was a simple combination of pasta and cheese. Its earliest recorded recipe dates back to 13th century Italy. Fast forward to the American Revolution, Thomas Jefferson introduces mac and cheese to the United States, making it a staple in American cuisine. To taste its original glory, craft your mac and cheese with hand-made pasta and a blend of authentic aged cheeses.

The Hot Dog: A Frank Discussion

The hot dog, a symbol of American cuisine, has its roots deeply embedded in German tradition. Originally called “frankfurters,” these sausages were enjoyed without buns, seasoned with just mustard. To relive the hot dog’s journey, grill a traditional German sausage and serve it with only mustard. Experience the simplicity that captivated taste buds long before it became a ballpark staple.

Chocolate: The Bitter Beginning

Before chocolate became the sweet, creamy delight we crave, it was a bitter beverage prized by ancient Mesoamerican civilizations. The transformation from a sacred drink to the chocolate bars we know today is a tale of exploration, innovation, and global trade. Indulge in a piece of dark, minimally processed chocolate to get closer to the original taste that was once reserved for royalty and gods.

Bringing History to Your Plate

Understanding the origins of these foods enriches our appreciation for them, connecting us to the countless generations that have savored and refined these flavors before us. It challenges us to think about how future generations will perceive the dishes we consider staples. Will they marvel at our current tastes or transform them into something unrecognizable?

As we journey through the evolution of these iconic dishes, we’re reminded of the constant innovation that shapes our culinary landscape. Each meal is a chapter in the vast, unfolding story of human culture, flavored with the spices of history, tradition, and transformation.

So, the next time you sit down to enjoy your favorite dish, remember the journey it has taken through time to reach your plate. And perhaps, try recreating these ancient recipes yourself. Who knows? You might just develop a taste for history.

10 FAQs for “Ever Wondered Why Your Grandma’s Pizza Tastes Different? The Ancient Secrets of Modern Foods Unveiled!

1. What was pizza like originally?

Originally, pizza was a simple flatbread with few toppings, mainly used by the poor in Naples, Italy. It became closer to what we recognize today after tomatoes were introduced to Europe from the Americas.

2. How has the taste of chocolate changed over time?

Initially consumed as a bitter drink by ancient Mesoamericans, chocolate’s taste evolved significantly after Europeans added sugar and milk, transforming it into the sweet treat we love today.

3. Did tea always have the same variety as we have now?

No, all tea comes from the same plant, Camellia sinensis. The differences in taste and color (green, black, oolong) result from the processing methods developed over centuries.

4. What’s the origin of mac and cheese?

Mac and cheese trace back to Italy, with the earliest known recipe dating to the 13th century. It became popular in the US thanks to Thomas Jefferson after his chef, James Hemings, perfected the recipe.

5. Were hot dogs always considered fast food?

Yes and no. The concept of a meat sausage dates back to Roman times, but the modern hot dog, as we know it, originated in Germany and became a fast-food staple in the United States.

6. How did hamburgers become a global phenomenon?

Hamburgers gained popularity in the US after German immigrants brought their minced meat recipes. Their convenience and taste led to their global spread, especially with the rise of fast-food chains.

7. Is sushi a Japanese invention?

Sushi has its roots in Southeast Asia and China as a method to preserve fish in fermented rice. The contemporary version of sushi, emphasizing fresh fish and artistic presentation, developed in Japan.

8. What was the first known dessert?

The history of desserts is vast, but one of the earliest recorded desserts is honey-covered fruits and nuts, enjoyed by ancient civilizations like the Egyptians.

9. How did the ingredients in popular foods change over the years?

Ingredients changed due to availability, trade, culinary innovations, and cultural exchanges. For example, the introduction of New World crops like tomatoes and potatoes significantly altered global cuisines.

10. Can we still taste foods as they were originally made?

While some original recipes can be recreated, the exact taste profiles might be challenging to replicate due to changes in ingredient quality, cultivation methods, and lost culinary techniques.

Blog Tags

culinary history, food evolution, traditional recipes, global cuisine, ancient diets, cooking innovation, cultural exchange, food anthropology, ingredient history, gastronomy

Posted on Leave a comment

Lemon Pickle: Exploring Nimbu ka Achar

Galgal Adruk Mirchi Pickle

Greetings, food enthusiasts! 🍽️💕 Today, we’re embarking on a flavorful journey as we delve into the world of Lemon Pickle, also known as Nimbu ka Achar in India. This tangy and versatile condiment is a beloved accompaniment to many meals and is deeply ingrained in the culinary traditions of India. Let’s dive into the tantalizing world of Nimbu ka Achar, exploring its flavors, preparation methods, and cultural significance.

🍋 Nimbu ka Achar: A Culinary Treasure of India 🌶️

Nimbu ka Achar holds a special place in Indian cuisine, with each region having its unique take on this zesty pickle. Known by various names like Limbu Che Lonche (in Gujarati), Elumichai Oorugai (in Tamil), Nimbu ka Khatta Meetha Achar (in Hindi), and more, this tangy delicacy captures the essence of Indian flavors and culinary diversity.

🌿 Flavorful Preparation: The Art of Nimbu ka Achar 🍽️

The preparation of Nimbu ka Achar involves combining freshly squeezed lemon juice with a blend of aromatic spices and other ingredients. The key components may include lemon wedges, mustard seeds, fenugreek seeds, turmeric, red chili powder, salt, and oil. The proportions and variations may differ from one household to another, adding to the uniqueness of each recipe.

In some traditional methods, the lemon wedges are sun-dried before being marinated with the spices, allowing the flavors to infuse and intensify. This meticulous process enhances the taste and texture of the pickle, creating a harmonious balance between tanginess, spiciness, and a hint of sourness.

🍽️ Versatility on Your Plate: Nimbu ka Achar in Various Avatars 🥗

Nimbu ka Achar is an incredibly versatile condiment that can elevate a wide range of dishes. Here are a few popular ways to enjoy the delightful flavors of Nimbu ka Achar:

  1. Accompaniment to Indian Meals: Nimbu ka Achar pairs perfectly with traditional Indian meals, such as dal, rice, roti, and sabzi. It adds a tangy punch and complements the flavors of the main dishes.
  2. Sandwich Spreader: Spread Nimbu ka Achar on bread or toast to add a tangy and zesty twist to your sandwiches. It pairs well with cheese, veggies, and grilled meats.
  3. Rice Enhancer: Mix Nimbu ka Achar with steamed rice for an instant burst of flavor. The tanginess cuts through the richness of the rice and creates a delightful combination.
  4. Salad Dressing: Drizzle Nimbu ka Achar over salads to add a tangy and spicy element. It works particularly well with cucumber, carrot, and onion salads.
  5. Flavor Booster: Use Nimbu ka Achar as a flavor enhancer for curries, stews, and stir-fries. A spoonful of this pickle can transform an ordinary dish into a tangy and aromatic delight.

🌶️ Cultural Significance: Nimbu ka Achar in Indian Cuisine 🌼

Nimbu ka Achar holds cultural significance in Indian households. It is not just a condiment but a symbol of preservation and traditional culinary practices. Many families prepare Nimbu ka Achar during the harvest season when lemons are abundant. The pickle is then stored in ceramic jars or glass containers, allowing it to mature and develop its flavors over time.

In addition to its culinary role, Nimbu ka Achar has a place in Ayurveda, the ancient Indian system of medicine. It is believed to have digestive and cleansing properties, making it a popular choice during meals.

🙏 Credits and Celebrations 🙌

Let us extend our gratitude to the talented creators and homemakers who have preserved the art of making Nimbu ka Achar over generations. Their dedication and love for culinary traditions have enriched our palates and kept the flavors alive.

As we celebrate the diversity of Indian cuisine, let’s honor the cultural heritage of Nimbu ka Achar and its enduring popularity across India. Whether it’s the tangy delight of Gujarat or the spicy notes of Rajasthan, Nimbu ka Achar has left an indelible mark on the culinary landscape of the country.

🍽️ Join the Nimbu ka Achar Enthusiasts! 🌼

If you are captivated by the flavors of Nimbu ka Achar and wish to connect with fellow food enthusiasts, join our vibrant and engaging foodie community on Facebook. Share your experiences, recipes, and discoveries as we embark on a journey to savor the culinary treasures of the world.

🍋🌶️🌼