Posted on — Leave a comment

Twice Baked Potatoes Recipe: Crispy Skins, Creamy Cheesy Filling

Three finished twice-baked Russet potato halves with fluffy filling, melted cheddar, crisp bacon and chopped chives on a dark surface.

A really good twice-baked potato gives you crisp, salty skin around the edges and a generous mound of soft potato inside, rich with butter, sour cream and sharp cheddar. Bacon stays crunchy on top, while fresh chives cut through all that richness.

Twice-baked potatoes—also called double-baked potatoes—are baked whole, opened and scooped, mixed with a creamy filling, returned to their skins and baked again. In this twice baked potatoes recipe, bake the potatoes until completely tender, leave enough flesh behind to support the shells, and add the dairy gradually so the filling stays fluffy.

The method below gives you times and temperatures, but it also tells you what to look and feel for along the way. That matters more than chasing an exact minute when potatoes are a little larger, drier or simply cooking differently that day.

Before You Start: 5 Numbers That Matter

You do not need to memorize the whole recipe. These five numbers will get you through most of it.

NumberWhat it tells you
10–12 oz / 285–340 gA useful size range for each Russet. Similar weights help the potatoes finish at roughly the same time.
400°F / 205°CThe oven temperature for both fresh bakes.
208–211°F / about 98–99°CAn optional temperature check for a completely baked potato.
¼ inch / 6 mmAbout how much potato to leave attached when you scoop the shells.
¼ cup / 60 mlThe milk to add first. Keep the rest nearby and use it only if the filling needs it.
Visual guide showing a Russet potato on a scale, a 400°F oven setting, a thermometer reading 209°F, a quarter-inch shell wall and a quarter-cup measure of milk.
Five checkpoints keep the result consistent: size, oven temperature, center doneness, shell thickness, and the amount of milk you start with.

How long do twice-baked potatoes take? Plan on roughly 1 hour 45 minutes to 2 hours 15 minutes total when using 10–12 oz / 285–340 g Russets. The first bake usually takes 60–75 minutes at 400°F / 205°C, followed by another 15–20 minutes after filling. Start checking that first bake around 55 minutes rather than relying only on the clock.

Ready to cook? Jump to the recipe.

Twice Baked Potatoes Recipe

Crisp Russet shells filled with fluffy potato, butter, sour cream, sharp cheddar, bacon and chives, then baked again until the cheese melts into the ridges and the highest potato peaks begin to brown.

Yield
8 potato halves

Serves
8 as a side; about 4 as a main

Prep / active time
About 25–30 minutes

First bake
Usually 60–75 minutes

Second bake
15–20 minutes

Total time
About 1 hr 45 min–2 hr 15 min

Equipment

Rimmed baking sheet; wire rack if you have one; large mixing bowl; skillet for the bacon; sturdy spoon; potato masher or ricer; rubber spatula; clean folded kitchen towel or oven mitt; instant-read thermometer if you want a temperature check.

Ingredients

  • 4 large Russet potatoes, 10–12 oz / 285–340 g each, about 2½–3 lb / 1.15–1.35 kg total
  • 1 tbsp / 15 ml olive oil or neutral oil
  • Kosher salt, enough to lightly and evenly season all four skins, plus more for the filling if needed; use a lighter hand with fine or table salt
  • 6 oz / 170 g bacon, raw weight
  • 5 tbsp / 70 g unsalted butter, softened or cut into small pieces
  • ⅔ cup / about 160 g full-fat sour cream
  • ½ cup / 120 ml whole milk, warmed and divided—you may not need all of it
  • 1½ cups / about 170 g sharp cheddar, freshly shredded and divided
  • 3 tbsp chopped chives or ¼ cup thinly sliced green onions, divided
  • ½ tsp freshly ground black pepper, plus more to taste
  • ¼ tsp garlic powder, optional

Method

1. Bake the Russets until completely tender

Bake the oiled, salted Russets uncovered at 400°F / 205°C until a skewer slips easily through the thickest center, usually 60–75 minutes.

Set a rack in the middle of the oven. Scrub the potatoes well and dry them thoroughly. Prick each one several times with a fork, rub the skins lightly with oil and sprinkle them lightly and evenly with salt. Arrange them on a rimmed baking sheet with a little room between each potato. A wire rack improves airflow if you have one; the potatoes will still bake properly without it.

Start checking around 55 minutes. Push a thin skewer or knife through the thickest part. It should slide through the center with almost no resistance. The skin should feel dry and a little taut rather than damp, and the whole potato should give slightly when squeezed with an oven mitt. With a thermometer, look for roughly 208–211°F / about 98–99°C, the range the Idaho Potato Commission gives for a properly baked potato.

Take each potato out when it is ready. They do not all need to finish at exactly the same moment.

Baked Russet potato on a metal tray with an instant-read thermometer inserted into the center and displaying 209°F and 98°C.
Probe the thickest middle of the Russet; when the skewer meets almost no resistance, the potato is ready to scoop.

2. Cook the bacon while the potatoes bake

Meanwhile, cook the bacon over medium heat until crisp. Drain it well and chop or crumble it fairly small. Reserve about 2 tbsp cooked bacon for the finished tops.

The bacon can also cook in the air fryer while the Russets are in the oven; our air fryer bacon guide has separate timings for regular and thick-cut bacon.

3. Split and scoop while the flesh is warm

Rest the baked potatoes for 5–10 minutes. They should still be steaming inside but cool enough to handle with a folded kitchen towel or oven mitt.

Cut each potato in half lengthwise and scoop the flesh into a large bowl, leaving about ¼ inch / 6 mm attached to the skin.

The first shell may feel more delicate than expected. That is normal. Leave a little extra potato around the bottom and pointed ends and it becomes much easier to handle. The skin does not need to be scraped paper-thin.

Hand holding a baked potato half with a towel while a spoon removes the flesh, leaving about a quarter-inch layer of potato inside the skin.
Leave a sturdy layer of potato around the shell, especially at the base and tapered ends where it is easiest to tear.

For a crisper shell: lightly brush the empty skins with oil or melted butter and return them to the 400°F / 205°C oven for 5–8 minutes while you mix the filling. The edges should feel a little drier and firmer before the potato goes back in.

4. Build the filling gradually

Using a ricer? Rice the plain warm potato into the bowl first, then fold in the butter. Using a masher? Add the butter to the warm potato and mash gently until the large lumps are gone.

Add the sour cream, black pepper, optional garlic powder and ¼ cup / 60 ml warm milk. Fold everything together, then look at the texture. If it still seems stiff or crumbly, add another tablespoon / 15 ml of warm milk and fold again.

Once the potato sits in a soft mound and the spoon marks stay where you put them, stop adding liquid. A few small pieces of potato are fine; there is no need to chase a perfectly smooth filling.

Bowl of fluffy potato filling with visible spoon ridges beside a quarter-cup measure of milk and text reading “Milk is a ceiling, not a target.”
Aim slightly firmer in the bowl than you want at serving; the filling loosens as the butter and cheese heat.

5. Add the cheese, bacon and chives

Set aside ½ cup / 55–60 g cheddar and about 1 tbsp chives or green onions for the tops.

Fold the remaining cheddar, bacon and herbs into the potato. Work gently. Once the filling is creamy, extra beating only gives the starch more opportunity to turn sticky.

Taste it now. The filling should already be good enough to eat straight from the spoon. Add more salt only if the bacon and cheddar have not supplied enough.

6. Refill the shells

Spoon the filling generously into all eight shells without packing it down. They will not all look identical, and they do not need to.

Top with the reserved cheddar and leave the surface a little rough. Those small peaks are where the cheese catches and the potato browns first.

Eight filled Russet potato halves on a baking sheet with rough potato mounds and a light scattering of unmelted shredded cheddar.
Loose, rough mounds expose more edges for the cheese to settle into and the potato to brown.

7. Bake again

Return the potatoes to the 400°F / 205°C oven for 15–20 minutes. Pull them when the centers are hot, the cheddar has melted into the ridges and a few exposed potato peaks have started to turn golden.

Finish with the reserved crisp bacon, fresh chives or green onions and a little black pepper.

Freshly baked twice-baked potato halves with melted cheddar, browned potato peaks, crisp bacon and chopped chives on a metal tray.
The cheddar should be melted and the highest exposed potato peaks lightly browned.

What to Serve with Twice Baked Potatoes

One half makes a substantial side serving; two halves make a generous meal-sized portion. As a side, these fit naturally beside steak, roast chicken or pork. If the potato is the main event, something fresh and green keeps the plate from feeling too heavy.

Twice-baked potato with melted cheddar, bacon and chives served on a dark plate with sliced steak and green vegetables behind it.
Pair the rich potato with simply cooked meat and something fresh or green.

Scaling the Recipe

Cooking for two: use 2 Russets, about 1¼–1½ lb / 570–680 g total, and halve the other ingredients. With such a small batch it is easy to overshoot the liquid, so start with 2 tbsp / 30 ml milk and keep another 2 tbsp / 30 ml nearby only if you need it.

Cooking for guests: consider buying and baking one extra Russet. Its flesh can tighten filling that turns too loose, and the spare shell is useful if another one tears.

Making them ahead? Go to storage and reheating.  ·  Something went wrong? Open troubleshooting.


Best Potatoes for Twice Baked Potatoes

Russets are the best choice for classic twice-baked potatoes because their dry, starchy flesh turns fluffy while the thicker skin survives scooping and refilling.

Size matters almost as much as variety. A bag can contain several potatoes all labelled “large” even though one is visibly much heavier than another. Choosing similar weights gives them a better chance of finishing together.

Several Russet potatoes beside a digital kitchen scale, with one potato weighing 11 ounces or 312 grams and a larger potato nearby for comparison.
Similar-sized Russets are easier to bake evenly, so weight is a better guide than the word “large.”
PotatoWhat to expectUse here?
RussetFluffy flesh and a sturdy skinBest choice
Yukon GoldDenser, creamier flesh with a thinner skinYes, but handle the shell more gently
Red potatoWaxier flesh and smaller, more delicate shellsBetter suited to mini stuffed potatoes

Crisp Skin Starts With the First Bake

For crisp twice-baked potato skins, dry the Russets thoroughly, rub them lightly with oil and salt, and bake them uncovered until completely tender.

Dry skin needs exposed oven heat. Foil traps escaping steam against the potato, which is useful when you want a softer baked-potato skin but works against the crisp-edged shell here.

Two baked Russet potatoes side by side, one partly wrapped in foil with softer skin and one baked uncovered with a drier, more textured skin.
Foil keeps the skin softer, while uncovered baking builds the sturdier surface needed for crisp-edged shells.

Doneness matters too. A potato that feels tender near the surface but still resists at the center is not ready for scooping; the second bake is too short to rescue firm interior flesh.

Protect the shell without scraping it bare

The bottom and narrow ends are where the shell usually feels weakest. Leave a sturdy cushion of potato there and stop scooping before the skin turns flimsy in your hand.

Need the practical method? Go back to Step 1.

How to Keep the Filling Creamy, Not Runny or Gummy

Potatoes do not all take up dairy in exactly the same way. Size, doneness and moisture loss all change how much milk the filling needs.

Milk is a ceiling, not a target.

What the filling looks likeWhat to do
Stiff or crackingAdd warm milk a tablespoon at a time.
Soft mound; ridges stay visibleStop. The filling is ready.
Glossy or slowly spreadingFold in extra plain cooked potato if you have it.

The mixture will loosen a little more as the butter and cheese heat. In the bowl, you want it plush enough to move under the spoon while still holding those soft ridges.

Gentle mixing matters just as much

Gummy potato is a different problem from wet potato. Vigorous mixing releases more starch, which is why a blender, food processor or prolonged beating can spoil the texture even when the liquid amount is right.

Two bowls comparing fluffy potato filling with rough airy ridges against smoother, denser overmixed potato filling labeled “gummy.”
Gummy, smeary filling points to overmixing; the potato should stay soft and lightly ridged.

A masher or ricer keeps the job gentler.

A few tiny pieces are fine. Smooth enough to feel creamy is enough.

Our creamy mashed potatoes guide goes deeper into ricer versus masher, warm dairy and potato starch.

Need the exact filling method? Go back to Step 4.

Make Ahead, Freeze & Reheat Twice Baked Potatoes

For the best texture, assemble the potatoes up to 48 hours ahead and refrigerate them before the second bake. This is the useful version when dinner needs to be mostly finished before people arrive: the scooping and mixing are done, and only the final heating and browning are left.

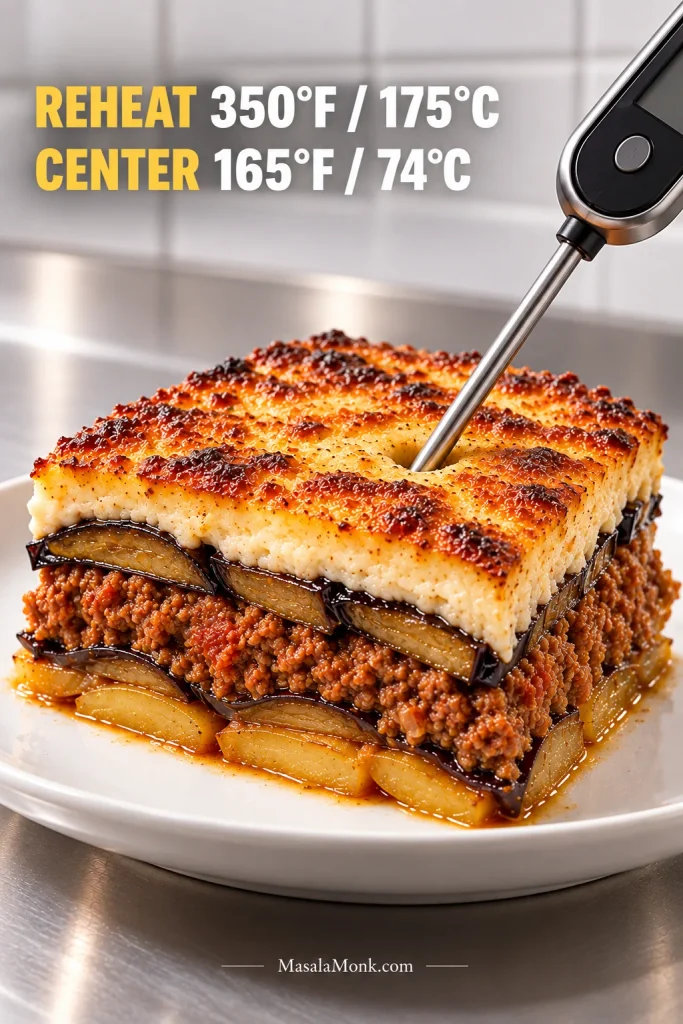
One reheating rule: for filled potatoes chilled or frozen after the first bake, and for already-baked leftovers, use 165°F / 74°C in the center as the reheating finish line.

The USDA Food Safety and Inspection Service recommends refrigerating perishable leftovers within 2 hours and generally using refrigerated cooked leftovers within 3–4 days.

Filled potato halves stored in a covered metal container behind a reheated twice-baked potato with a thermometer reading 165°F and 74°C.
Top color can mislead during reheating; check the center, then add fresh bacon and chives.

Refrigerated before the second bake

Arrange the filled potatoes in a shallow covered container or on a covered tray. Bake them cold at 400°F / 205°C and check from about 25 minutes. Large or very cold potatoes may need 30 minutes or a little longer.

For the nicest filling texture, scoop and assemble while the potato is still warm. If whole baked potatoes have already been refrigerated, warm them until the centers are hot and pliable before scooping.

Frozen before the second bake

Filled potatoes can be frozen, although their texture is usually a little less creamy afterward than it is with refrigerated make-ahead potatoes. Let heavy steam escape briefly, refrigerate promptly, then freeze the chilled potatoes on a tray until firm before wrapping or packing them airtight.

For best quality, use them within about 2–3 months. Fresh chives, green-onion tops and some of the crisp bacon are better held back and added after reheating.

Thawed overnight: bake at 400°F / 205°C and check from about 25 minutes.

Straight from frozen: use 375°F / 190°C. After roughly 40 minutes, test the center; large, densely filled potatoes may need 50 minutes or more. Tent the tops loosely with foil if they are browning before the middle is hot.

Already baked leftovers

MethodHow to reheat
Oven375°F / 190°C; check from about 15 minutes. This brings some crispness back to the shell while the center heats through.
Air fryer350°F / 175°C; check from about 5 minutes. Fast, and particularly good at refreshing the skin.
MicrowaveUse moderate power in short intervals. It is the fastest route, although the skin softens.

Ready to cook? Back to the recipe.

Air Fryer Twice Baked Potatoes

For 10–12 oz / 285–340 g Russets, start checking the whole potatoes at about 40 minutes at 400°F / 205°C. Expect roughly 40–55 minutes, depending on potato weight, basket size and appliance power.

The thickest center still decides when they are ready. A skewer should pass through with almost no resistance before you cut them open.

Once tender, scoop and fill them as in the oven method, then return the filled shells at 375°F / 190°C for roughly 6–10 minutes, until hot and lightly browned. Leave room around them so the hot air can circulate.

Four finished twice-baked potato halves spaced apart inside an open black air fryer basket with text reading “Leave room for airflow.”
Leave room between the potato halves so hot air can reach the exposed surfaces.

Useful Substitutions

Plain Greek yogurt is a straightforward sour-cream substitute when you still want tang and creaminess. Use roughly the same amount, then add the milk gradually because Greek yogurt thickness varies by brand.

For a richer, denser filling, replace about half the sour cream with 4 oz / 113 g softened cream cheese. You may need less milk.

No bacon? Leave it out. A small pinch of smoked paprika adds smokiness, while crisp fried onions or toasted breadcrumbs can bring back some crunch.

For broccoli cheddar, use about 1½ cups / 150–170 g small broccoli florets, cooked just until tender and then dried well. Moisture trapped between the florets can loosen the filling surprisingly quickly.

Twice Baked Potatoes Troubleshooting

Most problems trace back to the first bake, a fragile shell, too much liquid or too much mixing. Several can still be rescued after the potatoes are already open.

Shell & Filling Problems

ProblemWhat to do
Hard centerNow: Microwave the scooped flesh in short bursts until tender; return firm empty shells to the oven if needed.
Next time: Probe through the thickest center before cutting.
Torn shellNow: Divide the filling among the intact shells.
Next time: Leave about ¼ inch / 6 mm of potato attached.
Soft skinNow: Bake the empty shell another 5–8 minutes before filling.
Next time: Dry the potatoes well and bake them uncovered.
Dry fillingNow: Add warm milk 1 tbsp / 15 ml at a time.
Next time: Judge the texture before deciding how much milk to use.
Loose fillingNow: Fold in extra plain cooked potato if available.
Next time: Add liquid gradually and stop while the mixture still holds ridges.
Runny after bakingNow: Let the potatoes settle for a few minutes; severe runniness is difficult to reverse once the fats melt.
Next time: Keep the filling structured before it goes into the oven.
Gummy fillingNow: Stop mixing and gently fold in extra plain potato if available.
Next time: Mash or rice gently; avoid a blender or food processor.

Seasoning, Reheating & Freezer Problems

ProblemWhat to do
Bland fillingNow: Adjust with salt, pepper and fresh chives while you still can.
Next time: Taste after the bacon and cheddar are mixed in.
Too saltyNow: Fold in plain cooked potato.
Next time: Wait until the bacon and cheese are in before final seasoning.
Brown top, cool centerNow: Tent loosely and continue heating until the center is fully reheated.
Next time: Give refrigerator-cold potatoes more time than freshly filled ones.
Dry after reheatingNow: Add a little sour cream or butter at serving.
Next time: Use the center-temperature finish cue and avoid continuing to heat long after the potato is ready.
Slightly mealy after freezingNow: Add fresh sour cream, butter or cheese.
Next time: Refrigerate rather than freeze when texture matters most.

The potatoes are already open, and the centers are undercooked

Do not force hard pieces into the filling and hope the second bake fixes them. Scoop the firm flesh into a microwave-safe bowl and heat it in short intervals until completely tender. If the potato still attached to the shells is also firm, put those shells back in the oven while the flesh cooks.

Two opened Russet potatoes comparing fluffy fully tender flesh with a denser underdone center, labeled “Fully tender” and “Underdone center.”
A firm, smooth core inside otherwise fluffy potato means the center needs more cooking before it goes into the filling.

Once everything is tender, carry on with the filling. You have not lost the batch.

You’re making 20, 30 or 40 potatoes

Scale the potatoes, butter, sour cream, cheese and bacon by weight. Keep the milk and salt responsive to the food in front of you rather than multiplying them blindly.

A full oven changes the timing too. Use multiple trays in single layers with room around the potatoes for airflow, and expect a heavily loaded oven to recover heat more slowly. Judge the largest potatoes by doneness rather than assuming the four-potato timing will scale exactly.

Multiple sheet pans of whole Russet potatoes spaced in single layers on separate oven racks in a large commercial-style oven.
For large batches, keep potatoes spaced across trays and mix filling in manageable bowls so texture can be corrected as you go.

If individual shells become cumbersome for a larger table, our twice baked potato casserole keeps the same creamy, cheesy idea in a scoop-and-serve format.

Work in manageable batches and taste each bowl before you start filling shells. Correcting one bowl takes seconds. Correcting thirty filled potatoes does not.


How a Finished Twice Baked Potato Should Feel

At serving temperature, the shell should stay sturdy enough to lift while the center gives easily to a fork without feeling loose, dense or pasty.

Close-up of a fork lifting a bite from a finished twice-baked potato with crisp brown skin, fluffy filling, melted cheddar, bacon and chopped chives.
Look for a soft, irregular center inside a sturdy crisp shell, with melted cheddar settled into the folds.

Back to the recipe  ·  Back to top

Serve them straight from the second bake, while the rough potato peaks are browned, the bacon is still crisp and the middle is hot and creamy.

Posted on — Leave a comment

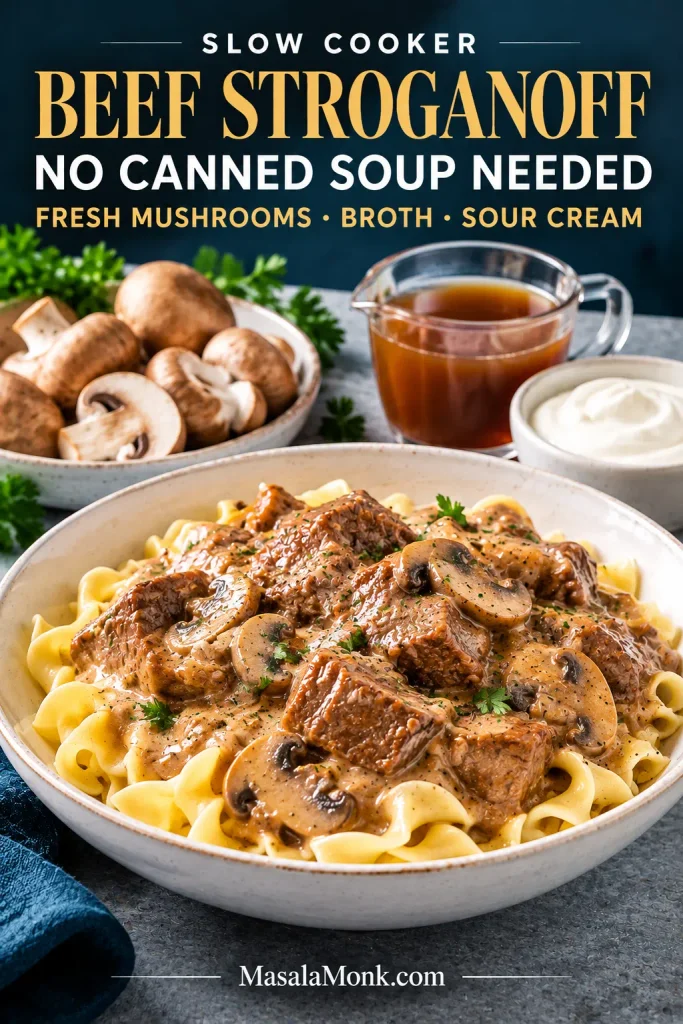
Slow Cooker Beef Stroganoff Recipe: Tender, Creamy & Easy Crock Pot Dinner

Close-up bowl of beef stroganoff with wide egg noodles, mushrooms and beef chunks, with a fork lifting a sauced bite.

Tender pieces of beef, mushrooms, tangy sour cream and glossy sauce caught in the folds of hot egg noodles are what you’re heading toward here. In this slow cooker beef stroganoff recipe, chuck gets several hours to soften until it yields under a fork without disappearing into the sauce.

Aim for a sauce loose enough to move when you tip the spoon but creamy enough to cling to the noodles. Most of the long cooking belongs to the beef; the last few minutes are where the stroganoff itself comes together.

The useful rule here: slow-cook the beef; finish the stroganoff at the end.

That means starting with less liquid than may look natural, letting tenderness—not just the timer—decide when the chuck is ready, and saving sour cream for the finish. The sauce here starts with fresh mushrooms and beef broth instead of condensed soup, although a cream-of-mushroom shortcut is included later if that’s the style you want. Browning first gives you deeper beef flavor; skipping the skillet is completely reasonable when the point is getting dinner started early and getting on with your day.

The 30-Second Slow Cooker Plan

Beef2 lb / 900 g chuck, cut 1¼–1½ inches / 3–4 cm
Slow cooker5½–6 qt / about 5.2–5.7 L
Broth1 cup / 240 ml to start; keep up to ¼ cup / 60 ml in reserve
Mushrooms12 oz / 340 g
CookLOW 7–8 hr (preferred for chuck); check around 6½ hr. HIGH 4–5 hr; check around 3½–4 hr.
Finish¾ cup / about 180 g full-fat sour cream, added after the long cook
Serve12 oz / 340 g wide egg noodles, cooked separately

Some beef sitting above the liquid is exactly what you should expect at the beginning. The onion, mushrooms and chuck will contribute more moisture as they cook.

Using sirloin or another tender steak? This is not its recipe. Use our 30-minute Beef Stroganoff instead. Thin steak strips suit a hot skillet and short cooking time; this slow-cooker version is built for chuck, stew beef, blade and other braising cuts.

Choose Your Route: Best Flavor or Easiest

Decide this before you start: brown first when deeper roasted flavor matters, or skip the skillet when an easier hands-off dinner matters more. The measured starting liquid stays controlled either way.

Browned beef in a skillet beside a slow cooker holding raw beef, mushrooms, onion and garlic, showing two preparation routes.
Whichever slow-cooker route you choose, the starting-liquid budget stays the same. If you deglaze with ¼ cup / 60 ml wine, it replaces that amount of broth; if you deglaze with broth, use it from the measured cup rather than pouring in extra liquid.

Slow Cooker Beef Stroganoff Recipe

Chuck slowly cooked with onion, mushrooms, beef broth, Worcestershire and Dijon, then finished with tempered sour cream and served over wide egg noodles.

Best-result route: brown the beef, deglaze the skillet with broth or wine, and brown the mushrooms separately near the end.
Easiest route: put the thawed raw beef, onion, garlic and mushrooms straight into the slow cooker and use broth only.

Yield
6 generous servings
About 2 oz / 57 g dry noodles each

Prep
About 15 minutes

Optional browning
About 10–15 minutes

Slow cook
7–8 hr LOW
4–5 hr HIGH

Finish: about 15–25 minutes
Total: roughly 7½–9 hours on LOW or 4½–6 hours on HIGH, depending on whether you brown first, whether the sauce needs thickening and how quickly the beef becomes tender.

Equipment

  • 5½- to 6-quart / approximately 5.2- to 5.7-L slow cooker
  • 12-inch / 30 cm heavy skillet, optional for browning
  • Large pot for the egg noodles
  • Small bowl and whisk for tempering the sour cream
  • Small bowl for cornstarch slurry, if needed

Ingredients

  • 2 lb / 900 g boneless chuck roast, trimmed of very thick exterior fat and cut into 1¼–1½ inch / 3–4 cm chunks
  • 1 tsp / about 6 g fine sea salt, plus more at the end if needed
  • 1 tsp freshly ground black pepper
  • 1½ tbsp / 22 ml neutral cooking oil, for browning; omit for dump-and-go
  • 1 medium onion, about 6 oz / 170 g, diced
  • 3 garlic cloves, finely minced
  • 12 oz / 340 g cremini, baby bella or white button mushrooms, sliced about ¼ inch / 6 mm thick
  • 1 cup / 240 ml low-sodium beef broth, plus up to ¼ cup / 60 ml more held back for finishing
  • 1½ tbsp / 22 ml Worcestershire sauce
  • 1 tbsp / 15 ml Dijon mustard
  • 1 tsp sweet paprika, not smoked
  • ¼ cup / 60 ml dry red wine, optional for the browned route; it replaces ¼ cup / 60 ml of the starting broth
  • 1 tbsp / 14 g butter, optional for browning the mushrooms separately
  • ¾ cup / about 180 g full-fat sour cream
  • Up to 2 tbsp / about 16 g cornstarch, as needed
  • Up to 2 tbsp / 30 ml cold water, matching the amount of cornstarch used
  • 12 oz / 340 g wide egg noodles
  • About 2 tbsp chopped parsley, optional

Instructions

Build the Slow Cooker Base

  1. Prep the beef. Cut the chuck into roughly 1¼–1½ inch / 3–4 cm chunks. If the surface is visibly wet from packaging, blot it dry before seasoning evenly with the salt and black pepper.
  2. Brown the beef, onion and garlic—or skip the skillet.

    Browned route: Heat the oil in a 12-inch / 30 cm heavy skillet over medium-high until it shimmers and a piece of beef sizzles immediately when it hits the pan. Brown the beef in 2–3 batches, leaving the first surface mostly undisturbed for roughly 2–3 minutes before turning and browning another side for about 1–2 minutes. You are building color; the beef does not need to cook through. Transfer it to the slow cooker. Lower the heat slightly, cook the onion for 2–3 minutes, then add the garlic for about 30 seconds.

    Dump-and-go: Put the seasoned raw beef, onion and garlic directly into the slow cooker. No skillet needed.
  3. Add the liquid, seasonings and mushrooms.

    Dump-and-go: Pour 1 cup / 240 ml broth directly into the slow cooker.

    Browned, no wine: Deglaze the skillet with a splash of that measured broth, scrape up the browned bits, then add the skillet liquid plus enough remaining broth to total 1 cup / 240 ml.

    Using wine: Deglaze the skillet with ¼ cup / 60 ml dry red wine, let it bubble for 1–2 minutes, then add ¾ cup / 180 ml broth.

    Stir in the Worcestershire, Dijon and sweet paprika. For the easiest version, add the mushrooms now. For the best mushroom texture, keep them aside and brown them near the end. Keep the extra ¼ cup / 60 ml broth in reserve.

Slow-Cook and Build Texture

  1. Slow-cook until the beef gives easily. Cover and cook on LOW for about 7–8 hours or HIGH for about 4–5 hours. Start checking around 6½ hours on LOW or 3½–4 hours on HIGH. The beef may still need another hour. It is ready when a fork slides in easily and the fibers begin to separate with gentle pressure. Moist but chewy chuck usually needs more time, so continue in roughly 30-minute increments.
  2. Brown the reserved mushrooms, if using that route. Melt the butter in a wide skillet over medium-high heat. Add the mushrooms without piling them too deeply. At first they may look crowded and wet; keep cooking until that released moisture has mostly evaporated and the edges begin to brown, usually about 6–10 minutes depending on the pan and heat. Set them aside for the finish.

Finish the Sauce and Serve

  1. Finish the sauce. Skim away any obvious layer of fat, then taste the cooking liquid before adding anything else. The sauce can taste slightly stronger at this stage than you want at the table; once the sour cream goes in, those sharper edges settle down. If it tastes flat, try a little more Worcestershire, Dijon or black pepper before reaching for more salt.

    When the sauce already lightly coats the back of a spoon, skip the starch. If it needs thickening, mix 1 tbsp / about 8 g cornstarch with 1 tbsp / 15 ml cold water. Switch or keep the slow cooker on HIGH, stir in the slurry, cover and give it about 10–15 minutes to thicken. If it is still clearly too loose, add the second tablespoon of cornstarch mixed with the remaining cold water and continue on HIGH just until the sauce thickens.
  2. Temper the sour cream and add the mushrooms. Put the sour cream in a bowl and gradually whisk in about ½ cup / 120 ml hot cooking liquid. Turn the slow cooker OFF or down to WARM, then fold the tempered sour cream gently into the beef. Add the browned mushrooms now if you reserved them. Keep the heat gentle from here.
  3. Cook the noodles and serve. Boil the wide egg noodles in salted water until just tender according to their package timing, then drain well. Loosen the stroganoff with a tablespoon or two of reserved broth if necessary and taste once more for salt. Divide the noodles among bowls, spoon the beef and sauce over them and scatter with parsley if using.

What you’re looking for: beef that still holds together but yields easily to a fork, with a glossy, creamy sauce that moves when you tip the spoon but still leaves a coating on the noodles.

Recipe Notes

  • LOW gives chuck a more forgiving cooking window. HIGH works when time is shorter.
  • Cornstarch is optional. Use it only if the finished cooking liquid actually needs it.
  • Doubling the recipe? Use a larger slow cooker instead of crowding a 5½- to 6-quart pot. Cooking time will not simply double, so start checking within the usual braising window and let tenderness decide the finish.

Is Browning Worth the Extra Skillet?

Yes—thawed raw beef can go straight into the slow cooker for this recipe. Browning isn’t required.

If you’re deciding whether washing one more pan is actually worth it: yes, you can taste the difference. Browning creates roasted beef flavor, and the dark bits left in the skillet become part of the sauce once you scrape them up.

Still, there are evenings when that extra skillet defeats the point. Put everything straight into the cooker, save the sour cream and noodles for later, and carry on with your day.

Beef chuck pieces browning in a skillet with caramelized surfaces, visible pan fond and tongs turning one piece.
You do not need to brown every surface of every beef chunk. Instead, give one or two broad faces uninterrupted contact with the hot skillet; that builds useful caramelization and fond while keeping the browning step focused.

Best Beef for Slow Cooker Stroganoff

Chuck roast is the best all-around choice here. It has the marbling and connective tissue that actually benefit from several hours of moist heat, and it becomes tender without disappearing completely into the sauce.

Can I use stew meat?

Yes. Buying a whole chuck roast simply gives you more control over what goes into the pot and how large the pieces are. Packaged stew meat can contain more than one muscle, so some cubes may soften faster than others.

Look for visible marbling and reasonably chunky pieces. Small cubes lose their shape sooner.

Why cut the beef into 1¼–1½ inch / 3–4 cm pieces?

Tiny cubes can fall apart long before dinner. Huge chunks take longer to soften and are awkward over noodles. The middle ground gives the beef time to become tender while leaving something substantial to bite into.

Raw boneless chuck roast cut into thick chunks beside a ruler showing one piece about 3 to 4 centimeters, or 1¼ to 1½ inches.
Packaged stew meat can contain different muscles and uneven pieces, so some cubes may tenderize before others. Cutting your own chuck into roughly 1¼–1½ inch / 3–4 cm chunks gives you more control over both marbling and how uniformly the beef braises.
CutHow it behavesUse here?
Chuck roastMarbled, collagen-rich and forgivingBest choice
Stewing beefConvenient but potentially inconsistentYes
Blade / braising steakWell suited to long moist cookingYes
Bottom roundLeaner and less forgivingPossible with careful timing
SirloinNaturally tender; better with quick cookingUse the skillet recipe
TenderloinVery tender and expensiveSave it for a faster method

Shoulder-area beef can carry several names—shoulder roast, chuck shoulder, arm roast or shoulder clod. If the package in front of you is not especially clear, our beef shoulder roast guide goes deeper into those labels.

The Broth Should Look a Little Too Low at First

If one cup of broth looks stingy when you put the lid on, that’s intentional. The beef, onion and mushrooms are about to contribute plenty of liquid themselves.

A slow cooker traps that moisture. Steam collects beneath the lid and falls back into the pot instead of evaporating from an open pan. Starting conservatively is much easier than trying to rescue a pot you accidentally turned into soup.

Seeing beef above the liquid is normal. It does not need to be submerged.

Overhead view into a slow cooker with raw beef, mushrooms and onion sitting mostly above a shallow layer of broth.
Think of the starting liquid as a fixed budget, not a level the beef needs to reach. If you use ¼ cup / 60 ml wine, it replaces the same amount of broth; meanwhile, the extra ¼ cup / 60 ml broth stays in reserve unless the finished stroganoff actually needs loosening.

Adding Red Wine

If you’re using wine in this recipe, use it with the browned route so it can reduce briefly in the hot skillet while loosening the browned bits. Count it as part of the starting liquid instead of pouring it in on top.

If the finished pot looks more like soup than sauce, jump to how to fix thin stroganoff sauce.

Let the Beef Tell You When It Is Done

The first fork test can be disappointing. Chuck may already be fully cooked yet still feel stubborn because its connective tissue has not softened enough.

Still moist but chewy? Give it another 30 minutes.

Fork slides in easily and the fibers separate with gentle pressure? It is ready.

Chunks collapse as soon as you stir them? Stop the heat and handle them gently from here.

A thermometer helps answer the safety question. For the texture of a braise, your fork tells you much more.

Fork inserted into an intact braised beef chunk surrounded by mushrooms and dark brown cooking liquid before sour cream is added.
Moist-but-chewy chuck and dry, stringy beef are different problems. The first usually needs more braising time; by contrast, once the fibers separate with gentle pressure while the chunk still holds its shape, you have reached the useful tenderness window.

Once the chuck passes the fork test, go straight to finishing the stroganoff sauce.

When to Add the Mushrooms

For the best texture, brown the mushrooms near the end. Their water cooks away in the skillet, their edges pick up color and they stay meaty enough to notice against the soft beef.

Browned sliced mushrooms in a stainless skillet beside softer mushrooms that cooked with the beef in the slow cooker.
Mushrooms often look wetter before they look browner. Keep cooking until their released moisture has mostly evaporated and the edges begin to color; otherwise, adding them late gives you little texture advantage over letting them slow-cook with the beef.

Add them with the beef when ease matters more. Cooked with the beef, they’ll become much softer and their flavor will blend into the sauce.

Making Stroganoff Without Mushrooms

Leave them out. Let the onion pick up some color if you’re browning first, then taste the Worcestershire and Dijon again near the end. The sauce will be less earthy but still very much stroganoff.

If browned mushrooms are the part you want more of, our Creamy Mushroom Sauce gives them the whole stage.

Finish the Sauce

Once the chuck is tender, skim any obvious surface fat and taste the cooking liquid before adding anything else. It can be slightly stronger than you want in the finished bowl because the dairy will round out some of those sharper edges and soften the seasoning. If the sauce tastes flat, Worcestershire, Dijon or black pepper may help more than another pinch of salt.

If the Sauce Is Too Thin

For a mildly loose sauce, start with 1 tbsp / about 8 g cornstarch mixed with 1 tbsp / 15 ml cold water. Stir it in with the slow cooker on HIGH, cover and give it about 10–15 minutes before deciding whether it needs more. Remember that the sour cream will add some body at the finish, so stop before the sauce starts behaving like gravy.

Very watery? Taste it first. Thin and weak cooking liquid can be reduced in a saucepan until the beef flavor concentrates. Thin but already salty is different: skip aggressive reduction and use a modest amount of slurry instead, because concentrating the liquid will concentrate the salt too.

Went too far with the starch? Loosen the sauce a tablespoon at a time with reserved broth, warm water or noodle water. Stop as soon as it starts moving naturally again.

Metal spoon coated with creamy brown stroganoff sauce forming a short drip above beef, mushrooms and wide egg noodles.
Watery stroganoff is not always the same problem: thin-and-weak cooking liquid can be reduced, whereas thin-but-already-salty liquid should not be aggressively concentrated. In either case, stop short of gravy because sour cream will add more body at the finish.

Temper the Sour Cream

Warm the sour cream gradually with some hot cooking liquid before folding it into the beef. That gentler transition helps keep the sauce smooth. Add any separately browned mushrooms at the same time, then keep the heat gentle. A hard boil after the dairy goes in only makes separation more likely.

Hot brown cooking liquid being whisked into white sour cream as the mixture begins turning pale brown.
For this batch, gradually whisk about ½ cup / 120 ml hot cooking liquid into the sour cream before it goes into the slow cooker. Once the dairy is warm and loosened, fold it in on OFF or WARM rather than bringing the finished stroganoff back to a hard boil.

With the dairy smooth, continue to the egg noodles and serving setup.

Cook the Egg Noodles Separately

Once noodles hit the sauce, the clock starts ticking. They keep absorbing liquid during dinner and continue doing it in the refrigerator, which is how a beautifully saucy stroganoff becomes dry leftovers.

Cook them while the sauce finishes, drain them while they still have some structure, then portion them into bowls and spoon the beef over the top. Everyone can choose how saucy they want dinner, and whatever remains stores much better.

Beef stroganoff being spooned over one side of a bowl of wide egg noodles while part of the noodles remain plain and separate.
With 12 oz / 340 g wide egg noodles for six generous servings, you are at roughly 2 oz / 57 g dry noodles per person. Portion the noodles first, then spoon over as much beef stroganoff as each bowl needs; consequently, the remaining sauce stores far better.

For an even softer, richer plate, serve the stroganoff over creamy mashed potatoes.

Cream Cheese, Condensed Soup, and Other Variations

If the stroganoff you’re after is the cream-cheese or condensed-soup kind, those versions work too. They change more than one ingredient, so broth, salt and thickening need to move with them.

Finished beef stroganoff with wide egg noodles beside fresh mushrooms, beef broth and a bowl of sour cream.
Making slow cooker beef stroganoff without canned soup keeps broth, dairy, salt and starch as separate controls. By contrast, condensed soup contributes several of those at once, so the shortcut works best when you deliberately reduce the starting broth and wait before adding extra salt or cornstarch.
If you want…ChangeResult
Cream-cheese stroganoffAdd 4 oz / 113 g softened cream cheese and reduce sour cream to about ½ cup / 120 gRicher, thicker and less tangy
Cream-of-mushroom shortcutUse one 10.5 oz / about 298 g can condensed cream of mushroom soup and start with about ½ cup / 120 ml brothThicker and closer to classic American Crock Pot versions
Golden-mushroom versionUse one 10.5 oz / about 298 g can golden mushroom soup with about ½ cup / 120 ml brothDarker and more savory
No mushroomsOmit them and adjust the savory seasoning at the endMore purely beef-forward

Cream Cheese Version

Soften the cream cheese first, then whisk it with a ladle of hot cooking liquid until smooth before folding it into the sauce. Dropping a cold block straight into the cooker is how you end up chasing white lumps around the pot.

Cream of Mushroom Soup Version

Condensed soup already brings liquid, salt and starch, so this version needs a lighter hand elsewhere. Hold back most or all of the initial added salt and wait until the end before deciding whether the sauce needs any cornstarch.

Fresh mushrooms are optional. Keep them when you want actual mushroom pieces; leave them out when the soup is doing that job for you. Golden mushroom soup follows the same liquid-and-salt logic but produces a darker, more savory sauce.

If you came here because the current batch needs fixing rather than changing the recipe, go to Rescue My Stroganoff.

Rescue My Stroganoff

Slow cookers vary, chuck varies, and dinner does not always look exactly like the photograph. Most problems become easier to fix once you name what actually went wrong.

ProblemLikely reasonWhat to do
Beef is still toughChuck needs more timeCook another 30 minutes and check again
Beef is dry and stringyLean cut or too much cookingMore time will not restore lost moisture
Beef is falling into shredsSmall pieces, hot cooker or too much timeStop cooking and stir very gently
Sauce looks greasyChuck rendered more fat than expectedSkim the excess before adding sour cream
Sauce looks like soupToo much starting liquid or extra moistureUse slurry gradually; reduce only if the liquid is not already salty
Sauce is glueyToo much starchLoosen gradually with reserved broth, water or noodle water
Sauce is blandSeasoning is muted or the cooking liquid is too diluteTry Worcestershire, Dijon or pepper before more salt
Sauce is too saltySeveral salty ingredients added upAdd a little unsalted liquid, then reassess thickness
Sour cream looks speckled or separatedDairy was cold or overheatedTake it off the heat and whisk gently. Mild separation may smooth out; badly curdled dairy may not fully recover
Sauce tastes mostly of sour creamDairy is overpowering the beef-and-mushroom baseStop adding dairy; taste the savory seasoning and loosen with a little beef cooking liquid if needed
Cream cheese stays lumpyIt went in coldWhisk it separately with hot sauce and return it to the cooker
Mushrooms are very softThey cooked with the beef the whole timeBrown and add them near the end next time
Leftovers are dryNoodles absorbed the sauceLoosen with broth and store noodles separately next time

Ready to Continue?

Serving Ideas

Egg noodles keep the classic balance: enough structure to carry the beef, with folds and edges that catch the sauce. Mashed potatoes make the whole plate softer and richer.

Beef stroganoff with mushrooms and creamy sauce spooned over mashed potatoes on a wide white plate.
Mashed potatoes make beef stroganoff an especially soft, rich plate, so contrast matters even more alongside it. For example, lemony green beans or a vinegar-bright cucumber salad can cut through the beef-and-sour-cream sauce rather than adding another creamy element.

Either way, this is a rich dinner, so something fresh or sharp beside it helps. Green beans with lemon or toasted almonds bring warmth and crunch. For a colder contrast, a cucumber salad with vinegar, dill and onion cuts cleanly through the sour cream and beef.

Make-Ahead, Storage, and Freezing

Make it a day ahead

Cook the beef until tender and skim excess surface fat if necessary. Before adding sour cream or doing the final cornstarch thickening, transfer the beef and cooking liquid to shallow containers and refrigerate promptly.

The next day, reheat the beef base and look at the sauce again. Refrigeration may have changed its thickness. Adjust only then, and fold in freshly tempered sour cream while the noodles cook.

Refrigerating Leftovers

Get leftovers into the refrigerator within about 2 hours and keep the noodles separate whenever practical. USDA guidance recommends using most cooked refrigerated leftovers within about 3–4 days. Its leftovers and food-safety guidance covers cooling, storage and reheating in more detail.

Reheating

Warm the stroganoff gently on the stovetop or in the microwave. A splash of broth or water is usually enough to loosen sauce that has tightened in the refrigerator. Reheated leftovers should reach 165°F / 74°C.

Skillet of reheated beef stroganoff being loosened with a small splash of broth, with egg noodles in a separate bowl behind it.
Do not judge refrigerated stroganoff solely by how thick it looks cold. Warm it gently first, then add broth or water only in small splashes if the sauce still needs loosening; meanwhile, reheat the stored egg noodles separately.

Freezing

For the best texture, freeze the cooked beef-and-mushroom base before sour cream and before the final cornstarch thickening. Leave the noodles out too. For best quality, use the frozen base within about 2–3 months.

After thawing, reheat the beef base, skim any separated surface fat if necessary, adjust the consistency and finish with fresh sour cream and freshly cooked noodles.

A Few Remaining Questions

1. Can I put frozen beef straight into the slow cooker?

Thaw it first. USDA guidance recommends thawing meat before slow cooking so it heats safely and predictably. Its slow-cooker food-safety guidance covers thawing, hot holding and reheating practices.

2. Can I use Greek yogurt instead of sour cream?

Full-fat Greek yogurt can work. Temper it with hot sauce and add it after the long cook. Its flavor is different from sour cream, and lower-fat versions are more likely to look grainy when heated.

3. Can I leave finished stroganoff on WARM?

WARM is for holding food that is already fully cooked. Hot-held food should stay at 140°F / 60°C or above. For the best sauce texture, add the sour cream reasonably close to serving instead of holding the finished dairy sauce for several hours.


Bring the bowls to the table while the sauce is still glossy and the noodles are hot. The best bites have soft chuck that still feels like a piece of beef, mushrooms you can actually notice, and enough sour-cream tang to keep the sauce from feeling heavy.

Posted on — Leave a comment

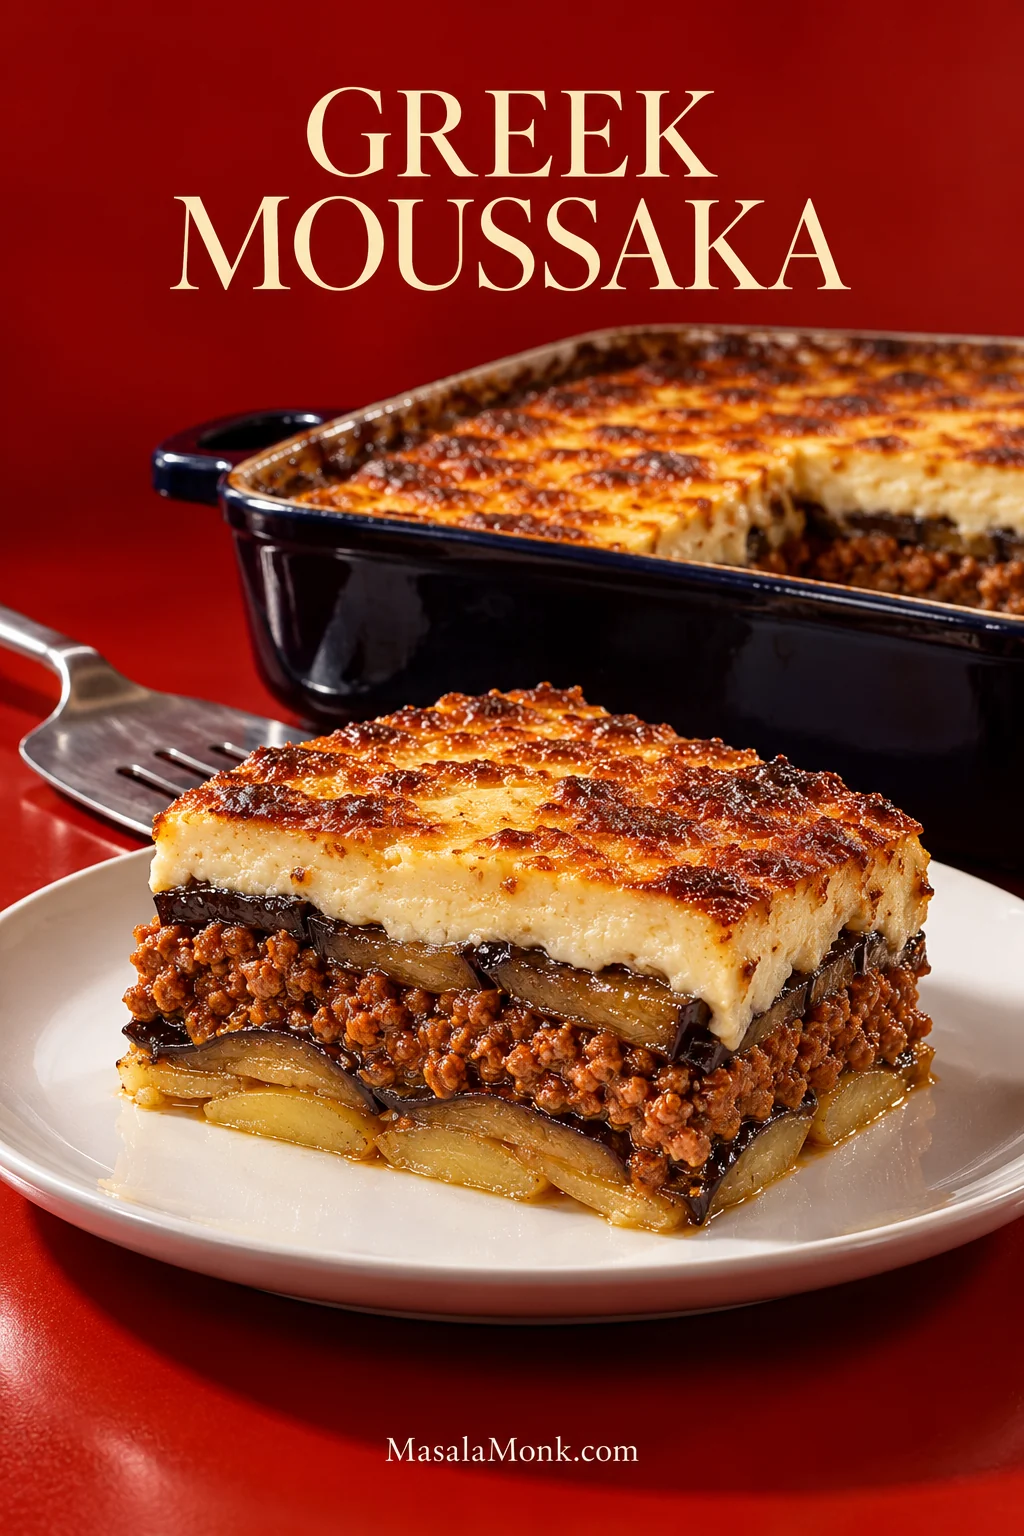
Greek Moussaka Recipe with Eggplant, Lamb & Béchamel

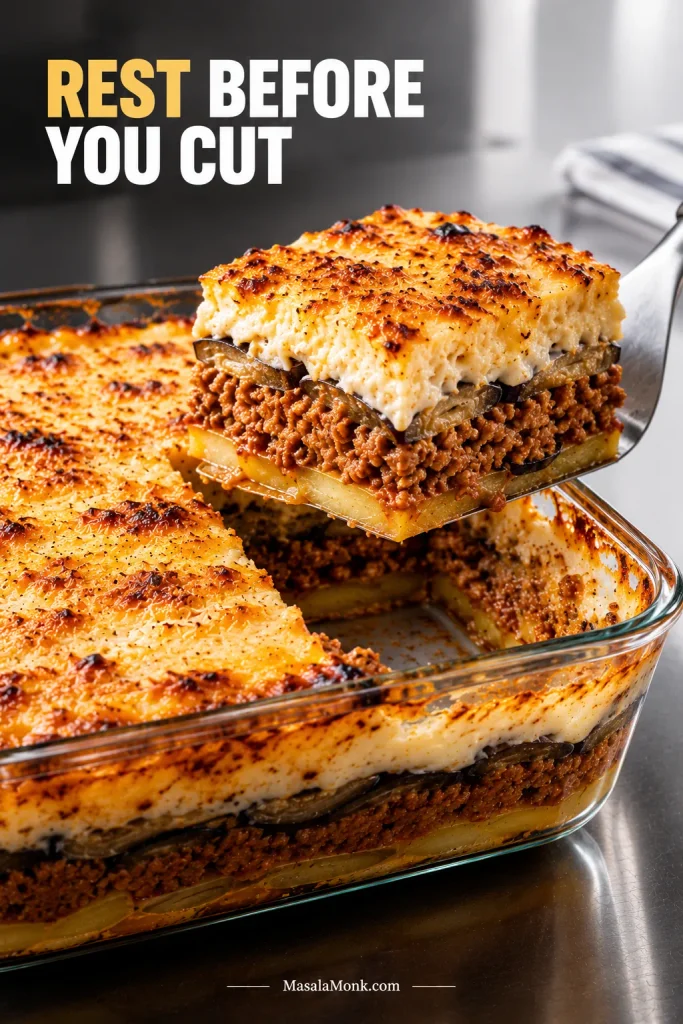
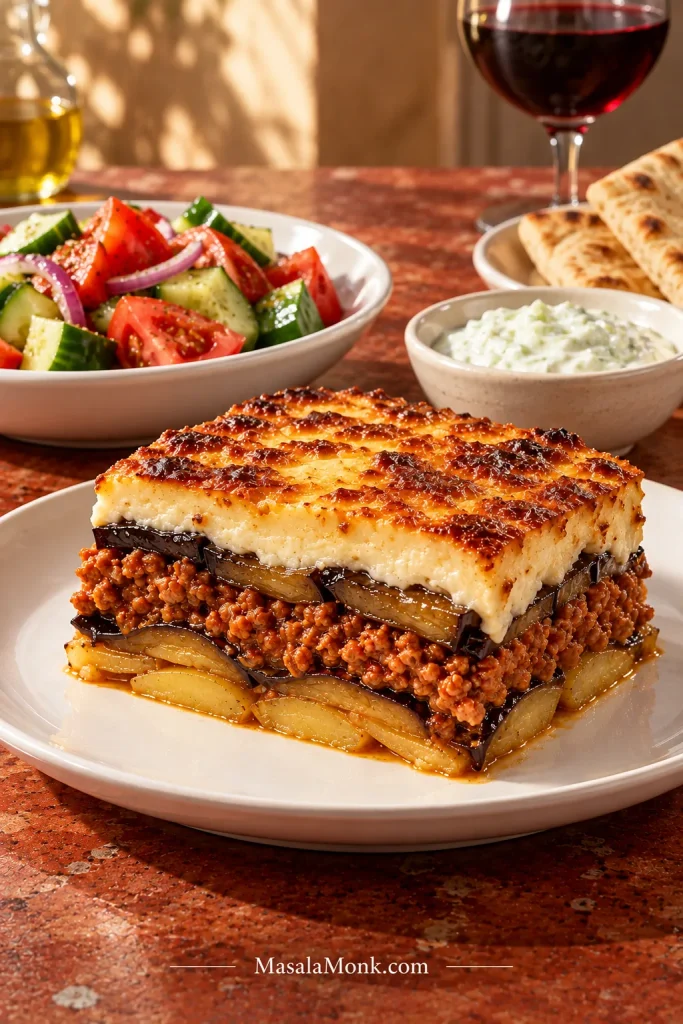
Slice of Greek moussaka on a white plate with a thin potato base, roasted eggplant, ground lamb and browned béchamel, with the casserole behind it.

A good moussaka comes to the table with a deeply browned top, tender eggplant underneath and lamb that has cooked down until it almost clings to the layers around it. Cut through the béchamel and those layers should still be visible: soft eggplant, savoury lamb and a thin potato base, all yielding without collapsing into one another.

Getting there takes a few separate jobs. Eggplant needs to soften without becoming oily, the lamb has to reduce into a concentrated sauce, the potatoes need a head start, and the béchamel must be thick before it ever reaches the oven. Done one after another, those jobs can make moussaka feel like an all-day undertaking.

The easiest way to make Greek moussaka feel manageable is to overlap the work: start the lamb while the eggplant salts, roast the vegetables while the sauce reduces, then make the béchamel last.

This is good food for a weekend dinner, a long lunch or a table where several people are properly hungry. Much of the work can happen before anyone arrives, which is one of the reasons moussaka rewards planning more than rushing.

Quick Answer

Greek moussaka is a baked casserole of eggplant (aubergine), seasoned minced meat and thick béchamel; many Greek versions also include a thin potato base. This Greek moussaka recipe uses ground lamb, roasted eggplant and potato, finished with an egg-and-cheese-enriched béchamel.

Four things matter before assembly: tender eggplant, partly cooked potatoes, lamb with no loose tomato liquid and béchamel thick enough to spread rather than pour. Get those right and the oven has a much easier job.

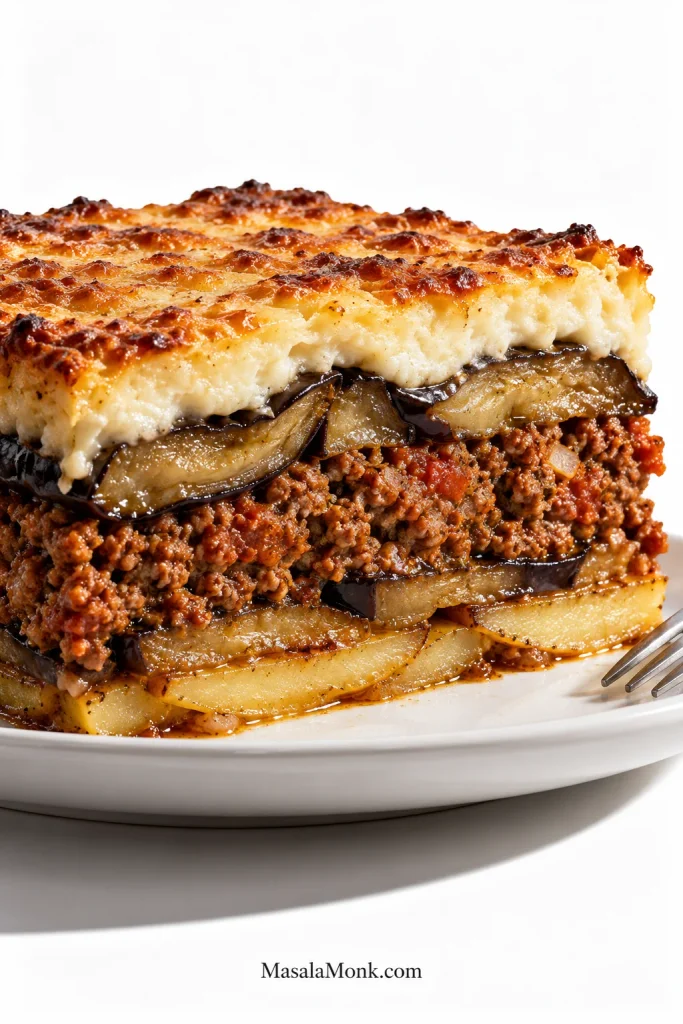
Close side view of a rested moussaka slice showing potato, two roasted eggplant layers, ground lamb filling and thick browned béchamel.
Real moussaka layers should look naturally irregular: overlapping eggplant, crumbly lamb and softly compressed potato, not ruler-straight bands.

Why This Moussaka Uses Lamb, Potato & Roasted Eggplant

Traditional Greek moussaka varies from kitchen to kitchen. Meat choices, potatoes, seasoning, cheese and vegetable preparation are not identical in every version. The Visit Greece moussaka recipe, for example, layers potatoes, eggplant, minced meat and béchamel.

Lamb tastes deeper and a little sweeter than beef here, which suits the tomato, oregano and eggplant particularly well. It also renders plenty of flavourful fat; we keep a little in the pan and remove any obvious pool before building the sauce. Ground beef can replace it at the same weight if you prefer a milder meat layer.

Potato catches some of the juices moving down from the meat and eggplant and gives the first slice a little support. About 1¼ lb / 550 g, cut 5–6 mm / roughly ¼ inch thick, is enough for one lightly overlapping layer in a 9 × 13-inch pan.

Roasting the eggplant makes the richness easier to control. Fried eggplant can be wonderfully silky, but it absorbs oil eagerly; roasting still gives us tender slices and useful browning without making the finished casserole unnecessarily oily.


Greek Moussaka Recipe with Eggplant, Lamb & Béchamel

Serves
8 generously
up to 10 with sides

Pan
9 × 13 in
23 × 33 cm, deep

Active prep
About
40 minutes

Cooking & baking
About
1 hr 20 min–1 hr 50 min

Final bake
40–45 minutes
included above

Resting
About
45 minutes

Total elapsed time: about 3 hours, typically 2 hours 45 minutes to 3 hours 15 minutes. The biggest variable is whether your oven can roast all the eggplant efficiently at once or needs another batch.

Oven temperatures: roast the vegetables at 425°F / 220°C conventional / 200°C fan, then bake the assembled moussaka at 375°F / 190°C conventional / 170°C fan.

Equipment

  • Deep 9 × 13-inch / approximately 23 × 33 cm casserole dish, ideally about 3 inches / 7–8 cm deep
  • 2–3 large rimmed sheet pans, or 2 pans plus time for another eggplant batch
  • Wide heavy skillet, sauté pan or Dutch oven
  • Heavy-bottomed saucepan
  • Balloon whisk
  • Kitchen scale

Also handy: a large colander, heatproof spatula, wide serving spatula and a mandoline for evenly slicing the potatoes.

Greek Moussaka Ingredients

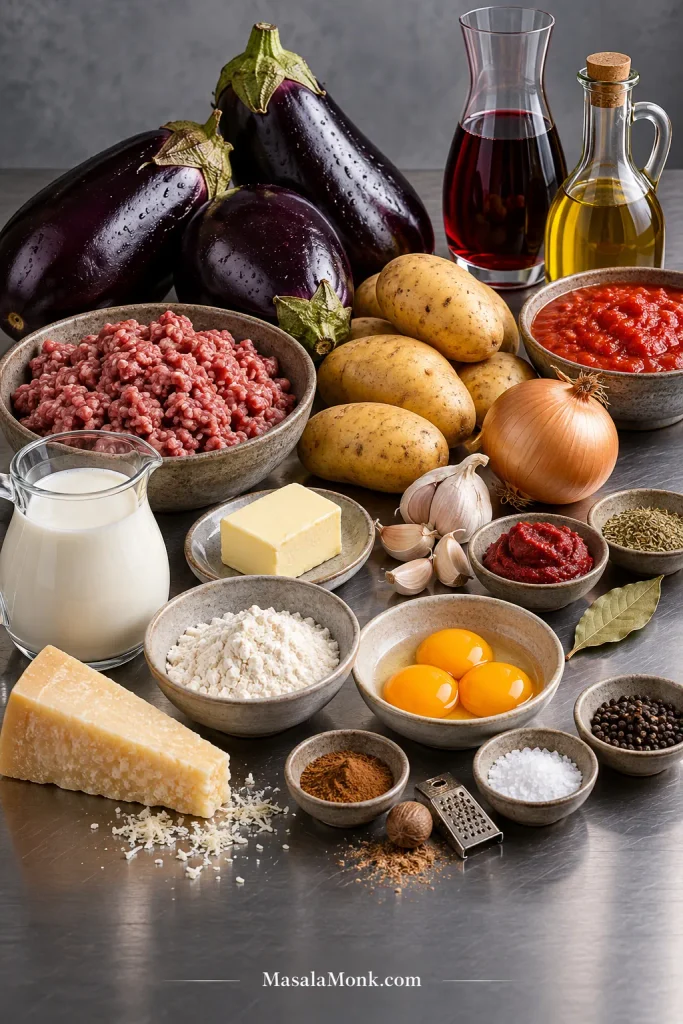
Moussaka ingredients arranged on a metal worktop, including eggplants, potatoes, ground lamb, tomato, onion, garlic, wine, milk, butter, flour, egg yolks, hard cheese and seasonings.
Eggplant, lamb, potato and béchamel build the structure; tomato, wine, cinnamon and nutmeg deepen the filling without taking over.

Eggplant & Potatoes

  • 2¾ lb / 1.25 kg globe eggplant (aubergine), about 3 large; buy by weight if possible
  • 1¼ lb / 550 g Yukon Gold, Russet, Maris Piper or another all-purpose/starchy potato
  • 1½ teaspoons / about 9 g fine sea salt, divided
  • ¼ cup / 60 ml olive oil, plus up to 1 tablespoon / 15 ml more if needed for a light coating

Lamb Sauce

  • 1¾ lb / 800 g ground lamb
  • 1 large yellow onion, about 7 oz / 200 g, finely diced
  • 4 garlic cloves, finely minced
  • 1 tablespoon / 15 ml olive oil, only if the lamb is very lean and the pan remains dry
  • 3 tablespoons / 45 g tomato paste — use the thick concentrated tomato product, not pourable tomato purée or passata; in the UK, the equivalent may be labelled concentrated tomato purée
  • ½ cup / 120 ml dry red wine
  • 1 can crushed tomatoes, 14 oz / 400 g; finely chopped canned tomatoes can be pulsed briefly if crushed tomatoes are unavailable
  • 1 teaspoon dried oregano
  • 1 bay leaf
  • ¼ teaspoon ground cinnamon
  • 1¼ teaspoons / about 7 g fine sea salt, then adjust to taste
  • ½ teaspoon freshly ground black pepper

Béchamel

  • ½ cup / 113 g unsalted butter
  • 1 cup / 120 g all-purpose flour
  • 4 cups / 950 ml whole milk, warmed but not boiling
  • 3 large egg yolks
  • 3½ oz / 100 g finely grated Kefalotyri, Pecorino Romano or Parmesan
  • ¼ teaspoon freshly grated nutmeg
  • ½ teaspoon / about 3 g fine sea salt, then adjust to taste
  • ¼ teaspoon black or white pepper

For the Top

  • 1½ oz / 40 g finely grated Kefalotyri, Pecorino Romano or Parmesan

How to Make Greek Moussaka

1. Salt the Eggplant

Trim the eggplants and cut them lengthways into slices about 8–10 mm / roughly ⅓ inch thick. Very skin-heavy end pieces can be discarded. For unusually mature eggplants with tough skin, peel a few narrow strips instead of removing all of it.

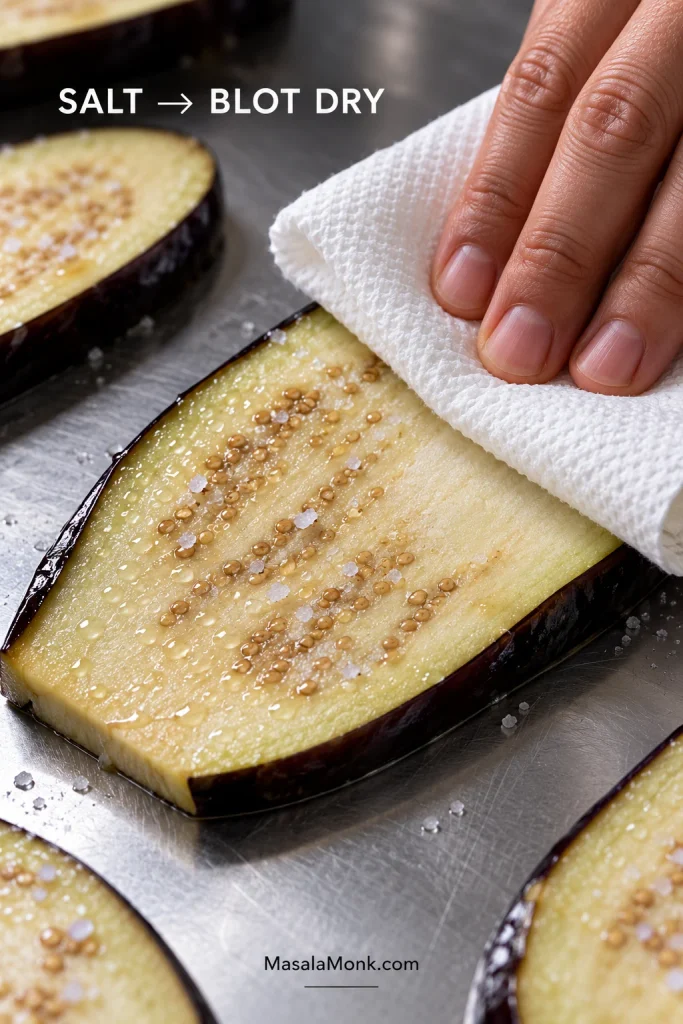
Arrange the slices in a colander or over trays and sprinkle both sides lightly with about 1 teaspoon of the measured salt. Leave them for 30 minutes.

Start the lamb while the eggplant sits.

The measured amount of salt here does not need rinsing; blotting is enough. A much heavier salting can be rinsed off briefly, followed by very thorough drying.

Hand blotting moisture from a salted lengthwise eggplant slice with a white towel before roasting.
A dry eggplant surface takes oil more evenly. If the towel still lifts obvious moisture, keep blotting before roasting.

2. Brown the Lamb and Start the Sauce

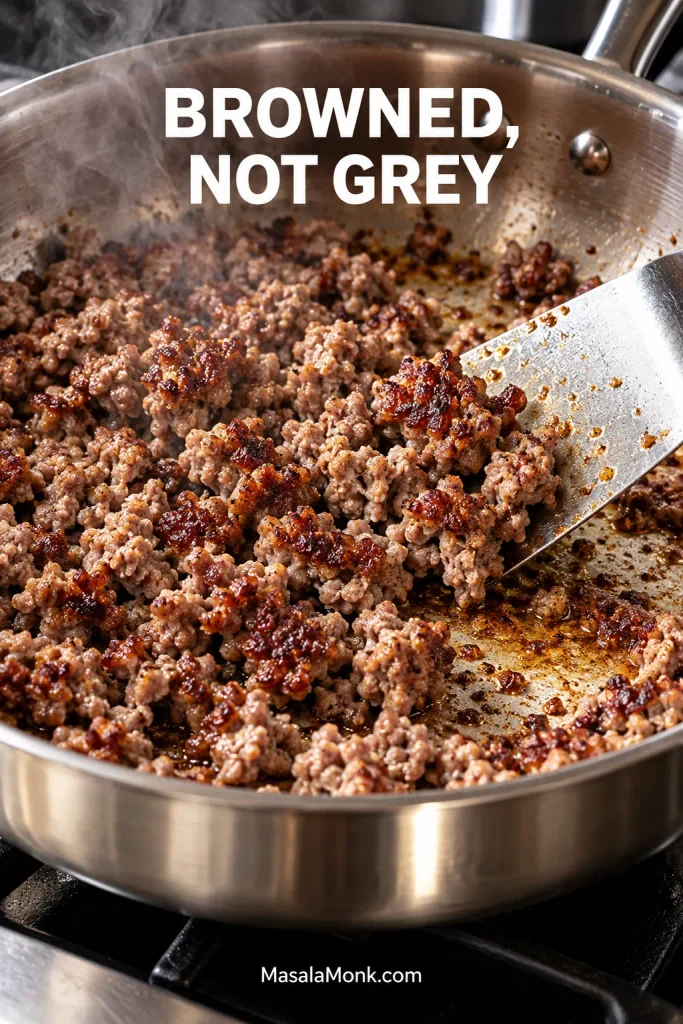
Heat a wide heavy skillet, sauté pan or Dutch oven over medium-high heat. Add the lamb and spread it into an even layer. Leave it undisturbed for 2–3 minutes so part of the meat can brown against the pan, then break it into smaller crumbles.

Continue cooking until no raw pink remains and browned patches appear among the crumbles, usually another 5–7 minutes. Very lean lamb may need the optional tablespoon / 15 ml olive oil; otherwise let its own fat do the work.

Look at the bottom of the pan. A sheen of lamb fat is useful; a visible pool is not. Spoon off the obvious excess.

Ground lamb with caramelised brown patches cooking in a stainless-steel pan while a metal spatula turns the crumbles.
You do not need every crumble deeply browned. Scattered caramelised patches build flavour; chasing a uniform dark crust can dry the lamb before the sauce finishes.

Add the onion and cook for 5–7 minutes until soft and beginning to colour. Stir in the garlic for about 30 seconds. Add the tomato paste and cook for another 1–2 minutes, scraping it over the hot surface until it darkens slightly.

Pour in the wine and scrape up the browned bits. Let it bubble until reduced by roughly half. Add the crushed tomatoes, oregano, bay leaf, cinnamon, salt and pepper.

Bring to a simmer, then lower the heat enough to maintain steady uncovered bubbling. Leave the sauce reducing while you return to the vegetables.

3. Dry and Roast the Vegetables

Heat the oven to 425°F / 220°C conventional / 200°C fan. Arrange the racks so two sheet pans can roast with reasonable airflow.

Blot the salted eggplant thoroughly with clean kitchen towels or paper towels. The surfaces should feel dry.

Peel the potatoes, then slice them 5–6 mm / about ¼ inch thick. Toss with 1 tablespoon / 15 ml olive oil and the remaining ½ teaspoon salt, then arrange them on one sheet pan.

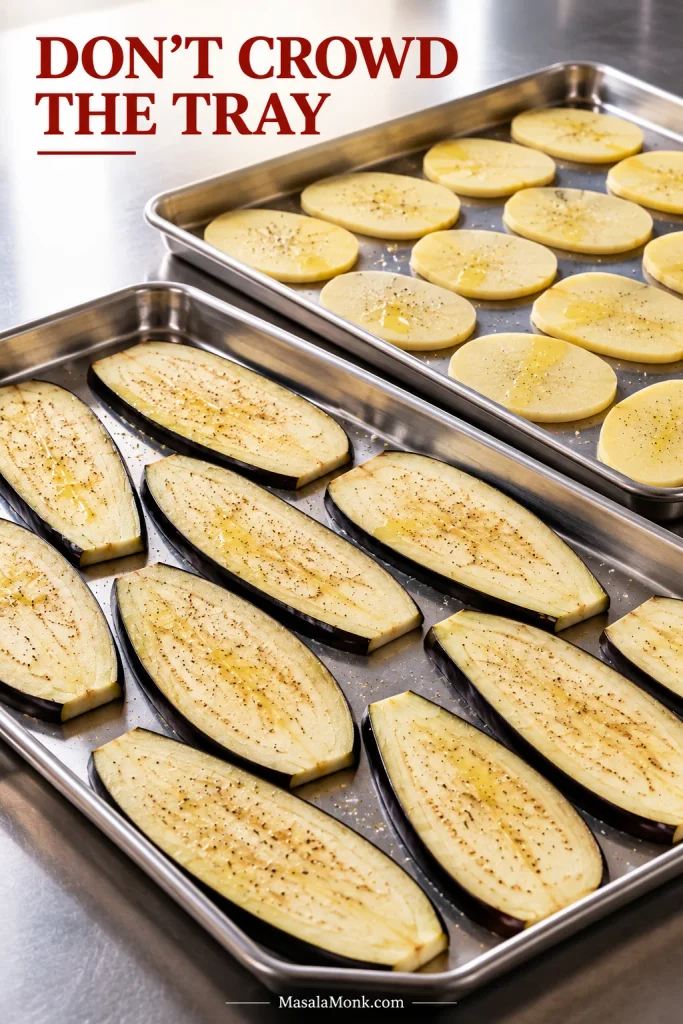
Give the Vegetables Room to Roast

Arrange the eggplant in a single layer on the remaining pans. Do not stack it. An oven that struggles with three trays will give better results if the extra eggplant is roasted as a second batch.

Separate metal trays of lengthwise eggplant slices and thin peeled potato slices arranged in uncrowded single layers.
Crowded trays trap steam. Use another tray or roast in batches so the eggplant can brown instead of merely soften.

Divide the remaining oil between the eggplant batches so the first tray does not use all of it. Brush or rub a thin sheen over both sides. The full 1.25 kg can take up to the extra tablespoon / 15 ml if needed.

Roast, swapping pan positions after about 10 minutes if your oven browns unevenly.

If the lamb sauce reaches the consistency described in Step 4 while the vegetables roast, take it off the heat rather than letting it reduce unnecessarily.

Check the Vegetables, Not Just the Clock

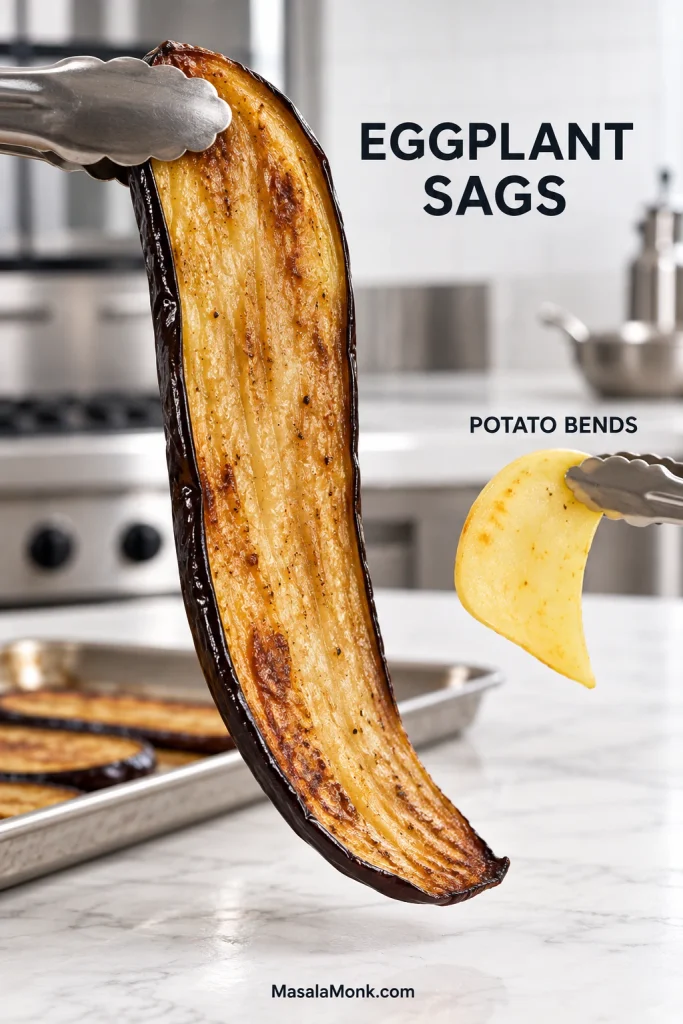
The potatoes usually need around 15–20 minutes. A ready slice bends without snapping and is partly tender while still lifting cleanly from the tray.

The eggplant usually needs about 20–25 minutes per batch. Pick up a slice with tongs. A properly roasted piece sags under its own weight, feels tender through the middle and has picked up a little browning around the edges.

Roasted eggplant slice drooping from metal tongs beside a thin cooked potato slice bending while remaining intact.
Potato should be only partly tender; eggplant should be fully tender through the centre before assembly.

Still firm in the middle? Give it another few minutes. There is no prize for hitting exactly 20 or 25 minutes. The eggplant needs to be fully tender before it goes into the casserole.

Reduce the oven to 375°F / 190°C conventional / 170°C fan once the vegetables are finished.

4. Finish the Lamb Sauce

Return to the lamb. If it already reached the right consistency while the vegetables were roasting, leave it off the heat. Otherwise, simmer uncovered until the sauce becomes dense and spoonable.

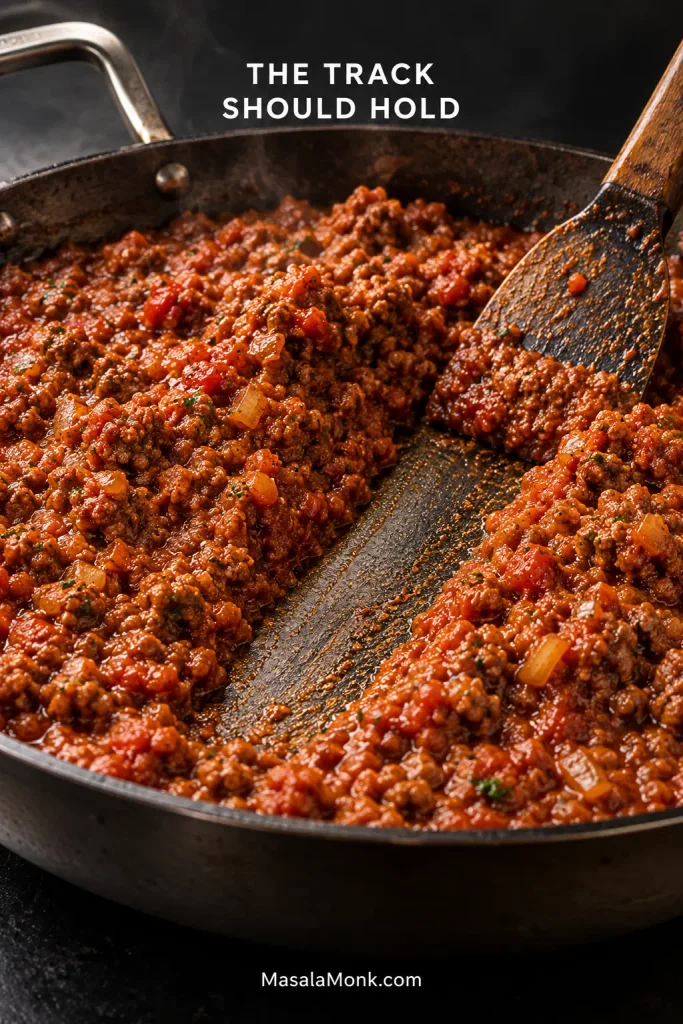
Drag a spatula across the bottom once to check. The gap should remain visible briefly instead of immediately filling with thin tomato liquid, and a spoonful pushed to one side should mound instead of spreading.

Thick ground-lamb tomato sauce pushed aside with a spatula, leaving an exposed strip of pan between two mounds of sauce.
The spatula track tests free liquid, not just thickness. If watery tomato juices rush back across the pan, the moussaka meat sauce needs more reduction.

A loose sauce may need another 5–15 minutes, depending on pan width, burner strength and the tomatoes you used. Trust what is happening in the pan more than the clock.

Remove the bay leaf, taste and adjust the seasoning. The sauce should smell primarily of browned lamb and concentrated tomato, with onion and warm spice underneath. Leave it uncovered while you make the béchamel.

5. Make the Béchamel Last

Warm the milk until steaming but not boiling.

Melt the butter in a heavy saucepan over medium heat. Add the flour and whisk for about 2 minutes. The roux should foam gently and lose its raw flour smell without browning.

Add roughly one-quarter of the warm milk and whisk until smooth. Add another quarter, whisk smooth again, then add the remaining milk in two additions.

Cook over medium to medium-low heat, whisking frequently and scraping the bottom corners of the saucepan. Once all the milk is incorporated, expect another 6–10 minutes before it becomes properly thick.

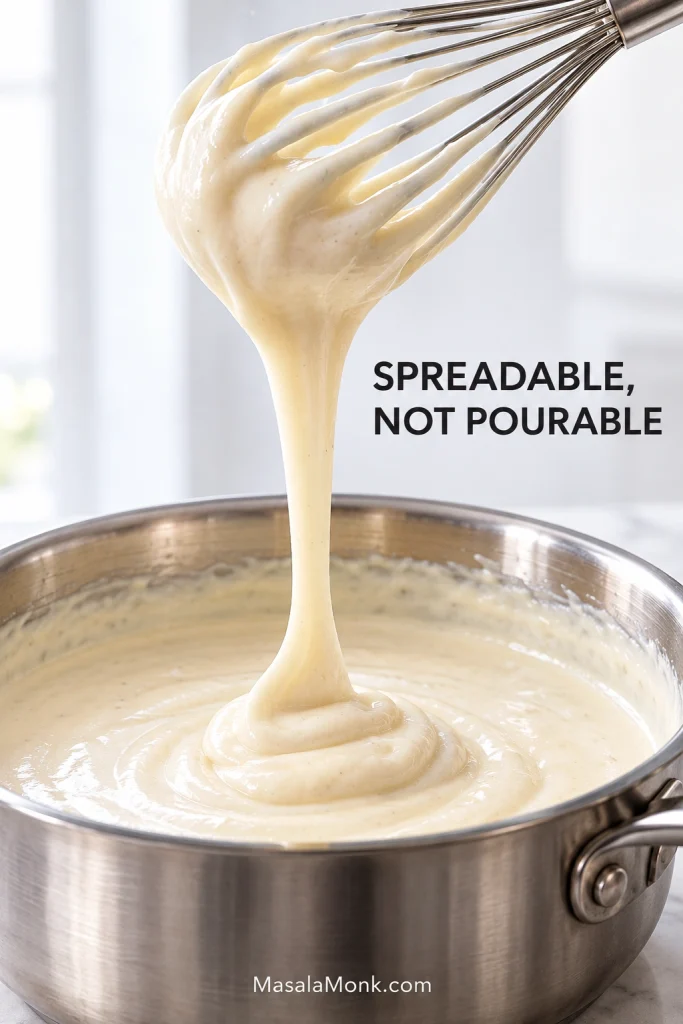
Lift the whisk. The sauce is ready when it falls back in thick, slow ribbons and leaves a spoon heavily coated. It should look smooth and rich rather than pourable.

It may look almost too thick compared with an everyday white sauce. That is what you want here.

Thick pale béchamel falling from a whisk in a broad ribbon and folding onto the surface of the sauce in a stainless-steel pan.
After the ribbon lands, watch the surface. Properly thick moussaka béchamel should hold the fold briefly before slowly smoothing out.
Check All Four Components Before Assembly

Once the béchamel reaches this consistency, take it off the heat.

ComponentReady When…If It Needs More Work
PotatoFlexible and partly tender while still holding its shape.Give it a few more minutes in the oven.
EggplantBends easily, feels tender through the centre and looks surface-dry.Keep roasting until the centre softens.
LambDense and spoonable with no loose tomato liquid in the pan.Reduce uncovered for longer.
BéchamelHeavy enough to coat a spoon and fall from the whisk in slow ribbons.Return it to moderate heat and cook a little longer before adding the yolks.

If another component needs a few extra minutes, leave the béchamel off the heat and give it a brief whisk before finishing it. Assembly can wait.

When everything is ready, stir 3½ oz / 100 g grated cheese, nutmeg, salt and pepper into the béchamel. Let it stand for about 5 minutes before tempering the yolks.

Whisk the egg yolks in a small bowl. Gradually whisk about ½ cup of hot béchamel into them, then pour the tempered yolks back into the saucepan and whisk until smooth and glossy. Once the yolks are in, do not bring the sauce back to a hard boil.

6. Layer the Moussaka

Lightly oil a deep 9 × 13-inch / approximately 23 × 33 cm baking dish.

After all the separate pans and pots, this is the satisfying part: everything finally becomes one moussaka.

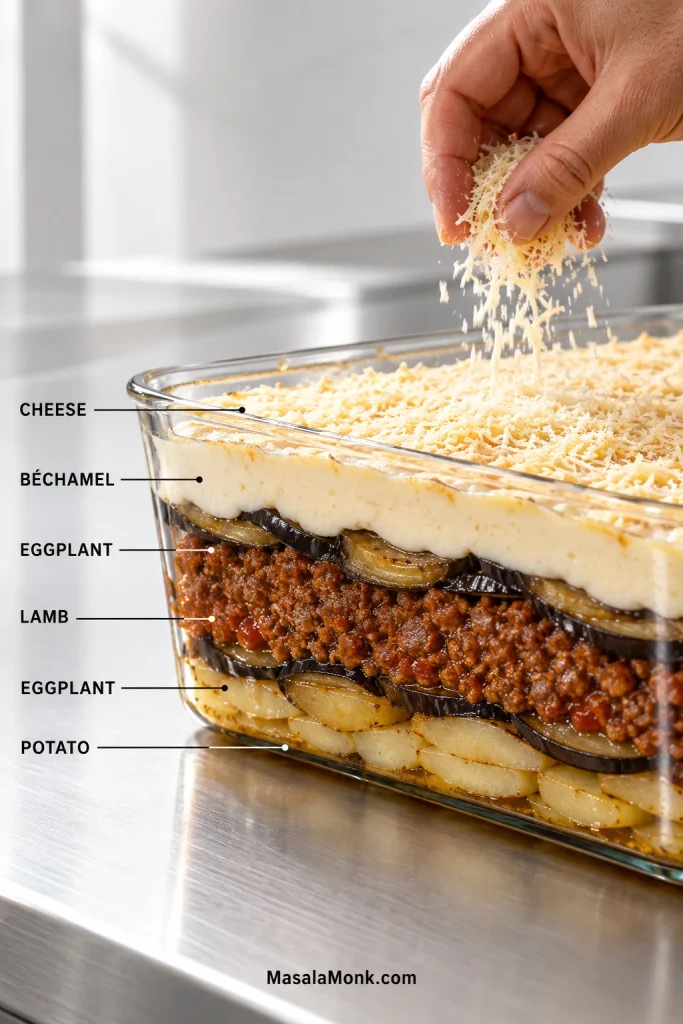
  1. Potato: cover the base in one lightly overlapping layer.
  2. Eggplant: arrange roughly half the slices over the potatoes.
  3. Lamb: spread the reduced meat sauce evenly over the eggplant.
  4. Eggplant: cover the lamb with the remaining slices.
  5. Béchamel: spread it right to the sides and corners in a generous layer about ½ inch / 1.5 cm deep.
  6. Cheese: scatter the remaining 1½ oz / 40 g hard cheese across the top.
Clear casserole showing layers of potato, eggplant, ground lamb, eggplant and béchamel with finely grated hard cheese over the top.
The upper eggplant layer separates the concentrated lamb from the béchamel, while potato gives the base support.

Leave about ½ inch / 1.5 cm of headspace below the rim. Anything that will not fit comfortably is better baked in a small second dish than piled right to the top.

7. Bake Until the Centre Is Set

Once the pan is assembled, the busy part is over. The oven does the next job, which also gives you a welcome chance to clear the counters.

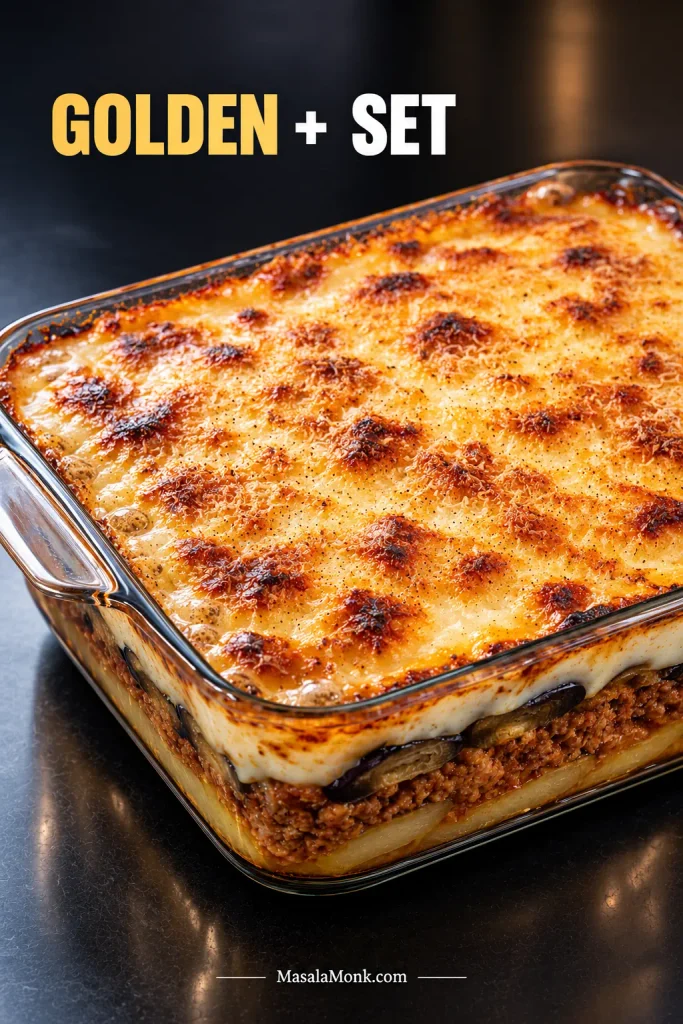
Bake uncovered until the béchamel is deeply golden, the edges are gently bubbling and the centre no longer sloshes. At 375°F / 190°C conventional / 170°C fan, this usually takes about 40–45 minutes.

As it bakes, the pale béchamel turns golden and the cheese begins to smell toasted, with warm nutmeg and lamb coming up underneath. A top that browns early can be loosely covered with foil while the centre finishes.

For anyone checking with a thermometer, the centre should reach 165°F / 74°C.

Whole baked moussaka in a rectangular glass casserole with a deeply golden béchamel surface and irregular darker toasted patches.
Do not judge doneness by the darkest corner; casserole edges brown first. The centre matters more than the perimeter.

8. Let the Pan Settle Before Cutting

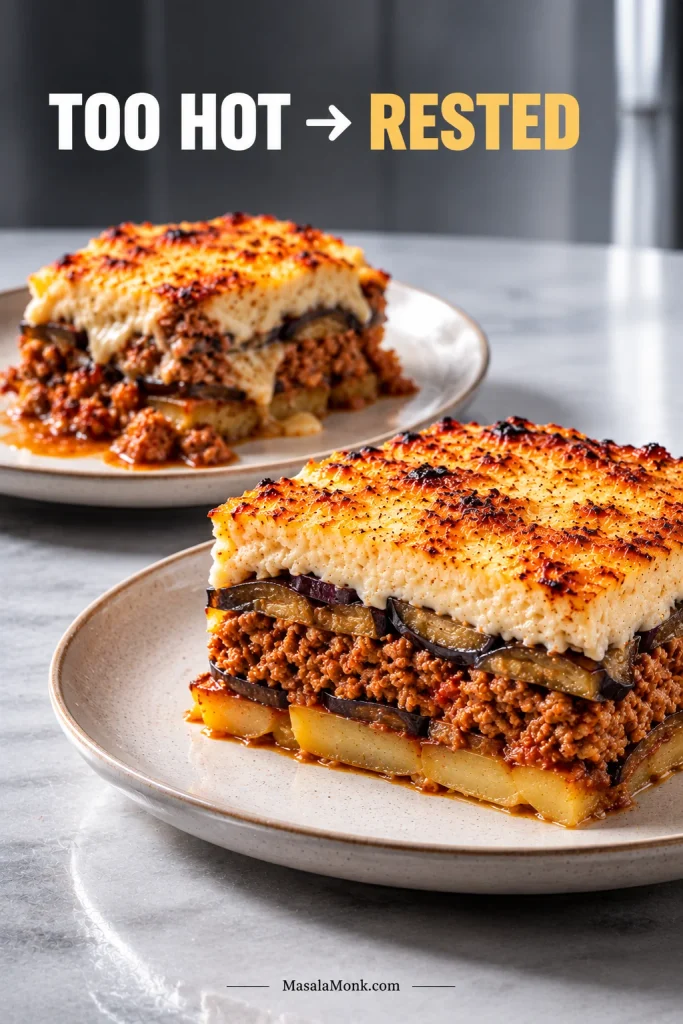
Rest the moussaka for about 45 minutes before slicing. Cut sooner and the first piece will simply be hotter and softer.

Move the pan to a heat-safe rack or trivet as soon as it comes out. After the rest, cut straight down with a sharp knife and lift each portion with a wide spatula.

Rectangular moussaka slice being lifted from the casserole on a wide metal spatula, leaving an empty space behind it in the pan.
The first slice is hardest to lift cleanly because there is no empty space beside it yet.

Why the Layers Hold Together

Do You Need to Salt Eggplant for Moussaka?

Most supermarket eggplants today are not especially bitter, so salting here is mainly about drawing out moisture that can be blotted away before roasting.

Slice thickness matters just as much. Paper-thin pieces can disappear after two rounds of cooking, while very thick slices may stay fibrous even when their surfaces look done. Around 8–10 mm gives the aubergine enough substance to stay recognisable in the finished slice.

Why the Lamb Sauce Needs to Be Well Reduced

A moussaka meat sauce has a different job from a pasta sauce. It has to sit between soft vegetables without sending tomato liquid into the bottom of the casserole. That is why we reduce it until concentrated and spoonable rather than stopping as soon as the meat is cooked.

Pan width and burner strength can move the reduction time considerably, so use the physical endpoint rather than expecting every batch to finish in exactly the same number of minutes.

Cinnamon should be background, not headline. Browning the lamb and concentrating the tomato give the sauce most of its depth. The cinnamon should arrive quietly behind them.

How Thick Should Moussaka Béchamel Be?

Moussaka béchamel is much thicker than an everyday white sauce. It needs enough body to sit above the eggplant instead of disappearing into the layers below, while the egg yolks help it set further during baking.

If you want the fundamentals of making a smooth roux-based sauce, the béchamel sauce guide goes deeper into adding milk and fixing consistency. For this dish, stop only when the sauce is unmistakably spreadable rather than pourable.

How Long Should Moussaka Rest Before Cutting?

About 45 minutes is a good target. Straight from the oven, fat is fluid, steam is still moving through the vegetables and the béchamel is at its softest. As the pan cools, everything becomes less mobile and the slice gains structure without needing to be served cold.

The same thing happens with a hot classic lasagna: waiting is part of getting clean layers, not dead time after the cooking is finished.

Firm rested moussaka slice in front with a softer, slumped slice of the same casserole behind it.
If later slices become noticeably cleaner as the pan cools, serving temperature—not automatically wet eggplant or loose sauce—was probably the issue.

Moussaka Troubleshooting: Fix the Problem You Can See

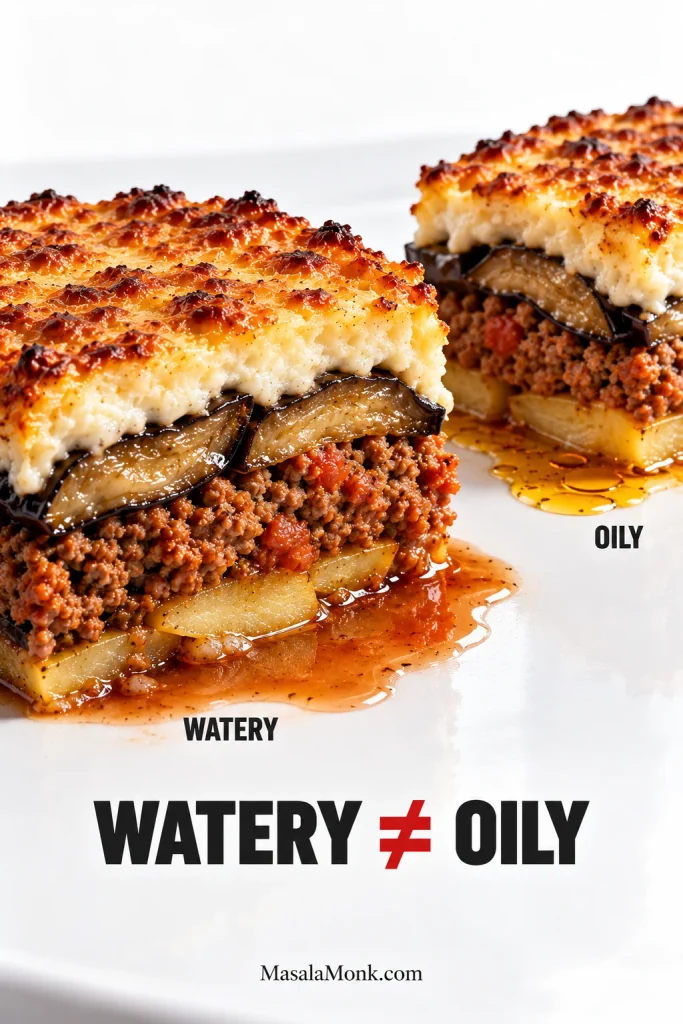
Most problems come back to moisture, excess fat, béchamel consistency or cutting the casserole too soon. The symptom matters because watery liquid, oily liquid and a hot collapsing slice do not have the same cause.

What You SeeWhat Probably HappenedWhat to Change
Red or watery liquid beneath the sliceEggplant went in wet, the meat sauce was loose, or the casserole was cut extremely hot.Dry and fully cook the eggplant, reduce the sauce well and give the pan time to settle.
Clear or orange oily liquidToo much rendered lamb fat or excess oil in the eggplant.Spoon off visible lamb fat and measure the roasting oil.
A good-tasting slice collapsesThe moussaka is still too hot.Let it rest longer before judging the structure.
Béchamel sinks into the fillingThe sauce was too thin, or the lower layers carried too much moisture.Thicken the béchamel properly and reduce the meat sauce fully.
Eggplant is difficult to cutSlices were too thick, under-roasted or very tough-skinned.Cut 8–10 mm and roast until tender throughout.
Eggplant almost disappearsSlices were too thin or overcooked.Keep them around 8–10 mm and remove them once tender.
Potatoes are firmThey were too thick or not pre-cooked enough.Keep them around 5–6 mm and roast until partly tender.
Two moussaka portions showing thin reddish watery liquid beneath one slice and clear golden-orange oily liquid beneath the other.
Judge leaked liquid after the pan settles. Hot lamb fat is very fluid, so a small clear sheen can look more alarming than it does once cooled.

Watery Right Now: Bake Longer or Let It Rest?

A centre that is still visibly loose or sloshing needs more oven time. A centre that is set but releases liquid when sliced straight from the oven usually needs more rest instead.

If the casserole has cooled properly and still leaves obvious watery liquid beneath the slices, look back to the earlier stages: the eggplant probably carried too much moisture, the meat sauce needed more reduction, or both.

Béchamel Thin, Lumpy or Curdled?

A thin béchamel needs more cooking over moderate heat before the yolks are added. Lumps can usually be dealt with at that same stage by vigorous whisking, passing the sauce through a fine sieve or giving it a brief pass with an immersion blender.

Curdling is a different problem: the yolks have met too much heat. Let the sauce cool briefly before tempering them, then avoid a hard boil once they are incorporated.

Can You Make Moussaka Ahead?

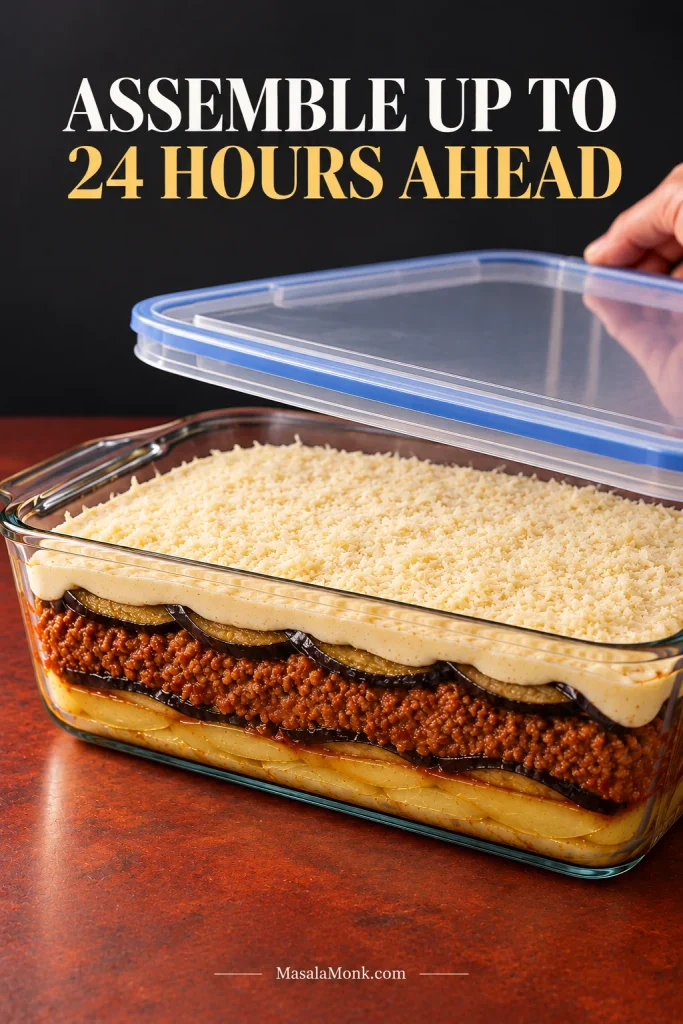
Yes. You can prepare the components a day ahead, assemble the full moussaka up to about 24 hours before baking, or bake it the day before and reheat it.

Moussaka is a much nicer dinner when you are not roasting eggplant, reducing lamb and whisking béchamel while people are already arriving.

Prepare the components the day before: roast the eggplant and potatoes, cook the lamb sauce, cool everything promptly and refrigerate the components separately. The next day, make the béchamel while they lose some of their refrigerator chill, then assemble and bake. Cold components may add a little oven time, so use the doneness cues in Step 7 rather than the clock alone.

Assemble it ahead: build the full casserole, cover it and refrigerate it promptly for up to about 24 hours. Bake from chilled, allowing extra time; if using glass or ceramic bakeware, follow the manufacturer’s fridge-to-oven guidance.

Unbaked layered moussaka in a clear rectangular casserole as a hand lowers a transparent lid over the dish.
Chilling changes the starting temperature, not the recipe. Keep the same layers and consistency, then allow extra baking time for the centre.

Bake it the day before: this is especially useful for a party. Once chilled, moussaka cuts very cleanly. Portion it cold, then reheat the pieces before serving.

What to Serve with Moussaka

If you make only one side, choose a sharp cucumber-tomato salad with plenty of acidity. Its crispness gives the lamb and béchamel exactly the contrast they need; lemon-dressed greens or tomatoes with red onion and olives follow the same idea.

For something cool and creamy, add a small spoonful of Greek tzatziki. A larger shared spread can also include warm homemade pita for tearing alongside salads, olives and dips.

Plated moussaka slice served with cucumber-tomato salad, tzatziki and warm pita on a rust-coloured table.
A sharp salad and cool tzatziki balance the rich lamb and béchamel; keep pita a modest extra.

Storage, Freezing & Reheating

The USDA leftovers guidance recommends refrigerating perishable leftovers within 2 hours. For this moussaka, start that clock when the casserole comes out of the oven, not when the meal ends.

How long does moussaka last in the fridge? Cover the dish well or transfer portions to shallow airtight containers and refrigerate for up to 3–4 days.

Can you freeze moussaka? Yes. Wrap cooled portions well and aim to use them within roughly 2–3 months for the best texture. The eggplant will soften somewhat after freezing and thawing.

For a whole make-ahead moussaka, cool the cooked potato, eggplant and lamb promptly. Once cool, assemble those layers without the béchamel, wrap tightly and freeze. Thaw overnight in the refrigerator, make the béchamel fresh, then top and bake. Because the base is chilled, allow extra baking time as needed and use the doneness cues in Step 7.

For reheating: 350°F / 175°C conventional / 160°C fan works well. Individual chilled portions generally need around 20–30 minutes; a larger chilled casserole may need 30–45 minutes or longer. Keep it loosely covered for most of the reheating time, then uncover near the end if the surface needs refreshing. Reheated leftovers should reach 165°F / 74°C in the centre.

Reheated moussaka slice with a food thermometer probe inserted deeply into the thick central part of the portion.
Probe the thickest central part when reheating; the browned béchamel warms faster than the middle.

For the most even reheating, thaw frozen portions overnight in the refrigerator. You can also reheat them from frozen; keep them covered for most of the heating time so the centre warms through before the béchamel dries out.

Useful Moussaka Substitutions

  • Beef instead of lamb: replace the lamb with the same 1¾ lb / 800 g ground beef for a milder flavour, or use 14 oz / 400 g each lamb and beef for a middle ground.
  • No potatoes: begin directly with eggplant. The base will be softer, so proper sauce reduction and cooling matter even more. If you would rather serve potatoes separately, Greek lemon potatoes are a natural option.
  • No red wine: use the same ½ cup / 120 ml of unsalted or low-sodium beef stock. Once the lamb has reduced, a small splash of red wine vinegar can replace some of the lost brightness.
  • No Kefalotyri: Pecorino Romano is an excellent substitute, and Parmesan also works well. Avoid soft, high-moisture or particularly stretchy cheeses in the béchamel.
  • Prefer fried eggplant: salt and dry the slices first, then shallow-fry in additional olive oil until tender and golden. Drain very well before assembly because the finished casserole is already rich.

Bring the moussaka to the table warm instead of scorching hot and cut straight through the browned top. Do not worry if the first piece is not restaurant-perfect. What matters is underneath: tender eggplant, savoury lamb, soft potato and a thick béchamel that stays creamy as you eat it.

Posted on — Leave a comment

Salmon Patties Recipe: Easy, Crispy & Made with Canned Salmon

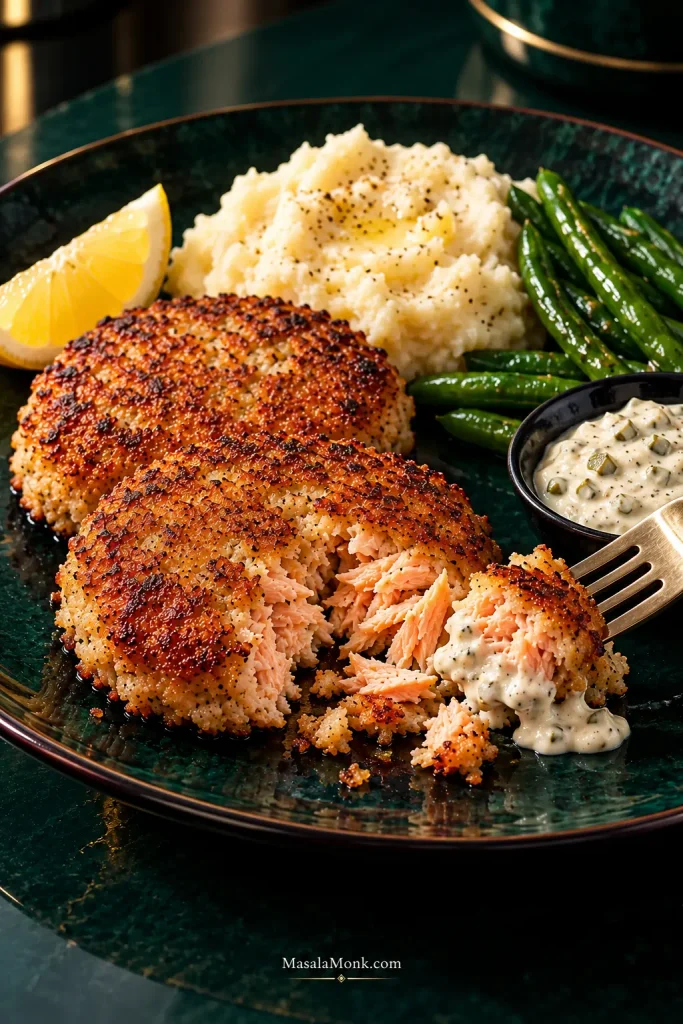
Three broad, thin golden-brown salmon patties on a dark plate; one is torn open to show moist pink salmon flakes, with lemon and tartar sauce behind.

The first salmon patty is usually the one that tells you whether dinner is going to be easy.

You slide a spatula underneath, start to turn it, and the middle threatens to split. The natural response is to add more crackers or breadcrumbs next time. Keep doing that and the patties may eventually hold beautifully while tasting more like the binder than the salmon.

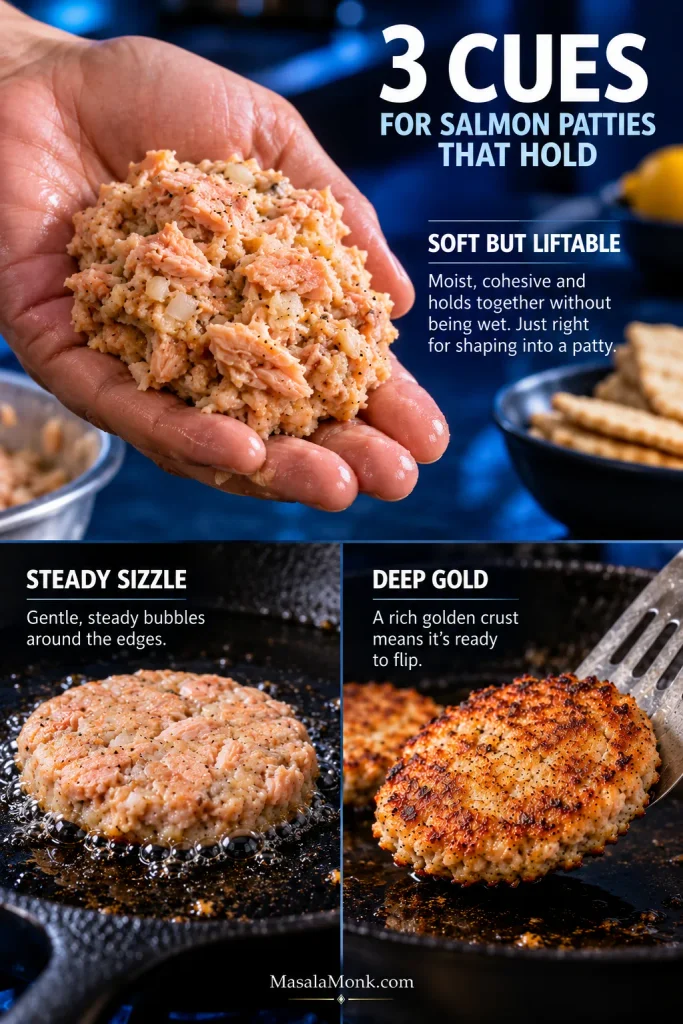
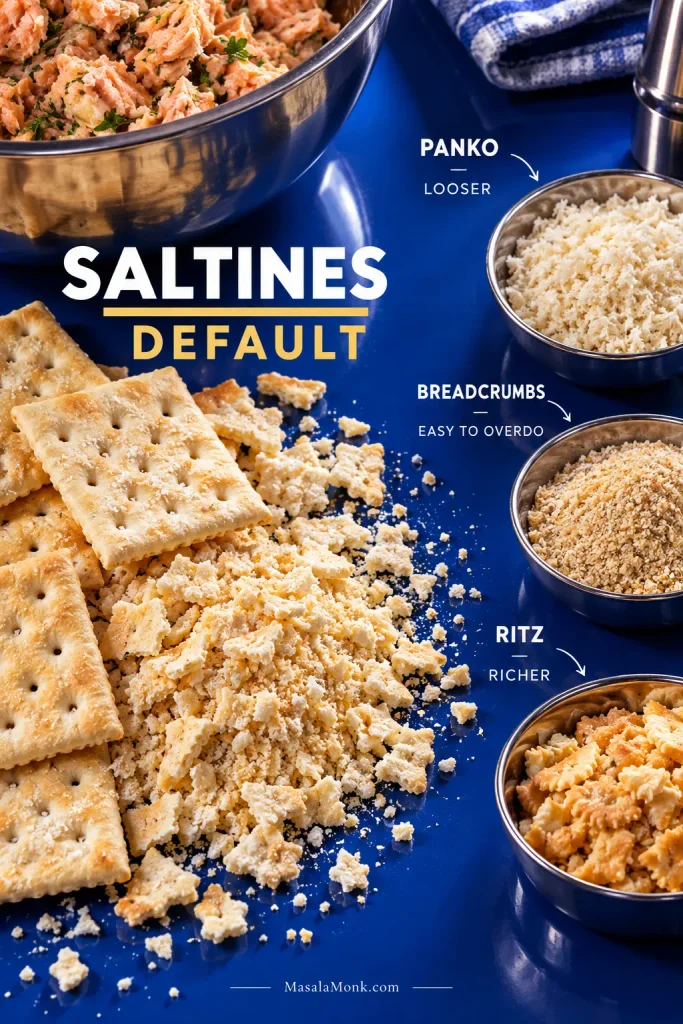
In this salmon patties recipe, the mixture should stay soft enough for a moist, flaky center while still holding together in your hand. Canned salmon keeps dinner practical, and a short rest gives the Saltine crumbs time to absorb the moisture around them.

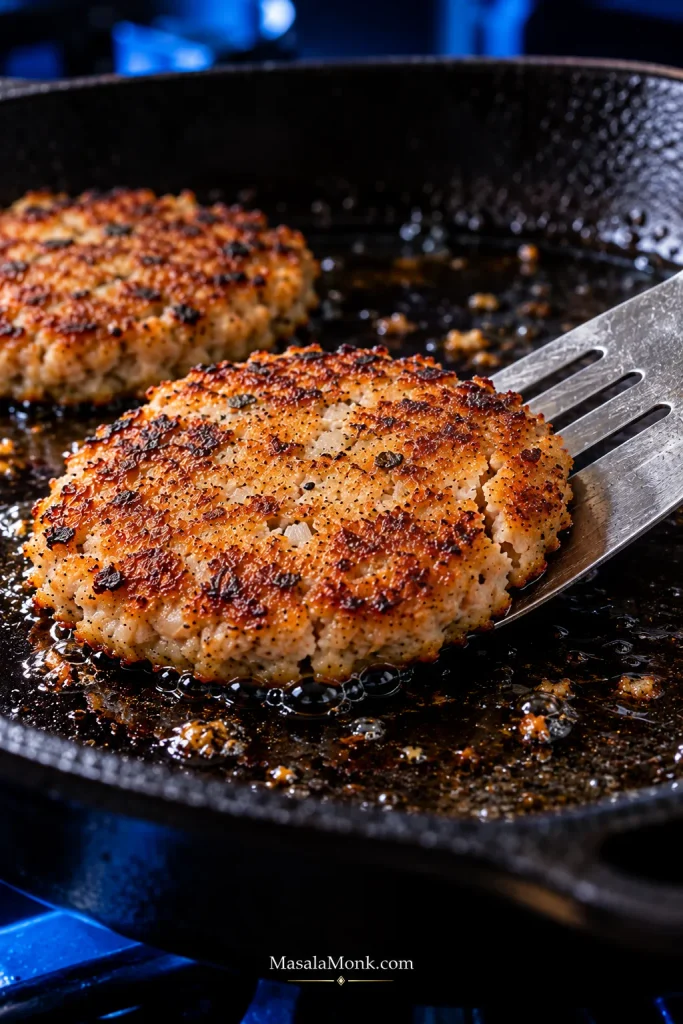
Get that balance right and the reward is simple: deeply browned, crisp edges around a tender center with visible flakes of salmon.

Close-up of a thin salmon patty in a cast-iron skillet being lifted with a wide metal spatula; a small crack begins near one edge.
A crack on the first turn is not automatically a binder failure. If the patty still flexes, the first crust may simply need more time to become the outer support that carries it through the flip.

Salmon Patties Recipe

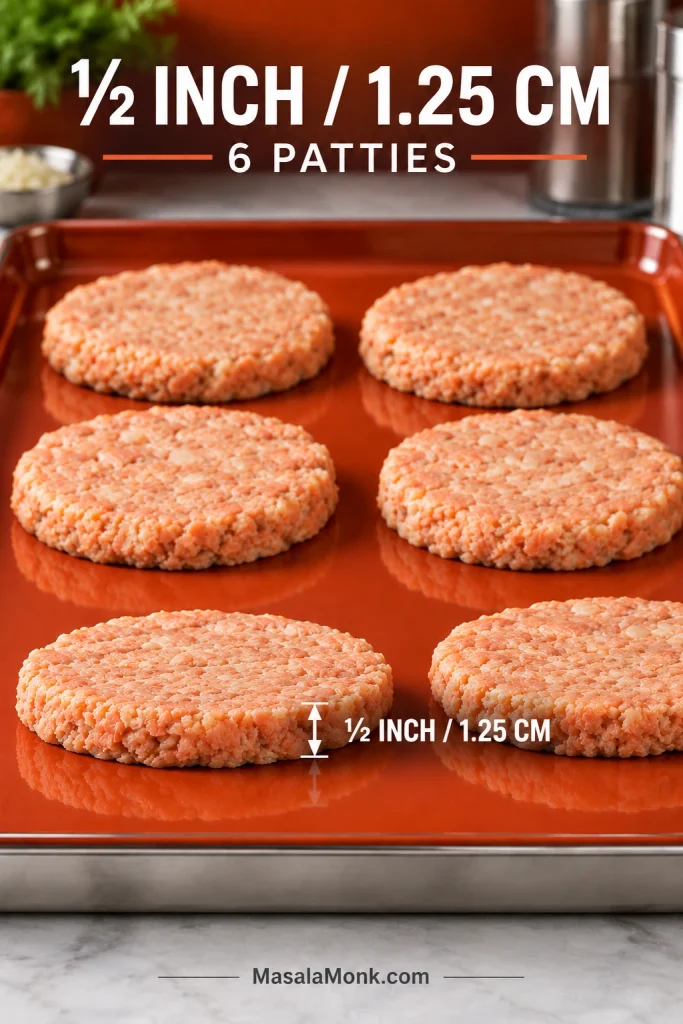
Yield: 6 medium patties
Prep: about 15 minutes
Rest: 5–10 minutes
Cook: about 12–16 minutes for two batches, plus a quick test piece
Total: about 35–40 minutes
Method: skillet

Ingredients

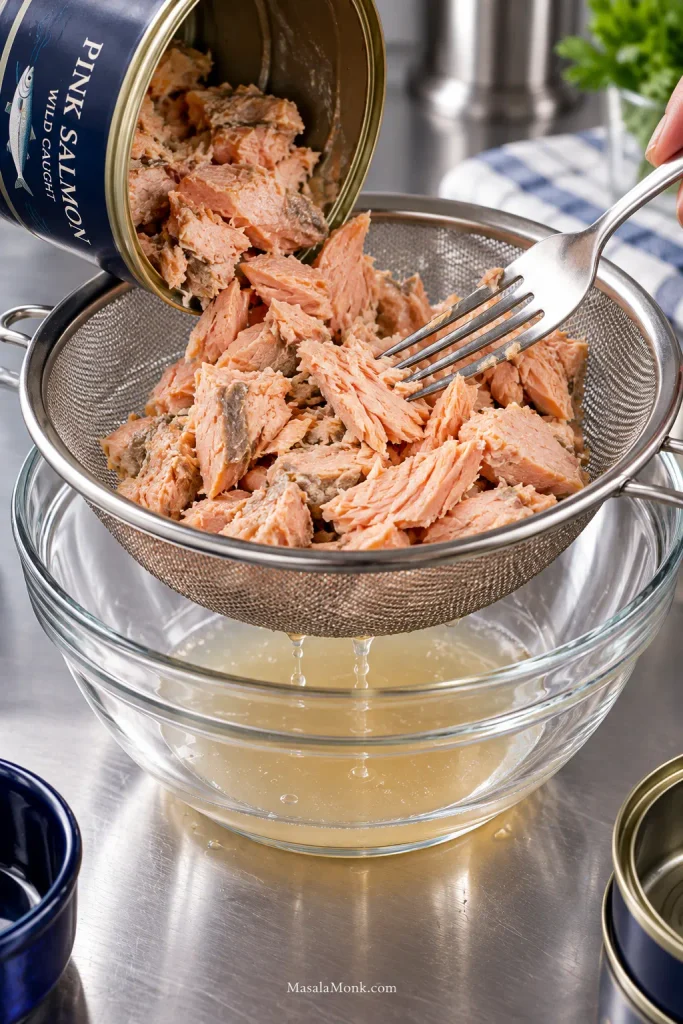
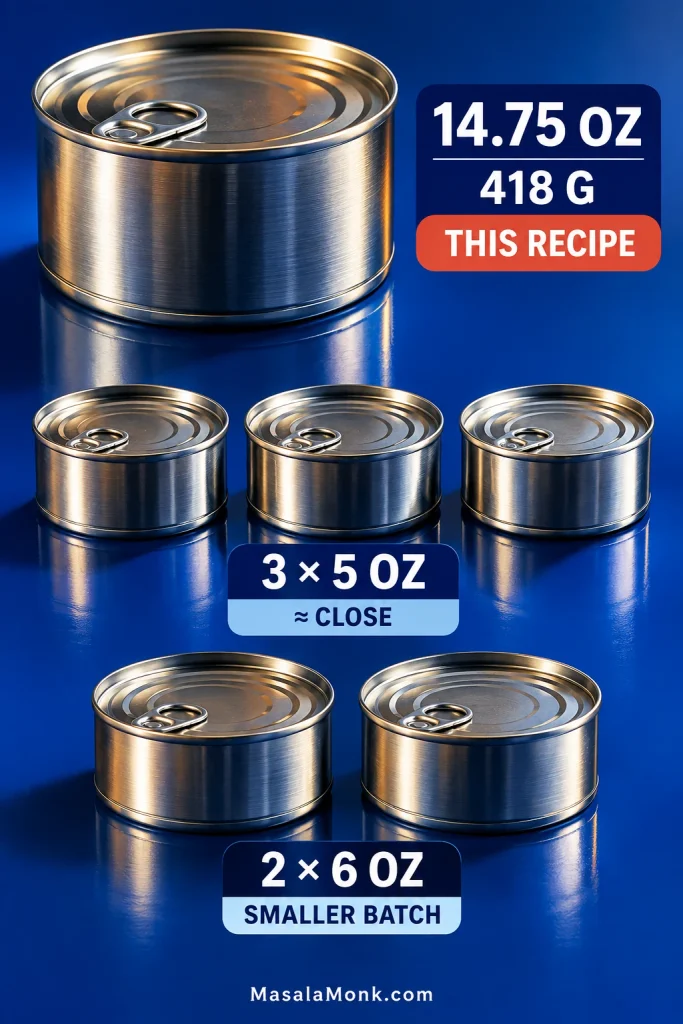
  • 1 can (14.75 oz / 418 g) pink salmon
  • 1 large egg
  • About 12 standard Saltine crackers (roughly 36 g; brands vary), finely crushed, plus more only if needed
  • 2 tablespoons very finely minced or grated onion
  • 1 tablespoon (15 g) mayonnaise
  • 1 teaspoon Dijon mustard
  • 1 tablespoon (15 ml) fresh lemon juice
  • ¼ teaspoon freshly ground black pepper
  • Fine salt, as needed after tasting the test piece
  • 2–3 tablespoons (30–45 ml) neutral cooking oil, or enough to coat the skillet generously, plus more between batches if needed

The base is intentionally simple. Dill or parsley takes the flavor in a fresher direction, while Old Bay or Cajun seasoning makes the patties warmer and spicier. Choose one direction rather than piling several onto the salmon.

Three cues are worth remembering: soft but liftable in the bowl, an immediate steady sizzle in the skillet, and deep gold before the first flip.

Teaching graphic showing cohesive salmon mixture held in a hand, a patty sizzling in a skillet, and a deep-golden underside, labeled Soft But Liftable, Steady Sizzle, and Deep Gold.
These cues answer three different questions: does the mixture hold, is the pan hot enough, and has the first crust become strong enough for a clean flip?

How to Make Salmon Patties

  1. Drain and flake the salmon. Set a small bowl underneath as you drain it, and save a tablespoon or two of the liquid for now. Transfer the salmon to a mixing bowl. Remove visible skin or larger bones if you prefer, then break the fish into flakes with a fork, leaving some larger pieces for texture.
Cooked canned salmon draining through a metal strainer into a clear bowl while a fork separates the fish into flakes; a small amount of liquid collects below.
Because canned salmon varies in how much liquid it carries, keeping a spoonful aside gives you a controlled way to correct a dry bowl later without automatically reaching for more egg or mayonnaise.
  1. Mix. Add the egg, very finely minced or grated onion, mayonnaise, Dijon mustard, lemon juice, and black pepper. Keep the onion pieces small; these patties cook quickly, and larger pieces can stay sharp. Fold gently, then mix in the crushed Saltines just until everything comes together.
  2. Rest for 5–10 minutes. Give the crumbs time to absorb moisture. During the final 2–3 minutes, set a 10- to 12-inch skillet over medium heat and add enough oil to coat the bottom generously.
  3. Check and taste. Press a small handful in your palm. It should hold when lifted while still feeling moist. A bowl that is noticeably wetter or drier can be corrected with the 30-second mixture check below. Once the oil gives you a steady sizzle, fry a teaspoon-sized test piece. Make sure it holds together, taste it while hot, and adjust salt, pepper, lemon, or seasoning now.
A teaspoon-sized piece of salmon mixture frying in shallow oil, with the bowl of mixture behind; on-image text asks Holds? and Taste Right?
The test piece also checks the skillet. Gentle, immediate bubbling with gradual browning means the heat is useful; fast scorching or no response tells you to adjust before all six patties go in.

Shape, Fry and Flip

  1. Shape. Divide the salmon into 6 equal portions and form patties about ½ inch / 1.25 cm thick. Press only as much as needed to bring them together.
Six raw salmon patties on a red tray; the front patty is shown from the side with a marker indicating one-half inch, or 1.25 centimeters, thickness.
For salmon patties, reach the ½-inch profile by widening the portion rather than pressing harder. That preserves a looser interior while giving the skillet more surface area to brown.
  1. Fry in two batches of three. Bring the oil back to a steady sizzle if needed, then add 3 patties with space around them. Cook for roughly 3–4 minutes, until the underside is deeply golden and the outer edge looks set.
  2. Turn once. Slide a wide, thin spatula fully underneath each patty. If it still clings to the skillet, give it another 30–60 seconds. Flip and cook another 3–4 minutes, until the second side is golden and the center is hot and set. If you check with a thermometer, aim for 160°F / 71°C in the center; that’s the USDA safe temperature for dishes containing egg. Transfer to a plate, add a little more oil if the pan needs it, and repeat with the remaining 3 patties.
  3. Eat them while they’re crisp. Keep the cooked patties in a single layer so steam doesn’t soften the crust. Break one open; the center should look moist and flaky, with recognizable pieces of salmon rather than a dense paste.

The 30-Second Mixture Check

Give the crumbs their full rest before changing the mixture. A loose, wet bowl may need more binder; a dry one needs moisture, not another handful of crackers.

What you noticeWhat it meansWhat to do
Slumps, smears, or loses its edgeToo wet, or not fully restedFinish the rest. If it still slumps, add crushed Saltines about 1 tablespoon at a time.
Presses together, lifts intact, stays moistReadyFry the test piece, then shape the patties.
Cracks badly or crumblesToo dryAdd mayonnaise or reserved salmon liquid about 1 teaspoon at a time.
Feels stiff and denseProbably too much binderStop adding crumbs. Loosen with a small amount of moisture if necessary.
Diagnostic graphic showing Ready salmon mixture in a hand, Too Wet mixture slumping, Too Dry mixture crumbling, and Too Dense mixture formed into a compact flattened puck.
Ready salmon patty mixture can look rougher than an over-bound one—and that is a good sign. Instead of chasing a smooth puck, look for just enough cohesion to lift while the salmon flakes stay distinct.

A dry salmon patty can still fall apart. You want something soft enough to stay tender and cohesive enough to lift cleanly.

Mixture ready? Shape the patties →

If It Won’t Release, Don’t Flip It Yet

A patty that still sticks to the skillet or bends in the middle when you slide a spatula underneath needs more time on the first side. Use the color underneath as your guide; burner settings vary from stove to stove.

When a Salmon Patty Is Ready to Flip

  • Look for deep gold underneath rather than pale yellow.
  • At the edge, the surface should look set instead of glossy.
  • The patty should begin releasing cleanly from the skillet.
  • Use a wide spatula so the whole patty is supported during the turn.
Comparison graphic showing a pale sticking patty labeled Too Early and three browned patties labeled Ready to Flip, with one lifting cleanly on a metal spatula.
When deciding when to flip salmon patties, treat clean release as feedback from the crust. Once the underside lifts without resistance, that browned surface can support the softer center through the turn.

Cast iron gives you a strong crust; nonstick makes release especially easy. Stainless steel works when it is properly preheated and has enough oil.

Already cooked them? If the texture still seems off, troubleshoot the finished patties.

If the Finished Patties Still Aren’t Right

The mixture check handles the raw bowl, and the crust cues handle the first flip. Once the patties are cooked, their texture shows you what to change next time.

What happenedLikely reasonNext batch
Dry and mealyToo much binder, naturally dry salmon, or too much cookingUse less crumb and stop cooking once the center is set.
Soft or mushy insideToo much moisture, thick patties, or not enough cookingKeep them around ½ inch thick and cook until the center is set.
Pale, soft or greasy crustOil too cool, crowded skillet, or moving the patties too soonWait for a steady sizzle, leave room around each patty, and let the first side brown before turning.

What a Good Salmon Patty Looks Like Inside

Extreme close-up of a cooked salmon patty broken open, showing a crisp dark-golden crust and separate moist pink salmon flakes inside.
Distinct flakes inside suggest the salmon was handled gently, while the irregular crust shows that the browning came from direct skillet contact rather than an external breadcrumb coating.

Back to the recipe ↑

Saltines, Panko or Breadcrumbs?

The egg and crushed Saltines do most of the holding in this version. A spoonful of mayonnaise keeps the mixture from feeling dry while the crumbs rest.

Saltines are the default here. They disappear into the salmon easily, absorb moisture well, and already bring some salt to the bowl.

Panko gives the mixture a looser texture. Start conservatively, let it sit, and add more only after you see how well the salmon holds.

Plain breadcrumbs are dependable but easy to overdo. Once the bread becomes more noticeable than the salmon, adding more won’t improve the patty.

Ritz crackers make a richer, more buttery version. Different crumbs and crackers absorb differently, so I would not treat them as automatic cup-for-cup substitutes before checking the rested mixture.

Binder comparison showing Saltines and crushed Saltines prominently, with panko, plain breadcrumbs and buttery round crackers arranged beside salmon mixture.
With Saltines, panko, breadcrumbs or Ritz, the useful comparison starts after the crumbs hydrate. Judging them dry can tempt you to add more binder before the mixture has had time to settle.

For the flour-and-cornmeal style often associated with Southern salmon croquettes, our salmon croquettes recipe follows that branch much further.

One Can of Salmon Isn’t Always One Can

This recipe starts with one 14.75-ounce / 418 g can before draining. Can sizes vary enough that “one can” is no longer a useful measurement by itself.

Package weight includes the packing liquid, so two cans with similar labelled weights may not leave exactly the same amount of salmon after draining.

Three 5-ounce cans are close to the labelled amount used here. Two 6-ounce cans make a smaller batch, so scale the egg as well as the crumbs instead of using a full egg and then adding extra dry binder to compensate. Beating the egg first makes it easier to use only part of it.

Can-size guide showing one 14.75-ounce / 418-gram can labeled This Recipe, three 5-ounce cans marked approximately close, and two 6-ounce cans marked smaller batch.
Use can size as a starting point, not the final adjustment. Because different packs shed different amounts of liquid, the rested mixture still decides whether the bowl needs a little more crumb or moisture.

Which Canned Salmon Works Best?

Pink or red? For a milder, generally less expensive option, pink salmon works well with the lemon, onion, and mustard in this recipe. Red salmon or sockeye gives you a stronger salmon flavor. Canned salmon can also smell much stronger straight from the can than it tastes after frying; the lemon, mustard, onion, and browned crust make the finished flavor noticeably more balanced.

Using a pouch? Pouch salmon can be drier than salmon packed with more liquid. Begin with less crumb and check the mixture after it rests.

Skin and bones? The soft canned bones are edible and can be mashed into the salmon. You do not have to make yourself enjoy them, though. Pull out the obvious bones and skin if you’d rather not deal with them.

Changed the package size? Before shaping, run the mixture check again.

What to Serve with Salmon Patties

You can lean into the comfort-food side of the dish or put something cool and crisp next to the hot patties.

  • Classic comfort: creamy mashed potatoes with peas, green beans, or corn.
  • Southern-style supper: a wedge of Southern cornbread with greens, slaw, or green beans.
  • Cold and crunchy: creamy coleslaw, either alongside the patties or tucked into a sandwich with lettuce and pickles.
  • Lighter: a sharp cucumber salad gives the plate cool crunch without another rich element.
  • Breakfast or brunch: smaller patties with eggs and grits or biscuits.

For the plate I’d make first: hot salmon patties, mashed potatoes, something green, a wedge of lemon, and cold homemade tartar sauce. Crisp crust, soft potatoes, something fresh, something sharp. Nothing on the plate is doing the same job.

Dark green dinner plate with golden salmon patties, mashed potatoes, green beans, lemon and tartar sauce; one patty is broken open near the sauce.
Keep cold tartar sauce beside hot salmon patties rather than over them. That way, each bite can pick up acidity and creaminess without softening the crust before it reaches the fork.

Make Ahead, Freeze & Reheat

Make ahead. Shape the patties up to 24 hours ahead, cover them, and refrigerate until you’re ready to cook. This matches USDA guidance for dishes containing raw egg.

Refrigerate leftovers. Cool cooked patties promptly, keep them covered, and use them within about 3–4 days, which is also the refrigerated storage window in USDA fish-storage guidance.

Freeze after cooking. Cool the patties, freeze them in a single layer until firm, then transfer them to a freezer-safe container with parchment between layers. USDA storage guidance lists cooked fish at up to about 3 months in the freezer for best quality. That is storage guidance rather than a promise that the crust will be identical after freezing.

Best Way to Reheat Salmon Patties

A skillet does the best job of bringing the fried crust back. An air fryer works well too, and the oven is handy for several patties at once. The microwave is fastest but softens the outside. Whichever method you use, USDA leftover guidance recommends reheating to 165°F / 74°C throughout.

A salmon patty reheating in a dark skillet while a metal spatula lifts one edge; the browned surface appears beneath text reading Bring the Crust Back and Skillet = Best Crust.
When you reheat salmon patties, leave space around them in the skillet. Otherwise, trapped steam works against the crisp surface you are trying to bring back.

Salmon Patties FAQ

Can salmon patties be made without eggs?

Not by simply leaving the egg out of this exact recipe. This formula relies on egg for structure, so an eggless version is better made from a recipe designed around a different binder.

Can I use fresh salmon instead of canned?

Yes—cooked fresh salmon can replace canned salmon, but raw salmon is not a direct 1:1 substitute for this recipe. Flake leftover cooked salmon gently and expect to adjust the moisture because it may be drier than canned fish. Raw salmon needs a formula built around uncooked fish.

What’s the difference between salmon patties, salmon cakes, and salmon croquettes?

There is no universally fixed difference between salmon patties and salmon cakes; the names often overlap. In American home cooking, especially in the South, “salmon croquettes” often refers to a closely related style that may lean more heavily on flour, cornmeal, coating, or a distinct frying method.


There is something satisfying about turning a can from the cupboard into six hot, golden patties. This is the kind of dinner that asks very little from the refrigerator and still gets to the table crisp, warm, and substantial.

The next can may be wetter, and another brand of crackers may absorb differently. What matters is learning what the salmon should feel like before it reaches the pan—and what the first side looks like when it’s ready to turn.

Once you know those two things, you’ll probably need the measurements less than you expect.

Posted on — Leave a comment

Pork Schnitzel Recipe: Crispy, Juicy German-Style Pork Cutlets

Thin golden pork schnitzel on a glossy black platter, cracked open with a knife to reveal cooked pork inside, with a lemon wedge near the top.

Cut into pork schnitzel while it is still hot and the crust should crack before the knife reaches the meat. Underneath, the pork stays thin and juicy; a squeeze of lemon hits the warm breadcrumbs and cuts through the richness.

The best version feels almost delicate for something fried: a thin golden crust, tender pork, salt and lemon.

The frying happens quickly, so small mistakes show up fast. A thick spot in the pork can leave you waiting for the center while the coating keeps darkening. Oil that has cooled between batches gives you pale, heavy crumbs. Too little fat leaves parts of the breading pressed against the skillet instead of frying evenly.

Pound the pork evenly, keep the crumb layer loose, and pay attention to what the oil is doing once the first cutlet goes in.

Schnitzel is a thin meat cutlet, often breaded and fried. Wiener Schnitzel specifically uses veal. With pork, you will also see the German term Schweineschnitzel; this recipe uses pork in a German-style preparation.

On This Page

Before the Oil Gets Hot

Four things do most of the work before frying:

  • Pork: boneless center-cut pork loin chops, 5–6 oz / 140–170 g each.
  • Thickness: pound them evenly to 1/4 inch / 6 mm.
  • Breading: flour → beaten egg → fine dry breadcrumbs.
  • Frying: start at 350°F / 175°C with enough oil to reach freely around the pork.

At that thickness, most schnitzels need about 2–3 minutes per side, but start looking at the crust around the 2-minute mark. Cook the pork to 145°F / 63°C and give it a 3-minute rest. Thin, evenly pounded pork doesn’t need a marinade for tenderness.

Raw center-cut pork loin, a flattened pork cutlet, flour, beaten egg, fine breadcrumbs and a shallow-fry pan arranged on a cobalt and stainless-steel set with preparation labels.
In this pork schnitzel recipe, thickness, crumb, oil depth and heat work as a system. Once one drifts, the pan has much less room to compensate for the others.

Pork Schnitzel Recipe

Start with boneless pork loin and pound it thin enough that the meat and breadcrumb crust can finish together. Flour, egg and fine crumbs give you the coating; shallow-frying in a generous layer of oil takes it from pale to crisp and golden.

You are looking for a dry, delicate crust that may blister and lift in places while the pork underneath stays juicy.

Prep: 20 minutes
Cook: 20–25 minutes
Total: about 45 minutes
Serves: 4

Equipment

  • Meat mallet with a flat side, or a heavy rolling pin
  • 11- to 12-inch / 28- to 30-cm heavy skillet
  • 3 shallow dishes
  • Instant-read thermometer
  • Tongs or a wide spatula
  • Wire rack set over a sheet pan or tray

Ingredients

  • 4 boneless center-cut pork loin chops, 5–6 oz / 140–170 g each
  • 1 1/4 teaspoons fine sea salt, using about 1 teaspoon for the pork and the remainder for finishing
  • 1/2 teaspoon freshly ground black pepper
  • 1/2 cup / 60 g all-purpose flour
  • 2 large eggs
  • 1 1/4 cups fine dry unseasoned breadcrumbs, plus more as needed
  • Canola, sunflower or another neutral high-heat frying oil, enough to reach 1/3–3/8 inch / 8–10 mm deep in the skillet
  • 1 large lemon, cut into wedges

Method

Prepare and Bread the Pork

  1. Prepare the pork and rack. Set a wire rack over a sheet pan or tray. For several batches, heat the oven to 200°F / 95°C. Trim any thick exterior fat or tough silverskin from the chops, then pound each one between sheets of parchment or plastic wrap to an even 1/4 inch / 6 mm. Pat the pork dry. If an edge has a tight strip of fat or connective tissue, make a few shallow snips through it.
  2. Season and set up the breading. Sprinkle both sides of the pork with about 1 teaspoon of the salt and all of the black pepper. Put the flour in one shallow dish, beat the eggs in another and add the breadcrumbs to a third.
  3. Bread the pork. Coat one cutlet in flour and shake away the excess. Dip it into the egg and let the extra drip back into the bowl. Cover both sides with breadcrumbs without packing them down. Repeat with the remaining pork and keep the breaded cutlets in a single layer while the oil heats.

Fry the Schnitzel

  1. Heat the oil. Add enough oil to reach 1/3–3/8 inch / 8–10 mm deep. Use the depth in your pan, not a cup measurement, as the guide. Heat to 350°F / 175°C.
  2. Fry the first side. Carefully lower one large cutlet into the oil away from your body. Lively bubbling should begin almost immediately. Start checking around 2 minutes; most need 2–3 minutes on the first side. Once the coating has set, gently move the skillet so hot fat washes around the pork, spooning a little oil over pale raised areas as needed.
  3. Flip and finish. Turn the schnitzel gently and begin checking again after about 2 minutes. The oil temperature will fall when the pork goes in, so adjust the heat as needed to keep it roughly within 330–350°F / 165–175°C. Look for a golden crust and an internal pork temperature of 145°F / 63°C.

Checking the temperature: slide an instant-read thermometer horizontally through the side so the sensing tip reaches the center instead of the hot crust or skillet. The USDA’s guidance for whole pork cuts is 145°F / 63°C followed by at least a 3-minute rest.

Digital thermometer probe inserted horizontally through the thin side of cooked pork schnitzel, with the display reading 145°F and 63°C.
Insert the probe through the thickest side edge you can find. Because pork schnitzel is thin, even a small downward angle can put the sensing tip into the skillet instead of the meat.

Rest and Serve

  1. Rest, reset and repeat. Move the pork to the wire rack, sprinkle with some of the remaining salt and rest it for at least 3 minutes. For multiple batches, keep the rested schnitzels on the rack in the 200°F / 95°C oven, in a single layer, while you cook the remaining cutlets. Scoop dark loose crumbs from the oil and let the pan recover before the next cutlet goes in.
  2. Serve hot. Bring the schnitzel to the table with lemon wedges and squeeze the juice over each piece just before eating.

What Cut of Pork Is Best for Schnitzel?

If you’re shopping specifically for schnitzel, boneless center-cut pork loin chops are the easiest all-around choice. They are lean, fairly uniform and broad enough to pound into full-size cutlets.

Boneless center-cut pork loin chop displayed on a cobalt and stainless-steel surface as the recommended all-around cut for schnitzel.
At the butcher counter, look for a broad center-cut pork loin chop with fairly even thickness and little hard exterior fat. That leaves more usable schnitzel surface after pounding.

Thin boneless pork cutlets from the loin are convenient too. Check the thickness first; many need only a little evening out with the mallet.

A whole boneless loin can be sliced into portions at home. Pork tenderloin also works, although its narrow shape gives you smaller, rounder schnitzels.

Bone-in loin chops are usable once the meat is cut away from the bone. Shoulder is a less natural fit here; schnitzel cooks too quickly to give a tougher cut much time to soften.

Starting with a Thick Pork Chop

Butterfly it first. Slice horizontally through the chop almost—but not completely—all the way, open it like a book and then pound it. That gives you a wider, more even cutlet without having to hammer a very thick chop all the way down.

Chef’s knife cutting horizontally through a thick boneless pork loin chop while leaving one edge attached as a hinge so the chop can open like a book.
The important clue is the intact hinge. Once opened, the chop should read visually as one wider piece rather than two separate slices sitting beside each other.

Prefer to leave a thick chop intact? This air fryer boneless pork chops method is designed around cooking that thicker piece without drying out the center.

Aim for an Even 1/4 Inch

At 1/4 inch, the pork cooks quickly enough for the meat and breading to finish together. Go thinner and it becomes more delicate; thick patches leave the crumbs browning while the center catches up.

Flattened raw pork cutlet beside a stainless-steel ruler showing a thickness of about 1/4 inch, or 6 millimeters.
Measure the thickest central area rather than the feather-thin edge. For schnitzel, consistency across the cutlet matters more than making its outline look perfectly uniform.

Use the flat side of the mallet and work outward instead of pounding one spot repeatedly. A folded kitchen towel under the cutting board keeps it steadier and takes some of the sharp noise out of the job.

Raw pork loin cutlet protected under clear material on a cobalt work surface while a flat meat mallet works near the center, with arrows pointing outward.
Aim for even thickness rather than a perfect shape. An irregular pork cutlet will cook more predictably than a beautiful oval that still hides one thick patch in the center.

The Breading Should Stay Light

Pat the flattened pork dry before you start. Visible moisture gets another quick pass with a paper towel before the flour goes on.

Flour gives the egg a dry surface to grab. The egg holds the crumbs. Shake away excess flour, let extra egg drip off and don’t pack down the breadcrumb layer.

Three-stage pork schnitzel breading station showing a floured cutlet, a cutlet dipped in beaten egg with tongs, and a cutlet coated with fine dry breadcrumbs.
Watch what gets carried from one stage to the next: visible flour clumps or wet streaks of egg usually mean too much of the previous layer came along for the ride.

One hand for flour and crumbs and one for egg keeps the breading on the pork instead of slowly building a schnitzel around your fingers.

Fine Breadcrumbs or Panko?

Fine dry unseasoned breadcrumbs give this schnitzel its thinner, more even crust. Panko works too, but the result is rougher and crunchier. Whichever you use, press the crumbs onto the pork only gently.

Two cooked breaded pork cutlets compare a thin, even fine-breadcrumb crust with a rougher coating made from larger panko flakes.
Use the photograph as a texture chooser: fine breadcrumbs sit close to the pork, while panko stands farther off the surface in larger ridges and flakes.

Homemade breadcrumbs are fine when the bread has been dried thoroughly and processed fairly small. A loose crumb layer has room to blister and lift in the oil.

Two raw breaded pork cutlets compare lightly adhered fine breadcrumbs with a second cutlet whose breadcrumb coating has been pressed and compressed.
If the breadcrumb layer already looks pasted flat before frying, it has probably been pressed too firmly. You should still be able to see the texture of the fine crumbs.

For gluten-free schnitzel, use gluten-free flour and gluten-free breadcrumbs in the same flour–egg–crumb sequence.

Some cooks rest breaded pork to help the coating attach firmly. For the crust we’re making here, a long refrigerated rest isn’t necessary. Bread the pork shortly before frying, while the oil heats.

Breaded cutlets should still look almost ordinary. The transformation happens in the oil.

Let the Schnitzel Move in the Oil

Shallow-fry 1/4-inch pork schnitzel in about 1/3–3/8 inch of oil heated to 350°F; most cutlets need 2–3 minutes per side. The oil should reach freely around the edges, with enough room for the pork to move instead of staying pinned flat against the skillet.

Low-angle view of a stainless-steel frying pan showing shallow frying oil measured at about 1/3 to 3/8 inch, or 8 to 10 millimeters, deep.
Once the schnitzel enters the skillet, look for a visible moat of frying oil around its lower edge. That real-world cue is more useful than thinking about oil in cups.

That generous layer of fat lets the thin meat and breading finish at almost the same moment. You don’t need a deep fryer, but this is more oil than you would use to sauté a pork chop.

Oil or Butter?

Neutral oil is easiest to manage. Clarified butter or ghee can replace part of the neutral oil for a little buttery flavor; keep the total frying fat at the same depth. Regular butter darkens more quickly at this heat.

Give a broad cutlet some room. Two can share the skillet when they fit without touching; otherwise fry one at a time. Gently moving the pan or spooning hot fat over a pale raised patch helps the crumbs brown without flattening them.

Metal spoon lifting hot frying oil from the skillet and pouring it over a pale area of a thin pork schnitzel as it shallow-fries.
When a raised patch stays pale, bring hot fat to that spot rather than pressing the crust down. The spoon reaches a surface the skillet itself cannot.

The first schnitzel is your calibration piece. A shade too pale or too dark tells you where to move the heat before the second one goes in; give the oil time to recover before adding that next cutlet.

Breaded pork schnitzel being lowered into shallow oil with tongs beside an oil thermometer showing a 350°F, 175°C starting temperature.
Let the oil recover after each cutlet so the next one fries at the same lively heat.

Before another cutlet goes in, scoop out dark crumbs that have broken loose. Left in the oil, they can make later batches taste bitter and look much darker.

The crust should feel almost brittle on the first bite, then give way to tender pork beneath it.

Extreme close-up of a fractured golden pork schnitzel showing a thin cooked pork interior and a fine, blistered breadcrumb crust.
A narrow air pocket between crust and pork is not automatically a breading failure. On schnitzel, small areas of separation can be part of the light, blistered texture you want.

Read the Pan While the Schnitzel Fries

The clock tells you when to start looking. The pan tells you what is actually happening.

From the first bubbles to the moment the schnitzel reaches the rack, watch how strongly the oil reacts, how the breading sets, the color before the flip and whether the finished crust looks dry or greasy.

Pork schnitzel frying in a skillet with four close-up stages showing first contact with bubbles, crust setting, an even golden pre-flip surface and the finished crisp crust.
Treat this as a visual calibration strip rather than four separate rules. Match your skillet to the closest stage first, then decide whether it needs more time, a flip or the rack.

When It First Lands

Lively bubbling should appear around the pork within moments. Barely any bubbling? Let the oil get hotter before another cutlet goes in. Quiet oil tends to produce a heavier, greasier crust.

Fast darkening in the first minute points the other way: lower the heat before the outside gets too far ahead of the meat.

Thin breaded pork schnitzel frying in shallow hot oil with active bubbles forming around its edges in a skillet.
Watch where the bubbles appear, not merely how many there are. A reasonably even ring around the cutlet suggests the oil and pan heat are reaching its perimeter consistently.

As the Crust Sets

Bubbles, wrinkles and small lifted patches are welcome. Leave them alone. By flip time, aim for an even golden surface; pale beige usually wants a little longer, while deep brown is your cue to rein in the heat.

When It Comes Out

The surface should look dry and crisp, not glossy with oil. Move the schnitzel straight to the rack so the underside can breathe.

Puffed Crust or Curled Pork?

These can look similar for a moment.

A dry breadcrumb crust that bubbles and lifts away from parts of the pork can be exactly right. That is the breading puffing.

A whole cutlet bending into a dome is different. The meat itself is tightening and pulling its center upward. Even pounding helps, and shallow snips through a tight outer edge can keep the next one flatter in the oil.

Two pork schnitzels in the same pan compare a mostly flat cutlet with small raised crust pockets against another cutlet whose whole body cups upward from meat curl.
Crust lift is normal; whole-cutlet doming is meat curl.

If Your Schnitzel Does Not Look Right

One imperfect schnitzel can usually tell you what to change before the next one reaches the pan. A pale, glossy crust is an especially useful clue that the frying conditions need attention.

Two pale breaded pork schnitzels crowded in shallow oil in a stainless-steel skillet, with a glossy surface and relatively weak bubbling.
Compare the bubbling as well as the color: weak activity around the edges is another clue that the pan has lost too much heat.
What you seeWhat’s happeningFix the next batch
Pale, greasy crustThe oil was too cool or the pan was crowded.Let the oil recover before adding more pork.
Dark crust before the pork is readyThe pork is too thick or the oil is too hot.Pound evenly and lower the heat.
Scorched patches underneathToo little oil or uneven pan heat is letting parts of the crust scorch against the skillet.Add enough fat to reach freely around the pork and steady the heat.
Coating slides off in a wet sheetThe pork was damp, or excess flour or egg remained in the breading.Pat dry, shake off flour and let extra egg drip away.
Crisp breading bubbles away from the meatThe coating has puffed.Nothing. That can be a sign of good schnitzel.
The whole cutlet curls upwardThe meat itself is tightening unevenly.Pound evenly and snip through a tight outer strip if needed.
First schnitzel golden, later ones much darkerLoose crumbs are burning and/or the oil temperature is drifting.Skim the oil and let it recover between batches.
Good crust but tough porkThe meat was too thick or cooked too long.Pound thinner and check doneness sooner.
Crisp at first, soft five minutes laterSteam or wet sauce is sitting against the breading.Use a rack, avoid stacking and keep wet accompaniments beside it.

How to Keep Pork Schnitzel Crisp After Frying

Move each schnitzel to a wire rack and season it while the breading is hot. For several batches, hold the finished cutlets in a single layer in a 200°F / 95°C oven for no more than about 15–20 minutes. Much longer and the pork gradually dries even if the outside still looks good.

Once the crust is crisp, steam is the enemy.
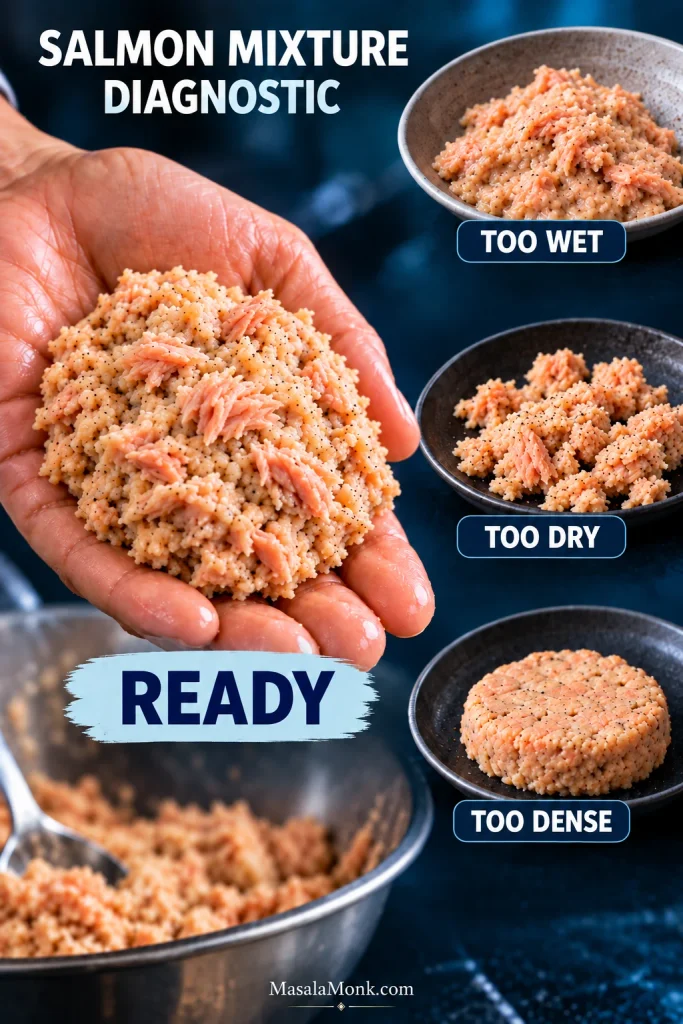
Stacking traps steam. So does a tightly covered tray. A paper towel can blot surface oil, but a hot schnitzel left flat against one for long enough will soften underneath.
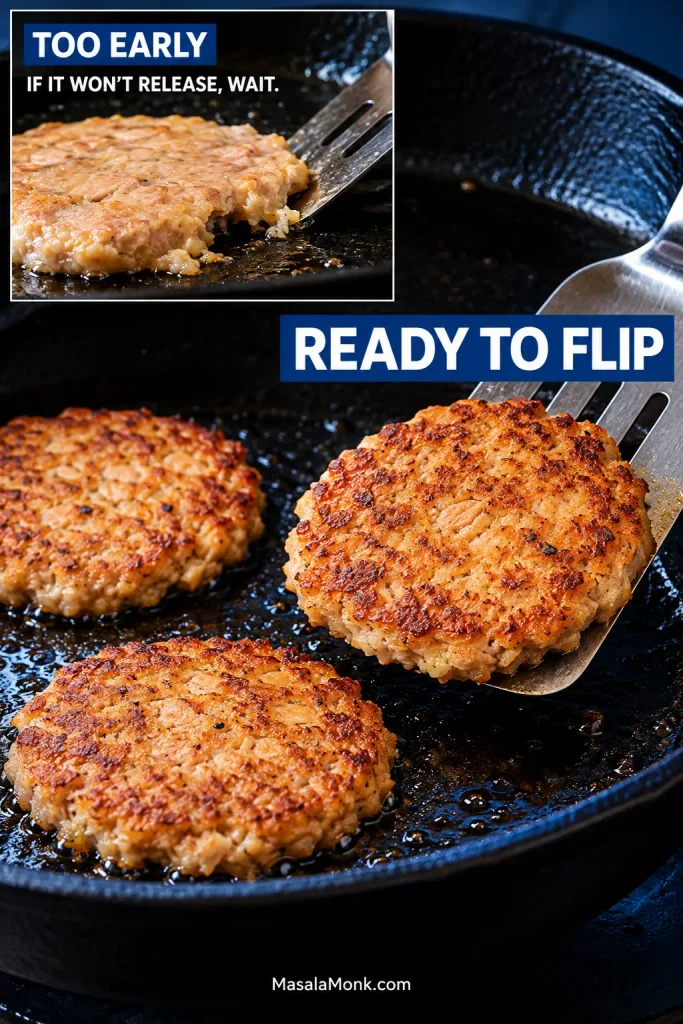
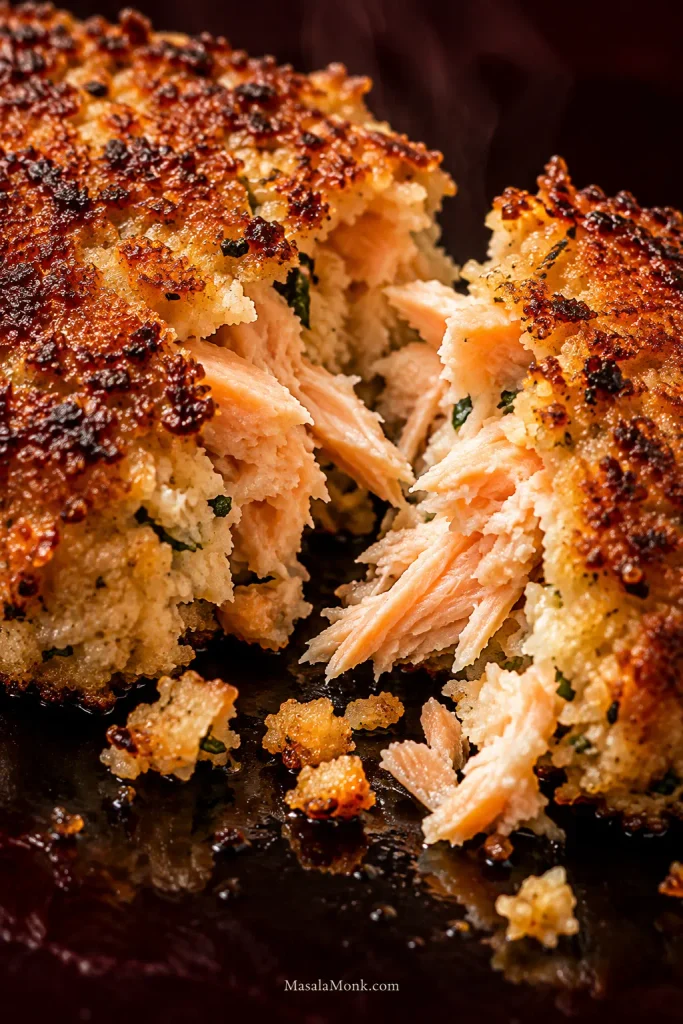
Golden pork schnitzel resting on a wire rack with open air beneath it, compared with two schnitzels stacked together with steam trapped between them.
A rack lets steam escape underneath; stacking traps it against the crust.

Wet food can do the same thing from above. Keep a cool vinegar-and-dill cucumber salad beside the schnitzel, not over the crust.

With gravy, spoon most of it beside the pork and drag each bite through at the table. You still get the sauce without surrendering the crunch.

Golden pork schnitzel on a dark green plate beside a polished silver sauceboat filled with creamy mushroom sauce and sliced mushrooms.
Keep creamy mushroom sauce beside, not over, the schnitzel so the crust stays crisp until each bite.

What Goes Well with Pork Schnitzel?

Schnitzel likes contrast: hot, crisp, rich pork next to something cool, sharp or acidic. Lemon does the simplest version of that job. Squeeze it over the pork at the last moment so the juice brightens the fried crumbs without sitting there long enough to soften them.

Hand squeezing a lemon over a crisp golden pork schnitzel, with droplets visible above the crust.
Lemon only the schnitzel you’re serving now; the rest stay crisp longer.

For a richer plate, a creamy mushroom sauce, mustard cream or dill sauce all work well. Keep wetter sauces beside the schnitzel and bring them into each bite as you eat.

You don’t need much beside it. Try German-style potato salad with cucumber salad, spätzle with braised red cabbage, or crisp roasted potatoes with a sharp green salad. A potato or noodle plus something fresh and acidic is usually enough.

Golden pork schnitzel on a dark blue plate with roasted potatoes, cucumber salad, red onion, dill and a lemon wedge.
Keep dressed salad and other wet sides beside the schnitzel so the crust stays crisp.

Make Ahead and Leftovers

If you want to get ahead, trim, portion and pound the pork earlier in the day or the day before, then keep it refrigerated. Bread the pork shortly before frying, not the night before.

Refrigerate cooked schnitzel within 2 hours and use it within 3–4 days. The crust is easiest to revive during the first day or two.

Reheat Without Softening the Crust

Dry heat works best. Reheat leftovers until the center reaches 165°F / 74°C.

  • Oven: 375°F / 190°C for around 8–10 minutes.
  • Air fryer: 375°F / 190°C for roughly 3–5 minutes; check early.
  • Skillet: moderate heat with a small amount of oil, turning once.
  • Microwave: it’ll heat the pork, but the breading will soften.
Reheated pork schnitzel shown with oven, air-fryer and skillet reheating methods on an emerald and cobalt background.
Reheat only until hot and crisp; extra time dries thin pork quickly.

Or skip reheating and turn the leftover schnitzel into a sandwich with mustard, crisp coleslaw or something pickled. The breaded pork gives a next-day sandwich plenty of texture even when served cool.

Cut leftover pork schnitzel sandwich on crusty bread with mustard, crisp slaw and pickled vegetables in a dark green, chrome-accented deli setting.
Assemble close to eating; mustard, slaw and pickles add contrast but eventually soften the crust.

Fresh from the pan is still the reason to make it: hot pork, a dry golden crust and lemon squeezed over at the last moment. By the second schnitzel, you’ll be watching the bubbles and the color as closely as the clock.

← Back to Recipe  ·  ↑ Back to Top