Posted on Leave a comment

Pork Leg Roast Recipe with Crackling and Cooking Time per kg

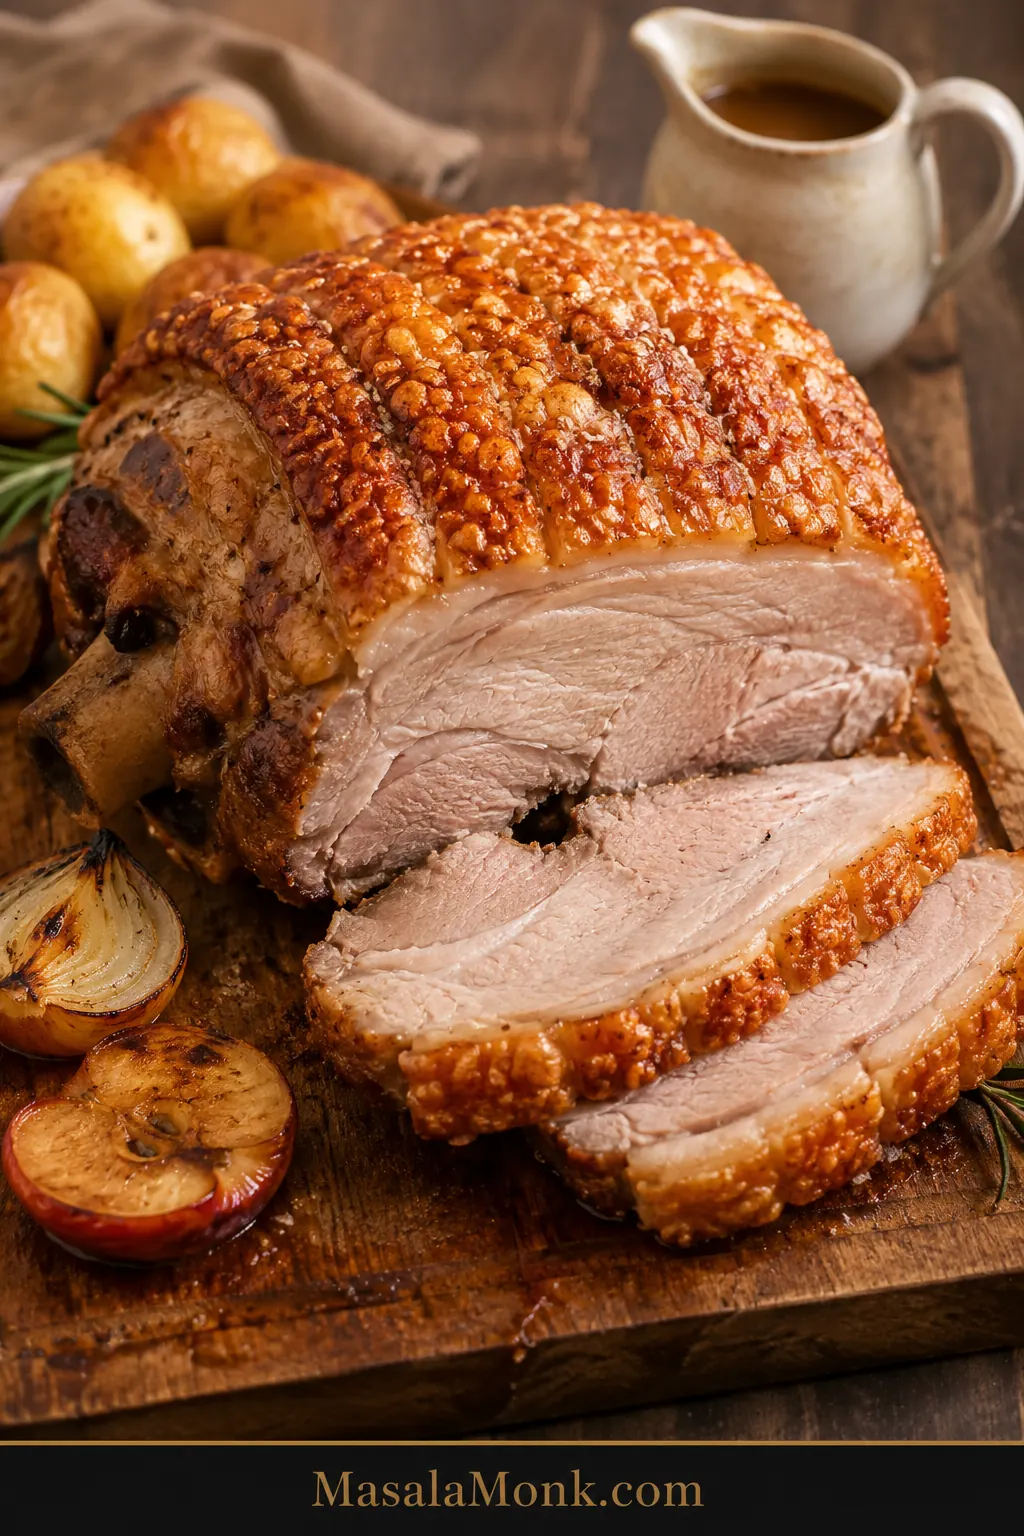
Roast pork leg with blistered golden crackling, carved slices, gravy, roasted apples, potatoes, and vegetables on a wooden board.

Pork leg roast is easy to love once it is cooked, but confusing before it goes into the oven. The label may say pork leg, leg of pork, pork joint, rolled pork leg, boneless roast, or bone-in joint. Then every timing chart seems to disagree.

It is one of those cuts that feels simple at the butcher and suddenly complicated at home. The joint is big, the rind has to crackle, the meat can dry out, and dinner still needs to happen on time.

That confusion is normal. Once you know the cut, the timing, and how to keep the skin dry, the roast becomes much easier.

This is a big roast, but it does not need to feel like a gamble. The secret is the two-job rule: crisp the rind first, then protect the meat. This guide gives you the full method for juicy sliceable pork, crisp crackling, cooking time per kg, internal temperature, and notes for boneless, bone-in, rolled, slow cooker, and air fryer pork leg.

The goal is simple: juicy sliceable pork, crisp crackling, and no guessing at the oven door.

Already cooking? Use the quick answer first, then check the cooking time chart and internal temperature guide before you roast.

Quick Answer: Pork Leg Roast Time and Temperature

For pork leg roast with rind, start hot at 240°C / 465°F or 220°C fan for 30–40 minutes to begin the crackling. Then reduce to 180°C / 350°F or 160°C fan and cook for about 30–40 minutes per kg, depending on the size and shape of the roast.

Use the time chart to plan, but use a thermometer to finish. For juicy sliceable pork, aim for 63–65°C / 145–149°F in the thickest part, then rest before carving. Prefer a firmer traditional roast? Cook closer to 70–71°C / 158–160°F.

Think of the roast as two separate jobs: dry heat for the skin, gentler heat for the center. If one finishes before the other, separate the jobs instead of overcooking the whole joint.

Jump to: Recipe · Choose Your Path · Cooking Time per kg · Internal Temperature · Timing Plan · Hot Start vs Final Blast · Crackling · Oven Method · Troubleshooting · Serving · Leftovers · FAQs

Choose Your Path Before You Follow the Chart

Before you choose a timing, check three things: whether your pork is fresh pork leg, whether it has rind, and whether it is boneless, rolled, or bone-in. Those details decide the cooking plan.

  • Fresh pork leg with rind: use the main oven method.
  • Boneless rolled pork leg: use the same method, but start checking early.
  • Bone-in pork leg: allow extra time and check the thickest meat away from the bone.
  • No rind: skip the crackling steps and focus on internal temperature.
  • Ham, gammon, cured leg, or smoked leg: pause and use ham-specific instructions.
  • Meat done but crackling soft: rest the pork and crisp the rind separately.

If the roast suddenly feels too big for the pan and too important to mess up, pause here. Dry skin, a hot oven, and a thermometer will do more for you than any complicated marinade.
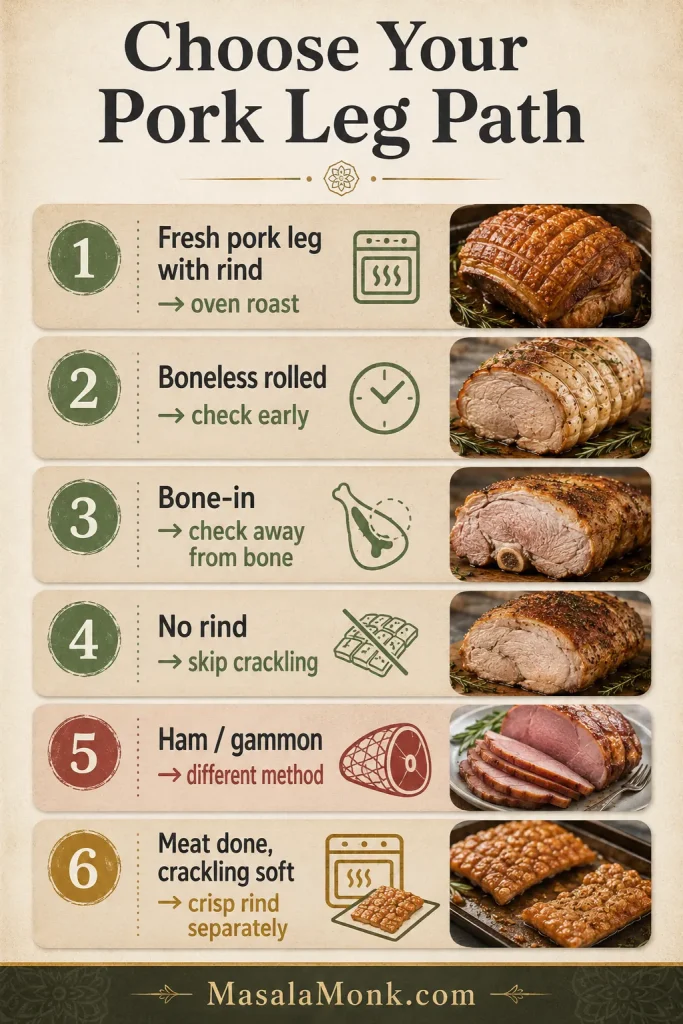
Decision guide showing different pork leg roast paths for rind-on pork, boneless rolled pork, bone-in pork, skinless pork, ham, gammon, and soft crackling.
Before you use a pork leg cooking time per kg chart, identify the cut because rind, bone, shape, and curing change the safest cooking path.

Next: Once you know the cut, go to the recipe card, cooking time per kg chart, or pork leg label guide.


Pork Leg Roast with Crackling

This recipe uses a 2.5 kg pork leg roast with rind. It works for boneless rolled pork leg, deboned pork leg roast, or a bone-in pork leg roast of a similar size. Adjust the timing using the chart below.

You do not need a complicated marinade here. The magic is in a dry rind, enough salt, a fully preheated oven, a hot start for crackling, and a lower oven temperature for the meat.

Recipe Details

Prep Time20 minutes active, plus optional drying time
Cook TimeAbout 2 hours for a 2.5 kg roast
Rest Time15–20 minutes
Total TimeAbout 2 hours 30 minutes, plus optional overnight drying
Servings6–8
Main Cut2.5 kg pork leg roast, rind on, boneless rolled or bone-in
Doneness63–65°C / 145–149°F in the thickest part for juicy slices
Crackling SignDry, salted rind that bubbles, blisters, and turns crisp during the hot start

No overnight drying? You can still make this today. Pat the rind dry several times, leave it uncovered while the oven preheats, salt it well, and use the hot-start oven stage. Overnight drying helps, but it is not mandatory.

Cooking a smaller roast? If your joint is closer to 1 kg, start checking much earlier than the default 2.5 kg timing. Small pork leg joints dry faster, especially when they are narrow, boneless, or rolled tightly.

Before you start, gather the few things that make this roast easier. The thermometer and a rack or trivet are the two most useful helpers.

Equipment You’ll Need

ToolWhy it helps
Roasting trayHolds the pork, aromatics, and pan juices
Wire rack or onion-and-apple trivetKeeps the pork lifted so the rind stays exposed
Paper towelsDry skin is the first step to good crackling
Sharp knife or utility bladeScores the rind cleanly without tearing it
Meat thermometerPrevents dry pork and removes guesswork
FoilUseful for shielding dark crackling patches or resting meat loosely
Serrated knifeCuts through crackling more cleanly
Carving boardGives the roast space to rest and slice neatly

If you only add one tool, make it the thermometer. It turns this from a timing gamble into a controlled roast.

Ingredients

  • 2.5 kg pork leg roast, rind on, boneless rolled or bone-in
  • 1½–2 tablespoons sea salt flakes
  • 1½–2 tablespoons olive oil or neutral oil
  • 1 teaspoon black pepper
  • 1–2 teaspoons fennel seeds, lightly crushed, optional
  • 4–6 garlic cloves, lightly crushed
  • 2 large onions, thickly sliced
  • 2–4 apples, halved or quartered, optional
  • 2–3 sprigs rosemary or sage
  • 250–500 ml stock, cider, or water for the tray and gravy
  • 1–2 tablespoons flour or cornflour, optional, for gravy
  • 1 teaspoon mustard or a splash of apple cider vinegar, optional

Salt note: Most of the salt is for the rind and crackling, not for heavily salting the meat. Rub it in after the rind is dry, not while it is still wet from packaging. If you are using fine table salt instead of flaky sea salt, use less.

Before the Pork Goes in the Oven

This quick check helps prevent the two biggest problems: soft crackling and dry pork.

  • Rind looks dry and matte, not wet or glossy.
  • Scoring cuts through the skin, but not deep into the meat.
  • Salt is rubbed into the scored cuts.
  • Oven is fully preheated before the pork goes in.
  • The joint sits rind-side up.
  • Skin is as level as you can make it.
  • Liquid stays in the bottom of the tray, below the pork.
  • The roast is not sitting deep in liquid.

Method

  1. Dry and score the rind. Pat the skin very dry. Score through the skin and some fat if needed, but do not cut deep into the meat.
  2. Bring the pork out briefly. Let the joint sit out for 45–60 minutes while the oven heats, but do not leave raw pork at room temperature for hours.
  3. Season the meat side only. Rub the meat side with pepper, fennel if using, garlic, herbs, and a little oil. Keep wet seasonings away from the rind.
  4. Oil and salt the rind. Rub the skin lightly with oil, then massage sea salt into the scored cuts.
  5. Set up the tray. Place onions, garlic, apples, and herbs in a roasting tray. Set the pork rind-side up on a rack or onion-and-apple trivet.
  6. Roast hot for crackling. Cook at 240°C / 465°F or 220°C fan for 30–40 minutes, until the rind starts to bubble, blister, and turn golden.
  7. Lower the heat. Reduce to 180°C / 350°F or 160°C fan. Add stock, cider, or water to the tray if making gravy, keeping it below the pork and away from the rind.
  8. Cook to temperature. Roast until the thickest part reaches 63–65°C / 145–149°F for juicy slices, or 70–71°C / 158–160°F for a firmer roast.
  9. Rest without steaming the crackling. Give the pork 15–20 minutes. Leave crisp crackling exposed so steam cannot soften it.
  10. Rescue, gravy, and carve. If the meat is done but the crackling is soft, remove the rind and crisp it separately. Make gravy from the pan juices, then carve the pork across the grain.

The full oven method below explains each step in more detail. First, make sure the cut you have matches the path you are following.

Quick Cut Check

Still not sure what kind of pork leg you bought? Use this table before you worry about exact timing.
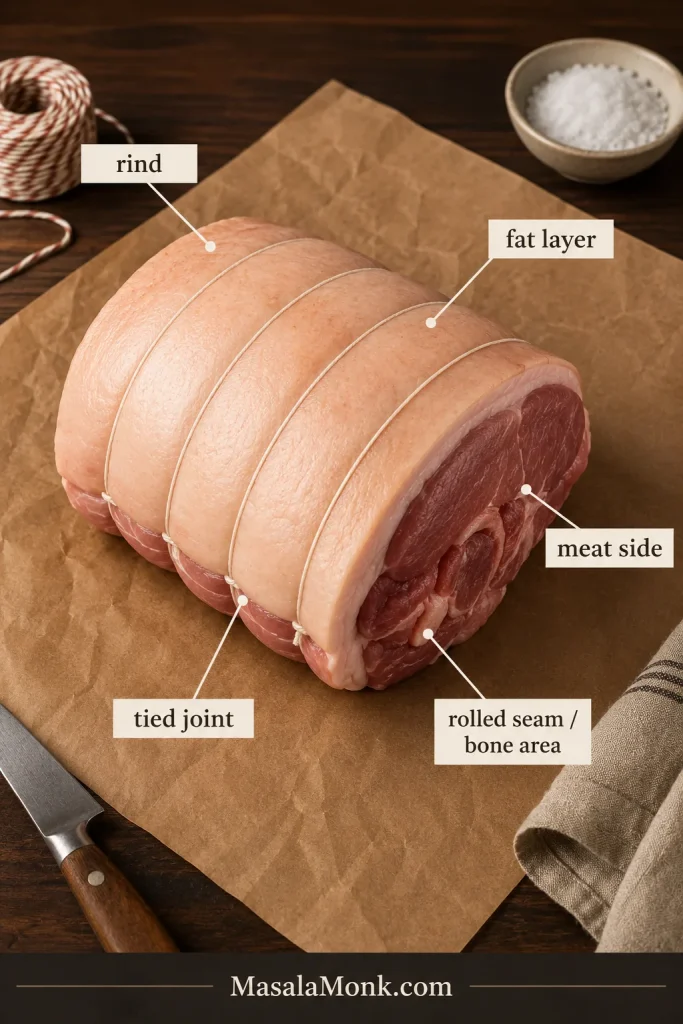
Raw skin-on pork leg roast on butcher paper with labels for rind, fat layer, meat side, rolled seam or bone area, and tied joint.
Once the rind, fat layer, meat side, and rolled shape make sense, pork leg roast labels stop feeling like butcher-counter guesswork.
What you haveBest approach
Boneless pork leg roastUse the main recipe and start checking early
Rolled pork leg jointKeep the rind level, roast as directed, and check the center of the roll
Bone-in pork legUse the time chart, allow extra time, and check away from the bone
Whole pork legUse the chart only as a guide; check more than one spot
Skin-on pork legBest choice for crackling
Fresh ham, uncookedTreat it like fresh pork leg, but use the thermometer and allow extra time for large pieces
Skinless pork legUse the roast method, but skip the crackling steps
Slow cooker pork legCook gently first, then crisp the rind separately
Pork leg for pulled porkPossible, but pork shoulder is usually better
Ham or gammonUse a ham-specific recipe, not this method

Once you know which version you have, the rest becomes much easier. Skin-on pork leg is for crackling. Boneless rolled pork leg is for neat slices. Bone-in pork leg is for a bigger centerpiece. Ham is a different recipe altogether.

Now plan the roast: use the pork leg cooking time per kg chart, then check the internal temperature guide before you finish.

Why This Pork Leg Roast Works

This method works because it stops forcing the skin and the meat to behave the same way. Bold heat helps the top blister. Gentle cooking keeps the center juicy. Once you separate those jobs, pork leg stops feeling like a gamble.

  • A hot start wakes up the crackling. Dry skin needs a blast of high heat to puff, blister, and crisp.
  • Lower heat protects the meat. After the skin has had its heat, the center can cook through without drying out.
  • The chart gets you close; the thermometer tells you when to stop. That keeps timing useful without making it the final judge.
  • Dry heat stays on top. Apples, onions, herbs, garlic, and stock sit under or around the roast, not over the crackling layer.
  • The method adapts to the cut. Boneless, bone-in, rolled, and pork leg joint versions all work when you adjust timing and check the center properly.
  • Leftovers stay useful. This cut slices cleanly for roast dinners, sandwiches, wraps, and next-day meals.

Pork Leg Labels Explained

The quick cut check above helps you choose a path. This section explains the labels you may see at the butcher or supermarket.

Fresh Pork Leg, Fresh Ham, Ham, and Gammon

Pork leg is sold under several names. The same basic roasting method works for most fresh pork leg roasts, but the timing changes with size, shape, bone, and whether the rind is attached.

A rind-on joint with an even fat layer is usually easier to crackle than a patchy, thin-skinned piece. You can still cook an uneven roast well, but you may need to level the skin or rescue a softer patch separately at the end.
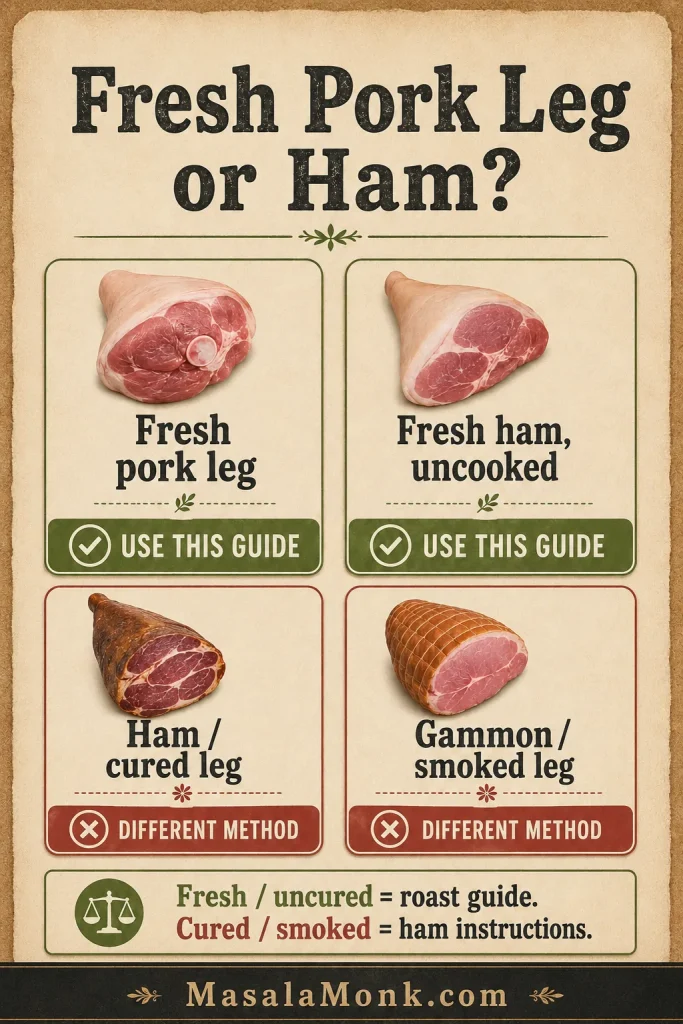
Comparison chart showing fresh pork leg, uncooked fresh ham, cured ham or leg, and gammon or smoked leg labels.
Fresh pork leg and uncooked fresh ham can follow this roast method; however, cured ham, smoked leg, and gammon need separate instructions.

Pork Leg Label Table

Cut or labelWhat it meansWhat changes
Boneless pork leg roastThe bone has been removed, and the meat may be rolledEasier to carve and cooks evenly, but can dry faster
Rolled pork legBoneless leg rolled and tied into a jointGreat for neat slices; check the center early
Deboned pork leg roastAnother name for boneless pork legUse boneless timing guidance
Bone-in pork leg roastPork leg with the bone still attachedMay take longer; check away from the bone
Whole pork legA large full-leg roastBest for gatherings; check more than one spot
Pork leg jointCommon UK-style name for a roasting pieceUse the weight-based chart below
Skin-on or rind-on pork legThe rind is still attachedBest choice for crackling
Skinless pork legThe rind has been removedCan be roasted, but it will not make crackling
Fresh pork legUncured raw pork legCorrect for this recipe
Fresh ham, uncookedUS-style label for uncured pork legCan be roasted like fresh pork leg, but large pieces need extra time and thermometer checks
Ham, gammon, or cured pork legPork leg that has been curedNeeds a different cooking or glazing method

Labels such as fresh pork, pork leg, leg joint, roasting joint, rolled leg, rind-on pork leg, or fresh ham uncooked usually mean you are in the right place. Gammon, ham, cured leg, smoked leg, or leg ham need ham-specific instructions instead.

When Pork Leg Is Not the Right Cut

Pork loin and pork tenderloin need cut-specific methods because they are smaller, leaner, and shaped differently. Compare with this pork tenderloin in oven guide or this slow cooker pork loin recipe if that is the cut you bought.

This cut is also different from shoulder. Choose shoulder when you want soft, fall-apart meat. Pick leg when you want neat roast slices and crisp crackling.

Pork Leg Cooking Time per kg

This is the chart to use when you are trying to work backward from dinner time. It will help you plan the meal, but it does not need to be perfect down to the minute.

If you came here with a label in one hand and a dinner time in mind, this is the section that matters most. These times are deliberately given as a range because shape matters as much as weight.
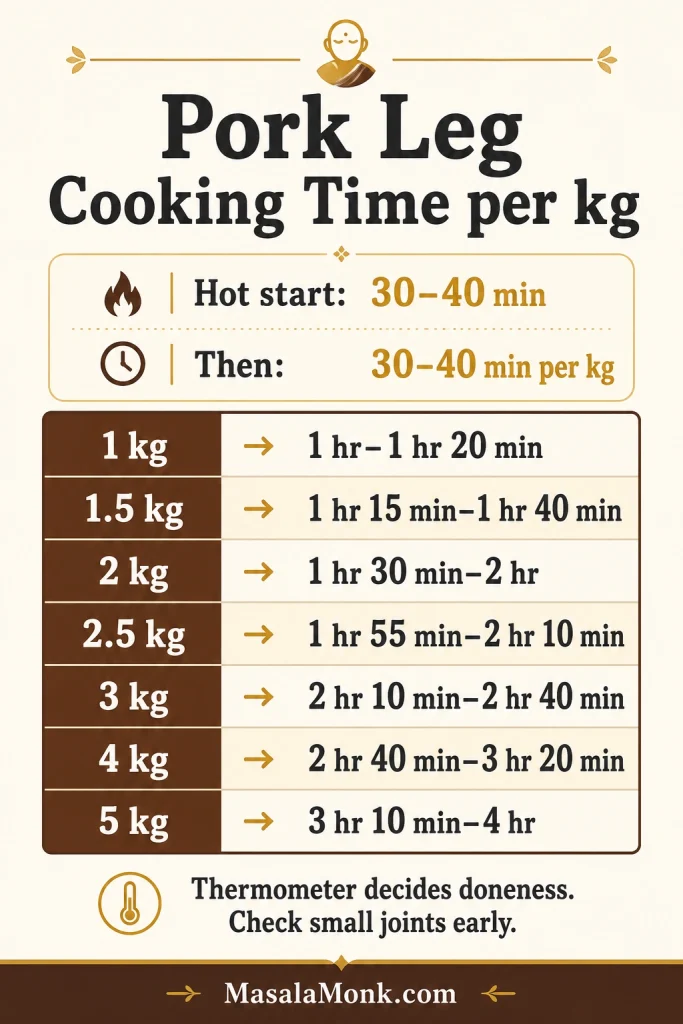
Pork leg roast cooking time per kilogram chart with hot-start timing, lower roasting ranges, resting time, and internal temperature reminder.
Use the pork leg cooking time per kg chart for planning, then confirm doneness with internal temperature instead of trusting the clock alone.

Pork Leg Time Chart by Weight

Pork leg sizeHot crackling stageLower roasting stageApprox total oven time
1 kg30–40 minutes30–40 minutes1 hour–1 hour 20 minutes
1.5 kg30–40 minutes45–60 minutes1 hour 15 minutes–1 hour 40 minutes
2 kg30–40 minutes60–80 minutes1 hour 30 minutes–2 hours
2.5 kg40 minutes75–90 minutes1 hour 55 minutes–2 hours 10 minutes
3 kg40 minutes90–120 minutes2 hours 10 minutes–2 hours 40 minutes
4 kg40 minutes2 hours–2 hours 40 minutes2 hours 40 minutes–3 hours 20 minutes
5 kg40 minutes2 hours 30 minutes–3 hours 20 minutes3 hours 10 minutes–4 hours

The simplest planning formula is 30–40 minutes hot for crackling, then about 30–40 minutes per kg at the lower temperature.

For a 1 kg pork leg joint: check the center temperature as soon as the hot crackling stage ends. Small boneless roasts can move from juicy to dry quickly, especially if they are narrow or rolled tightly.

A boneless rolled joint can cook a little faster because it is more even. Larger bone-in roasts and whole legs can take longer. Start checking before the earliest time in the chart so you do not accidentally push the meat too far.

Before you stop roasting: check the internal temperature. The chart organizes dinner, but the thermometer decides doneness.

Pork Leg Cooking Time per Pound

The kg chart is the main one. Use this next table only if your label is in pounds.

These totals include the hot crackling stage. After that first blast of heat, estimate about 15–20 minutes per pound at the lower roasting temperature.

Pork leg sizeApprox total oven timeNotes
3 lb1 hour 20 minutes–1 hour 45 minutesCheck early; small roasts dry quickly
4 lb1 hour 40 minutes–2 hoursCommon small family roast
5 lb1 hour 55 minutes–2 hours 20 minutesClose to the default recipe size
6 lb2 hours 10 minutes–2 hours 45 minutesBone-in may need longer
8 lb2 hours 45 minutes–3 hours 30 minutesCheck more than one spot

Timing gets dinner organized. The thermometer decides when the pork is actually ready.

Example Timing Plan for a 2.5 kg Pork Leg Roast

The charts tell you how long the pork may take. This timing plan shows how to work backward from serving time for the 2.5 kg roast used in this recipe.

Time before servingWhat to do
Night before or morningLeave the rind uncovered in the fridge if you can
About 3 hours before servingTake pork out, dry the rind, and check the scoring
About 2½ hours before servingPreheat the oven fully and prepare the tray
About 2¼ hours before servingStart the hot crackling stage
About 1½ hours before servingLower the oven and continue roasting
About 30 minutes before servingStart checking the center temperature
About 20 minutes before servingRest the pork and finish crackling separately if needed
Just before servingCarve, make gravy, and serve

Do not chase the exact minute. The point is to give yourself enough room for resting, gravy, and a crackling rescue if the rind needs it.

A roast that reaches temperature early is a good problem. Rest it. If the crackling needs help after the meat is done, crisp the rind separately.

Why Pork Leg Cooking Times Differ So Much

If you have checked a few pork leg roast recipes already, you have probably seen different timing formulas. One chart may say 30–35 minutes per kg. Another may suggest 40 minutes per kg. Pound-based recipes often use 20–30 minutes per pound, while supermarket labels sometimes build in extra time.

That does not mean everyone is wrong. It means the joint is affected by more than just weight. Two good recipes can give different times and still both make sense.

  • Shape matters. A short, thick roast cooks differently from a long, narrow one.
  • Boneless and bone-in are not identical. Rolled pork leg often cooks more evenly, while bone-in pork may need extra time.
  • Small joints dry faster. A 1 kg roast can overcook quickly if you follow a timing formula blindly.
  • Large whole legs are uneven. A 4–5 kg pork leg needs temperature checks in more than one place.
  • The rind adds a separate job. Crackling needs high heat, but the meat underneath still needs controlled cooking.
  • Ovens vary. Fan ovens, older ovens, and crowded roasting trays can all change the timing.

This is the moment where many roasts go wrong: the crackling looks behind schedule, so the cook keeps roasting everything. Don’t. Check the meat first. If the center is ready, save the skin separately instead of drying out the whole joint.

This is why the thermometer is not a fancy extra here. It is the simplest way to protect the roast you paid for.

Best Oven Temperature for Pork Leg Roast

A good roast usually needs two stages because the top and the center are asking for different things.

If your oven uses convection or fan-forced heat, use the fan temperature. Roast in the center or upper-middle of the oven so the rind gets strong heat without sitting too close to the element. Aggressive ovens need a little watching, so shield dark patches with foil if they brown before the rest of the skin catches up.

StageConventional ovenFan ovenPurpose
Crackling start240°C / 465°F220°C fanBlisters and crisps the rind
Main roast180°C / 350°F160°C fanCooks pork through gently
Crackling rescue220–240°C / 430–465°F200–220°C fanFinishes soft rind patches

Very high heat for the whole cook can make the crackling look good but leave the meat dry. Low heat from the start can cook the meat gently but leave the rind chewy. The two-stage method gives you the best balance.

Hot Start or Final Blast for Pork Leg Crackling?

Both methods can work, which is why roast pork advice can look contradictory. Some recipes begin with high heat. Others roast lower first and finish with a final blast to crisp the skin.

This recipe uses a hot start because pork leg is leaner than shoulder and the rind benefits from early dry heat. The first blast gets the crackling moving; the lower stage then protects the center of the roast.
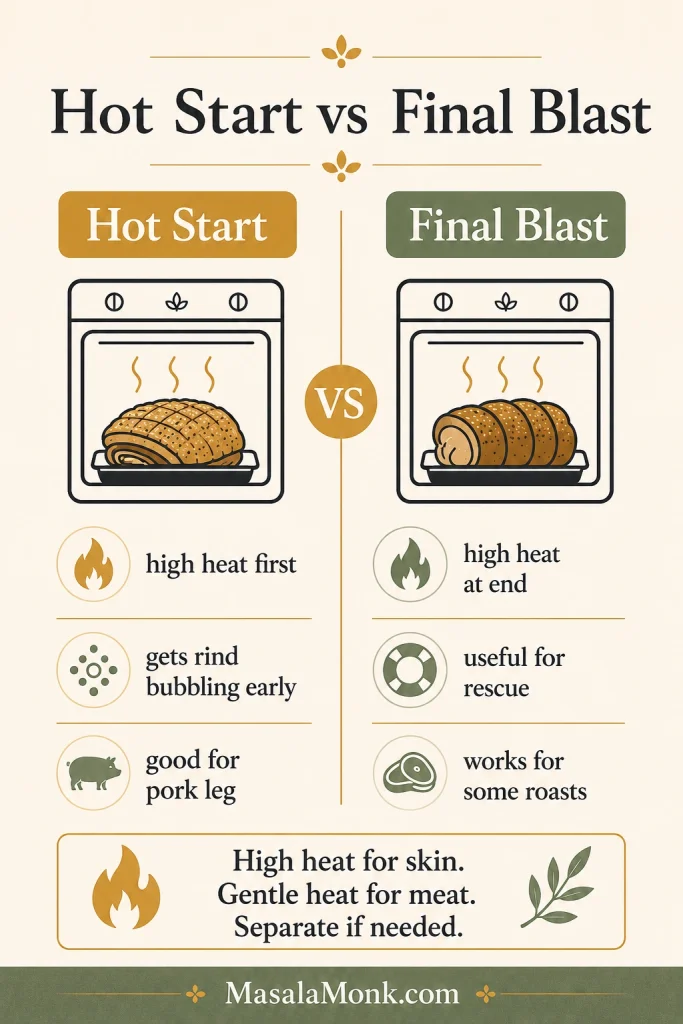
Side-by-side guide comparing hot start and final blast methods for pork crackling, with heat cues for skin and meat.
Hot start and final blast can both work for pork crackling; therefore, choose the method that protects the meat while drying and blistering the rind.

A final blast can also work, especially with fattier cuts, but it is not a reason to overcook the meat. For pork leg, the safest rule is this: give the rind enough high heat, cook the center gently, and separate the rind at the end if the crackling and meat do not finish together.

Do not judge the crackling too early. You are looking for signs of progress: dry-looking skin, bubbling, blistering, and golden patches. That blistered surface is what will later break into crisp shards instead of bending like chewy skin.

Need visual cues? See what good crackling progress looks like before deciding whether the rind needs more heat.

What Internal Temperature Should Pork Leg Roast Be?

The easiest way to stop guessing is to check the center with a thermometer. Insert it into the thickest part of the pork, away from the bone and away from the rolled seam if the roast is tied.

The center temperature can rise a little as the roast rests, especially in larger joints, so start checking early rather than waiting until the very last minute. Pork leg is lean enough that a few extra minutes can matter; the thermometer is not just about safety, it is how you protect juiciness.
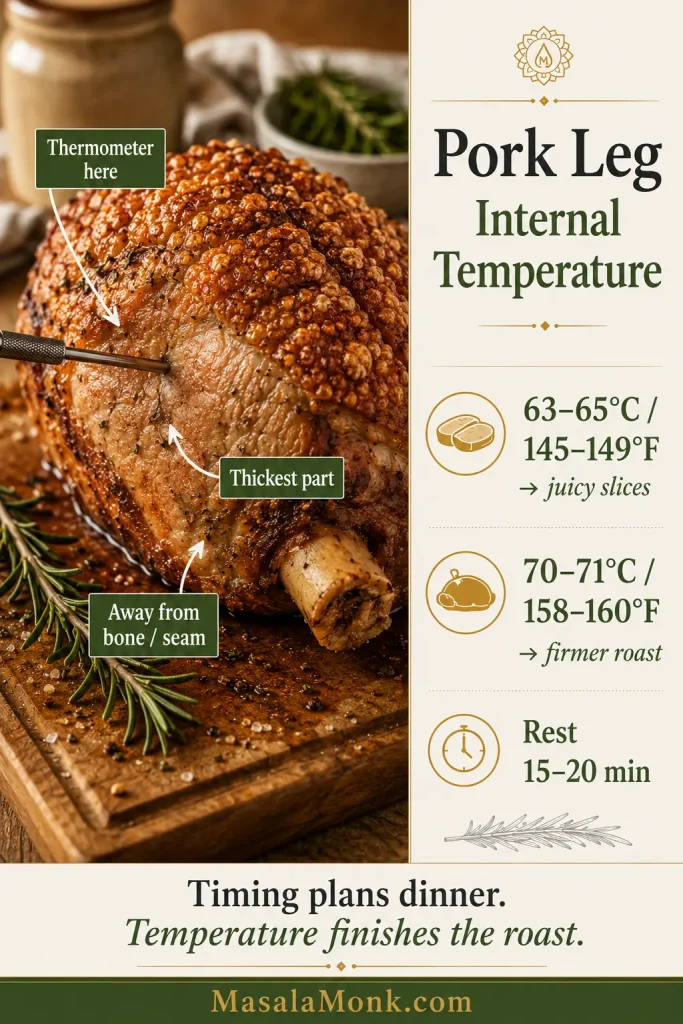
Pork leg roast with thermometer inserted into the thickest part, beside doneness ranges for juicy slices, firmer pork, and resting.
After the timing chart gets you close, the thermometer tells you whether the center is juicy, firmer, or ready to rest.

Choose Your Pork Leg Result

What you wantAim forWhat it means
Juicy sliceable pork63–65°C / 145–149°FTender slices for roast dinner, sandwiches, and leftovers
Firmer traditional roast70–71°C / 158–160°FLess pink, firmer texture, but it can be drier
Shredded pork legLonger moist cookingPossible for saucy sandwiches, though pork shoulder is better
Best cracklingDry rind + hot startNeeds a skin-on roast with dry, salted rind

Food safety guidance commonly lists whole cuts of fresh pork at 145°F / 63°C with a rest. The National Pork Board pork temperature guide gives the same 145°F guidance for fresh pork roasts, chops, loin, and tenderloin.

The useful rule is simple: let the timing chart guide the day, then let the thermometer decide when the pork is ready.

How to Get Crisp Pork Leg Crackling

Crackling looks dramatic, but the rules are simple: dry the rind, salt it well, and give it enough heat. Seasoning on the meat is flexible. The skin is the part that needs discipline.

Crackling is also the part you can rescue if the meat finishes first, so do not panic if everything is not perfect at the same moment. The meat and rind do not have to finish together.

What good crackling progress looks like

Good crackling does not need to look perfect halfway through. Look for dry-looking skin, small bubbles, blistered patches, golden edges, and a surface that looks tighter than when it went in. It just needs to be moving in the right direction.
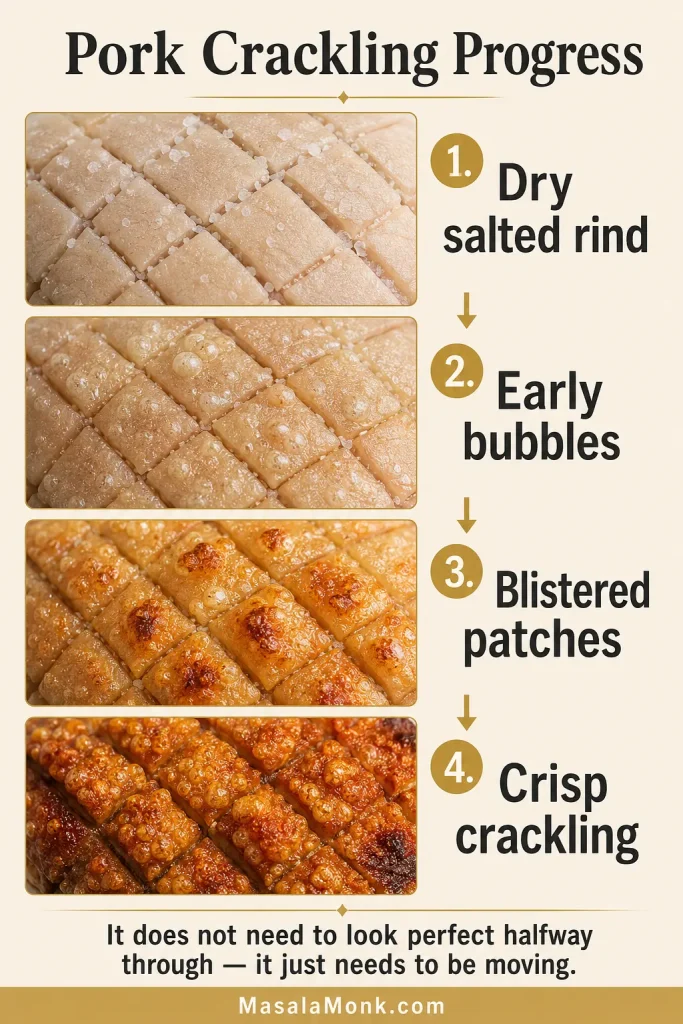
Four-stage pork crackling guide showing dry salted rind, early bubbles, blistered patches, and crisp golden crackling.
As the roast cooks, look for progress rather than perfection: dry rind, early bubbles, blistered patches, then crisp pork crackling.

If the meat and crackling are not finishing together, jump to the separate-rind rescue.

Dry the rind properly

Pat the rind dry with paper towels. If you have time, leave the pork uncovered in the fridge for several hours or overnight. The surface should look dry and matte before roasting, not wet or glossy.
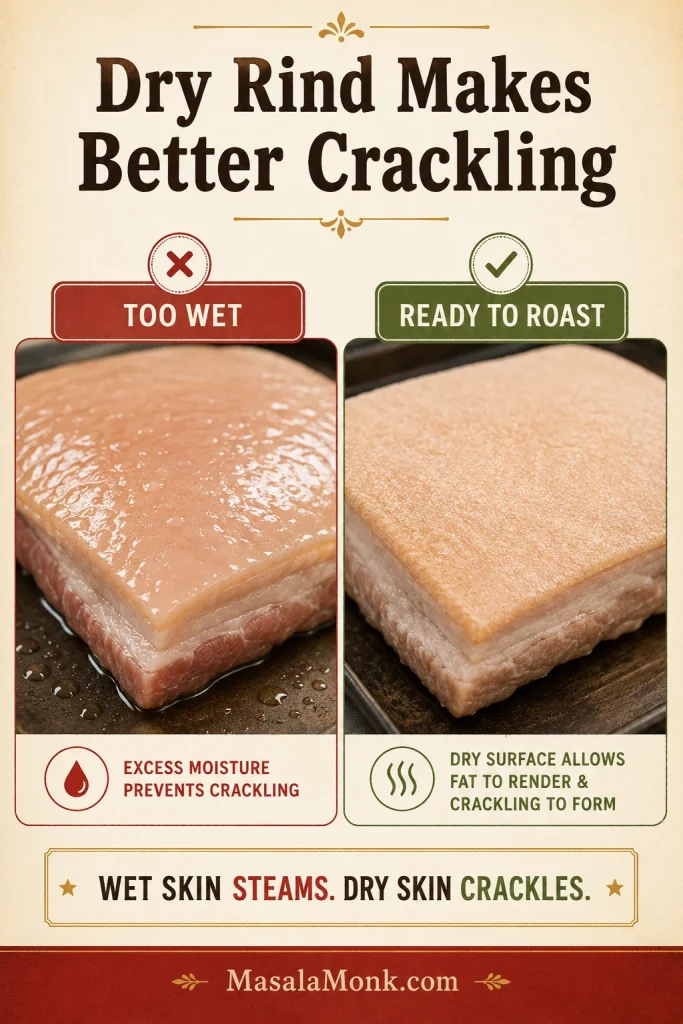
Side-by-side comparison of wet glossy pork rind and dry matte pork rind before roasting.
The rind should look matte before roasting because glossy surface moisture becomes steam, and steam is the enemy of crisp pork crackling.

No hours to spare? Dry it as well as you can, leave it uncovered while the oven preheats, then salt it generously. You can still get good crackling without overnight drying, but you have to remove as much surface moisture as possible.

Score the rind without cutting into the meat

If your pork leg is not already scored, use a very sharp knife to cut lines through the rind and fat. You are cutting through the skin and some fat, not making deep cuts into the pork itself. Deep cuts into the meat can release juices onto the rind and make crackling harder.
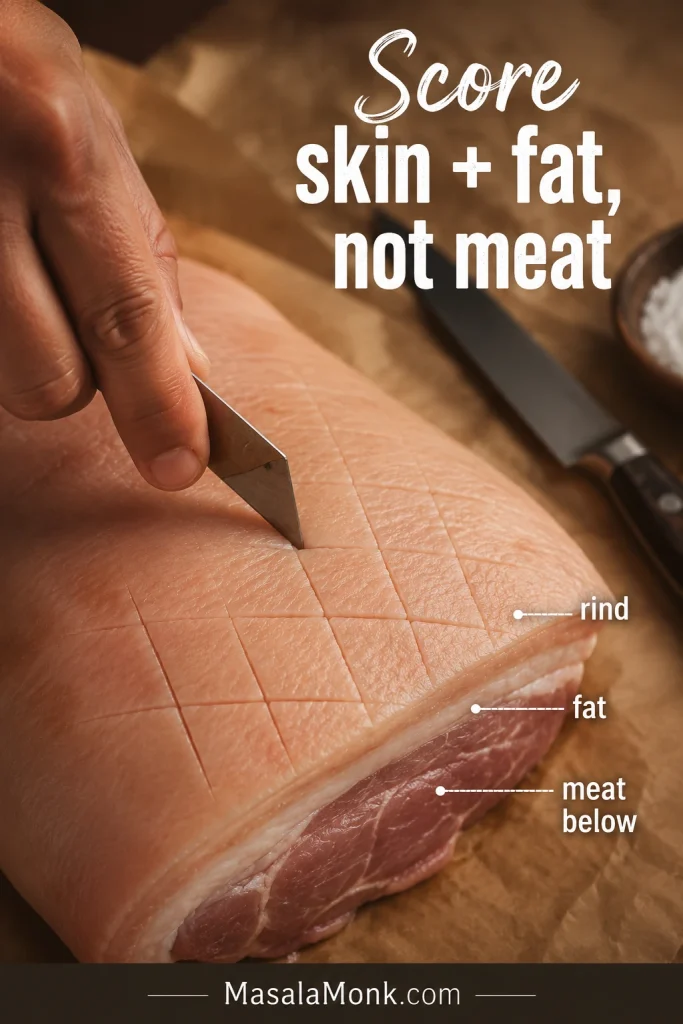
Close-up of pork leg rind being scored through the skin and fat, with labels showing rind, fat, and meat below.
Score the pork rind to open the fat layer for salt and heat, but stop before the meat so juices do not soften the crackling.

Already scored by the butcher? Do not keep cutting deeper. You only need channels for salt and heat to reach the fat.

Optional: use the boiling-water trick

Some cooks pour boiling water over scored pork rind to tighten the skin before roasting. If you do this, dry the rind completely afterward before adding oil and salt.

Do this before the final drying stage, not right before the pork goes into the oven. The trick only helps if the skin becomes dry again. Wet rind will steam, not crackle.

Keep wet seasonings away from the top

Garlic, herbs, mustard, cider, stock, and vegetables are all good with pork leg, but keep them under or around the roast. Avoid spreading wet marinades over the rind if you want crisp crackling.

Use oil lightly

A thin rub of oil helps salt stick and encourages even heat. You do not need to drown the rind.

Salt generously

Massage sea salt into the cuts after the rind is dry. Salt helps draw out moisture and season the crackling. If there are huge clumps sitting on top, brush off the excess before roasting.
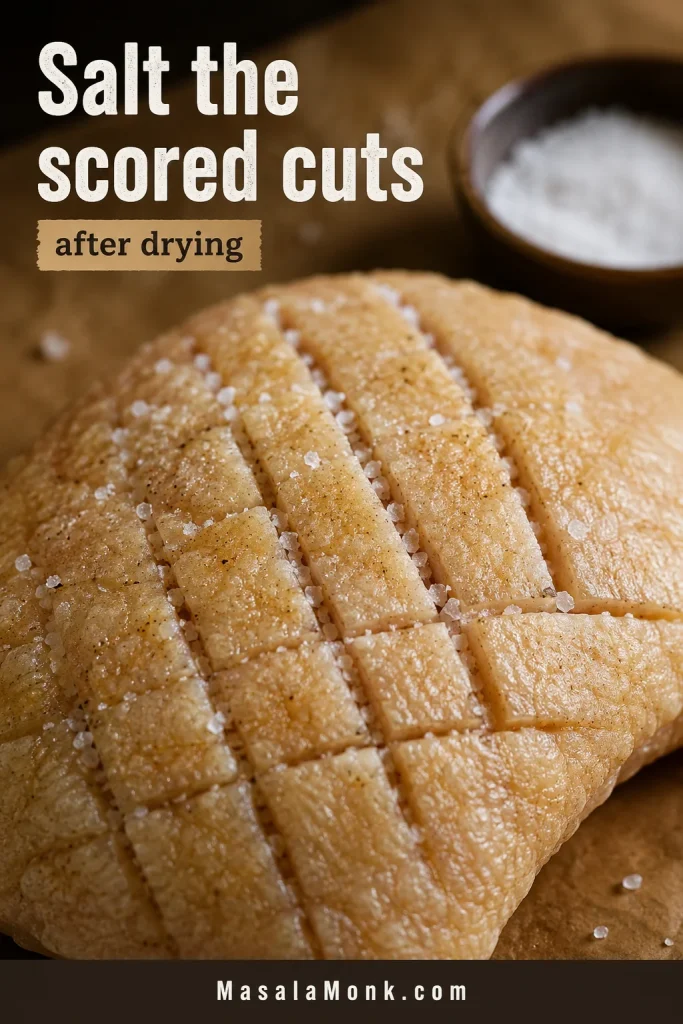
Flaky salt rubbed into the scored cuts of dry pork rind before roasting.
After the rind is dry, work salt into the cuts so the surface seasons evenly and sheds moisture before the hot oven stage.

Start hot and avoid steam

The first 30–40 minutes are important. Keep the pork uncovered and avoid opening the oven repeatedly. During this stage, the skin should start to bubble, blister, and turn golden in patches.

If you are worried about steam, add tray liquid after the hot crackling stage, not before. Keep that liquid in the bottom of the tray and away from the rind.

Keep the rind as level as possible

If one side of the rind sits much lower, juices can pool there. Use onions, apples, or a small piece of foil under the roast to level the surface if needed.

Know the crackling rescue rule

When the pork is done but the crackling is not crisp, stop cooking the meat and finish the rind separately while the pork rests.
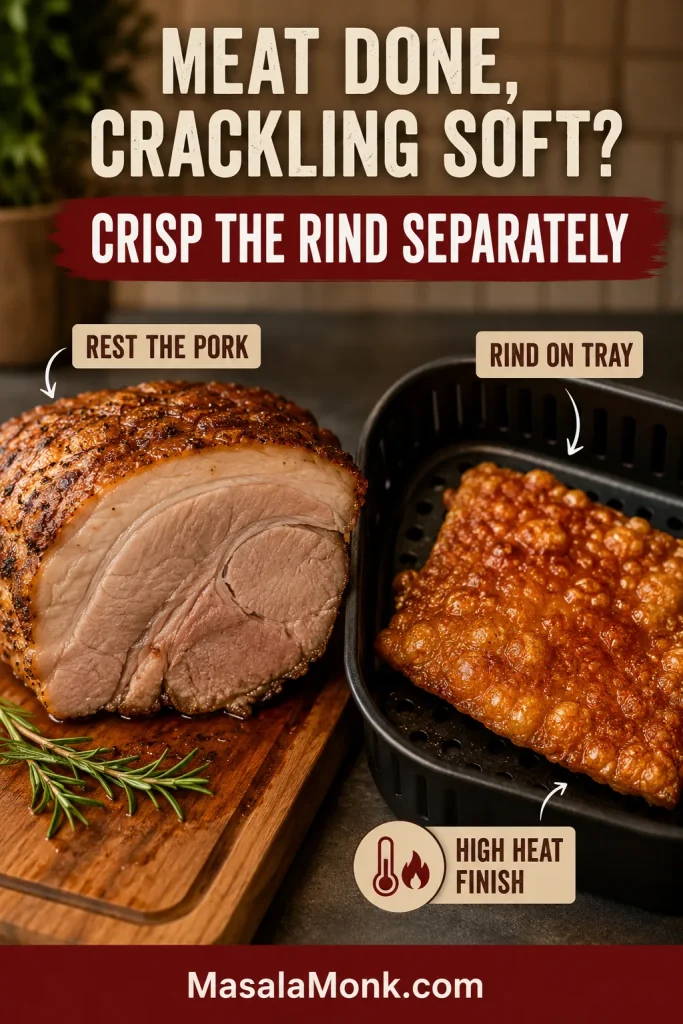
Cooked pork resting on a board while removed pork rind sits separately on a tray or air fryer basket to crisp.
If the meat finishes before the crackling, protect the roast first and crisp the rind separately as a controlled rescue.

To rescue crackling separately, lift off the rind, place it on a tray, salt lightly again if needed, and blast it in a hot oven, under the grill/broiler, or in an air fryer until hard and crisp. Check often because it can go from perfect to burnt quickly.

This one move can save both the meat and the crackling. You are not failing the roast; you are just separating the two jobs.

By this point, you do not need to know every possible pork label. You only need the weight, whether the joint has rind, and where to put the thermometer. The oven method below brings those pieces together.

How to Cook Pork Leg Roast in the Oven

The steps look long on paper, but most of the work is simple: dry the skin, salt it well, start hot, then let the thermometer guide the finish.

At this point, you only need four things: a dry scored top, a hot first stage, a lower second stage, and a thermometer in the thickest part. Everything else is there to help those four things work.

Step 1: Dry the pork

Remove any packaging and pat the pork dry, especially the rind. Overnight fridge drying helps when you have time. Even 30–60 minutes uncovered while the oven heats is better than roasting a wet rind.

Standing at the counter with the roast already unwrapped? Start with the skin. Dry it first, then move on to seasoning and tray setup.

Step 2: Bring it closer to room temperature

Take the pork out of the fridge about 45–60 minutes before roasting, usually while the oven heats and you prepare the tray. Do not leave raw pork sitting out for hours.

Step 3: Score the rind

Score the rind in narrow lines if it has not already been done. Cut through the skin and fat, but avoid cutting into the meat.

Step 4: Season the meat side

Rub the meat side with pepper, crushed fennel seeds if using, and a little oil. Tuck garlic, rosemary, sage, onions, and apples under the roast for aroma.

Step 5: Salt the rind

Rub a thin layer of oil over the rind, then massage salt into the scores. This gives crackling its flavor and crunch.

Step 6: Set up the roasting tray

Place sliced onions, garlic, apples, and herbs in the tray. Set the pork on top, rind facing up. A rack is ideal, but a thick bed of onions and apples also works as a trivet. The pork should sit above the liquid, not in it.
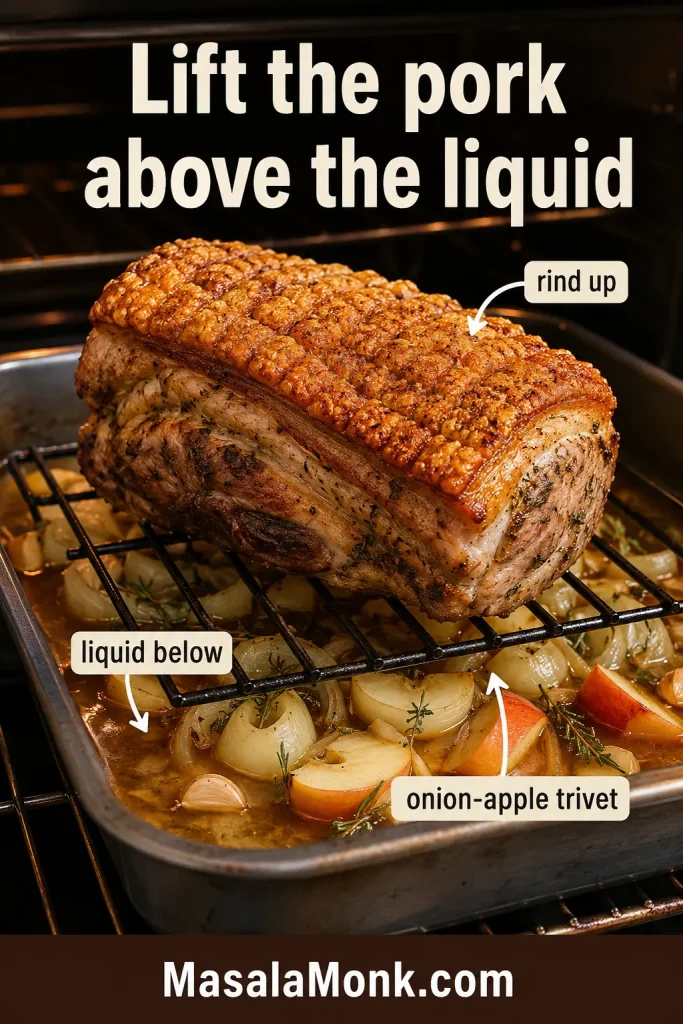
Pork leg roast sitting rind-side up on a rack above onions, apples, garlic, herbs, and liquid in a roasting tray.
Meanwhile, the tray setup matters: aromatics flavor the juices below while the pork rind stays lifted in dry oven heat.

Step 7: Roast hot for crackling

Make sure the oven is fully preheated. Roast in the center or upper-middle of the oven at 240°C / 465°F or 220°C fan for 30–40 minutes. The rind should begin to bubble, blister, puff, and turn golden.

The crackling does not need to look perfect halfway through. Look for progress: bubbling, blistering, dry-looking skin, and golden patches. That blistered surface is what will later break into crisp shards instead of bending like chewy skin.

When the rind still looks pale, flat, and soft after the hot stage, it needs more heat. A roast that is nowhere near done can continue cooking. If the center is already close, save that final heat for the skin separately later.

Step 8: Lower the oven

Reduce the oven to 180°C / 350°F or 160°C fan. If you want gravy, add stock, cider, or water to the bottom of the tray. Keep the liquid below the pork so the roast does not steam.

Step 9: Cook to temperature

Continue roasting until the thickest part reaches your preferred internal temperature. For juicy sliceable pork, aim for 63–65°C / 145–149°F. Prefer a firmer, more traditional roast? Aim for 70–71°C / 158–160°F.

If the meat reaches temperature before the crackling is perfect, you have not failed. That is exactly what the separate-rind rescue is for.

Step 10: Rest before carving

Rest the pork for 15–20 minutes. Resting is not just waiting; it helps keep the juices from running out as soon as you carve.

Rest the meat, not the steam. Leave crisp crackling exposed so steam cannot soften it. If you need to keep the meat warm, tent foil loosely around the sides but leave the top uncovered.

When the pork has rested properly, the slices should look moist rather than wet, with enough structure to hold together on the plate.

Step 11: Make gravy from the tray

Spoon off excess fat from the roasting tray. Stir flour or cornflour into the pan juices, then add stock, cider, or water and simmer until the gravy thickens. A little mustard or apple cider vinegar sharpens the flavor and balances the richness.

The gravy should taste savory, slightly sweet from the onions or apples, and sharp enough to cut through the richness of the pork.

Step 12: Slice and serve

Use a serrated knife to cut through the crackling, then carve the pork into slices. Slice across the grain when you can. If the grain changes direction as you carve around the roast, turn the meat and keep slicing across the lines of the muscle.

The best slices hold together but still look juicy at the center, with crisp pieces of crackling on the side for anyone who reaches for them first.
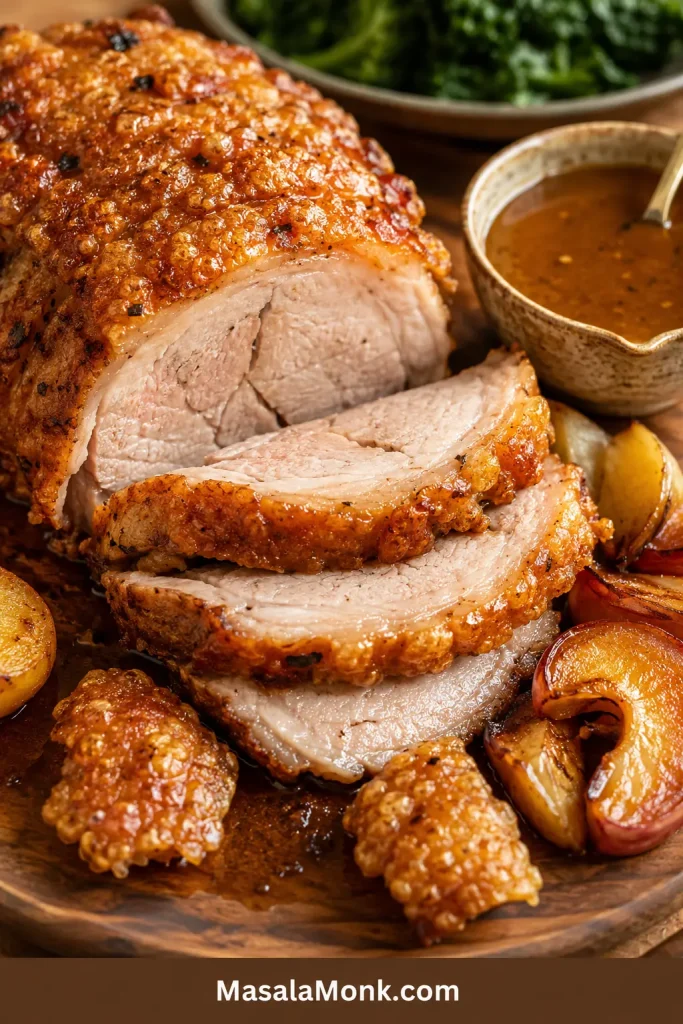
Sliced pork leg roast with moist meat, crisp golden crackling pieces, gravy, roasted apples, potatoes, and vegetables.
Proper resting shows in the slices: the pork holds together, stays moist in the center, and still gives crisp crackling for contrast.

Once you understand the oven method, the variations are easier. Boneless, bone-in, slow cooker, and air fryer versions all follow the same basic rule: protect the rind, then cook the center gently.

Need a specific version? Jump to boneless pork leg, bone-in pork leg, slow cooker pork leg, or air fryer pork leg.

Boneless Pork Leg Roast

Boneless pork leg roast is one of the easiest forms to cook because it is usually rolled into a neat shape and tied. It slices cleanly and fits well in a normal roasting tray.

The main thing to watch is dryness. Because the bone has been removed, a boneless or rolled pork leg can go from juicy to dry if it is roasted too long. It is convenient, but because it is lean and evenly shaped, it can give you less margin for error than a fattier cut.

  • Use the same hot-start crackling method.
  • Keep the rind facing up and as level as possible.
  • Check the center early.
  • Do not rely only on the label timing if the roast is small.
  • Rest before slicing so the juices settle.

A 1–1.5 kg joint needs earlier checking than the chart may suggest. Smaller rolled roasts cook faster than many people expect.

Bone-In Pork Leg Roast

A bone-in pork leg roast is larger, more dramatic, and excellent for a centerpiece meal. It can also take longer than a boneless roast of the same weight because the shape is less even.

  • Use the same high-heat start for crackling.
  • Check the temperature in the thickest meaty part, not touching the bone.
  • Allow extra time for large roasts.
  • Rest at least 20 minutes for bigger pieces.
  • Carve around the bone with a sharp knife.

If you are cooking a whole pork leg or a very large bone-in leg, use the chart only as a guide. Large roasts vary too much in shape for timing alone to be reliable.

Can You Cook Pork Leg in the Slow Cooker?

Yes, you can cook pork leg in the slow cooker, but there is one important catch: the slow cooker will not make crisp crackling by itself.

Use the slow cooker when tenderness matters more than oven-roast texture. It is helpful for gentle cooking, but not helpful if you expect the skin to crackle inside the cooker.

Slow cooker pork leg will taste more like tender sliced or chunked pork than classic oven roast pork. The meat can be good, but the rind needs a separate crisping step.

Slow cookers create steam and moist heat. That is good for tender meat, but bad for dry, blistered rind. If you want slow cooker pork leg with crackling, cook the meat gently first, then crisp the rind separately in a hot oven, under the grill/broiler, or in an air fryer.

Basic slow cooker pork leg method

  • Use a 1.5–2.5 kg pork leg joint, preferably skin-on if you want crackling.
  • Season the meat side with salt, pepper, garlic, herbs, onions, and apples.
  • Add a small amount of stock, cider, apple juice, or water to the slow cooker.
  • Keep the liquid below the rind if the skin is still attached.
  • Cook on low for about 7–8 hours, or on high for about 4–5 hours, until tender.
  • Remove the pork and pat the rind very dry.
  • Rub the rind with salt and crisp it in a hot oven at 220–240°C / 430–465°F until crackled.

When the meat is already perfectly cooked but the skin is rubbery, remove the rind in one piece and crisp it separately. That protects the pork from drying out while the crackling finishes.

If your real goal is classic shredded pork, pork shoulder is still the better cut. Pork leg can work, but it needs more moisture and is less forgiving. For a dedicated shredded method, use this slow cooker pulled pork recipe.

Can You Use Pork Leg for Pulled Pork? Only If You Have To

You can use pork leg for pulled pork, but it is not usually the best cut.

Pork leg can shred if cooked low and slow with enough moisture, but it will not be as rich, juicy, or forgiving as shoulder. If you already have this cut and want to pull it, cook it until very tender, add moisture such as stock, cider, apple juice, or sauce, then shred while warm.

Mix the shredded meat with cooking juices or sauce so it does not taste dry. If you are turning leftover roast pork into sandwiches, this BBQ sauce for pulled pork can help bring back moisture and flavor.

Can You Cook Pork Leg Roast in an Air Fryer?

Yes, but air fryer pork leg works best with smaller boneless joints. A 1–1.5 kg roast is usually more realistic than a large bone-in leg, unless you have a very large air fryer.

  • Dry and salt the rind the same way as the oven method.
  • Start hot to help the skin crisp.
  • Reduce the temperature to cook the meat through.
  • Use a thermometer, because air fryer models vary a lot.
  • Do not crowd the basket; air needs to circulate around the rind.

With many small joints, a hot start around 200–210°C / 400–410°F for about 20 minutes can help the rind. Then lower the heat to around 160–180°C / 320–350°F and cook until the center reaches your target temperature.

A roast that sits too close to the air fryer element is better cooked in the oven. If fat begins smoking in your air fryer, pause, drain excess fat from the drawer if your model allows, and continue at a slightly lower temperature.

If your pork has been sliced into chops rather than kept as a roast, use a chop-specific guide instead. This air fryer pork chops recipe is a better fit for individual pieces.

For larger pork leg roasts, the oven is usually easier and more reliable.

Is Pork Leg the Same as Ham?

Fresh pork leg and ham come from the same general part of the pig, but they are not the same thing in the kitchen.

Fresh pork leg is uncured raw pork. That is what this recipe uses. It can be roasted with rind to make crackling. In some US labels, you may also see fresh ham, uncooked, which means uncured pork leg rather than ready-to-eat ham.

Ham is cured pork leg. It may be smoked, salted, brined, or partially cooked depending on the product. Ham usually needs a different method, often with soaking, glazing, gentle reheating, or baking.

Labels such as fresh pork leg, fresh ham uncooked, pork leg roast, leg of pork, pork joint, boneless pork leg, rolled pork leg, or bone-in pork leg mean this guide is for you. Ham, gammon, cured pork leg, or leg ham need ham-specific cooking instructions instead.

Troubleshooting Pork Leg Roast

Most pork leg problems are fixable. The key is not to keep cooking the meat just because the rind needs more time.

Do not panic if the meat and crackling are not ready at the same moment. That happens often, and it is fixable.

Emergency Crackling Check

Use this check before you keep roasting. It helps you decide whether the meat needs more time, the crackling needs protection, or the rind should be finished separately.
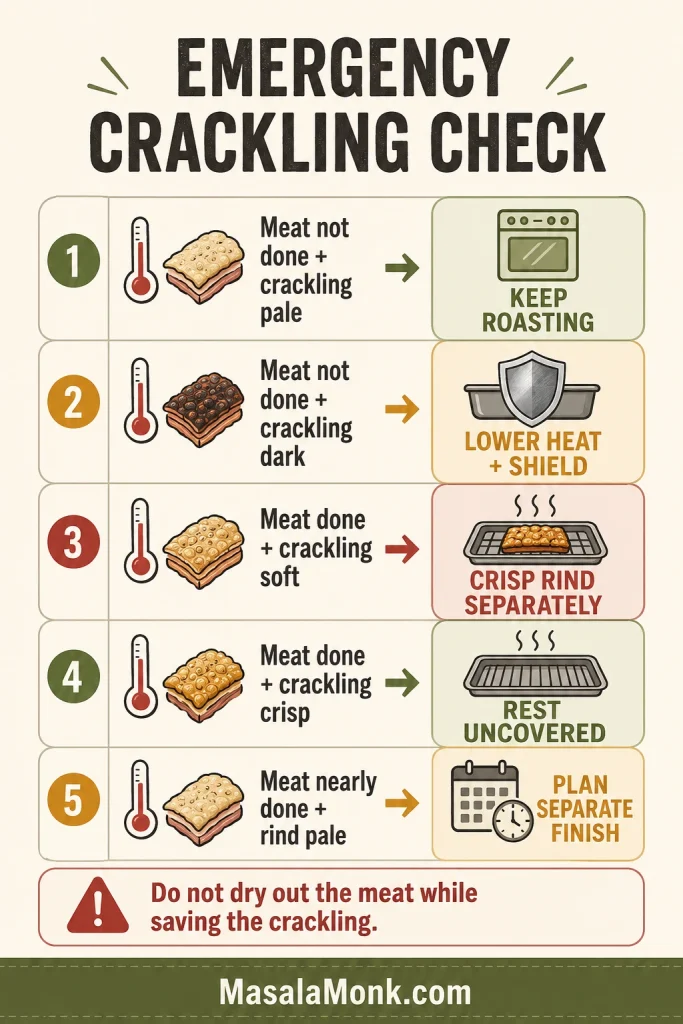
Troubleshooting chart showing what to do when pork meat is done or not done and crackling is pale, dark, soft, or crisp.
Use this emergency crackling check beside the oven when the pork and rind are moving at different speeds.
SituationBest move
Meat not done, crackling paleKeep roasting and check again soon
Meat not done, crackling darkLower the oven and shield dark patches with foil
Meat done, crackling softRemove the rind and crisp it separately
Meat done, crackling crispRest uncovered and leave the crackling exposed
Meat nearly done, rind still palePlan a separate crackling finish while the pork rests

If guests are waiting, this is where the separate-rind rescue saves dinner. Rest the pork, crisp the skin, and bring both back together on the board.

Common Pork Leg Roast Problems and Fixes

ProblemWhy it happenedWhat to do
Crackling is softThe rind was wet, the oven was not hot enough, or steam built upIncrease the heat, or remove the rind and crisp it separately
Meat is done but crackling is not crispThe pork cooked faster than the rind crackledRest the meat and crisp the rind separately in a hot oven, grill/broiler, or air fryer
Crackling is burning in spotsThe oven heat is uneven or one patch is too exposedCover dark spots loosely with foil and keep cooking the pale areas
Rind is pale, flat, and softIt has not had enough dry heat yetGive the rind more heat; if the meat is done, crisp the rind separately
Rind is chewyNot enough drying, salt, or high heatDry longer next time; for now, give it a hot final blast
Pork is dryIt cooked too long or too hot after the crackling stageSlice thinly and serve with gravy; next time check the center earlier
Boneless roast cooked unevenlyThe rolled joint was uneven or loosely tiedCheck more than one spot and rotate the tray if needed
Slow cooker rind is rubberySteam softened the skinPat it dry, salt it again, and crisp it separately
Skin is crisp but meat is not doneThe hot stage worked before the center finished cookingReduce the oven and continue roasting; shield crackling if needed

The Rescue Rule to Remember

The best rescue trick is this: if the pork meat is done but the crackling is not, stop cooking the meat. Remove the rind and crisp it separately. That gives you better crackling without turning the roast dry.

That is the real secret of pork leg roast: do not punish the meat while trying to save the crackling.

Back on track? Return to serving ideas or go back to the quick answer.

What to Serve with Pork Leg Roast

Once the crackling is crisp and the pork has rested, keep the sides simple and let the roast be the center of the plate.

The best plate has contrast: crisp crackling, tender slices, hot gravy, and sides that either catch the sauce, soften the plate, or cut through the richness with something sharp and fresh.

  • Roast potatoes
  • Apple sauce
  • Mustard gravy
  • Roasted apples and onions
  • Carrots and parsnips
  • Peas or green beans
  • Red cabbage or braised cabbage
  • Yorkshire puddings or dinner rolls
  • Simple green salad with a sharp vinaigrette

For a classic roast dinner plate, serve the pork with a soft potato side like this mashed potatoes recipe. If you want something crisp and cold beside the rich pork, a wedge salad works well, especially with sharp honey mustard dressing.

For a bigger holiday-style roast, add eggless Yorkshire pudding or a cozy green side like green bean casserole. Keep the sides simple if the pork has strong crackling and gravy.

Leftover Pork Leg Ideas

Pork leg is one of the better roasts for leftovers because it slices neatly instead of falling apart. This is one of the quiet benefits of pork leg: even after the roast dinner, you still have useful slices for tomorrow.

Tomorrow’s pork should not feel like leftovers you have to use up. Cold slices should feel useful, not sad: ready for mustardy sandwiches, quick pork-and-gravy rolls, hash, or bowls that are already halfway made.

Store the pork and crackling separately if you can. The meat likes moisture; the crackling does not.
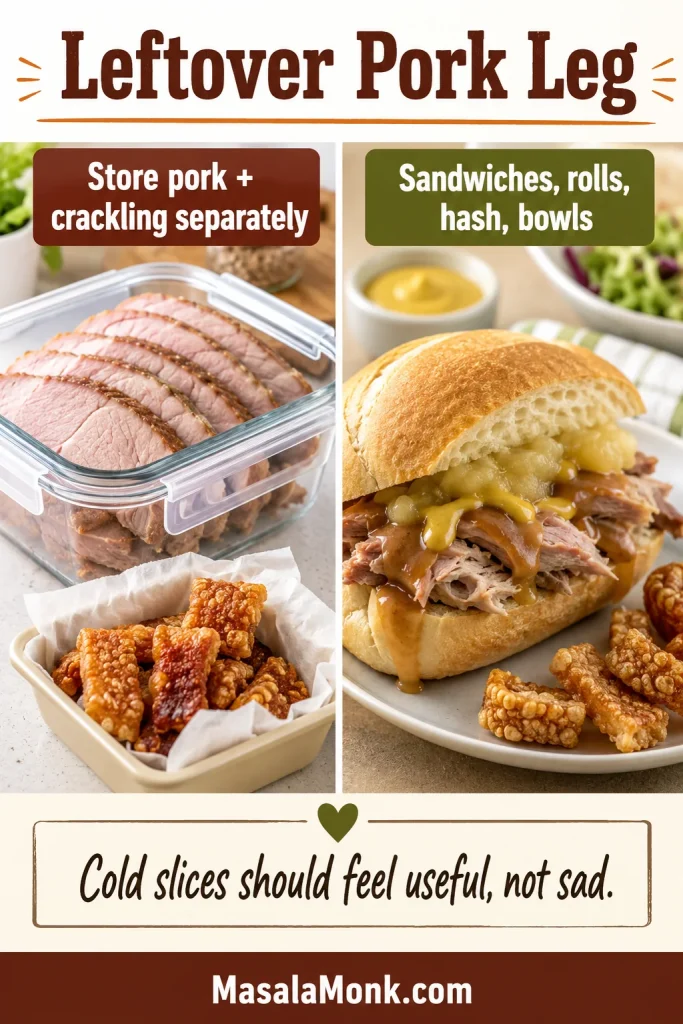
Split image showing sliced leftover pork stored separately from crackling and a roast pork sandwich with sauce and crisp crackling pieces.
Finally, store pork and crackling separately: the meat needs moisture, while crisp pieces need dryness for sandwiches, rolls, hash, or bowls.
  • Roast pork sandwiches with mustard or apple sauce
  • Pork and gravy rolls
  • Tacos or wraps
  • Pork hash with potatoes and onions
  • Soup with vegetables and stock
  • Salad bowls with apples, cabbage, and mustard dressing
  • Quick BBQ pork sandwiches with sauce

For leftover roast pork sandwiches, a little garlic aioli or BBQ sauce keeps the meat from tasting dry. If you want a cold side for next-day lunches, these potato salad recipes are a natural match.

Small chopped pieces of pork leg can also go into hash, pies, or croquettes. If you have leftover mashed potatoes too, this croquettes recipe is a useful next-day idea.

Cool leftovers and refrigerate them promptly. Store sliced pork in shallow airtight containers in the fridge for 3–4 days. For longer storage, freeze sliced pork with a little gravy or pan juice so it reheats more gently. Keep crackling separate and re-crisp it in a hot oven or air fryer.

For best texture, reheat sliced pork gently with a splash of gravy, stock, or water so it does not dry out. Reheat crackling separately until crisp again.


FAQs

How long does pork leg take to roast?

A pork leg roast usually takes 30–40 minutes at high heat for crackling, then about 30–40 minutes per kg at a lower roasting temperature. For a 2.5 kg roast, expect around 2 hours, plus resting time.

How long do you cook pork leg per kg?

After the hot crackling stage, cook pork leg for about 30–40 minutes per kg at 180°C / 350°F or 160°C fan. Start checking near the early end of the range.

What temperature should pork leg roast be cooked to?

For juicy sliceable pork, aim for 63–65°C / 145–149°F in the thickest part, then rest before carving. Prefer a firmer well-done roast? Cook closer to 70–71°C / 158–160°F.

Should pork leg be pink inside?

Pork leg can be slightly pink inside if it has reached the correct internal temperature. For juicy slices, cook the thickest part to 63–65°C / 145–149°F and rest before carving. If you prefer a firmer, less pink roast, cook closer to 70–71°C / 158–160°F, but it may be drier.

Is pork leg good for roasting?

It is, especially when it has the rind attached for crackling. Treat it as a slicing roast with a hot start for the skin and controlled heat for the meat.

Is boneless pork leg roast different from bone-in?

Yes. Boneless pork leg roast is easier to carve and often cooks more evenly. Bone-in pork leg may take longer and should be checked away from the bone.

How do I get crackling on pork leg?

Dry the rind well, score it if needed, rub with oil and salt, and start the roast in a hot oven. Keep liquid and wet seasonings away from the skin.

Do I put water in the roasting tray?

You can add a small amount of stock, cider, or water after the hot crackling stage if you want gravy. Keep it below the pork and away from the rind. Too much liquid creates steam, and steam softens crackling.

Can I roast pork leg without rind?

Yes. Roast skinless pork leg using the same internal-temperature guidance, but skip the crackling steps. Because there is no rind to protect the top, check early and avoid overcooking.

Should I pour boiling water over pork rind?

You can, but only before the final drying stage. Boiling water can tighten scored rind, but the skin must be dried completely afterward or it will steam instead of crackle.

Can I cook pork leg in the slow cooker?

Yes, but the rind will not crackle in the slow cooker. For crackling, finish the rind separately in a hot oven, grill/broiler, or air fryer.

Can I make pulled pork with pork leg?

You can, but pork leg is not the easiest cut for classic pulled pork. It needs slow cooking and enough moisture, while pork shoulder is usually richer and more forgiving.

Is pork leg the same as ham?

No. Fresh pork leg is uncured raw pork and can be roasted with crackling. Ham is cured pork leg and needs a different cooking or glazing method. In some US labels, uncured pork leg may also be called fresh ham.

Why is my pork leg roast dry?

Usually because it cooked too long after the crackling stage. Slice it thinly and serve it with gravy or pan juices; it is still usable. Next time, start checking the center earlier.

What should I do if the crackling is not crisp?

You have not ruined the roast. If the meat still needs time, increase the oven heat near the end. Once the meat is already done, remove the rind and crisp it separately.

Can I cook pork leg roast in an air fryer?

Small boneless joints can work in an air fryer. Start hot for the rind, then lower the temperature and cook until the center reaches the correct internal temperature.

Should I cover pork leg while roasting?

Not during the crackling stage. Steam is the enemy of crisp rind. Later, you can loosely shield parts of the roast if they are browning too fast.

How long should pork leg rest before carving?

Let pork leg rest for at least 15–20 minutes before carving. Larger bone-in roasts can rest a little longer.

What size pork leg roast do I need?

As a rough guide, allow 250–350 g raw pork leg per person if bone-in, or about 200–250 g per person if boneless. Add extra if you want leftovers.


The Simple Rule for Pork Leg Roast

The whole recipe comes back to the two-job rule: crisp the rind first, then protect the meat. Make the skin dry, salty, and hot enough for crackling. Then lower the oven and cook the meat gently until the center reaches the right temperature.

Use the chart to plan the meal, but let the thermometer decide when the pork is ready. When the knife gets through the crisp top and the pork underneath still slices cleanly, the method has done its job.

Once you have made it this way once, pork leg stops feeling like a risky centerpiece. You know what the skin needs, what the meat needs, and when to stop cooking. That is how you get crisp crackling, juicy slices, and a roast that feels calm from oven to carving board.

Keep a quick note of the weight, whether the roast was boneless or bone-in, and when it reached temperature. That one note makes the next pork leg roast much easier.
Posted on Leave a comment

Beef Shoulder Roast Crock Pot Recipe

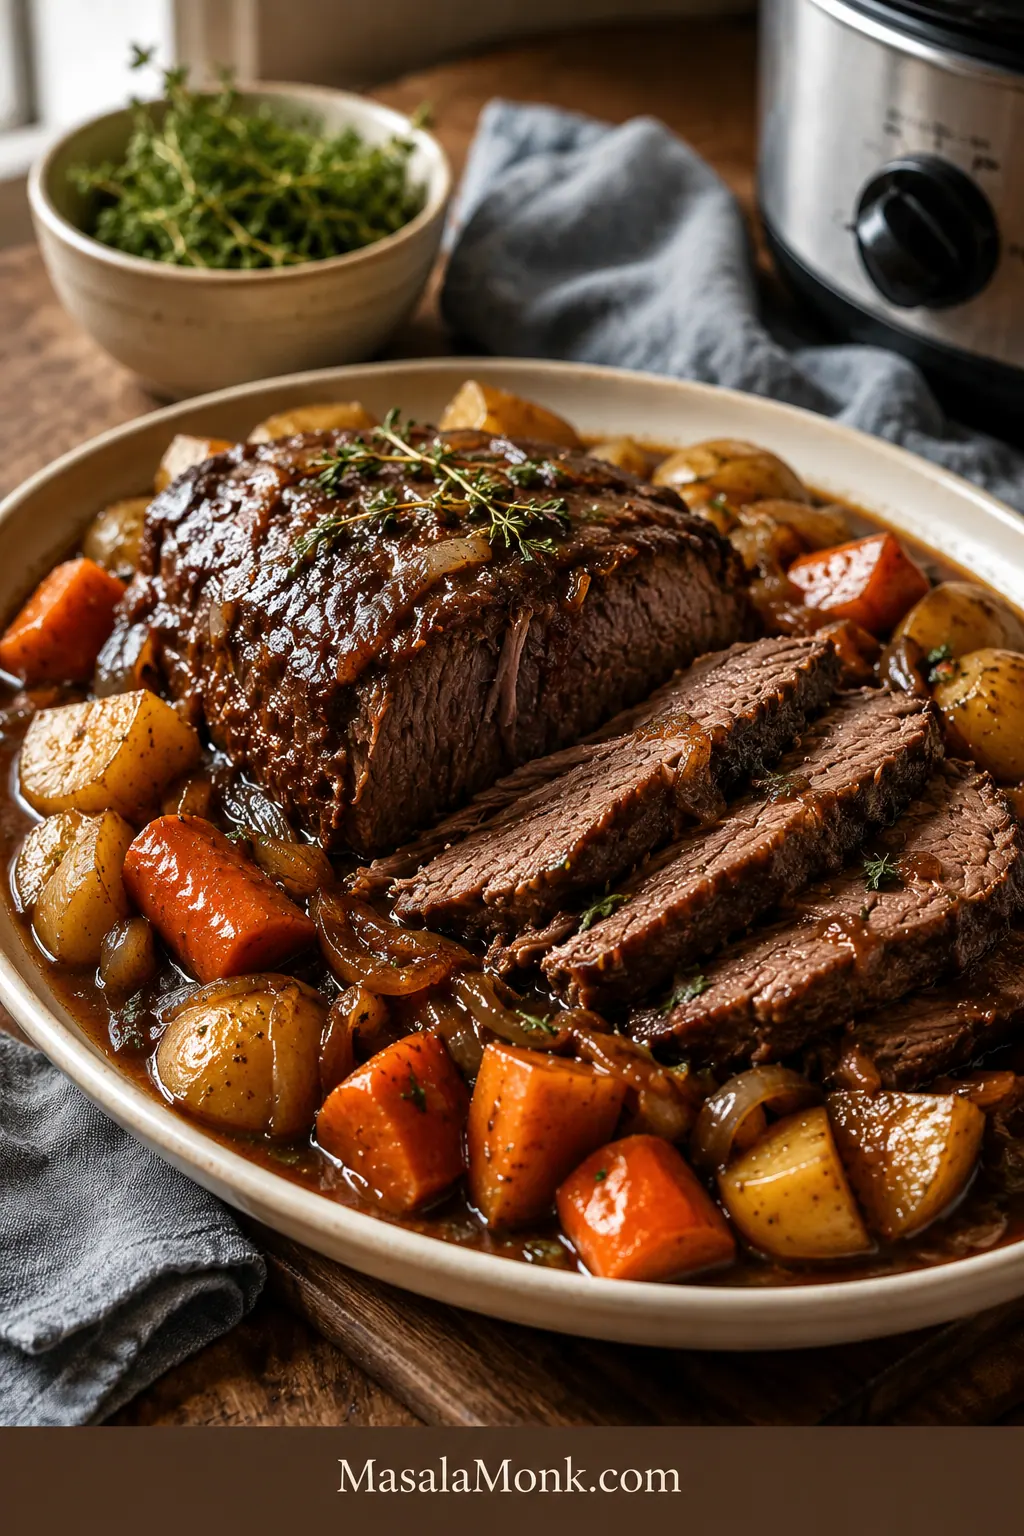
Sliced beef shoulder roast served with brown gravy, carrots, potatoes, onions, herbs, and a slow cooker in the background.

If you have a beef shoulder roast and are not sure what to do with it, treat it like pot roast, not pink roast beef. This is a firm, hardworking cut, but the crock pot gives it what it needs: gentle heat, enough savory liquid, and time to turn from stubborn to fork-tender.

Your package might say beef shoulder roast, chuck shoulder roast, boneless shoulder roast, shoulder clod, arm roast, or shoulder pot roast. Those labels can make dinner feel more confusing than it should, especially when you are just trying to get the roast into the slow cooker and move on with your day.

This guide is especially useful if you are holding one of those confusing shoulder-area roasts and wondering whether to cook it like chuck roast, roast beef, stew meat, or pulled beef. The safest answer is usually pot roast-style cooking: low heat, partial liquid, and tenderness as the final test.

By the end, the onions have melted into the cooking juices, the potatoes have soaked up the savory broth, and the finished sauce tastes like it did most of the work for you. Slice the beef for a classic roast dinner, or cook it longer and shred it for sandwiches, bowls, tacos, and leftovers.

Quick Answer: Beef Shoulder Roast in the Crock Pot

For tender beef shoulder roast in the crock pot, cook a 3 lb / 1.36 kg roast on low for 8 to 9 hours with about 2 to 2 1/4 cups / 480 to 540 ml total liquid. Beef broth, Worcestershire sauce, tomato paste, onion, garlic, herbs, and optional red wine create enough savory liquid for cooking and gravy.

Start checking around 6 1/2 to 7 hours if your roast is flatter, smaller, or well-marbled. Plan closer to 8 to 9 hours for a thick, compact, lean shoulder roast. For shredded beef, cook closer to 9 to 10 hours. The clock gets you close; the fork test decides.

Low is better than high because this cut needs time to soften. A roast can be food-safe before it is pot-roast tender, so do not judge only by temperature. The real test is texture: a fork should slide in easily and twist without a fight.

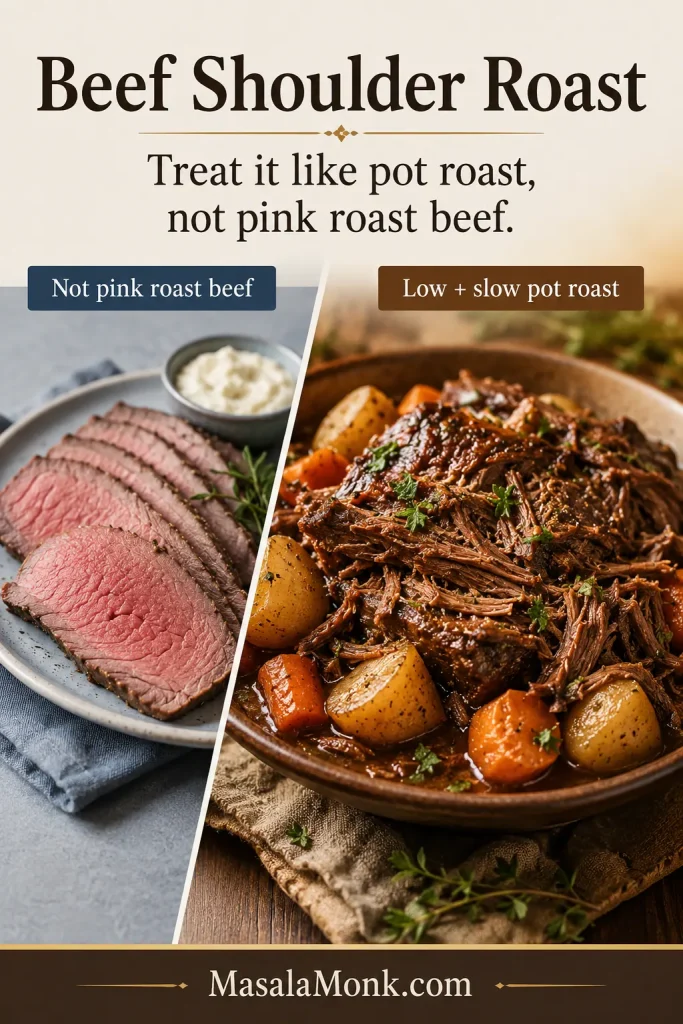
Visual Guide: Pot Roast, Not Pink Roast Beef

Here is the main cooking decision for beef shoulder roast: the crock pot is aiming for tender pot roast texture, not a rosy roast-beef center.

Comparison guide showing pink roast beef on one side and slow-cooked pot roast-style beef on the other, with text explaining to treat beef shoulder roast like pot roast.
For this cut, pot roast logic beats quick roast-beef timing. In other words, use gentle heat, partial liquid, and a tenderness check instead of chasing a rosy center.

Beef Shoulder Roast Crock Pot Recipe Card

Tender Crock Pot Beef Shoulder Roast with Gravy

A tender crock pot beef shoulder roast cooked low and slow with onions, garlic, carrots, potatoes, and a savory gravy made from the cooking juices. Slice it for a classic pot roast dinner or cook it longer for shredded beef.

Prep time20 minutes
Cook time8 to 9 hours on low
Total timeAbout 8 hours 30 minutes to 9 hours 30 minutes
Servings6
MethodSlow cooker / Crock Pot
Best slow cooker size6-quart
ResultTender sliceable beef with gravy; longer cook for shredded beef

Ingredients

  • Thawed beef shoulder roast, chuck shoulder roast, boneless shoulder roast, arm roast, shoulder clod, or chuck roast, 3 lb / 1.36 kg
  • Kosher salt, 2 teaspoons to start, plus more to taste; use up to 2 1/2 teaspoons if your broth is unsalted
  • Black pepper, 1 teaspoon
  • Neutral oil, 1 1/2 tablespoons / 22 ml
  • Yellow onion, 1 large, thick sliced, about 200 g
  • Garlic cloves, 5 to 6, smashed or minced
  • Carrots, 4 medium, cut into large chunks, about 300 to 350 g
  • Baby gold, Yukon gold, or red potatoes, 1 1/2 lb / 680 g
  • Beef broth, 1 1/2 cups / 360 ml
  • Dry red wine, 1/2 cup / 120 ml, or extra beef broth
  • Worcestershire sauce, 2 tablespoons / 30 ml
  • Tomato paste, 1 tablespoon / 15 g
  • Balsamic vinegar, 1 tablespoon / 15 ml, optional
  • Dried thyme, 1 teaspoon
  • Rosemary, dried, 3/4 to 1 teaspoon
  • Bay leaf, 1
  • Cornstarch, 2 tablespoons / 16 g, for gravy
  • Cold water, 2 tablespoons / 30 ml, for gravy

Instructions

  1. Pat the roast dry with paper towels. Season it all over with salt and pepper.
  2. Heat the oil in a large skillet over medium-high heat. Sear the roast for 3 to 4 minutes per side, until browned. This step is optional but recommended for deeper flavor.
  3. Add the sliced onion and garlic to the bottom of a 6-quart slow cooker.
  4. In a bowl or measuring cup, whisk together the beef broth, red wine or extra broth, Worcestershire sauce, tomato paste, balsamic vinegar, thyme, rosemary, and bay leaf.
  5. Place the seared roast on top of the onions and garlic. Pour the liquid around the roast rather than washing all the seasoning off the top.
  6. Add carrots and potatoes now for soft, classic pot roast vegetables. For firmer vegetables, add them during the last 2 1/2 to 3 hours.
  7. Cover and cook on low for 8 to 9 hours, or until a fork slides into the beef easily and twists without resistance. Start checking earlier if the roast is flatter or smaller.
  8. Transfer the roast and vegetables to a platter. Rest the beef for 10 to 15 minutes before slicing or shredding.
  9. For gravy, skim excess fat from the crock pot juices. Strain the liquid if you want a smoother sauce.
  10. Pour the juices into a saucepan and bring to a simmer. Whisk cornstarch with cold water, then stir the slurry into the simmering liquid. Cook for 2 to 4 minutes, until glossy and thickened.
  11. Taste and adjust with salt, pepper, Worcestershire sauce, or a small splash of vinegar if needed. Serve warm over the beef and vegetables.

At a Glance

Best roast size3 lb / 1.36 kg in a 6-quart slow cooker
Liquid amountAbout 2 to 2 1/4 cups / 480 to 540 ml total liquid
Start checking6 1/2 to 7 hours for flatter roasts; 8 to 9 hours for thick shoulder roasts
Best settingLow for the most tender texture
Ready cueFork slides in easily and twists without resistance

Before You Start: 7 Things That Make Shoulder Roast Easier

This is not a fussy roast, but it does reward a few good choices early. Start with thawed beef, use the right size slow cooker, keep the liquid balanced, and cook on low when you can.

  • Begin with a thawed roast. The USDA FSIS slow cooker guidance recommends thawing meat or poultry before using a slow cooker.
  • Use a 6-quart slow cooker for a 3 lb roast. It gives the beef, vegetables, and liquid enough room without crowding.
  • Keep the cooker about half to two-thirds full. Packed to the top, it may cook unevenly. Nearly empty, the edges can cook faster than expected.
  • Sear if you want deeper flavor. Skip it if you need a true dump-and-go roast.
  • Choose low when possible. High can work, but low gives this cut a better chance to soften without tightening.
  • Do not drown the beef. The liquid should come partway up the roast, not cover it like soup.
  • Keep the lid closed. Every peek releases heat and stretches the cook time.

A shoulder roast can look stubborn for hours before it finally softens. That is normal. The texture often changes late, which is why the fork test matters more than the timer alone.

That timing mindset is different from leaner quick-cooking roasts like slow cooker pork loin, where stopping at the right endpoint matters more than cooking all day.

What Is Beef Shoulder Roast?

Beef shoulder roast comes from the shoulder area of the animal. It is a hardworking cut with good beef flavor, but it is not naturally tender like a steak. To become soft enough for pot roast, it needs slow, moist cooking.

What Raw Beef Shoulder Roast Looks Like

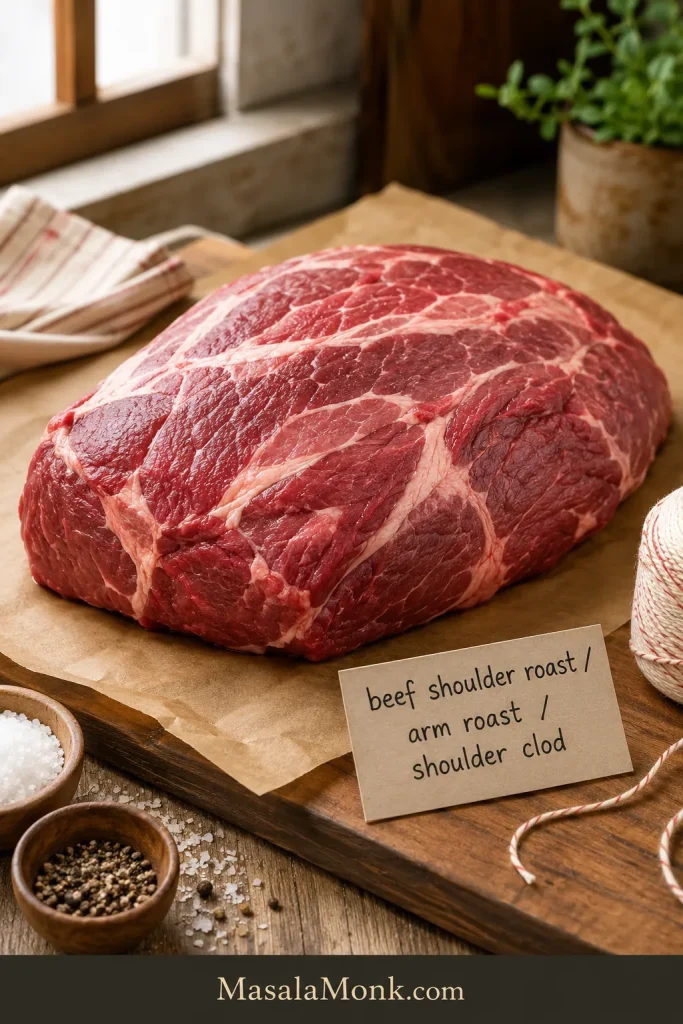
A raw shoulder roast may not look like the tender dinner you want yet. The firm shape and lean surface are exactly why low, moist cooking is the right direction.

Raw thawed beef shoulder roast on butcher paper with a label card reading beef shoulder roast, arm roast, and shoulder clod.
Beef shoulder roast often looks firm and lean before cooking, which can make the cut feel confusing. However, shoulder clod, arm roast, chuck shoulder roast, and similar labels all respond well to low, moist crock pot cooking.

That is why the crock pot works so well. The slow cooker keeps the heat gentle and traps moisture around the meat. Over several hours, a firm roast turns savory, tender, and easy to slice or shred.

The idea is similar to slow-cooked shoulder cuts in other recipes, like slow cooker pulled pork: the meat becomes useful and juicy only after enough time for shredding or slicing.

Depending on the butcher, grocery store, or region, the label may say chuck shoulder roast, shoulder clod roast, arm roast, shoulder pot roast, or boneless shoulder roast. The label may change, but the cooking logic stays the same: cover it, keep it moist, and let the slow cooker do the work.

Bought This Roast from a Butcher Box, Half Cow, or Freezer Pack?

A lot of people search for this recipe because they did not choose the cut from a familiar grocery-store display. It may have come in a butcher box, a half cow, a freezer bundle, or a sale pack with a label that does not explain much.

If the roast looks like a firm shoulder-area cut and the label says shoulder roast, shoulder clod, chuck shoulder, arm roast, or shoulder pot roast, this crock pot method is a safe direction. Treat it like pot roast, not quick roast beef. Use the same method here: the label matters less than the texture.

Leaner freezer beef can need the longer end of the timing range. A thick, compact roast may also take longer than a flatter roast of the same weight. That does not mean anything went wrong; it just means the beef needs enough time for the texture to change.

Beef Shoulder Roast vs Chuck Roast: What Changes?

Chuck roast is the classic pot roast cut, but shoulder roast is the cut many people end up with from butcher boxes, freezer packs, or confusing grocery labels. This recipe is built for that shoulder-area roast, which can be a little leaner and slightly less forgiving than a well-marbled chuck roast.

That is why the finished sauce matters. Chuck roast often brings more fat to the pot. A shoulder roast may need more help from broth, onion, garlic, Worcestershire sauce, tomato paste, and the cooking juices you thicken at the end.

Label on the packageHow to use it in this recipe
Beef shoulder roastUse as written. Cook gently until fork-tender.
Chuck shoulder roastUse the same method. Good for pot roast and shredded beef.
Beef chuck shoulder roastWorks well in this crock pot recipe.
Boneless shoulder roastWorks well, but keep some liquid in the cooker and avoid over-trimming.
Shoulder clod roastOften leaner. Cook with moisture and allow the full cook time.
Arm roastGood for slow cooking. It may need the longer end of the timing range.
Chuck roastExcellent substitute. Usually fattier and very forgiving.

Simple rule: if the roast is from the shoulder or chuck area and is sold as a pot roast-style cut, this crock pot method is usually the right direction. If the cut looks very lean, plan on serving it with the finished sauce.

Ingredients and Substitutions

Once you understand the method, the ingredient list makes sense: the liquid has to keep the roast moist and turn into something worth spooning over the beef. Broth alone can taste thin, so Worcestershire sauce, tomato paste, onion, and garlic help the juices become rich instead of watery.

Beef Shoulder Roast

A 3 lb / 1.36 kg roast is the best base size for this recipe. It fits well in a 6-quart slow cooker with vegetables and gives enough beef for dinner plus leftovers. Chuck shoulder roast, boneless shoulder roast, arm roast, shoulder clod, or chuck roast can be cooked the same way.

Salt and Pepper

Start with 2 teaspoons kosher salt if your broth is salted or you are unsure. You can always add more to the gravy at the end, but it is hard to fix a roast that started too salty. Use up to 2 1/2 teaspoons if your broth is unsalted and your roast is thick.

Onion and Garlic

Onion and garlic go under the roast and flavor the juices from the beginning. By the last hour, the onion should be soft enough to almost disappear into the sauce.

Beef Broth

Beef broth keeps the cooker moist and gives you something worth turning into gravy later. The meat does not need to be fully covered.

Red Wine or Extra Broth

Dry red wine adds depth, but it is optional. Use extra beef broth for a wine-free version. A tablespoon of balsamic vinegar can add rounded acidity without making the roast taste sour.

Worcestershire Sauce and Tomato Paste

Worcestershire sauce adds savory sharpness, while tomato paste gives the sauce body and color. Together, they help the slow cooker juices taste richer instead of thin or flat.

Carrots and Potatoes

Add carrots and potatoes, and you have dinner in the pot instead of just beef for later. Use large chunks so they do not disappear during the long cook time. Baby gold, Yukon gold, and red potatoes hold their shape better than russets.

Herbs

Thyme, rosemary, and bay leaf keep the flavor classic without making the roast taste busy. Dried herbs are easiest here because they can sit in the slow cooker all day.

Cornstarch

Cornstarch takes those thin crock pot juices and turns them into the kind of gravy that actually clings to the beef. Mix it with cold water before adding it to hot liquid so it does not clump.

No wine version: replace the red wine with extra beef broth. If the gravy tastes flat at the end, add a small splash of balsamic vinegar or a little more Worcestershire sauce to brighten it.

Equipment

You need a 6-quart slow cooker, a skillet if you plan to sear, tongs for handling the roast, and a saucepan if you want to thicken the cooking juices into gravy. A cutting board helps with resting and slicing, two forks are enough for shredding, and a thermometer is useful, though the fork test matters more here.

How to Make Beef Shoulder Roast in a Crock Pot

The method is simple, and each step earns its place. Drying and seasoning the beef helps flavor. Searing builds a deeper sauce. Onion and garlic create the base. The slow cooker does the quiet work after that.

1. Pat the Roast Dry and Season It

Dry the roast with paper towels before seasoning. A dry surface browns better and helps the salt and pepper cling to the beef. Season all sides generously.

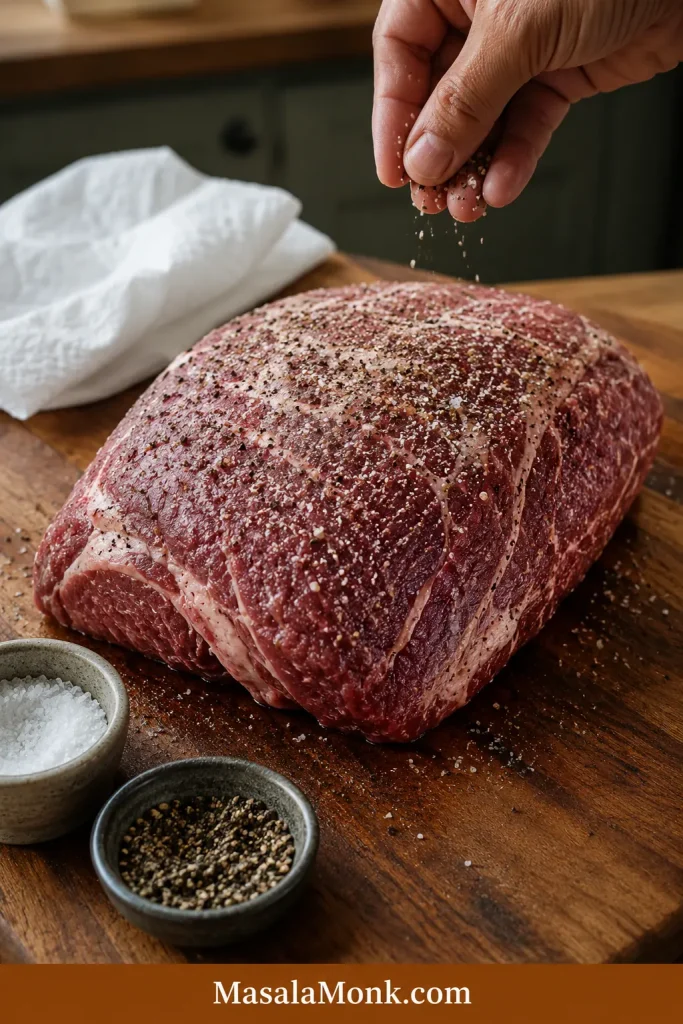
Raw beef shoulder roast on a wooden board being seasoned with salt and pepper before searing.
First, dry the thawed roast and season every side before it hits the skillet. This small prep step helps the beef brown better and keeps the finished crock pot roast from tasting under-seasoned.

2. Sear the Beef for Deeper Flavor

Heat oil in a skillet and brown the roast for 3 to 4 minutes per side. Searing will not seal in juices, but it gives the sauce a deeper, browned-beef flavor you cannot get from broth alone.

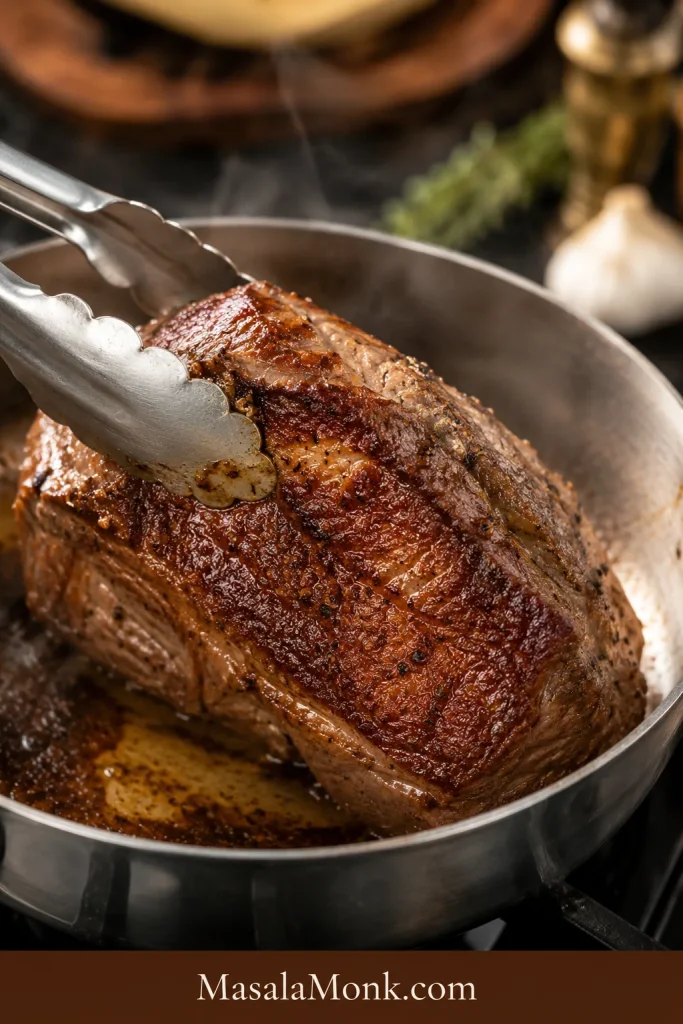
Beef shoulder roast browning in a skillet while metal tongs hold the meat.
Browning is not required, but it gives slow cooker beef roast a deeper flavor base. The browned surface helps the final gravy taste richer instead of depending on broth alone.

Need a true dump-and-go roast? Skip the sear. The beef will still become tender, although the flavor will be lighter.

3. Add Onion and Garlic to the Crock Pot

Place sliced onion and garlic in the bottom of the slow cooker. They act as a flavorful base and slowly season the cooking liquid.

4. Mix the Cooking Liquid

Whisk together beef broth, wine or extra broth, Worcestershire sauce, tomato paste, balsamic vinegar, thyme, rosemary, and bay leaf. The mixture should taste savory and slightly strong because it will season both the beef and the gravy.

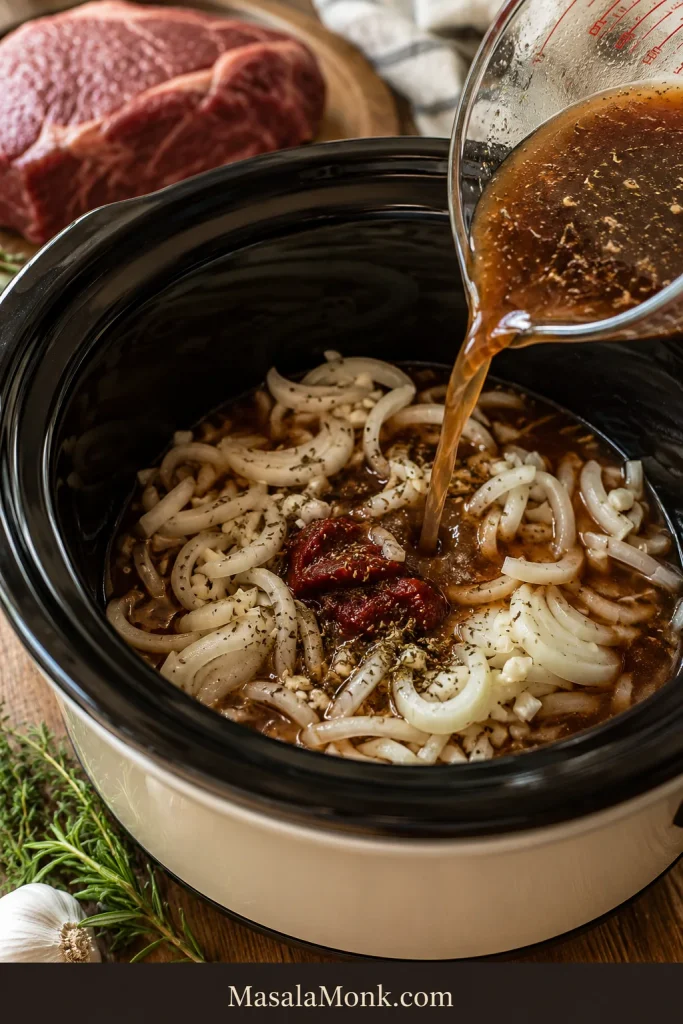
Sliced onions, garlic, tomato paste, herbs, and brown cooking liquid being added to a slow cooker.
Onions, garlic, broth, Worcestershire sauce, tomato paste, and herbs build the savory base for slow cooker beef shoulder roast. Later, those same juices become the sauce that ties the beef and vegetables together.

5. Add the Roast and Vegetables

Place the roast over the onion and garlic. Pour the liquid around the beef instead of washing all the seasoning off the top. Add carrots and potatoes now for soft pot roast vegetables, or add them later if you want them firmer.

6. Cook Low and Slow

Cover and cook on low for 8 to 9 hours. Start checking around 6 1/2 to 7 hours if the roast is flatter, smaller, or well-marbled. Slow cookers do not all run at the same temperature, so use the chart as a starting point, not a promise.

Do not panic at hour 6 if the beef still feels firm. A shoulder roast often looks unimpressive before it finally gives in. When the fork turns without resistance, that is the little reward for leaving it alone all day.

7. Rest, Slice, or Shred

Move the roast to a cutting board or platter and rest it for 10 to 15 minutes. For slices, look for the direction of the muscle fibers and cut across them, not with them. Shorter fibers make the beef feel more tender.

For shredded beef, pull the roast apart with two forks and return some of the meat to the warm juices before serving.

8. Make the Gravy

Skim excess fat from the slow cooker juices, strain if desired, and simmer the liquid in a saucepan. Stir in a cornstarch slurry and cook until the gravy turns glossy and thick enough to spoon over the beef.

How Much Liquid Should You Use?

For a 3 lb / 1.36 kg roast, use about 2 to 2 1/4 cups / 480 to 540 ml total liquid. That includes broth, wine or extra broth, Worcestershire sauce, vinegar, and tomato paste.

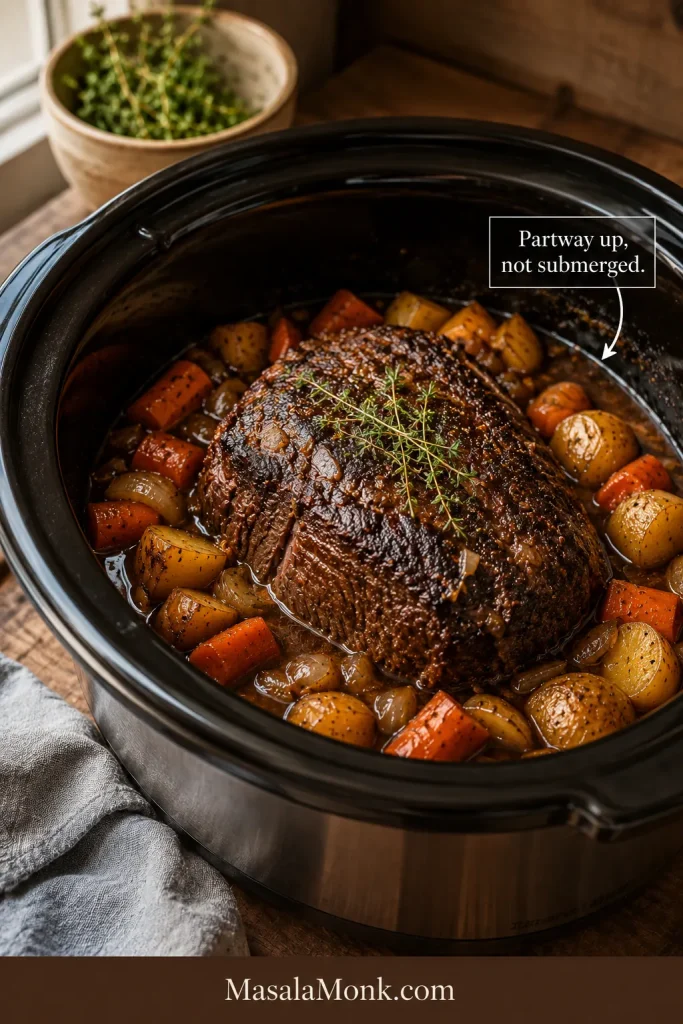
The roast does not need to be submerged. A crock pot traps moisture, and the beef releases juices as it cooks. Too much liquid can make the roast taste boiled and leave you with thin gravy.

Use this visual cue: the liquid should sit around the roast and come partway up the sides, while the top of the beef remains mostly exposed. You want enough moisture for cooking and enough juice for sauce, not a pot full of beef soup.

Visual Cue: Liquid Around the Roast

Keep this liquid-level cue in mind before starting the long cook. The goal is moisture and gravy, not a fully submerged roast.

Beef shoulder roast in a slow cooker with brown liquid coming partway up the sides and a label that says Partway up, not submerged.
Instead of drowning the roast, add enough liquid to surround the beef and create moisture. This visual cue helps prevent boiled-tasting meat while still leaving enough crock pot juices for gravy.

Potatoes and Carrots: When to Add Them

Potatoes and carrots are easy, but their texture depends on when they go in. Add them at the beginning for soft, classic pot roast vegetables, or add them later if you want them firmer.

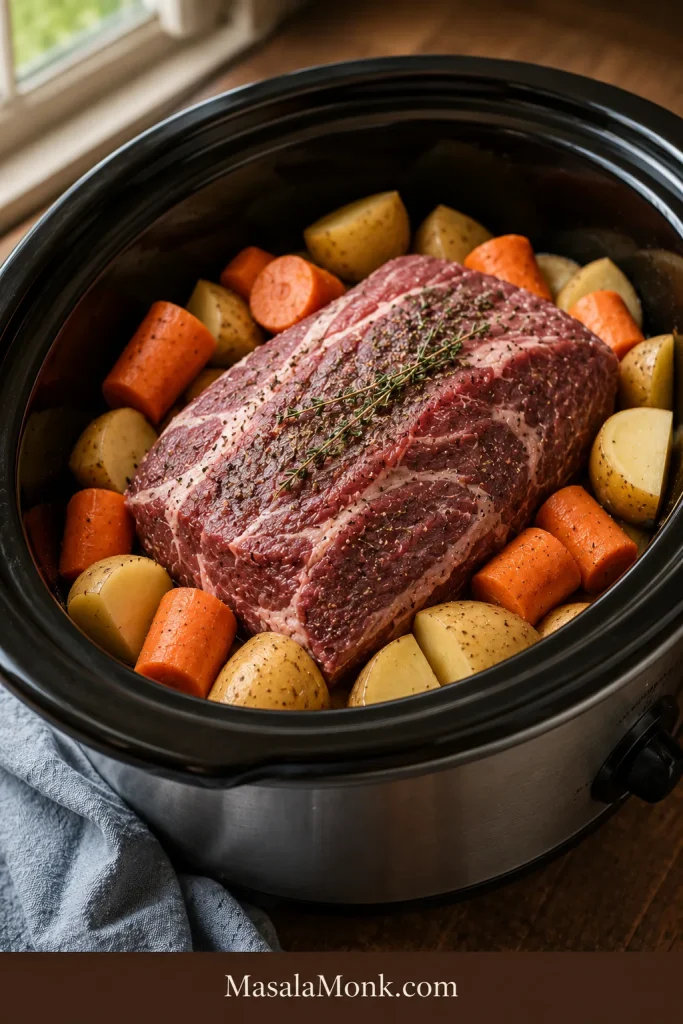
Visual Cue: Keep Carrots and Potatoes Large

Vegetable size affects texture during a long slow cooker cook. Before loading the crock pot, keep the carrots and potatoes large enough to hold their shape.

Raw beef shoulder roast in a slow cooker surrounded by large uncooked carrot chunks and halved potatoes.
Large carrot pieces and halved potatoes hold up better during a long beef shoulder roast cook time. Otherwise, small cuts can soften too early while the meat still needs more time.
Vegetable styleWhen to add themBest tip
Soft classic pot roast vegetablesAt the beginningCut carrots and potatoes large.
Firmer carrots and potatoesLast 2 1/2 to 3 hoursKeep onion and garlic in from the start.
Potatoes that hold up bestUse baby gold, Yukon gold, or red potatoesThey hold better than russets.
Flavor base from the startOnion and garlic from the beginningThey season the beef and gravy.

If you are cooking while away from home, add the vegetables at the beginning for ease. When you are nearby and can add them later, the potatoes and carrots will usually hold their shape better.

Beef Shoulder Roast Crock Pot Cook Time Chart

Cook time depends on the size and shape of the roast, the slow cooker model, how cold the beef was when it started, and how often the lid is opened. Shape matters almost as much as weight. A compact, thick roast can take longer than a flatter roast of the same size.

The chart gets you close; the fork test decides when dinner is truly ready.

Roast sizeLow settingHigh settingBest result
2 lb / 900 g6 to 7 hours3 1/2 to 4 1/2 hoursSliceable tender
2 1/2 lb / 1.1 kg7 to 8 hours4 1/2 to 5 hoursTender, lightly shreddable
3 lb / 1.36 kg8 to 9 hours5 to 6 hoursBest all-purpose result
4 lb / 1.8 kg9 to 10 hours6 to 7 hoursBest for shredding

What Cooked Beef Shoulder Roast Should Look Like

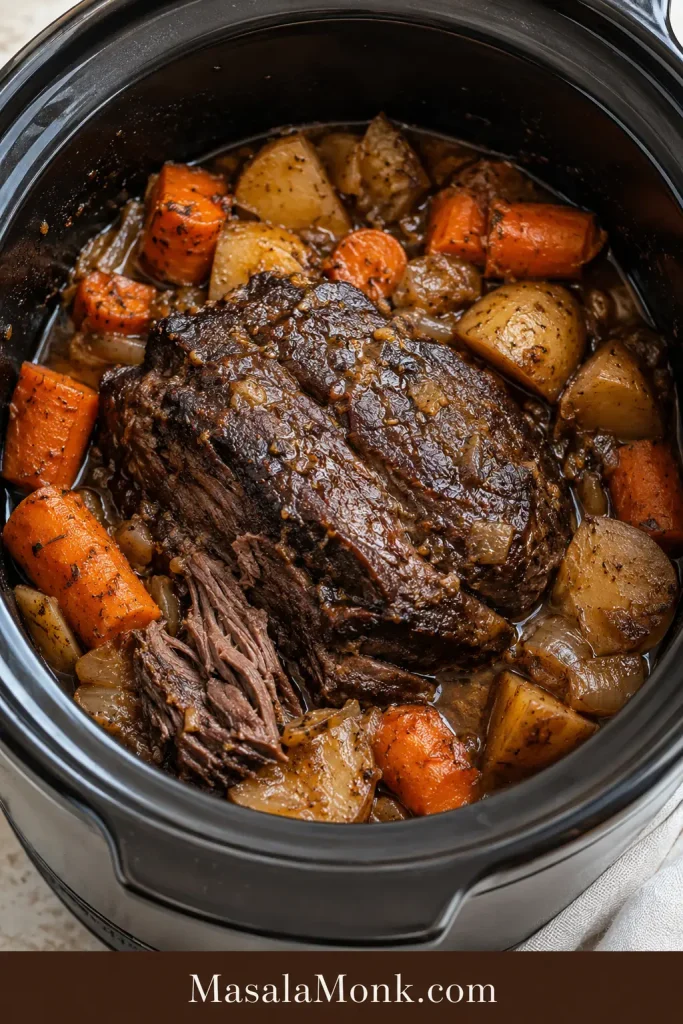
After the long cook, the signs matter: darker beef, softened vegetables, and juices gathered around the roast. From there, decide whether the meat is ready to slice or needs more time for shredding.

Cooked beef shoulder roast in a slow cooker with carrots, potatoes, onions, and brown cooking juices.
Once the roast has cooked low and slow, look for dark beef, softened vegetables, and savory juices around the meat. From there, decide whether the texture is better for slicing or shredding.

What success looks like: the fork slides in easily, the roast either holds for slicing or pulls for shredding, and the cooking juices taste savory enough to turn into gravy. A little beef, a soft carrot, and enough sauce to drag through the potatoes is the bite you are aiming for.

How to Know When Beef Shoulder Roast Is Done

The best doneness test is tenderness. A fork should slide into the beef easily. If you twist the fork, the meat should give instead of springing back. When it still feels tight, chewy, or resistant, it needs more time.

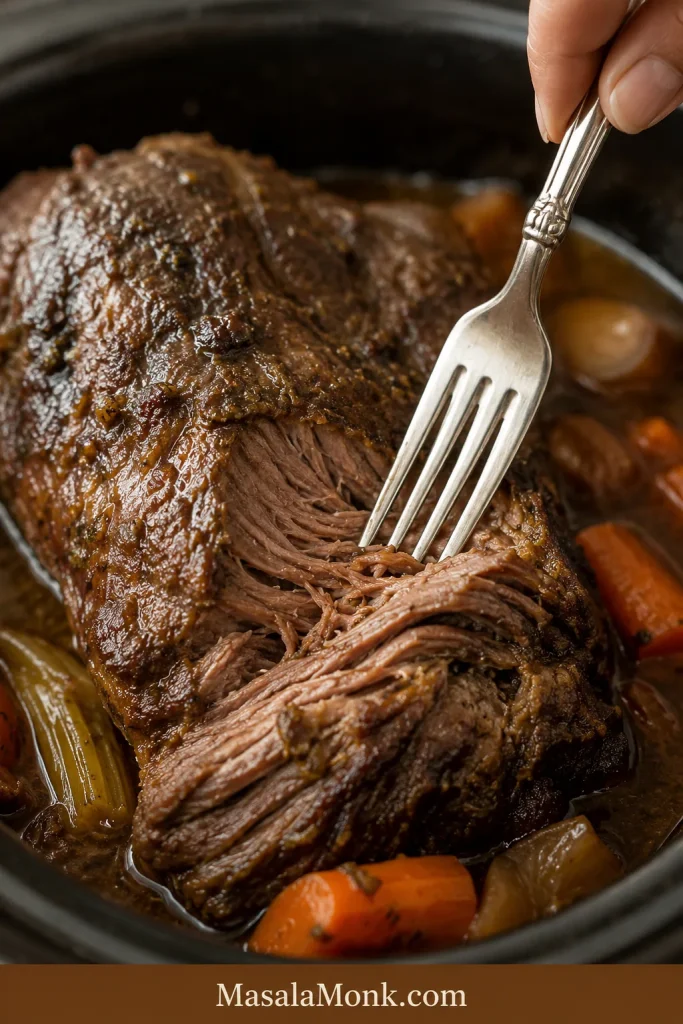
Visual Cue: The Fork Test

This is the most useful doneness cue for a shoulder roast because temperature alone does not prove pot-roast tenderness. Look for a fork that slides in and turns without the meat pushing back.

Fork pulling into a tender cooked beef shoulder roast inside a slow cooker with carrots and cooking juices.
Watch how the beef reacts to the fork. When it gives easily instead of springing back, the slow cooker roast is ready to rest, slice, or shred.

This is where many cooks get confused: food-safe temperature and pot-roast tenderness are not the same thing. Beef roast can be safe to eat before the connective tissue has softened enough for a tender crock pot texture. The FoodSafety.gov safe temperature chart lists beef roasts at 145°F / 63°C with a 3-minute rest, but this cut usually needs to cook well beyond that for pot roast tenderness.

For tender, pull-apart beef, the internal temperature often lands around 195 to 205°F / 90 to 96°C. Use that range as a helpful clue, not a strict rule. Texture matters most.

Low or High: Which Setting Is Better?

For beef shoulder roast, low is usually better because the firm parts of the meat need time to soften. High can work when you are short on time, especially for a smaller roast, but low gives the most relaxed texture.

SettingWhen to use itExpected texture
LowBest for most shoulder roastsMost tender and forgiving
HighUseful when time is limitedGood, but less ideal for lean roasts
WarmOnly after the roast is already tenderGood for short holding before dinner

How to Make Gravy from the Crock Pot Juices

The finished juices are where this roast really comes together. For a lean shoulder cut, they are not just a topping once thickened. They help every slice eat tender, juicy, and complete.

That is why this roast is so good with creamy mashed potatoes. The potatoes catch the sauce, and the sauce keeps every bite of beef feeling moist.

  1. Remove the beef and vegetables from the slow cooker.
  2. Skim excess fat from the top of the juices. A little fat tastes good; a thick layer can make the gravy heavy.
  3. Strain the liquid if you want a smoother sauce.
  4. Pour the juices into a saucepan and bring to a simmer.
  5. Mix 2 tablespoons cornstarch with 2 tablespoons cold water.
  6. Whisk the slurry into the simmering liquid.
  7. Cook for 2 to 4 minutes, until glossy and thickened.
  8. Taste and adjust with salt, pepper, Worcestershire sauce, or a tiny splash of vinegar.

Visual Cue: Glossy, Spoonable Gravy

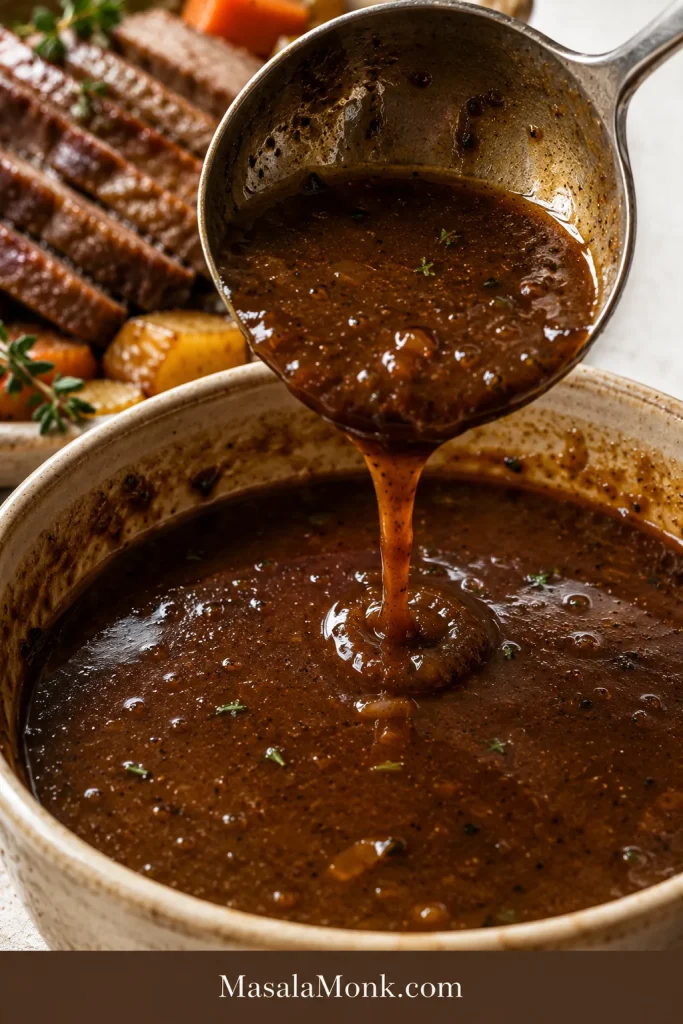
The gravy should look thicker than the raw crock pot juices but still pour easily. When it coats the spoon, it is ready to serve over the beef.

Thick brown gravy being poured from a ladle into a bowl, with sliced beef and vegetables blurred in the background.
Simmering the crock pot juices concentrates the flavor before thickening. Once the gravy coats the spoon, it is ready to keep each slice of beef moist, glossy, and rich.

Flat gravy usually needs salt or acidity. Sharp gravy can be rounded out with a short simmer, a splash of broth, or a little butter. Thin gravy needs more simmering or a little extra cornstarch slurry, while gravy that gets too thick can be loosened with broth.

For mushroom gravy, add sliced mushrooms with the onions at the start, or sauté mushrooms separately and stir them into the finished sauce. Mushrooms are especially good if you are serving the roast with mashed potatoes, noodles, or rice.

Sliceable vs Shredded Beef Shoulder Roast

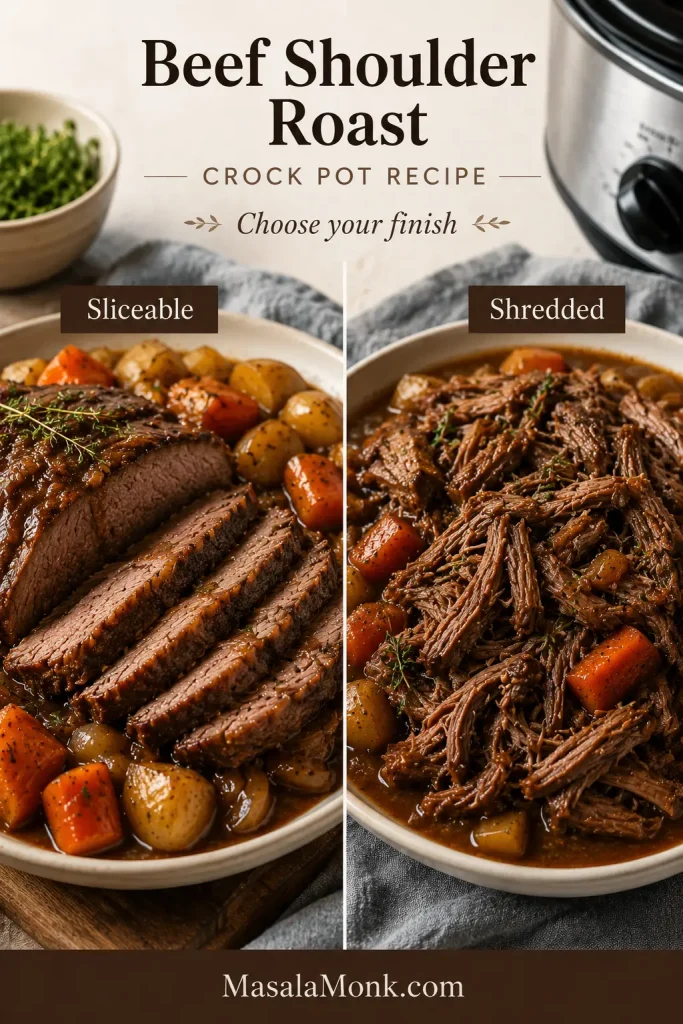
This roast can go two ways in the crock pot. Stop when it is tender but still holds together, and you can slice it for a classic pot roast dinner. Cook it longer, and it becomes better for shredding.

Visual Cue: Slice Across the Grain

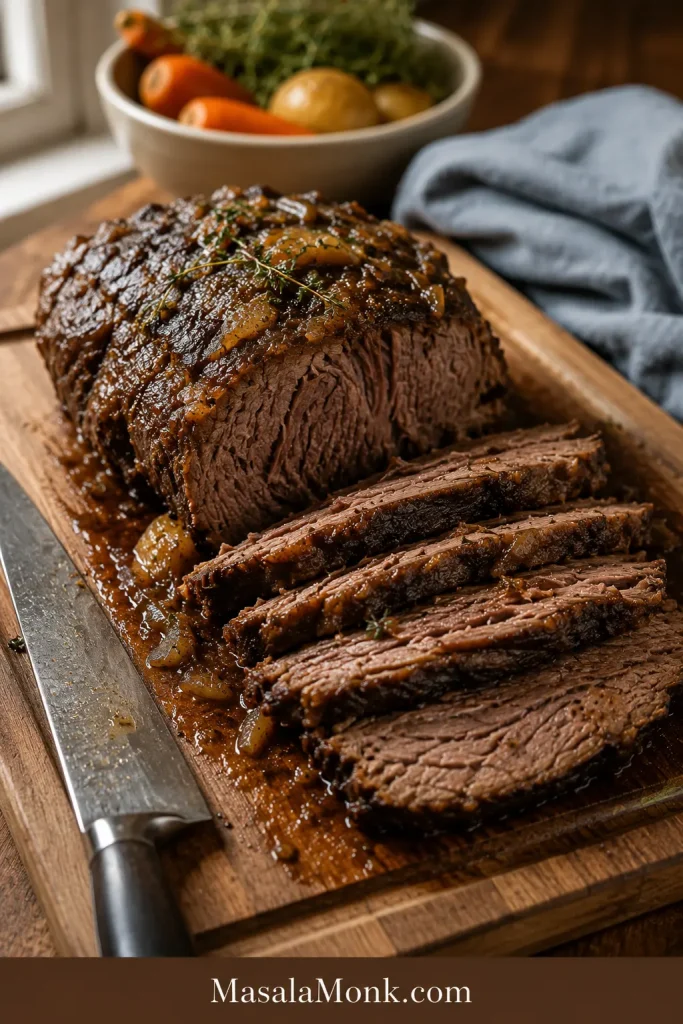
For a leaner shoulder roast, the serving cut matters. Slicing across the grain shortens the muscle fibers so each piece feels more tender with gravy.

Cooked beef shoulder roast sliced on a wooden cutting board with a knife beside the meat.
After resting, cut the beef into slices that shorten the muscle fibers. This makes a leaner beef shoulder roast feel more tender on the plate, especially once the gravy is spooned over it.
ResultWhat to look forBest use
Sliceable roastFork slides in easily, but roast still holds shapeClassic dinner plates with gravy and vegetables
Shredded beefFork twists and pulls the meat apart easilySandwiches, tacos, bowls, sliders, soup
Too firmFork meets resistance and meat feels springyKeep cooking and check again later

Visual Guide: Sliceable vs Shredded Beef

Use this as the texture decision point. A sliceable finish is best for dinner plates, while a longer cook gives shredded beef for sandwiches, tacos, bowls, and leftovers.

Comparison image showing sliced beef shoulder roast on one side and shredded beef shoulder roast in cooking juices on the other.
Beef shoulder roast can finish as neat slices or shredded beef in juices. Therefore, stop earlier for a classic pot roast dinner, or cook longer when you want sandwiches, bowls, or tacos.

When the roast is a little dry but tender, shredding is usually the better choice. Pull the beef apart, return it to some warm cooking juices, and let it soak for a few minutes before serving.

Boneless Beef Shoulder Roast Tips

Boneless shoulder roast works well in the crock pot, but it can be leaner than a well-marbled chuck roast. That means moisture, resting, and sauce matter more.

  • Do not trim away every bit of fat before cooking.
  • Use enough liquid to create gravy, but do not drown the roast.
  • Cook on low when possible.
  • Rest the beef before slicing.
  • If the roast seems dry, shred it into the cooking juices instead of serving thick slices.

For a very lean roast, the sauce is part of the recipe’s texture. Spoon it generously over slices, or mix shredded beef back into the juices before serving.

Shortcut Packet Version

To make an easier onion soup mix-style crock pot roast, adapt the seasonings without changing the cooking method.

Use the same beef, onion, garlic, broth, carrots, and potatoes. Replace the thyme, rosemary, tomato paste, and some of the salt with one packet of onion soup mix, brown gravy mix, or ranch seasoning. Taste before adding more salt because packet mixes can be very salty.

This shortcut version is less layered than the main recipe, but it is familiar, easy, and useful for a busy day. It is also a good option if you are cooking for someone who likes old-school packet-style pot roast flavor.

Troubleshooting Beef Shoulder Roast

A shoulder roast does not always look promising halfway through cooking. That is normal. The texture often changes late, and this section will help you decide whether to wait, shred, slice, or fix the gravy.

Visual Guide: Beef Shoulder Roast Fixes

This section is for the common panic moments: tough meat, dry slices, watery gravy, or bland flavor. Start here before assuming the roast is ruined.

Troubleshooting guide for beef shoulder roast with fixes for tough meat, dry slices, watery gravy, and bland roast.
If the beef shoulder roast turns tough, dry, watery, or bland, do not give up too early. More time, shredding into juices, reducing the gravy, or adjusting the sauce can still rescue dinner.

Why Is My Beef Shoulder Roast Still Tough?

It probably needs more time, not more heat. This is the most common moment where people think they ruined dinner, but most of the time they have not.

A shoulder roast can be cooked through before it becomes tender, especially if it is thick, lean, cold when it started, or cooking in a slower-running crock pot. If there is still liquid in the cooker, keep cooking on low and check again in 30 to 60 minutes.

Why Did My Roast Turn Out Dry?

It likely needs moisture and thinner serving, not panic. The roast may have been very lean, over-trimmed, cooked too long after becoming tender, or sliced without resting.

Dry slices are not a lost cause. Serve them with plenty of gravy, slice them thinly across the grain, or shred the beef and return it to the cooking juices.

Why Is My Roast Chewy but Falling Apart?

Shred it and serve it with sauce. This can happen when the connective tissue has softened but the muscle fibers have dried out.

It may not be perfect as slices, but it can still be useful in sandwiches, tacos, bowls, sliders, soup, or pasta.

Why Is My Gravy Watery?

Watery gravy needs reduction, thickening, or both. Slow cooker juices are often thin at first.

Simmer the liquid in a saucepan to reduce slightly, then thicken with a cornstarch slurry. Taste after thickening and adjust the seasoning.

Why Are My Potatoes Mushy?

They cooked for the full slow cooker time. Next time, use larger pieces, choose waxy potatoes like Yukon gold or red potatoes, or add the potatoes during the last 2 1/2 to 3 hours.

Why Does the Roast Taste Bland?

Fix the gravy first. It likely needs more salt, more savory depth, or a little acidity.

Add Worcestershire sauce, tomato paste, garlic, onion, herbs, or a small splash of vinegar to the gravy. The finished sauce is the easiest place to adjust flavor because you can taste it before serving.

What If I Added Too Much Liquid?

Reduce it before thickening it. Remove the beef and vegetables, then simmer the liquid in a saucepan until it tastes stronger. After that, thicken it with cornstarch slurry.

Common Mistakes to Avoid

  • Thaw the roast first instead of cooking it from frozen.
  • Wait for tenderness, not just a safe internal temperature.
  • Keep the liquid partway up the beef instead of fully submerging it.
  • Leave the lid closed as much as possible during cooking.
  • Slice only after the roast feels tender, not while it is still tight.
  • Save the crock pot juices until you have tasted them; they are usually the start of the gravy.

Flavor Variations

Once the basic method is clear, you can take the flavor in several directions without changing the cook time much.

VersionHow to adapt itBest use
Classic Pot RoastUse the main recipe with carrots, potatoes, herbs, and gravy.Sunday dinner or family meal
Mushroom GravyAdd sliced mushrooms with the onions and use wine or extra broth.Mashed potatoes, noodles, or rice
Onion Soup Mix ShortcutAdd one packet and reduce the salt.Easy weeknight roast
Shredded BeefCook 9 to 10 hours and shred into the juices.Sandwiches, bowls, tacos
Mexican-StyleAdd cumin, oregano, chipotle, salsa, and lime at the end.Tacos, burrito bowls, enchiladas
BBQ Pulled BeefUse BBQ rub, cook until shreddable, then stir in barbecue sauce.Sliders and sandwiches

For the BBQ version, add sauce after shredding rather than drowning the roast from the start. This BBQ sauce for pulled pork guide is useful for sauce timing, amounts, and fixing meat that turns too wet or too dry.

Can You Cook Beef Shoulder Roast Another Way?

Yes, but each method gives a different result. This post focuses on the crock pot because it is the easiest and most forgiving way to make beef shoulder roast tender.

Oven or Dutch oven cooking works well for braised pot roast-style beef. An Instant Pot is faster, but vegetable timing needs more care. A smoker or Traeger turns the roast into more of a BBQ-style pulled beef. An air fryer is not ideal for fall-apart shoulder roast because this cut needs moist, slow cooking.

What to Serve with Beef Shoulder Roast

This crock pot beef shoulder roast already includes potatoes and carrots, but the gravy makes it easy to turn into a bigger meal.

If you plan to shred the beef, skip the potatoes in the crock pot and serve the meat in sandwiches, tacos, burrito bowls, or over rice instead.

For a richer comfort-food plate, pair the roast with macaroni and cheese, especially if you are serving the shredded BBQ-style version instead of the classic carrots-and-potatoes dinner.

Storage, Freezing, Make-Ahead, and Leftovers

Store leftover beef with some gravy or cooking juices so it stays moist. The meat keeps better when it is not stored dry.

  • Refrigerator: Store beef and gravy in an airtight container for 3 to 4 days.
  • Freezer: Freeze beef with gravy for up to 3 months. Potatoes can become grainy after freezing, so freeze the beef and gravy separately if possible.
  • Reheating: Warm gently on the stovetop or in the microwave with a splash of broth or gravy.
  • Make-ahead: Cook the roast a day ahead, refrigerate it with the juices, then reheat gently before serving.
  • Best leftover texture: Shredded beef usually reheats better than thick slices.

Leftover beef is useful in sandwiches, tacos, rice bowls, hash, soup, enchiladas, sliders, pasta, or loaded baked potatoes. If it seems a little dry the next day, chop or shred it and warm it with gravy.

The leftovers may be the quiet win here: shredded beef in a sandwich, bowl, or quick weeknight plate usually tastes even better after a night in the juices.

FAQ

Is beef shoulder roast good for the crock pot?

Yes. Beef shoulder roast is a good crock pot cut because long, gentle cooking gives the firm muscle time to soften. It is less naturally forgiving than fatty chuck roast, so cook time and gravy matter.

What is the best way to cook beef shoulder roast?

Low, moist cooking is best. The crock pot gives the roast hours to soften without much attention.

How long does beef shoulder roast take in a slow cooker?

A 3 lb / 1.36 kg roast usually takes 8 to 9 hours on low. Start checking earlier if it is flatter or smaller, and cook closer to 9 to 10 hours for shredded beef.

Is beef shoulder roast the same as chuck roast?

Not always exactly. Chuck roast is usually fattier and more forgiving, while shoulder roast can be leaner and benefits from moisture, gentle heat, and gravy.

Why is my beef shoulder roast still tough?

It likely needs more time. This cut can be cooked through before it becomes tender, so keep cooking until a fork slides in easily.

How do I make beef shoulder roast fall apart?

Cook it on low until a fork twists easily in the beef. For a 3 lb roast, that usually means closer to 9 to 10 hours.

Should beef shoulder roast be covered with liquid?

No. For pot roast-style beef, the liquid should come partway up the sides, not cover it completely. A crock pot traps moisture, and too much liquid can leave you with boiled-tasting beef and thin gravy.

What temperature is beef shoulder roast tender?

Usually around 195 to 205°F / 90 to 96°C, but the fork test matters more than the number.

Does boneless beef shoulder roast work in this recipe?

Yes. Boneless shoulder roast works well, but it may be leaner, so keep some liquid in the cooker and serve it with gravy.

Can I use a bone-in beef shoulder roast?

A bone-in beef shoulder roast works with the same method. Start checking around the same time. The bone may add flavor, but the roast is done when a fork slides in easily and the meat feels tender.

Should I sear the roast before slow cooking?

Searing is optional but recommended. It gives the beef and gravy deeper flavor.

Can I cook frozen beef shoulder roast in a crock pot?

No. Thaw the roast first before putting it in the slow cooker so it heats safely and evenly.

What can I make with leftover beef shoulder roast?

Use leftovers in sandwiches, tacos, rice bowls, soup, hash, enchiladas, sliders, pasta, or loaded potatoes. Shredded beef mixed with gravy reheats especially well.

Final Tip

The best thing you can do for beef shoulder roast is not rush it. Give it enough liquid, keep the heat gentle, and let the fork test decide when it is ready. Once the meat finally softens, the gravy and vegetables make the whole slow wait feel worth it.

Posted on Leave a comment

Frozen Shrimp in Air Fryer: No-Thaw Time & Temp Guide

Cooked shrimp on a white plate with lemon wedges, garlic butter, parsley, and a blurred air fryer in the background.

This is the kind of recipe for the night when dinner was not really planned, the shrimp are still frozen, and you need the air fryer to save the meal. A bag of frozen shrimp can turn into shrimp tacos, rice bowls, pasta, salads, wraps, or garlic-butter shrimp in minutes — but only if you use the right timing for the shrimp you actually have.

Do not start with the timer. Start with the bag: raw or precooked, small or jumbo, peeled or shell-on, plain or breaded/coated. The rule is simple: cook raw shrimp, reheat precooked shrimp, and crisp coated shrimp. No thawing bowl, no guessing, no rubbery shrimp if you start with that bag check.

Quick Answer

Most plain frozen raw shrimp takes 8 to 10 minutes at 400°F / 205°C in the air fryer, with a shake or flip halfway. Frozen cooked or precooked shrimp takes 4 to 6 minutes at 375°F to 400°F / 190°C to 205°C because it only needs reheating.

Icy, glazed, or stuck-together pieces need a short head start. Air fry them plain for 2 to 3 minutes first, then separate them, drain off extra moisture if needed, add oil and seasoning, and finish cooking. Some frozen shrimp has a thin ice glaze, and that is normal. The short head start helps the flavor stick to the seafood, not the ice.

That tiny pause is the difference between seasoning the shrimp and seasoning the basket.

Timing graphic showing raw frozen shrimp at 400°F for 8 to 10 minutes, cooked frozen shrimp for 4 to 6 minutes, and icy shrimp loosened before seasoning.
Start with the timing split: raw frozen shrimp needs full cooking time, while precooked shrimp only needs a quick reheat.

Jump to What You Need

Bag Check: What Do You Have?

Use this quick check before you set the timer. It is the fastest way to avoid rubbery precooked shrimp, bland icy shrimp, or coated shrimp that browns outside before it heats through.

What the bag says or looks likeWhat to do
Grey or translucent shrimpCook as raw shrimp
Pink, orange, or white shrimpReheat only; do not use raw-shrimp timing
Icy, glazed, or clumped piecesAir fry briefly, separate, then season
Jumbo shrimp, prawns, or shell-on shrimpUse size-based timing and check doneness
Breaded, popcorn, coconut, or scampi shrimpFollow package timing and crisping cues
Bag check guide showing raw, cooked, icy, jumbo, shell-on, prawn, breaded, and coated frozen shrimp categories for air fryer timing.
Before the shrimp goes into the air fryer, check the bag. Raw, cooked, icy, jumbo, shell-on, and coated shrimp need different timing.

Air Fryer Frozen Shrimp Recipe

The recipe below is the simple cook-now path for plain frozen raw shrimp — the bag most people grab when dinner needs to happen fast. If yours is cooked, jumbo, shell-on, thawed, prawn-style, or coated, use the chart right after the card to adjust.

Recipe at a Glance

Cooking methodAir fryer
Shrimp typePlain frozen raw shrimp
ThawingNo thawing needed
Prep time3 minutes
Cook time8 to 10 minutes
Total time11 to 13 minutes
Serves3 to 4
Temperature400°F / 205°C
Using precooked shrimp?Reduce time to 4 to 6 minutes

Ingredients

  • 1 lb / 454 g frozen raw shrimp, peeled and deveined
  • 1 tbsp / 15 ml olive oil or avocado oil
  • ½ tsp garlic powder
  • ½ to 1 tsp paprika, Cajun seasoning, or Old Bay-style seafood seasoning
  • Salt: ¼ to ½ tsp, depending on how salty your seasoning blend is
  • ¼ tsp black pepper
  • Lemon wedges, to serve
  • Optional: 1 tbsp / 14 g melted butter, for finishing
  • Fresh herbs, optional: 1 to 2 tbsp chopped parsley or cilantro

For a smaller 8 oz / 225 g batch, use half the shrimp and roughly half the seasoning. Smaller batches are especially useful in 3 to 4 quart air fryers.

Frozen shrimp, oil, garlic powder, paprika, salt, pepper, lemon, melted butter, herbs, and an unbranded freezer bag arranged on a light counter.
Keep the base simple: oil helps seasoning cling, dry spices add quick flavor, and lemon or butter finishes the shrimp cleanly.

Method

  1. Preheat the air fryer to 400°F / 205°C for 3 to 5 minutes.
  2. Add the frozen shrimp in a mostly single layer.
  3. If the pieces are icy, glazed, or clumped, air fry them plain for 2 to 3 minutes first.
  4. Shake, separate, and drain excess liquid if needed.
  5. Toss with oil, garlic powder, seasoning, salt, and pepper.
  6. Air fry for 8 to 10 minutes total, shaking or flipping halfway, until opaque and tender.
  7. Finish with lemon, melted butter, herbs, or your favorite sauce. For a full garlic-butter pasta route, use the shrimp in a shrimp scampi-style dinner.

The batch is ready when the center is opaque, not grey or glassy. For jumbo, precooked, shell-on, thawed, or prawn-style bags, use the timing chart below.

Frozen Shrimp Air Fryer Time and Temperature Chart

Use this chart when your bag is not plain frozen raw shrimp. Size, raw or cooked status, surface ice, and crowding can all change the timing.

ShrimpTempTimeCue
Frozen raw small or medium400°F / 205°C6 to 8 minOpaque, gently curled
Frozen raw large400°F / 205°C8 to 10 minOpaque through center
Frozen raw jumbo400°F / 205°C9 to 12 minCheck thickest piece
Frozen cooked or precooked shrimp375°F to 400°F / 190°C to 205°C4 to 6 minHot through, not tight
Thawed raw shrimp350°F to 375°F / 175°C to 190°C5 to 7 minPat dry first
Thawed cooked shrimp350°F / 175°C2 to 4 minWarm gently
Shell-on frozen shrimp400°F / 205°C8 to 12 minShells pink, flesh opaque
Frozen prawns400°F / 205°C8 to 12 minTime by size

Treat the chart as a starting point, then let doneness get the final vote. In most baskets, large raw shrimp land in the 8 to 10 minute range, but crowding or a heavy glaze can push the batch toward the longer end. If the basket looks watery, it usually means surface ice is melting, so drain if needed instead of cooking the shrimp longer.

Got your timing? Go to the step-by-step method.

How to Air Fry Frozen Shrimp

The method below gives you tender shrimp without thawing first. That small head start for icy pieces is worth it because it keeps the seasoning from washing away. Frozen shrimp is fast, but it asks for one favor: stop early and check.

1. Preheat the air fryer

Preheat to 400°F / 205°C for raw frozen shrimp. A hot basket helps the pieces start cooking quickly instead of slowly thawing and releasing too much liquid.

2. Add the shrimp in one layer

Place the frozen shrimp in the basket in a mostly single layer. A little overlap is fine, but avoid a thick pile. You are not trying to fill the basket; you are trying to give the hot air room to work.

Grey frozen raw shrimp with visible frost spread in a mostly single layer inside a black air fryer basket.
A mostly single layer gives frozen raw shrimp space to cook evenly instead of trapping steam in a crowded basket.

3. Loosen icy or clumped shrimp first

When the pieces are stuck together or covered in a thin ice glaze, air fry them plain for 2 to 3 minutes. Then shake the basket and separate them with tongs. After that short head start, the icy glaze should look wet instead of frosty, and the pieces should separate easily. That is the moment to season.

Side-by-side comparison of icy clumped frozen shrimp before cooking and loosened shrimp after a short air fryer head start.
When shrimp is clumped or heavily glazed, loosen it first; then seasoning sticks to the shrimp instead of melting away.

4. Add oil and seasoning

Move the shrimp to a bowl if needed, then toss with oil, garlic powder, seasoning, salt, and pepper. Drain any liquid in the basket before adding the shrimp back.

Shrimp being tossed in a bowl with oil, garlic powder, paprika, salt, and pepper after the frost has loosened.
Season once the surface frost softens. At that point, oil and spices can coat the shrimp instead of pooling below.

5. Finish cooking

Air fry until the pieces are opaque and tender, shaking or flipping halfway. Use the timing chart for small, jumbo, precooked, shell-on, thawed, or prawn-style bags.

Partly cooked shrimp in an air fryer basket with tongs turning the pieces halfway through cooking.
Halfway through cooking, shake or flip the shrimp so pale centers, pink edges, and released moisture even out.

6. Finish with lemon or butter

Squeeze lemon over the hot shrimp. For a richer finish, toss with melted butter, chopped herbs, garlic butter, or a quick sauce after cooking. When it works, the shrimp tastes bright and clean, with lemon, butter, and seasoning clinging to the surface instead of sliding into the basket.

Close-up of finished air fryer shrimp with lemon butter, herbs, and light seasoning on the surface.
Finished shrimp should look moist, pearly, and lightly curled, with the seasoning clinging to the surface instead of the basket.

How Shrimp Type Changes the Timing

This is where the label on the bag matters most. The same air fryer can give you tender shrimp or rubbery shrimp depending on whether the pieces started raw, cooked, icy, jumbo, or shell-on.

Raw vs cooked frozen shrimp

Raw shrimp usually looks grey or translucent and needs to cook through. Cooked or precooked shrimp usually already looks pink, orange, or white and only needs to get hot. For precooked shrimp, look for heat, not a deeper curl.

Split comparison showing grey frozen raw shrimp on one side and pink cooked frozen shrimp on the other side.
This is the biggest timing mistake to avoid: grey raw shrimp must cook through, while pink cooked shrimp only needs heat.

Shrimp size guide: what 16/20, 21/25, and 31/40 mean

Many frozen shrimp bags use a count-per-pound number instead of words like medium or jumbo. A lower number means larger shrimp because there are fewer pieces in a pound. Higher numbers mean smaller shrimp, which cook faster.

Shrimp size guide showing 16/20 jumbo, 21/25 large, 31/40 medium, and 41/50 small shrimp arranged from largest to smallest.
Shrimp count tells you size. Lower numbers mean larger pieces, so jumbo shrimp usually needs more air fryer time than small shrimp.
Package countCommon sizeAir fryer note
16/20JumboUse the longer range, often 9 to 12 minutes from frozen
21/25Extra large or largeMain 8 to 10 minute timing usually works
26/30LargeMain 8 to 10 minute timing usually works
31/40MediumStart checking around 6 to 8 minutes
41/50 and smallerSmallCheck early; small shrimp can overcook fast

Once you know the count, the timing starts making much more sense. When the bag gives both a size word and a count, trust the count more. “Large” can vary by brand, but 16/20 will almost always need more time than 31/40.

Thin ice glaze or freezer burn?

A thin ice glaze is normal on many frozen shrimp bags. Heavy frost, dry white patches, freezer-burned edges, or a stale smell are different. If the seafood smells off after opening, do not use it.

Comparison of frozen shrimp with a normal thin ice glaze beside shrimp with heavy frost, dry white patches, and freezer burn signs.
A light ice glaze is normal. However, heavy frost, dry patches, rough edges, or an off smell are signs to pause and check quality.

Shell-on shrimp, prawns, and thawed shrimp

These need small adjustments, not a new recipe. Shell-on frozen shrimp usually needs 8 to 12 minutes at 400°F / 205°C, depending on size. Frozen prawns cook like shrimp; let size decide. Thawed raw shrimp cooks faster, usually about 5 to 7 minutes at 350°F to 375°F / 175°C to 190°C.

Shell-on shrimp or prawns cooked in a black air fryer basket with pink-orange shells and a lemon wedge.
Shell-on shrimp and prawns can air fry from frozen, but larger pieces need a center check instead of timer-only cooking.

Tail-on and tail-off shrimp cook almost the same way. Leaving the tail on looks a little more dramatic for serving, while tail-off is easier for bowls, tacos, fried rice, and pasta.

Ready to cook now? Return to the recipe card or follow the full method.

Why This Method Works

Frozen shrimp needs quick heat, enough space, and a moment for surface ice to loosen. Once the frost turns wet and the pieces separate, the seasoning can land on the shrimp instead of sliding into the basket. That is why the short head start matters more than adding extra seasoning at the beginning.

Ingredient Notes

Oil helps the spices cling. Garlic powder adds quick flavor without burning. Paprika, Cajun seasoning, or Old Bay-style seafood seasoning adds color and depth. If your bag is already seasoned, marinated, or salty, start with less salt and adjust after cooking.

Equipment and Batch Size

You do not need special equipment beyond an air fryer, but basket size matters. A hot basket helps. Crowding does not. In a smaller air fryer, a smaller batch works better than a longer struggle.

  • For a 3 to 4 quart air fryer, cook smaller 8 oz / 225 g batches.
  • A 5 to 6 quart air fryer can handle 12 to 16 oz / 340 to 454 g if the shrimp are mostly in one layer.
  • Keep tongs nearby to separate clumped pieces and a slotted spoon or quick drain ready if liquid collects.
  • Pat thawed shrimp dry with a paper towel before cooking.
  • Ninja Foodi, Cosori, Instant Vortex, basket-style, and oven-style air fryers can all work, but timing may vary slightly.

If your air fryer is small, cook less shrimp rather than forcing the whole bag in. That one choice fixes more problems than extra minutes ever will.

Season Before or After Air Frying?

Separate, lightly frosty shrimp can be seasoned before air frying. Icy, glazed, or clumped pieces do better with a short head start in the basket first, then seasoning.

  • Lightly frosty shrimp: toss with oil and seasoning before cooking.
  • Icy or clumped shrimp: loosen first, then season.
  • Thawed shrimp: pat dry, then season before air frying.
  • Precooked frozen shrimp: season lightly and reheat briefly.
  • Coated shrimp: skip wet seasoning before air frying; use dips or sauces after cooking.

For slightly crisp edges on plain shrimp, add 1 teaspoon cornstarch or cornflour after the surface frost has loosened. This is optional. Do not use this trick for shrimp that are already breaded, battered, popcorn-style, or coconut-coated.

Once the seasoning actually lands on the shrimp, even a simple garlic-lemon finish tastes cleaner and brighter.

How to Know Shrimp Is Done

The goal is not hard browning. You want tender shrimp with no grey center. For plain shrimp, the flesh should be pearly, opaque, and no longer grey or glassy in the middle. The pieces should feel springy, not tight.

Check the center

For a thermometer check, seafood is generally cooked to 145°F / 63°C. Visually, shrimp should be firm, pearly, and opaque. When you cut into the thickest piece, the center should look opaque and moist, not grey, glassy, or dry. For more detail, see the FDA seafood safety guide.

Cut shrimp comparison showing a grey glassy center labelled needs more time and an opaque white center labelled done.
When you are unsure, cut the thickest shrimp. The center should be opaque and moist, not grey, glassy, or translucent.

Use the curl as a texture clue

Shrimp moves from perfect to rubbery quickly, so checking early is not fussy. It is the shortcut.

  • Undercooked shrimp: grey, glassy, or translucent in the center
  • Done shrimp: opaque, pearly, springy, and loosely curled
  • Overcooked shrimp: tight, dry, rubbery, or curled into a very tight O
Cooked shrimp comparison showing a loose C-shaped tender shrimp and a tightly curled overcooked shrimp.
Shrimp shape gives a fast texture clue: a loose curl usually means tender, while a tight O-shape often means overcooked.

For coated or sauced frozen shrimp, follow the package directions because the outside can brown before the inside is fully heated.

Avoid These Mistakes

Most mistakes come from treating every frozen shrimp bag the same. A few small changes make the difference between tender shrimp and a tough batch.

  • Precooked shrimp should not cook like raw shrimp. It only needs reheating.
  • Do not season a block of icy shrimp. Loosen it first so the flavor can stick.
  • Give the pieces room instead of piling them high. Shrimp cook faster and more evenly with space.
  • If the basket gets watery, drain it instead of trying to cook the water away.
  • Do not use plain-shrimp timing for coated frozen shrimp. Breaded, popcorn, and coconut shrimp need package and crisping cues.

Already dealing with a watery, bland, or rubbery batch? Jump to troubleshooting or rescue it for dinner.

Troubleshooting Air Fryer Frozen Shrimp

A first batch that goes sideways is usually easy to fix. Watery baskets, bland seasoning, or a slightly rubbery bite do not mean the recipe failed. Usually, the shrimp just needed a different timing path.

If your first batch looks watery, do not panic. That is usually ice, not failure. The next batch is easier once you know what happened.

Why did my shrimp turn rubbery?

Rubbery shrimp usually means overcooking. This is common with frozen cooked or precooked shrimp because it only needs reheating. Use the shorter timing range, and check even earlier if the pieces are already thawed.

A batch that is already a little rubbery should not keep air frying. Toss it with garlic butter, lemon, sauce, pasta, fried rice, or a rice bowl where moisture can help soften the bite.

Why is there water in the air fryer basket?

That water in the basket is usually just surface ice melting. The goal is not to panic-cook the water away; drain it, season the shrimp itself, and finish gently.

Air fryer basket tilted over a bowl while liquid drains from cooked shrimp inside the basket.
If the basket turns watery, drain the moisture instead of adding more minutes. Extra time can make shrimp tough.
  • Loosen icy pieces before seasoning.
  • Shake halfway through cooking.
  • Separate clumped pieces as soon as they loosen.
  • Drain excess liquid instead of cooking it away.

Why is the shrimp bland?

Seasoning ice is frustrating because the flavor ends up in the basket. Let frosty pieces loosen first, then add oil and seasoning so the flavor sticks.

To rescue a bland batch, toss it immediately with melted butter, lemon juice, garlic powder, black pepper, and a pinch of seasoning while it is still hot. For rice bowls or noodles, a spoonful of stir-fry sauce can turn plain shrimp into dinner quickly.

Why did some pieces cook faster than others?

The pieces were probably clumped, crowded, or mixed in size. Separate stuck pieces early and shake the basket halfway. A mixed bag of small and jumbo shrimp will not finish all at once; the small ones will cook first.

ProblemLikely causeFix nowNext time
Rubbery shrimpPrecooked shrimp got too much timeStop cooking; toss with sauce, butter, pasta, or riceReheat only 4 to 6 minutes
Dry shrimpToo much heat or too much timeFinish with lemon, butter, or sauceCheck earlier and stop at opaque
Bland shrimpSeasoning slid off iceToss hot shrimp with butter, lemon, and seasoningSeason after frost loosens
Watery basketSurface ice meltedDrain the basket and finish gentlyUse one layer and shake halfway
Uneven cookingClumped, crowded, or mixed-size shrimpSeparate pieces and add 1 minute if neededSpread into a mostly single layer
Slightly underdoneJumbo pieces or cold centerAdd 1 minute and check the thickest pieceUse the longer range for jumbo shrimp

Best Uses for an Imperfect Batch

Not every batch has to become a perfect shrimp plate. If the texture or seasoning is not exactly where you wanted it, turn the shrimp into the kind of meal that helps it shine anyway.

Four-panel collage showing air fryer shrimp used in fried rice, garlic butter shrimp, wraps, and tacos.
An imperfect batch still has uses: watery shrimp suits fried rice, bland shrimp likes garlic butter, and firm shrimp works better chopped.
If the shrimp turned out…Use it for…
Tender and juicyTacos, bowls, salads, pasta, or peel-and-eat plates
A little wateryFried rice, noodles, saucy bowls, or garlic butter pasta
Slightly rubberyChopped wraps, rice bowls, pasta, or saucy stir-fries
Mild or blandStir-fry sauce, peanut sauce, Cajun butter, lemon butter, or chutney
Shell-onPeel-and-eat plates, seafood bowls, or simple lemon-and-salt platters

This is one of those freezer shortcuts that gets easier every time you make it. The first batch teaches you the bag; the next one feels simple.

Batch fixed? Turn it into tacos, rice bowls, pasta, or fried rice.

Flavor Variations

This is where the plain batch becomes dinner. Once you know the timing, keep the base method the same and change the seasoning or finish.

  • Garlic butter shrimp: finish with melted butter, garlic, lemon, and parsley so the hot shrimp turns glossy and bright. Best with pasta, rice bowls, bread, or vegetables.
  • Old Bay-style shrimp: use seafood seasoning, lemon, and black pepper for a simple peel-and-eat feel. Good for salads, tacos, and quick plates.
  • Cajun shrimp: use Cajun seasoning, paprika, and a little cayenne for smoky heat. Serve in tacos, wraps, or grain bowls.
  • Lemon pepper shrimp: use lemon zest, black pepper, and garlic powder for a bright, sharp finish. Good for salads, pasta, and quick lunches.
  • Taco shrimp: use chili powder, cumin, and lime. Serve in tacos, burrito bowls, lettuce cups, or with mango habanero sauce.
  • Light masala shrimp: use garlic, chili, black pepper, and a tiny pinch of turmeric or garam masala. Finish with green chutney.

Add fresh garlic or butter near the end or after cooking. Garlic can burn if it sits in the hot basket too long, and butter can brown quickly if it drips under the shrimp.

What to Serve With Air Fryer Frozen Shrimp

Think of this as a fast protein you can drop into whatever meal is already halfway planned. The shrimp cook quickly, so they work especially well with rice, pasta, noodles, salads, and wraps.

Three-panel collage showing cooked shrimp served as tacos, a garlic butter rice bowl, and shrimp fried rice.
Use cooked shrimp as a flexible protein: pile it into tacos, spoon it over rice, or fold it into fried rice when dinner needs to move fast.
  • Shrimp tacos with slaw, lime, and mango salsa
  • Rice bowls with vegetables, garlic butter, lemon, and herbs
  • Pasta with lemon butter, garlic, tomato sauce, or a quick scampi-style finish
  • Salads with avocado, cucumber, corn, herbs, or greens
  • Wraps with lettuce, onion, spicy mayo, and a squeeze of lime
  • Noodle bowls with chili oil, peanut sauce, or soy-lime dressing
  • Quick shrimp fried rice
  • Shrimp cocktail-style plates with lemon and dipping sauce

For pasta, fried rice, or saucy dishes, stop cooking as soon as the shrimp are just done. They will keep warming when tossed with the rest of the meal.

Storage and Reheating

Air fryer shrimp is best right after cooking, but leftovers can still be useful. Cool the shrimp, store it in an airtight container, and refrigerate for up to 3 days. Reheat gently at 300°F to 350°F / 150°C to 175°C for 1 to 3 minutes, just until warm.

Shrimp is not very patient the second time around, so reheat gently and avoid warming it again and again. Cold leftover shrimp is often kinder than reheated shrimp, especially in salads, wraps, shrimp cocktail-style plates, or quick lunch bowls.

Breaded, Popcorn, Coconut, or Scampi Shrimp

These are not plain uncoated shrimp, so let the bag’s directions lead. Coated shrimp plays by slightly different rules: the outside needs to crisp while the inside heats through.

  • Frozen breaded shrimp: use a single layer, shake or flip, and follow package timing so the coating crisps.
  • Popcorn shrimp: shake often because the pieces are small and can brown quickly.
  • Frozen coconut shrimp: watch the coating closely because coconut can brown faster than the inside heats.
  • Scampi-style frozen shrimp: use scampi-specific package directions because butter, sauce, and coating can change the method.

As a loose starting point, many frozen breaded, popcorn, and coconut shrimp products cook around 390°F to 400°F / 200°C to 205°C for 7 to 12 minutes, but the package should lead. Product size, coating, brand, and raw or precooked status can change the timing quickly.

Plain shrimp is about tenderness; coated shrimp is about crispness.

FAQs

Do you need to thaw shrimp before air frying?

No. Plain frozen shrimp can go straight into the air fryer. If the pieces are icy or clumped, loosen them briefly first, then season and finish cooking.

How long does frozen shrimp take in the air fryer?

Most frozen raw shrimp takes 8 to 10 minutes at 400°F / 205°C. Small shrimp can finish closer to 6 minutes, while jumbo shrimp may need 9 to 12.

What temperature works best for frozen shrimp?

For raw frozen shrimp, 400°F / 205°C is the best starting point. With precooked shrimp, use 375°F to 400°F / 190°C to 205°C and stop once hot.

Raw or cooked frozen shrimp: what changes?

Raw shrimp needs to cook through. Precooked shrimp only needs to get hot. That one difference changes the timing completely.

How do you air fry precooked frozen shrimp?

Air fry precooked frozen shrimp at 375°F to 400°F / 190°C to 205°C for 4 to 6 minutes, shaking halfway. Stop once the pieces are hot.

Can you air fry frozen shrimp with vegetables?

Yes, but vegetables often need more time and frozen vegetables can release water. Start firmer vegetables first, then add shrimp near the end.

Can you air fry frozen shrimp without oil?

Yes, but a little oil helps seasoning stick and improves texture. For oil-free shrimp, cook in one layer and finish with lemon or sauce.

What do shrimp size numbers like 16/20 or 31/40 mean?

The number tells you roughly how many shrimp are in one pound. Lower numbers mean larger shrimp, so 16/20 needs more time than 31/40 or 41/50.

Are frozen prawns cooked the same way as shrimp?

Yes. Frozen prawns can be air fried like frozen shrimp. Let size guide the timing.

Should shell-on frozen shrimp be peeled before cooking?

No. You can air fry shell-on frozen shrimp, then peel after cooking. Cook until the shells turn pink and the flesh is opaque.

Why did my air fryer shrimp turn rubbery?

Rubbery shrimp almost always means it went too long, especially if it was precooked. Use a shorter time and stop once hot.

Why is there water in the air fryer basket?

Frozen shrimp releases moisture as surface ice melts. Use one layer, shake halfway, separate clumps early, and drain excess liquid if needed.

What about frozen breaded shrimp or popcorn shrimp?

Treat breaded, popcorn, and coconut shrimp as coated products. Start with package directions, then watch for a crisp outside and a fully heated center.

Back to Quick Answer · Back to Recipe Card

Final Tender Shrimp Check

Before you serve, the shrimp should be opaque through the center, loosely curled, and hot without feeling tight or dry. Raw shrimp should have no grey or glassy center. Precooked shrimp should be hot, not curled tighter and tighter.

Once you learn to read the bag, frozen shrimp becomes one of the easiest freezer proteins to trust. Loosen icy pieces if needed, season the shrimp instead of the frost, and stop as soon as the center is opaque. That is how a forgotten bag of shrimp turns into dinner instead of a guessing game.

Posted on Leave a comment

Shrimp Fried Rice Recipe: Easy, Fluffy & Better Than Takeout

Bowl of shrimp fried rice with plump shrimp, scrambled egg, peas, carrots, scallions, and chopsticks lifting a bite of rice.

This shrimp fried rice recipe is for the night you open the fridge, see cooked rice, and realize dinner is almost already halfway done. A hot skillet turns yesterday’s rice into glossy, savory grains with juicy shrimp, soft egg, garlic, scallions, and vegetables — faster than takeout and fresher from the pan.

The goal is fluffy rice, tender shrimp, and a dinner that tastes planned, even when it started with leftovers. No restaurant burner needed. Just remember the four things that matter most: cold rice, dry shrimp, hot pan, light sauce.

What makes it better than takeout is control: more shrimp, less grease, tender egg, bright scallions, and rice that tastes soy-sesame savory without turning heavy.

Quick Answer: How to Make Shrimp Fried Rice

To make shrimp fried rice, start with cold cooked rice and break up the clumps. Pat raw shrimp dry, season lightly, then cook it quickly in a hot wok or large skillet until just opaque. Remove the shrimp, scramble the eggs, and cook the vegetables until the skillet looks dry again.

Stir-fry garlic, scallions, and rice, then add a small amount of soy-sesame sauce. Fold the shrimp and egg back in and serve while the rice is hot, loose, and glossy.

What is shrimp fried rice? It is a quick stir-fried rice dish made with cooked rice, shrimp, egg, vegetables, aromatics, and a savory soy-sesame sauce. In the best versions, cold rice and a hot pan keep the grains separate instead of soft or sticky.

Order matters because each ingredient behaves differently. Shrimp cooks fast, frozen vegetables can release water, and rice needs direct contact with heat before it gets sauced. When those pieces happen in the right order, the dish tastes fresh instead of heavy.

Already have cold rice and thawed shrimp? Jump straight to the recipe card. Need rice help first? See the best rice guide.

The 4 Rules for Fluffy Shrimp Fried Rice

Use this quick visual guide as the recipe’s safety net before you start cooking. Each rule protects the final texture in a different way.

Four-part guide showing cold rice, dry shrimp, a hot wok, and light sauce as the key rules for shrimp fried rice.
Use this four-rule system as your fried rice safety net: cold rice protects texture, dry shrimp sears cleanly, high heat adds flavor, and light sauce keeps the grains separate.

Shrimp Fried Rice Recipe

This version is built for real weeknights: cooked rice from yesterday, shrimp from the fridge or freezer, a few vegetables, and a hot pan that makes it all feel deliberate. Leftover rice makes it easiest, but the fresh-rice workaround below gives you a path when you are starting from scratch.

Prep Time10 minutes
Cook Time15 minutes
Total Time25 minutes
Yield4 servings
CourseMain dish, quick dinner
StyleTakeout-style shrimp fried rice

Timing note: The 25-minute total assumes you already have cooked and chilled rice. Cooking rice from scratch adds cooling time before frying. Starting with fresh rice today? Use the fresh-rice workaround before heating the pan.

Before you turn on the stove: Have the rice loosened, shrimp dried, eggs beaten, vegetables ready, and sauce mixed. Fried rice is easy, but it does not wait once the pan is hot.

Equipment

  • Wok or large 12-inch non-stick/heavy skillet
  • Wide spatula
  • Mixing bowl for shrimp
  • Small bowl for sauce
  • Sheet pan or wide plate if cooling fresh rice

Ingredients

Overhead view of cooked rice, raw shrimp, three eggs, peas, carrots, garlic, scallions, soy sauce, oyster sauce, sesame oil, cornstarch, white pepper, and salt.
Fried rice moves quickly once the pan gets hot, so prep the shrimp, eggs, vegetables, aromatics, rice, and sauce before you start cooking.
IngredientUS MeasureMetric
Cold cooked rice4 cupsabout 600–650 g
Raw peeled and deveined shrimp1 lb450 g
Large eggs, beaten33
Frozen peas and carrots1 to 1 1/2 cups140–200 g
Garlic, minced3 cloves10–12 g
Scallions / green onions, sliced3–425–35 g
Neutral oil2 tbsp30 ml
Light soy sauce2 tbsp30 ml
Oyster sauce, optional1 tbsp15 ml
Toasted sesame oil1 tsp5 ml
White pepper1/4 tspabout 0.5 g
Sugar1/4 tspabout 1 g
Cornstarch1 tspabout 3 g
Salt1/4 tsp for shrimp, then only more after tastingabout 1.5 g, then only more after tasting

Ingredient note: This main method is written for raw shrimp. If you are using cooked shrimp, skip the searing step and add it at the very end just to warm through.

Frozen shrimp note: Frozen shrimp works well once fully thawed and patted dry. To quick-thaw, keep the shrimp sealed in a bag and place it in cold water until thawed, then drain and pat very dry before cooking. The skillet should sear the shrimp, not hiss with extra water. If you are unsure when to pull it from the pan, use the shrimp doneness cues.

Instructions

Prep the Rice and Sauce

  1. Break up the rice. Use your fingers or a fork to loosen cold cooked rice before it goes into the skillet. Clumps are easier to fix now than once the heat is on.
  2. Mix the sauce. In a small bowl, stir together soy sauce, oyster sauce if using, sesame oil, white pepper, and sugar. Keep it beside the stove so you are not measuring while the rice is cooking.

Season the Shrimp and Heat the Pan

  1. Season the shrimp. Pat shrimp very dry. Toss with salt, cornstarch, and a small pinch of white pepper. A dry surface helps the shrimp cook quickly instead of steaming.
  2. Heat the pan. Place a wok or large skillet over medium-high to high heat. Add 1 tablespoon oil and let the pan get properly hot.

Cook Shrimp Separately So It Stays Tender

  1. Cook the shrimp. Add shrimp in a single layer. Cook for about 60–90 seconds per side, just until pearly, opaque, and lightly curled. Move it to a plate before it turns tight and firm.
  2. Scramble the eggs. Add 1 teaspoon oil if the pan is dry. Pour in the beaten eggs and scramble until just set. Move them to the plate with the shrimp; they will finish warming when they return to the rice.
Shrimp searing in a black wok with a spatula and an empty plate nearby for removing the shrimp.
Shrimp needs less time than rice, so cook it separately. Pull it while it is still plump, then return it near the end for tender shrimp in every bite.

Cook the Vegetables Until the Pan Looks Dry

  1. Cook the vegetables. If needed, add the remaining oil, then stir in the peas and carrots. Cook until the skillet looks dry again so their sweetness and color stay bright without softening the rice.
Peas and diced carrots cooking in a black wok with a wooden spatula while a bowl of cooked rice waits nearby.
Once peas and carrots stop releasing moisture, the pan should look dry again. That is when the rice can fry instead of steam.

Garlic and Scallions Build the First Flavor Layer

  1. Add aromatics. Stir in garlic and the white/light parts of the scallions. Cook for 15–30 seconds, just until the pan smells garlicky and sharp. You want the garlic lively, not browned.
Minced garlic and sliced scallions sizzling in oil inside a black wok with a wooden spatula.
Garlic and scallion whites flavor the oil almost instantly. Stir just until fragrant, because browned garlic can make the whole pan taste bitter.

Fry the Rice Before Adding Sauce

  1. Fry the rice. Add the cold rice, spread it out, and let it sizzle before stirring. The rice should look separate before it looks glossy; sauce comes after the grains are hot, not before.
Cooked rice frying in a wok with a spatula while a small bowl of dark sauce waits beside the pan.
Let the rice spend a little time in the pan before the sauce joins in. That early contact with heat keeps the grains loose instead of heavy.

Add Sauce, Return Shrimp and Egg, Then Finish

  1. Add the sauce. Drizzle in the sauce and toss quickly. The rice should look glossy, separate, and evenly seasoned. Puddles mean keep tossing over heat until the grains absorb the seasoning.
  2. Return shrimp and egg. Add the seared shrimp and scrambled egg back to the pan. Toss for 30–60 seconds, just until everything is hot, the shrimp stays springy, and the egg is tucked through the rice.
  3. Finish and serve. Add the green parts of the scallions so the final pan tastes fresh, sharp, and a little sweet. Taste before adding more soy sauce. If it needs lift, try white pepper, scallion greens, or a tiny pinch of salt before adding more liquid.

Cook’s cue: The pan should sound lively. Quiet, steamy rice usually means the skillet is crowded or something brought in too much moisture. If the rice steamed, clumped, or turned salty, jump to troubleshooting before trying again.

This is the kind of dinner that feels bigger than the effort it asks from you: one hot pan, a bowl of leftover rice, a handful of shrimp, and a few minutes where garlic, scallions, soy, and sesame make the kitchen smell like you planned ahead.

Shrimp Fried Rice Success Formula

Once you know the basic order, the recipe becomes easy to adapt. This quick table helps you adjust for the rice, shrimp, vegetables, or pan you actually have, while still landing in the same place: loose rice, tender shrimp, soft egg, bright scallions, and sauce that clings instead of pools.

If you have…Do this
Day-old riceBreak it up and fry it cold.
Fresh riceSpread, cool, and chill it until the surface feels dry.
Frozen shrimpThaw fully, pat dry, and cook briefly.
Cooked shrimpAdd it at the end just to warm through.
Frozen vegetablesCook them until the skillet looks dry before adding rice.
A small skilletCook in batches instead of crowding the pan.
Flat flavorAdd white pepper, scallions, heat, or a tiny pinch of salt before adding more soy sauce.

Why This Recipe Works

This recipe treats leftovers like an advantage. Cold rice is already drier and firmer, so the hot pan only has to wake it up.

The rest is order: shrimp cooks briefly and comes out, vegetables lose moisture before rice goes in, rice fries before sauce, and egg returns at the end for softness. That is how you get fried rice that tastes fresh instead of heavy.

If you like this leftover-rice style of cooking, MasalaMonk’s Spam fried rice recipe uses the same cold-rice logic with crispy Spam, egg, vegetables, and a quick savory sauce.

Ingredient Notes That Matter

The ingredient list is simple, which is part of the charm. A few ordinary things — cold rice, shrimp, egg, vegetables, garlic, scallions, and soy sauce — turn into a full dinner when the pan is hot and the moisture is under control.

Eggs

Egg makes the rice feel fuller and softer. Scramble it separately for the easiest method. Once you are comfortable, you can drizzle beaten egg over hot rice and stir quickly for a more golden restaurant-style effect. Try that only when the rice is already hot and loose; otherwise the egg can disappear into wet rice.

Soft egg gives the rice richness without needing extra sauce, which helps the whole pan stay savory instead of wet.

Vegetables

Frozen peas and carrots are classic because they are easy, colorful, and already cut small. Loose frozen vegetables can go straight into the hot skillet; just cook them until the pan looks dry again before adding rice. If they are icy or clumped together, thaw briefly and pat dry first.

No peas and carrots? Use corn, cabbage, bell pepper, mushrooms, green beans, or skip vegetables and add extra egg or shrimp. Small, quick-cooking add-ins give you color and texture without stealing heat from the rice.

Aromatics

Garlic and scallions are enough for a clean takeout-style flavor. For a deeper base, add 1/4 cup finely diced onion or 1 teaspoon minced ginger with the garlic. Keep the pieces small so they cook quickly and do not weigh down the rice.

Sauce and Seasoning

Light soy sauce gives salt and color. Oyster sauce adds a deeper takeout-style flavor, but it is optional. Low-sodium soy sauce gives you more control when your oyster sauce is already salty. Toasted sesame oil is strong, so use it sparingly. White pepper gives the rice a familiar restaurant-style warmth.

The goal is not dark, salty rice. Instead, aim for grains that taste seasoned all the way through — soy at the edges, sesame in the background, white pepper for warmth, and scallions keeping each bite fresh.

Want a warmer restaurant-style color? A tiny pinch of turmeric can add a light golden tint without needing food coloring. Use very little so it supports the rice instead of making it taste like turmeric.

For a broader sauce base you can use across vegetables, noodles, chicken, shrimp, tofu, and rice bowls, see this stir fry sauce recipe.

Best Rice for Shrimp Fried Rice

The rice matters, but the texture matters more. Choose a grain that can cool, separate, and move cleanly through a hot pan.

How Cold Rice Should Look Before Frying

Cold rice should feel firm enough to break apart easily. If the grains loosen before cooking, they have a better chance of frying evenly in the pan.

Hand using a fork to break up cold cooked rice in a metal bowl before adding it to the pan.
Break up chilled rice before cooking, not inside a crowded pan, so every grain can touch the heat instead of clumping together.

For the easiest fluffy texture, start with cold cooked rice that separates easily. Freshly cooked rice is usually too soft and steamy for direct frying, while chilled rice has enough structure to move cleanly through the skillet.

Choose jasmine rice for a takeout-style aroma, long-grain white rice for reliability, basmati rice if that is what you already cook, and brown rice if you want a firmer, nuttier version.

Not every rice behaves the same once it hits high heat, so use this as a quick guide.

Best Rice Types for Shrimp Fried Rice

Rice TypeGood for Shrimp Fried Rice?Notes
Jasmine riceYesAromatic and excellent for takeout-style fried rice.
Long-grain white riceYesReliable, fluffy, and easy to separate.
Basmati riceYes, if dryWorks well when cooked firm, cooled fully, and broken up before frying.
Brown riceYesFirmer and nuttier; taste and adjust seasoning carefully.
Short-grain or sticky riceNot idealCan clump and turn heavy unless you are making a different style intentionally.
Comparison board with bowls labeled jasmine rice, long-grain rice, basmati rice, brown rice, and sticky rice for fried rice.
Jasmine and long-grain rice are the easiest choices for fluffy shrimp fried rice, while basmati and brown rice can also work when cooked firm and cooled well.

Best make-ahead move: Cook the rice the day before, spread it out so steam escapes, then refrigerate it once cool. The next day, break up the grains before frying. This gives you the easiest fluffy texture.

Do not rinse cooked rice before frying. If the grains are clumped, loosen them with your fingers or a fork; adding water brings back the moisture you are trying to avoid.

No Day-Old Rice? Fresh Rice Workaround

You can make shrimp fried rice with fresh rice, but not while it is hot and steamy. Cook it slightly firm, spread it on a sheet pan so steam escapes, then chill it until the surface feels cool and dry. Once the grains separate easily, it can fry like day-old rice.

  1. Cook the rice with slightly less water than usual so it finishes a little firmer.
  2. Spread the hot rice on a sheet pan or large plate.
  3. Let the steam escape for 10 minutes.
  4. Refrigerate the rice for 30–60 minutes, or freeze it for about 15 minutes if you are rushing.
  5. Break up the cooled rice before frying.
Three-step guide showing fresh rice spread on a sheet pan, cooled, and chilled before being used for fried rice.
No day-old rice? Spread fresh rice thinly, let the steam escape, and chill it until the surface dries so it behaves more like leftover rice.

Fresh rice will not be quite as effortless as day-old rice, but it can still make good fried rice when you cool it properly. You are just trying to give it the same dry surface that leftovers already have.

Shrimp, Prawns, Frozen Shrimp, and Cooked Shrimp

Whether your market sells them as shrimp or prawns, cook them the same way here. Start with seafood that is dry on the surface, cook it briefly, and bring it back only after the rice has had time in the pan.

Size changes the way the fried rice eats, not just how it looks. Choose 26–30 count shrimp for a juicy home-style pan. For smaller restaurant-style pieces through every bite, use 51–60 count shrimp. Very large shrimp are best chopped into bite-size pieces so the rice eats evenly.

Shrimp SizeBest Use
51–60 count / small shrimpBest for restaurant-style fried rice because shrimp pieces mix through every bite.
26–30 count / medium shrimpBest balance for home cooks; juicy but still easy to mix into rice.
16–20 count / large shrimpLooks generous, but may need chopping so the rice eats evenly.
Cooked shrimpUse only in a pinch. Add at the end just to warm through.

How to Thaw and Dry Frozen Shrimp

Frozen shrimp can work as well as fresh shrimp when it is thawed safely and dried thoroughly. The goal is to remove surface moisture before the shrimp hits the hot pan.

Frozen shrimp sealed in a bag thawing in cold water, with drained shrimp and paper towel-dried shrimp beside it.
After a cold-water thaw, dry shrimp well before it hits the pan. A dry surface sears better and keeps the rice from steaming later.

Shrimp Doneness: Loose C, Not Tight Curl

The best doneness cue is visual: shrimp should turn opaque and curl gently. When it tightens into a firm ring, it has usually cooked too long.

Shrimp doneness guide showing raw grey shrimp, just-cooked coral shrimp in a loose C shape, and overcooked tightly curled shrimp.
Watch the shape, not only the color. A loose C-shape usually means tender shrimp, while a tight curl means it has stayed on the heat too long.

If you are using pre-cooked shrimp, do not sear it again. Add it near the end and toss only until warm. For shrimp that starts raw, a loose C-shape is usually a good cue; tight, firm curls usually mean it stayed on the heat too long.

When the shrimp is right, it should feel juicy and springy against the rice, not tight or chewy. That contrast is what makes the bowl feel generous.

The Sauce Ratio That Keeps Fried Rice Glossy, Not Wet

If your fried rice tastes salty but still flat, more soy sauce is usually not the answer. Try aroma, pepper, scallions, chili, or a tiny bit of sweetness before adding more liquid.

A balanced pan should taste savory all the way through, not sit in a puddle of sauce. For 4 cups cooked rice, this is enough to coat the grains without making them heavy:

  • 2 tbsp / 30 ml light soy sauce
  • 1 tbsp / 15 ml oyster sauce, optional
  • 1 tsp / 5 ml toasted sesame oil
  • 1/4 tsp white pepper
  • 1/4 tsp sugar
Sauce ratio board showing four cups of rice with soy sauce, oyster sauce, sesame oil, white pepper, and sugar.
A good sauce ratio should season the rice, not drown it. Measure first, then add just enough soy, oyster sauce, sesame oil, and white pepper for balance.

Mix the sauce before you start cooking. Fried rice moves quickly, and stopping to measure sauces while the pan is hot can lead to overcooked shrimp or wet rice.

A small splash of dark soy sauce can add color, while light soy sauce stays the main seasoning. Too much dark soy can make the rice look heavy and taste overly salty.

Sauce Ratio by Rice Amount

Sauce is where fried rice can go from balanced to salty fast. Start with these amounts, then taste at the end.

Cooked RiceSoy SauceOyster SauceSesame Oil
2 cups1 tbsp / 15 ml1 1/2 tsp / 7 ml1/2 tsp / 2.5 ml
3 cups1 1/2 tbsp / 22 ml2 tsp / 10 ml3/4 tsp / 4 ml
4 cups2 tbsp / 30 ml1 tbsp / 15 ml1 tsp / 5 ml

If you skip oyster sauce, keep the soy sauce measured and build flavor with white pepper, scallions, heat, or a tiny pinch of sugar after tasting. If the rice tastes flat or salty, check the pan cues before adding more soy sauce.

Sauce Swaps

  • No oyster sauce: Skip it, then taste for white pepper, scallions, heat, or a tiny pinch of sugar.
  • Gluten-free: Use tamari instead of soy sauce and check the oyster sauce label.
  • No soy sauce: Use coconut aminos, or season lightly with salt and a tiny splash of broth.
  • No sesame oil: Skip it and finish with extra scallions for freshness.
  • Spicy: Add chili crisp, sriracha, sambal, chopped green chili, or red pepper flakes.

Wok vs Skillet: Best Pan for Home Stoves

If you have ever made fried rice in a small pan and wondered why it steamed instead of fried, the pan size is probably the reason — not your cooking skill.

A wok is excellent for fried rice because it gives you room to toss and move ingredients quickly. But a large skillet is often better for home cooks than a small wok on a weak burner.

You do not need restaurant heat; you need restaurant order. A wide hot skillet, dry rice, and a little patience between stirs will get you much closer than a crowded wok on weak heat.

Comparison image showing shrimp fried rice being tossed in a wok and spread across a wide skillet.
On a home stove, a wide skillet often beats a small wok. More surface area lets more rice touch direct heat at once.

With less crowding, the rice has room to sizzle, which is where the better texture comes from. When the pan is too full, the vegetables leak water, the rice steams, and the sauce sits underneath instead of clinging to the grains.

  • Use a wok if your stove gives strong heat and you can toss quickly.
  • Choose a large non-stick skillet for the easiest beginner-friendly option.
  • Try a heavy stainless or cast-iron skillet if it holds heat well and you are comfortable managing sticking.
  • Cook in batches if your pan is small. A small pan can still make good fried rice — it just needs batches.

The Pan Cues That Matter Most

Use this while the rice is still in the pan. The troubleshooting table later is for fixing or understanding what went wrong; this section helps you catch problems before they become permanent.

Good fried rice gives you clear signs while it cooks. The pan tells you when to move forward and when to pause: steam, puddles, tight shrimp, or rice that sits in clumps instead of moving freely.

Think of it as the fried rice pan test: sizzle means go, steam means pause, puddles mean keep tossing, and tight shrimp means it cooked too long.

Fried rice pan test infographic showing four cues: sizzle means go, steam means pause, puddles mean toss, and tight shrimp means too long.
Let the pan guide you: sizzle means keep frying, steam means slow down, puddles need tossing, and tight shrimp should come off sooner.
CueWhat It MeansWhat to Do
Rice sizzlesThe pan is hot enough and the grains are frying.Let the rice get contact with the pan before adding sauce.
Rice steams heavilyThe pan is crowded or there is too much moisture.Spread the rice out or cook in batches.
Sauce pools underneathToo much liquid was added or the rice was not hot enough.Keep tossing over heat until the sauce clings to the grains.
Shrimp is tight and firmIt stayed on the heat too long.Cook shrimp briefly next time and return it only at the end.
Flavor tastes flatThe rice may need lift, not more liquid.Add white pepper, scallions, chili, or a tiny pinch of salt before more soy sauce.

When it is ready, you should see loose grains, springy shrimp, soft egg, fresh scallions, and no sauce puddles.

Shrimp Fried Rice Variations

Once the base method works, you can take the same pan in a few different directions: brighter with pineapple and lime, hotter with chili crisp, fuller with chicken, lighter with cauliflower rice, or simpler without egg. Keep the rice dry and the sauce measured, and the texture stays in your control.

Looking for a specific version? Jump to restaurant-style, pineapple, or chicken and shrimp fried rice.

Prawn Fried Rice

Use prawns exactly the same way as shrimp. Medium prawns stay juicy and still mix well with the rice. Very large prawns are easier to eat when cut into bite-size pieces before cooking or after searing.

Restaurant-Style Shrimp Fried Rice

Use jasmine rice, white pepper, scallions, a little oyster sauce, and small shrimp pieces that mix through the rice. Drizzle the sauce around the edge of the hot skillet so it sizzles before coating the grains. Keep the sauce light so the rice tastes restaurant-style without turning dark, salty, or heavy.

Restaurant-style shrimp fried rice in a bowl with small shrimp, egg, peas, carrots, scallions, and lightly glossy rice.
Restaurant-style shrimp fried rice should taste savory, not heavy. Keep the sauce light, finish with scallions and white pepper, and let the rice stay golden.

Pineapple Shrimp Fried Rice

Add 1/2 to 3/4 cup pineapple chunks, diced bell pepper, and a squeeze of lime at the end. Use less sugar in the sauce because pineapple brings sweetness. For a Thai-style direction, add a small splash of fish sauce, chopped chili, and extra scallions. Drain the pineapple well so the rice stays glossy instead of wet.

Pineapple shrimp fried rice with shrimp, pineapple chunks, egg, peas, carrots, red pepper, scallions, and a lime wedge.
Pineapple shrimp fried rice works best when the fruit is bright but not juicy. Drain it well and add it near the end so the rice stays fluffy.

Chicken and Shrimp Fried Rice

Use small pieces of boneless chicken along with the shrimp. Cook the chicken first until done, remove it, then cook the shrimp briefly. Return both proteins near the end so neither overcooks.

Chicken and shrimp fried rice with plump shrimp, browned chicken pieces, egg, peas, carrots, scallions, and glossy rice.
Chicken and shrimp need different timing. Cook the chicken first for browning, then add shrimp briefly so both proteins stay juicy.

Shrimp Fried Rice Without Egg

Skip the eggs and add more vegetables, tofu, or extra shrimp. Since egg adds richness, finish with scallions, white pepper, and a small amount of sesame oil to keep the rice flavorful.

Shrimp Fried Rice Without Soy Sauce

Use coconut aminos for a sweeter soy-free version, or season with salt, white pepper, sesame oil, and a tiny splash of broth. Add less liquid than you think you need, then taste after tossing.

Spicy Shrimp Fried Rice

Add chili crisp, sambal, sriracha, chopped green chili, or red pepper flakes. For the best texture, add chili oil or chili crisp near the end instead of flooding the rice early.

Cauliflower Shrimp Fried Rice

Use cauliflower rice instead of cooked rice for a lighter version. Frozen cauliflower rice should be thawed and squeezed dry first. Fry it in a wide skillet and leave it uncovered so it does not turn watery.

Why Fried Rice Turns Mushy — and How to Fix It

A difficult pan of fried rice is usually not a disaster. It is feedback: too much moisture, not enough heat, too much sauce, or shrimp that stayed in the pan too long.

Most fried rice problems are easy to diagnose once you know what to look for. Steam means moisture, puddles mean liquid, clumps mean the rice needed breaking up earlier, and tight shrimp means it stayed in the heat too long.

Troubleshooting board with fixes for mushy rice, rubbery shrimp, watery pan, salty rice, and rice clumps.
Mushy shrimp fried rice usually starts with excess moisture. Dry rice, dry add-ins, measured sauce, and enough pan space fix most texture issues.
ProblemWhy It HappenedFix
Rice is mushyRice was warm or wet, sauce was too heavy, or the pan was crowded.Use cold rice, reduce sauce, use a wider pan, and cook in batches.
Shrimp is rubberyShrimp cooked too long or stayed in the pan while the rice finished.Cook shrimp briefly, remove it, and return it at the end.
Rice tastes blandSauce was uneven or the rice was not seasoned enough.Mix sauce before cooking and taste for salt, white pepper, scallions, and heat before adding more sauce.
Rice is too saltyToo much soy sauce, oyster sauce, or dark soy sauce was added.Add plain rice, egg, or extra vegetables to balance it.
Rice is clumpyCold rice was added in large chunks.Break rice apart before it goes into the pan.
Fried rice is wateryFrozen shrimp, frozen vegetables, or pineapple added too much moisture.Dry shrimp well, cook off vegetable moisture, and drain pineapple before adding.
Egg disappeared into the riceEgg was mixed into wet rice or over-stirred.Scramble egg separately, then return it near the end.

What to Serve with Shrimp Fried Rice

This can be dinner on its own, especially with egg and vegetables. Because the rice is savory and glossy, the best sides bring crunch, acidity, freshness, or heat.

Shrimp fried rice served with cucumber salad, broccolini, chili crisp, scallions, and small side dishes.
Because shrimp fried rice is savory and rich, pair it with something crisp, green, acidic, or spicy. That contrast makes the meal feel fresher.
  • Cucumber salad or quick pickled cucumbers
  • Steamed or stir-fried greens
  • Spring rolls or lettuce wraps
  • Clear soup or hot and sour soup
  • Chili oil, chili crisp, or extra scallions on top

For a cold, crisp contrast, MasalaMonk’s cucumber salad recipe works especially well beside salty, glossy rice. For another quick shrimp dinner in a different direction, the shrimp scampi recipe gives you garlic butter, lemon, and tender shrimp instead of soy-sesame rice.

Storage and Reheating

This dish tastes best fresh from the pan, but leftovers can still be good when they are cooled, stored, and reheated properly.

  • Refrigerate: Store cooled shrimp fried rice in an airtight container for up to 3 days.
  • Reheat in a skillet: Warm over medium heat with a few drops of oil or water. Stir gently until hot.
  • Microwave carefully: Use short bursts and stop as soon as the rice is hot. Shrimp can get rubbery if overheated.
  • Freezing: Freezing is possible, but the shrimp and egg texture may not be as good after reheating.

Leftover rice note: Because this recipe often starts with leftover rice, cooling and reheating matter. If you cook rice ahead for fried rice, cool it quickly in a shallow container and refrigerate it within 2 hours. Do not leave cooked rice sitting out for hours before chilling. Reheat shrimp fried rice until hot all the way through, and reheat only the portion you plan to eat. For more detail, see the USDA leftover food safety guidance.

FAQs About Shrimp Fried Rice

What is the best rice for shrimp fried rice?

Cold cooked jasmine or long-grain white rice is the easiest choice because the grains stay separate in a hot skillet. Dry basmati can also work well when it has been cooked firm and cooled fully.

Do you need cold rice for shrimp fried rice?

Cold rice is easiest because the grains are firmer and drier on the surface. Fresh rice can work too, but it needs cooling time first so it stops steaming.

Can you use freshly cooked rice for shrimp fried rice?

Yes, but not straight from the cooker. Cook it slightly firm, spread it out so steam escapes, then chill it until the surface feels dry. Break up the grains before adding them to the pan.

How do you make shrimp fried rice not mushy?

Use cold rice, a hot wide pan, and a measured amount of sauce. Pat shrimp dry, cook off moisture from frozen vegetables, and avoid crowding the pan.

What shrimp works best for fried rice?

Raw peeled and deveined medium shrimp is the easiest choice. Smaller shrimp give a more restaurant-style bite, while very large shrimp are better chopped.

Should shrimp be cooked before adding rice?

Yes. Cook shrimp briefly first, remove it from the pan, then return it after the rice is fried. This keeps the shrimp tender while the rice gets enough time on the heat.

How much sauce should you add to shrimp fried rice?

For 4 cups cooked rice, start with 2 tablespoons soy sauce, 1 tablespoon oyster sauce, 1 teaspoon sesame oil, white pepper, and a small pinch of sugar. Add more only after tasting.

Is oyster sauce necessary?

No. Oyster sauce gives a deeper takeout-style flavor, but the rice still works without it. Keep the soy sauce measured, then use white pepper and scallions for extra flavor.

How do you make shrimp fried rice with frozen shrimp?

Thaw frozen shrimp fully and pat it dry. Season it, cook it briefly in a hot pan, then remove it before frying the rice so it stays juicy and the skillet stays dry.

Do prawns work instead of shrimp?

Yes. Prawns work the same way in this recipe. Use raw peeled and deveined prawns, dry them well, cook them briefly, and return them at the end.

How do you make shrimp fried rice without egg?

Skip the egg and add more shrimp, vegetables, or tofu. Since egg adds richness, finish with scallions, white pepper, and a small amount of sesame oil.

How long does shrimp fried rice keep?

Shrimp fried rice keeps for up to 3 days in the refrigerator when stored in an airtight container. Cool it before storing and reheat only the portion you plan to eat.

What is the best way to reheat shrimp fried rice?

A skillet over medium heat gives the best texture. Add a few drops of oil or water and stir gently until hot. Use short microwave bursts if reheating quickly.

Back to recipe card · Back to quick answer

The Takeaway

Good shrimp fried rice is not about a long ingredient list. It is about giving the rice enough heat, keeping the shrimp tender, and using just enough sauce to season every grain.

Once you hear the rice sizzling instead of steaming, you are on the right track. Keep the shrimp brief, the sauce measured, and the pan wide, and this becomes the kind of fried rice you can repeat with whatever is already in the fridge.

The best version does not taste like leftovers. It tastes like a hot pan gave yesterday’s rice a second life.

Posted on Leave a comment

Sausage Rolls Recipe: Easy Homemade Puff Pastry Sausage Rolls

Homemade puff pastry sausage rolls on parchment with one roll cut open beside a small bowl of mustard.

If you have puff pastry and sausages, you are already close to a tray of homemade sausage rolls: buttery layers, savory filling, crisp bottoms, and the kind of warm snack people reach for before you have even moved the tray to the table.

Sausage rolls are savory pastry rolls filled with seasoned sausage meat and baked until flaky, golden, and hot in the center. This version keeps the classic idea but makes it practical for real kitchens: store-bought puff pastry, everyday sausages if that is what you have, clear cutting sizes, and enough small technique to avoid greasy, soft pastry.

The method itself is simple: fill, roll, seal, cut, glaze, and bake. You do not need special sausage meat, you do not need to guess the bake time, and you do not have to settle for soggy bottoms.

Make them large for dinner, small for parties, or freeze them unbaked for later. Once you know the basic shape, the same method works for lunchboxes, snack trays, and the kind of warm batch that disappears faster than expected.

Quick Answer: How to Make Sausage Rolls

To make sausage rolls, fill cool puff pastry with seasoned sausage meat or regular sausages with the skins removed, roll and seal the pastry, brush with egg wash, then bake at 200°C / 400°F, or 180°C fan / convection, until the pastry is puffed and well browned.

Large sausage rolls usually take 25–30 minutes, 16 medium rolls usually take 22–25 minutes, and mini sausage rolls usually take 18–22 minutes.

The easiest version uses puff pastry, sausages, and egg wash. The better version adds softened onion, breadcrumbs, herbs, and a little mustard, so the filling tastes rounder, stays juicy, and does not soak the pastry as it bakes.

For pork or beef sausage rolls, the filling should reach 160°F / 71°C in the center. For chicken or turkey sausage rolls, use 165°F / 74°C. If the pastry browns before the center is done, lower the oven slightly and bake a few minutes longer.

When they come out right, you get the best kind of contrast: flaky pastry on top, a clean, crisp base, and a savory filling that stays juicy without soaking through.

Hands holding a sausage roll broken open to show flaky puff pastry layers and cooked sausage filling.
When the roll breaks open, the pastry should flake instead of collapse, and the filling should look moist, cooked, and evenly packed.

Sausage Rolls Recipe Card

Easy Homemade Puff Pastry Sausage Rolls

This recipe makes flaky homemade sausage rolls with ready-rolled puff pastry and sausage meat, or regular sausages with the skins removed. Make them big enough for lunchboxes, small enough for party trays, or somewhere in the middle for the kind of snack that disappears while it is still warm.

Prep time20 minutes
Optional chill time10–20 minutes
Cook time18–30 minutes, depending on size
Total time40–60 minutes
Yield8 large, 16 medium, or 24–32 mini sausage rolls
Oven200°C / 400°F, or 180°C fan / convection

Equipment: You need a baking sheet, parchment paper, mixing bowl, small pan, sharp knife, pastry brush, and wire rack. An instant-read thermometer is helpful for large rolls or chicken and turkey fillings.

Sausage Roll Ingredients

Puff pastry, sausage meat, onion, garlic, breadcrumbs, egg, mustard, herbs, and seeds arranged on a kitchen work surface.
This ingredient mix shows why the full version tastes rounder: breadcrumbs hold moisture, onion adds sweetness, and mustard sharpens the sausage filling.
  • 320–375g / 11–13 oz ready-rolled puff pastry, thawed if frozen but still cool
  • 450–500g / about 1 lb sausage meat, or 6–8 medium sausages with skins removed
  • 1 teaspoon oil or butter, for softening the onion
  • 1 small onion, about 70–90g / ½ cup very finely chopped
  • 1–2 garlic cloves, minced
  • 35–40g / about ½ cup panko breadcrumbs or fresh breadcrumbs, plus more if the filling feels loose
  • 1 egg for the filling
  • 1 egg for egg wash
  • 1 tablespoon / 15ml Dijon mustard or English mustard, optional
  • 1 teaspoon dried sage or thyme, or 1 tablespoon finely chopped fresh herbs
  • ½–1 teaspoon fennel seeds, lightly crushed, optional
  • Black pepper, to taste
  • Salt, only if using plain ground meat instead of seasoned sausage meat or sausages
  • Sesame seeds or nigella seeds, optional topping

If using plain ground pork or beef: start with about ¾ teaspoon fine salt per 500g / 1 lb meat. To check the seasoning safely, cook a tiny pinch of the filling in a pan before shaping the rolls.

Make the Filling and Shape the Rolls

  1. Preheat and line the tray. Preheat the oven to 200°C / 400°F, or 180°C fan / convection. Line a large baking sheet with parchment paper.
  2. Prepare the pastry. If frozen, thaw the puff pastry until flexible but still cool. It should unroll without cracking.
  3. Cook the onion. Warm the oil or butter in a small pan. Soften the onion for a few minutes, then add garlic for 30 seconds. Cool completely.
  4. Prepare the sausage meat. If using regular sausages, slit the skins lengthwise and squeeze the meat into a mixing bowl.
  5. Mix the filling. Combine sausage meat, cooled onion and garlic, breadcrumbs, 1 egg, mustard, herbs, optional fennel, and black pepper. Mix gently.
  6. Check the texture. You want a soft log that holds together without spreading like paste or crumbling apart. Add 1–2 tablespoons more panko if it feels loose, or 1–2 teaspoons cold water or milk if it feels dry.
  7. Cut the pastry. For one 320–375g sheet, cut the pastry in half lengthwise to make 2 long strips. If your pastry sheet is a different size, aim for strips wide enough to wrap around the filling without stretching.
  8. Add the filling. Divide the sausage filling into 2 even logs and place one log down the center of each pastry strip. For mini sausage rolls, shape thinner logs rather than simply cutting overfilled rolls smaller.
  9. Seal. Leave a small border beside the filling. Brush the edge lightly with beaten egg, fold the pastry over, and press just enough to close. Place seam-side down. Too much egg wash can make the edge slippery, and too much pressure can flatten the layers.
  10. Chill if soft. Chill the shaped rolls for 10–20 minutes if the pastry feels sticky, warm, or loose.

Cut, Bake, and Cool

  1. Cut and glaze. Cut each long roll into 4 pieces for 8 large rolls, 8 pieces for 16 medium rolls, or 12–16 pieces for 24–32 mini rolls. Brush tops with egg wash, add seeds if using, and slash lightly.
  2. Bake. Space the rolls at least 2.5cm / 1 inch apart on the baking sheet. Bake large rolls for 25–30 minutes, 16 medium rolls for 22–25 minutes, or mini rolls for 18–22 minutes.
  3. Cool. Rest for a few minutes on the tray, then move to a wire rack so the bottoms stay crisp.

Doneness: Look for well-browned pastry and cooked-through filling. Pork or beef sausage filling should reach 160°F / 71°C. Chicken or turkey filling should reach 165°F / 74°C.

What good looks like: the rolls should feel firm before baking, sit seam-side down, and come out browned on top with crisp bottoms and hot filling.

Freezer note: For best texture, freeze sausage rolls unbaked after shaping and cutting. Bake from frozen at 200°C / 400°F, or 180°C fan / convection, and add extra time. Do not thaw first unless your pastry packet specifically recommends it.

First batch recommendation: make the full version with onion, breadcrumbs, mustard, and herbs. It gives you the best balance of juicy filling and crisp pastry. Once you know how your pastry and sausages behave, use the 3-ingredient shortcut for faster batches.

The 3 Rules for Better Sausage Rolls

Good sausage rolls do not need fancy pastry or special sausage meat. They need three small things done well: filling that tastes good before it goes in, pastry that stays cool enough to puff, and a filling log slim enough for the pastry to close without a fight.

Visual guide showing flavorful filling, cool pastry, and a slim filling log for making sausage rolls.
Think of this as the sausage roll safety net: seasoned filling for flavor, cold pastry for lift, and a slim log for a clean seal.
  • Use filling that tastes good before it goes in. Sausage rolls are simple, so bland sausage has nowhere to hide.
  • Keep the pastry cool. Sticky, greasy, or slack pastry is a sign to pause and chill the tray.
  • Shape thinner than you think. The pastry should close like a wrapper, not stretch like a blanket.

Get those right and the rolls bake neater, crisper, and juicier, with fewer split seams, fewer soggy bottoms, and a center that cooks through before the pastry over-browns. Next, choose the filling, pastry, and size that fit the batch you actually want to make.

Need the exact amounts now? Jump back to the recipe card, or compare options in Choose the Sausage Roll Version You Want.

Choose the Sausage Roll Version You Want

A party tray, lunchbox roll, freezer batch, and fast snack all use the same base method, but the size and filling choices change slightly. Start with the version that fits the moment, then use the rest of the guide to fine-tune it.

Decision board showing sausage rolls for a fast snack, party tray, lunchbox, dinner, air fryer batch, freezer batch, and bakery-style serving.
Once the base method is clear, the same sausage roll recipe can become a snack, party tray, lunchbox option, air fryer batch, or freezer prep.
SituationBest sausage roll version
Fast snack3-ingredient sausage rolls with puff pastry, sausages, and egg wash
Best flavorMain recipe with onion, breadcrumbs, mustard, herbs, and optional fennel
Party trayMini sausage rolls, shaped thinner and frozen unbaked if making ahead
LunchboxesMedium rolls, cooled completely before packing
DinnerLarger rolls with salad, beans, soup, or potatoes
Air fryer batchMini or medium rolls cooked in one layer
Rich bakery-stylePork sausage, all-butter puff pastry, generous egg wash, and a short chill before baking

Can I Use Regular Sausages?

Yes. Most people do not buy “sausage meat” every week. Regular sausages are usually easier to find, and they work beautifully when the flavor is already good. Slit the skins, squeeze out the meat, and loosen it with a fork so it shapes evenly inside the pastry.

Hands opening regular sausages and shaping the sausage meat into a log on a kitchen counter.
Regular sausages can become sausage roll filling once the skins are removed; after that, shape the meat evenly so the pastry wraps cleanly.

Choose sausages you already like because the filling is the main flavor of the roll. If the sausage tastes bland before it goes in, the pastry cannot fix it.

Ingredient note: In the UK and Australia, “sausage meat” usually means seasoned loose sausage filling. In the US, look for bulk sausage, breakfast sausage meat, or simply remove the meat from sausages. Plain ground pork works too, but it needs proper seasoning.

  • Sausage meat: fastest and most classic, but check salt before adding more.
  • Regular sausages: easiest supermarket shortcut; slit the skins and use the filling.
  • Plain ground pork or beef: works if you season it properly and keep enough fat or moisture for juiciness.
  • Chicken, turkey, or vegetarian sausage: useful alternatives, but watch dryness or excess moisture.

Check the Seasoning Safely

Salt note: most sausages are already seasoned, so cook a tiny test piece before adding more salt. If you are using plain ground pork or beef instead, season it properly and test a small cooked piece before shaping.

Small cooked spoonful of sausage roll filling on a plate with a bowl of filling in the background.
A tiny cooked test piece lets you adjust seasoning before the pastry is involved, so the final sausage rolls taste balanced from the center out.

Which Sausages Make the Best Filling?

The best sausage rolls start with sausages you would happily eat on their own: savory, well-seasoned, and juicy without flooding the pan. Pork sausages are the classic choice because they usually have enough fat to stay tender. Breakfast sausage, Cumberland-style sausage, mild Italian sausage, chicken, turkey, and vegetarian sausage can all work too, as long as they are not too lean or watery.

For your first batch, avoid sausages that release a lot of liquid in the pan. Extra moisture can soften the pastry before it has time to crisp.

Simple rule: use sausage meat when you want speed, sausages when that is what you already have, and plain ground meat only when you are ready to season the filling properly.

What Pastry Is Best for Sausage Rolls?

Puff pastry is best for classic sausage rolls because it gives them lift, flakes, and crisp edges. Store-bought puff pastry is the right choice here because the point is a reliable homemade roll, not a pastry project.

All-butter puff pastry gives the richest flavor and the cleanest flaky bite: the kind that shatters a little when you bite in. Standard ready-rolled puff pastry still works well, especially if it stays cold and is not stretched around too much filling.

Close-up of a baked sausage roll with flaky puff pastry layers and cooked sausage filling on parchment.
Puff pastry gives sausage rolls their classic lift and crisp edges; keeping it cool helps those layers rise instead of melting flat.

Shortcrust pastry gives a firmer, more crumbly shell. Crescent roll dough makes a softer, breadier shortcut. Both can work, but neither gives the same flaky puff pastry bite.

How Much Filling Fits the Pastry?

Puff pastry sheets vary by country and brand. Use this table to avoid overfilling the pastry.

Pastry-to-filling ratio guide showing too little, just right, and too much sausage filling on puff pastry strips.
The best sausage roll ratio leaves a visible pastry border, so the roll seals better, puffs cleaner, and leaks less.
Pastry amountFilling amountBest use
280g / 10 oz puff pastry350–400g / 12–14 oz fillingSmaller batch or mini rolls
320g / 11 oz puff pastry400–450g / 14–16 oz fillingOne ready-rolled sheet
375g / 13 oz puff pastry450–500g / about 1 lb fillingStandard full batch
1 smaller US puff pastry sheet, about 225–250g / 8–9 oz275–350g / 10–12 oz fillingSmall batch
2 US puff pastry sheets, about 450–500g / 16–18 oz450–500g / about 1 lb fillingFull batch

When in doubt, use the visual cue: the filling log should let the pastry wrap around it without stretching. Think slim log, not stuffed tube. A sausage roll that looks slightly modest before baking often comes out neater, flakier, and better balanced after the pastry puffs.

The pastry is a wrapper, not a stretchable blanket. If you have to pull it hard to close, the roll is overfilled.

What Makes the Filling Better?

Cooked onion gives the filling deeper flavor without raw sharpness. Breadcrumbs are not just filler; they catch juices from the sausage so the filling stays tender without soaking the base. Mustard adds lift, sage and thyme bring classic savory flavor, and fennel seeds give pork sausage rolls a more aromatic, bakery-style finish.

Egg wash note: A whole beaten egg gives good shine and color. Egg yolk gives a deeper golden finish. Milk gives a softer, lighter color. For vegan sausage rolls, use plant milk, aquafaba, or a little oil depending on the finish you want.

The 3-Ingredient Sausage Roll Shortcut

Yes, you can make 3-ingredient sausage rolls with puff pastry, sausages, and egg wash. They will be simpler than the full recipe, but still good if the sausages are well seasoned and the pastry stays cool.

Use the full recipe when you want a juicier filling with onion, breadcrumbs, mustard, and herbs.

  • Unroll the pastry and cut it into strips.
  • Remove the sausage skins and shape the meat into logs.
  • Roll, seal, brush with beaten egg, and bake until golden and cooked through.

Step-by-Step Visual Cues for Better Sausage Rolls

The recipe card tells you what to do. This section shows you what to look for, because sausage rolls are much easier when you know how the pastry and filling should feel before they go into the oven.

1. Look for Pastry That Bends Without Grease

The puff pastry needs to unroll without cracking while still feeling cool to the touch. Sticky pastry is a sign to pause, not push through. A few minutes in the fridge gives the butter a cleaner start in the oven.

2. Cook the Onion Until Soft, Not Wet

The onion should be soft and fragrant before it goes into the sausage mixture, but not watery. Cooking it first gives sweetness and keeps raw onion moisture from softening the pastry.

Finely chopped onion softened in a pan with a wooden spoon for sausage roll filling.
Softened onion should look glossy and dry around the edges; that gives the filling sweetness without adding steam inside the pastry.

3. Shape a Filling Log That Holds Together

A good filling log holds its shape without slumping across the pastry. Loose filling needs a little more panko before it reaches the pastry. Dry, crumbly filling can take a teaspoon or two of cold water or milk.

Mixed sausage roll filling in a bowl with a shaped sausage filling log on parchment.
A filling that holds as a soft log is easier to roll, seal, and bake evenly; loose filling is more likely to soften the pastry.

4. Place the Filling on the Pastry

The pastry needs to wrap easily around the filling. If you have to pull hard to close it, the log is too thick. Shape thinner than you think, especially for mini sausage rolls.

A slim sausage filling log placed down the center of a puff pastry strip with clear pastry borders.
Center the filling like a narrow ridge, not a mound; then the pastry can wrap around it without stretching thin at the seam.

5. Seal with a Light Line of Egg Wash

Brush the edge lightly with egg wash, fold the pastry over, and press just enough to close. The seam needs to hold, but the layers should not be flattened.

A pastry brush applying egg wash along the edge of puff pastry beside sausage filling.
Egg wash works best as a thin glue line; a heavy brush of liquid can make the pastry edge slide open.

6. Bake Seam-Side Down

The sealed edge should sit against the tray, not face up. That way, the baking sheet supports the roll while the filling heats and the pastry expands.

Unbaked sausage rolls brushed with egg wash and arranged seam-side down on a parchment-lined tray.
Seam-side down placement turns the tray into support, so the pastry stays closed while the sausage filling heats and expands.

7. Cut Large, Medium, or Mini Sausage Rolls

Cut larger rolls for dinner or lunchboxes, medium rolls for snacks, and mini rolls for parties. Small rolls need thinner filling logs, not just shorter pieces of an overfilled roll.

Guide showing large, medium, and mini sausage rolls cut into different sizes.
Size changes the eating moment: large rolls suit dinner, medium rolls suit snacks, and mini sausage rolls suit parties or lunchboxes.

8. What the Tray Should Look Like Before Baking

The final tray should look tidy but not crowded: glossy tops, clear gaps between rolls, and pastry that still holds its shape when moved.

Unbaked sausage rolls brushed with egg wash, topped with seeds, and spaced on a parchment-lined tray.
Before baking, the best tray looks tidy but not crowded: glazed tops, visible gaps, and pastry firm enough to hold its shape.

9. Look for Bronzed Tops and Clean Bottoms

Look for deeply browned tops, set seams, and bottoms that lift cleanly from the paper. If the pastry bends or feels damp underneath, it likely needs more time or better air circulation after baking.

10. Cool on a Rack, Not a Plate

Let the rolls sit briefly on the tray, then move them to a wire rack. A plate traps steam underneath; a rack keeps the base crisp while the filling settles.

Before baking check: the rolls should be easy to lift, not stretched tight, with the seam tucked underneath and small gaps between each piece. If the pastry feels greasy or the filling is bulging through the seam, chill the tray before baking.

Changing the size? Check sausage roll cooking times before baking. If the pastry feels soft or crowded, go to How to Stop Soggy Sausage Rolls.

How Long to Cook Sausage Rolls

Once the rolls pass that before-baking check, size matters more than anything else. A mini party roll and a thick lunchbox roll should not bake for the same amount of time.

Most homemade sausage rolls bake best at 200°C / 400°F, or 180°C fan / convection. That temperature is hot enough to puff and brown the pastry while giving the sausage filling time to cook through.

The goal is not pale pastry with cooked meat, or dark pastry with a doubtful center. The sweet spot is a bronzed top, a clean base, and filling that is hot all the way through.

Cooking time guide for mini, medium, large, and frozen unbaked sausage rolls.
Size is the reason one timing never fits all; mini rolls, large rolls, and frozen unbaked rolls each need their own bake cue.
TypeTemperatureApprox. timeDoneness cue
Large fresh sausage rolls, 8 pieces200°C / 400°F, or 180°C fan25–30 minWell browned pastry, hot center
Medium sausage rolls, 16 pieces200°C / 400°F, or 180°C fan22–25 minGolden, crisp, cooked through
Mini sausage rolls, 24–32 pieces200°C / 400°F, or 180°C fan18–22 minPuffed, browned, and crisp
Frozen unbaked sausage rolls200°C / 400°F, or 180°C fanAdd 6–10 min to the fresh time for that sizeGolden pastry with bubbling edges
Reheating baked rolls180°C / 350°F, or 160°C fan8–12 minHot center and crisp pastry

When they are ready, look for bronzed, firm tops, set seams, and bottoms that lift cleanly from the paper instead of bending or feeling damp.

Check the Internal Temperature

Instant-read thermometer inserted into the cooked filling of a baked sausage roll.
A thermometer checks what pastry color cannot show: whether the center of a thicker sausage roll is cooked through.

Use color as a clue, not the only test. Puff pastry should look well browned, but thick rolls can brown before the center is fully cooked. For a safe check, use an instant-read thermometer in the thickest part of the filling. For the official temperature chart, FoodSafety.gov has a simple safe minimum internal temperatures guide.

Making a batch for later? Go to Freezing, Reheating, and Making Ahead, or jump back to the recipe card.

How to Stop Soggy Sausage Rolls

Soggy sausage rolls are disappointing, but they are rarely mysterious. If the base is soft, the seam opens, or fat leaks around the edges, the problem usually started before the tray went into the oven: wet filling, warm pastry, overfilling, or trapped steam after baking.

The oven can brown pastry, but it cannot fully rescue a filling that went in too wet.

Troubleshooting guide showing wet filling, warm pastry, crowded tray, and trapped steam as causes of soggy sausage rolls.
Soggy sausage rolls usually start before serving, with wet filling, warm pastry, crowding, or trapped steam weakening the crisp base.
ProblemLikely causeFix
Soggy bottomWet filling or pastry sitting in steamUse breadcrumbs, cool cooked onion, avoid watery vegetables, and move baked rolls to a wire rack.
Pastry leaking fatVery fatty filling, warm pastry, or oven too lowChill the shaped rolls if needed, bake at the right heat, and space rolls apart.
Pastry split openOverfilled rolls or weak sealUse egg wash on the edge, press firmly, and bake seam-side down.
Pale pastryWeak egg wash or underbakingBrush well with beaten egg and bake until golden and firm.
Dry fillingMeat too lean or filling overmixedUse sausage with enough fat, mix gently, and do not overbake.
Soft after bakingRolls cooled on a plate or covered too tightlyCool on a wire rack and avoid trapping steam.

A sturdy metal baking sheet also helps. Very thin trays can brown unevenly, and crowded trays trap steam. For extra-crisp bottoms, place the rolls on parchment on a hot tray only if you can transfer them safely.

What a Crisp Bottom Looks Like

A baked sausage roll lifted with a spatula to show an evenly browned crisp bottom.
A golden underside shows the pastry baked instead of steamed, which is why rack cooling matters as much as oven heat.

Cold pastry, confident bake: if the puff pastry feels greasy, sticky, or slack, pause and chill the tray before it goes into the oven.

Most batches do not need every fix here. If the pastry is cool, the rolls are not overfilled, and the tops are deeply browned, you are already most of the way there.

That is the sweet spot: hot filling, crisp base, and pastry that flakes instead of bending.

Mini Sausage Rolls for Parties, Lunchboxes, and Snacks

Mini sausage rolls are the party version for a reason: they bake faster, serve neatly, and disappear from a platter while people are still deciding what to drink. They are the thing people pick up while talking, then return for before they realize they have already had three.

Mini sausage rolls on a wooden party platter with dips and a hand reaching for one roll.
Mini sausage rolls stay easy to grab, dip, and share, which makes them especially useful for appetizers, party boards, and casual snack trays.
  • Cut each long roll into 12–16 small pieces for party-size sausage rolls.
  • Bake mini sausage rolls at 200°C / 400°F, or 180°C fan, for 18–22 minutes.
  • Shape thinner filling logs so each mini roll is balanced, not overstuffed.
  • Leave space between pieces so the pastry can puff.
  • Use sesame or nigella seeds if you want a more finished party-platter look.
  • Cool fully before packing into lunchboxes so steam does not soften the pastry.

Party math is simple: plan on 3–4 mini sausage rolls per person if they are one of several snacks, and more if these are the main warm bite on the table. Think two-bite snacks, not tiny overstuffed parcels.

How to Keep Sausage Rolls Warm for a Party

Keep baked sausage rolls in a low oven, loosely covered, so steam can escape. Wrapping them tightly in foil while hot softens the pastry. Softened rolls come back quickly in the oven or air fryer for a few minutes before serving.

For another easy party appetizer in the same make-ahead lane, these grape jelly meatballs are a useful option beside mini sausage rolls.

If you are baking a full party tray, the oven is still easier. For a handful of mini rolls, leftovers, or a small frozen batch, the air fryer is the faster tool.

Baking only a few? The air fryer section covers small batches. Planning ahead? Go to freezing and reheating.

Air Fryer Sausage Rolls

The air fryer is not the best tool for a full tray, but it is excellent for small batches, leftovers, and frozen mini sausage rolls when you want hot pastry without heating the oven.

It is especially useful for the last few frozen rolls in the bag: enough for a snack, not enough to justify a full oven.

Golden sausage rolls arranged in one layer inside a clean air fryer basket.
Air fryer sausage rolls need breathing room; with one open layer, hot air can reach the pastry instead of steaming it.
Air fryer useTemperatureApprox. time
Fresh mini sausage rolls180–190°C / 350–375°F10–14 min
Fresh medium sausage rolls190°C / 375°F13–16 min
Frozen unbaked sausage rolls180°C / 350°F18–22 min
Reheating cooked sausage rolls180°C / 350°F4–6 min

These air fryer times are for homemade sausage rolls. Store-bought frozen mini sausage rolls can vary by brand, so start checking early and use the package instructions as the first guide.

Air fryer timing is most reliable for mini and medium rolls. Cook in one layer with space for the pastry to expand, and start checking early the first time because machines vary. Large rolls can brown outside before the middle is hot, so lower the heat and cook a little longer if needed.

Freezing, Reheating, and Making Ahead

This is the kind of tray that earns its keep: hot enough for dinner, small enough for a party, and easy enough to freeze before you need it.

Freeze sausage rolls unbaked for the best texture. Shape, cut, freeze on a tray, then bake from frozen with extra time whenever you want a hot batch later.

When the rolls bake for the first time from frozen, the pastry stays fresher than it does after being baked, frozen, and reheated. It is the quiet freezer win: a tray you shaped when you had time, ready to bake when you do not.

That is the freezer version at its best: no flour on the counter, no filling bowl to wash, just a cold tray becoming hot, flaky sausage rolls when you need them.

Freezing Unbaked Sausage Rolls

Unbaked sausage rolls on a parchment-lined tray beside a freezer bag labeled for sausage rolls.
Freezing unbaked keeps the pastry from drying out twice; when baking from frozen, use the size of the roll to judge the extra time.
  1. Shape and cut the sausage rolls.
  2. Place them on a parchment-lined tray.
  3. Freeze until firm.
  4. Transfer to a freezer-safe bag or container.
  5. Bake from frozen at 200°C / 400°F, or 180°C fan, adding extra time.

Frozen unbaked sausage rolls usually need 6–10 minutes longer than fresh rolls, depending on size; very large rolls may need a few minutes more. Brush with egg wash before baking if possible. If the egg wash does not stick well to frozen pastry, bake the rolls plain or brush lightly after the first few minutes. Bake unbaked frozen rolls straight from the freezer unless the pastry packet says otherwise.

Simple Party-Day Plan

  • A few hours ahead: shape and cut the sausage rolls, then refrigerate until baking.
  • The day before or earlier: freeze them unbaked for the best texture.
  • Before guests arrive: brush with egg wash and bake until golden and cooked through.
  • To hold briefly: keep warm in a low oven, loosely covered, so steam can escape.
  • To refresh: return softened rolls to the oven or air fryer for a few minutes instead of wrapping them tightly.
  • For the table: serve with mustard or chutney, one creamy dip, and one fresh side so the pastry does not feel too heavy.

Can You Freeze Baked Sausage Rolls?

Yes, baked sausage rolls can be frozen, but the pastry is usually better when the rolls are frozen unbaked. If you freeze baked rolls, cool them completely first, pack airtight, and reheat in the oven or air fryer until hot and crisp again.

Storing Leftovers

Sausage rolls are best the day they are baked, especially while the pastry is crisp. Once cooled, store leftovers in an airtight container in the fridge for up to 3 days. Try to refrigerate them within 2 hours of baking.

Reheating Without Soft Pastry

Reheat baked sausage rolls in the oven at 180°C / 350°F, or 160°C fan, for 8–12 minutes. You can also use the air fryer at 180°C / 350°F for 4–6 minutes. Avoid the microwave when you want crisp pastry. It heats quickly, but it makes puff pastry soft.

Making Them Ahead

You can assemble sausage rolls a few hours ahead and keep them covered in the fridge until baking. For longer storage, freeze them unbaked. If the pastry softens while sitting, give the tray a short fridge rest before baking.

Serving a tray now? See what to serve with sausage rolls, or go back to top.

Sausage Roll Variations

Once the base recipe works, sausage rolls become easy to riff on. Keep the filling savory and not too wet, then change the mood: fennel for bakery-style rolls, apple for sweetness, cheddar for comfort, chili for heat, or cranberry and sage for a holiday tray.

  • Pork and fennel sausage rolls: add ½–1 teaspoon lightly crushed fennel seeds for an aromatic, bakery-style finish.
  • Pork and apple sausage rolls: add a small amount of grated apple, squeezed dry, for gentle sweetness.
  • Beef sausage rolls: use beef sausage meat and stronger seasoning such as mustard, pepper, or Worcestershire-style flavor.
  • Chicken sausage rolls: use chicken sausage or ground chicken and cook to 165°F / 74°C.
  • Cheese and onion sausage rolls: add grated cheddar and softened onion for a richer, more savory filling, but avoid overfilling.
  • Spicy sausage rolls: add chili flakes, smoked paprika, black pepper, or mustard.
  • Christmas sausage rolls: use sage, onion, apple, cranberry, chutney, or a little stuffing-style seasoning.
  • Bakery-style sausage rolls: keep the filling simple, use well-seasoned sausages, chill before baking, and egg wash generously.

When adding vegetables, be careful with moisture. Carrot, zucchini, mushrooms, spinach, and apple can all work, but watery ingredients should be cooked, squeezed, or used sparingly so the pastry does not turn soggy. For a completely different sausage dinner, this smoky kielbasa pasta is better when you want a full meal instead of a pastry snack.

Vegetarian, Vegan, Gluten-Free, and Lighter Sausage Rolls

Vegetarian, vegan, gluten-free, and lighter sausage rolls can all work, but they need the same care as the classic version. The filling needs body, the pastry needs to stay cool, and anything watery needs to be cooked, squeezed, or used sparingly before it is wrapped.

Vegetarian Sausage Rolls

For vegetarian sausage rolls, build savoriness first. Mushrooms, lentils, cheese, paneer, onions, herbs, and plant-based sausage can all work, but the mixture should be thick enough to shape into a log. If it slumps before baking, it will likely soften the pastry.

Vegan Sausage Rolls

For vegan sausage rolls, use vegan puff pastry and a plant-based filling. Replace egg wash with plant milk, aquafaba, or a little oil depending on the finish you want. Check both the pastry and the filling: many puff pastries are accidentally vegan, but not all are.

Gluten-Free Sausage Rolls

For gluten-free sausage rolls, check the pastry, sausage, breadcrumbs, mustard, and sauces. Gluten-free pastry can crack more easily, so let it soften just enough to fold, then chill again before baking if it turns sticky or fragile.

Healthy or Lighter Sausage Rolls

For a lighter version, make smaller rolls, use leaner sausage or chicken/turkey filling, add cooked vegetables, and serve with salad instead of heavier sides. Keep the promise honest: these are lighter sausage rolls, not diet food. Puff pastry and sausage are still rich ingredients.

What to Serve with Sausage Rolls

The best sausage rolls do not need much around them; they just need contrast. Add one sharp thing, one fresh thing, or one dip that cuts through the buttery pastry and makes people reach for another. A crisp wedge salad works especially well because the cold lettuce and creamy dressing balance the hot, flaky pastry.

Warm sausage rolls served on a wooden board with mustard, chutney, pickles, and green salad.
Sharp mustard, chutney, pickles, or fresh salad cut through the buttery pastry and make sausage rolls feel complete on the plate.
  • Sharp: English mustard, Dijon mustard, brown sauce, steak sauce, onion chutney, apple chutney, or pickles.
  • Fresh: green salad, wedge salad, slaw, cucumber salad, or a simple tomato salad.
  • Cozy: baked beans, soup, mashed potatoes, potato wedges, or chips.
  • Party-style: ketchup, creamy dips, chutney, mustard, pickles, or a cheese ball.

For a party platter, serve mini sausage rolls with two or three dips rather than too many sides. In lunchboxes, cool the rolls completely before packing so the pastry does not steam itself soft. On another sausage dinner night, this slow cooker sausage casserole gives you the opposite comfort-food mood: soft sausages, beans, vegetables, and a spoonable sauce.

FAQs About Sausage Rolls

Do you need sausage meat for sausage rolls?

No. Sausage meat is convenient, but regular sausages work well. Slit the skins, squeeze out the meat, and loosen the filling before shaping.

Do you cook sausage meat before making sausage rolls?

No. The sausage meat usually goes into the pastry raw and cooks as the pastry bakes. Cook only the onion, garlic, or watery vegetables first, then cool them before mixing. The filling is done at 160°F / 71°C for pork or beef, and 165°F / 74°C for chicken or turkey.

How do you make sausage rolls with regular sausages?

Remove the skins, loosen the meat with a fork, shape it into logs, and roll it inside cool puff pastry. Season only if needed because most sausages are already salted.

What pastry is best for sausage rolls?

Puff pastry is best for classic sausage rolls because it bakes flaky, crisp, and golden. All-butter puff pastry gives the richest flavor, but standard ready-rolled puff pastry works well if you keep it cool.

Can you use crescent dough instead of puff pastry?

Yes, but the result will be softer and breadier. Puff pastry gives the classic flaky sausage roll texture. Crescent dough is better for a quick shortcut than for a bakery-style sausage roll.
How long do sausage rolls take to cook?

Large sausage rolls usually take 25–30 minutes at 200°C / 400°F, or 180°C fan. Medium rolls usually take 22–25 minutes, while mini sausage rolls usually take 18–22 minutes. Frozen unbaked rolls need extra time.

What temperature should sausage rolls be cooked at?

Cook sausage rolls at 200°C / 400°F, or 180°C fan, for the best balance of puffed pastry and cooked filling. For reheating, use a slightly lower temperature such as 180°C / 350°F, or 160°C fan.

How do you know sausage rolls are cooked inside?

Use three checks: browned pastry, a base that lifts cleanly from the paper, and hot filling in the center. For thick rolls, use a thermometer rather than color alone.
Why is my sausage roll filling still pink?

Some sausage fillings stay slightly pink because of seasoning, curing ingredients, or the type of meat used. Use temperature, not color alone, as the final check. Pork or beef filling should reach 160°F / 71°C, and chicken or turkey filling should reach 165°F / 74°C.

Why are my sausage rolls soggy underneath?

Usually, moisture got trapped somewhere: wet filling, warm pastry, underbaking, or cooling on a tray. Breadcrumbs, a hot bake, and a wire rack solve most of it.

Why did my sausage rolls burst open?

Sausage rolls usually burst open when they are overfilled, sealed weakly, or baked seam-side up. Leave a pastry border, seal with a little egg wash, press gently, and bake seam-side down.

Should sausage rolls be frozen before or after baking?

Before baking is best. Shape and cut the rolls, freeze them on a tray, then store them in a freezer-safe bag or container. They bake up fresher because the pastry gets its first full bake from frozen.
Can sausage rolls be served cold?

Yes, sausage rolls can be served cold once they are fully cooked and properly cooled. They are best warm if you want crisp pastry, but cold rolls work well for lunchboxes, picnics, and party platters. Keep leftovers refrigerated.

How do you keep sausage rolls warm for a party?

Keep sausage rolls in a low oven, loosely covered, so steam can escape. Avoid wrapping them tightly while hot. If the pastry softens, refresh the rolls in the oven or air fryer for a few minutes before serving.

How do you reheat sausage rolls without making them soft?

Reheat sausage rolls in the oven at 180°C / 350°F for 8–12 minutes or in the air fryer for 4–6 minutes. Avoid the microwave if you want crisp pastry.

What is the best way to make mini sausage rolls?

Use thinner filling logs, then cut each long roll into small pieces before baking. Mini sausage rolls usually bake in 18–22 minutes at 200°C / 400°F, or 180°C fan.

Final Tip for Better Sausage Rolls

Good sausage rolls come down to three things: filling that tastes good before it goes in, pastry that stays cool and relaxed, and a bake that goes far enough for real color. Once those are right, the same base method works for regular sausages, mini party rolls, freezer batches, and air fryer snacks.

Make the first batch plain and classic. After that, sausage rolls become the kind of recipe you can adapt without overthinking: a warm tray for dinner, a freezer stash for later, lunchbox rolls for the next day, or the party snack people keep circling back to while pretending they are only having one more.

Back to top