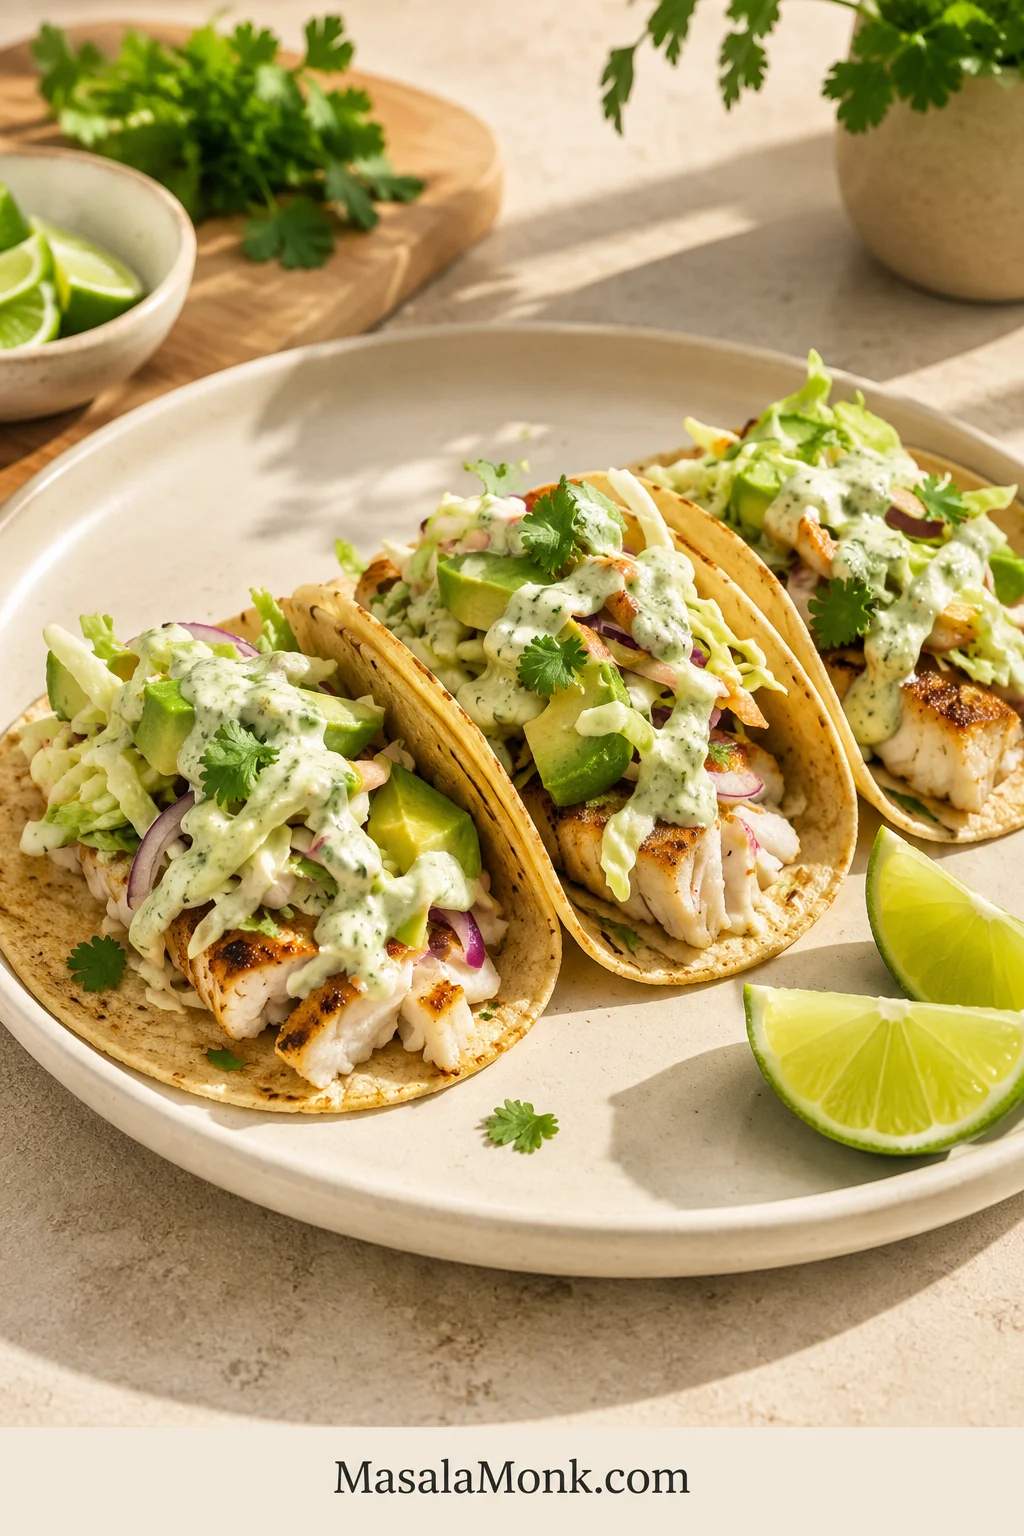
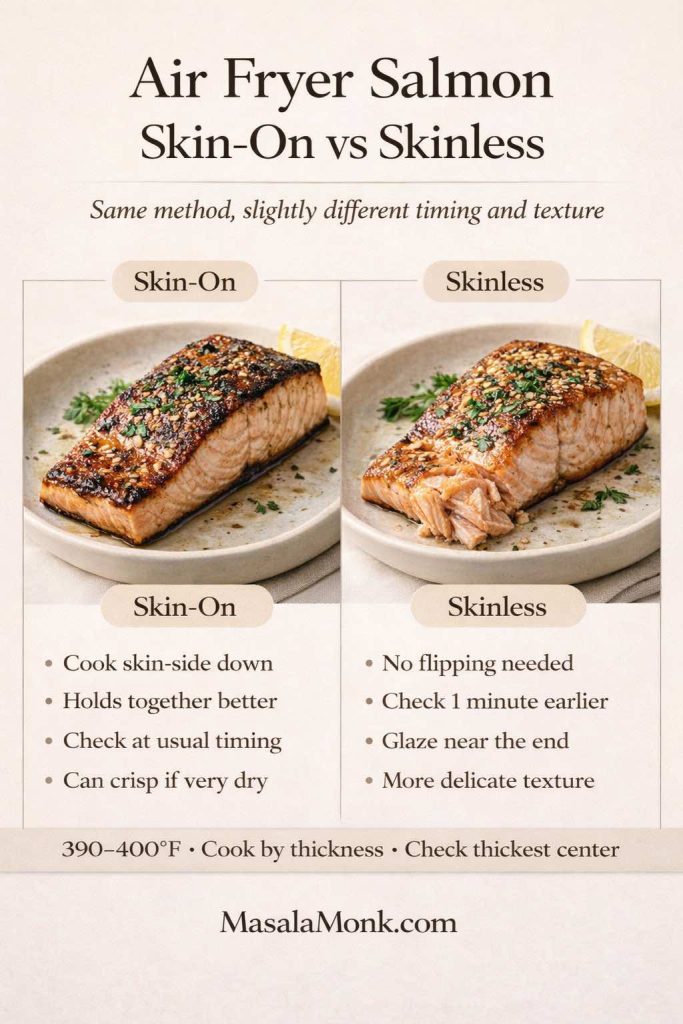
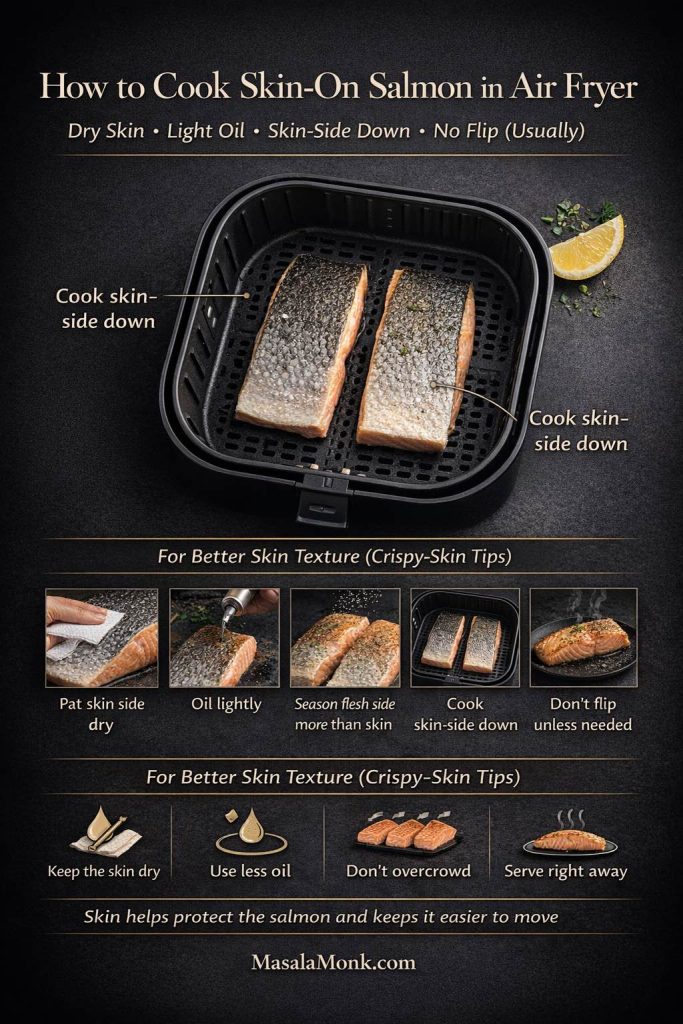
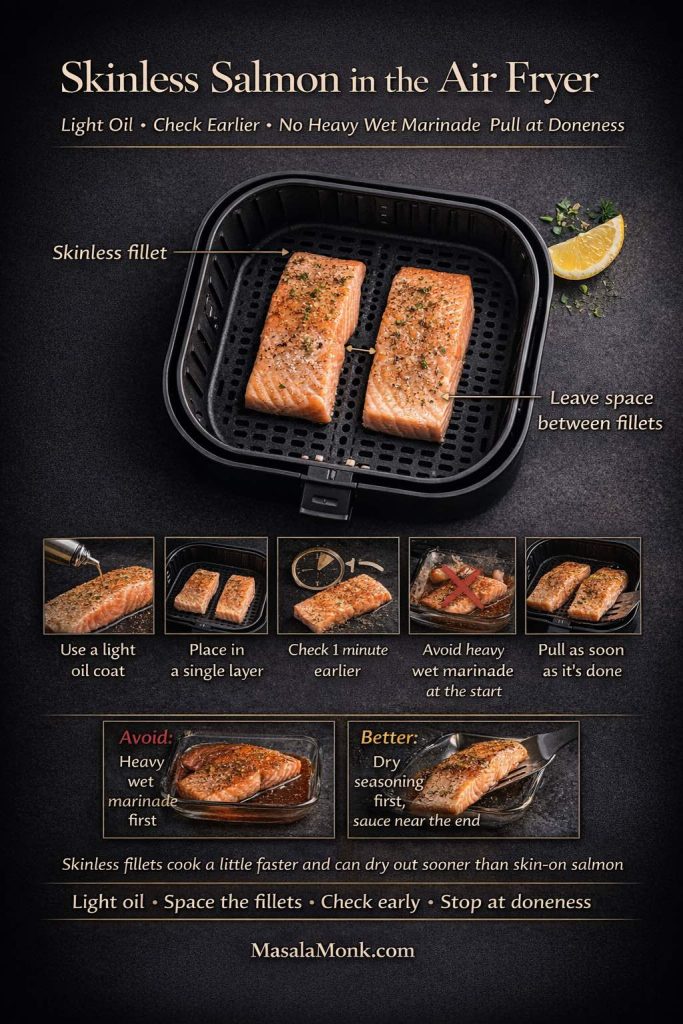
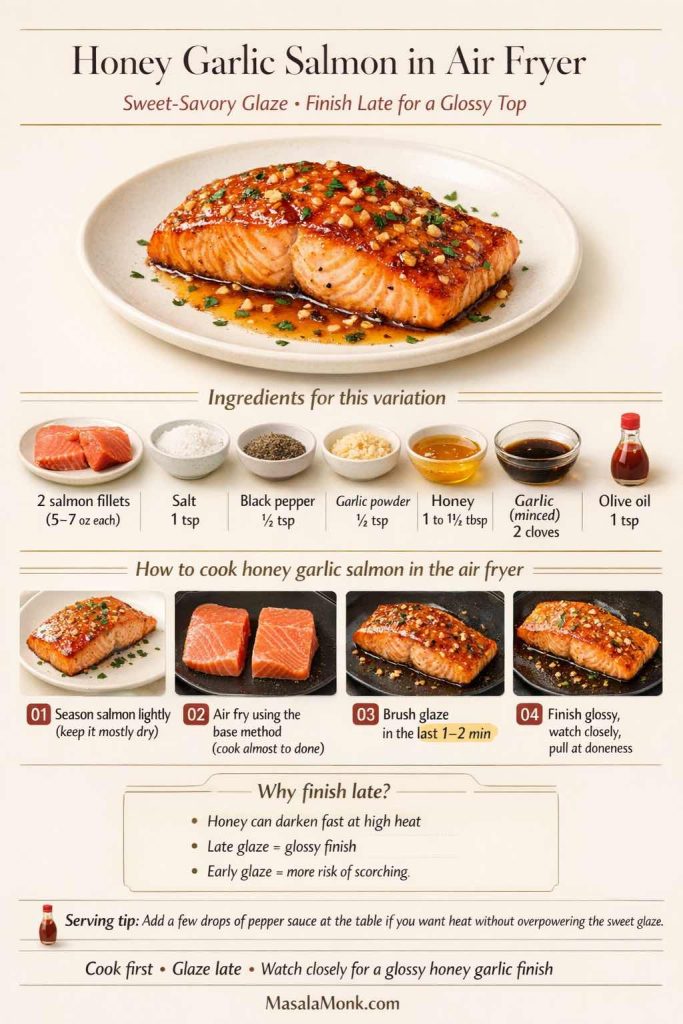
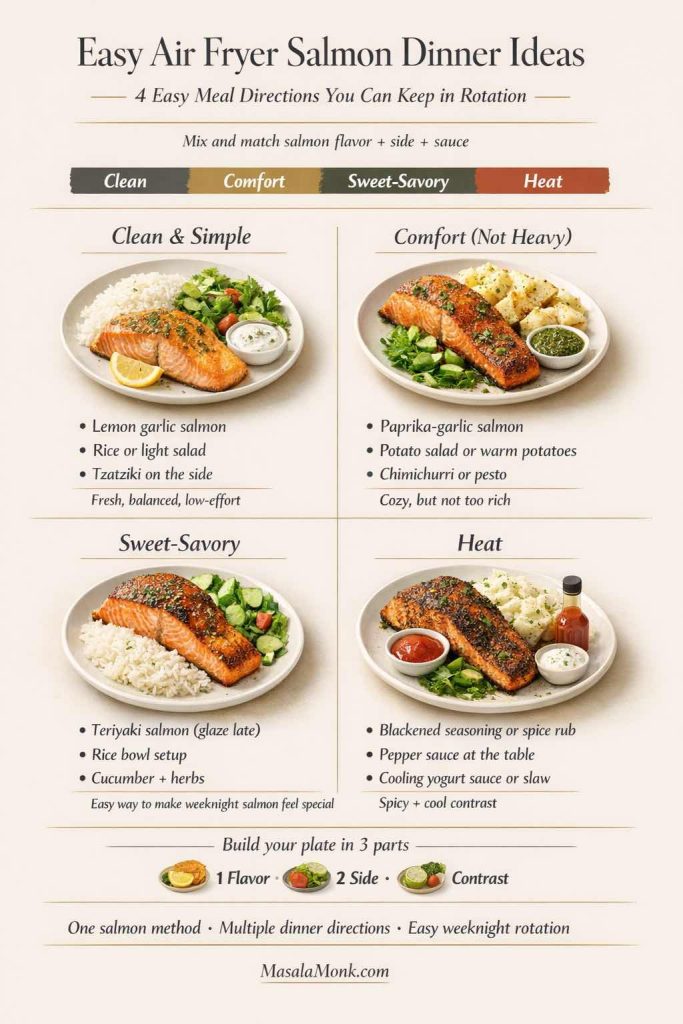
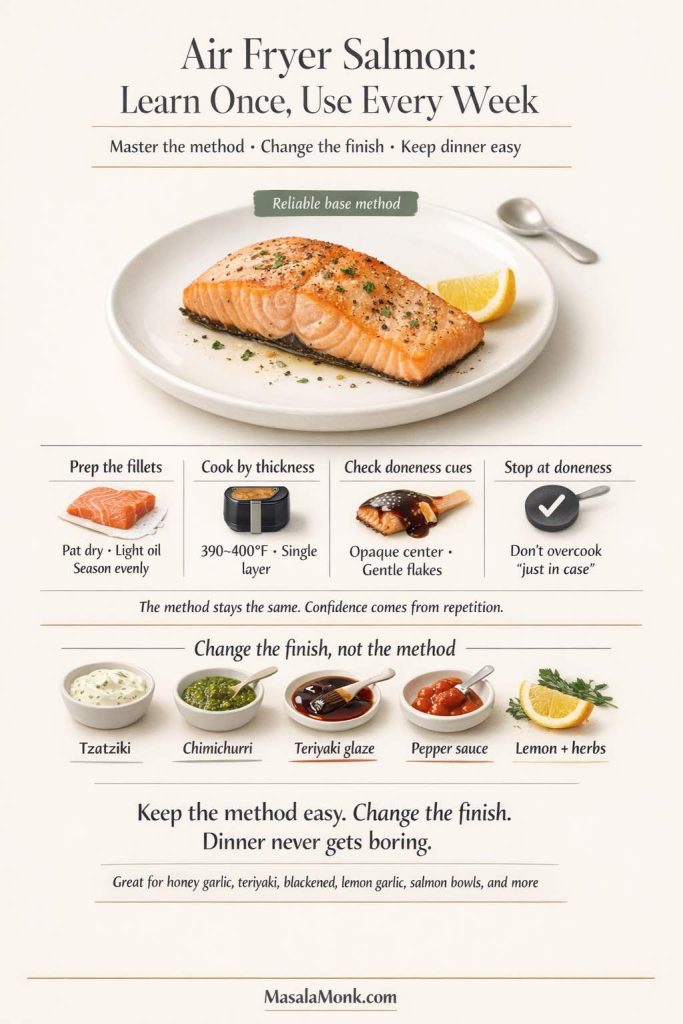
These tilapia fish tacos are for the nights when you want dinner to feel bright and generous without turning the kitchen into a project. Smoky skillet tilapia meets cold lime-dressed cabbage, cool cilantro-jalapeño sauce, avocado, and warm tortillas in every bite.
Tilapia is mild, affordable, and quick-cooking, so it rewards a hot pan and an early check. Dress the cabbage lightly, warm the tortillas before the fish is ready, and each taco stays flaky, crisp, and fresh rather than watery or soggy.
The timing does the work: make the cool sauce and crisp slaw first, warm the tortillas next, and cook the fish last so it reaches the table hot while the cabbage still snaps.
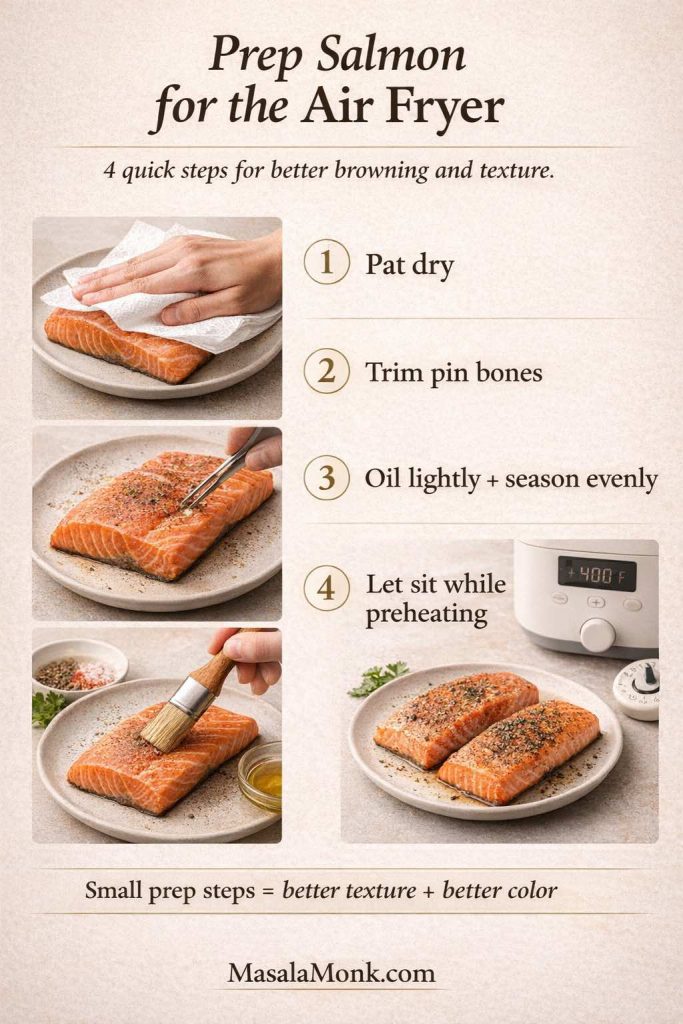
Three rules for better tilapia tacos:
Dry before seasoning. Surface moisture is the difference between browned fish and pale, steamed fish.
Check by thickness. Thin fillets may finish in 4–5 minutes; remove each piece when it reaches 145°F / 63°C and separates easily.
Cook the fish last. Once the tilapia hits the pan, the sauce, slaw, and tortillas should already be waiting.
The skillet recipe below is the one to make first: fast enough for a weeknight, but carefully balanced so the mild fish doesn’t disappear beneath the toppings.
Tilapia Tacos with Crisp Slaw and Creamy Lime Sauce
Smoky, tender tilapia with crisp lime slaw, creamy cilantro-jalapeño sauce, avocado, and warm tortillas.
Prep Time20 minutes
Cook Time6–8 minutes for one batch; 12–15 minutes for two
Total TimeAbout 26–35 minutes
Yield8 tacos / 4 servings
Equipment
12-inch / 30 cm nonstick or well-seasoned skillet
Thin, wide fish spatula or flexible turner
Instant-read thermometer
Medium mixing bowl and small bowl
Small blender or food processor, optional
Tongs and a clean kitchen towel for the tortillas
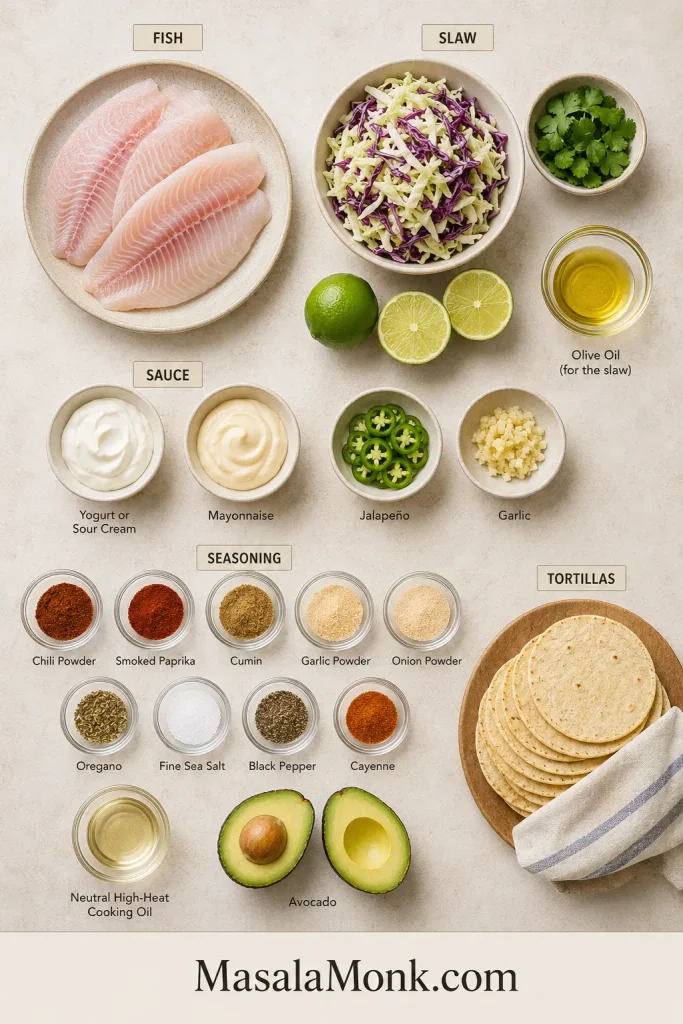
Limes, Cilantro, and Jalapeños
3–4 medium limes, divided among the slaw, sauce, and wedges for serving
1 small bunch cilantro (fresh coriander), divided
2 small jalapeños, divided, optional
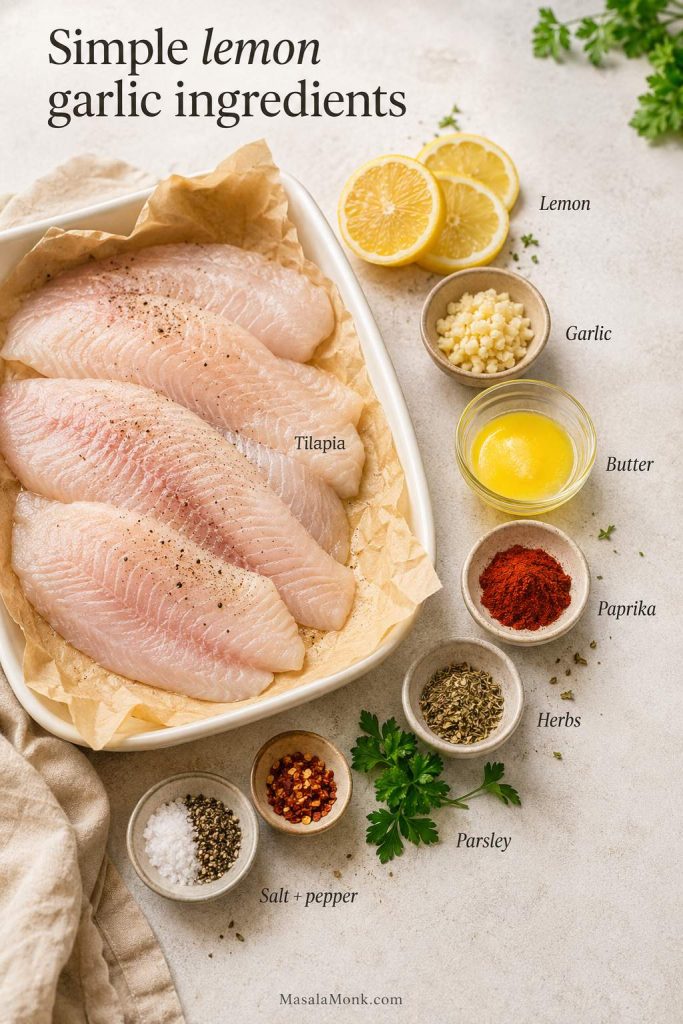
For the Tilapia
1¼ lb / 20 oz / 567 g skinless, boneless tilapia fillets
1 tbsp / 15 ml neutral high-heat oil, plus a little more if the fish needs two batches
2 tsp chili powder
1 tsp smoked paprika
1 tsp ground cumin
¾ tsp garlic powder
½ tsp onion powder
½ tsp dried oregano
¾ tsp / about 4 g fine sea salt
¼ tsp ground black pepper
⅛–¼ tsp cayenne pepper, optional
1–2 of the limes, cut into wedges for finishing
For the Cabbage Slaw
9 oz / 250 g finely shredded green cabbage, red cabbage, or a mixture
¼ cup / about 10 g chopped cilantro from the bunch above
2 tbsp / 30 ml fresh lime juice
1 tbsp / 15 ml olive oil
¼ tsp / about 1.5 g fine sea salt
1 small jalapeño, finely sliced or minced, optional
For the Creamy Lime Sauce
½ cup / 120 g plain Greek yogurt or sour cream
¼ cup / about 60 g mayonnaise
2 tbsp / 30 ml fresh lime juice, plus more to taste
½ packed cup / about 15 g cilantro from the bunch above
1 small garlic clove
½–1 jalapeño, seeded for less heat, or 1 tsp minced chipotle in adobo
¼ tsp / about 1.5 g fine sea salt, plus more to taste
1–2 tbsp / 15–30 ml cold water, only as needed
Sauce yield: about 1 cup / 240 ml—enough for a thin layer underneath and a light drizzle over all eight tacos, with a little extra for the table.
For Assembly
8 sturdy corn or flour tortillas, about 5–6 inches / 13–15 cm, or 16 very thin corn tortillas if using two per taco
1 ripe avocado, sliced or diced
Fresh cilantro
Lime wedges
Crumbled cotija or feta, optional
Fresh mango salsa, optional
Instructions
Prepare the Cool Components and Fish
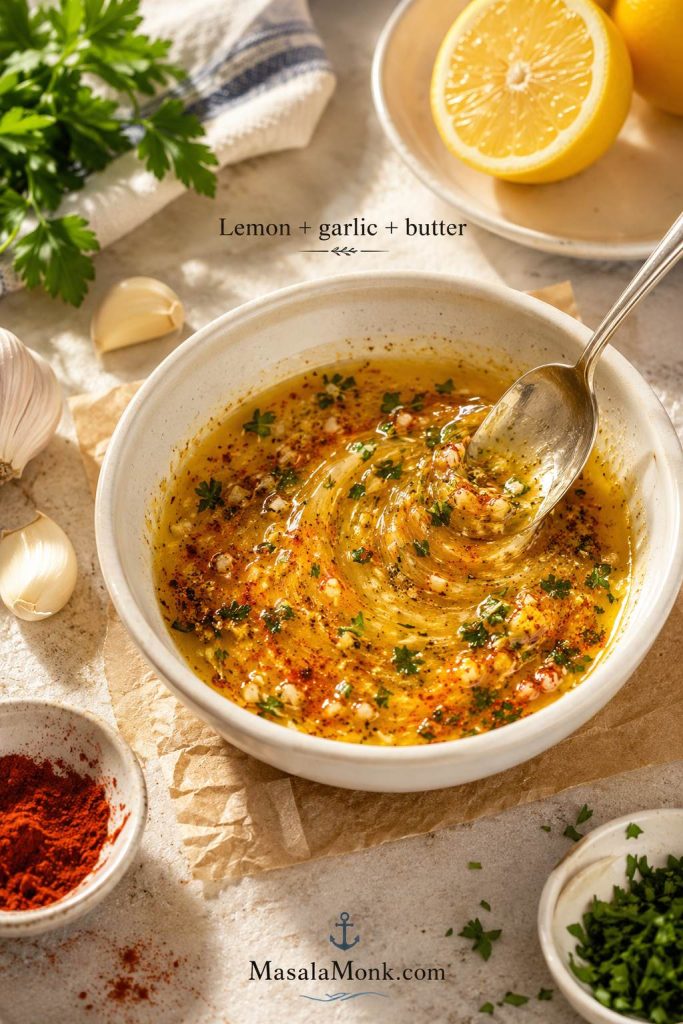
Make the sauce. Blend the yogurt or sour cream, mayonnaise, lime juice, cilantro, garlic, jalapeño or chipotle, and salt. Without a blender, finely mince the cilantro, garlic, and jalapeño first, then whisk everything together. Taste before adding water: the sauce should be bright, lightly salty, and a little more assertive than you want it to taste in the finished taco. Add cold water one tablespoon at a time until it falls from a spoon in a thick ribbon, then refrigerate.
Make the slaw. Toss the cabbage, cilantro, lime juice, olive oil, salt, and optional jalapeño. Let it stand for 10–15 minutes, then taste one strand. It should be crisp, lightly salty, and clearly lime-bright—not sharply sour or wet. If liquid gathers in the bowl, lift the slaw out with tongs when assembling.
Taste the cool components together. Try a strand of slaw with a little sauce. They should taste slightly brighter and bolder than necessary because the warm fish and tortilla will soften both.
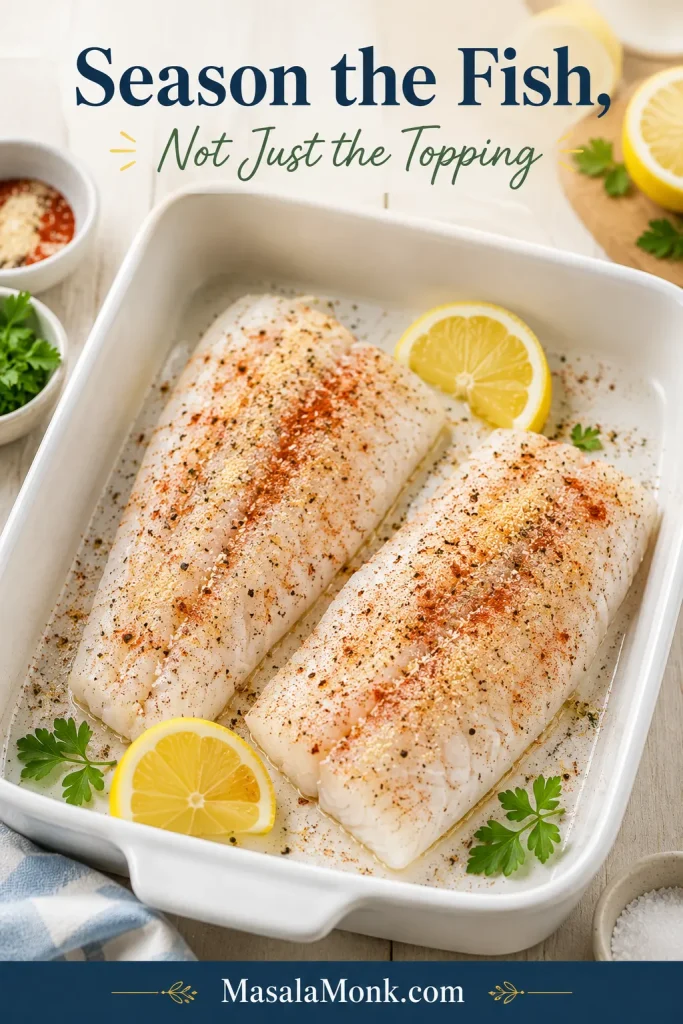
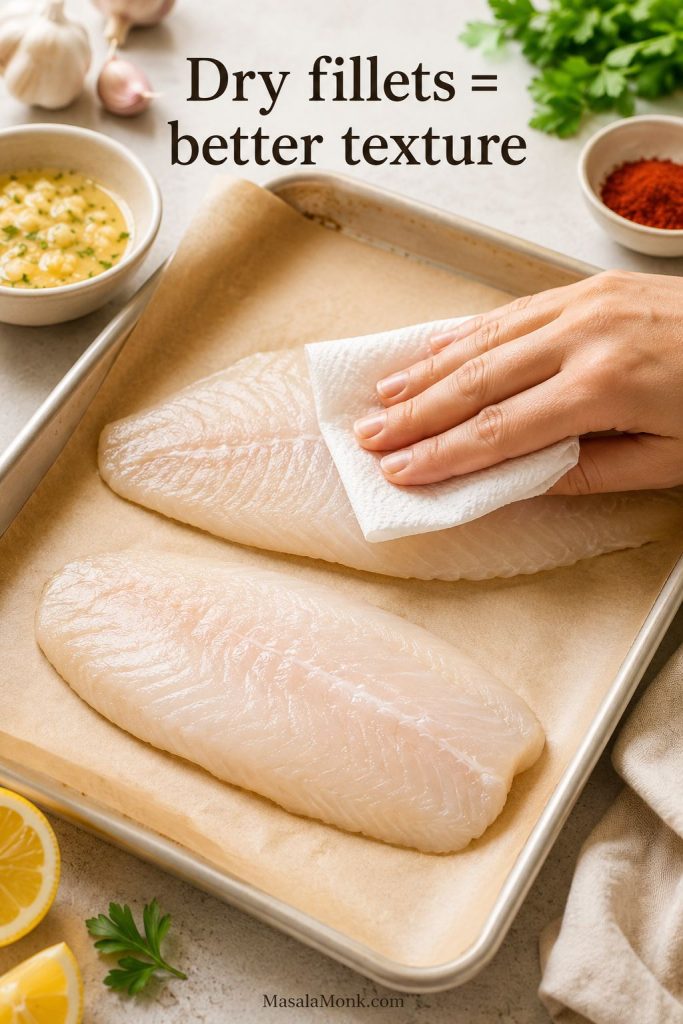
Dry the fish. Pat the tilapia thoroughly dry on both sides, especially if it was previously frozen.
Season. Mix the chili powder, smoked paprika, cumin, garlic powder, onion powder, oregano, salt, black pepper, and optional cayenne. Rub the fish lightly with oil, then press the seasoning evenly over both sides.
Warm the tortillas. Heat them in a dry skillet for about 15–30 seconds per side, then stack them inside a clean kitchen towel.
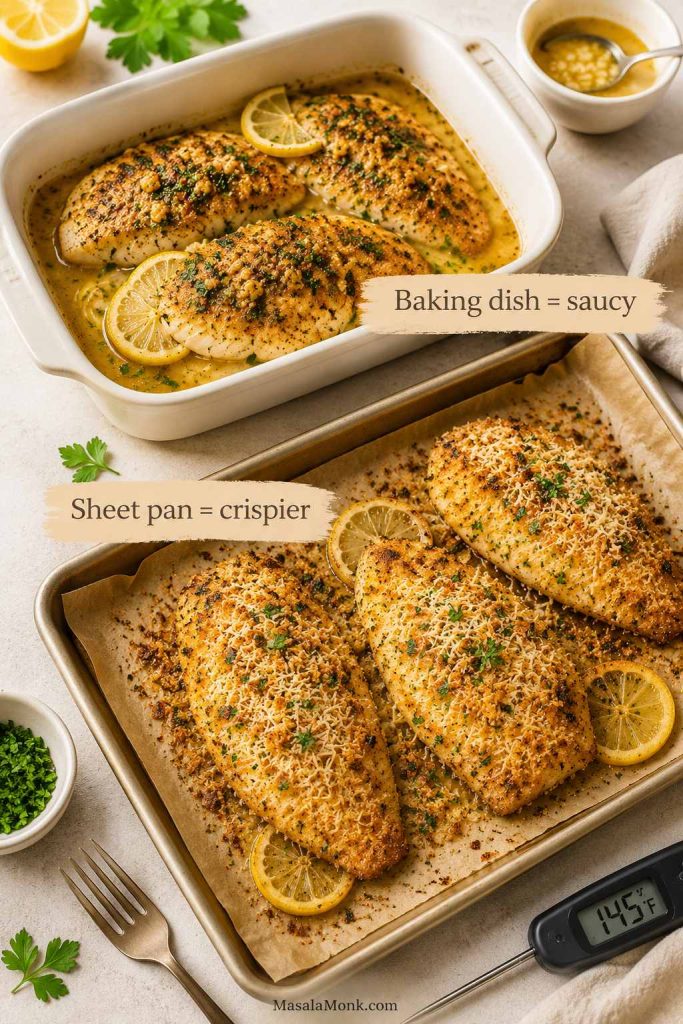
Cook, Rest, and Assemble
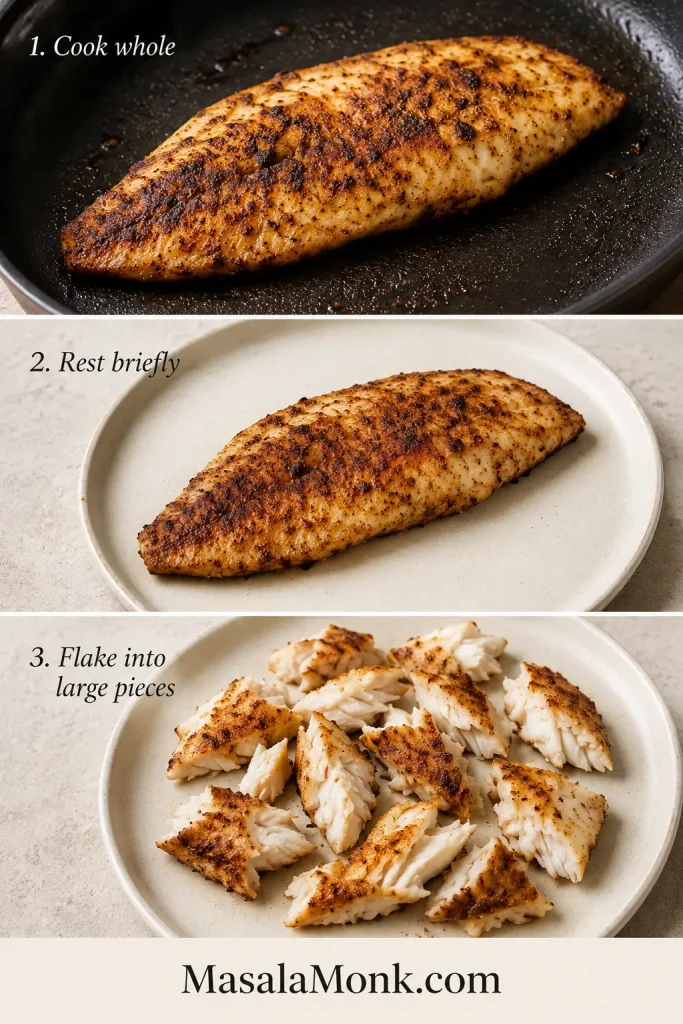
Cook the first side. Heat the 12-inch skillet over medium-high heat. Add a thin film of oil. When it shimmers, add as many fillets as fit in one layer with visible space between them. Cook mostly undisturbed for about 2–4 minutes, depending on thickness.
Turn and finish. Carefully turn the fish with a fish spatula and cook for about 1½–3 minutes more. Remove each fillet when the thickest point reaches 145°F / 63°C and the flesh is opaque and easy to separate.
Cook a second batch if needed. Add a little more oil and let the pan recover its heat before adding the remaining fish. Keep the first batch on a warm plate, loosely covered rather than sealed tightly.
Rest and flake. Let the fish rest for 2–3 minutes, then break it into large taco-size flakes.
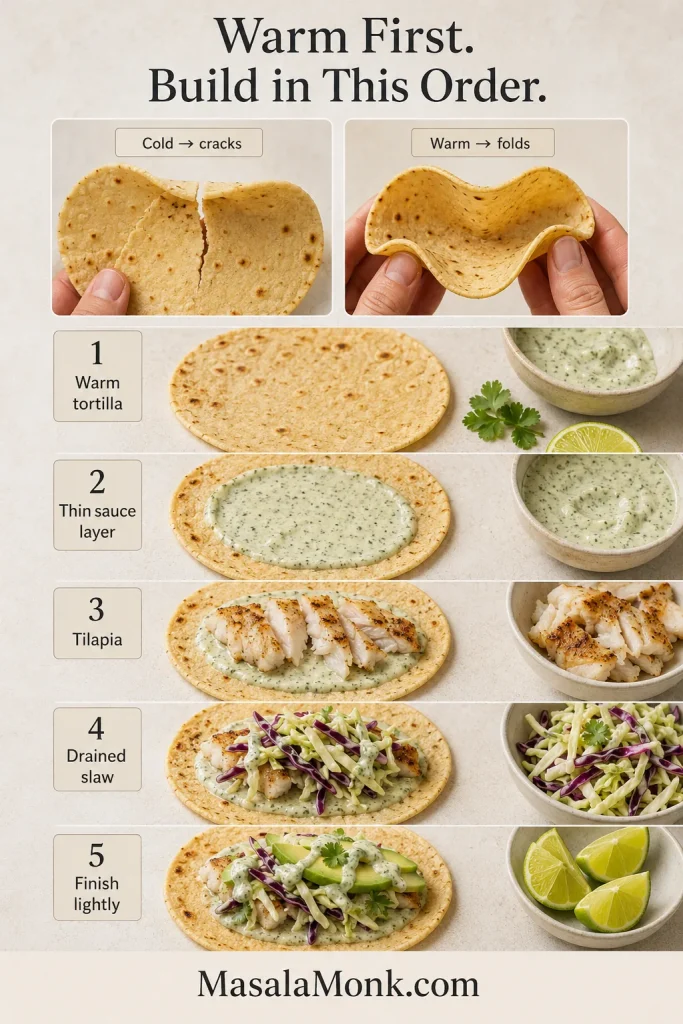
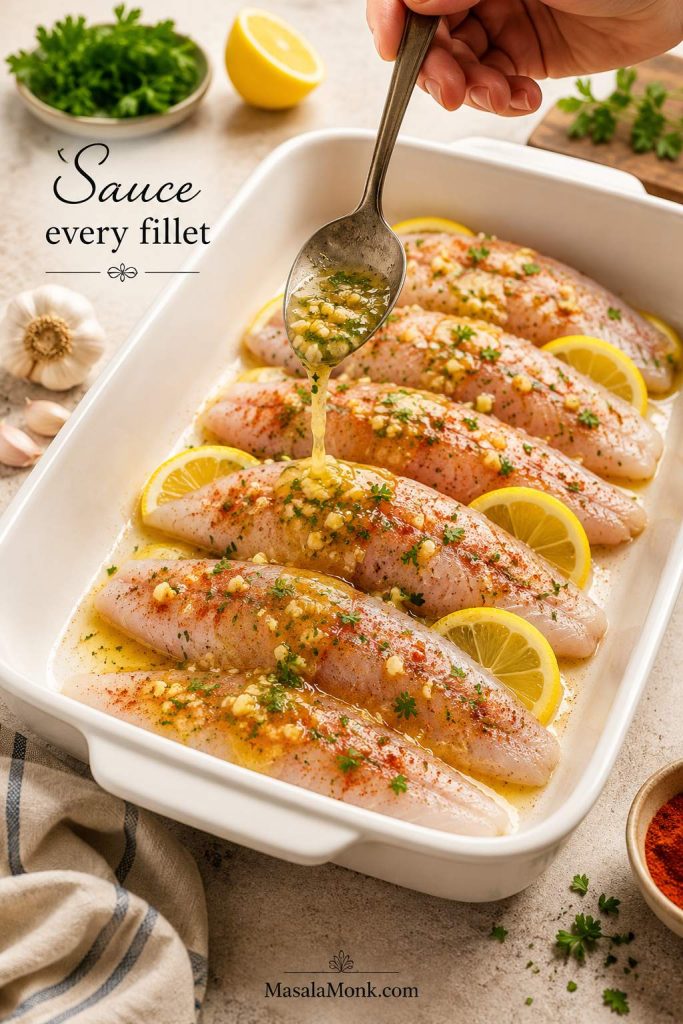
Assemble. Spread a little sauce over each warm tortilla. Add fish, drained slaw, avocado, another light drizzle of sauce, cilantro, and lime. Serve immediately.
Best result: serve as soon as the fish is ready. Don’t leave finished tilapia in the hot pan while the rest of dinner catches up.
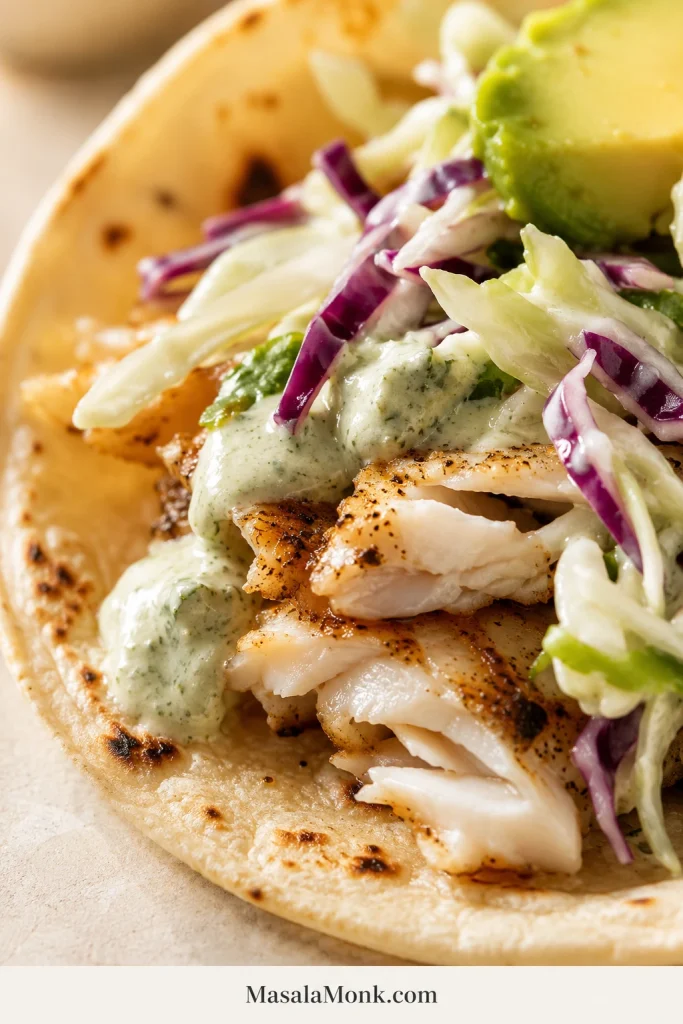
A finished tilapia taco should still show broad fish flakes beneath the toppings. Use the close-up below as a balance check: the slaw and sauce should support the fish, not cover it.
Keep the tilapia in broad flakes so it stays visible beneath the slaw and sits securely inside the tortilla.
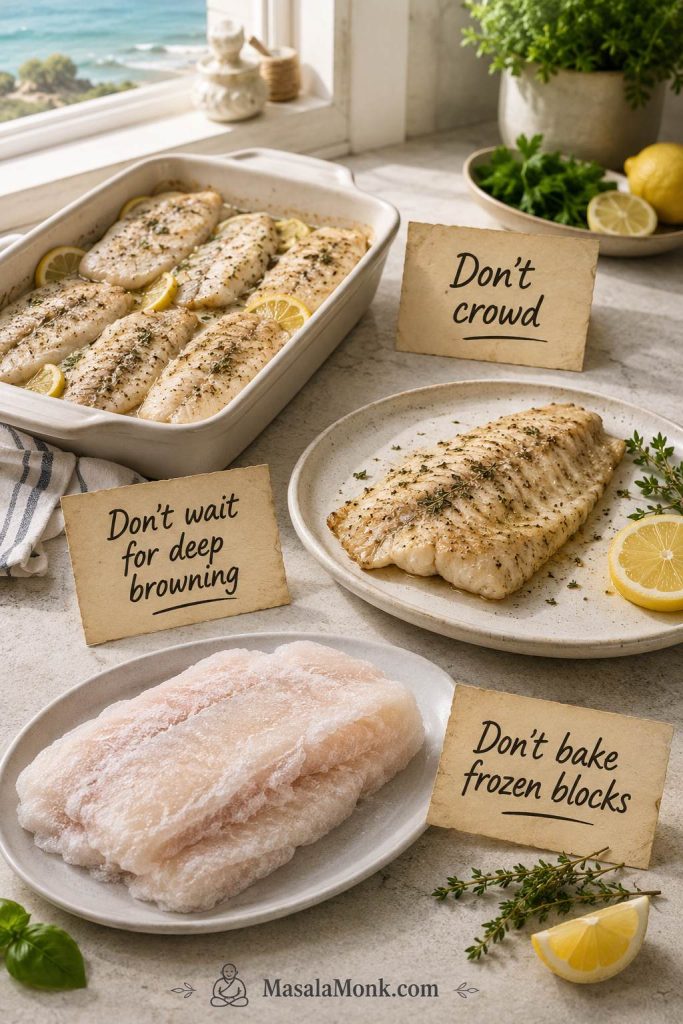
Whichever cooking method you choose, the same quality checkpoints protect the result. The guide below follows the fish from a dry fillet to a balanced taco.
These six checkpoints work across every method: dry, season, space, check, rest, and assemble without burying the fish.
Fish, Seasoning, and Tortillas
Tilapia cooks quickly. Thickness, surface moisture, and pan space decide whether it browns or steams. Choose evenly sized fillets, dry them well, and give them room in the pan.
The two oils have different jobs: neutral oil handles the skillet heat, while olive oil dresses the cabbage slaw.
Choosing the Fillets
Choose skinless, boneless fillets with an even pale color and no strong fishy smell. Similar thickness matters more than identical length. When one fillet is much thinner than the others, plan to remove it first instead of forcing the entire batch to finish together.
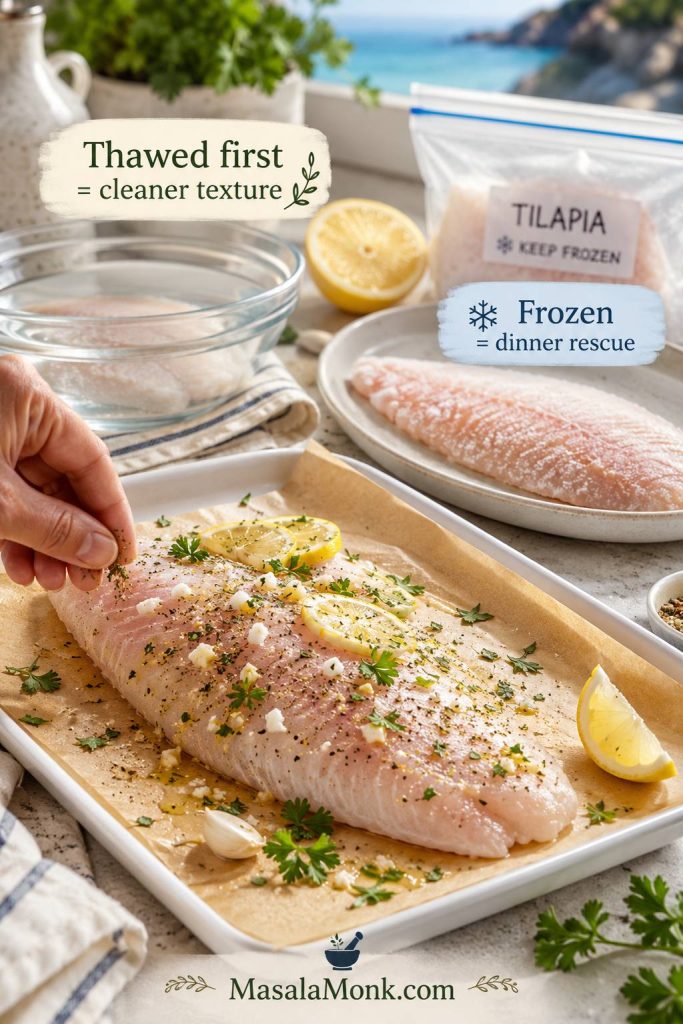
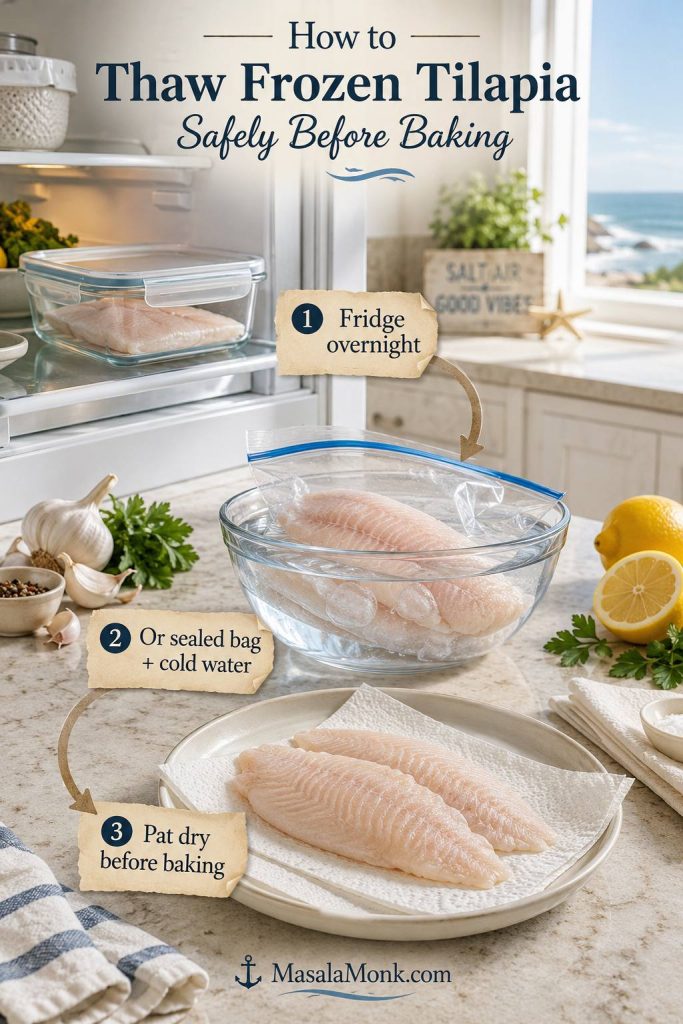
Fresh and frozen tilapia both work. Previously frozen fish may release more water, so drying isn’t a decorative step. Press both sides with paper towels, replace the damp towel, and check the surface once more immediately before seasoning.
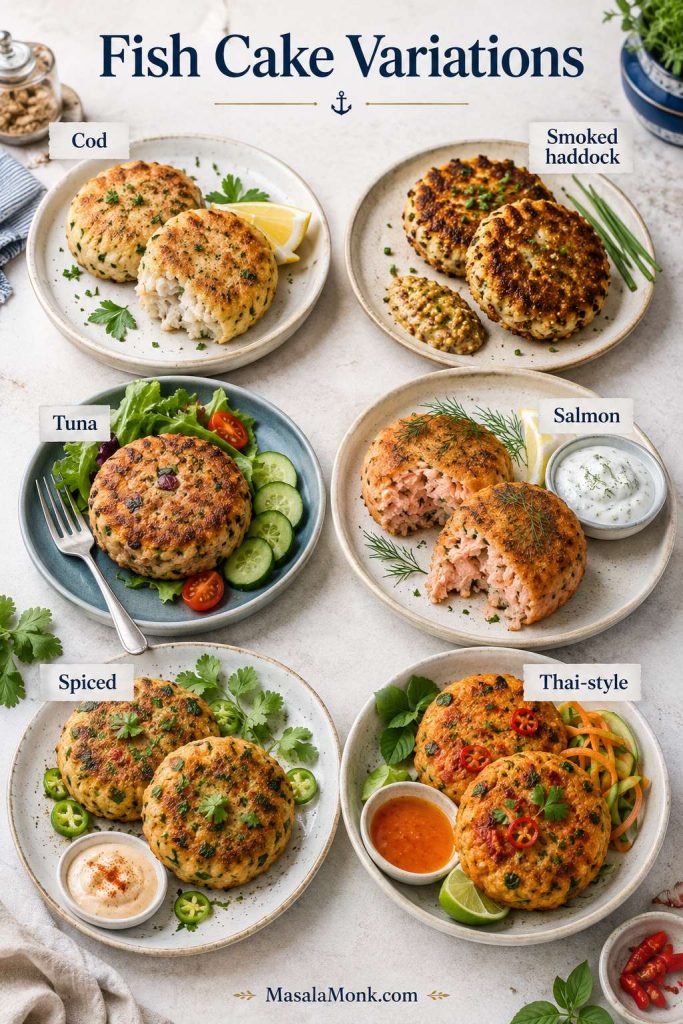
No tilapia? Use the same weight of cod, haddock, or another mild white fish. Choose fillets of similar thickness and follow the doneness cues rather than copying the exact skillet time.
Tilapia is one of the quickest and most affordable fish choices for tacos. To compare it with cod, mahi mahi, salmon, halibut, snapper, and Baja-style fish, use the complete fish tacos guide.
Tilapia Taco Seasoning
Tilapia doesn’t need to be hidden, but it does need enough seasoning to remain noticeable beside cabbage, sauce, avocado, and tortillas. Chili powder provides the main taco flavor, smoked paprika adds color and a gentle smoky edge, cumin adds warmth, and garlic, onion, and oregano fill out the middle.
Because chili powders vary, taste a tiny pinch before deciding how much cayenne to add. Some are mild seasoning blends, while others are made from hotter ground chilies.
This recipe uses ¾ teaspoon / about 4 g fine sea salt for the fish. If you use coarse kosher salt, weigh 4 g or adjust for the brand. Taste before adding cotija or another salty topping.
Mix the seasoning before applying it so salt, cayenne, and smoked paprika reach every fillet evenly.
Don’t use lime as a long marinade. If you want to marinate the fish with lime, keep it to 10–15 minutes. Longer contact can soften the surface of thin fillets. Keep most of the lime in the slaw, sauce, and final squeeze.
Corn or Flour Tortillas?
Corn tortillas bring toasted flavor and keep the tacos lighter. They are also the natural gluten-free choice when the package is certified for your needs. Warm them properly and double very thin tortillas if they split easily.
Flour tortillas are softer, more flexible, and a little richer. Use small taco-size tortillas rather than large wraps so the fish, slaw, and sauce stay balanced.
Cook the Fish Without Rushing It
Once the sauce, slaw, and tortillas are ready, the fish needs only a few focused minutes. Dry fish browns; wet fish steams. Pat both sides until slightly tacky, then oil and season just before cooking.
Dry tilapia looks matte and slightly tacky, which helps the seasoning cling. A glossy surface signals moisture that will steam in the skillet.
Give the fillets room. Add only as many as fit with visible space between them. Turn once, and remove thinner pieces as soon as they are done. That is good judgment, not a failed batch.
Watch the opaque line climb before testing the first side. If the spatula meets resistance, wait rather than forcing the turn.
A broken fillet is not a loss—it was going to be flaked for tacos anyway. Cook whole pieces when possible, rest them briefly, and break them into large flakes at the end.
Rest briefly, then separate the tilapia into broad taco-size flakes—not crumbs and not unwieldy chunks.
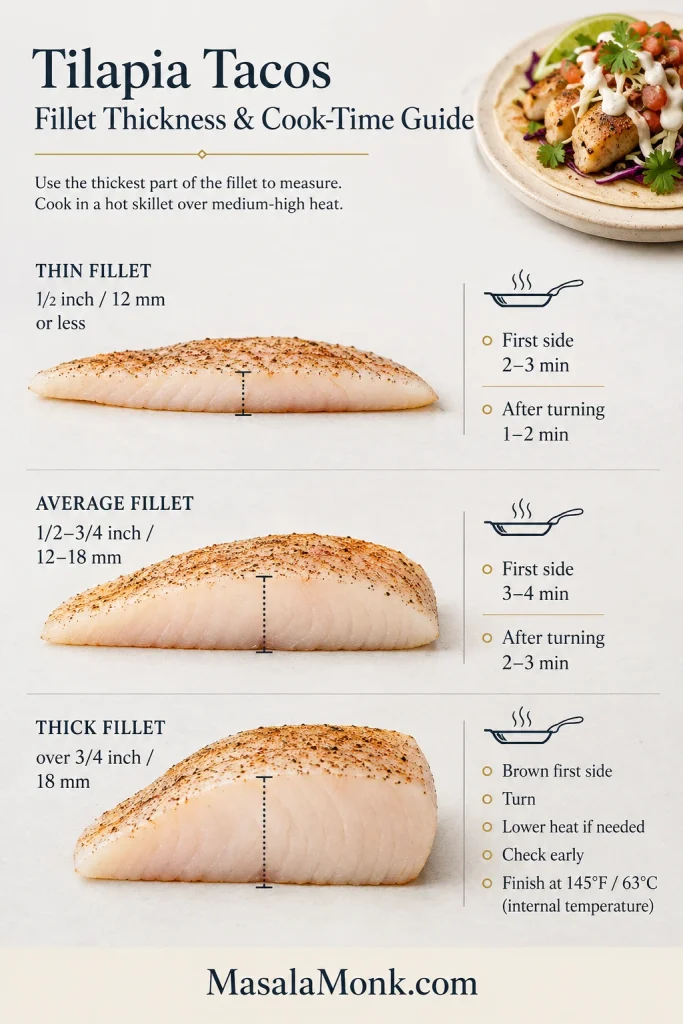
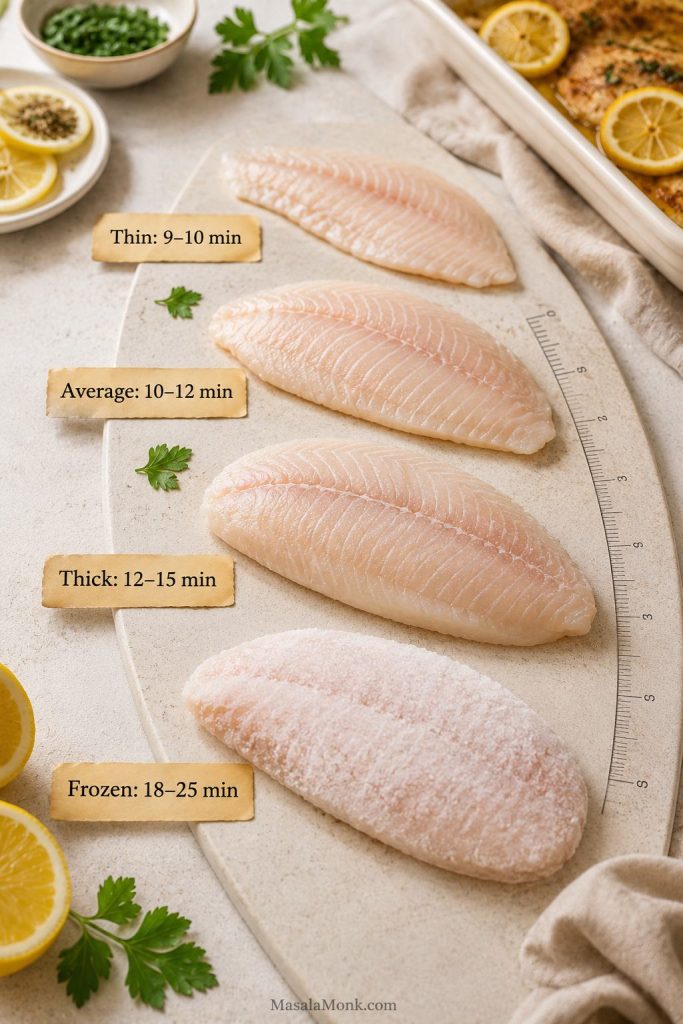
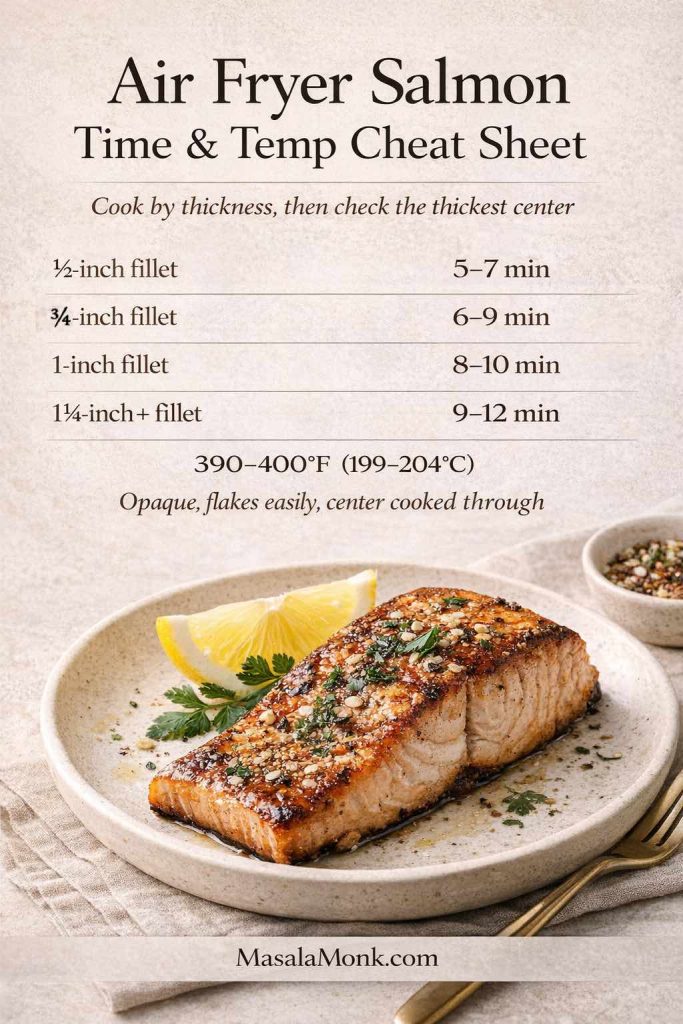
How Long to Cook Tilapia for Tacos
The thickest point of the fillet matters more than the total weight of the package. Use time as a reminder to begin checking, not as permission to ignore the fish until the timer rings.
Measure the thickest part of each fillet. Similar-looking pieces can still finish several minutes apart.
Fillet Thickness
First Side
Second Side
What to Watch
Up to ½ inch / 12 mm
About 2–3 minutes
About 1–2 minutes
Tail ends may finish before the center
½–¾ inch / 12–18 mm
About 3–4 minutes
About 2–3 minutes
Standard skillet range for many fillets
More than ¾ inch / 18 mm
Brown first, then lower heat slightly
Cook to temperature
Use the thermometer rather than color alone
Treat these as checking windows, not guarantees. A thick, cold fillet in a crowded pan cooks differently from a thin fillet in a wide, fully heated skillet.
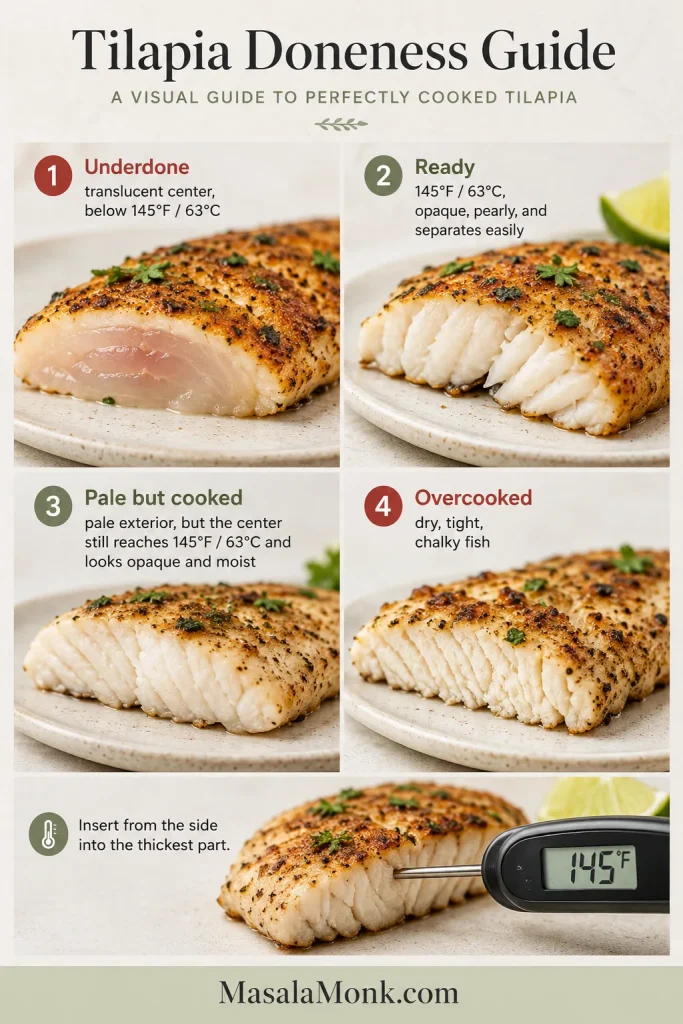
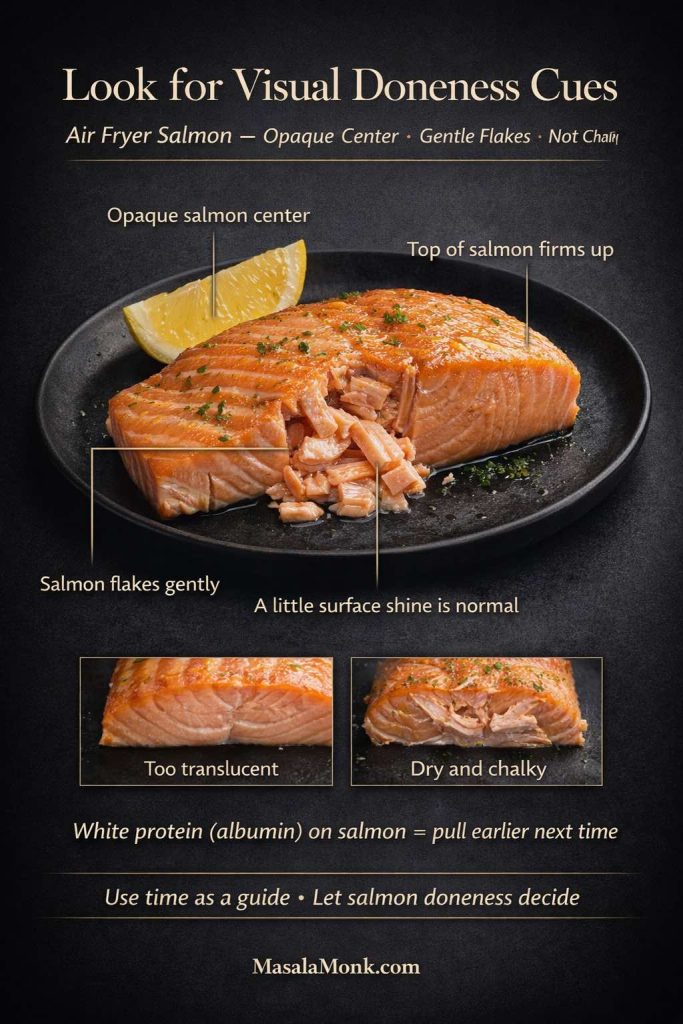
How to Tell When Tilapia Is Done
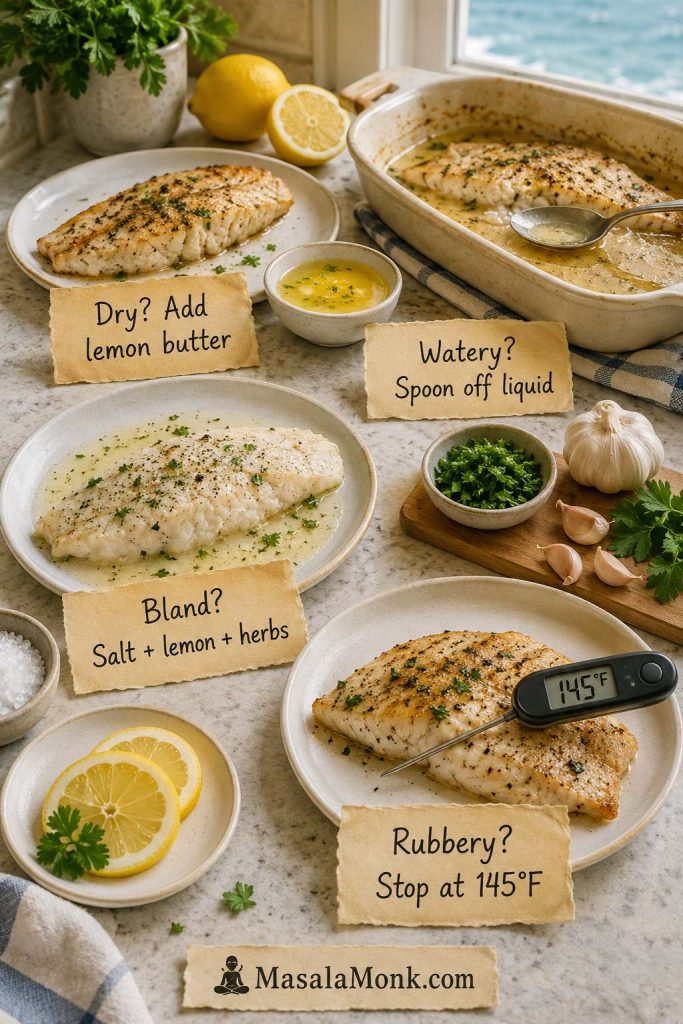
Check the thickest point. The flesh should have lost its translucent look and separate under gentle pressure. FoodSafety.gov lists 145°F / 63°C for fish such as tilapia, or cooking until the flesh is no longer translucent and separates easily with a fork. See the safe minimum temperature chart.
Pale is not the same as undercooked. A thin fillet can be completely done while the surface is still lightly colored. Once the center is ready, take it out—even if the crust is paler than expected.
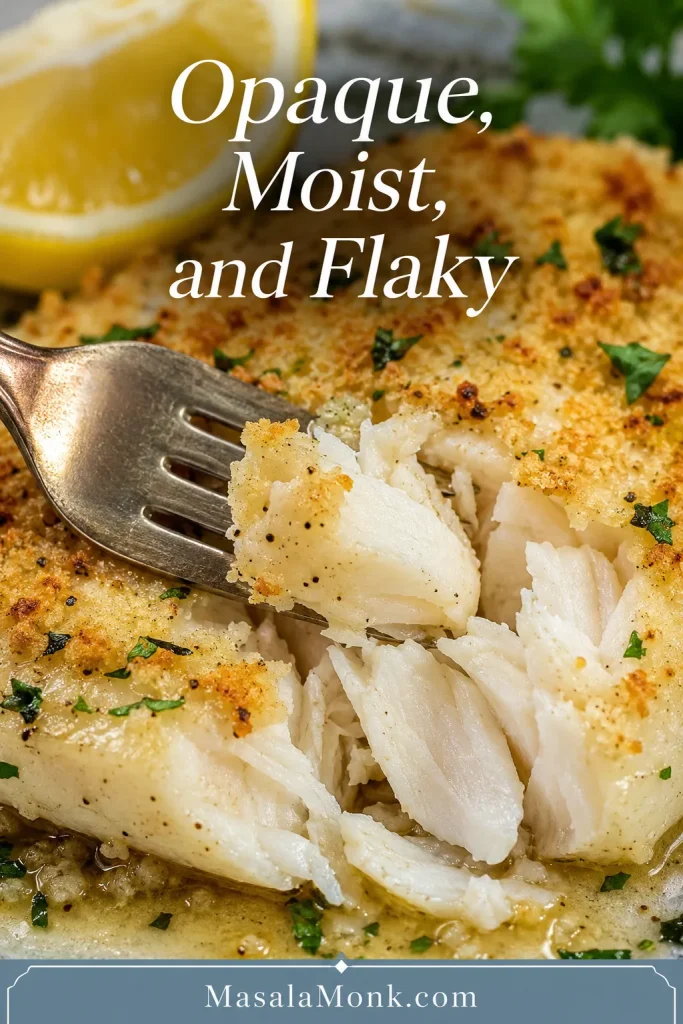
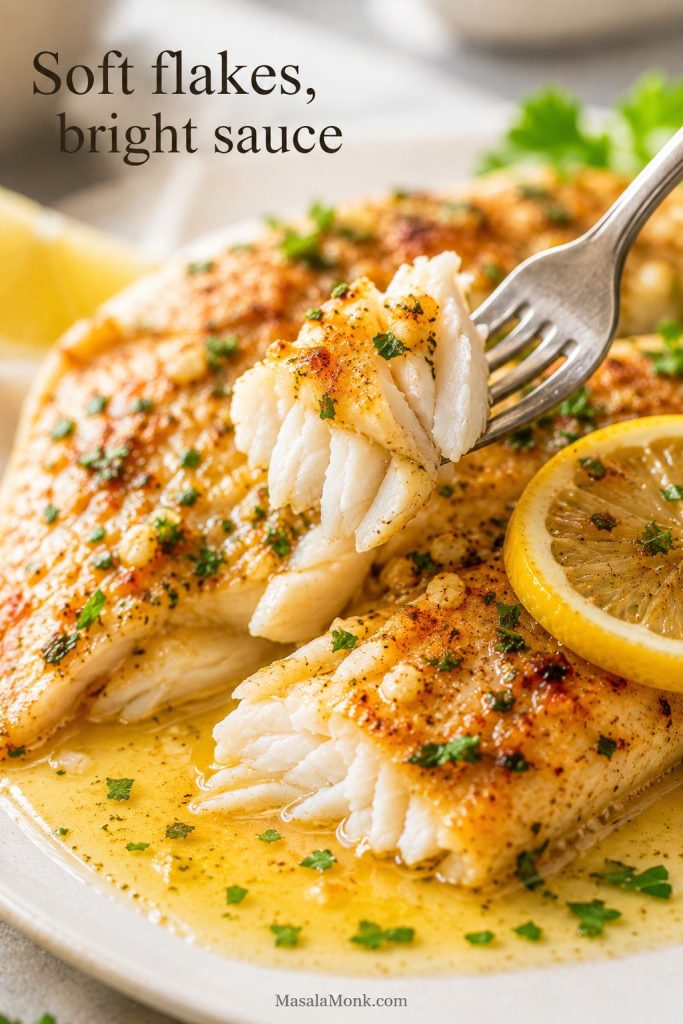
The visual difference: moist tilapia separates into pearly flakes. Overcooked tilapia turns chalky, tight, and dry around the edges.
A properly cooked center looks pearly and moist, not chalky. Use 145°F / 63°C and easy separation as the final checks.
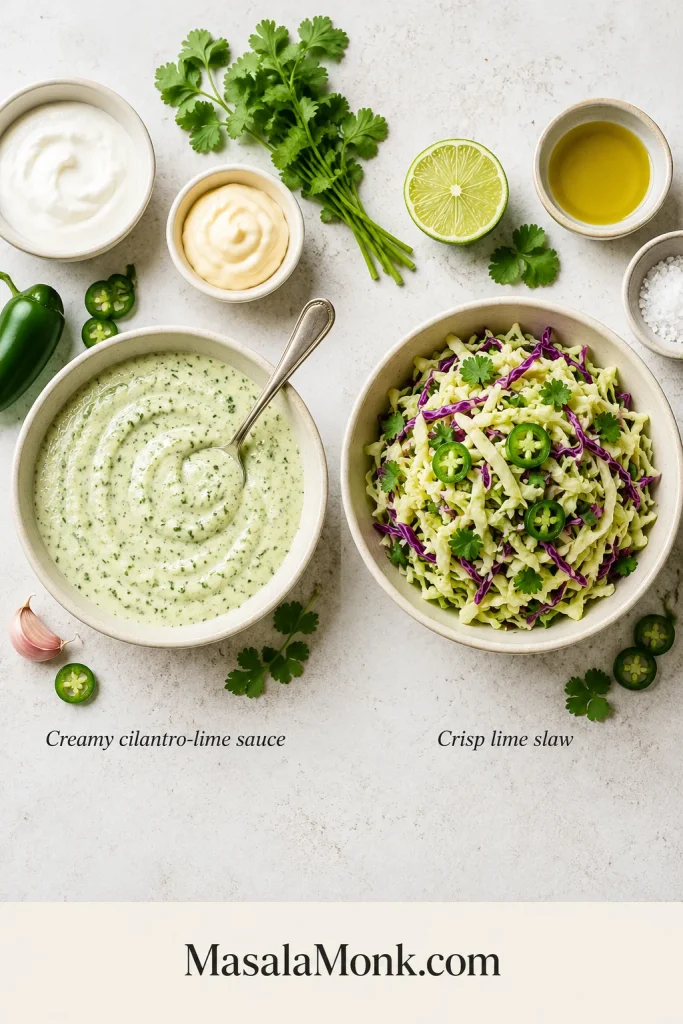
Crisp Slaw and Creamy Lime Sauce
The slaw should stay cold, crisp, and lime-bright; the sauce should be creamy enough to cling without soaking the tortilla. Make both before the fish goes into the pan, then follow the assembly order when the tilapia is ready.
Keep the sauce and slaw separate until serving so cabbage moisture cannot thin the sauce or soak the tortillas.
Cabbage Slaw
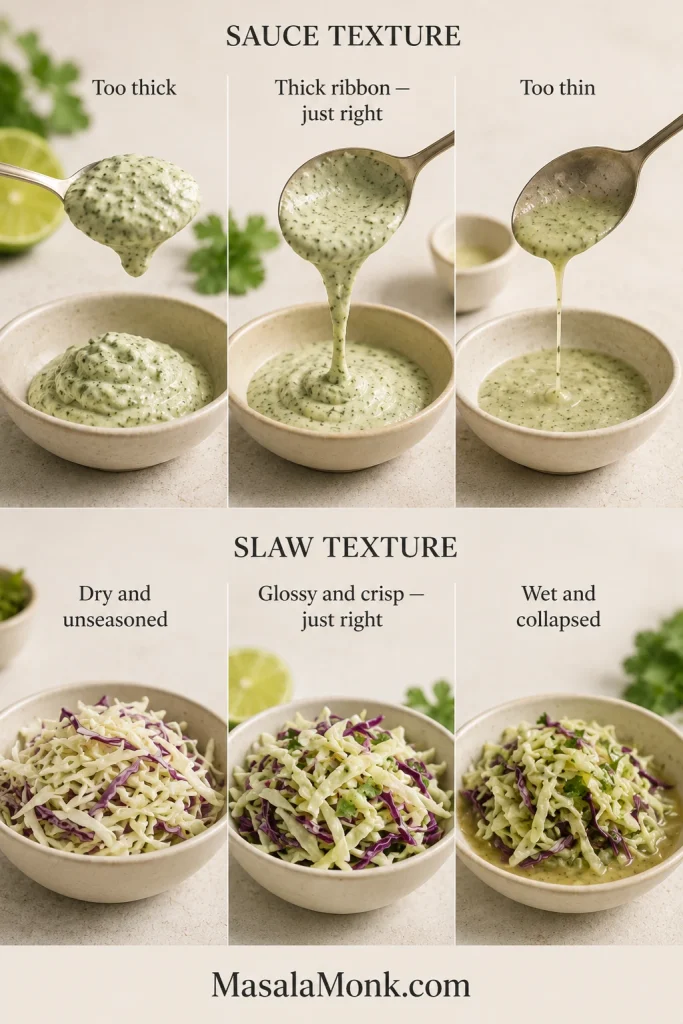
Finely shredded cabbage is easier to bite through than thick ribbons. For eight tacos, 250 g gives a generous amount without burying the fish. Dress it lightly for 10–15 minutes; it should look glossy, not wet.
Taste one strand. It should still snap, carry a light saltiness, and taste clearly of lime. If liquid gathers at the bottom, lift the slaw out with tongs so the excess dressing stays in the bowl. Prefer something creamier? This crisp homemade coleslaw keeps the dressing light enough for the cabbage to stay crunchy.
Creamy Lime Sauce
Greek yogurt makes the sauce lighter and tangier; sour cream makes it rounder and richer. Mayonnaise gives either base enough body to cling. Store-bought works well, or make homemade mayonnaise when you want full control over the flavor.
The recipe makes about 1 cup / 240 ml, enough for a thin layer below the fish and a light drizzle on top. Before thinning, the sauce should taste bright and slightly assertive; the fish, cabbage, and avocado will soften it in the finished taco.
Before assembling, compare both textures below: the sauce should fall in a thick ribbon, while the slaw should remain glossy, loose, and crisp.
The sauce should fall in a thick ribbon; the slaw should stay glossy, crisp, and loose enough to lift with tongs.
Easy Sauce Variations
Chipotle-lime: replace the jalapeño with 1–2 teaspoons minced chipotle in adobo.
Lighter: use ¾ cup / 180 g Greek yogurt and 2 tablespoons / 30 g mayonnaise.
No cilantro: use lime zest and finely sliced green onion instead.
Sweet heat: keep the sauce mild and add a little mango habanero sauce at the table.
The Best Assembly Order
Divide the fish generously among eight small tortillas so every taco feels substantial but still folds easily.
Warm tortilla
Thin layer of creamy sauce
Large flakes of tilapia
Drained cabbage slaw
Avocado, salsa, or cheese
Final light drizzle of sauce
Fresh lime and cilantro
The first layer of sauce keeps the taco from tasting dry. Next, the fish creates a barrier between the tortilla and the wetter slaw. Watery salsa, extra lime, and heavy drizzles should go on last.
Start with a thin sauce layer, then add fish, drained slaw, avocado, and only a light final drizzle.
Make a cook’s taco first. Taste one before building the remaining seven. Add lime if it feels flat, salt if the flavors disappear, more slaw for crunch, or another small drizzle of sauce if the fish needs moisture.
Taste one assembled taco before serving. The combined bite reveals whether the table needs more lime, heat, or crunch.
Nothing needs to be plated perfectly. Put the bowls in the middle, keep the tortillas warm, and let the table finish the meal while the fish is hot.
Fresh mango salsa adds sweetness and acidity without weighing down the fish, and its chunky texture is easier on the tortillas than a watery salsa.
Other Ways to Cook Tilapia for Tacos
The skillet remains the best starting point. Go blackened for more heat, use the oven for one full tray, turn to the air fryer for a small batch, choose panko for crunch, or grill the fish for light smoke.
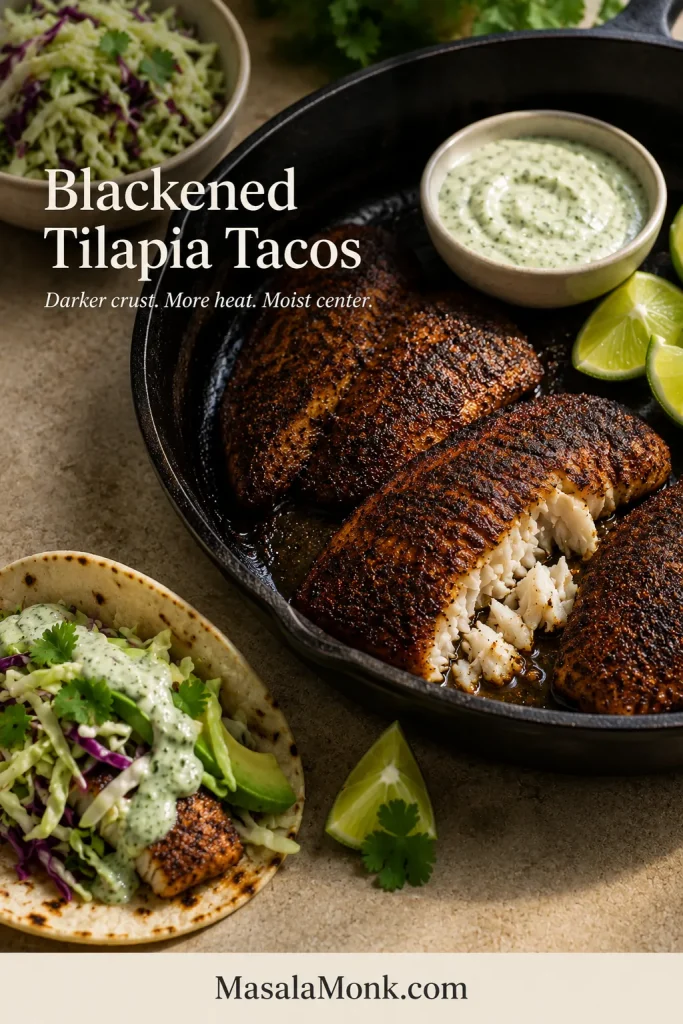
Blackened Tilapia Tacos
For a darker, hotter crust, increase the smoked paprika to 1½ teaspoons, use the full ¼ teaspoon cayenne, and choose a heavy skillet.
Cook over controlled medium-high heat for about 3–4 minutes on the first side and 2–3 minutes after turning. Blackened doesn’t mean burnt. The spices should smell smoky and warm, never bitter. Cool yogurt-lime sauce, cabbage, avocado, and fresh lime keep the stronger crust balanced.
Blackened tilapia should show reddish-brown spice detail, not a uniformly burnt surface; the interior should remain pale and moist.
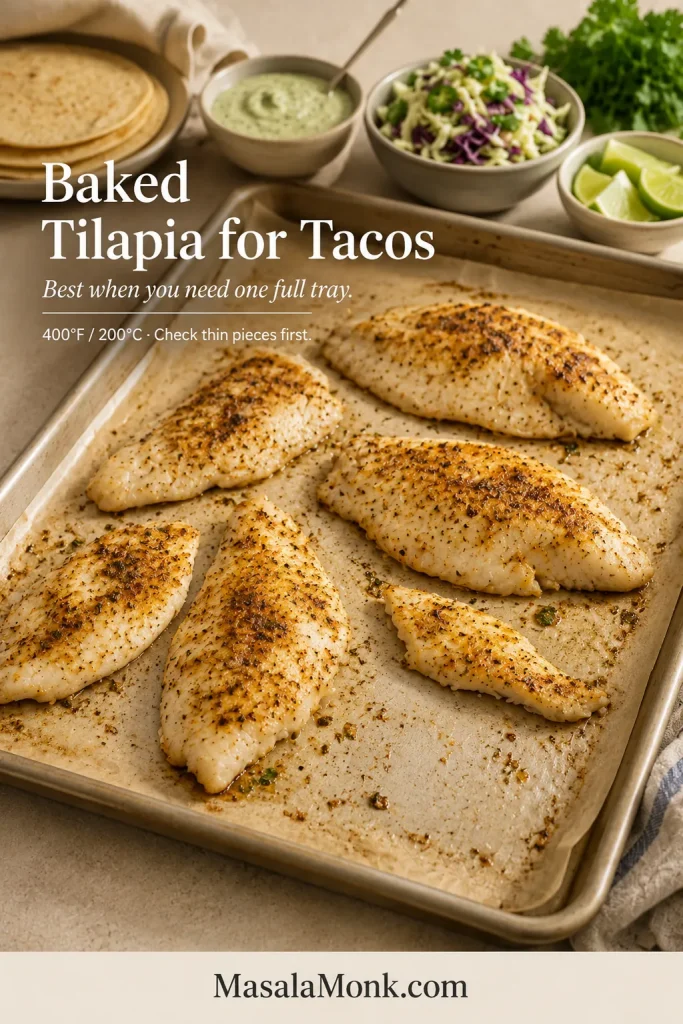
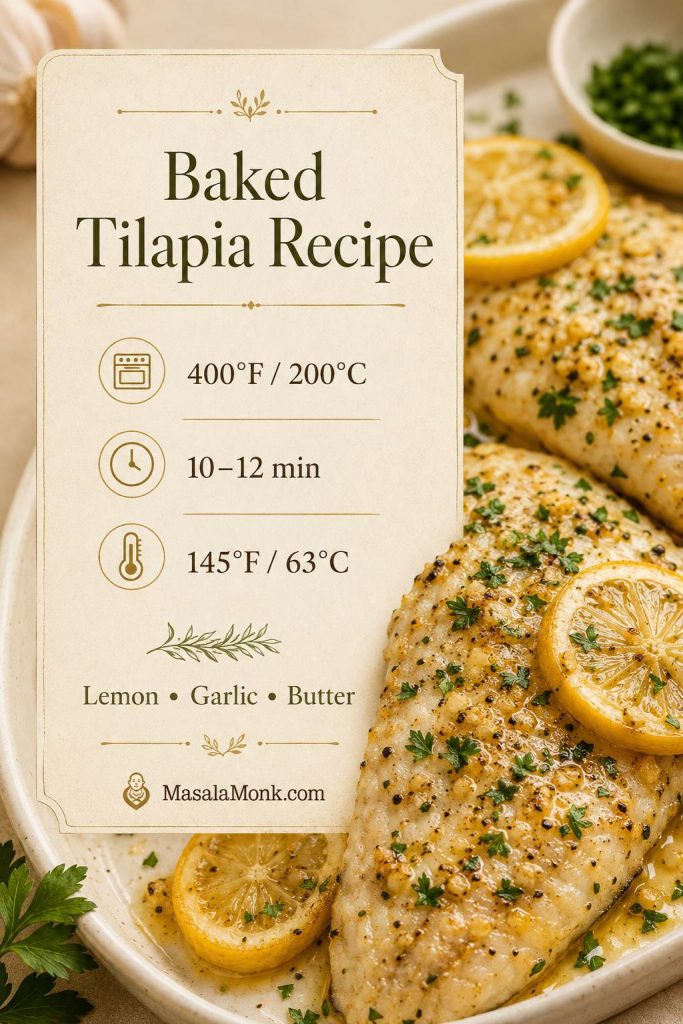
Baked Tilapia Tacos
Heat the oven to 400°F / 200°C and arrange the seasoned fillets in one layer on a lined rimmed sheet pan. Thin fillets may finish in 9–10 minutes, average pieces in 10–12, and thick fillets in 12–15. Remove each fillet as soon as the center is opaque and separates easily.
Baked fish is softer and paler than skillet tilapia, but it should still separate into moist, broad flakes. Choose the oven when several people are waiting and you would rather slide in one full tray than manage two skillet batches.
Remove thin baked fillets early rather than waiting for a perfectly symmetrical tray to finish together.
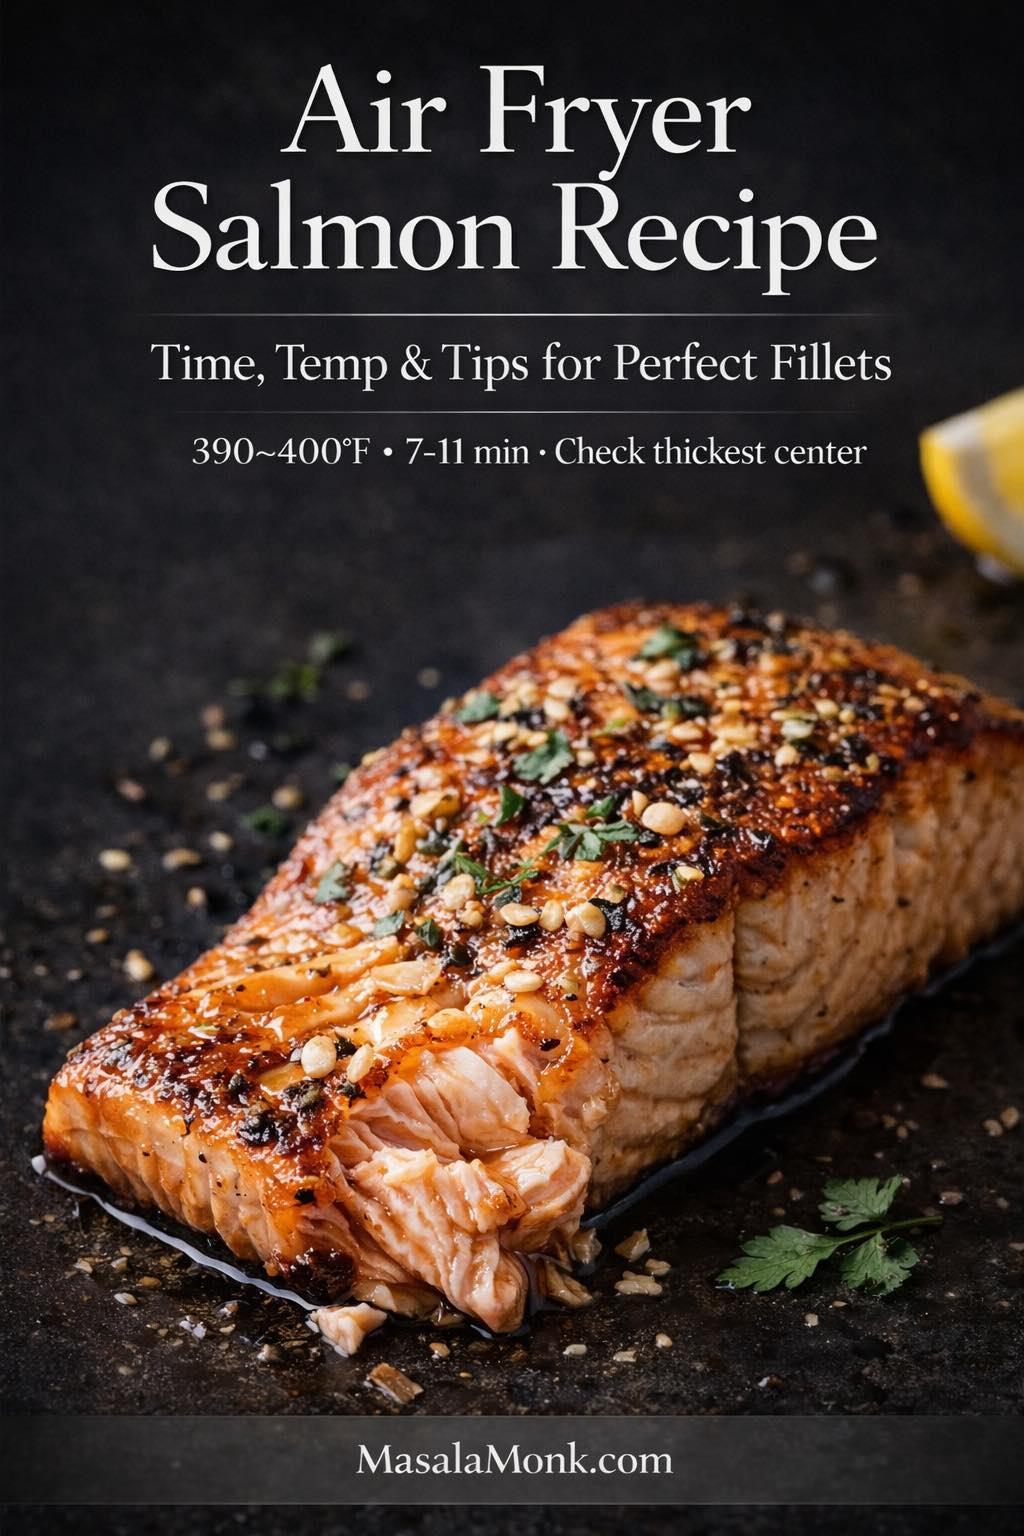
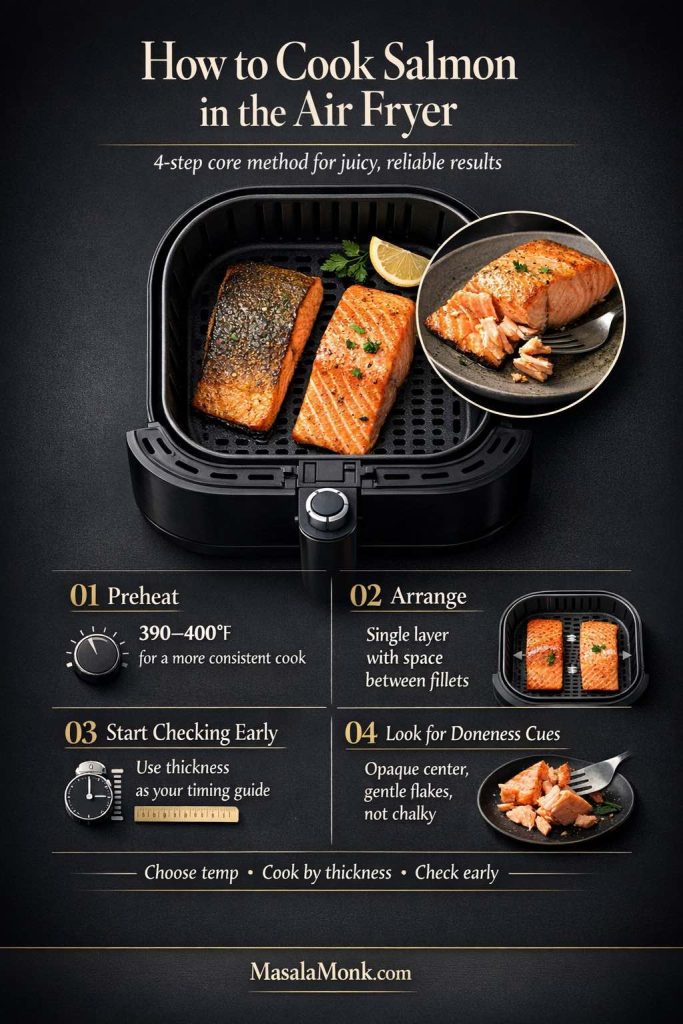
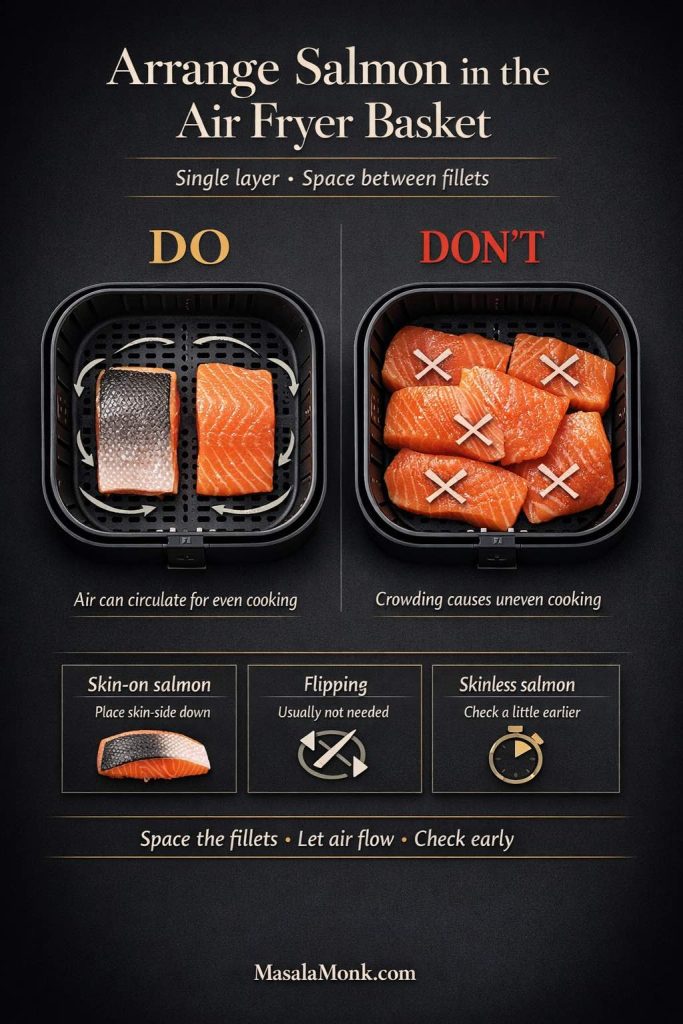
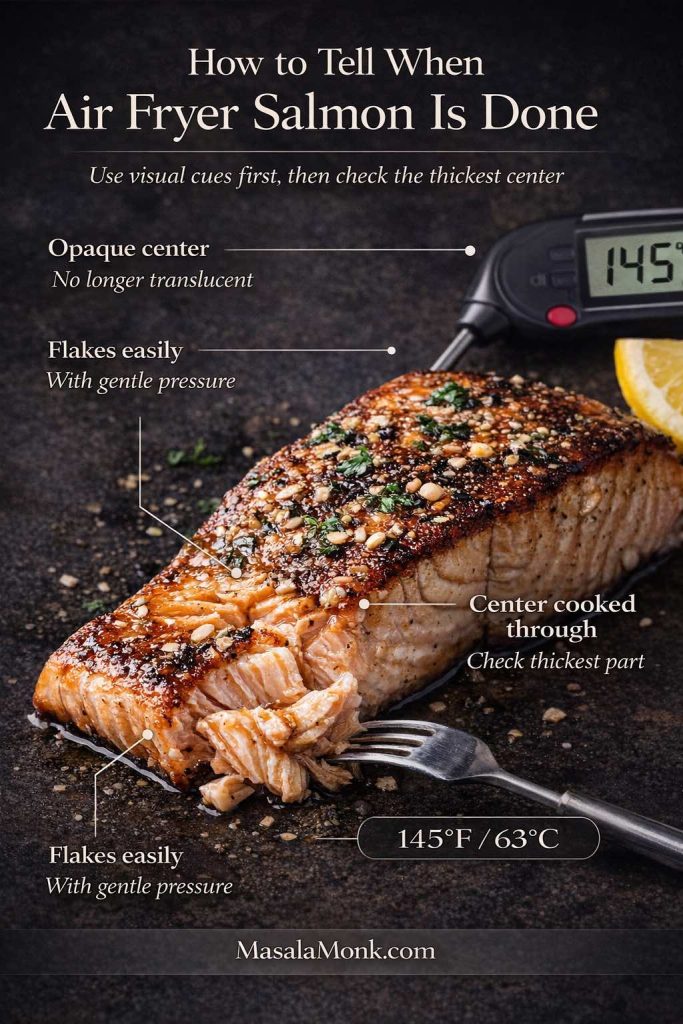
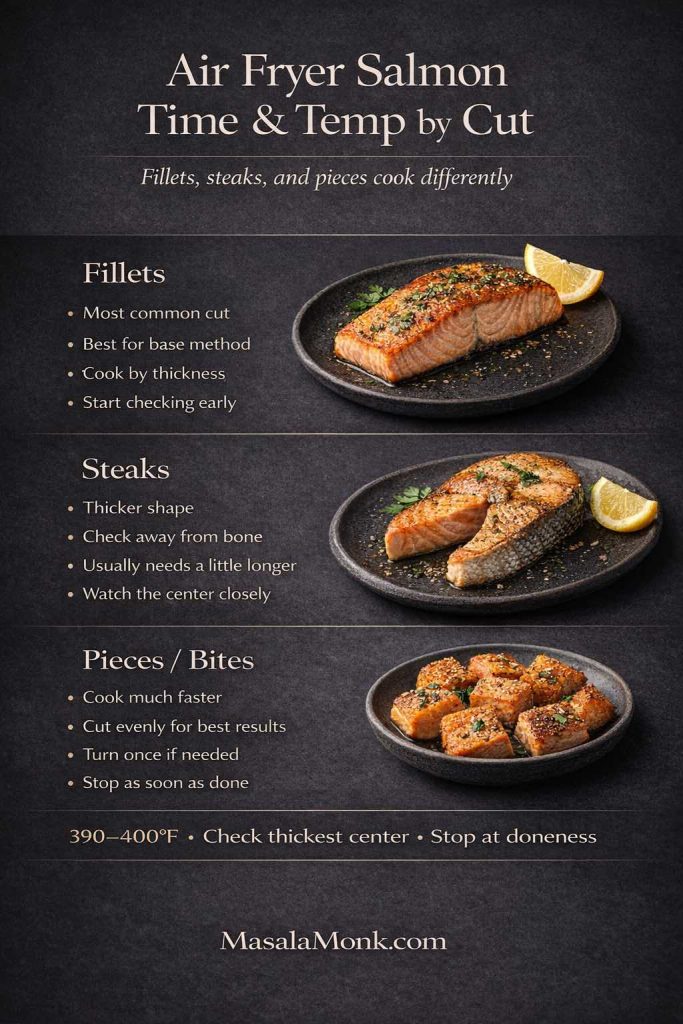
Air Fryer Tilapia Tacos
Preheat to 400°F / 200°C when your model benefits from it, then lightly oil the basket and fish. Cook in one layer for about 7–10 minutes, checking the thinnest pieces at 6 minutes and taking them out first if needed.
The air fryer suits two or three fillets, not the full eight-taco batch; the first fish may cool before the second round finishes. Expect lightly browned, drier edges rather than the deeper crust of a skillet.
Leave open space around each fillet; circulating air cannot brown covered surfaces.
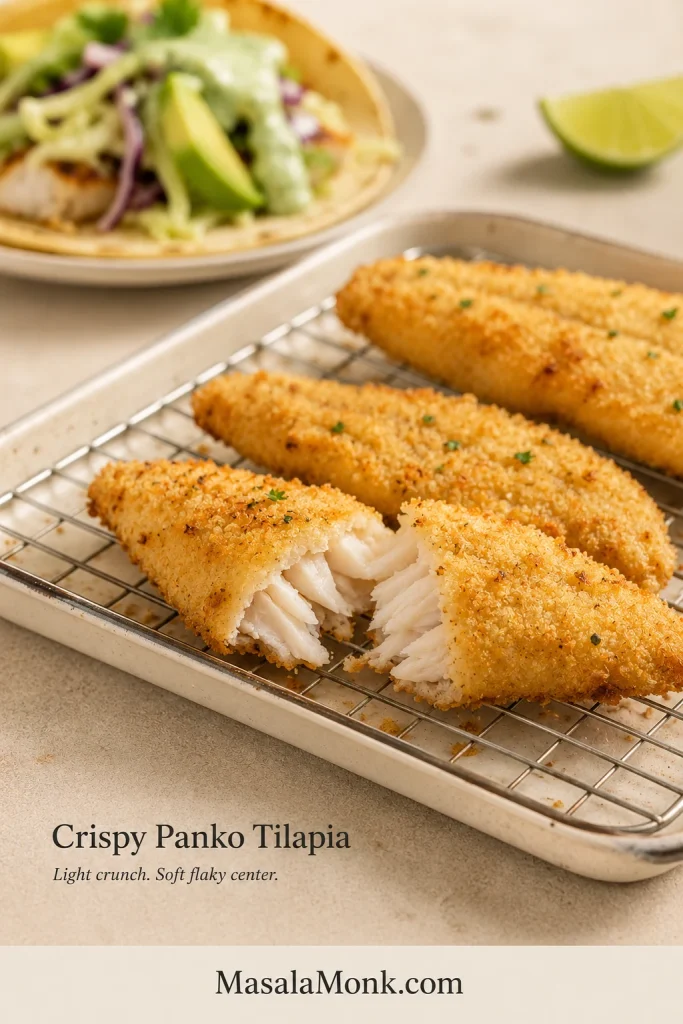
Crispy Tilapia Tacos
Cut 567 g tilapia into 1–1½-inch / 2.5–4 cm strips. Set out ½ cup / 60 g flour, 1 beaten egg with 1 tablespoon water, and 1¼ cups / 75 g panko tossed with 1 tablespoon oil. Combine 1 teaspoon chili powder, ½ teaspoon smoked paprika, ½ teaspoon cumin, ½ teaspoon garlic powder, ½ teaspoon fine sea salt, and ¼ teaspoon black pepper; mix half into the flour and half into the panko.
Coat each strip in flour, egg, and panko. Air fry at 400°F / 200°C for 7–9 minutes, or bake for 10–14 minutes, until the thickest strip reaches 145°F / 63°C. The coating should crack lightly and then give way to soft fish, not a thick shell of crumbs. Cook in batches when necessary, and discard coating ingredients that touched raw fish.
The panko should hug the fish in a thin crust. A thick shell overwhelms delicate tilapia.
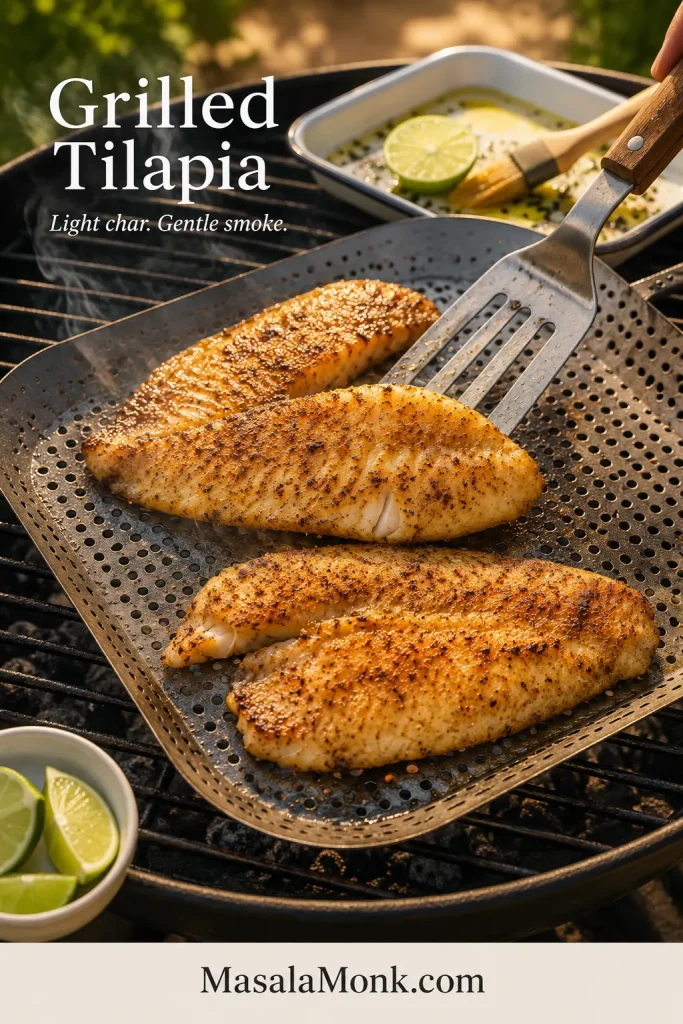
Heat a clean, oiled grill to about 400°F / 200°C. A perforated fish basket or grill-safe foil helps with thin fillets. Grill for 3–4 minutes on the first side and 2–3 minutes after turning. Pull the fish as soon as the center flakes; thin grilled tilapia dries quickly.
Finish with fresh lime and serve with avocado, roasted salsa verde, charred corn, or mango salsa. Avoid a long citrus marinade, which can soften the delicate surface.
A grill basket supports thin fillets. Light, patchy browning is enough; deep grill stripes can mean the fish cooked too long.
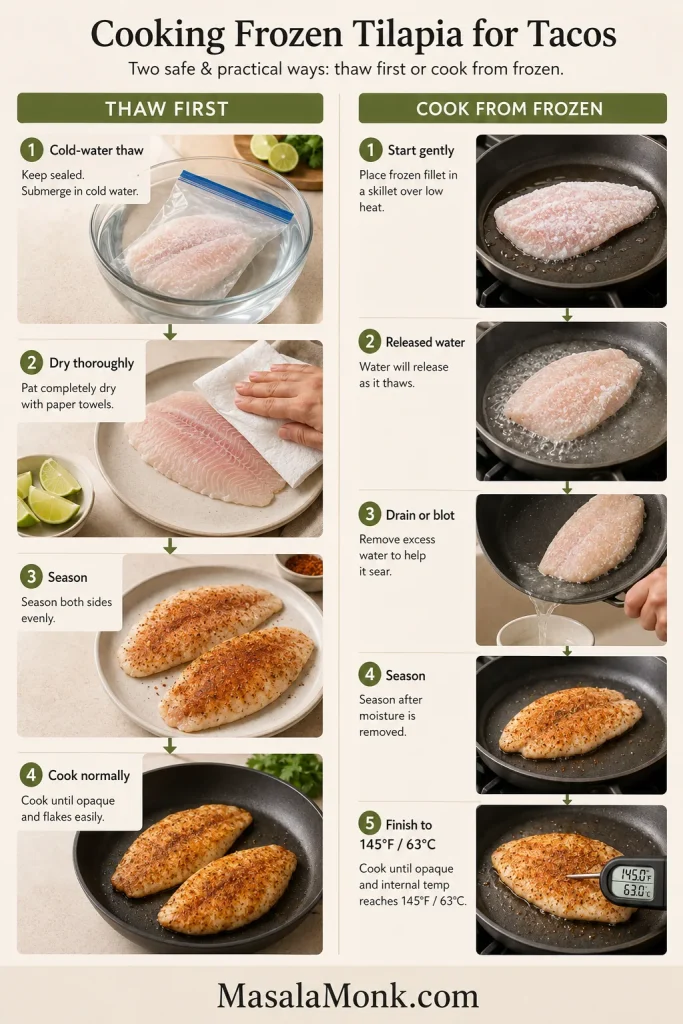
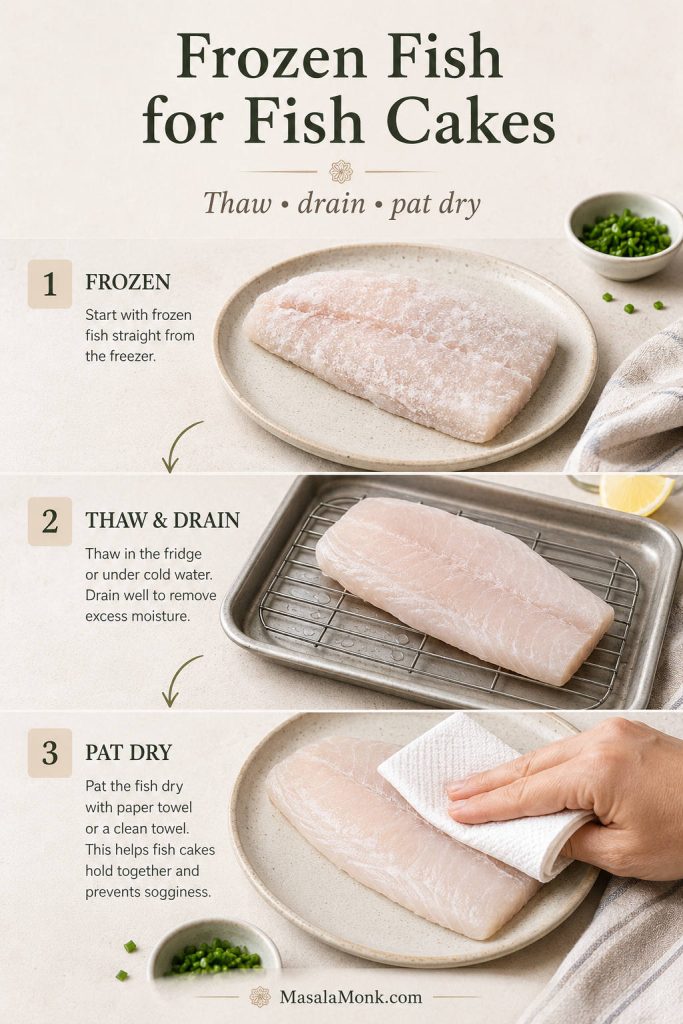
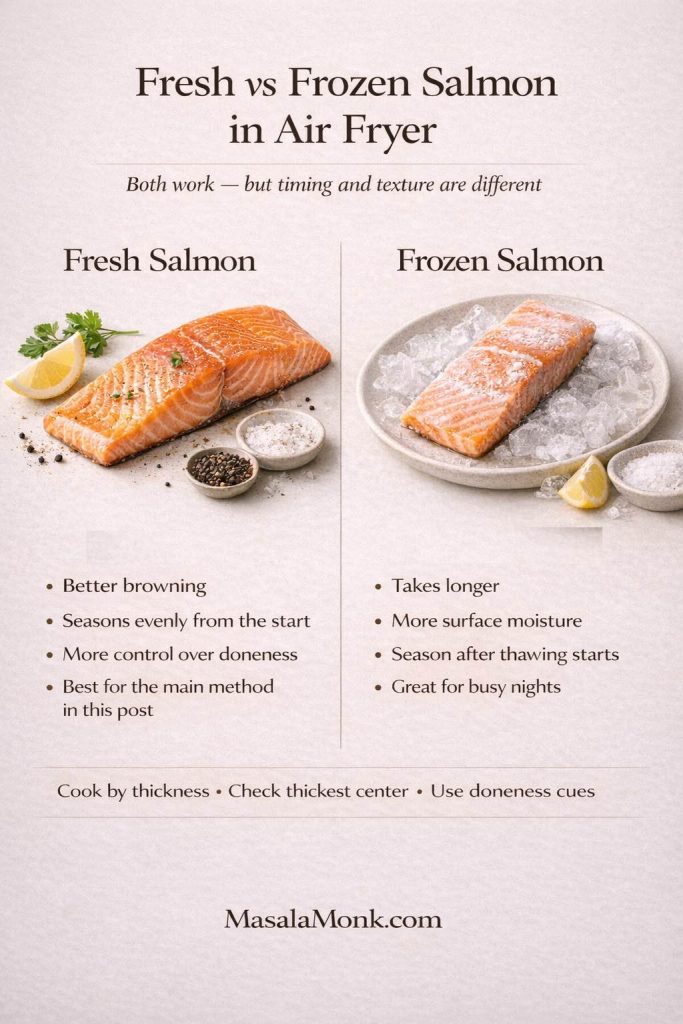
Thawed and thoroughly dried tilapia gives the best browning. Leave it in the refrigerator overnight, or thaw it in a sealed bag under cold water, changing the water regularly. FoodSafety.gov explains safe seafood handling.
When cooking from frozen, remove the released water before seasoning. That reset allows the surface to brown instead of steam.
Air fryer: cook frozen fillets at 400°F / 200°C for 5 minutes. Transfer them to a clean plate, pour away released liquid, and pat the surface dry. Oil and season, then cook for another 7–10 minutes.
Oven: bake frozen fillets at 400°F / 200°C for 5–7 minutes. Drain the sheet pan carefully, dry the exposed surface, then oil, season, and bake for another 12–18 minutes.
With either method, finish at 145°F / 63°C and check that the thickest part is opaque and easy to separate.
Direct-from-frozen skillet cooking is the weakest choice for browned tacos because the released water steams the fish and carries away seasoning. The baked tilapia guide goes deeper into thickness and frozen-fish troubleshooting.
Healthy Tilapia Tacos: Practical Lighter Swaps
A lighter taco should still feel generous. Keep the fish, cabbage, cilantro, and lime plentiful; lighten the sauce instead of shrinking the whole meal. Use small corn tortillas, make the sauce mostly with Greek yogurt, and treat avocado or cheese as accents. Exact nutrition varies with the tortillas, dairy base, and toppings you choose.
Keep the full fish portion. Fresh vegetables and yogurt-forward sauce lighten the taco without making dinner feel skimpy.
Keep the full fish portion and use the skillet or oven instead of a crumb coating.
Choose small corn tortillas.
Use ¾ cup Greek yogurt with only 2 tablespoons mayonnaise for the sauce.
Keep cabbage, radish, cilantro, lime, and fresh salsa generous.
Use avocado and cheese as accents rather than removing every creamy element.
Add black beans or extra slaw when you want a fuller plate.
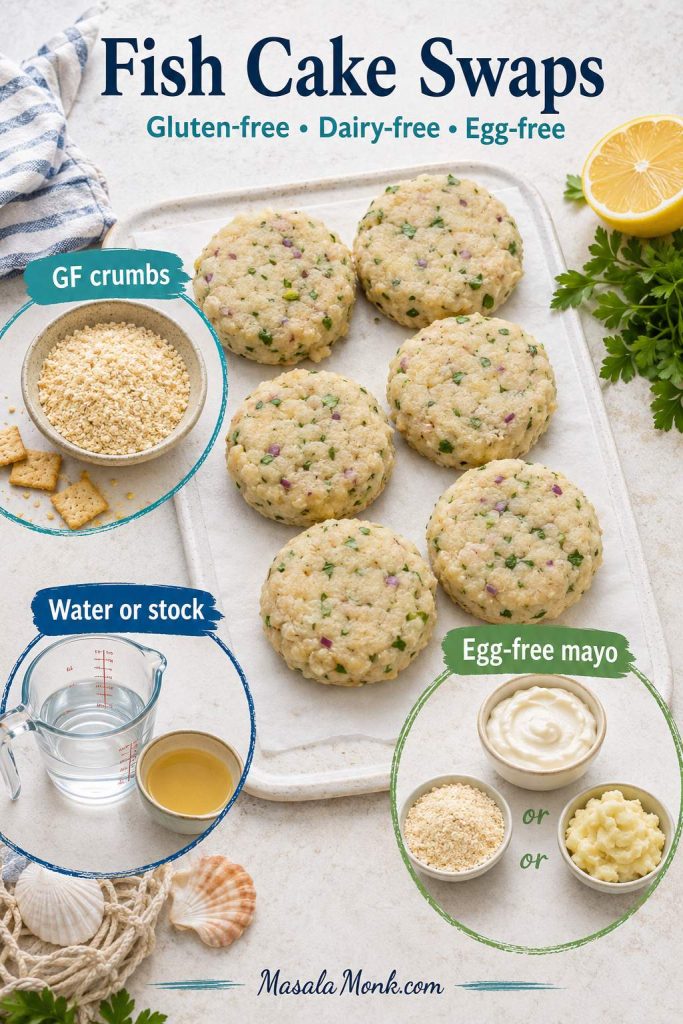
Gluten-Free and Dairy-Free Options
Making the tacos gluten-free is simple: use certified corn tortillas and check packaged chili powder, chipotle, and sauces when cross-contact matters. The skillet fish and cabbage slaw are naturally gluten-free as written.
To make the tacos dairy-free, use unsweetened dairy-free yogurt or mashed avocado in the sauce and omit cotija or feta. Regular mayonnaise is usually dairy-free; an egg-free vegan mayonnaise covers both needs. Add water slowly because dairy-free yogurt can be thinner than Greek yogurt or sour cream.
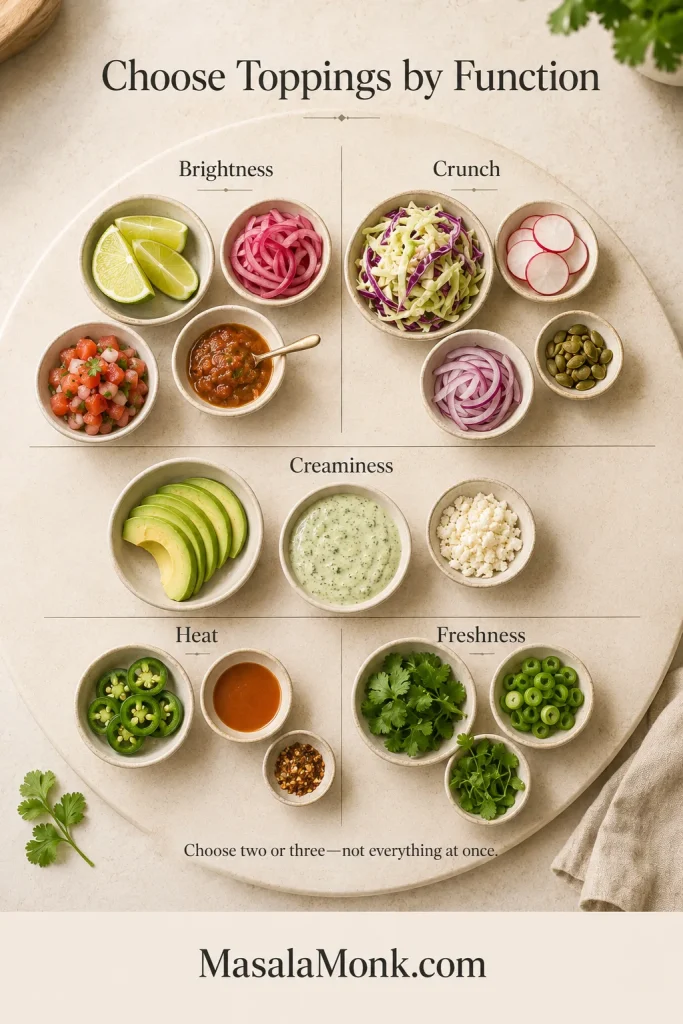
Toppings That Work
One creamy element, one crunchy element, and one fresh or acidic finish are usually enough. Too many wet or rich toppings hide the fish and soften the tortilla.
Choose toppings by function: one creamy element, one crunch, and one fresh or acidic finish.
Fresh and acidic: lime, cilantro, pico de gallo, pickled onion, or radish.
Creamy: avocado, lime sauce, fresh guacamole, cotija, or feta.
Extra crunch: cabbage, radish, pickled vegetables, or toasted pepitas.
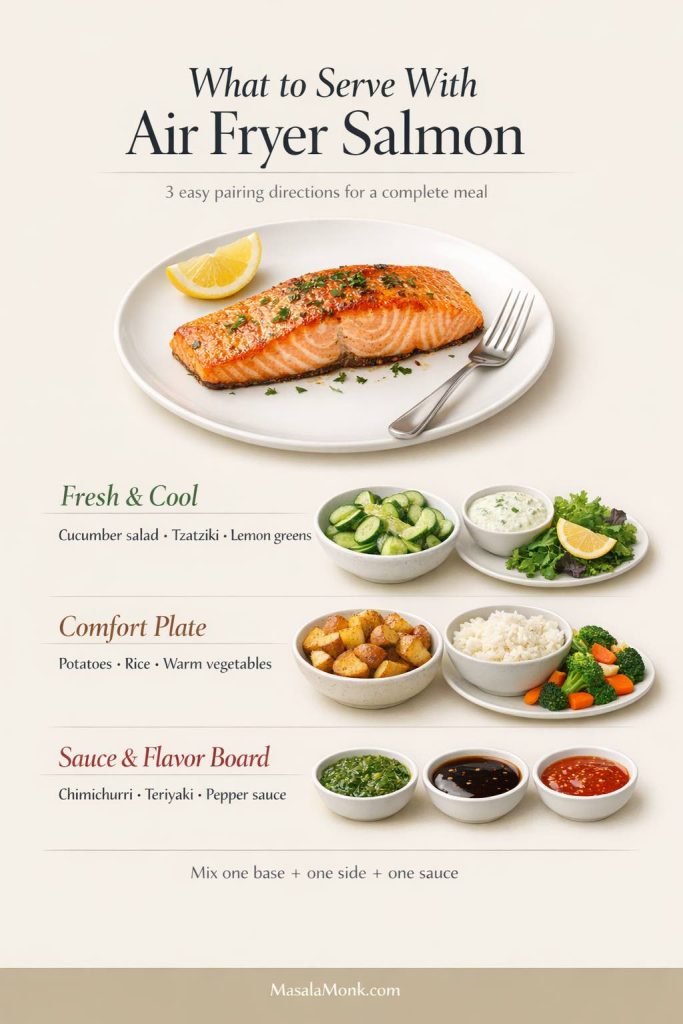
What to Serve with Tilapia Tacos
Keep the sides simple so the tacos remain the center of the meal. Good choices include fluffy rice finished with cilantro and lime, black or pinto beans, grilled corn, a light green salad, or crisp cucumber salad. Fresh mango salsa can work as both a topping and a side.
This spread shows the full range of serving ideas. For an ordinary dinner, choose one substantial side—rice or beans—and one fresh side such as cucumber salad or grilled corn.
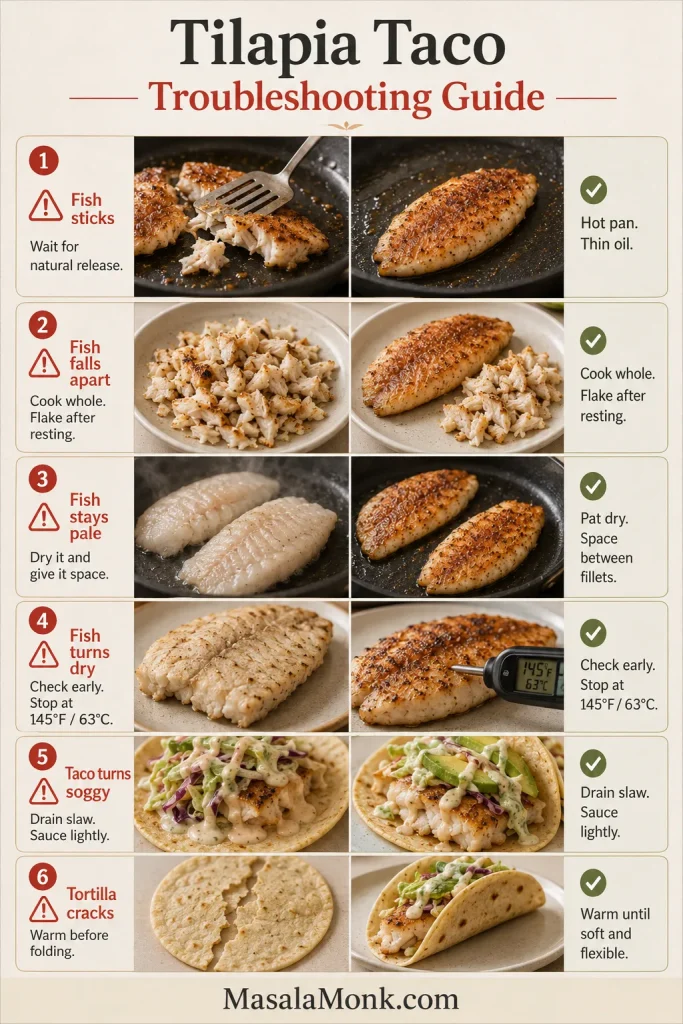
Common Problems and Fixes
Most problems begin with moisture, heat, or timing. Fix the cause first instead of trying to hide dry or watery fish under more sauce.
Pale fish and soggy tacos point to moisture; torn fillets and cracked tortillas usually signal rushed handling.
Problem
Likely Cause
What to Do
Fish is watery and pale
Wet fillets, cool pan, or overcrowding
Dry more thoroughly, reheat the pan, and cook in batches
Tilapia is dry
Thin fillets cooked for a thick-fillet time
Begin checking early and remove pieces separately
Fish breaks while turning
Moved too early or turned repeatedly
Use a wide fish spatula and turn only once
Seasoning tastes burnt
Pan too hot, coating too thick, or insufficient oil
Reduce heat slightly and use a thin, even spice layer
Tacos taste bland
Fish, slaw, or sauce under-seasoned
Taste the fish, slaw, and sauce separately; add salt or lime where it is actually missing
Tortillas become soggy
Wet slaw, too much sauce, or early assembly
Drain toppings, use controlled sauce, and assemble at the table
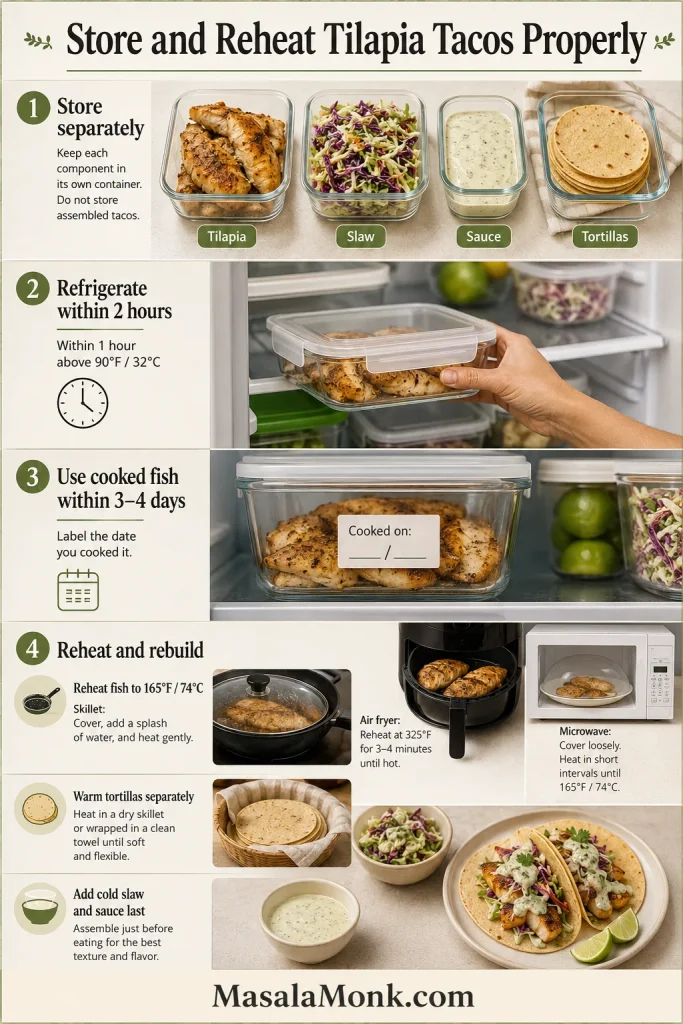
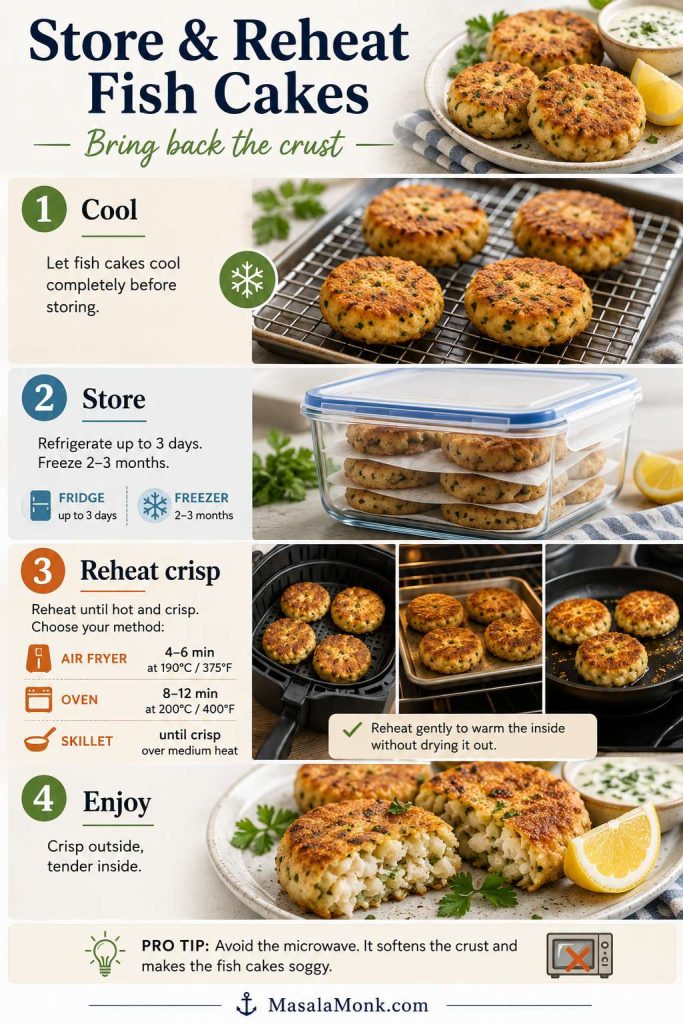
Store the fish, slaw, sauce, and tortillas separately. Following the USDA leftovers guidance, refrigerate cooked tilapia in a shallow, covered container within 2 hours—or within 1 hour when the temperature is above 90°F / 32°C. An assembled taco doesn’t reheat well because the tortilla absorbs moisture from the sauce and slaw.
Cooked tilapia: use within 3–4 days, or freeze it sooner if you will not eat it in that window.
Sauce: refrigerate for up to 3 days and stir before using.
Cabbage: shred a day ahead, but dress it closer to serving for the best crunch.
Seasoning: mix several days ahead and store dry.
Tortillas: warm immediately before serving.
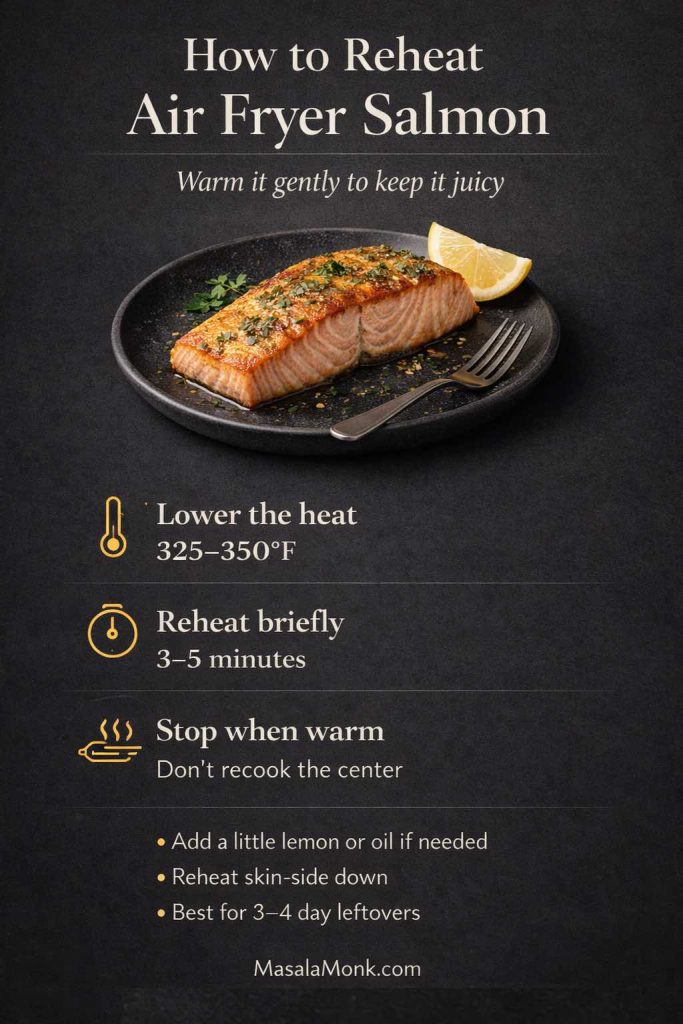
How to Reheat the Fish
Warm the fish gently in a lightly oiled skillet over medium-low heat, or air fry at 350°F / 175°C for 2–4 minutes, checking after 2 minutes. Reheat the thickest piece to 165°F / 74°C, then stop; extra time makes thin tilapia dry and rubbery.
The microwave works when speed matters. Arrange the fish evenly, cover it loosely with a microwave-safe lid, and heat at 50–70% power in 20–30 second intervals until the thickest piece reaches 165°F / 74°C.
Leftover fish also works well in a taco bowl with warm rice, slaw, sauce, avocado, and lime.
Store fish, slaw, sauce, and tortillas separately. Reheat only the fish, then rebuild the tacos just before serving.
Frequently Asked Questions
How Many Tacos Should I Plan per Person?
Plan on two small tacos per person, using about 5 oz / 140 g raw fish. Increase that for larger tortillas, bigger appetites, or a meal with very few sides.
What Can I Make Ahead?
Make the sauce up to 3 days ahead, shred the cabbage a day ahead, and mix the seasoning in advance. Dress the slaw and cook the fish close to serving. For leftovers, use the storage and reheating guide.
Hot Fish, Cold Slaw, Warm Tortillas
Bring everything to the table separately and build the first taco while the fish is still hot. That first bite—warm tortilla, smoky tilapia, cool sauce, sharp lime, and crisp cabbage—is the whole point.
Once the cook’s taco tastes balanced, pass the bowls around and let everyone build their own while the tortillas are warm.
What did your cook’s taco need—more lime, more heat, or more crunch?
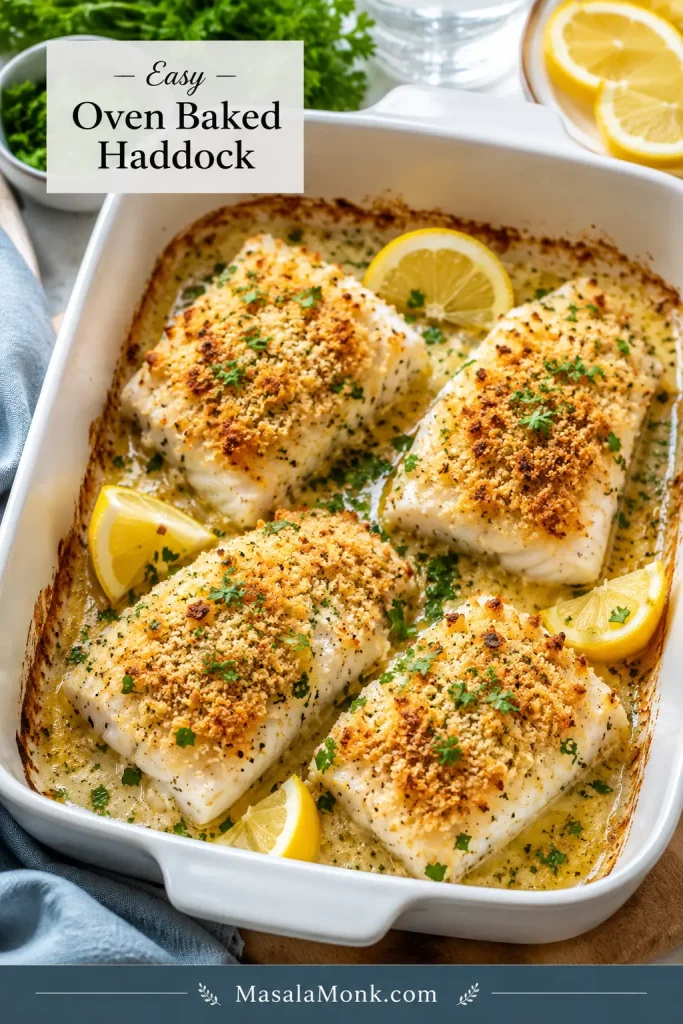
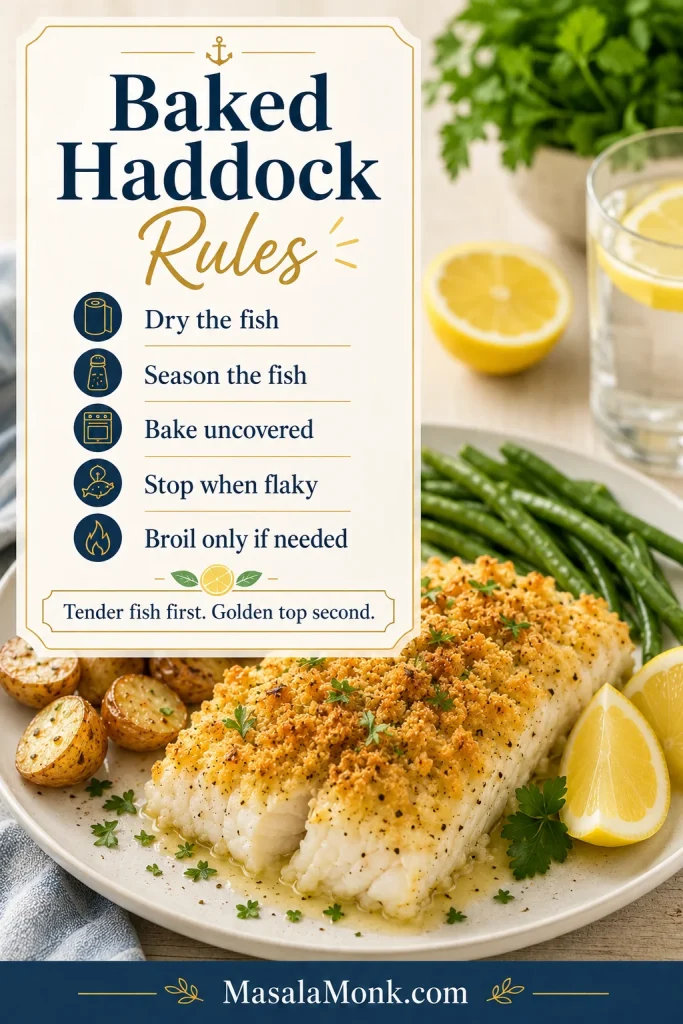
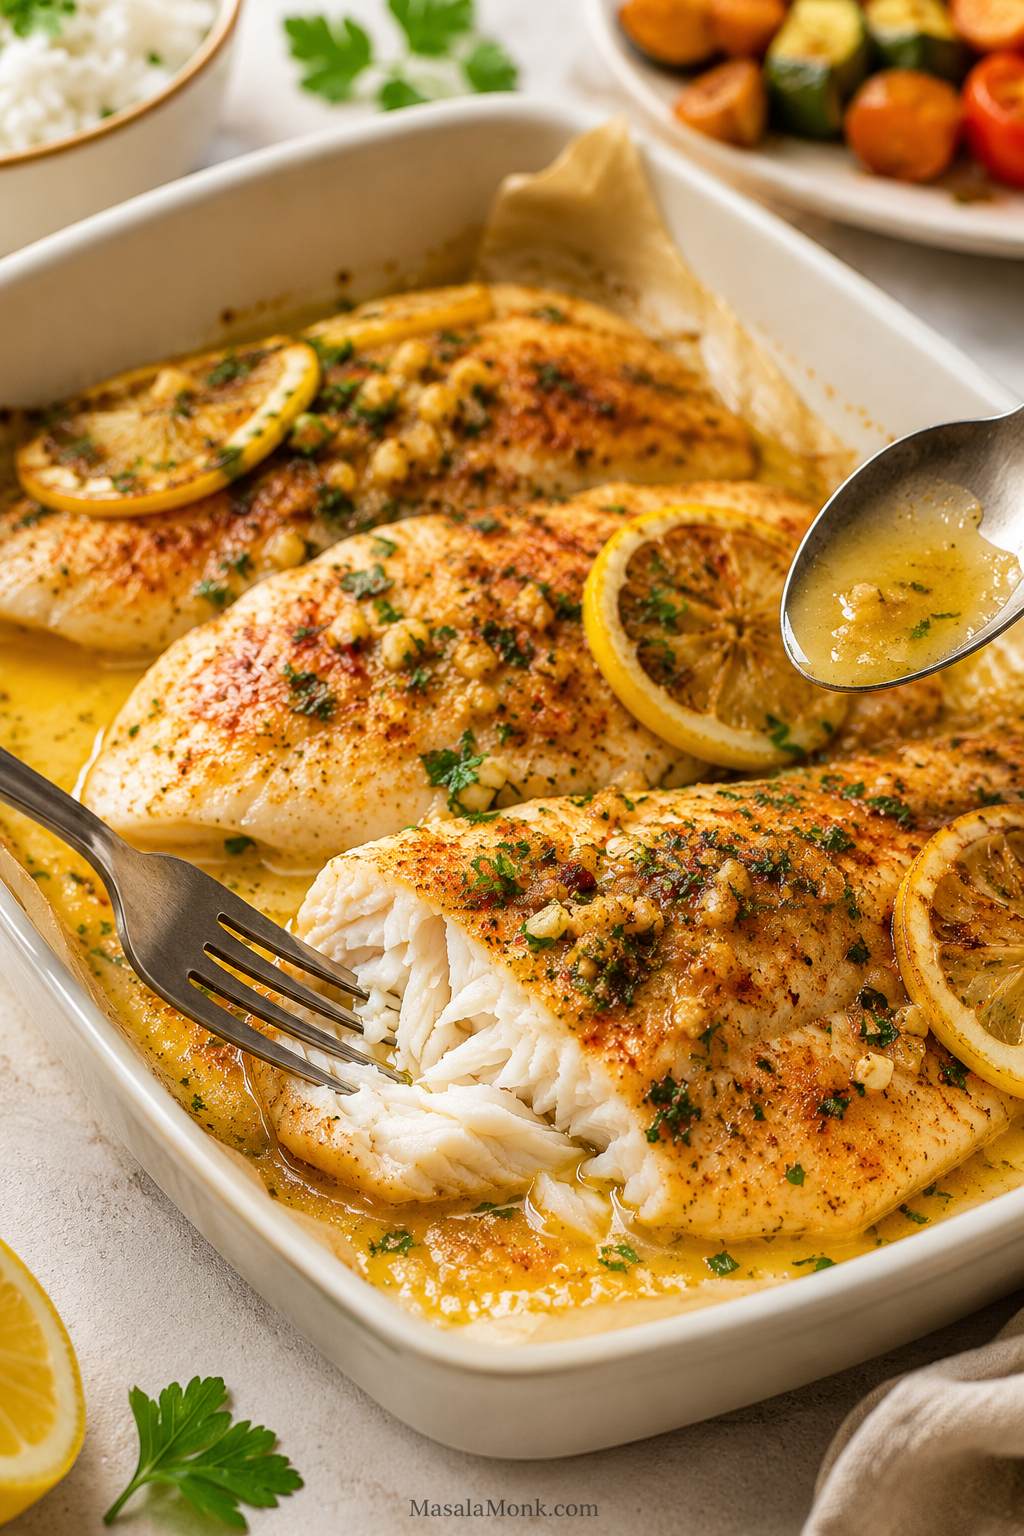
This baked haddock recipe gives you tender, flaky white fish with a golden buttery topping in about 25 minutes. It is simple oven fish, but with the small details that keep haddock from turning dry, watery, bland, or hidden under soggy crumbs.
Haddock cooks quickly, which can feel a little unforgiving at first. The rhythm is simple: dry the fish, season it directly, add a buttery topping, and stop baking when the fish is done. After that, it becomes one of the easiest weeknight seafood dinners.
Quick Answer: Bake Time, Temperature, and Doneness
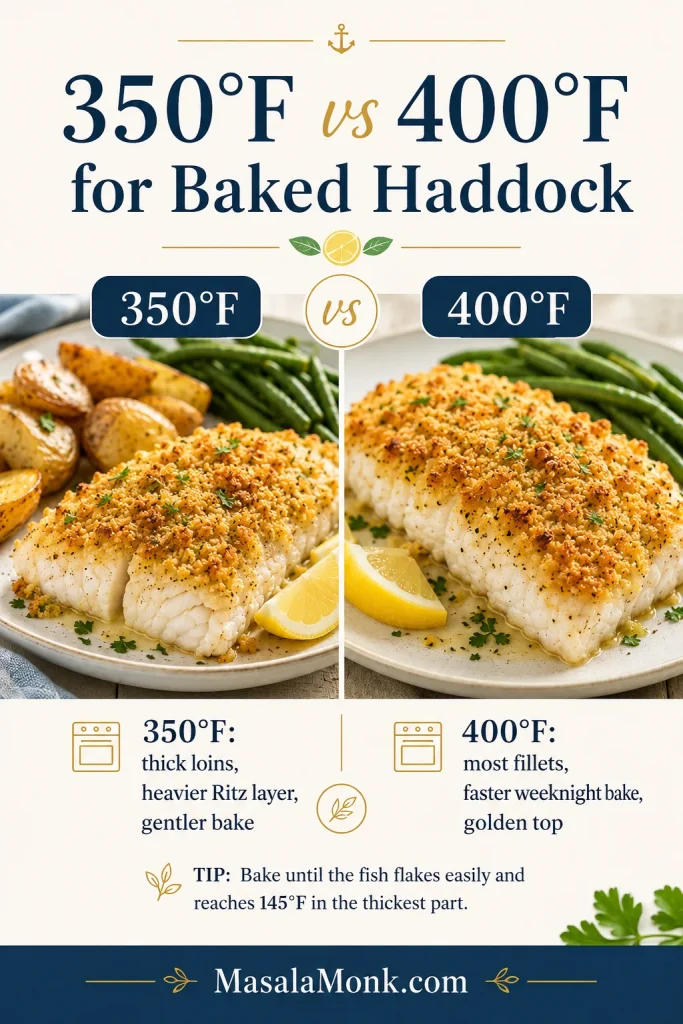
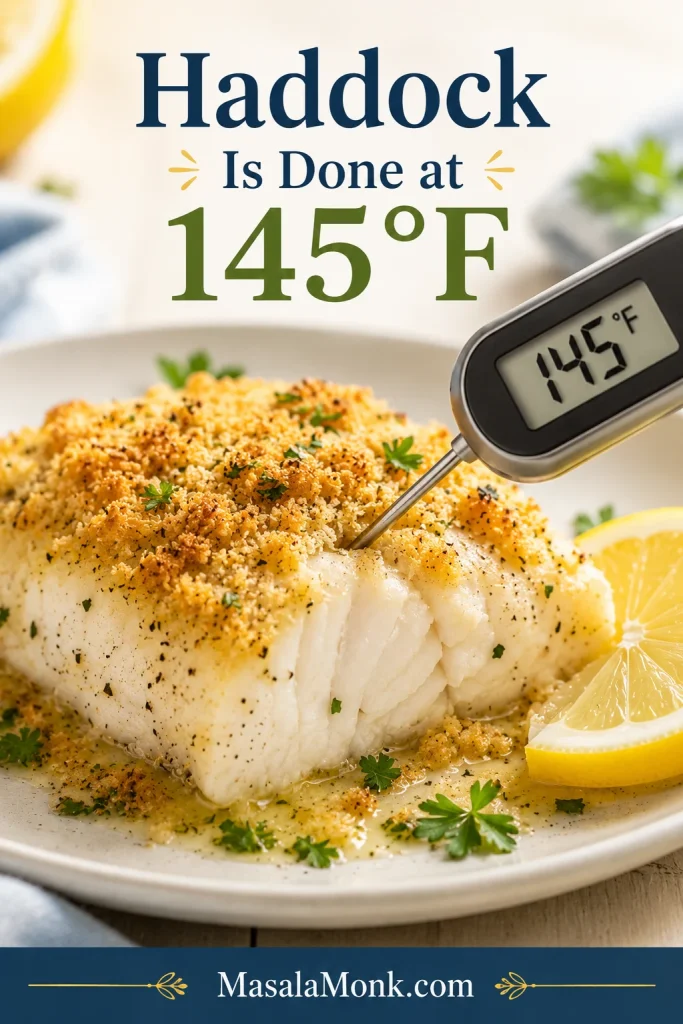
Bake haddock fillets at 400°F / 200°C for 12 to 16 minutes, depending on thickness. The fish is done when it turns opaque, flakes easily with a fork, and reaches 145°F / 63°C in the thickest part.
400°F / 200°C is the easiest everyday temperature for quick, flaky baked haddock.
350°F / 175°C is gentler for thick haddock loins, a heavier Ritz cracker topping, or a more traditional New England-style bake.
Bake uncovered when using panko, breadcrumbs, or Ritz crackers.
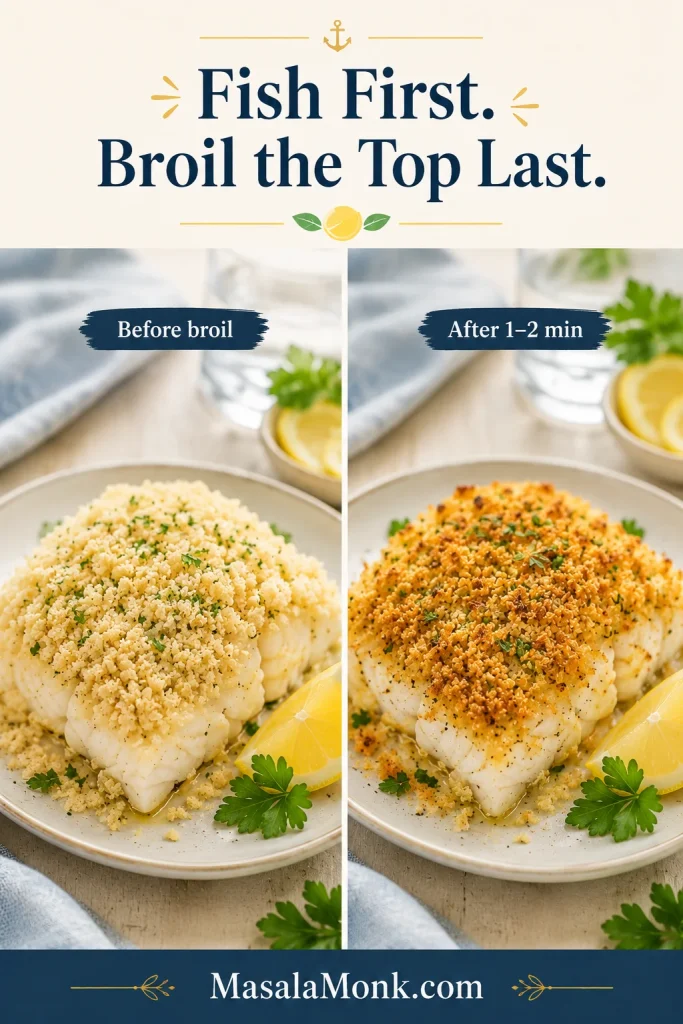
The fish comes first. The crumbs come second. Pull the haddock when it is done; the broiler can finish a pale surface in a minute.
A pale topping can be fixed. Overcooked fish cannot. That one idea makes this recipe much easier.
For most haddock fillets, 400°F gives a fast oven bake; then 145°F confirms the center is cooked without drying out.
Easy Baked Haddock Recipe
Easy Baked Haddock with Buttery Ritz or Panko Topping
Mild haddock fillets baked with lemon, butter, herbs, and your choice of panko, breadcrumbs, or crushed Ritz crackers. The fish turns soft and flaky while the surface becomes golden and savory.
Prep Time
10 minutes
Cook Time
12 to 16 minutes
Total Time
About 25 minutes
Servings
4
Yield
4 baked haddock fillets
Oven Temperature
400°F / 200°C
Doneness
145°F / 63°C, opaque, and flaky
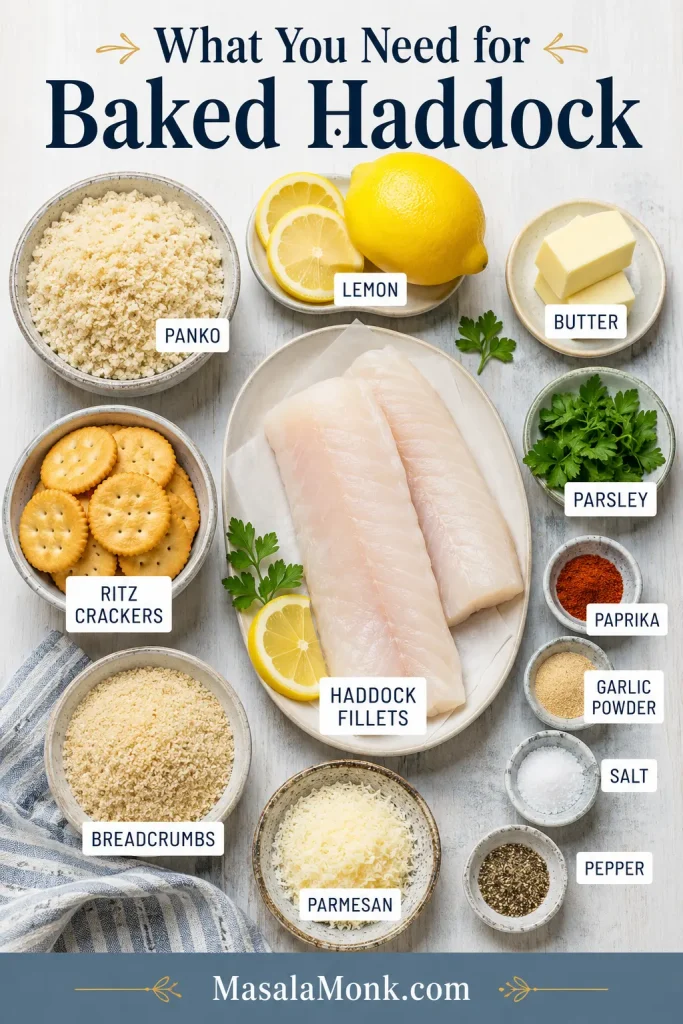
Ingredients
4 skinless boneless haddock fillets, about 6 oz / 170 g each, or about 1 1/2 lb / 680 g total
1 tablespoon olive oil or melted butter, for the baking dish and fish
Fine salt, to taste: about 3/4 teaspoon for plain crumbs, or 1/4 to 1/2 teaspoon for Ritz crackers, salted butter, or Parmesan
1/4 teaspoon black pepper
1 tablespoon lemon juice / 15 ml, plus lemon wedges for serving
1 teaspoon lemon zest, optional but excellent in the topping
1/2 teaspoon garlic powder
1/2 teaspoon paprika
2 tablespoons chopped parsley, plus more for serving
For a Breadcrumb or Panko Topping
3/4 to 1 cup panko or breadcrumbs
4 tablespoons melted butter / 56 g
1/4 cup grated Parmesan / about 22 g, optional
For a Ritz Cracker Topping
1 sleeve Ritz crackers, about 34 crackers / roughly 90 to 100 g, crushed
3 to 4 tablespoons melted butter / 42 to 56 g
1/4 to 1/2 teaspoon fine salt total, added only after tasting the cracker mixture
Instructions
Preheat the oven. Heat the oven to 400°F / 200°C. Lightly grease a 9×13-inch / 23×33 cm baking dish.
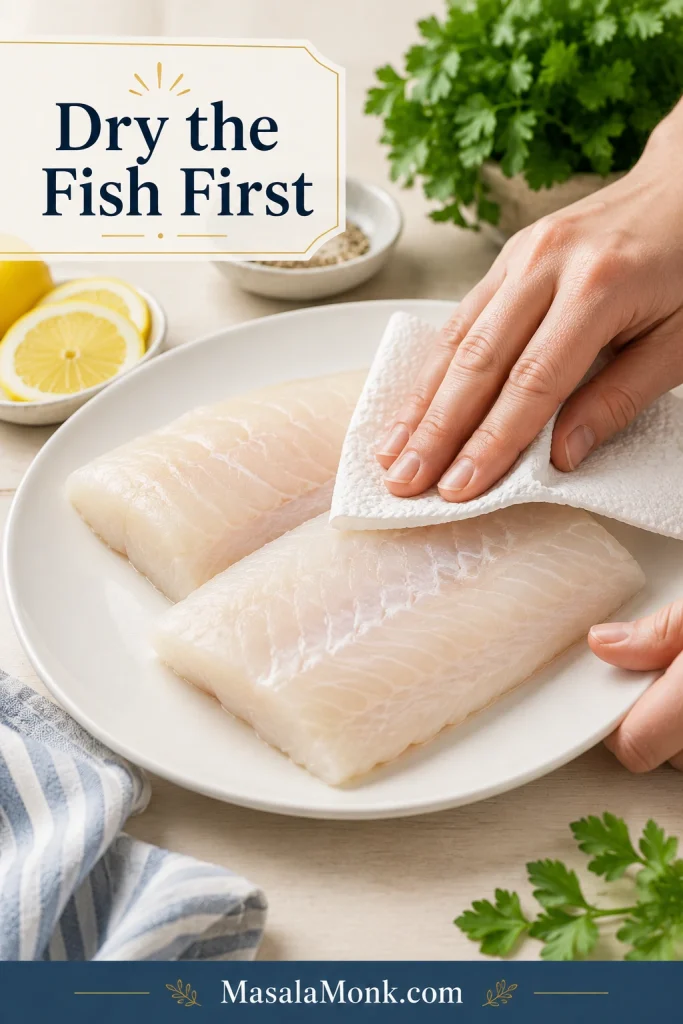
Dry the haddock. Pat the fillets very dry with paper towels. Dry fish before the oven means better texture after the oven.
Season the fish. Arrange the fillets in one layer. Brush lightly with olive oil or melted butter, then season with salt, pepper, lemon juice, garlic powder, and paprika.
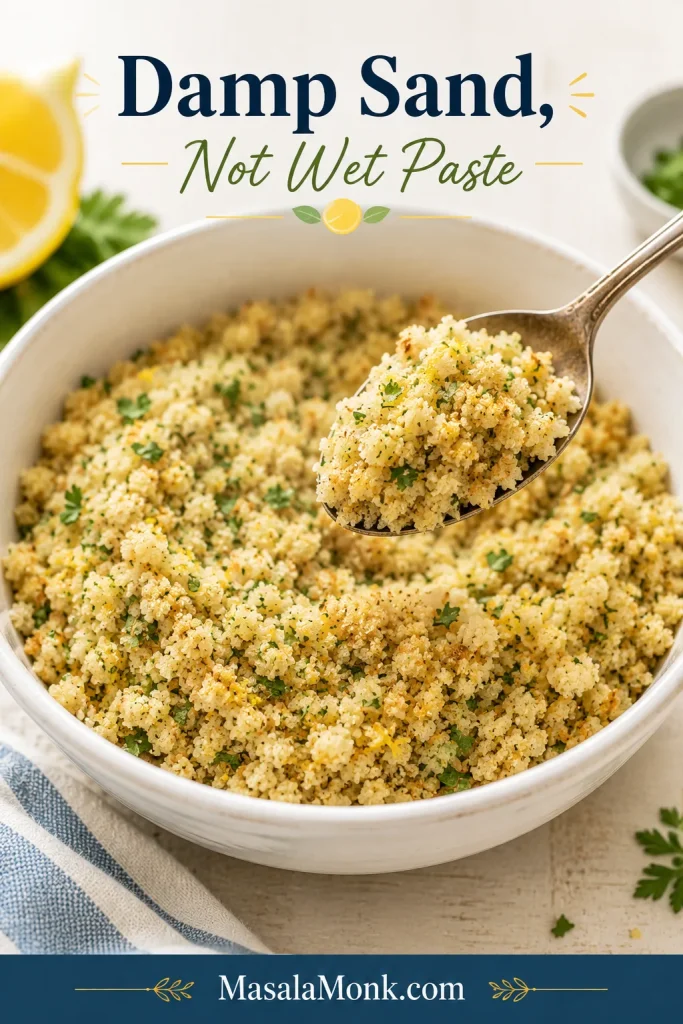
Make the topping. Mix panko, breadcrumbs, or crushed Ritz crackers with melted butter, lemon zest, parsley, and Parmesan if using. The mixture should look like damp sand, not wet paste.
Top the fillets. Spoon the mixture over the fish and press gently so it sticks. Keep the layer loose rather than packed down.
Bake uncovered. Bake for 12 to 16 minutes, depending on thickness, until the fish is opaque and flakes easily.
Check doneness. For the most reliable result, check the thickest part with an instant-read thermometer. Haddock is done at 145°F / 63°C.
Brown only if needed. If the fish is done but the topping is pale, broil, or use the oven grill, for 1 to 2 minutes. Watch closely.
Rest and serve. Let the fish rest for 2 minutes, then serve with lemon wedges and more parsley.
When it is right, the fish should lift in soft flakes, the center should look opaque and moist, and the buttery layer should be golden without feeling greasy.
Recipe Notes
For thicker haddock loins or a heavier Ritz layer, bake at 350°F / 175°C for 18 to 25 minutes instead.
Thin fillets may be done in less than 12 minutes, so start checking early.
If using a fan or convection oven, begin checking 2 to 3 minutes early.
Mixed-size fillets need mixed timing: lift out thinner pieces first and let thicker ones finish.
Serve soon after baking. The fish stays moist, but the golden layer is best while warm and fresh.
Baking the fillets uncovered helps the topping toast while the haddock underneath stays tender, moist, and easy to lift from the dish.
Start with the dinner you want, then choose the topping. Ritz gives you buttery New England comfort, panko gives you crunch, breadcrumbs keep it classic, and lemon butter keeps the plate lighter.
Once you know the style you want, this guide helps you choose between Ritz, panko, no breadcrumbs, or a from-frozen method.
Best Topping by Dinner Style
What You Want
Use
Best Temperature
Why It Works
New England baked haddock
Crushed Ritz crackers
350°F or 400°F
Buttery, cozy, and classic with lemon and parsley.
Crispy baked haddock without frying
Panko and Parmesan
400°F
Light crunch without a pot of oil.
Soft classic baked fish
Plain breadcrumbs
375°F or 400°F
Gentler texture and familiar flavor.
Baked haddock without breadcrumbs
Lemon, butter or olive oil, herbs
400°F
Clean, bright, and lighter.
Thick center-cut haddock
Haddock loins
350°F or longer 400°F timing
Thicker fish needs gentler timing.
Baked haddock from frozen
Emergency frozen method
400°F
Bake briefly first, blot moisture, then season.
Use this topping comparison to choose the texture you want before you bake: buttery Ritz, crisp panko, or softer breadcrumbs.
Choose Ritz for buttery New England baked haddock, panko for a crisp finish, or breadcrumbs for a softer classic crust.
For a first try, choose Ritz if you want the coziest fish dinner and panko if you want the crispest finish. Both make mild haddock feel more complete than plain baked fish.
Craving fried fish instead of baked fish? This fish batter recipe is the better path.
Haddock needs three things: a dry surface, seasoning on the fish itself, and the confidence to stop baking before the fillets turn firm. The buttery layer adds flavor and comfort, but the fish is still the main event.
If baked fish has disappointed you before, it was probably not because you did anything dramatic wrong. Delicate white fish simply rewards early checking. Once you learn that, this recipe feels relaxed instead of risky.
The buttered surface protects the fish, the lemon keeps the flavor bright, and the broiler gives you a backup plan when the fish is done before the surface looks perfect.
Ingredients You’ll Need
The ingredient list is short, so balance matters. Haddock is mild; it needs direct seasoning and enough butter in the topping to brown without turning greasy.
Before choosing your topping, gather the essentials: mild haddock, lemon, butter, herbs, and either Ritz crackers, panko, or breadcrumbs.
Haddock Fillets
Skinless boneless haddock fillets are easiest. Four fillets, about 6 oz / 170 g each, fit well in a 9×13-inch baking dish. Thinner pieces cook quickly; thick haddock loins need more time. Skin-on haddock can still be baked skin-side down.
Butter or Olive Oil
Butter gives the most classic flavor and helps the surface turn golden and savory. Olive oil works when you want a lighter plate, especially with plenty of lemon and herbs.
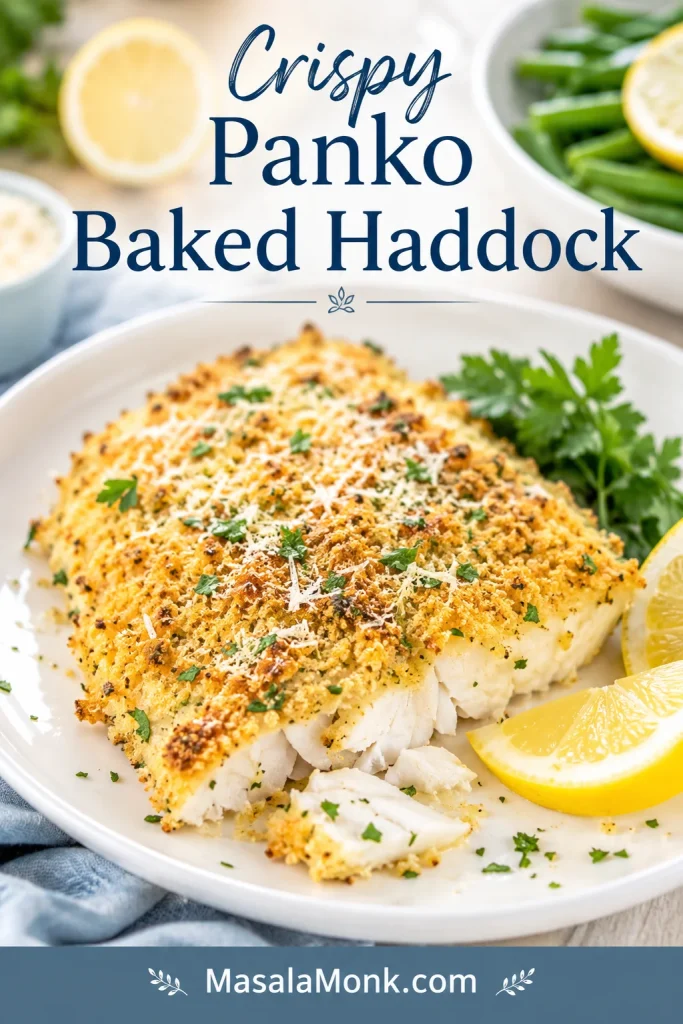
Panko, Breadcrumbs, or Ritz Crackers
Panko gives the lightest crunch. Fine breadcrumbs make a softer classic crust. Ritz crackers bring buttery New England comfort and need a lighter hand with salt.
Crush Ritz crackers into coarse pieces, not powder. You want little buttery bits that toast on top of the fish.
Lemon, Garlic, Paprika, and Herbs
Lemon brightens the fish, garlic powder seasons evenly, paprika adds color, and parsley keeps the plate fresh. For a seafood-seasoning flavor, replace the paprika with a small pinch of seafood seasoning and reduce the salt.
Parmesan
Parmesan is optional, but it works beautifully with panko. It adds savory depth and helps the panko crust taste more finished.
Step-by-Step Tips for Better Baked Haddock
The recipe card gives you the fast version. These cues help with thin fillets, thick loins, frozen fish, and heavier toppings.
1. Start with dry fillets
Pat both sides of the fish with paper towels. This one step helps seasoning stick and keeps the dish from turning watery.
First, pat the haddock dry; otherwise, extra surface moisture can make the fish steam and soften the topping.
2. Season the fish, not just the topping
Add salt, pepper, lemon juice, garlic powder, and paprika before the topping goes on. The golden layer should support the fish, not carry all the flavor by itself.
Next, season the haddock itself with lemon, salt, pepper, garlic, and paprika so the fish tastes good beneath the topping.
3. Keep the topping loose
Mix the panko, breadcrumbs, or crushed crackers with melted butter until the texture looks like damp sand. Spoon it over the fish, press gently, and stop there. A loose layer browns better than a packed one.
The topping should feel like damp sand because that texture browns better than dry crumbs or a greasy butter paste.
After mixing the crumbs, keep the layer loose on top of the fillets so the heat can move through the fish.
Spoon the topping on lightly instead of pressing it down, because a loose layer leaves room for heat to cook the fish evenly.
4. Bake uncovered
An uncovered dish gives the surface a chance to toast. Covering traps steam, which is useful for some foods but not for buttery topping on delicate fish.
5. Let the fish win
Pull the haddock when it flakes, even if the top is not quite as golden as you hoped. A minute under the broiler can fix the color.
If the haddock is done but the surface looks pale, broil the topping briefly instead of extending the bake time.
Once the topping choice is clear, the only real timing question is temperature.
A middle path when the topping browns quickly but the fish is thick
14 to 20 minutes
400°F / 200°C
Most everyday baked haddock fillets
12 to 16 minutes
425°F / 220°C
Very thin fillets or quick browning at the end
8 to 12 minutes
For most weeknight dinners, 400°F / 200°C is the easiest default. For a thicker loin or a heavy Ritz layer, 350°F / 175°C gives the fish more time to cook gently.
Use 400°F for most weeknight haddock fillets; however, thicker loins or a heavier Ritz layer often bake better at 350°F.
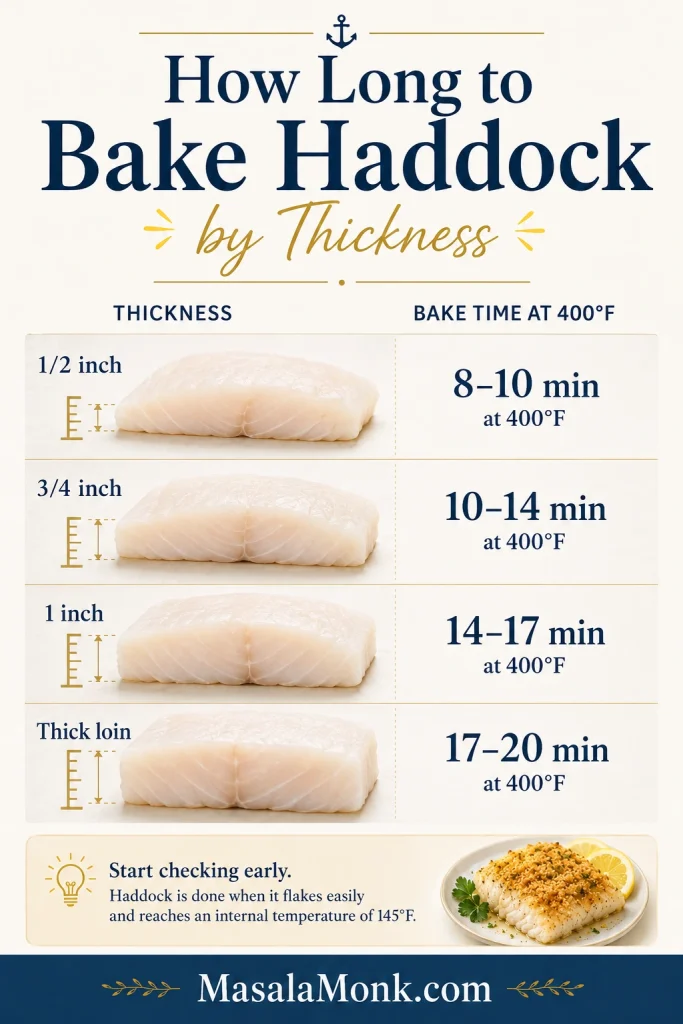
How Long to Bake Haddock by Thickness
Thickness matters more than weight. A thin 6 oz fillet can cook faster than a smaller but thicker haddock loin.
Fillets vs Loins
Haddock fillets are usually thinner and cook quickly, while haddock loins are thicker center-cut pieces that need more time and often do better with gentler heat.
If your dish has mixed sizes, remove the thinner fillets as soon as they are done and let the thicker pieces finish. This simple move prevents dry edges and underdone centers.
Haddock Thickness
At 400°F / 200°C
At 350°F / 175°C
Thin fillet, about 1/2 inch
8 to 10 minutes
12 to 15 minutes
Medium fillet, about 3/4 inch
10 to 14 minutes
15 to 18 minutes
Thick fillet, about 1 inch
14 to 17 minutes
18 to 22 minutes
Very thick haddock loin
17 to 20 minutes
22 to 25 minutes
Start checking at the early end of the range. Haddock rewards early checking more than extra oven time.
Because thickness changes bake time more than weight, thin fillets need early checking while thick haddock loins need extra minutes.
How to Know When Haddock Is Done
Haddock is done when the center is opaque, moist-looking, and flakes with gentle pressure. The most reliable check is an instant-read thermometer in the thickest part.
Temperature: 145°F / 63°C in the thickest part
Fork test: soft flakes separate without force
Visual cue: opaque center, not translucent or glossy
The first time, a thermometer is helpful. After that, you will start recognizing the soft flakes and opaque center by sight.
When the center turns opaque and separates into soft flakes, pull the haddock from the oven before the delicate fish overcooks.
A thermometer gives the clearest first-time answer: haddock is done when the thickest part reaches 145°F.
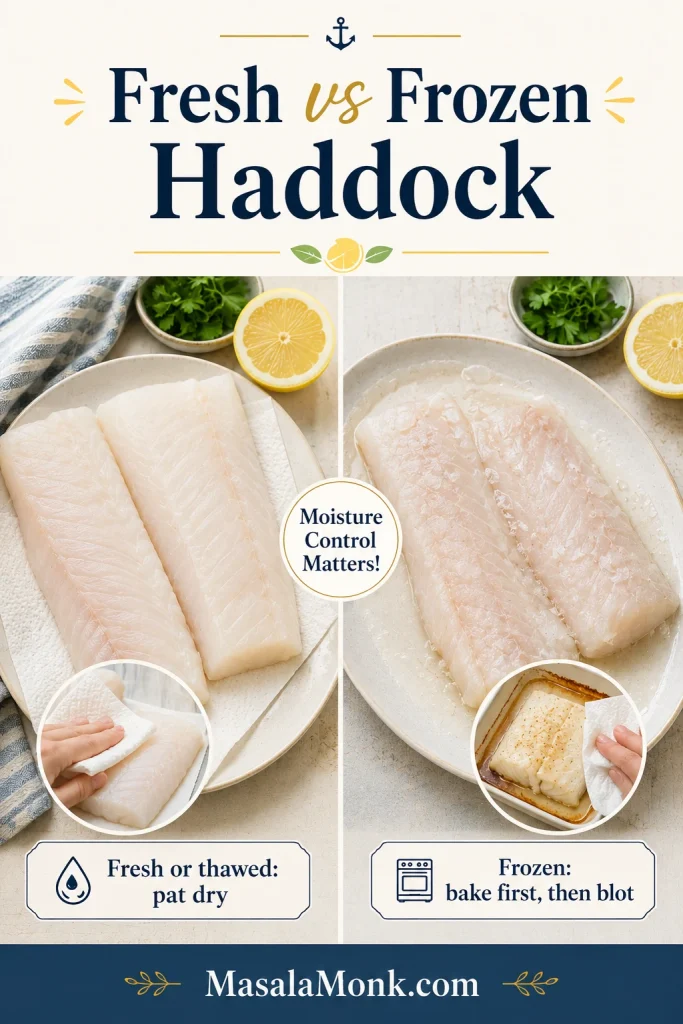
Fresh haddock is easiest, but frozen haddock works well when it is thawed and dried properly. Crumb-topped fish needs a dry surface more than extra liquid in the dish.
Fresh or thawed haddock needs a dry surface; for frozen haddock, a short first bake and a quick blot help control moisture.
Best Method: Thaw First
Thaw frozen haddock overnight in the refrigerator. For a faster method, keep the fish sealed and thaw it in cold water, changing the water every 30 minutes. The USDA describes refrigerator thawing, cold-water thawing, and microwave thawing as safe defrosting methods. Fish thawed by cold water or microwave should be cooked right away.
After thawing, unwrap the fillets and pat them dry before seasoning. That is the difference between a golden top and a wet crust.
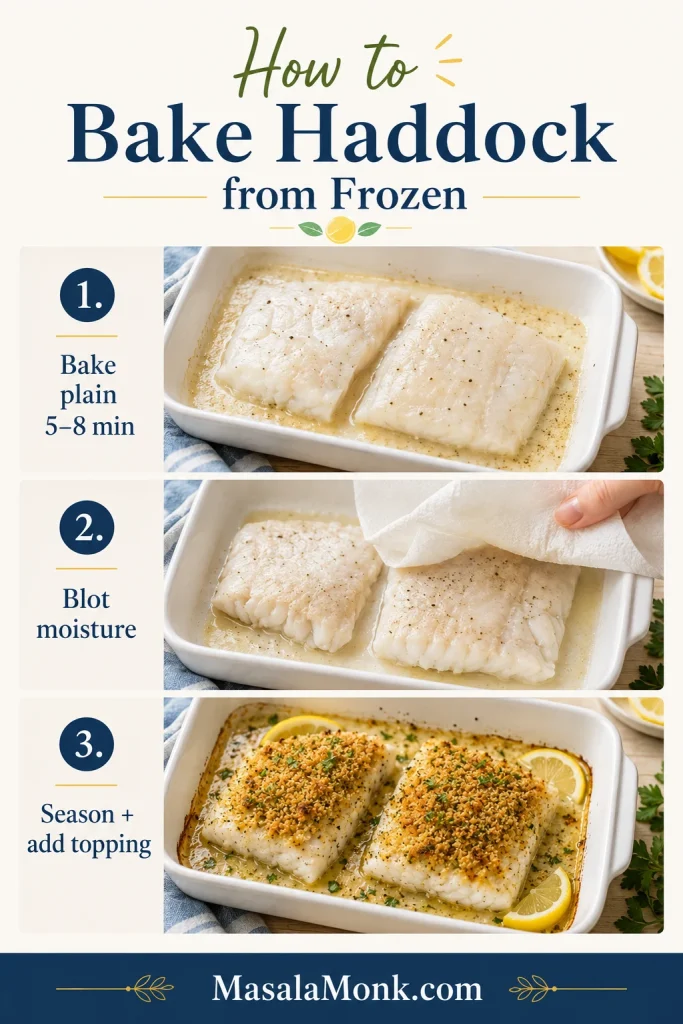
Emergency Method: Baking Haddock from Frozen
Thawed fish gives the best texture, but frozen fillets can still become dinner. Keep the topping off at first.
Heat the oven to 400°F / 200°C.
Place frozen fillets in a lightly greased baking dish.
Bake plain for 5 to 8 minutes, just until surface ice melts and moisture starts to release.
Blot or drain the dish carefully.
Season the fish, add the topping, and continue baking until the center reaches 145°F / 63°C.
This will get dinner on the table, but thawed fish gives you a drier surface and a better topping.
When baking haddock from frozen, bake it plain first, blot the released moisture, and only then add seasoning and topping.
Choose one flavor direction and keep it simple. Haddock is mild, so it does not need a crowded topping.
New England Baked Haddock with Ritz Crackers
This is the buttery comfort version: crushed Ritz crackers, melted butter, lemon, and parsley over mild white fish. Bake at 350°F for a gentler old-school feel, or 400°F when you want dinner faster. Keep the salt light and let the crackers do their job.
Crushed Ritz crackers give this New England baked haddock its buttery comfort, while lemon and parsley keep each bite balanced.
Panko Parmesan Baked Haddock
Panko and Parmesan give you the crunch of fried fish without pulling out a pot of oil. This version is best at 400°F so the panko crust can toast while the fish stays tender.
Panko and Parmesan add crispness without frying, so this baked haddock version works well when you want crunch with less mess.
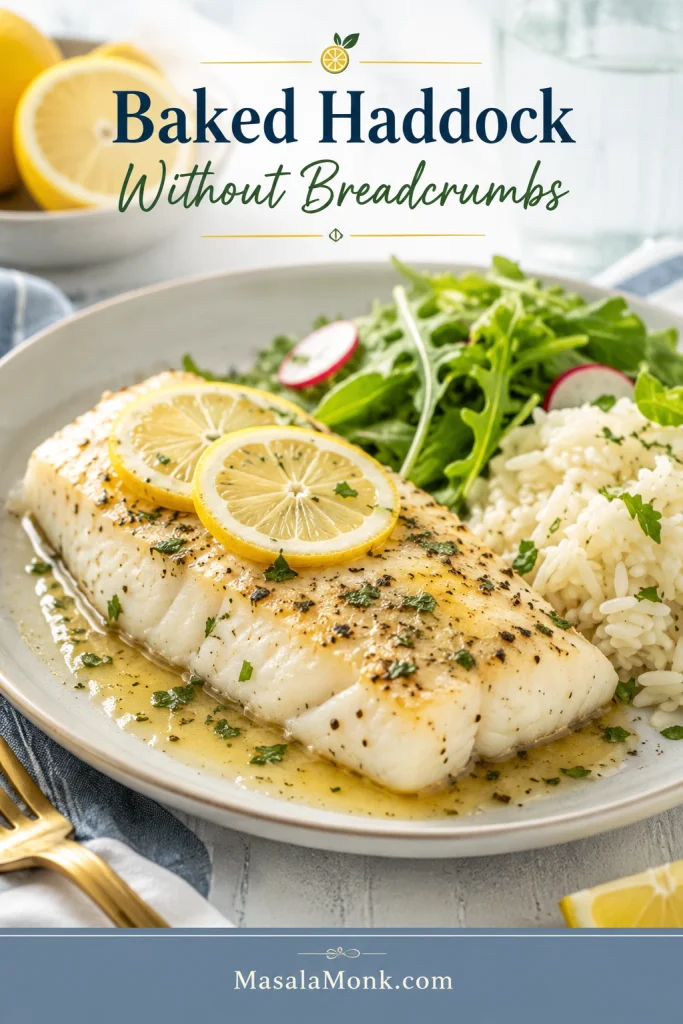
Lemon Butter Haddock
Skip the crumbs and let lemon butter lead. This is the lightest path, especially when the fish is fresh and you want a clean, bright dinner.
For a lighter baked haddock variation, skip the crumbs and let lemon butter, herbs, and gentle oven heat carry the flavor.
Garlic Butter Haddock
Add garlic powder or a little finely grated garlic to the melted butter, then finish with parsley and lemon. Fresh garlic can burn under the broiler, so use a light hand.
Warm Paprika or Chili Crumb Haddock
Add a small pinch of smoked paprika, mild chili powder, or Kashmiri chili powder to the buttered crumbs. Keep the warmth gentle; haddock tastes best when the spice supports the fish instead of taking over.
Healthy Baked Haddock
Use olive oil instead of some of the butter, keep the topping thin, and add lemon, herbs, and quick-cooking vegetables around the fish. The plate stays lighter, but the golden finish still makes it feel like dinner.
Cod or Another White Fish
This method also works with cod, pollock, hake, or another mild white fish. Cod is often thicker and meatier than haddock, so use the thickness chart instead of only the clock.
For a crisp battered dinner instead, save this fish and chips recipe for another night.
What to Serve with Baked Haddock
For the easiest comfort plate, serve the haddock with roasted potatoes, green beans, lemon wedges, and a spoonful of tartar sauce. It feels classic, but still light enough for a weeknight.
To make baked haddock feel like a full dinner, pair the flaky fish with roasted potatoes, green beans, lemon, and tartar sauce.
Keep the sides simple so the fish still feels like the center of the plate. For something brighter than tartar sauce, spoon a little mango salsa over the lemon-butter version, especially with rice or salad.
Troubleshooting
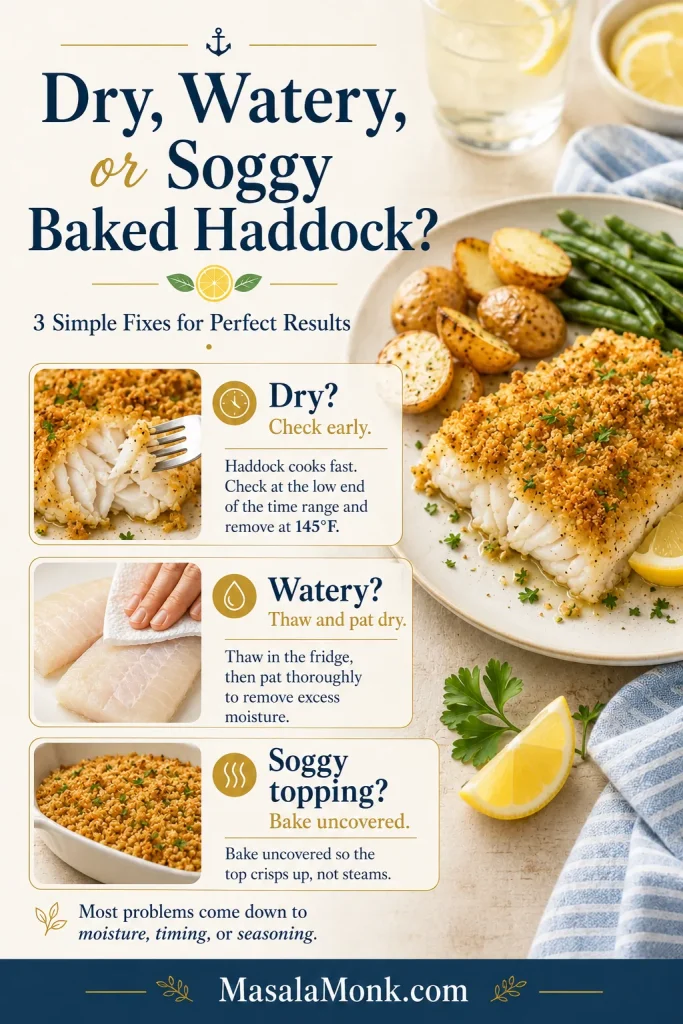
Most baked haddock problems come down to moisture, timing, or seasoning. The fix is usually simple.
Three things to remember: Start with dry fillets, bake uncovered when using a topping, and pull the fish when it is done. The surface can always be browned for one more minute.
If baked haddock turns dry, watery, or soggy, adjust the timing, dry the fillets better, and bake uncovered next time.
Problem
Likely Cause
How to Fix It
Haddock is dry
It baked too long or the fillets were thin.
Check early and pull the fish when it reaches 145°F / 63°C.
Fish is watery
The fish was frozen, not fully thawed, or crowded in the dish.
Thaw fully, pat dry, and leave space between fillets.
Topping is soggy
Too much moisture or a covered dish.
Bake uncovered and avoid adding extra liquid under the topping.
Topping is pale
The fish cooked before the surface browned.
Broil for 1 to 2 minutes after the fish is done.
Fish tastes bland
Only the topping was seasoned.
Season the fish directly before adding the top layer.
Fish fell apart
It was overcooked or lifted too roughly.
Rest for 2 minutes and use a thin fish spatula.
Topping is greasy
Too much butter, especially with crackers.
Use less butter with Ritz and keep the layer loose.
Fish smells too strong
The fish may not be fresh or was stored too long after thawing.
Use fresh-smelling fish and cook soon after thawing.
Assemble this recipe right before baking. You can thaw the fish ahead and mix the dry topping ahead, but add butter, seasoning, and the final layer close to oven time.
How to Store Leftovers
Store leftovers in an airtight container in the refrigerator for up to 2 days. Keep extra lemon wedges separate and add fresh lemon after reheating.
Flaked leftovers are useful, not wasted. Fold them into potato and herbs for simple fish cakes, or tuck them into fish tacos with slaw, lime, and a creamy sauce.
Leftover baked haddock still has options: flake it into bowls, shape it into fish cakes, or tuck it into tacos with slaw and lime.
How to Reheat It
Reheat gently in a low oven or air fryer until warmed through. The microwave works in a pinch, but it softens the topping and can make fish smell stronger.
Can You Freeze Cooked Haddock?
Cooked crumb-topped haddock does not freeze beautifully. The fish can turn watery and the topping usually softens. For best texture, freeze raw haddock, thaw it safely, and bake it fresh.
FAQ
What temperature is best for baked haddock?
For most fillets, 400°F / 200°C is the easiest everyday temperature. It cooks the fish quickly while giving the topping time to turn golden. For thicker loins or a heavier Ritz cracker topping, 350°F / 175°C gives a gentler bake.
How long does haddock take in the oven?
Most medium fillets take 12 to 16 minutes at 400°F / 200°C. Thin pieces may be ready in 8 to 10 minutes, while thick loins may need 17 to 20 minutes or more.
Should baked haddock be covered or uncovered?
Bake it uncovered when using a crumb topping. Covering traps steam, which helps some dishes but makes buttery crumbs soft instead of golden.
Can I bake frozen haddock?
Yes, but thawing first gives a drier surface and a better topping. For a frozen emergency, bake the plain fish briefly, blot the released moisture, season, add the topping, and continue baking until done.
Can I use cod instead of haddock?
Yes — cod works well here, but it is often thicker and meatier than haddock. Use the thickness chart and doneness cues instead of relying only on the clock.
Is haddock done at 145°F?
Yes. For safety, fish should reach 145°F / 63°C in the thickest part. It should also look opaque and flake easily with a fork.
Why did my baked haddock turn watery?
Watery haddock usually means the fish carried too much moisture into the oven. Fully thaw frozen fillets, pat them dry, and leave space in the dish so the fish bakes instead of steaming.
Can I make baked haddock without breadcrumbs?
Yes. Use melted butter or olive oil, lemon juice, lemon zest, parsley, salt, and pepper. Bake just until the fish is opaque and flaky. It will be lighter and softer, more lemon-butter fish than crisp-topped fish.
What is the best topping for baked haddock?
Ritz crackers give the buttery New England-style finish. Panko gives the crispest bite. Plain breadcrumbs give a softer, classic baked-fish texture.
Can I use smoked haddock for this recipe?
You can, but reduce the salt because smoked haddock is already salty and stronger in flavor. Smoked haddock is also excellent in chowder, Cullen skink, fish pie, and kedgeree.
A Few Last Tips Before You Bake
Baked haddock should feel simple, not stressful. Dry the fish, season the fish, bake it uncovered, and stop when the center is flaky and moist. The surface can always get one more minute under the broiler; the fish cannot be uncooked.
Finally, remember the core baked haddock rules: dry the fish, season it directly, bake uncovered, stop when flaky, and broil only if needed.
Whether you choose buttery Ritz crackers, crisp panko, plain breadcrumbs, or lemon butter, the goal is the same. You want tender haddock with enough golden flavor on top to make it feel like a proper dinner.
If you make this baked haddock, leave a comment and tell us which version you chose: Ritz, panko, breadcrumbs, or lemon butter. Also mention whether you used thin fillets, thick loins, or frozen haddock. Your notes help other readers choose their own path.
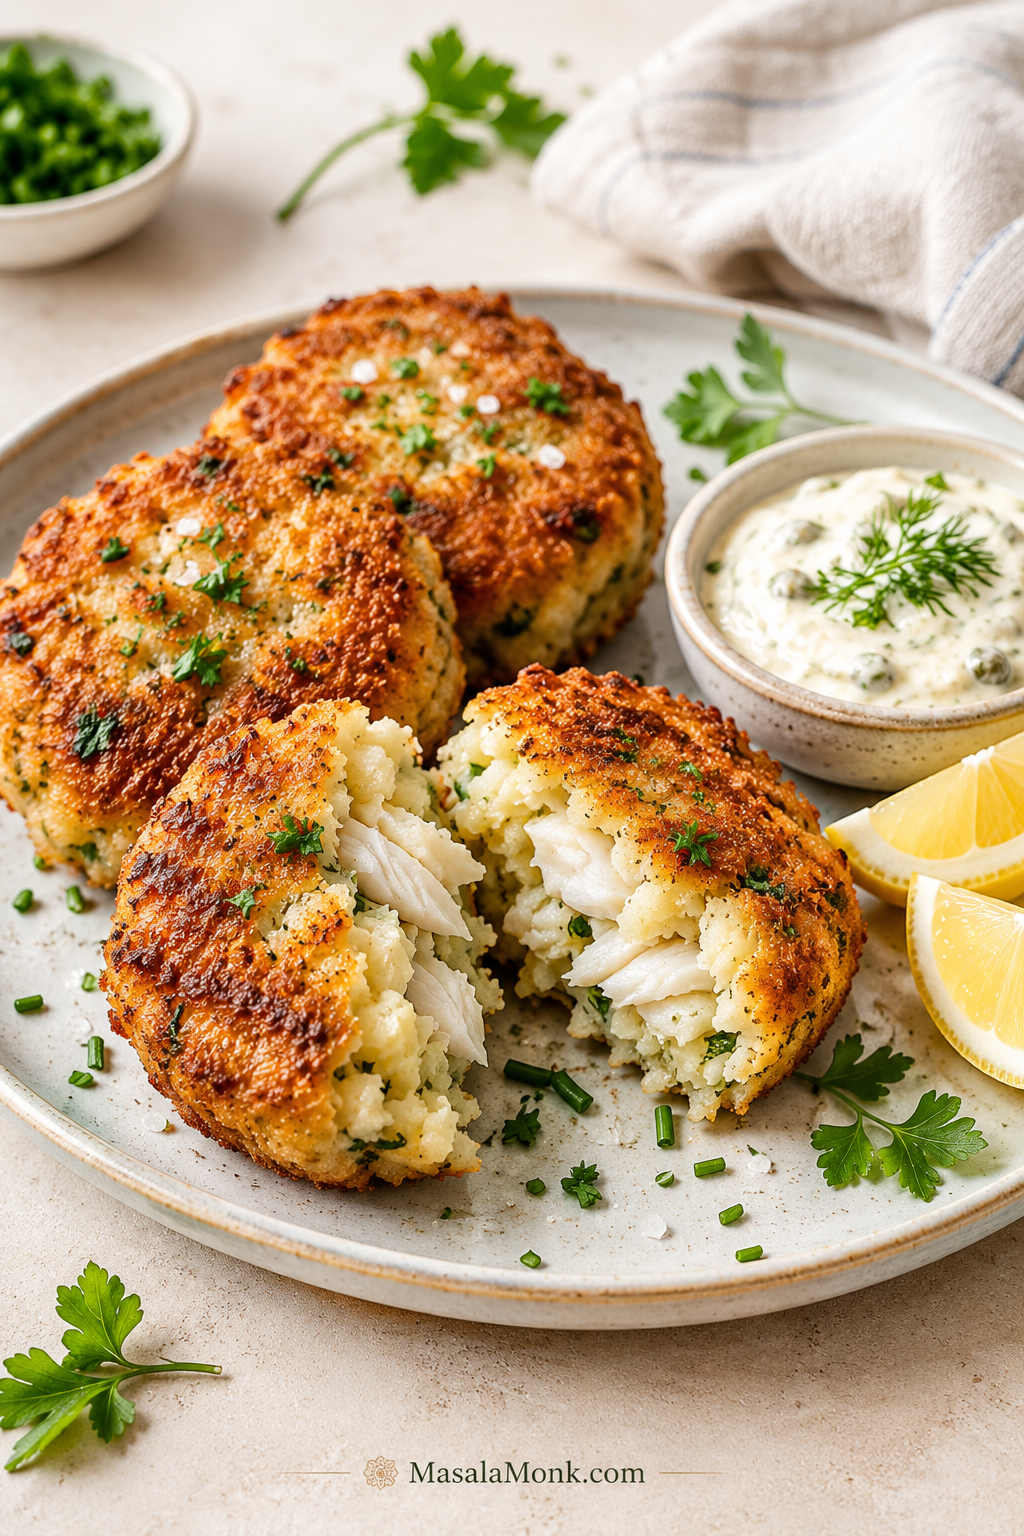
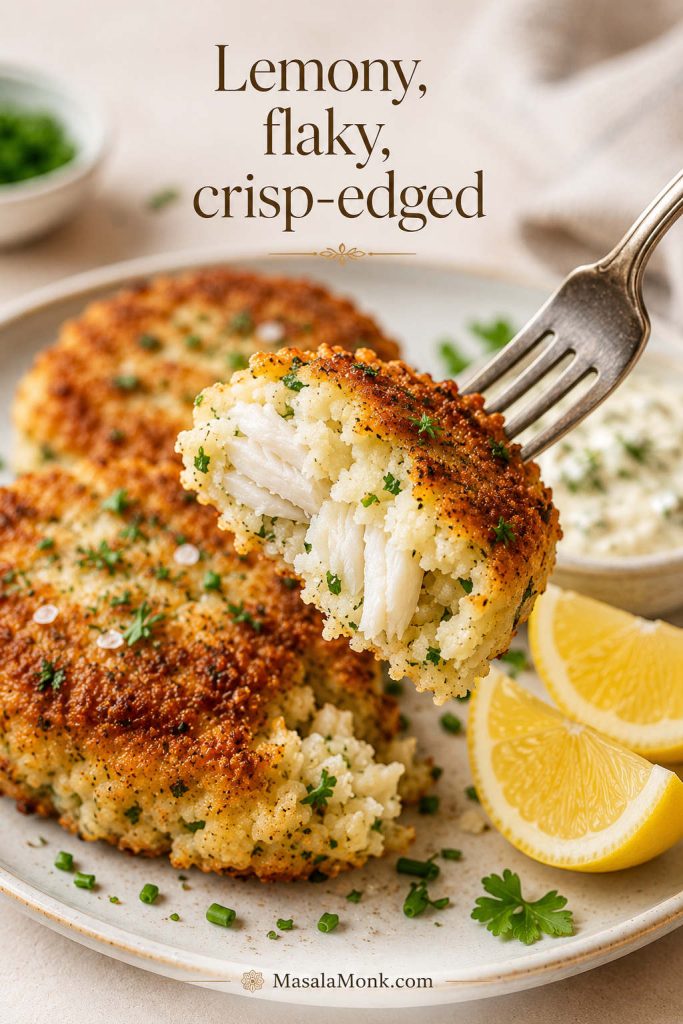
Good fish cakes should give you three things at once: a crisp golden crust, soft but not mushy potato, and real flakes of fish inside. This fish cakes recipe starts with cod because it is easy to find, gentle in flavor, and perfect with lemon, herbs, mustard, and breadcrumbs. However, the same method also works with haddock, pollock, hake, tilapia, leftover cooked white fish, or carefully thawed frozen fish.
These little cakes are the kind of dinner that can feel old-fashioned in the best possible way: a little potato, a little fish, a hot pan, and suddenly the meal feels generous. Still, the texture matters. Too much potato and they taste flat. Too much wet fish and they collapse. This recipe keeps the middle soft and flaky while giving you the crisp edge everyone reaches for first.
The method is simple once you know what matters: dry potato, visible fish flakes, a firm chill, and a crust that sets before you flip. Even if the mixture feels a little soft at first, it is usually easy to save with a spoonful of breadcrumbs and a short rest in the fridge.
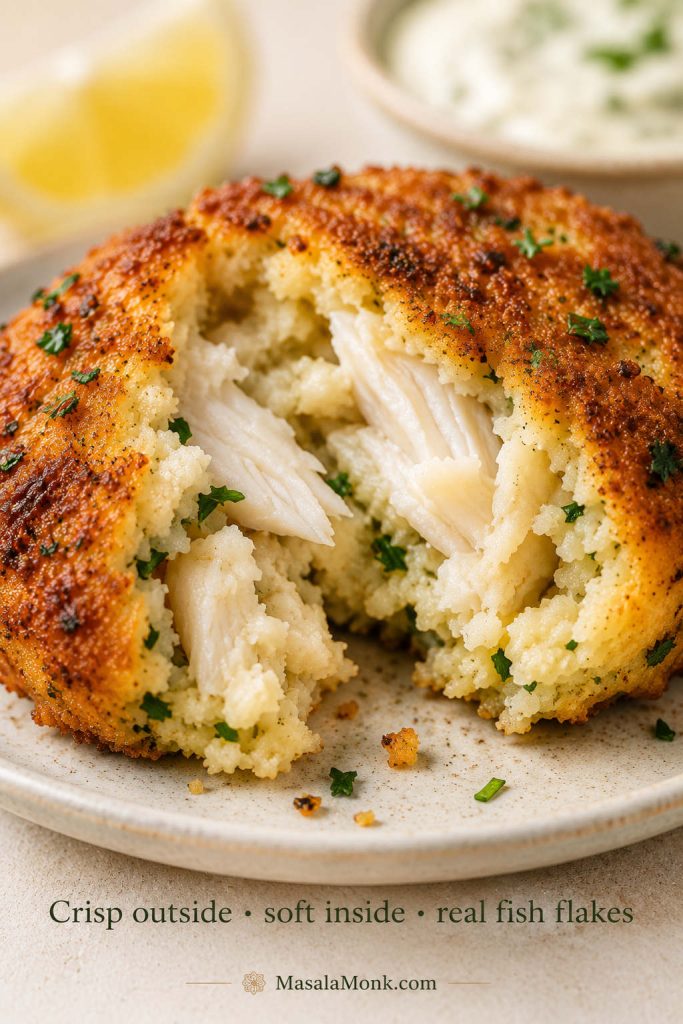
What Good Fish Cakes Should Look Like
Before you start cooking, it helps to know the texture you are aiming for: crisp outside, soft inside, and fish that stays visible instead of disappearing into the potato.
A good fish cake should not look smooth inside. Instead, the best texture shows tender potato, real fish flakes, and a crust that breaks cleanly.
To make crispy fish cakes, cook cod or another firm white fish until it flakes, then mix it gently with dry mashed potato, egg, lemon, herbs, mustard, and seasoning. Shape the filling into patties, chill for at least 30 minutes, coat with flour, beaten egg, and breadcrumbs, then pan-fry until golden on both sides.
Once you understand the basic flow — cook, fold, chill, and fry — this fish cakes recipe becomes easier to adjust without guesswork.
For 8 medium cakes, use about 450g / 1 lb raw fish and 500g / 1.1 lb peeled potatoes. That ratio gives enough potato to bind the patties without hiding the fish. When you break one open, you should see soft potato, clear flakes of fish, and a crunchy golden edge rather than a smooth, heavy paste.
If your mixture already feels too wet, too soft, or likely to break, use the fixing section before shaping the whole batch.
These are especially good when you want something comforting without making a heavy meal. A few crisp cakes, a sharp salad, lemon wedges, and a cold creamy sauce can feel like a proper dinner without needing much else.
Reliable first batch
Use cod or haddock, dry mashed potato, one egg or yolk, lemon zest, parsley, panko, and a 30-minute chill. Pan-fry over medium heat and let the first side fully set before flipping. If this is your first time, use the pan-fried method before trying the baked or air fryer versions.
For the safest first batch, keep the formula simple: mild cod, dry potato, enough binder, bright lemon, fresh herbs, panko, and a proper chill.
At a Glance
Main fish
Cod, haddock, pollock, hake, or firm white fish
Best potatoes
Starchy potatoes such as Russet, Maris Piper, King Edward, or Yukon Gold
Yield
8 medium fish cakes
Serves
4
Fish-to-potato ratio
About 450g raw fish to 500g peeled potatoes
Chill time
30 minutes
Pan-fry time
4–5 minutes per side
Optional oven finish
200°C / 400°F for 8–10 minutes
Air fryer
190–200°C / 375–400°F for 10–14 minutes
Fish doneness
145°F / 63°C, or opaque and flaking easily
Good sauces
Tartar sauce, lemon dill mayo, garlic mayo, green chutney mayo, sweet chili sauce
Why This Fish Cakes Recipe Works
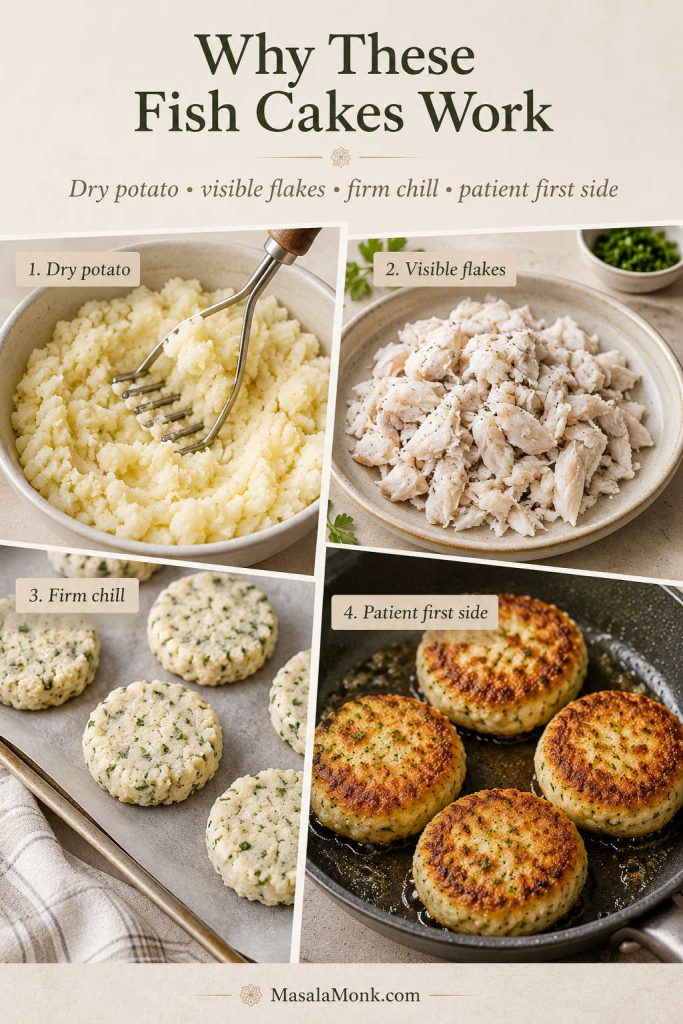
The real secret is not a complicated ingredient. It is moisture control. Dry potato gives the cakes structure, gently flaked fish keeps the middle light, and a short chill gives each patty enough firmness to survive the pan.
That is why a fish cake that looks simple on the plate can feel so satisfying: the crust, filling, and flakes all do different jobs. The coating gives crunch, the potato keeps everything tender, and the fish stays present instead of disappearing into the mash.
Think of these as the four control points: dry potato builds structure, visible flakes keep texture, chilling firms the patties, and patient frying protects the crust.
Flour helps the egg cling, egg helps the crumbs stick, and breadcrumbs give you that crisp outside. Panko makes the lightest crunch, while fresh breadcrumbs give a softer, more old-fashioned fishcake crust.
Just as importantly, the filling is folded instead of mashed into a paste. That small choice keeps the inside tender and textured, so every bite has a little potato, a little fish, and a clean lemony finish.
What They Should Taste Like
The finished fish cakes should taste clean, lemony, and savory, not heavy or fishy. The crust should give a quiet crunch when you cut in, while the middle stays warm and soft with visible flakes of fish and little pockets of potato. Add a squeeze of lemon and a spoonful of tartar sauce, dill mayo, or green chutney mayo, and the whole plate should feel bright rather than rich.
The best bite should feel balanced: crunchy outside, soft inside, lightly lemony, and savory enough that the potato supports the fish instead of hiding it.
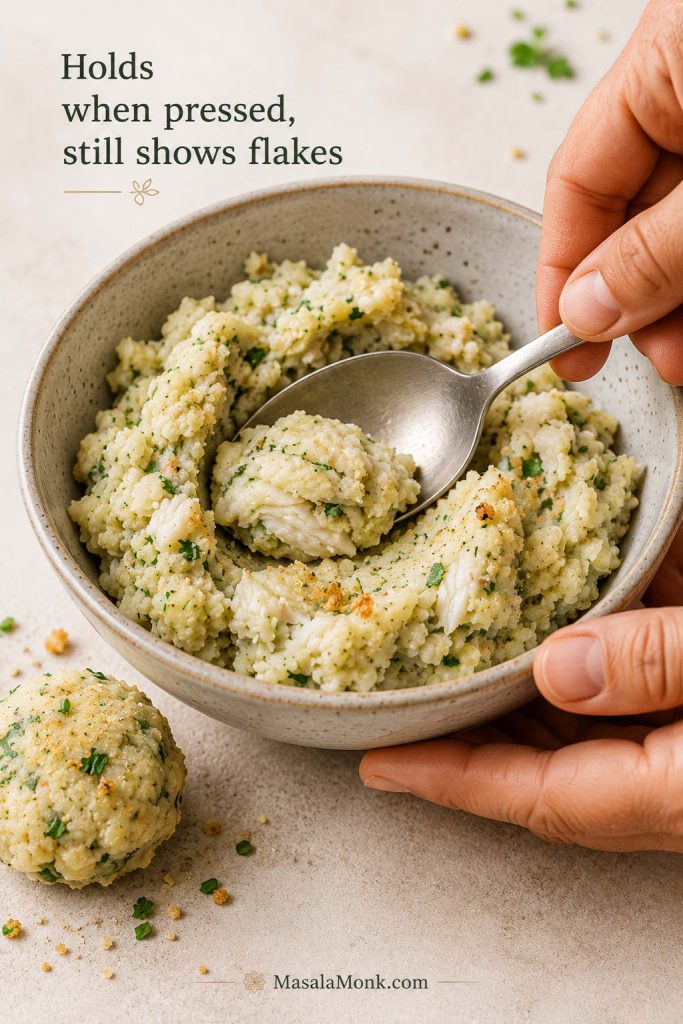
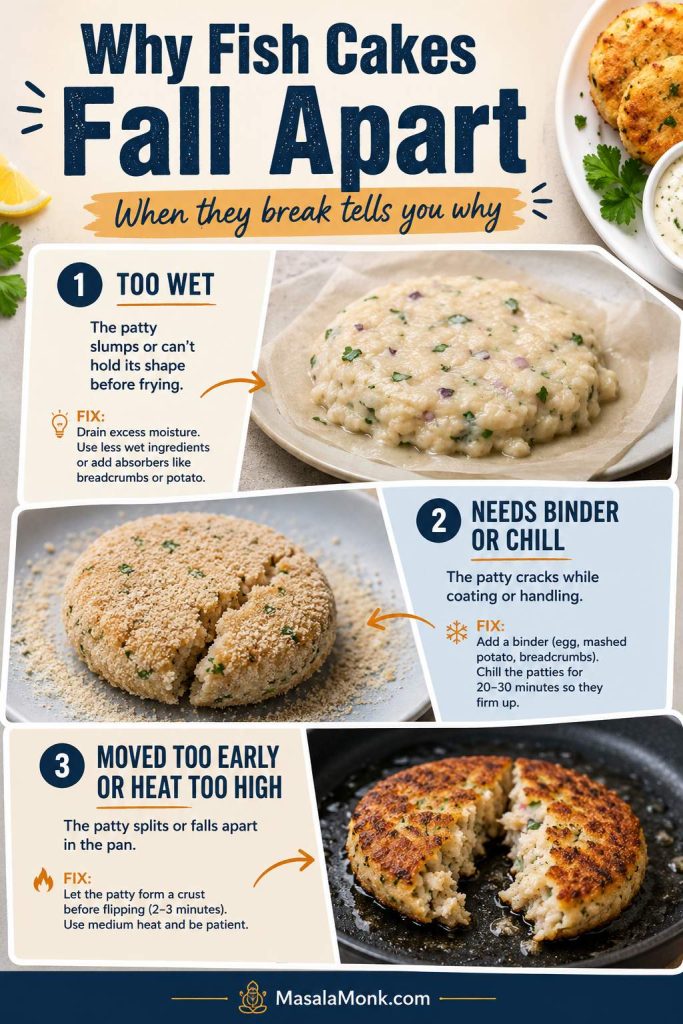
Texture checkpoint
Before chilling, the mixture should hold together when pressed but still show flakes of fish. If it looks smooth like paste, it has been overmixed. If it slumps on the tray, it needs breadcrumbs.
Before shaping, the mixture should press together while still looking rustic. If it turns smooth or gluey, the finished patties will feel heavy.
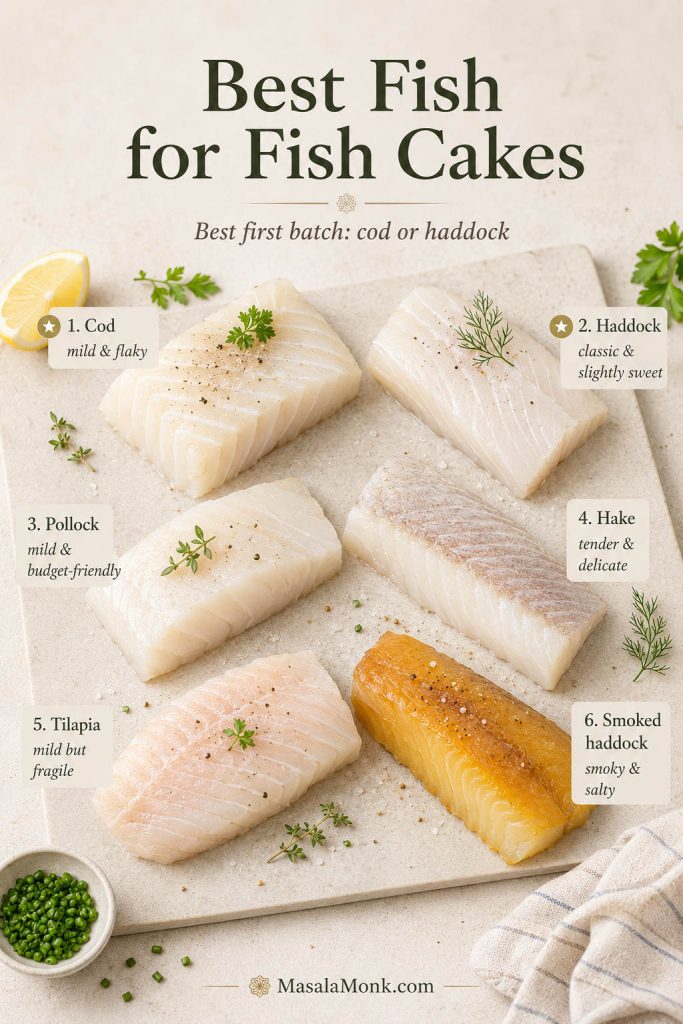
Best Fish for Fish Cakes
For most home cooks, cod is the easiest place to start. It flakes cleanly, tastes gentle rather than strong, and pairs naturally with potato, lemon, herbs, mustard, and breadcrumbs. Haddock is just as classic and slightly sweeter. Pollock and hake are good budget-friendly white fish options, while tilapia works if you handle it gently and avoid overcooking.
If you are standing at the fish counter, do not overthink it. Choose a mild white fish that looks fresh, smells clean, and flakes easily when cooked. Cod and haddock are the safest choices, but pollock, hake, and other firm white fish can make excellent cakes too.
Mild white fish is the easiest starting point because it flakes cleanly and lets the lemon, herbs, potato, and crisp coating do their jobs.
If you would rather turn cod or haddock into a battered fillet dinner instead of patties, start with this fish and chips recipe.
Fish choice shortcut
First batch: cod or haddock. Budget batch: pollock or hake. Stronger flavor: half smoked haddock, half plain white fish. Leftover option: cooked cod, haddock, salmon, or trout, folded in large flakes.
Why Cod Works So Well for Fish Cakes
Cod is especially good in fish cakes because it stays clean-tasting even after poaching, folding, chilling, and frying. It gives you real flakes inside the cake without making the filling taste heavy or oily.
If using frozen cod, thaw it fully, drain away any liquid, and pat it dry before cooking. Wet fish is one of the quickest ways to make the filling soft, loose, or difficult to brown. For full make-ahead storage and cooking guidance, use the frozen fish cakes guide later in the post.
Fish
How it behaves
Best use
Cod
Clean-tasting and flaky
A clean, reliable choice for classic cod fish cakes.
Haddock
Firm, classic, slightly sweeter
Excellent for traditional fish and potato cakes.
Pollock
Mild and budget-friendly
Good when you want an affordable white fish.
Hake
Soft and delicate
Works well if folded gently.
Tilapia
Mild but more fragile
Useful when cod or haddock is not available.
Smoked haddock
Bold and salty
Use partly with plain white fish or potato for a stronger flavor.
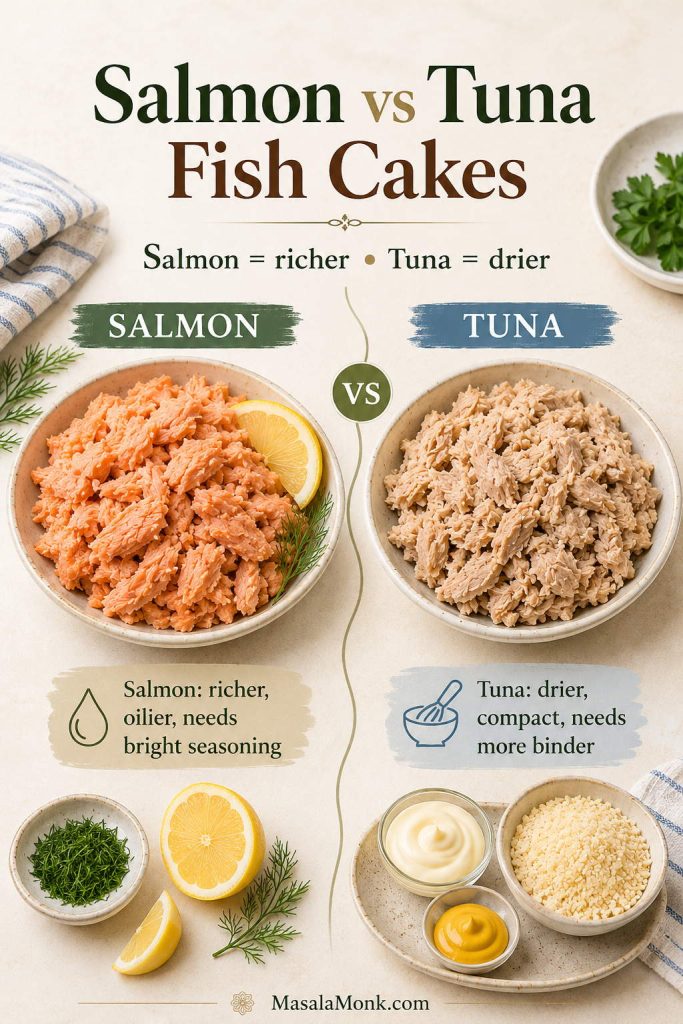
Salmon
Richer and oilier
Use a richer binder and brighter seasoning; canned salmon works especially well in croquettes.
Tuna
Drier and more compact when canned
Use mayo, mustard, egg, and breadcrumbs to keep canned tuna from tasting dry.
Mackerel
Strong and oily
Balance it with lemon, herbs, mustard, and a crisp coating.
Frozen Fish
Frozen fish works for this recipe, but it must be thawed and dried well. Thaw it in the refrigerator, drain off any liquid, then pat the fish dry before cooking. If frozen fish goes into the filling wet, the patties are more likely to break, taste watery, or refuse to brown.
Frozen fish works well once the extra moisture is handled. After thawing, drain and pat it dry so the mixture stays firm instead of watery.
For freezing shaped cakes, reheating leftovers, and choosing whether to thaw first or cook from frozen, use the full freezing guide below.
Leftover Cooked Fish
Leftover cooked cod, haddock, pollock, salmon, trout, or other flaky fish can work well. Keep the flakes fairly large and fold them in gently near the end. If the fish is already seasoned, taste the mixture before adding more salt.
Leftover fish is easiest to use when the flakes stay large. That way, the finished fish cakes still taste like fish, not only potato.
If you are also starting with leftover mashed potato, use the leftover mash section for the better ratio before you shape the patties.
Using Salmon or Tuna
Both salmon and tuna can make good patties, but they behave differently from poached white fish. Because salmon is richer and canned tuna is drier and more compact, both usually need slightly different seasoning and binding. For a salmon-specific recipe, especially with canned salmon and Southern-style patties, use the salmon croquettes recipe.
Salmon and tuna can both work, but they need different handling. Salmon benefits from bright seasoning, while tuna usually needs more moisture and binder.
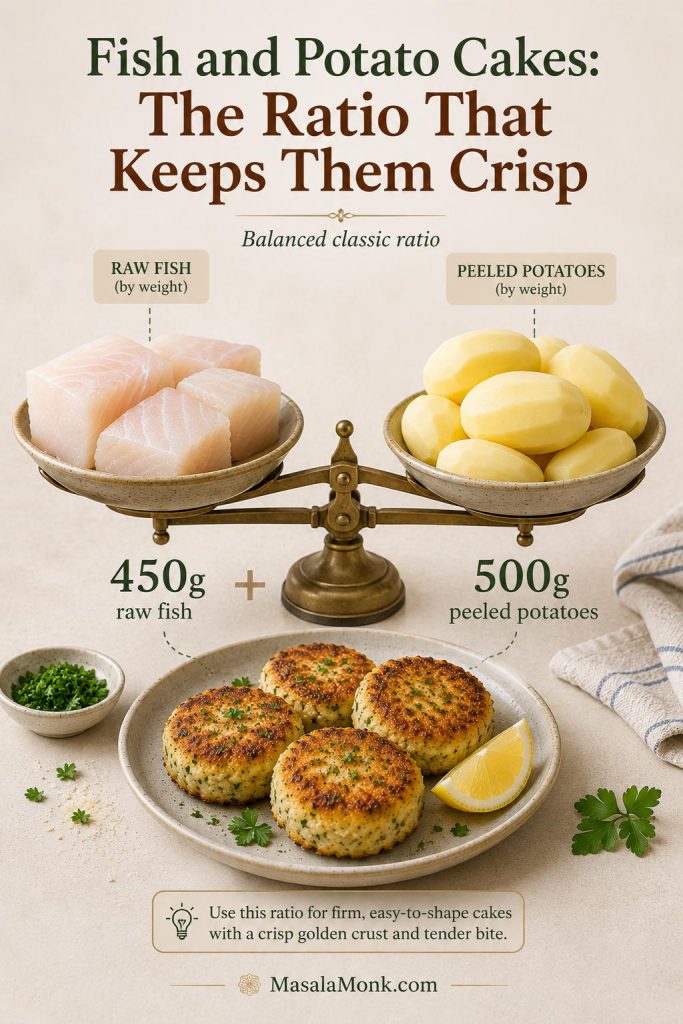
Fish and Potato Cakes: The Ratio That Keeps Them Crisp
The best fish and potato cakes use enough potato to bind the filling, but not so much that the fish disappears. A reliable working ratio is:
Reliable starting ratio
450g / 1 lb raw cod or white fish + 500g / 1.1 lb peeled starchy potatoes
This fish-to-potato ratio keeps the batch balanced. The potato gives structure, while the fish stays visible enough to make the cakes taste clean and flaky.
Think of the potato as the frame, not the main event. It should hold the fish together, soften the bite, and help the crust brown. It should not bury the fish so completely that the cakes taste like leftover mash with a little seafood mixed in.
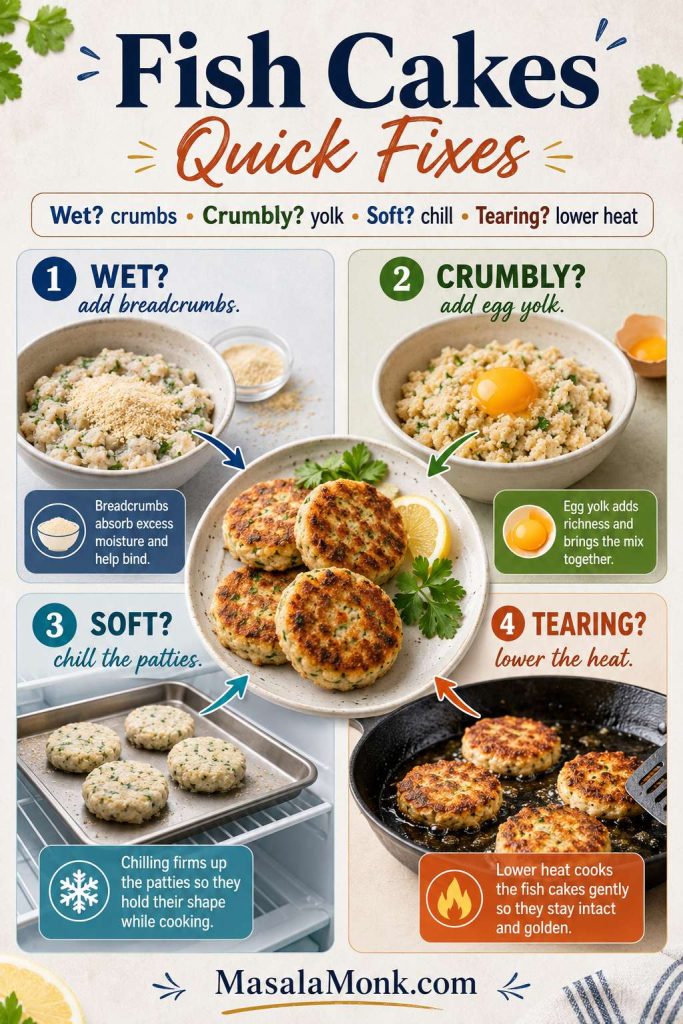
You are not chasing a perfect formula so much as a filling that presses together without turning into paste. A wet filling usually needs breadcrumbs, added one tablespoon at a time, followed by a short chill. A dry, crumbly base needs a little more binder, such as egg yolk, Dijon, mayo, or a tiny splash of poaching liquid.
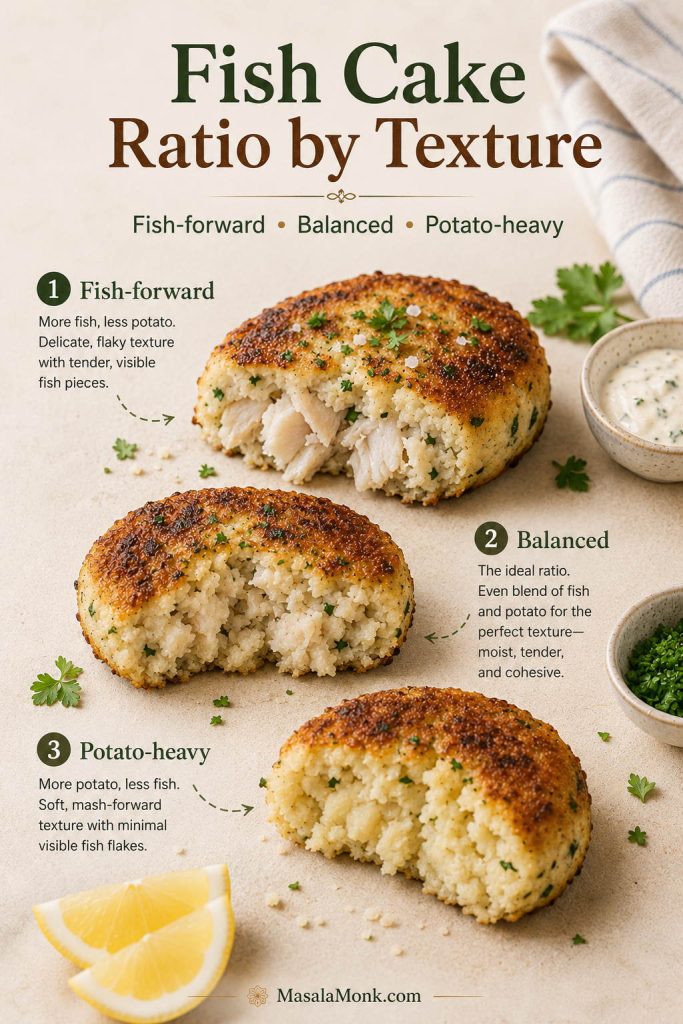
Adjust the Ratio by Texture
The table below is not meant to make the recipe fussy. It simply shows why some batches feel flaky and delicate while others feel soft, sturdy, and more potato-forward.
Changing the ratio changes the bite. Fish-forward cakes are flakier and more delicate, while potato-heavy cakes are softer, sturdier, and less fish-forward.
These weights follow the same basis as the main recipe: raw fish weight and peeled potato weight.
Style
Raw fish
Peeled potatoes
Result
Fish-forward
500g
400g
Flakier, more delicate, and a little harder to handle.
Balanced classic
450g
500g
The most reliable first batch.
Potato-heavy
350g
600g
Softer, cheaper, and less fish-forward.
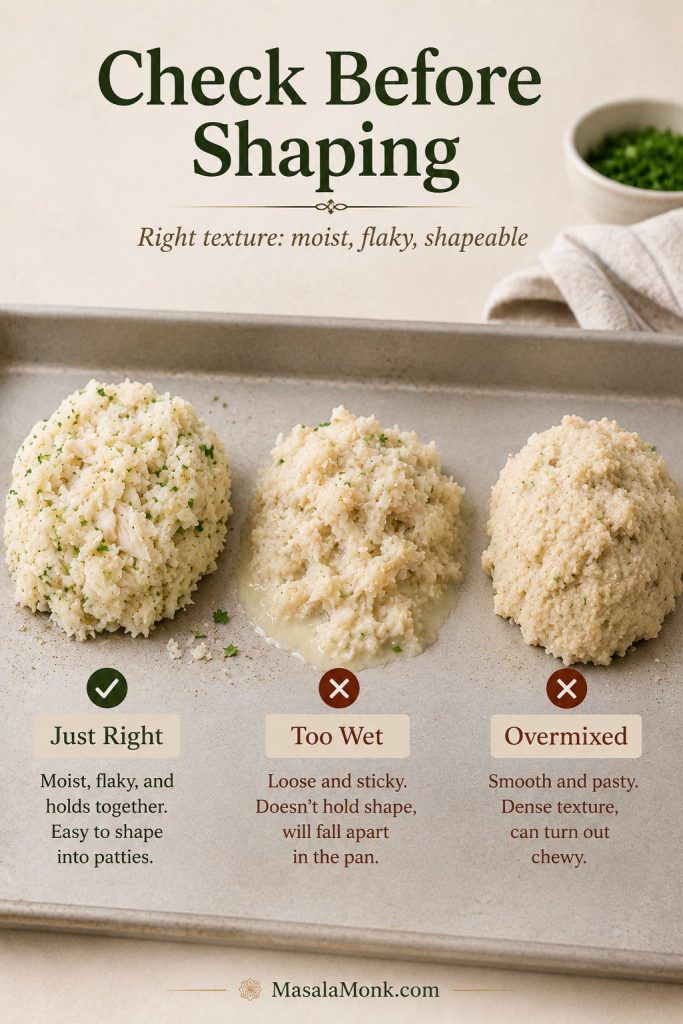
Check the Mixture Before Shaping
The goal is not smooth mashed potato. The most satisfying cakes have a mixture of soft potato, a few small potato lumps, and visible flakes of fish. If you mash the potato until gluey or crush the fish into paste, the inside becomes heavy instead of light and flaky.
Avoid loose, creamy mashed potatoes for this recipe. Mash made with lots of milk, cream, or butter can make the filling soft. If you are using leftover mashed potato, start with a drier mash and add breadcrumbs until the patties keep their shape.
Check the mixture before shaping, because this is where most fish cakes are saved. Shapeable and flaky is ready; wet or pasty needs crumbs, binder, or a chill.
If the mixture already looks wet, slumpy, or crumbly, the troubleshooting table gives faster fixes before you start coating.
Mixture texture
What it means
What to do
Holds shape but feels moist
Right where you want it
Chill, coat, and cook.
Slumps on the tray
Too wet
Add breadcrumbs 1 tablespoon at a time.
Crumbles when pressed
Too dry
Add egg yolk, Dijon, mayo, or a tiny splash of poaching liquid.
Looks smooth and pasty
Overmixed
Stop mixing. If available, fold in a few extra fish flakes.
Sticky and gluey
Potato was overworked or too wet
Add breadcrumbs and chill longer; avoid heavy stirring next time.
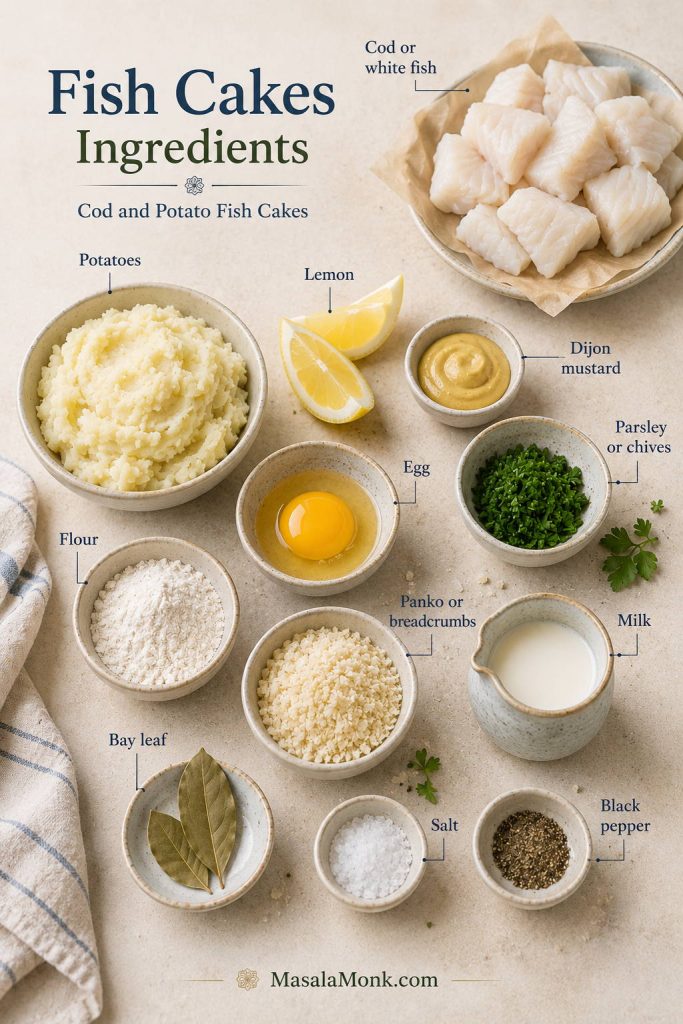
Ingredients for Cod and Potato Fish Cakes
The ingredient list is short, so the small choices matter: dry potato instead of creamy mash, enough lemon to wake up the fish, and a coating that protects the soft center while it fries.
Because the ingredient list is simple, each choice matters. Dry potatoes, mild fish, lemon, herbs, and breadcrumbs create the flavor, structure, and crust.
Fish
Use cod, haddock, pollock, hake, or another firm white fish. Cod is the easiest starting point because it flakes cleanly and has a gentle flavor that works with lemon, herbs, mustard, and breadcrumbs.
Fresh fish works well, but good frozen white fish is also a smart choice because it will be cooked, flaked, and folded into potato rather than served as a whole fillet. If sustainability labels matter where you shop, the Marine Stewardship Council haddock guide is a useful reference for certified haddock and related white fish choices.
Potatoes
Starchy potatoes are your friend here. Russet, Maris Piper, King Edward, or Yukon Gold mash into a dry, fluffy base that holds together well. Waxy potatoes can work, but they make the filling denser and a little stickier.
Starchy potatoes give potato fish cakes better structure because they mash fluffy and dry instead of turning creamy, loose, or gluey.
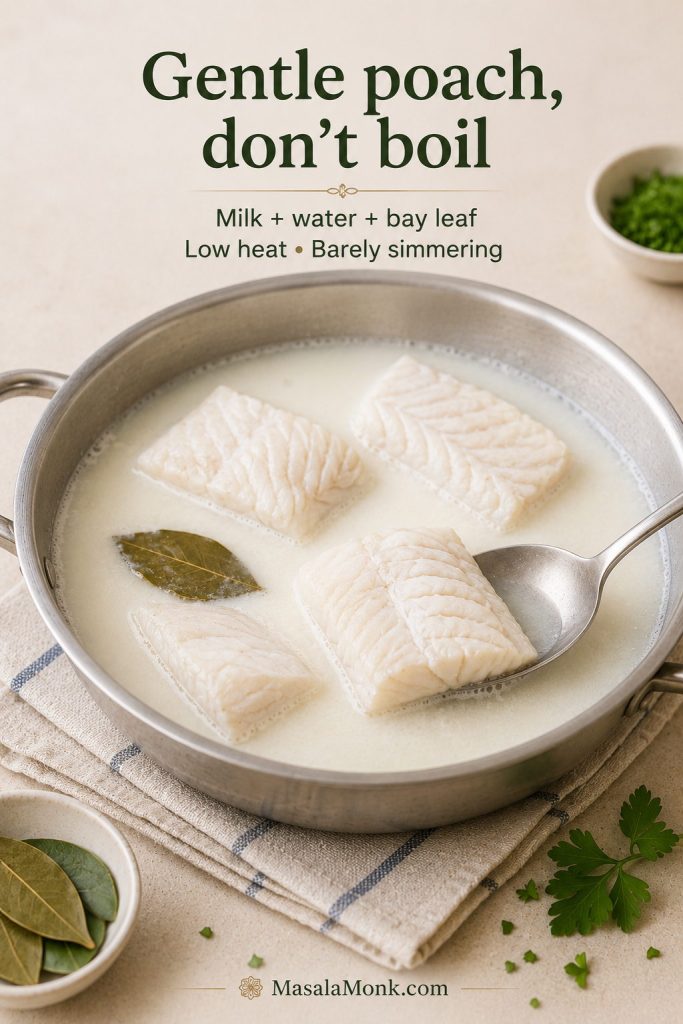
Milk, Water, and Bay Leaf
A simple poaching liquid of milk, water, and bay leaf keeps the fish gentle and lightly seasoned. You can use all water if needed, but milk gives the cod a softer, rounder flavor.
Gentle poaching keeps the fish tender enough to flake. However, boiling too hard can make it tight, dry, and harder to fold cleanly.
Egg
Use one small egg or one egg yolk in the filling. A whole egg gives more binding, while a yolk gives richness with slightly less wetness. If your mixture is already soft, use a yolk instead of a full egg.
Lemon, Mustard, and Herbs
Lemon zest, lemon juice, Dijon mustard, parsley, and chives or spring onion keep the filling bright. Fish cakes need more seasoning than plain fish because the potato and breadcrumb coating soften the flavor.
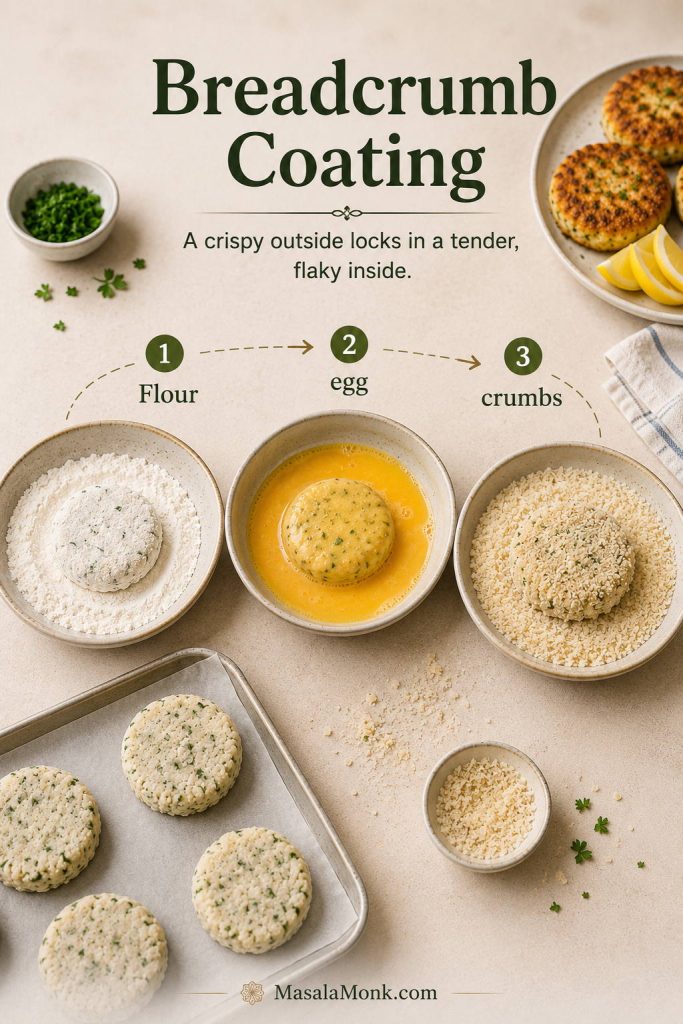
Breadcrumb Coating
For the crispest finish, use a flour, egg, and breadcrumb coating. Panko gives a lighter crunch. Fresh breadcrumbs give a more traditional homemade fishcake crust. If you like crispy coatings, you may also enjoy the separate fish batter recipe for fried fish.
The coating works in layers: flour dries the surface, egg helps crumbs cling, and breadcrumbs create the crisp shell that protects the soft center.
You do not need special equipment, but the right basic tools make the patties easier to handle. A wide skillet gives them room to brown, shallow bowls keep coating neat, and a fish spatula makes flipping less stressful.
Simple tools make the recipe calmer. A wide skillet, shallow bowls, and a thin spatula help with coating, frying, and gentle flipping.
Saucepan: for boiling the potatoes.
Shallow pan or skillet: for gently poaching the fish.
Colander: for draining the potatoes well.
Fork or potato masher: for rough mashing.
Mixing bowl: for folding the filling.
Tray or large plate: for chilling shaped cakes.
Three shallow bowls: for flour, egg, and breadcrumbs.
Large skillet: for pan-frying.
Fish spatula: for easier flipping.
Instant-read thermometer: optional, but useful for checking fish and reheated leftovers.
How to Make Fish Cakes Step by Step
Step 1: Cook the Potatoes
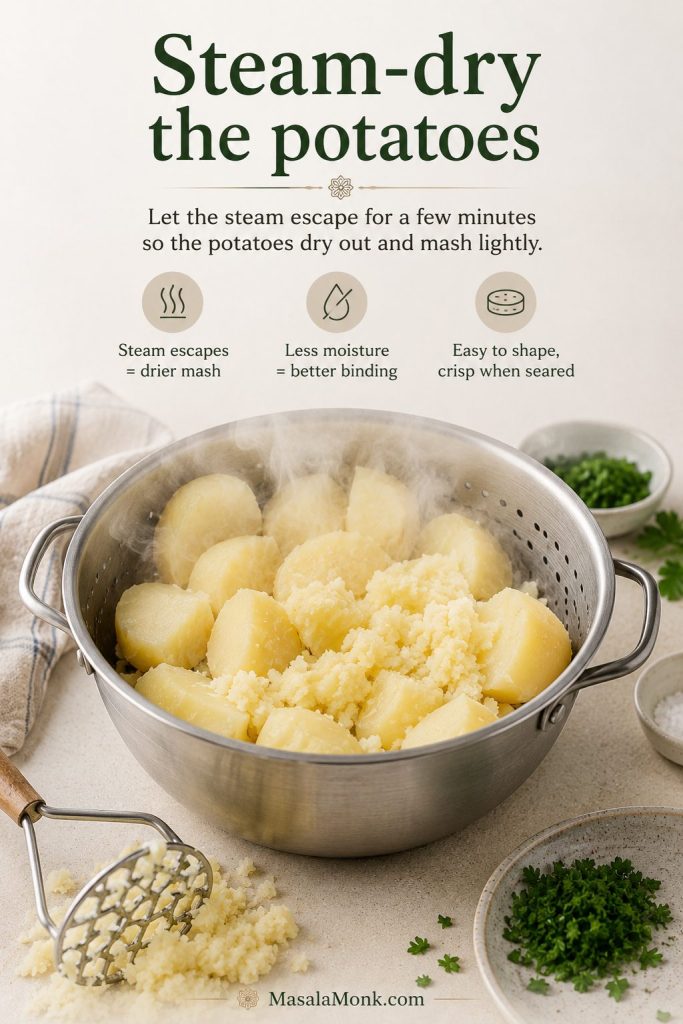
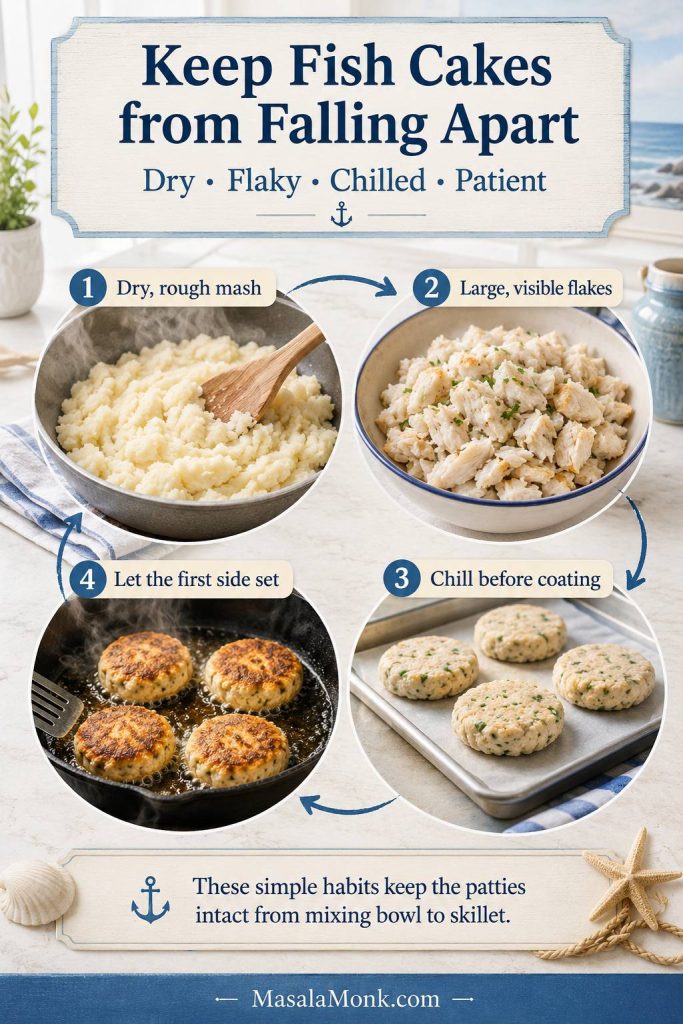
Peel and cut the potatoes into even chunks. Simmer in salted water for 10–15 minutes, or until tender enough to crush with a fork. Drain well, then return the potatoes to the hot pan for 1–2 minutes so excess steam escapes. Mash roughly. Do not add milk, cream, or butter.
Letting potatoes steam-dry removes extra moisture. As a result, the mash binds better and the patties are less likely to slump.
The potatoes are ready when they crush easily and look dry rather than glossy after steaming off. A rough mash is better than a perfectly smooth one because a little texture helps the cakes feel light.
Step 2: Poach the Fish
Place the cod or white fish in a shallow pan with milk, water, bay leaf, and a little black pepper. Bring just to a gentle simmer, then cook for about 4–6 minutes, depending on thickness. Turn off the heat, cover, and let the fish stand for 5 minutes. It should reach 145°F / 63°C, or be opaque and flake easily with a fork.
Step 3: Cool and Flake
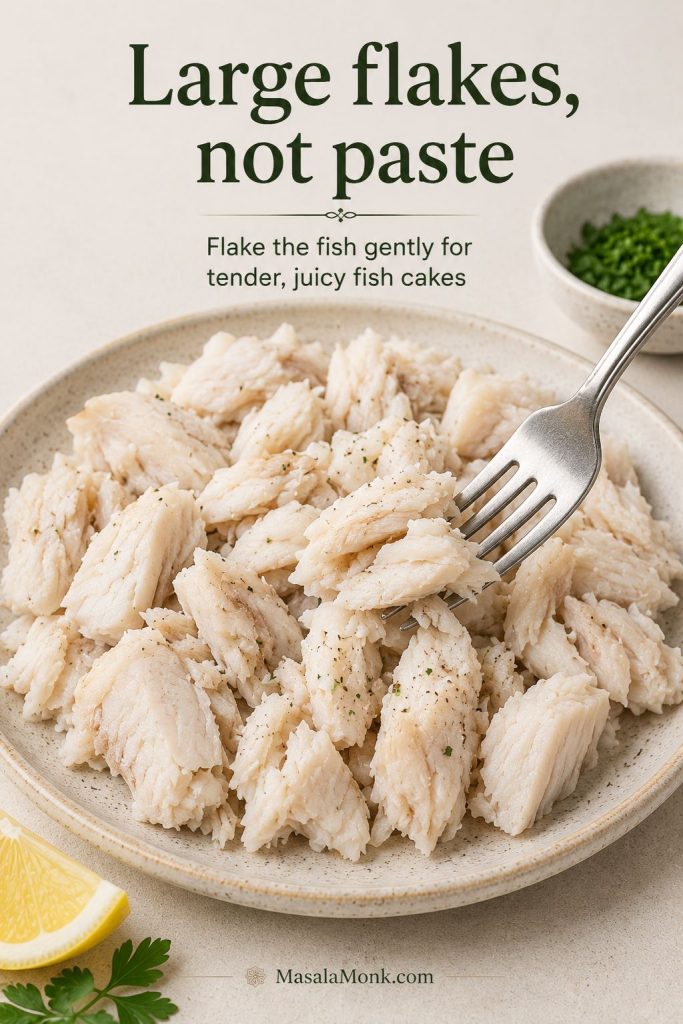
Lift the fish out of the poaching liquid and let it cool slightly. Flake it into large pieces, removing any skin or bones. Do not mash the fish into the potato. Visible flakes are what make the cakes feel like fish cakes instead of plain potato patties.
Keep the cod in large flakes rather than shredding it finely. Those pieces give homemade fish cakes a lighter, more satisfying texture.
Step 4: Mix the Filling
In a large bowl, combine the mashed potato, lemon zest, lemon juice, Dijon mustard, parsley, chives or spring onion, salt, pepper, and egg or egg yolk. Fold in the fish gently. The mixture may feel softer than burger patties, and that is okay. Once chilled and coated, it firms up enough to handle.
Fold gently so the fish stays visible. Overmixing may seem tidy, but it can turn the filling dense and paste-like.
Step 5: Shape and Chill
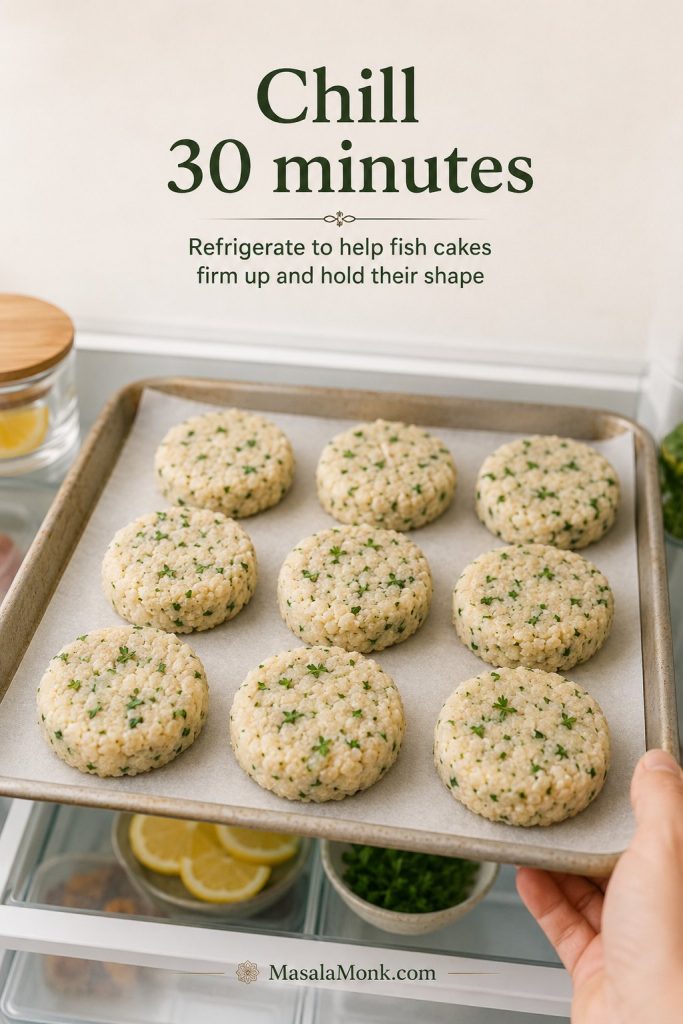
Divide the filling into 8 cakes, about 75–90g each. Shape each one about 2cm / ¾ inch thick. Place on a tray and chill for at least 30 minutes. Chilling firms the patties and makes them easier to coat and fry. If you want to make the batch ahead instead of frying right away, use the make-ahead timeline.
That short fridge rest makes the patties easier to coat and flip. Once chilled, the mixture behaves more like a cake and less like soft mash.
Do not worry if the shaped cakes look a little rustic. Neat edges are nice, but a chilled, well-coated patty matters more than a perfect circle.
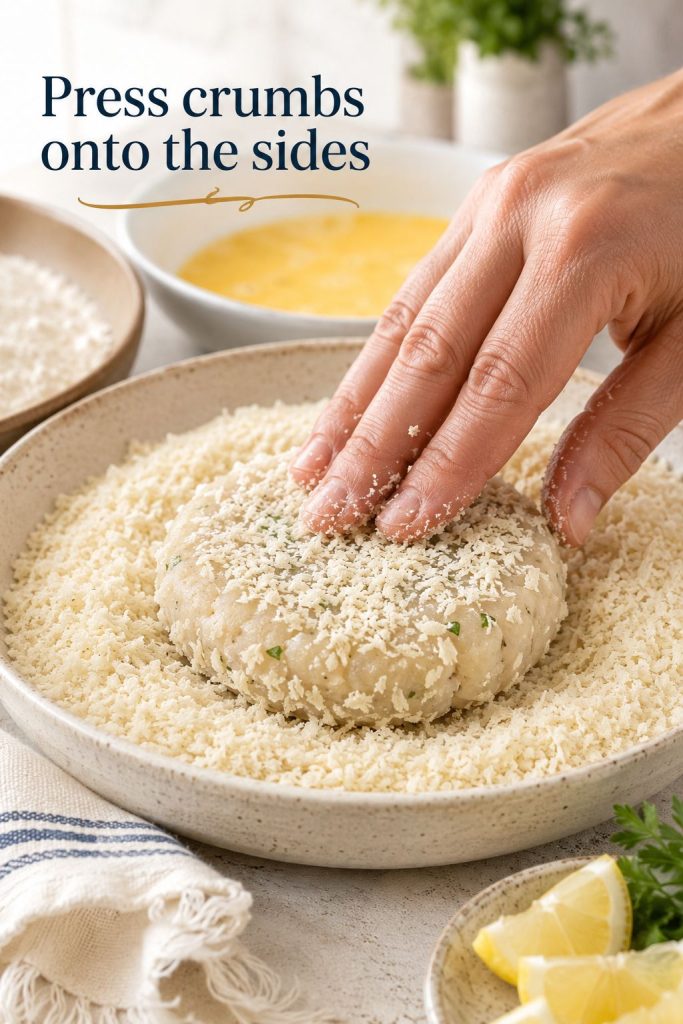
Step 6: Coat
Set up three shallow bowls: flour, beaten egg, and breadcrumbs. Coat each round lightly in flour, dip in egg, then press into breadcrumbs. Make sure the sides are coated too.
Press crumbs onto the sides as well as the top and bottom. This helps the crust protect the soft filling during frying.
Step 7: Fry
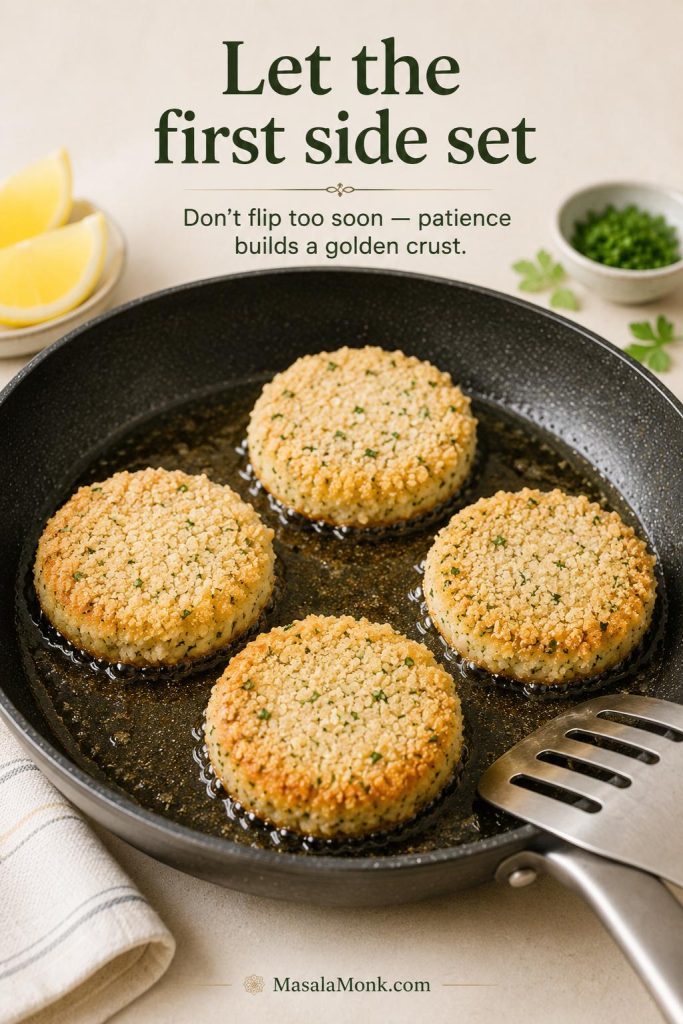
Heat oil in a large skillet over medium heat. Fry the cakes for 4–5 minutes per side, or until golden, crisp, and hot through. The first side is the patience side. Let it build a crust before you move it.
Wait until the first side forms a real crust before moving the patties. That small pause helps crispy fish cakes release cleanly instead of tearing.
Fish Cakes Recipe: Crispy Cod and Potato Fish Cakes
This fish cakes recipe makes crispy cod and potato patties with dry mashed potato, lemon, herbs, egg, and a golden breadcrumb coating. Pan-fry them for the crispiest crust, or use the baked and air fryer notes below.
Keep the core numbers handy: 450g raw fish, 500g peeled potatoes, 30 minutes chilling, and 4–5 minutes per side.
Yield8 fish cakes
Serves4
Prep Time30 minutes
Chill Time30 minutes
Cook Time25 minutes
Total Time1 hour 25 minutes
Main MethodPan-fried
Best FishCod or haddock
Ingredients
Fish and Potatoes
450g / 1 lb raw cod, haddock, pollock, hake, or firm white fish
500g / 1.1 lb peeled starchy potatoes, cut into chunks
150ml / ⅔ cup milk
150ml / ⅔ cup water
1 bay leaf
¾ teaspoon fine salt, divided, plus more for potato water
¼–½ teaspoon black pepper
Binder, Lemon, and Herbs
1 small egg or 1 egg yolk
1 teaspoon lemon zest
1–2 teaspoons lemon juice
1 teaspoon Dijon mustard
2 tablespoons chopped parsley
2 tablespoons chopped chives or spring onion
Coating and Frying
50–60g / ½ cup flour
1 large egg, beaten
85–100g / 1½–2 cups panko or fresh breadcrumbs
3–4 tablespoons neutral oil, or enough for a thin shallow-fry layer
Lemon wedges, for serving
Tartar sauce, lemon dill mayo, or green chutney mayo, for serving
Instructions
Cook and Mix
Cook the potatoes. Put the potato chunks in a saucepan, cover with cold water, add salt, and simmer for 10–15 minutes until tender. Drain well, then return to the hot pan for 1–2 minutes to steam dry. Mash roughly and let cool slightly.
Poach the fish. Place the fish in a shallow pan with the milk, water, bay leaf, and a little black pepper. Bring just to a gentle simmer. Cook for 4–6 minutes, depending on thickness, then turn off the heat, cover, and rest for 5 minutes. The fish should reach 145°F / 63°C, or be opaque and flake easily with a fork.
Flake the fish. Lift the fish from the poaching liquid, cool slightly, then flake into large pieces. Remove any skin or bones.
Mix the filling. In a bowl, combine the mashed potato, egg or yolk, lemon zest, lemon juice, Dijon mustard, parsley, chives or spring onion, remaining salt, and pepper. Fold in the fish gently, keeping visible flakes.
Adjust texture. A wet mixture needs breadcrumbs, added 1 tablespoon at a time. For a dry or crumbly mixture, add 1 teaspoon of reserved poaching liquid, mayonnaise, or Dijon.
Shape, Coat, and Fry
Shape. Divide into 8 cakes, about 75–90g each and about 2cm / ¾ inch thick. Place on a tray.
Chill. Refrigerate for at least 30 minutes. This helps the patties keep their shape.
Coat. Put flour, beaten egg, and breadcrumbs in three shallow bowls. Coat each cake in flour, dip in egg, then press into breadcrumbs.
Pan-fry. Heat oil in a skillet over medium heat. Fry for 4–5 minutes per side until golden and crisp. Flip gently and only once if possible.
Finish if needed. When the crust is ready before the center is hot, place the batch in a 200°C / 400°F oven for 8–10 minutes.
Serve. Serve hot with lemon wedges, tartar sauce, lemon dill mayo, garlic mayo, green chutney mayo, or sweet chili sauce.
Recipe Notes
For the driest potato texture, bake the potatoes instead of boiling them, then scoop and mash the flesh.
If using frozen fish, thaw fully and pat dry before cooking.
If using leftover mashed potato, avoid very creamy mash or add breadcrumbs to firm it up. See the leftover mashed potato section for the better ratio.
Panko gives the lightest crunch. Fresh breadcrumbs give a softer, classic crust.
Pan-Fried Fish Cakes: How to Get a Golden Crust
For your first batch, pan-frying is the best teacher because you can see how the crust sets. Baking is calmer for a full tray, and the air fryer is useful when you want less oil and easier cleanup, but the skillet gives you the clearest feedback. If you already know you want a hands-off batch, use the baked method; if you want less oil, use the air fryer method.
Pan-frying gives the strongest crust because the crumbs stay in direct contact with hot oil and steady heat.
Use a nonstick skillet, cast iron skillet, or heavy-bottom frying pan. Add enough neutral oil to coat the base generously, usually 3–4 tablespoons. For a deeper crust, use a shallow 1cm / 0.4 inch layer of oil.
You are looking for a steady sizzle, not aggressive frying. If the pan hisses hard or the crumbs darken within a minute, lower the heat. Fish cakes brown best when the crust has time to set before the inside overheats.
Add the patties in a single layer, leave space between them, and cook for 4–5 minutes on the first side before turning gently. The crust should sound gently crisp when you tap it with the spatula, not soft or oily.
When the crust is ready before the center is hot, the oven can finish the job without burning the crumbs. Transfer the batch to a 200°C / 400°F oven for 8–10 minutes, especially if the cakes are thick, very cold from the fridge, or made ahead.
Baked Fish Cakes
When you want the whole batch done at once, baking is the calmest route. The crust will not be quite as crackly as pan-fried, but a hot tray, a little oil, and a halfway flip still give you a golden finish. For a crisper but less hands-off result, use the pan-fried method instead.
Baked fish cakes are useful when you want the whole batch done together. For better browning, oil the crumb coating and flip the tray halfway through.
This is the method to choose when you care more about an easy full tray than the loudest crunch.
Heat the oven to 200°C / 400°F.
Place breaded fish cakes on a parchment-lined or lightly oiled baking sheet.
Brush or spray both sides with oil.
Bake for 18–22 minutes, flipping halfway.
For extra browning, broil or grill for 1–2 minutes at the end.
If the cakes are very thick, use a thermometer to check that the center is hot. Fish cooked from raw should reach 145°F / 63°C, or be opaque and flake easily with a fork. Leftovers should be reheated to 165°F / 74°C.
Air Fryer Fish Cakes
The air fryer is best when you want a neater, lighter version and do not want to babysit a skillet. The trade-off is texture: good crunch, but not the same shallow-fried crust.
Air fryer fish cakes crisp best when the basket is not crowded. A little oil helps the crumbs brown, while open space prevents steaming.
Think of the air fryer as a crisping tool, not a deep fryer. A little oil on the crumbs still matters.
For the best homemade air fryer fish cakes, chill them first, spray both sides with oil, and keep them in a single layer. Crowding traps steam and softens the crumb.
Type
Air fryer temperature
Time
Notes
Homemade chilled fish cakes
190–200°C / 375–400°F
10–14 minutes
Spray with oil and flip halfway.
Homemade frozen fish cakes
180–190°C / 360–375°F
14–18 minutes
Thicker cakes need longer; check the center.
Store-bought frozen fish cakes
180°C / 360°F
8–11 minutes
Cook in a single layer and flip or shake halfway.
Reheating cooked leftovers
190°C / 375°F
4–6 minutes
Best for restoring crispness. Reheat leftovers to 165°F / 74°C.
Air fryer models vary, so treat the times as a range. Smaller, flatter cakes brown faster. Larger or very cold patties may need a few extra minutes. The coating should look golden and crisp, and the center should be hot all the way through. If you are cooking a freezer batch, use the cook-from-frozen section for thaw-first versus frozen guidance.
Frozen Fish Cakes: How to Freeze, Cook, and Reheat
This is a recipe worth doubling. Once the cakes are shaped and coated, they freeze neatly and can become a quick dinner later with very little effort. Future-you will thank you for freezing them flat first; it keeps the coating neat and makes weeknight cooking much easier.
Fish cakes reward a little planning because chilling is not wasted time here. It is what makes the patties easier to coat, freeze, and fry without drama.
Make-Ahead Timeline
Make-ahead fish cakes work best when you plan around chilling. Shape tonight, cover for tomorrow, or freeze flat for a faster dinner later.
Plan
What to do
Cook tonight
Shape, chill 30 minutes, coat, and fry.
Prep 1 day ahead
Shape and refrigerate covered; coat before frying.
Freeze for later
Shape, coat, freeze on a tray, then bag.
Cleanest crust from frozen
Thaw overnight, then pan-fry.
Fastest frozen dinner
Air fry or bake from frozen, checking the center.
If the batch feels too soft before freezing, fix the mixture first so the patties do not break later.
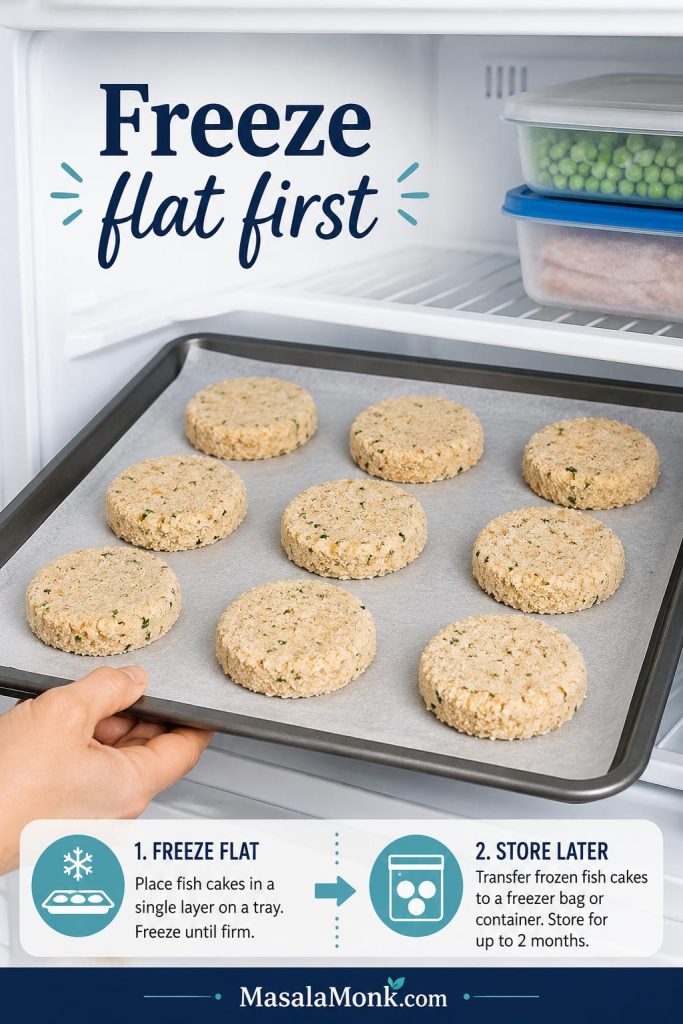
How to Freeze Them
Freeze the breaded patties flat before storing them. That simple step protects the coating and makes it easier to cook only what you need later.
Shape the fish cakes.
Chill for 30 minutes.
Coat with flour, egg, and breadcrumbs.
Place on a tray and freeze until firm.
Transfer to a freezer-safe container or bag.
Label with the date and use within 2–3 months for best texture.
Should You Freeze Fish Cakes Before or After Cooking?
For this potato fish cakes recipe, the best texture usually comes from freezing the cakes after shaping and coating, but before frying. Freeze them on a tray until firm, then store with parchment between layers. Thaw overnight before pan-frying for the crispiest crust.
If your fish was previously frozen and you are worried about refreezing, cook the patties first, cool them quickly, then freeze the cooked cakes. Reheat from frozen in the oven or air fryer until hot through.
Cook From Frozen or Thaw First?
For the cleanest crust, thaw fish cakes overnight in the fridge, then pan-fry, bake, or air-fry. If cooking from frozen, use a gentler temperature and allow more time so the outside does not brown before the center heats through.
For the cleanest crust, thaw first and pan-fry. However, baking or air frying from frozen is faster for weeknight dinners.
Method
Temperature
Time from frozen
Oven
200°C / 400°F
25–30 minutes, flipping once
Air fryer
180–190°C / 360–375°F
14–18 minutes
Skillet + oven finish
Medium skillet, then 200°C / 400°F oven
Brown first, then bake 10–15 minutes
Leftover Mashed Potato Fish Cakes
Leftover mashed potato can be a gift here, as long as it is not too loose. Cold, dry mash gives the fish something sturdy to hold on to, which means the cakes are easier to shape and less likely to fall apart.
Leftover mashed potato can save time, but it should be cold and fairly dry. If it is creamy, add breadcrumbs and chill longer.
Use about 2 cups cold mashed potato with 300–350g cooked flaked fish for a balanced leftover batch. If you have closer to 450g / 1 lb cooked fish, add another ½–1 cup mash or extra breadcrumbs until the mixture holds its shape.
Leftover mash rule
If the mashed potato tastes creamy enough to eat as a side dish, it may be too soft for fish cakes. Add breadcrumbs, chill longer, and shape smaller cakes.
Why Fish Cakes Fall Apart
Diagnose the Problem First
Fish cakes usually fall apart because the mixture is too wet, the patties were not chilled, the binder is weak, or the crust was moved before it had time to set. If the first cake breaks, do not panic. Most broken fish cakes are a moisture, binder, or timing problem, and the moment they break tells you what to fix.
When fish cakes fall apart, notice when it happens. Slumping points to moisture, cracking points to binder or chilling, and splitting in the pan points to heat or early flipping.
Look at when they break. Slumping before frying points to too much moisture. Cracking during coating usually means the patties need more binder or more time in the fridge. Splitting in the pan usually means the crust was moved too early or the heat was too aggressive.
For extra insurance, fry one small test cake before shaping the whole batch. Cracks mean the rest needs a spoonful of breadcrumbs and more chilling. A flat-tasting test cake means you should adjust the salt, lemon, mustard, or herbs before coating the remaining patties.
Quick Fixes for Common Problems
A broken first cake does not ruin the batch. Instead, use it as a test and adjust moisture, binder, chill time, or heat before frying the rest.
Problem
Likely cause
Fix
Fish cakes fall apart
Mixture too wet, not chilled, or weak binder
Add breadcrumbs, chill 30–60 minutes, and use egg or egg yolk.
Cakes are mushy
Wet mashed potato or overmixed filling
Steam-dry potatoes, avoid creamy mash, and fold fish gently.
Cakes taste bland
Potato diluted the seasoning
Add more salt, lemon zest, herbs, mustard, or a sharper sauce.
Outside browns too fast
Heat too high
Lower heat and finish thick cakes in the oven.
Cakes absorb oil
Oil too cool or pan overcrowded
Use medium heat, wait for a steady sizzle, and fry in batches.
Coating falls off
Surface too wet or coating not pressed in
Dust lightly with flour first, dip in egg, then press breadcrumbs firmly.
Center is cold
Cakes too thick or too cold from fridge/freezer
Finish in a 200°C / 400°F oven for 8–10 minutes.
Panic fix
If the first cake breaks, stop and adjust the rest: breadcrumbs for wetness, egg yolk for crumbling, longer chilling for softness, and lower heat for tearing. Once the batch is holding together, go back to coating and frying.
How to Keep Fish Cakes from Falling Apart
Prevention starts before the pan: dry mash, large flakes, chilled patties, and a patient first side make the batch easier to handle.
Use dry mashed potato, not loose creamy mash.
Drain and pat fish dry before mixing.
Keep fish flakes visible instead of mashing everything smooth.
Use egg or egg yolk as a binder.
Chill shaped cakes for at least 30 minutes.
Make cakes about 2cm / ¾ inch thick, not huge and heavy.
Flip only after the first side is golden and set.
Sauces for Fish Cakes
A good sauce makes fish cakes feel complete. You want something bright, creamy, tangy, or a little spicy to cut through the fried crust and wake up the potato.
Fish cakes need a sauce with contrast. Creamy, herby, tangy, or spicy sauces make the potato and fish taste brighter.
For tartar sauce, garlic mayo, or lemon dill mayo, the sauce tastes best when the base is rich but balanced. If you want to make the creamy base yourself, use this homemade mayonnaise recipe before adding pickles, herbs, lemon, capers, or mustard.
For the first batch, keep it simple: tartar sauce and lemon. Once you know you like the texture, try green chutney mayo for a sharper finish or mango mustard sauce when you want something brighter and more playful.
Sauce Ideas by Flavor
Sauce
Use it with
Tartar sauce
Classic cod fish cakes, chips, peas, salad
Lemon dill mayo
Cod, haddock, and lighter fish cakes
Garlic mayo
Crispy pan-fried fish cakes and fries
Green chutney mayo
Indian-spiced or herb-heavy fish cakes
Sweet chili sauce
Thai-inspired or spicy fish cake variations
Caper yogurt sauce
Lighter plates with salad or roasted vegetables
Sriracha mayo
Spicy fish patties, sandwiches, sliders
Need a full plate idea? The serving section below pairs these sauces with sides.
What to Serve with Fish Cakes
Fish cakes can be a light meal, a dinner plate, or part of a bigger seafood spread. Because they are crisp and savory, they pair best with something fresh, sharp, creamy, or crunchy. A simple green salad is enough, but coleslaw, cucumber salad, or fries can make the plate feel more complete.
Pair crisp fish cakes with cool sides, lemon, sauce, and something crunchy. That contrast keeps the plate bright instead of heavy.
The best plate has contrast: hot crisp cakes, something cool or sharp, and enough sauce or lemon to keep each bite bright.
Easy Sides and Pairings
Green salad: Best for a lighter dinner.
Coleslaw: Crunchy, creamy, and great with tartar sauce.
Cucumber salad: Cool, crisp, and bright enough to cut through the fried crust.
Peas or mushy peas: Classic with cod and potato fish cakes.
Battered fries or chips: Makes the plate feel closer to fish and chips, especially with tartar sauce and lemon.
Roasted vegetables: Good for a simple dinner plate.
Rice: Useful if you are serving the fish cakes with chutney, curry-style sauce, or sweet chili sauce.
Soup: Pair one or two smaller fish cakes with tomato soup, vegetable soup, or chowder.
If you want a spiced version instead, the variations section has Indian-spiced and Thai-style directions.
Fish Cakes vs Fish Patties vs Croquettes
The names overlap because all three are built around the same idea: a soft filling shaped into something you can fry or bake. In everyday cooking, fish cakes usually include fish and potato, while fish patties often rely more on breadcrumbs, egg, mayo, or soaked bread instead of mash.
The names overlap, but the texture changes. Fish cakes usually lean on potato, patties use more binder, and croquettes have a breaded shell.
Croquettes are usually breaded and fried with a softer filling, so fish cakes can feel like a simpler, flatter cousin of croquettes. If you like the breaded-and-fried style, you may also enjoy this broader croquettes recipe guide.
Variations When You Want a Different Fish or Flavor
Once the basic texture is right, the fish and seasoning can change. Keep the same rules — dry base, visible flakes, enough binder, and a proper chill — then adjust the flavor around the fish you are using.
Once the base texture is right, the flavor can change. Cod, smoked haddock, tuna, salmon, spiced, and Thai-style versions all need the same structure.
Cod Fish Cakes
Use cod as written in the main recipe for a clean, gentle, familiar version. It is the safest starting point if you want fish cakes that taste bright, flaky, and not too strong.
Smoked Haddock Fish Cakes
Replace half the cod with smoked haddock for a stronger flavor. Taste before adding salt because smoked fish is already seasoned.
Salt Cod Fish Cakes
Salt cod fish cakes are a separate regional style. Soak the salt cod properly first, then mix with potato, herbs, and binder. Do not use salt cod without soaking or the cakes will be far too salty.
Mackerel Fish Cakes
Mackerel gives a stronger, oilier fish cake. Use more lemon, herbs, mustard, or a sharp sauce to balance the richness.
Tuna Fish Cakes
Canned tuna can work, but tuna patties usually need a slightly different formula because canned tuna is drier and more compact than poached cod. Add mayo, mustard, egg, and breadcrumbs for structure.
Salmon Fish Cakes
Salmon patties and croquettes are close cousins of fish cakes, but they have their own binder, texture, and seasoning logic. Canned salmon usually needs a richer binder and a brighter seasoning profile than poached white fish.
Thai Fish Cakes
Thai fish cakes are a different style. They usually use fish paste or finely processed fish, red curry paste, fish sauce, makrut lime leaves, and green beans. The texture is springier and bouncier than potato fish cakes, so they deserve their own recipe rather than being treated as a small variation here.
Indian-Spiced Fish Cakes
For an Indian-style version, add a little ginger, green chili, cilantro, cumin, or garam masala to the mixture. Keep the spices modest so the fish still comes through. Serve with green chutney mayo or a spoonable mango mustard sauce for a tangy, sweet, mustard-forward finish. For more pairing ideas, go back to the sauces section.
Indian-spiced fish cakes work best when the spices brighten the fish rather than cover it. Cilantro, green chili, chutney mayo, and lime do that well.
Fish Tacos Instead of Fish Cakes
If you have thin fillets and want a fresher, tortilla-style dinner instead of potato fish cakes, make this fish tacos recipe with slaw, sauce, and quick-cooked fish.
Fish Cakes Without Potato
You can make fish cakes without potato, but the texture changes. Instead of mashed potato, use breadcrumbs, soaked bread, egg, mayo, or another binder. The cakes will be more like fish patties than classic potato fish cakes.
Gluten-Free, Dairy-Free, and Egg-Free Adjustments
These swaps work best when you keep the same texture goal: a filling that presses together, chills firm, and can be flipped without falling apart.
Dietary swaps still need the same texture goal. Use gluten-free crumbs, water or stock, and egg-free mayo while keeping the patties firm enough to flip.
Gluten-free: Use gluten-free flour and gluten-free breadcrumbs or crushed gluten-free crackers.
Dairy-free: Poach the fish in water or light stock instead of milk. Use unsweetened dairy-free milk only if its flavor is neutral.
Egg-free: Use egg-free mayo, extra breadcrumbs, or a little extra mashed potato to help bind. Chill the cakes longer and flip gently because they will be more delicate.
No panko: Use fresh breadcrumbs, dry breadcrumbs, crushed crackers, or a light cornmeal coating.
How to Store and Reheat Without Losing the Crust
The main goal with leftovers is to bring back the crust without drying out the middle. The microwave is fastest, but the oven, skillet, or air fryer will give you a much better second-day fish cake. If you are freezing uncooked cakes instead of leftovers, use the freezing guide above.
Let leftovers cool before storing, then reheat with dry heat. This brings back the crust while keeping the center soft and tender.
Refrigerator
Store cooked fish cakes in an airtight container in the refrigerator for up to 3 days. Let them cool before covering so trapped steam does not soften the crust too much.
Freezer
Freeze uncooked breaded fish cakes on a tray until firm, then transfer to a freezer bag or container. Use within 2–3 months for best texture.
How to Reheat Fish Cakes
Air fryer: 190°C / 375°F for 4–6 minutes.
Oven: 190–200°C / 375–400°F for 8–12 minutes.
Skillet: Medium heat with a thin film of oil until crisp and hot.
Microwave: Fast, but it softens the crust.
Reheated well, the outside should crisp back up while the center stays soft and flaky. Fish cooked from raw should reach 145°F / 63°C, or be opaque and flake easily with a fork. Leftovers should be reheated to 165°F / 74°C. You can check the official FoodSafety.gov internal temperature chart for current guidance.
Once you understand the texture cues, fish cakes become much less fussy. Keep the potato dry, leave the fish in flakes, chill before coating, and let the first side set in the pan. Those four habits matter more than the exact fish you choose.
FAQs
Best fish for a first batch
Cod is the easiest first choice because it flakes cleanly, tastes mild, and holds together well with potato. Haddock, pollock, hake, and tilapia also work. Smoked haddock gives a stronger flavor, while salmon and tuna need slightly different seasoning and binding.
Frozen fish: what matters most?
Thaw it fully, drain it well, and pat it dry before cooking. Frozen fish releases extra moisture, so drying it properly helps the cakes hold together and brown better.
Leftover fish works, but keep the flakes large
Leftover cooked fish is useful as long as it is not too wet. Fold it into the potato mixture near the end so the pieces stay visible instead of disappearing into the mash.
Leftover mashed potato: when it helps and when it hurts
Cold, dry mashed potato is helpful. Very creamy mash can make the mixture loose, especially if it contains lots of milk, cream, or butter. Add breadcrumbs until the mixture holds its shape.
Why the cakes break
Most broken fish cakes are not a disaster; they are a moisture or timing problem. Add breadcrumbs if the mixture is wet, chill longer if the patties feel soft, and wait until the first side is set before turning.
Egg, yolk, or no egg?
A whole egg gives more binding, while a yolk adds richness with slightly less wetness. Egg-free cakes can work with egg-free mayo, extra breadcrumbs, or a little more mashed potato, but they are more delicate.
Baking instead of frying
Bake breaded fish cakes at 200°C / 400°F for 18–22 minutes, flipping halfway. Brush or spray both sides with oil so the crumbs brown instead of drying out.
Air fryer timing for homemade cakes
Air fry chilled homemade fish cakes at 190–200°C / 375–400°F for 10–14 minutes, flipping halfway. Spray the coating lightly with oil and keep the cakes in a single layer.
Freezing before or after cooking?
For the cleanest crust, freeze shaped and breaded fish cakes before frying. If the fish was previously frozen and you prefer not to refreeze it uncooked, cook the cakes first, cool them quickly, then freeze.
Fish cakes, patties, and croquettes — the difference
The terms overlap. Classic versions usually include fish and potato, fish patties may use breadcrumbs, egg, mayo, or other binders instead of potato, and croquettes are usually breaded and fried with a softer filling.
This baked tilapia recipe is for the nights when dinner needs to feel easy but still taste like you tried: tender white fish, lemony garlic butter, a little paprika, and a spoonable pan sauce for rice, potatoes, or vegetables. Tilapia is mild, quick, and easy to dress up, which is exactly why it can become one of the most useful weeknight fish recipes in your rotation.
The trick is not to overthink it — but also not to underseason it. This fish is lean and delicate, so it needs enough salt, lemon, garlic, and butter or olive oil to taste bright instead of bland. It also cooks fast, which means a few extra minutes can turn flaky fish into dry fish.
For most thawed tilapia fillets, bake at 400°F / 200°C for 10–12 minutes, or until the fish is opaque, flakes easily with a fork, and reaches 145°F / 63°C in the thickest part. For more exact timing by oven temperature and fillet thickness, see the time and temperature chart. Once the timing is familiar, this baked tilapia recipe becomes one of those simple dinners you can repeat with lemon garlic butter, spicy seasoning, crispy parmesan topping, vegetables, tacos, or rice bowls.
For the most reliable baked tilapia recipe, keep things simple: dry the fillets, season them well, spoon lemon garlic butter or olive oil over the top, and bake them uncovered at 400°F / 200°C for 10–12 minutes. The fish should come out moist and flaky, not browned like chicken or crispy like fried fish. You are looking for tender fish with a bright sauce, not a dry fillet that has been pushed too far.
Baked Tilapia Time, Temperature, and Doneness
Use this quick visual when you need the core timing before you start cooking: 400°F, 10–12 minutes, and 145°F in the thickest part.
For most thawed tilapia fillets, start with 400°F for 10–12 minutes. However, the real finish line is texture and temperature: opaque fish that flakes easily and reaches 145°F.
Use a 9×13-inch baking dish for this lemon garlic butter version because the dish holds the sauce around the fish. For crispier parmesan or panko tilapia, use a rimmed sheet pan so the topping stays drier and lightly crisp.
Tilapia is done when it turns opaque, flakes easily, and reaches 145°F / 63°C in the thickest part. Thin fillets may be ready closer to 9–10 minutes, while thicker fillets may need 12–15 minutes.
Choose your path: For thawed average fillets, bake at 400°F / 200°C for 10–12 minutes. Very thin fillets should be checked at 9 minutes, while thicker fillets usually need 12–15 minutes. Frozen fillets are best thawed first for the cleanest texture, although you can bake them from frozen for 18–25 minutes when dinner needs saving.
If your fish is still frozen, jump to the fresh vs frozen tilapia section before you start so you know what texture and timing changes to expect.
Tilapia Fillet Timing Guide
Use this timing guide when your fillets look especially thin, thick, uneven, or still frozen. Thickness changes the bake time more than the package label does.
Tilapia fillets do not all bake at the same speed. Start checking thin pieces early, give thicker fillets a few extra minutes, and treat frozen tilapia as its own timing path.
Baked Tilapia at a Glance
Here is the simple version of this baked tilapia recipe before we get into the details. For most thawed fillets, remember this first: 400°F, 10–12 minutes, and 145°F inside.
Detail
Use this as your default
Oven temperature
400°F / 200°C
Cook time
10–12 minutes for most thawed fillets
Internal temperature
145°F / 63°C
Pan
9×13-inch baking dish for saucy tilapia; rimmed sheet pan for crispy topping
Flavor base
Lemon, garlic, butter or olive oil, paprika, black pepper, parsley
Frozen fillets
Best thawed first; no-thaw option takes about 18–25 minutes
Texture cue
Opaque, flaky, moist, and easy to separate with a fork
If you are unsure whether the fish is fully cooked, the doneness section shows the fork-flake and 145°F cues together.
What This Baked Tilapia Tastes Like
This baked tilapia recipe should taste light, lemony, and savory, with soft flakes of fish and a warm garlic-butter sauce you can spoon over rice, potatoes, or vegetables. The paprika gives the pale fish a little warmth and color, while the parsley and final squeeze of lemon keep the whole plate fresh instead of heavy.
Soft Flakes and Bright Lemon Garlic Sauce
The best texture is moist and easy to separate with a fork. You are not trying to create a dark crust here; you are looking for gentle flakes and a sauce that keeps the fish bright.
The best lemon garlic baked tilapia has soft flakes and a glossy sauce. Instead of chasing a dark crust, look for tender fish that separates easily with a fork.
For a stronger flavor, use the spicy, lemon pepper, masala-spiced, or crispy parmesan variations later in the post. The base recipe is intentionally simple, so it can work with rice, vegetables, salad, tacos, or grain bowls.
Why This Baked Tilapia Recipe Works
Tilapia does not need a complicated marinade or a long oven time. In fact, those are usually where things go wrong. The fish is thin and lean, so it does best with direct seasoning, a little fat, a bright finish, and a short bake.
The lemon garlic butter does most of the heavy lifting here. Lemon juice wakes up the mild fish, zest adds aroma without extra liquid, garlic brings savory depth, paprika adds warmth and color, and butter or olive oil helps the fillets stay tender.
400°F is a reliable default: it cooks tilapia quickly without forcing you into a long bake that can dry out thin fillets.
The sauce adds moisture and flavor: butter or olive oil keeps the fish tender, while lemon and garlic make it taste fresh.
Drying the fish helps: this is especially important if your tilapia was frozen and thawed.
The recipe is flexible: keep it lemon garlic, make it spicy, add a parmesan-panko topping, or bake it with quick-cooking vegetables.
Doneness is easy to check: look for opaque flesh, easy flaking, and 145°F / 63°C in the thickest part.
Useful tip: Start checking early the first time you make this. Fillet thickness matters more than the exact minute on the timer.
Ingredients for Baked Tilapia
Because this baked tilapia recipe uses only a few ingredients, each one has a clear job. Fresh lemon, enough garlic, and a balanced amount of salt and fat help the finished fish taste bright instead of plain.
Because tilapia is mild, every ingredient has a job. Lemon brings brightness, garlic adds depth, butter or olive oil keeps the fish moist, and paprika gives the fillets a warmer finish.
Ingredient
US measure
Metric
Why it matters
Tilapia fillets
4 fillets, 5–6 oz each
560–680 g total
Main protein. Thaw and pat dry for best texture.
Unsalted butter, melted
4 tbsp
56 g
Adds richness, moisture, and classic lemon garlic flavor.
Fresh lemon juice
1½ tbsp
22 ml
Brightens the mild fish and keeps the flavor lively.
Lemon zest
1 tsp
From about 1 lemon
Adds lemon aroma without making the sauce watery.
Garlic, minced
3 cloves
About 9 g
The main savory flavor in the sauce.
Fine salt
¾ tsp
About 4–5 g
Seasons the fish directly. Adjust if using salted butter.
Black pepper
¼ tsp
About 0.5 g
Adds gentle heat and balance.
Paprika
½ tsp
About 1 g
Adds warm color and mild flavor.
Dried oregano or thyme
½ tsp
About 0.5 g
Gives the fish a more complete savory flavor.
Red pepper flakes
⅛–¼ tsp
Optional
Use for a little heat.
Lemon slices or wedges
1 lemon
1 lemon
Use slices while baking or wedges for serving.
Fresh parsley
1–2 tbsp
4–8 g
Adds freshness and color after baking.
Once the basic lemon garlic version makes sense, the seasoning guide shows how to take the same baked tilapia method toward Cajun, blackened, parmesan-panko, Mediterranean, or masala-spiced flavors.
Butter or Olive Oil?
Butter gives the richest lemon garlic flavor. Olive oil makes the recipe lighter and works well for a fresher, less buttery dinner. You can also use half butter and half olive oil for a balanced version that still tastes rounded.
Easy swap: Replace the 4 tablespoons butter with 2 tablespoons butter plus 1 tablespoon olive oil, or use 1½–2 tablespoons olive oil for a lighter version.
Equipment for Oven Baked Tilapia
Although this baked tilapia recipe does not need special equipment, the pan you choose changes the texture. A baking dish keeps the fish saucy and moist, while a sheet pan is better when you want crisp edges or a breadcrumb topping.
The pan changes the result before the fish even goes into the oven. A baking dish holds lemon garlic sauce close to the tilapia, while a sheet pan helps parmesan or panko toppings stay crisp.
9×13-inch baking dish: best for saucy lemon garlic baked tilapia because it holds the butter and lemon around the fillets.
Rimmed sheet pan: better for parmesan, panko, or crispier baked tilapia.
Parchment paper or foil: useful for cleanup, especially when using a sheet pan.
Paper towels: important for drying thawed fillets before seasoning.
Small bowl: for mixing the lemon garlic butter.
Instant-read thermometer: the most reliable way to check for 145°F / 63°C.
If you are using a sheet pan because you want crunch, the crispy parmesan baked tilapia variation is the better path than trying to brown plain tilapia deeply.
Best Seasoning for Tilapia
Tilapia takes seasoning well, so you do not have to stay locked into lemon garlic. The fish has a gentle flavor, which means it can go bright and buttery, spicy, herby, crispy, or lightly masala-spiced without much effort.
For the main recipe, lemon, garlic, paprika, pepper, herbs, and parsley are the easiest starting point. They keep the fish bright, clean, and flexible enough for rice, vegetables, tacos, or bowls.
This baked tilapia seasoning guide gives you more than one dinner path. Keep it lemon garlic, make it Cajun or blackened, add parmesan-panko crunch, or use light masala spices for a warmer plate.
Flavor direction
Use this seasoning
Best with
Lemon garlic
Lemon juice, lemon zest, garlic, paprika, parsley, black pepper
Rice, potatoes, salad, roasted vegetables
Lemon pepper
Lemon pepper seasoning, extra lemon, butter or olive oil
Green beans, asparagus, couscous
Cajun or Old Bay-style
Cajun seasoning or Old Bay-style seasoning, lemon, butter, parsley
Paprika, cumin, turmeric, black pepper, lemon, light garam masala
Rice, kachumber-style salad, yogurt sauce
If you are baking the fish for fish tacos, season it a little more boldly with paprika, cumin, garlic, lime, and black pepper. This gentle white fish needs enough flavor to stand up to slaw, sauce, and fresh toppings.
A little more flavor is usually the answer. If baked tilapia tastes flat, it usually needs one of four things: a pinch of salt, a squeeze of lemon, a little more garlic, or fresh herbs after baking.
How to Bake Tilapia
This is a short baked tilapia recipe, so the small steps carry a lot of weight. Dry fillets, even seasoning, a single layer, and an early check are what keep the fish tender instead of watery or dry.
If your fish usually turns dry, watery, or bland, check the troubleshooting section before you bake; most problems come from wet fillets, crowding, or waiting too long for browning.
Pat Dry the Tilapia Before Baking
This is the quiet prep step that prevents watery sauce and helps the seasoning stay where you put it.
Patting the fillets dry is a small step with a big payoff. It prevents watery baked tilapia and helps the lemon garlic seasoning cling to the fish instead of sliding into the pan.
Mix the Lemon Garlic Butter Sauce
The sauce should be glossy, fragrant, and easy to spoon over the fish. Because tilapia is mild, this simple mixture carries most of the flavor.
This lemon garlic butter sauce does most of the flavor work. As the butter mixes with lemon, garlic, herbs, and paprika, it gives mild tilapia a brighter and more savory finish.
Before you bake: Make sure the fillets are in one layer, the surface is dry, the sauce touches every fillet, and the oven is fully preheated. Those four small things do more for texture than adding extra ingredients.
Preheat the oven. Set the oven to 400°F / 200°C. Lightly grease a 9×13-inch baking dish.
Dry the fish. Pat the tilapia fillets dry with paper towels. This helps the seasoning stick and reduces watery sauce.
Mix the sauce. In a small bowl, stir together melted butter, lemon juice, lemon zest, garlic, salt, pepper, paprika, oregano or thyme, and optional red pepper flakes.
Arrange the fillets. Place the tilapia in a single layer in the baking dish. Do not stack or overlap the fish.
Add flavor. Spoon the lemon garlic butter evenly over the fillets. Add lemon slices for a stronger lemon aroma.
Bake. Bake for 10–12 minutes, or until the fish is opaque, flakes easily, and reaches 145°F / 63°C in the thickest part.
Finish fresh. Sprinkle with parsley and serve with extra lemon wedges. Spoon a little pan sauce over the top as needed.
Spoon Sauce Over Every Fillet
Once the fillets are in a single layer, cover each one with the lemon garlic butter so the fish bakes evenly and tastes seasoned from edge to edge.
Even sauce coverage matters because tilapia cooks quickly. Spoon the lemon garlic butter over every fillet so each piece bakes with enough moisture, seasoning, and brightness.
Before and After Baked Tilapia
Use the visual change as a cue, but do not expect the fish to look deeply roasted. Tilapia is done when it turns opaque and begins to flake.
The change from raw to done is subtle: glossy fillets turn opaque and begin to flake. Since tilapia stays pale, do not wait for deep browning before you stop baking.
Do You Need to Flip Tilapia While Baking?
No. Tilapia fillets are thin and delicate, so flipping is not necessary. Arrange them in one layer, spoon the seasoning over the top, and let the oven do the work. Flipping can make the fillets break apart, especially once they are fully cooked.
Baked Tilapia Mistakes to Avoid
What not to do: Do not wait for tilapia to turn deeply golden, do not bake frozen fillets stuck together, do not crowd the dish, and do not keep cooking once the center is opaque and flaky. Most dry tilapia comes from trying to make it look more browned than it needs to be.
Most baked tilapia mistakes start before the timer ends. Give the fillets space, avoid baking frozen pieces stuck together, and stop judging doneness by browning alone.
How Long to Bake Tilapia: Time and Temperature Chart
For this baked tilapia recipe, 400°F / 200°C is the easiest weeknight default. However, different oven temperatures can work depending on your fillets, your pan, and whether you want a softer baked finish or a little more color on top.
Use the chart below as a practical guide, then check the fish itself. Tilapia is ready when it is opaque, flakes easily, and reaches 145°F / 63°C. If your pieces look especially thin, thick, or uneven, use the fillet timing guide near the top of the post as a quick reference.
If you are wondering how long to bake tilapia, start with 400°F for most thawed fillets. Lower temperatures, thicker pieces, and frozen fillets need extra time and closer checking.
Oven temperature
Best for
Approximate time
Notes
350°F / 175°C
Gentle baking, foil packets, covered fish
18–25 minutes
Useful for softer steamed-style methods, but not the fastest option.
375°F / 190°C
Older/simple baked tilapia methods
15–20 minutes for average fillets
Thicker or covered fillets may need closer to 25 minutes.
400°F / 200°C
Everyday oven baked tilapia
10–12 minutes, or 12–15 for thicker fillets
The most reliable balance of speed, moisture, and easy timing.
425°F / 220°C
Faster browning, panko, parmesan topping
10–15 minutes
Check early because thin fillets can overcook quickly.
400°F / 200°C from frozen
No-thaw frozen tilapia fillets
18–25 minutes
Expect extra liquid; check 145°F / 63°C in the center.
When in doubt, start checking early. Because the fillets are usually thin, one or two extra minutes can change the texture more than you expect.
Tilapia Thickness Chart at 400°F
Because tilapia fillets are not all the same size, thickness matters more than the package label. A thin fillet can finish before the timer reaches 10 minutes, while a thicker fillet may need a few extra minutes.
Fillet thickness
Approximate cook time at 400°F / 200°C
What to watch for
Thin fillets
9–10 minutes
Check early; they can dry out fast.
Average fillets
10–12 minutes
Most 5–6 oz fillets land here.
Thicker fillets
12–15 minutes
Check the thickest part, not the edge.
Frozen fillets
18–25 minutes
Expect more liquid and check the center carefully.
How Long to Bake Tilapia at 400°F
At 400°F / 200°C, most thawed tilapia fillets take 10–12 minutes. Very thin fillets may finish closer to 9 minutes. Thicker fillets may need 12–15 minutes. Start checking early, because tilapia can move from moist to dry quickly.
How Long to Bake Tilapia at 425°F
At 425°F / 220°C, tilapia usually takes 10–15 minutes. This hotter temperature is useful for panko, parmesan, or sheet-pan versions where you want a little more color. Watch closely if the fillets are thin.
How Long to Bake Tilapia at 375°F
At 375°F / 190°C, tilapia usually takes 15–20 minutes for average fillets, though thicker or covered fillets may need closer to 25 minutes. This lower temperature works, but the longer bake can make thin fillets drier.
How to Know When Tilapia Is Done
The most reliable way to check baked tilapia is to use both visual cues and temperature. The fish should look opaque, separate easily with a fork, and reach 145°F / 63°C in the thickest part.
Use both doneness cues together: the fish should look opaque and separate easily, while the thickest part reaches 145°F. That way, you avoid undercooked fish and dry overbaked tilapia.
Opaque: the center should look white and cooked through, not glassy or translucent.
Flaky: the fish should separate easily with gentle pressure from a fork.
Moist: the fish should look tender, not dry and tight.
145°F / 63°C: this is the safest final check if you have a thermometer.
Do not wait for heavy browning. Tilapia is lean and pale, so it may be fully cooked before it looks deeply golden. A short broil can add color, but only use it after the fish is almost done.
Fresh vs Frozen Tilapia
Frozen tilapia works in this baked tilapia recipe, but the cleanest texture comes from thawing it first. Once thawed, the fillets are easier to dry, season, and bake evenly. They also release less liquid into the baking dish. For the cleanest texture, use the thawing method below, then pat the fillets dry before seasoning.
Thawed tilapia gives the cleanest texture because it is easier to dry and season. Even so, frozen tilapia can still rescue dinner when you allow extra time and expect more liquid in the pan.
When it is 6 p.m. and the fish is still frozen, you still have a path. Frozen tilapia can go straight into the oven, although the texture will be cleaner if you thaw it first. The pan may collect more liquid, but you can still get a workable dinner when you forgot to thaw anything.
Method
Best use
Cook time
Texture notes
Thawed first
Most reliable everyday baked tilapia
10–12 minutes at 400°F / 200°C
Cleaner texture, less liquid, better seasoning contact.
Baked from frozen
Emergency no-thaw dinner
18–25 minutes at 400°F / 200°C
More liquid in the pan; check the center carefully.
How to Thaw Frozen Tilapia
The FDA seafood safety guidance recommends thawing frozen seafood gradually in the refrigerator overnight when possible. For a quicker method, keep the fish sealed in a bag and place it in cold water until flexible, then pat it very dry before seasoning. Do not bake fillets that are stuck together in a frozen block, because the outside can overcook before the center is done.
Thaw frozen tilapia gently when you can, then pat it dry before baking. Refrigerator thawing is easiest overnight, while sealed cold-water thawing helps when dinner is getting close.
How to Bake Frozen Tilapia
For the best result, thaw frozen tilapia first. To bake from frozen, place the frozen fillets in a greased baking dish, season them well, and bake at 400°F / 200°C for about 18–25 minutes, or until the center reaches 145°F / 63°C.
When the frozen fillets release a lot of liquid, carefully spoon off some of the excess before serving. Then add a little fresh lemon juice, parsley, or a small spoon of melted butter at the end to bring the flavor back.
Watery pan fix: If thawed frozen tilapia releases a lot of liquid, pat the fillets drier next time. For the current batch, spoon off excess liquid before finishing with lemon, parsley, or a little extra butter.
Should You Bake Tilapia Covered or Uncovered?
For this baked tilapia recipe, bake the fish uncovered. As a result, the top stays less steamy and the lemon garlic butter tastes brighter instead of diluted.
Covered baking or foil packets are useful when you want an extra-soft, steamed texture, especially with vegetables. However, the fish will not brown, and any sauce inside the packet may taste lighter because the moisture stays trapped.
Bake this lemon garlic version uncovered when you want a brighter sauce and a cleaner baked finish. Foil packets are useful too, although they create a softer, more steamed texture.
Method
Texture
Best for
Uncovered baking
Cleaner baked finish, less steamed, better flavor concentration
Once you know the basic time and temperature, baked tilapia becomes easy to bend toward whatever dinner needs to be: bright and lemony, spicy for tacos, crisp on top, lighter with vegetables, or warmer with masala-style spices. Keep the same core method, then change the seasoning, topping, or sides around it.
After choosing a flavor direction, use the serving ideas section to turn the fish into a full dinner with rice, vegetables, tacos, salad, potatoes, or bowls.
Not sure which version to make? Choose lemon garlic for the easiest dinner, lemon pepper for the brightest flavor, parmesan-panko for crunch, spicy tilapia for tacos, and masala-spiced tilapia when you want something warmer with rice.
Lemon Pepper Baked Tilapia
Use lemon pepper seasoning in place of the paprika and oregano. Then add extra lemon zest to the butter or olive oil and finish the baked fish with fresh lemon juice. This is one of the easiest variations because it keeps the flavor bright and simple.
Garlic Butter Baked Tilapia
For a stronger garlic butter tilapia, increase the garlic to 4 cloves and spoon a little extra melted butter over the fish right after baking. This version is especially good with rice, mashed potatoes, roasted vegetables, or crusty bread to catch the sauce.
Crispy Parmesan Baked Tilapia
For a crispier baked tilapia, use a sheet pan instead of a baking dish and add a parmesan-panko topping. This gives the delicate fish more texture without needing to fry it.
For 4 fillets, mix ¼ cup panko, 2–3 tablespoons grated parmesan, 1 tablespoon melted butter or olive oil, ½ teaspoon paprika, ½ teaspoon garlic powder, parsley, and black pepper. Spoon the topping over the fillets and bake at 400°F / 200°C for 12–15 minutes. Broil for 30–60 seconds at the end for more color.
Crispy baked tilapia works best when the crunch comes from the topping, not from overbaking the fish. Use a sheet pan and parmesan-panko crumbs to protect the moist flakes underneath.
If you broil at the end, watch closely. Broiling is for color, not for finishing undercooked fish. For a true fried-fish texture instead of a baked topping, use a separate fish batter recipe. The parmesan-panko version gives you crunch on top, while batter is the better route when you want a full crispy coating.
Tilapia with Quick-Cooking Vegetables
For a vegetable version, use cherry tomatoes, zucchini, thin bell pepper strips, asparagus, broccolini, or thin onion slices. Toss the vegetables with olive oil, salt, pepper, and a little garlic before arranging them around the fish.
Quick-cooking vegetables belong beside tilapia because the fish finishes fast. Choose tomatoes, zucchini, asparagus, broccolini, or thin peppers instead of dense vegetables that need a longer roast.
Avoid thick potatoes, large carrot pieces, or dense vegetables unless they are par-cooked first. Tilapia cooks much faster than those vegetables, so the fish can dry out while you wait for the vegetables to soften.
Spicy Baked Tilapia
For a spicy baked tilapia, add cayenne, chili powder, smoked paprika, Cajun-style seasoning, or crushed red pepper to the lemon garlic butter. Finish with lime instead of lemon for a sharper, brighter flavor. For a sweet-hot finish on tacos or rice bowls, drizzle a little mango habanero sauce over the fish after baking rather than before.
When baked tilapia is headed for tacos, season it more boldly than you would for a plain dinner plate. The extra spice helps the fish stand up to slaw, salsa, lime, and sauce.
Masala-Spiced Baked Tilapia
For a masala-spiced variation, season the fish with paprika, cumin, turmeric, black pepper, lemon juice, and a light pinch of garam masala. Keep the spice blend balanced so the tilapia still tastes fresh and delicate, not heavy. Serve it with rice, cucumber salad, or a spoonful of green chutney for a brighter herb finish.
A light masala-spiced baked tilapia keeps the fish fresh while adding warmth from cumin, turmeric, paprika, and pepper. Rice, cucumber salad, and green chutney turn it into a complete meal.
What to Serve with Baked Tilapia
Baked tilapia is mild enough to go with many sides. For a fast dinner, pair it with rice, roasted vegetables, salad, potatoes, or a simple grain bowl. Meanwhile, something crisp and cool next to the warm fish — like a vinegar-dill cucumber salad — keeps the plate fresh.
Baked tilapia is mild enough to become several dinners from one method. Serve it with rice and vegetables tonight, then use the same flaky fish for tacos, bowls, salad, or potatoes.
Rice or pilaf: good with lemon garlic butter from the baking dish. For fluffy plain rice as the base, this how to cook rice guide helps with stovetop, cooker, and Instant Pot timing.
Roasted vegetables: asparagus, zucchini, broccoli, carrots, or bell peppers.
Potatoes: mashed potatoes, roasted potatoes, baby potatoes, or a simple potato mash.
Salad: cucumber salad, green salad, tomato salad, slaw, or a lemony bean salad when you want the meal to feel more filling.
Tacos: flake the baked tilapia into tortillas with slaw and sauce.
Grain bowls: couscous, quinoa, rice, vegetables, lemon yogurt sauce, or plenty of fresh herbs.
Pasta: keep it light with olive oil, lemon, parsley, garlic, and vegetables.
Leftovers can also become a different meal. The fish works beautifully in tacos with slaw, lime, salsa, and a creamy sauce. A spoonful of mango salsa is especially good when the fillets are seasoned with lime, cumin, paprika, or chili powder.
Troubleshooting Baked Tilapia
If your baked tilapia did not come out the way you hoped, you are not alone. This fish cooks quickly, and small things — a wet fillet, a few extra minutes, not enough lemon or salt — can change the whole plate. The fixes below help you rescue the current batch and make the next one easier.
Dry, watery, bland, or rubbery tilapia usually has a simple fix. Add lemon butter for dryness, spoon off excess liquid, brighten bland fish with salt and herbs, and stop cooking once it reaches 145°F.
Problem
Why it happened
How to fix it
Dry tilapia
Overbaked, fillets were thin, or not enough fat/sauce
Check earlier next time, use 400°F / 200°C, and add butter or olive oil before baking.
Watery baking dish
Frozen fish was not fully thawed or dried
Pat fillets very dry. Spoon off excess liquid before serving.
Bland fish
Not enough salt, acid, garlic, or seasoning
Add lemon juice, parsley, pepper, and a pinch of salt after baking.
Fishy smell
Older fish, poor thawing, or too little lemon/seasoning
Use fresh-smelling fillets, thaw properly, pat dry, and season boldly.
Rubbery texture
Overcooked
Use an instant-read thermometer and stop at 145°F / 63°C.
Sticking
Pan was not greased or fish was too wet
Grease the dish, use parchment on sheet pans, and dry the fish first.
No browning
Tilapia is lean and cooks quickly
Use a parmesan-panko topping or broil briefly at the end.
How to Fix Dry Baked Tilapia After Cooking
If the tilapia is already dry, do not put it back in the oven. Spoon a little melted butter, olive oil, lemon juice, or warm pan sauce over the top. Fresh parsley, black pepper, and a small pinch of salt can also help revive the flavor.
How to Fix Bland Baked Tilapia
Bland tilapia usually needs acid and salt. Add a squeeze of lemon, a pinch of salt, fresh herbs, and a little black pepper right before serving. If you are using the fish for tacos, add a stronger sauce, slaw, or salsa to bring the whole dish together.
Once the fixes make sense, use the recipe card for the simple bake time, ingredients, and method.
How to Store and Reheat Baked Tilapia
Although baked tilapia is best right after it comes out of the oven, leftovers can still work if you reheat them gently. The main goal is to warm the fish without cooking it all over again.
Fridge: Store leftover baked tilapia in an airtight container for up to 3 days.
Reheat gently: Warm in a low oven, covered skillet, or microwave at reduced power until just heated through.
Add moisture: A small spoon of butter, olive oil, lemon sauce, or broth helps prevent dryness.
Avoid repeated reheating: Tilapia is lean, so reheating it more than once can make it rubbery.
Use leftovers creatively: Flake into tacos, rice bowls, salads, wraps, or quick fish sandwiches.
Baked Tilapia Recipe Card
Baked Tilapia Recipe
This easy baked tilapia recipe uses lemon, garlic, butter, paprika, and a 400°F oven for flaky fish in about 20 minutes. It is simple enough for a weeknight dinner, but seasoned well enough to avoid bland, dry fish.
Prep Time8 minutes
Cook Time10–12 minutes
Total TimeAbout 20 minutes
Servings4
Ingredients
4 tilapia fillets, 5–6 oz each / 560–680 g total
4 tbsp / 56 g unsalted butter, melted
1½ tbsp / 22 ml fresh lemon juice
1 tsp lemon zest
3 garlic cloves, minced
¾ tsp fine salt, or to taste
¼ tsp black pepper
½ tsp paprika
½ tsp dried oregano or thyme
⅛–¼ tsp red pepper flakes, optional
1 lemon, sliced or cut into wedges
1–2 tbsp chopped fresh parsley
Instructions
Preheat the oven to 400°F / 200°C. Lightly grease a 9×13-inch baking dish.
Pat the tilapia fillets dry with paper towels and arrange them in a single layer in the baking dish.
In a small bowl, mix melted butter, lemon juice, lemon zest, garlic, salt, pepper, paprika, oregano or thyme, and optional red pepper flakes.
Spoon the lemon garlic butter evenly over the tilapia. Add lemon slices if using.
Bake for 10–12 minutes, or until the fish is opaque, flakes easily, and reaches 145°F / 63°C in the thickest part.
Sprinkle with parsley and serve with extra lemon wedges.
Notes
This baked tilapia recipe is written for thawed 5–6 oz fillets; adjust timing for very thin, thick, or frozen fillets.
Cook time depends on thickness. Thin fillets may finish in 9–10 minutes, average fillets in 10–12 minutes, and thicker fillets in 12–15 minutes.
The fish should look opaque and separate easily with a fork. Do not wait for deep browning.
If you do not have a thermometer, use the opaque-and-flaky test, but a thermometer is the most reliable check.
If there is a lot of liquid in the dish, spoon off the excess before serving and finish with lemon, parsley, or a little melted butter.
For frozen fillets, thaw first for best texture. To bake from frozen, cook at 400°F / 200°C for about 18–25 minutes and check the center carefully.
For a lighter version, replace some or all of the butter with olive oil.
For crispy parmesan tilapia, use the panko-parmesan topping in the variations section.
Save this baked tilapia recipe card for the core method: lemon, garlic, butter, 400°F, 10–12 minutes, and 145°F. Once those cues are familiar, the recipe becomes easy to repeat.
FAQs About Baked Tilapia
What makes this baked tilapia recipe easy?
This baked tilapia recipe is easy because the fish cooks quickly, the seasoning is simple, and you do not need to flip, fry, marinate, or guess. Most thawed fillets need only 10–12 minutes at 400°F / 200°C.
What temperature is best for baking tilapia?
400°F / 200°C is the most reliable everyday temperature for baked tilapia because it cooks the fillets quickly without drying them out as easily as a hotter oven can. It is also easy to adjust: thin fillets may need only 9–10 minutes, while thicker fillets may need 12–15 minutes.
How long does tilapia take in the oven?
Most thawed tilapia fillets take 10–12 minutes at 400°F / 200°C. The exact time depends on thickness, so check for opaque flesh, easy flaking, and an internal temperature of 145°F / 63°C.
Can you bake frozen tilapia?
You can bake frozen tilapia, but thawing first gives better texture and less liquid in the pan. When baking from frozen, use 400°F / 200°C and start checking around 18 minutes. Thicker frozen fillets may need closer to 25 minutes.
Is baked tilapia healthy?
Baked tilapia can be a light, high-protein dinner, especially when you use olive oil or a smaller amount of butter and serve it with vegetables, rice, salad, or potatoes. The main thing is to season it well so it tastes bright and satisfying without needing a heavy sauce.
Should tilapia be covered while baking?
Uncovered baking works best for this lemon garlic version because it keeps the top from getting too steamy and lets the sauce taste brighter. Foil packets are still useful when you want a softer, more steamed texture or easier cleanup.
What seasoning goes well with tilapia?
Lemon, garlic, paprika, black pepper, parsley, Cajun seasoning, lemon pepper, parmesan, chili powder, cumin, oregano, and thyme all work well because tilapia is gentle and takes on flavor easily.
Why is my baked tilapia watery?
Baked tilapia usually turns watery when frozen fillets are not fully thawed or dried before cooking. Pat the fish very dry before seasoning, and spoon off excess liquid if needed after baking.
How do you keep tilapia from drying out?
Use enough butter or olive oil, avoid overbaking, and check doneness early. Tilapia is lean and thin, so a few extra minutes can change it from flaky to dry.
Is baked tilapia good for tacos?
It works especially well for tacos because baked tilapia flakes easily and has a mild flavor that welcomes slaw, lime, salsa, and creamy sauce. Season it slightly bolder than you would for a plain dinner plate so the fish does not disappear under the toppings.
Can I use this recipe with another white fish?
This same lemon garlic method works with other mild white fish fillets, including cod, haddock, basa, swai, and pollock. Just adjust the cook time for thickness and check the thickest part for opaque flesh, easy flaking, and 145°F / 63°C.
The goal of this baked tilapia recipe is not just cooked fish. It is tilapia that tastes bright, juicy, and easy enough to make again on a busy night. Once you know the timing, the doneness cues, and how to fix watery or bland fish, this becomes one of those simple oven dinners you can trust when you need something fast, light, and actually satisfying.
Salmon is one of those dinners that can feel either effortlessly elegant or weirdly stressful, depending on how the cooking goes. One minute it looks glossy and promising, and the next minute it turns dry, chalky, or overdone at the edges while the center still looks undercooked. That’s exactly why this air fryer salmon recipe earns a permanent place in a real home kitchen: it gives you a repeatable method that stays simple, cooks fast, and leaves plenty of room for flavor.
Once you get the rhythm right, making salmon in air fryer stops feeling like guesswork. You learn the temperature that works best in your machine, you understand how thickness changes the timing, and you know what to look for when the fillet is done. From there, everything gets easier. A plain lemon garlic version becomes a weeknight staple. A teriyaki glaze turns into a quick dinner that feels restaurant-ish. A blackened variation suddenly becomes your go-to when you want something bolder.
This post is built as a full, reader-friendly guide, so you can come back to it whether you’re making your first fillet or trying to dial in the best salmon in air fryer for your own taste. We’ll cover the base method, time it takes to air fry a salmon and temp, skin-on versus skinless, seasoning directions, serving ideas, and the easiest way to reheat leftovers without drying them out.
And because salmon is already a naturally rich, satisfying fish, it doesn’t need much to taste good. A few small decisions—patting it dry, seasoning it evenly, cooking it at the right heat, and checking doneness early—make all the difference.
Why this air fryer salmon recipe works
The best thing about an air fried salmon is how quickly it gets from raw to beautifully cooked without asking for much from you. You don’t need a complicated marinade. You don’t need a cast iron pan smoking on the stove. And you don’t even need a long ingredient list. Instead, the circulating heat does most of the heavy lifting, and the salmon naturally brings richness and flavor on its own.
Why this air fryer salmon recipe works: this visual method guide shows the simple logic behind consistently good salmon in the air fryer—fast circulating heat, minimal ingredients, thickness-based timing, early doneness checks, and easy flavor flexibility for weeknight dinners.
Even so, speed can be a trap if you treat salmon like chicken or a frozen snack. Fish cooks quickly, and salmon fillets vary a lot in thickness. That’s why this method focuses less on a single magic number and more on a reliable flow: choose a temperature, use thickness as your timing guide, and start checking before you think it’s done.
That approach works whether you’re making a simple salmon air fryer recipe on a busy weekday or trying a more dressed-up dinner for guests. It also gives you flexibility. You can keep the seasoning minimal and serve it with a sauce, or you can build flavor directly into the fish and keep the sides light.
There’s another reason this method lands so well in a weekly rotation: salmon already fits neatly into a balanced dinner without much effort. It’s filling, it pairs with almost anything, and it doesn’t need a lot of oil to cook well. The American Heart Association also continues to recommend eating fish, especially fatty fish, as part of a heart-healthy eating pattern, which is one more reason salmon tends to show up so often in practical meal plans. (www.heart.org)
You can make excellent salmon in the air fryer with just a handful of pantry basics. In fact, the simpler the starting point, the easier it is to branch into different versions later.
Ingredients for air fryer salmon, organized into a simple base list and easy flavor add-ons. Start with salmon fillets, olive oil, salt, pepper, garlic powder, paprika, and lemon, then branch into variations with dill, chili flakes, Dijon, honey, teriyaki, garlic, ginger, or a yogurt sauce for serving—same method, different flavor direction.
Base ingredients for a simple salmon done in an air fryer recipe
2 salmon fillets (about 5 to 7 ounces each, ideally similar thickness)
1 to 1½ tablespoons olive oil
1 teaspoon kosher salt
½ teaspoon black pepper
½ teaspoon garlic powder
½ teaspoon paprika (optional, but nice for color)
Lemon wedges, for serving
That’s enough for a clean, dependable version that tastes great on its own and also works as a base for different sauces and add-ons.
Optional ingredients for flavor variations
Once you’ve made the base version once or twice, these are useful to keep around:
Lemon zest
Dried dill or parsley
Chili flakes
A little Dijon mustard
Honey (for honey garlic style finishes)
Soy sauce or teriyaki sauce
Fresh garlic or ginger
A spoonful of yogurt-based sauce for serving
If you enjoy changing the feel of the same dish without changing the method, this is where salmon really shines. One night you can top it with a cool spoon of Greek tzatziki. Another night, you can go bright and herbal with chimichurri. And when you want something sweeter and glossier, a homemade teriyaki sauce does the job beautifully.
Before the air fryer even turns on, a few small prep moves set you up for a better result.
Prep salmon for the air fryer in 4 quick steps: pat it dry, trim pin bones if needed, oil and season evenly, and let it sit while the air fryer preheats. These small prep steps help salmon brown better and cook more evenly.
Pat the salmon dry first
This step looks minor, but it changes everything. Surface moisture slows browning, softens the seasoning layer, and can make the salmon look steamed instead of roasted. Use paper towels and pat both sides dry, especially if the fillets were just unwrapped.
If you’re making skin-on salmon in air fryer, pay extra attention to the skin side. A drier surface gives you a better chance of getting nicer texture, especially if you like the skin.
Trim pin bones if needed
Many fillets are sold with pin bones already removed, but not all of them. Run a finger lightly over the center line of the fillet. If you feel little bones sticking up, pull them out with clean tweezers or kitchen pliers. This takes a minute and makes the final dish much easier to eat.
Oil lightly, then season evenly
Brush or rub a light coating of oil over the fillets. You don’t need much. The goal is just enough to help the seasonings stick and to support gentle browning.
Then season the fish evenly. Don’t dump everything in the center and hope it spreads. A more even layer cooks more evenly and tastes more balanced.
For a classic everyday version, salt, pepper, garlic powder, and paprika are enough. If you want a stronger flavor, add lemon zest or chili flakes at this stage.
Let the fillets sit while the air fryer preheats
A short rest on the counter—just a few minutes—is useful while you preheat. It takes the chill off slightly and gives the seasoning time to adhere. You don’t need a long rest. Just enough time to get your air fryer ready and your basket set.
This is the core method you’ll come back to again and again. Once you’re comfortable with this, it becomes easy to adapt into all the common variations: honey glazed air fried salmon, teriyaki salmon that is air fried, blackened salmon, lemon salmon recipe air fryer, and more.
How to cook salmon in the air fryer: this 4-step visual guide shows the core method for consistently juicy salmon fillets—preheat to 390–400°F, arrange in a single layer, start checking early based on thickness, and finish using visual doneness cues instead of guessing by time alone.
Preheat your air fryer
Not every air fryer behaves the same way, but in general, salmon cooks more consistently when the machine is preheated. A short preheat helps the exterior start cooking right away instead of warming slowly.
Set your air fryer to 390°F or 400°F and let it heat for a few minutes.
Preheat air fryer for salmon with confidence: this quick 390°F vs 400°F guide helps you choose the best temperature for your air fryer salmon recipe based on how hot your machine runs, the thickness of your salmon fillets, and whether you want a gentler cook or deeper top color.
If your model runs hot, start at 390°F. If your model is gentle and you want a slightly deeper top color, go with 400°F.
Arrange the salmon in a single layer
Place the fillets in the basket with space between them. Air fryers need airflow to do their job, so crowding the basket is one of the fastest ways to get uneven cooking.
Arrange salmon in the air fryer basket the right way: this DO vs DON’T visual shows why a single layer with space between fillets cooks more evenly than a crowded basket. It also includes quick reminders for skin-on salmon (skin-side down), flipping (usually not needed), and skinless salmon (check a little earlier) for more reliable air fryer salmon results.
For skin-on salmon:
Place the fillets skin-side down
Leave them in place while cooking
Skip flipping unless your machine cooks very unevenly (most don’t need it)
For skinless salmon:
You still usually don’t need to flip
Just plan to check a little earlier
This is true whether you’re making salmon fillet in air fryer, salmon steaks, or slightly smaller portions.
Cook, but start checking early
This is the biggest habit shift that makes air fried salmon better.
Even if a recipe says 10 minutes, don’t wait until 10 minutes to check. Start early. A lot of fillets are done faster than expected, especially thinner pieces or tail-end portions.
Use this air fryer salmon timing guide to start checking early based on fillet thickness instead of waiting for one fixed cook time. It’s a quick visual reference for thin, average, and thick salmon fillets at 390–400°F, with simple timing ranges that help you avoid dry, overcooked salmon and get better results in any air fryer.
As a general range:
Thin fillets can finish in 5 to 7 minutes
Average fillets often finish in 7 to 10 minutes
Thick center-cut fillets can take 9 to 12 minutes
The exact number depends on thickness, air fryer model, and whether the fish is skin-on or skinless. That’s why checking early matters more than memorizing a single time.
Look for visual doneness cues
Before you even touch a thermometer, your eyes tell you a lot.
The salmon is getting close when:
The flesh turns more opaque
The center no longer looks very translucent
The top firms up slightly
The fillet flakes when you press gently with a fork
Use this air fryer salmon visual doneness guide to check salmon by sight before you overcook it. Look for an opaque center, gentle flakes, and a moist (not chalky) texture. This quick cue card also shows what underdone salmon (too translucent) and overcooked salmon (dry and chalky) look like, so you can cook with more confidence even when fillet thickness varies.
A little shine is normal. Dry, chalky flesh is not the goal.
If white protein (albumin) starts pushing out aggressively from the sides, it usually means the salmon is heading past ideal doneness. It’s still edible, but that’s your cue to pull earlier next time.
This is the part most people come back to, and it’s worth getting right. There’s no single cook time that works for every fillet, but there is a reliable way to think about it.
Air fryer salmon time and temp by thickness
For best results, think in terms of thickness instead of just weight.
Use this air fryer salmon time and temp cheat sheet to cook salmon by fillet thickness at 390–400°F. It’s a quick visual guide for juicy salmon in the air fryer, with timing ranges and doneness cues to help you avoid overcooking.
At 390°F to 400°F, use this as a practical guide:
Very thin fillets or tail pieces (about ½ inch): 5 to 7 minutes
¾-inch fillets: 6 to 9 minutes
1-inch fillets: 8 to 10 minutes
Thick fillets (1¼ inch or more): 9 to 12 minutes
That timing applies to fresh salmon in air fryer, including common cuts like Atlantic salmon and many standard grocery fillets.
If you’re working with a fattier cut, it may tolerate a tiny bit more time without drying out. If you’re working with leaner salmon, check even earlier.
Best temperature for air fryer salmon
If you’re wondering about the best way to cook salmon in air fryer, the answer is less about finding one “perfect” number and more about choosing a temperature you can repeat confidently.
For most kitchens, the sweet spot is:
400°F for a faster finish and a little more top color
390°F if your machine runs hot or you want a slightly gentler cook
Both produce excellent results. What matters more is consistency. If you always cook at the same temperature, you learn your machine faster, and your salmon turns out more reliably every time.
Time and temp for salmon in air fryer without overcooking
A lot of people are curious about “salmon air fryer temp and time,” “time to cook salmon in air fryer,” or “air fried salmon cooking time,” and the real answer is this:
Use the clock as a guide, but let doneness decide when to stop.
That’s the difference between salmon that’s technically cooked and salmon that actually tastes great. The best air fried salmon isn’t just “hot enough.” It’s cooked through while still tender and juicy in the center.
This is where confidence really kicks in. Once you know what done salmon looks and feels like, you stop second-guessing every batch.
Use this air fryer salmon doneness guide to check when salmon is ready: look for an opaque center, easy flaking, and a thickest-center temperature of 145°F (63°C). It’s a simple visual reference to help you avoid overcooking salmon in the air fryer.
Use the thermometer in the thickest center
If you want consistency, a thermometer is your best friend.
Insert it into the thickest part of the fillet, not the thin edge. FoodSafety.gov lists fish (including salmon) at 145°F (63°C), and it also notes the classic visual cue that fish should be opaque and separate easily with a fork. (FoodSafety.gov)
That temperature is a strong, practical benchmark for a general home-cooking recipe, especially if you’re cooking for a family and want a clear doneness target.
The USDA safe temperature chart also lists fish and shellfish at 145°F, which aligns with the same guidance. (Food Safety and Inspection Service)
Use this air fryer salmon temperature guide to check doneness accurately: insert the thermometer into the thickest center of the fillet, avoid the edges and pan contact, and cook to 145°F (63°C) for a reliable, juicy result.
What done salmon looks like
When salmon is done, the flesh:
Looks opaque rather than raw-looking in the middle
Flakes with gentle pressure
Feels tender, not mushy
Holds together when you lift it
If it still looks very translucent in the center, give it another minute and check again.
If it’s dry and crumbly, it’s gone a little too far. Not a disaster, but you’ll want to reduce the cook time next time.
Rest briefly before serving
Salmon doesn’t need a long rest like a large roast, but 2 to 3 minutes helps.
That short pause lets the juices settle and makes the fillet easier to plate neatly. It also gives you a moment to finish a side dish, squeeze lemon, or spoon on a sauce.
Both versions work well, but they behave a little differently. Knowing the difference helps you avoid overcooking and gets you a better texture.
This air fryer salmon skin-on vs skinless guide shows the key differences in timing, texture, and cooking approach so you can choose the best method for the salmon fillets you have and avoid overcooking.
How to cook skin-on salmon in air fryer
Skin-on salmon is often easier for beginners because the skin helps protect the bottom of the fillet and makes it easier to move after cooking.
Use this skin-on air fryer salmon guide for better texture and easier handling: pat the skin dry, oil lightly, season the flesh side more than the skin, and cook skin-side down without flipping unless needed. It also includes crispy-skin tips like avoiding overcrowding and serving right away before steam softens the skin.
For air fryer salmon with skin:
Pat the skin side dry
Oil lightly
Season the flesh side more heavily than the skin
Cook skin-side down
Don’t flip unless absolutely necessary
The skin doesn’t always get ultra-crispy in every air fryer, but it usually cooks well and helps the fish stay moist.
If you like crispy skin salmon air fryer style, a few small moves help:
Keep the skin dry
Avoid too much oil
Don’t overcrowd the basket
Serve right away (steam softens crisp skin quickly)
Skinless salmon in the air fryer
Skinless salmon in the air fryer works beautifully too, but it tends to cook a little faster and can dry out more easily if you overshoot the timing.
This skinless salmon in the air fryer guide shows the best way to cook skinless fillets without drying them out: use a light oil coat, leave space between fillets, check a little earlier than skin-on salmon, and avoid heavy wet marinades at the start. It’s a practical visual reference for keeping air fryer salmon juicy and evenly cooked.
For skinless fillets:
Use a light oil coat
Check one minute earlier than usual
Avoid heavy wet marinades at the start
Pull the fillet as soon as it reaches doneness
This is especially important if you’re making thinner cuts or smaller salmon portions.
If sticking is an issue in your basket, a lightly greased perforated liner can help, but avoid blocking too much airflow.
Salmon steak in air fryer
Salmon steaks are a little different from fillets because the shape is thicker and more uneven around the center bone.
This salmon steak in air fryer guide shows how steak cuts cook differently from fillets: they’re thicker, shaped unevenly around the center bone, and need a little extra time. Use the same 390–400°F range, then check the thickest flesh away from the bone for a better doneness read and more reliable texture.
If you’re cooking salmon steak air fryer style:
Use the same temperature range (390°F to 400°F)
Add a little extra time
Check doneness in the thickest part, away from the bone
The same doneness rules apply, but the steak shape means you’ll want to watch the center closely.
This is where the fun starts. Once you have the base method down, seasoning is what keeps air fryer salmon from feeling repetitive.
Use this seasoning guide to choose a flavor direction for your salmon fillets that are air fried or otherwise—simple garlic pepper, lemon garlic, blackened, teriyaki, or honey garlic—while keeping the same base air fryer salmon method for reliable results.
Simple seasoning for air fryer salmon
The most reliable version is still the simplest:
Salt
Pepper
Garlic powder
Paprika
Lemon to finish
Start with this simple seasoning for air fryer salmon when you want a reliable, easy base that works with almost any side. This visual shows the exact seasoning mix (salt, pepper, garlic powder, paprika, and lemon) so readers can make a balanced salmon recipe without overthinking it. It’s the best foundation for weeknight dinners and also the easiest version to build into lemon garlic, blackened, teriyaki, or honey garlic variations later. Save this pin for a quick salmon seasoning reference, and boomark this post for the complete method, timing-by-thickness guide, and more air fryer salmon flavor ideas.
This combination works with almost any side and leaves room for a sauce if you want one. It’s also the best starting point if you’re new to cooking salmon in an air fryer.
Lemon garlic salmon recipe in air fryer
For a bright, fresh variation:
Add lemon zest before cooking
Use a touch more garlic
Finish with lemon juice right after cooking
This lemon garlic salmon recipe in the air fryer is a bright, fresh variation built on the same easy base method. The card shows the full flow: add lemon zest and extra garlic, cook using the core air fryer salmon method, then finish with lemon juice right after cooking for the cleanest citrus flavor. It’s a great option when you want something light, balanced, and easy to pair with tzatziki or a cool yogurt sauce. Save this for an easy weeknight salmon idea, and follow full recipe for exact timing, doneness cues, and more flavor variations you can rotate through all week.
This version tastes clean and balanced, and it pairs really well with cool sauces. A spoonful of tzatziki on the side gives it a creamy contrast without making the dish heavy.
Blackened air fryer salmon
Blackened salmon in the air fryer works beautifully because the hot circulating air sets the spice coating quickly.
This blackened air fryer salmon card is a bold, spice-forward variation that shows exactly how to build a flavorful crust without over-oiling the fish. It includes the blackened seasoning blend (paprika, garlic powder, onion powder, black pepper, cayenne, and optional herbs), a step-by-step visual method, and a helpful comparison showing why a light oil coat gives a cleaner finish. The cooling-side pairing cue also makes this easy to turn into a complete meal. Save this pin if you love smoky, spicy salmon, and read the full post for the core air fryer salmon method and more variations.
A good blackened-style blend includes:
Paprika
Garlic powder
Onion powder
Black pepper
Cayenne
Dried thyme or oregano (optional)
Use just enough oil to help the spices stick. Too much oil can make the coating patchy or overly soft.
This version is excellent with something cooling and tangy on the side, like yogurt sauce or a quick cucumber salad.
Teriyaki salmon in air fryer
Teriyaki is one of the easiest upgrades, but timing matters.
This teriyaki salmon in air fryer infographic teaches the key trick that makes teriyaki work: cook first, glaze late. The visual step sequence shows when to season, when to cook, and when to brush the teriyaki sauce (last 1–2 minutes) so the salmon gets glossy without burning. The do-vs-don’t comparison panel is especially helpful if your sweet glazes tend to scorch. It’s a great standalone save for readers who want a fast teriyaki salmon dinner with better results. Pin this for later, and read the full post for timing-by-thickness and more flavor cards in the series.
Instead of starting with a thick sweet sauce, cook the salmon most of the way first. Then brush on teriyaki during the last 1 to 2 minutes so it turns glossy without burning.
That late-glaze method gives you a much better finish than adding sauce from the beginning.
If you want a homemade option, MasalaMonk’s teriyaki sauce recipe is especially useful because it includes a thicker glaze-style version as well as lighter directions, so you can choose what suits your salmon best.
Honey garlic salmon air fryer style
Honey garlic salmon is another favorite, and the same glaze rule applies.
Make Honey Garlic Salmon in the Air Fryer with a glossy sweet-savory finish—without burning the glaze. This recipe card shows the ingredient amounts, the 4-step method, and the key trick: cook the salmon first, then brush on the honey garlic glaze in the last 1–2 minutes. It’s an easy weeknight salmon recipe that looks impressive and tastes balanced, with an optional pepper sauce tip for extra heat at the table. Save this for later, pin it for your air fryer dinner board, and follow this post for the full air fryer salmon guide with more flavor variations like lemon garlic, blackened, and teriyaki.
A simple honey garlic finish works best when you:
Cook the salmon almost to done
Brush on the glaze
Finish for 1 to 2 minutes
Watch closely
Sweet glazes can darken quickly at high heat. Finishing late keeps the top glossy and flavorful instead of scorched.
If you want extra spice, add a few drops of pepper sauce at the table instead of mixing it into the glaze. That way, the sweetness stays balanced, and everyone can adjust the heat level.
Salmon marinade for air fryer
A quick note on marinades: they work, but wet marinades can reduce browning if you use too much.
Can you marinate salmon before air frying? Yes — but this guide shows how to do it without losing browning. The key is simple: marinate briefly (15–30 min), lift the salmon out instead of pouring all the marinade into the basket, pat the surface lightly, and finish with fresh sauce after cooking. This visual also includes a quick “good approach vs common mistake” comparison so you can avoid soggy, less-browned salmon. Save and pin this for easy weeknight air fryer salmon dinners.
If you want to marinate:
Keep it short (15 to 30 minutes is usually enough)
Pat the surface lightly before cooking
Save some fresh sauce for the end
This is why a lot of the best air fryer salmon recipes rely on dry seasoning first and sauce second.
Common air fryer salmon mistakes and how to fix them
Even with a good method, a few things can throw off the final result. The good news is that most of them are easy to correct.
Use this air fryer salmon mistakes and fixes guide to troubleshoot the most common problems fast—from overcooking by fixed time and crowding the basket to glazing too early and reheating too hot—so your salmon turns out juicier, more even, and more reliable every time.
Mistake 1: Cooking by one fixed time every time
No two fillets are exactly the same. Thickness changes everything.
Fix it by using a timing range, then checking early. Once you start treating the clock like a guide rather than a rule, your salmon gets more consistent immediately.
Mistake 2: Crowding the basket
When fillets are packed too tightly, hot air can’t move around them properly. The result is uneven cooking and weaker browning.
Fix it by cooking in batches if needed. It’s better to cook two good fillets than four crowded ones.
Mistake 3: Starting with a sugary glaze
Honey, teriyaki, and similar sauces taste great, but they burn fast.
Fix it by glazing near the end. Let the salmon cook first, then brush and finish.
Mistake 4: Not checking the thickest part
The edge of the fillet will look done before the center. If you only look at the edges, you’ll pull too early or keep cooking too long while trying to “fix” the wrong spot.
Fix it by checking the center every time.
Mistake 5: Overcooking leftovers during reheating
A lot of people blame the original cook when the real problem happens the next day. Reheating salmon too hot or too long dries it out fast.
Fix it by reheating gently at a lower temperature and just warming it through.
One of the best parts of a solid salmon air fryer recipe is how easily it turns into several dinners with very little extra work.
Use this easy air fryer salmon variations guide to turn one base air fryer salmon recipe into four weeknight dinners: a rice bowl, a comfort plate, a sauce-board dinner, and a spicy blackened salmon plate. It’s a quick visual planner for keeping salmon meals interesting without changing the core method.
Air fryer salmon bowl with rice and herbs
A salmon bowl is one of the easiest ways to turn this into a full meal.
Start with a base of rice, then add:
Flaked air fryer salmon
Sliced cucumber
Fresh herbs
Lemon wedges
Tzatziki or a yogurt sauce
Chili flakes, if you like heat
If you need a dependable rice base, MasalaMonk’s how to cook rice guide is a great companion because it walks through different rice types and methods in a way that makes weeknight bowls much easier to build.
Crispy-style salmon plate with a side of croquettes
When you want something a little more fun than the usual rice-and-veg combo, pair the salmon with a crisp side.
This is where a side like croquettes fits surprisingly well. MasalaMonk’s croquettes recipe guide is especially useful if you like the idea of one method that can be baked, fried, or air-fried and reused with different fillings. It also naturally opens the door to leftover salmon ideas later in the week.
Sauce-board salmon dinner
Another easy way to make the same salmon feel new is to serve it with more than one sauce.
A simple plate with the same air fryer salmon fillets can feel completely different when you offer:
That setup works especially well when people at the table like different flavor styles, and it makes the meal feel more generous without much extra cooking.
Lemon herb salmon with pesto on the side
Pesto is often associated with pasta, but it works beautifully with salmon too.
A spoonful of pesto on warm salmon adds richness, herbs, and a lot of flavor very quickly. It’s a great pairing if you’re keeping the salmon seasoning simple and want the sauce to do more of the work.
This version also pairs well with roasted potatoes, rice, or a crisp salad.
Spicy salmon with pepper sauce finish
If you enjoy heat, a bright pepper sauce works better than an overly aggressive spice rub in many cases.
You can keep the salmon seasoned simply, then finish with a few drops of pepper sauce at the table. That gives you more control over the spice level and keeps the salmon from tasting flat or one-note.
It’s a small move, but it makes the same basic air fryer salmon feel much more dynamic.
Salmon is flexible enough to go in several directions, so this part depends on the kind of meal you want: clean and light, cozy and comforting, or a little more dinner-party style.
What to serve with air fried salmon: use this pairing guide to build an easy full meal with fresh sides, comfort-style options, and flavorful sauces. Mix one base, one side, and one sauce to turn your salmon fillets into a complete dinner without overthinking it.
Fresh, cool sides that balance salmon well
Because salmon is naturally rich, cool sides are a great match.
Some of the easiest options:
Cucumber salad
Lemony greens
Yogurt-herb sauce
Tomato and onion salad
Light slaw
If you want a more substantial cold side, a scoop of potato salad works especially well. MasalaMonk’s potato salad recipes post is handy here because it includes multiple styles, so you can pair a sharper German-style salad with glazed salmon or a creamier version with lemon garlic salmon.
Warm sides for a more filling dinner
If you want a heartier plate, salmon pairs beautifully with:
Rice
Roasted potatoes
Steamed vegetables with butter and lemon
Sautéed greens
Simple pasta
Rice is one of the easiest choices because it absorbs sauces well and turns leftover salmon into an easy next-day bowl.
Sauce-led pairings that make the same salmon feel different
Sometimes the side isn’t the main decision. The sauce is.
If you want to keep the salmon method exactly the same and still avoid boredom, rotate sauces:
That rotation alone can carry multiple weeks of dinners without changing how you cook the fish.
Drinks and desserts that round out the meal
If you like building a complete dinner experience, this is an easy place to add a little personality without complicating the main recipe.
For drinks, a crisp non-alcoholic option pairs really well with salmon, especially when the seasoning leans citrusy or spicy. MasalaMonk’s keto mocktails guide is a good place to pull ideas like fresh, low-sugar coolers and citrus-forward drinks.
For dessert, a simple make-ahead option works especially well after fish:
Reheating salmon in air fryer without drying it out
Leftovers are where a lot of salmon recipes quietly fail, not because the original dish was bad, but because the reheating is too aggressive.
The good news: reheating salmon in air fryer works really well when you treat it gently.
Reheating air fried salmon is easy when you keep the heat low and the time short. Use this quick guide to warm leftover salmon at 325–350°F for 3–5 minutes so it stays juicy instead of drying out.
How to store cooked salmon first
Before reheating, proper storage matters.
Let the salmon cool slightly, then transfer it to an airtight container and refrigerate it. The USDA’s Ask USDA guidance states that cooked fish and seafood can be safely stored in the refrigerator for 3 to 4 days. (Ask USDA)
That’s a great practical window for meal planning: dinner on day one, leftovers on day two or three.
For broader seafood handling and storage basics, the FDA’s seafood safety guidance is also useful, especially its advice on keeping seafood cold and handling fresh or frozen seafood properly. (U.S. Food and Drug Administration)
Best way to reheat salmon in air fryer
To reheat without drying:
Set the air fryer to 325°F to 350°F
Reheat for 3 to 5 minutes
Check early and stop as soon as it’s warmed through
That lower-temperature approach is much better than trying to re-crisp it at 400°F.
If the salmon seems a little dry from the fridge, brush on a tiny bit of oil or squeeze lemon over it before reheating. A spoon of sauce after reheating also helps a lot.
Reheating skin-on salmon
If your leftover salmon has skin, reheat skin-side down. It won’t be exactly the same as fresh, but it keeps the fillet stable and helps avoid tearing.
You can also flake leftover salmon and warm it briefly for:
Rice bowls
Salads
Wraps
Grain bowls
Quick pasta tosses
That’s often the easiest way to reuse salmon without worrying about perfect texture the second time.
This post is focused on fresh salmon, but it’s still useful to understand where frozen fits in.
Fresh vs frozen salmon in the air fryer: this quick comparison shows how timing, browning, and seasoning change depending on what you start with, so you can cook either version with better results and fewer surprises.
Fresh salmon in air fryer gives you more control
Fillets of fresh salmon are easier to season evenly, easier to monitor, and usually cook more predictably. You get better browning and more control over the final texture.
That’s one reason this guide uses fresh salmon as the baseline method.
Frozen salmon in air fryer can still work
Frozen salmon in air fryer is absolutely possible, and it can be a lifesaver on busy nights. The process is just different:
It usually takes longer
Surface moisture changes the texture
Seasoning often works better partway through
If you cook frozen salmon often, it’s worth eventually giving it its own dedicated method because the timing, seasoning flow, and texture cues are different from fresh fillets.
For now, if you’re cooking from frozen and want the best result, the same principle still helps: cook by doneness, not just by the clock.
Air fryer salmon for different cuts and salmon types
Once you’ve made basic fillets a few times, you can use the same logic across different salmon cuts.
Use this air fryer salmon by-cut guide to adjust your method for fillets, steaks, and salmon bites. It’s a quick visual reference for cook time differences, doneness checks, and better texture across different salmon cuts.
Salmon fillets in air fryer
This is the easiest and most common format. The base method in this post is designed around salmon fillets, including:
Atlantic salmon
Coho salmon
Sockeye salmon
Wild salmon portions
Farmed salmon fillets
The exact time changes, but the process stays the same.
Sockeye salmon air fryer notes
Sockeye is often leaner than some other salmon types, so it can overcook a little faster.
If you’re making sockeye salmon air fryer style:
Start checking a bit earlier
Don’t rely on a long cook time
Consider a sauce or glaze for extra moisture and richness
Coho and Atlantic salmon in air fryer
Coho and Atlantic fillets often behave very well in the air fryer, especially in standard grocery-store thicknesses.
Atlantic salmon tends to be richer and more forgiving, which makes it a nice choice if you’re learning the method. Coho can be excellent too, just a little less forgiving if overcooked.
Salmon pieces and smaller portions
If you’re cooking salmon pieces in air fryer (smaller cuts, trimmed portions, or bite-sized pieces), reduce the time and watch closely. Small pieces cook very fast.
A few easy dinner directions you can keep in rotation
Once you’ve made this salmon recipe a few times, it helps to have a few “default directions” in mind so dinner doesn’t feel repetitive.
Keep weeknight salmon from feeling repetitive with this Easy Air Fryer Salmon Dinner Ideas guide 🐟✨ This visual gives you 4 easy meal directions you can rotate: Clean & Simple (lemon garlic + rice/salad + tzatziki), Comfort (Not Heavy) (paprika-garlic + potatoes + chimichurri/pesto), Sweet-Savory (teriyaki salmon + rice bowl + cucumber/herbs), and Heat (blackened salmon + pepper sauce + cooling yogurt sauce/slaw). It also includes a quick “build your plate in 3 parts” formula so dinner is easier to plan. Save and pin this for busy nights, follow the full air fryer salmon method, doneness tips, and flavor variations in this post.
When you want something clean and simple
Go with:
Lemon garlic salmon
Rice or a light salad
Tzatziki on the side
It feels fresh, balanced, and low-effort.
When you want a little comfort without a heavy meal
Go with:
Paprika-garlic salmon
Potato salad or warm potatoes
Chimichurri or pesto for a flavor lift
You still get a cozy plate, but it doesn’t feel too rich.
When you want a sweet-savory finish
Go with:
Teriyaki salmon in air fryer (glaze at the end)
Rice bowl setup
Cucumber and herbs for contrast
This is one of the easiest ways to make salmon feel special on a weekday.
A really good air fryer salmon recipe is less about chasing a perfect one-time result and more about learning a method you can trust. Once you know your air fryer, your preferred temperature, and your doneness cues, the rest becomes easy. You stop hovering. You stop overcooking “just in case.” And suddenly salmon becomes one of the fastest, most dependable dinners in your kitchen.
A final recap card for the post: learn one reliable air fryer salmon method, then keep dinner interesting by changing the finish. This visual sums up the core flow (prep, cook by thickness, check doneness, stop at doneness) and shows how the same base salmon can turn into totally different meals with tzatziki, chimichurri, teriyaki glaze, pepper sauce, or lemon and herbs. It’s the easiest way to make air fryer salmon part of a weekly rotation without getting repetitive. Save and share this guide for quick weeknight dinner inspiration.
That’s why this base method is worth learning first.
It covers the fundamentals—how to prep the fillets, how to cook salmon in the air fryer, how to handle air fryer salmon time and temp, how to work with skin-on or skinless pieces, and how to reheat leftovers properly. From there, you can branch into all the versions people actually make in real life: honey garlic air fryer salmon, teriyaki salmon, blackened salmon, lemon salmon, salmon bowls, and more.
And if you want to keep the same fish but make dinner feel completely different next time, the easiest move is usually not changing the cooking method at all. Just change the finish: a spoon of chimichurri, a swipe of tzatziki, a teriyaki glaze, a little pepper sauce, or a fresh pesto on the side.
That way, the method stays easy, but the meal never gets boring.
In most cases, salmon in the air fryer takes about 7 to 11 minutes at 390°F to 400°F, but the exact time depends on thickness. Thin fillets can finish in 5 to 7 minutes, while thicker center-cut pieces may need 9 to 12 minutes. Rather than relying on one fixed time, start checking early and finish based on doneness.
2. What is the best temperature for air fryer salmon?
For most fillets, the best temperature for air fryer salmon is 390°F to 400°F. If your air fryer runs hot, 390°F gives you a little more control. On the other hand, 400°F is great when you want a quicker cook and a slightly more roasted top.
3. How do I know when air fryer salmon is done?
The easiest way to tell is by checking the thickest center of the fillet. The salmon should look opaque and flake gently with a fork. If you use a thermometer, check the center and cook until it reaches the proper internal temperature for fish. In addition, avoid judging doneness by the edges alone, because they cook faster than the middle.
4. Do I need to flip salmon in the air fryer?
Usually, no. Most air fryer salmon recipes cook well without flipping, especially when the fillets are placed in a single layer with space around them. If you’re cooking skin-on salmon, keep it skin-side down and leave it undisturbed for the best texture.
5. Can I cook salmon with skin in the air fryer?
Yes, and air fryer salmon with skin is often easier to cook well. The skin helps hold the fillet together and can protect the bottom from overcooking. For better texture, pat the skin dry, use a light coating of oil, and cook skin-side down.
6. How do I get crispy skin salmon in the air fryer?
To get crispier skin, start with very dry skin, use only a light layer of oil, and avoid overcrowding the basket. Also, serve the salmon right away, because trapped steam softens the skin quickly. While every air fryer behaves a little differently, these steps noticeably improve crispy skin salmon in air fryer cooking.
7. Can I make salmon fillets in the air fryer without drying them out?
Absolutely. The key is to cook by thickness, not just by the clock. Keep the temperature steady, check early, and stop cooking as soon as the salmon is done. As a result, your salmon fillet in air fryer stays moist instead of turning chalky or dry.
8. What seasoning works best for air fryer salmon?
A simple mix of salt, pepper, garlic powder, and paprika works beautifully for everyday air fryer salmon. After that, you can build other flavors easily—lemon garlic, blackened, teriyaki, or honey garlic—without changing the core cooking method.
9. Can I use a marinade for salmon in the air fryer?
Yes, although lighter marinades usually work better than very wet ones. If the marinade is too heavy, the salmon can steam instead of roast. For better results, marinate briefly, pat off excess moisture, and add glaze-style sauces near the end of cooking.
10. Can I cook frozen salmon in air fryer?
Yes, frozen salmon in air fryer is possible and very convenient. However, it takes longer than fresh salmon and often needs a slightly different seasoning approach because of the extra surface moisture. If you cook from frozen often, it helps to use a separate method with its own time and temperature flow.
11. What is the best way to cook frozen salmon in air fryer?
The best way to cook frozen salmon in air fryer is to start cooking first, then season once the surface thaws enough for seasoning to stick properly. Since frozen fillets release moisture as they cook, check doneness in the thickest center and expect a longer total cook time than fresh salmon.
12. Can I cook salmon steak in the air fryer?
Yes, salmon steak in air fryer works well, but it may take a little longer than a fillet because the cut is thicker and shaped differently around the center bone. Use the same temperature range (390°F to 400°F), then check the thickest part for doneness.
13. What’s the difference between cooking fresh salmon and frozen salmon in the air fryer?
Fresh salmon in air fryer usually gives you better browning and more control over seasoning from the start. Frozen salmon in the air fryer is still a great option, though it cooks differently because moisture releases as it thaws. In either case, checking doneness early makes the biggest difference.
14. Can I make teriyaki salmon in the air fryer?
Yes, teriyaki salmon air fryer style is one of the easiest variations. Still, the best approach is to cook the salmon most of the way first, then brush on teriyaki sauce in the last minute or two. That way, the glaze turns glossy without burning.
15. Can I make honey garlic salmon in the air fryer?
Definitely. Honey garlic salmon air fryer recipes work best when the glaze is added near the end, just like teriyaki. Because honey can darken quickly at high heat, finishing late helps you get a sweet, sticky coating without scorching.
16. How do I reheat salmon in air fryer without drying it out?
For reheating salmon in air fryer, use a lower temperature than you used for cooking—usually 325°F to 350°F. Warm it for 3 to 5 minutes, then stop as soon as it’s heated through. A small brush of oil or a squeeze of lemon can help keep the texture moist.
17. How long can I keep cooked air fryer salmon in the fridge?
Cooked salmon is best within a few days when stored in an airtight container in the refrigerator. For the best texture, reheat gently instead of using very high heat. Likewise, flaking leftover salmon into bowls or salads is a great way to use it without overcooking.
18. Can I cook salmon in a Ninja air fryer using the same method?
Yes, the same overall method works for salmon in a Ninja air fryer, including seasoning, basket spacing, and checking doneness early. Even so, different models can run hotter or faster, so use the recommended time range as a guide and check the fillet a little early the first time.
19. Why is my salmon overcooked in the air fryer?
Usually, overcooked salmon happens because the fillet was cooked by a fixed time instead of checked by thickness and doneness. Another common reason is using a sugary glaze too early, which can make the outside look done before the center is ready. Starting your doneness check earlier solves most of this.
20. What is the easiest air fryer salmon recipe for beginners?
The easiest air fryer salmon recipe for beginners is a simple fillet with olive oil, salt, pepper, garlic powder, and paprika cooked at 390°F to 400°F. Once that base is working well, you can branch into lemon garlic, blackened, teriyaki, or honey glazed salmon without changing the core method.