Posted on Leave a comment

Tilapia Tacos Recipe with Crisp Slaw and Creamy Lime Sauce

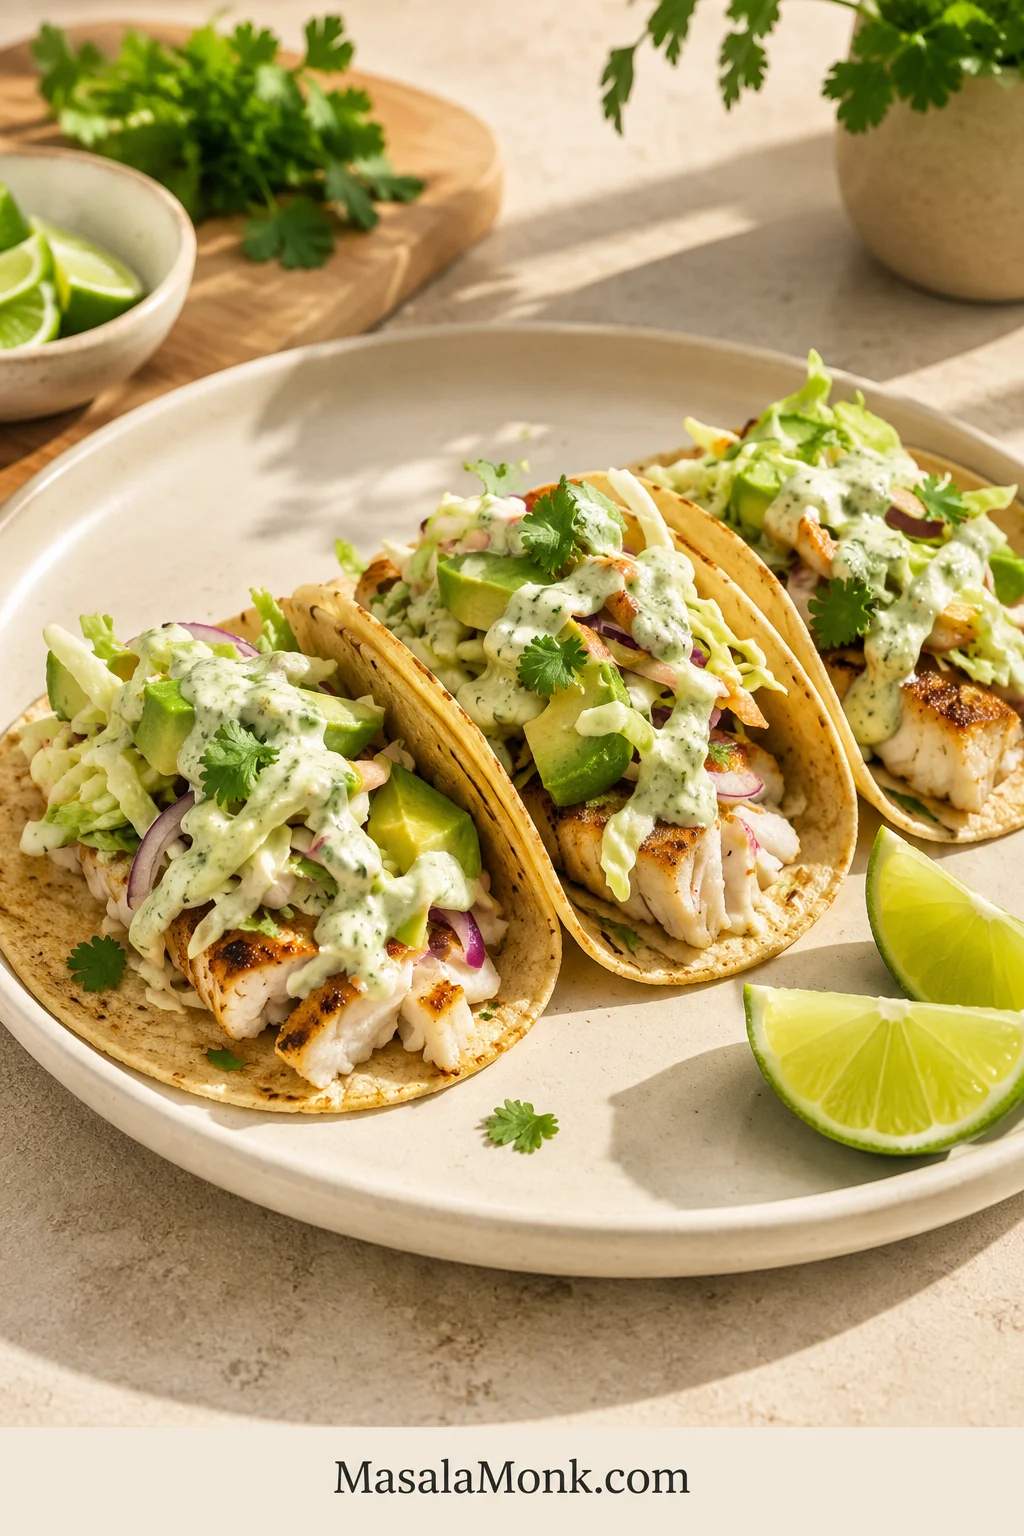
Three corn-tortilla tacos filled with browned tilapia, green and purple cabbage slaw, avocado, pale cilantro-lime sauce and fresh cilantro, with lime wedges beside the plate.

These tilapia fish tacos are for the nights when you want dinner to feel bright and generous without turning the kitchen into a project. Smoky skillet tilapia meets cold lime-dressed cabbage, cool cilantro-jalapeño sauce, avocado, and warm tortillas in every bite.

Tilapia is mild, affordable, and quick-cooking, so it rewards a hot pan and an early check. Dress the cabbage lightly, warm the tortillas before the fish is ready, and each taco stays flaky, crisp, and fresh rather than watery or soggy.

The timing does the work: make the cool sauce and crisp slaw first, warm the tortillas next, and cook the fish last so it reaches the table hot while the cabbage still snaps.

Three rules for better tilapia tacos:

  • Dry before seasoning. Surface moisture is the difference between browned fish and pale, steamed fish.
  • Check by thickness. Thin fillets may finish in 4–5 minutes; remove each piece when it reaches 145°F / 63°C and separates easily.
  • Cook the fish last. Once the tilapia hits the pan, the sauce, slaw, and tortillas should already be waiting.

Tilapia Tacos Recipe

The skillet recipe below is the one to make first: fast enough for a weeknight, but carefully balanced so the mild fish doesn’t disappear beneath the toppings.

Tilapia Tacos with Crisp Slaw and Creamy Lime Sauce

Smoky, tender tilapia with crisp lime slaw, creamy cilantro-jalapeño sauce, avocado, and warm tortillas.

Prep Time20 minutes
Cook Time6–8 minutes for one batch; 12–15 minutes for two
Total TimeAbout 26–35 minutes
Yield8 tacos / 4 servings

Equipment

  • 12-inch / 30 cm nonstick or well-seasoned skillet
  • Thin, wide fish spatula or flexible turner
  • Instant-read thermometer
  • Medium mixing bowl and small bowl
  • Small blender or food processor, optional
  • Tongs and a clean kitchen towel for the tortillas

Limes, Cilantro, and Jalapeños

  • 3–4 medium limes, divided among the slaw, sauce, and wedges for serving
  • 1 small bunch cilantro (fresh coriander), divided
  • 2 small jalapeños, divided, optional

For the Tilapia

  • 1¼ lb / 20 oz / 567 g skinless, boneless tilapia fillets
  • 1 tbsp / 15 ml neutral high-heat oil, plus a little more if the fish needs two batches
  • 2 tsp chili powder
  • 1 tsp smoked paprika
  • 1 tsp ground cumin
  • ¾ tsp garlic powder
  • ½ tsp onion powder
  • ½ tsp dried oregano
  • ¾ tsp / about 4 g fine sea salt
  • ¼ tsp ground black pepper
  • ⅛–¼ tsp cayenne pepper, optional
  • 1–2 of the limes, cut into wedges for finishing

For the Cabbage Slaw

  • 9 oz / 250 g finely shredded green cabbage, red cabbage, or a mixture
  • ¼ cup / about 10 g chopped cilantro from the bunch above
  • 2 tbsp / 30 ml fresh lime juice
  • 1 tbsp / 15 ml olive oil
  • ¼ tsp / about 1.5 g fine sea salt
  • 1 small jalapeño, finely sliced or minced, optional

For the Creamy Lime Sauce

  • ½ cup / 120 g plain Greek yogurt or sour cream
  • ¼ cup / about 60 g mayonnaise
  • 2 tbsp / 30 ml fresh lime juice, plus more to taste
  • ½ packed cup / about 15 g cilantro from the bunch above
  • 1 small garlic clove
  • ½–1 jalapeño, seeded for less heat, or 1 tsp minced chipotle in adobo
  • ¼ tsp / about 1.5 g fine sea salt, plus more to taste
  • 1–2 tbsp / 15–30 ml cold water, only as needed

Sauce yield: about 1 cup / 240 ml—enough for a thin layer underneath and a light drizzle over all eight tacos, with a little extra for the table.

For Assembly

  • 8 sturdy corn or flour tortillas, about 5–6 inches / 13–15 cm, or 16 very thin corn tortillas if using two per taco
  • 1 ripe avocado, sliced or diced
  • Fresh cilantro
  • Lime wedges
  • Crumbled cotija or feta, optional
  • Fresh mango salsa, optional

Instructions

Prepare the Cool Components and Fish
  1. Make the sauce. Blend the yogurt or sour cream, mayonnaise, lime juice, cilantro, garlic, jalapeño or chipotle, and salt. Without a blender, finely mince the cilantro, garlic, and jalapeño first, then whisk everything together. Taste before adding water: the sauce should be bright, lightly salty, and a little more assertive than you want it to taste in the finished taco. Add cold water one tablespoon at a time until it falls from a spoon in a thick ribbon, then refrigerate.
  2. Make the slaw. Toss the cabbage, cilantro, lime juice, olive oil, salt, and optional jalapeño. Let it stand for 10–15 minutes, then taste one strand. It should be crisp, lightly salty, and clearly lime-bright—not sharply sour or wet. If liquid gathers in the bowl, lift the slaw out with tongs when assembling.
  3. Taste the cool components together. Try a strand of slaw with a little sauce. They should taste slightly brighter and bolder than necessary because the warm fish and tortilla will soften both.
  4. Dry the fish. Pat the tilapia thoroughly dry on both sides, especially if it was previously frozen.
  5. Season. Mix the chili powder, smoked paprika, cumin, garlic powder, onion powder, oregano, salt, black pepper, and optional cayenne. Rub the fish lightly with oil, then press the seasoning evenly over both sides.
  6. Warm the tortillas. Heat them in a dry skillet for about 15–30 seconds per side, then stack them inside a clean kitchen towel.
Cook, Rest, and Assemble
  1. Cook the first side. Heat the 12-inch skillet over medium-high heat. Add a thin film of oil. When it shimmers, add as many fillets as fit in one layer with visible space between them. Cook mostly undisturbed for about 2–4 minutes, depending on thickness.
  2. Turn and finish. Carefully turn the fish with a fish spatula and cook for about 1½–3 minutes more. Remove each fillet when the thickest point reaches 145°F / 63°C and the flesh is opaque and easy to separate.
  3. Cook a second batch if needed. Add a little more oil and let the pan recover its heat before adding the remaining fish. Keep the first batch on a warm plate, loosely covered rather than sealed tightly.
  4. Rest and flake. Let the fish rest for 2–3 minutes, then break it into large taco-size flakes.
  5. Assemble. Spread a little sauce over each warm tortilla. Add fish, drained slaw, avocado, another light drizzle of sauce, cilantro, and lime. Serve immediately.

Best result: serve as soon as the fish is ready. Don’t leave finished tilapia in the hot pan while the rest of dinner catches up.

A finished tilapia taco should still show broad fish flakes beneath the toppings. Use the close-up below as a balance check: the slaw and sauce should support the fish, not cover it.
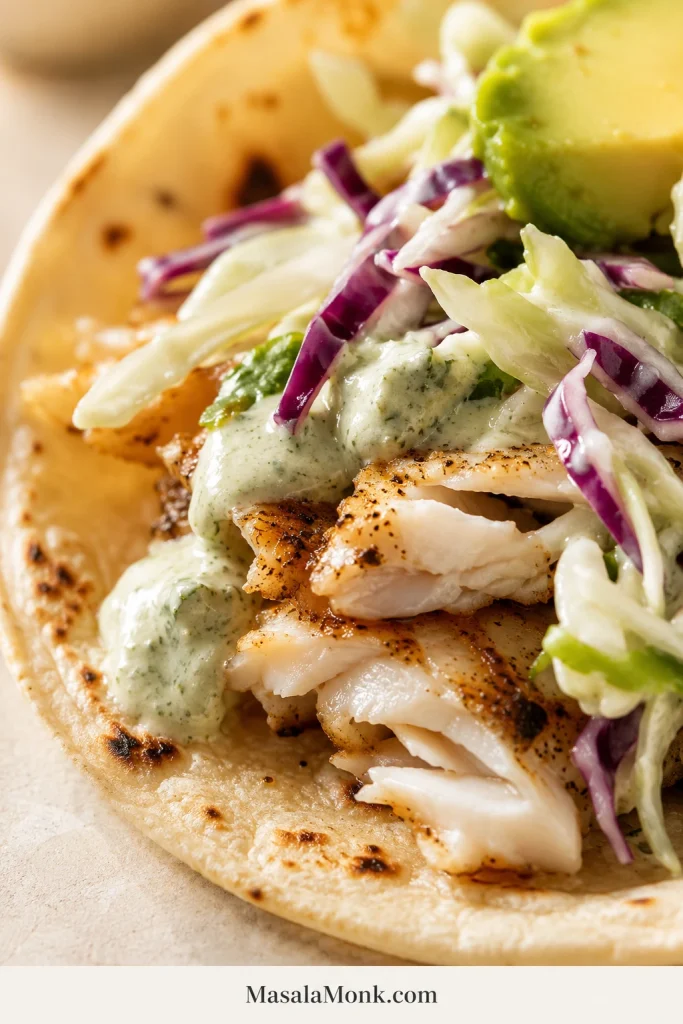
Close view of a corn tortilla holding large browned tilapia flakes, purple and green cabbage slaw, avocado and pale cilantro-lime sauce.
Keep the tilapia in broad flakes so it stays visible beneath the slaw and sits securely inside the tortilla.

Need a technique check? Skillet method·Cook time by thickness·Sauce and slaw·Assembly order

Choose the Method That Fits Tonight

The skillet gives the best balance of browning and control. Use the oven for a larger table, or the air fryer when you are cooking only a few fillets.

Choose This WhenMethodWhat You’ll Get
Making the recipe for the first timeSmoky skilletBrowned edges and moist flakes
Wanting a darker crust and more heatBlackened skilletDeeper spice and a darker surface
Feeding a larger tableOvenSoft, evenly cooked fish
Cooking only two or three filletsAir fryerLightly browned, drier edges
Wanting crunch without deep fryingPanko-coatedCrisp outside, flaky inside
Cooking outdoorsGrillLight char and smoke

Whichever cooking method you choose, the same quality checkpoints protect the result. The guide below follows the fish from a dry fillet to a balanced taco.
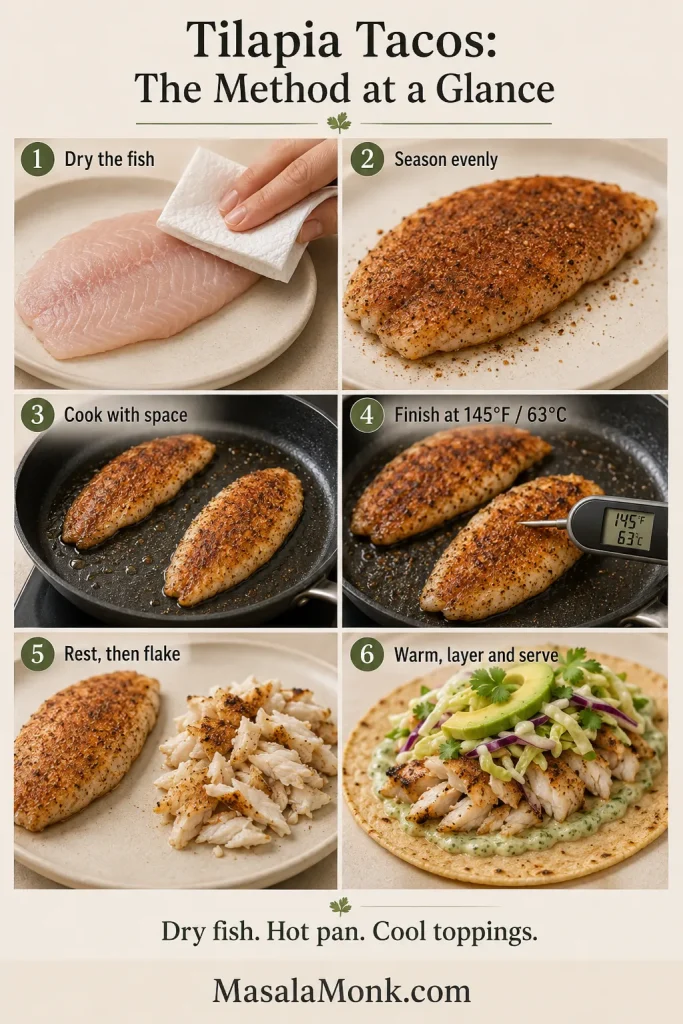
Six-step guide showing tilapia being dried, seasoned, cooked with space, checked with a thermometer, rested and flaked, then assembled in a warm tortilla.
These six checkpoints work across every method: dry, season, space, check, rest, and assemble without burying the fish.

Fish, Seasoning, and Tortillas

Tilapia cooks quickly. Thickness, surface moisture, and pan space decide whether it browns or steams. Choose evenly sized fillets, dry them well, and give them room in the pan.
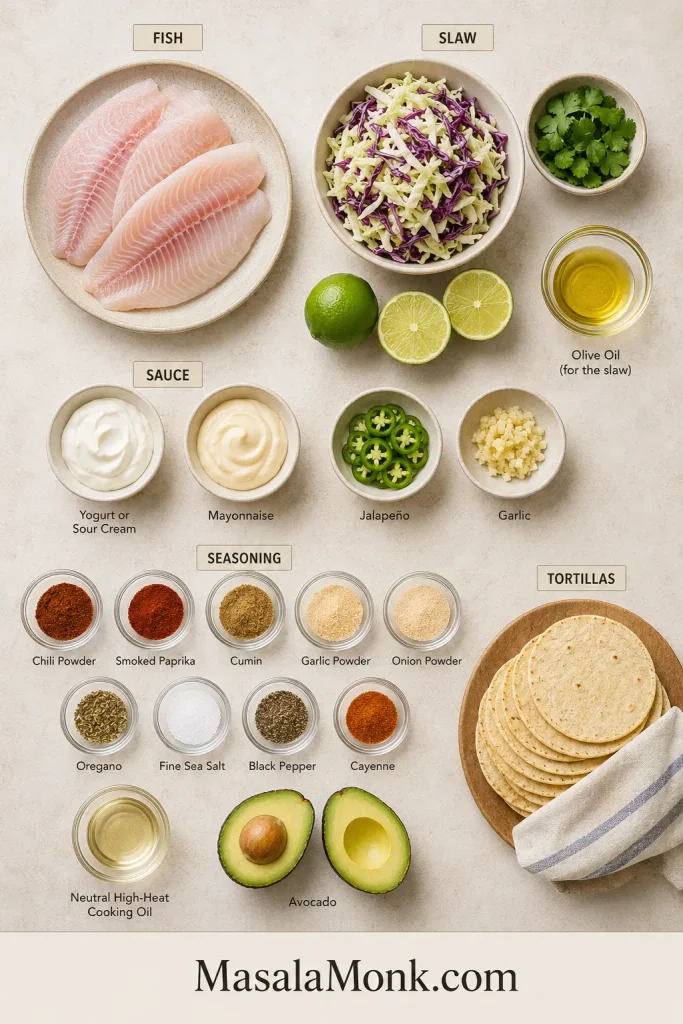
Overhead arrangement of raw tilapia, corn tortillas, cabbage, cilantro, limes, avocado, jalapeño, garlic, yogurt, mayonnaise, two cooking oils and small bowls of spices.
The two oils have different jobs: neutral oil handles the skillet heat, while olive oil dresses the cabbage slaw.

Choosing the Fillets

Choose skinless, boneless fillets with an even pale color and no strong fishy smell. Similar thickness matters more than identical length. When one fillet is much thinner than the others, plan to remove it first instead of forcing the entire batch to finish together.

Fresh and frozen tilapia both work. Previously frozen fish may release more water, so drying isn’t a decorative step. Press both sides with paper towels, replace the damp towel, and check the surface once more immediately before seasoning.

No tilapia? Use the same weight of cod, haddock, or another mild white fish. Choose fillets of similar thickness and follow the doneness cues rather than copying the exact skillet time.

Tilapia is one of the quickest and most affordable fish choices for tacos. To compare it with cod, mahi mahi, salmon, halibut, snapper, and Baja-style fish, use the complete fish tacos guide.

Tilapia Taco Seasoning

Tilapia doesn’t need to be hidden, but it does need enough seasoning to remain noticeable beside cabbage, sauce, avocado, and tortillas. Chili powder provides the main taco flavor, smoked paprika adds color and a gentle smoky edge, cumin adds warmth, and garlic, onion, and oregano fill out the middle.

Because chili powders vary, taste a tiny pinch before deciding how much cayenne to add. Some are mild seasoning blends, while others are made from hotter ground chilies.

This recipe uses ¾ teaspoon / about 4 g fine sea salt for the fish. If you use coarse kosher salt, weigh 4 g or adjust for the brand. Taste before adding cotija or another salty topping.
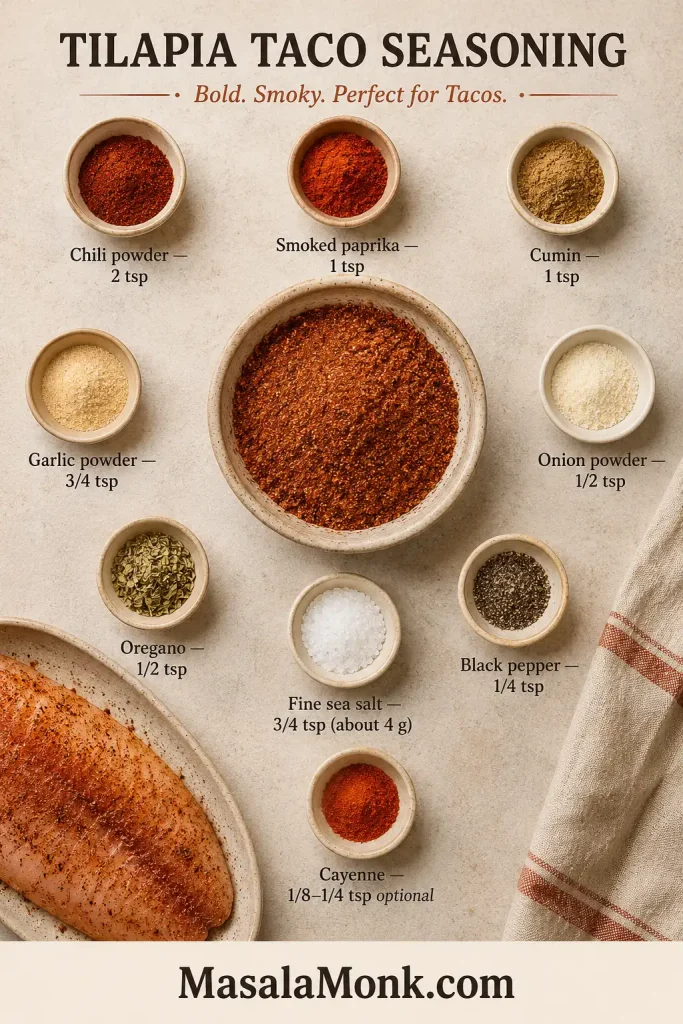
Nine labeled bowls containing measured chili powder, smoked paprika, cumin, garlic powder, onion powder, oregano, sea salt, black pepper and optional cayenne.
Mix the seasoning before applying it so salt, cayenne, and smoked paprika reach every fillet evenly.

Don’t use lime as a long marinade. If you want to marinate the fish with lime, keep it to 10–15 minutes. Longer contact can soften the surface of thin fillets. Keep most of the lime in the slaw, sauce, and final squeeze.

Corn or Flour Tortillas?

Corn tortillas bring toasted flavor and keep the tacos lighter. They are also the natural gluten-free choice when the package is certified for your needs. Warm them properly and double very thin tortillas if they split easily.

Flour tortillas are softer, more flexible, and a little richer. Use small taco-size tortillas rather than large wraps so the fish, slaw, and sauce stay balanced.

Cook the Fish Without Rushing It

Once the sauce, slaw, and tortillas are ready, the fish needs only a few focused minutes. Dry fish browns; wet fish steams. Pat both sides until slightly tacky, then oil and season just before cooking.
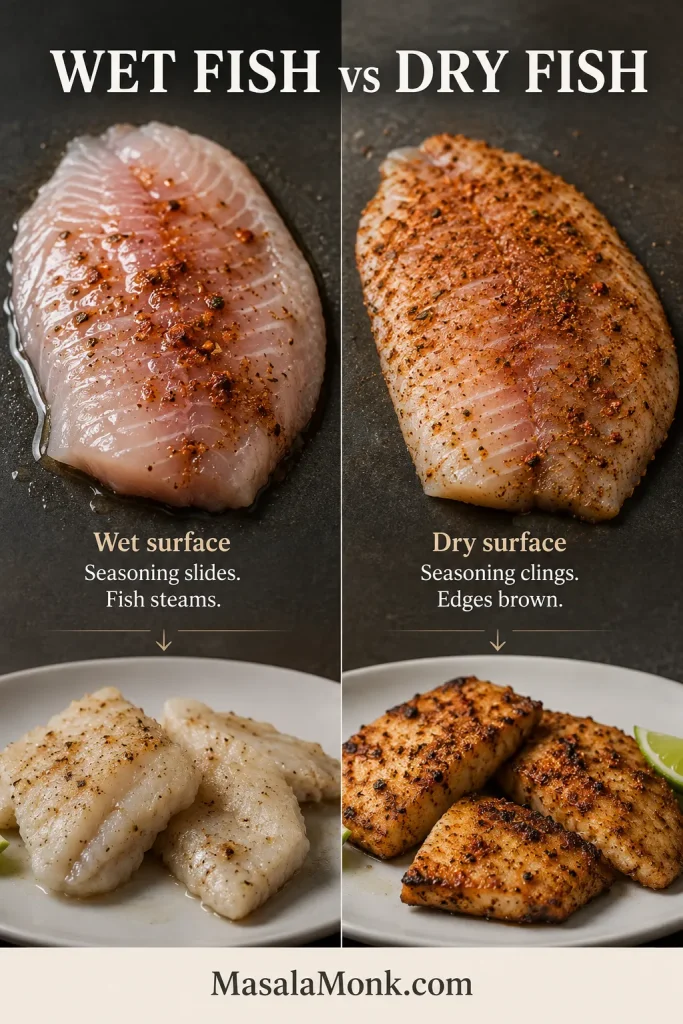
Comparison of a glossy wet tilapia fillet and a matte dried fillet, followed by pale steamed fish on one side and browned cooked fish on the other.
Dry tilapia looks matte and slightly tacky, which helps the seasoning cling. A glossy surface signals moisture that will steam in the skillet.

Give the fillets room. Add only as many as fit with visible space between them. Turn once, and remove thinner pieces as soon as they are done. That is good judgment, not a failed batch.
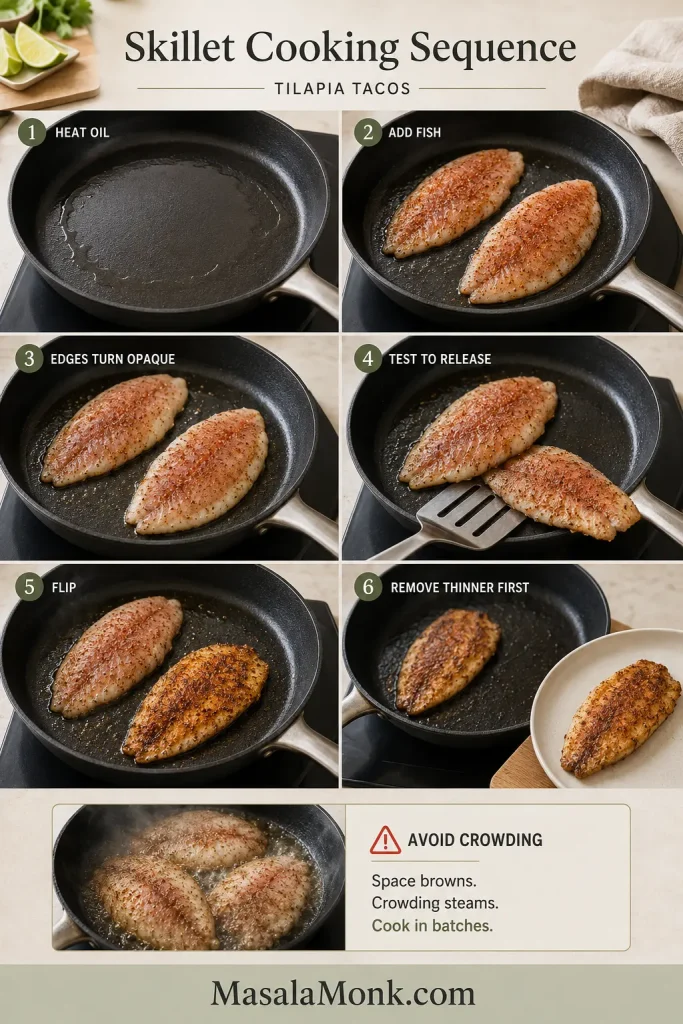
Step-by-step skillet sequence showing oil heating, spaced tilapia fillets cooking, opaque edges forming, release being tested, one fillet flipped and a thinner fillet removed first.
Watch the opaque line climb before testing the first side. If the spatula meets resistance, wait rather than forcing the turn.

A broken fillet is not a loss—it was going to be flaked for tacos anyway. Cook whole pieces when possible, rest them briefly, and break them into large flakes at the end.
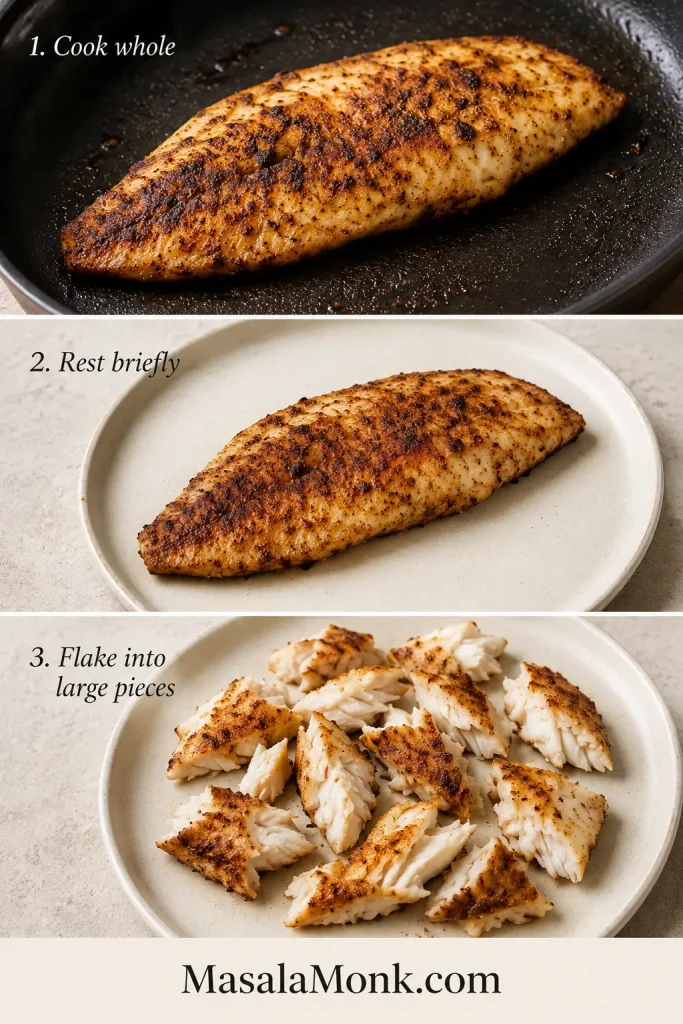
Three stages showing a whole tilapia fillet cooking, resting on a plate and separated into several large moist flakes.
Rest briefly, then separate the tilapia into broad taco-size flakes—not crumbs and not unwieldy chunks.

How Long to Cook Tilapia for Tacos

The thickest point of the fillet matters more than the total weight of the package. Use time as a reminder to begin checking, not as permission to ignore the fish until the timer rings.
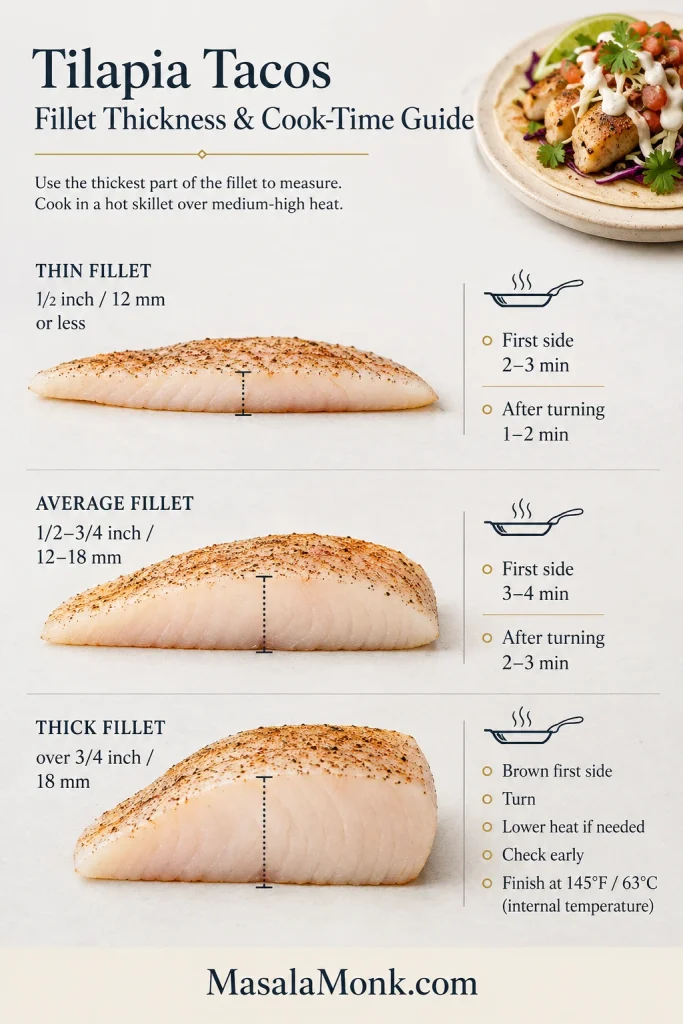
Guide comparing thin, average and thick tilapia fillets with thickness measurements, separate first-side and finishing times, and a 145°F or 63°C target.
Measure the thickest part of each fillet. Similar-looking pieces can still finish several minutes apart.
Fillet ThicknessFirst SideSecond SideWhat to Watch
Up to ½ inch / 12 mmAbout 2–3 minutesAbout 1–2 minutesTail ends may finish before the center
½–¾ inch / 12–18 mmAbout 3–4 minutesAbout 2–3 minutesStandard skillet range for many fillets
More than ¾ inch / 18 mmBrown first, then lower heat slightlyCook to temperatureUse the thermometer rather than color alone

Treat these as checking windows, not guarantees. A thick, cold fillet in a crowded pan cooks differently from a thin fillet in a wide, fully heated skillet.

How to Tell When Tilapia Is Done

Check the thickest point. The flesh should have lost its translucent look and separate under gentle pressure. FoodSafety.gov lists 145°F / 63°C for fish such as tilapia, or cooking until the flesh is no longer translucent and separates easily with a fork. See the safe minimum temperature chart.

Pale is not the same as undercooked. A thin fillet can be completely done while the surface is still lightly colored. Once the center is ready, take it out—even if the crust is paler than expected.

The visual difference: moist tilapia separates into pearly flakes. Overcooked tilapia turns chalky, tight, and dry around the edges.
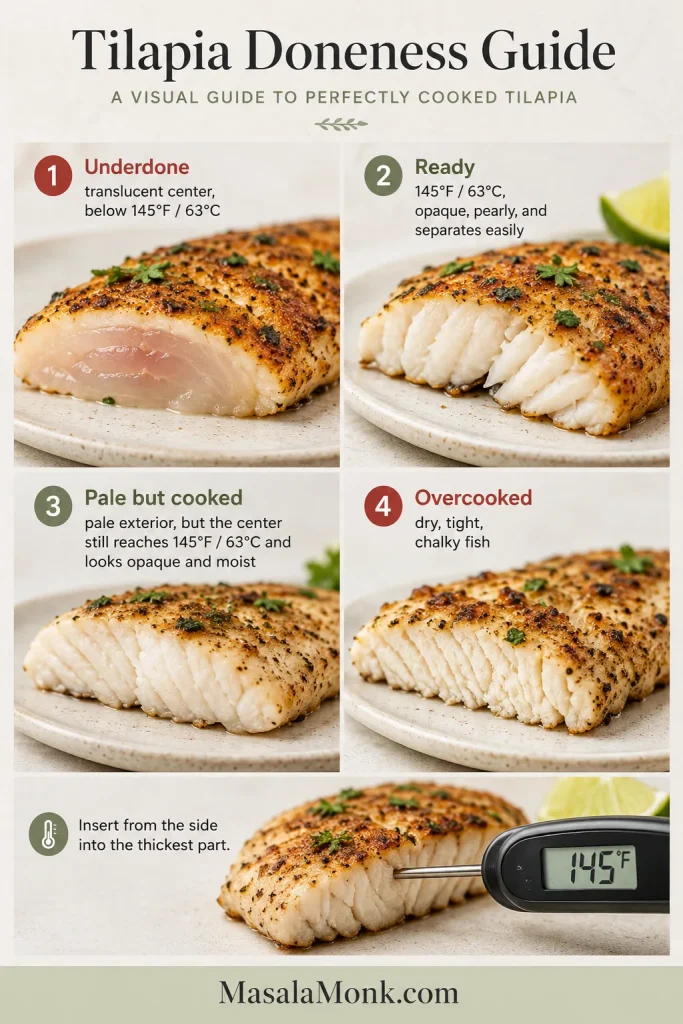
Four tilapia cross-sections showing translucent underdone fish, moist properly cooked fish, pale but cooked fish and dry overcooked fish, plus side-entry thermometer placement.
A properly cooked center looks pearly and moist, not chalky. Use 145°F / 63°C and easy separation as the final checks.

Crisp Slaw and Creamy Lime Sauce

The slaw should stay cold, crisp, and lime-bright; the sauce should be creamy enough to cling without soaking the tortilla. Make both before the fish goes into the pan, then follow the assembly order when the tilapia is ready.
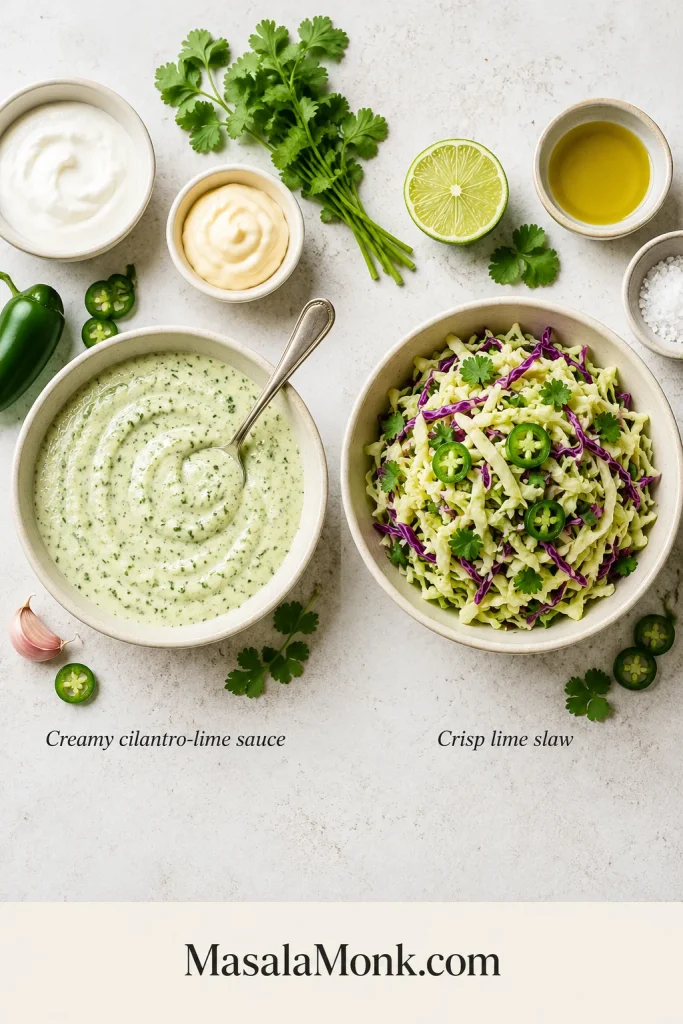
Separate bowls of pale cilantro-lime sauce and green-and-purple cabbage slaw surrounded by yogurt, mayonnaise, cilantro, lime, jalapeño, garlic, oil and salt.
Keep the sauce and slaw separate until serving so cabbage moisture cannot thin the sauce or soak the tortillas.

Cabbage Slaw

Finely shredded cabbage is easier to bite through than thick ribbons. For eight tacos, 250 g gives a generous amount without burying the fish. Dress it lightly for 10–15 minutes; it should look glossy, not wet.

Taste one strand. It should still snap, carry a light saltiness, and taste clearly of lime. If liquid gathers at the bottom, lift the slaw out with tongs so the excess dressing stays in the bowl. Prefer something creamier? This crisp homemade coleslaw keeps the dressing light enough for the cabbage to stay crunchy.

Creamy Lime Sauce

Greek yogurt makes the sauce lighter and tangier; sour cream makes it rounder and richer. Mayonnaise gives either base enough body to cling. Store-bought works well, or make homemade mayonnaise when you want full control over the flavor.

The recipe makes about 1 cup / 240 ml, enough for a thin layer below the fish and a light drizzle on top. Before thinning, the sauce should taste bright and slightly assertive; the fish, cabbage, and avocado will soften it in the finished taco.

Before assembling, compare both textures below: the sauce should fall in a thick ribbon, while the slaw should remain glossy, loose, and crisp.
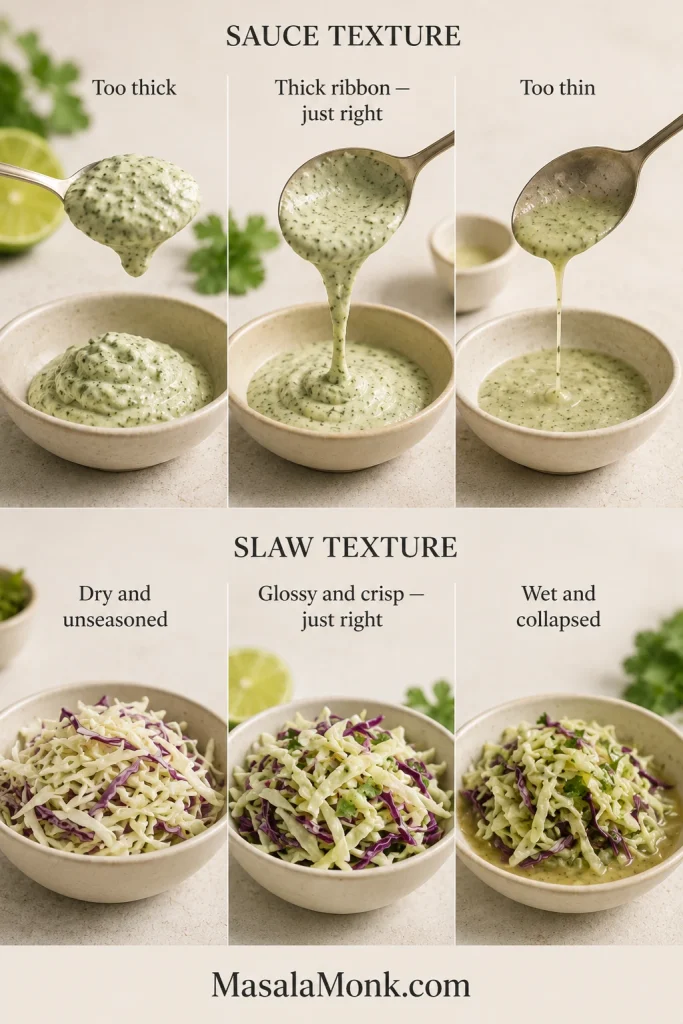
Six-panel comparison of sauce that is stiff, correctly ribboning or runny, and cabbage slaw that is dry, glossy and crisp or wet with pooled dressing.
The sauce should fall in a thick ribbon; the slaw should stay glossy, crisp, and loose enough to lift with tongs.

Easy Sauce Variations

  • Chipotle-lime: replace the jalapeño with 1–2 teaspoons minced chipotle in adobo.
  • Lighter: use ¾ cup / 180 g Greek yogurt and 2 tablespoons / 30 g mayonnaise.
  • No cilantro: use lime zest and finely sliced green onion instead.
  • Sweet heat: keep the sauce mild and add a little mango habanero sauce at the table.

The Best Assembly Order

Divide the fish generously among eight small tortillas so every taco feels substantial but still folds easily.

  1. Warm tortilla
  2. Thin layer of creamy sauce
  3. Large flakes of tilapia
  4. Drained cabbage slaw
  5. Avocado, salsa, or cheese
  6. Final light drizzle of sauce
  7. Fresh lime and cilantro

The first layer of sauce keeps the taco from tasting dry. Next, the fish creates a barrier between the tortilla and the wetter slaw. Watery salsa, extra lime, and heavy drizzles should go on last.
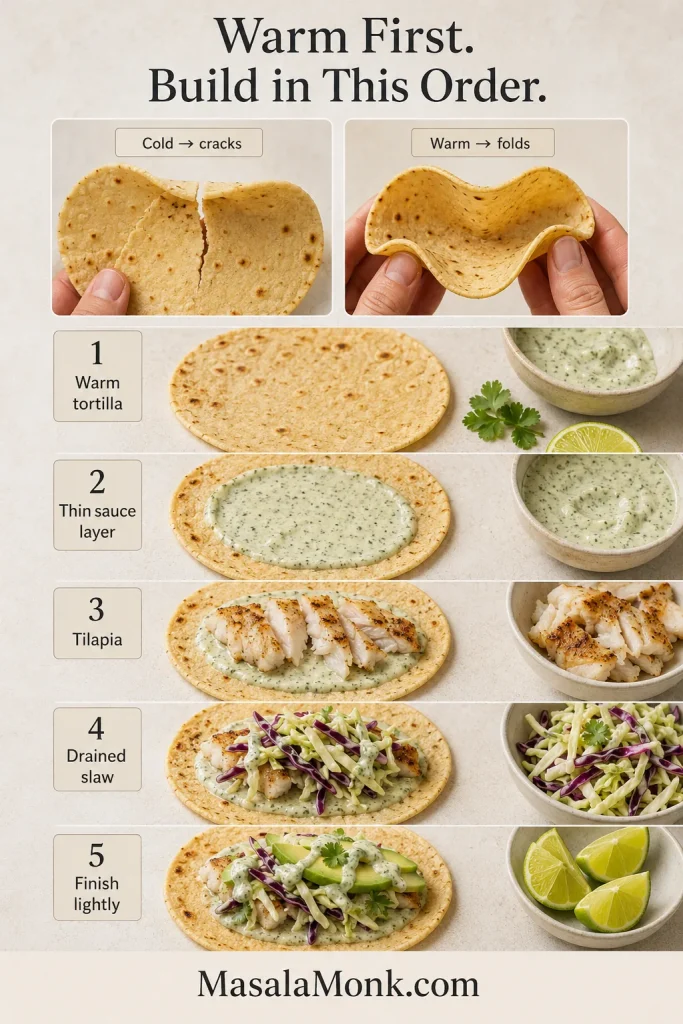
Guide comparing a cracked cold tortilla with a flexible warm tortilla, followed by assembly with sauce, tilapia, drained slaw, avocado and a light final drizzle.
Start with a thin sauce layer, then add fish, drained slaw, avocado, and only a light final drizzle.

Make a cook’s taco first. Taste one before building the remaining seven. Add lime if it feels flat, salt if the flavors disappear, more slaw for crunch, or another small drizzle of sauce if the fish needs moisture.
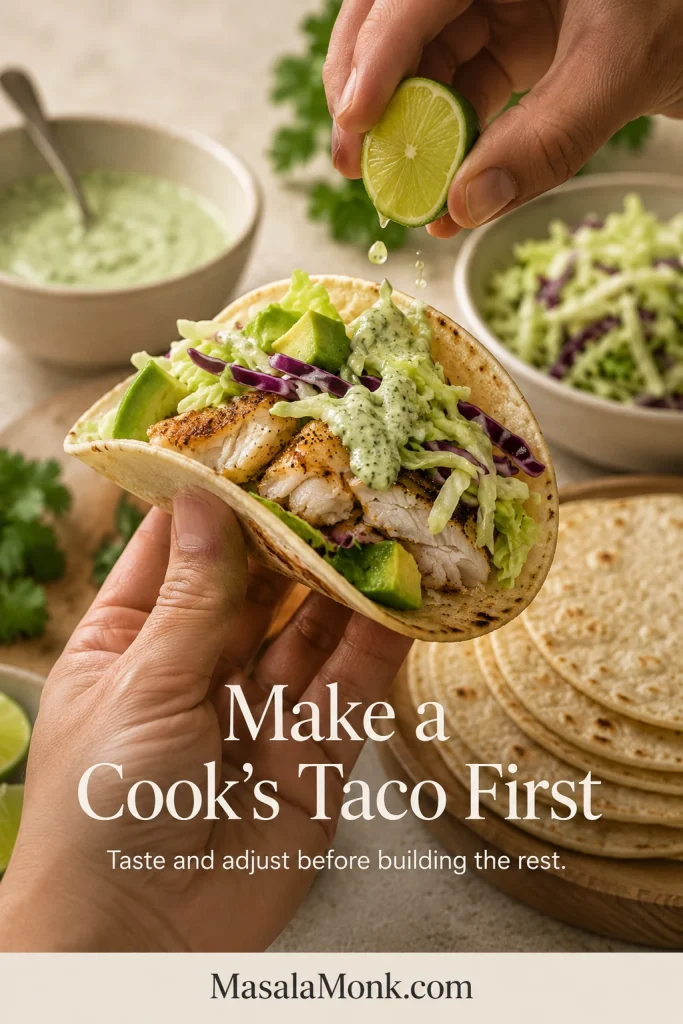
Hands holding a tilapia taco while squeezing lime over browned fish, cabbage slaw, avocado and pale sauce, with prepared taco components behind it.
Taste one assembled taco before serving. The combined bite reveals whether the table needs more lime, heat, or crunch.

Nothing needs to be plated perfectly. Put the bowls in the middle, keep the tortillas warm, and let the table finish the meal while the fish is hot.

Fresh mango salsa adds sweetness and acidity without weighing down the fish, and its chunky texture is easier on the tortillas than a watery salsa.

Other Ways to Cook Tilapia for Tacos

The skillet remains the best starting point. Go blackened for more heat, use the oven for one full tray, turn to the air fryer for a small batch, choose panko for crunch, or grill the fish for light smoke.

Blackened Tilapia Tacos

For a darker, hotter crust, increase the smoked paprika to 1½ teaspoons, use the full ¼ teaspoon cayenne, and choose a heavy skillet.

Cook over controlled medium-high heat for about 3–4 minutes on the first side and 2–3 minutes after turning. Blackened doesn’t mean burnt. The spices should smell smoky and warm, never bitter. Cool yogurt-lime sauce, cabbage, avocado, and fresh lime keep the stronger crust balanced.
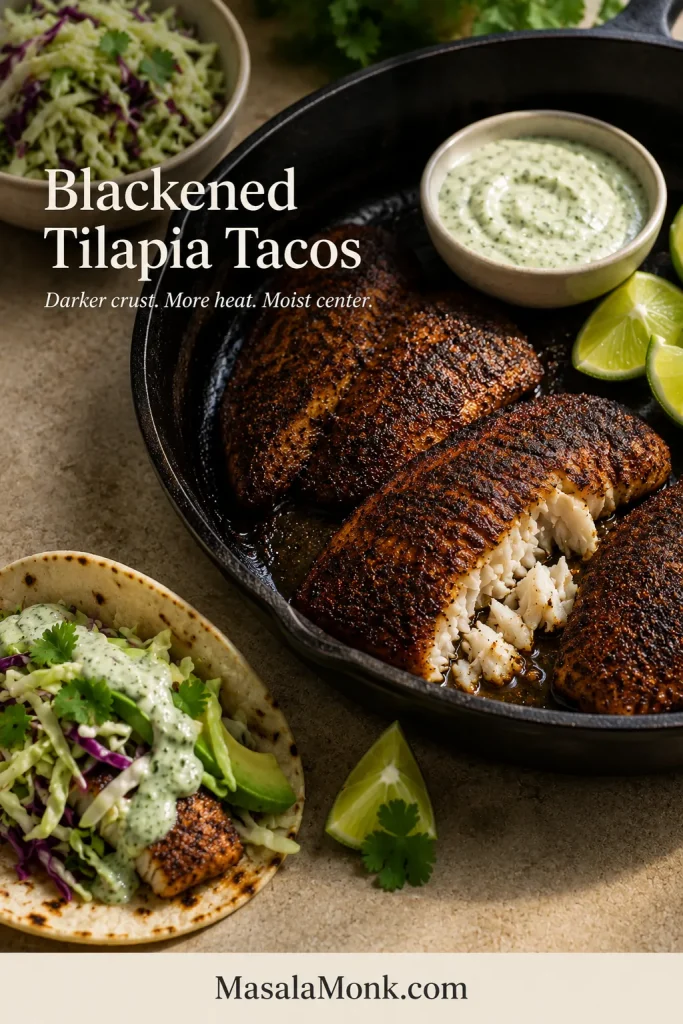
Darkly seasoned tilapia fillets in a cast-iron skillet, with one opened piece showing moist white flakes and sauce, lime, slaw and a taco nearby.
Blackened tilapia should show reddish-brown spice detail, not a uniformly burnt surface; the interior should remain pale and moist.

Baked Tilapia Tacos

Heat the oven to 400°F / 200°C and arrange the seasoned fillets in one layer on a lined rimmed sheet pan. Thin fillets may finish in 9–10 minutes, average pieces in 10–12, and thick fillets in 12–15. Remove each fillet as soon as the center is opaque and separates easily.

Baked fish is softer and paler than skillet tilapia, but it should still separate into moist, broad flakes. Choose the oven when several people are waiting and you would rather slide in one full tray than manage two skillet batches.
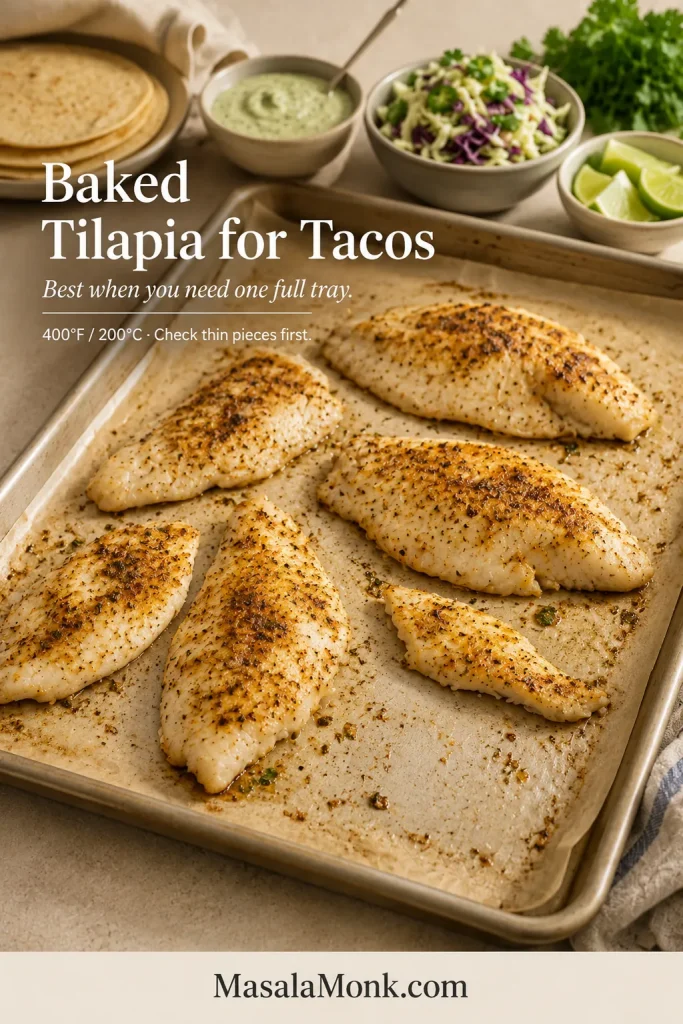
Several seasoned tilapia fillets of different sizes spaced on parchment, with an open area on the tray and tortillas, slaw, sauce and lime in the background.
Remove thin baked fillets early rather than waiting for a perfectly symmetrical tray to finish together.

Air Fryer Tilapia Tacos

Preheat to 400°F / 200°C when your model benefits from it, then lightly oil the basket and fish. Cook in one layer for about 7–10 minutes, checking the thinnest pieces at 6 minutes and taking them out first if needed.

The air fryer suits two or three fillets, not the full eight-taco batch; the first fish may cool before the second round finishes. Expect lightly browned, drier edges rather than the deeper crust of a skillet.
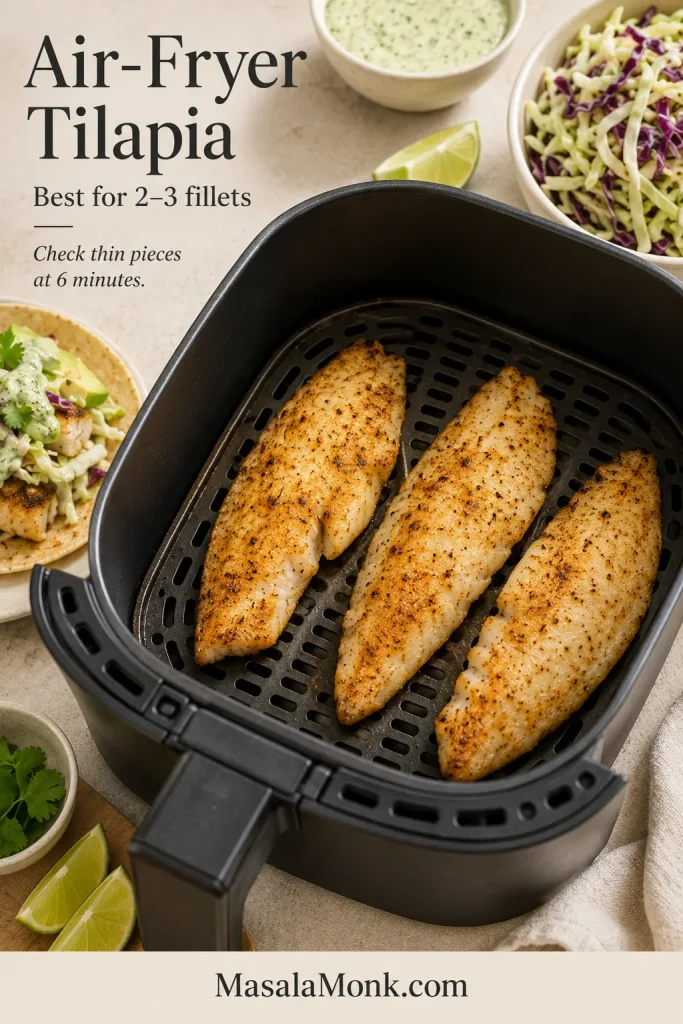
Open air-fryer basket containing three separated golden tilapia fillets, with cabbage slaw, pale sauce, lime wedges and a prepared taco nearby.
Leave open space around each fillet; circulating air cannot brown covered surfaces.

Crispy Tilapia Tacos

Cut 567 g tilapia into 1–1½-inch / 2.5–4 cm strips. Set out ½ cup / 60 g flour, 1 beaten egg with 1 tablespoon water, and 1¼ cups / 75 g panko tossed with 1 tablespoon oil. Combine 1 teaspoon chili powder, ½ teaspoon smoked paprika, ½ teaspoon cumin, ½ teaspoon garlic powder, ½ teaspoon fine sea salt, and ¼ teaspoon black pepper; mix half into the flour and half into the panko.

Coat each strip in flour, egg, and panko. Air fry at 400°F / 200°C for 7–9 minutes, or bake for 10–14 minutes, until the thickest strip reaches 145°F / 63°C. The coating should crack lightly and then give way to soft fish, not a thick shell of crumbs. Cook in batches when necessary, and discard coating ingredients that touched raw fish.
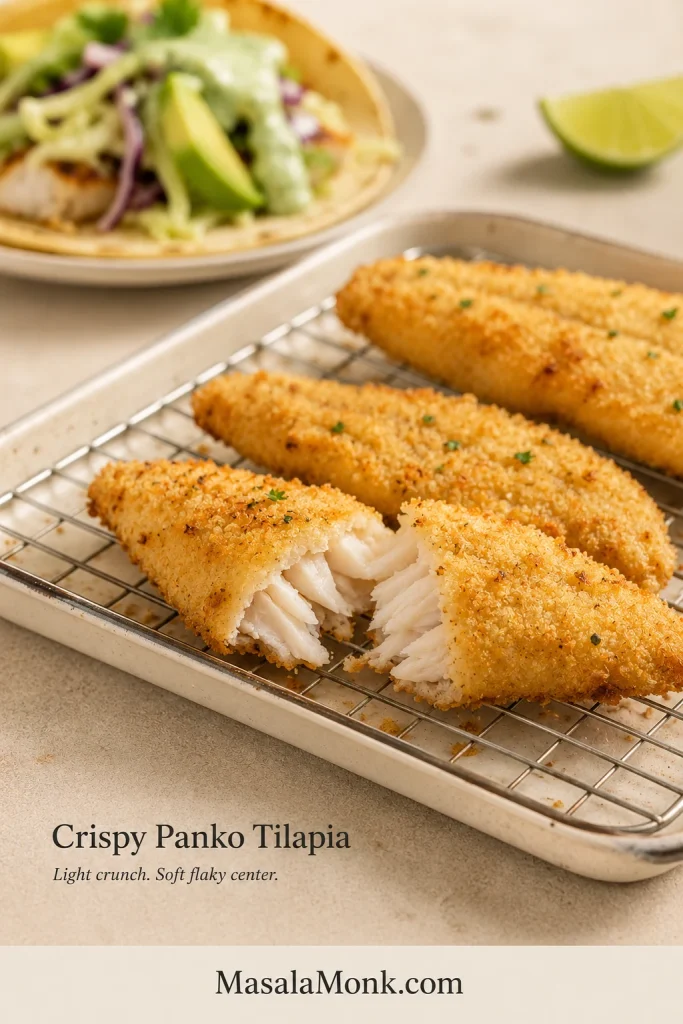
Thin golden panko-coated tilapia pieces on a wire rack, including one broken piece showing a delicate crust and moist white flakes inside.
The panko should hug the fish in a thin crust. A thick shell overwhelms delicate tilapia.

For a true fried Baja-style version, use the crispy fish batter recipe.

Grilled Tilapia Tacos

Heat a clean, oiled grill to about 400°F / 200°C. A perforated fish basket or grill-safe foil helps with thin fillets. Grill for 3–4 minutes on the first side and 2–3 minutes after turning. Pull the fish as soon as the center flakes; thin grilled tilapia dries quickly.

Finish with fresh lime and serve with avocado, roasted salsa verde, charred corn, or mango salsa. Avoid a long citrus marinade, which can soften the delicate surface.
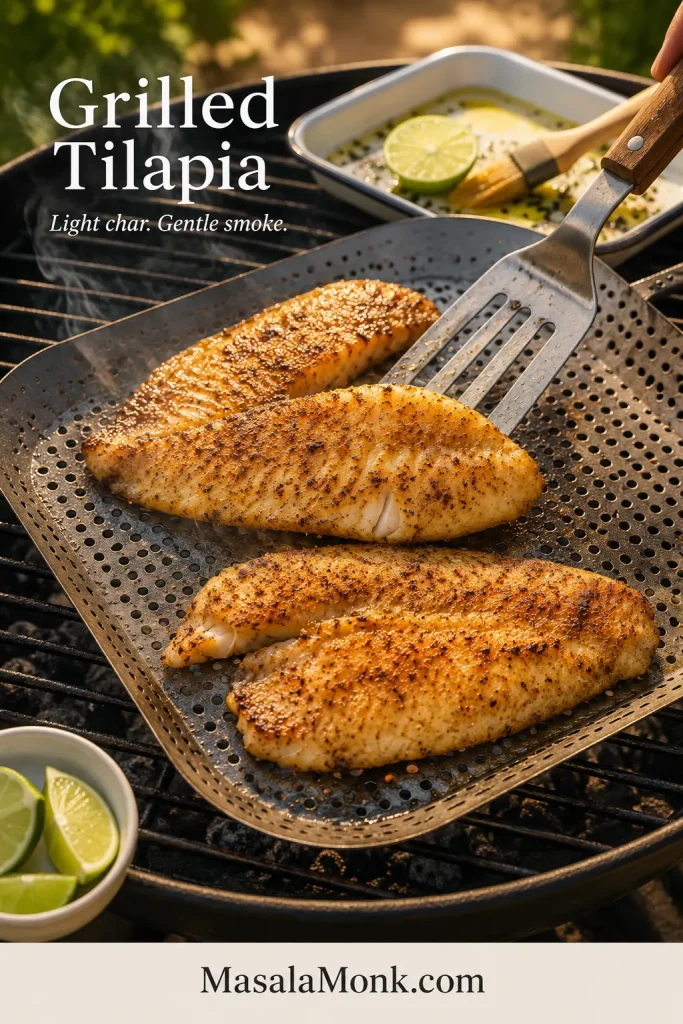
Seasoned tilapia fillets cooking inside a perforated grill basket outdoors, with one fillet being lifted by a spatula and lime wedges nearby.
A grill basket supports thin fillets. Light, patchy browning is enough; deep grill stripes can mean the fish cooked too long.

Continue with: Frozen tilapia·Lighter tacos·Topping ideas·Serving ideas·Back to top

How to Cook Frozen Tilapia for Tacos

Thawed and thoroughly dried tilapia gives the best browning. Leave it in the refrigerator overnight, or thaw it in a sealed bag under cold water, changing the water regularly. FoodSafety.gov explains safe seafood handling.
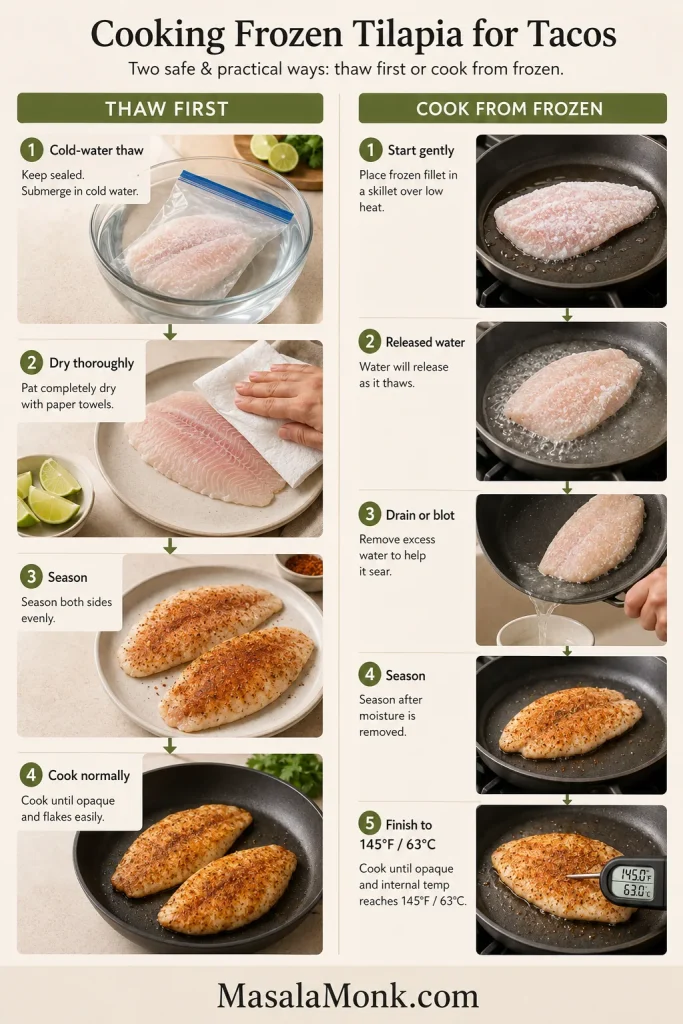
Two-path guide showing sealed cold-water thawing, drying and seasoning on one side, and gentle cooking from frozen, moisture removal, seasoning and temperature checking on the other.
When cooking from frozen, remove the released water before seasoning. That reset allows the surface to brown instead of steam.

Air fryer: cook frozen fillets at 400°F / 200°C for 5 minutes. Transfer them to a clean plate, pour away released liquid, and pat the surface dry. Oil and season, then cook for another 7–10 minutes.

Oven: bake frozen fillets at 400°F / 200°C for 5–7 minutes. Drain the sheet pan carefully, dry the exposed surface, then oil, season, and bake for another 12–18 minutes.

With either method, finish at 145°F / 63°C and check that the thickest part is opaque and easy to separate.

Direct-from-frozen skillet cooking is the weakest choice for browned tacos because the released water steams the fish and carries away seasoning. The baked tilapia guide goes deeper into thickness and frozen-fish troubleshooting.

Healthy Tilapia Tacos: Practical Lighter Swaps

A lighter taco should still feel generous. Keep the fish, cabbage, cilantro, and lime plentiful; lighten the sauce instead of shrinking the whole meal. Use small corn tortillas, make the sauce mostly with Greek yogurt, and treat avocado or cheese as accents. Exact nutrition varies with the tortillas, dairy base, and toppings you choose.
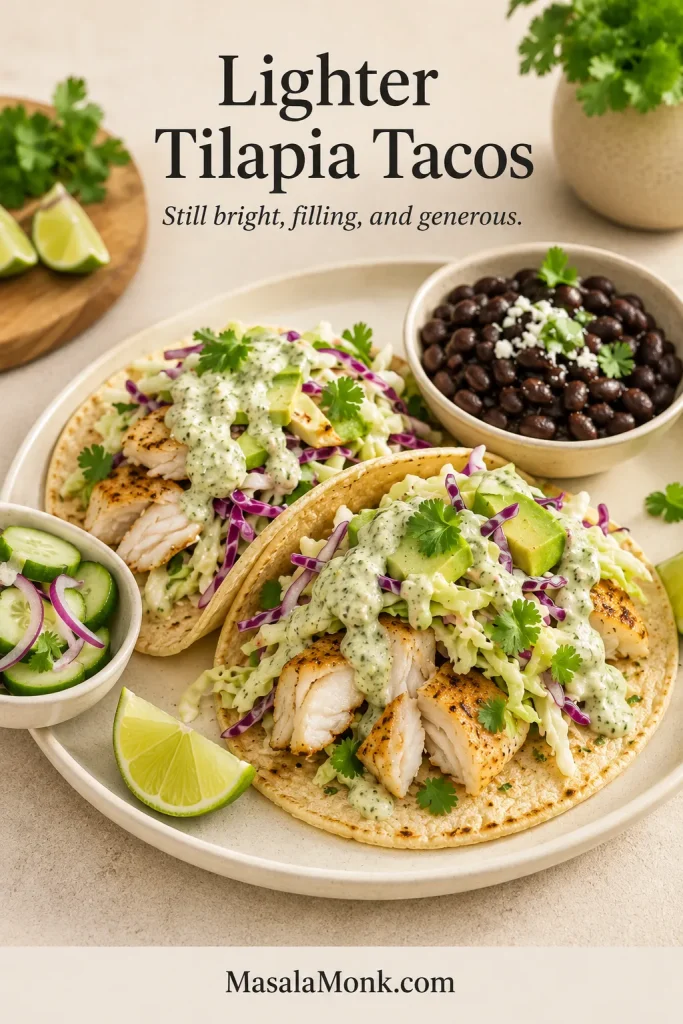
Two tilapia tacos with cabbage slaw, avocado, cilantro and pale sauce, served with black beans, cucumber salad and lime wedges.
Keep the full fish portion. Fresh vegetables and yogurt-forward sauce lighten the taco without making dinner feel skimpy.
  • Keep the full fish portion and use the skillet or oven instead of a crumb coating.
  • Choose small corn tortillas.
  • Use ¾ cup Greek yogurt with only 2 tablespoons mayonnaise for the sauce.
  • Keep cabbage, radish, cilantro, lime, and fresh salsa generous.
  • Use avocado and cheese as accents rather than removing every creamy element.
  • Add black beans or extra slaw when you want a fuller plate.

Gluten-Free and Dairy-Free Options

Making the tacos gluten-free is simple: use certified corn tortillas and check packaged chili powder, chipotle, and sauces when cross-contact matters. The skillet fish and cabbage slaw are naturally gluten-free as written.

To make the tacos dairy-free, use unsweetened dairy-free yogurt or mashed avocado in the sauce and omit cotija or feta. Regular mayonnaise is usually dairy-free; an egg-free vegan mayonnaise covers both needs. Add water slowly because dairy-free yogurt can be thinner than Greek yogurt or sour cream.

Toppings That Work

One creamy element, one crunchy element, and one fresh or acidic finish are usually enough. Too many wet or rich toppings hide the fish and soften the tortilla.
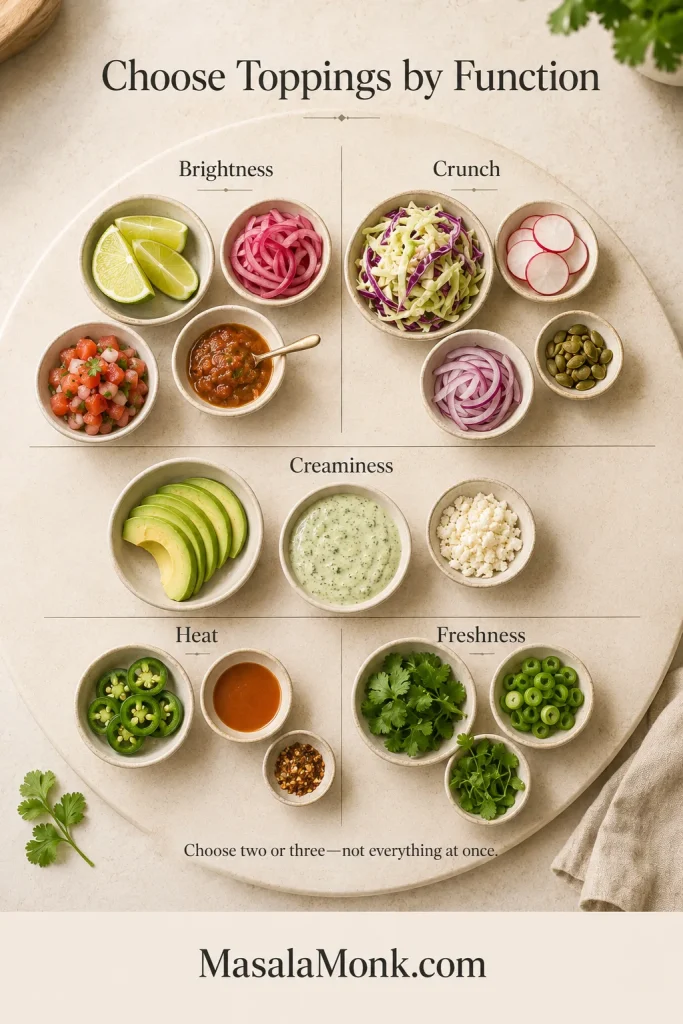
Overhead topping board divided into brightness, crunch, creaminess, heat and freshness, with lime, onion, salsa, cabbage, radish, avocado, sauce, cheese, jalapeño and herbs.
Choose toppings by function: one creamy element, one crunch, and one fresh or acidic finish.
  • Fresh and acidic: lime, cilantro, pico de gallo, pickled onion, or radish.
  • Creamy: avocado, lime sauce, fresh guacamole, cotija, or feta.
  • Sweet heat: mango salsa, pineapple salsa, mango habanero, or chipotle crema.
  • Extra crunch: cabbage, radish, pickled vegetables, or toasted pepitas.

What to Serve with Tilapia Tacos

Keep the sides simple so the tacos remain the center of the meal. Good choices include fluffy rice finished with cilantro and lime, black or pinto beans, grilled corn, a light green salad, or crisp cucumber salad. Fresh mango salsa can work as both a topping and a side.
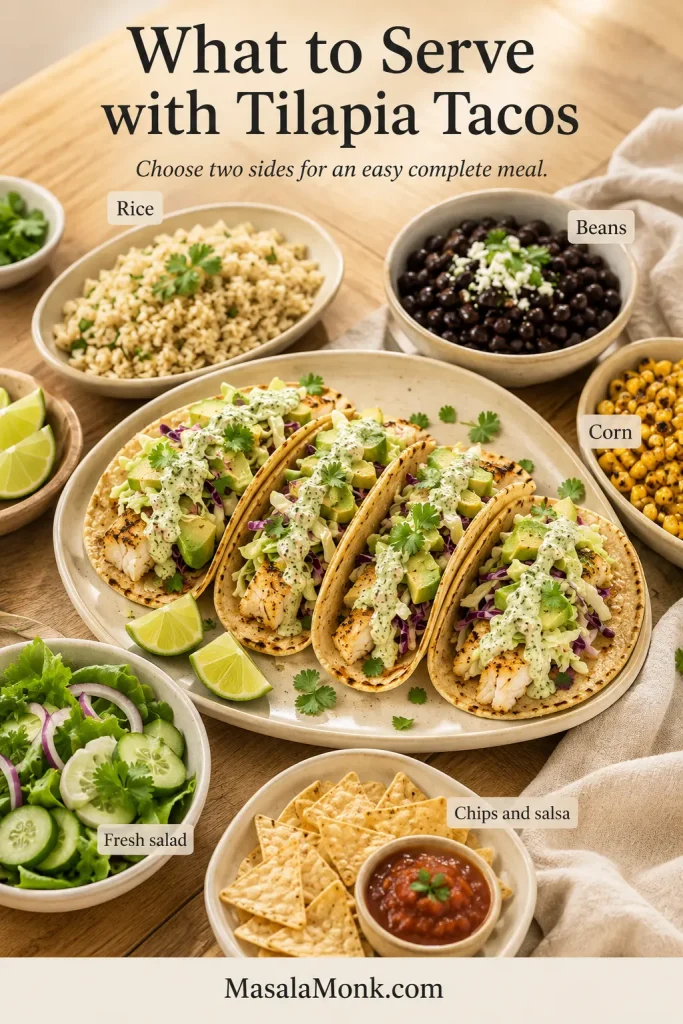
Family-style spread of four tilapia tacos with seasoned rice, black beans, charred corn, cucumber salad, tortilla chips, salsa and lime wedges.
This spread shows the full range of serving ideas. For an ordinary dinner, choose one substantial side—rice or beans—and one fresh side such as cucumber salad or grilled corn.

Common Problems and Fixes

Most problems begin with moisture, heat, or timing. Fix the cause first instead of trying to hide dry or watery fish under more sauce.
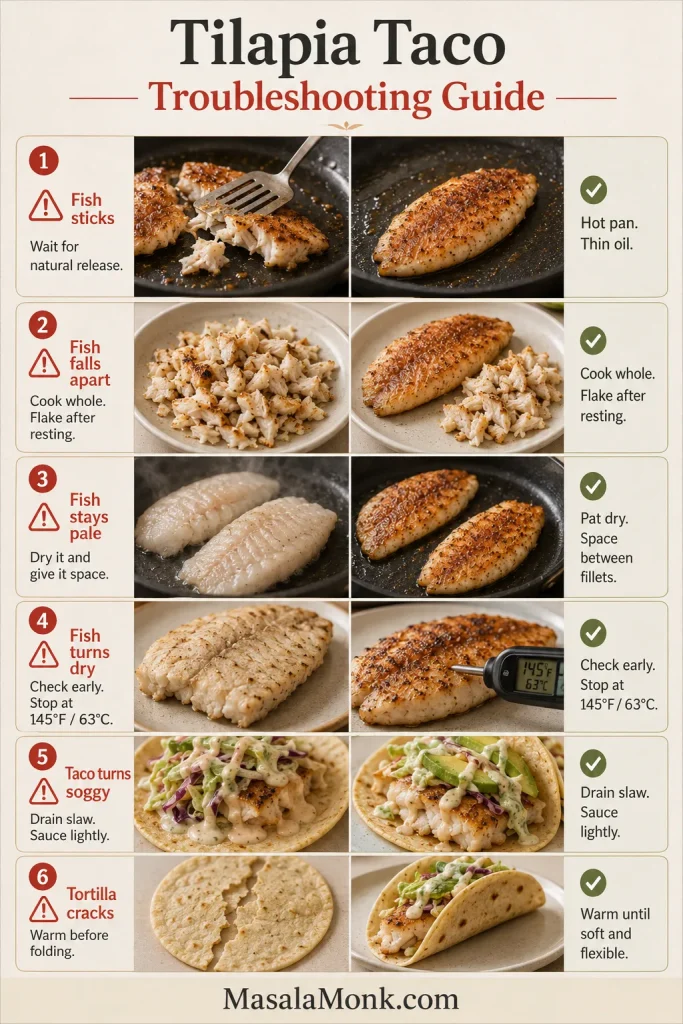
Six-part guide comparing sticking, broken, pale and dry tilapia, plus soggy tacos and cracked tortillas, with corrected examples beside each problem.
Pale fish and soggy tacos point to moisture; torn fillets and cracked tortillas usually signal rushed handling.
ProblemLikely CauseWhat to Do
Fish is watery and paleWet fillets, cool pan, or overcrowdingDry more thoroughly, reheat the pan, and cook in batches
Tilapia is dryThin fillets cooked for a thick-fillet timeBegin checking early and remove pieces separately
Fish breaks while turningMoved too early or turned repeatedlyUse a wide fish spatula and turn only once
Seasoning tastes burntPan too hot, coating too thick, or insufficient oilReduce heat slightly and use a thin, even spice layer
Tacos taste blandFish, slaw, or sauce under-seasonedTaste the fish, slaw, and sauce separately; add salt or lime where it is actually missing
Tortillas become soggyWet slaw, too much sauce, or early assemblyDrain toppings, use controlled sauce, and assemble at the table

Fix the underlying step: Skillet technique·Timing by thickness·Doneness cues·Recipe card

Storage, Make-Ahead, and Reheating

Store the fish, slaw, sauce, and tortillas separately. Following the USDA leftovers guidance, refrigerate cooked tilapia in a shallow, covered container within 2 hours—or within 1 hour when the temperature is above 90°F / 32°C. An assembled taco doesn’t reheat well because the tortilla absorbs moisture from the sauce and slaw.

  • Cooked tilapia: use within 3–4 days, or freeze it sooner if you will not eat it in that window.
  • Sauce: refrigerate for up to 3 days and stir before using.
  • Cabbage: shred a day ahead, but dress it closer to serving for the best crunch.
  • Seasoning: mix several days ahead and store dry.
  • Tortillas: warm immediately before serving.

How to Reheat the Fish

Warm the fish gently in a lightly oiled skillet over medium-low heat, or air fry at 350°F / 175°C for 2–4 minutes, checking after 2 minutes. Reheat the thickest piece to 165°F / 74°C, then stop; extra time makes thin tilapia dry and rubbery.

The microwave works when speed matters. Arrange the fish evenly, cover it loosely with a microwave-safe lid, and heat at 50–70% power in 20–30 second intervals until the thickest piece reaches 165°F / 74°C.

Leftover fish also works well in a taco bowl with warm rice, slaw, sauce, avocado, and lime.
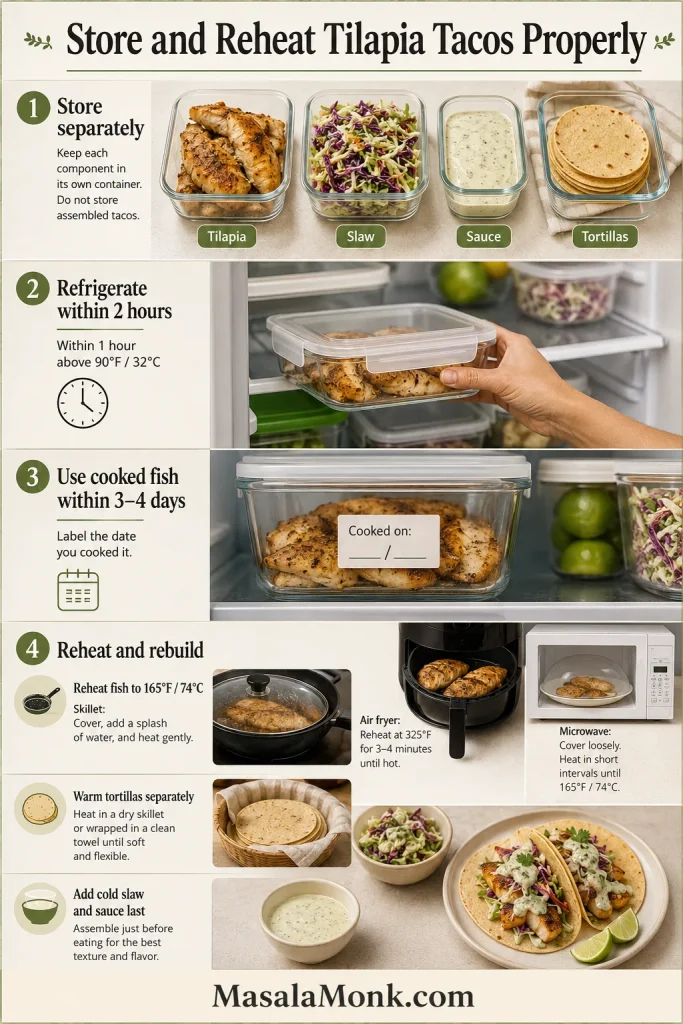
Storage guide showing tilapia, slaw, sauce and tortillas in separate containers, a dated fish container in a refrigerator, three reheating methods and freshly rebuilt tacos.
Store fish, slaw, sauce, and tortillas separately. Reheat only the fish, then rebuild the tacos just before serving.

Frequently Asked Questions

How Many Tacos Should I Plan per Person?

Plan on two small tacos per person, using about 5 oz / 140 g raw fish. Increase that for larger tortillas, bigger appetites, or a meal with very few sides.

What Can I Make Ahead?

Make the sauce up to 3 days ahead, shred the cabbage a day ahead, and mix the seasoning in advance. Dress the slaw and cook the fish close to serving. For leftovers, use the storage and reheating guide.

Hot Fish, Cold Slaw, Warm Tortillas

Bring everything to the table separately and build the first taco while the fish is still hot. That first bite—warm tortilla, smoky tilapia, cool sauce, sharp lime, and crisp cabbage—is the whole point.

Once the cook’s taco tastes balanced, pass the bowls around and let everyone build their own while the tortillas are warm.

What did your cook’s taco need—more lime, more heat, or more crunch?

Quick return: Recipe card·Method chooser·Troubleshooting·Back to top
Posted on Leave a comment

Baked Tilapia Recipe

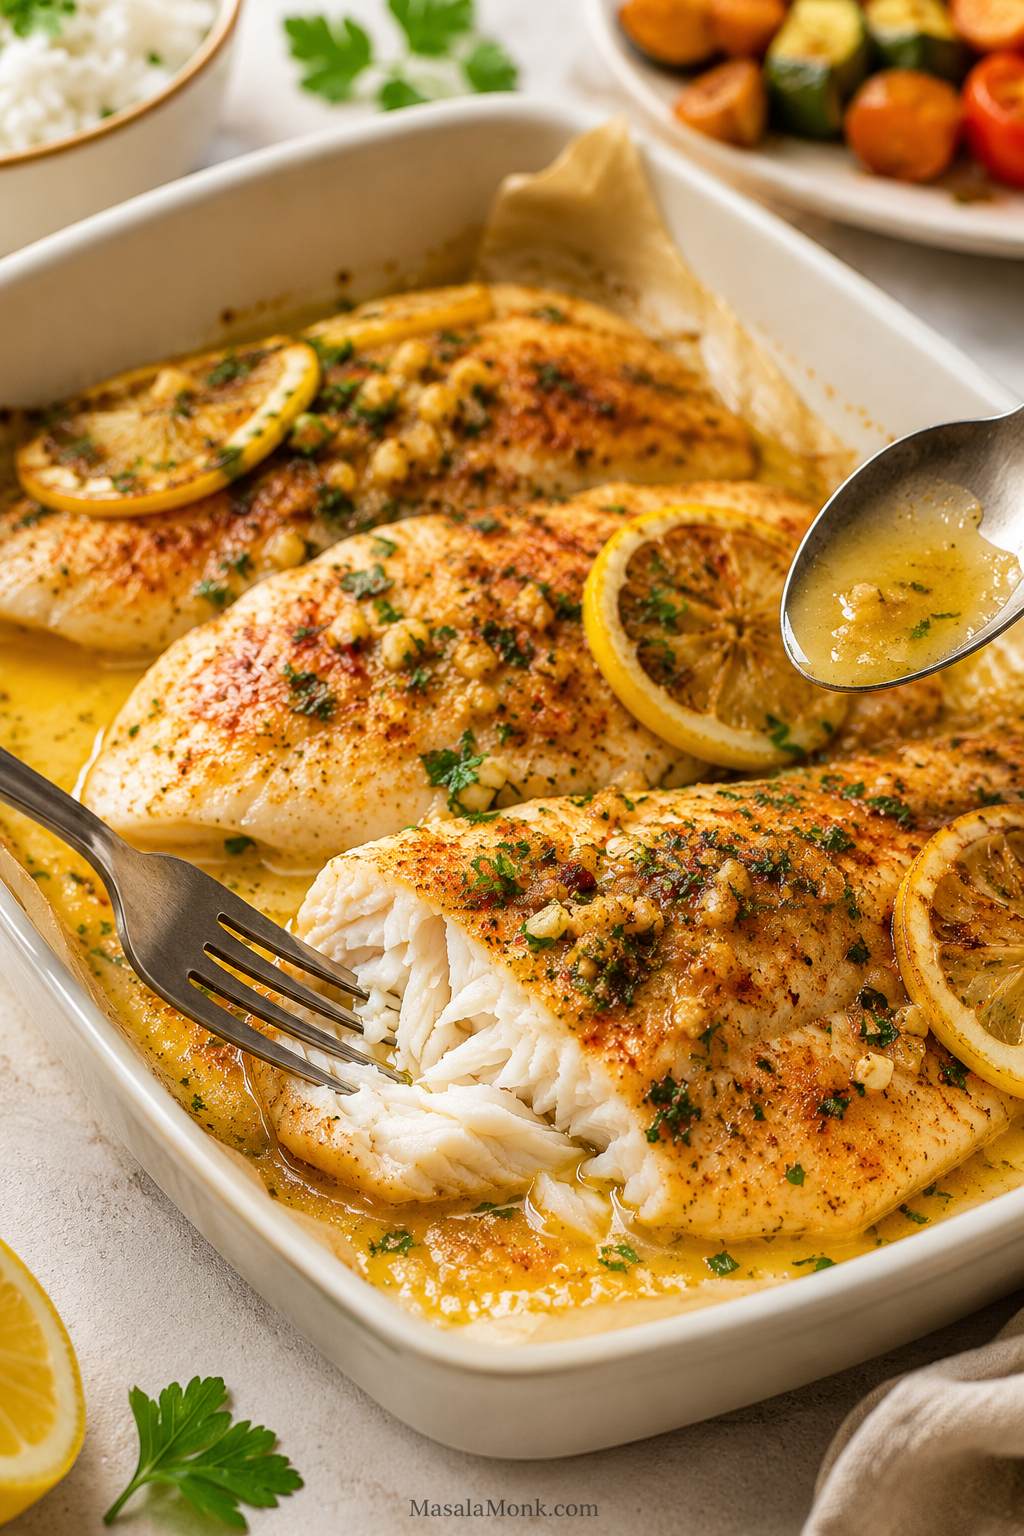
Lemon garlic baked tilapia in a white ceramic baking dish with lemon slices, parsley, paprika, and butter sauce.

This baked tilapia recipe is for the nights when dinner needs to feel easy but still taste like you tried: tender white fish, lemony garlic butter, a little paprika, and a spoonable pan sauce for rice, potatoes, or vegetables. Tilapia is mild, quick, and easy to dress up, which is exactly why it can become one of the most useful weeknight fish recipes in your rotation.

The trick is not to overthink it — but also not to underseason it. This fish is lean and delicate, so it needs enough salt, lemon, garlic, and butter or olive oil to taste bright instead of bland. It also cooks fast, which means a few extra minutes can turn flaky fish into dry fish.

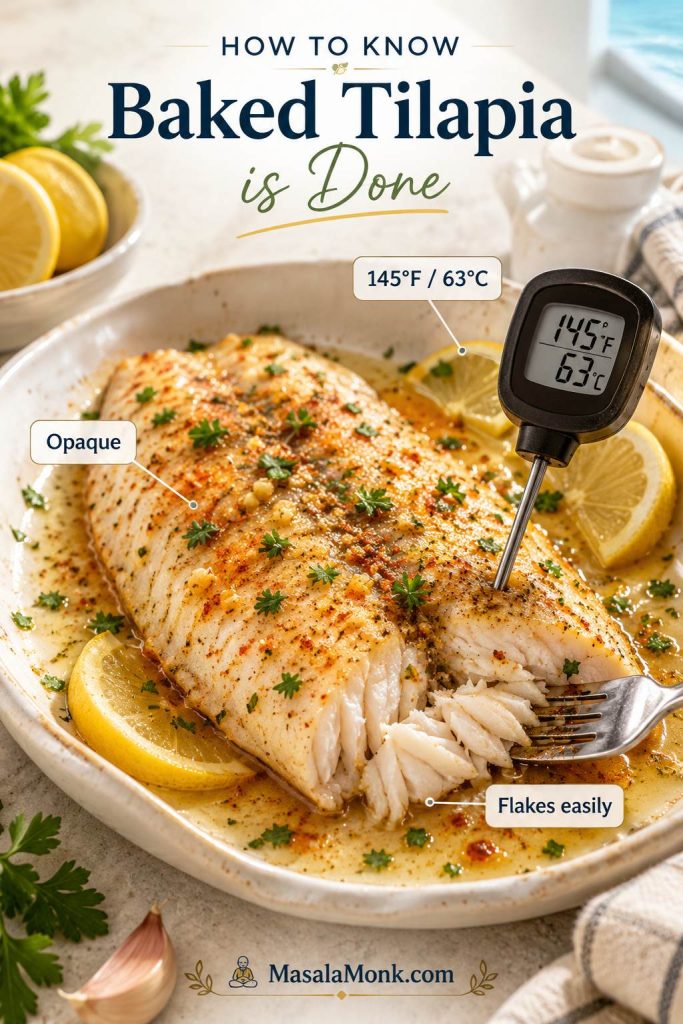
For most thawed tilapia fillets, bake at 400°F / 200°C for 10–12 minutes, or until the fish is opaque, flakes easily with a fork, and reaches 145°F / 63°C in the thickest part. For more exact timing by oven temperature and fillet thickness, see the time and temperature chart. Once the timing is familiar, this baked tilapia recipe becomes one of those simple dinners you can repeat with lemon garlic butter, spicy seasoning, crispy parmesan topping, vegetables, tacos, or rice bowls.

Quick Answer: Best Way to Bake Tilapia

For the most reliable baked tilapia recipe, keep things simple: dry the fillets, season them well, spoon lemon garlic butter or olive oil over the top, and bake them uncovered at 400°F / 200°C for 10–12 minutes. The fish should come out moist and flaky, not browned like chicken or crispy like fried fish. You are looking for tender fish with a bright sauce, not a dry fillet that has been pushed too far.

Baked Tilapia Time, Temperature, and Doneness

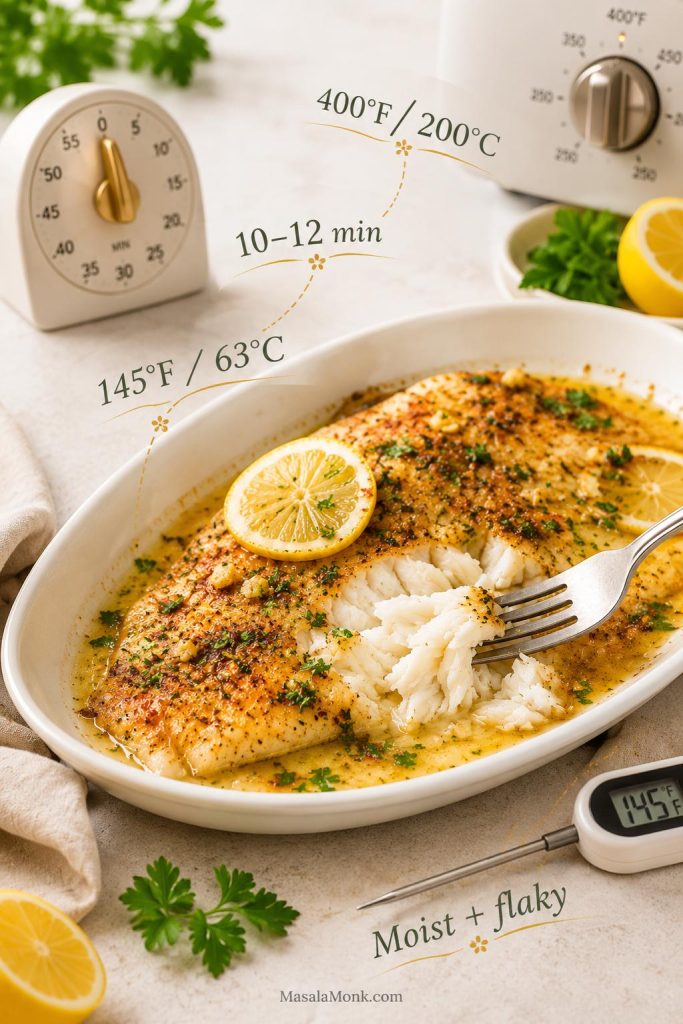
Use this quick visual when you need the core timing before you start cooking: 400°F, 10–12 minutes, and 145°F in the thickest part.

Baked tilapia timing guide showing a cooked fillet with 400°F, 10 to 12 minutes, and 145°F temperature cues.
For most thawed tilapia fillets, start with 400°F for 10–12 minutes. However, the real finish line is texture and temperature: opaque fish that flakes easily and reaches 145°F.

Use a 9×13-inch baking dish for this lemon garlic butter version because the dish holds the sauce around the fish. For crispier parmesan or panko tilapia, use a rimmed sheet pan so the topping stays drier and lightly crisp.

Tilapia is done when it turns opaque, flakes easily, and reaches 145°F / 63°C in the thickest part. Thin fillets may be ready closer to 9–10 minutes, while thicker fillets may need 12–15 minutes.

Choose your path: For thawed average fillets, bake at 400°F / 200°C for 10–12 minutes. Very thin fillets should be checked at 9 minutes, while thicker fillets usually need 12–15 minutes. Frozen fillets are best thawed first for the cleanest texture, although you can bake them from frozen for 18–25 minutes when dinner needs saving.

If your fish is still frozen, jump to the fresh vs frozen tilapia section before you start so you know what texture and timing changes to expect.

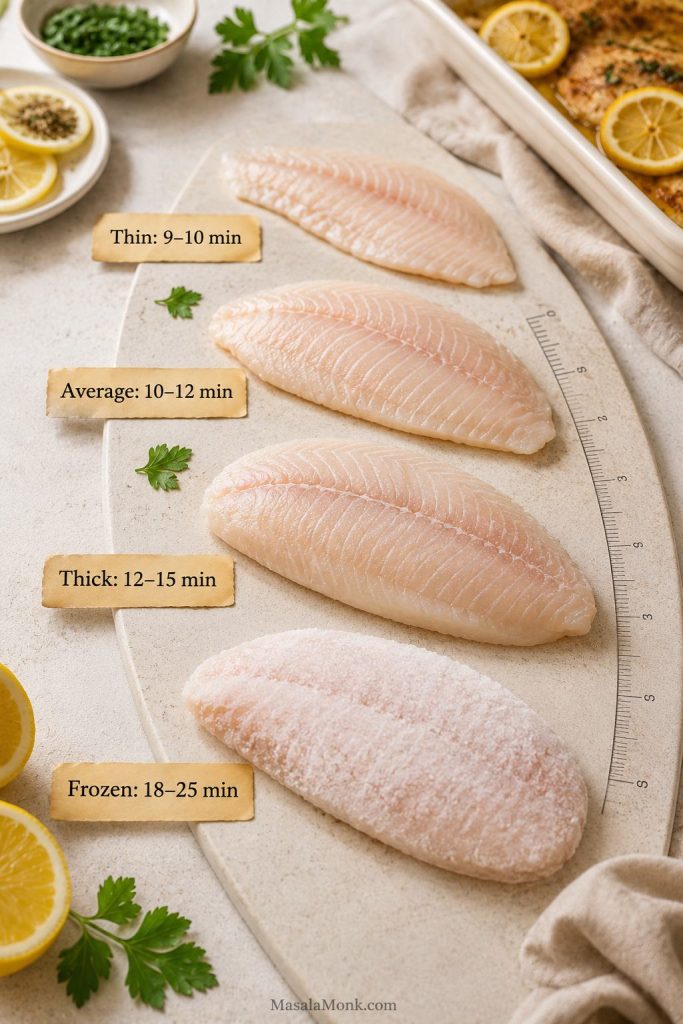
Tilapia Fillet Timing Guide

Use this timing guide when your fillets look especially thin, thick, uneven, or still frozen. Thickness changes the bake time more than the package label does.

Tilapia fillet timing guide showing thin, average, thick, and frozen fillets with different baking times.
Tilapia fillets do not all bake at the same speed. Start checking thin pieces early, give thicker fillets a few extra minutes, and treat frozen tilapia as its own timing path.

Baked Tilapia at a Glance

Here is the simple version of this baked tilapia recipe before we get into the details. For most thawed fillets, remember this first: 400°F, 10–12 minutes, and 145°F inside.

Detail Use this as your default
Oven temperature 400°F / 200°C
Cook time 10–12 minutes for most thawed fillets
Internal temperature 145°F / 63°C
Pan 9×13-inch baking dish for saucy tilapia; rimmed sheet pan for crispy topping
Flavor base Lemon, garlic, butter or olive oil, paprika, black pepper, parsley
Frozen fillets Best thawed first; no-thaw option takes about 18–25 minutes
Texture cue Opaque, flaky, moist, and easy to separate with a fork

If you are unsure whether the fish is fully cooked, the doneness section shows the fork-flake and 145°F cues together.

What This Baked Tilapia Tastes Like

This baked tilapia recipe should taste light, lemony, and savory, with soft flakes of fish and a warm garlic-butter sauce you can spoon over rice, potatoes, or vegetables. The paprika gives the pale fish a little warmth and color, while the parsley and final squeeze of lemon keep the whole plate fresh instead of heavy.

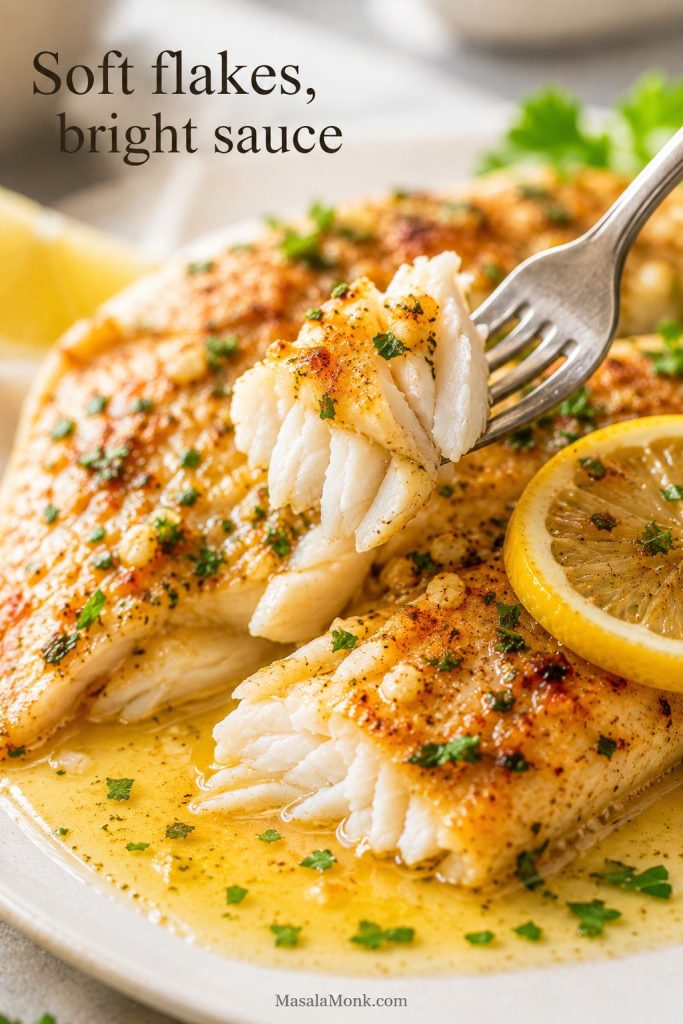
Soft Flakes and Bright Lemon Garlic Sauce

The best texture is moist and easy to separate with a fork. You are not trying to create a dark crust here; you are looking for gentle flakes and a sauce that keeps the fish bright.

Close-up of lemon garlic baked tilapia flaking apart with a fork, butter sauce, parsley, and lemon.
The best lemon garlic baked tilapia has soft flakes and a glossy sauce. Instead of chasing a dark crust, look for tender fish that separates easily with a fork.

For a stronger flavor, use the spicy, lemon pepper, masala-spiced, or crispy parmesan variations later in the post. The base recipe is intentionally simple, so it can work with rice, vegetables, salad, tacos, or grain bowls.

Why This Baked Tilapia Recipe Works

Tilapia does not need a complicated marinade or a long oven time. In fact, those are usually where things go wrong. The fish is thin and lean, so it does best with direct seasoning, a little fat, a bright finish, and a short bake.

The lemon garlic butter does most of the heavy lifting here. Lemon juice wakes up the mild fish, zest adds aroma without extra liquid, garlic brings savory depth, paprika adds warmth and color, and butter or olive oil helps the fillets stay tender.

  • 400°F is a reliable default: it cooks tilapia quickly without forcing you into a long bake that can dry out thin fillets.
  • The sauce adds moisture and flavor: butter or olive oil keeps the fish tender, while lemon and garlic make it taste fresh.
  • Drying the fish helps: this is especially important if your tilapia was frozen and thawed.
  • The recipe is flexible: keep it lemon garlic, make it spicy, add a parmesan-panko topping, or bake it with quick-cooking vegetables.
  • Doneness is easy to check: look for opaque flesh, easy flaking, and 145°F / 63°C in the thickest part.
Useful tip: Start checking early the first time you make this. Fillet thickness matters more than the exact minute on the timer.

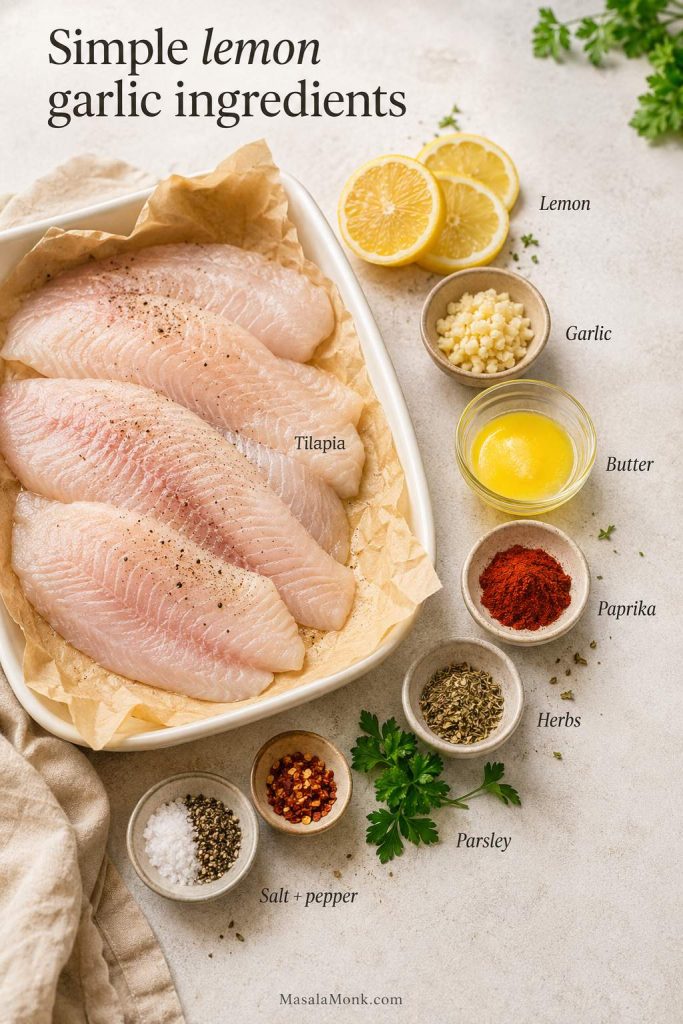
Ingredients for Baked Tilapia

Because this baked tilapia recipe uses only a few ingredients, each one has a clear job. Fresh lemon, enough garlic, and a balanced amount of salt and fat help the finished fish taste bright instead of plain.

Ingredients for baked tilapia including raw tilapia fillets, lemon, garlic, butter, paprika, herbs, parsley, salt, and pepper.
Because tilapia is mild, every ingredient has a job. Lemon brings brightness, garlic adds depth, butter or olive oil keeps the fish moist, and paprika gives the fillets a warmer finish.
Ingredient US measure Metric Why it matters
Tilapia fillets 4 fillets, 5–6 oz each 560–680 g total Main protein. Thaw and pat dry for best texture.
Unsalted butter, melted 4 tbsp 56 g Adds richness, moisture, and classic lemon garlic flavor.
Fresh lemon juice 1½ tbsp 22 ml Brightens the mild fish and keeps the flavor lively.
Lemon zest 1 tsp From about 1 lemon Adds lemon aroma without making the sauce watery.
Garlic, minced 3 cloves About 9 g The main savory flavor in the sauce.
Fine salt ¾ tsp About 4–5 g Seasons the fish directly. Adjust if using salted butter.
Black pepper ¼ tsp About 0.5 g Adds gentle heat and balance.
Paprika ½ tsp About 1 g Adds warm color and mild flavor.
Dried oregano or thyme ½ tsp About 0.5 g Gives the fish a more complete savory flavor.
Red pepper flakes ⅛–¼ tsp Optional Use for a little heat.
Lemon slices or wedges 1 lemon 1 lemon Use slices while baking or wedges for serving.
Fresh parsley 1–2 tbsp 4–8 g Adds freshness and color after baking.

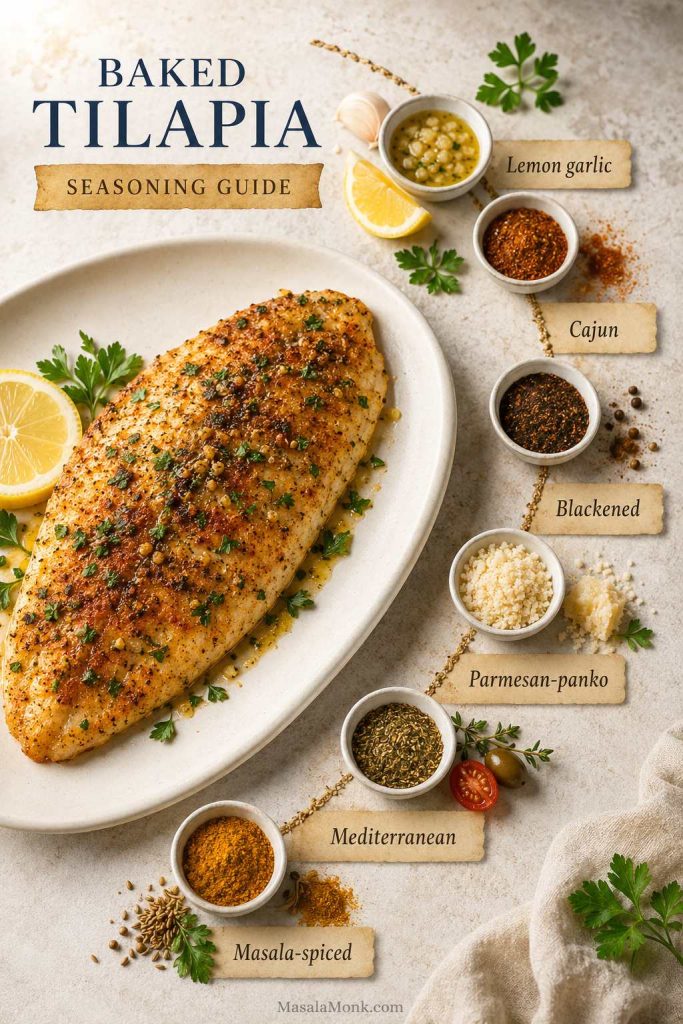
Once the basic lemon garlic version makes sense, the seasoning guide shows how to take the same baked tilapia method toward Cajun, blackened, parmesan-panko, Mediterranean, or masala-spiced flavors.

Butter or Olive Oil?

Butter gives the richest lemon garlic flavor. Olive oil makes the recipe lighter and works well for a fresher, less buttery dinner. You can also use half butter and half olive oil for a balanced version that still tastes rounded.

Easy swap: Replace the 4 tablespoons butter with 2 tablespoons butter plus 1 tablespoon olive oil, or use 1½–2 tablespoons olive oil for a lighter version.

Equipment for Oven Baked Tilapia

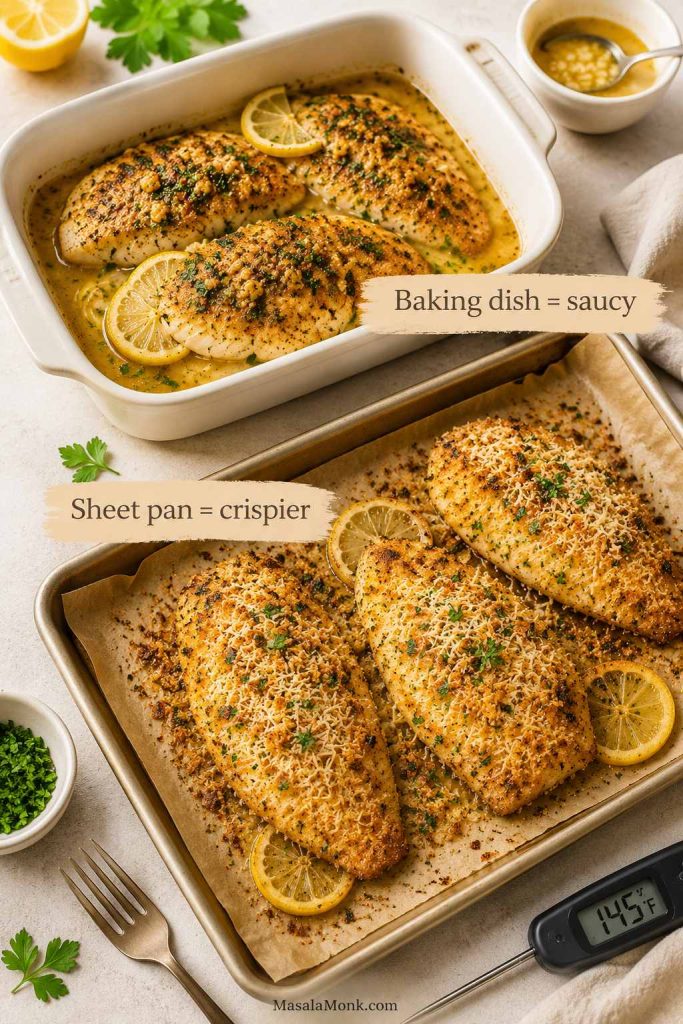
Although this baked tilapia recipe does not need special equipment, the pan you choose changes the texture. A baking dish keeps the fish saucy and moist, while a sheet pan is better when you want crisp edges or a breadcrumb topping.

Baking dish and sheet pan options for oven baked tilapia, showing saucy fish in a dish and crispier fish on a pan.
The pan changes the result before the fish even goes into the oven. A baking dish holds lemon garlic sauce close to the tilapia, while a sheet pan helps parmesan or panko toppings stay crisp.
  • 9×13-inch baking dish: best for saucy lemon garlic baked tilapia because it holds the butter and lemon around the fillets.
  • Rimmed sheet pan: better for parmesan, panko, or crispier baked tilapia.
  • Parchment paper or foil: useful for cleanup, especially when using a sheet pan.
  • Paper towels: important for drying thawed fillets before seasoning.
  • Small bowl: for mixing the lemon garlic butter.
  • Instant-read thermometer: the most reliable way to check for 145°F / 63°C.

If you are using a sheet pan because you want crunch, the crispy parmesan baked tilapia variation is the better path than trying to brown plain tilapia deeply.

Best Seasoning for Tilapia

Tilapia takes seasoning well, so you do not have to stay locked into lemon garlic. The fish has a gentle flavor, which means it can go bright and buttery, spicy, herby, crispy, or lightly masala-spiced without much effort.

For the main recipe, lemon, garlic, paprika, pepper, herbs, and parsley are the easiest starting point. They keep the fish bright, clean, and flexible enough for rice, vegetables, tacos, or bowls.

Seasoning ideas for tilapia with lemon garlic, Cajun, blackened, parmesan-panko, Mediterranean, and masala-spiced options.
This baked tilapia seasoning guide gives you more than one dinner path. Keep it lemon garlic, make it Cajun or blackened, add parmesan-panko crunch, or use light masala spices for a warmer plate.
Flavor direction Use this seasoning Best with
Lemon garlic Lemon juice, lemon zest, garlic, paprika, parsley, black pepper Rice, potatoes, salad, roasted vegetables
Lemon pepper Lemon pepper seasoning, extra lemon, butter or olive oil Green beans, asparagus, couscous
Cajun or Old Bay-style Cajun seasoning or Old Bay-style seasoning, lemon, butter, parsley Slaw, corn, potatoes, tacos
Blackened Paprika, garlic powder, onion powder, thyme, oregano, cayenne Rice bowls, tacos, creamy sauce
Parmesan-panko Parmesan, panko, garlic powder, paprika, parsley, melted butter Sheet-pan dinners, kids’ plates, crispy fish nights
Mediterranean Olive oil, lemon, garlic, oregano, parsley, za’atar-style seasoning Tomatoes, zucchini, cucumber salad, couscous
Masala-spiced Paprika, cumin, turmeric, black pepper, lemon, light garam masala Rice, kachumber-style salad, yogurt sauce

If you are baking the fish for fish tacos, season it a little more boldly with paprika, cumin, garlic, lime, and black pepper. This gentle white fish needs enough flavor to stand up to slaw, sauce, and fresh toppings.

A little more flavor is usually the answer. If baked tilapia tastes flat, it usually needs one of four things: a pinch of salt, a squeeze of lemon, a little more garlic, or fresh herbs after baking.

How to Bake Tilapia

This is a short baked tilapia recipe, so the small steps carry a lot of weight. Dry fillets, even seasoning, a single layer, and an early check are what keep the fish tender instead of watery or dry.

If your fish usually turns dry, watery, or bland, check the troubleshooting section before you bake; most problems come from wet fillets, crowding, or waiting too long for browning.

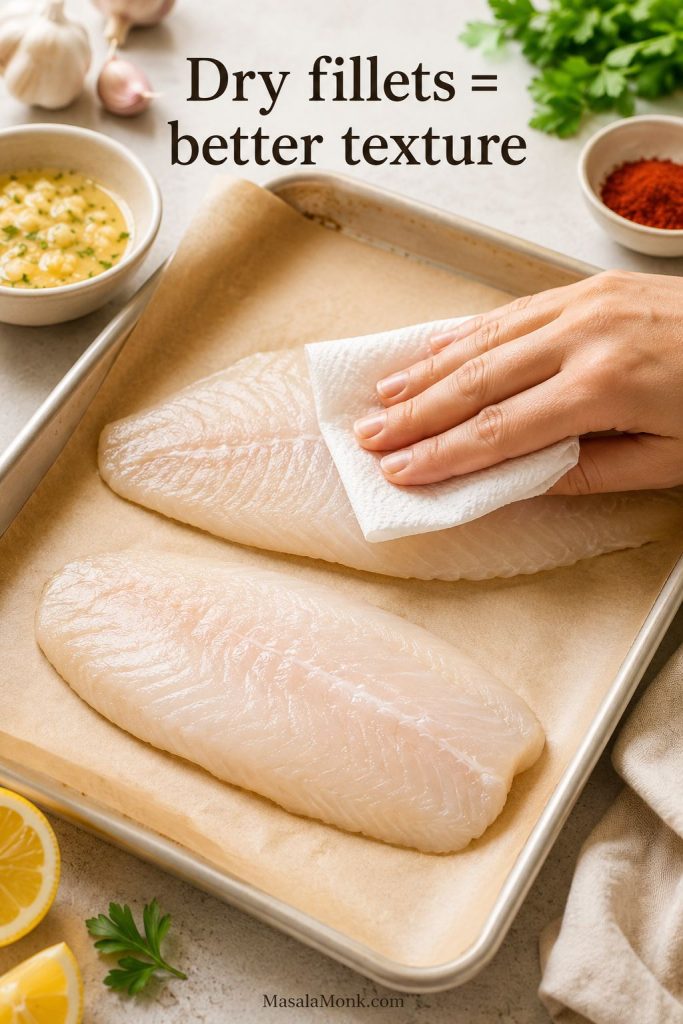
Pat Dry the Tilapia Before Baking

This is the quiet prep step that prevents watery sauce and helps the seasoning stay where you put it.

Tilapia fillets being patted dry with a paper towel before seasoning and baking.
Patting the fillets dry is a small step with a big payoff. It prevents watery baked tilapia and helps the lemon garlic seasoning cling to the fish instead of sliding into the pan.

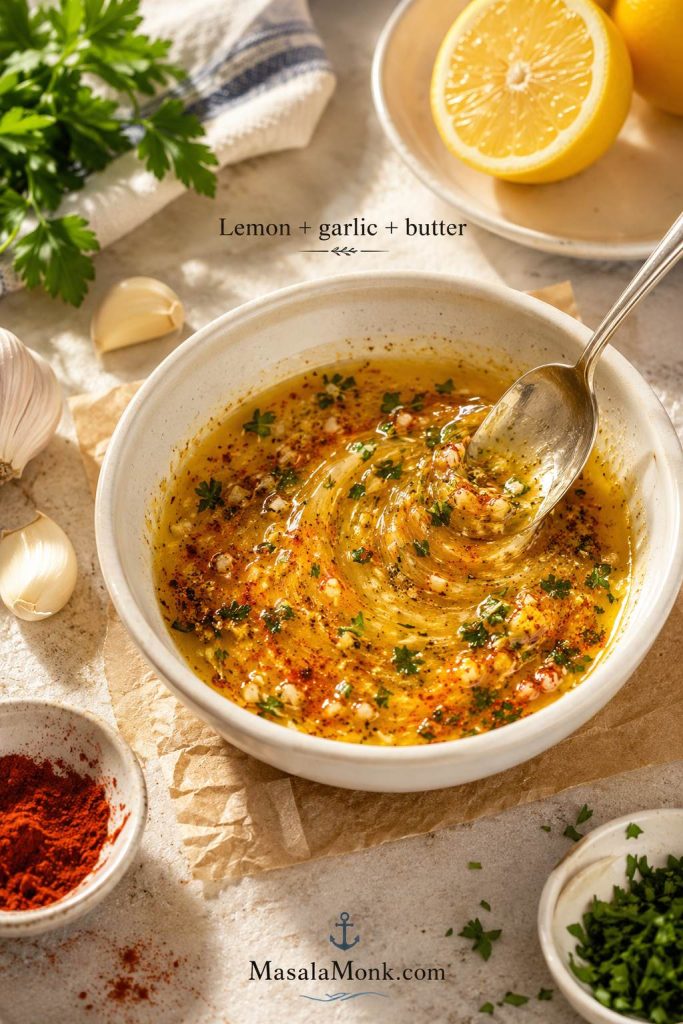
Mix the Lemon Garlic Butter Sauce

The sauce should be glossy, fragrant, and easy to spoon over the fish. Because tilapia is mild, this simple mixture carries most of the flavor.

Lemon garlic butter sauce being stirred with melted butter, lemon zest, garlic, paprika, herbs, and parsley.
This lemon garlic butter sauce does most of the flavor work. As the butter mixes with lemon, garlic, herbs, and paprika, it gives mild tilapia a brighter and more savory finish.
Before you bake: Make sure the fillets are in one layer, the surface is dry, the sauce touches every fillet, and the oven is fully preheated. Those four small things do more for texture than adding extra ingredients.
  1. Preheat the oven. Set the oven to 400°F / 200°C. Lightly grease a 9×13-inch baking dish.
  2. Dry the fish. Pat the tilapia fillets dry with paper towels. This helps the seasoning stick and reduces watery sauce.
  3. Mix the sauce. In a small bowl, stir together melted butter, lemon juice, lemon zest, garlic, salt, pepper, paprika, oregano or thyme, and optional red pepper flakes.
  4. Arrange the fillets. Place the tilapia in a single layer in the baking dish. Do not stack or overlap the fish.
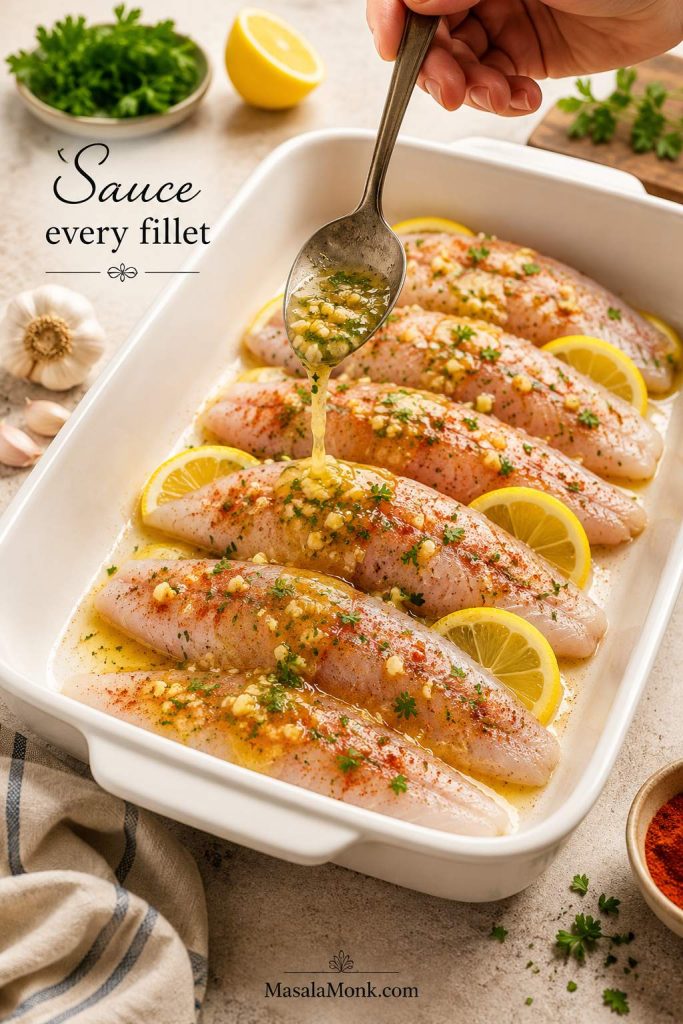
  5. Add flavor. Spoon the lemon garlic butter evenly over the fillets. Add lemon slices for a stronger lemon aroma.
  6. Bake. Bake for 10–12 minutes, or until the fish is opaque, flakes easily, and reaches 145°F / 63°C in the thickest part.
  7. Finish fresh. Sprinkle with parsley and serve with extra lemon wedges. Spoon a little pan sauce over the top as needed.

Spoon Sauce Over Every Fillet

Once the fillets are in a single layer, cover each one with the lemon garlic butter so the fish bakes evenly and tastes seasoned from edge to edge.

Lemon garlic butter being spooned over raw tilapia fillets arranged in a single layer in a white baking dish.
Even sauce coverage matters because tilapia cooks quickly. Spoon the lemon garlic butter over every fillet so each piece bakes with enough moisture, seasoning, and brightness.

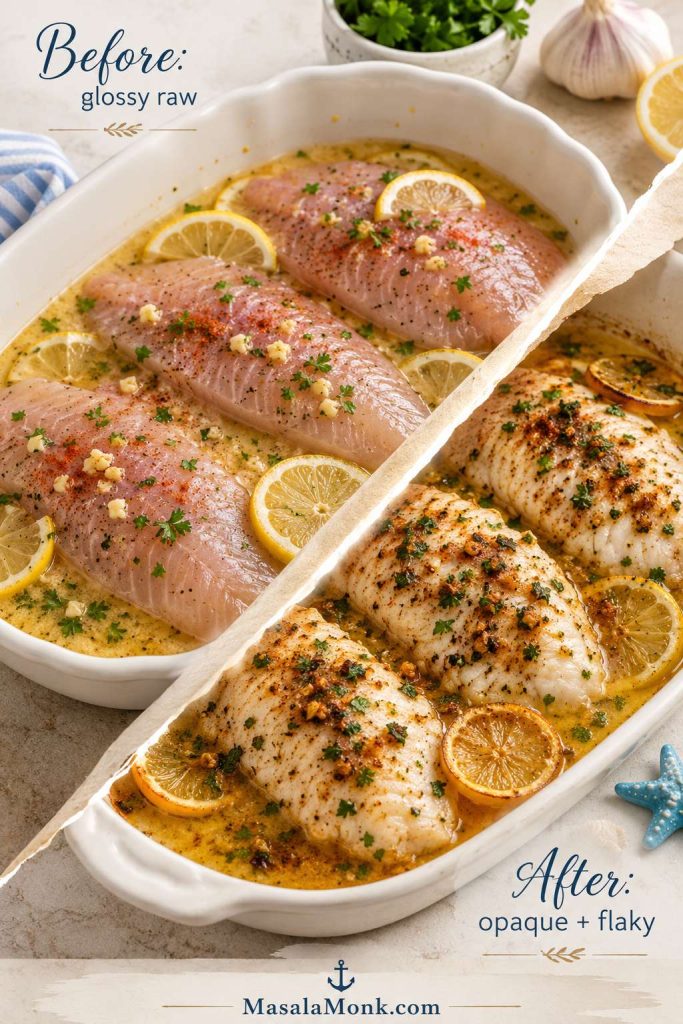
Before and After Baked Tilapia

Use the visual change as a cue, but do not expect the fish to look deeply roasted. Tilapia is done when it turns opaque and begins to flake.

Before and after baked tilapia showing raw seasoned fillets and cooked opaque fillets with lemon and herbs.
The change from raw to done is subtle: glossy fillets turn opaque and begin to flake. Since tilapia stays pale, do not wait for deep browning before you stop baking.

Do You Need to Flip Tilapia While Baking?

No. Tilapia fillets are thin and delicate, so flipping is not necessary. Arrange them in one layer, spoon the seasoning over the top, and let the oven do the work. Flipping can make the fillets break apart, especially once they are fully cooked.

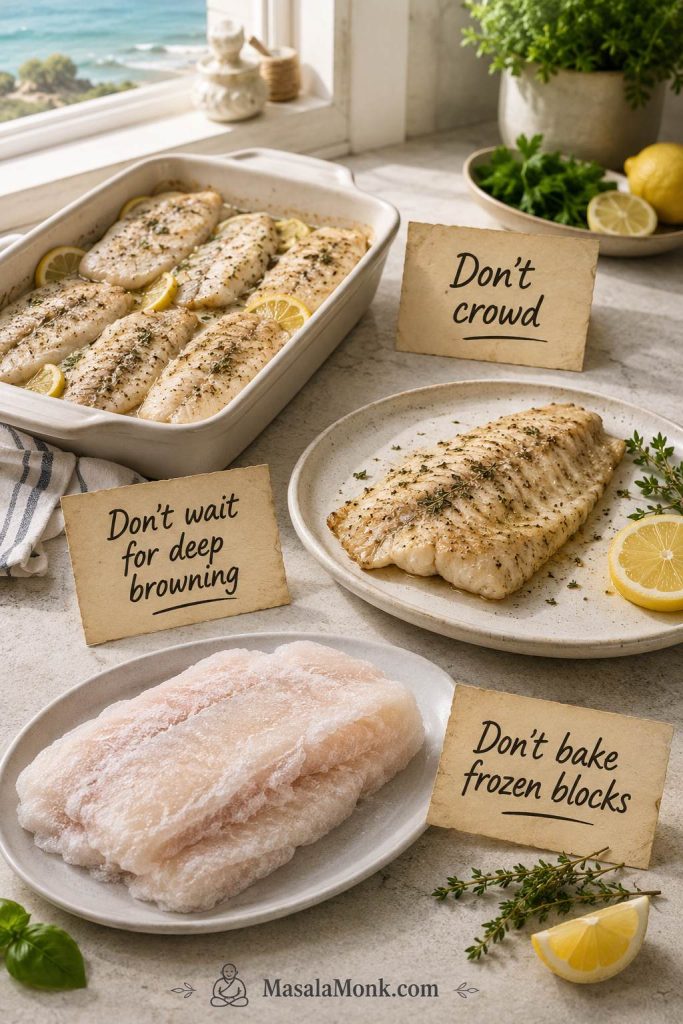
Baked Tilapia Mistakes to Avoid

What not to do: Do not wait for tilapia to turn deeply golden, do not bake frozen fillets stuck together, do not crowd the dish, and do not keep cooking once the center is opaque and flaky. Most dry tilapia comes from trying to make it look more browned than it needs to be.
Common baked tilapia mistakes showing a crowded pan, an overcooked fillet, and frozen fillets stuck together.
Most baked tilapia mistakes start before the timer ends. Give the fillets space, avoid baking frozen pieces stuck together, and stop judging doneness by browning alone.

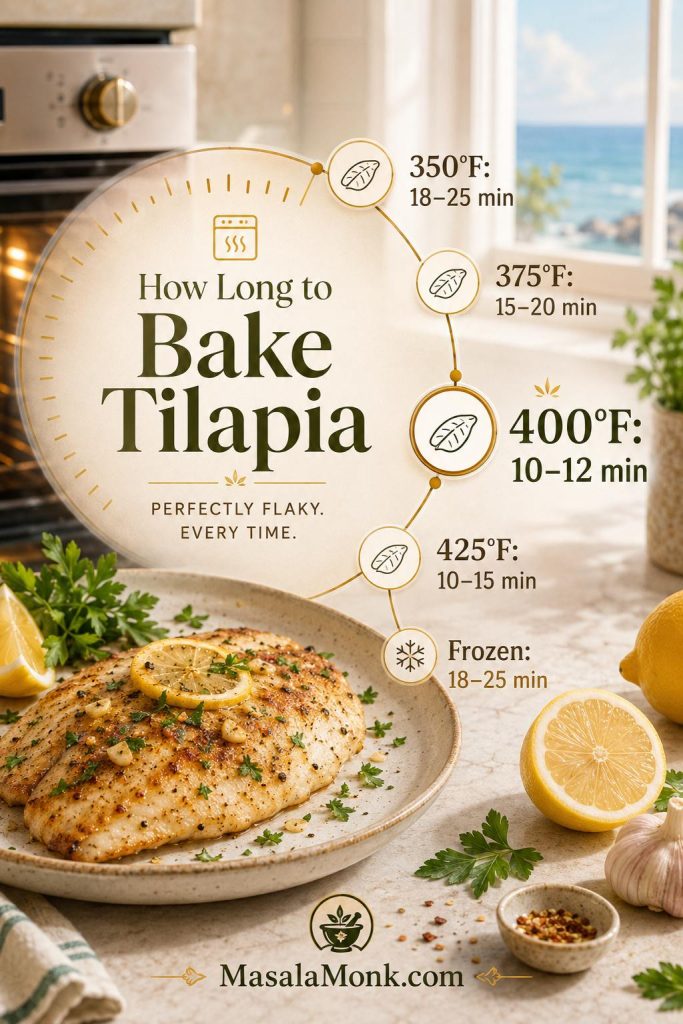
How Long to Bake Tilapia: Time and Temperature Chart

For this baked tilapia recipe, 400°F / 200°C is the easiest weeknight default. However, different oven temperatures can work depending on your fillets, your pan, and whether you want a softer baked finish or a little more color on top.

Use the chart below as a practical guide, then check the fish itself. Tilapia is ready when it is opaque, flakes easily, and reaches 145°F / 63°C. If your pieces look especially thin, thick, or uneven, use the fillet timing guide near the top of the post as a quick reference.

Oven temperature chart for baked tilapia showing times for 350°F, 375°F, 400°F, 425°F, and frozen fillets.
If you are wondering how long to bake tilapia, start with 400°F for most thawed fillets. Lower temperatures, thicker pieces, and frozen fillets need extra time and closer checking.
Oven temperature Best for Approximate time Notes
350°F / 175°C Gentle baking, foil packets, covered fish 18–25 minutes Useful for softer steamed-style methods, but not the fastest option.
375°F / 190°C Older/simple baked tilapia methods 15–20 minutes for average fillets Thicker or covered fillets may need closer to 25 minutes.
400°F / 200°C Everyday oven baked tilapia 10–12 minutes, or 12–15 for thicker fillets The most reliable balance of speed, moisture, and easy timing.
425°F / 220°C Faster browning, panko, parmesan topping 10–15 minutes Check early because thin fillets can overcook quickly.
400°F / 200°C from frozen No-thaw frozen tilapia fillets 18–25 minutes Expect extra liquid; check 145°F / 63°C in the center.

When in doubt, start checking early. Because the fillets are usually thin, one or two extra minutes can change the texture more than you expect.

Tilapia Thickness Chart at 400°F

Because tilapia fillets are not all the same size, thickness matters more than the package label. A thin fillet can finish before the timer reaches 10 minutes, while a thicker fillet may need a few extra minutes.

Fillet thickness Approximate cook time at 400°F / 200°C What to watch for
Thin fillets 9–10 minutes Check early; they can dry out fast.
Average fillets 10–12 minutes Most 5–6 oz fillets land here.
Thicker fillets 12–15 minutes Check the thickest part, not the edge.
Frozen fillets 18–25 minutes Expect more liquid and check the center carefully.

How Long to Bake Tilapia at 400°F

At 400°F / 200°C, most thawed tilapia fillets take 10–12 minutes. Very thin fillets may finish closer to 9 minutes. Thicker fillets may need 12–15 minutes. Start checking early, because tilapia can move from moist to dry quickly.

How Long to Bake Tilapia at 425°F

At 425°F / 220°C, tilapia usually takes 10–15 minutes. This hotter temperature is useful for panko, parmesan, or sheet-pan versions where you want a little more color. Watch closely if the fillets are thin.

How Long to Bake Tilapia at 375°F

At 375°F / 190°C, tilapia usually takes 15–20 minutes for average fillets, though thicker or covered fillets may need closer to 25 minutes. This lower temperature works, but the longer bake can make thin fillets drier.

How to Know When Tilapia Is Done

The most reliable way to check baked tilapia is to use both visual cues and temperature. The fish should look opaque, separate easily with a fork, and reach 145°F / 63°C in the thickest part.

According to FoodSafety.gov’s safe minimum internal temperature chart, fish such as tilapia should reach 145°F / 63°C, or be cooked until the flesh is no longer translucent and separates easily with a fork.

Baked tilapia doneness test with a fork separating flakes and a thermometer showing 145°F.
Use both doneness cues together: the fish should look opaque and separate easily, while the thickest part reaches 145°F. That way, you avoid undercooked fish and dry overbaked tilapia.
  • Opaque: the center should look white and cooked through, not glassy or translucent.
  • Flaky: the fish should separate easily with gentle pressure from a fork.
  • Moist: the fish should look tender, not dry and tight.
  • 145°F / 63°C: this is the safest final check if you have a thermometer.
Do not wait for heavy browning. Tilapia is lean and pale, so it may be fully cooked before it looks deeply golden. A short broil can add color, but only use it after the fish is almost done.

Fresh vs Frozen Tilapia

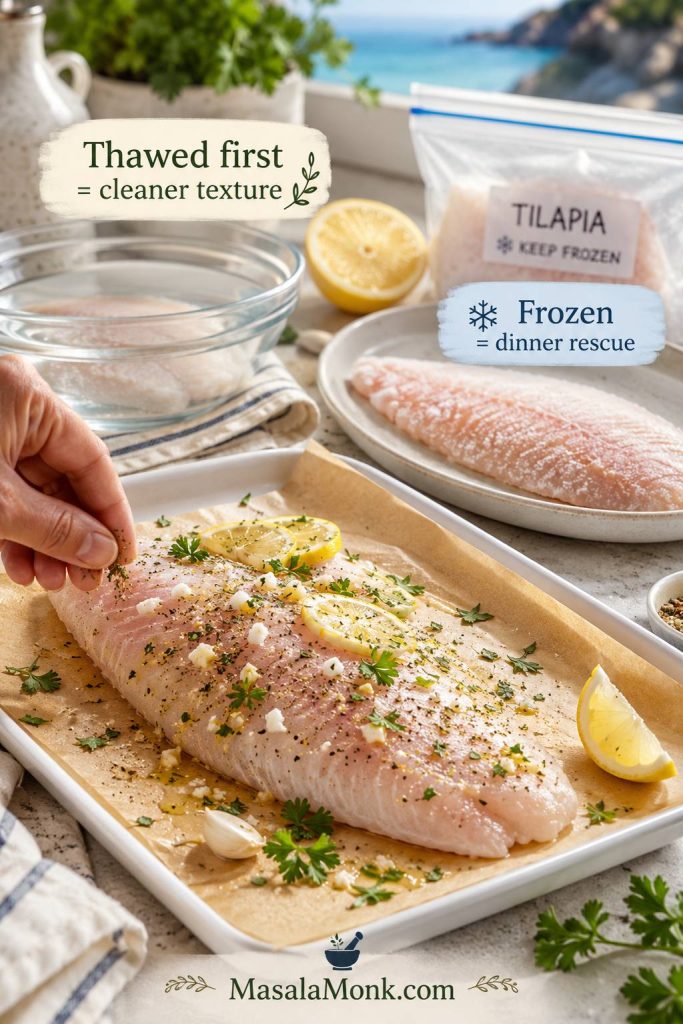
Frozen tilapia works in this baked tilapia recipe, but the cleanest texture comes from thawing it first. Once thawed, the fillets are easier to dry, season, and bake evenly. They also release less liquid into the baking dish. For the cleanest texture, use the thawing method below, then pat the fillets dry before seasoning.

Fresh or thawed tilapia fillet being seasoned with a frozen fillet and cold-water thawing setup in the background.
Thawed tilapia gives the cleanest texture because it is easier to dry and season. Even so, frozen tilapia can still rescue dinner when you allow extra time and expect more liquid in the pan.

When it is 6 p.m. and the fish is still frozen, you still have a path. Frozen tilapia can go straight into the oven, although the texture will be cleaner if you thaw it first. The pan may collect more liquid, but you can still get a workable dinner when you forgot to thaw anything.

Method Best use Cook time Texture notes
Thawed first Most reliable everyday baked tilapia 10–12 minutes at 400°F / 200°C Cleaner texture, less liquid, better seasoning contact.
Baked from frozen Emergency no-thaw dinner 18–25 minutes at 400°F / 200°C More liquid in the pan; check the center carefully.

How to Thaw Frozen Tilapia

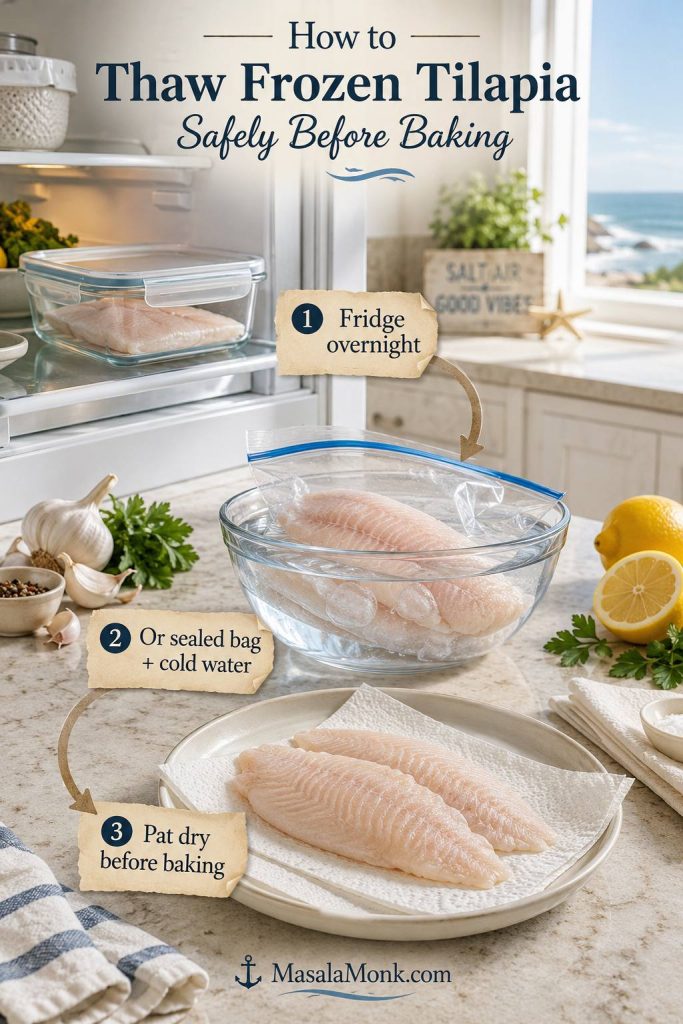
The FDA seafood safety guidance recommends thawing frozen seafood gradually in the refrigerator overnight when possible. For a quicker method, keep the fish sealed in a bag and place it in cold water until flexible, then pat it very dry before seasoning. Do not bake fillets that are stuck together in a frozen block, because the outside can overcook before the center is done.

Frozen tilapia thawing setup with a refrigerator container, a sealed bag in cold water, and paper towels for drying.
Thaw frozen tilapia gently when you can, then pat it dry before baking. Refrigerator thawing is easiest overnight, while sealed cold-water thawing helps when dinner is getting close.

How to Bake Frozen Tilapia

For the best result, thaw frozen tilapia first. To bake from frozen, place the frozen fillets in a greased baking dish, season them well, and bake at 400°F / 200°C for about 18–25 minutes, or until the center reaches 145°F / 63°C.

When the frozen fillets release a lot of liquid, carefully spoon off some of the excess before serving. Then add a little fresh lemon juice, parsley, or a small spoon of melted butter at the end to bring the flavor back.

Watery pan fix: If thawed frozen tilapia releases a lot of liquid, pat the fillets drier next time. For the current batch, spoon off excess liquid before finishing with lemon, parsley, or a little extra butter.

Should You Bake Tilapia Covered or Uncovered?

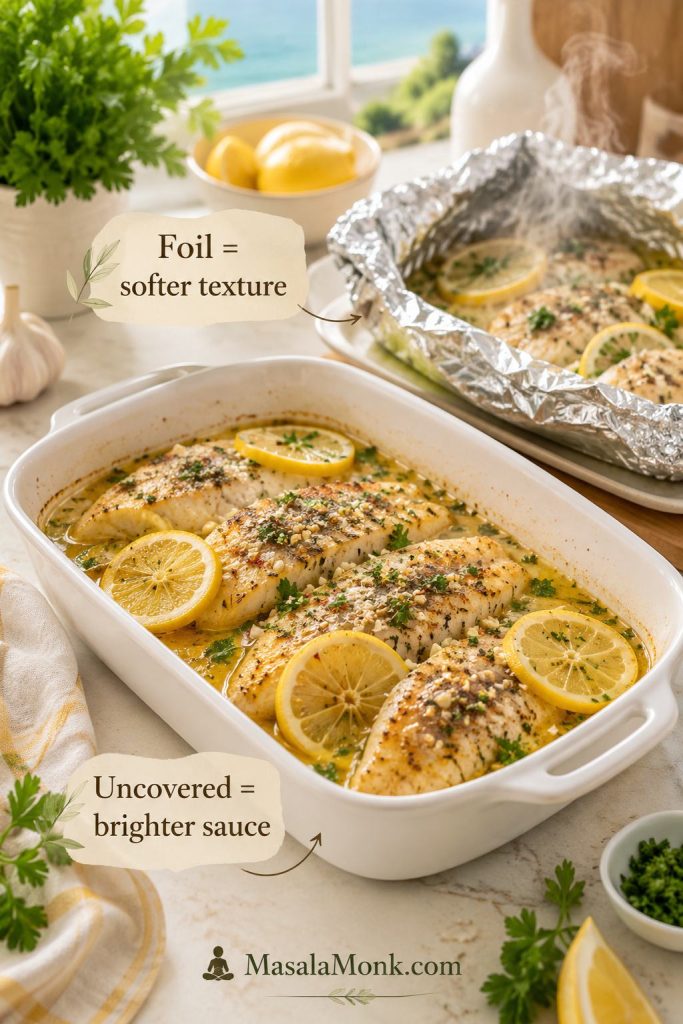
For this baked tilapia recipe, bake the fish uncovered. As a result, the top stays less steamy and the lemon garlic butter tastes brighter instead of diluted.

Covered baking or foil packets are useful when you want an extra-soft, steamed texture, especially with vegetables. However, the fish will not brown, and any sauce inside the packet may taste lighter because the moisture stays trapped.

Covered and uncovered baked tilapia comparison showing an uncovered saucy baking dish and a foil packet with steam.
Bake this lemon garlic version uncovered when you want a brighter sauce and a cleaner baked finish. Foil packets are useful too, although they create a softer, more steamed texture.
Method Texture Best for
Uncovered baking Cleaner baked finish, less steamed, better flavor concentration Lemon garlic butter tilapia, parmesan tilapia, weeknight fillets
Covered baking Softer and more steamed Very delicate fillets or recipes with more liquid
Foil packets Moist, soft, no browning Vegetables, easy cleanup, individual portions

Baked Tilapia Variations

Once you know the basic time and temperature, baked tilapia becomes easy to bend toward whatever dinner needs to be: bright and lemony, spicy for tacos, crisp on top, lighter with vegetables, or warmer with masala-style spices. Keep the same core method, then change the seasoning, topping, or sides around it.

After choosing a flavor direction, use the serving ideas section to turn the fish into a full dinner with rice, vegetables, tacos, salad, potatoes, or bowls.

Not sure which version to make? Choose lemon garlic for the easiest dinner, lemon pepper for the brightest flavor, parmesan-panko for crunch, spicy tilapia for tacos, and masala-spiced tilapia when you want something warmer with rice.

Lemon Pepper Baked Tilapia

Use lemon pepper seasoning in place of the paprika and oregano. Then add extra lemon zest to the butter or olive oil and finish the baked fish with fresh lemon juice. This is one of the easiest variations because it keeps the flavor bright and simple.

Garlic Butter Baked Tilapia

For a stronger garlic butter tilapia, increase the garlic to 4 cloves and spoon a little extra melted butter over the fish right after baking. This version is especially good with rice, mashed potatoes, roasted vegetables, or crusty bread to catch the sauce.

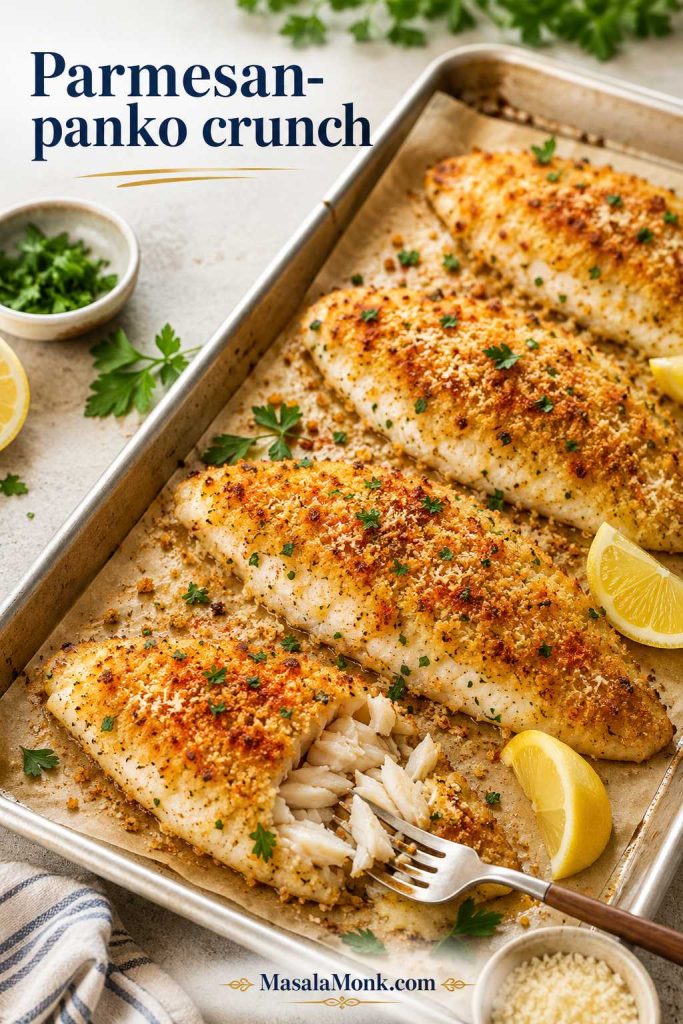
Crispy Parmesan Baked Tilapia

For a crispier baked tilapia, use a sheet pan instead of a baking dish and add a parmesan-panko topping. This gives the delicate fish more texture without needing to fry it.

For 4 fillets, mix ¼ cup panko, 2–3 tablespoons grated parmesan, 1 tablespoon melted butter or olive oil, ½ teaspoon paprika, ½ teaspoon garlic powder, parsley, and black pepper. Spoon the topping over the fillets and bake at 400°F / 200°C for 12–15 minutes. Broil for 30–60 seconds at the end for more color.

Crispy parmesan baked tilapia on a sheet pan with golden panko topping, parsley, lemon, and a fork-flaked fillet.
Crispy baked tilapia works best when the crunch comes from the topping, not from overbaking the fish. Use a sheet pan and parmesan-panko crumbs to protect the moist flakes underneath.

If you broil at the end, watch closely. Broiling is for color, not for finishing undercooked fish. For a true fried-fish texture instead of a baked topping, use a separate fish batter recipe. The parmesan-panko version gives you crunch on top, while batter is the better route when you want a full crispy coating.

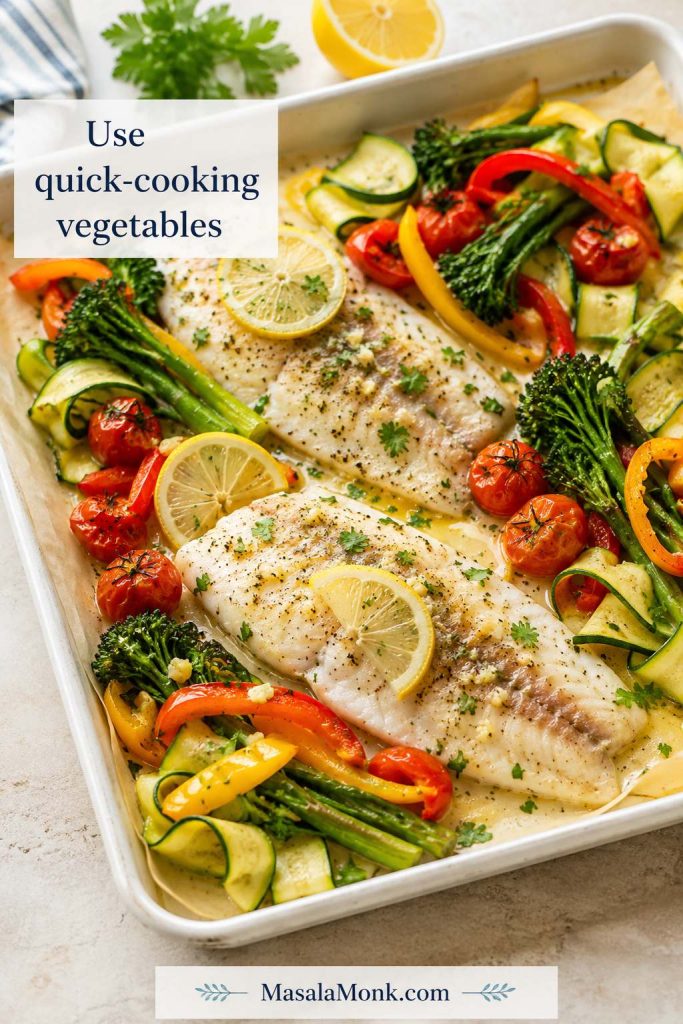
Tilapia with Quick-Cooking Vegetables

For a vegetable version, use cherry tomatoes, zucchini, thin bell pepper strips, asparagus, broccolini, or thin onion slices. Toss the vegetables with olive oil, salt, pepper, and a little garlic before arranging them around the fish.

Baked tilapia with quick-cooking vegetables including cherry tomatoes, zucchini, broccolini, bell peppers, lemon, and parsley.
Quick-cooking vegetables belong beside tilapia because the fish finishes fast. Choose tomatoes, zucchini, asparagus, broccolini, or thin peppers instead of dense vegetables that need a longer roast.

Avoid thick potatoes, large carrot pieces, or dense vegetables unless they are par-cooked first. Tilapia cooks much faster than those vegetables, so the fish can dry out while you wait for the vegetables to soften.

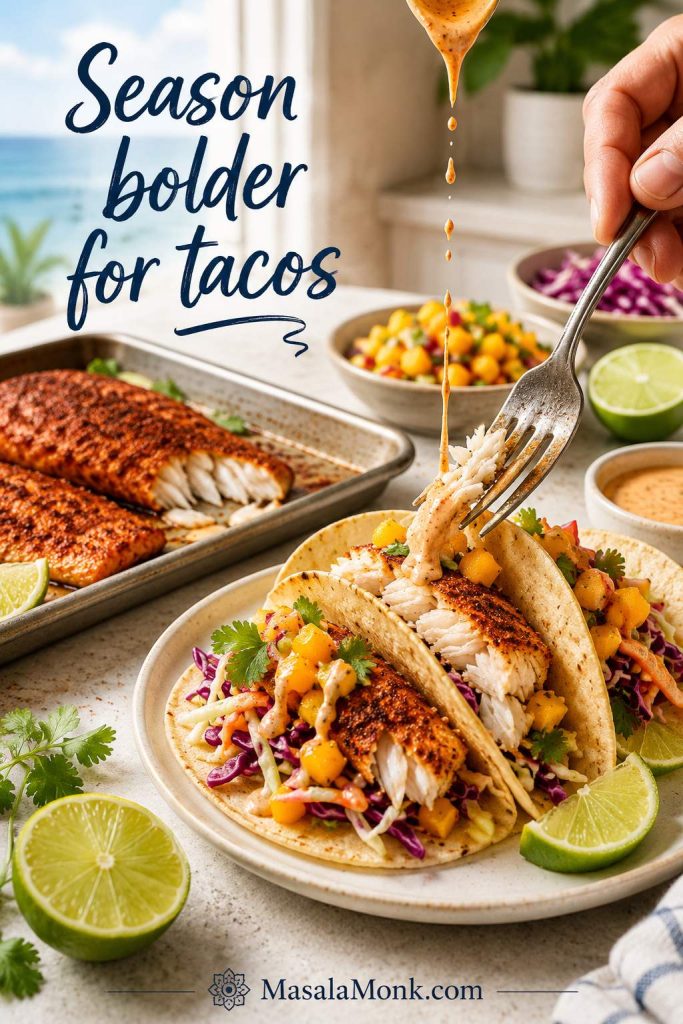
Spicy Baked Tilapia

For a spicy baked tilapia, add cayenne, chili powder, smoked paprika, Cajun-style seasoning, or crushed red pepper to the lemon garlic butter. Finish with lime instead of lemon for a sharper, brighter flavor. For a sweet-hot finish on tacos or rice bowls, drizzle a little mango habanero sauce over the fish after baking rather than before.

Spicy baked tilapia being flaked into tacos with slaw, lime, mango salsa, cilantro, and creamy sauce.
When baked tilapia is headed for tacos, season it more boldly than you would for a plain dinner plate. The extra spice helps the fish stand up to slaw, salsa, lime, and sauce.

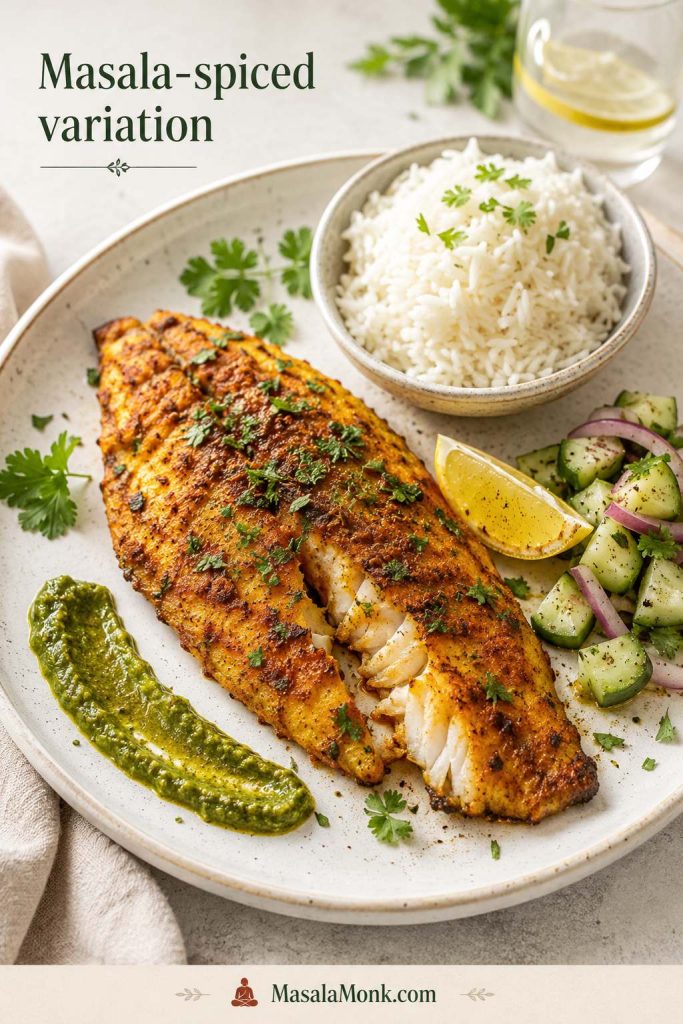
Masala-Spiced Baked Tilapia

For a masala-spiced variation, season the fish with paprika, cumin, turmeric, black pepper, lemon juice, and a light pinch of garam masala. Keep the spice blend balanced so the tilapia still tastes fresh and delicate, not heavy. Serve it with rice, cucumber salad, or a spoonful of green chutney for a brighter herb finish.

Masala-spiced baked tilapia served with rice, cucumber salad, lemon, herbs, and green chutney.
A light masala-spiced baked tilapia keeps the fish fresh while adding warmth from cumin, turmeric, paprika, and pepper. Rice, cucumber salad, and green chutney turn it into a complete meal.

What to Serve with Baked Tilapia

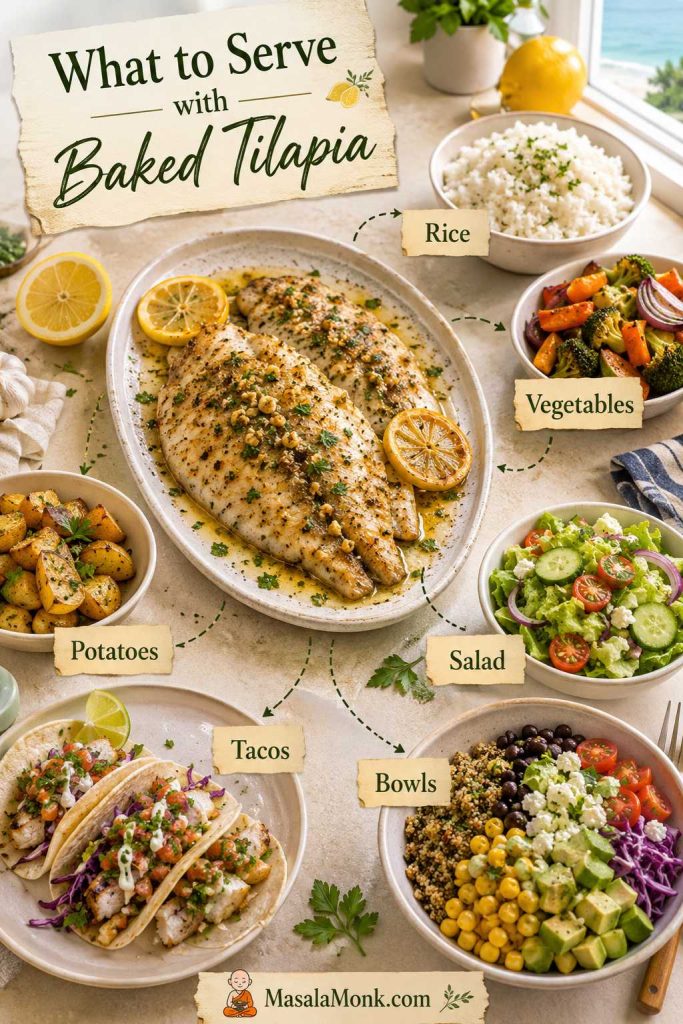
Baked tilapia is mild enough to go with many sides. For a fast dinner, pair it with rice, roasted vegetables, salad, potatoes, or a simple grain bowl. Meanwhile, something crisp and cool next to the warm fish — like a vinegar-dill cucumber salad — keeps the plate fresh.

Serving ideas for baked tilapia with rice, roasted vegetables, salad, potatoes, tacos, and a grain bowl around the fish.
Baked tilapia is mild enough to become several dinners from one method. Serve it with rice and vegetables tonight, then use the same flaky fish for tacos, bowls, salad, or potatoes.
  • Rice or pilaf: good with lemon garlic butter from the baking dish. For fluffy plain rice as the base, this how to cook rice guide helps with stovetop, cooker, and Instant Pot timing.
  • Roasted vegetables: asparagus, zucchini, broccoli, carrots, or bell peppers.
  • Potatoes: mashed potatoes, roasted potatoes, baby potatoes, or a simple potato mash.
  • Salad: cucumber salad, green salad, tomato salad, slaw, or a lemony bean salad when you want the meal to feel more filling.
  • Tacos: flake the baked tilapia into tortillas with slaw and sauce.
  • Grain bowls: couscous, quinoa, rice, vegetables, lemon yogurt sauce, or plenty of fresh herbs.
  • Pasta: keep it light with olive oil, lemon, parsley, garlic, and vegetables.

Leftovers can also become a different meal. The fish works beautifully in tacos with slaw, lime, salsa, and a creamy sauce. A spoonful of mango salsa is especially good when the fillets are seasoned with lime, cumin, paprika, or chili powder.

Troubleshooting Baked Tilapia

If your baked tilapia did not come out the way you hoped, you are not alone. This fish cooks quickly, and small things — a wet fillet, a few extra minutes, not enough lemon or salt — can change the whole plate. The fixes below help you rescue the current batch and make the next one easier.

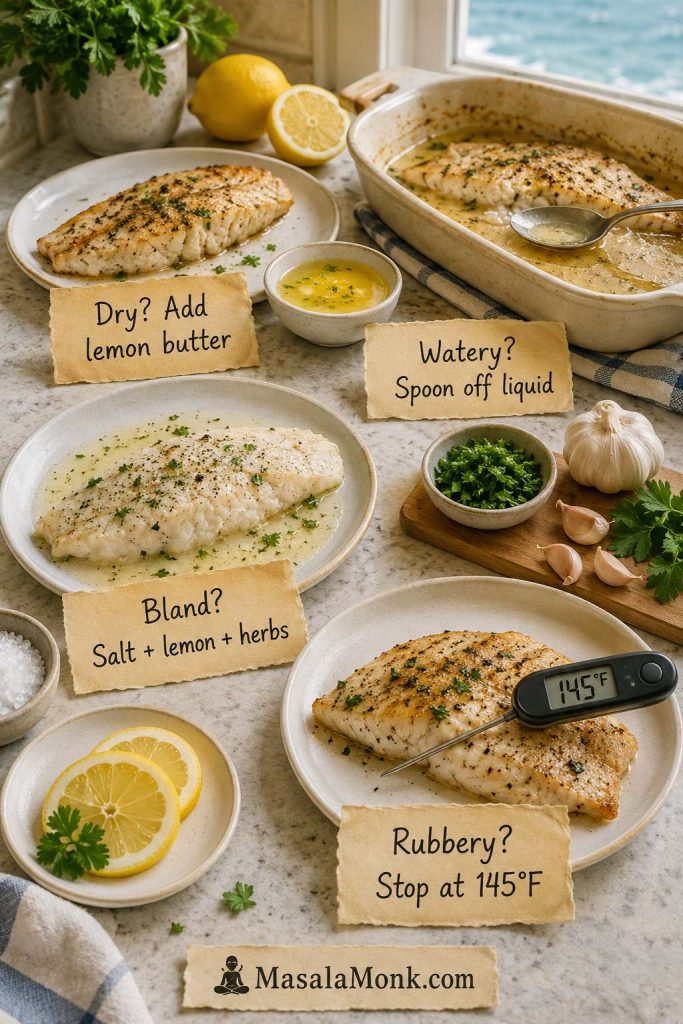
Troubleshooting guide for baked tilapia with dry, watery, bland, and rubbery fish fixes, including lemon butter and a 145°F thermometer.
Dry, watery, bland, or rubbery tilapia usually has a simple fix. Add lemon butter for dryness, spoon off excess liquid, brighten bland fish with salt and herbs, and stop cooking once it reaches 145°F.
Problem Why it happened How to fix it
Dry tilapia Overbaked, fillets were thin, or not enough fat/sauce Check earlier next time, use 400°F / 200°C, and add butter or olive oil before baking.
Watery baking dish Frozen fish was not fully thawed or dried Pat fillets very dry. Spoon off excess liquid before serving.
Bland fish Not enough salt, acid, garlic, or seasoning Add lemon juice, parsley, pepper, and a pinch of salt after baking.
Fishy smell Older fish, poor thawing, or too little lemon/seasoning Use fresh-smelling fillets, thaw properly, pat dry, and season boldly.
Rubbery texture Overcooked Use an instant-read thermometer and stop at 145°F / 63°C.
Sticking Pan was not greased or fish was too wet Grease the dish, use parchment on sheet pans, and dry the fish first.
No browning Tilapia is lean and cooks quickly Use a parmesan-panko topping or broil briefly at the end.

How to Fix Dry Baked Tilapia After Cooking

If the tilapia is already dry, do not put it back in the oven. Spoon a little melted butter, olive oil, lemon juice, or warm pan sauce over the top. Fresh parsley, black pepper, and a small pinch of salt can also help revive the flavor.

How to Fix Bland Baked Tilapia

Bland tilapia usually needs acid and salt. Add a squeeze of lemon, a pinch of salt, fresh herbs, and a little black pepper right before serving. If you are using the fish for tacos, add a stronger sauce, slaw, or salsa to bring the whole dish together.

Once the fixes make sense, use the recipe card for the simple bake time, ingredients, and method.

How to Store and Reheat Baked Tilapia

Although baked tilapia is best right after it comes out of the oven, leftovers can still work if you reheat them gently. The main goal is to warm the fish without cooking it all over again.

  • Fridge: Store leftover baked tilapia in an airtight container for up to 3 days.
  • Reheat gently: Warm in a low oven, covered skillet, or microwave at reduced power until just heated through.
  • Add moisture: A small spoon of butter, olive oil, lemon sauce, or broth helps prevent dryness.
  • Avoid repeated reheating: Tilapia is lean, so reheating it more than once can make it rubbery.
  • Use leftovers creatively: Flake into tacos, rice bowls, salads, wraps, or quick fish sandwiches.

Baked Tilapia Recipe Card

Baked Tilapia Recipe

This easy baked tilapia recipe uses lemon, garlic, butter, paprika, and a 400°F oven for flaky fish in about 20 minutes. It is simple enough for a weeknight dinner, but seasoned well enough to avoid bland, dry fish.

Prep Time8 minutes
Cook Time10–12 minutes
Total TimeAbout 20 minutes
Servings4

Ingredients

  • 4 tilapia fillets, 5–6 oz each / 560–680 g total
  • 4 tbsp / 56 g unsalted butter, melted
  • 1½ tbsp / 22 ml fresh lemon juice
  • 1 tsp lemon zest
  • 3 garlic cloves, minced
  • ¾ tsp fine salt, or to taste
  • ¼ tsp black pepper
  • ½ tsp paprika
  • ½ tsp dried oregano or thyme
  • ⅛–¼ tsp red pepper flakes, optional
  • 1 lemon, sliced or cut into wedges
  • 1–2 tbsp chopped fresh parsley

Instructions

  1. Preheat the oven to 400°F / 200°C. Lightly grease a 9×13-inch baking dish.
  2. Pat the tilapia fillets dry with paper towels and arrange them in a single layer in the baking dish.
  3. In a small bowl, mix melted butter, lemon juice, lemon zest, garlic, salt, pepper, paprika, oregano or thyme, and optional red pepper flakes.
  4. Spoon the lemon garlic butter evenly over the tilapia. Add lemon slices if using.
  5. Bake for 10–12 minutes, or until the fish is opaque, flakes easily, and reaches 145°F / 63°C in the thickest part.
  6. Sprinkle with parsley and serve with extra lemon wedges.

Notes

  • This baked tilapia recipe is written for thawed 5–6 oz fillets; adjust timing for very thin, thick, or frozen fillets.
  • Cook time depends on thickness. Thin fillets may finish in 9–10 minutes, average fillets in 10–12 minutes, and thicker fillets in 12–15 minutes.
  • The fish should look opaque and separate easily with a fork. Do not wait for deep browning.
  • If you do not have a thermometer, use the opaque-and-flaky test, but a thermometer is the most reliable check.
  • If there is a lot of liquid in the dish, spoon off the excess before serving and finish with lemon, parsley, or a little melted butter.
  • For frozen fillets, thaw first for best texture. To bake from frozen, cook at 400°F / 200°C for about 18–25 minutes and check the center carefully.
  • For a lighter version, replace some or all of the butter with olive oil.
  • For crispy parmesan tilapia, use the panko-parmesan topping in the variations section.
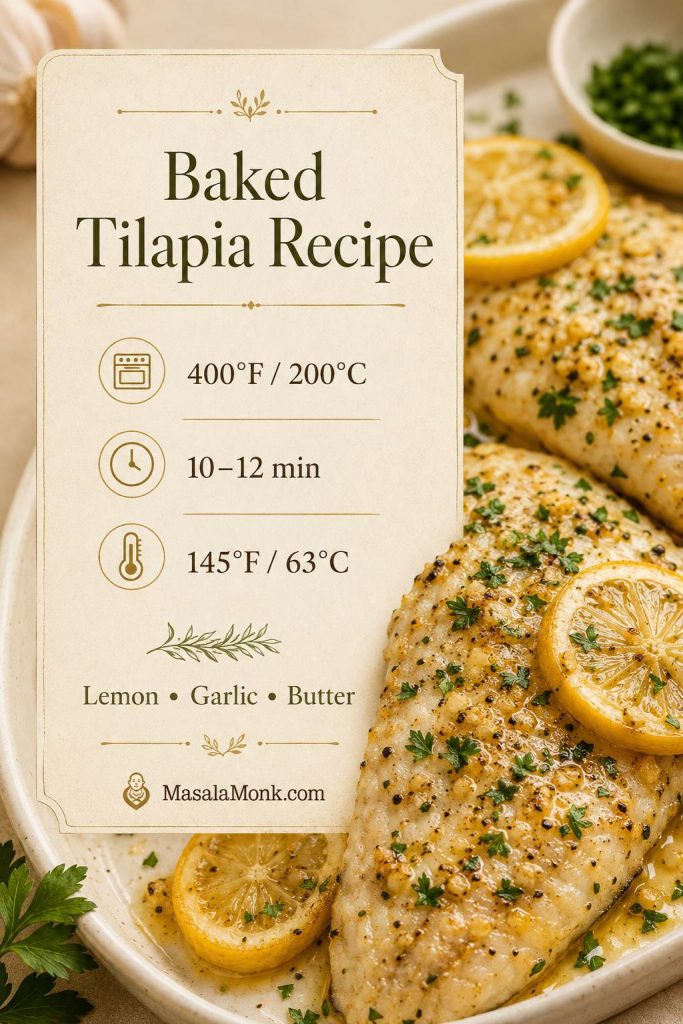
Saveable baked tilapia recipe card showing 400°F, 10 to 12 minutes, 145°F, and lemon garlic butter cues beside cooked fish.
Save this baked tilapia recipe card for the core method: lemon, garlic, butter, 400°F, 10–12 minutes, and 145°F. Once those cues are familiar, the recipe becomes easy to repeat.

FAQs About Baked Tilapia

What makes this baked tilapia recipe easy?

This baked tilapia recipe is easy because the fish cooks quickly, the seasoning is simple, and you do not need to flip, fry, marinate, or guess. Most thawed fillets need only 10–12 minutes at 400°F / 200°C.

What temperature is best for baking tilapia?

400°F / 200°C is the most reliable everyday temperature for baked tilapia because it cooks the fillets quickly without drying them out as easily as a hotter oven can. It is also easy to adjust: thin fillets may need only 9–10 minutes, while thicker fillets may need 12–15 minutes.

How long does tilapia take in the oven?

Most thawed tilapia fillets take 10–12 minutes at 400°F / 200°C. The exact time depends on thickness, so check for opaque flesh, easy flaking, and an internal temperature of 145°F / 63°C.

Can you bake frozen tilapia?

You can bake frozen tilapia, but thawing first gives better texture and less liquid in the pan. When baking from frozen, use 400°F / 200°C and start checking around 18 minutes. Thicker frozen fillets may need closer to 25 minutes.

Is baked tilapia healthy?

Baked tilapia can be a light, high-protein dinner, especially when you use olive oil or a smaller amount of butter and serve it with vegetables, rice, salad, or potatoes. The main thing is to season it well so it tastes bright and satisfying without needing a heavy sauce.

Should tilapia be covered while baking?

Uncovered baking works best for this lemon garlic version because it keeps the top from getting too steamy and lets the sauce taste brighter. Foil packets are still useful when you want a softer, more steamed texture or easier cleanup.

What seasoning goes well with tilapia?

Lemon, garlic, paprika, black pepper, parsley, Cajun seasoning, lemon pepper, parmesan, chili powder, cumin, oregano, and thyme all work well because tilapia is gentle and takes on flavor easily.

Why is my baked tilapia watery?

Baked tilapia usually turns watery when frozen fillets are not fully thawed or dried before cooking. Pat the fish very dry before seasoning, and spoon off excess liquid if needed after baking.

How do you keep tilapia from drying out?

Use enough butter or olive oil, avoid overbaking, and check doneness early. Tilapia is lean and thin, so a few extra minutes can change it from flaky to dry.

Is baked tilapia good for tacos?

It works especially well for tacos because baked tilapia flakes easily and has a mild flavor that welcomes slaw, lime, salsa, and creamy sauce. Season it slightly bolder than you would for a plain dinner plate so the fish does not disappear under the toppings.

Can I use this recipe with another white fish?

This same lemon garlic method works with other mild white fish fillets, including cod, haddock, basa, swai, and pollock. Just adjust the cook time for thickness and check the thickest part for opaque flesh, easy flaking, and 145°F / 63°C.

The goal of this baked tilapia recipe is not just cooked fish. It is tilapia that tastes bright, juicy, and easy enough to make again on a busy night. Once you know the timing, the doneness cues, and how to fix watery or bland fish, this becomes one of those simple oven dinners you can trust when you need something fast, light, and actually satisfying.

Back to top