There’s a reason pancakes are so deeply comforting. They’re warm, they’re familiar, and they’re endlessly customizable. Yet when you swap regular flour for almond flour (or almond meal) to make pancakes, the first attempt can feel like the rules changed overnight. The batter looks thicker. The surface browns faster. The flip feels delicate. And instead of an easy breakfast, you’re suddenly negotiating with your pan.
Even so, almond-based pancakes are incredibly forgiving once you learn their rhythm. They’re naturally gluten-free, they’re filling in a way that many traditional stacks aren’t, and they can suit everything from low-carb mornings to protein-heavy meal prep. Best of all, they can taste like a real treat instead of “diet food,” as long as you cook them with gentle heat and a little patience.
This guide is designed to make that process feel simple. You’ll start with a dependable base recipe, then branch into variations that still feel natural in a home kitchen: almond meal pancakes, fluffy almond flour pancakes, 3 ingredient almond flour pancakes, 2 ingredient almond flour pancakes, protein almond flour pancakes, almond flour cottage cheese pancakes, vegan almond flour pancakes, low carb pancakes with almond flour, and seasonal versions like almond flour and banana pancakes, almond flour blueberry pancakes, and almond flour pumpkin pancakes. You’ll also get a practical section for almond flour pancake mix and pancake-and-waffle mix style batters—because sometimes convenience is the whole point.
Now, let’s get into the batter.
Almond Flour vs Almond Meal for Pancakes
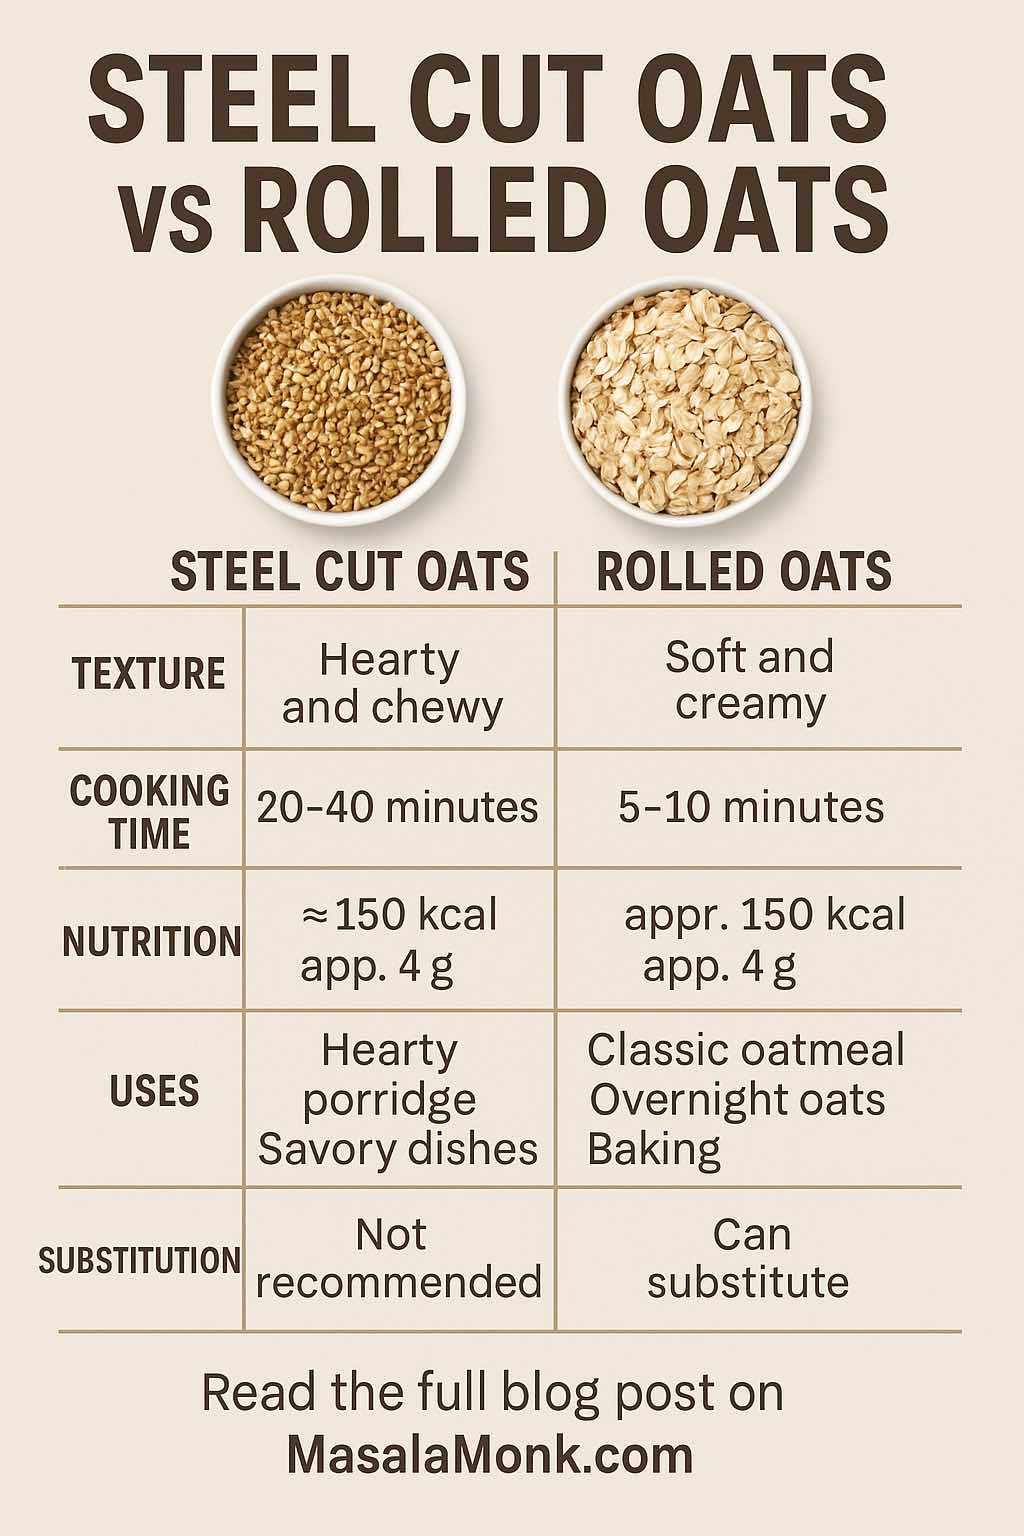
Almond flour and almond meal both come from ground almonds, but they aren’t identical. That difference matters most in texture and hydration.
Almond flour is usually finely ground, often from blanched almonds. As a result, pancakes made with almond flour tend to be smoother, lighter on the tongue, and more “cake-like” in the center.
Almond meal is often coarser and may include the skins. That coarser texture can create a heartier pancake—more rustic, more “flapjack,” with a slightly deeper nutty taste. Almond meal pancakes are still tender, but they can feel sturdier and more substantial. If you’ve ever heard people call them almond flour flapjacks, this is usually what they mean: a thicker, cozier pancake made with nut flour that eats more like a tender breakfast cake than a diner-style wheat pancake.
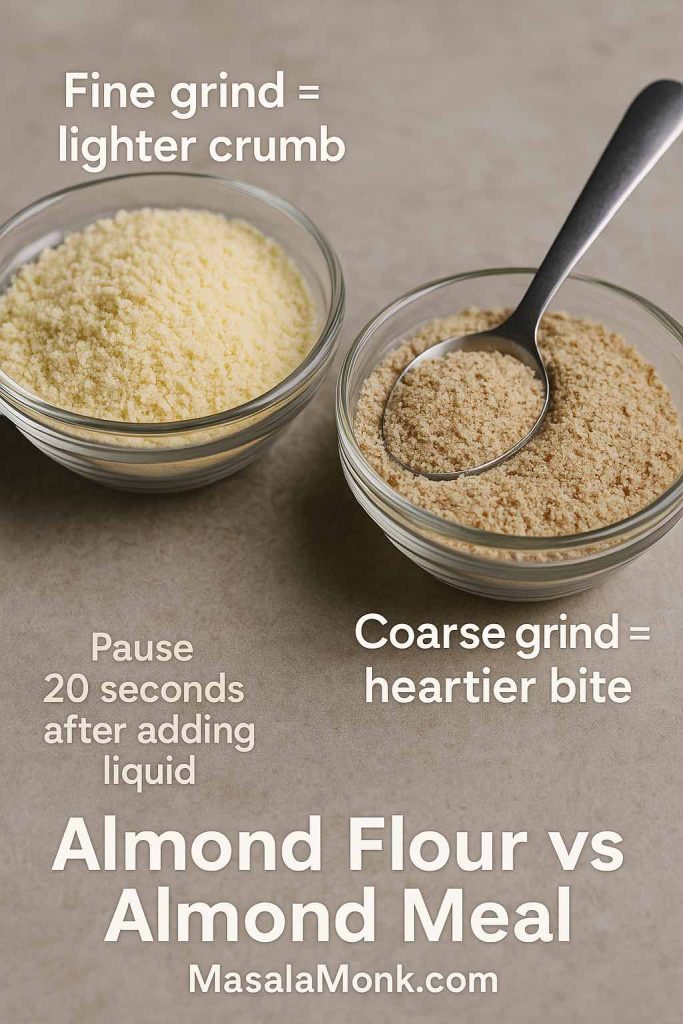
Here’s the practical part: almond meal often absorbs liquid differently. So if you’re making pancakes made with almond meal and the batter thickens quickly, don’t fight it. Add liquid in small amounts. Stir. Pause for 20–30 seconds. Then decide if it needs more. That tiny pause is surprisingly powerful because nut flours keep hydrating even after you’ve mixed them.
In other words, treat the batter like it has a heartbeat. Give it a moment. Then adjust.
Also Read: Almond Flour and Diabetes: A Low-Carb, High-Impact Swap for Better Blood Sugar
A Dependable Almond Flour Pancakes Recipe
This is your everyday base: easy almond flour pancakes that work plain, but also welcome banana, blueberries, pumpkin, cottage cheese, protein powder, or savory add-ins. Think of it as your go-to pancake made with almond flour (what some people simply call almond pancakes): dependable on its own, but flexible enough for mix-ins.
It’s also built on a logic you’ll see in reliable tested recipes, like King Arthur Baking’s almond flour pancakes: almond flour + eggs for structure + milk for moisture + baking powder for lift.
Ingredients (makes about 8–10 small pancakes)
- 1 cup almond flour (or almond meal)
- 2 large eggs
- 1/3 cup milk of choice (dairy or non-dairy)
- 1 teaspoon baking powder
- Pinch of salt
Optional: 1 tablespoon sweetener, 1/2 teaspoon vanilla
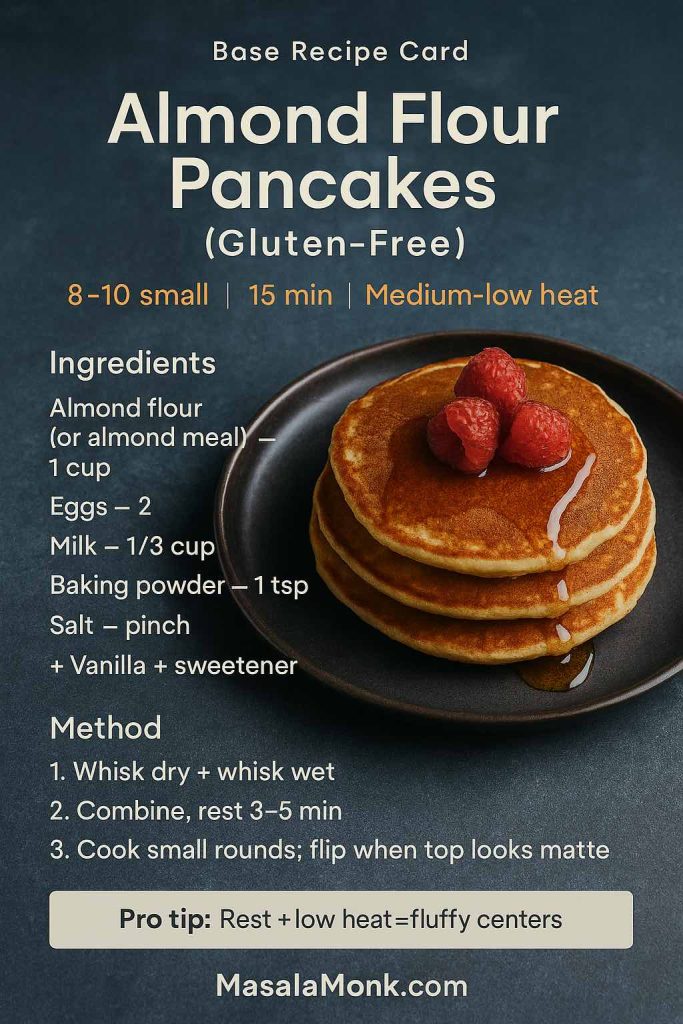
Method
- In a bowl, whisk almond flour, baking powder, and salt until evenly combined.
- In a second bowl, whisk eggs and milk until smooth. Add vanilla or sweetener if using.
- Pour wet into dry and stir until the batter is cohesive. It should be thick but still spoonable.
- Let the batter rest for 3–5 minutes while you warm your pan.
- Cook on medium-low heat in a lightly greased skillet. Make small rounds (3–4 inches wide). Flip only once the edges look set and the top looks more matte than glossy.
That brief rest is not a fussy extra step—it’s what keeps the batter consistent from the first pancake to the last. Resting batter is a classic pancake habit even outside nut-flour cooking, and it’s baked into traditional approaches like King Arthur’s classic pancake method.
Also Read: Mayo Recipe: 15+ Homemade Mayonnaise Variations
Almond Flour Pancake Batter That Behaves
Nut-flour batters don’t look like wheat batters. They’re thicker, less elastic, and they set differently. Once you accept that, the rest becomes easier.
What “right consistency” looks like
- The batter falls from a spoon in a ribbon and spreads slowly.
- It looks glossy and cohesive, not dry and clumpy.
- It doesn’t run like crepe batter.
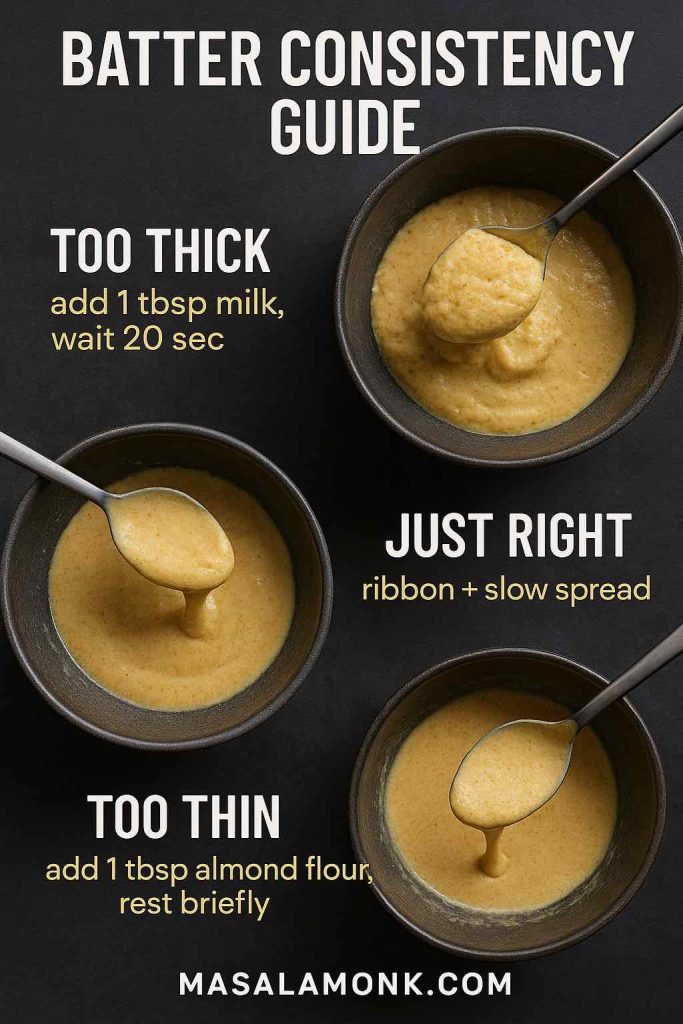
The three most common batter problems
Too thick: It won’t spread; it sits like a mound.
Fix it by adding 1 tablespoon milk, stirring, then waiting 20–30 seconds before deciding whether to add more.
Too thin: It spreads into very wide, fragile pancakes.
Fix it by adding 1 tablespoon almond flour (or almond meal), stirring, and resting briefly.
Thickens mid-batch: This is normal.
Fix it by stirring and loosening with small splashes of milk if needed.
That last point matters more than you’d expect. Almond flour pancake batter often changes slightly as it sits. Instead of trying to “perfect” it in one go, treat it like a living mixture and make micro-adjustments.
Also Read: Pepper Sauce Recipe Guide: Classic Vinegar Heat to Chipotle, Ají & Peppercorn
Fluffy Almond Flour Pancakes
If your goal is fluffy almond flour pancakes—soft, tender, and slightly lifted—there are a few levers that do most of the work. Fortunately, none of them require culinary gymnastics.
1) Fresh leavening
Baking powder is the lift here. If it’s old, the pancakes can turn out flat even if everything else is right. A quick way to check freshness is the method described in King Arthur’s baking powder test.
2) Gentle heat
Almond flour browns quickly. Medium-low heat gives the pancake time to set inside without over-darkening outside. You’ll get a more even crumb and a cleaner flip.
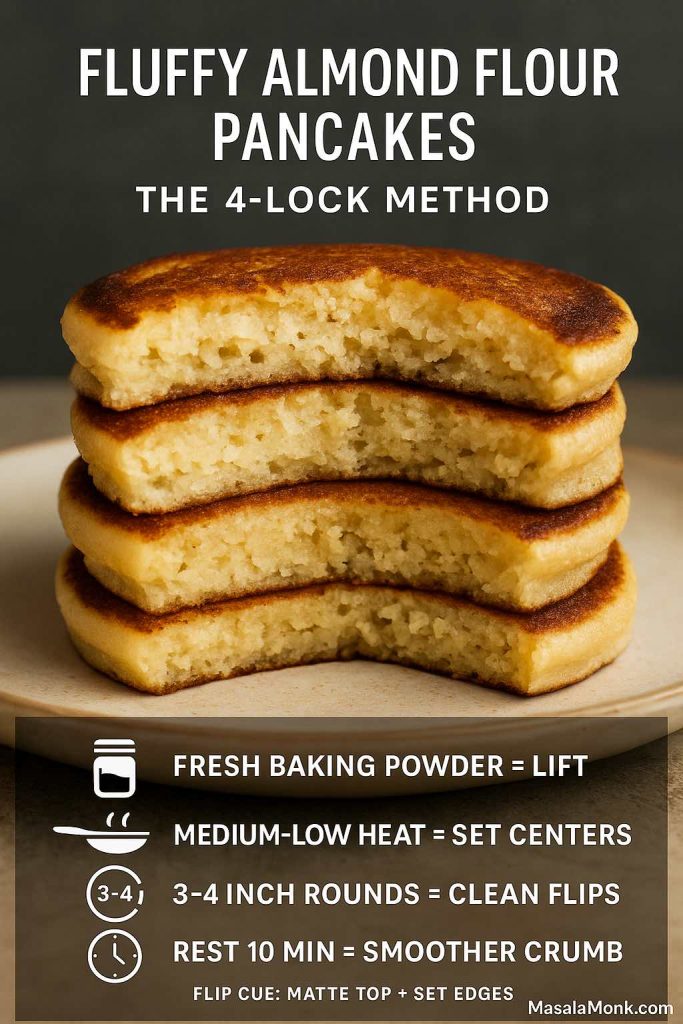
3) Smaller pancakes
It’s tempting to pour big rounds, especially when you want a “proper stack.” Nevertheless, smaller pancakes cook more evenly and rise more consistently. Once you’ve nailed the method, you can go bigger. Until then, keep it tidy.
A quiet upgrade: rest the batter a little longer
A short rest already helps. A slightly longer rest—say 10 minutes—can make the texture even more uniform. Resting batter is a widely recommended way to improve pancake texture in general, not just for nut flours.
For a classic pancake inspiration that leans cozy and traditional, MasalaMonk’s fluffy buttermilk pancakes with stewed cinnamon apples is a delicious reference point for texture and topping ideas.
Simple Almond Flour Pancakes for Everyday Mornings
Sometimes you want a no-drama breakfast—something you can make on autopilot. Simple almond flour pancakes are exactly that once you settle into a routine.
First, treat the first pancake as your “test pancake.” If it browns too quickly, lower the heat. If it takes too long to set, nudge the heat slightly higher. Then keep the rest consistent.
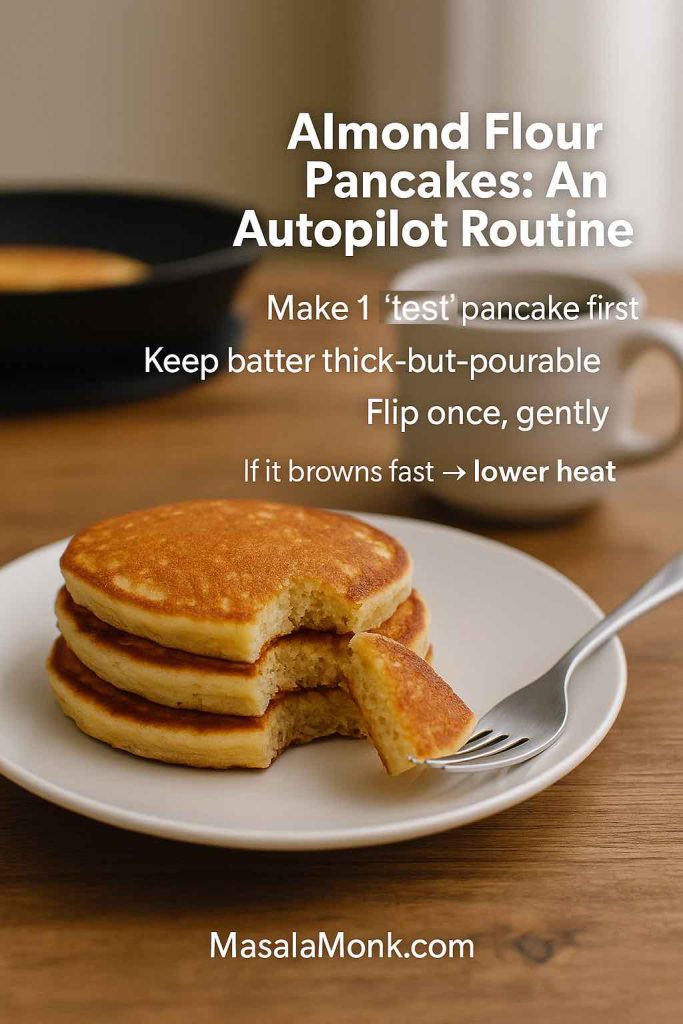
Second, keep the batter slightly thicker than you think. Thin batter tends to spread, and spreading creates pancakes that are harder to flip and easier to tear. Thick-but-pourable is your friend.
Third, flip gently and only once. Pancakes made with almond flour don’t love being pressed, smashed, or flipped repeatedly. If you let them set properly, they hold together beautifully.
Also Read: Whole Chicken in Crock Pot Recipe (Slow Cooker “Roast” Chicken with Veggies)
3 Ingredient Almond Flour Pancakes
There are mornings when you want breakfast in the fewest possible steps. Three-ingredient versions are perfect for that.
Ingredients
- 1 cup almond flour
- 2 eggs
- 1/3 cup milk
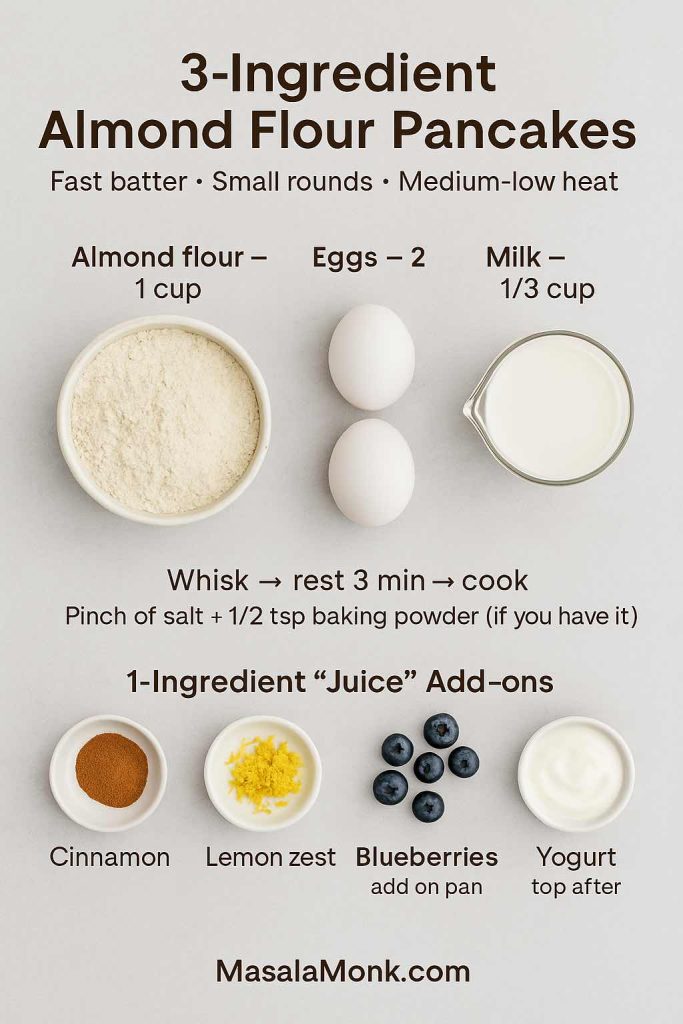
Method
Whisk everything until smooth, rest 3 minutes, then cook small pancakes on medium-low. If you have salt, add a pinch. If you have baking powder, add 1/2 teaspoon for a little lift. Still, even without extras, these can be satisfying when cooked gently.
To add “juice” without adding complexity, you can fold in one of these single-ingredient upgrades:
- cinnamon for warmth
- lemon zest for brightness
- a handful of blueberries placed on the pan after pouring
- a spoonful of yogurt on top after cooking
Each one changes the experience without changing the method.
Also Read: Cheesy Chicken Broccoli Rice – 4 Ways Recipe (One Pot, Casserole, Crockpot & Instant Pot)
2 Ingredient Almond Flour Pancakes
Two-ingredient versions are as minimal as it gets. They’re also more egg-forward, and the texture leans closer to soft breakfast cakes than classic diner pancakes.
Ingredients
- 1 cup almond flour
- 3 eggs
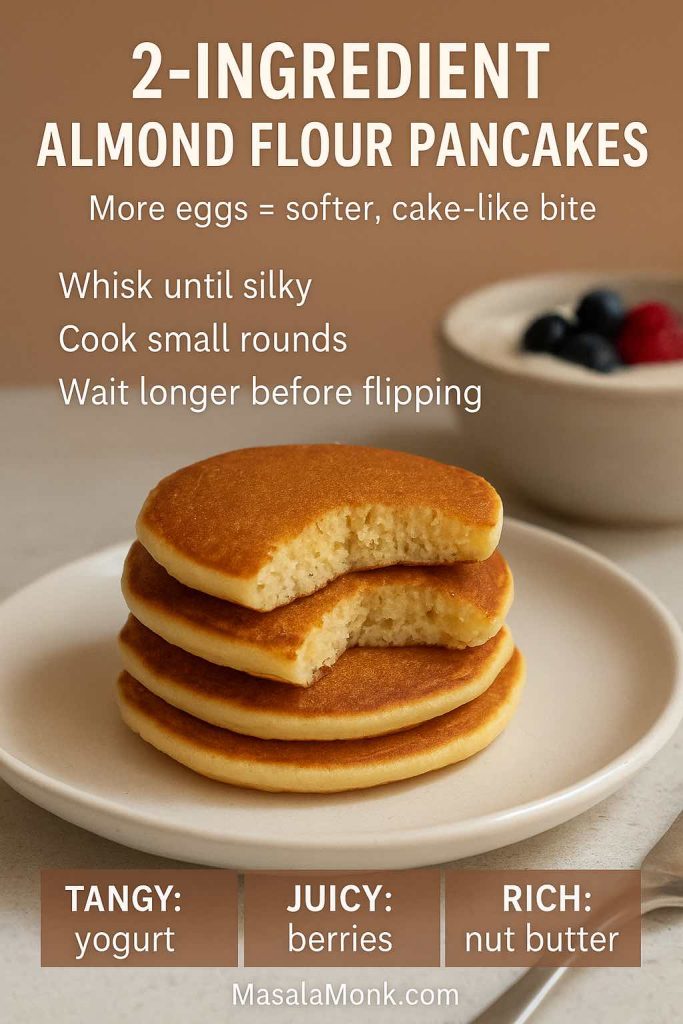
How to make them feel more pancake-like
- Whisk very thoroughly so the batter becomes uniform.
- Cook smaller rounds so they set through.
- Wait longer before flipping; the first side needs time.
These are excellent with toppings that bring contrast. For instance, something creamy and tangy (yogurt), something juicy (berries), or something nutty and rich (nut butter) can make the whole plate feel balanced rather than heavy.
Also Read: Sheet Pan Chicken Fajitas Recipe (Easy One-Pan Oven Fajitas)
5 Ingredient Almond Flour Pancakes
If you want the minimal version that still feels consistently “right,” five ingredients is often the sweet spot.
- almond flour
- eggs
- milk
- baking powder
- salt
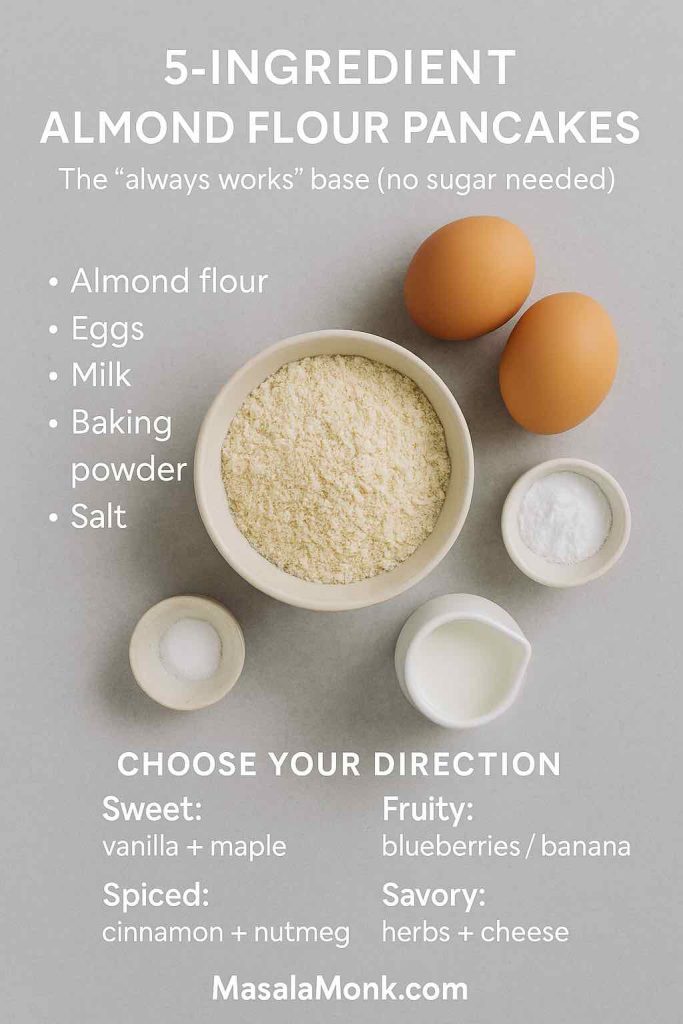
This is basically the base recipe without vanilla or sweetener. It’s also ideal for customization. Because the flavor is neutral, you can push it sweet, fruity, spiced, or savory without fighting the batter.
Also Read: Authentic Louisiana Red Beans and Rice Recipe (Best Ever)
Protein Almond Flour Pancakes
If you want breakfast that keeps you full, protein almond flour pancakes are an obvious move. The trick is to add protein without drying the batter or turning it rubbery. Moisture and gentle heat solve most issues.
Protein almond flour pancakes with protein powder
Start with the base batter. Add one scoop of protein powder. Then loosen with milk a tablespoon at a time until it returns to thick-but-pourable.
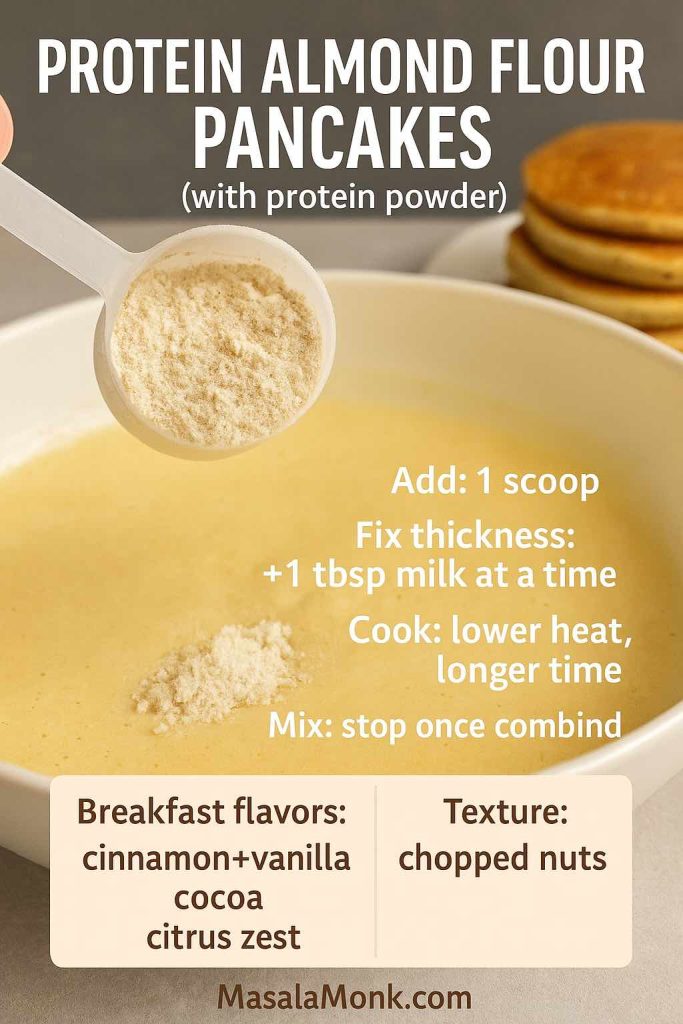
Because protein powder thickens batter quickly and can brown faster, keep the heat lower and cook longer. Also, resist the urge to keep stirring after you’ve mixed it. Overmixing can make protein batters feel tougher.
To make the flavor feel like breakfast rather than a shake in pancake form, add one of these:
- cinnamon + vanilla
- cocoa + a touch of sweetener
- citrus zest for a bright finish
- chopped nuts for texture
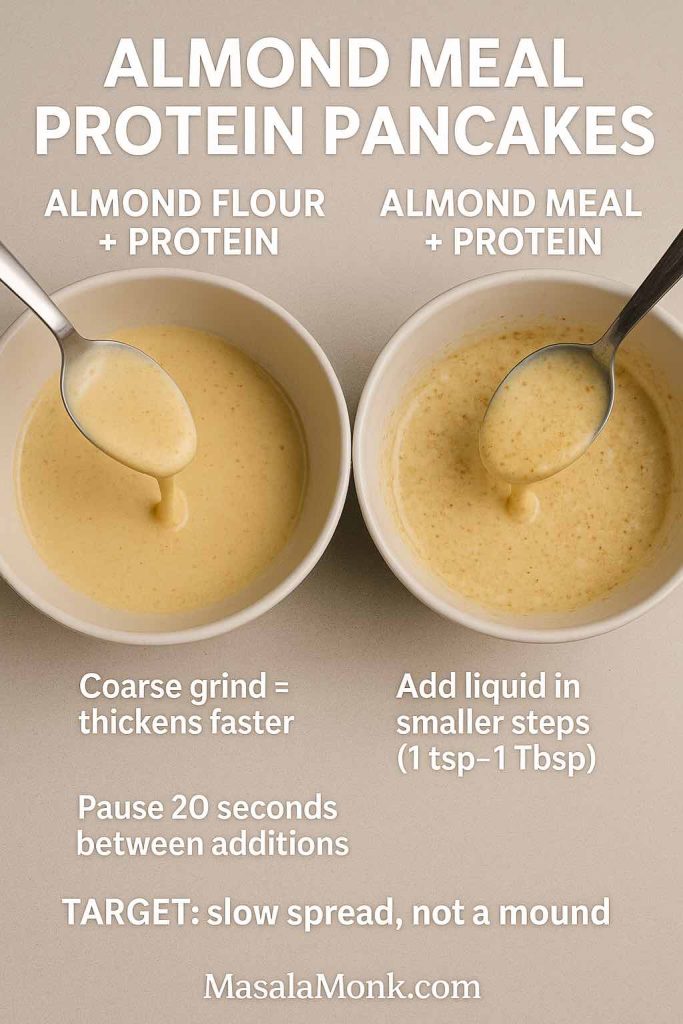
Almond meal protein pancakes
If you’re using almond meal rather than almond flour, the same concept applies, but the batter may thicken faster because of the coarser grind. In that case, add liquid in smaller steps and give it a short pause between additions. You’re aiming for a batter that spreads slowly rather than sitting in a mound.
Almond flour cottage cheese pancakes
This is the high-protein option that stays moist and tender without needing protein powder.
Blend until smooth:
- 1 cup cottage cheese
- 2 eggs
- 3/4 cup almond flour
- 1 teaspoon baking powder
- pinch of salt
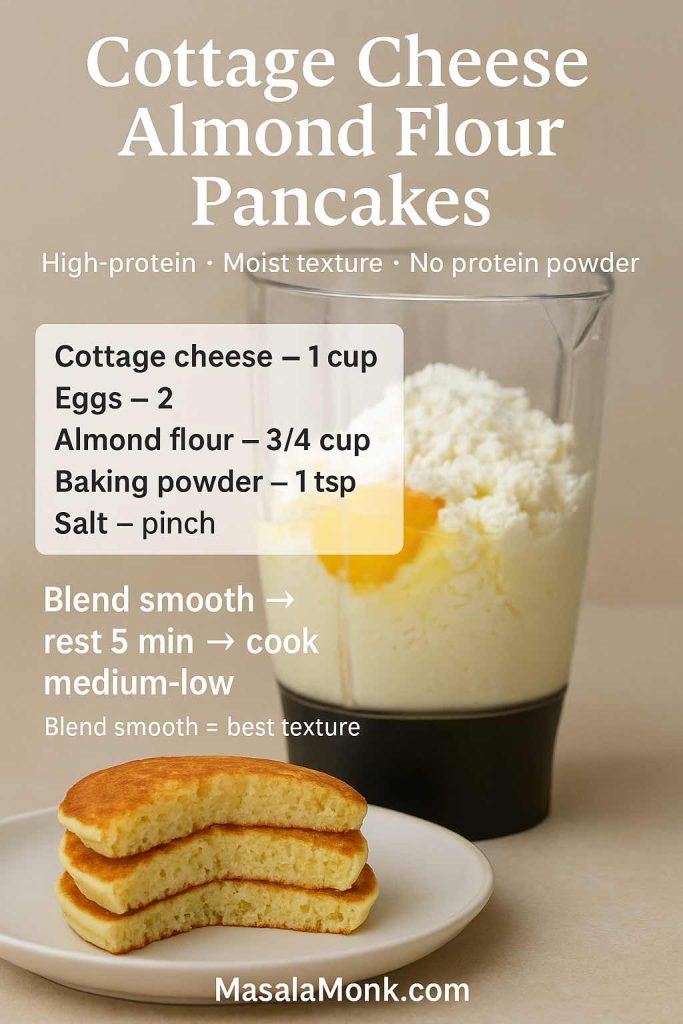
Let it rest for 5 minutes, then cook on medium-low. The texture tends to be soft, moist, and satisfying—especially when served warm.
For more protein-focused breakfast variety that’s still pancake-adjacent, MasalaMonk’s millet protein pancakes and protein-rich cherry pancakes are great rotation options.
Also Read: Baked Jalapeño Poppers (Oven) — Time, Temp & Bacon Tips
Almond Flour and Banana Pancakes
Banana adds sweetness and tenderness, which can make almond-based batter feel plush. It’s also one of the easiest ways to make breakfast feel like a treat without doing much extra work.
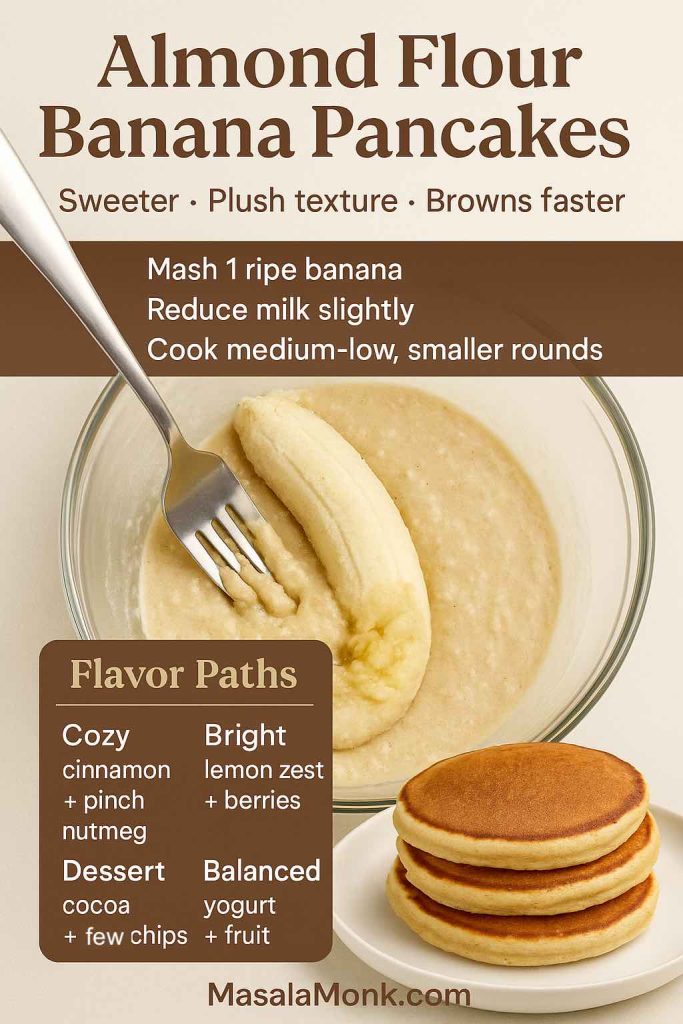
Method
Mash 1 ripe banana into the base batter and reduce milk slightly (banana adds moisture). Cook on medium-low and keep pancakes smaller; banana encourages faster browning.
To add more “juice” while keeping it simple, you can choose a direction:
Cozy direction: cinnamon + a tiny pinch of nutmeg
Bright direction: lemon zest + berries
Dessert direction: cocoa + a few chocolate chips
Balanced direction: top with yogurt and fruit
Each direction uses the same batter, so you’re not learning a new recipe—just playing with the flavor.
Also Read: Carbonara Recipe: Italian Pasta (Creamy, Veggie, Chicken, Shrimp, Tuna & Keto)
Almond Flour Blueberry Pancakes
Blueberries work beautifully with a nutty base. The key is to avoid turning the entire batter purple and to keep the pancakes easy to flip.
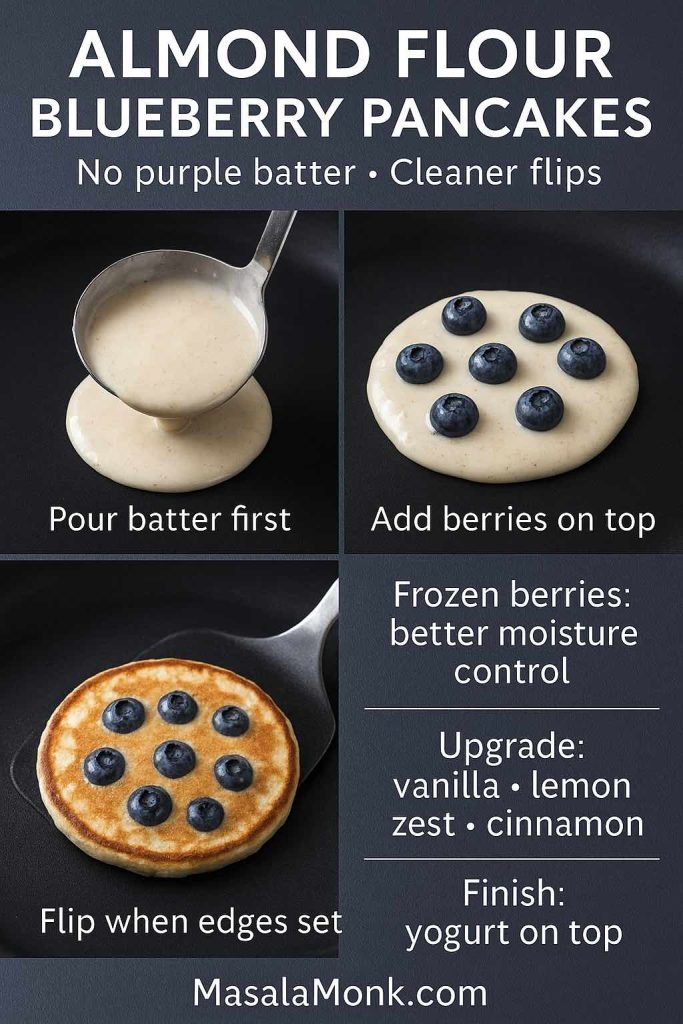
Method
Pour your batter onto the skillet first, then place blueberries on top of each pancake. Flip once the edges are set. This works especially well with frozen berries because you keep control of the moisture.
MasalaMonk’s blueberry pancake roundup reinforces the same practical approach of keeping heat moderate and adding berries on the pan for better results.
To deepen flavor without complicating the recipe, try one small add-on:
- vanilla in the batter
- lemon zest in the batter
- cinnamon in the batter
- a dollop of yogurt on top after cooking
The goal is contrast: warm pancake, juicy berries, creamy topping.
Also Read: Protein Oatmeal: Turn Plain Oats into a High-Protein Meal
Almond Flour Pumpkin Pancakes
Pumpkin makes nut-flour pancakes feel especially tender because it adds moisture and body. It also brings that cozy, spiced flavor that makes breakfast feel seasonal even in the middle of an ordinary week.
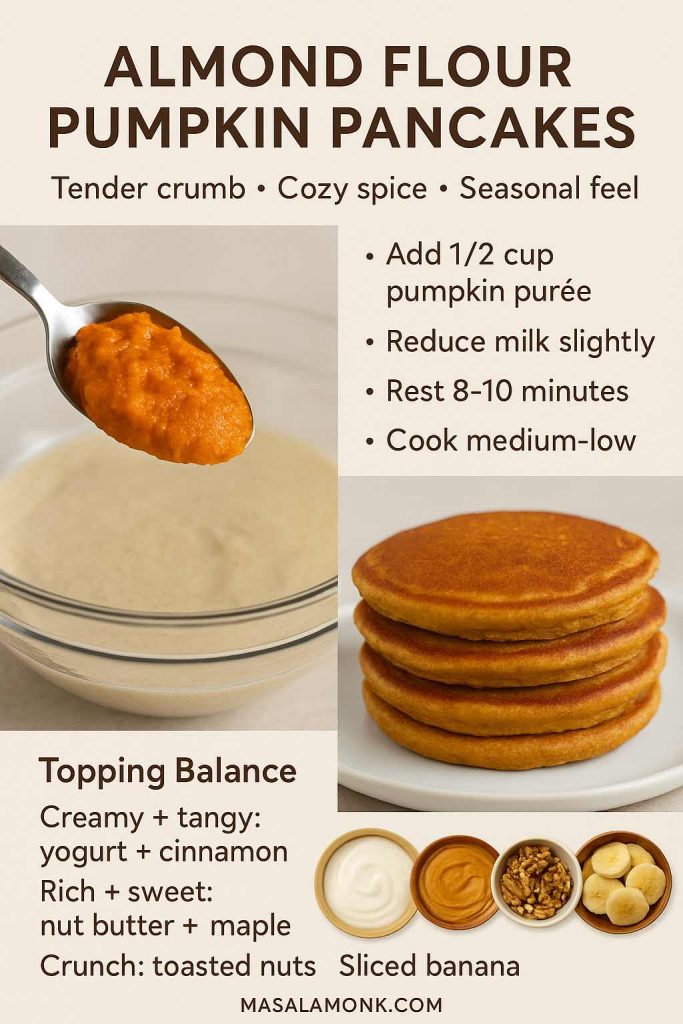
Method
Add 1/2 cup pumpkin purée to the base batter, add cinnamon (or pumpkin spice), and reduce milk slightly. Rest 8–10 minutes so the batter becomes smoother and more uniform. Cook on medium-low.
To “juice” the experience, pair pumpkin pancakes with toppings that create balance:
- yogurt + cinnamon (creamy and tangy)
- nut butter + a drizzle of maple (rich and sweet)
- toasted nuts (crunch)
- sliced banana (soft sweetness)
Also Read: Healthy Oat Protein Bars – 5 Easy No Sugar Recipes for Snacks
Keto Pancakes With Almond Flour
If you’re going for keto pancakes with almond flour, the base recipe already fits the general structure. The difference is mainly what you add.
- Use unsweetened milk or a mix of milk and water.
- Skip banana.
- Sweeten only if desired, with a keto-friendly sweetener.
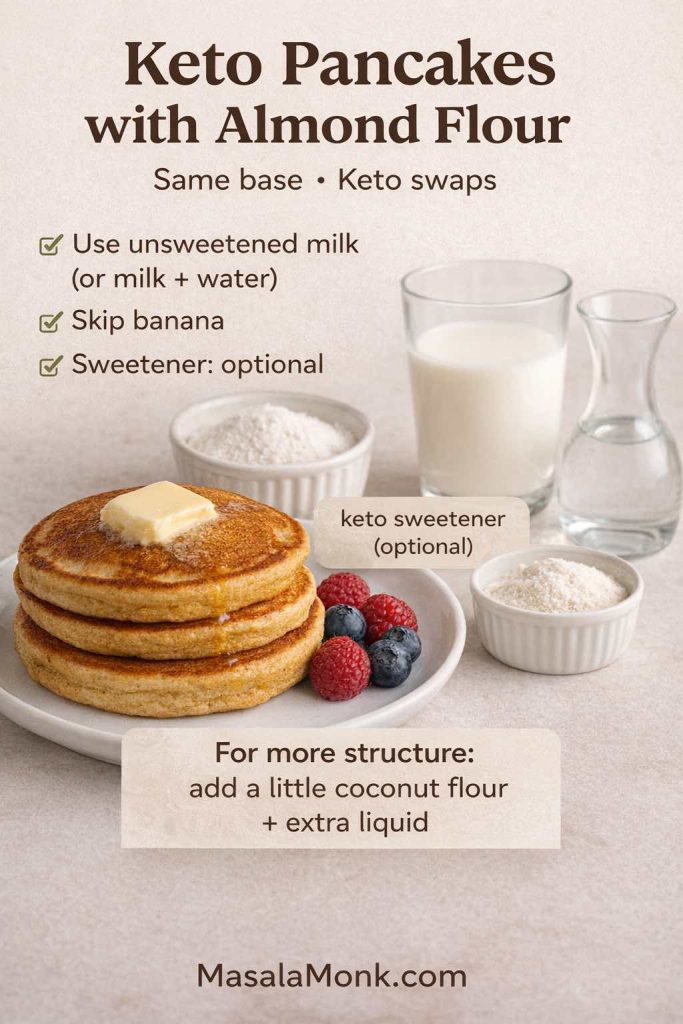
In other words, this becomes your basic almond flour keto pancake template—then you decide whether you want it plain, spiced, or protein-boosted.
If you like blending flours for structure, King Arthur’s keto pancake recipe is a useful reference for how almond flour and coconut flour can work together and why the batter may need extra liquid. For days when you want something keto-friendly that isn’t pancakes, MasalaMonk’s chia breakfast ideas provide a nice change of pace.
Gluten-Free Almond-Flour Pancakes
Almond flour is naturally gluten-free. Still, if you’re cooking for someone who needs strict gluten avoidance, packaged ingredients matter: baking powder, flavorings, add-ins, and especially mixes.
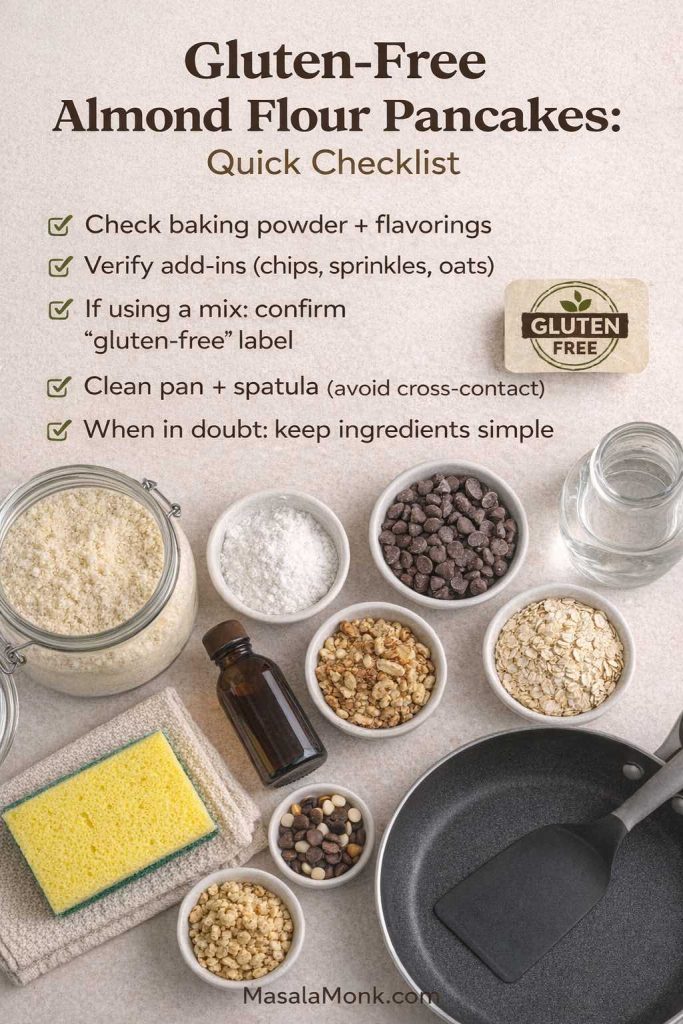
For official context, the FDA’s page on gluten-free labeling explains the standard used for foods labeled “gluten-free.” The Celiac Disease Foundation’s label reading guide is also helpful because it clarifies that “wheat-free” isn’t always the same as gluten-free and encourages checking the ingredients list.
In practice, the simplest approach is: trusted ingredients, a clean pan, and careful add-ins.
Also Read: 10 Best Espresso Martini Recipe Variations (Bar-Tested)
Vegan Almond Flour Pancakes
Vegan nut-flour pancakes are absolutely possible. They just need a binder, because eggs usually provide structure. Flax works well because it gels and helps hold the batter together.
Ingredients
- 1 cup almond flour
- 1 tablespoon ground flax + 3 tablespoons water (rest 5–10 minutes)
- 1 teaspoon baking powder
- 1/2 to 2/3 cup plant milk
- pinch of salt
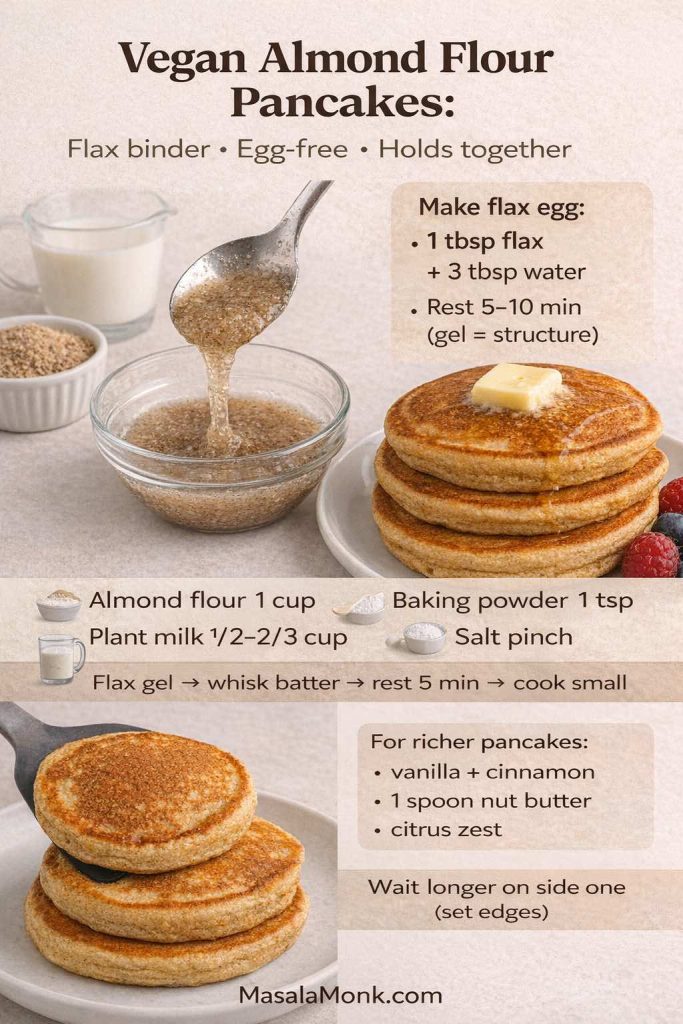
Method
Mix flax and water first and let it thicken. Then whisk in the remaining ingredients. Rest 5 minutes. Cook small pancakes on low-to-medium heat, and let the first side set properly before flipping.
To make vegan almond flour pancakes feel richer without breaking the structure, you can add:
- vanilla + cinnamon
- a spoonful of nut butter stirred in
- citrus zest for lift
The batter remains the same in spirit; it simply becomes more interesting.
Also Read: Vegan French Toast: 6 Easy Recipes (Pan, Air Fryer, GF & High-Protein)
Almond Flour Pancake Mix and Pancake-and-Waffle Mixes
Sometimes you want speed. Mixes are useful. Still, nut-based mixes can frustrate people because they thicken mid-batch or brown too quickly. Luckily, the solution is consistent and simple.
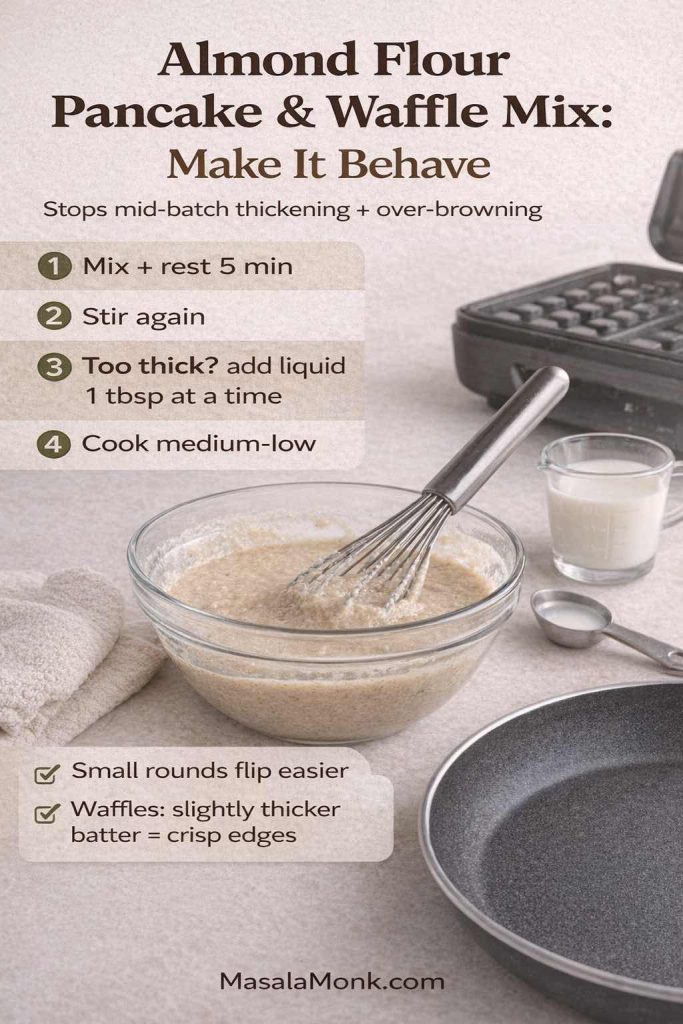
A routine that makes mixes behave
- Mix batter and rest 5 minutes.
- Stir again and check thickness.
- Add liquid one tablespoon at a time if it becomes too thick.
- Cook on medium-low.
If you want ideas for improving the flavor and texture of boxed mixes in general—without turning breakfast into a science project—Serious Eats tested a wide range of additions in their boxed pancake mix upgrade guide.
Meanwhile, if you enjoy making breakfast feel playful, waffles are the natural cousin of pancakes. MasalaMonk’s post on waffle twists is a fun way to add variety when you’re using a pancake-and-waffle mix style batter.
Coconut Flour Pancake Recipes and Almond–Coconut Blends
Coconut flour is extremely absorbent. That’s why coconut flour pancake recipes often use very different ratios compared to almond flour batters. If you’re blending coconut flour into an almond-based batter for structure, start small.
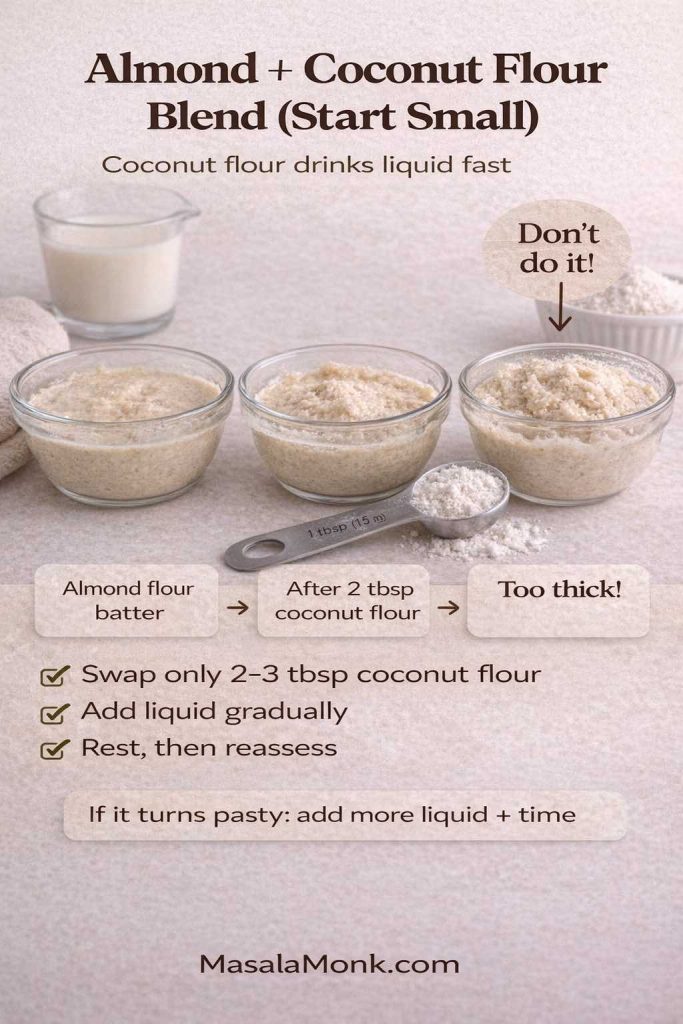
A gentle approach:
- Replace only 2–3 tablespoons of almond flour with coconut flour.
- Add liquid gradually.
- Rest and reassess before adding more.
Again, King Arthur’s keto pancake recipe is a practical reference for how blended low-carb batters behave and why the mixture may need extra liquid.
Also Read: Fermented RAGI (Finger Millet) IDLIS- Gluten Free | Gut Friendly | Breakfast Recipe
Almond and Oat Flour Pancakes, Buckwheat, Tapioca, and Other Blends
Once you’ve nailed your base batter, blending becomes a fun way to tailor texture.
- Oat flour often makes pancakes feel softer and more familiar.
- Buckwheat adds depth and a sturdier bite.
- Tapioca can add a gentle spring and flexibility.
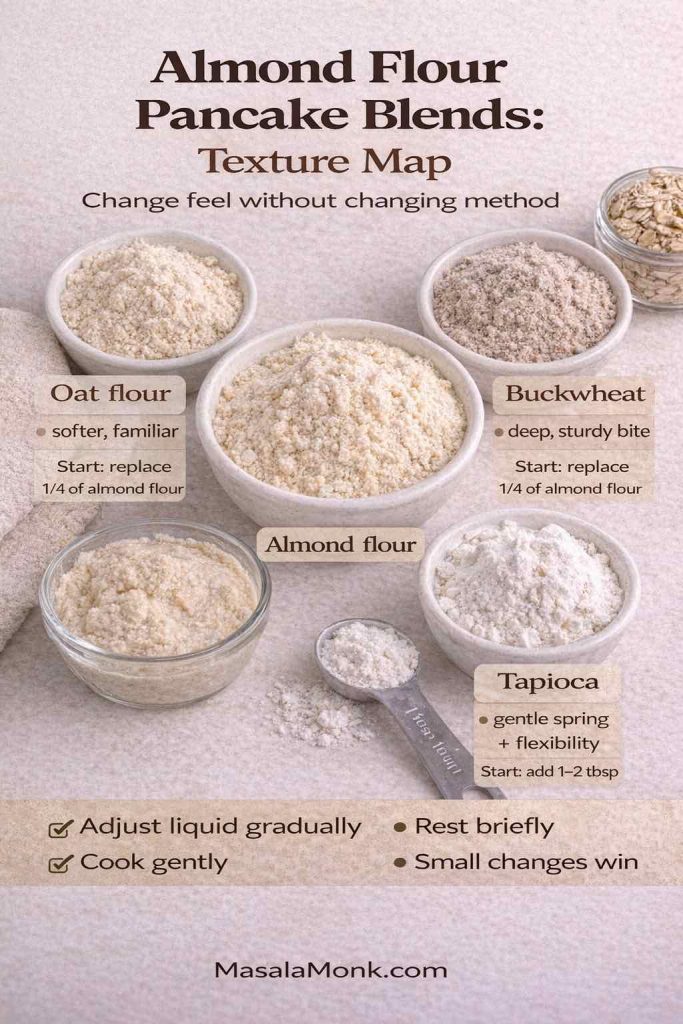
The method stays the same: adjust liquid gradually, rest briefly, cook gently. The biggest mistake with blends is over-correcting too fast. Small adjustments win.
Also Read: Buckwheat and Weight Loss: Examining Its Role in a Healthy Diet
Savory Pancakes and Breakfast Variety
Not every pancake needs syrup. Savory nut-flour pancakes can be delicious when you treat them like a quick breakfast flatbread: skip sweetener and vanilla, add spices and herbs, and fold in greens or grated vegetables.
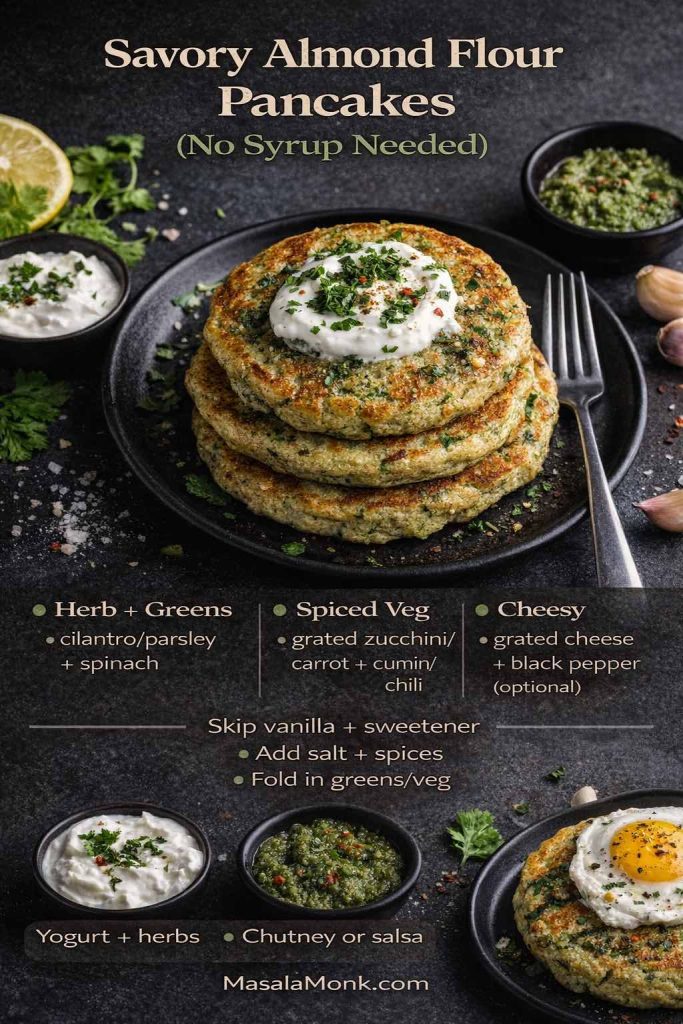
If you want savory pancake inspiration that naturally expands a breakfast menu, MasalaMonk has great posts that fit here:
These aren’t almond flour recipes, but they’re perfect recipes for readers who want more savory breakfast options without switching to entirely different meal categories.
Toppings That Make Nut-Flour Pancakes Feel Special
A pancake can be perfectly cooked and still feel a little flat emotionally. Toppings fix that. More importantly, toppings create contrast—creamy with crisp, bright with rich, salty with sweet.
Creamy toppings
- Greek yogurt or thick yogurt: tangy, cooling, protein-friendly.
- Cottage cheese whipped smooth: especially good on banana or pumpkin pancakes.
- Nut butter: rich, filling, and great for low-carb routines.
Fruity toppings
- Warm berries: makes any stack feel like brunch.
- Sliced banana: soft sweetness and extra satiety.
- Stewed apples: a cozy topping that feels like dessert for breakfast—MasalaMonk’s cinnamon-apple method is a good reference.
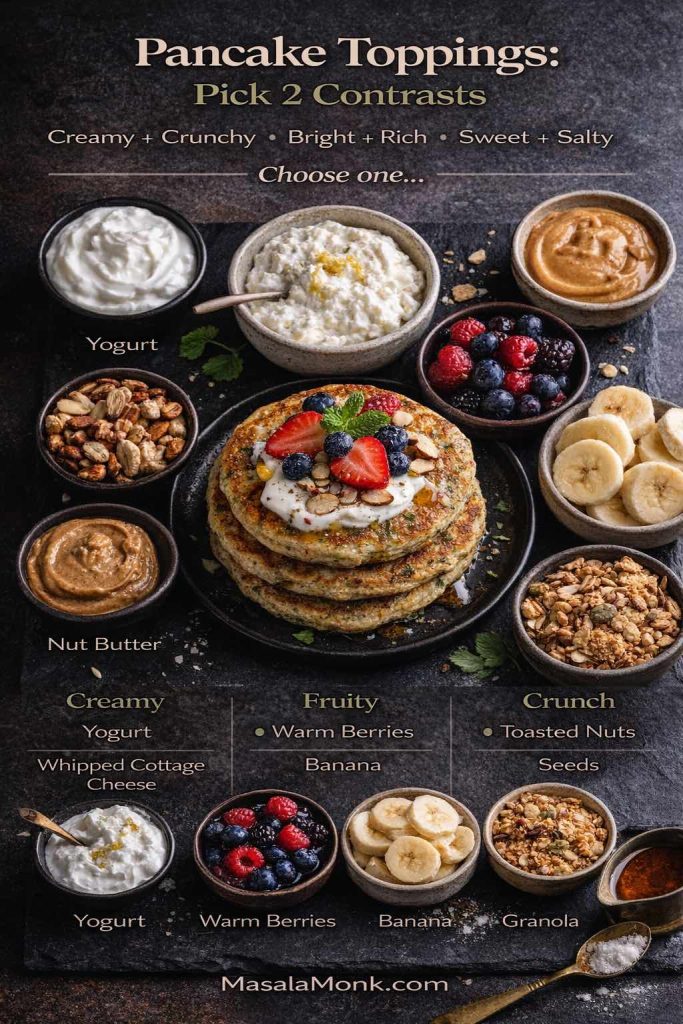
Crunch toppings
- Toasted nuts: excellent with pumpkin or banana.
- Seeds: add texture without much effort.
- A sprinkle of granola: great on yogurt-topped pancakes.
Sweeteners (when you want them)
- Maple syrup: classic for a reason.
- Honey: floral sweetness.
- A small dusting of powdered sweetener: subtle and quick.
The point isn’t to overdo it. Rather, it’s to pick one or two contrasts so the plate feels complete.
Also Read: Upma Recipe: 10+ Easy Variations (Rava, Millet, Oats, Semiya & More)
Meal Prep: How to Store and Reheat Without Ruining Texture
Nut-flour pancakes are surprisingly meal-prep friendly, especially the cottage cheese version, which stays moist even after chilling.
Storage
Let pancakes cool completely, then store them in an airtight container. If stacking, place parchment between layers so they don’t stick.
Freezing
Freeze in a single layer first, then transfer to a container or bag with parchment between pancakes. This prevents them from freezing into one solid slab.
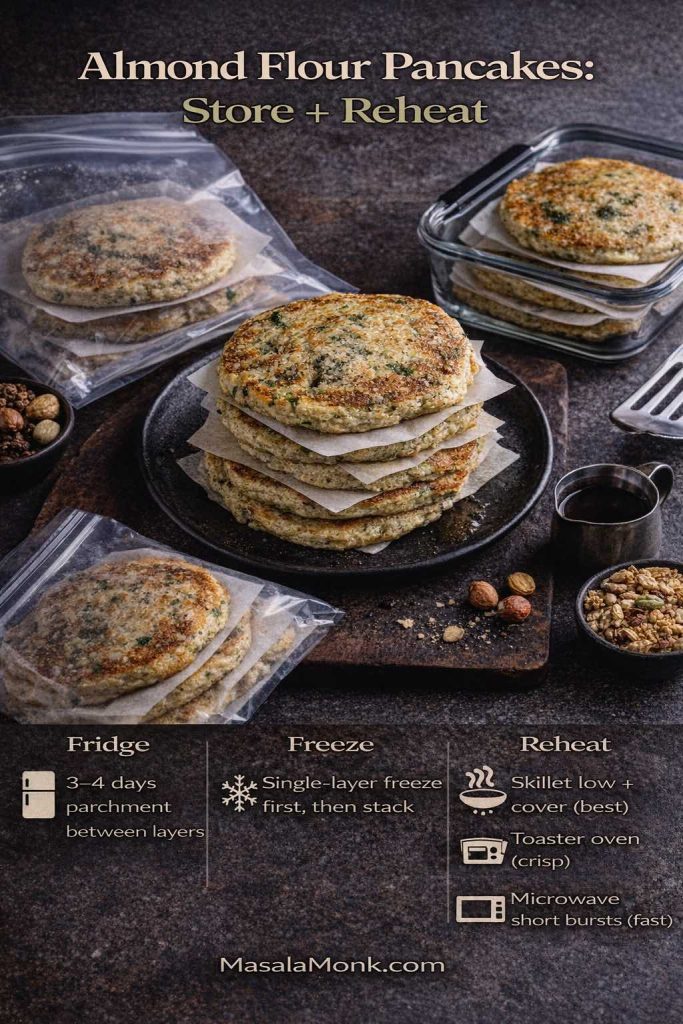
Reheating
- Skillet: best for texture. Low heat, cover briefly to warm through.
- Toaster oven: great for gentle crisping.
- Microwave: fastest, but keep it short to avoid rubberiness.
Because almond flour can go rancid faster than wheat flour (it contains natural oils), it’s also worth storing almond flour and almond meal properly. UC Davis provides practical guidance on nut storage—such as refrigeration/freezing for quality and using odor-tight containers—in their PDF on safe handling and storing nuts. For broader pantry staples and general storage practices, Penn State Extension’s guide to storing staple ingredients is a helpful reference.
Troubleshooting: Small Fixes That Save a Batch
Even good cooks get weird pancakes sometimes. Fortunately, most problems come from a few predictable causes.
Pancakes are crumbly
Usually too dry or flipped too early.
Fix: add 1–2 tablespoons milk, cook smaller pancakes, and wait longer before flipping.
Pancakes are gummy in the center
Often the heat is too high or the batter is too thin.
Fix: lower the heat, cook longer, and thicken with 1 tablespoon almond flour if needed.
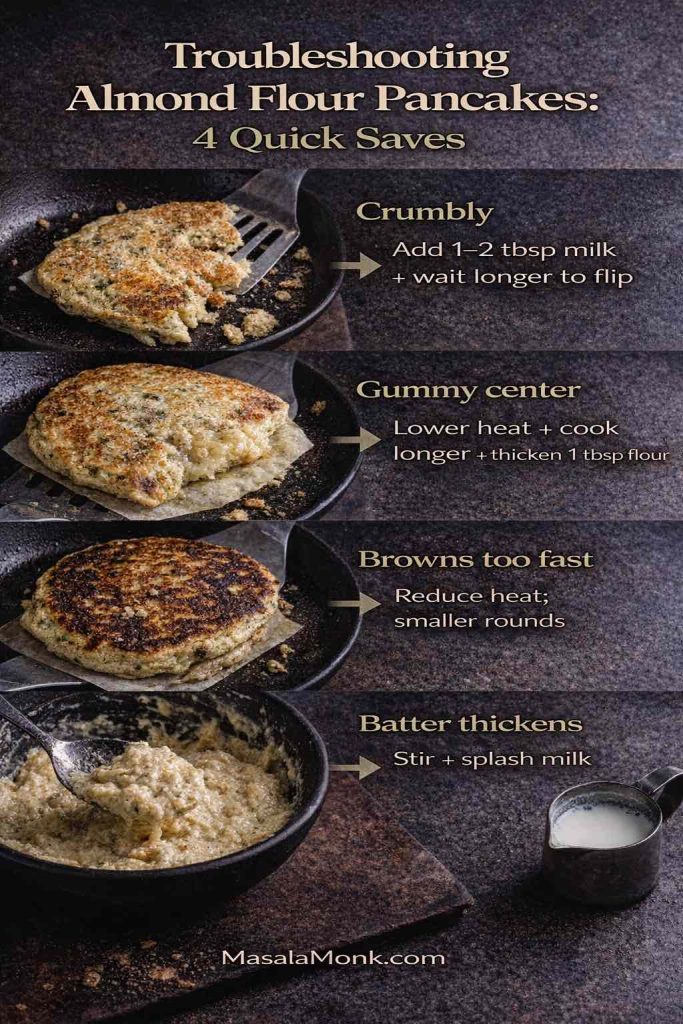
Pancakes brown too quickly
Heat is too high. Almond flour browns fast.
Fix: reduce heat and give the center time to set.
Batter thickens between pancakes
Normal.
Fix: stir and loosen with small splashes of milk.
That’s it. No panic. No starting over.
Nutrition Lookups Without Guessing
If you like checking nutrition details—almond flour vs almond meal, cottage cheese vs yogurt, or comparing add-ins—the USDA’s FoodData Central and its food search are the standard public references.
A Final Way to Think About It
Once you get comfortable with how almond flour pancake batter looks and cooks, everything becomes easier. The process becomes familiar: a thicker batter than wheat pancakes, medium-low heat, smaller rounds for clean flips, and tiny adjustments instead of big corrections.

From there, the variations stop feeling like separate recipes. Banana becomes a sweetness choice. Blueberries become a texture choice. Pumpkin becomes a cozy-season choice. Cottage cheese becomes a protein choice. Flax becomes a vegan choice. Coconut flour becomes a structure choice. Savory spices become a mood choice.
That’s when almond flour pancakes stop being a “special” breakfast and become what they should be: a simple, comforting meal you can make on any morning—without drama.
Also Read: Peanut Butter Cookies (Classic Recipe & 3 Variations)
FAQs
1) Can I replace all-purpose flour with almond flour in pancakes?
Yes, although it isn’t a 1:1 swap in behavior. Almond flour has less starch and more fat, so the batter is usually thicker and the pancakes brown faster. Use a recipe designed for almond flour rather than converting a wheat-flour one directly.
2) What’s the difference between almond flour and almond meal for pancakes?
Almond flour is typically finer, so the texture comes out smoother and more “classic.” Almond meal is coarser and can produce a heartier bite. Either works, but almond meal often needs a touch more liquid to keep the batter pourable.
3) Why is my almond flour pancake batter so thick?
Because almond flour absorbs liquid and thickens as it rests. If it becomes too stiff, add milk one tablespoon at a time, stir, then pause briefly before adjusting again.
4) Why do my pancakes made with almond flour fall apart?
Most often, the pancakes are too thin, too large, or flipped too early. Make smaller pancakes, cook longer on the first side, and ensure the batter is thick-but-pourable rather than runny.
5) How do I make fluffy almond flour pancakes?
Use fresh baking powder, rest the batter, keep the heat on medium-low, and cook smaller rounds. If you want extra lift, add one egg white without changing the rest of the recipe.
6) Why are my almond pancakes browning too fast?
Almond flour browns quickly due to its fat content and fine particles. Lower the heat and extend the cook time so the center sets without over-darkening the outside.
7) Can I make 3 ingredient almond flour pancakes?
Absolutely. The common three are almond flour, eggs, and milk. They’ll be more tender if you also add salt and baking powder, but the minimalist version can still work with gentle heat and small pancakes.
8) Do 2 ingredient almond flour pancakes really work?
They do, though the texture is more egg-forward. Typically it’s almond flour plus eggs; cook smaller pancakes and wait longer before flipping so they set properly.
9) What are 5 ingredient almond flour pancakes?
Usually almond flour, eggs, milk, baking powder, and salt. This “simple but reliable” set is a popular middle ground between minimalist versions and more flavored recipes.
10) How can I make a simple almond flour pancakes recipe taste better?
Add one flavor element rather than many: vanilla, cinnamon, lemon zest, or a pinch of salt if you skipped it. Also, avoid high heat—better texture often tastes better too.
11) How do I make protein almond flour pancakes without them turning dry?
Protein powder thickens batter fast, so increase liquid gradually and cook on lower heat. Alternatively, use cottage cheese for moisture and protein without the “chalky” texture.
12) How do almond meal protein pancakes differ from almond flour protein pancakes?
Almond meal is coarser, so the batter can be thicker and sometimes needs more liquid. Beyond that, the cooking approach is similar: smaller pancakes, steady heat, and a careful flip.
13) Can I make almond flour cottage cheese pancakes without a blender?
Yes. Mash and whisk thoroughly; you may get a slightly more textured batter. For smoother pancakes, blending helps, but it’s not mandatory.
14) Are cottage cheese almond flour pancakes good for meal prep?
They’re one of the best options for meal prep because they stay moist and tender after refrigeration compared to some other high-protein versions.
15) How do I make keto pancakes with almond flour?
Use unsweetened milk (or partially water), skip banana, and sweeten only if needed with a keto-friendly option. Keep the batter thicker and cook on medium-low for even setting.
16) Are almond flour pancakes low carb?
They’re typically lower carb than wheat-based pancakes, although the exact carbs depend on add-ins like banana, sweeteners, and mix-ins.
17) Can I make almond flour gluten free pancakes?
Yes, almond flour is naturally gluten-free. Still, confirm that baking powder, flavorings, and any mix-ins are also gluten-free if you need strict avoidance.
18) Can I make vegan almond flour pancakes?
Yes, but you’ll need a binder since eggs normally provide structure. A flax “egg” (ground flax + water) is a common solution, and small pancakes flip more easily.
19) Why do vegan almond flour pancakes stick more?
Egg-free batters can be more delicate and take longer to set. Use a good nonstick pan, cook on lower heat, and wait until the first side is fully set before flipping.
20) How do I make almond flour and banana pancakes that aren’t mushy?
Use a ripe banana but reduce the added milk since banana adds moisture. Cook gently and longer on the first side so the center sets.
21) Can I make almond flour pancakes with banana and no sweetener?
Yes. Banana naturally sweetens the batter, especially when very ripe. Add cinnamon or vanilla for extra flavor without additional sugar.
22) How do I make almond flour blueberry pancakes without streaky batter?
Instead of mixing berries into the bowl, pour batter into the pan first, then add blueberries on top. This keeps the batter cleaner and helps them cook evenly.
23) Can I use frozen blueberries in blueberry almond flour pancakes?
Yes. Place frozen berries onto the batter once it’s in the pan. This reduces “bleeding” and makes flipping easier.
24) How do I make almond flour pumpkin pancakes thicker and fluffy?
Pumpkin adds moisture, so reduce the milk slightly and rest the batter longer. Cook on medium-low to prevent over-browning while the center sets.
25) Can I turn almond flour pancake batter into waffles?
Yes. Make the batter slightly thicker than for pancakes and add a teaspoon of oil or melted butter for crisping. Cook until the waffle is deeply set before opening the iron.
26) Why does my almond flour pancake mix turn out dry?
Many mixes thicken as they sit. Rest the batter, then adjust with small splashes of milk or water. Also, avoid high heat, which can dry the outside before the inside finishes.
27) How do I fix an almond flour pancake mix batter that’s too thick?
Add liquid one tablespoon at a time, stir, then wait briefly. This stepwise method prevents over-thinning and keeps the pancakes from turning fragile.
28) Can I make an almond flour pancake mix recipe at home?
Yes. A common DIY “mix” combines almond flour with baking powder, salt, and optional sweetener; then you add eggs and milk when cooking. Store the dry mix airtight for quick mornings.
29) How should I store almond flour so it doesn’t taste off?
Because almond flour contains oils, store it in an airtight container in a cool place; refrigeration or freezing helps for longer storage. If it smells bitter or “paint-like,” it may be rancid.
30) Why are my pancakes using almond flour gummy in the middle?
Typically the heat is too high or the batter is too thin. Lower the heat, cook a bit longer, and thicken the batter slightly if it spreads too much.