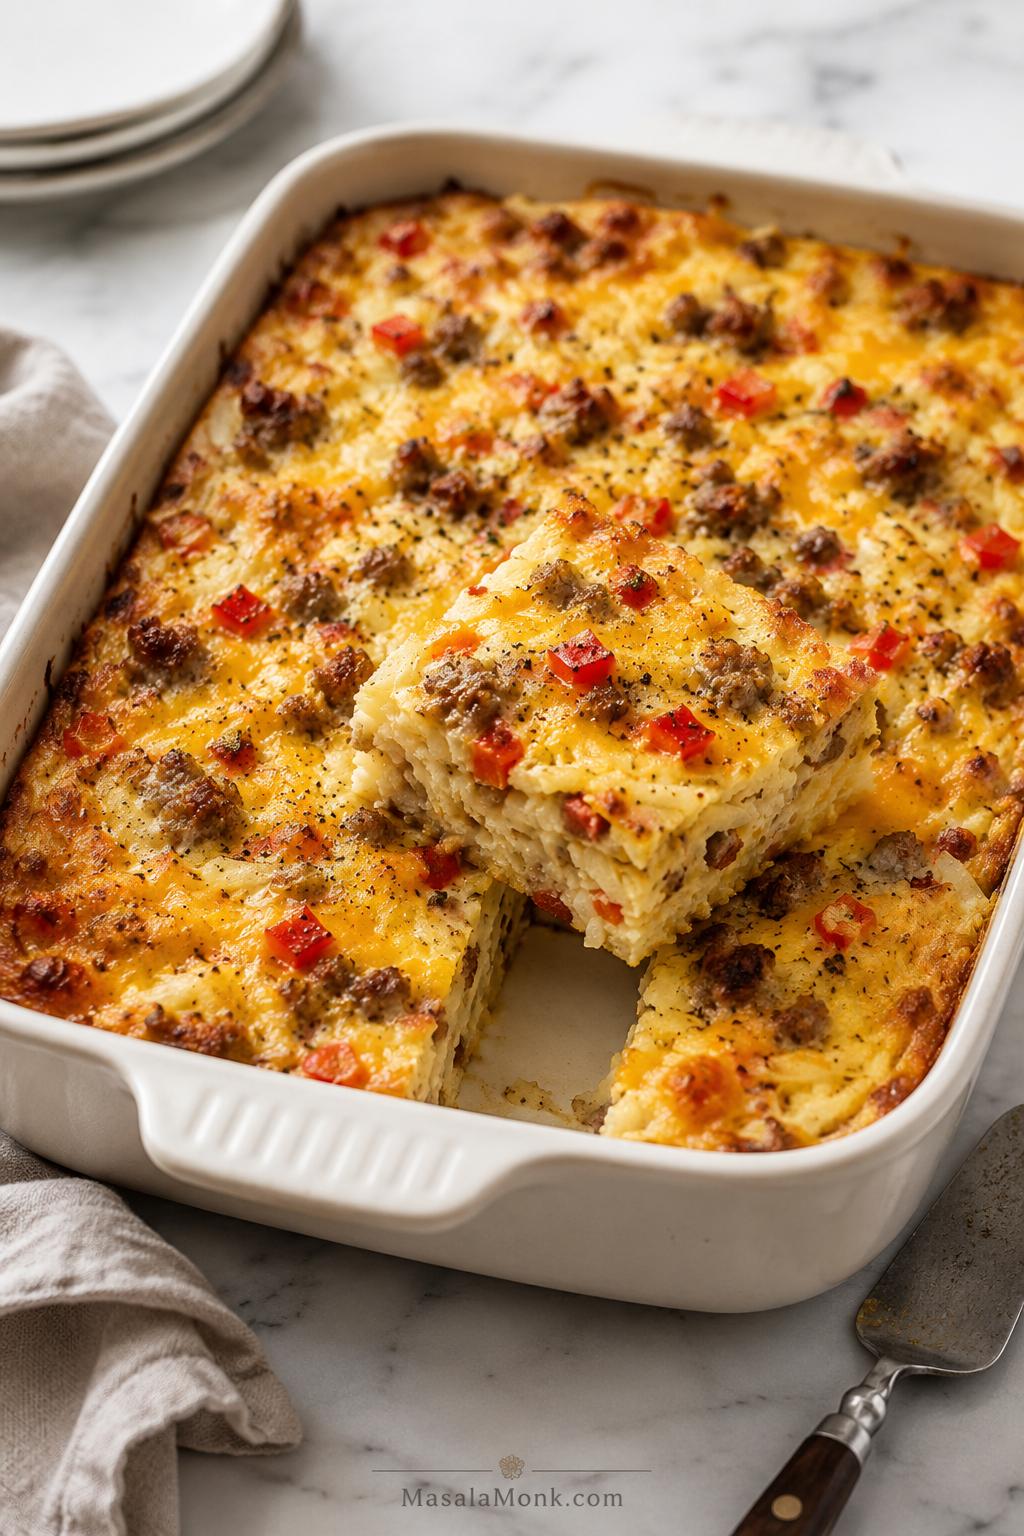
This breakfast casserole with hash browns is the egg-based brunch bake to make when you want something hearty, cheesy, sliceable, and easy to prep ahead. Frozen shredded hash browns, eggs, sausage, cheese, and a creamy egg mixture bake together in a 9×13 pan until the center is softly set, the cheese melts into the potatoes, and the edges turn golden.
The key is moisture control. Hash brown breakfast casserole can turn watery, greasy, rubbery, or bland if the potatoes are too wet, the meat is not drained, or the vegetables go in raw. This version shows you how to avoid that, plus how to make it with bacon, ham, no meat, hash brown patties, or overnight prep.
It is the kind of casserole that makes sense when the morning already has enough going on, whether that means Christmas breakfast, Easter brunch, overnight guests, a weekend family breakfast, or a meal-prep Sunday where one pan needs to handle the eggs, potatoes, cheese, and sausage.
This pan is especially good for the kind of morning where people drift into the kitchen at different times, coffee is still being poured, and nobody wants to stand at the stove making eggs in batches. It comes out hot, cheesy, and ready to slice, and everyone can make it their own with hot sauce, scallions, salsa, or fruit on the side.
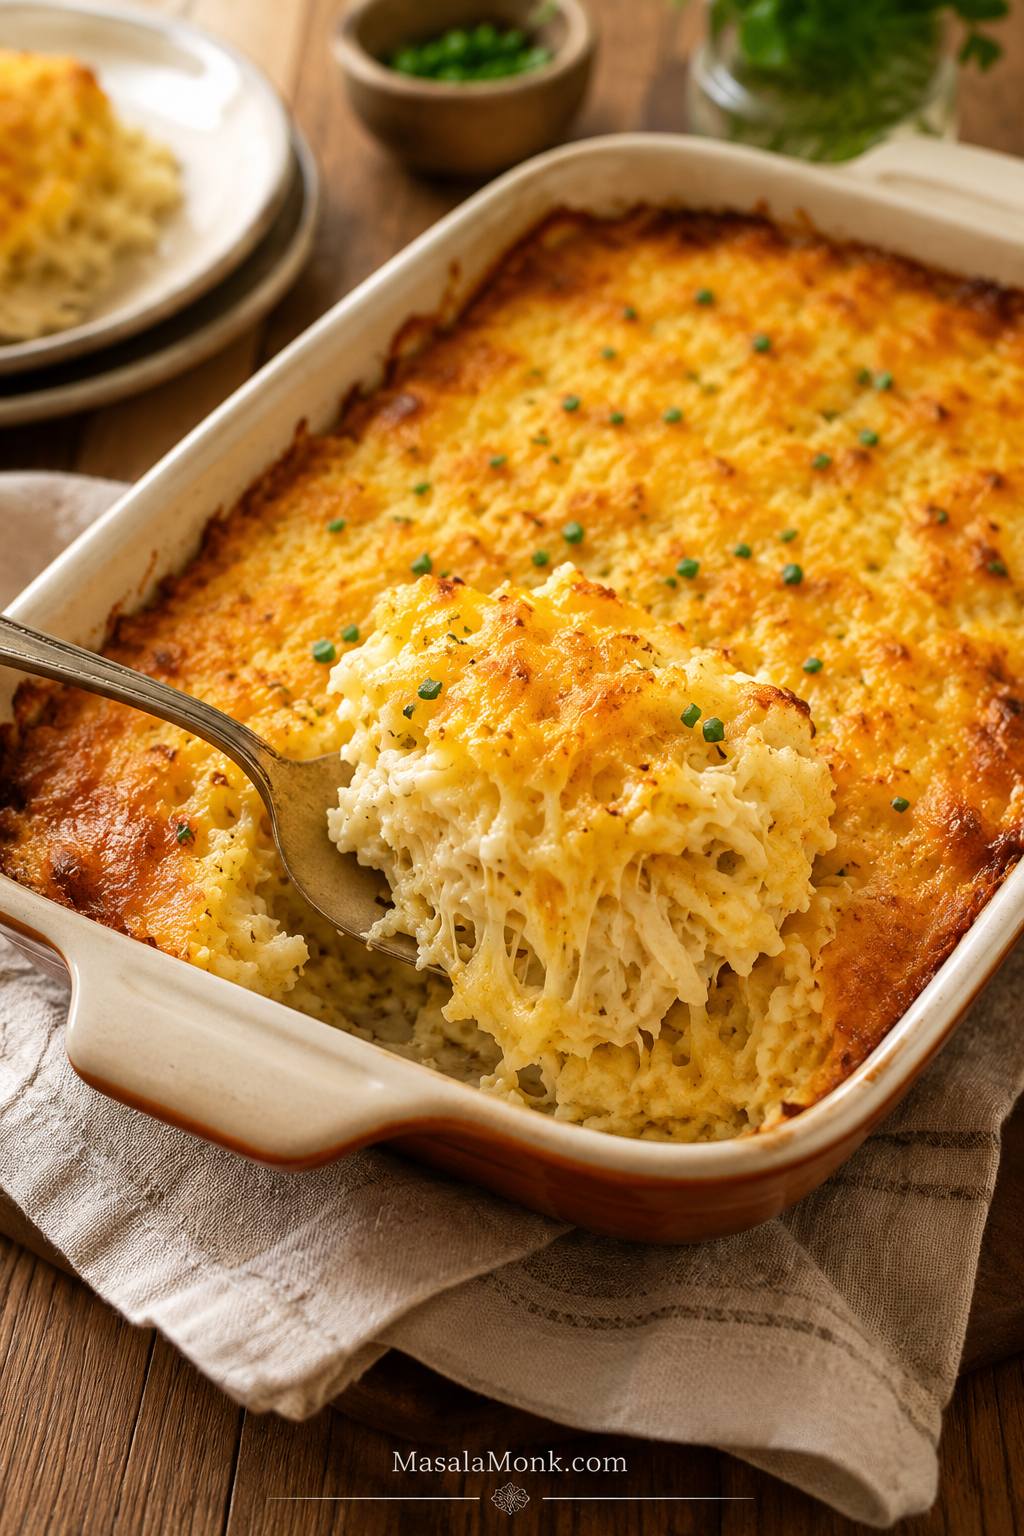
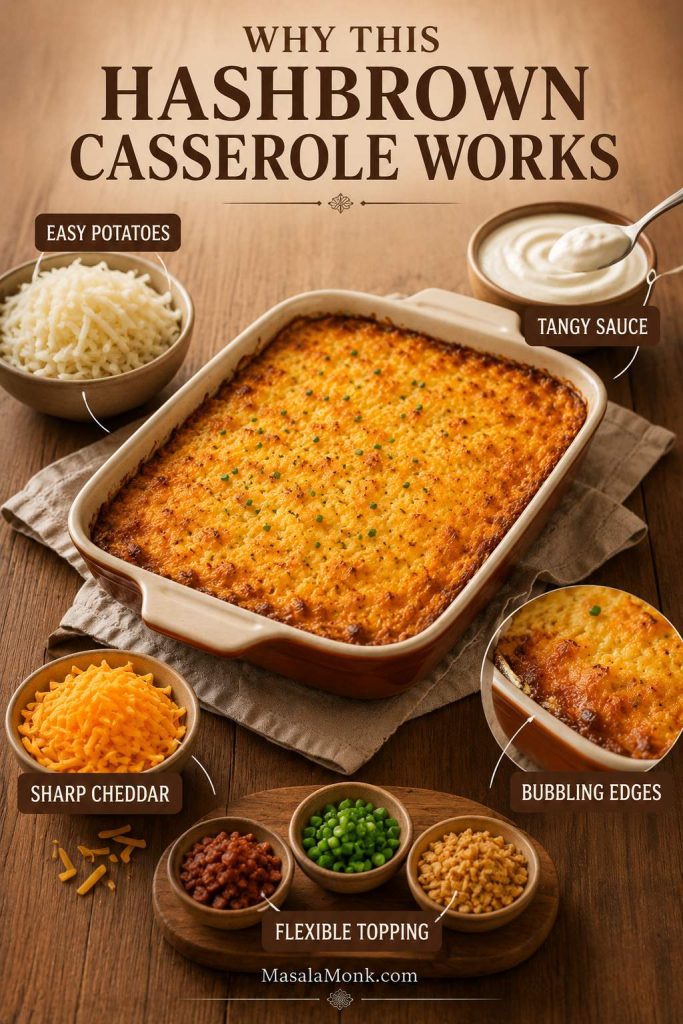
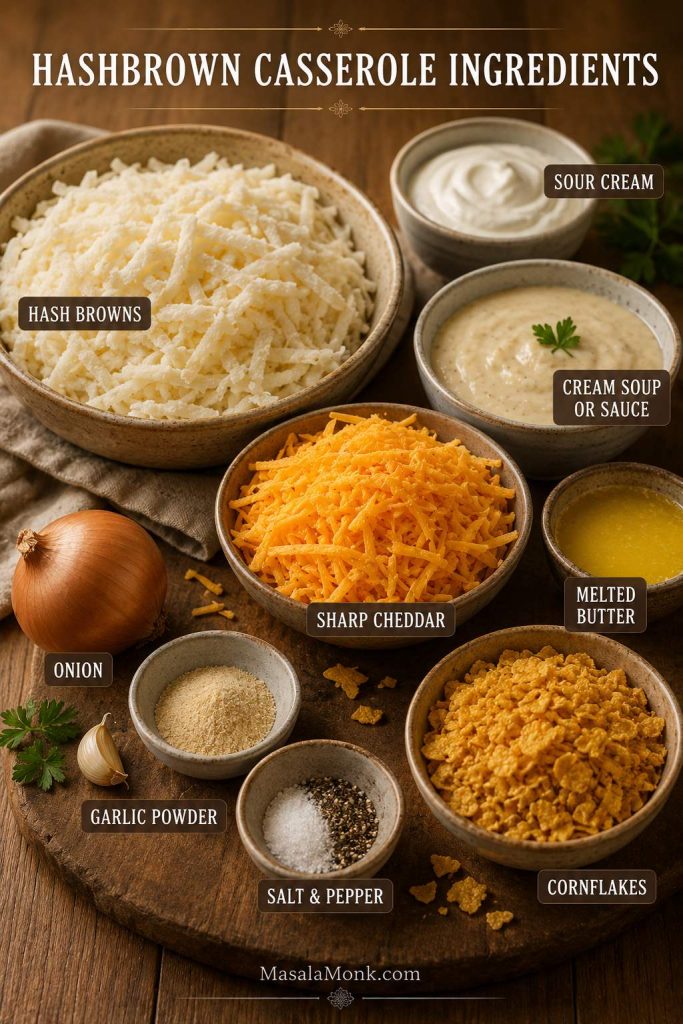
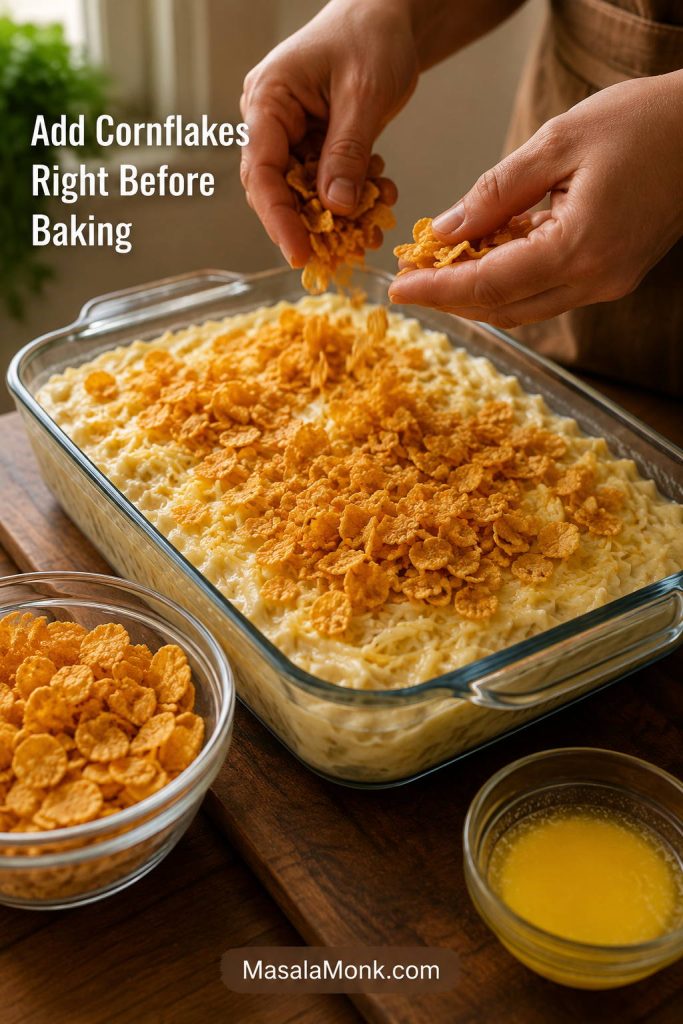
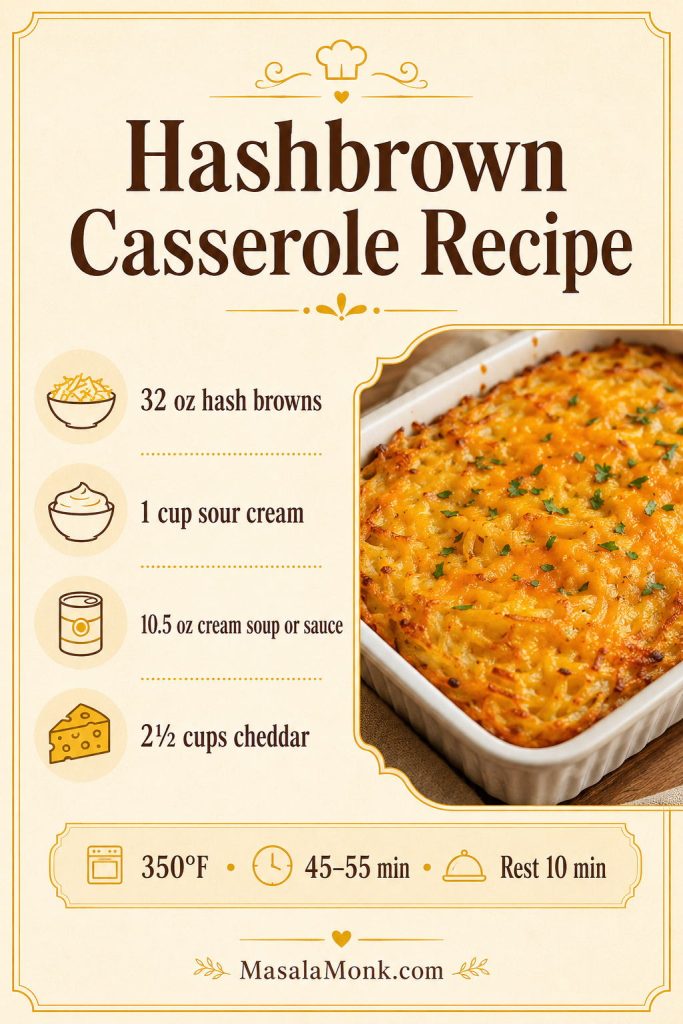
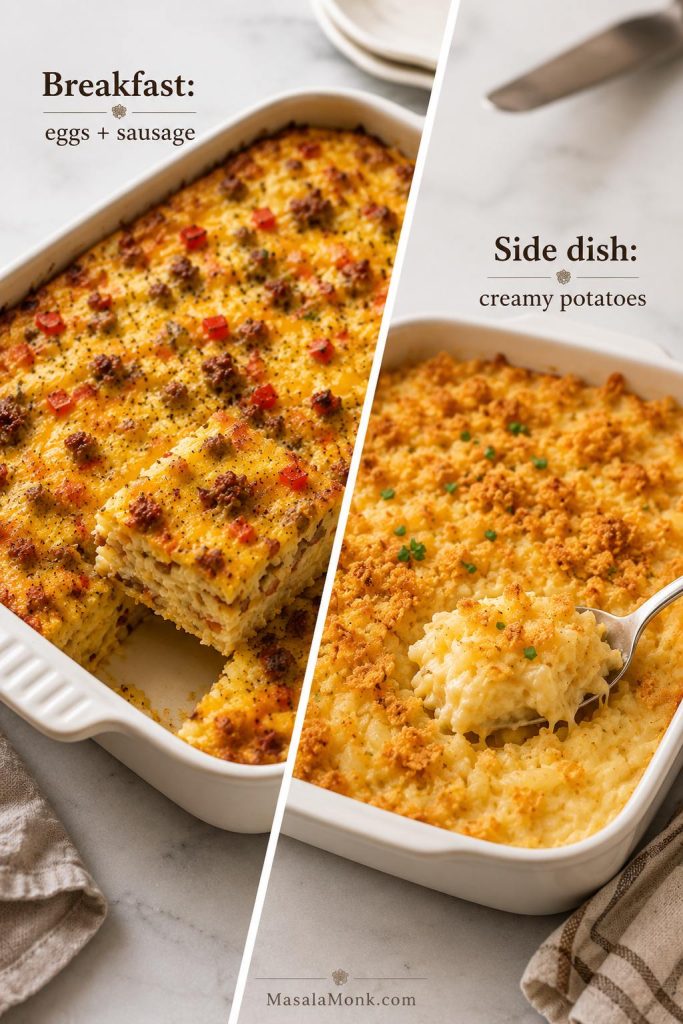
This is the egg-based breakfast version. If you were looking for the creamy cheesy potato side dish made with sour cream, cheddar, cream soup or homemade sauce, and a crunchy topping, use this hashbrown casserole recipe instead. That one is the dinner-side and potluck version; this one is the breakfast casserole with eggs.
In This Recipe
Recipe Basics
Quick Answer: Breakfast Casserole with Hash Browns
To make breakfast casserole with hash browns, layer thawed and patted-dry frozen shredded hash browns in a greased 9×13-inch baking dish with cooked sausage, sautéed onion and bell pepper, and shredded cheese. Pour over a mixture of eggs, milk or half-and-half, sour cream or Greek yogurt, and seasoning. Bake at 350°F / 175°C for 45–55 minutes, or until the center is set and the edges are lightly golden.
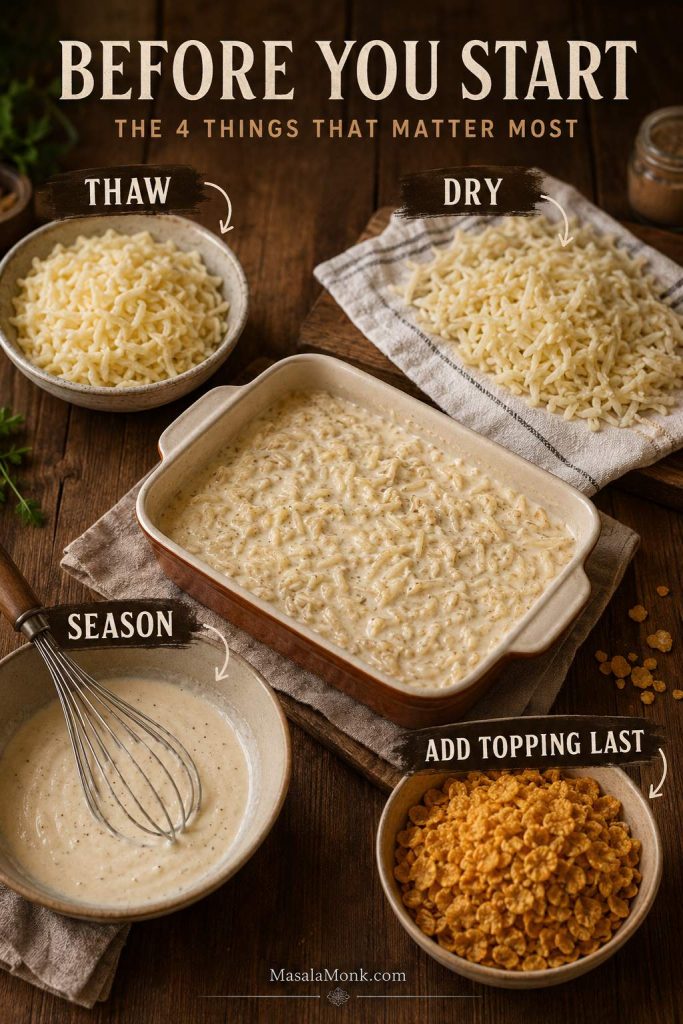
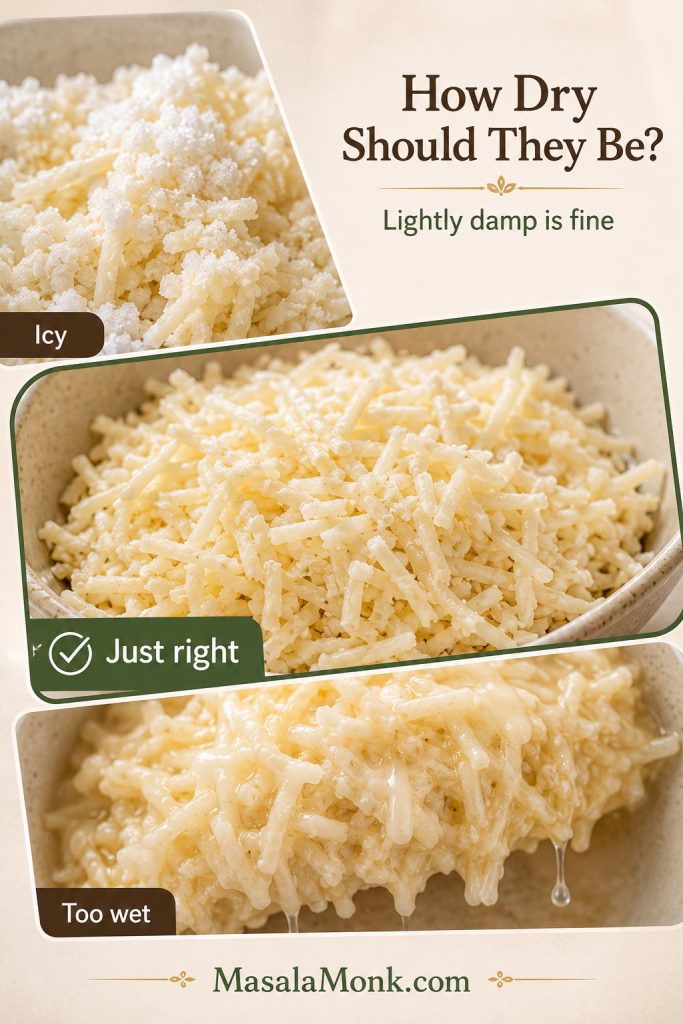
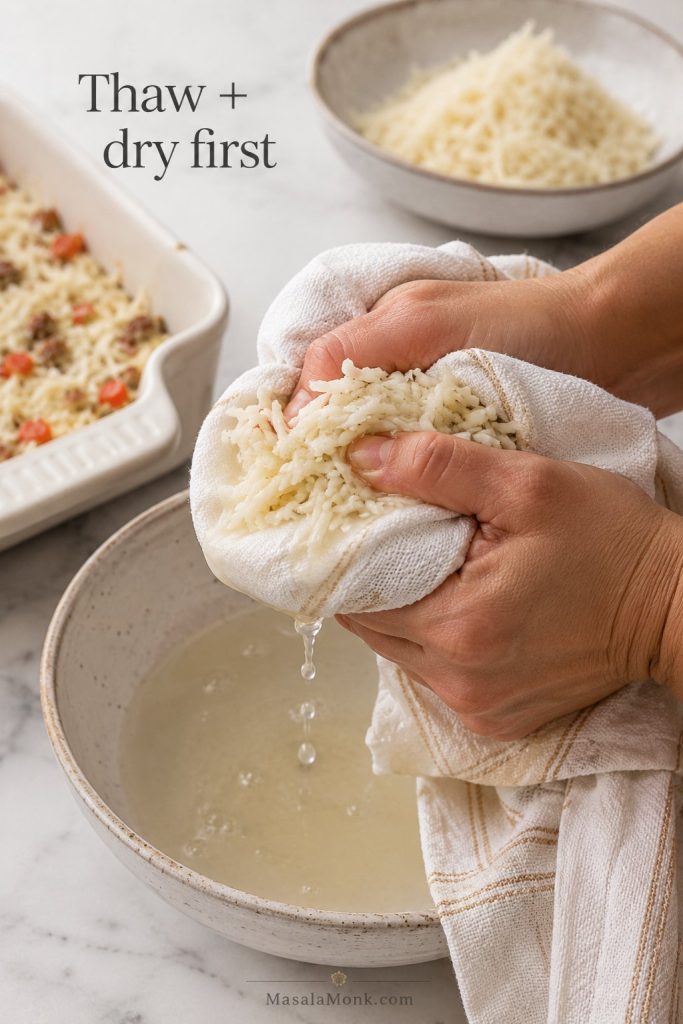
The texture is much better when the hash browns are thawed and excess moisture is removed before baking. This keeps the casserole from turning watery and helps the eggs set more evenly. If that is your main concern, the watery casserole fixes below are worth reading before you assemble the pan. If you assemble it the night before, bake it cold from the fridge and add a few extra minutes as needed.
The finished bake should feel hearty but not heavy: tender eggs, savory sausage, melted cheese, and hash browns that taste like breakfast potatoes instead of a wet potato layer.
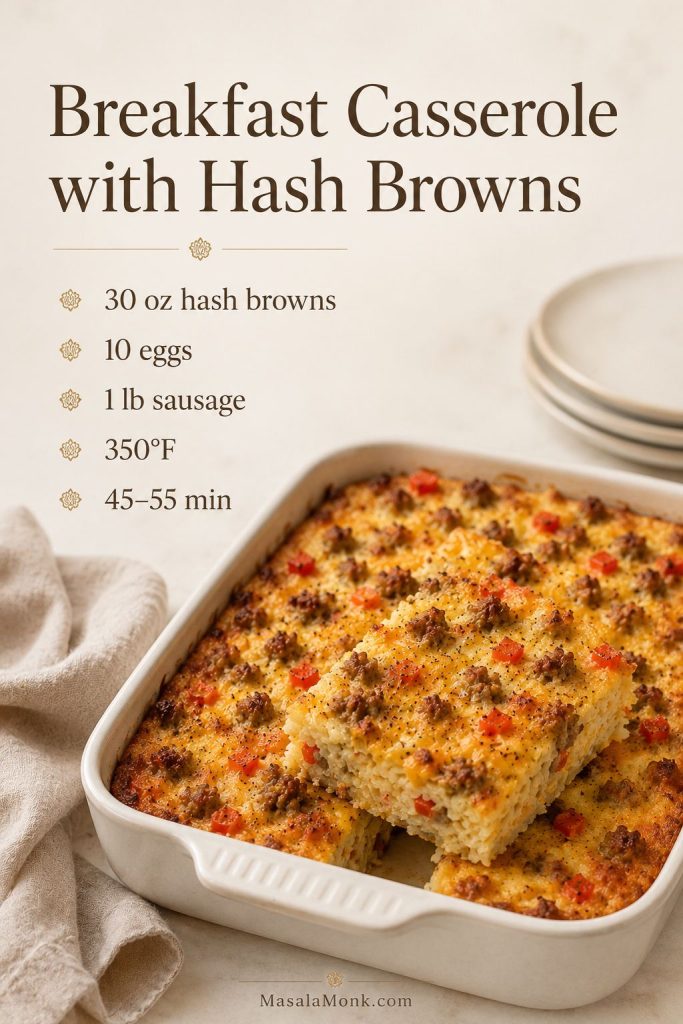
Best default formula: 30 oz / 850 g frozen shredded hash browns + 10 large eggs + 1 lb / 454 g cooked sausage + 2 cups / 225 g cheese + 1 cup / 240 ml milk or half-and-half + ½ cup / 120 g sour cream or Greek yogurt.
This is the version I would choose for a holiday breakfast, a brunch table, or a meal-prep pan because it is sturdy enough to slice but still soft and creamy in the center.
Hash Brown Breakfast Casserole at a Glance
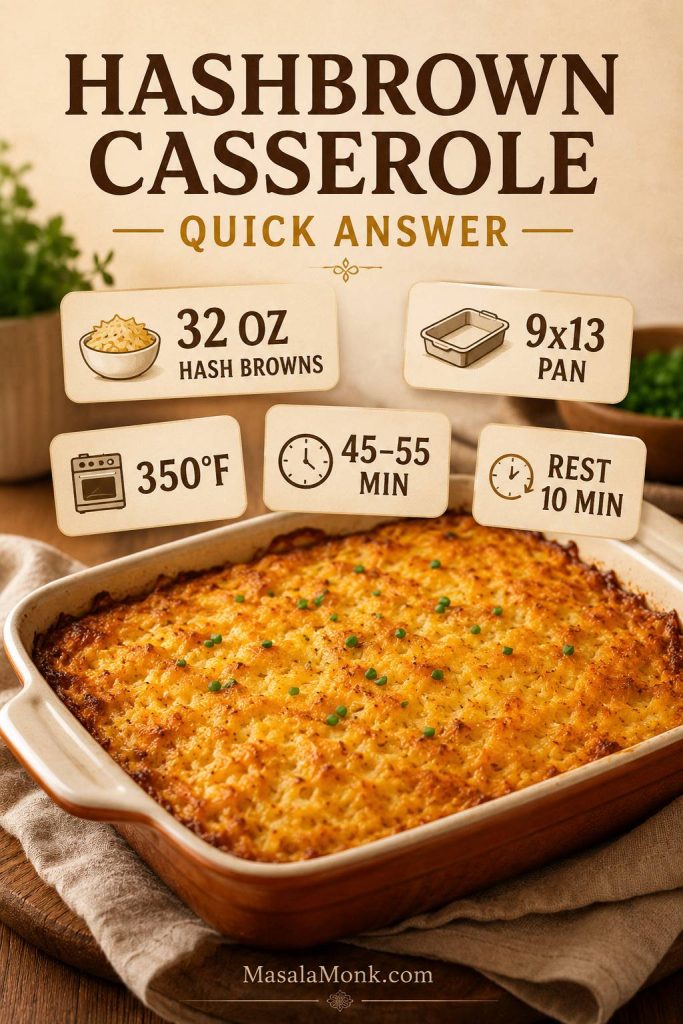
| Best pan | 9×13-inch / 23×33 cm baking dish |
|---|---|
| Oven temperature | 350°F / 175°C |
| Hash browns | 30 oz / 850 g frozen shredded hash browns, thawed and patted dry |
| Eggs | 10 large eggs for balanced texture; 12 for a taller egg bake |
| Default protein | 1 lb / 454 g breakfast sausage, cooked and drained |
| Cheese | 2 cups / about 225 g shredded cheddar, Colby Jack, Monterey Jack, or pepper Jack |
| Bake time | 45–55 minutes, or 55–65 minutes if chilled overnight |
| Make-ahead | Assemble overnight, or prep components separately for the cleanest texture |
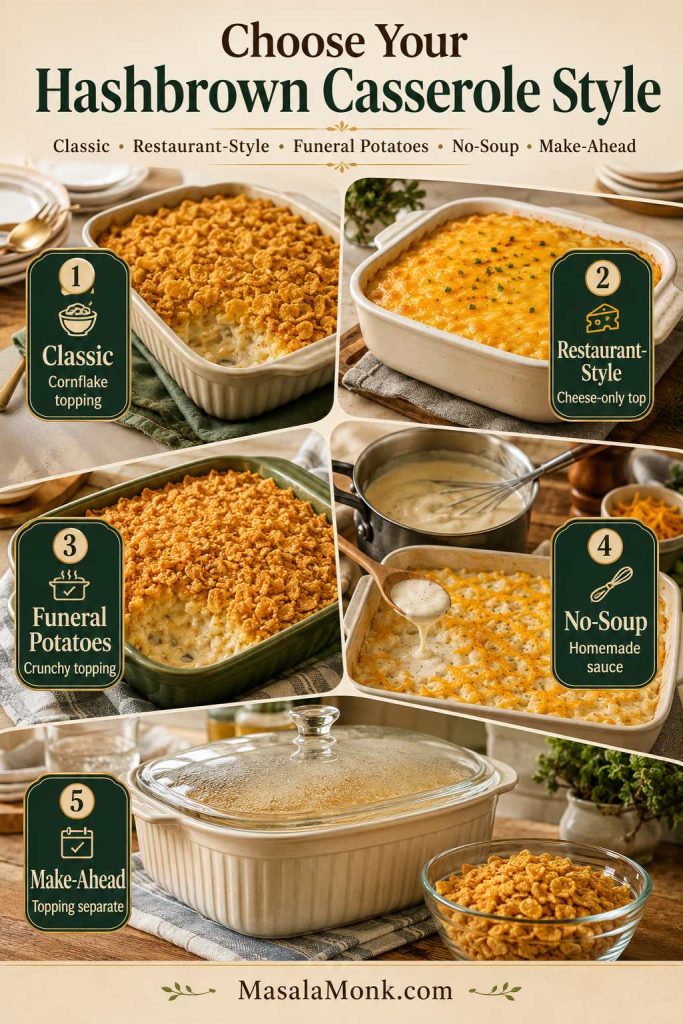
Breakfast Casserole vs Hashbrown Casserole
The phrase “hashbrown casserole” can mean two different dishes. This recipe is a breakfast casserole with hash browns, which means it has eggs, cheese, hash browns, and usually sausage, bacon, ham, or vegetables. It is baked like a brunch egg casserole and served in slices.
A classic side-dish hashbrown casserole is different. That version is usually a creamy potato bake with sour cream, cheddar, cream soup or homemade sauce, butter, and sometimes a crunchy topping. It is served with dinner, holiday meals, potlucks, and barbecue-style mains. This breakfast version stays in the egg-and-brunch lane.
Use this breakfast version when you want eggs and protein in the same pan. Use the side-dish version when you want a cheesy potato casserole to serve next to ham, chicken, barbecue, or a holiday dinner spread.
Why This Hash Brown Breakfast Casserole Works
The best hash brown breakfast casseroles taste like a real breakfast plate baked into one pan: golden potatoes, savory sausage, soft eggs, sweet peppers, and melted cheese. This recipe works because each part is handled before it goes into the dish instead of asking the oven to fix everything at once.
Thawed, dried hash browns do not leak water into the eggs. Cooking and draining the sausage first keeps the casserole savory without making it greasy. A quick sauté gives the onion and bell pepper time to soften and lose some moisture before baking.
Milk or half-and-half keeps the eggs tender, while sour cream or Greek yogurt adds body and creaminess without making the center loose. Dry mustard or Dijon, garlic powder, pepper, and enough salt help season the potatoes, not just the eggs.
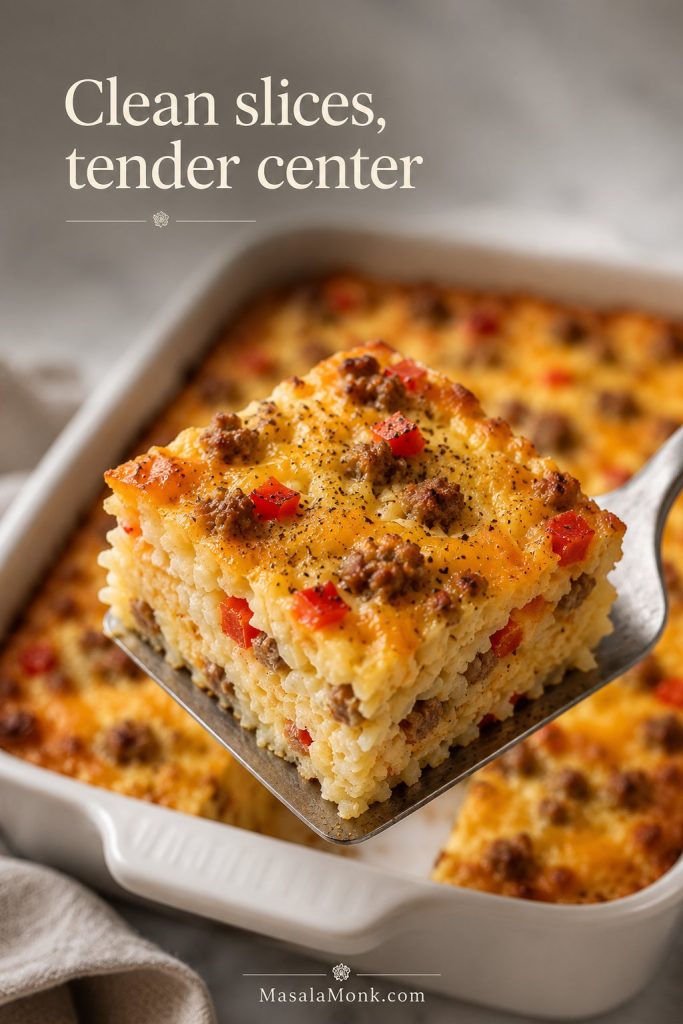
Resting is the quiet step that makes the slices look better. Like many egg bakes, this casserole firms as it sits, so cutting into it right away can make the center look looser than it really is.
Ingredients for Hash Brown Breakfast Casserole
The main version is a sausage breakfast casserole with hash browns, but the same base works with bacon, ham, or vegetables. If you are not sure which potatoes to use, jump to the hash brown comparison before you start. Here is what each ingredient does.
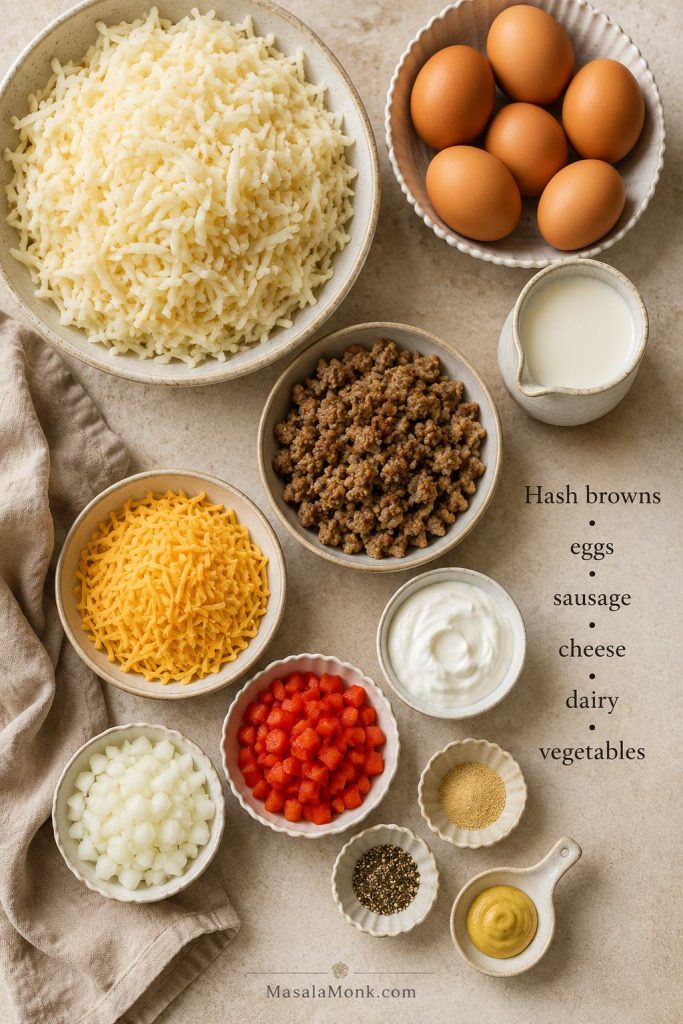
Hash Browns
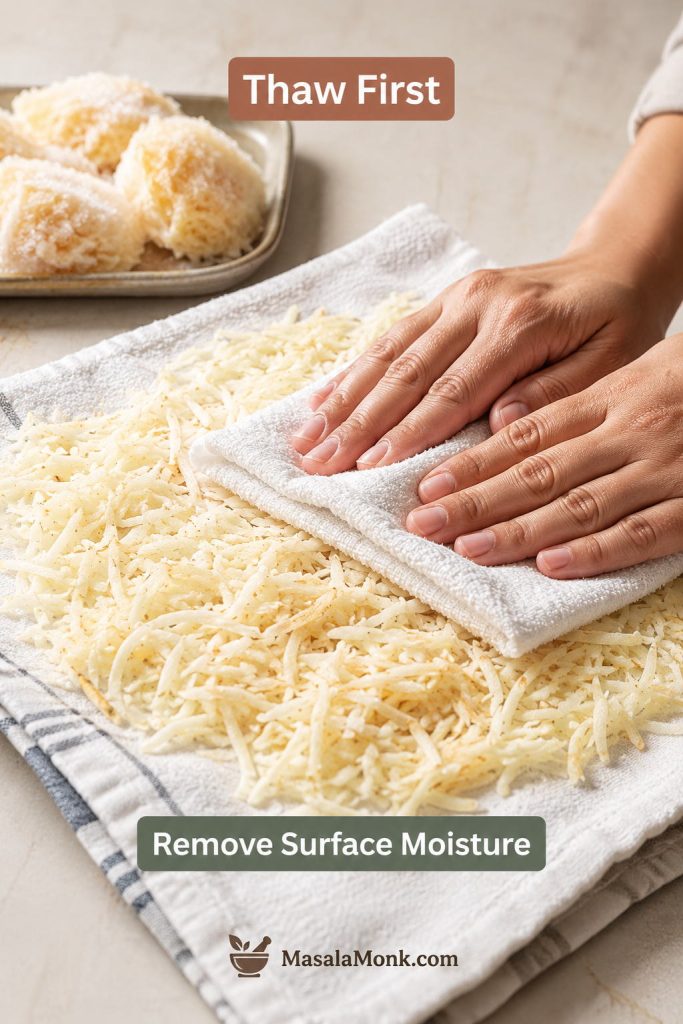
Use 30 oz / 850 g frozen shredded hash browns for the most classic texture. Thaw them first, then pat them dry with paper towels or squeeze gently in a clean kitchen towel if they feel wet. This step is one of the biggest differences between a clean, sliceable casserole and a watery one.
For a more golden potato layer, see the crispy hash brown base option before layering the eggs.
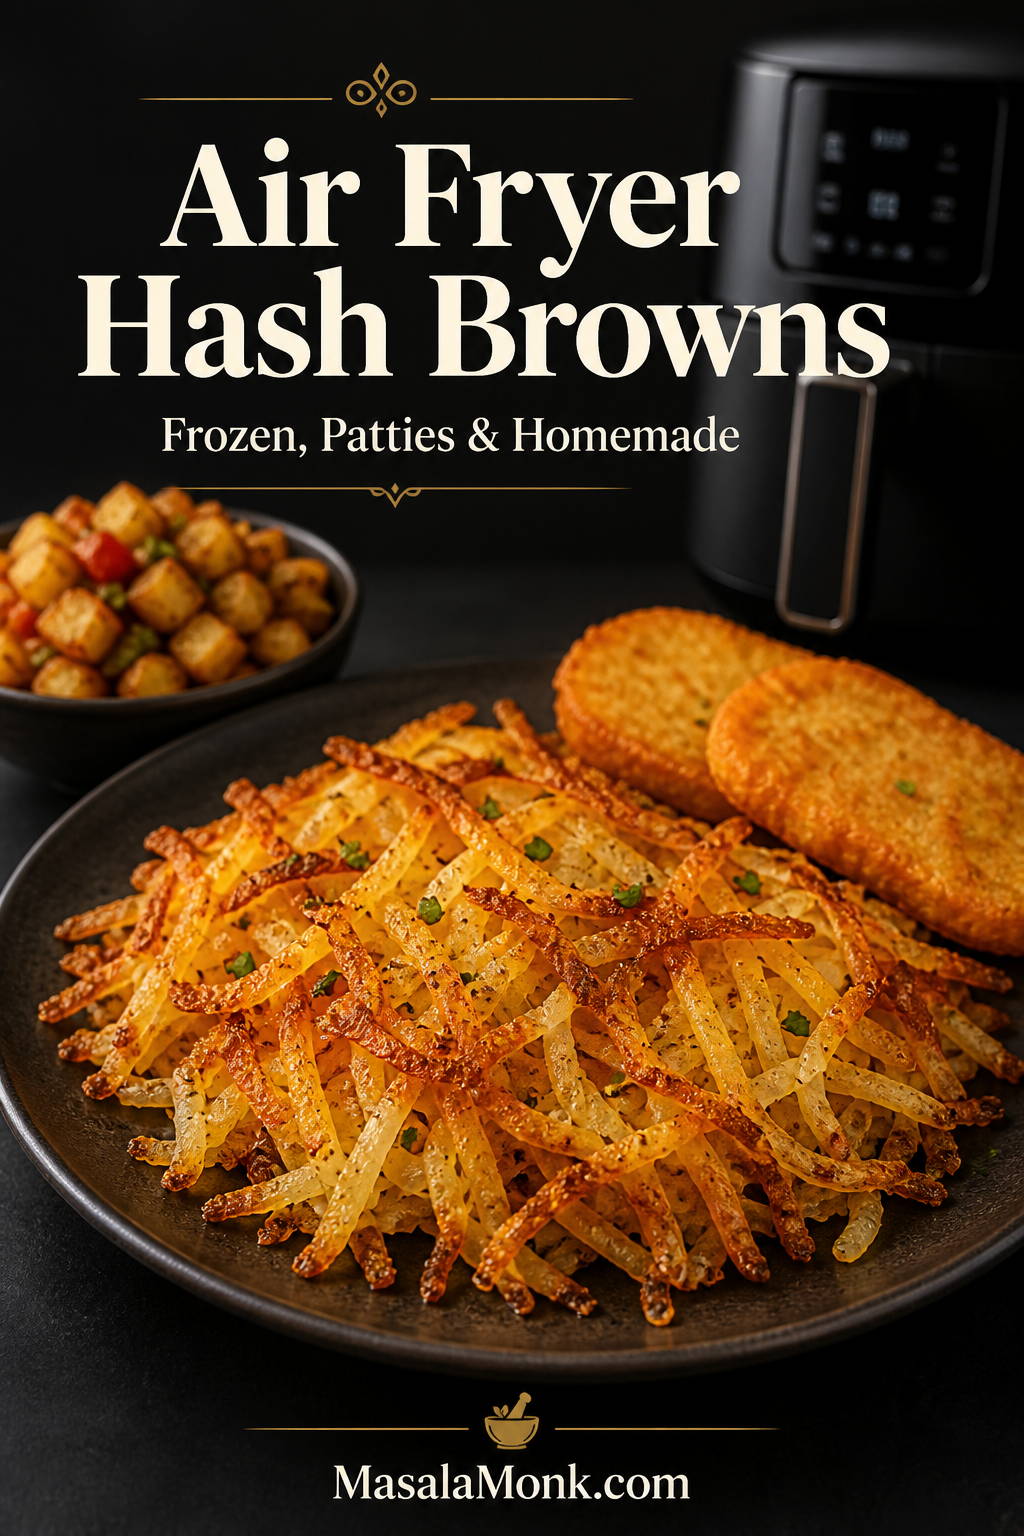
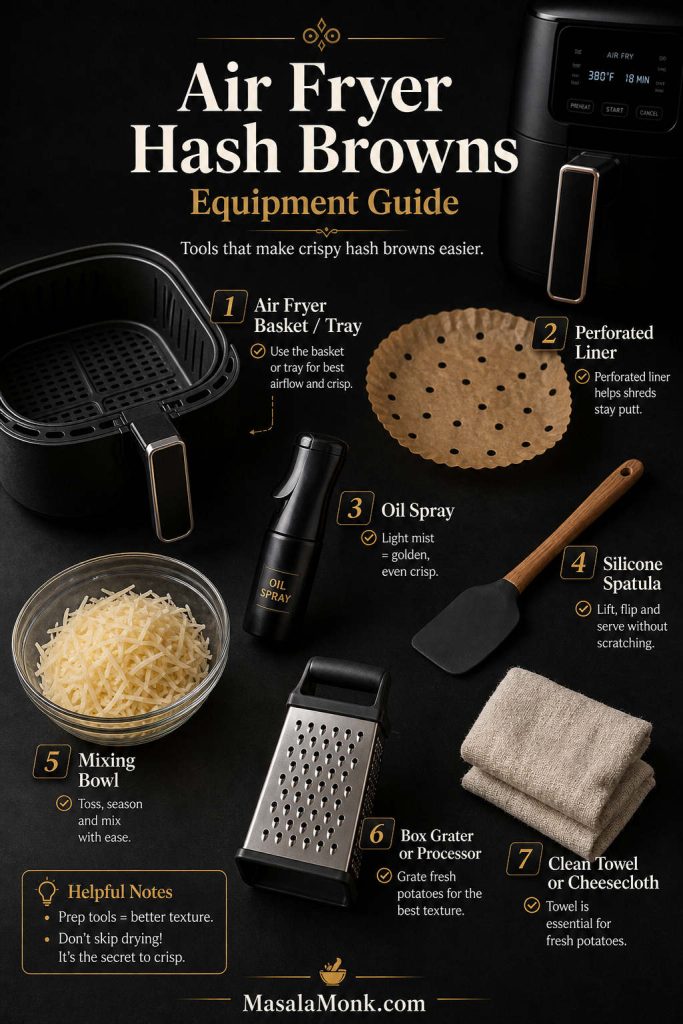
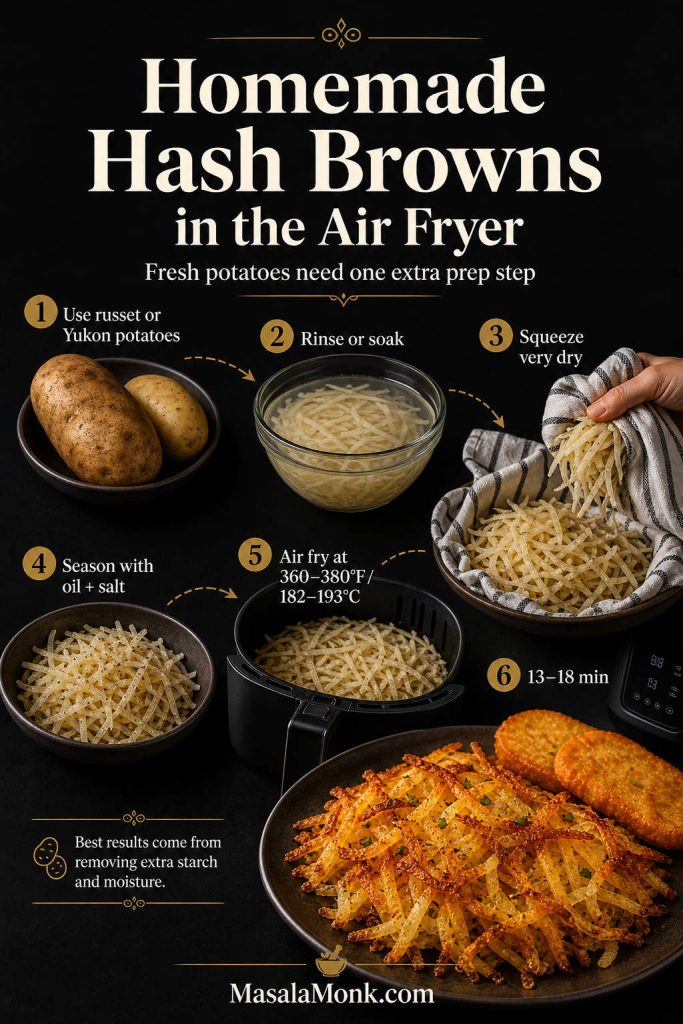
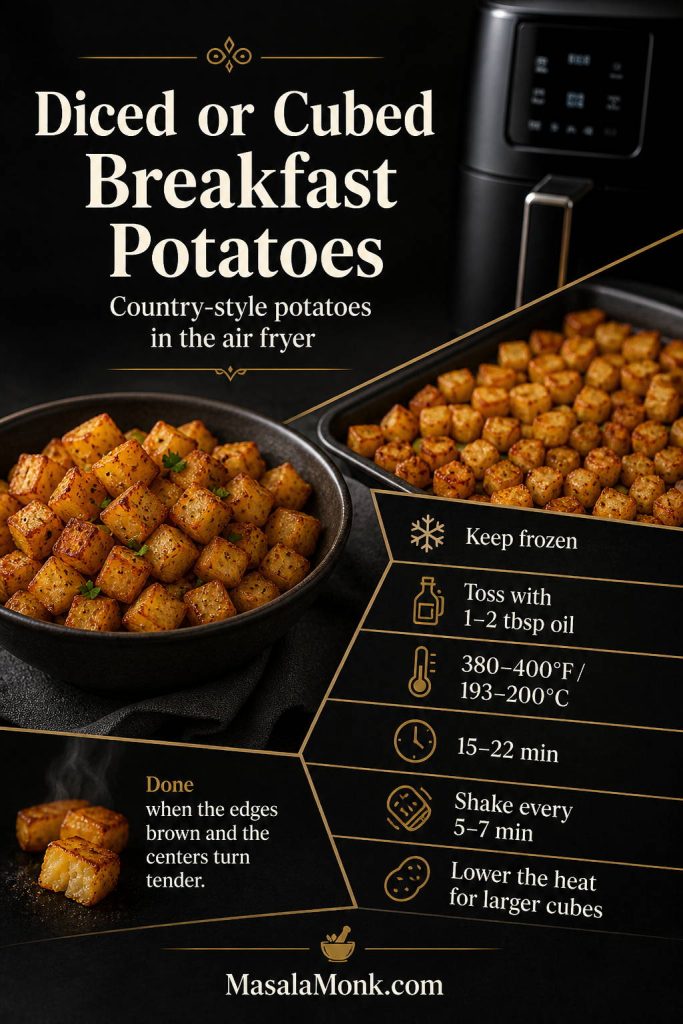
If you are still deciding which kind of potatoes to use, this air fryer hash browns guide is useful because it explains frozen shredded hash browns, patties, diced potatoes, and homemade grated potatoes in more detail.
Eggs
Use 10 large eggs for a creamy, balanced 9×13 casserole. If you want a taller, more egg-forward breakfast bake, use 12 eggs. If you use fewer than 8 eggs in a 9×13 pan, the casserole becomes more potato-heavy and may not hold together as neatly.
Dairy
Use 1 cup / 240 ml whole milk or half-and-half plus ½ cup / 120 g sour cream or Greek yogurt. Whole milk keeps the casserole lighter; half-and-half makes it richer. Sour cream gives a softer, creamier texture and helps the egg layer feel less flat.
Cheese
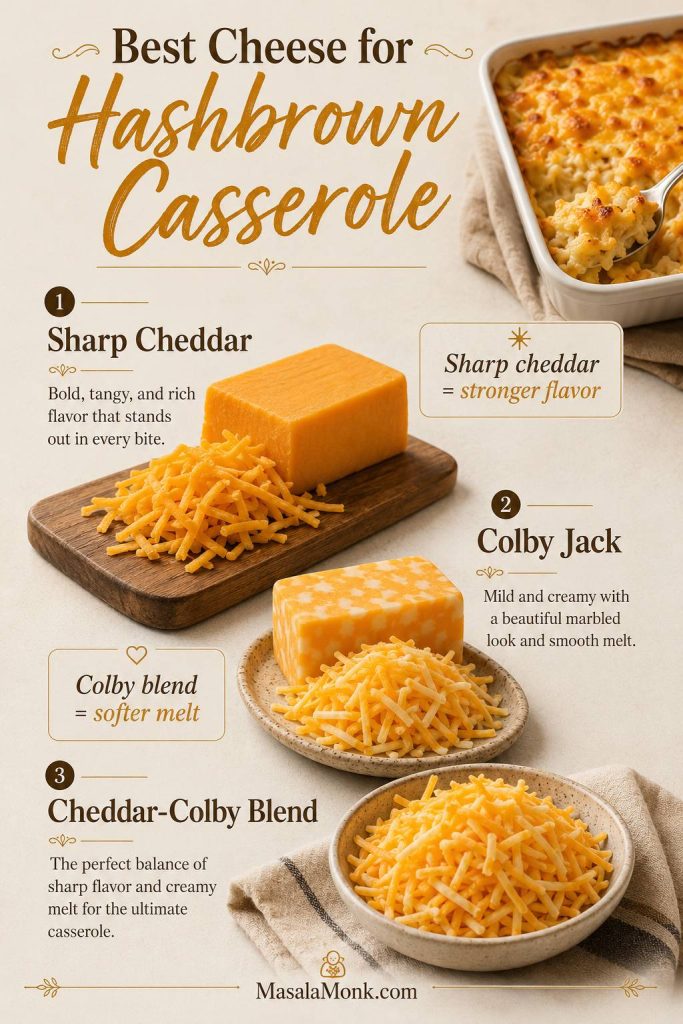
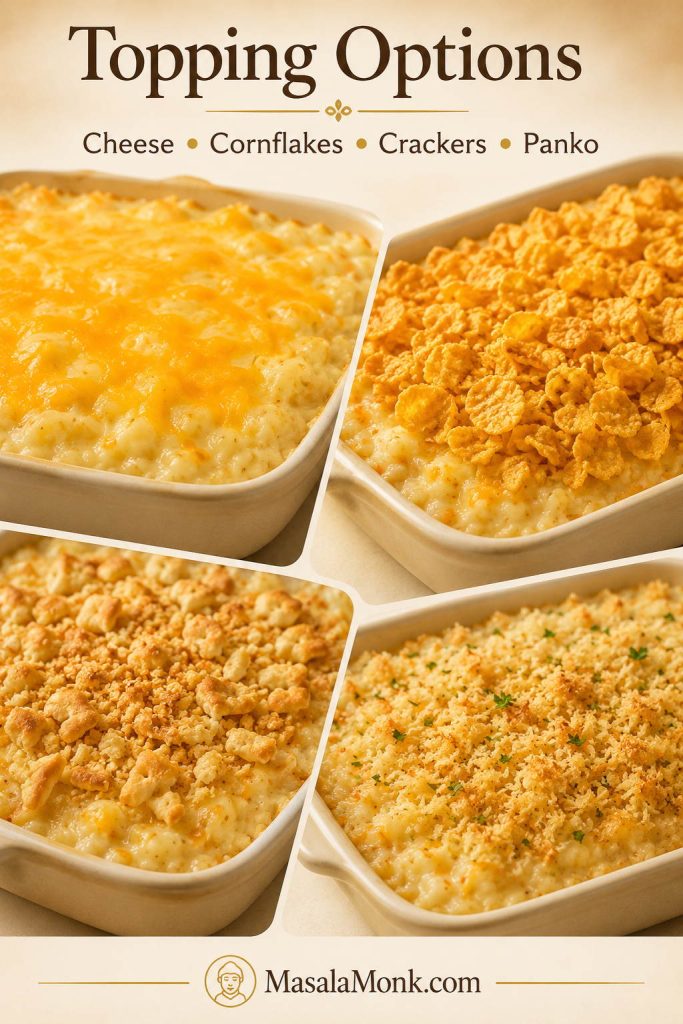
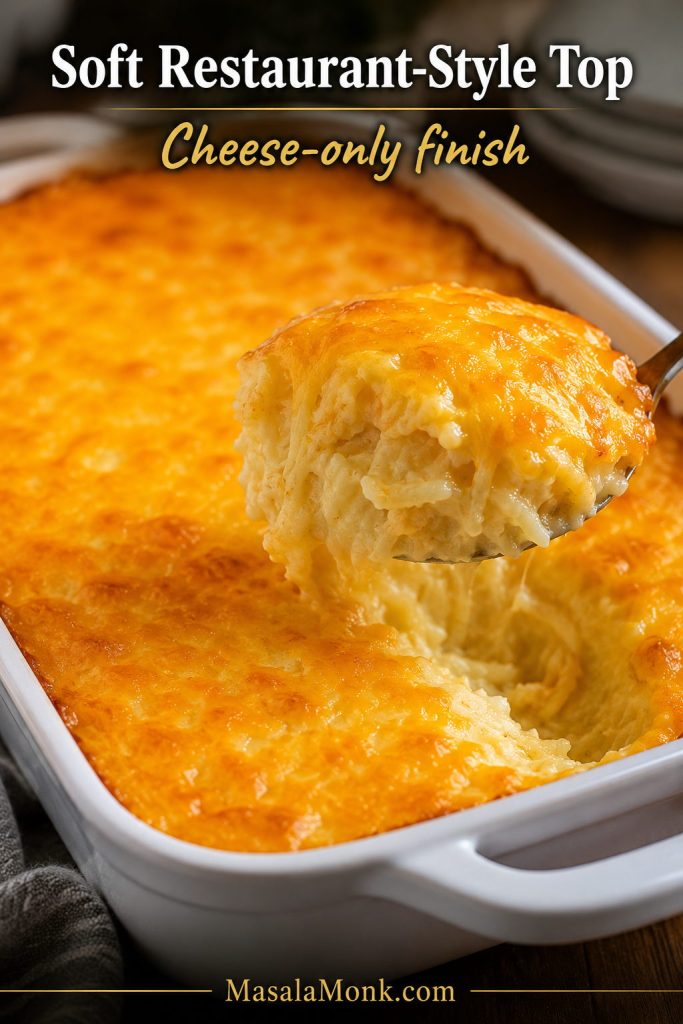
Use 2 cups / about 225 g shredded cheese. Cheddar gives the most classic breakfast-casserole flavor, Colby Jack melts smoothly, Monterey Jack keeps things mild and creamy, and pepper Jack adds a little heat without changing the whole dish. Divide the cheese so some melts into the casserole and some goes on top.
Sausage, Bacon, Ham, or No Meat
The default is 1 lb / 454 g breakfast sausage, cooked and drained. You can replace it with cooked bacon, diced ham, or sautéed vegetables. For a bacon version, cook the bacon first and crumble it before adding it to the pan.
Vegetables and Seasoning
Onion and bell pepper are the safest default because they bring sweetness and color without overwhelming the casserole. Sauté them first. Raw vegetables can release water as they bake, especially mushrooms, spinach, zucchini, and peppers. For seasoning, use garlic powder, black pepper, dry mustard or Dijon, and enough salt to season the potatoes.
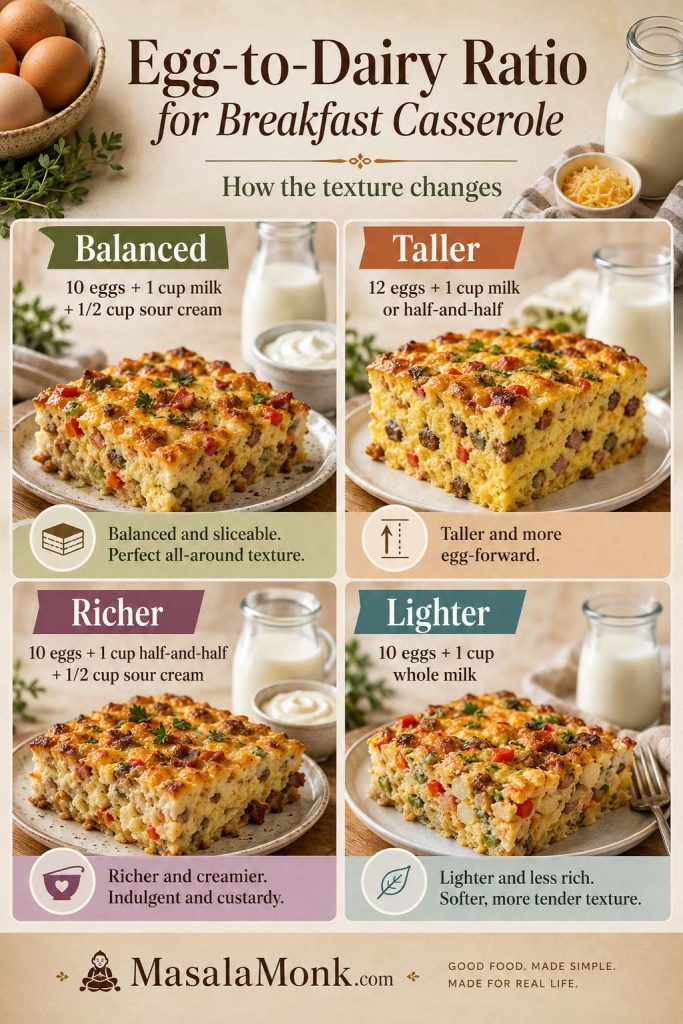
Egg-to-Dairy Ratio for a 9×13 Breakfast Casserole
The egg-to-dairy balance is what keeps the center creamy instead of wet. Use this table if you want to make the bake taller, richer, lighter, or more sliceable.
| Texture Goal | Eggs | Dairy |
|---|---|---|
| Balanced and sliceable | 10 large eggs | 1 cup milk + ½ cup sour cream |
| Taller and more egg-forward | 12 large eggs | 1 cup milk or half-and-half |
| Richer and creamier | 10 large eggs | 1 cup half-and-half + ½ cup sour cream |
| Lighter | 10 large eggs | 1 cup whole milk only |
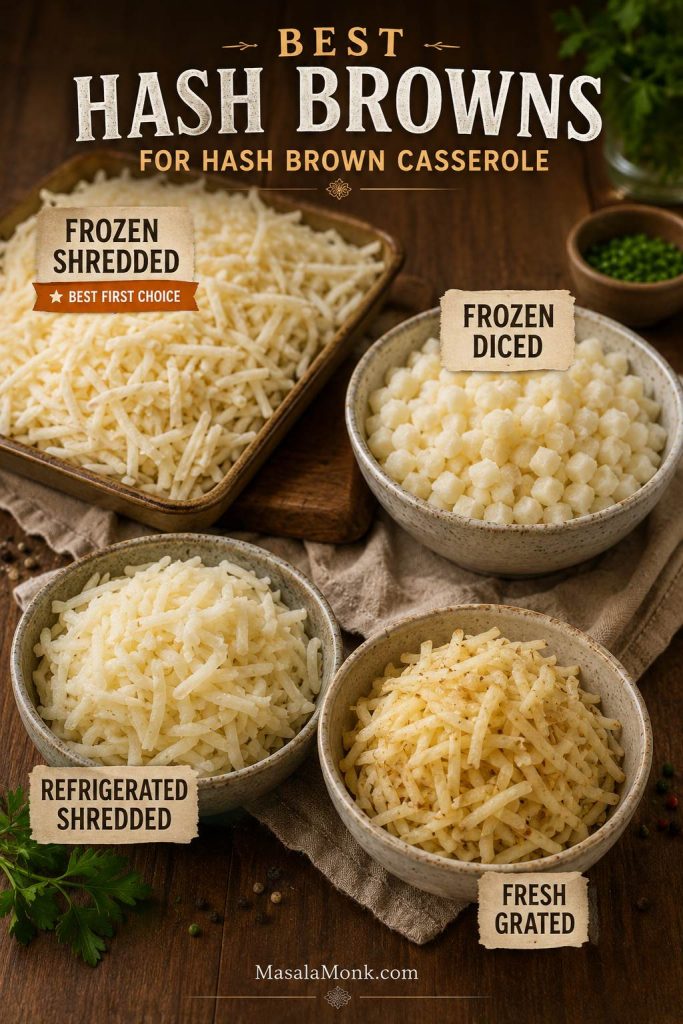
Best Hash Browns for Breakfast Casserole
Most breakfast casserole recipes use frozen shredded hash browns, but they are not the only option. The best choice depends on whether you want a soft, classic casserole, a chunkier potato bite, or a more defined potato layer.
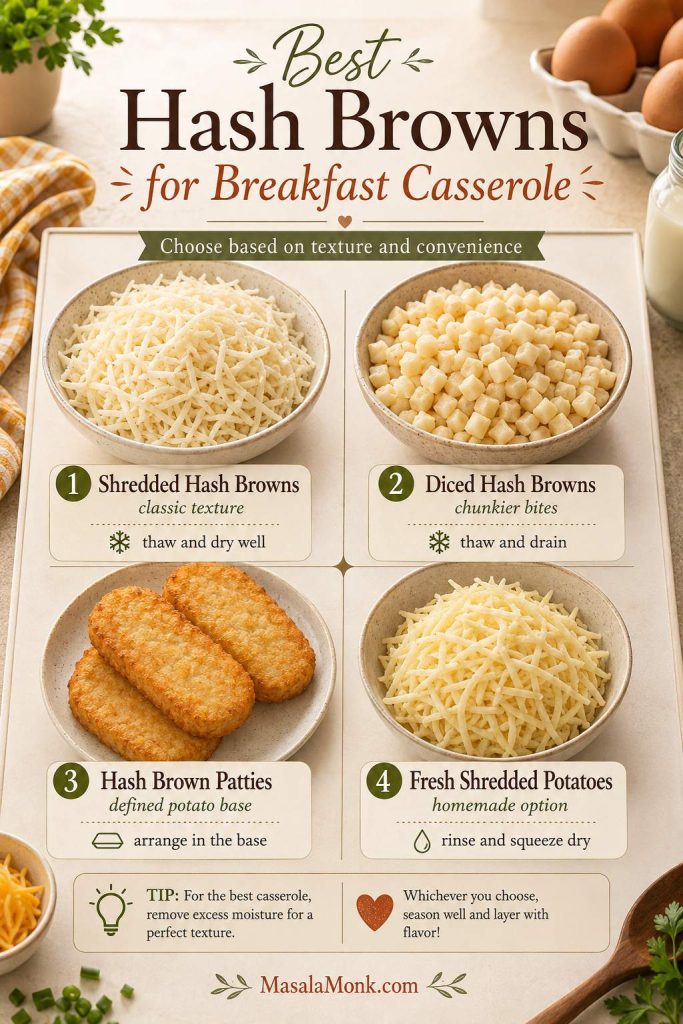
| Hash Brown Type | Best For | How to Use |
|---|---|---|
| Frozen shredded hash browns | Classic breakfast casserole texture | Thaw, pat dry, and layer into the pan. |
| Diced hash browns | Chunkier, potato-forward casserole | Thaw if frozen. Bake time may be slightly longer. |
| Hash brown patties | Defined potato base or shortcut layer | Arrange 8–10 patties in the bottom of a 9×13 pan. |
| Refrigerated shredded hash browns | Fast prep, less thawing | Pat dry if damp. Use the same amount by weight. |
| Fresh shredded potatoes | Homemade version | Rinse, drain, and squeeze very dry before using. |
O’Brien-style hash browns, which usually include diced peppers and onions, also work. Because they already include vegetables, reduce or skip the fresh bell pepper and onion in the recipe, and make sure the potatoes are thawed so the casserole does not bake up watery.
Should You Thaw Hash Browns First?
For this recipe, yes. Thawing is the safer choice because frozen hash browns can release extra moisture into the egg mixture and extend the bake time. Longer bake time can make the edges overcook before the center sets.
The best method is to thaw the hash browns in the refrigerator overnight, then pat them dry. If they feel wet, squeeze them gently in a clean towel. They do not need to be bone-dry, but they should not be icy or dripping.
Can You Use Frozen Hash Browns Without Thawing?
You can bake this with frozen hash browns, but thawed and dried hash browns give a cleaner, less watery casserole. If speed matters more than sliceability, use them frozen and expect a softer center and a longer bake time.
Should You Brown the Hash Browns First?
You do not have to, but it gives the casserole better potato flavor and helps remove moisture. To do it, warm a little butter or oil in a large skillet, add the thawed hash browns, and cook for 5–8 minutes until some of the moisture evaporates and a few edges turn lightly golden. Then spread them into the baking dish.
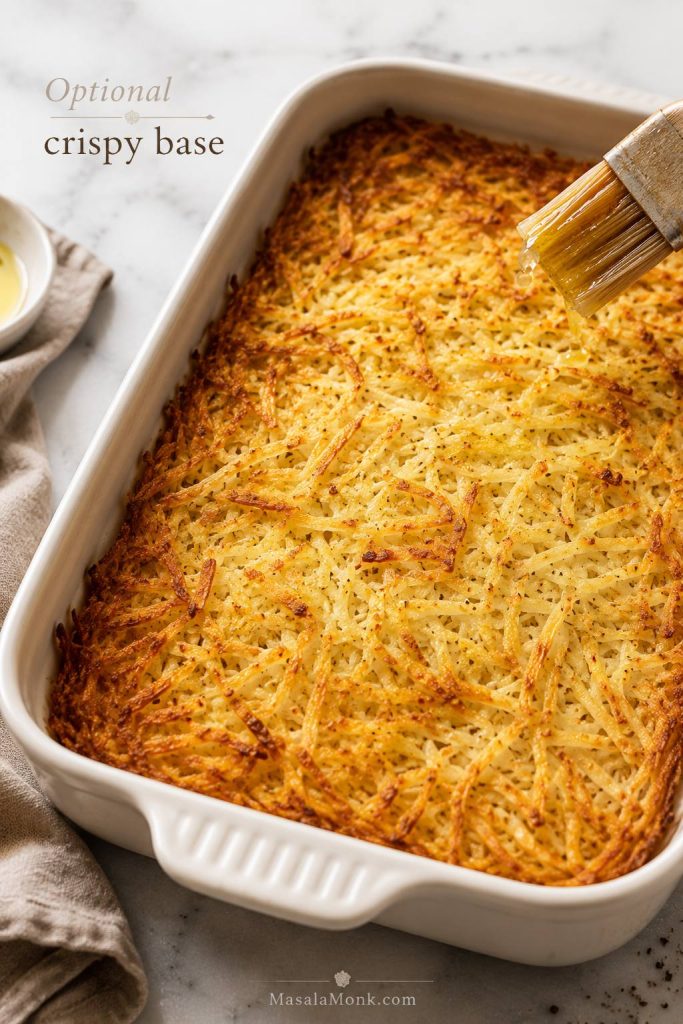
Want a Crispier Hash Brown Base?
If you want the potato layer to taste more like diner-style breakfast potatoes, pre-bake it before adding the eggs. Spread the thawed hash browns in the greased baking dish, drizzle with 2 tablespoons melted butter or oil, and bake at 400°F / 200°C for 15–20 minutes. Then add the sausage, cheese, and egg mixture and bake as directed.
This step is optional, but it makes the edges more golden and gives the casserole a more memorable first bite.
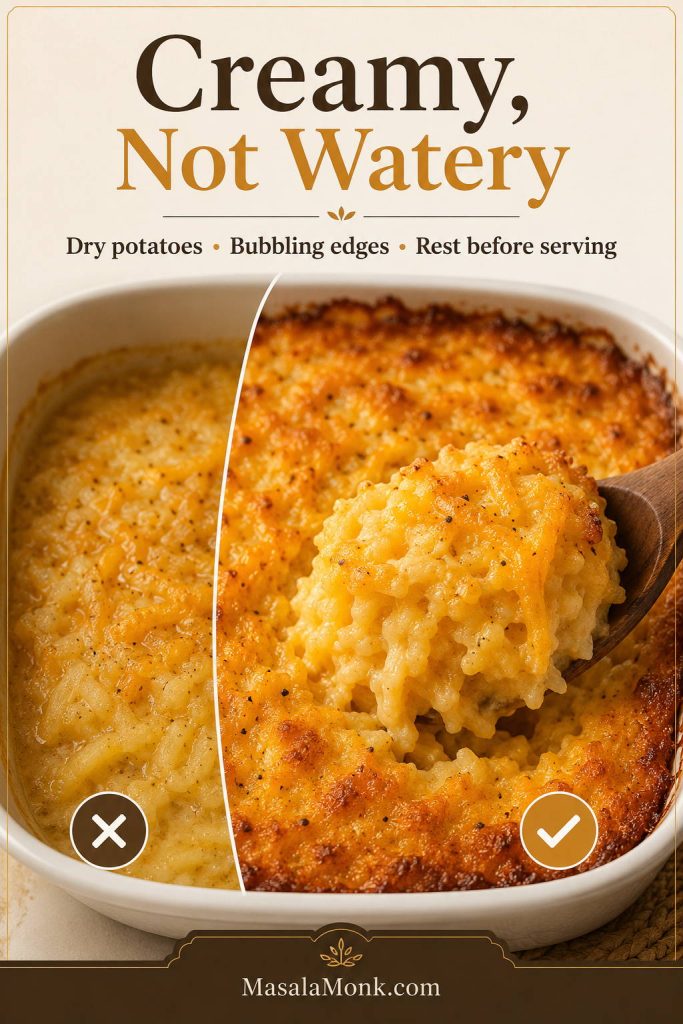
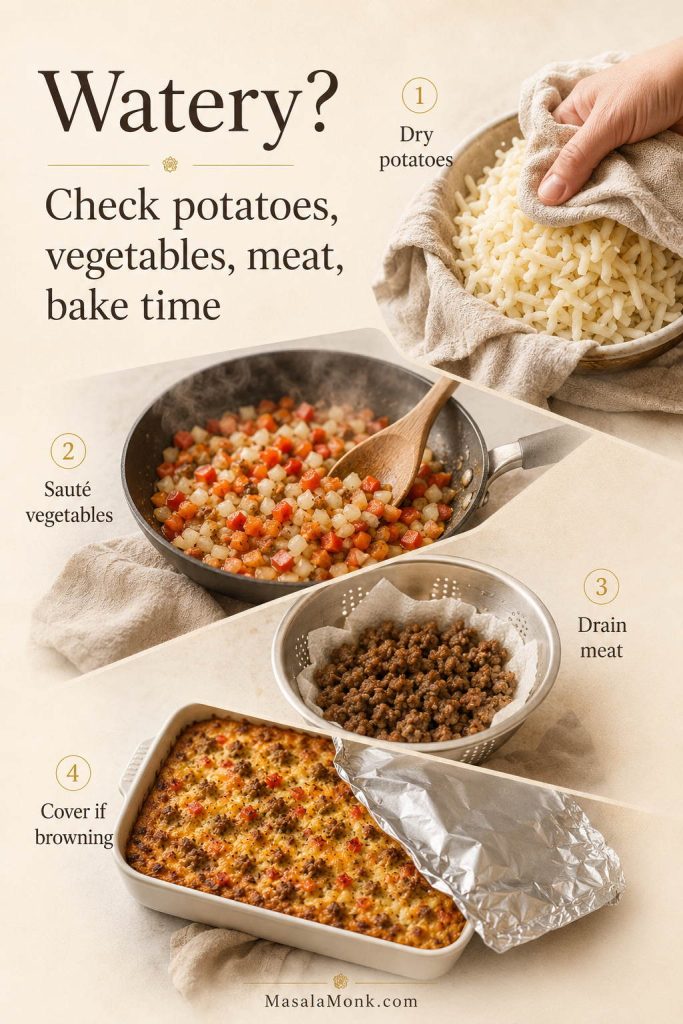
How to Keep It from Getting Watery
The biggest mistake with breakfast casserole with hash browns is adding too much hidden moisture. Hash browns, vegetables, sausage, bacon, and spinach can all release liquid into the eggs if they are not handled first.
| Moisture Source | What to Do | Why It Helps |
|---|---|---|
| Frozen shredded hash browns | Thaw and pat dry before layering. | Prevents icy potatoes from watering down the egg mixture. |
| Bell peppers and onions | Sauté for 3–5 minutes first. | Softens the vegetables and cooks off extra water. |
| Mushrooms | Cook until their liquid evaporates. | Stops them from leaking water into the eggs. |
| Spinach | Wilt and squeeze dry before adding. | Keeps the casserole from turning loose or watery. |
| Sausage or bacon | Cook and drain well. | Prevents grease from pooling around the eggs. |
The cleanest slices come from thawed hash browns, cooked vegetables, drained meat, and a wide 9×13-inch dish. For extra potato flavor, lightly brown the hash browns in a skillet before layering them into the casserole.
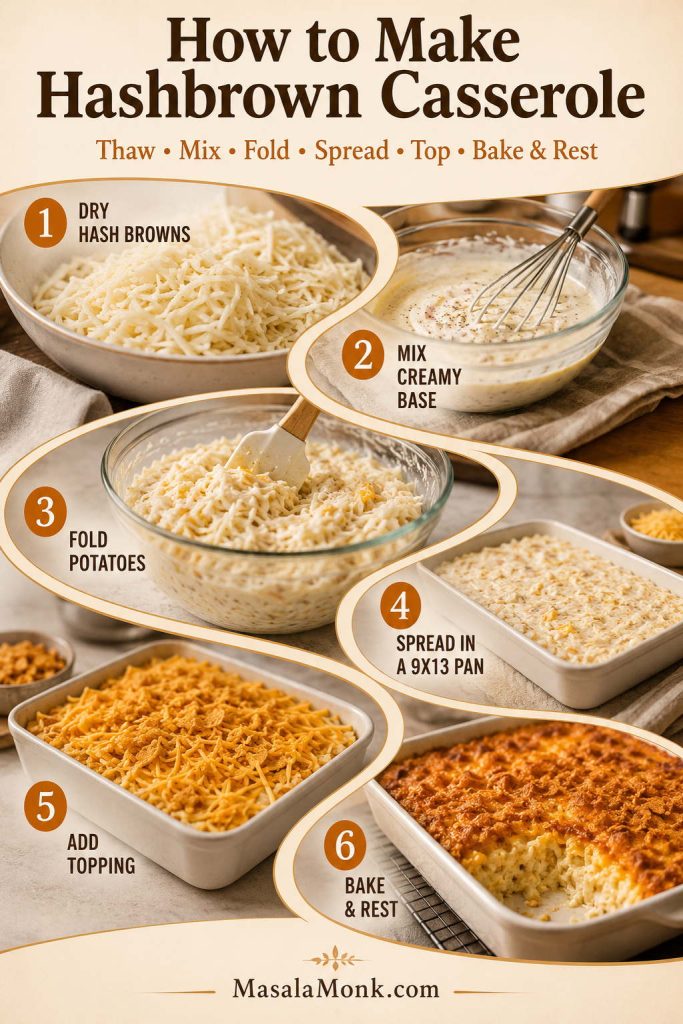
How to Make Breakfast Casserole with Hash Browns
This is the basic 9×13 method. It is simple, but the order matters. For exact amounts while you cook, use the recipe card.
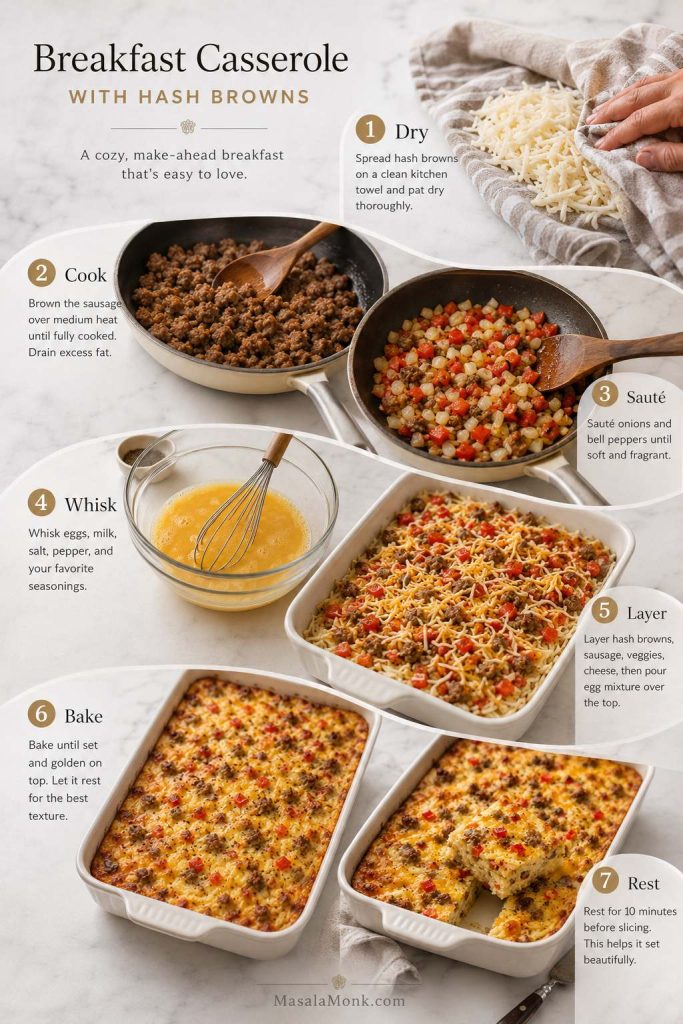
1. Prepare the Baking Dish
Grease a 9×13-inch / 23×33 cm baking dish with butter or nonstick spray. A 3-quart baking dish works well. Avoid a very deep smaller dish unless you are prepared to bake longer.
2. Thaw and Dry the Hash Browns
Thaw the frozen shredded hash browns, then pat them dry. Spread them evenly in the bottom of the prepared baking dish. Season this layer lightly because potatoes need more seasoning than eggs.
3. Cook the Sausage
Cook the sausage in a large skillet over medium heat, breaking it into small pieces. Drain off excess grease. If you are using bacon, cook it until crisp and crumble it. If you are using ham, it usually only needs to be diced.
4. Sauté the Vegetables
In the same skillet, cook the onion and bell pepper for a few minutes until slightly softened. This keeps them from releasing too much water into the casserole.
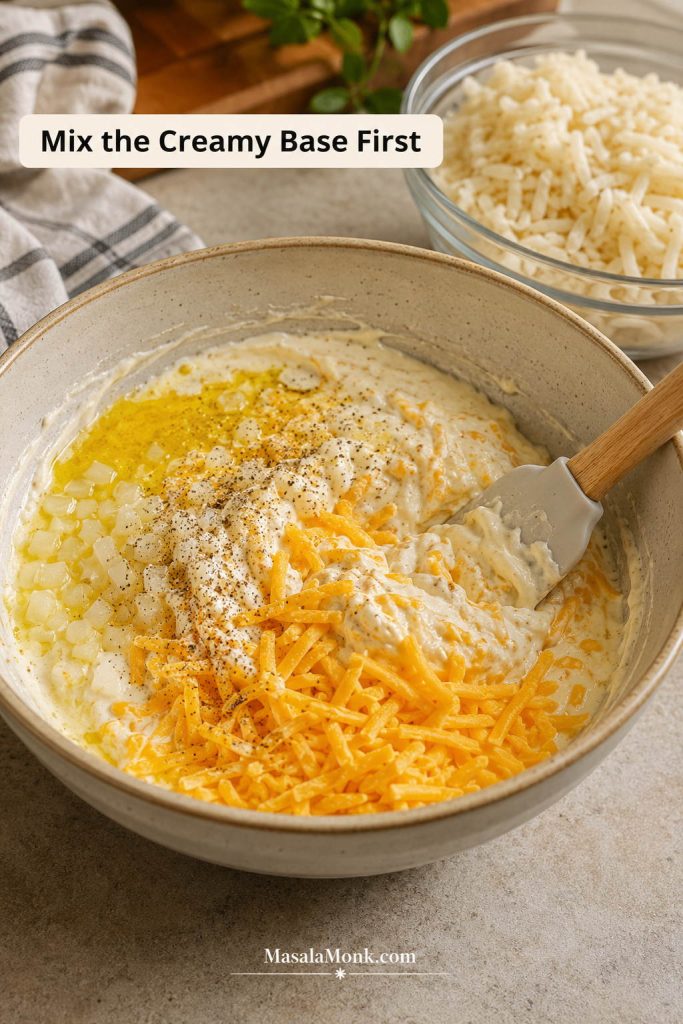
5. Whisk the Egg Mixture
In a large bowl, whisk the eggs, milk or half-and-half, sour cream or Greek yogurt, garlic powder, dry mustard or Dijon, black pepper, and salt. Whisk until the mixture looks smooth and evenly blended.
6. Layer the Casserole
Scatter the cooked sausage, sautéed vegetables, and most of the cheese over the hash browns. Pour the egg mixture evenly over the top. Use a spatula to gently nudge the filling so the eggs settle into the layers. Finish with the remaining cheese.
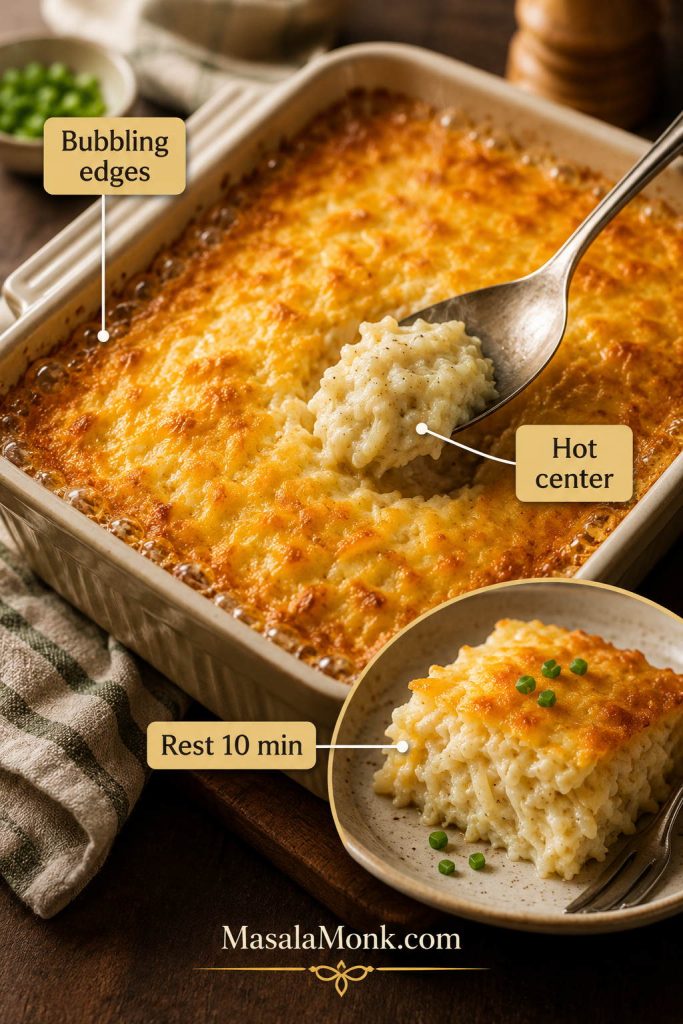
7. Bake Until Set
Bake at 350°F / 175°C for 45–55 minutes, or until the edges are puffed and lightly golden and the center no longer jiggles loosely. Do not wait for the whole top to look dry; the casserole will continue to firm as it rests. If it was refrigerated overnight, it may need 55–65 minutes.
8. Rest Before Slicing
Let the casserole rest for 10–15 minutes before cutting. This improves the texture and makes the slices cleaner.
If this is your first time making it, start with the sausage-and-cheddar version below. It gives you the cleanest baseline for texture, seasoning, and bake time, then the bacon, ham, spicy, vegetarian, and patty versions are easy to adjust later.
Recipe Card: Breakfast Casserole with Hash Browns
This make-ahead breakfast casserole bakes hash browns, eggs, sausage, and cheese into a creamy, savory 9×13 breakfast bake with golden edges and clean slices. It is hearty enough for brunch, holidays, or breakfast meal prep.
Equipment
- 9×13-inch / 23×33 cm baking dish
- Large skillet
- Large mixing bowl
- Whisk
- Spatula
- Foil, optional for overnight storage or if the top browns too quickly
Ingredients
- 30 oz / 850 g frozen shredded hash browns, thawed and patted dry
- 1 lb / 454 g breakfast sausage
- ½ cup / 75 g diced onion
- 1 cup / 120–150 g diced bell pepper
- 10 large eggs
- 1 cup / 240 ml whole milk or half-and-half
- ½ cup / 120 g sour cream or plain Greek yogurt
- 2 cups / about 225 g shredded cheddar, Colby Jack, or Monterey Jack, divided
- 1 tsp kosher salt, or to taste depending on sausage and cheese
- ½ tsp black pepper
- ½ tsp garlic powder
- ½ tsp dry mustard or 1 tsp Dijon mustard
- Optional: ¼ tsp smoked paprika, a few dashes hot sauce, sliced scallions for serving
Instructions
- Preheat the oven to 350°F / 175°C. Grease a 9×13-inch baking dish.
- Thaw the hash browns and pat them dry. Spread them evenly in the prepared baking dish.
- Cook the sausage in a large skillet over medium heat until browned and fully cooked. Break it into small crumbles, then drain excess grease.
- Add the diced onion and bell pepper to the skillet and cook for 3–5 minutes, until slightly softened. Scatter the sausage and vegetables over the hash browns.
- Sprinkle about 1½ cups of the cheese over the potato and sausage layer. Save the remaining ½ cup for the top.
- In a large bowl, whisk the eggs, milk or half-and-half, sour cream or Greek yogurt, salt, pepper, garlic powder, and dry mustard or Dijon until smooth.
- Pour the egg mixture evenly over the casserole. Gently press the filling with a spatula so the egg mixture settles through the layers. Sprinkle the remaining cheese on top.
- Bake for 45–55 minutes, until the edges are lightly golden, the center is set, and the middle no longer sloshes when the dish is gently moved. If baking straight from the refrigerator, plan on 55–65 minutes.
- Rest for 10–15 minutes before slicing. Top with scallions or hot sauce if you like.
Notes
- Use 12 eggs instead of 10 if you want a taller, more egg-forward casserole.
- While you prep the sausage and vegetables, you can let the eggs sit out for 15–20 minutes so they blend more easily and bake a little more evenly.
- Thaw and dry the hash browns before baking for the cleanest texture.
- Replace the sausage with 2½–3 cups cooked vegetables for a no-meat version.
- Use 1½ cups / 225 g diced ham instead of sausage for a ham version.
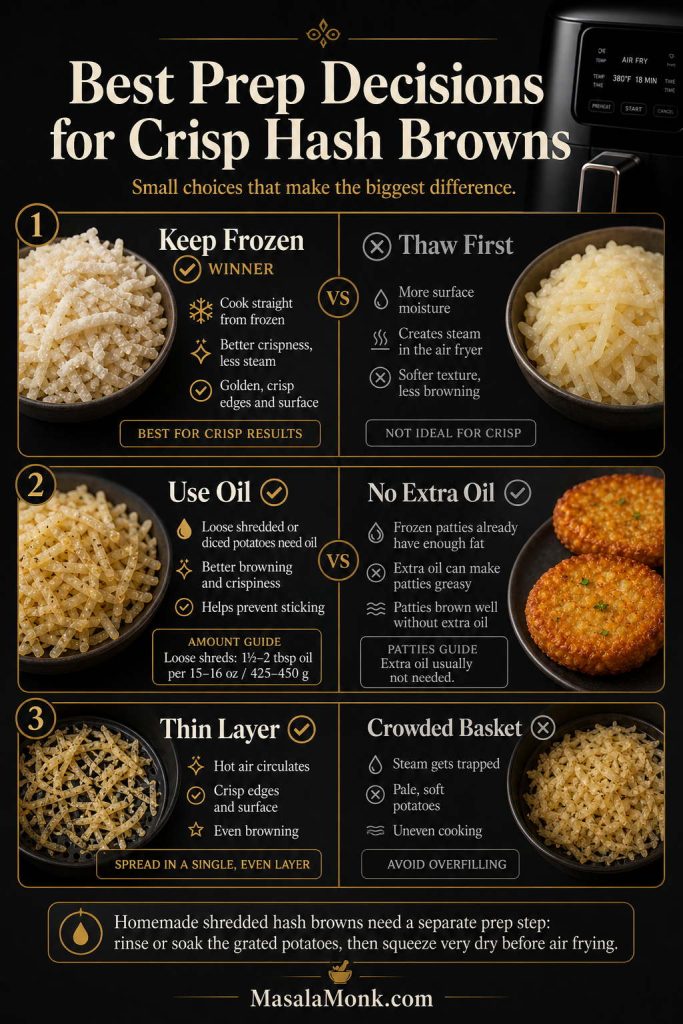
- Use about 1 cup cooked crumbled bacon for a bacon version. For an easier prep option, cook the strips first using this air fryer bacon recipe, then crumble them into the casserole.
- If using hash brown patties, use 8–10 patties in the bottom of the pan and expect a slightly longer bake.
- To avoid a watery casserole, do not add raw mushrooms, raw spinach, or icy hash browns directly to the pan.
- If the top browns before the center is set, loosely cover the dish with foil.
- Egg-based casseroles should be cooked until set; for food safety, egg dishes are commonly cooked to 160°F / 71°C. See the FDA’s egg safety guidance for more detail: What You Need to Know About Egg Safety.
Overnight Breakfast Casserole with Hash Browns
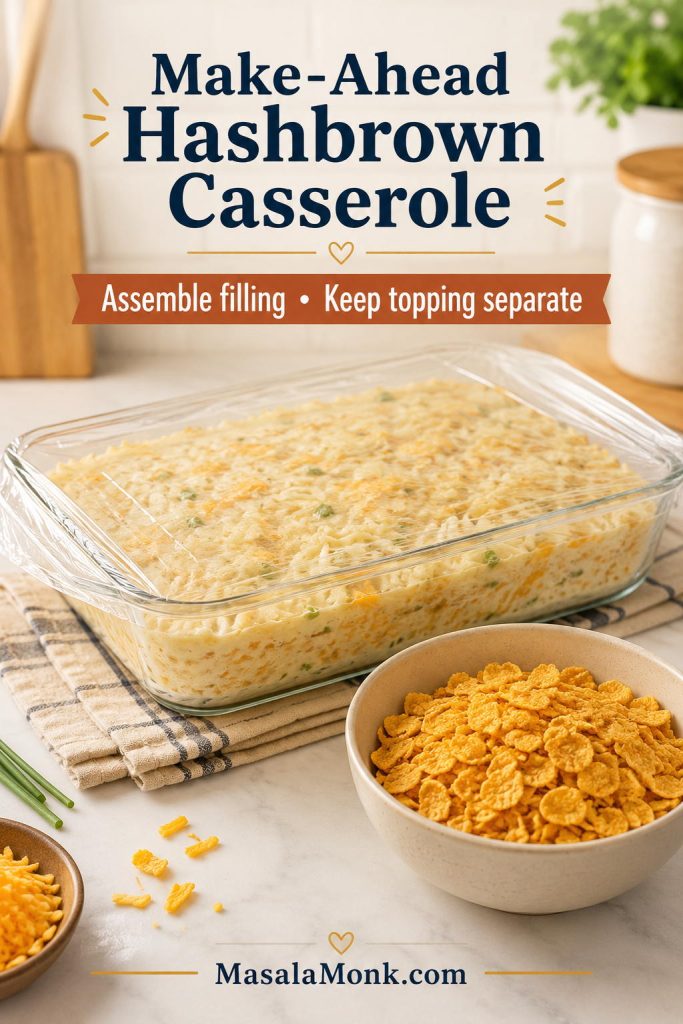
This casserole is ideal for making ahead because the ingredients are sturdy and the 9×13 format feeds a group. You have two good options: the easiest overnight method and the best-texture method.
If you are making this for guests, the overnight version is less about saving ten minutes and more about saving your morning. The sausage is cooked, the cheese is ready, the potatoes are handled, and breakfast can go into the oven before the kitchen gets busy.

Easy Overnight Method
Assemble the entire casserole in the baking dish, cover tightly, and refrigerate overnight. In the morning, let the dish sit at room temperature while the oven preheats. Bake as directed, adding 5–10 minutes if the center is still loose.
Best-Texture Overnight Method
For the cleanest texture, prep the components separately. Cook and drain the sausage, sauté the vegetables, thaw and dry the hash browns, and whisk the egg mixture. Refrigerate everything separately, then assemble just before baking. This prevents the potatoes from sitting in the egg mixture all night and gives a neater slice.
Overnight tip: If your hash browns are very wet or your vegetables are raw, the casserole can turn watery by morning. Dry the potatoes well, cook the vegetables first, and drain the meat before assembling.
Can You Bake It Straight from the Fridge?
Yes. A cold casserole usually needs extra time. Start checking around 50 minutes, but do not be surprised if it takes 55–65 minutes. When the top browns quickly while the center is still soft, cover the dish loosely with foil and keep baking.
If you are baking from cold, use the doneness cues rather than the clock alone.
Sausage, Bacon, Ham, and No-Meat Hash Brown Breakfast Casserole
Once the base is set, this recipe becomes very flexible. Sausage is the classic choice, bacon makes it smoky, ham makes it perfect for leftovers, and the no-meat version works well when the vegetables are cooked first. Pick the version that fits your morning rather than changing the whole recipe.
For the most dependable first batch, use sausage, cheddar or Colby Jack, thawed shredded hash browns, and the 10-egg base. Bacon, ham, cream cheese, pepper Jack, and extra vegetables all work, but they change salt, moisture, richness, or bake time.
If you are using patties instead of shredded potatoes, go straight to the hash brown patty version because the setup and bake time are slightly different.
If your family already has a “usual” breakfast casserole version, this is the section to make it yours. Some houses are sausage-and-cheddar houses, some are bacon-and-pepper-Jack houses, and some are firmly leftover-ham-after-Easter houses.
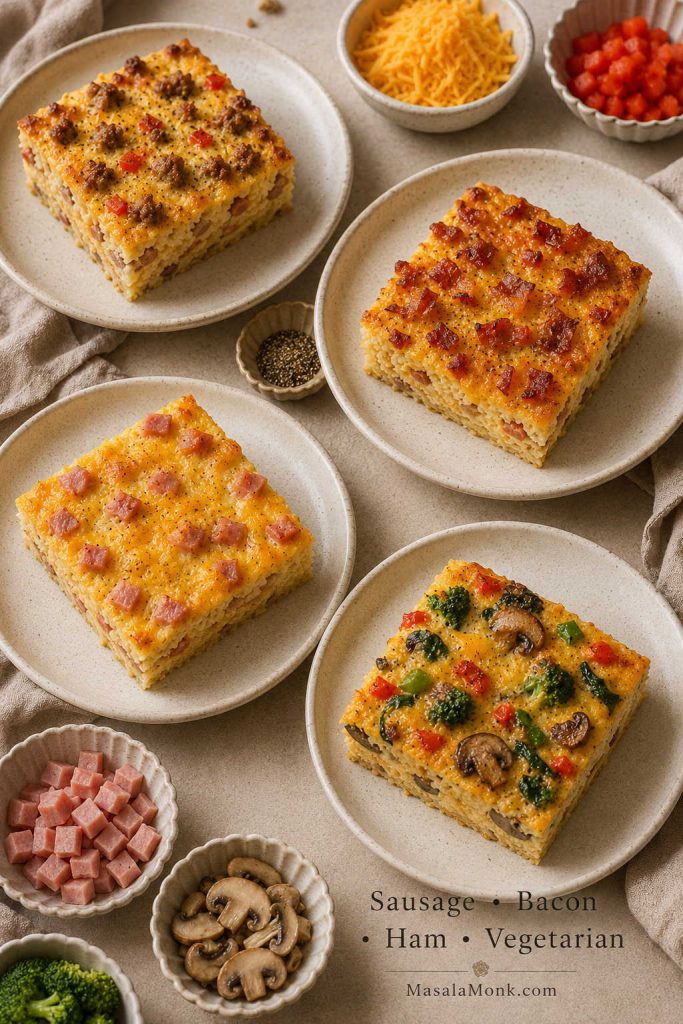
Sausage Version
This is the default version and the most classic. Use 1 lb / 454 g breakfast sausage, cooked and drained. Mild sausage gives a family-friendly flavor, while hot sausage adds more punch. If your sausage is very salty, reduce the added salt in the egg mixture.
Bacon Version
Replace the sausage with 8–12 oz raw bacon, cooked until crisp and crumbled, or about 1 cup cooked bacon pieces. Bacon is saltier than sausage, so go easy on extra salt. For a loaded version, use half sausage and half bacon.
Ham and Cheese Version
Use 1½ cups / about 225 g diced ham, or up to 12 oz / 340 g for a ham-heavy version. This is especially useful after Easter, Christmas, or any big breakfast where leftover ham is already in the fridge. Cheddar, Swiss, Monterey Jack, and Colby Jack all work well here.
Vegetarian Version
Skip the meat and add more vegetables. Good choices include sautéed mushrooms, bell peppers, onions, spinach, broccoli, and scallions. The key is to cook watery vegetables first. Spinach should be wilted and squeezed dry. Mushrooms should be sautéed until their liquid cooks off.
For a no-meat 9×13 casserole, use about 2½–3 cups cooked vegetables in place of the sausage. A good mix is 1 cup bell pepper, ¾ cup mushrooms, ½ cup onion, and 1 cup spinach that has been wilted and squeezed dry. Add an extra ½ cup cheese if you want the casserole to feel richer without meat.
Cream Cheese Version
A richer version starts with 4 oz / 115 g softened cream cheese stirred into the warm cooked sausage before it goes into the casserole. This makes the filling extra creamy and hearty. Keep the sour cream in the egg mixture or reduce it slightly if you prefer a lighter texture.
Spicy Version
Use pepper Jack cheese, hot breakfast sausage, diced jalapeño, and a few dashes of hot sauce in the egg mixture for a version that tastes warmer and sharper without losing the potato-and-egg comfort. A little smoked paprika or chili powder also works well.
Gluten-Free Notes
The casserole can be naturally gluten-free, but check labels carefully. Some sausage, frozen hash browns, seasoning blends, and shredded cheeses may include additives or cross-contact warnings. Use certified gluten-free ingredients if needed.
Breakfast Casserole with Hash Brown Patties
Hash brown patties make a more defined potato layer and are a useful shortcut. Instead of shredded hash browns, arrange 8–10 frozen hash brown patties in a single layer in the bottom of a greased 9×13-inch baking dish. They can overlap slightly if needed.
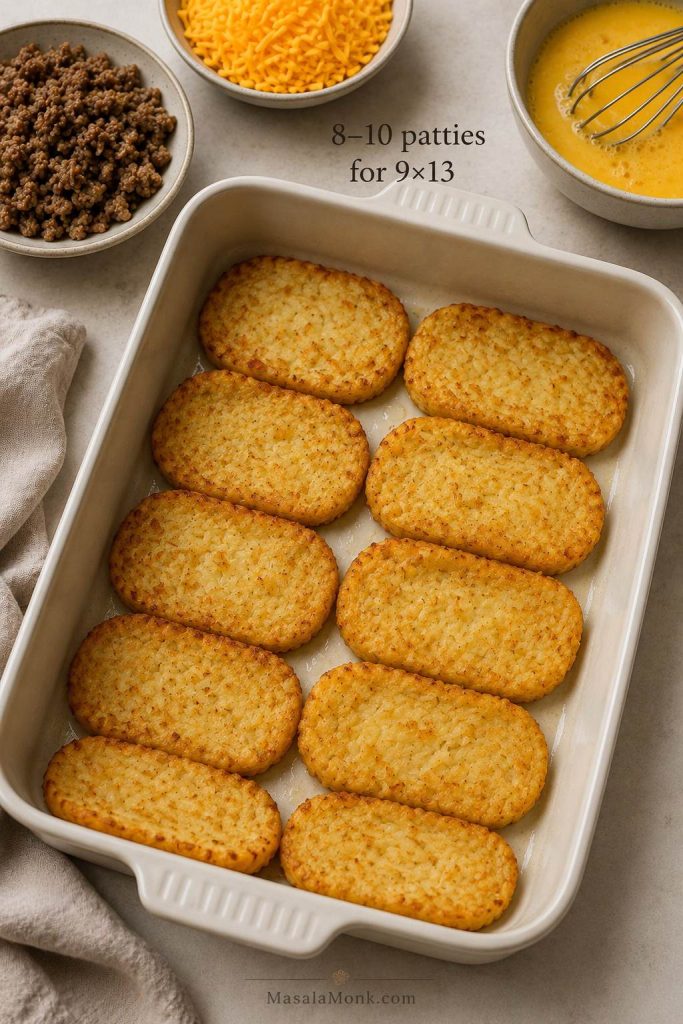
Top the patties with cooked sausage, bacon, or ham, then add cheese and pour the egg mixture over everything. Because patties are denser than shredded hash browns, the bake time may land closer to 50–60 minutes. Let the casserole rest before slicing so the patty layer and egg layer hold together.
| Patty Setup | Amount for 9×13 Pan |
|---|---|
| Hash brown patties | 8–10 frozen patties |
| Eggs | 10 large eggs, or 9 if using fewer toppings |
| Milk or half-and-half | 1 cup / 240 ml |
| Cheese | 2 cups / 225 g |
| Protein | 1 lb sausage or 1½ cups diced ham |
For a more structured patty-style bake, cover the dish with foil for the first 25 minutes, then uncover and bake another 20–30 minutes until the edges are golden and the center is set. This helps the egg mixture cook through without drying out the cheese on top too early.

Patty version shortcut: Use 8–10 hash brown patties, 10 eggs, 1 cup / 240 ml milk or half-and-half, 2 cups / 225 g cheese, and 1½ cups diced ham or 1 lb cooked sausage. Use 9 eggs only if your pan is less loaded.
Can You Make It in a Slow Cooker?
You can make a breakfast casserole with hash browns in a slow cooker, but the texture will be softer and more scoopable than the oven version. It will not have the same golden edges or clean slices.
For a slow cooker version, layer thawed hash browns, cooked sausage or ham, vegetables, cheese, and egg mixture in a greased slow cooker. Cook on low until the eggs are set, and avoid holding it too long after cooking because eggs can turn rubbery.
Start checking around 3–4 hours on low, depending on your slow cooker size and how full it is. Avoid cooking on high if you want a softer egg texture; the edges can overcook before the center sets.
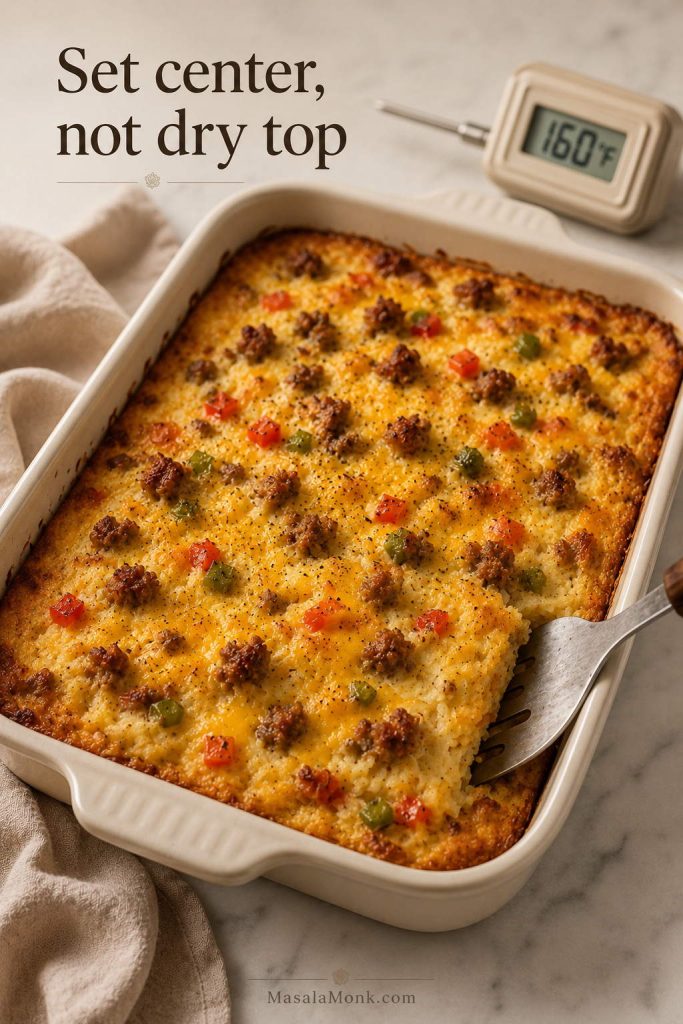
How to Tell When It’s Done
Breakfast casserole is done when the center is set, the edges are puffed, and the top is lightly golden. The middle should not slosh when you gently shake the dish. A knife inserted near the center should come out mostly clean, though a little melted cheese is normal.
If you use a food thermometer, the center of an egg-based casserole should reach 160°F / 71°C. This is especially helpful when baking a cold overnight casserole, a deeper pan, or a loaded version with extra meat and vegetables.
A good finished casserole should not look dry or stiff. The center should be set enough to slice after resting, but the eggs should still look tender and slightly creamy around the potatoes.
Try not to bake it until the top looks dry all the way across. A breakfast egg bake should look set, puffed, and lightly golden, but still moist inside. The rest time will finish the texture without drying out the eggs.
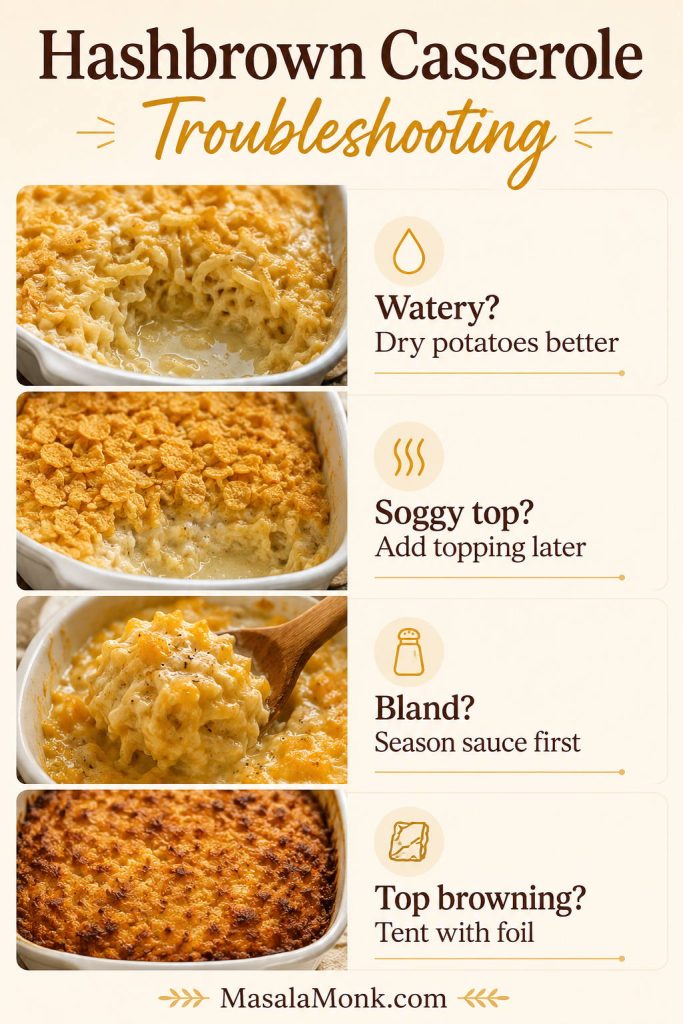
Troubleshooting: Watery, Rubbery, Bland, or Loose
Most problems come down to moisture, bake time, or balance. Use this table if your casserole is watery, greasy, bland, or hard to slice.
| Problem | Likely Cause | Fix |
|---|---|---|
| Watery casserole | Wet hash browns, raw vegetables, or too much liquid | Thaw and dry the hash browns. Sauté vegetables first. Drain spinach, mushrooms, sausage, and bacon well. |
| Rubbery eggs | Overbaking or too little dairy | Bake just until set. Use milk, half-and-half, sour cream, or Greek yogurt for tenderness. |
| Center not set | Cold pan, deep dish, frozen potatoes, or too many add-ins | Keep baking in 5–10 minute increments. Cover the top loosely with foil if it is browning too fast. |
| Greasy casserole | Sausage or bacon was not drained | Drain cooked meat before layering it into the dish. |
| Bland potatoes | Hash browns were not seasoned | Season the egg mixture well and lightly season the potato layer before adding toppings. |
| Casserole falls apart | Cut too soon or too little egg for the amount of filling | Rest 10–15 minutes before slicing. Use 10–12 eggs for a full 9×13 pan. |
| Top browns too quickly | Oven runs hot or cheese is exposed too long | Cover loosely with foil and continue baking until the center sets. |
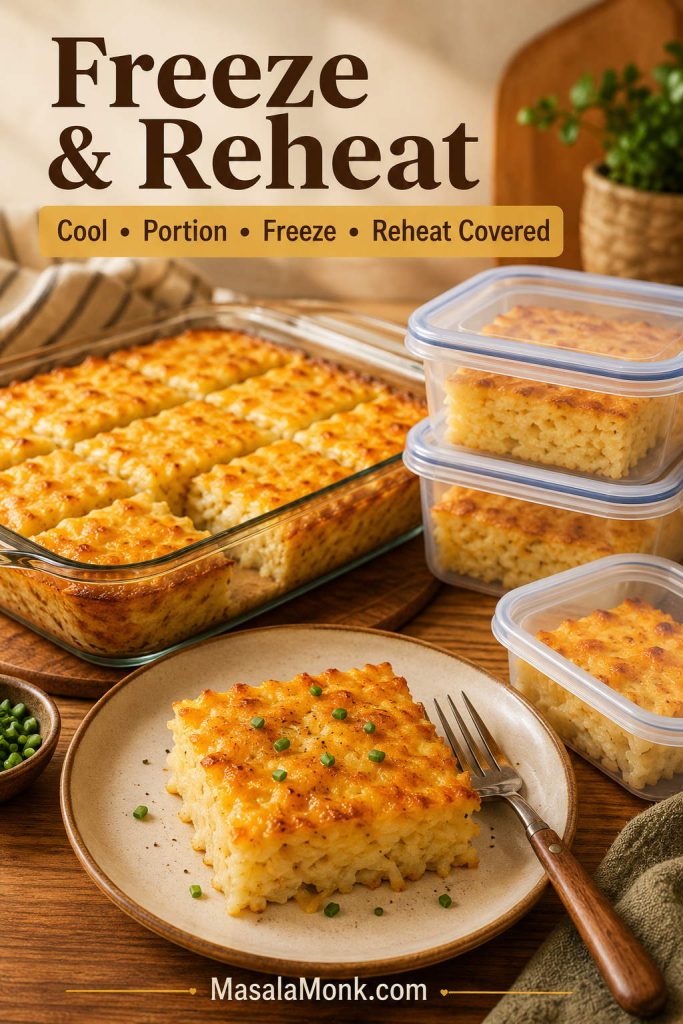
Storage, Freezing, and Reheating
Let the casserole cool, then store leftovers in an airtight container in the refrigerator. For best quality and food safety, cooked egg casseroles and leftovers are generally best used within 3–4 days. You can also freeze portions for longer storage. FoodSafety.gov’s cold storage chart is a useful reference for leftover timing: Cold Food Storage Charts.
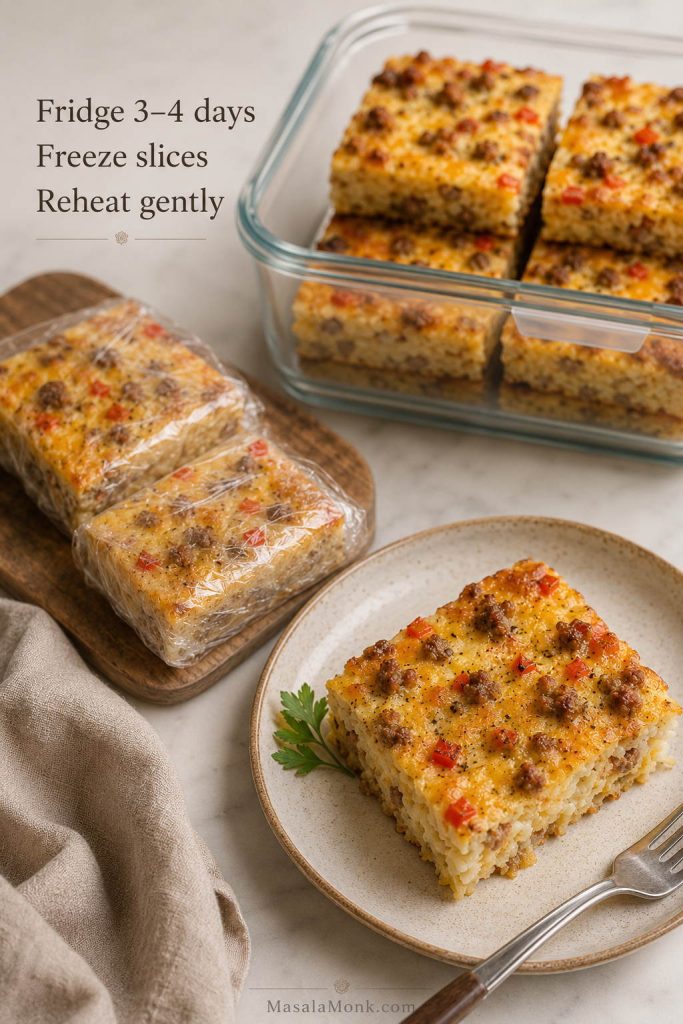
How to Refrigerate
Cool the casserole, cover the baking dish, or move slices to airtight containers. Refrigerate within 2 hours of baking.
How to Freeze
Freeze individual slices wrapped tightly, then place them in a freezer-safe bag or container. For easier breakfasts, freeze slices separately so you can reheat only what you need.
If you are building a bigger freezer breakfast rotation, these meal prep breakfast burritos use the same cooked-filling, no-soggy logic in a grab-and-go format.
How to Reheat
Reheat individual slices in the microwave in short intervals until hot. For better texture, reheat slices in a covered oven-safe dish at 325°F / 165°C until warmed through. Add a splash of milk before reheating if the casserole seems dry.
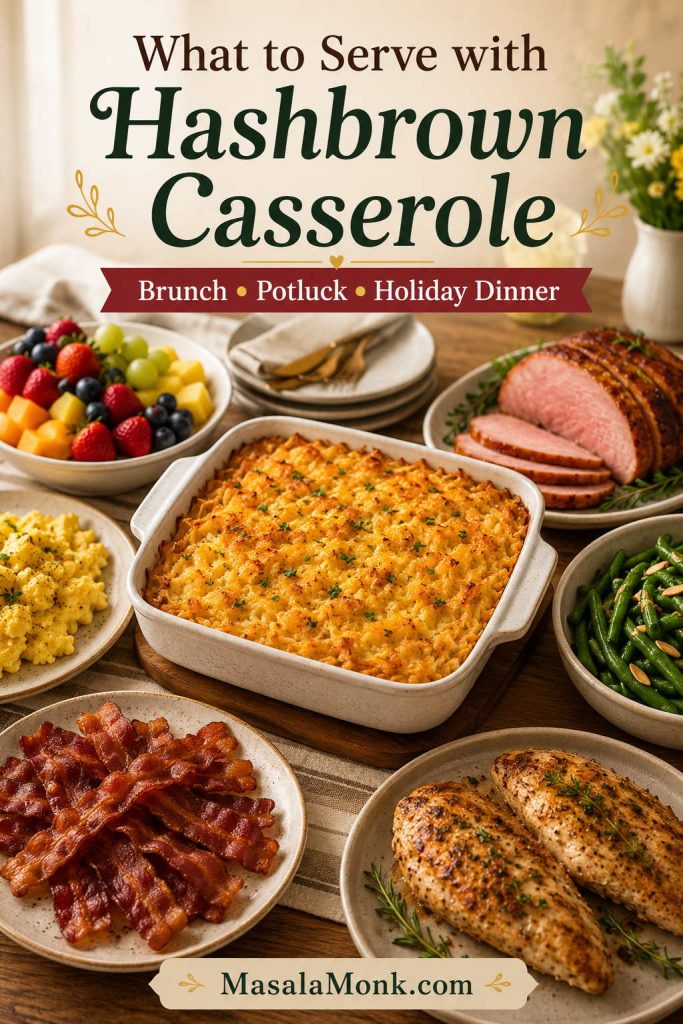
What to Serve with It
This casserole is hearty on its own, so the best sides are usually fresh, bright, or simple. Serve it with fruit salad, sliced avocado, toast, biscuits, salsa, hot sauce, or a green salad for brunch.
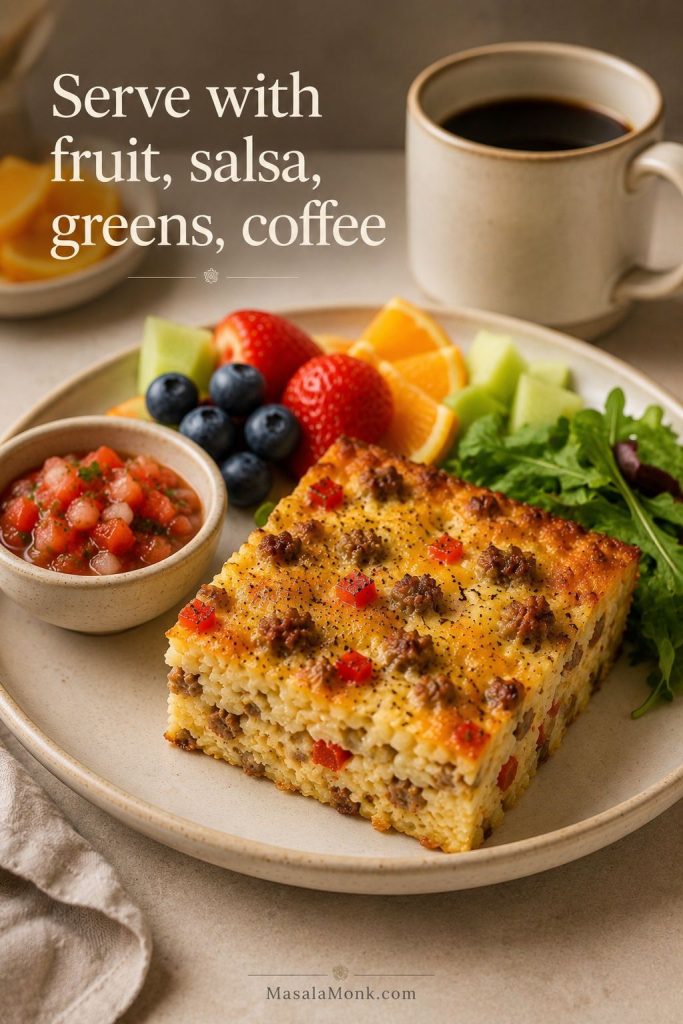
For brunch, keep the plate balanced with fruit and something crisp or fresh so the casserole does not feel too heavy. For meal-prep mornings, simple sides work best because the eggs, potatoes, cheese, and sausage are already doing the filling work. To rotate in a cold make-ahead option, these overnight oats are a good opposite: creamy, chilled, and ready straight from the fridge.
FAQs
Do hash browns need to be thawed before breakfast casserole?
For the best texture, yes. Thawed hash browns bake more evenly and are easier to dry before adding to the casserole. This helps prevent a watery center.
What kind of hash browns work best?
Frozen shredded hash browns are the best all-purpose choice. They give the classic breakfast casserole texture and spread evenly through a 9×13 dish. Diced hash browns make the casserole chunkier, while hash brown patties create a more defined potato base.
Should I cook the hash browns before adding them?
You do not have to cook them first, but lightly browning thawed hash browns gives the casserole better flavor and helps remove moisture. If you are short on time, thawing and patting them dry is enough.
Can I use fresh potatoes instead of frozen hash browns?
Yes, but fresh shredded potatoes need more prep. Rinse them to remove excess starch, drain well, and squeeze very dry before using. If they go into the casserole wet, the egg mixture can turn loose.
Why is my breakfast casserole watery?
Usually, extra moisture sneaks in through the potatoes, vegetables, or meat. Thaw and dry the hash browns, cook watery vegetables first, squeeze spinach dry, and drain sausage or bacon before layering everything into the pan.
How many eggs do I need for a 9×13 hash brown breakfast casserole?
Use 10 large eggs for a balanced casserole or 12 eggs for a taller, more egg-forward bake. If you use fewer eggs, the casserole becomes more potato-heavy and may slice less cleanly.
Can I halve this recipe?
Yes. Use an 8×8-inch or 9×9-inch baking dish, about 15 oz / 425 g hash browns, 5–6 eggs, ½ lb / 225 g sausage, ½ cup milk or half-and-half, ¼ cup sour cream or Greek yogurt, and 1 cup cheese. Start checking around 30–35 minutes because a smaller casserole bakes faster.
Is this better with sausage, bacon, or ham?
Sausage gives the most classic breakfast casserole flavor. Bacon adds smoky crispness, while ham is a great option for leftover holiday ham. All three work, as long as cooked meats are drained before layering.
Can this breakfast casserole be made the night before?
Yes. Assemble the casserole, cover it tightly, and refrigerate overnight. Bake it in the morning, adding 5–10 extra minutes if it goes into the oven cold. For the cleanest texture, prep the components separately and assemble before baking.
How long does breakfast casserole with hash browns bake at 350°F?
Most 9×13 versions bake for 45–55 minutes at 350°F / 175°C. If the casserole is cold from the refrigerator, extra loaded, or made in a deeper dish, it may need closer to 55–65 minutes.
Can I use hash brown patties instead of shredded hash browns?
Yes. Arrange 8–10 hash brown patties in the bottom of a greased 9×13 pan, then layer the meat, cheese, and egg mixture over them. The casserole may need a slightly longer bake time.
How do I make it without meat?
Skip the sausage and use 2½–3 cups cooked vegetables such as mushrooms, peppers, onions, spinach, broccoli, or scallions. Cook watery vegetables first so they do not release liquid into the eggs.
Does hash brown breakfast casserole freeze well?
It freezes best in individual slices. Cool the casserole completely, wrap the portions tightly, and reheat only what you need. The texture is usually better when slices are thawed overnight in the refrigerator before reheating.
If you make this, I’d love to know which version became your house version: sausage, bacon, ham, vegetarian, or hash brown patties. Those little changes are often what make a breakfast casserole feel like it belongs on your table.