Posted on Leave a comment

Rotel Dip Recipe: Easy Velveeta Cheese Dip with Sausage, Beef & Crock Pot Tips

A tortilla chip lifting warm Rotel dip with melted Velveeta, sausage crumbles, diced tomatoes, and green chilies from a dark serving bowl.

This Rotel dip recipe is for the moment when the chips are open, people are hovering, and the cheese needs to stay creamy long after the first scoop. It is not fancy food. Think warm, glossy, salty, tomato-chile cheese dip that does exactly what party food should do: disappear from the table.

The best bowl should be soft enough to drag through with a chip, thick enough to cling, but not so stiff that the chip snaps. That texture comes from a few simple choices: use the Rotel undrained, melt the cheese gently, drain the meat well, and keep the finished dip warm instead of hot.

Keep it classic with Velveeta and Rotel when you need something fast. Add ground beef when you want it hearty and mild. Choose sausage when you want a bolder game-day bowl. Stir in cream cheese when you want it thicker and richer. Use the slow cooker when people are going to keep coming back for one more scoop.

Quick Answer: How to Make Rotel Dip

To make classic Rotel dip, combine 16 oz Velveeta with one 10 oz can of Rotel, undrained. Melt gently on the stovetop, in the microwave, or in a slow cooker until smooth. For a heartier dip, add 1 lb cooked and drained sausage or ground beef.

For the best all-around party dip, use sausage. A milder, family-friendly bowl works better with ground beef. Need the fastest version? Skip the meat. Want the thickest scoop? Add cream cheese.

There is no fancy sauce technique here. The Rotel liquid loosens the cheese, Velveeta keeps it steady, and cooked meat makes it hearty. Once everything is melted, your only job is to keep it soft and stir it now and then.

  • Classic ratio: 16 oz Velveeta + one 10 oz can Rotel, undrained
  • Cream cheese version: add 4 to 8 oz cream cheese for a thicker scoop
  • Crock pot version: cook on low for 2 to 3 hours, then switch to warm
  • Main rule: melt gently; do not boil the cheese mixture

The Easy Rotel Dip Ratio

This simple ratio gives the dip enough cheese to stay creamy, enough Rotel to loosen it, and enough meat to feel like a real party bowl.

Velveeta, an open can of Rotel, cooked ground meat, and tortilla chips arranged on a dark wooden table.
For the easiest Rotel dip ratio, use 16 oz Velveeta, one 10 oz can of Rotel, and 1 lb cooked meat for a heartier batch.

Rotel Dip Recipe Card

Rotel Dip Recipe

A creamy, scoopable cheese dip made with Velveeta, Rotel tomatoes with green chilies, and optional ground beef or sausage. Make it on the stovetop for a quick appetizer, or move it to a crock pot to keep it warm for a crowd.

  • Prep time: 5 minutes
  • Cook time: 10 to 15 minutes
  • Total time: 15 to 20 minutes
  • Servings: 10 to 12 appetizer servings
  • Best for: game day, potlucks, parties, movie nights, nachos, and snack boards

Ingredients

  • 1 lb ground beef or breakfast sausage / 454 g, optional but recommended for a heartier dip
  • 16 oz Velveeta, cubed / 454 g
  • 1 can Rotel diced tomatoes and green chilies, undrained / 10 oz / about 283 g
  • 1/2 tsp chili powder or 1 to 2 tbsp taco seasoning, optional
  • 1 to 3 tbsp milk / 15 to 45 ml, optional, only if the cheese needs thinning
  • 4 to 8 oz cream cheese / 113 to 227 g, optional, for a thicker and richer dip
Cubed Velveeta, an open can of Rotel, cooked meat, cream cheese, milk, seasoning, and a spoon arranged on a wooden board.
Before cooking, set up each ingredient by job: Velveeta melts smoothly, Rotel adds tomato-chile flavor, meat adds body, and cream cheese makes the dip richer.

Instructions

  1. Brown the ground beef or sausage in a large skillet over medium-high heat, breaking it into small crumbles as it cooks.
  2. Drain the meat very well. Keep the crumbles, not the grease.
  3. Reduce the heat to medium-low.
  4. Add the cubed Velveeta, undrained Rotel, and chili powder or taco seasoning if using.
  5. If using cream cheese, add it now in small cubes so it melts evenly.
  6. Stir until the cheese melts and the mixture looks smooth, glossy, and creamy.
  7. If it is too thick, add milk 1 tablespoon at a time until it is easy to scoop.
  8. Taste before serving. Add a pinch of chili powder, taco seasoning, or hot sauce only if it needs more flavor.
  9. Serve warm with tortilla chips, or transfer to a slow cooker on warm for parties.

Recipe Notes

  • For 2-ingredient Rotel dip, skip the meat and use only Velveeta and Rotel.
  • Mild breakfast sausage keeps the batch crowd-friendly, while hot sausage adds more heat.
  • Lean ground beef works well because it keeps the bowl hearty without adding too much grease.
  • Use 4 oz cream cheese for a slightly richer dip or 8 oz for a thick sausage-style batch.
  • If using sausage or taco seasoning, taste before adding extra salt.
  • Cook ground beef or sausage fully before adding the cheese. Ground meat and sausage should reach 160°F / 71°C; FoodSafety.gov has a safe minimum temperature chart if you want a reference.
  • Do not boil the cheese after it melts. Low, steady heat keeps the texture smoother.

What the Dip Should Look Like

Finished Rotel dip should look glossy, melted through, and thick enough to coat a chip. You should see small tomato and green chile pieces suspended in the cheese, not watery liquid around the edges.

When the dip falls from a spoon in slow ribbons, it is ready. A stiff clump needs gentle heat and a little milk. Grease pooling on top usually means the meat needed more draining. The final test is simple: a sturdy chip should scoop through without snapping.

Look for Slow Ribbons

The spoon tells you more than the clock. Smooth ribbons mean the cheese has melted evenly and the dip is ready to serve.

A spoon lifting glossy Rotel dip with diced tomatoes and green chilies so the dip falls back into the bowl in thick ribbons.
Once the cheese falls from the spoon in slow ribbons, the texture is right: melted through, easy to dip, and still strong enough for chips.

Which Version Should You Make?

Keep this ratio handy: 16 oz Velveeta, one 10 oz can Rotel, and 1 lb meat if you want the bowl hearty. From there, choose the version that fits the table.

SituationMake This
Need dip in 10 minutes2-ingredient Velveeta + Rotel
Want the best all-around party bowlSausage + Velveeta + Rotel
Serving kids or spice-sensitive guestsGround beef + mild Rotel
Want thicker scoopsAdd 4 to 8 oz cream cheese
Want the richest versionSausage + cream cheese + Velveeta + Rotel
Keeping it warm for a partyUse the crock pot on warm after melting
Dip got too thickRewarm gently and add milk slowly
Making a bigger party batch32 oz Velveeta + two cans Rotel + 1 to 2 lb meat

Match the Version to the Table

Use the version guide when you are choosing between fast, mild, bold, thick, or slow-cooker friendly.

Four bowls of Rotel dip on a dark table labeled meatless, ground beef, sausage, and cream cheese, with tortilla chips nearby.
Next, match the version to the table: meatless for speed, ground beef for mild flavor, sausage for game day, and cream cheese for thicker scoops.

For most parties, sausage with original Rotel is the safest bold version. A milder family bowl is easier to love with ground beef and mild Rotel.

Need more detail before choosing? Compare the ground beef version, sausage version, cream cheese version, or crock pot method.

Why This Cheese Dip Works

This dip works because every ingredient has a job, and none of them ask much from you.

  • Velveeta melts smoothly. It gives the bowl that classic creamy texture without needing a roux or careful cheese sauce technique.
  • Rotel adds flavor and moisture. The tomatoes and green chilies bring tang, gentle heat, and enough liquid to loosen the cheese.
  • Well-drained meat keeps it clean. Ground beef or sausage makes the bowl more filling, but extra grease can float on top if the meat is not drained.
  • Low heat protects the texture. Cheese dip does not need to boil. It needs to melt gently until loose, glossy, and dippable.
  • A slow cooker solves the party problem. Once melted, the warm setting keeps the cheese soft enough for chips without constant reheating.

If you like understanding why cheese turns smooth instead of grainy, this easy cheese sauce recipe goes deeper into gentle heat and creamy texture.

What Is Rotel Dip?

Rotel dip is the quick American-style cheese dip people make when they want melted cheese, tomato-chile flavor, and almost no prep. The classic version uses Velveeta because it melts smoothly and stays creamy, while Rotel adds tomatoes, green chilies, and just enough liquid to loosen the cheese.

The familiar 10 oz can plus 16 oz cheese ratio is also the brand-style queso formula. Ro-Tel’s Famous Queso Dip uses a 10 oz can of Ro-Tel, undrained, with a 16 oz package of Velveeta.

Searchers may call this Rotel cheese dip, Velveeta Rotel dip, Rotel queso dip, sausage Rotel dip, or hamburger cheese dip, but the idea is usually the same: melted cheese, Rotel, and sometimes meat.

Once you know the basic idea, the ingredient choices are simple: cheese controls the texture, Rotel brings the tomato-chile flavor, and meat decides how filling the bowl feels.

Ingredients You’ll Need

Velveeta

Velveeta gives this recipe its familiar party texture: creamy, steady, and almost impossible to mess up if you keep the heat low. A 16 oz block gives one standard batch the texture people expect from Velveeta Rotel dip.

Regular Velveeta gives the classic flavor. Queso blanco Velveeta also works for a lighter-colored dip. Shredded cheddar alone can turn grainy, so it works better with cream cheese in the no-Velveeta option.

Rotel Tomatoes and Green Chilies

One 10 oz can is the right amount for one 16 oz block of Velveeta. Pour in the tomatoes, chilies, and liquid together; that liquid keeps the cheese from turning stiff. The tomato and green chile pieces also keep the bowl from tasting flat.

Original Rotel is the default for that familiar tomato-chile bite. Mild Rotel is better for a gentle, crowd-friendly bowl. Hot Rotel works when you want more heat.

Ground Beef or Sausage

Meat is optional, but it makes the cheese dip more filling. Ground beef brings a milder, heartier flavor. Sausage makes it bolder, saltier, and more game-day friendly.

For one standard batch, cook 1 lb of ground beef, breakfast sausage, pork sausage, or hot sausage. Break it into small crumbles, spoon off excess fat, and then add the cheese and Rotel.

Cream Cheese

A little cream cheese gives the dip more body; a full 8 oz block turns it into a thicker, richer party scoop. It works especially well with sausage and in no-Velveeta versions.

Cut it into small cubes before adding it so it melts evenly. Use 4 oz when you still want classic queso energy; go up to 8 oz when you want the chip to come up loaded.

Seasoning and Heat

You do not need much seasoning because Velveeta, Rotel, and sausage already bring flavor. For more depth, add a little chili powder, taco seasoning, garlic powder, hot sauce, or chopped jalapeños. Start light, especially with sausage or taco seasoning.

How to Make Rotel Dip

The method is simple: cook the meat if you are using it, turn the heat down, melt the cheese with Rotel, and thin only if the dip needs it.

Stovetop Method

  1. Brown the ground beef or sausage in a large skillet over medium-high heat.
  2. Drain the meat well and return it to the pan.
  3. Lower the heat to medium-low.
  4. Add cubed Velveeta and undrained Rotel.
  5. Add cream cheese now if using it.
  6. Stir until the cheese melts into a smooth dip.
  7. Add a splash of milk only if the dip is too thick.

Drain the Meat Well

Draining the meat is the small step that keeps the finished dip rich instead of oily.

Cooked sausage crumbles in a skillet with a spoon removing excess grease before the meat is added to cheese dip.
After browning sausage or ground beef, drain it well so the cheese dip stays savory and rich without a greasy layer on top.

Once the meat is drained, add the Rotel with its liquid. That can liquid is part of the sauce, helping the cheese loosen while carrying tomato-chile flavor through the whole pan.

Use the Rotel Liquid

Pour in the tomatoes, green chilies, and liquid together before the cheese fully melts, so the mixture has enough moisture from the start.

Undrained Rotel tomatoes, green chilies, and liquid being poured from a can over cubed Velveeta in a dark pan.
When adding Rotel, pour in the tomatoes, green chilies, and liquid together; that juice loosens the Velveeta and keeps the dip scoopable.

Stop when the cheese looks glossy and the dip moves slowly from the spoon, not when it starts bubbling. High heat can make the edges oily, the texture heavy, or real cheese grainy.

Melt the Velveeta Gently

Low heat gives the cheese time to melt into the Rotel liquid, so the dip stays glossy and smooth.

Cubed Velveeta melting with Rotel tomatoes and green chilies in a skillet while a spoon stirs the mixture.
As the Velveeta melts, keep the heat gentle. The goal is glossy, dippable cheese, not a bubbling pot that turns heavy or oily.

Making this ahead for a crowd? Use the crock pot method. If the texture changes while it sits, the troubleshooting guide will help you bring it back.

Microwave Method

The microwave is best when you are making the fast meatless version and just need cheese dip on the table now. Add cubed Velveeta and undrained Rotel to a microwave-safe bowl. Microwave on high for 2 to 3 minutes, stir well, then continue in 30 to 60 second bursts until the cheese is melted through.

If adding ground beef or sausage, cook and drain the meat separately first, then stir it into the melted cheese mixture.

Slow Cooker Method

For parties, the slow cooker is the easiest method. Brown and drain the meat first, then add the meat, cubed Velveeta, and undrained Rotel to the slow cooker. Cook on low for 2 to 3 hours or high for 1 to 2 hours, stirring occasionally. Once smooth, switch to warm for serving.

2-Ingredient / Meatless Rotel Dip

When speed matters more than making it hearty, skip the meat and keep the bowl simple: Velveeta and Rotel. This is the fastest version and the easiest one to make at the last minute.

  • 16 oz Velveeta, cubed / 454 g
  • 1 can Rotel, undrained / 10 oz / about 283 g

Melt them together on the stovetop or in the microwave, stirring until smooth. It is lighter than the ground beef or sausage batch, but it still gives you that classic warm cheese-and-chile flavor. Corn or beans can make it more filling, but they move the recipe into a different style.

Ground Beef Version

Start here when you want the dip to feel like food, not just a snack, but still keep the flavor mild enough for everyone. Ground beef makes the bowl feel more like a filling snack than plain melted cheese, while still letting the tomato-chile flavor come through.

For one batch, use 1 lb ground beef, 16 oz Velveeta, and one 10 oz can Rotel. Brown the beef, break it into small crumbles, and drain it well before adding the cheese and Rotel. You may know this as hamburger Rotel dip, hamburger cheese dip, or Velveeta cheese dip with hamburger meat.

A dark bowl of Rotel dip with fine ground beef crumbles, melted Velveeta, diced tomatoes, green chilies, and tortilla chips.
For a milder bowl, ground beef gives this dip taco-night flavor that works with chips, nachos, baked potatoes, or a mixed crowd.

Sausage Version

Sausage is the game-day version: bolder, saltier, and a little more “people keep coming back” than ground beef. The sausage version smells richer and more savory as it melts, which is why it feels especially right for game day.

A standard sausage batch needs 1 lb breakfast sausage, 16 oz Velveeta, and one 10 oz can Rotel. Mild sausage keeps the dip crowd-friendly. Hot sausage makes it spicier and pairs well with original or hot Rotel. Cook the sausage fully, drain it well, and leave the grease behind before the cheese goes in.

Close-up of sausage Rotel dip with melted cheese, browned sausage crumbles, diced tomatoes, and green chili pieces.
For a bolder party dip, sausage brings deeper savory flavor, more texture, and a stronger game-day feel than ground beef.

This is also the option that works especially well with cream cheese. Add 4 to 8 oz when you want a thicker, richer scoop.

Cream Cheese Version

Cream cheese is for the thick-scoop people. It turns the dip into a heavier, richer scoop — the kind that sits on a sturdy chip instead of sliding right off.

Add 4 oz cream cheese for extra creaminess or 8 oz cream cheese for a thick sausage-style dip. Cut it into small cubes and let it soften slightly so it melts evenly.

A hand holding a tortilla chip topped with thick cream cheese Rotel dip, diced tomatoes, green chilies, and small meat pieces.
Add cream cheese when you want a heavier scoop; it makes the cheese dip richer, sturdier, and easier to load onto thick chips.

Because cream cheese makes the dip thicker, it pairs especially well with the chip test and the sturdy serving ideas below.

Slow Cooker / Crock Pot Rotel Dip

The slow cooker is the best choice when the cheese needs to stay soft for a party. It melts everything gently and keeps the finished bowl ready for repeat scoops.

BatchUse ThisSlow Cooker Size
Standard batch1 lb cooked meat + 16 oz Velveeta + 1 can Rotel3 to 5 quart
Small meatless batch16 oz Velveeta + 1 can Rotel2 to 3 quart
Big party batch1 to 2 lb cooked meat + 32 oz Velveeta + 2 cans Rotel4 to 6 quart
A slow cooker filled with Rotel dip on a party table with tortilla chips, diced tomatoes, jalapeños, green onions, and serving utensils.
For parties, the crock pot is about holding as much as cooking. Once melted, the warm setting keeps each scoop soft and ready.

Cook on low for 2 to 3 hours or high for 1 to 2 hours. Once the cheese is smooth, switch to warm. A large slow cooker batch may need up to 1/4 to 1/2 cup milk as it sits, but add it slowly so the cheese does not become thin.

Do not add raw ground beef or sausage directly into the cheese dip. Cook and drain the meat first. If using 2 lb sausage, taste before adding seasoning because sausage can make the dip salty.

Serving this for a longer party? Keep the dip on warm, then use the troubleshooting section if it thickens, turns oily, or needs loosening later.

For another slow-cooker bite that can stay warm for a crowd, grape jelly meatballs fit the same potluck and game-day table.

Do You Drain the Rotel?

No, do not drain Rotel for regular cheese dip. The liquid in the can helps the cheese melt into a smooth, creamy, dippable texture. The Rotel pour visual above shows how the tomatoes, green chilies, and liquid go in together.

Drain part of the liquid only for a very thick bowl, a doubled recipe that needs more control, or a different recipe where extra moisture causes problems. For the classic dip, use the whole can.

No-Velveeta Version

Real cheese can work, but it will not behave exactly like Velveeta. The no-Velveeta version tastes more like homemade queso, with stronger cheese flavor but less foolproof texture. Keep the heat low and give it help from cream cheese so it stays smoother.

  • 8 oz cream cheese / 227 g
  • 1 to 1 1/2 cups freshly shredded cheddar or pepper jack
  • 1 can Rotel, partly drained if you want a thicker dip
  • A splash of milk if the cheese needs loosening

Freshly shredded cheese melts better than pre-shredded cheese because bagged shredded cheese often has anti-caking ingredients. Add shredded cheese off the heat or over very low heat, and stir gently.

How to Make It Spicier

The easiest way to add heat is to use hot Rotel instead of original. For a stronger kick, add spicy sausage, chopped jalapeños, cayenne, hot sauce, pepper jack, or a little extra chili powder.

Add heat slowly. Cheese dip can become too spicy faster than expected, especially if you use hot sausage and hot Rotel together. For a brighter bowl beside all that cheese, salsa verde adds a tangy green contrast for chips, tacos, bowls, and nachos.

How to Keep It Creamy and Warm

Rotel dip is best when it stays soft enough to scoop. As it cools, the cheese naturally tightens; that is normal, and it is easy to fix.

  • Serve it from a slow cooker on warm.
  • Stir every 20 to 30 minutes during a party.
  • Keep the lid on when people are not serving.
  • Add milk slowly if it gets too thick.
  • Keep the heat low after the cheese melts.
  • Drain meat well so grease does not collect on top.

If the bowl has been sitting for a while, stir it before adding more liquid. Sometimes the top looks thick, but the inside is still creamy once stirred. The same rule applies to other dairy-heavy dips, like spinach artichoke dip: once it is hot and melted, warm is safer than high.

Troubleshooting

When the cheese changes while it sits, do not panic. Warm dips thicken, cool, and sometimes look oily before a quick stir brings them back. Most problems are easy to fix if you control heat, thickness, and grease.

ProblemWhy It HappensHow to Fix It
Too thickThe cheese cooled, or too much liquid evaporatedWarm gently and add milk 1 tablespoon at a time
Too thinToo much liquid or not enough cheeseAdd more cubed Velveeta, or warm uncovered on low for a few minutes while stirring often
GreasyThe meat was not drained wellSpoon off excess grease or blot the surface lightly
Oily edgesThe heat is too high, or the meat was greasyLower the heat, stir gently, and spoon off excess oil
GrainyHeat was too high, or real cheese did not melt smoothlyLower the heat and use Velveeta or cream cheese for a smoother base
Skin on topIt sat uncovered or unstirred for too longKeep covered and stir every 20 to 30 minutes
Too spicyHot Rotel, spicy sausage, or too much hot sauceAdd more Velveeta or cream cheese to mellow it
BlandMild meat and mild Rotel need more seasoningAdd taco seasoning, chili powder, garlic powder, or hot sauce
Too saltySausage, Velveeta, or seasoning added more salt than expectedAdd cream cheese, a splash of milk, or more unsalted meat if you have it

Quick Fix Guide

Most dip problems come down to heat, liquid, or grease. Fix one at a time and the bowl usually comes back quickly.
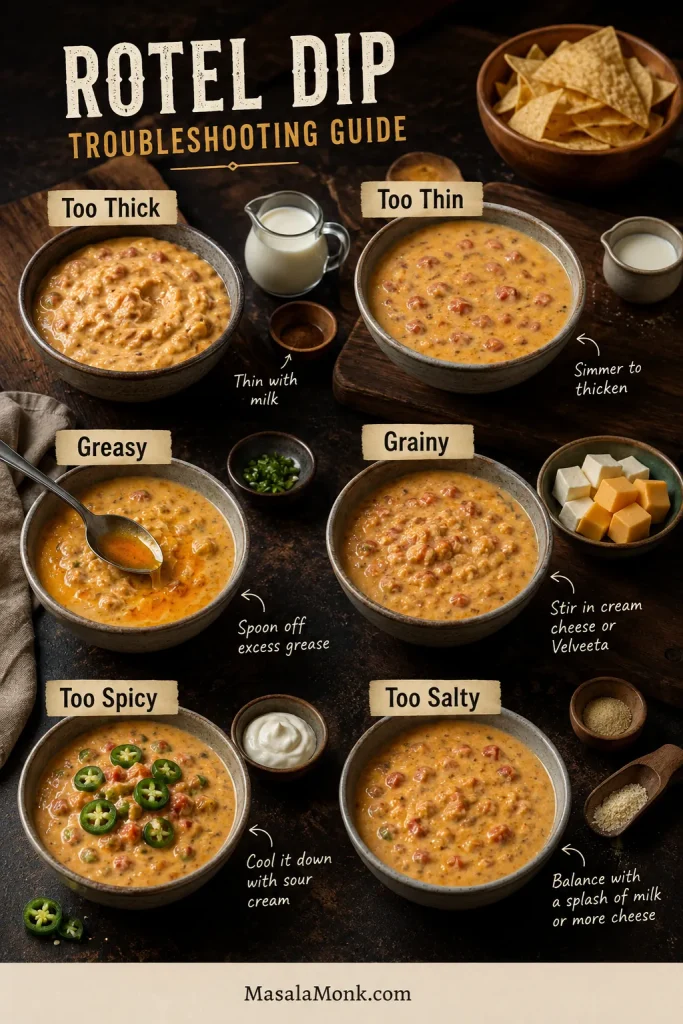
A Rotel dip troubleshooting board with bowls labeled too thick, too thin, greasy, grainy, too spicy, and too salty, plus small fix ingredients.
If the dip gets too thick, thin, greasy, grainy, spicy, or salty, small fixes like milk, gentle heat, cream cheese, or extra cheese can bring it back.

What to Serve with Rotel Dip

Once the cheese is warm and glossy, the only real question is what gets dipped first. Set out the sturdy chips first. The thin ones can wait for salsa.

Use the Chip Test Before Serving

A sturdy tortilla chip should scoop through the dip without snapping. That tells you the dip is thick enough to cling but still soft enough to serve.

A hand pushing a sturdy tortilla chip into Rotel dip with melted cheese, meat crumbles, diced tomatoes, and green chilies.
Before serving, try the chip test: a sturdy tortilla chip should scoop through cleanly and bring up cheese, meat, tomato, and chile.
  • Best dippers: thick tortilla chips, scoop-style corn chips, Fritos Scoops, pretzels, or sturdy crackers.
  • Fresh contrast: celery sticks, bell pepper strips, cucumber rounds, jalapeño slices, green onion, cilantro, pico de gallo, or a little sour cream drizzle.
  • Load it onto: nachos, fries, tater tots, baked potatoes, tacos, rice bowls, burgers, or hot dogs.
  • Game-day spread: pair it with something crisp and savory like air fryer chicken wings.

The best scoop should bring up cheese, tomato, chile, and little bits of meat in one bite. That is why thick chips matter, especially with sausage or cream cheese versions.

Make Ahead, Storage, Reheating, and Freezing

Yes, you can make Rotel dip ahead. Let it cool, store it in the fridge, and reheat it gently on the stovetop, in the microwave, or in a slow cooker. Add a splash of milk if it has thickened.

Store leftovers in an airtight container in the fridge for 3 to 4 days. Refrigerate leftovers within 2 hours; during serving, keep the dip warm rather than letting it sit at room temperature for long stretches.

Reheating is easy; the only trick is not rushing it. Use low heat on the stovetop or short microwave intervals, stirring often so the edges do not overheat before the center is warm.

Freezing is not ideal. Cheese dips can separate, turn grainy, or lose their smooth texture after thawing. For the best texture, refrigerate leftovers and reheat them within a few days instead.

Make It a Snack Table

A good snack table needs contrast. Keep this cheese dip warm, add a cold 7 layer dip, set out something crunchy, and bring in one savory bite like wings, meatballs, or sliders. That way the Rotel dip stays the warm centerpiece without having to carry the whole table.

Build the Serving Board

Put sturdy chips closest to the warm dip, then use vegetables, jalapeños, green onion, pico, and toppings to add freshness around the rich cheese.

A serving board with Rotel dip, tortilla chips, scoop chips, celery sticks, red bell pepper strips, jalapeños, green onion, diced tomatoes, shredded cheese, and cilantro.
Finally, serve the dip with sturdy chips first, then add scoop chips, vegetables, jalapeños, green onion, pico, and toppings for contrast.

For a second warm dip, buffalo chicken dip brings a spicy, creamy option beside this cheesy one. If you are turning the snack table into dinner, slow cooker pulled pork works for sliders, nachos, rice bowls, and loaded baked potatoes.

FAQ

What is Rotel dip made of?

The classic version is Velveeta plus Rotel diced tomatoes with green chilies. Many versions also add ground beef, sausage, cream cheese, taco seasoning, or chili powder.

Do you drain Rotel before adding it?

No. Use Rotel undrained for regular cheese dip. The liquid helps the cheese melt smoothly and keeps the texture scoopable.

How much Velveeta do I need for one can of Rotel?

Use 16 oz Velveeta for one 10 oz can of Rotel. That is the classic ratio for smooth, scoopable Rotel dip.

Is Rotel dip better with sausage or ground beef?

Sausage gives the dip a bolder, saltier, more party-style flavor. Ground beef is milder and better for a crowd that does not want much spice.

How do you make Rotel dip in a crock pot?

Cook and drain the meat first, then add it to the slow cooker with cubed Velveeta and undrained Rotel. Heat on low for 2 to 3 hours or high for 1 to 2 hours, then switch to warm.

What does cream cheese do in Rotel dip?

Cream cheese makes the dip thicker, richer, tangier, and sturdier on chips. Use 4 oz for a small creamy boost or 8 oz for a thick sausage-style batch.

How do I thin Rotel dip without making it watery?

Warm it gently and add milk 1 tablespoon at a time. Stir before adding more because the center may be creamier than the top looks.

What can I use instead of Velveeta?

Use cream cheese with freshly shredded cheddar or pepper jack. It will taste more like homemade queso, but it will not be as foolproof as classic Velveeta dip.

How long does Rotel dip last in the fridge?

Leftover Rotel dip keeps well in an airtight container in the fridge for 3 to 4 days. Reheat gently and stir in a little milk if it has thickened.

Does Rotel dip freeze well?

Freezing is not the best choice because the cheese can separate or turn grainy after thawing. Refrigerate leftovers and reheat them within a few days for the best texture.

Rotel dip should make the table easier, not more complicated. Start with Velveeta and Rotel, add sausage or ground beef if the bowl needs to feel hearty, stir in cream cheese for a thicker scoop, and let the slow cooker do the quiet work while people come back for more.

Made it with sausage, ground beef, cream cheese, or just Velveeta and Rotel? Tell us which version disappeared first.
Posted on Leave a comment

Pecan Pie Bars Recipe with Easy Shortbread Crust

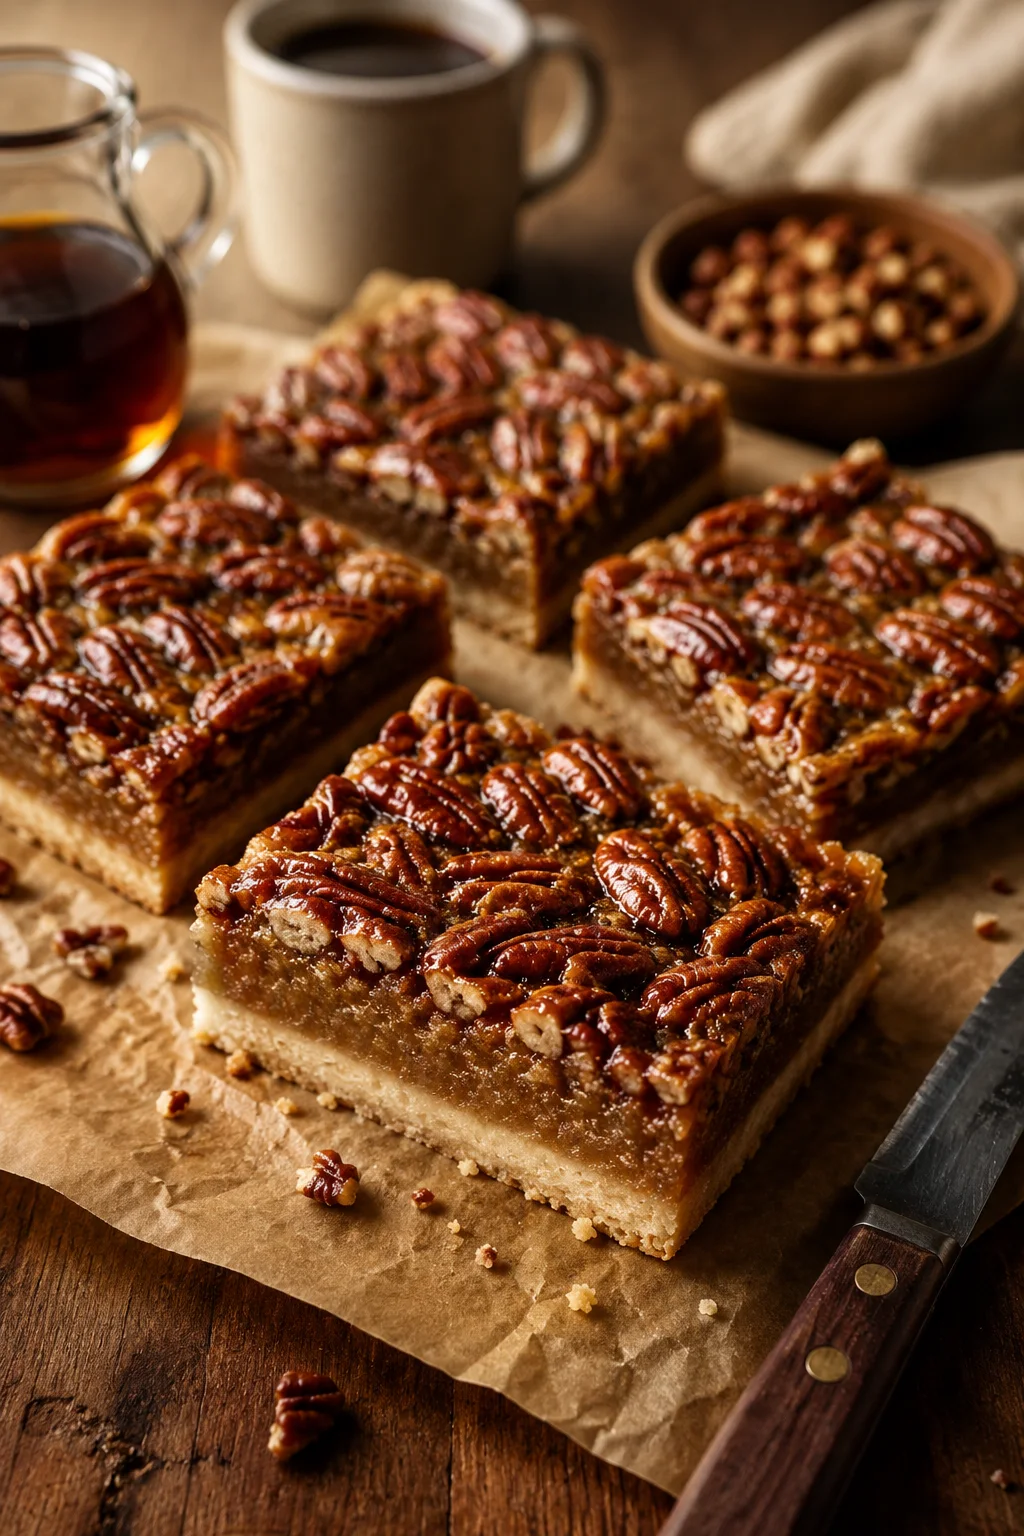
Clean-cut pecan pie bars with glossy pecan topping and pale shortbread crust arranged on parchment paper.

These pecan pie bars are for the moment when pecan pie sounds perfect, but rolling dough, lifting wedges, and hoping the center has set all feel like too much. You still get the glossy pecan top, the buttery base, and the soft caramel-like filling — just in a pan you can cool, lift, cut, and carry.

The promise here is simple: no rolling, no runny middle, no nervous first slice. A press-in shortbread crust makes the bars sturdy, while maple syrup and brown sugar bake into a warm, glossy pecan filling that stays gooey without turning into syrup on the plate.

This version uses maple syrup, so it works for pecan pie bars without corn syrup. Prefer the classic glossy filling? Use light corn syrup instead. Either way, the method stays simple: prebake the crust, bake until the edges bubble and the center softly wobbles, then cool completely before slicing.

Quick Answer: What Are Pecan Pie Bars?

Pecan pie bars are dessert bars with a buttery crust and a gooey pecan pie-style filling baked on top. They taste like pecan pie, but they are easier to make, easier to slice, and easier to serve to a crowd. Instead of baking one round pie, you bake the recipe in a rectangular pan and cut it into squares.

A good pan comes down to three things: a firm crust, a filling that sets without turning hard, and enough cooling time before cutting. Prebaking protects the crust, bubbling edges show the filling got hot enough, and cooling turns the gooey layer into bars you can lift.

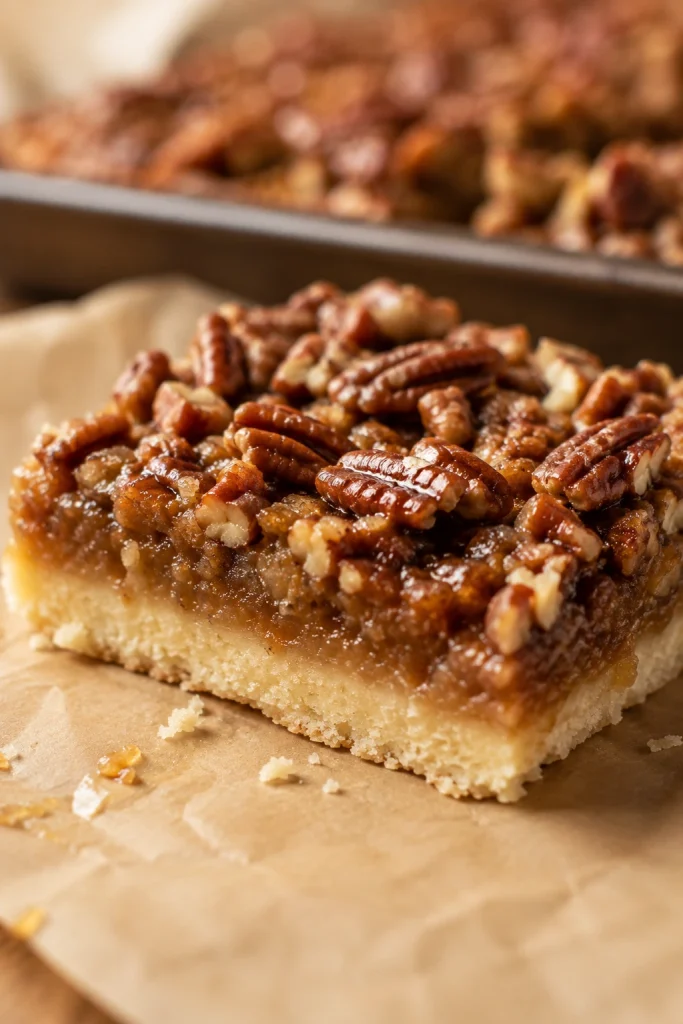
Close-up of a pecan pie bar showing glossy pecans, soft brown filling, and a pale shortbread base.
Look at the layer contrast: the pecan filling stays glossy and soft, while the shortbread crust holds firm enough for a clean bite.

Pecan Pie Bars Recipe

These pecan pie bars bake into a buttery shortbread base with a glossy maple-brown sugar pecan layer on top. One 9×13 pan gives you 24 rich bars or 36 smaller dessert-table squares.

What success looks like: the crust is pale golden at the edges, the pecan layer is glossy, the sides bubble before the pan comes out, and the center still has a soft wobble. After cooling, the bars should lift cleanly but bite like soft pecan pie filling, not syrup and not candy. One small square should feel satisfying, with a buttery bottom, sticky pecan top, and the best part of pecan pie in the middle.

Recipe Details

Prep Time20 minutes
Crust Bake Time18 to 20 minutes
Filling Bake Time25 to 30 minutes
Cooling TimeAt least 2 hours
Optional Chill Time30 to 60 minutes for sharper cuts
Total TimeAbout 3 hours 10 minutes, plus optional chilling
Oven Temperature350°F / 177°C
Pan Size9×13 inch / 23×33 cm
Yield24 rich bars or 36 small squares

Equipment

  • 9×13 inch / 23×33 cm baking pan
  • Parchment paper
  • Large mixing bowl
  • Whisk
  • Pastry cutter, fork, or food processor for the crust
  • Rubber spatula
  • Wire cooling rack
  • Sharp knife
  • Optional kitchen scale
  • Optional oven thermometer

A metal pan is best for even browning and tidy edges. Glass works too, but it holds heat longer, so start checking a few minutes early near the end.

Ingredients

For the Shortbread Crust

  • 2 cups all-purpose flour / 250 g
  • 1/2 cup powdered sugar / 60 g
  • 1 tablespoon cornstarch / 8 g, optional but helpful for tenderness
  • 1/2 teaspoon fine salt
  • 1 cup cold unsalted butter, cut into small cubes / 226 g / 8 oz

If measuring flour by cups, spoon it into the cup and level it instead of scooping directly from the bag. Too much flour can make the crust dry or crumbly.

For the Pecan Filling

  • 3 cups chopped pecans / about 300 to 330 g / 10.5 to 12 oz
  • 1 cup packed light brown sugar / 200 g
  • 3/4 cup pure maple syrup / 180 ml, or light corn syrup for a classic version
  • 1/2 cup unsalted butter, melted and slightly cooled / 113 g / 4 oz
  • 3 large eggs, at room temperature / about 150 g without shells
  • 2 tablespoons heavy cream / 30 ml
  • 2 teaspoons vanilla extract / 10 ml
  • 1/2 teaspoon fine salt
  • Flaky salt, optional, for finishing

Chopped pecans are better than pecan halves here because they spread evenly and slice more easily. Pecan halves look pretty, but they can drag the knife through the topping.

Instructions

Make and Prebake the Crust

  1. Prepare the pan. Preheat the oven to 350°F / 177°C. Line a 9×13 inch / 23×33 cm baking pan with parchment paper, leaving overhang on the long sides so you can lift the bars out later.
  2. Make the crust mixture. In a large bowl, whisk together the flour, powdered sugar, cornstarch if using, and salt. Add the cold cubed butter. Cut it into the flour mixture with a pastry cutter, fork, or your fingertips until it looks like damp crumbs and holds together when squeezed.
  3. Press the crust into the pan. Tip the crust mixture into the prepared pan. Press it firmly into an even layer, especially in the corners and along the edges.
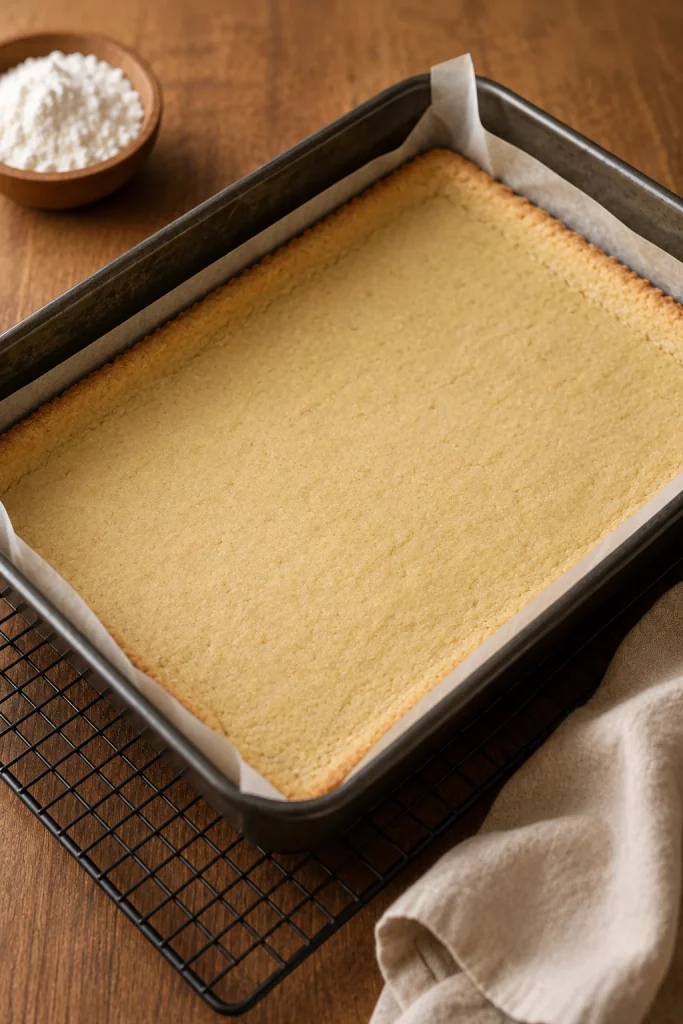
  4. Prebake the crust. Bake for 18 to 20 minutes, until the surface looks set and the edges are just beginning to turn pale golden.

Add the Filling, Bake, and Slice

  1. Make the filling. While the crust bakes, whisk the brown sugar, maple syrup, melted butter, eggs, heavy cream, vanilla, and salt until smooth and glossy. Stir in the chopped pecans.
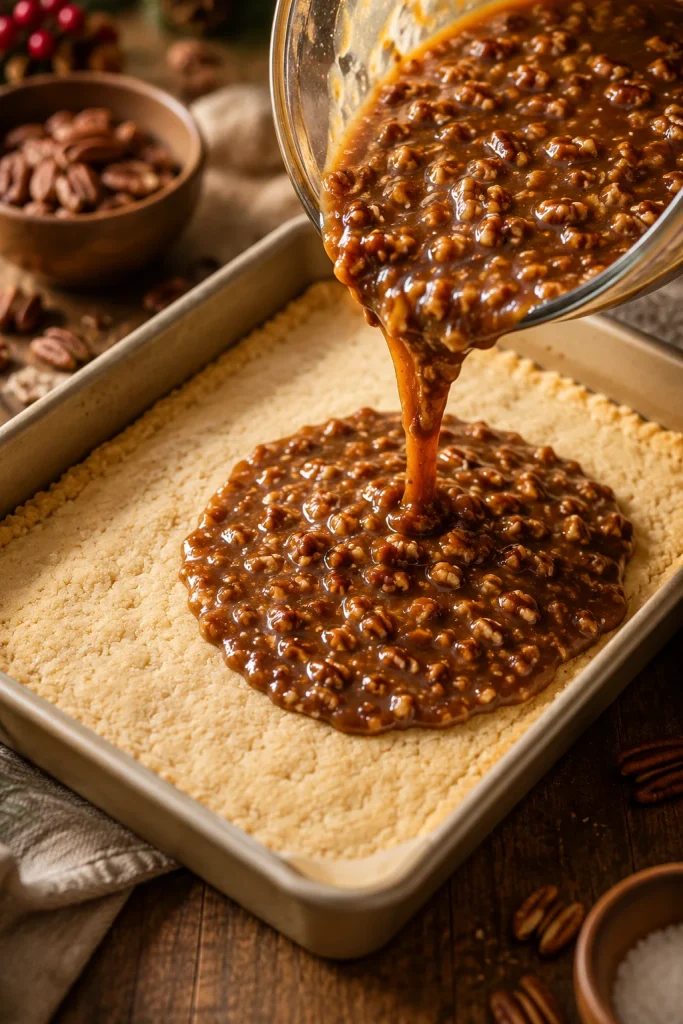
  2. Pour over the warm crust. Remove the crust from the oven and carefully pour the pecan filling over it. Spread the pecans evenly so every piece gets a good nutty layer.
  3. Bake the bars. Return the pan to the oven and bake for 25 to 30 minutes, until the edges bubble, the top looks glossy and set, and the center wobbles slightly like soft custard. It should not ripple like liquid.
  4. Cool completely. Place the pan on a wire rack and let the bars cool completely, at least 2 hours. Do not judge the final texture while the bars are hot; the filling will continue to set as it cools.
  5. Sharper cuts. Chill the cooled slab for 30 to 60 minutes before cutting if you want the neatest pieces.
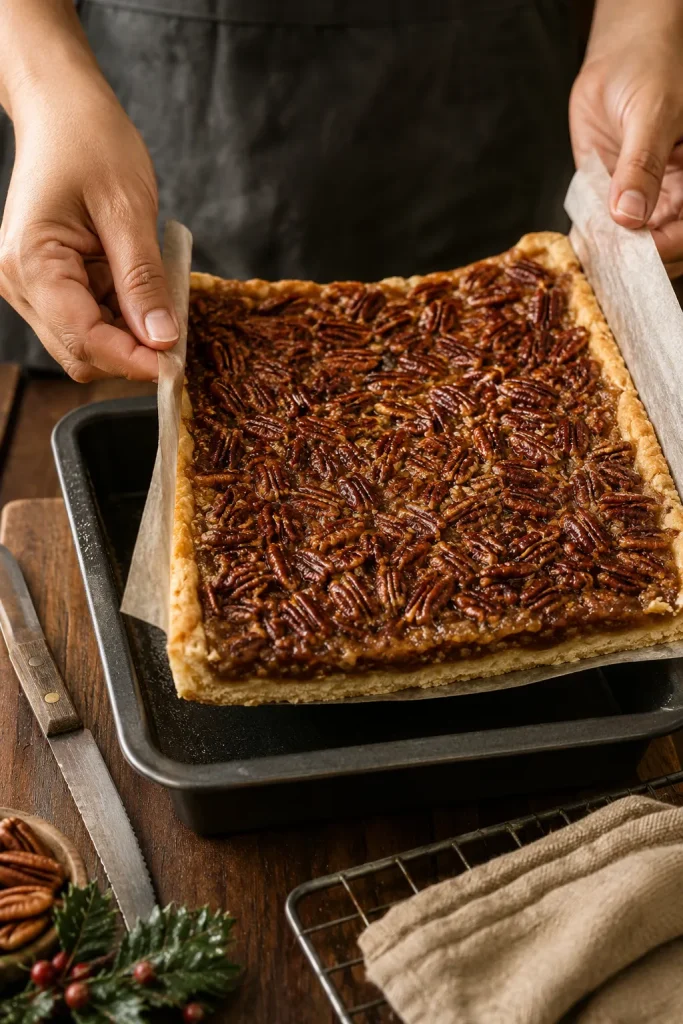
  6. Slice and serve. Use the parchment overhang to lift the slab out of the pan. Cut into 24 rich bars or 36 smaller squares with a sharp knife, wiping the blade between cuts.

Recipe Notes

  • Classic pecan pie bars: replace the maple syrup with the same amount of light corn syrup. The filling will taste sweeter and look a little glossier.
  • Stronger maple flavor: use dark maple syrup and finish the baked bars with a little flaky salt.
  • Slightly firmer set: leave out the heavy cream. The cream gives the filling a softer, richer bite, but the bars still work without it.
  • Deeper pecan flavor: lightly toast the pecans before adding them, but watch the final bake closely so the nuts do not over-brown.
  • Sharper edges: cool completely, then chill before cutting.
  • Better sweetness balance: cut smaller squares and use flaky salt instead of reducing the sugar heavily.
  • Storage: cool uncovered first, then cover and refrigerate if you are not serving them the same day.

Need more visual help? See the step-by-step cues, doneness guide, or clean-cutting tips before you start.

The 5 Rules for Pecan Pie Bars That Slice Cleanly

These bars are simple, but they do ask for patience. Most problems come from skipping one of two things: giving the crust a head start, or giving the filling time to cool.

  1. Prebake the crust until it looks set, not brown. This gives the filling a dry, sturdy base to sit on.
  2. Look for bubbling edges. If the edges never bubble, the filling probably did not get hot enough to set.
  3. Trust a soft wobble, not a liquid ripple. A little movement is fine. Waves across the pan mean more oven time.
  4. Cool before judging. Hot pecan filling can fool you. The real texture shows after cooling.
  5. Chill before clean cuts. Room-temperature bars taste softer, but chilled bars slice better.
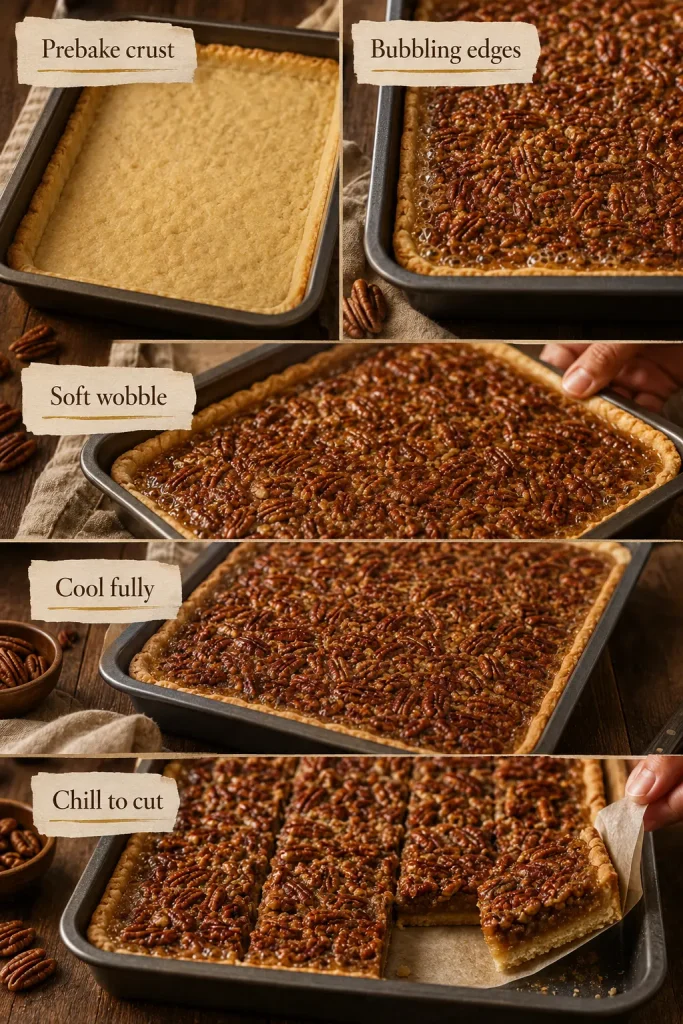
Five-panel guide for pecan pie bars labeled Prebake crust, Bubbling edges, Soft wobble, Cool fully, and Chill to cut.
This visual checklist keeps the recipe on track: prebake the crust, look for bubbling edges, accept a gentle wobble, cool fully, and chill before slicing.

If you remember only one thing, remember this: judge the bars after cooling, not straight from the oven.

Make These When

These are the bars to make when the dessert table is crowded, the pie server is missing, and nobody wants to be responsible for the first messy slice. They feel festive without needing last-minute attention.

  • Pecan pie flavor sounds good, but rolling pie crust does not.
  • A Thanksgiving or Christmas dessert needs to serve a crowd.
  • Make-ahead baking would make the meal feel calmer.
  • The dessert has to travel well to a potluck or office party.
  • Smaller squares would fit a cookie box or mixed dessert spread.
  • Sturdy bars sound better than soft pie wedges.
  • You have pecan pieces and want a dessert where they work better than perfect halves.

You can bake them the day before, chill them overnight, and stop worrying about dessert while the rest of the meal comes together. For a cozy fall table, they sit nicely beside soft bakes like apple cake. You can save the day-of baking energy for something fresh, like homemade cinnamon rolls.

More Help If You Need It

Why This Recipe Works

This recipe works because each part has a clear job. Prebaking helps the shortbread crust hold the sticky filling. Eggs and brown sugar give structure, not just sweetness. Chopped pecans spread through the pan so every square cuts cleanly.

Shortbread is sturdier than pie dough under a gooey pecan filling. It gives the bars a firm, buttery base without asking you to roll dough, chill dough, or worry about a fragile bottom crust. After cooling, the center should bite like soft caramel custard — not syrup, not candy.

Ingredient Notes

The ingredient list is simple, but the choices matter. Butter keeps the crust tender, while the filling needs enough structure to set after cooling.

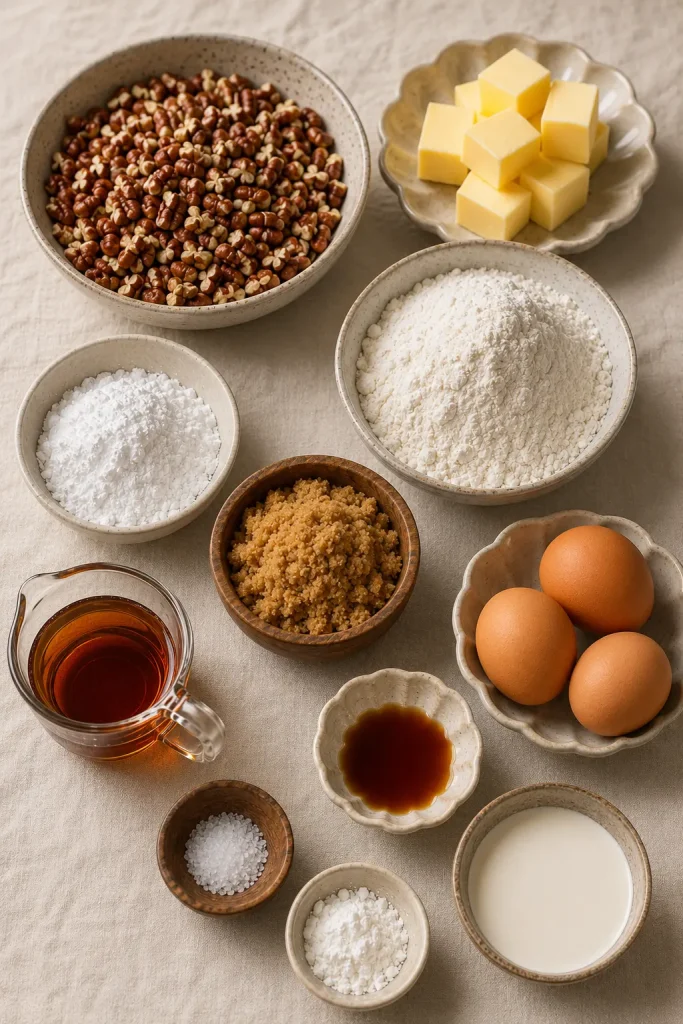
Ingredients for pecan pie bars arranged on linen, including chopped pecans, butter, flour, powdered sugar, brown sugar, eggs, maple syrup, vanilla, cream, salt, and cornstarch.
Gather the crust and filling ingredients before you start so the filling can be mixed while the crust prebakes.

Shortbread Crust

This shortbread crust is made with flour, powdered sugar, salt, cold butter, and a little cornstarch. When you squeeze a handful, the sandy mixture should clump like damp shortbread crumbs.

  • All-purpose flour gives the crust structure.
  • Powdered sugar keeps the crust tender and lightly sweet.
  • Cornstarch is optional, but it helps make the crust a little more delicate.
  • Cold butter creates a shortbread texture instead of a greasy base.
  • Salt balances the sweet pecan filling.

For bars, shortbread has one big advantage over pie crust: it holds its shape when you lift and cut it. If you are comparing this with a traditional pastry base, MasalaMonk’s apple pie crust guide explains cold butter, chilling, and rolling — but for these bars, shortbread is the sturdier choice.

Pecan Filling

Most of the pecan pie character comes from the filling. It should be glossy and pourable before baking, with the pecans suspended through the mixture instead of sitting in one dry pile.

  • Pecans: chopped pecans are easier to slice through than large halves.
  • Brown sugar: gives the filling a deeper caramel flavor.
  • Maple syrup: works as the main syrup for a no-corn-syrup-friendly version.
  • Butter: adds richness and helps the filling taste rounded.
  • Eggs: help the filling set as it bakes and cools.
  • Heavy cream: gives a softer, richer bite. Leave it out if you want a slightly firmer set.
  • Vanilla and salt: keep the flavor warm, balanced, and not flat.

You do not need perfect pecan halves for this recipe. Pecan pieces are often the smarter choice because the nuts need to be distributed through the filling rather than arranged on top of a pie.

Should You Toast the Pecans First?

You do not have to toast the pecans first because they will toast as the bars bake. Lightly toasting them before mixing can deepen the flavor, but keep an eye on the final bake so the nuts do not get too dark on top.

Step-by-Step Cues for Better Pecan Pie Bars

Use this section when the timer is not enough. These are the visual cues that tell you the crust, filling, and finished pan are on track.

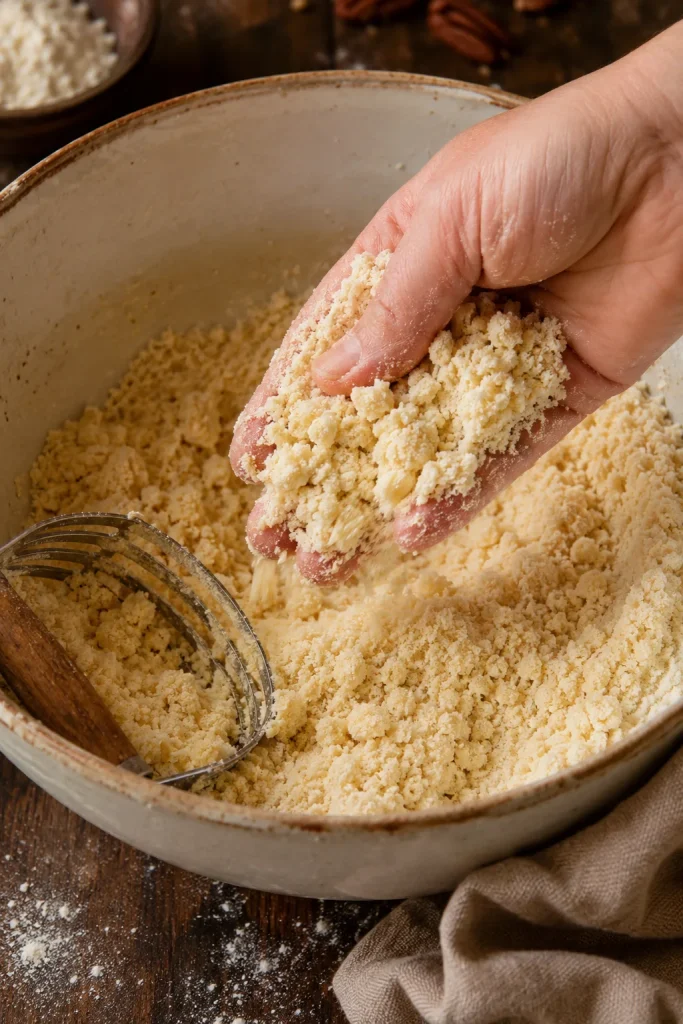
1. Crust Mixture: Damp Crumbs, Not Smooth Dough

The crust mixture should look crumbly, not creamy. When you squeeze a small handful, it should hold together. If it stays powdery, the butter may not be worked in evenly.

Hand squeezing crumbly shortbread crust mixture in a bowl to show damp crumbs holding together.
Instead of a smooth dough, aim for buttery crumbs that clump when squeezed; that texture presses evenly and bakes into a tender shortbread crust.

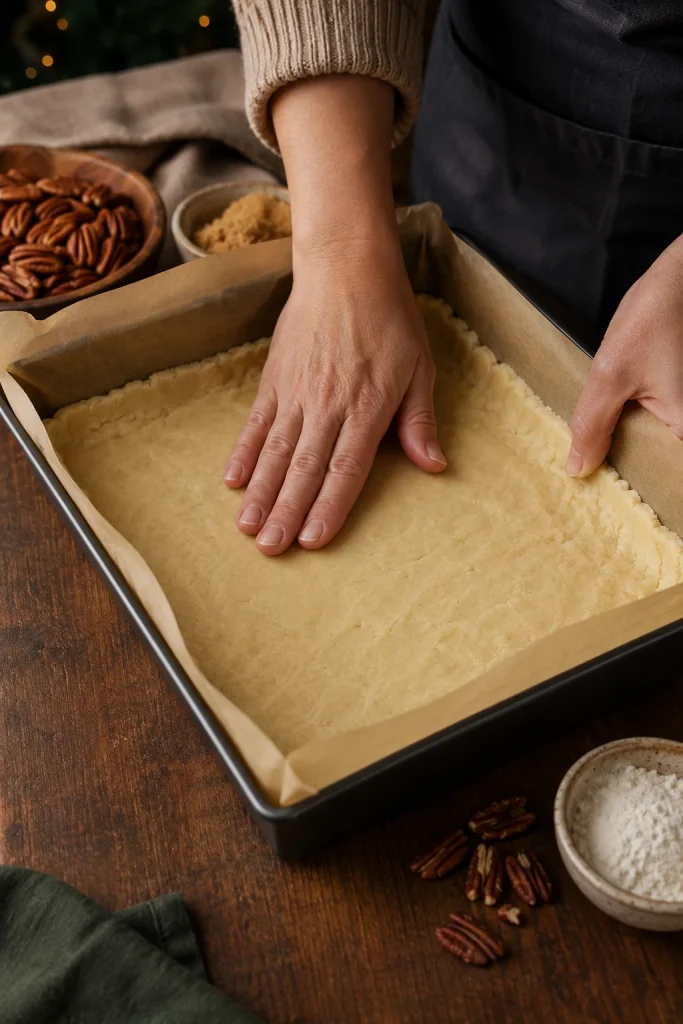
2. Pressed Crust: Compact and Even

Press the crust firmly into the pan, especially in the corners and along the edges. Thin corners can overbake, while thick patches can stay soft.

Hands pressing shortbread crust evenly into a parchment-lined rectangular baking pan.
Once the crumbs are ready, press them firmly into the parchment-lined pan, especially around the edges, so every bar has a steady base.

3. Prebaked Crust: Set and Pale Golden

The crust does not need to turn deeply brown. It only needs to look set with pale golden edges. That head start keeps the sticky filling from sinking into a soft base.

Prebaked shortbread crust in a parchment-lined metal pan with a set surface and lightly golden edges.
The prebaked crust should look set with pale golden edges; it still needs to bake again under the sticky pecan filling.

4. Filling Pour: Glossy, Even, and Ready to Bake

Whisk the sugar, syrup, butter, eggs, cream, vanilla, and salt until smooth before the pecans go in. Once the pecans are stirred through, pour the filling over the warm crust and guide the nuts toward the corners.

Glossy maple pecan filling being poured over a prebaked shortbread crust in a parchment-lined baking pan.
After the crust is prebaked, pour the glossy maple pecan filling over the warm base and guide the nuts toward the corners.

5. Before Baking: Even Pecan Coverage

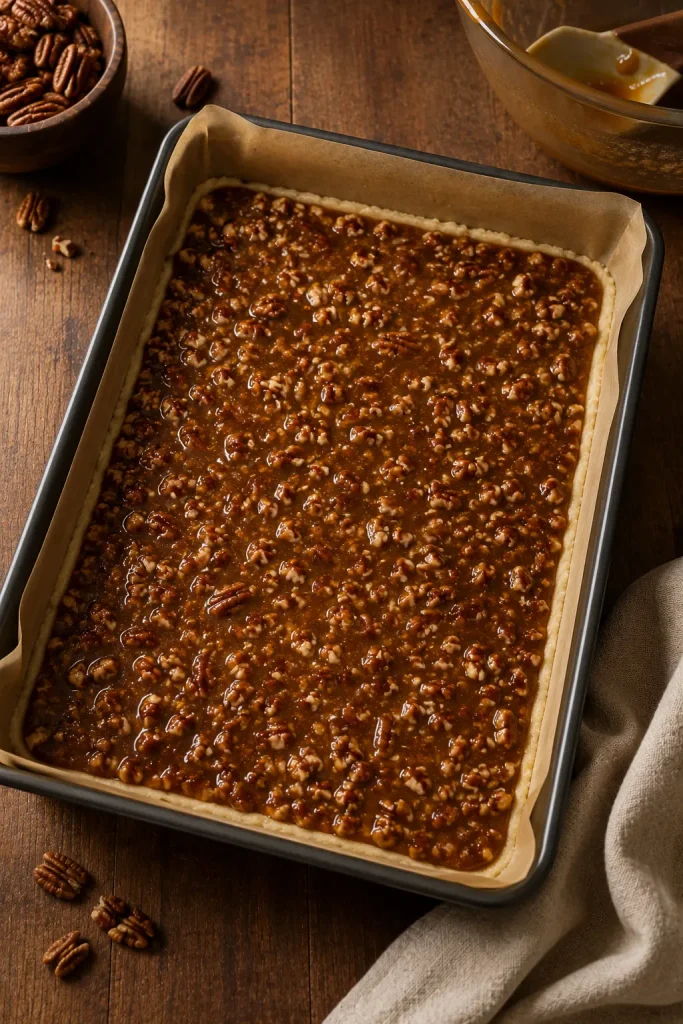
Before the pan goes back into the oven, nudge the pecans into an even layer so the corners are not bare and the center does not bake as one thick nut pile.

Unbaked pecan pie bars in a parchment-lined pan with glossy filling and evenly spread chopped pecans.
Before the pan returns to the oven, check for even pecan coverage; this helps the bars bake evenly and gives each square enough topping.

6. After Baking: Bubbling Edges and Soft Center Wobble

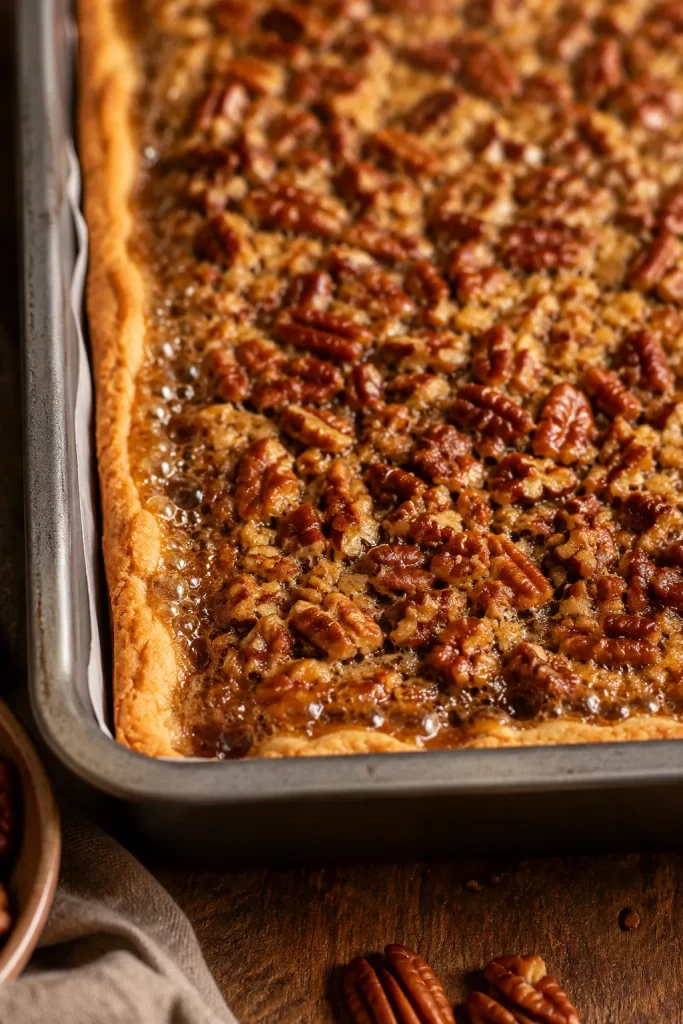
Edges should bubble before the pan comes out. A glossy, set-looking top is good, but the center should still move gently. Soft wobble is fine. Liquid ripple means more oven time.

Baked pecan pie bars in a pan with bubbling edges, glossy pecan topping, and a golden crust.
As the filling bakes, watch the edges first: steady bubbling around the pan is a better doneness clue than waiting for a stiff center.

7. After Cooling: Liftable Slab, Soft Bite

Once cool, the bars should lift from the pan as one slab. The top may still be slightly tacky, but it should not look wet. Center texture should bite like soft pecan pie filling, not run like syrup.

Cooled slab of pecan pie bars being lifted from a metal baking pan using parchment paper.
After cooling, use the parchment overhang to lift the slab out cleanly, then cut on a board instead of fighting the pan.

Still worried about the filling? Go straight to the doneness guide, or return to the recipe card.

How to Tell When Pecan Pie Bars Are Done, Not Runny

This is the part where pecan pie bars make people nervous, because done does not mean stiff. You want gooey, not raw; soft, not sloshy; rich, not hard like candy.

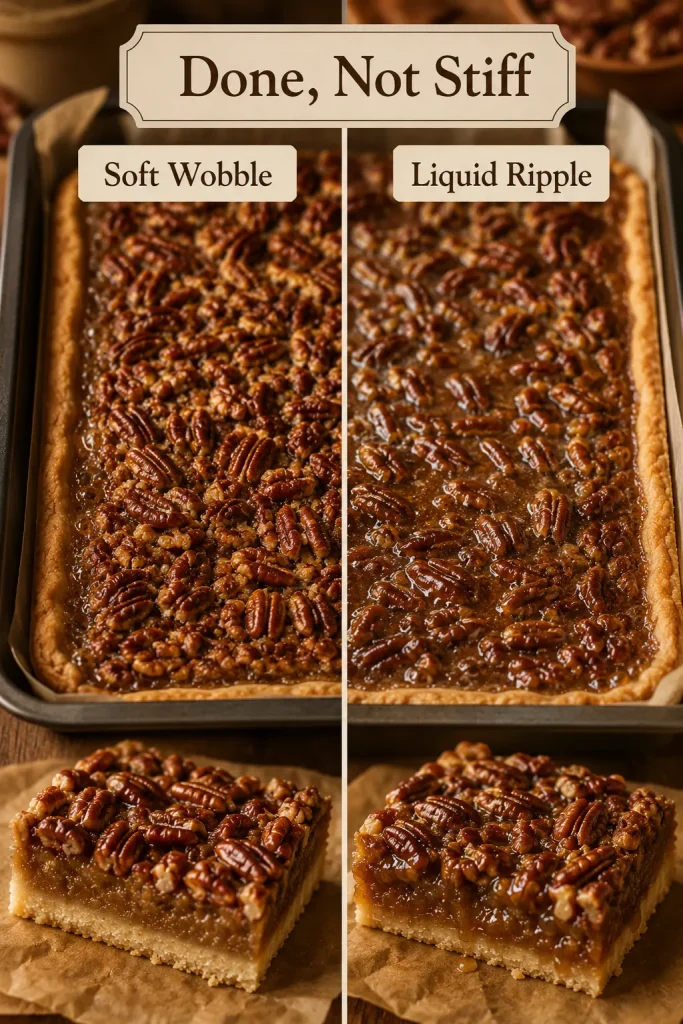
Soft Wobble vs Liquid Ripple

Split comparison guide showing pecan pie bars labeled Soft Wobble on one side and Liquid Ripple on the other, with the title Done, Not Stiff.
Gentle movement is fine, but a loose ripple means the filling still needs more time before it can set into clean pecan pie bars.

If you wait until the center looks completely firm in the oven, the filling can cool into something too hard or sticky-chewy. The edges matter more than the exact minute on the timer: look for bubbling sides, a glossy top, and a center that moves gently without sloshing.

Look for these signs before removing the pan from the oven:

  • Edges are bubbling around the pan.
  • A glossy, set-looking top covers the filling.
  • Pecans look toasted, not burnt.
  • Crust edges are lightly golden.
  • The center has a slight custard-like wobble.
  • Gentle pan movement does not create a liquid ripple or slosh.
  • No wet or raw-looking patch remains in the middle.

Slight movement in the center is fine because the filling keeps setting as it cools. A liquid wave means the bars need more time. Add 3 to 5 minutes, then check again.

If using a thermometer, these bars are usually set around 185°F / 85°C in the center, but do not chase the number alone. The better test is the full set of cues: bubbling edges, a glossy top, and a center that wobbles softly without rippling like liquid.

That visual cue makes the pan much less intimidating.

After baking, the next move is cooling and cutting cleanly. If the pan looks off, use troubleshooting.

How to Cool, Chill, and Cut Clean Squares

This is where the recipe stops being about skill and starts being about patience. Hot bars smear. Cold bars slice.

  • Cool the pan completely on a wire rack.
  • Chill the slab for 30 to 60 minutes if you want sharper edges.
  • Lift the bars out using the parchment overhang.
  • Use a long, sharp knife.
  • Wipe the knife between cuts.
  • Trim the outer edges if you want a polished party platter.
  • Cut 24 larger bars or 36 smaller squares.
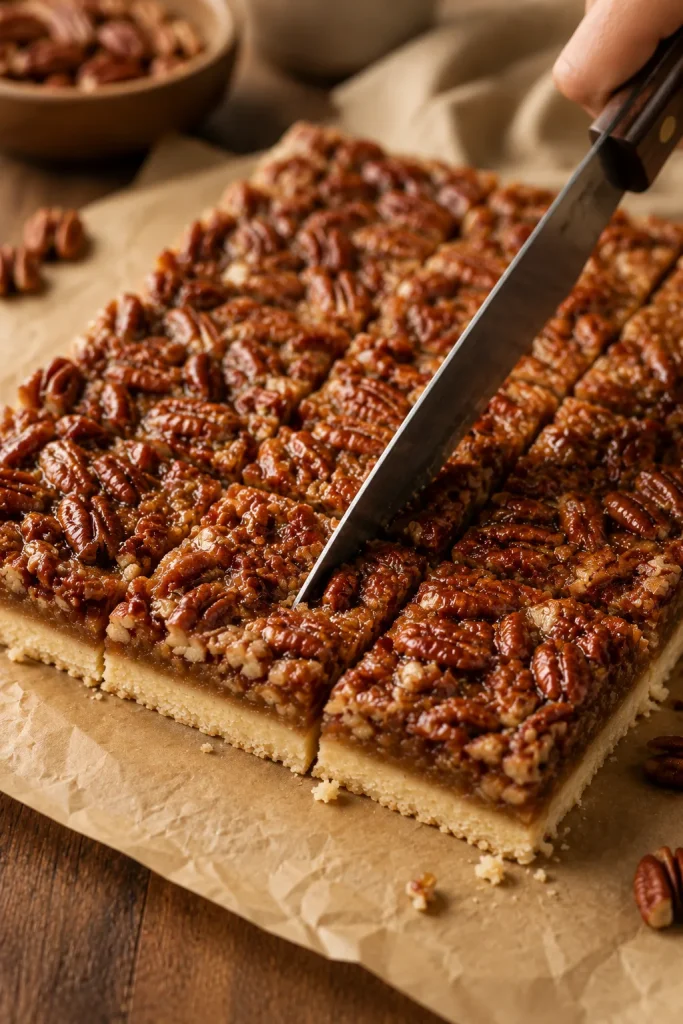
Sharp knife cutting chilled pecan pie bars into neat squares on parchment paper.
Slice the bars cold for sharp edges; chilled filling resists smearing and the shortbread base stays steadier under the knife.

For the neatest look, cut the bars cold and then let them sit at room temperature before serving. A chilled slab is easier to cut than a room-temperature one, even if you plan to serve the bars softer.

For serving, smaller pieces usually work better than large ones because the bars are rich. Coffee, unsweetened tea, lightly sweetened homemade whipped cream, or a little flaky salt all help balance the sweetness.

That is the difference between a delicious pan and a dessert tray that looks intentional.

How to Make Them Gooier, Firmer, or Cleaner-Cut

Once the base recipe is clear, you can steer the bars a little softer, a little firmer, or cleaner-cut without changing the whole formula.

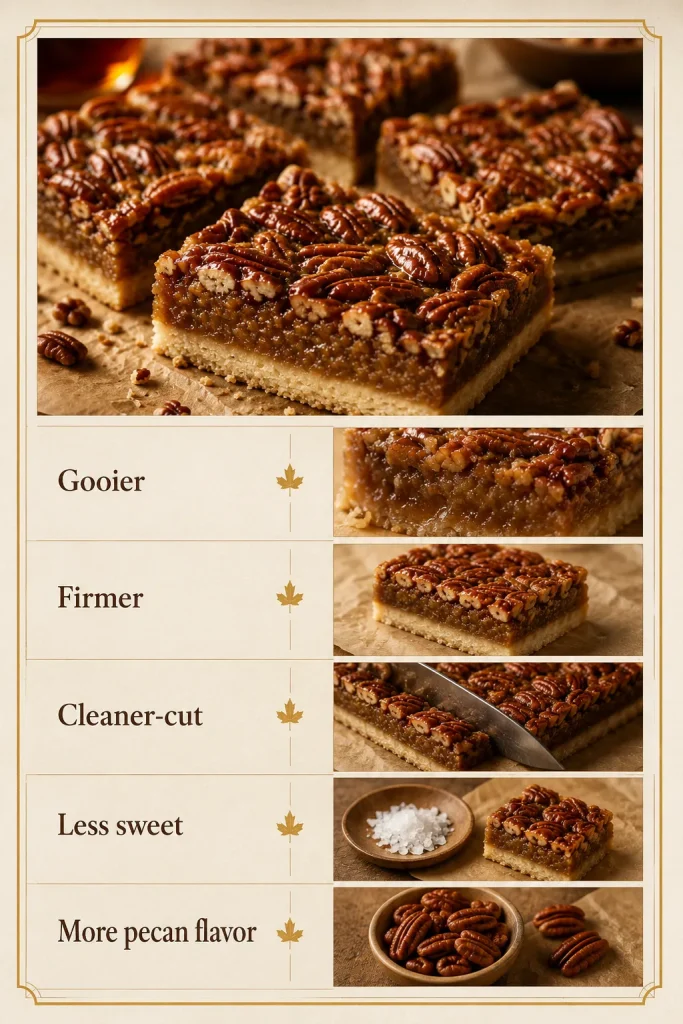
Texture control guide for pecan pie bars with sections labeled Gooier, Firmer, Cleaner-cut, Less sweet, and More pecan flavor.
Use this guide to choose a softer center, firmer set, cleaner cuts, less sweetness, or deeper pecan flavor.
Desired ResultWhat to Do
Gooier centerUse maple syrup as written, keep the cream, and do not overbake.
Firmer barsSkip the cream and chill before slicing.
Cleaner cutsChill the slab, use a sharp knife, and wipe between cuts.
Less sweet feelCut smaller squares and finish with flaky salt.
Stronger pecan flavorLightly toast the pecans before adding them to the filling.

You are not locked into one texture; you just need the right small adjustment. Do not reduce the sugar heavily to make the bars less sweet, because sugar helps the filling set. Better balance comes from smaller pieces, flaky salt, coffee, tea, or lightly sweetened cream.

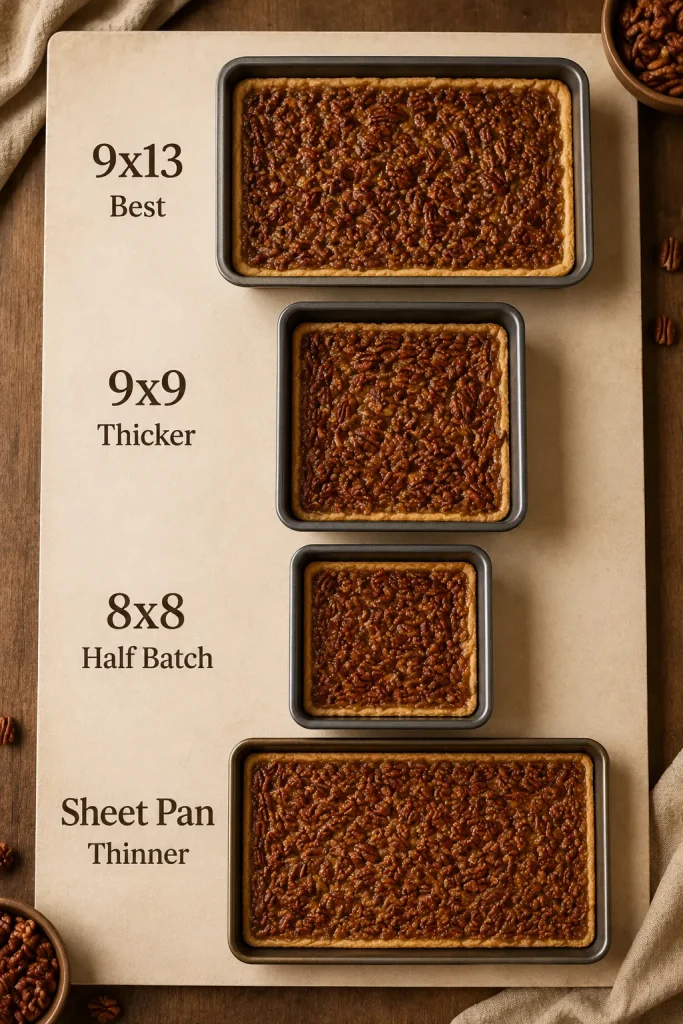
Pan Size Guide

For holiday baking, a 9×13 inch pan is the calm choice. It gives you enough bars to share without making the filling so thick that the center struggles to set.

Pan size guide for pecan pie bars showing 9x13 best, 9x9 thicker, 8x8 half batch, and sheet pan thinner.
Changing pan size changes thickness, timing, and texture; the 9×13 pan is the safest fit, while smaller pans need scaling and sheet pans bake thinner.
Pan SizeBest ForWhat to Know
9×13 inch / 23×33 cmHoliday trays, potlucks, partiesBest default. Makes 24 rich bars or 36 smaller squares.
9×9 inchSmaller batchBars will be thicker. They may need a little more time to set.
8×8 inchSmall batchUse a scaled-down recipe rather than baking the full amount in this pan.
Jelly roll pan or sheet panLarge thin barsNot a direct swap. The bars will be thinner and may bake faster.
Metal baking panClean edges and even browningBest choice if available.
Glass baking dishHome bakingWorks, but glass holds heat longer. Check early near the end of baking.

Can I Make a Smaller Batch?

Yes, but use a true half batch for an 8×8 pan rather than pouring the full 9×13 mixture into a smaller dish. The bake time will usually be shorter for a scaled-down batch, but use the same doneness cues: bubbling edges, glossy top, and a soft wobble in the center.

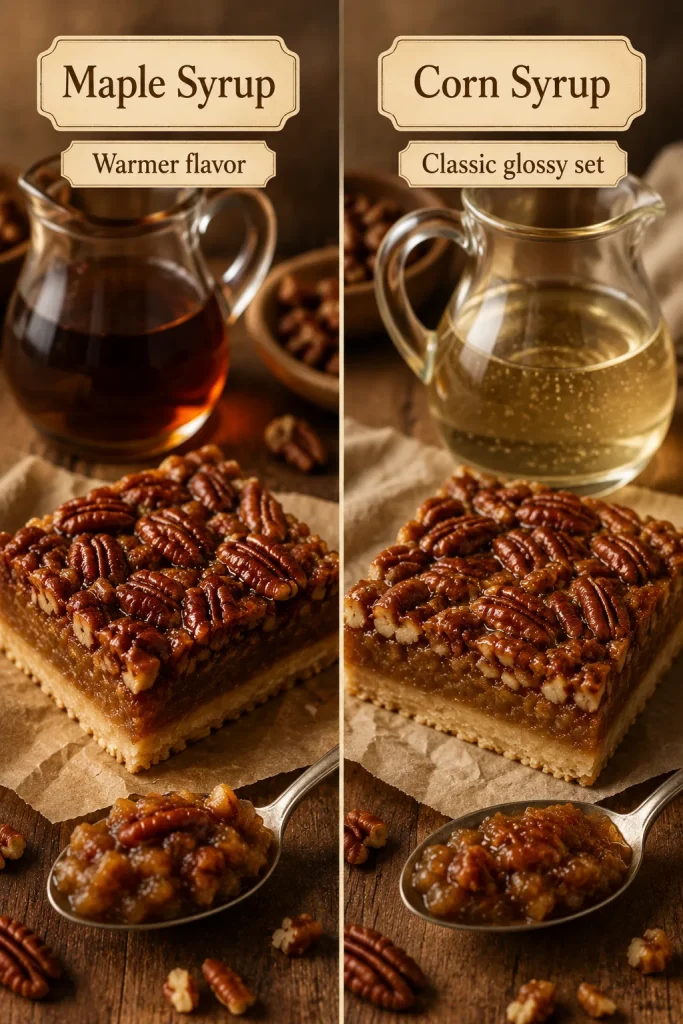
Best Syrup for Pecan Pie Bars: Maple vs Corn Syrup

Syrup changes both flavor and texture. Corn syrup gives the classic glossy sweetness; maple brings a warmer flavor and a slightly softer bite.

Split image comparing maple syrup and corn syrup with pecan pie bars and spoonfuls of pecan filling.
Maple syrup brings a warmer, deeper flavor, while corn syrup gives pecan pie bars the more traditional glossy set.
SweetenerBest ForTexture and Flavor
Maple syrupNo-corn-syrup pecan pie barsWarm, deep, slightly caramel-like flavor.
Light corn syrupClassic pecan pie barsGlossy, sweet, familiar, and reliable.
HoneyHoney-forward barsSticky and floral, with a stronger flavor.
Golden syrupCaramel-style sweetnessRich, buttery, and slightly toasty.
Brown sugar onlyDeeper caramel flavorNot always a direct syrup replacement because syrup helps texture.

Use the syrup listed in the recipe card for the most reliable result. Swapping sweeteners can change the sweetness, set, and sliceability.

Can You Make Pecan Pie Bars Without Corn Syrup?

Yes. These pecan pie bars can be made without corn syrup by using maple syrup. Maple brings more flavor and a slightly softer bite, so this recipe does not ask maple to do all the structural work alone. The eggs, brown sugar, bubbling edges, and full cooling time all help the filling set into bars instead of staying loose.

So yes, you can skip corn syrup here — just do not treat maple syrup like a magic swap. The bars still need the eggs, sugar, bake time, and cooling time to become sliceable.

For a more classic version, replace the maple syrup with the same amount of light corn syrup. Honey can work for a stronger natural-sweetener flavor, but it will taste noticeably like honey.

Make-Ahead Holiday Timeline

This is why these bars belong on a holiday table: they let you finish dessert before the kitchen gets chaotic. By the next day, the filling is settled, the cuts are cleaner, and one dessert is already off your list.

Best Plan for Thanksgiving or Christmas

  • One day before serving: bake the bars, cool completely, cover, and refrigerate.
  • Serving day: lift the slab from the pan and cut while chilled.
  • Before serving: let the bars sit at room temperature briefly for a softer, gooier bite.
  • Trays or boxes: place parchment between layers so the tops do not stick.

Thanksgiving plan: bake the bars on Wednesday, chill overnight, slice Thursday morning, and serve later in the day. On a busy holiday morning, already-cut bars feel much calmer than a pie that still needs a clean first slice.

  • Chill before packing so the pieces hold their shape.
  • Cut smaller squares for dessert trays and cookie boxes.
  • Use parchment between layers so the tops do not stick.
  • Keep the top layer flat instead of pressing bars together.
  • Do not pack warm bars; the filling needs to be fully cooled first.
  • Add flaky salt after cutting if the tops are no longer tacky.
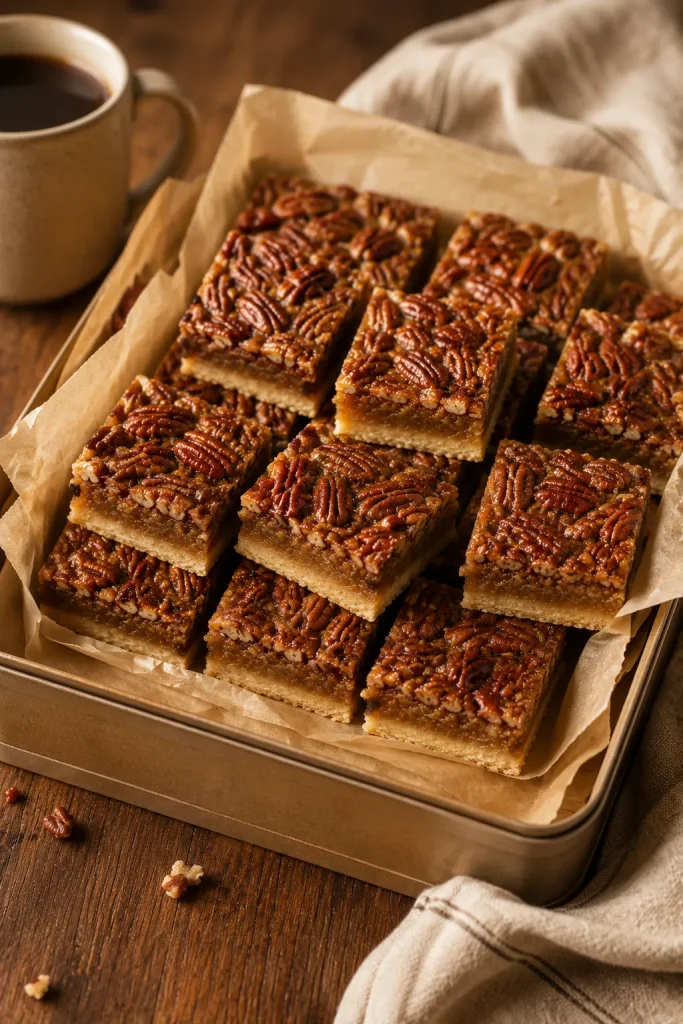
Pecan pie bars packed in a shallow box with parchment paper between layers and a coffee mug nearby.
Packing for potlucks, dessert trays, or cookie boxes works best when the bars are cold and the glossy tops are protected with parchment.

Picture the pan on a crowded Thanksgiving counter: bars already cut, parchment between layers, no pie server required. Small squares are often the smartest choice for a mixed dessert table because they feel generous without making the plate too heavy.

Storage and Freezing

Let the bars cool completely at room temperature so the filling can set. Leave them uncovered while they cool, then cover once they are no longer warm. The safest make-ahead approach is to treat them like pecan pie and refrigerate after cooling, especially because this version contains eggs and cream.

For a cautious storage approach, Iowa State University Extension and Outreach recommends refrigerating homemade pecan and pumpkin pies made with fresh ingredients after baking and cooling unless they are served within the safe room-temperature window.

They are also forgiving in the fridge, which is exactly what you want from a holiday dessert.

Storage MethodHow LongBest Practice
Cooling after bakingAbout 2 hours, or until fully cooledCool uncovered so the filling can set before chilling or slicing.
Room-temperature servingUp to 2 hours after coolingGood for dessert tables, especially in a cool room.
Refrigerator3 to 4 daysStore airtight, with parchment between layers if stacked.
FreezerUp to 3 months for best qualityFreeze sliced bars with parchment between layers.

To freeze, cool the bars completely, cut them into squares, and freeze in an airtight container. Place parchment between layers so the tops do not stick. Thaw overnight in the refrigerator, then let them sit at room temperature briefly before serving if you want a softer texture.

Variations

Some changes are easy because they only adjust flavor. Others change the structure of the filling, and that is where pecan pie bars stop being casual.

Easy Flavor Changes

  • Chocolate pecan pie bars: sprinkle 1/2 to 3/4 cup chocolate chips over the crust before adding the filling, or drizzle melted chocolate over the cooled bars. For a true chocolate-square dessert instead, try fudgy brownies.
  • Bourbon pecan pie bars: add 1 to 2 tablespoons bourbon to the filling. It works especially well with maple syrup and brown sugar.
  • Salted pecan pie bars: finish the baked bars with flaky salt while the top is still slightly tacky.
  • Brown butter pecan bars: brown the butter first, then cool it slightly before whisking it into the filling.
  • Maple spice pecan bars: use maple syrup as written and add a small pinch of cinnamon or a little apple pie spice. Keep it light so the pecans, brown sugar, and maple stay in front.

Bigger Changes

  • Pecan pie cheesecake bars: add a cheesecake layer only if you are using a version built for that extra layer.
  • Pumpkin pecan pie bars: use a purpose-built pumpkin version because pumpkin changes the moisture, filling thickness, and bake time.
  • Vegan pecan pie bars: use a recipe designed without eggs and butter rather than swapping them casually here.
  • Keto or sugar-free pecan pie bars: use a dedicated low-carb version because sugar and syrup help this filling set.

Can You Use Pie Crust, Cookie Dough, or Cake Mix?

The shortbread crust gives the best balance of buttery flavor, strength, and tidy slicing. Shortcuts can work, but they will change the final texture.

  • Store-bought pie crust: softer and more pie-like, but less sturdy than shortbread.
  • Sugar cookie dough: sweeter and softer, more like a cookie bar.
  • Cake mix crust: cakier and less classic.
  • Crescent roll dough: very soft and quick, but not traditional.
  • Graham cracker crust: sweeter and more crumbly unless packed firmly.

Dietary Notes

These bars depend on butter, eggs, sugar, and syrup for structure, so small swaps are safer than big ones. A 1:1 gluten-free flour blend is the easiest likely swap for the crust, though the base may be more delicate. Vegan, keto, and sugar-free versions need separate formulas because they change how the filling sets. When the bars need to feel less sweet, cut smaller pieces and add flaky salt instead of reducing the sugar heavily.

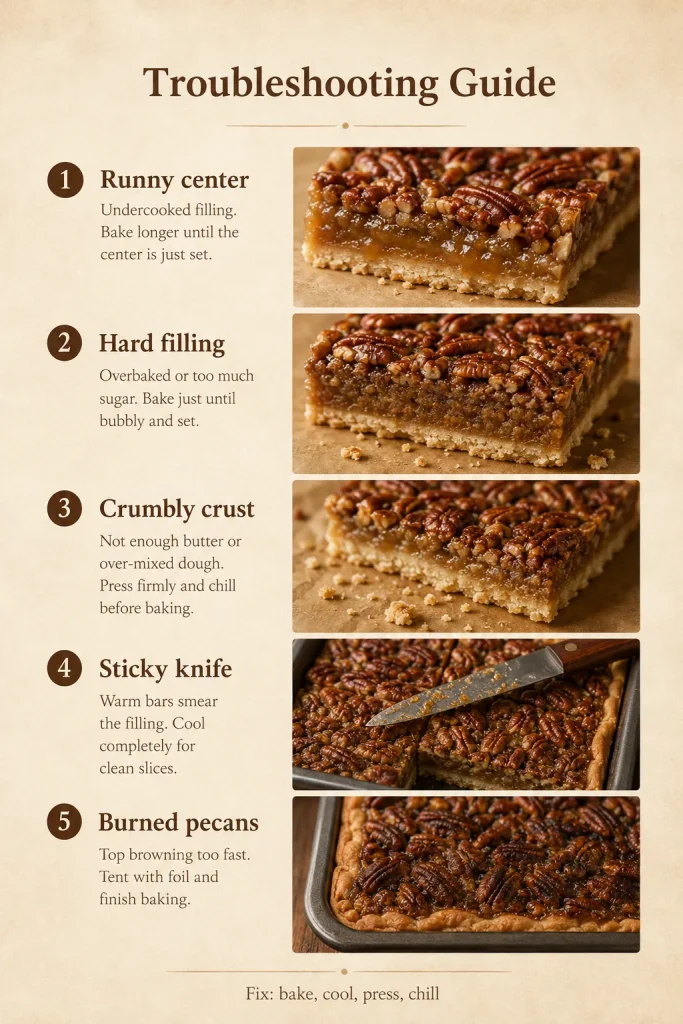
Troubleshooting Pecan Pie Bars

A pan that looks wrong is usually not a disaster. Most problems come from one of four places: bake time, cooling time, crust pressure, or filling changes.

Troubleshooting guide for pecan pie bars with labeled sections for runny center, hard filling, crumbly crust, sticky knife, and burned pecans.
Use the cue first: runny centers need more baking, sticky cuts need more chilling, and dark tops need gentler heat protection.

Quick Fix Table

ProblemLikely CauseFix
Bars are runnyUnderbaked, cut too soon, or filling ratio changedBake until edges bubble and center is set with only a slight wobble. Cool completely before cutting.
Filling is too hardOverbaked or baked too long after the filling was already setCheck earlier next time. Remove when the center is just set, not dry.
Crumbly crustCrust was not pressed firmly enough or flour was overmeasuredPress the crust tightly into the pan and measure flour carefully.
Soggy crustCrust was not prebaked enoughPrebake until set and lightly golden at the edges before adding filling.
Filling leaked under the crustCrust had cracks or was pressed unevenlyPress the crust firmly and evenly, especially along the edges.
Pecans burnedBars baked too long or oven runs hotCheck earlier and use an oven thermometer if needed.
Too sweetPecan pie filling is naturally richCut smaller squares, add flaky salt, and serve with coffee or lightly sweetened whipped cream.
Sticky knifeBars are too warm or the knife is stickyChill before cutting and wipe the knife between slices.
Falling apart when cutNot cooled enough or crust too looseCool fully, chill briefly, and use a sharp knife.
Center still jigglesCould be normal or underbaked depending on movementA soft wobble is fine. A liquid ripple means it needs more time.

Problem solved? Return to the recipe card, or review the doneness cues before your next batch.

FAQ

What is the difference between pecan pie and pecan pie bars?

Pecan pie is usually baked in a round pie crust and cut into wedges. By contrast, pecan pie bars are baked in a rectangular pan with crust on the bottom and pecan filling on top, then cut into squares. The flavor is similar, but bars are easier to serve, pack, and share.

Are pecan pie bars easier than pecan pie?

Yes. The crust is pressed instead of rolled, and the slab cuts into squares instead of fragile wedges.

Why did my pecan pie bars turn out runny?

Runny bars are usually underbaked, cut too early, or made with changed filling ratios. If the edges did not bubble before you removed the pan, the filling probably did not get hot enough to set.

How long should pecan pie bars cool before cutting?

Give them at least 2 hours, or until the pan is completely cool. For sharper cuts, chill the cooled slab for 30 to 60 minutes before slicing.

Do pecan pie bars need to be refrigerated?

Refrigeration is the safest choice after they cool, especially if you are making them ahead. Cool them uncovered first, then cover and store leftovers in an airtight container in the fridge.

Can pecan pie bars be frozen?

They freeze well once the filling has cooled and set. Slice before freezing, place parchment between layers, seal tightly, and freeze for up to 3 months. Thaw in the refrigerator before serving.

Can maple syrup replace corn syrup in pecan pie bars?

Maple syrup can replace corn syrup in this recipe. The flavor becomes deeper and slightly more caramel-like. Maple bars may be a little softer than classic corn syrup bars, so let them cool fully before cutting.

Should I use pecan halves or chopped pecans?

Chopped pecans work better because they spread evenly and do not drag the knife through the topping. Pecan halves look attractive, but they can make the top harder to slice neatly.

Can I make pecan pie bars ahead for Thanksgiving?

Yes. Bake them a day ahead, cool completely, chill overnight, slice cold, and bring them closer to room temperature before serving.

Final Thoughts

Pecan pie bars are the dessert to make when you want all the glossy, nutty comfort of pecan pie without the pressure of carving out the first fragile wedge. Give the crust its head start, let the filling bubble, and cool the pan completely. The reward is a quiet holiday win: buttery bars that cut cleanly, travel easily, and still taste like the center of a pecan pie.

Back to quick answer · Back to recipe card

Posted on Leave a comment

Spanakopita Recipe: Greek Spinach Pie with Feta, Phyllo & Crispy Layers

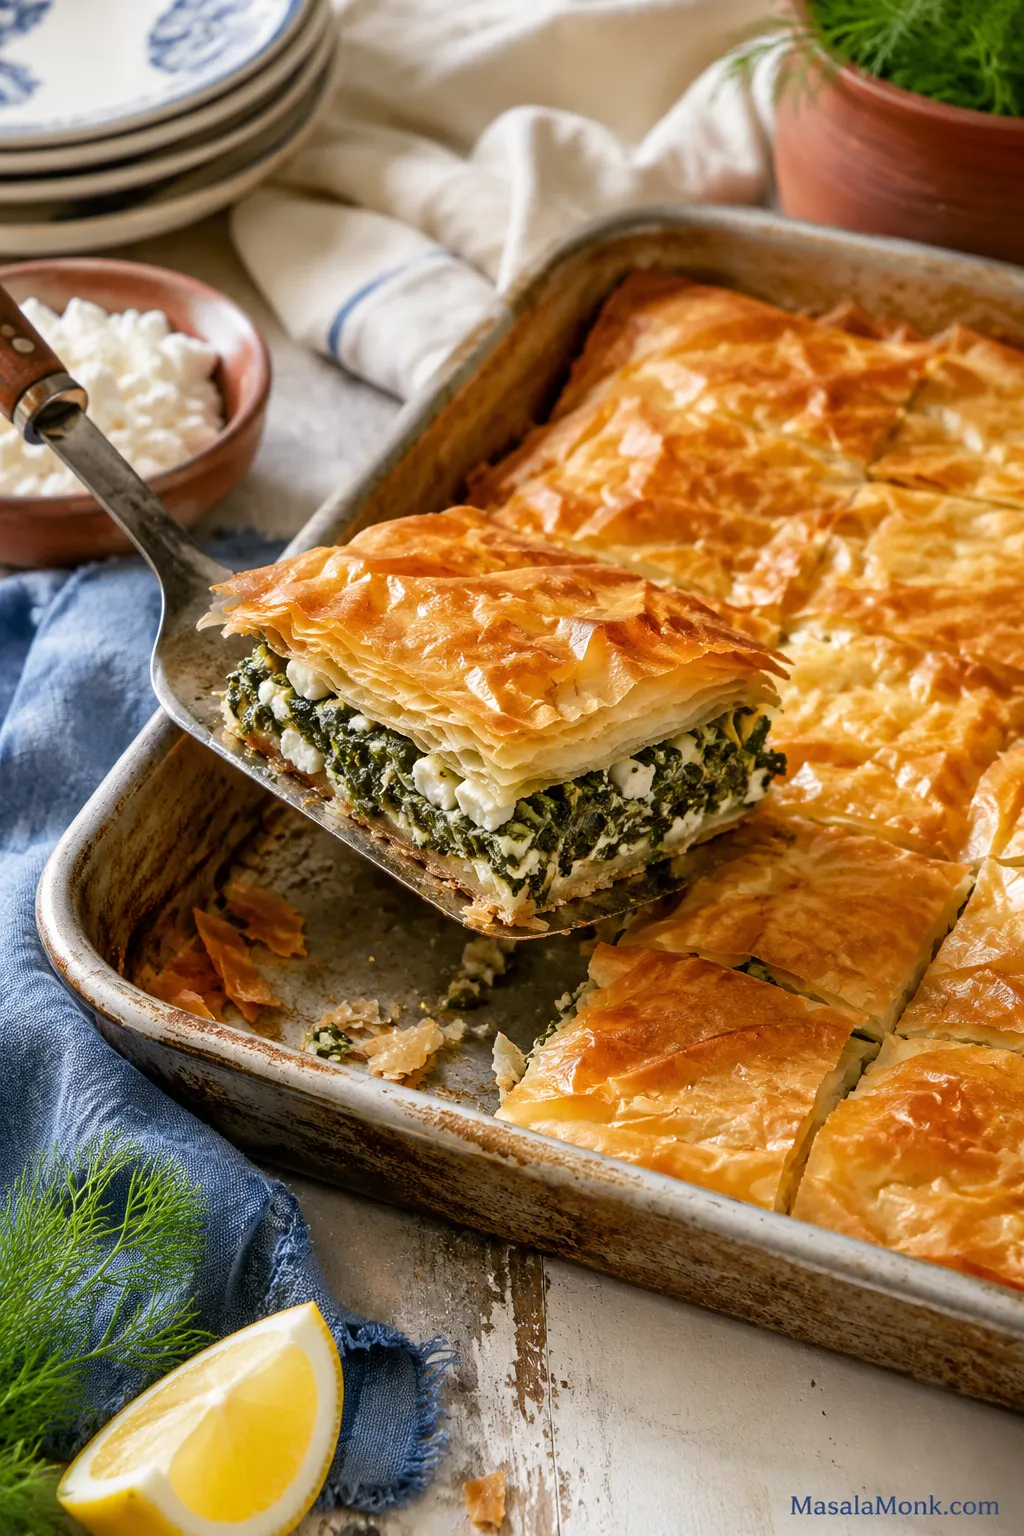
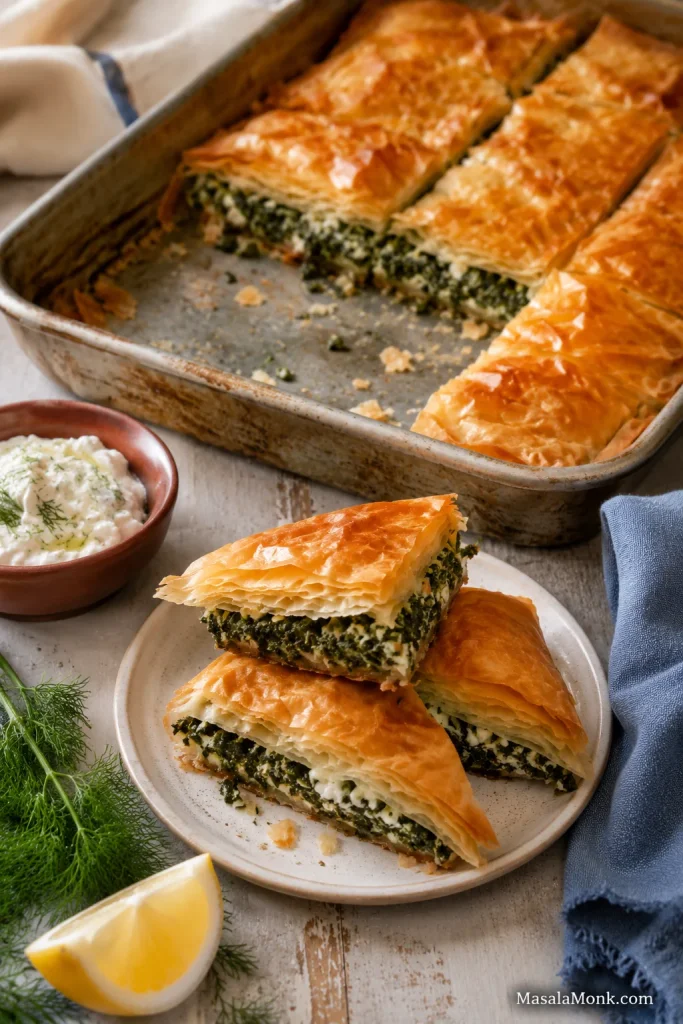
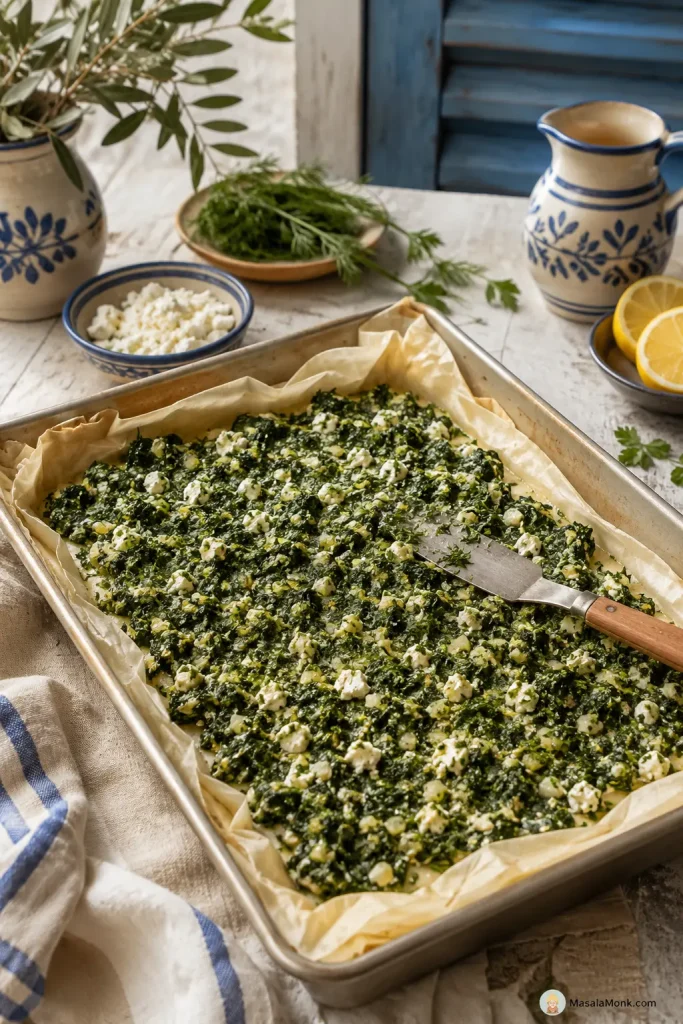
A spatula lifting a corner piece of baked spanakopita from a rectangular pan, showing golden phyllo layers and green spinach feta filling.

You know spanakopita is right when the knife crackles through the golden top and the first corner lifts cleanly from the pan. Under those flaky phyllo layers should be warm spinach, salty feta, fresh herbs, and enough structure to slice without the bottom turning wet.

This is a practical home-kitchen spanakopita: store-bought phyllo, a well-drained spinach-feta filling, clear success cues, and a crisp base that does not depend on perfect pastry work. You still get the drama of a flaky Greek spinach pie, but the process stays manageable: dry the greens, mix the filling, layer, bake, rest, and slice.

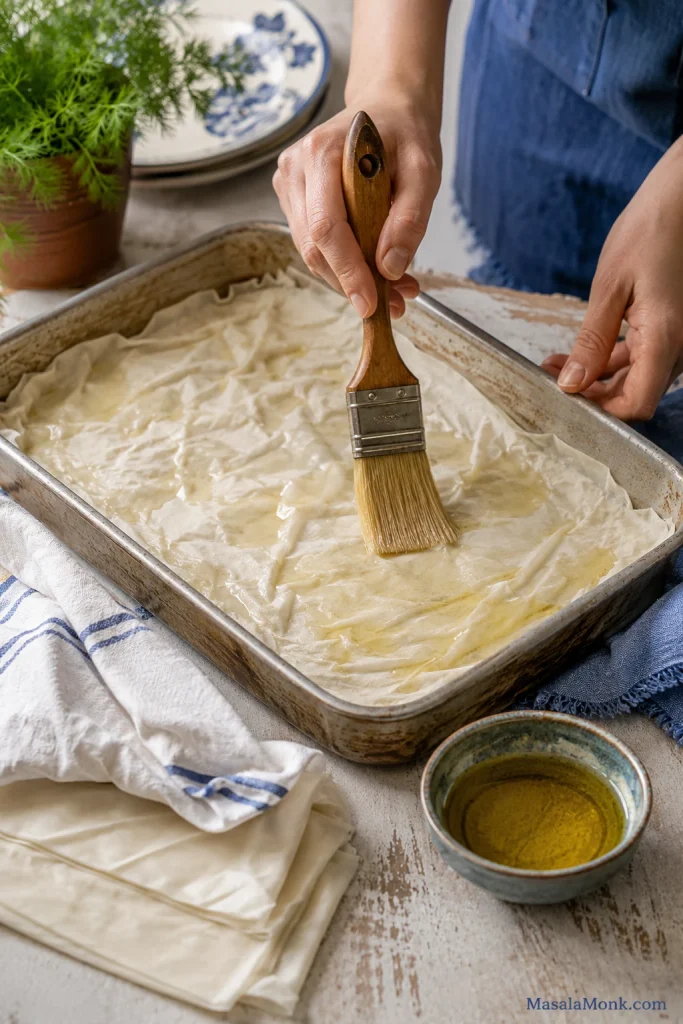
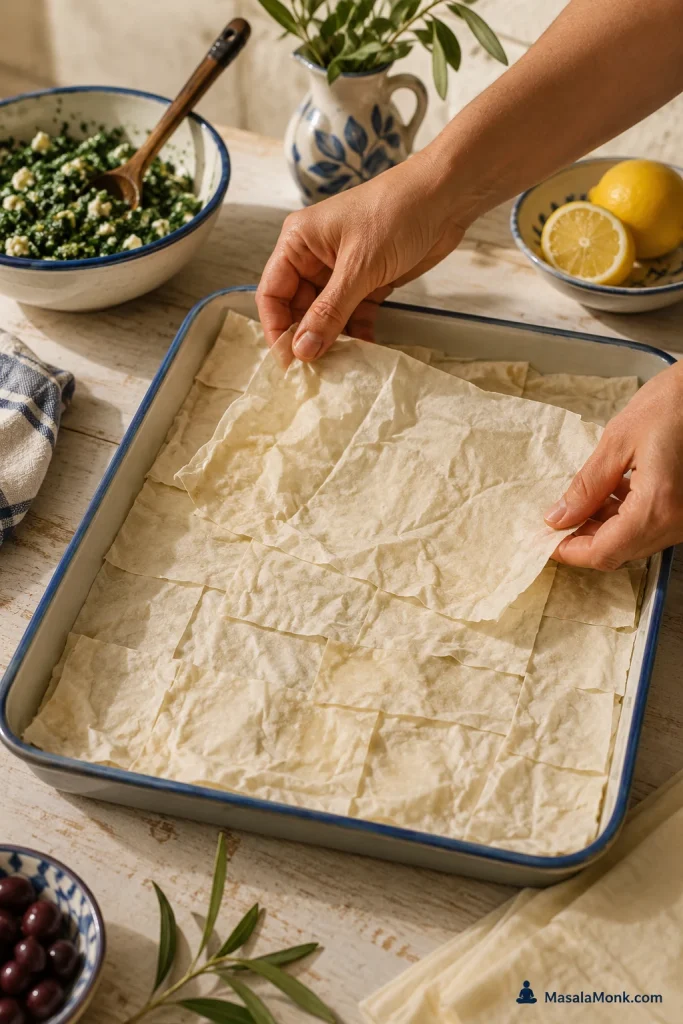
If phyllo makes you nervous, you are in good company. It tears, dries, and wrinkles, but this pie does not need perfect sheets. The hidden layers can be patchwork, the top can be a little rustic, and the tray will still bake into something golden, flaky, and shareable.

Hands brushing oil over a wrinkled sheet of phyllo pastry inside a rectangular baking pan.
Wrinkled phyllo is still usable phyllo. Once it is lightly brushed and layered, those folds become extra flaky edges instead of a problem to fix.

Fastest reliable path: use frozen spinach, block feta, 14 phyllo sheets, and a 9 x 13 inch pan. Fresh spinach works too, but frozen keeps the filling easier to control for a first tray.

This is the version for the cook who wants spanakopita to feel doable before it feels impressive.

Spanakopita Recipe Snapshot

Recipe typeGreek spinach pie / spinach and feta phyllo pie
Prep time35–45 minutes with frozen spinach; longer with fresh bunch spinach
Cook time45–55 minutes
Total time1 hour 20 minutes to 1 hour 40 minutes, not including phyllo thawing
Advance stepThaw frozen phyllo overnight in the refrigerator
Yield10–12 pieces
Pan size9 x 13 inch / 23 x 33 cm baking dish or pan
Oven temperature350°F / 180°C
Oven rackLower-middle rack
Spinach500 g / 16 oz frozen spinach or 700–900 g / 1½–2 lb fresh spinach
Resting time15–20 minutes, uncovered, before slicing

Jump to the full recipe, or keep reading for the spinach, phyllo, and crisp-bottom tips that make the tray work.

Table of Contents

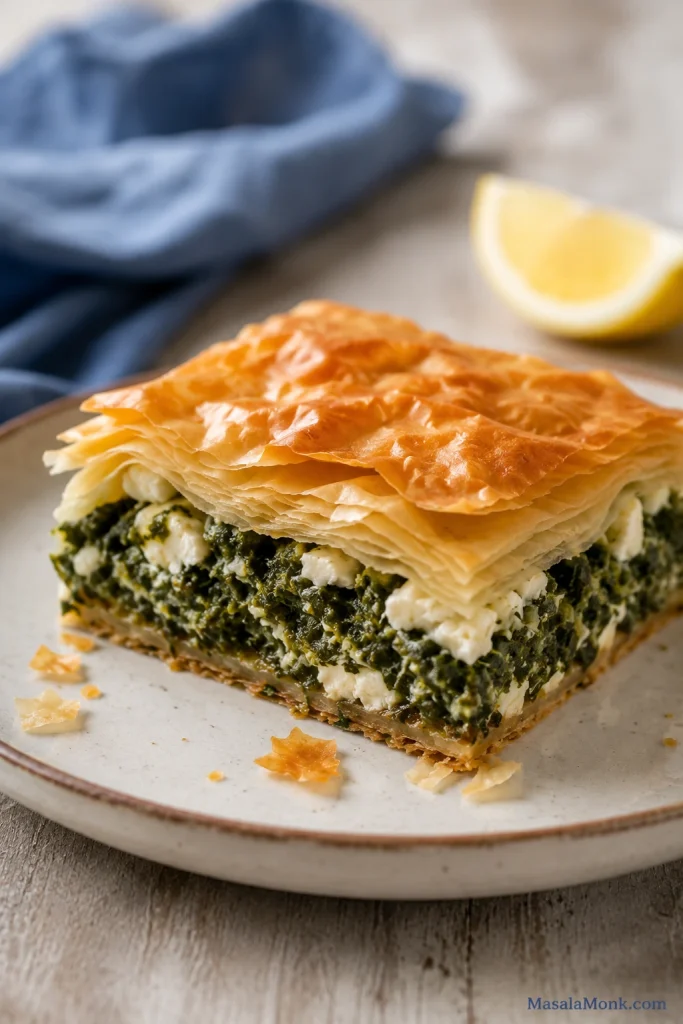
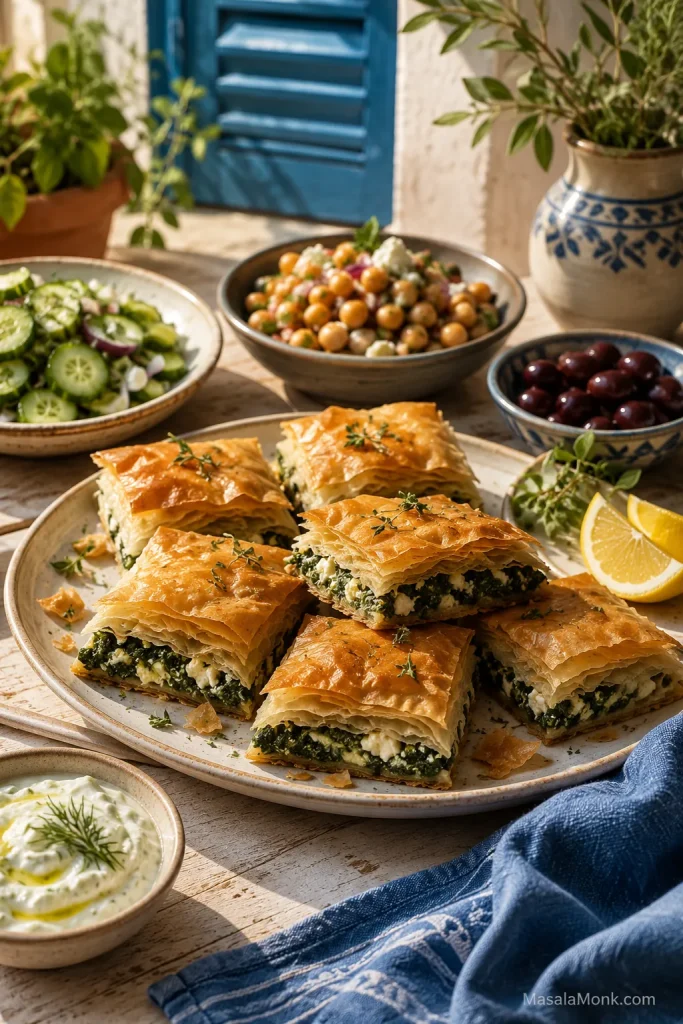
Before we get into the details, this is the texture you are aiming for: crisp pastry outside, green spinach through the middle, and small feta pieces that stay visible after baking.

A plated slice of Greek spinach pie showing flaky phyllo layers, green spinach filling, and white feta pieces.
A good Greek spinach pie slice should show contrast: crisp pastry outside, herby spinach inside, and small feta pockets throughout. That uneven texture is part of what makes spanakopita feel homemade.

Why This Spanakopita Works

The goal here is not perfect pastry work. It is a tray that lifts cleanly, tastes generous, and gives you flaky layers without asking you to baby every sheet. Frozen spinach takes one variable off your hands, block feta gives better texture, seven bottom phyllo sheets create structure, and the lower-middle rack helps the base bake through before the top gets too dark.

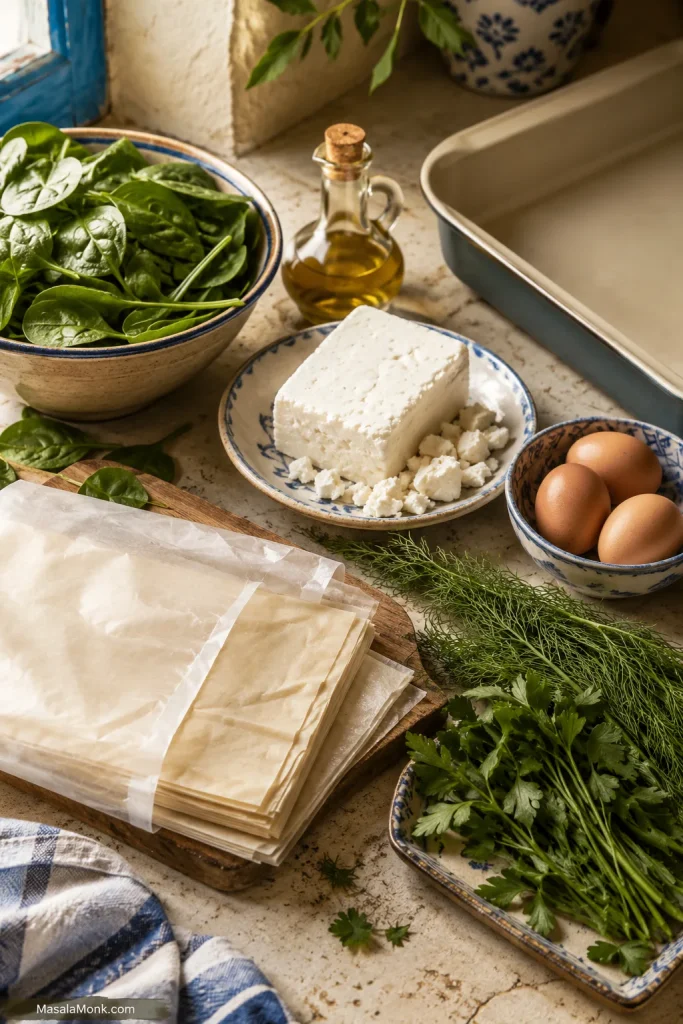
This is the practical spanakopita setup: filling ingredients ready, phyllo still protected, and the pan waiting before assembly begins.

Spanakopita ingredients on a kitchen counter, including phyllo sheets, spinach, feta, herbs, eggs, olive oil, and a rectangular baking pan.
Set up the spanakopita station before opening the phyllo: spinach, feta, herbs, eggs, oil, brush, and pan. Then the delicate sheets spend less time drying on the counter.
  • Frozen spinach makes the filling easier to control. Fresh works too, but frozen is already wilted, so once it is pressed well, the tray becomes more predictable.
  • Block feta gives creamy, salty pockets. It tastes fuller than very dry pre-crumbled feta.
  • Seven bottom sheets support the filling. They help the pie slice cleanly.
  • The lower-middle rack helps the base cook. This is especially useful in glass or ceramic pans.
  • A short rest finishes the texture. The filling settles, the pastry stays flaky, and the pieces cut cleaner.

The tray format is forgiving in a way triangles are not. Torn sheets disappear inside, the filling spreads evenly, and the lower layers have enough time to firm up before slicing.

You still get the flavor of a classic Greek spinach pie, just with store-bought phyllo, a forgiving tray format, and enough structure that the first slice does not collapse.

What Is Spanakopita?

Spanakopita is a Greek spinach pie made with thin phyllo pastry and a savory filling of spinach, feta cheese, herbs, and often eggs.

You may see the pastry spelled as phyllo or filo. They are the same thing: paper-thin pastry sheets that bake into crisp, flaky layers when brushed with olive oil or melted butter.

Greek spinach pies vary by family and region. Some use leeks, some add more herbs, some use homemade phyllo, and some keep the filling very simple. Here, the spirit is classic — greens, feta, herbs, olive oil, and crisp phyllo — while the handling is modern and practical: store-bought pastry, clear texture cues, and a tray format that gives the filling room to settle.

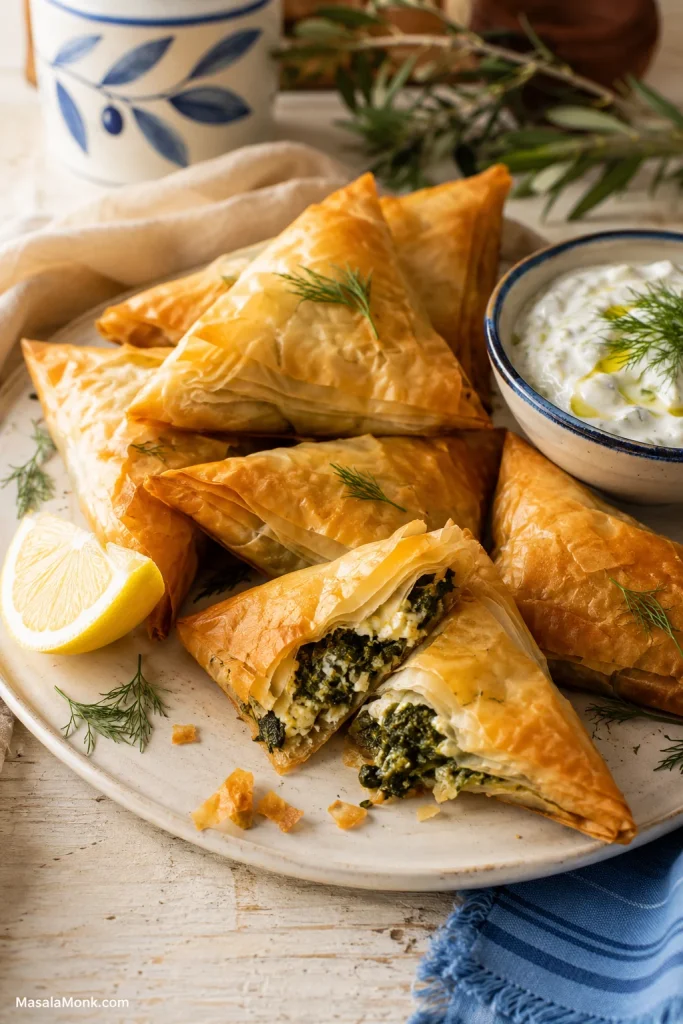
For dinner and clean slices, the tray version is the easiest path; triangles are better when you want appetizers, lunch boxes, or party bites.

A tray of spanakopita in the background with baked spinach and feta phyllo triangles in the foreground.
The same spinach-feta filling can become a full tray or folded spanakopita triangles. Choose the tray for an easier family-style bake, or make triangles when you want appetizer-sized pieces.

Spanakopita is not meant to be creamy like spinach dip. The filling should be savory, herby, and moist enough to taste generous, but firm enough that the phyllo bakes into layers instead of steaming from underneath.

In either shape, the best pieces have contrast: brittle golden corners, soft salty feta tucked into the greens, and a herby filling that smells good before the tray even reaches the oven.

Ingredients and Substitutions

The filling is simple, which is why the details show up in the finished slice. Good feta gives salty pockets, fresh herbs keep the spinach lively, and well-prepared greens let the phyllo stay flaky instead of heavy. If spinach is your main question, jump to the fresh vs frozen spinach guide before mixing.

Spinach and feta are the two ingredients that matter most. Spinach controls texture; feta controls flavor. Loose spinach weakens the pastry, while bland feta makes the whole filling taste flat.

This amount gives a generous but sliceable filling: enough spinach and feta to taste full, but not so much that the lower layers steam. If you add extra greens, keep the final squeezed amount close to the recipe amount.

Spanakopita Ingredient Amounts

IngredientAmountNotes
Frozen chopped spinach500 g / 16 ozThaw fully and press well.
OR fresh spinach700–900 g / 1½–2 lbWilt in batches, cool, chop if needed, then squeeze well.
Feta cheese300 g / about 10½ ozBlock feta gives better flavor and texture than very dry pre-crumbled feta.
Large eggs2Help bind the filling so the pieces slice more cleanly.
Phyllo sheets14 sheetsUse 7 sheets on the bottom and 7 on top.
Olive oil, divided120 ml / ½ cup for brushing, plus 1–2 tablespoons for cookingYou may not use all of it. Sheets should look lightly glossy, not heavy.
Onion or scallions1 small onion or 4–6 scallionsAdds sweetness and depth.
Garlic1–2 cloves, minced, optionalAdds extra savory depth.
Dill, fresh¼ cup choppedClassic fresh herb flavor.
Parsley, fresh¼ cup choppedAdds brightness.
Mint, fresh1–2 tablespoons, optionalAdds a brighter, more aromatic note.
Lemon zest½ teaspoon, optionalAdds brightness if your feta is mild or the filling tastes flat.
Black pepperTo tasteUse generously if your feta is mild.
NutmegPinch, optionalWorks well with spinach and cheese.

Before the eggs go in, taste the filling so you can judge the feta’s saltiness. Some feta needs no added salt at all.

Feta Cheese

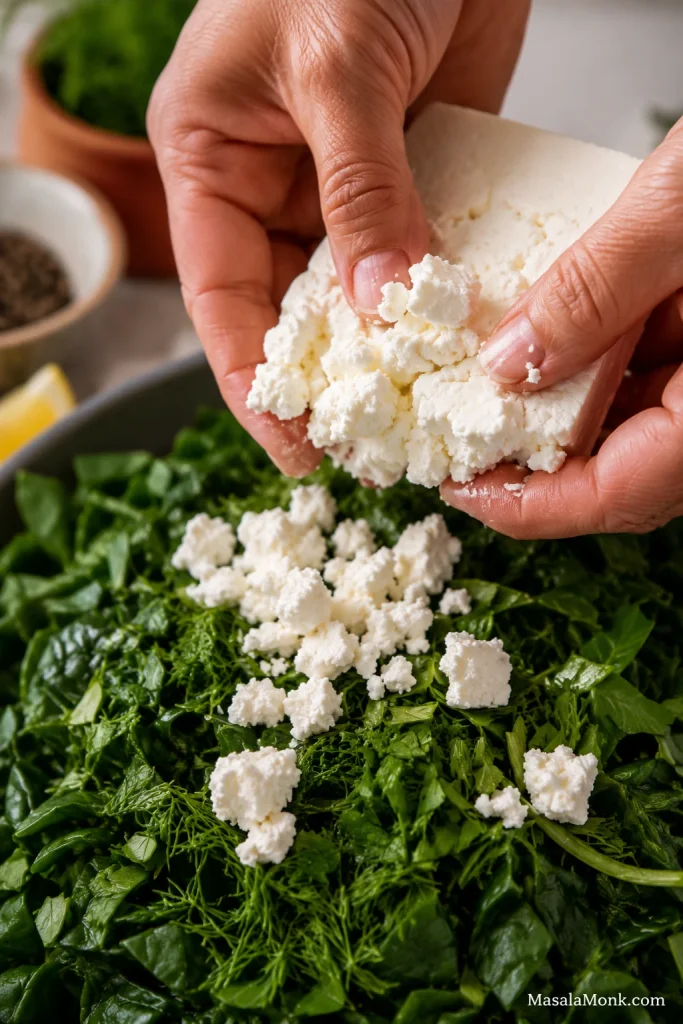
Most of the salt and tang comes from the feta, so it matters. Block feta is the better choice if you can get it. Crumble it yourself for a softer, creamier texture. Pre-crumbled feta works, but it can be drier.

A hand crumbling block feta over chopped spinach and herbs for spanakopita filling.
Crumble block feta unevenly instead of mashing it smooth. Those small salty pockets give the filling better flavor and a more satisfying bite.

Use 300 g / about 10½ oz as the default. If your feta is very salty, use a little less and skip extra salt. If your feta is mild, lean on black pepper, herbs, and a little lemon zest before adding more salt.

Olive Oil or Butter?

Olive oil gives the pie a more classic Greek flavor. Melted butter makes the pastry richer and more golden. Both work, and you can also use half olive oil and half melted butter.

Brush lightly. The pastry needs enough fat to crisp, but it should not feel soaked or heavy.

Can You Add Ricotta, Cream Cheese, or Yogurt?

You can add a little ricotta, cream cheese, or Greek yogurt for a creamier filling, but use a light hand. Too much soft cheese makes the mixture wetter and heavier. It should mound softly on a spoon, not spread like dip. If what you really want is a creamy spinach appetizer, MasalaMonk’s spinach dip recipes are a better fit.

Fresh Herbs and Dried Herb Substitutes

Fresh dill and parsley give the filling its best flavor. If using dried dill, start with about 1 teaspoon dried dill for every 1 tablespoon fresh dill. Dried parsley is milder, so fresh parsley is better when possible. Dried mint can be strong, so use only a small pinch.

Leeks, Chard, and Other Greens

Leeks add sweetness and depth. Chard or silverbeet can replace part of the spinach, especially if you like a stronger green flavor. Kale, mushrooms, artichokes, and pine nuts can work too, but treat them as variations. For the cleanest first tray, keep the filling simple: spinach, feta, herbs, onion, and eggs.

Fresh or Frozen Spinach: Which Works Better?

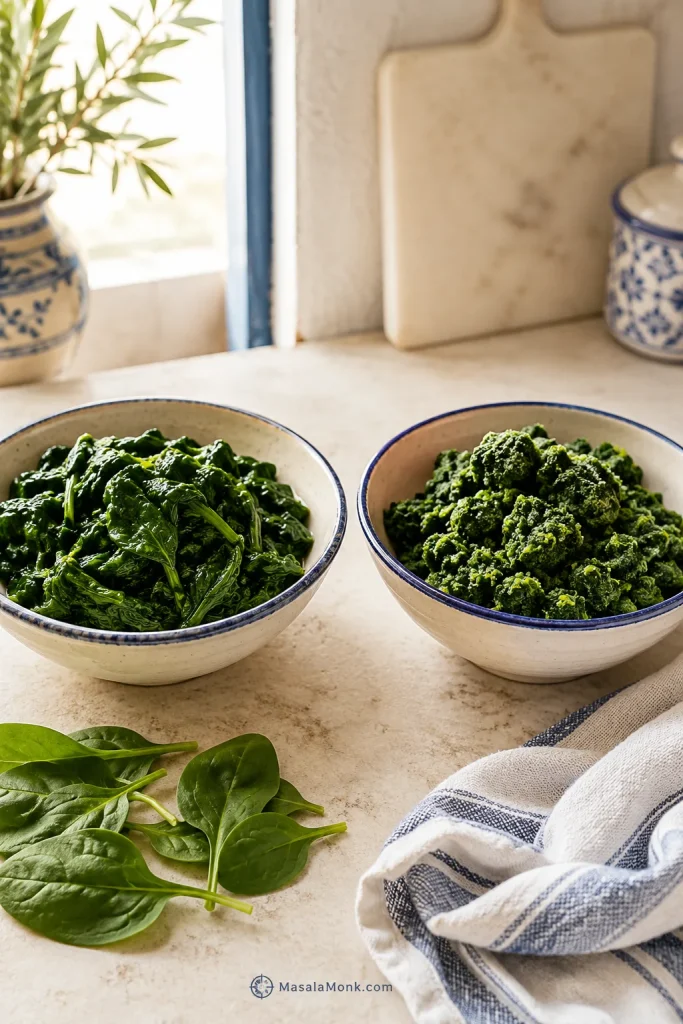
Best spinach for spanakopita: frozen chopped spinach is the most reliable choice for a first tray because it is already wilted and easier to drain evenly. Fresh spinach gives brighter flavor, but it takes more prep and still needs to be cooked, cooled, chopped, and pressed before mixing.

Two bowls showing wilted fresh spinach and thawed frozen spinach side by side, with a kitchen towel nearby.
Fresh spinach gives a brighter taste, while frozen spinach is easier and more predictable. Either way, the winning move is removing moisture before the filling touches the phyllo.
Use thisBest whenWatch out for
Frozen spinachYou want the most reliable first tray.It must be fully thawed and pressed well.
Fresh bunch spinachYou want brighter flavor and a more traditional fresh-greens feel.It takes longer and cooks down heavily.
Baby spinachYou want faster fresh spinach prep.The filling can be softer and milder.
Chard or silverbeetYou want a deeper greens flavor.Stems need chopping finely or removing.

Use about 700 g for tender baby spinach and closer to 900 g for mature bunch spinach with stems. After wilting and squeezing, you want roughly the same packed amount you would get from 500 g / 16 oz thawed frozen spinach.

Fresh spinach always looks like too much at first. Then it wilts down dramatically, which is exactly why the recipe starts with such a large amount.
Spinach Dryness Test

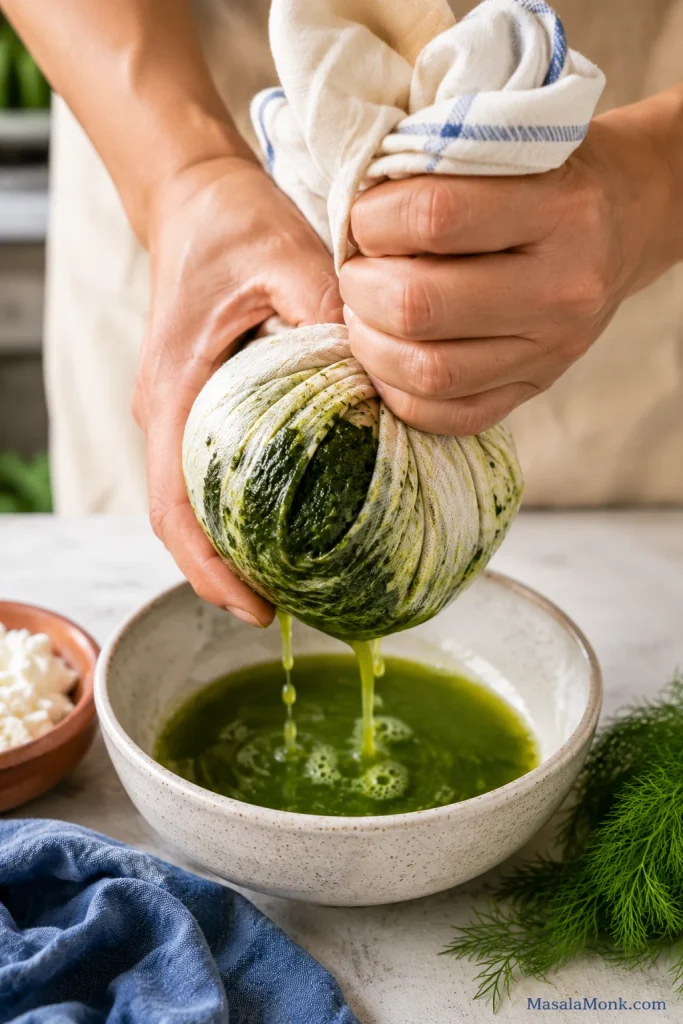
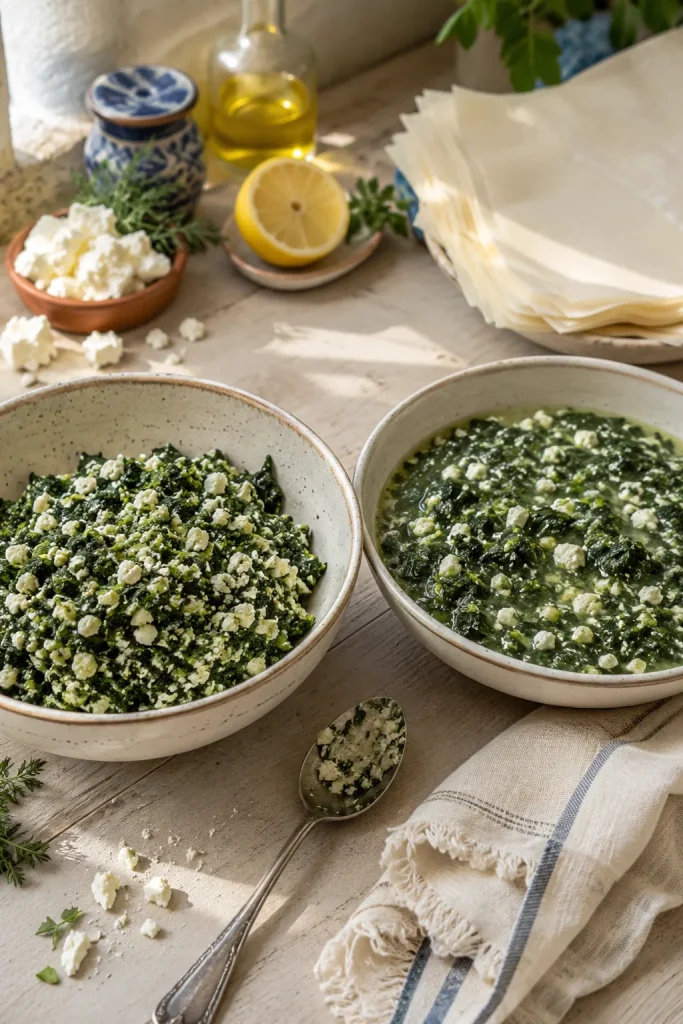
After squeezing, press the spinach with your hand or the back of a spoon. It should hold together in a soft mound, but the bowl should stay dry. If green liquid gathers at the bottom, squeeze again.

Hands squeezing spinach in a kitchen towel over a bowl to remove excess liquid.
First, squeeze out the hidden water. This one step does more for crisp spanakopita than almost any extra seasoning or topping.

For frozen spinach, squeeze it in a clean kitchen towel in small handfuls rather than one large mass; it is easier to remove more liquid that way.

The Dry-Bowl Cue

Here, the greens stop being watery and become a proper filling. Spanakopita can handle moist spinach. It cannot handle dripping spinach.

A compact mound of pressed spinach in a dry bowl with no visible liquid underneath.
After pressing, the spinach should sit in a compact mound with no liquid pooling below it. That dry-bowl cue tells you the filling is ready to mix.

How to Make Spanakopita

Once the spinach is ready and the filling tastes good, assembly is straightforward. The prep work is what makes the tray easy; now it comes together quickly. If the phyllo is the stressful part, the phyllo help section has the calmer fixes.

This method makes one large 9 x 13 inch / 23 x 33 cm Greek spinach pie. It is easier than folding triangles and gives you generous pieces with firm edges, flaky tops, and warm spinach-feta filling.

The tray may look a little untidy before baking. That is normal. Phyllo has a way of looking chaotic in the pan and beautiful after heat does its work.

Step 1: Thaw the Phyllo

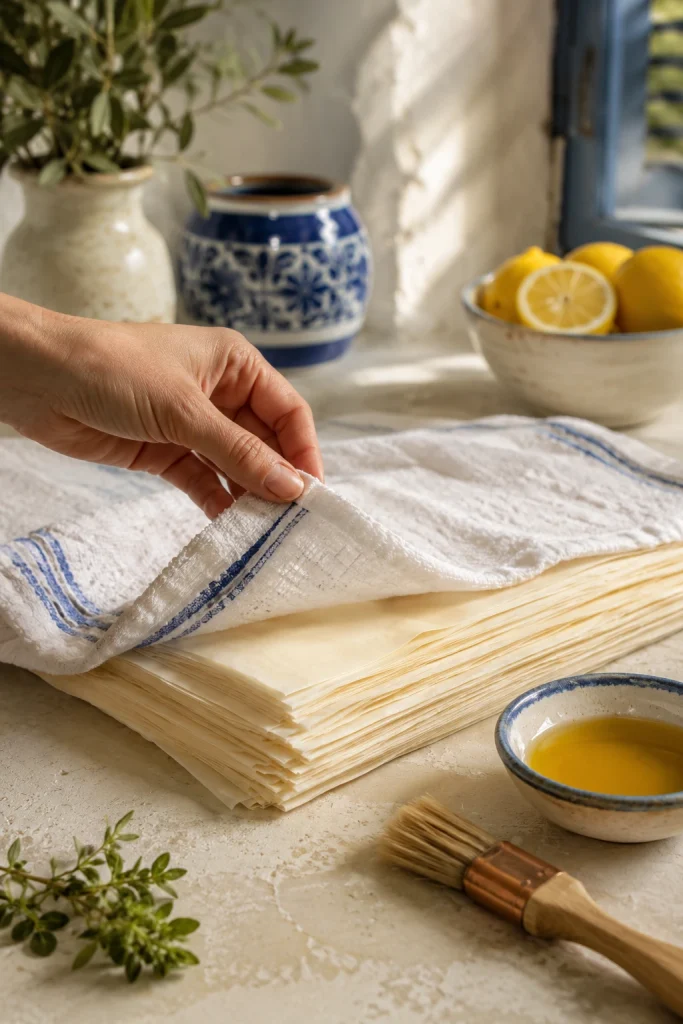
Thaw frozen phyllo overnight in the refrigerator, or according to package directions. Before assembling, let the sealed package sit briefly at room temperature so the sheets are easier to unroll. Open the package only when the filling and pan are ready.

Step 2: Prepare the Spinach

For frozen spinach, thaw it completely and press out as much liquid as possible. For fresh spinach, wilt it in batches in a large pan, let it cool, chop it if the leaves are large, and squeeze well. If liquid gathers in the bowl after squeezing, press it again.

Step 3: Cook the Aromatics

Warm 1–2 tablespoons olive oil in a skillet. Add the onion or scallions and cook until softened. Add optional garlic and cook briefly until fragrant. Let the mixture cool slightly.

The onion should smell sweet and mellow, not sharp, before it goes into the spinach.

Softened onion, scallion, and garlic cooking in a skillet with a wooden spoon.
Let the aromatics soften until they smell mellow and sweet. This gives the spinach-feta filling depth without making the Greek spinach pie taste heavy.

Step 4: Mix and Taste the Filling Before Adding Eggs

In a large bowl, combine the squeezed spinach, cooked aromatics, crumbled feta, dill, parsley, black pepper, optional lemon zest, and any optional mint or nutmeg. Taste this mixture before adding salt, because feta can be very salty. Once the seasoning tastes right, mix in the eggs.

A bowl of spanakopita filling before eggs are added, with spinach, feta chunks, herbs, onion, and seasonings.
Before the eggs go in, the filling should look textured rather than creamy. Visible herbs, spinach, and feta pieces mean every slice will have better flavor contrast.

The Filling Texture Test

You should have a generous bowl of filling that looks clumpy and spoonable, with little white pieces of feta still visible in the greens. When you drag a spoon through it, it should not leave watery liquid behind.

A spoon dragged through spinach and feta filling, leaving a visible trail with no liquid pooling in the bowl.
Use the spoon trail as a quick filling test. If water does not rush back into the line, the mixture is clumpy enough to protect the phyllo layers.

By this point, the bowl should already smell like the finished pie: salty feta, green herbs, softened onion, and clean spinach.

Step 5: Heat the Oven and Ready the Pan

Heat the oven to 350°F / 180°C and place a rack in the lower-middle position. Brush a 9 x 13 inch / 23 x 33 cm baking dish or pan with olive oil.

For a fan or convection oven, start around 170°C and check a little early, since the top may brown faster.

Step 6: Layer the Bottom Phyllo

Now comes the part that looks fancier than it is. Open the phyllo and keep the unused sheets covered with a barely damp towel. Place one sheet in the dish and brush lightly with olive oil. Repeat until you have 7 bottom sheets. Torn or wrinkled sheets can go here; save the neatest ones for the top.

A hand lifting a striped towel to reveal stacked phyllo sheets beside a pastry brush and oil.
Cover the phyllo between layers, but keep the towel only barely damp. The goal is flexible sheets, not wet pastry.

Patchwork the Hidden Layers

Use torn or smaller phyllo pieces where they will be hidden. Overlapping the gaps gives the filling support without requiring perfect sheets.

Hands layering torn and overlapping sheets of phyllo in the bottom of a rectangular baking pan.
Torn sheets belong in the bottom layers. Overlap them like patchwork, then keep building; the filling needs coverage and structure, not perfect rectangles.

Step 7: Add the Filling

Spread the spinach-feta filling evenly over the phyllo. Keep it loose and even rather than pressing it down hard. The filling should sit in a generous layer, not a compacted block.

Spinach and feta filling being spread evenly over layered phyllo in a rectangular pan.
Spread the filling evenly, then stop. Pressing it down too hard can make the pie dense instead of giving you a lighter, layered spanakopita.

Step 8: Add the Top Phyllo

Layer 7 more phyllo sheets over the filling, brushing each sheet lightly with olive oil. Tuck or fold the edges into the pan. The sheets should look lightly glossy in spots. They do not need to shine like they are soaked.

A pastry brush spreading a thin sheen of oil over wrinkled phyllo sheets in a baking pan.
Brush just enough oil to leave a light sheen. Too much fat can weigh down the phyllo, while a thin coat helps the layers crisp and separate.

Tuck the Top Edges

Fold the overhanging sheets inward so the top looks tidy and the corners have enough pastry to crisp.

Hands folding and tucking the top phyllo edges into a rectangular pan before baking.
Tuck the top sheets inward for a tidy edge and better corner texture. Those folded bits often bake into the crispiest parts of the tray.

Step 9: Score the Top

Use a sharp knife to score the top layers into squares, rectangles, or diamonds. You do not need to cut all the way through the filling before baking. Scoring now makes the finished pie easier to slice without shattering the top.

A knife scoring the top of an unbaked spanakopita tray into portions before baking.
Score before baking, while the phyllo is still soft enough to guide. Once crisp, those shallow lines help the knife move cleanly instead of crushing the top.

Squares are easiest for weeknights. Diamonds make the same tray look instantly party-ready once the golden top opens along the scored lines.

Step 10: Bake Until Golden-Brown and Crisp

Bake for 45–55 minutes, until the top is golden-brown, the edges are firm, and the filling is hot and set. Start checking at 45 minutes, but trust the pastry more than the clock. If the top browns too quickly, tent it loosely with foil and keep baking. Not sure yet? Compare it with the doneness cues before pulling the tray.

Step 11: Rest, Then Slice

Let the spanakopita rest uncovered for 15–20 minutes before cutting fully through the scored lines. The wait is annoying, but it is what turns a hot, loose filling into clean pieces with flaky tops and edges that hold.

If you only follow the method above, you can make a good tray. The next sections are for the moments that make cooks nervous: a soft base, fussy phyllo, loose filling, make-ahead timing, and slices that need to hold together.

How to Keep the Bottom Crisp

To keep spanakopita from getting soggy: remove excess spinach moisture, avoid loose or creamy filling, use enough bottom phyllo, bake until the pastry is fully golden, and rest the pie uncovered before slicing.

If the bottom turns soft, the pie is usually telling you one of two things: the filling was too wet, or the base needed more heat and time. For specific fixes, use the troubleshooting table.

What Actually Keeps the Bottom Crisp

  1. Moisture first: no liquid pooling in the filling.
  2. Structure second: enough bottom phyllo to support the greens and feta.
  3. Heat third: lower-middle rack so the base bakes before the top over-browns.
  4. Rest last: 15–20 minutes so the filling settles before slicing.

If the filling looks wet, drain off any visible liquid before layering. If the mixture still looks loose, stir in 1–2 tablespoons breadcrumbs, fine semolina, or crushed crackers to absorb extra moisture. This is a rescue trick, not something you should need every time.

Clean First Corner Lift

When the bottom is right, the first corner lifts cleanly instead of slumping, and that is the moment you know the tray worked.

A lifted corner piece of baked spanakopita on a spatula, showing a firm bottom layer, green filling, and golden phyllo top.
The first lifted piece is the real test. If it holds shape on the spatula, the spinach was drained well and the bottom phyllo had enough time to crisp.

If Phyllo Makes You Nervous

The method above is enough for most cooks, but these small phyllo habits make the first tray feel calmer. Most of the fear disappears once you stop trying to keep every sheet perfect.

Thaw phyllo overnight in the refrigerator, then let the sealed package sit at room temperature until pliable. Rushing the thaw can make sheets crack, stick, or turn damp in patches. Once opened, keep unused sheets covered with a barely damp towel.

For this recipe, 14 sheets is the default: 7 on the bottom and 7 on top. Very thin brands can take up to 16 sheets.

Smaller phyllo sheets can be overlapped to make one layer. Larger sheets can climb the sides of the pan and fold inward. The goal is layered coverage, not perfect single-sheet geometry.

If a sheet tears, use it in the bottom or middle layers and overlap the gaps. If a sheet dries out, discard it or tuck it into the middle rather than forcing it across the top.

Think of the inner sheets as patchwork. Nobody will see them, and they still bake beautifully. Once the first few sheets are down, the rest feels much less precious.

Since phyllo brands vary, follow your package first. For a deeper handling reference, Athens Foods has a practical guide to phyllo storage, thawing, and handling.
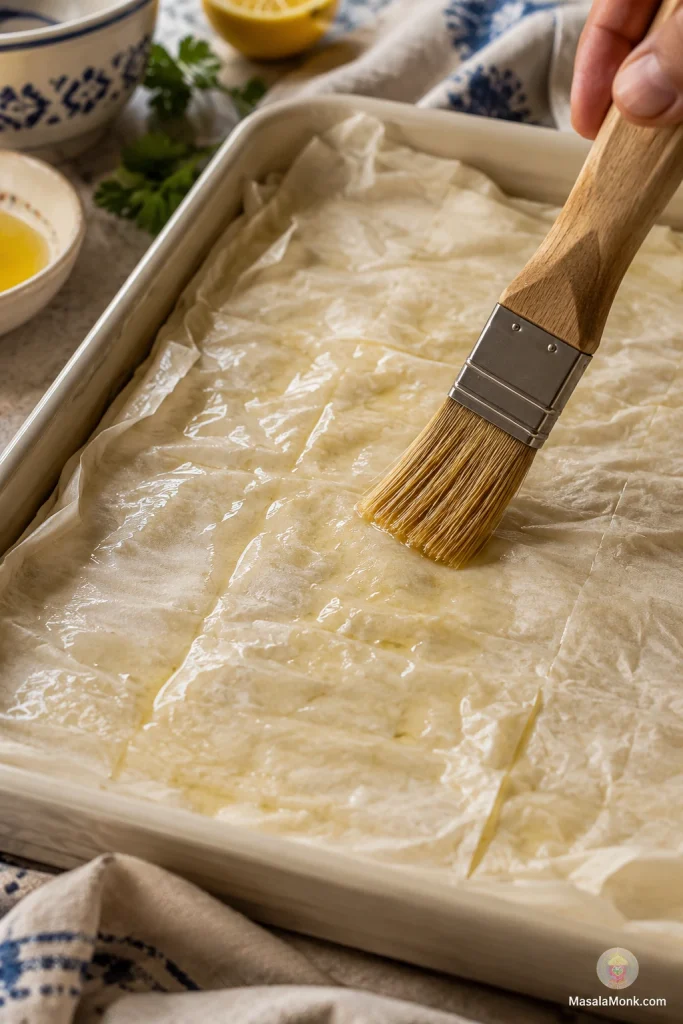
How to Tell When Spanakopita Is Done

For a 9 x 13 inch / 23 x 33 cm tray, bake at 350°F / 180°C for 45–55 minutes. Your oven and pan matter, but the pastry will tell you when it is ready.

A pale top usually means the lower layers need more time too. A deeply golden top, dry scored lines, and a firm first corner matter more than hitting exactly 50 minutes.

Golden Tray Doneness

Look for a tray that reads crisp before you cut into it: browned edges, dry scoring lines, and a top that no longer looks soft or steamed.

A whole baked tray of spanakopita with a golden phyllo top and dry scored lines.
Check more than color. A finished spanakopita tray should have browned edges, dry scored seams, and a top that looks crisp rather than steamed.
  • Top: deeply golden and crisp, not pale.
  • Edges: flaky, browned, and firm.
  • Scored lines: dry-looking, not wet.
  • Filling: hot and set, not leaking.
  • Bottom: firm enough that a corner lifts with a spatula instead of drooping back into the pan.

When the pie is close, the kitchen starts to smell like toasted pastry, herbs, and warm feta.

A metal pan gives the crispest bottom. Glass or ceramic works too; just give the base a few extra minutes if it still looks soft. If using a metal baking pan, setting it on a preheated sheet pan can help the bottom crisp. If using glass or ceramic, avoid sudden temperature changes, especially if the dish is cold from the refrigerator.

Spanakopita Success Cues

  • Before assembly: the filling smells herby and salty, with no liquid pooling in the bowl.
  • While layering: the phyllo looks lightly glossy, not wet or heavy.
  • Before baking: the top is scored and the edges are tucked into the pan.
  • After baking: the top is deeply golden and the scored lines look dry.
  • After resting: the first corner lifts cleanly instead of collapsing.

Crisp Flaky Phyllo Layers

Close up, the finished pastry should look brittle and layered, with small shards breaking away from the spinach-feta filling beneath.

A close-up of crisp baked phyllo layers with flaky shards and a glimpse of green filling.
This close-up shows the payoff of careful layering: brittle phyllo on top, tender spinach-feta filling below, and flaky shards that break cleanly when cut.

Troubleshooting Spanakopita

Most spanakopita problems are not mysterious. A soggy bottom, leaking filling, or shattered top usually comes from one of three things: too much moisture, not enough baking time, or slicing before the filling has settled.

Correct Filling vs Loose Filling

Before assembly, compare the filling texture instead of guessing. A clumpy mixture protects the pastry; a loose mixture brings too much steam and moisture into the tray.

Two bowls of spanakopita filling, one thick and clumpy and the other looser with visible liquid.
For troubleshooting, compare the two textures before assembly. The thicker filling bakes into cleaner slices, while the loose mixture can soften the pastry and make cutting messier.
ProblemLikely causeFix
Soggy bottomWet filling or underbaked basePress more moisture from the spinach, bake longer, and use a lower rack.
Top browns too fastOven runs hot or tray is too highTent loosely with foil and continue baking.
Bottom is soft but top is doneWeak bottom heatMove lower and bake 10 more minutes with foil over the top.
Phyllo tearsSheets are dry, cold, or handled slowlyKeep covered and use torn sheets inside.
Leaking fillingToo much moisture or overfillingDrain the filling better and keep the layer even.
Bland fillingMild feta or not enough herbsAdd dill, parsley, black pepper, or a little lemon zest.
Too-salty fillingVery salty fetaAdd more spinach or herbs if available; serve with yogurt sauce or a lemony salad.
Dense fillingThe spinach layer was packed down too hardSpread loosely next time; do not compress the spinach layer.
Top shatters badly when slicingNot scored before baking or cut too soonScore before baking, rest 15–20 minutes, then cut through the same lines.
Slices fall apartCut too soon or filling too looseRest 15–20 minutes before slicing fully.
Pastry soft after storageFridge moisture or trapped steamReheat uncovered in the oven or air fryer.

Variations and Shortcuts

The large tray is the main recipe. Once you understand that filling and layering method, these variations become easy to judge.

Spanakopita Triangles

Once the filling is made, triangles are just a folding project. They are great for appetizers, mezze platters, lunch boxes, and party trays. The first triangle is usually the clumsiest. By the third or fourth, your hands understand the fold.

Baked spanakopita triangles on a plate with one broken open to show spinach and feta filling, served with tzatziki.
For appetizer-style spanakopita triangles, use less filling than you think. Snug folds and modest filling help the phyllo seal, brown, and crisp all the way around.

They are especially good with a bowl of Greek tzatziki sauce and crisp bites like homemade falafel.

  • Phyllo strip width: 2½–3 inches / 6–7.5 cm.
  • Layers: 2 phyllo sheets per strip.
  • Filling: ½–1 tablespoon per triangle.
  • Fold: like folding a flag.
  • Oven: 375°F / 190°C.
  • Small appetizer triangles: 15–18 minutes.
  • Medium triangles: 20–25 minutes.

If the filling squeezes out as you fold, use less. A neat triangle needs less filling than you think. The triangles are done when the seams look dry, the corners are golden, and the pastry feels crisp enough to pick up. For dips and sides, jump to the serving ideas.

Puff Pastry Shortcut

Puff pastry makes a delicious shortcut, though the texture is thicker and more buttery than classic phyllo. It is a good option when you want a spinach-feta pie without layering many thin sheets.

Puff pastry should be pliable but still cold; once it warms too much, it gets sticky and bakes less cleanly. Use the same filling, place one puff pastry sheet on the bottom, add the spinach mixture, cover with a second sheet, seal the edges, and cut a few slits in the top so steam can escape.

For a full puff pastry pie, start checking around 35 minutes and expect 40–50 minutes depending on the thickness of the filling and pastry. For small puff pastry parcels, start checking around 20–25 minutes.

Gluten-Free Spanakopita

Use gluten-free phyllo if available, or gluten-free puff pastry as a shortcut. If neither is available, make a crustless spinach-feta bake with the same filling flavors.

Vegan or Dairy-Free Spanakopita

Use olive oil for brushing and replace feta with a salty vegan feta or a firm tofu-cashew mixture. Keep the filling well-seasoned because feta normally provides both salt and tang.

Egg-Free Spanakopita

You can skip the eggs, but the slices will be looser. Keep the spinach very well pressed, avoid wet cheeses, and rest the pie before cutting.

Make It Ahead Without Losing the Crisp Layers

Spanakopita is one of those recipes you can do in pieces. For the best make-ahead texture, assemble it unbaked, refrigerate it for up to 24 hours, then bake until golden and crisp. For longer storage, freeze it unbaked.

  • Make the filling ahead: Prepare up to 1 day ahead and refrigerate. Drain off any liquid before assembling.
  • Assemble unbaked: Refrigerate the covered tray for up to 24 hours, then bake from chilled with a few extra minutes if needed.
  • Freeze unbaked: Score the top while the phyllo is still soft, wrap tightly, and freeze.
  • Bake from frozen: Add 15–25 minutes and cover loosely with foil if the top browns early.
  • Store leftovers: Cool fully, refrigerate for 3–4 days, and reheat uncovered in the oven or air fryer.

If making the filling ahead, check it again before assembling. Spinach can release more liquid in the fridge, so drain or squeeze off any liquid before layering it with phyllo. Use the filling texture comparison if it looks loose.

For a party, serve the pie warm after a 15–20 minute rest, or at room temperature on a mezze table. Let hot spanakopita breathe; trapped steam softens the pastry. Room temperature is fine for serving, but refrigerate leftovers rather than leaving them out for a long time.

This is the kind of dish that solves more than one meal: dinner tonight, brunch tomorrow, party squares on a platter, or a cold leftover piece eaten straight from the fridge.

Reheating Frozen or Leftover Spanakopita

Best way to reheat spanakopita: reheat pieces uncovered in the oven or air fryer. Dry heat helps the phyllo crisp again, while covered reheating traps steam and softens the pastry. The microwave is fast, but it will not bring back the flaky texture.

SituationMethodTime
Frozen spanakopita trianglesAir fryer at 350°F / 177°C8–12 minutes
Frozen spanakopitaOven at 400°F / 200°C17–20 minutes
Leftover homemade sliceOven at 350°F / 175°C8–13 minutes
Leftover homemade sliceAir fryer at 325–350°F / 160–177°C4–7 minutes
MicrowaveFastest, but softens pastryUse only if needed

For frozen or store-bought spanakopita, follow the package instructions first because sizes vary. If using a thermometer, the center should reach 165°F / 74°C. FoodSafety.gov gives the same 165°F / 74°C target for reheated leftovers in its safe minimum internal temperature chart.

These general notes can help with Costco, Trader Joe’s, Aldi, or other frozen spanakopita, but start checking early because every brand and size cooks differently.

What to Serve with Spanakopita

A good tray of spanakopita does not need much ceremony. Cut it warm, let the flaky shards fall where they want, and serve it with something cold and lemony.

It is the kind of food that does not need to be piping hot to be loved; even warm or room temperature, the salty filling and flaky edges still do their job.

For a full Greek-inspired spread, keep the sides cool, bright, and simple so they balance the rich phyllo instead of competing with it.

Spanakopita served on a table with tzatziki, cucumber salad, chickpea salad, olives, lemon wedges, and herbs.
Serve rich spanakopita with cool and bright sides. Tzatziki, cucumber salad, chickpeas, olives, lemon, and herbs balance the salty feta and crisp phyllo without distracting from the pie.

Greek-Inspired Dinner

Serve warm pieces with Greek salad, roasted potatoes, red lentil soup, baked chicken breast, fish, lamb, olives, and lemon wedges.

Vegetarian Mezze Table

Cut smaller pieces and serve with tzatziki, hummus, pita, roasted vegetables, olives, cucumber salad, and homemade falafel.

Brunch or Lunch Boxes

Room-temperature pieces are excellent with cucumber salad, chickpea salad, yogurt sauce, eggs, fresh fruit, or a tomato cucumber salad.

Tabbouleh is also a strong side because the lemon, parsley, mint, and tomato cut through the rich pastry.

Quick lemon-dill yogurt sauce: Mix Greek yogurt with lemon juice, minced garlic, chopped dill, a little olive oil, salt, and black pepper. It is especially good with warm triangles.

Full Spanakopita Recipe

This tray-style spanakopita gives you flaky top layers, a firm base, and a spinach-feta filling that settles into clean pieces after resting.

Recipe name: Spanakopita Recipe: Greek Spinach Pie with Feta and Phyllo

Description: A generous Greek spinach pie recipe with crisp golden phyllo, salty feta, fresh herbs, and a spinach filling that slices cleanly after resting.

Yield: 10–12 pieces

Prep time: 35–45 minutes with frozen spinach, longer with fresh bunch spinach. This does not include overnight phyllo thawing.

Cook time: 45–55 minutes

Total time: 1 hour 20 minutes to 1 hour 40 minutes, plus phyllo thawing

Equipment: 9 x 13 inch / 23 x 33 cm baking dish or pan, large skillet, mixing bowl, colander, clean kitchen towel or cheesecloth, pastry brush, sharp knife, barely damp towel for phyllo.

Before you start: Make sure the spinach is pressed well, the phyllo is fully thawed, and the filling is mixed before you open the phyllo package. Once phyllo is exposed to air, the recipe moves much faster.

Ingredients

  • 500 g / 16 oz frozen chopped spinach, thawed and squeezed well or 700–900 g / 1½–2 lb fresh spinach, wilted, cooled, and squeezed well
  • 300 g / about 10½ oz feta cheese, crumbled
  • 2 large eggs
  • 14 sheets phyllo pastry, thawed
  • Olive oil, divided: 120 ml / ½ cup for brushing, plus 1–2 tablespoons for cooking the onion
  • 1 small onion, finely chopped, or 4–6 scallions, sliced
  • 1–2 garlic cloves, minced, optional
  • ¼ cup chopped fresh dill
  • ¼ cup chopped fresh parsley
  • 1–2 tablespoons chopped fresh mint, optional
  • ½ teaspoon lemon zest, optional
  • Black pepper, to taste
  • Pinch of nutmeg, optional
  • Salt, only if needed after tasting the filling before adding eggs

Instructions

Prepare the Filling

  1. Thaw the phyllo. Thaw frozen phyllo overnight in the refrigerator, or according to package directions. Let the sealed package sit briefly at room temperature before opening. Open the phyllo only when the filling is mixed, the oil is ready, and the pan is brushed.
  2. Prepare the spinach. If using frozen spinach, thaw completely and press out as much liquid as possible. If using fresh spinach, wilt it in batches in a large pan, cool it, chop if needed, and squeeze well. The bowl should not show liquid pooling when pressed.
  3. Cook the aromatics. Heat 1–2 tablespoons olive oil in a skillet. Add onion or scallions and cook until softened. Add optional garlic and cook briefly until fragrant. Let cool slightly.
  4. Mix and taste before adding eggs. In a large bowl, mix spinach, cooked aromatics, feta, dill, parsley, optional mint, optional lemon zest, black pepper, and optional nutmeg. Taste and add salt only if needed. Then mix in the eggs. The filling should hold together without liquid pooling at the bottom of the bowl.

Layer the Spanakopita

  1. Prepare the pan and oven. Heat oven to 350°F / 180°C. Place a rack in the lower-middle position. Brush a 9 x 13 inch / 23 x 33 cm baking dish or pan with olive oil.
  2. Layer the bottom phyllo. Open the phyllo and cover unused sheets with a barely damp towel. Place one sheet in the dish and brush lightly with olive oil. Repeat until you have 7 bottom sheets. Use torn or wrinkled sheets here if needed.
  3. Add the filling. Spread the spinach-feta filling evenly over the phyllo. Keep it loose and even rather than pressing it down hard.
  4. Add the top phyllo. Layer 7 more sheets over the filling, brushing each sheet lightly with olive oil. Tuck or fold the edges into the pan. The sheets should look lightly glossy, not soaked.

Bake, Check, and Rest

  1. Score the top. Use a sharp knife to score the top layers into squares, rectangles, or diamonds. You do not need to cut all the way through the filling yet.
  2. Bake. Bake for 45–55 minutes, until the top is golden-brown, the edges are firm, and the filling is hot and set. If the top browns too quickly, tent loosely with foil and keep baking.
  3. Check for doneness. The top should be golden and crisp, the scored lines should look dry, and a corner should lift without sagging. If the top is brown but the bottom feels soft, cover loosely with foil and bake 5–10 minutes longer.
  4. Rest and slice. Let the spanakopita rest uncovered for 15–20 minutes. Cut fully through the scored lines and serve warm or at room temperature.

Recipe Notes

  • Block feta gives better flavor and texture. Use slightly less if it is very salty, or up to 340 g / 12 oz for a cheesier filling.
  • Lemon zest is optional but useful if your feta is mild or the filling tastes flat. Avoid adding much lemon juice because extra liquid can loosen the filling.
  • If your phyllo sheets are very thin, use up to 16 sheets total.
  • You may not use all the oil. The phyllo should look lightly glossy, not soaked.
  • A metal pan gives the crispest bottom. Glass or ceramic works too, but may need a few extra minutes.
  • For a fan/convection oven, start around 170°C and check a little early because the top can brown faster.
  • If the filling looks wet, drain visible liquid and mix in 1–2 tablespoons breadcrumbs, fine semolina, or crushed crackers.
  • Let hot spanakopita breathe. Steam softens the pastry if it is covered tightly.

Frequently Asked Questions

These are the questions that usually come up the first time you make spanakopita.

Spanakopita Basics

Is spanakopita the same as Greek spinach pie?

Yes. Spanakopita is Greek spinach pie made with phyllo pastry and a filling of spinach, feta, herbs, and often eggs.

Is it phyllo or filo?

Both spellings refer to the same thin pastry sheets. Phyllo is common in the US, while filo is common in the UK and other places.

Ingredients, Spinach, and Phyllo

Fresh spinach or frozen spinach: which is better for spanakopita?

Frozen spinach is easier and more predictable because it is already chopped and wilted. Fresh spinach gives brighter flavor, but it takes more prep and still needs to be pressed well before mixing.

Should fresh spinach be cooked before adding it to spanakopita?

Yes. Fresh spinach should be wilted, cooled, chopped if needed, and pressed well before mixing. Raw spinach releases too much moisture as it bakes and can make the filling loose.

How many phyllo layers should spanakopita have?

Use 14 sheets as a reliable default: 7 on the bottom and 7 on top. If your phyllo is very thin, you can use up to 16 sheets.

Do torn phyllo sheets matter?

No. Use torn sheets in the bottom or middle layers and save the neatest sheets for the top. Once baked, the inner patchwork still turns flaky.

Why did my spanakopita turn soggy?

The most common cause is excess spinach moisture or underbaking. Press the spinach well, keep the filling moundable instead of loose, and bake until the pastry is fully golden-brown.

What cheese can I use besides feta?

Feta gives spanakopita its classic salty tang, so keep it as the main cheese if possible. For a milder filling, replace a small portion with ricotta or cottage cheese, but keep the mixture firm and well-drained so the phyllo does not soften.

Make-Ahead, Freezing, and Reheating

How far ahead can I assemble spanakopita?

You can assemble it unbaked and refrigerate it for up to 24 hours. Check for released liquid before baking and add a few extra minutes if baking from chilled.

Does spanakopita freeze better baked or unbaked?

Unbaked usually gives the best texture because the phyllo crisps for the first time in the oven. Score the top before freezing while the sheets are still soft, wrap tightly, and bake from frozen with extra time. Baked leftovers can also be frozen, but the pastry is more likely to soften after reheating.

What is the best way to reheat spanakopita?

Reheat it uncovered in the oven or air fryer. Dry heat helps the phyllo crisp again. The microwave works for speed, but it softens the pastry.

Diet and Serving Questions

Should spanakopita be served hot or room temperature?

Spanakopita is good warm or at room temperature. Let it rest after baking so the filling settles and the pieces slice more cleanly.

Can spanakopita be made without eggs?

Yes, but the filling will be looser. Keep the spinach especially well pressed, avoid wet cheeses, and rest the pie before cutting.

Puff pastry or phyllo: which is better for spanakopita?

Phyllo is better for classic spanakopita because it bakes into thin, crisp, flaky layers. Puff pastry works as a shortcut, but it gives a thicker, buttery crust and a less traditional texture.

Is classic spanakopita gluten-free?

No. Classic spanakopita uses wheat-based phyllo, so it is not usually gluten-free. For a gluten-free version, use gluten-free phyllo if available, gluten-free puff pastry as a shortcut, or make a pastryless spinach-feta bake inspired by the same flavors.

If you make it, I would love to know which route you took: frozen spinach tray, fresh spinach tray, triangles, or puff pastry shortcut.

The first tray may look a little rustic before it goes into the oven, and that is part of the charm. Once the phyllo turns golden and the spinach-feta filling settles, you get the kind of pie people keep returning to, knife in hand, promising they are cutting “just one more” piece.

Posted on Leave a comment

Candied Yams Recipe

Classic candied yams should show tender orange slices, not mashed sweet potatoes. Keeping one side plain and one side topped with marshmallows is an easy way to satisfy both holiday-table preferences.

Candied yams are one of those sides people remember by texture: soft orange slices, a shiny brown sugar glaze, warm spice, and maybe a toasted marshmallow topping. This version keeps that familiar comfort, but gives you the cues that prevent watery sauce, mushy canned yams, burnt sugar, or marshmallows that disappear into the dish.

Fresh or canned, oven or stovetop, marshmallows or not — this recipe is built around the same goal: soft, buttery yams, a spoonable brown sugar glaze, and no thin liquid pooling at the bottom of the pan. This is the kind of side dish people expect to taste familiar, not reinvented.

For many tables, candied yams are not the place for wild reinvention. Use this recipe as a steady base, then finish it the way your family remembers it.

Best quick method: for classic candied yams, use fresh orange sweet potatoes sliced 1/2 inch thick.
  1. Make a smooth butter, brown sugar, and spice glaze, then stir in vanilla off the heat.
  2. Bake covered at 350°F / 175°C for 35–40 minutes.
  3. Uncover and bake 20–25 minutes more, basting once.
  4. Add marshmallows only during the final 8–12 minutes, if using.
  5. Rest 10 minutes so the sauce turns shiny and spoonable.

The full guide below covers fresh, canned, stovetop, marshmallow, no-marshmallow, and make-ahead versions, but the basic idea stays the same: soften the yams, thicken the sauce, and give it a short rest.

Spoon lifting soft orange candied yam slices from a cream baking dish with sauce coating the pieces.
Aim for a soft but still sliceable texture. If the yams lift cleanly and the syrup clings to the spoon, they are ready to rest before serving.

Quick Answer: What Are Candied Yams?

Candied yams are a sweet side dish made with orange-fleshed sweet potatoes, butter, brown sugar, cinnamon, nutmeg, vanilla, and sometimes marshmallows. At the table, they eat like soft sweet potatoes in a buttery brown sugar sauce.

In most U.S. grocery stores, the “yams” used for candied yams are actually sweet potatoes, and they are exactly what you want here. For the classic orange color and soft texture, look for sweet potatoes labeled as garnet yams, jewel yams, red yams, or simply yams.

Here, there is no need to hunt for true yams. Buy orange-fleshed sweet potatoes, even if your store labels them yams. They soften into the glaze instead of staying dry or starchy.

Why This Recipe Works

The difference here is that the recipe is built around texture cues, not just time: covered heat to soften, uncovered heat to reduce, and a short rest so the sauce clings.

Thick slices hold their shape, a smooth saucepan glaze prevents grainy sugar, covered baking softens the yams, uncovered baking reduces the extra liquid, and resting helps the brown sugar butter mixture cling instead of pool.

Think of it as steam first, reduction second, rest last. That order keeps the yams tender without leaving a watery pool underneath.

Hands peeling foil from a baking dish of candied yams with visible text reading Cover, Uncover, Rest.
Think of the bake in three stages: steam, reduce, settle. Covered heat softens the slices, uncovered heat concentrates the syrup, and the short rest helps the sauce cling.

The watery batches usually have one thing in common: too much liquid and not enough uncovered time. Often, the best batches look a little loose straight from the oven, then settle into a glossy coating after the rest.

The simple rhythm:
  • Fresh yams: cover, uncover, rest.
  • Canned yams: drain, coat, heat, stop.
  • Marshmallows: tender first, toast last.
  • Sauce: shiny and spoonable, not watery or caramel-thick.

Candied Yams Quick Facts

Fact Detail
Servings 8
Main oven temp 350°F / 175°C for fresh sweet potatoes
Fresh bake time 35–40 minutes covered, then 20–25 minutes uncovered
Best baking dish 9×13-inch / 23×33 cm glass or ceramic dish
Rest time 10 minutes before serving
Marshmallow timing Final 8–12 minutes for fresh yams; 5–8 minutes for canned yams

Which Candied Yams Method Should You Use?

Start with the method that fits the day. Maybe you have time for fresh sweet potatoes. Or maybe the oven is crowded with turkey, ham, stuffing, green bean casserole, or another side. You may already have canned yams in the pantry.

Fresh sweet potatoes, drained canned yams, an opened unbranded can, and a Dutch oven arranged on a warm kitchen counter.
Fresh sweet potatoes, canned yams, and stovetop candied yams can all work well. However, fresh slices need time, canned yams need gentleness, and stovetop yams need steady low heat.

Fresh yams give you the prettiest slices. Canned yams give you speed. Stovetop cooking gives you control. Marshmallows give you nostalgia. None of those choices are wrong.

Method Best For Approx. Time Key Cue
Fresh baked candied yams Best texture, neat slices, holiday table presentation 60–70 minutes Uncover long enough for the sauce to reduce
Canned baked candied yams Fast shortcut, pantry version, smaller batch 20–30 minutes Drain well and heat gently
Stovetop candied yams Oven is full, spoon-coated finish, Southern-style cooking 50–65 minutes Keep the heat medium-low
Crockpot candied yams Freeing oven space and holding a side dish warm 3–4 hours on low Expect a thinner syrup
Marshmallow finish Classic Thanksgiving-style topping 5–12 minutes Add only at the end

As a default, use the fresh baked version when texture matters, canned yams when speed matters, and stovetop cooking when the oven is full. If you are starting with cans, keep the rhythm even simpler: drain, coat, heat, stop.

Are Candied Yams Actually Sweet Potatoes?

Most of the time, yes. In the United States, the orange “yams” sold in regular grocery stores are usually orange-fleshed sweet potatoes. True yams are starchier, drier, and less common in everyday U.S. supermarkets. The Library of Congress explanation of sweet potatoes and yams is useful if you want the longer background.

For this recipe, buy orange sweet potatoes or yams labeled garnet, jewel, red yam, or simply yam. That naming confusion matters less than the flesh color here. Orange, moist sweet potatoes give the classic color, sweetness, and soft texture people expect in candied yams.

Hands holding a freshly cut raw orange sweet potato half with whole sweet potatoes in the background.
For most candied yams recipes, orange-fleshed sweet potatoes are the right choice even when the store labels them “yams.” Their color, sweetness, and soft texture create the familiar holiday side dish.
Simple shopping rule: if the inside is deep orange and the label says sweet potato, yam, jewel, garnet, or red yam, it will work for this recipe.

Ingredients You’ll Need

The ingredient list is simple because candied yams are not trying to be fancy. What matters is balance: enough brown sugar to feel candied, enough butter to feel rich, enough salt and citrus to keep the sweetness from going flat.

Brown sugar gives the sauce depth, butter gives it body, and salt keeps the dish balanced. Vanilla, warm spices, and a little orange juice or lemon juice round out the flavor. If you like that orange-bright flavor, the same idea works beautifully in cranberry sauce with orange juice.

Butter, brown sugar, cinnamon, nutmeg, orange juice, vanilla, and salt arranged beside a small saucepan.
A good candied yams sauce needs more than sweetness. Butter and brown sugar bring richness, while salt, vanilla, warm spices, and citrus keep the flavor rounded.

Ingredient Amounts and Cues

Ingredient Amount Why It Matters
Orange sweet potatoes / yams 3 lb / 1.35 kg The base of the dish. Use orange sweet potatoes for the classic color and texture.
Unsalted butter 1/2 cup / 113 g Makes the sauce rich and smooth.
Brown sugar 3/4 cup / 150 g, or up to 1 cup / 200 g for a sweeter style Gives the deep caramel-like sweetness.
Maple syrup or orange juice 1/4 cup / 60 ml Maple gives deeper flavor; orange juice gives brightness.
Water 2–4 tbsp / 30–60 ml Helps the sugar dissolve into a smooth sauce.
Cinnamon 1 tsp The main warm spice.
Nutmeg 1/4 tsp Adds classic warmth.
Ginger 1/4 tsp, optional Adds a little extra spice without taking over.
Salt 1/2 tsp Balances the sugar and butter.
Vanilla extract 1–2 tsp Rounds out the brown sugar mixture. Add it off the heat.
Lemon juice or apple cider vinegar 1–2 tsp, optional Useful if you want a sweet-but-not-cloying finish.
Mini marshmallows 2–3 cups, optional Add at the end for a toasted topping.
Chopped pecans 1/2 cup, optional Adds crunch. Best added near the end so they stay crisp.

Small Ingredient Choices That Matter

When the balance is right, the coating tastes buttery and warm, not just sugary, and the sweet potatoes stay tender enough to spoon but firm enough to hold.

Less sweet version: use 3/4 cup brown sugar instead of 1 cup, choose orange juice instead of maple syrup, and add 1–2 teaspoons lemon juice or apple cider vinegar to balance the sauce.

If you are tempted to use a ready spice blend, keep it gentle. A small pinch of apple pie spice can work because it usually leans on cinnamon, nutmeg, and warm baking spices, but too much can make the yams taste more like dessert than a side dish.

Best dish: use a deep 9×13-inch / 23×33 cm glass or ceramic baking dish for the fresh version. Use an 8×8-inch / 20×20 cm dish for one 29 oz / 822 g can. Avoid sheet pans because the syrup spreads too thin and can burn before the yams soften.

How to Make Candied Yams

This is the version to make when you want the dish to look generous on the table: tender slices, glossy sauce, and enough structure that the yams do not collapse when you spoon them out. For the fresh baked version, the rhythm is simple: cover, uncover, rest.

1. Prep the sweet potatoes

Peel the sweet potatoes and slice them into 1/2-inch / 1.25 cm rounds. If the sweet potatoes are very wide, cut the rounds into half-moons so they are easier to serve.

Thin slices tend to soften before the syrup has time to reduce, while very thick slices need longer and can make the edges overcook. The best texture comes from slices that are thick enough to hold together but thin enough to soften in the covered bake.

Hands slicing peeled orange sweet potatoes into half-inch rounds on a wooden cutting board.
Even slices make the whole dish easier to control. Around 1/2 inch gives the sweet potatoes enough body to stay intact while still softening into the sauce.

2. Make the brown sugar butter glaze

Melt the butter in a saucepan over medium heat. Add the brown sugar, maple syrup or orange juice, water, cinnamon, nutmeg, ginger if using, and salt. Stir until the sugar dissolves and the mixture looks smooth and shiny.

Let it bubble gently for 1–2 minutes, then remove it from the heat and stir in the vanilla. If using lemon juice or apple cider vinegar, stir it in now.

Brown sugar butter sauce simmering in a saucepan while a wooden spoon moves through the mixture.
Before it goes over the sweet potatoes, the butter and brown sugar mixture should look smooth and shiny. If it looks grainy, warm it gently until the sugar dissolves.
Glaze cue: the mixture should look shiny and pourable, not grainy or separated. It does not need to be thick like caramel at this stage. The oven will reduce it more.

3. Arrange and coat the yams

Place the sliced sweet potatoes in a greased 9×13-inch / 23×33 cm baking dish. Pour the warm glaze over the top, then gently turn the slices or spoon the brown sugar mixture over them so they are coated.

Brown sugar butter sauce being poured over arranged orange sweet potato slices in a cream baking dish.
Coat every slice before the dish goes into the oven. As a result, the sweet potatoes bake into the sauce instead of drying out on top.

The slices do not have to be in one perfect layer, but avoid packing them so tightly that the sauce cannot move around them. A little space helps the edges bubble slowly and the syrupy coating thicken without scorching.

4. Bake covered

Cover the dish tightly with foil and bake at 350°F / 175°C for 35–40 minutes. The yams should begin to soften, but they should not be falling apart yet.

During the covered stage, steam softens the sweet potatoes without drying them out. It also gives the buttery syrup time to soak into the slices.

5. Bake uncovered

Remove the foil, spoon the sauce over the yams, and bake uncovered for another 20–25 minutes. By the end of baking, the edges should bubble slowly and the top slices should look lacquered, not dry.

The yams are ready when they are fork-tender and a spoon drags a shiny trail over the slices instead of leaving thin liquid behind. They do not need to look perfect at every stage; by the time they rest, they should be tender, coated, and sitting in a glossy coating. If the dish still looks loose, give it another 5–10 minutes uncovered.

Candied yams bubbling uncovered in a cream baking dish as the sauce reduces around the orange slices.
The uncovered bake is where the sauce tightens. Look for gentle bubbling around the edges and shiny slices instead of thin liquid sitting underneath.

If the edges darken too quickly or the syrup starts to smell scorched instead of buttery and spiced, move the dish away from the hottest part of the oven.

What success looks like: the yams are fork-tender but still holding together, the edges bubble slowly, a spoon drags a shiny trail through the coating, and there is no thin liquid pooling at the bottom.
Spoon dragging through thick brown sugar sauce between candied yam slices in a baking dish.
A spoon trail is one of the clearest doneness cues. When the sauce leaves a shiny path before slowly settling back, the candied yams are close to ready.

6. Add marshmallows if you want them

If using marshmallows, scatter them over the yams during the final 8–12 minutes of baking. They should puff into a soft golden blanket, with toasted tops and a little give underneath. For deeper browning, use the broiler for a few seconds at the end.

Marshmallows brown fast, so this is the one moment to stay by the oven.

7. Rest before serving

Let the dish rest for about 10 minutes before serving. Give the brown sugar sauce a chance to settle before deciding it is too thin. A short rest is part of the recipe, not just waiting time, and the resting section explains why it works.

After that rest, the slices are easier to lift and the sauce clings better. Serve the yams warm, not straight-from-the-oven hot, so the glossy coating has time to settle. The dish should smell like butter, brown sugar, cinnamon, and sweet potatoes — not scorched sugar.

How to Make Candied Yams with Canned Yams and Marshmallows

Canned yams are not a shortcut you need to apologize for. For many families, they are the version that actually tastes familiar. The only trick is to remember that they are already cooked, so you are simply warming, coating, and finishing them.

With canned yams, keep the rhythm even simpler: drain, coat, heat, stop. Add marshmallows at the end if you want that classic topping.

Small cream baking dish of canned candied yams with toasted mini marshmallows and a scooped corner showing orange yams underneath.
With canned yams, the best result is a warm coated center and a toasted finish. The scooped corner should still show orange pieces underneath, not a mashed layer hidden by marshmallows.

Canned-Yam Timing

Batch Size Canned Yams Dish Oven Timing
Small batch 1 can, 29 oz / 822 g, drained 8×8-inch / 20×20 cm 375°F / 190°C 15 minutes, then 5–8 minutes with marshmallows
Larger batch 1 large can, 40 oz / 1.13 kg, drained 9×13-inch / 23×33 cm 375°F / 190°C 18–20 minutes, then 5–8 minutes with marshmallows
Double-can batch 2 cans, 29 oz / 822 g each, drained 9×13-inch / 23×33 cm 375°F / 190°C 20–22 minutes, then 5–8 minutes with marshmallows
Mini canned-yam version: for one 29 oz / 822 g can, drain well, use 3 tbsp butter, 1/3–1/2 cup brown sugar, 1/2 tsp cinnamon, a pinch of nutmeg, a pinch of salt, and 1 tsp vanilla. Bake at 375°F / 190°C for 15 minutes, then add marshmallows for 5–8 minutes if using.
Small cream baking dish filled with canned yams as brown sugar sauce is poured over them.
For a one-can batch, scale the dish and sauce down together. Since canned yams are already cooked, the goal is warming and coating, not long baking.

Drain well. A few tablespoons of canning liquid can loosen a thick sauce; the full can usually makes the dish watery.

Drained canned yams in a metal colander with an opened unbranded can and a small measuring cup of liquid nearby.
Canned yams save time, but the liquid in the can can thin the sauce quickly. Drain first, then add back only a spoonful or two if the mixture needs loosening.

Warm the butter, brown sugar, cinnamon, nutmeg, salt, and vanilla into a quick glaze, pour it over the drained canned yams, and bake only until hot. With canned yams, gentleness matters most. Stirring breaks them down faster than baking does.

How to keep canned yams from getting mushy

Spoon gently pouring sauce over intact canned yam pieces with visible text reading Spoon, don’t stir.
Instead of stirring canned yams, spoon the sauce over the top. This keeps the pieces intact and helps prevent the dish from turning into sweet potato mash.
  • Leave large pieces large. Smaller pieces break down faster.
  • Use less sugar if the yams are packed in syrup. Start lower, then adjust next time if you want them sweeter.
  • Rinse only if the syrup is very heavy. Draining is usually enough. Rinsing helps only if you want a less sweet version.
  • Spoon instead of stirring. Tilt the dish gently or ladle sauce over the top.
  • Bake uncovered if the syrup looks loose. This helps extra moisture evaporate.
  • Make canned yams closer to serving time if presentation matters. They soften more as they sit.

Quick glaze for canned yams

Can Size Butter Brown Sugar Spices and Vanilla
29 oz / 822 g can 3 tbsp 1/3 cup if packed in syrup, 1/2 cup if packed in water or light syrup 1/2 tsp cinnamon, pinch nutmeg, pinch salt, 1 tsp vanilla
40 oz / 1.13 kg can 4 tbsp 1/2 cup 3/4 tsp cinnamon, pinch nutmeg, pinch salt, 1 tsp vanilla
2 cans, 29 oz / 822 g each 5–6 tbsp 2/3 cup if packed in syrup, 3/4 cup if packed in water or light syrup 1 tsp cinnamon, 1/4 tsp nutmeg, 1/4 tsp salt, 2 tsp vanilla

If your canned yams are very sweet already, start with the lower sugar amount. You can always make the next batch sweeter, but it is harder to rescue a dish that has become cloying.

Stovetop Candied Yams, Southern-Style

Southern-style candied yams are often less about a casserole and more about tender sweet potatoes coated in a buttery brown sugar syrup. Some versions are baked, some are made on the stovetop, some finish with marshmallows, and some stay plain and glossy.

When the oven is full, the stovetop is often the easiest way to stay in control of the sauce. It is also a good choice if you like a spoon-coated finish because you can watch it reduce in real time, baste the slices, and stop when the yams are tender but still holding together.

The flavor usually leans brown sugar, butter, cinnamon, nutmeg, vanilla, and sometimes citrus. Done well, it tastes rich without becoming flat: enough sugar to feel candied, enough salt and spice to keep every bite balanced.

Use the widest heavy-bottomed skillet or Dutch oven you have. A wide pan gives the sweet potatoes enough room to cook evenly, and a heavy base helps protect the sugar from scorching.

Fresh orange sweet potato slices being added by hand to a dark skillet with a shallow butter and sugar mixture.
For stovetop candied yams, use a wide pan so the slices have room to cook evenly. A shallow butter-sugar mixture also helps the syrup reduce without crushing the sweet potatoes.

How to make candied yams on the stove

  • Melt the butter in a wide skillet or Dutch oven over medium-low heat.
  • Add brown sugar, maple syrup or orange juice, water, cinnamon, nutmeg, ginger if using, and salt.
  • Stir until the sugar starts to dissolve and the glaze looks smooth.
  • Add the 1/2-inch / 1.25 cm sweet potato slices and gently coat them.
  • Cover and cook over medium-low heat for 35–45 minutes, basting every 10–15 minutes. Start checking at 35 minutes.
  • When the yams are almost tender, uncover and simmer for 7–15 minutes more so the syrup thickens.
  • Finish with vanilla off the heat. Add lemon juice or apple cider vinegar if the sauce tastes too sweet.

Stovetop Reduction Cues

Keep the stovetop version patient and gentle; high heat can burn the sugar before the potatoes soften. If the pan looks dry at any point, lower the heat before adding more liquid.

Spoon basting brown sugar syrup over orange candied yam rounds in a dark skillet.
Once the stovetop syrup begins to thicken, baste gently instead of stirring hard. This coats the tops while the sweet potato rounds stay whole.

Stay close during the uncovered reduction stage. The syrup can move from shiny to scorched quickly once the extra moisture cooks off.

Stovetop cue: the yams are done when they are fork-tender and the sauce coats the back of a spoon. If the syrup thickens before the yams are soft, add 1–2 tablespoons water and keep cooking covered. When the yams are soft but the sauce is thin, uncover and simmer a little longer.

Stir as little as possible. Use a spoon to baste the slices or gently shake the pan instead of stirring like a stir-fry. This keeps the sweet potatoes from breaking apart.

Spoon lifting stovetop candied yam slices from a dark skillet with thick syrup dripping back into the pan.
Finished stovetop candied yams should look rich and syrupy, with a darker, deeper glaze than the baked version. Keep the heat gentle so the sugar thickens without scorching.

Can I Bake Candied Yams at 375°F?

Yes. The main recipe uses 350°F / 175°C for steady, even softening, but 375°F / 190°C works if you need a slightly faster bake. Check earlier, baste once or twice, and watch the edges so the sugar does not dry out before the yams are tender.

Candied Yams with Marshmallows

For marshmallows, the timing is everything: tender first, toast last. Marshmallows are the part people notice first, so they deserve a little timing. Add them too early and they disappear into the sauce; add them at the end and you get the soft, golden topping people remember.

Mini marshmallows being sprinkled over hot candied yams with visible text reading Tender first, toast last.
Marshmallows are a finish, not a cooking ingredient. Add them when the yams are already tender so they puff on top instead of disappearing into the sauce.

If your family expects marshmallows, let them be the finish, not the sauce.

When to Add Marshmallows

  • At 350°F / 175°C, add marshmallows for the final 8–12 minutes.
  • For 375°F / 190°C, add them for the final 5–8 minutes.
  • In a 400°F / 200°C oven, watch closely and check after 5 minutes.
  • Under the broiler, they may brown in 30–90 seconds.

You want the topping puffed, soft, and lightly golden — not fully dissolved into the glaze.

Close-up of toasted mini marshmallows on candied yams with orange yam slices visible underneath.
The marshmallow topping is ready when it is puffed, soft, and lightly golden. Importantly, you should still see orange yams and a little sauce underneath.

The best marshmallow topping comes from adding them when the yams are already hot, so they puff quickly instead of sinking into the sauce.

Mini marshmallows are easiest because they scatter evenly and brown quickly. Large marshmallows can work, but cut them in half or use fewer so the topping does not become too thick.

For pecans and marshmallows together, add the pecans near the end, then scatter marshmallows over the top. This keeps the nuts from sitting under foil for too long and turning soft.

Hand sprinkling chopped pecans over candied yam slices in a cream baking dish.
Add pecans near the end so they stay crisp instead of steaming under foil. They bring crunch and nuttiness without taking over the brown sugar flavor.

How to make candied yams without marshmallows

To make candied yams without marshmallows, simply skip the topping and focus on the glaze. Bake uncovered until the yams are tender and the brown sugar butter sauce looks shiny and spoonable. For a little finish without marshmallows, add pecans near the end, a small pinch of orange zest, or nothing at all.

Candied yams without marshmallows served on a cream plate with brown sugar sauce.
No-marshmallow candied yams rely on the sauce for their finish. The flavor should be buttery, warmly spiced, and complete without needing a topping.

If your table loves the glossy plain version, stop before the topping and let the brown sugar butter sauce shine. The plain version is often the best choice when you want the sweet potatoes, butter, brown sugar, and warm spices to be the main flavor.

Small Things That Make a Big Difference

These are the small choices that prevent most candied-yam problems before they start.

  • Keep slices about 1/2 inch thick. Thin slices soften quickly and can fall apart before the sauce thickens.
  • Drain canned yams well. A few tablespoons of liquid can loosen the syrup, but the full can may make it watery.
  • Handle canned yams gently. Spoon sauce over them instead of stirring hard.
  • Save marshmallows for the end. They need just enough time to puff and brown.
  • Let the sauce rest before judging it. It thickens after the dish cools slightly.
  • Use a deeper baking dish. A flat sheet pan spreads the syrup too thin for this style.

Thanksgiving Timing Plan

On a holiday table, candied yams should not be the dish that makes the day harder. They can wait, reheat, hold their sauce, and still feel special when they come to the table warm and glossy.

The best part of this dish is that it does not need to be dramatic at the last minute. Make it ahead, reheat it gently, and save the marshmallows for the final finish.

For storage and reheating details, use the make-ahead section before planning the serving-day schedule, especially if your oven also needs time for macaroni and cheese or other baked sides.

When What to Do
2 days before Buy sweet potatoes or yams, butter, brown sugar, spices, marshmallows, and pecans if using.
1 day before Bake the fresh candied yams without marshmallows. Cool, cover, and refrigerate.
Serving day Reheat covered at 350°F / 175°C until hot, usually 20–25 minutes.
Final 8–12 minutes Add marshmallows or pecans and bake until puffed, golden, and hot.
When the oven is full Use the stovetop method, or reheat the baked yams once the oven opens up.
Using canned yams Make them closer to serving time for the best texture and cleanest presentation.

If you are transporting candied yams, keep the marshmallows off until you reheat, if possible. Marshmallows soften as they sit, and they look best when added close to serving.

Crockpot Candied Yams

Crockpot candied yams are helpful when the oven is full, but the sauce will usually stay thinner than baked or stovetop versions. Use fresh sweet potatoes, not canned, for the best shape. Cook on low for 3–4 hours, then reduce extra liquid in a small saucepan if needed. Add marshmallows only before serving.

Variations

  • No marshmallows: keep the top plain and let the brown sugar butter sauce shine.
  • Pecan topping: add chopped pecans near the end so they stay crisp instead of steaming under the foil.
  • Orange juice glaze: use it instead of maple syrup for a brighter, less heavy glaze.
  • Maple finish: use maple syrup for a deeper, rounder flavor.
  • Pineapple version: add well-drained pineapple near the end so it does not thin the sauce too much.
  • Less sweet: reduce brown sugar to 3/4 cup and add lemon juice or apple cider vinegar.
  • Vegan version: use plant-based butter and skip marshmallows unless they are vegan.

Keep variations simple. Candied yams are already rich, so one or two upgrades are usually enough. Pecans and marshmallows work well together. Orange juice and maple syrup are both good, but you do not need every sweet ingredient in the same dish.

Troubleshooting Candied Yams

Most candied-yam problems are fixable because they usually come from one of four things: too much liquid, too much heat, too much time, or too much stirring.

Candied yams in a baking dish with a spoon lifting thin liquid from one corner and visible text reading Too watery? Bake uncovered.
For watery candied yams, a thin pool at the edge usually means more uncovered time, not a full rescue. Let extra moisture evaporate, then give the sauce a few minutes to settle.

They often look worse in the pan than they taste on the plate. If the dish tastes good but looks loose, pause before changing anything. Rest it, then reduce it if needed. Hot sauce almost always looks thinner than settled sauce, so check why the sauce thickens after resting before extending the bake time.

Quick Fixes by Problem

Problem Why It Happened How to Fix It
Yams are watery Too much liquid, canned yams were not drained, or the dish stayed covered too long Bake or simmer uncovered until the sauce reduces. Spoon out extra liquid if needed.
Yams are mushy Slices were too thin, overcooked, or canned yams were stirred too much Use 1/2-inch slices for fresh yams and handle canned yams gently.
Sauce is thin It has not reduced enough, or it is still very hot Bake uncovered longer and let the dish rest for 10 minutes before serving.
Sugar burned Heat was too high or the pan was too shallow Use a deeper baking dish or lower heat. Spoon sauce over the yams during baking.
Butter separated The sugar did not dissolve fully into the butter mixture Simmer the glaze until smooth before pouring it over the yams.
Too sweet Heavy syrup canned yams or too much sugar Add a little salt, orange juice, lemon juice, or apple cider vinegar. Use less sugar next time.
Marshmallows disappeared They were added too early Add marshmallows only in the final 5–12 minutes.
Pecans got soggy They were baked under foil too long Add pecans near the end or sprinkle them on before the marshmallows.

Why the sauce thickens after resting

The sauce often looks loose when the dish first comes out of the oven. That does not mean it failed. As the butter-sugar mixture cools slightly, it becomes thicker and clings better to the sweet potatoes. Give the dish 10 minutes before deciding it is too thin.

Candied yams resting on a wire cooling rack in a cream baking dish with a kitchen timer nearby.
The sauce often looks looser when it is boiling hot. A short rest lets the bubbles calm down and turns the syrup into a better coating for the sweet potato slices.

Make Ahead, Storage, and Reheating

Can you make candied yams ahead?

Yes. For the best texture, make the fresh version up to 1 day ahead. Bake the yams without marshmallows, cool, cover, and refrigerate. Add marshmallows only when reheating before serving.

Canned yams are more delicate, so they are best made closer to serving time. If you do make them ahead, reheat gently and avoid stirring.

How to reheat candied yams

Reheat covered at 350°F / 175°C for 20–25 minutes, or until hot. If the sauce is very thick, add a small splash of water or orange juice before reheating. Add marshmallows near the end and bake until puffed and golden.

How long do leftovers last?

Store leftover candied yams in an airtight container in the refrigerator for 3–4 days. The texture will soften as they sit, especially if you used canned yams or marshmallows. For general leftover safety, the USDA FSIS leftovers guide is a helpful reference.

Can you freeze candied yams?

You can freeze them without marshmallows, but the texture may soften after thawing. For a special meal, refrigeration and reheating usually gives a better result than freezing.

What to do with leftovers

Leftover candied yams can be served again as a side dish, mashed into oatmeal, spooned over pancakes or waffles, folded into muffin batter, or used like a sweet potato pie-style filling. If they have marshmallows on top, the texture will be softer, but the flavor will still be good.

What to Serve with Candied Yams

Because candied yams are sweet and buttery, they work best beside something savory, salty, green, or tangy.

They pair well with roast turkey, baked ham, roast chicken, stuffing or dressing, green beans, cranberry sauce, collard greens, mac and cheese, garlic mashed potatoes, and cornbread.

Candied yams in a cream serving dish on a Thanksgiving table with green beans, mac and cheese, cranberry sauce, and sliced turkey in the background.
Thanksgiving candied yams bring sweetness and warmth to the plate. They work especially well beside savory sides like green beans, mac and cheese, cranberry sauce, turkey, or ham.

For a Southern-style plate, candied yams also work beside richer mains like smothered pork chops, especially when you want something sweet to balance gravy, greens, and cornbread.

Candied Yams vs Sweet Potato Casserole

Candied yams are usually sliced or chunked sweet potatoes cooked in a brown sugar butter glaze. Sweet potato casserole is usually mashed or whipped, then baked with marshmallows, pecans, or streusel on top.

The two dishes can overlap, especially when marshmallows are involved, but candied yams are more about tender pieces in sauce, while casserole is creamy and scoopable. If you want that creamy version instead, use this sweet potato casserole recipe.

Frequently Asked Questions

Are candied yams actually sweet potatoes?

In most U.S. grocery stores, yes. The orange “yams” used for this dish are usually sweet potatoes, and they are exactly what you want for soft, classic candied yams.

Do you peel sweet potatoes for candied yams?

Yes, peel them for the classic soft, glossy dish. Sweet potato skins can turn chewy in a brown sugar glaze, and peeled slices give candied yams their traditional smooth texture.

Is brown sugar or white sugar better for candied yams?

Brown sugar is better for this version because it gives the glaze deeper flavor and a softer caramel-like finish. White sugar makes a cleaner, sweeter glaze with less depth. You can use a mix if you want a more candy-sweet style.

Can I make candied yams with canned yams?

Yes. Drain canned yams well, use a smaller sauce, bake at 375°F / 190°C only until hot, and avoid stirring. Canned yams are already cooked, so the goal is coating and warming, not softening.

Do I drain canned yams before making candied yams?

Yes, drain them first. A few tablespoons of the liquid can loosen a thick glaze, but the full can usually makes the dish watery.
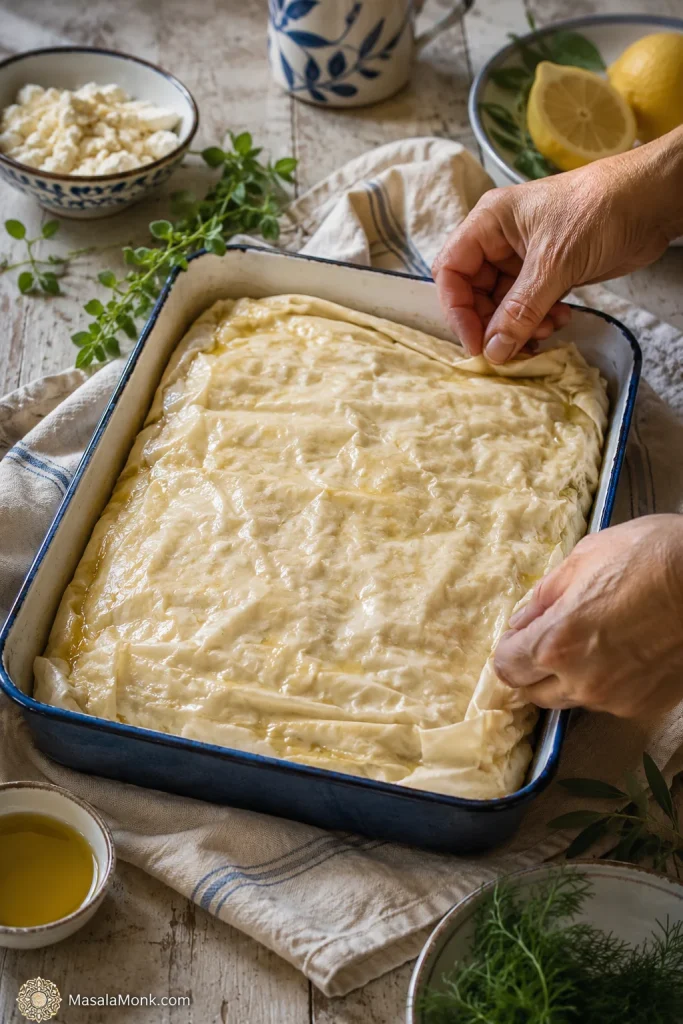
Should I rinse canned yams?

Usually, no. Draining is enough unless the yams are packed in very heavy syrup and you want a less sweet dish.

Can I make candied yams on the stove?

Yes. Cook fresh 1/2-inch sweet potato slices in a wide skillet with the glaze over medium-low heat, covered until tender and uncovered at the end until the glaze coats the slices.

Do I need to boil sweet potatoes first?

No, not for this baked version. Slicing the sweet potatoes evenly and baking them covered first lets them soften in the sauce. Boiling first can save time, but it also makes the pieces easier to overcook.

When do I add marshmallows?

Add marshmallows near the end, once the yams are tender and the sauce has started to thicken. At 350°F / 175°C, the final 8–12 minutes is usually enough. If you add them too early, they melt into the sauce instead of forming a toasted topping.

Can I use large marshmallows?

Large marshmallows work, but mini marshmallows brown more evenly. If using large ones, cut them in half or use fewer so the topping does not become too thick.

How do I keep candied yams from getting watery?

Drain canned yams well, keep added liquid modest, bake uncovered long enough for the sauce to reduce, and let the dish rest before judging the texture.

How do I keep canned yams from getting mushy?

Handle them gently and do not bake them too long. Canned yams need heat, not more cooking, so spoon the sauce over them instead of stirring.

Can I make candied yams ahead for Thanksgiving?

Yes. Make the fresh version 1 day ahead without marshmallows, refrigerate, then reheat covered at 350°F / 175°C until hot. Add marshmallows only during the final few minutes before serving.

Can I double this recipe?

You can double it, but use two baking dishes instead of piling everything too deeply into one pan. Crowding the yams traps steam and makes it harder for the sauce to reduce.

Candied Yams Recipe

Soft orange sweet potatoes baked in a brown sugar butter glaze until tender, shiny, and spoon-coated — with canned-yam, stovetop, marshmallow, no-marshmallow, and make-ahead notes included.

Prep Time20 minutes
Cook Time60–70 minutes
Rest Time10 minutes
Servings8

Ingredients

  • 3 lb / 1.35 kg orange-fleshed sweet potatoes or yams
  • 1/2 cup / 113 g unsalted butter
  • 3/4 cup / 150 g packed brown sugar, or up to 1 cup / 200 g for a sweeter style
  • 1/4 cup / 60 ml maple syrup or orange juice
  • 2–4 tbsp / 30–60 ml water
  • 1 tsp ground cinnamon
  • 1/4 tsp ground nutmeg
  • 1/4 tsp ground ginger, optional
  • 1/2 tsp salt
  • 1–2 tsp vanilla extract
  • 1–2 tsp lemon juice or apple cider vinegar, optional
  • 2–3 cups mini marshmallows, optional
  • 1/2 cup chopped pecans, optional

Instructions

  1. Preheat the oven to 350°F / 175°C. Grease a 9×13-inch / 23×33 cm glass or ceramic baking dish.
  2. Peel the sweet potatoes and slice them into 1/2-inch / 1.25 cm rounds or half-moons.
  3. In a saucepan over medium heat, melt the butter. Add brown sugar, maple syrup or orange juice, water, cinnamon, nutmeg, ginger if using, and salt. Stir until smooth and shiny.
  4. Simmer the glaze gently for 1–2 minutes. Remove from heat and stir in vanilla. Add lemon juice or apple cider vinegar if using.
  5. Arrange the sweet potatoes in the baking dish. Pour the glaze over the top and gently coat the slices.
  6. Cover tightly with foil and bake for 35–40 minutes, until the yams begin to soften.
  7. Remove foil, spoon sauce over the yams, and bake uncovered for another 20–25 minutes, until fork-tender and shiny.
  8. If using marshmallows, add them during the final 8–12 minutes of baking. Bake until puffed and lightly golden.
  9. Rest for 10 minutes before serving so the sauce can thicken slightly. Serve warm, not piping hot.

Notes

  • Main cue: fresh or canned, the yams should be fork-tender and coated in sauce, not sitting in watery liquid.
  • Canned yams: bake drained canned yams at 375°F / 190°C: 15 minutes for a 29 oz / 822 g can, 18–20 minutes for a 40 oz / 1.13 kg can, or 20–22 minutes for two 29 oz / 822 g cans. Add marshmallows for the final 5–8 minutes. Canned yams need heat, not more cooking.
  • Stovetop method: cook sliced fresh sweet potatoes with the glaze ingredients in a wide skillet over medium-low heat for 35–45 minutes covered, then uncover and reduce for 7–15 minutes.
  • No marshmallows: skip the topping and bake uncovered until the sauce is glossy and spoonable.
  • Make-ahead: bake without marshmallows, refrigerate, reheat covered, and add marshmallows before serving.
  • Less sweet: use 3/4 cup brown sugar and add lemon juice or apple cider vinegar for balance.

Final Thoughts

Candied yams do not need to be complicated. Once the slices are soft, the sauce is shiny, and the marshmallows go on only at the end, the dish feels exactly how it should: familiar, sweet, buttery, and ready to be passed around the table.

When it works, the dish lands exactly where it should: soft slices, glossy sauce, warm spice, and that familiar sweet-buttery smell that makes people reach for the spoon.

Some families want the glossy plain version. Others want marshmallows browned until the corners catch. A few want pecans, orange juice, stovetop yams, or the canned version because that is the one that was always on the table.

Use this recipe as the steady base, then finish it the way your table remembers it. If your family has a must-have candied-yam tradition, I’d love to hear which version shows up every year.

Posted on Leave a comment

Bean Stew Recipe with Canned or Cooked Beans: Thick, Hearty & Flexible

A bowl of thick tomato-based bean stew with mixed beans, carrots, greens, herbs, a spoon, and crusty bread beside it. The image includes the text “Bean Stew Recipe” and “Thick, hearty, flexible.”

This bean stew turns three cans of beans into a thick, hearty one-pot dinner in about 50 minutes. Onion, carrot, celery, garlic, tomato paste, tomatoes, broth, and a small mash of beans cook down into a glossy tomato-bean sauce that is scoopable instead of thin.

It is especially useful on the nights when the pantry is not empty, just awkward: a few cans of beans, one onion, the last carrot in the drawer, and enough broth to pull everything together. Because the beans carry most of the meal, rice, bread, potatoes, or polenta can stretch the pot into more servings without making it feel like less dinner.

Ingredients for bean stew arranged on a kitchen counter, including beans, onion, carrot, celery, garlic, tomato paste, crushed tomatoes, broth, herbs, and bay leaf.
The base is simple: beans, aromatics, tomato paste, tomatoes, broth, herbs, and a bay leaf.

The main recipe is tomato-based, gently smoky, full of soft-edged beans and sweet vegetables, and finished with lemon juice or vinegar so the final bowl tastes lively instead of heavy.

Most bean stew recipes ask you to choose one bean or one flavor direction first. This one gives you one base method for almost any cooked beans: cannellini beans, butter beans, black beans, pinto beans, chickpeas, kidney beans, or mixed pantry beans.
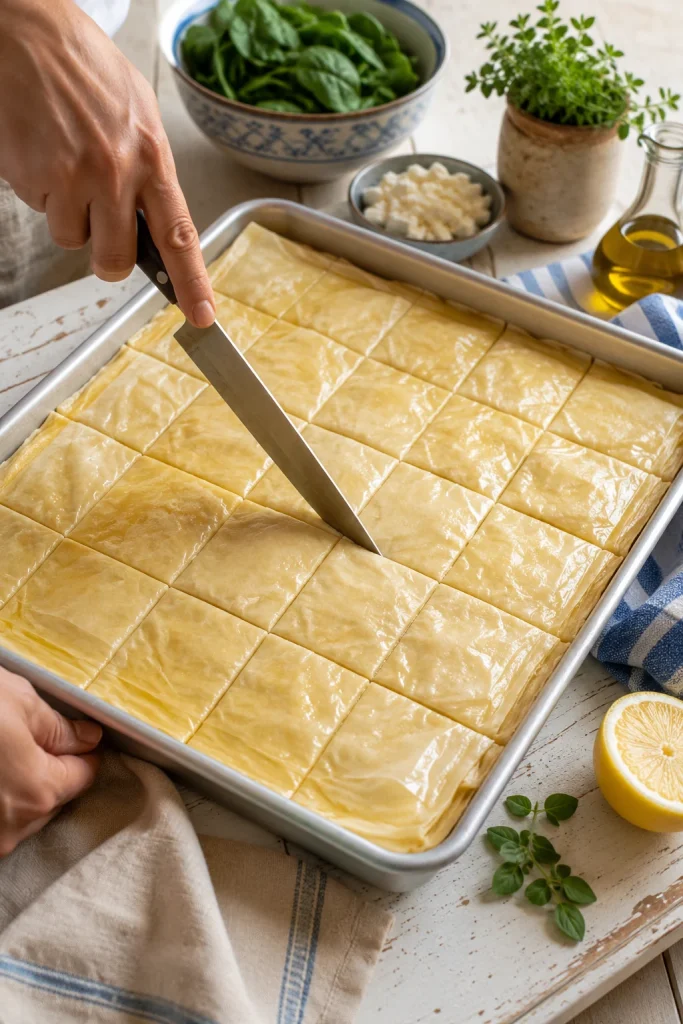
Quick Answer: What Is Bean Stew?

Bean stew is a hearty one-pot meal made with cooked beans, aromatics, tomatoes or broth, herbs, vegetables, and optional meat. It has less liquid than bean soup, so it sits on rice, clings to bread, and feels more like a full dinner. It is also less narrowly seasoned than chili, which usually has a stronger chili powder, pepper, and spice profile.

For the easiest version, use three cans of beans, a savory tomato base, and 1½–2 cups of broth. Simmer until the sauce reduces, mash a small portion of the beans into the pot, stir in greens if you like, and finish with lemon juice, vinegar, herbs, or olive oil. The bowl should be spoonable, glossy, and filling without cream.

A guide-style image for hearty bean stew showing a bowl of stew with callouts for 50 minutes, 3 cans beans, one pot, thick not soupy, vegetarian base, and freezer-friendly.
This visual summary shows the promise of the recipe: one pot, three cans of beans, a thick spoonable texture, and leftovers that still feel useful the next day.

The exact measurements are in the recipe card, and the thickening cues below show when to reduce, mash, or loosen the pot.

Recipe Snapshot

Main methodStovetop, one pot
Prep time15 minutes
Cook time35–40 minutes
Total time50–55 minutes
Servings6 bowls, or 8 smaller servings with rice/bread
Stretch-it sideRice, bread, potatoes, polenta, or another sauce-catching base
Best beansCannellini, butter beans, black beans, pinto beans, kidney beans, chickpeas, navy beans, Great Northern beans, or mixed beans
Easiest optionCanned beans
Budget optionDried beans, cooked separately first
Finished textureGlossy tomato-bean sauce that clings to the spoon
DietVegetarian base; vegan-friendly; meat-flexible
Freezer-friendlyYes

Before You Start: Beans and Ratio

This stew works best with cooked, starchy beans that can simmer, soften at the edges, and help thicken the sauce. Sweet baked beans, refried beans, and green beans behave differently, so they are better treated as separate recipes or add-ins. Green beans can be added as a vegetable, but they will not make this kind of cooked-bean stew on their own.

The Simple Ratio Behind a Good Pot

Once you know this ratio, you can make a good bean stew without needing the same cans twice. It is the kind of formula that saves dinner when the pantry looks random but not empty.

  • 3 cans cooked beans, 14–15 oz / 400–425 g each, or about 4½ cups cooked beans
  • 1 large onion plus carrot, celery, and garlic
  • 2–3 tbsp / 30–45 g tomato paste
  • 1 can crushed tomatoes, 28 oz / 800 g, or 14 oz / 400 g for a lighter tomato version
  • 1½–2 cups / 360–480 ml broth, added gradually
  • 10–15 minutes uncovered simmering to reduce the liquid
  • ½–1 cup mashed beans to thicken naturally
  • 1 tbsp / 15 ml lemon juice or vinegar to finish
A bean stew ratio guide with bowls of beans, chopped vegetables, tomato paste, tomatoes, broth, mashed beans, and lemon wedges, each labeled with the recipe ratio.
This bean stew ratio is the saveable formula: beans for body, vegetables for sweetness, tomato paste for depth, broth for looseness, and mashed beans for a thicker finish.

The stew may look thick before it has simmered, but wait 10–15 minutes before adding more broth. Beans release starch, tomatoes loosen, and vegetables soften as they cook. It is easier to loosen a thick pot than to rescue one that started too watery.

Why This Works with Almost Any Beans

The base recipe works because it does not ask every bean to behave the same way. Creamy beans help the sauce; firmer beans stay visible; mixed beans give you contrast. Start with cooked beans, keep the broth controlled, use tomato paste for depth, and mash a small portion of beans for body.
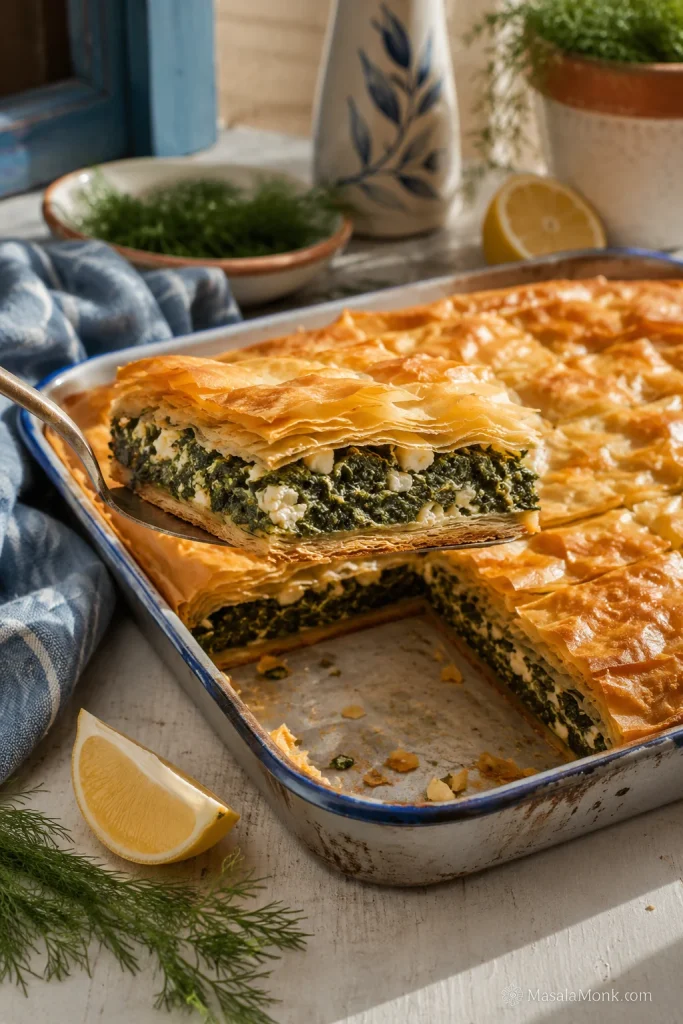
Choose Your Path

Start with the row that matches your pantry today; the main recipe is complete as written.

  • Canned or cooked beans: Follow the main recipe. Drain canned beans first, then simmer until the sauce tightens around the beans.
  • Dried beans: Cook them until tender first, then use about 4½ cups cooked beans.
  • Different bean styles: Use rosemary and lemon for white beans, lime and cumin for black beans, and herbs or vinegar for mixed beans.
  • Meat or slow cooker version: Brown meat first if using it. For slow cooker stew, use cooked/canned beans and less broth.
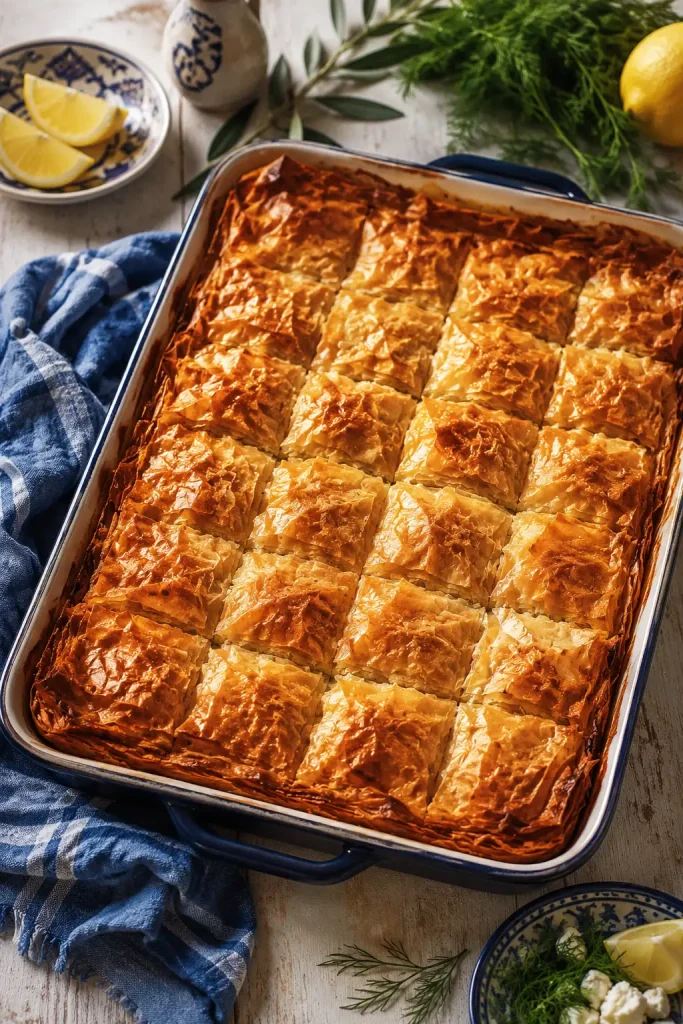
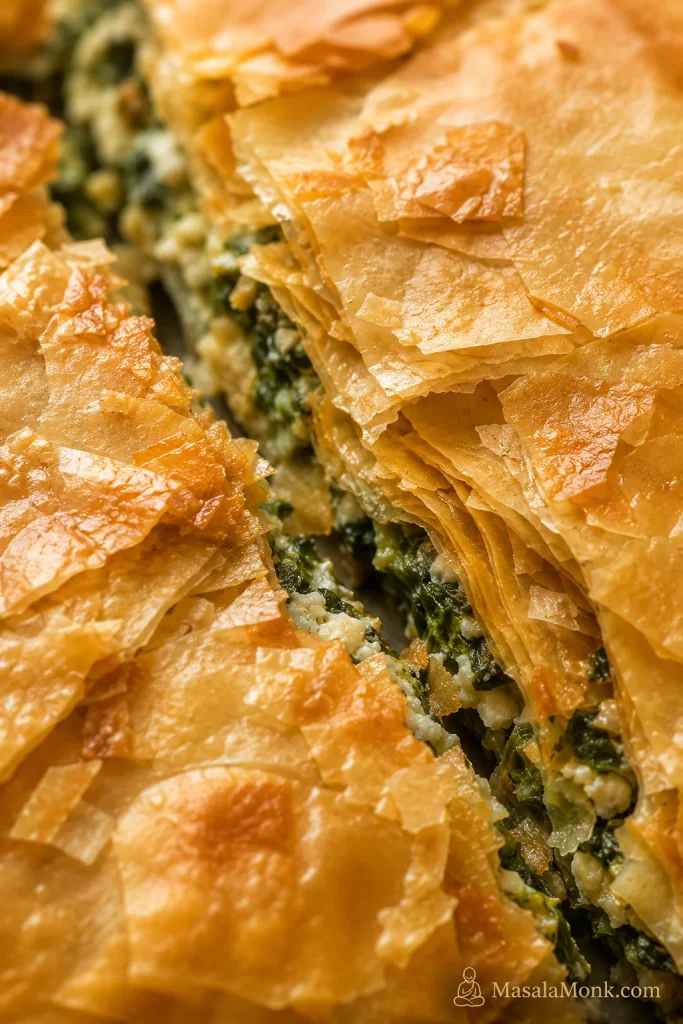
Cooking dried beans instead of opening cans? Check the canned vs dried bean notes before the pot starts so the beans are already tender when they meet the tomato base.

Ingredients, Swaps, and What Each One Does

The ingredients are simple, but the base matters. Let the onion, carrot, celery, garlic, and tomato paste smell sweet, savory, and cooked before the beans go in; that is what makes canned beans taste like a real stew instead of beans stirred into tomato sauce.

Main Ingredients

  • Olive oil: Softens the vegetables and gives the stew a rounder finish. Use less if adding sausage or chorizo.
  • Onion, carrot, and celery: The flavor base. Cook them until sweet-smelling and softened.
  • Garlic: Adds savory depth. Add it after the vegetables soften so it does not burn.
  • Tomato paste: Makes the stew taste deeper and more slow-cooked.
  • Smoked paprika, oregano or thyme, bay leaf, and pepper: A flexible seasoning base that works with many beans.
  • Crushed tomatoes: Create the main sauce. The full 28 oz / 800 g gives a tomato-rich pot. Use 14 oz / 400 g if you want the beans and broth to lead.
  • Broth: Low-sodium vegetable broth keeps the base vegetarian and easier to season.
  • Beans: Use three cans drained and rinsed, or about 4½ cups cooked beans.
  • Greens: Spinach, kale, chard, or collards add color. Use closer to 60 g for spinach and closer to 100 g for chopped kale, chard, or sturdier greens.
  • Lemon juice, vinegar, or balsamic: Adds a fresh lift after simmering.

Pantry Swaps

The recipe can still work if you are missing celery, using a smaller can of tomatoes, or trying to stretch two cans of beans into dinner.

If you are missingUse instead
CeleryExtra carrot, bell pepper, leek, fennel, or skip it.
CarrotSweet potato, squash, bell pepper, or extra onion.
Tomato pasteSimmer the tomatoes longer, or add a very small splash of soy sauce for depth if it fits your version.
Crushed tomatoesPassata, diced tomatoes, tomato sauce, or 14 oz / 400 g tomatoes plus more broth for a lighter stew.
BrothWater plus bouillon, or water with extra herbs, pepper, and olive oil.
Fresh herbsDried herbs in the base, then lemon or vinegar at the end.
GreensFrozen spinach, chopped cabbage, kale, chard, collards, or skip them.
Third can of beansAdd diced potato, cooked lentils, rice, extra vegetables, or use the small-batch notes below.

Salt tip: Start with ¾ tsp fine salt if using regular broth, salted canned beans, sausage, chorizo, parmesan, bouillon, or salty toppings. Use up to 1½ tsp only when your broth and beans are low-sodium or unsalted. Taste again after the stew reduces.

How to Cook It

The recipe is simple, but the pot tells you a few things as it cooks: the tomato paste should smell deeper, the sauce should slow down, and the spoon should come up with beans, not broth.

1. Soften the Vegetables

Heat olive oil in a large Dutch oven or heavy-bottomed pot over medium heat. Add onion, carrot, celery, and a pinch of salt. Cook for 7–10 minutes, stirring occasionally, until the onion looks translucent, the carrot has started to soften, and the pot smells sweet rather than raw.

Onion, carrot, and celery softening in olive oil inside an enameled Dutch oven with a wooden spoon.
First, soften the onion, carrot, and celery until glossy and sweet-smelling so the stew starts with a real cooked base, not just beans in tomato sauce.

2. Cook the Garlic, Tomato Paste, and Spices

Add garlic, tomato paste, smoked paprika, oregano or thyme, cumin if using, chili flakes if using, and black pepper. Stir for 1–2 minutes. The tomato paste should darken slightly and coat the vegetables. This is the step that makes the stew taste slow-cooked even when the beans came from cans.

Softened onion, carrot, and celery coated with cooked tomato paste, garlic, herbs, and spices inside a Dutch oven, with a wooden spoon in the pot.
Next, let the tomato paste darken slightly with the garlic, herbs, and spices; that small step gives canned or cooked beans a deeper stew flavor.

3. Add Tomatoes, Broth, Beans, and Bay Leaf

Add crushed tomatoes, 1½ cups / 360 ml broth, drained beans, and bay leaf. Stir well and scrape the bottom of the pot. If the mixture is too thick to bubble gently, add another ½ cup / 120 ml broth. Hold back extra liquid until the stew has simmered for at least 10 minutes.

Beans, crushed tomatoes, broth, and a bay leaf combined in a Dutch oven at the early simmer stage of bean stew.
After the beans, tomatoes, broth, and bay leaf go in, the pot should look a little loose; simmering uncovered is what turns it into stew.

At this stage, a loose-looking pot is normal; the thickening cues below explain when to wait, reduce, mash, or add more liquid.

4. Simmer Covered

Bring the pot to a gentle boil, then reduce the heat and cover. Simmer for 15–20 minutes. The beans should absorb the garlic-tomato flavor, and the vegetables should become fully tender.

5. Simmer Uncovered

Remove the lid and simmer for 10–15 minutes more. Stir occasionally so the bottom does not catch. The bubbles should slow down, the sauce should look glossier, and a spoon should leave a brief trail through the stew before the sauce flows back. If you plan to serve it over rice, keep it slightly saucier.

6. Mash a Small Portion of the Beans

Mash ½–1 cup of beans against the side of the pot with a spoon, ladle, or potato masher. Do not puree the stew. You want enough broken beans to make the sauce creamy while most beans stay whole. Chickpeas will stay firmer than white beans, so mash a little more if using mostly chickpeas.

A potato masher pressing some beans into thick tomato bean stew inside a Dutch oven, with many whole beans still visible.
Instead of adding cream or flour, mash a small portion of the beans into the sauce while leaving plenty of whole beans for texture.

When the stew stays thinner than you want after mashing, use the troubleshooting table before adding extra ingredients.

7. Add Greens and Finish

Stir in spinach, kale, chard, or other greens. Spinach needs 2–3 minutes; kale and chard may need 4–5 minutes. Turn off the heat, remove the bay leaf, then stir in lemon juice, vinegar, or balsamic. If the stew tastes dull even after salt, it probably needs acid, not more spices.

A hand adding fresh spinach and kale to a pot of thick tomato bean stew while a wooden spoon rests in the pot.
Toward the end, fold in spinach, kale, or chard so the greens soften into the hot stew while still adding freshness and color.

8. Rest Before Serving

Let the stew rest for 10 minutes before serving. The beans settle, the sauce tightens, and the bowl becomes more balanced. If it gets too thick, loosen it with broth or water ¼ cup / 60 ml at a time.

Finished bean stew in a Dutch oven with white beans, carrots, tomatoes, greens, herbs, and a thick red sauce, with bread and a wooden spoon nearby.
After resting, the stew should look settled and glossy in the pot before it ever reaches the bowl.

How to Keep It Thick, Not Soupy

If the stew looks too loose at first, give it a few minutes uncovered before adding fixes.

  • Start with less broth. For three cans of beans, begin with 1½ cups / 360 ml broth and add more only if needed.
  • Wait before adding liquid. Tomatoes loosen and beans release starch as they simmer.
  • Simmer uncovered near the end. This reduces extra liquid and concentrates flavor.
  • Mash some beans. Breaking down ½–1 cup beans thickens the sauce naturally.
  • Use tomato paste. Cooked tomato paste adds body and depth.
  • Choose creamy beans. Cannellini, butter beans, pinto beans, and white beans make a thicker pot.
  • Blend a small amount. You can blend 1 cup of stew and stir it back in, but do not blend the whole pot unless you want a bean puree.
  • Rest before serving. The stew thickens slightly as it cools.

Texture cue: after the uncovered simmer, a spoon should leave a short trail through the stew before the sauce slowly flows back. The stew should sit on rice instead of flooding it, and bread should be able to drag through the sauce.

Close-up of thick tomato bean stew with a wooden spoon creating a visible trail through the sauce. The image includes the text “Thick, Not Soupy” and “Look for a spoon trail.”
The best texture cue is the spoon trail: when the sauce clings to the beans and slowly settles back, the stew is thick enough without becoming dry.

Recipe Card

Thick and Hearty Bean Stew

This thick bean stew turns canned or cooked beans into a hearty tomato-based dinner with garlic, herbs, soft vegetables, greens, and a bright lemon or vinegar finish. Mash a small amount of beans into the pot so the sauce turns glossy and spoonable without cream.

Prep Time
15 minutes
Cook Time
35–40 minutes
Total Time
50–55 minutes
Servings
6 bowls

Equipment

  • Large Dutch oven or heavy-bottomed pot, 5–6 quart / 5–6 liter
  • Wooden spoon
  • Measuring cups and spoons
  • Can opener
  • Potato masher or ladle, optional

Ingredients

  • 2 tbsp / 30 ml olive oil
  • 1 large onion, diced, about 150–180 g
  • 2 medium carrots, diced, about 160–200 g
  • 2 celery ribs, diced, about 100 g
  • 4 garlic cloves, minced, about 12–16 g
  • 2–3 tbsp / 30–45 g tomato paste
  • Smoked paprika, 1 tsp
  • Dried oregano or thyme, 1 tsp
  • ½ tsp ground cumin, optional
  • ¼–½ tsp chili flakes, optional
  • Bay leaf, 1
  • Crushed tomatoes, 1 can, 28 oz / 800 g
  • Low-sodium vegetable broth, 1½–2 cups / 360–480 ml, plus more as needed
  • 3 cans beans, 14–15 oz / 400–425 g each, drained and rinsed; about 4½ cups cooked beans
  • 2 cups / 60–100 g spinach, kale, chard, or other greens
  • 1 tbsp / 15 ml lemon juice, red wine vinegar, or balsamic vinegar
  • 2–3 tbsp chopped fresh parsley or basil
  • ¾ tsp fine salt to start, plus more to taste; use up to 1½ tsp if using low-sodium broth and unsalted beans
  • ½ tsp black pepper
  • Extra olive oil for serving, optional

Instructions

  1. Soften the vegetables. Heat olive oil in a large Dutch oven or heavy pot over medium heat. Add onion, carrot, celery, and a pinch of salt. Cook for 7–10 minutes, stirring occasionally, until softened and sweet-smelling.
  2. Add garlic and tomato paste. Stir in garlic, tomato paste, smoked paprika, oregano or thyme, cumin if using, chili flakes if using, and black pepper. Cook for 1–2 minutes, stirring often, until the tomato paste darkens slightly.
  3. Add tomatoes, broth, beans, and bay leaf. Add crushed tomatoes, 1½ cups / 360 ml broth, the drained beans, and bay leaf. Stir well. If the stew looks too thick to simmer, add another ½ cup / 120 ml broth.
  4. Simmer covered. Bring to a gentle boil, reduce heat, cover, and simmer for 15–20 minutes.
  5. Simmer uncovered. Remove the lid and simmer for 10–15 minutes, stirring occasionally, until the liquid reduces and clings to the beans.
  6. Mash some beans. Mash ½–1 cup of beans into the sauce with a spoon, ladle, or potato masher. Keep most beans whole.
  7. Add greens. Stir in spinach, kale, or chard. Cook for 2–5 minutes, depending on the green, until tender.
  8. Finish the stew. Remove the bay leaf. Stir in lemon juice, vinegar, or balsamic, plus fresh herbs. Taste and adjust salt, pepper, and balance.
  9. Rest and serve. Let the stew rest for 10 minutes before serving. Add broth or water ¼ cup / 60 ml at a time if it becomes too thick.

Notes

  • Taste after simmering before adding more salt; broth reduces and canned beans vary.
  • For a thicker stew, start with 1½ cups / 360 ml broth and mash more beans near the end.
  • Prefer a looser stew? Use the full 2 cups / 480 ml broth and add more as needed.
  • For a lighter, less tomato-heavy version, use 14 oz / 400 g crushed tomatoes and add broth only as needed.
  • If using cooked dried beans, some good-tasting bean cooking liquid can replace part of the broth.
  • If using kidney beans, use canned kidney beans or dried kidney beans that have already been properly cooked.
  • For sausage, brown 12–16 oz / 340–450 g sausage first and reduce the olive oil.
  • For a vegan version, use vegetable broth and finish with olive oil, lemon, and herbs.

Best Beans for Stew

The bean mix changes the whole bowl: creamy beans soften the sauce, firmer beans stay visible, and mixed beans make the stew feel more like a pantry dinner than a planned recipe.

Several bowls of different beans for stew, including white beans, butter beans, black beans, pinto beans, kidney beans, chickpeas, and mixed beans.
Different beans bring different texture: creamy white beans, butter beans, chickpeas, kidney beans, black beans, pinto beans, or a mixed-bean blend can all work here.
BeanBest forTextureNotes
Cannellini beansWhite bean stew, Tuscan-style stewCreamy but holds shapeBest all-purpose choice for the main version.
Butter beansThick, soft, comforting stewLarge, tender, butteryExcellent with tomatoes, smoked paprika, rosemary, mushrooms, or chorizo.
Great Northern or navy beansWhite bean stewSmall to medium, creamyBest when you want the stew creamy and gentle.
Black beansSmoky or Latin-style stewEarthy and creamy-firmUse cumin, smoked paprika, chili, lime, cilantro, and rice.
Pinto beansMexican-style or pantry stewSoft and creamyThey break down nicely and help thicken the sauce.
Kidney beansMixed bean stew, beef bean stewFirmUse canned or properly cooked kidney beans.
Chickpeas / garbanzo beansMediterranean, Spanish, or Moroccan-style stewNutty and firmGood with tomato, cumin, coriander, paprika, greens, and lemon.
Mixed beansBudget stew, pantry cleanout stewVariedMash some creamy beans into the sauce to bring the textures together.

Once you know which beans you are using, the variation table below shows how to season white beans, black beans, chickpeas, butter beans, and mixed pantry beans.

If you were looking for a green bean side dish instead of a cooked-bean stew, MasalaMonk’s green bean casserole recipe is the better place to start.

Canned vs Dried Beans

For speed, canned beans get dinner on the table faster; dried beans give you more control, economy, and often excellent texture. Once they simmer with the garlic-tomato base, canned beans still taste like they belong.

Two bowls of beans on a kitchen counter, one with smooth drained canned beans and one with cooked dried beans, with a small bowl of bean cooking liquid and an unlabeled can nearby.
Use the comparison as a measuring cue: 3 cans of beans usually give about 4½ cups cooked / about 720 g drained beans, while about 1½ cups dried beans can replace them after cooking.

For this recipe, 3 cans of beans, 14–15 oz / 400–425 g each, gives about 4½ cups cooked beans once drained, or roughly 720 g drained beans. To replace them with dried beans, start with about 1½ cups dried beans, cook them until tender, then measure about 4½ cups cooked beans for the stew. The exact yield varies by bean type, size, and age.

If your cooked dried-bean liquid tastes good and is not overly salty, use some of it in place of broth. It adds body and keeps the stew even more budget-friendly.

Very old dried beans may take much longer to soften or stay firm even after extended cooking. When cooking dried beans, keep tomatoes, lemon juice, and vinegar out until the beans are tender. Acidic ingredients can slow softening.

Planning to use the slow cooker? Read the slow cooker notes before using dried beans, especially kidney beans.

Kidney bean note: Canned kidney beans are the easiest choice here. If starting with dried kidney beans, cook them properly before adding them to stew, especially before slow cooking. For food-safety details, see the FDA’s guidance on kidney bean toxins and Utah State University Extension’s guide to storing and cooking dry beans.

Variations

Think of these as directions for the next pot, not decisions you need to make before the first one. The main recipe is complete as written; choose only the path that matches what you have today.

For a hands-off version, use the slow cooker and Instant Pot notes after the flavor ideas.

Vegetarian or Vegan Bean Stew, Plus Meat Add-Ins

Vegetarian or vegan bean stew: The main recipe is vegetarian with vegetable broth. For a fully vegan pot, skip parmesan, yogurt, sour cream, and other dairy toppings; olive oil, mushrooms, smoked paprika, nutritional yeast, lemon, and herbs can still make the finish rich and lively.

Sausage: Brown 12–16 oz / 340–450 g sausage in the pot for 5–7 minutes before adding the vegetables. Spoon off excess fat, reduce the olive oil to 1 tablespoon / 15 ml, and build the stew in the same pot. White beans, butter beans, and pinto beans work especially well. For a more sausage-forward slow-cooker dinner, MasalaMonk’s slow cooker sausage casserole recipe follows that comfort-food direction more fully.

Chorizo: Use 4–6 oz / 115–170 g chorizo. Cured Spanish-style chorizo should be sliced or diced and gently rendered. Fresh Mexican-style chorizo should be cooked until browned and crumbly. Reduce the added oil and taste before adding more salt.

Chicken: Cooked shredded chicken is the simplest route. Stir in 2 cups / 280–320 g during the last 10 minutes of simmering. For raw chicken, use boneless thighs or breasts cut into large pieces, simmer until cooked through, then shred and return to the pot.

Beef: Beef turns this into a longer-cooked stew, not a 50-minute variation. Brown 1 lb / 450 g stew beef first, then simmer it with tomatoes and broth until mostly tender before adding canned beans. Depending on the cut, this may take 1½–2 hours.

Best Bean Mixes and Flavor Versions

This is where the recipe becomes useful for real pantry cooking: two half-used cans can make a better stew than one perfect bean. Keep the same method, then change the herbs, spices, finish, and side.

Version or mixChange these ingredientsFinish withServe with
Cannellini + butter beansUse mostly white beans with rosemary, thyme, and greens.Lemon, olive oil, parsleyBread or sautéed greens
Black beans + pinto beansUse cumin, chili, smoked paprika, and less Italian herb.Lime, cilantro, avocadoRice
Chickpeas + cannelliniUse cumin, coriander, paprika, tomato, and greens.Lemon, parsley, yogurt if desiredFlatbread or couscous
Butter beans + mushrooms or chorizoUse smoked paprika, rosemary, mushrooms, or rendered chorizo.Vinegar, parsley, black pepperPotatoes or bread
Mixed pantry cansUse any cooked beans and mash the creamier ones into the sauce.Vinegar, herbs, olive oilRice or bread

If you want chickpeas in a fresher, no-cook direction instead, MasalaMonk’s chickpea salad recipe turns canned chickpeas into a bright lemony lunch or side.

Fresh Tomato, No-Tomato, and Small-Batch Notes

Fresh tomato version: Fresh tomatoes work, but they need more time to cook down than canned tomatoes. Use them when they are ripe and flavorful, simmer longer, and expect a slightly looser, brighter sauce. MasalaMonk’s guide to tomato sauce from fresh tomatoes shows how reduction changes both texture and flavor.

Lighter no-tomato version: Skip the crushed tomatoes and tomato paste. Use 2½–3 cups / 600–720 ml broth, white beans, rosemary or thyme, garlic, greens, and lemon. Mash about 1 cup of beans into the pot so the broth becomes creamy.

Small batch with 2 cans of beans: Use 1 tbsp / 15 ml olive oil, 1 small onion, 1 carrot, 1 celery rib, 2 garlic cloves, 1½ tbsp / about 22 g tomato paste, 14 oz / 400 g tomatoes, ¾–1 cup / 180–240 ml broth, and 2 cans of beans. This makes about 3–4 bowls.

Adding Beans to Another Stew

Already have a pot of stew going? Use cooked or canned beans. Raw dried beans should not be added to an existing stew unless the recipe was designed for that timing.

  • Canned or cooked beans: Add during the final 15–20 minutes.
  • Delicate white beans or butter beans: Add later if you want them to stay whole.
  • Kidney, black, or pinto beans: Add a little earlier if you want them to absorb more flavor.
  • To thicken another stew: Mash some beans into the liquid.

Slow Cooker and Instant Pot Notes

The stovetop gives the best control over thickness. Choose the slow cooker for convenience, not the glossiest texture, and use the Instant Pot when speed matters more than deep reduction.

Slow Cooker

The slow cooker version will usually be softer and less glossy than the stovetop version, but it is excellent for a hands-off, make-ahead dinner. Use canned beans or beans that have already been safely cooked, and sauté the onion, carrot, celery, garlic, tomato paste, and spices first if you can.

  1. Sauté the vegetables, garlic, tomato paste, and spices in a skillet or in the slow cooker insert if it has a sauté function.
  2. Add tomatoes, cooked/canned beans, bay leaf, herbs, and 1¼–1½ cups / 300–360 ml broth.
  3. Cook on high for 3–4 hours or low for 5–6 hours. Timing depends on bean type and how soft you want the stew.
  4. Add greens near the end.
  5. Mash some beans after cooking. If the stew is still thin, transfer to a pot and simmer uncovered for a few minutes.

Slow cooker kidney bean warning: Do not cook raw dried kidney beans from scratch in the slow cooker. Use canned kidney beans or dried kidney beans that have already been boiled and cooked properly.

Instant Pot with Canned Beans

The Instant Pot is best when you want speed, not deep reduction. The sauté step and final simmer are what keep it from tasting flat. This version works best with cooked or canned beans unless you are following a bean-specific dried-bean pressure-cooking method.

  1. Use the sauté function to soften the onion, carrot, celery, garlic, tomato paste, and spices.
  2. Deglaze thoroughly with a splash of broth, scraping until the bottom feels smooth before adding beans and tomatoes.
  3. Add drained beans, 1 cup / 240 ml broth, bay leaf, and crushed tomatoes on top.
  4. Pressure cook for 5 minutes.
  5. Let the pressure release naturally for 10 minutes, then release the remaining pressure.
  6. Mash some beans after cooking. If the stew is thin, use sauté mode for a few minutes to reduce it.
  7. Add greens, lemon or vinegar, and herbs after pressure cooking.

What to Serve with Bean Stew

The best sides are the ones that catch the sauce: rice, bread, potatoes, polenta, or anything sturdy enough for a thick spoonful. Serve it thick enough for bread, or just saucy enough to settle into rice. A final drizzle of olive oil and a squeeze of lemon can make the bowl feel richer, brighter, and more intentional than the ingredient list suggests.

A hand dipping a piece of crusty bread into a bowl of thick tomato bean stew with white beans, carrots, herbs, and a warm linen beside it.
Serve the stew with crusty bread when you want the sauce to be part of the meal; one scoop should catch beans, herbs, and tomato base together.

To Make It More Filling

  • Crusty bread or garlic bread
  • Steamed rice
  • Polenta
  • Cornbread
  • Baked potatoes
  • Quinoa, bulgur, or couscous
  • Buttered toast

A pot of plain rice is one of the easiest ways to stretch the stew. MasalaMonk’s guide on how to cook rice covers stovetop, rice cooker, and Instant Pot methods so the base comes out right before you spoon the stew over it.

A bowl of white rice topped with tomato bean stew, carrots, herbs, and a lemon wedge, with a spoon resting in the bowl.
For a bigger dinner, spoon the bean stew over rice; the rice catches the tomato sauce and stretches the pot without making the meal feel thin.

The storage section explains why extra stew is worth planning for: it thickens overnight and loosens easily when reheated gently.

To Add Freshness

Because the stew is rich and hearty, the best toppings either brighten it, cool it, or add contrast.

  • Lemon or lime wedges
  • Fresh parsley, basil, cilantro, or dill
  • Pickled onions
  • Green salad
  • Sautéed greens
  • Avocado for black bean versions
  • Yogurt or sour cream, if not vegan

For another bean-and-rice dinner with a Louisiana-style flavor base, MasalaMonk’s red beans and rice recipe is a heartier, smokier route.

Make-Ahead, Storage, Freezing, and Reheating

Bean stew thickens and deepens as it rests, which means tomorrow’s bowl may taste even better than tonight’s. The leftovers are part of the reward here; the beans keep soaking up flavor as they sit. If you are making it ahead, keep it slightly looser than you want. It will thicken as it cools and again in the fridge.

A glass storage container filled with leftover tomato bean stew beside a reheated bowl of the same stew, with bread, herbs, and a spoon on a kitchen counter.
Leftover bean stew usually thickens as it rests; store it in glass if you can, then loosen it with a splash of broth or water when reheating.
  • Make ahead: Make the stew 1–2 days ahead if you want the flavor to settle.
  • Refrigerator: Store in an airtight container for 4–5 days.
  • Freezer: Freeze for up to 3 months.
  • Greens: If freezing, consider adding fresh greens after reheating rather than before freezing.
  • Reheating: Warm on the stovetop over low-medium heat with a splash of broth or water.
  • Brighten after reheating: Add lemon juice, herbs, or olive oil at the end.

The troubleshooting table below covers reheated stew that turns too thick, too loose, or flat-tasting.

Mistakes That Make It Watery or Bland

Most disappointing bean stews fail in the same few ways: too much liquid, not enough base flavor, or no fresh finish. Fix those, and the pot usually comes back.

  • Adding too much broth at the start. Begin with less, simmer, then adjust.
  • Skipping the vegetables. Beans need onion, garlic, herbs, and seasoning to taste like dinner.
  • Not cooking the tomato paste. Raw tomato paste can taste sharp and flat.
  • Adding tomatoes or vinegar before dried beans are tender. Acidic ingredients can slow softening.
  • Forgetting the fresh finish. A small splash of vinegar or lemon at the end keeps the stew from tasting heavy.
  • Ignoring salt from broth, canned beans, sausage, or chorizo. Taste before adding the full amount of salt.

Troubleshooting

Most bean stew problems are fixable because beans are forgiving. When the pot is watery, give it time uncovered. Flat flavor usually needs salt first, then a small splash of vinegar or lemon juice. A too-thick pot should be loosened slowly and tasted again.

ProblemFix nowFix next time
Too waterySimmer uncovered and mash ½–1 cup beans into the sauce.Start with less broth and add more only after simmering.
Too thickAdd broth or water ¼ cup / 60 ml at a time.Reduce for less time or use the full 2 cups / 480 ml broth.
Bland beansAdd salt first, then a small splash of vinegar or lemon juice, herbs, olive oil, or chili.Season the vegetables and cook the tomato paste properly.
Flat flavorAdd a small splash of vinegar or lemon juice, fresh herbs, black pepper, or olive oil.Do not skip the final balance.
Too acidicAdd more beans, a splash of broth, olive oil, or a small pinch of sugar.Use fewer tomatoes or cook tomato paste longer.
Bitter tomato pasteAdd tomatoes, broth, and beans to soften the flavor.Cook tomato paste until darkened, but do not let it burn.
Firm beansSimmer longer with extra broth until tender.Use canned beans or cook dried beans fully before adding.
Too saltyAdd unsalted beans, potato, tomatoes, or low-sodium broth.Use low-sodium broth and season gradually.
Thin slow cooker versionMash beans at the end or transfer to a pot and simmer uncovered.Use less broth in the slow cooker.

FAQs

What beans are best for bean stew?

Cannellini beans and butter beans are the easiest all-purpose choices for bean stew because they turn creamy without disappearing. Black beans make it smoky, chickpeas keep it firmer, pinto beans help thicken the sauce, and mixed beans are best when you want to use what is already open.

Is bean stew the same as bean soup?

No. Bean stew is thicker than bean soup. Soup has more broth and a looser texture, while this stew is reduced, spoonable, and sturdy enough to serve with bread, rice, polenta, or potatoes as a full meal.

How is bean stew different from chili?

Bean stew is usually less chili-spice focused than chili. This version leans on aromatics, tomatoes, herbs, beans, and a flexible finish rather than a heavy chili-powder base.

Can I use canned beans for bean stew?

Yes, canned beans work very well for bean stew. Drain and rinse three 14–15 oz cans, then simmer them in the tomato base until the sauce clings to the beans.

Should I drain canned beans?

Usually, yes. Draining and rinsing gives you more control over salt and texture. If the can liquid tastes clean and you want extra body, add a small splash, but do not use it as the main liquid.

Can I use dried beans?

Yes, dried beans work well if they are cooked until tender first. Use about 4½ cups cooked beans to replace three cans; the stew should be where they absorb flavor, not where they struggle to soften.

How do I thicken bean stew?

To thicken bean stew, simmer uncovered and mash ½–1 cup of beans into the sauce. Starting with less broth and cooking the tomato paste properly also helps the finished bowl become glossy and scoopable.

Can I make bean stew without tomatoes?

Yes, bean stew can be made without tomatoes. Use broth as the base, add extra aromatics and herbs, mash more beans for body, and finish with olive oil and a little acidity so it still tastes complete.

Can this bean stew be vegan?

Yes, this bean stew can be vegan. Use vegetable broth, skip dairy toppings, and finish with olive oil, herbs, mushrooms, or nutritional yeast for extra richness.

Can I make bean stew in a slow cooker?

Yes, bean stew can be made in a slow cooker with canned beans or beans that have already been cooked. Use less broth than the stovetop version, and expect a softer, less glossy stew that is still excellent for a hands-off dinner.

Does bean stew freeze well?

Yes, bean stew freezes well for up to 3 months. It usually looks thicker after thawing, so reheat it gently with a splash of broth or water, then brighten it at the end so it tastes fresh again.

What should I serve with bean stew?

Serve bean stew with crusty bread, rice, polenta, cornbread, baked potatoes, quinoa, couscous, or a green salad. Bread is best when the stew is extra thick; rice is best when you want to stretch the pot into more servings.

Final Thoughts

A good bean stew is not fancy food. It is the kind of recipe that makes three cans of beans, one onion, and the last carrot in the drawer feel like dinner for tonight and lunch tomorrow.

Once the method clicks, you stop needing one exact bean. Try white beans and rosemary when you want something soft and cozy. Go with black beans, cumin, and lime when you want a smoky bowl over rice. Choose chickpeas with paprika and lemon, butter beans with chorizo, or mixed beans when the pantry needs clearing out.

If you make this with a different bean mix, leave a comment with the exact cans or cooked beans you used and what you served it with — especially if you tried black beans, butter beans, chickpeas, or a mixed pantry batch. It helps the next person staring at the same random cans.

Back to top