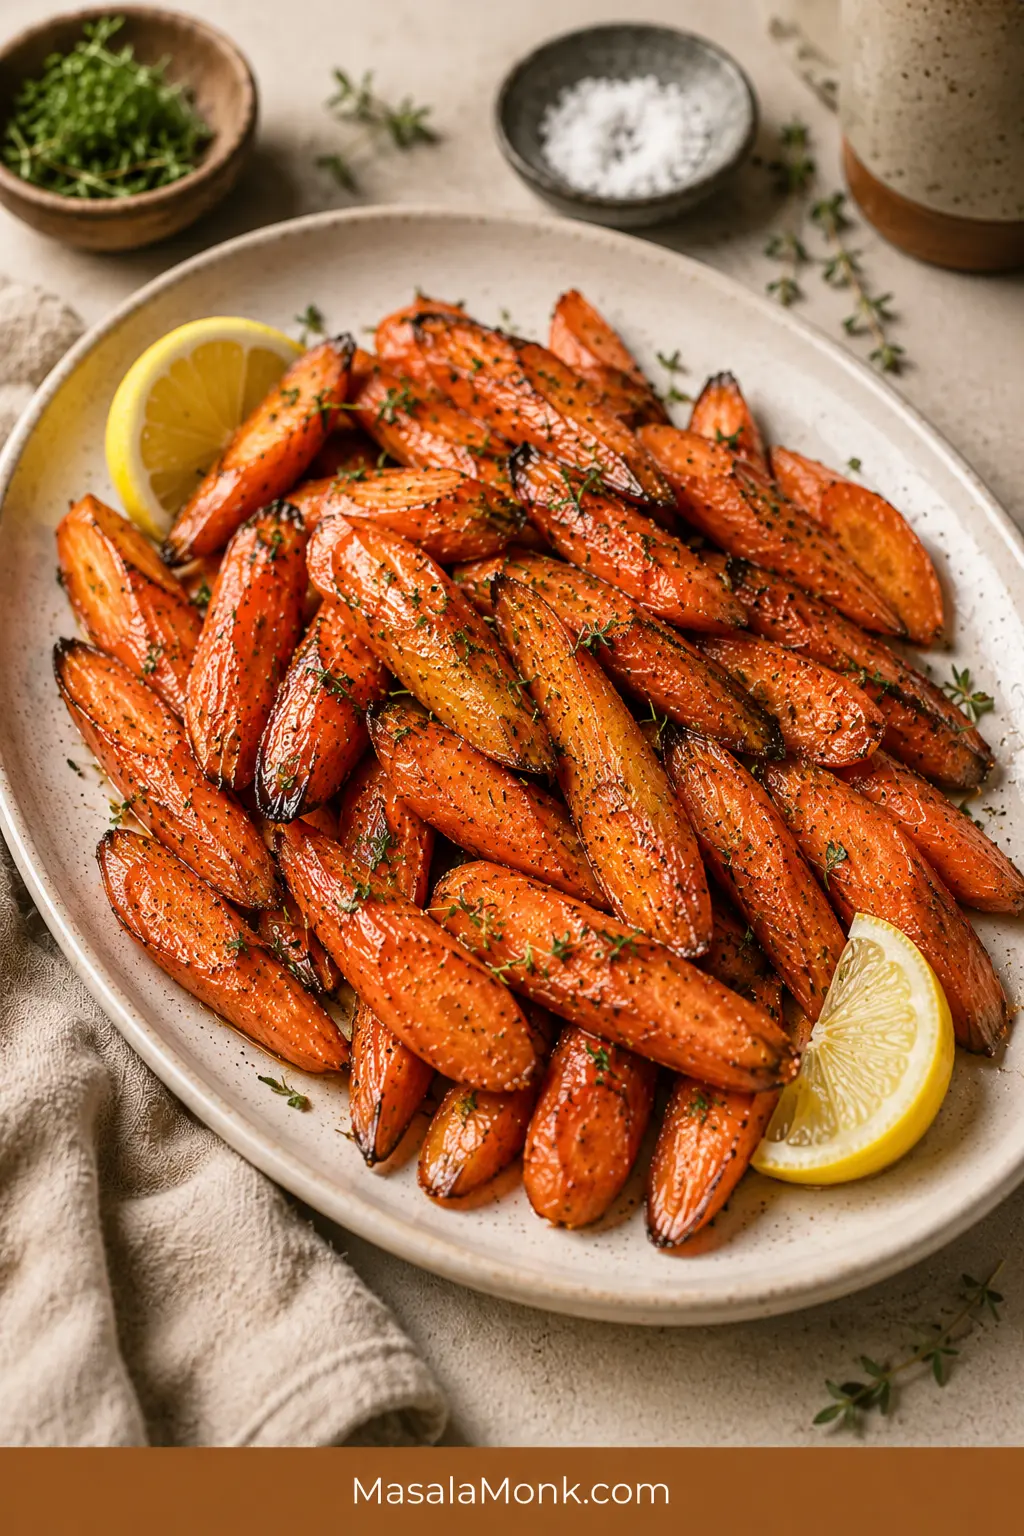
Roasted carrots should be easy: browned at the edges, tender through the center, and sweet enough to make everyone reach for more. The trouble is that carrots can also turn pale, dry, wrinkled, mushy, or sticky-burnt when the pieces are uneven, the pan is crowded, or the glaze goes in too early.
This roasted carrots recipe keeps the main method simple first: carrots, olive oil, salt, pepper, a hot oven, and a roomy sheet pan. Once that tray works, every other version is just a finish — honey roasted carrots, maple glazed carrots, garlic butter carrots, brown sugar carrots, baby carrots, whole carrots, rainbow carrots, or a prettier holiday platter.
The promise is dependable roasted carrots without babysitting the pan. Make the plain olive-oil tray once, then use the same method whenever you want a glossy honey finish, a buttery maple holiday version, a savory garlic butter side, or warm spiced carrots with cumin, chili, and lemon.
Quick Answer: How to Roast Carrots
Roast carrots at 425°F / 220°C for 20 to 30 minutes, depending on thickness. Cut them into even 2 to 3 inch diagonal pieces, toss with olive oil, salt, and pepper, then spread them in one layer on a rimmed sheet pan. They are done when the centers are fork-tender and the edges are browned.
For most cut carrots, 425°F / 220°C gives the best mix of browned edges and tender centers. Move down to 400°F / 200°C for large whole carrots, very thin pieces in a strong fan oven, or heavier maple and brown sugar glazes.
Honey and maple are least likely to scorch when added during the final 5 to 10 minutes or tossed with the carrots after roasting. Fresh garlic is best added halfway, warmed in butter first, or used as a finish. Garlic powder can go in from the start.
The rule that saves the tray: make the pieces similar in thickness, give them space, and add sweet glazes late. That is the difference between roasted carrots and steamed, dry, or burnt carrots.
Ready to cook? Jump to the recipe card. Still choosing a finish? Compare the roasted carrot versions.
Roasted Carrots Recipe Card
Easy Oven Roasted Carrots With Honey, Maple & Garlic Options
A reliable tray of oven roasted carrots for 2 to 3 inch carrot pieces, with browned edges, tender centers, and optional honey, maple, brown sugar, garlic butter, baby carrot, and rainbow carrot finishes.
Yield: 4 to 6 servings
Prep time: 10 minutes
Cook time: 22 to 30 minutes for 2 to 3 inch pieces
Total time: About 35 to 40 minutes
Method: Oven roasted
Oven temperature: 425°F / 220°C
Texture target: Fork-tender centers, browned edges
Diet: Vegetarian; vegan if using olive oil and maple syrup instead of butter or honey
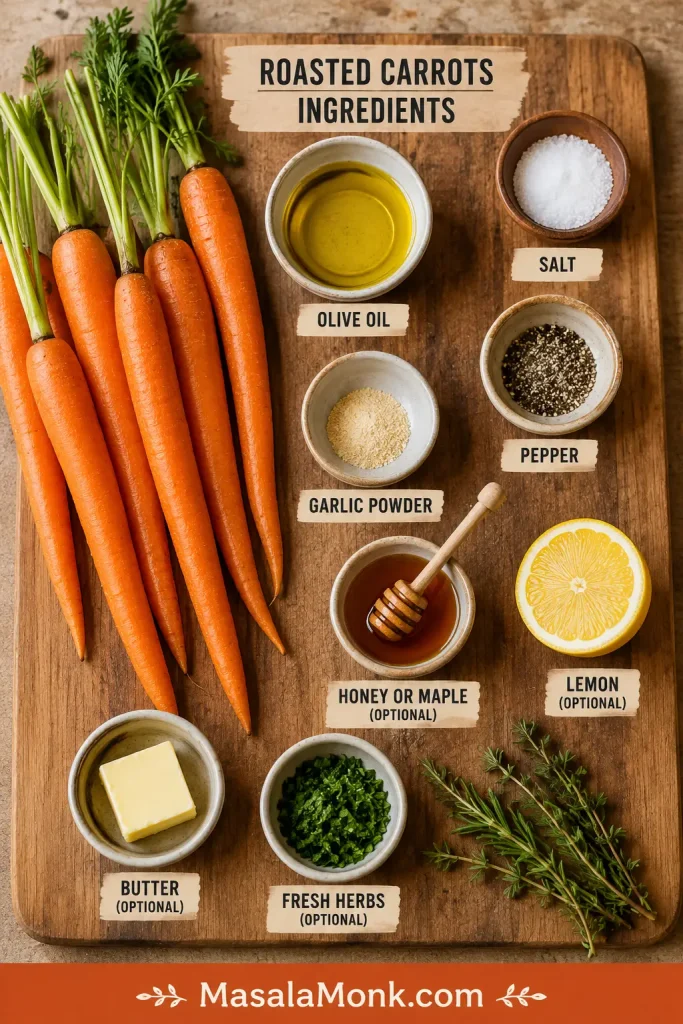
Ingredients
- 2 lb / 900 g carrots, peeled or scrubbed
- 2 tablespoons / 30 ml olive oil
- ½ to ¾ teaspoon fine sea salt, plus more to taste
- ¼ teaspoon black pepper, or to taste
- ½ teaspoon garlic powder, optional
- 1 tablespoon / 15 ml honey or maple syrup, optional, for a light glaze
- 1 to 2 tablespoons chopped parsley, thyme, dill, or chives
- 1 to 2 teaspoons lemon juice, optional
Optional light glaze: use 1 tablespoon honey or maple syrup for a gentle shine, or up to 2 tablespoons for a sweeter finish. Add near the end of roasting or toss with the carrots after roasting. For a simple savory tray, skip the glaze and finish with herbs, lemon, and salt.
Instructions
- Heat the oven to 425°F / 220°C. Place a rack in the center of the oven.
- Wash and dry the carrots. Peel rough-skinned carrots, or scrub fresh thin-skinned carrots well.
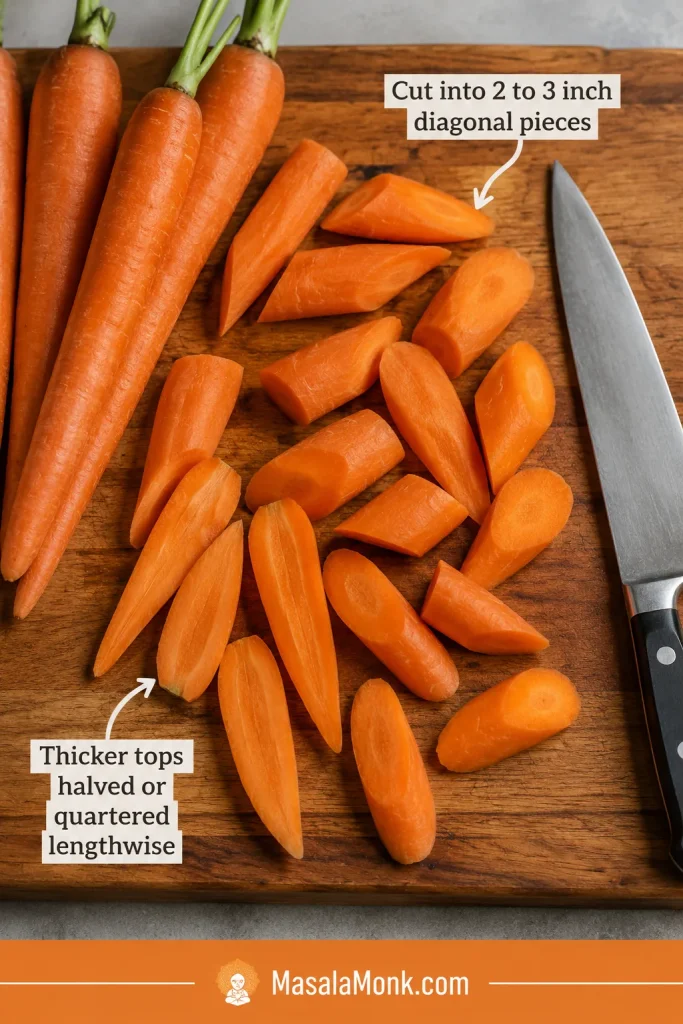
- Cut the carrots diagonally into 2 to 3 inch pieces. Halve or quarter thick pieces lengthwise so the carrots are similar in thickness.
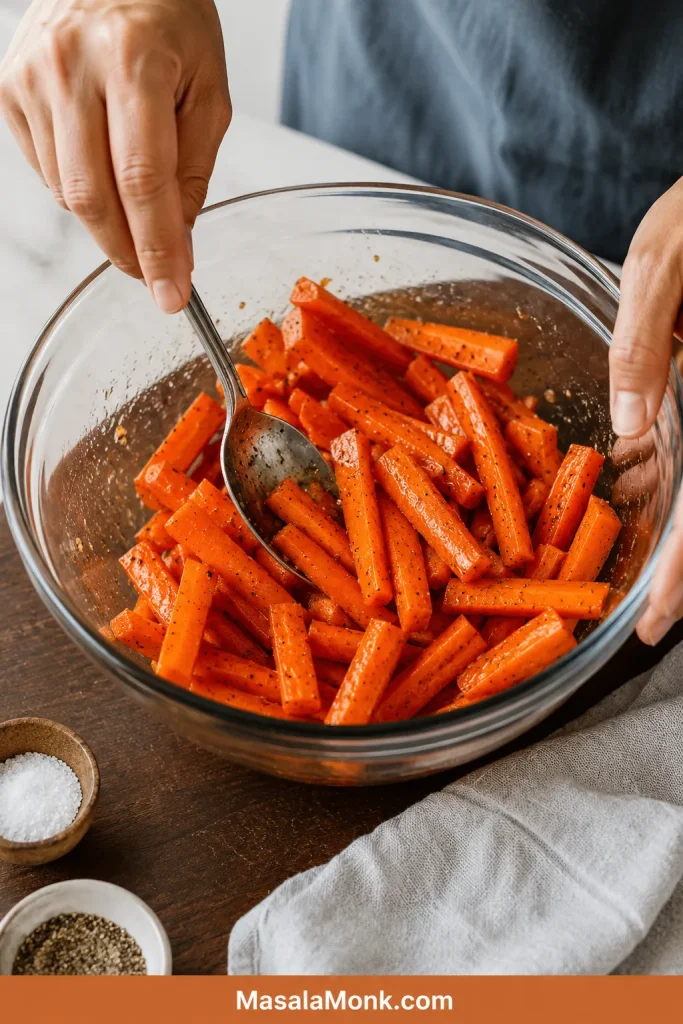
- Toss the carrots with olive oil, salt, pepper, and garlic powder if using. The pieces should look lightly shiny, not drenched.
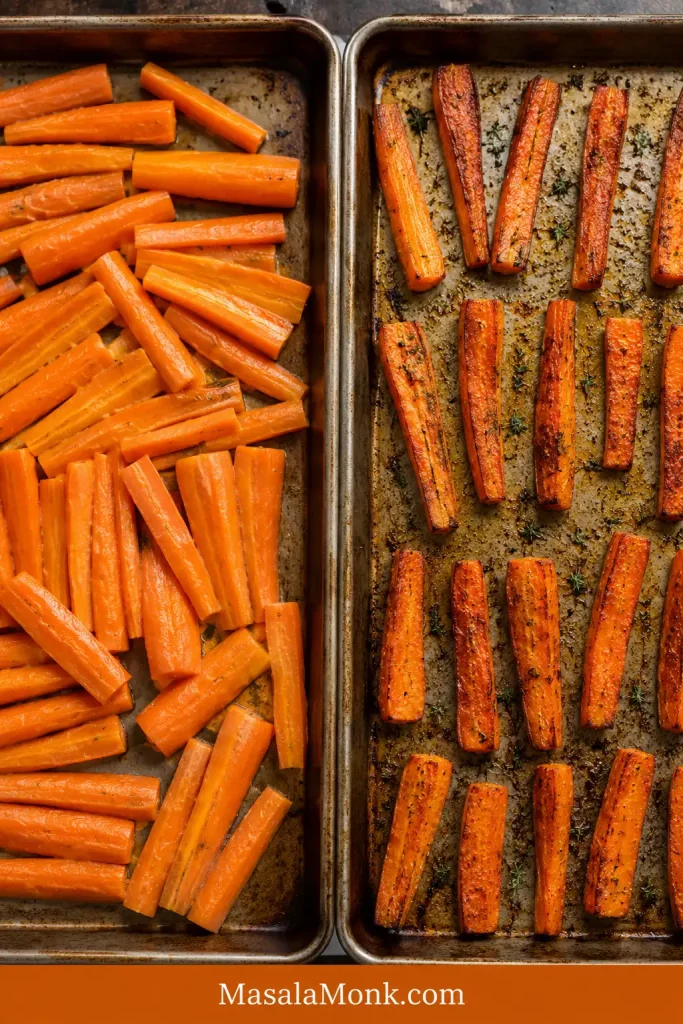
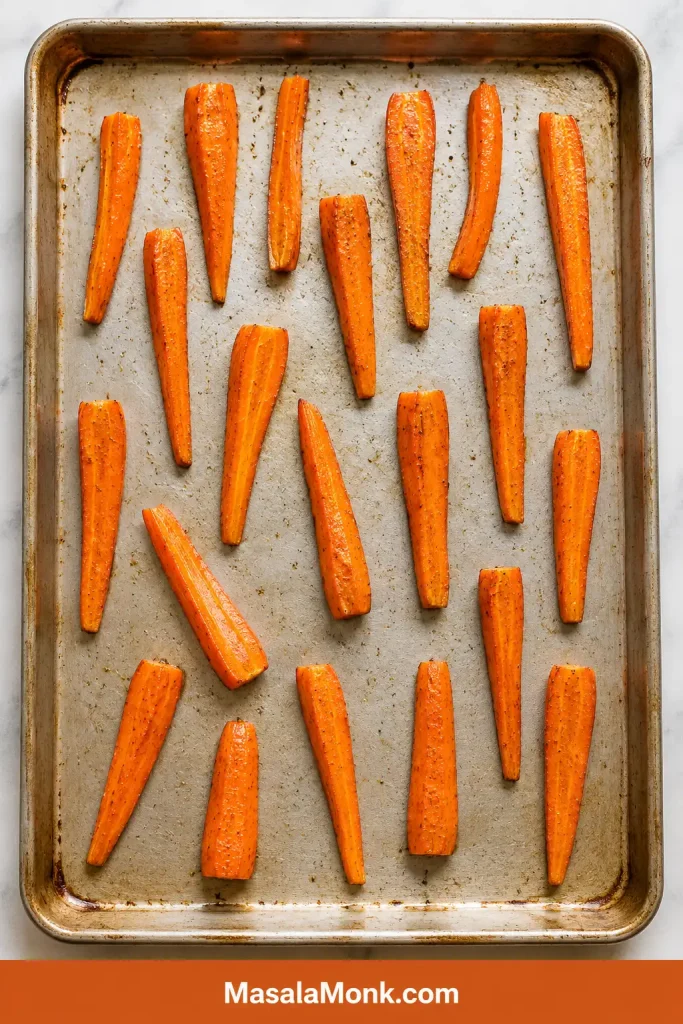
- Spread the carrots in one layer on a large rimmed sheet pan. Give them space now, because a crowded pan can smell good and still give you pale carrots.
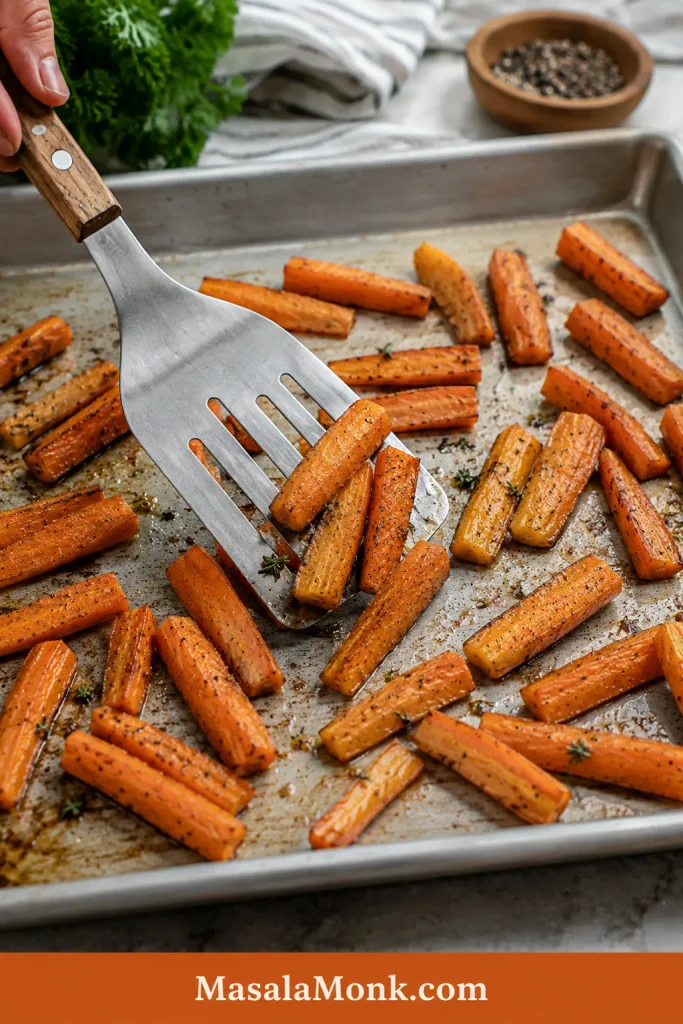
- Roast for 22 to 30 minutes, tossing halfway, until the edges are browned and the centers are fork-tender.
- For honey or maple roasted carrots, drizzle with honey or maple syrup during the final 5 to 10 minutes, or toss with the glaze just after roasting. The carrots should look roasted before they look glazed.
- Finish with herbs, lemon juice, and a little extra salt if needed. Serve warm.
Success Notes
- Do not crowd the pan: use two pans if the carrots overlap.
- Deeper browning: use a bare metal sheet pan.
- Easy cleanup: use parchment rated for 425°F / 220°C for the basic recipe, or foil for sticky maple and brown sugar glazes.
- Fresh garlic: add it halfway, warm it in butter first, or toss it with the carrots after roasting.
- Baby carrots: pat them very dry before roasting so they do not steam.
- Large or dry carrots: parboil until just crisp-tender, dry well, then roast for softer centers and less shriveling.
- Fan or convection ovens: start checking 3 to 5 minutes earlier, especially with thin or glazed carrots.
- Scaling: for every extra 1 lb / 450 g carrots, add about 1 tablespoon / 15 ml oil and ¼ teaspoon salt.
- Doubling the recipe: use two sheet pans and rotate them halfway. Do not pile 4 lb / 1.8 kg carrots onto one pan.
Want the method explained with visuals? See the step-by-step guide. If your carrots usually turn pale, dry, or burnt, jump to troubleshooting.
The 5-Point Roasted Carrot Check
The tray usually fails before it ever goes into the oven. Run this quick check first and roasted carrots become almost boringly reliable.
- Similar thickness: thick tops are halved or quartered so they cook with the thinner ends.
- Roomy pan: carrots sit in one layer instead of steaming in a pile.
- Dry surface: especially important for bagged baby carrots and mini carrots.
- Protected garlic: garlic powder can start early; fresh garlic needs gentler timing.
- Late sweet glaze: honey, maple, and brown sugar should shine, not burn before the centers soften.
The biggest visual fixes are usually pan spacing, even cut size, and late glaze timing.
Pan note: for better browning, use a roomy bare metal sheet pan. Parchment makes cleanup easier but gives slightly lighter edges. Honey and maple taste cleanest when the carrots already look roasted before the glaze goes on.
Which Roasted Carrot Version Should You Make?
Make the simple olive-oil tray first if you are unsure. The first tray teaches you more than any variation. Every version below uses the same roasting method; only the finish changes.
| Situation | Best Version | Why It Works |
|---|---|---|
| First time making this | Simple olive oil roasted carrots | Teaches the timing without glaze risk |
| Kids or family dinner | Honey roasted carrots | Glossy, sweet, familiar |
| Thanksgiving, Christmas or Easter | Maple butter carrots with thyme | Warm, shiny, holiday-friendly |
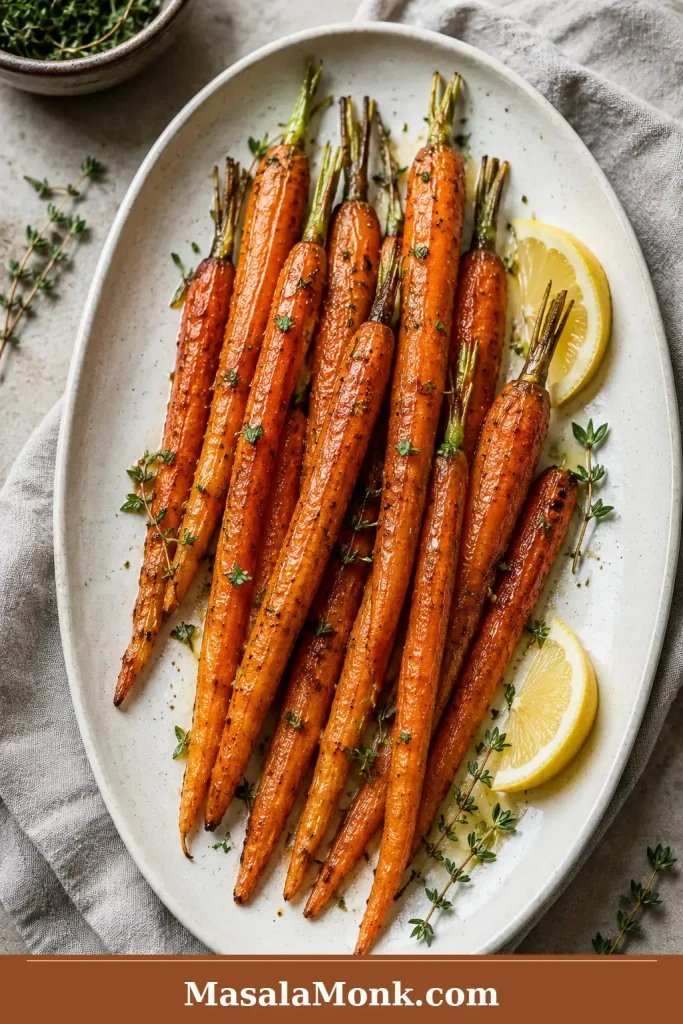
| Roast chicken, beef or pork | Garlic butter lemon carrots | Savory enough for rich mains |
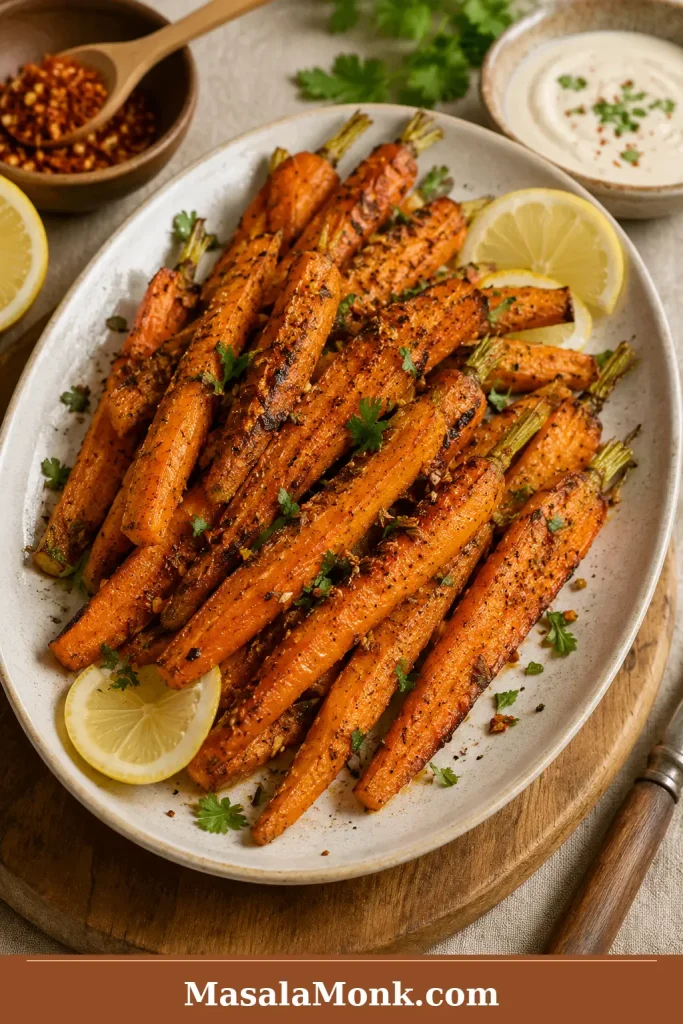
| Less sweet version | Cumin, chili, lemon and herbs | Warm and bright without being sugary |
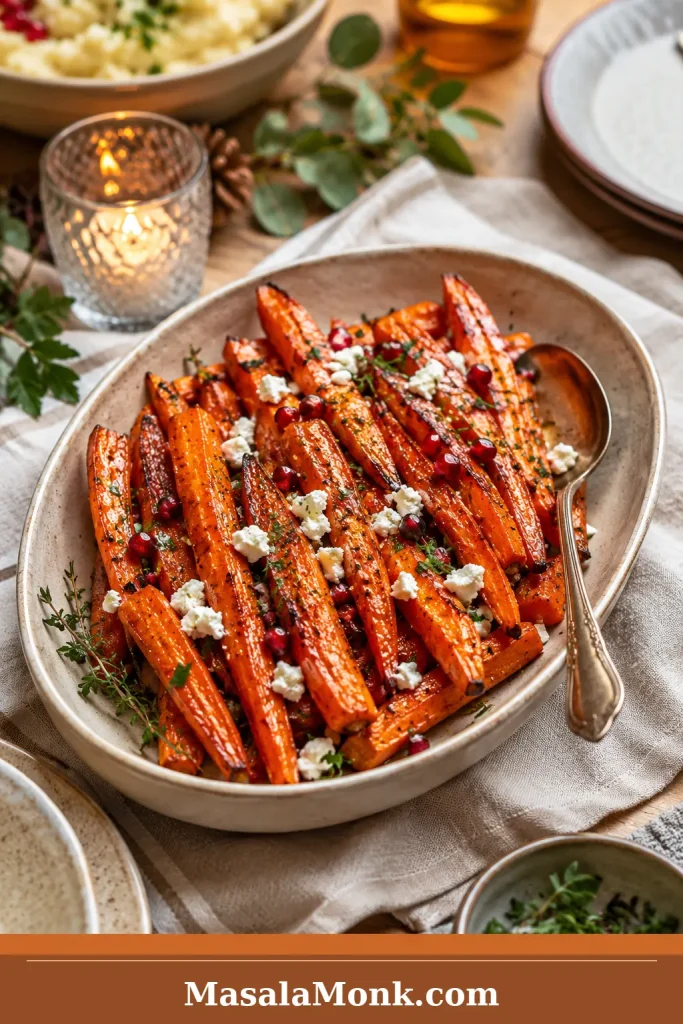
| Pretty platter | Rainbow carrots with feta, herbs or pomegranate | Colorful and finished-looking |
Choose Your Roasted Carrot Finish
Once the base tray works, the finish decides the mood: plain and savory for a weeknight, honey-glossed for family dinner, maple-buttery for holidays, garlic butter for roast dinners, or cumin-chili-lemon when you want something warmer and less sweet.
After choosing a version, use this table to keep the finish balanced and timed correctly.
| Version | Flavor | What to Add | Timing |
|---|---|---|---|
| Simple oven roasted carrots | Savory, sweet, clean | Olive oil, salt, pepper, garlic powder | Season before roasting |
| Honey roasted carrots | Glossy, sweet-savory | Honey, lemon, herbs, black pepper | Add honey near the end or after roasting |
| Maple glazed carrots | Warm, buttery, festive | Maple syrup, butter, thyme, chili flakes | Add maple near the end; use 400°F for heavy glaze |
| Brown sugar carrots | Caramel-like, rich | Brown sugar, butter or oil, flaky salt | Use lightly and watch closely |
| Garlic butter carrots | Rich, savory, buttery | Butter, fresh garlic, parsley, lemon | Toss with finished carrots |
| Baby or mini carrots | Sweet, simple, quick | Oil, salt, pepper, optional honey | Pat dry first; check around 18 minutes |
| Whole or rainbow carrots | Elegant, colorful, naturally sweet | Maple, herbs, lemon, feta, nuts, pomegranate | Cut evenly and finish after roasting |
| Sweet spiced roasted carrots | Warm, bright, lightly spiced | Cumin, coriander, chili, honey, lemon | Spices before roasting; honey and lemon after |
More Roasted Carrot Help
Roast It Right
If you are cooking now, the recipe card above is enough. The sections below explain how to adjust the same tray for different carrot cuts, glazes, ovens, holiday servings, and the little problems that can make carrots turn pale, dry, or sticky-burnt.
Why This Roasted Carrots Recipe Works
A hot oven gives the tray its roasted flavor. At 425°F / 220°C, the edges can brown while the centers become tender instead of collapsing.
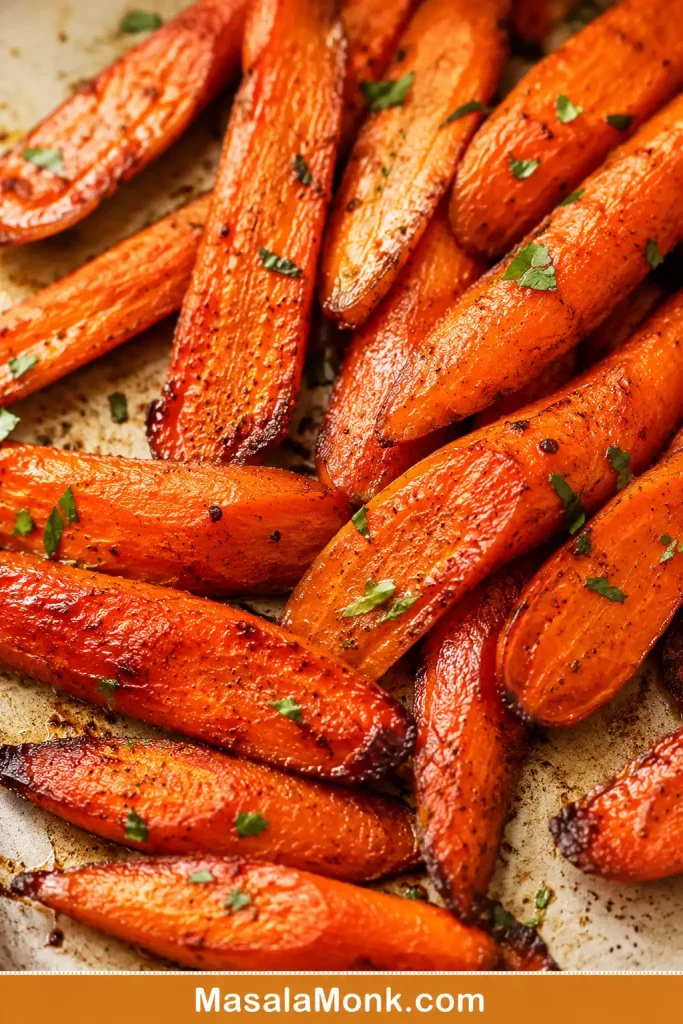
What Browned Roasted Carrot Edges Should Look Like
Use the browned edges as your visual cue. The centers should look tender, while the outside has enough color to taste sweet, savory, and roasted.
Even thickness makes the timing predictable. Carrots taper, so thick tops need to be split lengthwise. A single layer lets steam escape, which is why roomy pans brown better than crowded pans.
The glaze is controlled instead of dumped on early. A light glaze should cling to the carrots, not sit in puddles on the pan. Add it late and the carrots turn glossy instead of bitter.
If roasted carrots have disappointed you before, it was probably a cut-size, pan, or glaze-timing problem — not a carrot problem.
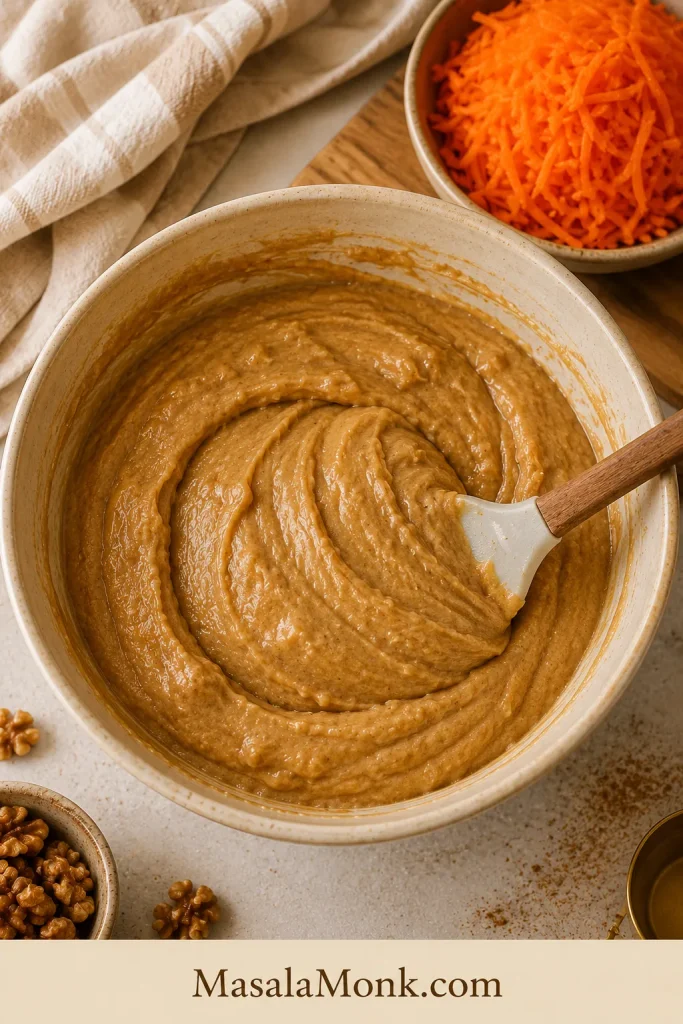
Roasted Carrots Ingredients and Smart Swaps
The ingredient list stays short because the oven does most of the work. What matters is starting with dry carrots, coating them lightly but evenly, salting them enough, and keeping sweet glazes controlled.
- Carrots: medium carrots are easiest. Baby-cut carrots, mini carrots, whole slim carrots, and rainbow carrots all work, but very wet carrots need extra drying.
- Olive oil: use about 1 tablespoon per pound / 450 g carrots. The pieces should look lightly shiny, not slick.
- Salt and pepper: salt makes carrots taste sweeter and fuller; pepper balances the natural sweetness.
- Garlic powder: the most reliable garlic option from the start because it does not burn as easily.
- Fresh garlic: best warmed in butter, added halfway, or tossed with finished carrots.
- Honey, maple or brown sugar: use lightly and add near the end or after roasting for a glossy finish.
- Lemon, vinegar, herbs or chili: small bright finishes keep sweet carrots from tasting flat.
- Butter: best as a finish or glaze; olive oil is easier for the main high-heat roast.
Best Pan for Roasted Carrots
The pan is where most roasted carrots are won or lost. Seasoning matters, but space matters more. A large rimmed sheet pan gives moisture room to escape, which helps the carrots brown instead of steam.
Crowded Pan vs Spaced Carrots
The same carrot cut can come out pale or caramelized depending on pan space. If the pieces overlap, spread them onto a second sheet pan before roasting.
- Bare metal: best for deeper browning.
- Parchment: easier cleanup if rated for 425°F / 220°C, with slightly lighter browning.
- Foil: useful for sticky maple, honey, or brown sugar glazes.
- Preheated sheet pan: helpful for wet baby carrots, but use carefully and skip it for your first heavy sugar-glaze batch.
How to Roast Carrots Step by Step
1. Heat the oven
Preheat the oven to 425°F / 220°C. A properly hot oven helps the carrots brown instead of slowly drying out.
2. Wash, dry and peel
Scrub the carrots well, then dry them. Peeling is optional for fresh, thin-skinned carrots. Older carrots with rough skins usually look and taste better peeled.
3. Cut even pieces
Cut the carrots diagonally into 2 to 3 inch pieces. Split thick tops lengthwise so the pieces are close in thickness, even if they are not identical in shape.
4. Toss with oil and seasoning
Toss with olive oil, salt, pepper, and garlic powder if using. The oil should coat the carrots lightly and evenly.
5. Spread with space
Give the carrots room on the pan. If they look crowded before roasting, they will taste crowded after roasting — softer, paler, and less caramelized.
6. Roast and toss halfway
Roast for 12 to 15 minutes, toss or flip, then continue roasting until the centers are tender and the edges are browned.
7. Add glaze after the carrots start roasting
For honey, maple, or brown sugar carrots, let the carrots roast first and glaze second. Add the sweet glaze during the final 5 to 10 minutes or toss it with the carrots after roasting. For garlic butter carrots, warm the garlic in butter and toss with the finished tray.

8. Finish bright
Once the carrots are hot and browned, a small finish — lemon, herbs, flaky salt, chili, feta, tahini, yogurt, or toasted nuts — makes them taste brighter and more complete.
Roasting Time Chart for Carrots
The timer is a guide, not a contract. Thin carrots finish quickly; thick carrots need more time. Start checking early when pieces are thin, glazed, or close to the edge of the pan.
| Carrot Type or Cut | Oven Temperature | Approx. Time | Best Use |
|---|---|---|---|
| Thin diagonal slices | 425°F / 220°C | 15 to 20 minutes | Fast weeknight side |
| 2-inch chunks | 425°F / 220°C | 20 to 25 minutes | Everyday roasted carrots |
| 2 to 3 inch diagonal pieces | 425°F / 220°C | 22 to 30 minutes | Best default cut |
| Baby-cut carrots | 425°F / 220°C | 18 to 25 minutes | No-chop convenience |
| Whole slim carrots | 425°F / 220°C | 25 to 35 minutes | Holiday presentation |
| Thick whole carrots | 400°F / 200°C | 35 to 45 minutes | Gentler cooking for large carrots |
| Large whole carrots with rich glaze | 400°F / 200°C | 35 to 50 minutes | Holiday-style glazed carrots |
How to Know Roasted Carrots Are Done
Roasted carrots are done when a fork slides into the center with light resistance. They should be tender but not collapsing. You want bend, not collapse.
Fork-Tender Roasted Carrots
The fork test matters more than the timer. Check the thickest pieces first, because they decide whether the tray is truly done.

The edges should look browned and slightly caramelized. If the carrots are browned but still firm in the middle, lower the oven to 375°F / 190°C and roast for a few more minutes. If they are soft but pale, the pan was probably crowded, the oven was too low, or the carrots were too wet.
Temperature is the next lever: hotter for browning, gentler for large carrots or heavier glazes.
Best Temperature for Roasted Carrots
The best default temperature for roasted carrots is 425°F / 220°C. It gives the best balance of browned edges and tender centers for most cut carrots. For larger whole carrots or heavier sweet glazes, move down to 400°F / 200°C. Choose 375°F / 190°C only for gentler roasting, such as after parboiling or when your oven runs hot.
Using a fan or convection oven? Start checking 3 to 5 minutes earlier. If your oven browns aggressively, use 400°F / 200°C for glazed carrots or thin pieces.
Once the carrots roast properly, the finish is where the same pan can become a weeknight side, a kid-friendly dinner vegetable, or the glossy holiday dish people actually take seconds of.
Honey, Maple, Brown Sugar and Garlic Butter Finishes
The glaze should shine, not swim. A light coating makes carrots glossy; too much glaze turns the pan sticky before the centers finish cooking. The carrots should taste like roasted carrots first, with sweetness around the edges.
Honey makes the carrots glossy and familiar, maple makes them deeper and more holiday-like, and garlic butter pulls the whole tray back toward savory dinner territory.
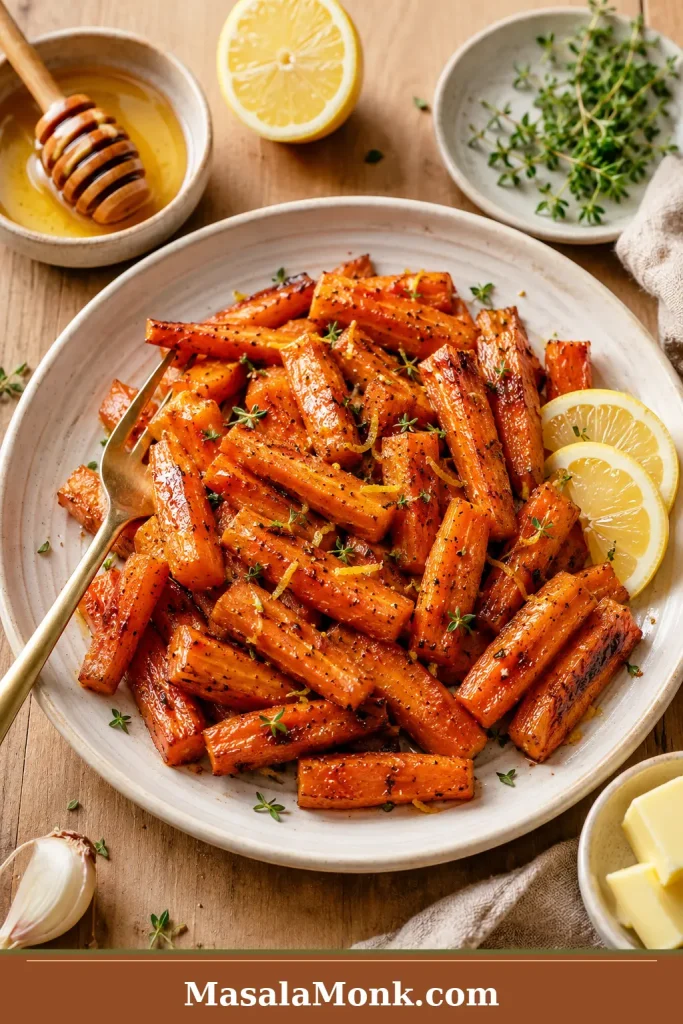
Sweet carrots also need a small counterpoint — lemon, vinegar, salt, black pepper, chili, or fresh herbs — so the flavor stays balanced. The lemon or vinegar at the end is small, but it is what keeps sweet carrots from tasting like dessert.
Looking for a specific finish? Jump to honey, maple, brown sugar, garlic butter, or savory roasted carrots without honey.
Glaze Formula Table
Use these amounts for a 2 lb / 900 g tray. Keep the glaze light for the main recipe, especially at 425°F / 220°C.
| Version | For 2 lb / 900 g Carrots | When to Add | Best Finish |
|---|---|---|---|
| Honey roasted carrots | 1 to 2 tbsp / 15 to 30 ml honey | Final 5 to 10 minutes or after roasting | Lemon, parsley, thyme, black pepper |
| Maple glazed carrots | 1 to 2 tbsp / 15 to 30 ml maple syrup | Final 5 to 10 minutes; use 400°F for heavy glaze | Butter, thyme, rosemary, chili flakes |
| Brown sugar carrots | 1 to 2 tbsp / 12 to 25 g brown sugar + oil or butter | Light amount before roasting or near the end | Flaky salt, lemon, black pepper |
| Garlic butter carrots | 2 to 3 tbsp / 28 to 42 g butter + 2 to 3 garlic cloves | After roasting | Parsley, lemon juice |
| Honey garlic butter carrots | 3 tbsp / 42 g butter + 1½ to 2 tbsp / 22 to 30 ml honey + 3 garlic cloves | Brush lightly near the end; toss more after roasting | Lemon, parsley, flaky salt |
| Honey balsamic carrots | 1 tbsp / 15 ml honey + 1 tbsp / 15 ml balsamic vinegar | Near the end | Thyme, black pepper |
| Sweet spiced carrots | ½ tsp cumin + ½ tsp coriander + pinch chili + 1 tbsp honey + lemon | Spices before roasting; honey and lemon after | Cilantro, mint, yogurt, tahini |
Honey Roasted Carrots
The best honey version should look glossy, not sticky. Use 1 to 2 tablespoons honey for 2 lb / 900 g carrots and add it near the end or after roasting. Finish with lemon, black pepper, flaky salt, parsley, thyme, or a tiny pinch of chili. These carrots work well beside a salty, smoky, or mustardy main like honey glazed ham.
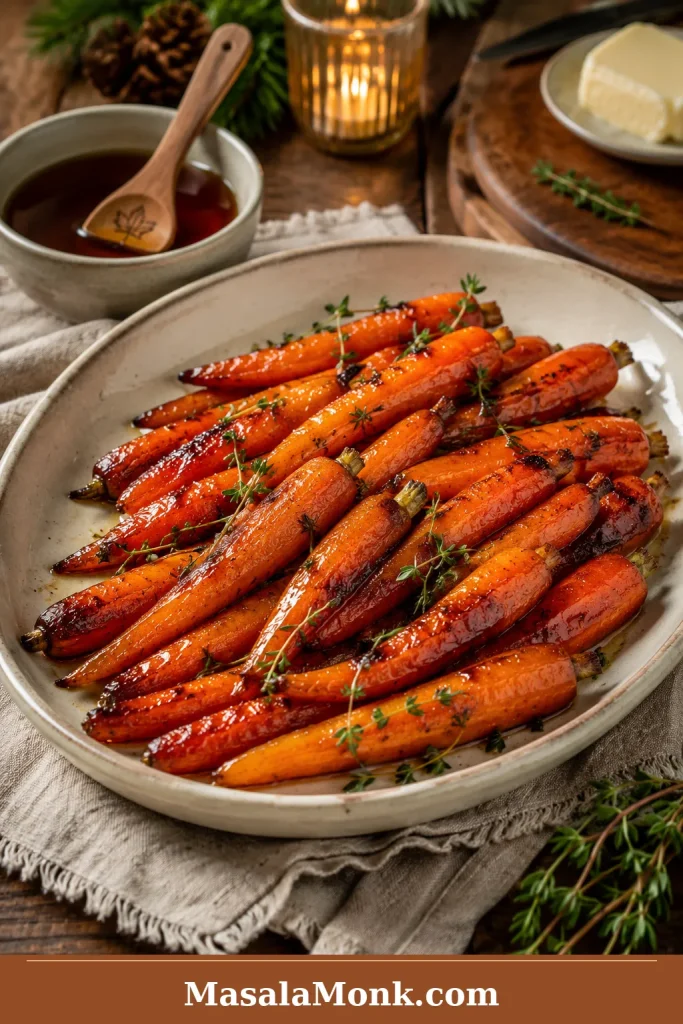
Maple Glazed Carrots
Maple carrots are the holiday version: buttery, shiny, and a little deeper than honey. Use 1 to 2 tablespoons maple syrup for 2 lb / 900 g carrots. For a heavier maple glaze, roast at 400°F / 200°C, use foil for easier cleanup, and toss more often. They sit nicely beside a creamy side like sweet potato casserole.
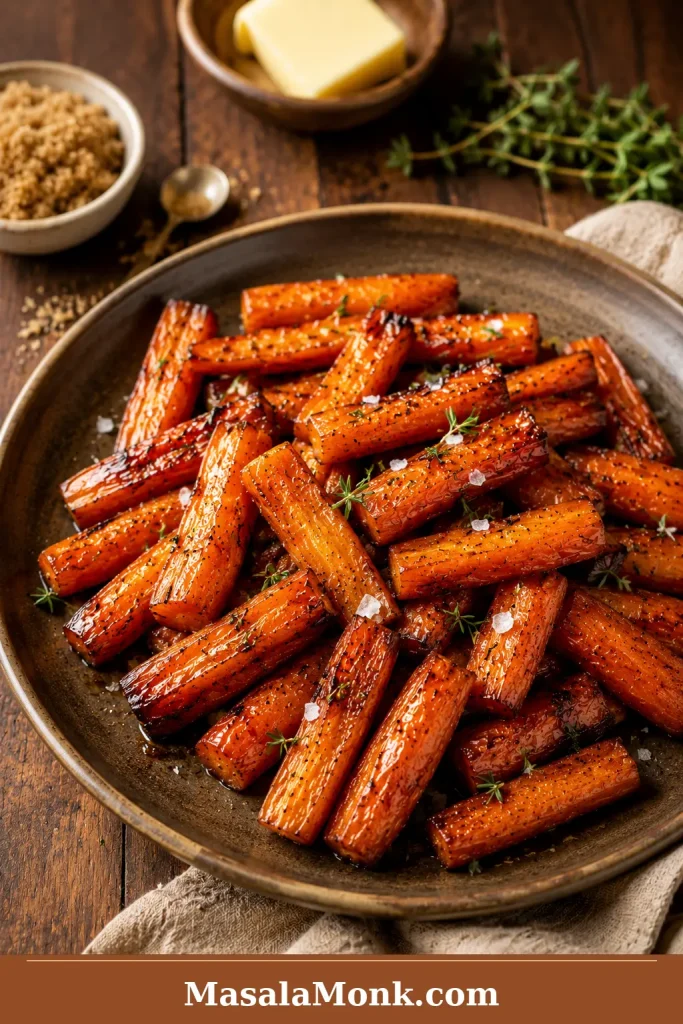
Brown Sugar Roasted Carrots
Brown sugar gives carrots a caramel-like flavor. Use 1 to 2 tablespoons brown sugar, mixed with olive oil or melted butter so it coats evenly. Balance the sweetness with lemon juice, vinegar, black pepper, chili, or flaky salt.
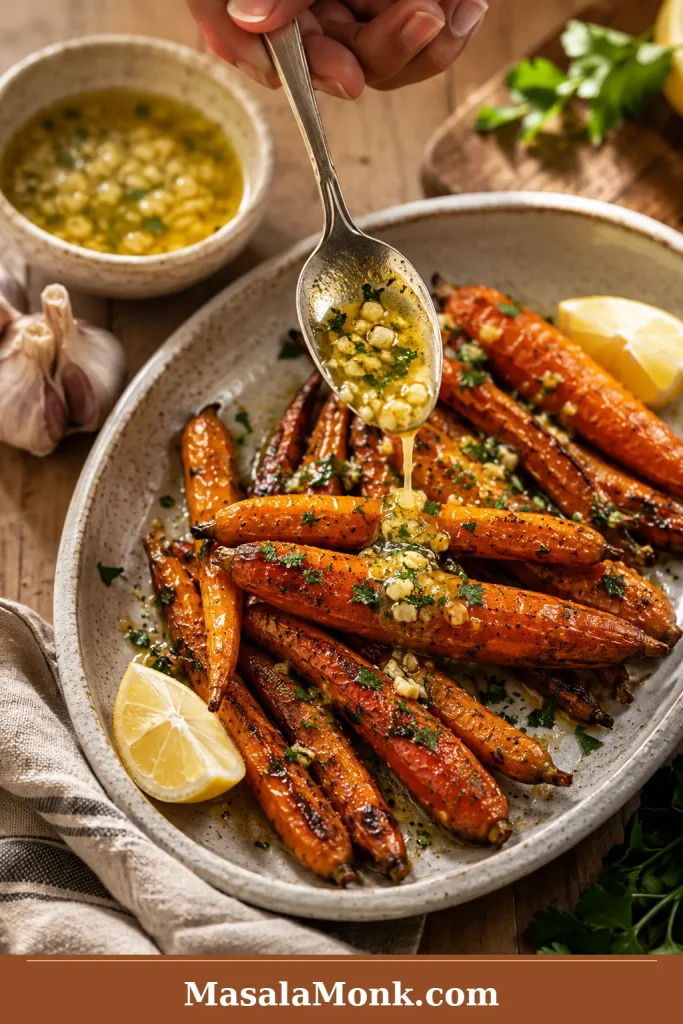
Garlic Butter Roasted Carrots
Garlic butter carrots should smell savory first, sweet second. Melt 2 to 3 tablespoons butter with 2 to 3 minced garlic cloves, warm just until fragrant, then toss with the roasted carrots at the end. Add parsley and lemon juice before serving. This version is especially good with cozy mains such as cream of mushroom chicken.
Honey Garlic Butter Carrots
For honey garlic butter carrots, warm 3 tablespoons / 42 g butter with 3 minced garlic cloves just until fragrant, then take it off the heat and stir in 1½ to 2 tablespoons honey. Brush a little over the carrots during the final few minutes, then toss with the rest after roasting for a glossy finish.
Honey Balsamic Roasted Carrots
For a tangy-sweet version, use 1 tablespoon honey and 1 tablespoon balsamic vinegar near the end of roasting. Balsamic gives the carrots depth and keeps the glaze from tasting only sweet.
Sweet Spiced Roasted Carrots
For a less-sweet version, season the carrots with olive oil, salt, pepper, ½ teaspoon cumin, ½ teaspoon coriander, and a small pinch of chili powder. Roast as usual, then finish with honey, lemon juice, and fresh herbs.
Simple glaze timing: oil, salt, pepper, and garlic powder can go in before roasting. Honey, maple, brown sugar, lemon, vinegar, fresh herbs, yogurt, tahini, and delicate toppings are usually better near the end or after roasting.
Baby, Mini, Whole and Rainbow Carrots
Baby-cut carrots
Baby carrots and packaged baby-cut carrots roast well, but they need to be dry. Bagged baby carrots often hold surface moisture, which makes them steam instead of brown. Pat dry, toss with oil and seasoning, then roast at 425°F / 220°C for 18 to 25 minutes.

Mini carrots
Mini carrots roast like baby carrots, but timing depends on thickness. Slim mini carrots may finish around 15 to 18 minutes; thicker ones may need 22 to 25 minutes.
Whole carrots
Whole roasted carrots look beautiful on a platter. Use slim carrots when possible, or halve thick carrots lengthwise so the centers soften before the outside overcooks. Whole slim carrots usually take 25 to 35 minutes at 425°F / 220°C.
Rainbow carrots
Rainbow carrots roast almost the same way as orange carrots. Cut them to similar thickness and finish simply: maple, lemon, herbs, feta, tahini, toasted nuts, or pomegranate is enough to make the plate feel special.

How to Make Roasted Carrots for Holidays
For Thanksgiving, Christmas, Easter, or Sunday roasts, choose whole slim carrots or rainbow carrots if you want a platter that looks finished. They bring color, shine, and sweetness between creamy, buttery, rich dishes.
The holiday formula is simple: pretty carrots + light maple or honey glaze + herbs + one finishing touch. Try thyme and flaky salt, parsley and lemon, feta and pomegranate, or tahini and toasted nuts. The best tray should look glossy at the edges, smell sweet-savory, and still taste balanced beside all the creamy sides.
Holiday Roasted Carrots Platter
For a party table, the garnish should support the carrots instead of covering them. Choose one colorful finish, then keep the platter easy to serve.
For a classic holiday spread, pair these carrots with one creamy side and one green vegetable. Green bean casserole gives the table that familiar savory-creamy contrast, while garlic mashed potatoes make the plate feel fuller without competing with the carrots.
Holiday shortcut: peel and cut the carrots 1 to 2 days ahead, mix the glaze separately, and roast the carrots fresh. If oven space is tight, slightly under-roast earlier in the day, then reheat and finish with herbs or garnish before serving.
Best Seasonings for Roasted Carrots
Think of seasoning as the mood of the tray. Choose one direction and keep the finish focused.
- Classic: olive oil, salt, pepper, parsley.
- Honey garlic: honey, butter, garlic, lemon.
- Maple holiday: maple syrup, butter, thyme, chili flakes.
- Brown sugar: brown sugar, butter, pepper, flaky salt.
- Honey balsamic: honey, balsamic vinegar, thyme.
- Herby: rosemary, thyme, dill, parsley.
- Warm spice: cumin, coriander, paprika, cinnamon.
- Creamy finish: yogurt, tahini, feta, or miso-maple drizzle after roasting.
Roasting Carrots With Other Vegetables
Carrots roast well with other vegetables, but timing matters. Potatoes, sweet potatoes, parsnips, cauliflower, and Brussels sprouts can share the pan if everything is cut thoughtfully and kept in one layer. Broccoli and asparagus cook faster, so add them later. Roast beets separately if you do not want color bleeding.
Potatoes need the most planning. Cut them smaller than the carrots or start them first. If you want a separate potato side, this ranch roasted potatoes recipe is a better second tray.
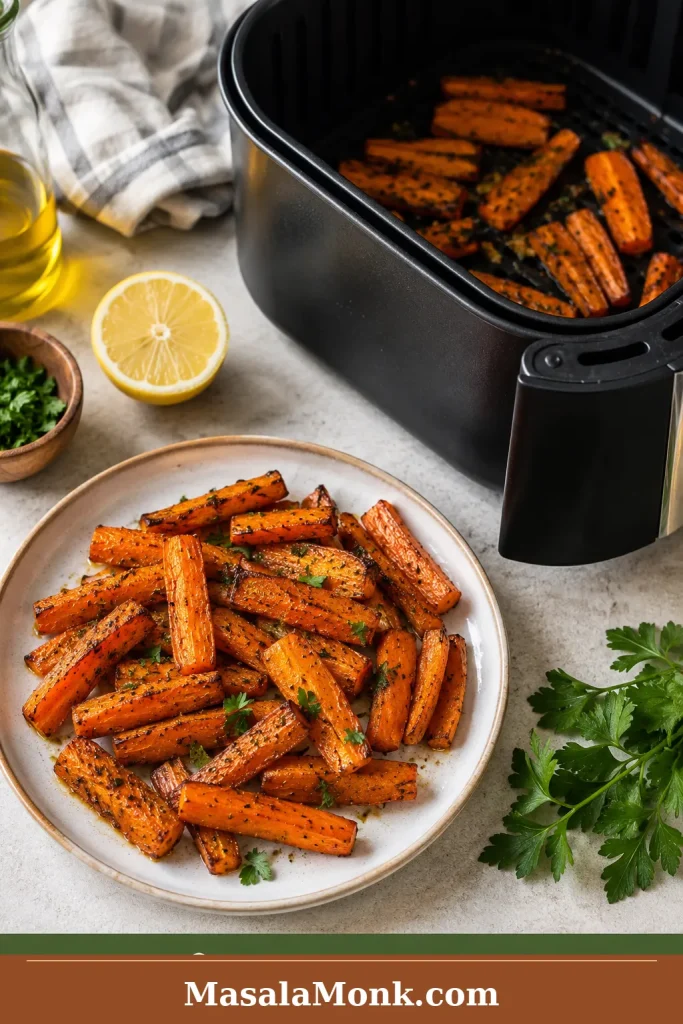
Air Fryer Roasted Carrots
The oven gives the best full-tray roasted carrots. Use the air fryer for small batches when the oven is full.
Cook carrots at 380°F to 400°F / 193°C to 204°C, shaking halfway. Thin pieces may take 10 to 12 minutes; thicker pieces may need 15 to 20 minutes. The air fryer is less forgiving with sticky glazes, so add honey or maple lightly, or toss with extra glaze after cooking. These carrots can go beside air fryer boneless pork chops when the oven is busy.
If the first tray does not come out exactly right, the problem is usually easy to spot from the way the carrots look.
Troubleshooting Roasted Carrots
Roasted Carrots Troubleshooting Guide
Use the visual cues first, then check the table below for the likely cause. Most tray problems come back to moisture, spacing, cut size, time, or glaze timing.
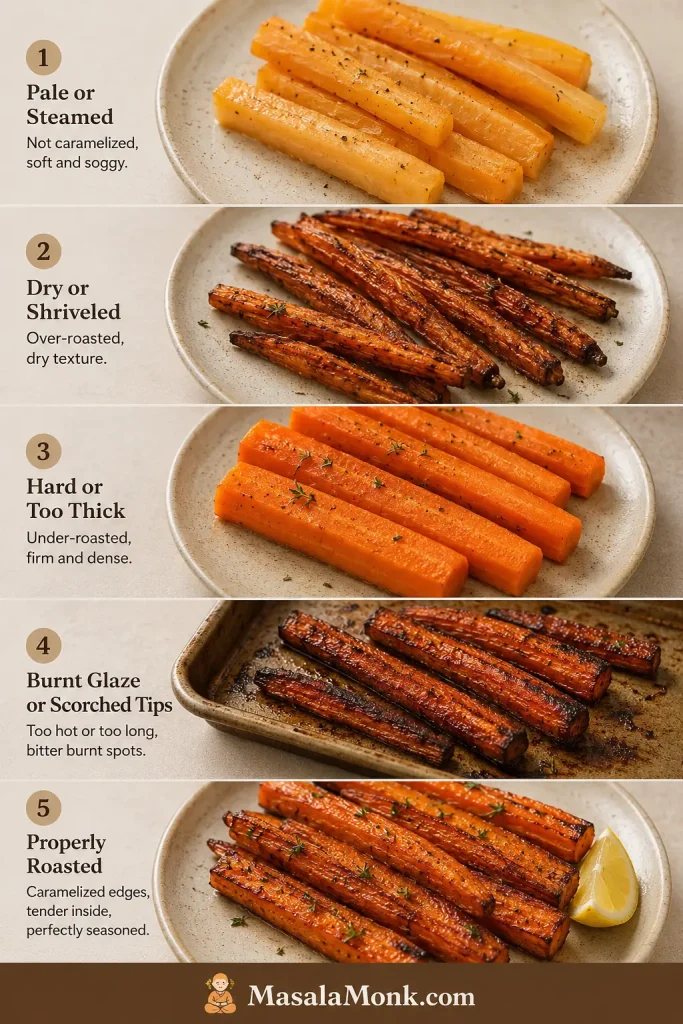
If your carrots come out dry, pale, mushy, hard in the center, or burnt at the tips, the fix is usually small. Use this table for the next tray.
Common Roasted Carrot Problems and Fixes
| Problem | Likely Cause | Fix |
|---|---|---|
| Dry or shriveled carrots | Pieces too thin, roasted too long, or carrots naturally dry | Cut thicker pieces, coat evenly with oil, avoid over-roasting, or parboil large/dry carrots first. |
| Mushy carrots | Overcooked, cut too small, or crowded | Cut larger pieces, use one layer, and check earlier. |
| Hard carrots | Pieces too thick, oven too low, or not enough time | Keep roasting until a fork slides in with light resistance; parboil very large carrots next time. |
| Pale carrots | Oven too low, pan crowded, or carrots wet | Use 425°F, dry the carrots, and give them space. |
| Honey burned | Honey added too early or too much used | Add honey near the end or after roasting. |
| Maple glaze got sticky and dark | Too much syrup or too much heat for too long | Use less maple, toss more often, or roast heavy glazes at 400°F. |
| Garlic burned | Fresh garlic added from the beginning | Add fresh garlic halfway, warm it in butter, or use garlic powder. |
| Uneven carrots | Pieces different thicknesses | Halve or quarter thick carrot tops lengthwise. |
| Baby carrots watery | Wet from the bag or crowded | Pat dry, use a hot pan, and roast in one layer. |
| Glaze too sweet | Too much honey, maple, or brown sugar | Add lemon, vinegar, chili, herbs, black pepper, or flaky salt. |
Fixed the issue? Return to the recipe card, choose a glaze finish, or go back to the top.
Should you parboil carrots before roasting?
Most weeknight trays do not need parboiling. A hot oven, even cuts, enough oil, and a single layer are enough.
Parboiling helps when carrots are large, dry, or leathery. Simmer in salted water until just crisp-tender, drain well, let the surface steam dry, then roast until browned. The center softens first, so the oven can focus on caramelized edges.
Make Ahead, Storage and Reheating
Roasted carrots taste best fresh, but the prep is easy to do ahead. Peel and cut the carrots 1 to 2 days in advance and store them in an airtight container in the fridge. If you store cut carrots in water, drain and dry them very well before roasting.
Store leftover roasted carrots in an airtight container in the refrigerator for 3 to 4 days, in line with general USDA leftovers and food safety guidance. Let the carrots cool before covering so steam does not collect inside the container and soften them further.
How to Store Leftover Roasted Carrots
Store the carrots so they stay useful, not soggy. A shallow airtight container helps them cool evenly and makes leftovers easier to add to quick meals.
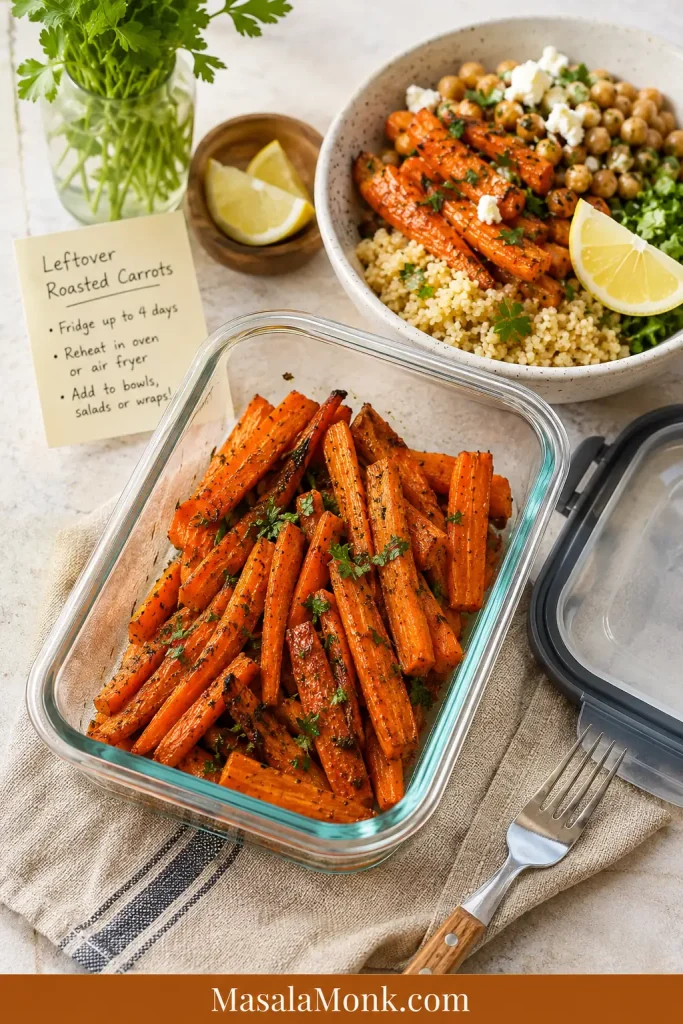
Reheat in a 375°F / 190°C oven until warm, or use an air fryer for small portions. The microwave works, but it softens the edges. Leftover roasted carrots are good warm as a side, chopped into grain bowls, folded through couscous, tossed into salads with something tangy, or blended into a quick soup.
You can freeze roasted carrots, but they soften after thawing. Freeze them only if you plan to use them in soups, purees, sauces, or mash.
Making another tray? Back to the recipe card, check troubleshooting, or back to top.
What to Serve With Roasted Carrots
Roasted carrots bring sweetness, color, and warmth without demanding much attention from the cook. Match the finish to the rest of the plate.
- Honey or maple glazed carrots: pair them with salty, smoky, or savory mains like ham, roast chicken, turkey, pork, or beef.
- Creamy mains: finish the carrots with lemon, herbs, black pepper, or something crisp like cucumber salad.
- Cozy dinners: garlic butter carrots work well beside whole chicken in the crock pot, beef roast, or pork tenderloin in the oven.
- Fish or salmon: keep the carrots lighter with olive oil, lemon, dill, parsley, or a small honey-balsamic finish. They would work well beside this sockeye salmon recipe.
- Vegetarian plates: use cumin, chili, lemon, tahini, yogurt, chickpeas, lentils, rice bowls, couscous, or quinoa.
- Holiday plates: pair the carrots with one creamy side, one green side, and a bright garnish so they do not disappear among rich dishes.
FAQ
These quick answers cover the timing, temperature, glaze, make-ahead, and texture questions that usually come up after the first tray.
What temperature is best for roasting carrots?
425°F / 220°C is the best default. Use a gentler 400°F / 200°C oven for large whole carrots or richer maple and brown sugar glazes.
How long do carrots take to roast at 425°F?
Most cut carrots take 20 to 30 minutes at 425°F / 220°C. Thin slices can finish in 15 to 20 minutes; whole or thick carrots may need 30 to 40 minutes.
Do convection or fan ovens work for roasted carrots?
Yes. Use the same temperature and start checking 3 to 5 minutes earlier. For thin or glazed carrots, 400°F / 200°C may be safer in a strong fan oven.
Should carrots be covered while roasting?
No. Leave them uncovered so steam can escape and the edges can brown. Covering the pan gives softer, less caramelized carrots.
Do you peel carrots before roasting?
Peeling is optional. Fresh, thin-skinned carrots can be scrubbed well. Older or rough-skinned carrots usually taste and look better peeled.
Do baby carrots roast well?
Yes. Pat baby carrots dry first because they are often wet from the bag. Roast them in one layer at 425°F / 220°C for 18 to 25 minutes.
Should honey or maple go on before or after roasting?
Add honey or maple during the final 5 to 10 minutes, or toss it with the carrots after roasting. The carrots should roast first and glaze second.
Can I make roasted carrots without honey or maple?
Yes. Use olive oil, salt, pepper, garlic powder, and herbs, then finish with lemon or vinegar. The carrots will still taste naturally sweet from roasting, just less glossy.
Why did my roasted carrots burn?
The carrots may have been cut too thin, the oven may have been too hot for the glaze, or honey, maple, brown sugar, or fresh garlic may have gone in too early.
Why are my roasted carrots dry?
Carrots can turn dry if they are cut too thin, roasted too long, or not coated with enough oil. Cut medium-thick pieces and pull them when they are just fork-tender with browned edges.
Why are my roasted carrots still hard?
They were probably cut too thick, roasted at too low a temperature, or pulled too early. Keep roasting until a fork slides in with light resistance; for very large carrots, parboil first or roast longer at 400°F / 200°C.
Do you boil carrots before roasting?
Most cut carrots do not need it. Parboil large, dry, or leathery carrots until just crisp-tender, dry them well, then roast for softer centers and less shriveling.
Can roasted carrots be made ahead for holidays?
Yes, but they taste best freshly roasted. For holidays, peel and cut them 1 to 2 days ahead, mix the glaze separately, then roast fresh or slightly under-roast and reheat before serving.
Do carrots and potatoes roast well together?
Yes, but potatoes often need smaller cuts or a head start. Keep everything in one layer so both vegetables brown instead of steam.
Are roasted carrots better with oil or butter?
Oil is better for the base recipe because it handles high heat well. Butter gives richer flavor, but it is best mixed with oil, used in a glaze, or added after roasting.
Final Tips for Better Roasted Carrots
Once the pieces are even, the pan is roomy, and the glaze goes on late, roasted carrots become one of the easiest sides to trust.
- Safest first tray: keep it simple with olive oil, salt, pepper, and garlic powder.
- Glossy family side: add honey near the end and finish with lemon or herbs.
- Holiday platter: use maple, butter, thyme, and one bright or pretty finish.
Once you have made the plain tray once, the rest becomes instinctive. Keep them plain and savory for a weeknight, glossy with honey for family dinner, maple-rich for holidays, or bright with cumin, chili, lemon, and herbs when the plate needs balance. The method stays simple; the finish does the work.