Posted on Leave a comment

Roasted Brussels Sprouts Recipe: Crispy, Caramelized & Easy

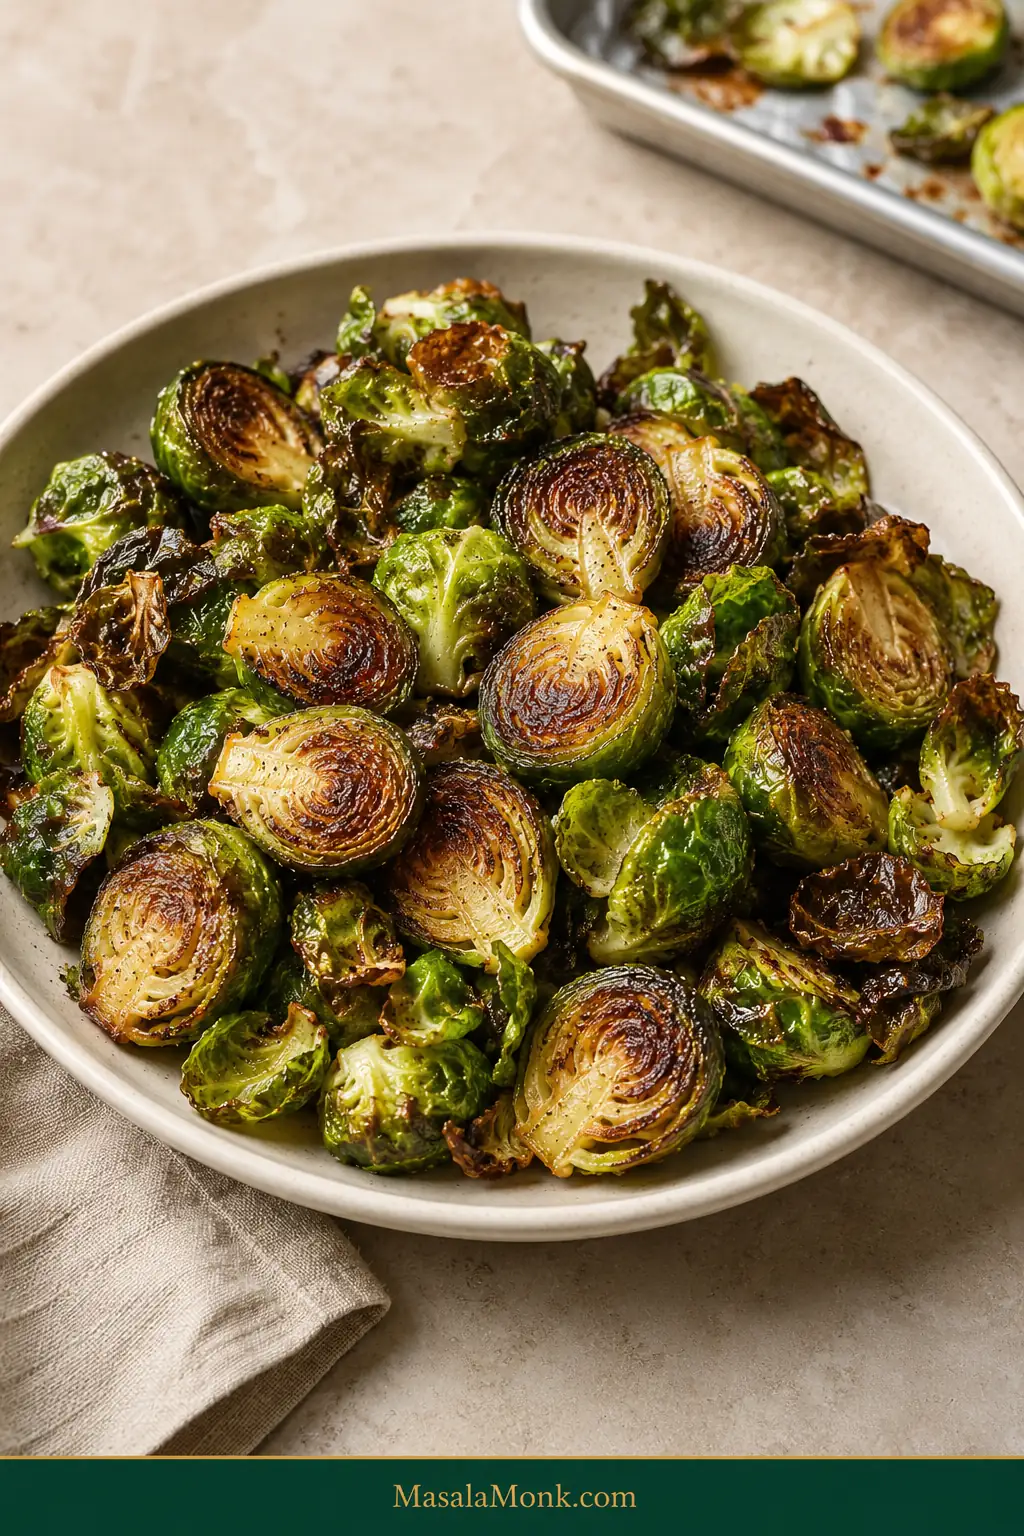
Cream bowl filled with roasted Brussels sprouts with mahogany-brown cut sides, crisp dark-green outer leaves and tender green centers.

Roasted Brussels sprouts are at their best when the flat sides turn mahogany-brown and caramelized, the outer leaves become crisp, and the centers stay tender without collapsing into mush.

If the Brussels sprouts you remember were pale, soft, and aggressively cabbage-like, the surprise is how different they taste once they get real color: nuttier, faintly sweet, and much harder to stop picking from the pan.

All you need is fresh Brussels sprouts, olive oil, salt, pepper, a roomy sheet pan, and a 425°F / 220°C oven. Here, “crispy” means crisp edges and deeply browned surfaces around a tender center—not a sprout that crunches dry all the way through like a chip.
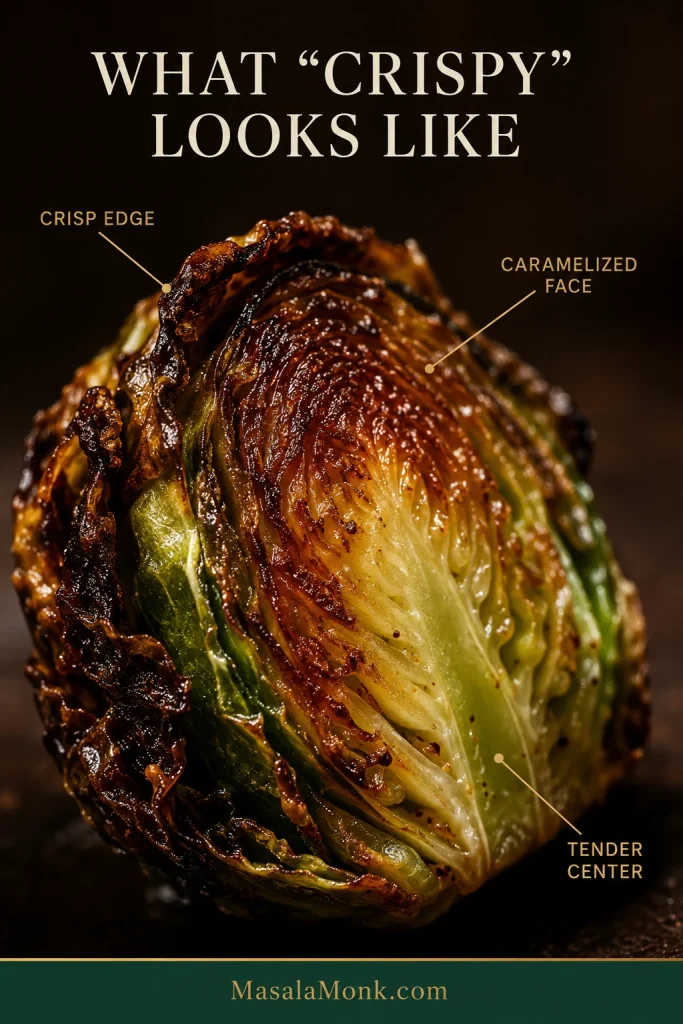
Close-up roasted Brussels sprout with labels pointing to a crisp curled edge, caramelized brown face and tender layered green center.
Crisp edges and a tender center can exist in the same bite; thin outer leaves lose moisture much faster than the dense middle.

Quick Answer: How to Roast Brussels Sprouts

  1. Heat: Set the oven to 425°F / 220°C.
  2. Rinse and dry: Rinse the whole sprouts under running water, then dry them very well.
  3. Cut: Halve average Brussels sprouts lengthwise and quarter unusually large ones.
  4. Season: For 1½ lb / 24 oz / 680 g sprouts, use 2 tbsp / 30 ml olive oil, ½ tsp fine sea salt / about 3 g, and ¼ tsp black pepper.
  5. Arrange: Spread them in one uncrowded layer with the cut sides facing down.
  6. Roast: Start checking at 17–18 minutes. Most average-size sprouts finish around 20–25 minutes. Stop when the undersides are richly browned and the centers have the texture you enjoy.

Let the clock tell you when to look. Let color and tenderness tell you when to stop.

Roasted Brussels Sprouts Recipe

Prep time: 10 minutes
Roast time: about 20–25 minutes
Total time: about 30–35 minutes
Yield: 4 generous side servings or about 6 smaller holiday portions
Oven: 425°F / 220°C

As written, the recipe is naturally vegan and gluten-free.

Equipment

  • Large rimmed half-sheet pan, about 13 × 18 in / 33 × 46 cm
  • Chef’s knife
  • Cutting board
  • Large mixing bowl
  • Clean kitchen towel or paper towels

If your baking sheet is much smaller, roast the sprouts in batches or divide them between two pans. Packing everything onto one sheet works against the browning we want.

Ingredients

  • 1½ lb / 24 oz / 680 g fresh Brussels sprouts
  • 2 tbsp / 30 ml extra-virgin olive oil
  • ½ tsp fine sea salt / about 3 g, plus more to taste
  • ¼ tsp freshly ground black pepper
  • Lemon wedges, optional

Method

Preheat and Prep the Brussels Sprouts

  1. Heat the oven to 425°F / 220°C. Set a rack around the middle of the oven.
  2. Rinse and dry the sprouts while they are still whole. Rinse them under running water—there’s no need to soak them—then dry them very well with a clean kitchen towel or paper towels.
  3. Trim and cut. Slice off only the dry end of each stem; leave enough attached to hold the leaves together. Remove yellow or badly damaged outer leaves. Halve average sprouts lengthwise through the stem and quarter unusually large ones the same way. Set aside any clean leaves that fall free; they cook much faster than the larger pieces, so roast them separately or add them only near the end when you can watch them closely.
  4. Season. Toss the cut sprouts with the olive oil, salt, and pepper until every piece has a light glossy coating. There should be no puddles of oil left in the bowl.

Arrange, Roast and Finish

  1. Give them room. Spread the sprouts in one layer with visible space around most pieces.
  2. Turn the cut sides down. Put the largest flat face of each halved or quartered sprout directly against the baking sheet.
  3. Roast without fussing with them. Begin looking at 17–18 minutes. Average-size sprouts usually finish around 20–25 minutes, although small sprouts, dark pans, and hot-running ovens can move faster.
  4. Check the food, not just the timer. They are ready when the undersides have developed deep color and a knife or fork enters the centers with the amount of resistance you prefer.
  5. Taste while hot. Add another pinch of salt if needed and finish with lemon or one of the flavor ideas later in the post.

Serve soon after roasting for the crispest edges.
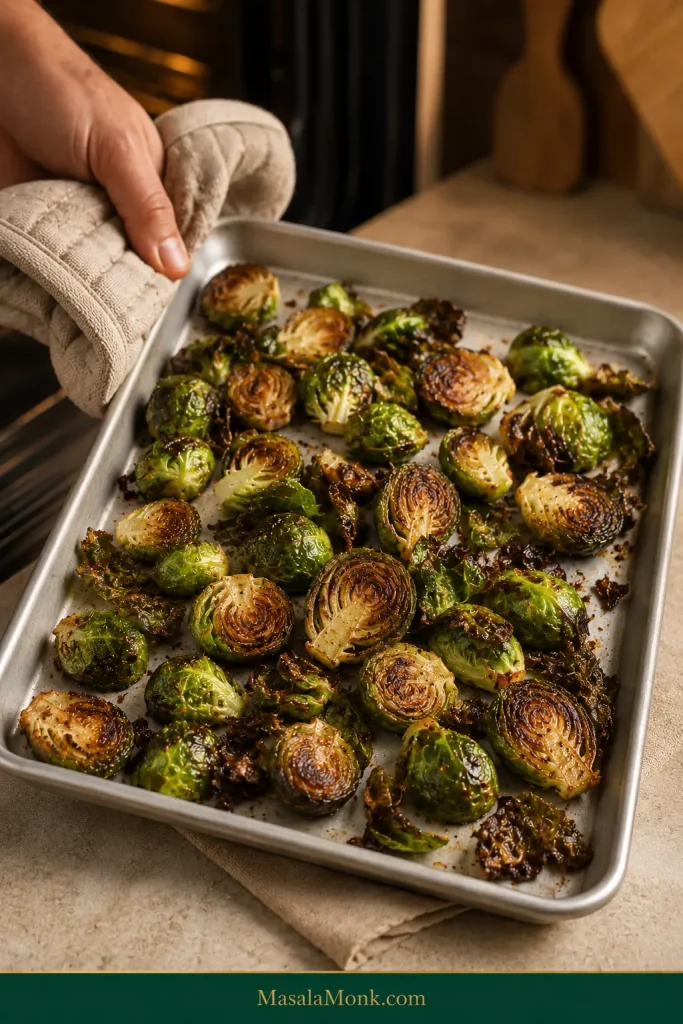
Sheet pan of freshly roasted Brussels sprouts with browned cut surfaces, green centers and several dark crisp loose leaves.
Judge the largest sprouts, not the loose leaves. Thin leaves can turn very dark before the larger halves are tender.

Cooking right now? The recipe above is enough.

In This Guide

MAKE THEM WELL

CONTROL THE RESULT

PLAN & SERVE

5 Rules for Crispy, Caramelized Brussels Sprouts

The recipe tells you what to do. These five ideas explain why it works.

1. Similar thickness helps everything cook at the same pace. Heat takes longer to reach the middle of a thick piece, which is why an oversized sprout can darken outside while staying hard inside.

2. Dry surfaces brown sooner. Water has to evaporate before strong browning can get underway. The FDA recommends rinsing fresh produce under running water. There’s no need to soak the sprouts; once rinsed, thorough drying is what matters for roasting.

3. Oil should form a light coating. Dry patches brown poorly, while puddled oil can leave the tray heavy and greasy.
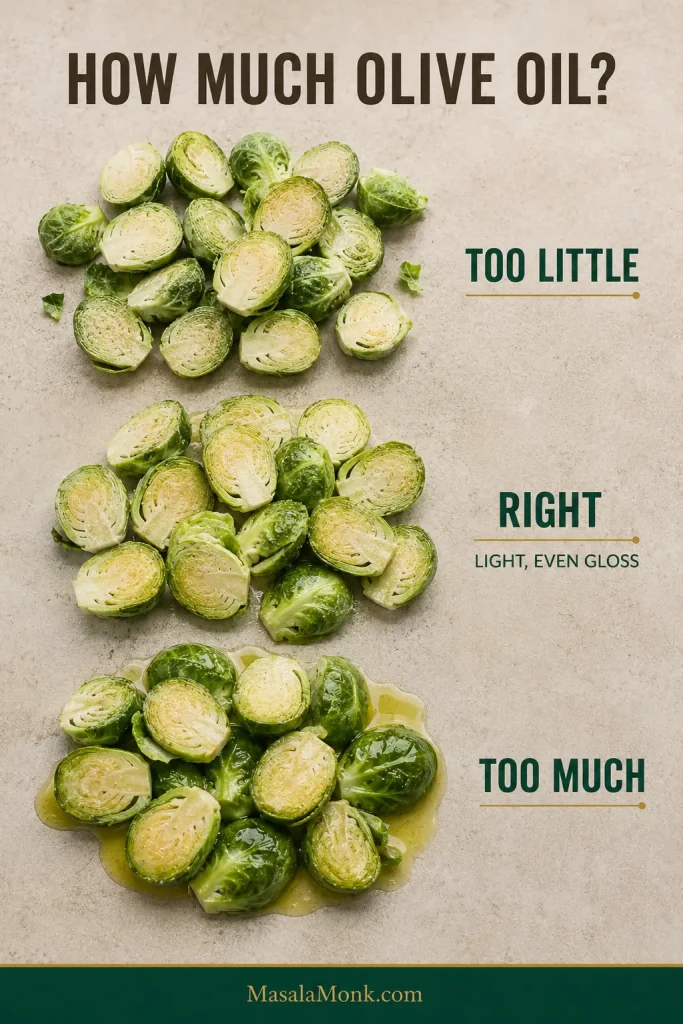
Three groups of cut raw Brussels sprouts showing too little oil, a thin even coating and excessive oil pooling underneath.
Aim for a thin, even gloss. Dry patches brown unevenly; excess oil pools and makes the tray feel heavy.

4. Crowding traps steam. Moisture escapes around well-spaced pieces. Crowd the pan and that moisture gets trapped around the sprouts.

Double the ingredients, not the pan density.

Doubling. Use two sheet pans rather than crowding one. If the pans roast on separate racks, swap their positions top-to-bottom and rotate them front-to-back partway through if your oven browns unevenly.

5. Flat contact builds the deepest color. The broad cut face gives each sprout a large surface to caramelize directly against the hot baking sheet.
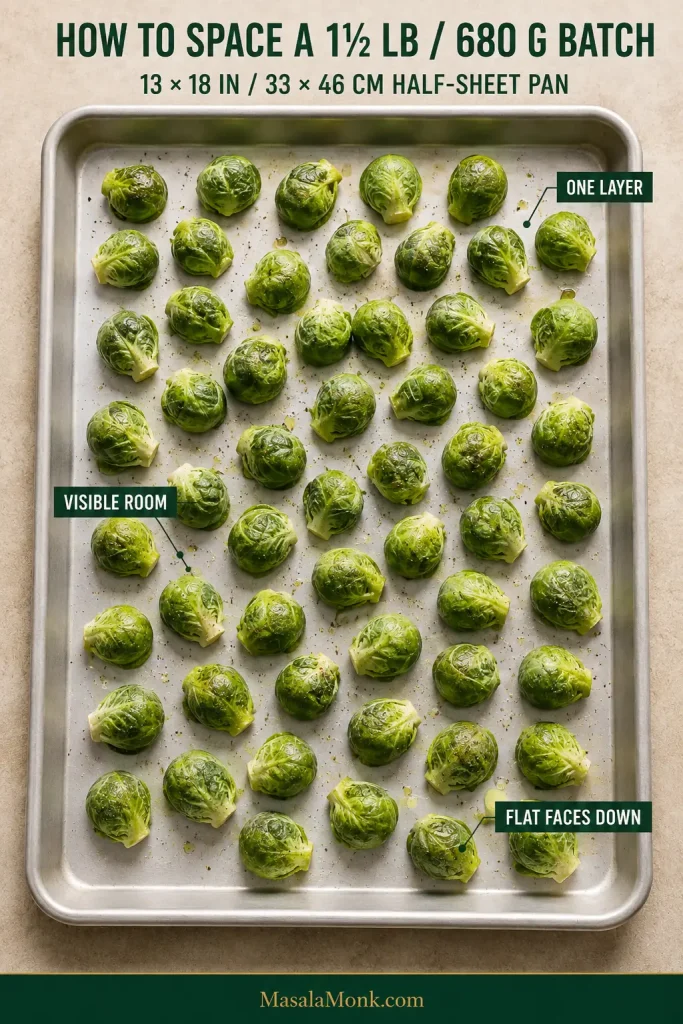
Overhead half-sheet pan with Brussels sprouts arranged in one uncrowded layer, leaving gaps between pieces and keeping flat cut sides against the metal.
Visible gaps let moisture escape, while flat cut sides maximize pan contact. Both matter for strong, even browning.

How to Choose and Cut Brussels Sprouts

When you have a choice, look for firm, fresh-looking Brussels sprouts with tight green leaves. A reasonably similar size range makes even roasting easier, although real bags rarely cooperate perfectly.

Halve average sprouts and quarter very large ones. Tiny sprouts can stay whole, though they give you less flat surface for caramelization. Aim for roughly similar cooking thickness even when the pieces are not identical.

Trim conservatively. Cutting away only the dry stem tip leaves enough of the base intact to keep the layers from falling apart as you halve or quarter them.
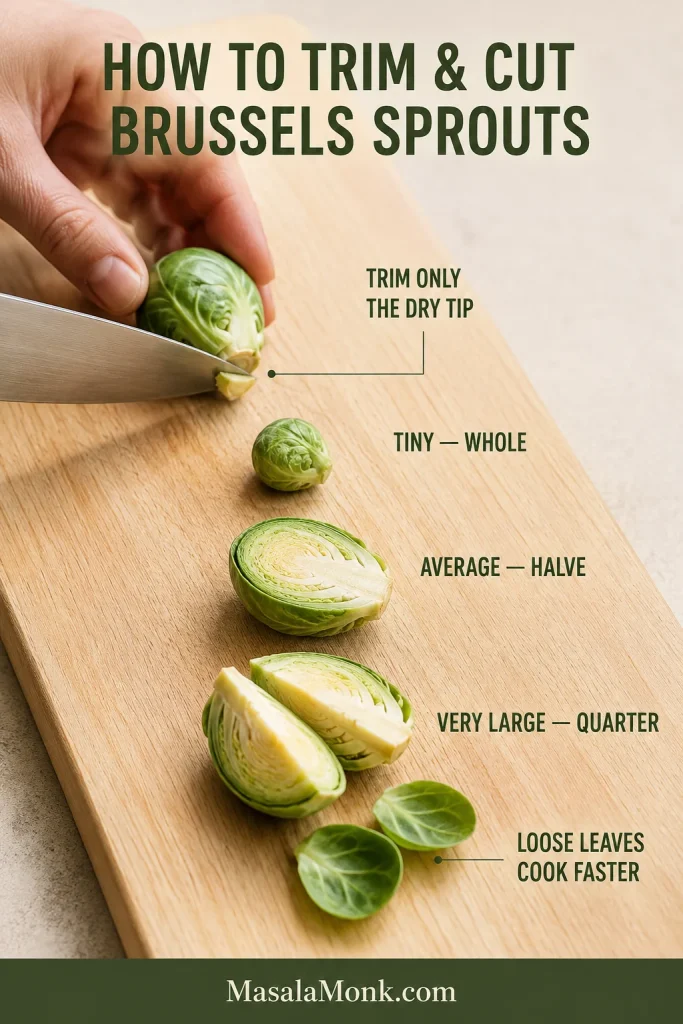
Cutting board showing a dry stem tip being trimmed, a small whole Brussels sprout, a medium sprout halved through the stem, a large sprout quartered and several loose leaves.
Quarter the biggest sprouts so their centers keep pace with smaller halves. Match cooking thickness, not perfect size.

How to Know When Brussels Sprouts Are Done

Once they’re roasting, the sprouts themselves tell you more than the timer does.

  • Look underneath. The cut face should be deep golden brown through mahogany, not pale green with a few tan spots.
  • Look at the edges. The exposed outer leaves should be crisp and brittle in places. A few very dark tips are fine when they taste roasted and nutty rather than acrid.
  • Test the middle. Slide in the tip of a small knife or fork. The sprout should be tender while still holding its shape.
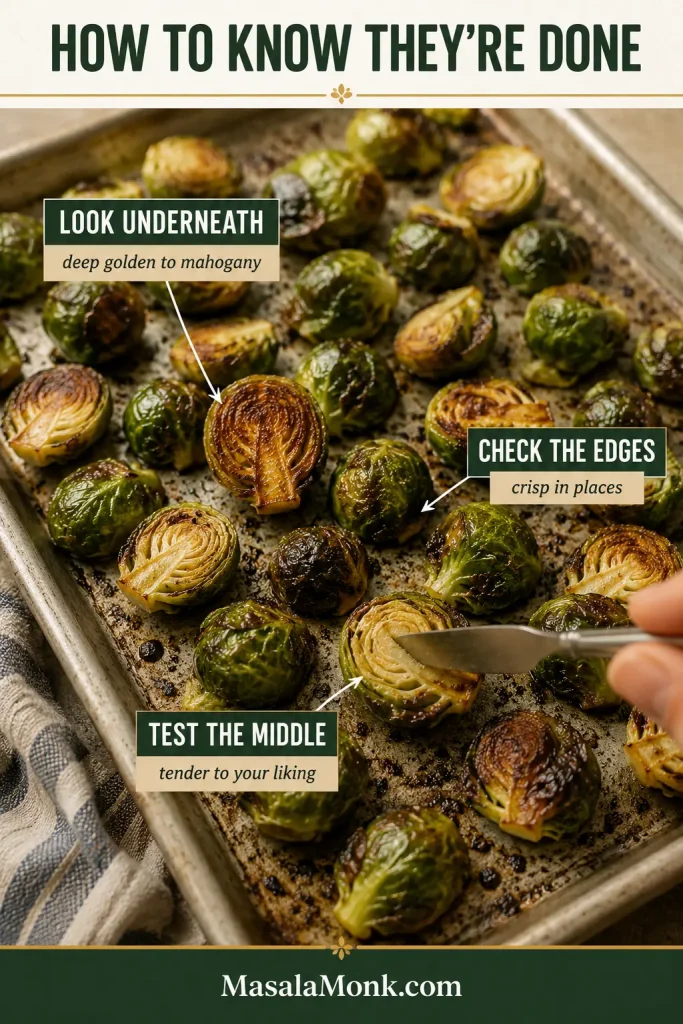
Roasted Brussels sprouts on a sheet pan with one piece turned over to show its browned underside and another being tested in the center with a utensil.
Test one of the largest pieces. If its underside is richly browned and its center is tender enough, the tray is ready.

Choose the Center You Like

Pull the tray once the outside is well browned but the middle still offers a little resistance if you enjoy a firmer bite. Leave the sprouts a little longer if you prefer the center soft and almost creamy.

There is no single perfect center here. The right stopping point is the one you actually enjoy eating.

Two opened roasted Brussels sprouts showing a tighter, greener firmer center beside a softer, more relaxed center.
Both can be properly roasted. Pull the tray earlier for more bite, or leave it longer for a softer, almost creamy center.

Deeply caramelized is not the same as burned. Properly browned sprouts smell nutty and sweet-savory. Burned ones taste acrid or charcoal-bitter and may be dry through the middle. If they already taste good, there is no prize for chasing one more shade of brown.
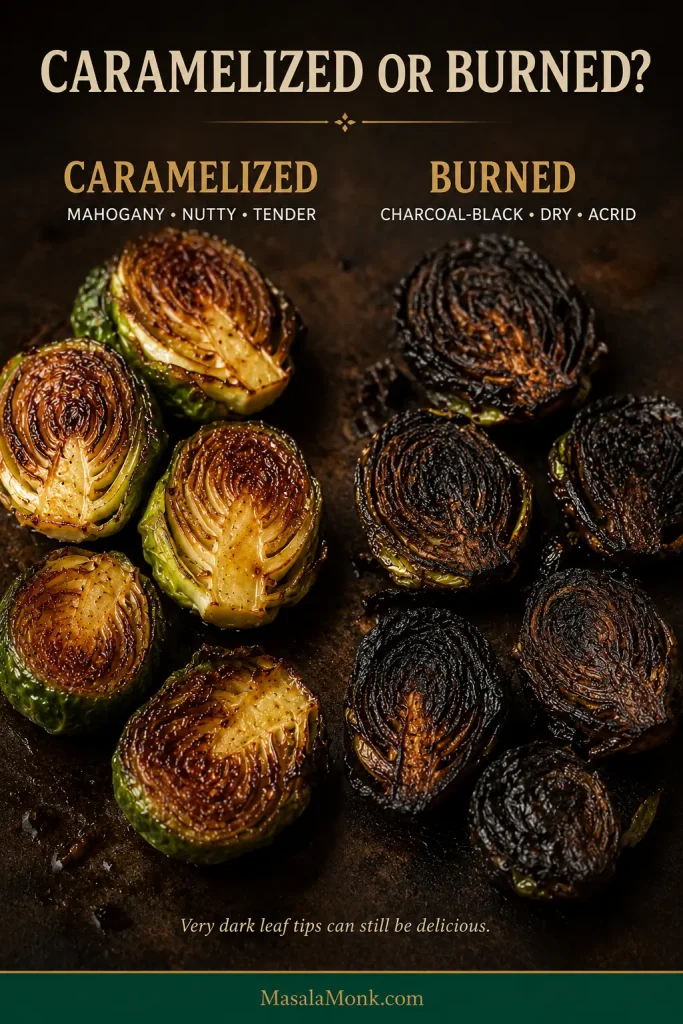
Brussels sprout halves comparing deep mahogany caramelization with dry, charcoal-black burned surfaces.
Judge the broad cut face more than one black leaf tip. Mahogany is caramelized; dry, charcoal-black flesh has gone too far.

A good tray has contrast: brittle little edges, a burnished underside, and a center that gives when you bite into it.
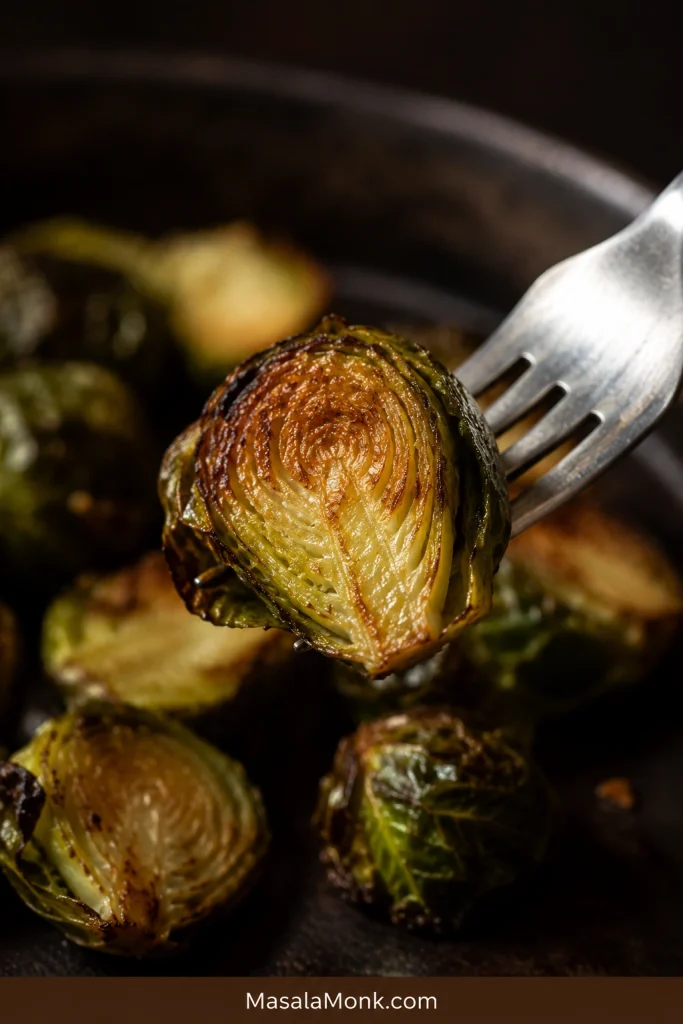
Fork holding a roasted Brussels sprout half with a deeply caramelized exterior, curled crisp leaf and tender green center.
Serve promptly for the strongest contrast between brittle edges and the softer interior; crispness fades as moisture redistributes after roasting.

The same doneness cues work at every oven temperature. What changes is how quickly the exterior develops color relative to how quickly the middle softens.

Best Temperature for Roasting Brussels Sprouts

Lower heat gives the centers more time to soften before deep color develops; hotter roasting builds that color faster. 425°F / 220°C gives a particularly useful balance for this method.

Another dish sometimes gets to decide the oven temperature, especially during a holiday meal. The sprouts can still work; their appearance and tenderness simply become even more important than the clock.

OvenCompared With 425°FWhat to Expect
350°F / 175°CSubstantially slowerCenters soften well before deep color develops
375°F / 190°CSlowerGentler, more gradual browning
400°F / 205°CSomewhat slowerA reliable middle ground
425°F / 220°CDefault methodStart checking at 17–18 minutes; often ready around 20–25 minutes
450°F / 230°CFasterRapid, darker browning with less margin before thin edges scorch

These are relative guides, not alternate exact timers. Sprout size, baking-sheet material, oven behavior, and the tenderness you prefer all move the endpoint.
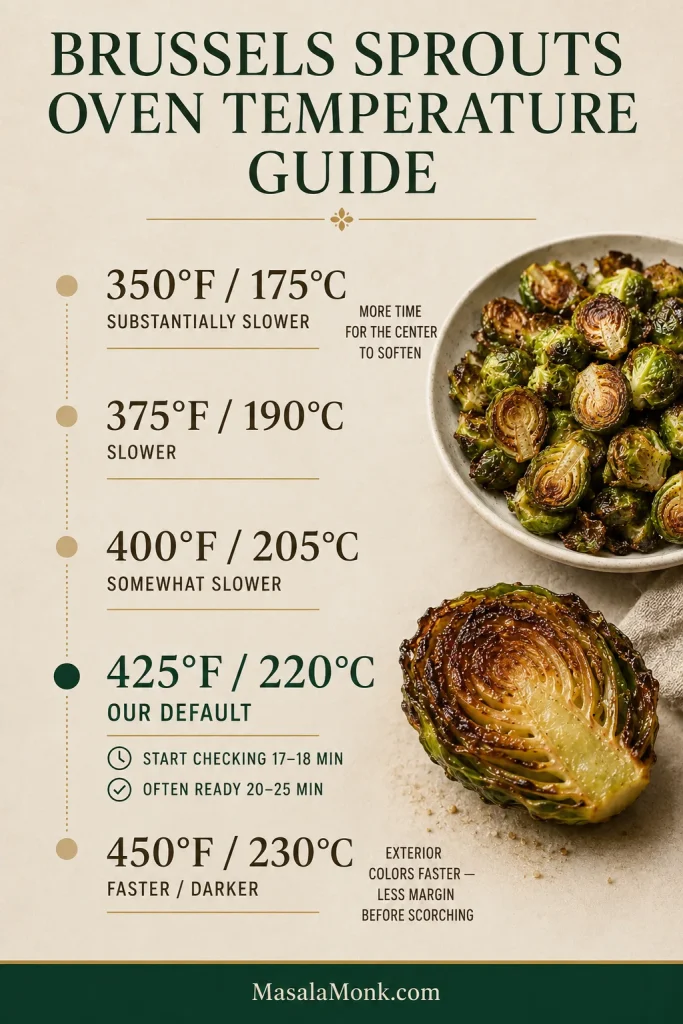
Temperature guide for roasting Brussels sprouts from 350°F to 450°F, highlighting 425°F as the default with a first check at 17–18 minutes.
Think of temperature as a trade-off: lower heat favors gradual softening, while higher heat builds exterior color faster. 425°F balances both.

Using a toaster oven? Keep it at 425°F / 220°C on the bake setting, use a small enough batch to leave real space between the pieces, and start watching around 15 minutes. Depending on sprout size and the appliance, a small batch may take roughly 15–25 minutes.

When Another Dish Sets the Oven Temperature

If scalloped potatoes already have the oven at 375°F / 190°C, leave it there and let the sprouts take longer rather than forcing a separate oven schedule for one side dish.

Small Roasting Choices That Change the Result

You don’t need to flip the sprouts. Leaving the flat sides against the baking sheet gives them uninterrupted contact and deeper caramelization. For a firmer center, pulling the tray sooner is the simpler adjustment.
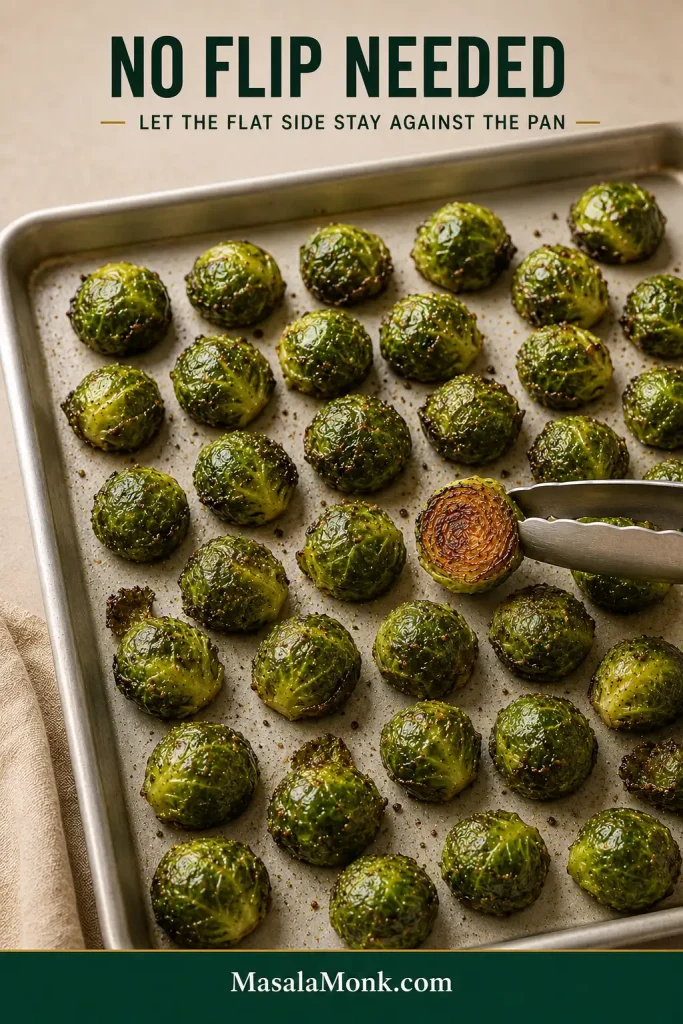
Roasted Brussels sprouts resting rounded-side up on a sheet pan while one piece is turned to reveal its dark caramelized underside.
Near the end, lift one representative sprout. A deeply caramelized pan-contact face means the rest can stay undisturbed.

A bare, light-colored aluminum sheet pan gives strong, predictable contact browning. Parchment is perfectly workable when easier cleanup matters, though the underside may color a little more gently. Dark pans tend to brown the bottoms faster.
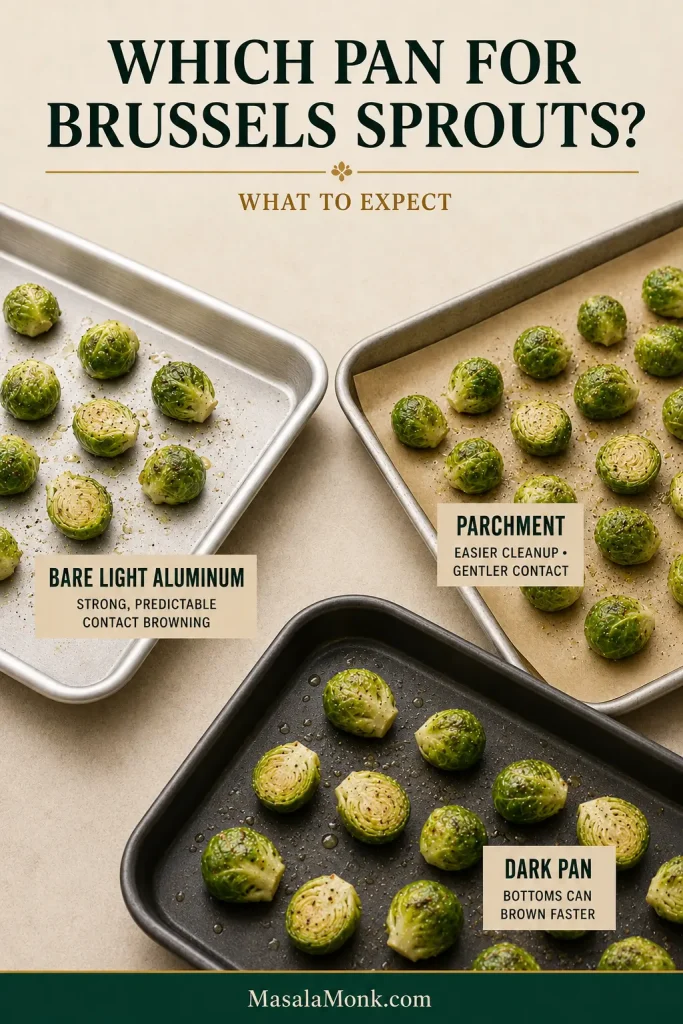
Brussels sprouts shown on three roasting surfaces: bare light aluminum, parchment paper and a clean dark metal baking pan.
If bottoms darken before centers soften, parchment or a lighter pan can give you more margin without changing the whole method.

Starting with a room-temperature sheet pan is enough for this method. Preheating can give the bottoms a head start. Blanching or steaming first can give the centers a head start before high-heat browning, which is why some restaurant-style methods use it. You don’t need that extra step for this straightforward roasted version.

Should You Marinate Brussels Sprouts Before Roasting?

For the crispest result, skip a wet marinade. Extra liquid delays browning, while sugary marinades can darken before the centers are tender. Roast with oil and dry seasonings, then add balsamic, citrus, honey, maple, or another wet finish afterward. For exact starting amounts, jump to the measured flavor finishes. If you do marinate them, drain off the excess before roasting.

Already tender but still too pale? A brief turn under the broiler can add the missing color. Stay nearby—the thin outer edges can move from beautifully browned to genuinely burned very quickly.

Brussels Sprouts Troubleshooting

Brussels sprouts that refuse to crisp are usually too wet, too crowded, not making enough contact with the baking sheet, or not getting enough heat. The appearance of the tray usually tells you which problem you have.

Pale Brussels sprouts on a sheet pan with callouts for excess moisture, overcrowding, poor pan contact and insufficient heat.
A crowded tray can stay pale long after the centers soften. Spread the sprouts out before simply adding more time.

The Most Common Problems

  • Pale and soft — Spread the pieces out and keep roasting if they still have some structure. A wet or crowded tray needs more time before strong browning begins. A larger sheet and drier sprouts will help on the next batch.
  • Tender but still pale — They have cooked through without developing enough contact color. A brief broil can rescue this batch; keeping the flat faces in direct contact with the baking sheet helps the next one.
  • Dark outside but hard in the middle — Remove any finished pieces and return the hard ones to the oven. Very large sprouts are the usual culprit, so cut those outliers smaller next time.
  • Too soft — They have simply passed the center texture you prefer. They may still taste excellent; on the next tray, trust the center earlier.
  • Greasy instead of crisp — Lift the sprouts from the excess oil with tongs or a slotted spatula. On another batch, stop adding oil once the surfaces are lightly glossy rather than wet.
  • Outer leaves scorched before the centers were ready — Remove anything that tastes acrid. A hot-running oven, dark pan, or especially small pieces can all make the outside brown too fast, so check those first on the next tray.
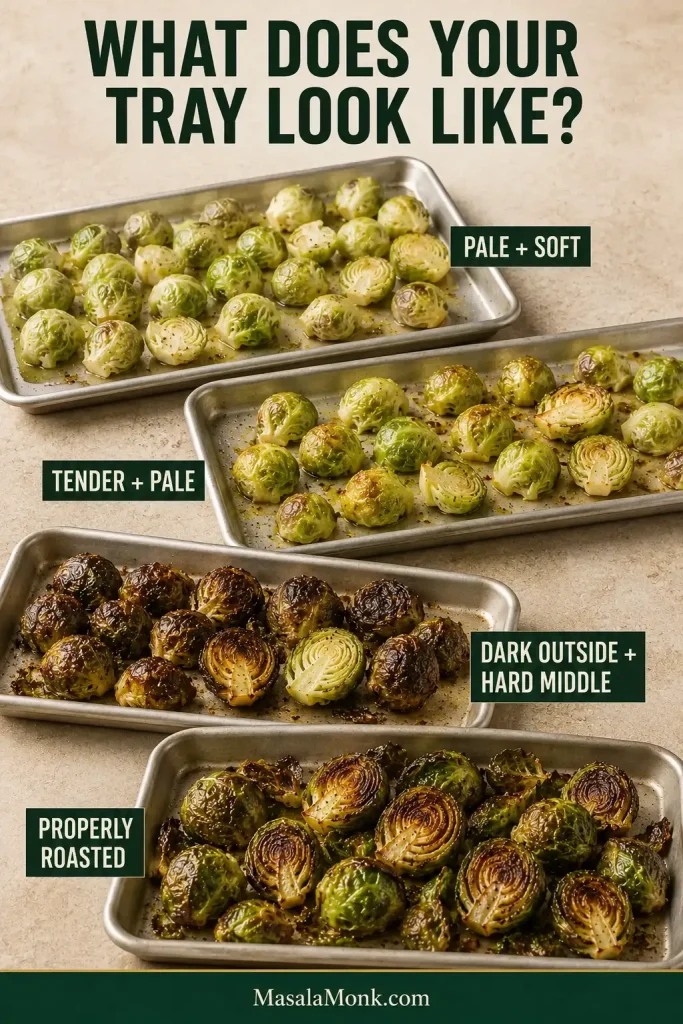
Four Brussels sprout outcomes labeled pale and soft, tender and pale, dark outside with a hard middle, and properly roasted.
Match the fix to the result: tender-but-pale needs more browning; dark outside with a firm center usually means pieces were too thick.

A Few Less Common Problems

  • Strong cabbage or sulfur smell — The sprouts have spent too long cooking gently in a moist environment. Spread them out and continue uncovered if they still need cooking; once tender, serve promptly and brighten them with lemon.
  • Bitter but not burned — Check the salt first, then try lemon, Parmesan, balsamic, or a restrained sweet finish. A little more caramelization can also take the edge off that bitterness.
  • Acrid or charcoal-bitter — That is actual burning. Discard the worst pieces and pull the next tray sooner. If the bottoms are scorching much faster than the rest of the sprouts, use parchment or switch to a lighter-colored baking sheet.
  • A double batch came out soft — Too many sprouts probably shared one baking sheet. Move half the batch to a second sheet pan if dinner can wait a few more minutes; use two pans from the beginning next time.

When food in your oven consistently finishes much earlier or later than recipes suggest, a simple oven thermometer can tell you whether the temperature inside matches the number on the dial.

Restaurant-Crispy vs Straight Oven Roasting

A home-roasted tray can be beautifully browned and still not crunch like a restaurant appetizer. Some restaurant versions are blanched, fried, cooked twice, or finished with considerably more fat and aggressive heat.

That does not make the oven version a failure. Once the centers taste good, stop roasting rather than sacrificing them in pursuit of a texture this simple method was never meant to produce.

Comparison of straight oven-roasted Brussels sprouts with tender centers beside extra-crisp restaurant-style sprouts with rougher, crunchier exteriors.
Restaurant-level crunch often comes from an extra cooking stage. More oven time alone can dry the centers before matching that texture.

Choose Your Finish

Once the sprouts are roasted, this is where the tray gets personal. Olive oil, salt, and pepper are enough on their own, but a small finish can take the same batch in a brighter, cheesier, sweeter, tangier, or spicier direction.

Not sure where to start? Use lemon and Parmesan. Lemon wakes up the deep roasted flavor, while Parmesan adds salt and nuttiness without covering the sprouts in sauce.
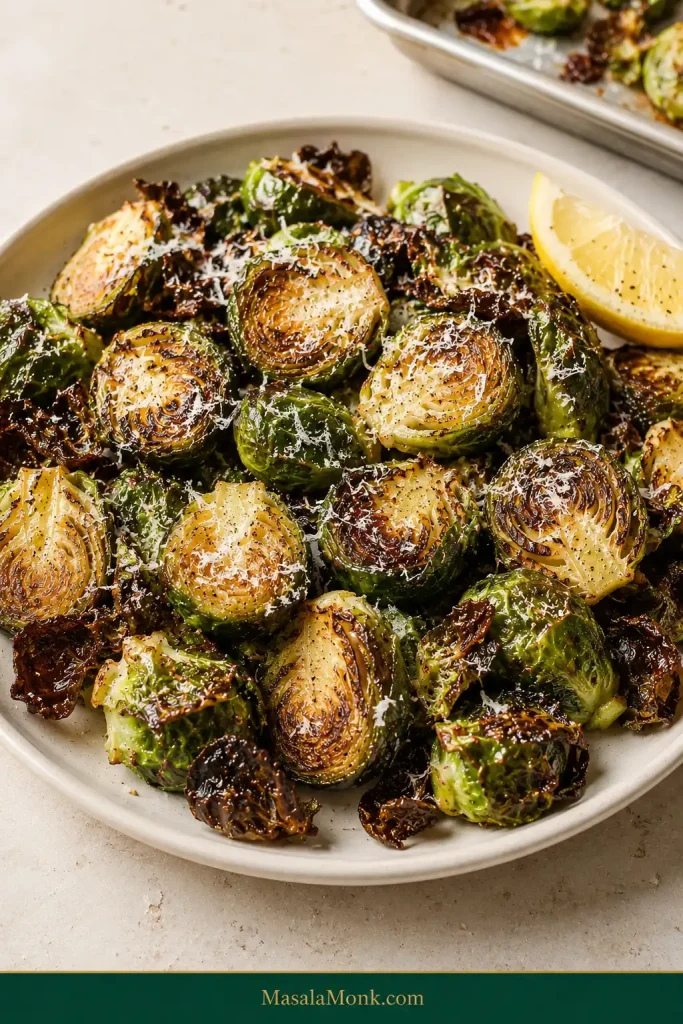
Plate of roasted Brussels sprouts lightly coated with finely grated Parmesan and served with fresh lemon.
Add Parmesan while the sprouts are hot so it clings, then finish with lemon to keep the acidity bright and the edges crisp.

Measured Flavor Finishes

These are conservative starting amounts for the 1½ lb / 680 g batch. Once you know your favorite finish, adjust freely.

FinishStarting AmountWhen to Add
Lemon1 tbsp / 15 ml fresh lemon juiceAfter roasting; add more to taste
Parmesan¼ cup / about 20 g finely grated ParmesanToss with the sprouts while hot; taste before adding more salt
Garlic powder½ tsp / about 1.5 gAdd with the salt and pepper before roasting
Balsamic vinegar1 tbsp / 15 mlDrizzle over the finished sprouts
Honey or maple syrup1 tbsp / 15 mlAdd after roasting and toss
Red-pepper flakes¼ tsp / about 0.5 gAdd before roasting

With balsamic, honey, or maple, think finish, not bath. You want enough to complement the caramelized surfaces without soaking the crisp edges.
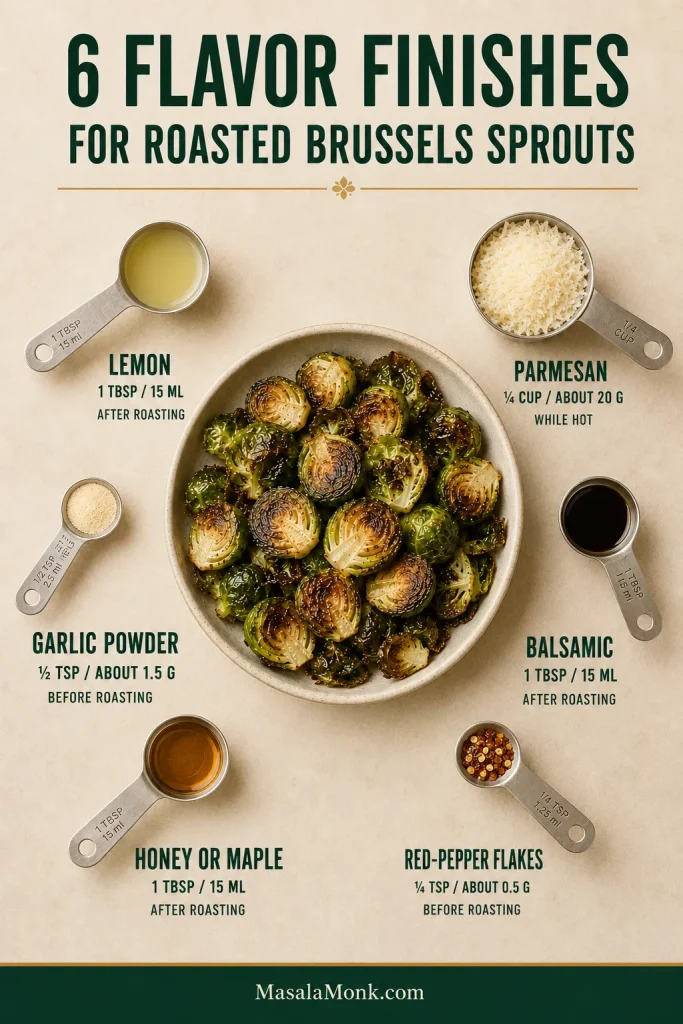
Roasted Brussels sprouts surrounded by measured lemon juice, Parmesan, garlic powder, balsamic vinegar, honey or maple syrup, and red-pepper flakes with amounts and timing.
Dry seasonings can roast with the sprouts; wet finishes are easier to control afterward. Start lightly and add more if needed.

For another vegetable that takes honey, maple, and garlic especially well, try roasted carrots. For sweet heat, use a light drizzle of hot honey sauce instead of plain honey.

What to Serve With Roasted Brussels Sprouts

Their deep roasted flavor and nutty caramelized edges make Brussels sprouts easy to pair with both simple proteins and richer mains.

For a weeknight dinner, serve them beside baked chicken breast or honey garlic salmon. Lemon or Parmesan is especially good when the main dish already brings a sweeter glaze.

On a holiday table, roasted Brussels sprouts also fit naturally beside ham, turkey, stuffing, scalloped potatoes, or mashed potatoes. When the rest of the plate is rich, a bright lemon or restrained balsamic finish keeps the sprouts lively.
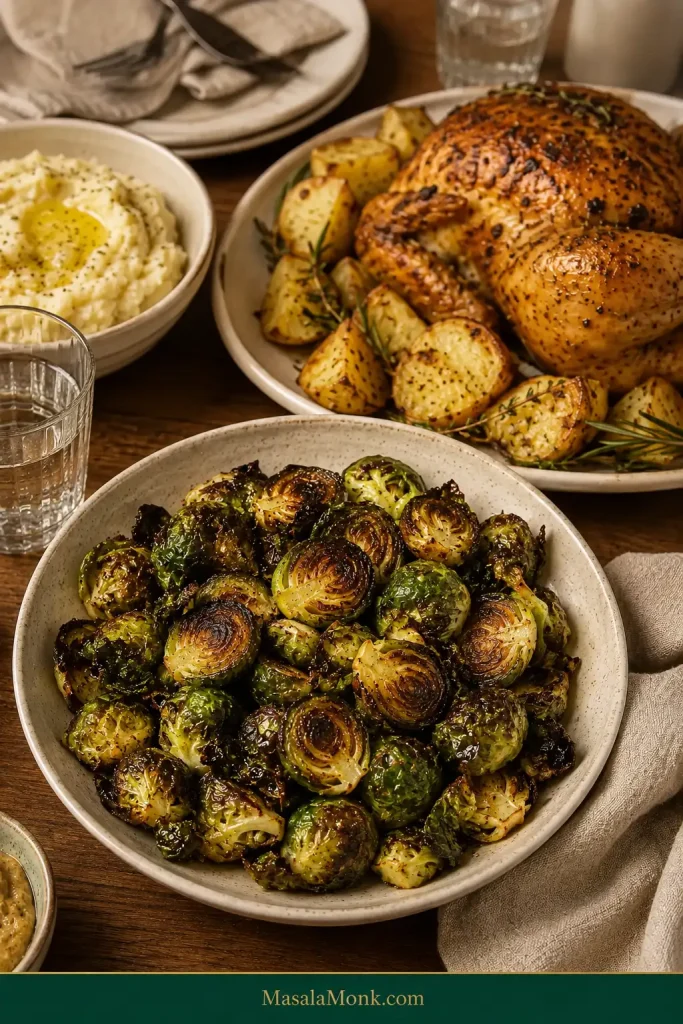
Dinner table with a prominent bowl of roasted Brussels sprouts served beside roast chicken, potatoes and other simple side dishes.
Let the main dish guide the finish. Rich or sweet mains usually pair best with brighter lemon or savory Parmesan.

Can I Substitute Frozen Brussels Sprouts?

Not if you’re after the crisp edges and tender centers you get with this method. Frozen Brussels sprouts can certainly be roasted, but freezing changes their structure and they release much more moisture as they heat.

Use fresh sprouts for the method on this page. Frozen Brussels sprouts are better treated as their own roasting method rather than dropped into these timings and expected to behave the same way.
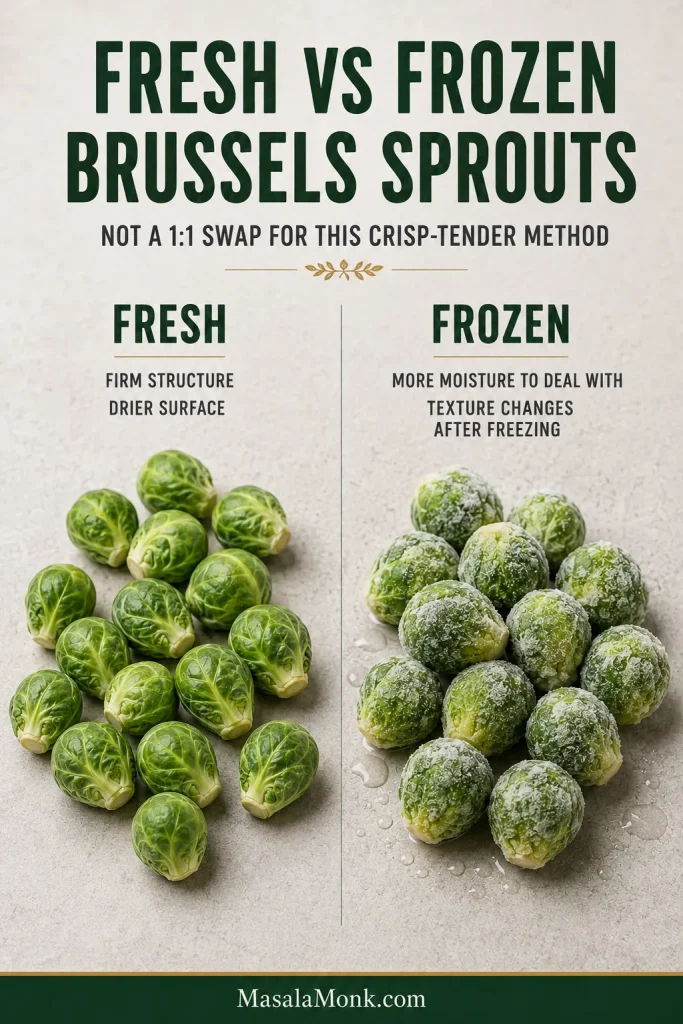
Fresh firm Brussels sprouts beside frosted frozen Brussels sprouts with visible moisture around the frozen vegetables.
Frozen sprouts release more moisture and have a softer structure, so they need their own roasting strategy rather than fresh-sprout timing.

Make Ahead, Store and Reheat

Prep Ahead and Transport

Prep ahead. Rinse and dry the sprouts, then trim and cut them up to 1 day ahead and refrigerate them covered. Keep them unseasoned until you are ready to roast. If they look damp after refrigeration, pat them dry again before adding the olive oil, salt, and pepper.

Roasting ahead is possible, but the edges are best straight from the oven. For Thanksgiving, Christmas, or another busy meal, doing the knife work early and roasting close to serving is usually the better compromise.

When something like honey glazed ham already controls the oven, use the temperature guide above rather than squeezing the Brussels sprouts onto a smaller, crowded tray just to speed them up.

Taking them somewhere? Hot sprouts soften when trapped under a lid or tight foil. Roast close to serving when possible; otherwise cool and refrigerate them promptly, transport them chilled, and reheat uncovered at your destination. Without reheating, expect softer edges.
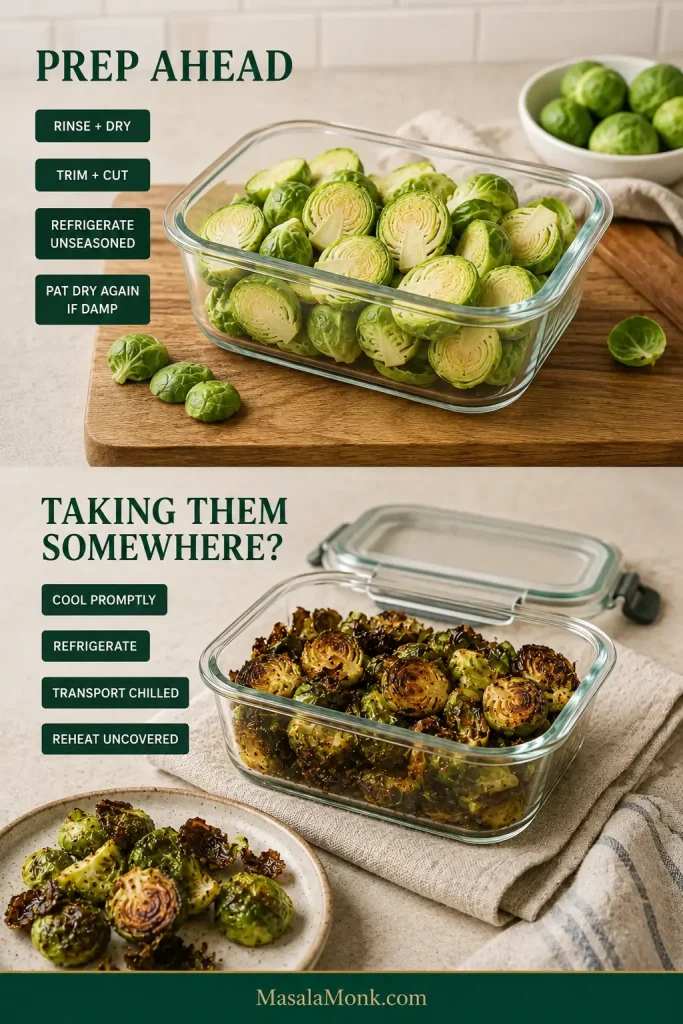
Guide showing dry cut raw Brussels sprouts stored unseasoned in glass and roasted Brussels sprouts prepared for chilled transport and uncovered reheating.
Do the knife work ahead, not the roasting. Keep cut sprouts dry and unseasoned until the last moment for better browning.

Store and Reheat Brussels Sprouts

Storage. Refrigerate cooked Brussels sprouts promptly and use them within 3–4 days, in line with USDA leftovers guidance.

Oven reheating. Spread the sprouts over a baking sheet and warm them at 375°F / 190°C for about 5–10 minutes, until hot and beginning to crisp again.

Air-fryer reheating. For a small batch, use 375°F / 190°C for about 3–5 minutes. Already-dark edges can move quickly, so watch them near the end.

The microwave is fastest, but it softens the exterior. That may be perfectly acceptable for Tuesday lunch; it simply won’t recreate a tray fresh from the oven.
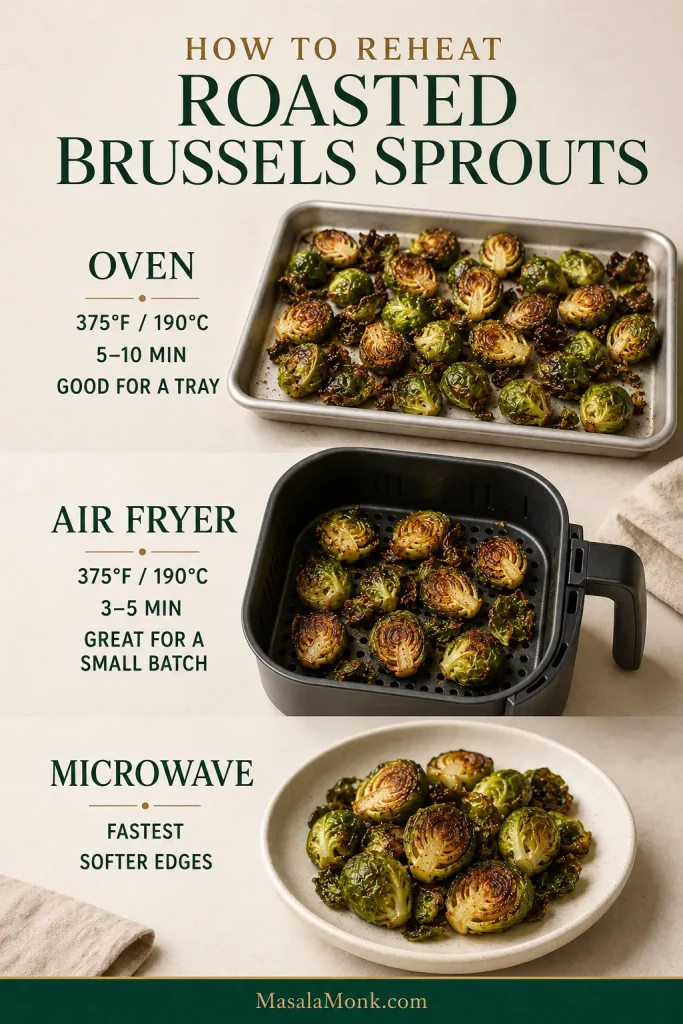
Reheating guide showing Brussels sprouts on an oven tray, in an air-fryer basket and in a microwave serving bowl with the corresponding method guidance.
Reheat in a shallow layer so moisture can escape. A deep pile steams itself before the exterior has much chance to crisp again.

Use the Leftovers

Leftovers are also good chopped into grain bowls, salads, pasta, or eggs, where softer edges aren’t a problem.
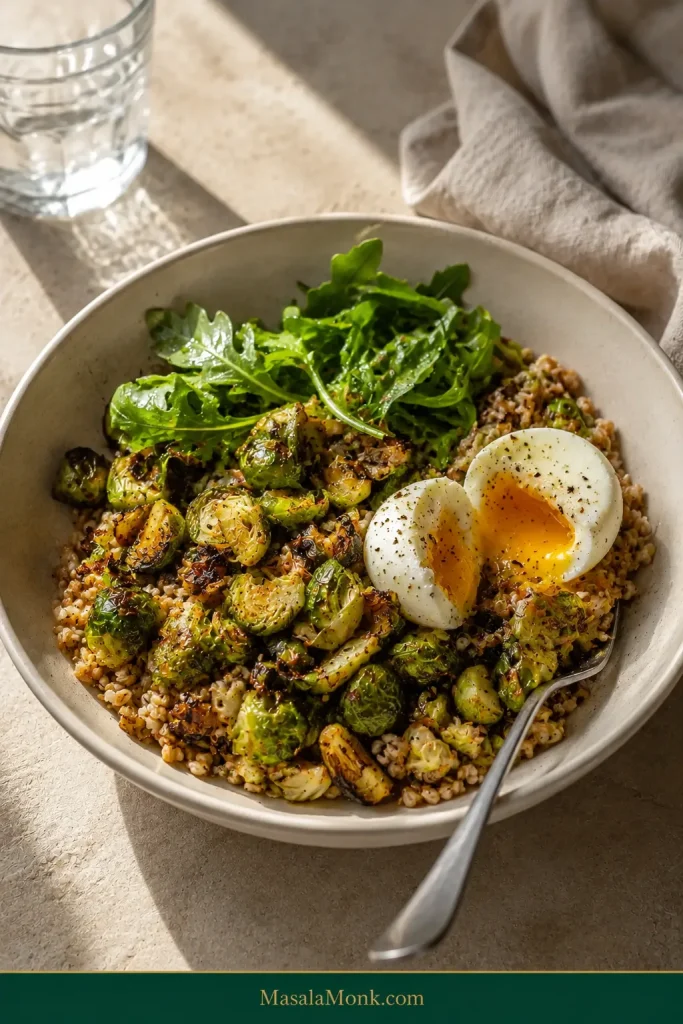
Grain bowl containing chopped roasted Brussels sprouts, cooked grains, leafy greens and a soft-boiled egg with a runny yolk.
Softer leftovers belong naturally in grain bowls, pasta, eggs and salads, where the changed texture becomes part of the meal.

Once You Know What to Look For

After a tray or two, you probably will not need this recipe beside you anymore. You will recognize the moment the Brussels sprouts are ready.

Serve them hot—and if a few crisp little leaves disappear before the pan reaches the table, that is entirely understandable.
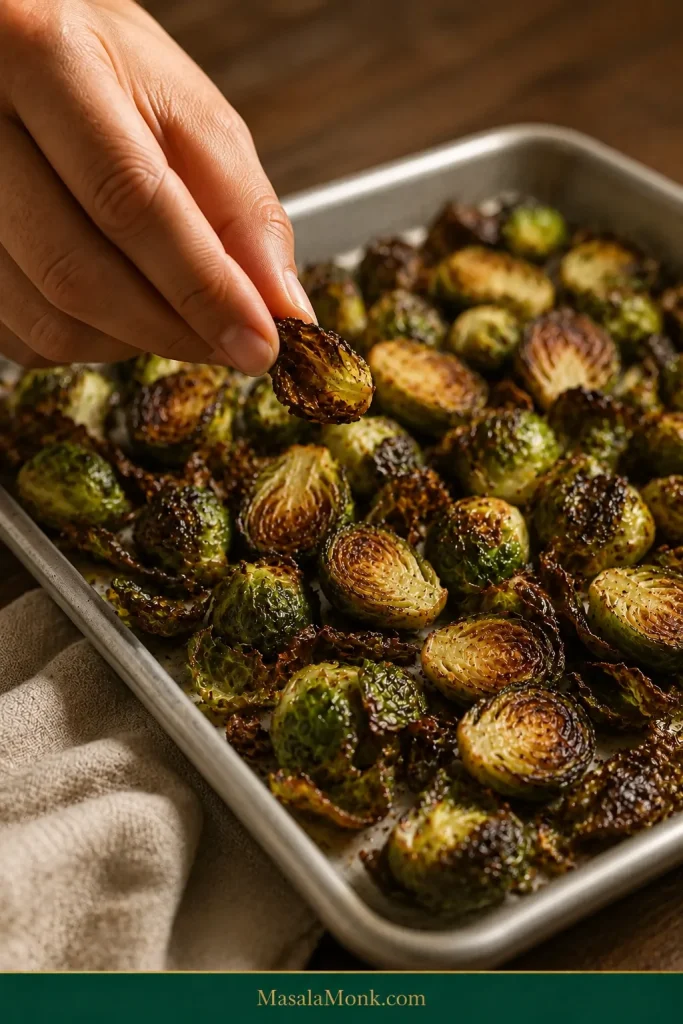
Hand picking up a crisp roasted Brussels sprout piece from a sheet pan filled with deeply browned sprouts and loose crispy leaves.
Posted on Leave a comment

Refried Beans Recipe From a Can: Creamy, Restaurant-Style & Easy

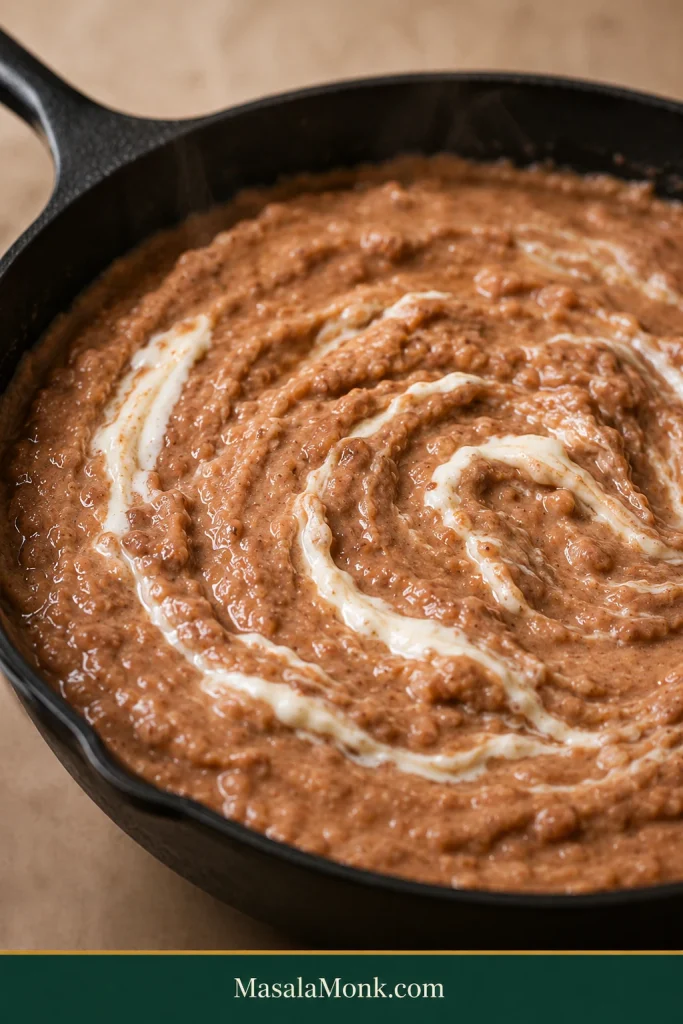
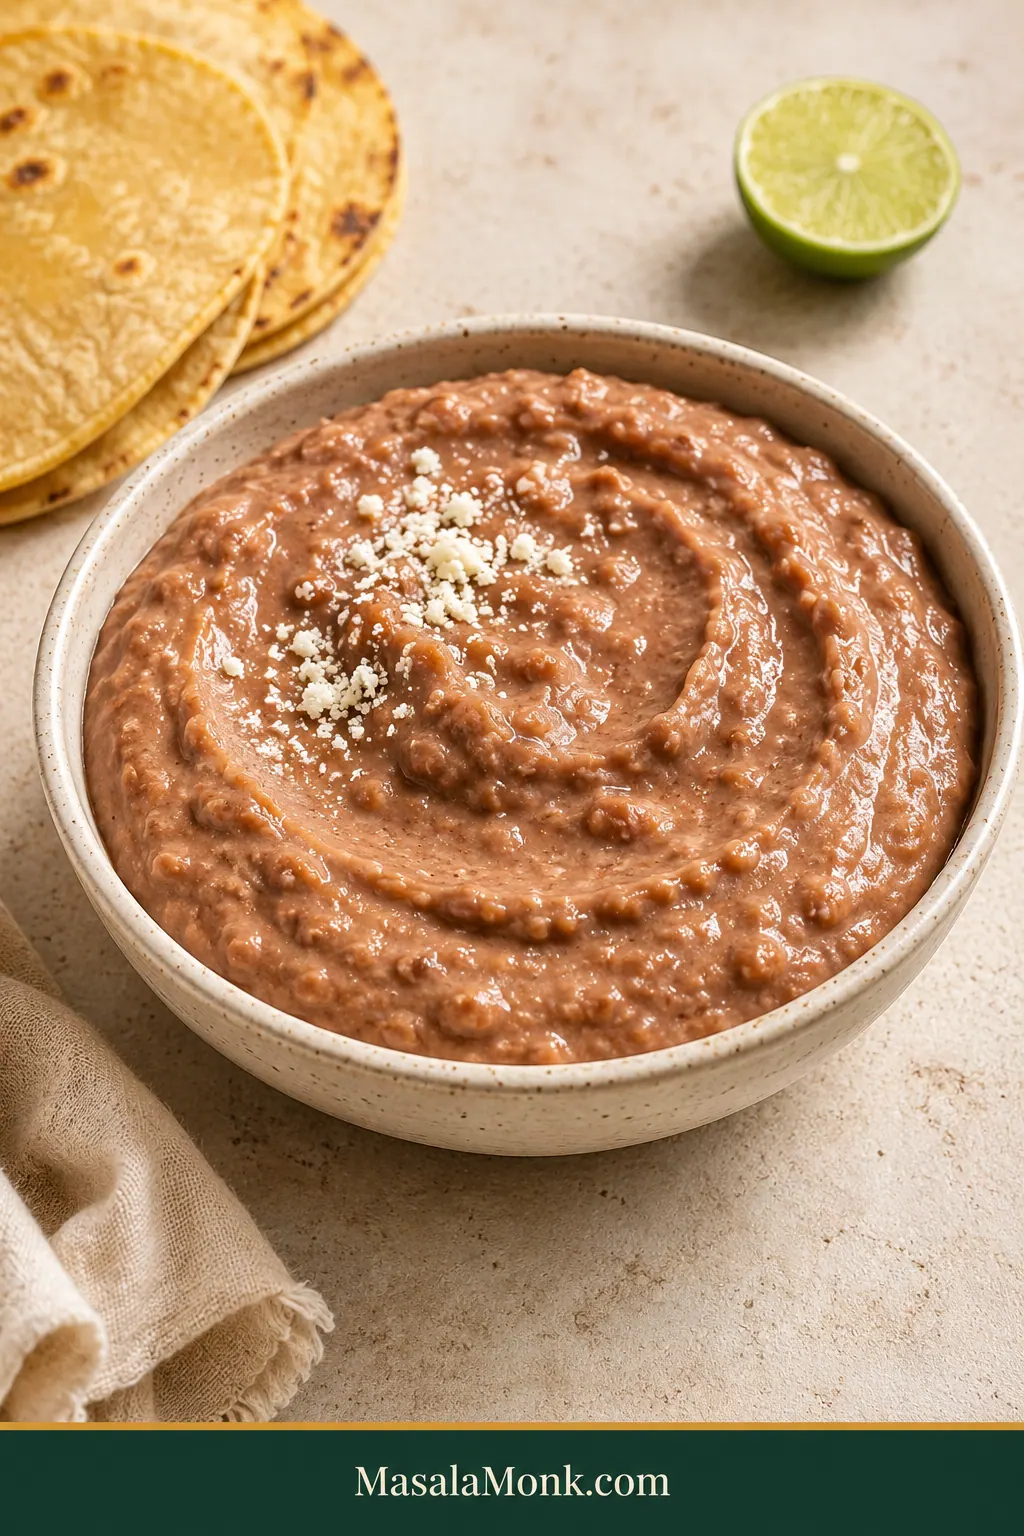
Creamy brown refried beans with a soft spoon swirl in a speckled ceramic bowl beside warm tortillas and lime.

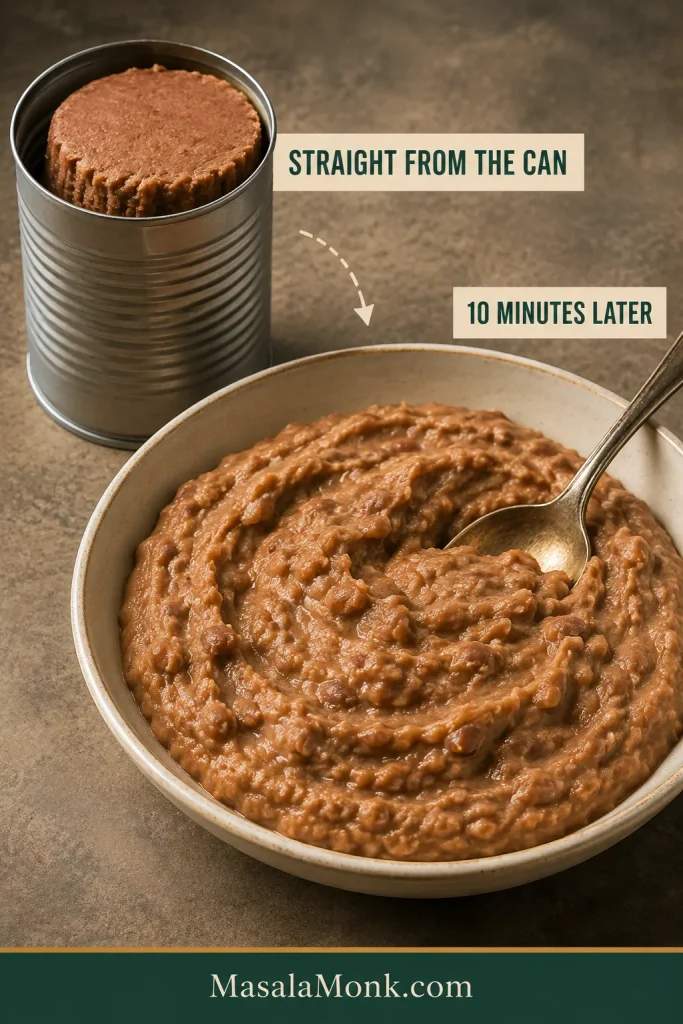
A can of refried beans is convenient, but straight from the can it can be dense enough to keep the ridges of the tin, bland enough to disappear beside the rest of dinner, or stiff enough to feel more like paste than a creamy side.

This easy refried beans recipe from a can fixes that in about 10 minutes with one small pan. The goal isn’t to bury the beans under sour cream and seasoning. It’s to loosen them, wake up the flavor, and add the richness they need to become soft and spoonable.
Ten minutes later, those same dense beans can be steamy, lightly glossy, and ready to settle beside tacos instead of sitting on the plate in one stiff mound.

Before-and-after view of stiff canned refried beans holding their shape and creamy finished beans in a serving bowl.
Straight-from-the-can refried beans can look hopelessly dense; judge the consistency after they are hot, not immediately after opening.

The rule to remember: loosen slowly. Salt last.

The Short Version

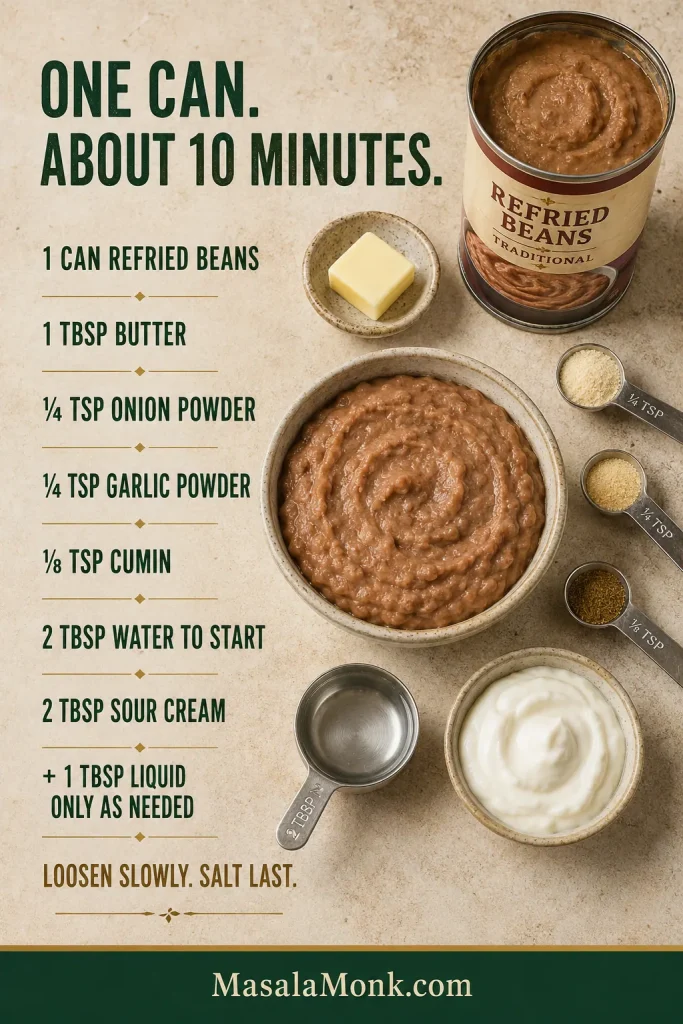
To make canned refried beans better, warm them with fat and seasoning, loosen gradually with water or broth, then stir in sour cream and taste before adding salt. For one 15–16 oz can, start with 2 tablespoons (30 mL) liquid and stop cooking while the beans are still a touch softer than you want on the plate.

Don’t want to think about the options? Use butter, water, and the base seasonings exactly as written below. Everything else is there only if you want to change the flavor or texture.

One-can refried beans formula showing butter, onion powder, garlic powder, cumin, water, sour cream, and their measured amounts.
One can, measured fat and seasoning, 2 tablespoons liquid to start, then sour cream—small additions keep the texture under control.

Yes, canned refried beans are already cooked. The can has done the slow part; you’re reheating the beans while improving their texture and flavor.

You usually don’t drain them. Hold back an obvious puddle of watery liquid, though, and add only what the texture needs.

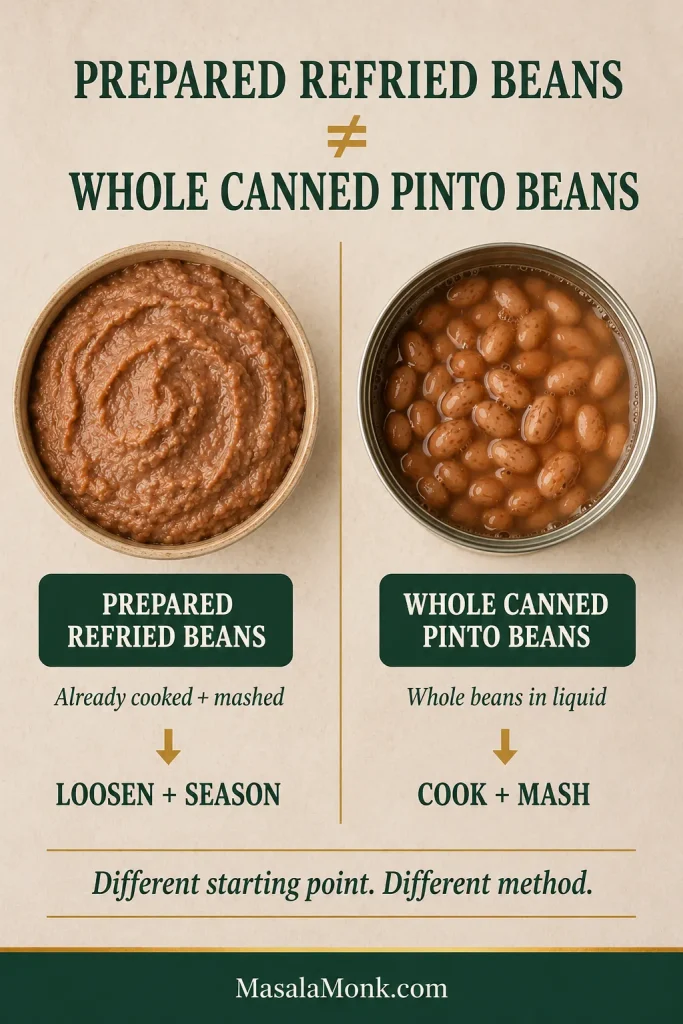
Whole pinto beans sitting in liquid? That’s a different starting point; use the quick whole-pinto guide farther down the page.

Refried Beans Recipe From a Can

Soft, creamy, restaurant-style refried beans made from one ordinary can in about 10 minutes.

Prep2 minutes
Cook7–8 minutes
TotalAbout 10 minutes
ServesAbout 4 as a side

Equipment

  • Small saucepan or 8–10 inch skillet
  • Silicone spatula or wooden spoon
  • Measuring spoons
  • Whisk, optional for a smoother texture

Base Ingredients

  • 1 can prepared refried pinto beans, 15–16 oz (425–454 g)
  • 1 tablespoon (15 mL) butter — or lard, bacon fat, or neutral oil
  • ¼ teaspoon each onion powder and garlic powder
  • ⅛ teaspoon ground cumin, or a generous pinch
  • 2 tablespoons (30 mL) water — or unsalted chicken/vegetable broth, plus more as needed
  • 2 tablespoons (about 30 g) sour cream

Optional Finish

  • ½–1 teaspoon hot sauce
  • Fine salt, if needed after tasting
  • ½ teaspoon lime juice or pickled-jalapeño brine, if the beans taste flat
  • Monterey Jack, Oaxaca, Cotija, or queso fresco, to taste

Instructions

  1. Warm the fat and seasonings. Heat your chosen fat over medium heat. Reduce to medium-low, add the onion powder, garlic powder, and cumin, and stir for 10–15 seconds, just until fragrant. Don’t let the spices darken.
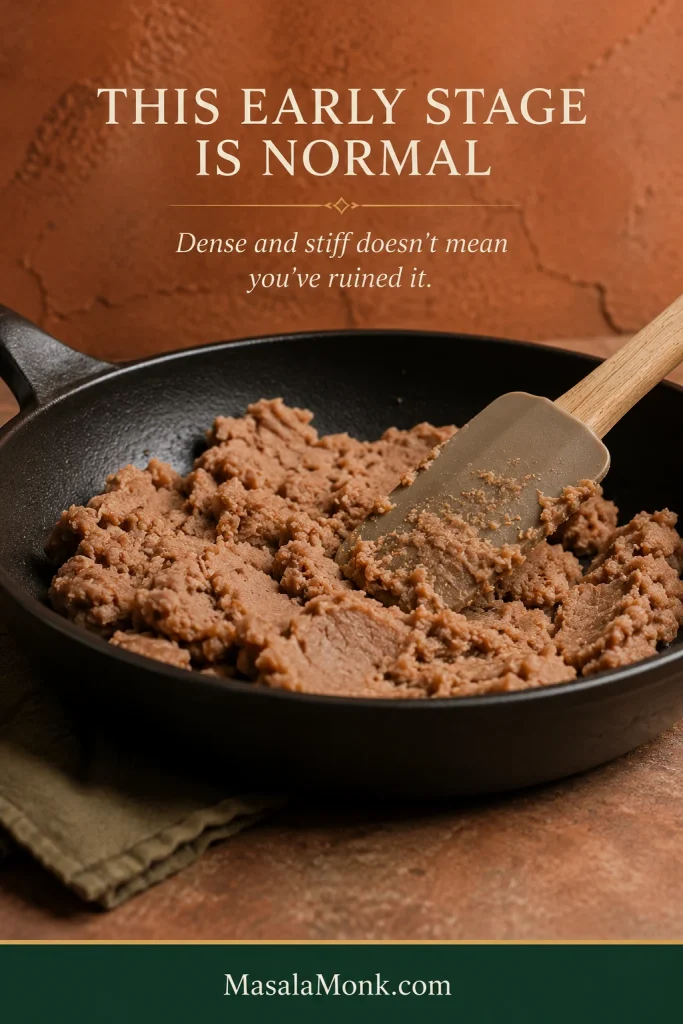
  2. Add the beans and first liquid. Scrape in the refried beans and stir for about 1 minute. Add 2 tablespoons (30 mL) water or unsalted broth and cook for another 2–3 minutes, scraping the bottom and corners. A stiff canned mass may look a little hopeless at first; it should soon soften and fold over itself more easily.
  3. Adjust the consistency. Still stiff? Add another 1 tablespoon (15 mL) liquid, stir well, and give the pan a moment before adding more. A particularly dense can may need another tablespoon after that.
  4. Make them creamy. Stir in the sour cream and cook gently for 1–2 minutes. The surface should look soft and lightly glossy, without a dry crust or pools of oil.
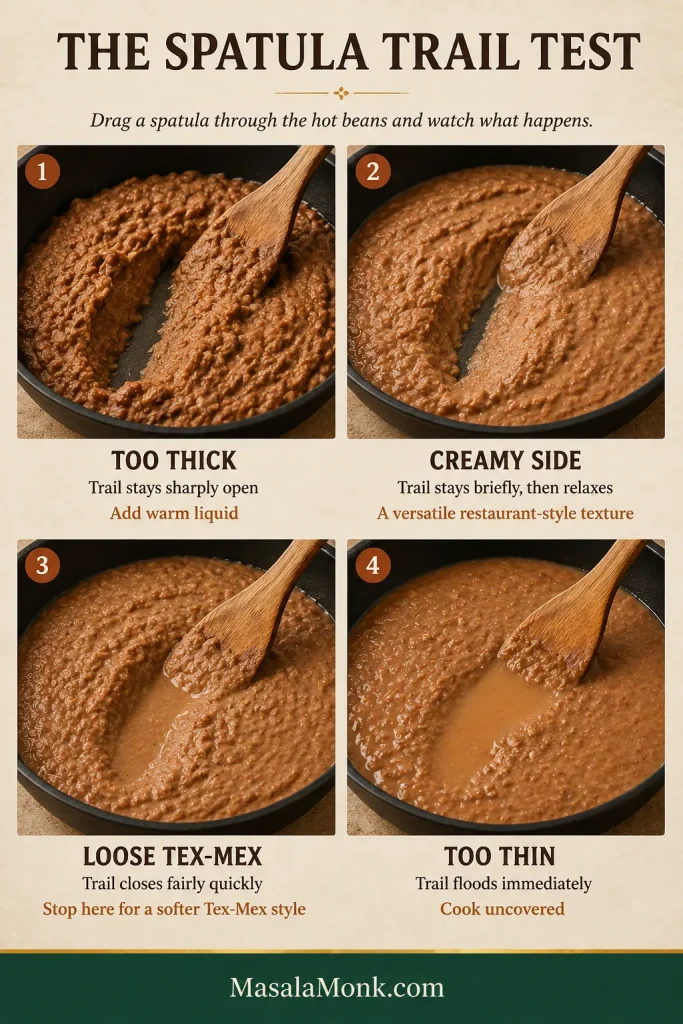
  5. Check the texture. Drag the spatula through the middle. For a creamy side, the trail should remain visible briefly while the edges slowly relax inward. Leave the beans thicker for burritos and tostadas, or loosen them further for a softer Tex-Mex-style plate.
  6. Taste and serve. Add hot sauce if you want it, then taste before salting. Beans that are salty enough but taste heavy or flat may benefit from the optional lime juice or jalapeño brine. Remove from the heat while they’re slightly softer than your final target, then spoon into a serving bowl while hot and creamy.

Recipe Notes

  • For a smoother texture, a whisk is usually enough. Prepared refried beans are already mashed, and whisking can make the texture more uniform without turning them into purée.
  • Vegetarian? Check the can because some traditional refried beans contain lard. Choose a lard-free can; butter, sour cream, and cheese can otherwise remain as written.
  • Vegan? Start with a lard-free can, use neutral oil and vegetable broth, omit or replace the sour cream, and choose dairy-free toppings instead of cheese.
  • For cheese: melt Monterey Jack or Oaxaca over the hot beans, or scatter Cotija or queso fresco over the top.

If you’re cooking right now, the recipe above is enough. It makes an easy side for juicy ground beef tacos. The rest of this guide is for a can that behaves strangely, the butter-versus-lard question, or that moment when you’re staring at the pan wondering whether the texture is actually right.

Dense canned refried beans in a dark skillet being pressed and folded with a spatula before they loosen.
Work the first liquid through before adding more; dense canned beans often loosen once the pan is hot.
Explore the Refried Beans Guide

How to Make Canned Refried Beans Taste Better

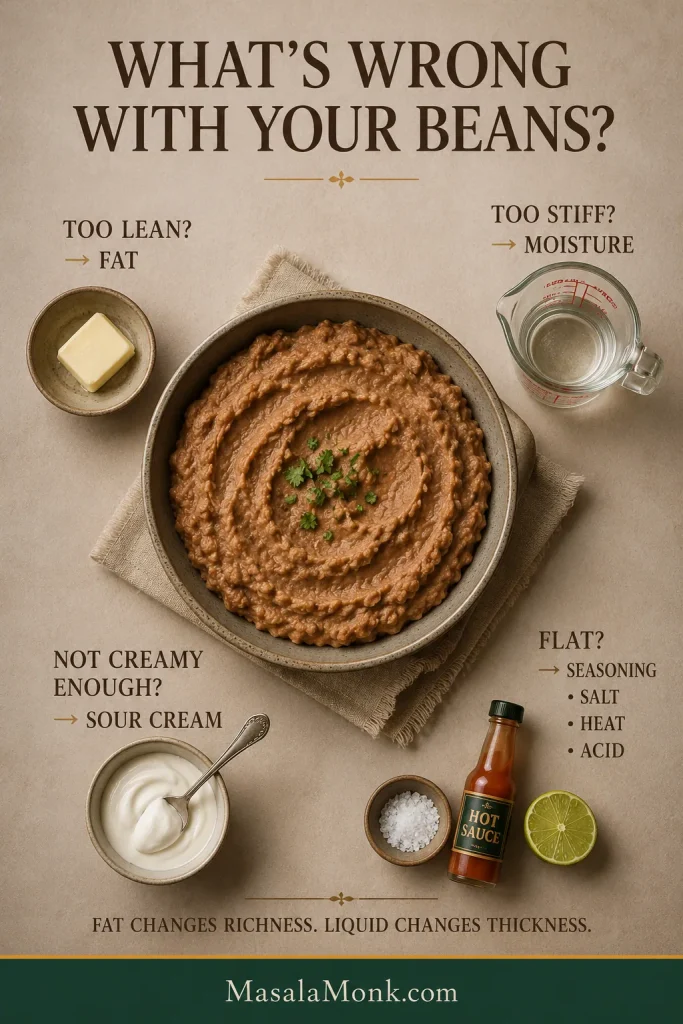
Start by identifying the problem instead of adding everything at once.

  • Too lean? Fat gives the beans more richness.
  • Too stiff? They need moisture.
  • Not creamy enough? A modest amount of sour cream can soften the texture.
  • Flat-tasting? Seasoning, salt, heat, or acidity may be missing.
Refried bean diagnostic guide connecting lean beans with fat, stiff beans with moisture, low creaminess with sour cream, and flat flavor with seasoning or acid.
Fix the right problem: richness, moisture, creaminess, and flavor each need a different adjustment.

Get Creamy Without Making Them Heavy

That keeps you from fixing the wrong thing. Stiff beans don’t automatically need more butter, and adding broth won’t make already-loose beans more flavorful. Once the consistency is right, too much sour cream can start hiding the pinto-bean flavor.

Small ribbons of white sour cream being folded into warm mashed refried beans in a black skillet.
Add sour cream after the beans are nearly loose enough; it adds creaminess and tang, not the main thinning moisture.

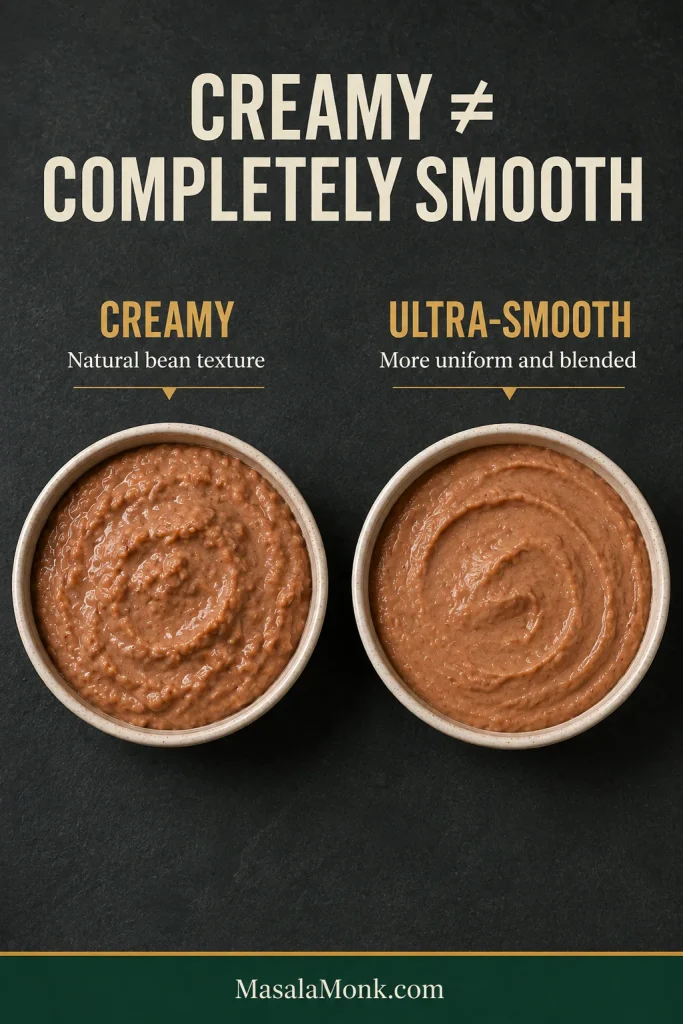
Creamy and smooth aren’t the same thing.

Creaminess comes from the mashed beans having enough moisture and a little richness. Smoothness is about how fine and uniform the bean texture is. Properly loosened beans can feel creamy while retaining some natural texture.

Two bowls compare creamy refried beans with visible natural texture and a finer, more uniformly blended version.
Creamy can still have natural bean texture; use a whisk for finer beans and blend only for an ultra-smooth finish.

How to Season One Can

For one 15–16 oz can, start with ¼ teaspoon onion powder, ¼ teaspoon garlic powder, and ⅛ teaspoon cumin. The small amount of cumin is deliberate: it should sit in the background while the pinto beans remain the main flavor.

Powdered onion and garlic also keep the texture even. Fresh onion can be delicious, but it leaves more noticeable texture. Hot sauce is optional; keeping the pan mild and serving roasted tomatillo salsa verde at the table gives everyone control over the heat.

For a little more savory depth, add a small amount of chicken or vegetable bouillon or a tiny pinch of MSG. Neither is necessary, and both can add quite a bit of salt, so go cautiously and taste before adjusting anything else.

Butter, Lard, Bacon Fat or Oil?

The best fat is mainly a flavor decision. Moisture still does most of the work of changing the consistency, so choose the fat for the kind of richness you want.

Fat What it brings Best for
Butter Mild, familiar richness Easy everyday default
Lard Richer savory character Savory depth without bacon smoke
Bacon fat Stronger pork flavor and smoke When a smoky note suits the meal
Neutral oil Body with little added flavor Letting the bean flavor lead

Do You Need Lard?

No. Lard can add savory richness, but butter or oil can still give you soft, creamy refried beans. The final consistency depends much more on moisture, gentle heat, and stopping at the right moment.

Clean rendered pork fat left from slow-cooker pork carnitas can work nicely here too. Leave dark or scorched drippings behind.

The can itself matters as well. Traditional, vegetarian, fat-free, and reduced-fat beans can start with very different levels of richness. A batch that already looks oily as it warms may need less added fat than a leaner one.

Fat changes flavor and richness, but it won’t loosen a thick batch. For that, you need moisture.

Water, Broth or Milk?

Water is the neutral default, unsalted broth adds savory flavor, and whole milk gives you a softer, more dairy-forward variation.

Liquid What it changes Use it when
Water Loosens without adding flavor or salt The beans mainly need a better consistency
Unsalted broth Adds moisture plus savory flavor The beans taste a little flat as well as thick
Whole milk Adds mild dairy richness and can soften a canned-tasting edge You deliberately want a softer, dairy-forward result
Three small vessels of clear water, golden unsalted broth, and white whole milk beside a bowl of refried beans.
Water loosens neutrally, broth adds savory depth, and whole milk adds dairy richness and can mellow a canned-tasting edge.

Jalapeño brine is different. Treat it as a final flavor adjustment, not the main thinning liquid. It brings acid, chile, and salt together, so about ½ teaspoon is a sensible place to start when the consistency is already right but the flavor feels heavy.

Whatever liquid you choose, begin cautiously.

How Much Liquid Should You Add?

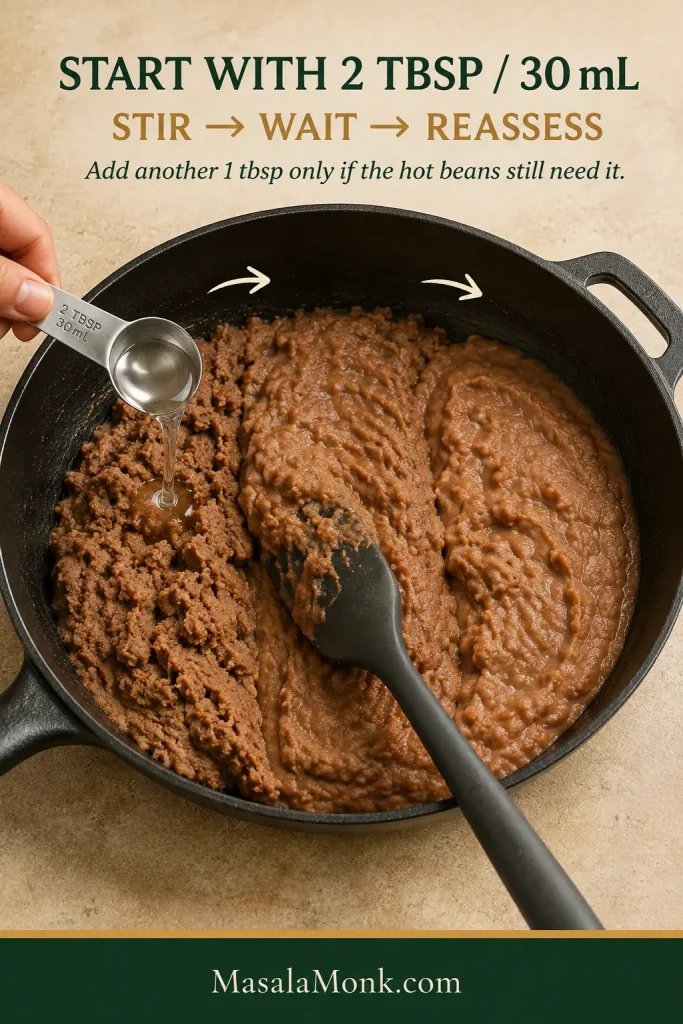
Start with 2 tablespoons (30 mL) liquid for one 15–16 oz can, then add another 1 tablespoon (15 mL) only if the hot beans still feel stiff.

A particularly dense can may need another tablespoon. Stop as soon as the mixture begins moving the way you want it to.

Why start small?

You can loosen thick beans quickly. Too much liquid means waiting for that moisture to cook back out.

Measured liquid being added to refried beans with guidance to start with 2 tablespoons, stir, wait, and reassess.
Start with 2 tablespoons, stir, wait, then reassess—one extra spoonful can noticeably change a one-can batch.

The final number matters less than what happens when you drag a spatula through the pan.

Get the Texture Right: The Spatula Trail Test

Restaurant-style isn’t one exact thickness. Some Tex-Mex restaurants serve refried beans very smooth and fairly loose; others bring a thicker, more substantial scoop to the table.
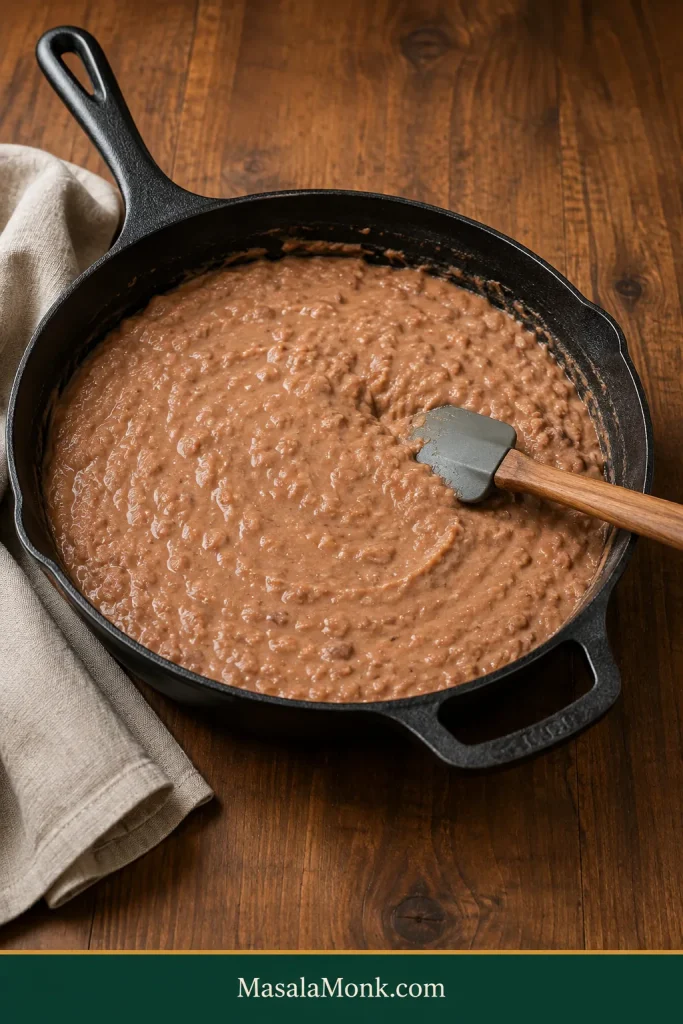
Finished creamy refried beans across a dark skillet with a shallow spatula track and no visible water or oil separation.

Drag your spatula through the middle of the pan and watch the trail.

Four refried bean textures show a spatula trail staying open when too thick, relaxing when creamy, closing faster when loose, and flooding when too thin.
Test the beans while hot: the trail’s speed of closing tells you whether they are thick, creamy, loose, or watery.
What you see Texture What to do
The trail stays sharply open and the beans sit in two stiff banks Too thick Add some warm liquid and stir again
The trail stays visible briefly, then the edges slowly relax inward Creamy side A versatile restaurant-style consistency
The trail closes fairly quickly and the beans settle into a low, soft pool without watery separation Loose Tex-Mex style Stop here if this is the restaurant texture you prefer
The trail floods shut immediately or a watery moat forms around the beans Too thin Cook uncovered over medium-low heat

How to Know When Refried Beans Are Done

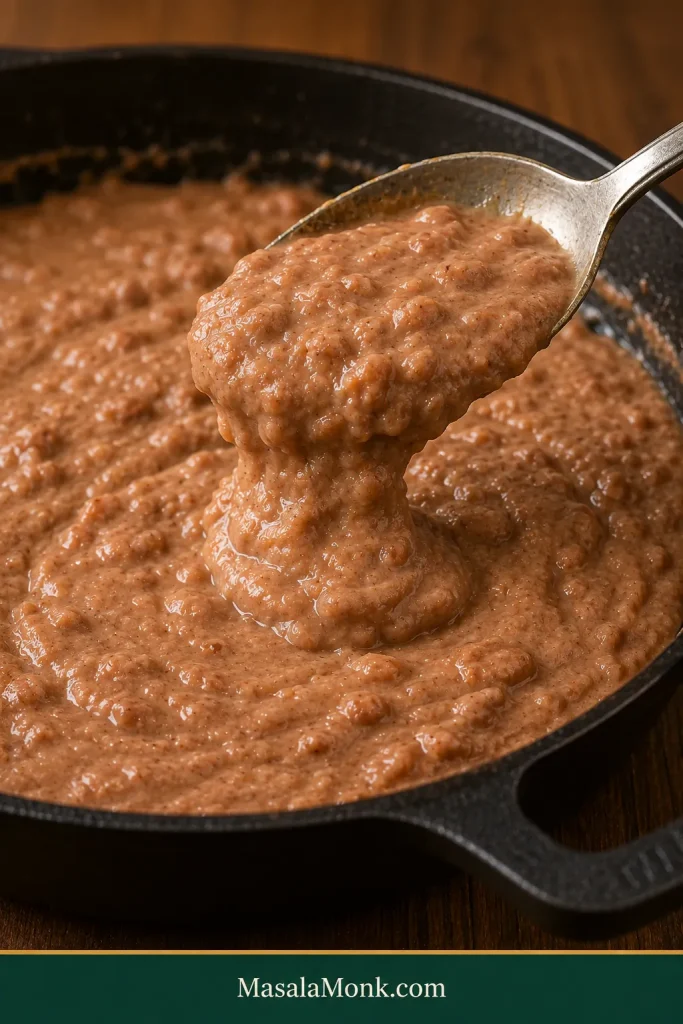
At the table, the beans should look soft and lightly glossy, fall slowly from the spoon, and settle without standing in a rigid mound or spreading like soup. When the trail looks right, you’re done; don’t keep cooking just because the clock has another minute on it.

Spoon held close above a skillet as creamy refried beans fall back in a short, thick, soft fold.
Creamy refried beans should cling briefly, then fall back in a heavy, soft fold—not drip or stay rigid.

For an ultra-smooth Tex-Mex texture, adjust the moisture first and then give the beans a few short pulses with an immersion blender. Stop when obvious bean pieces disappear. Blend too long and the mixture can turn pasty and overprocessed.

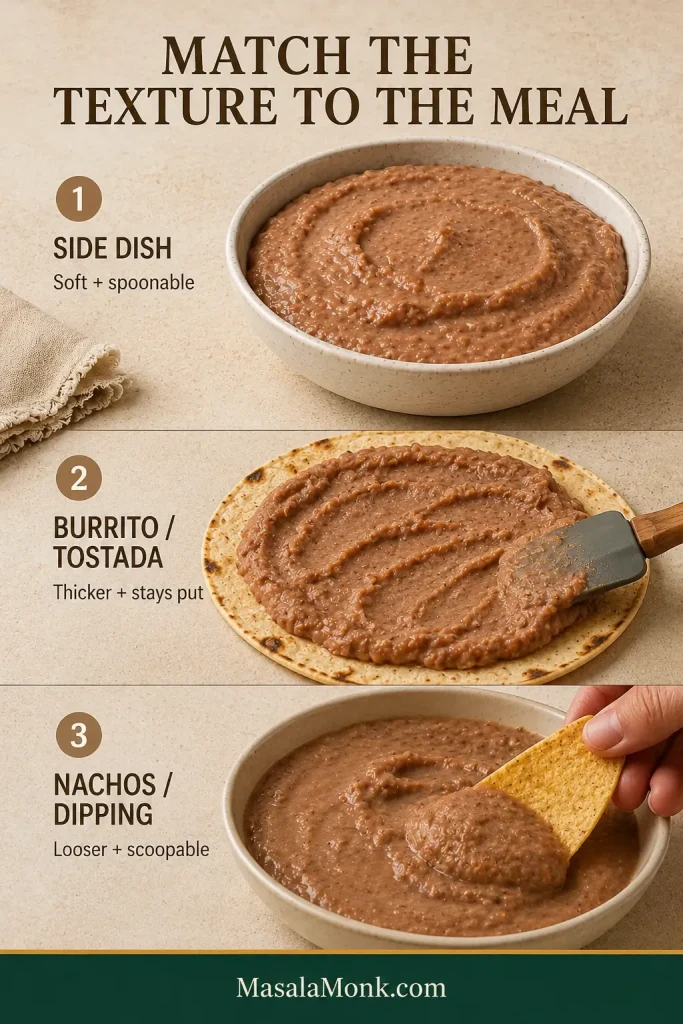
Match the Texture to the Meal

  • As a side: soft enough to settle gently on the plate.
  • For burritos, tacos, and tostadas: thicker so the beans stay where you spread them.
  • For nachos or dipping: looser so they remain easy to scoop as they cool.
Three examples show soft refried beans as a side, thicker beans spread on a tortilla, and looser beans scooped with a tortilla chip.
Match texture to the job: softer for a side, thicker for filling, looser for dipping.

A fresh homemade corn tortilla wants beans with enough body to spread without running toward the edge. Beside saucy chicken enchiladas, a softer consistency usually makes more sense.

And if what you really want is a cold, scoopable bean layer with sour cream, guacamole, salsa, and cheese, our 7 layer dip recipe builds the beans for that job.

↑ Back to Recipe Short Version

Troubleshooting Canned Refried Beans

Match the fix to the problem. Most batches don’t need another ingredient so much as the right adjustment.

Problem Fast fix
Too thick Loosen gradually with warm water or unsalted broth
Too thin Cook uncovered over medium-low heat until the excess moisture evaporates
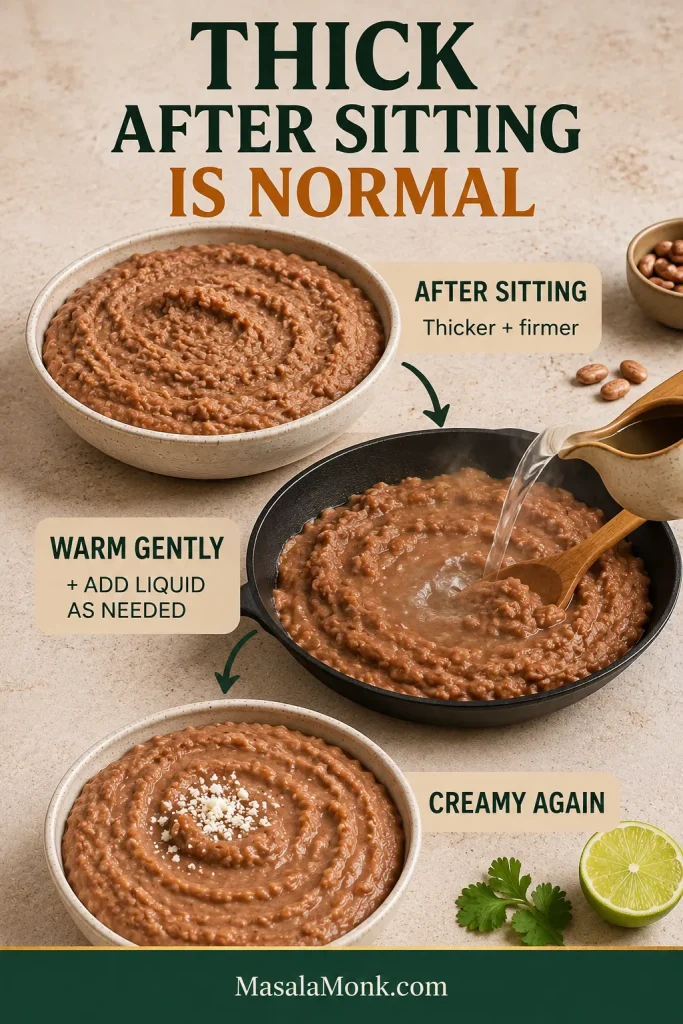
Stiff after sitting Stir in warm liquid until the creamy consistency returns
Bland Taste for seasoning, salt, heat, or brightness before deciding what to add
Tastes canned or slightly metallic A small splash of whole milk can mellow the edge; warm gently and taste again
Too salty Avoid any further salty ingredients; for a badly oversalted batch, mix in lower-sodium or unsalted beans if available
Too tangy Stop adding acid and mix in more plain refried beans if available
Greasy Spoon off pooled fat; if the beans are also stiff, loosen with water instead of adding more fat
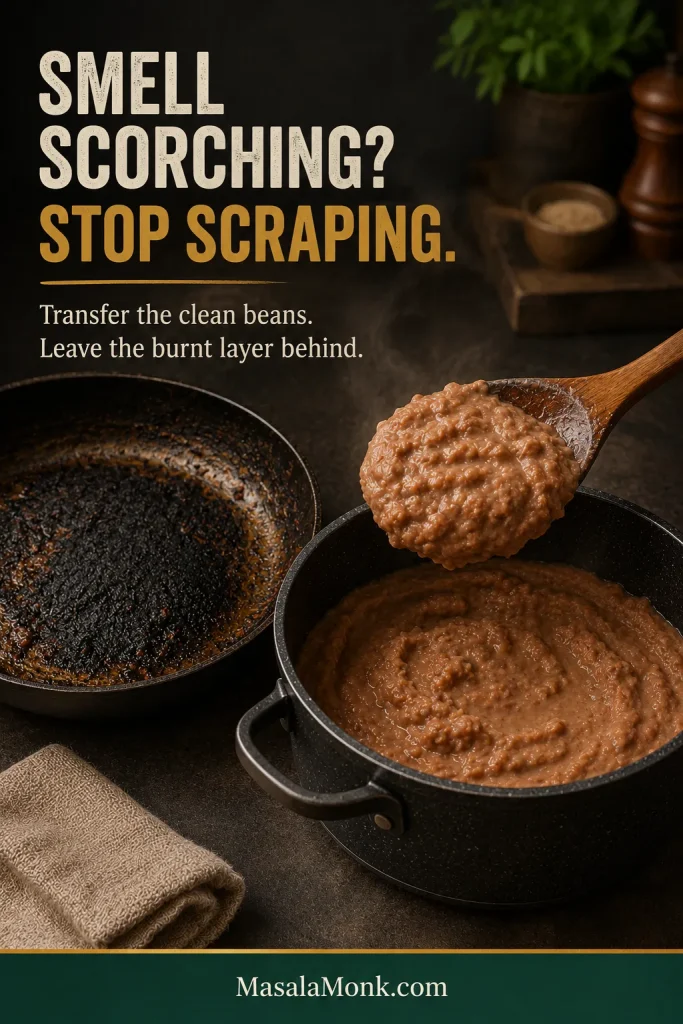
Burnt Transfer the unburnt portion immediately without scraping the scorched layer
Splattering Lower the heat and stir carefully

Too Thick, Too Thin or Stiff After Sitting?

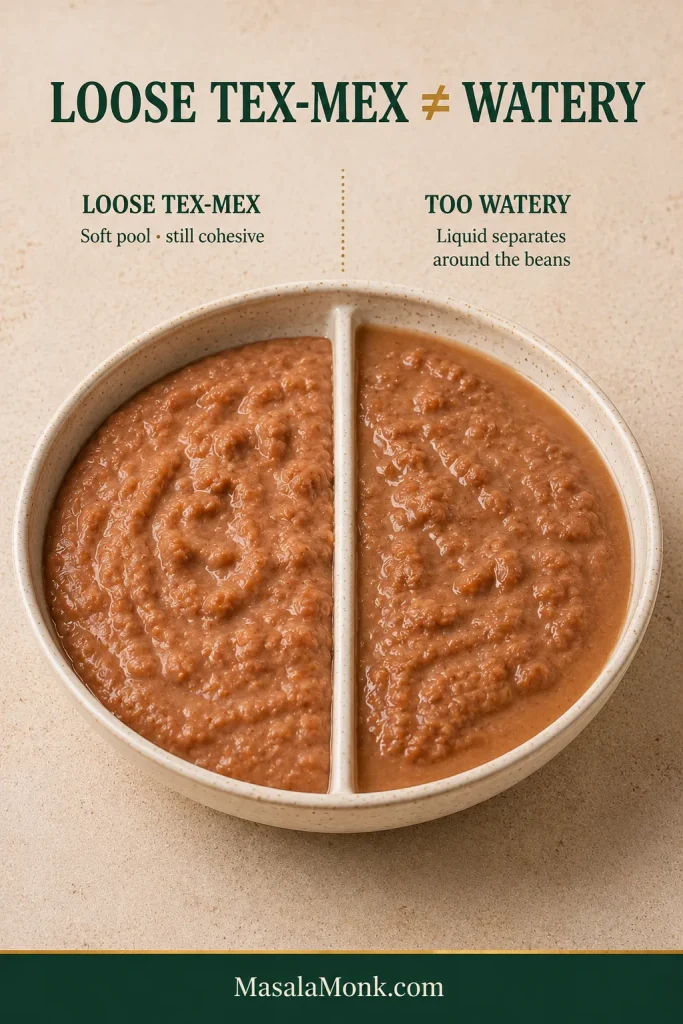
Thick, thin, and stiff-after-sitting beans are really three versions of the same consistency problem. Add moisture when the mixture won’t relax; let excess moisture evaporate when it floods; and expect the beans to tighten somewhat as they cool. A splash of warm water or broth usually brings a batch that sat too long straight back.

Comparison of cohesive loose Tex-Mex refried beans and overly thin beans with visible liquid separated around the edge.
Loose beans stay cohesive; visible water separating around the edges means they have crossed into too thin.

Bland? Figure Out What’s Missing

“Bland” doesn’t automatically mean “needs more salt.” Salty enough but still flat? A touch more onion or garlic seasoning may help. A heavy-tasting batch may need a few drops of lime juice or jalapeño brine instead. Keep cumin in the background so the final spoonful still tastes first and foremost like pinto beans.

Burnt or Bitter? Get Them Out of That Pan

Smell scorching? Stop scraping and transfer the unburnt beans into a clean saucepan, leaving the dark layer behind. Mild bitterness can sometimes be softened after the rescue, but deeply scorched flavor is difficult to disguise. Bacon fat should also be clean rendered fat, not blackened drippings carrying burnt pieces.

Clean refried beans are transferred into a fresh pan while a dark scorched layer remains untouched in the original pan.
Transfer clean beans before scraping the scorched bottom; once burnt residue mixes in, bitterness spreads fast.

↑ Back to Recipe Short Version

Microwave Method

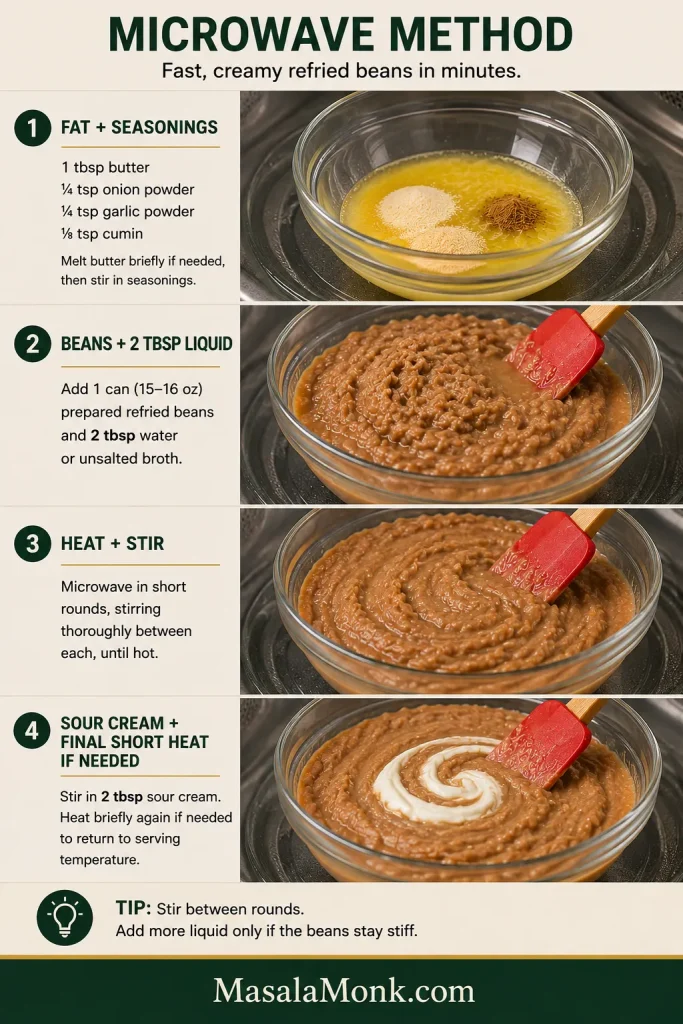
To microwave canned refried beans, heat them in short intervals, stirring between each, and add more liquid only when they remain thick. The stovetop gives you finer control, but if tacos are already hitting the table, the microwave route is perfectly respectable.
  1. Start the flavor. Put 1 tablespoon butter—or your chosen alternative—in a large microwave-safe bowl. Melt briefly if necessary, then stir in the onion powder, garlic powder, and cumin.
  2. Add the beans. Mix in the canned refried beans and 2 tablespoons (30 mL) water or broth. Cover loosely so steam can escape while splatters stay contained.
  3. Heat and stir. Microwave in short rounds, stirring thoroughly between each, until hot. Use another splash of liquid only when the texture still feels stiff.
  4. Add the sour cream and serve. Stir in the sour cream, then give the beans one final short heating round if needed to return them to serving temperature. Taste and adjust with hot sauce, acid, or salt.
Four-step microwave refried beans guide showing seasonings and butter, prepared beans with liquid, stirring after heating, and sour cream added near the end.
Short microwave rounds plus thorough stirring give you repeated chances to adjust thickness without overcooking the beans.

Use a bowl larger than seems necessary. Thick bean mixtures have a talent for popping just when you think they won’t.

What If You Have Whole Canned Pinto Beans?

You can absolutely turn whole canned pintos into quick refried beans, but the route is different. Reserve some of the can liquid. Warm your fat and seasonings, add the whole beans with enough liquid to keep them moist, then mash and adjust until creamy.

Prepared refried beans have already been cooked and mashed. That’s why the liquid and sour-cream amounts in the recipe above shouldn’t simply be transferred to a can of whole pintos.

Prepared mashed refried beans are compared with intact canned pinto beans sitting in liquid, with their different cooking methods labeled.
Prepared refried beans need loosening; whole canned pintos still need seasoning, heating, mashing, and texture adjustment.

Scaling for a Crowd

The recipe scales well for a larger taco night — perhaps alongside sheet-pan chicken fajitas — but consistency doesn’t scale perfectly by arithmetic.

For 2–3 cans, scale the fat and sour cream with the beans. Start a little conservatively with the dry seasonings, taste once everything is hot, and hold back some of the liquid until you can see how the batch moves. Let the Spatula Trail Test decide the final consistency.

Keeping Them Creamy for a Taco Bar

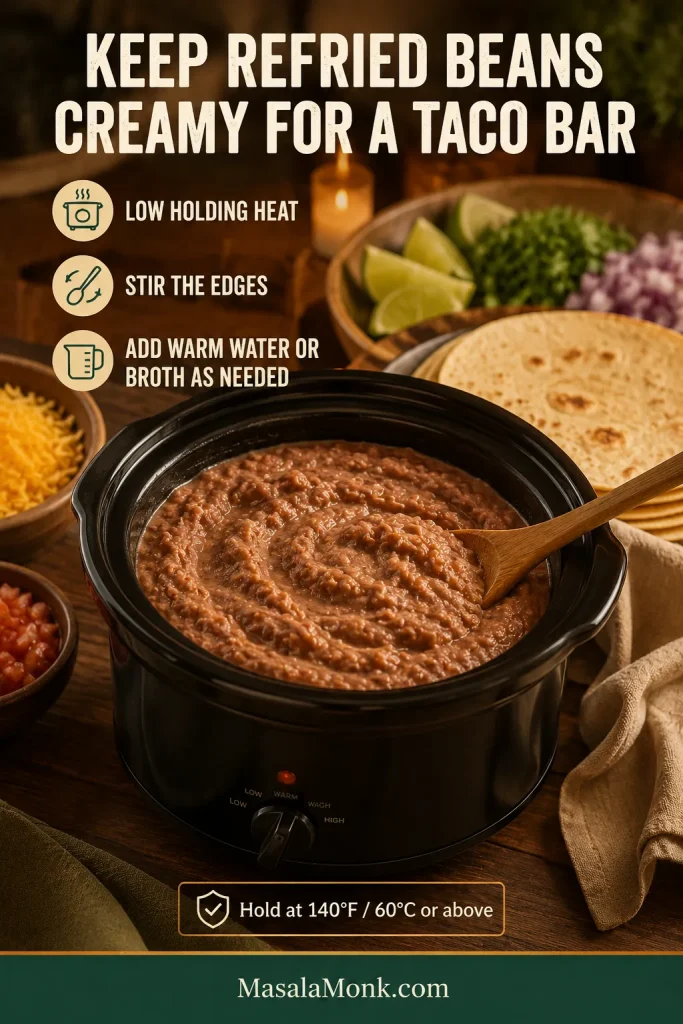
Transfer the beans to a covered slow cooker or other suitable hot-holding vessel and use low holding heat. Stir periodically, especially when the edges start thickening, and add warm water or unsalted broth as needed.

If the beans will stay out for a while, keep them at 140°F (60°C) or above; that’s the USDA hot-holding recommendation.

Creamy refried beans in a slow cooker at a taco bar with tortillas and toppings arranged nearby.
Keep warm liquid beside the slow cooker so thickening taco-bar beans can be loosened in small, controlled additions.

Storage, Freezing and Reheating

Refrigerate leftovers within 2 hours, use them within 3–4 days, and reheat to 165°F (74°C). The USDA has the full leftovers and reheating guidance.

Cold refried beans can look dramatically thicker than they did when freshly cooked. That’s expected; reheating is usually as much about restoring lost moisture as making the beans hot again.

Firm refried beans after sitting are reheated with added liquid and shown again after returning to a softer creamy consistency.
Reheat first, then judge thickness; cold refried beans often look much denser than they will once hot.

How to Reheat Refried Beans

Stovetop: warm over low to medium-low heat, stirring in water or unsalted broth until the soft, spoonable consistency returns.

Microwave: cover loosely and heat in short intervals, stirring between rounds. A batch that’s hot but still dense needs moisture, not another spoonful of fat.

Can You Freeze Them?

Yes. Cool the beans, portion them into airtight freezer-safe containers, and freeze. For best quality, aim to use frozen leftovers within about 3–4 months. Thaw in the refrigerator, then reheat gently with enough water or broth to restore the texture.

Once loosened again, leftovers are handy for freezer-friendly breakfast burritos. Just make sure the filling isn’t watery before it goes into the tortilla.

What to Serve With Refried Beans

These beans are happiest anywhere you want something warm and mellow beside brighter, spicier, or crunchier food.

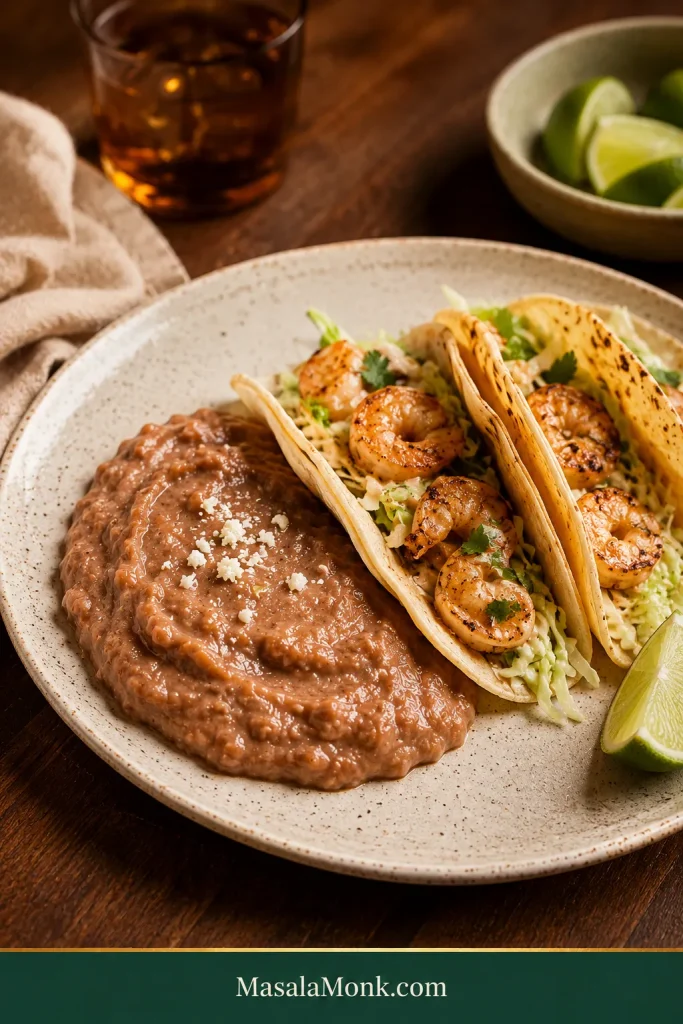
Keep them simple beside shrimp tacos with lime slaw, where the creamy beans give the fresh toppings somewhere soft to land. Mango salsa offers a fruitier contrast with lime, chile, and freshness.

Creamy refried beans served beside shrimp tacos with cabbage slaw and lime wedges on a neutral ceramic plate.
Creamy refried beans make a mellow, comforting side for bright shrimp tacos and lime slaw.

They’re equally at home beside Mexican-style rice and eggs, or tucked into burritos, tostadas, quesadillas, nachos, and taco bowls.

Once You Know What the Pan Needs, This Gets Easy

Once you know what to look for, canned refried beans stop feeling like a compromise. They become the kind of ten-minute side you can fix while the tortillas warm, spoon onto the plate, and actually look forward to eating.

Next time, you probably won’t need this whole guide. Loosen slowly. Salt last. Trust what the pan is showing you.

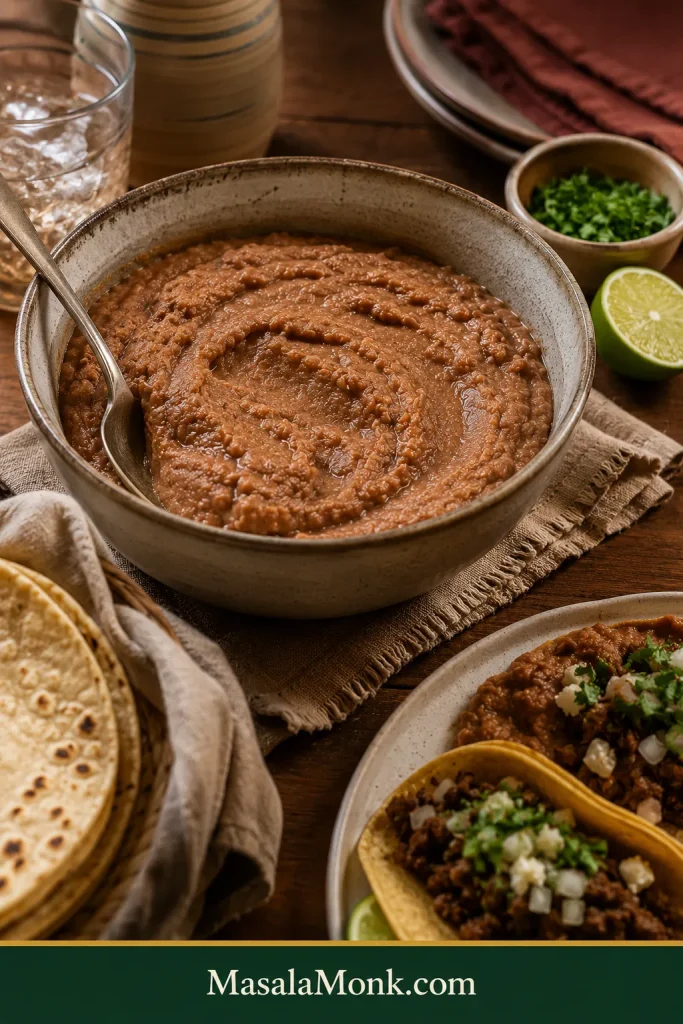
Large communal bowl of creamy refried beans with a serving spoon, tortillas, lime, and taco dinner dishes on a warm wooden table.

Warm, creamy refried beans from one ordinary can—ready for the rest of dinner.

If you make them, tell us which brand you started with, which fat you used, and whether your can needed more than the first 2 tablespoons of liquid. That real-world variation can help the next person opening the same can.

↑ Back to Recipe Short Version

Posted on Leave a comment

Beef Stroganoff Recipe: Tender Beef, Creamy Mushroom Sauce & Easy 30-Minute Dinner

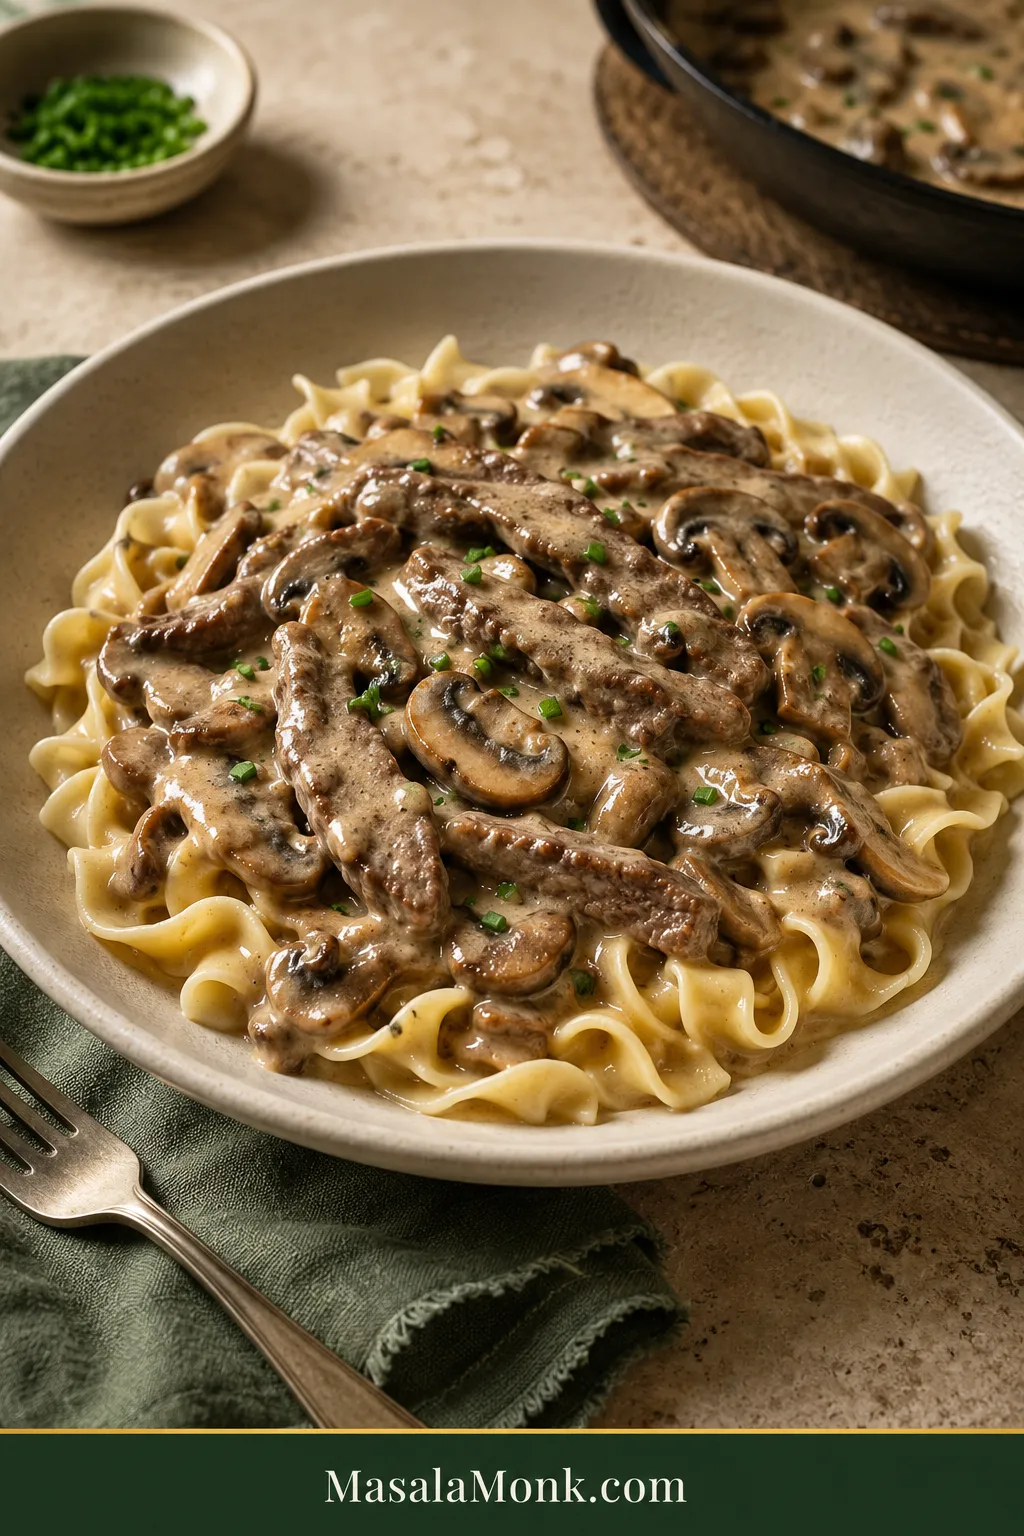
Beef Stroganoff over wide egg noodles with thin browned beef strips, sliced cremini mushrooms, glossy tan sauce and a small scattering of chopped chives.

A good skillet of Beef Stroganoff is all tender browned beef, mushrooms with real color, and a glossy sour-cream sauce that finds its way into the noodles.

It can also look right and still disappoint.

A creamy sauce can hide chewy beef. Mushrooms can soften without developing much flavor. And a sauce that looked generous in the skillet can all but disappear once it meets the noodles.

The fork tells you the truth.

Tender beef yields easily instead of making you chew through long fibers. Properly browned mushrooms taste developed, not merely cooked. The sauce clings in a smooth, savory coat—creamy enough to comfort, loose enough to flow.

This Beef Stroganoff comes together in about 30 minutes with top sirloin, fresh cremini mushrooms, beef broth, Dijon mustard, Worcestershire sauce and full-fat sour cream. There is no cream of mushroom soup, no heavy cream and no wine required.

The Beef Stroganoff Method in One Minute

Sear fast. Brown the mushrooms fully. Build the sauce. Keep the final heat low; return the beef last.

  • Sear fast: use tender steak, slice it thinly across the grain and brown it in uncrowded batches.
  • Brown the mushrooms fully: cook away the moisture they release before building the sauce.
  • Build the sauce: get the flavor and consistency where you want them while the beef rests.
  • Keep the final heat low: stir in the sour cream, then return the steak only long enough to finish cooking and heat through.

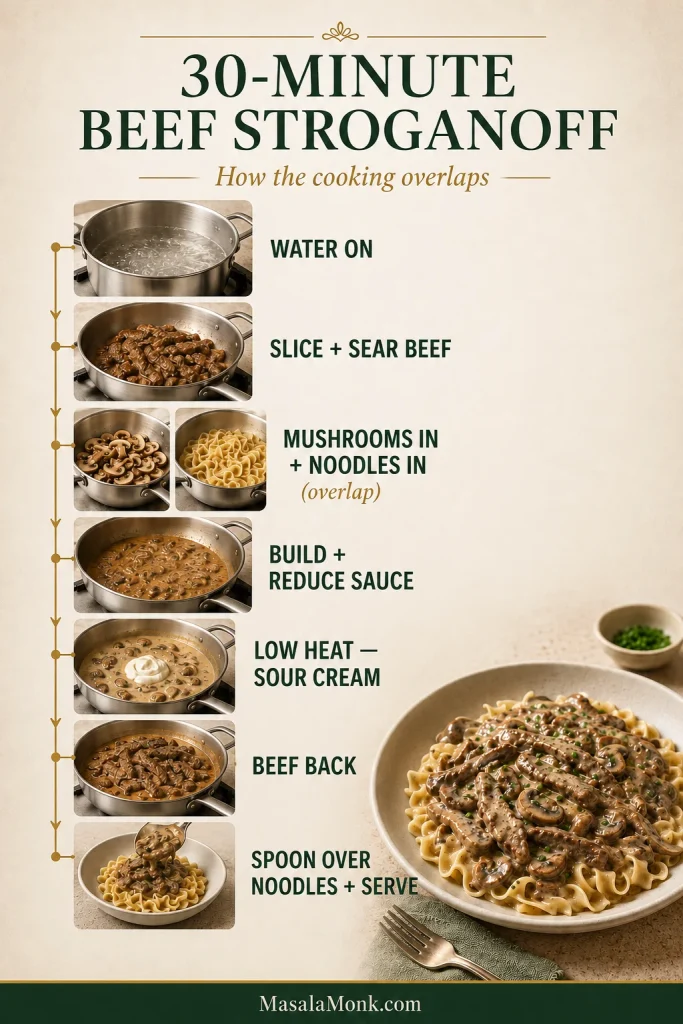
The timing works because several jobs overlap. Start the noodle water first; slice and sear the steak while it heats, drop the noodles when the mushrooms go into the skillet, and build the sauce while the beef rests. That overlap is what makes about 30 minutes of elapsed time realistic, although especially juicy mushrooms or slower knife work can add a few minutes.

Timeline showing overlapping Beef Stroganoff tasks: heating noodle water, preparing and searing beef, cooking mushrooms and noodles, building the sauce, adding sour cream and serving.
If timing slips, let the noodles wait; thin sirloin is less forgiving of extra heat than buttered pasta.

It is the sort of dinner that feels richer than the time it took to make.

Beef Stroganoff Recipe

Serves: 4 generously
Prep: about 10 minutes
Cooking: about 20 minutes
Total elapsed time: about 30 minutes, with some prep overlapping the cooking
Main equipment: 12-inch (30 cm) heavy skillet and a pot for the noodles

Ingredients

For the Stroganoff

  • 1¼ lb (570 g) top sirloin steak
  • ¾ tsp fine sea salt (about 4–5 g), divided, plus more to taste
  • ¾ tsp freshly ground black pepper, divided
  • 1½ tbsp (22 ml) neutral high-heat oil, divided
  • 12 oz (340 g) cremini or baby bella mushrooms, sliced
  • 1 medium-large yellow onion (about 160 g), thinly sliced
  • 2 tbsp (28 g) unsalted butter
  • 2 garlic cloves (about 6 g), finely minced
  • ½ tsp sweet paprika, optional — use sweet, not smoked
  • 2 tbsp (about 16 g) all-purpose flour
  • 1½ cups (360 ml) low-sodium beef broth, plus extra for loosening if needed
  • 2 tsp Dijon mustard
  • 2 tsp (10 ml) Worcestershire sauce
  • ⅔ cup full-fat sour cream (about 150 g), taken out of the refrigerator before cooking
  • 2 tbsp chopped fresh chives, for serving

For Serving

  • 10 oz (285 g) wide egg noodles
  • 1 tbsp (14 g) unsalted butter
  • Salt for the noodle water

Optional Wine Variation

Add ¼ cup (60 ml) dry white wine after the garlic. Scrape up the browned bits and reduce until only a thin layer of wine remains in the skillet, then continue with the regular 1½ cups (360 ml) beef broth. The wine adds brightness and complexity; it does not replace part of the broth in this version.

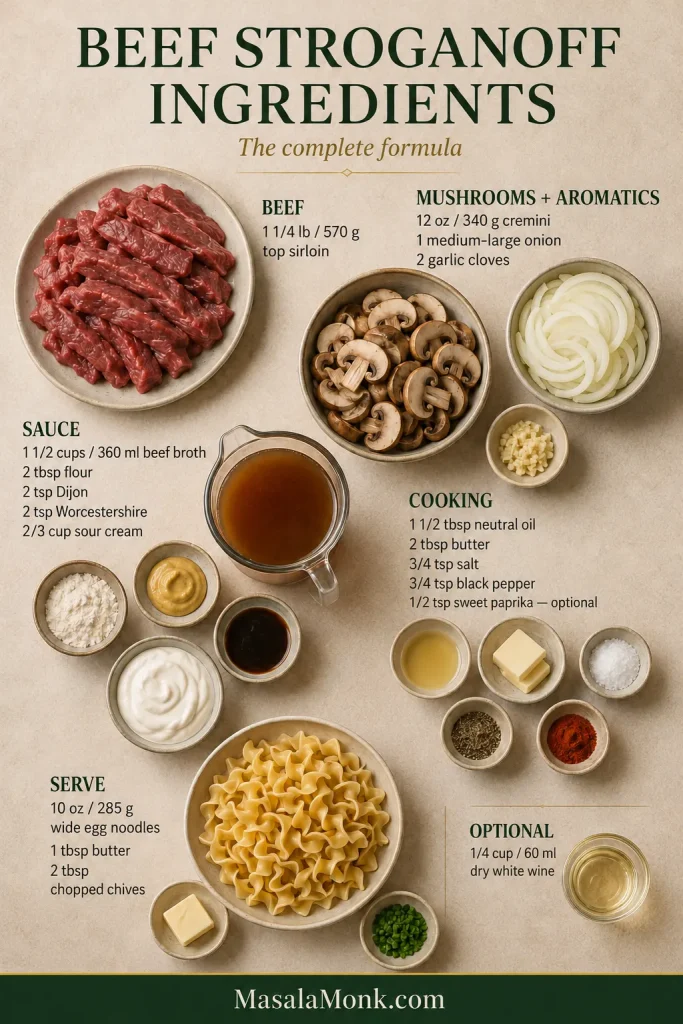
Overhead ingredient board with top sirloin, cremini mushrooms, onion, garlic, broth, flour, Dijon mustard, Worcestershire sauce, sour cream, egg noodles, butter, oil, chives and optional wine.
Measure the sauce ingredients first so the beef can leave the heat the moment it is ready.

Instructions

Start the Noodles and Sear the Beef

  1. Start the noodle water. Put a large pot of well-salted water over high heat, then move straight to the beef. Once the water boils, keep it ready while you sear the steak. When the mushrooms go into the skillet in Step 4, add the noodles to the boiling water. Cook according to the package directions, drain when just tender, toss with 1 tablespoon butter and keep warm. Keep the noodles separate from the Stroganoff unless every serving is going straight to the table.

  2. Slice and season the beef. Trim thick exterior fat and obvious tough sinew. Cut the steak across the grain into strips about ¼ inch (6 mm) thick and roughly 2 inches (5 cm) long. Pat very dry, then season with ½ teaspoon salt and ½ teaspoon black pepper.
  3. Sear the beef in two batches. Heat a 12-inch (30 cm) heavy skillet over high heat until a strip of beef sizzles immediately on contact. Add about half the oil and half the beef in one uncrowded layer. Sear for roughly 30–45 seconds per side, just until browned patches develop. Transfer to a plate, let the skillet return to strong heat, then repeat with the remaining oil and beef. The centers may look underdone when the strips leave the pan. That’s intentional; they cook again at the end.

Brown the Mushrooms and Build the Sauce

  1. Brown the mushrooms and onion. Lower the heat to medium. Once the aggressive searing heat has settled, add 1 tablespoon butter and the mushrooms. Drop the noodles into their boiling water now. Cook the mushrooms for about 3 minutes, then add the onion and remaining tablespoon butter. Continue for roughly 5–8 minutes, until most of the released mushroom water has evaporated and browned edges begin to appear. Listen to the pan: the wet hiss eventually gives way to a sharper sizzle. Season with the remaining ¼ teaspoon salt and ¼ teaspoon pepper.

  2. Build the sauce. Stir in the garlic for about 30 seconds. For the wine variation, add the wine now, scrape up the browned bits and reduce until only a thin layer remains. Stir in the optional paprika, sprinkle the flour over the mushrooms and onion, and cook for about 1 minute. Add a small splash of broth and stir until smooth, scraping the browned bits from the bottom of the skillet. Gradually stir in the remaining broth, followed by the Dijon and Worcestershire.


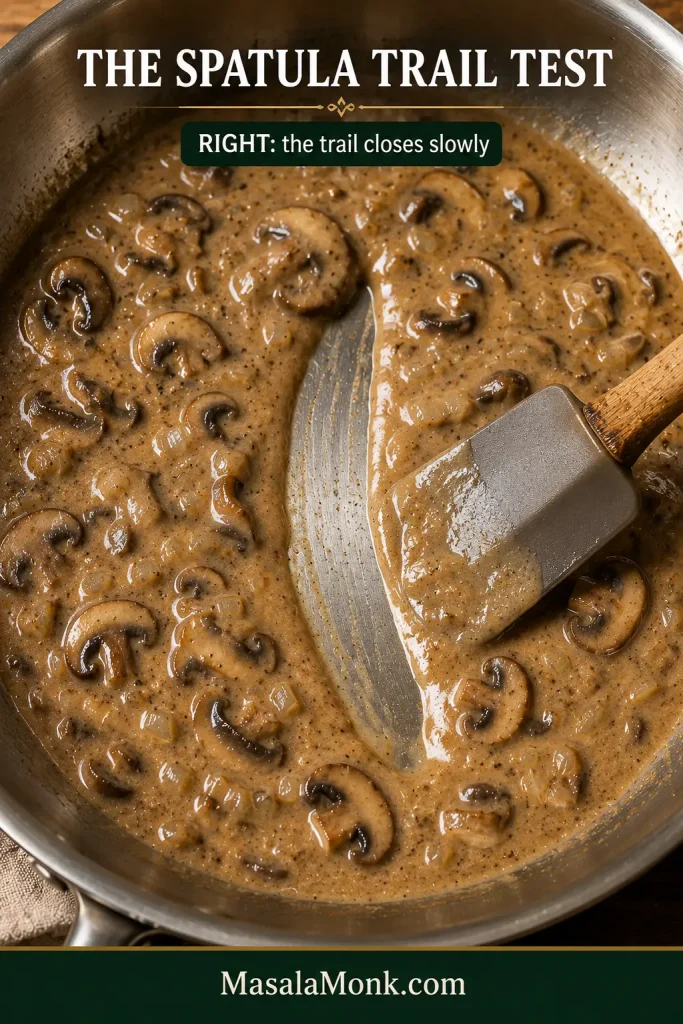
  3. Reduce to the right consistency. Simmer for roughly 3–5 minutes. Drag a spatula through the skillet; the trail should remain visible briefly before flowing closed. A loose sauce needs more reduction. A sauce that has become too thick can be loosened with broth or hot noodle water, one tablespoon at a time.

Finish Gently and Serve

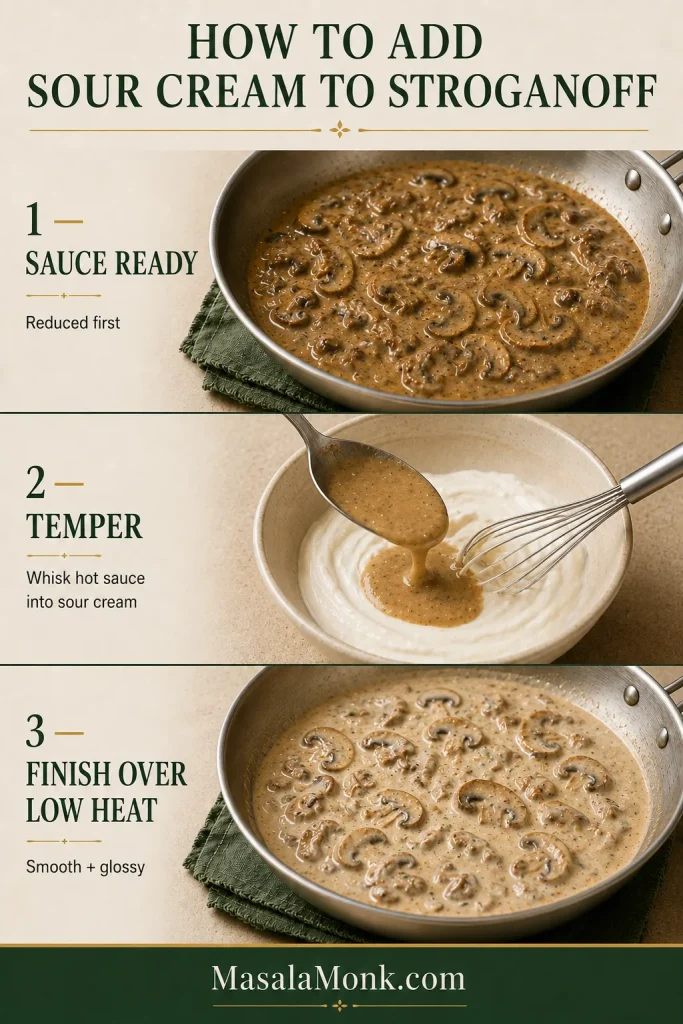
  1. Add the sour cream over low heat. Put the sour cream in a small bowl and whisk in 2–3 tablespoons of hot sauce, one spoonful at a time. Lower the heat—or briefly take the skillet off the burner—then stir the warmed sour cream into the sauce until smooth and glossy.
  2. Taste and adjust. Check the salt first. A muted sauce may need another ¼ teaspoon Dijon. Taste before adding anything else. Another ¼–½ teaspoon Worcestershire can deepen the savory flavor without taking over.
  3. Return the beef. Fold in the steak and every drop of juice collected on the plate. Cook only long enough for the thin strips to finish cooking and heat through. Taste the sauce once more and adjust the salt if needed.
  4. Serve. Spoon the Stroganoff over the warm buttered noodles and scatter the chopped chives over the top.
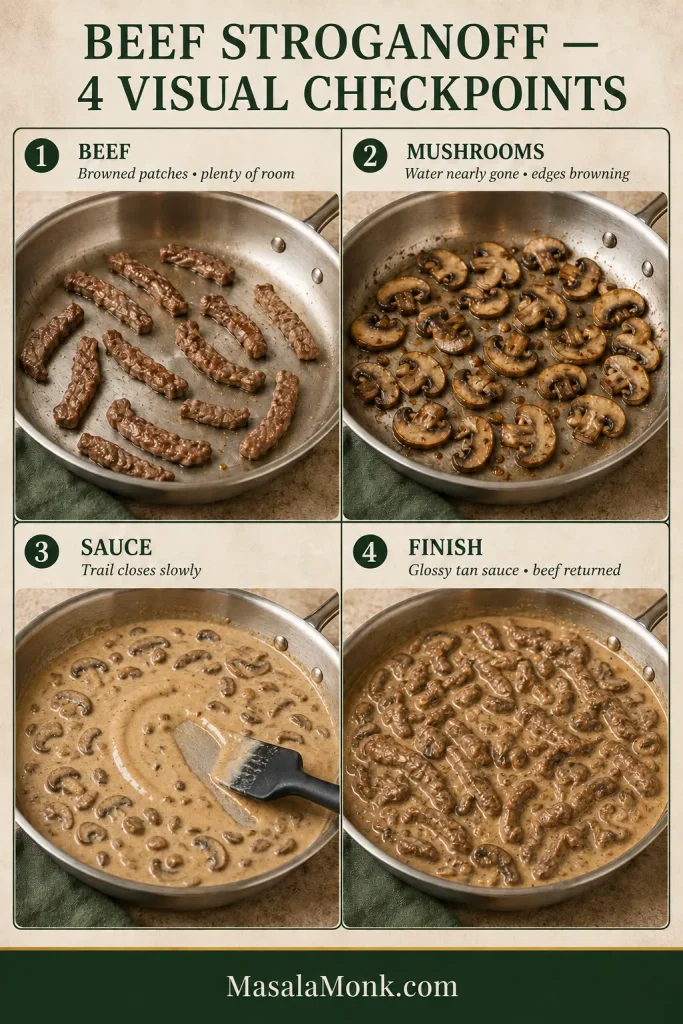
Four cooking checkpoints showing spaced browned beef, mushrooms after most moisture has evaporated, sauce leaving a slow-closing spatula trail, and finished creamy Stroganoff with beef returned.
Use the skillet, not the stopwatch: browning, evaporated mushroom moisture and a slow-closing sauce trail are the key checkpoints.

Food-safety note: USDA guidance for whole beef steaks, chops and roasts is 145°F (63°C) followed by a 3-minute rest. See the USDA safe minimum temperature chart for current guidance.

Doubling the recipe: pan surface area becomes the limiting factor. Keep the beef batches the same size, which usually means four batches instead of two, or work with two large skillets. Twice as many mushrooms also need more room and more time for their moisture to evaporate, so a double batch will take longer than 30 minutes.

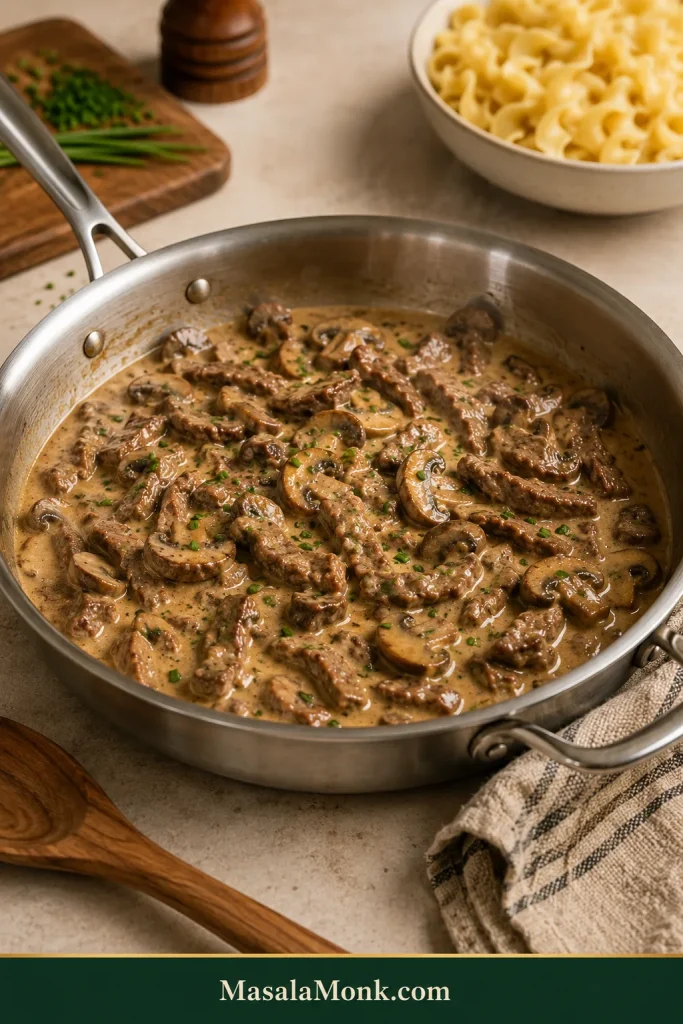
Finished Beef Stroganoff in a stainless steel skillet with thin beef strips and browned mushrooms in glossy tan sauce; wide egg noodles are kept separately nearby.
The finished sauce should still move when the skillet tilts; if it sits stiffly, loosen it before serving.

Need a closer look at one technique? Keep the beef tender · Brown the mushrooms · Understand the sauce · Troubleshoot a problem

What Is the Best Beef for Beef Stroganoff?

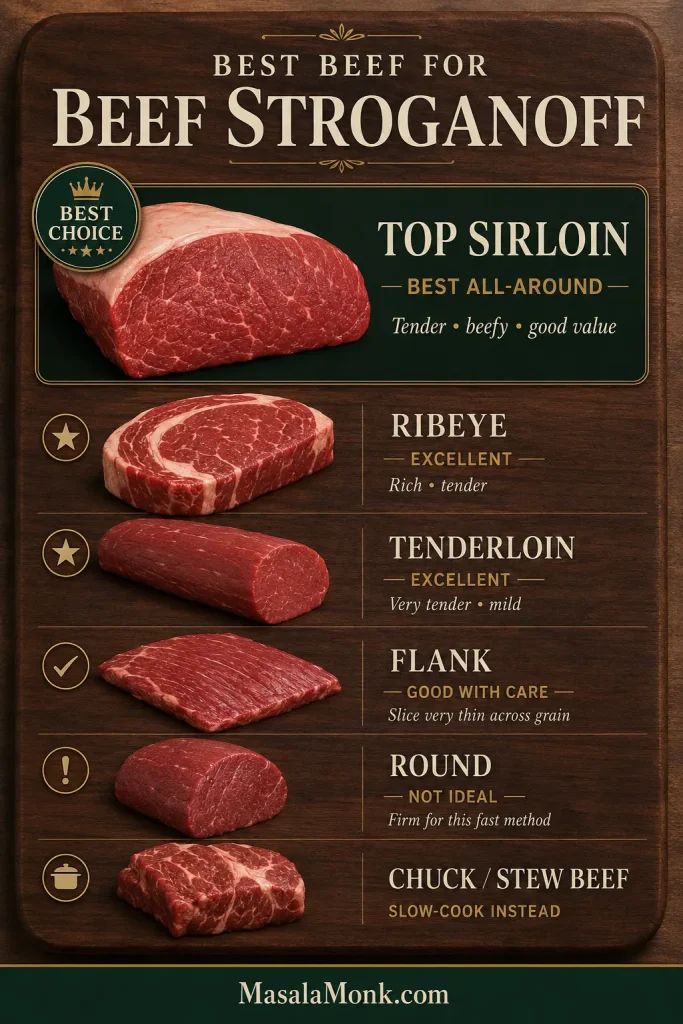
Top sirloin is the best all-around beef for this fast Beef Stroganoff. It is naturally tender enough for a short sear, has plenty of beef flavor, is easy to find and usually costs less than tenderloin or ribeye.

Price isn’t really the dividing line here. Cooking style is. Tender steaks suit this quick skillet method. Tougher cuts need a slower route; a few extra minutes in this skillet won’t suddenly make stew meat tender.

Comparison guide for Beef Stroganoff cuts, with top sirloin presented as the best all-around choice alongside ribeye, tenderloin, flank, round and chuck.
For quick Beef Stroganoff, fine marbling helps; thick fat seams and connective tissue do not have time to soften.

Chuck is much more at home in our slow cooker pot roast, where several hours of low, steady cooking give connective tissue time to soften.

Beef cutFor this fast method?What to expect
Top sirloinExcellent — best overallTender, beefy and good value
RibeyeExcellentRich, tender and more expensive
Tenderloin / filetExcellentVery tender, mild and expensive
Pre-cut steak stripsSometimesDepends on the original cut
Flank steakGood with careSlice very thinly across the grain
RoundNot idealOften lean and firm in a short cook
Chuck / stew meatNoBetter with long, slow cooking

If sirloin doesn’t fit the budget tonight, Stroganoff is not off the table—the beef and cooking method just need to suit each other.

What About Beef Labeled “Stroganoff Strips”?

Check whether the original cut is listed on the package. Some pre-sliced Stroganoff strips are sirloin and work beautifully; others are inexpensive beef cut into narrow pieces. The label tells you how the store expects the meat to be used, not whether it is naturally tender. Thickness matters too: even when the cut itself is suitable, slice unusually thick strips down toward the ¼-inch (6 mm) target before cooking.

How to Keep the Beef Tender

For tender Beef Stroganoff, slice a naturally tender cut thinly across the grain, dry it well, sear it quickly in batches and keep its final cooking time brief.

Slice Across the Grain

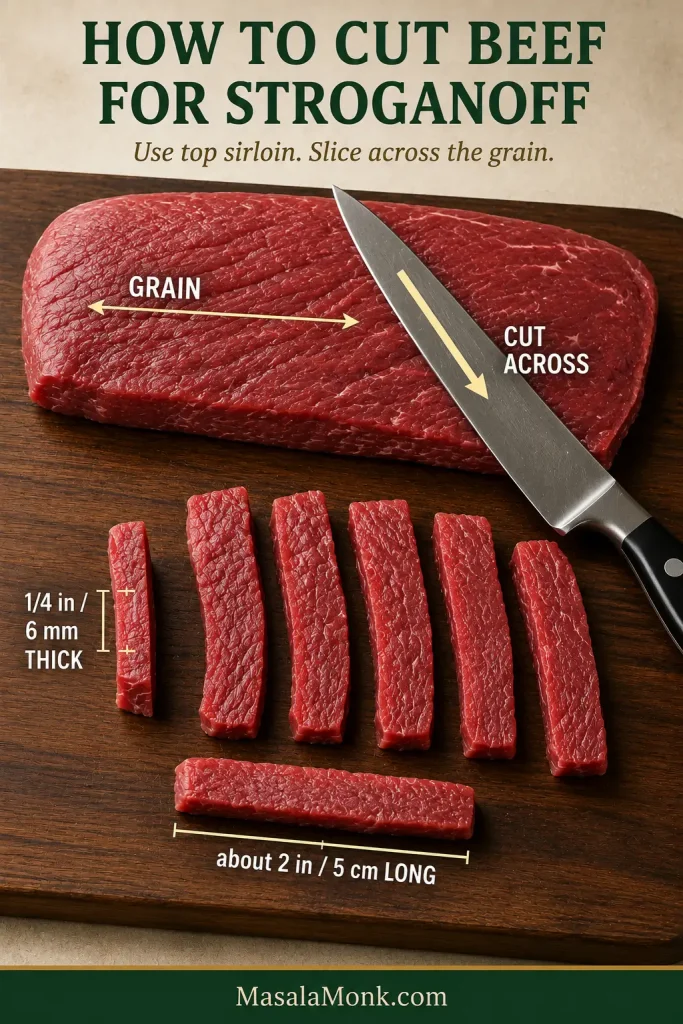
Look at the steak before cutting it and find the direction of the long muscle fibers. Cut across those fibers, not alongside them. Shorter fibers are easier to chew.

Aim for strips around ¼ inch (6 mm) thick and 2 inches (5 cm) long. They should be easy to eat in the same forkful as a mushroom and a few noodles, not long enough to turn dinner into a tug-of-war.

Top sirloin with muscle grain marked, a knife cutting across the grain, and Stroganoff strips shown about 6 millimeters thick and 5 centimeters long.
If the grain changes direction, rotate the sirloin as you cut so every strip stays across the fibers.

Trim what a fast sear cannot soften. Fine marbling is welcome. Thick bands of exterior fat and tough sinew are not. This recipe cooks too quickly for a large chewy seam to render or soften.

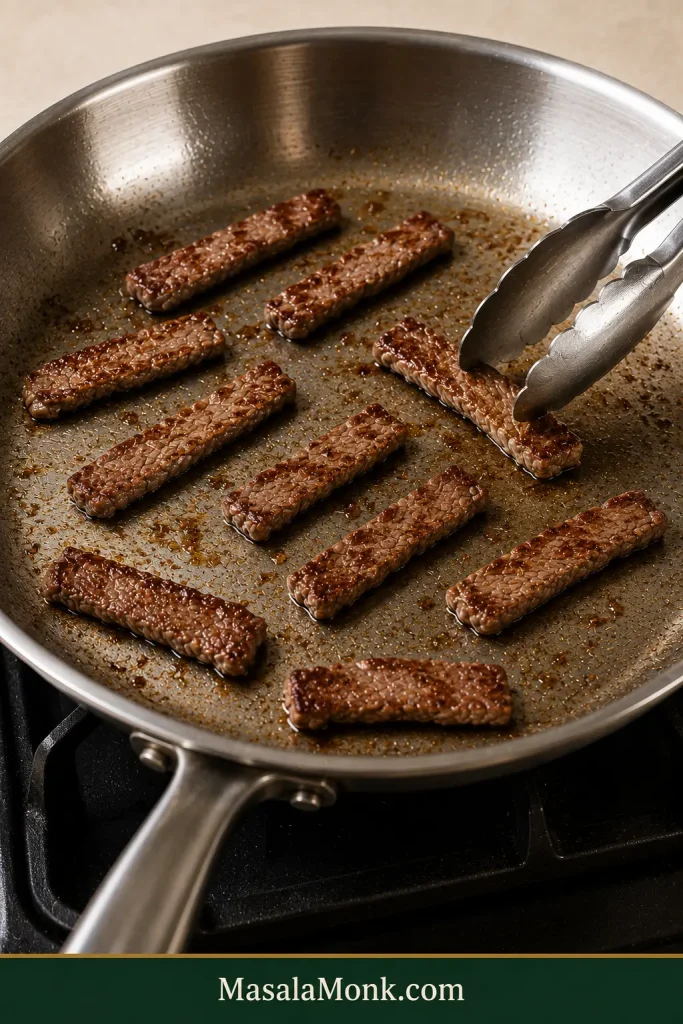
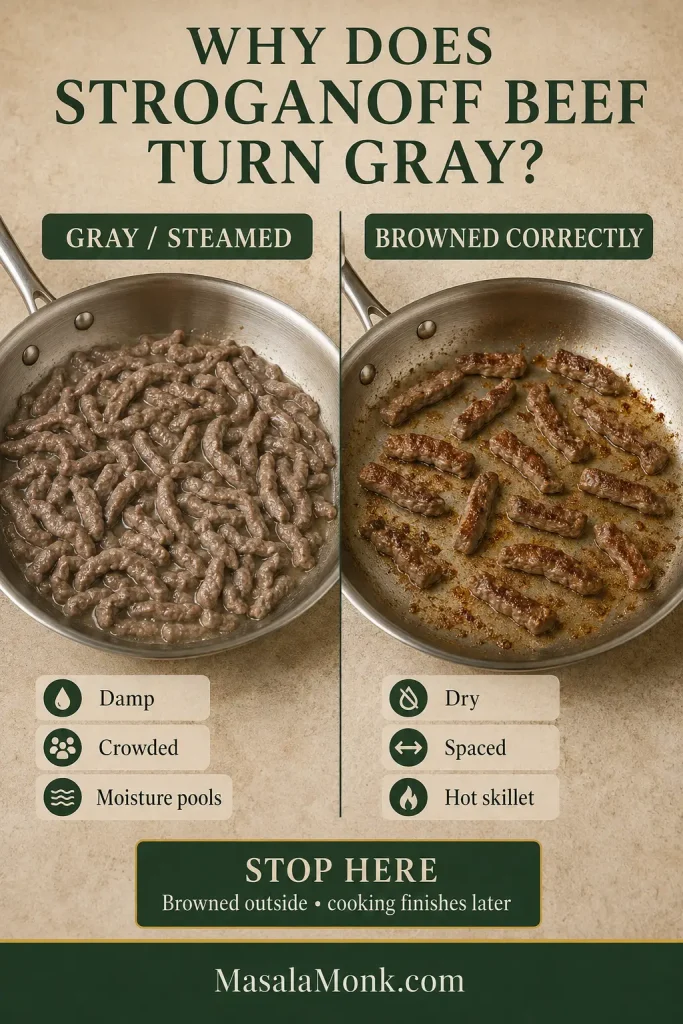
Dry beef browns better. Blot the strips thoroughly before they enter the skillet. Surface moisture has to evaporate before serious browning begins, and a pan crowded with damp beef cools quickly. With dry beef and strong heat, you get brown patches outside while those thin centers have cooking left for the return to the skillet. That’s the sweet spot.

Thin beef strips browning with clear space between them in a stainless steel skillet while metal tongs turn one browned strip.
If batch two stops sizzling on contact, let the skillet regain heat before adding more beef.

Keep the First Sear Short

Thin sirloin strips need only a brief head start. Once they have color, move them to a plate and let the mushrooms and sauce catch up. Extra simmering does not make sirloin more tender. It just keeps cooking it.

Side-by-side comparison of crowded gray beef surrounded by moisture and properly spaced browned beef in a hot stainless steel skillet.
Once gray beef is cooked, stop chasing color; extra heat cannot undo steaming, but it can toughen the meat.

With the beef out of the way, the mushrooms can have the skillet to themselves.

How to Get Deeply Browned Mushrooms

Cook the mushrooms until the water they release has evaporated and browned edges begin to appear. Soft mushrooms are not necessarily browned mushrooms.

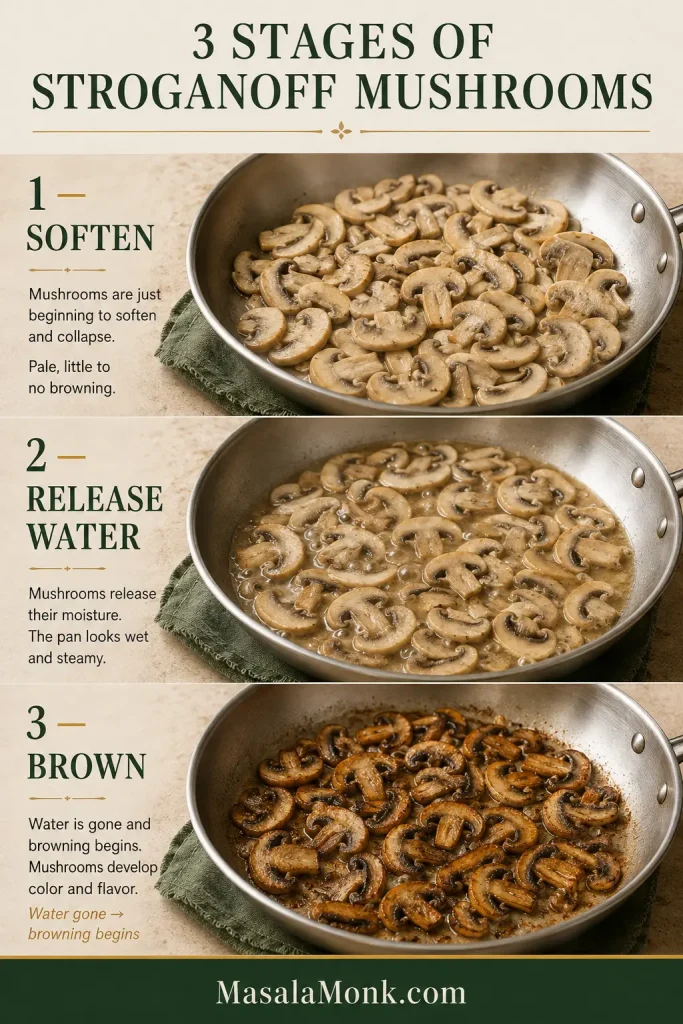
Fresh mushrooms usually move through three recognizable stages:

  1. They soften and absorb some of the fat.
  2. They release water. The skillet can suddenly look much wetter than expected.
  3. The water cooks away and browning begins.
Three stages of sliced cremini mushrooms in one skillet: initially softening, sitting in released liquid, and finally browned after the moisture has evaporated.
Let released mushroom liquid evaporate in the pan; meaningful browning begins only after the wet stage passes.

The wet middle stage is where cooks often think something has gone wrong. It hasn’t.

Keep cooking while liquid covers the bottom of the skillet. As it disappears, the pan moves from a wet hiss to a sharper sizzle, and brown patches show around the mushroom edges. The aroma deepens too. Suddenly the skillet smells much more like dinner.

That change in sound, aroma and color tells you more than the clock does.

Cremini, White Button or Shiitake?

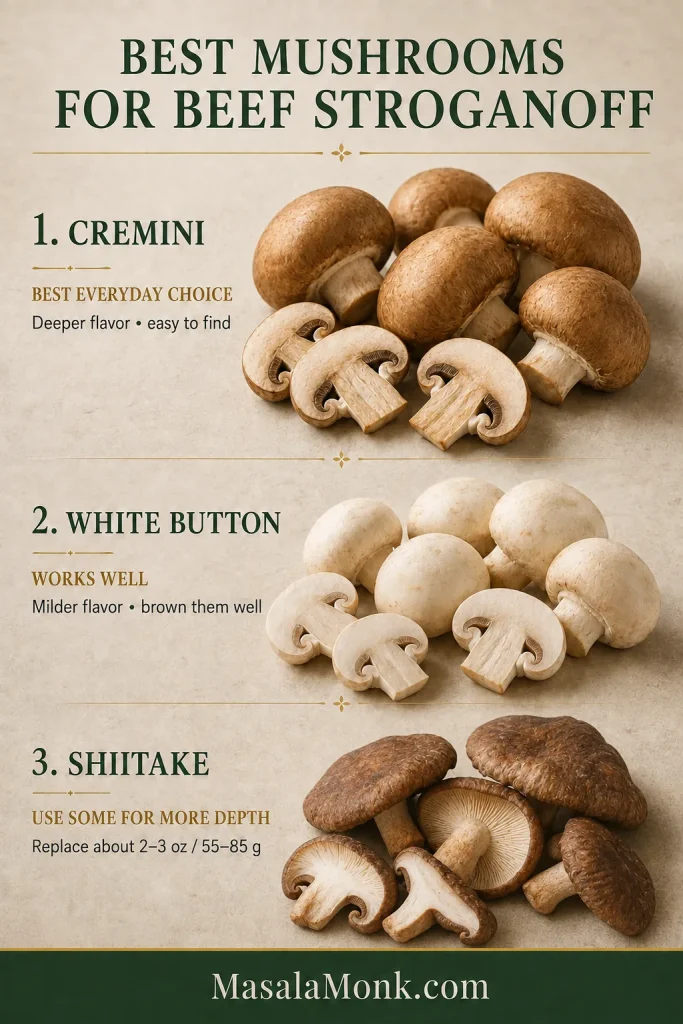
Cremini, also sold as baby bella mushrooms, are the everyday choice here. They bring more mushroom depth than white buttons while remaining easy to find.

White button mushrooms work well too. Good browning matters more than buying an expensive variety. For a deeper mushroom note, replace 2–3 oz (55–85 g) of the cremini with sliced shiitake caps.

Mushroom comparison showing brown cremini, white button and dark-capped shiitake mushrooms, with cremini identified as the everyday Stroganoff choice.
Similar slice thickness helps cremini, white buttons or shiitake lose moisture and brown more evenly.

Love that browned-mushroom flavor? Our creamy mushroom sauce takes the same idea in a direction designed for steak, chicken or pasta. Once the mushroom water is gone and the edges have color, the skillet is ready to become the sauce.

How Beef Stroganoff Sauce Works

The sauce should taste first of browned beef and mushrooms, with sour cream smoothing the edges—not like a bowl of sour cream with a little beef in it.

What Is Stroganoff Sauce Made Of?

Stroganoff sauce is a savory sour-cream sauce built from beef broth and browned mushrooms, with Dijon and Worcestershire for depth and flour to give it body.

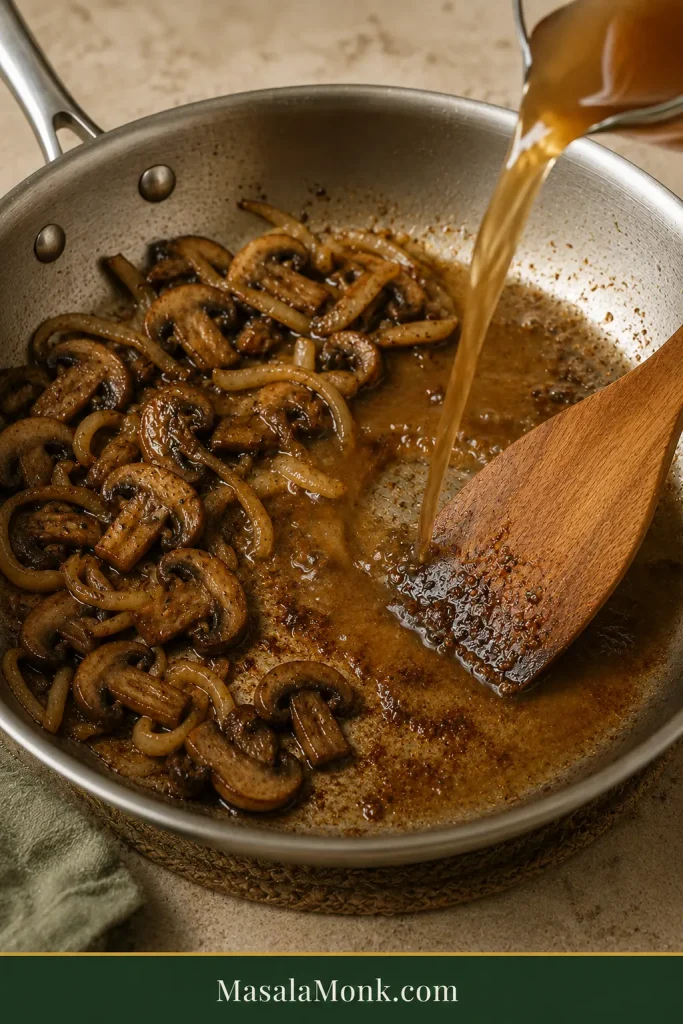
The broth pulls the browned bits from the skillet into the sauce, while Dijon adds brightness and Worcestershire deepens the beefy side. Flour gives the broth enough body to cling to the noodles; sour cream comes last with richness and tang.

Beef broth being poured into a stainless skillet with browned mushrooms and onions while a wooden spatula loosens browned fond from the pan.
Keep the deep-brown fond for flavor; remove any truly black, scorched residue before deglazing.

Finished Stroganoff sauce is glossy and pale brown to tan rather than stark white, with browned mushrooms visible through it.

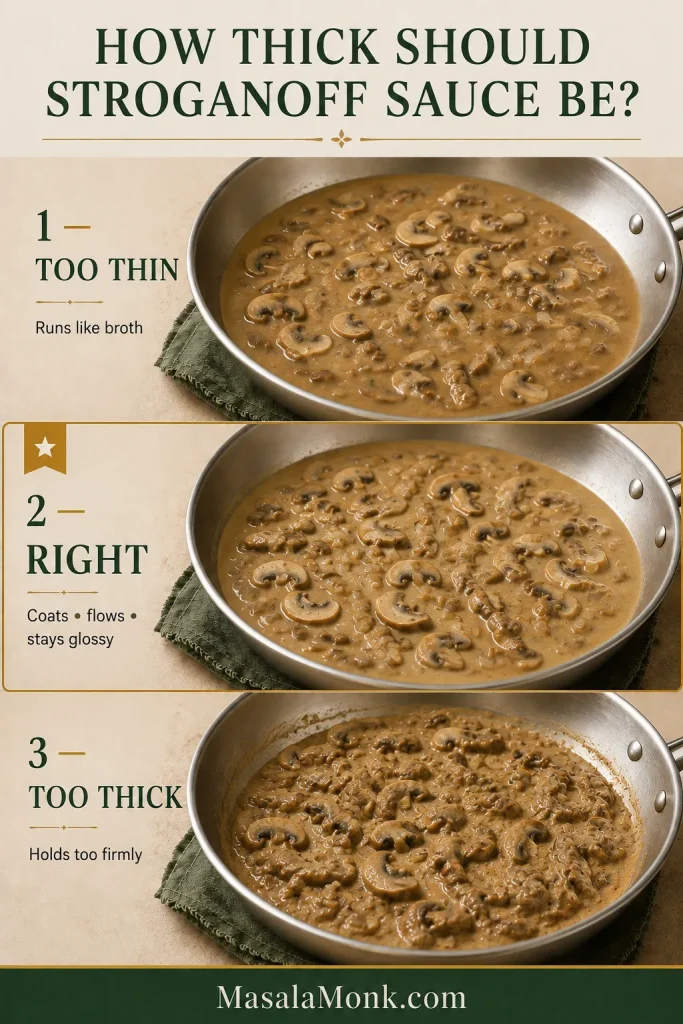
How Thick Should Stroganoff Sauce Be?

Think loose gravy rather than soup or paste: enough body to coat a noodle, but fluid enough to move around the plate.

Three skillets comparing thin, correct and overly thick mushroom sauce, with the correct sauce glossy and fluid around the mushroom slices.
Stop reducing slightly before perfect thickness; sour cream and a short rest will add more body.

On a spoon, the sauce leaves an opaque coating instead of running straight off. Drag a spatula through the skillet and the trail hangs around briefly before flowing closed. More reduction fixes most thin sauces at this stage; broth or hot noodle water loosens one that has gone too far.

Wooden spatula drawn through glossy mushroom sauce in a stainless skillet, creating a clear path that is beginning to flow closed.
Test an open patch of sauce—the liquid, not a pile of mushrooms, should make the spatula trail linger.

Sour Cream Is the Finish, Not the Fix

Before the sour cream goes in, the sauce should already be close to the thickness and flavor you want.

Up to this point, the skillet can simmer and reduce freely. Once the sour cream is in, keep the heat low. Tempering it with a few spoonfuls of hot sauce first makes that last stage more forgiving.

Three-stage guide showing reduced mushroom sauce, hot sauce mixed gradually into sour cream, and the resulting pale tan creamy sauce finished gently over low heat.
Cold sour cream benefits from tempering: a little hot sauce warms it gradually before the low-heat finish.

By then, the mushrooms have color, the sauce coats the spoon and the seasoning is nearly there. Stir in the sour cream and dinner is close.

Does Beef Stroganoff Need Heavy Cream?

No. Beef broth and flour provide the body in this version, while sour cream supplies the richness and tang. Heavy cream appears in many modern Stroganoff recipes and makes a richer, softer-tasting sauce, but it isn’t necessary here.

When the Sauce Looks Good but Tastes Flat

A beautiful skillet can still taste muted. More sour cream usually isn’t the answer.

Salt wakes up an underseasoned sauce. Dijon gives it lift, while Worcestershire adds deeper savoriness. Make small adjustments and taste between them; it is much easier to add another drop than to pull one back out.

Something still off in the skillet? Jump to troubleshooting · Back to the recipe

What to Serve With Beef Stroganoff

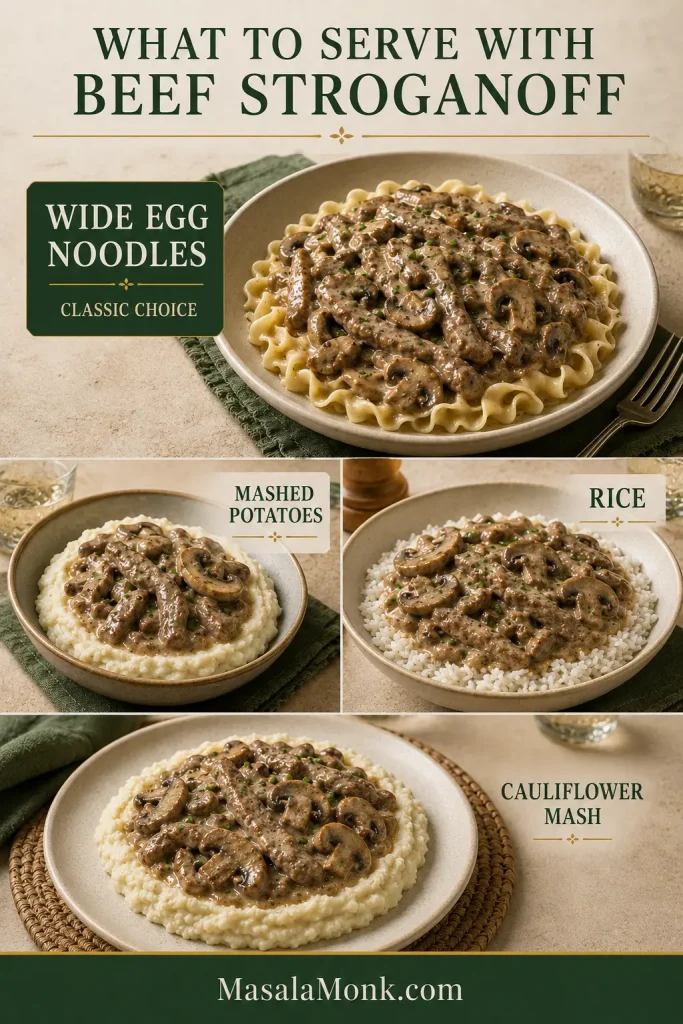
Wide egg noodles are the first choice here. Their broad surfaces catch the sauce without competing with the beef.

Mashed potatoes make the plate softer and richer; rice keeps things simple. Pappardelle or tagliatelle work when wide egg noodles are hard to find, while cauliflower mash gives you a lower-carb base that holds a creamy sauce well.

Serving comparison showing Beef Stroganoff paired with wide egg noodles, mashed potatoes, white rice and cauliflower mash.
Noodles catch sauce in folds, potatoes absorb it eagerly, and rice keeps more separation between bites.

If potatoes sound especially good tonight, these creamy mashed potatoes are soft and spoonable enough for the Stroganoff to settle right into them.

The rest of the plate does not need much. Stroganoff is already warm, soft and rich, so a crisp green salad or simply cooked green vegetable gives it contrast without turning an easy skillet dinner into a project.

Swaps and Variations That Work

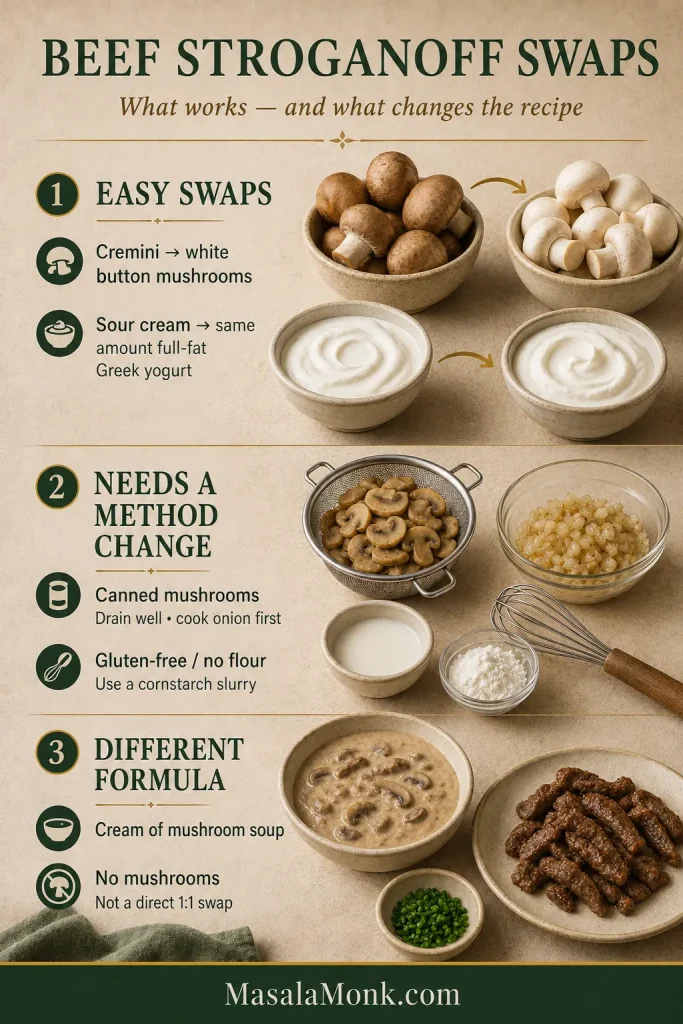
Missing an ingredient doesn’t always mean changing the whole recipe. These swaps fit the method without quietly turning it into a different Stroganoff.

SwapHow to make it work
White button mushroomsUse them 1:1 in place of cremini and cook them through the same moisture-release and browning stages.
Canned mushroomsDrain very well. Instead of the normal mushroom step, melt the full 2 tablespoons butter and cook the onion first until softened. Add the drained mushrooms for the final 2–3 minutes and cook off any remaining moisture. Season with the remaining ¼ teaspoon salt and ¼ teaspoon pepper, then continue with the garlic. They will not develop the same browned flavor as fresh mushrooms.
Full-fat Greek yogurtUse the same amount as the sour cream. Temper it the same way and keep the final heat low. Expect a slightly sharper finished sauce.
No WorcestershireLeave it out rather than forcing a substitute. Check the salt at the end. Extra Dijon can add brightness, but the finished sauce will have less savory depth.
Gluten-freeUse gluten-free noodles and check the broth, Worcestershire and mustard labels. Omit the flour. After the broth reduces, mix 1 teaspoon cornstarch with 1 tablespoon cold water and stir the slurry in gradually. Repeat only when more thickening is needed.
No flourOmit the flour and let the broth reduce first. Mix 1 teaspoon cornstarch with 1 tablespoon cold water, add part of the slurry, and cook briefly before deciding whether the sauce needs the rest.
Beef Stroganoff substitution guide grouping white mushrooms and Greek yogurt as easier swaps, canned mushrooms and cornstarch as method changes, and condensed soup or removing mushrooms as larger formula changes.
Ask what the ingredient does: flavor-only swaps are simpler than changes to moisture, thickening or dairy behavior.

Can I Use Cream of Mushroom Soup?

Yes—but not as a direct 1:1 replacement for the broth and sour cream here. Condensed soup brings its own salt, starch, dairy and mushroom flavor, so swapping it in changes too much of this sauce to treat it like one ordinary ingredient substitution.

A soup-based Stroganoff works best when the recipe is built around the soup from the beginning. Adding a can halfway through this version and trying to correct everything afterward creates more problems than it solves.

Using Leftover Cooked Steak

Skip the searing completely. Slice the cooked steak thinly and fold it in at the very end, only long enough to heat through. Already-cooked steak does not need another full round of cooking.

What If I Don’t Want Mushrooms?

Leaving out all 12 ounces (340 g) of mushrooms isn’t a clean swap in this formula. They account for a large amount of the food in the skillet and contribute moisture and savory flavor as they cook. With all of that removed, too much else changes for “just leave them out” to be good advice. A mushroom-free Stroganoff needs its sauce built differently from the start.

A Note on “Authentic” Beef Stroganoff

There isn’t one frozen-in-time version everyone has to reproduce. Beef Stroganoff has changed as it has traveled through countries and home kitchens, with different approaches to mushrooms, seasoning and dairy, as well as different choices of noodles, rice or potatoes underneath.

The goal here is narrower: tender quickly seared steak, deeply browned mushrooms and a tangy sour-cream sauce that works on an ordinary weeknight.

Beef Stroganoff Troubleshooting

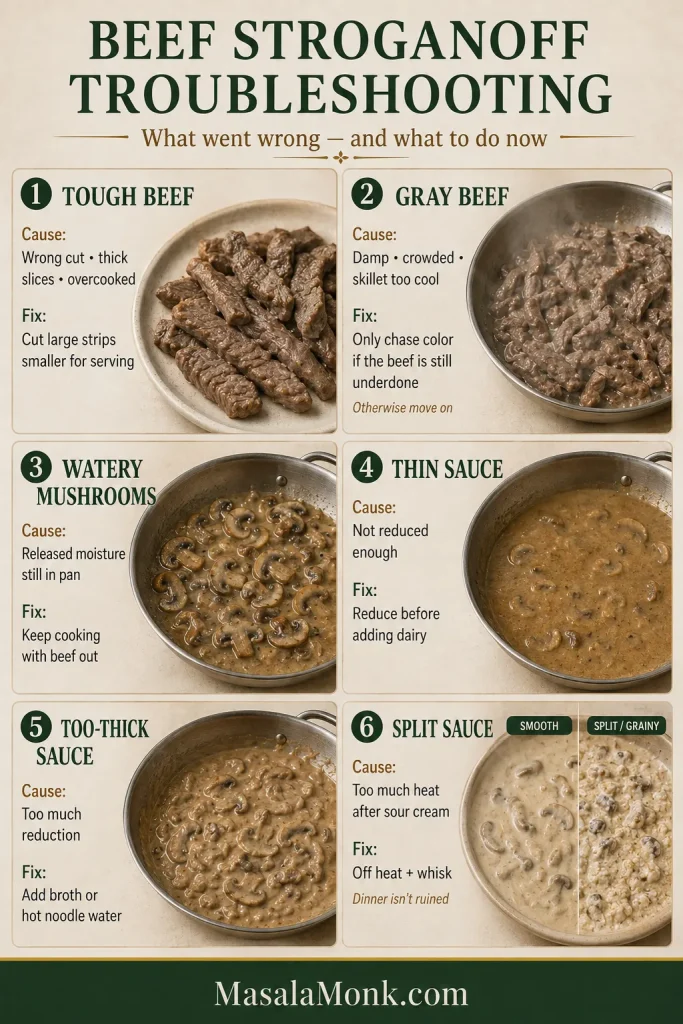
If dinner is already in the skillet and something looks wrong, start with the symptom you can see or taste. Most problems come back to the beef, the mushrooms, the sauce consistency or too much heat after the sour cream goes in.

Six-part Beef Stroganoff troubleshooting guide covering tough beef, gray beef, watery mushrooms, thin sauce, overly thick sauce and split sauce with causes and corrective actions.
Protect tenderness and sauce texture first; fixing color or thickness is not worth creating a worse problem.

Beef and Mushroom Problems

ProblemLikely causeWhat to do nowNext time
Beef is toughWrong cut, thick slices or too much cookingCut large strips smaller to make them easier to eatUse sirloin or another tender steak, slice across the grain and keep the cooking brief
Beef is grayDamp meat, cool skillet or overcrowdingIf still underdone, remove excess liquid and briefly restore strong heat. If already cooked, move on—don’t sacrifice tenderness chasing colorDry the beef, work in batches and let the skillet recover between them
Mushrooms are wateryReleased moisture has not evaporated yetKeep the beef out and continue cooking until the liquid is gone and browning beginsFollow the pan rather than relying only on the timer

Sauce, Noodle and Leftover Problems

ProblemLikely causeWhat to do nowNext time
Sauce is thinToo much moisture or insufficient reductionReduce before adding dairy or beef; use a small slurry when reduction is not enoughLet mushroom moisture evaporate before building the sauce
Sauce is too thickToo much reduction or thickenerAdd broth or hot noodle water one tablespoon at a timeStop reducing while the sauce is slightly looser than the texture you want on the plate
Flour is lumpyThe broth went in too quicklyWhisk or stir vigorously before adding sour creamStart with a small splash of broth and smooth it out before adding more
Sauce is grainy or splitThe sour cream met excessive heatTake the skillet off the heat and whisk. It may not regain perfect gloss, but dinner isn’t ruinedTemper the sour cream and keep the final heat low
Sauce tastes flatUnderseasoning or weak browningCheck salt first, then adjust Dijon or Worcestershire in small amountsDevelop color on the beef and mushrooms and scrape the browned bits into the sauce
Sauce disappeared into noodlesThe noodles sat in the sauce and absorbed itLoosen the remaining sauce with some brothKeep the main skillet and noodles separate until serving
Leftovers are dryNoodles absorbed sauce during storageReheat with a splash of brothStore the noodles separately

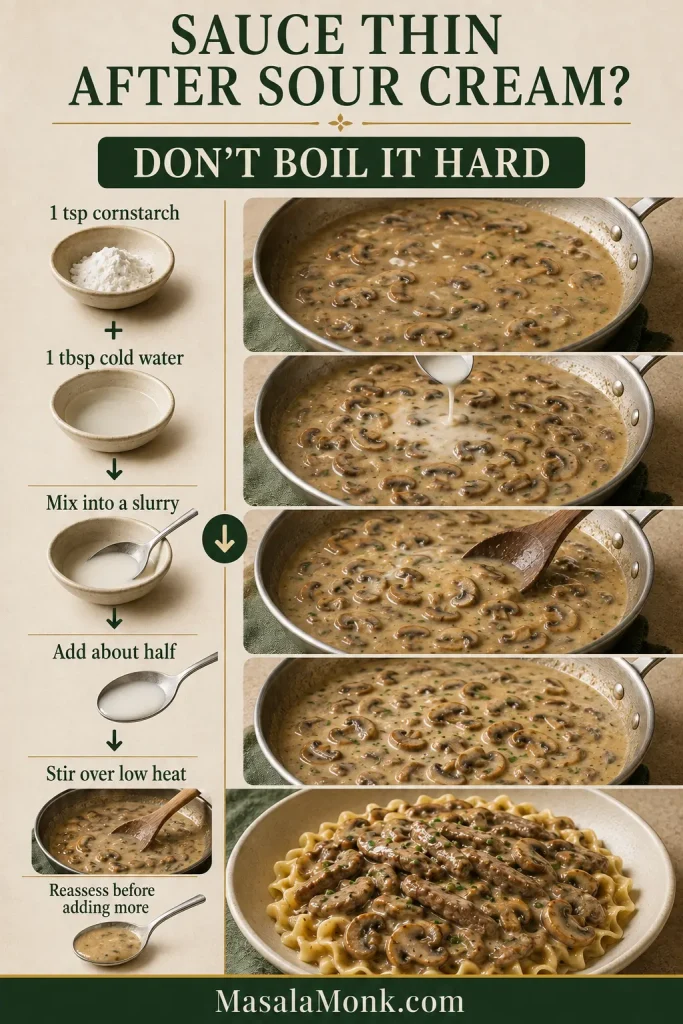
My Sauce Is Thin, but the Sour Cream Is Already In

Once the sour cream is in, boiling the sauce down hard creates a second problem while you’re trying to fix the first.

Mix 1 teaspoon cornstarch with 1 tablespoon cold water. Stir about half into the Stroganoff over low heat and give it a moment to thicken. Add more only when the sauce needs it. Next time, do most of the reducing before adding the sour cream.

Step-by-step sauce rescue showing cornstarch mixed with cold water into a slurry and added gradually to thin Stroganoff sauce over low heat.
Add slurry gradually and pause before adding more—cornstarch needs heat and a moment to show its full effect.

Dinner back on track? Back to the recipe · Back to top

Make It Ahead, Store It and Reheat It

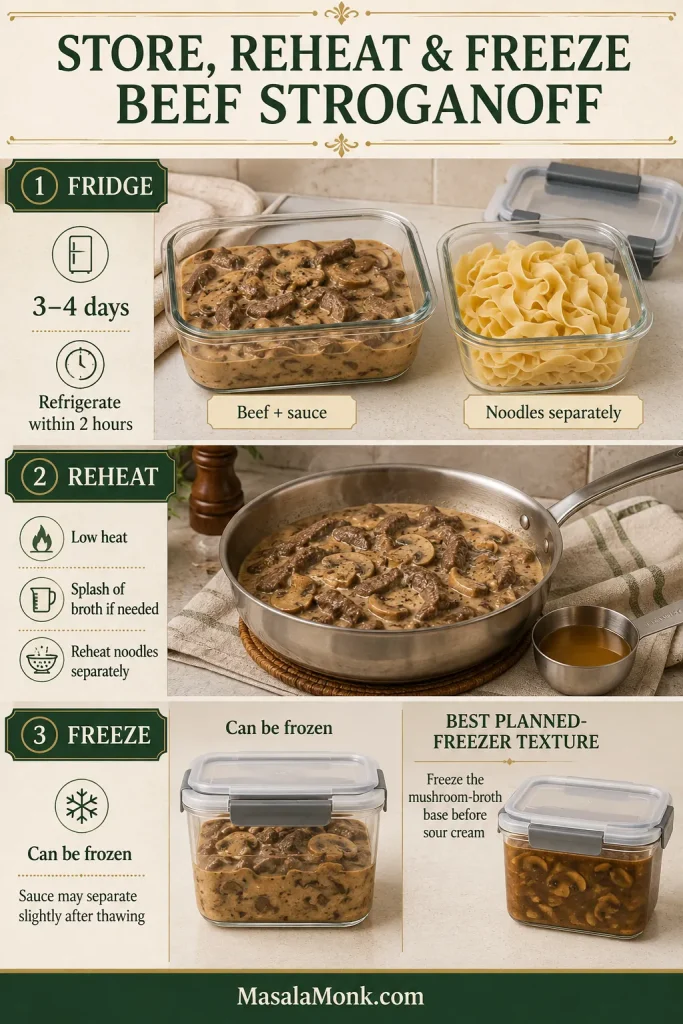
For the best leftovers, keep the noodles separate, reheat the sauce gently and treat freezing as a texture decision rather than an all-or-nothing rule. The details below cover each route.

Storage guide showing Beef Stroganoff beef and sauce refrigerated separately from egg noodles, gentle skillet reheating with broth, and mushroom-broth sauce base frozen before sour cream.
Separate noodles give you control: loosen the sauce with broth without overcooking the pasta during reheating.

How Long Does Beef Stroganoff Keep?

Refrigerated Beef Stroganoff keeps for 3–4 days. Refrigerate leftovers within 2 hours of cooking. For reheating guidance, FoodSafety.gov recommends heating leftovers to 165°F (74°C).

Store the beef and sauce together and the noodles separately. That prevents tomorrow’s noodles from soaking up much of the sauce while everything sits in the refrigerator.

How to Reheat It Without Breaking the Sauce

Warm Stroganoff slowly, adding a splash of broth when the chilled sauce needs loosening. Stir often so the edges do not get much hotter than the center. Reheat the noodles separately.

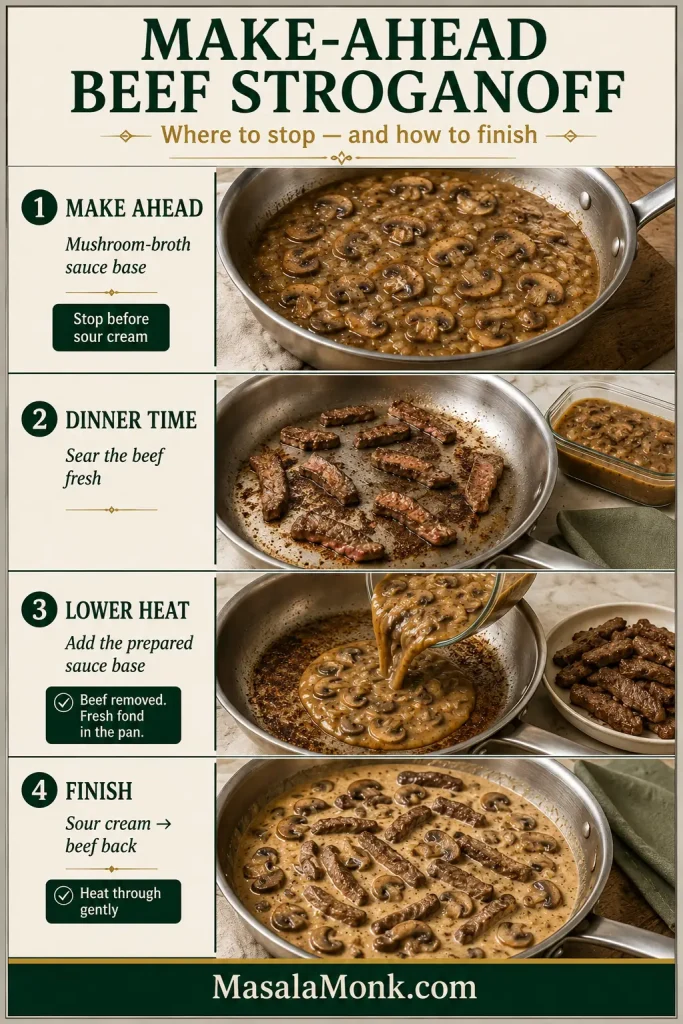
Where to Stop If You’re Making It Ahead

Make the mushroom-broth sauce base ahead, but sear the steak fresh when you’re ready to eat. Stop once the sauce base reaches the consistency you want, before the sour cream goes in. Cool it promptly and refrigerate it. Keep the raw steak refrigerated separately.

At dinnertime, heat the skillet and sear the beef first. Transfer it to a plate, lower the heat and let the skillet settle for a moment, then add the prepared mushroom-broth base to the same pan. Warm it through, scraping in the fresh browned bits left by the steak. Temper and stir in the sour cream, then return the beef only long enough to finish cooking and heat through. Do not partially sear the beef, refrigerate it and plan to complete its cooking later.

Four-step make-ahead guide showing mushroom-broth sauce prepared without dairy, fresh beef seared separately, sauce base reheated in the skillet, then sour cream added and beef returned.
The chilled sauce base will thicken; loosen it gently with broth before adding sour cream and freshly seared beef.

Can You Freeze Beef Stroganoff?

Yes. Fully cooked Beef Stroganoff can be frozen, although the sour-cream sauce may look slightly separated after thawing. Thaw and reheat it slowly, adding broth as needed to loosen the sauce.

If you’re cooking specifically for the freezer, the smoother option is to freeze the mushroom-broth sauce base before adding the sour cream. Reheat the base and add fresh sour cream when you make the meal.

The Fork Should Tell You It Worked

A 30-minute dinner does not have to taste hurried.

The beef gets its short blast of high heat. The mushrooms stay in the skillet long enough to develop real color. Those browned bits make their way into the sauce, and the sour cream softens everything without burying the beef and mushrooms underneath it.

Spoon it over the warm noodles while the sauce is glossy and flowing. Add the fresh chives last.

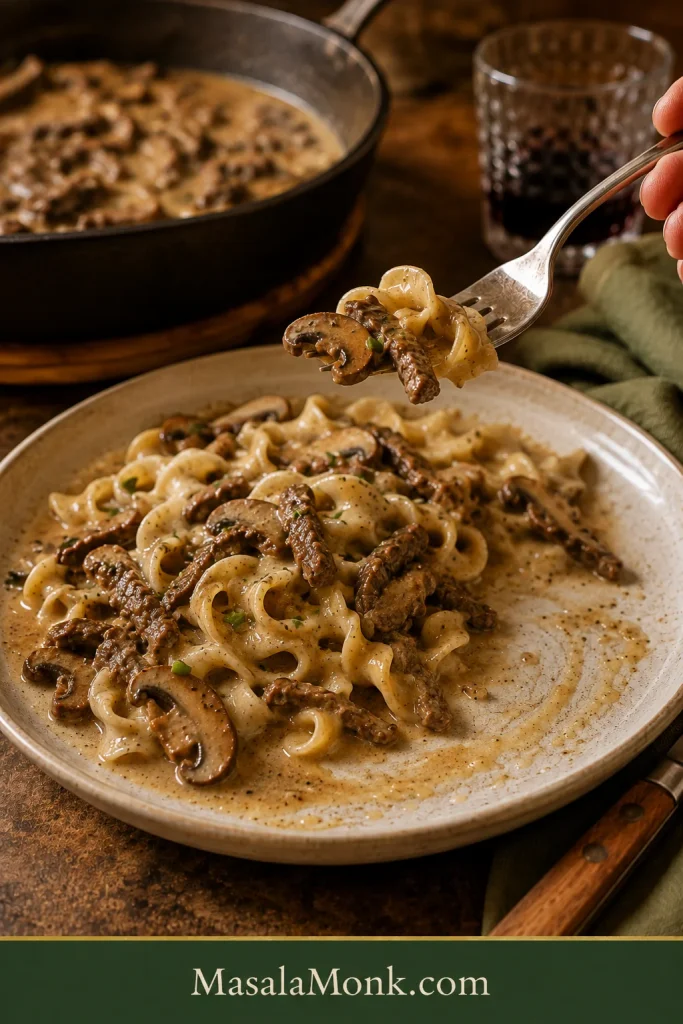
Then take the first forkful: a tender strip of beef, a browned mushroom, a few noodles and enough tangy sauce to bring all three together.

Partially eaten plate of Beef Stroganoff as a fork lifts a bite with one thin beef strip, a browned mushroom slice, a fold of wide egg noodle and glossy tan sauce.
Posted on Leave a comment

Hot Honey Chicken Tenders Recipe: Crispy, Juicy & Sweet-Spicy

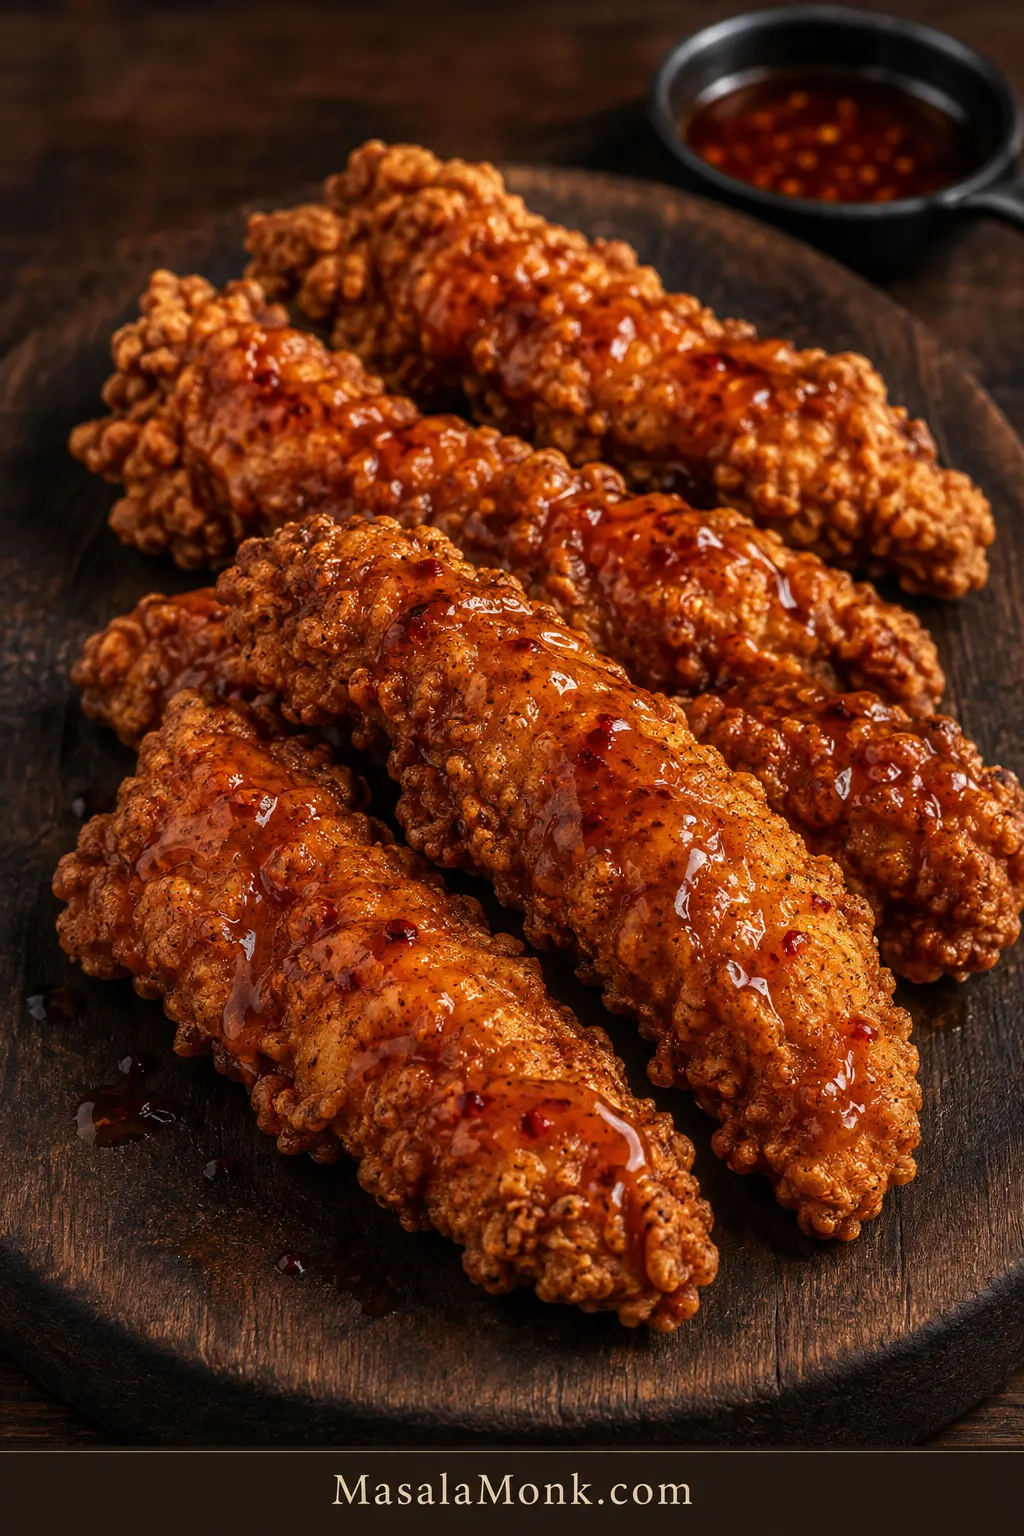
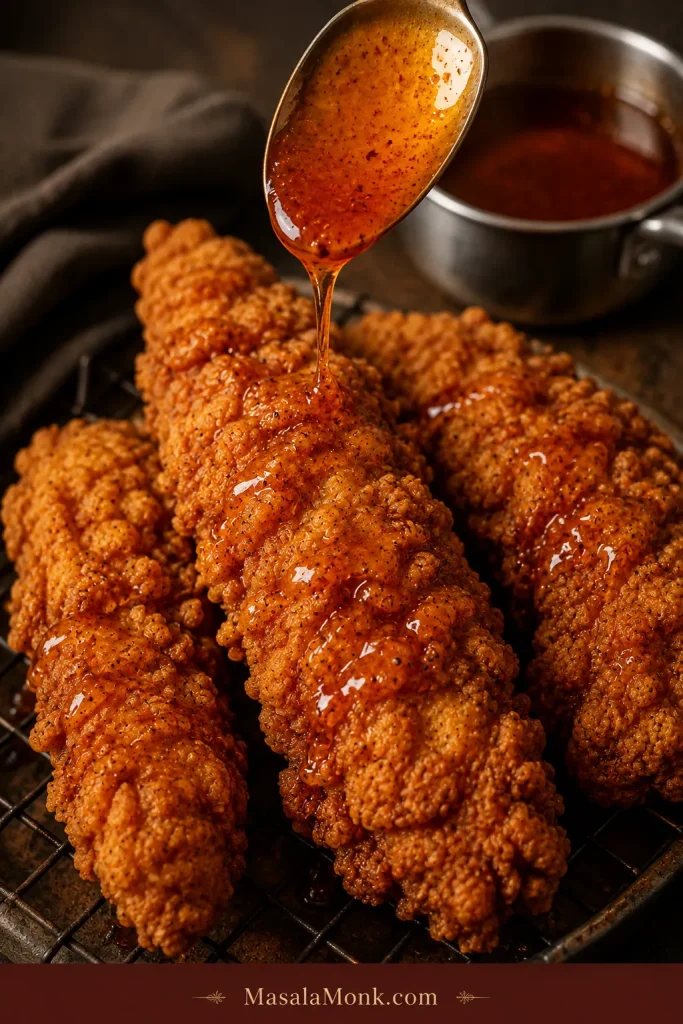
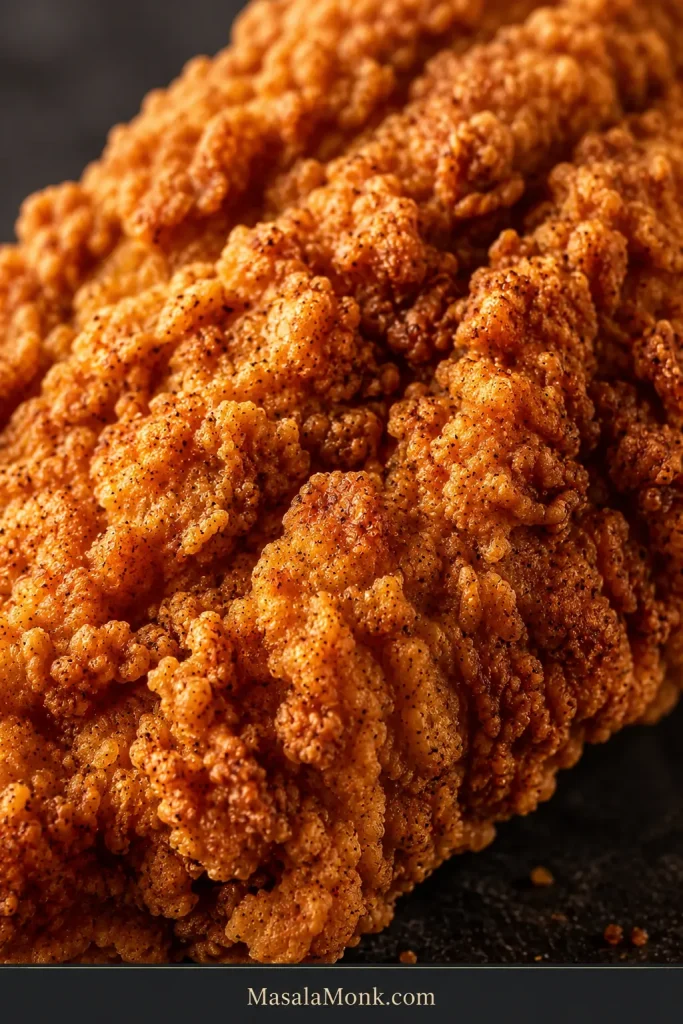
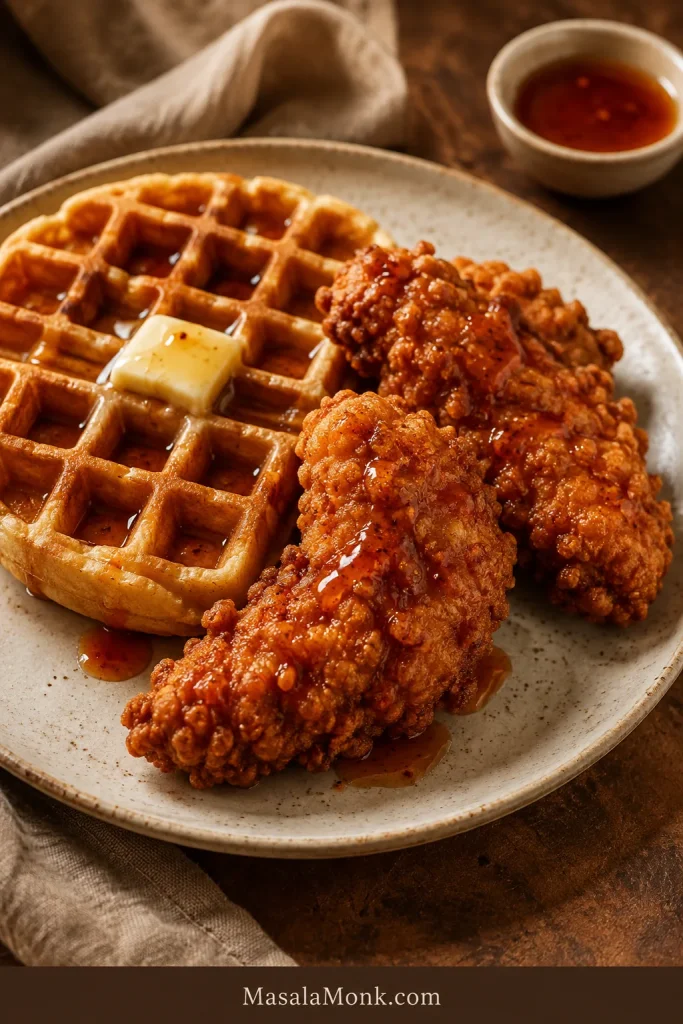
Deep-golden craggy fried chicken tenders with thin amber-red hot honey drizzled over the exposed crust.

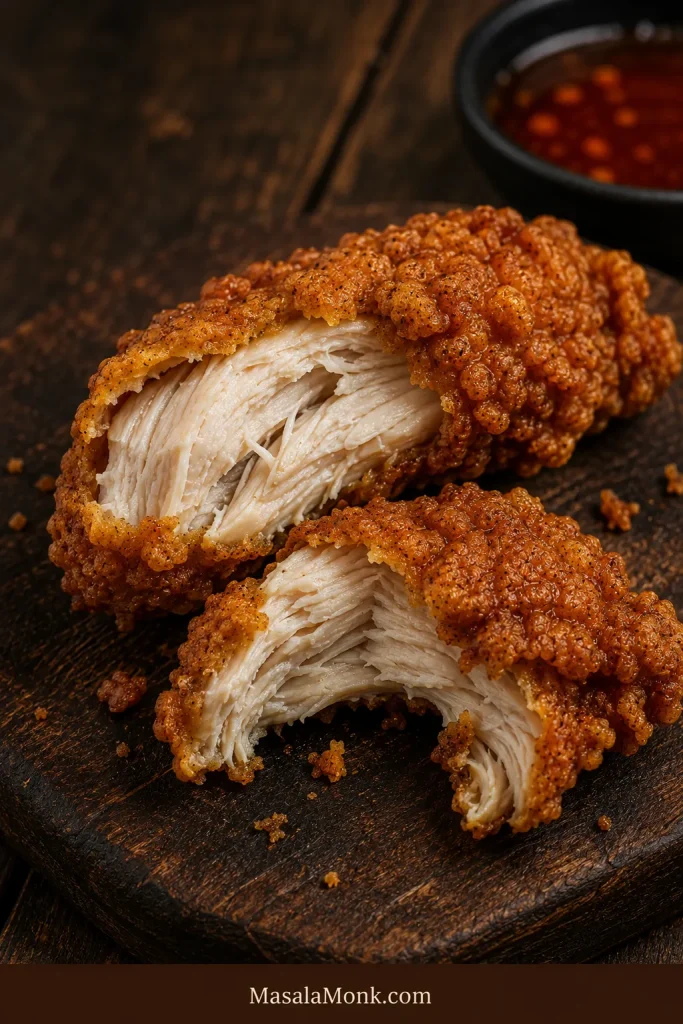
The best hot honey chicken tenders crackle when you bite through the coating, then give way to juicy chicken, sticky honey and a little heat that arrives just after the sweetness. Those rough golden ridges matter—they give the honey somewhere to catch without covering every bit of crunch.

Homemade tenders usually go wrong in a few predictable places. The breading slips off, too much chicken cools the oil, a thick piece stays underdone while the outside darkens, or the hot honey goes on so heavily that a beautiful crust turns soft almost immediately.

This version keeps those trouble spots under control without turning fried chicken into a project. The chicken is seasoned before breading, the coating gets rough little flour flakes for extra crunch, and only a few similarly sized pieces go into the oil at a time. Once the tenders hit the rack, you can drizzle, brush or toss them depending on how much crunch you want to keep.

Quick Answer: How to Make Crispy Hot Honey Chicken Tenders

  • Marinate: Season 1½ lb (680 g) chicken tenders in buttermilk for at least 30 minutes; 2–4 hours gives the seasoning more time to work.
  • Bread: Press the chicken into a flour-cornstarch dredge with small damp flour flakes, then rest the breaded tenders for 10 minutes.
  • Fry: Start the oil at 360–365°F (182–185°C), keep it around 340–350°F (171–177°C) while the chicken cooks, and cook the thickest piece to 165°F (74°C).
  • Finish: Rest the fried chicken on a wire rack for 2–3 minutes, then add warm hot honey.

Build the crunch before frying, protect it afterward, and add the hot honey last.

Four-step guide showing chicken marinating, being breaded, frying in oil, and finished with hot honey.

Choose Your Hot Honey Finish

How you add the hot honey changes the bite. A drizzle leaves plenty of golden ridges exposed; a full toss fills almost every crevice with sauce.

You wantFinishWhat to expect
Maximum crunchDrizzleSweet heat with plenty of crisp breading still exposed. Recommended.
More even sauceBrushBroader coverage while much of the coating stays crisp.
Sticky glazed chickenTossMaximum sauce coverage; eat it right away.

The main recipe uses the drizzle method.

Three-panel comparison of fried chicken tenders with drizzled, brushed, and tossed hot honey, from least to most sauce coverage.

Hot Honey Chicken Tenders Recipe

Craggy, deeply golden chicken tenders with juicy centers and warm hot honey that catches in the ridges instead of soaking the whole crust.

  • Yield: 10–12 tenders
  • Serves: about 4
  • Hands-on time: about 50 minutes
  • Marinate: 30 minutes minimum; 2–4 hours preferred
  • Total time: about 1 hour 20 minutes with the 30-minute marinade
  • Doubling: double the ingredients, but keep the same small frying batches

Equipment

  • 5–6-quart heavy Dutch oven or similarly deep pot
  • Deep-fry thermometer or other clip-on oil thermometer
  • Instant-read thermometer for the chicken
  • Wire rack set over a rimmed tray

You will also need a parchment-lined tray or large plate for the raw breaded chicken, shallow bowls, a small saucepan and tongs or a spider/skimmer. Keep a clean utensil ready for transferring the cooked chicken.

For the Chicken

  • 1½ lb (680 g) chicken tenderloins, ideally 10–12 similarly sized pieces
  • 1 cup (240 ml) buttermilk
  • 1 tablespoon (15 ml) cayenne-style hot sauce
  • 6 g fine sea salt, about 1 teaspoon
  • 1 teaspoon garlic powder
  • ½ teaspoon freshly ground black pepper

No buttermilk? Put 1 tablespoon (15 ml) lemon juice or white vinegar in a measuring cup, then add enough whole milk to reach 1 cup (240 ml). Stir and let it stand for 5 minutes.

Three-step guide showing 15 ml acid in a measuring cup, milk added to 240 ml total, and slight thickening after five minutes.

Using chicken breast? Cut it into strips ¾–1 inch (2–2.5 cm) wide and ½–¾ inch (1.25–2 cm) thick. Aim for 2–2½ oz (55–70 g) per strip.

Raw chicken tenderloins beside similarly sized chicken breast strips labeled about 2 to 2½ ounces each.

For the Crispy Coating

  • 1½ cups (180 g) all-purpose flour
  • ½ cup (60–65 g) cornstarch
  • 1½ teaspoons baking powder
  • 8 g fine sea salt, about 1⅓ teaspoons
  • 1 teaspoon garlic powder
  • 1 teaspoon onion powder
  • 1 teaspoon sweet paprika
  • 1 teaspoon freshly ground black pepper
  • ¼ teaspoon cayenne pepper, optional
  • 3 tablespoons (45 ml) seasoned buttermilk mixture, removed before the raw chicken is added

If you use kosher salt, follow the gram weights rather than the teaspoon estimates because crystal size varies by brand.

For the Medium Hot Honey

  • ½ cup (170 g) honey
  • 1 tablespoon (15 ml) cayenne-style hot sauce
  • 1 teaspoon (5 ml) apple cider vinegar or fresh lemon juice
  • ¼ teaspoon crushed red pepper flakes
  • Small pinch fine salt
  • 1 tablespoon (14 g) unsalted butter, optional

Use a thin, vinegar-forward cayenne hot sauce here. Thick sriracha, chili crisp and highly concentrated pepper sauces behave differently and are not tablespoon-for-tablespoon substitutes.

Hot honey recipe guide with a saucepan and honey, cayenne hot sauce, acid, red pepper flakes, salt, and optional butter.

Want it milder, hotter or made with bottled hot honey? See the hot honey adjustment table and notes.

For Frying

  • 1½–2 quarts (1.4–1.9 L) neutral frying oil, or enough to reach 1¼–1½ inches (3–4 cm) deep in your pot while leaving plenty of empty space above the oil

Peanut, canola, sunflower or standard vegetable oil all work well. Let the depth in your pot determine the exact amount. Fresh oil—or clean, well-filtered oil that still smells neutral—gives the cleanest flavor.

New to deep frying? The USDA deep-fat frying safety guide is worth reading before you heat the oil.

Instructions

Marinate, Make the Hot Honey and Bread

  1. Season and marinate the chicken. Whisk together the buttermilk, hot sauce, salt, garlic powder and black pepper. Before raw chicken enters the bowl, spoon 3 tablespoons (45 ml) into a separate clean bowl for the dredge. Add the chicken, turn to coat, cover and refrigerate for at least 30 minutes. Two to four hours is ideal; these thin pieces gain little from a much longer soak.
  2. While the chicken marinates, make the hot honey. Combine the honey, hot sauce, vinegar or lemon juice, red pepper flakes and salt in a small saucepan. Warm over low heat for 1–2 minutes, just until loose and fragrant. Do not boil. Stir in the butter if using, taste and set aside. Rewarm briefly before serving if the sauce thickens.
  3. Mix the dredge while the chicken finishes marinating. Whisk together the flour, cornstarch, baking powder, salt, garlic powder, onion powder, paprika, black pepper and cayenne. Drizzle the clean reserved buttermilk over the flour mixture and rub lightly with your fingertips until small damp flakes and pebbly pieces form. Break apart anything that resembles wet dough.
  4. Bread the chicken. Lift one tender from the marinade and let the excess drip back into the bowl. Do not pat it dry. The surface should stay tacky without dripping in streams. Press the chicken firmly into the dredge on every side, picking up some of the rough flour flakes, then place it on the parchment-lined tray. Repeat with the remaining pieces. Discard the remaining raw-chicken marinade and any dredge that touched raw chicken.

Fry the Chicken

  1. Rest the breading and start heating the oil. Begin heating the oil to 360–365°F (182–185°C). Let the breaded chicken rest for at least 10 minutes while the oil comes up to temperature. The coating should look shaggy and slightly hydrated in patches. If the oil needs another few minutes, the chicken can simply stay on the tray.
  2. Fry the first batch and let the coating set. Lower 3–4 tenders gently into the oil, leaving visible space between them. Do not keep nudging or turning them as soon as they land; give the crust time to set. Aim to keep the oil around 340–350°F (171–177°C).
  3. Cook until deep gold and 165°F. Pieces in the 2–2½ oz (55–70 g) range usually need 5–7 minutes total. Turn once when needed. The bubbling should stay energetic while the ridges move gradually from pale to deep gold. Start checking the largest piece near the early end of the range; poultry should reach 165°F (74°C) in the thickest part.

Once a batch comes out deep gold, crisp at the edges and 165°F (74°C) in the center, you have your pot figured out. The remaining batches are mostly repetition.

Deep-golden fried chicken tenders on a wire rack with a thermometer showing 165°F and 74°C.

Rack, Reset and Finish

  1. Move the cooked chicken to the rack. Transfer the tenders with clean tongs or a clean spider/skimmer and keep them in one layer so steam can escape underneath.
  2. Reset the oil between batches. Let it return to the starting range before adding more chicken. If recovery is slow, make the next batch smaller. Skim out loose breading once it turns dark so burnt crumbs do not make later batches bitter.
  3. Add the hot honey last. Give each fried batch 2–3 minutes on the rack, until the strongest steam has eased. Rewarm the sauce if needed, then drizzle it over only the tenders you expect to eat right away. The honey should fall in glossy ribbons and catch on the rough ridges. Keep the rest of the sauce at the table.

Give the steam somewhere to go: the rack keeps the bottom from softening while the crust settles before the hot honey goes on.

Unsauced fried chicken tenders resting in one layer on a raised wire rack with air space underneath.

For the first serving, drizzle a few tenders and listen for that first crunch before deciding whether the rest need more honey.

Pepper-flecked amber-red hot honey falling from a spoon in thin ribbons over craggy fried chicken tenders.

Break one open while it is still hot: the center should be moist white chicken beneath a closely attached craggy crust, not a thick hollow shell.

Fried chicken tender broken open to reveal moist white chicken inside a closely attached deep-golden craggy crust.

Need help with a particular part of the recipe? Jump to breading problems, oil temperature, air-fryer and oven methods, hot honey adjustments, troubleshooting or storage and reheating.

Chicken Tenderloins or Chicken Breast Strips?

Tenderloins are already close to the shape you want. Split or gently flatten any unusually thick ones so they finish alongside the rest.

The firm white tendon is harmless. Trim the exposed portion, or grip it with paper towel and gently pull it through the tines of a fork if you prefer to remove more. Stop if the tender begins tearing.

Two-panel guide showing a white tendon trimmed from a raw chicken tenderloin and pulled through fork tines with a paper towel.

Chicken breast is an easy substitute. Cut it to the size given in the recipe rather than making long, thick strips. Similar-size pieces are what keep the frying time predictable.

If you would rather cook the breasts whole, our baked chicken breast recipe goes deeper into thickness, timing and keeping lean chicken juicy.

Chicken fingers, strips and tenders are often used loosely for the finished dish. Here, size matters more than the label on the package.

The Ingredients That Actually Change the Result

Buttermilk

Buttermilk carries seasoning, adds mild tang and leaves a naturally tacky surface for the flour. The milk-and-acid substitute in the recipe is thinner than cultured buttermilk, but it still gives the coating something to grip.

Buttermilk-marinated chicken tender lifted from a bowl with a moist, tacky surface and no heavy streams of marinade.

If the recipe leaves most of a carton behind, save it for flaky Southern buttermilk biscuits. Fried chicken and warm biscuits rarely need much persuasion to share a plate.

Flour, Cornstarch and Baking Powder

Flour gives the coating enough structure to cling to the chicken, while cornstarch keeps the fried edges lighter and crisper. A little baking powder helps keep the surface rough instead of dense and smooth. When the clean reserved buttermilk is rubbed lightly through this mixture, the small damp flakes become the craggy pieces you want the chicken to pick up.

Four-step guide showing clean buttermilk reserved, drizzled into flour dredge, rubbed with fingertips, and forming small damp flour flakes.

What you are building toward: a fried crust with thin ridges, folds and blisters rather than one thick, smooth shell. Those irregular edges create more crisp surface without burying the chicken in breading.

Extreme close-up of fried chicken crust with irregular flour ridges, folds, small flakes, and dark-golden peaks.

Seasoning the Chicken and the Coating

Seasoning in the marinade reaches the meat itself; seasoning in the dredge flavors the crust. Once the honey goes on, that distinction matters. Sweet, spicy sauce should finish good fried chicken rather than cover a bland center.

Sweet paprika brings color and mild pepper flavor. Cayenne in the dredge is optional, especially when several people at the table have different ideas about what “hot” means.

How to Keep Breading on Chicken Tenders

Before frying, the coating can tell you a lot. Good breading looks rough and patchy, with some flour hydrated against the chicken and little shaggy ridges still standing up.

Six breaded chicken tenders labeled Dusty, Pasty, Wet knobs, Too thick, Sliding, and Right.
  • Still dusty almost everywhere after resting? A few floury spots are fine. On the next tender, let slightly less marinade drip away before dredging; do not try to wet an already breaded piece.
  • Smooth and pasty? Too much marinade followed the chicken into the flour. Let the next piece drip a little longer.
  • Huge wet knobs? Break the damp flour clumps smaller so they fry into crisp ridges rather than hard chunks.
  • A thick shell forming around the meat? The coating is too heavy. One well-pressed dredge is enough for this recipe.
  • Coating slides when you lift the tender? Press it on more firmly and give the breading its full resting time.
  • Rough, patchy and a little untidy? Good. Leave it alone.

Keeping one hand for wet chicken and the other for dry dredge also prevents the breading process from turning into a bowl full of floury fingerprints.

After the breading rests: the coating should still look rough and shaggy, with only a few slightly hydrated patches. It should not turn uniformly shiny, smooth or wet.

Three stages showing breading pressed onto chicken, a freshly coated tender, and the slightly hydrated coating after a 10-minute rest.

How to Control the Oil Temperature Between Batches

A thermometer makes home frying much less mysterious. The useful number is not only where the oil starts; it is what happens after cold chicken enters the pot.

StageTargetWhat you want to see
Before chicken enters360–365°F (182–185°C)Enough stored heat for the initial temperature drop
While frying340–350°F (171–177°C)Steady bubbling and gradual golden browning
Before the next batchBack near 360–365°F (182–185°C)Oil recovered before more cold chicken enters

Little flour peaks that darken almost immediately mean the oil is running too hot. Pale chicken sitting in weak bubbles points the other way. Small crumbs in the pot are normal, but remove them once they turn dark.

Three-panel frying comparison showing chicken in oil that is too hot, correctly heated, and too cool.

Use the first batch to learn your pot. Once the bubbling and browning settle into the right rhythm, the remaining batches become much easier to repeat.

A deep cast-iron skillet is another good option. A Dutch oven gives you higher sides and a little more protection from splatter. An electric fryer is fine too; resist filling the basket just because there is room.

Use the bubbling as a batch-size check: leave visible oil between the tenders, and if active bubbling weakens sharply after loading the pot, make the next batch smaller rather than squeezing in another piece.

Four breaded chicken tenders frying with visible oil between each piece and no utensil disturbing the coating.

Keep the whole frying cycle in view: start near 360–365°F (182–185°C), let the oil work around 340–350°F (171–177°C), then give it time to recover before the next batch.

Oil-temperature guide showing the start range, working fry range, recovery before the next batch, and dark crumbs being skimmed.

From here, choose your cooking path: use the air fryer or oven, or skip to the hot honey adjustments if you are frying.

Air Fryer and Oven Methods

The flour coating used for frying relies on hot oil to set those craggy edges. Dry heat does better with panko. Use the air fryer when you want to avoid a pot of oil; the oven is easier when you need more tenders at once.

Side-by-side chicken tenders comparing irregular fried flour crust with a coarser dry-heat panko coating.

For the cooking times below, use 10–12 similarly sized tenderloins or chicken breast strips around 2–2½ oz (55–70 g) each. Very thick pieces will need longer.

Prepare the same medium hot honey used for the fried version while the chicken marinates, or use the heat-adjustment section for a milder, hotter or bottled version.

Marinade for Air Fryer or Oven Tenders

For 1½ lb (680 g) chicken, use:

  • 1 cup (240 ml) buttermilk
  • 1 tablespoon (15 ml) cayenne hot sauce
  • 6 g fine sea salt, about 1 teaspoon
  • 1 teaspoon garlic powder
  • ½ teaspoon freshly ground black pepper

Marinate for at least 30 minutes; 2–4 hours is ideal. Unlike the fried version, you do not need to reserve any marinade for the coating.

If you are cooking with dry heat anyway, our honey mustard chicken tenders use a similar panko approach with a tangier finish.

Panko Coating

  • ½ cup (60 g) all-purpose flour
  • 2 large eggs
  • 1½ cups (95 g) panko breadcrumbs
  • 1 tablespoon (15 ml) neutral oil
  • Oil spray or a little extra neutral oil for the basket, rack and any dry crumb patches
  • 6 g fine sea salt, about 1 teaspoon
  • 1 teaspoon garlic powder
  • 1 teaspoon onion powder
  • 1 teaspoon sweet paprika
  • ½ teaspoon freshly ground black pepper
  • ⅛ teaspoon cayenne, optional

Mix the dry seasonings together. Stir roughly one-third into the flour and the rest into the panko, then work the tablespoon of oil through the crumbs.

Air Fryer

  1. Let excess marinade drip from the chicken.
  2. Coat lightly in seasoned flour, dip in beaten egg, then press firmly into the panko.
  3. Preheat the air fryer to 400°F (205°C) if your model benefits from preheating.
  4. Lightly oil the basket and arrange the tenders in one layer with space around them. Mist any visibly dry crumb patches.
  5. Air fry for 8–11 minutes, turning halfway, until golden and 165°F (74°C) in the thickest piece.
  6. Transfer the tenders to a wire rack and rest for 2–3 minutes, until the initial steam has eased. Drizzle with warm hot honey just before serving.
Three-stage air-fryer guide showing spaced panko chicken tenders, cooked tenders at 165°F, and hot honey added after cooking.

Later batches may finish a little sooner once the air fryer is thoroughly hot.

Oven

  1. Heat the oven to 425°F (220°C).
  2. Set a lightly greased wire rack over a rimmed baking sheet.
  3. Bread the chicken with the panko mixture and arrange the pieces in one layer. Mist any dry-looking crumb patches.
  4. Bake for 14–18 minutes, depending on thickness, until golden and 165°F (74°C) inside.
  5. Leave the tenders on the rack for 2–3 minutes, until the initial steam has eased, then drizzle with warm hot honey.
Golden panko-coated chicken tenders spaced on a raised wire rack over a rimmed baking sheet.

Adjust the Hot Honey: Mild, Medium or Hot

The recipe is medium as written. Keep the ½ cup (170 g) honey, teaspoon of acid and pinch of salt the same, then choose the heat level below.

Heat levelUse this
Mild2 teaspoons (10 ml) cayenne hot sauce; no pepper flakes
Medium — default1 tablespoon (15 ml) cayenne hot sauce + ¼ teaspoon red pepper flakes
Hot1½ tablespoons (22 ml) cayenne hot sauce + ½ teaspoon red pepper flakes + a small optional pinch of cayenne
Three bowls of hot honey labeled Mild, Medium default, and Hot with increasing hot sauce and pepper flakes.

Taste the sauce warm before adding more heat; hot sauces and pepper flakes vary quite a bit.

One batch can easily cover two heat preferences. Divide the warm honey between two bowls and increase the chili in only one; there is no need to make the fried chicken itself aggressively spicy.

Butter is optional. One tablespoon (14 g) makes the glaze richer and slightly softens the heat; keep the sauce over low heat so it stays smooth.

How Much Hot Honey Do You Need?

  • Drizzle: start with ¼ cup (60 ml)
  • Brush: use roughly ⅓ cup (80 ml)
  • Toss: use most or all of the basic sauce batch

Make 1½ batches when you want heavily glazed chicken and extra sauce at the table. The sauce should be warm enough to fall in ribbons, but not thin or watery.

Three spoons of hot honey labeled Too thin, Right, and Too thick, showing progressively thicker dripping consistencies.

Already have bottled hot honey? Start with ½ cup (120 ml). A few drops of vinegar or lemon juice can sharpen it if the sweetness feels flat.

For more variations on the sauce itself, see our hot honey sauce recipe.

What Went Wrong?

If a batch goes wrong, do not change five things at once. Start with what you can see; the crust, color and oil usually point toward the problem.

Breading and Frying Problems

What you seeWhat it means and what to change
Breading falls offToo much marinade, weak pressing or too little resting time. Let excess drip, press firmly and give the coating time to settle.
Breading is thick and hardThe wet flour pieces are too large or the dredge is too heavy. Use smaller flakes and one substantial coating.
Chicken is pale and greasyThe oil spent too much of the batch too cool. Fry fewer pieces and let it recover before reloading.
Outside is dark, center underdoneThe oil is too hot or the chicken is too thick. Lower the heat and make the pieces more even.
Chicken is dryIt cooked too long. Start checking the largest piece sooner.
Bottom turns softSteam is trapped underneath. Move cooked tenders to a wire rack in one layer.
Later batches taste bitterLoose breading has burned in the oil. Skim out dark crumbs between batches.

A pot that starts at 360°F but spends most of the batch near 300°F is still frying too cool. What the thermometer does after the chicken enters matters more than the starting number alone.

Hot Honey and Crispness Problems

What you seeWhat it means and what to change
Sauce softens the crust quicklyThe chicken was sauced too soon or too heavily. Give it a brief rack rest and start with a drizzle.
Hot honey is too sweet or too hotToo sweet: add a little acid, salt and measured heat. Too hot: stir in more honey; butter can soften the heat too.
Hot honey looks oily or splitButter-containing sauce may have overheated. Take it off the heat, whisk gently and rewarm only over low heat.
Sauce runs offIt is too hot or thin. Let it cool until it falls from the spoon in ribbons.

If buttered hot honey turns oily or streaky: take it off the heat, whisk gently and rewarm only over low heat. The finished sauce should look smooth and cohesive rather than separated.

Two-panel comparison of separated oily hot honey and smooth, cohesive pepper-flecked hot honey.

Correct one thing at a time while the sauce is warm: use a little acid, salt and measured heat when it is too sweet; add more honey when it is too hot. If someone at the table simply wants a gentler creamy option, our easy yum yum sauce gives them another path without changing the whole batch.

Two-panel troubleshooting guide showing acid, salt, and hot sauce for overly sweet hot honey and honey with optional butter for overly hot sauce.

Make Ahead, Store and Reheat

Hot honey: Make it up to 1 week ahead, refrigerate it in a covered container and warm it gently before serving. Low heat is especially important when butter is included.

Chicken: Marinate 2–4 hours ahead when convenient. Bread it close to frying; the short 10-minute rest helps the coating settle, while a long breaded hold works against that rough, crisp texture.

If coleslaw is part of dinner, this is a good moment to make it too. Our creamy coleslaw recipe can chill while the chicken marinates.

Holding fresh batches: Keep the tenders unsauced on their rack in a 200°F (95°C) oven for up to 30 minutes while you finish frying. A short hold works, but straight from frying is still best.

Leftovers: Refrigerate cooked chicken for 3–4 days, with extra hot honey stored separately whenever possible.

Freezing: Freeze cooked tenders unsauced. For best quality, use them within roughly 1–3 months, then re-crisp before adding fresh hot honey.

  • Air fryer: 350°F (175°C) for 4–6 minutes
  • Oven: 375°F (190°C) on a rack for 8–12 minutes
  • Microwave: quickest, but the coating will be softer

Whichever method you choose, reheat the center of the chicken to 165°F (74°C), then add fresh hot honey.

Four-part guide showing fried chicken held on a rack, refrigerated with sauce separate, frozen, and reheated in an air fryer.

What to Serve With Hot Honey Chicken Tenders

You do not need an elaborate plate. Something cold and crunchy, creamy, tart or pickled is usually enough to balance rich fried chicken and sticky sweet heat.

Plate of hot honey chicken tenders with fries, creamy coleslaw, pickle slices, and a small bowl of extra sauce.
  • Classic and crunchy: Add crispy homemade French fries, slaw and plenty of pickles.
  • Cold and sharp: A crisp cucumber salad with vinegar and dill cuts through both the frying oil and the honey beautifully.
  • Sandwich night: Add slaw, pickles and a little hot honey to a toasted bun. Our chicken sandwich recipes have more ideas for building around crisp chicken.
  • Sweet-savory: Pile the tenders onto waffles and drizzle the honey over both while leaving plenty of fried ridges exposed.
Hot honey chicken tenders beside a golden waffle with butter, thin hot-honey drizzle, and a small bowl of extra sauce.

The best plate of these still lets you see rough dark-gold ridges beneath thin glossy streaks of honey. The first bite should give you crunch and juicy chicken, then sweetness, then the chili catching up a moment later.

If you make them, tell us whether you used tenderloins or breast strips, how you cooked them, and whether you drizzled, brushed or tossed the hot honey. Your notes may help the next person standing over a batch of chicken wondering whether theirs looks right.

Posted on Leave a comment

Hot and Sour Soup Recipe: Easy Chinese Restaurant-Style Soup

White ceramic bowl of glossy deep amber-brown hot and sour soup with egg ribbons, tofu, shiitake, wood ear mushrooms, bamboo shoots and scallions on a dark tabletop, with steam rising.

Hot and sour soup is one of those bowls you notice before the first spoonful. Vinegar rises with the steam, white pepper catches gently at the back of your throat, and underneath it all is savory broth threaded with mushrooms, tender tofu and silky ribbons of egg.

It is also surprisingly easy to get almost right. Plenty of chilli makes the soup spicy without necessarily giving it that familiar white-pepper warmth. Too much starch turns the broth gluey. Let the vinegar cook too long and some of its brightness fades. Pour the egg too quickly and it disappears into cloudy flecks instead of ribbons.

The simplest way to make restaurant-style hot and sour soup is to build it in layers: make the broth savory first, thicken only until it looks right, set the egg, then adjust sourness and peppery heat separately at the end.

Maybe the bowl in your head is thin and sharply peppery. Maybe it is darker and glossy, with enough vinegar to catch in your nose over the first spoonful. This method gives you a reliable place to start—and enough room to take the pot toward whichever version you remember.

Quick Answer: What Makes Hot and Sour Soup Hot and Sour?

White pepper gives hot and sour soup its characteristic peppery heat. Vinegar supplies the sourness. Chilli oil gives a more immediate chilli burn. White pepper leaves the cleaner warmth that lingers after each sip.

Broth, mushrooms and soy sauce provide the savory foundation. Cornstarch controls the body of the soup, while egg provides the silky strands.

Check one thing at a time. Is the broth savory enough? Then judge the heat, sourness and thickness. Finally, look for some contrast—soft tofu or egg against something chewy or crisp. Fix only what is missing.

Teaching board with a bowl of glossy brown soup surrounded by vinegar, pale ground white pepper, chilli oil, and broth, mushroom and soy cues explaining sourness, heat and savory flavor.
Sourness and heat are separate controls. Vinegar brightens the broth; white pepper provides the lingering warmth that chilli alone does not recreate.

Which Hot and Sour Soup Are You Looking For?

Hot and sour soup is a Chinese soup built around peppery heat and vinegar sourness, usually with ingredients such as mushrooms, tofu and egg; restaurant versions vary considerably in thickness and supporting ingredients.

Two excellent hot and sour soups can look surprisingly different. It helps to know which style you are chasing before you start changing the vinegar, chilli or starch.

Comparison guide with a dominant Chinese-American hot and sour soup bowl, a redder vegetable-heavy Indo-Chinese bowl, and regional Chinese ingredient cues including black vinegar and dried mushrooms.
Color can mislead. Chinese-American, regional Chinese and Indo-Chinese hot and sour soups can differ in thickness, heat and ingredients, so season toward the bowl you actually want.
StyleWhat to Expect
Chinese-American restaurant styleBrownish, glossy, peppery and tangy, usually with mushrooms, tofu and egg. This is the style made below.
Regional Chinese versionsRecipes vary widely and may use black vinegar, dried shiitake, wood ear, dried lily buds and pork, with thickness varying considerably by style.
Indo-Chinese restaurant styleOften redder and more chilli-forward, with vegetables such as cabbage, carrot and capsicum/bell pepper, and sometimes chicken.

This recipe makes the first style: savory broth with a clear vinegar tang, white-pepper warmth, a glossy broth that still pours freely and enough contrast between mushrooms, tofu and egg to keep the soup interesting.

Many Chinese-American restaurant versions also include thin strips of pork or chicken. Here, added meat is optional, with an easy chicken or pork variation later.

Hot and Sour Soup Recipe

Using fresh mushrooms, this takes about 30–35 minutes from prep to bowl. Dried mushrooms need soaking time but give the broth more depth. Keep some vinegar and white pepper in reserve either way so you can make the final adjustment by taste.

Recipe Snapshot

  • Prep: about 15 minutes
  • Cook: about 15–20 minutes
  • Total with fresh mushrooms: about 30–35 minutes
  • Total with dried mushrooms: about 40–50 minutes, depending on how much soaking overlaps with prep
  • Makes: 4 generous bowls or about 6 appetizer servings

No specialty market tonight? Fresh shiitake or cremini, ordinary low-sodium broth and distilled white or unseasoned rice vinegar still make a very good soup. Wood ear and bamboo are optional.

Equipment: a 4–5 quart / 4–5 litre saucepan or Dutch oven, a few small prep bowls, and a fine-mesh strainer if using shiitake soaking liquid.

Ingredients and Measurements

Broth & Solids

  • Mushrooms: 15 g dried shiitake, about 4 medium mushrooms, or 5 oz / 140 g fresh shiitake or cremini. Use up to 6 oz / 170 g fresh mushrooms for a mushroom-heavy soup.
  • Wood ear: ¼ oz / 7 g dried wood ear mushrooms (black fungus), dry weight, optional.
  • Broth: 6 cups / 1.4 litres total low-sodium chicken or vegetable broth. If using strained shiitake soaking liquid, substitute up to ½ cup / 120 ml for the same amount of broth.
  • Tofu: 8 oz / 225 g firm or medium-firm tofu, cut into thin strips or small spoon-sized cubes.
  • Bamboo: ½ cup / about 70 g bamboo shoots, drained, rinsed and cut into strips, optional.
  • Ginger: 1 teaspoon finely grated fresh ginger.

Broth Seasoning

  • 1½ tablespoons / 22 ml Chinese light soy sauce or regular soy sauce; start with 1 tablespoon / 15 ml if your broth or bouillon is already quite salty
  • 1 teaspoon / 5 ml dark soy sauce, optional
  • ½ teaspoon sugar
  • Fine salt, only if needed after tasting

Thickening & Egg

  • 3 tablespoons / about 24 g cornstarch (UK: cornflour). Make the full slurry but expect to begin with about two-thirds.
  • ¼ cup / 60 ml cold water or cold broth
  • 2 large eggs
  • 1 teaspoon water, optional, to loosen the beaten eggs slightly

Hot-Sour Finish

  • ¼ cup / 60 ml distilled white vinegar or unseasoned rice vinegar, divided: 3 tablespoons / 45 ml to start, plus up to 1 tablespoon / 15 ml more to taste
  • 1 teaspoon ground white pepper, divided: ¾ teaspoon to start, plus up to ¼ teaspoon more to taste
  • 1 teaspoon toasted sesame oil
  • 2 scallions, thinly sliced, optional
  • Chilli oil, optional, for serving

1. Soak and Prep Before the Pot Gets Hot

Using fresh mushrooms? Skip the soaking instructions below, slice them, and continue with the rest of the prep.

Comparison showing fresh mushrooms sliced and ready beside dried shiitake soaking until pliable, with a small vessel of clear strained shiitake soaking liquid.
Fresh mushrooms are the faster route. Dried shiitake are worth the soak when you want more mushroom depth, especially with a mild broth.

If using dried mushrooms, cover them with very hot water and soak until completely pliable. Most soften in about 20–30 minutes, but the mushrooms get the final say: there should be no hard, dry center left.

If you plan to use shiitake soaking liquid in the broth, soak the dried shiitake separately from the wood ear. Lift the softened mushrooms from the water, trim any tough stems and slice thinly. Strain the shiitake liquid through fine mesh or carefully pour off only the clear upper portion. Leave the sediment behind.

For a more restaurant-like spoonful, cut the mushrooms, tofu and bamboo into fairly thin pieces of similar length. Measure the seasonings, beat the eggs and mix the cornstarch with cold water or cold broth.

Prep board with sliced shiitake, wood ear mushrooms, tofu strips, bamboo shoots, grated ginger, eggs, soy sauce, vinegar, white pepper and cornstarch arranged as soup mise en place.
Use the spoon as the size guide. Tofu, mushrooms and bamboo should fit comfortably into one bite instead of arriving as long, awkward pieces.

In another small bowl, whisk together 3 tablespoons / 45 ml vinegar and ¾ teaspoon white pepper for the finish. Once the broth starts simmering, the remaining steps move quickly, so have everything within reach.

2. Build a Broth That Already Tastes Good

Add the broth, mushrooms, bamboo shoots, ginger, soy sauce, optional dark soy and sugar to the pot. Bring to a gentle simmer over medium-high heat, then lower the heat and cook for about 5 minutes.

Add the tofu and simmer for another 2–3 minutes. Firm tofu tolerates stirring well. With softer tofu, sweep the spoon around the pieces so they stay intact.

Check the broth here. It should already be savory enough to drink on its own, even though the vinegar and white pepper are still missing.

If the broth has good depth but simply needs more seasoning, add salt a small pinch at a time. If it tastes weak or hollow, deepen the base with a small amount of concentrated broth or bouillon. Extra soy alone can push the salt too far. Starch can change a watery texture; it cannot fix watery flavor.

Broth checkpoint guide showing the same pre-egg hot and sour soup with two tasting paths: under-seasoned broth needing salt and weak or hollow broth needing a stronger base or bouillon.
Taste before thickening. Once starch and the final seasonings go in, a weak broth becomes harder to diagnose cleanly.

3. Add the Slurry Gradually

Cornstarch has a habit of settling the moment you stop looking at it, so stir the slurry thoroughly just before it goes into the soup.

While stirring, pour in about two-thirds of the slurry. Return the soup to a simmer and wait 20–30 seconds before judging the texture.

Lift some with a spoon and tip it back. The broth should leave a glossy trace, then fall away cleanly. It should still move like soup, not gravy.

Still too light? Remix the remaining slurry and add it in stages. Bring the soup back to a simmer each time before deciding whether it needs more.

Smooth cornstarch slurry being poured from a small bowl into a pot of pre-egg hot and sour soup, with a cue to add about two-thirds first.
Start with about two-thirds of the slurry, bring the soup back to a simmer, then judge. Add more only if the broth still needs body.

4. Pour the Egg Ribbons

Beat the eggs until the whites and yolks are completely combined. A teaspoon of water makes them slightly easier to pour in a fine stream, but it is optional.

Keep the thickened soup at a gentle simmer. Stir slowly in one direction to create a mild current, then pour the beaten egg in a thin stream as you move your hand around the pot.

Then stop.

Once all the egg is in, leave the pot unstirred until the strands look set. Stir once or twice afterward to separate them without breaking them into tiny flecks.

Thin stream of beaten egg being poured into glossy brown hot and sour soup with tofu and mushrooms, with a resting spoon and a cue to stop stirring while the egg sets.
Pour the egg in a thin stream into a mild current, then stop stirring until the strands look set.

5. Turn Off the Heat—Then Make It Hot and Sour

Add the vinegar and white pepper after the heat is off. Stir in the prepared vinegar-and-pepper mixture, then add the toasted sesame oil.

Hand pouring a pale vinegar and ground white pepper mixture into a steaming pot of finished hot and sour soup on a stovetop with the burner visibly off.
Once the heat is off, the job changes from cooking to preserving aroma. That is when vinegar and white pepper can stay sharp, fragrant and distinct.

Taste, Adjust and Stop

Now taste. This is where you steer the soup toward the one you remember. For more sourness, add the remaining vinegar 1 teaspoon / 5 ml at a time. For stronger peppery warmth, add the reserved white pepper in small pinches. If it tends to clump, first mix it with a teaspoon of vinegar or broth.

The vinegar should brighten the broth without erasing the mushrooms and soy underneath it. White pepper should become more noticeable toward the finish than on the first instant of the sip.

Add scallions if using and put extra vinegar, white pepper and chilli oil on the table.

Try one complete spoonful before serving. Check the savory base first, then the vinegar and white pepper, then the body and textures.

Change one thing at a time. A pale soup may already taste right. A glossy soup does not need more starch just because another restaurant serves theirs thicker.

Warm close-up of a finished bowl of hot and sour soup being tasted and adjusted, with small bowls of vinegar, ground white pepper and chilli oil nearby.
Taste broth and solids together. Mushrooms, tofu and egg can change how strong the vinegar or white pepper feels in a complete bite.

Something crisp is lovely beside the soft tofu and egg. Crispy vegetable spring rolls make an especially good contrast.


Dial in the soup you want:

White Vinegar, Rice Vinegar or Black Vinegar?

For Chinese-American takeout-style soup, distilled white vinegar gives the sharpest, cleanest tang. Use unseasoned rice vinegar for gentler acidity, or Chinkiang black vinegar for a deeper, earthier sourness.

Distilled white vinegar is direct and bright. If the soup you remember has a nose-tingling takeout tang, this will usually get you there fastest.

Unseasoned rice vinegar is softer and rounder. The soup remains distinctly sour, but the acidity lands less sharply.

Chinkiang or Chinese black vinegar brings earthy, slightly malty flavor along with acidity. Use it in place of the white or rice vinegar, starting with the same 3 tablespoons / 45 ml off heat, then adjust by taste because brands vary.

Three unbranded vessels containing clear distilled white vinegar, pale rice vinegar and dark Chinkiang vinegar beside a bowl and spoonful of finished brown soup.
For familiar Chinese-American takeout-style hot and sour soup, distilled white vinegar is the cleanest starting point; rice vinegar softens the edge, while Chinkiang adds darker depth.

If Chinkiang vinegar is new to you, this guide to Chinese black vinegar from The Woks of Life explains how it differs from lighter rice vinegars.

Adding most of the vinegar after cooking keeps the acidity lively. Prolonged boiling makes its sharp edge less noticeable.

White Pepper vs Chilli

White pepper delivers the sharp warmth that builds toward the end of the sip. Chilli oil hits sooner with a more obvious chilli burn.

Black pepper will still add heat, but its aroma is different; white pepper gives the more familiar Chinese-American restaurant-style finish.

Small bowls of pale ground white pepper and black pepper with a Chinese soup spoon filled with red chilli oil on a light stone surface, each labeled by its heat profile.
Use the timing of the heat as a clue: chilli burns sooner, while white pepper is more noticeable toward the finish and lingers differently from black pepper.

If you know you prefer gentler heat, start with ½ teaspoon white pepper instead of ¾ teaspoon in the finishing mixture. The standard recipe starts with ¾ teaspoon and keeps the final ¼ teaspoon in reserve.

Keep chilli at the table unless everyone wants it. One serving may be fiery while another stays purely peppery.

How Thick Should Hot and Sour Soup Be?

Hot and sour soup should be glossy and lightly spoon-coating while still flowing freely. It should not move like gravy.

Three ladles show hot and sour soup at different consistencies: watery and thin, glossy and freely flowing, and very thick and gloopy.
Thickness is easiest to judge while the soup is moving. The right broth briefly coats the ladle, then falls cleanly instead of hanging like sauce.

Restaurants disagree on exactly where that line sits. Some versions are almost brothy. Others are thick enough to keep strips of tofu and mushroom suspended.

If the takeout soup you love is particularly dense, take this one thicker too. The staged slurry lets you stop early or keep building body without committing the entire pot at once.

Used all the slurry and still want it very thick? Mix another 1 tablespoon cornstarch with 1 tablespoon cold water. Add it gradually, return the soup to a simmer and reassess before making another batch.

If you overshoot, loosen the soup with hot broth and check the seasoning again.

How to Make Silky Egg Ribbons

Why do some bowls have broad egg ribbons while others have fine wisps? Broth thickness, pour speed and movement all affect the shape.

A broth with some body supports the egg better than a completely thin liquid. A calm current encourages broader ribbons. More movement breaks the egg into finer strands.

The pause matters too. Stir before the egg has set and the strands break into flecks. Pour too much into one place and you get larger clumps.

Egg texture guide with a main bowl showing broad silky egg ribbons and three smaller examples showing fine wisps, egg clumps and cloudy flecks in hot and sour soup.
The egg itself records what happened in the pot. Broad ribbons, fine wisps, clumps and cloudy flecks reveal differences in pour speed and stirring.

Imperfect ribbons do not ruin dinner. The technique helps you get the shape you prefer more consistently.

Why Doesn’t My Homemade Hot and Sour Soup Taste Like Chinese Takeout?

You can make a perfectly good hot and sour soup and still know after the first taste that it is not the restaurant soup you were trying to make.

The usual differences are a weaker broth base, not enough fresh vinegar or white-pepper heat, and a starch level that does not match the restaurant version you remember.

  • The base tastes weak. Some restaurants start with a more concentrated broth or bouillon-style base.
  • The heat is mostly chilli. Chilli burn does not taste the same as white-pepper warmth.
  • The vinegar has gone quiet. A fresh splash after cooking brings the sourness back into focus.
  • The texture is wrong. Your favorite place may use considerably more—or less—starch.
  • The soup lacks mushroom depth or contrast. Dried shiitake brings savoriness. Wood ear or bamboo adds a firmer bite beside the soft tofu and egg.
Dark editorial guide centered on a bowl of hot and sour soup with five surrounding cues for weak broth, quiet vinegar, wrong heat, wrong thickness and missing mushroom depth.
When homemade hot and sour soup feels close but not quite right, start with broth depth before chasing extra vinegar, pepper or soy sauce.

Restaurant kitchens may also lean on more sodium or MSG. Our guide to MSG and umami explains what MSG does to savory perception. It is optional here; if you use it, count it as part of the overall seasoning so the broth does not become overly salty.

Once the soup is where you want it, shrimp fried rice turns it into a fuller takeout-style meal without making the soup itself heavier.

Hot and Sour Soup Ingredients: What Each One Adds

The ingredient list looks less intimidating once flavor and texture are separated. Some ingredients deepen the broth; others are there for chew, crunch or softness.

IngredientMain JobIf You Skip It
Dried shiitakeDeep mushroom savorinessThe broth tastes lighter
Wood earSpringy chewLess textural contrast
TofuSoft bodyThe soup feels less substantial
BambooClean crunchLittle change to the broth itself
Dark soyDeeper colorThe soup looks lighter

Broth: Mild Homemade or Deeper Takeout Flavor?

Chicken broth gives the most familiar base, while vegetable broth works well for a meatless version. Mild carton broth makes a lighter soup. A more concentrated chicken or bouillon-style base gets closer to the savory intensity of many Chinese-American takeout versions.

You should still be able to taste the broth after the vinegar goes in. If all you notice is sourness, the foundation was probably too weak. Concentrated broth also brings more sodium, so start with less soy and salt and adjust once everything is hot.

Mushrooms: Flavor and Texture Are Separate Jobs

Dried shiitake deepens both the smell and flavor of the broth as it simmers. Its brown soaking liquid is intensely mushroomy too, which is why a strained portion is useful in the pot.

Wood ear does something different. It brings a springy bite against the softer tofu and egg. If you omit it, bamboo or water chestnuts restore some crunch.

Macro comparison of hydrated sliced shiitake mushrooms and glossy wrinkled wood ear mushrooms, with a ceramic spoon holding both and labels for deep savoriness and springy chew.
Using both mushrooms gives depth without making every bite soft. If one is missing, replace the job it performs—not simply the mushroom name.

Dried lily buds are another traditional addition in some Chinese versions, bringing an earthy, slightly chewy element. They are optional and not needed for the restaurant-style recipe above.

Tofu: Firm Is Easiest

Firm or medium-firm tofu is easiest because it holds its shape. Soft tofu gives the soup a silkier, more delicate texture but is more fragile.

A partly used block can go into Mapo tofu, which takes the same ingredient in a much bolder, spicier direction.

Bamboo Shoots: Taste Before They Go In

Some canned bamboo carries a strong aroma straight from the tin. Drain and rinse it well. If a piece still tastes unpleasant, blanch the bamboo in boiling water for 30–60 seconds and drain it before adding it to the soup.

Bamboo strips being rinsed under water in a mesh strainer, one strip held for tasting, with a saucepan of bamboo in the background for a brief 30-to-60-second blanch.
The quick blanch is about cleaner flavor, not softer bamboo. If rinsing removes the canned note, there is no reason to cook it again.

Soy, Ginger, Sugar and Final Aromatics

Chinese light soy sauce or regular soy sauce supplies salt and savoriness. Dark soy is mainly useful for deeper color and is entirely optional.

A lighter-colored soup may already taste exactly right. Adding regular soy merely to darken the liquid risks making the soup saltier than intended. No need to chase the color.

Ginger gives the base a fresh aromatic edge. The small amount of sugar rounds the soy and vinegar without making the soup sweet. Toasted sesame oil goes in after cooking so its nutty aroma remains noticeable.

Making the soup without onion or garlic? Neither is required. Omit the scallions, avoid garlic-containing chilli condiments, and check packaged broth and sauce labels because some brands include onion or garlic.

Where next? Need an ingredient swap? See substitutions and variations. Trying to fix a bowl that already tastes off? Go to troubleshooting.

Hot and Sour Soup Substitutions & Variations

Missing one ingredient rarely ruins the soup. Most substitutions change flavor, texture or both.

  • No dried shiitake? Use fresh shiitake or cremini. The mushroom flavor will be lighter.
  • No wood ear? Leave it out, or use bamboo or water chestnuts for some crunch.
  • No cornstarch? Leave it out for a brothier soup. The egg ribbons may not stay suspended as evenly. Potato starch is another option; add it gradually because it thickens differently.
  • No tofu? Omit it or use cooked chicken or pork for a firmer, meatier result.

Adding Chicken or Pork

Stir about 4 oz / 115 g cooked shredded chicken or thinly sliced cooked pork into the soup with the tofu, or use the meat in place of tofu. Heat it through briefly before finishing the soup.

Vegetarian, Vegan & Gluten-Free

For vegetarian hot and sour soup, use vegetable broth and keep the tofu, mushrooms and egg. For a vegan version, omit the egg as well. A mushroom-forward broth becomes especially useful once the chicken broth and egg are gone.

For a gluten-free version, use certified gluten-free tamari or soy sauce and check the broth, vinegar and chilli-condiment labels. Chinese black vinegars vary by brand, and some contain wheat-derived ingredients.

Adaptation guide centered on Chinese-American hot and sour soup with ingredient cues for the base, vegetarian, vegan, gluten-free, and optional chicken or pork versions.
Most variations need only targeted swaps. Change the broth, egg, soy sauce or protein according to the version you want rather than rebuilding the entire soup.

Keep additions in proportion to the broth. Pile in too many extras and the vinegar and white pepper start getting lost among all the solids.

You want soft tofu or egg, something with bite, and enough broth around both for the soup to remain lively.

What About Indo-Chinese Hot and Sour Soup?

Indo-Chinese hot and sour soup is usually redder, more vegetable-heavy and more chilli-driven than this Chinese-American version. It works better as its own style than as this soup with extra chilli sauce.

Common additions include cabbage, carrot, capsicum/bell pepper, chicken, chilli sauce or chilli paste and sometimes tomato or ketchup, with green-chilli vinegar alongside. When that is the soup you want, those ingredients should shape the pot from the beginning.

Chosen your version? Back to the recipe and method.

Hot and Sour Soup Troubleshooting

Most problems become much easier to fix once you identify which part of the soup actually went wrong.

Hot and Sour Soup Rescue Guide with a central bowl and six callouts for bland soup, too sour, not peppery enough, too thin, too thick, and cloudy or clumped egg.
Fix the problem that actually failed, retaste, then move on. Changing salt, vinegar, white pepper and starch together makes the next adjustment harder to read.
What Happened?Likely ReasonQuick Fix
BlandThe savory base is weakStrengthen the broth; then adjust soy or salt
Not sour enoughToo little fresh acidityAdd vinegar 1 tsp / 5 ml at a time
Too sourToo much vinegarAdd lightly seasoned broth gradually, then reassess seasoning and body
Not peppery enoughToo little white pepperAdd small pinches after cooking
Too chilli-hotToo much chilliDilute gradually with lightly seasoned broth, then rebalance
Too thinNot enough starchAdd a small fresh slurry and return to a simmer
Too thickToo much starchAdd hot broth gradually, then reseason
Cloudy eggThe egg dispersed before settingPour more slowly and wait before stirring next time
Big egg clumpsToo much egg entered one spotUse a finer stream around the pot next time
Broken tofuHard boiling or too much stirringUse a softer simmer and less movement
Gritty or grainySediment or a starch problemCheck the soaking liquid and slurry; see below

What the Egg Shape Tells You

Large clumps usually mean too much egg reached one area at once. Very fine flecks suggest too much movement before the egg set. A milky or cloudy broth means the egg dispersed through the liquid before distinct strands formed.

There is nothing urgent to rescue—the soup will still taste good. The shape tells you what to change next time.

Gritty, Grainy or Muddy-Tasting Soup

Visible or earthy grit often points to sediment from shiitake soaking liquid. A powdery or starchy mouthfeel may mean the slurry was not mixed smoothly, the soup did not return to a simmer after the starch went in, or the wrong corn product was used.

For thickening, use the fine white starch sold as cornstarch in the US and cornflour in the UK—not cornmeal or coarser US-style corn flour.

Poorly rinsed bamboo sometimes carries an unpleasant canned flavor. White pepper varies by brand; if yours tastes stale or unpleasantly harsh to you, try a fresher or different one before increasing the amount. Too much dark soy added only for color may make the broth taste muddy.

If one ingredient tastes wrong on its own, piling on extra vinegar or chilli usually just hides it.

Make Ahead, Storage and Reheating

For make-ahead prep, prepare the broth, mushrooms, bamboo and tofu in advance. Reheat the base before serving, then do the final starch adjustment, egg ribbons, vinegar, white pepper and sesame oil close to serving time for the freshest texture and aroma.

Make-ahead guide showing a pot of broth with mushrooms, bamboo and tofu beside small bowls of slurry, beaten egg, vinegar, ground white pepper and sesame oil for finishing fresh.
This make-ahead split protects the two things that fade fastest: freshly set egg texture and the bright finish from vinegar, white pepper and sesame oil.

Storage, Reheating and Freezing

Cool leftovers promptly and refrigerate them in a covered container for 3–4 days. The USDA leftovers guidance recommends reheating leftovers thoroughly to 165°F / 74°C and bringing soups to a boil during reheating.

After the soup is thoroughly reheated, lower the heat and check it again. If it has loosened, stir in a small fresh slurry and briefly return it to a simmer. If the flavor seems dull, fresh vinegar and white pepper are often more useful than extra salt.

You can freeze hot and sour soup, but the tofu, egg and starch-thickened broth may not return to exactly the same texture after thawing. Correct the body and seasoning after reheating.

Leftovers also make a quick noodle soup. Add cooked noodles or ramen, loosen with broth if needed, and refresh the vinegar and white pepper just before eating.

One Last Taste

A good hot and sour soup should feel lively rather than heavy: savory broth underneath, vinegar bright in the steam, white pepper warming the finish, and soft tofu and egg interrupted now and then by the springy bite of wood ear or the crunch of bamboo.

Some people will want another splash of vinegar. Others will reach for more white pepper. Keep both on the table, taste once more, and stop when the bowl tastes like the one you were hoping for.

Porcelain spoon held above a bowl of hot and sour soup, carrying glossy brown broth, tofu, shiitake, dark wood ear mushroom, bamboo, soft egg ribbons and a small piece of scallion.
The best bite carries several textures at once: silky egg and tofu, meaty shiitake, springy wood ear and crisp bamboo in the same bright, peppery-sour broth.

Back to Recipe · Back to Top