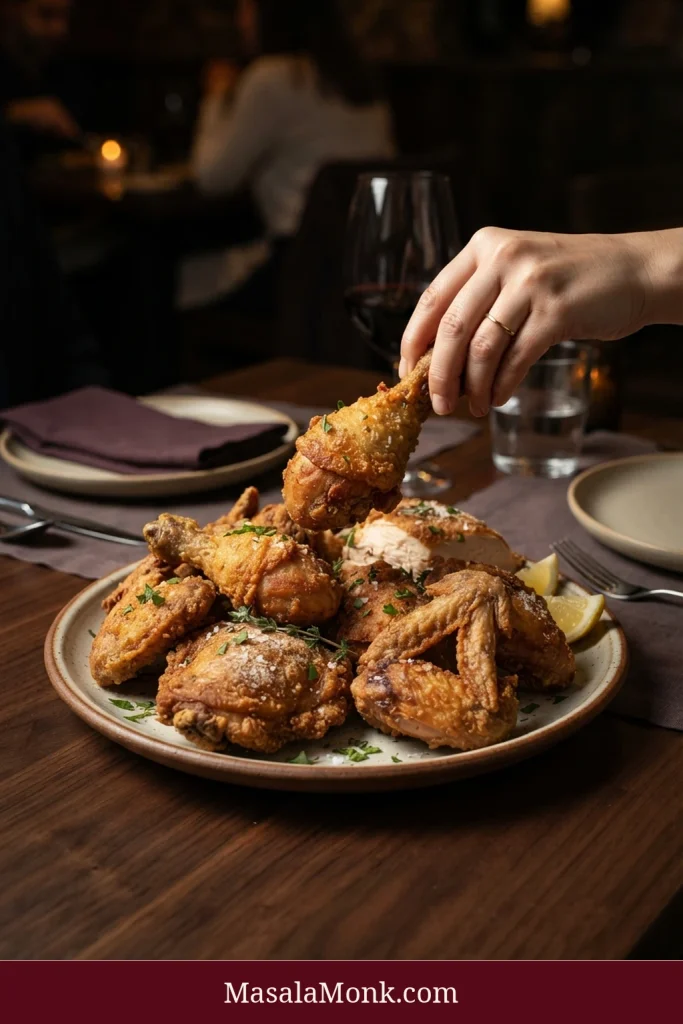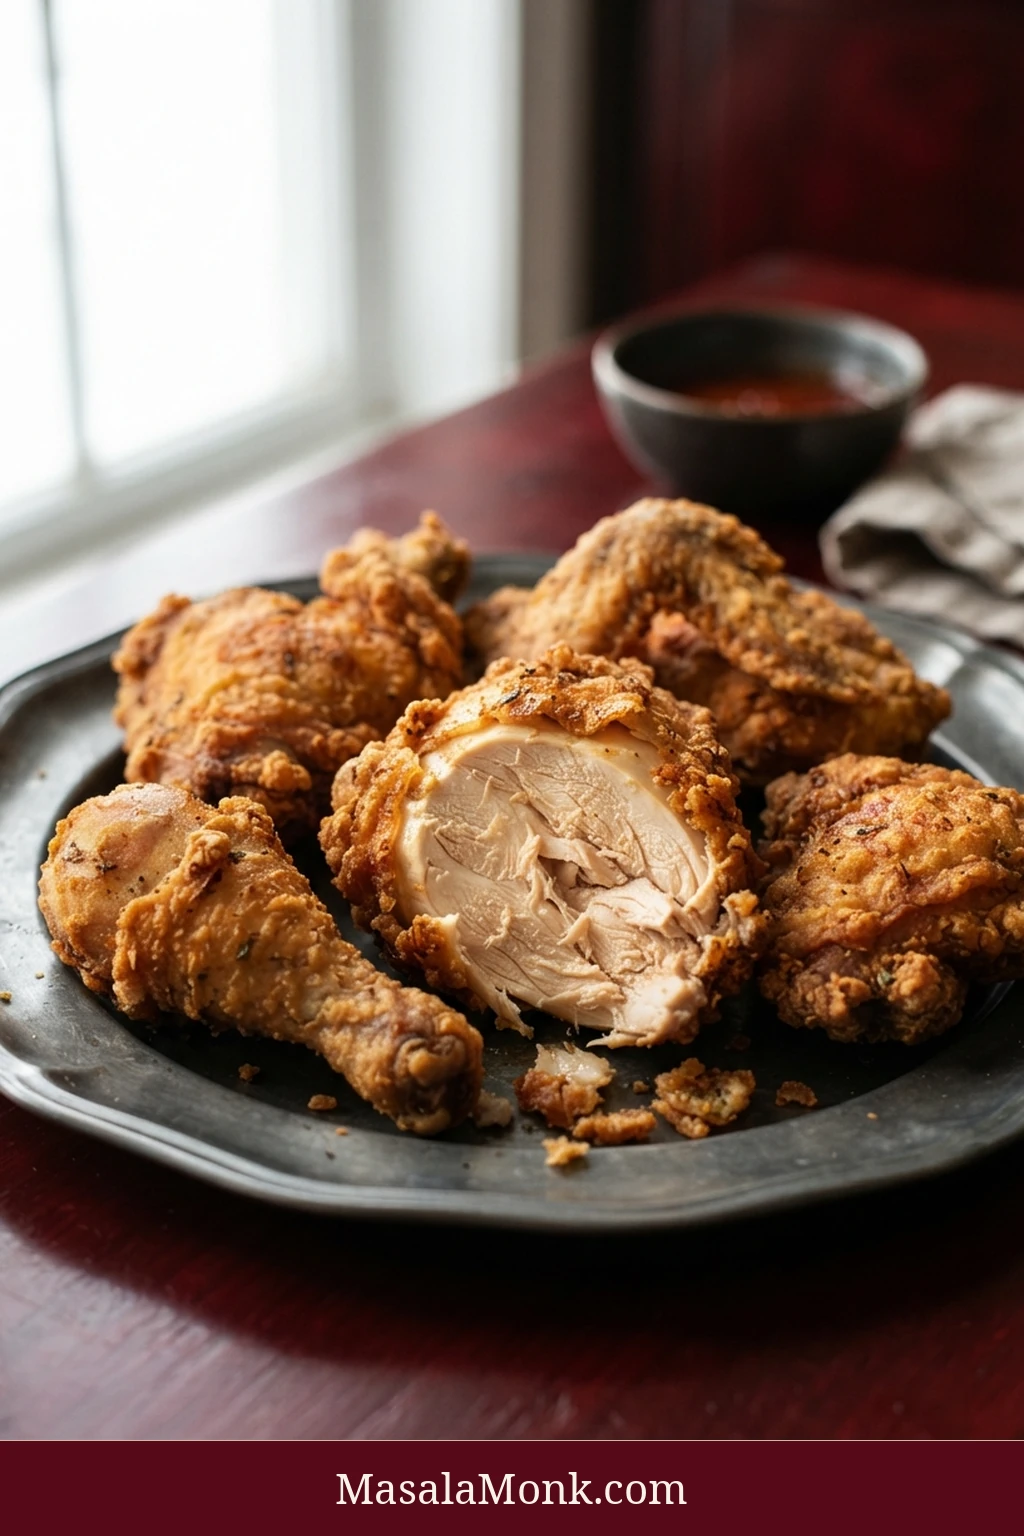
Good fried chicken should crackle at the first bite, with rough golden ridges giving way to juicy, well-seasoned chicken underneath. You want brittle edges and a substantial crisp crust around tender meat right to the bone.
Getting there is less about a secret ingredient than controlling a few ordinary things. Oversized chicken can leave you with dark crust and an underdone center. Wet, heavy breading can pull away from the meat. And a pot that never gets time to recover can turn a beautiful first batch into a greasy third one.
This version uses bone-in chicken, cultured buttermilk, a flour-and-cornstarch dredge and a heavy pot. The method is built around visible checkpoints, so you know what the chicken, coating and oil should look like before moving on.
Size the Pieces. Set the Coating. Control the Oil.
Crispy, juicy fried chicken comes down to three practical controls: manageable chicken pieces, a coating that has time to attach, and oil that stays hot enough to crisp the crust without racing ahead of the meat.
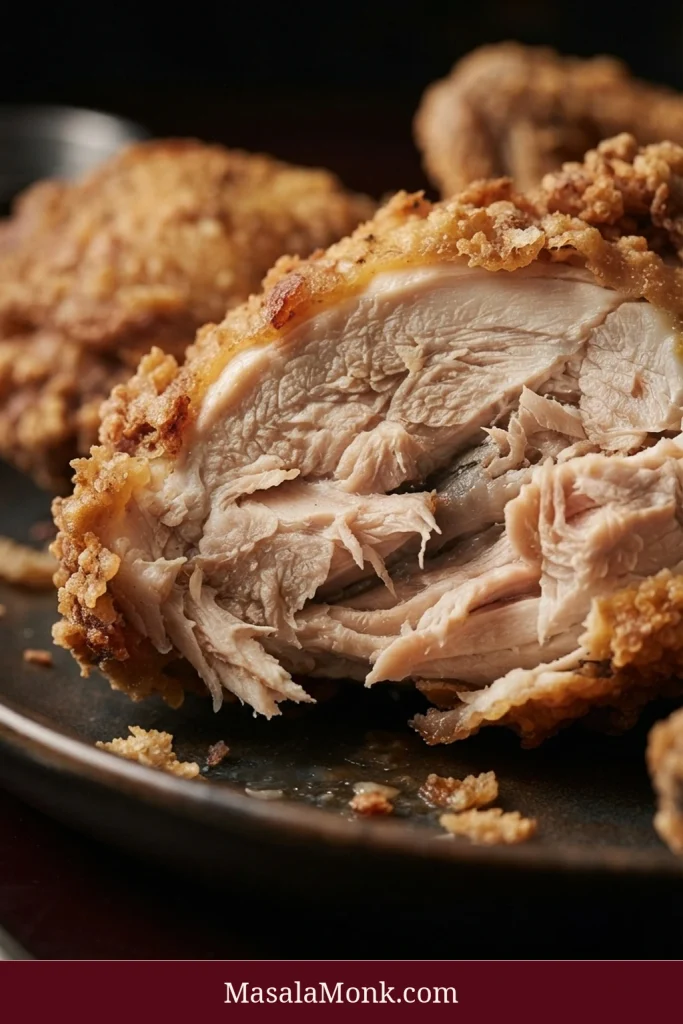
- Size the pieces: split very large breast portions before marinating so the center can cook before the crust gets too dark.
- Set the coating: let excess buttermilk drip away, press on the dredge and rest each batch until the flour looks attached instead of dusty.
- Control the oil: start at 350°F / 177°C, expect a drop when the chicken goes in, then let the pot get hot again before loading the next batch.
The clock tells you when to start checking; the thermometer decides when the chicken leaves the oil.
Before the Oil
At the Pot
If Something Goes Wrong
Fried Chicken Recipe
Crispy, Juicy Bone-In Fried Chicken
Bone-in buttermilk fried chicken with a substantial flour crust made crisper with a little cornstarch. Frying in small batches helps the rough coating stay crisp while the chicken cooks through.
Yield: 10 pieces; 4–6 servings
Marinate: 4–12 hours preferred; up to 24 hours
Coating rest: about 15 minutes per batch
Frying + oil recovery: allow 1–1½ hours, depending on piece size, batch size and your stove
Total buttermilk: 2¼ cups / 540 ml — 2 cups / 480 ml for the marinade plus ¼ cup / 60 ml kept clean for making crags in the dredge.
Equipment
- 6–7 qt heavy Dutch oven
- Deep-fry or candy thermometer
- Instant-read meat thermometer
- 2 separate wire-rack and sheet-pan setups—one for coated raw chicken and one kept clean for cooked chicken
- Long tongs
- Spider or fine skimmer
- 2 wide dredging trays
Hot-oil safety: use a deep pot with plenty of headspace, keep water away from hot oil, lower chicken away from your body, never leave active frying unattended and never use water on an oil or grease fire.
Chicken & Buttermilk Marinade
- 1 bone-in, skin-on chicken, 3½–4 lb / 1.6–1.8 kg, cut into 10 frying pieces
- 2 cups / 480 ml cultured buttermilk
- 18 g salt, weighed
- 2 tsp sweet paprika
- 2 tsp garlic powder
- 1 tsp onion powder
- 1 tsp freshly ground black pepper
- ½ tsp cayenne pepper, or to taste
- ½ tsp dried thyme
Clean Buttermilk for the Dredge
- ¼ cup / 60 ml additional buttermilk, kept separate from the raw-chicken marinade and used as needed between the dredging trays
Crispy Flour Coating
- 3 cups / 360 g all-purpose flour
- ¾ cup / 90 g cornstarch
- 12 g salt, weighed
- 2 tsp sweet paprika
- 2 tsp garlic powder
- 1½ tsp onion powder
- 1½ tsp freshly ground black pepper
- ½–1 tsp cayenne pepper, to taste
- 1 tsp dried thyme
For Frying
- Peanut, canola or neutral vegetable oil, enough to reach 1½–2 inches / 4–5 cm deep; typically 2–3 qt / 1.9–2.8 L depending on the pot
Instructions
1. Size, Season and Marinate the Chicken
Check the breast portions before they go into the marinade. If one is much larger than the others, split it crosswise. For larger breast portions, 5–7 oz / 140–200 g is a useful size to aim for; wings and smaller drumsticks will naturally weigh less.
There is no need to rinse raw chicken. If the pieces are very wet with package juices, blot them with paper towels and discard the towels immediately.
Whisk the 2 cups / 480 ml buttermilk with the 18 g salt, paprika, garlic powder, onion powder, black pepper, cayenne and thyme. Add the chicken, coat every surface, cover and refrigerate for 4–12 hours. Overnight is convenient too; keep the total marinating time within about 24 hours.
Keep the separate ¼ cup / 60 ml buttermilk refrigerated. It is for the dredge and should never touch raw chicken.
2. Set Up the Racks, Oven and Dredge
Set up one rack for coated raw chicken and keep the second rack completely clean for cooked pieces. Heat the oven to 200°F / 95°C if you expect to hold finished pieces briefly between batches.
Mix the flour, cornstarch, 12 g salt, paprika, garlic powder, onion powder, black pepper, cayenne and thyme. Divide it between two wide trays. Keep the second tray dry and fresh until the first becomes too damp to coat cleanly.
3. Make the Crisp Flour Crags
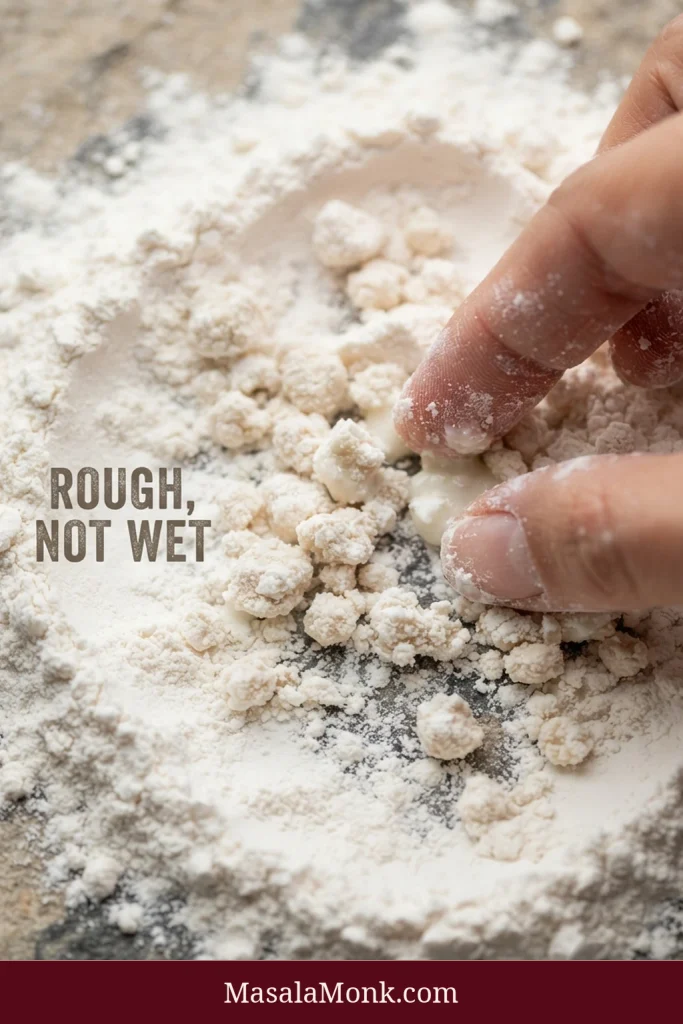
Drizzle a little of the clean reserved buttermilk into the first tray. Toss lightly with a fork or your fingertips, adding only enough to create scattered small damp clumps while most of the flour stays dry.
Stop there. You want rough surface, not wet dough. Those little clumps will fry into some of the brittle edges that crack first when you bite through the crust.
4. Dredge and Rest the First Batch
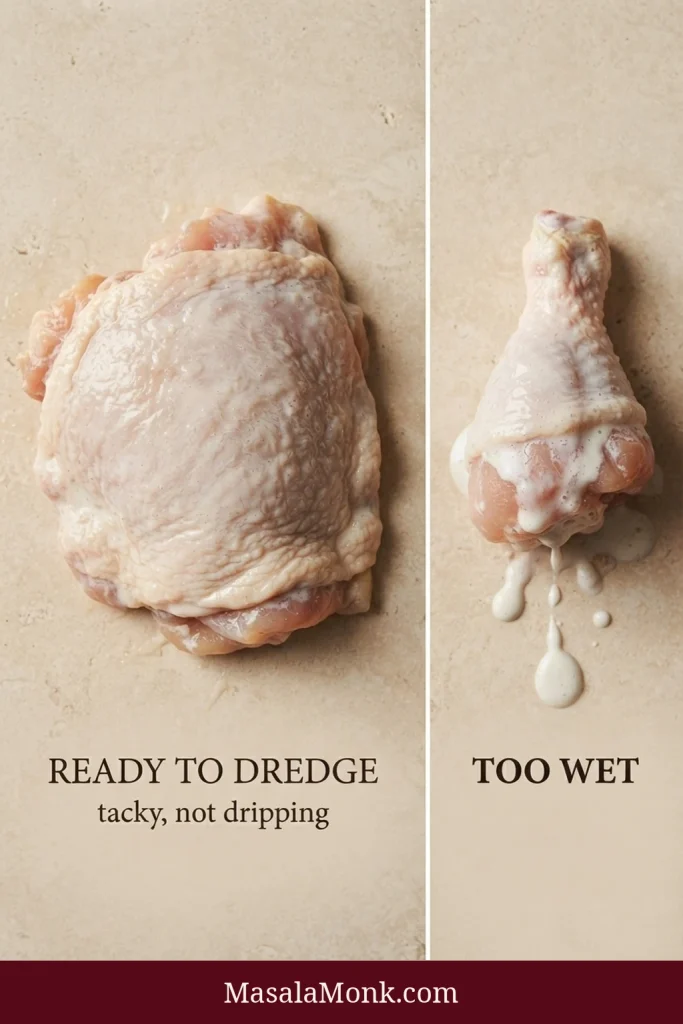
Coat only enough chicken for the first batch. Lift each piece from the marinade and let the heavy excess drip away. The surface is ready for flour when it remains tacky without dripping heavily.
Press the chicken firmly into the dredge, especially around folds of skin and uneven edges. Lift it out, shake away loose flour and place it on the raw-chicken rack.
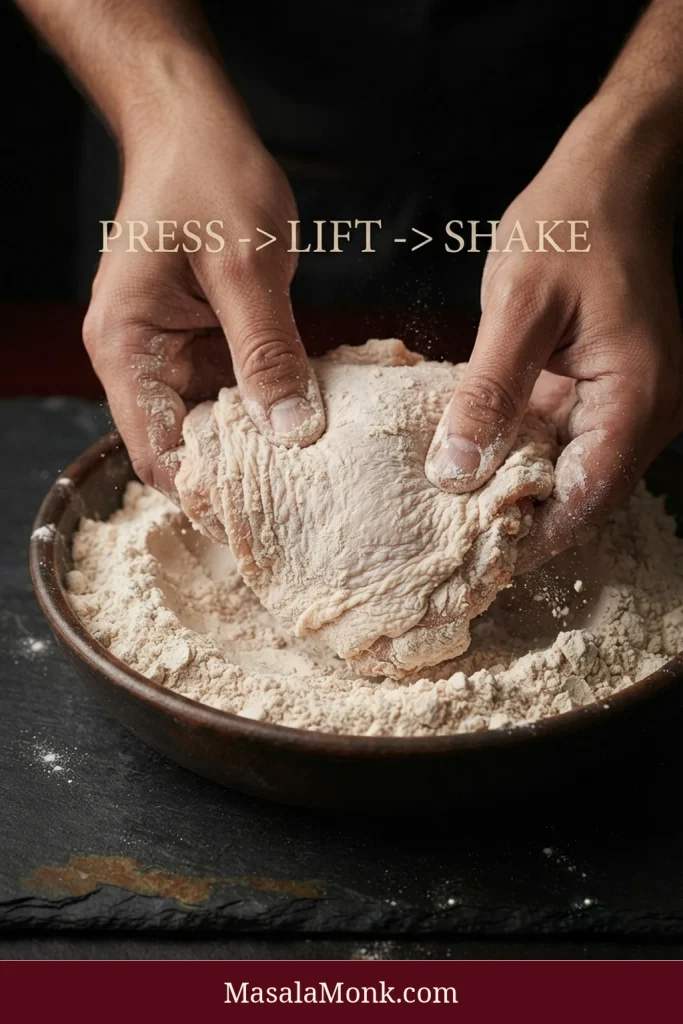
Give the coating about 15 minutes to settle. While it rests, begin heating the frying oil. The chicken is ready when the flour no longer looks freshly powdered; the surface should look slightly damp and firmly attached when you lift the piece.
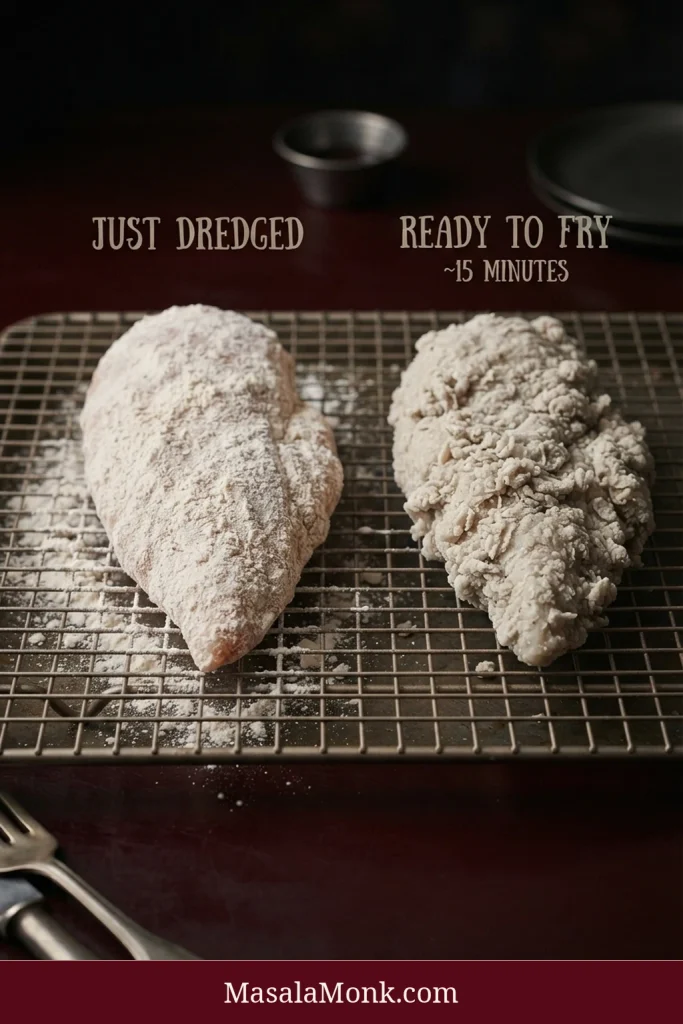
Before the first piece hits the oil: have the clean rack, meat thermometer, tongs and skimmer beside the stove.
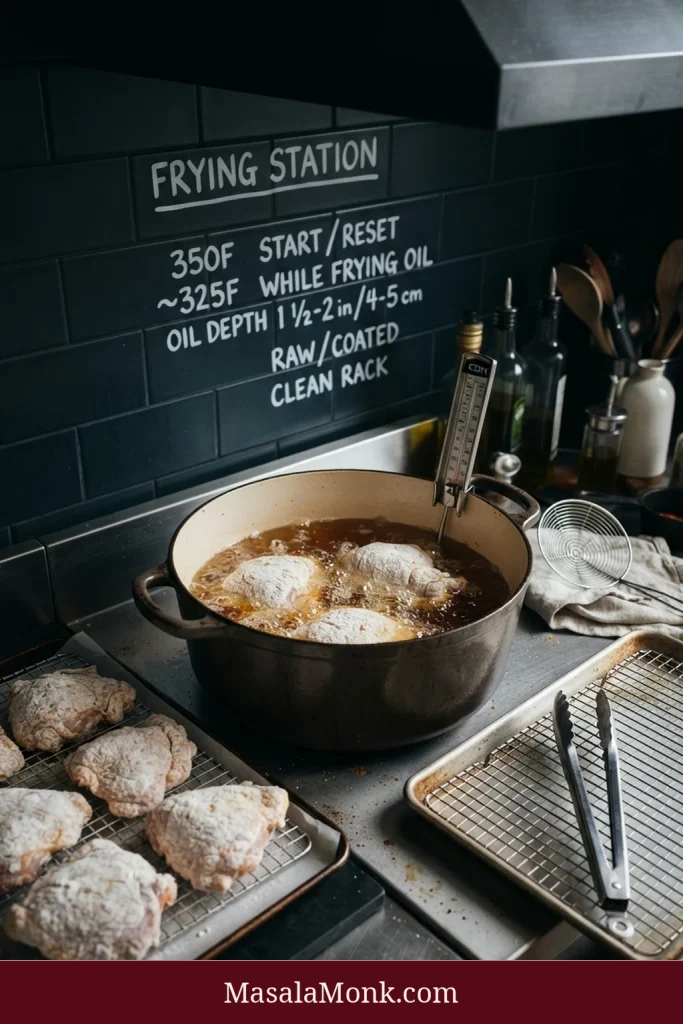
5. Bring the Oil to 350°F / 177°C
Add enough oil to reach 1½–2 inches / 4–5 cm deep while leaving plenty of empty pot above it. Position the thermometer so the tip sits in the oil without touching the bottom.
Bring the oil to 350°F / 177°C.
6. Fry in Small Batches
Carefully lower 2 large pieces or 2–3 smaller pieces into the oil, moving them away from your body and leaving visible space around each one.
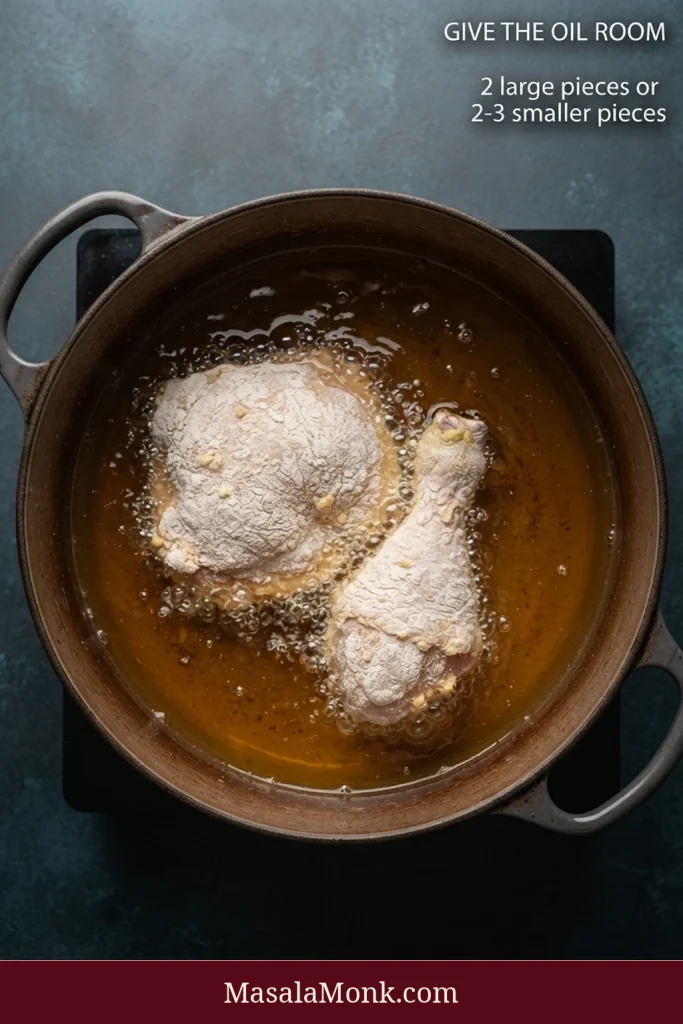
The temperature will fall. That’s normal. Aim for 325°F / 163°C while the chicken fries; 315–330°F / 157–166°C is a workable range. Make small burner adjustments and give a heavy pot of oil time to respond.
Let the Crust Set Before Turning
For the first 2 minutes, leave the chicken mostly alone. After that, turn or rotate pieces as needed.
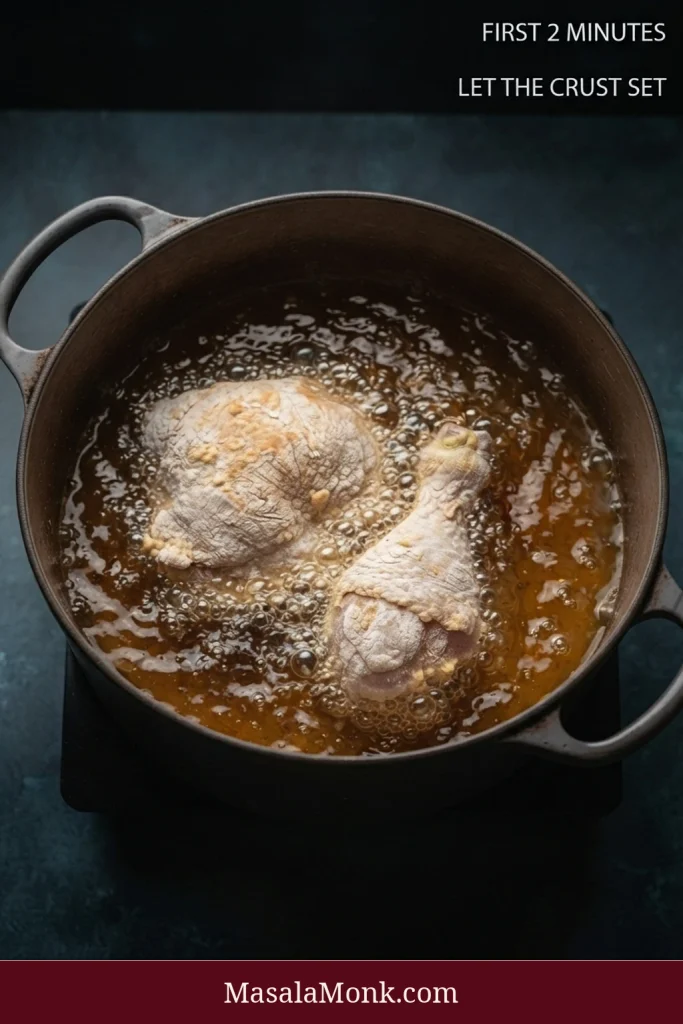
The pale flour gradually turns rough and golden, with little ridges and bubbles forming around the edges. That’s the crust you’re trying to preserve through the rest of the fry.
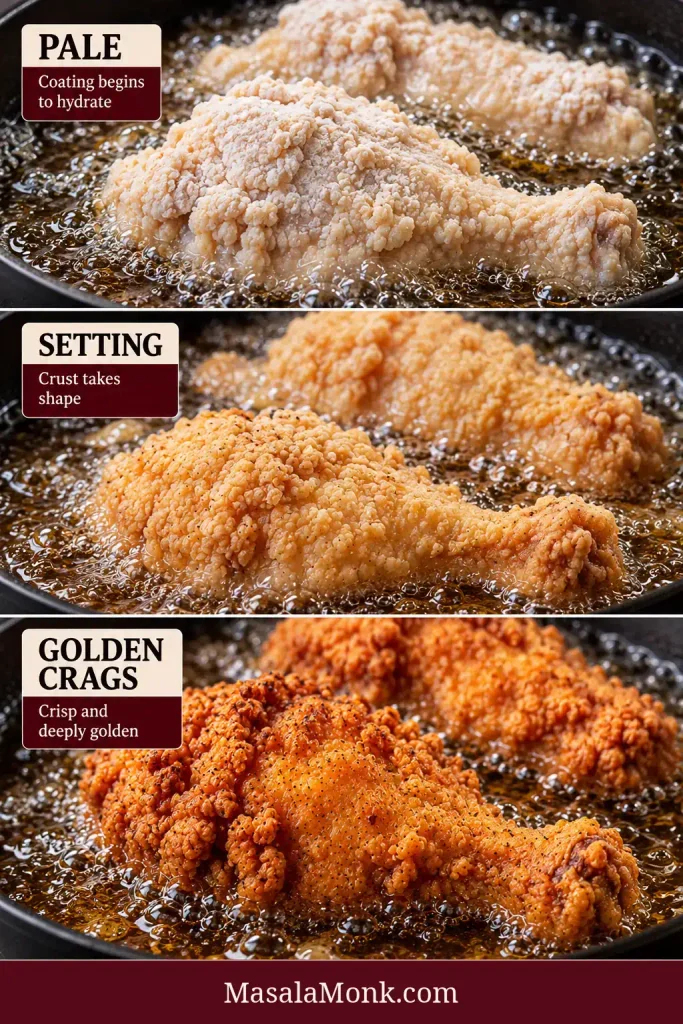
While one batch fries: dredge the next group of similar-size pieces so the coating gets about 15 minutes to settle before reaching the oil. If a quick batch finishes first, rack it, skim the pot and let the next coating finish resting. When the first dredging tray turns damp and gluey, switch to the fresh flour and use a little more of the clean buttermilk to make new crags.
Grouping similar cuts makes the batches easier to read. Fry thighs and drumsticks earlier in the session. Breast portions can come later so the lean meat spends less time waiting after it is cooked; wings are flexible and can go wherever they fit comfortably into your batch plan.
7. Check the Meat Before the Crust Gets Too Dark
Use the clock to decide when to start checking. Lift the piece from the oil, then insert an instant-read thermometer into the thickest meat without touching bone. Every piece should reach at least 165°F / 74°C.
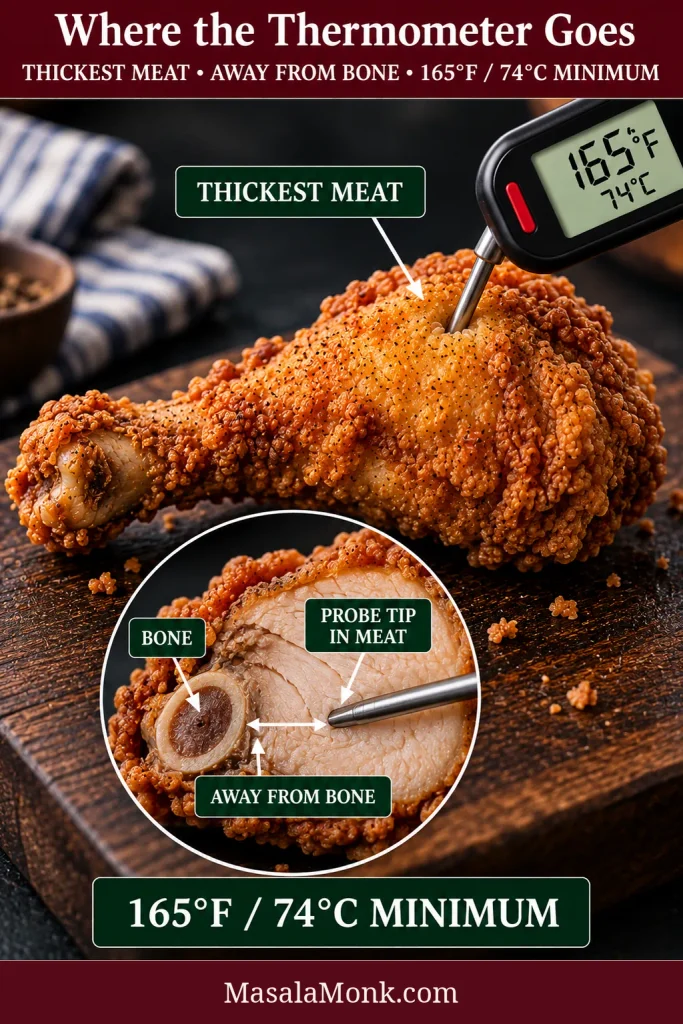
Thighs and drumsticks can take some extra heat without drying as quickly. Breast meat gives you less room, so check it early.
Approximate Checking Times by Cut
| Piece | Begin Checking | Planning Range |
|---|---|---|
| Wings | 7 minutes | 7–9 minutes |
| Split breast portions | 9–10 minutes | 10–13 minutes |
| Drumsticks | 11–12 minutes | 12–15 minutes |
| Thighs | 12 minutes | 13–16 minutes |
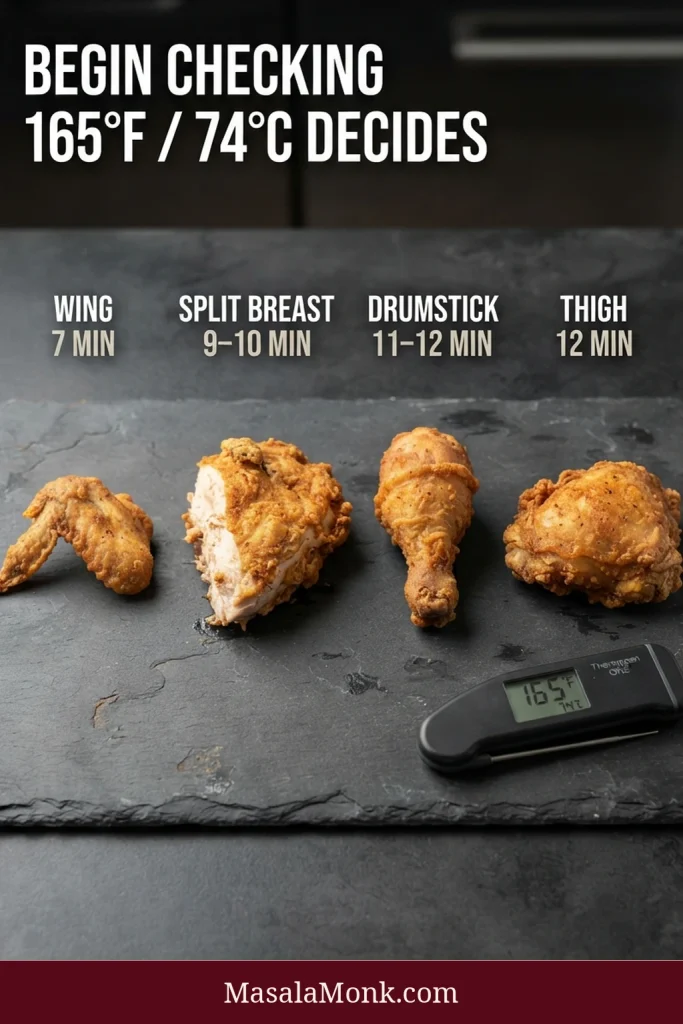
These are checking points, not automatic finish times. Piece size, starting temperature and the way your stove recovers heat can all move the clock. The meat still needs to reach at least 165°F / 74°C.
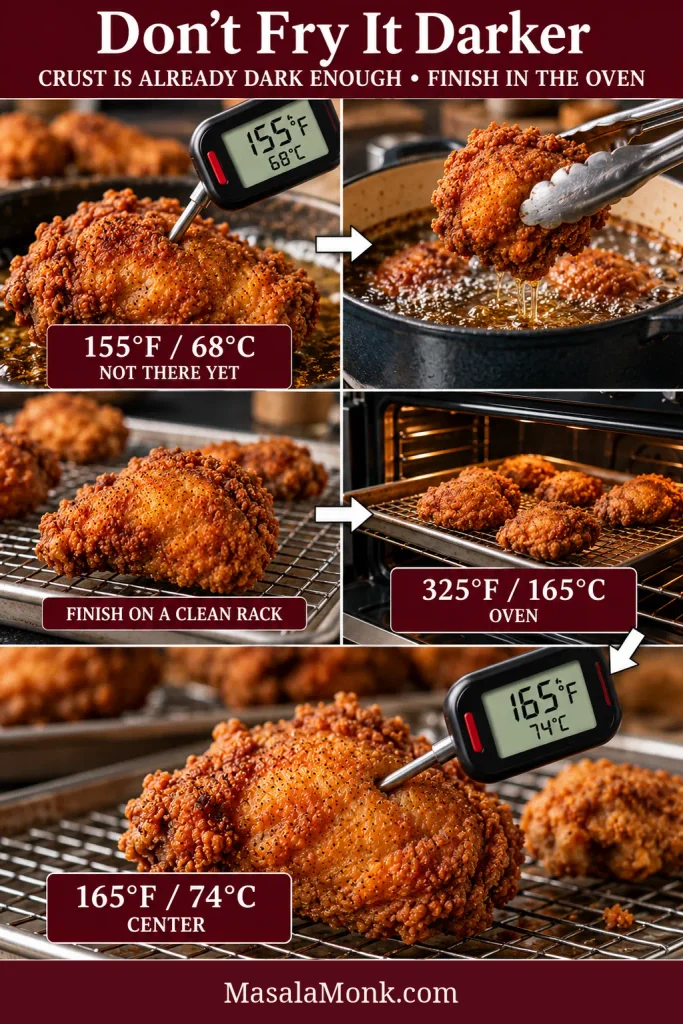
Crust already as brown as you want it, but the center is below 165°F / 74°C? Stop frying it darker. Move the piece to the clean rack and finish it in a 325°F / 165°C oven until the center reaches 165°F / 74°C.
8. Rack, Skim, Recover and Repeat
Move finished chicken to the clean rack. The crust should feel set rather than fragile now, while steam escapes underneath instead of collecting against it.
Use the 200°F / 95°C oven for short holds between batches, especially for dark meat, and keep the chicken uncovered. Avoid parking breast pieces there for the entire frying session.
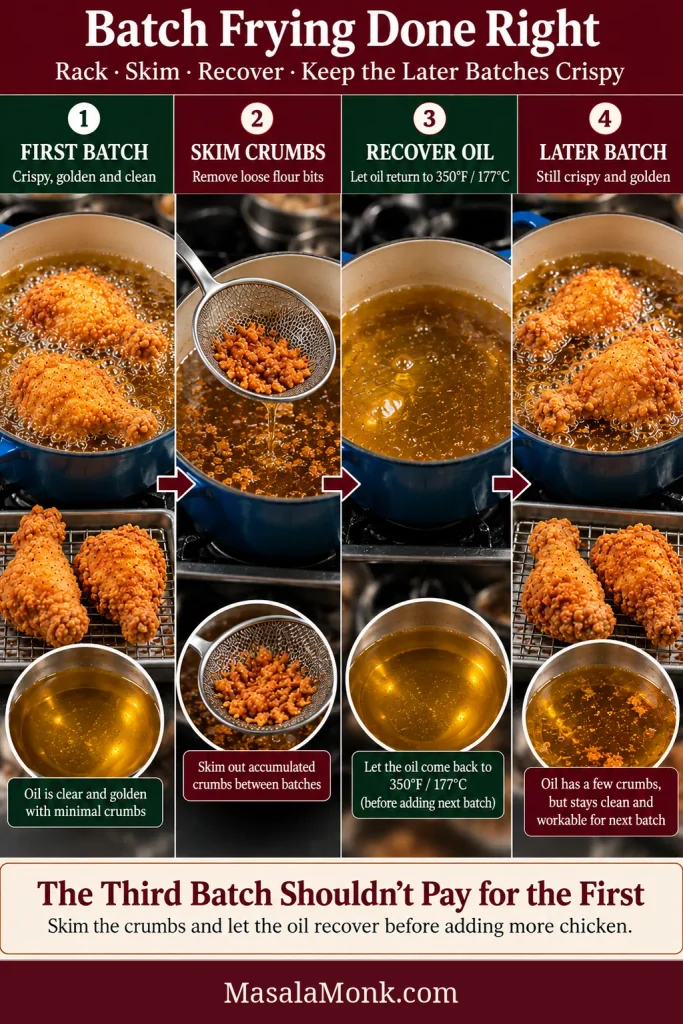
Skim dark flour crumbs from the oil and let it return to 350°F / 177°C before loading again. Then repeat the rhythm: fry, rack, skim, recover.
Discard the used marinade and any dredge that has contacted raw chicken.
Chicken Size Controls the Frying Time
Breast size is the biggest variable you can easily correct before frying. For larger breast portions, 5–7 oz / 140–200 g is much easier to fry evenly than an oversized breast half. Wings and smaller drumsticks will naturally fall below that range.
A 5 oz / 140 g breast portion and a 12 oz / 340 g breast half simply do not fry on the same schedule. The bigger piece needs much longer for heat to reach its center while the crust keeps browning.
For a 3½–4 lb / 1.6–1.8 kg chicken, use 10 frying pieces: two wings, two drumsticks, two thighs and four breast portions made by splitting each breast half crosswise.
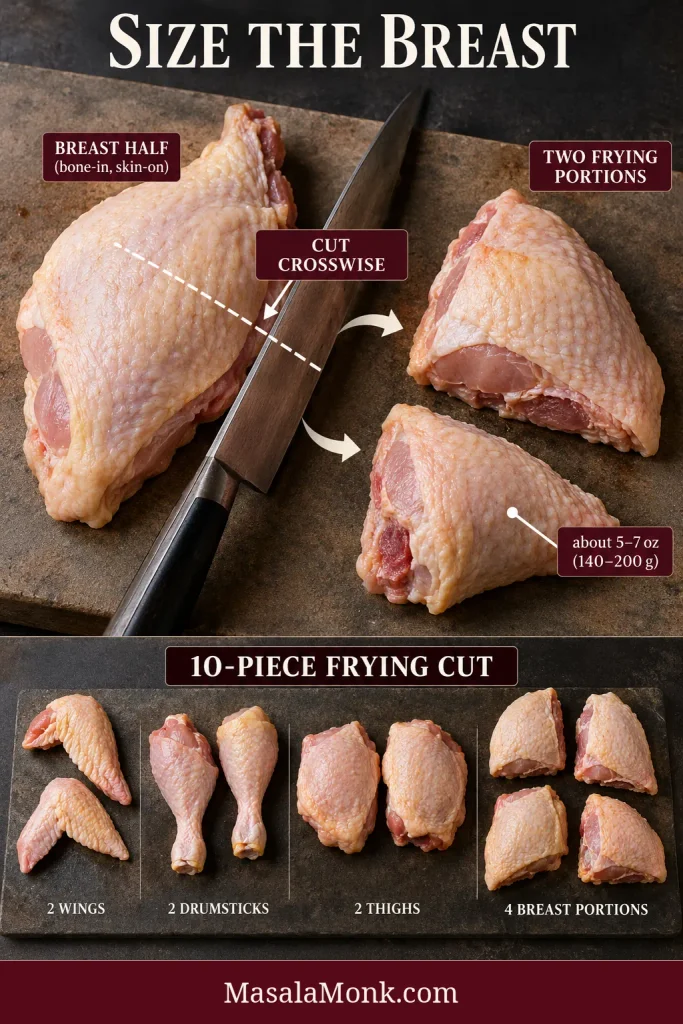
If you buy parts instead, pay particular attention to the breasts. One piece twice the size of everything else in the pack? Split it before marinating.
If you actually want a thin boneless breast with a crisp coating, Air Fryer Fried Chicken Breast is built around ½-inch cutlets and is a better fit than adapting these bone-in timings.
Buttermilk, Salt and Marinating Time
Buttermilk carries seasoning around the chicken, adds a gentle tang and leaves a thin film for the dredge to grab after the heavy excess drips away.
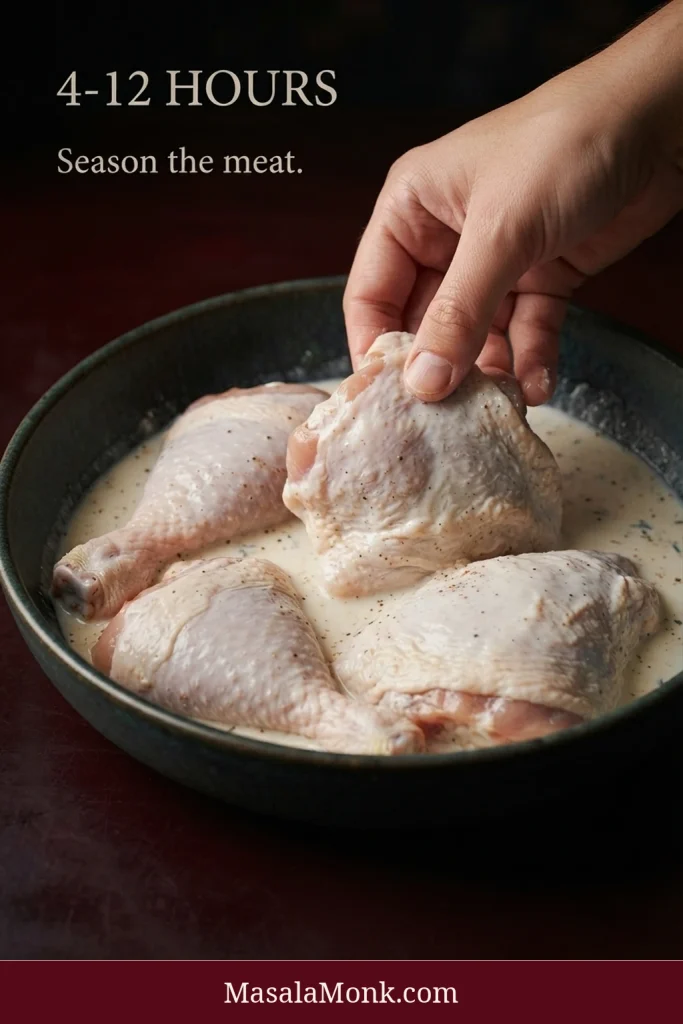
Four to twelve hours is a good target. Two hours is still useful when dinner is closer than planned, while an overnight marinade is convenient when you’re thinking ahead. Up to 24 hours is workable; there is little reason to leave the chicken in the acidic marinade longer for this recipe.
Why Weigh the Salt?
A tablespoon of fine salt can contain much more salt than the same spoonful of coarse kosher salt. Weighing removes most of that uncertainty.
The marinade seasons the meat; the dredge seasons the crust. Fine sea salt or kosher salt can both work when weighed, but don’t swap them spoon-for-spoon. If you add a salty seasoning blend, reduce the plain salt to account for it.
No Buttermilk?
For similar body and tang, try thinned plain yogurt. Kefir is another good option. Milk soured with a little lemon juice or vinegar works in a pinch, although it is thinner and will not cling quite like cultured buttermilk.
Have buttermilk left in the carton? Use it earlier in the meal prep for Southern Buttermilk Biscuits, then keep the biscuits warm while the chicken gets your attention.
How to Make Fried Chicken Coating Stay On
Fried-chicken breading stays attached when there is enough surface moisture for the flour to grip, but not so much that a slippery layer forms underneath. Resting gives the flour time to absorb that moisture before the crust has to survive hot oil.
Flour Builds the Crust; Cornstarch Makes It Crisper
Most of the crust comes from all-purpose flour; the smaller cornstarch portion helps it fry crisper. This recipe uses 360 g flour and 90 g cornstarch, keeping the coating firmly flour-led.
You don’t need baking powder or baking soda for this version.
Craggy Does Not Mean Thick
Craggy fried chicken needs rough surface, not a mountain of breading. Small damp flour clumps create crisp ridges; too many wet layers can build a heavy shell that pulls away from the meat. After resting, the coating should look slightly damp and settled instead of snowy.
Once that crust is attached, the pot takes over.
Keep the Oil Steady From the First Batch to the Last
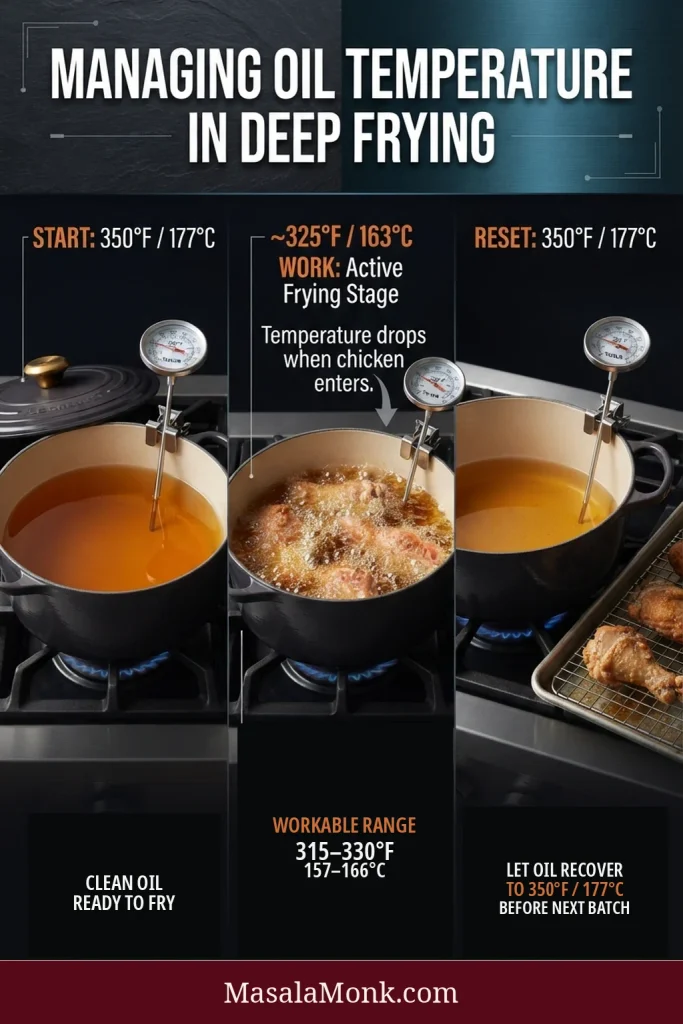
Heat the oil to 350°F / 177°C before adding chicken. During frying, target 325°F / 163°C; 315–330°F / 157–166°C is a workable range. Let the oil return to 350°F / 177°C before loading again.
The first batch gets the cleanest oil, but the third batch should not have to pay for it.
| Stage | Temperature | What to Do |
|---|---|---|
| Start | 350°F / 177°C | Load the chicken |
| Work | Target 325°F / 163°C | Keep frying; 315–330°F / 157–166°C is workable |
| Reset | 350°F / 177°C | Wait before loading again |
Let the Temperature Drop Without Chasing It
The instinct when you see the thermometer fall can be to turn the burner way up. Give the pot a moment first. Adding chicken naturally pulls the oil temperature down.
A heavy pot of oil responds slowly. Make small adjustments and pay more attention to a temperature that stays too low or too high than a brief wobble.
Batch size matters too. Commercial fryers hold more oil and recover heat much faster than a Dutch oven on a home stove. Two large pieces or two to three smaller ones are easier to manage.
Reset the Pot Before Loading Again
Skim out the crumbs left behind. They keep frying after the chicken is gone, eventually turning dark and bitter.
If the flour tray has become sticky and paste-like, move to the fresh portion. When the opposite problem appears—the crust is getting dark before the center is ready—jump ahead to Dark Crust, Underdone Center.
Piece Timing, Doneness and the Oven Rescue
Use frying times to decide when to start checking. Wings, breasts, drumsticks and thighs do not run on one clock.
Poultry should reach at least 165°F / 74°C in its thickest part, measured away from bone. See the USDA safe temperature guidance.
Thighs and drumsticks can take some extra heat without drying as quickly as breast meat. When you’re unsure which piece to check first, check the breast.
Dark Crust, Underdone Center
If the crust already looks exactly right but the meat is still below 165°F / 74°C, move the chicken to a rack in a 325°F / 165°C oven and finish it there.
Dinner is still salvageable. Before the next piece goes in, check the two likely causes: an oversized cut, oil running too hot, or both.
Keep Every Batch Crisp
Put fried chicken on a wire rack and keep it uncovered. Air can move underneath, so steam escapes instead of softening the bottom crust.
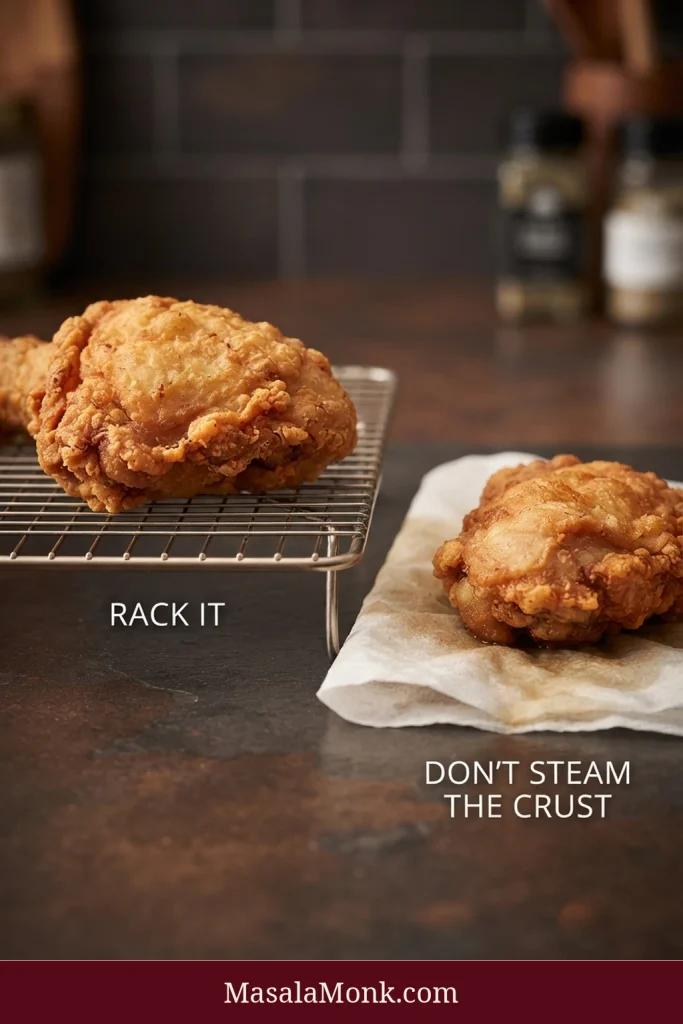
A 200°F / 95°C oven is useful for short holds between batches. For a long frying session, don’t leave the earliest pieces warming for the entire hour. Serve in waves when that suits the meal, or re-crisp earlier pieces briefly before serving.
At the table, something cold and crunchy works beautifully against the hot crust. Creamy Coleslaw brings enough tang to lighten the plate without burying the chicken under another sauce.
For sweet heat, drizzle Hot Honey Sauce over individual pieces just before eating. Keep it light and late so plenty of the rough crust stays dry enough to crackle.
Fried Chicken Troubleshooting
Breading and Crust Problems
Start with what you can see. “The breading went wrong” can mean loose flakes, a whole shell sliding off, raw flour pockets or a crust that simply turned greasy. Those problems do not have the same fix.
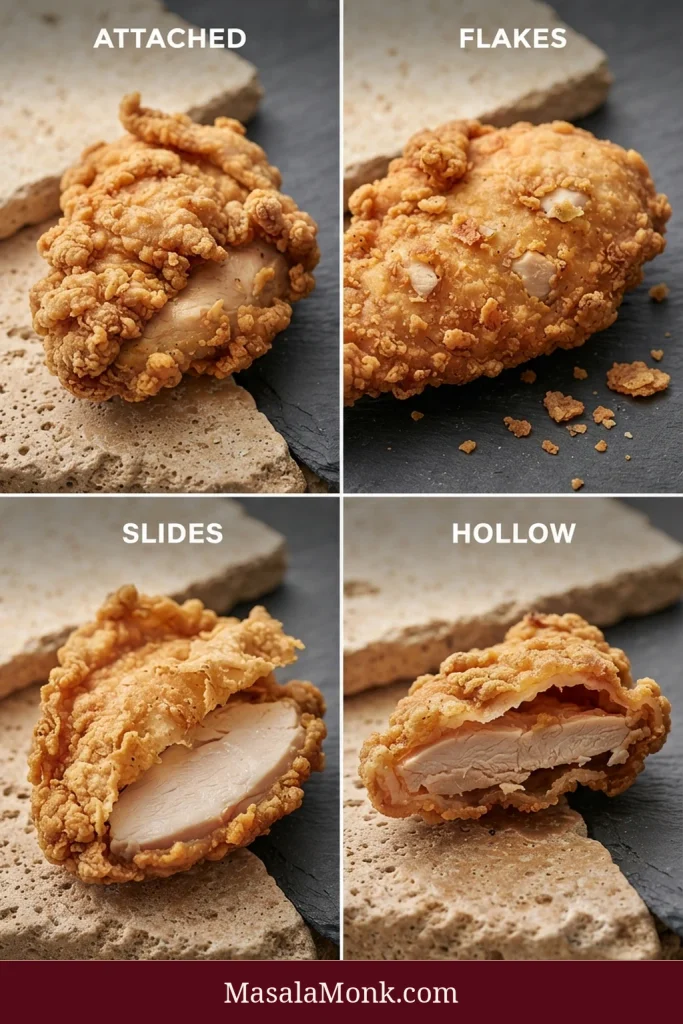
| Problem | Diagnosis & Fix |
|---|---|
| Breading flakes off | Cause: loose flour, flour that stayed too dry or crust moved too soon. Right now: handle the remaining pieces less. Next batch: press the coating on, remove loose flour and let it settle before frying. |
| Whole crust slides off | Cause: too much liquid or too much coating left a weak layer against the chicken. Right now: little can reattach a finished shell. Next batch: let more marinade drip away and build a thinner coat. |
| Crust forms a hollow shell | Cause: the breading became its own casing around the meat. Right now: serve it if the chicken is safely cooked and otherwise good. Next batch: build small crags instead of another full layer. |
| Raw or chalky flour pockets | Cause: excess dry flour or coating that never became slightly damp and settled. Right now: if the chicken is safely cooked, leave it rather than overcooking the meat trying to repair the crust. Next batch: shake off loose flour and give the coating time to rest. |
| Hard crust | Cause: coating too thick or frying too aggressively. Right now: there is little you can do without softening the crust. Next batch: keep the flour layer thinner. |
Heat, Seasoning and Holding Problems
| Problem | Diagnosis & Fix |
|---|---|
| Pale and greasy | Cause: oil stayed too cool for too long. Right now: rack the chicken and restore the heat before continuing. Next batch: fry fewer pieces and wait for the oil to get back to 350°F / 177°C. |
| Dark outside, underdone inside | Cause: piece too large, oil too hot or both. Right now: finish it in a 325°F / 165°C oven. Next batch: split oversized pieces before marinating or lower the frying temperature. |
| Crust tasty, meat bland | Cause: most seasoning stayed in the flour. Right now: serve it with a well-seasoned sauce or side. Next batch: season the chicken through the marinade. |
| Too salty | Cause: too much total salt, often from spoon-for-spoon salt substitutions or salty seasoning blends. Right now: pair the chicken with unsalted sides. Next batch: use the weighed amounts here and account for salt in any seasoning blend you add. |
| First batch crisp, later chicken greasy | Cause: the oil never got hot enough again before reloading. Right now: pause and restore the heat. Next batch: wait for 350°F / 177°C before loading. |
| Black or bitter specks | Cause: burned dredge crumbs. Right now: skim them out. Next batch: clear the oil after every batch. |
| Bottom goes soft while waiting | Cause: steam trapped underneath. Right now: move the chicken to a wire rack. Next batch: rack pieces as soon as they leave the oil. |
Four Fried Chicken Failure Patterns to Recognize
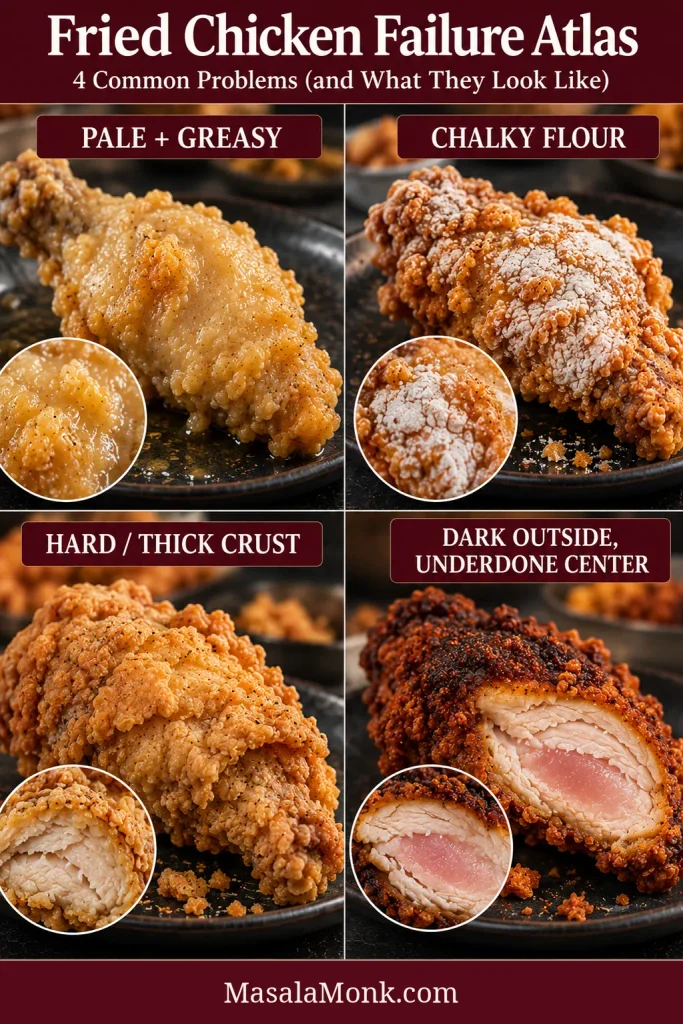
Why Does Fried Chicken Breading Fall Off?
A few crunchy flakes breaking away are normal. If the whole crust slips away from the chicken, the problem is deeper: excess moisture or an overbuilt coating has left a weak layer underneath a crust strong enough to hold its own shape. For the prevention steps, go back to How to Make Fried Chicken Coating Stay On.
Why Is My Fried Chicken Pale and Greasy?
The oil has usually stayed too cool for too long. Overcrowding, reloading before the pot recovers or a burner struggling with the batch can all leave the crust absorbing oil before it crisps properly. Review the fried chicken oil-temperature guide before the next batch.
Why Did the First Batch Turn Out Better?
The frying system changes as you work. Later pieces inherit darker crumbs, increasingly damp dredge and a pot that may not have fully recovered from the previous load. That’s why the small reset between batches matters even when the chicken itself hasn’t changed. If you are mid-cook, return to Rack, Skim, Recover and Repeat for the working sequence.
Using a Cast-Iron Skillet Instead
A shallow cast-iron skillet is a different cooking setup from the Dutch oven method above. More of the chicken sits above the oil, the crust spends more time close to the pan, and the pieces need more active turning.
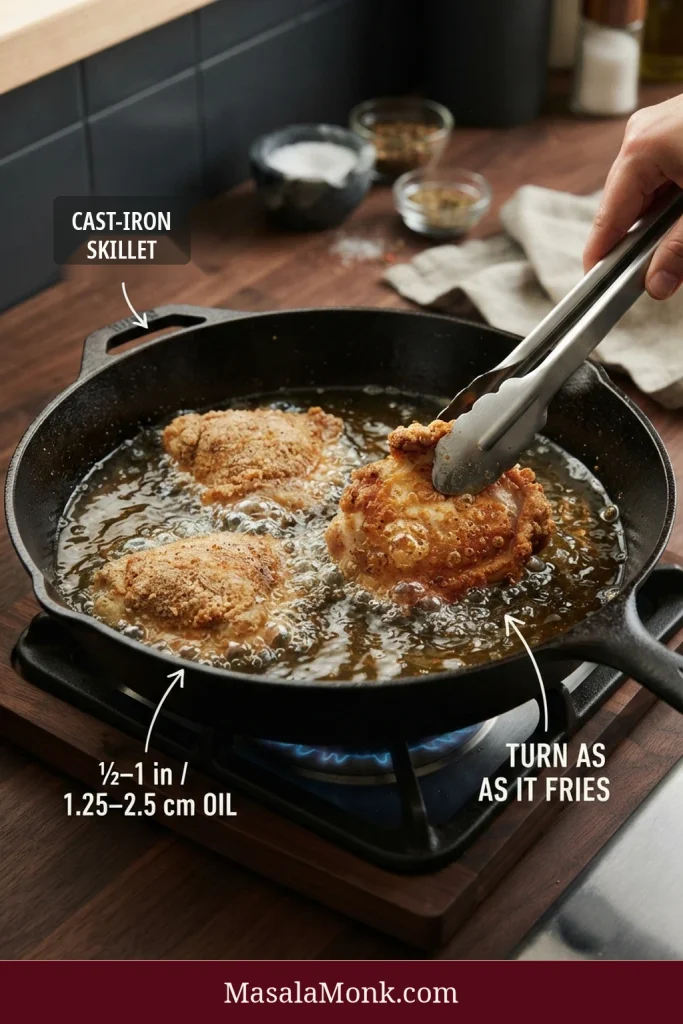
Traditional skillet recipes vary in oil depth and temperature. A practical home setup uses enough oil to come partway up the chicken—often ½–1 inch / 1.25–2.5 cm, depending on the skillet and pieces. Heat it well before loading, then adjust the burner as the chicken fries rather than trying to force the Dutch-oven temperature pattern onto a shallow pan.
Some skillet methods also cover the pan for part of the cook, using trapped steam to help the meat along before the lid comes off and the crust crisps again. That’s a separate technique with its own timing. Don’t switch between covered and uncovered methods halfway through because one batch seems slow.
Make Ahead, Leftovers and Frying Oil
Making Fried Chicken Ahead
Fresh from the fryer is best. For a larger meal, make the sides wait for the chicken rather than asking crisp chicken to wait for everything else.
Creamy Mashed Potatoes can be prepared ahead and reheated gently while your last-minute attention stays on the fryer.
If the chicken itself must be cooked earlier, let the steam escape on a rack, cool it safely and re-crisp it with dry heat shortly before serving.
How to Reheat Fried Chicken and Keep It Crispy
Reheat fried chicken with dry circulating heat. A 375–400°F / 190–204°C oven or an air fryer works best for bringing the crust back. Heat the chicken through to 165°F / 74°C.
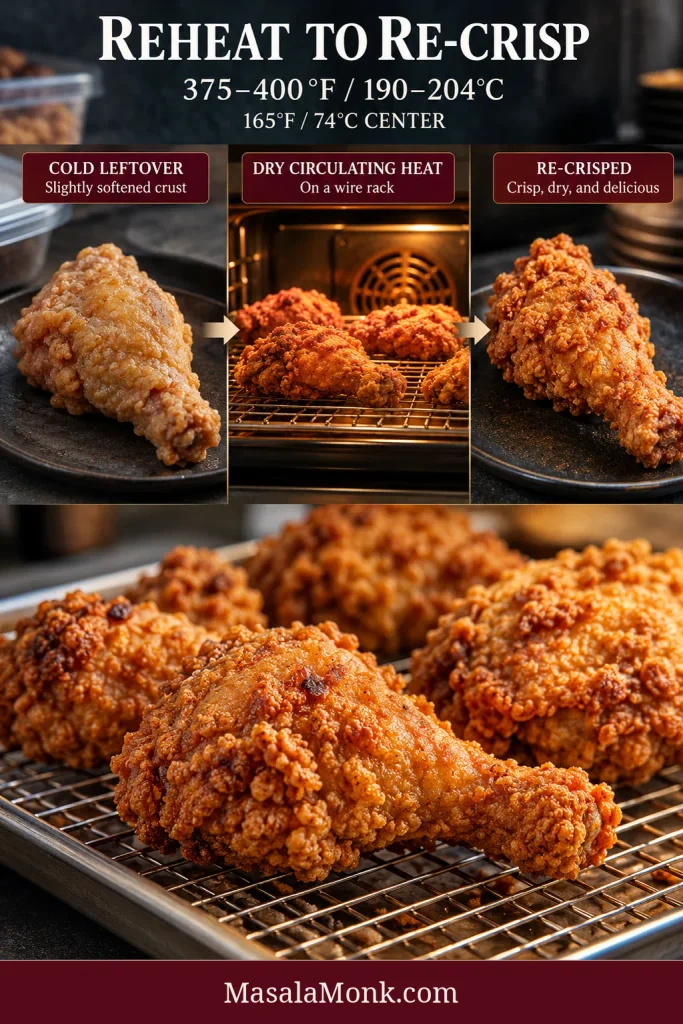
Refrigerate cooked chicken within two hours and use refrigerated leftovers within 3–4 days.
- Oven: place the chicken on a rack over a sheet pan so hot air can reach underneath.
- Air fryer: especially useful for one or two pieces because moving hot air reaches the crust quickly.
- Microwave: fastest, but the crust will soften.
A leftover piece can become a different dinner too. Re-crisp it, remove the bone and use the builds in Chicken Sandwich Recipes for ideas such as Buffalo, BBQ or hot-honey chicken sandwiches.
Can You Reuse Frying Oil?
Yes, if the oil is still in good condition. Let it cool completely, strain out the crumbs through a fine sieve or cheesecloth, then transfer it to a sealed, light-proof container. USDA deep-fat frying guidance says used frying oil can be stored for up to 3 months and recommends refrigeration for best quality.
Discard oil that has become unusually cloudy, foamy, very dark or foul-smelling. Fried-chicken crumbs and seasoning also affect flavor, so even usable oil may not suit something delicate the next time you fry.
Keep water away from hot frying oil and never use water on an oil fire.
Never pour used frying oil down the sink. Once it is cool, seal it in a suitable container for disposal or use a local cooking-oil recycling option if one is available.
Research note: This recipe is research-led, synthesizing established fried-chicken techniques, food-safety guidance and recurring problems reported by home cooks.
Once you can recognize those states, the frying becomes much easier to read. The coating tells you when it’s ready for the oil; the thermometer tells you when the meat is ready to leave it. What you’re left chasing is the part that made fried chicken worth the effort in the first place: a deeply golden crust that crackles when you bite it, with juicy, seasoned chicken underneath.