Posted on Leave a comment

Egg Drop Soup Recipe: Silky Chinese Restaurant-Style Soup in 15 Minutes

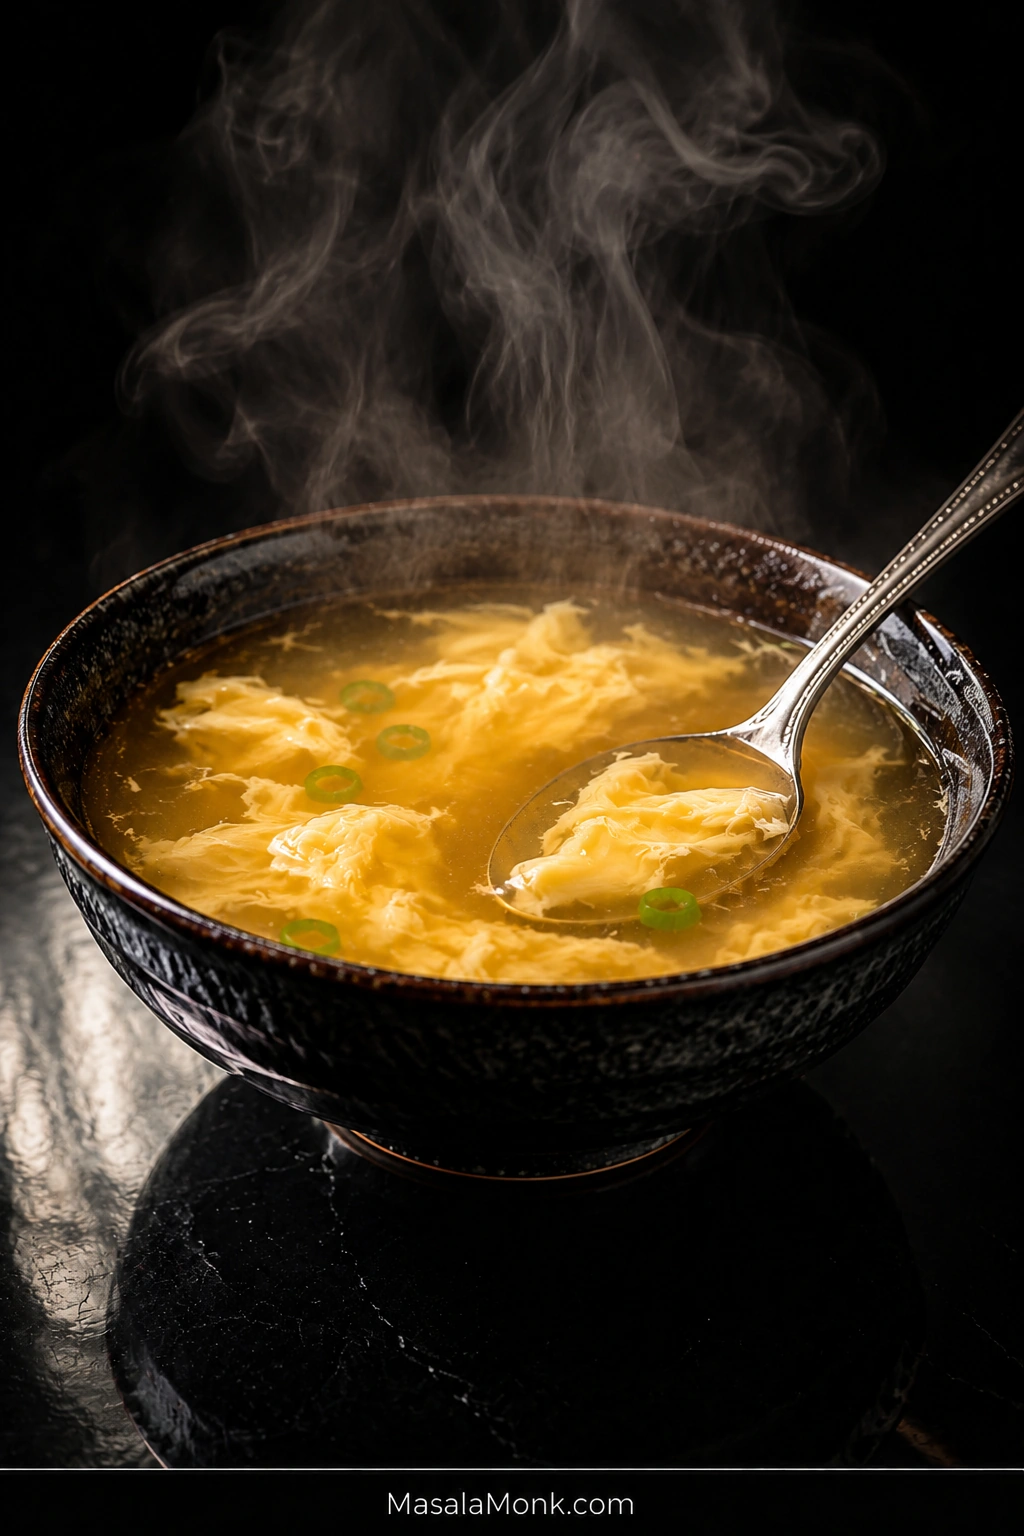
Steaming black bowl of golden egg drop soup with broad pale-yellow egg ribbons, sliced scallions, and a metal soup spoon on a dark reflective table.

Sometimes egg drop soup is the first thing you want from a Chinese takeout order: a steaming bowl, soft ribbons drifting through savory broth, a few scallion greens on top, and just enough body to make every spoonful feel silky.

The base is simple. The egg pour is the only part worth slowing down for.

Too much movement can break the egg into tiny flecks. A heavy pour can leave dense clumps. Stir before the egg has set and the ribbons may disappear into cloudy broth.

Thicken first. Create the movement first. Let the egg set before you move it again.

Quick formula: For the base recipe, use 4 cups / 946 ml chicken broth, 2 large eggs, 2 teaspoons / 10 ml water for the eggs, and 1½ tablespoons / about 12 g cornstarch.

In this guide

Egg Drop Soup Recipe

This makes 4 starter bowls or 2 generous bowls. The finished soup is broth-forward and lightly thickened, with soft egg ribbons suspended throughout.

Recipe at a Glance

Serves4 starter bowls or 2 generous bowls
PrepAbout 5 minutes
CookAbout 10 minutes
TotalAbout 15 minutes
PotMedium saucepan, about 2½–3 qt

Equipment

  • Medium saucepan, about 2½–3 quarts
  • Small bowl for the cornstarch slurry
  • Spouted measuring cup or another easy-pouring cup for the eggs
  • Fork or small whisk
  • Ladle or large spoon

Ingredients

  • 4 cups / 32 fl oz / 946 ml low-sodium chicken broth
  • 2 scallions, thinly sliced, white and green parts separated
  • 2 thin slices fresh ginger, about 5 g
  • ½–1 teaspoon chicken powder or bouillon, optional, depending on your broth
  • ¼ teaspoon ground white pepper, plus more to taste
  • ⅛ teaspoon turmeric, optional, for warmer color
  • 1½ tablespoons cornstarch, about 12 g
  • 1½ tablespoons / 22 ml cold water, for the slurry
  • 2 large eggs, about 100 g without shells
  • 2 teaspoons / 10 ml water, for loosening the eggs
  • ½ teaspoon / 2.5 ml toasted sesame oil, optional, plus more by drops to taste
  • Salt, as needed after tasting
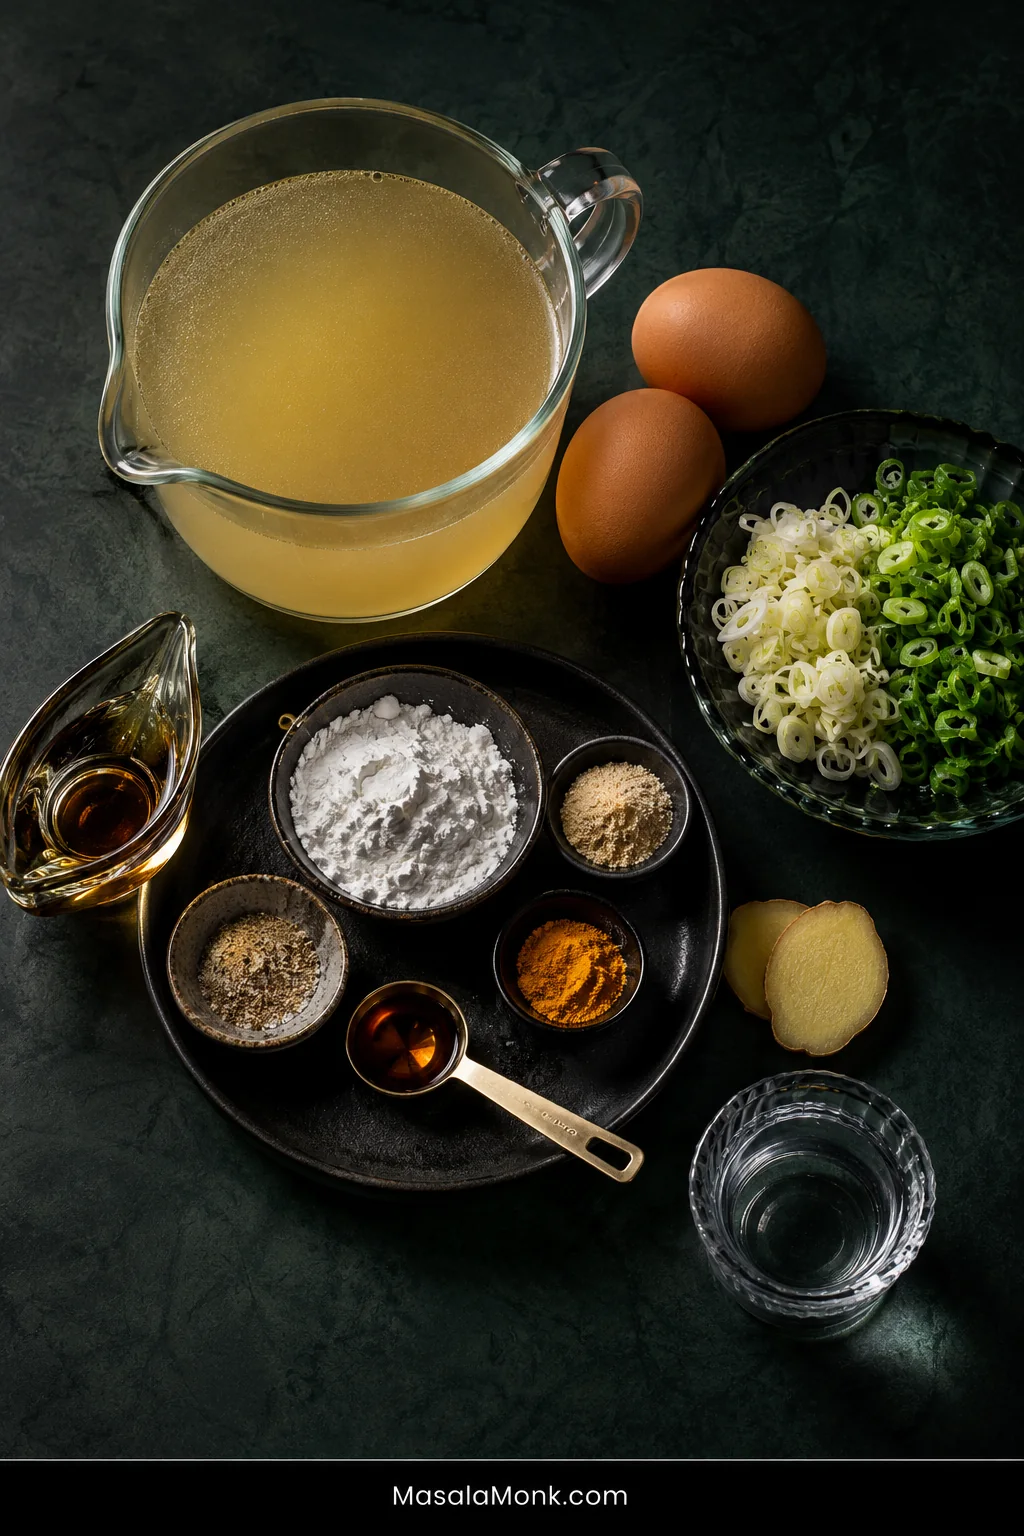
Overhead arrangement of chicken broth, two eggs, sliced scallions, ginger, cornstarch, white pepper, turmeric, sesame oil, salt, chicken powder, and water on a dark green surface.
Most of this recipe’s leverage sits in three things: broth for flavor, egg for texture, and cornstarch for body. The rest should stay deliberately restrained.

1. Season the Broth

Add the chicken broth, scallion whites, ginger, white pepper, and optional turmeric to a medium saucepan.

Bring to a boil, lower the heat, and simmer for 2–3 minutes. Remove the ginger slices after they have flavored the broth.

Now taste. If the chicken flavor is good but the broth simply tastes underseasoned, add salt. If the chicken flavor itself feels weak or hollow, add ½ teaspoon chicken powder or bouillon, let it dissolve, and taste again before using more.

Get the broth tasting good here. Cornstarch will change its texture and egg will add richness, but neither one can supply the savory foundation the broth is missing.
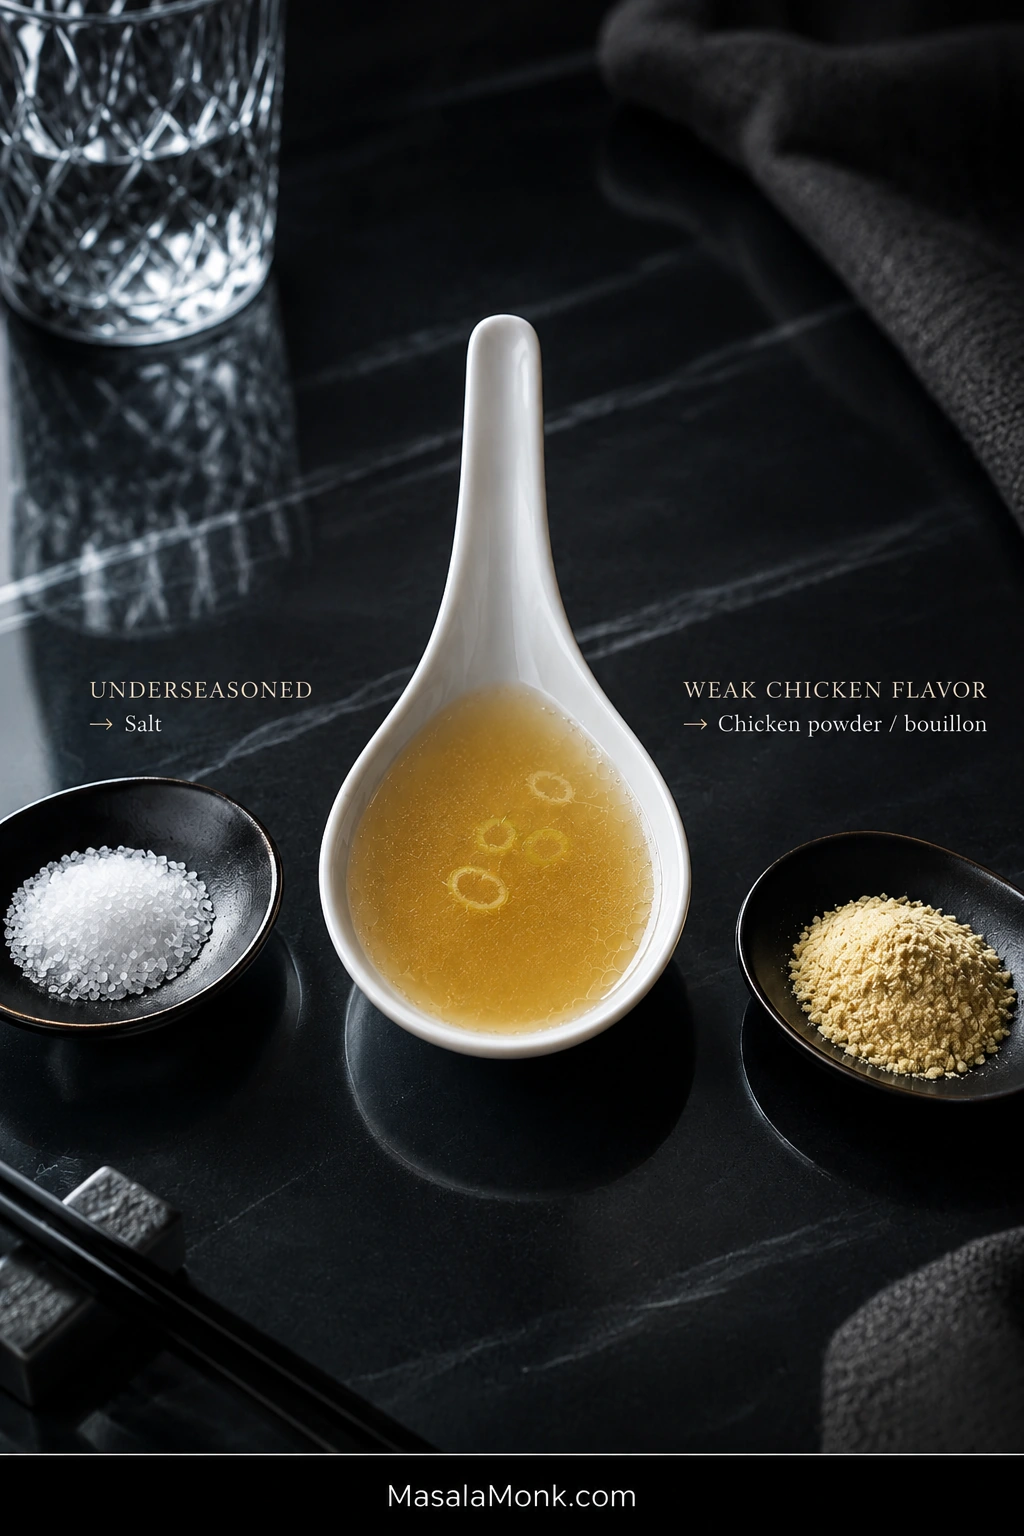
Golden broth in a white tasting spoon between a dish of salt and a dish of chicken powder, labeled for underseasoned broth versus weak chicken flavor.
If the broth is salty enough but still tastes hollow, the missing piece may be chicken depth rather than more salt.

2. Thicken the Broth

Mix the cornstarch with 1½ tablespoons / 22 ml cold water until smooth.

Stir the slurry again immediately before using it; cornstarch settles quickly. Pour it gradually into the simmering broth while stirring.

Cook for about 45–60 seconds, then drag a spoon through the pot. The broth should have a slight sheen, and the path behind the spoon should close almost immediately. A lingering trench means the soup is becoming too thick. If it looks almost unchanged from plain stock, give the starch another few seconds at a simmer.

The texture should remain fluid enough to move easily around the saucepan, with just enough body to feel silky on the spoon.
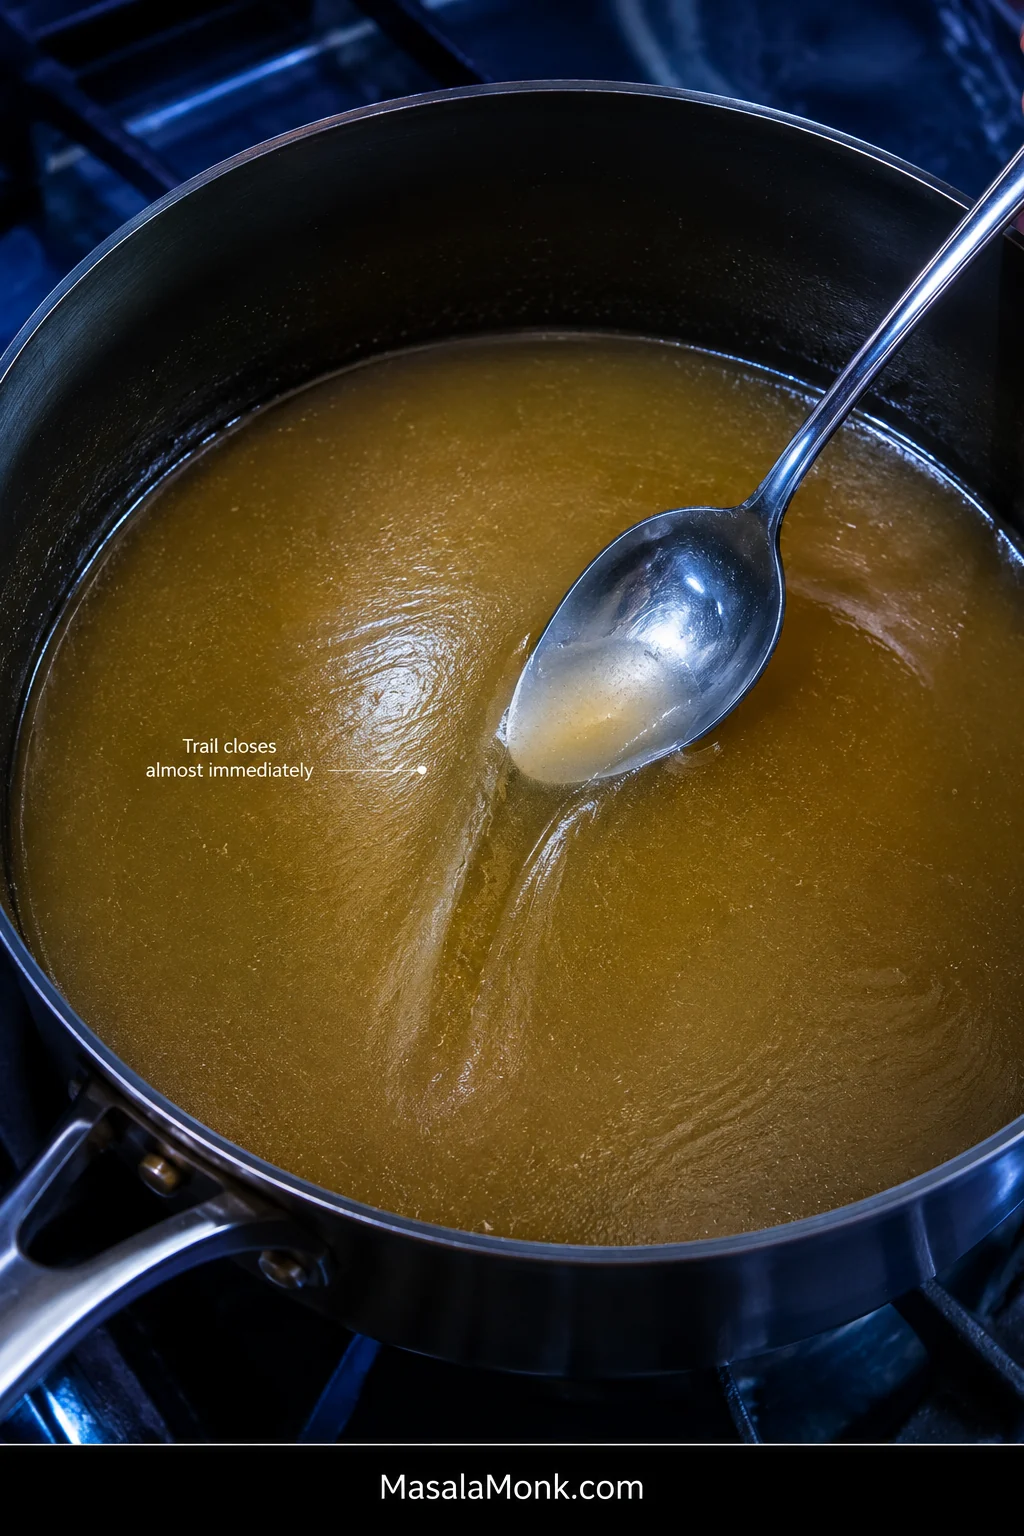
Metal spoon dragged through lightly thickened golden broth in a stainless saucepan, leaving a shallow trail that begins closing behind the spoon.
Think of the trail as a wake, not a trench. You want to glimpse where the spoon passed without leaving a channel that sits open behind it.

3. Prepare the Eggs

Beat the eggs with 2 teaspoons / 10 ml water until the yolks and whites are evenly combined and no clear, stringy ropes of egg white remain.

The added water makes the eggs easier to pour in a narrow stream. Stop once the mixture is smooth and fluid; foam does not help the ribbons.
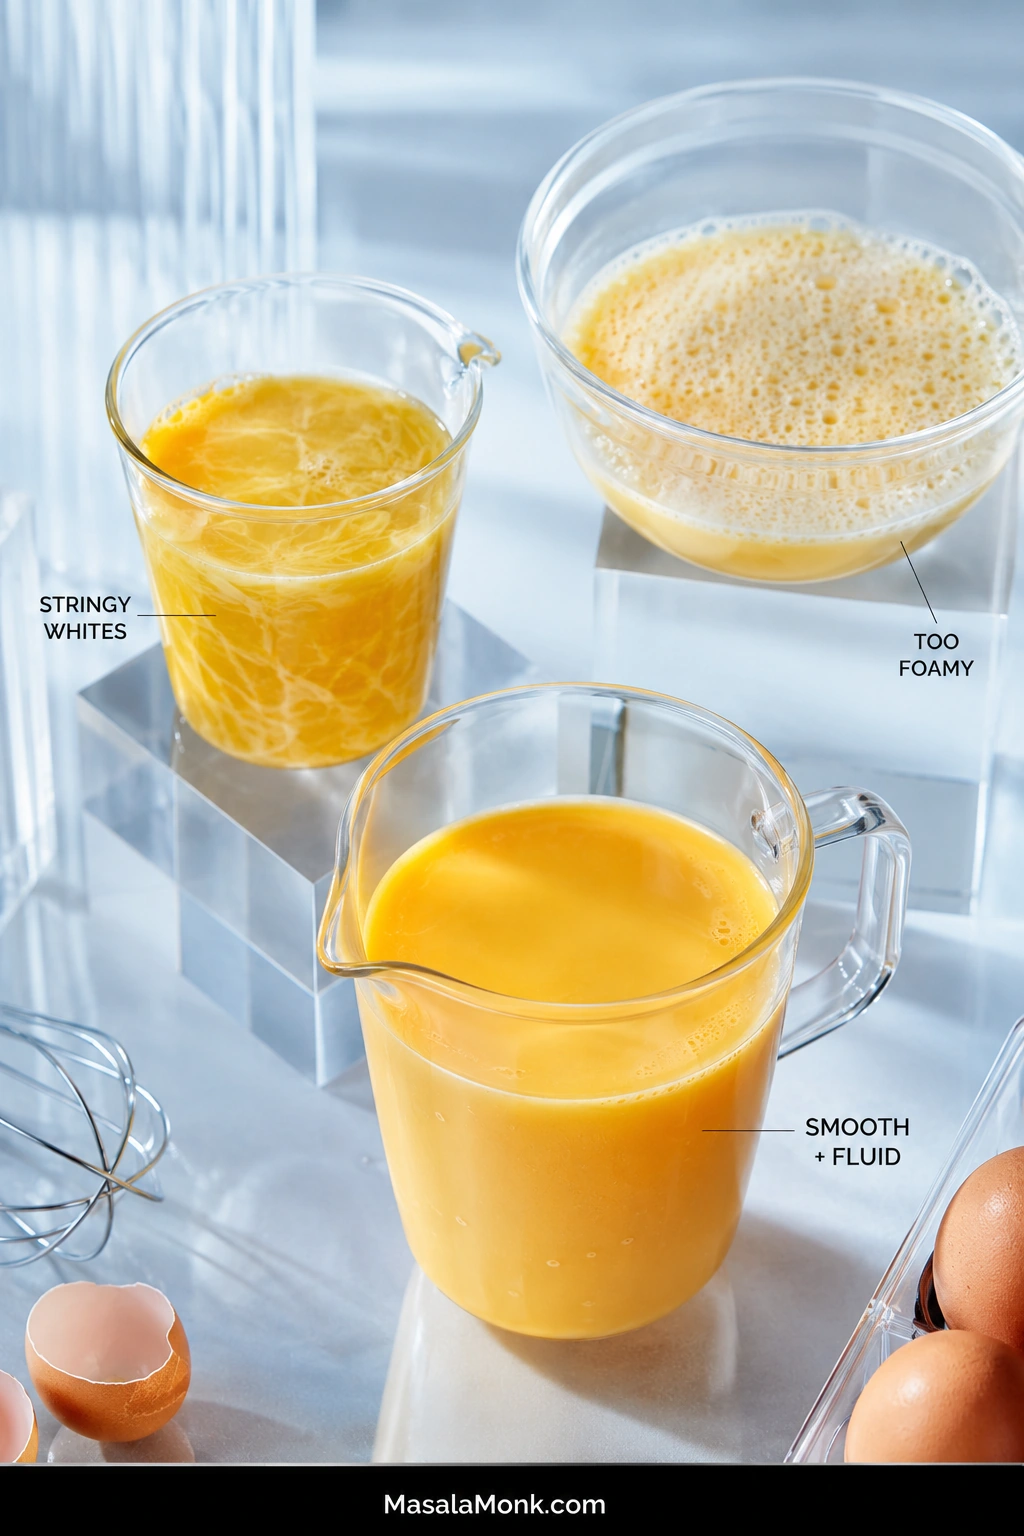
Three clear vessels compare beaten eggs with stringy whites, excessive foam, and a smooth fluid mixture ready for making egg ribbons.
The smooth sample gives you the most predictable pour. Stringy whites create uneven pieces, while excess foam makes the stream harder to control.

4. Make the Egg Ribbons

For this simmer-based method, keep a few quiet bubbles breaking the surface.

Give the broth one broad circular stir to create a slow current, then put the spoon down.

Pour the egg in a thin, steady stream around the pot, allowing the moving broth to carry it instead of repeatedly pouring into one spot.
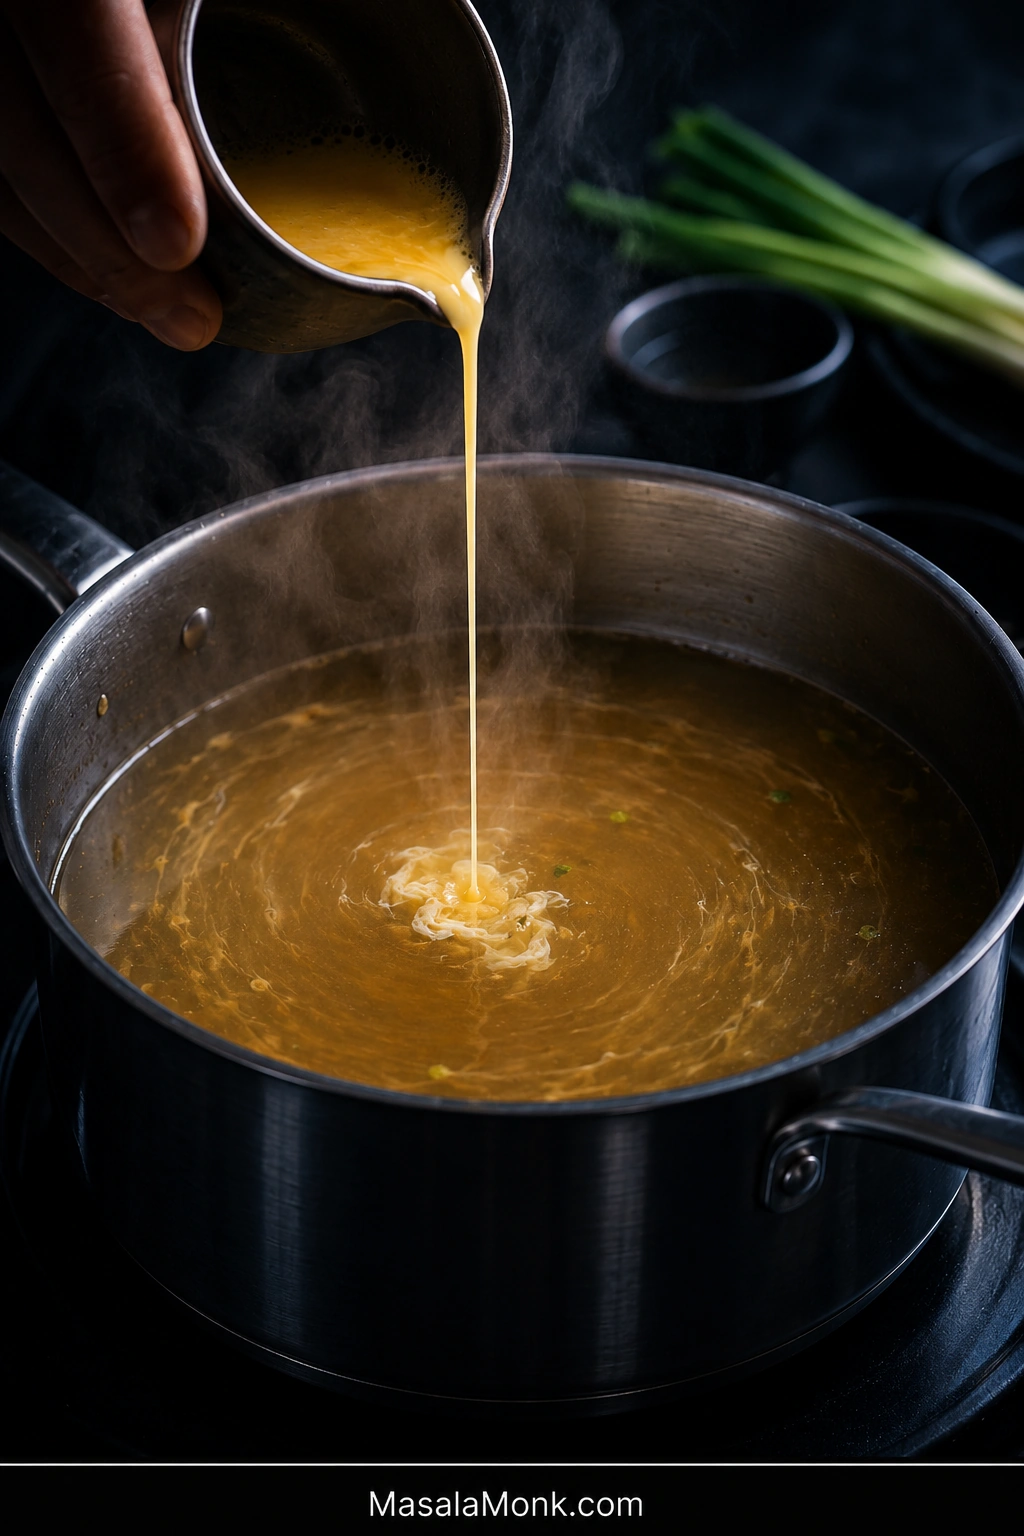
Thin stream of beaten egg being poured from a small spouted cup into mostly clear golden broth with a gentle circular current and the first egg wisps forming.
Because the spoon is out of the pot, the slow current can stretch a narrow pour into ribbons instead of breaking the setting egg into flecks.

Leave the soup untouched for about 10–15 seconds, or until the egg is opaque and distinct ribbons are visible. Use one or two easy strokes to separate pieces that have joined together.
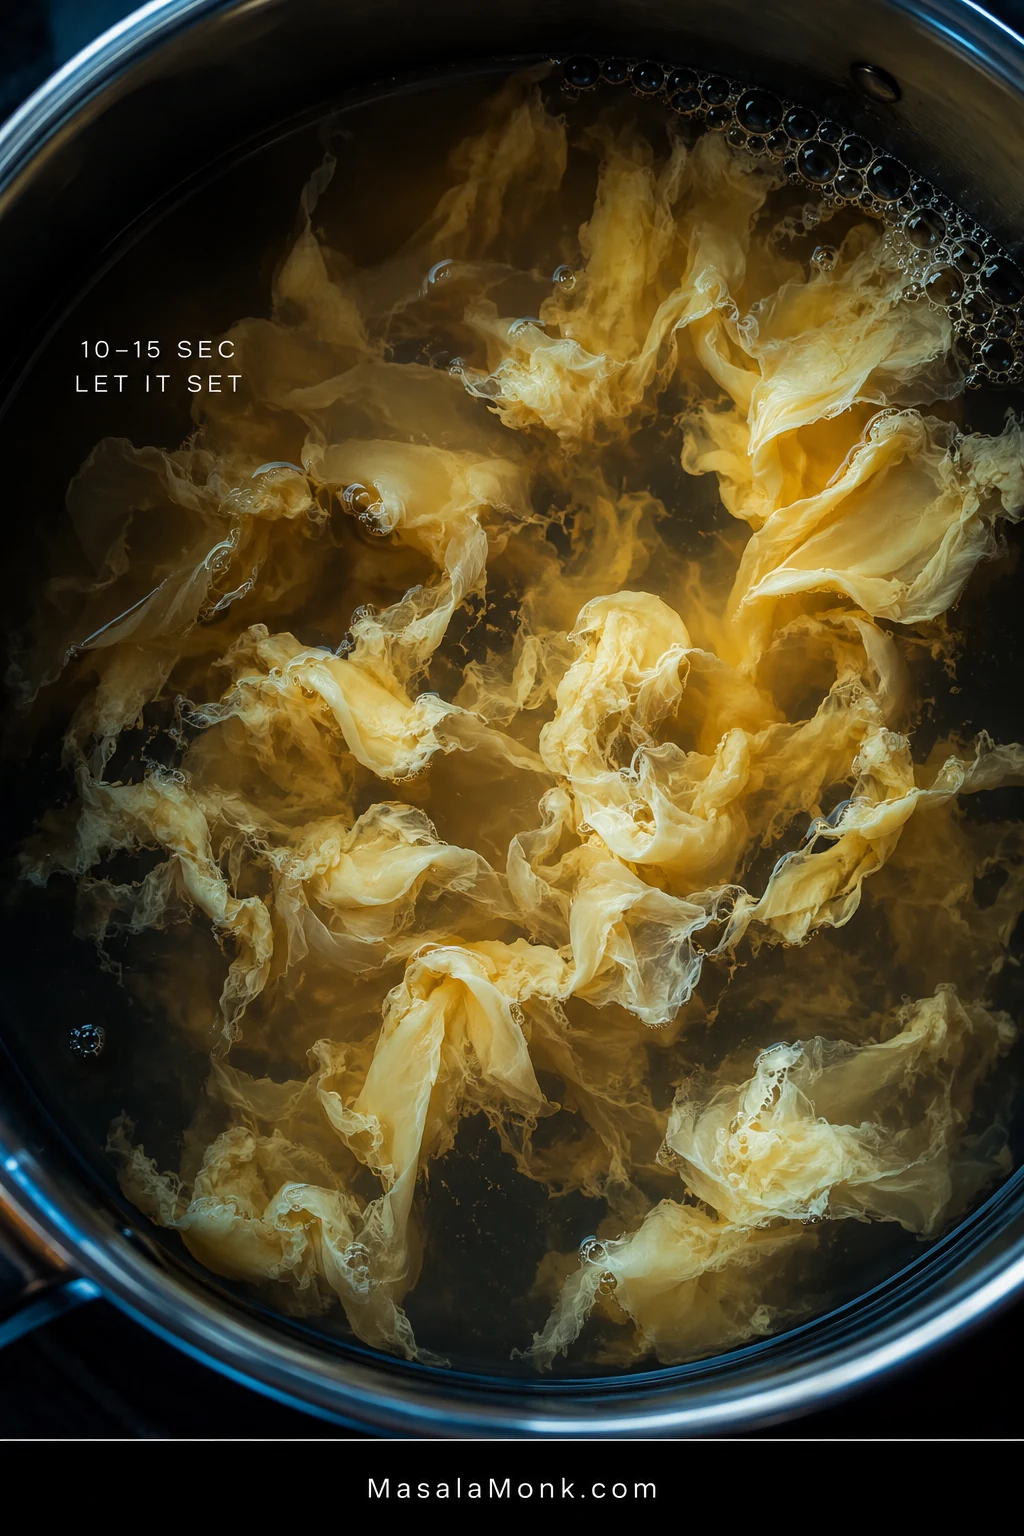
Close overhead view of pale egg ribbons blooming and setting in hot golden broth, with no spoon or stirring utensil touching the soup.
Watch the color change: translucent streaks become opaque folds. That shift—not the stopwatch alone—tells you the egg is ready for gentle separation.

Once those ribbons are visible, the tricky part is over.

A spouted cup gives you the most control. With a wider cup, hold a fork across the lip and let the beaten egg pass through the tines in a narrower stream.

5. Finish and Serve

Turn off the heat. Add the scallion greens and, if you like it, ½ teaspoon toasted sesame oil.

Taste once more. Add salt only when needed. Increase the sesame oil by drops so its toasted fragrance stays in the background.

Serve while the soup is steaming and the ribbons are soft.

Before You Sit Down: Check the Soup

  • The broth pours easily from the ladle.
  • The egg floats through it as ribbons or soft flowers instead of one heavy mass.
  • White pepper gives the sip a quiet warmth.

The ribbons do not need to look identical. When the soup tastes good and looks inviting, stop adjusting it and eat it hot.
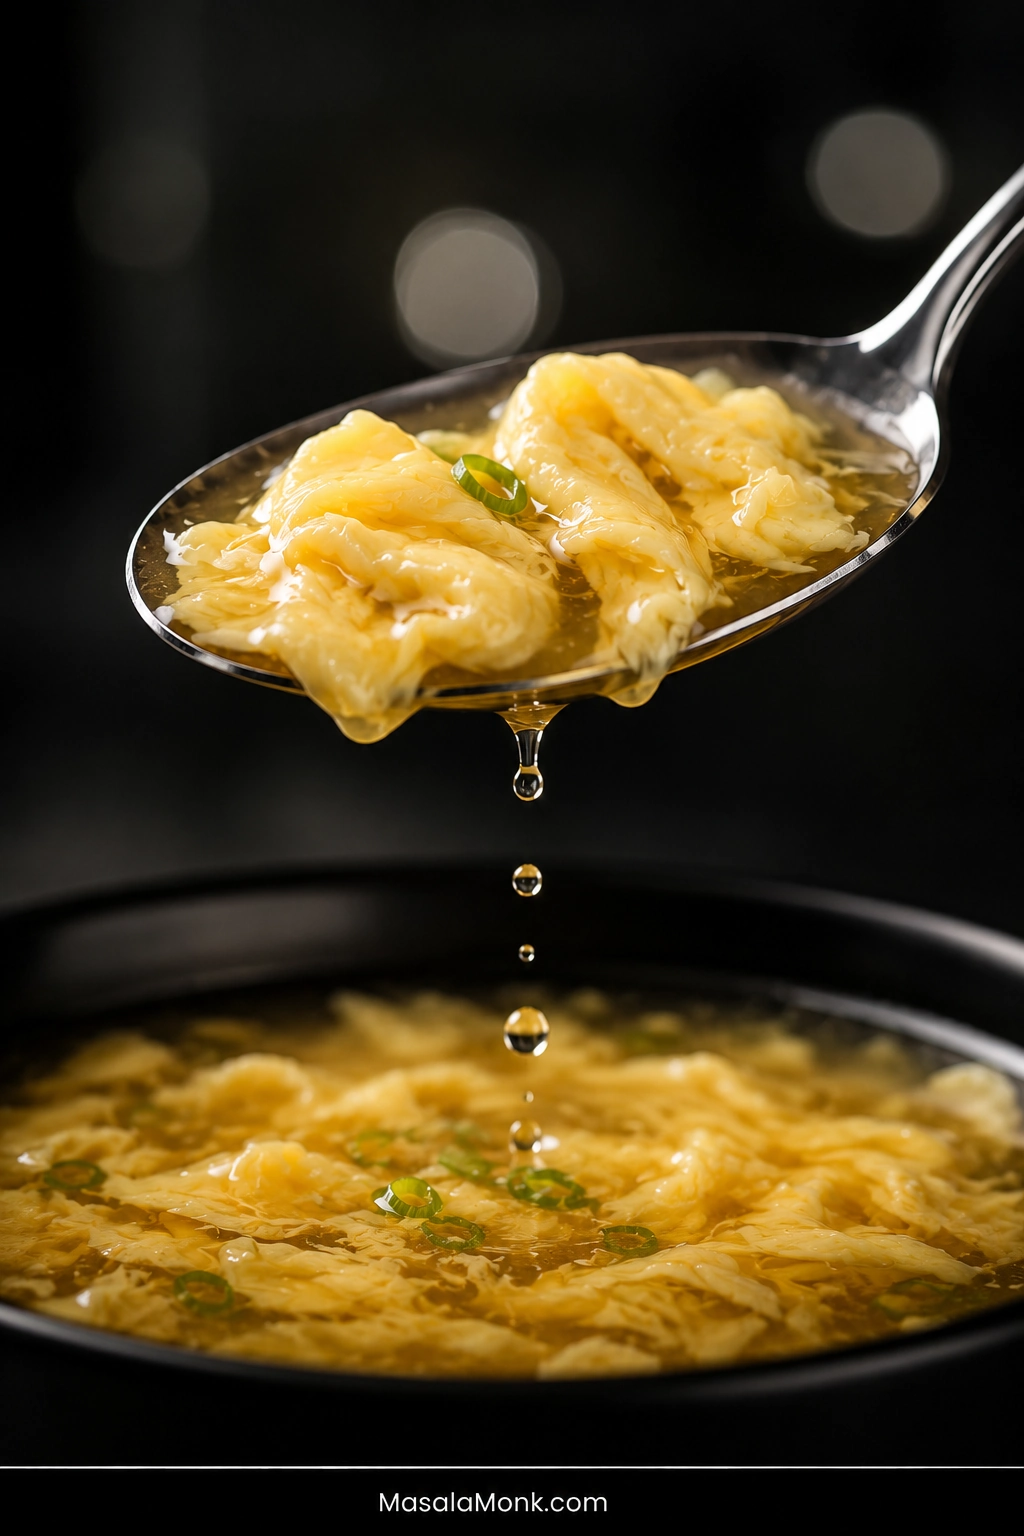
Close-up metal spoon lifting several soft folded egg ribbons and golden broth above a bowl of finished egg drop soup, with droplets falling from the spoon.
Lifted from the broth, tender ribbons should drape and fold rather than stand stiff like curds. That softness is more useful to judge than perfect shape.

Egg Drop Soup Ingredients: What Matters Most

Start with a clean-tasting chicken broth rather than one dominated by heavy roasting, tomatoes, or strong herbs. A mild broth is fine because you can correct its salt and savory strength before making the ribbons.

Cornstarch gives many restaurant-style versions their lightly glossy body and helps keep the egg suspended. The amount determines how broth-like or thick the finished soup feels.

White pepper supplies the familiar earthy warmth. Chicken powder or bouillon strengthens weak chicken flavor, while sesame oil is an optional finishing aroma and is best added cautiously.

Turmeric only adjusts color here. It is not needed for the flavor or for successful egg ribbons.

Choose Your Texture

One restaurant may serve egg drop soup almost broth-like while another makes it thick enough to cling to the spoon. Ribbon size varies too.

You want…Try this
A lighter brothStart with about 1 tbsp / 8 g cornstarch
The silky defaultUse 1½ tbsp / about 12 g
A thicker takeout textureIncrease gradually toward 2 tbsp / about 16 g
More eggUse 3 large eggs
Fine wispsUse a finer stream with more movement in the broth
Broad soft flowersGive the egg more stillness once it enters

These are starting points, not pass-or-fail rules. The difference between wisps, ribbons, and broad flowers is mostly texture and appearance.
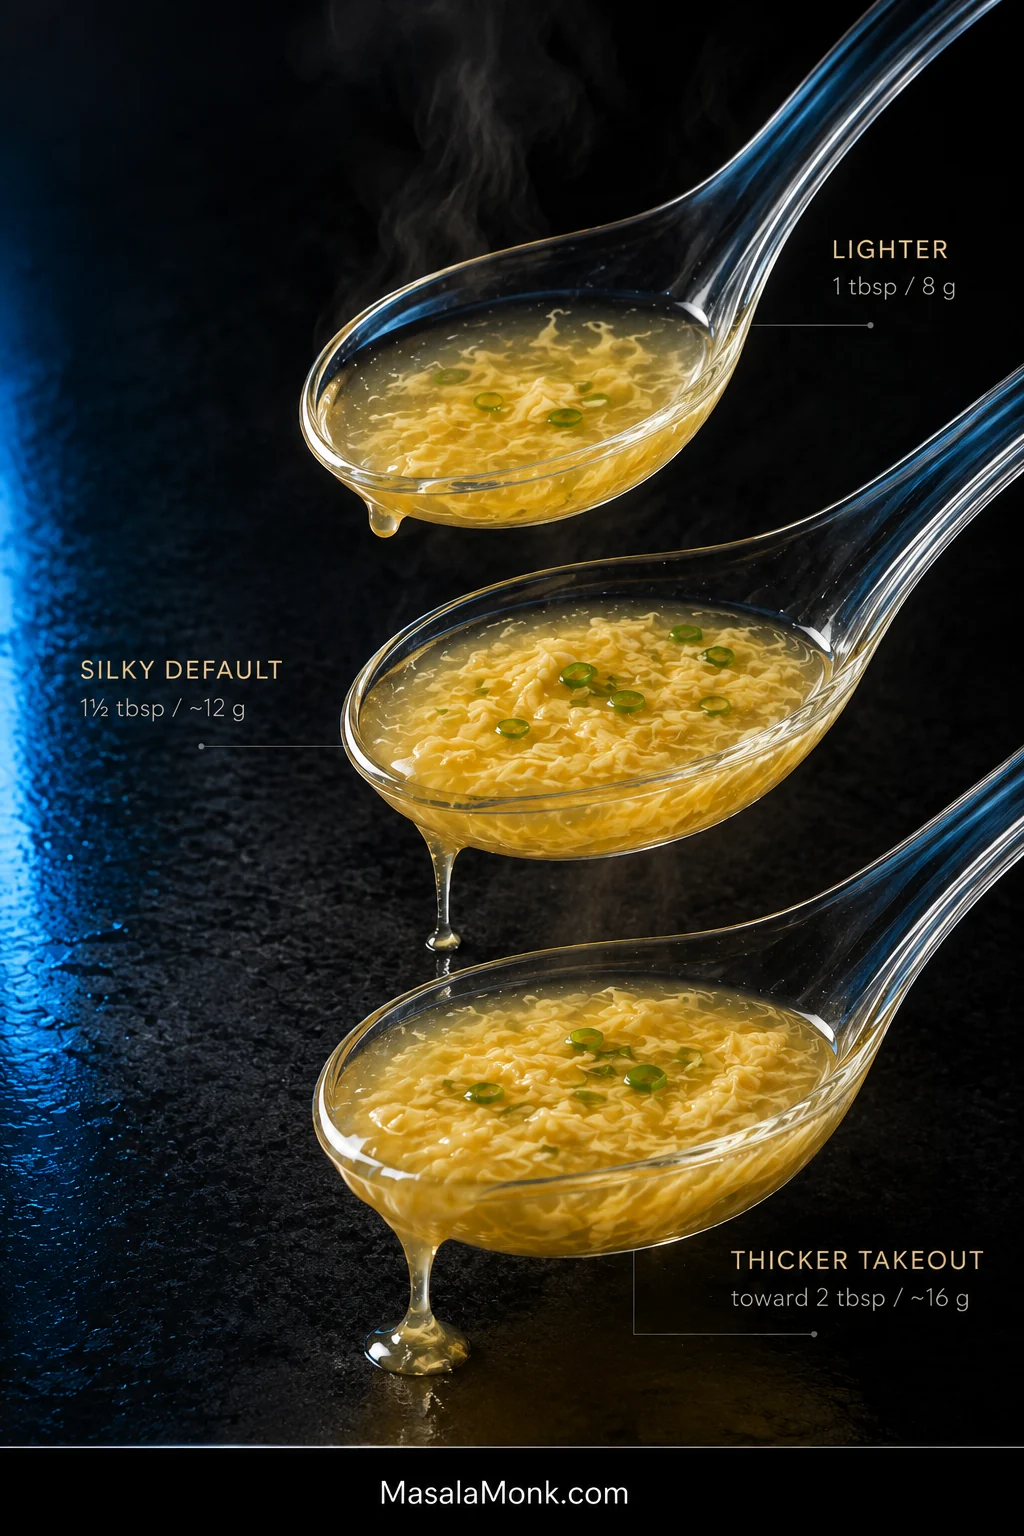
Three clear soup spoons compare lighter, silky-default, and thicker egg drop soup, labeled with 1 tablespoon, 1½ tablespoons, and about 2 tablespoons cornstarch.
Read the drips, not the color. Lighter broth runs cleanly off the spoon; a thicker takeout-style egg drop soup coats and releases more slowly.

Soup already too thin or thick? Jump to the texture fixes.

How to Get Silky Egg Ribbons

The shape of the egg comes down to four controls: broth body, heat, pour width, and movement.

A little starch slows the egg enough to help it remain suspended instead of immediately sinking through thin broth. Too much starch goes the other way and makes the soup heavy. Heat matters too: vigorous boiling can break delicate egg apart, while broth that has cooled too far may not set the stream cleanly with this simmer-based method.

Pour width changes the size of the pieces that enter the soup. A narrow stream produces finer ribbons; a heavier stream naturally forms broader ones. Movement determines how much those setting pieces are broken apart.

After you create a slow current, the broth can do most of the work. Continued stirring during the pour breaks the setting egg into smaller pieces before the ribbons have time to hold together.

Create the current → stop stirring → pour → wait → gently separate.
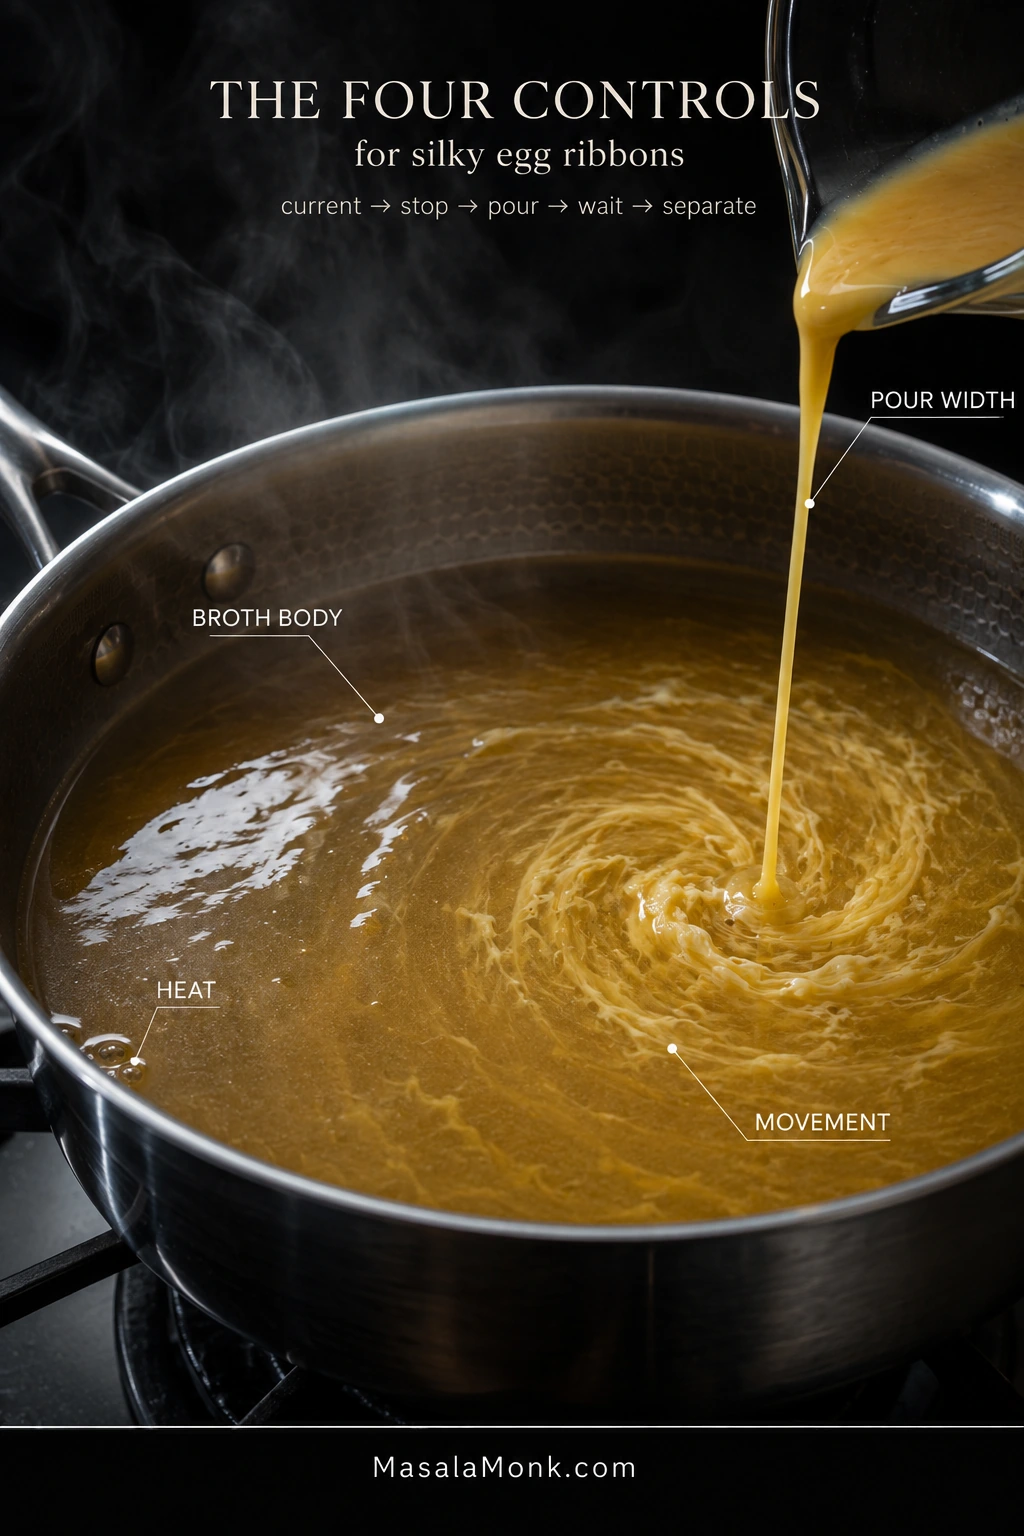
Saucepan of golden broth during an egg pour with labels pointing to broth body, gentle heat, thin pour width, and the circular movement of the liquid.
Use this as a diagnosis map rather than a formula. Large pieces point you toward pour width and stillness; tiny flecks point you toward excess movement or heat.

That same pause-before-stirring principle is useful in Hot and Sour Soup, where the egg shares the broth with tofu, mushrooms, and stronger seasonings.

Got clumps, flecks, or cloudy broth instead? Jump to troubleshooting.

Why Homemade Egg Drop Soup Doesn’t Taste Like the Restaurant

The frustrating batch is the one that looks right but tastes nothing like the soup you had in mind.

The difference is usually broth strength, salt and savory depth, white pepper, or how heavily sesame and soy are used. Start with what you can actually taste instead of adding every seasoning at once.

Weak chicken flavor: add some chicken powder or bouillon. Mild carton broth benefits more from this than a rich homemade stock.

Savory but flat: check the salt first. When the salt tastes right, add a very small pinch of MSG, stir, taste, and add more only if the broth needs it. Many chicken powders already contain MSG, so read the label before adding more. The FDA’s overview of MSG has more background on the ingredient and its use in food.

Missing warmth: add another touch of white pepper. Its heat tends to arrive toward the back of the sip without dominating the first taste.

Missing aroma: try a few drops of toasted sesame oil and stop when the fragrance becomes noticeable.

Tastes too busy: simplify. Skip the soy sauce, reduce or omit sesame oil, and let chicken broth, white pepper, ginger, and scallion carry the soup. Some takeout versions are much more restrained than heavily seasoned homemade recipes.
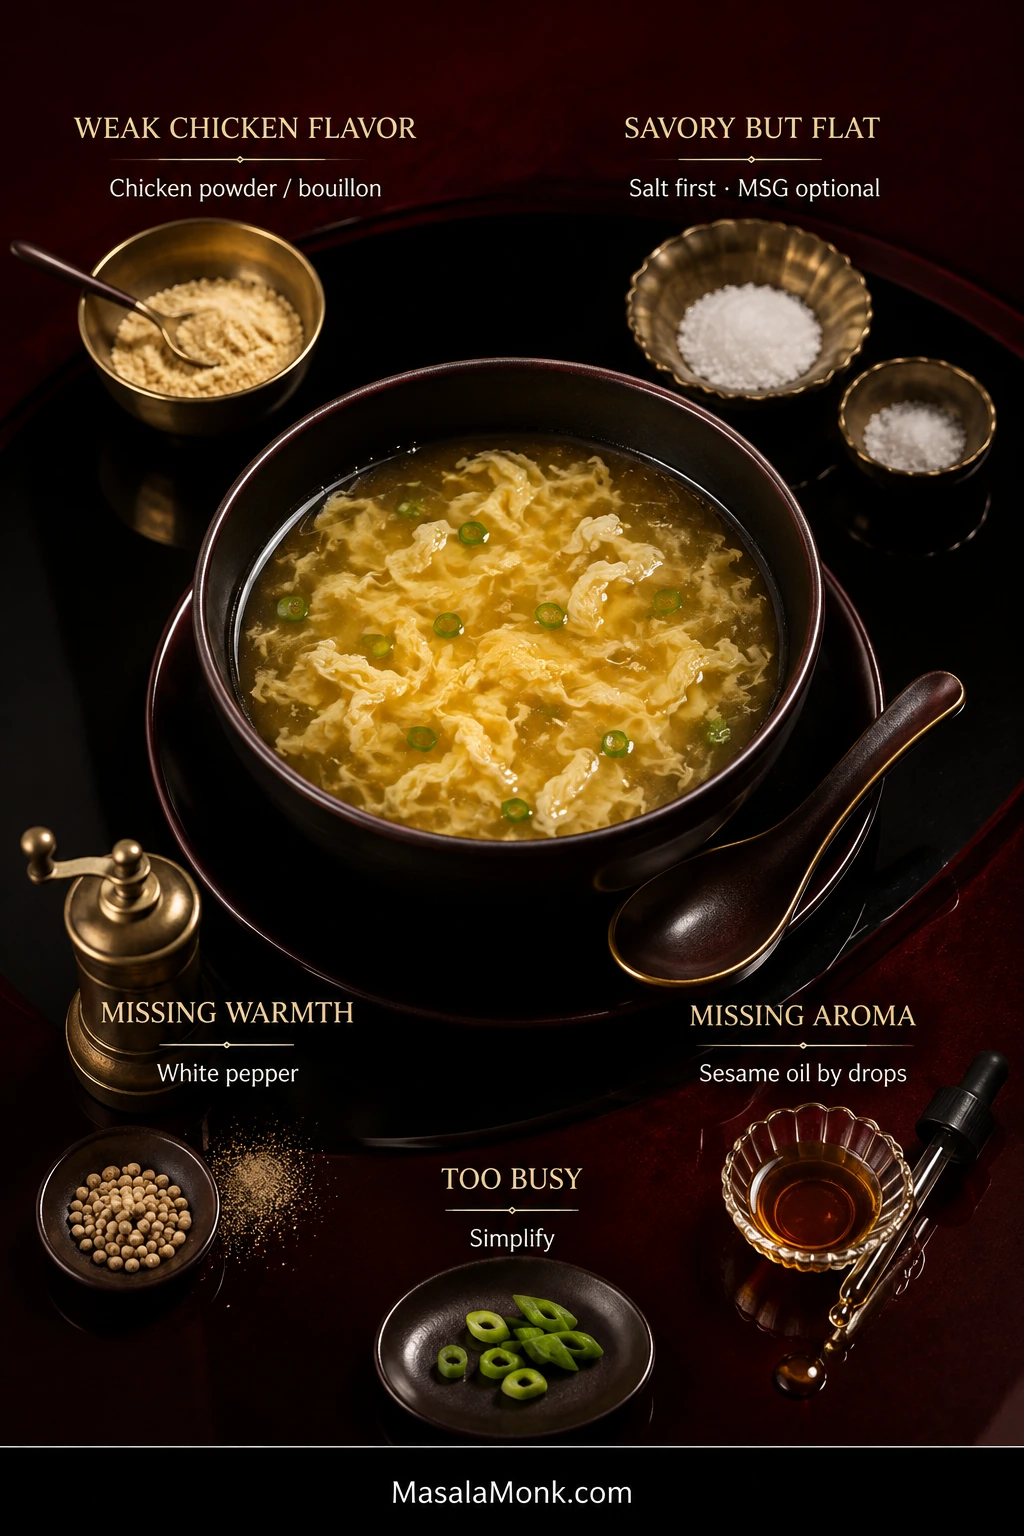
Dark red and black restaurant-style still life with egg drop soup surrounded by chicken powder, salt, white pepper, and sesame oil, with labels explaining five flavor adjustments.
Restaurant-style flavor often comes from restraint. The best correction is usually the smallest adjustment that makes the broth taste complete, then stopping there.

Do You Need Soy Sauce?

No. Soy sauce is perfectly usable, but it changes both the color and flavor of the broth.

For a pale, clean-tasting soup, build the chicken flavor first. Add soy when you specifically want its savory fermented character.

Why Is Restaurant Egg Drop Soup Yellow?

Egg drop soup can be naturally pale yellow; brighter restaurant-yellow versions may use turmeric or food coloring. Color has nothing to do with whether the ribbons formed correctly.

Chicken broth and egg yolks on their own can range from cream-gold to soft yellow.

For a warmer shade, the base recipe needs only ⅛ teaspoon turmeric. More can begin changing the flavor instead of simply warming the color.

Some Chinese-American restaurants use food coloring for a brighter takeout look. It is entirely cosmetic.

Pale soup is not failed soup.
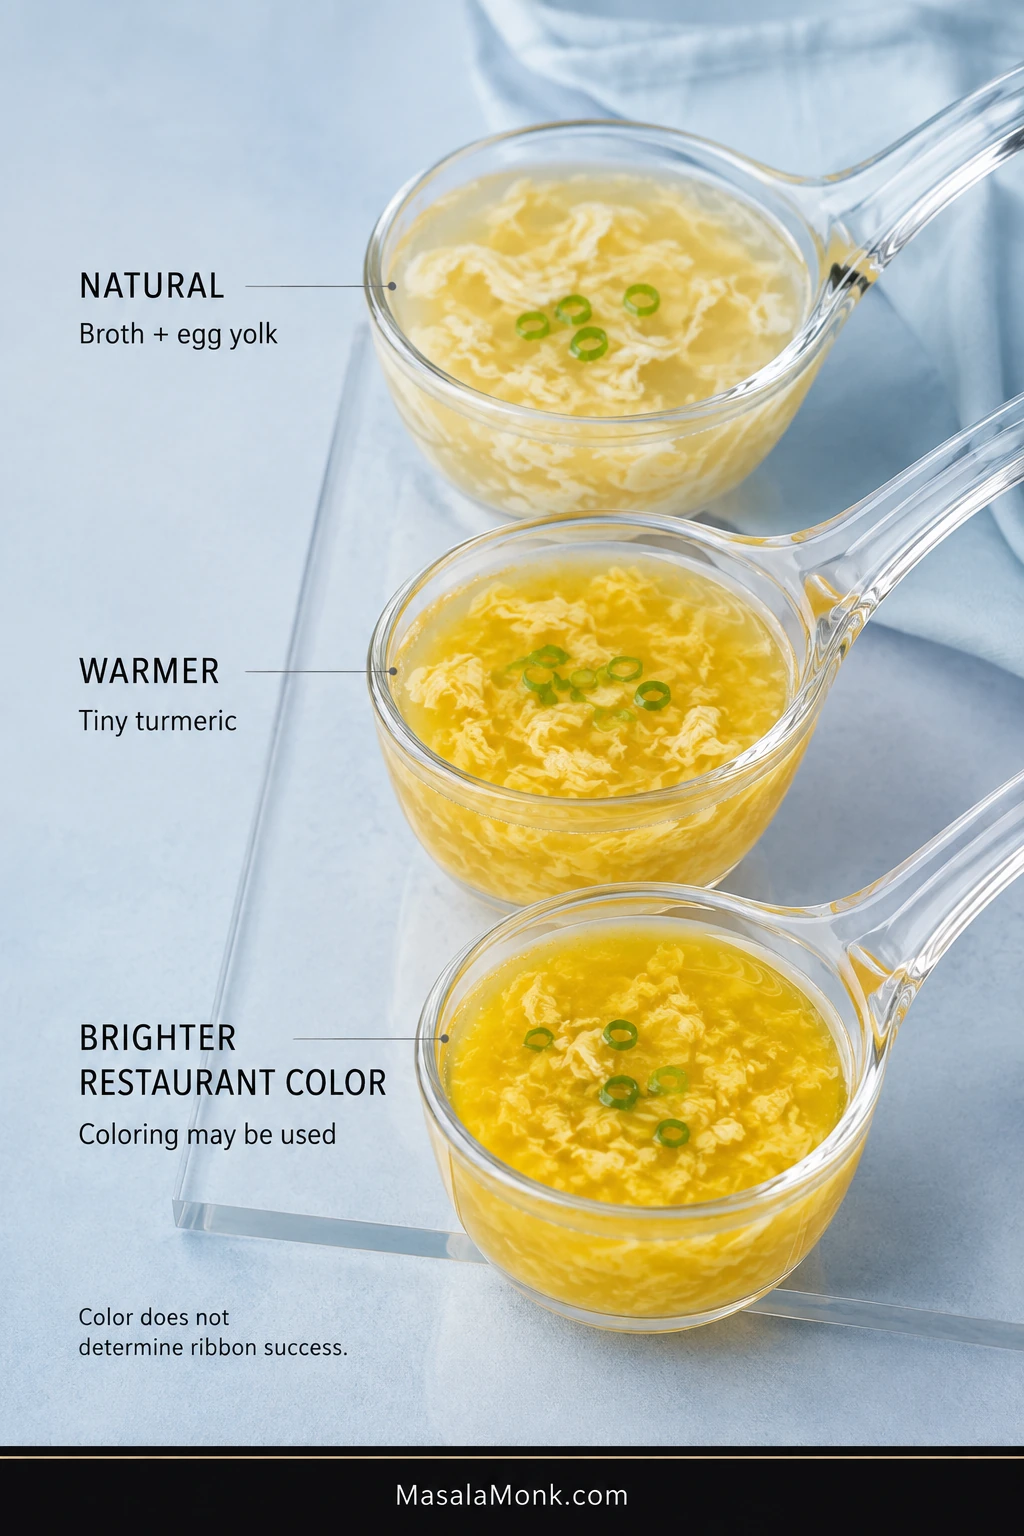
Three clear ladles of egg drop soup compare natural pale gold, warmer turmeric-yellow, and brighter restaurant-style yellow while keeping similar egg ribbons.
Color and technique are separate variables. A pale bowl can have perfect ribbons, while brighter restaurant-yellow soup may simply use turmeric or coloring.

Troubleshooting

Broth problems are easier to rescue than cooked egg. You can thicken a watery soup, loosen an over-thickened one, and strengthen a bland broth. After the egg has cooked into a particular shape, the useful question is what caused it and what can be done with the bowl you already have.

My Egg Disappeared and the Broth Turned Cloudy

The egg dispersed before distinct ribbons had time to set. Continuous stirring is the usual culprit; broth that has cooled too far can also make clean setting harder with this method.

Give the poured egg more stillness while it sets. The broth may stay cloudy, but that does not stop it from tasting good.
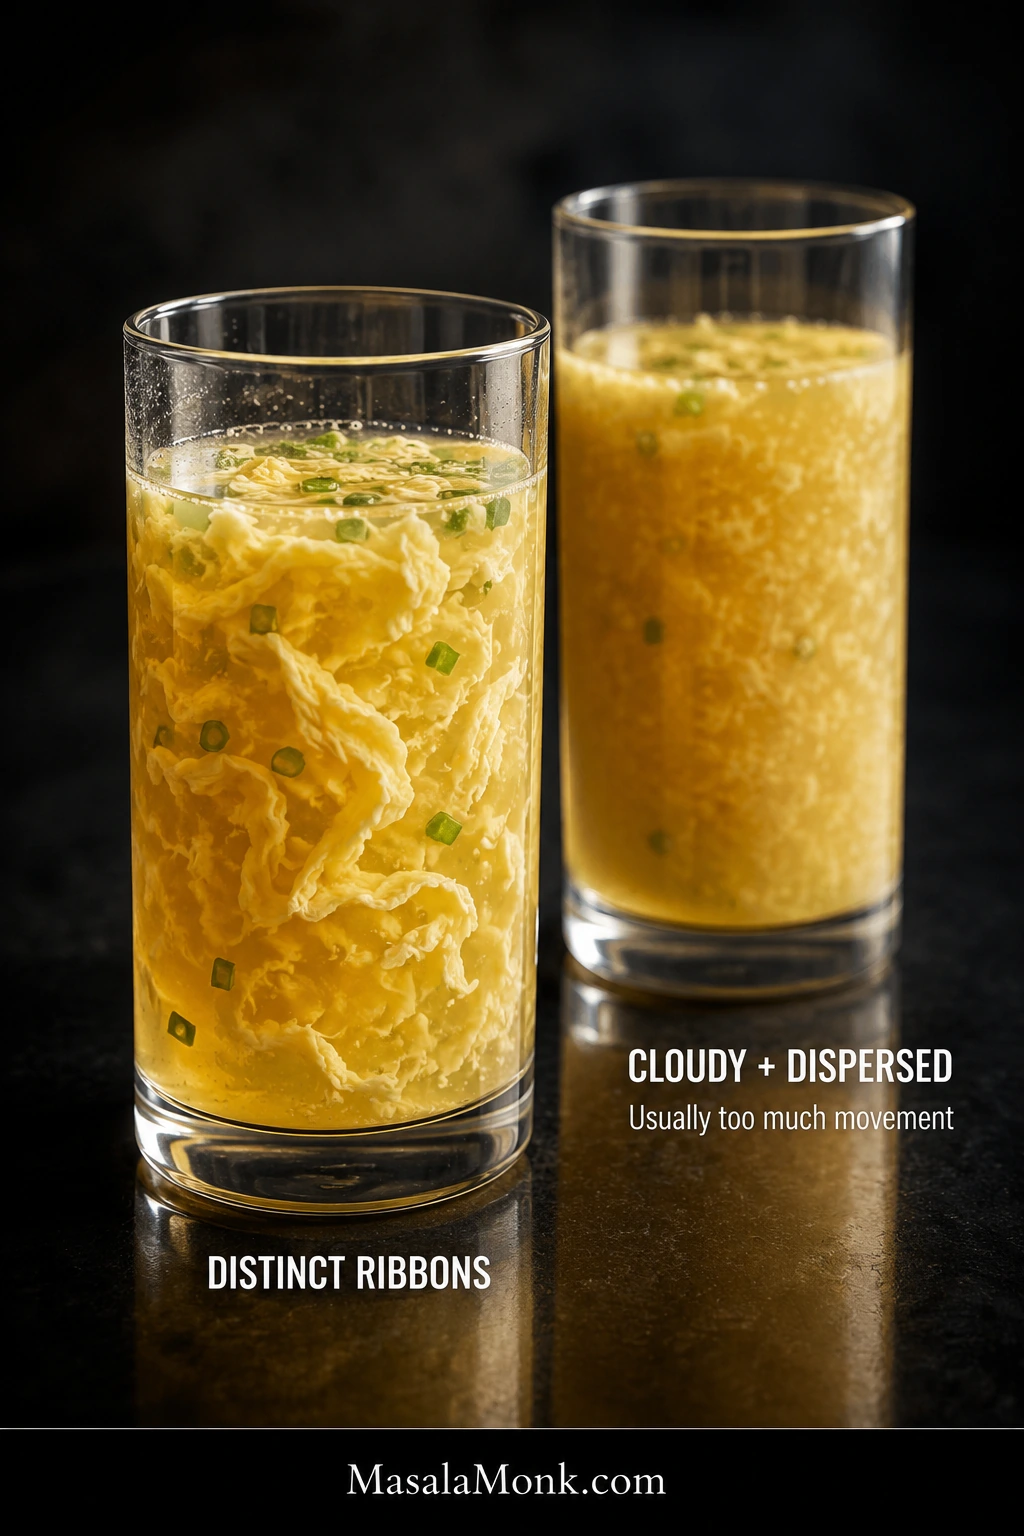
Two tall clear glasses compare golden broth with distinct egg ribbons against cloudier broth containing finely dispersed egg particles.
Glass makes the difference easy to see: distinct ribbons hold their shape, while dispersed egg turns the broth hazier. The cloudy version is different—not wasted.

I Got Scrambled-Looking Clumps

Large dense pieces usually mean too much egg reached one area at once, or thick ropes of white were still present in the beaten eggs.

A narrower pour and fully blended eggs prevent most of this. Separate the clumps lightly in the soup you already have and carry on. The texture is different, but dinner is still dinner.

I Got Tiny Flecks

The egg was broken apart by too much movement while it was trying to set.

Use less agitation after the pour. The flecks will not turn back into broad ribbons, but the soup itself is perfectly usable.

I Got One Big Sheet of Egg

The egg set with too little separation and joined into one connected piece.

Break the sheet gently into ribbons. When newly poured egg turns opaque, one or two careful strokes are enough to separate it before the whole mass sets together.

My Soup Is Too Thin

Give the original slurry about a minute at a simmer before assuming you need more starch.

Still too light? Mix 1 teaspoon / about 3 g cornstarch + 1 teaspoon / 5 ml cold water. Add part of it, simmer briefly, and reassess before using the rest.

My Soup Is Too Thick

Add hot low-sodium chicken broth a splash at a time, moving the spoon carefully around the ribbons.

If it takes a substantial amount of broth to loosen the soup, use less cornstarch when you make it again.
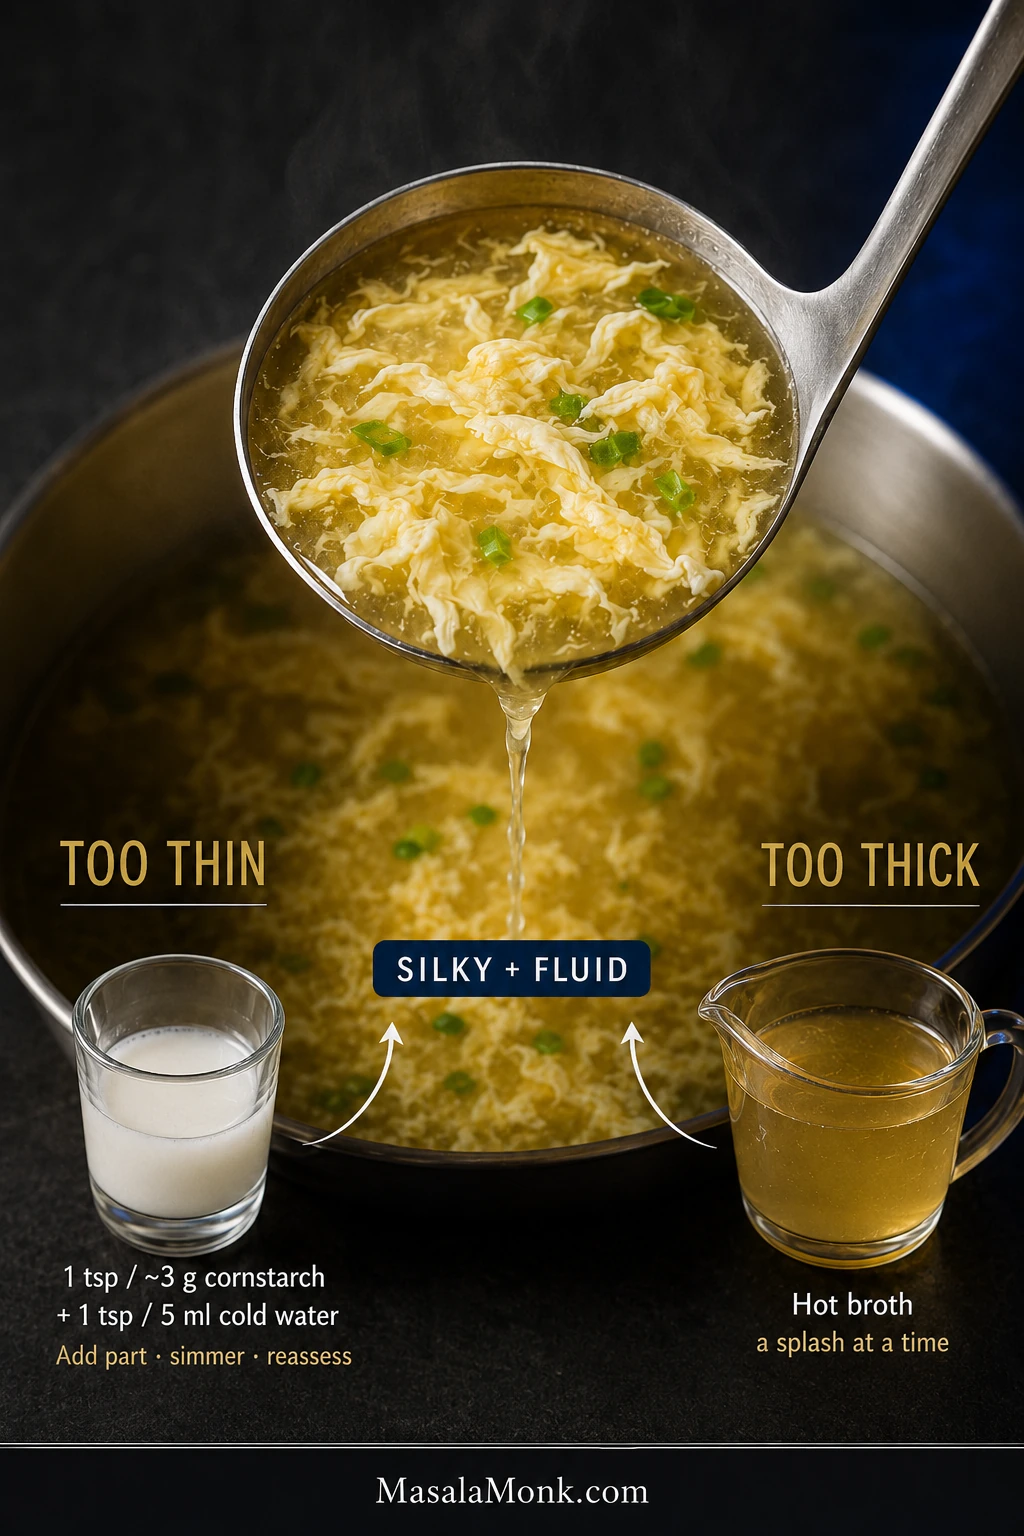
Egg drop soup ladle between a glass of cornstarch slurry for thin soup and a pitcher of hot broth for thick soup, with rescue amounts and a silky-fluid target.
Both rescues are deliberately incremental. Cornstarch keeps developing as it simmers, while extra broth also dilutes seasoning—so correct a little, then reassess.

Other Quick Fixes

  • Ribbons sank: thin broth, heavy pieces of egg, too much egg, or broth that cooled too far can contribute. Keep the base egg ratio and make sure the broth is back at a quiet simmer before pouring.
  • Rubbery egg: prolonged boiling after the ribbons have set is usually responsible. When the egg is opaque and set, finish the soup and get it off the heat.
  • Cornstarch lumps: if you spot them before adding the egg, strain the broth and return it to the saucepan. After ribbons have formed, remove obvious lumps with a spoon instead of sending the finished soup through a strainer.
  • Too much sesame oil: dilute the soup with more broth. Sesame is much easier to add than remove.
  • Broth looks brown: dark stock or soy sauce is usually responsible. The color alone does not mean anything went wrong.
  • Soup tastes of turmeric: dilute it when practical and use less in the next pot.
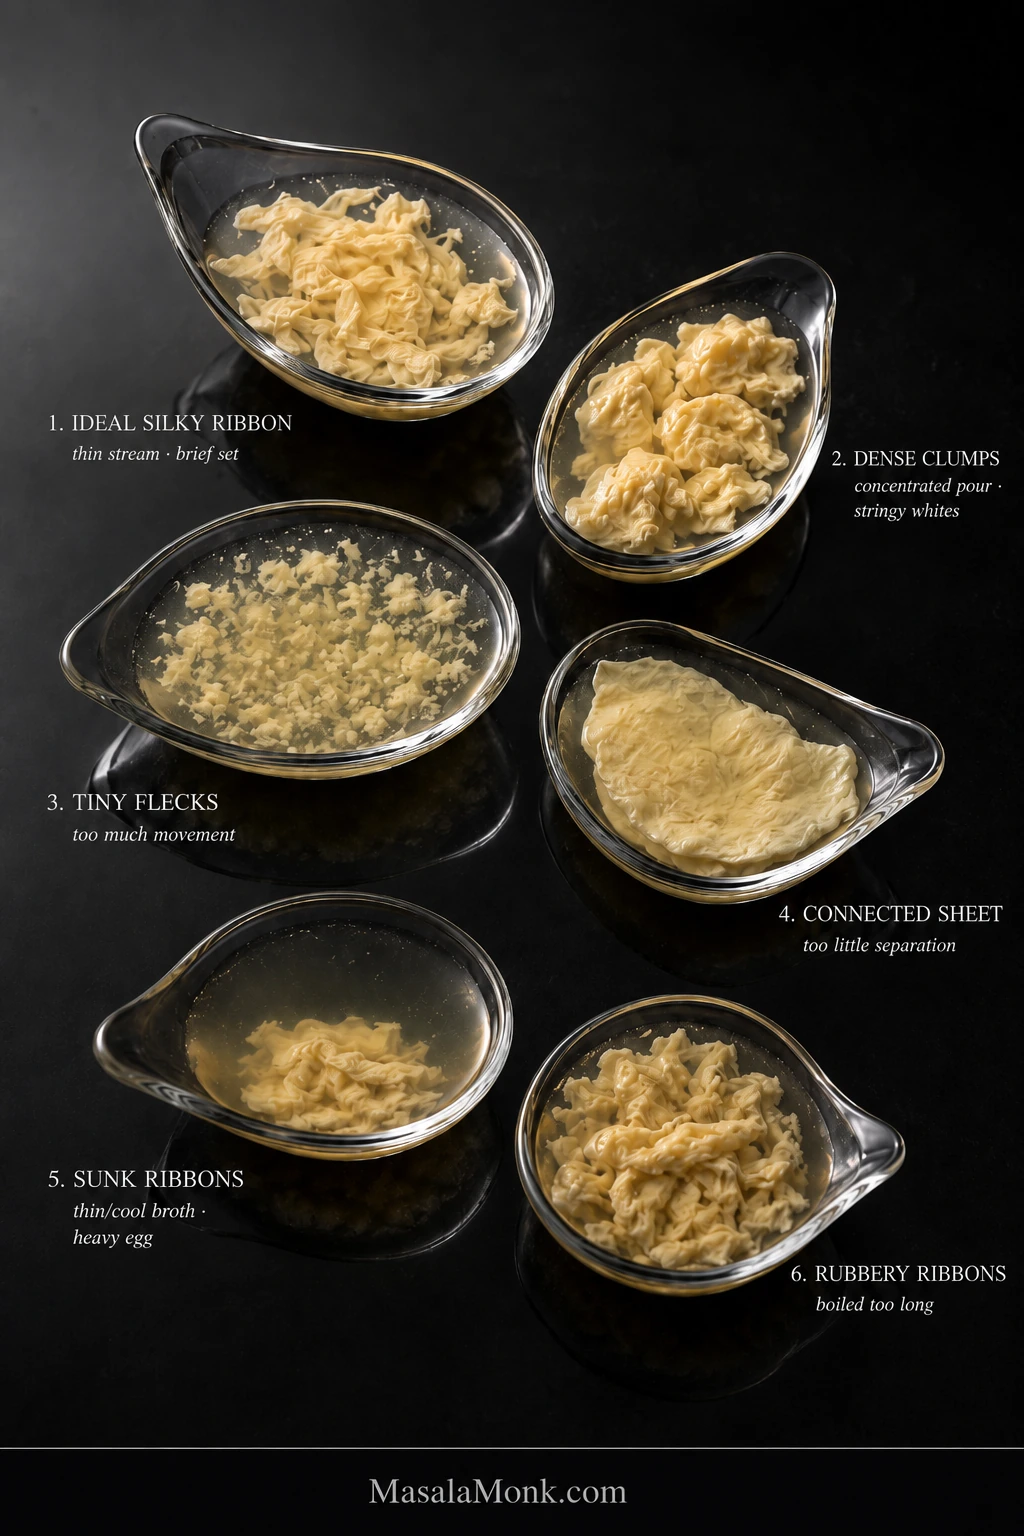
Six clear tasting dishes show ideal silky egg ribbons, dense clumps, tiny flecks, a connected egg sheet, sunk ribbons, and firmer rubbery ribbons with brief cause labels.
Identify the shape before choosing the fix. Clumps, flecks, sheets, sinking, and rubbery ribbons point back to different moments in the egg-drop process.

Ready to try again? Back to the recipe steps.

How to Scale Egg Drop Soup for One, Two or a Crowd

Egg drop soup is especially handy when you are cooking only for yourself. One egg and a couple of cups of broth are enough for a hot lunch or easy dinner without leaving a large pot behind.

NeedStarting brothEggCornstarch
1 generous bowl2 cups / 473 ml1 large / ~50 g2¼ tsp / ~6 g
Base recipe4 cups / 946 ml2 large / ~100 g1½ tbsp / ~12 g
6 starter bowls6 cups / 1.42 L3 large / ~150 g2¼ tbsp / ~18 g

Use about 1 teaspoon / 5 ml water per large egg to loosen the mixture.

Scale broth, eggs, and cornstarch by measurement. Salt, bouillon, and chicken powder are better adjusted by taste because brands vary so much.
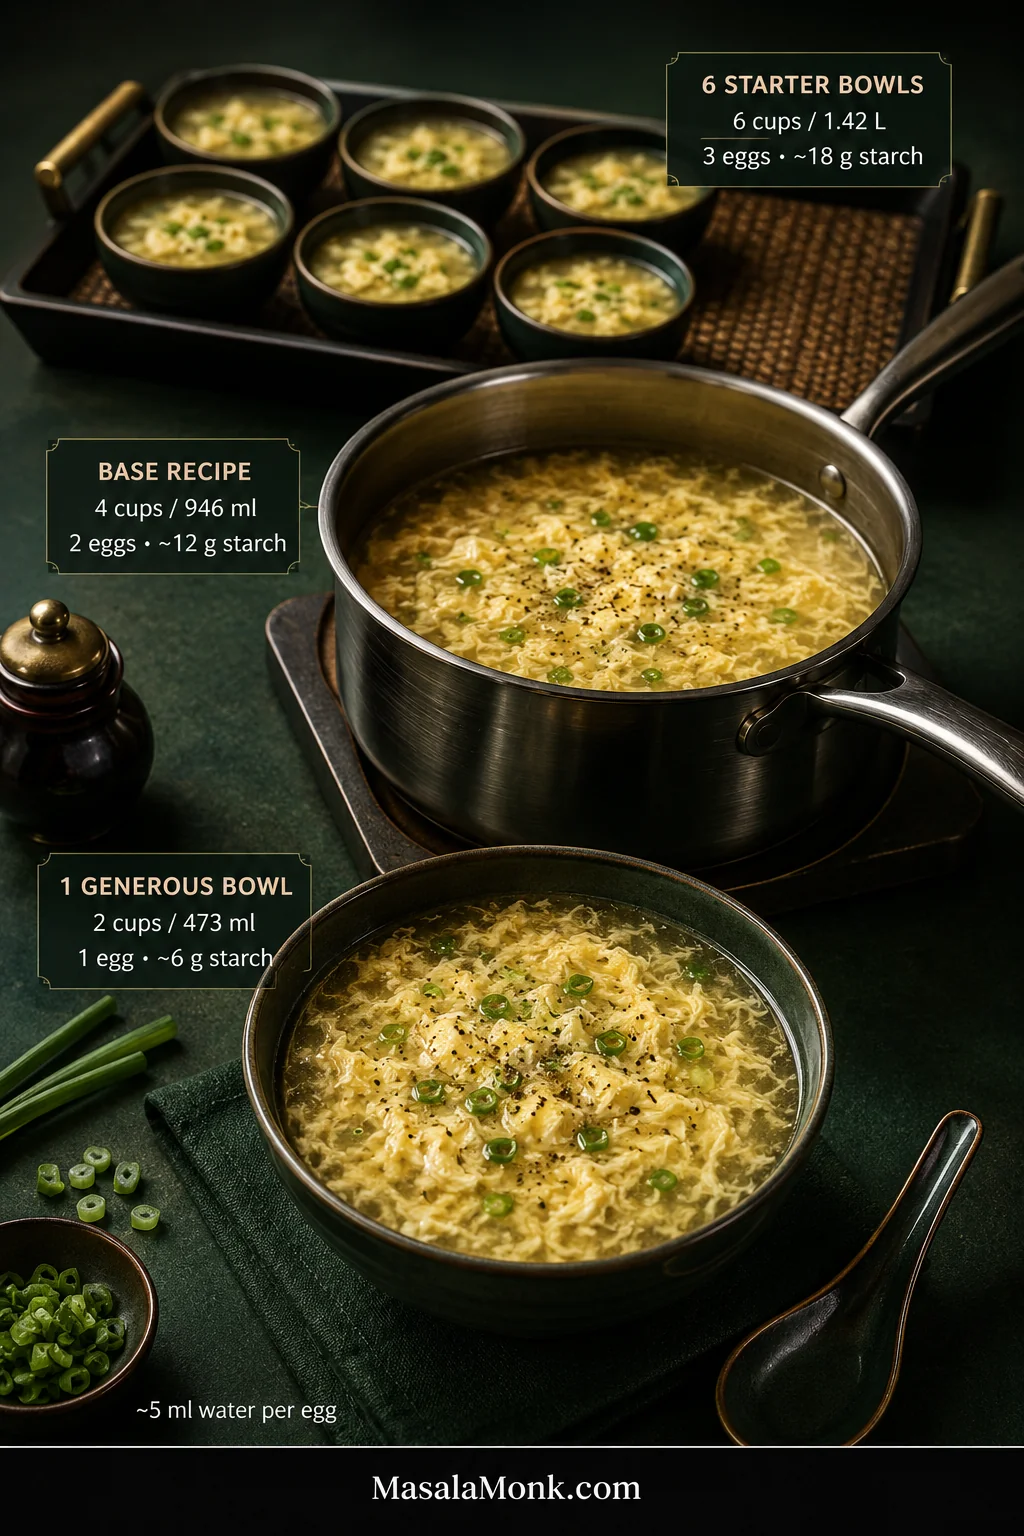
One large bowl, a saucepan of egg drop soup, and a tray of six small starter bowls labeled with broth, egg, and cornstarch quantities for each batch size.
Scaling changes more than the arithmetic. A larger pot can take longer to recover a gentle simmer, so re-check the heat before the egg pour.

Variations and Substitutions

Can I Make Egg Drop Soup Without Cornstarch?

Yes. Leave the cornstarch out and the egg will continue to form wisps or ribbons. The broth will simply be lighter and more delicate, without the glossy body common in many Chinese-American restaurant versions.

Other Easy Variations

  • Potato starch: make a cold slurry and begin with less than the full cornstarch quantity. Add gradually until the broth reaches the same spoon-path cue used in the base recipe; different starches do not always thicken one-for-one.
  • Vegetable broth: choose a clean, savory one. Dark roasted or tomato-heavy broth changes the character of the soup considerably.
  • Tofu: warm small cubes of soft or silken tofu in the seasoned broth before adding the slurry and egg. For a tofu-centered meal, serve the soup alongside Mapo Tofu and rice.
  • Shrimp: poach peeled, deveined shrimp until barely cooked, lift them out, and continue with the slurry and egg. Return the shrimp at the end just long enough to heat through.
  • Vegetables: peas, finely diced carrot, mushrooms, spinach, and other quick-cooking vegetables fit easily. Add firm vegetables earlier and delicate greens near the end.
  • Corn: a handful adds sweetness and texture. With enough corn to become a main flavor, the soup takes on a noticeably sweeter, fuller character.
  • Rice: spoon cooked rice into individual bowls so leftovers do not absorb most of the broth. Starting from dry rice? Our guide to cooking rice covers the basics.
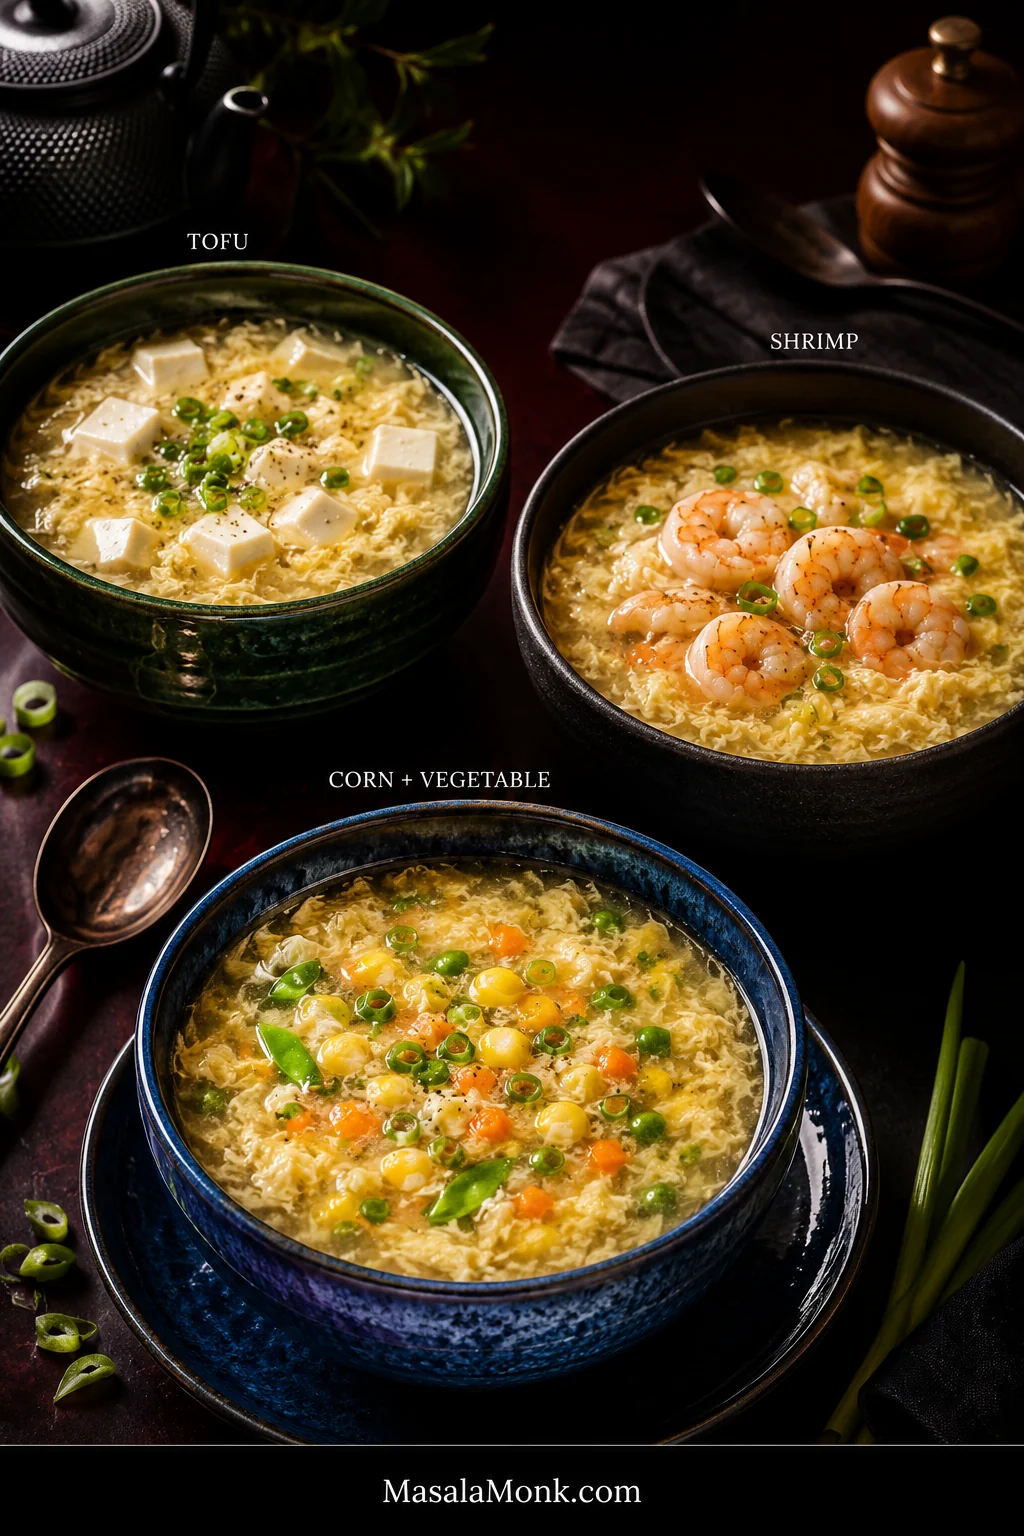
Three bowls of golden egg drop soup show tofu cubes, cooked shrimp, and a corn-and-vegetable variation in green, black, and blue ceramic bowls.
Whatever you add, leave enough open broth for the egg ribbons to move and stay visible. The variation should support the soup rather than crowd it.

Is Egg Flower Soup the Same as Egg Drop Soup?

Yes. Egg drop soup and egg flower soup generally refer to the same broad family of soups. “Egg flower” describes the soft, flower-like shapes created when beaten egg sets in hot broth.

The exact soup changes from kitchen to kitchen. Some versions are clear and delicate with fine wisps; others have broad flowers and noticeably more body.
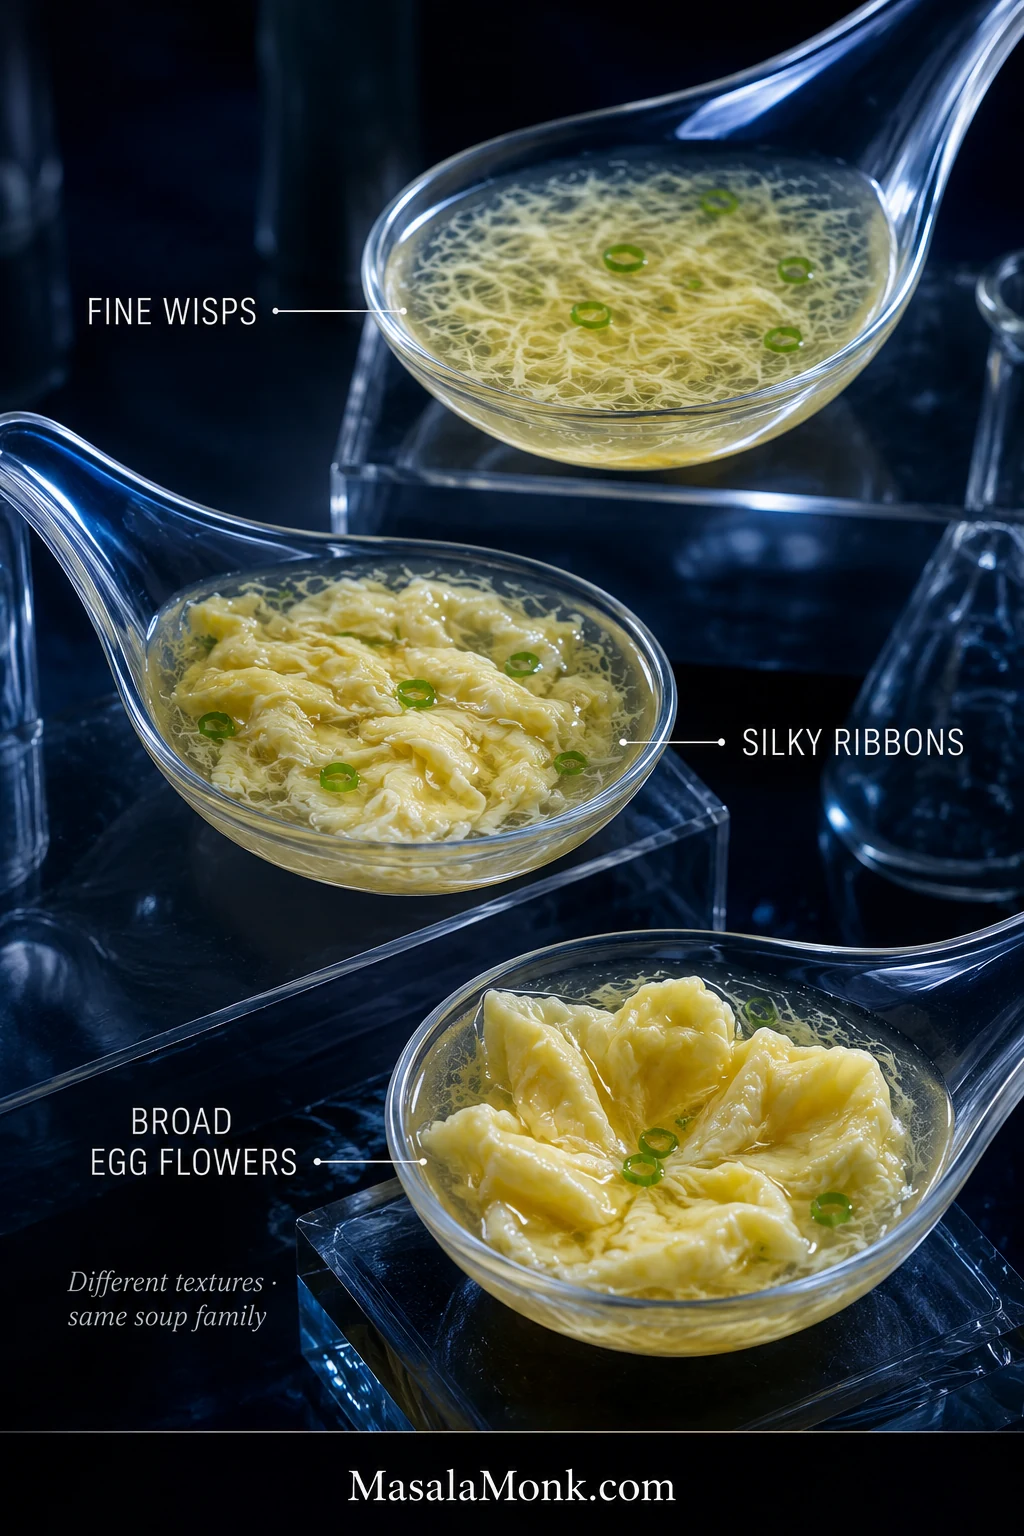
Three clear ladles compare very fine egg wisps, medium silky ribbons, and broad petal-like egg flowers in translucent golden broth.
This spectrum also explains why two restaurants can serve visibly different soups under the same name: ribbon geometry varies even when the underlying technique belongs to the same family.

Chinese home-style soups may include tomato, seaweed, tofu, corn, or vegetables. Many Chinese-American restaurant versions lean toward concentrated chicken flavor, some starch thickening, white pepper, and egg suspended through a pale or yellow broth.

Egg plays a completely different role in Egg Foo Young, another Chinese-American restaurant favorite where it becomes the body of the dish instead of delicate ribbons in broth.

Your favorite restaurant may serve its soup thinner, thicker, brighter, or more egg-heavy. The controls above make those differences easy to adjust.

What to Serve With Egg Drop Soup

As a starter, egg drop soup works especially well with something that brings more texture or substance to the table.

A small bowl before Chicken Fried Rice makes an easy takeout-style dinner: hot soup first, followed by separate grains, vegetables, egg, and chicken.

Crispy spring rolls add crunch; steamed dumplings, plain rice, Chinese-style noodles, stir-fried vegetables, and simple chicken or beef dishes all fit comfortably beside it.
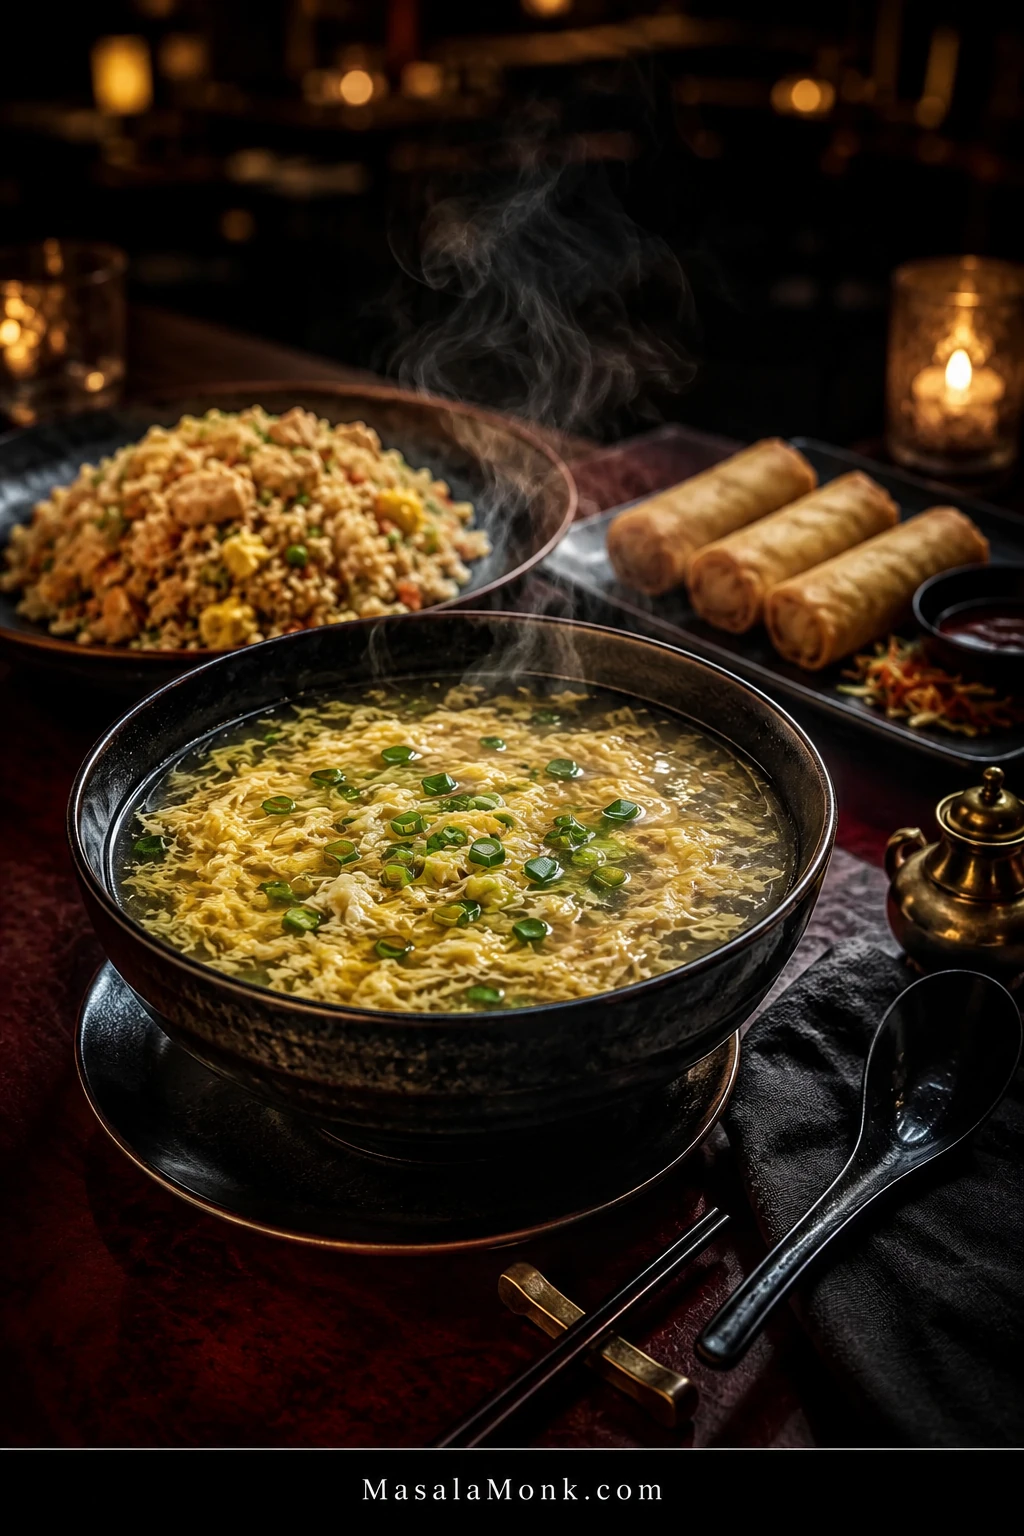
Steaming bowl of egg drop soup in the foreground with chicken fried rice and three crisp spring rolls on a dark red restaurant table behind it.
After all the technique, texture contrast is what makes the meal satisfying: soft soup beside fried rice, crisp spring rolls, dumplings, or another substantial side.

Two generous cups can also make a light lunch on their own, especially on a day when cooking anything elaborate sounds unnecessary.

Make Ahead, Store & Reheat

Egg drop soup is nicest when the ribbons have just been made, but the seasoned broth is easy to prepare ahead. That gives you most of the convenience while saving the egg for the last few minutes.

Best Make-Ahead Method

  1. Prepare the seasoned broth, remove the ginger slices, cool it, and refrigerate without cornstarch or egg.
  2. Bring the broth back to a simmer when you want the soup.
  3. Add a freshly mixed slurry.
  4. Add freshly beaten egg when the broth has the body you want.
  5. Finish with scallion greens and optional sesame oil.

A few minutes at the stove later, you have fresh ribbons without remaking the broth from the beginning.
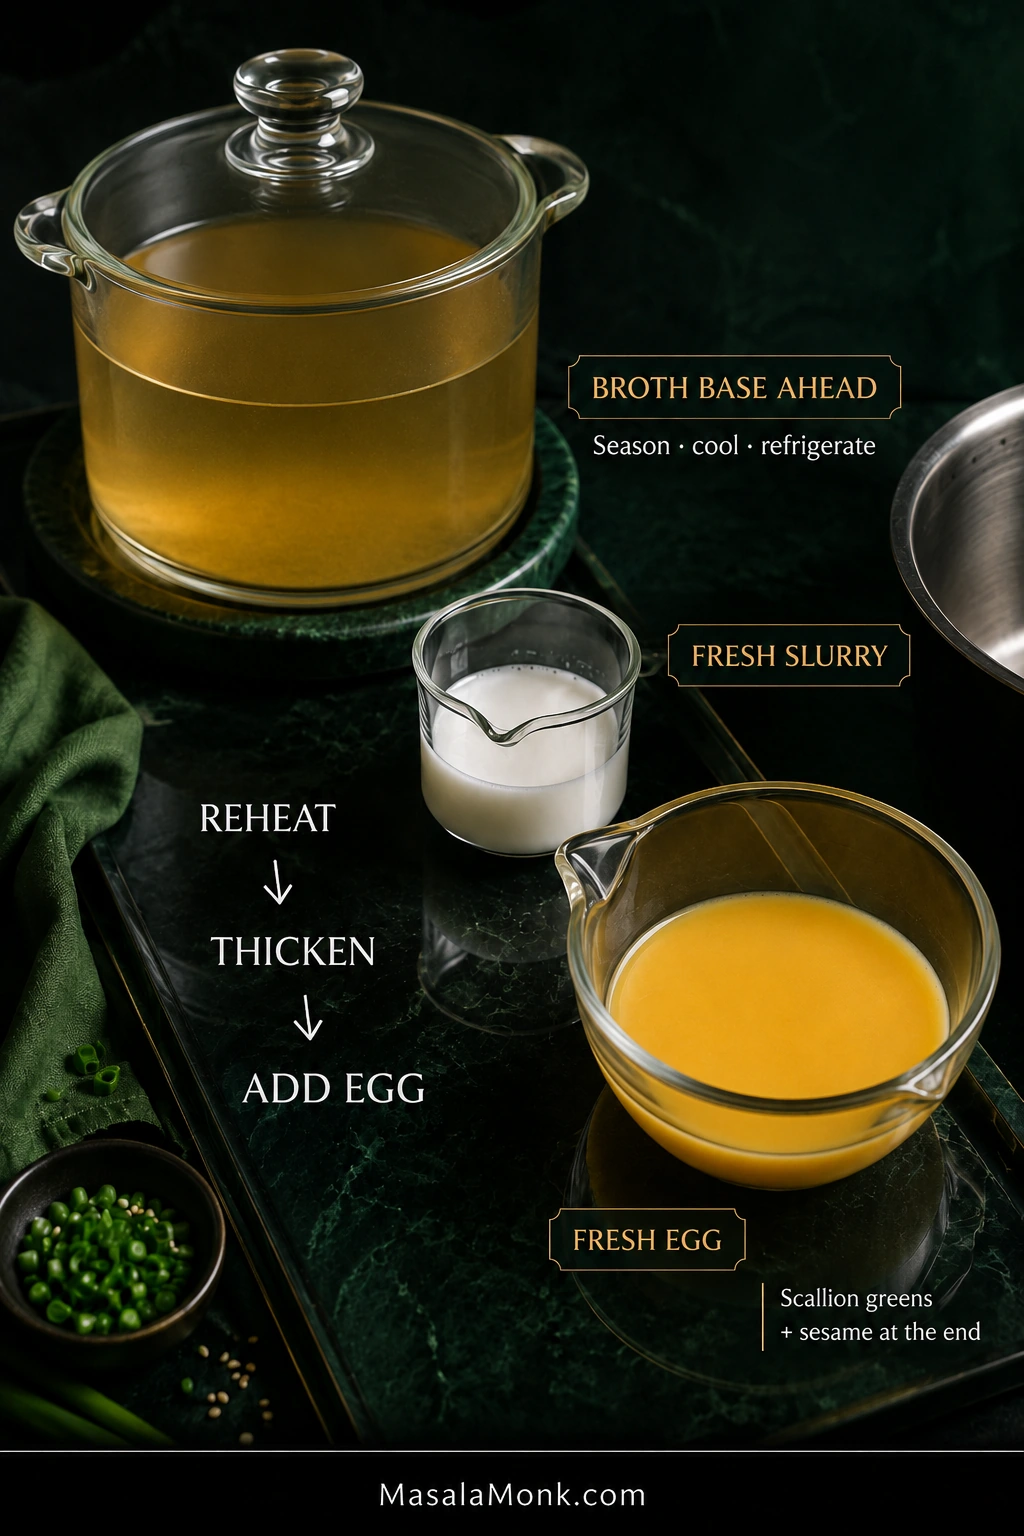
Clear container of seasoned golden broth beside fresh cornstarch slurry and smooth beaten egg, labeled to reheat the broth, thicken it, then add the egg.
Broth waits better than ribbons do. For make-ahead egg drop soup, hold the seasoned base, then thicken and pour the egg close to serving.

Storing Leftovers

Refrigerate leftovers promptly in a covered, shallow container. For the nicest ribbon and broth texture, aim to eat the soup within 1–2 days. Properly refrigerated cooked leftovers generally have a broader 3–4 day food-safety window at 40°F / 4°C or below.

Get leftovers into the refrigerator within 2 hours of cooking, or within 1 hour when the surrounding temperature is above 90°F / 32°C. The USDA guide to leftovers and reheating has the broader food-safety guidance.

Reheating

Bring leftover soup to a rolling boil when reheating and make sure it reaches 165°F / 74°C. After the soup is thoroughly hot, take it off the heat so the cooked ribbons spend as little extra time boiling as possible.

In the microwave, heat in shorter intervals and stir between them so the soup warms evenly.

If chilled soup has lost some of its original body, mix 1 teaspoon / about 3 g cornstarch + 1 teaspoon / 5 ml cold water. Add only as much of that slurry as the reheated soup needs.
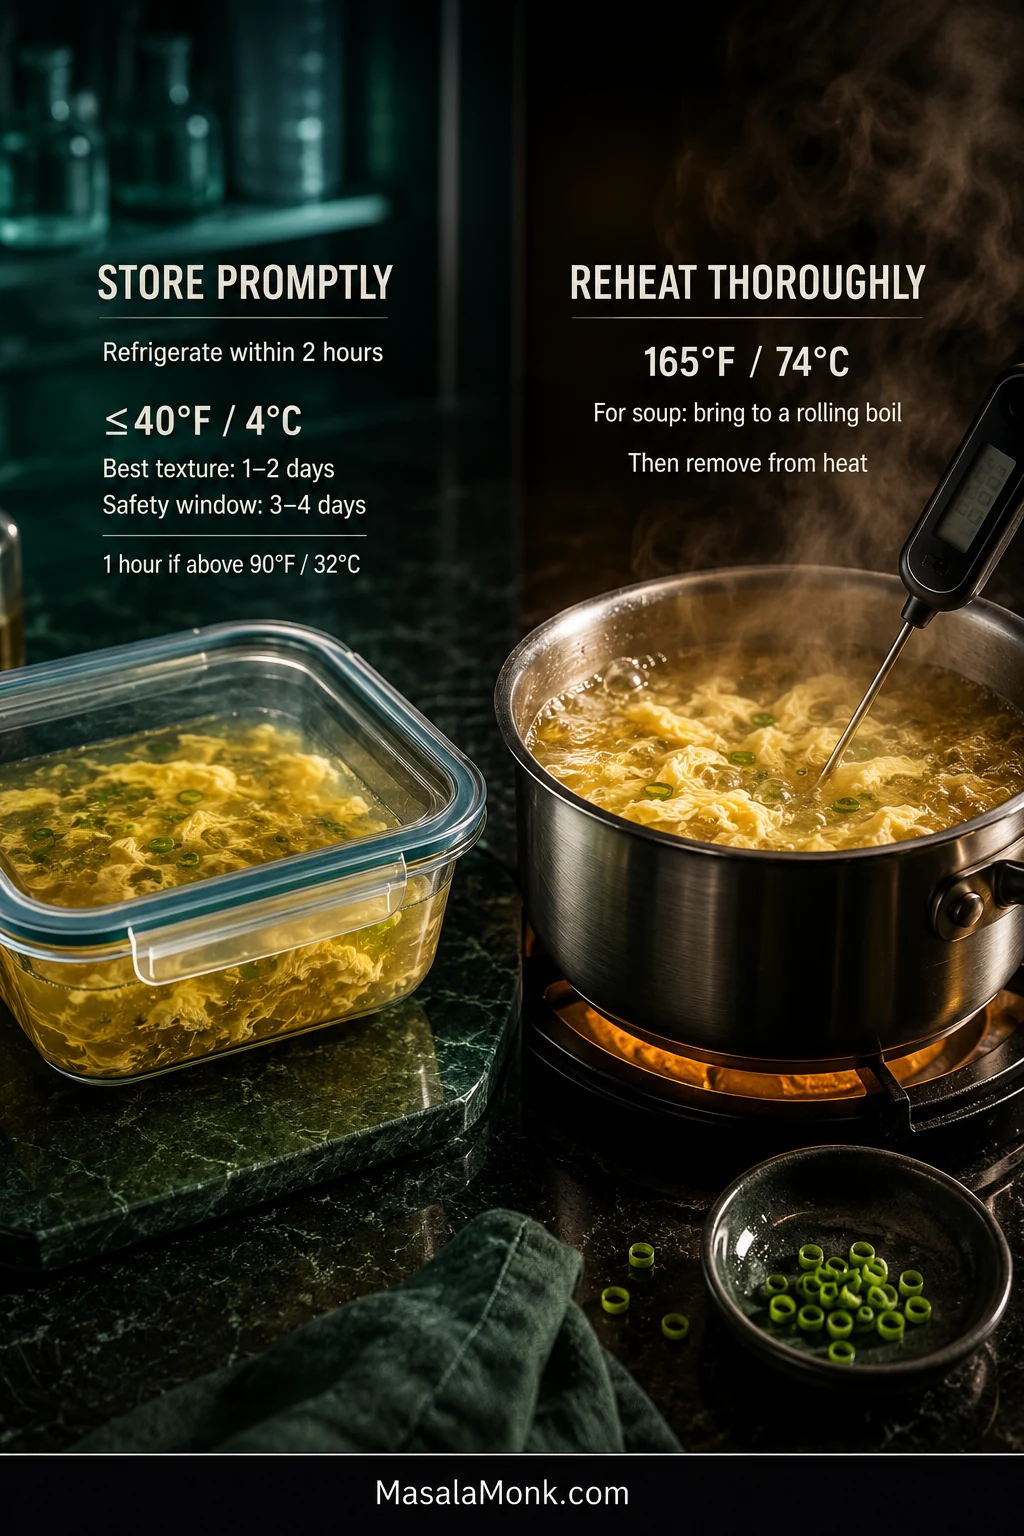
Covered shallow glass container of cooled egg drop soup beside a steaming saucepan being reheated, with storage temperatures, refrigeration timing, and 165°F or 74°C reheating guidance.
The shallow container is part of the method, not just storage. It helps leftovers cool more quickly and evenly; reheating then brings the soup back to serving temperature.

Can You Freeze It?

The seasoned broth base freezes better than the completed soup. Thaw and reheat the broth, then add fresh slurry and egg when you are ready to eat.


The best part of learning the egg pour is not making every ribbon look identical. It is knowing that a saucepan of broth and a couple of eggs can become that familiar steaming soup whenever you want it.

Some nights it is a starter before dinner. Some nights it is the whole point: something warm, savory, and comforting on the table in about 15 minutes.
Posted on Leave a comment

Million Dollar Chicken Casserole Recipe: Creamy, Cheesy & Easy

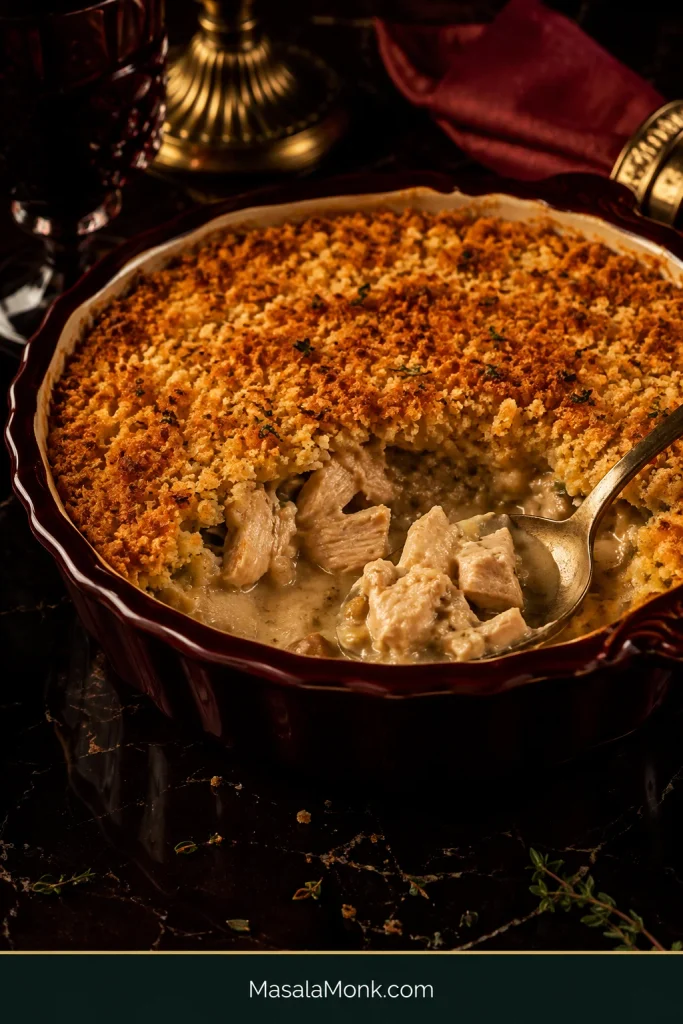
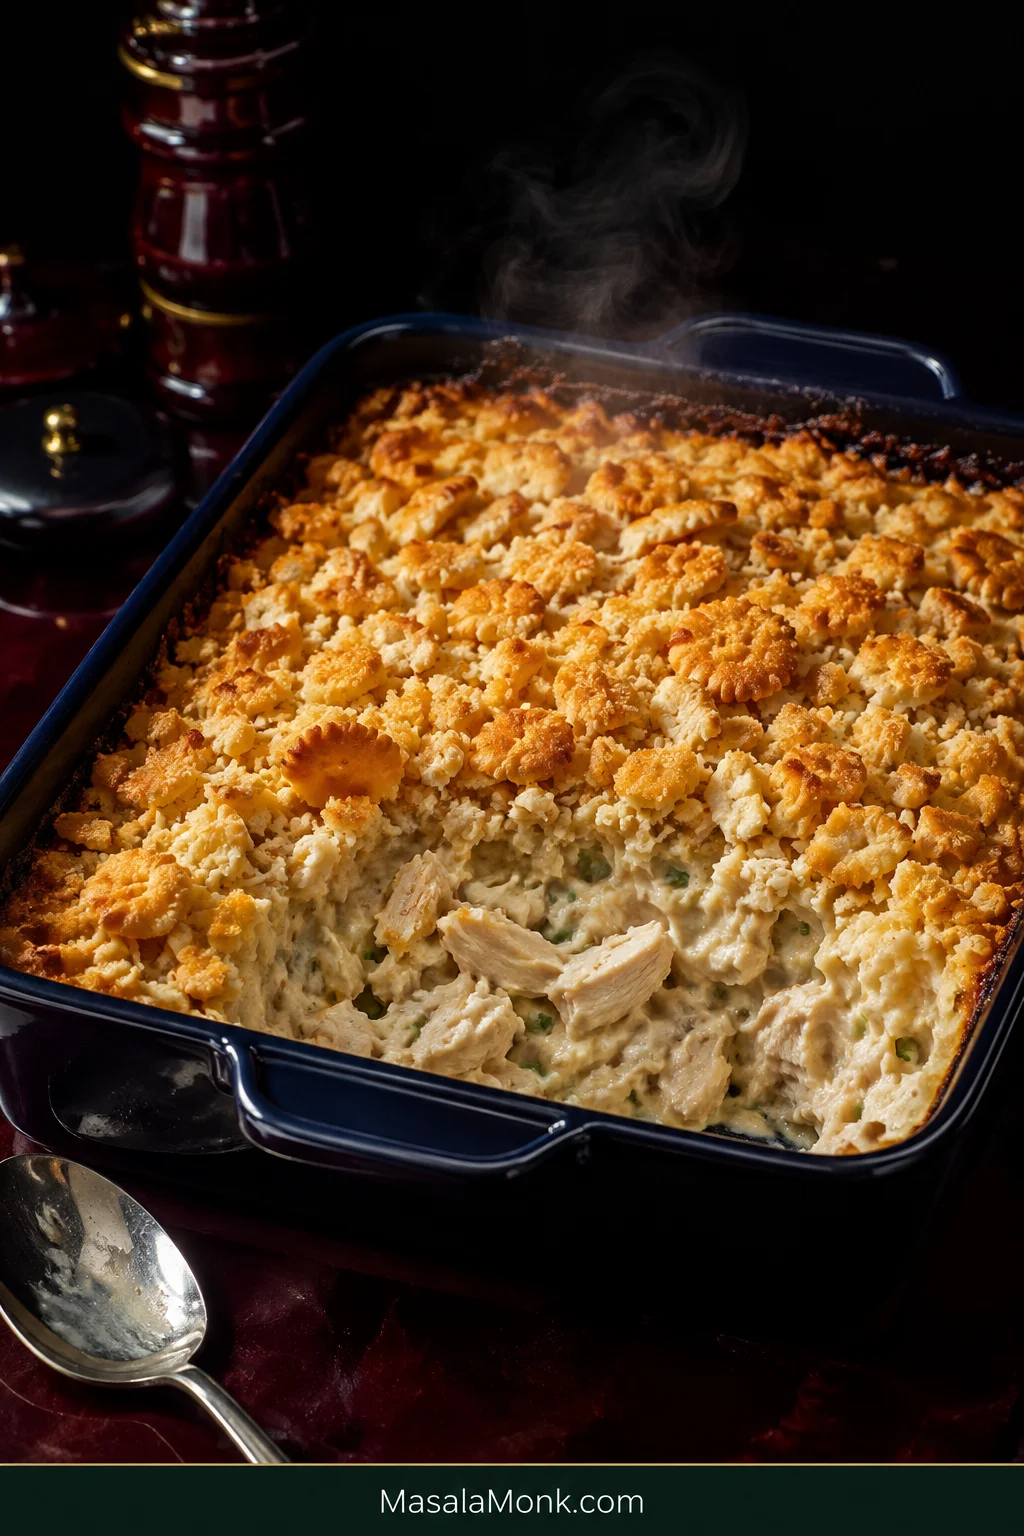
Million Dollar Chicken Casserole in a dark blue baking dish with golden buttery cracker topping and exposed thick creamy chicken filling.

Million Dollar Chicken Casserole brings tender chicken, a rich, savory sauce and buttery golden crackers together in the kind of dinner that asks very little from you.

The best version isn’t the one with the most dairy piled into it. It’s the one where everything lands in balance: chicken with some texture, enough sauce to coat every piece, plenty of savory flavor, and crisp crumbs breaking through all that softness.

That balance is especially handy when there’s cooked chicken in the fridge and you want tonight’s dinner to feel like a new meal rather than leftovers again.

With the chicken ready, plan on about 15 minutes of prep. Mix, spread, top and bake at 350°F / 175°C. Then give the casserole 10 minutes before you scoop it so the bubbling sauce has time to settle around the chicken.

Quick Answer: How to Make Million Dollar Chicken Casserole

  1. Mix: Combine 4½ loosely packed cups cooked shredded chicken, about 1⅓ lb / 600 g, with softened cream cheese, cottage cheese, sour cream, undiluted condensed cream of chicken soup and savory seasonings.
  2. Spread: Spoon the thick chicken mixture into a 9×9-inch baking dish.
  3. Top: Coarsely crush 3½ oz / 100 g buttery round crackers—roughly 30–32 Ritz crackers—and toss with 4 tbsp / 57 g melted unsalted butter.
  4. Bake: Bake uncovered at 350°F / 175°C for 35–40 minutes, until the edges bubble, the crackers are golden and the center reaches 165°F / 74°C.
  5. Rest: Leave the casserole for 10 minutes before serving.

Before baking, drag a spatula through the mixture. The trail should remain visible for a moment. After resting, the finished casserole should be creamy and easy to scoop, without liquid pooling around the serving.

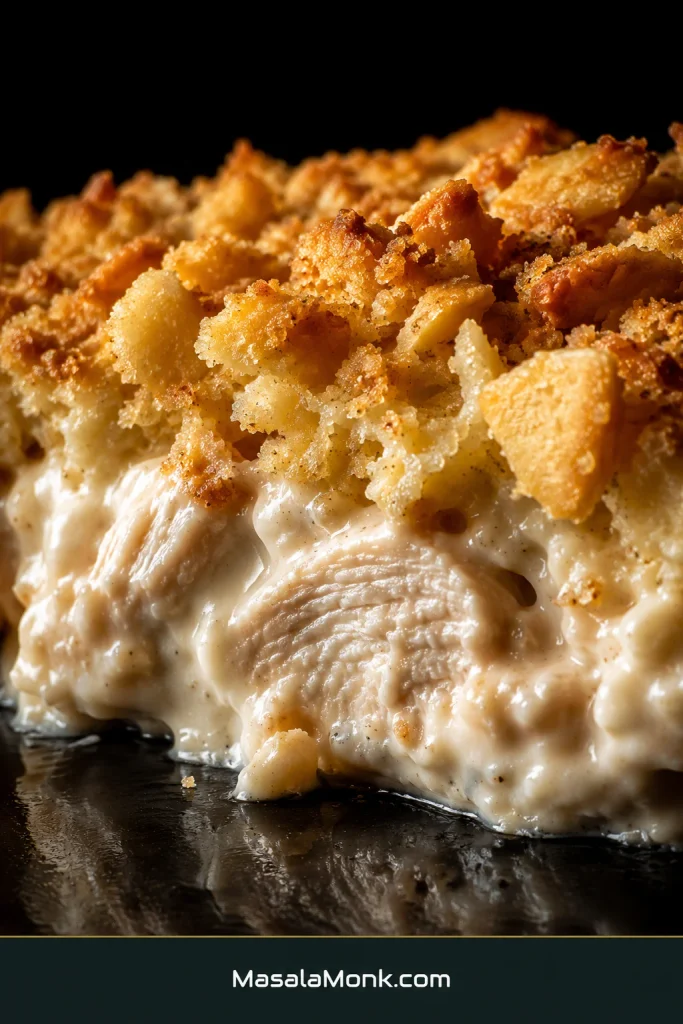
Close-up cross-section of golden cracker crust above thick creamy sauce clinging to pieces of chicken.
Notice the boundary between the layers: crisp crumbs stay above the sauce instead of forming a damp, soaked band where topping and filling meet.

Million Dollar Chicken Casserole Recipe

Recipe at a Glance

Prep15 minutes
Bake35–40 minutes
Rest10 minutes
Oven350°F / 175°C
Best dish9×9 in / 23×23 cm / roughly 2 qt
Yield6 hearty main-dish servings or up to 8 smaller portions with substantial sides
Look forBubbling edges, golden crackers and sauce that settles around the chicken after resting

Equipment

  • 9×9-inch / 23×23 cm baking dish, roughly 2-quart capacity
  • Large mixing bowl
  • Small bowl for the cracker topping
  • Spatula or sturdy spoon

An instant-read thermometer helps with the center, especially when the casserole starts refrigerator-cold. If the dish is filled close to the rim, a sheet pan underneath can catch bubbling drips.

Ingredients

For the chicken filling

  • 4½ loosely packed cups cooked shredded chicken, about 1⅓ lb / 600 g
  • 1 can condensed cream of chicken soup, 10.5 oz / 298 g, undiluted; reduced-sodium is helpful when the chicken is already fairly salty
  • 4 oz / 113 g cream cheese, fully softened
  • ¾ cup / about 170 g small-curd cottage cheese
  • ½ cup / about 120 g sour cream
  • ¾ tsp garlic powder
  • ¾ tsp onion powder
  • ½ tsp freshly ground black pepper
  • 2 tbsp thinly sliced scallions, optional but recommended
  • 1 tbsp chopped fresh parsley, optional
  • Fine salt, only if needed after tasting
  • ½ cup / 2 oz / 55–60 g shredded mozzarella, Monterey Jack or mild cheddar, optional for a more visibly cheesy casserole

For the buttery cracker topping

  • 3½ oz / 100 g buttery round crackers, roughly 30–32 Ritz crackers
  • 4 tbsp / 2 oz / 57 g unsalted butter, melted
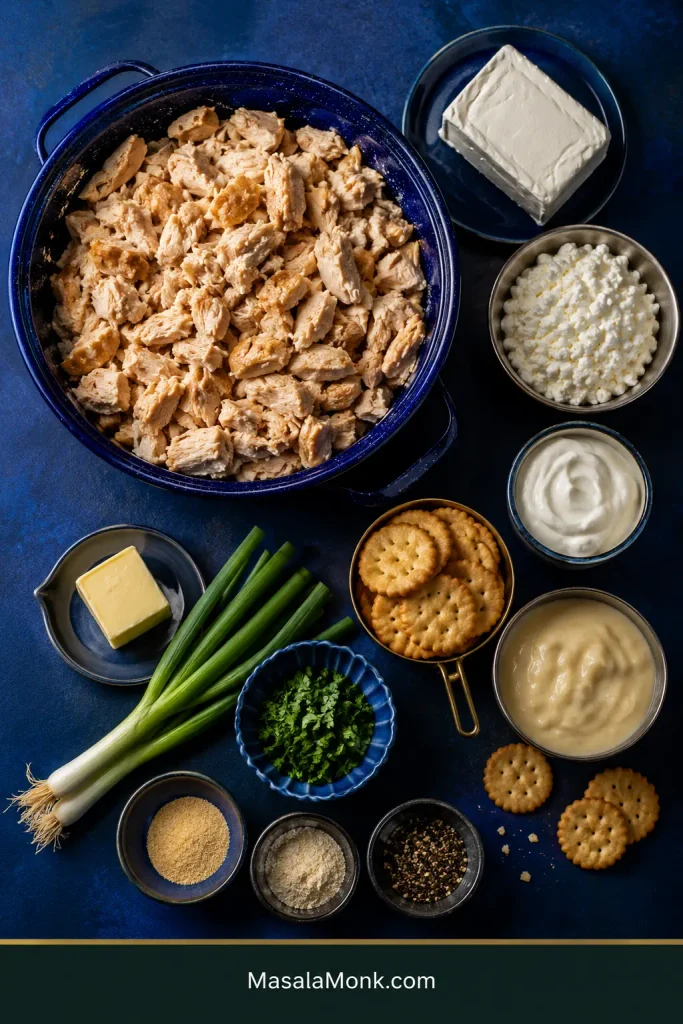
Ingredients for Million Dollar Chicken Casserole arranged around a large bowl of cooked chicken, including cream cheese, cottage cheese, sour cream, soup, crackers, butter and seasonings.
Chicken should supply most of the bulk; the dairy is the creamy binder, not the main event.

Before you start: use the condensed soup straight from the can, without added water or milk. The cream cheese needs to be soft enough for a spatula to press through easily, while remaining creamy rather than melted or oily.

Method

  1. Heat the oven to 350°F / 175°C and lightly grease a 9×9-inch baking dish.
  2. Mix the sauce. Stir the softened cream cheese, sour cream and condensed cream of chicken soup until mostly smooth. Stir in the cottage cheese, garlic powder, onion powder, black pepper, scallions and parsley.
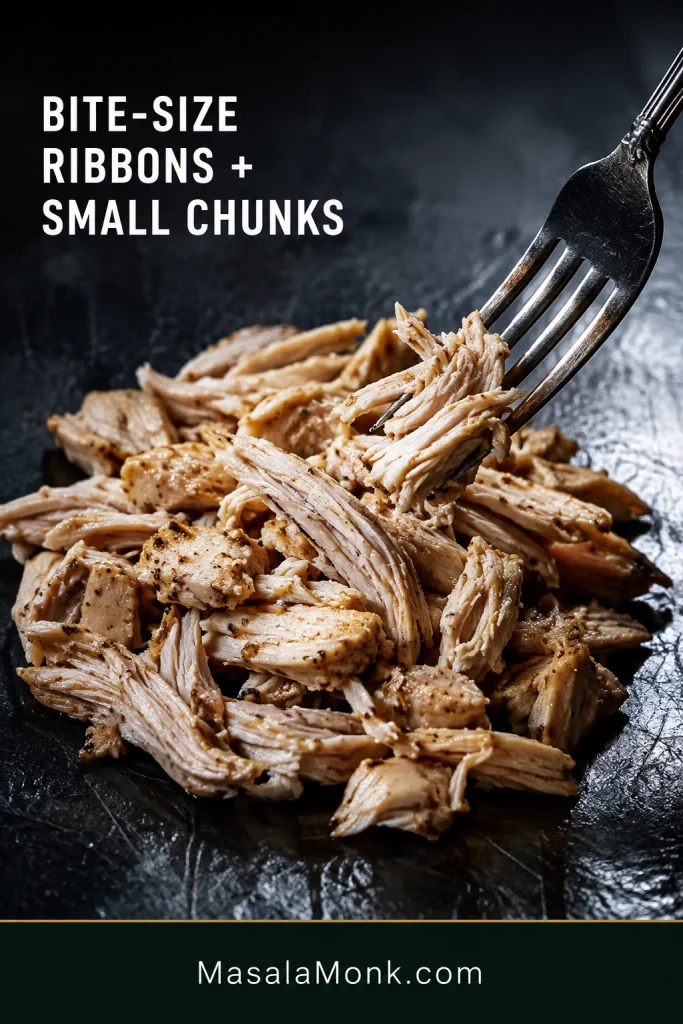
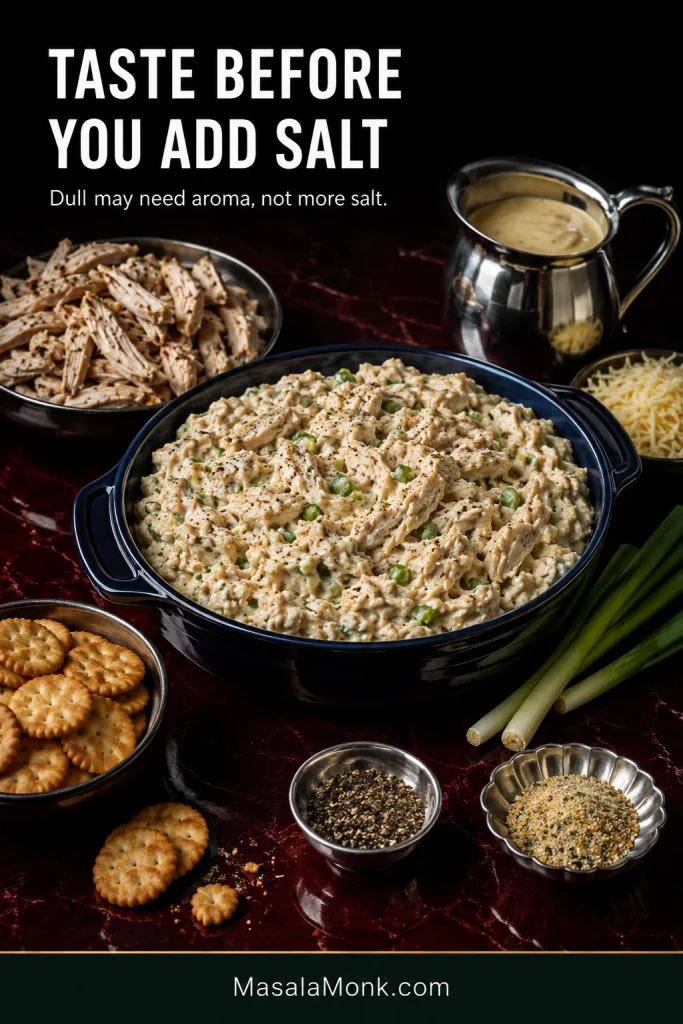
  3. Add the chicken and taste. Keep the chicken in bite-size ribbons and small chunks so you get distinct pieces in every scoop. Fold it through the sauce gently. Taste before adding salt; if the filling is salty enough but tastes dull, pepper, garlic, onion or herbs can bring more flavor without adding more salt.
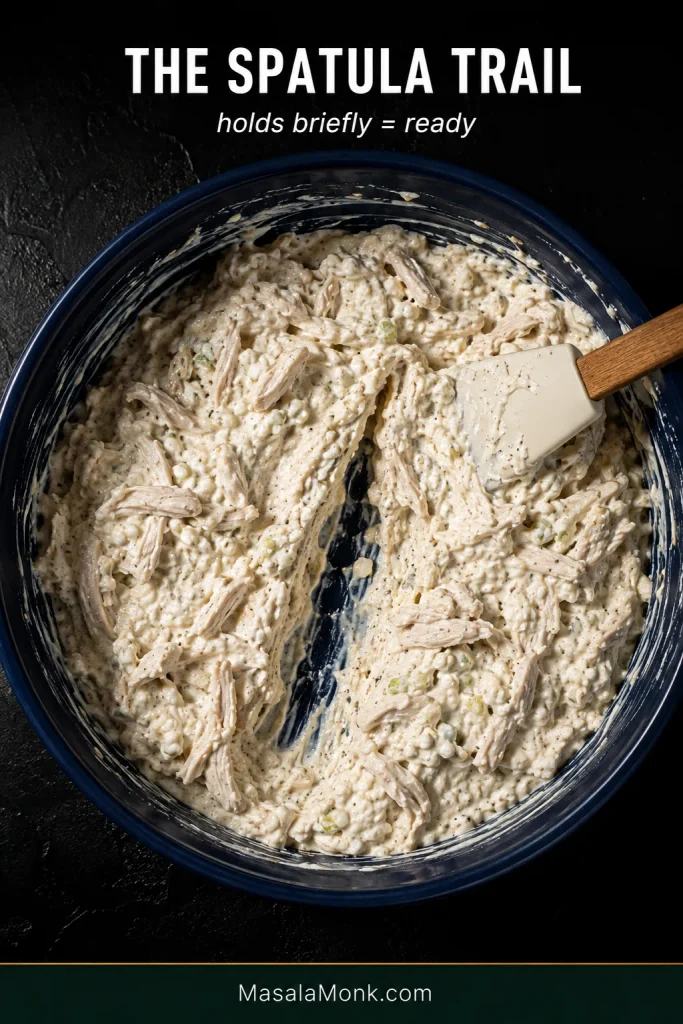
  4. Check the Spatula Trail. Drag the spatula through the bowl once. The path needs to stay open briefly. If thin liquid immediately runs back in, check for obvious cottage-cheese whey, wet chicken or another ingredient carrying excess moisture. Spread the thick mixture evenly into the baking dish. Sprinkle the optional shredded cheese over the filling now, if using.
Thick creamy chicken mixture in a blue bowl with a spatula trail that remains open briefly.
This check becomes especially valuable when chicken, cottage cheese or brands vary in moisture; instead of guessing from ingredients, you judge the consistency in the bowl.

Top, Bake & Rest

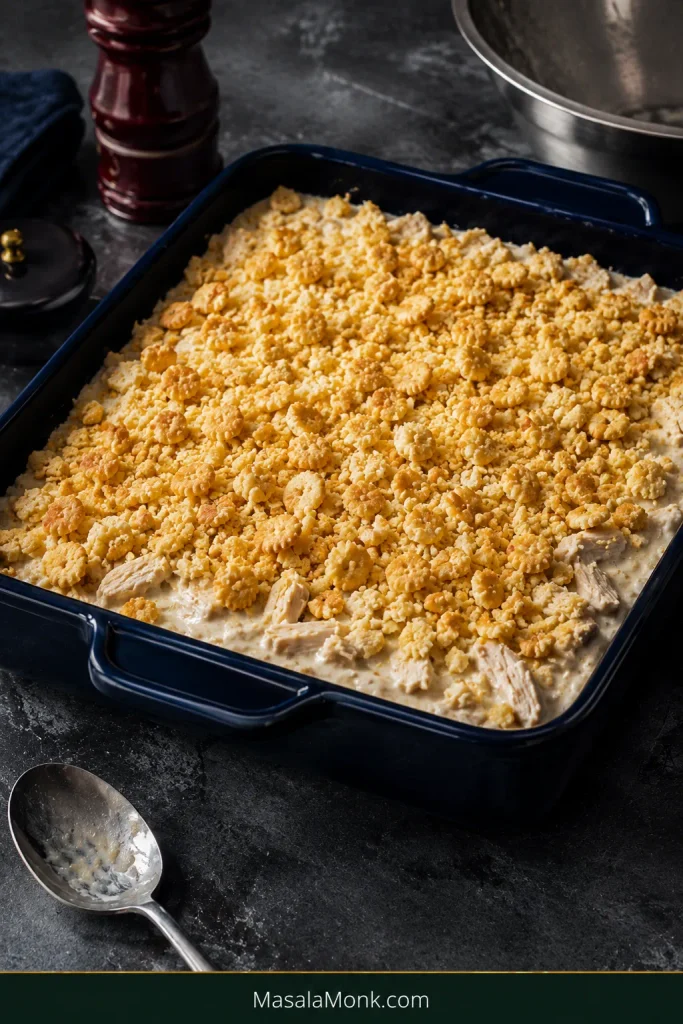
  1. Add the cracker topping. Crush the crackers coarsely so fine crumbs sit alongside small irregular pieces. Toss with the melted butter and scatter over the chicken.
Unbaked creamy chicken casserole in a dark blue dish covered with loose buttery cracker crumbs and small cracker pieces.
Before baking, the topping should still look dry and sit above the filling—not pasted down or saturated.
  1. Bake uncovered for 35–40 minutes. Look for bubbling around the edges and crackers that have turned golden and toasted.
  2. Check the center. It needs to reach 165°F / 74°C. If the topping gets deeply browned first, cover the dish loosely with foil and keep baking.
  3. Rest for 10 minutes, then scoop and serve.

When it is right, a spoon breaks through crisp golden crumbs into tender pieces of chicken coated in a thick, pale sauce. The serving can relax a little on the plate; what you don’t want is a puddle of liquid left around it.

Freshly served scoop of chicken casserole with golden cracker crust and thick creamy filling after resting.
A little slump is normal. What matters is that the sauce stays with the chicken instead of pooling separately.

Cooking right now? Stop here—you have everything you need. The rest is optional help for substitutions, make-ahead cooking and anything that looks different from what you expected.

In This Guide

Make it right

Change it safely

Plan & fix

What Is Million Dollar Chicken Casserole?

Million Dollar Chicken Casserole is cooked shredded chicken baked in a rich sauce of cream cheese, cottage cheese, sour cream and condensed cream of chicken soup, with buttery cracker crumbs across the top.

The “million dollar” name signals indulgent comfort food made from ordinary ingredients. Creamy dairy coats the chicken, while the toasted crackers break up all that softness with a crisp, buttery bite.

Choose Your Chicken: Rotisserie, Leftovers or Freshly Cooked

Rotisserie chicken, cooked breast, thigh and leftovers all work here. Measure the cooked meat instead of relying on “one rotisserie chicken,” since whole birds vary widely in size.

Rotisserie chicken is the quickest route. Plain or lightly seasoned meat gives you the most control; a strongly flavored bird brings those seasonings into the casserole too. Remove the skin before shredding and taste the mixture before adding salt.

Leftover roasted or baked chicken works just as well. Leave excess pan juices behind so yesterday’s chicken doesn’t carry unnecessary liquid into tonight’s dinner.

Canned chicken can work in a pinch too. Drain it very well, expect a softer texture, and taste the filling before adding salt.

Freshly cooked breast is milder and leaner; thigh is richer and more forgiving. Let either cool until comfortable to handle, then tear or shred it into bite-size ribbons with a few small chunks.

Cooked chicken pulled into bite-size ribbons and small chunks, showing the desired texture for the casserole.
Think of this as the stopping point for shredding. Once the chicken reaches irregular bite-size pieces, pulling it further only makes those pieces easier to lose in the sauce.

Cooking chicken specifically for this dish? This baked chicken breast recipe gives you juicy cooked meat that is easy to cool and shred.

Can You Use Raw Chicken?

Not in this version. The timing assumes the chicken is already cooked. Here, the oven’s job is to heat the creamy filling through and brown the cracker topping.

Raw chicken breasts baked under cream cheese, cheddar or bacon belong to a different Million Dollar Chicken Bake style with its own timing and proportions.

The Cottage Cheese Question

If you’re already looking suspiciously at the tub of cottage cheese, this is usually the ingredient that makes people pause.

Can You Taste the Cottage Cheese?

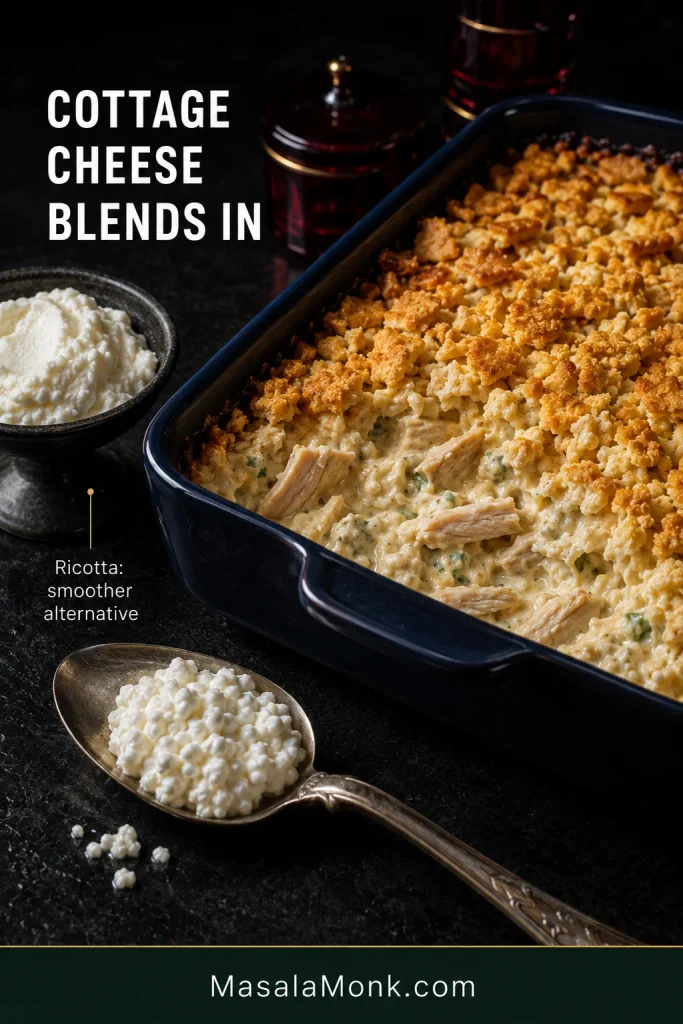
Usually not as a distinct cottage-cheese flavor. Baked with the cream cheese, sour cream, soup and chicken, it blends into the sauce and contributes mild tang and richness.

Small-curd cottage cheese is the easiest choice because the curds disappear more readily among the chicken. See a puddle of watery whey in the container? Leave the obvious liquid behind. There’s no need to squeeze the cottage cheese dry.

No Cottage Cheese? Use Ricotta

Whole-milk ricotta is a practical replacement. Start with roughly the same volume, leave behind obvious excess liquid and check that the chicken mixture remains thick and spreadable before baking.

Ricotta produces a smoother, slightly denser casserole. Simply omitting the cottage cheese removes a substantial part of the creamy base.

Blending cottage cheese is another option when you mainly want to hide the curds, although brands vary in moisture. Ricotta is the simpler choice when a completely smooth texture matters most.

Cottage cheese on a spoon beside finished creamy chicken casserole and a bowl of smooth ricotta as an alternative.
Cottage cheese looks much more obvious before baking. Afterward, the curds largely disappear into the creamy filling.

The 3 Controls of a Better Casserole

For a recipe this simple, three details do most of the work: moisture, flavor and cracker texture.

1. Moisture: Creamy, Not Watery

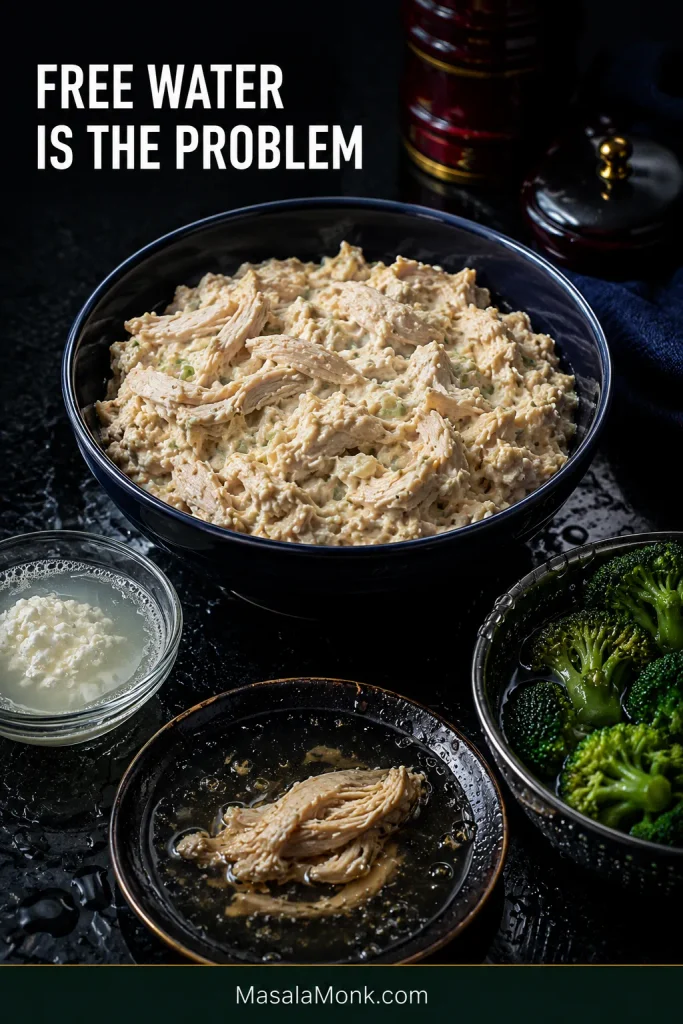
Broccoli isn’t the problem. Cottage cheese isn’t the problem. Even rotisserie chicken isn’t the problem. Free water is.

Condensed soup stays undiluted. Obvious cottage-cheese whey stays in the container. Cooking juices stay out of the bowl. Watery vegetables get drained or cooked before they go in.

Thick creamy chicken mixture surrounded by cottage cheese whey, chicken juices and wet broccoli to show sources of excess moisture.
A better way to judge moisture is to look for liquid that moves independently. An ingredient can be naturally moist without being a problem; free-running liquid is what changes the casserole’s balance.

The same Spatula Trail from the recipe is your quickest final check before the bowl is scraped clean. A thick mixture keeps the path visible briefly; a thin mixture closes over almost immediately.

Already baked and looking watery? Jump to Troubleshooting and judge it after the 10-minute rest.

2. Flavor: More Salt Isn’t Always the Answer

Rotisserie chicken arrives seasoned. Condensed soup and crackers bring seasoning of their own. Taste the mixed filling before adding more salt.

If the filling is salty enough but tastes dull, wake it up with pepper, garlic, onion, scallions, parsley or another salt-free seasoning.

Creamy chicken mixture surrounded by cooked chicken, condensed soup, crackers, scallions and seasonings, emphasizing tasting before adding salt.
Seasoning is cumulative. Once seasoned chicken and condensed soup are combined, ask whether the filling actually needs salt—not simply whether you have added any yet.

For a little extra spice, ½–1 tsp Creole or Cajun seasoning works well. Check the label first because the salt level varies considerably between blends.

3. Cracker Crunch: Butter Them Late

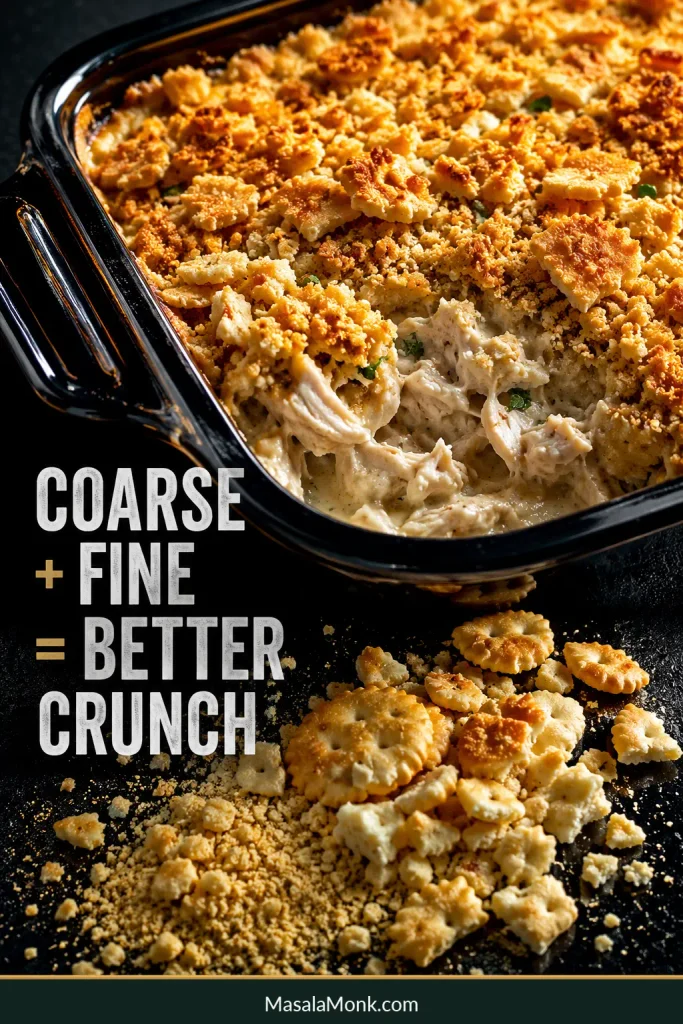
Crush and butter the crackers when you’re ready to bake. A mixture of fine crumbs and small irregular pieces gives the top a better bite than pulverized crumbs alone.

Crushed crackers in fine crumbs and larger pieces beside a casserole with an irregular crisp golden cracker crust.
The two crumb sizes do different jobs: fine crumbs improve coverage, while larger shards add height, exposed edges and more places for the buttery topping to toast.

For make-ahead and freezer versions, store the cracker topping separately until baking day.

None of this makes the casserole delicate. Cooked chicken, condensed soup, a thick filling and freshly buttered crackers will take you most of the way there.

Quick jumps: Recipe · Doneness · Troubleshooting · Back to Top

How to Know When It’s Done

Look for bubbling edges, a golden cracker topping and a center temperature of 165°F / 74°C.

By then the kitchen smells buttery and toasted, and the sauce underneath has noticeably more body than it did when it first began bubbling.

StageWhat Success Looks Like
Before bakingThick filling with a brief spatula trail
Near the endBubbling edges and a golden cracker topping
Center165°F / 74°C
After restingCreamy, scoopable filling with no puddle around the serving
Finished chicken casserole with a golden top, bubbling edges and a thermometer showing 165°F and 74°C in the center.
When color, bake time and center temperature disagree, trust the center. Refrigerator-cold or deeper casseroles can brown beautifully before the middle has fully caught up.

Golden top, cool center? Cover the casserole loosely with foil and keep baking until the middle catches up. This comes up most often with a refrigerator-cold or unusually deep dish.

What You Can Change—and What Needs Another Recipe

Some substitutions leave the basic casserole intact. Others change moisture, starch or cooking time enough to need a different formula.

ChangeUse It Here?What to Know
Cooked breast ↔ cooked thighYesBoth work; thigh gives a richer result
Ritz ↔ similar buttery crackersYesMatch approximately by weight because sleeve sizes vary
Sour cream → thick plain Greek yogurtUsuallyStart with roughly the same amount; choose a genuinely thick plain Greek yogurt and expect a tangier, slightly less rich result
Gluten-free soup + crackersYesCheck every packaged ingredient when strict gluten avoidance matters
Cottage-cheese replacementNeeds adjustmentUse another dairy such as whole-milk ricotta instead of simply omitting it
Homemade cream-of-chicken replacementNeeds adjustmentKeep it thick like condensed soup
Raw chickenDifferent recipeCooking time and method change substantially
Pasta, noodles or rice inside the casseroleDifferent recipeThose starches need additional liquid and their own cooking plan

Can You Make It Without Canned Cream of Chicken Soup?

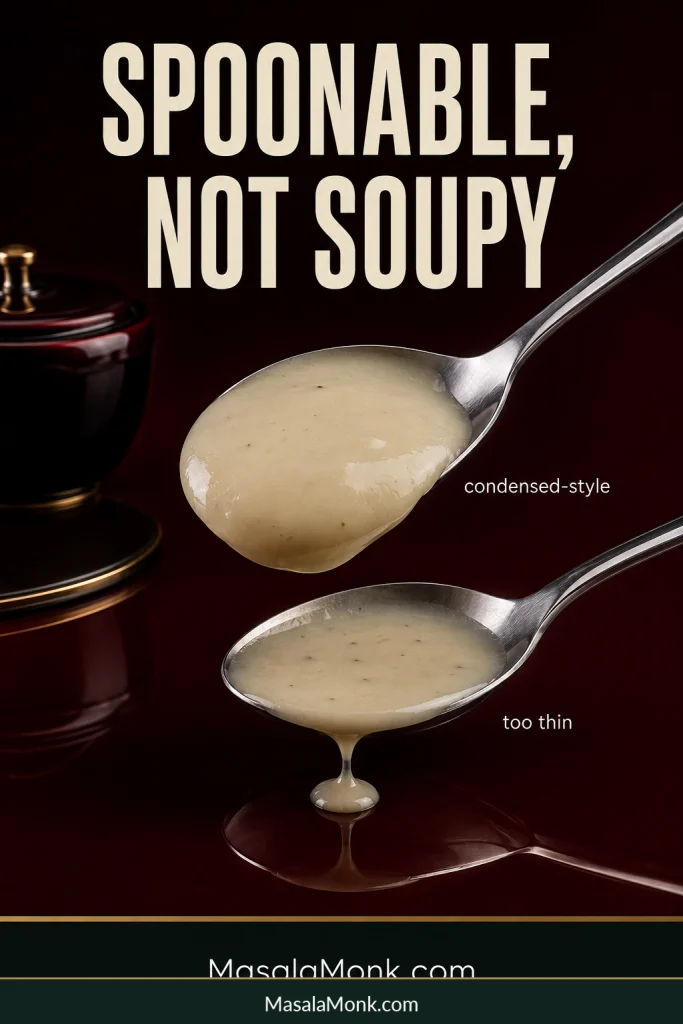
Yes, but keep the replacement thick and spoonable. Prepared cream soup is generally too loose for a direct swap.

Use about 10½ oz / 300 g of a condensed-style homemade chicken sauce with enough body to cling to a spoon.

Two spoons comparing thick condensed-style cream sauce that clings to the spoon with a thinner sauce that drips.
Matching the amount of canned soup isn’t enough—the replacement also has to match its concentration. Two equal weights of sauce can carry very different amounts of free water.

Adding Vegetables Without Making It Watery

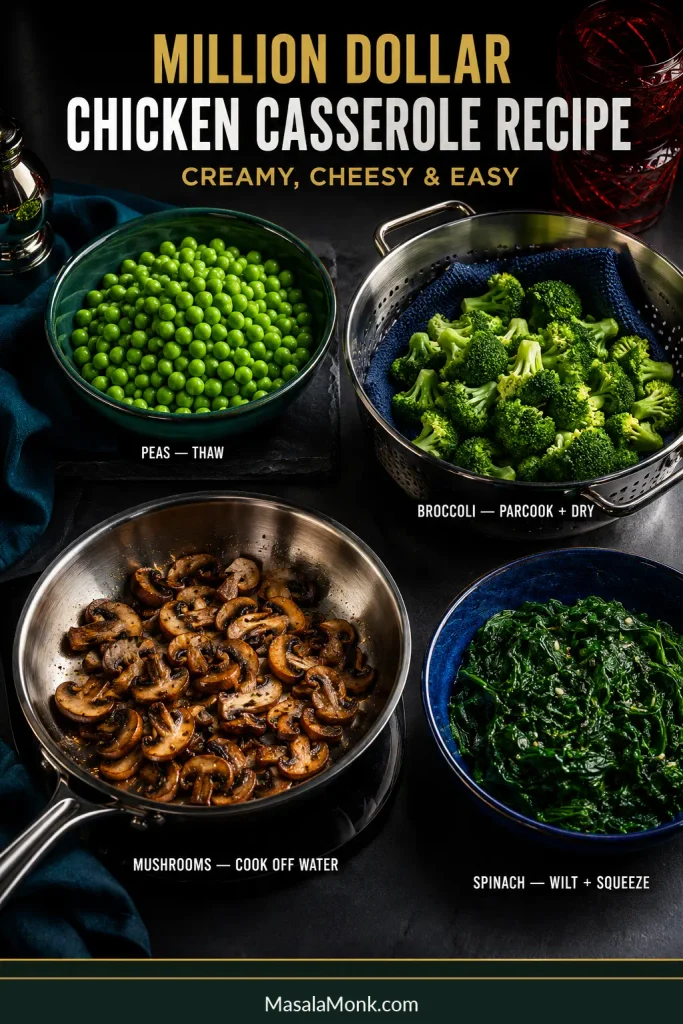
Peas are the easiest addition. Broccoli, mushrooms and spinach work too once any excess water is dealt with before they reach the casserole.

For a first try, around 1 cup of prepared vegetables is a sensible starting point for the base batch. That adds color and texture without pushing the chicken into the background.

  • Peas: fold them straight in; thaw first if they’re heavily coated in ice.
  • Broccoli: cut into small florets, blanch or parcook for 1–2 minutes, drain and pat dry.
  • Mushrooms: sauté until the moisture they release has cooked away.
  • Spinach: wilt first and squeeze well.
Prepared peas, dried parcooked broccoli, browned mushrooms and squeezed wilted spinach showing how to control moisture before adding vegetables.
Measure vegetables after thawing, cooking and draining whenever possible. That way, the roughly 1-cup guideline reflects what actually enters the casserole rather than water or volume lost during prep.

If broccoli and rice are what you really want for dinner, cheesy chicken broccoli rice is built for that combination from the start.

Or keep the vegetable beside the casserole. Crispy roasted Brussels sprouts bring dark caramelized edges and a little bitterness that works especially well with the creamy chicken.

Troubleshooting

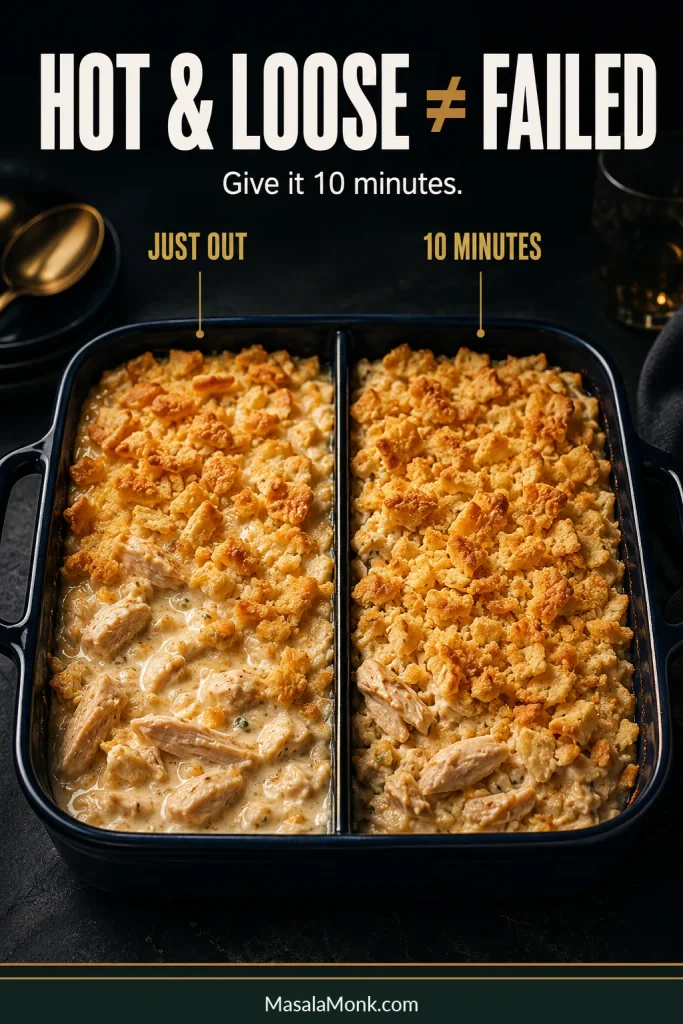
A casserole that looks loose while it is still bubbling may only need its 10-minute rest. Give it that time first. If something is still off afterward, the pattern usually points to the cause.

Comparison of chicken casserole just out of the oven with a looser filling and the same casserole more settled after 10 minutes.
Troubleshooting begins after the rest, not at the oven door. Waiting those few minutes prevents a normally hot, mobile filling from being mistaken for a genuinely watery casserole.
ProblemLikely CauseWhat to Do
Still watery after resting Extra whey, wet chicken, diluted soup or a watery add-in Serve it if needed; next time remove that excess moisture before baking
Too salty Seasoned chicken, soup, crackers, cheese or spice blends have stacked their sodium Use unsalted butter, consider reduced-sodium soup and taste the filling before adding salt
Salty enough but still bland The casserole needs more aromatic seasoning Add pepper, garlic, onion, scallions, parsley or another salt-free seasoning
Soggy cracker topping The crackers sat on the moist filling too long or softened during reheating Add the buttered topping just before baking; use the oven when restoring crunch matters
Cream-cheese lumps The cream cheese went into the bowl too cold Soften it fully and mix it into the sour cream and soup before adding chicken
Looser after reheating Chilled dairy can release a little moisture as it reheats Heat gently and let the portion stand briefly before serving

Quick jumps: Recipe · 3 Controls · Make Ahead & Reheat · Pan Size · Back to Top

Make Ahead, Freeze & Reheat

Can You Make It Ahead?

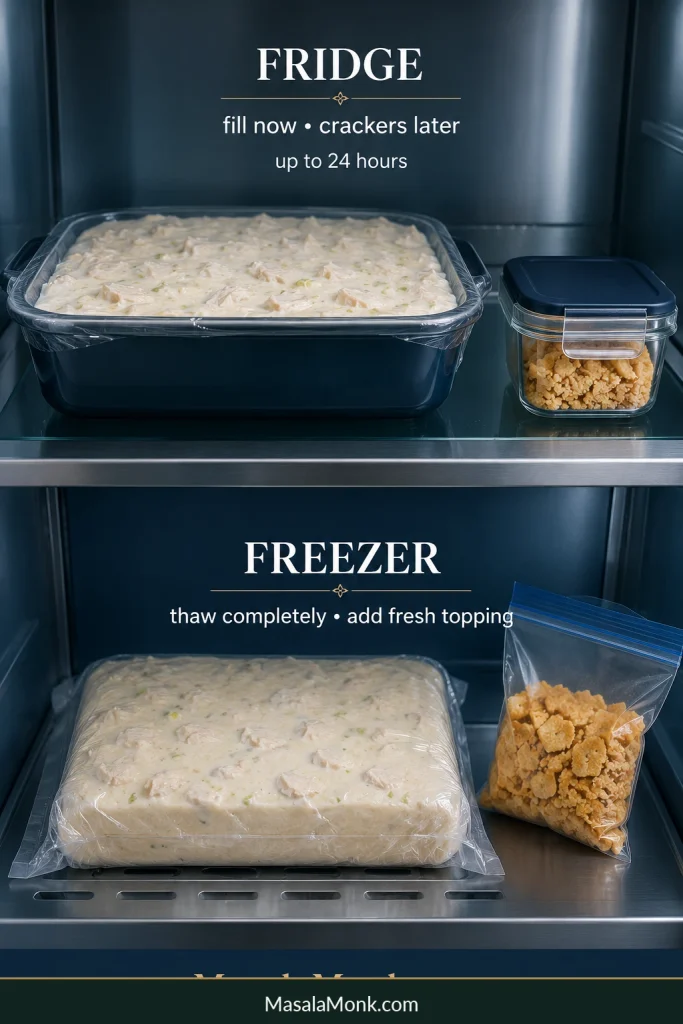
Yes. Assemble the chicken filling up to 24 hours ahead, cover and refrigerate it, then add the buttered cracker topping just before baking.

This is the useful kind of make-ahead dinner: the messy part can be finished before anyone is hungry.

A refrigerator-cold casserole often needs about 5–10 extra minutes, and a deeper dish can take longer. Start checking in that range, then let the center temperature and visual cues decide when dinner is ready.

Using glass bakeware? Follow the manufacturer’s guidance on moving the dish between refrigerator and oven temperatures.

Can You Freeze It?

The casserole freezes best without the cracker topping. Wrap it well and use it within about 3 months for best quality.

Thaw completely in the refrigerator; depending on the depth of the casserole, allow overnight or longer. Add freshly buttered crackers before baking.

Fresh gives you the smoothest sauce and crispest top. Freezing makes sense when having dinner ready matters more than getting the very crispiest topping.

Untopped creamy chicken casserole stored for the refrigerator and freezer with buttery cracker topping kept separately.
Refrigerate for tomorrow; freeze for later. In either case, keep the buttery crackers separate until baking day.

Store and Reheat Leftovers

Refrigerator: refrigerate leftovers within 2 hours and use them within about 3–4 days.

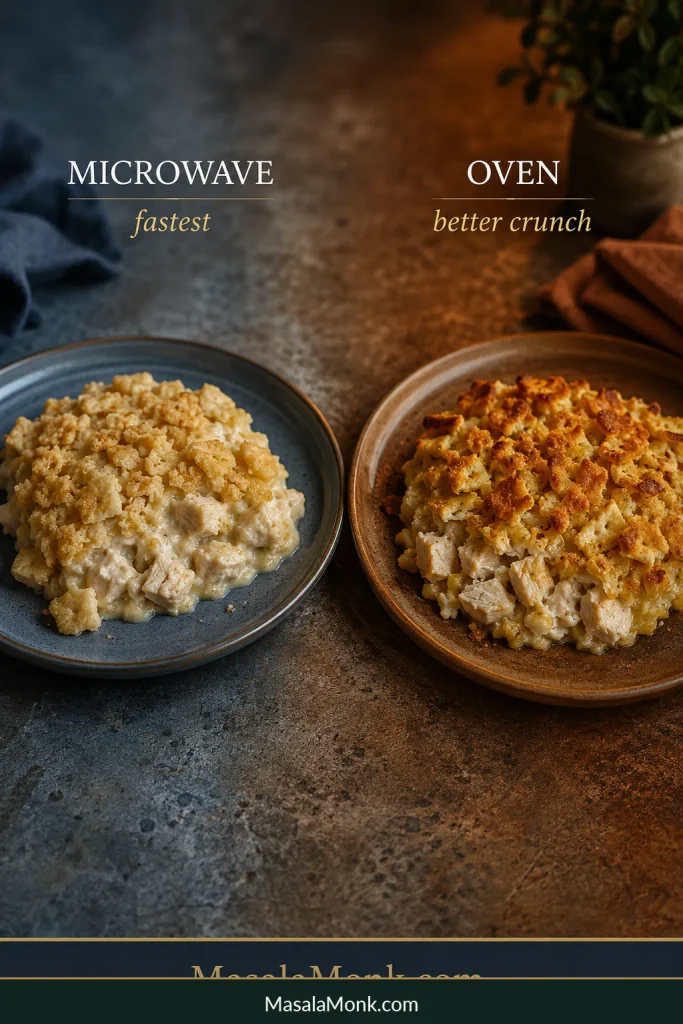
The microwave is fastest for individual portions, although the crackers soften. Oven reheating takes longer but brings back more of that toasted texture. Reheated leftovers should reach 165°F / 74°C.

Two reheated servings of chicken casserole showing a softer cracker topping from the microwave and a crisper browned topping from the oven.
For leftovers, the filling isn’t really the deciding factor—the topping is. Choose the microwave when time matters most and the oven when preserving cracker texture matters more.

Pan Size, Doubling & Feeding a Crowd

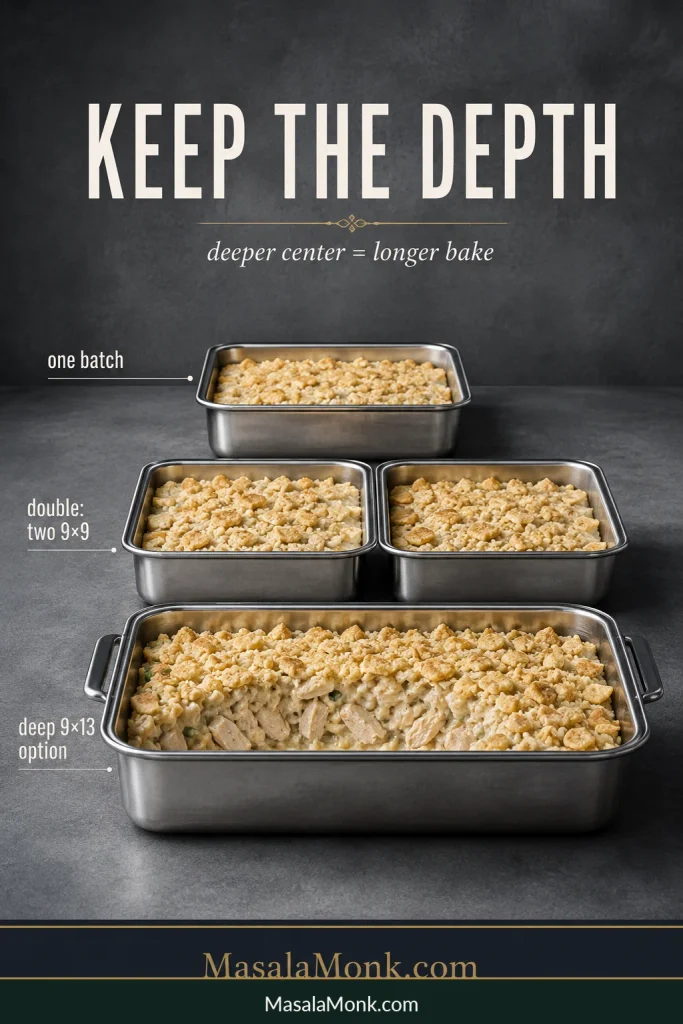
For one batch, use a 9×9-inch baking dish. When doubling, two 9×9 dishes give the most predictable result because each casserole keeps roughly the same depth as the original.

Pan / BatchRecommendationWhat Changes
9×9 in / ~2 qtBest for one batchGood filling depth and topping-to-chicken balance
11×7 inGood alternative when capacity is similarResult stays close to the base recipe
9×13 with one batchPossible but not preferredThe casserole becomes noticeably shallower and may heat faster
Two 9×9 dishes, doubled recipeMost predictable double batchDepth and bake behavior stay closest to the original
Deep 9×13, doubled recipeOne-pan optionThe casserole is deeper, needs good headroom and usually takes longer to heat through
One 9×9 casserole, two 9×9 casseroles at similar depth, and a deeper 9×13 casserole illustrating why pan depth affects baking time.
Pan depth is often more informative than total area when scaling a chicken casserole. It tells you how far heat must travel before the center reaches serving temperature.

The ingredients double; the baking time usually doesn’t. Two 9×9 dishes can stay close to the original timing. A doubled batch in one deep 9×13 needs longer because the center has farther to heat.

For dinner, count on roughly 6 hearty main-course portions from the base batch. With substantial sides, it can stretch to around 8 smaller servings. A basket of soft dinner rolls makes an easy addition when you’re feeding a larger table.

What to Serve With It

Serve Million Dollar Chicken Casserole with a crisp salad or green vegetable for contrast, or add rice, rolls, egg noodles or bread for a fuller comfort-food meal.

The casserole already brings plenty of richness, so smaller portions often feel better beside something fresh, green or lightly acidic.

A cold cucumber salad with vinegar and dill is especially good here: crisp, cool and bright against the warm sauce.

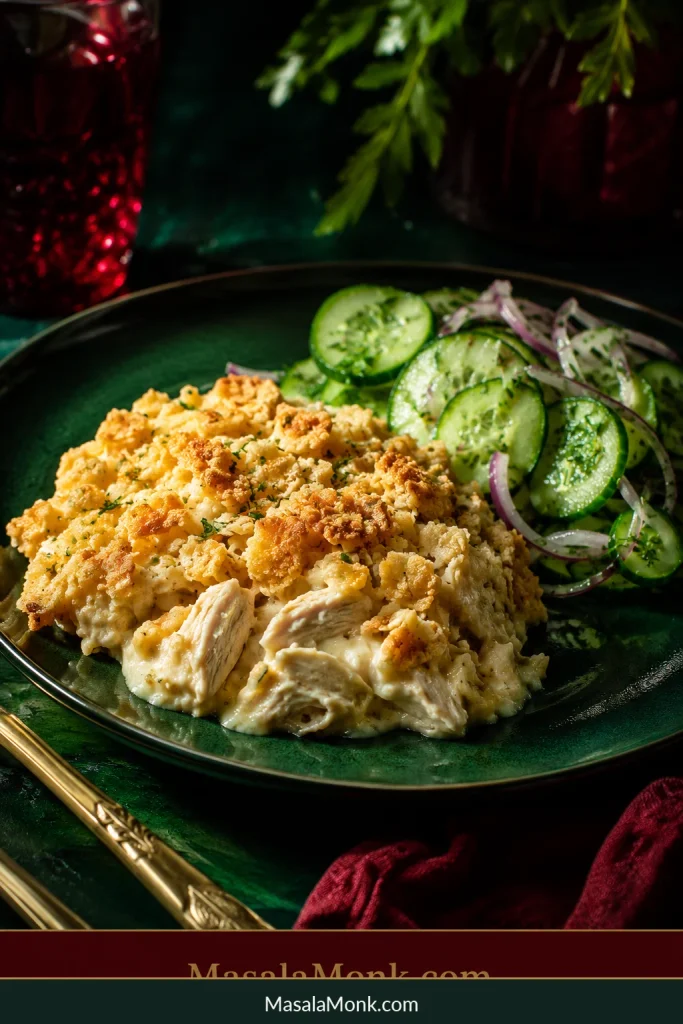
Serving of creamy cracker-topped chicken casserole on a dark green plate beside a fresh cucumber and red onion salad.
If vegetables are mainly there to bring freshness, keeping them beside the casserole has another advantage: you gain contrast without introducing extra moisture into the creamy filling.

Roasted broccoli, green beans, asparagus or a simple green salad work for the same reason. They don’t compete with the casserole; they give it some space.

For the full comfort-food plate, mashed potatoes, buttered egg noodles or crusty bread all fit naturally beside it.

Rice works beautifully too. Keep it on the side; if you need help with the pot itself, this guide to cooking rice covers stovetop, rice-cooker and Instant Pot methods. Dry rice or noodles baked into the casserole need their own liquid and cooking plan.

Easy Comfort Food Should Still Be Reliable

There is a reason casseroles like this get assembled before busy evenings, carried to potlucks and dropped off when somebody could use a dinner they don’t have to think about.

After you’ve made it once, most of the details turn into routine: bowl, baking dish, buttery crumbs, oven.

Then comes the best part—the smell of those crackers turning buttery and toasted, the sauce bubbling around the edges, and a few quiet minutes on the counter before the serving spoon goes in.

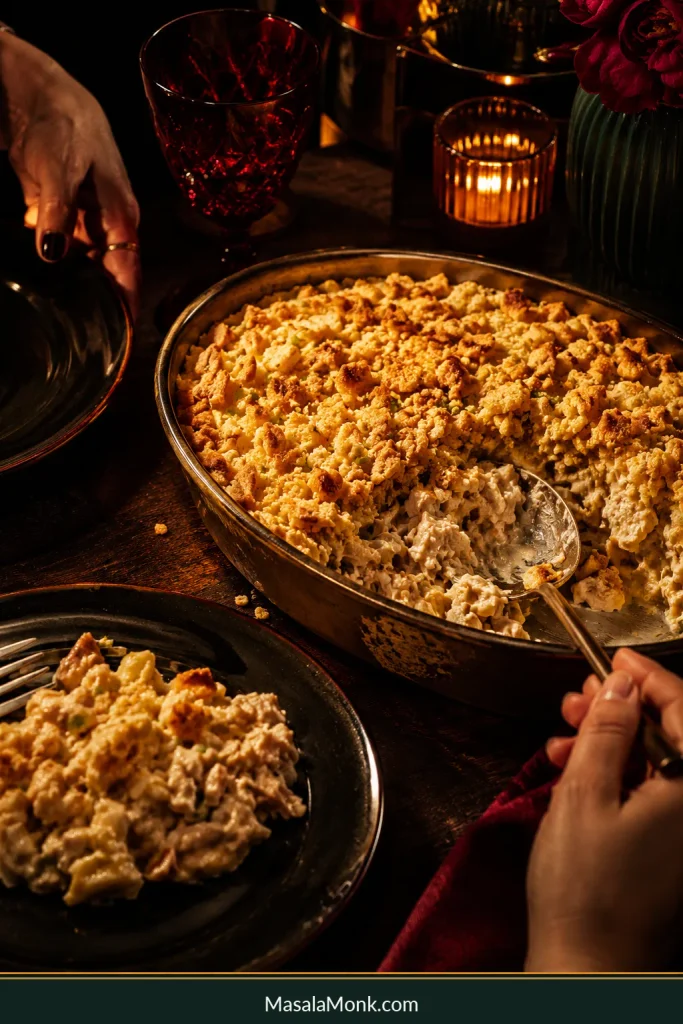
Warm dinner-table scene with a partly served chicken casserole, golden cracker topping, serving spoon, plates and hands reaching to serve.
Once rested, the casserole should need nothing more—just a serving spoon and a place at the table.
Posted on Leave a comment

Southern Cornbread Dressing Recipe: Old-Fashioned, Moist & Easy

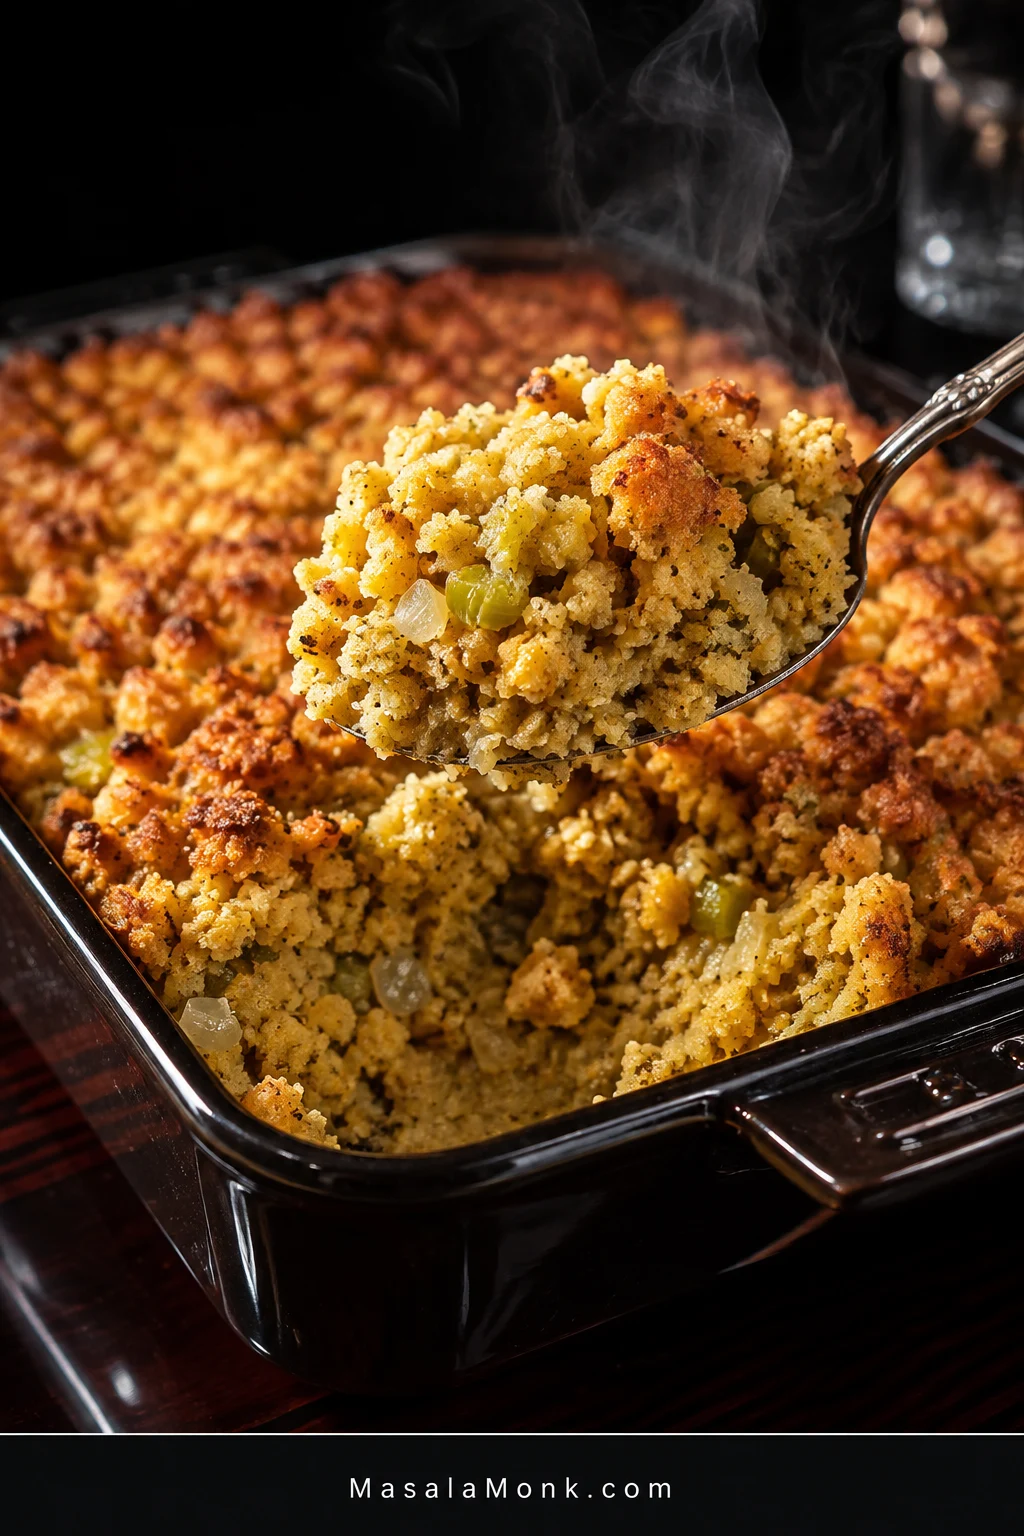
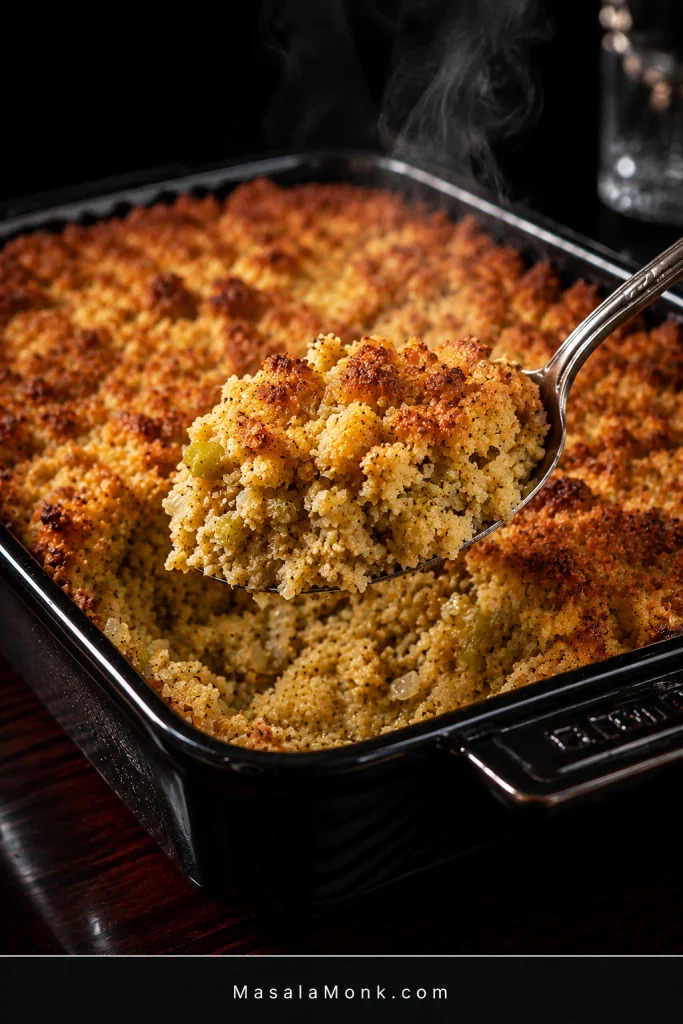
Southern cornbread dressing in a dark baking dish with a serving removed, showing a golden top and soft interior with onion, celery and herbs.

Southern cornbread dressing has a lightly golden top and a soft, moist center that gives easily to a serving spoon and holds together on the way to the plate.

It is also one of those dishes people may cook only once or twice a year, often for a table full of people who already know exactly how they think dressing should taste. That can make the bowl just before baking feel unusually important: Is it wet enough? Too wet? Did I add too much sage?

This one keeps things straightforward—savory homemade cornbread, a little plain bread, tender onion and celery, butter, broth, sage and eggs. Southern families disagree about plenty of the details; here, cornbread leads the flavor and the finished center stays soft, savory and spoonable.

Quick Answer

Cornbread dressing should look very moist before baking, with the broth soaked through the bread instead of pooling separately underneath it.

For the cornbread used in this recipe, start with 4 cups / 950 mL warm broth, fold gently and leave the bowl alone for 5 minutes. Dry crumbs or a stiff mound mean it needs more. When a spoonful slowly settles and the broth is absorbed throughout the bread, stop adding liquid. A persistent puddle beneath saturated crumbs means the bowl has gone too wet.

Taste and season before adding the raw eggs. Bake in a 9×13-inch / 23×33 cm dish at 375°F / 190°C until lightly golden, set through the middle and at least 165°F / 74°C.

Pan: 9×13 in / 23×33 cm   •   Serves: 10–12   •   Texture: soft, moist and spoonable

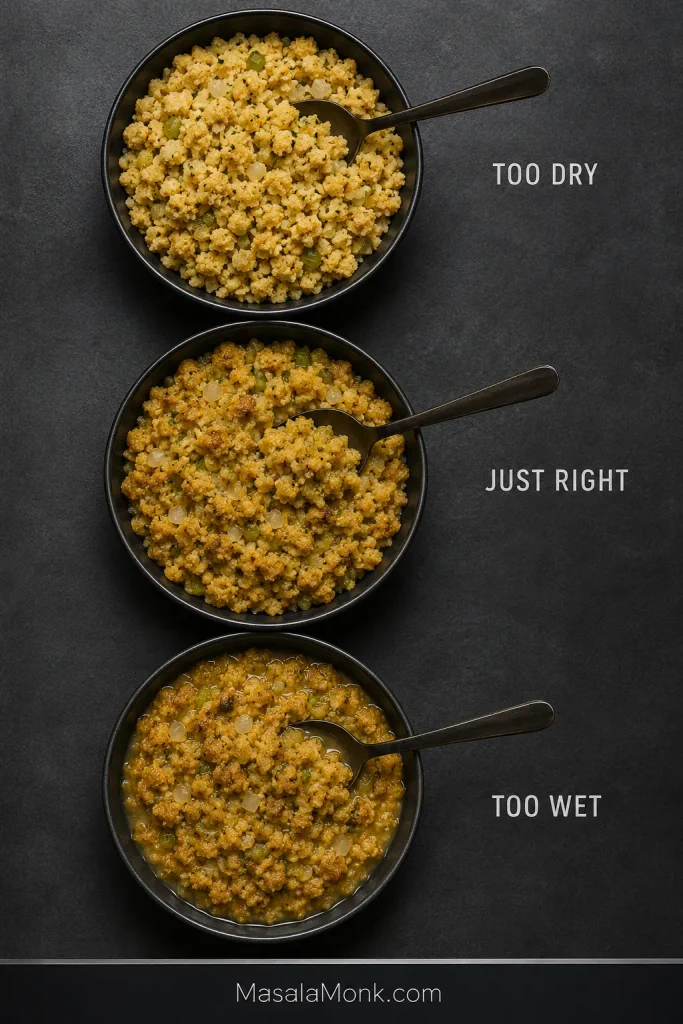
Three bowls compare cornbread dressing that is too dry, correctly moistened, and too wet with broth pooling around saturated crumbs.
After the five-minute rest, the middle bowl can move on to seasoning and eggs; the dry and pooled-liquid versions still need correction.

Southern Cornbread Dressing Recipe

Old-fashioned Southern cornbread dressing with tender onion and celery, sage and a soft, moist center with recognizable pieces of cornbread.

Active prep: about 25 minutes with prepared cornbread   •   Bake: 45–55 minutes   •   Rest: 10–15 minutes   •   Total with prepared cornbread: about 1 hour 20 minutes–1 hour 35 minutes

Starting with freshly baked cornbread? Allow extra time for it to cool and dry before the active prep begins.

Equipment

  • 9×13-inch / 23×33 cm baking dish
  • Large mixing bowl
  • Large skillet
  • Baking sheet if drying the breads the same day
  • Aluminum foil
  • Instant-read thermometer

Ingredients

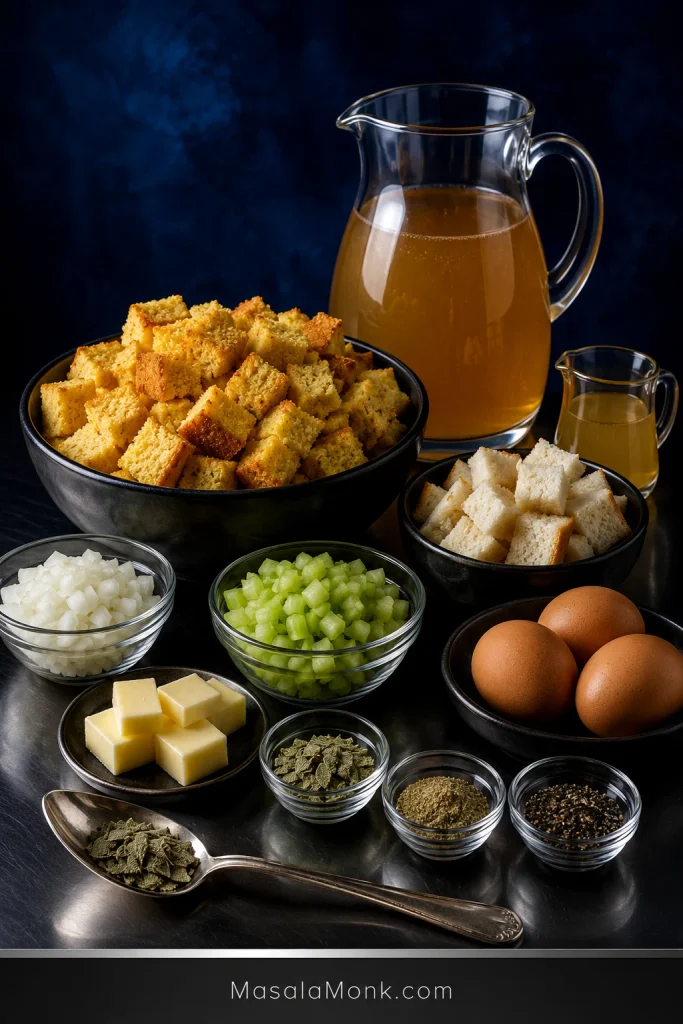
Ingredients for Southern cornbread dressing arranged on a dark blue set: cornbread, white bread, onion, celery, butter, sage, seasoning, eggs and broth.
Cornbread leads; the smaller amount of white bread supports the soft center without turning this into ordinary bread stuffing.

Bread

  • 1 full 10-inch / 25 cm skillet savory Southern cornbread, completely cooled and slightly dried
  • 4 oz / 115 g plain white sandwich bread, about 4–5 standard slices, dried and torn

For the closest match to the method below, use the savory version of MasalaMonk’s Southern Cornbread Recipe. Other homemade and boxed cornbreads can differ in size, sweetness and absorption, so the broth may need to be handled a little differently.

Butter, Onion and Celery

  • 8 tablespoons / 4 oz / 113 g unsalted butter, plus more for the baking dish
  • About 1½ cups / 7 oz / 200 g yellow onion, finely diced
  • About 1½ cups / 6.3 oz / 180 g celery, finely diced

Seasoning

  • 2 teaspoons rubbed sage
  • 1 teaspoon poultry seasoning
  • 1 teaspoon freshly ground black pepper
  • Fine salt, to taste after the first broth soak; broth and cornbread can vary considerably in saltiness

Broth and Eggs

  • Starting broth: 4 cups / 950 mL low-sodium chicken or turkey broth, warmed
  • Reserve broth: up to 1 cup / 240 mL, warmed
  • 3 large eggs

Good homemade turkey broth can replace the chicken broth. Strained juices or drippings from a fully cooked turkey can replace part of it too; use concentrated or salty drippings sparingly.

Think of the last cup of broth as insurance, not a target. Very dry bread may want most of it. Fresher bread may need little or none.

Instructions

1. Dry and Crumble the Breads

If possible, bake the cornbread a day ahead and cool it completely. Breaking it into large pieces gives some of the fresh-baked moisture a chance to escape.

For same-day dressing, spread the cooled cornbread pieces on a baking sheet and dry them at 250°F / 120°C, turning occasionally and beginning to check around 20 minutes. Add the torn white bread too, watching the thinner pieces because they may dry sooner.

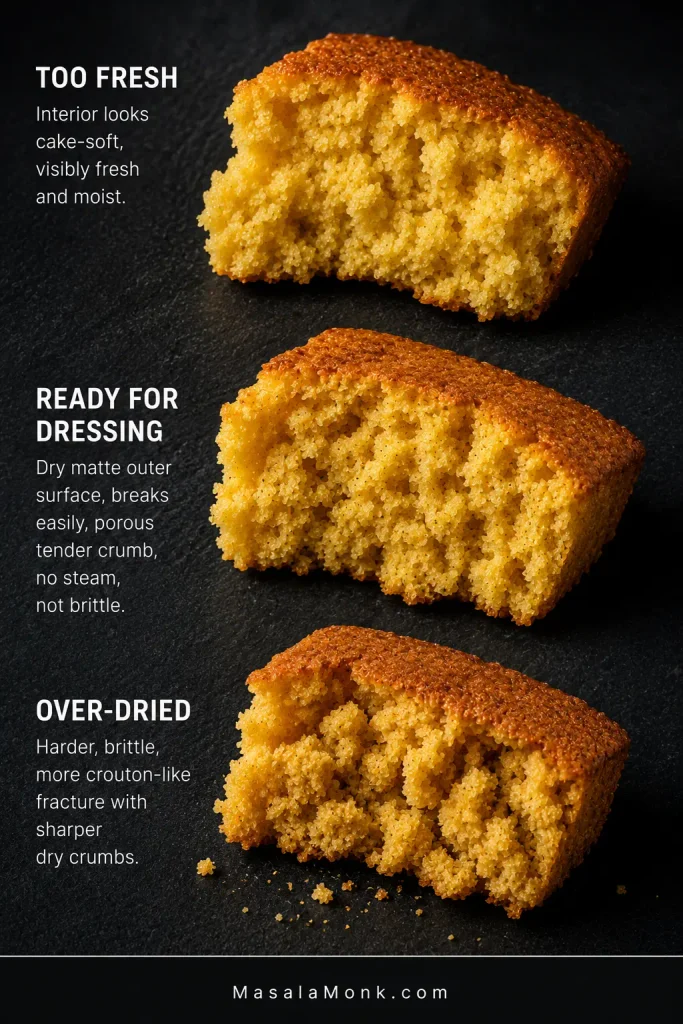
The surface feels dry and the pieces break easily when they are ready. The middle no longer feels steamy or cake-soft. There is no need to turn the bread into hard croutons.

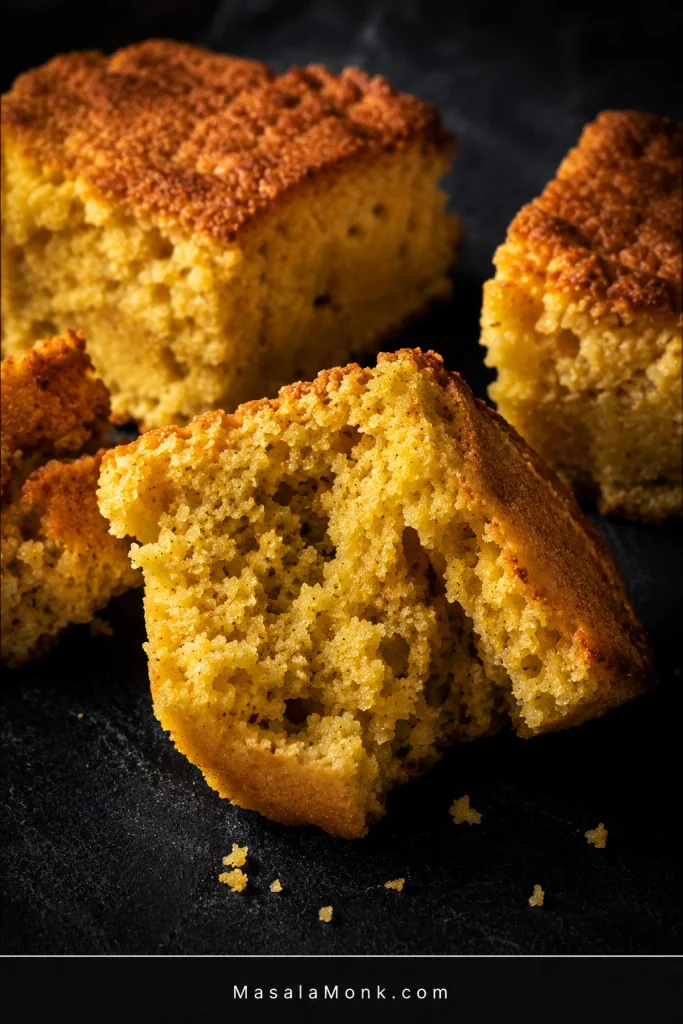
Broken pieces of slightly dried cornbread with a matte exterior and porous, still-tender interior crumb.
Slightly dried cornbread gives you more control over broth without becoming hard or crouton-like.

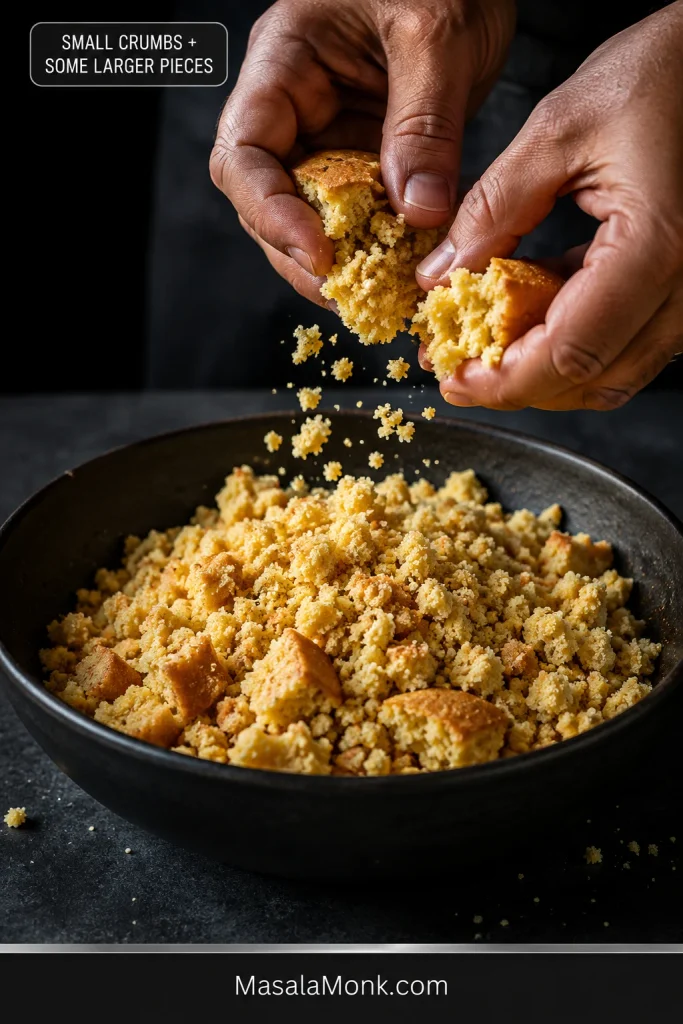
Crumble the cornbread into a large bowl. Most pieces can be small, with a scattering of irregular ½–1 inch / 1–2.5 cm pieces. Uneven crumbs are fine.

Hands crumble cornbread over a bowl, leaving mostly small irregular crumbs with some larger half-inch to one-inch pieces.
Small crumbs absorb and bind; a few larger pieces keep the finished dressing recognizably cornbread.

Raise the oven to 375°F / 190°C when the bread is ready. If you dried it ahead, simply preheat the oven before assembly.

2. Cook the Onion, Celery and Seasonings

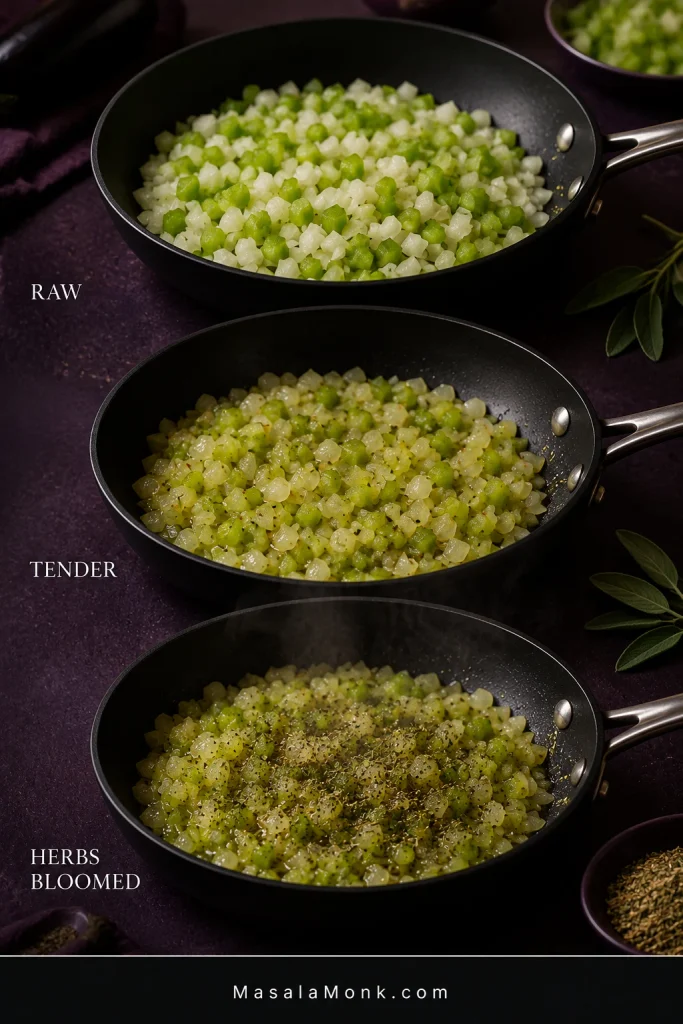
Melt the butter in a large skillet over medium heat. Add the onion and celery and cook for 8–10 minutes, stirring occasionally, until tender and translucent. A little color around the edges is welcome.

Add the rubbed sage, poultry seasoning and black pepper for the final 30–60 seconds. When the herbs hit the warm butter, the skillet should smell unmistakably like dressing. Scrape the vegetables and all of that seasoned butter over the bread.

Three pans show diced onion and celery raw, softened and translucent, then cooked with sage and poultry seasoning in butter.
Tender vegetables will not need to cook inside wet bread, while the brief herb bloom seasons the butter.

3. Add the First Broth

Using the linked cornbread or another similarly sized homemade batch, pour 4 cups / 950 mL warm broth around the bowl and fold gently from the bottom.

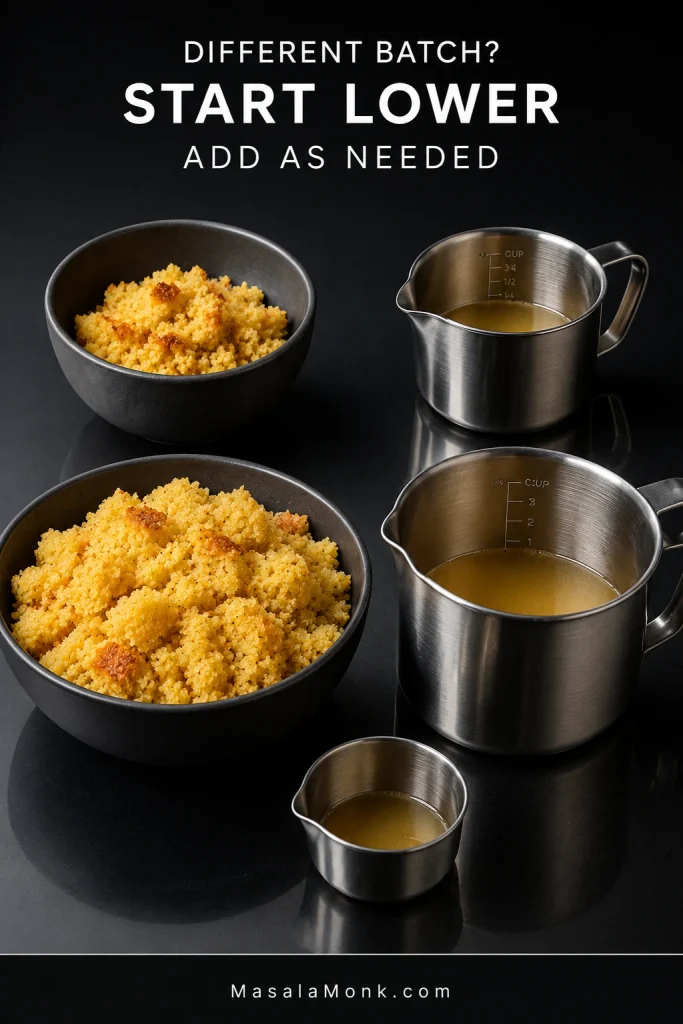
Using a noticeably smaller or very different batch of cornbread? Start with less broth and work upward instead of automatically pouring in all 4 cups.

As the broth spreads through the bowl, the crumbs become glossy and heavy with moisture while their cornbread texture remains visible. Fold only enough to distribute the liquid.

4. Leave It Alone for 5 Minutes

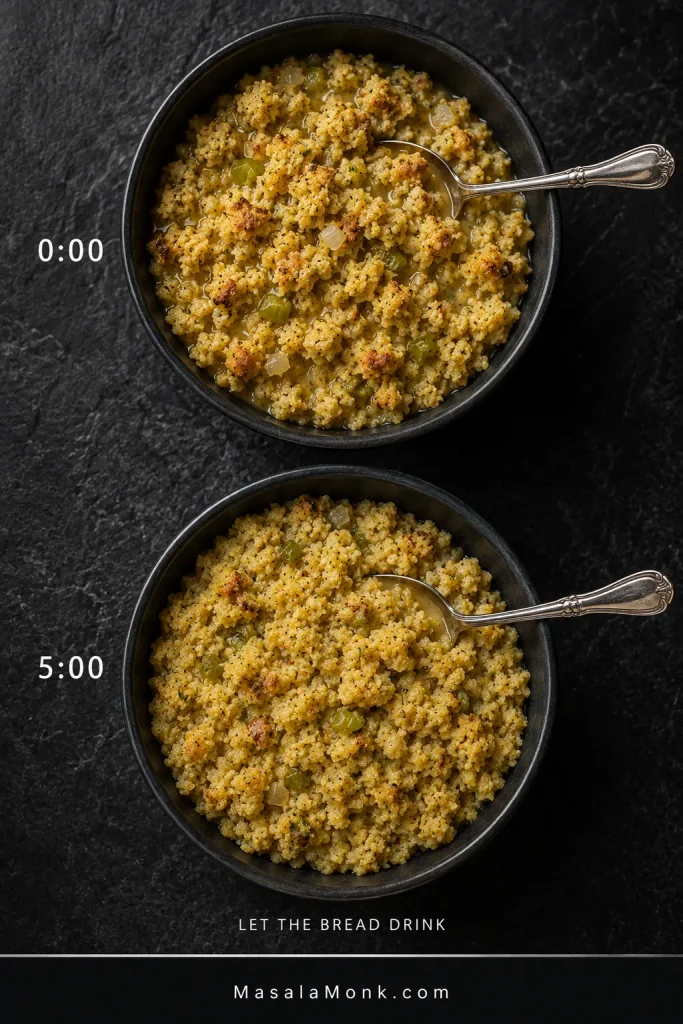
This is the point where dressing often looks wrong even when it isn’t. Give the bread time to drink before changing anything.

After 5 minutes, fold once or twice. Pale dry crumbs or a spoonful that sits in a stiff mound mean the bowl wants more broth. Add the reserve ¼ cup / 60 mL at a time.

Two bowls compare cornbread dressing immediately after broth is added and after five minutes, when the bread has absorbed more liquid and thickened.
Five minutes changes the picture: give the bread time to absorb the first broth before deciding whether it needs more.

Stop when the bread is moist all the way through and a spoonful slowly settles back into the bowl. Saturated crumbs with a persistent pool of broth underneath have gone too far.

Trust what the bread is doing more than the amount left in the measuring cup.

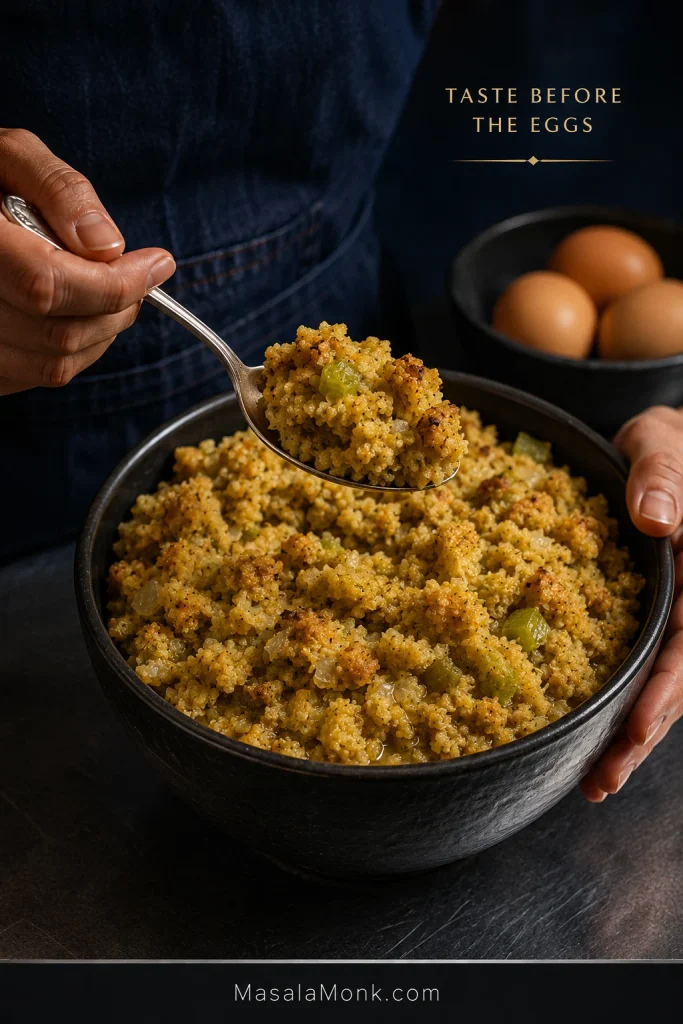
5. Taste, Season, Then Add the Eggs

Taste the dressing before the raw eggs go in. Add salt as needed, then taste for pepper or another small pinch of rubbed sage.

A hand tastes moistened cornbread dressing from a spoon while three whole eggs wait separately in the background.
After hydration, salt and sage register more clearly—making this the best moment for the final seasoning adjustment.

Go carefully with the sage. Adding another pinch is easy; softening an overwhelmingly herbal pan is not.

Whisk the 3 eggs, pour them over the dressing and fold gently until evenly distributed. Stop tasting once the raw eggs are in.

6. Fill the Baking Dish

Butter a 9×13-inch / 23×33 cm baking dish. Spoon in the dressing and spread it evenly without packing it down.

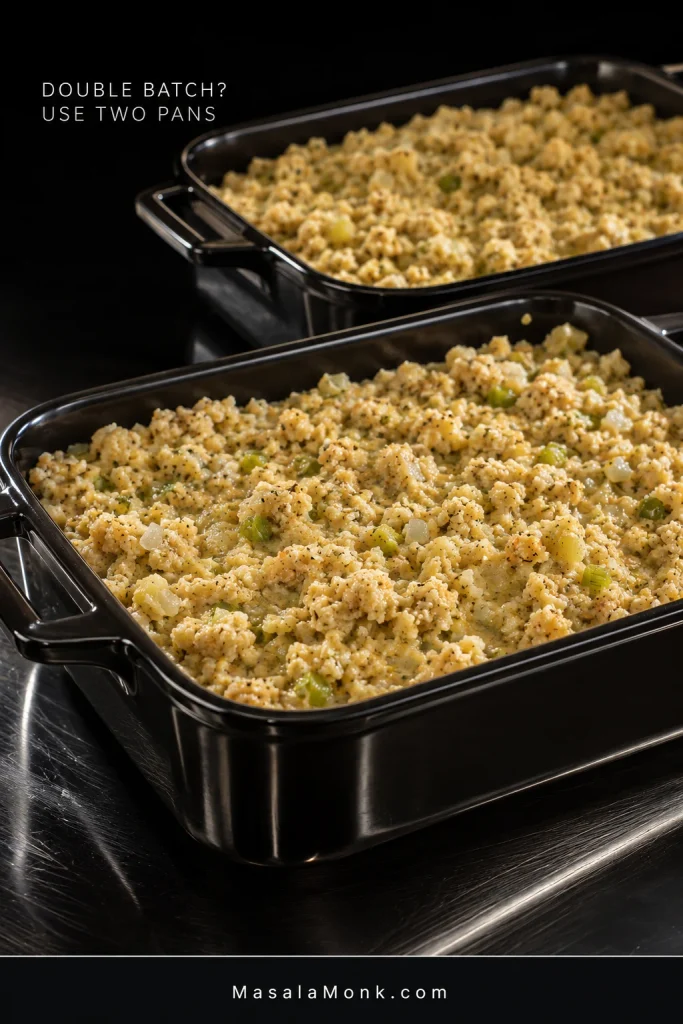
Making a double batch? Use two 9×13 pans. Keeping the layer close to the original depth helps both pans cook evenly.

Two dark baking dishes filled with moist unbaked cornbread dressing, illustrating the use of two pans for a double batch.
Two pans keep a double batch close to the original depth, so the bake behaves more like the single recipe.

7. Bake Covered, Then Uncovered

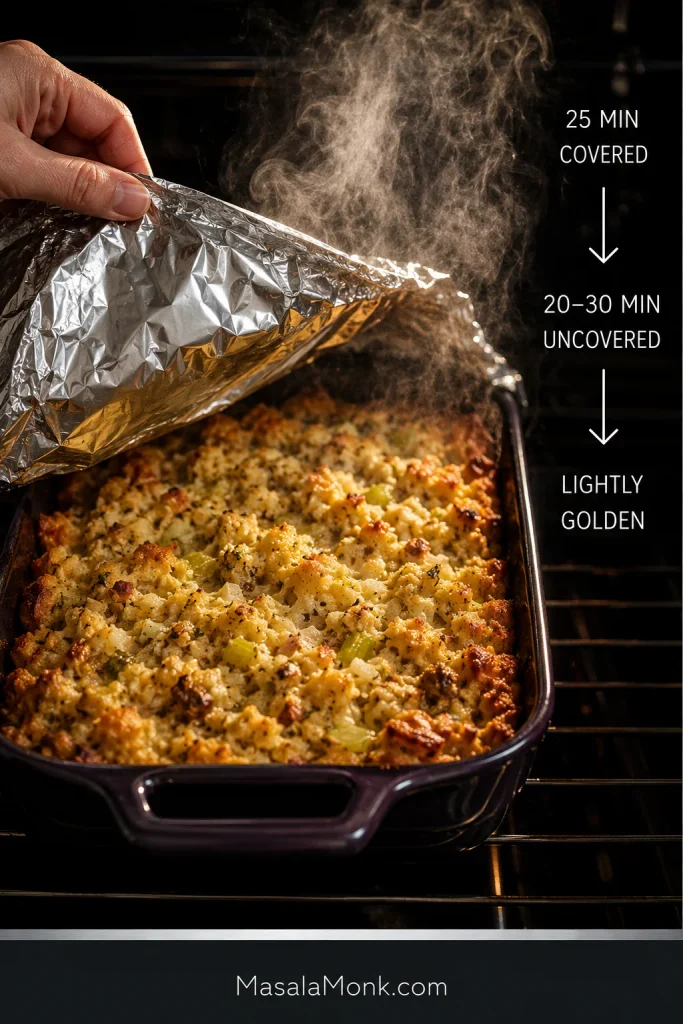
Cover loosely with foil and bake at 375°F / 190°C for 25 minutes. Remove the foil and bake another 20–30 minutes, beginning to look in on it around 20 minutes.

Foil being lifted from a steaming cornbread dressing casserole with instructions for 25 minutes covered, then 20 to 30 minutes uncovered until lightly golden.
Covered first protects the center; uncovering later shifts the oven’s job toward browning the surface.

The top turns lightly golden, with deeper toasted patches near some of the edges. Nudge the dish and the middle moves together gently instead of rippling or sloshing like loose batter. The center needs to reach at least 165°F / 74°C.

Take it out while the center still looks moist. The 10–15 minute rest will give it a little more structure.

8. Rest Before Serving

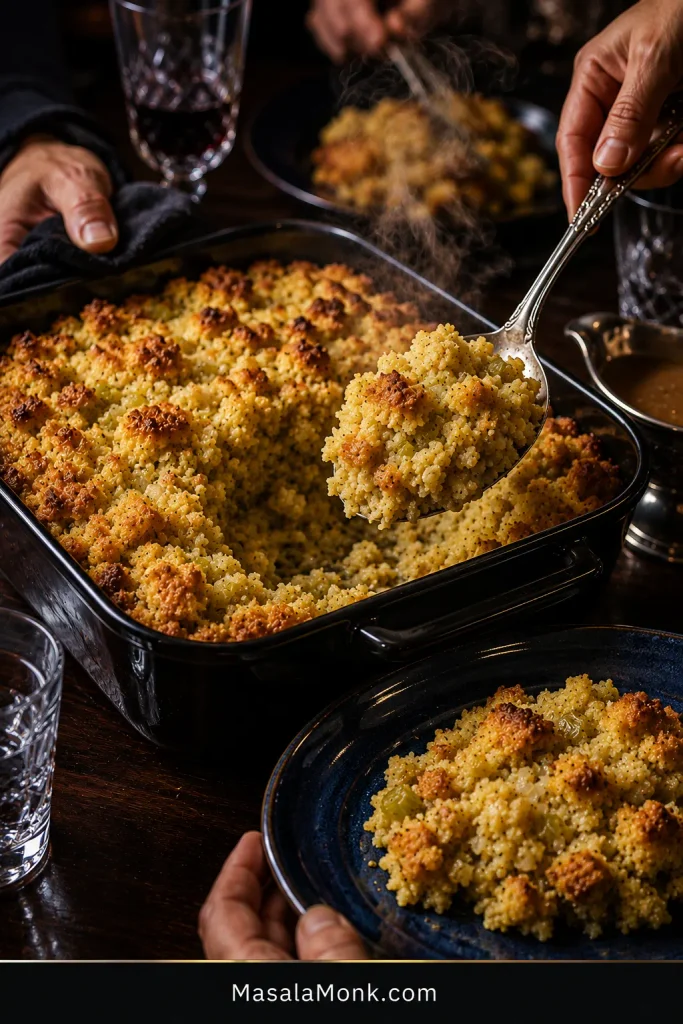
Leave the pan alone for 10–15 minutes. A serving spoon uncovers a moist interior beneath the lightly toasted surface, tender enough to yield and firm enough to reach the plate.
A silver serving spoon lifts rested Southern cornbread dressing from a dark casserole, revealing a soft moist interior beneath the browned top.
The 10–15 minute rest lets the moist center settle without baking away its tenderness.

Serve warm, while the top still has a little toastiness and the center is soft, savory and fragrant with sage and butter.

What Kind of Southern Cornbread Dressing Is This?

There isn’t one Southern dressing rulebook. One family may love a pan so soft it is almost spoon-pudding tender. Another may expect neat squares. Biscuits, white bread, chicken and condensed soup all appear in different family versions.

Three spoonfuls compare scoop-soft dressing, this recipe’s soft and spoonable texture, and a firmer sliceable style.
Two recipes can both be Southern cornbread dressing and land at very different points on this spectrum. Choose the texture you want before changing broth or bake time.

For a lot of cooks, the real reference point isn’t another written recipe at all. It is the pan they remember from Thanksgiving—the one somebody made largely by feel, adding broth until “it looked right.” The cues here are meant to make that judgment easier to recognize and repeat.

Here, cornbread leads the flavor. Onion and celery soften in butter first, sage stays clearly present, and raw eggs help the moist center set. Chicken, sausage and condensed soup can make excellent dressings too; they change the salt, fat and moisture enough to deserve their own balance.

Dressing vs Stuffing

The words overlap heavily in everyday use. A practical distinction is that dressing is commonly baked in its own casserole dish, while stuffing traditionally cooks inside poultry. This recipe is baked separately.

Which Cornbread Is Best for Dressing?

Slightly dried or day-old savory cornbread is easiest to work with because it has room to take on broth. Fresh cornbread works too; give it some time in the low oven first.

Good dressing bread feels dry at the surface and crumbles easily. It does not need to be brittle. Starting with a very moist, cake-soft pan simply makes the broth harder to control.

Three pieces of cornbread compare too-fresh cake-soft crumb, bread ready for dressing with a dry surface and tender crumb, and brittle over-dried bread.
The middle state gives you the most room to build moisture gradually without starting with cake-soft bread.

Why Add a Little White Bread?

The 4 oz / 115 g white bread is a small supporting part of the bowl. Cornbread supplies the flavor; the plain bread gives the tender center a little extra help holding together.

Some Southern dressings use biscuits for a similar reason. Plain sandwich bread stays deliberately quiet here.

Prefer all cornbread? Replace the white bread with 4 oz / 115 g additional dried cornbread. Let the first broth soak in before reaching for more, since an all-cornbread bowl may absorb differently.

Can I Use Jiffy or Another Corn Muffin Mix?

Yes, but expect a sweeter flavor and different absorption. Boxed mixes and other homemade recipes can also produce a smaller or larger amount of cornbread.

When the amount differs noticeably from the linked recipe, add the broth gradually. A smaller batch may need considerably less than 4 cups, while a larger or drier batch may take more.

Two bowls with different amounts of crumbled cornbread beside different starting amounts of broth, illustrating starting lower and adding broth as needed.
Batch size changes absorption capacity. A smaller boxed or homemade cornbread batch should not automatically receive the full broth amount.

How Much Sage—and What Do the Eggs Do?

Start with 2 teaspoons rubbed sage plus 1 teaspoon poultry seasoning. After the broth has soaked into the bread, taste and make any final adjustment before the eggs go in.

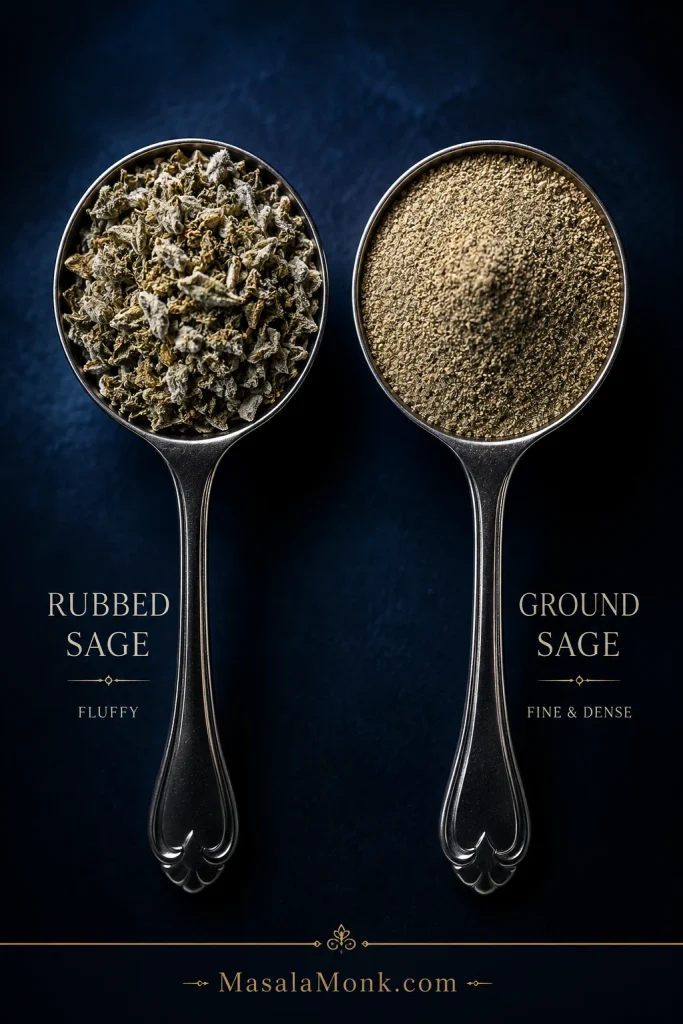
Rubbed Sage vs Ground Sage

Ground sage is much finer and packs more tightly into a measuring spoon than fluffy rubbed sage. A teaspoon-for-teaspoon swap can therefore taste considerably stronger.

Using ground sage? Begin cautiously. Poultry seasoning often contains sage as well, so check the label if you want a milder sage flavor or need to avoid it altogether.

Two measuring spoons compare fluffy leafy rubbed sage with fine, dense ground sage on a dark blue background.
Ground sage packs more densely than rubbed sage, so start conservatively and adjust after the broth soaks in.

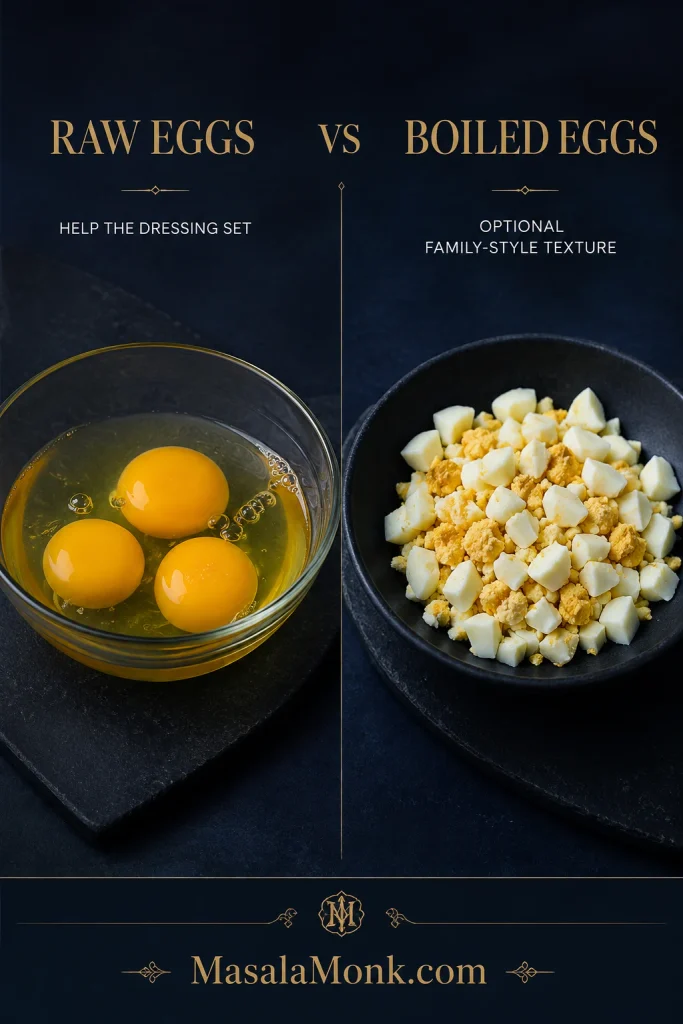
Do You Put Eggs in Cornbread Dressing?

Raw eggs help the very moist dressing set as it bakes. Chopped hard-boiled eggs are a separate family-style addition.

Raw eggs in a glass bowl are labeled as helping dressing set, while chopped hard-boiled eggs are shown as an optional family-style texture addition.
Think structure versus texture: raw eggs help the dressing set; chopped boiled eggs change the bites you encounter.

Using eggs—or not using them—is a family and regional choice, not a test of whether dressing is “really Southern.” Plenty of long-standing versions exist on both sides.

If the dressing you grew up with had chopped boiled eggs, keep them if that’s the version you love. They bring their own flavor and texture; they do not replace the raw eggs used here for structure.

Leaving the raw eggs out entirely changes how this formula sets, so an intentionally eggless dressing is better balanced from the start as its own version.

How Wet Should Cornbread Dressing Be Before Baking?

Very moist and slowly settling is the goal. The bread is moist all the way through, from top to bottom. There are no dry pockets and no free liquid underneath.

This soft Southern dressing looks considerably wetter than cubed bread stuffing. Draw a serving spoon through the bowl and the path gradually relaxes instead of staying sharply open.

A spoon creates a shallow channel through very moist unbaked cornbread dressing; the soft sides of the trail begin to relax inward without pooled broth.
The groove should be temporary. Correctly moistened dressing slowly relaxes toward the spoon trail; a stiff trench points dry, while liquid collecting in it points too wet.
StateWhat It Looks LikeWhat to Do
Too dryDry crumbs remain and the mixture sits stifflyAdd warm broth ¼ cup / 60 mL at a time
Just rightThe bread is moist through, crumb texture remains, and a spoonful slowly settlesStop adding broth
Too wetThe crumbs are saturated but broth still gathers separately after restingFold in additional dried bread before adding the eggs

Freshly added broth can look alarmingly loose for a few minutes. Let it soak in. What matters is whether free liquid remains after the bread has had a chance to absorb it.
Soft Is the Goal; Paste Is Not

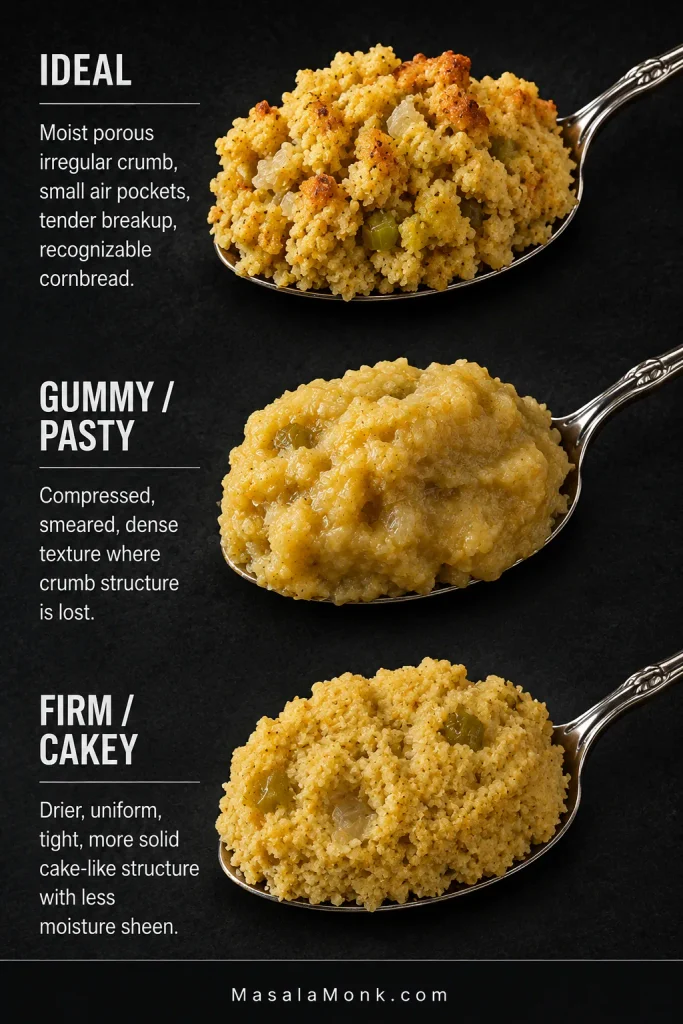
Soft dressing can be extremely tender and still show recognizable pieces of cornbread. Gummy dressing has lost that crumb and feels more like paste.

Very fresh bread, crumbs worked too fine, excess broth and aggressive mixing can all push the bowl in that direction. Extra oven time can remove moisture; it cannot rebuild crumb texture that has already broken down.

Bowl looks right? Back to the recipe. Still unsure? Go to troubleshooting.

Pan Size and Doneness for Cornbread Dressing

A standard 9×13-inch / 23×33 cm dish gives the dressing a comfortable depth for an even bake. Go deeper and the center needs more time; use a shallower dish and the surface browns and dries faster.

Look, Move, Measure

  • Look: the surface is lightly golden, with deeper toasted patches near some of the edges.
  • Move: the center shifts together gently when the dish is nudged; loose batter would ripple or slosh.
  • Measure: the middle reaches at least 165°F / 74°C.
Three-part doneness guide shows lightly golden cornbread dressing, a hand nudging the casserole, and a thermometer reading 165°F / 74°C in the center.
No single doneness cue is enough: browning can get ahead of the center, movement shows the set, and 165°F / 74°C confirms temperature.

Once the top looks right, the middle moves together and the thermometer says 165°F / 74°C, it is done. Don’t leave it in waiting for a firm center; the rest will take care of the final bit of setting.

For a moist dressing like this, gravy is an extra pleasure rather than the only thing keeping the serving from tasting dry.

Cornbread Dressing Troubleshooting

Your best rescue window is before the eggs. Broth, dry bread, salt and herbs are much easier to adjust then. Once the pan is baking, time and foil are your main tools.

Before Baking

Dry and stiff: Let the existing broth soak in first. If dry crumbs remain, add warm broth ¼ cup / 60 mL at a time.

Broth pooling underneath: Saturated bread plus persistent free liquid means the bowl is too wet. Fold in additional dried bread before adding the eggs.

Bland: Add salt, then reassess the pepper and herbs.

Too much sage: Dilute with unseasoned dried bread and enough broth to restore the soft, moist texture.

Crunchy onion or celery: Return the vegetables to the skillet and cook until tender before continuing.

During or After Baking

Center still wet or loose: Keep baking. If the top is already well browned, cover the dish loosely with foil. A deeper casserole may simply need longer through the middle.

A hand loosely covers browned cornbread dressing with foil because the center is still loose, with instructions to continue baking to 165°F / 74°C.
If the top browns first, loose foil protects it while the softer center finishes cooking.

Gummy or pasty: More baking may remove moisture, but it cannot fully restore crumb texture after the bread has been overworked or oversaturated.

Too firm or cakey: The bowl was probably too dry, or the pan stayed in the oven too long. Gravy helps at the table; next time leave the mixture wetter or pull it sooner.

Three spoonfuls compare ideal moist cornbread dressing, gummy pasty dressing with lost crumb structure, and firmer dry cakey dressing.
The crumb often reveals what went wrong: gummy dressing has lost its bread structure, while firm or cakey dressing usually points to a drier mixture or longer bake.

Falls apart: Give it the full 10–15 minute rest first. If it remains very crumbly, the mixture was likely too dry or the center needed more time.

Problem solved? Back to the recipe.

Simple Substitutions

A missing vegetable does not mean Thanksgiving is cancelled.

No celery or onion: Either can simply be left out. Omitting both gives you a plainer dressing, but the recipe still works.

No chicken broth: Turkey broth is the closest substitute. Vegetable broth works too, though it gives the dressing a different savory background.

All-cornbread dressing: Replace the 4 oz / 115 g white bread with the same amount of dried cornbread. Let the bread absorb the broth before adding more; an all-cornbread mixture may not need exactly the same amount.

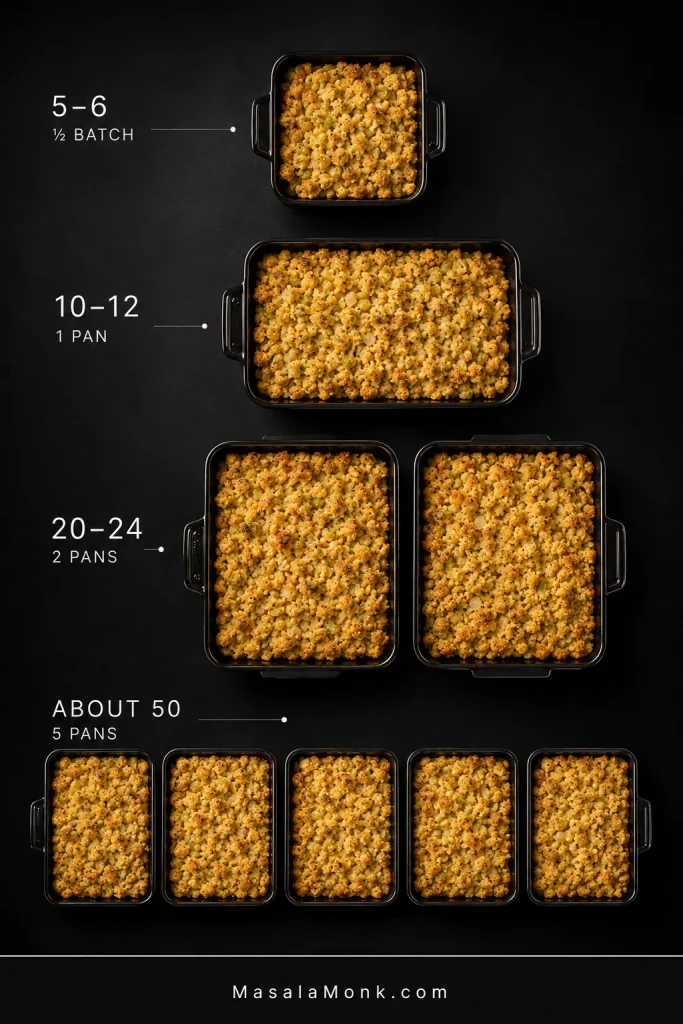
How Much Cornbread Dressing Do You Need?

One 9×13 pan gives about 10–12 side servings. For a crowd, use more pans rather than building one unusually deep casserole.

Overhead serving guide shows a half batch for 5–6 people, one pan for 10–12, two pans for 20–24, and five pans for about 50 people.
Scale sideways rather than deeper: keeping similar pan depth preserves the recipe’s familiar center-to-edge bake.
PeopleAmountPan Setup
5–6½ batch8×8 in / 20×20 cm or similar; begin checking earlier
10–121 batchOne 9×13 pan
20–242 batchesTwo 9×13 pans
About 50About 5 batchesFive 9×13 pans when several other substantial sides are being served

For very generous servings or planned leftovers at a 50-person meal, make six pans.

Mix one or two batches at a time instead of wrestling with one giant bowl. It is easier to see how the bread is taking up the broth and easier to season evenly.

If you’re trying to match a particular family style before a big holiday, a half batch also gives you an easy way to dial in the moisture and seasoning for the version you remember.

Make-Ahead Southern Cornbread Dressing for Thanksgiving

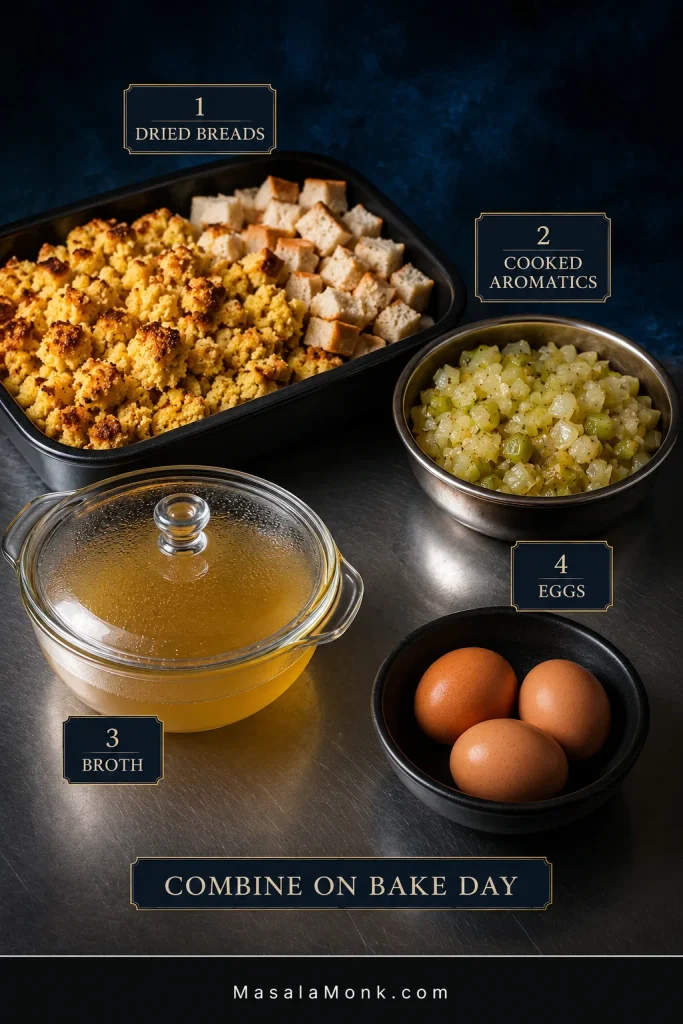
Yes. Bake and dry the breads and cook the onion and celery ahead, then bring everything together close to baking.

Don’t fully assemble the dressing with broth and raw eggs the night before. Keep the dried breads separate from the refrigerated ingredients, then combine them on bake day.

Make-ahead cornbread dressing components kept separate: dried cornbread and white bread, cooked onion and celery, broth, and three whole eggs, labeled to combine on bake day.
Make-ahead dressing works best when prep does not lock in the final moisture level. Keep the liquid separate so absorption can be judged on bake day.

If you’re responsible for the dressing this year, getting the bread and vegetables out of the way ahead of time takes a lot of pressure off Thanksgiving morning.

WhenWhat to Do
1–2 days aheadBake the cornbread, cool it completely and begin drying it
Day beforeFinish drying both breads. Once completely cool, keep them covered and dry. Cook the onion and celery and refrigerate them. Keep broth and eggs refrigerated separately.
Bake dayCombine bread, vegetables and broth; adjust the moisture and seasoning; add the eggs; bake
Serving timeLet the finished dressing rest 10–15 minutes before serving

This also follows USDA stuffing food-safety guidance, which recommends preparing wet and dry ingredients ahead separately and combining them close to cooking.

If oven space is the bigger Thanksgiving problem, MasalaMonk’s Sweet Potato Casserole is another side that can be largely prepared ahead.

Keeping Dressing Warm Without Drying It Out

Holding it hot for a delayed meal? Keep the dressing at 140°F / 60°C or warmer. Otherwise, refrigerate it within 2 hours.

For a short delay, leave the pan covered so the surface holds onto more of its moisture. That also gives you a little breathing room to finish something best served fresh, such as soft dinner rolls.

Storage, Freezing and Reheating

Refrigerate: Transfer leftovers to reasonably shallow containers and refrigerate within 2 hours. Use refrigerated dressing within 3–4 days.

Freeze: Freeze cooked dressing in practical meal-size or family-size portions. For best quality, use it within about 2–3 months.

Reheat: Cover the dressing so it holds onto steam. A dry-looking portion can take a small splash of broth before reheating. Heat the center to 165°F / 74°C, uncovering near the end if you want a little texture back on top.

For the storage guidance behind those refrigerator and freezer times, see the FoodSafety.gov Cold Food Storage Chart.

The Dressing We Are After

The most important moment arrives before the oven door closes.

The bread is thoroughly moist. You can still see pieces of cornbread. The onion and celery are tender, and the sage smells warm and savory in the butter.

Then the oven takes over. The edges toast, the middle sets softly, and the bowl that looked almost suspiciously wet becomes dressing that gives easily under the spoon.

That is what the measurements and checkpoints are really for: turning “add broth until it looks right” into something you can recognize for yourself.

Hands serve steaming Southern cornbread dressing from a dark casserole onto a blue plate, showing a golden top and soft moist interior with onion and celery.
The payoff: a generous serving holds together on the way to the plate, then gives easily under the fork.

Once you can look at the bowl and know it is ready, Southern cornbread dressing stops feeling like a once-a-year gamble.

Back to top ↑

Posted on Leave a comment

Grinch Punch Recipe: Easy Green Christmas Punch With Sherbet

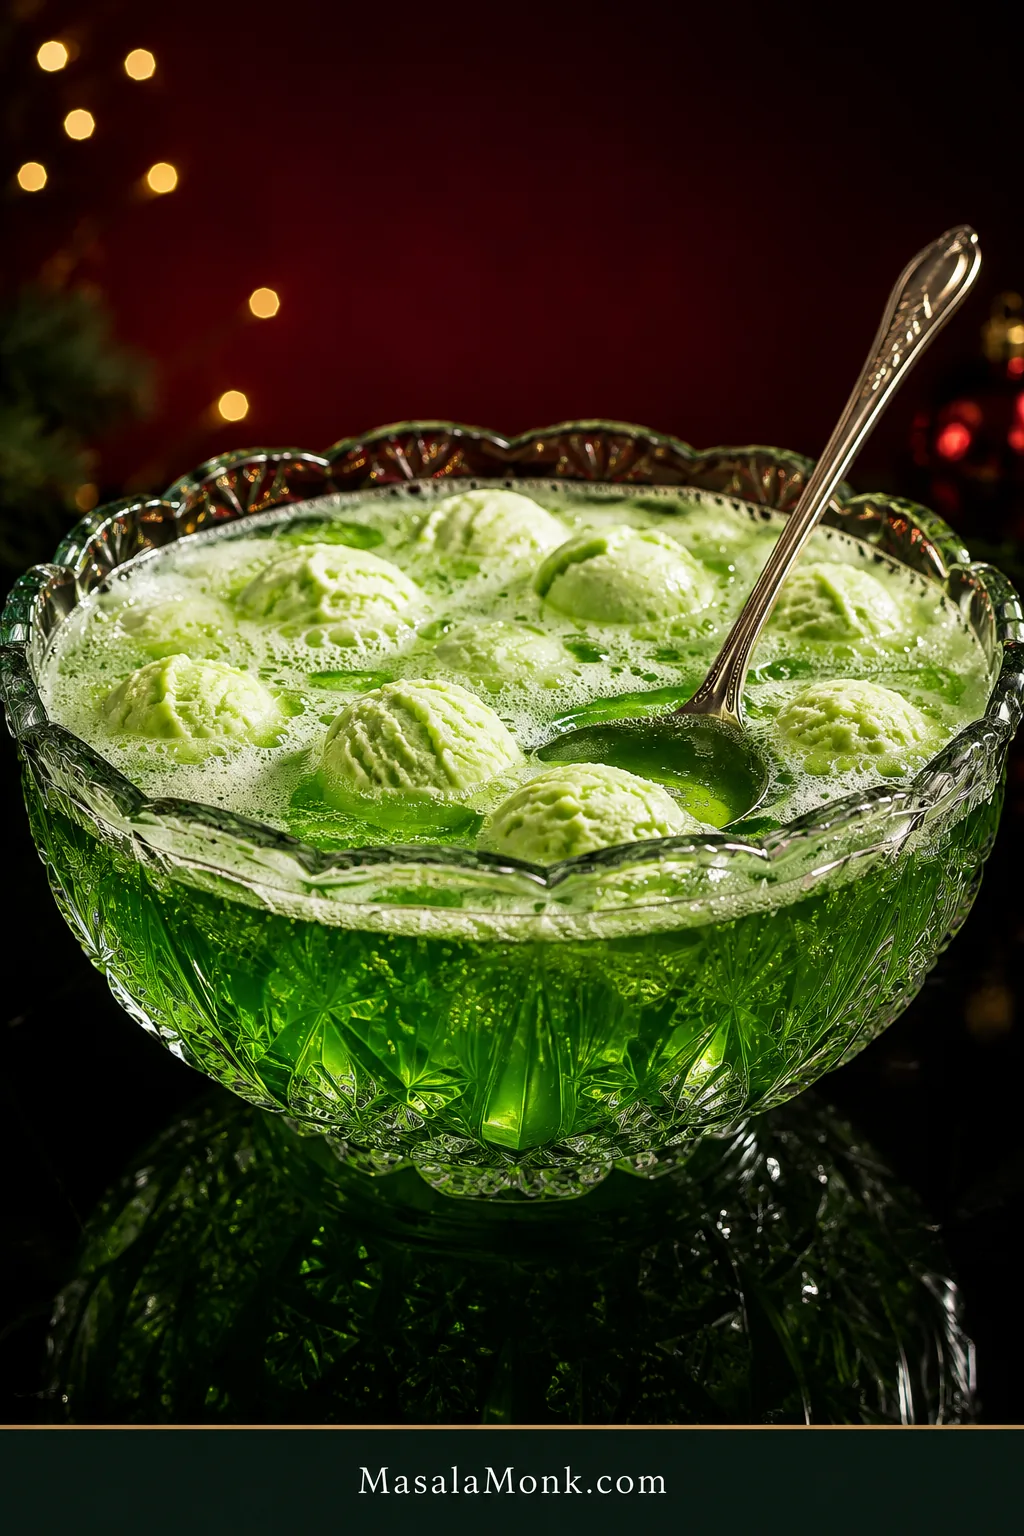
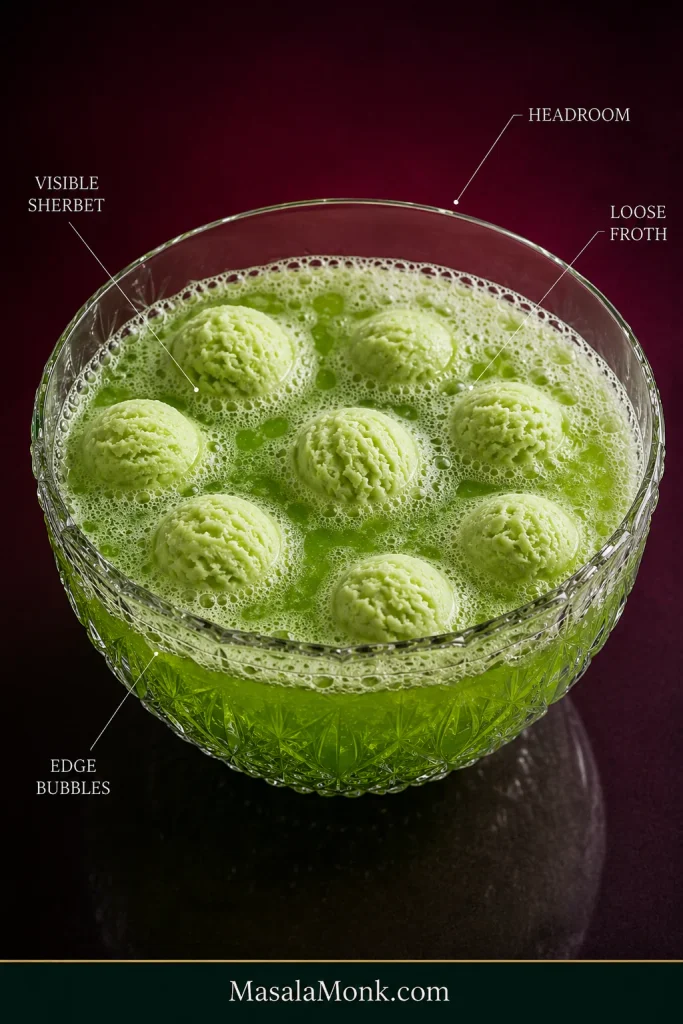
Crystal punch bowl filled with bright green fizzy punch, pale lime sherbet scoops, loose froth and a silver ladle against a dark red Christmas setting.

Set a bowl of bright green, frothy punch on a Christmas table and it rarely goes unnoticed for long. Lime sherbet floats across the top, bubbles gather around the scoops, and the kids are often lining up with cups before anyone has even asked what is in the bowl.

This non-alcoholic Grinch Punch is the family-friendly version: lime sherbet, green fruit punch, pineapple juice and lemon-lime soda. Four main ingredients, one punch bowl and about five minutes to put it together.

Quick Answer: How Do You Make Grinch Punch?

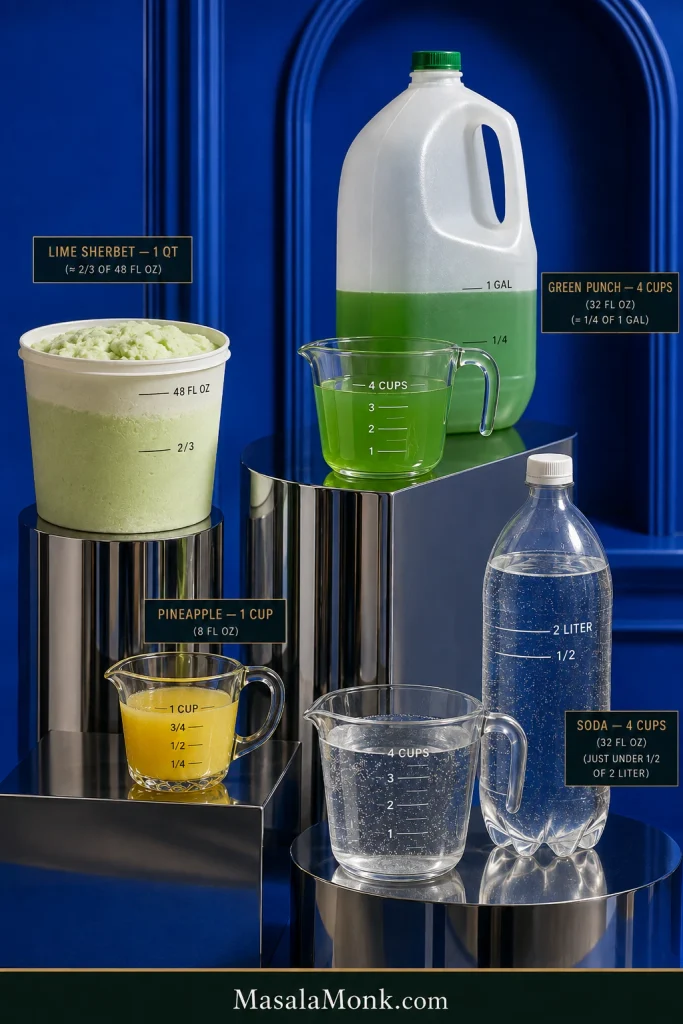
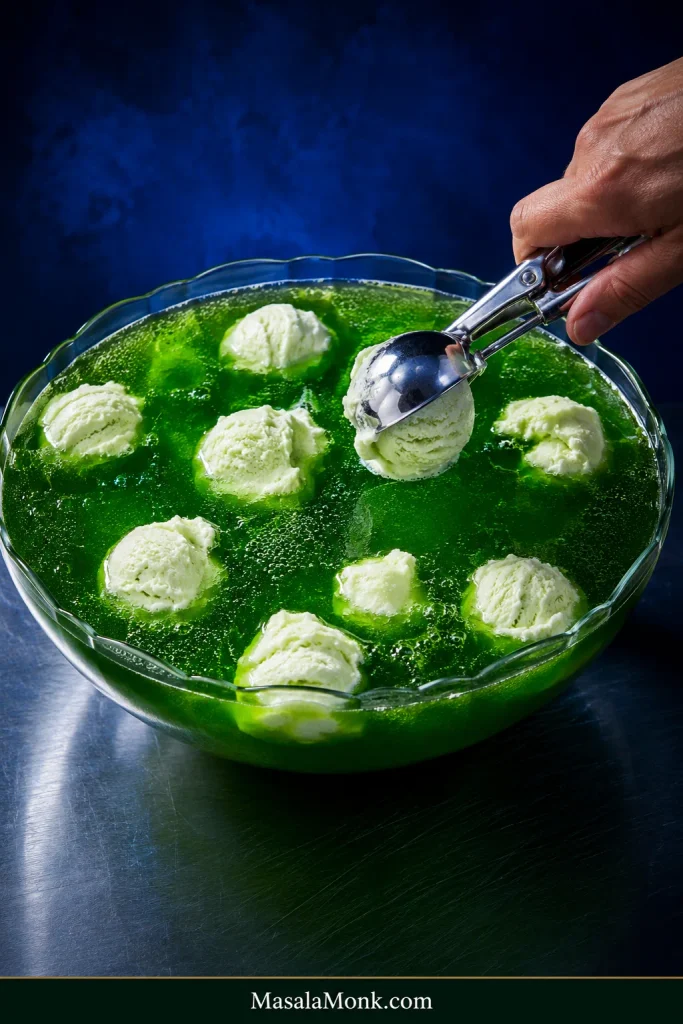
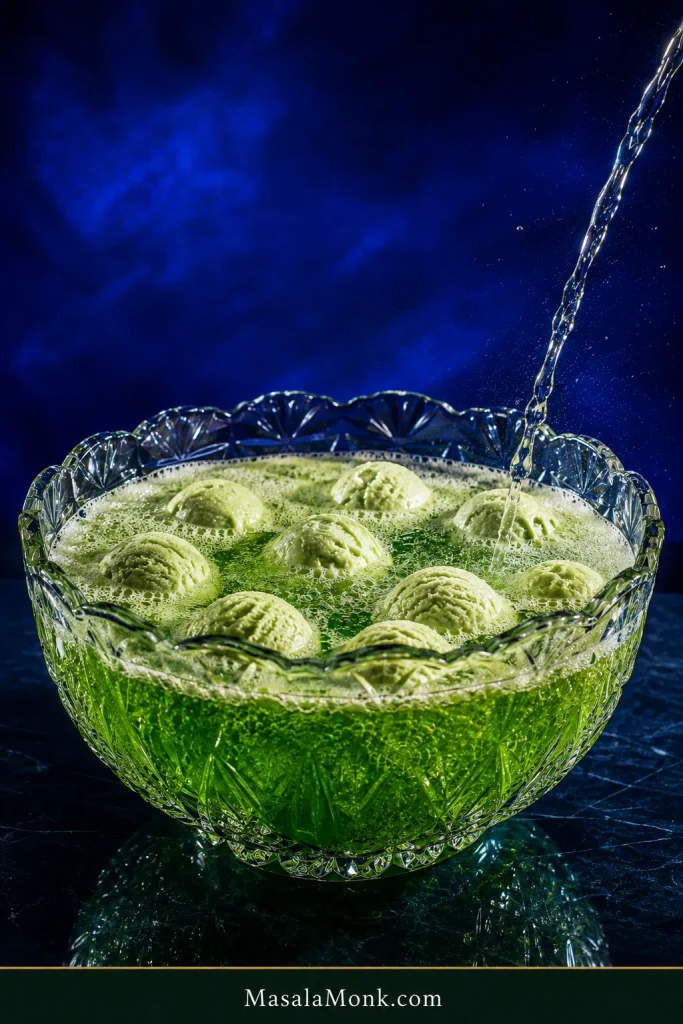
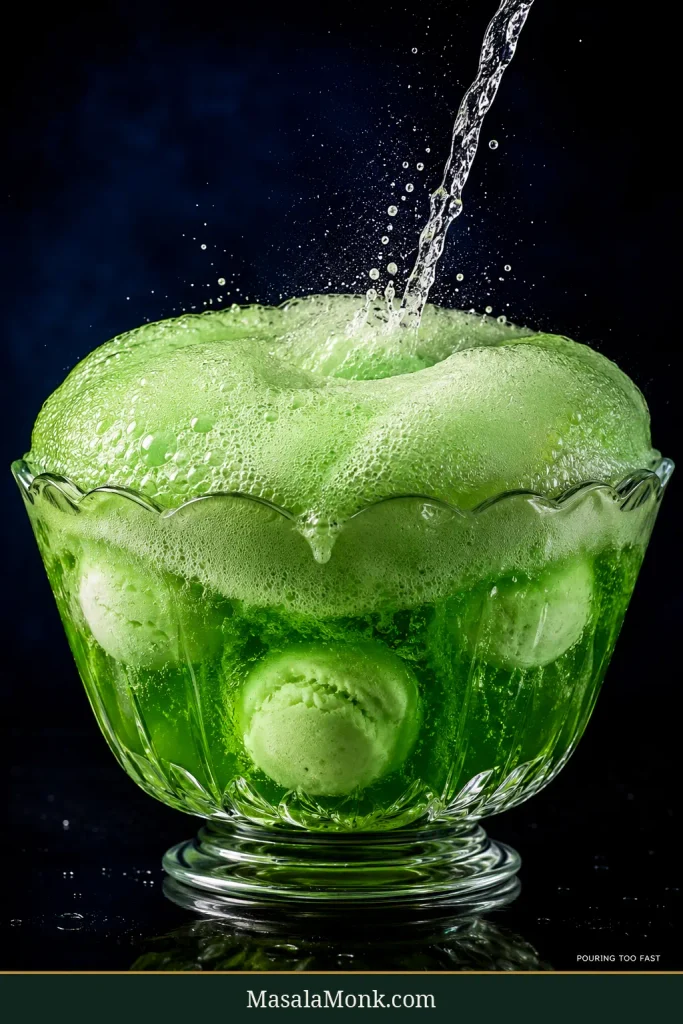
Combine 4 cups green fruit punch with 1 cup pineapple juice, add 1 quart lime sherbet, then slowly pour in 4 cups very cold Sprite or 7Up. Give the punch one or two gentle folds and serve while the soda is fizzy and the sherbet is floating on top.

  • Active prep: about 5 minutes
  • Alcohol: none
  • Best vessel: a roomy open punch bowl
  • Best timing: assemble shortly before serving

You may also see this same style of kid-friendly green Christmas drink called Grinch Juice.

Remember: Cold liquids. Scoopable sherbet. Slow soda.

Make this for: Christmas parties, Grinch movie nights, classroom celebrations, holiday buffets and family gatherings where one playful drink needs to work for both children and adults.

Grinch Punch Recipe

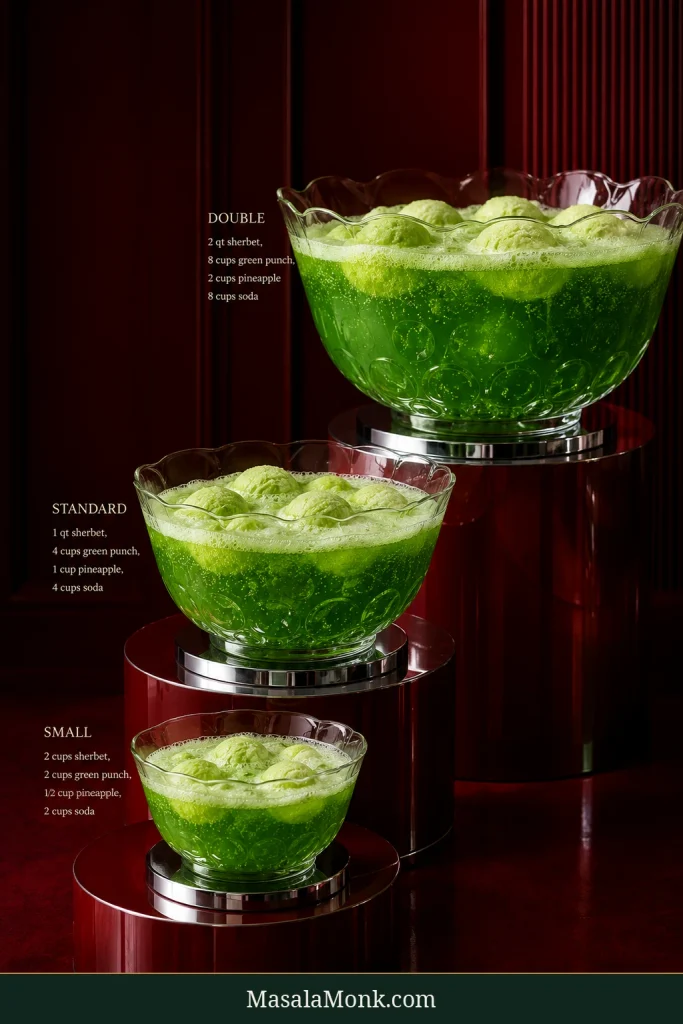
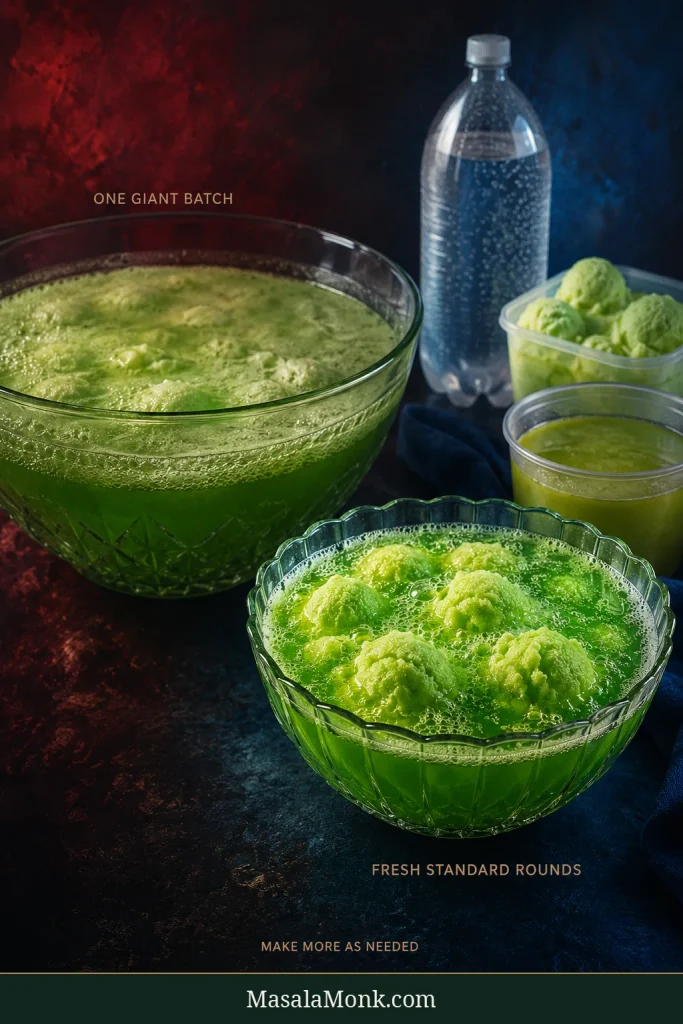
This recipe makes one standard party-bowl batch. Halve the quantities for movie night or repeat the standard batch when you need more.

Ingredients

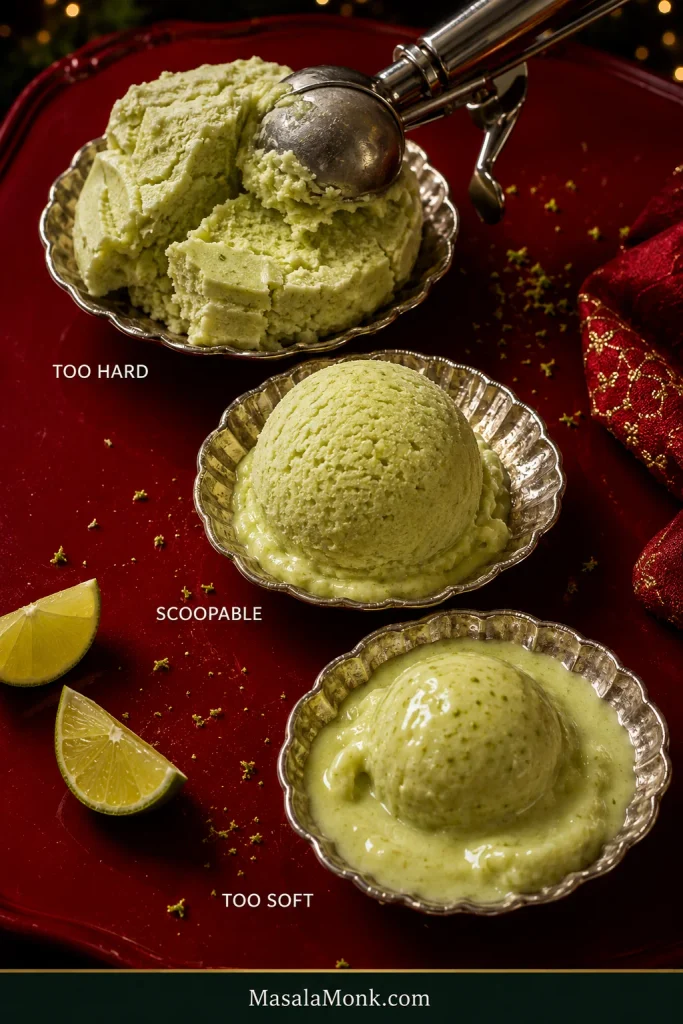
  • 1 quart (32 fl oz / 946 mL) lime sherbet, cold and scoopable
  • 4 cups (32 fl oz / 946 mL) green fruit punch, preferably Hawaiian Punch Green Berry Rush
  • 1 cup (8 fl oz / 237 mL) 100% pineapple juice, chilled
  • 4 cups (32 fl oz / 946 mL) Sprite or 7Up, very cold
  • Red sanding sugar, as needed, optional
  • Lime wedges or maraschino cherries, as needed, optional

Shopping shortcut:

  • Lime sherbet: 1 quart, or about two-thirds of a 48-fl-oz tub.
  • Green punch: 32 fl oz, or one-quarter of a gallon jug.
  • Soda: 32 fl oz, just under half of a 2-liter bottle.
Lime sherbet tub, green fruit punch jug, pineapple juice and lemon-lime soda arranged with measuring vessels. Labels show 1 quart sherbet, 4 cups green punch, 1 cup pineapple juice and 4 cups soda, plus approximate package fractions used.
One 48-fl-oz sherbet tub covers a standard batch, but two full batches need another 16 fl oz of lime sherbet.

You’ll need: a large punch bowl, ladle, ice cream scoop and long spoon.

Instructions

  1. Chill the liquids. Keep the green punch, pineapple juice and soda refrigerated until needed. Leave the sherbet frozen until shortly before assembly.
  2. Get the sherbet scoopable. If it is rock-hard, leave it at room temperature for about 5 minutes—just long enough to scoop cleanly without becoming soft or slushy.
Three lime sherbet samples labeled Too Hard, Scoopable and Too Soft; the hard sample is fractured, the ideal scoop holds its shape, and the soft sample is beginning to melt.
If the sherbet is still too hard after a few minutes, warm the scoop under hot water, dry it, then scoop.
  1. Build the base. Pour the green fruit punch and pineapple juice into the punch bowl.
  2. Add the sherbet. Scoop it across the surface rather than dropping one solid block into the middle.
Hand placing a scoop of lime sherbet into a clear bowl of bright green punch, with several separate sherbet scoops distributed across the surface.
Spread smaller sherbet scoops across the surface so they soften gradually instead of melting from one large block.
  1. Add the fizz. Slowly pour the Sprite or 7Up around the bowl, letting some run over the sherbet for froth. If the foam climbs quickly, pause and let it settle before continuing.
Thin stream of clear carbonated soda pouring near the edge of a glass bowl containing green punch and floating lime sherbet, with bubbles and light foam forming below the rim.
Move the soda stream around the bowl; spreading the first burst of froth helps prevent one tall foam mound.
  1. Finish gently. Give the punch one or two slow folds with a long spoon, then ladle it into cups and serve.

Check the Finished Punch

What should it look like? A bright green bowl with a loose frothy top, visible sherbet scoops and lively bubbles gathering around the edges.

Overhead view of green sherbet punch with labels pointing to Visible Sherbet, Loose Froth, Edge Bubbles and Headroom.
Serve while green punch, pale sherbet and loose froth still look distinct instead of blending into one creamy layer.

In the cup, the first sip is fizzy and citrusy. As the sherbet softens, the drink becomes creamier, while the pineapple rounds out the fruitiness without taking over.

Close-up of a clear glass of green fizzy punch with a pale lime sherbet scoop softening into the drink, rising bubbles, condensation and a red sugar rim.
Sherbet-heavy pours drink creamier, while mostly liquid servings stay lighter and fizzier—so cups naturally vary a little.

Optional Grinch Garnish

For cups you are serving right away, rub a lime wedge lightly around the rim and dip it into red sanding sugar. Preparing the cups a few hours ahead? A very thin coat of corn syrup holds the sugar more securely. Test one disposable cup first, because some plastic rims are stubborn.

Two empty glasses demonstrating red sugar rims: a hand rubs lime around one rim labeled Serve Now — Lime, while the other is labeled Prep Ahead — Thin Corn Syrup beside red sanding sugar.
Coat only the cup’s outer edge; red sanding sugar stays decorative instead of dissolving into the first sip.

A maraschino cherry adds a simple red accent if you want a touch of Grinch-heart contrast without turning every glass into a craft project.

What Each Ingredient Does

Lime sherbet. This gives the punch its citrus flavor, creamy body and floating green scoops. Very soft sherbet disappears into the drink quickly; very hard sherbet is awkward to portion.

Sherbet contains some dairy, which is part of what makes it creamier than sorbet. If the freezer-case labels blur together, our guide to sherbet vs sorbet explains the difference. For school parties, check the sherbet label and your school’s allergy rules before serving.

Lime sherbet can be surprisingly hard to find around Christmas, so buy it when you see it rather than leaving it to the day of the party.

Green fruit punch. When recipes call for “green Hawaiian Punch,” Hawaiian Punch Green Berry Rush is the bright-green drink to look for. It supplies much of the color, fruit flavor and sweetness. Another green fruit punch works when Green Berry Rush is unavailable.

Sprite or 7Up. Lemon-lime soda brings the fizz. Use it straight from the refrigerator and open it close to serving so those bubbles end up in the bowl.

Pineapple juice. One cup adds fruitiness and some tartness without taking over the lime. Use ordinary 100% pineapple juice from a bottle or can, not frozen concentrate. If pineapple is a flavor you particularly enjoy, these punch recipes with pineapple juice explore it more fully.

For a three-ingredient version, replace the pineapple juice with another cup of green fruit punch. The result is sweeter and more straightforward.

Sherbet punch has an unmistakably old-school feel: a bright, bubbling bowl that somehow looks familiar before anyone has taken a sip. Turning it Grinch green simply gives that familiar party drink a Christmas twist.

Can’t Find Lime Sherbet or Green Berry Rush?

These are the two ingredients most likely to send you back around the supermarket. Both have workable substitutes.

If you can’t find…Try…What changes
Lime sherbetAnother citrus sherbetClosest overall style; color may change
Lime sherbetPineapple sherbetMore tropical but still bright and fruity
Lime sherbetLime sorbetUsually dairy-free; icier, lighter and less creamy or frothy. Check the label if dairy must be avoided
Lime sherbetVanilla ice creamCreamier and sweeter, with much less lime flavor and a paler top
Green Berry RushSame amount of another green fruit punchUsually the simplest swap; sweetness varies
Green Berry RushPrepared green lemon-lime Kool-Aid or a similar drink mixMore citrus-forward; mix it as directed for drinking before using
Any green drinkLight-colored fruit drink plus green food coloringGets you the color; taste before adjusting sweetness
Five frozen-dessert scoops labeled Lime Sherbet, Citrus Sherbet, Pineapple Sherbet, Lime Sorbet and Vanilla Ice Cream, showing different colors and textures in silver dishes.
Another sherbet keeps the familiar body; sorbet turns icier, while vanilla ice cream pushes Grinch Punch toward a float.

When you change the green punch, taste the cold fruit-punch and pineapple mixture before adding the sherbet and soda. Some replacements are much sweeter than others.

Start with one drop of green food coloring, stir, and add more only if the bowl needs it.

Three clear glasses contain different green drink bases labeled Green Fruit Punch, Green Drink Mix and Light Fruit Drink + Color, with a green dropper labeled Add Color Gradually.
Compare green drink bases before adding sherbet; melting sherbet lightens the color and makes opacity differences harder to judge.

Want Grinch Punch with no sherbet at all? That works better as a different punch formula because removing the sherbet also removes much of the body, citrus flavor and volume. This easy Christmas Punch uses cranberry, pineapple, orange, ginger ale and sparkling water instead.

Sprite, 7Up or Ginger Ale?

  • Sprite or 7Up: the familiar sweet lemon-lime version used in the main recipe.
  • Ginger ale: still fizzy, with a gentle ginger note in the background.
  • Sparkling water: useful for dialing back the sweetness.
  • Zero-sugar lemon-lime soda: reduces the sugar coming from the soda, although the sweetener flavor will be different.

For a less-sweet bowl, use 3 cups Sprite or 7Up plus 1 cup plain sparkling water. You keep most of the fizz while bringing the sweetness down a notch.

Two clear measuring vessels of carbonated liquid on a blue background. The larger is filled to the 3-cup mark and labeled Lemon-Lime Soda; the smaller is filled to 1 cup and labeled Sparkling Water.
Sparkling water reduces sweetness without changing the fruit-base or lime-sherbet ratio, so the punch keeps its balance.

Another kid-friendly fizzy option is a classic Shirley Temple, which uses grenadine and cherries with Sprite, 7Up or ginger ale.

How to Control the Foam

The froth is part of the fun. The foam climbing over the rim is not.

What separates a bubbly Grinch bowl from a green foam eruption mostly comes down to how the soda goes in. Start with well-chilled fruit punch and pineapple juice, add the sherbet, then pour the soda slowly around the bowl.

Green sherbet punch foaming rapidly above the rim of a clear punch bowl as a stream of soda pours into it.
Foam steals headroom quickly, so a comfortably underfilled punch bowl can become crowded as soon as soda hits sherbet.

If the foam begins climbing too quickly, stop pouring and give it a moment to settle. There is no prize for emptying the whole bottle into the bowl in one go.

For more froth at the end, save a small splash of soda and pour it gently over a few sherbet scoops. A loose bubbly layer is plenty; the sherbet should still be visible underneath.

The scoops naturally soften as the punch sits and gradually make the drink creamier. That is normal. The distinct floating scoops are simply the freshest-looking stage.

Three glasses labeled Fresh, Softening and Creamier show lime sherbet changing from a distinct scoop to partially melted ribbons and then a lighter, creamier green punch.
As the sherbet softens, the punch becomes creamier and more even in color while the floating scoops gradually disappear.

How Much Grinch Punch Do You Need?

“Serves 12” does not tell you much when one person is picturing a small punch cup and another is filling an eight-ounce glass.

Sherbet contains air, so the amount you can ladle into cups varies by brand and by how much sherbet lands in each serving. Use these as party-planning ranges.

How Many Cups Will One Batch Pour?

Pour sizeBest forPlanning range
4 oz / 118 mLKids’ party, classroom, large buffetRoughly 22–26 small pours
6 oz / 177 mLNormal punch cupRoughly 15–17 pours
8 oz / 237 mLFull drinkRoughly 11–13 pours
Three clear glasses of green sherbet punch increase in size from left to right and are labeled 4 oz / 118 mL, 6 oz / 177 mL and 8 oz / 237 mL.
Moving from a 6-ounce to 8-ounce cup costs roughly four servings from a standard batch, so cup size matters.

Pours are not the same as guests. At a kids’ party, four-ounce first pours often make more sense. Anyone who wants more can come back, and you are less likely to collect half-full cups from every table afterward.

Planning for 20 people? One standard batch can cover one small first pour per guest. Keep ingredients ready for another batch when this is the main drink or you expect plenty of refills.

Small, Standard and Double Batches

IngredientSmall BatchStandard BatchDouble Batch
Lime sherbet (volume)2 cups / 473 mL1 qt / 946 mL2 qt / 1.89 L
Green fruit punch2 cups / 473 mL4 cups / 946 mL8 cups / 1.89 L
Pineapple juice½ cup / 118 mL1 cup / 237 mL2 cups / 473 mL
Sprite or 7Up2 cups / 473 mL4 cups / 946 mL8 cups / 1.89 L
Three increasingly large bowls of green sherbet punch labeled Small, Standard and Double, with corresponding scaled ingredient quantities.
Remember 4:4:1:4 by cups—sherbet, green punch, pineapple juice and soda—to keep scaled batches balanced.

The small batch is plenty for movie night or a few people when the punch is part of the fun rather than the whole event. At most home parties, two standard batches made at different times are easier to manage than one enormous double batch.

For a very large crowd, buy enough ingredients for several standard batches and make them in rounds. Later batches stay fizzier, and you avoid committing everything to one bowl at the start.

Large bowl of older green punch with softened sherbet beside a smaller fresh bowl with distinct sherbet scoops and bubbles; unbranded soda, reserved sherbet and chilled fruit base sit behind it.
Keep extra soda cold and unopened until the next round so every fresh batch starts with maximum fizz.

What Size Punch Bowl?

A bowl around 6 quarts / 5.7 liters or larger gives the standard batch useful headroom. Sherbet floats above the liquid and soda can build a temporary layer of foam, so the empty space matters.

With a smaller bowl, make the half batch or serve the punch in two rounds.

Side view of a clear punch bowl with green punch and lime sherbet. Brackets mark Punch + Sherbet, Working Headroom and Bowl: 6 qt / 5.7 L or Larger.
A wide bowl adds surface area, making floating sherbet and rising foam easier to manage than in a narrow vessel.

Keep It Cold and Fizzy

You can do nearly everything before the doorbell starts ringing. The only jobs worth saving for the end are putting the bowl together and opening the soda.

Prepare ahead, assemble late.

What to Prep Ahead

Earlier in the day, refrigerate the green punch, pineapple juice and soda, prepare the garnishes or sugar-rimmed cups, and put the bowl, ladle and glasses where you can find them. For a crowd, you can also pre-scoop the sherbet onto a lined tray or into a chilled muffin pan and return it to the freezer.

Empty crystal punch bowl surrounded by chilled green fruit punch, pineapple juice, unbranded soda, pre-scooped lime sherbet, glasses, red-sugar-rimmed glasses and a ladle. Labels mark Chill, Pre-Scoop, Set Out, Rim and Assemble When Guests Gather.
Leave space between pre-scooped portions; separate lime-sherbet scoops refreeze cleanly instead of joining into one awkward slab.

Once that is done, you are not wrestling with a frozen tub or hunting for the ladle while guests are walking through the door.

When to Assemble a Fresh Round

Put the punch together when people are beginning to gather around the drinks. That is a better cue than the clock—and certainly better than assembling it when you start setting up the buffet an hour earlier.

For a longer party, put out only part of the punch at first. Keep the remaining fruit base refrigerated, the sherbet frozen and the extra soda cold and unopened. When the first bowl runs low, make another. The bubbles are fresher, and there is usually less punch left sitting around at the end of the party.

Keep It Cold and Easy to Serve

Properly chilled ingredients usually make loose ice unnecessary, and melting ice dilutes the drink. For longer service, set the punch bowl inside a larger bowl or tray of ice. You can also freeze some green fruit punch into cubes if you want ice inside the bowl without adding plain water.

Because sherbet contains dairy, do not leave the finished punch at room temperature for more than 2 hours, or more than 1 hour when the temperature is above 90°F / 32°C. The USDA food-safety guidance has more detail.

A punch bowl is the easiest vessel because the sherbet and froth have room to float. For a small batch, a wide pitcher works. With a spigot dispenser, run only the chilled fruit base through the dispenser; add sherbet and soda to the cups or serving bowl so pieces do not interfere with the spout.

At a mixed-age party, keep the shared bowl alcohol-free so everyone can reach for the same festive drink. A fully alcoholic Grinch Punch is better treated as its own recipe instead of adding spirits to the family batch.

Guests gathered around a large crystal bowl of green fizzy punch with visible lime sherbet scoops. A ladle lifts sherbet and punch while several people hold ordinary clear punch cups in a warmly lit Christmas room.

Fix a Problem

Sherbet punch is forgiving, but it can still become too sweet, too foamy, too flat or simply too large for the bowl you grabbed. Most problems can be fixed without dumping the bowl and starting over.

ProblemFix NowNext Time
Too sweetAdd cold sparkling waterUse 3 cups soda plus 1 cup sparkling water
Foam is overflowingStop pouring and let the foam settleChill the liquids well, pour the soda more slowly and leave more bowl headroom
Hardly any frothPour a small final splash of soda over a few scoopsLet some soda run directly over the sherbet during assembly
Punch went flatRefresh it with newly opened cold sodaOpen the soda close to serving and stir gently
Sherbet disappeared quicklyAdd a few fresh frozen scoops if you have themKeep the sherbet frozen until shortly before assembly
Punch is separatingGive the bowl one slow sweep with the ladleAvoid vigorous stirring that knocks out carbonation
Bowl is too fullRemove some liquid before adding the rest of the sodaUse a larger bowl or serve two rounds
Dispenser is cloggingMove the punch to an open bowl if possibleRun only the fruit base through a dispenser
Tastes sweet and one-noteAdd a small squeeze of fresh limeUse the lighter soda mix or taste the fruit base before finishing the bowl
Visual troubleshooting board showing common Grinch Punch problems and quick fixes around a bowl of green sherbet punch.
Change one variable at a time—sweetness, fizz, sherbet or volume—so a quick rescue does not create another problem.

Leftovers

Grinch Punch does not store especially well once assembled.

Refrigerate leftovers promptly if you want to keep them. By the next day, the bubbles are gone and the frothy top has disappeared, so expect a creamy fruit drink rather than freshly made punch.

The Final Ladle

Grinch Punch does not need a complicated ingredient list to make a Christmas table feel more fun. A vivid green bowl, a few lime-sherbet scoops and that first rush of bubbles already do most of the work—especially once someone comes back carrying an empty cup and asks for another.

Hand holding a nearly empty glass of green punch beside a partially served crystal punch bowl with softened lime sherbet, bubbles and froth while a silver ladle lifts another scoop.

That is the charm of this punch: it looks like a celebration without becoming another hosting job. It gives the table color, gives the kids something to get excited about, and still leaves the person who made it free to enjoy the party.

Posted on Leave a comment

Crockpot Taco Meat Recipe: Easy Slow Cooker Ground Beef for Tacos

A hand spoons seasoned ground beef from a black slow cooker into a soft tortilla on a taco-night table with cheese, avocado, onion, lime and salsa nearby.

The best Crockpot taco meat has small, juicy beef crumbles coated in warm taco spices and tomato, ready to pile into soft tortillas while the cheese starts melting over the top.

And because the slow cooker does most of the work, the meat can be finished before everyone is ready to sit down. No standing over a skillet crumbling and stirring beef just as people start asking about dinner.

Ground beef has a few slow-cooker quirks. A dense block can stay clumpy, fatty beef can leave a slick of grease, thin salsa can make the filling watery, and extra hours do soft taco crumbles no favors. This method avoids most of those problems without turning an easy dinner into a project.

Quick Answer

No browning or chopping is needed. For a 2-pound batch, combine 2 lb / 907 g raw, fully thawed lean ground beef with 1¼ cups / 300 ml thick salsa and taco seasoning.

Loosen the beef before cooking, then break it into the final crumble once it begins to set. Cook on HIGH for about 2½–3 hours or LOW for about 4–5 hours, starting your checks at the early end.

The beef is ready when it reaches at least 160°F / 71°C throughout and has the texture you want. Look for juicy, lightly glossy crumbles with very little free liquid underneath.

Added water or broth: none. Thick salsa already gives the beef the moisture it needs.

Want a visual finish check? See the Taco Meat Test.

Crockpot Taco Meat Recipe

Prep: about 5 minutes with prepared taco seasoning or 10 minutes with homemade. Yield: about 8 dinner servings.

The 3-Ingredient Version

  • 2 lb / 907 g raw, fully thawed 90/10 ground beef
  • 1¼ cups / 300 ml thick salsa
  • Taco seasoning for 2 lb / 907 g beef

Using prepared taco seasoning? Use the amount your package recommends for 2 pounds of beef. If your brand’s packet is intended for 1 pound, that will usually mean two packets. Skip the packet’s stovetop water because the salsa supplies the cooking moisture here.

Ingredient guide showing 2 pounds of ground beef, 1¼ cups of thick salsa and taco seasoning, with a note that no added water or broth is needed.
Thick salsa does double duty as flavor and cooking liquid, so this three-ingredient version needs no broth or packet water.

Using prepared seasoning? Jump straight to Instructions.

Prefer Homemade Taco Seasoning?

  • 4 teaspoons mild American-style chili powder (not pure cayenne or hot Indian red chilli powder)
  • 2 teaspoons ground cumin
  • 2 teaspoons paprika
  • 1 teaspoon garlic powder
  • 1 teaspoon onion powder
  • 2 teaspoons dried oregano
  • 1 teaspoon fine sea salt to start, plus more if needed
  • ½ teaspoon black pepper
  • ¼–½ teaspoon cayenne, optional

In American taco recipes, “chili powder” usually means a relatively mild seasoning blend. Pure cayenne or a hot Indian chilli powder can be dramatically hotter, so use those much more cautiously.

Salsa can contribute plenty of sodium too. Starting with less salt gives you room to taste the cooked beef and adjust without discovering too late that the combination is overly salty.

Homemade taco seasoning guide with measured spices for 2 pounds of beef and a warning that American-style chili powder is a mild blend rather than pure cayenne or hot Indian chilli powder.
Mix the spices before seasoning so cumin, paprika, oregano and salt distribute more evenly over the beef.

Instructions

  1. Loosen and season the beef. Put the thawed beef in the slow cooker and pull the dense block into loose chunks. Scatter the taco seasoning evenly over the meat.
  2. Add the salsa. Spoon the thick salsa over the beef and stir lightly. Cover the slow cooker.
  3. Cook. Cook on HIGH for about 2½–3 hours or LOW for about 4–5 hours. Begin checking at the early end because slow cookers vary, and deeper batches can take longer.
  4. Make the crumble. Around the middle of the cooking window, start checking the beef. When the chunks have started to set and separate easily, use a wooden spoon, meat chopper or potato masher to break them into the size you like. Replace the lid and continue cooking.
  5. Check doneness. Test several spots near the center. The beef should reach at least 160°F / 71°C throughout, with no dense raw pockets. Color alone is not a reliable doneness test.
  6. Finish and serve. Stir well. Skim obvious grease or remove excess thin liquid only if needed, then taste and correct the salt or seasoning. If you add more dry seasoning, give it another 5–10 minutes of heat. Spoon into warm flour tortillas or soft homemade corn tortillas with cheese, onion, avocado, salsa, cilantro, jalapeños or lime.

Before You Serve

Food-safety note: if a spoon, masher or chopper touches undercooked beef, wash it or switch to a clean utensil before using it again with the fully cooked meat.

Cook’s note: can’t be there for the mid-cook breakup? Loosen the raw beef especially well at the beginning, then crumble it thoroughly once it is safely cooked. The pieces may be less uniform, but dinner still works.

When the beef is glossy, well seasoned and easy to scoop without liquid running around the crumbles, you’re done. Warm the tortillas and eat.

Close-up of finished slow cooker taco meat with distinct medium crumbles, small tomato and onion flecks, a light glossy coating and very little free liquid.

Want the process photos? See what to look for while the beef cooks. · Something looks off? Go straight to Troubleshooting.

When the Crockpot Works Best—and When to Brown First

The Crockpot’s advantage here is timing, not tenderness. Ground beef does not need hours of slow cooking to become tender. The Crockpot cuts down the stove work, lets the meat be ready before you need it, and keeps it hot until everyone is ready to eat.

If browned edges and a faster stovetop dinner matter more, the skillet wins.

Mostly Hands-Off

Thawed raw beef goes directly into the Crockpot with salsa and seasoning.

Best for: ordinary dinner batches, minimal cleanup and softer taco crumbles.

Browned & Firmer

Brown and drain the beef in a skillet. Stir in the seasoning and enough salsa to leave it juicy rather than saucy, then transfer it to the Crockpot to stay hot for serving.

Best for: firmer pieces, deeper browned flavor or higher-fat beef.

Big Taco Bar

Cook and drain the beef in batches, then use one or more Crockpots to keep it hot for serving.

Best for: larger quantities where even cooking and easy draining matter more than dump-and-go convenience.

Prefer firmer, deeply browned stovetop crumbles? Our Ground Beef Tacos Recipe is built around that skillet texture and a much faster cook.

Which Ground Beef Works Best?

With skillet taco meat, excess fat can be poured off before the seasoning goes in. With the raw slow-cooker method, everything released by the beef stays in the pot until the end.

For this recipe, 90/10 hits the sweet spot: plenty of beefy flavor without leaving a large slick of fat underneath.

Ground beefWhat to expectBest use
93/7Very little rendered fat; leaner, less rich resultMinimal draining
90/10Good beef flavor with some fat to skim if neededBest all-around choice
85/15Richer, with more fat collecting at the bottomFine if you don’t mind draining some
80/20Can leave a substantial grease layerBetter browned and drained first

Already have 85/15 in the refrigerator? Use it. Taco night does not require a special grocery run; just expect more fat at the end.

Four bowls of cooked taco meat labeled 93/7, 90/10, 85/15 and 80/20, showing progressively more visible rendered fat as the beef becomes fattier.

If your store labels it beef mince, use the same lean ratio and follow the recipe as written.

Why Salsa Consistency Matters

Salsa has a big say in how wet the taco meat becomes because it brings tomato, chile, aromatics, acidity, salt and moisture all at once.

To keep the beef juicy without leaving a puddle underneath, choose a thick salsa that sits on a spoon instead of immediately running off it. Thick salsa clings to the crumbles; very thin restaurant-style or watery fresh salsa is more likely to pool around them.

Two spoons compare salsa consistency: thick chunky salsa mounds and clings to one spoon, while thinner salsa runs off the other and pools in its bowl.
Use the spoon, not the label. If salsa runs off immediately, start with less; if it holds a mound, the recipe amount is a better fit.

Thin salsa can still taste excellent. Start with less and add another spoonful after cooking if the beef needs it.

Chunky or smooth? Chunky salsa leaves visible pieces of tomato, onion and chile. A smoother salsa blends more completely into the beef and gives the filling a more uniform look. Mild, medium or hot is your call; consistency matters more to the slow-cooker method than heat level does.

For something brighter at the table, keep the finishing salsa separate. A spoonful of roasted salsa verde adds fresh acidity without making the beef wetter in the Crockpot.

Can Raw Ground Beef Go Straight Into the Slow Cooker?

Yes. Use fully thawed beef, loosen the dense block before cooking and check doneness with a food thermometer instead of relying on color.

USDA slow-cooker guidance recommends thawing meat before it goes into a slow cooker. Thawed ground beef also separates more evenly and is much easier to crumble. Read the USDA slow-cooker guidance.

Loose thawed raw ground beef beside a solid frozen block of ground beef, showing the thawed meat ready for the slow cooker and the frozen block needing to be thawed first.

What to Look for While the Beef Cooks

Start loose. Pull the raw beef into handful-size chunks before the lid goes on. They do not need to be tiny; opening up the dense block is what matters.

Thawed raw ground beef broken into several loose chunks inside a dark slow cooker, with taco seasoning scattered over the meat and no liquid added yet.

Expect moisture later. The pot may look surprisingly dry at first. Ground beef releases its own juices as it heats, and very little escapes from a covered slow cooker.

Break it when it yields easily. When the chunks separate with very little resistance, they are ready to crumble. Break them into the size you prefer and let the beef finish cooking.

Partially cooked ground beef in a slow cooker with browned outer surfaces and some pink interior as a wooden spoon begins splitting one tender chunk apart.
Crush the chunks when they yield easily; if the spoon smears or drags through the meat, give them more time.

Don’t judge by color alone. Appearance can be misleading, so use the thermometer reading in the recipe as the final doneness check.

Digital food thermometer inserted into ground beef near the center of a slow cooker, reading 160 degrees Fahrenheit, with guidance to check several central areas.
Check several dense spots near the center. 160°F / 71°C throughout is the target, not color alone.

The Taco Meat Test: Too Wet, Just Right or Too Dry?

Drag a wooden spoon or spatula through the middle of the beef and watch what happens to the channel.

Three matched taco meat samples show too wet, just right and too dry states: the wet trail floods with liquid, the correct trail remains briefly visible, and the dry meat looks matte.
Use the trail after the finished taco meat has been stirred. A little juice is desirable—the speed at which the channel disappears tells you more than visible liquid alone.

Too Wet

Thin liquid immediately floods back in and the meat looks as though it is sitting in sauce.

What to do: spoon out excess liquid or leave the lid off briefly while the beef is hot.

Just Right

The crumbles look juicy and lightly glossy. The spoon trail stays visible for a moment before a thin sheen of flavorful cooking juice slowly settles back in.

Leave it alone. You’re there. A thin layer of juice at the bottom belongs with moist taco meat, and the filling should scoop neatly without soaking the tortilla underneath.

Too Dry

The beef looks matte and loose with very little moisture clinging to the crumbles.

What to do: stir in 1–2 tablespoons of salsa if the beef could use more flavor as well as moisture, or water if the seasoning is already where you want it. Heat briefly, then check again before adding more.

Is That Liquid Cooking Juice or Grease?

  • Oily slick or yellow-brown beads: mostly rendered beef fat. Skim or drain it.
  • Thin reddish-brown liquid: mostly beef juices and salsa moisture. Remove only what is excessive.
  • An oily layer over thinner liquid: remove the fat first, stir the beef, then decide whether the remaining juice actually needs reducing.

Draining every drop can leave good taco meat unnecessarily dry. Remove the fat you do not want, stir again and reassess.

Three close-up taco meat samples compare oily golden rendered fat, thinner reddish-brown cooking juice, and a mixture where a shiny fat layer sits above darker juice.
If shiny oil floats over darker cooking juice, skim the top layer first, stir, then reassess. Draining everything can remove useful seasoned moisture with the fat.

Still not right? Match the symptom in Troubleshooting.

How Fine Should You Crumble Taco Meat?

The Crockpot works well for fine and medium crumbles; deeply browned beef still belongs in a hot skillet. Choose the texture that fits the tacos you want tonight.

Three matching bowls compare fine Tex-Mex ground beef crumbles, medium slow-cooker taco meat crumbles and firmer skillet-browned pieces with darker edges.
Use the guide as a stopping-point check: medium crumbles should still look unmistakably like ground beef rather than a uniform paste.
  • Fine Tex-Mex-style crumbles: use a potato masher or meat chopper and work the beef fairly fine. Stop while distinct small pieces remain. The meat should feel tender and meaty, not pasty.
  • Medium everyday crumbles: use a wooden spoon or sturdy spatula and stop earlier. This is what the main recipe aims for—tender, juicy and easy to scoop while still clearly feeling like ground beef.
  • Firm, browned crumbles: use a hot skillet for browned edges and a firmer bite. The Crockpot can then keep the cooked meat hot until everyone is ready.

Easy Variations

No-Salsa Version

For an intentionally smoother, saucier version without salsa, keep the 2 lb / 907 g ground beef and the same amount of taco seasoning. Replace the 1¼ cups / 300 ml salsa with 1 can plain tomato sauce, about 15 oz / 425 g.

Tomato sauces vary in saltiness, so hold back any extra salt until the beef is cooked and tasted. This version will not finish exactly like the thick-salsa recipe. If more sauce collects around the beef than you want, spoon off the excess or let the meat sit briefly uncovered while hot.

This skips salsa, not tomato. A completely tomato-free version needs a different moisture balance, so simply omitting the tomato is not a direct substitute.

Rotel Version

Replace the 1¼ cups / 300 ml salsa with 1 undrained 10-oz / 283 g can of Rotel. Keep the same homemade spice blend—or use enough packet seasoning for 2 pounds of beef. No added water is needed.

Rotel is thinner than the salsa used in the main recipe, so let the beef cook before deciding whether it needs anything else.

Stretch It With Beans

Drain and rinse a 15-oz / 425 g can of black beans or pinto beans, then stir them into the cooked beef for the final 20–30 minutes.
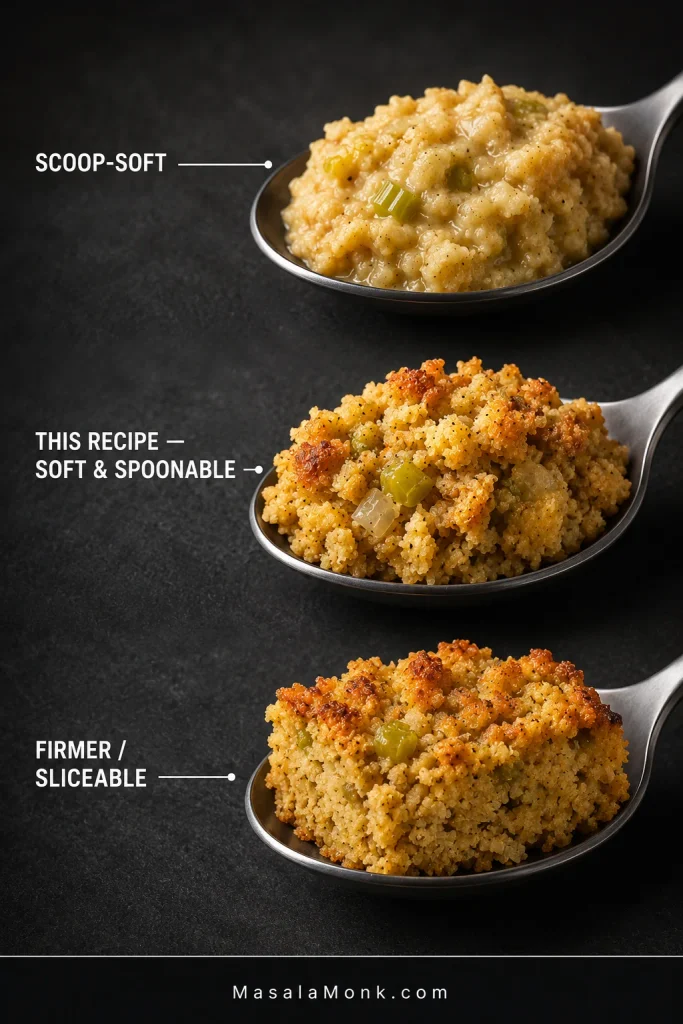
Whole beans stretch the batch without turning it into a completely different filling. Want the beans to become the meal instead of an add-in? That’s closer to our Crockpot chili.

Three bowls compare Crockpot taco meat made with thick salsa, a Rotel version with visible diced tomato and chile, and taco meat mixed with whole black beans.

Scaling Crockpot Taco Meat: What Changes From 1 to 4 Pounds

Scale the taco seasoning with the amount of beef. Salsa is different: as the batch gets larger and sits deeper in the cooker, don’t increase the salsa in exact proportion to the beef. Start with less and add more after cooking if the meat needs it.

Scaling guide for 1, 2 and 3 to 4 pounds of ground beef, with exact salsa amounts for the smaller batches and more cautious salsa guidance for larger batches.
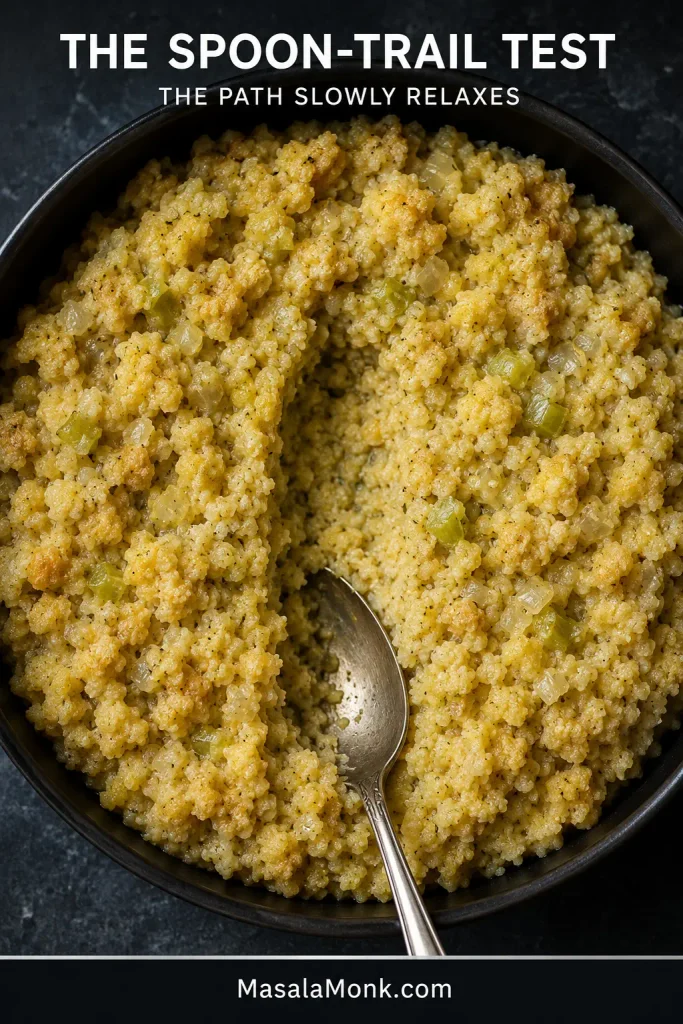
For 3–4 lb, leave room to correct upward: adding salsa later is easy; removing excess liquid is not.
BatchSalsa guidanceWhat changes
1 lb / 454 g⅝ cup / 150 ml thick salsaBegin checking earlier; a smaller cooker is useful if available
2 lb / 907 g1¼ cups / 300 ml thick salsaMain recipe: HIGH 2½–3 h or LOW 4–5 h
3–4 lb / 1.36–1.81 kgDon’t increase the salsa in exact proportion to the beef; start with less and add more after cooking if neededUse a roomy cooker and rely on center temperature and texture rather than adding a fixed amount of extra cooking time

When the Cooker Gets Too Full

If the beef is packed unusually deep in your cooker, split the batch rather than crowding it in. The beef cooks more evenly and is easier to crumble that way. And when your cooker manual specifies a maximum fill level, follow it rather than packing the batch too deeply.

Two matching slow cookers compare a moderate layer of ground beef with exposed cooker sides against a much deeper, densely packed batch that is harder to stir and crumble.

Feeding more than a family batch? Jump to taco-bar quantities and the large-batch method.

Troubleshooting

ProblemWhat to do nowNext time
WateryRemove excess thin liquid or briefly cook uncoveredUse thicker salsa and avoid adding extra liquid
GreasySkim or drain the rendered fatUse 90/10 or 93/7 beef, or brown fattier beef first
Big clumpsBreak the hot beef apart while it separates easilyLoosen the raw block and give it one mid-cook breakup
MushyRemove excess liquid and stop working the meatCheck sooner and stop at a larger crumble
Dry but sitting in liquidRemove excess liquid first; taste the beef before adding any salsaCheck sooner and begin with thick salsa instead of extra liquid
BlandCorrect the salt and seasoning; if it is seasoned but still tastes flat, finish with lime for acidityScale the seasoning with the amount of beef
Too saltyDilute with unseasoned cooked beef or beansHold back extra salt until the meat has been tasted

If the table solved your problem, you’re done. Two problems are especially easy to misread.

Why Is the Beef Dry When There Is Liquid in the Crockpot?

A wet Crockpot doesn’t necessarily mean juicy beef. You can have plenty of liquid around the meat while the crumbles themselves still taste dry.

The meat can continue losing moisture while sitting in released juices, fat or sauce.

Remove obvious excess liquid first and taste the meat. When extra cooking time is the real problem, pouring in a cup of broth only gives you dry-feeling beef in a wetter pot. A spoonful or two of salsa is plenty if the crumbles still need help.

A wooden spoon lifts coarse, matte-looking taco meat above a slow cooker with visible reddish cooking liquid pooled around the remaining beef.
Drain first, then taste. More salsa or broth will not fix overcooked, dry-feeling crumbles that are already sitting in plenty of liquid.

Is It Mushy—or Just Soft?

Slow-cooker taco meat is naturally softer than beef browned hard in a skillet. Tender crumbles that still hold their shape are exactly what many people want.

When the pieces lose that structure and become paste-like or waterlogged, they have moved into mushy territory. Prefer a firmer bite every time? Brown the beef first and let the Crockpot keep it hot instead.

Two samples compare soft taco meat with distinct tender crumbles against mushier taco meat whose wet pieces are beginning to lose their individual shape.
Once the crumble size is right, stop working the meat aggressively; continued mashing can turn tender crumbles pasty.

For a family batch, that’s most of what can go wrong. Feeding a crowd changes the Crockpot’s job.

↑ Back to top · Jump to Recipe

For a Party or Taco Bar

How Much Taco Meat Per Person?

For a full taco bar with plenty of beans, cheese, vegetables, salsa and sides, plan roughly 2½–3 oz / 70–85 g cooked taco meat per person.

For a meat-heavy meal or an especially hungry crowd, move closer to 3½–4 oz / 100–115 g cooked meat per person.

The buying amounts here assume plenty of other fillings and sides. Buy above them when the meat is doing most of the work.
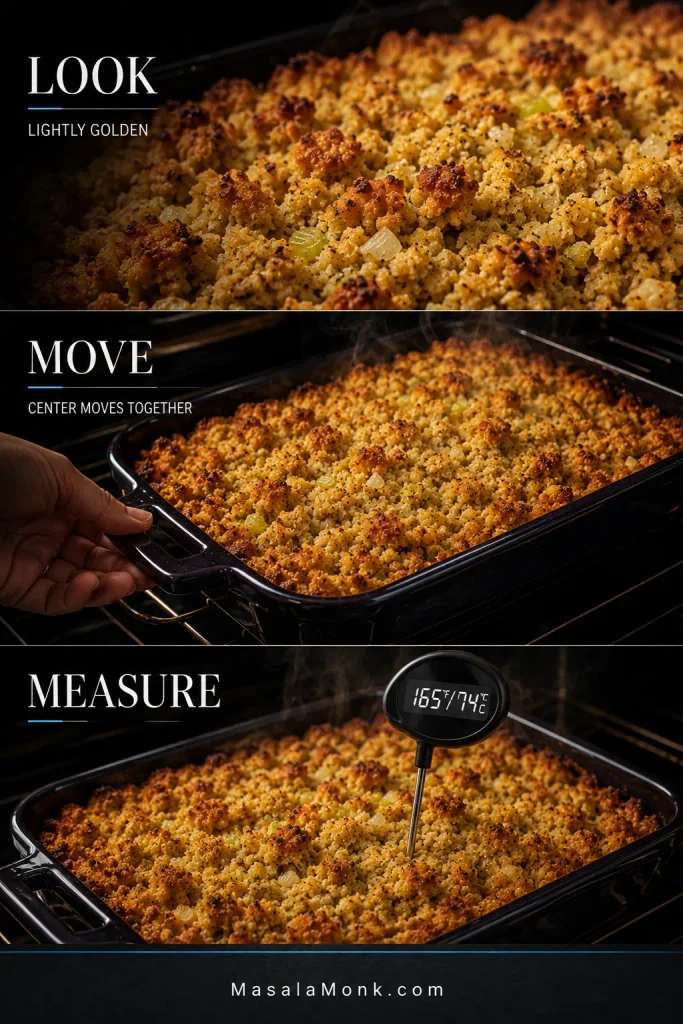
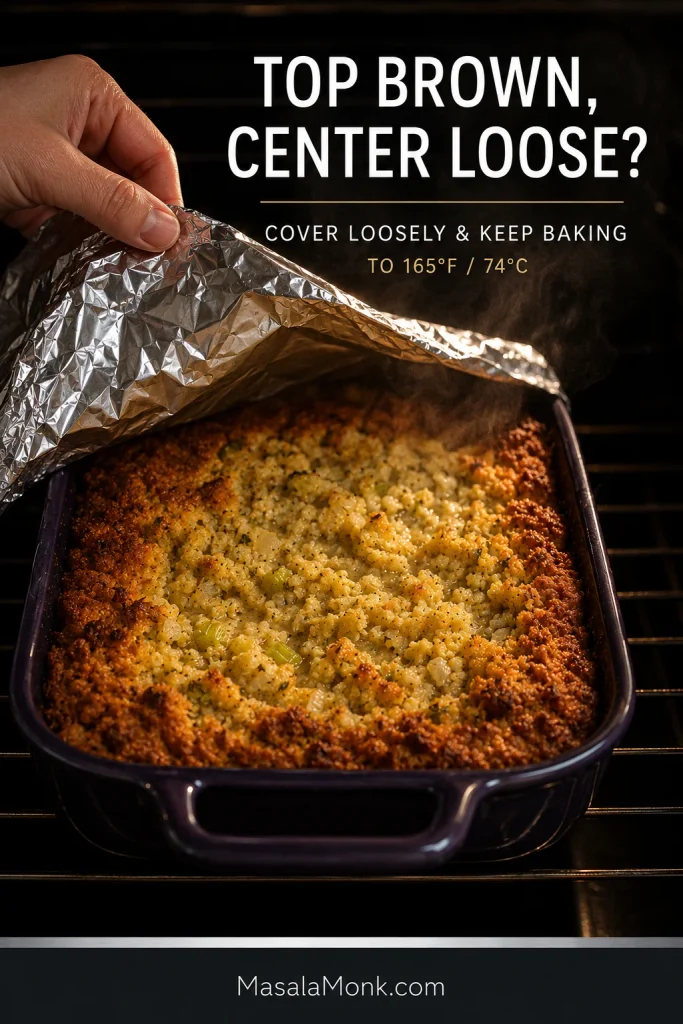
CrowdRaw beef to buyBest approach
8–10 peopleabout 2–2½ lb / 0.9–1.1 kgThe main slow-cooker method works well
12–16 peopleabout 3–4 lb / 1.4–1.8 kgUse a roomy cooker or split the batch
20 peopleabout 4½–5½ lb / 2.0–2.5 kgCook in batches, then keep hot for serving
30 peopleabout 6½–8 lb / 3.0–3.6 kgCook in batches; two Crockpots can make serving easier
Taco bar planning guide showing raw ground beef ranges for 8 to 10, 12 to 16, 20 and 30 people, with a note that the estimates assume plenty of other fillings and sides.

Why the Crockpot Works for a Taco Bar

A taco bar works because everyone builds exactly what they want while you only have one hot filling to keep track of. For a cold side that can be finished before people arrive, our 7 layer dip can be waiting in the refrigerator.

Several hands build tacos around an open black slow cooker filled with seasoned ground beef, surrounded by tortillas, cheese, salsa, avocado, onion and lime on a used taco-bar table.

For 5 Pounds or More, Change the Method

At about 5 lb / 2.3 kg and above, stop treating the meat as one giant raw slow-cooker batch. Brown the beef in batches that fit comfortably in the skillet, or divide the raw beef between multiple slow cookers. Drain excess rendered fat, season each batch, then combine the cooked meat in the Crockpot and keep it hot for serving.

Working in smaller batches keeps the crumbles distinct, makes excess fat easier to drain and helps the seasoning coat the beef evenly. For a big taco bar, the Crockpot becomes the serving station: the meat stays hot while you actually get to enjoy the gathering instead of playing line cook.

Four-step large-batch taco meat guide showing beef browned in batches, drained and seasoned, combined in an unbranded black slow cooker, then kept at 140 degrees Fahrenheit or above for serving.

Keeping Taco Meat Warm

Use WARM only after the meat is fully cooked and already hot. Keep hot food at 140°F / 60°C or above during serving and keep the lid on between rounds.

↑ Back to top · Jump to Recipe

Make Ahead, Store, Freeze and Reheat

Quick storage guide: refrigerate cooked taco meat for 3–4 days, freeze it for about 3 months for best quality, and reheat leftovers to 165°F / 74°C.

Make It the Day Before

Cook the taco meat completely and get the moisture where you want it before storing. Divide a large batch into smaller, shallow containers and refrigerate it within 2 hours. If food is sitting outdoors above 90°F / 32°C, that window drops to 1 hour.

When serving leftovers again, reheat the meat to 165°F / 74°C before transferring it to a slow cooker on WARM.

How to Freeze Taco Meat

Freeze the meat in amounts that match the way you actually eat it. A dinner-size package or larger family-size package is far more useful than one giant frozen block.

Flat freezer bags stack neatly and thaw faster. For the best eating quality, use the frozen taco meat within about 3 months.

A hand places a thin, flat freezer bag labeled Taco Meat into a freezer drawer beside several other flat bags of cooked ground beef stacked behind it.
Flatten portions before they freeze solid so they stack neatly and thaw faster than one thick block.

Reheat Without Turning It Into Soup

Cold taco meat often looks firmer and drier than it really is. Heat it first, then decide whether it needs anything.

Add salsa 1–2 tablespoons at a time if the meat could use more flavor as well as moisture, or use water if the seasoning is already where you want it. Add slowly so the beef stays juicy without becoming soupy.

Two matching bowls of taco meat show thick salsa being added when more flavor and moisture are needed and plain water being added when the seasoning is already right.

Ways to Use the Leftovers

The nicest part of making 2 pounds is that tomorrow’s dinner is already halfway done.

Warm tabletop spread showing four uses for leftover taco meat: beef quesadillas, a taco salad bowl, enchiladas with visible ground beef filling, and breakfast tacos with eggs and taco meat.
Small leftovers disappear easily into breakfast tacos or quesadillas; larger portions are worth turning into enchiladas or taco bowls.
  • Need dinner fastest? Make quesadillas, another round of tacos or a tray of nachos.
  • Want something fresher? Spoon the beef over taco salad or build burrito bowls with crisp vegetables and salsa.
  • Want it to feel like a different dinner? Turn the meat into enchiladas or pile it onto loaded baked potatoes.
  • Saving a small portion for morning? Warm it for breakfast tacos with eggs, cheese or avocado.

Leftovers heading toward enchiladas? Pair the beef with our homemade red enchilada sauce and it feels like a completely different dinner.

Frequently Asked Questions

Can I Leave Taco Meat on LOW All Day?

This is not an 8–10 hour workday Crockpot recipe. Ground beef does not need the long tenderizing time of a tough roast. Start checking the standard batch around four hours on LOW; several extra hours can soften and dry the crumbles more than you want.

Can I Put Frozen Ground Beef in the Crockpot?

For this recipe, thaw it first. USDA slow-cooker guidance recommends thawing meat before slow cooking. Thawed beef separates much more easily, which makes it simpler to crumble and check for even doneness.

Can I Use Ground Turkey?

Yes. Expect a softer crumble, and don’t be surprised if the turkey releases more or less liquid depending on how lean it is. Because ground turkey is poultry, cook it to 165°F / 74°C, then drain excess liquid if needed.

How Long Can Taco Meat Stay on WARM?

For Crock-Pot-branded slow cookers, manufacturer guidance recommends no more than about 4 hours on WARM. Other brands may differ, so check your manual. Use WARM only for food that is already fully cooked and hot.

Taco Night Is Basically Handled

Once the beef has the crumble you like and just enough moisture to stay juicy, this is where the Crockpot earns its place: dinner can sit there ready while the tortillas warm and everyone finishes whatever they were doing.

Put out whatever cheese, onion, avocado, lettuce, salsa, jalapeños or lime you already have. Leave the Crockpot where everyone can reach it and let people build their tacos the way they want them.

The meat is hot, seasoned and waiting when everyone is finally ready to eat. That’s really the whole point.

A hand holds a partly eaten soft taco filled with ground beef, avocado, cheese, onion and salsa, with a used black slow cooker, topping bowls, squeezed lime and a messy dinner plate softly visible behind it.

↑ Back to top · Jump to Recipe