A good avocado toast recipe should not taste like plain mashed avocado on dry bread. The best version is creamy, bright, salty, crisp at the edges, and finished with just enough contrast to make the next bite interesting. That contrast can be as simple as chili flakes and lemon, or as filling as egg, cottage cheese, smoked salmon, or crisp vegetables.
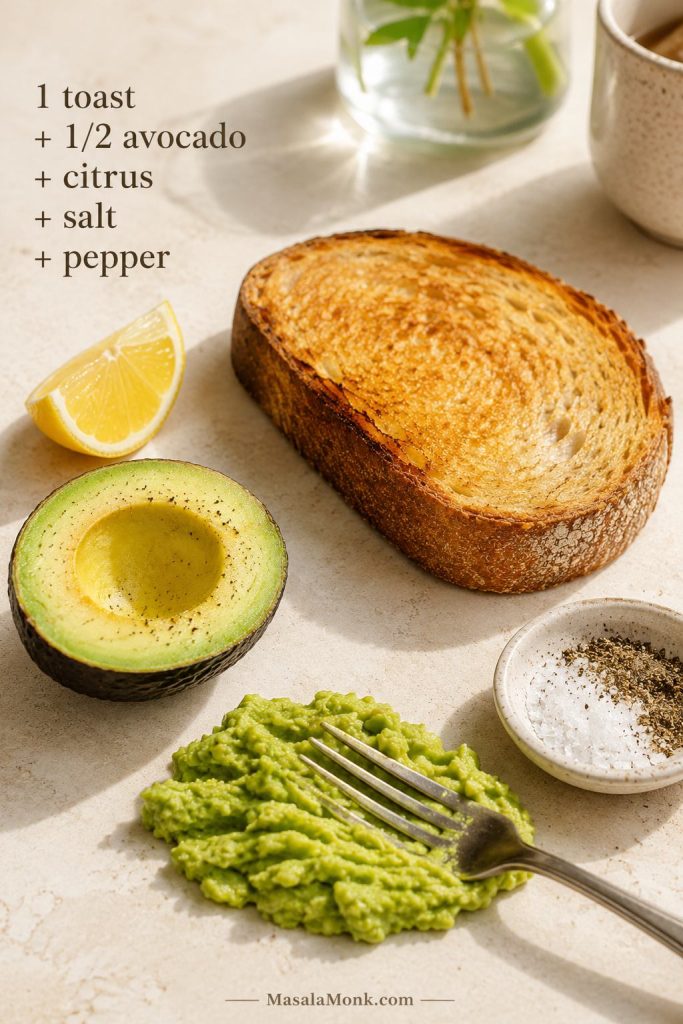
The everyday formula is easy: 1 thick slice of toast + 1/2 ripe avocado + 1–2 teaspoons lemon or lime juice + salt + pepper. Once that base tastes right, you can turn it into a fast breakfast, a high-protein toast, a brunch plate, or a simple lunch without making the recipe complicated.
If your toast usually tastes bland, soft, or overrated, the fix is rarely more avocado. It is better bread, a riper avocado, enough salt, enough citrus, and one topping that changes the bite.
The goal is not to pile everything on. The goal is to make the base so good that toppings feel like a choice, not a rescue mission.
Avocado Toast Guide
Quick Answer: Best Ratio
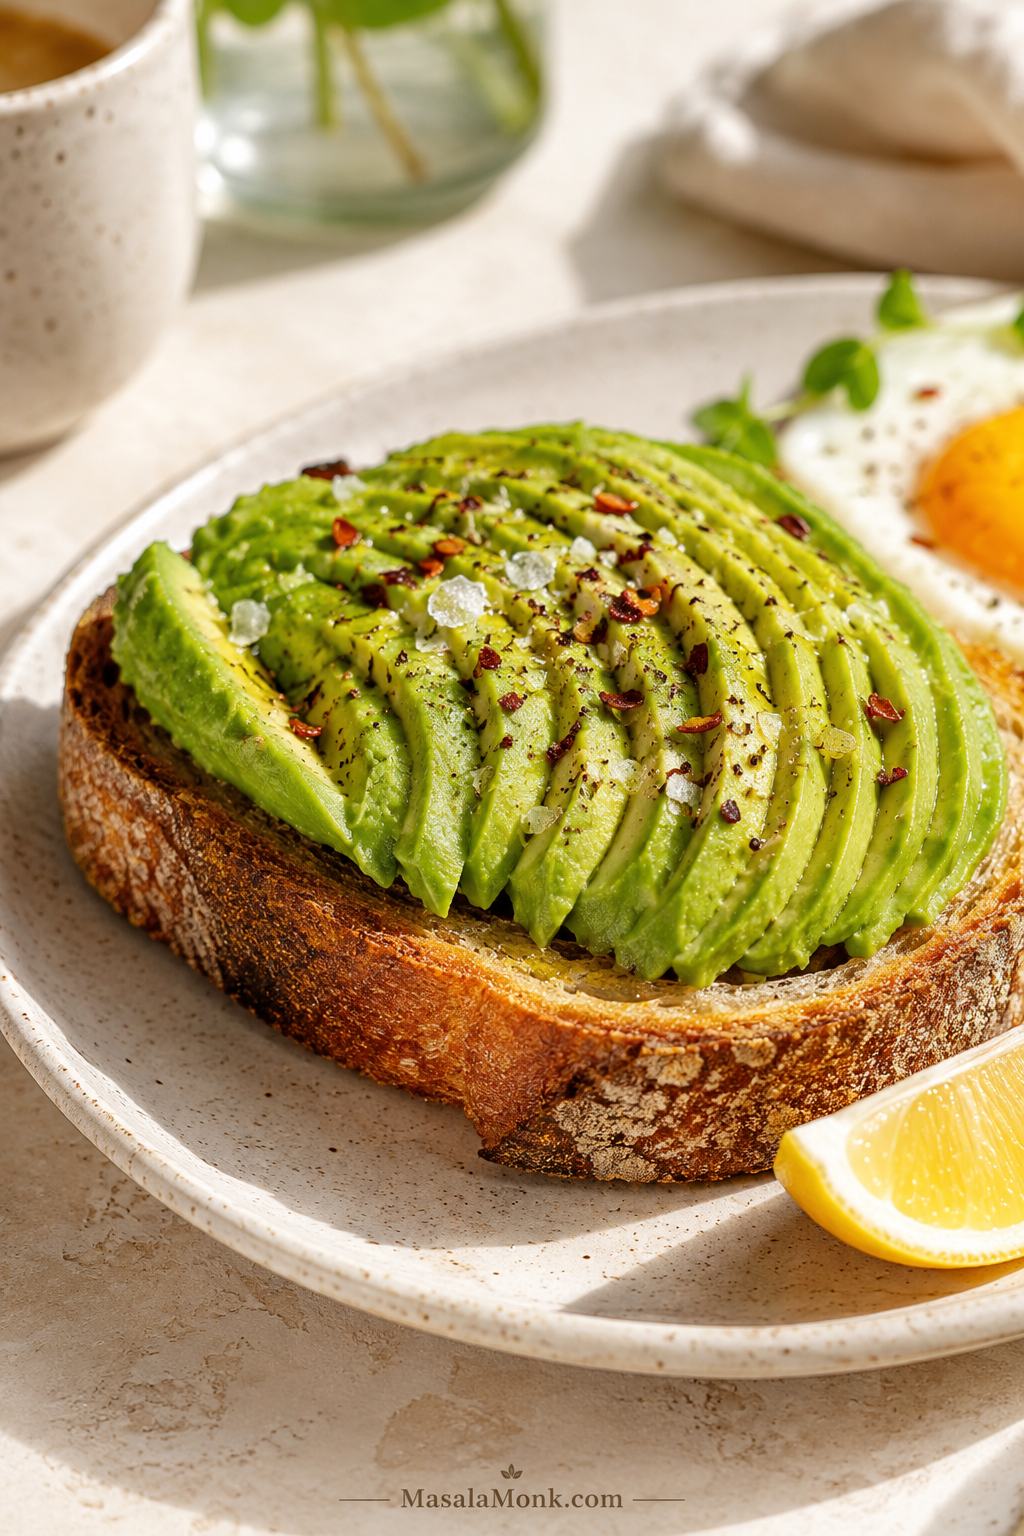
For one slice, use 1 thick piece of well-toasted bread, 1/2 ripe avocado, 1–2 teaspoons lemon or lime juice, a generous pinch of salt, and black pepper. Mash the avocado with the citrus and seasoning, spread it over hot sturdy toast, and eat it right away.
In a hurry, stop there. Toast well, season the avocado properly, spread it thickly, and finish with pepper, chili flakes, flaky salt, or everything bagel seasoning.
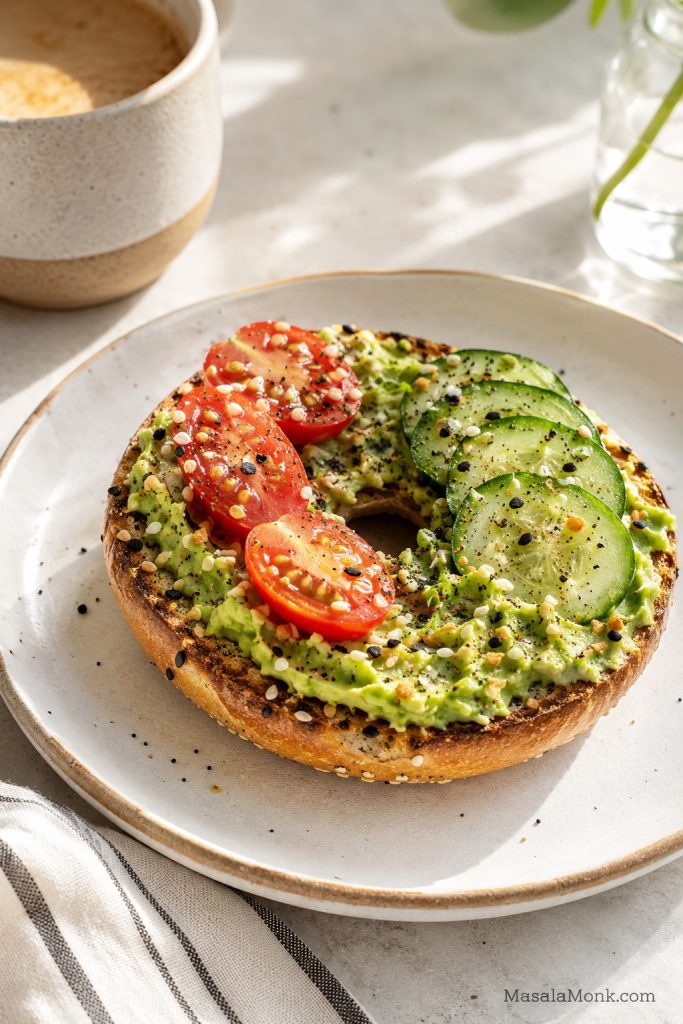
Best everyday build: Start with sourdough or seeded bread, 1/2 avocado, lemon or lime, fine salt, black pepper, flaky salt, and chili flakes. Add a fried egg when you want breakfast, or cucumber/radish when the slice needs crunch.
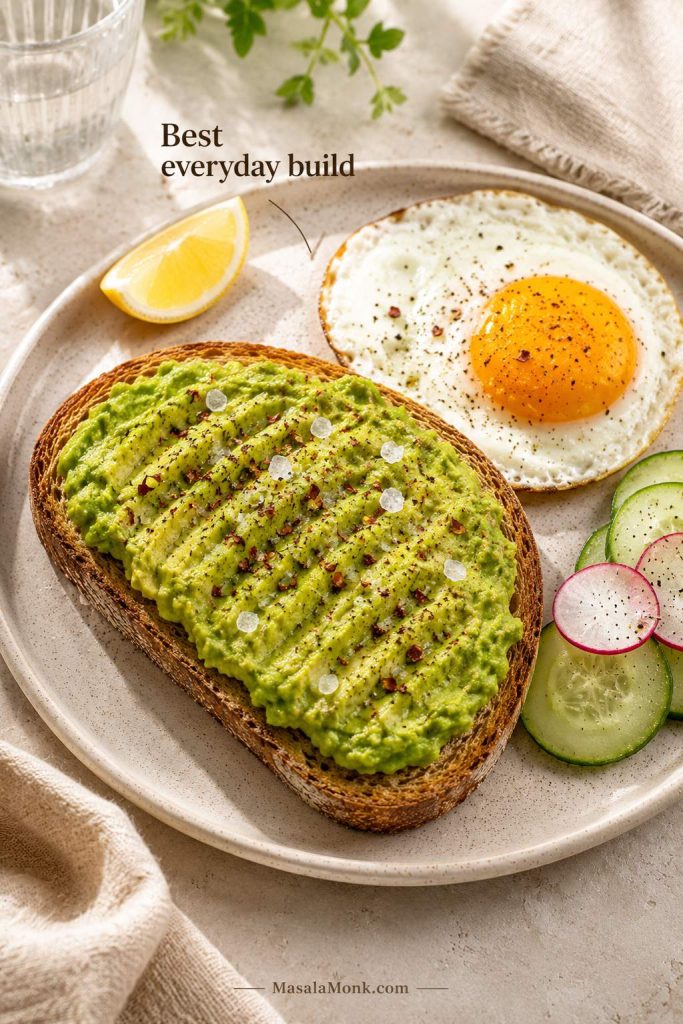
This is the version to make before you start loading on toppings. If this tastes good, every variation after it gets easier.
For two toasts, use 2 slices bread, 1 ripe avocado, 2–4 teaspoons lemon or lime juice, 1/4 teaspoon fine salt, and black pepper. Egg makes it breakfast, cottage cheese makes it more filling, and smoked salmon turns it into brunch.
Not sure what to add next? Jump to What Your Toast Needs to choose by crunch, salt, freshness, protein, or heat.
Base Formula
Use this base: 1 thick slice sourdough or whole-grain bread, 1/2 ripe avocado, 1–2 teaspoons lemon or lime juice, 1/8 teaspoon fine salt, black pepper, and optional flaky salt, olive oil, chili flakes, or one topping for contrast.
Once the base tastes right, use the toast ideas or the Fix the Bite guide to choose a topping.
That is the difference between toast that tastes like a café breakfast and toast that tastes like avocado spread on bread.
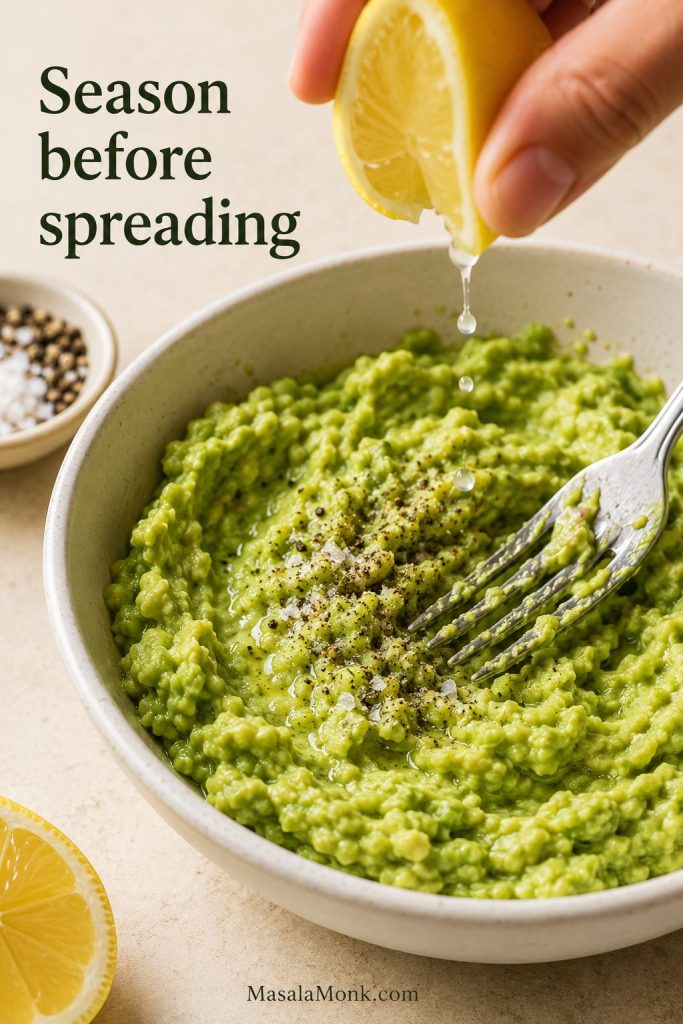
The Rule: Toast, Season, Contrast
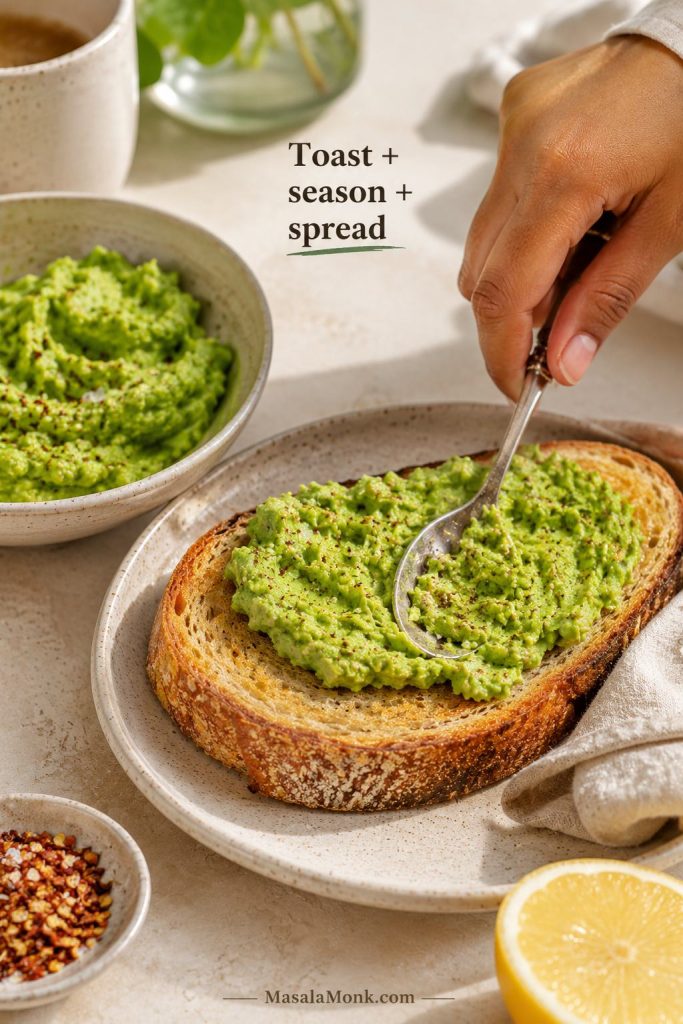
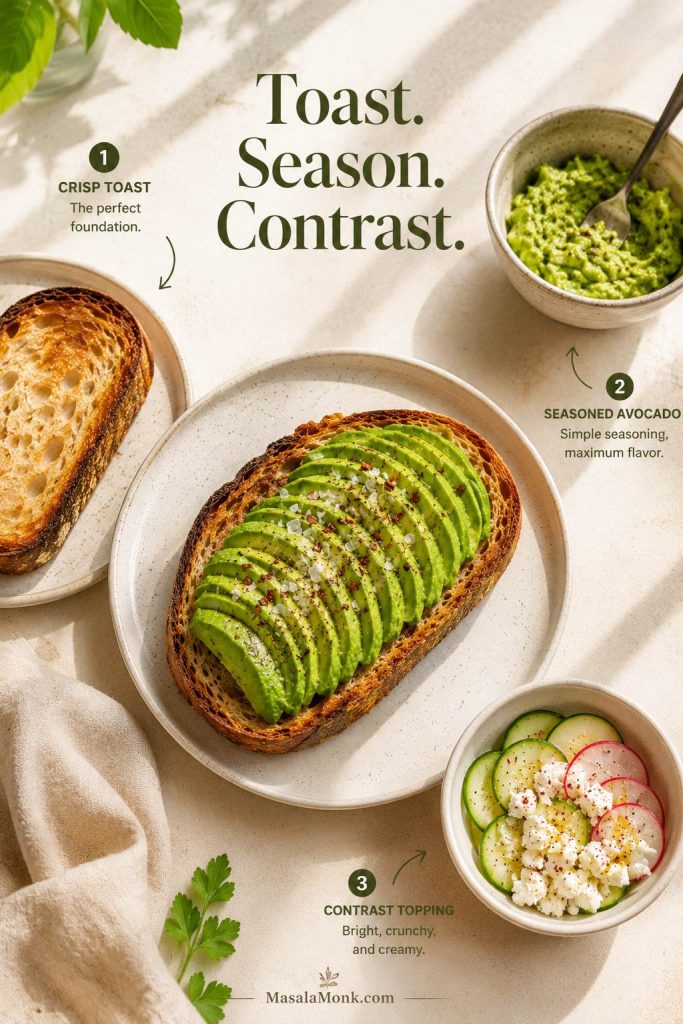
The best version follows one simple rule: toast, season, contrast. Toast the bread deeply enough to hold the avocado. Season the avocado before it touches the bread. Then add one topping that changes the bite.
Toast, Season, Contrast
- Toast: Use bread with enough structure, and toast it until the edges have crunch.
- Season: Mash the avocado with lemon or lime, fine salt, and black pepper before spreading.
- Contrast: Add one thing that changes the bite: egg for fullness, cucumber for crunch, feta for salt, tomato for freshness, or chili crisp for heat.
The first bite should feel creamy and crisp. If the second bite already feels boring, the toast needs contrast.
Once the base tastes good on its own, toppings become optional upgrades instead of rescue attempts.
Ingredients
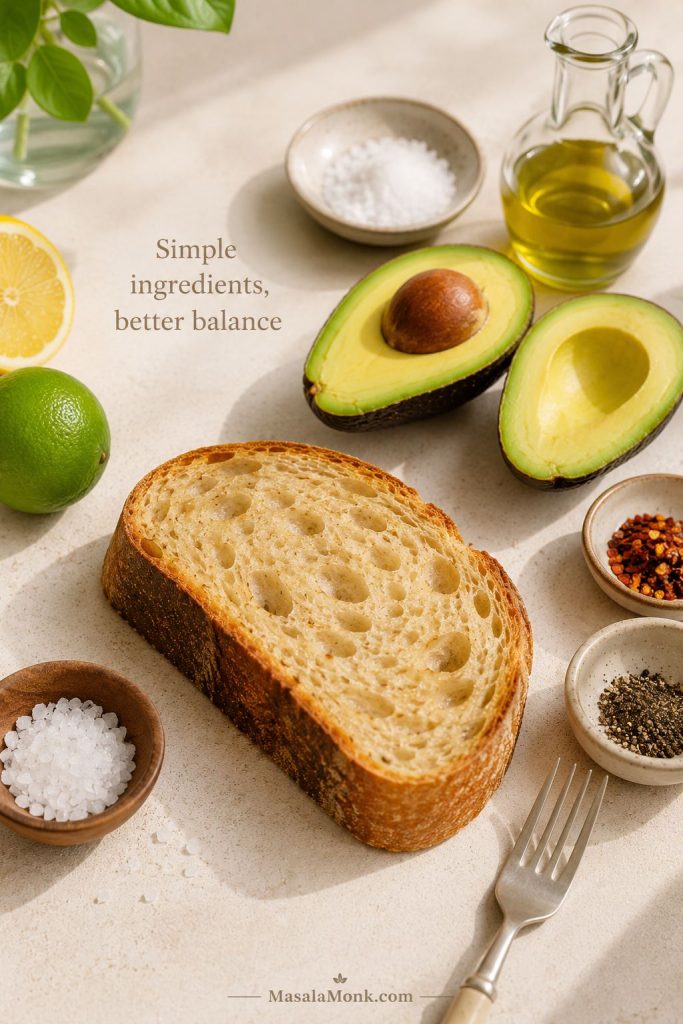
This recipe is simple, so there is nowhere for weak ingredients to hide. The avocado should be ripe, the bread should be sturdy, and the seasoning should be bold enough to wake up the mild, creamy avocado. Lemon or lime gives brightness, salt brings the flavor forward, and pepper, chili, herbs, seeds, or crunchy vegetables keep each bite from feeling one-note.
Use the table as a starting point, then taste the avocado before it goes on the bread. That one small step is what keeps the whole slice from tasting flat.
| Ingredient | Amount for 2 toasts | Why it matters |
|---|---|---|
| Thick bread | 2 slices | Gives the avocado somewhere to sit without turning the whole slice soft. |
| Ripe avocado | 1 medium-large avocado, about 140–160 g flesh | Mashes smoothly and gives the toast a creamy, buttery base. |
| Lemon or lime juice | 2–4 tsp / 10–20 ml, to taste | Cuts through the creamy avocado so the toast tastes fresh, not flat. |
| Fine salt | 1/4 tsp, plus more to taste | Brings the avocado forward instead of leaving it muted. |
| Black pepper | 1/8 tsp | Adds a warm, sharp finish. |
| Extra-virgin olive oil | 1–2 tsp, optional | Adds café-style richness, especially with sourdough. |
| Red pepper flakes | Pinch, optional | Adds a small kick so the avocado does not feel too creamy or quiet. |
| Flaky salt | To finish | Gives the top a crisp, salty pop. |
How to Pick a Ripe Avocado
Look for fruit that gives slightly when pressed near the top or side. It should not feel rock-hard, hollow, wrinkled, or mushy. Underripe avocado tastes grassy and firm, while overripe avocado can taste dull and may have brown stringy patches inside.
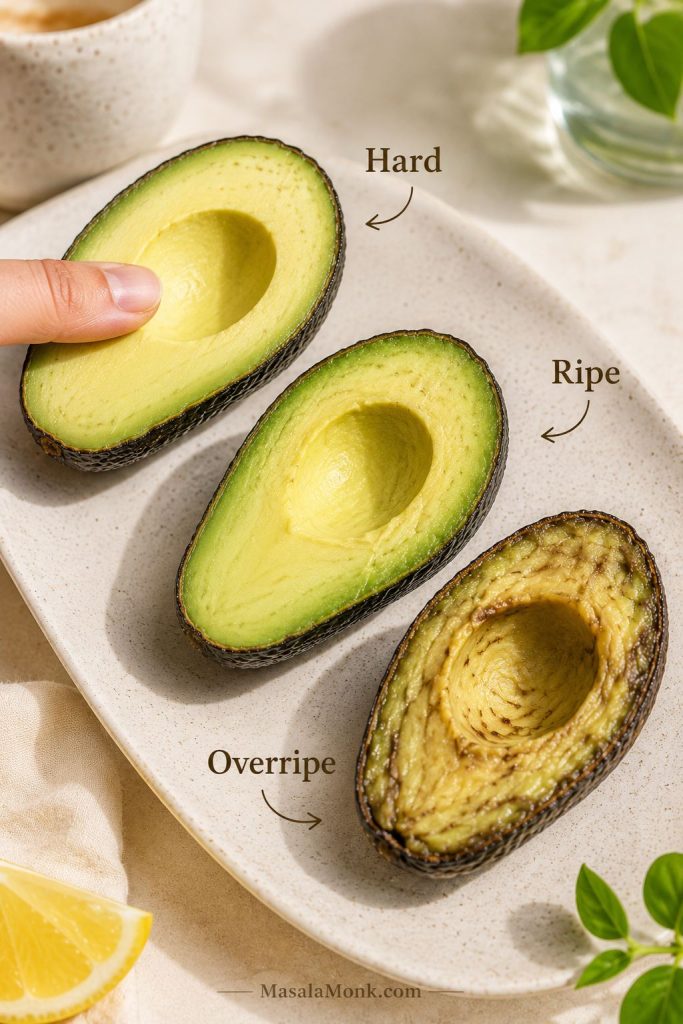
If the small stem nub comes off easily and the flesh underneath looks green, the avocado is usually close. If it looks brown underneath or the fruit feels very soft, it may be overripe.
Not ripe yet? Leave it at room temperature. To speed things up, place it in a paper bag with a banana or apple. Once ripe, refrigerate it to slow things down.
If your avocado is hard, make something else today. Toast cannot fix fruit that is not ready.
Best Bread
Bread is where many avocado toasts quietly fail. It has to do more than sit underneath the avocado. It needs enough structure to hold the mash, enough crunch to stay interesting, and enough flavor that the toast still tastes good after the first bite.
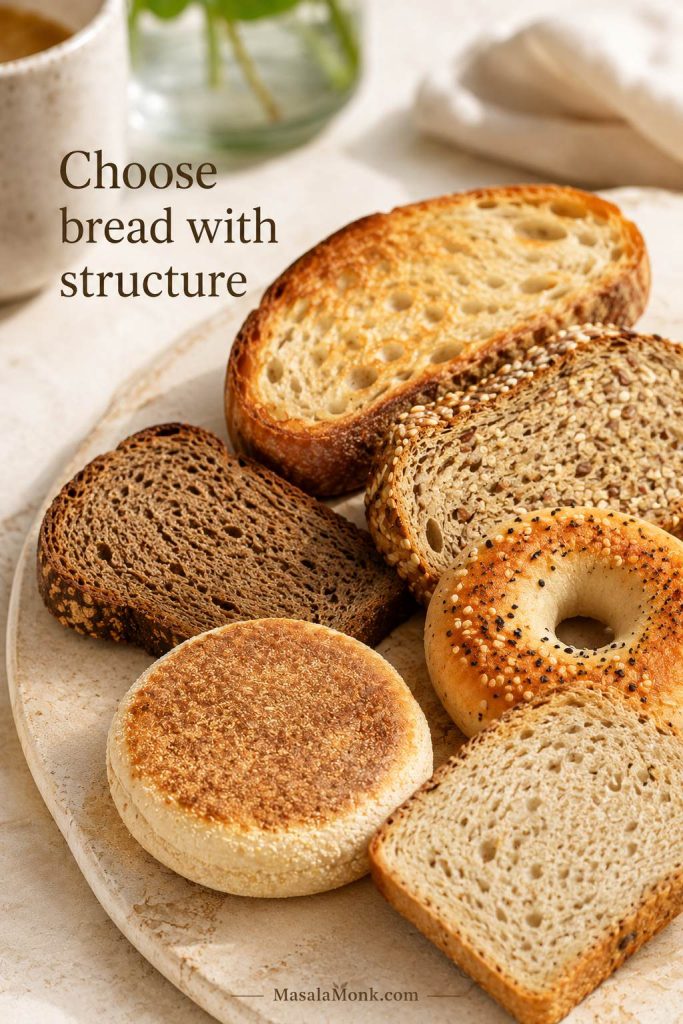
Sourdough is the best all-around choice, but whole grain, seeded bread, rye, bagels, English muffins, and gluten-free bread can all work if you toast them well.
| Bread | Best for | Tip |
|---|---|---|
| Sourdough | Classic café-style toast | Toast until deeply golden so the center stays firm. |
| Whole grain | Everyday healthy breakfast | Choose a sturdy slice with good texture, not soft sandwich bread. |
| Seeded bread | Crunch, fiber, and extra flavor | Excellent with egg, tomato, cottage cheese, or cucumber. |
| Rye or pumpernickel | Smoked salmon avocado toast | Pairs well with capers, dill, onion, and lemon. |
| Bagel | Bigger brunch-style serving | Use half a bagel if you want a balanced portion. |
| English muffin | Smaller breakfast portion | Good with poached egg or cottage cheese. |
| Gluten-free bread | Gluten-free avocado toast | Toast it longer than usual so it does not turn soft. |
| Low-carb bread | Lower-carb version | Add protein so the meal feels complete. |
Whatever bread you choose, toast it a little more than you would for buttered toast. Avocado is soft and rich, so the bread needs extra structure.
Soft sandwich bread can work in a pinch, but only if you toast it harder than usual; otherwise, the avocado will flatten it quickly.
If sogginess is the main issue, jump to How to Keep It from Getting Soggy.
If you like making toast from homemade bread, this sourdough bread recipes guide is a useful place to start, especially if you want a loaf, sandwich bread, English muffin bread, or bagel that works well for breakfast toast.
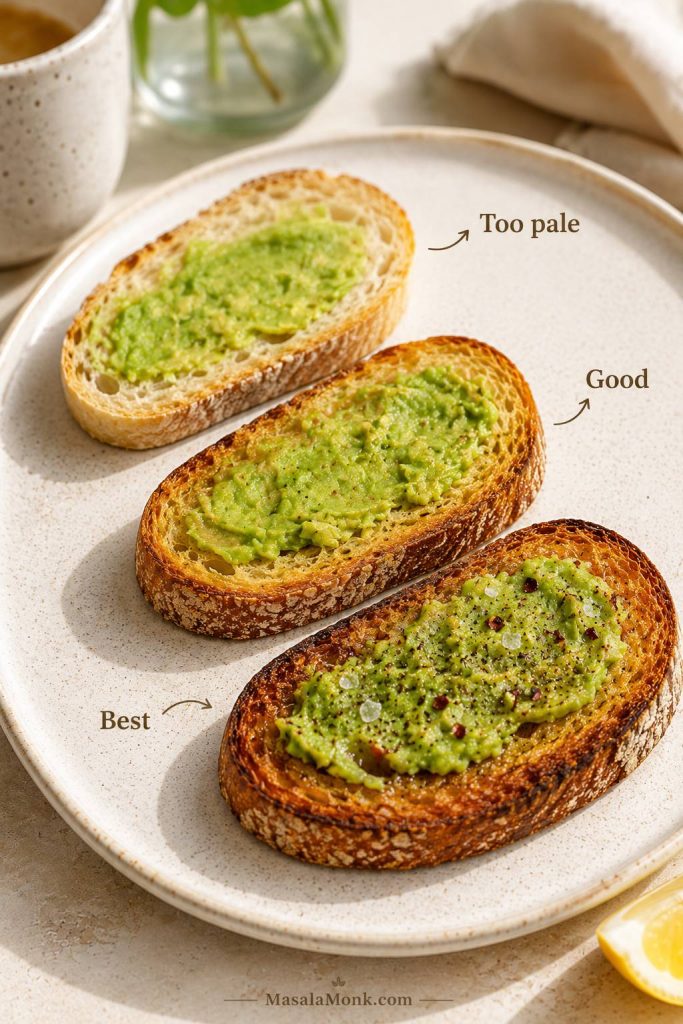
How to Toast Bread Properly
Most disappointing slices start with bread that is too soft. The toast should be firm enough to resist the avocado, especially if you are adding tomato, cucumber, poached egg, smoked salmon, pickled onions, or cottage cheese.

- Toaster: Best for fast everyday toast. Toast until golden and firm, not just warm.
- Skillet or griddle: Best for thicker sourdough or café-style toast. Use medium heat and toast for 2–3 minutes per side.
- Toaster oven: Best for multiple slices. Toast until the edges have crunch and the center feels sturdy.
- Garlic rub: Rub hot toast lightly with the cut side of a garlic clove for extra savory flavor.
- Olive oil or butter: Use a thin layer before pan-toasting, or a light drizzle after toasting, for a richer café-style finish.
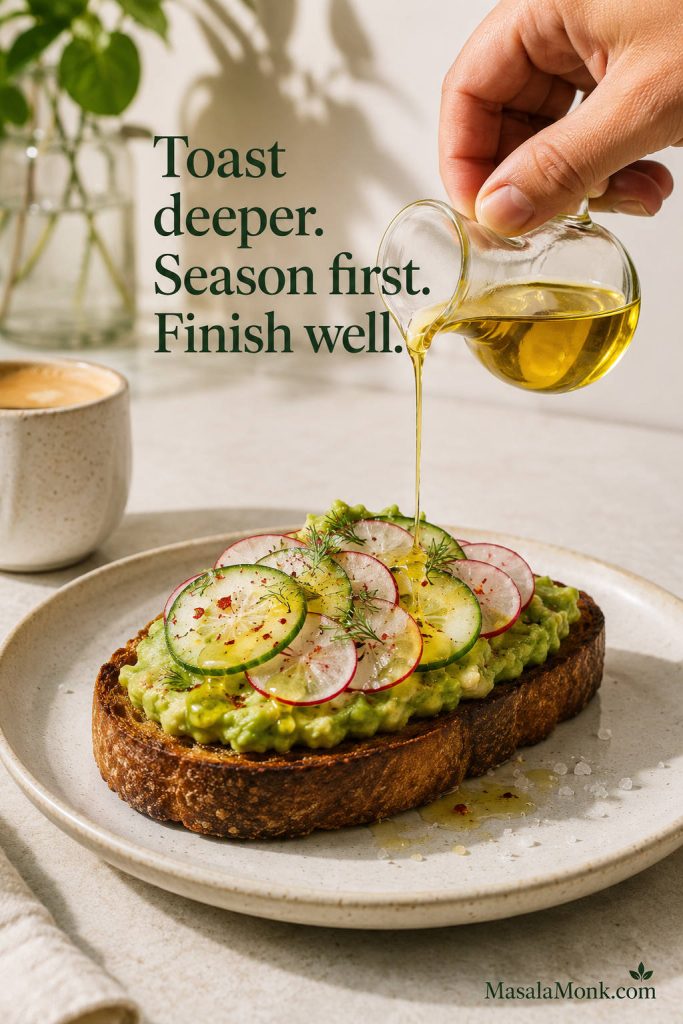
Restaurant-style upgrade: Rub the hot toast lightly with garlic, brush or drizzle with a little olive oil, season the avocado before spreading, and finish with flaky salt. Those small details make the toast taste brighter and more complete.
Do not cook the avocado mixture in the skillet. Toast the bread first, then add the avocado after. Warm bread is good; cooked avocado mash usually tastes dull.
How to Make It
It works best when the bread is hot and sturdy, the avocado is seasoned before spreading, and the finished toast is eaten while the edges still have crunch. The method is short, but the order matters: toast first, season the avocado second, then build the toppings right before serving.
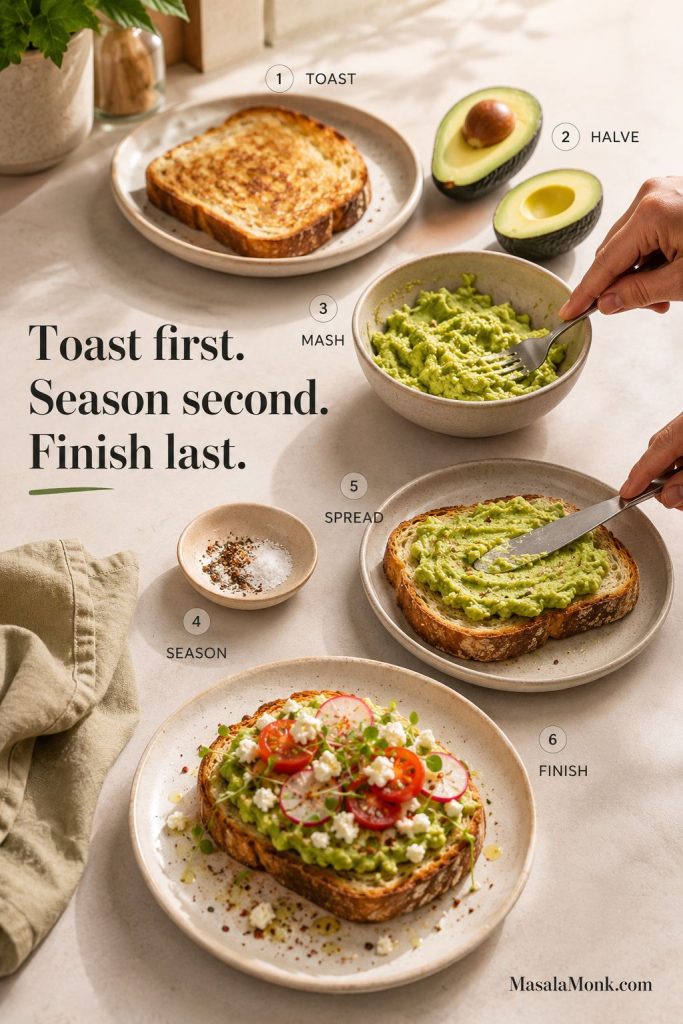
- Toast the bread. Toast until golden and firm, not pale and soft.
- Prepare the avocado. Halve the avocado, remove the pit, and scoop the flesh into a small bowl.
- Season the mash. Add lemon or lime juice, salt, and black pepper. Mash with a fork until mostly smooth but still a little textured.
- Taste before spreading. Add more salt, citrus, pepper, or chili flakes if it tastes flat.
- Spread over hot toast. Use about 1/2 avocado per thick slice.
- Finish and serve. Add flaky salt, olive oil, chili flakes, herbs, egg, cottage cheese, smoked salmon, feta, or another topping with contrast. Eat immediately.
Season before spreading: This small step helps the avocado taste bright and balanced before it ever touches the bread.
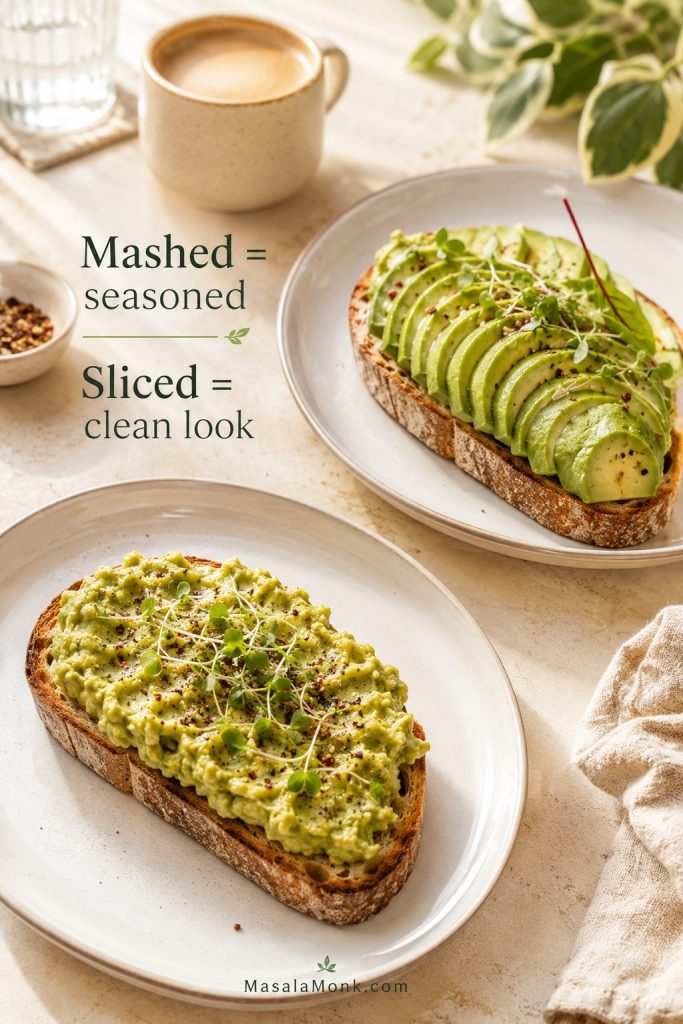
Texture tip: Mash the avocado in a bowl if you want even seasoning and a creamier bite. Slice it if you want a cleaner café-style look, especially with smoked salmon, feta, tomato, or poached egg. Either way, season it before you add the toppings.
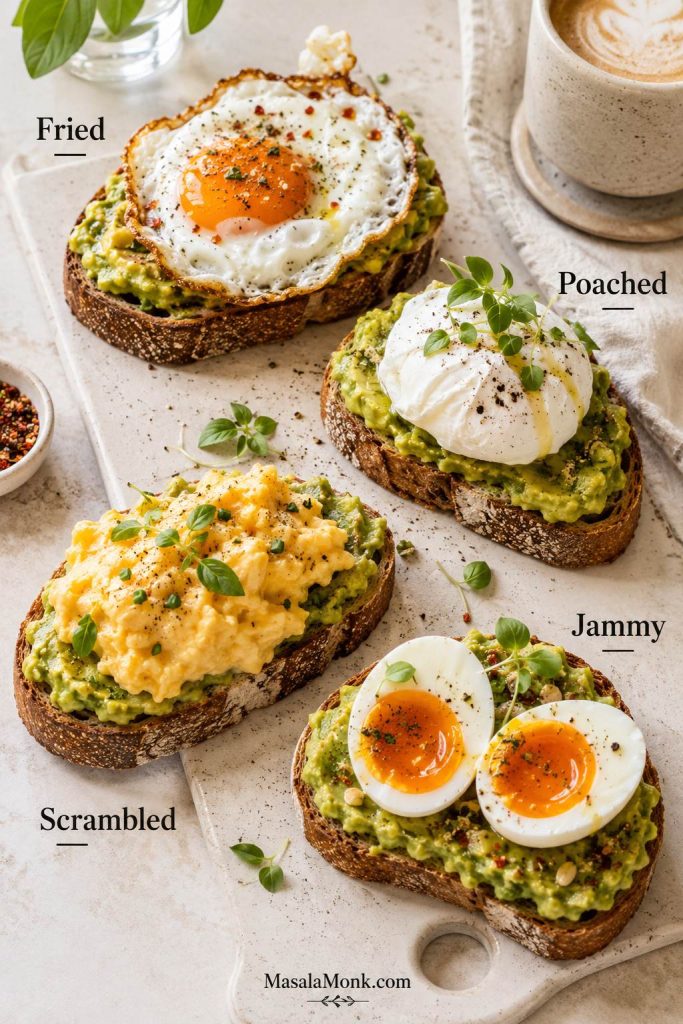
Avocado Toast with Egg
Egg turns the slice into breakfast, not a snack. One egg is enough for most slices. Two makes sense when the toast is the meal, not the side.
| Egg style | Choose it when you want | Watch out for |
|---|---|---|
| Fried egg | Classic café-style toast with a rich yolk | Do not over-salt if using bacon, feta, capers, or smoked salmon. |
| Poached egg | Brunch-style toast | Drain well or the bread gets wet. |
| Scrambled egg | Soft, filling breakfast | Keep the eggs creamy, not dry. |
| Jammy egg | Meal-prep-friendly breakfast | Slice gently so the yolk stays neat. |
| Egg whites | Lighter high-protein toast | Season more because egg whites are mild. |
For the safest first version, choose fried egg. It gives the toast richness without making the method fussy. Poached egg is prettier for brunch, scrambled is softer and more filling, and jammy egg is the easiest make-ahead option.
Want a no-cook protein version instead? Jump to the Cottage Cheese Version.
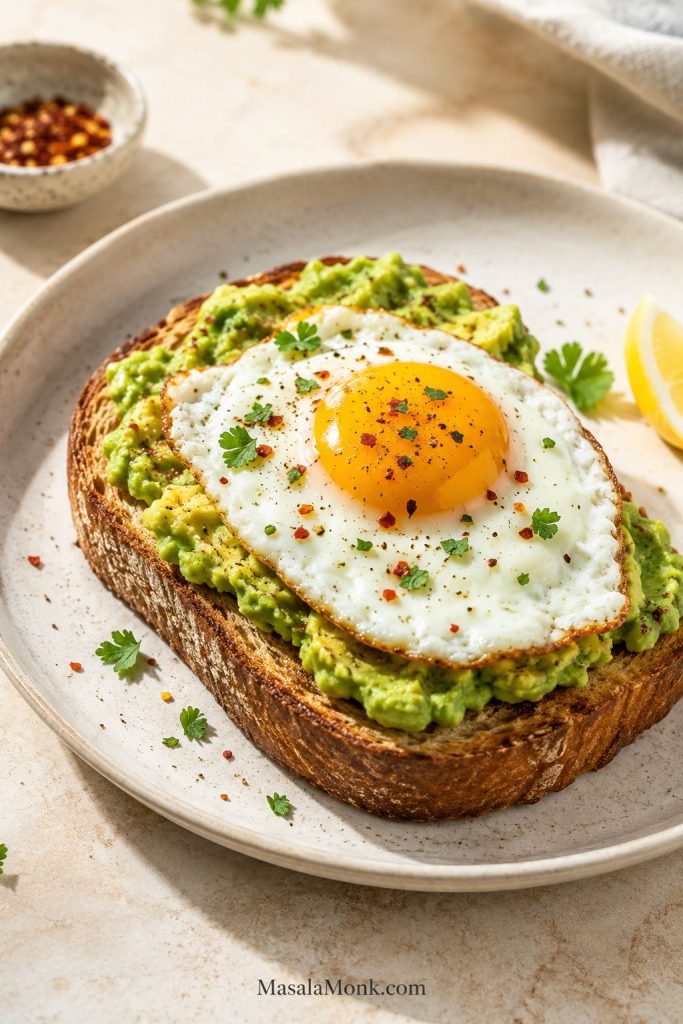
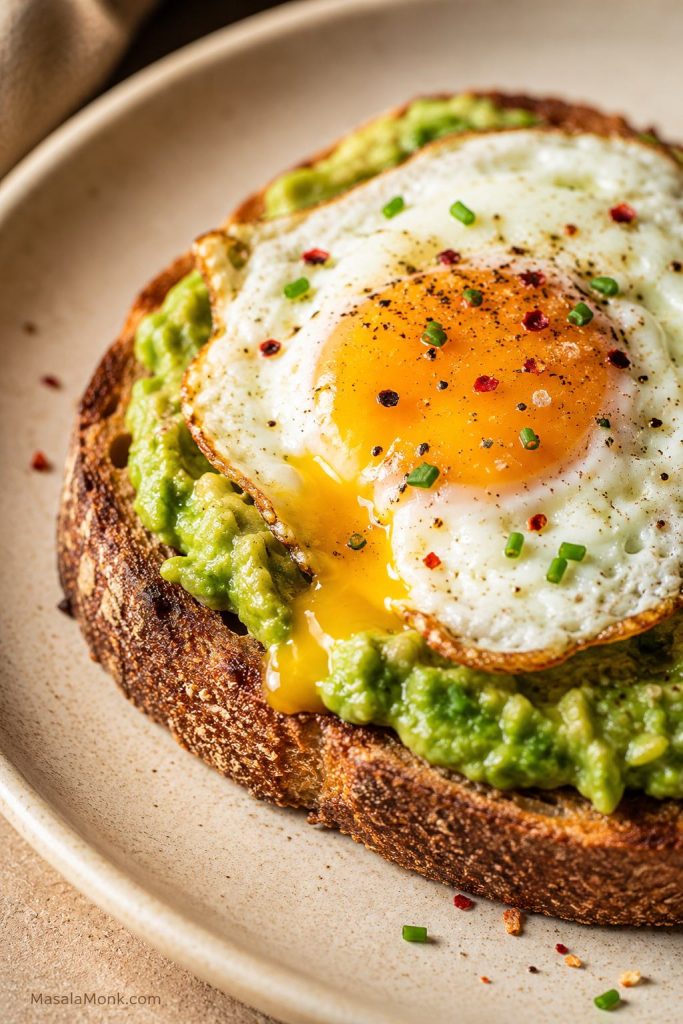
Fried Egg Version
Spread 1/2 mashed avocado over one slice of toast, then top with one fried egg. Cook the egg on medium heat until the white is set and the yolk is still soft, about 2–3 minutes if covered, or a little longer if your pan runs cooler. Finish with salt, pepper, chili flakes, and herbs.
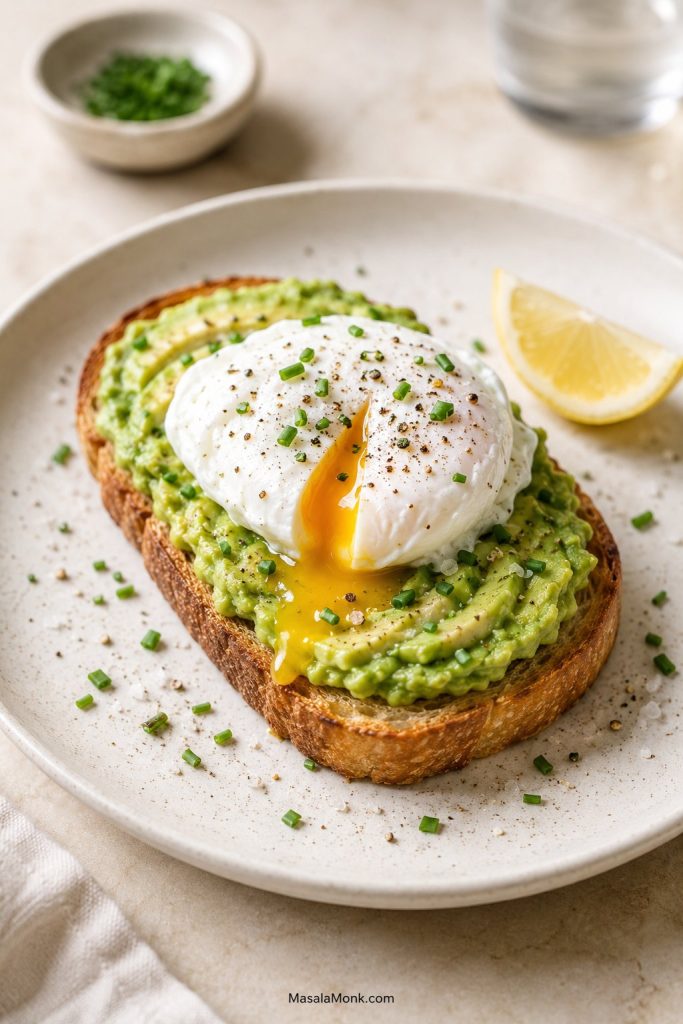
Poached Egg Version
Poach the egg at a bare simmer for 3–4 minutes, then drain it well before placing it on the toast. This version is excellent with chives, flaky salt, black pepper, lemon, and a little chili oil.
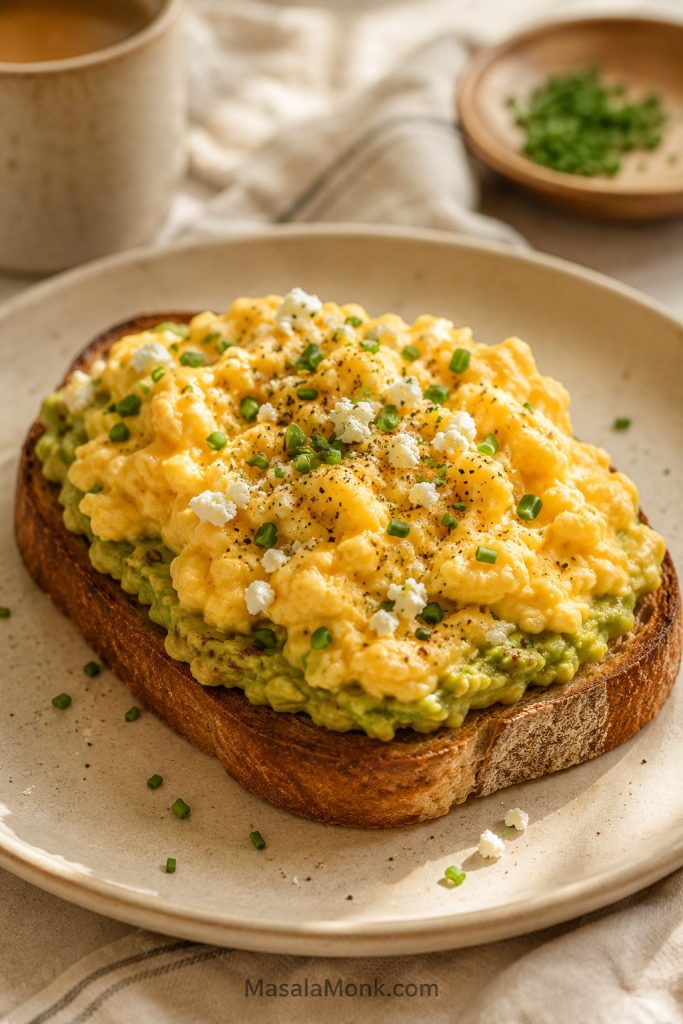
Scrambled Egg Version
Use soft scrambled eggs rather than dry curds. Cook them on low to medium-low heat for 2–3 minutes, then spoon them over the avocado base. Chives, black pepper, chili flakes, and a little feta work well here.
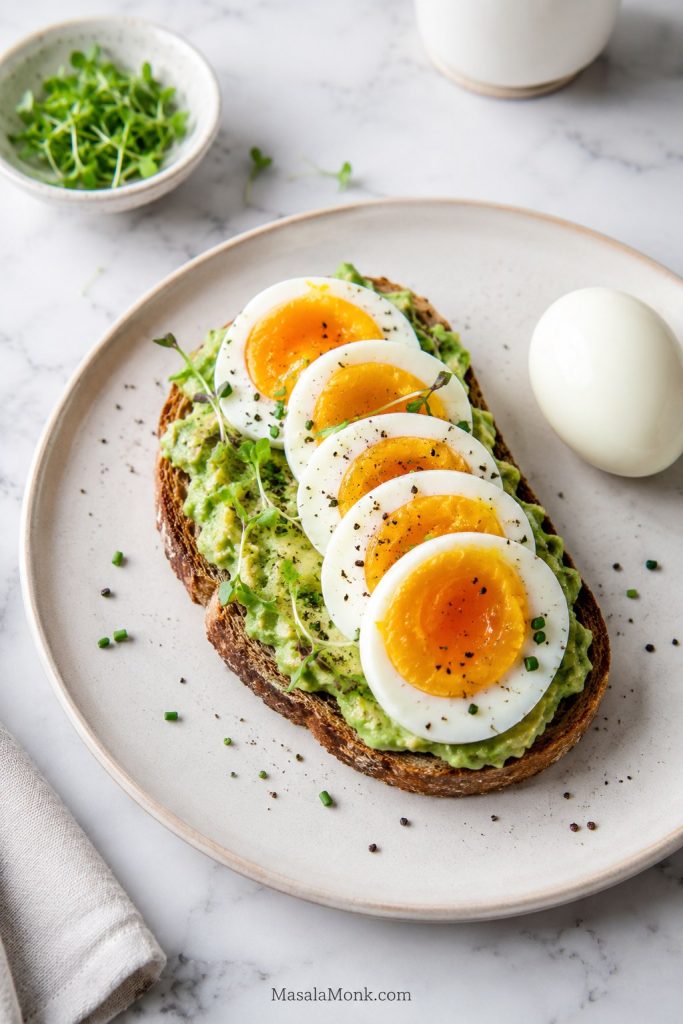
Boiled or Jammy Egg Version
For a jammy egg, lower the egg into simmering water and cook for 6–7 minutes, then cool briefly before peeling. For clean hard-boiled slices, cook for 9–10 minutes. This is the best egg version when you want to prep part of breakfast ahead.
If you are cooking for more than one person, a toast bar can get messy fast. For a bigger egg breakfast, this frittata recipe is easier to prep ahead than building every slice one by one.
Cottage Cheese Version
The cottage cheese version is the no-cook protein route: cool, creamy, tangy, and more filling without another pan of eggs. Choose it when you want the toast to feel like a real breakfast but do not want to cook anything.
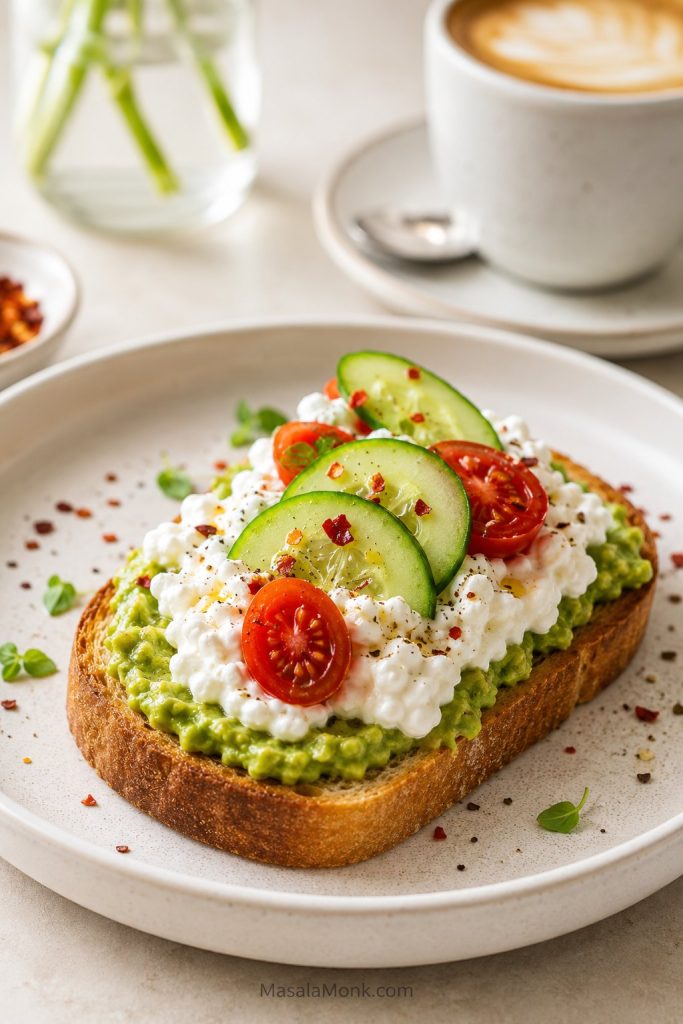
One thick slice needs 1/4 to 1/2 avocado, 1/3 cup / about 75 g cottage cheese, 1 teaspoon lemon or lime juice, salt, black pepper, and chili flakes. Watery cottage cheese should be drained first so the bread stays firm.
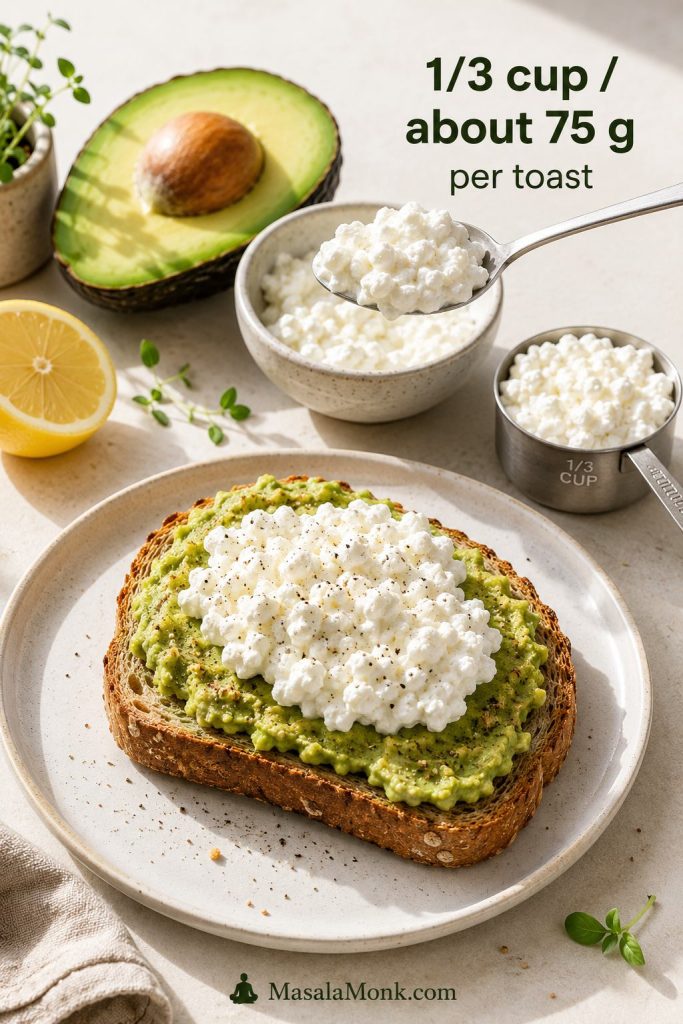
Low-fat cottage cheese is usually lighter but can be wetter. Full-fat cottage cheese is creamier and richer. Both work, but season carefully because cottage cheese is already salty. For contrast, add something crisp, spicy, or fresh.
For a warmer version of the same high-protein idea, these scrambled eggs with cottage cheese give you a creamy breakfast option without relying on toast.
Brunch Versions: Smoked Salmon, Feta, and Bagel
Once the base is right, richer versions are easy. The trick is restraint: smoked salmon, feta, bagels, and cheese can make the toast feel special, but they also add salt, richness, or weight. Let one main topping lead, then use lemon, herbs, pepper, or crunchy vegetables to keep the bite balanced.
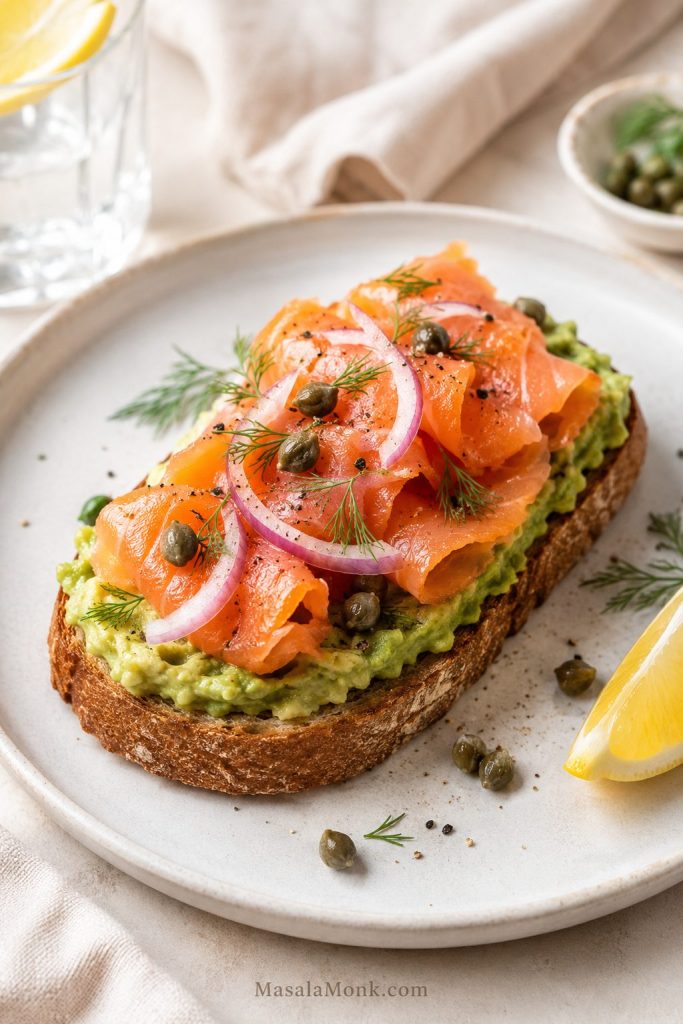
Smoked Salmon Version
For brunch, keep the avocado quieter and let salmon, lemon, capers, onion, and dill lead. Because smoked salmon is already salty, season the mash more lightly and use citrus or herbs for lift.
For one toast, use 1 slice sourdough, rye, seeded bread, or 1/2 toasted bagel; 1/2 avocado; 1–2 ounces / 30–60 g smoked salmon; 1 teaspoon lemon juice; 1 teaspoon capers; thin red onion or shallot; and dill, chives, or microgreens. Cream cheese, goat cheese, or cottage cheese can go under the avocado if you want a richer version.
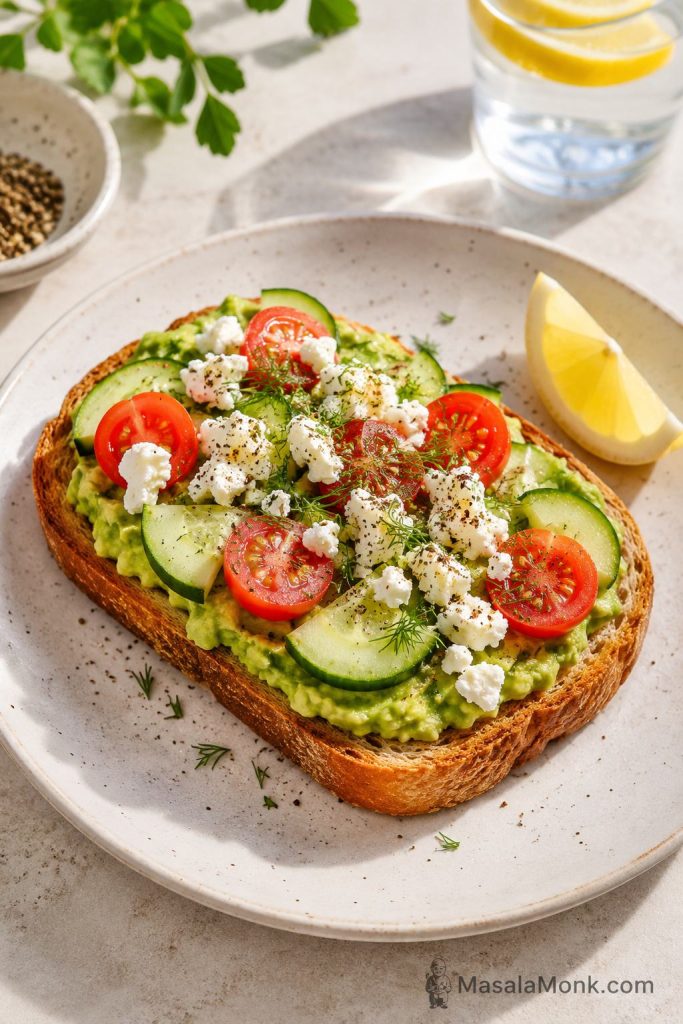
Feta Version
Feta is the fastest fix for a mild, creamy base. It brings salt and edge, especially when you add tomato, cucumber, herbs, black pepper, or a little lemon.
For one toast, spread 1/2 avocado over sturdy toast, then add 1–2 tablespoons crumbled feta. If using olives, capers, or pickled onions too, reduce the salt in the avocado mash.
Bagel Version
A bagel turns this into a bigger breakfast, so the build needs more restraint. Toast the cut side well, use 1/2 avocado per bagel half, and choose one main direction: egg, cottage cheese, smoked salmon, tomato, or everything bagel seasoning.
If the bagel is large, start with half. A full bagel with avocado and toppings can become very filling quickly.
If you like the bagel direction, MasalaMonk’s breakfast sandwich ideas have more ways to build egg, cheese, avocado, sauce, and toasted bread into a fuller morning meal.
What Your Toast Needs: Fix the Bite
Do not choose toppings randomly. Choose them by what the bite is missing. If the base already tastes good, one topping is usually enough.
Take one bite of the base first; the answer is usually obvious once you notice whether it needs crunch, salt, heat, freshness, or protein.
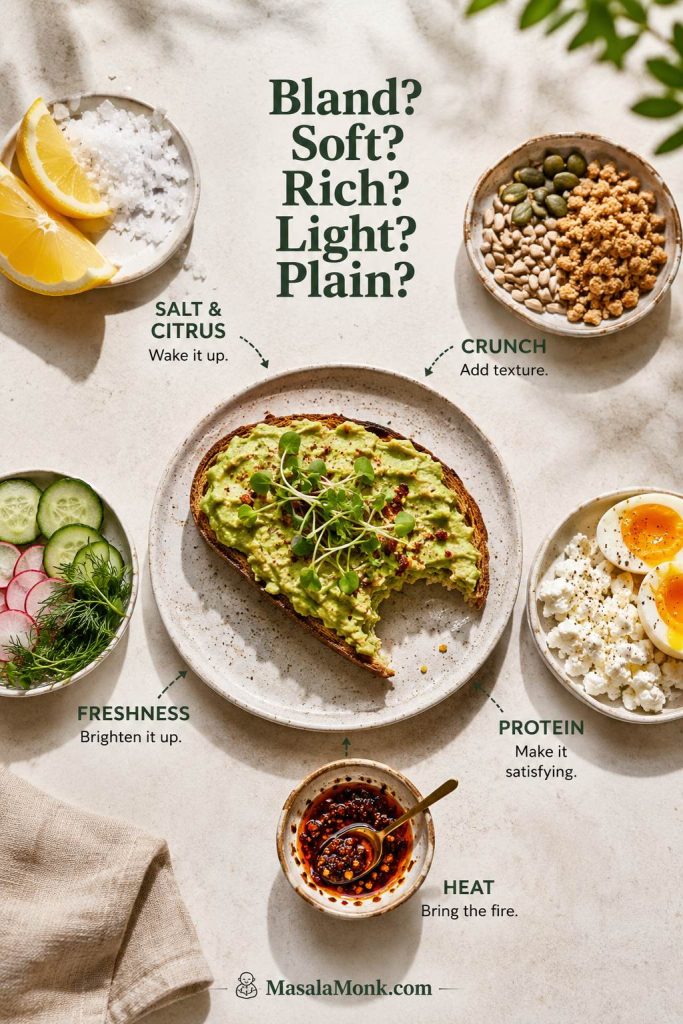
What Your Toast Needs
- Bland? Add salt, lemon or lime, chili flakes, hot sauce, flaky salt, or everything bagel seasoning.
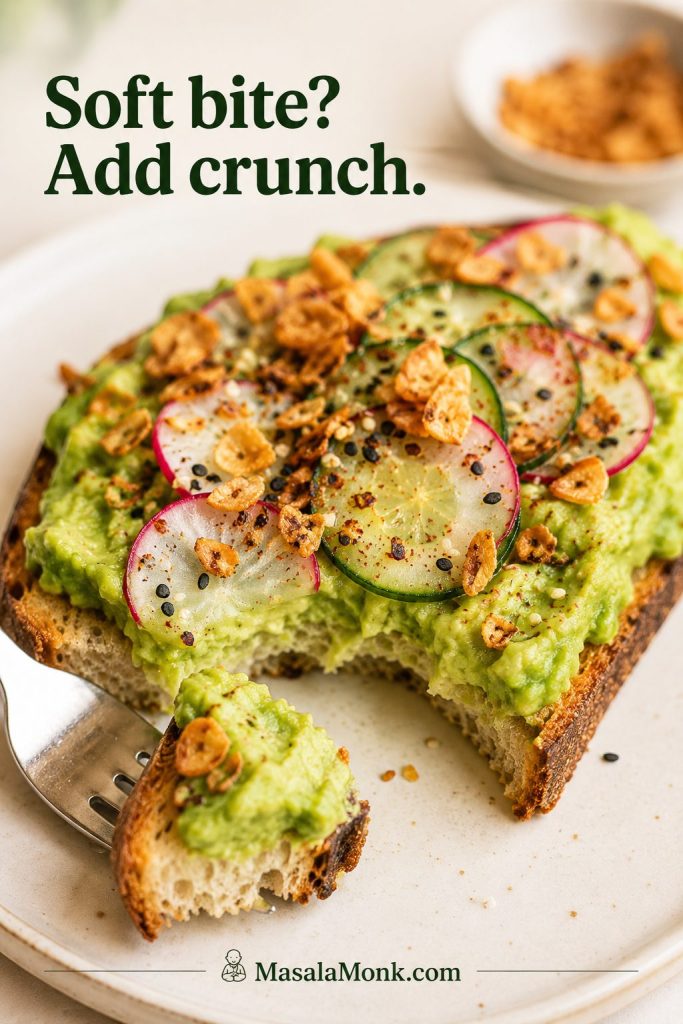
- Soft-on-soft? Add cucumber, radish, seeds, crispy garlic, toasted nuts, or crisp bacon.
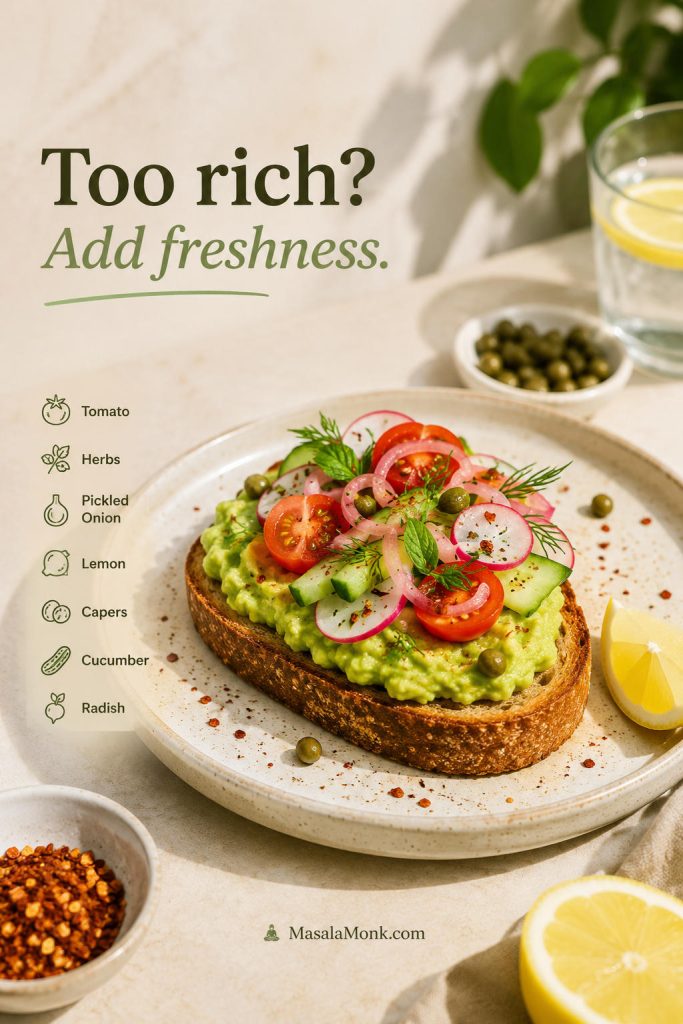
- Too rich? Add tomato, herbs, pickled onion, lemon or lime, capers, sprouts, or cucumber.
- Not filling? Add egg, cottage cheese, beans, tuna, smoked salmon, tofu, or seeds.
- Too plain? Add feta, goat cheese, za’atar, pesto, chili crisp, hot sauce, or a garlic rub on the toast.
15 Ideas That Actually Work
Think of these as starting points, not rules. A weekday toast might only need lemon and chili flakes, while a weekend brunch version can handle egg, smoked salmon, capers, herbs, and a little extra crunch.
Quick Everyday Ideas
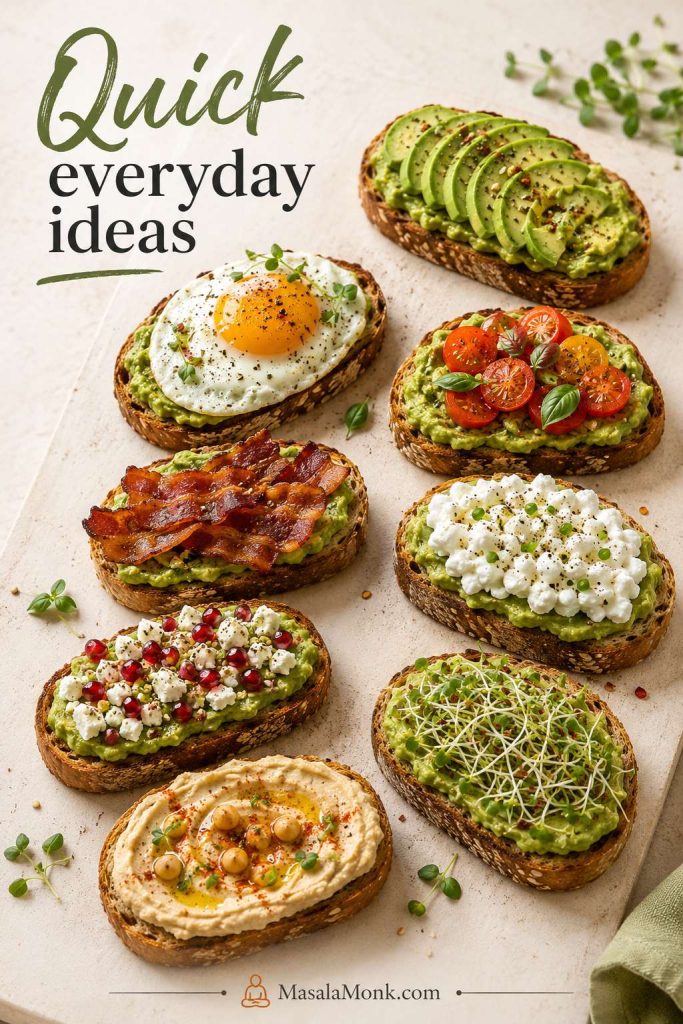
| Idea | What to add | Why it works |
|---|---|---|
| Classic café toast | Avocado, lemon, flaky salt, chili flakes, olive oil | The cleanest version when the avocado is ripe and well-seasoned. |
| Fried egg avocado toast | Avocado, fried egg, pepper, chives | Rich yolk makes it feel like a full breakfast. |
| Tomato avocado toast | Avocado, tomato, basil or coriander/cilantro, black pepper | Tomato makes the toast feel juicy and summery. |
| Bacon avocado toast | Avocado, crisp bacon, egg, hot sauce | Salty crunch cuts through the creamy avocado. |
| Cottage cheese avocado toast | Avocado, cottage cheese, cucumber, chili flakes | Cool, creamy, tangy, and more filling without cooking another egg. |
| Feta avocado toast | Avocado, feta, cucumber, tomato, oregano or za’atar | Salty cheese and fresh vegetables balance the avocado. |
| Hummus avocado toast | Hummus, avocado, olive oil, paprika | Creamy, savory, and vegan-friendly. |
| Sprouts avocado toast | Avocado, sprouts, cucumber, seeds, lemon | Crunchy, fresh, and lighter. |
Filling, Brunch, and Bigger Ideas
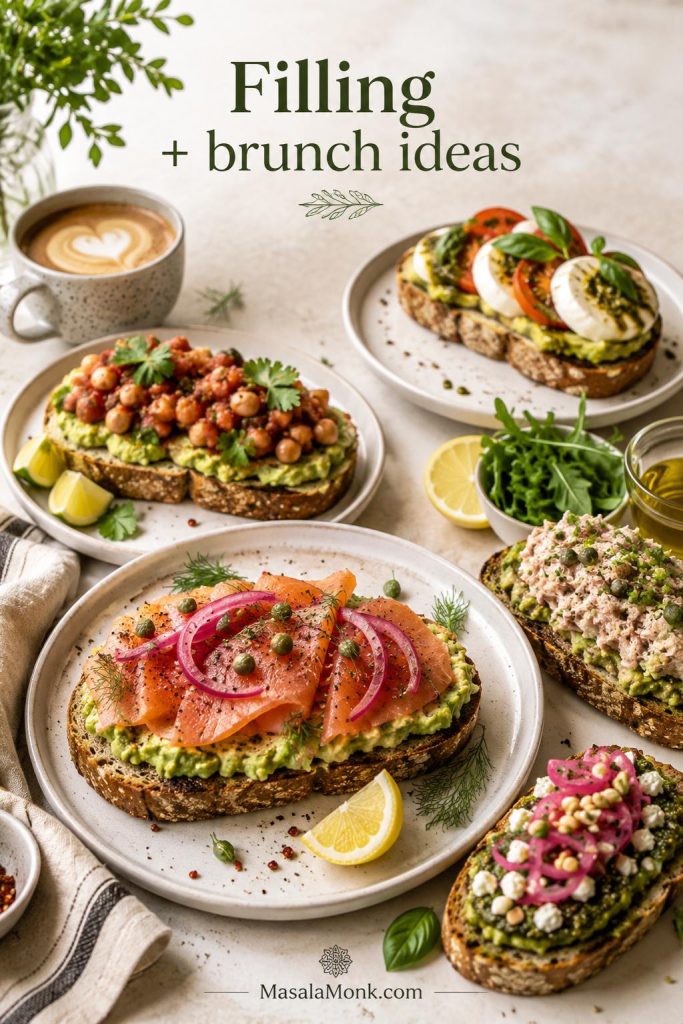
| Idea | What to add | Why it works |
|---|---|---|
| Smoked salmon avocado toast | Avocado, salmon, capers, dill, red onion | Premium brunch flavor with salt, tang, and herbs. |
| Black bean salsa avocado toast | Avocado, black beans, salsa, coriander/cilantro, lime | Filling, bright, vegan-friendly, and strong enough for brunch. |
| White bean avocado toast | Avocado, white beans, lemon, herbs, pepper | Creamy, mellow, and more satisfying without egg or cheese. |
| Caprese avocado toast | Avocado, tomato, mozzarella or burrata, basil | Fresh, creamy, and summer-friendly. |
| Tuna avocado toast | Avocado, tuna, lemon, pepper, onion | Protein-heavy and lunch-friendly. |
| Pickled onion avocado toast | Avocado, pickled onions, herbs, black pepper | Sharp, colorful, and useful when the toast tastes too rich. |
| Pesto avocado toast | Avocado, pesto, tomato, flaky salt | Herby, savory, and a fast way to make the base taste more complete. |
You do not need to turn every slice into a loaded café plate. Most days, one strong direction is enough: egg and pepper, tomato and basil, cottage cheese and cucumber, or beans and salsa.
Still unsure what to add? Use What Your Toast Needs to choose by texture, salt, freshness, protein, or heat.
For the bacon version, keep the bacon crisp and the portion modest; the crunch matters more than piling it on. This air fryer bacon recipe is handy when you want a few crisp strips for breakfast without standing over a skillet.
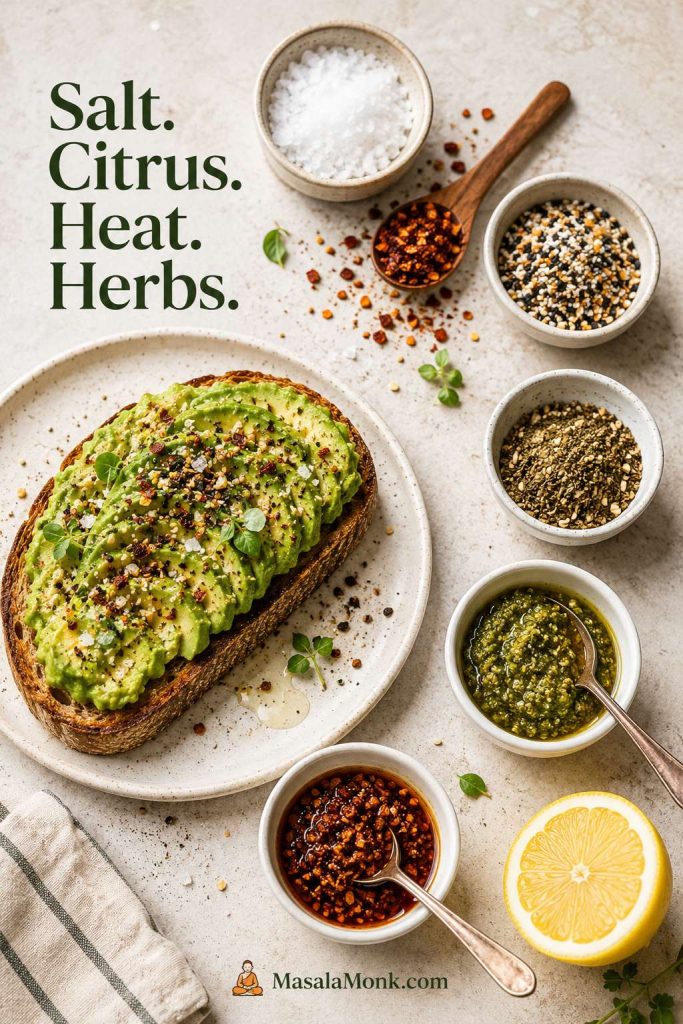
Best Seasoning
If the toast tastes bland, it usually needs more salt, citrus, heat, or crunch — not more avocado. Start with salt and lemon or lime, then build from there. The seasoning should make the avocado taste brighter, not cover it completely.
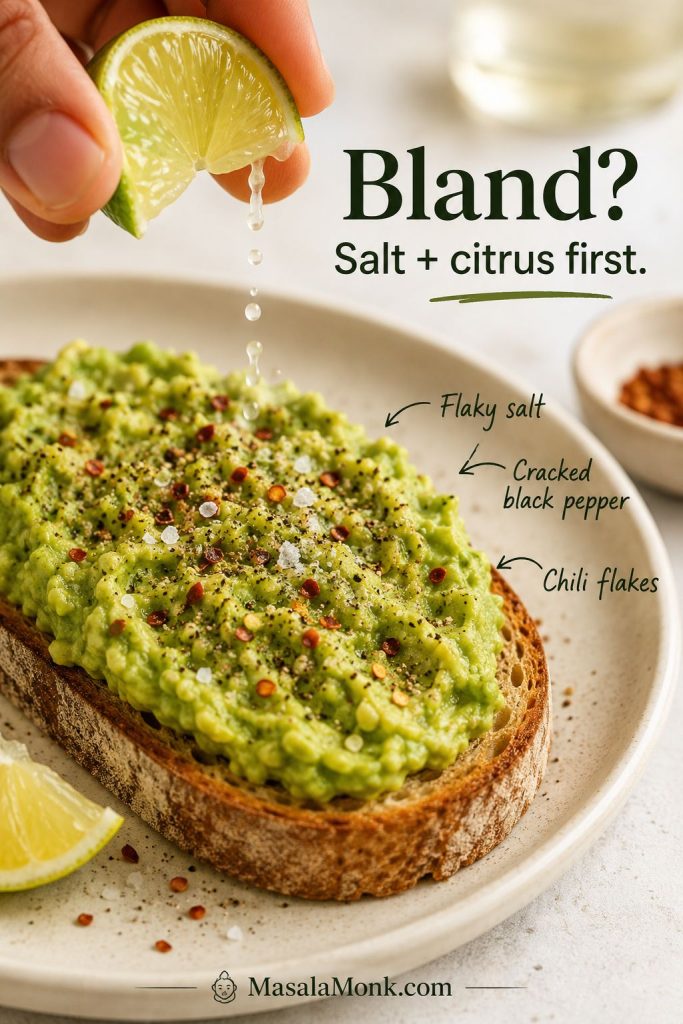
- Classic: flaky salt, black pepper, red pepper flakes, and olive oil.
- Bagel-style: everything bagel seasoning, garlic powder, onion powder, or sesame seeds.
- Fresh and herby: lemon pepper, za’atar, dill, basil, coriander/cilantro, or chives.
- Warm and smoky: smoked paprika, chili flakes, chili crisp, or hot sauce.
- Rich and savory: pesto, garlic rub, goat cheese, feta, or a light drizzle of olive oil.
For a safe first version, use lemon, flaky salt, black pepper, and chili flakes. For a bigger savory finish, try everything bagel seasoning, pesto, chili crisp, or a light garlic rub on the hot toast.
If seasoning does not fix the problem, check Mistakes & Fixes next.
Healthy & High-Protein Notes
This can be a healthy breakfast, but it depends on how you build it. Avocado brings fiber and mostly unsaturated fat, while the bread, toppings, and portion size decide whether the toast feels light, balanced, or too heavy.
Plain avocado toast can be delicious, but it is not automatically a full breakfast. Protein is what turns it from a good slice into a meal.

Think of avocado as the creamy fat-and-fiber part of the meal; then add egg, cottage cheese, beans, tuna, tofu, seeds, or smoked salmon if you want it to keep you full longer.
A good everyday version is 1 slice of whole-grain or seeded toast, 1/2 avocado, lemon or lime, salt, pepper, egg or cottage cheese, and tomato, cucumber, sprouts, herbs, or seeds. For a deeper nutrition read, Harvard’s avocado nutrition guide is a helpful reference.
If you are making it for weight loss, focus on portion and protein rather than treating one version as automatically “diet-friendly.” Use one slice of sturdy bread, about 1/2 avocado, plenty of lemon or lime, and a protein topping. Be careful with oversized bread, extra oil, heavy cheese, bacon, or several rich toppings at once.
For days when you want another protein-focused breakfast that is not toast, this high-protein oatmeal guide gives you a warmer bowl-style option with yogurt, egg whites, cottage cheese, tofu, or protein powder.
For practical protein builds in this post, jump to Avocado Toast with Egg or the Cottage Cheese Version.
Restaurant-Style Ideas
Restaurant-style versions work best when you borrow the method, not every exact detail. Toast the bread deeply, season the avocado before spreading, finish with flaky salt or olive oil, and add one fresh or crunchy topping so the slice tastes finished.
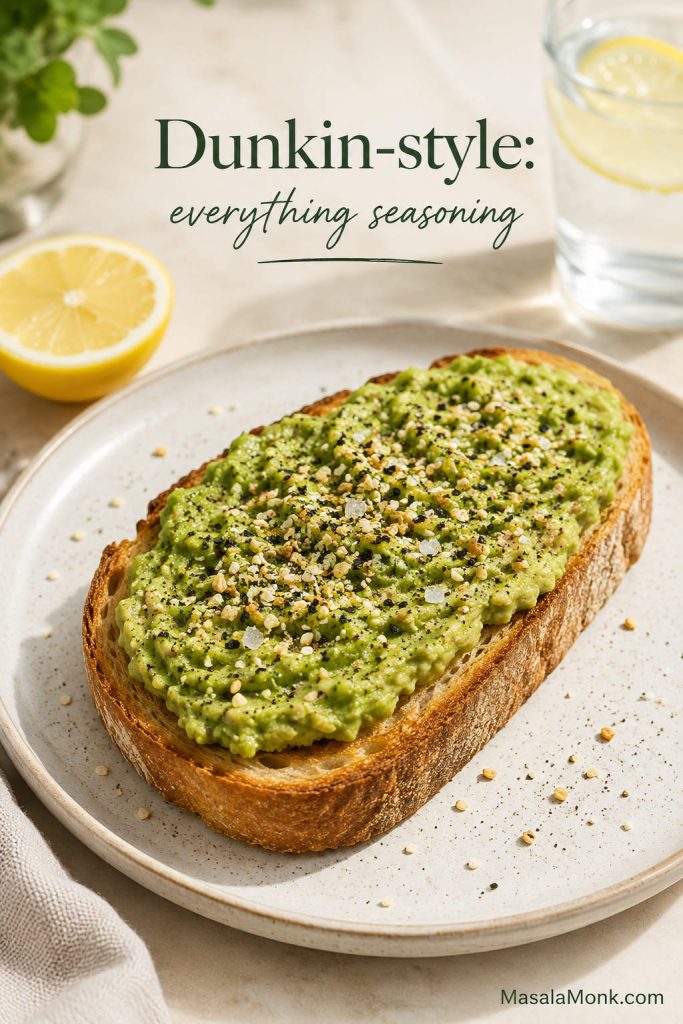
Dunkin-Style Version
For a Dunkin-style version, use toasted sourdough, a smooth avocado spread, lemon juice, sea salt, black pepper, and a generous finish of everything bagel seasoning. The official Dunkin avocado toast announcement confirms those signature details, which makes this one of the easiest copycat versions to echo at home.
Café-Style Whole-Grain Version
For a café-style whole-grain version, use thick toast, smashed avocado, extra-virgin olive oil, lemon, flaky salt, and eggs. It gives you the bigger breakfast-plate feel without needing a restaurant copycat.
Why Your Avocado Toast Tastes Bland, Soggy, or Boring
Avocado toast gets mocked when it is made badly: pale bread, underripe avocado, no salt, no lemon, no crunch, and nothing to break up the creaminess. Fortunately, the fix is usually simple. Toast the bread harder, season the avocado before spreading, and add one topping that changes the bite.
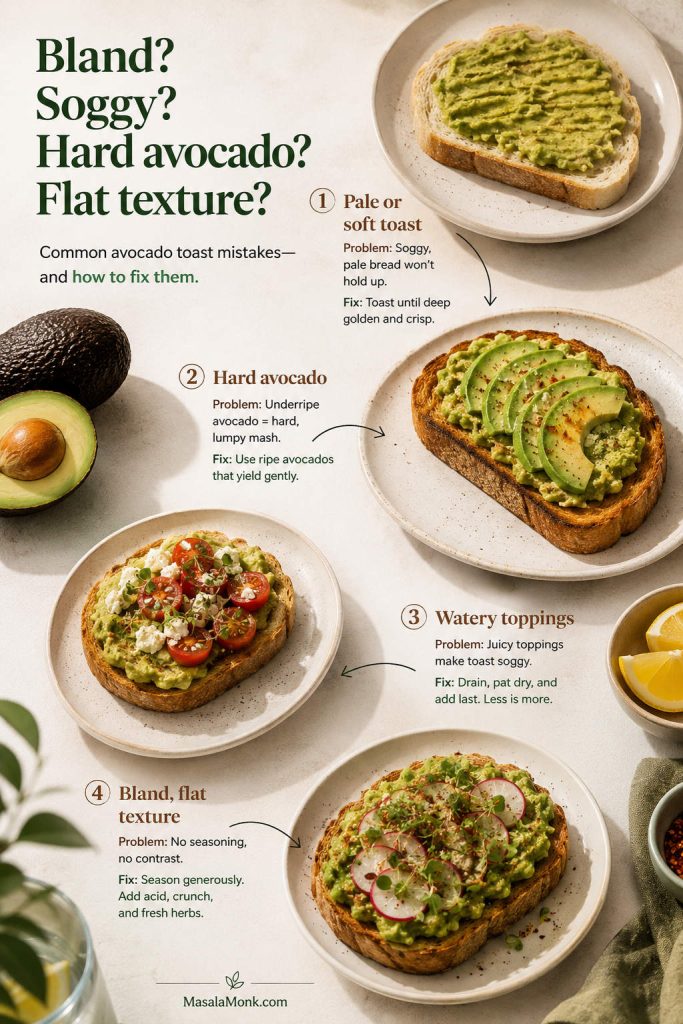
| Problem | Why it happens | Fix |
|---|---|---|
| Bland avocado toast | Not enough salt, citrus, or seasoning | Add salt, lemon or lime, black pepper, chili flakes, hot sauce, or everything seasoning. |
| Soggy toast | Bread is too soft or toppings are wet | Use thicker bread, toast it darker, drain wet toppings, and assemble right before eating. |
| Hard avocado | Avocado is underripe | Wait until it gives slightly when pressed. Do not force hard avocado into toast. |
| Brown avocado | Avocado was cut too early or exposed to air | Add lemon or lime and use it fresh. Press wrap directly onto leftovers if needed. |
| Too rich | Too much avocado, oil, cheese, or creamy topping | Add tomato, cucumber, herbs, pickled onion, lemon, or capers. |
| Not filling | No protein | Add egg, cottage cheese, smoked salmon, beans, tofu, tuna, or seeds. |
| Flat texture | Everything is soft | Add radish, cucumber, seeds, crispy garlic, onions, or toasted nuts. |
When the toast tastes too rich, freshness is the fix. Tomato, herbs, pickled onion, lemon, capers, cucumber, or radish cut through the creamy base without making the slice heavier.
If sogginess is the main issue, the next section shows how to protect the bread.
How to Keep It from Getting Soggy
Toast the bread until it is deeply golden, not just warm. Thick sourdough, seeded bread, rye, and bagels hold up better than soft sandwich bread. If using tomato, cucumber, poached egg, pickled onion, or smoked salmon, drain or pat the topping before adding it. For tomatoes, remove watery seeds or pat slices dry before they hit the toast.
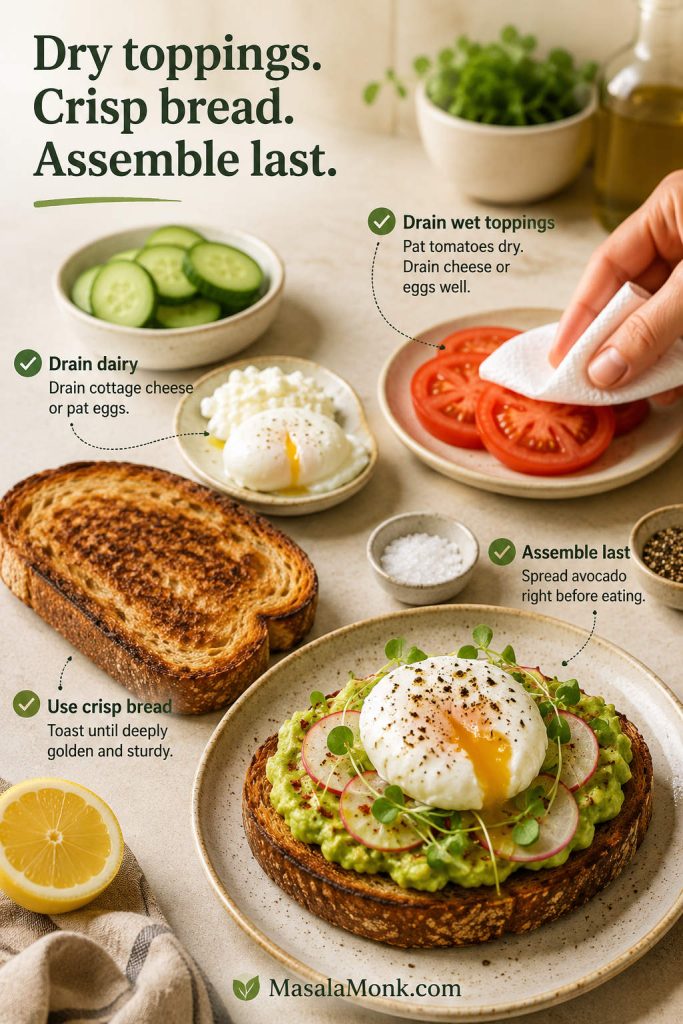
Do not let wet toppings do the bread’s job. The bread should carry the avocado; the toppings should add contrast, not soak the slice.
The safest rule is simple: assemble right before eating. Avocado softens the bread as it sits, and wet toppings speed that up. If you are making breakfast for several people, toast the bread, prep the toppings, and mash the avocado last.
Storage and Make-Ahead Tips
This toast is best fresh. The bread loses its edge, the avocado browns, and wet toppings can make the slice soft. However, you can still prep the parts ahead.
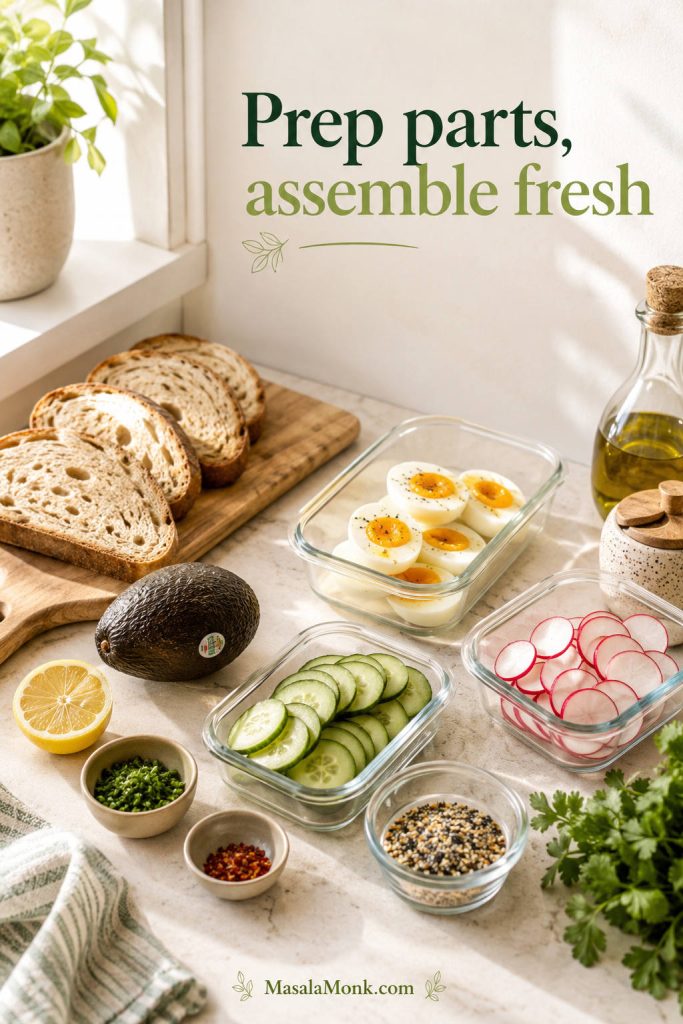
- Boil eggs ahead and refrigerate them.
- Slice cucumber, radish, onion, or tomato shortly before serving.
- Toast the bread right before eating.
- Mash avocado with lemon or lime as close to serving time as possible.
- If you must store avocado mash briefly, press plastic wrap directly onto the surface and refrigerate.
Do not freeze assembled avocado toast. It will not come back with a good texture.
Ready to make it now? Use the saveable guide below, then jump into the recipe card for the full amounts and steps.
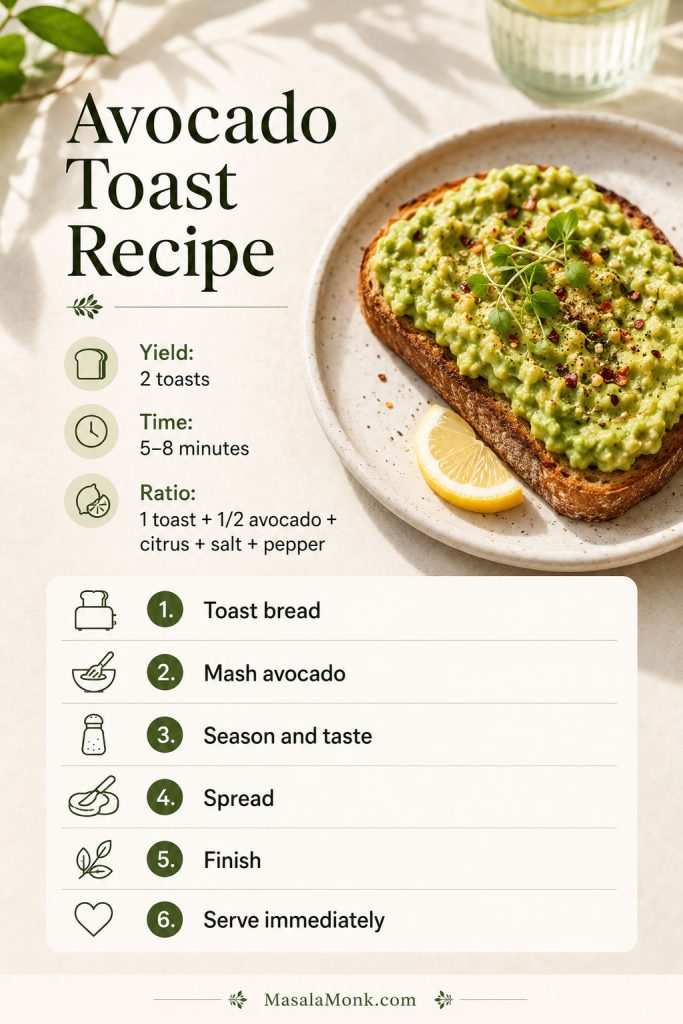
Avocado Toast Recipe
This easy avocado toast recipe gives you a bright, well-seasoned base first: crisp bread, ripe avocado, lemon or lime, salt, and pepper. Keep it simple, or choose one direction: egg for breakfast, cottage cheese for protein, smoked salmon for brunch, or tomato and cucumber for freshness.
Ingredients
- 2 thick slices sourdough, whole-grain, seeded, or multigrain bread
- 1 ripe avocado, about 140–160 g flesh
- 2–4 tsp lemon or lime juice / 10–20 ml, to taste
- 1/4 tsp fine salt, plus more to taste
- 1/8 tsp black pepper
- 1–2 tsp extra-virgin olive oil, optional
- Pinch red pepper flakes, optional
- Flaky salt, for finishing
- Optional toppings: egg, cottage cheese, smoked salmon, feta, tomato, cucumber, herbs, or your favorite seasoning
Instructions
- Toast the bread until crisp and golden.
- Mash the avocado with lemon or lime juice, fine salt, and black pepper until creamy but still slightly textured.
- Taste and adjust with more salt, citrus, pepper, or chili flakes if needed.
- Spread the avocado over the hot toast, using about half an avocado per slice.
- Finish with flaky salt, olive oil, chili flakes, herbs, egg, cottage cheese, smoked salmon, feta, or your chosen topping.
- Serve immediately while the bread still has bite.
Notes
- Use 1/2 avocado per thick slice of toast as the base ratio.
- For the egg version, add 1 fried, poached, scrambled, boiled, jammy, or egg-white topping per toast.
- For the cottage cheese version, use 1/3 cup / about 75 g cottage cheese per toast and drain it if watery.
- For the smoked salmon version, use 1–2 oz / 30–60 g smoked salmon per toast and reduce the added salt.
- Toast the bread deeply enough to stay crisp under the avocado.
- Assembled toast does not store well. Eat it right away.
FAQs
Most avocado toast questions come back to the same few problems: the bread got soft, the avocado tasted flat, or the toast did not feel filling enough.
What is the best bread?
Sourdough is the best all-around bread because it gets crisp, tastes slightly tangy, and holds the avocado well. Whole grain, seeded bread, rye, bagels, English muffins, and gluten-free bread also work if you toast them properly.
How much avocado do you need per slice?
Use about 1/2 medium-large avocado per thick slice. That is usually 70–80 g avocado flesh per toast. Use less if you are adding cottage cheese, egg, smoked salmon, or another rich topping.
Should avocado be mashed or sliced?
Mashed avocado is better for everyday toast because it spreads evenly and holds seasoning well. Sliced avocado looks cleaner and works nicely with smoked salmon, feta, tomato, or a poached egg. Either way, season it with salt and lemon or lime.
Do you cook the avocado?
No. Toast the bread first, then add the avocado after. Cooking the avocado mixture in a skillet can make it taste dull. The bread should be hot and crisp, but the avocado should stay fresh and seasoned.
What seasoning is best?
Start with salt, black pepper, and lemon or lime. Then add one stronger finish if needed: everything bagel seasoning, chili crisp, hot sauce, pesto, za’atar, smoked paprika, or flaky salt.
Why does it taste bland?
It usually tastes bland when the avocado is underripe or under-seasoned. Add more salt, lemon or lime, black pepper, chili flakes, or something crunchy. A little citrus and enough salt make a much bigger difference than adding more avocado.
What can I add for protein?
Egg and cottage cheese are the easiest breakfast options. For lunch or brunch, smoked salmon, tuna, beans, tofu, seeds, or egg whites can also make the toast more filling.
What goes with it besides egg?
Choose one direction: cottage cheese for creamy protein, tomato or cucumber for freshness, feta for salt, beans or hummus for a plant-based version, or chili crisp, pesto, and seeds for more flavor and texture.
Is cottage cheese good here?
Yes. Cottage cheese adds protein, tang, and creaminess. Use about 1/3 cup / 75 g cottage cheese per toast, and drain it first if it looks watery.
Is this healthy?
It can be a healthy breakfast when it uses sturdy whole-grain or seeded bread, about half an avocado, and a protein or vegetable topping. The avocado brings creaminess and healthy fats; the extra protein or vegetables make the meal more balanced.
Is it enough for breakfast?
It can be enough for a light breakfast. For a longer-lasting meal, add egg or cottage cheese so the toast has more staying power.
Is it good for weight loss?
It can fit into a weight-loss breakfast if the portion is sensible. Use one slice of bread, about 1/2 avocado, lemon or lime, and a protein topping such as egg or cottage cheese. Be careful with oversized bread, extra oil, heavy cheese, bacon, or too many rich toppings together.
Can you meal prep it?
You can prep the toppings, but assembled toast is best fresh. Boil eggs, slice vegetables, and keep toppings ready, then toast the bread and mash the avocado right before eating.
How do you keep it from getting soggy?
Use thick bread, toast it until crisp, drain wet toppings, and assemble right before serving. If using poached egg, tomato, cucumber, pickled onion, or smoked salmon, remove excess moisture before adding it.
Why do restaurant versions taste better?
Restaurant versions usually taste better because each small detail is handled well: the bread is toasted harder, the avocado gets enough salt and citrus, and the top has a finishing touch like olive oil, flaky salt, herbs, chili flakes, or something crunchy.
How do you make the Dunkin-style version?
Use toasted sourdough, mashed avocado, lemon juice, sea salt, black pepper, and everything bagel seasoning. Keep the avocado spread smooth and finish with enough seasoning to give the toast a savory, garlicky crunch.
Final Thoughts
Good avocado toast comes down to that same rule: crisp bread, seasoned avocado, and one topping that changes the bite. That will beat a loaded but bland slice every time.
Egg makes it breakfast, cottage cheese makes it more filling, smoked salmon makes it brunch, feta brings salt, and cucumber or radish brings crunch. Once the base is right, your best version can be simple, loaded, spicy, crunchy, or somewhere in between.
What is your go-to avocado toast topping — fried egg, cottage cheese, smoked salmon, feta, chili crisp, pesto, everything bagel seasoning, or something I should try next? Share it in the comments so other readers can try it too.