Posted on — 2 Comments

Easy Cheese Sauce Recipe for Mac, Broccoli, Nachos and More

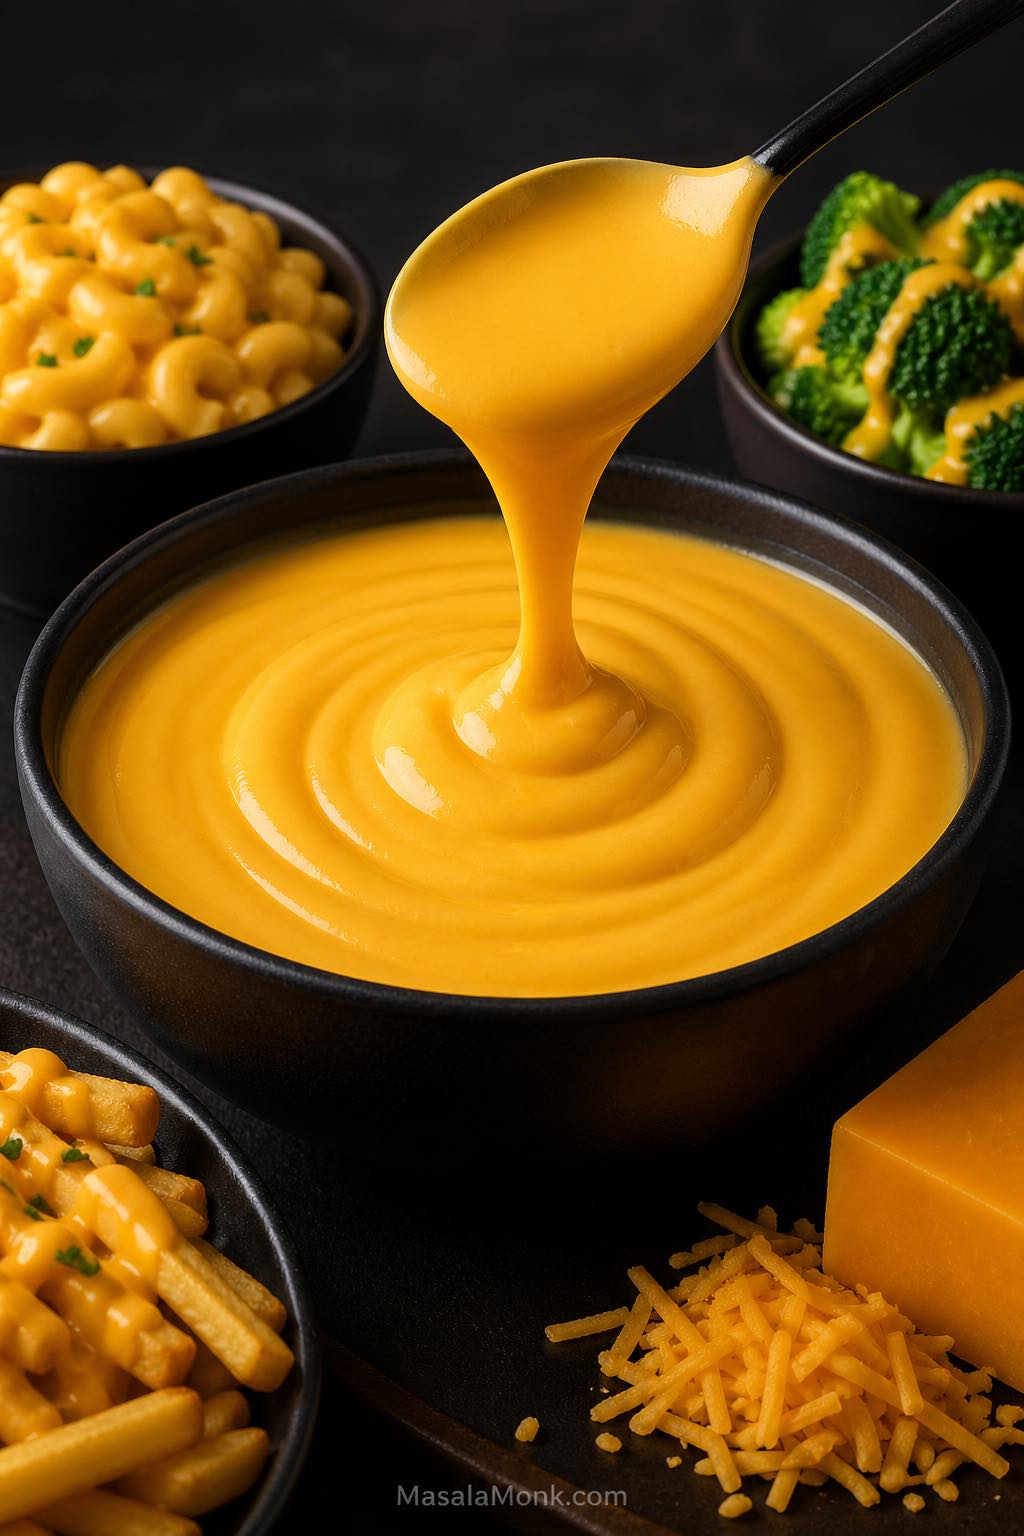
Smooth cheddar cheese sauce lifted with a spoon, served with mac and cheese, broccoli, fries and grated cheddar.

A good cheese sauce recipe should give you a smooth, creamy, cheesy sauce that is easy to control. It should work for mac and cheese, broccoli, cauliflower, fries, baked potatoes, pasta, nachos, pretzels, burgers, rice bowls, and casseroles without turning grainy, oily, lumpy, or gluey.

This easy cheese sauce recipe uses a simple butter-flour roux, milk, and freshly grated cheddar. The method is quick, but the details matter: cook the roux long enough, add the milk slowly, remove the pan from heat before adding cheese, and adjust the texture based on how you plan to serve it.

The main recipe turns cheddar cheese, milk, butter, and flour into a medium-thick sauce for vegetables, fries, potatoes, sandwiches, and pasta. It tastes fresher than a jarred sauce because it starts from scratch with real ingredients. From there, you can adapt the same base for mac and cheese, broccoli, cauliflower, pasta, nachos, no-flour sauce, gluten-free sauce, keto sauce, microwave sauce, thicker dips, thinner drizzles, and reheated leftovers.

Cheese Sauce Guide

Use this guide to make a smooth basic cheese sauce first, then adjust the texture, ingredients, and method for the way you want to serve it.

Quick Answer: How to Make Cheese Sauce

To make a smooth cheese sauce, melt butter, whisk in flour, cook the roux briefly, then slowly whisk in milk. Once the base thickens, remove the pan from heat and stir in freshly grated cheddar until melted.

The most important step is adding the cheese away from direct heat. That way, the sauce stays creamy instead of turning grainy, oily, or separated.

For a reliable all-purpose sauce, this recipe uses 2 tablespoons butter, 2 tablespoons flour, 1¼ cups milk, and 6 ounces freshly grated cheddar cheese. That gives you a medium-thick sauce for mac and cheese, broccoli, cauliflower, baked potatoes, fries, pasta, and nachos-style drizzling.

The smooth sauce rule: thicken the milk base first, then turn off the heat before adding cheese. Cheese does not need hard boiling to melt. Gentle residual heat is enough.

At a Glance

At a glance: This cheese sauce recipe makes about 2 cups / 480 ml / 0.48 L of smooth cheddar sauce in about 12 minutes. It uses 2 tbsp butter, 2 tbsp flour, 1¼ cups / 300 ml milk, and 6 oz / 170 g cheddar cheese. Keep it thick for broccoli, fries, potatoes, and sandwiches, or thin it with warm milk for pasta, mac and cheese, and rice bowls.

Practically speaking, that means you can start with one reliable base and adjust it without guessing. The same cheese sauce can stay thick for fries, loosen into a pasta coating, cover broccoli and cauliflower, or shift into a no-flour version with one small method change.

Why This Cheese Sauce Recipe Works

This recipe works because the cheese is added to a thickened milk sauce instead of being melted directly over high heat. As a result, the cheddar has a smoother base to melt into and the finished sauce is easier to control.

The butter and flour create a smooth base, the milk gives the sauce enough moisture, and the cheddar melts in gently after the pan comes off the heat. The same butter-flour-milk logic also shows up in béchamel sauce. Here, however, the base becomes richer because cheddar cheese is stirred in at the end.

That order matters. When cheese is boiled too hard, the sauce can turn grainy, oily, or separated. With a thickened milk base, though, the cheese has a smoother place to melt.

For a homemade cheese sauce, the goal is not just melting cheese. The recipe needs enough liquid, enough thickening power, and gentle heat so the sauce stays smooth after the cheddar melts.

This recipe also starts with a medium-thick texture on purpose. It is thick enough for vegetables, fries, potatoes, and sandwiches, while still being easy to loosen with warm milk or pasta water when you want a thinner sauce for noodles, mac and cheese, or rice bowls.

Cheese Sauce Ingredients

Although this recipe uses basic ingredients, each one has a specific job. The butter and flour create the thickened base, the milk makes it creamy, and the cheddar cheese gives the sauce its main flavor.
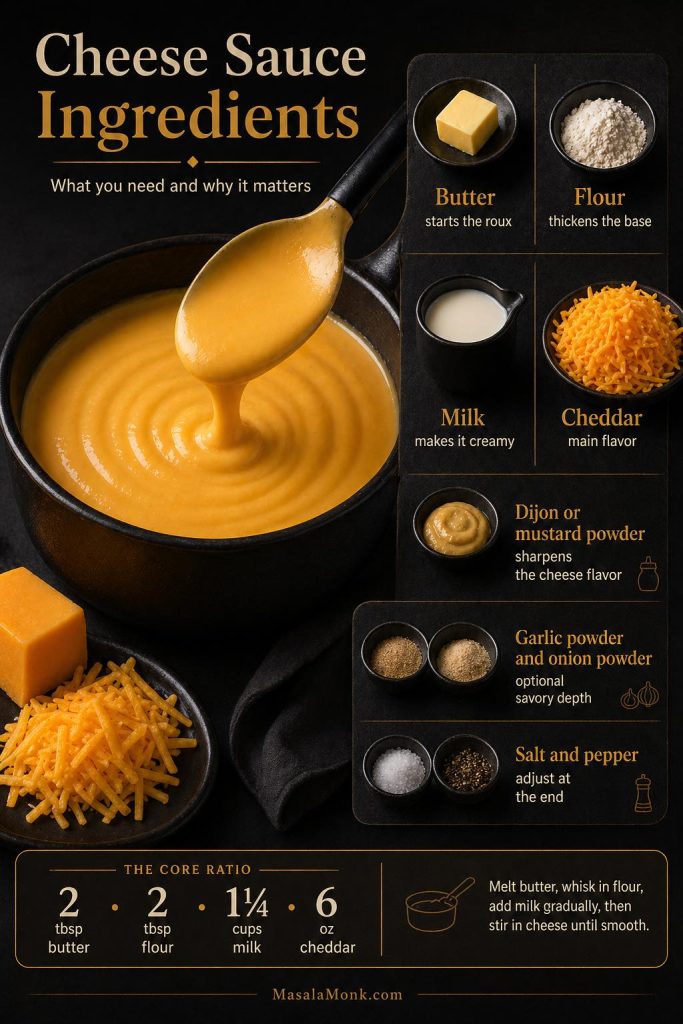
Cheese sauce ingredients guide showing butter, flour, milk, cheddar, mustard, garlic powder, onion powder, salt and pepper with the core ratio.
The basic cheese sauce ingredients are simple, but each one has a job: butter and flour build the roux, milk makes the sauce creamy, cheddar gives flavor, and seasonings sharpen the final taste.

Main Ingredients and What They Do

Ingredient Amount Why it matters
Unsalted butter 2 tbsp / 28 g / 1 oz Combines with flour to make the roux. Salted butter works too, but reduce added salt.
All-purpose flour / plain flour 2 tbsp / 16–18 g / 0.6 oz Thickens the milk and helps stabilize the sauce so the cheese melts smoothly. Do not use self-rising flour.
Whole milk 1¼ cups / 300 ml / 10 fl oz / 0.3 L Gives the sauce body and creaminess. Whole milk gives the smoothest everyday result.
Freshly grated cheddar cheese 6 oz / 170 g / about 1½ cups The main cheese. Medium cheddar is the easiest default; sharp cheddar gives stronger flavor.
Dijon mustard or mustard powder 1 tsp Dijon / 5 ml, or ¼ tsp mustard powder / about 1 g Optional, but it sharpens the flavor and makes the sauce taste more cheesy.
Garlic powder ¼ tsp / about 0.7 g Optional background flavor, especially good for potatoes, fries, broccoli, and pasta.
Onion powder ¼ tsp / about 0.6 g Optional savory depth without making the sauce taste onion-heavy.
White pepper or black pepper Pinch to ⅛ tsp / about 0.3 g Adds gentle warmth. White pepper keeps the sauce paler; black pepper is easier to find.
Salt ⅛–¼ tsp / about 0.75–1.5 g Add after the cheese melts because cheddar can vary a lot in saltiness.

Measurement note: cheese is best measured by weight. If using cups, lightly spoon the grated cheese into the cup instead of packing it down. For this recipe, 1 cup of liquid is treated as 240 ml.

Milk Options

The milk you choose changes the richness of the sauce. Whole milk is the best everyday choice for this cheese sauce recipe, although other dairy options can work depending on the texture you want.

  • Whole milk: best everyday choice for a smooth, creamy cheese sauce.
  • 2% milk: works, but the sauce will taste slightly lighter.
  • Skim milk: not ideal because the sauce can taste thinner and less creamy.
  • Half-and-half: richer and thicker; useful when you want a heavier sauce.
  • Heavy cream: very rich; better for keto-style sauce than the basic roux version.

Can I Use Pre-Shredded Cheese?

Freshly grated cheese melts more smoothly. Pre-shredded cheese is convenient, but many bags contain anti-caking ingredients that can make the sauce less silky. If pre-shredded cheese is all you have, use gentle heat, add it slowly, and avoid boiling after it goes in.

Best Cheese for Cheese Sauce

In general, the best cheese for cheese sauce is flavorful but still easy to melt. Medium cheddar is the safest default because it gives a classic cheddar taste without becoming as temperamental as very aged cheese.
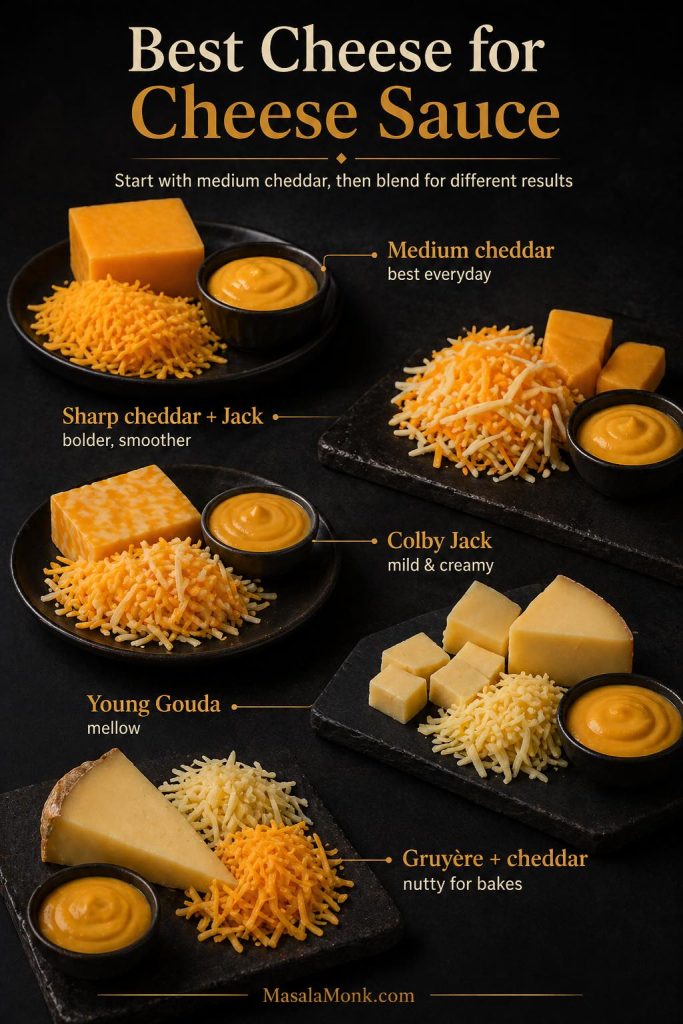
Best cheeses for cheese sauce including medium cheddar, sharp cheddar with Monterey Jack, Colby Jack, young Gouda, and Gruyère with cheddar.
Medium cheddar is the easiest everyday choice for cheese sauce, while Monterey Jack, Colby Jack, young Gouda and Gruyère can help adjust the flavor, smoothness and richness.

For the smoothest everyday result, start with medium cheddar or a cheddar-Monterey Jack blend. Sharp cheddar gives stronger flavor, but it works best when blended with a smoother melting cheese.

Cheese Best use Notes
Medium cheddar Best everyday choice Balanced flavor, good melting, and classic color.
Sharp cheddar Stronger cheddar flavor Use gentle heat. Sharp cheddar tastes great but can turn grainy if overheated.
Mild cheddar Kid-friendly sauce Smooth and mellow, but less bold.
White cheddar White cheese sauce Good when you want a pale sauce for pasta, potatoes, or vegetables.
Monterey Jack Smooth melting blend Excellent mixed with cheddar when you want a softer, creamier melt.
Colby or Colby Jack Mild creamy sauce Good for kids, nachos-style drizzling, and burgers.
Young Gouda Creamy, mellow sauce Use young gouda rather than very aged gouda for smoother melting.
Gruyère Cauliflower, potatoes, gratins Nutty and excellent, but more expensive. Good blended with cheddar.
Parmesan Flavor accent Use a small amount with cheddar or Jack. Parmesan alone can make the texture gritty.
Mozzarella Stretchy accent Not ideal as the main cheese sauce cheese. It can become stringy.
Blue cheese or Gorgonzola Specialty sauces Better for dedicated blue cheese or Gorgonzola sauce, not the basic cheddar version.

Once you know the texture you like, you can experiment with sharper cheddar, smoked cheddar, white cheddar, gouda, Gruyère, or small amounts of Parmesan.

How to Make Cheese Sauce

Before you start cooking, it helps to understand that the method is simple but heat-sensitive. Timing and temperature control make the difference between a smooth cheese sauce and a grainy one. This recipe works best in a small to medium heavy-bottomed saucepan, about 1.5–2 qt / 1.5–2 L.
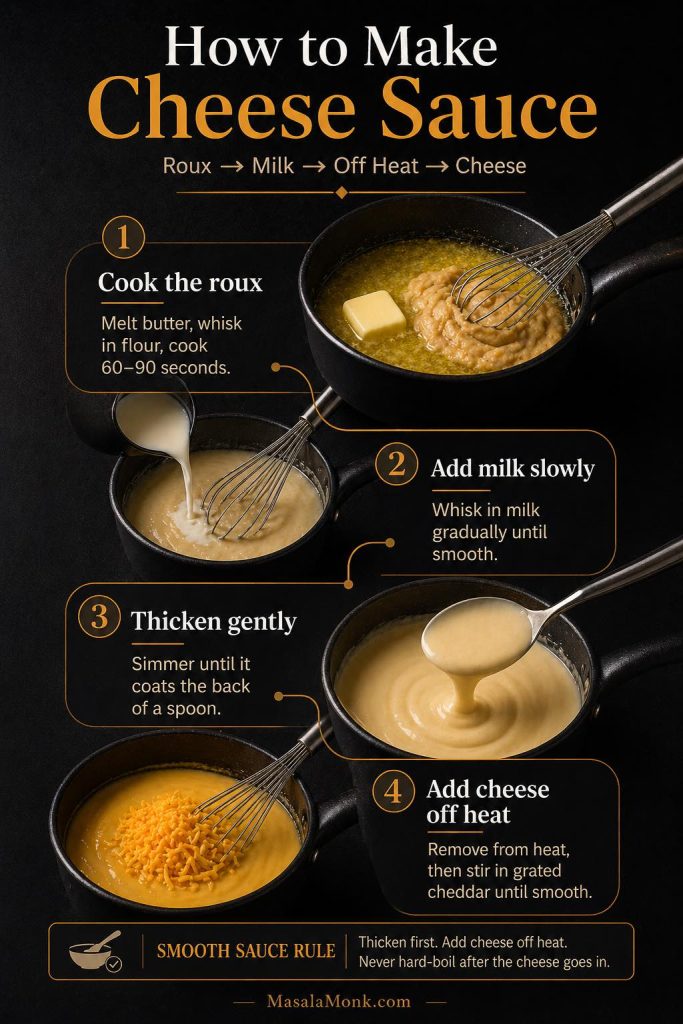
Step-by-step guide showing how to make cheese sauce by melting butter, whisking in flour, adding milk and stirring in cheddar.
The key to smooth cheese sauce is the order of steps: make the roux, add milk slowly, thicken the base, then remove the pan from heat before stirring in cheddar.

1. Grate the Cheese First

Grate the cheddar before you start cooking. Cheese melts more evenly when it is ready to add in small handfuls. If it is very cold, let it sit at room temperature for a few minutes while you make the roux.

2. Melt the Butter Gently

Place the saucepan over medium-low to medium heat. Add the butter and let it melt without browning. If the butter starts sizzling aggressively, lower the heat.

3. Whisk in the Flour

Add the flour and whisk for 60–90 seconds. The mixture should look pale, foamy, and smooth. This step cooks out the raw flour taste. Do not brown the roux for this recipe; a pale roux keeps the sauce creamy and mild.

4. Add the Milk Slowly

Whisk in the milk in 3 additions. Add a splash first, whisk until smooth, then add more. This gradual method helps prevent lumps. Once all the milk is in, keep whisking until the sauce looks smooth.

5. Simmer Until the Base Thickens

Cook the milk base until it reaches a gentle simmer and coats the back of a spoon. This usually takes 3–5 minutes. At this stage, you want gentle bubbling around the edges, not a hard boil.

6. Remove From Heat Before Adding Cheese

Turn off the heat and move the pan away from the burner if your stove stays hot. Wait until the bubbling settles. Then stir in the grated cheese by handfuls, letting each handful melt before adding the next.

7. Season and Adjust

Once the cheese is melted, taste the sauce. Add salt only after tasting because cheddar can be mild or salty depending on the brand and age. To build more flavor, add mustard, pepper, garlic powder, onion powder, cayenne, or a small splash of hot sauce.

Cheese Sauce Temperature Guide

Cheese is most fragile after it melts, so temperature control is one of the easiest ways to protect the texture. You do not need to measure every stage, but the cues below help when you want the sauce to turn out the same way every time.
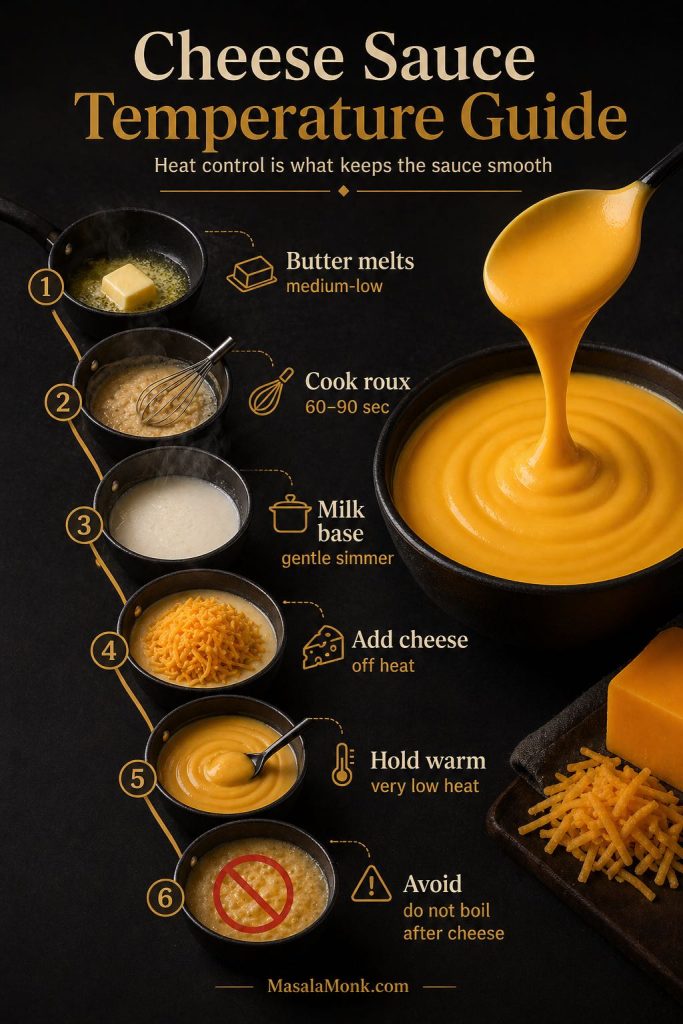
Cheese sauce temperature guide showing butter melting, roux cooking, milk simmering, cheese added off heat and sauce held warm.
Heat control is what keeps cheese sauce smooth. Cook the roux and milk base gently, then add the cheese off heat so the sauce does not turn grainy or oily.
Stage Best temperature / heat cue Why it matters
Melting butter Medium-low to medium heat The butter should melt gently without browning.
Cooking the roux 60–90 seconds over medium-low heat This removes the raw flour taste while keeping the sauce pale.
Thickening the milk base Gentle simmer, about 82–88°C / 180–190°F The flour fully thickens the milk before the cheese is added.
Before adding cheese Turn off heat and let bubbling stop Cheese melts best with residual heat, not aggressive boiling.
Melting cheese Ideally about 65–75°C / 150–167°F This helps the cheese melt smoothly without separating.
Holding warm Very low heat, about 55–60°C / 130–140°F if using a thermometer This keeps the sauce warm without pushing it toward splitting.
Danger zone for texture Do not hard-boil after cheese is added Hard boiling can make cheese sauce grainy, oily, or separated.

Cheese Sauce Ratio

Once you understand the base ratio, the recipe becomes easier to adjust. Instead of starting over, you can change the amount of milk or cheese depending on whether you want a dip, a topping, or a looser pasta sauce.

The easiest cheese sauce ratio for this recipe is 2 tbsp butter + 2 tbsp flour + 300 ml milk + 170 g cheese. That gives you a medium-thick sauce. For dipping, reduce the milk slightly; for pasta, add more liquid after the cheese melts.
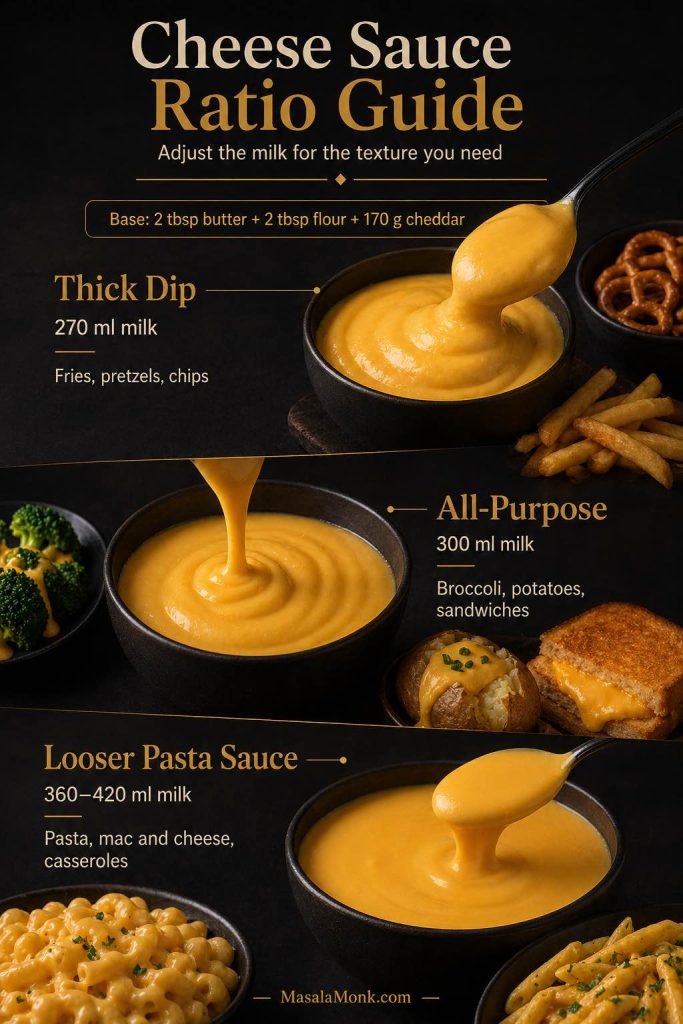
Cheese sauce ratio guide showing thick dip, all-purpose cheese sauce and looser pasta sauce with different milk amounts.
Use the same butter, flour and cheddar base, then adjust the milk to make a thick dip, an all-purpose sauce, or a looser cheese sauce for pasta and casseroles.
Style Milk Cheese Best for
Thick dip 270 ml / 9 fl oz 170 g / 6 oz Fries, pretzels, chips, burgers
All-purpose sauce 300 ml / 10 fl oz 170 g / 6 oz Broccoli, cauliflower, potatoes, sandwiches
Looser pasta sauce 360–420 ml / 12–14 fl oz 170 g / 6 oz Pasta, macaroni, rice bowls, casseroles

Texture cue: when the sauce is hot, it should fall from a spoon in a thick ribbon. If it sits in a heavy blob, whisk in warm milk. If it runs like plain milk, simmer the base longer next time before adding cheese.

How to Scale This Cheese Sauce Recipe

Fortunately, this recipe scales well as long as you keep the butter, flour, milk, and cheese in balance. For the smoothest result, use a larger pan when doubling the recipe so the milk base thickens evenly.

Yield Butter Flour Milk Cheese
1 cup / 240 ml / 0.24 L 1 tbsp / 14 g 1 tbsp / 8–9 g 150 ml / 5 fl oz 85 g / 3 oz
2 cups / 480 ml / 0.48 L 2 tbsp / 28 g 2 tbsp / 16–18 g 300 ml / 10 fl oz 170 g / 6 oz
4 cups / 960 ml / 0.96 L 4 tbsp / 56 g 4 tbsp / 32–36 g 600 ml / 20 fl oz 340 g / 12 oz

Easy Homemade Cheese Sauce Recipe

This recipe makes a smooth cheddar cheese sauce that is thick enough for vegetables, fries, and baked potatoes, but easy to thin for pasta, mac and cheese, rice bowls, or drizzling.

Prep Time5 minutes
Cook Time7 minutes
Total Time12 minutes
YieldAbout 2 cups / 480 ml / 0.48 L

Equipment

  • Small to medium heavy-bottomed saucepan, about 1.5–2 qt / 1.5–2 L
  • Whisk
  • Box grater or fine grater

Ingredients

  • 2 tbsp unsalted butter / 28 g / 1 oz
  • 2 tbsp all-purpose flour or plain flour / 16–18 g / 0.6 oz
  • 1¼ cups whole milk / 300 ml / 10 fl oz / 0.3 L, warmed slightly if possible
  • 6 oz freshly grated cheddar cheese / 170 g / about 1½ cups
  • 1 tsp Dijon mustard / 5 ml, or ¼ tsp mustard powder / about 1 g
  • ¼ tsp garlic powder / about 0.7 g, optional
  • ¼ tsp onion powder / about 0.6 g, optional
  • Pinch to ⅛ tsp white pepper or black pepper / about 0.3 g
  • ⅛–¼ tsp salt / about 0.75–1.5 g, added to taste after the cheese melts
  • Warm milk, as needed, for thinning

Instructions

  1. Grate the cheese. Grate the cheddar from a block and set it aside. Freshly grated cheese melts more smoothly than most bagged shredded cheese.
  2. Make the roux. Melt the butter in a saucepan over medium-low to medium heat. Add the flour and whisk for 60–90 seconds, until pale, smooth, and lightly foamy.
  3. Add the milk. Slowly whisk in the milk in 3 additions, smoothing out the sauce before adding more. Keep whisking until no lumps remain.
  4. Thicken the base. Cook for 3–5 minutes, whisking often, until the sauce reaches a gentle simmer and coats the back of a spoon.
  5. Remove from heat. Turn off the heat and let the bubbling settle. This helps keep the cheese from overheating.
  6. Add the cheese. Stir in the grated cheddar by handfuls, letting each handful melt before adding the next.
  7. Season. Stir in Dijon, garlic powder, onion powder, pepper, and a small amount of salt. Taste and adjust.
  8. Adjust the texture. For a thinner cheese sauce, whisk in warm milk 1 tbsp / 15 ml at a time. For a thicker dip, add a little more grated cheese off heat.

Recipe Notes

  • Do not boil the sauce after the cheese is added.
  • For pasta or mac and cheese, thin this recipe with warm milk or pasta water until the cheese sauce is glossy and loose enough to coat noodles.
  • For fries, pretzels, burgers, or sandwiches, keep the sauce slightly thicker.
  • For extra smoothness, use medium cheddar or a cheddar-Monterey Jack blend.
  • Cheese is best measured by weight. Cup measurements vary depending on how finely the cheese is grated and how tightly it is packed.

How Thick Should Cheese Sauce Be?

In practice, the best thickness depends on how you want to use the sauce. A cheese sauce for fries should be thicker than a cheese sauce for pasta, while a sauce for casseroles should start slightly loose because it thickens in the oven.
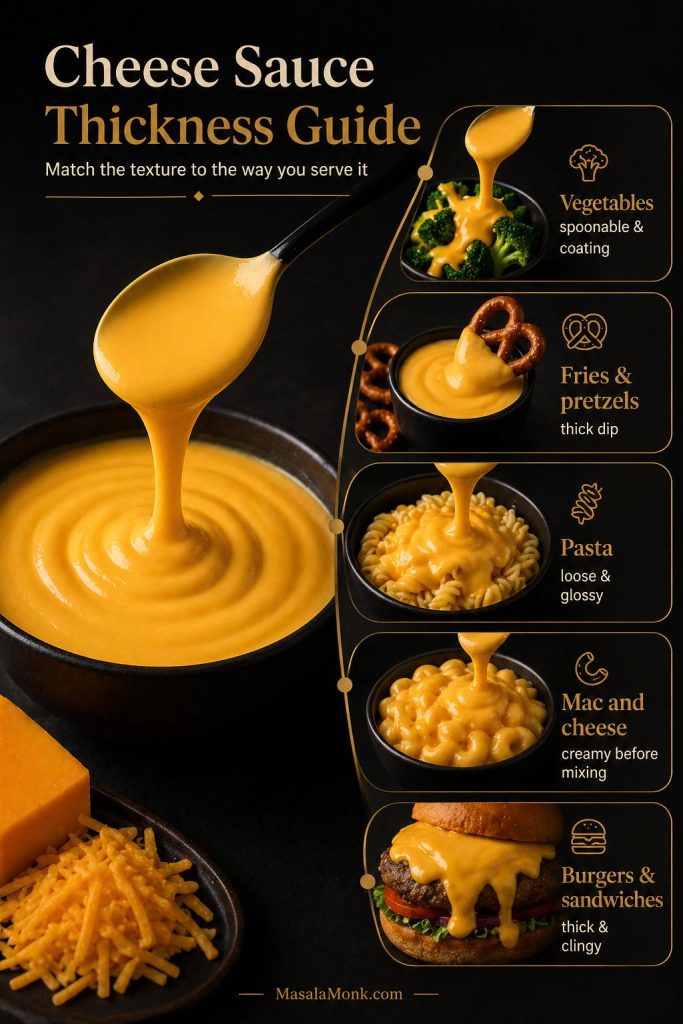
Cheese sauce thickness guide showing different textures for vegetables, fries, pasta, mac and cheese, burgers and sandwiches.
The best cheese sauce texture depends on how you serve it: spoonable for vegetables, thick for fries and pretzels, loose for pasta, creamy for mac and cheese, and clingy for burgers or sandwiches.
Use Best texture How to adjust the main recipe
Broccoli or cauliflower Spoonable and coating Use the main recipe as written.
Fries, pretzels, chips Thick dip Use 270–300 ml milk, or add 30 g / 1 oz extra cheese off heat.
Pasta Looser, glossy, coating Add 60–120 ml / 2–4 fl oz warm milk or pasta water after the cheese melts.
Macaroni and cheese Creamy and loose before mixing Thin slightly before adding pasta because noodles absorb sauce.
Baked potatoes Medium-thick Use the main recipe as written.
Rice bowls or grain bowls Pourable drizzle Add 30–60 ml / 1–2 fl oz warm milk.
Casseroles and bakes Slightly loose before baking Add about 60 ml / 2 fl oz extra milk because oven heat thickens it.
Burgers and sandwiches Thick and clingy Use a little less milk or add extra cheese.

If the sauce cools down, it will thicken. However, that does not mean you made the recipe wrong. Warm the cheese sauce gently and whisk in a splash of milk to bring it back to a pourable texture.

Cheese Sauce for Mac and Cheese

For mac and cheese, the sauce should be slightly looser than a dip because pasta absorbs liquid as it sits. Therefore, instead of making the sauce extra thick in the pan, keep it glossy and pourable before mixing it with the macaroni.

Creamy macaroni and cheese coated with smooth cheddar cheese sauce in a dark bowl.
For mac and cheese, keep the sauce slightly loose and glossy before mixing because pasta absorbs liquid as it sits.

One batch of this recipe is usually enough for 8 oz / 225 g pasta when making creamy stovetop mac and cheese. A larger batch with 1 lb / 450 g pasta needs a doubled sauce recipe, or about 4 cups / 960 ml sauce. If you are baking the mac and cheese, loosen the sauce with an extra 60–120 ml / 2–4 fl oz milk because the oven will thicken it.

For the smoothest mac and cheese sauce, use medium cheddar with a smoother melting cheese such as Monterey Jack, Colby Jack, or young gouda. Sharp cheddar adds flavor, but too much aged cheese can make the sauce more likely to turn gritty if it gets too hot.

If you want a full pasta build instead of only the sauce, use this macaroni and cheese recipe for stovetop, baked, and Southern-style options.

Cheese Sauce for Broccoli, Cauliflower, and Vegetables

For broccoli, cauliflower, and other vegetables, the goal is different. Instead of making a loose pasta sauce, you want a spoonable sauce that coats the florets without clumping on top.

Broccoli and cauliflower served with smooth cheddar cheese sauce spooned over the vegetables.
For broccoli and cauliflower, the cheese sauce should be spoonable and coating, thick enough to cling to the florets without clumping heavily on top.

For steamed broccoli or cauliflower, use the main recipe as written. If the vegetables are very wet, drain them well first, because extra water can thin the sauce and make it slide off. For roasted vegetables, the sauce can be slightly looser because the dry edges help it cling.

For cauliflower cheese or a vegetable bake, keep the sauce a little looser before baking. As the dish sits in the oven, the cheese sauce thickens and the vegetables release moisture, so a sauce that looks perfect in the pan can become too heavy after baking.

For a full comfort-food dinner, this cheesy chicken broccoli rice shows how broccoli and cheese can move from a side dish into a complete meal.

Cheese Sauce for Pasta, Lasagna, and Casseroles

When cheese sauce is used for pasta, lasagna, or casseroles, it needs extra looseness because starches and oven heat both thicken the final dish. For that reason, a sauce that looks slightly thin before baking often finishes at the right texture.
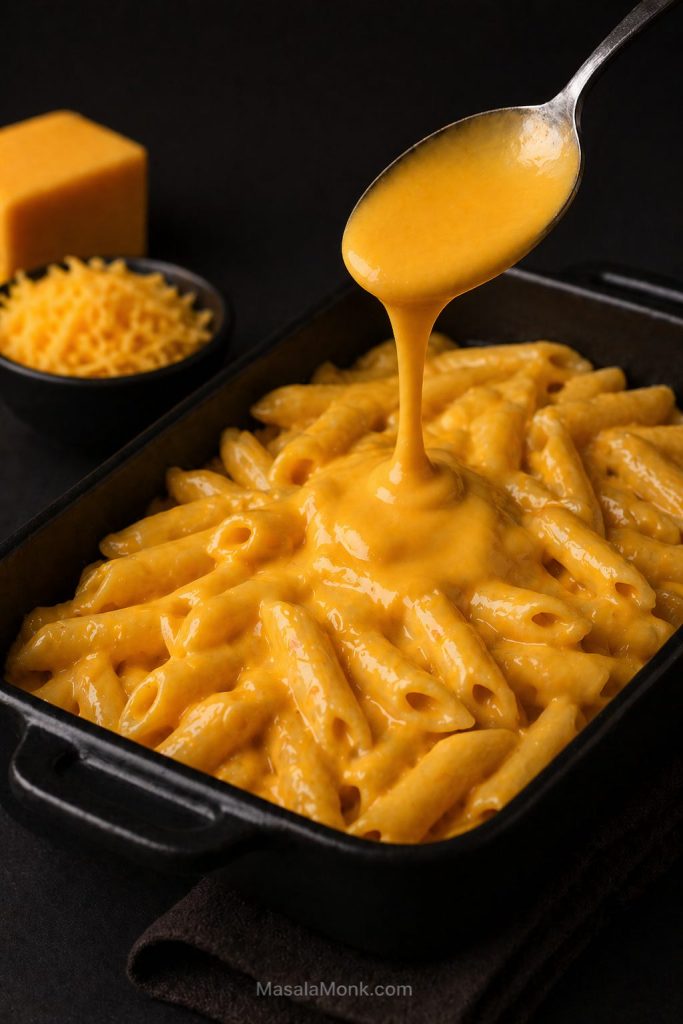
Pasta in a dark baking dish coated with looser glossy cheddar cheese sauce for casseroles and pasta bakes.
Pasta, lasagna and casseroles need a slightly looser cheese sauce because noodles, starches and oven heat all thicken the final dish.

For pasta, thin the finished sauce with 60–120 ml / 2–4 fl oz warm milk or pasta water before tossing. Pasta water adds starch and helps the sauce cling, while milk keeps the flavor creamier. If the pasta sits for more than a few minutes, loosen it again with a small splash of warm milk.

For lasagna, pasta bakes, and casseroles, use the looser pasta-sauce ratio from the table above. A thicker sauce can work for topping, but it can make layered dishes feel heavy or gluey once baked.

For another creamy pasta direction, this chicken Alfredo pasta is useful because it stays in the same creamy sauce family while using a different method. If you want a baked pasta idea, this baked ziti recipe collection gives more casserole-style inspiration.

Nacho Cheese Sauce for Fries, Pretzels, Chips, and Dips

For fries, pretzels, chips, and dips, the sauce should be thicker and more seasoned than a pasta sauce. Otherwise, it can taste too mild once it is spread over salty snacks or used as a dip.
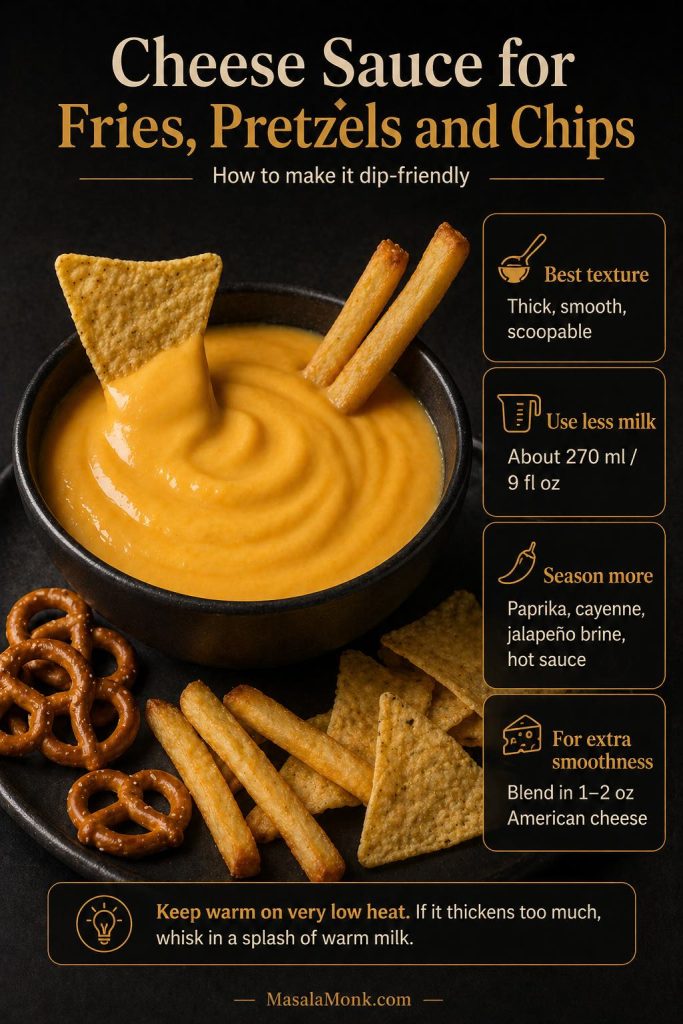
Thick cheddar cheese sauce served as a dip with fries, pretzels and tortilla chips.
For fries, pretzels and chips, make the cheese sauce thicker and more seasoned so it stays scoopable, flavorful and dip-friendly.

To make this recipe work more like a nacho cheese sauce, use the thick-dip ratio: 270 ml / 9 fl oz milk with 170 g / 6 oz cheese. Then season it with paprika, cayenne, jalapeño brine, hot sauce, garlic powder, or a little mustard. These additions make the sauce taste more like a dip instead of a plain cheddar topping.

For a smoother processed-style dip, replace 1–2 oz / 30–55 g of the cheddar with American cheese or another easy-melting processed cheese. Alternatively, a small amount of sodium citrate can make a very glossy sauce, but that is an advanced option rather than a requirement for this homemade version.

For a snack-style pairing, serve the thicker version with crispy homemade French fries. For a bigger game-day board, add pretzels, chips, roasted potatoes, or a scoopable dip on the side.

The classic roux method is the best starting point, but it is not the only option. If you need a no-flour, gluten-free, keto, or microwave cheese sauce, use the quick guide below before choosing the version that fits your kitchen.
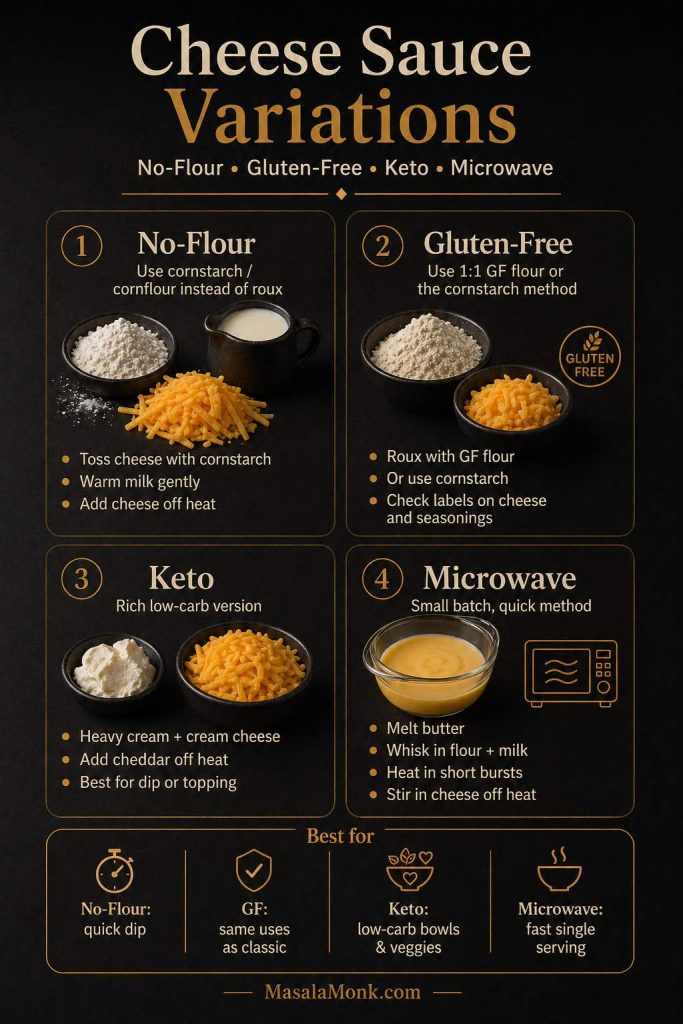
Cheese sauce variations guide showing no-flour, gluten-free, keto and microwave cheese sauce methods.
The same cheese sauce idea can be adapted into no-flour, gluten-free, keto and microwave versions depending on how you cook and what ingredients you want to avoid.

Cheese Sauce Without Flour

Still, a roux is not the only way to make a smooth sauce. If you want to skip flour, cornstarch can help the cheese melt into the liquid without making the sauce gritty.

You can make cheese sauce without flour by using cornstarch, also called cornflour in the UK and India. This version is useful if you want a flourless cheese sauce, a gluten-free cheese sauce, or a quicker sauce that does not start with a roux.

The no-flour version of this recipe uses cornstarch to help the cheese melt into the sauce smoothly. It makes a glossy sauce that is especially useful for dipping, drizzling, and quick snacks.
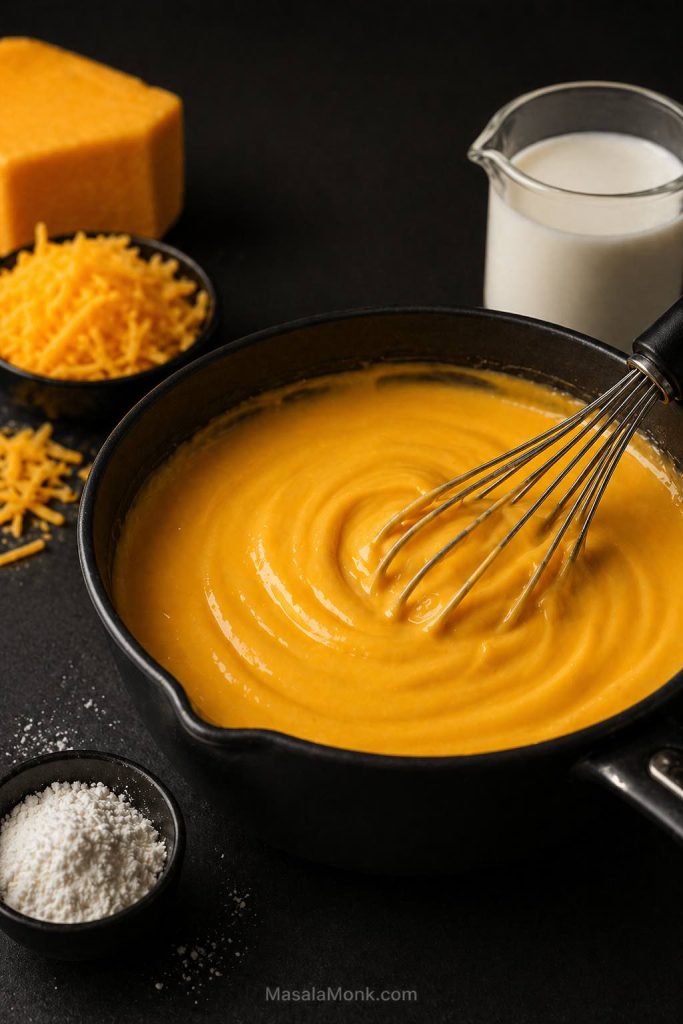
No-flour cheese sauce made with cornstarch, milk and cheddar stirred into a smooth sauce.
For cheese sauce without flour, cornstarch or cornflour helps the cheddar melt smoothly into the milk without starting from a classic butter-flour roux.
Ingredient US Metric
Evaporated milk or whole milk 1 cup 240 ml / 8 fl oz / 0.24 L
Freshly grated cheddar cheese 6 oz 170 g
Cornstarch / cornflour 1½ tsp 4–5 g
Butter 1 tbsp 14 g / 0.5 oz
Dijon mustard or mustard powder 1 tsp Dijon or ¼ tsp powder 5 ml Dijon or about 1 g powder
Salt and pepper To taste To taste

How to Make No-Flour Cheese Sauce

  1. Toss the grated cheddar cheese with the cornstarch until lightly coated.
  2. Warm the milk and butter in a saucepan over medium-low heat until steaming, not boiling.
  3. Lower the heat or remove the pan from heat.
  4. Add the cheese by handfuls, stirring until smooth.
  5. Add mustard, pepper, and salt to taste.
  6. If the sauce is too thick, loosen it gradually with warm milk, about 1 tbsp / 15 ml at a time.

Important: cornflour here means white cornstarch, not yellow cornmeal, maize flour, or makki atta. Cornmeal will not make a smooth cheese sauce.

Gluten-Free Cheese Sauce

As a result, the no-flour method also becomes the easiest gluten-free path for many readers. Still, a gluten-free flour blend can work well if you prefer the classic roux technique.

There are two easy ways to make gluten-free cheese sauce. The best choice depends on whether you want the recipe to feel like a classic roux-based cheese sauce or a faster cornstarch-thickened sauce.

  • Use a 1:1 gluten-free flour blend in the main roux recipe. This keeps the method almost the same.
  • Use the cornstarch/cornflour method above. This is the cleanest option if you want to avoid wheat flour completely.

If you are cooking for someone who needs a strictly gluten-free meal, check the labels on the cheese, mustard, seasonings, and any toppings you serve with the sauce.

Keto Cheese Sauce

On the other hand, keto cheese sauce needs a different base, since the classic version relies on both flour and milk. This version skips the roux and uses cream, cream cheese, butter, and cheddar instead.

Ingredient Amount
Heavy cream ½ cup / 120 ml / 4 fl oz / 0.12 L
Cream cheese 2 oz / 55 g
Freshly grated cheddar cheese 4 oz / 115 g
Butter 1 tbsp / 14 g / 0.5 oz
Mustard powder ¼ tsp / about 1 g
Pepper, cayenne, or hot sauce To taste

Warm the cream, butter, and cream cheese over low heat until smooth. Remove from heat and stir in the cheddar gradually. Do not boil after adding cheddar. This keto version is richer and heavier than the classic sauce, so it works best as a dip, topping, or low-carb drizzle.

For low-carb dipping, pair this richer sauce with sturdy options from this keto chips guide, especially if you want something scoopable for nachos, dips, or snack plates.

Microwave Cheese Sauce

Although the stovetop method gives you the best control, the microwave works for a small batch when speed matters more than precision. For best results, heat the base in short bursts and stir often.

Ingredient Amount
Butter 1 tbsp / 14 g / 0.5 oz
Flour 1 tbsp / 8–9 g / 0.3 oz
Milk ½ cup / 120 ml / 4 fl oz / 0.12 L
Freshly grated cheddar cheese 2–3 oz / 55–85 g
Salt, pepper, mustard To taste
  1. Melt the butter in a microwave-safe bowl for 20–30 seconds.
  2. Whisk in the flour until smooth.
  3. Whisk in the milk gradually.
  4. Microwave for 45 seconds, then whisk.
  5. Microwave for another 30–45 seconds, or until thickened.
  6. Stir in the grated cheese off heat until smooth.
  7. Thin with a small splash of warm milk if needed.

Use short microwave bursts and stir often. The sauce can overheat quickly in the microwave, especially after the cheese is added.

How to Fix Grainy, Oily, Thick, Thin, or Lumpy Cheese Sauce

When cheese sauce goes wrong, the problem usually comes from heat, cheese choice, or the order of steps. Fortunately, many issues can be fixed, especially if you catch them early.
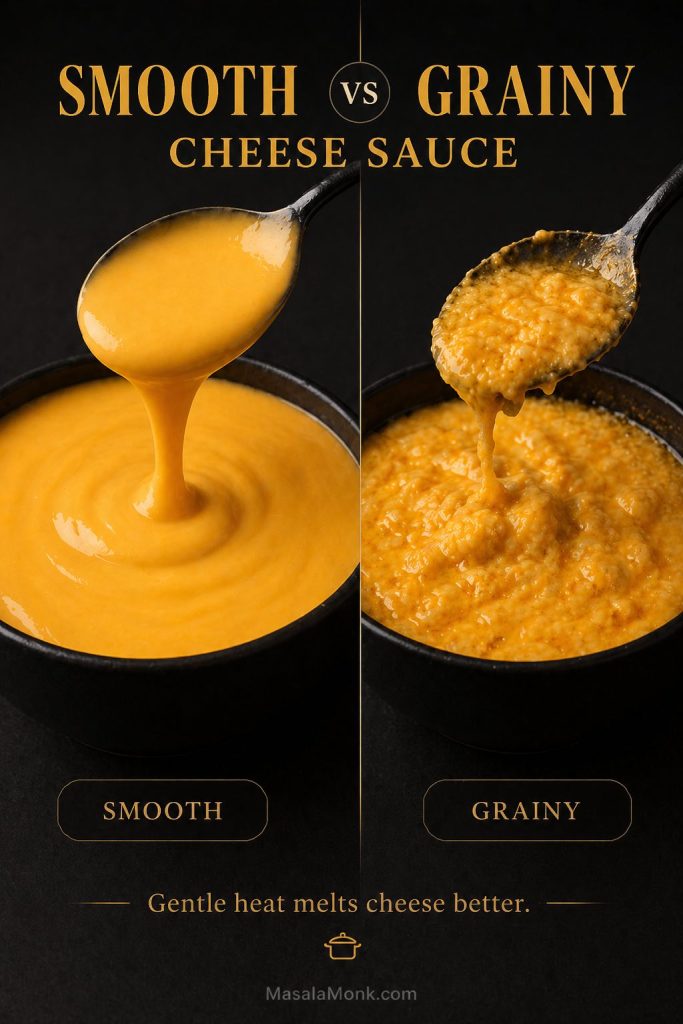
Comparison of smooth cheese sauce and grainy cheese sauce showing the difference between silky and broken texture.
Smooth cheese sauce comes from gentle heat and gradual melting. Grainy cheese sauce usually happens when the cheese overheats, separates, or is added before the base is ready.

Quick Fixes for Common Cheese Sauce Problems

Problem Likely cause How to fix it
Grainy or gritty cheese sauce The cheese overheated, the sauce boiled after cheese was added, or the cheese was very aged. Remove from heat. Whisk in warm milk 1 tbsp / 15 ml at a time. If needed, blend briefly or strain. Next time, add cheese off heat.
Oily or separated sauce The emulsion broke and fat separated from the cheese. Lower the heat immediately. Whisk in warm milk, or add a tiny cornstarch slurry made with ½ tsp cornstarch and 1 tbsp / 15 ml cold milk.
Lumpy sauce Milk was added too quickly to the roux, or the sauce was not whisked enough. Whisk firmly. If lumps remain before adding cheese, strain the sauce, then continue.
Floury taste The roux was undercooked. Cook the butter and flour for 60–90 seconds before adding milk. It should smell lightly buttery, not raw.
Too thick Too much cheese, too little milk, too much simmering, or the sauce cooled down. Whisk in warm milk 1 tbsp / 15 ml at a time until it loosens.
Too thin The milk base did not thicken enough before cheese was added. Simmer the base longer next time. To fix now, use a small cornstarch slurry and heat gently until thicker.
Stringy sauce Too much mozzarella or another stretchy cheese, or cheese was overheated. Use cheddar, Monterey Jack, Colby, or young Gouda as the base. Keep stretchy cheeses as accents.
Bland sauce Mild cheese, not enough salt, or no sharp/acidic seasoning. Add salt carefully, then mustard, pepper, garlic powder, onion powder, cayenne, or a small splash of hot sauce.
Too salty Salty cheese, salted butter, or too much added salt. Whisk in unsalted milk or cream. Serve with unsalted potatoes, pasta, rice, or vegetables.

How to Prevent Cheese Sauce Problems Next Time

To prevent most problems, grate the cheese fresh, cook the roux briefly, thicken the milk before adding cheese, and remove the pan from heat before stirring in the cheddar. Rather than using more heat to force the cheese to melt, give it time to melt gently in the hot sauce base.
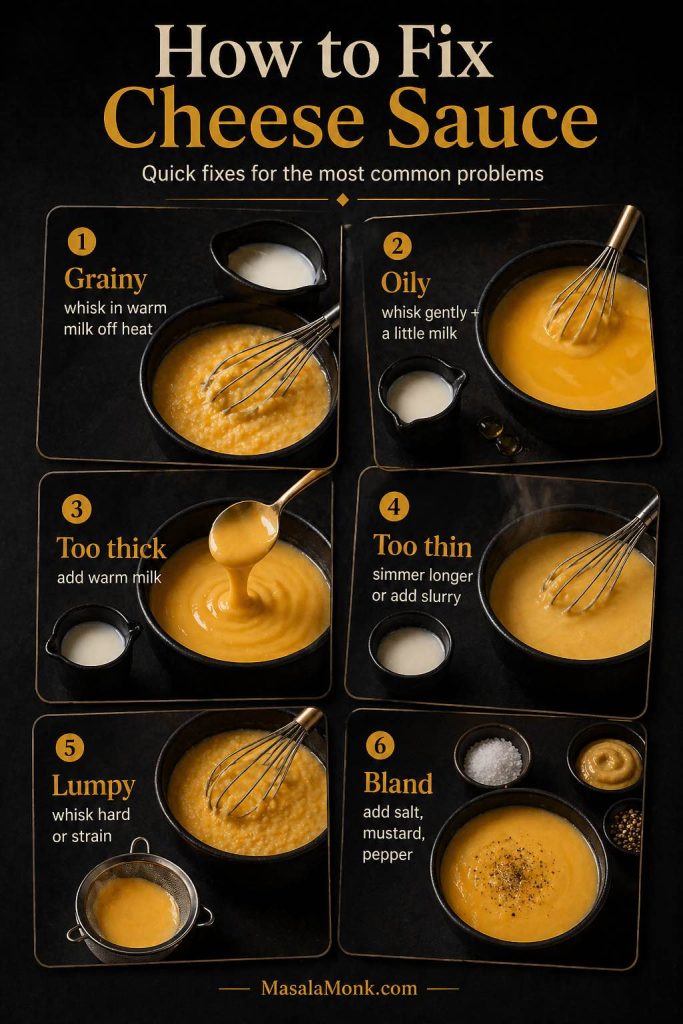
Guide showing how to fix grainy, oily, thick, thin, lumpy and bland cheese sauce.
Most cheese sauce problems can be corrected if you catch them early: lower the heat, whisk gently, add warm milk, strain lumps, or adjust seasoning once the sauce is smooth again.

Why Cheese Sauce Turns Grainy

Cheese sauce turns grainy when the cheese proteins tighten and the fat separates instead of staying evenly dispersed in the sauce. High heat makes this more likely. Very sharp, aged, or dry cheeses can also be more difficult to melt smoothly.

For that reason, the safest method is to thicken the milk first, turn off the heat, and then stir in the cheese gradually. The residual heat melts the cheese without pushing it into a hard boil.

For a deeper look at why cheese sauces break, Serious Eats explains how heat can separate cheese fat, water, and proteins, which is why gentle heat matters so much here.

Can I Use Sodium Citrate for Extra-Smooth Cheese Sauce?

Yes, but treat it as an advanced option rather than a requirement. Sodium citrate is an emulsifying salt that helps cheese melt into a very smooth, glossy sauce. It is most useful when you want a processed-style dip or nacho-style sauce that stays more fluid as it cools.

If you already use sodium citrate in your kitchen, follow the ratio on your product or use a tested sodium-citrate sauce formula. For this homemade cheese sauce recipe, though, the roux method is the easier and more familiar starting point.

How to Store and Reheat Cheese Sauce

Even though cheese sauce is best fresh, leftovers can still work well if you reheat them gently. Cool leftover sauce quickly, transfer it to a shallow airtight container, and refrigerate it within 2 hours.

For general leftover safety, FoodSafety.gov recommends keeping refrigerators at 40°F / 4°C or below and freezers at 0°F / -18°C or below.
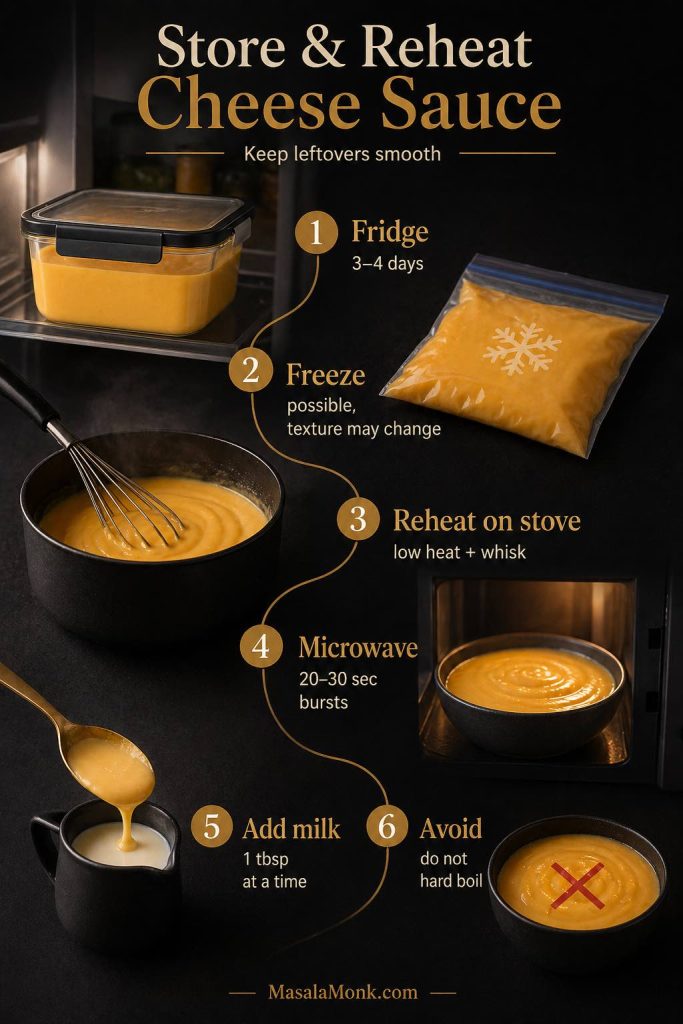
Guide showing how to store and reheat cheese sauce in the fridge, freezer, saucepan and microwave.
Leftover cheese sauce is best reheated gently. Use low heat, whisk often, and add a splash of milk to bring the sauce back to a smooth, pourable texture.

After that, reheat only the amount you need. Repeated cooling and reheating can make the sauce more likely to split, especially because this recipe contains both cheese and milk.

Storage method Best guidance
Refrigerator Store in an airtight container for 3–4 days.
Refrigerator temperature Keep at or below 4°C / 40°F.
Freezer Possible, but not ideal for texture. Freeze for up to 1–2 months for best quality.
Freezer temperature Keep at about -18°C / 0°F for longer storage.
Stovetop reheating Reheat over low heat, whisking often. Add milk 1 tbsp / 15 ml at a time.
Microwave reheating Use 20–30 second bursts and stir between each burst.
Keeping warm Use very low heat or a warm setting. Stir occasionally and add milk if it thickens.
What to avoid Do not hard-boil leftover cheese sauce. It can split or turn grainy.

If refrigerated cheese sauce looks thick or slightly set, that is normal. To bring it back, warm it gently and whisk in a splash of milk until it becomes smooth again.

What to Serve With Cheese Sauce

By this point, you can treat the sauce as a flexible base rather than a single-use recipe. It can work as a vegetable sauce, pasta sauce, potato topping, snack dip, sandwich sauce, or creamy base for simple dinners.

Vegetables

  • Broccoli
  • Cauliflower
  • Roasted carrots
  • Green beans
  • Asparagus
  • Brussels sprouts
  • Roasted potatoes

Pasta, Rice, and Potatoes

  • Macaroni
  • Shells
  • Penne
  • Rotini
  • Baked potatoes
  • Rice bowls
  • Casseroles

Snacks, Sandwiches, and Game-Day Food

  • French fries
  • Potato wedges
  • Pretzels
  • Nachos-style chips
  • Burgers
  • Chicken sandwiches
  • Grilled cheese
  • Paneer wraps
  • Tofu wraps

If you are building a game-day table, this sauce can sit next to a warmer, scoopable dip like buffalo chicken dip instead of trying to do every job on the table by itself.

Cheese Sauce FAQs

Can I Make This Cheese Sauce From Scratch?

Yes. This recipe makes cheese sauce from scratch with butter, flour, milk, and cheddar cheese. You do not need a packaged mix, jarred sauce, or processed cheese unless you want a glossier processed-style version.

Can I Make Cheese Sauce Without Flour?

Yes. Use cornstarch/cornflour instead of flour. Toss the grated cheese with cornstarch, warm the milk, then stir the cheese in gently. This is also a good gluten-free method if all your ingredients are certified gluten-free.

Is Cheese Sauce Gluten-Free?

The main recipe is not gluten-free because it uses all-purpose flour. To make it gluten-free, use a 1:1 gluten-free flour blend or use the cornstarch/cornflour method.

Is Cheese Sauce Keto?

The main recipe is not keto because it uses flour and milk. For keto cheese sauce, use heavy cream, cream cheese, butter, and cheddar instead.

Why Is My Cheese Sauce Grainy?

Cheese sauce usually turns grainy when the cheese gets too hot. Remove the sauce from heat before adding cheese, add the cheese gradually, and avoid boiling after the cheese melts.

How Do I Thin Cheese Sauce?

Whisk in warm milk 1 tablespoon / 15 ml at a time until the cheese sauce reaches the texture you want. For pasta, you can also use warm pasta water.

How Do I Thicken Cheese Sauce?

If the sauce is only slightly thin, let the milk base simmer a little longer before adding cheese. If the finished cheese sauce is thin, whisk in a small cornstarch slurry and heat gently, or add more grated cheese off heat.

Can I Make Cheese Sauce Without Milk?

Yes, but the sauce will change. Unsweetened oat milk, almond milk, or another neutral dairy-free milk can work, but the sauce may taste lighter and less creamy. Water works in an emergency, but milk gives this recipe a smoother cheese sauce with better flavor.

Can I Make Cheese Sauce With Water?

You can, but milk gives a much better texture and flavor. Water makes the sauce thinner and less creamy. If you need to avoid milk, use an unsweetened dairy-free milk that works well in savory sauces.

Can I Make Cheese Sauce With Cream?

Yes, but cream makes the cheese sauce richer and heavier. You can replace part of the milk with cream, or use cream in the keto version. For an everyday recipe, whole milk gives a better balance.

Can I Add American Cheese for a Smoother Sauce?

Yes. If you want a smoother, more processed-style cheese sauce, replace 1–2 oz / 30–55 g of the cheddar with American cheese or another easy-melting processed cheese. It makes the sauce glossier and more stable, but the flavor will be less purely cheddar.

Can I Freeze Cheese Sauce?

You can freeze cheese sauce, but the texture may change after thawing. Reheat it slowly over low heat and whisk in milk to bring it back together. For the smoothest texture, cheese sauce is best made fresh or refrigerated for a few days.

What Cheese Melts Best for Cheese Sauce?

Medium cheddar, mild cheddar, Monterey Jack, Colby Jack, young gouda, and Gruyère melt well. Very aged cheddar, Parmesan, and mozzarella can be used, but they are better as accents rather than the entire sauce base.

Is Cheese Sauce the Same as Mornay Sauce?

They are related. A classic Mornay sauce is a cheese sauce made from béchamel, usually with cheeses such as Gruyère, Parmesan, or other melting cheeses. This recipe is a practical cheddar cheese sauce for everyday cooking.

Can I Use This Cheese Sauce Recipe for Mac and Cheese?

Yes. Thin it slightly with warm milk or pasta water before tossing it with cooked macaroni because pasta absorbs sauce quickly. For baked mac and cheese, keep the sauce even looser before it goes into the oven.

Can I Use This Cheese Sauce Recipe for Nachos?

Yes, for a quick nachos-style drizzle. Keep it warm, make it slightly thicker, and season with cayenne, paprika, jalapeño, or hot sauce. For a more stadium-style nacho cheese sauce, use a smoother melting blend, a little American cheese, or an emulsifying-salt method.

Easy cheese sauce recipe graphic with smooth cheddar sauce for mac and cheese, broccoli, nachos, fries and dips.
Save this easy cheese sauce recipe for a smooth cheddar sauce you can use with mac and cheese, broccoli, nachos, fries, dips and more.

Back to top

Posted on — 10 Comments

Baked Jalapeño Poppers (Oven) — Time, Temp & Bacon Tips

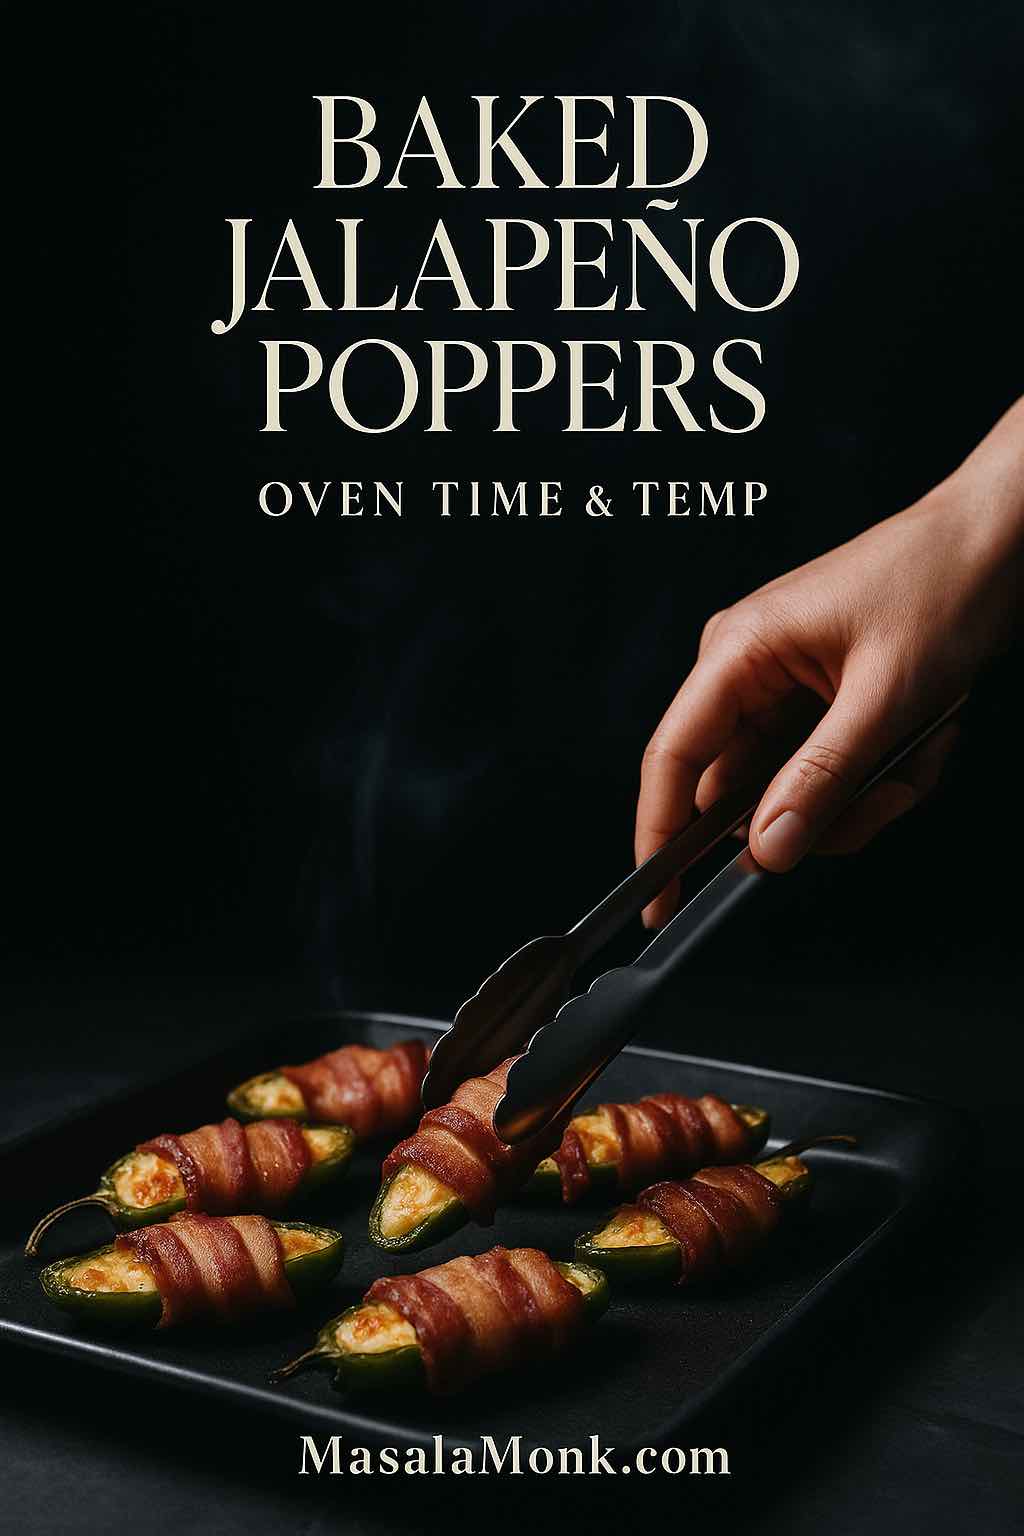
Hand plating bacon-wrapped baked jalapeno poppers on a tray — oven time and temp guide by MasalaMonk

There’s a particular kind of party food that somehow disappears the moment the tray lands on the table. Baked jalapeno poppers are that food—spicy, creamy, crisp around the edges, and just messy enough to feel celebratory. Instead of deep-frying, we’ll rely on the oven (and, if you like, a quick finish on the grill or under the broiler) for a version that stays crunchy where it should and melty where it counts. Along the way, you’ll get precise time and temperature cues for plain and bacon-wrapped jalapeño poppers in oven, clever variations, and a handful of drink pairings that make every bite pop.

Before we jump in, a quick word on method: because the oven is less aggressive than a fryer, we’ll engineer crispness with smart setup—wire rack, middle rack placement, proper spacing, and (optionally) a light panko top. This combination delivers the sought-after contrast: tender pepper, hot filling, and a lightly golden cap you can tap with a finger.

Also Read: How to Cook Bacon in the Oven (Crispy, No-Mess, Crowd-Ready Recipe)

The Roadmap (What You’ll Do, in Spirit)

First, split the jalapeños lengthwise. Next, scoop out seeds and ribs (leave some ribs if you want a little sting). Then, stir together a balanced filling—cream cheese for structure, sharp cheddar for pull, scallion for freshness, garlic for warmth, a pinch of salt to wake everything up. After that, pipe or spoon the filling into the pepper “boats.” Finally, either bake them as-is or wrap each with thin-cut bacon, setting the halves seam-side down so the wrap tightens as it cooks.

Although that sounds almost too simple, the difference between good and great lives in the details. A wire rack over a sheet pan is essential: rendered fat and vegetable moisture drip away, heat surrounds the peppers, and the bottoms crisp instead of steam. And yes, a quick sprinkle of panko creates a crackly top without cumbersome breading—Serious Eats has long championed oven-crisp poppers and even suggests techniques like a brief chill to keep fillings tidy. See their crispy baked jalapeño poppers method for why this works so well. (Serious Eats: Crispy & Gooey Baked Jalapeño Poppers)

Also Read: French Toast Sticks (Air Fryer + Oven Recipe) — Crispy Outside, Custardy Inside

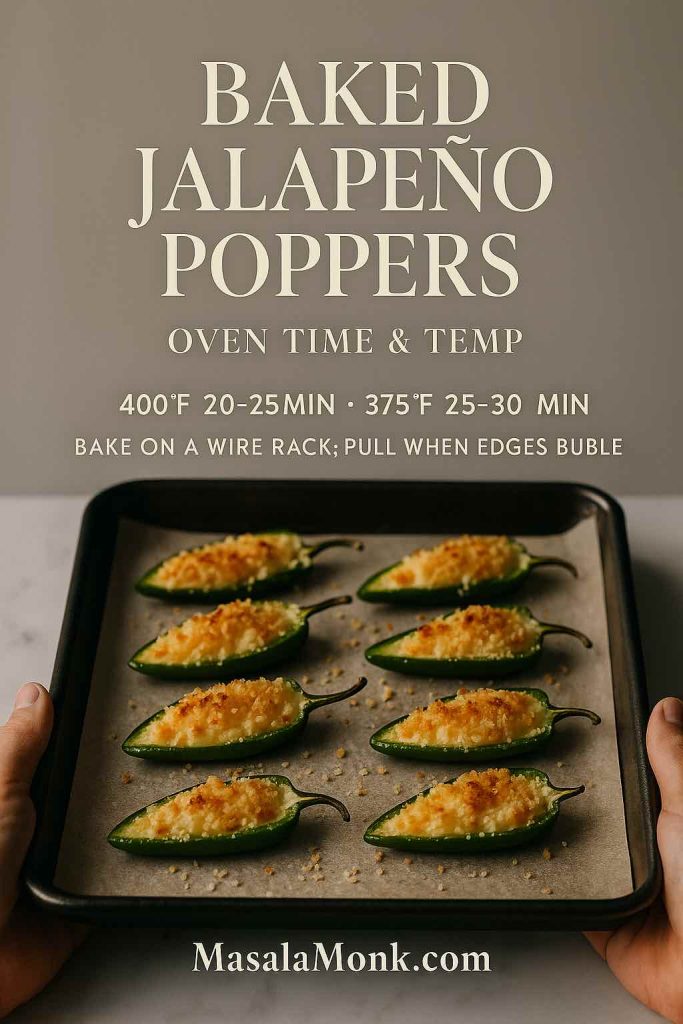
Here’s the baseline method for baked jalapeño poppers—time, temp, and the rack setup that keeps them crisp.

Hands holding a sheet pan of baked jalapeno poppers with golden panko topping—oven time and temp guide for MasalaMonk
Baked jalapeño poppers with a light panko crust—use a wire rack and bake 400°F for 20–25 min (or 375°F for 25–30) until edges bubble and tops are golden.

Baked Jalapeno Poppers: Oven Time & Temp (Your Baseline)

Because jalapeños vary—some are slender and fiery, others plump and mild—cook times flex. Nevertheless, a reliable pattern emerges:

  • 400°F (204°C): about 20–25 minutes for plain baked poppers.
  • 375°F (190°C): roughly 25–30 minutes, especially for larger peppers that need a more gradual cook.

Importantly, doneness cues beat the clock every time: look for a lightly golden top, bubbling edges where the cheese meets the pepper, and a pepper wall that yields to a fork without collapsing. If you opted for panko, a slightly hotter oven helps the crumbs set fast; if you skipped crumbs, stay anywhere in that 375–400°F lane and track the visual signs. For more on oven-based technique, you can cross-reference this test-driven baked poppers approach. (Serious Eats: Crispy & Gooey Baked Jalapeño Poppers)

Also Read: Air Fryer or Air Fryer Toaster Oven: Making the Right Choice

Why Panko Helps (Without Going Full Breaded)

Now, you could dredge and bread, but that’s overkill for an oven method. Instead, sprinkle a little oiled panko on top; the large, airy flakes brown quickly and stay crisp. Panko’s structure (bigger flakes, more surface area) is the real reason it works so well for light oven crunch. If you’d like a deeper dive into why those crumbs behave differently, skim this primer on what panko does in high-heat applications. (Serious Eats: Everything You Can Do With Panko)

Bacon-Wrapped Jalapeño Poppers in Oven (Time, Temp & Finish)

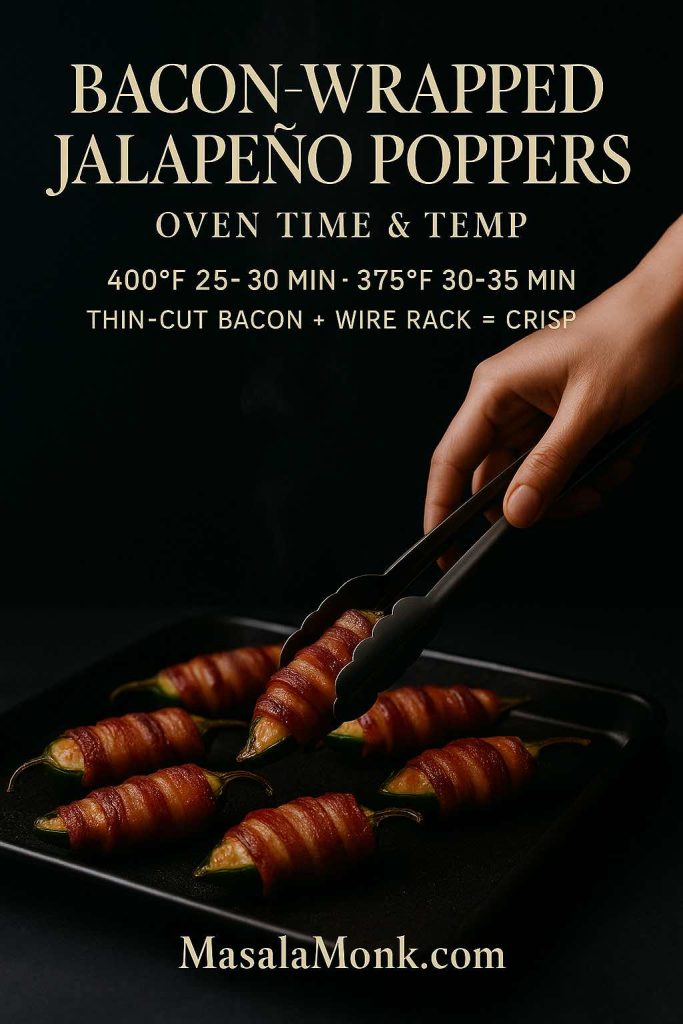
For bacon-wrapped, use thin-cut slices and the timings below; finish hot for snap.

Hand lifting bacon-wrapped baked jalapeno poppers from a black tray—oven time and temperature guide
Bacon-wrapped jalapeño poppers—bake on a wire rack at 400°F for 25–30 minutes (or 375°F for 30–35), then broil briefly for extra snap.

Because bacon needs time to render, bacon-wrapped jalapeño poppers in oven take a touch longer. Furthermore, thin-cut bacon is your friend here: it renders faster, tightens beautifully, and crisps without overcooking the pepper. Consequently, aim for:

  • 400°F (204°C): about 25–30 minutes.
  • 375°F (190°C): approximately 30–35 minutes.

Afterward, if you want a final snap, broil for 60–90 seconds, keeping the tray on the middle rack so the bacon doesn’t leap from crisp to scorched. Prefer smoke instead of broil? As an alternative, a pellet grill or smoker gives you that campfire flavor with very little effort: many cooks smoke at a low setting for about 30 minutes, then raise the heat to around 375°F to finish until the bacon is as crisp as you like. Traeger’s step-by-step method follows that exact logic—low smoke, then hot finish—so you can use it as a cross-check. (Traeger: Smoked Jalapeño Poppers)

If the grill calls your name instead, indirect medium heat (think a covered grill with the poppers off the direct flame) usually lands you in the 20–30 minute window, after which a quick kiss of direct heat crisps the bacon edges. Weber’s popper playbooks outline both grilled and smoked takes, complete with setup notes you can mirror on gas or charcoal. (Weber: Smoked Jalapeño Poppers; Weber: Grilled Jalapeño Poppers)

a quick safety nudge: bacon should be handled cold, cooked once, and cooled promptly. for storage windows (and a handy chart you can cite in your notes), the USDA FSIS has clear guidance on bacon handling and leftovers. (USDA FSIS: Bacon & Food Safety)

The Cleanest Base Recipe of Baked Jalapeño Poppers

You’ll need: fresh jalapeños, cream cheese, shredded sharp cheddar, scallions, garlic, fine salt, optional panko, and thin-cut bacon if you’re wrapping.

  1. Prep the peppers. Halve lengthwise; scrape seeds and ribs with a small spoon. For milder poppers, remove everything; for a gentle tingle, keep a little rib in place.
  2. Mix the filling. Beat the cream cheese until spreadable; fold in cheddar, scallion, and garlic; season lightly.
  3. Fill confidently. Spoon or pipe; keep the filling just proud of the rim (too much will ooze). If you’re wrapping, tuck the bacon seam underneath.
  4. Set the stage. Line a sheet pan with foil for easy cleanup; place a wire rack on top; spray lightly. Arrange peppers with space.
  5. Bake by cues. Use the time/temps above, but trust your eyes: bubbling edges, tender pepper walls, light golden tops.
  6. Finish with intention. Broil briefly for bacon crisp; or, if you’ve got a lit grill, slide the rack on for a minute per side for faint smoke and char.

Because you might be like to try some variations without redundancy, here are a few ideas that change the feel without changing the base.

Variations of Baked Jalapeño Poppers

Panko-Crisp Cap. Toss panko with a touch of oil or melted butter, then sprinkle sparingly before baking. It’s just enough texture to crackle without hiding the pepper. For a rationale rooted in testing, see why panko’s larger shards resist sogginess. (Serious Eats: Panko Guide)

Cheddar-Forward Filling. Increase sharp cheddar for melt and salt; balance with extra scallion. Because cheddar tightens as it melts, leaving a little headspace helps prevent spillover. For ideas on alternative coatings or fillings (including pulled pork for a smoked spin), peek at this pulled-pork poppers riff. (Serious Eats: Pulled-Pork Jalapeño Poppers)

Grilled Finish (No Bacon). Bake until nearly done, then finish on a hot grill grates for 1–2 minutes to add a whisper of smoke. Weber’s jalapeño guides show indirect setups that minimize flare-ups while you get that last bit of char. (Weber: Jalapeño Poppers)

Cook indirect to tender, then kiss with direct heat for the crisp finish.

Tongs moving jalapeño popper on a grill from indirect heat toward flames—grill 20–30 min, then sear briefly to finish
Grilled Jalapeño Poppers: cook over indirect heat for ~20–30 minutes, then flash over direct heat for crisp edges.

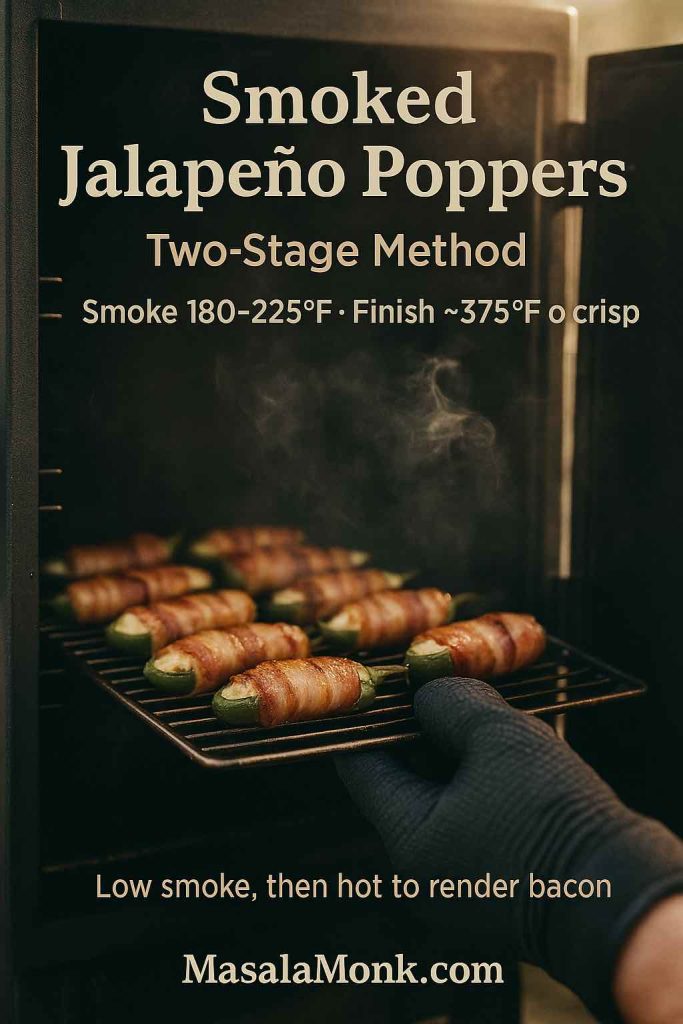
Smoked, Then Crisped. If you’re hosting outdoors, smoke the tray for 30 minutes on low, then raise heat to 375°F until the bacon is just right. Traeger’s method lays out that two-stage approach clearly. (Traeger: Smoked Jalapeño Poppers)

Low smoke, then hot finish—use this two-stage rhythm for perfect texture.

Gloved hand sliding bacon-wrapped jalapeño poppers into a smoker—smoke 180–225°F, then finish near 375°F to crisp
Smoked Jalapeño Poppers: go low for flavor at 180–225°F, then finish around 375°F until bacon is rendered and filling bubbles.

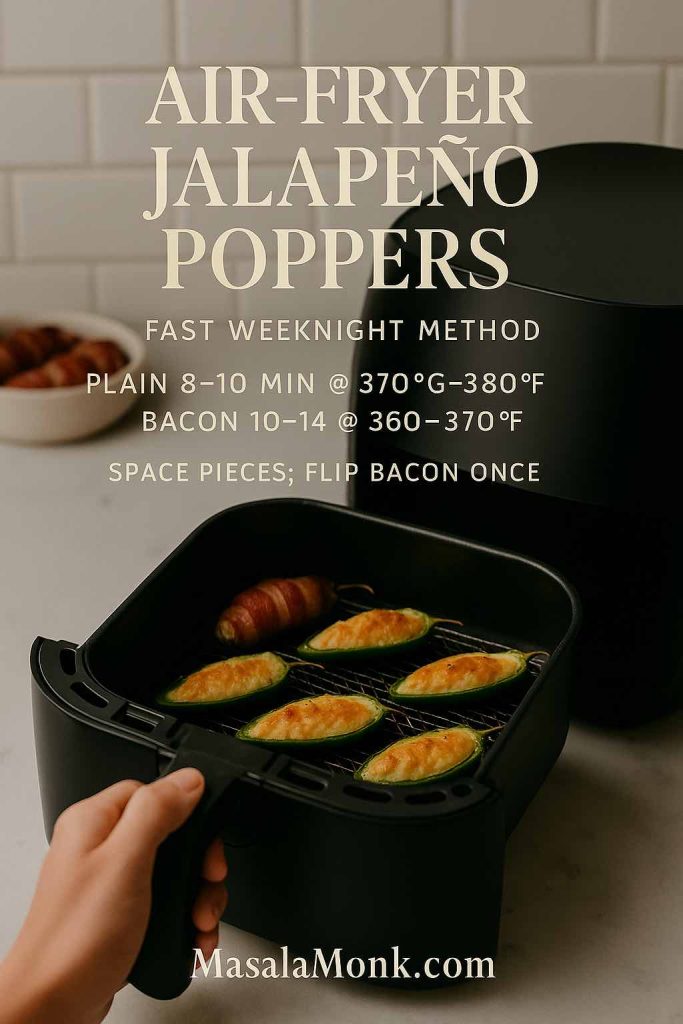
Air-Fryer Shortcut (Small Batches). On weeknights, the basket can be a lifesaver. In that case, preheated around 370–380°F, you’ll usually see 7–10 minutes for plain poppers and about 10–14 minutes for bacon-wrapped, with a flip halfway. For a published reference that mirrors those times and cues, here’s a reliable kitchen resource. (The Kitchn: Air Fryer Jalapeño Poppers)

Weeknight quick? These air-fryer times get you color without crowding the basket.

Hand pulling out an air fryer basket with jalapeno poppers—plain and bacon-wrapped—showing fast weeknight cook times
Air-fryer jalapeño poppers: plain cook in 8–10 minutes at 370–380°F; bacon-wrapped take 10–14 at 360–370°F. Space pieces and flip bacon once for color.

Jalapeño Popper Bake (Casserole). All the popper flavor in a crowd-friendly dish—brown the top under the broiler.

Spoon lifting a square of jalapeño popper bake with browned panko top and chives—375–400°F for about 25–30 minutes
Jalapeño Popper Bake: bake at 375–400°F for ~25–30 minutes until the center bubbles; broil 1 minute for a browned top.

Serving: Contrast, Then More Contrast

Since poppers are rich and salty—and, with bacon, downright luxurious—pair them with drinks and sides that cut through. Naturally, you’ll want variety on the board, but more importantly, you’ll want balance in the glass.

Bright, savory-tangy refreshers. When bacon’s on the tray, the savory sparkle of Jal Jeera (an Indian cumin-mint lemonade) does magical things; it’s zippy, cooling, and distinctly moreish alongside spicy bites.

Tropical, minty coolers. For a crowd pleaser that never fights the food, mix Pineapple Mojito Mocktails; add ginger if you want a light snap that stands up to bacon fat. On a sweeter note—though still bright—Mango Lemonade settles the heat without weighing down the palate.

Creamy, tangy dip to reset the palate. A cool blue cheese dip pairs as naturally with poppers as it does with wings: the funk and acid balance heat, while the thickness reins in drips and crumbs.

Something hearty on the side. Because the spicy-creamy combo begs for a neutral foil, toss a tray of crisped tubers into the mix; you can swipe them through stray cheese and crumbs between bites. This roundup of potato appetizers is a helpful springboard.

Also Read: Air Fryer Chicken Wings (Super Crispy, No Baking Powder)

Technique Notes You’ll Use For Baked Jalapeño Poppers

Gloves and steam. Always seed jalapeños with gloves if possible; capsaicin sticks to skin. Meanwhile, after baking, let poppers rest 3–5 minutes so steam relaxes into the filling; that short pause prevents molten blowouts.

Rack, not pan. Elevation is everything. A rack allows hot air to circulate and keeps bottoms from stewing in their own juices. If you don’t have one, crumple long coils of foil into “rails” and set peppers on top—janky, yes, but effective.

Thin bacon wins. Because thick slices remain chewy by the time peppers are done, thin-cut bacon is the right call for the oven. If all you have is thick-cut, par-render it briefly on a rack in a hot oven, then wrap and finish on the peppers. For safe handling and storage windows, keep the USDA FSIS bacon guide bookmarked. (USDA FSIS: Bacon & Food Safety)

Breadcrumb restraint. A little panko goes a long way; too much turns the bite into a crust with a pepper attached. Oil the crumbs lightly so they brown instead of drying out. If you’re nerdy about why panko behaves the way it does, this explainer is a quick, satisfying read. (Serious Eats: What to Do With Panko)

Alternate heat sources. If you’re grilling, aim for indirect heat to start; once the pepper softens and the filling bubbles, slide briefly over direct heat to toast the edges. Weber’s popper recipes show timing patterns (often 16–30 minutes total) you can translate to your setup. (Weber: Grilled Jalapeño Poppers; Weber: AU Jalapeño Poppers, 20–30 minutes indirect)

Smoker logic. Smoke likes time, bacon likes heat. Consequently, a two-stage approach—low smoke first, then a hotter finish—gives you both. Traeger’s versions document that climb from 180°F smoke to a 375°F finish until bacon is crisp. (Traeger: Smoked Jalapeño Poppers)

Air-fryer guardrails. Especially on small batches, the basket keeps things weeknight-friendly. Keep space between halves, flip once for bacon, and begin checking early; models run hot or cool by a few degrees. The Kitchn’s recipe lands around 7–10 minutes for plain poppers, and that aligns well with home testing. (The Kitchn: Air Fryer Jalapeño Poppers)

Flavor Tweaks Without Starting Over

Scallion swap. Chives create a softer onion note; minced pickled jalapeños add tang and echo the main pepper without extra heat.

Citrus lift. A micro-grate of lime zest over hot poppers brightens the whole bite; if you’re serving with Jal Jeera or Mango Lemonade, the citrus ties everything together.

Cheese balance. Cream cheese softens heat and prevents greasy leaks; cheddar adds savor and stretch. If you want a stronger punch, swap a little cheddar for smoked gouda or pepper jack, then rein in the salt.

Herb crunch. Minced cilantro and a dusting of toasted panko take the bite from creamy to layered without making it fussy.

Pulled-pork cameo. For a smoker day or a tailgate platter, tuck a teaspoon of pulled pork beneath the cheese; it eats luxurious and leverages leftovers. The inspiration isn’t new, but it’s timeless. (Pulled-Pork Poppers)

Make-Ahead, Leftovers, and Freezer Smarts

Assemble ahead. Filled, unbaked poppers chill beautifully. Cover and refrigerate overnight; bake from cold and add a couple of minutes until the same doneness cues appear. If you sprinkled panko, hold it back until right before baking so it stays perky.

After the party. Cool leftovers, stash airtight, and enjoy within a few days for best quality. When in doubt, reheat on a rack in a hot oven so bottoms crisp again. For freezer logic, the USDA FSIS notes frozen foods remain safe indefinitely, while quality has a practical window; as a reference point, bacon sits comfortably in the 1–2 month range for peak texture. (USDA FSIS: Freezing & Food Safety)

Batch strategy. If you’re cooking multiple trays, rotate pans halfway. Moreover, keep the rack in the middle position to balance top browning with pepper tenderness.

Re-crisp rescue. If bacon lost crunch in the fridge, bring poppers back to life at 425°F for a few minutes on a rack; broil briefly if needed, watching closely.

Also Read: Lemon Drop Martini Recipe (Classic, 3-Ingredient, & More)

When You Want a Show-Stopping Platter

Start with a mountain of baked jalapeño poppers—some plain, some bacon-wrapped. Then, surround them with a few high-contrast sides and sips. Slide in that blue cheese dip for tang, pour a pitcher of Pineapple Mojito Mocktails for brightness, and add a bowl of potato appetizers for an easy, neutral foil. Or, for a more savory-spicy lean, pour tall glasses of Jal Jeera and let the cumin-mint twist do the heavy lifting between bites.

Troubleshooting Baked Jalapeño Poppers

Soggy bacon? Use thinner slices, keep the rack elevated, and finish hot. Alternatively, grill briefly over direct heat right at the end; Weber’s popper recipes show how to move from indirect to direct without flare-ups. (Weber Grilling Inspiration)

Leaky filling? Don’t overfill, and if you’re wrapping, place the seam under the pepper. In addition, a quick 10-minute chill helps the filling set up before baking—a tip baked (pun intended) into many test kitchens’ workflows. (Serious Eats baked poppers)

Too spicy? Remove every last seed and rib; then up the cream cheese and add a drop of honey or a spoon of cooled, mashed potato to the filling—both tame heat without turning the bite into dessert. Finally, pour Mango Lemonade alongside for a sweet-tart buffer.

Not tender yet? Give the peppers 3–5 more minutes; the sweet spot is when the wall yields easily but still holds its shape.

Also Read: 10 Best Chicken Sandwich Recipes (BBQ, Parm, Buffalo & More)


Wrap It Up (and Bake)

Ultimately, baked jalapeño poppers are all about contrasts done right: hot and cool, creamy and crisp, spicy and refreshing. With an oven-first method, a few small tricks (rack, spacing, panko), and dependable timing for both plain and bacon-wrapped jalapeño poppers in oven, you get consistent results without baby-sitting oil. And if you feel like leveling up, you’ve got options: a smoke-then-crisp routine on the pellet grill, a quick detour across hot grates for whisper-char, or an air-fryer sprint for weeknights.

Now, line a tray, grab those peppers, and claim the last popper before someone else does.

FAQs

1) How long to bake jalapeño poppers at 400°F?

At 400°F, baked jalapeno poppers without bacon usually finish in about 20–25 minutes, while bacon-wrapped poppers tend to need 25–30 minutes. Moreover, pull them once the tops are lightly golden, the filling bubbles at the edges, and the peppers feel tender yet hold shape.

2) How long to bake jalapeño poppers at 375°F?

At 375°F, plain poppers generally take 25–30 minutes and bacon-wrapped versions about 30–35 minutes. Additionally, rotate the pan once so color develops evenly across the tray.

3) How long to bake jalapeño poppers at 350°F?

At 350°F, expect a gentler cook: 30–35 minutes for plain and 35–40 minutes for bacon-wrapped. Consequently, if you want extra browning after they’re tender, finish with a brief broil while watching closely.

4) What oven temperature works best for baked jalapeno poppers?

A range of 375–400°F is the sweet spot for consistent results. Notably, 400°F crisps faster, whereas 375°F gives larger peppers and heavy fillings a more even cook.

5) How long to cook jalapeño poppers in the oven overall?

Most trays land between 20 and 35 minutes depending on pepper size, filling volume, and temperature. Ultimately, remove them when the cheese is bubbling and the pepper walls yield to a fork without collapsing.

6) How to keep bacon crisp on bacon-wrapped jalapeño poppers in oven?

Thin-cut bacon and a wire rack make the difference by letting fat render and drip away. Likewise, baking hot on the middle rack and finishing with a short broil locks in snap without overcooking the peppers.

7) How to bake stuffed jalapeños (no bacon) so the filling doesn’t leak?

Keep the filling just proud of the rim rather than mounded, then chill the filled peppers for about ten minutes. Furthermore, a light sprinkle of oiled panko helps the surface set quickly.

8) What’s the best cheese mix for baked jalapeno poppers?

Cream cheese provides body and prevents greasy leaks; sharp cheddar adds savory pull. Conversely, if you want a bolder bite, swap in a little smoked gouda or pepper jack and adjust salt.

9) How long to bake jalapeño poppers with panko on top?

In a 400°F oven, plain poppers with a panko topper usually finish in 20–25 minutes, while bacon-wrapped need roughly 25–30. Additionally, oil the crumbs lightly so they brown instead of drying out.

10) What’s the simplest way to reheat baked jalapeno poppers?

Re-crisp on a rack at 400–425°F for a few minutes until the tops liven up again. Alternatively, avoid microwaving, which softens crust and bacon.

11) How long to bake jalapeño poppers wrapped in bacon at 400°F?

Plan about 25–30 minutes on the middle rack for bacon-wrapped jalapeños. Importantly, thicker bacon may require a minute or two of broil to finish rendering.

12) How long do extra-large jalapeño poppers take?

At 375°F, oversized peppers often need 30–35 minutes; at 400°F, start checking around 25–30. Moreover, test tenderness with a fork and extend time in small increments.

13) What temp to cook bacon-wrapped jalapeños if I want gentle heat?

Choose 375°F for more control over pepper softness and even rendering. Subsequently, if you’d like sharper crisp, raise to 400°F for the final few minutes.

14) How long to cook jalapeño poppers in air fryer (plain and bacon)?

Plain poppers at roughly 370–380°F typically take 8–10 minutes, while bacon-wrapped at about 360–370°F run 10–14 minutes with a flip. Nevertheless, check early because basket crowding and model variance change browning speed.

15) How to cook bacon-wrapped jalapeños in oven without soggy bottoms?

Elevate everything on a wire rack so heat circulates and drips fall away. Similarly, give pieces space; overcrowding traps steam and softens the bacon.

16) How to bake stuffed jalapeños so peppers stay tender, not mushy?

Bake on the middle rack uncovered and stop as soon as a fork slides in with slight resistance. Thereafter, rest a few minutes so steam settles into the filling rather than making the walls limp.

17) How long to bake jalapeño poppers if I’m using thick bacon?

Expect 35 minutes or a touch more at 375°F, depending on thickness. Alternatively, par-render the bacon briefly before wrapping to shorten the final bake.

18) How far ahead can I assemble baked jalapeno poppers?

Assemble up to one day ahead and refrigerate tightly covered. Additionally, bake from cold and add two to three minutes until the same visual cues appear.

19) How long to bake jalapeño popper “casserole” or bake?

In a shallow dish at 375–400°F, estimate about 25–30 minutes until the center bubbles. Afterward, broil briefly for a browned top and rest several minutes so slices hold.

20) What’s the best rack position for even results?

Use the middle rack to balance top browning with pepper tenderness. Similarly, if you’re running multiple trays, rotate positions halfway through.

21) How to cook jalapeños wrapped in bacon on the grill without flare-ups?

Set up indirect heat first and cook until nearly done, then kiss with direct heat to crisp edges. Moreover, keep the seam underneath and use toothpicks sparingly.

22) How long to cook jalapeño poppers in the air fryer when they’re thick and crowded?

Start around 10–14 minutes for bacon-wrapped at 360–370°F but reduce the load for better airflow. Consequently, smaller batches brown more reliably and finish on time.

23) How long to bake jalapeño poppers with bacon bits instead of wrapping?

At 400°F, 20–25 minutes typically does it since there’s no strip to render. Additionally, sprinkle bits over the filling before baking for quick porky flavor.

24) What’s the ideal way to store and re-crisp leftovers?

Cool promptly, refrigerate airtight, and re-crisp on a rack in a hot oven just before serving. Hence, bottoms stay firm and the top regains texture without drying out the pepper.

25) Baked jalapeno poppers: what visual cues mean “done” regardless of time?

Look for bubbling cheese at the edges, lightly golden tops, and pepper walls that are tender but upright. Thus, even if clocks vary, those indicators guarantee the right bite on both plain and bacon-wrapped jalapeño poppers in oven.

Posted on — 2 Comments

Carbs in Cheese: Keto Diet Perspective

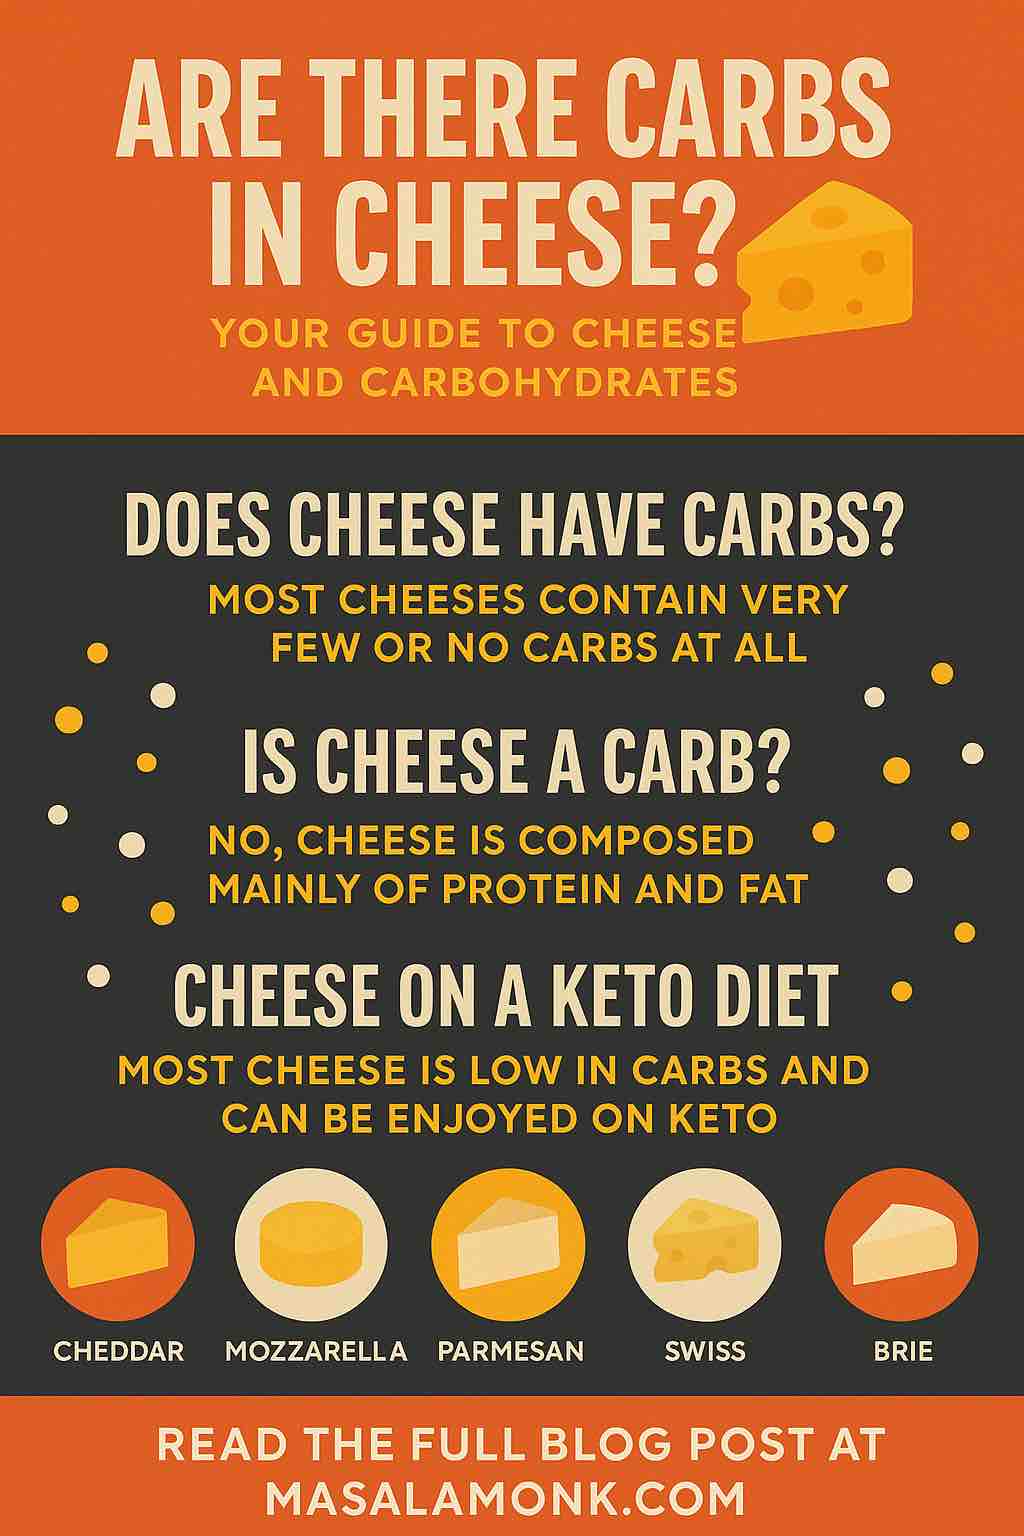
ARE THERE CARBS IN CHEESE? YOUR GUIDE TO CHEESE AND CARBOHYDRATES

Cheese lovers who are following a ketogenic diet, you’re in for a treat! Cheese, with its rich flavors and varied textures, can be a delicious and satisfying part of your low-carb lifestyle. However, it’s essential to remember that not all cheeses are created equal, especially when it comes to their carbohydrate content. This detailed guide will delve into the carb counts of various types of cheese, their roles in a keto diet, and how to incorporate them into your meals.

is Cheese Keto and other Low Carb Diet friendly?

Cheese, with its high-fat, moderate-protein, and low-carb nutritional profile, is often a staple in ketogenic (keto) and other low-carb diets. The goal of these diets is to shift your body into a state of ketosis, where it burns fat for fuel instead of carbohydrates.

However, not all cheeses are created equal when it comes to carb content. Some cheeses, like Swiss and cheddar, have less than 1 gram of carbs per ounce, making them an excellent choice for those following a keto or low-carb diet. Others, like cottage cheese and Velveeta, have slightly higher carb counts and should be eaten in moderation.

For those following other types of low-carb diets, such as the Atkins or South Beach diets, cheese can also be a beneficial addition. These diets also limit carb intake, especially in the initial phases, and emphasize protein and fat intake. As such, the high protein and fat content of cheese can help to keep you feeling full and satisfied.

However, as with any food, it’s important to consume cheese in moderation. While it’s a nutritious food that can fit into various dietary patterns, it’s also high in calories and saturated fat, which can contribute to weight gain and other health issues if eaten in excess.

Carb Counts of Popular Cheeses

Cheese is a versatile food that can be incorporated into a variety of meals, from salads and sandwiches to gourmet dishes. It’s a rich source of protein and calcium, and many types of cheese also contain beneficial probiotics that support gut health. However, the carb content can vary significantly between different types of cheese, making some more suitable for certain diets than others.

The ketogenic, or keto, diet is a high-fat, moderate-protein, low-carb diet designed to put your body into a state of ketosis. In this metabolic state, your body burns fat for fuel instead of carbohydrates. Cheese, with its high fat and protein content and generally low carb count, is a natural fit for this diet. However, the carb content can vary between different types of cheese, so it’s crucial to choose wisely to stay within your daily carb limit.

But what about other diets? Whether you’re following a Mediterranean diet, a vegetarian diet, or simply trying to eat healthier, cheese can still have a place in your meal plan. Let’s take a closer look at the carb content in one ounce (28 grams) of some popular cheeses and explore some creative ways to incorporate them into various diets.

Cream Cheese

Cream cheese is a versatile option with only 1.6 grams of carbs per ounce. Its smooth texture and mild flavor make it a popular spread for bagels and a key ingredient in cheesecakes. For those on a keto diet, cream cheese can be used as a base for various dips and sauces, or added to a low-carb wrap for a creamy twist. For vegetarians, cream cheese can be spread on whole grain crackers and topped with fresh fruits or vegetables for a balanced snack.

Cottage Cheese

Cottage cheese contains about 3.4 grams of carbs per ounce, making it a higher-carb option compared to other cheeses. However, it’s a great source of protein, making it a popular choice for vegetarians and those following a Mediterranean diet. Consider pairing it with some fresh berries for a delicious and satisfying breakfast or snack. For those on a keto diet, remember to eat cottage cheese in moderation due to its higher carb content.

Feta Cheese

Feta cheese, known for its tangy flavor, contains 1.2 grams of carbs per ounce. It’s a staple in Greek cuisine and a great addition to salads and Mediterranean-inspired dishes. Try it with cucumber, olives, and a drizzle of olive oil for a quick and easy Greek salad. For those on a keto diet, the low carb content of feta cheese makes it a great choice.

Cheddar Cheese

Cheddar cheese, a classic choice, contains 0.4 grams of carbs per ounce, making it a great choice for snacking or topping off dishes. It’s a good source of calcium and protein, and its robust flavor makes it a favorite in many dishes. For those on a keto diet, cheddar cheese can be used in a variety of dishes, from omelets to keto-friendly grilled cheese sandwiches.

Mozzarella Cheese

Mozzarella cheese, with 0.6 grams of carbs per ounce, is a fantastic low-carb option. It’s a key ingredient in Italian cuisine, especially in dishes like pizza and caprese salad. For those on a keto diet, mozzarella is the perfect cheese for a keto-friendly pizza night. For vegetarians, fresh mozzarella can be paired with tomatoes and basil for a simple and delicious caprese salad.

American Cheese

American cheese contains about 2 grams of carbs per ounce. While it’s not the lowest carb option, it can still fit into a keto diet when used sparingly. It’s a classic choice for burgers or melted into an omelet. For those following a traditional American diet, this cheese can be used in a variety of dishes, from sandwiches to mac and cheese.

Parmesan Cheese

Parmesan cheese is very low in carbs, with only 0.9 grams per ounce. It’s a hard, aged cheese that’s packed with flavor, making it a great addition to a variety of dishes. For those on a keto diet, try it grated over zucchini noodles for a low-carb pasta alternative. For those following a Mediterranean diet, Parmesan can be used to add a burst of flavor to pasta dishes, salads, and soups.

Swiss Cheese

Swiss cheese contains 1.5 grams of carbs per ounce, making it a good option for sandwiches or as a snack. Its nutty flavor pairs well with fruits and whole grain bread, making it a good option for those following a balanced diet. For those on a keto diet, Swiss cheese can be enjoyed with cold cuts for a quick roll-up snack.

Ricotta Cheese

Ricotta cheese has about 2 grams of carbs per ounce. It’s a soft cheese that’s often used in Italian desserts and pasta dishes. For those on a keto diet, it can be used in moderation in dessert recipes, providing a creamy base for cheesecakes or as a filling for low-carb crepes. For vegetarians, ricotta can be used in a variety of dishes, from lasagna to stuffed shells.

Velveeta Cheese

Velveeta cheese contains about 3 grams of carbs per ounce. It’s a processed cheese product that’s known for its smooth melting properties, making it a popular choice for cheese sauces and dips. For those on a keto diet, it can be used sparingly due to its higher carb content. For those following a traditional American diet, Velveeta can be used in a variety of comfort food dishes, from mac and cheese to cheesy broccoli casserole.

Goat Cheese

Goat cheese contains about 0.2 grams of carbs per ounce, making it one of the lowest carb cheeses available. Its tangy flavor and creamy texture make it a great addition to salads and roasted vegetables. For those on a keto diet, goat cheese can be enjoyed as a snack with low-carb vegetables or added to salads for a burst of flavor. For vegetarians, goat cheese can be spread on whole grain crackers for a satisfying snack.

Queso

Queso, or cheese dip, can range from 1 to 3 grams of carbs per ounce, depending on the recipe. It’s a popular choice for a dip with tortilla chips or drizzled over Mexican dishes. For those on a keto diet, be sure to check the nutrition facts and choose a low-carb version. You can enjoy it as a dip with low-carb vegetables or drizzled over a plate of nachos made with low-carb tortilla chips.

Provolone Cheese

Provolone cheese contains about 0.6 grams of carbs per ounce, making it a good low-carb option. It’s a semi-hard cheese that’s often used in sandwiches and Italian dishes. For those on a keto diet, it can be used in sandwiches made with low-carb bread or melted over chicken for a satisfying dinner. For those following a Mediterranean diet, provolone can be used in a variety of dishes, from pasta bakes to stuffed peppers.

Pimento Cheese

Pimento cheese varies greatly depending on the recipe, but it typically contains about 2 grams of carbs per ounce. It’s a flavorful spread made with cheddar cheese, mayonnaise, and pimentos. For those on a keto diet, it can be used as a spread for celery sticks or cucumber slices. For those following a traditional Southern diet, pimento cheese can be enjoyed as a spread on crackers or in a sandwich.

American Cheese Slice

One slice of American cheese contains about 2 grams of carbs. It’s a convenient option for a quick snack or to melt over a burger. For those on a keto diet, it can be used to add a creamy element to burgers or omelets. For those following a traditional American diet, a slice of American cheese can be used in a variety of sandwiches or melted into a grilled cheese sandwich.

Here’s a more extensive breakdown of popular cheeses and their carbohydrate content per 1-ounce (28-gram) serving:

Cheese TypeCarbs (grams)
Cheddar0.4
Mozzarella1
Parmesan0.9
Swiss1.5
Brie0.1
Gouda0.6
Blue Cheese0.7
Feta1.2
Cream Cheese1.2
Ricotta3
Cottage Cheese3.4
Camembert0.1
Halloumi0.5
Provolone1
Neufchâtel1.1

Is Cheese a Carb?

No! Cheese is not a carbohydrate. It’s mostly composed of protein and fat. The tiny amount of carbohydrates in cheese mainly comes from residual lactose.

This is why cheese fits so well into low-carb and ketogenic diets — you’re getting energy mainly from fats and proteins without many carbs.


Is Cheese High in Carbs?

No. Cheese is considered a low-carb food. Even the soft cheeses that have more carbs are still quite low compared to bread, pasta, or sugary snacks.

For people on a ketogenic diet, where carb intake is typically limited to 20–50 grams per day, cheese is an ideal food to enjoy.


Cheese on a Low-Carb or Keto Diet

If you’re asking “is cheese keto?”, the answer is overwhelmingly yes.

Because most cheese has minimal carbohydrates, it’s a keto diet staple. Cheese provides:

  • Healthy fats
  • Moderate protein
  • Essential vitamins and minerals (calcium, vitamin A, B12)

Popular Keto-Friendly Cheeses

  • Cheddar
  • Mozzarella
  • Parmesan
  • Swiss
  • Brie
  • Gouda
  • Blue Cheese
  • Camembert
  • Halloumi

These cheeses tend to have very low carbs and are rich in fats, making them perfect for maintaining ketosis.

What About Velveeta Cheese?

Velveeta and other processed cheeses have slightly more carbs than natural cheeses due to added ingredients. It’s still relatively low-carb, but you’ll want to check the nutrition label to confirm if it fits your daily carb limits.


How Much Cheese Can You Eat on Keto?

While cheese is keto-friendly, it’s important to practice moderation. Cheese is calorie-dense and high in saturated fats, so:

  • Aim for 1–2 ounces (28-56 grams) of cheese per serving.
  • Keep track of total carbs to avoid exceeding your daily limits.
  • Combine cheese with non-starchy vegetables and proteins for balanced meals.

Are There Any Downsides to Eating Cheese?

While cheese is nutritious, here are a few considerations:

  • Sodium content: Some cheeses are high in salt, which can be a concern for blood pressure.
  • Lactose intolerance: If you’re lactose intolerant, you may want to avoid fresh cheeses and stick to aged varieties.
  • Calories: Cheese is calorie-rich, so portion control is key if weight loss is your goal.

Frequently Asked Questions about Carbs in Cheese

1. Is cheese keto-friendly?

Yes, most cheeses are keto-friendly due to their high-fat, moderate-protein, and low-carb content. However, some cheeses have slightly higher carb counts, so it’s important to check the nutritional information.

2. How many carbs are in cream cheese?

Cream cheese contains about 1.6 grams of carbs per ounce, making it a keto-friendly option.

3. Can I eat cottage cheese on a keto diet?

Cottage cheese contains about 3.4 grams of carbs per ounce. While it’s higher in carbs than some other cheeses, it can still be included in a keto diet when eaten in moderation.

4. What is the carb count in cheddar cheese?

Cheddar cheese contains about 0.4 grams of carbs per ounce, making it a great low-carb option.

5. Is mozzarella cheese low in carbs?

Yes, mozzarella cheese contains about 0.6 grams of carbs per ounce, making it a good choice for a low-carb diet.

6. How many carbs are in a slice of American cheese?

One slice of American cheese contains about 2 grams of carbs.

7. Can I eat parmesan cheese on a low-carb diet?

Yes, parmesan cheese is very low in carbs, with only 0.9 grams per ounce, making it a good choice for a low-carb diet.

8. Is Swiss cheese suitable for a keto diet?

Yes, Swiss cheese contains 1.5 grams of carbs per ounce, making it a good option for a keto diet.

9. How many carbs are in ricotta cheese?

Ricotta cheese contains about 2 grams of carbs per ounce. It’s slightly higher in carbs than some other cheeses, so it should be eaten in moderation on a keto diet.

10. Can I eat Velveeta cheese on a keto diet?

Velveeta cheese contains about 3 grams of carbs per ounce. While it’s not the lowest carb option, it can still fit into a keto diet when used sparingly.

11. Is goat cheese low in carbs?

Yes, goat cheese is one of the lowest carb cheeses available, with about 0.2 grams of carbs per ounce.

12. How many carbs are in provolone cheese?

Provolone cheese contains about 0.6 grams of carbs per ounce, making it a good low-carb option.

13. Can I include cheese in my diet if I’m trying to lose weight?

While cheese is high in protein and can be included in a balanced diet, it’s also high in calories and saturated fat. It’s important to consume cheese in moderation and as part of a balanced diet. Always consult with a healthcare provider or a registered dietitian before making any major changes to your diet.


Conclusion

Cheese can be a delicious and satisfying part of a ketogenic diet. However, it’s essential to be aware of the carb content in different types of cheese to ensure you stay within your daily carb limit. As always, moderation is key, and it’s important to balance your cheese intake with a variety of other nutrient-dense, low-carb foods. With this guide, you can navigate the cheese aisle with confidence and continue to enjoy the rich, creamy goodness of cheese while sticking to your keto goals.


Remember, this blog post is for informational purposes only and should not replace professional medical advice. Always consult with a healthcare provider before making changes to your diet or supplement regimen.

Posted on — Leave a comment

Cheese and Chive Scones Recipe

woman in apron preparing food against light background

Welcome back, baking enthusiasts! Today, we’re exploring a bit off the beaten path, leaving behind the realm of sweet and venturing into the savory with an enticing twist on a classic English recipe: Cheese and Chive Scones. These scones are the perfect addition to a hearty breakfast, an ideal snack for a quick pick-me-up, or a tasty accompaniment to your favorite soup or salad. They’re also the perfect solution for those with a less sweet tooth but who still crave a satisfying treat with their afternoon tea.

What Makes Cheese and Chive Scones Special?

Unlike traditional scones, which are often sweet and served with clotted cream and jam, these savory scones are studded with sharp cheddar cheese and fresh chives. This combination offers an irresistible balance, with the rich, tangy cheese complementing the mild, onion-like taste of chives.

Cheese and Chive Scones are not just delectable, but also surprisingly easy to make, requiring only a handful of ingredients and a little time. They’re fantastic served warm, straight from the oven, but they cool well for later enjoyment too.

One of the best things about this recipe is its versatility. If you’re feeling adventurous or want a different flavor profile, the recipe is flexible. Add some cooked, crumbled bacon for Bacon Cheddar Chive Scones or swap the chives for chopped scallions for Cheddar Scallion Scones. The possibilities are endless!

Let’s Get Baking!

Without further ado, let’s get started on our Cheese and Chive Scones!

Ingredients

  • 3 cups (375g) self-rising flour
  • 1 cup (225g) cold butter, cut into small cubes
  • 1 cup (115g) cheddar cheese, grated
  • 3 tablespoons fresh chives, chopped
  • 1 cup (240ml) milk
  • 1 egg, for egg wash

Instructions

  1. Preparation: Preheat your oven to 220C/200C Fan/Gas 7 (425F) and line a baking sheet with parchment paper.
  2. Mix the Dough: In a large mixing bowl, combine the self-rising flour and cold butter. Use your fingers to rub the butter into the flour until the mixture resembles fine breadcrumbs.
  3. Add the Flavor: Stir in the grated cheddar cheese and chopped fresh chives.
  4. Form the Dough: Gradually add the milk, stirring with a fork until a dough starts to form. You might not need all the milk, so add it slowly to avoid making the dough too wet.
  5. Knead and Cut: Turn the dough out onto a lightly floured surface and knead it gently just a few times to bring it together. Roll out the dough to about 2cm thick and use a round cutter to cut out the scones. Arrange the scones on your prepared baking sheet.
  6. Final Touches: Beat the egg and use it to brush the tops of the scones. This will give them a beautiful, golden color as they bake.
  7. Bake: Bake the scones in your preheated oven for about 12-15 minutes, or until they’re golden brown and well risen.
  8. Cool and Serve: Allow the scones to cool on a wire rack for a few minutes before serving.

And there you have it, homemade Cheese and Chive Scones! A delicious alternative to sweet scone recipes. Whether you serve them for breakfast or enjoy them as a snack, they’re sure to be a hit!

Share your baking adventures with us using the hashtags #CheeseChiveScones, #Baking, #EnglishScones, and #HomemadeScones. We can’t wait to see your creations!

Stay tuned for more delectable recipes, and happy baking!

Blog Tags: Cheese and Chive Scones, Baking, English Scones, Homemade Scones, Savory Scones, Cheddar Cheese, Chives, Quick and Easy Recipes, Breakfast Ideas, Snack Recipes, Versatile Baking, Cheddar and Chive Scones, Cheddar Scallion Scones, Bacon Cheddar Chive Scones