Posted on — Leave a comment

No-Bake Cookies Recipe: Classic Chocolate Peanut Butter Oatmeal Cookies

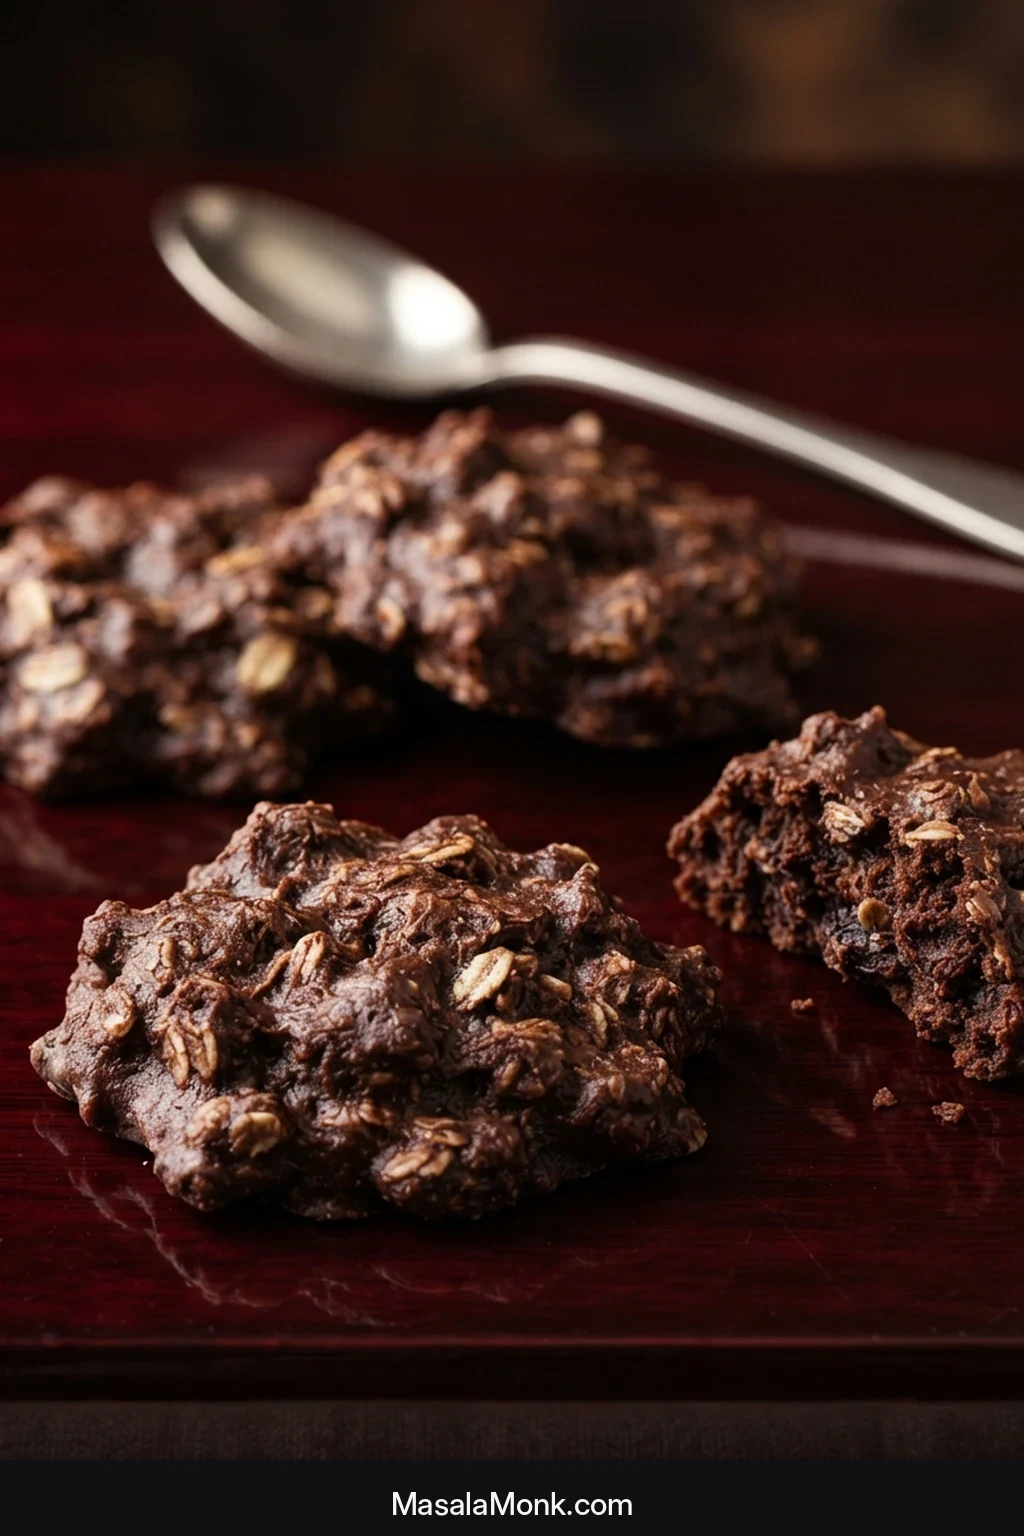
Four dark chocolate peanut butter oatmeal no-bake cookies on a deep red surface, including one broken cookie showing a dense oat-studded center.

No-bake cookies have a funny way of failing in opposite directions. One batch can still be sitting in shiny, sticky puddles half an hour later; another can start turning crumbly before you have finished dropping the last few onto the paper. Both problems usually begin in the same saucepan.

The ingredient list is short: cocoa, peanut butter, oats, butter, milk and sugar. The tricky part is the boil. Get that short stovetop window right and the mixture settles into the fudgy, chewy texture people remember from wax-paper-lined counters and old recipe boxes.

Once you know what that boil looks like, this no-bake cookies recipe becomes as easy as its reputation suggests: chocolatey, peanut-buttery, pleasantly chewy and firm enough to lift cleanly at room temperature—without ever turning on the oven.

The boil to watch

Don’t start timing at the first bubbles around the rim. Wait until the entire surface reaches a full rolling boil. Using a thermometer? For this recipe, aim for about 230°F / 110°C before any high-altitude adjustment.

Classic Chocolate Peanut Butter No-Bake Cookies

These are the classic stovetop chocolate-peanut-butter oatmeal no-bakes: fudgy through the middle, pleasantly chewy and sturdy enough to lift cleanly from the paper once set.

Yield
About 30 cookies (2 tablespoons each)

Prep
10 minutes

Stovetop
8–12 minutes

Set
20–30 minutes

Total
About 40–55 minutes

What you’ll need

A 3- to 4-quart / 2.8- to 3.8-liter saucepan, a sturdy spoon or silicone spatula, two trays lined with parchment or wax paper, and a cookie scoop or two spoons. A kitchen scale is especially useful for the oats. If you want to cook by temperature, use a clip-on candy thermometer or a fast instant-read thermometer.

Ingredients

  • ½ cup unsalted butter — 113 g / 4 oz
  • 1½ cups granulated sugar — 300 g / 10.6 oz
  • ½ cup whole milk — 120 ml / 4 fl oz
  • ¼ cup unsweetened cocoa powder — about 21 g / 0.75 oz
  • ¾ cup creamy no-stir peanut butter — about 200 g / 7.1 oz
  • 1 teaspoon vanilla extract — 5 ml
  • ¼ teaspoon fine salt — about 1.5 g
  • 2½ cups quick-cooking oats — 250 g / 8.8 oz; weighing is strongly recommended because oat density varies by brand

Instructions

  1. Get everything ready. Line the trays and measure the oats, peanut butter, vanilla and salt before the saucepan goes on the heat. Keep the oats, peanut butter and scoop within arm’s reach. Once the syrup is ready, the recipe moves quickly.
  2. Start the chocolate mixture. Put the butter, sugar, milk and cocoa in the saucepan. Cook over medium heat, stirring as the butter melts, until the mixture is smooth and beginning to bubble.
  3. Wait for a full rolling boil. A ring of small bubbles around the edge is too early. Keep heating until the whole surface is actively bubbling, including the center.
  4. Cook to the right point. Once the full rolling boil begins, let the syrup boil without unnecessary stirring.

    Using a thermometer? Cook to about 230°F / 110°C before any high-altitude adjustment. Keep the thermometer tip in the syrup and off the bottom of the pan. If the timer and thermometer disagree, follow the temperature.

    No thermometer? Start timing only when the entire surface reaches that full rolling boil; this is usually about one minute. See the high-altitude adjustment if needed.
  5. Add the peanut butter and oats. Remove the saucepan from the heat. Stir in the peanut butter until smooth, then add the vanilla and salt. Fold in the oats just until every flake is coated.
  6. Check the texture. Once the oats are evenly coated, the mixture should still look glossy and fall from the scoop in a soft mound rather than running flat. When it holds that mound, it is ready to portion.
  7. Scoop promptly. Drop about 2 tablespoons per cookie onto the prepared paper. Work steadily because the mixture thickens as it cools.
  8. Let them firm at room temperature. The cookies are ready when they lift cleanly from the paper without feeling wet underneath but remain fudgy through the middle. In a moderate kitchen, this usually takes 20–30 minutes. Warm or humid rooms can take longer.

Cooking with children? Measuring the oats and lining the trays are good helping jobs. An adult should handle the boiling sugar mixture; hot syrup sticks to skin and can cause a serious burn.

A few recipe notes

  • Quick oats give these cookies a softer, more cohesive texture. Old-fashioned oats make them rougher and chewier.
  • Use unsweetened baking cocoa, not hot cocoa mix or drinking chocolate.
  • Creamy no-stir peanut butter gives the most predictable texture. Very oily natural peanut butter can leave the cookies softer or greasy underneath.
  • Keep the sugar close to the recipe amount. It helps the cooked cocoa syrup firm as it cools.

What properly set no-bake cookies look like

Before you portion the whole batch, watch what one scoopful does on the paper. The mixture should leave the scoop as one soft mass and relax gradually rather than immediately flowing outward.
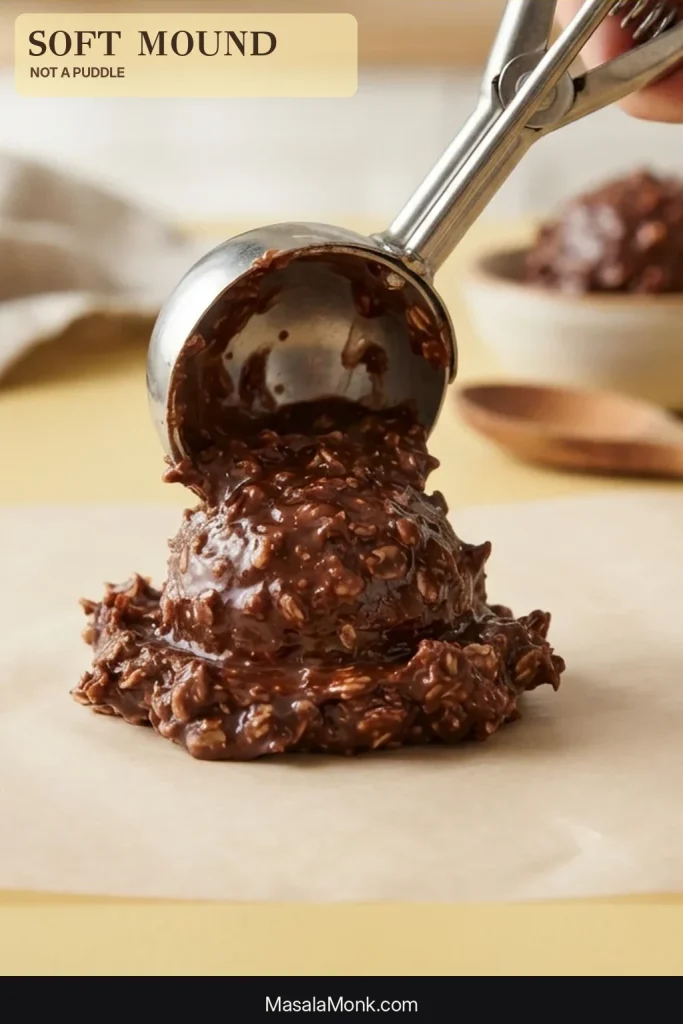
A stainless cookie scoop dropping dark chocolate oatmeal no-bake cookie mixture onto paper, where it forms a soft mound.
The mixture should leave the scoop as one soft mass and settle gradually after it hits the paper. A little relaxation is fine; what you do not want is a spoonful that immediately races outward and loses its shape.

Once the cookies have cooled, the underside gives you another useful check. A properly set cookie should come away as one piece without leaving a wet smear behind, while the center can still stay tender.
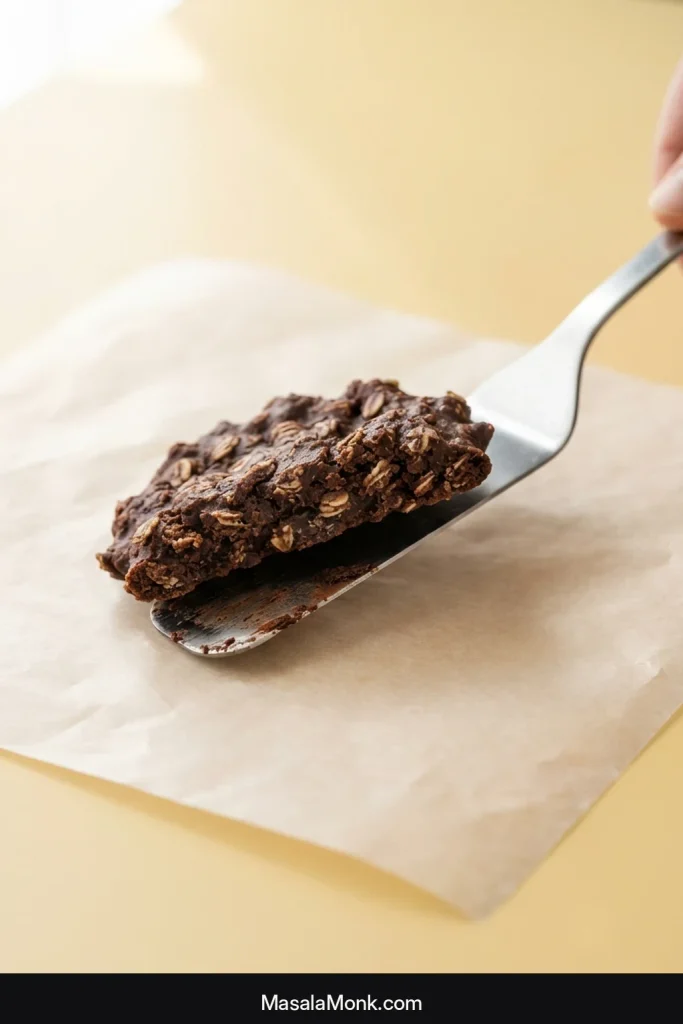
A dark chocolate oatmeal no-bake cookie being lifted from wax paper with a stainless spatula, showing its intact underside and clean paper beneath it.
The underside is one of the simplest places to check the set. A cookie that lifts as one piece with the paper mostly clean has crossed an important threshold; it should still feel tender rather than hard or brittle.

Need more help?

Making them now? The recipe above is all you need. If a batch went wrong—or you’re deciding which oats, peanut butter or substitutions make sense—the sections below go deeper.

Why “boil for one minute” causes so much trouble

“Boil for one minute” sounds perfectly precise until two cooks start counting that minute at completely different stages. Small bubbles creeping around the edge of the saucepan are not the same thing as a rolling boil across the center.

Watch the middle of the saucepan as the mixture comes up to temperature. The useful starting point is when active bubbles are moving across the whole surface, not merely collecting around the perimeter.
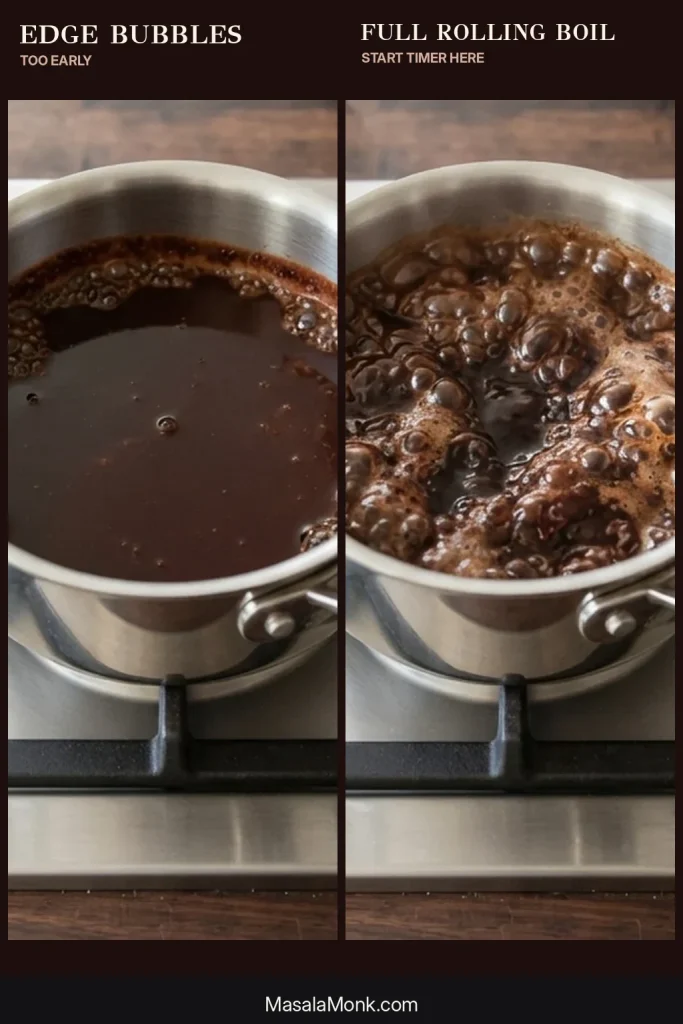
Two views of dark chocolate syrup in a saucepan, showing bubbles around the edge in one view and vigorous bubbles across the entire surface in the other.
Watch the middle of the saucepan, not just the rim. Once bubbles are moving actively across the center, the syrup has reached the visual threshold for timing; the first perimeter bubbles are only an early warning that you’re getting close.

No-bake cookies are closer to oats held together by a simple cooked fudge than to ordinary cookie dough. As the syrup boils, water cooks away and the mixture becomes concentrated enough to firm as it cools. That’s why recognizing the start of the real boil matters more than watching the clock from the first bubble.

A thermometer removes some of that ambiguity. For this formula, about 230°F / 110°C is the target before any high-altitude adjustment. Measure the syrup itself rather than the hot metal underneath it.
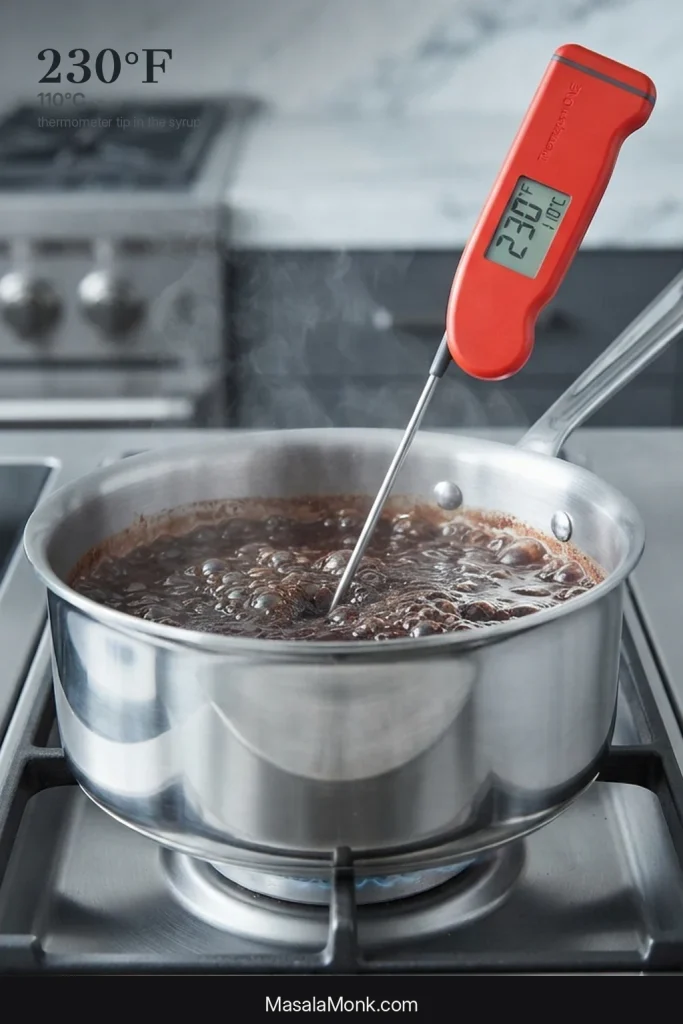
A thermometer probe immersed in dark chocolate syrup in a stainless saucepan, positioned above the pan bottom.
The temperature matters, but so does where you measure it. Keep the probe surrounded by syrup and clear of the saucepan base; otherwise the metal can give you a less useful reading just when the mixture is approaching its finishing point.

Pull the syrup off too early and the dropped cookies can remain glossy and wet. Let it go too far and the oat mixture begins thickening before you are ready for it.

Boiling longer is not extra insurance. Once enough water has cooked away, more time over the heat simply pushes the batch toward dry and crumbly.

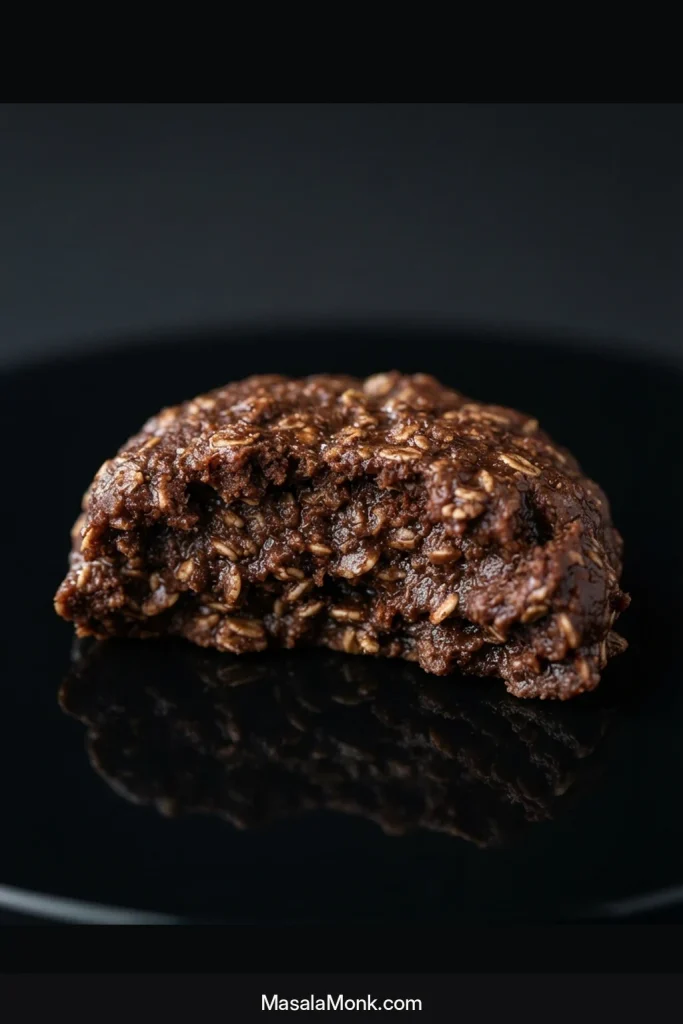
Close-up of a broken chocolate peanut butter oatmeal no-bake cookie showing a compact fudgy center with small oats embedded throughout.
Look at the fracture as well as the color. A successful no-bake cookie breaks into a compact, cohesive center with oats running through the chocolate matrix, rather than the airy crumb or dry separation you would expect from a baked cookie.

Jump to troubleshooting by what you see.

Quick oats vs. old-fashioned oats

Yes, old-fashioned rolled oats work; they make a rougher, chewier cookie. Quick oats give the softer, more cohesive texture used here. If substituting rolled oats, use the same 250 g / 8.8 oz by weight; the cup measure can differ because the flakes are larger.
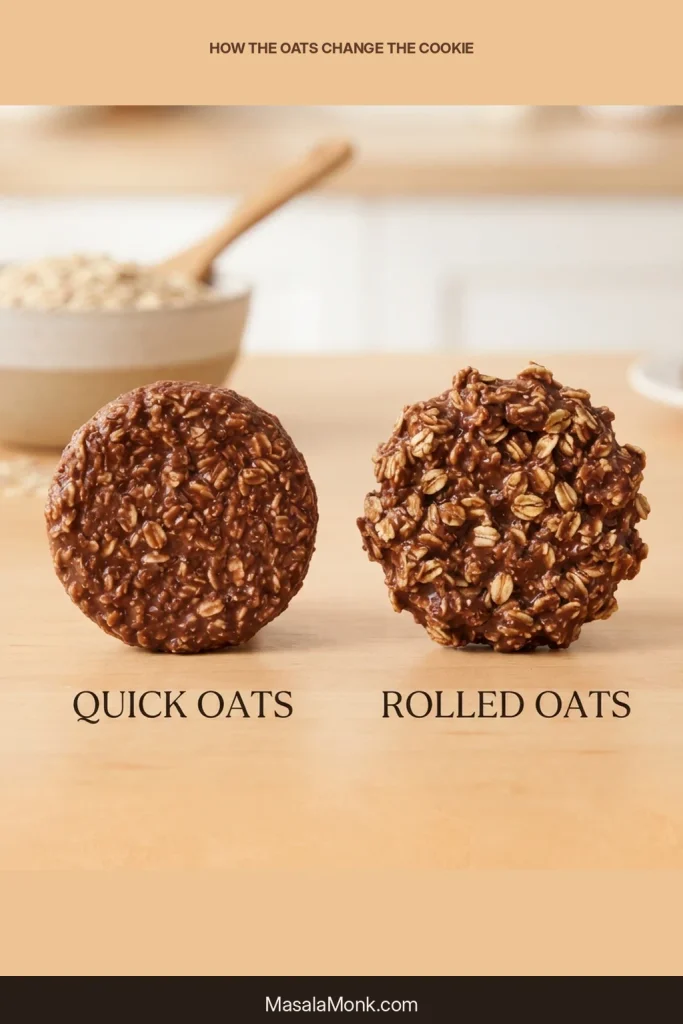
Two finished chocolate oatmeal no-bake cookies comparing a finer, more cohesive quick-oat texture with a rougher texture made from larger rolled-oat flakes.
The important difference is the prominence of the flakes, not the basic cookie itself. Quick-cooking oats blend into a tighter chocolate matrix, while rolled oats stay more noticeable; choose between them according to the chew you remember and want.
OatWhat changes
Quick-cooking oatsSmaller, thinner flakes take up the hot cocoa mixture quickly, giving the cookies a softer, more cohesive texture.
Old-fashioned rolled oatsThe flakes remain more obvious, giving the cookies a rougher surface and a noticeably chewier bite.
Very thick rolled oatsThey can still feel firm by the time the chocolate around them has already set.
Instant oatmeal packetsUse plain quick oats instead. Instant packets often contain extra sugar, flavorings or differently processed oats.
Steel-cut oatsThey need far more liquid and cooking time than this recipe provides.

If you need these cookies to be gluten-free, choose oats specifically labeled gluten-free and check the other packaged ingredients too. Oats can pick up gluten through cross-contact during growing, transport or processing; the FDA explains the U.S. gluten-free labeling rules and cross-contact issue.

Still staring at two nearly identical oat canisters? Our guide to rolled, quick, instant and steel-cut oats shows how the different types are made and why they behave differently.

One reason people are so certain about which oats are “right” is that family versions really do differ. If the no-bakes you remember were soft and fudgy with the oats almost disappearing into the chocolate, quick oats are probably closer. If you remember distinctly chewing through the flakes, rolled oats may be the version you’re trying to recreate.

Chosen your oats? Return to the recipe.

Ingredient swaps that actually matter

Natural and Dutch-process cocoa both work here. Peanut butter and sugar are less flexible, and changing the butter or milk can shift the way the batch sets.

Creamy no-stir peanut butter is the easiest choice because the oil stays evenly mixed. If a natural peanut butter has a layer of oil floating on top, stir it back in completely before measuring. A very loose, oily jar can leave the cookies softer or greasy underneath.
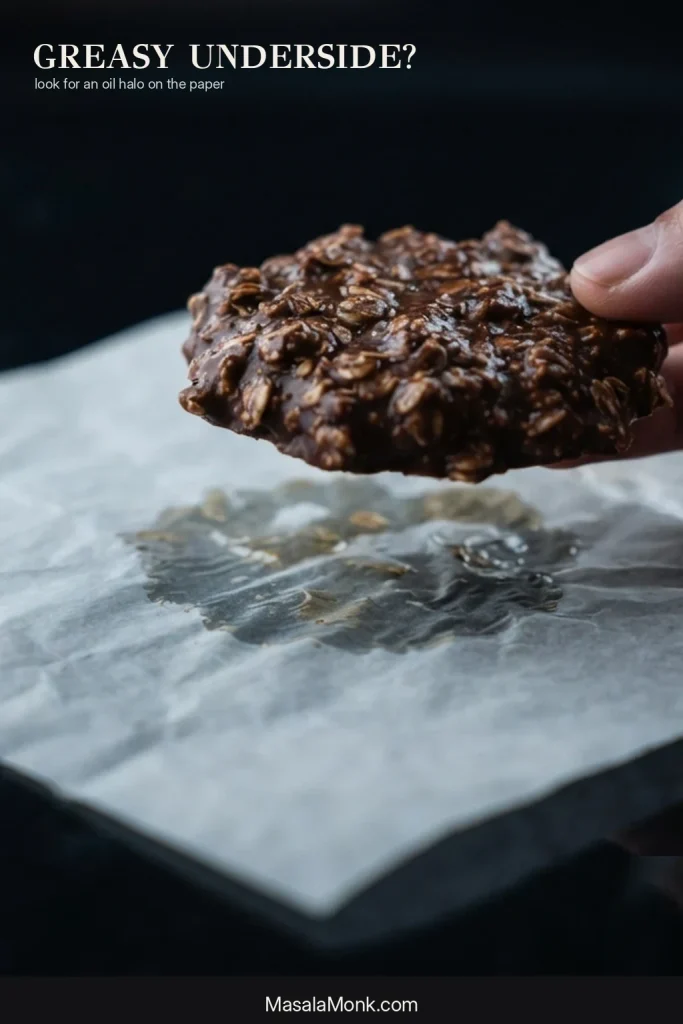
A chocolate oatmeal no-bake cookie lifted from paper with a translucent oil halo visible underneath.
Sometimes the top of a no-bake cookie looks perfectly normal while the paper underneath tells you what went wrong. A translucent oil halo is worth checking when the peanut butter has separated, particularly with a natural peanut butter that needed more thorough mixing.

Natural cocoa gives a slightly brighter chocolate flavor; Dutch-process cocoa is usually darker and smoother. Either works here because there is no baking soda or baking powder whose reaction depends on the cocoa’s acidity.

Sugar is less flexible. Do not simply halve it: sugar helps the cookies firm as well as making them sweet. Brown sugar brings molasses and extra moisture, so it is not a neutral replacement.

If you’re trying to avoid refined sugar altogether, our date-sweetened oat cookies are built around that goal rather than asking this cooked syrup to behave differently.

Whole milk gives the most predictable result, and 2% is a close substitute. Unsweetened oat, soy or almond milk can also work, although differences in fat and water content may give you a slightly different set. If you’re substituting the milk, avoid changing several other ingredients in the same batch—it becomes much harder to tell what affected the texture.

Can you make no-bake cookies without peanut butter?

Yes—but don’t simply leave the peanut butter out of this batch. Chocolate-oatmeal no-bakes without peanut butter do exist, but they are formulated differently.

Here, peanut butter does more than add flavor. It makes up a substantial part of what thickens and holds the cookie together. Peanut-butter-free recipes adjust some combination of butter, sugar, milk, cocoa and oats so everything can still firm properly.

The same caution applies to sunflower-seed butter and other allergy-friendly spreads. Seed butters can work, but they do not all behave exactly like peanut butter. If avoiding peanuts is essential, use a recipe written around the replacement rather than relying on a straight 1:1 swap.

Troubleshooting by what you see

Start with what you can see in the pan and on the tray.

Before they have set

What you seeLikely cause / what to do
The scoopful immediately melts into a flat puddleLikely undercooked. Let the cookies cool completely; chill them if they still won’t hold. On the next batch, start timing only at the full rolling boil.
The last few cookies are almost impossible to scoopThe syrup may have cooked too far or the mixture sat too long. Portion what remains quickly; have the trays and scoop ready before the next batch boils.
A slick of oil appears underneathUsually separated peanut butter. Thoroughly remix natural peanut butter before measuring, or use a creamy no-stir style.
The chocolate has firmed but the oats still seem hardThe rolled oats may be particularly thick. The cookies will simply be chewier; use quick oats or thinner rolled oats for a softer result.

A wide, glossy puddle is the clearest early visual warning that the mixture is not holding enough structure. Let the current batch cool before judging it completely, but if each scoop immediately runs outward, pay particular attention to when you started the boil timer on the next batch.
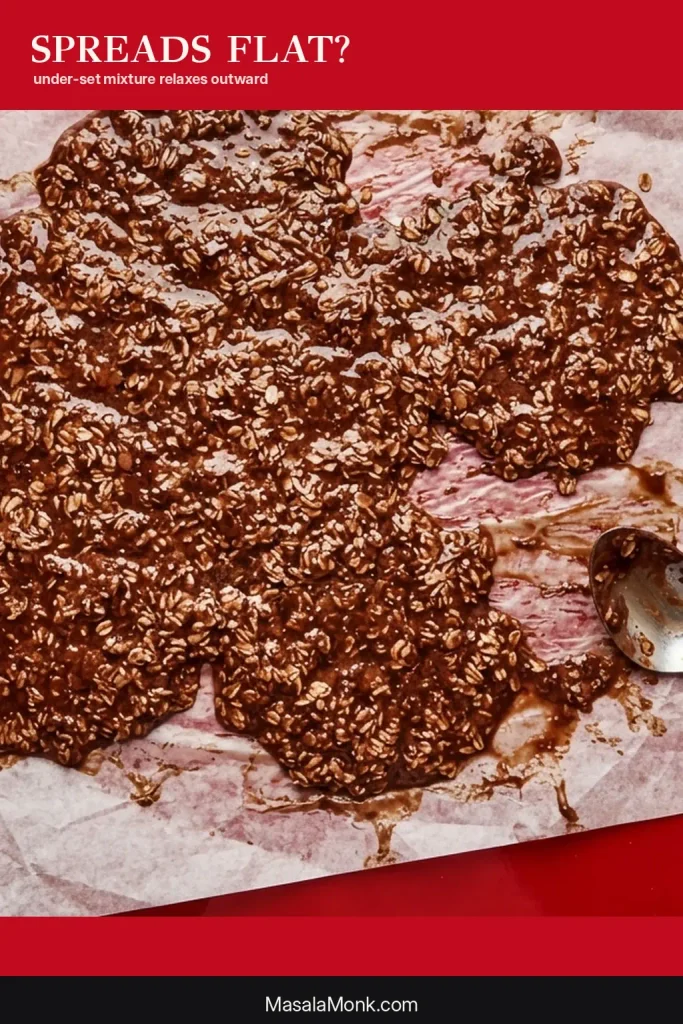
Dark chocolate oatmeal no-bake cookie mixture spread into flat glossy puddles on paper instead of holding spoon-dropped mounds.
The shape of the mixture can warn you about the final set before the cookies have even cooled. When a spoonful relaxes into a wide glossy puddle instead of holding a low mound, it is time to pay attention to the boil and syrup concentration.

After they cool

What happenedLikely cause / what to do
They still look wet and shiny twenty minutes laterProbably undercooked. Let them cool completely; refrigerate them if they still won’t hold. On the next batch, start timing only when the whole surface reaches a full rolling boil.
They stay sticky or tackyThe syrup may have come off the heat too soon. Oily peanut butter, extra liquid or humid weather can also leave the surface softer.
They crumble when you pick them upThe syrup probably cooked too far, or too many oats went in. A badly dry batch is difficult to reverse; the rescue ideas below are more useful than adding liquid back.
They feel gritty or grainyThe sugar may not have dissolved smoothly, or the syrup may have crystallized unevenly during cooking. Stir until smooth before the full boil, then avoid unnecessary stirring.
They hold together only when coldKeep this batch refrigerated if you like the texture. For a room-temperature set, make sure the syrup reaches the proper boil before it comes off the heat.
Every batch seems slightly differentWeigh the oats, use the same kind of peanut butter and start timing at a true rolling boil. A thermometer removes another variable.

If the cookies feel grainy, look closely at the chocolate between the oat flakes. Fine crystals can give that matrix a noticeably different texture from the smoother chocolate of a well-dissolved batch.
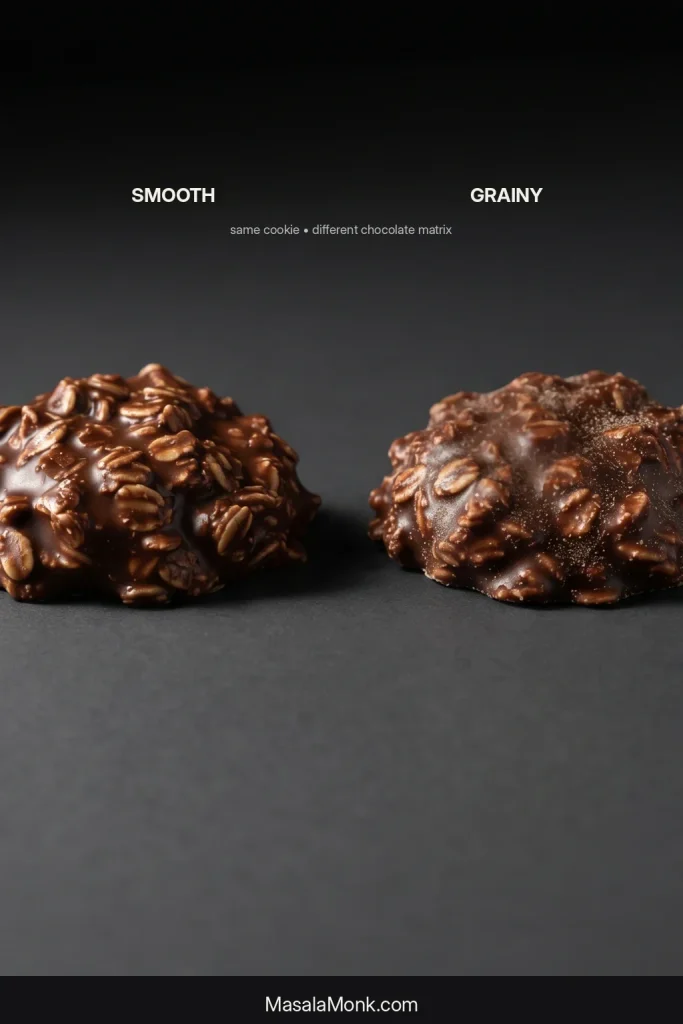
Close comparison of two chocolate oatmeal no-bake cookie surfaces, with one showing a continuous smooth chocolate matrix and the other showing fine granular texture between the oats.
Compare the chocolate between the oat pieces, rather than judging the surface by shine alone. A smooth batch has a continuous satin matrix; when crystals form, that same matrix takes on a fine granular texture.

Can you save a failed batch?

If they are still soft, don’t throw them out yet. Let the cookies cool completely first, then chill one as a test. A cold cookie does not mean the syrup hit the right point, but it can still turn an under-set batch into something perfectly enjoyable.

Dry, crumbly cookies are harder to repair reliably. Instead of repeatedly adding liquid to the whole batch, crumble them over ice cream, pudding or yogurt. They may have missed the cookie stage, but chocolate, peanut butter and oats still make a very good topping.
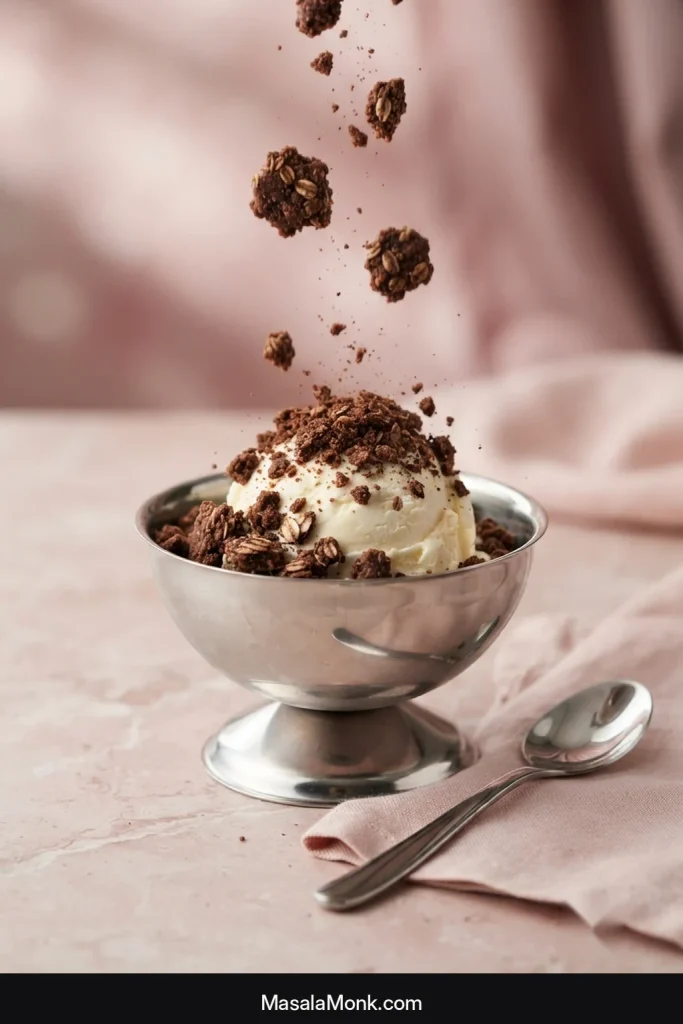
Dry pieces of chocolate oatmeal no-bake cookies scattered over vanilla ice cream in a bowl with a spoon.
Once a batch has gone too dry, adding liquid back can make the texture unpredictable. Breaking the cookies into crumbs preserves the chocolate-and-oat flavor while giving vanilla ice cream a useful crunchy contrast instead.

Trying another batch? Return to the recipe.

Humid weather

Humidity can slow setting and leave the surface tacky. Don’t compensate by boiling the syrup longer; use the same 230°F / 110°C target for this recipe, or the usual roughly one minute from a full rolling boil, then let the cookies cool fully and store them airtight.

High altitude

At high altitude, lower the finishing temperature by the same number of degrees that your local water boiling point falls below 212°F / 100°C. For example, if water boils at 202°F where you live—10°F below the sea-level boiling point—lower this recipe’s 230°F target to about 220°F. Colorado State University Extension explains the adjustment in more detail.
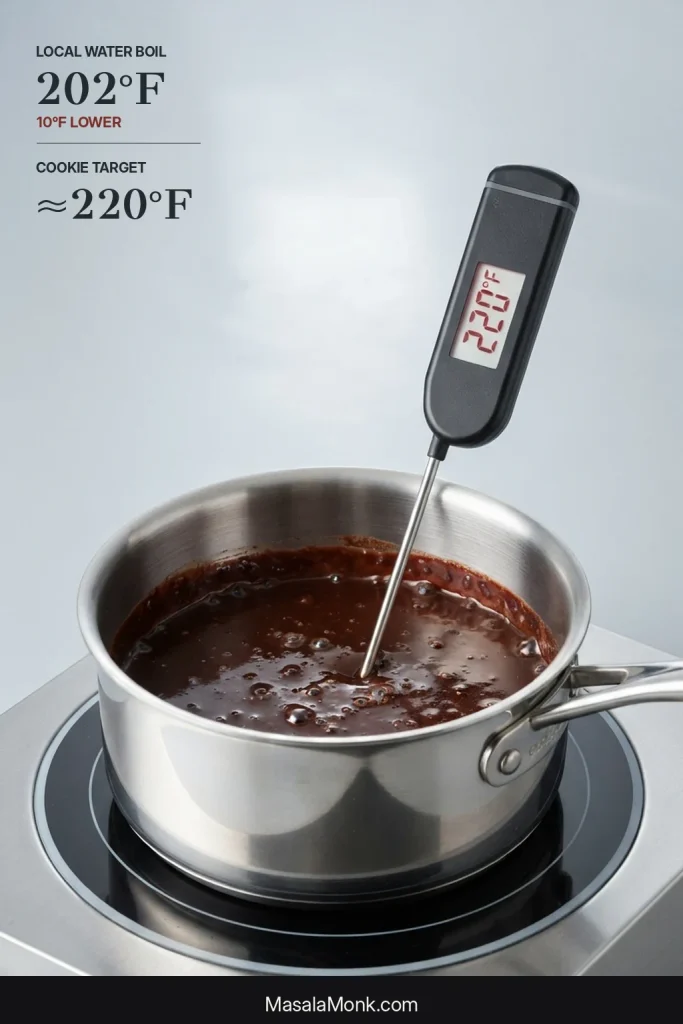
Dark chocolate cookie syrup in a stainless saucepan with a thermometer beside a high-altitude temperature adjustment showing a lower boiling point and lower cookie-syrup target.
The adjustment follows the local boiling point of water, not the elevation number by itself. Because water boils at a lower temperature higher up, the syrup’s finishing temperature is lowered by the same difference.

Finished with the adjustment? Return to the cooking step.

How to store and freeze no-bake cookies

Room temperature: Keep fully set cookies in an airtight container for up to about 5 days in a cool, dry room. Put parchment or wax paper between layers if they tend to stick.

Refrigerator: Keep them airtight for up to about 1 week. Chilled cookies will be firmer, so give them a few minutes at room temperature if you prefer a softer bite.

Freezer: Freeze the cookies in a well-sealed container with parchment between layers for up to about 2 months. Let them thaw while still covered, either in the refrigerator or at cool room temperature, so condensation is less likely to settle directly on the surface.

A few more no-bake cookie questions

Can I double the batch?

Two normal batches are easier to control than one enormous one. A larger volume takes longer to heat and cool, and twice as much cookie mixture is waiting in the saucepan while you scoop. With such a short working window, bigger is not necessarily easier.

Do I need a thermometer?

No. Plenty of cooks make no-bakes with nothing more than a saucepan and a clock. A thermometer simply gives you another reference when your burner, saucepan or idea of a rolling boil differs from somebody else’s.

Are preacher cookies the same as no-bake cookies?

Often, yes. “Preacher cookies,” “cowpies” or “cow patties,” boiled cookies, chocolate oatmeal no-bakes and simply “no-bakes” are names used for closely related stovetop cookies. Family versions differ: some use peanut butter, some add coconut or nuts, and some skip peanut butter completely.

Can I use wax paper instead of parchment?

Yes. Wax paper works well because these cookies are never going into the oven. It is also the surface many older family versions were dropped onto and left to cool.
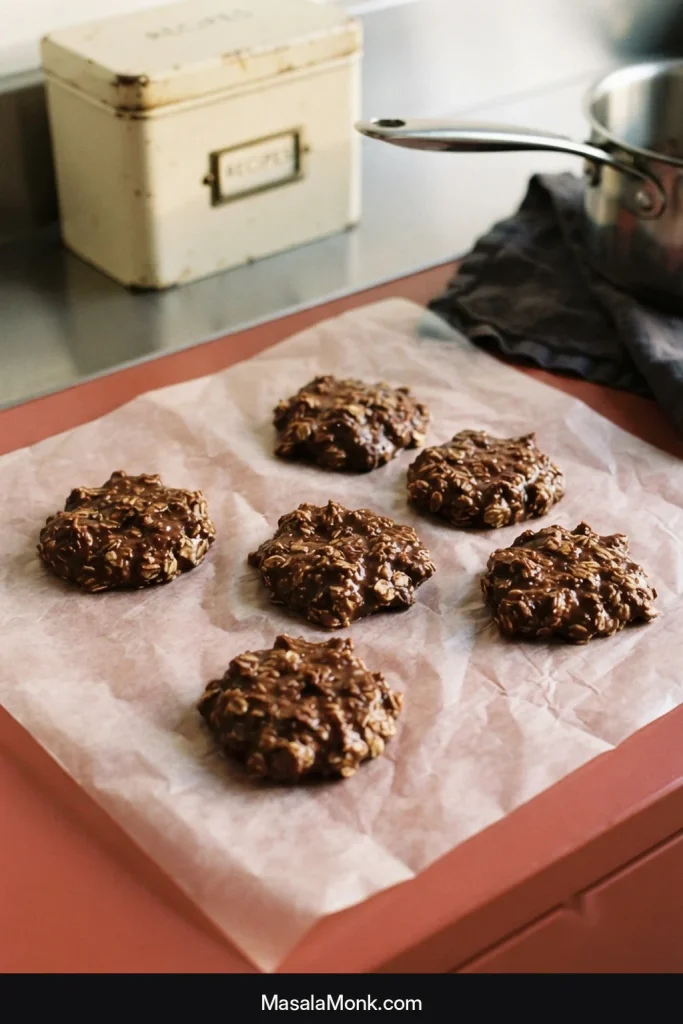
Several classic chocolate peanut butter oatmeal no-bake cookies cooling on translucent wax paper beside a stainless saucepan and recipe box.
Wax paper earns its place for a practical reason as well as a nostalgic one: freshly dropped no-bake cookies can cool and firm on the paper without being baked onto it. That simple surface is part of the character of this old-fashioned stovetop treat.

↑ Back to recipe · ↑ Back to top

Posted on — Leave a comment

Carne Asada Recipe: Juicy, Tender Mexican Grilled Steak

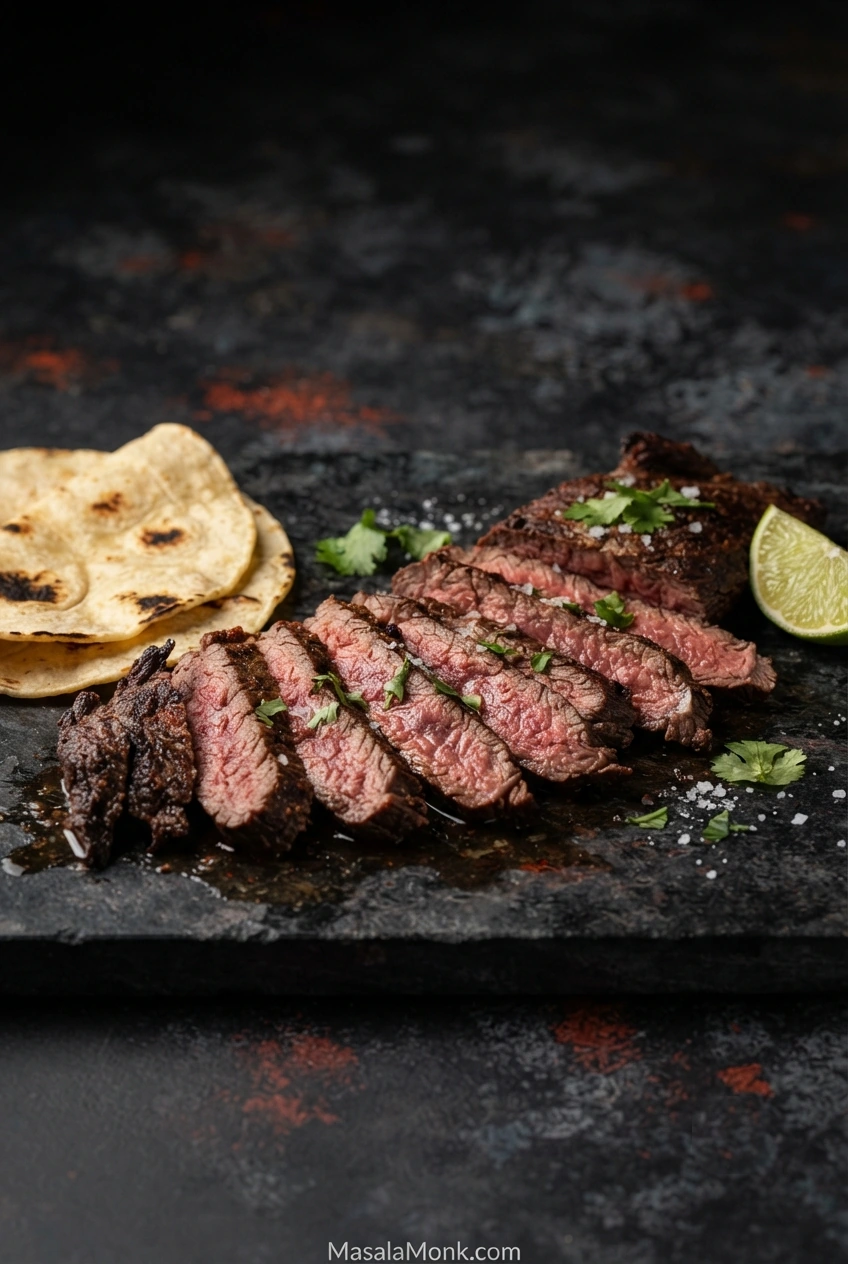
Thin slices of grilled carne asada with deeply charred edges and a juicy interior, with warm tortillas and lime nearby.

The best carne asada has dark, almost singed edges, hot beef juices on the cutting board, and enough citrus, garlic and chile to brighten the steak without covering up its beefiness. Slice it thinly across the grain and it should fold into a warm tortilla without turning dinner into a tug-of-war.

Carne asada literally means grilled meat, and the cuts, seasoning and accompaniments vary across Mexico and Mexican-American cooking. This carne asada recipe takes the citrus-marinated route, followed by fierce heat for a deeply browned exterior and juicy beef inside.

Outside skirt steak and flap meat are especially good here. Flank steak works too, and it is often easier to find. The marinade supplies the citrus, garlic and chile; tenderness depends just as much on the beef you buy, the heat of the grill and the way you slice it at the end.

Carne asada at a glance:
Best beef: outside skirt first, flap/bavette close behind; flank is the easiest supermarket substitute.
Marinate: 2–4 hours for this citrus marinade.
Heat: about 450–500°F / 230–260°C or hotter for direct grilling.
Cook: watch thickness, browning and temperature instead of trusting one timer.
Rest: 3–5 minutes for very thin beef; 5–10 minutes for thicker skirt, flap or flank.
Slice: thinly across the grain; chop afterward for tacos.

Carne Asada Recipe

Citrus-marinated skirt or flap steak grilled over intense heat until deeply browned, then rested and sliced thinly.

Yield
4–6 main servings or about 8 smaller taco servings
Prep
15 minutes
Marinate
2–4 hours
Cook
About 2–12 minutes for most cuts; thick flank may take longer
Rest
3–10 minutes
Total
About 2½–5 hours with the recommended marinating time

Equipment

  • Gas or charcoal grill
  • Large zip-top bag or shallow non-reactive container
  • Long grill tongs
  • Instant-read thermometer for meat thick enough to probe reliably
  • Sharp chef’s or slicing knife
  • Cutting board
  • Paper towels

Ingredients

  • 2 lb / 907 g outside skirt steak or flap/bavette; flank steak also works
  • ½ cup / 120 ml fresh orange juice
  • 3 tbsp / 45 ml fresh lime juice
  • ¼ cup / 60 ml olive oil or neutral oil
  • 4 garlic cloves / about 16 g, finely grated or minced
  • ½ cup loosely packed chopped cilantro / about 8 g
  • 1 medium jalapeño / about 15–20 g, finely chopped; remove seeds and ribs for less heat
  • 1 tsp / about 1 g Mexican oregano; regular oregano works if needed
  • 1 tsp / about 2 g ground cumin
  • 1 tsp / about 2 g pure ancho chile powder, not a blended chili seasoning mix
  • 6 g kosher salt, preferably weighed; about 2⅛ tsp Diamond Crystal or 1¼ tsp Morton kosher salt
  • ¾ tsp / about 1.5 g freshly ground black pepper
  • Neutral high-heat oil, as needed for the grill grates
  • Fresh lime wedges, for serving

Instructions

  1. Prepare the beef. Trim away obvious thick silver skin or tough membrane. Cut very long skirt or flap steak into 2–3 sections so each piece can lie flat on the grill. Notice which direction the muscle fibers run now; they are easier to see before cooking.
  2. Mix the marinade. Whisk together the orange juice, lime juice, oil, garlic, cilantro, jalapeño, oregano, cumin, ancho chile, salt and black pepper. It should smell bright, citrusy and strongly garlicky.
  3. Marinate. Add the beef and turn until well coated. Refrigerate for 2–4 hours. Even 30 minutes gives the surface noticeable citrus, garlic and chile flavor when dinner is close. With this acidic formula, keep the total marinating time within about 8 hours.
  4. Heat the grill. Prepare a direct grilling zone at about 450–500°F / 230–260°C or hotter. Clean the hot grates well and, if your grill tends to stick, lightly oil them with a little neutral high-heat oil.
  5. Drain and blot. Remove the steak from the marinade and discard the used liquid. Blot the beef well with paper towels. Brush away heavy clumps of garlic or herbs that could scorch before the meat develops a crust.
  6. Grill. Very thin ranchera or flap may need only 1–2 minutes per side. Regular skirt or flap often takes 2–4 minutes per side. Thicker flank may need 4–6 minutes per side or longer. Look for deep brown patches and darkening edges, then start watching closely. A few blackened tips are welcome; a uniformly black steak has gone too far.
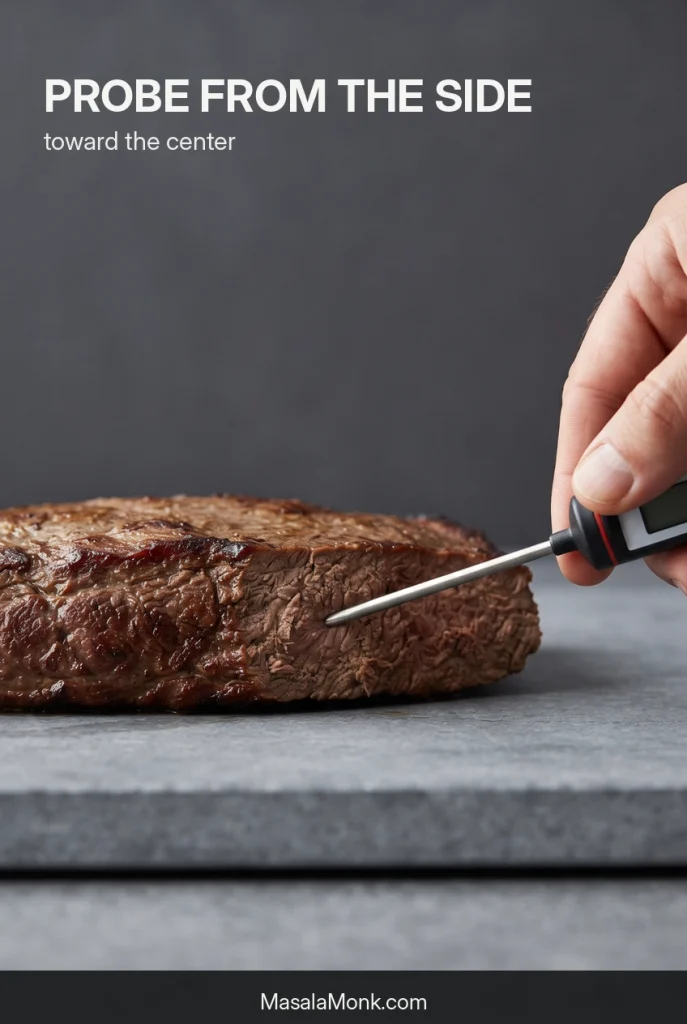
  7. Check doneness. Use an instant-read thermometer when the steak is thick enough to probe reliably, cooking to your preferred doneness while keeping the food-safety guidance below in mind. With thinner skirt or flap, insert the probe horizontally from the side toward the center. Paper-thin carnicería cuts cook so quickly that browning, timing and close attention matter especially.
  8. Rest. Give very thin steak about 3–5 minutes. Rest thicker skirt, flap or flank for 5–10 minutes.
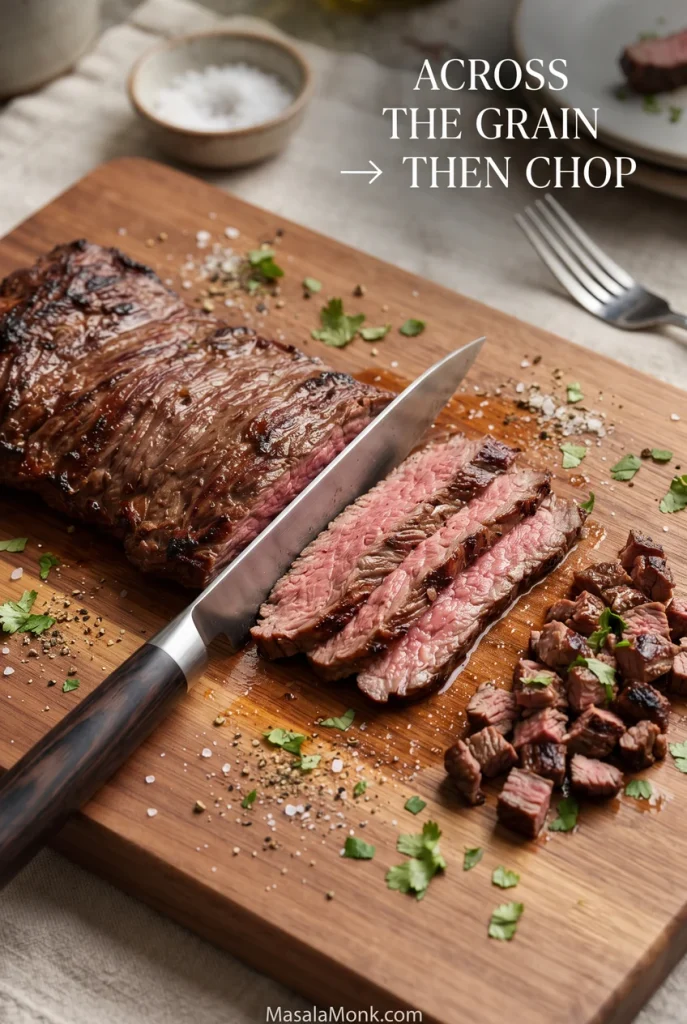
  9. Slice across the grain. Turn the steak so your knife crosses the visible muscle fibers. Slice thinly. For tacos or burritos, chop those slices into pieces about ½ inch / 1.25 cm across.
  10. Taste and serve. Taste a freshly cut piece and add a small pinch of salt if needed. Finish with fresh lime and serve immediately.
How much beef per person: 2 lb / 907 g serves about 4–6 people when the steak is the center of the meal, or roughly 8 smaller taco servings with sides. That usually works out to about 2–3 tacos per person, depending on tortilla size and toppings.
Food-safety note: For intact whole beef steaks, USDA guidance is 145°F / 63°C followed by at least a 3-minute rest. Follow the package cooking instructions if your beef is labeled mechanically, blade or needle tenderized.
Cooking indoors: Well-drained, blotted steak can be cooked in a thoroughly preheated cast-iron skillet or under a hot broiler. Work in batches when using a skillet and ventilate the kitchen well.

Match the Cooking Time to Your Steak

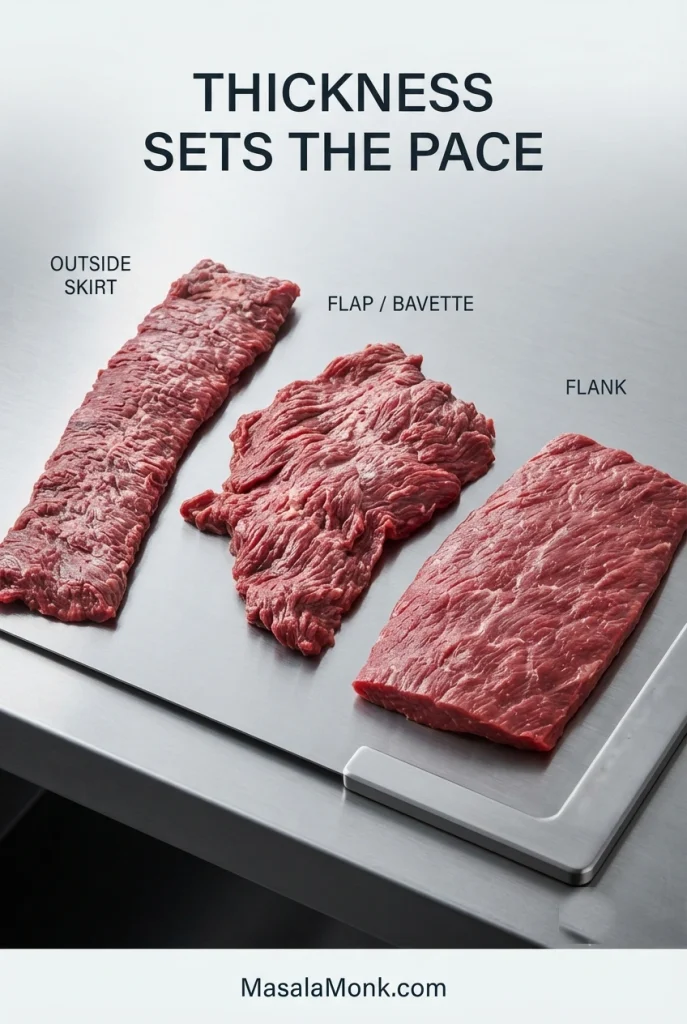
Whether the package says ranchera or the cut is skirt, flap or flank, thickness sets the pace. Thin carne asada needs fierce heat and very little time; thicker flank simply needs longer to develop the same strong browning. Find the row closest to the steak you actually bought.

Raw outside skirt steak, flap or bavette, and flank steak arranged together to show their different shapes, grain and thickness.
Outside skirt, flap and flank all work for carne asada, yet their different thicknesses change how quickly heat reaches the center. That is why two steaks on the same grill can need very different cooking times.
If you bought…Start checking here
Very thin ranchera/flapAbout 1–2 minutes per side over fierce heat.
Regular skirt or flapAbout 2–4 minutes per side.
Thicker flank steakAbout 4–6 minutes per side; use a thermometer once the meat is thick enough to probe reliably.

Best Meat for Carne Asada: Skirt, Flap and Flank

Outside skirt is the first choice here, flap/bavette is an excellent alternative, and flank is the easiest widely available supermarket substitute. All three can make terrific carne asada.

Outside skirt steak is deeply beefy, relatively thin and full of loose muscle fibers that brown quickly and become tender when cut across the grain.

Flap meat, or bavette, has a similarly coarse grain and plenty of beef flavor. It is particularly good when the steak will be chopped for tacos.

Flank is not a consolation prize. It is leaner and usually thicker than skirt or flap, so give it the extra time its thickness requires.

Inside skirt works too, although it can be firmer than outside skirt. Careful trimming and thin slicing help. Where classic skirt has become expensive or difficult to find, thin chuck or diezmillo also works well for taco-style carne asada when a butcher slices it appropriately thin.

Ranchera and Arrachera at the Meat Counter

At many Mexican markets, arrachera means skirt steak, while ranchera may be flap or another thin grilling cut. The names can change from one butcher shop to another.

Ask what cut you are buying, then ask how thick it has been sliced. After that, stop worrying about the label and cook the steak you actually brought home.

Package says mechanically, blade or needle tenderized? Follow its cooking instructions rather than treating it exactly like an intact steak.

Carne Asada Marinade: Citrus, Garlic and Chile

This carne asada marinade combines orange and lime juice with garlic, cilantro, jalapeño, oregano, ancho chile, cumin, oil and salt. Orange rounds out the sharper lime, while garlic, jalapeño, oregano and ancho do most of the aromatic work. Cumin stays in the background, oil helps the mixture cling to the beef, and salt seasons it.

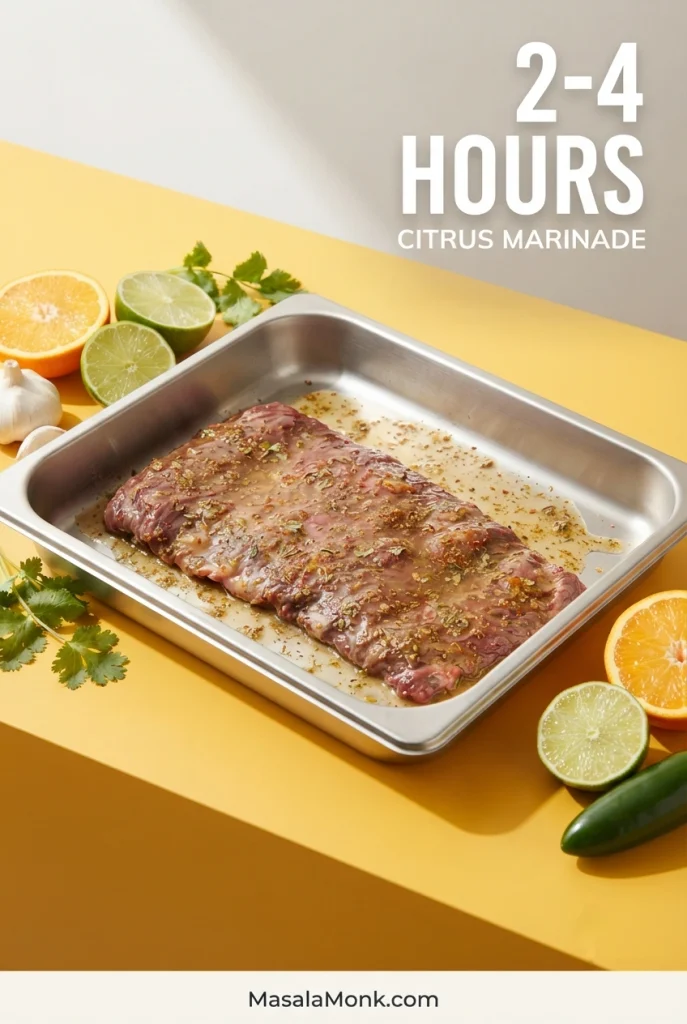
Raw steak coated in a light citrus marinade, with orange, lime, garlic, jalapeño, cilantro and ground spices nearby.
This carne asada marinade is designed to brighten the beef rather than bury it. Orange rounds out lime’s sharper acidity, while garlic, jalapeño, cilantro and ground spices build depth that the grill later turns darker and smokier.

When it is mixed, the marinade should smell fresh, citrusy and strongly garlicky. Once the steak reaches the grill, browned beef and smoke should move to the front.

How Long to Marinate Carne Asada

Two to four hours is the sweet spot. Even 30 minutes gives the surface noticeable flavor when you are rushed, and 4–8 hours is workable, especially with thicker beef. For this citrus-heavy marinade, skip the overnight soak and keep it within about 8 hours. Longer exposure gives the citrus more time to change the surface texture without necessarily making the steak taste better.

Carne asada can be much simpler than the version here. In parts of northern Mexico, excellent beef, salt and live fire can be the whole idea. Pati Jinich’s Sonora-style carne asada is a useful example; this recipe deliberately takes the citrus-marinated route instead.

How to Make Carne Asada on the Grill

Now get the grill hot.

Build a direct grilling zone around 450–500°F / 230–260°C or above. For thin skirt or flap, hotter than feels polite is usually better: you want color on the outside before the middle has time to overcook.

Scrub the hot grates clean. If your grill has a history of sticking, lightly oil them with a little neutral high-heat oil before the steak goes down.

Dry the Steak Before It Hits the Grill

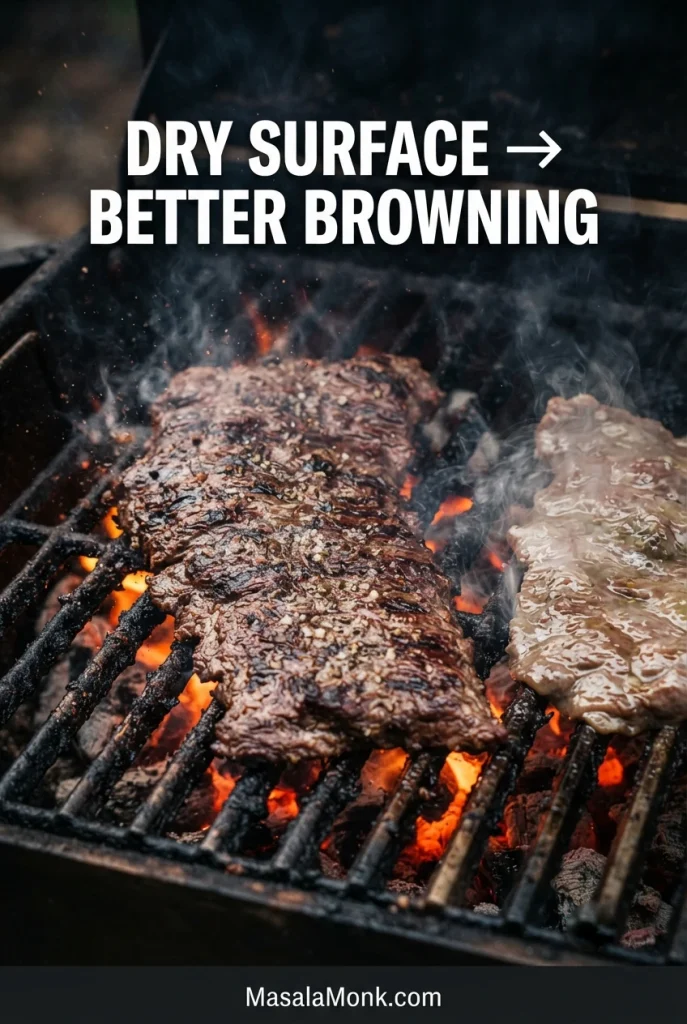
Remove the steak from the marinade, discard the liquid and blot the beef well. Dry the surface well. A wet steak can steam and turn gray while you wait for char that never arrives.

Carne asada steak cooking over high heat, with a wetter pale surface beside a darker browned surface.
A marinated steak does not need to be dry inside; only the outside needs to be free of excess liquid before it hits the heat. Once that surface moisture is reduced, more of the grill’s energy can go toward browning and crust formation.

The steak should answer with a hard sizzle almost immediately when it hits the grate. A weak hiss usually means the surface is still too wet or the grill needs more heat.

What you seeWhat it means
Dull, wet or gray surfaceThe steak needs a drier surface, more heat, or more time undisturbed against the grill.
Deep brown or mahogany patchesThe crust is developing; start watching the thinner areas closely.
Blackened thin tips and edgesUsually fine on skirt steak as long as the rest of the piece is browning rather than burning.
Black from edge to edgeThe char has gone too far; pull the steak before bitterness takes over.

Give the Steak Time to Brown

Lay the beef over the hottest part of the grill that is not engulfed in flare-ups and leave the first side alone long enough to develop color. Constant lifting and turning makes a good crust harder to build.

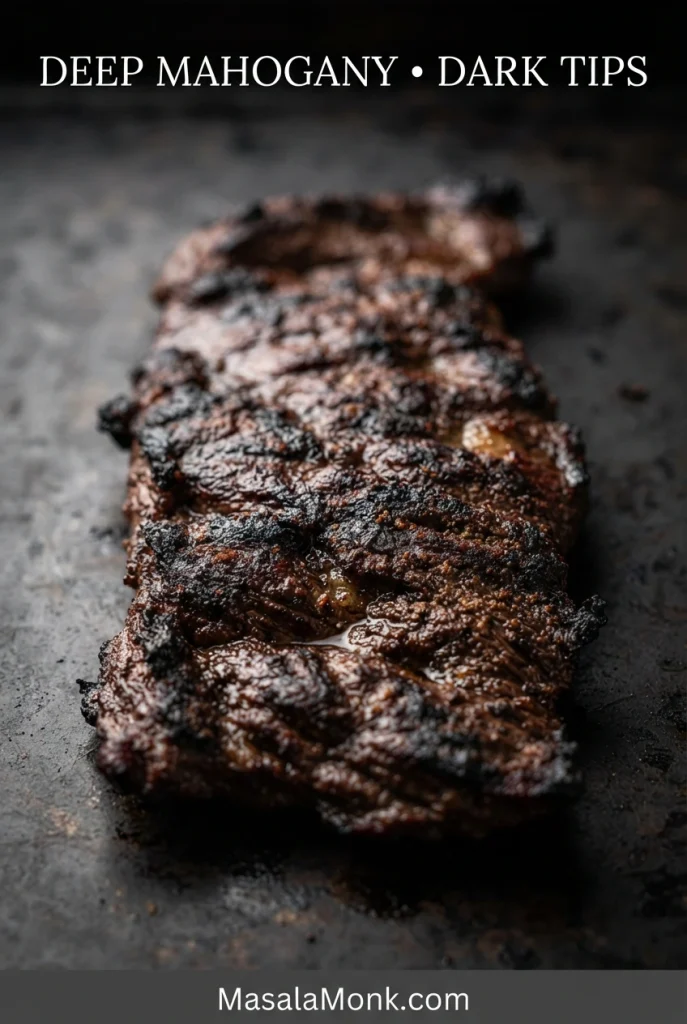
Close-up of grilled carne asada with a deeply browned mahogany crust, irregular charred areas and darker thin edges.
Good carne asada char is concentrated rather than uniform. Look for a dry, deeply browned crust with a few darker edges; the goal is smoky contrast around juicy beef, not a steak blackened from end to end.

Uneven char is normal on skirt steak. Thin ends darken before the thicker center, so do not keep the whole piece over the fire just to make every inch the same color.

Charcoal naturally adds smoke and live-fire flavor. A standard gas grill gives you plenty of heat and char, though without quite the same smoke profile. Mesquite pushes that smoky character further, while a very hot plancha or griddle produces its own taco-shop style of browned beef.

If the steak is properly seasoned but still tastes flat, stronger browning or a little smoke may be what it is missing.

Carne Asada Temperature: Medium-Rare vs. USDA Guidance

For culinary doneness, medium-rare steak is commonly finished around 130–135°F / 54–57°C. Thicker steak may rise a few degrees as it rests; paper-thin carne asada has much less carryover.

That is different from the official food-safety recommendation. The USDA recommends 145°F / 63°C for intact whole beef steaks followed by at least a 3-minute rest.

On thicker steak, insert an instant-read thermometer horizontally through the side toward the center. Paper-thin cuts may be too shallow for a reliable probe reading, which makes browning, timing and close attention more important.

Instant-read thermometer entering horizontally through the side of a thick grilled steak toward its center.
The probe needs to reach the middle of the steak, not simply touch its surface. With thicker flank or flap, entering through the side gives the sensor a straighter path into the center, making the reading more representative of the meat inside.

Cooking Carne Asada Indoors

No outdoor grill? You can still make excellent carne asada indoors. Cast iron gives you a hard sear; the broiler keeps the cooking off the stovetop.

Cast Iron

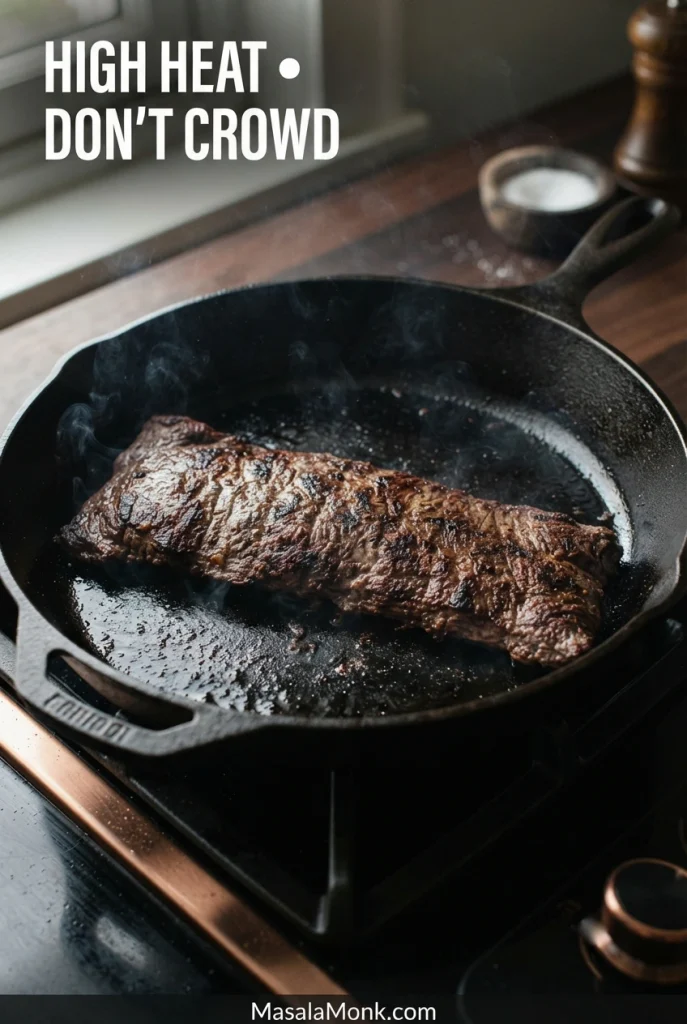
Cut long skirt or flap steak into pieces that can lie completely flat. Blot them especially well, then heat a heavy cast-iron skillet over high heat until very hot. Add just enough high-heat oil to lightly coat the cooking surface.

Carne asada steak searing flat in a hot cast-iron skillet with space around the meat.
A heavy cast-iron skillet holds a lot of heat, which is exactly what carne asada needs for a hard crust indoors. Keep the pieces flat and spaced apart; otherwise, released moisture cools the cooking surface and encourages steaming instead of searing.

Start checking the first side after about 2–3 minutes. Turn when it has developed a strong brown crust, then watch the second side closely; thin pieces can finish quickly, while thicker flap or flank needs longer. Use the thermometer and temperature guidance above whenever the steak is thick enough to probe reliably.

Cook in batches so every piece gets direct contact with the pan, and let the empty skillet regain its heat before starting the next batch. A properly hot skillet will create smoke, so turn on the exhaust hood and open the windows before cooking.

Broiler

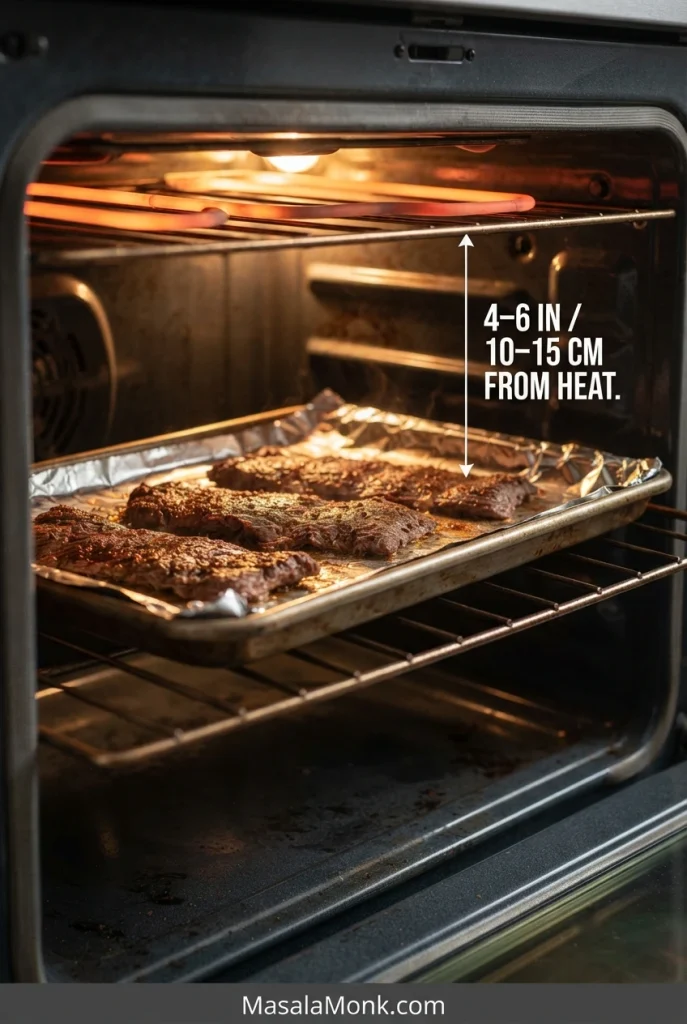
Arrange the well-drained steak on a foil-lined broiler-safe sheet pan and place it roughly 4–6 inches / 10–15 cm from a fully heated broiler.

Carne asada on a foil-lined tray positioned beneath the upper heating element of an oven broiler.
A broiler puts intense heat directly above the steak, so thin carne asada can brown surprisingly fast without a grill. Broilers vary widely, however, which is why the color of the crust is a better stopping signal than blindly following one fixed cooking time.

Start checking regular skirt after about 6 minutes total; many pieces finish in roughly 6–10 minutes, turning once as the first side browns. Paper-thin ranchera can be ready much sooner, while thicker flank needs more time. Broilers vary considerably, so let browning and doneness decide when the steak comes out.

Slice Across the Grain Before You Chop

While the steak rests, warm a stack of soft homemade corn tortillas and keep them covered for serving.

Look closely at the rested steak before reaching for the knife. The long muscle fibers should be visible running in one direction.

Turn the beef so the knife crosses those fibers and make thin slices. A slight diagonal cut gives you wider pieces while keeping the fibers short.

Cooked skirt steak being sliced across its grain, with thin slices and smaller chopped pieces on the cutting board.
Once the steak is sliced across the grain, those thin pieces are easier to eat and portion into tacos. A quick chop then creates small, loose pieces that distribute through the tortilla instead of forming one dense mouthful.

Slicing direction matters more than it seems: juicy skirt steak can still feel frustratingly chewy when it is sliced with the grain.

For Tacos, Slice First and Chop Second

Serving the steak on a platter? Stop at thin slices. When it is headed for tacos or burritos, chop those slices into pieces around ½ inch / 1.25 cm across.

This is the payoff: thin, juicy slices, dark at the edges, with the long fibers shortened enough to bite cleanly. A hot tortilla, chopped steak, onion, salsa and lime are often all it needs.

Why Is My Carne Asada Tough? Don’t Blame the Marinade First

A flavorful steak can still be tough. The cause might be the cut, leftover membrane, overcooking, long muscle fibers or simply pieces that are too large for an easy taco bite.

What happenedWhat to check next time
Gray with little crustBlot the steak more thoroughly, increase the heat and avoid crowding the cooking surface.
Dry and leatheryThe meat likely cooked too long, especially if thin steak was given thick-steak timing.
Juicy but chewyCheck the grain direction, slice thickness, tough membrane and the actual cut.
Hard to bite through in a tacoSlice across the grain first, then chop the slices smaller.
Burnt garlic or herbsBrush away heavy marinade solids before the steak reaches fierce heat.
Soft or mealy outsideShorten the time in the acidic marinade.
Too saltyCheck the salt measurement and marinating time. Weigh the kosher salt if possible because brands differ substantially by volume.
Some pieces tender, others toughUneven thickness can put different pieces at different levels of doneness.
Well seasoned but missing taqueria characterLook at the heat, browning and smoke before changing the marinade.

A marinade can change flavor and surface texture; it cannot shorten long muscle fibers. Your knife does that when you slice across the grain.

Make Ahead, Freeze and Use the Leftovers

Make Ahead

The marinade can be mixed up to 1 day ahead and refrigerated separately. Combine the beef and marinade 2–4 hours before cooking. Carne asada is best soon after grilling, so prep early rather than cooking the steak hours ahead.

Freezing

For best texture, freeze the raw beef and marinade separately. FoodSafety.gov lists 4–12 months at 0°F / −18°C for the best quality of frozen fresh beef steaks, although carne asada is better used toward the earlier end of that range for texture. Thaw the beef in the refrigerator, then marinate normally for 2–4 hours.

Leftovers

Refrigerate cooked carne asada promptly in a covered container and use it within 3–4 days. Reheat only what you need, ideally in a hot skillet, until it reaches 165°F / 74°C. If you freeze the cooked steak, FoodSafety.gov lists 2–6 months for cooked-meat quality, although thin cooked steak is at its best much sooner.

Leftover carne asada is excellent in a crisp skillet quesadilla; the folding and browning method in our chicken quesadilla recipe works just as well once you swap in the chopped steak.

A smaller handful can become carne asada fries: warm the beef quickly, then scatter it over crisp homemade French fries with cheese, salsa and avocado.

What to Serve with Carne Asada

Bring the sliced beef straight to the table and let everyone build their own. Carne asada does not improve by waiting under a pile of elaborate toppings.

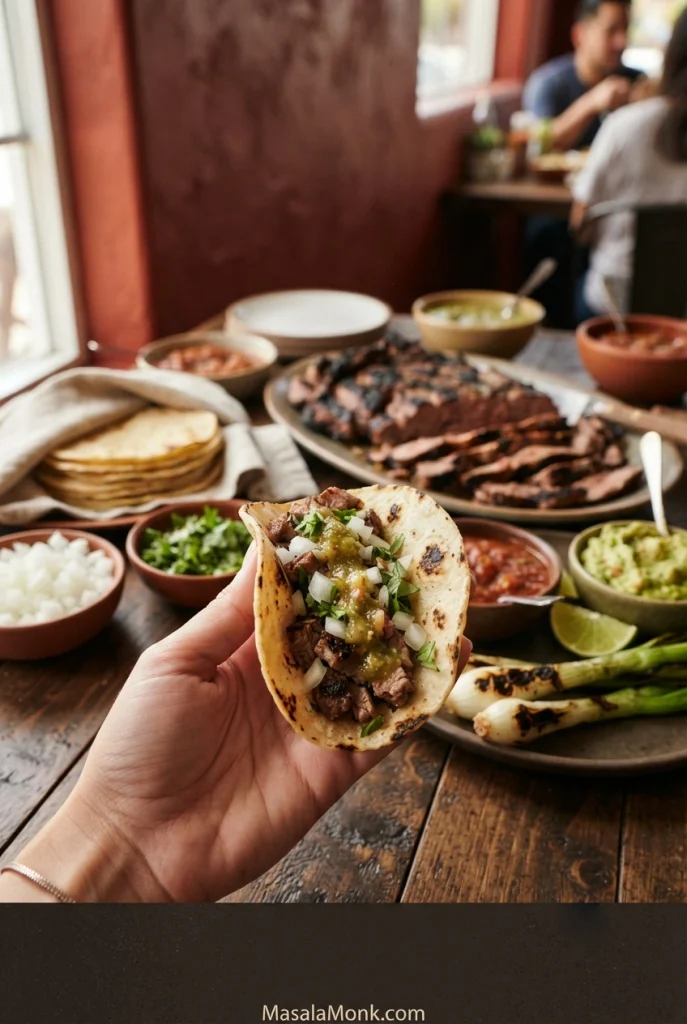
Hand holding a warm corn tortilla filled with chopped carne asada, with tortillas, lime and taco toppings arranged on the table behind it.
A good carne asada taco leaves room for the steak to remain distinct. Warm corn tortillas carry the beef, while lime, onion and salsa add brightness and contrast. A lighter hand with the toppings lets the char and seasoning stay noticeable.

Lime, guacamole, pico de gallo, charred green onions and blistered chiles all make sense around smoky beef. You do not need all of them on the same plate.

For tacos, keep the pile loose. A modest spoonful of chopped beef, onion, salsa and lime gives you a cleaner bite than packing the tortilla so full that the filling falls out before the first mouthful.

Choose the salsa to suit the rest of the meal: roasted salsa verde brings tart tomatillo and chile, while fresh mango salsa gives the smoky steak a sweeter, juicier contrast.

For a fuller plate, add creamy refried beans and fluffy Mexican rice.

Get it into warm tortillas and eat it while those charred edges are still hot.

Posted on — Leave a comment

Spaghetti Aglio e Olio Recipe: Easy, Silky Garlic & Olive Oil Pasta

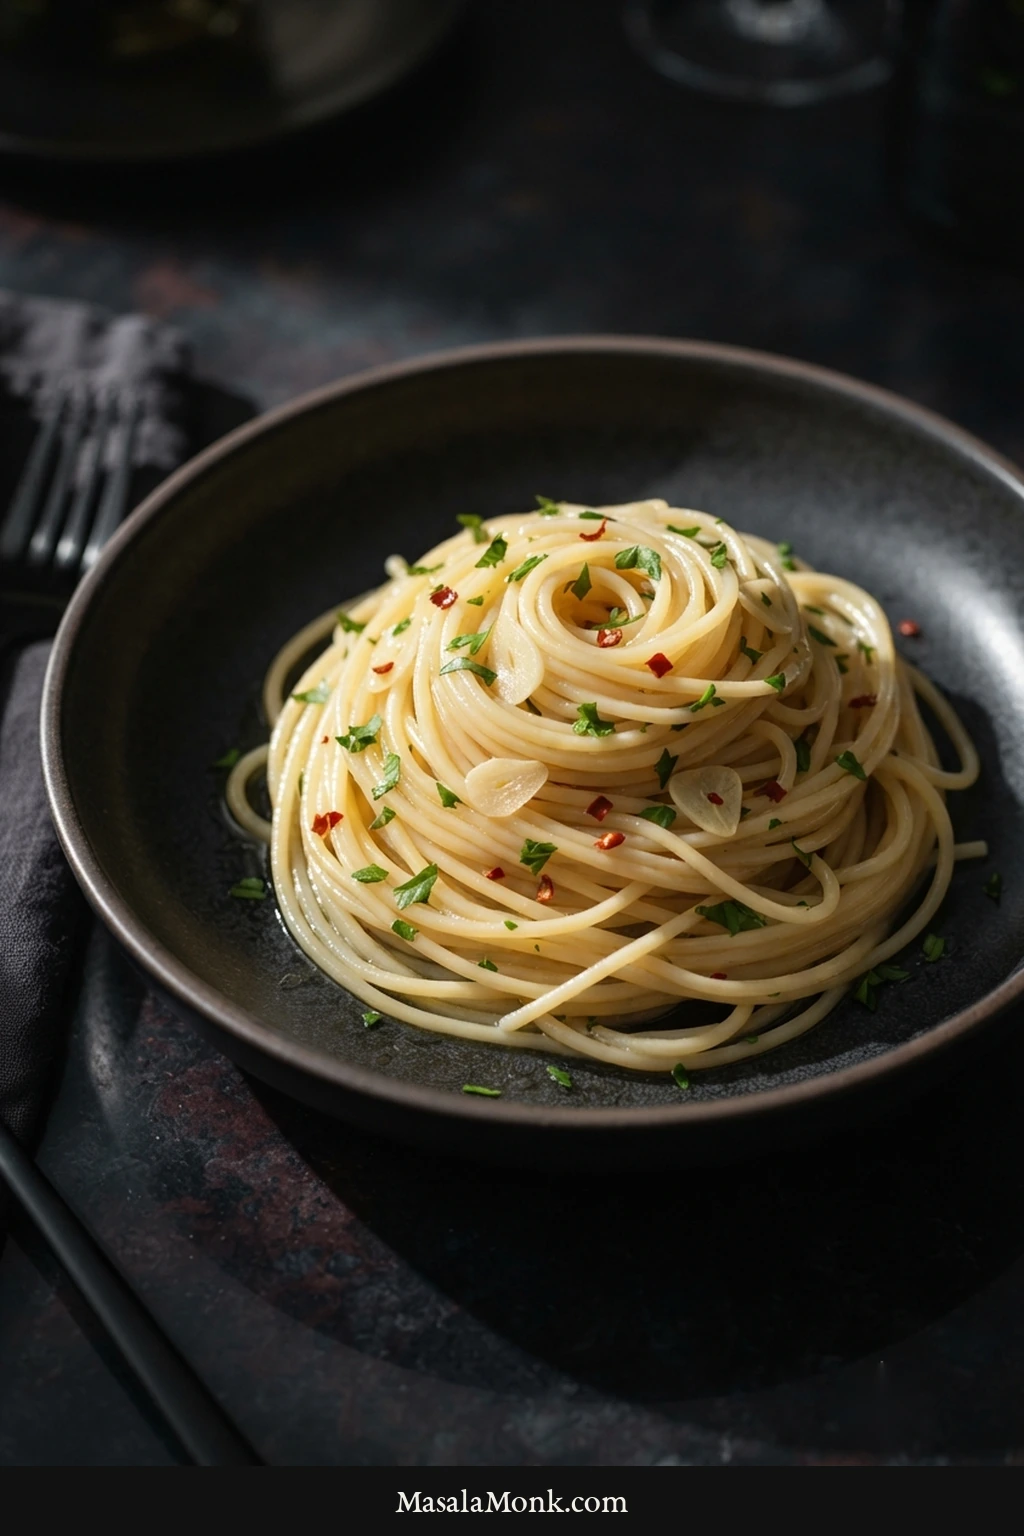
Shallow white bowl of spaghetti aglio e olio with glossy strands, thin pale garlic slices, parsley, and small red chile pieces on a dark graphite surface.

The awkward thing about aglio e olio is that you can use all the right ingredients and still end up with oily spaghetti. Or dry spaghetti. Or garlic that went from fragrant to bitter while you were looking at the pasta pot.

Spaghetti aglio e olio is a simple Italian pasta of garlic, extra-virgin olive oil, and spaghetti, finished with starchy pasta water until the strands are lightly silky. Most of the action happens during the last few minutes in the pan.

Aglio e olio—roughly AH-lyoh eh OH-lyoh—means garlic and oil. When it lands right, the garlic is fragrant rather than harsh, the olive oil still tastes fresh, and a little chile warmth lingers behind it if you use any. Once you know what to watch in the pan, most of the mystery disappears.

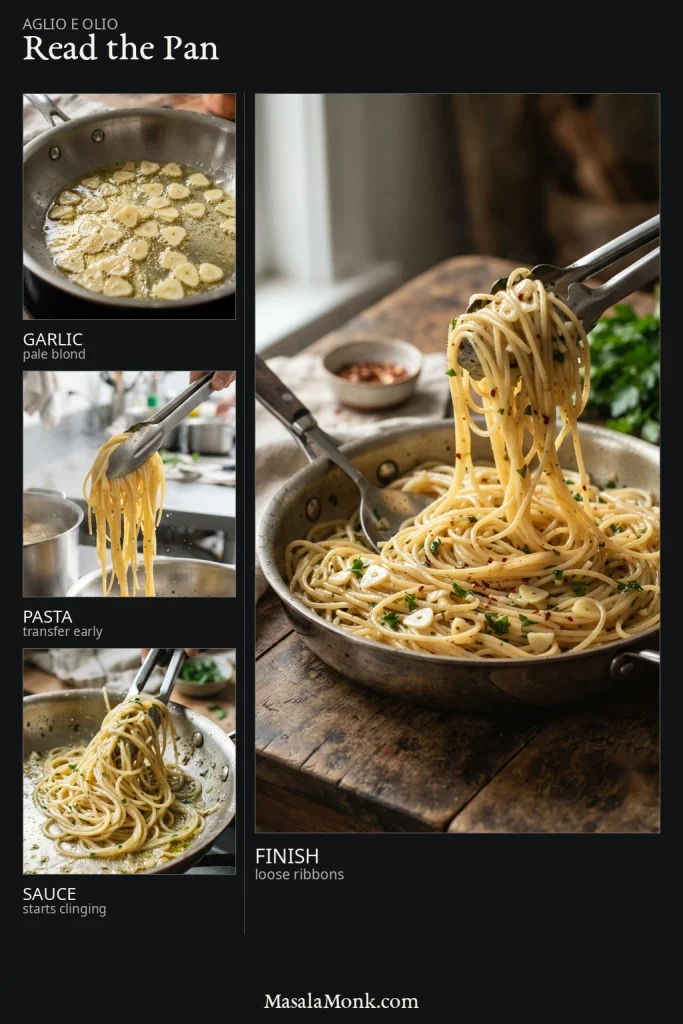
Read the Pan Before You Start

WatchThe moment you want
GarlicPale straw to light blond, fragrant, with no deep browning
SpaghettiMove it to the skillet while the center is still a little firmer than you want to eat
SauceThe oil and water begin following the strands instead of pooling separately underneath
FinishThe spaghetti moves freely and falls from the tongs in loose ribbons

Keep those four cues in mind. They will tell you more than an extra thirty seconds on a timer.

Editorial cooking guide showing four stages of spaghetti aglio e olio: pale-blond garlic, spaghetti being transferred early, sauce beginning to cling to the noodles, and finished spaghetti falling in loose ribbons.
Pasta cooks differently from burner to burner, so visual checkpoints make this garlic and olive oil pasta more reliable than treating the package time as an exact finish line.

Spaghetti Aglio e Olio Recipe

Spaghetti tossed with gently cooked garlic, extra-virgin olive oil, starchy pasta water, optional chile, and parsley. No cream or butter is needed to make the sauce coat the noodles.

Prep
10 minutes
Cook
15 minutes
Total
About 25 minutes
Yield
3 generous or 4 lighter servings

Equipment

  • Large pasta pot
  • 12-inch / 30 cm wide sauté pan or deep skillet
  • Tongs
  • Heatproof measuring cup or ladle
  • Sharp knife

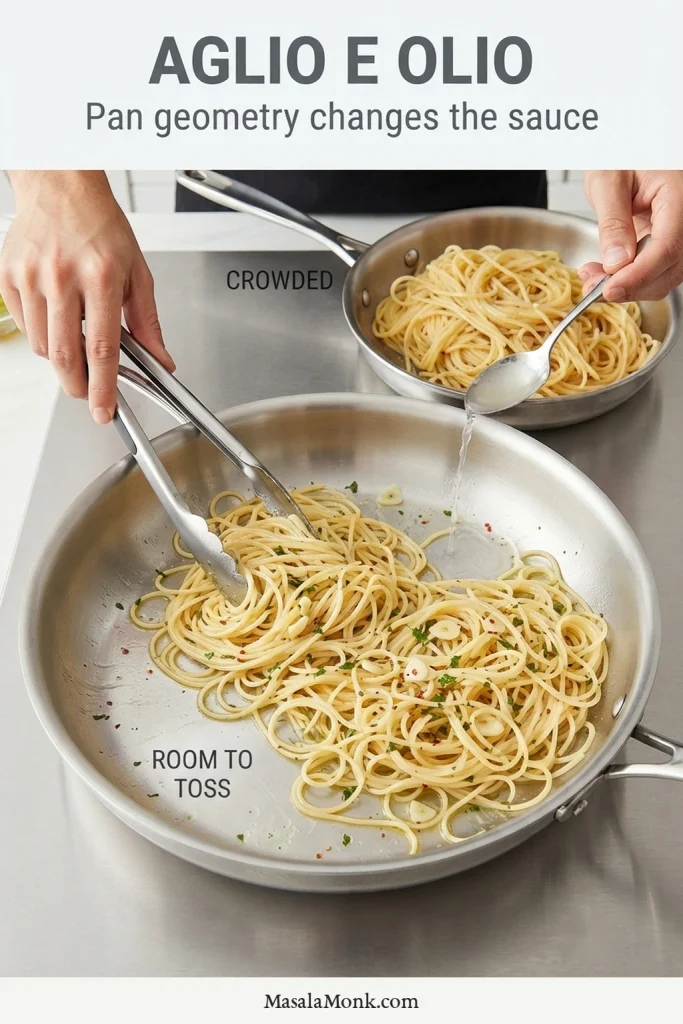
A wide pan makes this easier. It gives the spaghetti room to move and exposes more liquid to evaporation, so you can toss freely and see what the sauce is doing underneath.

No 12-inch skillet? Cook the garlic in your widest skillet. If there is not enough room to toss the spaghetti freely, transfer the garlic-oil-water mixture to the emptied pasta pot and finish the spaghetti there.

Ingredients

  • 12 oz / 340 g dried spaghetti
  • 2.5 L / about 2.6 qt water, for cooking the pasta
  • 20 g fine sea salt; roughly 1 tablespoon for many fine salts, but weighing is much more reliable
  • ⅓ cup / 80 ml extra-virgin olive oil, divided; use ¼ cup / 60 ml for the garlic and up to 1 tablespoon + 1 teaspoon / 20 ml to finish
  • 18 g fresh garlic, about 5–6 medium or 4 large cloves, sliced about 1/16 inch / 1–2 mm thick
  • ¼–½ teaspoon red pepper flakes, or 1 small fresh red chile/peperoncino thinly sliced, to taste
  • ¼ cup / about 15 g finely chopped flat-leaf parsley, optional but recommended
  • At least 1¼ cups / 300 ml pasta cooking water, reserved from the pot
  • Finely grated Parmesan or Pecorino Romano, optional for serving

Before You Start

  • Olive oil: Use one that tastes fresh on its own. Fruity, grassy, mild, or peppery can all be good; stale or rancid cannot. If the labels are confusing, the differences between virgin olive oil and extra-virgin olive oil are worth knowing before you choose a bottle.
  • Another long pasta: Linguine works too. Follow its own cooking time and move it to the skillet while the center is still firm.
  • Gluten-free spaghetti: The starch in the cooking water can still help the oil and water come together. Start checking early, since some gluten-free varieties soften or break more quickly.

Save more pasta water than you expect to use. Start with 6 tablespoons / 90 ml in the pan. Keep the rest close by for adjustments.

Instructions

1. Start the Spaghetti

Bring 2.5 L / about 2.6 qt water to a rolling boil. Add 20 g fine sea salt, then the spaghetti.

Stir during the first minute so the strands separate. Check the package time. You will move the pasta to the skillet about 2 minutes before its usual al dente point, so begin checking early rather than waiting for the timer to finish.

2. Start the Garlic With About 5–6 Minutes Left on the Pasta

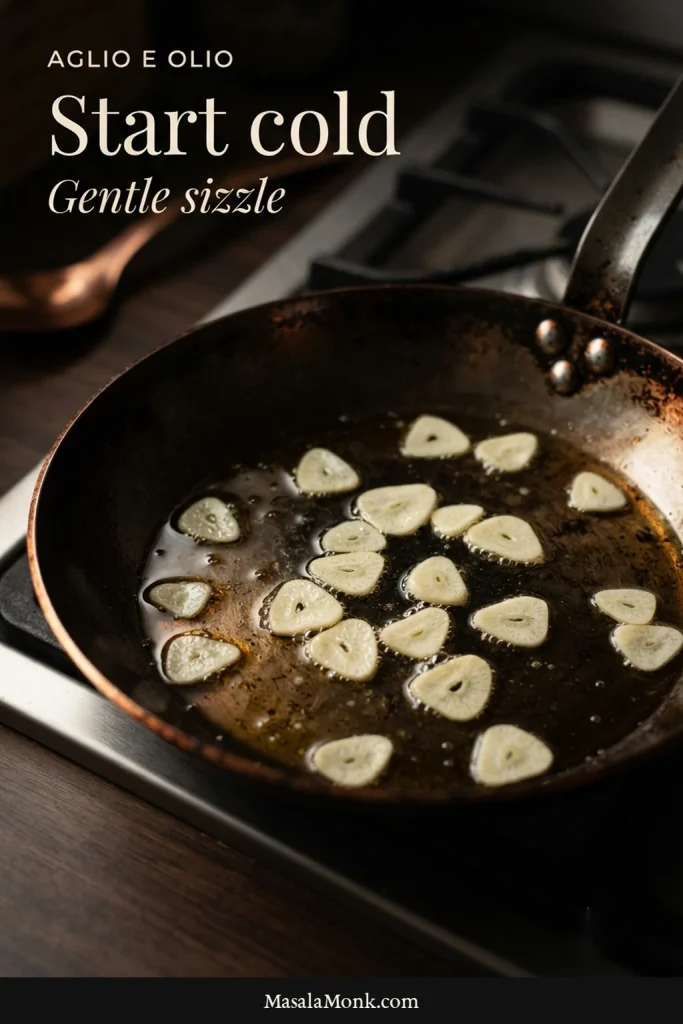
Put ¼ cup / 60 ml olive oil and the sliced garlic into a cold 12-inch / 30 cm skillet. Set it over low to medium-low heat.

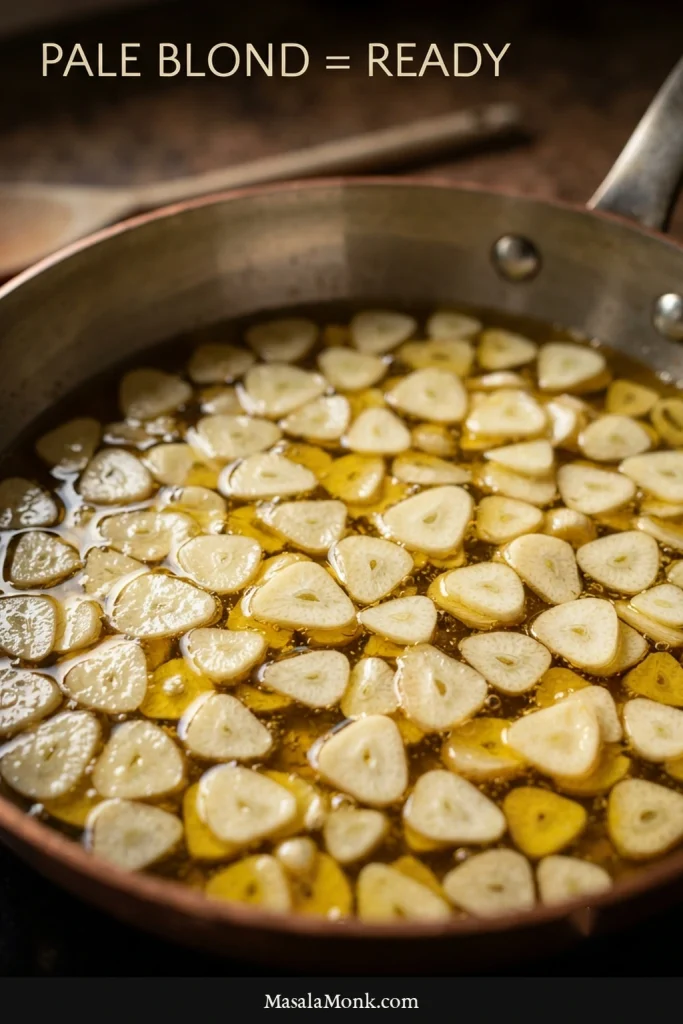
The slices will soften, turn translucent, and begin to sizzle gently. As the raw sharpness gives way to a sweeter garlic aroma, watch for pale straw to light blond around the edges. Depending on the pan and burner, that usually takes about 3–5 minutes.

Add red pepper flakes or fresh chile for the final 20–30 seconds.

Do not wait for deeply golden garlic. The slices keep cooking in hot oil after they reach the color you want.

3. While the Garlic Cooks, Reserve the Pasta Water

As the spaghetti gets close to its transfer point, scoop out at least 1¼ cups / 300 ml pasta water. Water collected later in cooking is generally starchier, which makes it especially useful for helping the oil and water cling to the spaghetti.

4. Cool the Garlic With the First Splash of Pasta Water

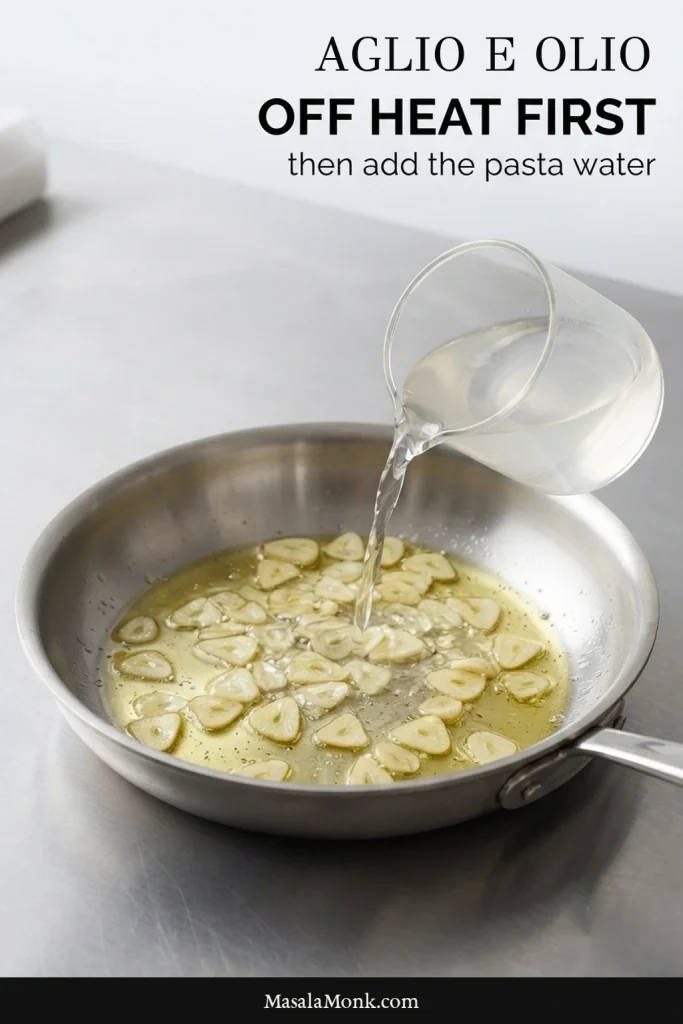
Once the garlic is pale blond, pull the skillet off the heat. Carefully add 6 tablespoons / 90 ml hot pasta water, then return the pan to medium heat.

The water starts the sauce and slows the garlic’s cooking at the same time. Some sputtering is normal. If the oil was smoking or the water spits violently, let the pan cool briefly before continuing.

Hot pasta water being added to a stainless-steel skillet containing olive oil and pale sliced garlic while the skillet sits away from the active burner.
Taking the skillet off direct heat creates a short temperature reset before the hot pasta water goes in, giving you more control over garlic browning as the sauce begins to form.

The oil and cloudy water may still look separate at this point. That’s fine for now.

Garlic ready first? Pull the skillet off the heat, add the measured water, and wait for the pasta. If the spaghetti is nearly ready while the garlic still looks raw, give the garlic another moment instead of rushing it.

5. Finish the Spaghetti in the Skillet

Transfer the spaghetti with tongs while the center is still a little firmer than you want to eat. Some cooking water clinging to the strands is useful.

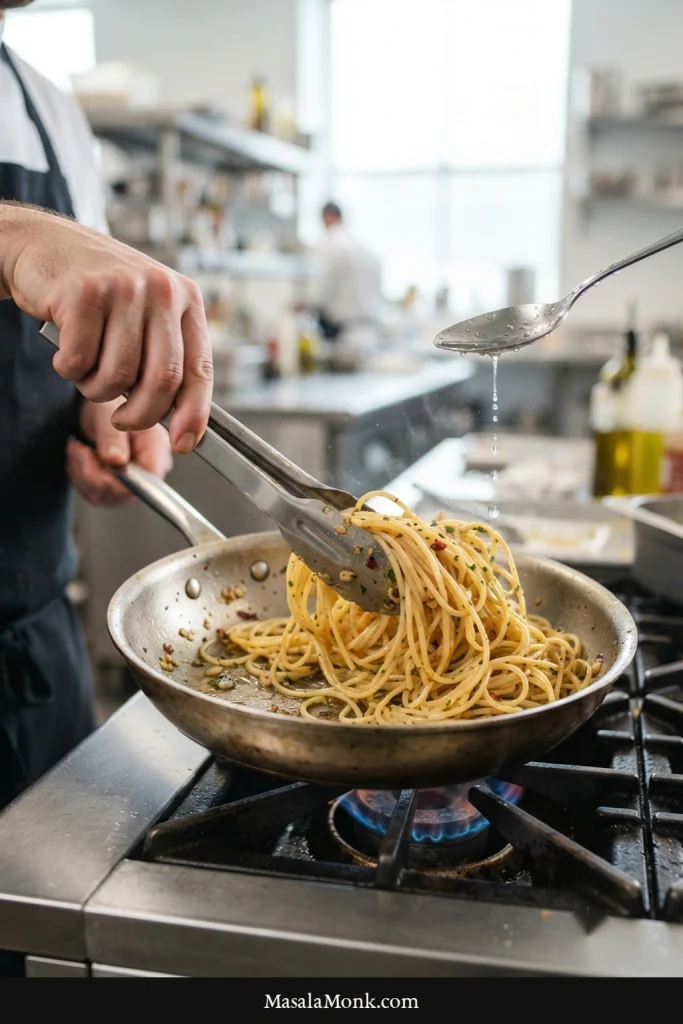
Keep the skillet around medium heat and toss the spaghetti through the garlic oil and water for about 1½–2 minutes. The main thing is to keep enough fluid sauce in the pan for the spaghetti to finish cooking while you toss.

As the sauce comes together, the pan should look less like separate oil and water and more like one fluid coating around the spaghetti. If plenty of liquid remains, nudge the heat toward medium-high. If the pan starts drying before the spaghetti is tender, lower the heat and add reserved water 1–2 tablespoons / 15–30 ml at a time.

If repeated splashes vanish almost immediately, adding more water is not always the answer. A crowded pan, too little tossing, or excessive heat can leave you chasing the sauce while the pasta keeps cooking.

6. Stop Before the Pan Looks Dry

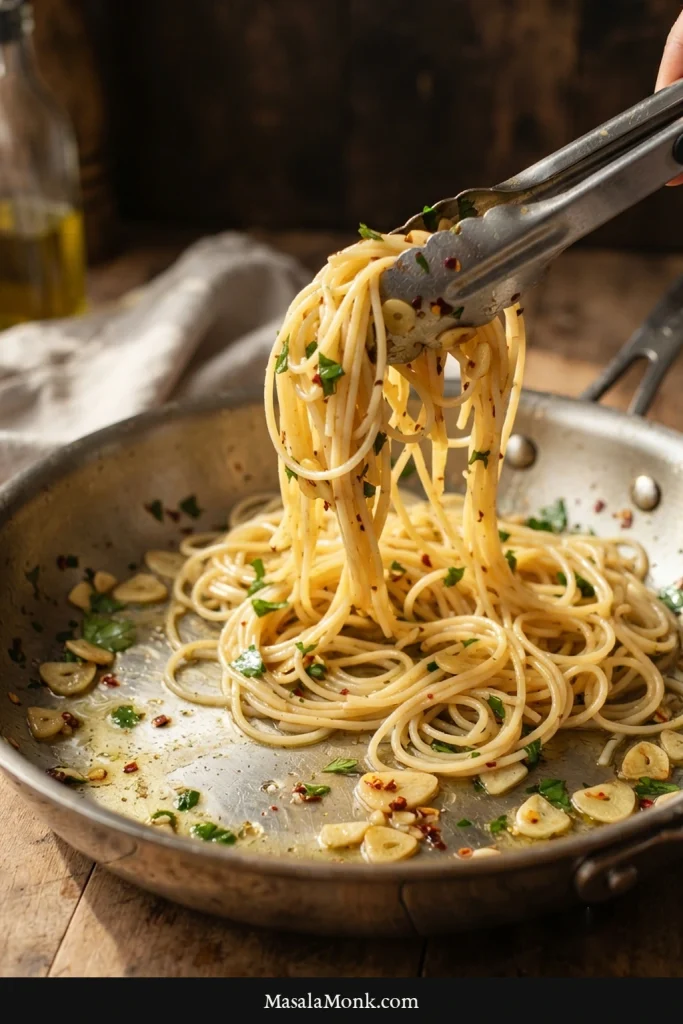
You’re there when the spaghetti carries a thin coating, moves freely, and falls back from the tongs in loose ribbons. Very little clear oil should be sitting underneath.

A little fluid sauce left in the pan is welcome. It tightens quickly once the spaghetti leaves the heat.

Stainless-steel tongs lifting loose glossy spaghetti from a skillet with pale garlic and a small amount of remaining sauce.
The skillet should look a touch wetter than the finished plate because the sauce keeps tightening as heat leaves the noodles and moisture continues to evaporate during serving.

7. Finish Off the Heat

Turn off the heat. Toss in some of the remaining olive oil for a fresher olive-oil flavor, then add the parsley. You may not need all 1 tablespoon + 1 teaspoon / 20 ml.

If the finishing oil begins collecting at the bottom, add 1 tablespoon / 15 ml hot pasta water and toss again. The finished spaghetti should still feel loose rather than slick or heavy.

Taste for salt, then serve immediately. Parmesan or Pecorino can go on at the table if you want it.

If the pasta looked oily, dry, sticky, or difficult to control, start with what you saw in the pan—the fixes are not all the same. Diagnose what happened →

Getting the Sauce to Cling

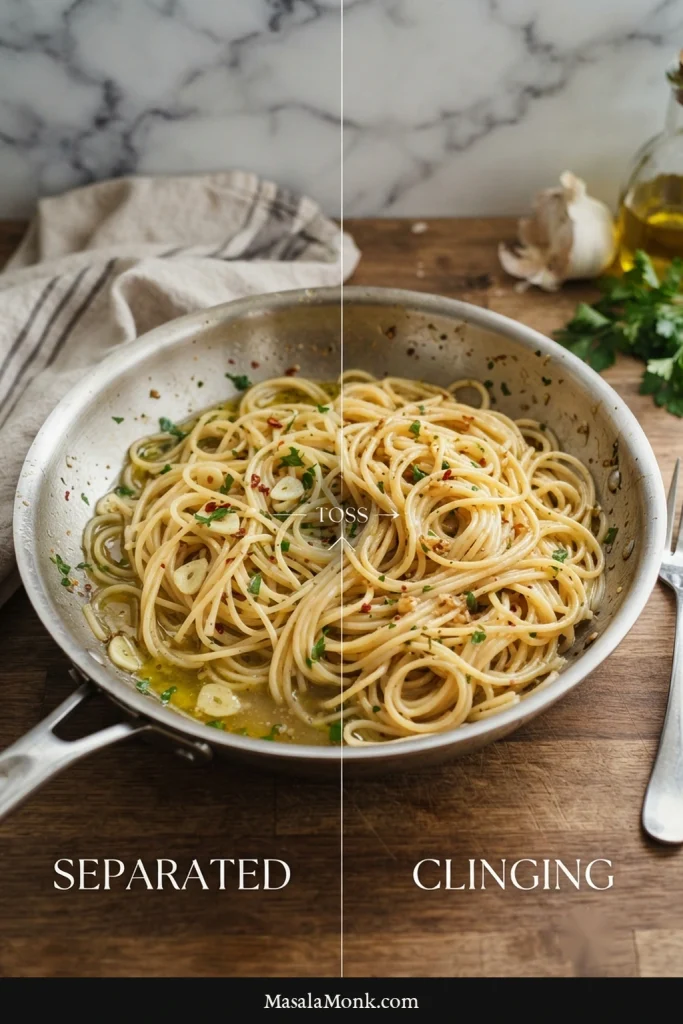
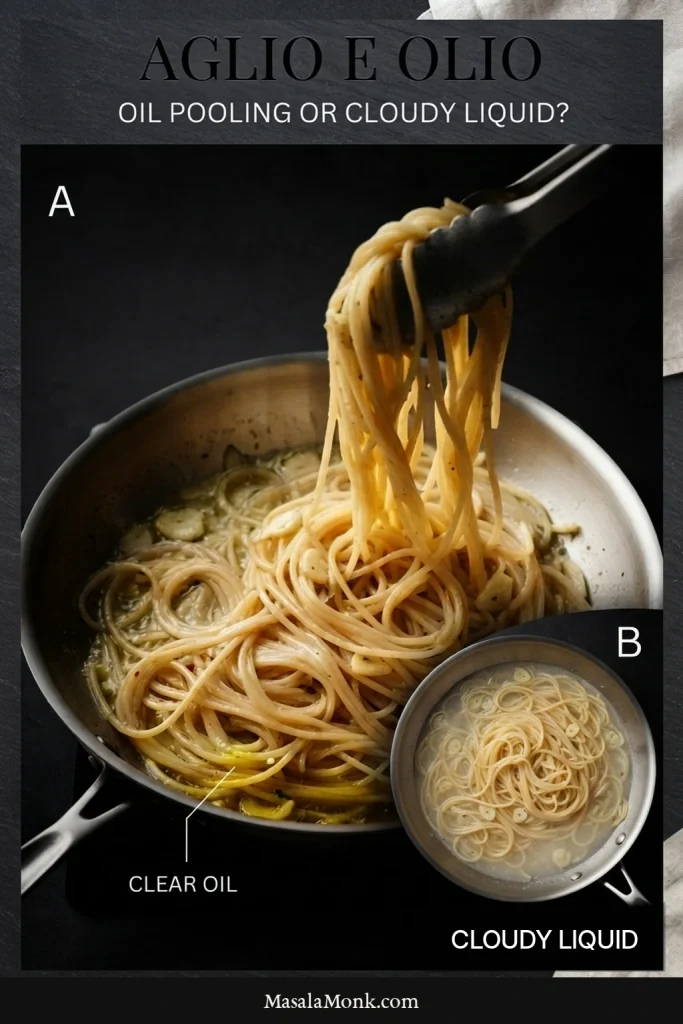
The final toss creates the emulsion: starch in the cooking water helps the olive oil cling to the spaghetti instead of collecting underneath.

Before-and-after comparison of spaghetti in a skillet, showing separated oil and cooking water on one side and a thin cohesive coating clinging to the noodles on the other.
Oil and cooking water can look separate at first. As you toss, pasta starch helps them come together, forming the thin emulsion that lets the sauce cling to the spaghetti.

Oil still pooling underneath the spaghetti? Fix oily, dry pasta →

More Pasta Water Is Not Always Better

A moderate pot of water gives you cooking water with enough starch to be useful later. In the skillet, start with a controlled amount and add more only when the noodles need it. Extra water cannot compensate for excessive heat, too little movement, or an overcrowded pan.

Finish the Spaghetti in the Pan, Not the Pot

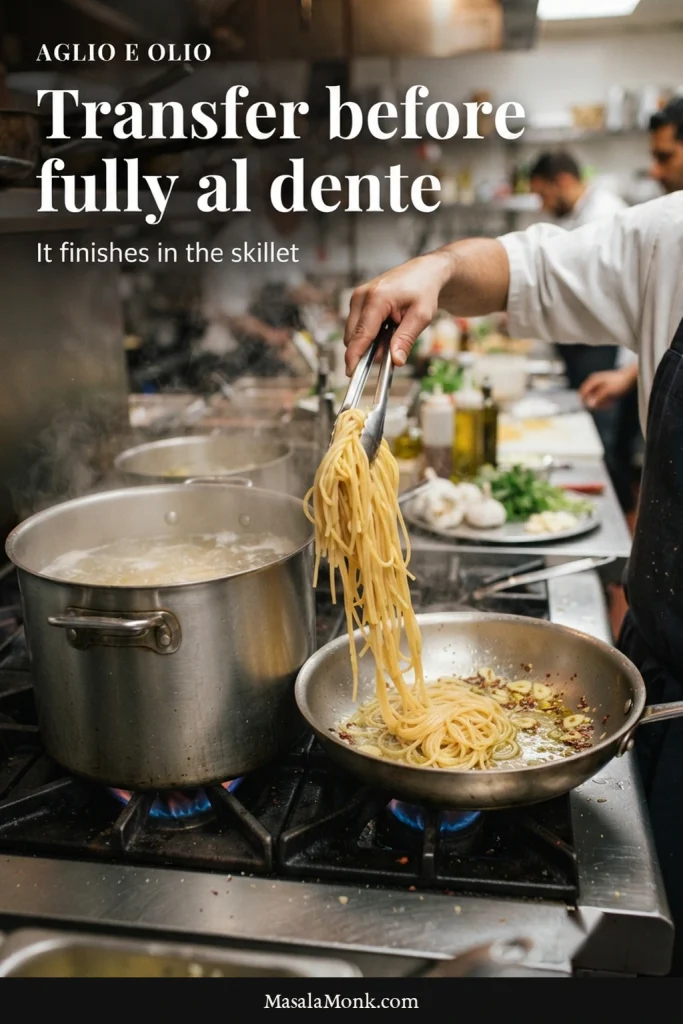
The skillet finish still counts as cooking time. Move perfectly al dente spaghetti into the pan and it can only get softer while the sauce comes together.

Cooked spaghetti being lifted with stainless-steel tongs from a pasta pot toward a nearby skillet so the noodles can finish cooking in the pan.
An early transfer gives the skillet time to finish the spaghetti and develop the sauce together, leaving more room for adjustment than fully cooked noodles allow.

Transferring it early gives you room to work without racing the pasta. For spaghetti labeled 10 minutes to al dente, that can mean beginning to check it around minute 7½–8 rather than waiting for the full timer.

Garlic Is the Step You Cannot Really Undo

A tight sauce can be loosened and a watery one can reduce. Once badly browned garlic has flavored the oil, the bitterness is much harder to escape.

Close-up of thin pale garlic slices gently sizzling in olive oil in a stainless-steel skillet, with small bubbles around the edges.
Thin garlic slices need a gentle sizzle rather than an aggressive fry; slower cooking gives the olive oil time to take on garlic flavor before the edges begin browning.

How Pale Is Pale Enough?

  • Opaque: still raw.
  • Soft and translucent: fragrant and getting close.
  • Pale straw to light blond: ready for the pasta water.
  • Clearly brown or darker: farther than needed for this version.
Macro close-up of thin sliced garlic in olive oil at a pale straw to light-blond stage, with translucent centers and lightly golden edges.
For garlic and olive oil pasta, pale blond is the useful stopping cue. Deeper browning changes the flavor toward bitterness rather than simply making the garlic taste stronger.

On an older electric coil, move the whole skillet off the burner as the garlic gets close. Turning the dial down does not instantly remove the heat already beneath the pan.

Garlic browning too quickly? Go to garlic control →

Why Thin Slices and a Cold Start Help

Minced garlic releases its flavor quickly, but it burns quickly too. Thin slices give you more time to judge the color, while a cold start slows the early cooking enough to make that change easier to catch.

When Aglio e Olio Goes Wrong

If aglio e olio has ever felt strangely difficult for something with such a short ingredient list, the pan usually tells you why. Look at what is happening before reaching for more oil or another ladle of water.

Diagnostic comparison of spaghetti aglio e olio showing clear golden oil pooling beneath the noodles in one skillet and lightly cloudy cooking liquid surrounding the noodles in another.
Look underneath the spaghetti before adding anything: clear oil pooling and cloudy cooking liquid are different pan states, so the correct fix depends on what you actually see.
What you see or tasteDo this now
Clear oil pooling underneathIf the pasta is dry too, add 1–2 tablespoons hot starchy water and toss firmly
Dry but greasyAdd a little water while tossing; more oil will make it worse
Cloudy liquid sloshing aroundKeep the pasta moving and let some liquid reduce
Sticky or tacky spaghettiAdd 1–2 tablespoons hot pasta water and take the pan off the heat
Bitter garlicBadly browned garlic is best restarted
Bland pastaCheck salt first, then garlic flavor and the olive oil itself
Pasta turning softStop cooking; next time move it from the pot earlier
Water spits violentlyPull the pan off the burner before adding more

My Pasta Is Oily Even After I Added Water

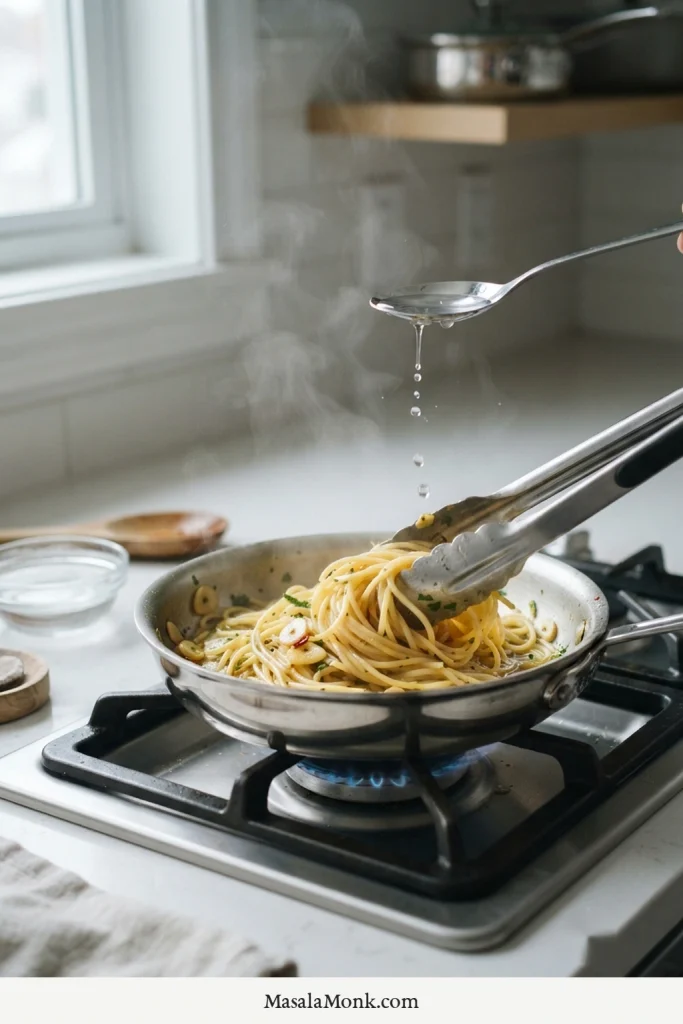
Water alone does not guarantee a good sauce. Clear oil beneath otherwise dry spaghetti usually means the pan needs a splash of starchy water plus more tossing.

Stainless-steel tongs tossing slightly dry spaghetti in a skillet while a small spoon adds a little water to the noodles.
When pasta looks dry but clear oil is still visible underneath, more olive oil only increases the separation. Add a small splash of hot starchy pasta water and toss firmly so the existing oil can begin coating the strands instead of pooling below them.

If plenty of cloudy liquid is already moving around the pan, work with what you have first. Another large ladle just gives you more liquid to reduce.

The Spaghetti Keeps Swallowing the Sauce

This often shows up with a crowded pan. The noodles keep absorbing water while you wait for the sauce to come together, so each splash seems to vanish.

Overhead comparison of spaghetti in a wide skillet with room for tossing and a smaller crowded pan containing a dense mound of noodles.
A working pan still shows space around the spaghetti as it moves. Once the noodles are packed into a tight mound, judging evaporation and tossing evenly become much harder.

That’s one reason the main recipe uses 12 oz / 340 g spaghetti in a 12-inch pan instead of a full pound / 454 g.

If you’re doubling the recipe, use a substantially larger sauté pan or cook two batches. Twice the ingredients inside the same pan does not behave like the original batch.

My Garlic Is Bitter—or Barely Tastes Like Garlic

Dark garlic can taste bitter even when you used plenty of it. At the other extreme, slices that barely warmed may never have flavored the oil properly.

If the pasta tastes good but you want more garlic next time, use a little more. Cooking the same amount darker gives you a different flavor, not simply more of it.

It Still Tastes Bland

Check the salt first. There is very little else in the bowl to compensate for underseasoned pasta.

If the salt seems right, taste the olive oil and think back to the garlic. Did the slices have enough gentle cooking time to flavor the oil?

You may also simply prefer a louder pasta. There is no reason to keep adding things until aglio e olio becomes another dish. Cajun shrimp pasta deliberately goes bigger with browned shrimp, chile, cream, and Parmesan.

Cooking another batch? Back to the recipe →

Chile, Cheese, Lemon—or Shrimp?

Garlic, olive oil, spaghetti, and salt are enough to make the dish. Peperoncino and parsley are both at home here. Beyond that, cook according to what you actually want to eat.

Fresh Chile or Red Pepper Flakes

Dried red pepper flakes bloom quickly in the oil and can scorch if left there too long, which is why they go in near the end of the garlic cooking. Fresh chile gives a brighter, fresher kind of heat.

Parmesan or Pecorino

Neither cheese is needed for the sauce. If you want one, Pecorino is sharper and saltier, while Parmesan is usually rounder and a little sweeter. The differences among Parmesan, Parmigiano Reggiano, Pecorino, and other hard cheeses can help if you’re deciding what to buy.

With egg-free pasta and no optional cheese, the base dish is vegan. If you’re adding cheese but need the meal to remain vegetarian, check the label for vegetarian or microbial rennet; traditional Parmigiano Reggiano uses calf rennet under the official Parmigiano Reggiano guidelines.

Lemon

If you want lemon, start with finely grated zest; it adds fragrance without much extra liquid. Add a squeeze of juice off the heat only if you want more acidity.

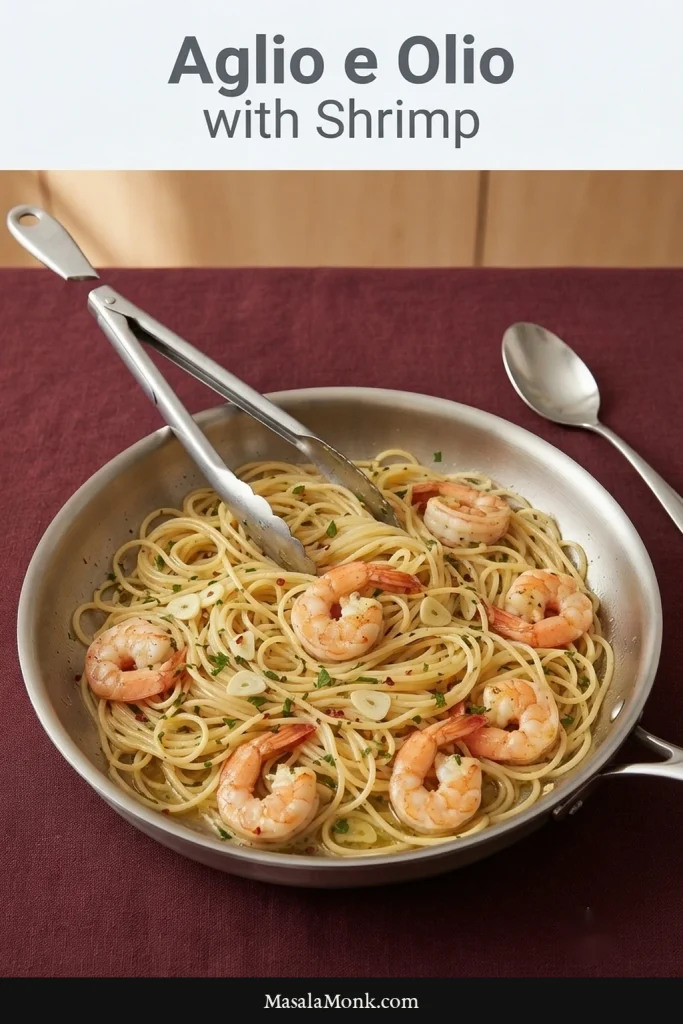
Shrimp or Prawns

Sear shrimp or prawns first and take them out of the pan. Build the garlic-oil sauce, then return the seafood near the end so it stays tender.

Plate of spaghetti aglio e olio with several seared shrimp, thin garlic slices, parsley, and small red chile pieces.
Shrimp should remain an addition to aglio e olio rather than turning it into a heavy seafood sauce—the spaghetti should still look lightly coated, loose and recognizably garlic-and-oil based.

For a richer pasta built around garlic, shrimp, butter, and lemon, the shrimp scampi recipe takes that idea further.

Serve It While the Sauce Still Moves

Aglio e olio is at its best straight from the skillet. The noodles keep absorbing moisture as they sit, so the sauce gets tighter and the oil becomes more noticeable.

Warm bowls help if you have them. More importantly, get everyone to the table before the final toss rather than finishing the pasta and then rounding people up.

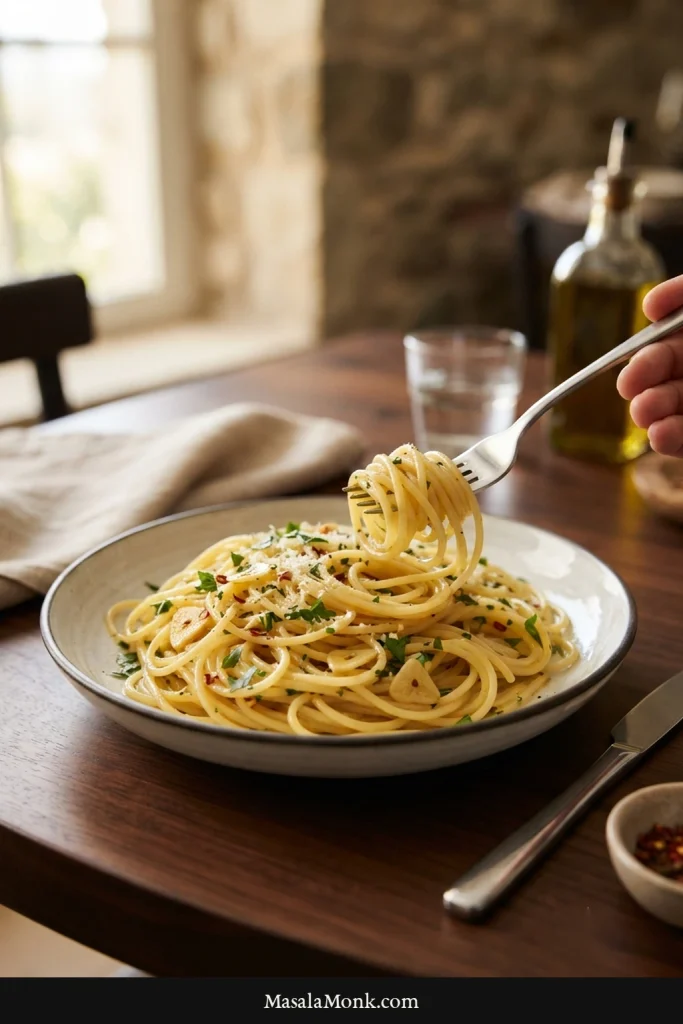
At the table, the strands should still slip easily around the fork, with enough sauce to keep them glossy but not enough oil to leave a slick behind. A little parsley gives the richness some freshness and color.

Fork winding loose glossy spaghetti aglio e olio from a shallow white bowl at a contemporary dining table.
The serving cue is movement: properly finished spaghetti should still wind easily around the fork while keeping a light sheen instead of leaving an oily slick behind.

For a fuller dinner, a lemony chickpea salad brings cucumber, tomato, herbs, and crunch without burying the pasta under another rich dish.

Storing Leftovers

For the best texture, eat leftovers the next day. Refrigerate them within 2 hours of cooking, or within 1 hour when the surrounding temperature is above 90°F / 32°C, and use within 3–4 days. Those storage limits follow USDA food-safety guidance.

Reheating Without Making It Greasy

Put the spaghetti in a skillet with a splash of water. Warm gently and toss until the strands loosen and the pasta is piping hot throughout—165°F / 74°C if you’re checking with a thermometer. Add more water by the tablespoon only when needed.

Leftover spaghetti aglio e olio being loosened with tongs in a small skillet while a small amount of clear water is added.
Leftover aglio e olio usually needs moisture before it needs more fat. A little clear water loosens the chilled strands without turning the pasta into another round of frying.

The next time you make aglio e olio, watch the pan more than the timer. A few good ingredients and a few attentive minutes are enough to turn garlic, olive oil, and pasta water into dinner.

Posted on — Leave a comment

Lemon Bars Recipe: Easy, Tangy Bars with Buttery Shortbread Crust

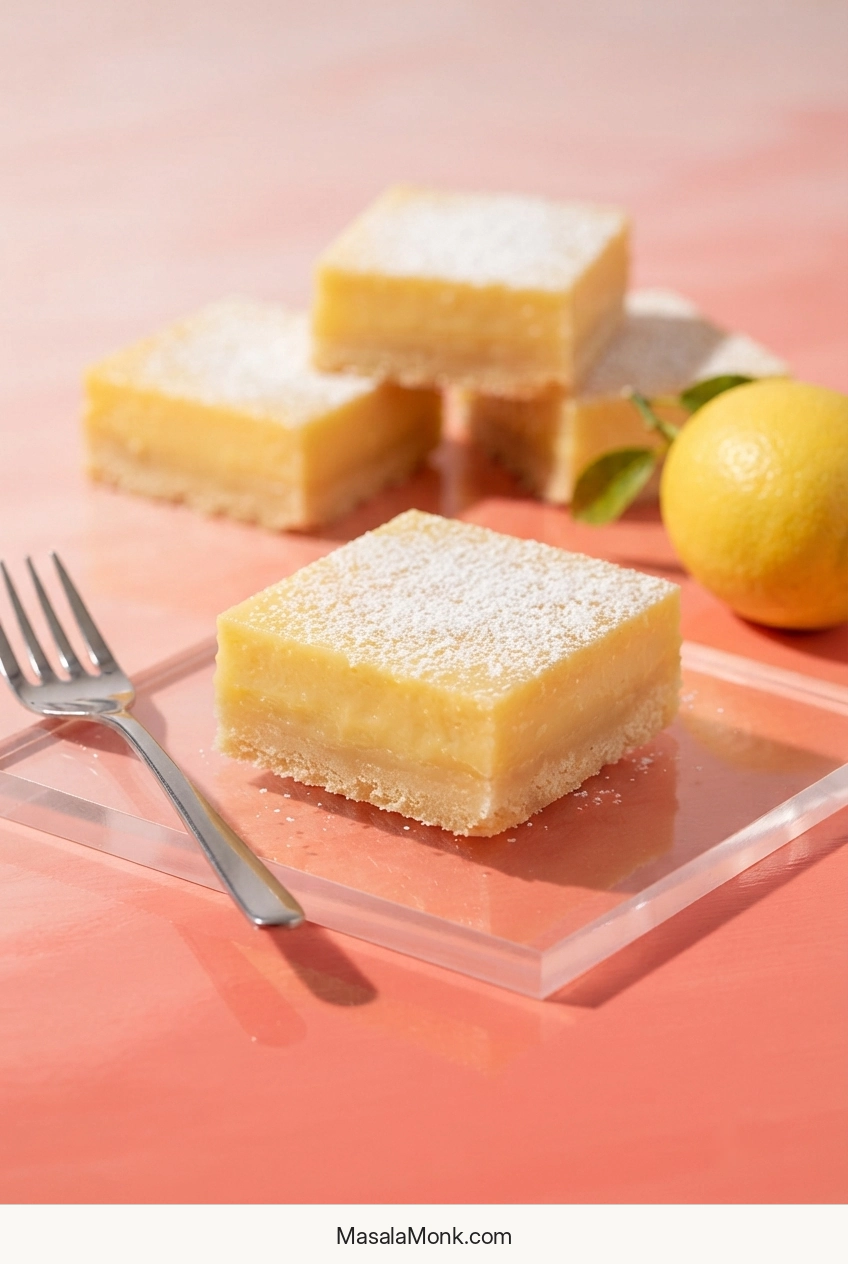
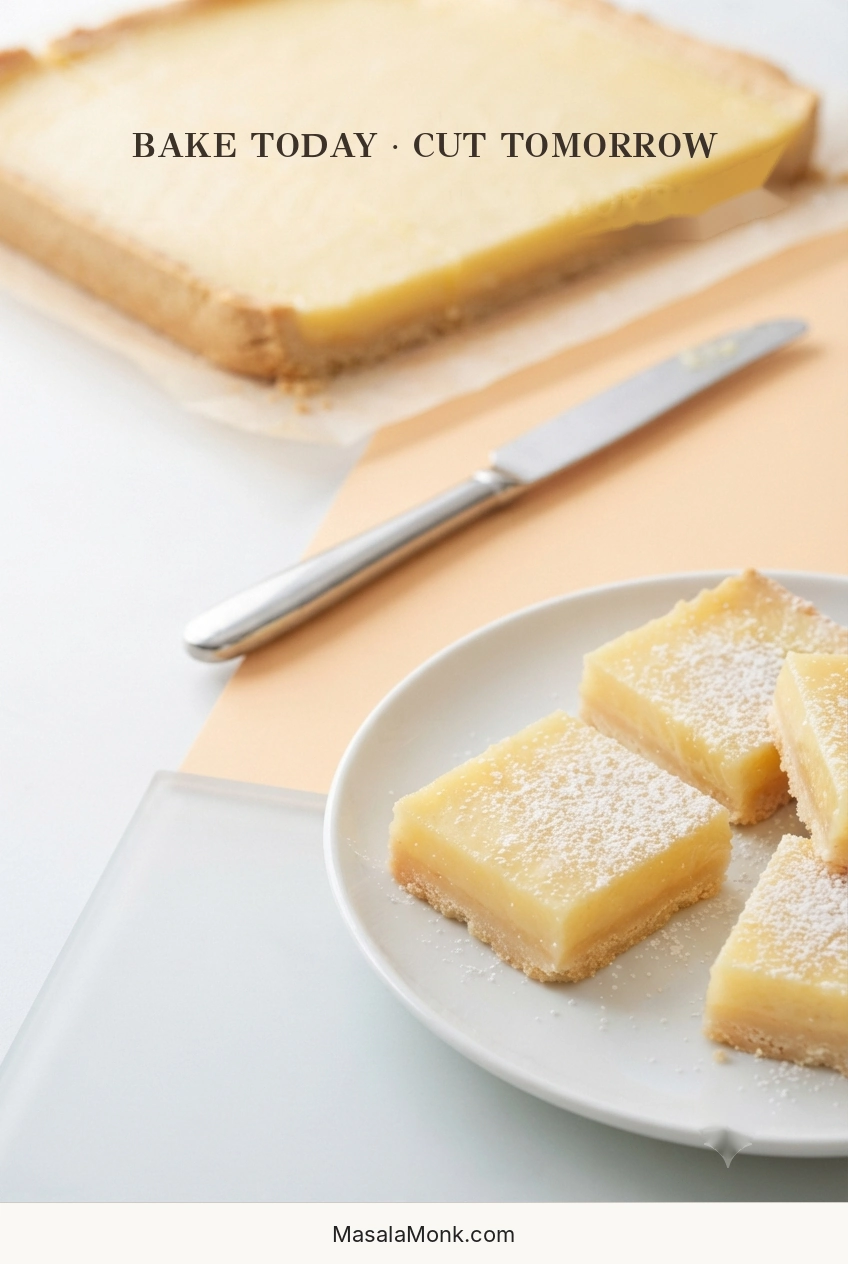
Finished lemon bars with smooth pale-yellow lemon filling over thin golden shortbread crusts, lightly dusted with powdered sugar.

Homemade lemon bars—also called lemon squares—ask you to trust a filling that looks far too thin when it first goes into the oven. It sits over freshly baked shortbread, pours almost like cream, and is still surprisingly soft when the pan comes back out.

After cooling and chilling, that loose mixture becomes a smooth, bright lemon layer that holds its shape when cut. Underneath, the shortbread stays buttery and crisp-tender, substantial enough to support the filling without taking over the bite.

Classic Lemon Bars Recipe

Bright lemon custard over tender shortbread, baked only until the center moves softly and then chilled until fully set. Have the filling ready before the crust comes out so the two layers can go straight back into the oven.

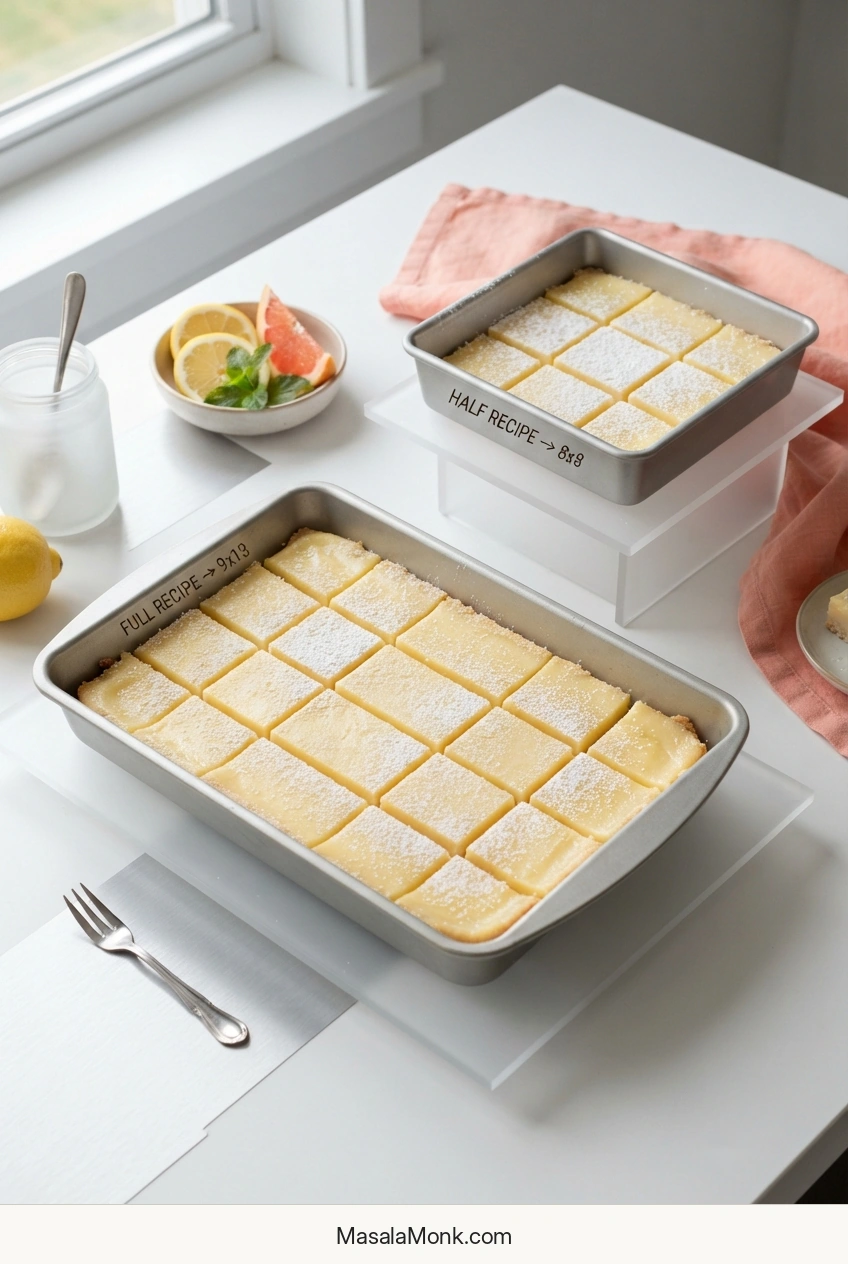
Pan
9 × 13 in / 23 × 33 cm

Yield
20 standard bars

Hands-On
About 20 min

Crust Bake
20–24 min

Filling Bake
About 22–27 min

Cool
About 1–1½ hr

Chill
At least 3 hr

Total
About 5½ hr

Equipment

  • 9 × 13-inch / 23 × 33 cm light-colored metal baking pan
  • Parchment paper
  • Two mixing bowls, whisk and silicone spatula
  • Fine grater or Microplane and citrus juicer
  • Flat-bottomed measuring cup or glass for pressing the crust
  • Kitchen scale, recommended
  • Long sharp knife for cutting

Pan note: A light-colored metal pan gives the most predictable bake for these timings. If your bare aluminum pan has previously given acidic foods a metallic taste, use glass instead and follow the visual cues rather than trying to match the timing exactly.

Shortbread Crust

  • 1 cup / 226 g unsalted butter, melted and cooled for a few minutes
  • 1¾ cups plus 2 tablespoons / 225 g all-purpose flour
  • ⅓ cup / 40 g cornstarch
  • ¾ cup / 90 g powdered sugar
  • ½ teaspoon fine salt
  • 1 teaspoon vanilla extract, optional

Using cups? Spoon the flour into the measuring cup and level the top instead of scooping straight from the bag. Packed flour can make the chilled crust much harder than intended.

Lemon Filling

  • 2 cups / 400 g granulated sugar
  • 2 tablespoons finely grated lemon zest, from 2–4 of the lemons
  • 6 tablespoons / 46 g all-purpose flour
  • ¼ teaspoon fine salt
  • 6 large eggs
  • 1 cup / 240 ml freshly squeezed lemon juice, usually from 5–7 lemons total
  • Powdered sugar, for finishing

Zest before you juice. Grate only the yellow outer peel and stop before you reach the bitter white pith. Then squeeze the same lemons and measure the juice. Once you have 1 cup / 240 ml, stop.

Method

Prepare the Crust and Lemon Filling

  1. Heat the oven. Set a rack in the center and heat the oven to 350°F / 175°C conventional. For a fan oven, use 160°C and start watching the crust a little early. Line the pan with a parchment sling, leaving overhang on two opposite sides so the chilled slab can be lifted out later.
  2. Mix the shortbread. Stir together the flour, cornstarch, powdered sugar and salt. Add the melted butter and optional vanilla. Mix until no dry flour remains. The mixture will look crumbly but hold easily when squeezed.
  3. Press an even base. Scatter the mixture over the whole pan before pressing it down. Use the bottom of a measuring cup or glass to level it, paying particular attention to the corners and perimeter. Close visible cracks or thin spots, then leave it alone.
  4. Par-bake the crust. Bake for 20–24 minutes. The surface will look dry and set, with light-golden color beginning around the edges. Make the filling while the crust is in the oven.
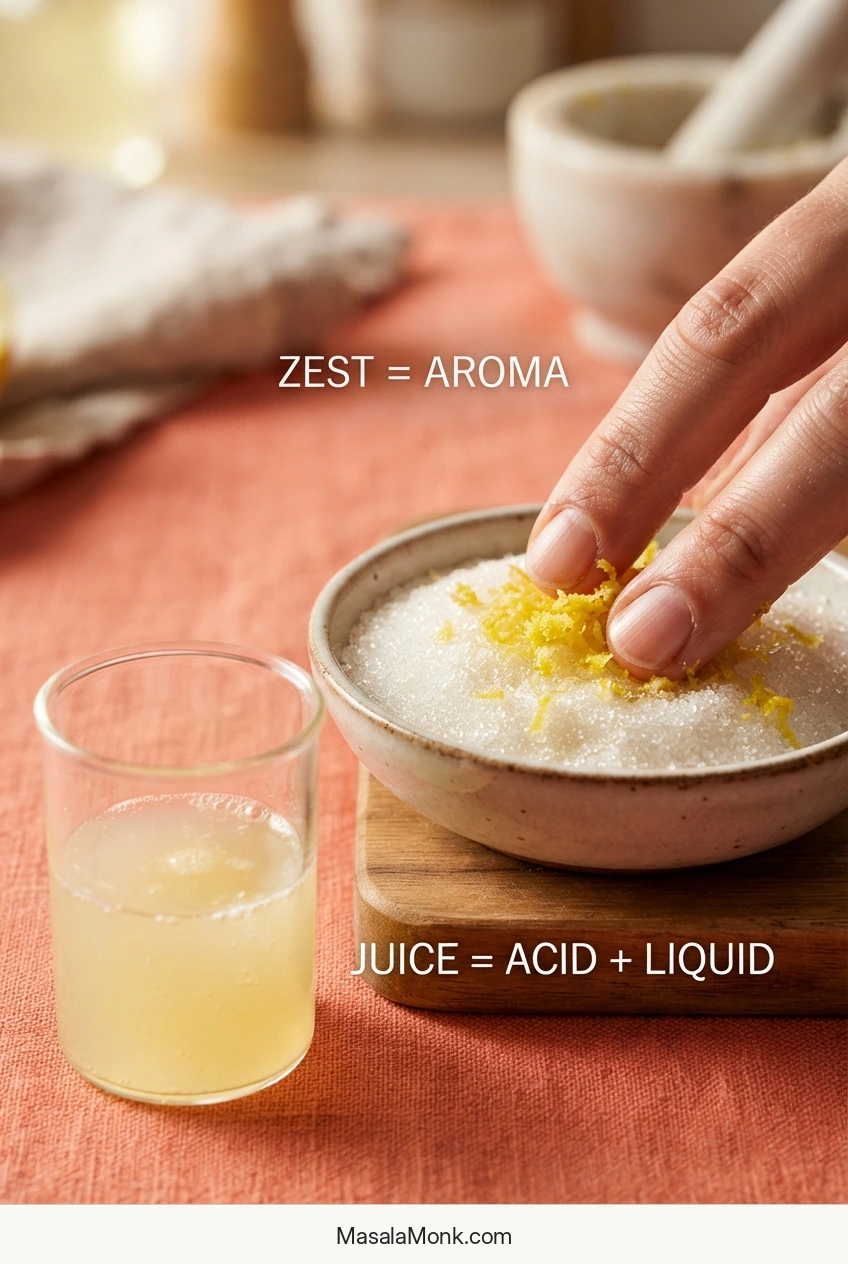
  5. Make the lemon sugar. Put the granulated sugar and zest in a large bowl. Rub them together with your fingertips for 30–60 seconds. The sugar will become damp, and the bowl should smell much more strongly of fresh lemon. Whisk in the flour and salt.
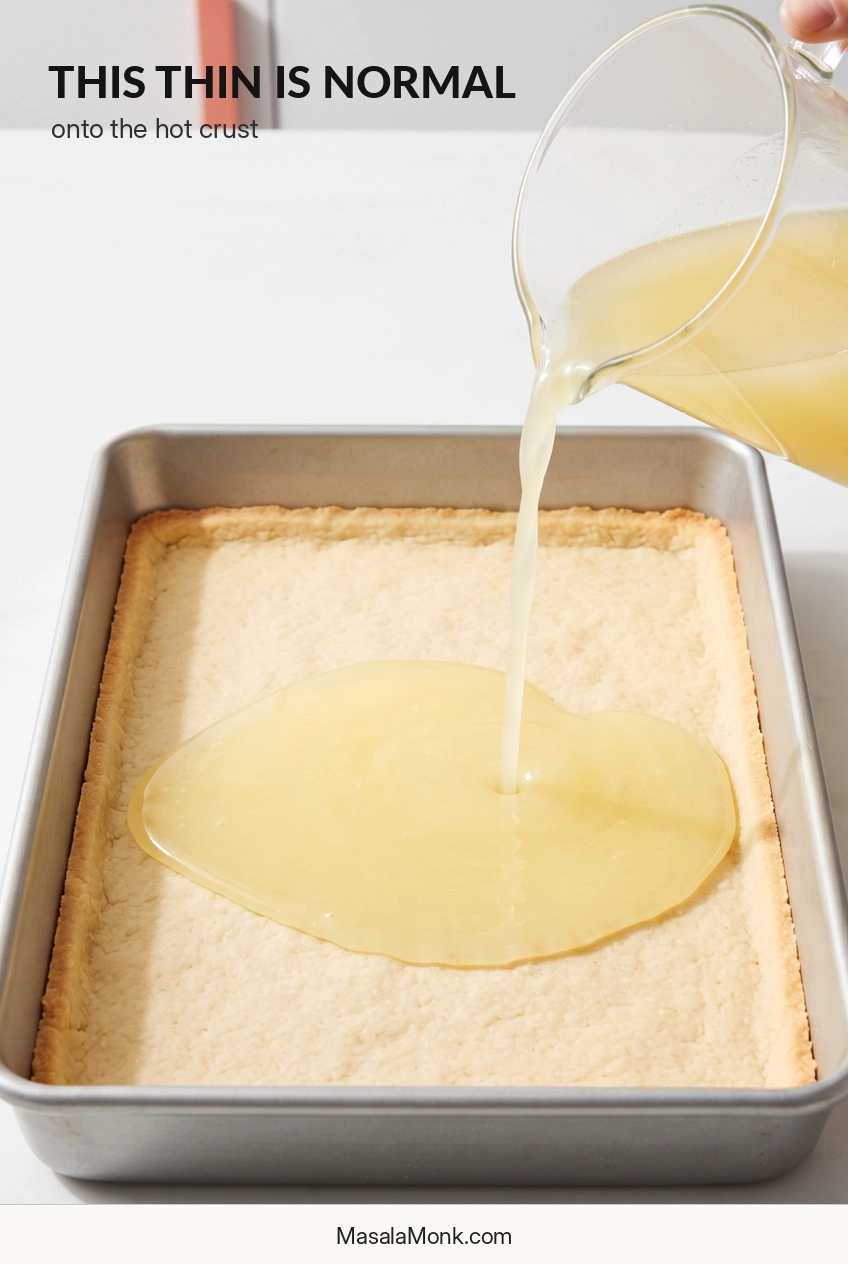
  6. Mix the lemon filling. Whisk in the eggs until evenly combined, then add the measured lemon juice and whisk just until smooth. The mixture will be very thin and easy to pour. If this is your first batch, this is often the point that looks wrong. It isn’t.

Bake, Chill and Finish

  1. Pour onto the hot crust. Take the crust from the oven and reduce the temperature to 325°F / 165°C conventional; for a fan oven, use 150°C. If you see an obvious crack or edge gap, gently nudge the surrounding shortbread closed with the back of a spoon before pouring in the filling. If a thick layer of foam has collected on top, let it settle briefly and give it one gentle stir. Pour the filling onto the hot crust and return the pan straight to the oven.
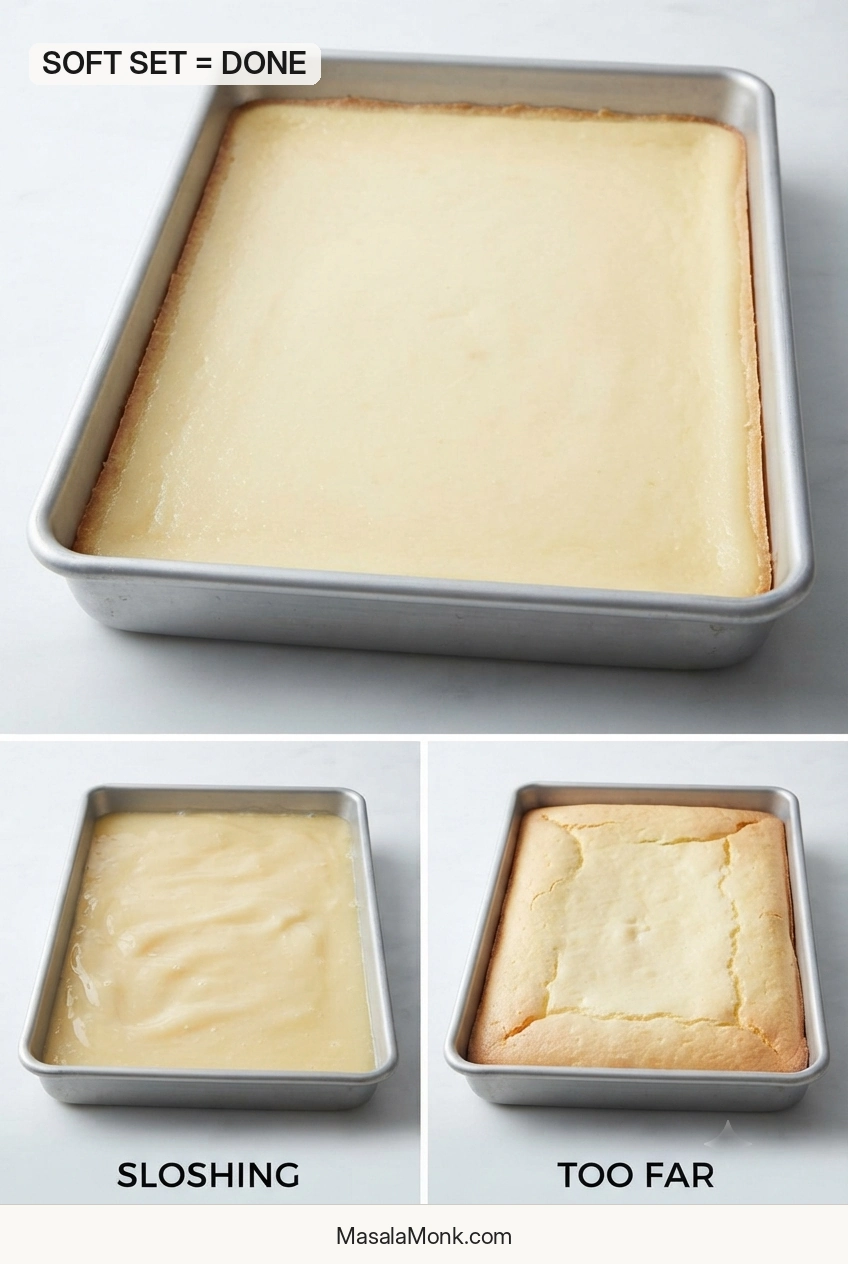
  2. Bake until the center moves as one layer. Begin checking at about 22 minutes. The edges will be set while the center moves softly when the pan is nudged. If liquid visibly ripples or sloshes underneath, give it a few more minutes. Most pans will finish in roughly 22–27 minutes.
  3. Cool, then chill. Set the pan on a rack until the filling and pan are no longer warm, usually 1–1½ hours. Refrigerate for at least 3 hours. Cutting while the custard is warm or only partly chilled turns defined layers into a much messier job. Overnight chilling is excellent when neat slices matter.
  4. Cut and finish. Lift the cold slab out by the parchment. Use a long sharp knife and wipe the blade after each cut. Dust with powdered sugar shortly before serving.

Cold from the refrigerator, the lemon filling is silky and firm enough to hold its shape, with lemon arriving before the butter and shortbread. As the chill comes off, both layers soften slightly and the citrus aroma comes forward.

What the Pan Should Look Like

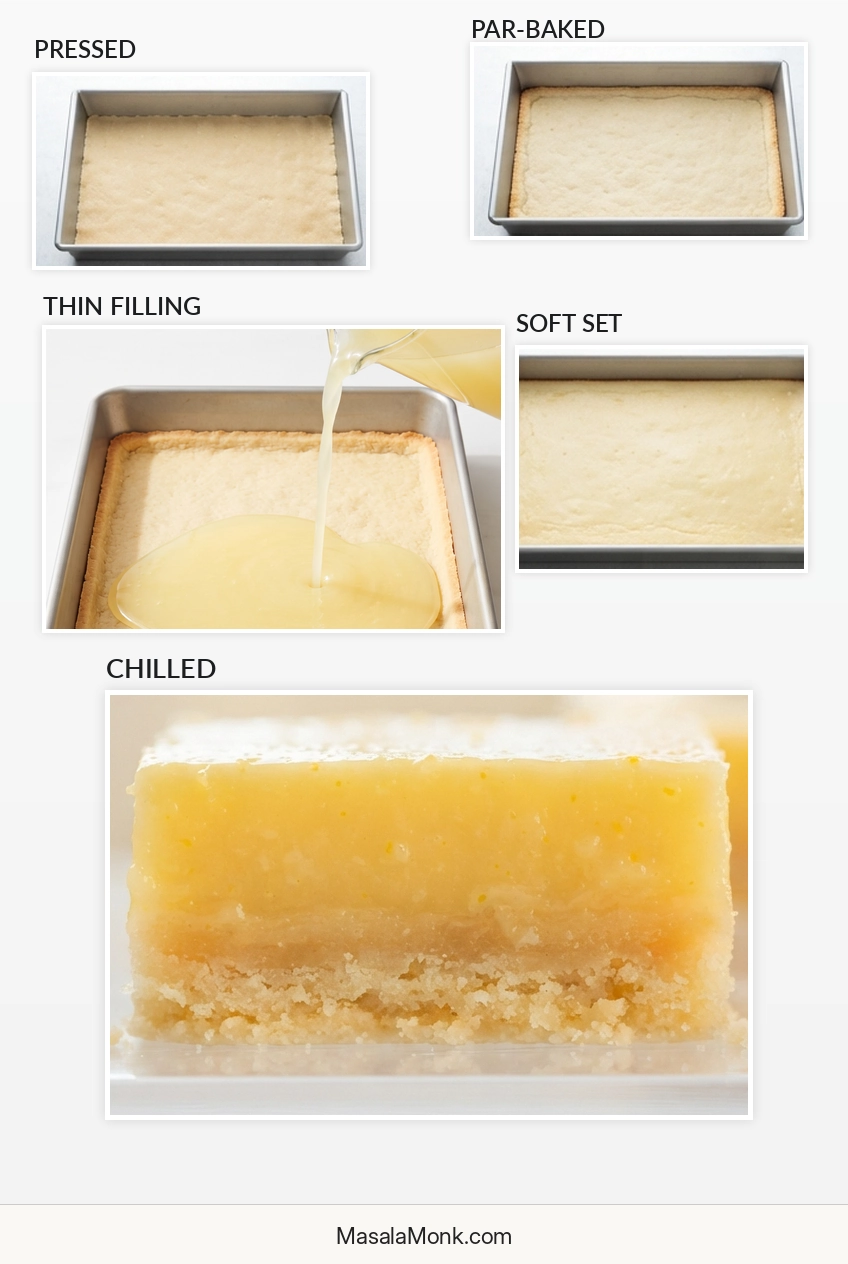
The crust, raw filling and finished custard look quite different from one another. These are the checkpoints worth remembering.

StageLook for
Pressed crustAn even layer reaching the corners and perimeter, without obvious cracks or thin channels.
Par-baked crustA dry, set surface with the first light-golden color around the edges.
Raw fillingThin, smooth and easily pourable. A few small bubbles are normal.
Finished bakeSet edges and a center that moves gently as one soft layer, with no liquid sloshing underneath.
Fully chilledFirm enough to lift and slice neatly, but still silky when you bite into it.
Five-stage visual showing pressed shortbread, lightly par-baked crust, thin raw lemon filling, a soft-set baked lemon layer, and a chilled finished bar.
The important changes happen in texture and structure, not just color: the flat crust sets first, the very thin filling follows, and chilling finally turns the soft baked center into a clean-cut bar.

The Shortbread Has Two Jobs

It needs to taste like shortbread, and it has to support a bowlful of liquid filling. A very thick base may feel safer under all that liquid, but too much shortbread leaves you with a bar that tastes mostly of crust.

A little cornstarch takes the place of some flour and helps the shortbread stay tender once the bars are cold. Spread the crumbs throughout the pan before pressing them down. Even thickness matters more than brute force.

Firmly packed is enough. Once the crust is level and the obvious gaps are gone, leave it alone. Butter-rich shortbread is naturally firmer when cold.

Gluten-free: For gluten-free lemon bars, use a recipe developed for the particular flour blend you plan to use instead of making a straight 1:1 substitution in this shortbread. Different blends absorb butter differently.

Lemon Juice and Zest

Lemon juice provides most of the acidity and the bulk of the liquid; zest adds concentrated aromatic citrus oils. For stronger lemon aroma, add more zest. Extra juice changes the amount of liquid the custard has to set. Lemons vary widely in size and juiciness, so measure the juice rather than relying on the number of lemons.

Hands rubbing finely grated lemon zest into granulated sugar beside a clear glass of fresh lemon juice.
Fresh zest and lemon juice do different jobs in the filling: rubbing the zest into sugar releases aromatic oils first, while the juice brings the sharp acidity that makes the bars taste distinctly lemony.

Fresh juice is the better default when lemon is the main flavor. Serious Eats’ fresh-versus-bottled testing found the difference mattered most in lemon-forward recipes, while fresh zest narrowed the gap. If you don’t have enough lemons for a full cup, bottled juice plus fresh zest is the better fallback.

Meyer lemons work at the same measured juice volume and give a sweeter, more floral result with less sharp acidity.

Can you use prepared lemon curd instead? Not as a direct swap. Lemon curd has already been cooked and balanced differently, so it will not behave like the raw egg-lemon filling used here.

When to Add the Filling

Pour the filling onto the crust while it is still hot. The residual heat begins setting the custard where it meets the shortbread, helping the two layers stay where they belong.

Keep the handoff short. Lower the oven temperature, pour in the filling and send the pan straight back in.

Thin pale-yellow lemon filling pouring from a clear pitcher onto a flat par-baked shortbread base in a rectangular metal baking pan.
The raw lemon mixture should look almost unexpectedly loose; when it lands on the hot shortbread, it levels into a shallow layer rather than sitting on top as a thick mound.

How to Tell When Lemon Bars Are Done

Begin checking around 22 minutes. Lemon bars are ready when the edges are set and the center moves softly as one layer when you gently nudge the pan. If liquid visibly ripples or sloshes underneath, keep baking.

Rectangular baking pan showing the desired soft-set lemon-bar center alongside smaller examples of a liquid underbaked center and a firmer overbaked center.
Don’t wait for the center to look completely firm in the oven; a gentle, unified movement is the useful checkpoint, whereas obvious liquid sloshing means the filling is not there yet.
What you seeWhat to do
Liquid ripples or sloshingKeep baking and check again after a few minutes.
Set edges; center moves softly as one layerTake the pan out. Cooling and chilling will firm it substantially.
Heavy puffing, strong browning or a rigid hot centerThe custard is heading toward a firmer, more rubbery texture.

Glass, dark nonstick and light metal pans heat differently, and home ovens are rarely perfectly calibrated. Use the timing as a guide, then watch the center. Chilling finishes the texture; it does not finish the cooking.

If the texture already looks wrong, jump to troubleshooting.

Cooling and Cutting

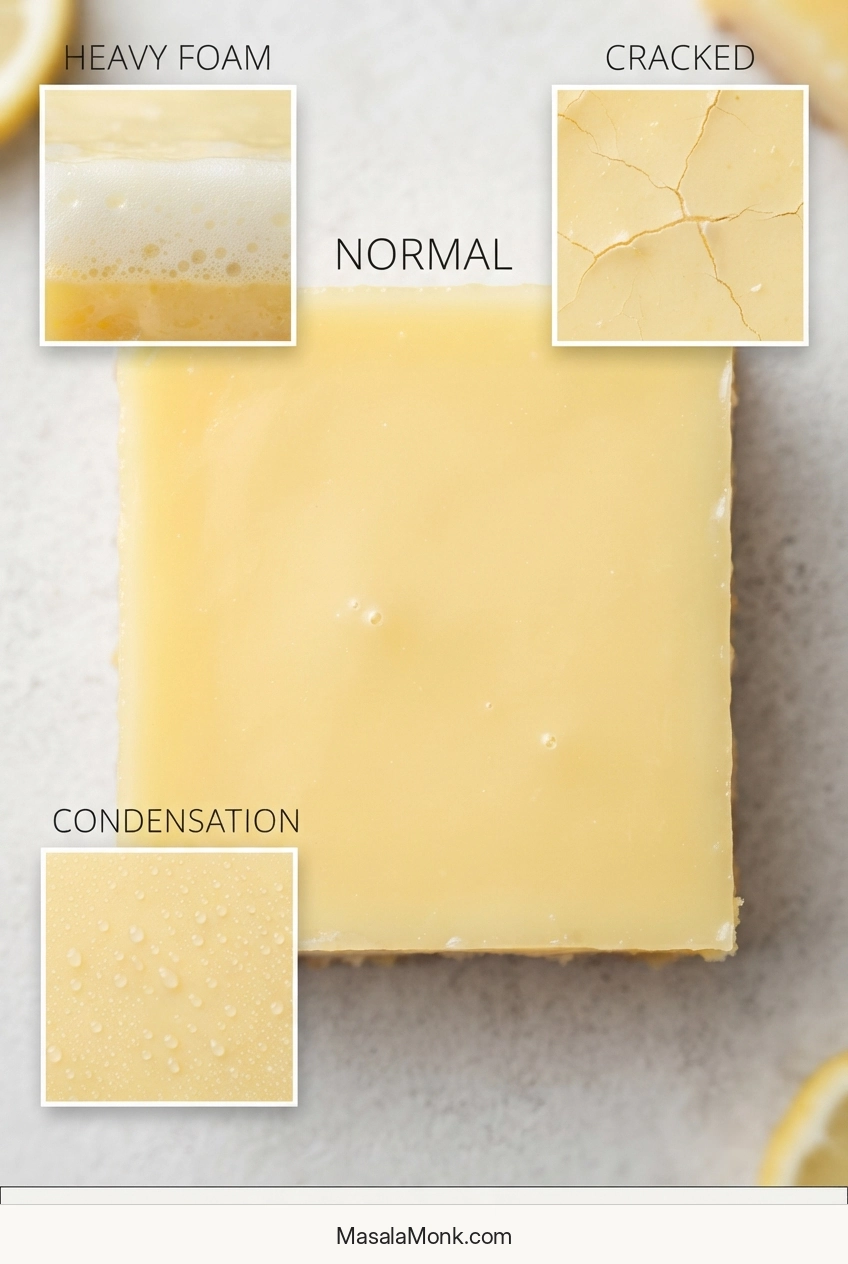
Let the pan cool until it is no longer warm before covering and refrigerating it. Cover too early and trapped steam can settle back onto the lemon layer as condensation.

What the Chilled Layers Should Look Like

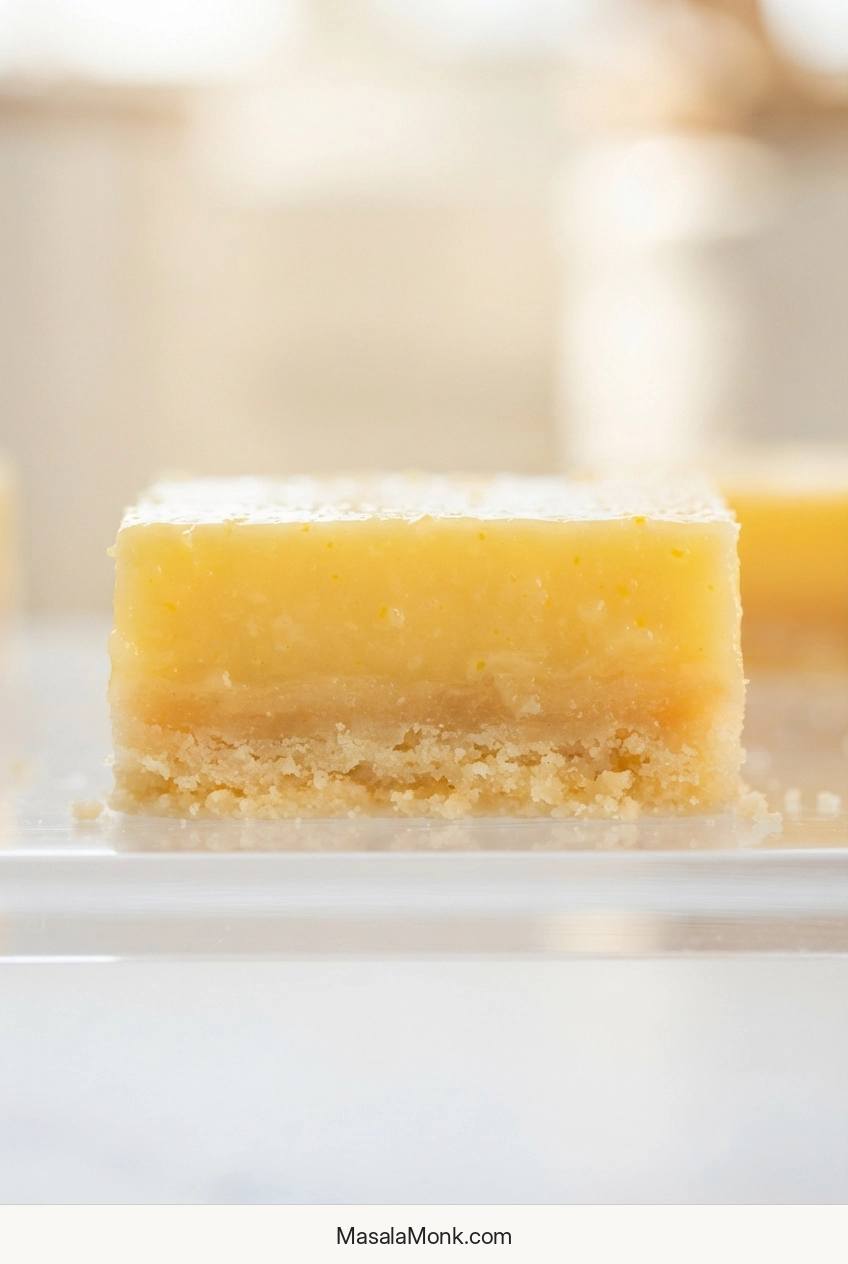
The long chill is worth it. Once the slab lifts out in one piece, the layers are easy to see: lemon on top, shortbread underneath, without the two smearing together as you cut.

Close side view of a chilled lemon bar showing a smooth pale-yellow filling above a thin compact golden shortbread crust.
The clean boundary between the two layers is the useful clue here: the chilled lemon custard should cut as one tender layer while the shortbread stays compact underneath.

How to Cut Clean Lemon Bar Squares

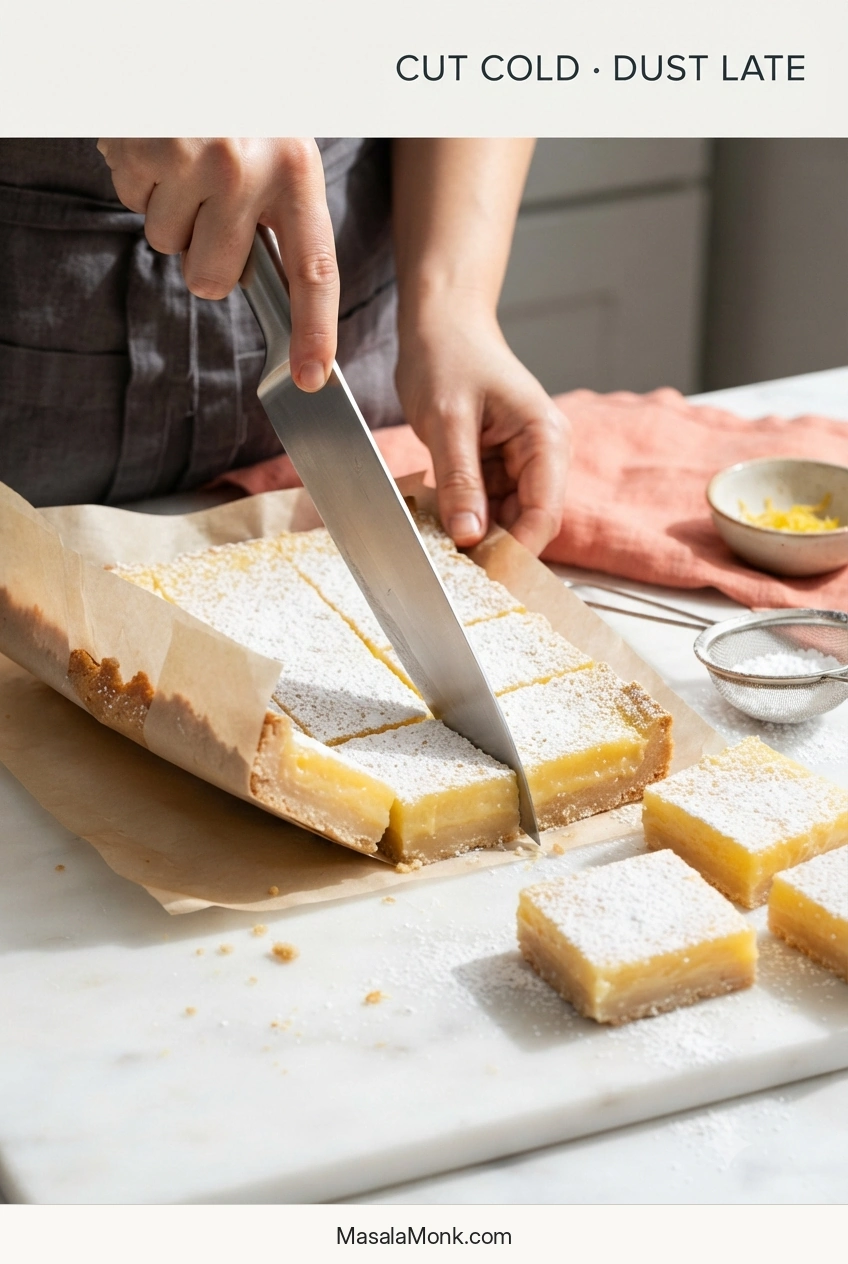
Use a long sharp knife and wipe it after each cut. That is mostly about presentation—the bars taste just as good if the edges are less tidy. Cut the slab into 15 generous bars, 20 standard squares or 24 smaller pieces, depending on how you plan to serve them.

Chilled lemon-bar slab being lifted with parchment while a knife makes clean cuts and finished pieces receive powdered sugar.
The long chill does more than cool the bars: it gives the lemon layer enough structure for the knife to reveal two clean layers instead of dragging the filling through the shortbread.

Dust with powdered sugar after cutting and preferably shortly before serving. It gradually absorbs moisture from the surface and disappears, which is normal.

For a softer bite and stronger lemon aroma, let the bars sit out for about 10–15 minutes before eating.

Troubleshooting Lemon Bars

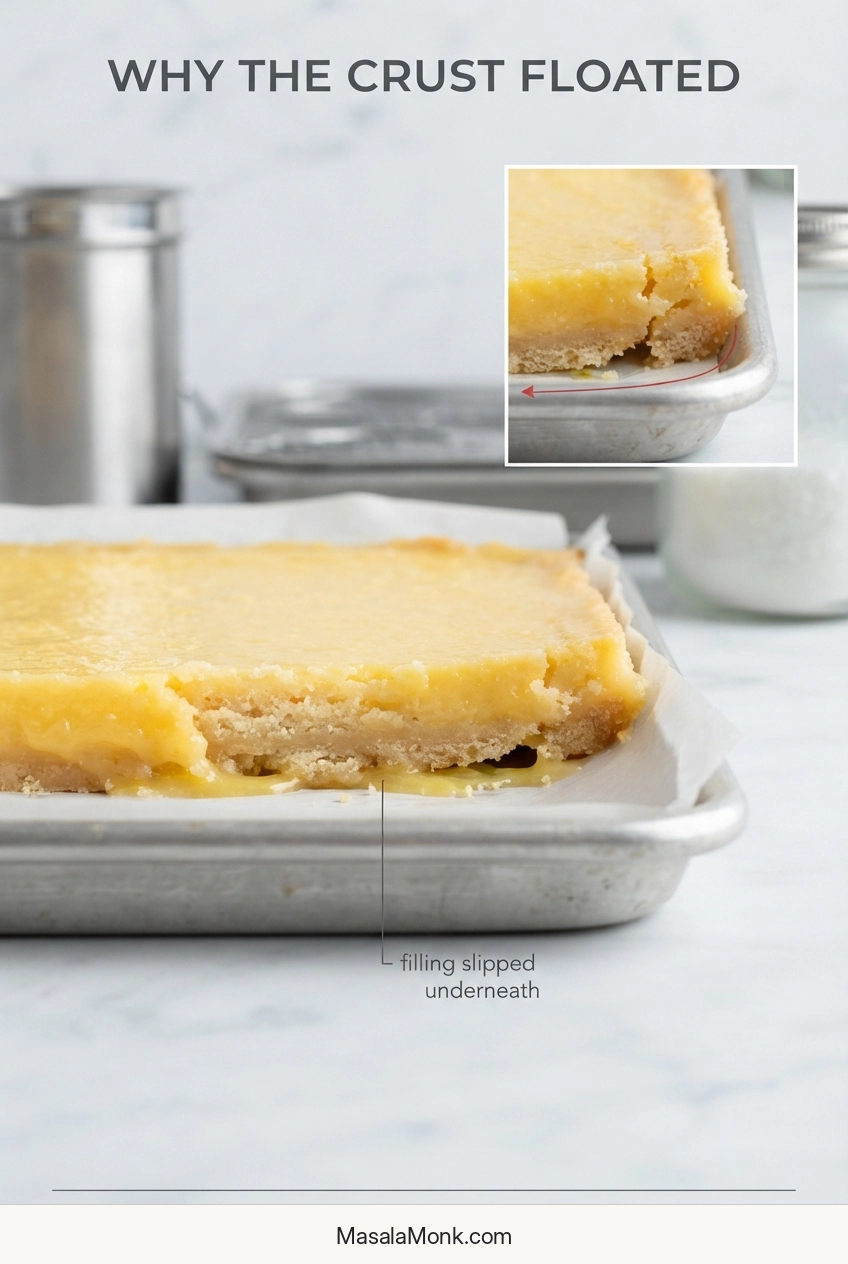
The crust floated or the filling baked underneath it

A lemon-bar crust floats when thin filling finds a crack, thin spot or edge gap, gets underneath the shortbread and pushes it upward as it bakes.

Cross-section of a lemon bar with the shortbread lifted above the lemon filling, with a smaller detail showing filling beneath an edge gap.
An upside-down-looking crust is actually a useful diagnostic clue; when lemon filling appears beneath the shortbread, check the edge for the path it took underneath.

Next time, press the base evenly to the perimeter so the thin filling has no easy route underneath. If the slab is fully set and intact despite the layers ending up upside down, you may be able to chill it thoroughly, invert it and cut it.

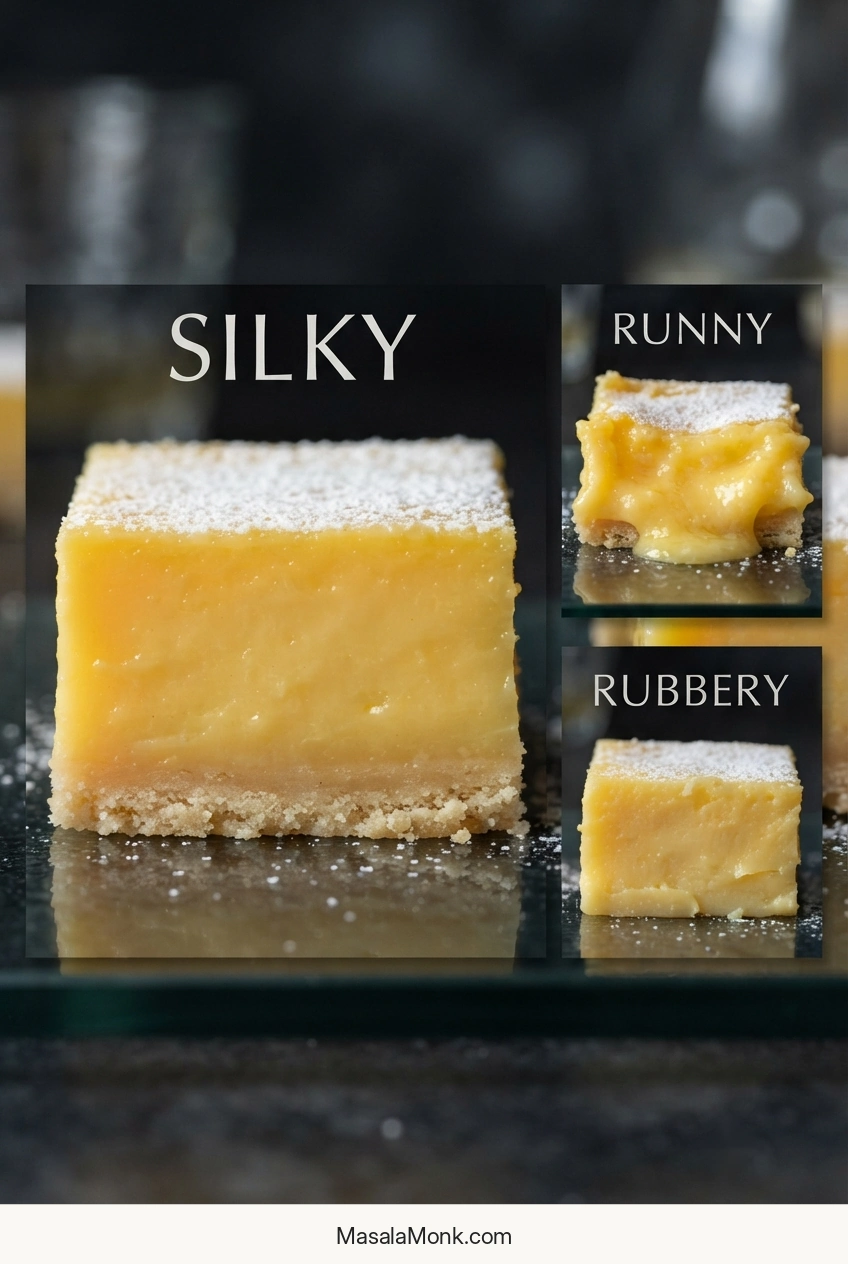
The filling is still runny

If the center was actually sloshing instead of moving softly as one layer, the bars were underbaked. If you catch that as soon as the pan comes out, return it to the oven and check again after a few minutes.

Three close-up lemon-bar textures comparing a loose runny filling, a smooth silky filling, and a firm rubbery filling.
Once chilled, the center reveals the bake more clearly: the ideal lemon custard stays smooth and tender, without collapsing on the knife or bouncing back like a firm gel.

A smaller pan, extra lemon juice or an oven running cool can all lengthen the bake.

The filling tastes eggy or feels rubbery

If the filling is firm and rubbery as well as eggy, overbaking is the likely cause. If the texture is good but the flavor seems egg-forward, use more zest next time—not extra juice. Zest strengthens the lemon aroma without adding more liquid.

There are white bubbles or foam on top

A few white bubbles are cosmetic. Ignore them. Heavy foam usually means the filling was whisked harder than necessary; next time, let it settle briefly before pouring.

The filling has flour lumps

If you see flour lumps before pouring, press the filling through a fine-mesh sieve. Scrape any zest caught in the sieve back into the bowl. Next time, whisk the flour into the lemon sugar before adding the eggs and juice.

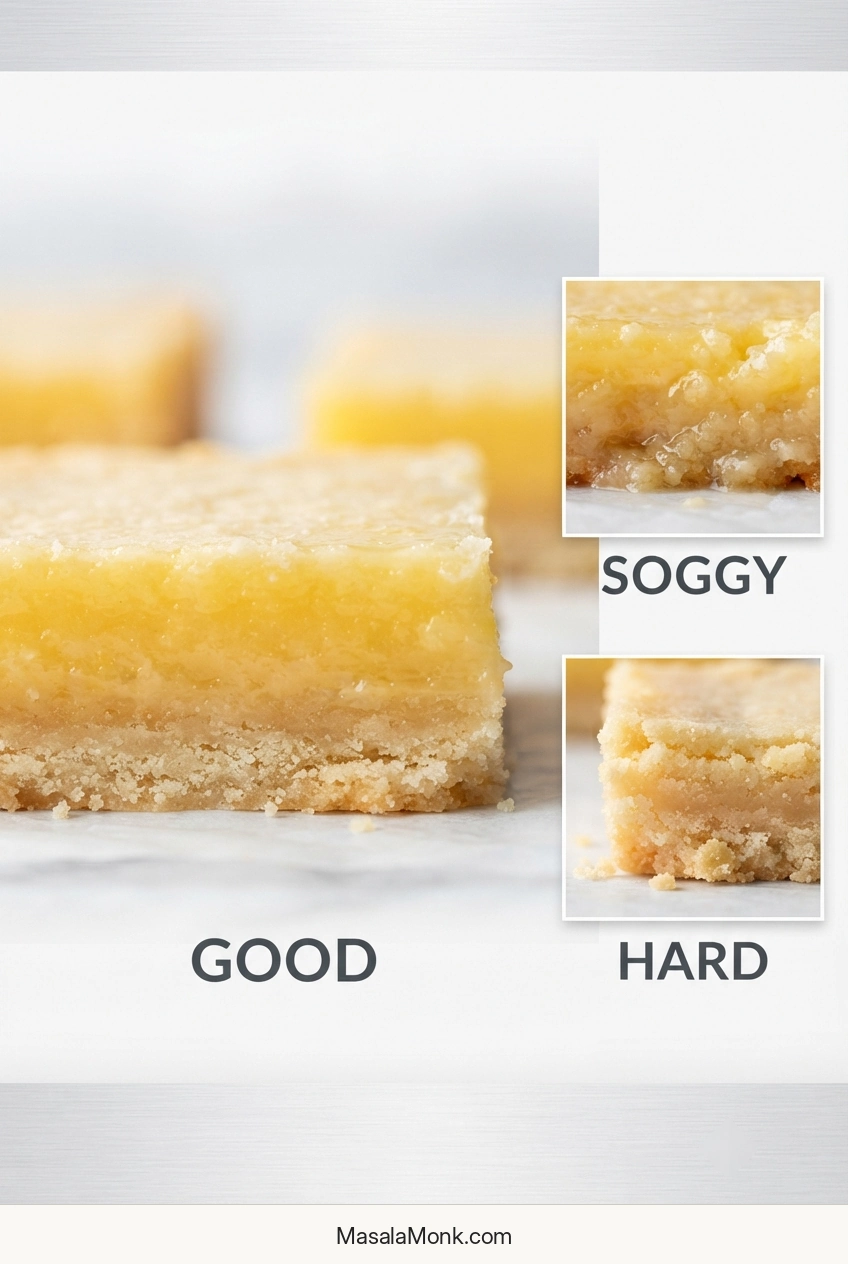
The crust is soggy or very hard

For a soggy base, first look back at the par-bake. The surface needed to be dry and set before the lemon mixture went on. Filling that slipped underneath the crust can cause a similar texture, and several days in the refrigerator will soften even a well-baked base.

A very hard crust points toward too much flour, excessive par-baking, an unusually thick layer or heavy compaction. Let one bar lose some refrigerator chill before deciding; butter-rich shortbread is much firmer when cold.

Comparison of lemon-bar shortbread showing a tender crust, a moisture-softened soggy crust, and a dense hard crust beneath lemon filling.
The best shortbread should break cleanly without fighting the bite: it stays tender enough to chew, yet firm enough to carry the lemon layer without turning wet or dense.

The top looks pale, cracked or wet

Pale yellow is normal. It says very little about how lemony the bars will taste. Cracks can come with excess air or too much oven time. If a properly set surface looks wet after chilling, condensation is a likely cause, especially if the pan was covered while warm.

Lemon-bar surface close-ups showing a normal pale top with small bubbles, heavy foam, cracking, and condensation.
Start with the ordinary-looking surface: a pale top and a few tiny bubbles can be perfectly fine, so appearance alone is not a reason to call the batch a failure.

The bars taste metallic

If lemon or other acidic foods have picked up a metallic taste from your pan before, use glass next time and avoid letting aluminum foil touch the filling. Stainless-steel bowls, whisks and utensils are fine.

Ugly does not always mean ruined. Surface bubbles are cosmetic. A set slab with inverted layers may still be usable. And if the bars break while cutting but taste good, spoon the pieces into glasses with whipped cream or yogurt and berries.

Using an 8×8 Pan

For an 8×8-inch / 20×20 cm pan, make half the recipe. That gives you almost the same layer depth as the full batch in a 9×13, so begin checking around the normal time. It may finish a little earlier.

If you want the math, a 9×13 pan has about 117 square inches of surface area; half of that is 58.5 square inches. An 8×8 pan has 64 square inches, so a half batch is about 9% shallower. Putting the entire recipe into an 8×8 would make the layers more than 80% deeper and require a substantially different bake.

Two lemon-bar pans comparing a full batch in a 9-by-13-inch pan with a half batch in an 8-by-8-inch pan at similar finished depth.
The useful thing to compare is the finished depth, not simply the pan dimensions: using half the mixture in an 8×8 keeps the lemon-bar layer close to the thickness of a full batch in a 9×13.

Make Ahead, Storage and Freezing

Make the Bars a Day Ahead

Lemon bars are particularly easy to make a day ahead because the long chill is already part of the recipe. Bake and cool the slab, refrigerate it overnight, then lift, cut and dust the bars the next day. Besides taking work off your serving day, the overnight chill makes especially neat slices easier.

Whole uncut lemon-bar slab in the background with clean powdered-sugar-dusted lemon-bar squares in the foreground, illustrating make-ahead preparation.
Overnight chilling turns the bars into an easier make-ahead dessert: tomorrow’s slab is firmer, steadier and much easier to portion neatly than one that is still warm from the oven.

Yes, lemon bars should be refrigerated. Keep them covered and plan to finish them within about 4 days. Their texture is best during the first 2–3 days, while the shortbread still contrasts clearly with the creamy lemon layer. That four-day limit also lines up with FDA guidance for cooked egg dishes, which gives a 3–4 day refrigerator window.

For a party or bake sale, put out smaller batches and replenish them from the refrigerator. Don’t leave the bars unrefrigerated for more than 2 hours, or more than 1 hour when the temperature is above 90°F / 32°C.

For longer storage, chill and cut the bars first but leave off the powdered sugar. Freeze the pieces until firm, then wrap them well or stack them with parchment between layers in a freezer-safe container. For best quality, use them within about 3 months. Thaw overnight in the refrigerator, then dust shortly before serving.

If oven space is the real constraint, No-Bake Lemon Bars take a different route, setting in the refrigerator instead of relying on eggs and oven heat.

Posted on — Leave a comment

Chicken Tetrazzini Recipe: Creamy, Cheesy & Easy Casserole

Chicken tetrazzini in a burgundy baking dish with golden breadcrumb topping and a creamy center showing spaghetti, chicken, mushrooms and peas.

A good chicken tetrazzini recipe comes out of the oven bubbling at the edges, golden across the top and creamy underneath. The spaghetti keeps a little bite, the chicken sits in mushroom-Parmesan sauce, and when you scoop into the pan, the sauce still moves between the noodles instead of leaving you with a dry square.

This is the kind of comfort-food casserole that makes especially good sense when yesterday’s chicken needs to become tonight’s dinner. Rotisserie chicken works beautifully too. With the chicken already cooked and the sauce coming together in one main pan, most of the work is finished before the casserole reaches the oven.

Chicken tetrazzini is an American baked pasta casserole typically made with cooked chicken, long pasta, mushrooms and a creamy sauce, then finished with cheese or breadcrumbs. The trick is to let it look saucier before baking than you want it on the plate. The noodles keep taking up liquid as they bake and rest, so a casserole that already looks thick going into the oven can finish much drier than expected.

Firm pasta
Cook 2 minutes shy of al dente.

Browned mushrooms
Cook off their released liquid.

Pourable sauce
It should move between the noodles.

Short bake
Stop once hot and bubbling.

Make the Chicken Tetrazzini

Spaghetti, cooked chicken and browned mushrooms go into a pourable Parmesan cream sauce, then get a layer of mozzarella and crisp Parmesan-panko crumbs. This main version makes the sauce from scratch rather than using canned soup; the old-fashioned condensed-soup version is included farther down. The oven is mostly there to heat everything through and brown the top, not to cook the casserole until it stiffens. Because the chicken and sauce are already cooked and the pasta is nearly cooked, extra oven time mostly means more moisture loss rather than a better casserole.

Serves
8

Prep
20 minutes

Cook
50 minutes

Total
About 1 hour 20 minutes

Oven: 375°F / 190°C
Pan: 9×13 in / 23×33 cm, roughly 3 qt / 2.8 L
Rest: 10 minutes
Timing note: Times assume cooked chicken is ready to use.

A shallow dish or one filled close to the rim is worth setting on a rimmed sheet pan before baking. It is cheap insurance against bubbling sauce.

Cooking for fewer people? An 8×8-inch pan is the closest match for the depth of a half batch. A 9×9 also works, but the casserole will be shallower, so start checking it earlier.

Equipment

  • Large pasta pot, about 6–8 qt / 5.5–7.5 L
  • Large 12-inch / 30 cm skillet, sauté pan or Dutch oven
  • Colander
  • Whisk
  • Wooden spoon or silicone spatula
  • 9×13-inch / 23×33 cm baking dish, roughly 3 qt / 2.8 L

Ingredients

The sherry, peas, nutmeg and cayenne are optional and can be omitted without changing the core method.

Pasta, Chicken & Mushrooms

  • 12 oz / 340 g dry spaghetti
  • 4 loosely packed cups / about 18–20 oz / 510–565 g cooked chicken, chopped or coarsely shredded
  • 12 oz / 340 g cremini or white button mushrooms, sliced
  • 1 medium yellow onion, diced
  • 4 garlic cloves, minced
  • 1 tbsp / 15 ml olive oil
  • 1 tbsp / 14 g unsalted butter
  • 1 cup / 140 g frozen peas, no need to thaw, optional
  • 1 cup / 240 ml pasta cooking water, reserved and used only if needed

Starting with raw chicken? Cook it first, let it cool enough to handle, then chop and measure what you need. This baked chicken breast recipe is an easy option when rotisserie or leftover chicken is not available.

Creamy Mushroom-Parmesan Sauce

  • ¼ cup / 60 ml dry sherry, optional
  • 4 tbsp / 56 g unsalted butter
  • ¼ cup / 30 g all-purpose flour
  • 3 cups / 720 ml low-sodium chicken broth
  • 2 cups / 480 ml half-and-half
  • ¾ cup / 75 g finely grated Parmesan
  • 1 tsp dried thyme or 1 tbsp fresh thyme leaves
  • 1 tsp fine salt, divided, plus more to taste
  • 1 tsp freshly ground black pepper
  • ⅛ tsp ground nutmeg, optional
  • ⅛ tsp cayenne pepper, optional
  • 1 tbsp / 15 ml fresh lemon juice

For the closest substitute for half-and-half, combine 1½ cups / 360 ml whole milk with ½ cup / 120 ml heavy cream. All whole milk works too when you specifically want a lighter sauce; the roux will still provide body, so there is no need to cook it unusually thick.

Cheese, Crisp Topping & Finish

  • 1½ cups / 170 g shredded low-moisture mozzarella
  • ½ cup / 30 g panko breadcrumbs
  • ¼ cup / 25 g finely grated Parmesan
  • 1 tbsp / 14 g unsalted butter, melted
  • 2 tbsp chopped flat-leaf parsley, for finishing

Use low-moisture mozzarella here; fresh mozzarella can release enough water to loosen the casserole.

Method

1. Heat the Oven and Start the Pasta Water

Heat the oven to 375°F / 190°C and lightly grease the baking dish. Put a large pot of pleasantly salty water over high heat while you begin the mushrooms. Once it boils, lower the heat until you are ready to cook the spaghetti in Step 3.

2. Brown the Mushrooms Properly

Heat the olive oil and 1 tbsp / 14 g butter in the skillet or Dutch oven over medium-high heat. Add the mushrooms and ½ tsp salt.

At first, the pan will get wetter, not drier. Keep going. Once the liquid disappears and the sound shifts back toward a sizzle, let the mushroom edges take on color; that is when their deeper savory flavor starts to develop. Depending on your pan and heat, this usually takes 8–12 minutes.

Two stages of sliced mushrooms in a skillet: pale mushrooms releasing liquid and browned mushrooms in a mostly dry pan. Text says “Wet first is normal” and “Cook until the pan sizzles again.”
Browning only starts after the released water is gone; that dry-pan contact is where the mushrooms gain much of their deeper savory flavor.

With a skillet smaller than 12 inches / 30 cm, brown the mushrooms in two batches instead of crowding them into one steaming layer.

Add the onion and cook for 4–5 minutes, until softened. Stir in the garlic and thyme for 30–60 seconds, just until fragrant.

Using sherry? Pour in ¼ cup / 60 ml and let it bubble for 1–2 minutes, until the sharp alcohol smell fades. Skipping it changes nothing else; move straight to the butter and flour without replacing it with extra broth.

3. Make the Cream Sauce and Cook the Spaghetti

Reduce the skillet heat to medium and add the 4 tbsp / 56 g butter. Once melted, sprinkle the flour evenly over the mushrooms and onions and stir for 1–2 minutes so no dry flour remains.

Gradually pour in the chicken broth while stirring and scraping the bottom of the pan. Once the mixture loosens, whisk if needed to smooth out any floury pockets. Add the half-and-half and bring the sauce to a gentle simmer—not a hard boil.

Bring the pasta water back to a full boil and add the spaghetti. Cook it about 2 minutes less than the package’s al-dente time. When the box gives a range, work from the lower end. The strands should bend easily but still resist slightly in the center.

While the spaghetti cooks, finish the sauce: let it simmer gently for 4–6 minutes and judge the texture rather than relying only on the clock.

First Sauce Check: Leave Room for the Pasta

It should lightly coat the back of a spoon and pour easily. If the sauce already sits in a thick mound, stop reducing it.

Creamy mushroom-Parmesan sauce coating a silver spoon and flowing back toward a pan. Text reads “Sauce Check #1 — Coats the spoon. Still pours.”
Parmesan, pasta, baking and resting will all tighten the sauce further, so this stage needs room to thicken later.

Reduce the heat to low. Stir in ¾ cup / 75 g Parmesan, the remaining ½ tsp salt, black pepper, optional nutmeg and optional cayenne. Finely grated Parmesan melts most smoothly; some pre-shredded brands can make the sauce less silky.

Stir in the lemon juice and taste. It should not make the sauce taste lemony; it cuts through the cream, broth and Parmesan so the finished casserole tastes rich rather than flat. Add more salt if needed before the chicken and spaghetti soften the overall seasoning.

Just before the spaghetti reaches its stopping point, scoop out 1 cup / 240 ml pasta water. Drain the pasta without rinsing it and take it straight to the sauce.

4. Combine Before It Goes in the Oven

Fold the cooked chicken, drained spaghetti and frozen peas, if using, into the sauce. Turn everything gently until the sauce works its way between the strands instead of sitting around the outside of a pasta bundle.

Second sauce check: visible sauce should remain between the noodles and at the bottom of the pan. A tight mixture needs reserved pasta water 2 tbsp / 30 ml at a time. You may not need any at all, so do not add the whole cup automatically.

Unbaked chicken tetrazzini in a green casserole dish with spaghetti, cooked chicken, mushrooms and peas surrounded by visible creamy sauce. Text says sauce should still show between the noodles.
Visible sauce between the strands gives the pasta enough moisture to absorb in the oven without leaving the finished casserole dry.

5. Bake, Brown and Rest

Transfer everything to the prepared dish without packing it down. Scatter the mozzarella over the surface.

Mix the panko with the ¼ cup / 25 g Parmesan and melted butter, then sprinkle it evenly over the mozzarella.

Bake uncovered for 20–25 minutes. Stop when the edges are bubbling, the center is steaming hot, the cheese has melted and sauce remains visible between the noodles.

A hot center with a pale top only needs 1–2 minutes under the broiler. That gives the crumbs color without leaving the whole casserole in the oven longer. Watch it closely.

Golden chicken tetrazzini bubbling in a metal baking dish with chicken, mushrooms, peas and breadcrumbs, plus a small inset showing a paler topping. Text says “Hot + bubbling? Stop. Pale top? Broil 1–2 min.”
Once the center is hot, extra oven time mostly removes moisture; use the broiler for surface color instead.

Rest for 10 minutes, then scatter the parsley over the top. The crisp crumbs and salty Parmesan are a welcome contrast to the creamy middle.

What Creamy Chicken Tetrazzini Should Look Like

Most of the decisions that determine the final texture happen before the baking dish reaches the oven. The finished scoop should confirm those choices: separate strands, sauce that still clings and a crisp topping over a creamy middle.

Close-up spoonful of creamy chicken tetrazzini with spaghetti, chicken, sliced mushrooms, peas and golden breadcrumb pieces.
This is the texture payoff: spaghetti that still separates, sauce that clings, tender chicken and mushrooms, and crisp crumbs scattered through the bite. Creamy should feel generous, not heavy or gluey.

How to Keep Chicken Tetrazzini Creamy

Why the Two Sauce Checks Matter

The first check happens before the spaghetti goes in because the sauce is not finished changing. As it simmers, flour gives it body, Parmesan thickens it further, and both continue tightening as the sauce sits. Taking it too far at this stage leaves very little room for what happens next.

The second check matters because cooked pasta keeps taking up liquid after it meets the sauce, including while the casserole bakes and rests. Only after the chicken and spaghetti are mixed in can you see whether there is enough sauce around the noodles.

That is also why loose does not mean watery. A good pre-bake mixture is creamy and cohesive. Thin liquid separating around the noodles points to a different problem; a sauce that flows between them is doing what it should.

Why This Recipe Uses 12 Ounces of Spaghetti

A full 1-pound box works, but it crowds this amount of sauce. With 12 oz / 340 g spaghetti, the chicken and mushrooms stay noticeable and there is more sauce around each forkful. Using all 16 oz / 454 g pasta calls for more sauce if you want the same creamy balance.

Twelve-ounce and sixteen-ounce bundles of dry spaghetti beside a vessel of creamy sauce, illustrating the pasta ratio for chicken tetrazzini. Text asks “Why 12 oz?”
Choosing 12 ounces does more than preserve sauce. It also keeps the chicken and mushrooms noticeable in every serving, so the casserole still tastes like chicken tetrazzini rather than noodles carrying a few scattered extras.

Using another pasta shape? See spaghetti, linguine and other pasta choices.

Cook the Mushrooms Past Their Watery Stage

Waiting for the pan to dry does two jobs: it lets the mushrooms brown, which builds deeper savory flavor, and it keeps their water out of the cream sauce. A wet pan means they need more time.

The same technique matters in a creamy mushroom sauce. Add dairy while the mushrooms are releasing water and the finished sauce can end up thin and muted.

Other vegetables need similar treatment. Wilt and squeeze spinach, sauté zucchini until its water is gone, and lightly cook broccoli before it goes into the casserole.

If the Tetrazzini You Remember Used Cream of Mushroom Soup

You are not remembering it wrong. Many American chicken tetrazzini recipes use condensed cream of mushroom or cream of chicken soup, sometimes with sour cream, pimiento, bell pepper, celery or extra cheese.

The homemade sauce above gives you more control over salt and thickness, but that does not make the soup version less legitimate. For plenty of people, that creamy, pantry-friendly casserole is the tetrazzini they grew up eating.

Two chicken tetrazzini casseroles: a from-scratch version in a blue baking dish and an old-school condensed-soup version in a red dish with pimiento.
These are two legitimate versions of the same comfort-food idea. From-scratch chicken tetrazzini gives you more control over seasoning and thickness, while the condensed-soup version delivers the softer, familiar casserole character many people grew up with.

Old-School Condensed-Soup Shortcut

Cook the 12 oz / 340 g spaghetti 2 minutes shy of al dente, then complete the mushroom, onion, garlic and thyme step from the main recipe, including the optional sherry if using. Skip the roux and homemade cream sauce. Instead, whisk together the shortcut sauce below and fold it into the cooked mushrooms, chicken, spaghetti and peas, if using.

  • 1 can condensed cream of mushroom soup, about 10.5 oz / 298 g
  • 1 can condensed cream of chicken soup, about 10.5 oz / 298 g
  • 1 cup / 240 g sour cream
  • 1 cup / 240 ml whole milk
  • ½ cup / 120 ml low-sodium chicken broth, plus more only if needed
  • ½ cup / 50 g grated Parmesan
  • Black pepper to taste

Check the consistency before the mixture goes into the baking dish. Condensed soup, Parmesan and rotisserie chicken can already bring plenty of salt, so taste before adding more. Add the mozzarella and panko topping, then bake at 375°F / 190°C for 20–25 minutes, following the same doneness cues as Step 5. Rest for 10 minutes before serving.

Older-School Details You Can Lean Into

These are directions you can take the casserole rather than requirements for the core recipe:

  • Pimiento: fold in ¼–½ cup drained diced pimiento.
  • Green bell pepper or celery: dice finely and sauté with the onion.
  • Dry sherry: keep it in for the aromatic note common to many older cream-sauce versions.
  • Sage: especially good with turkey.
  • Toasted slivered almonds: add a little retro crunch.
  • Buttery crackers: use them instead of panko for a softer, richer topping.

Chicken Tetrazzini vs. Chicken Spaghetti

Chicken tetrazzini usually uses a creamy white sauce, mushrooms and Parmesan; Southern chicken spaghetti more often leans on cheddar, condensed soup and peppers or tomatoes. The lines can blur in older casserole recipes, but those flavor patterns are a useful way to tell the two styles apart.

← Back to the main recipe · See more variations →

Ways to Change the Recipe

Spaghetti, Linguine and Other Pasta Choices

Linguine can replace spaghetti 1:1 by weight and gives the casserole a broader, slightly heavier bite. Spaghetti keeps the texture a little lighter. Thin spaghetti and vermicelli work too, but both soften faster, so pull them from the water earlier.

No Mushrooms? Leave Them Out

You do not need to replace the mushrooms with an equal amount of something else. Broccoli is probably the easiest vegetable substitute. Wilted spinach also works when squeezed dry, while sautéed bell pepper fits particularly well with the old-fashioned casserole style.

Turkey, Gruyère and Cream Cheese

Cooked turkey can replace the chicken 1:1 and is one of the easiest ways to turn holiday leftovers into a different dinner. For a nuttier top, replace half the mozzarella with Gruyère while keeping the Parmesan in the sauce.

Cream cheese changes the casserole more noticeably. Melt 2–4 oz / 55–115 g into the warm sauce when you want it thicker and tangier, then loosen it with broth or reserved pasta water as needed. If that richer cream-cheese-and-cracker direction is what you are after, Million Dollar Chicken Casserole is built around it.

When the Casserole Goes Sideways

Most problems trace back to four things: pasta cooked too far, water carried in by vegetables, sauce that was too thick or thin, or too much time in the oven. Some can be corrected at the table; mushy pasta is mostly a lesson for the next batch.

Two unbaked chicken tetrazzini mixtures comparing creamy cohesive sauce with thin separated liquid around spaghetti, chicken, mushrooms and peas. Text reads “Loose is right. Watery is not.”
Watch how the liquid behaves when the noodles move. Creamy sauce travels with the pasta; watery liquid separates from it and collects on its own. That distinction is far more useful than judging the casserole simply by how loose it looks.

Too Loose Before Baking

A creamy, cohesive mixture does not need thickening just because it looks loose. The pasta will take up more sauce in the oven and again during the rest. Thin liquid separating from the creamy part means the mixture is genuinely watery, not simply loose.

Watery After Baking

Give the casserole the full 10-minute rest first. Liquid that remains visibly separated after that usually points to excess moisture from mushrooms or another vegetable, or a sauce that was too thin before assembly.

Dry Tetrazzini

The usual causes are overcooked pasta, over-reduced sauce or too much oven time. An already-baked portion can often be improved with a spoonful or two of warm milk or broth.

Working with leftovers rather than a fresh bake? Jump to the reheating method.

Mushy Pasta

Mushy tetrazzini usually starts with pasta cooked too far before baking. There is not much to reverse once that has happened, so stop the first boil sooner next time.

Bland Sauce

Correct the salt first, then look at black pepper, Parmesan and acidity. A small squeeze of lemon can wake up a flat sauce without turning the casserole into lemon pasta.

Grainy Sauce

Keep the dairy below a hard boil and lower the heat before adding Parmesan. At the first sign of graininess, take the sauce off the heat and whisk gently instead of pushing it with more heat.

← Back to the recipe · Make it ahead →

Make It Ahead Without Drying It Out

Tonight → Tomorrow

You can assemble chicken tetrazzini up to about 24 hours ahead, which is useful when you want dinner finished before people arrive or need a casserole ready to take somewhere the next day. Stop before adding the panko, cover the casserole and refrigerate it. Keep the crumb mixture separate so it stays crisp.

Unbaked chicken tetrazzini with cooked chicken, browned mushrooms, peas and creamy spaghetti beside a separate bowl of Parmesan-panko crumb topping. Text reads “Make it ahead — Keep the crumb topping separate.”
Make-ahead chicken tetrazzini asks you to protect two different textures at once. The pasta needs enough moisture to survive an overnight rest, while the crumb topping needs to stay away from that moisture until the casserole is ready to bake.

For an overnight casserole, leave the pasta mixture a touch looser than you would for immediate baking because the noodles will continue taking up sauce in the refrigerator. A mixture that already looks tight can take ¼ cup / 60 ml broth or reserved pasta water. Add another ¼ cup / 60 ml only if it still looks tight.

Just before baking, add the panko. A chilled casserole usually needs another 10–15 minutes. Look for bubbling edges and a thoroughly hot center. For food safety, the center should reach 165°F / 74°C.

With a glass baking dish, follow the manufacturer’s guidance before moving a very cold dish into a hot oven.

Freezer → Dinner

Freeze tetrazzini before baking when possible; the pasta holds up better that way. Assemble it with cooled or just-warm components, cover well and chill promptly before freezing. For best quality, use it within about 3 months.

Keep the panko topping separate when convenient. Thaw the casserole overnight in the refrigerator, add the topping and bake it as a chilled casserole.

Leftovers → Lunch

Add 1–2 tbsp / 15–30 ml milk or chicken broth per serving, cover and reheat until thoroughly hot. For a larger amount, drizzle a few tablespoons between portions before covering the dish with foil.

A measuring spoon pours a small amount of liquid over leftover chicken tetrazzini with spaghetti, chicken, mushrooms, peas and breadcrumb topping. Text reads “Dry leftovers? Add 1–2 tbsp liquid per serving.”
Reheating is mostly about replacing what the spaghetti absorbed while it chilled. Add only a little liquid at first; the goal is to loosen the sauce again, not create a new pool of broth or milk around the leftovers.

Refrigerate cooked leftovers within 2 hours and use them within 3–4 days. USDA guidance recommends reheating leftovers to 165°F / 74°C throughout. See the USDA leftovers and food-safety guidance.

← Back to the recipe · Back to top ↑

What to Serve With Chicken Tetrazzini

After a creamy casserole, something sharp, crisp or green feels especially good on the plate. A simple salad, roasted asparagus or broccoli all work. Green beans almondine bring lemon, crisp-tender beans and toasted almonds—a useful contrast to the rich pasta. Garlic bread makes sense when you want to lean all the way into comfort food.

Plated chicken tetrazzini with creamy spaghetti, chicken, mushrooms and peas beside a casserole dish, green beans almondine and garlic bread on a dark dinner table.
Because chicken tetrazzini is already rich and creamy, the best sides usually bring contrast rather than more weight. Something green, bright or crisp refreshes the plate, while garlic bread can be the deliberate extra indulgence.

Once you know the cues—firm pasta, properly browned mushrooms, a pourable sauce and a short bake—tetrazzini stops feeling like a casserole you have to hope turns out. It becomes the kind of dinner you can make from leftover chicken, assemble for tomorrow, or put on the table for a crowd with confidence. Give it 10 minutes to rest, then serve while the crumbs are crisp and the middle is creamy.

← Back to the recipe · Back to top ↑