Posted on — Leave a comment

Lemon Bars Recipe: Easy, Tangy Bars with Buttery Shortbread Crust

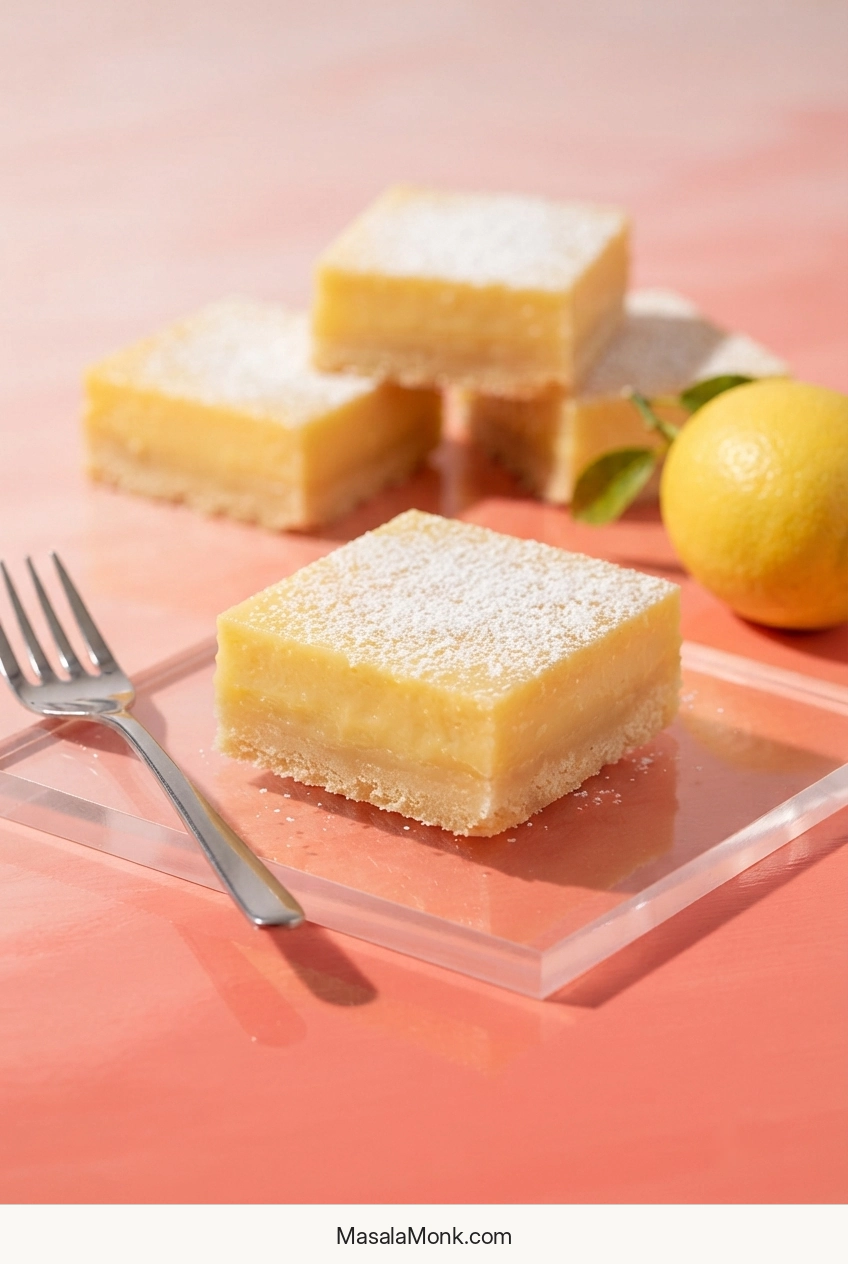
Finished lemon bars with smooth pale-yellow lemon filling over thin golden shortbread crusts, lightly dusted with powdered sugar.

Homemade lemon bars—also called lemon squares—ask you to trust a filling that looks far too thin when it first goes into the oven. It sits over freshly baked shortbread, pours almost like cream, and is still surprisingly soft when the pan comes back out.

After cooling and chilling, that loose mixture becomes a smooth, bright lemon layer that holds its shape when cut. Underneath, the shortbread stays buttery and crisp-tender, substantial enough to support the filling without taking over the bite.

Classic Lemon Bars Recipe

Bright lemon custard over tender shortbread, baked only until the center moves softly and then chilled until fully set. Have the filling ready before the crust comes out so the two layers can go straight back into the oven.

Pan
9 × 13 in / 23 × 33 cm

Yield
20 standard bars

Hands-On
About 20 min

Crust Bake
20–24 min

Filling Bake
About 22–27 min

Cool
About 1–1½ hr

Chill
At least 3 hr

Total
About 5½ hr

Equipment

  • 9 × 13-inch / 23 × 33 cm light-colored metal baking pan
  • Parchment paper
  • Two mixing bowls, whisk and silicone spatula
  • Fine grater or Microplane and citrus juicer
  • Flat-bottomed measuring cup or glass for pressing the crust
  • Kitchen scale, recommended
  • Long sharp knife for cutting

Pan note: A light-colored metal pan gives the most predictable bake for these timings. If your bare aluminum pan has previously given acidic foods a metallic taste, use glass instead and follow the visual cues rather than trying to match the timing exactly.

Shortbread Crust

  • 1 cup / 226 g unsalted butter, melted and cooled for a few minutes
  • 1¾ cups plus 2 tablespoons / 225 g all-purpose flour
  • ⅓ cup / 40 g cornstarch
  • ¾ cup / 90 g powdered sugar
  • ½ teaspoon fine salt
  • 1 teaspoon vanilla extract, optional

Using cups? Spoon the flour into the measuring cup and level the top instead of scooping straight from the bag. Packed flour can make the chilled crust much harder than intended.

Lemon Filling

  • 2 cups / 400 g granulated sugar
  • 2 tablespoons finely grated lemon zest, from 2–4 of the lemons
  • 6 tablespoons / 46 g all-purpose flour
  • ¼ teaspoon fine salt
  • 6 large eggs
  • 1 cup / 240 ml freshly squeezed lemon juice, usually from 5–7 lemons total
  • Powdered sugar, for finishing

Zest before you juice. Grate only the yellow outer peel and stop before you reach the bitter white pith. Then squeeze the same lemons and measure the juice. Once you have 1 cup / 240 ml, stop.

Method

Prepare the Crust and Lemon Filling

  1. Heat the oven. Set a rack in the center and heat the oven to 350°F / 175°C conventional. For a fan oven, use 160°C and start watching the crust a little early. Line the pan with a parchment sling, leaving overhang on two opposite sides so the chilled slab can be lifted out later.
  2. Mix the shortbread. Stir together the flour, cornstarch, powdered sugar and salt. Add the melted butter and optional vanilla. Mix until no dry flour remains. The mixture will look crumbly but hold easily when squeezed.
  3. Press an even base. Scatter the mixture over the whole pan before pressing it down. Use the bottom of a measuring cup or glass to level it, paying particular attention to the corners and perimeter. Close visible cracks or thin spots, then leave it alone.
  4. Par-bake the crust. Bake for 20–24 minutes. The surface will look dry and set, with light-golden color beginning around the edges. Make the filling while the crust is in the oven.
  5. Make the lemon sugar. Put the granulated sugar and zest in a large bowl. Rub them together with your fingertips for 30–60 seconds. The sugar will become damp, and the bowl should smell much more strongly of fresh lemon. Whisk in the flour and salt.
  6. Mix the lemon filling. Whisk in the eggs until evenly combined, then add the measured lemon juice and whisk just until smooth. The mixture will be very thin and easy to pour. If this is your first batch, this is often the point that looks wrong. It isn’t.

Bake, Chill and Finish

  1. Pour onto the hot crust. Take the crust from the oven and reduce the temperature to 325°F / 165°C conventional; for a fan oven, use 150°C. If you see an obvious crack or edge gap, gently nudge the surrounding shortbread closed with the back of a spoon before pouring in the filling. If a thick layer of foam has collected on top, let it settle briefly and give it one gentle stir. Pour the filling onto the hot crust and return the pan straight to the oven.
  2. Bake until the center moves as one layer. Begin checking at about 22 minutes. The edges will be set while the center moves softly when the pan is nudged. If liquid visibly ripples or sloshes underneath, give it a few more minutes. Most pans will finish in roughly 22–27 minutes.
  3. Cool, then chill. Set the pan on a rack until the filling and pan are no longer warm, usually 1–1½ hours. Refrigerate for at least 3 hours. Cutting while the custard is warm or only partly chilled turns defined layers into a much messier job. Overnight chilling is excellent when neat slices matter.
  4. Cut and finish. Lift the cold slab out by the parchment. Use a long sharp knife and wipe the blade after each cut. Dust with powdered sugar shortly before serving.

Cold from the refrigerator, the lemon filling is silky and firm enough to hold its shape, with lemon arriving before the butter and shortbread. As the chill comes off, both layers soften slightly and the citrus aroma comes forward.

What the Pan Should Look Like

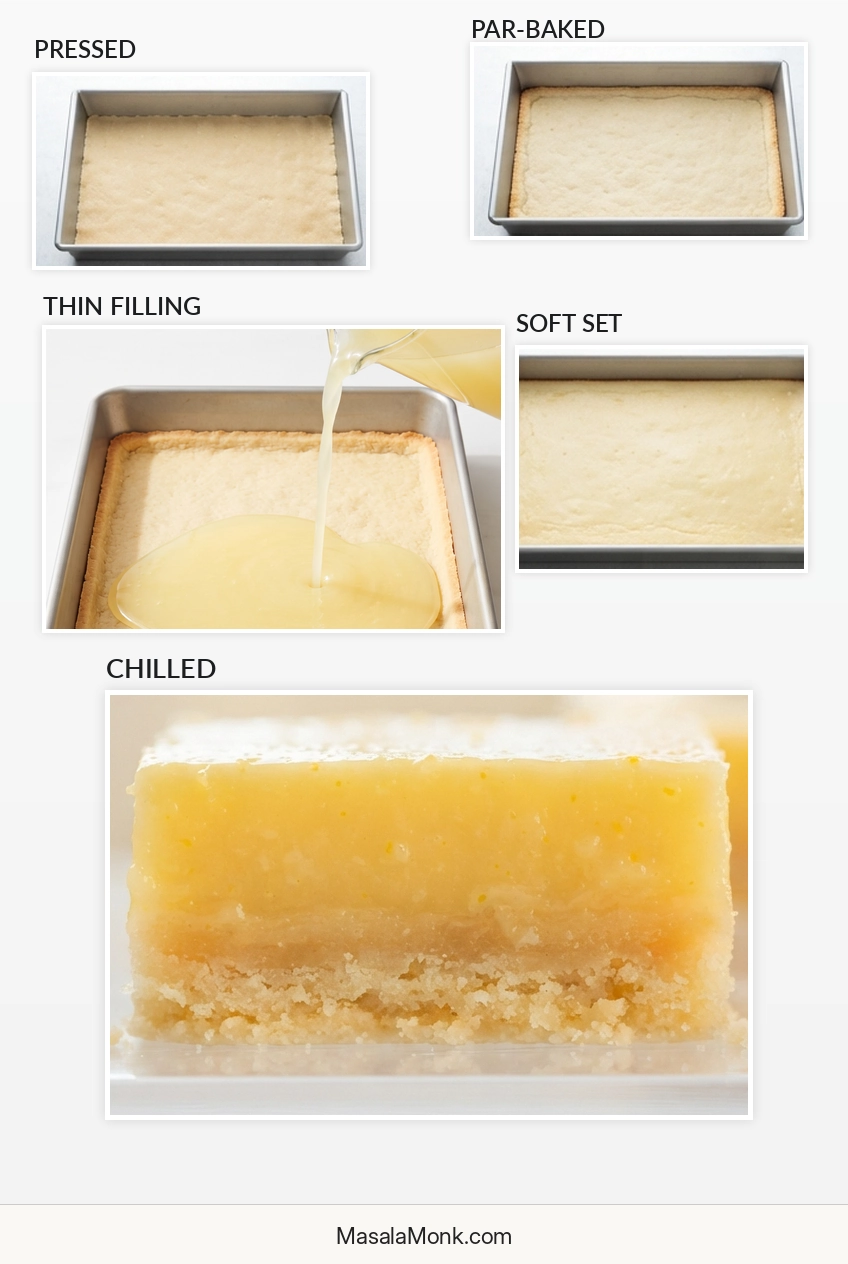
The crust, raw filling and finished custard look quite different from one another. These are the checkpoints worth remembering.

StageLook for
Pressed crustAn even layer reaching the corners and perimeter, without obvious cracks or thin channels.
Par-baked crustA dry, set surface with the first light-golden color around the edges.
Raw fillingThin, smooth and easily pourable. A few small bubbles are normal.
Finished bakeSet edges and a center that moves gently as one soft layer, with no liquid sloshing underneath.
Fully chilledFirm enough to lift and slice neatly, but still silky when you bite into it.
Five-stage visual showing pressed shortbread, lightly par-baked crust, thin raw lemon filling, a soft-set baked lemon layer, and a chilled finished bar.
The important changes happen in texture and structure, not just color: the flat crust sets first, the very thin filling follows, and chilling finally turns the soft baked center into a clean-cut bar.

The Shortbread Has Two Jobs

It needs to taste like shortbread, and it has to support a bowlful of liquid filling. A very thick base may feel safer under all that liquid, but too much shortbread leaves you with a bar that tastes mostly of crust.

A little cornstarch takes the place of some flour and helps the shortbread stay tender once the bars are cold. Spread the crumbs throughout the pan before pressing them down. Even thickness matters more than brute force.

Firmly packed is enough. Once the crust is level and the obvious gaps are gone, leave it alone. Butter-rich shortbread is naturally firmer when cold.

Gluten-free: For gluten-free lemon bars, use a recipe developed for the particular flour blend you plan to use instead of making a straight 1:1 substitution in this shortbread. Different blends absorb butter differently.

Lemon Juice and Zest

Lemon juice provides most of the acidity and the bulk of the liquid; zest adds concentrated aromatic citrus oils. For stronger lemon aroma, add more zest. Extra juice changes the amount of liquid the custard has to set. Lemons vary widely in size and juiciness, so measure the juice rather than relying on the number of lemons.

Hands rubbing finely grated lemon zest into granulated sugar beside a clear glass of fresh lemon juice.
Fresh zest and lemon juice do different jobs in the filling: rubbing the zest into sugar releases aromatic oils first, while the juice brings the sharp acidity that makes the bars taste distinctly lemony.

Fresh juice is the better default when lemon is the main flavor. Serious Eats’ fresh-versus-bottled testing found the difference mattered most in lemon-forward recipes, while fresh zest narrowed the gap. If you don’t have enough lemons for a full cup, bottled juice plus fresh zest is the better fallback.

Meyer lemons work at the same measured juice volume and give a sweeter, more floral result with less sharp acidity.

Can you use prepared lemon curd instead? Not as a direct swap. Lemon curd has already been cooked and balanced differently, so it will not behave like the raw egg-lemon filling used here.

When to Add the Filling

Pour the filling onto the crust while it is still hot. The residual heat begins setting the custard where it meets the shortbread, helping the two layers stay where they belong.

Keep the handoff short. Lower the oven temperature, pour in the filling and send the pan straight back in.
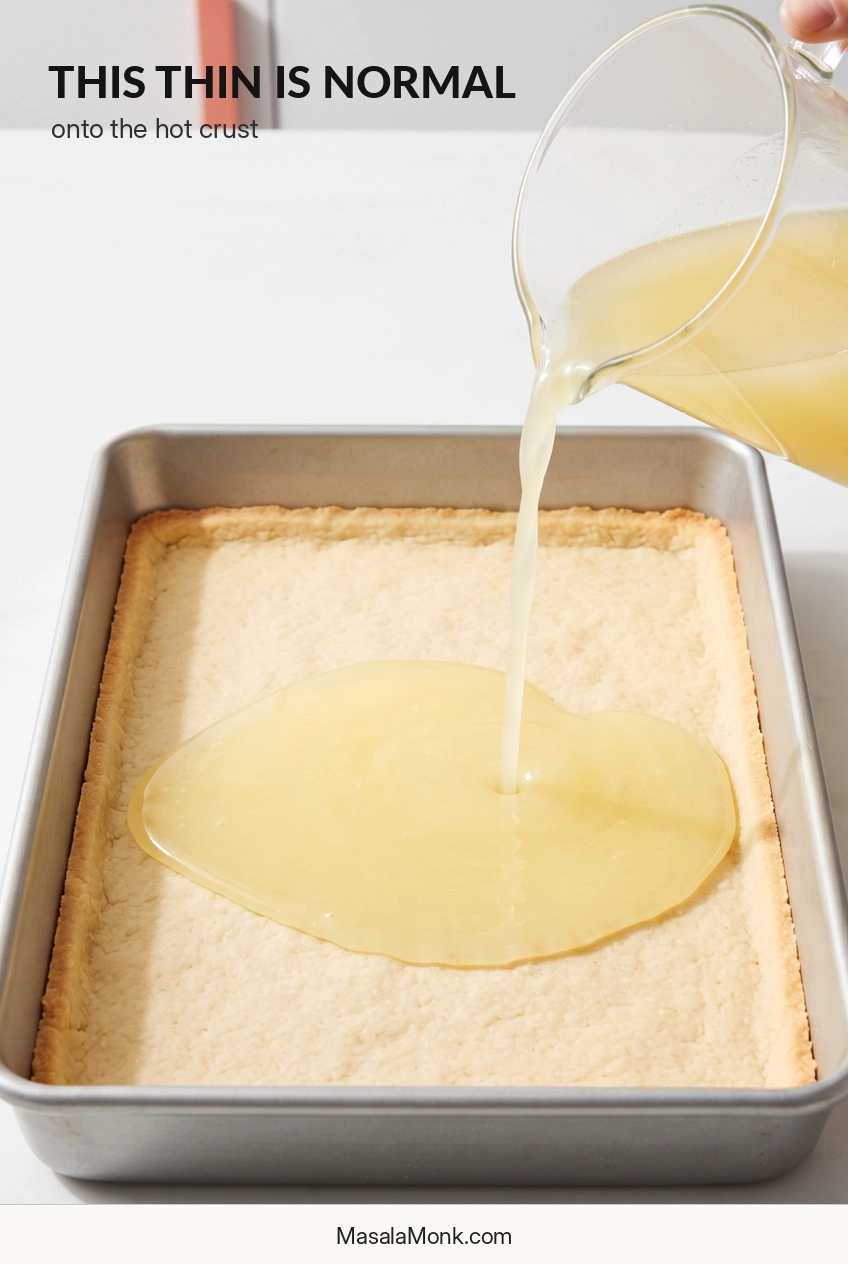
Thin pale-yellow lemon filling pouring from a clear pitcher onto a flat par-baked shortbread base in a rectangular metal baking pan.
The raw lemon mixture should look almost unexpectedly loose; when it lands on the hot shortbread, it levels into a shallow layer rather than sitting on top as a thick mound.

How to Tell When Lemon Bars Are Done

Begin checking around 22 minutes. Lemon bars are ready when the edges are set and the center moves softly as one layer when you gently nudge the pan. If liquid visibly ripples or sloshes underneath, keep baking.
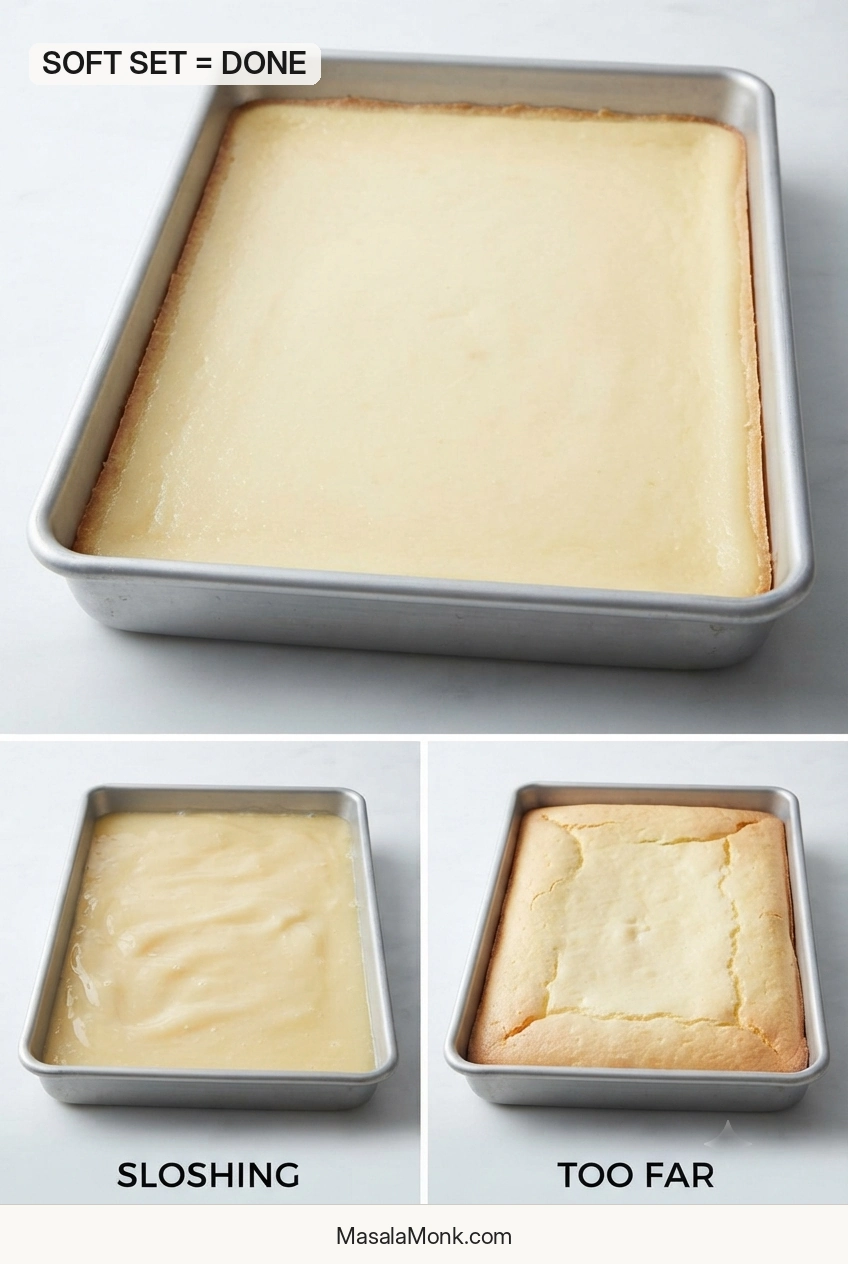
Rectangular baking pan showing the desired soft-set lemon-bar center alongside smaller examples of a liquid underbaked center and a firmer overbaked center.
Don’t wait for the center to look completely firm in the oven; a gentle, unified movement is the useful checkpoint, whereas obvious liquid sloshing means the filling is not there yet.
What you seeWhat to do
Liquid ripples or sloshingKeep baking and check again after a few minutes.
Set edges; center moves softly as one layerTake the pan out. Cooling and chilling will firm it substantially.
Heavy puffing, strong browning or a rigid hot centerThe custard is heading toward a firmer, more rubbery texture.

Glass, dark nonstick and light metal pans heat differently, and home ovens are rarely perfectly calibrated. Use the timing as a guide, then watch the center. Chilling finishes the texture; it does not finish the cooking.

If the texture already looks wrong, jump to troubleshooting.

Cooling and Cutting

Let the pan cool until it is no longer warm before covering and refrigerating it. Cover too early and trapped steam can settle back onto the lemon layer as condensation.

What the Chilled Layers Should Look Like

The long chill is worth it. Once the slab lifts out in one piece, the layers are easy to see: lemon on top, shortbread underneath, without the two smearing together as you cut.
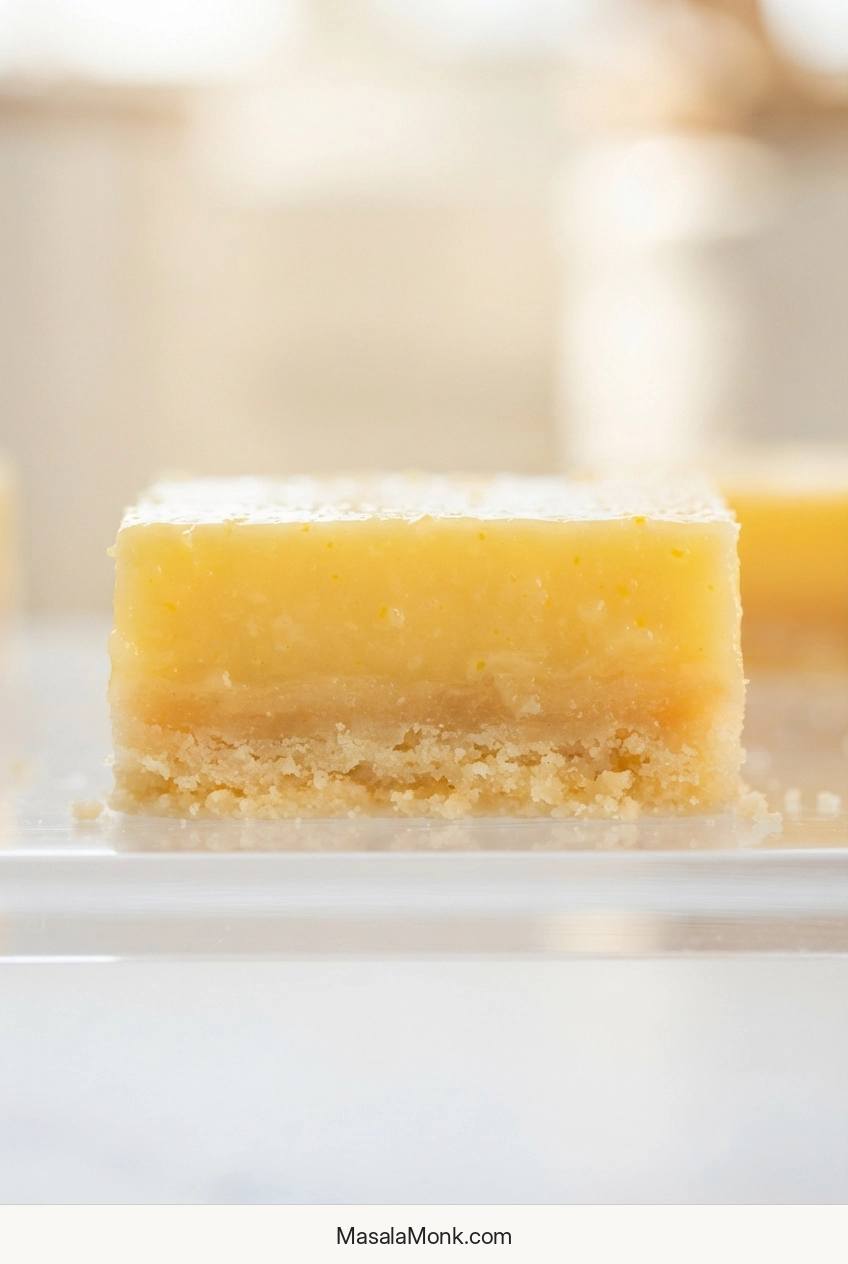
Close side view of a chilled lemon bar showing a smooth pale-yellow filling above a thin compact golden shortbread crust.
The clean boundary between the two layers is the useful clue here: the chilled lemon custard should cut as one tender layer while the shortbread stays compact underneath.

How to Cut Clean Lemon Bar Squares

Use a long sharp knife and wipe it after each cut. That is mostly about presentation—the bars taste just as good if the edges are less tidy. Cut the slab into 15 generous bars, 20 standard squares or 24 smaller pieces, depending on how you plan to serve them.
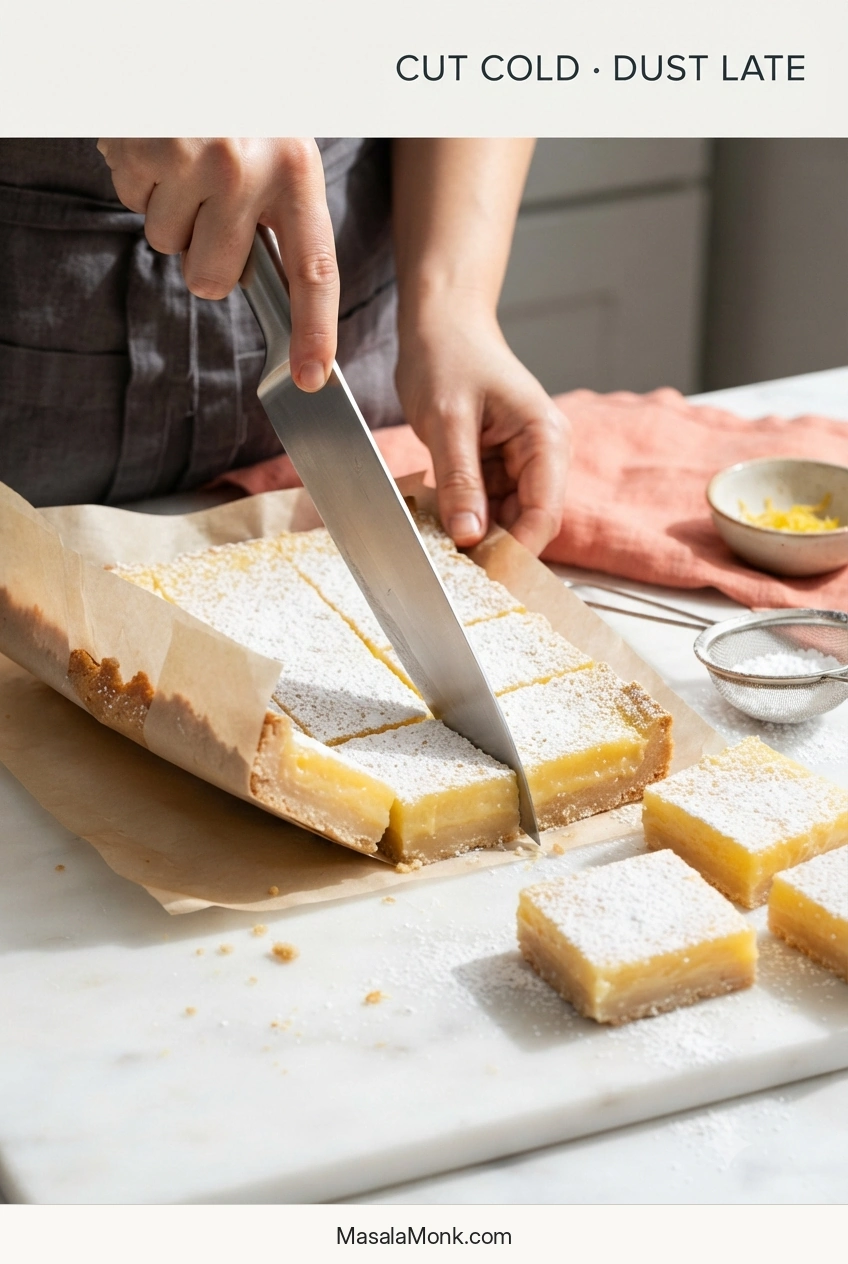
Chilled lemon-bar slab being lifted with parchment while a knife makes clean cuts and finished pieces receive powdered sugar.
The long chill does more than cool the bars: it gives the lemon layer enough structure for the knife to reveal two clean layers instead of dragging the filling through the shortbread.

Dust with powdered sugar after cutting and preferably shortly before serving. It gradually absorbs moisture from the surface and disappears, which is normal.

For a softer bite and stronger lemon aroma, let the bars sit out for about 10–15 minutes before eating.

Troubleshooting Lemon Bars

The crust floated or the filling baked underneath it

A lemon-bar crust floats when thin filling finds a crack, thin spot or edge gap, gets underneath the shortbread and pushes it upward as it bakes.
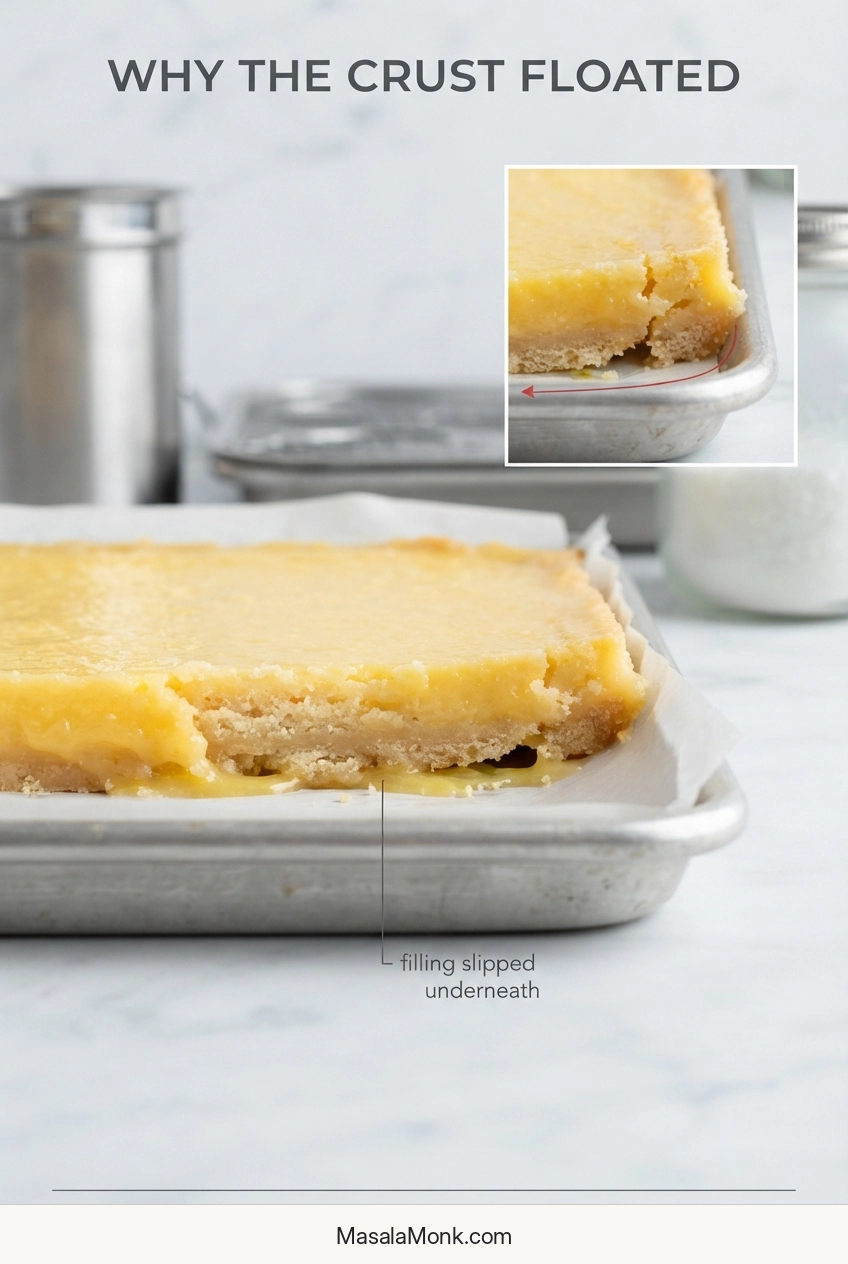
Cross-section of a lemon bar with the shortbread lifted above the lemon filling, with a smaller detail showing filling beneath an edge gap.
An upside-down-looking crust is actually a useful diagnostic clue; when lemon filling appears beneath the shortbread, check the edge for the path it took underneath.

Next time, press the base evenly to the perimeter so the thin filling has no easy route underneath. If the slab is fully set and intact despite the layers ending up upside down, you may be able to chill it thoroughly, invert it and cut it.

The filling is still runny

If the center was actually sloshing instead of moving softly as one layer, the bars were underbaked. If you catch that as soon as the pan comes out, return it to the oven and check again after a few minutes.
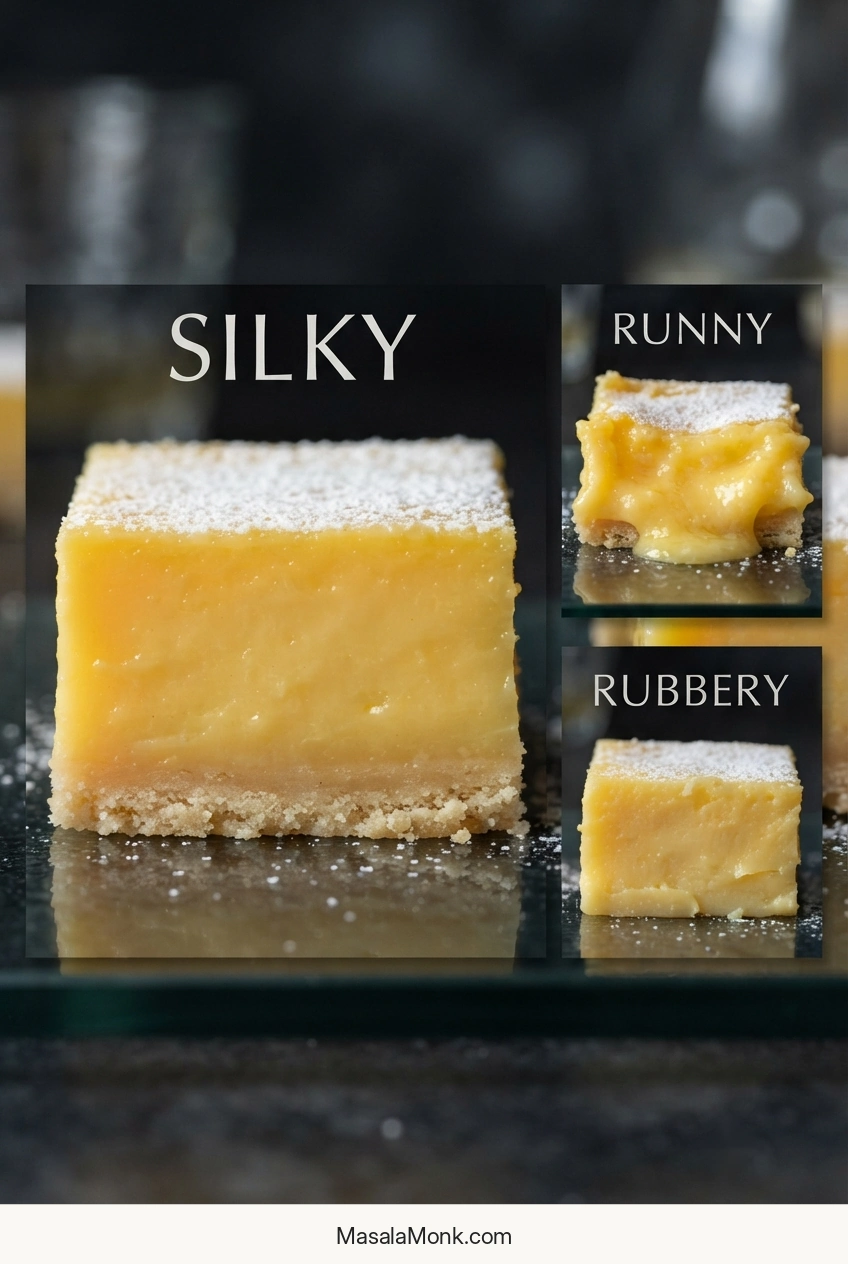
Three close-up lemon-bar textures comparing a loose runny filling, a smooth silky filling, and a firm rubbery filling.
Once chilled, the center reveals the bake more clearly: the ideal lemon custard stays smooth and tender, without collapsing on the knife or bouncing back like a firm gel.

A smaller pan, extra lemon juice or an oven running cool can all lengthen the bake.

The filling tastes eggy or feels rubbery

If the filling is firm and rubbery as well as eggy, overbaking is the likely cause. If the texture is good but the flavor seems egg-forward, use more zest next time—not extra juice. Zest strengthens the lemon aroma without adding more liquid.

There are white bubbles or foam on top

A few white bubbles are cosmetic. Ignore them. Heavy foam usually means the filling was whisked harder than necessary; next time, let it settle briefly before pouring.

The filling has flour lumps

If you see flour lumps before pouring, press the filling through a fine-mesh sieve. Scrape any zest caught in the sieve back into the bowl. Next time, whisk the flour into the lemon sugar before adding the eggs and juice.

The crust is soggy or very hard

For a soggy base, first look back at the par-bake. The surface needed to be dry and set before the lemon mixture went on. Filling that slipped underneath the crust can cause a similar texture, and several days in the refrigerator will soften even a well-baked base.

A very hard crust points toward too much flour, excessive par-baking, an unusually thick layer or heavy compaction. Let one bar lose some refrigerator chill before deciding; butter-rich shortbread is much firmer when cold.
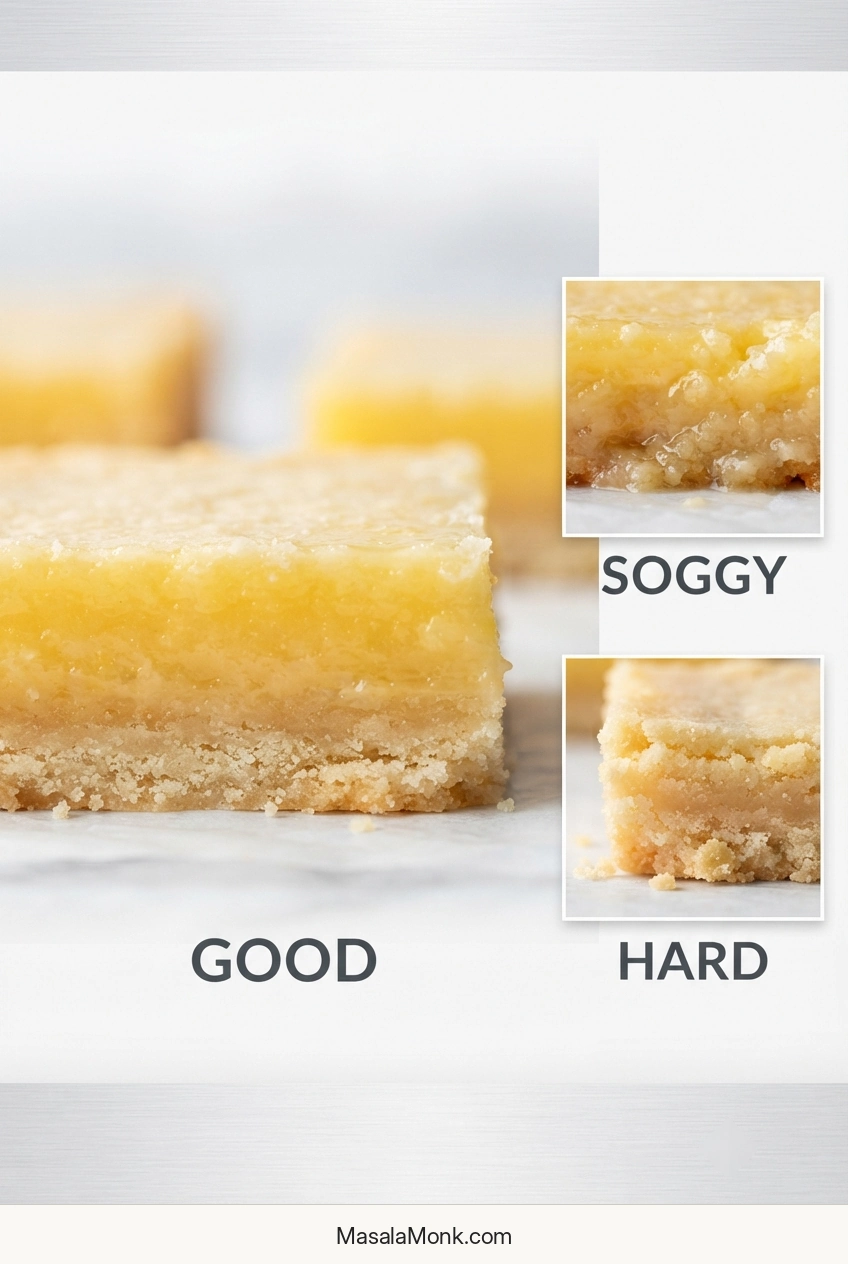
Comparison of lemon-bar shortbread showing a tender crust, a moisture-softened soggy crust, and a dense hard crust beneath lemon filling.
The best shortbread should break cleanly without fighting the bite: it stays tender enough to chew, yet firm enough to carry the lemon layer without turning wet or dense.

The top looks pale, cracked or wet

Pale yellow is normal. It says very little about how lemony the bars will taste. Cracks can come with excess air or too much oven time. If a properly set surface looks wet after chilling, condensation is a likely cause, especially if the pan was covered while warm.
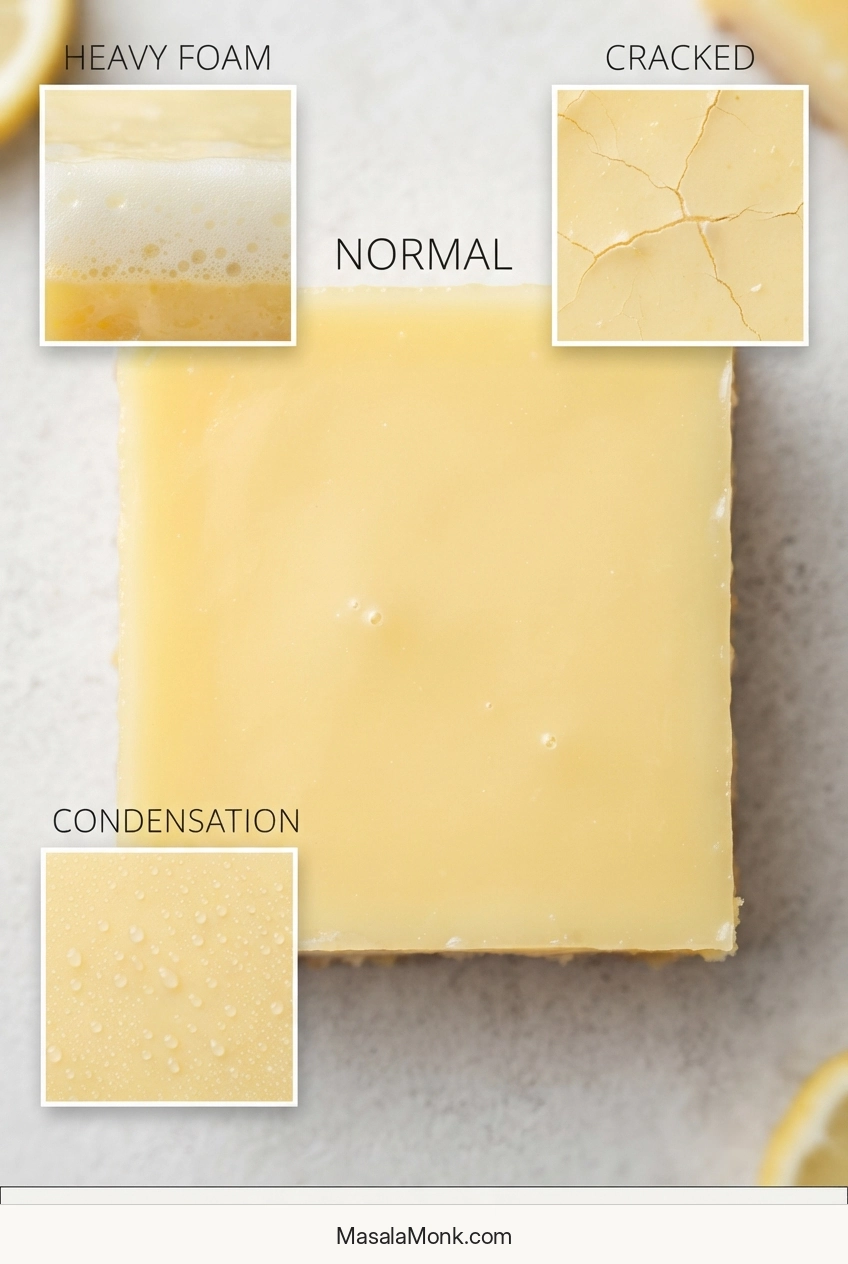
Lemon-bar surface close-ups showing a normal pale top with small bubbles, heavy foam, cracking, and condensation.
Start with the ordinary-looking surface: a pale top and a few tiny bubbles can be perfectly fine, so appearance alone is not a reason to call the batch a failure.

The bars taste metallic

If lemon or other acidic foods have picked up a metallic taste from your pan before, use glass next time and avoid letting aluminum foil touch the filling. Stainless-steel bowls, whisks and utensils are fine.

Ugly does not always mean ruined. Surface bubbles are cosmetic. A set slab with inverted layers may still be usable. And if the bars break while cutting but taste good, spoon the pieces into glasses with whipped cream or yogurt and berries.

Using an 8×8 Pan

For an 8×8-inch / 20×20 cm pan, make half the recipe. That gives you almost the same layer depth as the full batch in a 9×13, so begin checking around the normal time. It may finish a little earlier.

If you want the math, a 9×13 pan has about 117 square inches of surface area; half of that is 58.5 square inches. An 8×8 pan has 64 square inches, so a half batch is about 9% shallower. Putting the entire recipe into an 8×8 would make the layers more than 80% deeper and require a substantially different bake.
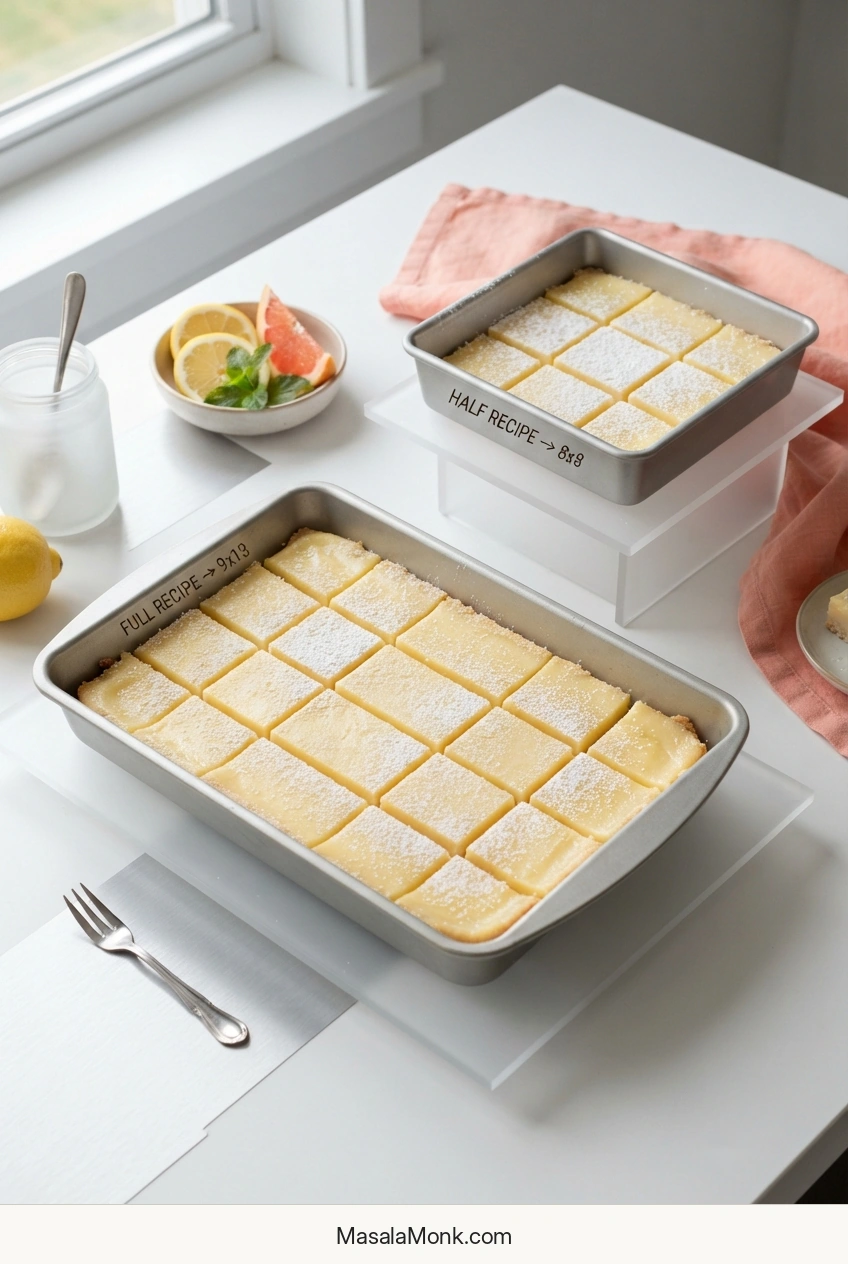
Two lemon-bar pans comparing a full batch in a 9-by-13-inch pan with a half batch in an 8-by-8-inch pan at similar finished depth.
The useful thing to compare is the finished depth, not simply the pan dimensions: using half the mixture in an 8×8 keeps the lemon-bar layer close to the thickness of a full batch in a 9×13.

Make Ahead, Storage and Freezing

Make the Bars a Day Ahead

Lemon bars are particularly easy to make a day ahead because the long chill is already part of the recipe. Bake and cool the slab, refrigerate it overnight, then lift, cut and dust the bars the next day. Besides taking work off your serving day, the overnight chill makes especially neat slices easier.
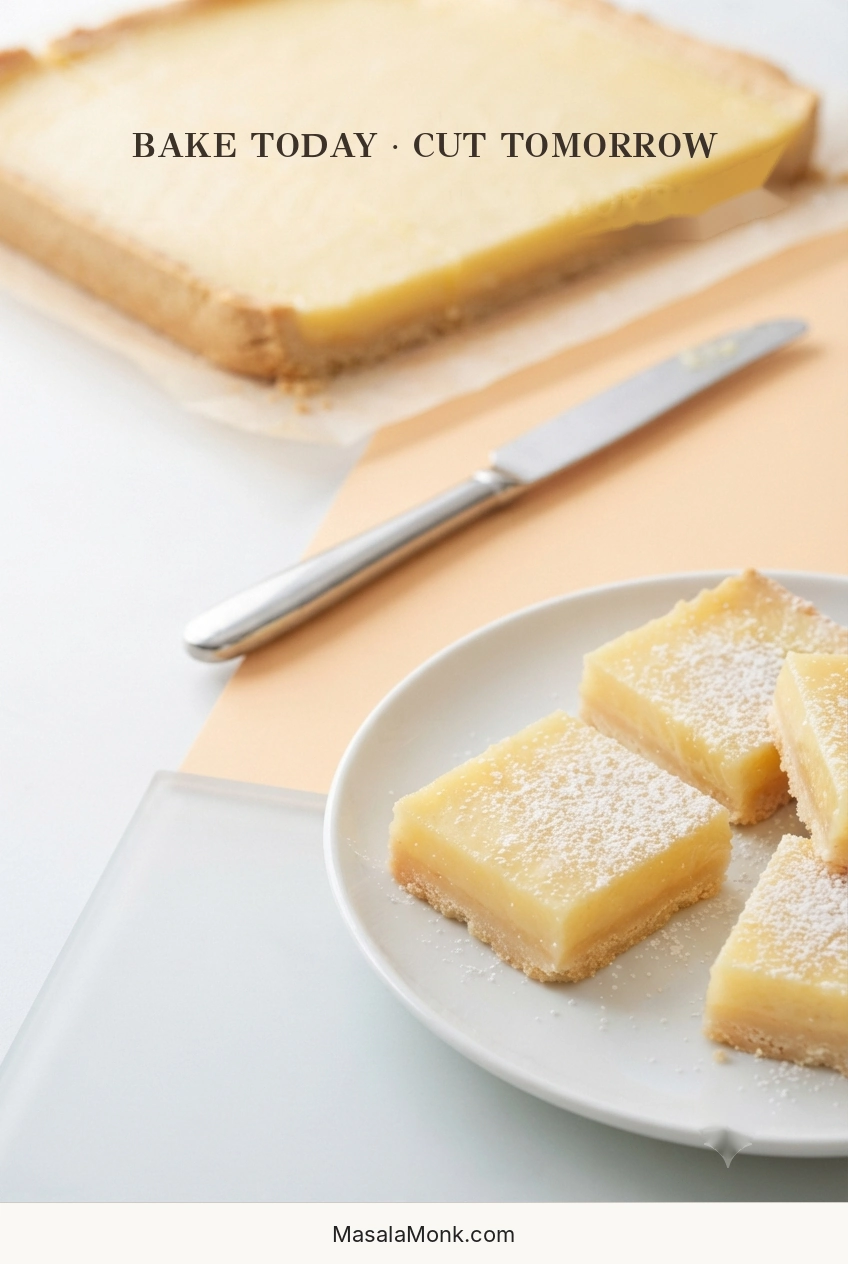
Whole uncut lemon-bar slab in the background with clean powdered-sugar-dusted lemon-bar squares in the foreground, illustrating make-ahead preparation.
Overnight chilling turns the bars into an easier make-ahead dessert: tomorrow’s slab is firmer, steadier and much easier to portion neatly than one that is still warm from the oven.

Yes, lemon bars should be refrigerated. Keep them covered and plan to finish them within about 4 days. Their texture is best during the first 2–3 days, while the shortbread still contrasts clearly with the creamy lemon layer. That four-day limit also lines up with FDA guidance for cooked egg dishes, which gives a 3–4 day refrigerator window.

For a party or bake sale, put out smaller batches and replenish them from the refrigerator. Don’t leave the bars unrefrigerated for more than 2 hours, or more than 1 hour when the temperature is above 90°F / 32°C.

For longer storage, chill and cut the bars first but leave off the powdered sugar. Freeze the pieces until firm, then wrap them well or stack them with parchment between layers in a freezer-safe container. For best quality, use them within about 3 months. Thaw overnight in the refrigerator, then dust shortly before serving.

If oven space is the real constraint, No-Bake Lemon Bars take a different route, setting in the refrigerator instead of relying on eggs and oven heat.
Posted on — Leave a comment

Magic Cookie Bars Recipe: Easy 7 Layer Bars with Chocolate, Coconut & Pecans

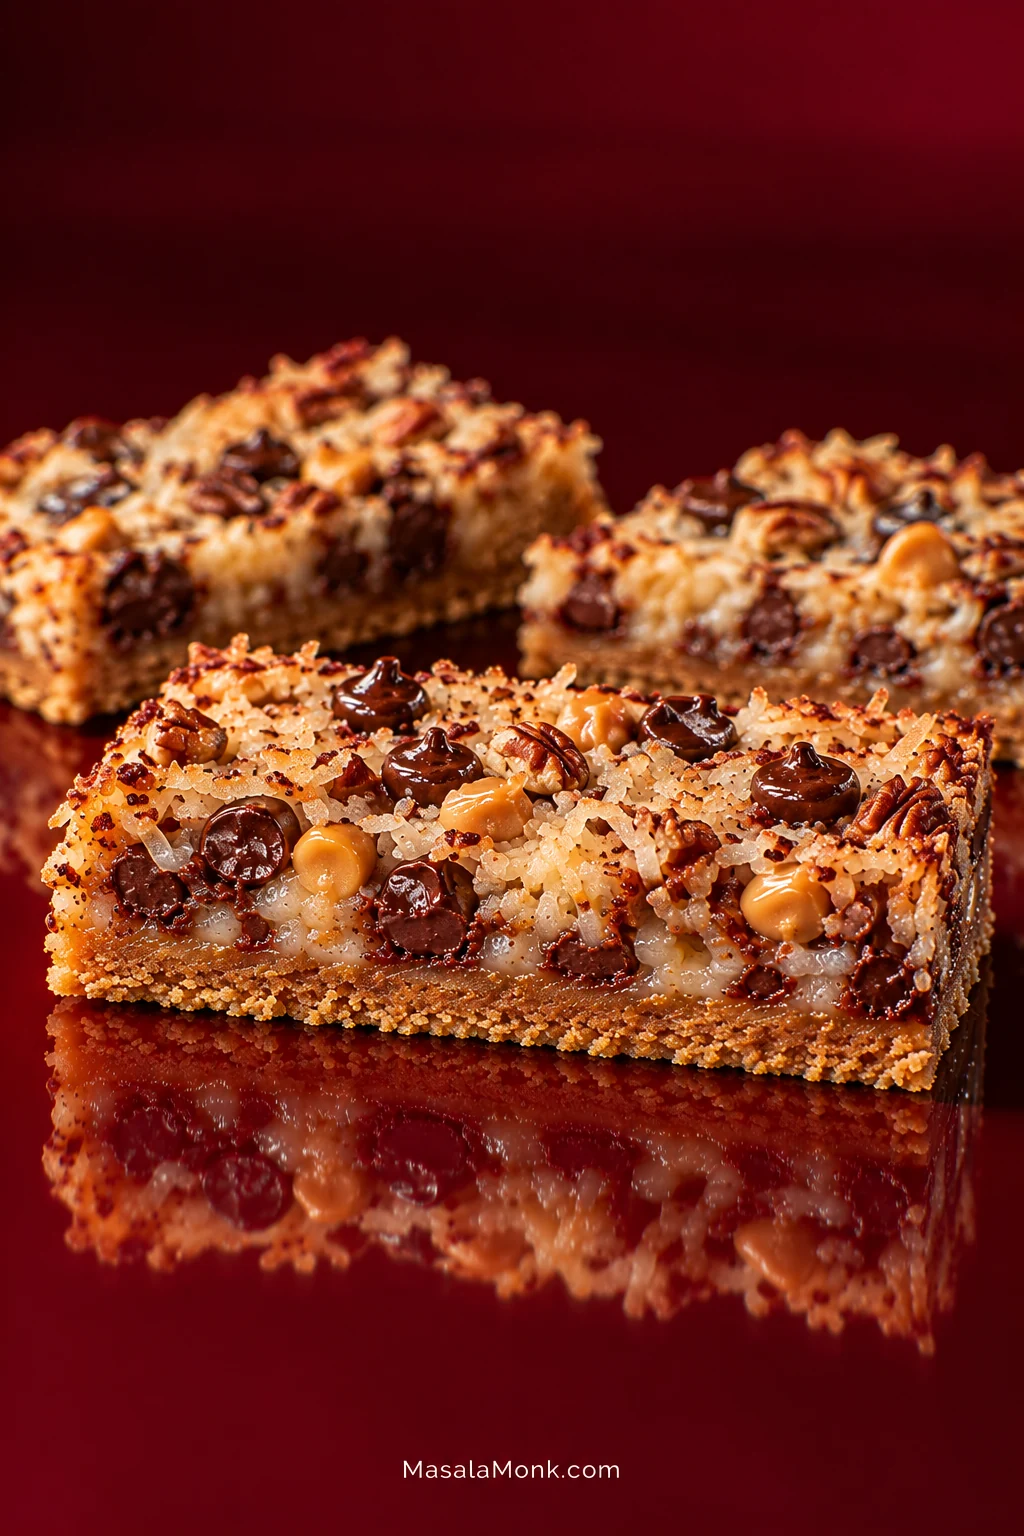
Three Magic Cookie Bars on a glossy deep-red surface, with golden graham crusts beneath toppings of coconut, pecans, chocolate chips and butterscotch chips.
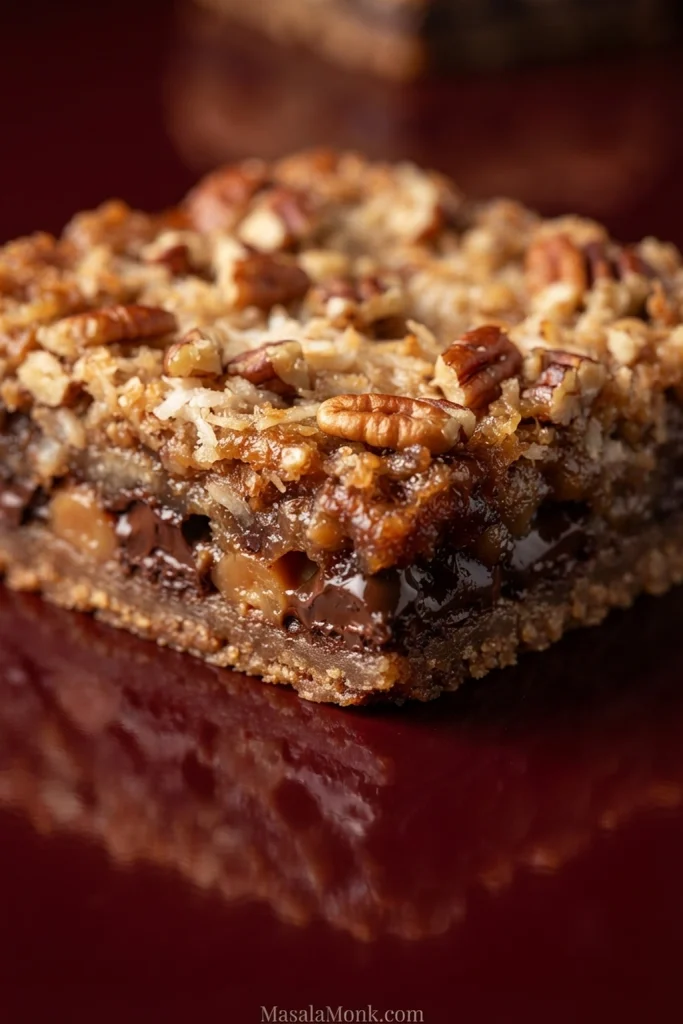
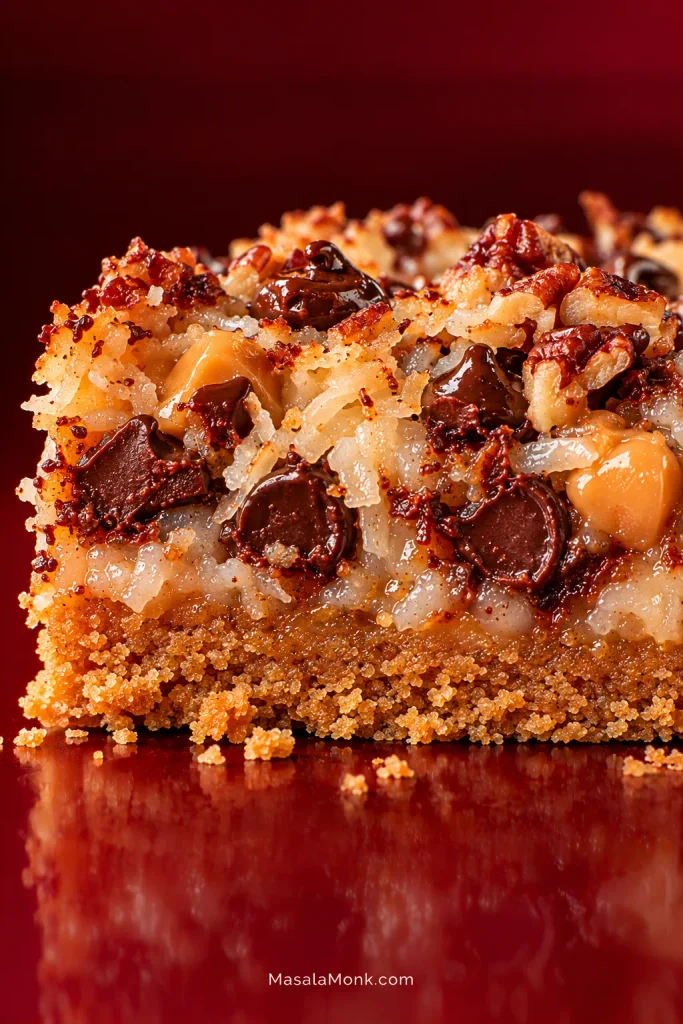
Side view of a Magic Cookie Bar with a compact golden graham base beneath a thick chewy layer containing chocolate, butterscotch, coconut and pecans.
The cut edge should show structure without looking rigid. A compact graham base supports a chewy topping where chocolate, coconut, pecans, and butterscotch still remain easy to distinguish.

This version keeps the familiar character of the bars while pulling back on some of the extra sweetness. Part of their charm is that families remember the same dessert differently anyway—under another name, with another nut, or with the condensed milk poured in a different place.

For all those layers, the method itself stays simple: press the crust, scatter the toppings, bake, and give the bars enough time to cool.

Get These Three Things Right

Crust

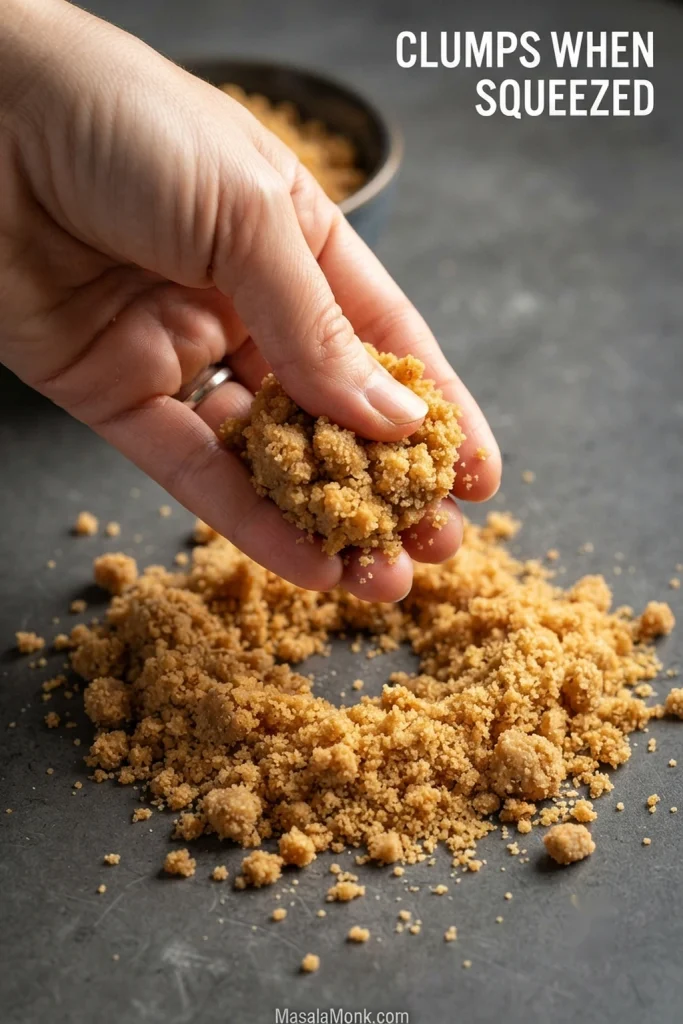
The crumbs should clump when squeezed and form an even, cohesive base when pressed, with no loose dry patches or butter pooling underneath.

Bake

Look for bubbling golden edges, toasted patches of coconut, and a center that has set but still looks soft.

Set

Give the bars 1½–2 hours before cutting. A batch that looks almost too soft while hot can become perfectly chewy as it cools.

Classic 7 Layer Bars with a buttery graham crust, chewy center, and caramelized edges, balanced with semisweet chocolate, less butterscotch, and unsweetened coconut so they stay rich without becoming candy-sweet.

Pan
9×13 in / 23×33 cm

Prep
15 min

Bake
25–30 min

Cool / Set
1½–2 hr

Yield
24 regular bars

Total time: 2 hours 10 minutes to 2 hours 45 minutes, plus an optional 20–30 minute chill for very clean cuts.

  • 9×13-inch / 23×33 cm light-colored metal baking pan
  • Parchment paper
  • Mixing bowl
  • Flat-bottom measuring cup or drinking glass for pressing the crust

Using a glass baking dish? The timing below is written for a light-colored metal pan. Follow your bakeware manufacturer’s temperature guidance and use the visual doneness cues instead of expecting the timing to transfer exactly.

  • 2 cups / 200 g finely ground graham cracker crumbs
  • ½ cup / 113 g unsalted butter, melted
  • ¼ teaspoon fine sea salt
  • 1 can sweetened condensed milk, 14 oz / 397 g, roughly 300 ml
  • 1 cup / about 170 g semisweet chocolate chips
  • ⅔ cup / about 110 g butterscotch chips
  • 1¼ cups / about 105 g unsweetened desiccated coconut, fine shred
  • 1 cup / about 105–110 g unsalted pecans, roughly chopped

Heat the oven to 350°F (175°C) with a rack in the middle. Line the pan with parchment, leaving enough overhang to lift out the cooled bars.

Mix the graham crumbs, butter, and salt until evenly moistened and able to clump when squeezed. Scatter the mixture across the pan, then press gently with a flat-bottom cup until the crust is level, cohesive, and no longer shifts.

Reserve about one-quarter of the can, roughly 100 g. Pour the rest over the crust in thin ribbons. If the condensed milk is very thick, transfer it to a microwave-safe bowl or measuring jug and warm it for 10–15 seconds so it flows without dragging up crumbs.

Scatter the chocolate chips, butterscotch chips, coconut, and pecans evenly over the surface, including the corners.

Drizzle the reserved condensed milk across the toppings and press very lightly so the loose pieces make contact with the sticky layers beneath.

Before baking: the bars should look generous and slightly unruly, with the toppings evenly scattered and lightly anchored by ribbons of condensed milk.

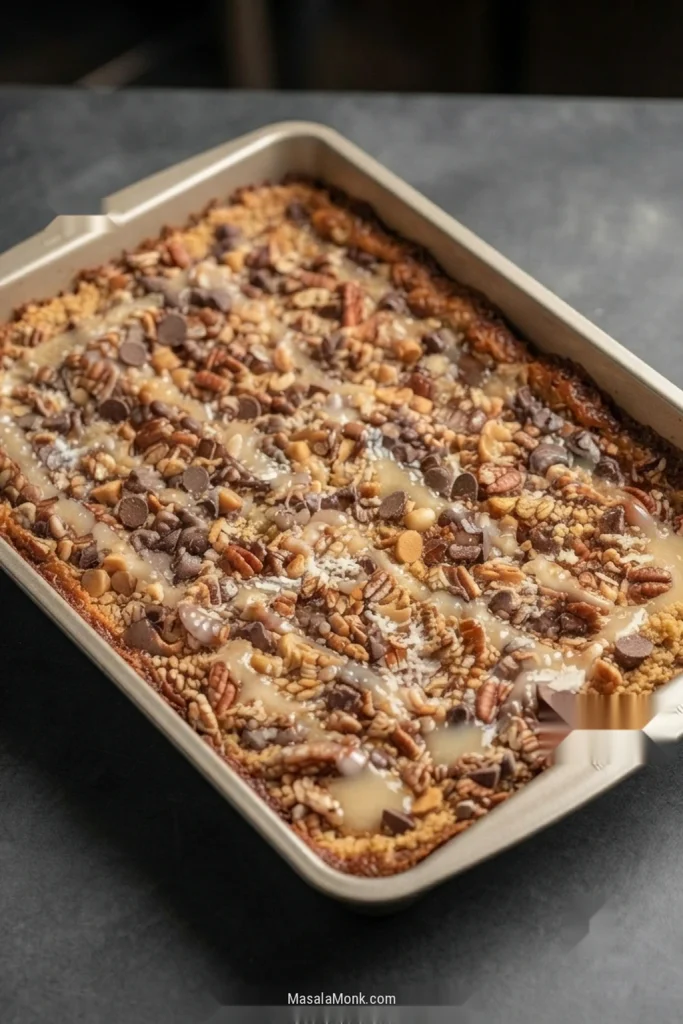
Start checking at 20–22 minutes. Most batches will take 25–30 minutes. Pull the bars when the perimeter is visibly bubbling and golden-brown, the coconut has toasted in patches, and the center looks set but still soft.

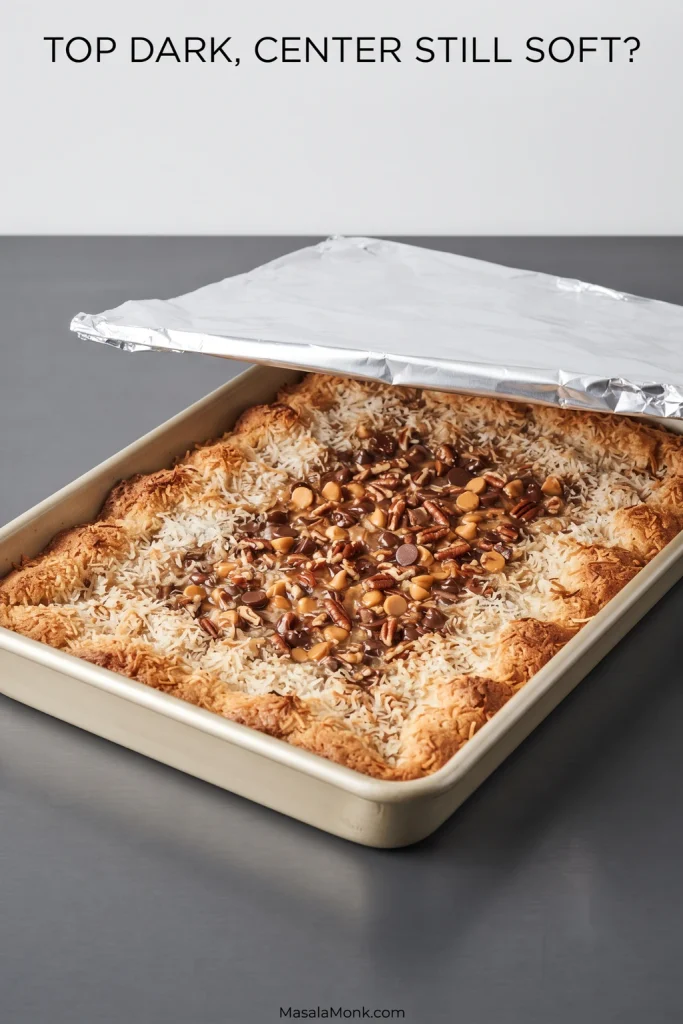
If the coconut darkens before the center is ready, lay a loose sheet of foil over the top and let the middle finish baking.

Rectangular metal pan of baked Magic Cookie Bars with browned edges, toasted coconut, pecans, chocolate and butterscotch chips, and a softer-looking center.
Use the whole pan as the checkpoint. The edges should look more advanced than the center, with scattered toasted coconut and a middle that has set without looking dry.

Let the bars cool for 1½–2 hours. Lift the slab out with the parchment and cut it into 24 bars. If you want especially neat edges, use the optional chilling and cutting method in the guide below.

The recipe above gets you to the finished bars; the guide below explains why the layers behave the way they do, how to read the bake, and how to fix the problems that most often show up.

What Are the Seven Layers, Really?

Magic Cookie Bars, Seven Layer Bars, and Hello Dolly Bars are essentially the same dessert family. Their formulas have moved through recipe boxes, community cookbooks, holiday trays, and condensed-milk labels for decades, so two households can remember the “same” bar a little differently.

By the late 1960s, Borden was already promoting Magic Cookie Bars made with Eagle Brand sweetened condensed milk, helping cement the name in American home baking. That familiar combination still appears in Eagle Brand’s Seven Layer Magic Cookie Bars.

You can see the “magic” in the method: ordinary pantry ingredients are layered straight into the pan and bake into one cohesive bar without making a conventional cookie dough.

  1. Butter
  2. Graham cracker crumbs
  3. Sweetened condensed milk
  4. Chocolate chips
  5. Butterscotch chips
  6. Coconut
  7. Pecans or walnuts

Butter and crumbs become one crust, of course, so you should not expect seven perfect stripes when you cut the bars.

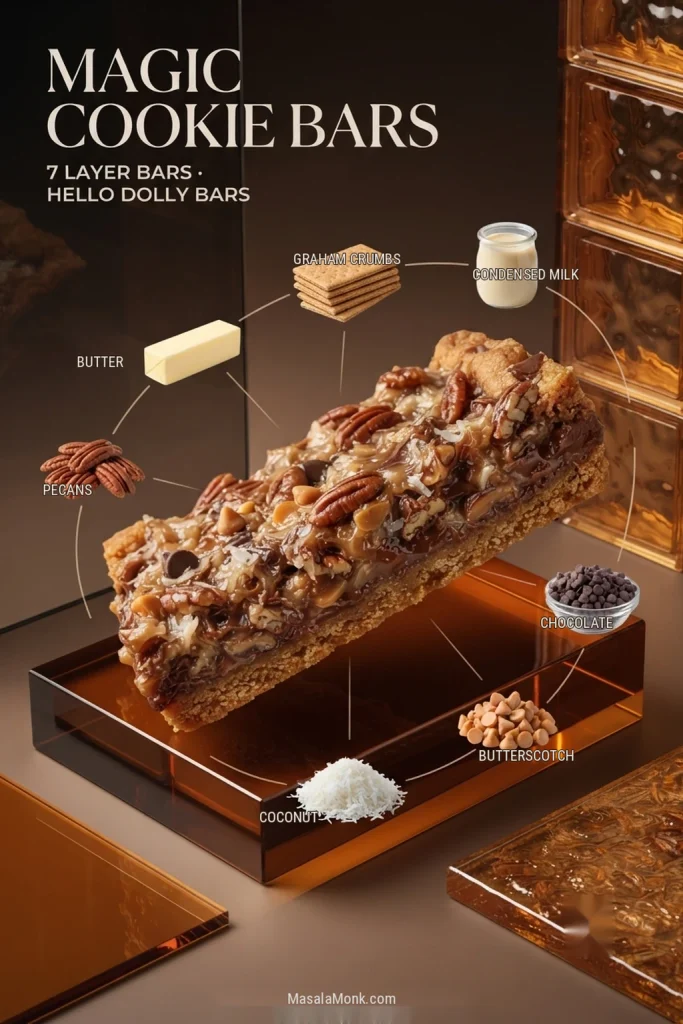
Ingredient diagram for Magic Cookie Bars showing butter, graham crumbs, sweetened condensed milk, chocolate, butterscotch, coconut and pecans around a finished bar.
Think of 7 Layer Bars by function, not by seven visible stripes: butter and crumbs form the foundation, condensed milk binds, chips add sweet pockets, coconut adds chew, and pecans add crunch.

Ingredients That Matter Most

Graham Crust

Hand squeezing buttered graham cracker crumbs into a cohesive clump above loose crumbs. Text reads “Clumps when squeezed.”
The goal is cohesion without compression. Once the crumbs hold together in your hand, pressing should make them level and stable rather than dense and hard.

Do you need to pre-bake the crust? Not for this method. The base bakes with the toppings; press it just until level and cohesive.

Sweetened Condensed Milk

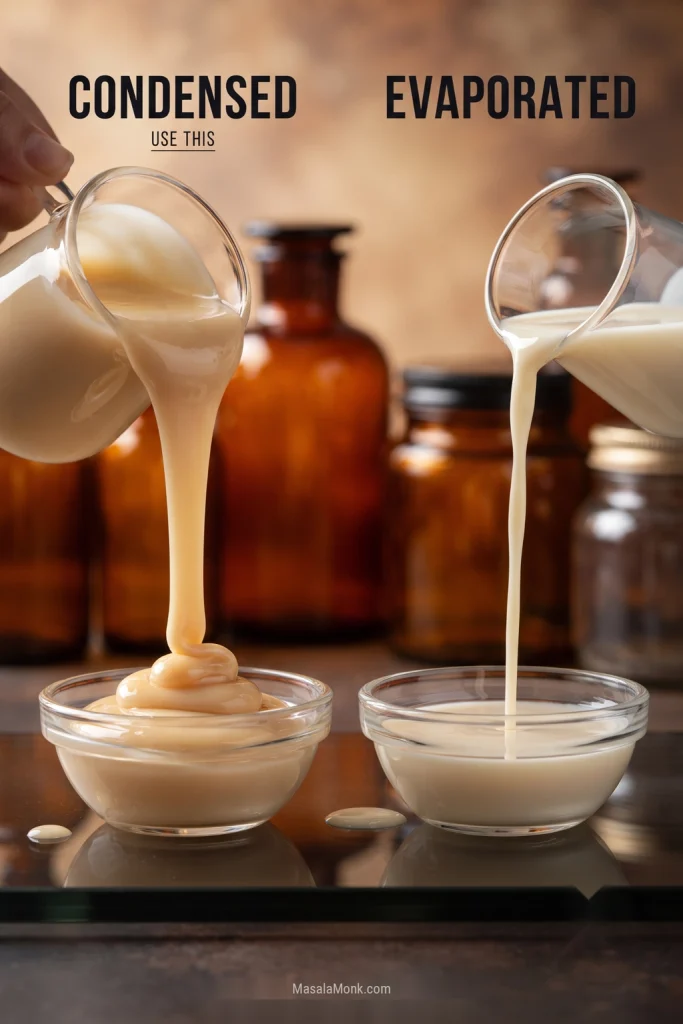
Side-by-side comparison of thick sweetened condensed milk and thinner evaporated milk, with condensed milk identified as the ingredient to use.
Use the pour as a quick check: sweetened condensed milk falls in a slow, heavy ribbon, while evaporated milk is much thinner and moves more like cream.

Chocolate, Butterscotch, Coconut & Pecans

Semisweet chocolate and unsweetened coconut keep the filling from becoming one-note sweet. Butterscotch stays for its familiar caramel flavor, just in a smaller amount than many old-school formulas use. Pecans bring toasted crunch, while a little salt keeps the richer layers from tasting flat.

That balance matters in the finished bar: toasted coconut and pecan crunch should still register against the chocolate instead of disappearing into one flat sweetness. Sweetened coconut works too if that is the version you remember; expect a sweeter result and keep an eye on the exposed strands as they brown.

Changing the coconut, nuts, or chips? Jump to the substitutions that make sense before you start swapping.

Condensed Milk First or Last?

Classic Magic Cookie Bar recipes disagree about where the condensed milk belongs. Some pour it directly over the crust; others drizzle it over the toppings.

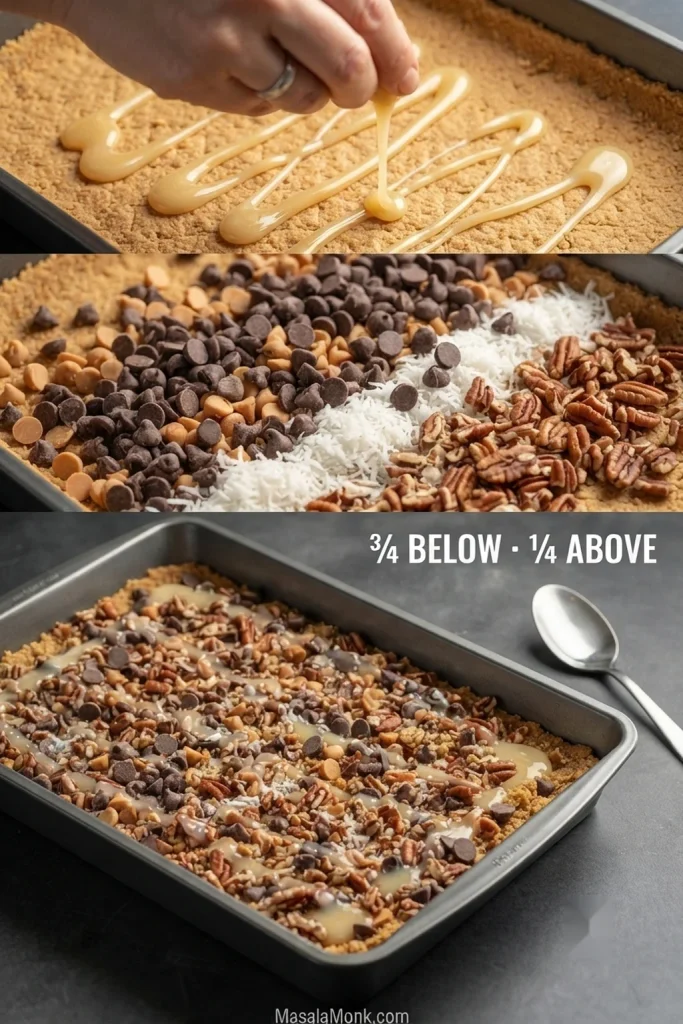
Three-step assembly graphic showing condensed milk poured over graham crust, chocolate, butterscotch, coconut and pecans added, then more condensed milk drizzled on top. Text reads “¾ below • ¼ above.”
The split keeps both surfaces working for you. Most of the milk stays close to the crust, while the finishing ribbons catch loose coconut and nuts without burying the toppings.

Building the bars now? Return to the recipe method.

Keep the Sweetness in Balance

The easiest way to make Magic Cookie Bars less sweet is to keep the full can of condensed milk, then use semisweet chocolate, less butterscotch, and unsweetened coconut.

Keeping the condensed milk matters because it also helps hold the layers together. Meanwhile, pecans and salt add contrast, and smaller pieces help too. This is one of those desserts where a modest square often tastes better than a heroic one.

Close-up of the browned outer edge of a Magic Cookie Bar showing graham crust, chewy filling, coconut, pecans, chocolate and butterscotch chips.
The edge shows why balance matters in such a rich bar. Deep caramelization, toasted coconut, and pecans add contrast, while chocolate and butterscotch remain distinct instead of collapsing into one flat sweetness.

Don’t Judge These Bars by the Clock

The clock gives you a window; the surface tells you when the bars are ready. Start checking at 20–22 minutes, with most metal pans finishing around 25–30 minutes.

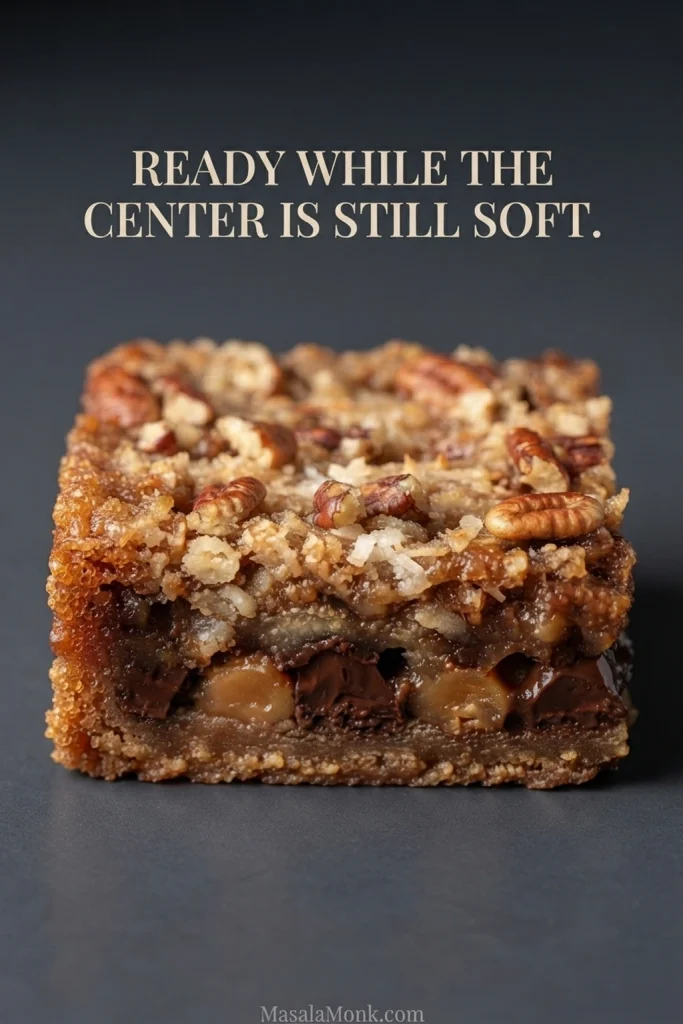
Close-up of a baked Magic Cookie Bar with browned edges and a softer center. Text reads “Ready while the center is still soft.”
“Soft” and “liquid” are the distinction that matters. A soft-set middle can finish firming as it cools; visible fluidity is the cue that the center still needs oven time.

The center is supposed to make you hesitate a little. Waiting until it looks dry or rigid risks taking the bars beyond the soft, chewy texture they develop as they cool.

The Bar Isn’t Finished When It Leaves the Oven

Fresh from the oven, the chocolate is melted, the condensed-milk layer is very soft, and the graham base is still fragile. The kitchen may already smell as though dessert is finished, but the texture is not there yet.

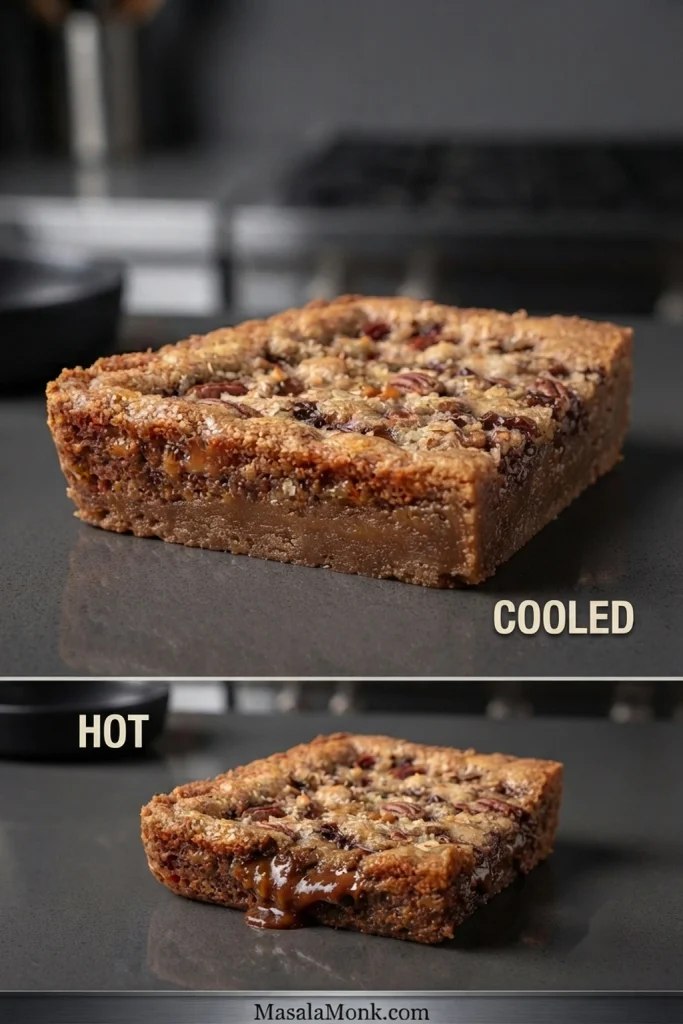
Comparison of a firm cooled Magic Cookie Bar and a hot bar with noticeably softer filling. Labels read “Cooled” and “Hot.”
The contrast here is the point: the hot bar can slump at the cut edge, while the cooled bar holds a cleaner layer structure without turning dry.

How to Cut Clean Magic Cookie Bar Squares

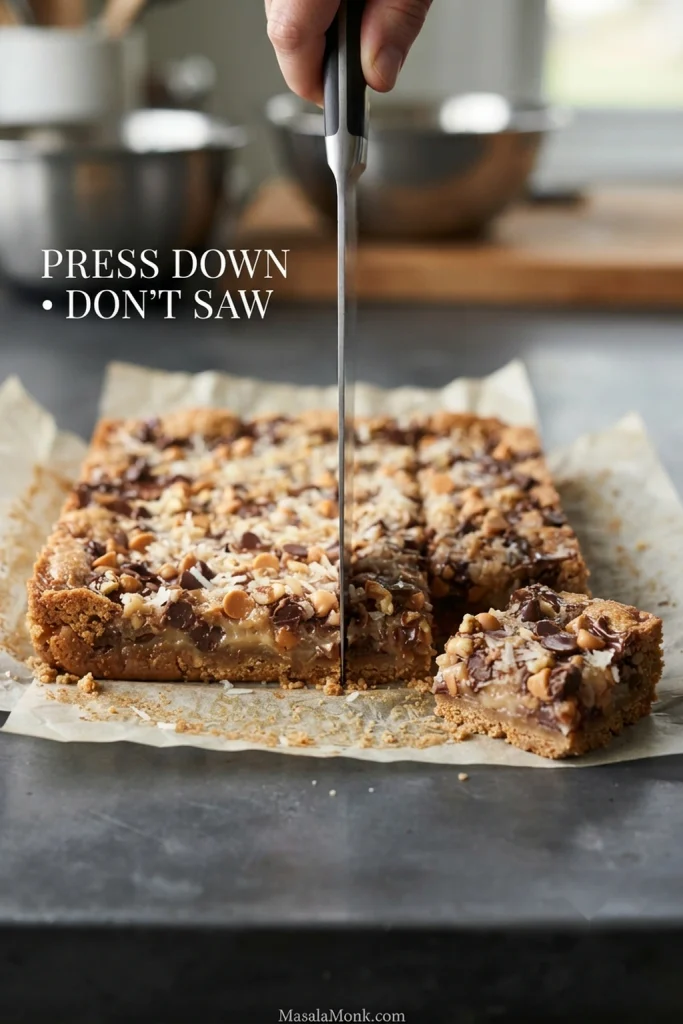
Hand pressing a long knife straight down through a cooled slab of Magic Cookie Bars on parchment. Text reads “Press down • don’t saw.”
A clean vertical edge is a useful clue that the slab was ready to cut. Ragged or dragged layers usually mean the bars were still too warm or the blade needed wiping.
  • 24 pieces: regular dessert bars
  • 30–36 pieces: potlucks, bake sales, and parties
  • 40–48 pieces: small cookie-tray bites

Troubleshooting Magic Cookie Bars

Why are my Magic Cookie Bars falling apart or still gooey?

Warm bars are naturally much softer than cooled ones. If the center had begun to set before the batch came out, let the bars cool fully before deciding they are underbaked. A center that was still visibly fluid usually needed more oven time.

Loose toppings can also make a square fall apart. The finishing drizzle and gentle press before baking help the upper layers settle together.

Why is the crust crumbly—or too hard?

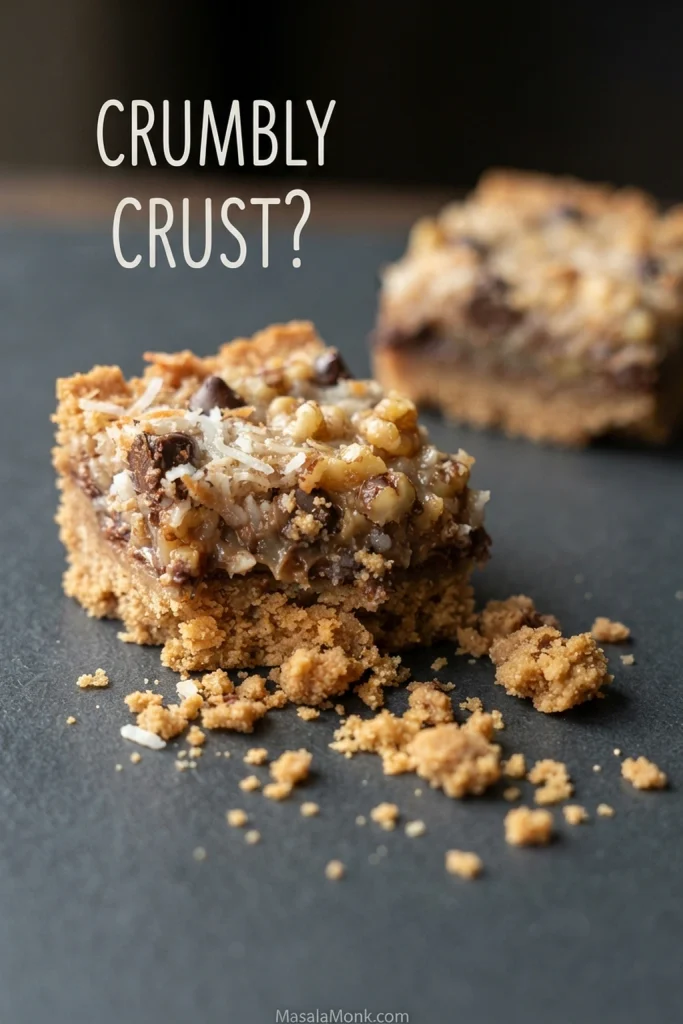
Magic Cookie Bar with its graham cracker base breaking into loose crumbs. Text reads “Crumbly crust?”
Look at the type of break, not just the crumbs on the plate. A weak, sandy base suggests poor cohesion; a dense, brittle base points more toward overpacking.

Use finely ground crumbs and mix until evenly moistened. Once the base is level and stops shifting beneath the measuring cup, stop pressing.

Why is the crust greasy?

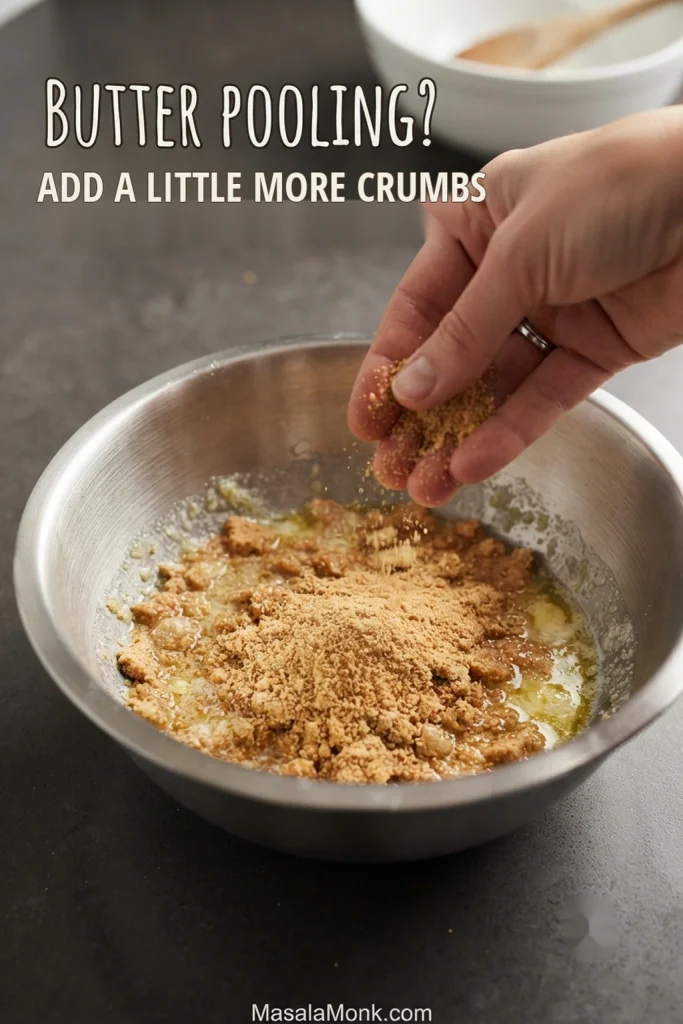
Hand adding graham cracker crumbs to a bowl of wet crumb mixture with visible melted butter. Text reads “Butter pooling? Add a little more crumbs.”
Stop adjusting once the mixture looks evenly damp rather than shiny. It should clump cleanly without leaving visible free butter around the crumbs.

Why is the coconut dark before the center is ready?

Pan of Magic Cookie Bars with browned coconut on top and a loose sheet of foil being positioned over the pan. Text asks “Top dark, center still soft?”
Watch the exposed coconut, especially near the perimeter. Uneven browning is normal; intervene only when the top is clearly getting ahead of the still-soft center.

Quick fixes for a few other problems

  • Condensed milk pulls crumbs from the crust: warm it briefly and pour it in ribbons instead of repeatedly spreading it.
  • Toppings fall off: use the reserved finishing drizzle and press the surface lightly before baking.
  • Bars stick to the pan: line the baking pan with a parchment sling before building the layers.

Substitutions That Make Sense

Leaving out either coconut or nuts is straightforward; leaving out both removes a large share of the topping. When one ingredient disappears, replace texture only if you miss it instead of automatically filling the space with more sweet chips.

ChangeWhat to do
No coconutOmit it. If the top feels sparse, add some extra pecan or coarsely crushed pretzel for texture.
No nutsLeave them out for a softer bar, or use some crushed pretzel for crunch.
No coconut and no nutsRemoving both takes away a large amount of solid topping, so use a recipe specifically balanced for both omissions instead of treating them as a simple swap.
No butterscotch chipsOmit them for a more chocolate-forward bar, or replace only part of the amount with another chip or some toffee to keep the sweetness in balance.
Walnuts instead of pecansSwap directly.
Less-sweet chocolateReplace part of the semisweet chocolate with dark or bittersweet chips.
Sweetened coconutUse the same general amount, but expect a sweeter result and potentially faster browning.
No graham crackersUse plain digestive biscuits by weight. Brands vary in fat and crumb texture, so use the same clump test and adjust the butter slightly if the crumbs seem unusually dry or greasy.

Brownie batter, blondie dough, and chocolate-chip-cookie dough are different kinds of bases, not simple graham-crust swaps. If a thick cookie-dough base is what you actually want, Cookie Pie is built around that deeper center and its longer bake.

Make Ahead, Store & Freeze

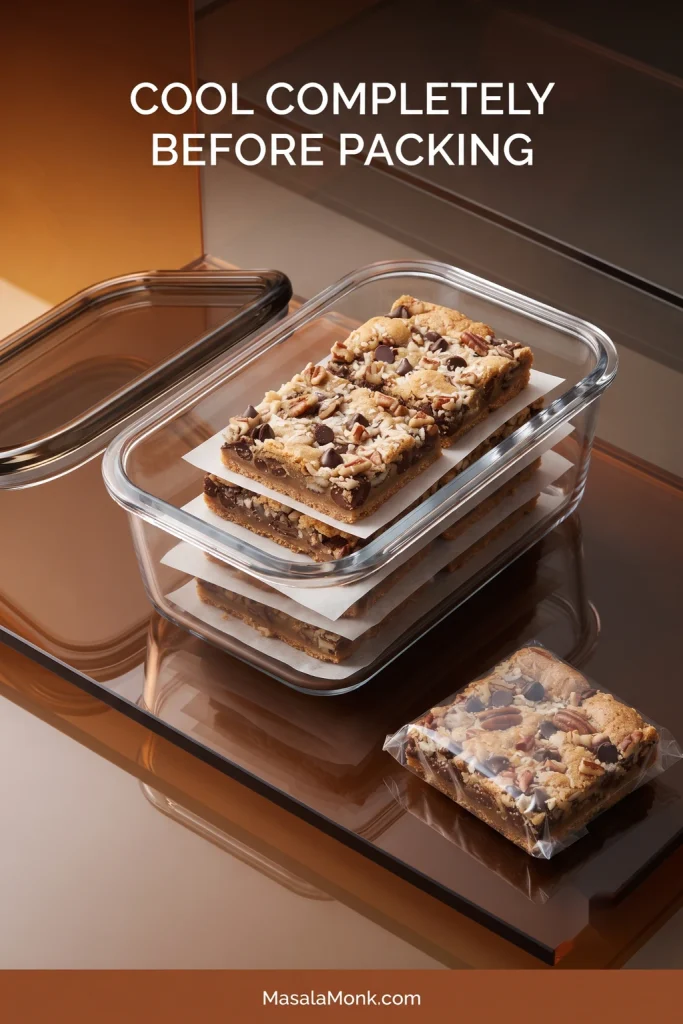
Cooled Magic Cookie Bars stacked in glass storage containers with parchment between the layers, with one separately wrapped bar nearby. Text reads “Cool completely before packing.”
Parchment does more than keep the container tidy. It separates sticky tops when the bars are stacked, while a snug airtight container helps protect the texture during storage.

Room temperature: Keep completely cooled bars airtight for 3 days. Put parchment between stacked layers.

Refrigerator: Store airtight for up to 1 week. Let the bars sit briefly at room temperature when you want a softer, chewier texture.

Freezer: Freeze completely cooled bars airtight for up to 3 months, with parchment between layers or individual pieces wrapped separately.

Do not package or freeze the bars while they are warm. Trapped steam can soften the crust and leave condensation on the sticky surface.

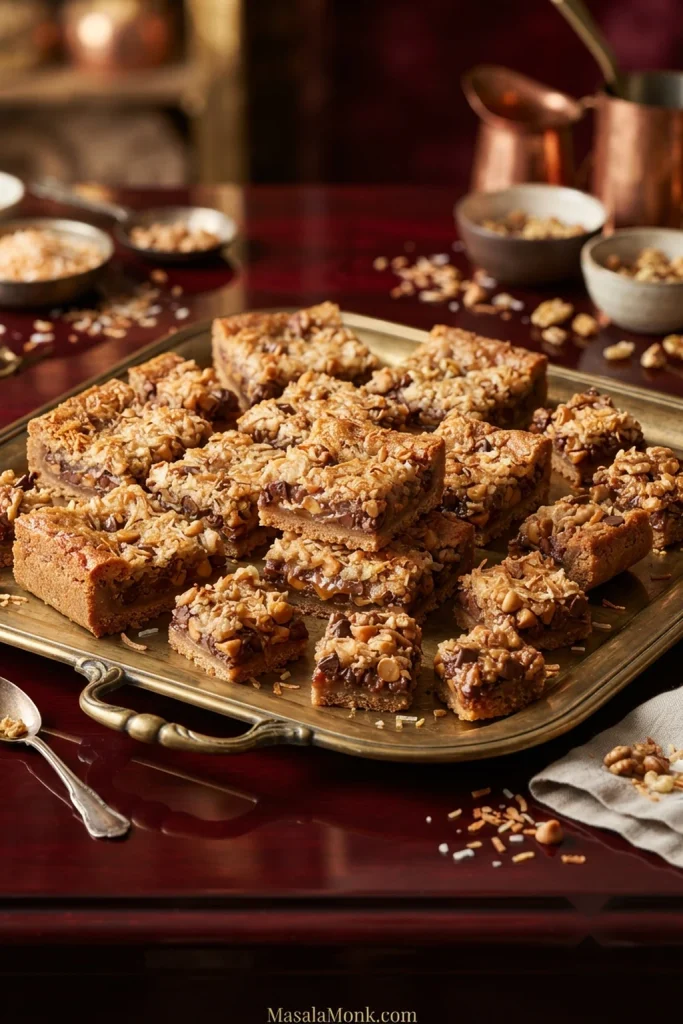
Serving tray filled with small Magic Cookie Bars topped with coconut and pecans on a warm holiday-style table setting.
Smaller squares work especially well on a mixed dessert tray. They still carry the full crust-to-topping balance, but leave room for people to sample more than one thing.

Whatever your family calls them, give the bars their full cooling time before deciding whether you got them right. By then, the messy-looking layers should have settled into what you wanted: a buttery graham base, chewy middle, toasted coconut, pockets of chocolate and butterscotch, and pecan crunch in every square.