
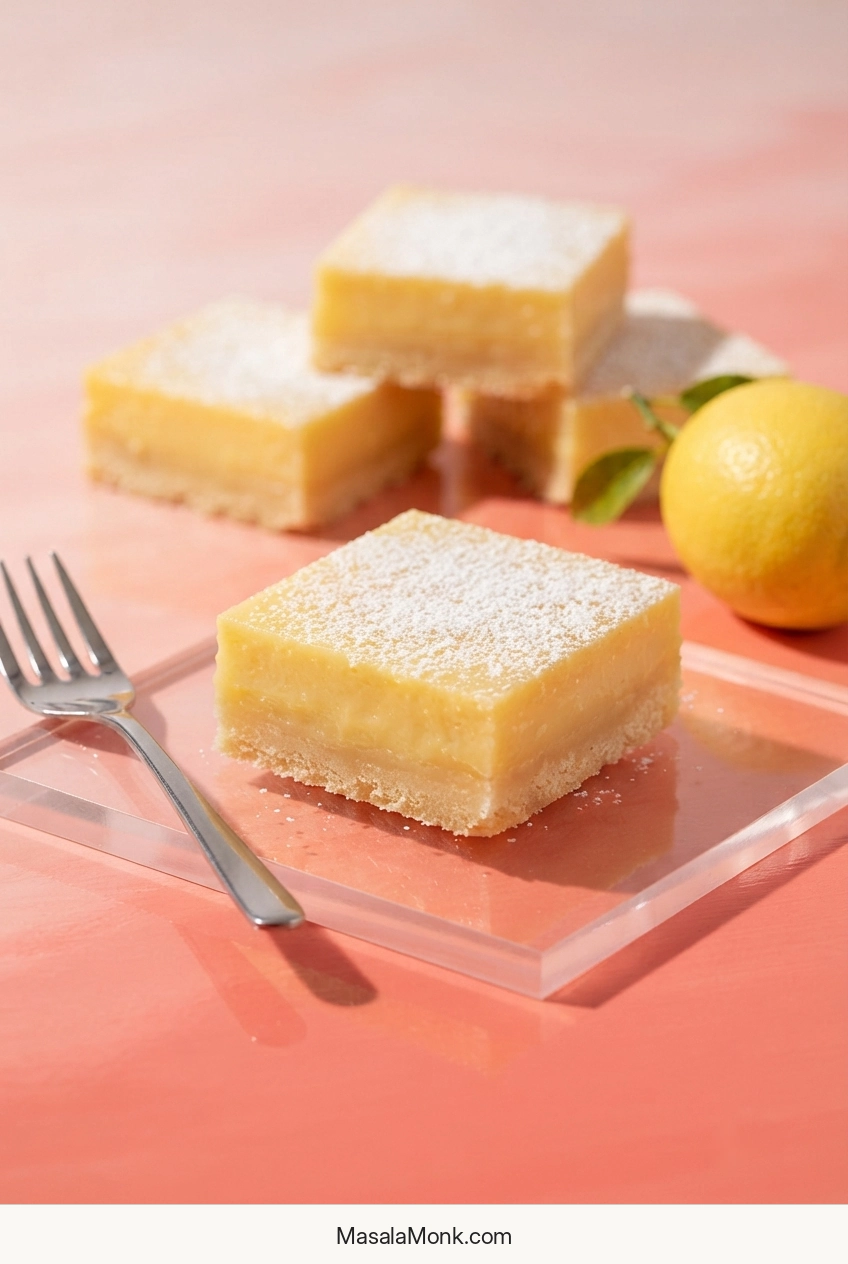
Homemade lemon bars—also called lemon squares—ask you to trust a filling that looks far too thin when it first goes into the oven. It sits over freshly baked shortbread, pours almost like cream, and is still surprisingly soft when the pan comes back out.
After cooling and chilling, that loose mixture becomes a smooth, bright lemon layer that holds its shape when cut. Underneath, the shortbread stays buttery and crisp-tender, substantial enough to support the filling without taking over the bite.
Classic Lemon Bars Recipe
Bright lemon custard over tender shortbread, baked only until the center moves softly and then chilled until fully set. Have the filling ready before the crust comes out so the two layers can go straight back into the oven.
Equipment
- 9 × 13-inch / 23 × 33 cm light-colored metal baking pan
- Parchment paper
- Two mixing bowls, whisk and silicone spatula
- Fine grater or Microplane and citrus juicer
- Flat-bottomed measuring cup or glass for pressing the crust
- Kitchen scale, recommended
- Long sharp knife for cutting
Pan note: A light-colored metal pan gives the most predictable bake for these timings. If your bare aluminum pan has previously given acidic foods a metallic taste, use glass instead and follow the visual cues rather than trying to match the timing exactly.
Shortbread Crust
- 1 cup / 226 g unsalted butter, melted and cooled for a few minutes
- 1¾ cups plus 2 tablespoons / 225 g all-purpose flour
- ⅓ cup / 40 g cornstarch
- ¾ cup / 90 g powdered sugar
- ½ teaspoon fine salt
- 1 teaspoon vanilla extract, optional
Using cups? Spoon the flour into the measuring cup and level the top instead of scooping straight from the bag. Packed flour can make the chilled crust much harder than intended.
Lemon Filling
- 2 cups / 400 g granulated sugar
- 2 tablespoons finely grated lemon zest, from 2–4 of the lemons
- 6 tablespoons / 46 g all-purpose flour
- ¼ teaspoon fine salt
- 6 large eggs
- 1 cup / 240 ml freshly squeezed lemon juice, usually from 5–7 lemons total
- Powdered sugar, for finishing
Zest before you juice. Grate only the yellow outer peel and stop before you reach the bitter white pith. Then squeeze the same lemons and measure the juice. Once you have 1 cup / 240 ml, stop.
Method
Prepare the Crust and Lemon Filling
- Heat the oven. Set a rack in the center and heat the oven to 350°F / 175°C conventional. For a fan oven, use 160°C and start watching the crust a little early. Line the pan with a parchment sling, leaving overhang on two opposite sides so the chilled slab can be lifted out later.
- Mix the shortbread. Stir together the flour, cornstarch, powdered sugar and salt. Add the melted butter and optional vanilla. Mix until no dry flour remains. The mixture will look crumbly but hold easily when squeezed.
- Press an even base. Scatter the mixture over the whole pan before pressing it down. Use the bottom of a measuring cup or glass to level it, paying particular attention to the corners and perimeter. Close visible cracks or thin spots, then leave it alone.
- Par-bake the crust. Bake for 20–24 minutes. The surface will look dry and set, with light-golden color beginning around the edges. Make the filling while the crust is in the oven.
- Make the lemon sugar. Put the granulated sugar and zest in a large bowl. Rub them together with your fingertips for 30–60 seconds. The sugar will become damp, and the bowl should smell much more strongly of fresh lemon. Whisk in the flour and salt.
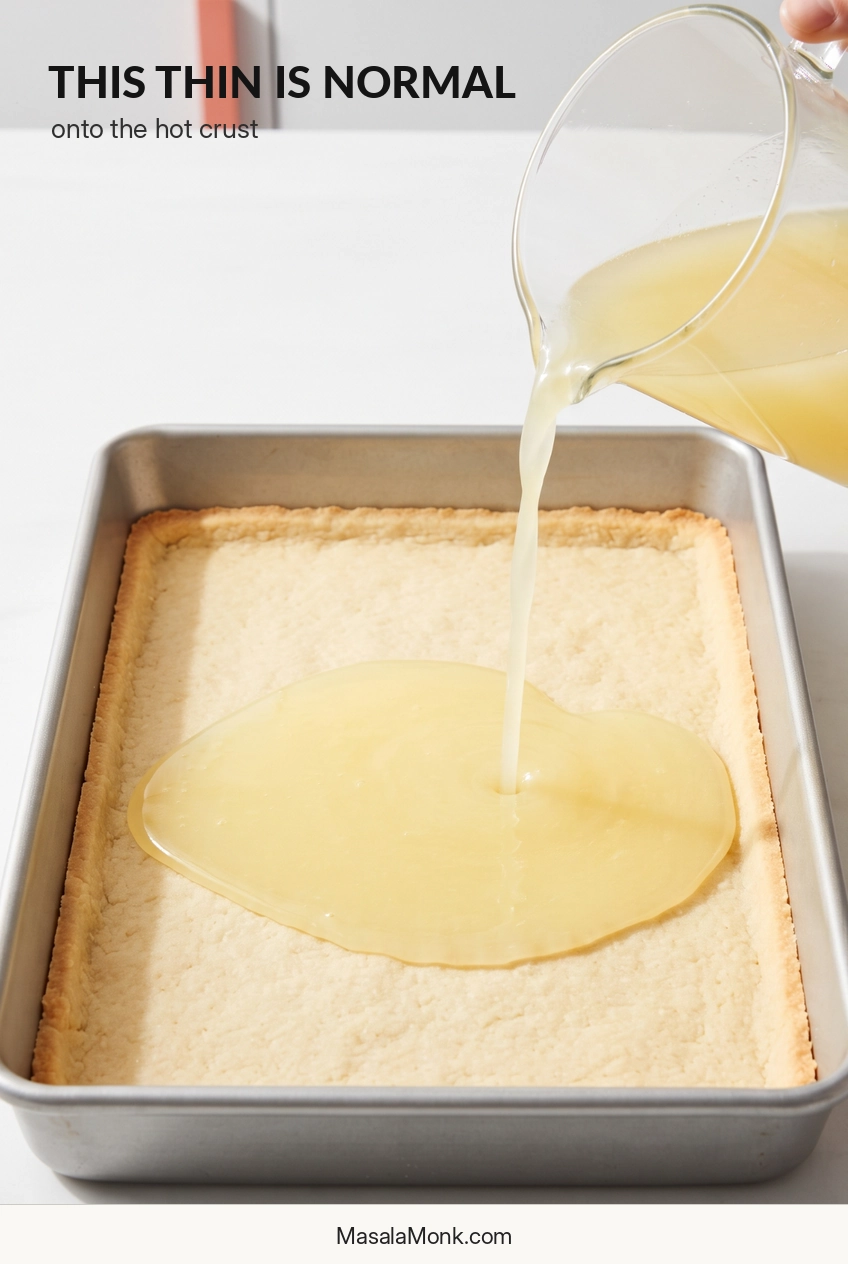
- Mix the lemon filling. Whisk in the eggs until evenly combined, then add the measured lemon juice and whisk just until smooth. The mixture will be very thin and easy to pour. If this is your first batch, this is often the point that looks wrong. It isn’t.
Bake, Chill and Finish
- Pour onto the hot crust. Take the crust from the oven and reduce the temperature to 325°F / 165°C conventional; for a fan oven, use 150°C. If you see an obvious crack or edge gap, gently nudge the surrounding shortbread closed with the back of a spoon before pouring in the filling. If a thick layer of foam has collected on top, let it settle briefly and give it one gentle stir. Pour the filling onto the hot crust and return the pan straight to the oven.
- Bake until the center moves as one layer. Begin checking at about 22 minutes. The edges will be set while the center moves softly when the pan is nudged. If liquid visibly ripples or sloshes underneath, give it a few more minutes. Most pans will finish in roughly 22–27 minutes.
- Cool, then chill. Set the pan on a rack until the filling and pan are no longer warm, usually 1–1½ hours. Refrigerate for at least 3 hours. Cutting while the custard is warm or only partly chilled turns defined layers into a much messier job. Overnight chilling is excellent when neat slices matter.
- Cut and finish. Lift the cold slab out by the parchment. Use a long sharp knife and wipe the blade after each cut. Dust with powdered sugar shortly before serving.
Cold from the refrigerator, the lemon filling is silky and firm enough to hold its shape, with lemon arriving before the butter and shortbread. As the chill comes off, both layers soften slightly and the citrus aroma comes forward.
Lemon Bar Guide
What the Pan Should Look Like
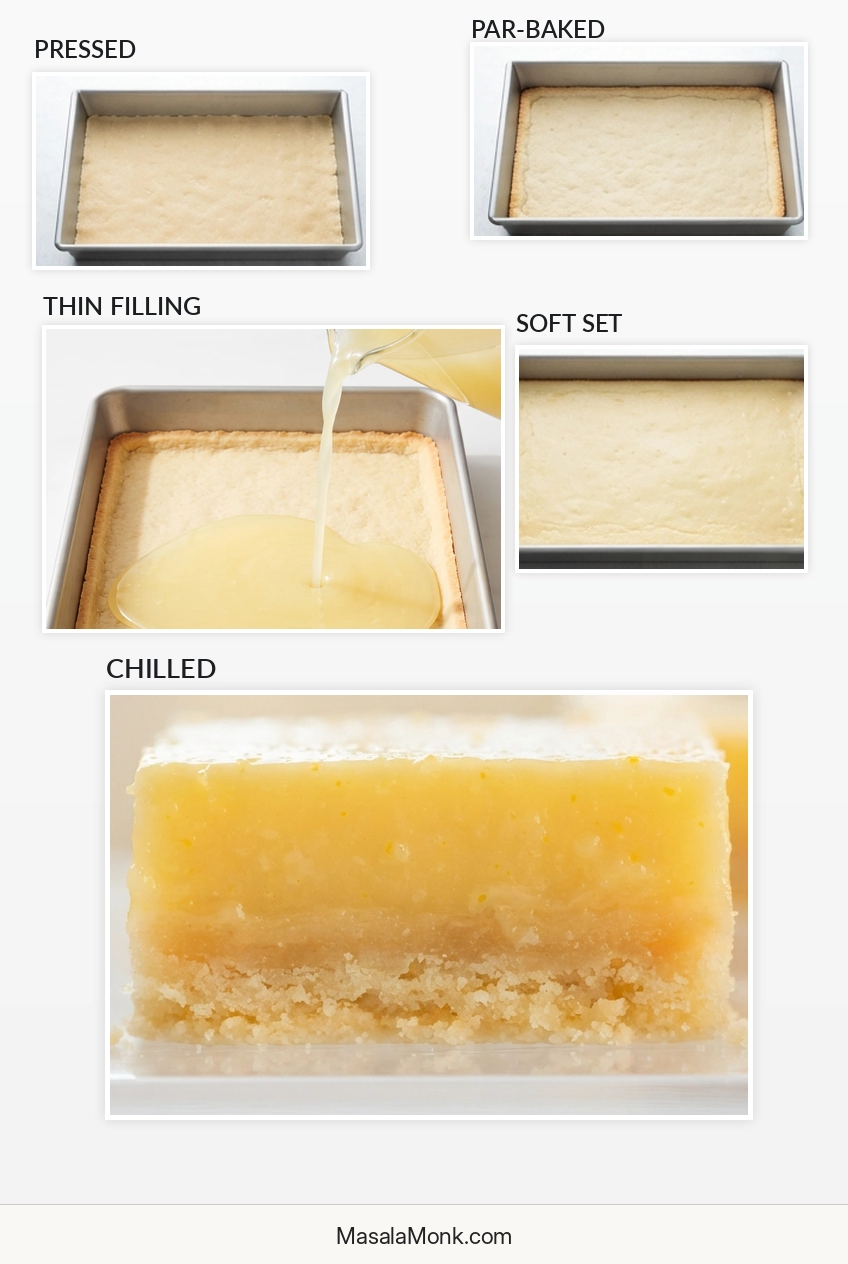
The crust, raw filling and finished custard look quite different from one another. These are the checkpoints worth remembering.
| Stage | Look for |
|---|---|
| Pressed crust | An even layer reaching the corners and perimeter, without obvious cracks or thin channels. |
| Par-baked crust | A dry, set surface with the first light-golden color around the edges. |
| Raw filling | Thin, smooth and easily pourable. A few small bubbles are normal. |
| Finished bake | Set edges and a center that moves gently as one soft layer, with no liquid sloshing underneath. |
| Fully chilled | Firm enough to lift and slice neatly, but still silky when you bite into it. |
The Shortbread Has Two Jobs
It needs to taste like shortbread, and it has to support a bowlful of liquid filling. A very thick base may feel safer under all that liquid, but too much shortbread leaves you with a bar that tastes mostly of crust.
A little cornstarch takes the place of some flour and helps the shortbread stay tender once the bars are cold. Spread the crumbs throughout the pan before pressing them down. Even thickness matters more than brute force.
Firmly packed is enough. Once the crust is level and the obvious gaps are gone, leave it alone. Butter-rich shortbread is naturally firmer when cold.
Gluten-free: For gluten-free lemon bars, use a recipe developed for the particular flour blend you plan to use instead of making a straight 1:1 substitution in this shortbread. Different blends absorb butter differently.
Lemon Juice and Zest
Lemon juice provides most of the acidity and the bulk of the liquid; zest adds concentrated aromatic citrus oils. For stronger lemon aroma, add more zest. Extra juice changes the amount of liquid the custard has to set. Lemons vary widely in size and juiciness, so measure the juice rather than relying on the number of lemons.

Fresh juice is the better default when lemon is the main flavor. Serious Eats’ fresh-versus-bottled testing found the difference mattered most in lemon-forward recipes, while fresh zest narrowed the gap. If you don’t have enough lemons for a full cup, bottled juice plus fresh zest is the better fallback.
Meyer lemons work at the same measured juice volume and give a sweeter, more floral result with less sharp acidity.
Can you use prepared lemon curd instead? Not as a direct swap. Lemon curd has already been cooked and balanced differently, so it will not behave like the raw egg-lemon filling used here.
When to Add the Filling
Pour the filling onto the crust while it is still hot. The residual heat begins setting the custard where it meets the shortbread, helping the two layers stay where they belong.
Keep the handoff short. Lower the oven temperature, pour in the filling and send the pan straight back in.
How to Tell When Lemon Bars Are Done
Begin checking around 22 minutes. Lemon bars are ready when the edges are set and the center moves softly as one layer when you gently nudge the pan. If liquid visibly ripples or sloshes underneath, keep baking.
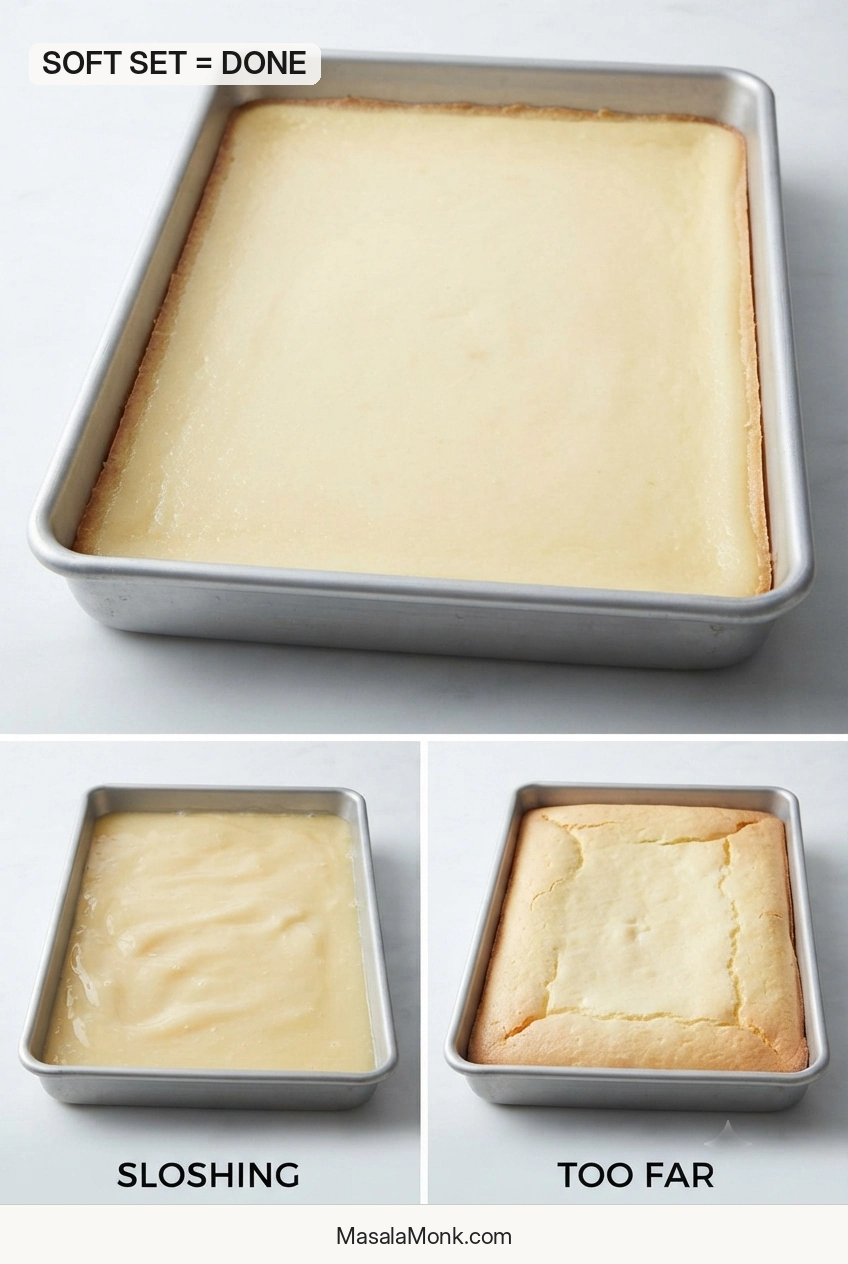
| What you see | What to do |
|---|---|
| Liquid ripples or sloshing | Keep baking and check again after a few minutes. |
| Set edges; center moves softly as one layer | Take the pan out. Cooling and chilling will firm it substantially. |
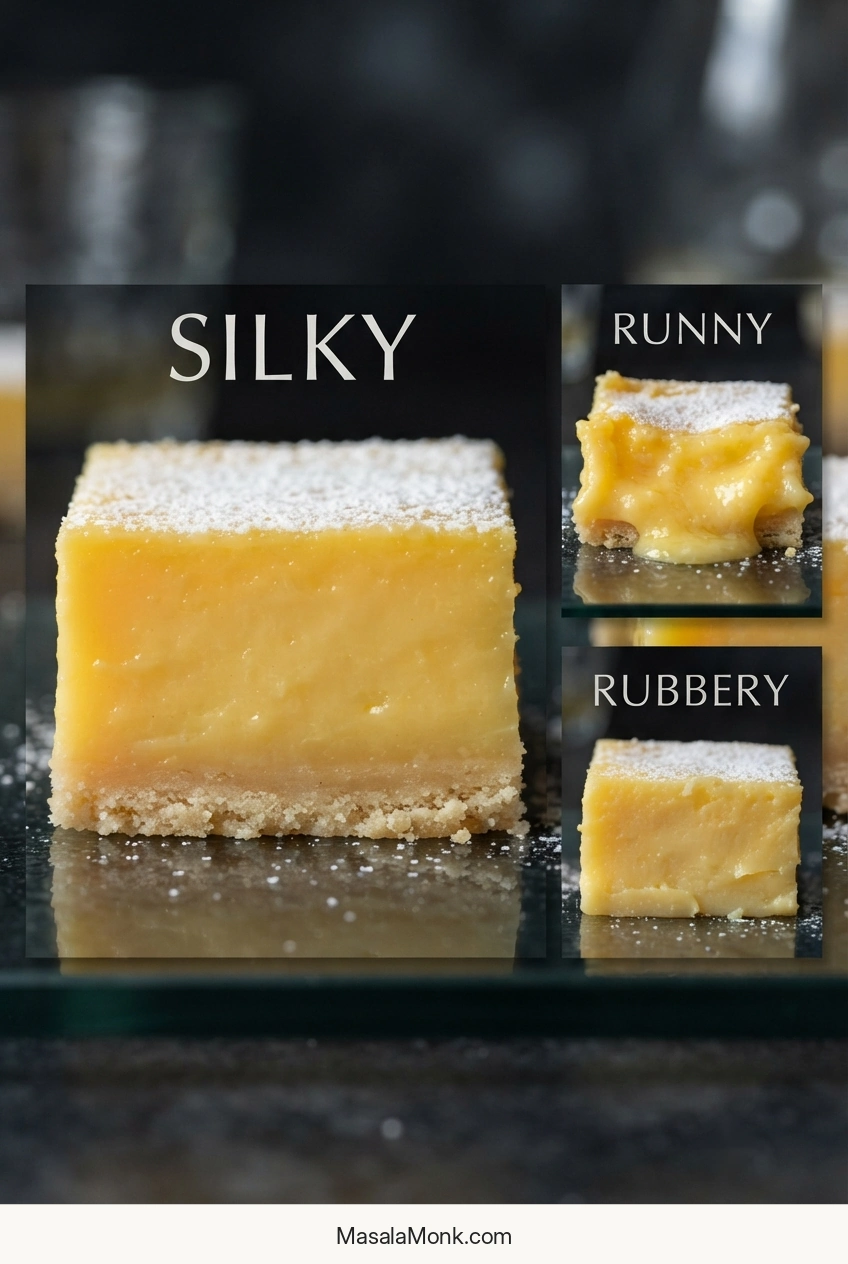
| Heavy puffing, strong browning or a rigid hot center | The custard is heading toward a firmer, more rubbery texture. |
Glass, dark nonstick and light metal pans heat differently, and home ovens are rarely perfectly calibrated. Use the timing as a guide, then watch the center. Chilling finishes the texture; it does not finish the cooking.
If the texture already looks wrong, jump to troubleshooting.
Cooling and Cutting
Let the pan cool until it is no longer warm before covering and refrigerating it. Cover too early and trapped steam can settle back onto the lemon layer as condensation.
What the Chilled Layers Should Look Like
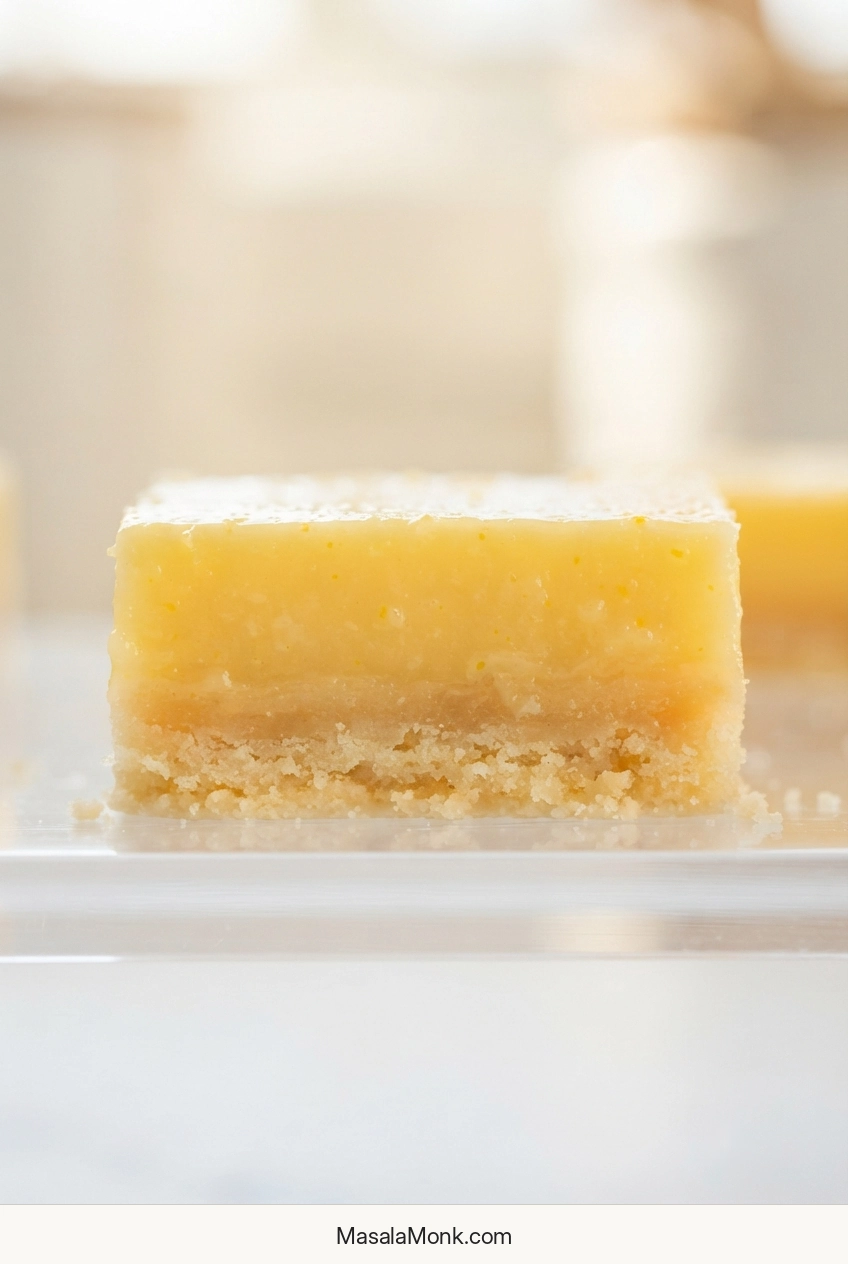
The long chill is worth it. Once the slab lifts out in one piece, the layers are easy to see: lemon on top, shortbread underneath, without the two smearing together as you cut.
How to Cut Clean Lemon Bar Squares
Use a long sharp knife and wipe it after each cut. That is mostly about presentation—the bars taste just as good if the edges are less tidy. Cut the slab into 15 generous bars, 20 standard squares or 24 smaller pieces, depending on how you plan to serve them.
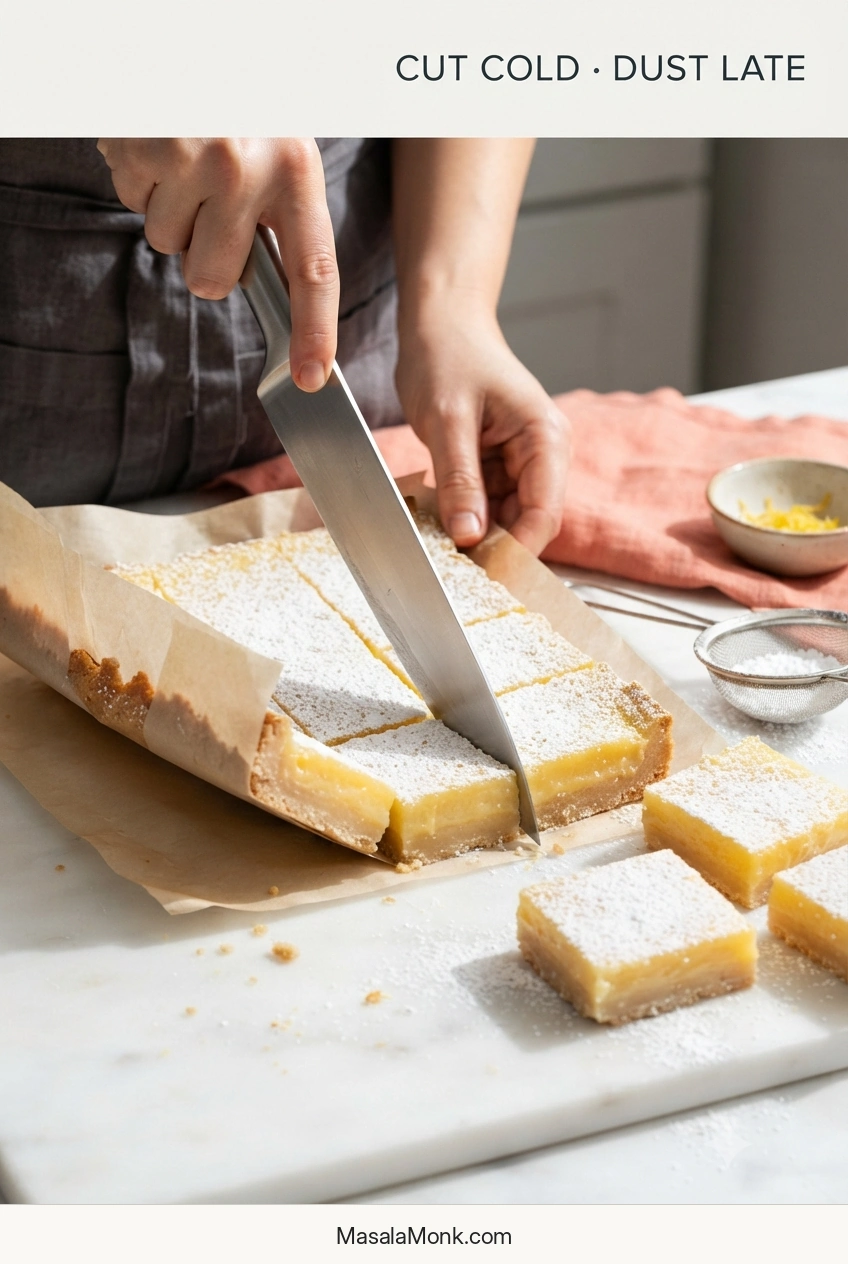
Dust with powdered sugar after cutting and preferably shortly before serving. It gradually absorbs moisture from the surface and disappears, which is normal.
For a softer bite and stronger lemon aroma, let the bars sit out for about 10–15 minutes before eating.
Troubleshooting Lemon Bars
The crust floated or the filling baked underneath it
A lemon-bar crust floats when thin filling finds a crack, thin spot or edge gap, gets underneath the shortbread and pushes it upward as it bakes.
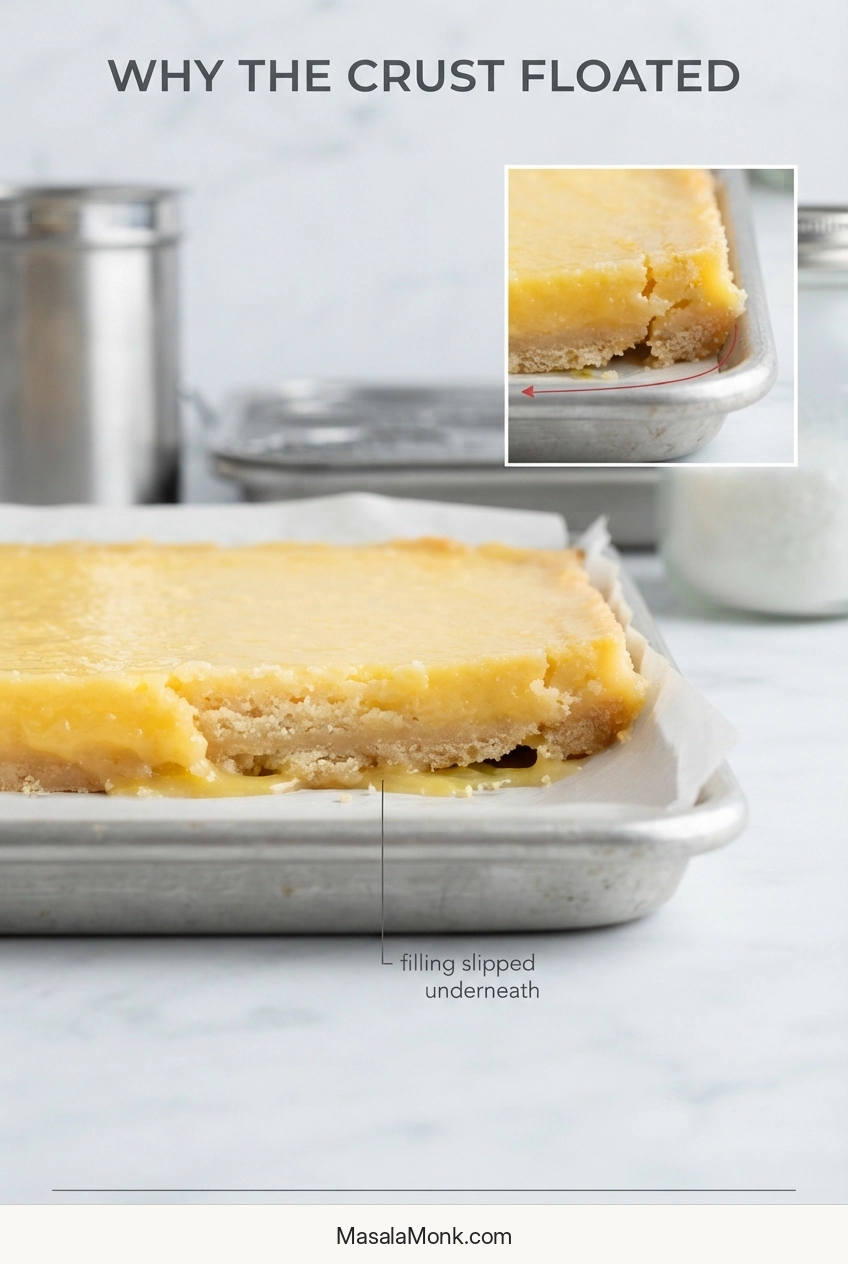
Next time, press the base evenly to the perimeter so the thin filling has no easy route underneath. If the slab is fully set and intact despite the layers ending up upside down, you may be able to chill it thoroughly, invert it and cut it.
The filling is still runny
If the center was actually sloshing instead of moving softly as one layer, the bars were underbaked. If you catch that as soon as the pan comes out, return it to the oven and check again after a few minutes.
A smaller pan, extra lemon juice or an oven running cool can all lengthen the bake.
The filling tastes eggy or feels rubbery
If the filling is firm and rubbery as well as eggy, overbaking is the likely cause. If the texture is good but the flavor seems egg-forward, use more zest next time—not extra juice. Zest strengthens the lemon aroma without adding more liquid.
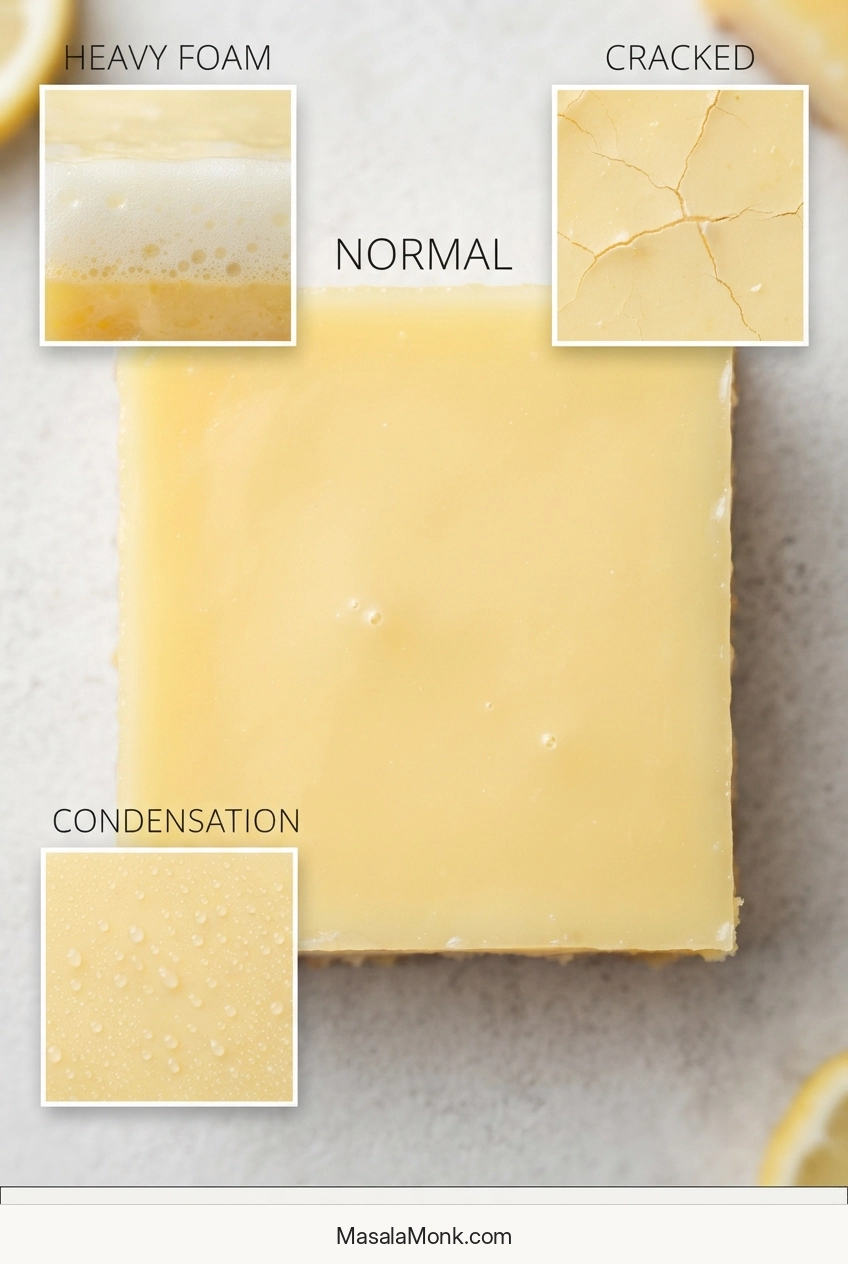
There are white bubbles or foam on top
A few white bubbles are cosmetic. Ignore them. Heavy foam usually means the filling was whisked harder than necessary; next time, let it settle briefly before pouring.
The filling has flour lumps
If you see flour lumps before pouring, press the filling through a fine-mesh sieve. Scrape any zest caught in the sieve back into the bowl. Next time, whisk the flour into the lemon sugar before adding the eggs and juice.
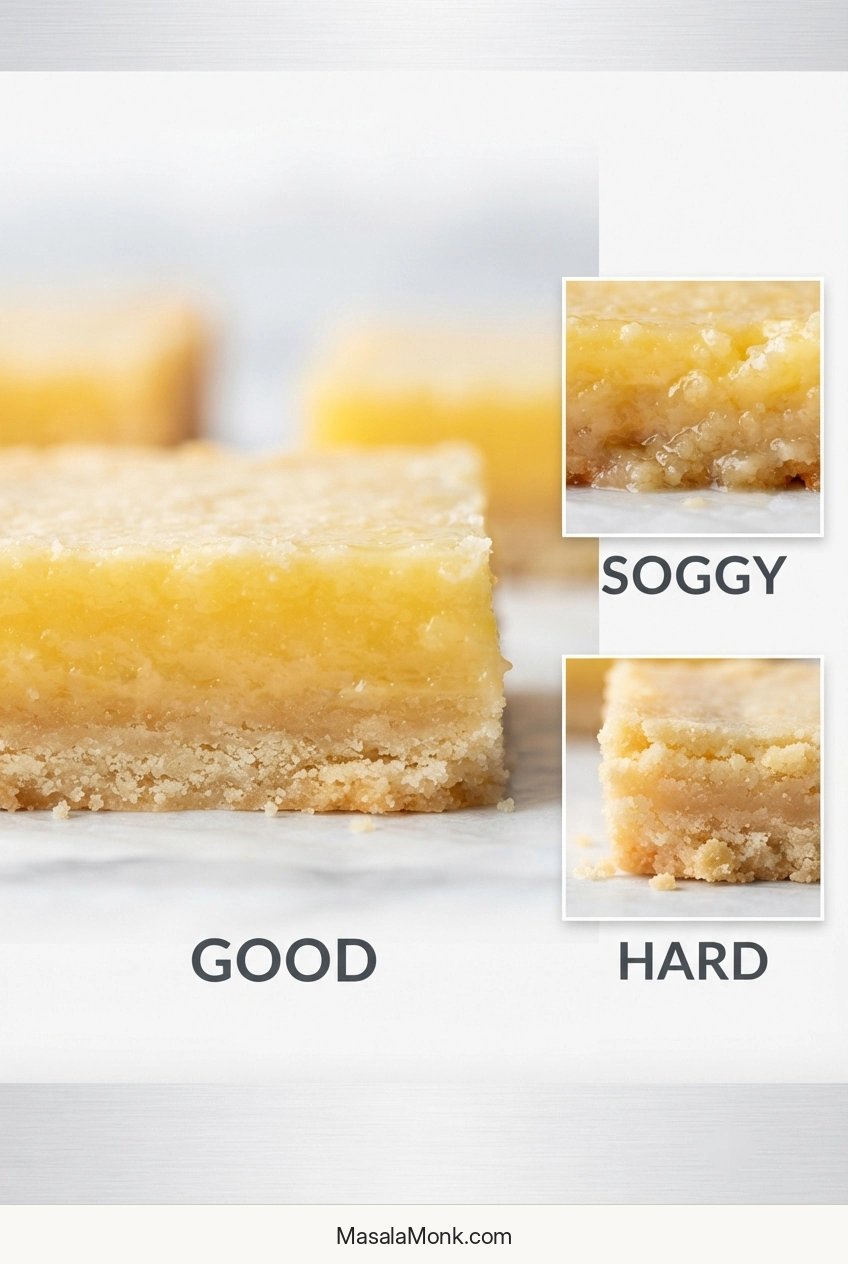
The crust is soggy or very hard
For a soggy base, first look back at the par-bake. The surface needed to be dry and set before the lemon mixture went on. Filling that slipped underneath the crust can cause a similar texture, and several days in the refrigerator will soften even a well-baked base.
A very hard crust points toward too much flour, excessive par-baking, an unusually thick layer or heavy compaction. Let one bar lose some refrigerator chill before deciding; butter-rich shortbread is much firmer when cold.
The top looks pale, cracked or wet
Pale yellow is normal. It says very little about how lemony the bars will taste. Cracks can come with excess air or too much oven time. If a properly set surface looks wet after chilling, condensation is a likely cause, especially if the pan was covered while warm.
The bars taste metallic
If lemon or other acidic foods have picked up a metallic taste from your pan before, use glass next time and avoid letting aluminum foil touch the filling. Stainless-steel bowls, whisks and utensils are fine.
Ugly does not always mean ruined. Surface bubbles are cosmetic. A set slab with inverted layers may still be usable. And if the bars break while cutting but taste good, spoon the pieces into glasses with whipped cream or yogurt and berries.
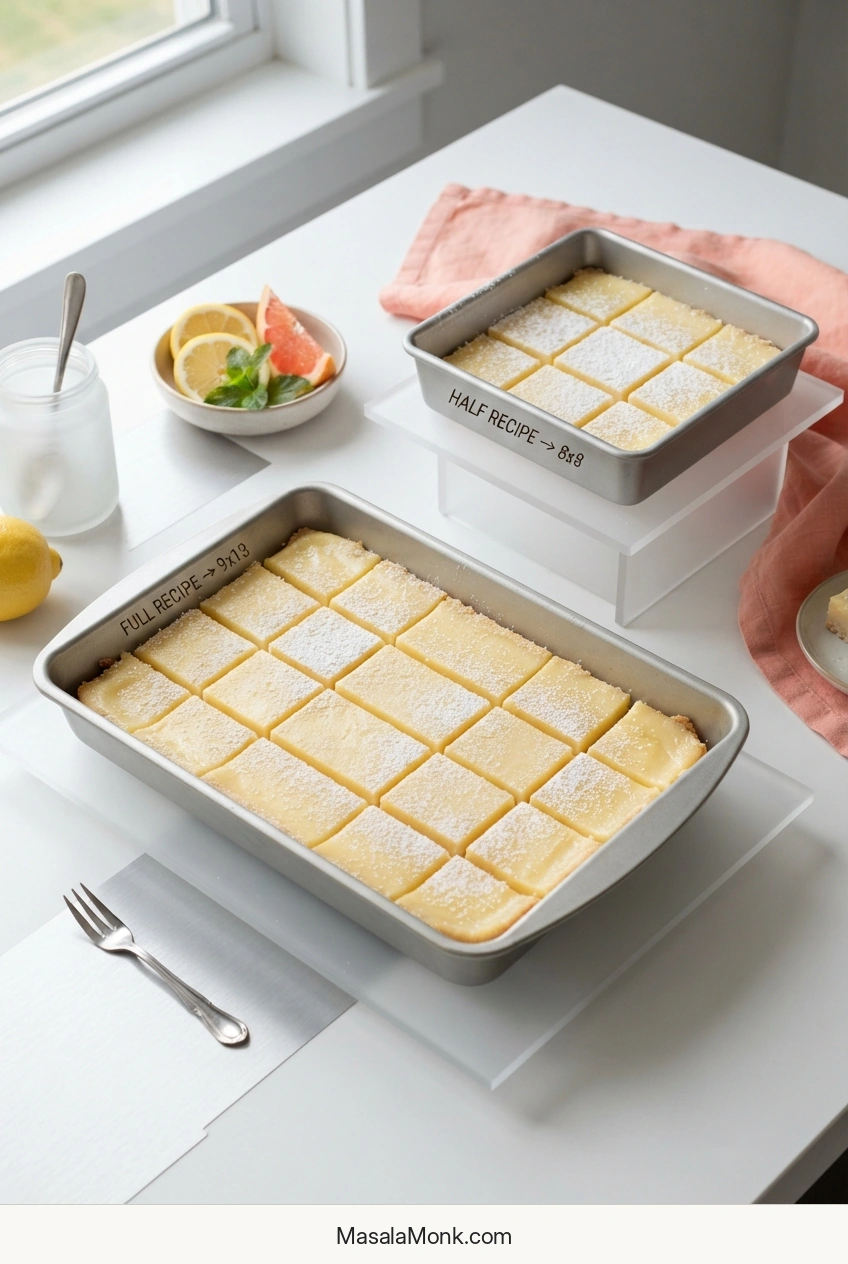
Using an 8×8 Pan
For an 8×8-inch / 20×20 cm pan, make half the recipe. That gives you almost the same layer depth as the full batch in a 9×13, so begin checking around the normal time. It may finish a little earlier.
If you want the math, a 9×13 pan has about 117 square inches of surface area; half of that is 58.5 square inches. An 8×8 pan has 64 square inches, so a half batch is about 9% shallower. Putting the entire recipe into an 8×8 would make the layers more than 80% deeper and require a substantially different bake.
Make Ahead, Storage and Freezing
Make the Bars a Day Ahead
Lemon bars are particularly easy to make a day ahead because the long chill is already part of the recipe. Bake and cool the slab, refrigerate it overnight, then lift, cut and dust the bars the next day. Besides taking work off your serving day, the overnight chill makes especially neat slices easier.
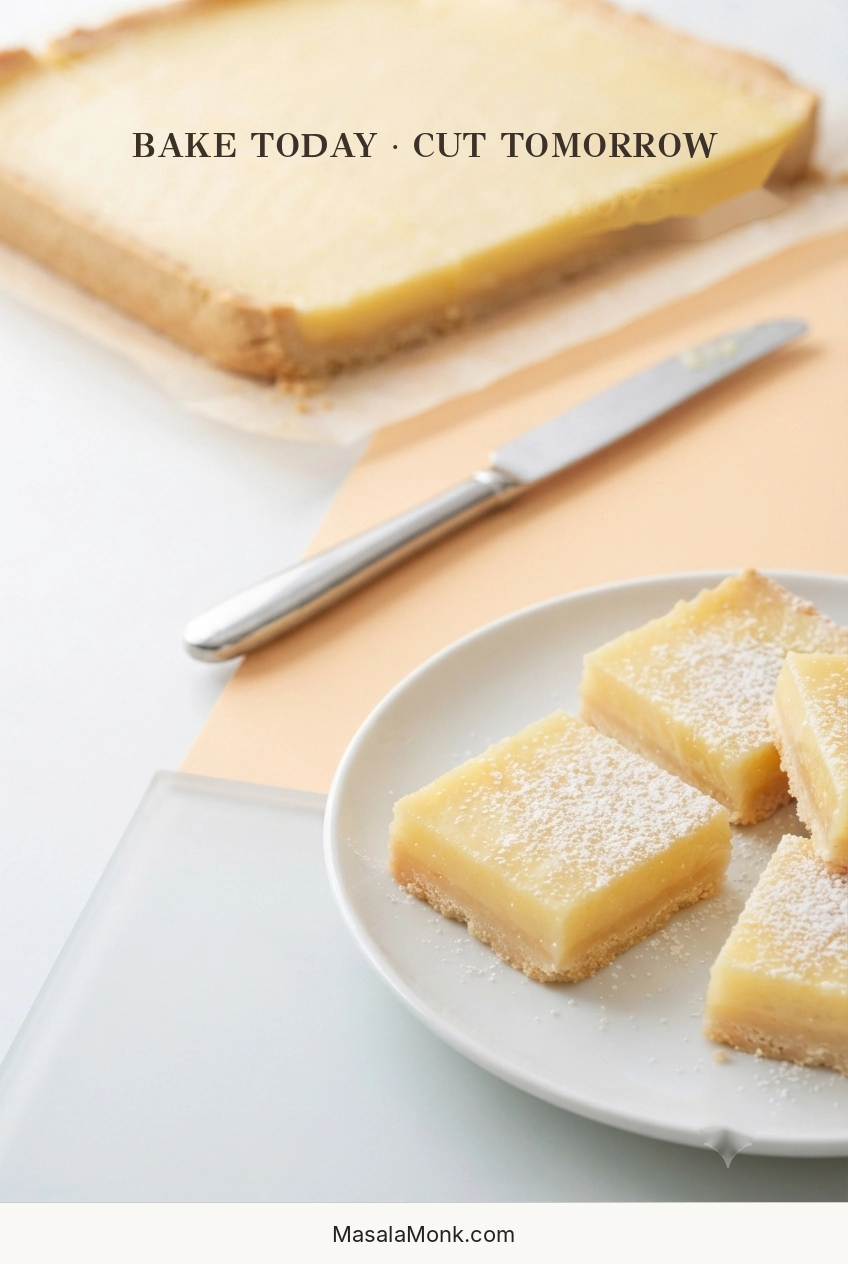
Yes, lemon bars should be refrigerated. Keep them covered and plan to finish them within about 4 days. Their texture is best during the first 2–3 days, while the shortbread still contrasts clearly with the creamy lemon layer. That four-day limit also lines up with FDA guidance for cooked egg dishes, which gives a 3–4 day refrigerator window.
For a party or bake sale, put out smaller batches and replenish them from the refrigerator. Don’t leave the bars unrefrigerated for more than 2 hours, or more than 1 hour when the temperature is above 90°F / 32°C.
For longer storage, chill and cut the bars first but leave off the powdered sugar. Freeze the pieces until firm, then wrap them well or stack them with parchment between layers in a freezer-safe container. For best quality, use them within about 3 months. Thaw overnight in the refrigerator, then dust shortly before serving.
If oven space is the real constraint, No-Bake Lemon Bars take a different route, setting in the refrigerator instead of relying on eggs and oven heat.








