Posted on Leave a comment

Sourdough Discard Pancakes: Fluffy, Tender & Easy to Get Right

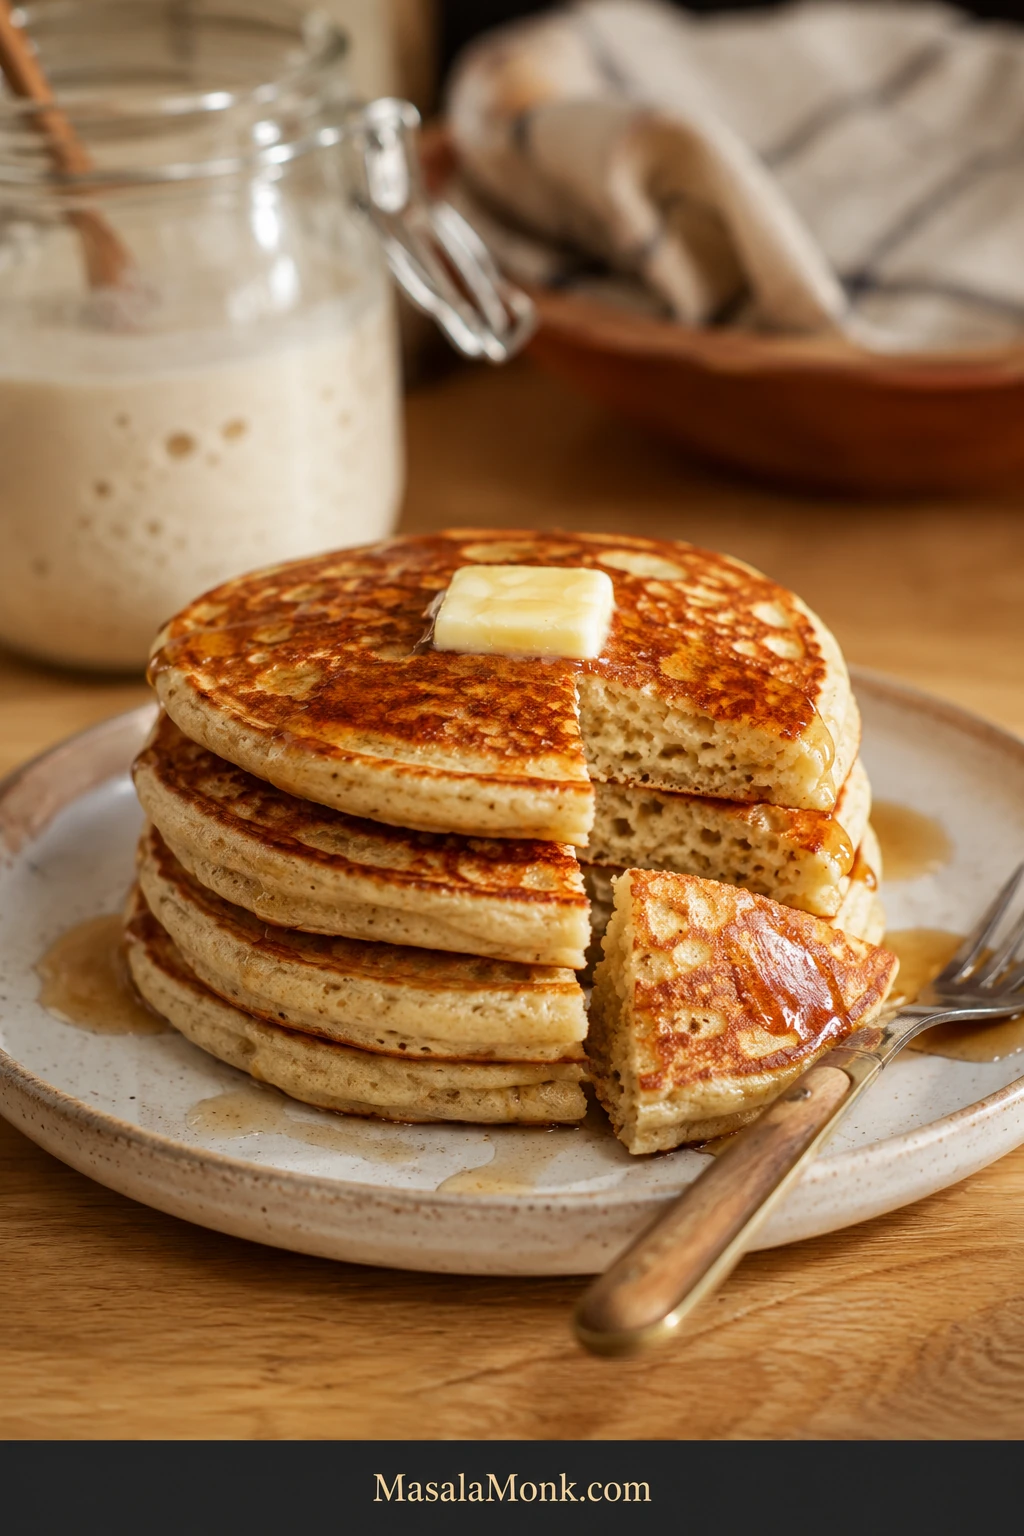
Stack of golden-brown sourdough discard pancakes with melting butter and maple syrup, with one cut pancake showing a soft cream-colored interior with small air pockets.

A jar of sourdough discard has a way of turning breakfast into a small negotiation. There is too much of it to feel good about throwing away.

But you also do not want to feed a starter, wait for it to peak, or spend the morning wondering why the first pancake is beautifully brown outside and still wet in the middle.

These sourdough discard pancakes are fluffy American-style pancakes with lightly crisped golden edges, a soft, springy center, and a mild sourdough tang that still leaves butter and maple syrup in charge. Refrigerator-cold discard works, and active starter works too. This is a same-day recipe: no feeding first, no overnight fermentation, no waiting for a rise.

Jump to the recipe · Check the batter · Troubleshooting

Discard does change from jar to jar. One pours; another mounds. Fresh discard may be thick and mild, while an older refrigerator jar can become sharper and looser.

So instead of pretending every jar needs exactly the same amount of milk, this recipe gives you a dependable starting point and a clear picture of what ready-to-cook batter looks like.
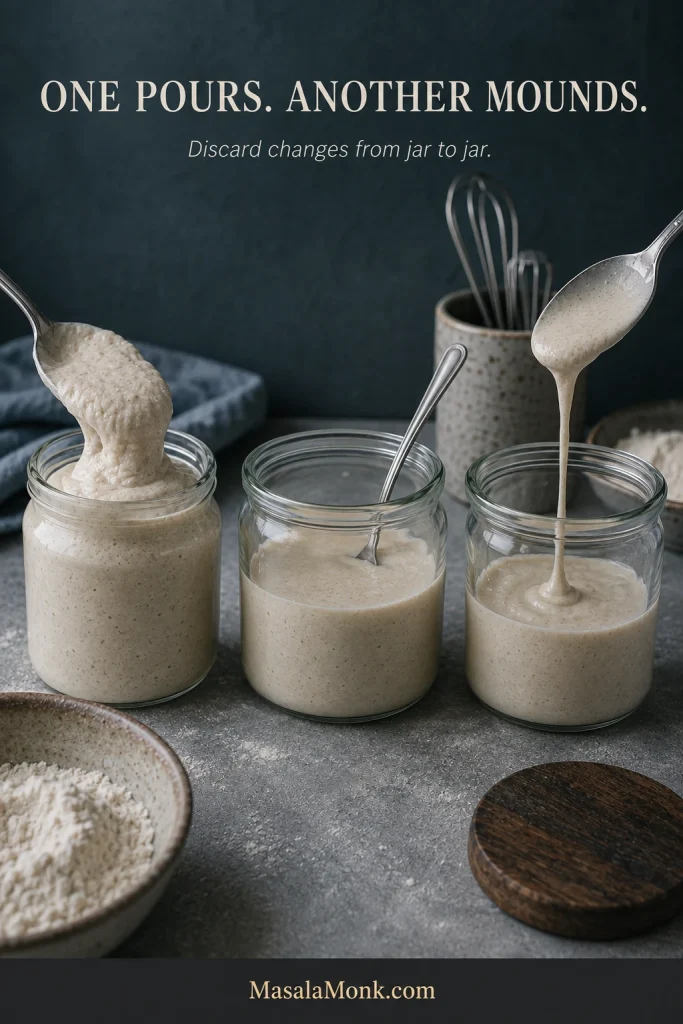
Several portions of sourdough discard showing visibly different consistencies, from thick and mounded to looser and more pourable.
One jar may pour while another mounds. Treat the final batter flow—not the discard’s starting thickness—as the calibration target.

The measurements get you started; the batter and first pancake tell you the rest.

Quick Answer: How Do You Make Fluffy Sourdough Discard Pancakes?

Cold, unfed sourdough discard works. Hands-on prep takes about 10 minutes, with no feeding or overnight wait. Baking powder and baking soda provide the same-day lift.

Use a thick but pourable batter, start the pan around 350°F / 175°C, and cook one tester pancake before filling the griddle. Flip when the edge looks matte, bubbles have formed and begun staying open, and the underside is golden.

Sourdough Discard Pancakes Recipe

This version uses 220 g discard—enough to make a real dent in the jar—while keeping enough fresh flour for a fluffy American-style crumb. Start with 200 ml milk and keep another 30 ml nearby only if the rested batter needs it.

Recipe at a Glance

Hands-on prepAbout 10 minutes
RestAbout 10 minutes
CookAbout 15–20 minutes on a roomy griddle
TotalAbout 35–40 minutes; longer with a small skillet
YieldAbout 12–13 pancakes
Serves3–4

Ingredients

  • 220 g sourdough discard, from a 100%-hydration starter
  • 180 g all-purpose flour, about 1½ cups spooned and leveled
  • 200 ml milk, about ¾ cup + 1½ tablespoons, plus up to 30 ml / 2 tablespoons more as needed
  • 2 large eggs, about 100 g without shells
  • 35 g unsalted butter, about 2½ tablespoons, melted and cooled until just warm, plus a little for the pan
  • 25 g granulated sugar, about 2 tablespoons
  • 8 g baking powder, about 2 teaspoons
  • 2 g baking soda, about ½ teaspoon
  • 4 g fine salt, roughly ⅔–¾ teaspoon
  • 1 teaspoon vanilla extract, optional

Weigh the discard if you can. Its cup volume can vary considerably depending on hydration, temperature, and whether the starter is bubbly or collapsed.
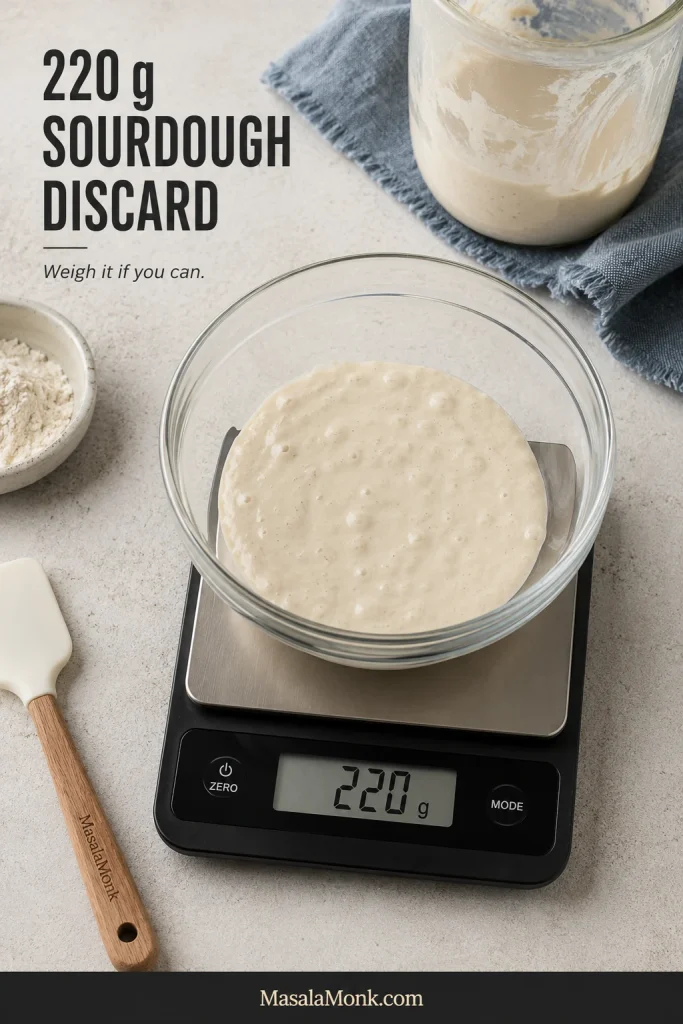
Glass bowl of sourdough discard on a digital kitchen scale reading 220 grams.
Weighing 220 g removes one variable before you begin adjusting the batter.

Instructions: Prepare the Pan and Batter

  1. Preheat the pan. Warm a skillet or griddle over medium to medium-low heat while you make the batter. If you can measure the cooking surface, start around 350°F / 175°C. Heavy cast iron needs a gentler, longer preheat than a thin nonstick pan.

Mix and Rest the Batter

  1. Mix dry and wet separately. In one bowl, whisk together the flour, baking powder, baking soda, and salt. Separately, whisk the discard with 200 ml milk, the eggs, sugar, vanilla, and melted butter. Refrigerator-cold discard can make hot butter firm up, so let the butter cool until just warm first. A few tiny butter flecks are harmless.
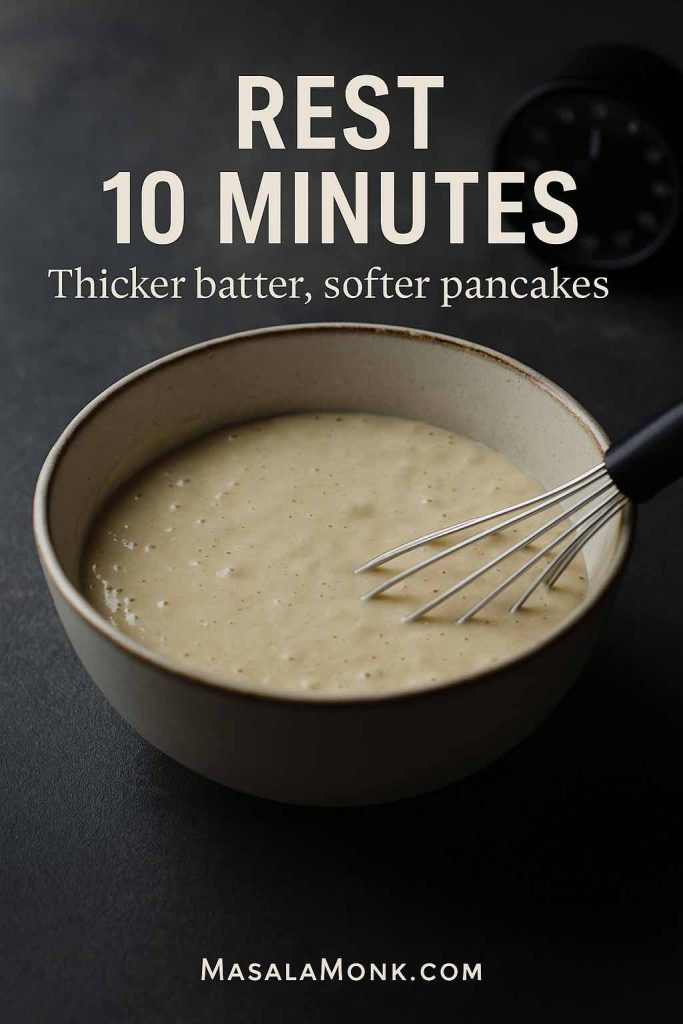
  2. Combine and rest. Add the dry ingredients to the wet and mix gently until the large streaks of flour disappear. Small lumps are fine. Let the batter sit for about 10 minutes so the flour can absorb the liquid.

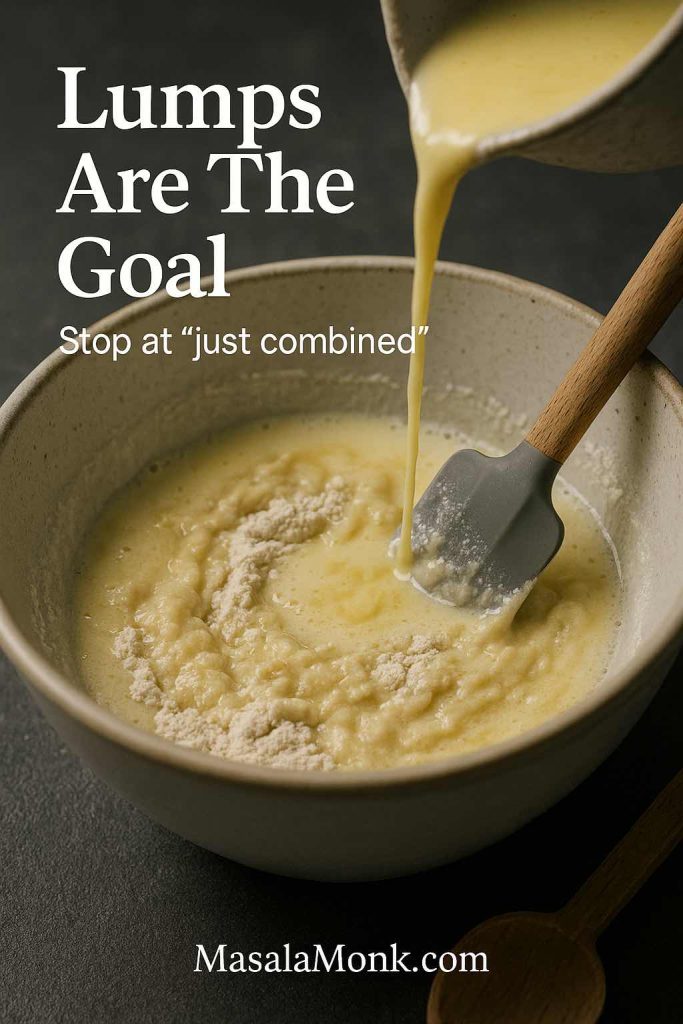
Leave the little lumps alone. Once the large streaks of flour disappear, the short rest can finish hydrating the batter.
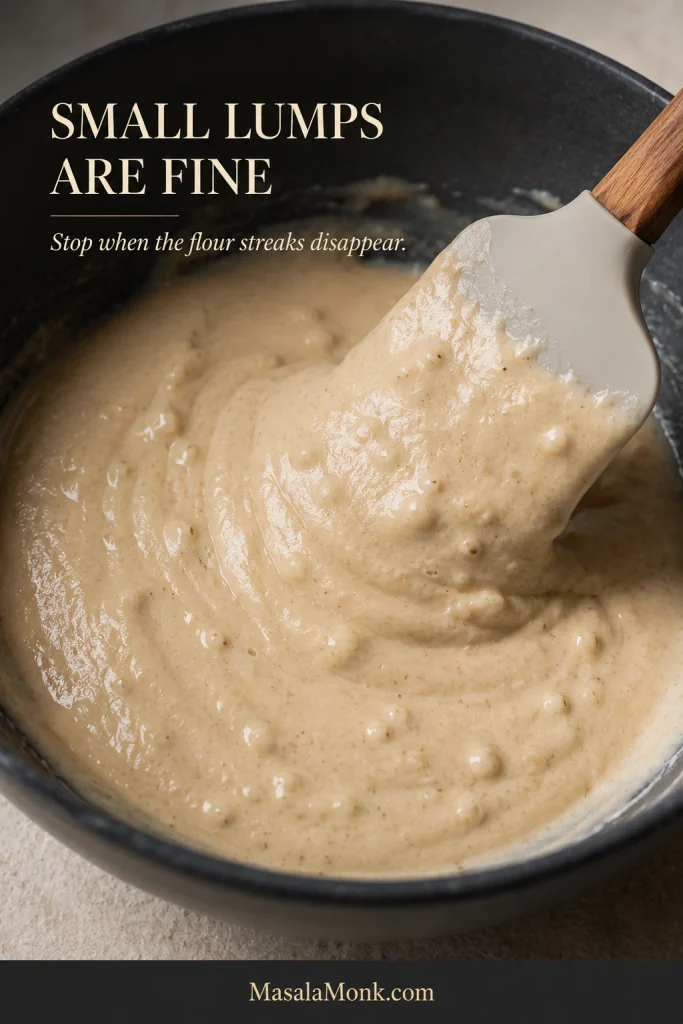
Close-up of pale sourdough pancake batter with small soft lumps and no visible pockets of dry flour.
Small soft lumps are fine; chasing perfect smoothness with extra stirring can make pancakes tougher.
  1. Check the thickness. After the rest, yours may already be ready to cook. The batter should fall in a slow, heavy ribbon and mound briefly before settling. A stiff batter can take milk 1 tablespoon / 15 ml at a time; a clearly runny batter can take flour about 1 tablespoon / 8 g at a time. If you need much more than the reserved 30 ml milk—or repeated additions of flour—pause and recheck the original measurements.

When the ribbon looks like this, stop adjusting. Let it settle briefly, then move on to the tester pancake.
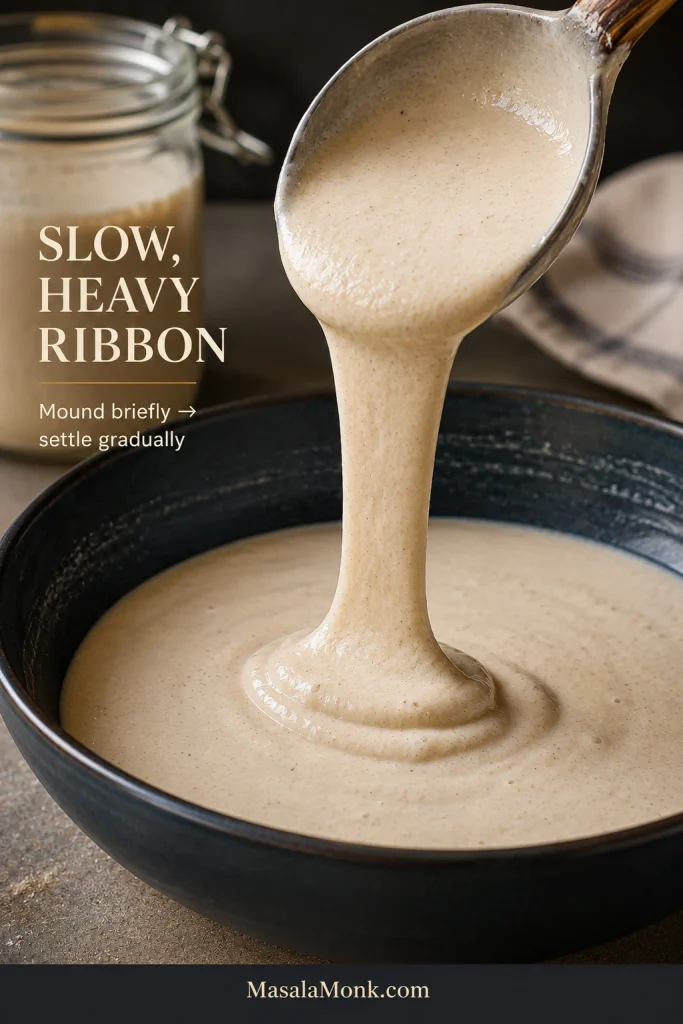
Thick sourdough pancake batter falling from a spoon in a slow ribbon and forming a low mound that begins settling back into the bowl.
Aim for the same slow, heavy ribbon even when two discard jars start differently. Final batter flow matters more than identical milk additions.

Cook the Tester, Then Finish the Batch

  1. Grease lightly and cook one tester. Coat the pan with a thin film of butter or neutral oil, then add about 60 g / a scant ¼ cup batter. The first pancake answers four questions: did it spread correctly, did it brown at the right speed, did the center set, and did the crumb stay tender?

Keep the tester close to 60 g / a scant ¼ cup. That keeps its spread and cooking cues aligned with the timings in this recipe.
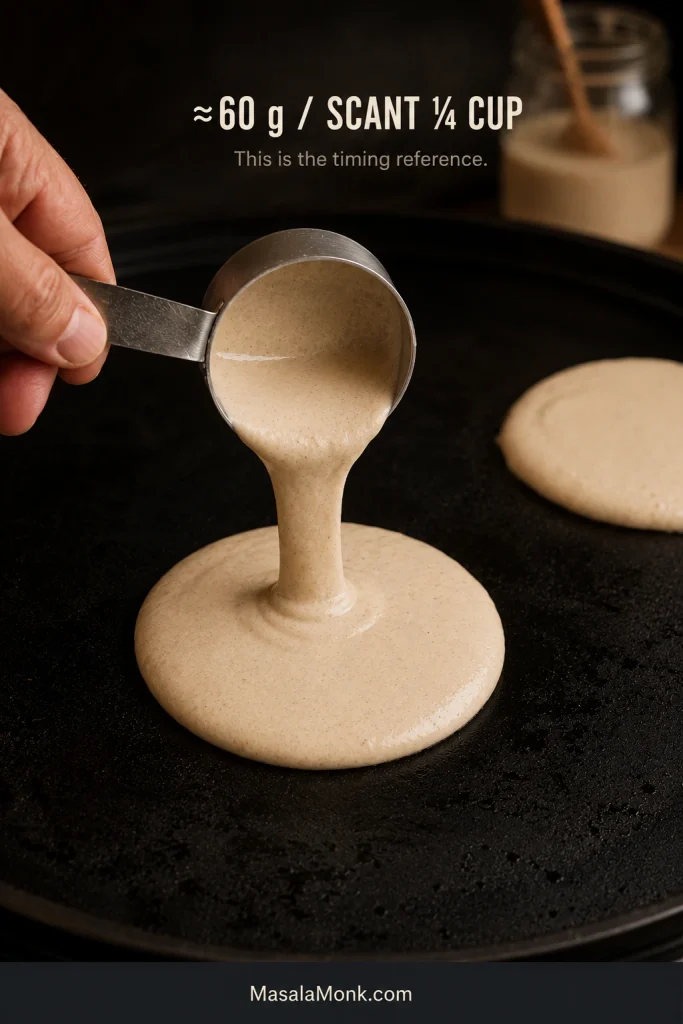
A scant quarter-cup measure portions about 60 grams of sourdough pancake batter onto a dark griddle.
A consistent 60 g portion makes spread, browning and doneness much easier to compare.
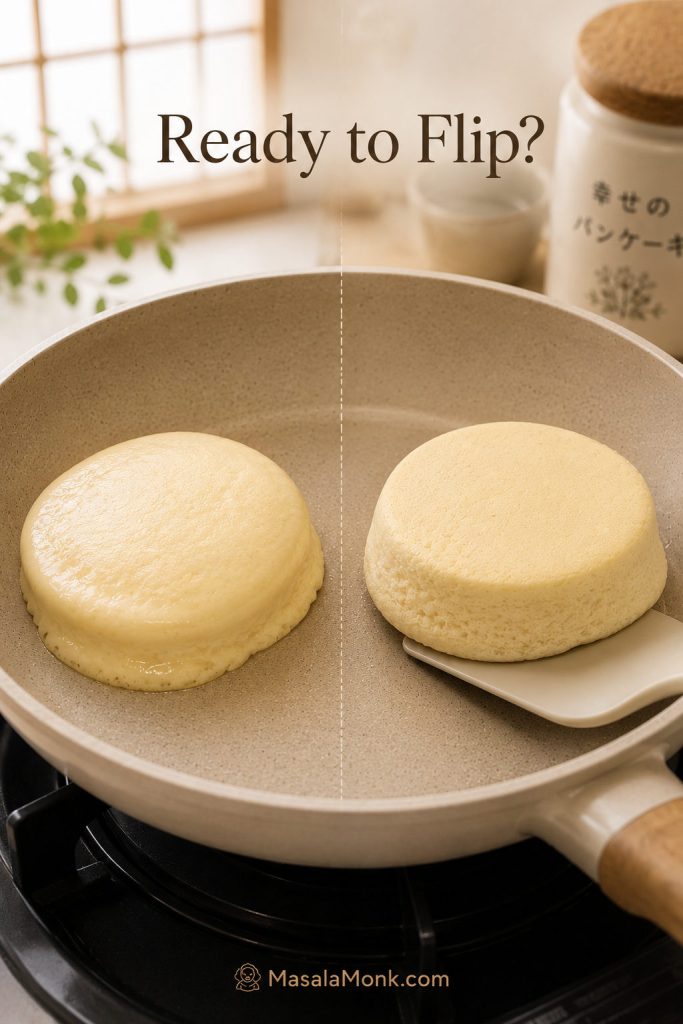
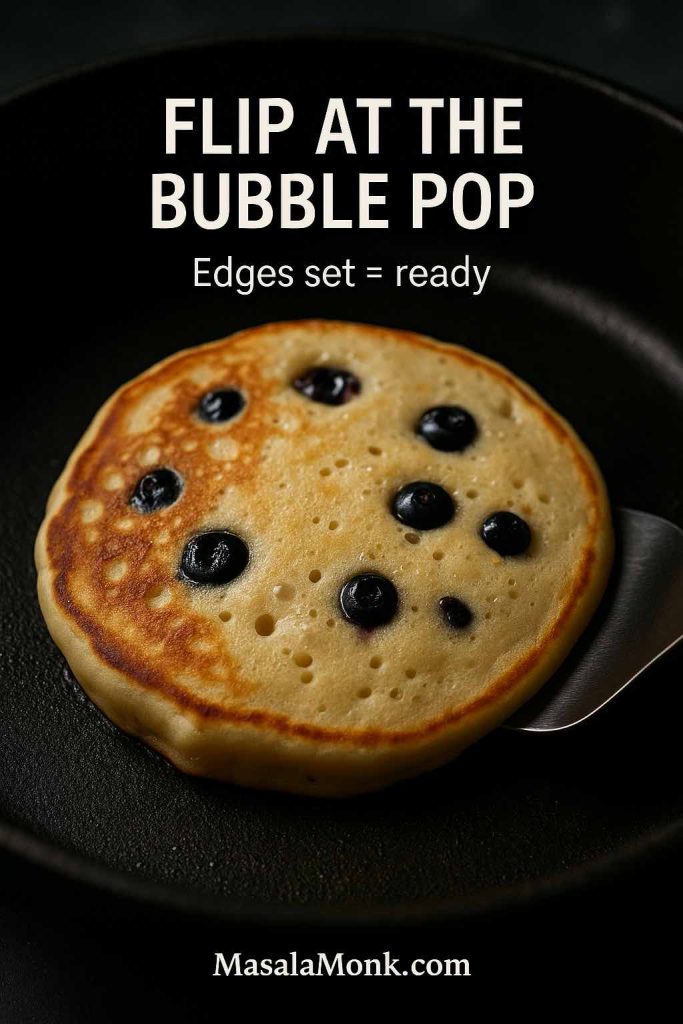
  1. Flip when the cues line up. For a roughly 60 g pancake, the first side usually takes about 2–3 minutes. Look for a matte outer edge, bubbles across the surface, a few bubbles that have burst and stayed open, and a golden underside. Flip once and cook the second side for roughly 1–2 minutes.

Use the cues together. The surface should look more set, the edge matte, and the underside golden before you turn the pancake.
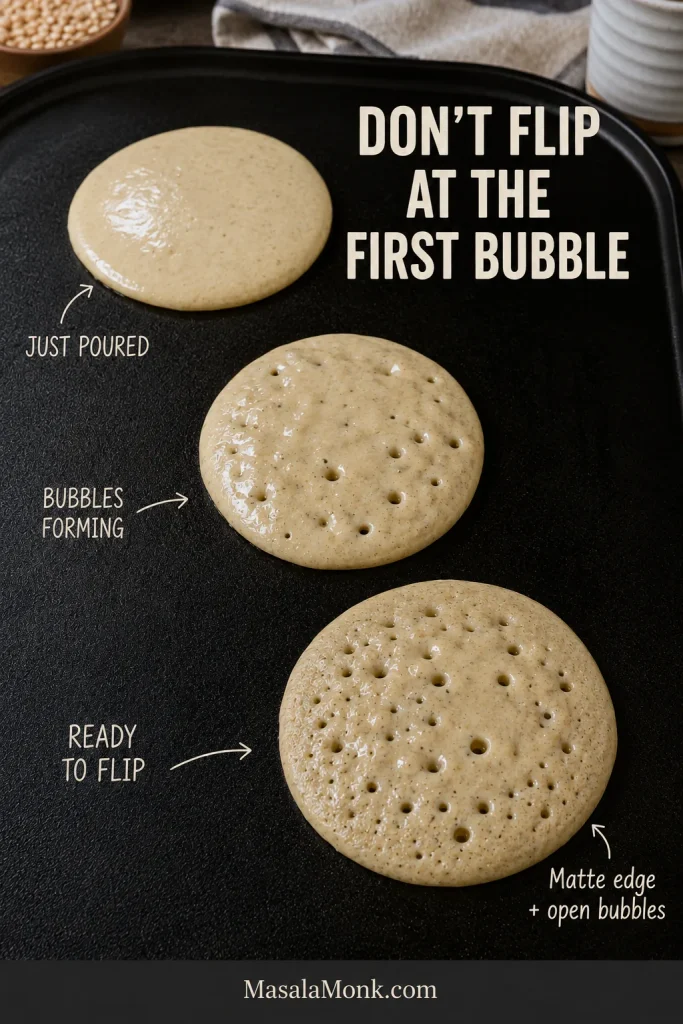
Three pancakes on one griddle show cooking stages from freshly poured batter to forming bubbles and a ready-to-flip pancake with a matte edge and open bubbles.
Don’t flip at the first bubbles. Wait for matte edges and a few burst bubbles that stay open.

Finish the Batch

  1. Adjust the pan, then cook the batch. A dark underside beneath a still-wet top means the pan is running too hot; lower the heat before the next pour. If the tester races outward, the batter needs a little more body. Once the center tears open soft and fully set, cook the remaining pancakes. If butter solids start getting too dark between batches, wipe the pan and grease it lightly again.
  2. Serve or keep warm. Eat the pancakes as they come off the griddle, or hold them on a wire rack over a sheet pan in a 200°F / 95°C oven while the rest cook.

Can I Use Cold Sourdough Discard or Active Starter?

Yes—cold refrigerator discard and active starter both work, as long as the starter is established and healthy. Cold discard can go straight into this same-day batter.
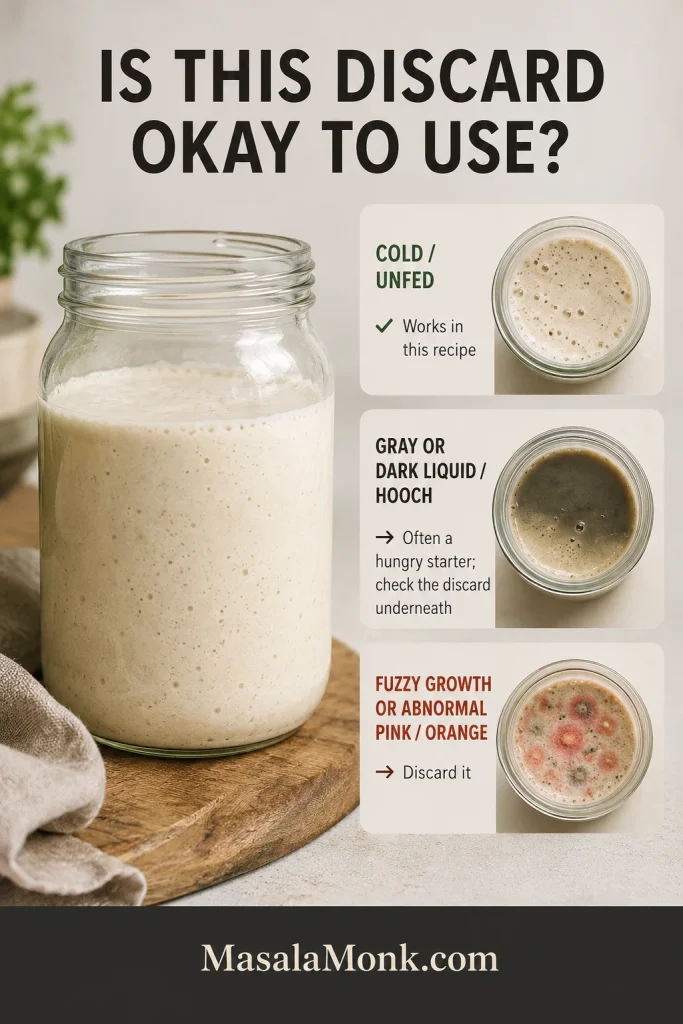
Sourdough discard safety guide showing cold unfed discard as usable, gray or dark hooch as a sign to inspect the discard underneath, and fuzzy growth or abnormal pink or orange color as reasons to discard it.
Gray or dark hooch alone is not mold. Fuzzy growth or abnormal pink/orange discoloration means the discard should not be used.
  • Cold, unfed refrigerator discard: use it directly.
  • Fresh or active starter: use the same weight.
  • Gray or dark liquid on top: this is usually hooch from a hungry starter, not mold. Pour it off if you want a milder result, then check the discard underneath as usual.
  • Discard from a brand-new starter that is not reliably active yet: wait until the starter is established and behaving consistently before saving its discard for cooking.
  • Moldy or abnormally discolored starter: fuzzy growth or unusual pink or orange discoloration means it should not go into breakfast.

How Old Can Sourdough Discard Be for Pancakes?

There is no single day when refrigerated discard suddenly becomes unusable. King Arthur Baking notes that refrigerated discard can keep for several weeks. Older discard usually tastes sharper and may become looser; use the safety checks above rather than age alone to decide whether it belongs in the batter.

If the starter itself is giving you trouble, our sourdough starter recipe for beginners goes deeper into feeding, texture, discard, and keeping a healthy culture.

Discard unusually thick or thin? Go to the batter consistency guide.

Sourdough Pancake Batter: Too Thin, Just Right, or Too Thick?

Get this part right and most of the rest becomes easy. Two people can weigh the same 220 g of discard and still see slightly different batter, especially when one jar is fresh and thick and another is older and looser.

The target is still the same: a slow, heavy ribbon that sits briefly on the surface before easing back into the bowl.

How to Adjust Thin or Thick Pancake Batter

What you seeWhat it meansWhat to do
Runs quickly from the scoop and spreads immediatelyToo thinAdd about 8 g / 1 tbsp flour, mix gently, and check again.
Falls in a thick ribbon and gradually relaxesJust rightCook the tester pancake.
Drops in a mound and barely movesToo thickAdd 15 ml / 1 tbsp milk, mix gently, and check the flow again.

A loose batter runs outward before the pancake has much chance to build height. At the other extreme, batter that barely moves can sit too tall, allowing the underside to brown before enough heat reaches the center.
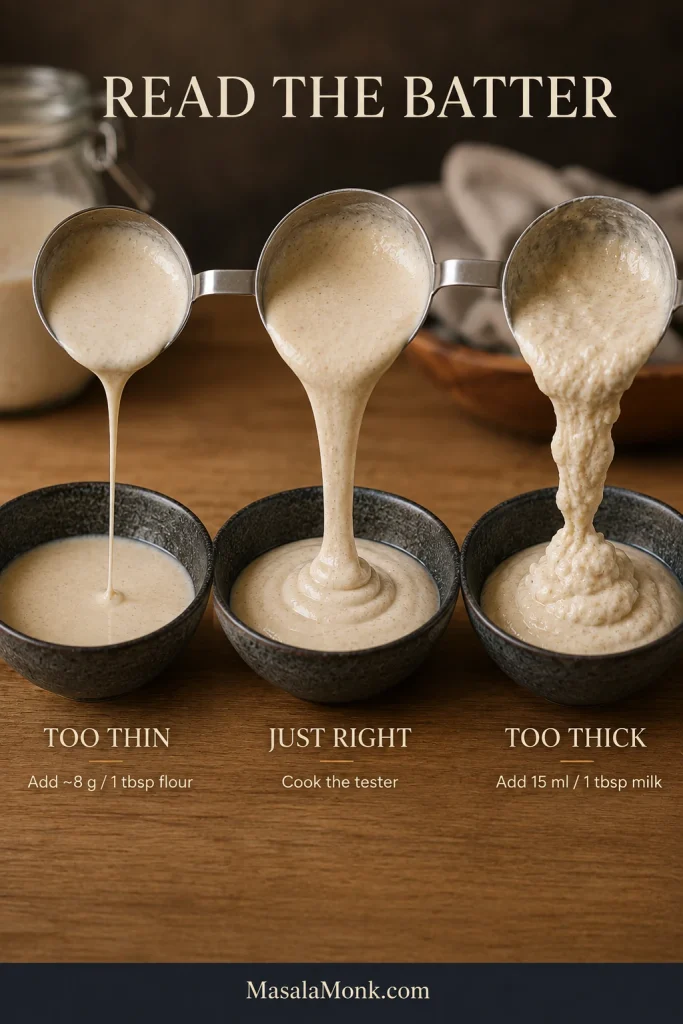
Three bowls compare sourdough pancake batter that is too thin, just right, and too thick; the guide suggests about 8 grams flour for thin batter and 15 milliliters milk for thick batter.
Correct thin or thick batter in small increments, then mix gently and check the flow again before adding more.

Let the First Pancake Check the Pan

The first pancake has a bad reputation. Give it a job instead.

A bad first pancake is useful information; finding the same problem after the whole bowl has been cooked is much more annoying. Check four things:
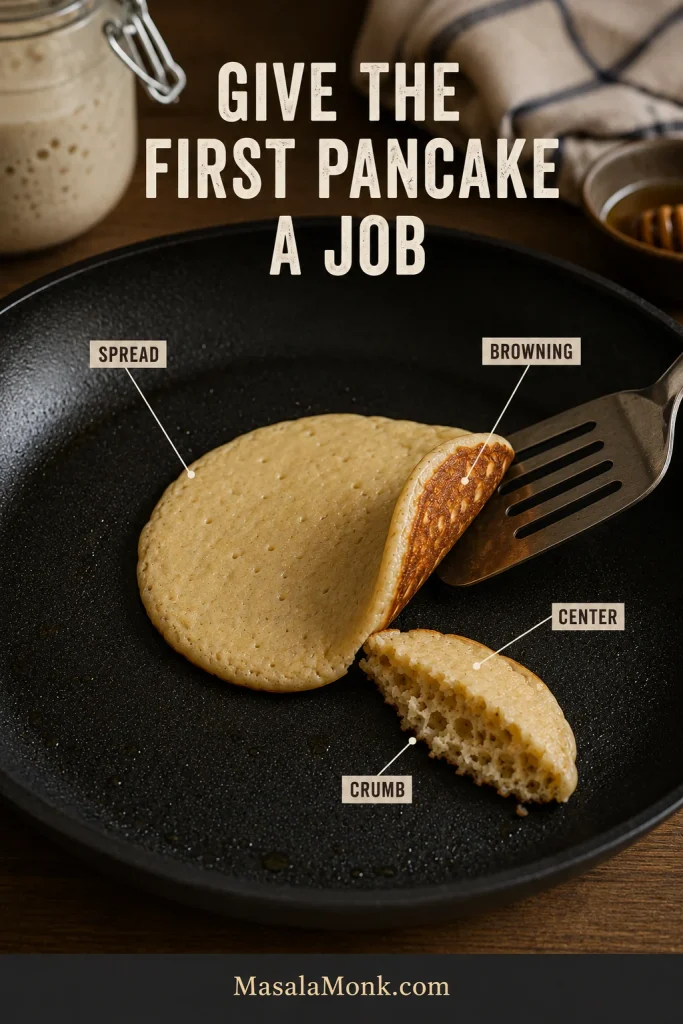
A single tester pancake is used to check its diameter, golden underside, cooked center, and exposed interior crumb before cooking the remaining batter.
After the tester, change one variable at a time so you know which adjustment actually fixed the problem.

What to Check on the Tester

  • Spread: does it widen into a neat, fairly thick round?
  • Browning: does the underside turn golden at roughly the same pace that the top begins to set?
  • Center: does it cook through before the bottom gets too dark?
  • Crumb: when torn open, is it soft and springy instead of shiny or paste-like?

Let that pancake overrule the temperature dial. Electric griddles, heavy cast iron, and thin skillets can behave very differently even when their settings sound similar.
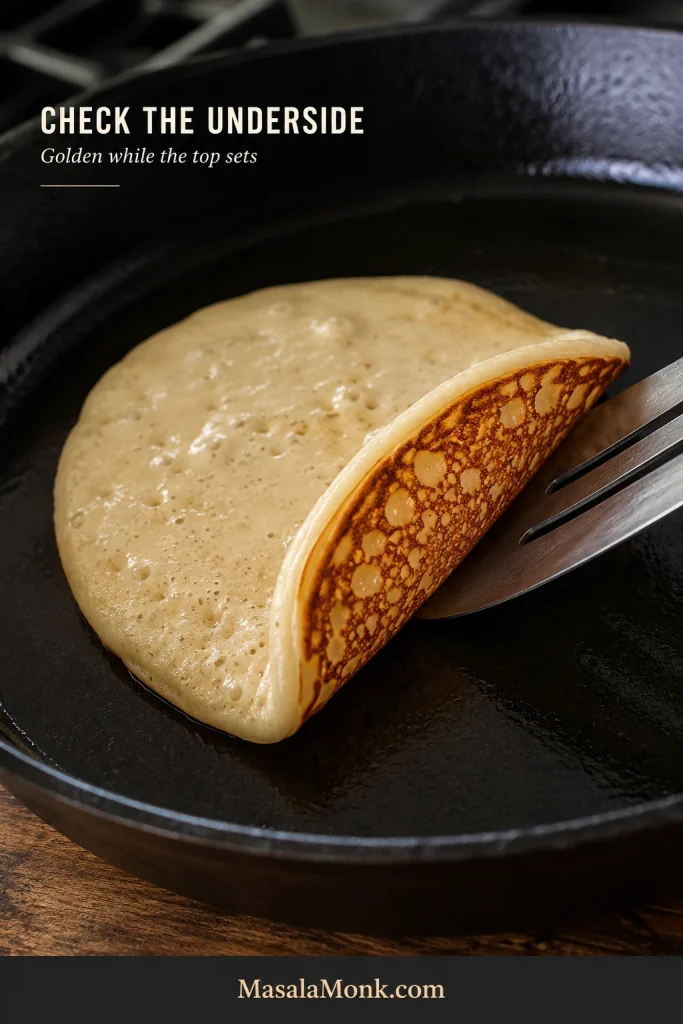
Pancake edge lifted with a spatula to reveal a mottled golden-brown underside while the top shows bubbles and a partly set surface.
The underside and surface should progress together; dark below and wet above usually means too much heat.

Read the Crumb

Once the tester tears open fluffy and fully set, breakfast gets much easier. The edges should be lightly browned and delicately crisp, while the warm center springs back instead of smearing against the fork.
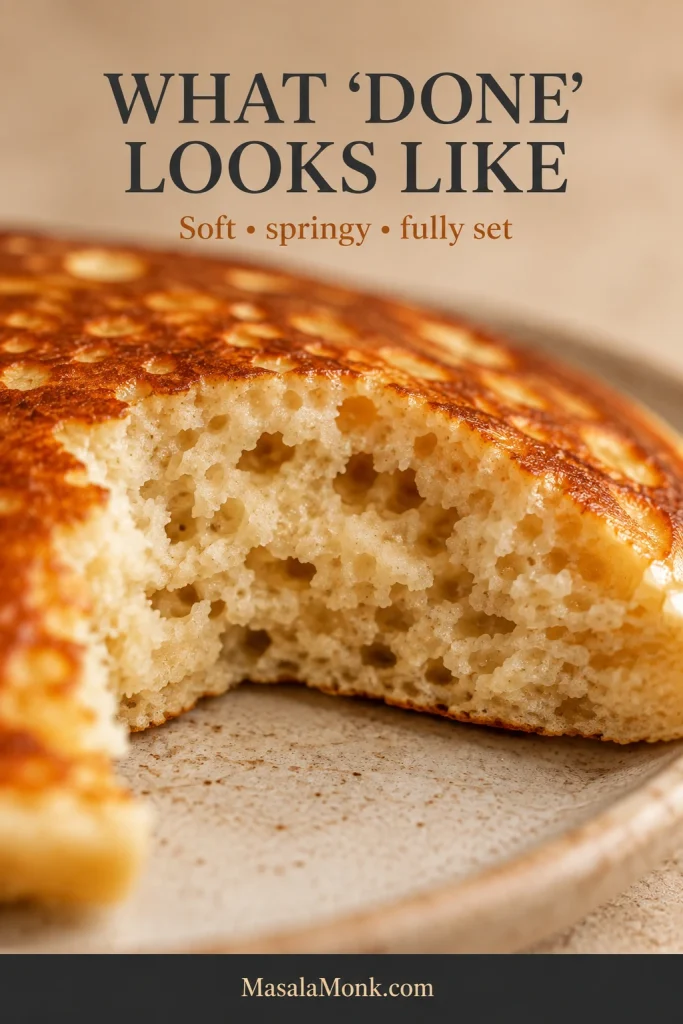
Torn sourdough pancake showing a fully cooked cream-colored interior with small irregular air pockets and a soft, set crumb.
Let a freshly torn pancake sit for a few seconds before judging it. Escaping steam can make a fully cooked center look temporarily wetter.

Once the tester is right, cook the remaining pancakes with the same portion and steady heat.
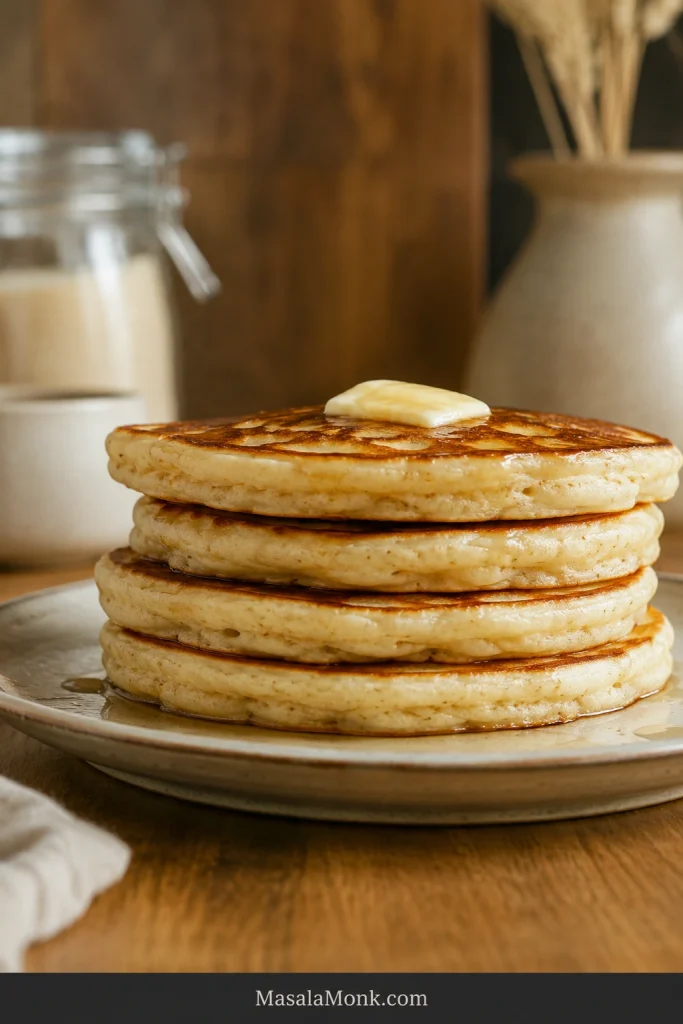
Side view of a stack of four fluffy golden sourdough discard pancakes with melting butter and lightly syruped edges.
A settled batter and steady griddle should give you a consistent batch.

Tester still not right? Go straight to troubleshooting.

Sourdough Discard Pancake Troubleshooting

Most pancake problems announce themselves early. The first question is simple: does the pan need adjusting, or does the batter?
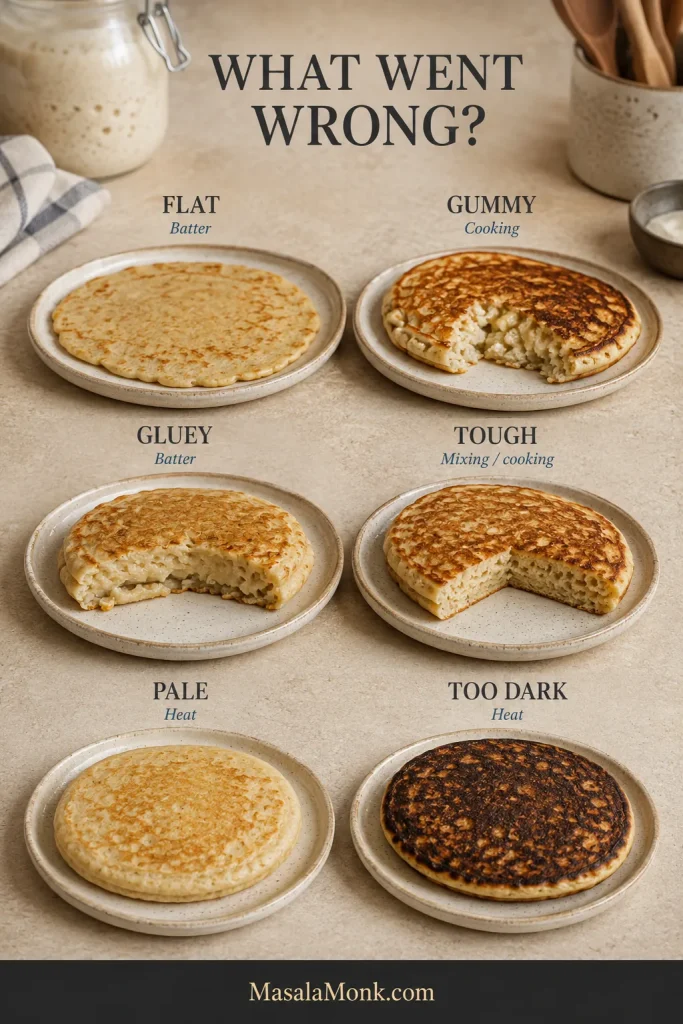
Troubleshooting guide showing six pancake problems: flat, gummy, gluey, tough, pale, and too dark, with each linked to batter, cooking, mixing, or heat.
Start with the symptom, then separate batter problems from heat, mixing and cooking problems before changing the recipe.

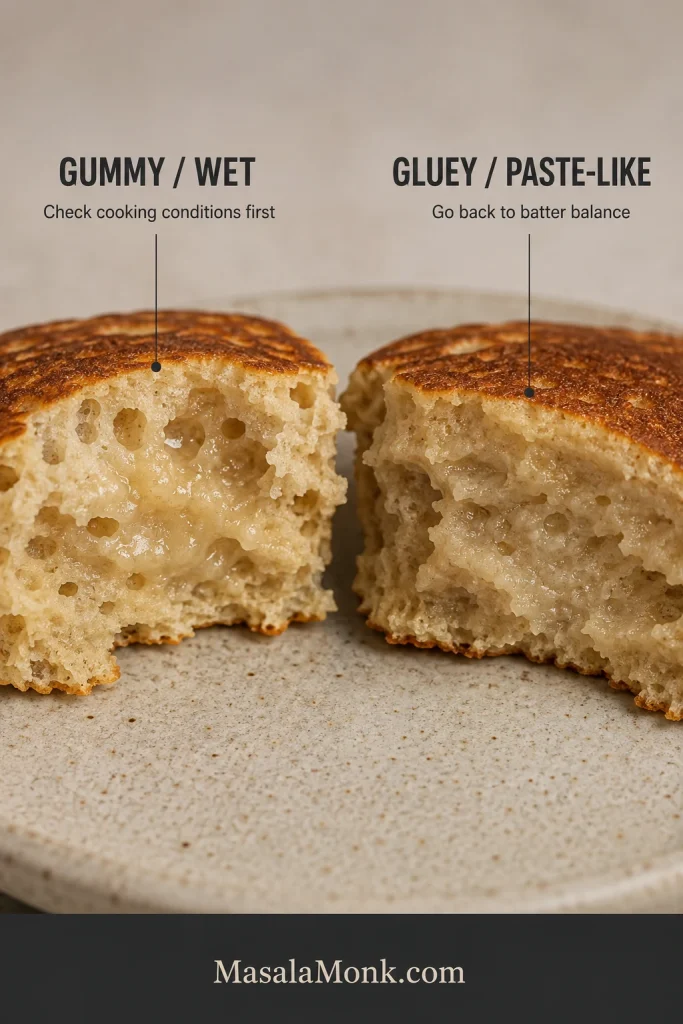
A gummy, wet middle often points to cooking conditions; a persistently gluey, paste-like crumb sends you back to the batter.
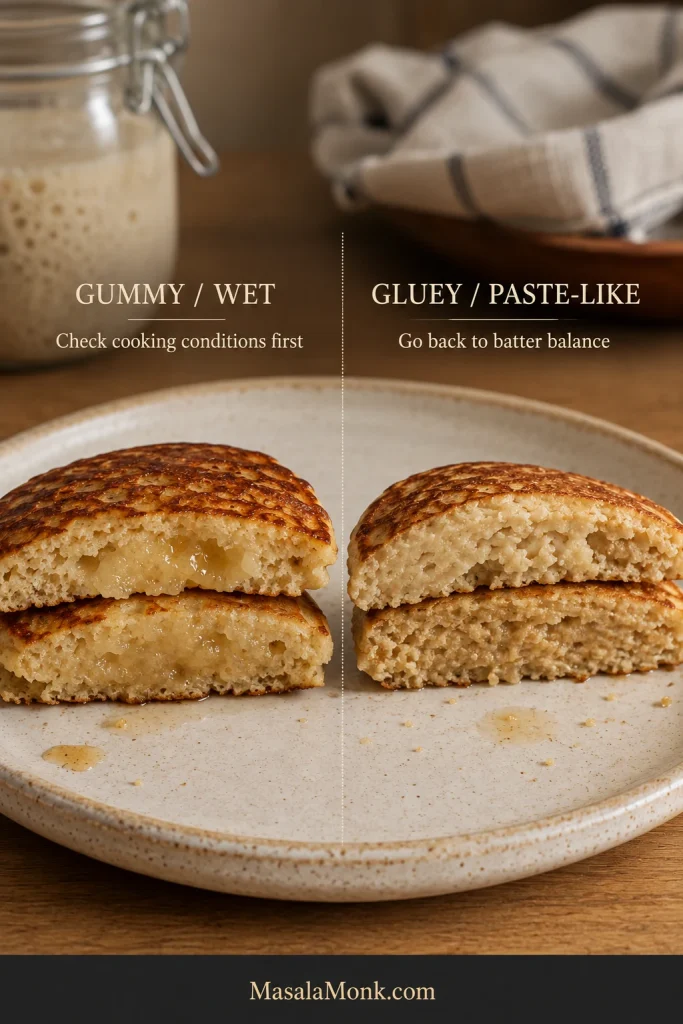
Two cut pancakes compare a gummy wet center with otherwise formed crumb against a broadly dense, paste-like gluey interior with poor air-cell structure.
Try one lower-and-slower tester first. If the wet center disappears, suspect cooking; if the crumb stays paste-like throughout, revisit batter balance.

Start With the Symptom

What happenedCheck firstWhat usually helps
Flat and spreadingBatter too looseThicken slightly; if the consistency already looks right, make sure the baking powder is fresh.
Golden outside, wet or gummy insidePan too hot, pancake too large, or batter sitting too tallLower the heat, make a slightly smaller pancake, or loosen an overly thick batter.
Gluey despite longer, gentler cookingToo much liquid or too little fresh flourRecheck discard thickness, milk, flour, and major substitutions.
Tough or rubberyOvermixing, too much added flour, or overcookingMix less, keep corrections small, and shorten the cook once the center is set.
Pale and slowPan too coolIncrease the heat slightly.
Too sourOlder, more acidic discardUse fresher discard next time.
Soapy or alkaline tasteToo much baking sodaStick to the measured amount.
Bubbly but still denseLoose batter, tired baking powder, or a pan that’s too coolCheck the batter first, then make sure the baking powder is fresh and the pan is hot enough.

Golden Outside, Gummy Inside

A beautifully browned underside with a wet middle means the surface is cooking faster than the center.
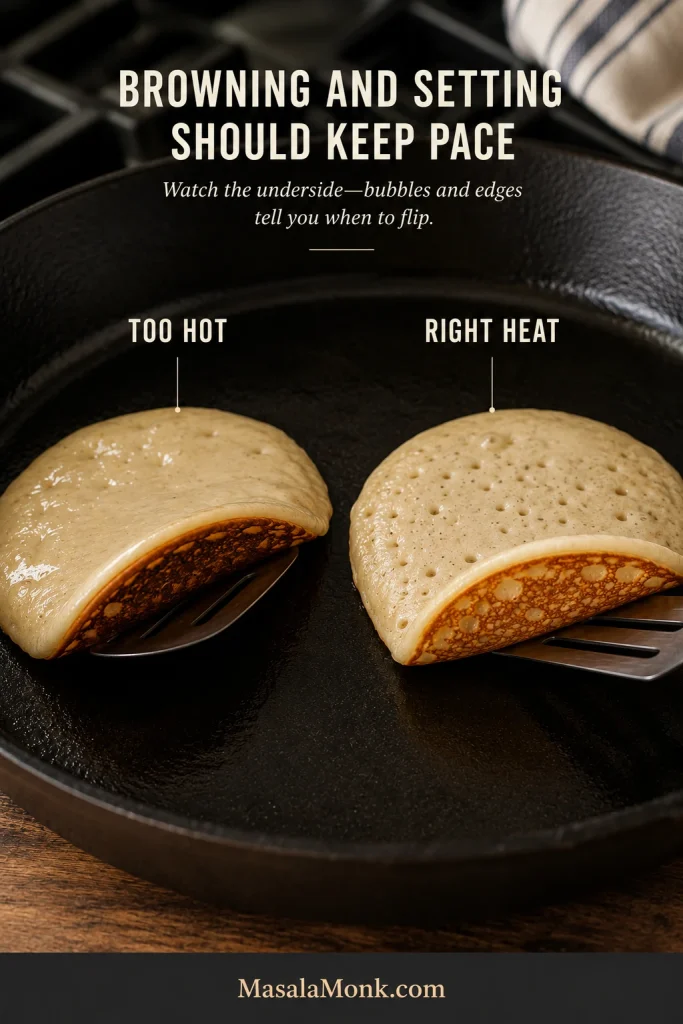
Two pancakes are lifted on spatulas: the too-hot example has a dark underside while the top remains wet, and the correct-heat example has a golden underside with bubbles and a more set top.
If later pancakes brown faster than the first, reduce the heat slightly; the skillet may simply be getting hotter.

Lower the heat for the next pancake. A very tall mound of batter may need a splash of milk. An oversized pour simply needs more time than the roughly 60 g pancakes used for these timings.
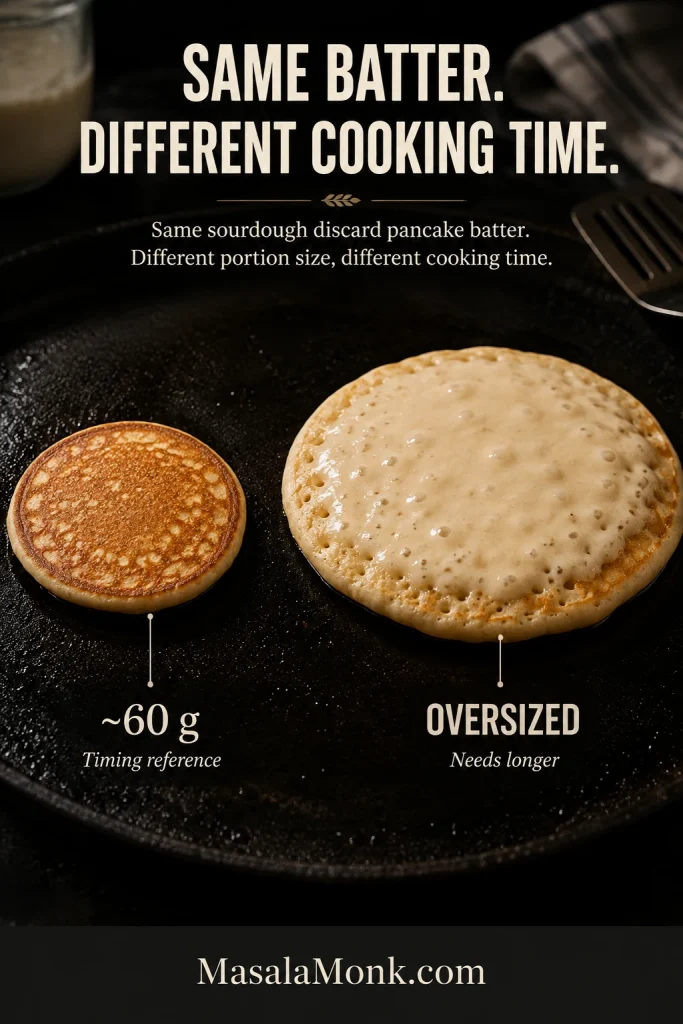
Two pancakes made from the same batter cook side by side; the smaller 60-gram pancake is more evenly set while the oversized pancake remains wetter in the center.
Larger pancakes need more time for heat to reach the center, even when the outside looks ready.

For repeated trouble, an instant-read thermometer can be a temporary learning tool. A center around 190°F / 88°C is a useful cooked-through reference. Once you recognize the correct crumb, there is no reason to measure every pancake.
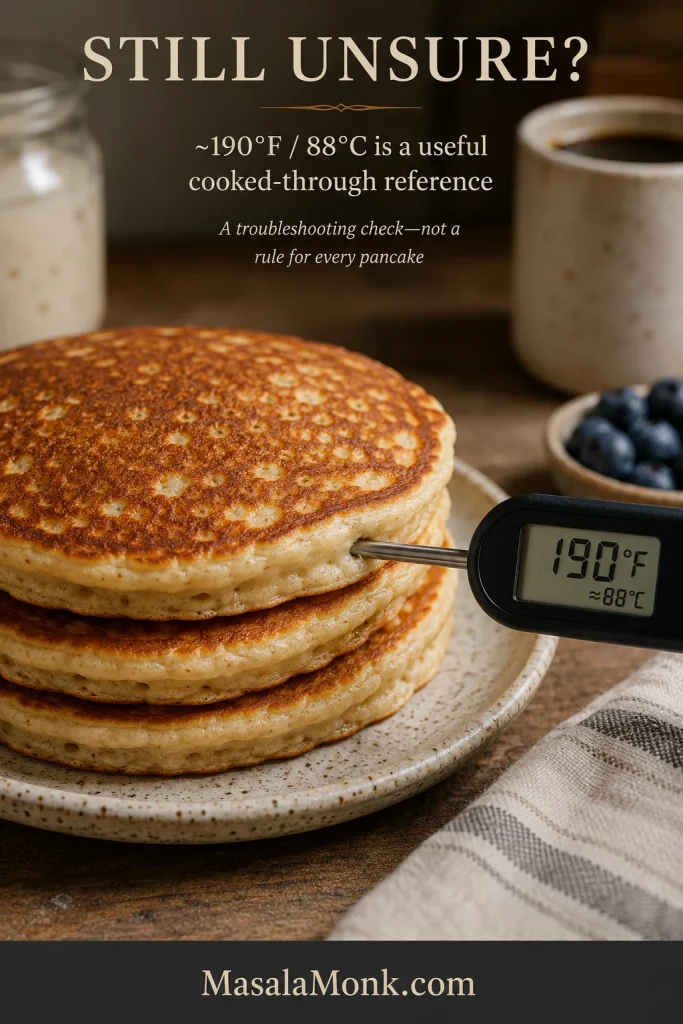
Instant-read thermometer inserted from the side into a stack of sourdough pancakes, displaying 190 degrees Fahrenheit and approximately 88 degrees Celsius.
Measure the thickest center, not the crust or pan-facing edge. Around 190°F / 88°C is a useful cooked-through reference while learning the cues.

The Center Stays Gluey Even After Longer Cooking

A persistently gluey center is different from one that simply needed another minute. When lower heat and enough cooking time still leave a paste-like interior, go back to the bowl before sacrificing the outside of another pancake.

Several things can push the crumb in this direction: very loose batter, using all the optional milk with unusually thin discard, too little fresh flour, or major substitutions.

If the batter is badly out of balance, cooking the pancake until the outside becomes leather will not rescue the middle.

Back to recipe · Check batter consistency · Back to top

Why Does Unfed Sourdough Discard Still Work in Pancakes?

Here, the baking powder and baking soda do the lifting. The discard brings flour, water, acidity, and sourdough flavor, but it does not need to raise the pancakes by itself.

This recipe assumes a 100%-hydration starter, meaning equal weights of flour and water are normally used when feeding it. So 100 g of discard contains roughly 50 g flour and 50 g water.
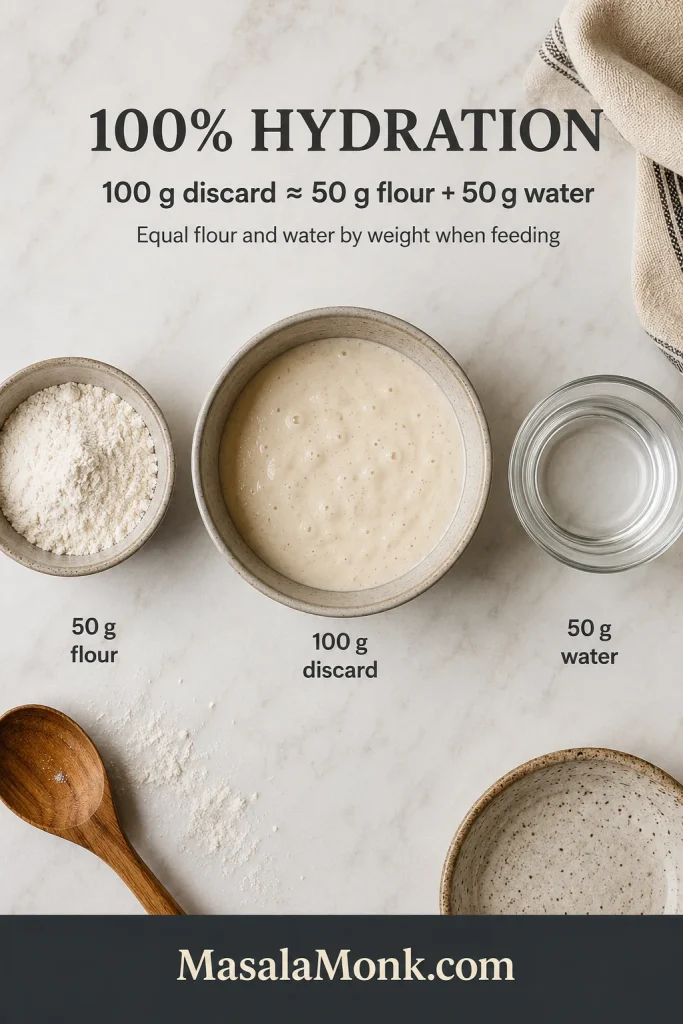
Overhead guide showing 100 grams of sourdough discard beside 50 grams of flour and 50 grams of water to explain 100 percent hydration.
Hydration is the flour-to-water ratio, not a visual thickness score. Two 100%-hydration starters can still look and feel different.

If your starter is much stiffer or wetter than a 100%-hydration starter, you may need a little more or less milk. That’s fine—after the rest, judge the bowl by the same batter cue.

Fresh flour and eggs give the pancakes enough body to set. Once the rested batter looks right, it can go straight to the griddle; the discard does not have to puff up the bowl the way active starter raises bread dough.

How Discard Age and Thickness Affect the Batter

Most jar-to-jar differences come down to flavor and how much extra milk the batter needs.

Your discardLikely effectWhat to do
Fresh or activeMilder flavor; sometimes a more aerated batterStart with the base recipe.
Older refrigeratedSharper flavor; may be looserStart with 200 ml milk and add more only if needed.
Very thinWetter final batterYou may need little or none of the reserved milk.
Very thickStiffer final batterAdd the reserved milk gradually after the rest.

If the batter looks right before you use the full extra 30 ml milk, stop there. The extra milk is there for the jars that need it.
Three bowls show pancake batter made with thin, typical, and thick sourdough discard, with guidance to use little or no reserved milk, check the ribbon, or add milk gradually up to 30 milliliters.
Hold back the extra milk until after the rest. That gives you room to calibrate thick discard without making a thinner jar too loose.

Make the Batch Fit the Discard You Actually Have

Sometimes the jar gives you the full 220 g. On other mornings, you scrape out only 60–70 g and breakfast still needs to happen. A discard recipe should not make you feed the starter again just to create enough discard for breakfast.

Choose the batch closest to what is in your jar. The ingredient amounts change, but each version uses the same mixing, resting, batter-checking, and cooking method as the main recipe.
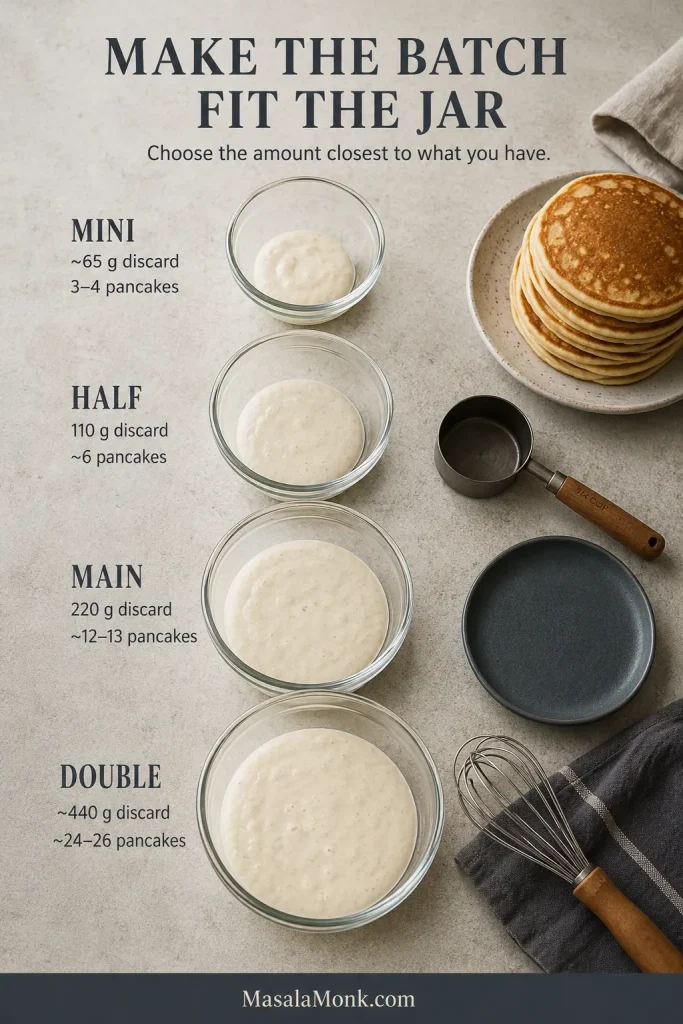
Batch-size guide showing about 65 grams discard for 3 to 4 pancakes, 110 grams for about 6, 220 grams for about 12 to 13, and about 440 grams for about 24 to 26 pancakes.
Choose the nearest established batch instead of forcing every gram into one formula; clean ratios are easier to cook predictably.

Mini Batch: About 65 g Discard

This is the “there really isn’t much in the jar” batch. It makes about 3–4 pancakes.
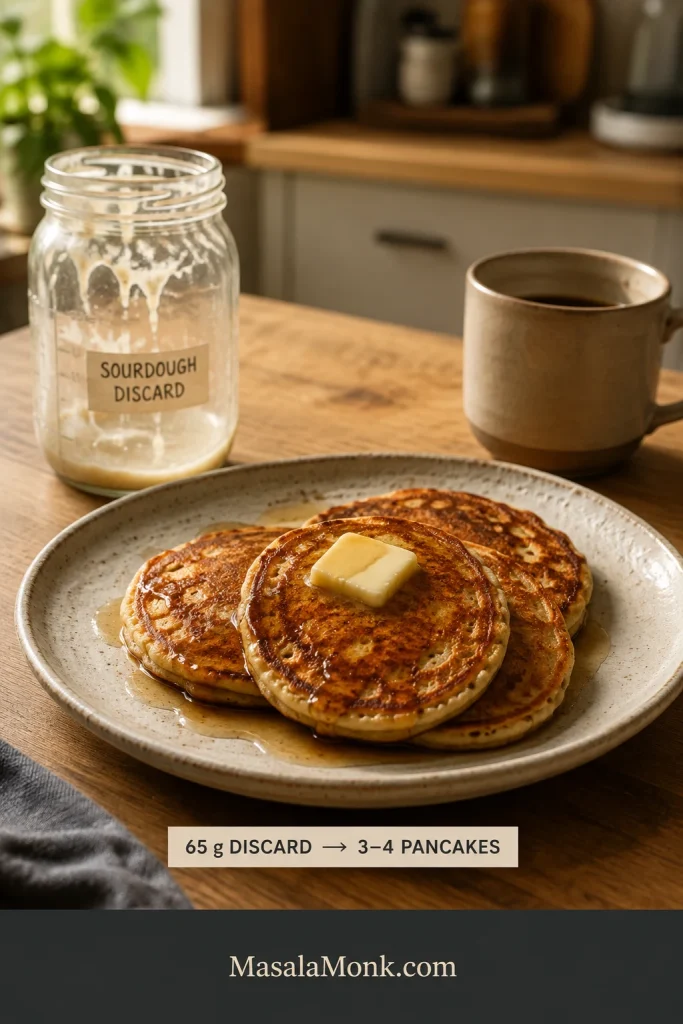
Small breakfast plate with three to four golden sourdough discard pancakes beside a nearly empty discard jar and a mug.
Even 65 g of discard is enough for a small 3–4-pancake breakfast.
  • 65 g sourdough discard
  • 55 g all-purpose flour
  • 60 ml milk, plus up to about 10 ml more if needed; add it 1 teaspoon / 5 ml at a time
  • 30 g beaten egg, about 2 tablespoons
  • 10 g melted butter, about 2 teaspoons
  • 8 g sugar, about 2 teaspoons
  • ½ teaspoon + ⅛ teaspoon baking powder
  • ⅛ teaspoon baking soda
  • Scant ¼ teaspoon fine salt
  • A small splash of vanilla, optional

Beat one egg, use 30 g for the batter, and save the rest for scrambled eggs or another breakfast use.

Half Batch: 110 g Discard

This is the neatest smaller batch because one large egg divides the main recipe cleanly in half. It makes about 6 pancakes.

  • 110 g sourdough discard
  • 90 g all-purpose flour, about ¾ cup
  • 100 ml milk, plus up to 15 ml more if needed; add it 1–2 teaspoons / 5–10 ml at a time
  • 1 large egg
  • 18 g melted butter, about 1 tablespoon + 1 teaspoon
  • 12–13 g sugar, about 1 tablespoon
  • 1 teaspoon baking powder
  • ¼ teaspoon baking soda
  • About ⅓ teaspoon fine salt
  • ½ teaspoon vanilla, optional

For the full 220 g discard batch, use the main recipe above. At every size, start with the listed milk and adjust only when the rested batter clearly needs it.

What If You Have 400–500 g of Sourdough Discard?

Have around 440 g? Double the whole recipe. That gives you roughly 24–26 pancakes.
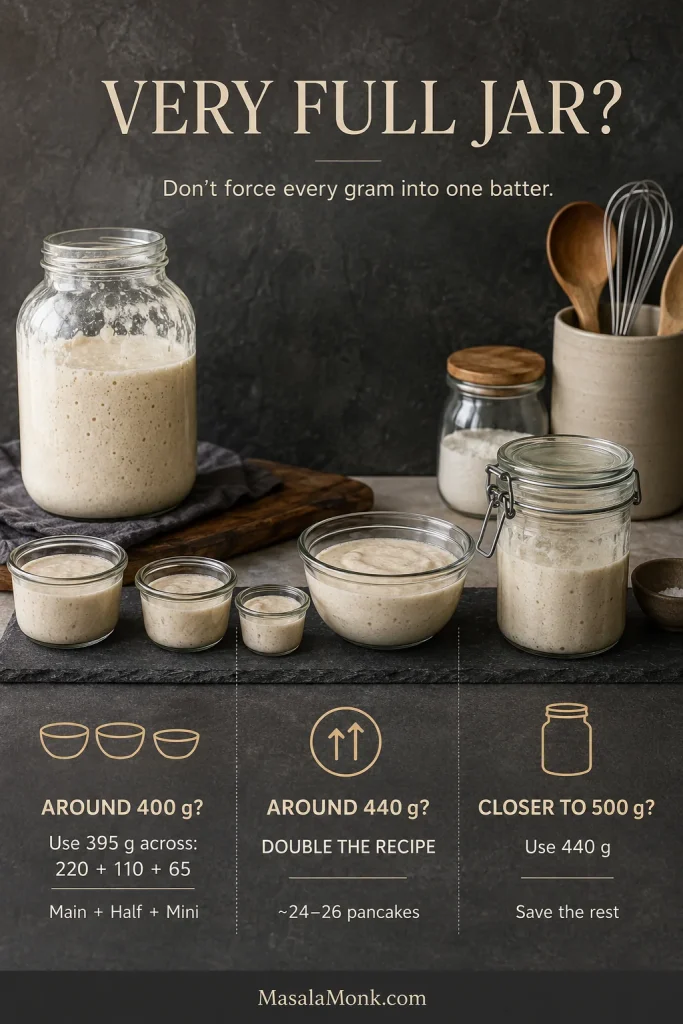
Guide for a large amount of sourdough discard: around 400 grams can use 395 grams across 220, 110 and 65 gram batches; around 440 grams doubles the recipe; closer to 500 grams uses 440 grams and saves the rest.
Around 440 g doubles cleanly. Near 400 g, the full + half + mini batches use 395 g; near 500 g, use 440 g and save the rest.
  • 440 g sourdough discard
  • 360 g all-purpose flour
  • 400 ml milk, plus up to 60 ml more if needed
  • 4 large eggs
  • 70 g melted butter
  • 50 g sugar
  • 16 g baking powder
  • 4 g baking soda
  • 8 g fine salt
  • 2 teaspoons vanilla, optional

Closer to 400 g? The full, half, and mini batches above use 395 g discard altogether, so you can make those three batches without wrestling with awkward egg fractions.

Closer to 500 g? Weigh out 440 g for the double batch and save the rest for another recipe.

Want to use 400–500 g of discard without ending up with two dozen pancakes? That’s a different recipe. Adding more discard here also adds more fermented flour and water, so the whole batter changes.

If the jar is still looking alarmingly full after breakfast, our sourdough banana bread with discard gives some of it another useful destination.

Can I Make This Sourdough Pancake Batter Overnight?

Not as written. This is a same-day batter, and the baking powder and baking soda go in before the short rest.

Don’t simply put the finished batter in the refrigerator until morning. Overnight sourdough pancakes need the long rest and the leaveners timed differently, so use a method written specifically for an overnight batter.

Easy Substitutions—and the Ones That Need a Different Recipe

Plant milk and neutral oil are straightforward changes. Eggs and gluten do much more work in the pancake, so removing either needs a recipe built for that change.
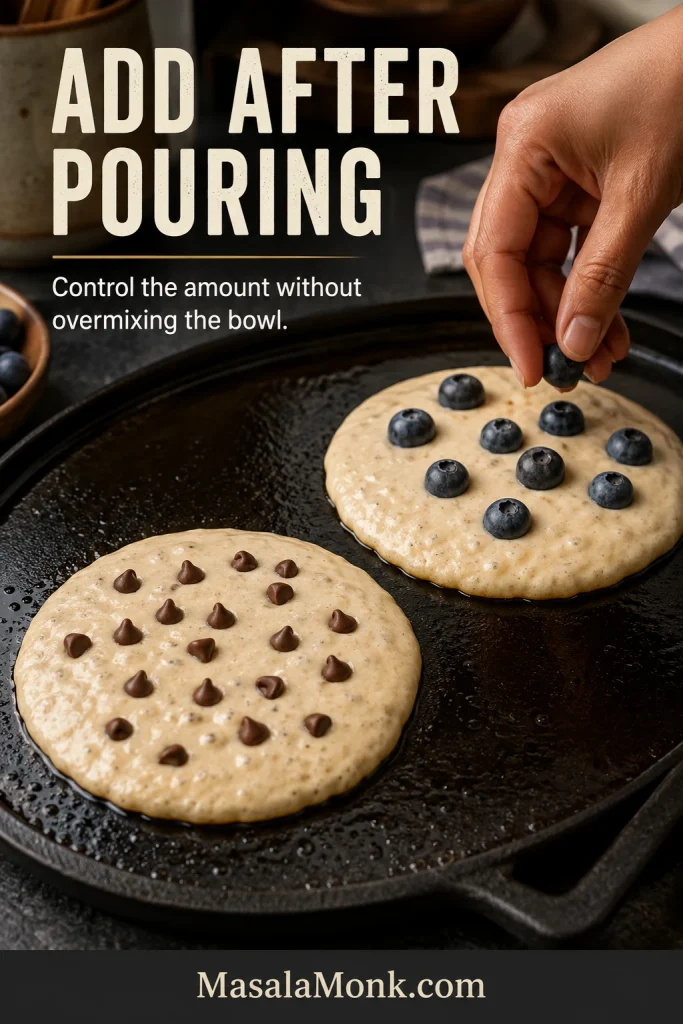
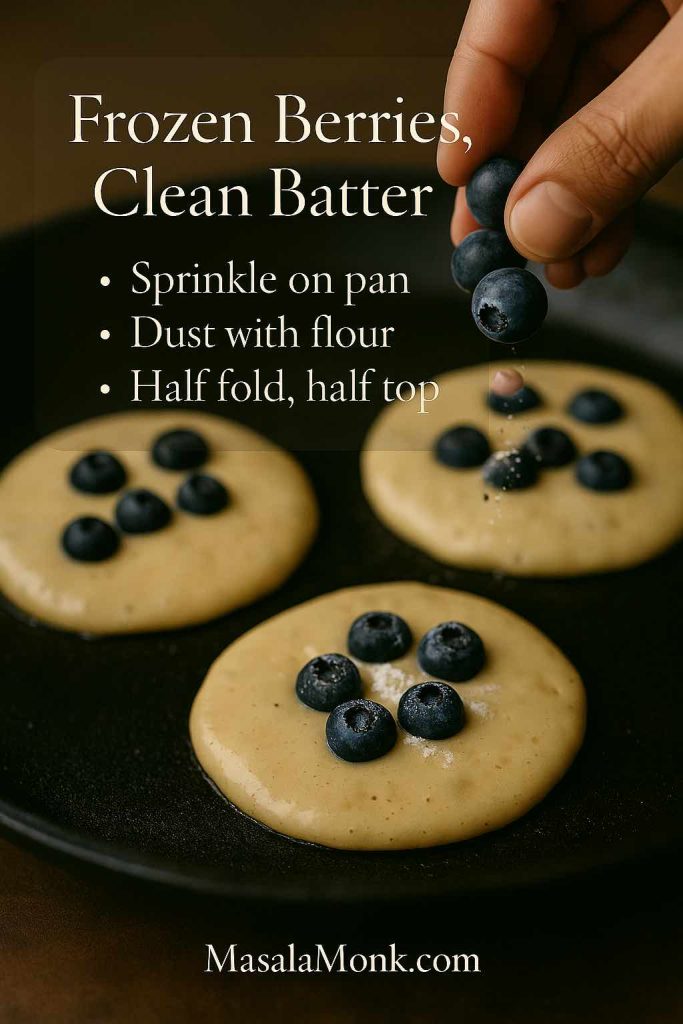
Two wet pancakes on a griddle, one topped with blueberries by hand and the other dotted with chocolate chips after the batter has been poured.
Scatter blueberries or chocolate chips after pouring so one batch can stay partly plain.

Substitution and Add-In Guide

ChangeHow to handle itWhat to expect
Unsweetened plant milkEasy swapUse it in place of the milk and check the rested batter the same way.
Neutral oil for butterEasy swapThe flavor will be less buttery, and the browning may differ slightly.
Blueberries or chocolate chipsEasy add-inScatter them over each pancake after pouring so you can control the amount without repeatedly stirring the whole bowl.
ButtermilkNot a straight 1:1 swapIt changes both acidity and batter thickness.
Eggless or veganUse a recipe designed for itRemoving eggs changes binding, moisture, and crumb.
Fully gluten-freeUse a gluten-free recipeYou need a gluten-free starter and a pancake recipe built around gluten-free flour.
No-added-flour/high-discardUse a high-discard recipeThe flour-to-liquid balance and finished texture will be different.

Buttermilk is a good example of why some swaps deserve their own recipe. If that is the pancake you actually want, our fluffy buttermilk pancakes are built around it from the start.

Thinking about replacing the eggs with flax? Our guide to how to make a flax egg explains what flax contributes and where it behaves differently from a chicken egg. That does not make it an automatic replacement for the two eggs here.

Storing, Freezing, and Reheating Sourdough Pancakes

Keep a Batch Warm

Set a wire rack over a sheet pan and keep cooked pancakes in a 200°F / 95°C oven while the rest cook. The rack lets steam escape instead of trapping it underneath the stack.

Refrigerate

Cool leftovers, refrigerate them promptly in a covered container, and use them within 3–4 days. That matches the USDA guidance for refrigerated cooked leftovers.

Freeze

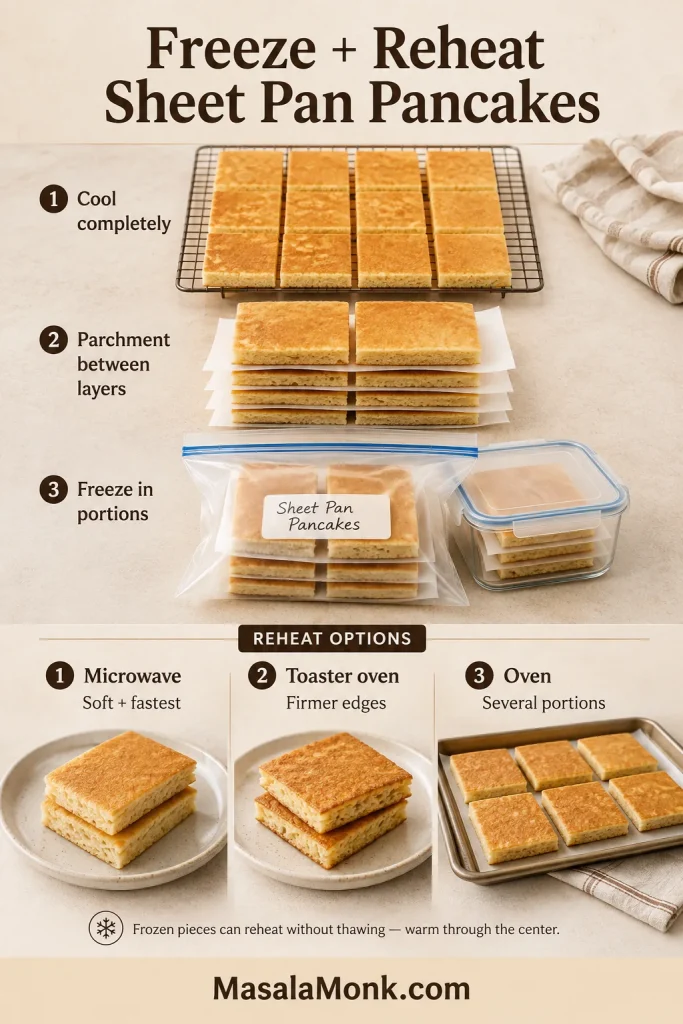
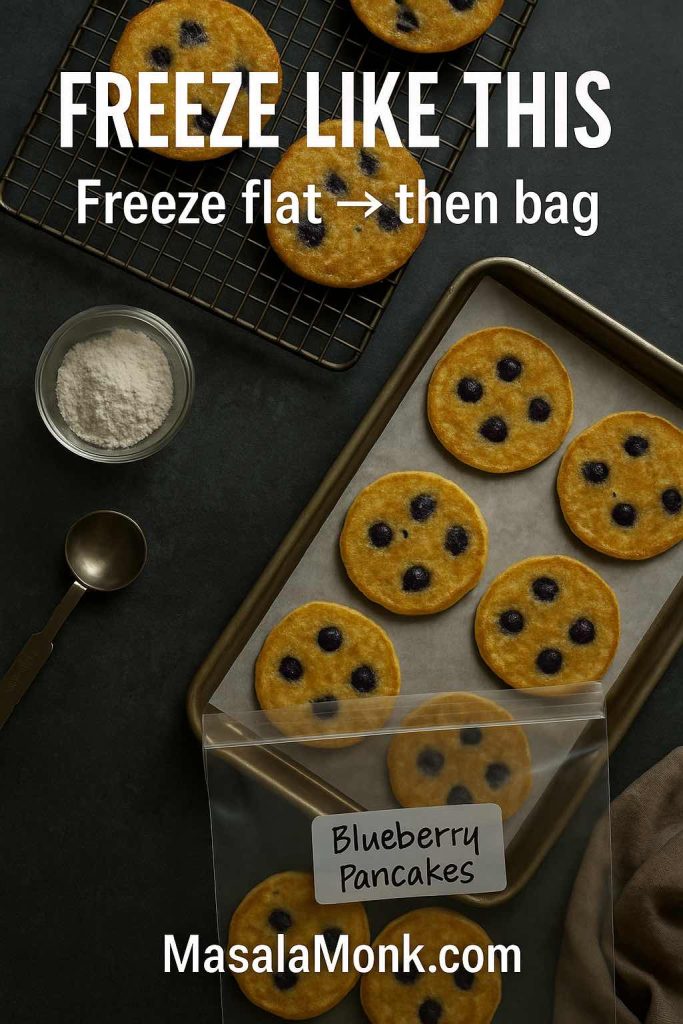
Cool the pancakes completely, then freeze them in a single layer or separate small stacks with parchment. Once firm, transfer them to a freezer-safe bag or container. For the best texture, try to use them within about 1–2 months.
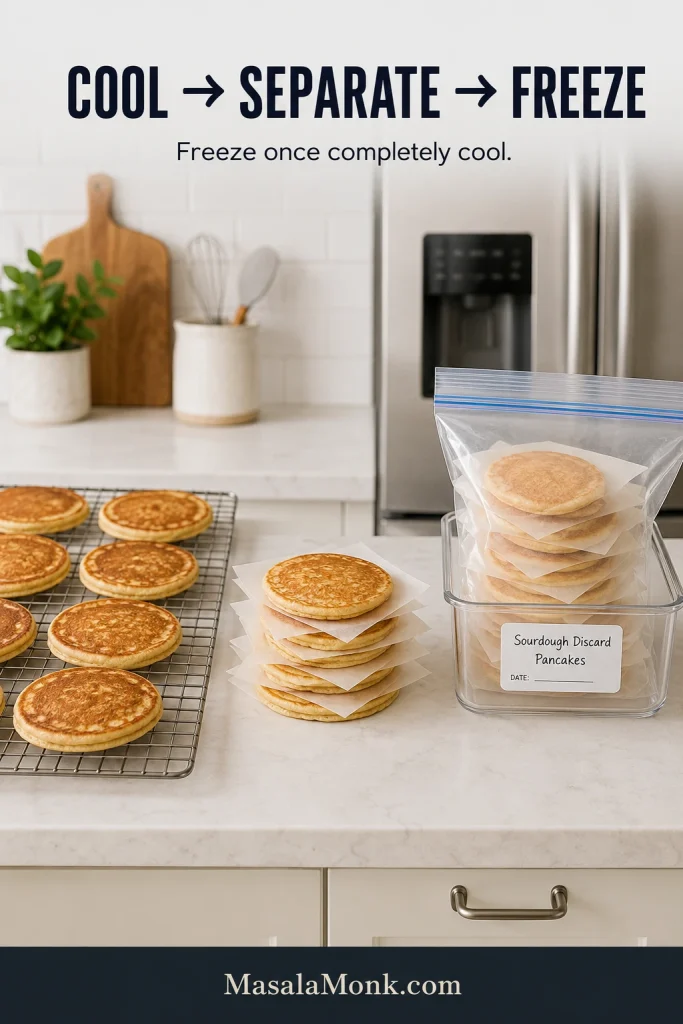
Pancakes shown cooling on a wire rack, stacked with sheets of parchment, and packed in a freezer-safe bag for storage.
Cool pancakes completely before packing; separating them makes it easier to remove only what you need.

Reheat

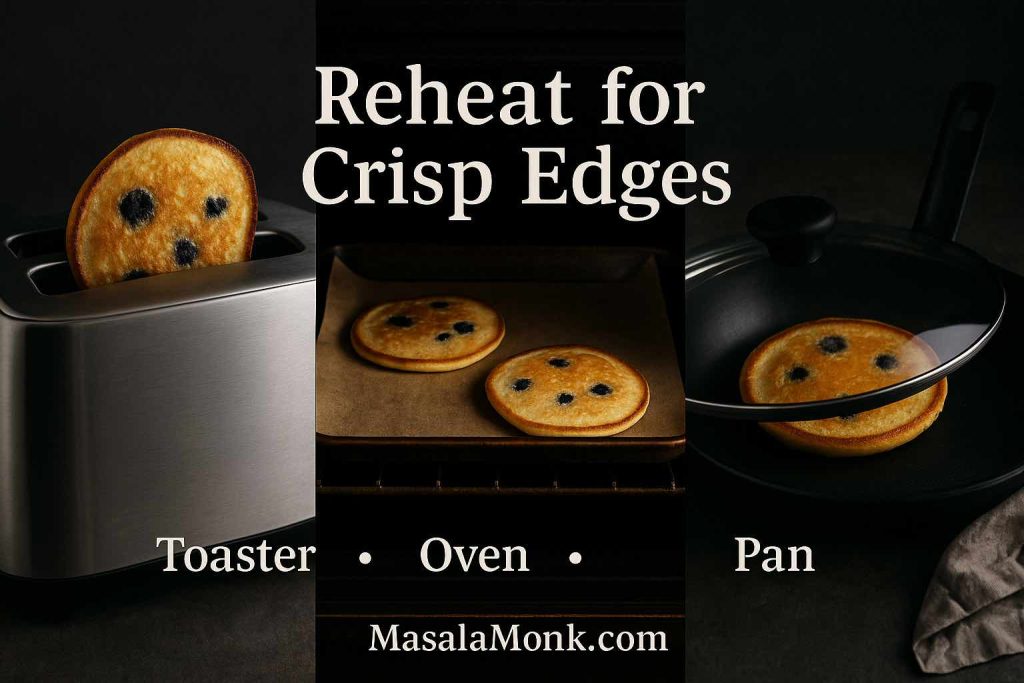
  • Toaster: great for one or two pancakes when you want slightly crisper edges.
  • Skillet: warm over low to medium-low heat for roughly 1–2 minutes per side.
  • Microwave: use short 15–20 second bursts; fastest, but also the softest finish.
  • Oven: warm several pancakes around 350°F / 175°C for about 5–7 minutes, adding more time when starting from frozen.
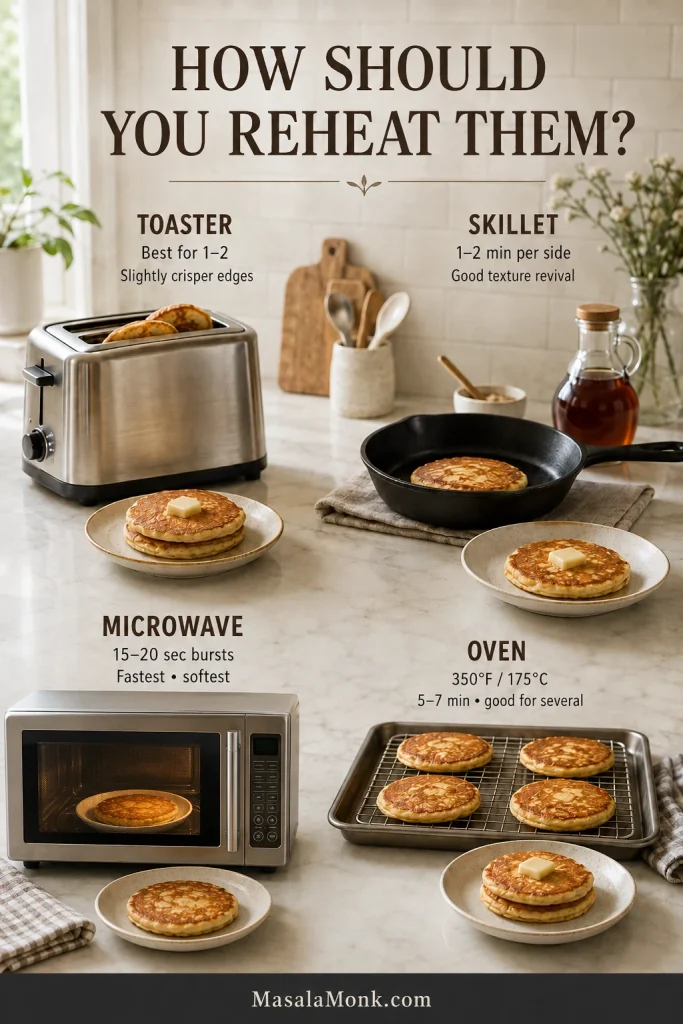
Reheating guide showing a toaster for 1 to 2 pancakes, skillet for 1 to 2 minutes per side, microwave in 15 to 20 second bursts, and oven at 350 degrees Fahrenheit or 175 degrees Celsius for 5 to 7 minutes.
Reheat only the pancakes you plan to eat; repeated warming and cooling gradually dries the crumb.

A Better Use for the Jar in the Fridge

The best sourdough discard pancake is not the one made from the most photogenic starter. It is the one that works with the jar you actually have.

Get the batter into that slow, heavy ribbon. Let the first pancake tell you what the pan needs. Then cook the rest while the edges take on color, the centers stay soft and springy, and a little butter starts melting into the warm stack.

When breakfast is finished, the discard jar is a little emptier instead of going into the bin—and the next jar should feel much less mysterious.
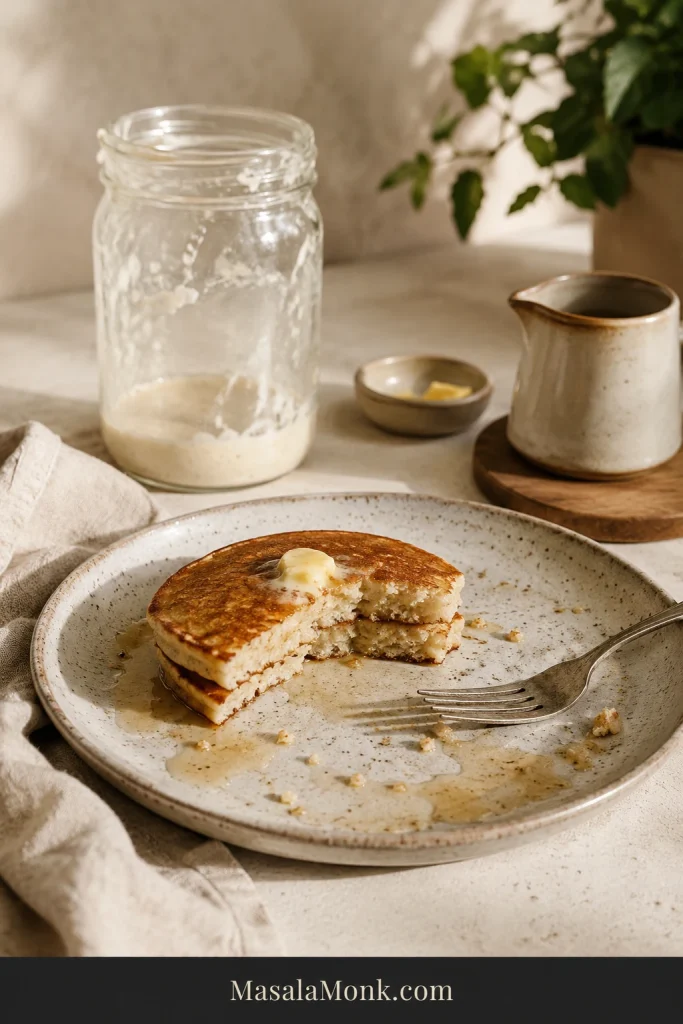
Partially eaten sourdough pancakes on a ceramic plate with a used fork, maple syrup traces, crumbs, and a nearly empty sourdough discard jar in the background.

If you make these, tell us what kind of discard you used and whether the batter needed any of the reserved milk. Sourdough jars behave differently, and your experience may help the next person staring into theirs.

Back to recipe · Back to top

Explore more sourdough: If sourdough is becoming less of a leftover-management project and more of a hobby, our sourdough bread recipes guide is a natural next step into loaves, rolls, buns, and longer-fermented doughs.
Posted on Leave a comment

Sheet Pan Pancakes Recipe: Fluffy, Easy and No Flipping

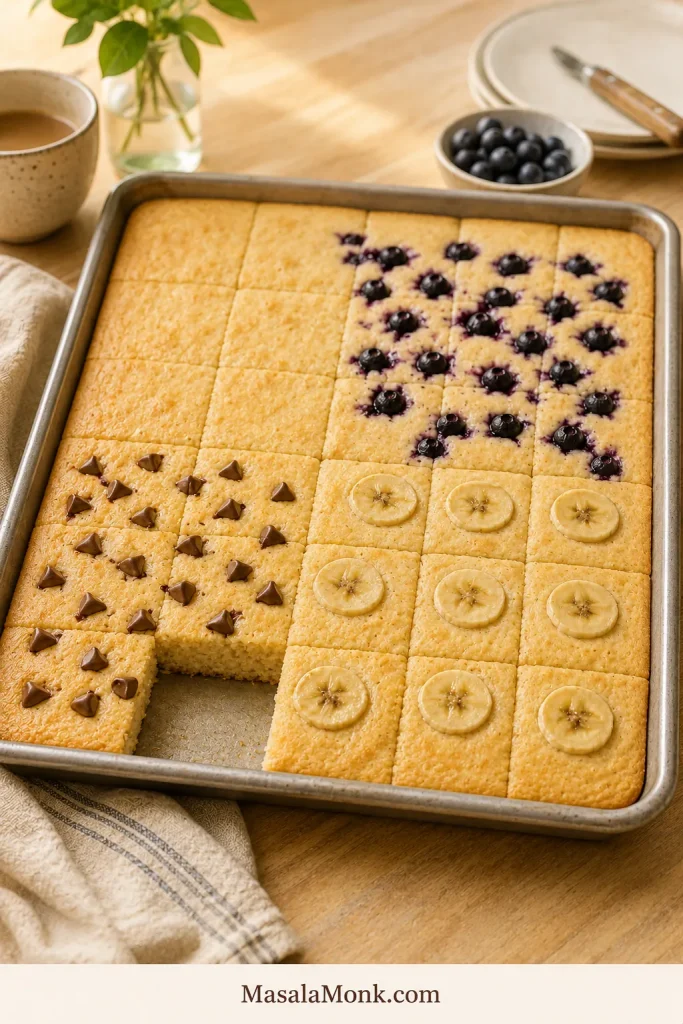
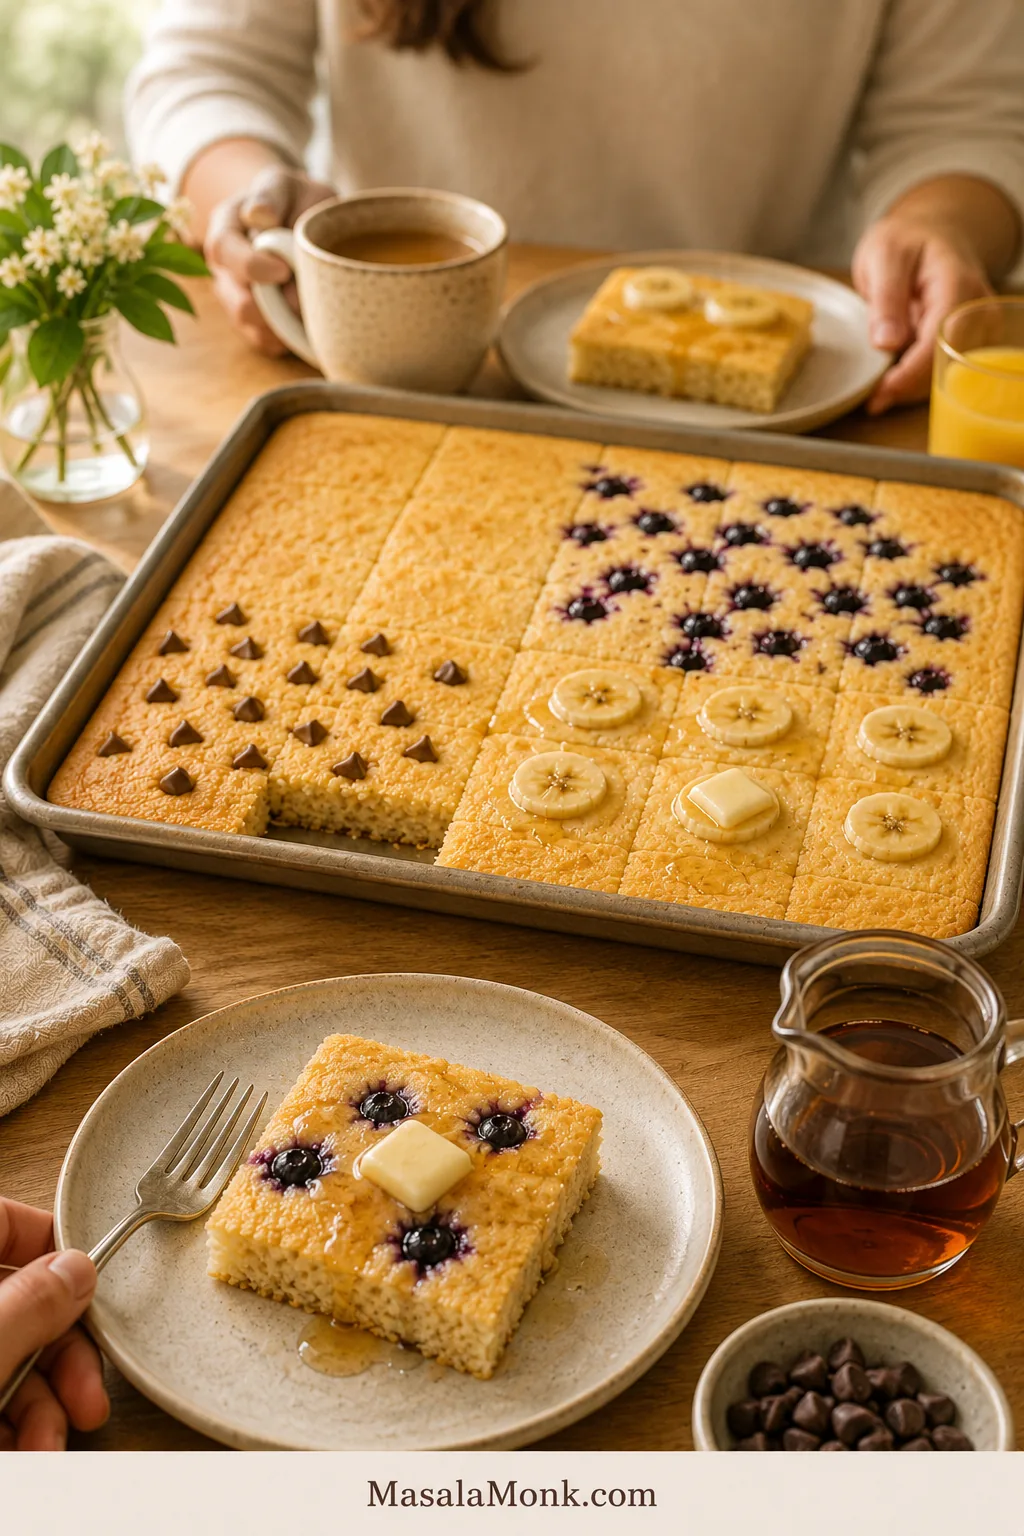
Rimmed sheet pan of shallow pancakes with plain, blueberry, chocolate chip and banana sections, with one square plated beside butter and maple syrup on a breakfast table.

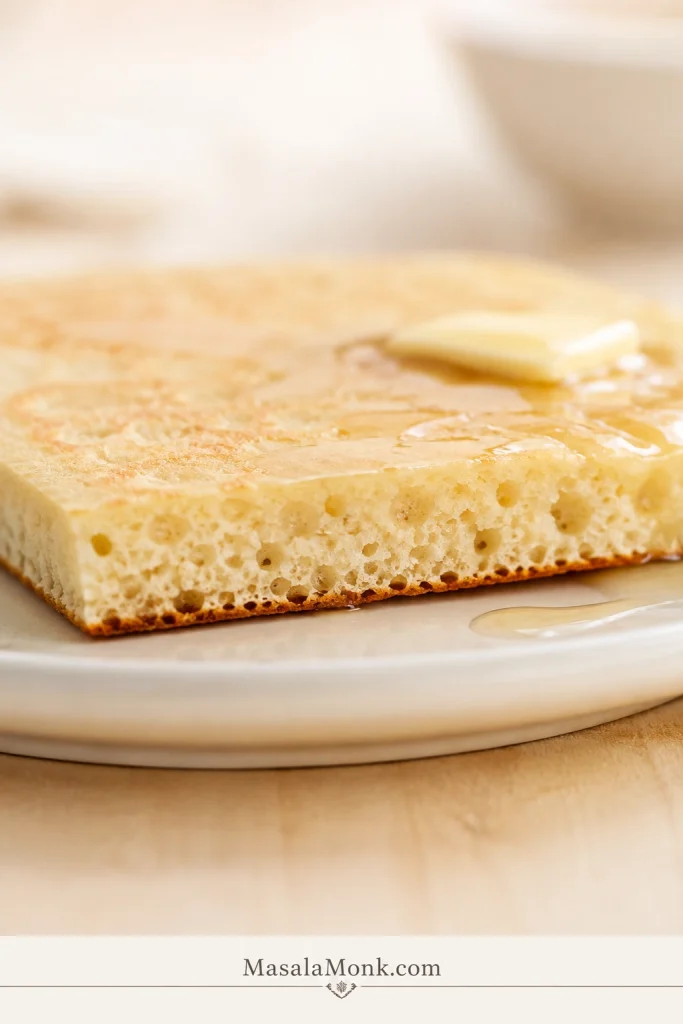
Pancake morning has one small unfairness built into it: the person holding the spatula usually eats last. While everyone else gets a hot stack, you are still standing at the stove pouring, flipping and starting the next batch.

Sheet pan pancakes fix that. One batch goes into one rimmed pan, everyone gets a warm square together, and the result should still taste unmistakably like pancakes: lightly browned underneath, soft and buttery through the middle, ready for melting butter and maple syrup.

This recipe is sized for a 13×18-inch rimmed half-sheet, so the batter stays shallow enough to bake through without leaving you with dry edges and a slow-cooking middle.

Jump to Recipe  ·  Choose Your Pan  ·  Fix Common Problems  ·  Make Ahead

Quick Answer: Sheet Pan Pancakes at 425°F

Spread thick-but-pourable buttermilk pancake batter evenly in a 13×18-inch (33×46 cm) rimmed half-sheet pan. Bake at 425°F / 220°C and start checking at 12 minutes. Most trays finish in 12–16 minutes.

The middle should look set and show no wet batter when checked. A lightly golden top is completely fine—you don’t need the deep browning of a pancake cooked on both sides of a griddle.

Sheet Pan Pancakes Recipe

Make the whole tray plain, scatter one topping across it, or divide the batter into flavor zones so everyone gets the pancake they actually want.

Recipe at a Glance

PrepAbout 10 minutes
Bake12–16 minutes
TotalAbout 25–30 minutes, including a brief rest before cutting
Oven425°F / 220°C conventional; 400°F / 205°C fan/convection
Pan13×18-inch / 33×46 cm rimmed half-sheet
Yield12 large squares
ServesAbout 6 as the main breakfast

Equipment

  • 13×18-inch light-colored rimmed half-sheet pan
  • Large mixing bowl
  • Medium bowl or large measuring jug
  • Whisk
  • Flexible silicone spatula or offset spatula
  • Digital kitchen scale, especially useful for the flour

Ingredients

  • 325 g (11.5 oz; about 2⅔ cups) all-purpose flour, spooned and leveled if using cups
  • 50 g (¼ cup) granulated sugar
  • 1 tablespoon baking powder (12 g)
  • ¾ teaspoon baking soda (about 4 g)
  • ¾ teaspoon fine sea salt (about 4–5 g)
  • 2 cups / 480 ml buttermilk
  • 2 large eggs
  • 4 tablespoons / 57 g unsalted butter, melted and cooled slightly
  • 2 teaspoons vanilla extract
  • 1 tablespoon / 14 g butter, softened or melted, for the pan
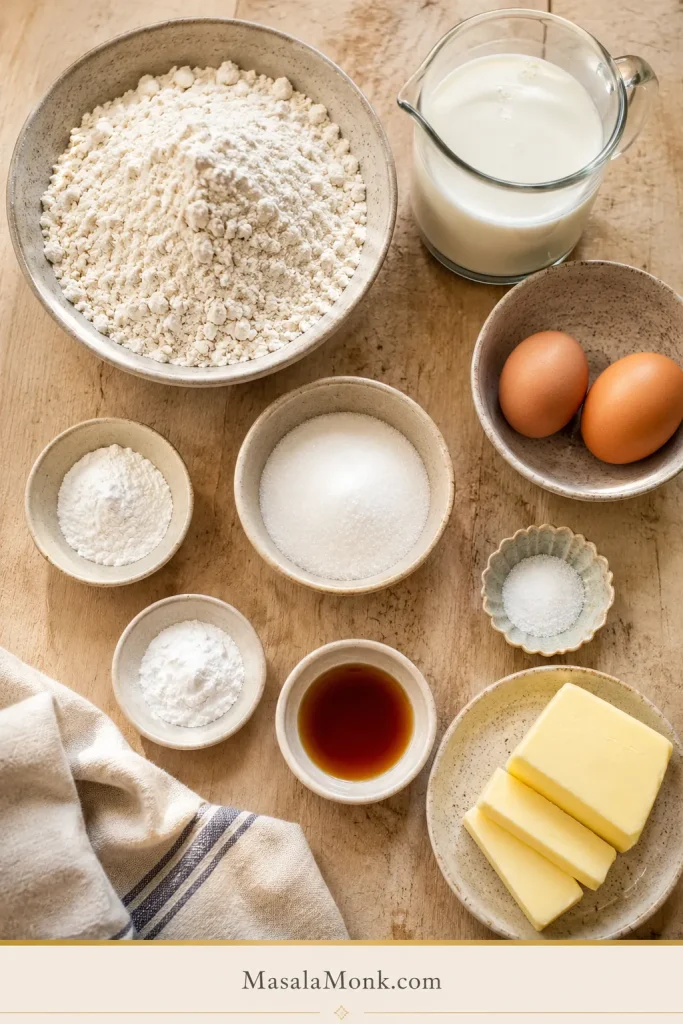
Flour, sugar, baking powder, baking soda, salt, buttermilk, eggs, butter and vanilla arranged on a light kitchen surface.
Flour and leaveners are especially worth measuring carefully: flour affects batter thickness, while small leavener errors can change rise and flavor.

Optional Toppings

These are useful starting amounts for one full tray. There is no need to pull out a scale just to scatter a few berries.

  • 125–150 g blueberries, about ¾–1 cup
  • 100–120 g chocolate chips, about ½–⅔ cup
  • 1 medium banana, thinly sliced
  • 75–100 g strawberries, about ½–⅔ cup sliced
  • 60–80 g pecans or walnuts, about ½–⅔ cup chopped

For several flavors on one pan, use less of each. Plenty of batter should remain visible between the toppings.

How to Make Sheet Pan Pancakes

  1. Preheat the oven. Put a rack in the middle and heat the oven thoroughly to 425°F / 220°C conventional or 400°F / 205°C fan/convection, unless your oven automatically adjusts for fan cooking.
  2. Prepare the pan. Butter the half-sheet, including the corners and sides. You don’t need to preheat the pan for this version; starting at room temperature gives you time to spread the batter evenly. If your pan has a history of sticking, line the base with parchment and lightly butter it.
  3. Whisk the dry ingredients. Combine the flour, sugar, baking powder, baking soda and salt in a large bowl.
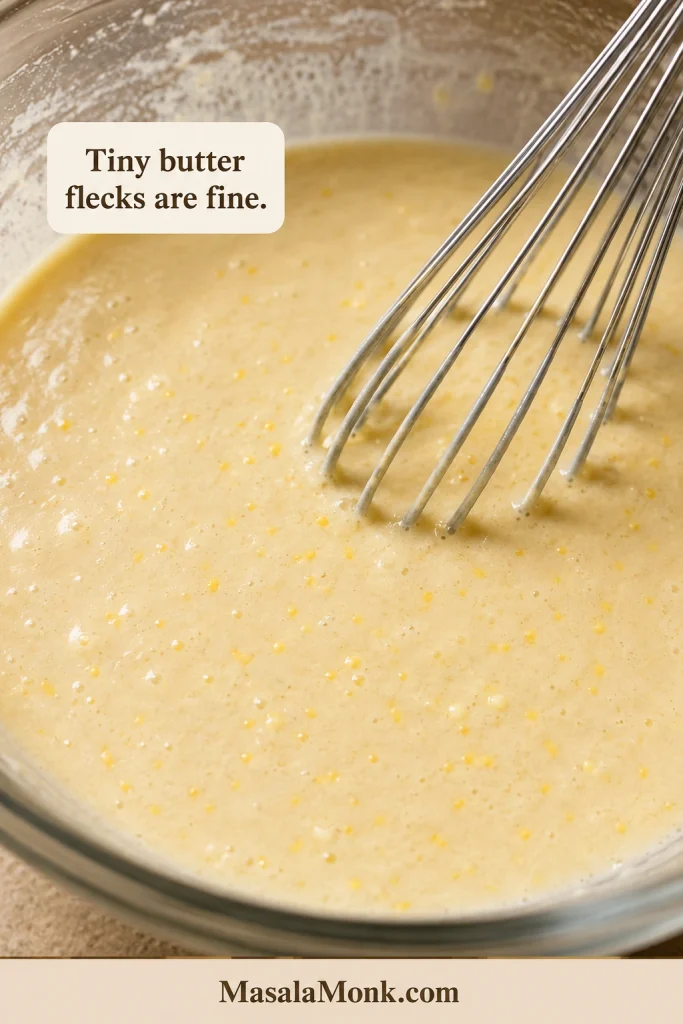
  4. Mix the wet ingredients. In another bowl or large jug, whisk the buttermilk, eggs and vanilla. Whisk in the cooled melted butter. Cold buttermilk may make the butter form a few tiny flecks; that’s fine. They’ll melt in the oven.
Close-up of pale pancake wet mixture in a glass bowl with a whisk and many tiny flecks of butter suspended throughout.
Tiny butter flecks are normal when melted butter meets cold buttermilk. They will melt in the oven.
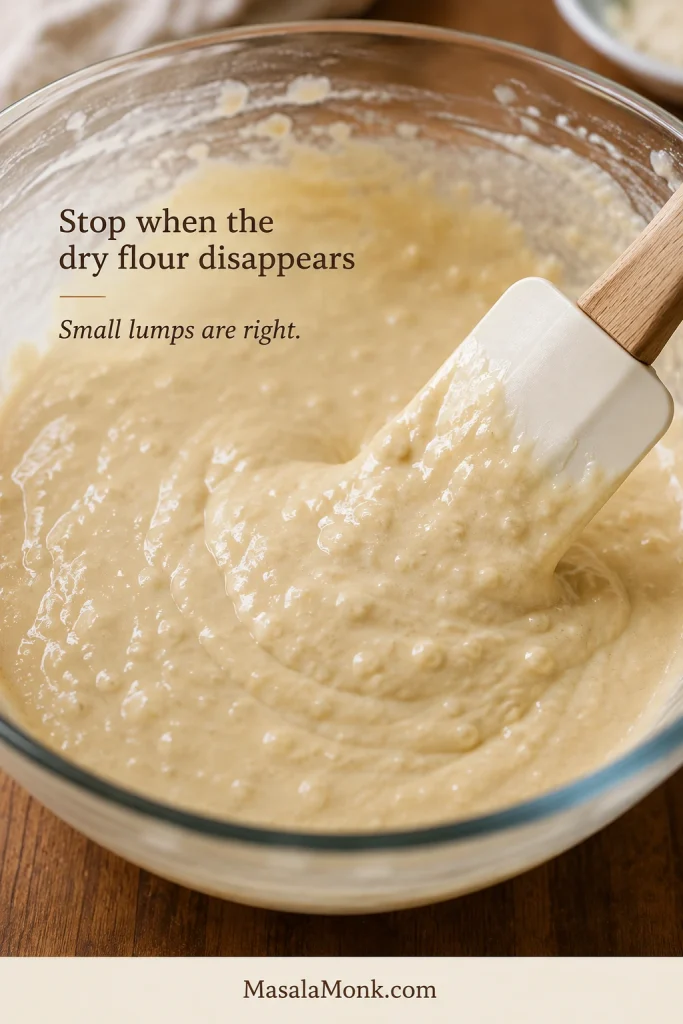
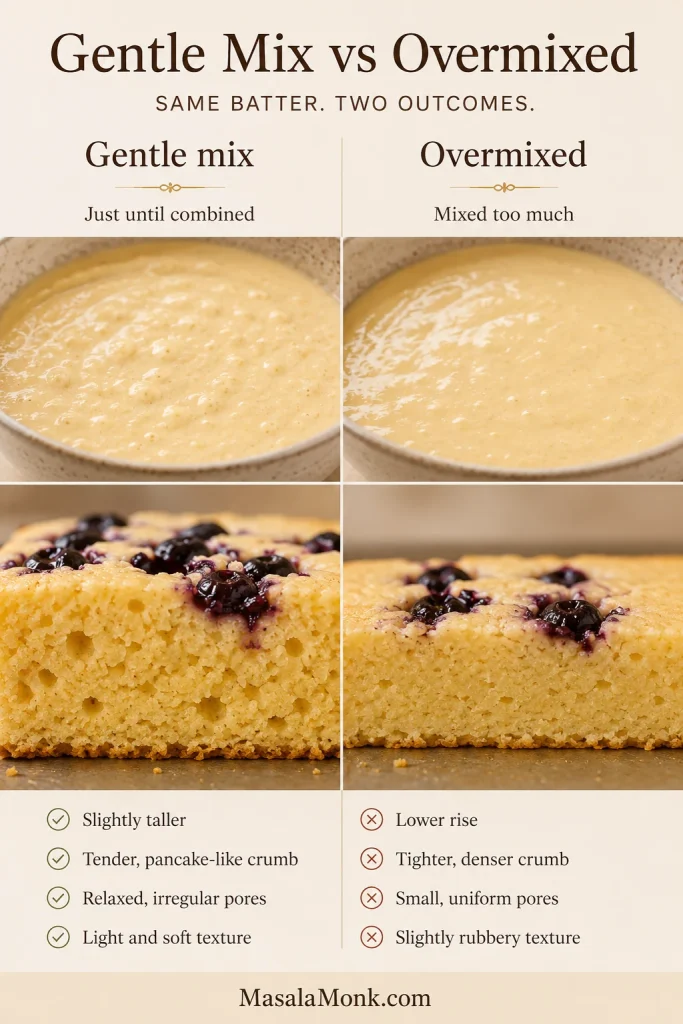
  1. Fold the batter. Pour the wet mixture into the dry and fold gently with a flexible spatula. Stop as soon as the dry flour disappears. A few small lumps are exactly what you want.
Thick pancake batter being gently folded with a spatula after the dry flour has disappeared, with several small lumps still visible.
Scrape the bowl once for hidden dry flour, then stop. Small lumps should remain.

Spread, Top and Bake

  1. Spread it promptly. This batter doesn’t need a deliberate long rest. Pour it into the prepared pan, ease it toward the corners and give the tray a gentle jiggle to even the surface.
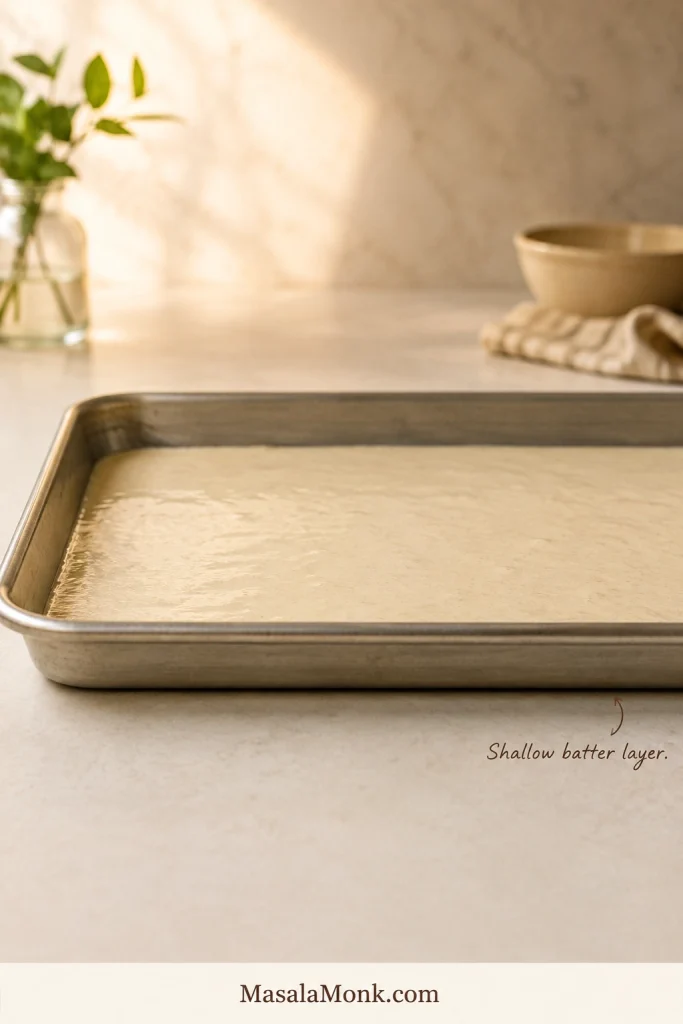
Low side view of pale pancake batter spread in a rimmed half-sheet pan, leaving substantial empty rim height above the shallow batter layer.
The batter should sit shallowly in the half-sheet. If it looks deep now, fix the pan or amount before baking.
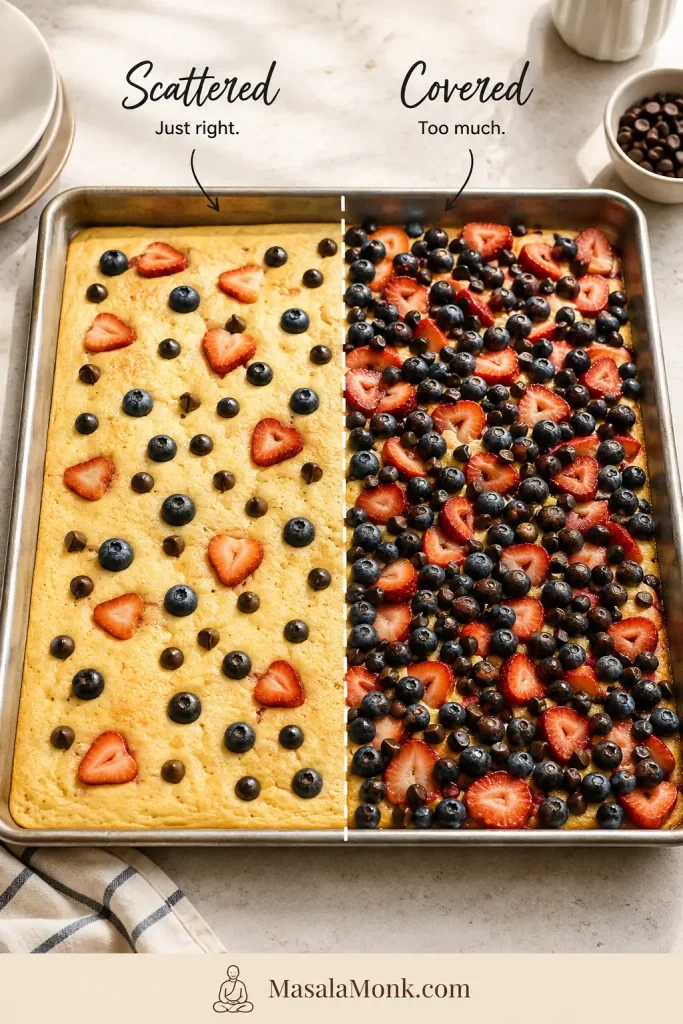
  1. Add toppings. Scatter them over the surface, leaving plenty of batter visible between them.
Side-by-side topping comparison showing pancake batter with a light scatter of fruit and chocolate versus batter almost completely covered with toppings.
Leave plenty of batter visible between toppings. Coverage matters more than counting individual berries or chips.
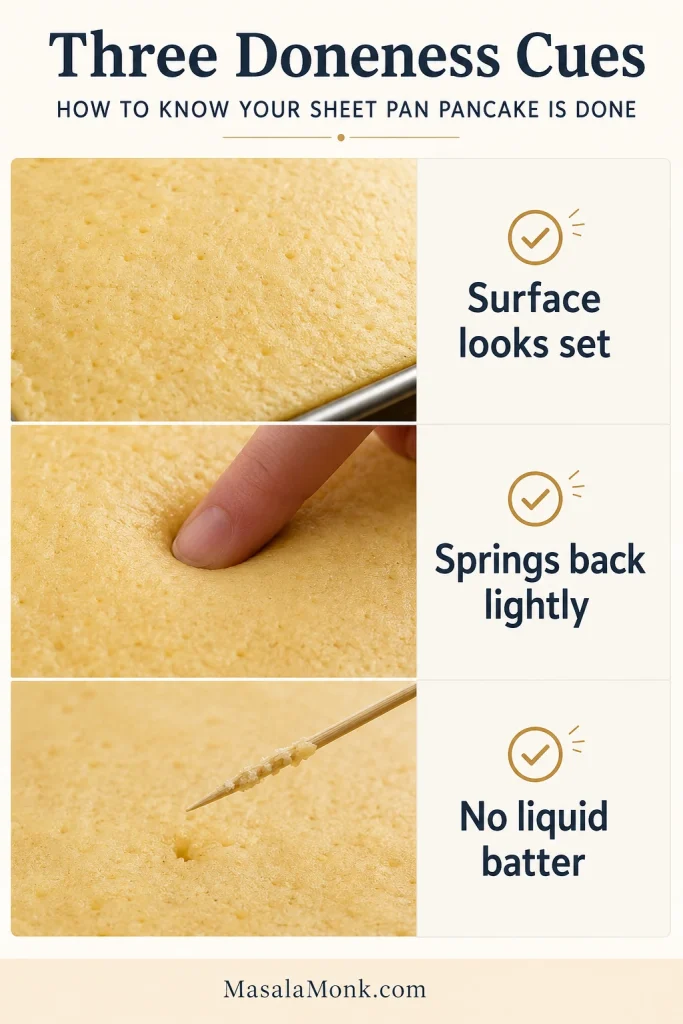
  1. Bake. Start checking at 12 minutes. The center should look set, spring back lightly when pressed and show no liquid batter on a tester. Expect 12–16 minutes in most ovens.
  2. Add more color only if you want it. Once the pancake is cooked through, broil very briefly if you want a little more browning. Watch continuously. Skip the broiler if parchment is sticking up near the heating element.
  3. Rest and serve. Let the tray stand for 2–3 minutes, then cut the pancake into 12 large squares.

The finished tray should smell of warm butter and vanilla, with slightly firmer edges and a tender, springy middle. A broiler can add color in seconds; it can’t put moisture back into an overbaked pancake.

Why They Stay Fluffy

A good sheet pan pancake should still feel like a pancake when you lift a square: tender through the middle, springy rather than rubbery, and sturdy enough to reach the plate without behaving like a slice of sponge cake.

Close side view of a thin sheet-pan pancake square with a pale golden top, soft porous interior and narrow browned underside.
Small, irregular air pockets and a browned underside are exactly what a tender baked pancake should show.

Buttermilk + Leavening Give the Batter Its Lift

Buttermilk brings a slight tang and supplies the acid that baking soda needs. Baking powder adds more lift. Together, they give the batter what it needs to rise.

If what you really want is the traditional stovetop version, these fluffy buttermilk pancakes with cinnamon apples keep the classic griddle-and-flip approach.

Gentle Mixing Keeps Them Tender

Once flour gets wet, continued mixing develops more gluten. Some structure is useful; too much gives pancakes a chewy, rubbery bite.

Comparison of gently mixed and overmixed pancake batter with cut baked pieces below; the overmixed piece is lower with a tighter, more compressed crumb.
The smoother batter is not the better batter: overmixing tightens the crumb.

Stop while a few lumps remain. Pancake batter doesn’t need to look polished before it goes into the oven.

Measure the Flour Carefully

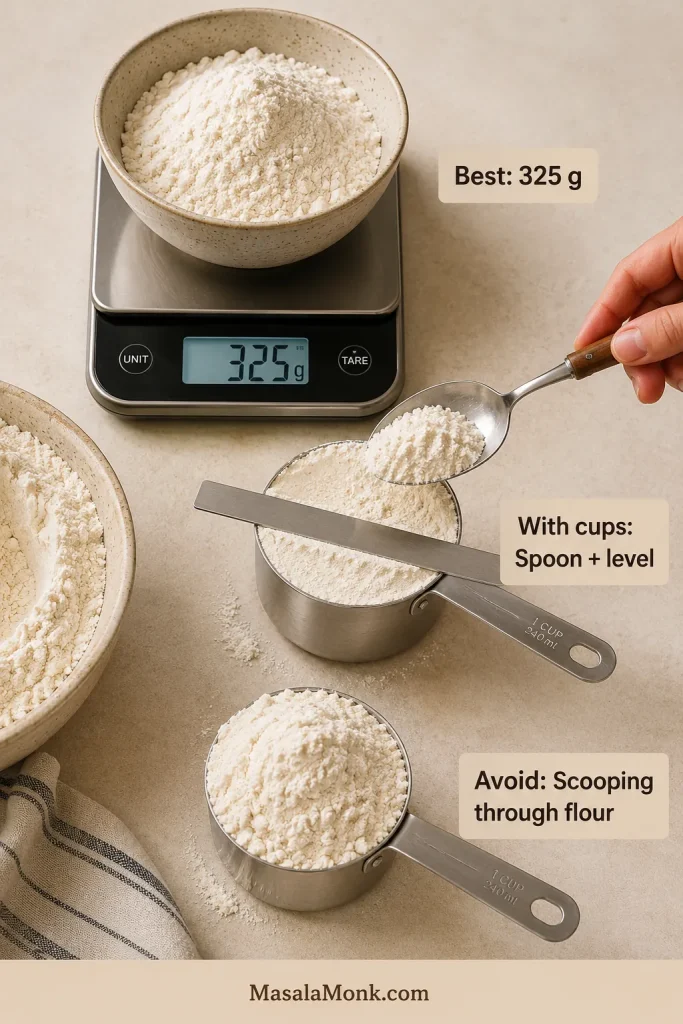
Extra flour makes the batter unnecessarily thick. If you have a scale, use the 325 g measurement. With cups, spoon the flour into the cup and level the top.

Flour measuring guide showing a kitchen scale at 325 g, a dry measuring cup filled by spooning and leveling, and a more heavily packed cup representing direct scooping.
Using a scale? Tare the bowl first, then add 325 g flour directly.

Eggs give the pancake enough structure to cut cleanly, while melted butter keeps the crumb rich and tender. The sugar stays modest because syrup and toppings can add plenty later.

Numbers get you close. The batter itself is the final check.

What the Batter Should Look Like

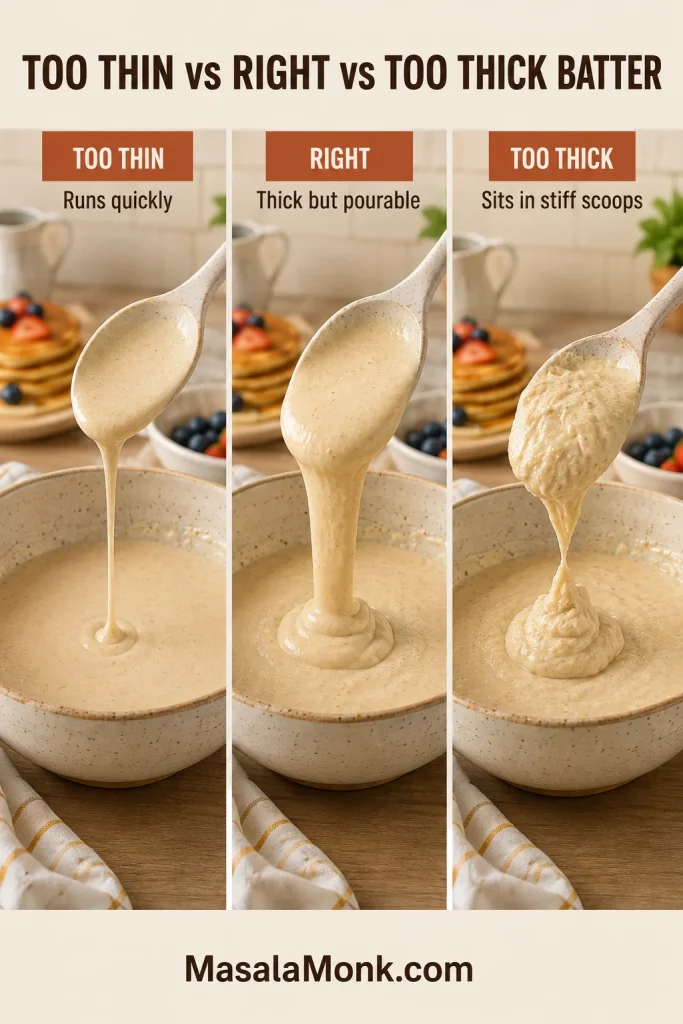
The batter should be thick but pourable.

  • It falls from the spatula in a broad, heavy ribbon.
  • It spreads slowly when encouraged toward the corners.
  • A few small lumps remain visible.
  • It doesn’t race across the pan like crêpe batter.
  • It doesn’t sit in stiff scoops like muffin batter either.
Three batter consistencies shown with the same spatula test: thin batter running quickly, correct batter falling in a broad ribbon, and thick batter dropping in a stiff mound.
The right ribbon lands heavily, then slowly relaxes back into the batter.

If the batter is unusually stiff, first check whether the flour was overmeasured. Once that’s ruled out, fold in extra buttermilk 1 tablespoon at a time until the batter becomes comfortably pourable.

The homemade buttermilk substitute in the FAQ can be thinner than cultured buttermilk, so use these visual cues before making any adjustment.

Which Pan Works Best?

Use a light-colored 13×18-inch (33×46 cm) rimmed half-sheet for the easiest, most predictable version of this recipe. If that’s the pan you have, you’re set; the details below are mainly useful when your pan is darker, smaller or unusually sticky.

You might call yours a baking sheet, baking tray, sheet tray, oven tray or cookie sheet. The name isn’t important. It needs a raised rim and should be close to the standard half-sheet size.

A completely flat cookie sheet is the one style to avoid. Pancake batter and an unprotected oven floor are not a combination worth trying.

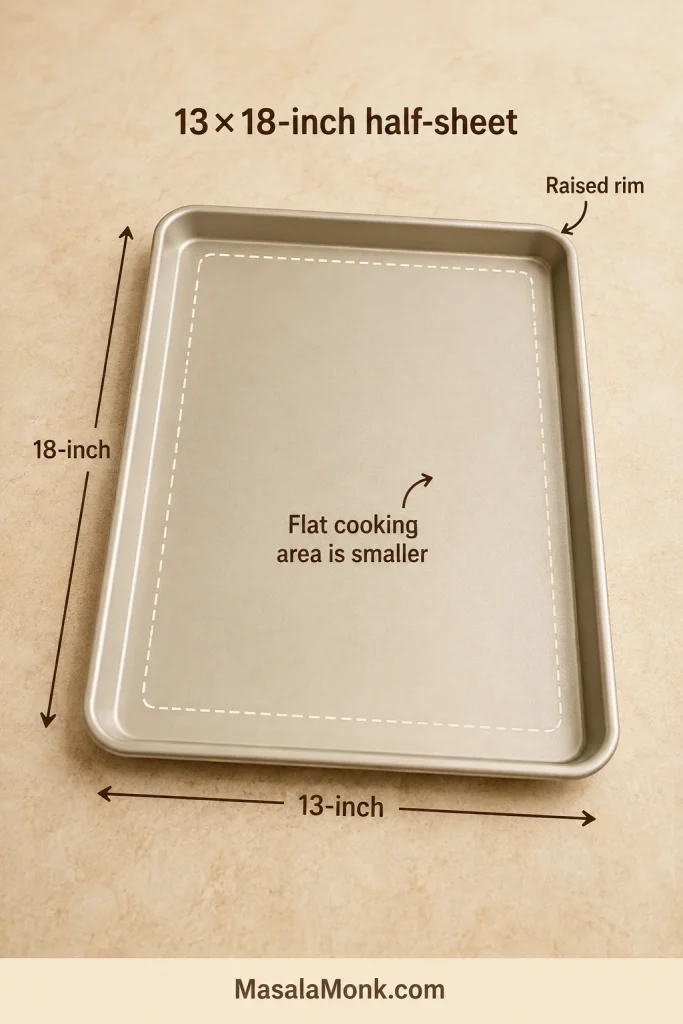
Why Does a 13×18 Pan Measure Smaller Inside?

The listed dimensions usually include the rim. Across the flat cooking surface, a pan sold as 13×18 inches may measure closer to roughly 12×17 inches.

So if yours seems a little smaller when you put a ruler inside it, you probably bought the right pan.

Annotated light aluminum half-sheet pan showing 13-inch and 18-inch outside dimensions, a raised rim and a dashed outline around the smaller flat cooking area.
Measure across the outer rim; the flat cooking surface is naturally smaller than 13×18 inches.

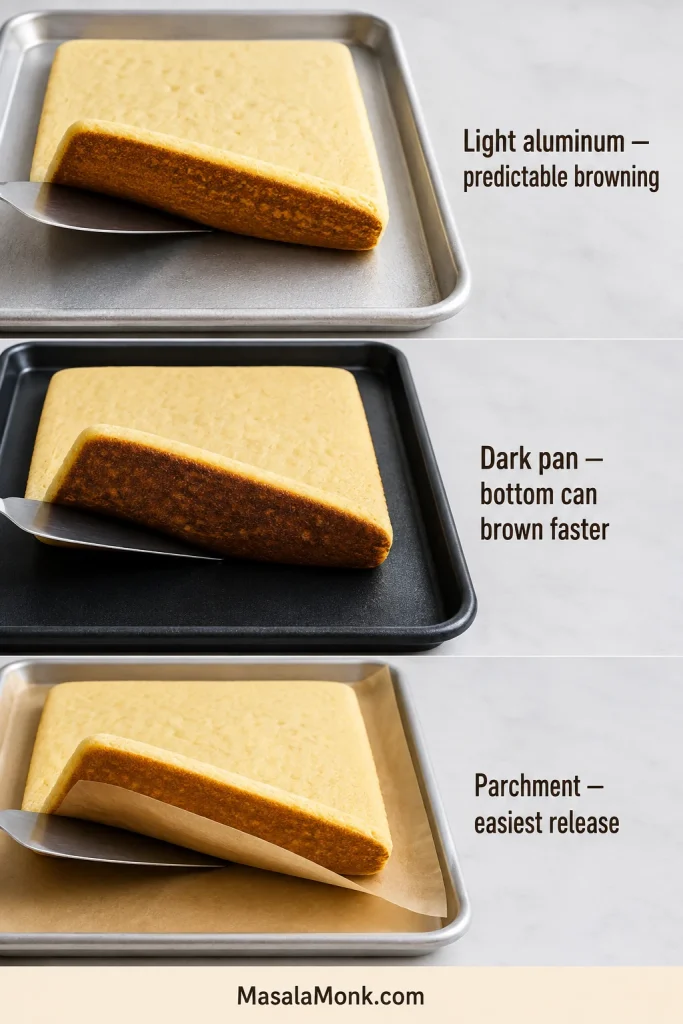
Light Pan, Dark Pan or Parchment?

Light aluminum tends to give predictable bottom browning. Dark nonstick bakeware can color the underside faster, so start checking sooner.

Parchment is fine too. Buttering the metal directly can give you a little more color underneath; parchment wins on easy release and cleanup. If your pan has betrayed you before, use the parchment.

Three baking setups comparing a light aluminum pan, a dark pan with a darker pancake underside, and a parchment-lined pan with a pancake lifting cleanly.
Dark pans brown the underside faster; parchment favors easy release and cleanup.

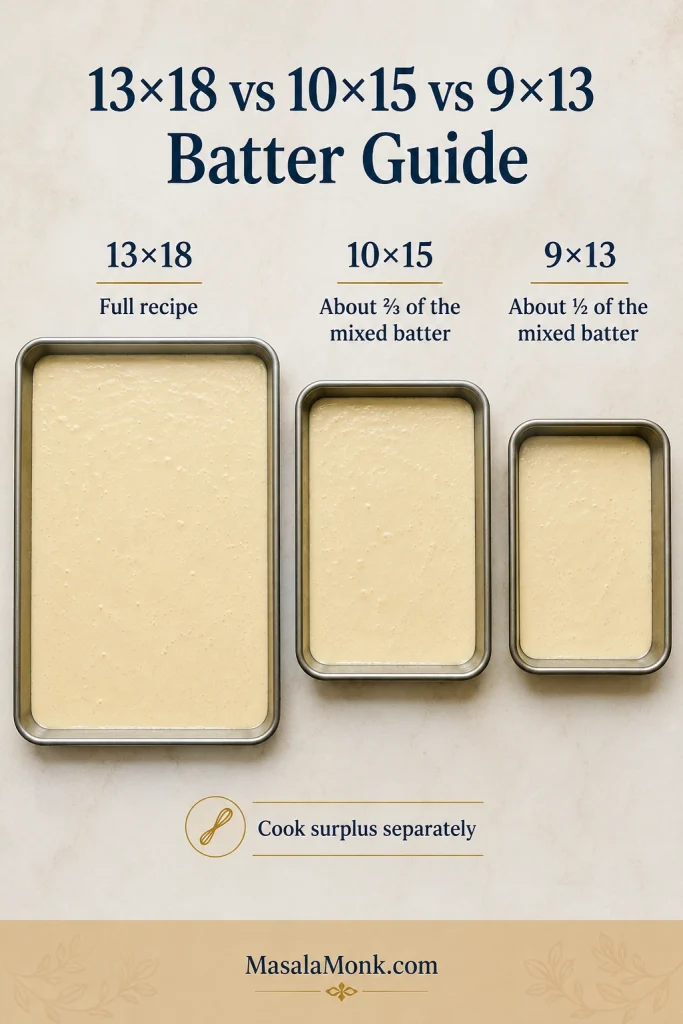
13×18 vs 10×15 vs 9×13

A smaller pan gives the same amount of batter less room to spread, so the pancake becomes deeper.

PanHow Much Batter to UseWhat to Expect
13×18-inch half-sheetFull recipeShallow, fluffy pancake squares
10×15-inch panAbout two-thirds of the mixed batterSimilar depth; timing may shift
9×13-inch panAbout half of the mixed batterSimilar depth; start checking early
9×13 + full recipeNot recommendedVery deep batter; slow-cooking middle, drier edges and a much more cake-like result
Three rimmed pans with similar shallow batter depths: a 13×18 pan with the full batch, 10×15 with about two-thirds, and 9×13 with about half.
13×18 uses the full batch; 10×15 needs about two-thirds; 9×13 needs about half to keep a similar depth.

A 10×15 pan has about two-thirds the nominal area of a 13×18 half-sheet, while a 9×13 has about half. Mix the full recipe, pour only the approximate amount shown above and cook the surplus separately.

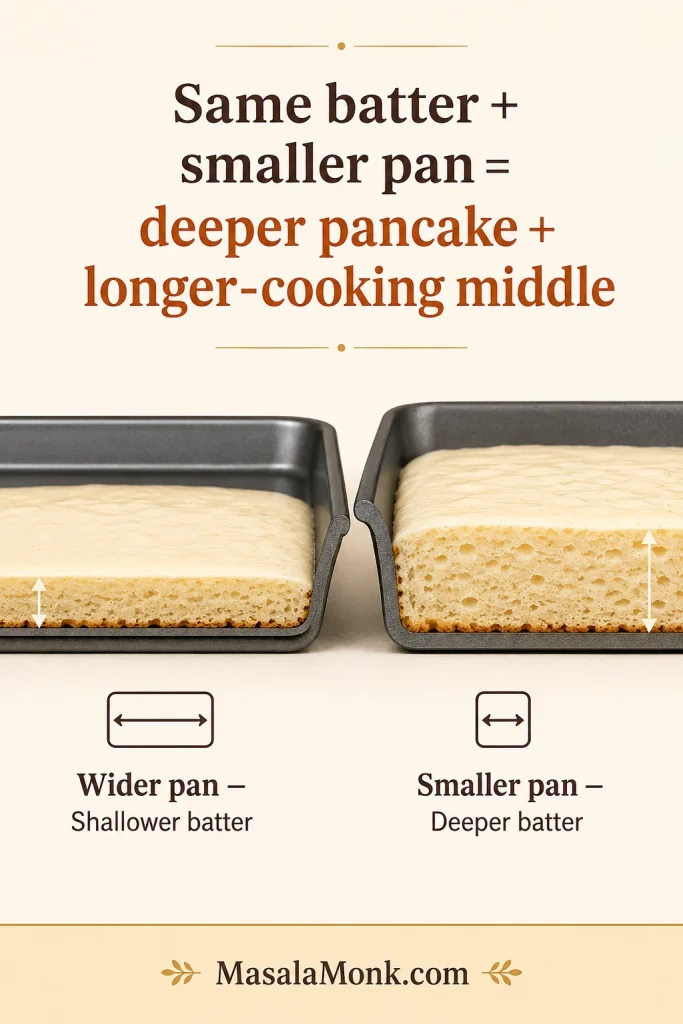
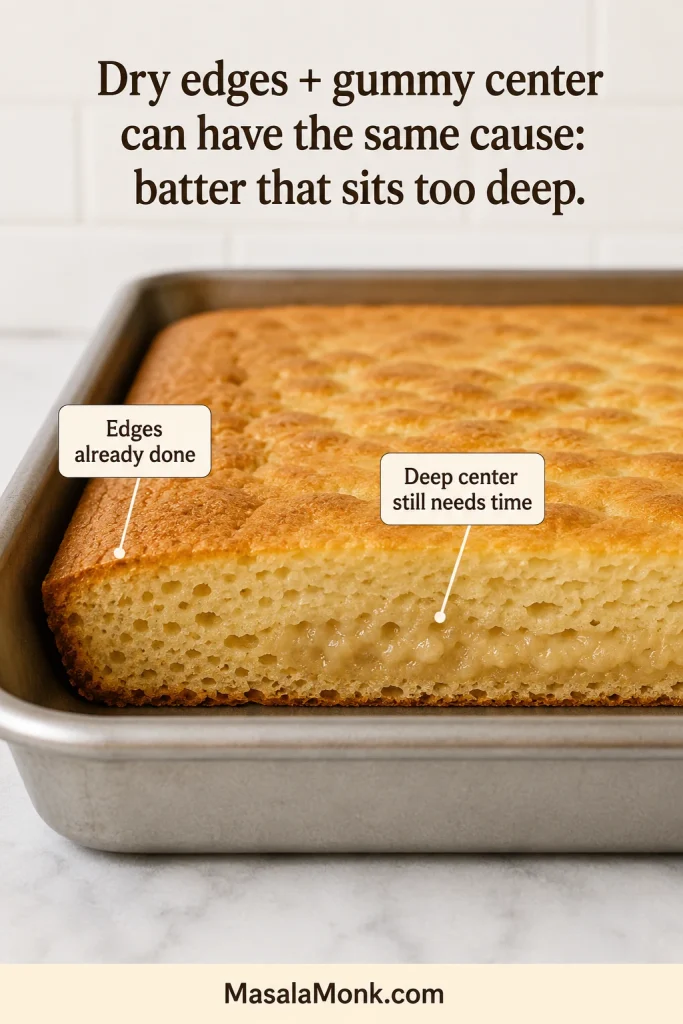
Pour the whole batch into a 9×13 and the pancake sits roughly twice as deep.

Same batter + smaller pan = deeper pancake + longer-cooking middle.

Cutaway comparison showing the same amount of pancake batter spread shallowly in a wide pan and much deeper in a smaller pan.
Same batter + smaller footprint = a deeper center and a longer path to doneness.

That is how dry edges and a gummy middle can happen at the same time: the center still needs heat after the edges have had enough.

Cross-section of an overly deep pancake with darker, drier-looking edges and a moist, compressed, under-set band through the center.
Dry edges with a gummy center usually point to a layer that was too deep, not simply too little oven time.

Pan sorted? Back to the recipe method.

How to Tell They’re Done

Stovetop pancakes give you an obvious sequence: bubbles, dry edges, flip, brown the second side. A baked tray removes the flip, so color alone isn’t a reliable finish line.

Look at the middle. It’s ready when the surface is set, a gentle press springs back and a tester shows no liquid batter. A few moist crumbs are fine. The edges may also begin to pull slightly from the pan.

Three sheet-pan pancake doneness checks showing a set center surface, a fingertip pressing the middle and a toothpick with moist crumbs but no wet batter.
Look for all three cues together: a set center, gentle spring-back and a tester with no liquid batter.

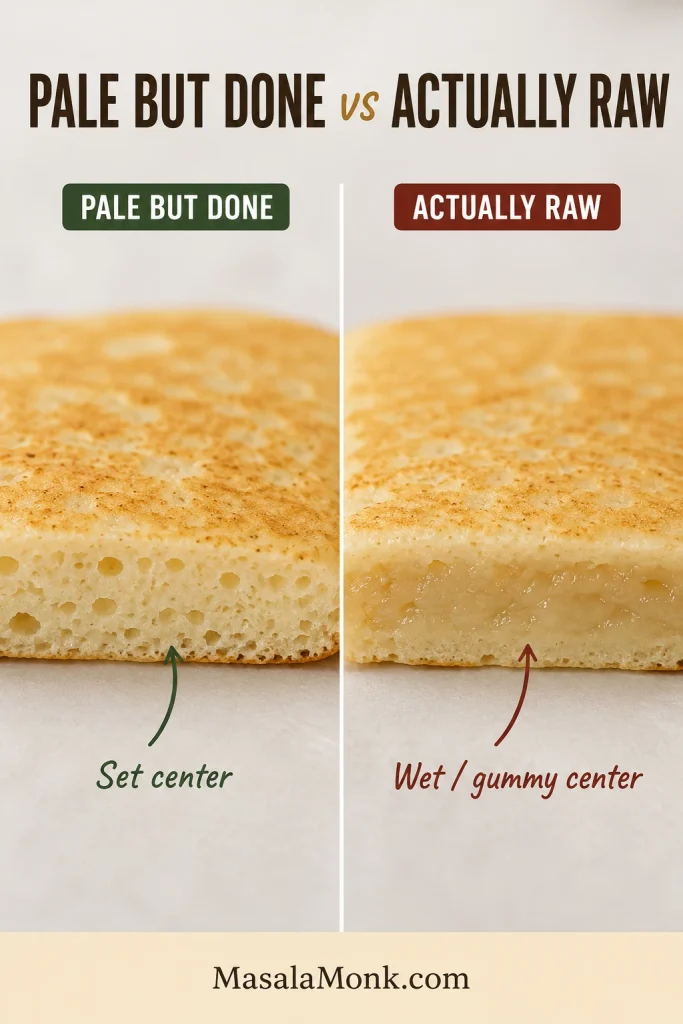
Why Is the Top Still Pale?

This is the moment that can tempt you to leave the tray in too long.

A regular pancake gets direct contact with hot metal twice: once before the flip and again afterward. Here, the bottom sits against the pan while the top cooks mostly in oven air.

A fully cooked middle with a pale-golden top is completely normal. For extra color, use the brief broiler finish after the center is cooked.

Two pale pancake pieces cut open side by side; one has a fully set tender crumb while the other has a visibly wet, dense, gummy center.
A pale top can be fully cooked. The cut edge tells you more than surface color.

Make One Flavor—or Four on the Same Pan

Getting everyone breakfast at the same time solves one pancake problem. One pan can solve another too: everyone wants something different.

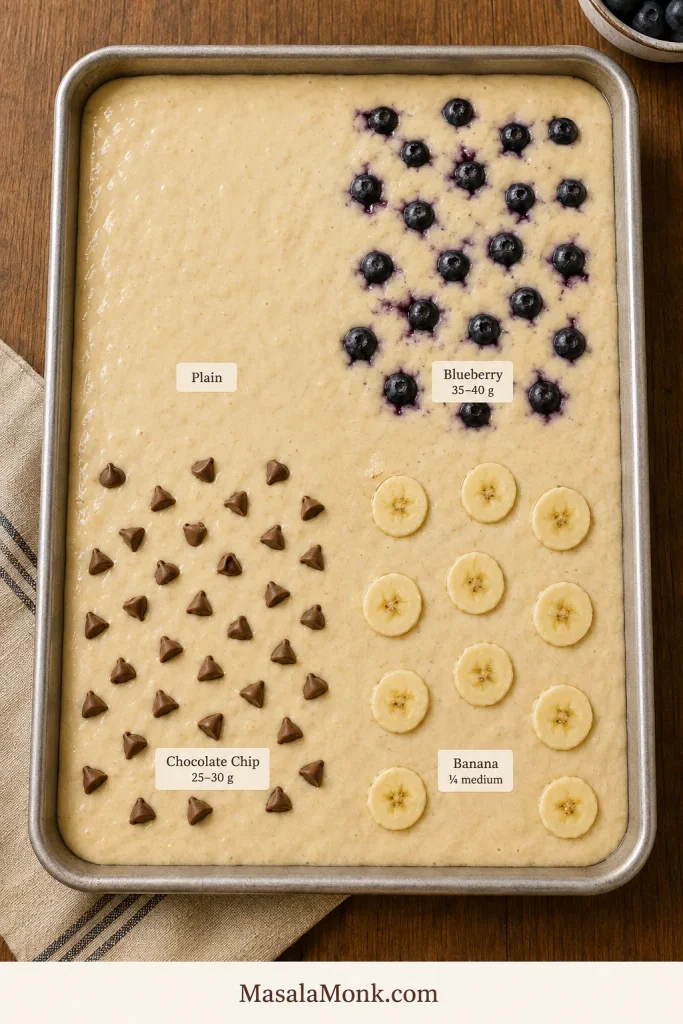
Blueberry can have one corner, chocolate chips another, banana gets its quarter, and anyone who thinks pancakes need no decorating at all can keep the fourth section plain.

Overhead view of raw pancake batter in a rimmed sheet pan with plain, blueberry, chocolate chip and banana topping areas using modest amounts of each.
Level the batter first, then build the flavor zones lightly so one section does not end up deeper than another.
Quarter-Pan FlavorGood Starting Amount
PlainLeave untouched
Blueberry35–40 g blueberries, about ¼ cup
Chocolate chip25–30 g chocolate chips, about 2–3 tablespoons
BananaAbout ¼ medium banana, thinly sliced

Think scattered, not covered. A heavy topping layer can weigh down the batter and bring more moisture with it.

The berries soften and burst, the chocolate goes molten, and the plain corner needs nothing more complicated than butter and syrup.

Finished shallow sheet pan pancake cut into squares with distinct plain, blueberry, chocolate chip and banana sections.
Cut along the flavor boundaries first for cleaner blueberry, chocolate, banana and plain servings.

Fresh vs Frozen Blueberries

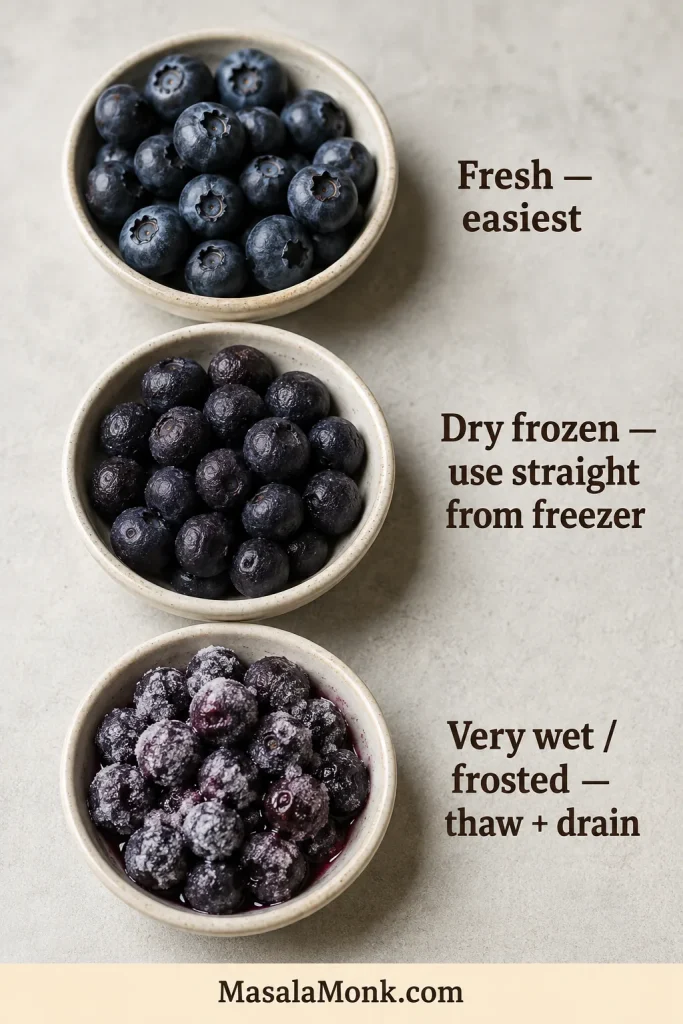
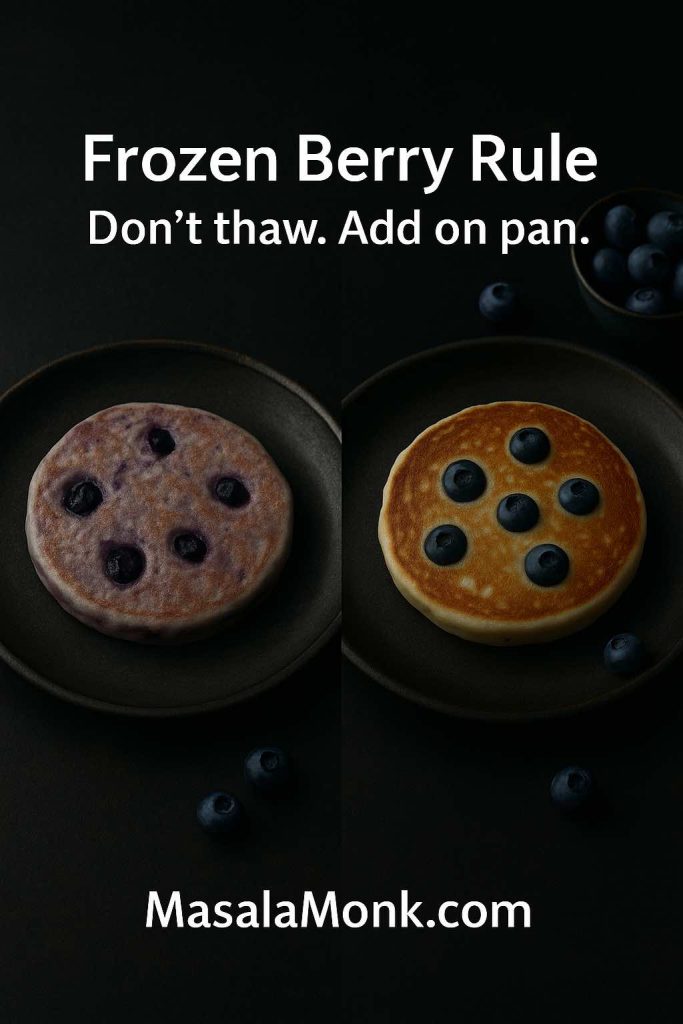
Fresh blueberries are the simplest option, but frozen berries work too. Fairly dry frozen berries can go straight onto the batter; shake off loose ice and keep the layer light.

Heavily frosted berries or berries already releasing lots of juice are better thawed and drained first. Keep excess water off the batter and either type can work well.

Three blueberry states showing dry fresh berries, relatively dry frozen berries with little loose frost, and heavily frosted wet berries with visible excess moisture.
The real variable is loose moisture: shake off surface ice, and drain berries that are already thawing or juicy.

Making blueberry the main event? Our blueberry pancakes guide goes further into classic, lemon, banana, oat and other blueberry pancake variations.

Bananas, Strawberries and Apples

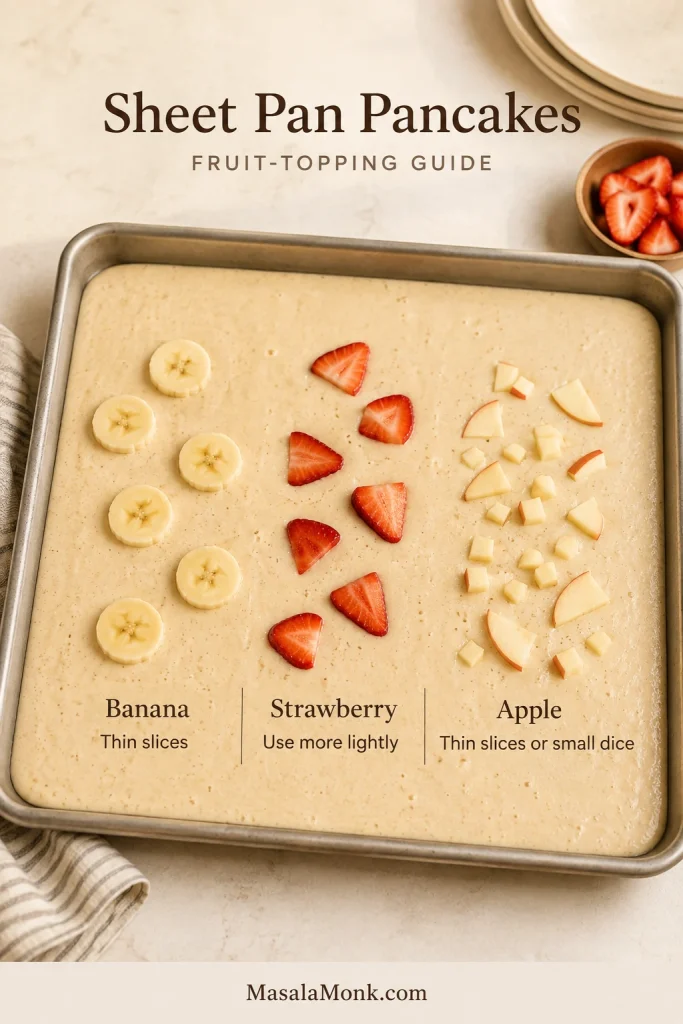
Thin banana slices soften easily during the short bake. Strawberries release more water, so use them more sparingly.

Apples are firmer. Very small dice or thin slices work better than large raw chunks; you can also soften them briefly before adding them to the batter.

Raw sheet-pan pancake batter with small demonstration areas of thin banana slices, lightly scattered strawberry slices and thin or finely diced apple pieces.
Match the cut to the bake: softer fruit can stay sliced; firmer apples need thin slices or small dice.

Troubleshooting

Most problems trace back to batter depth, mixing, measurements or the way a particular pan and oven handle heat.

Texture & Rise

What You’re SeeingWhat Probably HappenedWhat to Do
Dense or heavyToo much flour, overmixing or stale leavenerCheck the flour; mix more gently; use fresh leavener
Chewy or rubberyBatter was mixed too muchStop folding once the dry flour disappears
Gummy middleUnderbaked, batter too deep or too many wet toppingsReturn it to the oven if still raw; use the correct batter depth next time
Dry edges, wet centerBatter layer was too deep or unevenUse less batter in a smaller pan and spread it evenly
Didn’t rise muchOld leavener, cool oven, long batter rest or overmixingUse fresh leavener, preheat fully and bake soon after mixing
Bitter, metallic or soapyToo much baking powder or baking sodaMeasure the leaveners carefully
Batter too thickUsually excess flourCheck the flour measurement; loosen with buttermilk 1 tablespoon at a time if needed
Batter very thinFlour or liquid measurement may be offRecheck the quantities before adding anything else

Pan, Browning & Toppings

What You’re SeeingWhat Probably HappenedWhat to Do
Bottom too darkDark pan or a longer bake than neededStart checking sooner next time
Top looks paleOften completely normalUse the doneness cues above; broil briefly only after it’s cooked
Wet fruit pocketsToo much fruit or excess surface moistureUse less fruit and remove excess moisture before topping
One side thinnerBatter wasn’t level before bakingSpread gently and jiggle the pan before baking
Pancake stuckThe pan needed more grease or parchmentButter thoroughly or line the base next time

Need the deeper explanation? Check batter consistency  ·  Check the pan guide  ·  Check doneness.

Back to top

Make Ahead, Freeze & Reheat

You can make the morning easier without leaving a bowl of mixed pancake batter in the refrigerator overnight. A little measuring the night before leaves much less to do once everyone is hungry.

Best Night-Before Prep

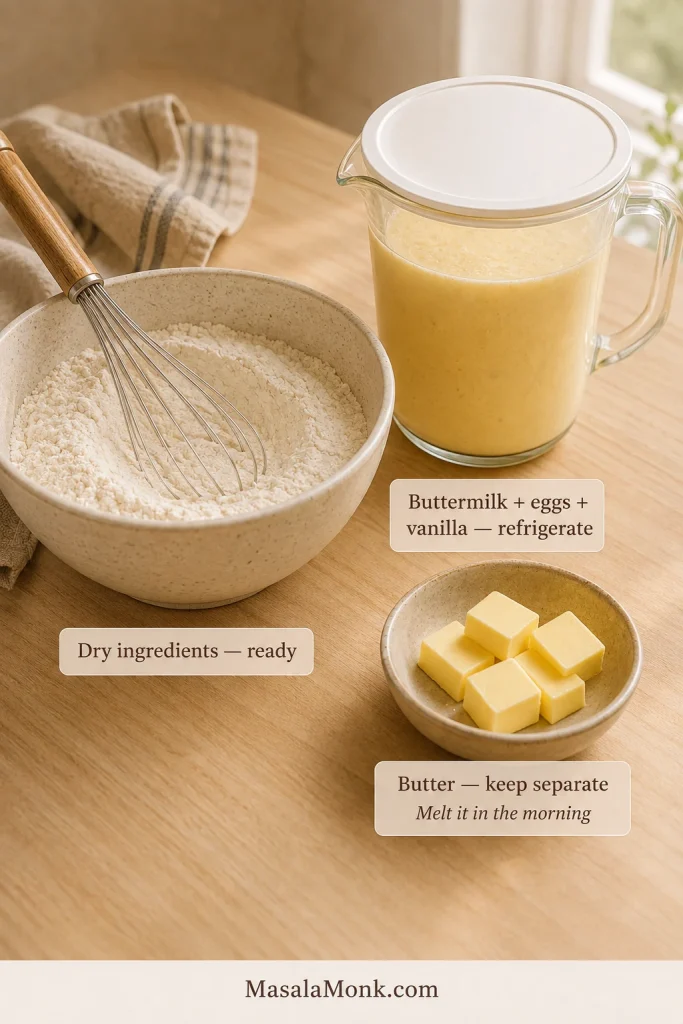
Measure the dry ingredients into one bowl. In another container, whisk together the buttermilk, eggs and vanilla, then cover and refrigerate that mixture overnight.

Keep the butter separate. In the morning, preheat the oven, melt the butter and whisk it into the cold wet mixture before combining wet and dry. A few tiny butter flecks are harmless and will melt during baking.

Bowl of prepared dry pancake ingredients beside a covered jug of whisked buttermilk, eggs and vanilla, with butter kept separately in a small dish.
Measure tonight; mix tomorrow. Keep dry ingredients, wet ingredients and butter separate until breakfast.

For a breakfast that really can be assembled before bed, an overnight French toast casserole shifts even more of the work to the night before.

Refrigerator Storage

Let the pancakes cool briefly, then cover and refrigerate them promptly. For the best texture, eat them within about 3 days. The USDA gives a general 3–4 day refrigerator window for properly stored cooked leftovers.

How to Freeze Sheet Pan Pancakes

Cut the cooled pancake into portions and place parchment between layers, or freeze the pieces in a single layer until firm before transferring them to a freezer bag or container.

For the best results, use them within about 2 months.
Individual squares can go straight from the freezer to reheating; there’s no need to thaw them first. Frozen pieces simply need more time than refrigerated ones, so make sure they’re warm through the middle before serving.

Guide showing cooled pancake squares separated with parchment for freezing, followed by microwave, toaster oven and oven reheating options.
Freeze the pancakes in the portion size you normally reheat, with parchment between stacked pieces.
Best Way to Reheat Them

If You Want…Use…What You Get
Fastest breakfastMicrowaveSoft, quick pancakes
Firmer edgesToaster ovenA slightly crisper surface
Several portions at onceOvenGentle, even reheating

Microwave one or two refrigerated squares in 20–30-second bursts until warm through the middle. Frozen pieces can be reheated the same way; keep the bursts short, reposition the pancake between them if needed, and expect it to take longer.

If you want firmer edges, warm individual squares in a toaster oven at about 325°F / 165°C. Put them on a small tray and leave them uncovered for a drier surface, or cover loosely with foil if you want to preserve more tenderness. Frozen or heavily topped pieces will need longer, so check the center before serving.
Reheating several servings? Arrange the pancakes in a single layer on a baking sheet, cover loosely with foil and warm at 325°F / 165°C until hot through the middle. Remove the foil near the end if you want the surface a little drier.

Whichever method you use, a thin plain square will warm faster than a thick or heavily topped one. Let the temperature in the center—not just the warmth on the surface—be your guide.

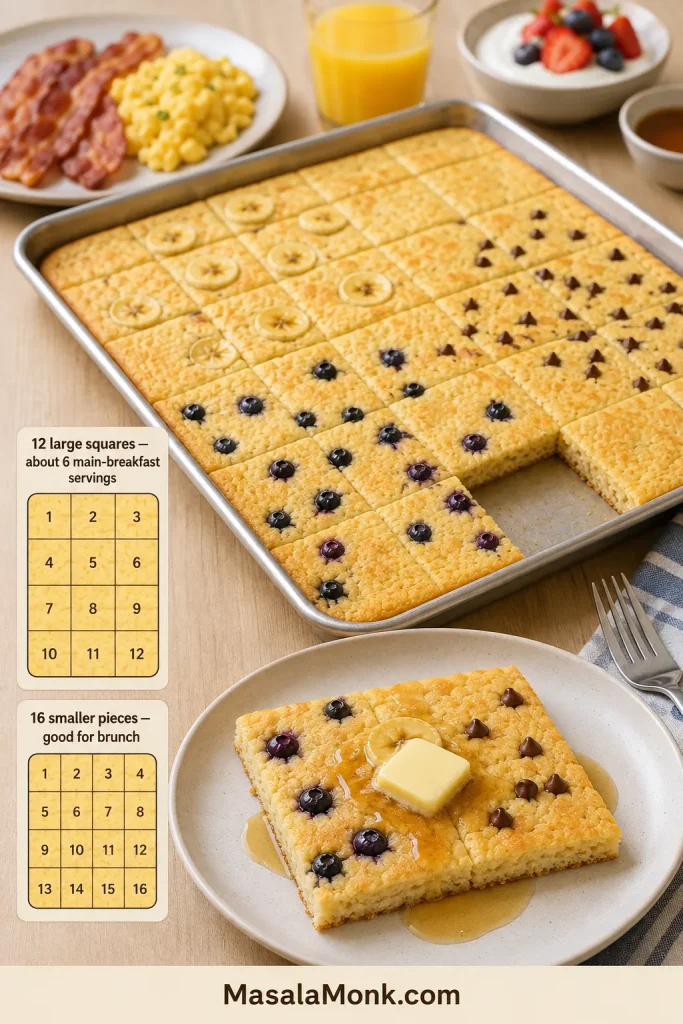
How Many People Does One Pan Serve?

The tray cuts neatly into 12 generous squares. If pancakes are the main breakfast, plan on roughly two squares per adult, or about 6 servings.

For a brunch table with eggs, bacon, yogurt or fruit, cut the tray into 16 smaller pieces and let people come back for seconds.

Breakfast table with a sheet pan of shallow pancakes and a plated square, plus diagrams showing a 3-by-4 cut for 12 pieces and a 4-by-4 cut for 16.
Make the long cuts first, then cross-cut the tray into a simple grid for even squares.

What to Serve With Them

A simple breakfast needs little more than salted butter, maple syrup and fresh berries. The butter softens almost immediately on the warm surface, and syrup settles into the tender crumb instead of simply running off the plate.

For brunch, add eggs, breakfast sausage, Greek yogurt, fresh fruit or toasted nuts. If bacon is on the table too, cooking bacon in the oven lets you handle a full pack at once without standing over another skillet.

The batter isn’t overly sweet, so it works just as comfortably beside something savory as it does under a generous pour of maple syrup.

Frequently Asked Questions

Can I Use Regular Milk Instead of Buttermilk?

Yes. Because the batter uses baking soda, give regular milk some acidity first.

Add 2 tablespoons / 30 ml lemon juice or white vinegar to a measuring jug, then add milk until the total reaches 2 cups / 480 ml. Stir and let it stand for about 5 minutes.

This homemade buttermilk substitute can be thinner than cultured buttermilk, so use the batter-consistency cues above before deciding it needs any adjustment.

Can I Double the Recipe?

Yes. Use two half-sheet pans. Putting twice as much batter into one pan changes the depth too much.

If both pans bake at the same time, place the racks in the upper and lower thirds of the oven. If your oven browns unevenly, swap rack positions and rotate the pans during the second half of baking. Use the usual doneness cues instead of adding a fixed number of minutes.

Can I Bake These in a Fan or Convection Oven?

Yes. Use 400°F / 205°C fan/convection unless your oven automatically adjusts temperatures for you. Start checking earlier than you would in a conventional oven.

Can I Use Pancake Mix?

Yes. Make the pancake batter according to the package directions; don’t swap a boxed mix cup-for-cup for the flour in this recipe. Complete mixes, Bisquick-style baking mixes and higher-protein mixes such as Kodiak can all need different amounts of liquid, eggs and fat.

If you adapt a prepared mix to a half-sheet, keep the batter layer shallow and use the same visual doneness cues described above. Exact proportions depend on the mix, so a dedicated mix-based recipe is more reliable than trying to make one ratio fit every brand.

The Payoff Is More Than No Flipping

The best thing about sheet pan pancakes isn’t really that they save you from using a spatula.

It’s that breakfast stops arriving in shifts.

Once you know the few cues that matter—the right batter depth, gentle mixing and a cooked center—the rest is simple.

Then cut the tray, pass the syrup and sit down while everybody’s breakfast is still warm—including yours.

Back to the recipe  ·  Back to top

Posted on Leave a comment

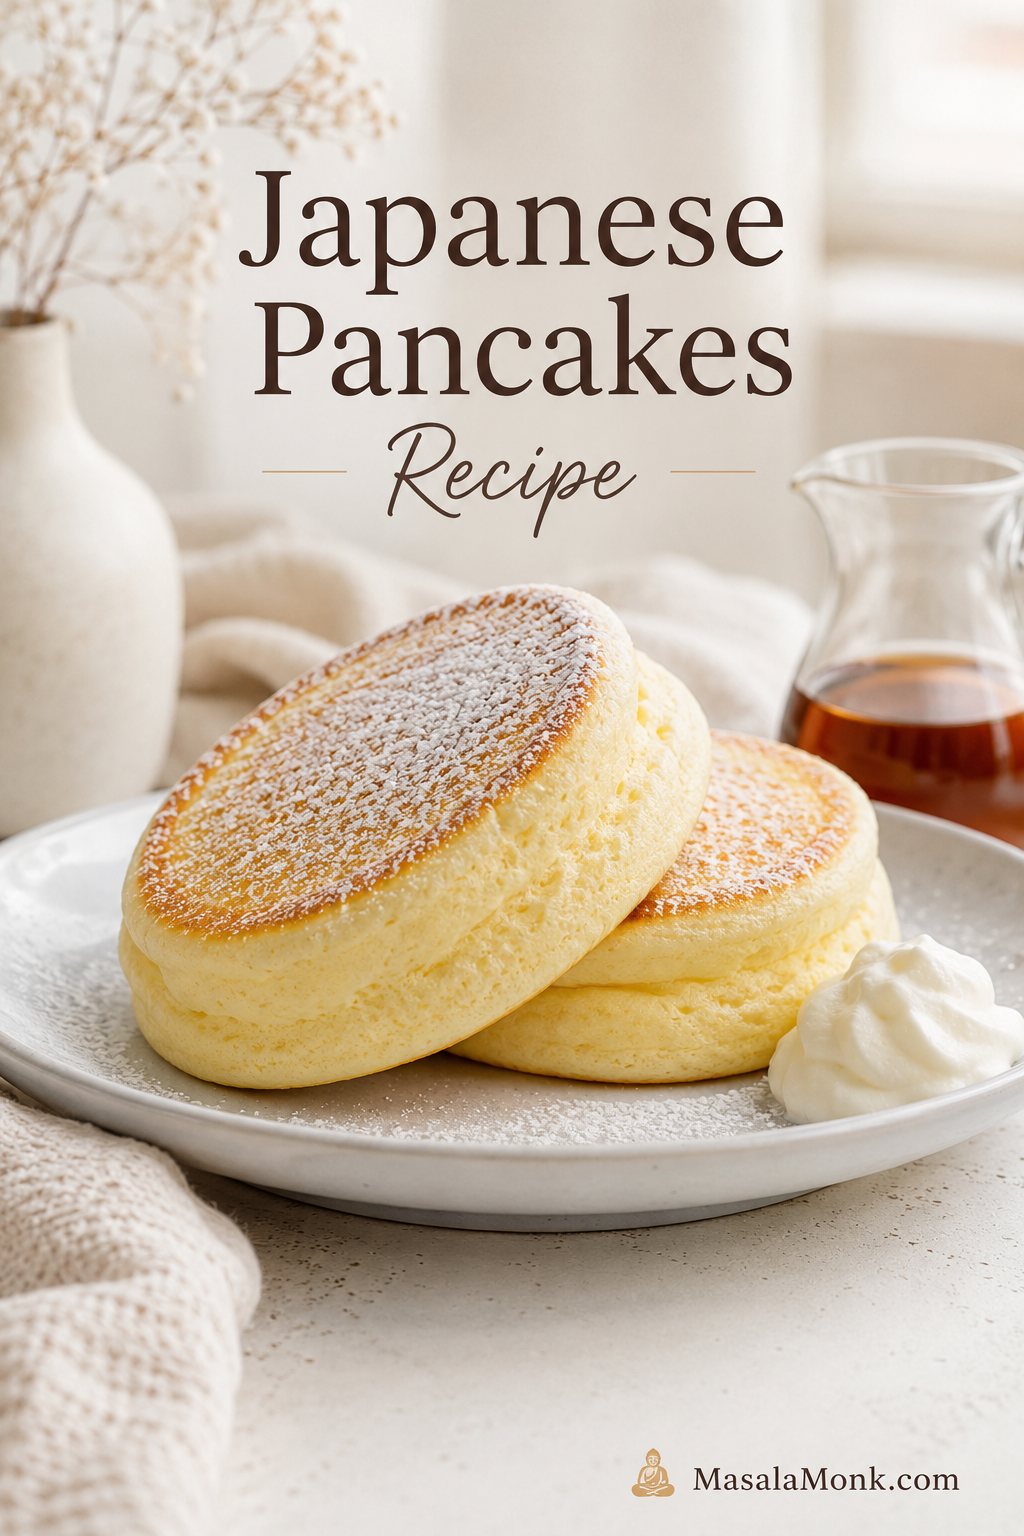
Japanese Pancakes Recipe: Tall, Fluffy Soufflé Pancakes

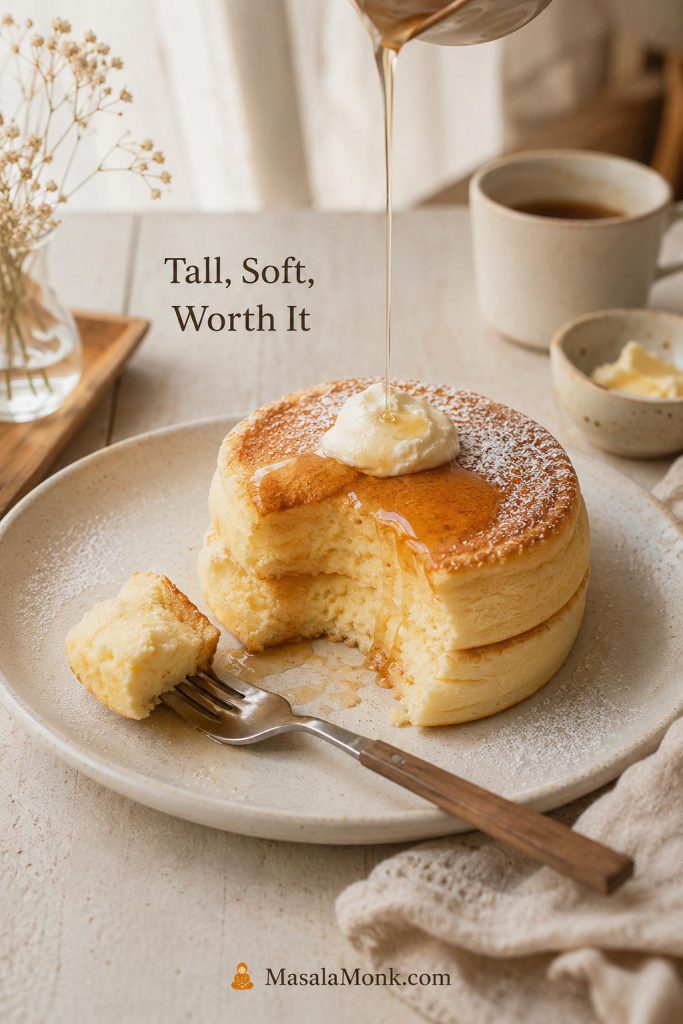
Tall Japanese soufflé pancakes stacked on a pale plate with whipped cream, powdered sugar, and syrup nearby.

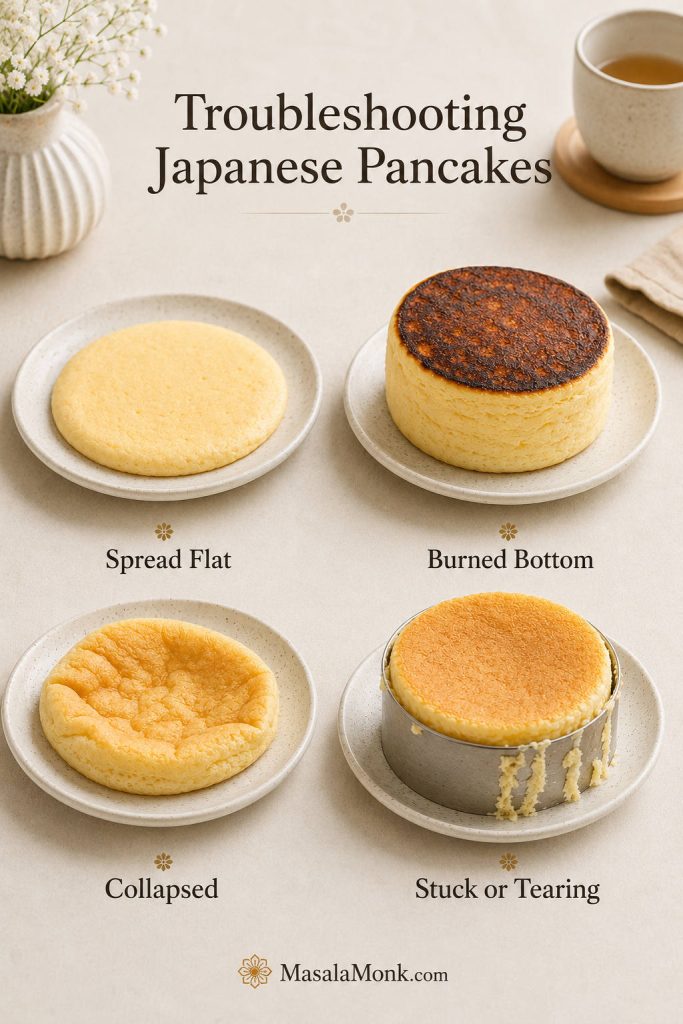
Japanese pancakes look magical until you try to make them at home. They rise like little clouds, jiggle when the plate moves, and seem soft enough to collapse under a spoon. Then the real fear arrives: what if they spread flat, burn on the bottom, stay raw in the center, or puff up beautifully in the pan and sink the second you serve them?

The real challenge is technique, not ingredients. That is the moment this Japanese pancakes recipe is built for. The ingredients are simple, but the method matters. These are not regular pancakes with extra baking powder. They are small soufflés cooked like pancakes, and once you treat them that way, the method starts to make sense.

The secret is a stable meringue, gentle folding, controlled heat, a little steam, and patience. In this guide, you will get exact grams and spoon measures, the right batter texture, the meringue stage to aim for, ring-mold and no-mold methods, a pancake-mix shortcut, and clear fixes for deflating, spreading, burning, shrinking, and raw centers. If you only remember one framework, start with the 3 checks that decide whether Japanese pancakes rise or collapse.

By the time you reach the pan, you will know what the meringue should look like, how the batter should stand, when to flip, and why a pancake that looks almost ready often needs one more covered minute. That extra minute is not hesitation; it is usually the difference between a pancake that holds and one that sinks as it cools.

If you want a more classic pancake stack instead of the tall soufflé style, you may also like these fluffy buttermilk pancakes with stewed cinnamon apples. This recipe is for the café-style Japanese soufflé pancakes that are tall, soft, jiggly, and best eaten right away.

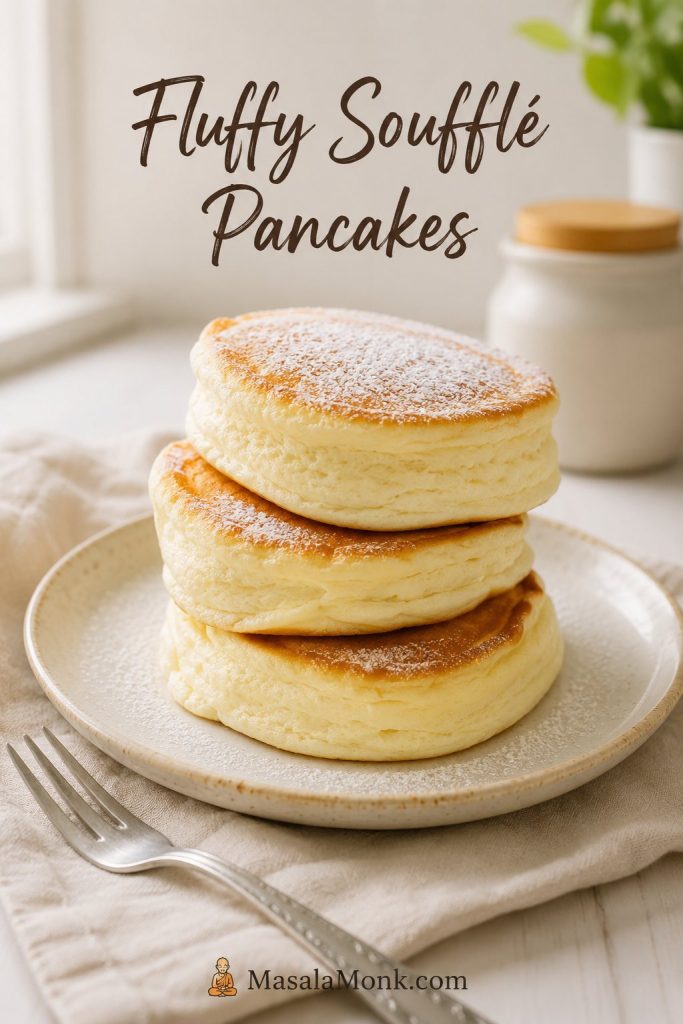
This is the home-cook target: soft, tall pancakes that feel special without needing every edge to look like a perfect café cylinder.

Homemade fluffy Japanese soufflé pancakes stacked on a plate with powdered sugar and a fork nearby.
A home batch does not need perfect café edges; instead, aim for fluffy soufflé pancakes with height, softness, and a fully set center.

Quick Answer: How Do You Make Fluffy Japanese Pancakes?

Japanese pancakes, often called Japanese soufflé pancakes, are tall pancakes made by folding whipped egg whites into a small yolk batter and cooking the batter slowly in a covered pan. The fluff comes mostly from meringue, not from baking powder alone.

For the best height, beat the egg whites to glossy stiff peaks, fold gently, scoop the batter into tall mounds, cook on gentle heat, and use a little steam so the center sets before the outside over-browns. A ring mold gives the neatest shape, but the no-mold Japanese pancake method works by stacking the batter in layers. If your first batch spreads, burns, or sinks, use the troubleshooting guide before changing the whole recipe. Serve them immediately because this soufflé-style texture naturally settles as it cools.

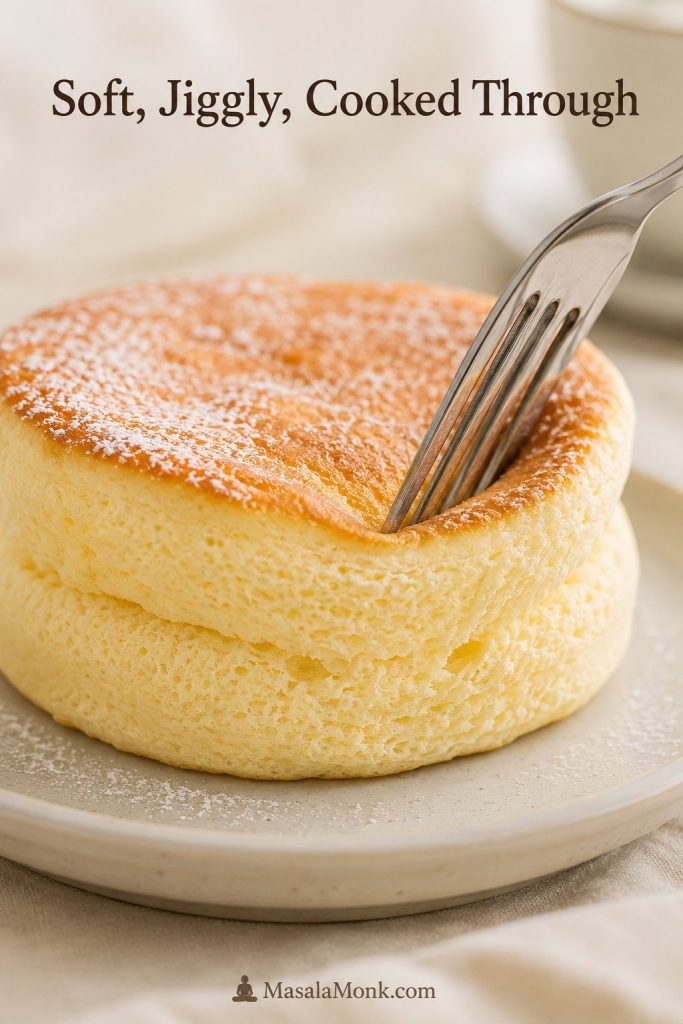
What Jiggly but Cooked Through Looks Like

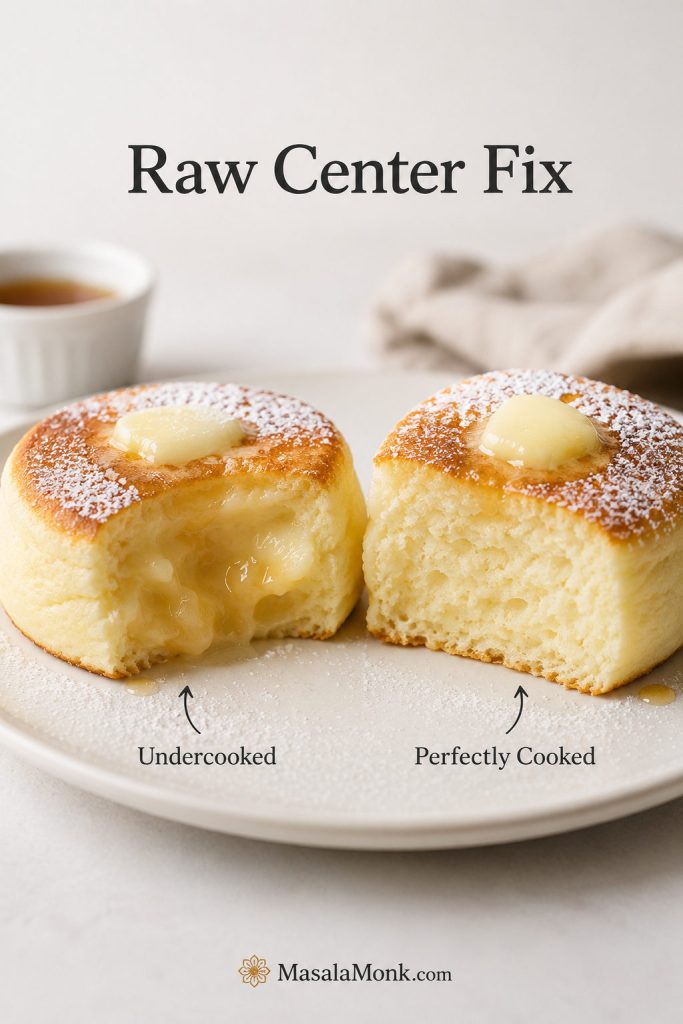
The pancake should move softly, but it should still feel set. Think gentle spring, not wet batter hiding under a browned top.

A fork gently pressing into a soft Japanese soufflé pancake to show its springy texture.
Jiggly should mean soft and bouncy, not wet. If the pancake springs back gently, the center is much closer to ready.

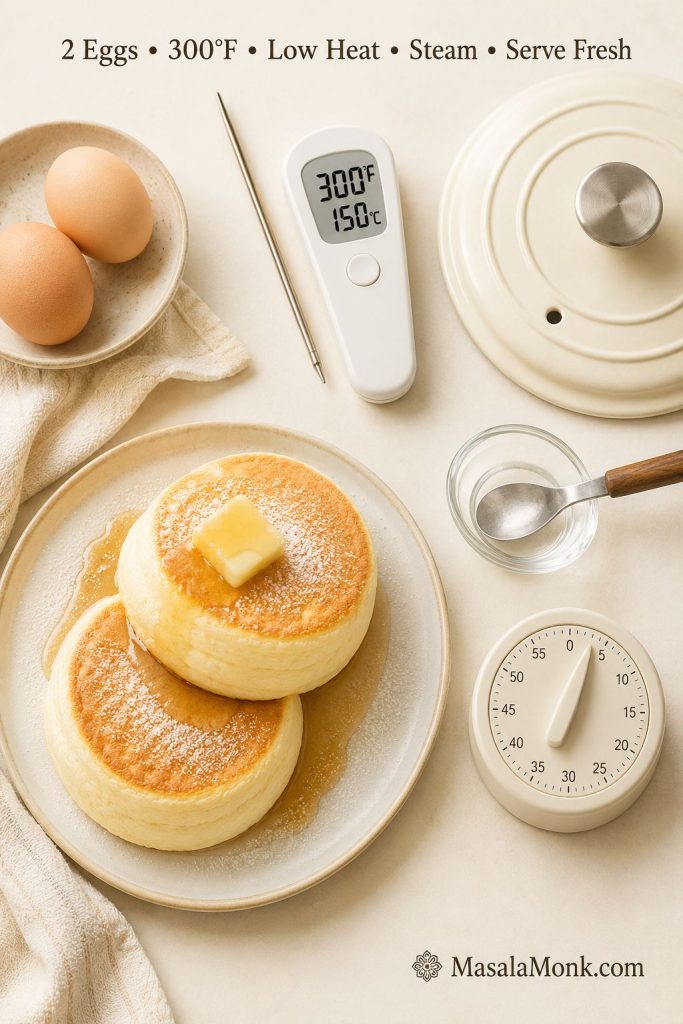
Japanese Pancakes at a Glance

Yield2–3 thick pancakes
Texture goalTall, soft, airy, gently jiggly, cooked through
Meringue targetGlossy firm/stiff peaks
Batter textureThick and spoonable; it should mound, not pour
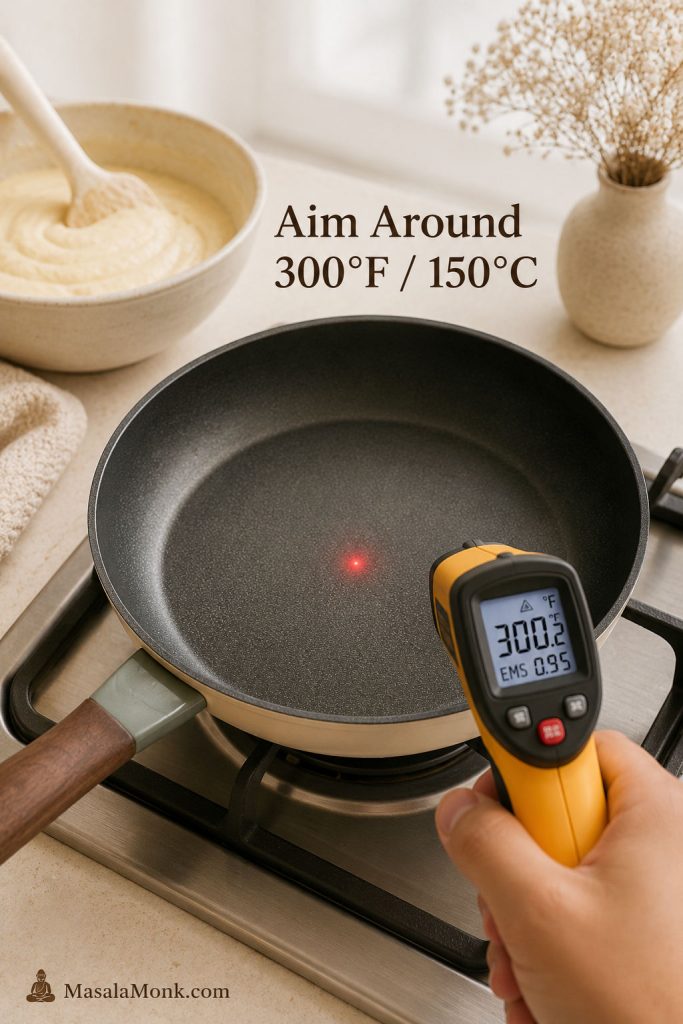
Pan targetAbout 300°F / 150°C
Workable pan range285–320°F / 140–160°C
First side6–8 minutes covered, depending on size
Second side4–6 minutes covered
Cook timeAbout 12–15 minutes per batch
MoldOptional; no-mold method included
Best servedImmediately, ideally within 5–10 minutes
Japanese pancake quick guide showing two eggs, a 300°F pan cue, a lid, a water spoon, and pancakes.
Before cooking, remember the working numbers: two eggs, low heat near 300°F, a covered pan, steam, and quick serving.

What Are Japanese Pancakes?

In this tall, café-style version, Japanese pancakes means Japanese soufflé pancakes: soft, airy pancakes made with whipped egg whites and cooked gently until they rise into a thick, delicate stack.

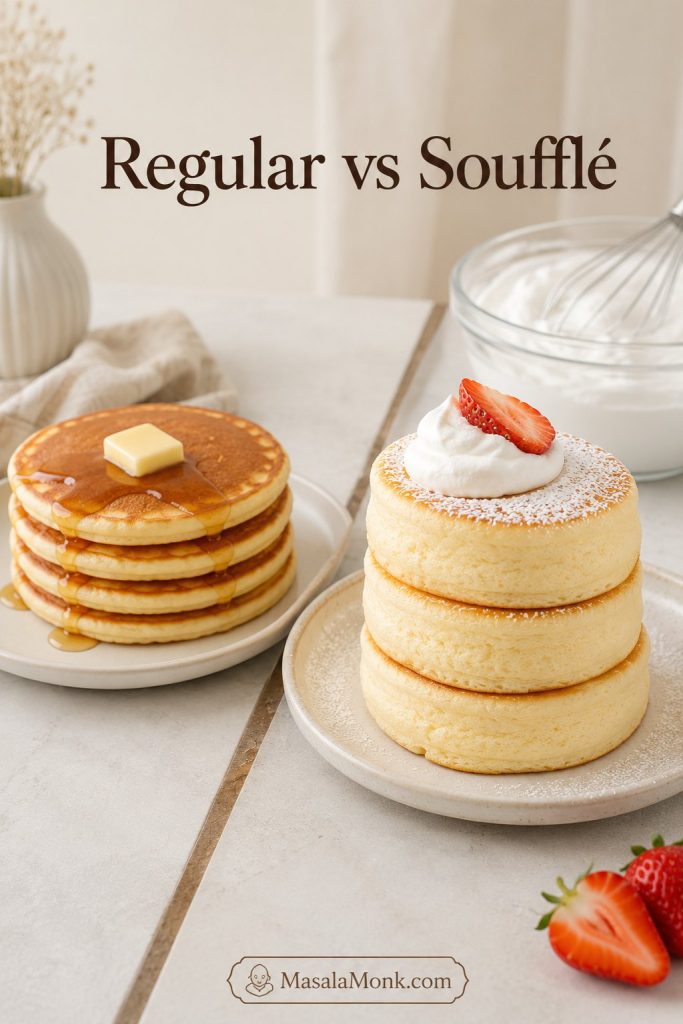
They are different from regular pancakes. A normal pancake batter is mixed, poured, and cooked fairly quickly. Japanese soufflé pancake batter is built around foam. The egg whites are beaten into a meringue, folded into a yolk mixture, then cooked low and slow so the foam has time to set.

That is why the method feels more precise than a usual pancake recipe. You are not only browning batter on a pan. You are setting a fragile structure full of air. Once that idea clicks, the recipe stops feeling mysterious and starts feeling manageable.

Regular pancakes compared with taller Japanese soufflé pancakes and a meringue bowl in the background.
Because this batter is lifted by whipped egg whites, it behaves more like a delicate pan-cooked soufflé than a regular pancake.

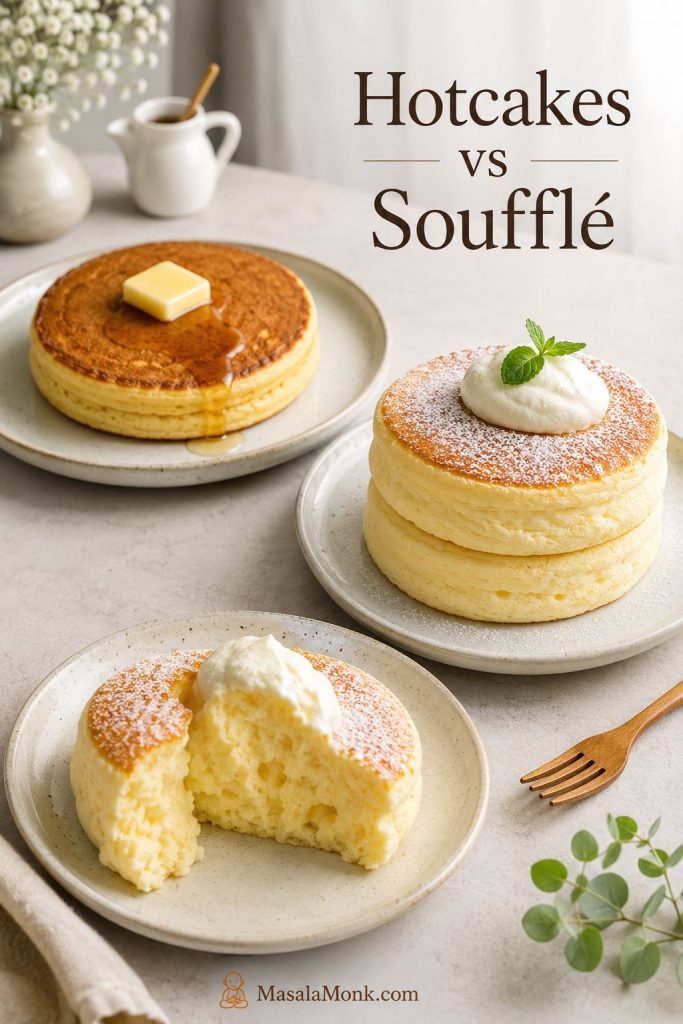
Japanese Hotcakes vs Japanese Soufflé Pancakes vs Fuwa Fuwa Pancakes

The names can get confusing because several styles of Japanese pancakes appear in cafés, cookbooks, and social videos. Here is the simple difference.

TermWhat it usually meansTexture
Japanese hotcakesThicker, sweeter, more regular-style pancakes, often made from a batter or mixSoft, cakey, and sturdy
Japanese soufflé pancakesTall pancakes lifted with whipped egg whites and cooked slowlyAiry, jiggly, delicate, and cloudlike
Fuwa fuwa pancakesA texture-focused name for soft, fluffy pancakesLight, soft, and pillowy
Jiggly pancakesA social-media-friendly name for Japanese soufflé pancakesWobbly and tall, but still cooked through
Japanese hotcakes, Japanese soufflé pancakes, and a soft fuwa fuwa pancake texture shown together.
Japanese hotcakes are sturdier and more cake-like; soufflé pancakes need meringue, low heat, and steam for their tall café-style texture.

This recipe focuses on the tall, meringue-based pancake version. Japanese soufflé cake is a different dessert, usually closer to Japanese cheesecake or cotton cheesecake, which is baked rather than cooked on a skillet. There is a short note on that difference later in the post.

So if you came here for the tall, jiggly café pancakes, you are in the right place. If you wanted a sturdier everyday hotcake, treat this as the soufflé-style weekend version instead.

What Does Fuwa Fuwa Mean?

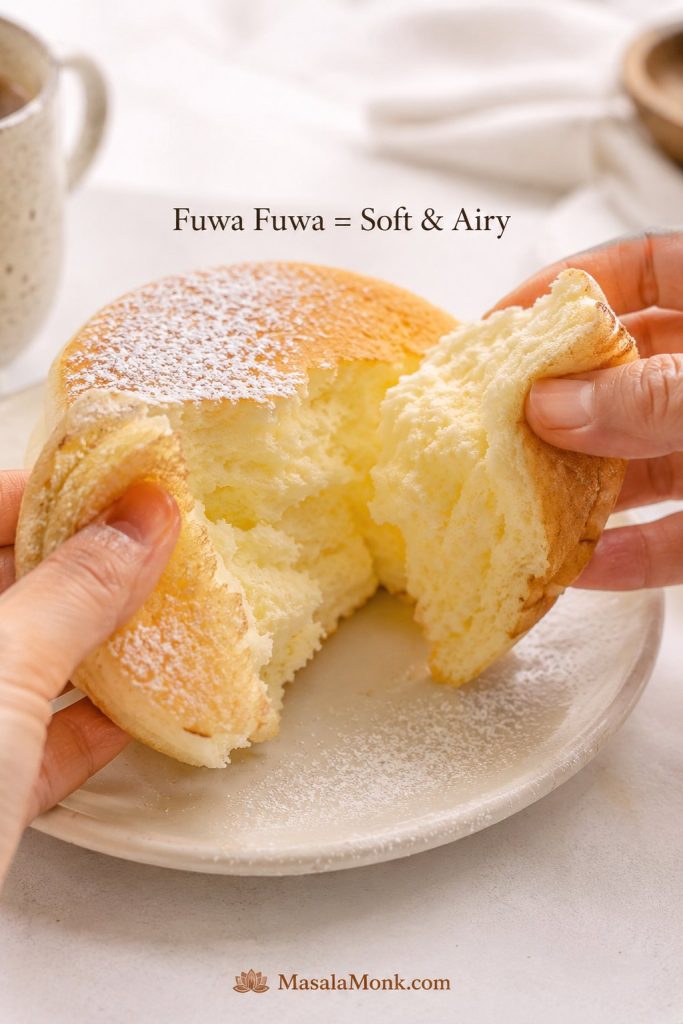
Fuwa fuwa is a Japanese expression used for something soft, airy, and fluffy. In a pancake context, it describes the texture people want from café-style Japanese pancakes: tall, tender, light, and gently wobbly.

Fuwa fuwa texture does not come from making the batter sweeter or loading it with baking powder. It comes from air. The egg whites trap tiny bubbles, sugar helps stabilize those bubbles, and gentle heat gives the pancake enough time to cook without collapsing too quickly.

Texture target: A good Japanese soufflé pancake should feel soft and airy, with a gentle jiggle. It should not be wet, runny, or raw in the center.

A Japanese pancake being pulled open to show a soft airy interior crumb.
Fuwa fuwa is the soft, airy texture you are chasing, so protect the foam from mixing bowl to pan.

Before You Start: Set Yourself Up to Win

This small setup step makes the recipe much easier. Once the meringue is folded into the batter, the clock starts. The batter slowly loses air as it sits, so you do not want to stop halfway through to find a lid, wash a spatula, or clear space on the stove.

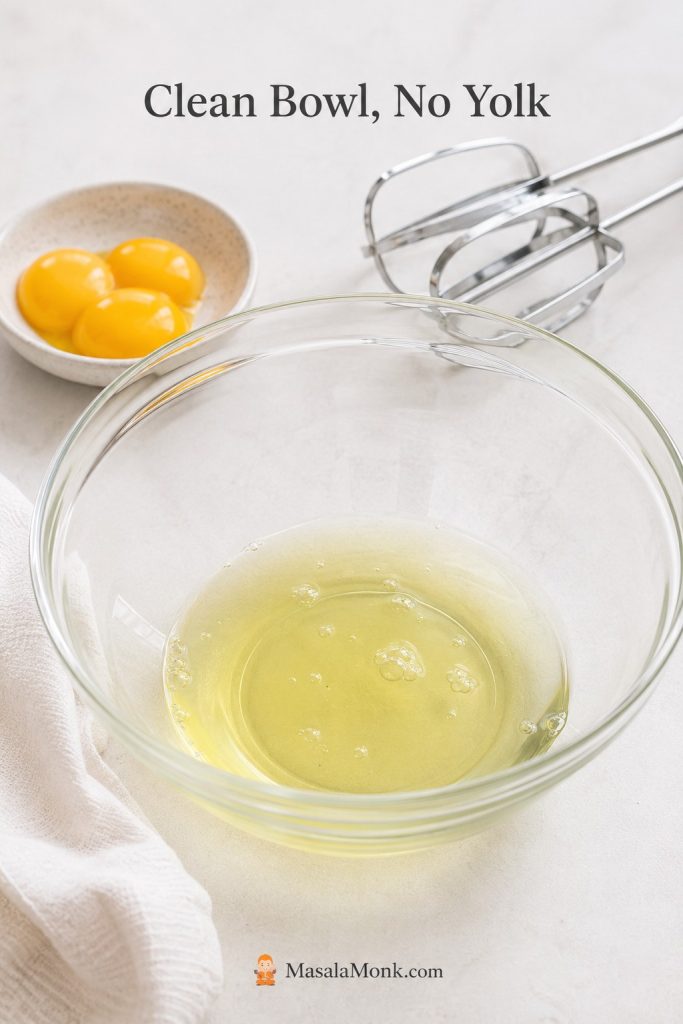
  • Use clean, dry bowls and beaters. Grease or yolk in the egg whites can weaken the meringue; the meringue guide shows what the right texture should look like.
  • Have the pan, lid, spatula, water, and serving plates ready. The batter should be cooked soon after folding.
  • Start with gentle heat. You can always cook a little longer, but you cannot un-burn the outside.
  • Make only 2–3 pancakes at once. Crowding makes flipping harder and lowers control.
  • Serve immediately. These pancakes are meant to be eaten fresh, while the structure is still warm and lifted.

Why the Egg White Bowl Must Be Clean

Before you beat the whites, check the bowl and beaters. This tiny setup detail protects the foam that gives the pancakes their height.

Egg whites in a clean bowl with separated yolks and beaters nearby for making meringue.
Start with spotless egg whites. Even a small streak of yolk or grease can keep the meringue from whipping properly.

Beginner reassurance: Your first batch may not look like a café stack, and that is completely normal. If the pancakes taste good but sit a little lower, you are already close. The next batch usually improves once you understand your pan heat and meringue texture.

Why This Japanese Pancakes Recipe Works

Home kitchens are messy in the best way: one stove runs hot, another pan holds heat differently, and not everyone has a ring mold. Instead of asking you to trust the timer blindly, this method shows you what to look for at each stage.

  • Meringue gives height. The whipped egg whites are the main lift in this style. Baking powder helps a little, but it cannot replace a strong foam.
  • A small amount of flour keeps the pancakes light. Too much flour makes them cakey and heavy; too little structure makes them fragile.
  • Cornstarch gives extra support. A teaspoon helps the delicate foam hold together without making the pancake dense.
  • Slow covered cooking sets the middle. Tall pancakes need more time than normal pancakes. High heat gives you a browned outside and a wet center.
  • Steam helps the pancake set. A covered pan traps moisture and heat around the tall batter so the inside cooks through.
  • Layered scooping builds height without a mold. Instead of pouring all the batter at once, you add it in mounds so the pancake rises upward, not outward.

The 3 Checks That Decide Whether They Rise or Collapse

If the recipe starts to feel fussy, bring it back to three checks: the meringue should hold itself, the batter should stand in a mound, and the heat should be gentle enough that the middle sets before the bottom browns too deeply.

CheckWhat you wantWhat it tells you
MeringueShiny, firm peaks that hold their shapeA drooping meringue usually leads to spread; a dry, clumpy one is hard to fold smoothly.
BatterThick, airy, and able to mound on a spoonA batter that slides off the spoon instead of sitting in a mound will usually cook flatter.
HeatGentle enough to cook slowly under a lidThe bottom should set and lightly color while the center has time to catch up.

Meringue Stages for Japanese Pancakes

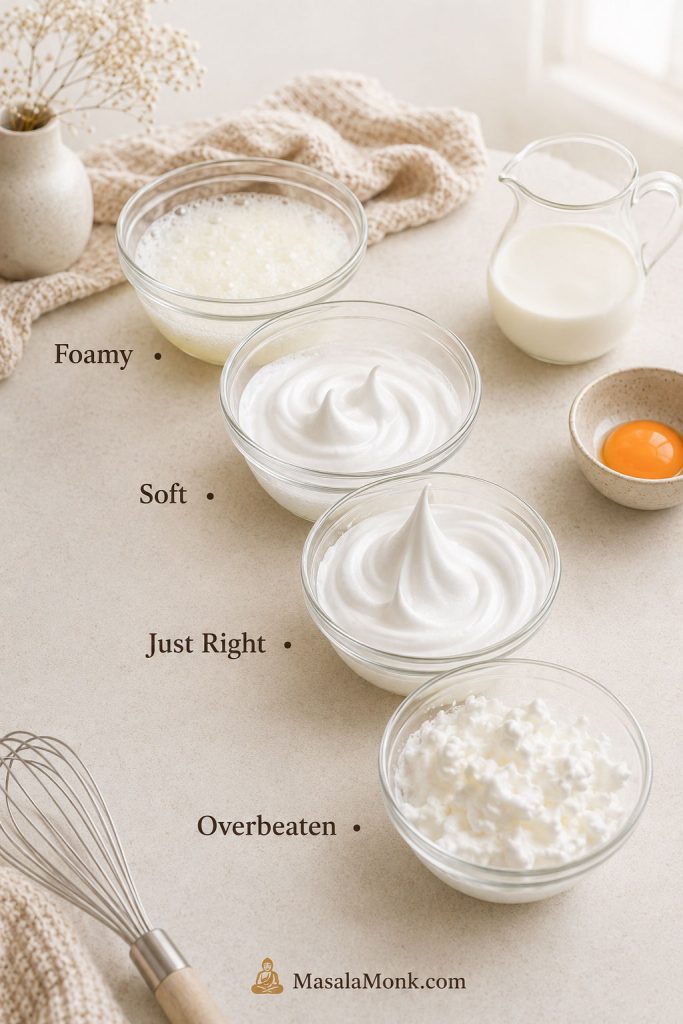
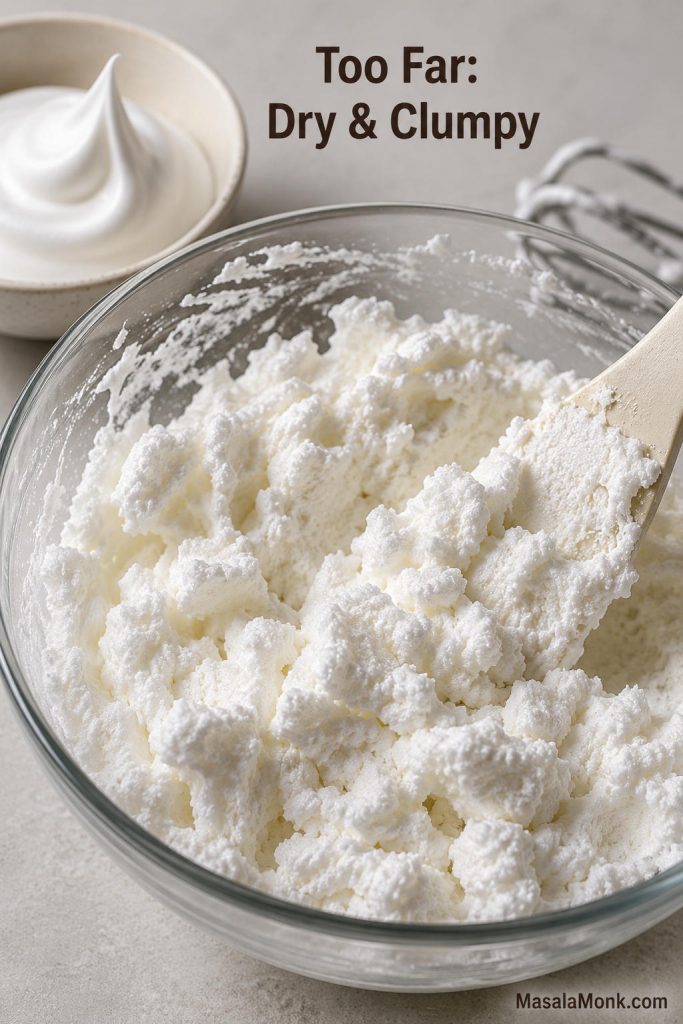
Use the meringue stage as your first checkpoint. Foam is too early, soft peaks are usually weak, glossy firm peaks are the target, and dry clumps mean you went too far.

Four meringue stages for Japanese pancakes showing foamy, soft, glossy stiff, and overbeaten egg whites.
Use the stages as a checkpoint: keep beating past foam and soft peaks, then stop at glossy firm peaks before the meringue breaks.

A pancake that looks tall but feels liquid under the spatula needs more covered time, not a brave flip. In testing, the pancakes that looked almost ready were usually the ones that needed one more covered minute.

Ingredients for Japanese Soufflé Pancakes

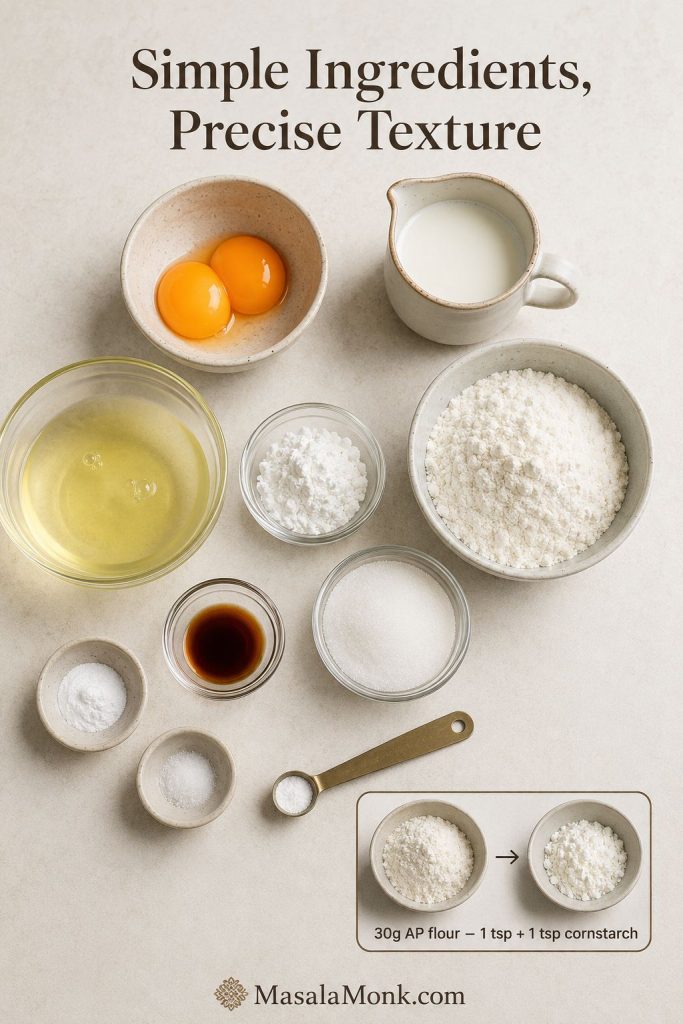
Use a scale if you have one. This is a tiny batter, so small changes matter. An extra splash of milk can make the batter slide instead of mound, and a heavy scoop of flour can make the pancakes feel cakey instead of cloudlike. The gram amounts in this recipe are the ones to follow here. After mixing, compare your bowl with the batter texture cues before scooping.

Ingredients for Japanese soufflé pancakes arranged on a counter with eggs, milk, flour, sugar, cornstarch, and a cake flour swap note.
Small measurements matter here: too much milk loosens the batter, while careful flour and cornstarch balance keeps the texture light.
IngredientAmountWhy it matters
Large egg yolks2 yolks, about 35–40gMake the rich base of the batter
Large egg whites2 whites, about 60–65gCreate the main soufflé lift
Whole milk20ml / 1 tbsp + 1 tspLoosens the yolk batter without making it runny
Vanilla extract½ tspSoftens the eggy flavor
Cake flour30g / about ¼ cup spooned and leveledGives light structure
Cornstarch1 tsp / about 3gHelps support the delicate foam
Baking powder¼ tspAdds a little backup lift
Fine saltPinchBalances the sweetness
Granulated sugar24–25g / 2 tbspSweetens and stabilizes the meringue
Cream of tartar¼ tspHelps stabilize the egg whites
Neutral oil or melted butterFor greasingPrevents sticking without frying the pancake
Water1–2 tbsp totalCreates steam under the lid

Ingredient Notes and Substitutions

Cake flour: Cake flour gives a lighter pancake. If you do not have it, measure 30g all-purpose flour, remove 1 teaspoon, and replace that teaspoon with cornstarch.

Cream of tartar: This helps the egg whites whip into a more stable meringue. If you do not have it, use 1 teaspoon lemon juice or ½ teaspoon white vinegar instead.

Egg temperature: Cold eggs can be easier to separate cleanly, while room-temperature whites usually whip faster. Either works here as long as the bowl is clean and the whites are beaten to the right stage.

Milk: Whole milk gives the best body. Add more only if the yolk batter is too stiff to mix. The finished batter should feel light but not loose.

Optional taller version: For a taller café-style pancake, use 3 egg whites and 2 yolks. Keep the other ingredients the same, but fold carefully because the batter becomes more delicate. Start with the basic 2-white version if this is your first try.

Equipment: What You Need and What You Don’t

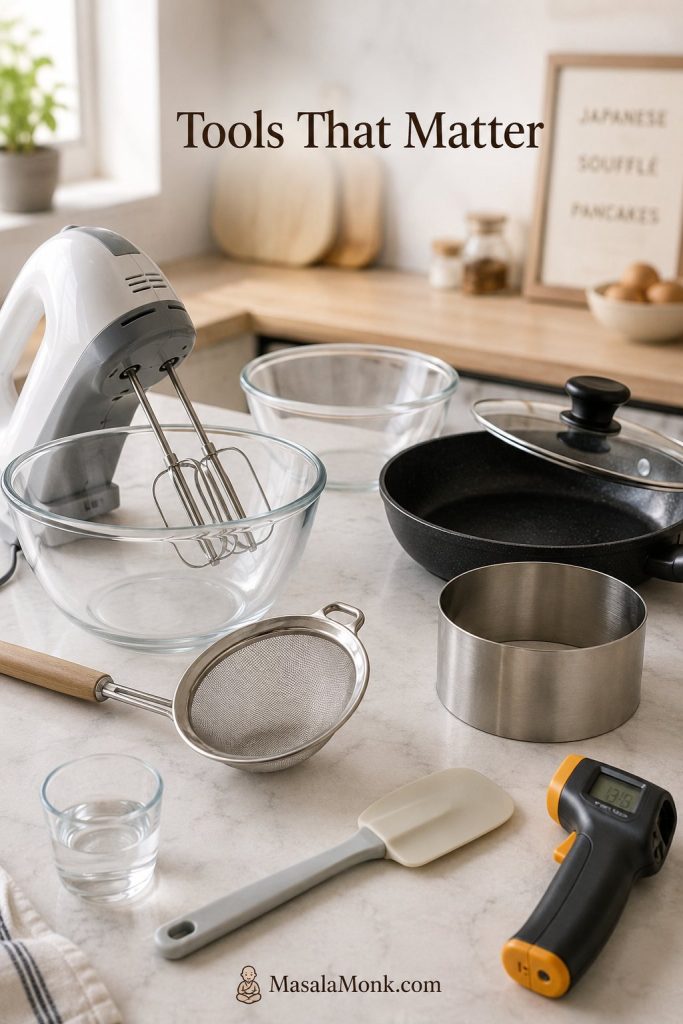
You do not need a professional kitchen to make fluffy Japanese pancakes. The most important “equipment” is really control: a clean bowl for the whites, a pan that heats gently, and a lid that traps steam around the tall batter. If you have molds, see how to use a ring mold; if not, the no-mold method is built for a normal home pan.

Equipment for Japanese soufflé pancakes including mixing bowls, beaters, a pan, lid, spatula, ring mold, and thermometer.
The most useful tools are the ones that give control: clean bowls, steady heat, a lid for steam, and a thin spatula.

Essential Equipment

  • Electric hand mixer or stand mixer
  • Two clean mixing bowls
  • Fine mesh sieve
  • Nonstick pan or electric griddle
  • Tight-fitting lid, preferably tall enough not to touch the pancakes
  • Thin flexible spatula
  • Paper towel for spreading a thin film of oil

Helpful but Optional

  • Cookie scoop or disher for even mounds
  • Piping bag for cleaner shaping
  • Ring molds for straighter sides
  • Infrared thermometer for checking pan surface temperature
  • Instant-read thermometer for checking the center of the pancake

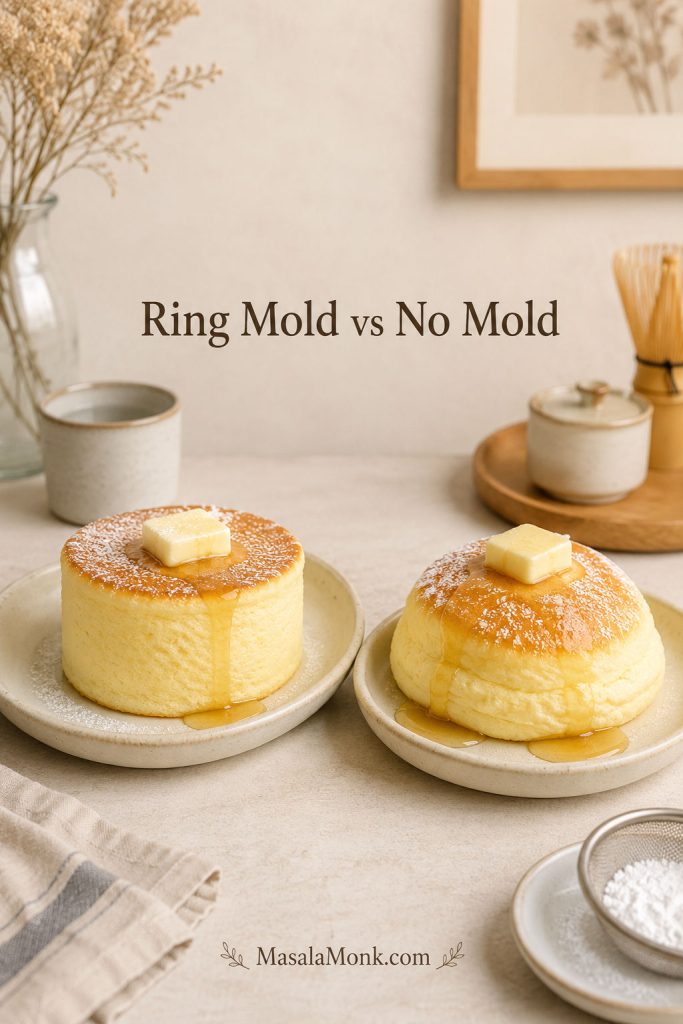
Choose Your Method: Ring Mold, No Mold, or Pancake Mix

There is more than one way to make these pancakes, and the best path depends on your tools and comfort level. A ring mold gives the neatest sides, the no-mold method is friendlier for home cooks, and pancake mix is a convenience shortcut rather than a magic fix.

MethodBest forWhat to watch
Basic 2-white batterFirst attempts and best controlStart here before trying a taller, more delicate version.
No moldHome cooks who want fewer toolsThe batter must be thick enough to mound; the shape will be softer.
Ring moldVery tall, straight-sided pancakesGrease the mold well and fill only halfway to two-thirds full.
Pancake mix shortcutConvenienceThe mix replaces the dry base, not the whipped egg whites.
3-white versionExtra height after you know the methodFold carefully because the batter becomes more delicate.
A straight-sided ring mold Japanese pancake beside a softer no-mold Japanese pancake on plates.
Ring molds give cleaner sides, but a strong no-mold batter can still make fluffy Japanese pancakes worth serving proudly.

A ring mold can make the pancakes look more like café cylinders, but it is not required for a lovely plate. Without a mold, expect softer café-style mounds rather than perfectly vertical sides. The texture can still be airy, tender, and special.

How to Make Japanese Pancakes Without a Mold

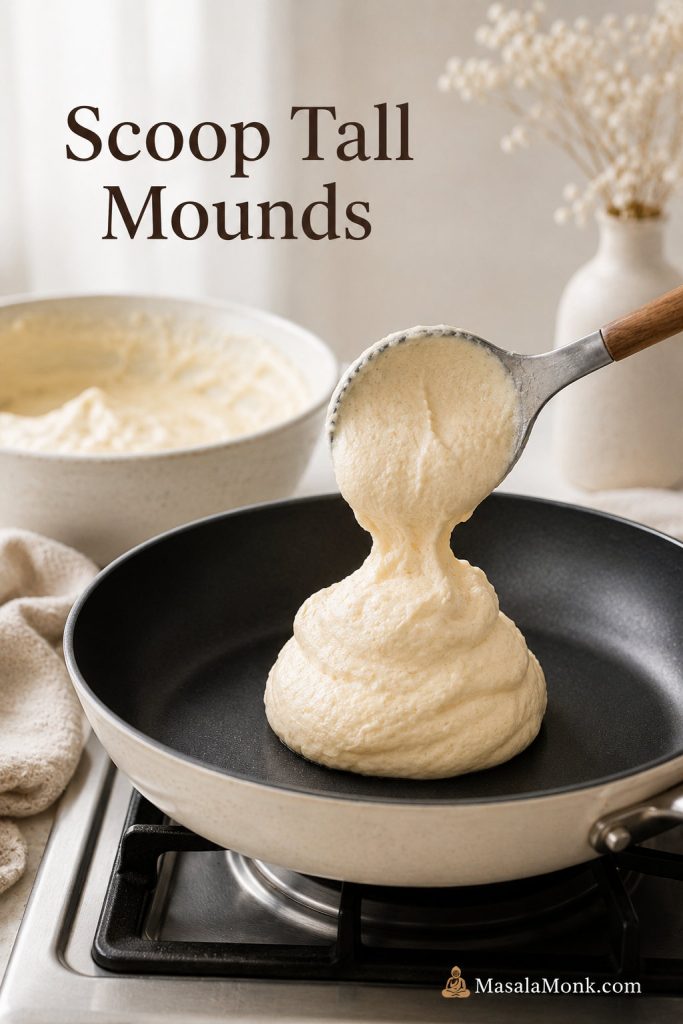
For the no-mold method, scoop the batter into tall mounds instead of pouring it. Use about two-thirds of the batter for the first mounds and reserve the rest for topping them after the base starts to set.

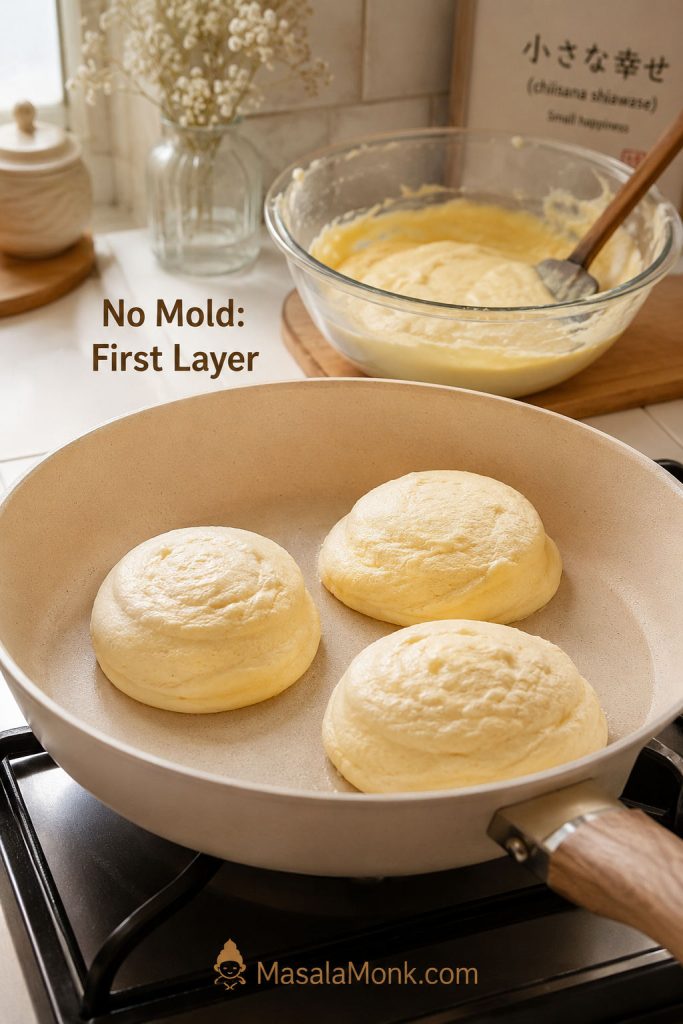
No-Mold First Layer

The first scoop should sit tall in the pan. Once that base begins to set, it can hold more batter without spreading as much.

Three no-mold Japanese pancake batter mounds cooking in a pan with a bowl of batter behind them.
For the no-mold method, start with thick first-layer mounds; once they begin to set, they can support the second scoop.
  1. Preheat the pan on gentle heat and wipe it with a thin film of oil.
  2. Scoop 2–3 tall mounds of batter into the pan, leaving space between them.
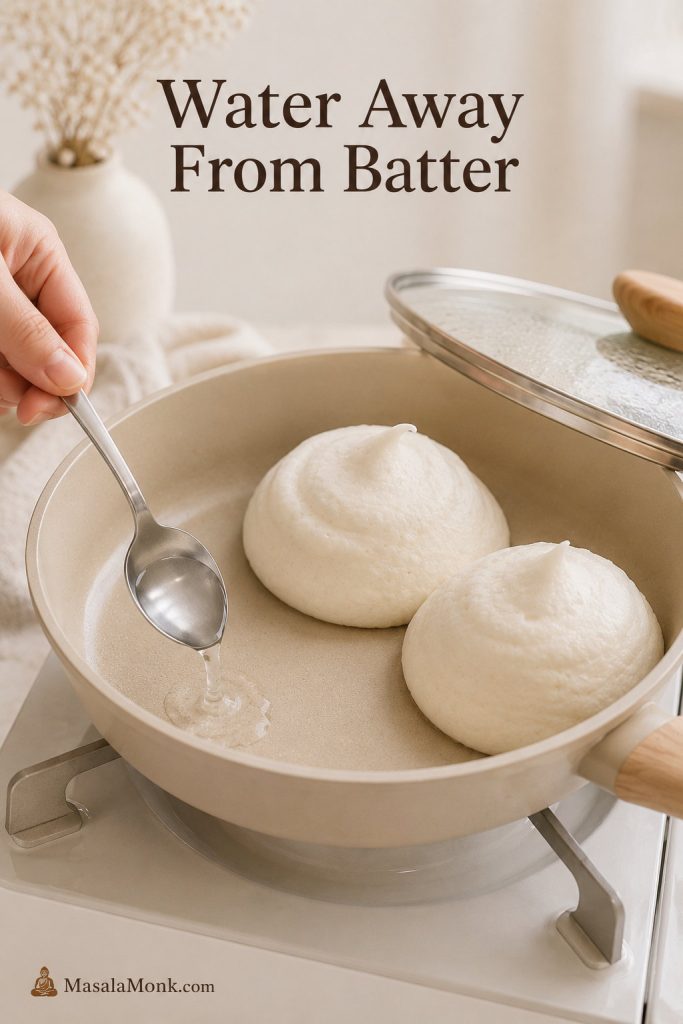
  3. Add 2 teaspoons water to the empty space in the pan, away from the batter.
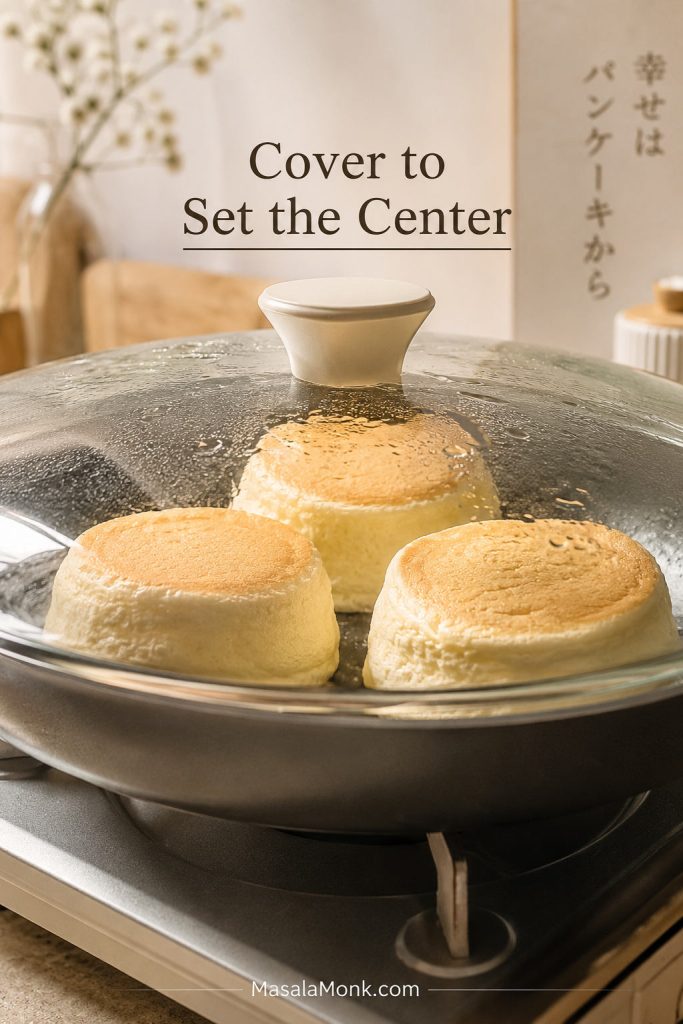
  4. Cover and cook for 3–4 minutes, until the bottom layer starts to set.
  5. Add the reserved batter on top of each pancake.
  6. Cover again and cook until the sides look less glossy and the base releases cleanly.
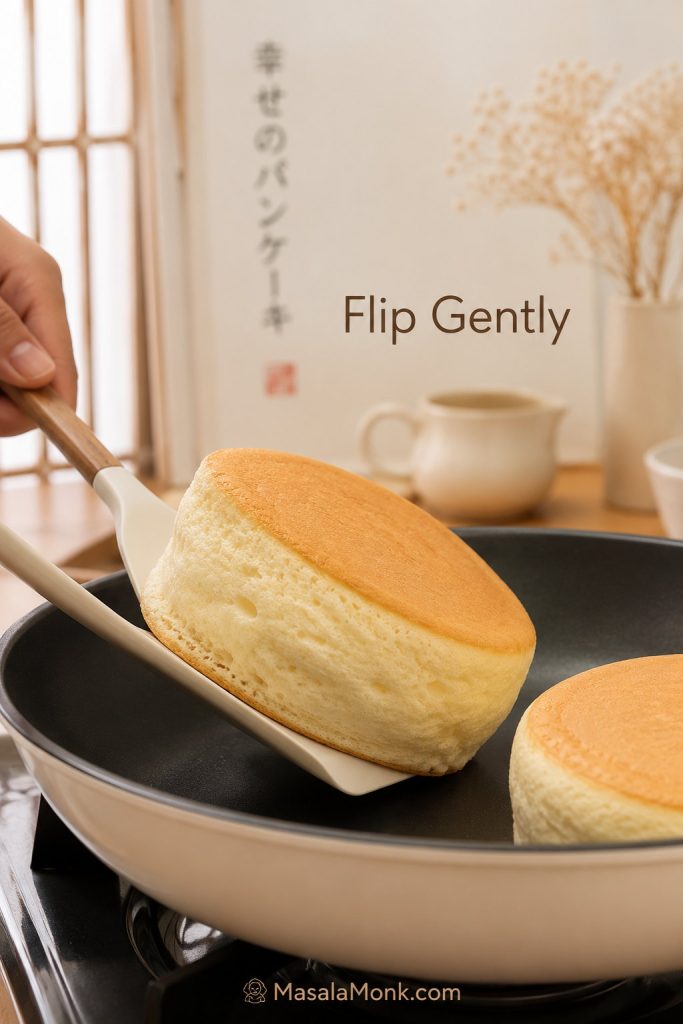
  7. Flip gently, add another small splash of water, cover, and finish cooking.

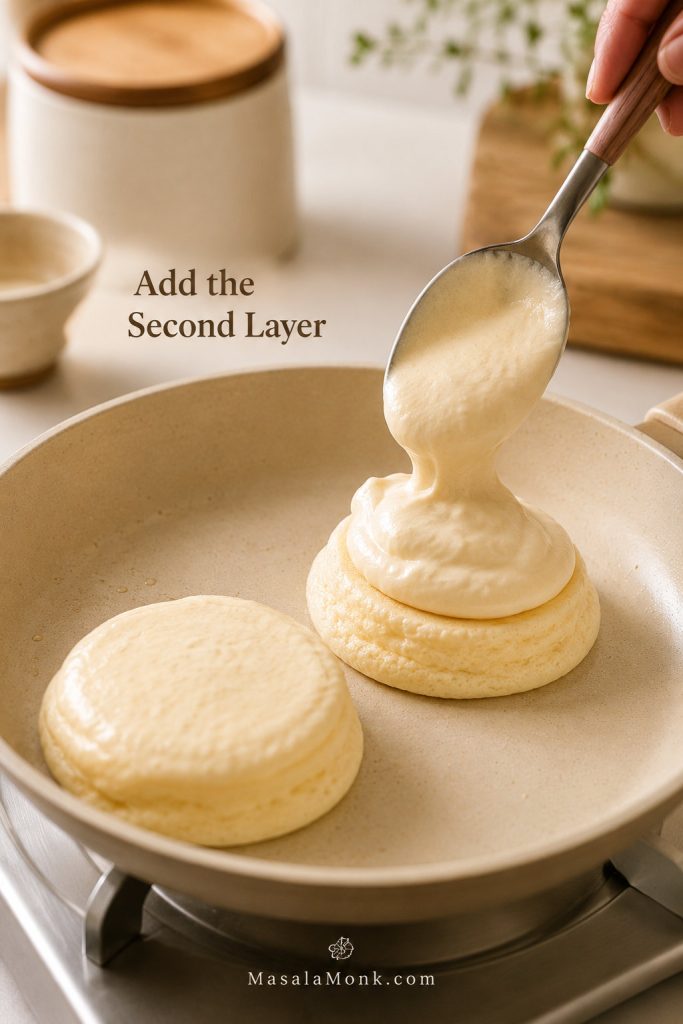
How to Layer No-Mold Japanese Pancakes

Add the reserved batter after the first layer has started to hold its shape. This gives the pancake height without needing a ring mold.

Reserved batter being spooned on top of a partially set no-mold Japanese pancake in a pan.
Add the second layer only after the base starts to set; otherwise, the batter spreads outward instead of stacking upward.

The no-mold pancakes may lean a little, and their edges may look softer. That is not failure. The win is a pancake that rises upward, cooks through, and lands on the plate warm and tender.

How to Use a Ring Mold

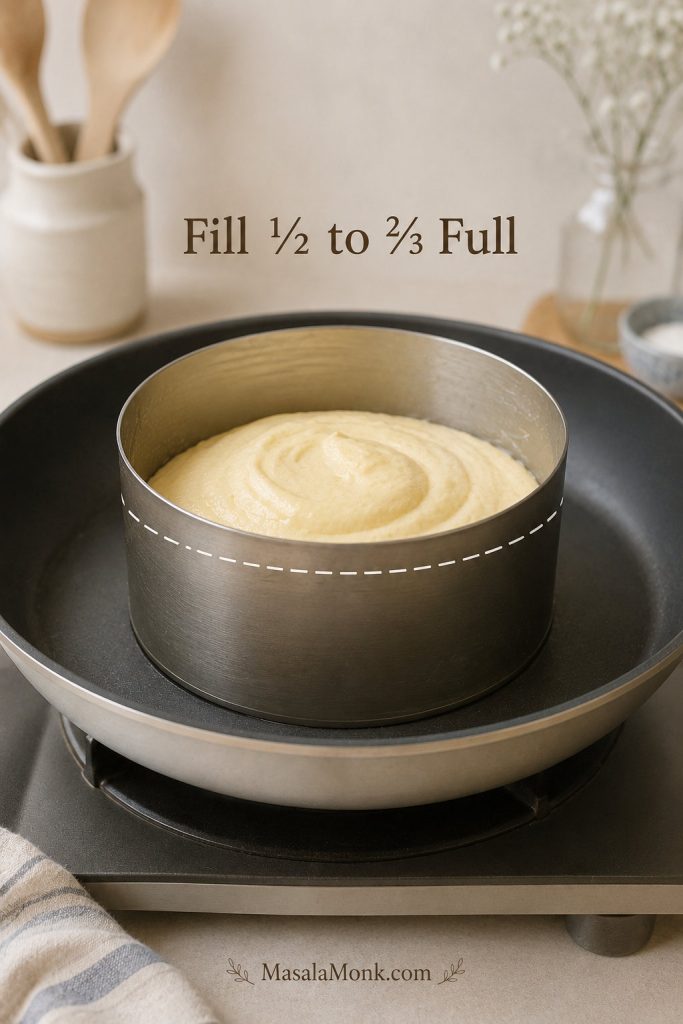
Use a ring mold about 2.5–3 inches wide and roughly 2 inches high. Grease the inside very well, place it in the pan, and fill it only halfway to two-thirds full. The batter needs room to rise.

How High to Fill a Ring Mold

Leave visible headroom in the mold. Filling to the top looks dramatic, but it gives the batter nowhere to rise.

Japanese pancake batter inside a metal ring mold in a pan with a fill-height guide line.
Fill the ring mold only halfway to two-thirds full. The batter needs headroom to rise without spilling or compressing.

When flipping, slide a thin spatula under the mold and use tongs to steady the ring. A pancake that resists or looks wet at the sides is asking for more time. Ring molds get hot, so use tongs or a towel when adjusting them.

Meringue Guide: The Most Important Step

The meringue is where these pancakes get their height. Think of it as the scaffolding inside the pancake: too soft and the batter spreads; too dry and it becomes hard to fold smoothly.

A good meringue looks shiny and confident. It should not slide around the bowl like foam, and it should not break into dry chunks. When the peak stands with only a small bend at the tip, you are in the right zone. In testing, batter made with soft peaks spread quickly, even when the pan heat was right.

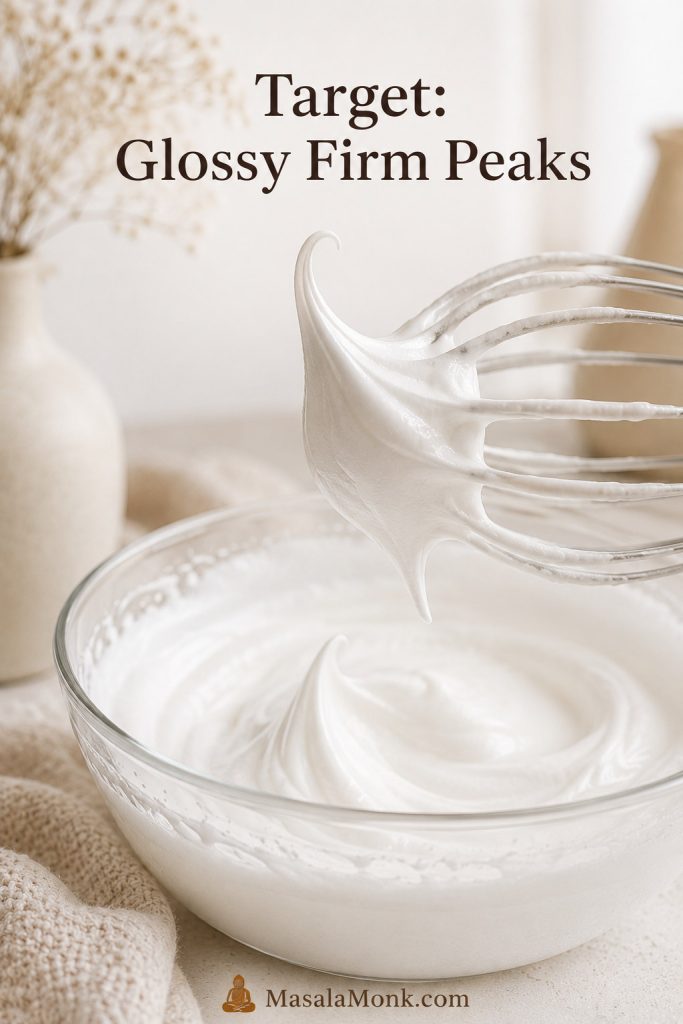
The Glossy Firm Peak Target

The target is not just “fluffy.” It is glossy, structured foam that can hold the batter up once it reaches the pan.

Glossy stiff meringue peak lifted from a bowl with a mixer beater.
This is the target texture: shiny, strong, and stable enough to help the batter mound in the pan instead of spread.

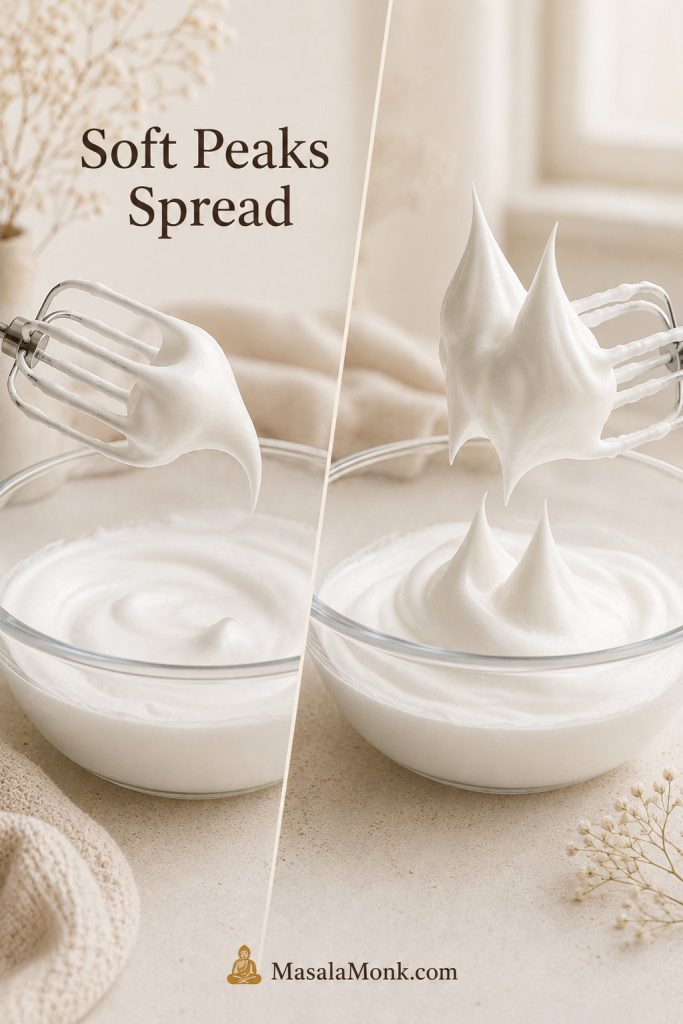
Soft Peaks vs Stiff Peaks

Soft peaks may seem close, but this batter needs a stronger foam. A drooping peak often becomes a spreading pancake.

Soft meringue peaks compared with stiff glossy peaks for Japanese pancake batter.
Soft peaks can look promising, but they often collapse after folding. Beat a little longer until the peaks stand firmly.
Meringue stageWhat it looks likeUse it?
FoamyBubbles with no real shapeNo. Too early.
Soft peaksPeak forms but droops overUsually too weak for tall pancakes.
Firm/stiff glossy peaksPeak stands upright or nearly upright; meringue looks smooth and shinyYes. This is the target.
Dry or clumpy peaksGrainy, dull, broken-looking foamNo. Overbeaten and harder to fold.

What Overbeaten Meringue Looks Like

The other mistake is going too far. Once the meringue looks dry, dull, and broken, it becomes harder to fold into a smooth, airy batter.

Dry clumpy overbeaten meringue in a bowl with a glossy peak comparison in the background.
Once meringue turns dry and clumpy, it becomes harder to fold evenly; next time, stop at glossy firm peaks.
  1. Use a clean, dry bowl. Any grease or yolk can weaken the foam.
  2. Start beating the egg whites with cream of tartar until foamy.
  3. Add the sugar gradually, not all at once.
  4. Beat until the meringue is shiny and structured enough to hold strong peaks.
  5. Stop before it turns dry, grainy, or chunky.

If the whites refuse to foam after a minute or two, it is usually better to start over in a clean bowl than to keep trying to rescue them. A little yolk or grease can quietly ruin the lift.

What the Batter Should Look Like

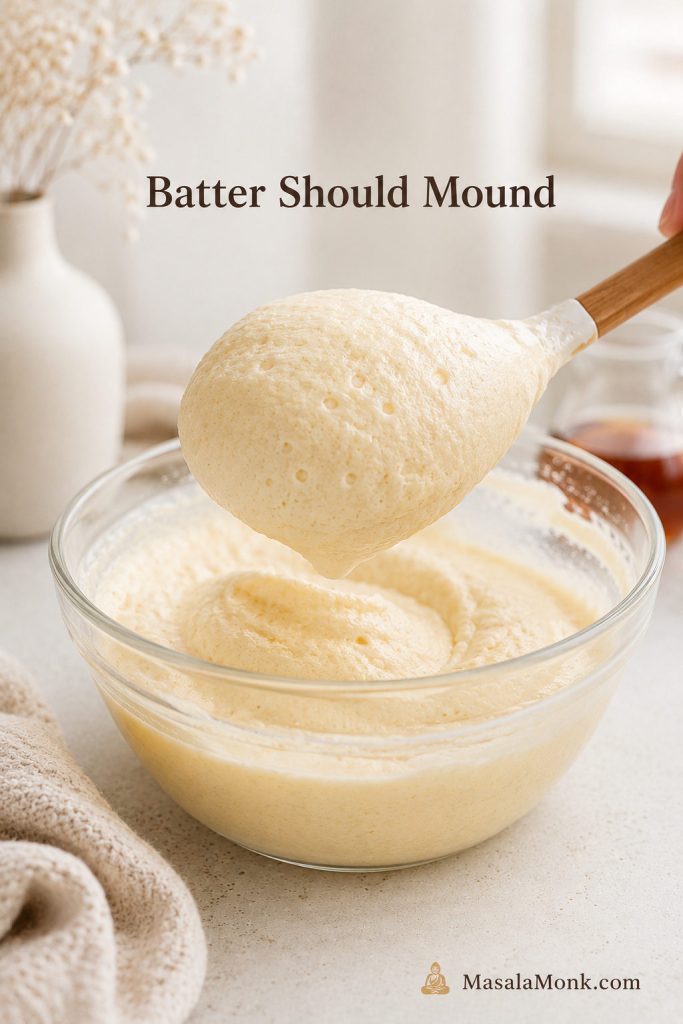
The batter should be thick, airy, and spoonable. It should hold its shape when dropped into the pan. It should not pour like crepe batter or spread immediately into a flat circle.

Thick Japanese pancake batter holding a mound on a spoon above a mixing bowl.
The batter should sit in a soft mound on the spoon. If it slides away quickly, the pancakes will likely spread.

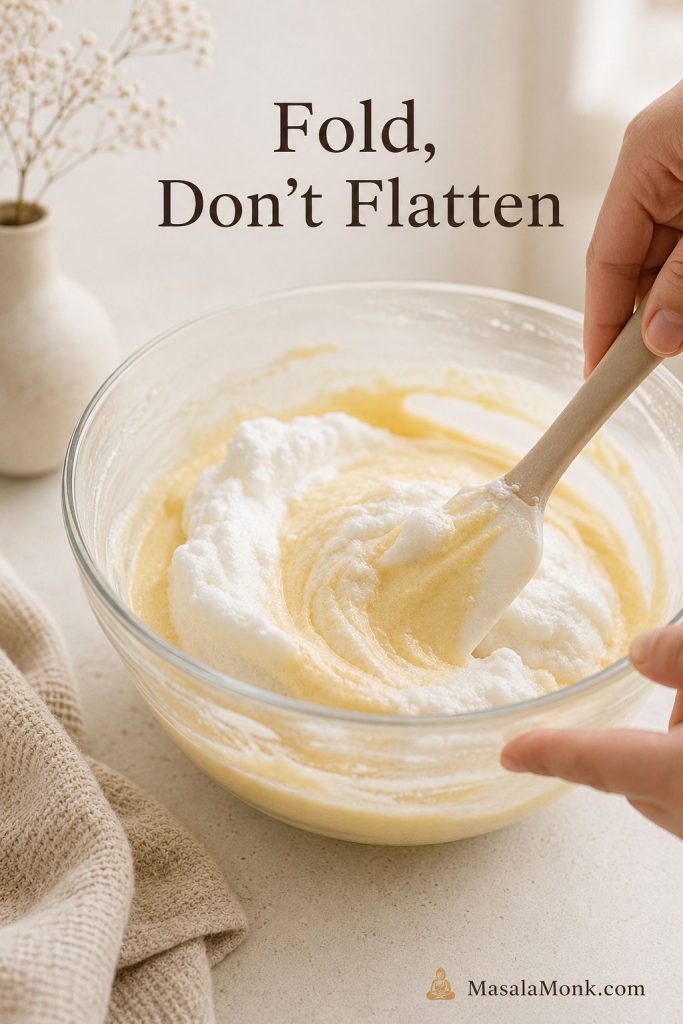
When folding, keep the movement calm and broad. Sweep under the batter, turn it over itself, and stop before you flatten the air out of it. A few faint streaks are better than a perfectly smooth batter that has lost its lift.

Batter cueWhat it means
Thick and mounds on a spoonGood. The meringue is holding structure.
Loose and pourableMeringue may be underwhipped, overfolded, or the batter has too much liquid.
Lumpy with dry white clumpsMeringue may be overbeaten or not folded evenly.
Watery at the bottomBatter has started breaking down. Cook immediately, but expect less height.

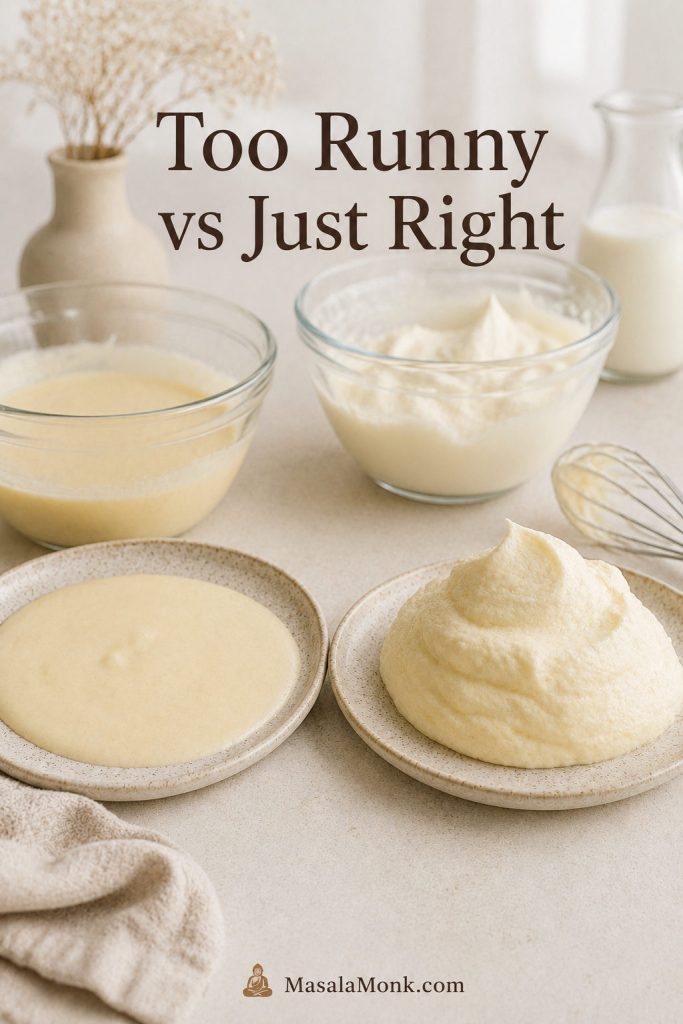
Runny vs Moundable Batter

Before the pan gets involved, the bowl already tells you a lot. Batter that sits in a mound has structure; batter that flows quickly is already warning you it may spread.

Runny Japanese pancake batter compared with thicker moundable batter in two bowls.
Check texture before cooking: moundable batter rises upward, while runny batter usually flattens before it can set.

How to Make Japanese Soufflé Pancakes Step by Step

Read through the method once before starting. The batter is best cooked soon after folding, so it helps to have the pan, lid, spatula, water, and serving plates ready.

First-batch reality check: The first pancake is where you learn your pan. A quick-browning bottom means the heat needs to come down. A spreading mound points back to the meringue or batter texture. A shorter but cooked-through pancake is still progress.

1. Separate the Eggs

Separate 2 large eggs into yolks and whites. Keep the whites completely free of yolk. If you separated the eggs while cold, let the whites sit for a few minutes while preparing the yolk batter. They do not need to be perfectly room temperature; the final meringue stage matters more.

2. Make the Yolk Batter

In a medium bowl, whisk the egg yolks, milk, vanilla, and salt until smooth. Sift in the cake flour, cornstarch, and baking powder. Whisk just until the batter is smooth and thick. Add extra milk only if the batter is too stiff to mix.

3. Beat the Meringue

In a clean bowl, beat the egg whites and cream of tartar until foamy. Add the sugar gradually while beating. Continue until the meringue is smooth, shiny, and firm enough to stand. If the peak stage feels unclear, check the glossy firm peak cue before folding. Soft peaks make soft pancakes; firm peaks give the batter a chance to rise tall.

4. Fold the Batter

Add about one-third of the meringue to the yolk batter and mix it in more freely to lighten the base. Add the remaining meringue in two additions, folding with a spatula until the batter is mostly even, thick, and airy.

Before scooping, the batter should match the moundable batter cues. A batter that sits proudly on the spoon is ready for the pan; one that slides away quickly will usually cook flatter, so move quickly and keep the mounds smaller.

A spatula gently folding whipped meringue into Japanese pancake batter in a glass bowl.
Fold with broad, gentle strokes. A few faint streaks are better than a smooth batter that has lost its air.

5. Preheat the Pan Gently

Set a nonstick pan over gentle heat. If using an infrared thermometer, aim for about 300°F / 150°C, with a workable range of 285–320°F / 140–160°C. Wipe the pan with a very thin film of oil.

If your lid is low, use smaller mounds so the batter does not touch the lid as it rises.

6. Scoop and Steam

Scoop the batter into 2 or 3 tall mounds. Use about two-thirds of the batter for this first layer and reserve the rest for building height. Add 2 teaspoons water to the empty area of the pan, away from the batter, and cover immediately.

Thick Japanese pancake batter being scooped into a tall mound in a nonstick pan.
Scoop upward, not outward. Tall mounds give no-mold Japanese pancakes a better chance to rise instead of spreading flat.

7. Build Height

After 3–4 minutes, the first layer should look slightly more set around the base. Add the reserved batter on top of each mound. Cover again and continue cooking.

8. Flip Gently

Flip when the sides look less glossy, the bottom is lightly golden, and the pancake feels like it has a body of its own. The spatula should slide under with support, not drag through wet batter.

How to Know When Japanese Pancakes Are Ready to Flip

This is the part where most people want to move too soon. Wait for the sides to lose their wet gloss and for the pancake to feel supported under the spatula.

Two Japanese pancakes in a pan showing a glossy pancake that needs more time and a set pancake ready for a spatula.
Flip when the sides lose their wet gloss and the spatula slides underneath with support. If it drags, wait longer.

If you are nervous here, that is normal. The safer move is usually one more covered minute, not forcing the spatula under a pancake that is still wet at the sides. Use the flip-readiness cues before trying again.

After flipping, add another small splash of water, cover, and cook until the second side is set. Let the pancake keep the air you built into it; a gentle flip is enough.

A tall Japanese soufflé pancake being lifted gently with a thin spatula in a pan.
Use a thin spatula and a calm hand. A rough flip can press out the air you worked so hard to keep.

9. Serve Immediately

These pancakes have a short golden window. Bring the plate to the table first, then bring the pancakes. A little settling is normal because the hot air inside cools, but they are at their softest and tallest right away.

The best bite is warm, soft, and custard-tender in the center without being wet. The pancake should give under the fork, then spring back just a little. That is the café-at-home moment you are cooking toward.

Low Heat and Steam: Time, Temperature, and Doneness

Most failed Japanese pancakes come down to heat. Tall batter needs time. When the pan is too hot, the outside browns before the inside cooks. When the pan is too cool and the lid is lifted too often, the center can stay gummy.

Best Pan Temperature for Japanese Pancakes

Think gentle surface heat, not a hot pancake rush. A pan near 300°F gives the foam time to set before the bottom goes too dark.

Infrared thermometer aimed at a nonstick pan to check the temperature for Japanese soufflé pancakes.
Keep the pan gentle, not blazing hot. Around 300°F gives the center time to cook before the outside browns too fast.

The bottom should not race ahead of the middle. A sweet, warm pancake smell is fine; a toasted smell before the sides look set is your cue to lower the heat. The batches that browned fastest were also the ones most likely to stay wet inside. If the outside is browning while the middle stays wet, go straight to the raw center fix.

Cooking cueBest target
Pan surface temperature285–320°F / 140–160°C
Ideal targetAbout 300°F / 150°C
First side6–8 minutes total, covered
Second side4–6 minutes, covered
Steam water2 teaspoons to 1 tablespoon at a time
Optional center temperatureAbout 160°F / 71°C
Best serving windowImmediately, ideally within 5–10 minutes

The water should go into the empty space in the pan, not on top of the batter. You only need enough to create a quiet puff of steam under the lid, not a puddle.

Where to Add Water for Steam

Place the water beside the batter so the steam can circulate around the pancakes. Pouring on top can thin or disturb the mounds you just built.

A spoon adding water to the empty space beside Japanese pancake batter in a pan.
Add water to the empty pan space, then cover. That way, steam surrounds the pancakes without thinning the batter.

Why Covered Steam Cooking Matters

Once covered, the pan becomes a small steam chamber. Keep the lid on long enough for the center to set instead of chasing color too early.

Japanese soufflé pancakes cooking under a clear glass lid with steam and condensation.
Once the lid goes on, let the steam work. Opening too often releases heat and slows the center from setting.

How to Tell If the Pan Is Too Hot or Too Cool

What you seeWhat it meansWhat to do
Bottom browns deeply in 2–3 minutesPan is too hotLower the heat and move the pan off the burner briefly
Edges look cooked but center feels liquidHeat is too high or pancake is too thickCover longer on low heat and make smaller mounds next time
Pancake barely colors after 8 minutesPan may be too coolIncrease heat very slightly, but keep it gentle
Pancake deflates when lid opensStructure is not set yetCover again and give it more time before flipping

Keep the lid on as much as possible. Every time you lift it, you release heat and steam, and the pancakes may take longer to set.

Optional safety cue: If using a thermometer, aim for about 160°F / 71°C in the center. The pancake should also feel softly bouncy, not liquid, when touched gently. For general egg-dish temperature guidance, see the USDA egg safety guide.

Can You Make Japanese Soufflé Pancakes With Pancake Mix?

Yes, you can make a shortcut version with pancake mix, but use it for fewer dry ingredients, not to skip the soufflé technique. The height still comes from whipped egg whites.

Think of pancake mix as a replacement for the flour, baking powder, and part of the dry base. It does not replace separated eggs, meringue, slow covered cooking, steam, or gentle folding.

Japanese hotcake mix or regular pancake mix can both work, but the result may be a little sweeter, cakier, or more mix-flavored than the main recipe. Keep the heat low because mixes with sugar can brown faster.

If you want a more everyday pancake-mix direction instead of the soufflé method, this guide to blueberry pancakes and homemade pancake mix is the better place to go.

Simple Pancake Mix Shortcut Formula

IngredientAmount
Large eggs2, separated
Pancake mix3 tablespoons / about 25–30g
Milk1½–2 tablespoons / 22–30ml, added gradually
Vanilla½ teaspoon
Sugar2 tablespoons / 24–25g
Cream of tartarPinch to ¼ teaspoon, or a few drops of lemon juice

Start with 1½ tablespoons milk. Add the remaining ½ tablespoon only if the yolk batter is too stiff to mix. Pancake mixes vary, and a looser shortcut batter is harder to stack tall.

Make the yolk batter with the yolks, milk, vanilla, and pancake mix. Beat the whites with the acid and sugar until the meringue is glossy and holds its shape, then fold and cook the same way as the main recipe.

Shortcut truth: Pancake mix can make the dry ingredients easier, but it will not save a weak meringue. If the egg whites are not whipped well, the pancakes will still spread or deflate.

What Success Looks Like

A good batch does not have to look identical to a café pancake. Look for these signs instead.

  • The batter rises upward more than it spreads outward.
  • The sides look set instead of glossy-wet.
  • The pancake releases from the pan without tearing.
  • The center feels softly bouncy, not liquid.
  • The inside is moist and airy, not raw.
  • The pancakes settle slightly after serving, but do not collapse into flat rounds.

Normal settling means the pancakes soften and lower slightly as they cool. A failure collapse means they flatten quickly, slump into the plate, or look wet in the middle.

Save the batch: If the first pancakes are shorter than expected but cooked through and soft, serve them proudly with toppings. A slightly shorter pancake with a set center is better than a dramatic tall pancake that is wet inside.

Troubleshooting Japanese Pancakes

Most pancake problems are not disasters. They are clues. Find the problem you actually saw, not the problem you are afraid of, and the next batch becomes much easier.

This style is technique-sensitive, but the fixes are usually simple: strengthen the meringue, fold less, lower the heat, cook longer covered, or make smaller mounds.

Troubleshooting board showing Japanese pancakes that spread flat, burned on the bottom, collapsed, and stuck to a ring mold.
Use the failure shape as a clue: spreading points to batter, burning points to heat, collapse points to structure, and sticking points to mold prep.

Rise, Spread, and Collapse Problems

ProblemLikely causeFix nowNext time
Pancakes never roseMeringue was too soft, batter was overfolded, or the pan was too hot too soonCook them through, stack with toppings, and serve as soft pancakesBeat to firm peaks that hold their shape and fold more gently
Pancakes rose in the pan but collapsed on the plateCenter was undercooked or structure was too weakServe quickly; texture may still be pleasantCook longer covered and make slightly smaller mounds
Batter spread flatMeringue was underwhipped, batter was too loose, or too much milk was addedUse a ring mold if you have oneBatter should hold a mound, not pour

Heat, Doneness, and Texture Problems

ProblemLikely causeFix nowNext time
Outside burnedPan was too hotLower heat immediately and move pan briefly off the burnerUse gentle heat and aim for 285–320°F / 140–160°C
Center stayed rawPancakes were too tall, flipped early, or cooked too hot outsideCover and cook longer on low heatMake smaller mounds and use steam
Pancakes wrinkled or shrank at the sidesSudden cooling, undercooked center, or weak structureServe quickly while still warmCook until the center is set and avoid opening the lid too often
Eggy flavorUnderseasoned batter or undercooked centerAdd toppings such as fruit, cream, or syrupUse vanilla, salt, and enough cook time

Flipping, Batch, and Mold Problems

ProblemLikely causeFix nowNext time
Pancake cracked while flippingIt was flipped before the base setSupport with a second spatula if neededWait until the sides look less glossy and the base releases cleanly
Second batch was flatterBatter sat too long and lost airCook immediately if possibleMake a small batch or use two pans
Pancakes stuck to moldMold was not greased well enoughLoosen gently with a thin knifeGrease the inside of the ring generously before filling

Why Did My Japanese Pancakes Deflate?

The most common reasons are weak meringue, overfolded batter, heat that was too high, or an undercooked center. Some settling is normal after cooking, but a full collapse usually means the pancake did not have enough structure to hold itself.

Why Are My Pancakes Raw Inside?

The pan was probably too hot or the pancakes were too large. High heat browns the outside before the center has time to set. Lower the heat, cover the pan, use a little steam, and make slightly smaller mounds next time.

Cut Japanese pancakes showing an undercooked raw center beside a properly cooked airy center.
A raw center usually means the outside cooked too quickly. Lower the heat, cover longer, and let steam help next time.

Why Is My Batter Runny?

Runny batter usually means the meringue was underwhipped, overmixed into the yolk batter, or left sitting too long. The batter should look airy and thick enough to hold a mound.

Why Are They Not Jiggly?

They may be too thin, overcooked, or made with batter that lost too much air. The jiggle comes from height, moisture, and a set-but-soft center. Aim for thick mounds, gentle heat, and a center that feels bouncy rather than dry.

Why Was the Second Pancake Worse Than the First?

Soufflé pancake batter loses air as it sits. If the first pancake was tall and the later ones were flatter, the batter probably waited too long. For best results, cook all the batter at once in one large pan, use two pans, or make a smaller batch.

Best Toppings for Japanese Pancakes

Japanese soufflé pancakes are delicate, so the best toppings should make them feel café-special without crushing them. Think light cream, soft fruit, a little syrup, or a sauce served mostly to the side. The pancakes are the drama; the toppings should frame them.

Classic Café-Style Toppings

  • Powdered sugar
  • Softened butter
  • Maple syrup
  • Whipped cream
  • Fresh strawberries or mixed berries

For a warmer fruit topping, spoon over a little homemade apple pie filling; keep the portion light so it does not flatten the stack.

Japanese-Inspired Toppings

  • Matcha whipped cream
  • Sweet red bean paste
  • Black sesame cream
  • Kinako sugar
  • Yuzu honey

Dessert-Style Toppings

For the tallest look, finish with powdered sugar, berries, or a light cream first. Add heavier sauces at the table, after the pancakes have had their moment.

Can You Make Japanese Pancakes Ahead?

This is a cook-and-eat-now recipe, and that is part of its charm. The batter should not be made ahead because the meringue loses air as it sits. Cooked pancakes also deflate as they cool, which is normal for this style.

If you have leftovers, refrigerate them in an airtight container for up to 1 day. Reheat gently in a covered pan over low heat or microwave briefly at low power. They will still be soft, but they will not be as tall or jiggly as freshly cooked pancakes.

Japanese Soufflé Pancakes vs Japanese Soufflé Cake

Japanese soufflé pancakes and Japanese soufflé cake sound similar, but they are different recipes. The pancake version is cooked in a pan or on a griddle and served like breakfast pancakes. Japanese soufflé cake usually refers to Japanese cheesecake or cotton cheesecake, which is baked, sliced, and served as a dessert.

Both use meringue logic, so they share that soft, airy personality. However, the method, texture, and serving style are different. If you wanted the cake version, see this Japanese cheesecake recipe.

FAQs About Japanese Pancakes

Are Japanese pancakes and soufflé pancakes the same thing?

For this tall, café-style version, yes. Here, Japanese pancakes means Japanese soufflé pancakes: thick pancakes made with whipped egg whites and cooked slowly until soft, airy, and jiggly.

Do I need a ring mold?

No. A ring mold gives cleaner sides and more dramatic height, but the no-mold method still works if the batter is thick enough to mound. The shape will be softer, but the pancakes can still be fluffy and tender.

Why did my pancakes collapse after cooking?

A little settling is normal. A dramatic collapse usually means the meringue was too weak, the batter was overmixed, or the center needed more covered cooking time. The fix is usually stronger peaks, gentler folding, and a lower, slower pan.

How do I know when to flip them?

Flip when the bottom is lightly golden, the sides look less glossy, and the pancake releases cleanly from the pan. If the spatula drags through wet batter, cover the pan again and give it another minute.

Can I use pancake mix?

Yes, but pancake mix only replaces the dry base. You still need separated eggs, whipped egg whites, gentle folding, steam, and slow covered cooking for the soufflé height.

Can I make the batter ahead?

No. Once the meringue is folded in, the batter starts losing air. Make it, scoop it, and cook it right away for the best rise.

Can I double this recipe?

You can, but only if your pan or griddle can cook the batter right away. Soufflé pancake batter loses air as it waits, so a small fresh batch is usually better than a large bowl sitting on the counter.

Can I make them without cake flour?

Yes. Use 30g all-purpose flour, remove 1 teaspoon, and replace that teaspoon with cornstarch. The pancakes may be slightly less delicate than the cake-flour version, but the swap works well for this small batch.

Can I make them gluten-free?

A cup-for-cup gluten-free flour blend is the safest first experiment, but this batter is delicate, so results can vary. Almond flour is heavier and can make soufflé pancakes collapse more easily. For a more reliable gluten-free-style pancake, try almond flour pancakes instead.

Can I make these eggless or vegan?

Classic Japanese soufflé pancakes depend on egg-white meringue, so eggless or vegan versions need a separate tested formula. For an easier egg-free or vegan-friendly pancake direction, a recipe like oat pancakes is a better place to start.

Can I make keto Japanese soufflé pancakes?

Not cleanly with this exact recipe. Low-carb flours and sweeteners change the batter structure, and soufflé pancakes are already delicate. Use a dedicated keto pancake formula rather than adapting this one directly.

Why do they taste eggy?

Eggy flavor usually comes from undercooking, skipping vanilla or salt, or using a formula with a very high egg ratio. Cook the center through, keep the vanilla and salt, and serve with fruit, cream, or syrup.

What does fuwa fuwa mean?

Fuwa fuwa means soft, fluffy, and airy. For Japanese pancakes, it describes the cloudlike texture created by whipped egg whites and gentle cooking.

Once you understand the three checks — meringue that holds, batter that mounds, and heat that stays gentle — these pancakes stop feeling like a café trick. They become a small weekend project you can actually pull off, one covered minute at a time.

Serve Japanese Pancakes While They Are Tall and Warm

Bring the plate to the table first, then bring the pancakes. The reward is that first soft bite while the stack is still warm, lifted, and a little magical.

Tall Japanese soufflé pancakes with syrup, whipped cream, and a forkful showing the soft cooked interior.
Once the meringue, batter, and heat checks click, the final stack feels less like a café trick and more like a weekend win.

Japanese Pancakes Recipe Card

Japanese Pancakes Recipe: Fluffy Soufflé Pancakes

Tall, soft, jiggly Japanese soufflé pancakes made with whipped egg whites, a light yolk batter, gentle heat, and steam. Use the no-mold method for a simple home version or ring molds for straighter café-style sides.

Yield2–3 thick pancakes
Prep Time20 minutes
Cook Time12–15 minutes per batch
Total Time35–50 minutes

Ingredients

Yolk Batter
  • 2 large egg yolks, about 35–40g
  • 20ml whole milk, about 1 tablespoon + 1 teaspoon
  • ½ teaspoon vanilla extract
  • 30g cake flour, about ¼ cup spooned and leveled
  • 1 teaspoon cornstarch, about 3g
  • ¼ teaspoon baking powder
  • Pinch of fine salt
Meringue
  • 2 large egg whites, about 60–65g
  • 24–25g granulated sugar, about 2 tablespoons
  • ¼ teaspoon cream of tartar, or 1 teaspoon lemon juice, or ½ teaspoon white vinegar
For Cooking
  • Neutral oil or melted butter, for greasing
  • 1–2 tablespoons water, for steam, used in small splashes
  • Powdered sugar, whipped cream, berries, maple syrup, or toppings of choice

Instructions

Make the Batter
  1. Prepare the pan and tools. Set out the pan, lid, spatula, water, and serving plates before mixing.
  2. Separate the eggs. Place the yolks in one bowl and the whites in a clean, dry mixing bowl. Make sure no yolk gets into the whites.
  3. Make the yolk batter. Whisk the yolks, milk, vanilla, and salt. Sift in the cake flour, cornstarch, and baking powder. Whisk just until thick and smooth.
  4. Start the meringue. Beat the egg whites with cream of tartar until foamy. Add the sugar gradually.
  5. Beat to glossy stiff peaks. Continue beating until the meringue is shiny and holds strong peaks. Stop before it turns dry or clumpy.
  6. Fold the batter. Lighten the yolk batter with one-third of the meringue, then fold in the rest until the batter is thick, airy, and mostly even.
Cook and Serve
  1. Preheat gently. Heat a nonstick pan over low heat. If using a thermometer, aim for about 300°F / 150°C. Wipe with a thin film of oil.
  2. Scoop the pancakes. Add 2 or 3 tall mounds of batter, using about two-thirds first and reserving the rest. Add 2 teaspoons water away from the batter and cover.
  3. Build height. After 3–4 minutes, add the reserved batter on top. Cover again and cook until the sides look less glossy and the bottom releases cleanly.
  4. Flip carefully. Slide a thin spatula under each pancake and flip gently. Add another small splash of water, cover, and cook for 4–6 minutes more.
  5. Check doneness. The pancakes should be lightly golden, softly bouncy, and set in the center. If using a thermometer, aim for about 160°F / 71°C.
  6. Serve immediately. Dust with powdered sugar and add toppings. Some settling is normal as the pancakes cool.

Recipe Notes

  • Best cue: The batter should hold a soft mound, and the cooked pancakes should feel gently bouncy in the center.
  • If the batter spreads: The meringue was likely too soft, the batter was overfolded, or too much liquid was added.
  • If the center is raw: Lower the heat, cover longer, and make smaller mounds next time.
  • No-mold layering: Use about two-thirds of the batter for the first mounds and reserve the rest for topping.
  • For ring molds: Grease well and fill only halfway to two-thirds full.
  • For taller pancakes: Use 3 egg whites and 2 yolks, keeping the other ingredients the same, but fold carefully.
  • Pancake mix shortcut: Use the shortcut formula in the guide above; the mix replaces the dry base, not the whipped egg whites.
  • Storage: Best fresh. Leftovers can be refrigerated for 1 day, but they will lose height and jiggle.

Back to top

Posted on 9 Comments

Almond Flour Pancakes (Easy Recipes) Fluffy, High-Protein, Keto & More

Dark, Vogue-style portrait cover featuring a stack of almond flour pancakes with almond flour, eggs, blueberries, cottage cheese, and spices, with elegant headline text and MasalaMonk.com in the footer.

There’s a reason pancakes are so deeply comforting. They’re warm, they’re familiar, and they’re endlessly customizable. Yet when you swap regular flour for almond flour (or almond meal) to make pancakes, the first attempt can feel like the rules changed overnight. The batter looks thicker. The surface browns faster. The flip feels delicate. And instead of an easy breakfast, you’re suddenly negotiating with your pan.

Even so, almond-based pancakes are incredibly forgiving once you learn their rhythm. They’re naturally gluten-free, they’re filling in a way that many traditional stacks aren’t, and they can suit everything from low-carb mornings to protein-heavy meal prep. Best of all, they can taste like a real treat instead of “diet food,” as long as you cook them with gentle heat and a little patience.

This guide is designed to make that process feel simple. You’ll start with a dependable base recipe, then branch into variations that still feel natural in a home kitchen: almond meal pancakes, fluffy almond flour pancakes, 3 ingredient almond flour pancakes, 2 ingredient almond flour pancakes, protein almond flour pancakes, almond flour cottage cheese pancakes, vegan almond flour pancakes, low carb pancakes with almond flour, and seasonal versions like almond flour and banana pancakes, almond flour blueberry pancakes, and almond flour pumpkin pancakes. You’ll also get a practical section for almond flour pancake mix and pancake-and-waffle mix style batters—because sometimes convenience is the whole point.

Now, let’s get into the batter.

Stack of almond flour pancakes on a plate with text overlay highlighting gluten-free and low-carb breakfast.
Quick cue for success: almond-flour pancakes like gentle heat and smaller rounds—aim for a matte top before flipping for clean, tender centers.

Almond Flour vs Almond Meal for Pancakes

Almond flour and almond meal both come from ground almonds, but they aren’t identical. That difference matters most in texture and hydration.

Almond flour is usually finely ground, often from blanched almonds. As a result, pancakes made with almond flour tend to be smoother, lighter on the tongue, and more “cake-like” in the center.

Almond meal is often coarser and may include the skins. That coarser texture can create a heartier pancake—more rustic, more “flapjack,” with a slightly deeper nutty taste. Almond meal pancakes are still tender, but they can feel sturdier and more substantial. If you’ve ever heard people call them almond flour flapjacks, this is usually what they mean: a thicker, cozier pancake made with nut flour that eats more like a tender breakfast cake than a diner-style wheat pancake.

Almond flour vs almond meal in bowls showing fine vs coarse texture for making pancakes, with tips for batter hydration.
If your batter suddenly thickens, it’s not “wrong”—nut flours keep absorbing liquid. Add milk 1 tbsp at a time, stir, then wait 20 seconds before deciding again.

Here’s the practical part: almond meal often absorbs liquid differently. So if you’re making pancakes made with almond meal and the batter thickens quickly, don’t fight it. Add liquid in small amounts. Stir. Pause for 20–30 seconds. Then decide if it needs more. That tiny pause is surprisingly powerful because nut flours keep hydrating even after you’ve mixed them.

In other words, treat the batter like it has a heartbeat. Give it a moment. Then adjust.

Also Read: Almond Flour and Diabetes: A Low-Carb, High-Impact Swap for Better Blood Sugar


A Dependable Almond Flour Pancakes Recipe

This is your everyday base: easy almond flour pancakes that work plain, but also welcome banana, blueberries, pumpkin, cottage cheese, protein powder, or savory add-ins. Think of it as your go-to pancake made with almond flour (what some people simply call almond pancakes): dependable on its own, but flexible enough for mix-ins.

It’s also built on a logic you’ll see in reliable tested recipes, like King Arthur Baking’s almond flour pancakes: almond flour + eggs for structure + milk for moisture + baking powder for lift.

Ingredients (makes about 8–10 small pancakes)

  • 1 cup almond flour (or almond meal)
  • 2 large eggs
  • 1/3 cup milk of choice (dairy or non-dairy)
  • 1 teaspoon baking powder
  • Pinch of salt
    Optional: 1 tablespoon sweetener, 1/2 teaspoon vanilla
Recipe card for almond flour pancakes (gluten-free) showing ingredients, quick method, and a tip for fluffy centers.
Save this card for repeat mornings: keep pancakes small, rest the batter briefly, and flip only when the surface turns matte—this is the easiest way to avoid undercooked centers.

Method

  1. In a bowl, whisk almond flour, baking powder, and salt until evenly combined.
  2. In a second bowl, whisk eggs and milk until smooth. Add vanilla or sweetener if using.
  3. Pour wet into dry and stir until the batter is cohesive. It should be thick but still spoonable.
  4. Let the batter rest for 3–5 minutes while you warm your pan.
  5. Cook on medium-low heat in a lightly greased skillet. Make small rounds (3–4 inches wide). Flip only once the edges look set and the top looks more matte than glossy.

That brief rest is not a fussy extra step—it’s what keeps the batter consistent from the first pancake to the last. Resting batter is a classic pancake habit even outside nut-flour cooking, and it’s baked into traditional approaches like King Arthur’s classic pancake method.

Also Read: Mayo Recipe: 15+ Homemade Mayonnaise Variations


Almond Flour Pancake Batter That Behaves

Nut-flour batters don’t look like wheat batters. They’re thicker, less elastic, and they set differently. Once you accept that, the rest becomes easier.

What “right consistency” looks like

  • The batter falls from a spoon in a ribbon and spreads slowly.
  • It looks glossy and cohesive, not dry and clumpy.
  • It doesn’t run like crepe batter.
Visual guide showing almond flour pancake batter consistency: too thick, just right, and too thin, with quick fixes for each.
Use this as a mid-batch rescue chart: adjust in tablespoon steps and give the batter a short pause—almond flour keeps hydrating even after you stop stirring.

The three most common batter problems

Too thick: It won’t spread; it sits like a mound.
Fix it by adding 1 tablespoon milk, stirring, then waiting 20–30 seconds before deciding whether to add more.

Too thin: It spreads into very wide, fragile pancakes.
Fix it by adding 1 tablespoon almond flour (or almond meal), stirring, and resting briefly.

Thickens mid-batch: This is normal.
Fix it by stirring and loosening with small splashes of milk if needed.

That last point matters more than you’d expect. Almond flour pancake batter often changes slightly as it sits. Instead of trying to “perfect” it in one go, treat it like a living mixture and make micro-adjustments.

Also Read: Pepper Sauce Recipe Guide: Classic Vinegar Heat to Chipotle, Ají & Peppercorn


Fluffy Almond Flour Pancakes

If your goal is fluffy almond flour pancakes—soft, tender, and slightly lifted—there are a few levers that do most of the work. Fortunately, none of them require culinary gymnastics.

1) Fresh leavening

Baking powder is the lift here. If it’s old, the pancakes can turn out flat even if everything else is right. A quick way to check freshness is the method described in King Arthur’s baking powder test.

2) Gentle heat

Almond flour browns quickly. Medium-low heat gives the pancake time to set inside without over-darkening outside. You’ll get a more even crumb and a cleaner flip.

Fluffy almond flour pancakes with a cut-open crumb photo and a quick guide for lift, heat, pancake size, and resting batter.
Want height without fuss? Keep rounds small, cook on medium-low, and wait for a matte top—most “flat” almond pancakes are just heat + timing.

3) Smaller pancakes

It’s tempting to pour big rounds, especially when you want a “proper stack.” Nevertheless, smaller pancakes cook more evenly and rise more consistently. Once you’ve nailed the method, you can go bigger. Until then, keep it tidy.

A quiet upgrade: rest the batter a little longer

A short rest already helps. A slightly longer rest—say 10 minutes—can make the texture even more uniform. Resting batter is a widely recommended way to improve pancake texture in general, not just for nut flours.

For a classic pancake inspiration that leans cozy and traditional, MasalaMonk’s fluffy buttermilk pancakes with stewed cinnamon apples is a delicious reference point for texture and topping ideas.


Simple Almond Flour Pancakes for Everyday Mornings

Sometimes you want a no-drama breakfast—something you can make on autopilot. Simple almond flour pancakes are exactly that once you settle into a routine.

First, treat the first pancake as your “test pancake.” If it browns too quickly, lower the heat. If it takes too long to set, nudge the heat slightly higher. Then keep the rest consistent.

Simple almond flour pancakes on a plate with a quick routine checklist for a test pancake, thick-but-pourable batter, and flipping once gently.
Your “test pancake” is the thermostat: if it browns too fast, lower heat; if it takes forever to set, nudge heat up—then don’t touch the dial again.

Second, keep the batter slightly thicker than you think. Thin batter tends to spread, and spreading creates pancakes that are harder to flip and easier to tear. Thick-but-pourable is your friend.

Third, flip gently and only once. Pancakes made with almond flour don’t love being pressed, smashed, or flipped repeatedly. If you let them set properly, they hold together beautifully.

Also Read: Whole Chicken in Crock Pot Recipe (Slow Cooker “Roast” Chicken with Veggies)


3 Ingredient Almond Flour Pancakes

There are mornings when you want breakfast in the fewest possible steps. Three-ingredient versions are perfect for that.

Ingredients

  • 1 cup almond flour
  • 2 eggs
  • 1/3 cup milk
Recipe card showing 3-ingredient almond flour pancakes with almond flour, eggs, milk, a quick method, and simple add-on ideas.
Shortcut math: the add-ons aren’t new recipes—just one small change. Cinnamon for cozy, lemon zest for brightness, blueberries for bursts, yogurt for contrast.

Method

Whisk everything until smooth, rest 3 minutes, then cook small pancakes on medium-low. If you have salt, add a pinch. If you have baking powder, add 1/2 teaspoon for a little lift. Still, even without extras, these can be satisfying when cooked gently.

To add “juice” without adding complexity, you can fold in one of these single-ingredient upgrades:

  • cinnamon for warmth
  • lemon zest for brightness
  • a handful of blueberries placed on the pan after pouring
  • a spoonful of yogurt on top after cooking

Each one changes the experience without changing the method.

Also Read: Cheesy Chicken Broccoli Rice – 4 Ways Recipe (One Pot, Casserole, Crockpot & Instant Pot)


2 Ingredient Almond Flour Pancakes

Two-ingredient versions are as minimal as it gets. They’re also more egg-forward, and the texture leans closer to soft breakfast cakes than classic diner pancakes.

Ingredients

  • 1 cup almond flour
  • 3 eggs
2-ingredient almond flour pancakes with a cake-like crumb and tips to whisk thoroughly, cook small rounds, and flip later, plus topping contrast ideas.
Two-ingredient batter is naturally egg-forward—treat it like a mini breakfast cake: cook smaller, wait longer on side one, then balance with something tangy (yogurt) or juicy (berries).

How to make them feel more pancake-like

  • Whisk very thoroughly so the batter becomes uniform.
  • Cook smaller rounds so they set through.
  • Wait longer before flipping; the first side needs time.

These are excellent with toppings that bring contrast. For instance, something creamy and tangy (yogurt), something juicy (berries), or something nutty and rich (nut butter) can make the whole plate feel balanced rather than heavy.

Also Read: Sheet Pan Chicken Fajitas Recipe (Easy One-Pan Oven Fajitas)


5 Ingredient Almond Flour Pancakes

If you want the minimal version that still feels consistently “right,” five ingredients is often the sweet spot.

  • almond flour
  • eggs
  • milk
  • baking powder
  • salt
Flat-lay guide showing the five ingredients for almond flour pancakes and a “choose your direction” chart for sweet, fruity, spiced, or savory variations.
Think of this as your neutral batter “template”: keep the five ingredients constant, then change the mood with one direction—sweet, fruity, spiced, or savory.

This is basically the base recipe without vanilla or sweetener. It’s also ideal for customization. Because the flavor is neutral, you can push it sweet, fruity, spiced, or savory without fighting the batter.

Also Read: Authentic Louisiana Red Beans and Rice Recipe (Best Ever)


Protein Almond Flour Pancakes

If you want breakfast that keeps you full, protein almond flour pancakes are an obvious move. The trick is to add protein without drying the batter or turning it rubbery. Moisture and gentle heat solve most issues.

Protein almond flour pancakes with protein powder

Start with the base batter. Add one scoop of protein powder. Then loosen with milk a tablespoon at a time until it returns to thick-but-pourable.

Protein almond flour pancake batter with protein powder being added, showing tips to adjust thickness with milk, cook on lower heat, and avoid overmixing.
Protein powder is thirsty: add it, then “dial back” thickness with milk in tablespoon steps—over-thinning is what makes pancakes spread and tear.

Because protein powder thickens batter quickly and can brown faster, keep the heat lower and cook longer. Also, resist the urge to keep stirring after you’ve mixed it. Overmixing can make protein batters feel tougher.

To make the flavor feel like breakfast rather than a shake in pancake form, add one of these:

  • cinnamon + vanilla
  • cocoa + a touch of sweetener
  • citrus zest for a bright finish
  • chopped nuts for texture

Almond meal protein pancakes

If you’re using almond meal rather than almond flour, the same concept applies, but the batter may thicken faster because of the coarser grind. In that case, add liquid in smaller steps and give it a short pause between additions. You’re aiming for a batter that spreads slowly rather than sitting in a mound.

Side-by-side comparison of almond flour vs almond meal protein pancake batter showing how almond meal thickens faster and needs smaller liquid additions.
Almond meal + protein is a “thickener combo.” Treat liquid like seasoning—add a little, pause, then repeat until the batter spreads slowly instead of sitting like a scoop.

Almond flour cottage cheese pancakes

This is the high-protein option that stays moist and tender without needing protein powder.

Blend until smooth:

  • 1 cup cottage cheese
  • 2 eggs
  • 3/4 cup almond flour
  • 1 teaspoon baking powder
  • pinch of salt
Recipe card for cottage cheese almond flour pancakes showing blended ingredients, rest time, medium-low cooking tip, and moist high-protein results.
For the smoothest, most tender bite: blend until completely silky, then let the batter rest 5 minutes so it thickens evenly before hitting the pan.

Let it rest for 5 minutes, then cook on medium-low. The texture tends to be soft, moist, and satisfying—especially when served warm.

For more protein-focused breakfast variety that’s still pancake-adjacent, MasalaMonk’s millet protein pancakes and protein-rich cherry pancakes are great rotation options.

Also Read: Baked Jalapeño Poppers (Oven) — Time, Temp & Bacon Tips


Almond Flour and Banana Pancakes

Banana adds sweetness and tenderness, which can make almond-based batter feel plush. It’s also one of the easiest ways to make breakfast feel like a treat without doing much extra work.

Almond flour banana pancake guide showing mashed banana in batter, tips to reduce milk and cook smaller rounds, plus cozy, bright, dessert, and balanced flavor options.
Banana makes pancakes brown faster—keep heat medium-low and think “mini pancakes” for the cleanest flips. Then pick one flavor path to change the vibe without changing the method.

Method

Mash 1 ripe banana into the base batter and reduce milk slightly (banana adds moisture). Cook on medium-low and keep pancakes smaller; banana encourages faster browning.

To add more “juice” while keeping it simple, you can choose a direction:

Cozy direction: cinnamon + a tiny pinch of nutmeg
Bright direction: lemon zest + berries
Dessert direction: cocoa + a few chocolate chips
Balanced direction: top with yogurt and fruit

Each direction uses the same batter, so you’re not learning a new recipe—just playing with the flavor.

Also Read: Carbonara Recipe: Italian Pasta (Creamy, Veggie, Chicken, Shrimp, Tuna & Keto)


Almond Flour Blueberry Pancakes

Blueberries work beautifully with a nutty base. The key is to avoid turning the entire batter purple and to keep the pancakes easy to flip.

Almond flour blueberry pancake guide showing pour batter first, add blueberries on top, flip when edges set, with tips for frozen berries and flavor add-ins.
The cleanest blueberry pancakes come from a simple order of operations: batter first, berries second. You’ll get better structure, less bleeding, and easier flips—especially with frozen blueberries.

Method

Pour your batter onto the skillet first, then place blueberries on top of each pancake. Flip once the edges are set. This works especially well with frozen berries because you keep control of the moisture.

MasalaMonk’s blueberry pancake roundup reinforces the same practical approach of keeping heat moderate and adding berries on the pan for better results.

To deepen flavor without complicating the recipe, try one small add-on:

  • vanilla in the batter
  • lemon zest in the batter
  • cinnamon in the batter
  • a dollop of yogurt on top after cooking

The goal is contrast: warm pancake, juicy berries, creamy topping.

Also Read: Protein Oatmeal: Turn Plain Oats into a High-Protein Meal


Almond Flour Pumpkin Pancakes

Pumpkin makes nut-flour pancakes feel especially tender because it adds moisture and body. It also brings that cozy, spiced flavor that makes breakfast feel seasonal even in the middle of an ordinary week.

Almond flour pumpkin pancake guide showing pumpkin purée added to batter, resting time, medium-low cooking tip, and topping balance ideas like yogurt, nut butter, toasted nuts, and banana.
Pumpkin adds moisture, so give the batter time to “settle” (8–10 minutes). That rest is what turns a loose bowl into a smooth, spoonable batter that cooks up tender.

Method

Add 1/2 cup pumpkin purée to the base batter, add cinnamon (or pumpkin spice), and reduce milk slightly. Rest 8–10 minutes so the batter becomes smoother and more uniform. Cook on medium-low.

To “juice” the experience, pair pumpkin pancakes with toppings that create balance:

  • yogurt + cinnamon (creamy and tangy)
  • nut butter + a drizzle of maple (rich and sweet)
  • toasted nuts (crunch)
  • sliced banana (soft sweetness)

Also Read: Healthy Oat Protein Bars – 5 Easy No Sugar Recipes for Snacks


Keto Pancakes With Almond Flour

If you’re going for keto pancakes with almond flour, the base recipe already fits the general structure. The difference is mainly what you add.

  • Use unsweetened milk or a mix of milk and water.
  • Skip banana.
  • Sweeten only if desired, with a keto-friendly sweetener.
Keto pancakes with almond flour guide showing keto swaps like unsweetened milk, optional sweetener, skipping banana, and a tip to add coconut flour for structure.
Keto success is mostly “what you don’t add”: keep the base, skip banana and sugar, and use unsweetened liquid—then fine-tune texture with a small pinch of coconut flour plus extra liquid.

In other words, this becomes your basic almond flour keto pancake template—then you decide whether you want it plain, spiced, or protein-boosted.

If you like blending flours for structure, King Arthur’s keto pancake recipe is a useful reference for how almond flour and coconut flour can work together and why the batter may need extra liquid. For days when you want something keto-friendly that isn’t pancakes, MasalaMonk’s chia breakfast ideas provide a nice change of pace.


Gluten-Free Almond-Flour Pancakes

Almond flour is naturally gluten-free. Still, if you’re cooking for someone who needs strict gluten avoidance, packaged ingredients matter: baking powder, flavorings, add-ins, and especially mixes.

Gluten-free almond flour pancakes checklist showing label checks for baking powder and add-ins plus clean pan and spatula tips to avoid cross-contact.
The biggest gluten-free “gotchas” aren’t almond flour—they’re the extras. Treat baking powder, flavorings, mix-ins, and shared cookware as the real checklist items.

For official context, the FDA’s page on gluten-free labeling explains the standard used for foods labeled “gluten-free.” The Celiac Disease Foundation’s label reading guide is also helpful because it clarifies that “wheat-free” isn’t always the same as gluten-free and encourages checking the ingredients list.

In practice, the simplest approach is: trusted ingredients, a clean pan, and careful add-ins.

Also Read: 10 Best Espresso Martini Recipe Variations (Bar-Tested)


Vegan Almond Flour Pancakes

Vegan nut-flour pancakes are absolutely possible. They just need a binder, because eggs usually provide structure. Flax works well because it gels and helps hold the batter together.

Ingredients

  • 1 cup almond flour
  • 1 tablespoon ground flax + 3 tablespoons water (rest 5–10 minutes)
  • 1 teaspoon baking powder
  • 1/2 to 2/3 cup plant milk
  • pinch of salt
Vegan almond flour pancake guide showing how to make a flax egg binder, ingredient ratios, cooking cues, and add-ins for richer egg-free pancakes.
The flax gel is the “glue.” If your vegan pancakes feel fragile, the fix is usually more resting time for the binder—not more flipping.

Method

Mix flax and water first and let it thicken. Then whisk in the remaining ingredients. Rest 5 minutes. Cook small pancakes on low-to-medium heat, and let the first side set properly before flipping.

To make vegan almond flour pancakes feel richer without breaking the structure, you can add:

  • vanilla + cinnamon
  • a spoonful of nut butter stirred in
  • citrus zest for lift

The batter remains the same in spirit; it simply becomes more interesting.

Also Read: Vegan French Toast: 6 Easy Recipes (Pan, Air Fryer, GF & High-Protein)


Almond Flour Pancake Mix and Pancake-and-Waffle Mixes

Sometimes you want speed. Mixes are useful. Still, nut-based mixes can frustrate people because they thicken mid-batch or brown too quickly. Luckily, the solution is consistent and simple.

Almond flour pancake and waffle mix guide showing a 4-step routine to rest batter, stir again, add liquid 1 tablespoon at a time, and cook on medium-low.
The 5-minute rest is the secret: it reveals the “true” thickness of nut-based mixes so you can adjust once—then cook consistently without chasing the batter.

A routine that makes mixes behave

  1. Mix batter and rest 5 minutes.
  2. Stir again and check thickness.
  3. Add liquid one tablespoon at a time if it becomes too thick.
  4. Cook on medium-low.

If you want ideas for improving the flavor and texture of boxed mixes in general—without turning breakfast into a science project—Serious Eats tested a wide range of additions in their boxed pancake mix upgrade guide.

Meanwhile, if you enjoy making breakfast feel playful, waffles are the natural cousin of pancakes. MasalaMonk’s post on waffle twists is a fun way to add variety when you’re using a pancake-and-waffle mix style batter.


Coconut Flour Pancake Recipes and Almond–Coconut Blends

Coconut flour is extremely absorbent. That’s why coconut flour pancake recipes often use very different ratios compared to almond flour batters. If you’re blending coconut flour into an almond-based batter for structure, start small.

Guide showing almond and coconut flour pancake batter blend with bowls comparing thickness and tips to swap only 2–3 tablespoons coconut flour, add liquid gradually, and rest before adjusting.
Coconut flour’s superpower is absorbency—measure it in tablespoons, not handfuls. The pause after mixing is part of the recipe because it keeps thickening.

A gentle approach:

  • Replace only 2–3 tablespoons of almond flour with coconut flour.
  • Add liquid gradually.
  • Rest and reassess before adding more.

Again, King Arthur’s keto pancake recipe is a practical reference for how blended low-carb batters behave and why the mixture may need extra liquid.

Also Read: Fermented RAGI (Finger Millet) IDLIS- Gluten Free | Gut Friendly | Breakfast Recipe


Almond and Oat Flour Pancakes, Buckwheat, Tapioca, and Other Blends

Once you’ve nailed your base batter, blending becomes a fun way to tailor texture.

  • Oat flour often makes pancakes feel softer and more familiar.
  • Buckwheat adds depth and a sturdier bite.
  • Tapioca can add a gentle spring and flexibility.
Texture map for almond flour pancake blends showing oat flour, buckwheat flour, and tapioca with beginner starting ratios and tips to adjust liquid gradually and rest batter.
Use this like a dial: oat flour softens, buckwheat deepens, tapioca adds spring. Start small, let the batter rest, then decide—most blend mistakes come from adjusting too fast.

The method stays the same: adjust liquid gradually, rest briefly, cook gently. The biggest mistake with blends is over-correcting too fast. Small adjustments win.

Also Read: Buckwheat and Weight Loss: Examining Its Role in a Healthy Diet


Savory Pancakes and Breakfast Variety

Not every pancake needs syrup. Savory nut-flour pancakes can be delicious when you treat them like a quick breakfast flatbread: skip sweetener and vanilla, add spices and herbs, and fold in greens or grated vegetables.

Savory almond flour pancakes guide with herb-and-greens, spiced veggie, and cheesy variations plus serving ideas like yogurt, chutney, or a fried egg.
Savory pancakes work best when you build contrast: salty batter + cool yogurt, or herby pancakes + bright chutney. Pick one “cool” topping and one “punchy” condiment and you’re done.

If you want savory pancake inspiration that naturally expands a breakfast menu, MasalaMonk has great posts that fit here:

These aren’t almond flour recipes, but they’re perfect recipes for readers who want more savory breakfast options without switching to entirely different meal categories.


Toppings That Make Nut-Flour Pancakes Feel Special

A pancake can be perfectly cooked and still feel a little flat emotionally. Toppings fix that. More importantly, toppings create contrast—creamy with crisp, bright with rich, salty with sweet.

Creamy toppings

  • Greek yogurt or thick yogurt: tangy, cooling, protein-friendly.
  • Cottage cheese whipped smooth: especially good on banana or pumpkin pancakes.
  • Nut butter: rich, filling, and great for low-carb routines.

Fruity toppings

  • Warm berries: makes any stack feel like brunch.
  • Sliced banana: soft sweetness and extra satiety.
  • Stewed apples: a cozy topping that feels like dessert for breakfast—MasalaMonk’s cinnamon-apple method is a good reference.
Pancake toppings guide showing how to pick two contrasts—creamy, fruity, and crunchy—with yogurt, whipped cottage cheese, nut butter, warm berries, banana, nuts, seeds, granola, and sweet finishes.
A simple rule that makes any stack feel “complete”: choose one creamy base, one bright fruit, and finish with either crunch or a light drizzle—three elements max keeps it special, not messy.

Crunch toppings

  • Toasted nuts: excellent with pumpkin or banana.
  • Seeds: add texture without much effort.
  • A sprinkle of granola: great on yogurt-topped pancakes.

Sweeteners (when you want them)

  • Maple syrup: classic for a reason.
  • Honey: floral sweetness.
  • A small dusting of powdered sweetener: subtle and quick.

The point isn’t to overdo it. Rather, it’s to pick one or two contrasts so the plate feels complete.

Also Read: Upma Recipe: 10+ Easy Variations (Rava, Millet, Oats, Semiya & More)


Meal Prep: How to Store and Reheat Without Ruining Texture

Nut-flour pancakes are surprisingly meal-prep friendly, especially the cottage cheese version, which stays moist even after chilling.

Storage

Let pancakes cool completely, then store them in an airtight container. If stacking, place parchment between layers so they don’t stick.

Freezing

Freeze in a single layer first, then transfer to a container or bag with parchment between pancakes. This prevents them from freezing into one solid slab.

Meal prep guide for almond flour pancakes showing how to store in the fridge, freeze with parchment between layers, and reheat using skillet, toaster oven, or microwave.
Best texture trick: reheat in a covered skillet on low for a minute or two—gentle steam warms the center without drying the edges.

Reheating

  • Skillet: best for texture. Low heat, cover briefly to warm through.
  • Toaster oven: great for gentle crisping.
  • Microwave: fastest, but keep it short to avoid rubberiness.

Because almond flour can go rancid faster than wheat flour (it contains natural oils), it’s also worth storing almond flour and almond meal properly. UC Davis provides practical guidance on nut storage—such as refrigeration/freezing for quality and using odor-tight containers—in their PDF on safe handling and storing nuts. For broader pantry staples and general storage practices, Penn State Extension’s guide to storing staple ingredients is a helpful reference.


Troubleshooting: Small Fixes That Save a Batch

Even good cooks get weird pancakes sometimes. Fortunately, most problems come from a few predictable causes.

Pancakes are crumbly

Usually too dry or flipped too early.
Fix: add 1–2 tablespoons milk, cook smaller pancakes, and wait longer before flipping.

Pancakes are gummy in the center

Often the heat is too high or the batter is too thin.
Fix: lower the heat, cook longer, and thicken with 1 tablespoon almond flour if needed.

Troubleshooting guide for almond flour pancakes showing four common problems—crumbly, gummy center, browns too fast, and batter thickens—with quick fixes.
No panic fixes: change just one variable at a time—heat first, then thickness. Most “bad batches” turn around with a lower flame and a tablespoon-level adjustment.

Pancakes brown too quickly

Heat is too high. Almond flour browns fast.
Fix: reduce heat and give the center time to set.

Batter thickens between pancakes

Normal.
Fix: stir and loosen with small splashes of milk.

That’s it. No panic. No starting over.


Nutrition Lookups Without Guessing

If you like checking nutrition details—almond flour vs almond meal, cottage cheese vs yogurt, or comparing add-ins—the USDA’s FoodData Central and its food search are the standard public references.


A Final Way to Think About It

Once you get comfortable with how almond flour pancake batter looks and cooks, everything becomes easier. The process becomes familiar: a thicker batter than wheat pancakes, medium-low heat, smaller rounds for clean flips, and tiny adjustments instead of big corrections.

Closing guide image showing almond flour pancakes with options to choose your version—everyday base, fluffy, protein, or fruity—with a tip to cook on medium-low and flip when matte.
Use this as your shortcut: pick the goal (fluffy, protein, fruity, or everyday), then keep the two universal rules—medium-low heat and flip when the top turns matte—for consistently tender pancakes.

From there, the variations stop feeling like separate recipes. Banana becomes a sweetness choice. Blueberries become a texture choice. Pumpkin becomes a cozy-season choice. Cottage cheese becomes a protein choice. Flax becomes a vegan choice. Coconut flour becomes a structure choice. Savory spices become a mood choice.

That’s when almond flour pancakes stop being a “special” breakfast and become what they should be: a simple, comforting meal you can make on any morning—without drama.

Also Read: Peanut Butter Cookies (Classic Recipe & 3 Variations)

FAQs

1) Can I replace all-purpose flour with almond flour in pancakes?

Yes, although it isn’t a 1:1 swap in behavior. Almond flour has less starch and more fat, so the batter is usually thicker and the pancakes brown faster. Use a recipe designed for almond flour rather than converting a wheat-flour one directly.

2) What’s the difference between almond flour and almond meal for pancakes?

Almond flour is typically finer, so the texture comes out smoother and more “classic.” Almond meal is coarser and can produce a heartier bite. Either works, but almond meal often needs a touch more liquid to keep the batter pourable.

3) Why is my almond flour pancake batter so thick?

Because almond flour absorbs liquid and thickens as it rests. If it becomes too stiff, add milk one tablespoon at a time, stir, then pause briefly before adjusting again.

4) Why do my pancakes made with almond flour fall apart?

Most often, the pancakes are too thin, too large, or flipped too early. Make smaller pancakes, cook longer on the first side, and ensure the batter is thick-but-pourable rather than runny.

5) How do I make fluffy almond flour pancakes?

Use fresh baking powder, rest the batter, keep the heat on medium-low, and cook smaller rounds. If you want extra lift, add one egg white without changing the rest of the recipe.

6) Why are my almond pancakes browning too fast?

Almond flour browns quickly due to its fat content and fine particles. Lower the heat and extend the cook time so the center sets without over-darkening the outside.

7) Can I make 3 ingredient almond flour pancakes?

Absolutely. The common three are almond flour, eggs, and milk. They’ll be more tender if you also add salt and baking powder, but the minimalist version can still work with gentle heat and small pancakes.

8) Do 2 ingredient almond flour pancakes really work?

They do, though the texture is more egg-forward. Typically it’s almond flour plus eggs; cook smaller pancakes and wait longer before flipping so they set properly.

9) What are 5 ingredient almond flour pancakes?

Usually almond flour, eggs, milk, baking powder, and salt. This “simple but reliable” set is a popular middle ground between minimalist versions and more flavored recipes.

10) How can I make a simple almond flour pancakes recipe taste better?

Add one flavor element rather than many: vanilla, cinnamon, lemon zest, or a pinch of salt if you skipped it. Also, avoid high heat—better texture often tastes better too.

11) How do I make protein almond flour pancakes without them turning dry?

Protein powder thickens batter fast, so increase liquid gradually and cook on lower heat. Alternatively, use cottage cheese for moisture and protein without the “chalky” texture.

12) How do almond meal protein pancakes differ from almond flour protein pancakes?

Almond meal is coarser, so the batter can be thicker and sometimes needs more liquid. Beyond that, the cooking approach is similar: smaller pancakes, steady heat, and a careful flip.

13) Can I make almond flour cottage cheese pancakes without a blender?

Yes. Mash and whisk thoroughly; you may get a slightly more textured batter. For smoother pancakes, blending helps, but it’s not mandatory.

14) Are cottage cheese almond flour pancakes good for meal prep?

They’re one of the best options for meal prep because they stay moist and tender after refrigeration compared to some other high-protein versions.

15) How do I make keto pancakes with almond flour?

Use unsweetened milk (or partially water), skip banana, and sweeten only if needed with a keto-friendly option. Keep the batter thicker and cook on medium-low for even setting.

16) Are almond flour pancakes low carb?

They’re typically lower carb than wheat-based pancakes, although the exact carbs depend on add-ins like banana, sweeteners, and mix-ins.

17) Can I make almond flour gluten free pancakes?

Yes, almond flour is naturally gluten-free. Still, confirm that baking powder, flavorings, and any mix-ins are also gluten-free if you need strict avoidance.

18) Can I make vegan almond flour pancakes?

Yes, but you’ll need a binder since eggs normally provide structure. A flax “egg” (ground flax + water) is a common solution, and small pancakes flip more easily.

19) Why do vegan almond flour pancakes stick more?

Egg-free batters can be more delicate and take longer to set. Use a good nonstick pan, cook on lower heat, and wait until the first side is fully set before flipping.

20) How do I make almond flour and banana pancakes that aren’t mushy?

Use a ripe banana but reduce the added milk since banana adds moisture. Cook gently and longer on the first side so the center sets.

21) Can I make almond flour pancakes with banana and no sweetener?

Yes. Banana naturally sweetens the batter, especially when very ripe. Add cinnamon or vanilla for extra flavor without additional sugar.

22) How do I make almond flour blueberry pancakes without streaky batter?

Instead of mixing berries into the bowl, pour batter into the pan first, then add blueberries on top. This keeps the batter cleaner and helps them cook evenly.

23) Can I use frozen blueberries in blueberry almond flour pancakes?

Yes. Place frozen berries onto the batter once it’s in the pan. This reduces “bleeding” and makes flipping easier.

24) How do I make almond flour pumpkin pancakes thicker and fluffy?

Pumpkin adds moisture, so reduce the milk slightly and rest the batter longer. Cook on medium-low to prevent over-browning while the center sets.

25) Can I turn almond flour pancake batter into waffles?

Yes. Make the batter slightly thicker than for pancakes and add a teaspoon of oil or melted butter for crisping. Cook until the waffle is deeply set before opening the iron.

26) Why does my almond flour pancake mix turn out dry?

Many mixes thicken as they sit. Rest the batter, then adjust with small splashes of milk or water. Also, avoid high heat, which can dry the outside before the inside finishes.

27) How do I fix an almond flour pancake mix batter that’s too thick?

Add liquid one tablespoon at a time, stir, then wait briefly. This stepwise method prevents over-thinning and keeps the pancakes from turning fragile.

28) Can I make an almond flour pancake mix recipe at home?

Yes. A common DIY “mix” combines almond flour with baking powder, salt, and optional sweetener; then you add eggs and milk when cooking. Store the dry mix airtight for quick mornings.

29) How should I store almond flour so it doesn’t taste off?

Because almond flour contains oils, store it in an airtight container in a cool place; refrigeration or freezing helps for longer storage. If it smells bitter or “paint-like,” it may be rancid.

30) Why are my pancakes using almond flour gummy in the middle?

Typically the heat is too high or the batter is too thin. Lower the heat, cook a bit longer, and thicken the batter slightly if it spreads too much.

Posted on 12 Comments

Blueberry Pancakes (6 Recipes) + Homemade Pancake Mix

For photo-worthy blueberry pancakes, keep the heat medium and add blueberries on the pan (especially if they’re frozen), then finish with a warm maple-syrup pour for glossy, golden edges.

Some mornings call for something simple. Others practically demand a warm stack, a pat of butter sliding into the edges, and that first bite where the blueberries burst and the pancake stays airy instead of heavy. That’s the promise here: blueberry pancakes that taste like blueberries, not like flour with a few berries sprinkled in out of obligation.

To get there, we’ll start with a dependable classic—your “best blueberry pancake” base—then move through the variations people actually look for: blueberry hotcakes, banana and blueberry pancakes, blueberry lemon pancake, blueberry ricotta hotcakes, blueberry oat pancakes (and blueberry oatmeal pancake), plus high protein blueberry pancakes that still taste like breakfast. Along the way, you’ll get a practical approach for frozen blueberries for pancakes, a homemade blueberry pancake mix you can stash for fast mornings, and an easy way to make blueberry pancakes with pancake mix taste like you made them from scratch.

If you’re the type who loves building a whole breakfast scene, there are plenty of natural pairings too: crisp bacon, cozy hot chocolate, café-style coffee, or even a bright smoothie. We’ll get to those at the end—without turning breakfast into a project.


Blueberry Pancakes That Stay Fluffy: A Simple Recipe That Works Every Time

Blueberry pancakes become reliably fluffy for a handful of reasons, and once you understand them, you can switch flavours, add protein, go gluten-free, or use frozen berries—without losing the texture you came for.

Fluffy blueberry pancakes with butter and maple syrup, featuring a quick checklist for keeping pancakes light and airy.
Pro tip: if your first pancake spreads too thin, let the batter rest 3–5 minutes more—hydration thickens it and improves lift.

First, keep the batter gentle

Pancakes want a light touch. As soon as flour meets liquid, gluten starts developing. Stir vigorously and the batter tightens; cook that batter and you’ll get dense pancakes that feel more like bread. Instead, fold until the dry flour disappears and stop. Even if you see a few lumps, leave them alone. They relax as the batter rests.

If you like seeing the logic behind the “don’t overmix” rule, King Arthur’s pancake guidance is consistently practical and clear: Simply Perfect Pancakes. Epicurious also explains why mixing matters in a way that’s easy to remember: why overmixing matters in baking.

Next, let the batter rest—briefly, not forever

A short rest—about 8 to 15 minutes—lets the flour hydrate and the leavening begin to work. The batter thickens slightly, bubbles form more evenly, and the pancakes cook up softer. Serious Eats has a great, tested perspective on pancake rest and texture: The Easiest, Fluffiest Pancake Recipe.

Meanwhile, treat heat like an ingredient

High heat is the fastest way to scorch the outside while leaving the middle undercooked. Low heat, on the other hand, can dry pancakes out before they brown. Medium heat is the sweet spot for most stoves—steady enough to set the center and gentle enough to cook through.

Finally, handle blueberries with intention

Fresh berries and frozen berries behave differently. Frozen blueberries for pancakes bleed juice as they warm; if you fold them into the bowl, you may end up with purple batter and uneven streaking. Consequently, the simplest move is also the smartest: add blueberries per pancake on the pan rather than mixing all of them into the batter. King Arthur recommends this approach for a reason.

With those basics in place, you’re ready for the classic.

Also Read: Double Chocolate Chip Cookies – Easy Recipe with 7 Variations


Classic Blueberry Pancakes (The Best Blueberry Pancake Base Recipe)

This is the stack that fits almost any situation: weekend brunch, quick weekday comfort, or the kind of morning when you want blueberries and pancakes without fuss. It also forms the backbone for many of the variations below.

Ingredients (makes about 10–12 medium pancakes)

Overhead portrait photo of measured blueberry pancake ingredients arranged on a dark countertop with a mixing bowl and whisk, featuring text overlay “Your Pancake Setup, Simplified” and “Mix gently. Stop early.” with MasalaMonk.com in the footer.
Pre-measuring your ingredients keeps the batter calm—once wet meets dry, mix only until the flour disappears to keep blueberry pancakes light and fluffy.

Dry ingredients

  • 1 ½ cups (190 g) all-purpose flour
  • 2 tbsp (25 g) sugar
  • 2 tsp baking powder
  • ½ tsp baking soda
  • ½ tsp fine salt
Pancake ingredient ratio card showing flour, buttermilk, eggs, and blueberries for classic blueberry pancakes.
Use this as your “batter compass”: if it feels thick like scoopable yogurt, you’re in the fluffy zone; if it pours like milk, add 1–2 tbsp flour.

Wet ingredients

  • 1 ¼ cups (300 ml) buttermilk
  • 2 large eggs
  • 3 tbsp (45 g) melted butter (or neutral oil)
  • 1 tsp vanilla extract (optional)

Berries

  • 1 to 1 ¼ cups blueberries (fresh preferred here)

Buttermilk substitute: If you don’t have buttermilk, stir 1 tbsp lemon juice (or vinegar) into 1 ¼ cups milk and let it stand for 5–10 minutes.

Classic blueberry pancakes recipe card with buttermilk batter, showing time, yield, key ingredients, and a quick method for fluffy pancakes.
Batter consistency check: it should mound, then slowly spread. If it pours like milk, add 1–2 tbsp flour; if it’s too thick to ribbon off a spoon, add a splash of buttermilk.

Step by Step Method – How to make Blueberry Pancakes

1. Whisk the dry ingredients in a large bowl: flour, sugar, baking powder, baking soda, salt.

Close-up portrait photo of a whisk mixing dry pancake ingredients in a ceramic bowl with text overlay “Whisk 20 Seconds” and “Even lift, no salty pockets,” with MasalaMonk.com in the footer.
A quick whisk spreads baking powder and salt evenly, so every blueberry pancake rises the same way—no bitter spots, no uneven texture.

2. Whisk the wet ingredients in a second bowl: buttermilk, eggs, melted butter, vanilla.

Portrait close-up of wet ingredients for blueberry pancakes—eggs and buttermilk in a mixing bowl with a whisk—featuring text overlay “Butter warm, not hot” and “So eggs don’t scramble,” with MasalaMonk.com in the footer.
Let melted butter cool slightly before whisking it in—smooth, glossy wet batter blends faster and keeps blueberry pancakes tender.

3. Combine gently. Pour wet into dry and fold with a spatula until just combined. Stop the moment the flour disappears.

Portrait action shot of blueberry pancake batter as wet ingredients are poured into dry ingredients in a ceramic bowl, with a spatula folding gently and visible lumps, featuring text overlay “Lumps Are The Goal” and “Stop at ‘just combined’,” with MasalaMonk.com in the footer.
Resist smoothing the batter—those small lumps are what keep blueberry pancakes tender instead of chewy.

4. Rest the batter for 10 minutes while you warm your pan.

Portrait photo of blueberry pancake batter resting in a ceramic bowl on a dark counter with a whisk, featuring text overlay “Rest 10 Minutes” and “Thicker batter, softer pancakes,” with MasalaMonk.com in the footer.
A short rest lets the batter thicken and bubble—so your blueberry pancakes cook up fluffy instead of spreading thin.

5. Preheat a skillet over medium heat and lightly grease it.

Portrait close-up of butter melting and foaming in a dark skillet for blueberry pancakes, with text overlay “Medium Heat Only” and “Gold outside, cooked through,” and MasalaMonk.com in the footer.
When butter foams gently (not smoking), the pan is ready—medium heat helps blueberry pancakes brown evenly while cooking through.

6. Spoon the batter (about ¼ cup per pancake). Immediately sprinkle blueberries on top of each pancake. This keeps the batter from turning grey-purple and ensures berries distribute evenly.

Portrait action photo of blueberry pancakes being cooked as batter is ladled onto a skillet and blueberries are added on top, with text overlay “Add berries on the pan” and “Cleaner batter, better spread,” and MasalaMonk.com in the footer.
Adding blueberries on the pan works for fresh berries and frozen blueberries for pancakes—your batter stays clean and each pancake gets an even scatter of fruit.

7. Flip when ready. Look for bubbles that rise and pop on the surface and edges that look set. Flip and cook 1–2 minutes more.

Portrait close-up of a blueberry pancake cooking in a skillet with bubbles on the surface and a spatula sliding underneath, featuring text overlay “Flip at the Bubble Pop” and “Edges set = ready,” with MasalaMonk.com in the footer.
Wait for popped bubbles and set edges before flipping—this timing helps blueberry pancakes cook through without tearing or going pale.
Portrait photo of a blueberry pancake in a skillet after flipping, showing an even golden-brown surface and a pat of butter melting nearby, with text overlay “One Flip Is Enough” and “Cook 60–90 seconds more,” plus MasalaMonk.com in the footer.
After flipping, cook briefly—just long enough to set the center—so blueberry pancakes stay fluffy instead of drying out.

Why this classic recipe works

Because the batter is thick enough to suspend bubbles, the rest improves hydration, and the berries are added at the right moment. In other words, the method protects the fluff.

Portrait photo of a stack of blueberry pancakes with one pancake cut open to show the tender crumb and blueberries inside, featuring text overlay “Look for a tender crumb” and “No wet line in the middle,” with MasalaMonk.com in the footer.
A fully cooked blueberry pancake looks moist but not raw—check for a tender crumb with no wet line through the center.

If you’re making a bigger breakfast and want something warm-spiced on the side, you could borrow ideas from fluffy buttermilk pancakes with stewed cinnamon apples—even if you stick with blueberries here.


Blueberry Hotcakes: How to Choose and Store Blueberries for Pancakes

Blueberry hotcakes are only as good as the berries you put in them. Fortunately, “good berries” doesn’t always mean expensive berries—it usually means berries with the right texture and storage.

Choosing blueberries

  • Look for berries that are plump and deep blue, not shriveled.
  • A light silvery “bloom” is normal and protective.
  • Avoid wet or leaky containers; moisture speeds spoilage.

For practical storage guidelines on Blueberries, this Martha Stewart guide is straightforward.

Close-up of fresh blueberries with a guide for choosing firm, deeply colored berries for blueberry pancakes and blueberry hotcakes.
Buying ahead? Keep berries unwashed in the fridge, then rinse right before cooking—dry berries brown better and prevent watery batter.

Storing blueberries

  • Don’t wash berries until you’re ready to use them.
  • Keep them chilled and dry.
  • If you notice a few soft berries, remove them quickly so the rest stay fresher longer.

If you also enjoy the “why blueberries are good for you” angle—without turning breakfast into homework—this reader-friendly overview is a solid companion: health benefits of blueberries. For a reputable broader look at blueberries and health, the American Heart Association has a helpful summary: fresh or frozen—what to know about blueberries and health.

Now, if fresh berries aren’t an option—or you simply prefer keeping a bag in the freezer—let’s make frozen blueberry pancakes that taste just as good.


Frozen Blueberry Pancakes: How to Use Frozen Blueberries for Pancakes Without Purple Batter

Frozen blueberry pancakes can be wonderful; they can also become streaky and odd-looking if the berries leak too much juice. Thankfully, there’s a calm, dependable approach.

Frozen blueberries being sprinkled onto pancake batter on a skillet, showing methods to prevent purple batter when making frozen blueberry pancakes.
Keep berries frozen until the last second—cold berries bleed less. Sprinkle them on each pancake after ladling batter, then flip once bubbles pop for clean edges and even berry distribution.

The easiest method: add berries on the pan

Make your batter as usual, then ladle batter onto the hot skillet and sprinkle frozen blueberries right on top. Flip once the edges set. The berries warm inside the pancake rather than staining the whole bowl.

Frozen blueberry pancakes recipe card showing frosty blueberries and the no-purple method of adding frozen blueberries on the pan instead of mixing into batter.
Extra insurance: toss frozen berries with 1 tsp flour per cup before cooking—this helps them “grip” the batter and reduces streaking, especially if your kitchen is warm.

A second method: a light flour coat

If you prefer folding berries into the batter, toss frozen berries with 1 tsp flour per cup of berries. This reduces bleeding and helps the berries grip the batter. Then fold gently and cook immediately.

Portrait comparison image showing two blueberry pancakes side by side—one made with thawed frozen blueberries that stains the batter purple and one with frozen blueberries added on the pan—featuring text overlay “Frozen Berry Rule: Don’t thaw. Add on pan.” and MasalaMonk.com in the footer.
For frozen blueberry pancakes with clean color and better berry distribution, skip thawing and add frozen blueberries directly onto each pancake after ladling the batter.

A third method: half-and-half

Fold in half the berries, then add the rest per pancake on the skillet. This gives you berries throughout without turning everything purple.

For a well-tested, practical take on blueberry handling and pancake texture, King Arthur is again a dependable reference: Blueberry Pancakes recipe.


Banana Blueberry Pancake: Banana and Blueberry Pancakes That Stay Light

Banana blueberry pancake batter can become heavy because banana adds moisture and density. The trick is balance: enough banana for sweetness and structure, but not so much that the pancake turns cakey.

Ingredients (makes about 8–10 pancakes)

  • 1 ripe banana, mashed (about 120–140 g)
  • 1 ¼ cups (160 g) all-purpose flour
  • 2 tsp baking powder
  • ½ tsp salt
  • 1 tbsp sugar or honey (optional, depending on banana)
  • 1 large egg
  • ¾ cup (180 ml) milk
  • 2 tbsp melted butter or oil
  • ¾ to 1 cup blueberries
Portrait photo of a stack of banana blueberry pancakes topped with blueberries, a caramelized banana slice, and a small butter pat, featuring text overlay “Ripe Banana = Sweeter Batter” and “Use 1 banana per batch,” with MasalaMonk.com in the footer.
For banana and blueberry pancakes that stay fluffy, use one very ripe banana per batch—enough sweetness and moisture without turning the stack dense.

Method

  1. Mash banana until mostly smooth.
  2. Whisk in egg, milk, and oil.
  3. Add flour, baking powder, salt, and sugar if using; fold gently.
  4. Rest 5–8 minutes.
  5. Cook on medium heat and add blueberries per pancake on the skillet.
Banana and blueberry pancakes recipe card showing batter being poured into mashed banana, with tips to keep banana blueberry pancake batter fluffy and not dense.
Banana moisture changes by ripeness—aim for a batter that pours in a slow ribbon. If it’s too thick, add milk 1 tbsp at a time; if too loose, add 1 tbsp flour.

Small upgrades that feel special

  • A pinch of cinnamon makes the whole thing taste like banana bread meets blueberry pancakes.
  • A little lemon zest brightens the fruit flavour, especially if your blueberries are mild.

If you’re cooking for kids and want another soft breakfast option, you might enjoy apple pancakes for baby-led weaning or toddlers. It’s a different flavour, yet the easy, forgiving style pairs nicely with the banana-blueberry approach.

Also Read: 10 Best Espresso Martini Recipe Variations (Bar-Tested)


Blueberry Lemon Pancake: Bright, Fragrant, and Balanced

A blueberry lemon pancake should taste sunny, not sour. That’s why zest matters more than juice. Juice adds acidity; zest adds aroma and perceived sweetness.

Ingredients (makes about 10 pancakes)

  • 1 ½ cups (190 g) flour
  • 2 tbsp sugar
  • 2 tsp baking powder
  • ½ tsp baking soda
  • ½ tsp salt
  • Zest of 1 lemon
  • 1 ¼ cups buttermilk
  • 2 eggs
  • 3 tbsp melted butter
  • 1 cup blueberries
Portrait photo of a stack of blueberry lemon pancakes with a butter pat and lemon zest on top, a lemon half and blueberries on the plate, featuring text overlay “Zest = Aroma” and “Juice = Tang (use less),” with MasalaMonk.com in the footer.
For blueberry lemon pancakes that taste bright (not sour), lean on lemon zest for aroma and use lemon juice lightly for tang.

Method

  1. Whisk flour, sugar, baking powder, baking soda, salt, lemon zest.
  2. Whisk buttermilk, eggs, melted butter.
  3. Combine gently; rest 10 minutes.
  4. Cook on medium heat; add blueberries per pancake on the pan.
Blueberry lemon pancakes recipe card showing lemon zest added for aroma, with blueberries ready to sprinkle for a bright, balanced blueberry lemon pancake flavor.
Avoid bitter lemon notes: zest only the yellow skin (stop before the white pith). If you accidentally hit pith, reduce zest slightly and lean on vanilla for balance.

Turning this into blueberry lemon ricotta pancakes

If you want blueberry lemon ricotta pancakes—one of the most craveable brunch variations—stir ⅓ to ½ cup ricotta into the wet ingredients. If the batter looks too thick afterward, loosen it with a splash of milk. The result is softer, richer, and still balanced.

For a topping that leans into the citrus, lemon curd is a classic companion. If you’d like a reliable method you can make once and use all week, this is a solid starting point: silky smooth lemon curd.


Blueberry Ricotta Hotcakes: Blueberry and Ricotta Pancakes With a Café Feel

Blueberry ricotta hotcakes are tender and slightly rich, the kind of breakfast that feels like a treat even if you’re still in your pajamas. They also align beautifully with searches for blueberry and ricotta pancakes and blueberry ricotta hotcakes because the texture really is different: softer, thicker, and more luxurious.

Ingredients (makes about 8–10 thicker pancakes)

  • 1 ¼ cups (160 g) flour
  • 2 tbsp sugar
  • 2 tsp baking powder
  • ½ tsp salt
  • 3 eggs, separated
  • 1 cup ricotta
  • ¾ cup milk (plus a bit more if needed)
  • 1 tsp vanilla
  • 1 tbsp melted butter or oil
  • 1 cup blueberries
Portrait photo of blueberry ricotta hotcakes stacked on a dark plate with a butter pat and a cut-out piece showing the plush interior, featuring text overlay “Thick batter, lower heat” and “Plush centers every time,” with MasalaMonk.com in the footer.
Blueberry ricotta hotcakes cook best low and steady—thick batter needs gentler heat so the centers set soft and fully cooked.

Method

  1. Whisk flour, sugar, baking powder, salt in a bowl.
  2. In a separate bowl, whisk egg yolks, ricotta, milk, vanilla, melted butter.
  3. Combine wet and dry gently.
  4. Whip egg whites to soft peaks and fold them into the batter. This step is what makes the hotcakes airy rather than heavy.
  5. Cook on medium-low heat because the batter is thicker. Add blueberries per pancake on the skillet.
Blueberry ricotta hotcakes recipe card showing ricotta batter with blueberries and a dollop of whipped egg whites, highlighting the soft-peaks method for airy hotcakes.
Soft peaks, not stiff: stop whipping when the whites hold a gentle curve. Stiff whites fold poorly and can leave the batter dense instead of airy.

A lovely pairing

If you’re building a brunch plate, these ricotta hotcakes work beautifully with something crisp and salty—especially bacon cooked in a way that doesn’t splatter your kitchen. This method is simple and reliable: how to cook bacon in the oven.


High Protein Blueberry Pancakes: Blueberry Protein Pancakes That Don’t Taste “Healthy”

High protein blueberry pancakes get searched for constantly, yet many recipes lean too hard on protein powder and end up chalky. Instead, the goal is to keep the pancake structure familiar and use protein in a way that supports tenderness.

Below are two dependable routes: blueberry cottage cheese pancakes (especially easy) and a Greek-yogurt approach that can include protein powder without taking over.

Blueberry Cottage Cheese Pancakes (Blender Option)

These blueberry cottage cheese pancakes are especially popular because they cook up tender and filling, and the batter comes together quickly.

Ingredients

  • 1 cup cottage cheese
  • 2 eggs
  • ½ cup rolled oats (or oat flour)
  • 1 tsp baking powder
  • ½ tsp vanilla
  • Pinch of salt
  • ¾ cup blueberries
Portrait photo of high protein blueberry pancakes with a cut piece showing a tender crumb and blueberries inside, topped with a small butter pat, with text overlay “Protein Without Dryness” and “Cottage cheese = tender crumb,” and MasalaMonk.com in the footer.
High protein blueberry pancakes stay soft when the protein comes from dairy like cottage cheese—gentle heat and minimal mixing keep the crumb tender.

Method

  1. Blend cottage cheese, eggs, oats, baking powder, vanilla, and salt until smooth.
  2. Rest 5 minutes; the batter thickens slightly.
  3. Cook on medium-low heat; add blueberries per pancake on the pan.
  4. Flip gently once edges set.

If you enjoy learning how cottage cheese can fit into breakfasts beyond pancakes, this is a helpful read: cottage cheese for breakfast.

Blueberry cottage cheese pancakes recipe card showing blender batter being poured into a bowl, a high-protein pancake method with cottage cheese, eggs, and blueberries.
For the best texture, blend until the batter looks completely smooth, then rest 5 minutes so the oats hydrate—this prevents gummy centers and helps the pancakes set cleanly.

Blueberry Pancakes Protein Style (Greek Yogurt + Optional Protein Powder)

This version targets blueberry protein pancakes and blueberry pancakes protein queries naturally because the recipe genuinely is protein-forward—yet it still tastes like a pancake.

Ingredients

  • 1 cup flour (or ½ flour + ½ oat flour)
  • 2 tsp baking powder
  • ½ tsp salt
  • ¾ cup milk
  • ½ cup Greek yogurt
  • 2 eggs
  • 1 tbsp honey or sugar
  • Optional: 1 scoop protein powder (whey or plant)
  • ¾ to 1 cup blueberries
High protein blueberry pancakes recipe card featuring Greek yogurt, eggs, and blueberries, with quick steps for blueberry protein pancakes that stay tender and not chalky.
If you add protein powder, reduce flour by 2–3 tbsp (or add an extra splash of milk). Most powders absorb more liquid than flour, which is the #1 reason protein pancakes turn dry.

Method

  1. Mix dry ingredients first (including protein powder if using).
  2. Whisk milk, yogurt, eggs, honey.
  3. Combine gently; rest 8–10 minutes.
  4. Cook on medium heat; add blueberries per pancake on the skillet.

If you’re into high-protein breakfast planning more broadly, you might also like how to eat 100 grams of protein a day, as well as high protein overnight oats for mornings when you want “grab-and-go” instead of “stand-and-flip.”

For another protein-leaning pancake idea that’s fruit-based, this is a fun variation to browse: protein rich cherry pancakes.


Blueberry Oat Pancakes and Blueberry Oatmeal Pancake Variations

Blueberry oat pancakes sit in a sweet spot: heartier than classic flour pancakes, lighter than a dense “health” pancake, and ideal for anyone who wants a blueberry oatmeal pancake that still feels fluffy.

Here are two options—one softer and one more rustic—so you can pick based on what you have.

Portrait flatlay showing oats, oat flour, and flour swap options in dark bowls with a measuring spoon, featuring text overlay “Oat Pancake Options” and “Oats • Oat flour • Flour swap,” with MasalaMonk.com in the footer.
For blueberry oat pancakes (or a blueberry oatmeal pancake), choose your base: soaked rolled oats for texture, oat flour for a smoother crumb, or a simple flour swap for the easiest upgrade.

Option A: Soaked-Oat Blueberry Oatmeal Pancake

Ingredients

  • 1 cup rolled oats
  • ¾ cup buttermilk (or milk + lemon)
  • ¾ cup flour
  • 1 tbsp sugar or honey
  • 1 ½ tsp baking powder
  • ½ tsp baking soda
  • ½ tsp salt
  • 1 egg
  • 2 tbsp melted butter or oil
  • ¾ to 1 cup blueberries

Method

  1. Combine oats and buttermilk; soak 10–15 minutes.
  2. Add egg and melted butter.
  3. Fold in flour, sugar, baking powder, baking soda, salt.
  4. Cook on medium heat; add blueberries per pancake.
Blueberry oat pancakes recipe card showing rolled oats soaking in buttermilk with quick steps for a lighter blueberry oatmeal pancake texture.
Oats keep absorbing liquid after mixing—if the batter thickens while you cook, add a small splash of milk to the bowl and fold gently to keep later batches just as fluffy as the first.

Option B: Oat-Flour Blueberry Oat Pancakes

This is smoother and more uniform.

Swap

  • Replace ⅓ of the flour in the classic recipe with oat flour.

Let the batter rest the full 10–15 minutes so oat flour hydrates properly.

If you’re building meal-prep breakfasts, these oat-based pancakes pair nicely with snackable, make-ahead items like healthy oat protein bars.


Blueberry Pancakes Gluten Free: Blueberry Gluten Free Pancakes and Almond Flour Blueberry Pancakes

Gluten-free blueberry pancakes can be just as tender as the classic if you choose the right structure. Instead of chasing a “perfect substitute,” pick a method that suits the ingredients you have.

Portrait photo of a gluten-free blueberry pancake cut open on a dark surface with a bowl of gluten-free flour and a kitchen timer, featuring text overlay “Gluten-Free Tip” and “Rest batter 15 minutes,” with MasalaMonk.com in the footer.
For blueberry pancakes gluten free that hold together, let the batter rest longer—extra hydration improves structure and keeps the crumb tender.

Approach 1: Blueberry Pancakes Gluten Free with a 1:1 Blend

Use your favourite gluten-free 1:1 flour blend in place of all-purpose flour in the classic recipe. Then add one small adjustment: let the batter rest 15 minutes instead of 10. That extra time helps the starches hydrate, which improves tenderness.

Blueberry gluten free pancakes recipe card using a 1:1 gluten-free flour blend, showing batter rest time, medium-low cooking, and flip-when-edges-set guidance.
Gluten-free batters benefit from patience: give the first side an extra 30–60 seconds so the starches set—then flip once and avoid pressing the pancake (pressing pushes out air).

Approach 2: Almond Flour Blueberry Pancakes (Tender and Rich)

Almond flour blueberry pancakes tend to be moist and slightly rich; however, almond flour alone can be fragile. So this hybrid approach keeps them tender yet sturdy.

Ingredients

  • ¾ cup almond flour
  • ½ cup gluten-free 1:1 blend (or oat flour)
  • 2 tsp baking powder
  • ½ tsp salt
  • 2 eggs
  • ¾ cup milk (dairy or plant)
  • 2 tbsp melted butter or oil
  • 1 tbsp honey or sugar
  • ¾ cup blueberries
Almond flour blueberry pancakes recipe card showing almond flour batter being whisked with blueberries, with a note to cook on medium-low heat because almond flour browns quickly.
Almond flour sets differently than wheat flour—cook a little slower on medium-low and wait for firm edges before flipping so the centers finish without over-browning the crust.

Method

  1. Whisk dry ingredients.
  2. Whisk wet ingredients.
  3. Combine gently; rest 10 minutes.
  4. Cook on medium-low heat; add blueberries per pancake.

If you like exploring other gluten-free pancake styles, you might enjoy healthy millet protein packed pancakes as another naturally gluten-free direction.


Blueberry Pancake Mix: A Homemade Pancake Mix You’ll Actually Use

A blueberry pancake mix isn’t just about speed. It’s about setting yourself up for mornings when you want pancakes and blueberries without measuring five different leaveners while half-awake.

This homemade pancake mix is a neutral base: you can use it for classic pancakes, blueberry pancakes with pancake mix, blueberry mini pancakes, and even a quick blueberry Dutch pancake. Moreover, if you keep it in an airtight jar, it’s ready whenever you are.

Portrait photo of a glass jar labeled “Homemade Pancake Mix” with flour being poured from a wooden scoop, blueberries and eggs nearby, featuring text overlay “Make once, cook all week” and “Dry mix stays ready,” with MasalaMonk.com in the footer.
A homemade pancake mix keeps weekday breakfasts effortless—stash the dry mix, then add milk, eggs, and butter when you’re ready to cook.

Homemade Pancake Mix (makes about 4–5 batches)

  • 4 cups (500 g) all-purpose flour
  • ¼ cup (50 g) sugar
  • 4 tbsp baking powder
  • 1 tbsp baking soda
  • 2 tsp fine salt

Whisk thoroughly and store airtight.

If you ever wonder whether your baking powder still has life, King Arthur has an easy freshness test: how to test baking powder and baking soda.

Homemade pancake mix in a jar recipe card showing dry ingredients and the “2 cups mix + buttermilk + eggs + butter” formula for making blueberry pancake mix quickly.
Whisk the jar mix for a full 30 seconds before storing—uneven baking powder distribution is the quiet reason some batches rise patchy while others stay flat.

Turning the mix into pancakes (one batch)

  • 2 cups pancake mix
  • 1 ½ cups buttermilk (or milk + lemon)
  • 2 eggs
  • 3 tbsp melted butter or oil
  • Optional: 1 tsp vanilla

Fold gently, rest 8–10 minutes, cook on medium heat.

Portrait flatlay showing pancake mix in a bowl with a measuring cup of milk, two eggs, and melted butter, featuring text overlay “Batch Formula” and “Mix + milk + eggs + butter,” with MasalaMonk.com in the footer.
This simple batch formula turns homemade pancake mix into a smooth batter fast—then you can add blueberries on the pan for cleaner color and even fruit in every pancake.

Keeping it safe and sensible

Because flour is a raw ingredient, it’s best not to taste raw batter. The FDA explains why raw flour matters here: flour is a raw food. CDC also reinforces the same idea in plain language: don’t eat raw dough or batter.


Blueberry Pancakes with Pancake Mix: How to Make Pancakes from the Mix Taste Homemade

Blueberry pancakes with pancake mix can be excellent. The difference between “boxy” pancakes and “why are these so good?” pancakes is usually just a few small choices.

Blueberry pancakes with pancake mix recipe card showing four upgrades—swap water for buttermilk, add vanilla, rest the batter, and add blueberries on the pan—for fluffier pancakes.
If your mix batter gets foamy quickly, cook sooner—boxed mixes can lose lift if they sit too long. Rest 5–8 minutes, then start cooking.

A simple upgrade approach

  • Use buttermilk (or milk + lemon) instead of water.
  • Add vanilla for warmth.
  • Rest the batter briefly.
  • Add blueberries on the pan, especially if using frozen berries.

Serious Eats tested mix upgrades thoroughly and shares what’s worth doing: how to make boxed pancake mix even better.

Portrait action photo of blueberry pancakes with pancake mix being cooked in a cast-iron skillet as batter is poured from a ladle and blueberries are placed on top, with text overlay “Upgrade Your Mix” and “Milk + rest + berries on pan,” and MasalaMonk.com in the footer.
For blueberry pancakes with pancake mix that taste homemade, swap in milk, let the batter rest briefly, then add blueberries on the pan for clean color and even fruit.

Blueberry pancake mix variations without a second recipe

Once you have the base pancake mix in a jar, you can steer it toward different styles:

  • For a more hearty flavour, replace part of the flour with oat flour and you’re halfway to blueberry oat pancakes.
  • For a lighter texture, add a tablespoon of cornstarch per batch.
  • For a warm brunch vibe, add cinnamon and a pinch of nutmeg—especially good for banana blueberry pancake stacks.

Blueberry Mini Pancakes: Tiny, Quick, Freezer-Friendly

Blueberry mini pancakes feel playful, yet they’re also practical. They cook faster, they’re easy for kids, and they reheat beautifully. Additionally, they’re perfect for those mornings when you want pancakes and blueberries but don’t want to commit to a tall stack.

Portrait overhead photo of blueberry mini pancakes arranged on a parchment-lined baking sheet with a measuring tablespoon and a cup of syrup, featuring text overlay “Mini Pancake Size” and “1 Tbsp batter each,” with MasalaMonk.com in the footer.
Blueberry mini pancakes cook fast and freeze well—keep them uniform by using 1 tablespoon of batter per pancake for even browning and easy reheating.

How to make blueberry mini pancakes

Use any batter above—classic, pancake mix, oat, protein, or gluten-free—then spoon 1 to 2 tablespoons per pancake onto a medium skillet. Sprinkle blueberries on top. Flip sooner than usual; mini pancakes set fast.

Turning them into frozen blueberry pancakes for busy mornings

Cool completely, freeze in a single layer on a tray, then transfer to a bag. Reheat in the toaster for crisp edges.

Portrait top-down photo showing blueberry pancakes cooling on a rack and freezing on a parchment-lined tray with a labeled freezer bag, featuring text overlay “Freeze Like This” and “Freeze flat → then bag,” with MasalaMonk.com in the footer.
For freezer-friendly frozen blueberry pancakes, freeze them flat first so they don’t stick together—then bag them for quick toaster reheats on busy mornings.

If you need a simple, reliable freezing and reheating guide, Better Homes & Gardens lays it out well: how to freeze and reheat pancakes. For broader freezer safety grounding, USDA has a clear overview: freezing and food safety.

Portrait triptych image showing three ways to reheat blueberry pancakes—toaster, oven, and pan—featuring text overlay “Reheat for Crisp Edges,” method labels, and MasalaMonk.com in the footer.
To bring frozen blueberry pancakes back to life, reheat for crisp edges—use a toaster for speed, the oven for batches, or a covered pan for a softer center.

Blueberry Dutch Pancake: The Big, Puffy Oven Version

A blueberry Dutch pancake is a different experience from classic blueberry pancakes: it’s puffed and dramatic, more custardy in the center, crisp at the edges, and made in one pan. It’s also a great choice when you want blueberries and pancakes but don’t want to stand at the stove flipping.

Ingredients (serves 2–3)

  • 3 eggs
  • ¾ cup milk
  • ½ cup flour (or ⅓ cup pancake mix as a shortcut)
  • Pinch of salt
  • 1 tbsp sugar (optional)
  • 2 tbsp butter for the pan
  • ¾ cup blueberries
Portrait photo of a blueberry Dutch pancake baked in a cast-iron skillet with puffed golden edges and blueberries on top, featuring text overlay “One Pan. Big Rise.” and “Bake until puffed + golden,” with MasalaMonk.com in the footer.
A blueberry Dutch pancake is the no-flip option—bake until the edges puff deep golden, then slice and serve straight from the skillet.

Method

  1. Preheat oven to 220°C / 425°F. Put a cast-iron skillet (or oven-safe pan) in the oven to heat.
  2. Blend or whisk eggs, milk, flour (or pancake mix), salt, and sugar until smooth.
  3. Carefully remove hot pan, add butter, swirl to coat.
  4. Pour in batter and scatter blueberries over the top.
  5. Bake 14–18 minutes until puffed and golden.

Serve immediately; Dutch pancakes deflate quickly, but that’s part of their charm.

Also Read: What to Mix with Jim Beam: Best Mixers & Easy Cocktails


Blueberry Maple Pancakes and Other Toppings That Make the Stack Sing

Sometimes the pancake is the main event; other times, toppings turn a good pancake into a “remember this breakfast” pancake. Blueberry maple pancakes are a classic direction—blueberries and maple simply belong together.

Portrait close-up of a blueberry maple pancake on a dark plate with warm maple syrup pooling around it and a cold pat of butter melting on top, featuring text overlay “Warm syrup + cold butter” and “Glossy finish, richer bite,” with MasalaMonk.com in the footer.
For blueberry maple pancakes with a restaurant-style sheen, warm the syrup and add cold butter at the end—the contrast creates a glossy finish and a richer bite.

A few topping routes that feel natural

Portrait photo of blueberry pancakes on a dark plate with a chocolate drizzle and fresh blueberries, featuring text overlay “Chocolate Drizzle Option” and “Brunch-to-dessert in 10 sec,” with MasalaMonk.com in the footer.
Turn blueberry pancakes into an easy dessert by adding a quick chocolate drizzle—especially good with frozen blueberry pancakes when you want extra richness.

If you’d rather keep it ultra-simple, don’t underestimate fresh berries scattered on top. Sometimes blueberries and pancakes need no persuasion.


What to Serve with Blueberry Pancakes (So Breakfast Feels Complete)

A stack is wonderful on its own; nevertheless, adding one drink and one side can make breakfast feel like a proper moment.

Drinks that pair beautifully

Portrait brunch pairing image showing a blueberry pancake sliced into wedges on a dark plate with fresh blueberries and a cup of coffee, featuring text overlay “Build the Brunch Plate” and “Coffee + berries + warm pancakes,” with MasalaMonk.com in the footer.
Serve blueberry pancakes with coffee and a side bowl of berries for an easy brunch plate that feels complete without extra cooking.

Sides that balance sweetness


A Few Final Details That Make Every Batch Better

Even a great recipe can stumble if one small detail goes off. So before you close the tab and heat the pan, here are the most common friction points—plus the quick fixes that keep blueberry pancakes fluffy.

If pancakes turn dense

Mix less. Seriously. Fold until the flour disappears and stop. Also, let the batter rest so the flour hydrates. If you want the science behind the tenderness, Scientific American has a friendly explanation on gluten and pancakes: the science of gluten in pancakes.

If pancakes brown too fast

Lower the heat. Thick pancakes—especially blueberry ricotta hotcakes and high protein blueberry pancakes—need steadier, gentler heat than thin batters.

If your blueberries sink

Either your batter is thin or your berries went in too early. In either case, add berries per pancake on the skillet. It’s a small habit that pays off immediately.

If you’re cooking for later

Freeze properly so your frozen blueberry pancakes reheat with good texture. The Better Homes & Gardens guide is a great quick reference: how to freeze and reheat pancakes.

Also Read: Mayo Recipe: 15+ Homemade Mayonnaise Variations

FAQs

1) What makes blueberry pancakes turn out fluffy instead of flat?

Fluffy blueberry pancakes usually come from a thicker batter, minimal mixing, and cooking over steady medium heat. In addition, letting the batter rest briefly helps the texture set up so the pancakes rise rather than spread.

2) Can I use frozen blueberries for pancakes without the batter turning purple?

Yes. To avoid streaky batter, use frozen blueberries straight from the freezer and add them after you pour the batter onto the pan. That way, the berries warm inside the pancake instead of bleeding into the bowl.

3) Should I fold blueberries into the batter or add them on top?

For the most even distribution, add blueberries on top of each pancake right after ladling the batter. This method works for blueberries and pancakes in general, and it’s especially helpful for frozen blueberry pancakes.

4) Why do my blueberries sink to the bottom of the pancakes?

Most often, the batter is too thin or the berries were stirred in early. As a result, the berries drop before the pancake sets. A thicker batter and adding berries per pancake solves it.

5) How do I keep blueberry hotcakes from burning on the outside?

If blueberry hotcakes brown too quickly, the heat is likely too high. Instead, lower the heat slightly and give the pan time to stabilize before cooking the next batch.

6) What’s the best blueberry pancake batter consistency?

The batter should be thick enough to mound slightly when spooned, then slowly spread. If it pours like milk, the pancakes may end up thin; conversely, if it’s stiff like dough, they can turn dense.

7) How long should I rest blueberry pancake batter?

Generally, 8–15 minutes is enough. Meanwhile, preheat the pan and prep toppings. Longer rests can work too, yet over-resting may reduce lift as the leavening loses strength.

8) Can I make blueberry pancakes with pancake mix and still get a homemade taste?

Absolutely. Start by using milk (or buttermilk) instead of water, then let the batter rest briefly. Finally, add blueberries on the pan so the mix stays light and the berries stay distinct.

9) What is blueberry pancake mix, and is it different from regular pancake mix?

Blueberry pancake mix may refer to a plain mix used to make blueberry pancakes, or a mix that already includes blueberry flavouring. Either way, you can create a better “blueberry pancakes with pancake mix” result by adding real berries during cooking.

10) How do I make pancakes from the mix without ending up with rubbery texture?

Mix gently, avoid over-stirring, and don’t cook on high heat. Additionally, resting the batter for a few minutes helps the flour hydrate, which leads to softer pancakes.

11) How can I make a blueberry oatmeal pancake that isn’t heavy?

Soak oats briefly before cooking, and keep the batter from getting too thick. Also, cook on medium heat so the center sets without drying out the edges.

12) Are blueberry oat pancakes the same as blueberry oatmeal pancakes?

They’re closely related. Blueberry oat pancakes often use oat flour or blended oats, while a blueberry oatmeal pancake usually features rolled oats for texture. Either way, both pair well with blueberries.

13) How do I make banana and blueberry pancakes without them becoming dense?

Use one ripe banana rather than multiple bananas, and keep mixing minimal. Furthermore, if the batter feels too thick, add a small splash of milk to loosen it.

14) What’s the difference between blueberry pancakes and blueberry hotcakes?

Typically, “hotcakes” are thicker and sometimes slightly sweeter, while “pancakes” can range from thin to thick. However, most recipes can be adjusted either way by tweaking batter thickness and pan temperature.

15) How do I make blueberry mini pancakes that cook evenly?

Use smaller portions of batter and keep the heat moderate. Then, add blueberries to each mini pancake before flipping so they don’t scatter in the pan.

16) Can I freeze blueberry pancakes for later?

Yes. Cool them fully, freeze in a single layer first, then store in a bag. Afterward, reheat in a toaster or oven for the best texture.

17) How do I reheat frozen blueberry pancakes so they don’t get soggy?

To avoid sogginess, reheat in a toaster or oven rather than microwaving. If you must microwave, use short bursts and finish briefly in a pan to restore texture.

18) How do I make high protein blueberry pancakes that still taste good?

Choose protein sources that add tenderness—like Greek yogurt or cottage cheese—rather than relying only on protein powder. Also, keep the batter moist and cook at a slightly lower heat.

19) Are blueberry protein pancakes and blueberry pancakes protein searches basically the same thing?

Yes—both phrases generally refer to pancakes designed to be higher in protein. Accordingly, the best recipes emphasize both nutrition and a fluffy, pleasant bite.

20) How do blueberry cottage cheese pancakes taste compared to classic pancakes?

They’re usually a bit creamier and more filling, with a tender interior. Moreover, they can be either smooth or lightly textured depending on whether you blend the batter.

21) What are blueberry ricotta hotcakes, and how are they different?

Blueberry ricotta hotcakes are thicker, softer pancakes enriched with ricotta. Consequently, they tend to feel more “brunch-style,” with a rich, delicate crumb.

22) Can I make blueberry and ricotta pancakes without separating eggs?

Yes. You can whisk ricotta into the wet ingredients and proceed normally. Still, separating eggs and folding in whipped whites often creates a lighter hotcake texture.

23) How do I make blueberry lemon pancake flavour stand out without making it sour?

Prioritize lemon zest for aroma and use lemon juice sparingly. Then, balance the brightness with a touch of sweetness and plenty of blueberries.

24) What are blueberry lemon ricotta pancakes, and why are they popular?

They combine berry sweetness, citrus fragrance, and creamy ricotta richness. As a result, they deliver a layered flavour that feels special while staying easy to cook.

25) Can I make blueberry pancakes gluten free without them crumbling?

Yes. Use a reliable gluten-free flour blend, let the batter rest longer, and avoid flipping too early. Additionally, cooking on medium-low heat helps the structure set before turning.

26) Are almond flour blueberry pancakes naturally gluten free?

They can be, since almond flour doesn’t contain gluten. Nevertheless, almond flour often benefits from extra eggs or a small amount of gluten-free blend to improve structure.

27) What’s the best way to keep blueberries from bursting too much?

Add blueberries on the pan rather than mixing aggressively, and avoid pressing them into the batter. Also, cook on moderate heat so the berries warm gently instead of exploding quickly.

28) Why do some “best blueberry pancake” recipes recommend buttermilk?

Buttermilk adds acidity that reacts with baking soda, which improves rise and tenderness. In turn, it creates a softer crumb and a pleasant tang that complements blueberries.

29) Can I make blueberry pancakes ahead for brunch guests?

Definitely. Make a large batch, keep them warm in a low oven, and serve in stacks. Meanwhile, you can cook bacon, prep toppings, or mix up drinks without rushing.

30) What’s a blueberry dutch pancake, and can I use blueberries in it?

A blueberry dutch pancake is an oven-baked, puffy pancake with crisp edges and a custardy center. Yes, blueberries work beautifully—scatter them over the batter before baking for a dramatic, fruit-studded result.