Pancake morning has one small unfairness built into it: the person holding the spatula usually eats last. While everyone else gets a hot stack, you are still standing at the stove pouring, flipping and starting the next batch.
Sheet pan pancakes fix that. One batch goes into one rimmed pan, everyone gets a warm square together, and the result should still taste unmistakably like pancakes: lightly browned underneath, soft and buttery through the middle, ready for melting butter and maple syrup.
This recipe is sized for a 13×18-inch rimmed half-sheet, so the batter stays shallow enough to bake through without leaving you with dry edges and a slow-cooking middle.
Jump to Recipe · Choose Your Pan · Fix Common Problems · Make Ahead
Quick Answer: Sheet Pan Pancakes at 425°F
Spread thick-but-pourable buttermilk pancake batter evenly in a 13×18-inch (33×46 cm) rimmed half-sheet pan. Bake at 425°F / 220°C and start checking at 12 minutes. Most trays finish in 12–16 minutes.
The middle should look set and show no wet batter when checked. A lightly golden top is completely fine—you don’t need the deep browning of a pancake cooked on both sides of a griddle.
Sheet Pan Pancakes Recipe
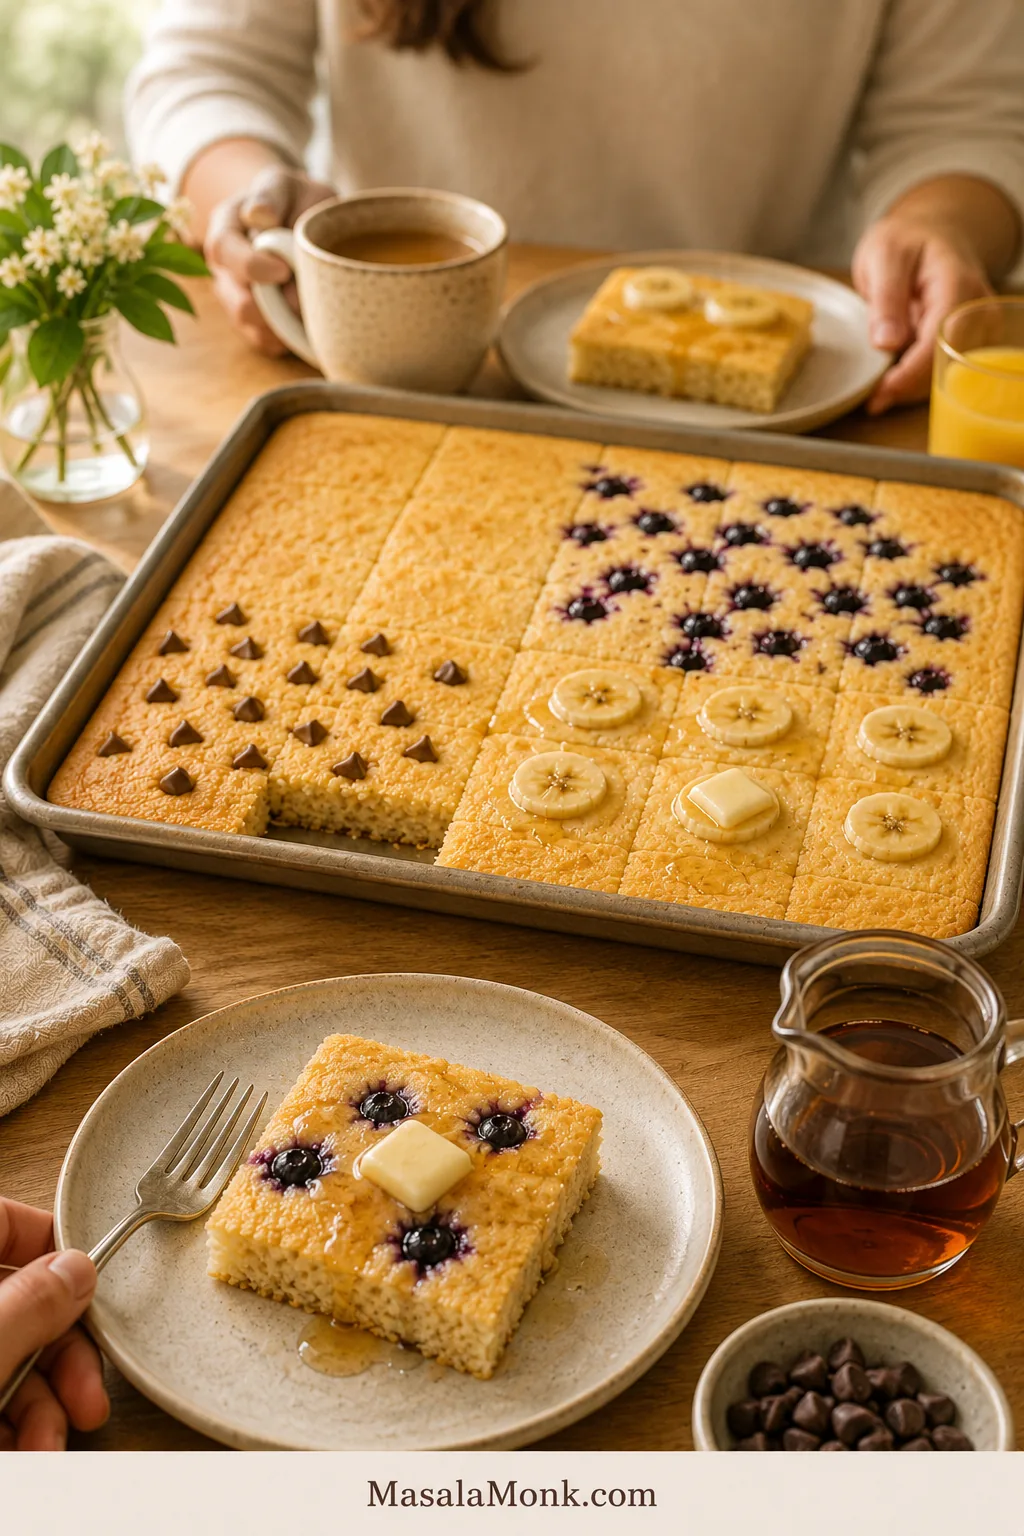
Make the whole tray plain, scatter one topping across it, or divide the batter into flavor zones so everyone gets the pancake they actually want.
Recipe at a Glance
| Prep | About 10 minutes |
|---|---|
| Bake | 12–16 minutes |
| Total | About 25–30 minutes, including a brief rest before cutting |
| Oven | 425°F / 220°C conventional; 400°F / 205°C fan/convection |
| Pan | 13×18-inch / 33×46 cm rimmed half-sheet |
| Yield | 12 large squares |
| Serves | About 6 as the main breakfast |
Equipment
- 13×18-inch light-colored rimmed half-sheet pan
- Large mixing bowl
- Medium bowl or large measuring jug
- Whisk
- Flexible silicone spatula or offset spatula
- Digital kitchen scale, especially useful for the flour
Ingredients
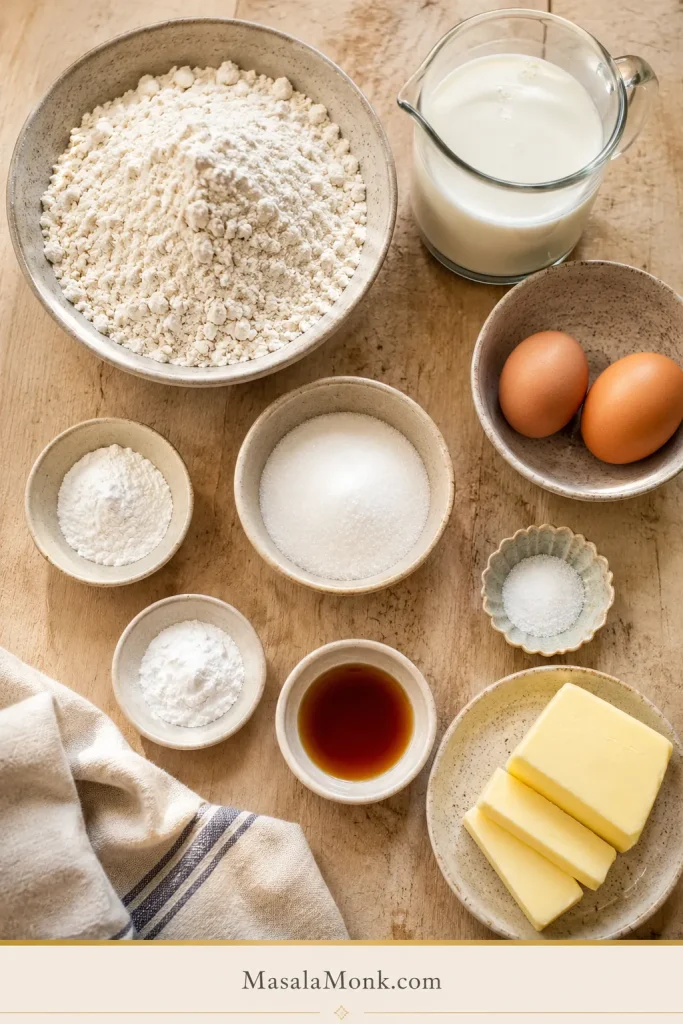
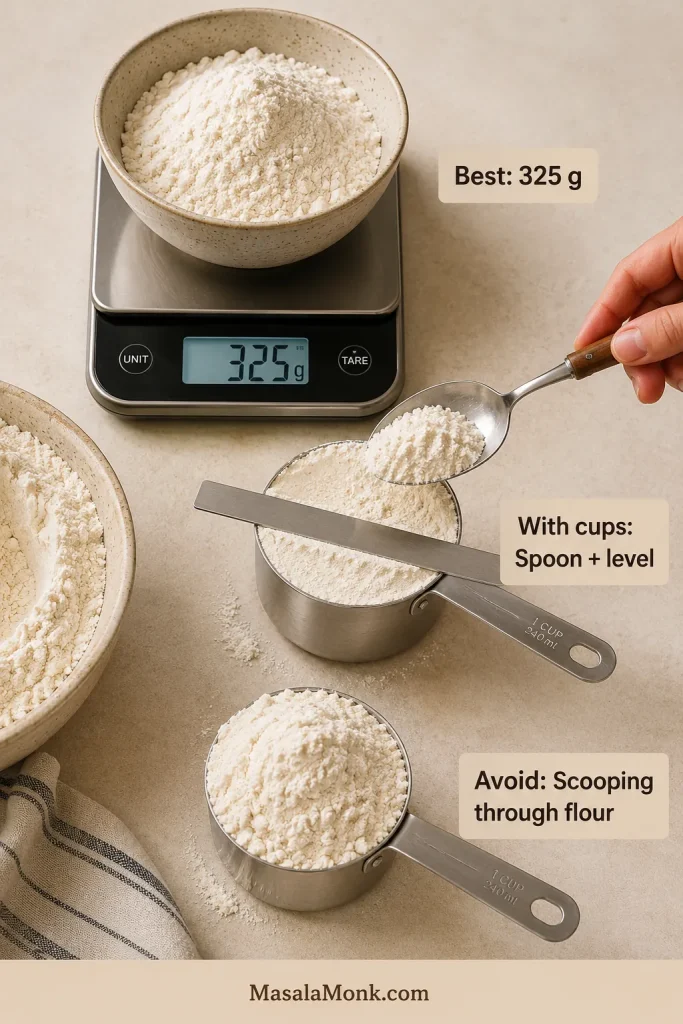
- 325 g (11.5 oz; about 2⅔ cups) all-purpose flour, spooned and leveled if using cups
- 50 g (¼ cup) granulated sugar
- 1 tablespoon baking powder (12 g)
- ¾ teaspoon baking soda (about 4 g)
- ¾ teaspoon fine sea salt (about 4–5 g)
- 2 cups / 480 ml buttermilk
- 2 large eggs
- 4 tablespoons / 57 g unsalted butter, melted and cooled slightly
- 2 teaspoons vanilla extract
- 1 tablespoon / 14 g butter, softened or melted, for the pan
Optional Toppings
These are useful starting amounts for one full tray. There is no need to pull out a scale just to scatter a few berries.
- 125–150 g blueberries, about ¾–1 cup
- 100–120 g chocolate chips, about ½–⅔ cup
- 1 medium banana, thinly sliced
- 75–100 g strawberries, about ½–⅔ cup sliced
- 60–80 g pecans or walnuts, about ½–⅔ cup chopped
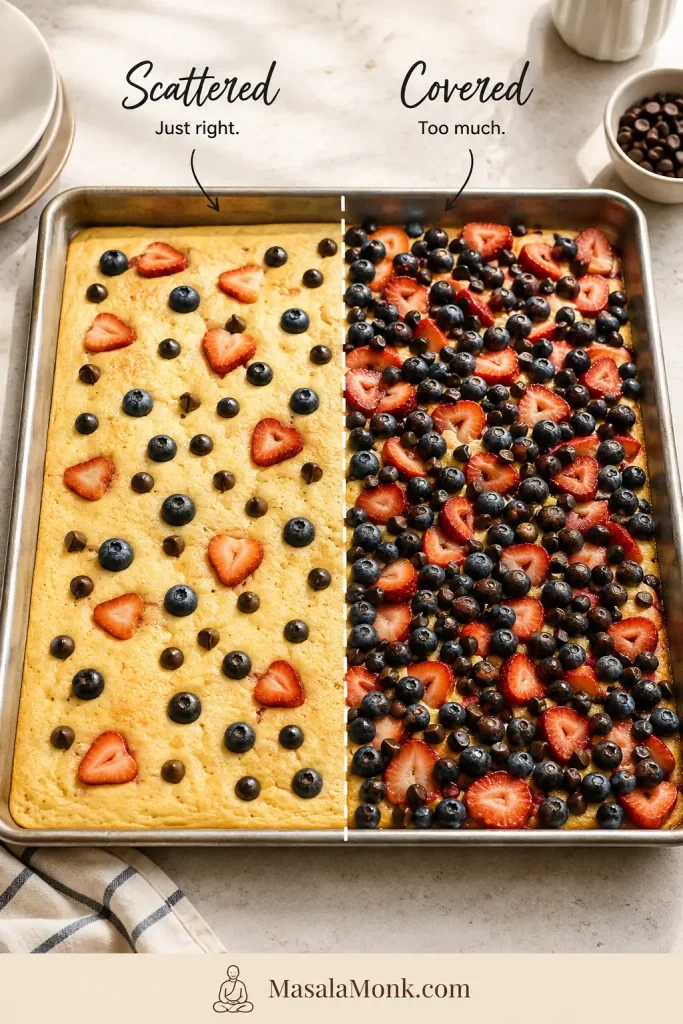
For several flavors on one pan, use less of each. Plenty of batter should remain visible between the toppings.
How to Make Sheet Pan Pancakes
- Preheat the oven. Put a rack in the middle and heat the oven thoroughly to 425°F / 220°C conventional or 400°F / 205°C fan/convection, unless your oven automatically adjusts for fan cooking.
- Prepare the pan. Butter the half-sheet, including the corners and sides. You don’t need to preheat the pan for this version; starting at room temperature gives you time to spread the batter evenly. If your pan has a history of sticking, line the base with parchment and lightly butter it.
- Whisk the dry ingredients. Combine the flour, sugar, baking powder, baking soda and salt in a large bowl.
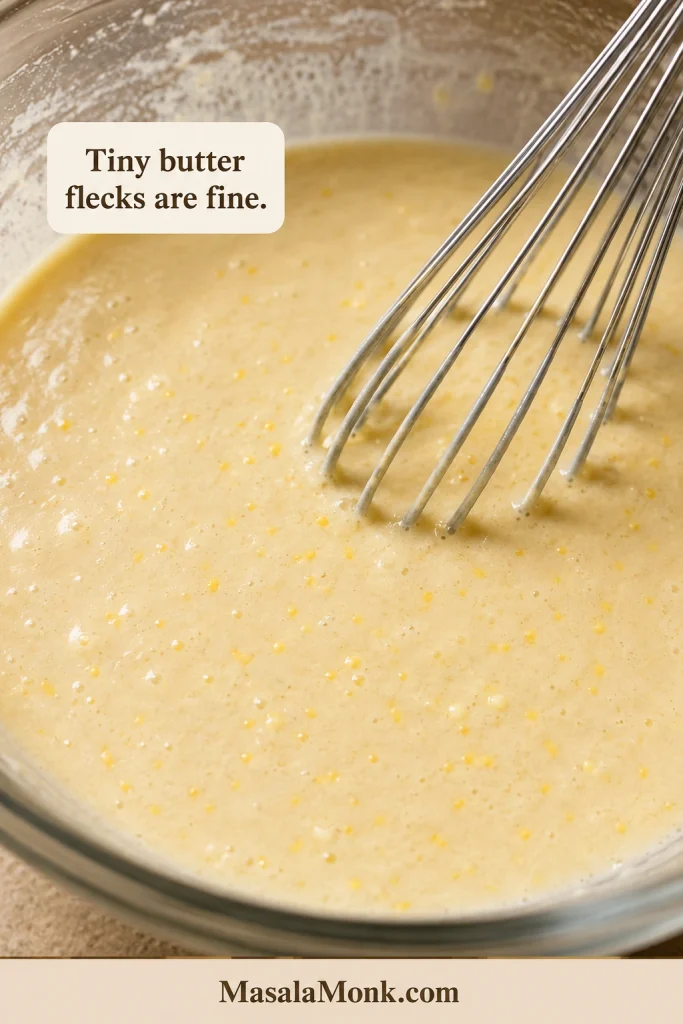
- Mix the wet ingredients. In another bowl or large jug, whisk the buttermilk, eggs and vanilla. Whisk in the cooled melted butter. Cold buttermilk may make the butter form a few tiny flecks; that’s fine. They’ll melt in the oven.
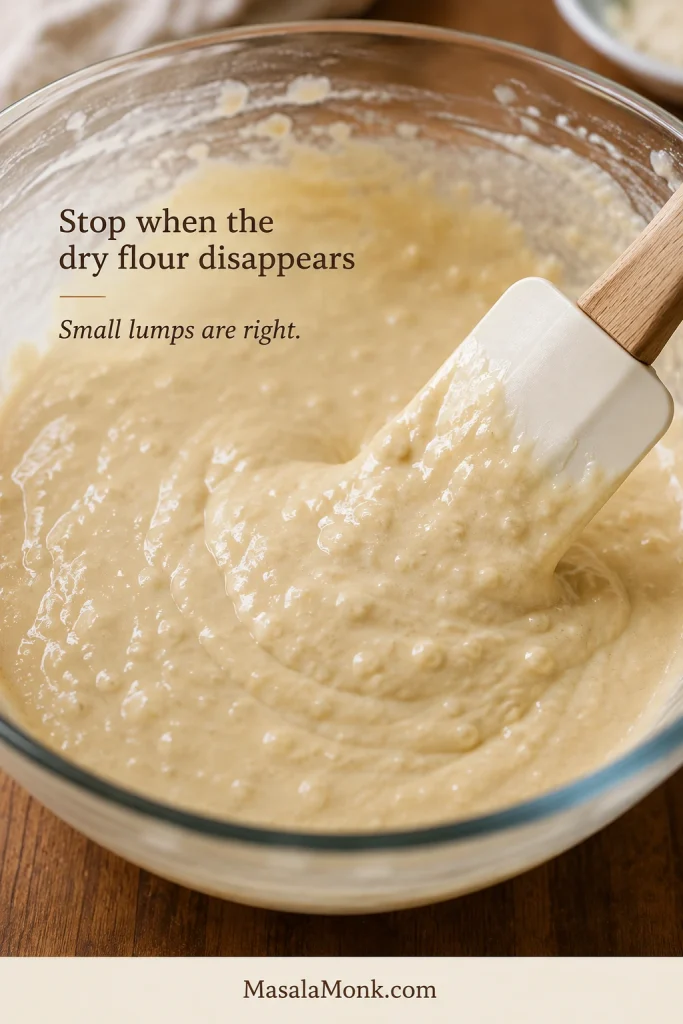
- Fold the batter. Pour the wet mixture into the dry and fold gently with a flexible spatula. Stop as soon as the dry flour disappears. A few small lumps are exactly what you want.
Spread, Top and Bake
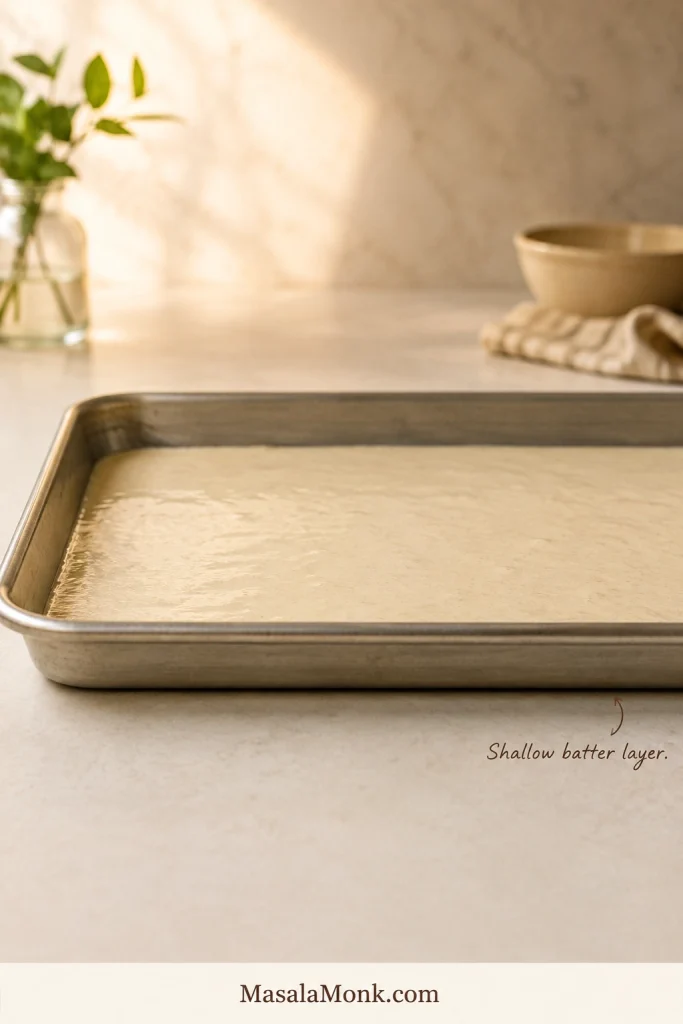
- Spread it promptly. This batter doesn’t need a deliberate long rest. Pour it into the prepared pan, ease it toward the corners and give the tray a gentle jiggle to even the surface.
- Add toppings. Scatter them over the surface, leaving plenty of batter visible between them.
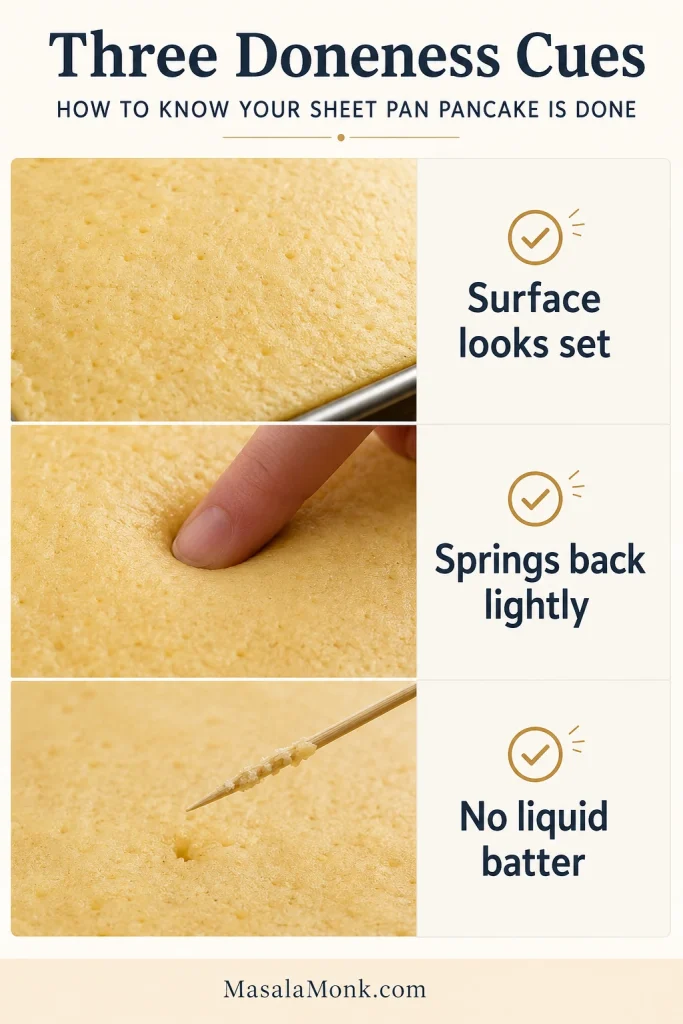
- Bake. Start checking at 12 minutes. The center should look set, spring back lightly when pressed and show no liquid batter on a tester. Expect 12–16 minutes in most ovens.
- Add more color only if you want it. Once the pancake is cooked through, broil very briefly if you want a little more browning. Watch continuously. Skip the broiler if parchment is sticking up near the heating element.
- Rest and serve. Let the tray stand for 2–3 minutes, then cut the pancake into 12 large squares.
The finished tray should smell of warm butter and vanilla, with slightly firmer edges and a tender, springy middle. A broiler can add color in seconds; it can’t put moisture back into an overbaked pancake.
Why They Stay Fluffy
A good sheet pan pancake should still feel like a pancake when you lift a square: tender through the middle, springy rather than rubbery, and sturdy enough to reach the plate without behaving like a slice of sponge cake.
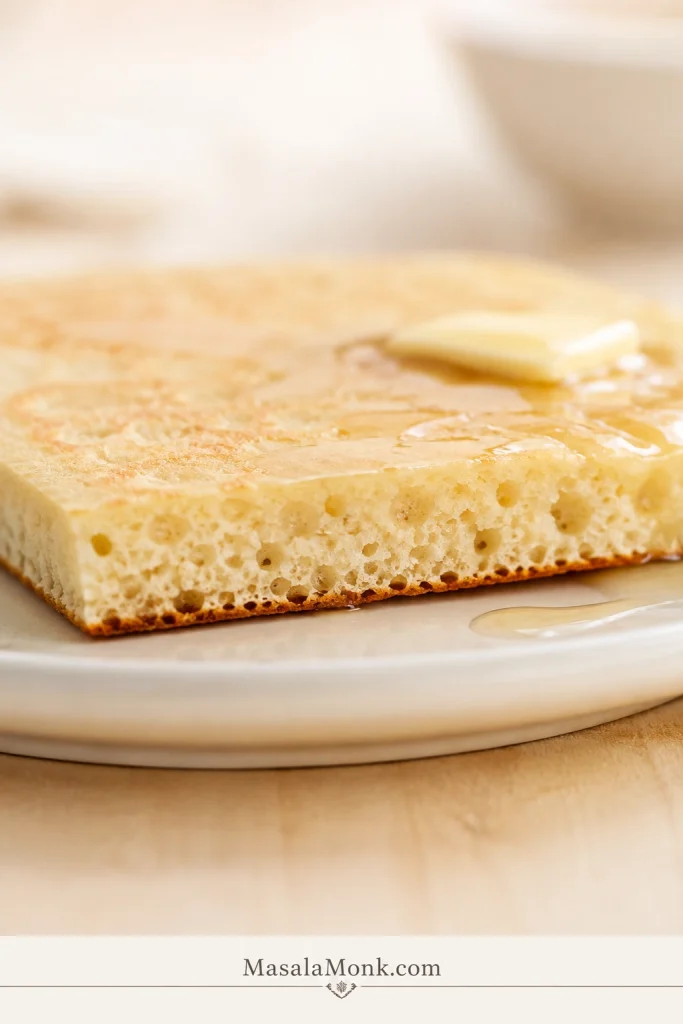
Buttermilk + Leavening Give the Batter Its Lift
Buttermilk brings a slight tang and supplies the acid that baking soda needs. Baking powder adds more lift. Together, they give the batter what it needs to rise.
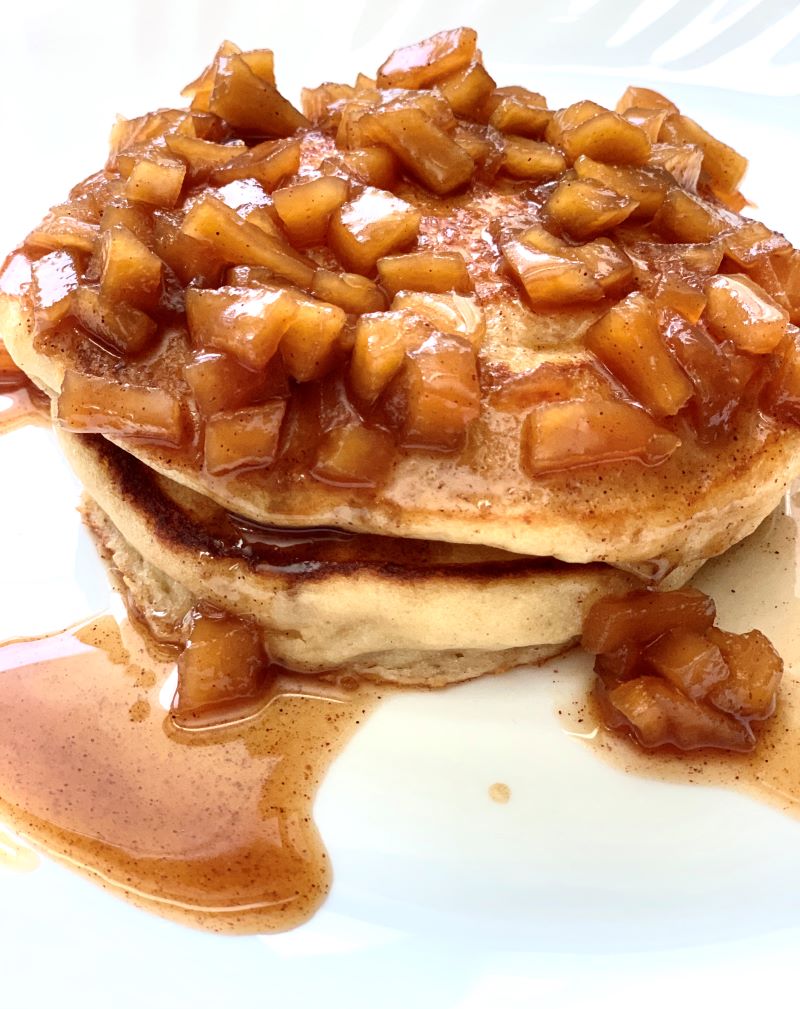
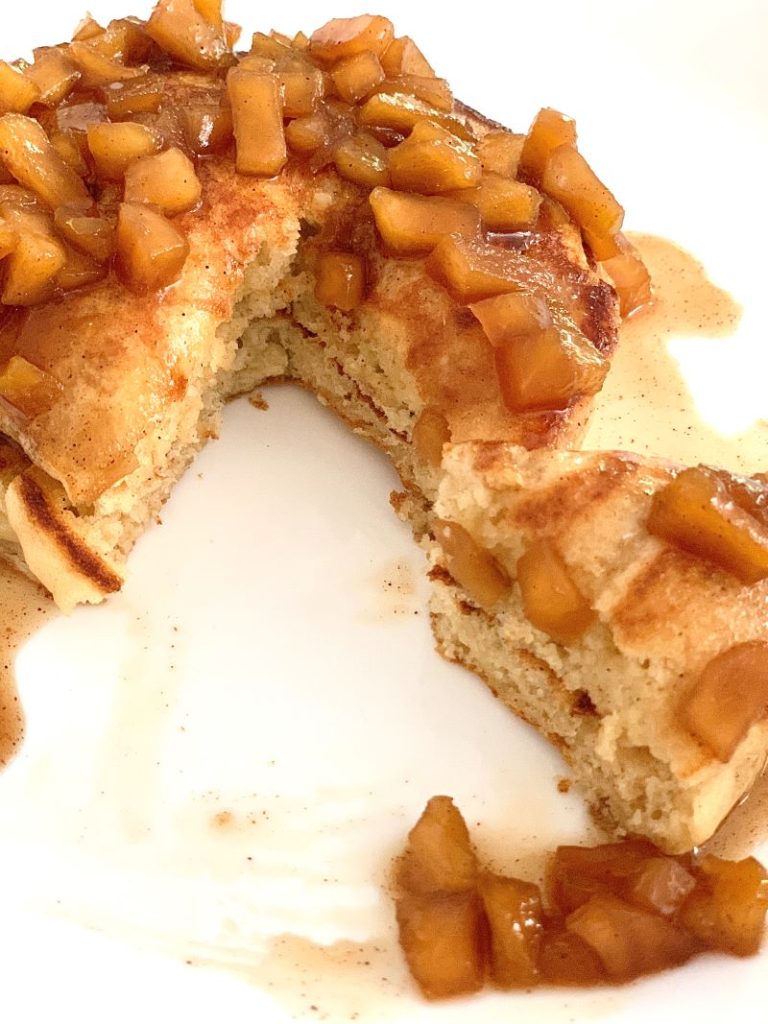
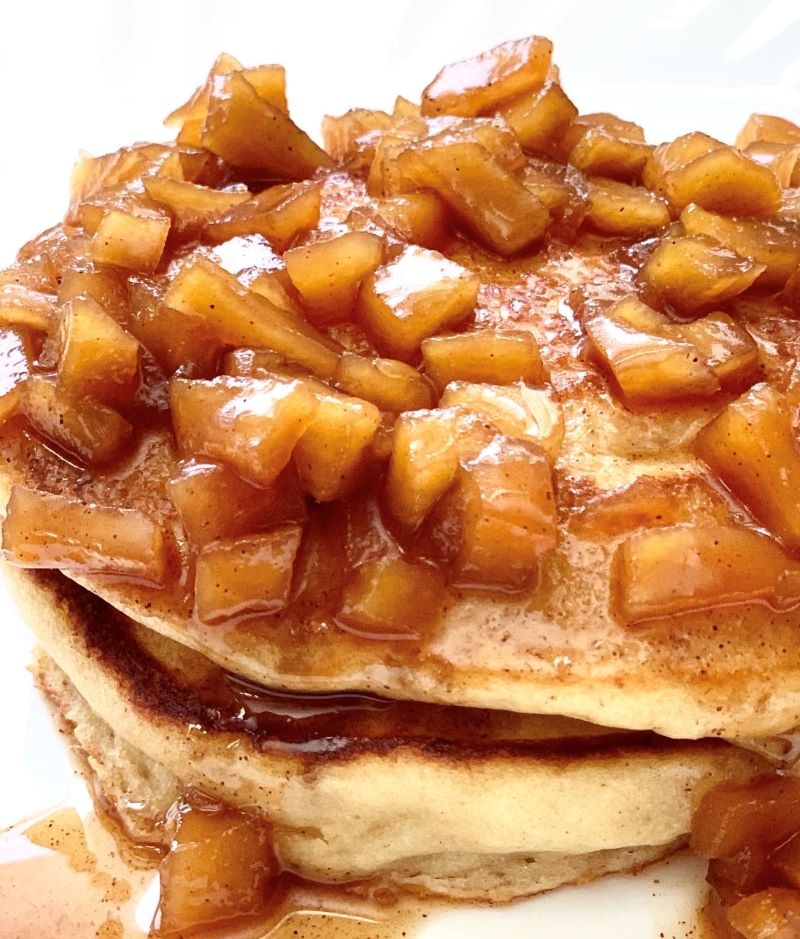
If what you really want is the traditional stovetop version, these fluffy buttermilk pancakes with cinnamon apples keep the classic griddle-and-flip approach.
Gentle Mixing Keeps Them Tender
Once flour gets wet, continued mixing develops more gluten. Some structure is useful; too much gives pancakes a chewy, rubbery bite.
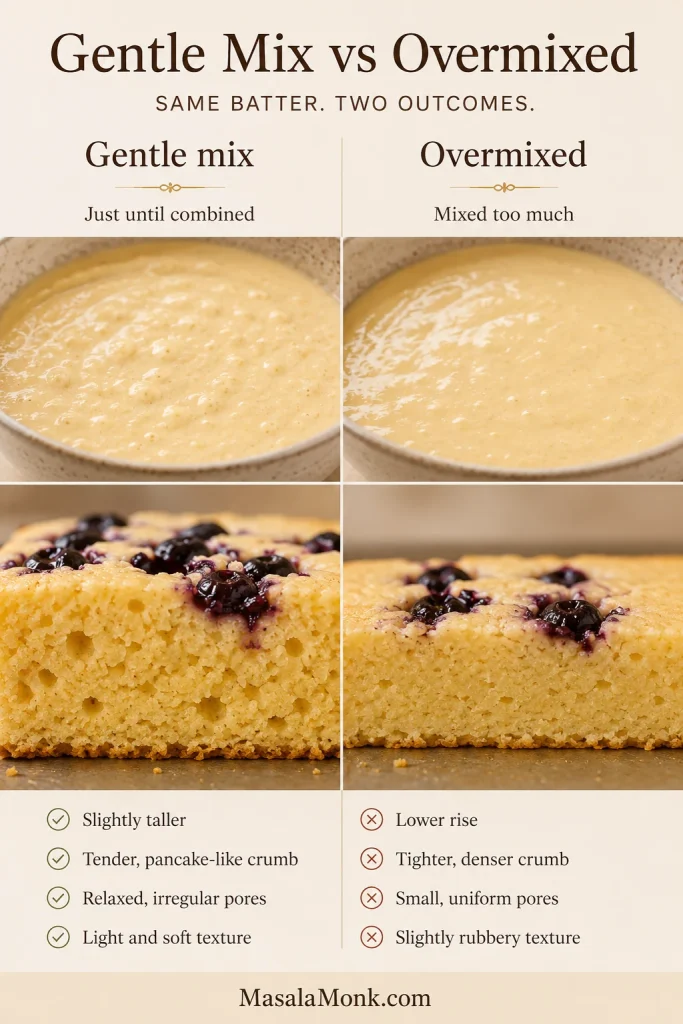
Stop while a few lumps remain. Pancake batter doesn’t need to look polished before it goes into the oven.
Measure the Flour Carefully
Extra flour makes the batter unnecessarily thick. If you have a scale, use the 325 g measurement. With cups, spoon the flour into the cup and level the top.
Eggs give the pancake enough structure to cut cleanly, while melted butter keeps the crumb rich and tender. The sugar stays modest because syrup and toppings can add plenty later.
Numbers get you close. The batter itself is the final check.
What the Batter Should Look Like
The batter should be thick but pourable.
- It falls from the spatula in a broad, heavy ribbon.
- It spreads slowly when encouraged toward the corners.
- A few small lumps remain visible.
- It doesn’t race across the pan like crêpe batter.
- It doesn’t sit in stiff scoops like muffin batter either.
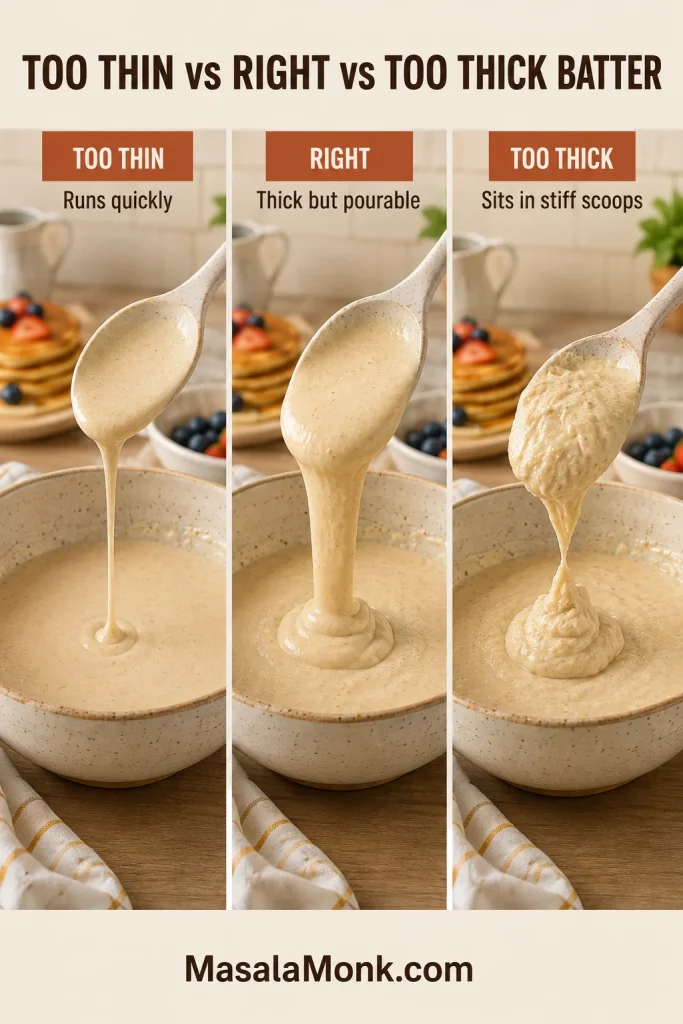
If the batter is unusually stiff, first check whether the flour was overmeasured. Once that’s ruled out, fold in extra buttermilk 1 tablespoon at a time until the batter becomes comfortably pourable.
The homemade buttermilk substitute in the FAQ can be thinner than cultured buttermilk, so use these visual cues before making any adjustment.
Which Pan Works Best?
Use a light-colored 13×18-inch (33×46 cm) rimmed half-sheet for the easiest, most predictable version of this recipe. If that’s the pan you have, you’re set; the details below are mainly useful when your pan is darker, smaller or unusually sticky.
You might call yours a baking sheet, baking tray, sheet tray, oven tray or cookie sheet. The name isn’t important. It needs a raised rim and should be close to the standard half-sheet size.
A completely flat cookie sheet is the one style to avoid. Pancake batter and an unprotected oven floor are not a combination worth trying.
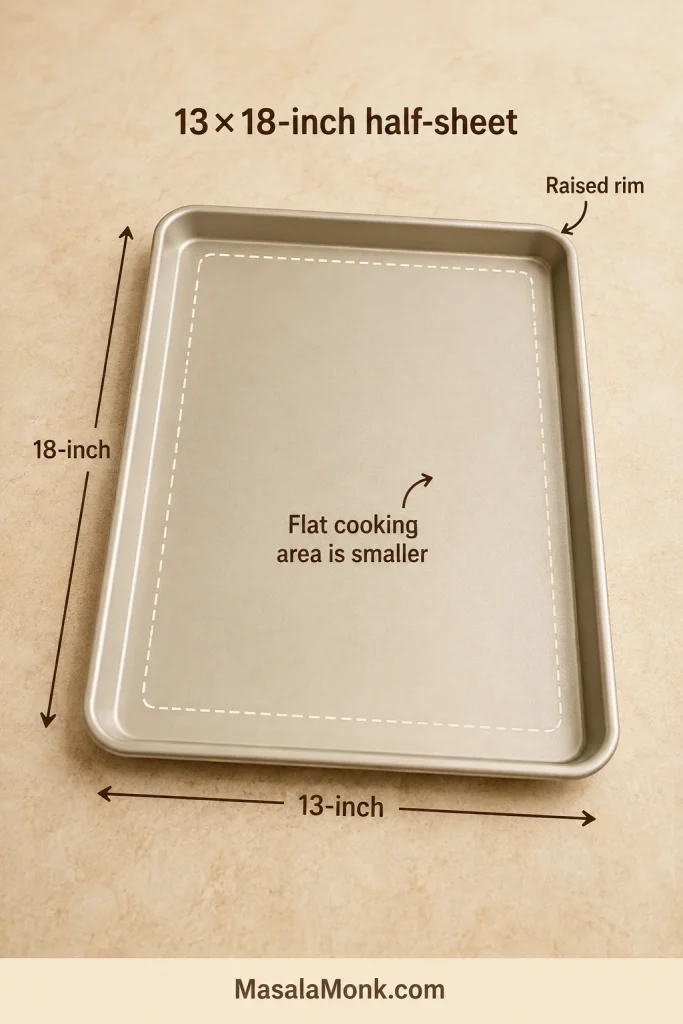
Why Does a 13×18 Pan Measure Smaller Inside?
The listed dimensions usually include the rim. Across the flat cooking surface, a pan sold as 13×18 inches may measure closer to roughly 12×17 inches.
So if yours seems a little smaller when you put a ruler inside it, you probably bought the right pan.
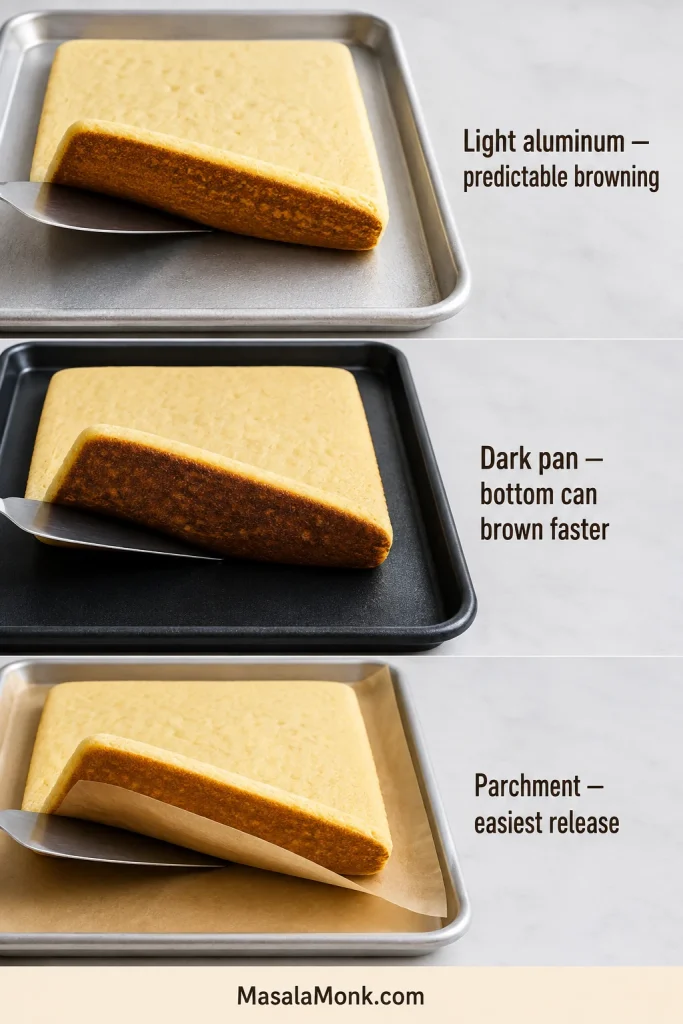
Light Pan, Dark Pan or Parchment?
Light aluminum tends to give predictable bottom browning. Dark nonstick bakeware can color the underside faster, so start checking sooner.
Parchment is fine too. Buttering the metal directly can give you a little more color underneath; parchment wins on easy release and cleanup. If your pan has betrayed you before, use the parchment.
13×18 vs 10×15 vs 9×13
A smaller pan gives the same amount of batter less room to spread, so the pancake becomes deeper.
| Pan | How Much Batter to Use | What to Expect |
|---|---|---|
| 13×18-inch half-sheet | Full recipe | Shallow, fluffy pancake squares |
| 10×15-inch pan | About two-thirds of the mixed batter | Similar depth; timing may shift |
| 9×13-inch pan | About half of the mixed batter | Similar depth; start checking early |
| 9×13 + full recipe | Not recommended | Very deep batter; slow-cooking middle, drier edges and a much more cake-like result |
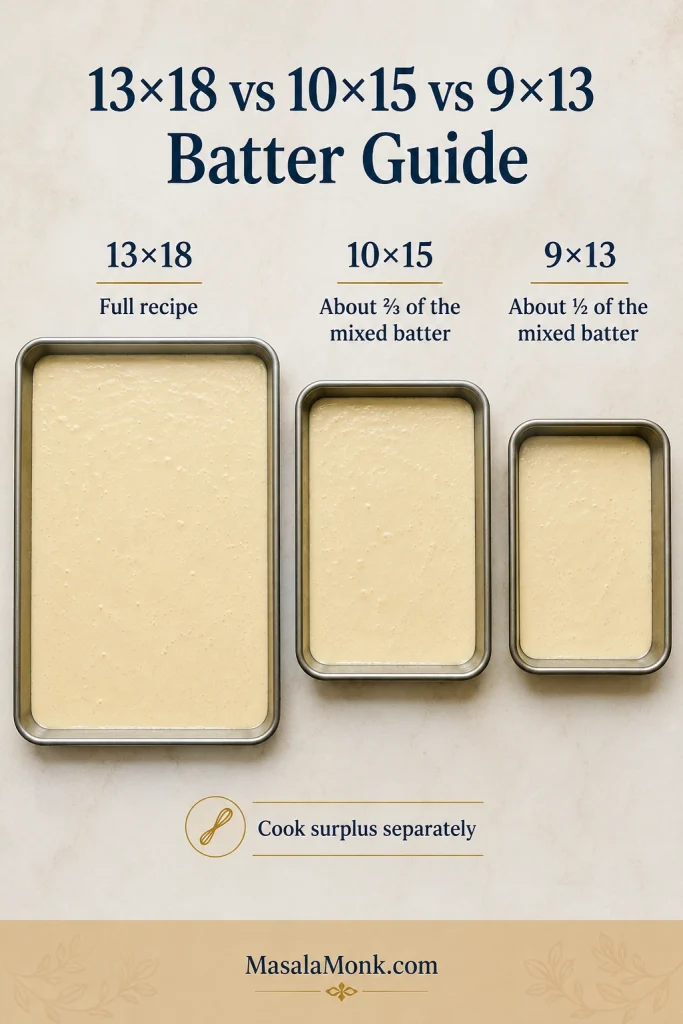
A 10×15 pan has about two-thirds the nominal area of a 13×18 half-sheet, while a 9×13 has about half. Mix the full recipe, pour only the approximate amount shown above and cook the surplus separately.
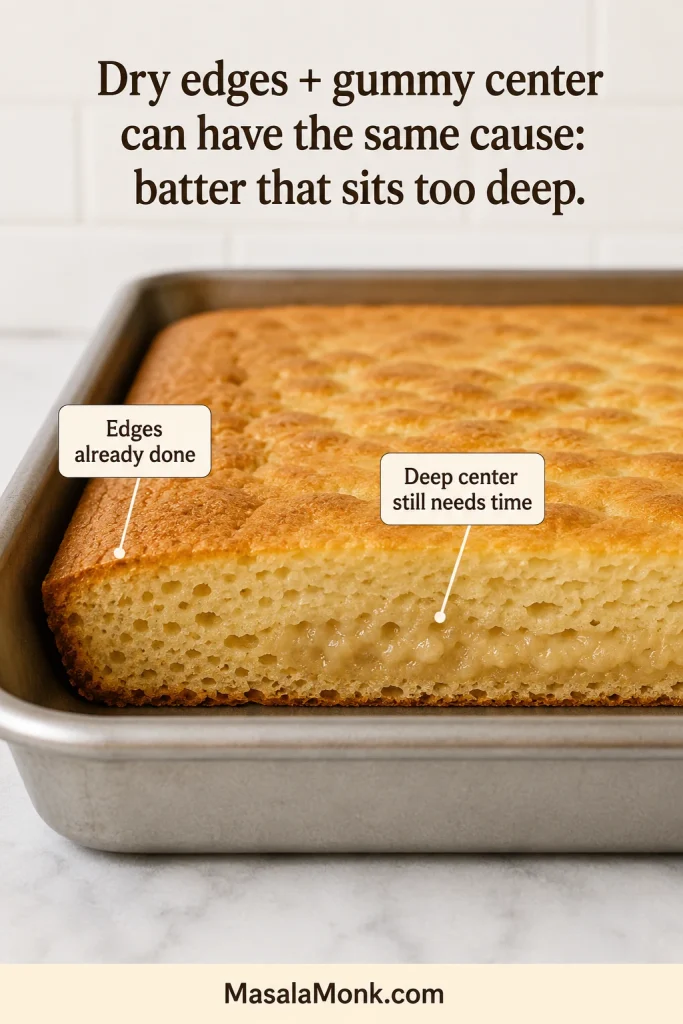
Pour the whole batch into a 9×13 and the pancake sits roughly twice as deep.
Same batter + smaller pan = deeper pancake + longer-cooking middle.
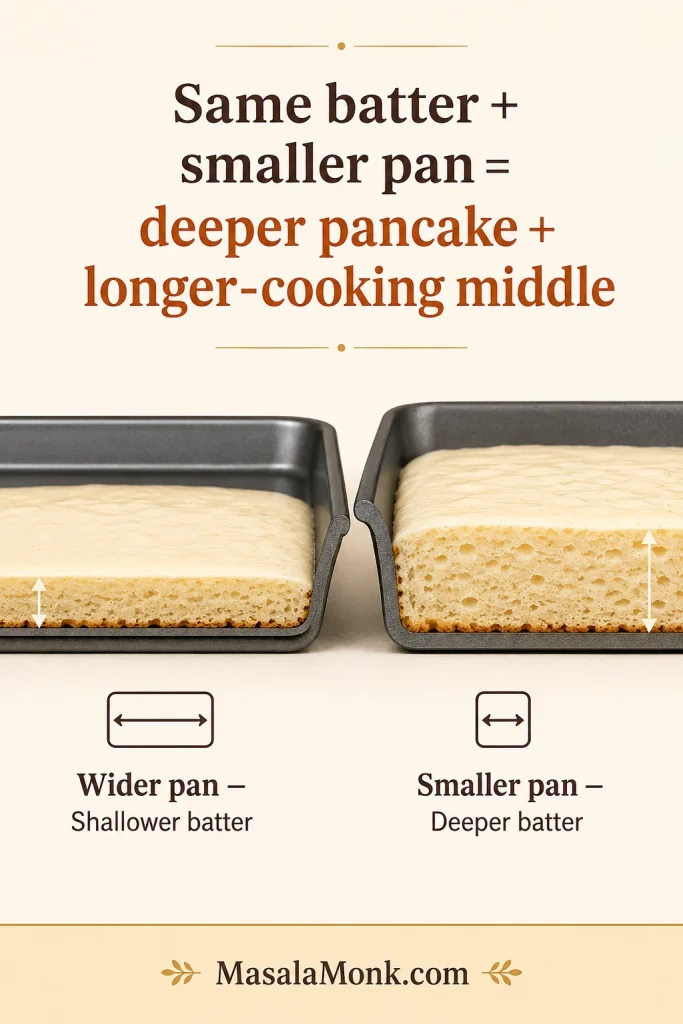
That is how dry edges and a gummy middle can happen at the same time: the center still needs heat after the edges have had enough.
Pan sorted? Back to the recipe method.
How to Tell They’re Done
Stovetop pancakes give you an obvious sequence: bubbles, dry edges, flip, brown the second side. A baked tray removes the flip, so color alone isn’t a reliable finish line.
Look at the middle. It’s ready when the surface is set, a gentle press springs back and a tester shows no liquid batter. A few moist crumbs are fine. The edges may also begin to pull slightly from the pan.
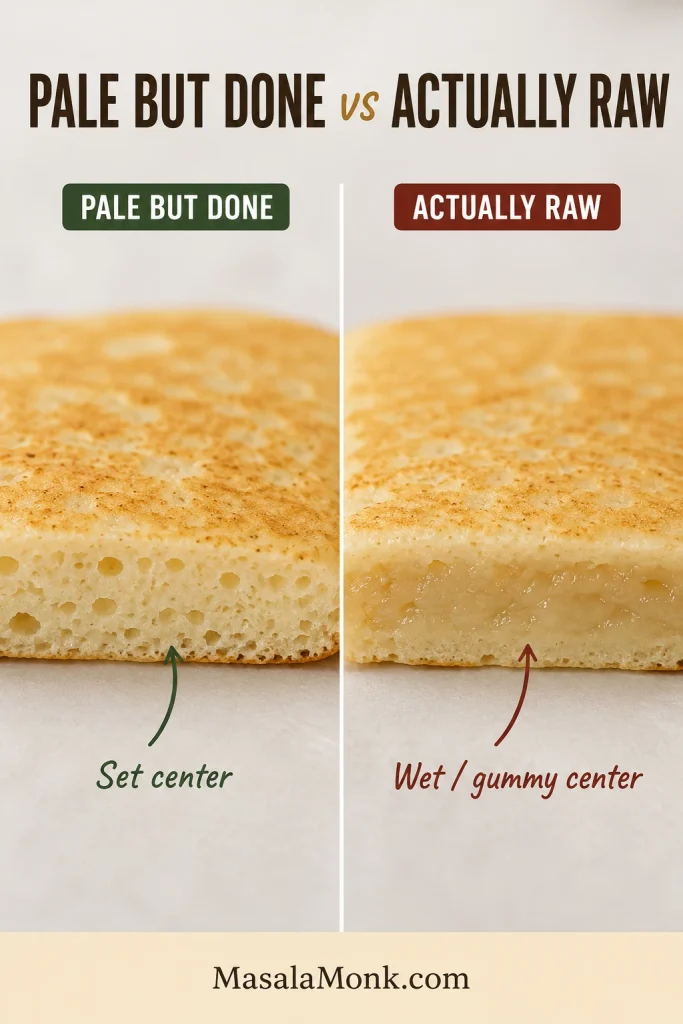
Why Is the Top Still Pale?
This is the moment that can tempt you to leave the tray in too long.
A regular pancake gets direct contact with hot metal twice: once before the flip and again afterward. Here, the bottom sits against the pan while the top cooks mostly in oven air.
A fully cooked middle with a pale-golden top is completely normal. For extra color, use the brief broiler finish after the center is cooked.
Make One Flavor—or Four on the Same Pan
Getting everyone breakfast at the same time solves one pancake problem. One pan can solve another too: everyone wants something different.
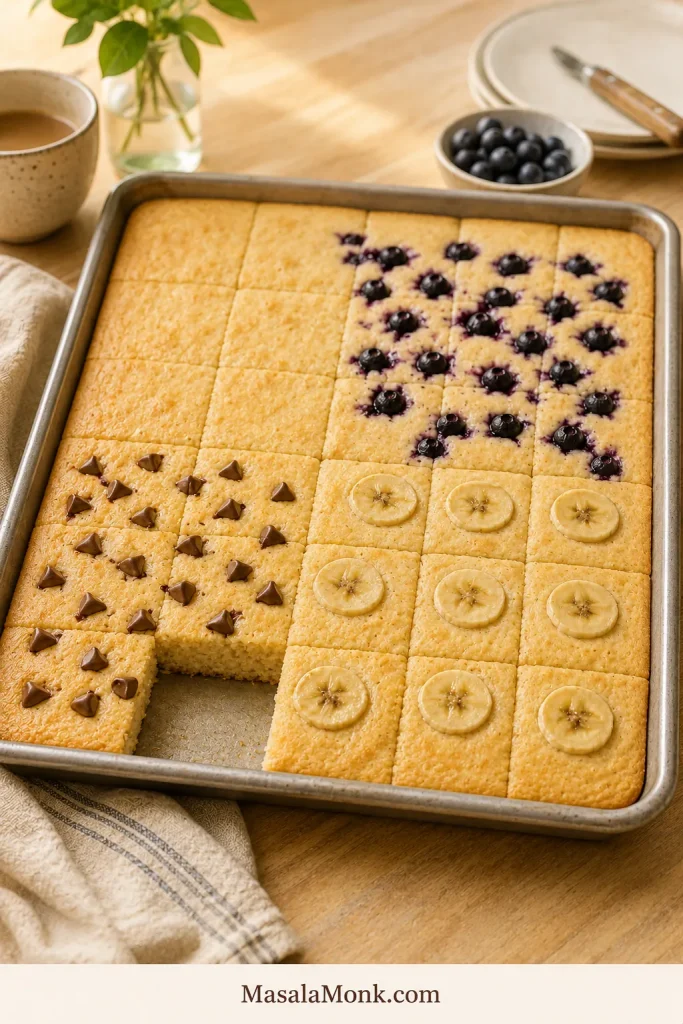
Blueberry can have one corner, chocolate chips another, banana gets its quarter, and anyone who thinks pancakes need no decorating at all can keep the fourth section plain.
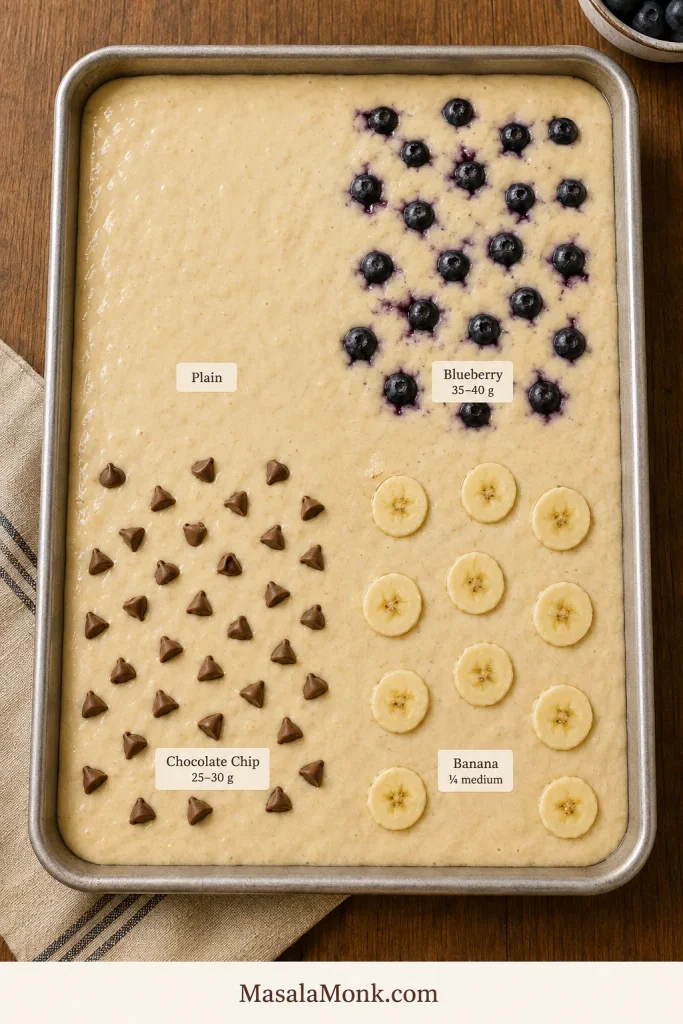
| Quarter-Pan Flavor | Good Starting Amount |
|---|---|
| Plain | Leave untouched |
| Blueberry | 35–40 g blueberries, about ¼ cup |
| Chocolate chip | 25–30 g chocolate chips, about 2–3 tablespoons |
| Banana | About ¼ medium banana, thinly sliced |
Think scattered, not covered. A heavy topping layer can weigh down the batter and bring more moisture with it.
The berries soften and burst, the chocolate goes molten, and the plain corner needs nothing more complicated than butter and syrup.
Fresh vs Frozen Blueberries
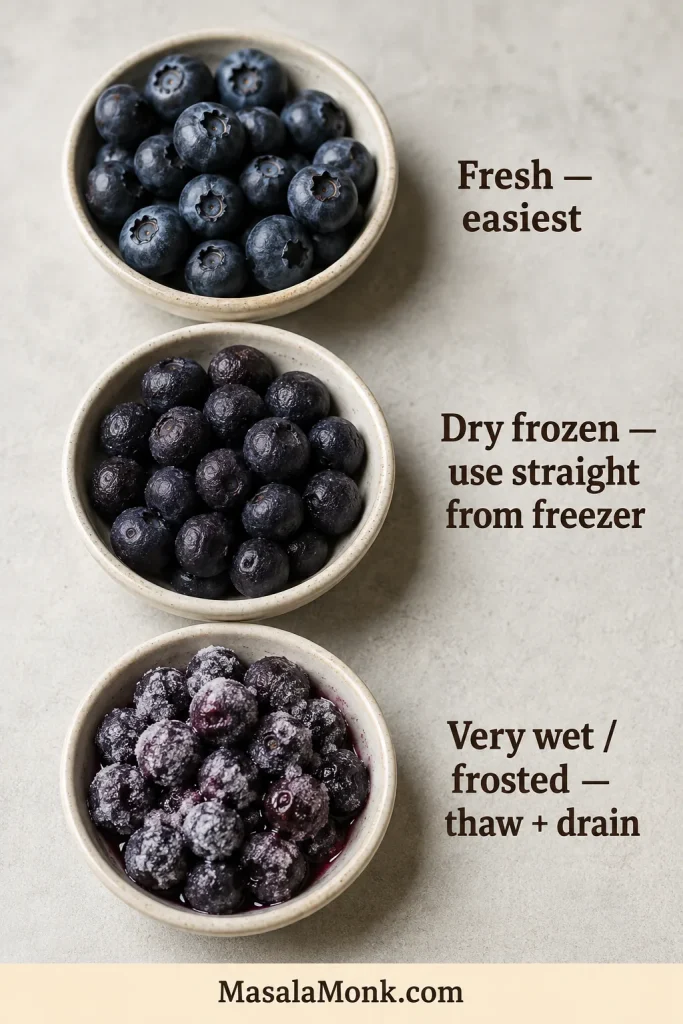
Fresh blueberries are the simplest option, but frozen berries work too. Fairly dry frozen berries can go straight onto the batter; shake off loose ice and keep the layer light.
Heavily frosted berries or berries already releasing lots of juice are better thawed and drained first. Keep excess water off the batter and either type can work well.
Making blueberry the main event? Our blueberry pancakes guide goes further into classic, lemon, banana, oat and other blueberry pancake variations.
Bananas, Strawberries and Apples
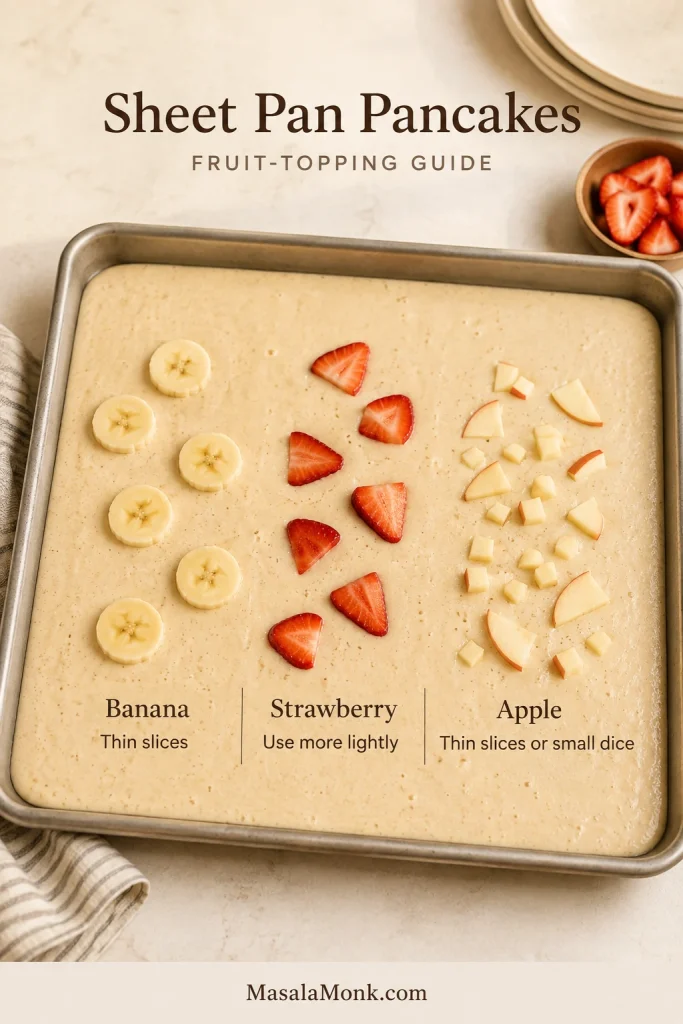
Thin banana slices soften easily during the short bake. Strawberries release more water, so use them more sparingly.
Apples are firmer. Very small dice or thin slices work better than large raw chunks; you can also soften them briefly before adding them to the batter.
Troubleshooting
Most problems trace back to batter depth, mixing, measurements or the way a particular pan and oven handle heat.
Texture & Rise
| What You’re Seeing | What Probably Happened | What to Do |
|---|---|---|
| Dense or heavy | Too much flour, overmixing or stale leavener | Check the flour; mix more gently; use fresh leavener |
| Chewy or rubbery | Batter was mixed too much | Stop folding once the dry flour disappears |
| Gummy middle | Underbaked, batter too deep or too many wet toppings | Return it to the oven if still raw; use the correct batter depth next time |
| Dry edges, wet center | Batter layer was too deep or uneven | Use less batter in a smaller pan and spread it evenly |
| Didn’t rise much | Old leavener, cool oven, long batter rest or overmixing | Use fresh leavener, preheat fully and bake soon after mixing |
| Bitter, metallic or soapy | Too much baking powder or baking soda | Measure the leaveners carefully |
| Batter too thick | Usually excess flour | Check the flour measurement; loosen with buttermilk 1 tablespoon at a time if needed |
| Batter very thin | Flour or liquid measurement may be off | Recheck the quantities before adding anything else |
Pan, Browning & Toppings
| What You’re Seeing | What Probably Happened | What to Do |
|---|---|---|
| Bottom too dark | Dark pan or a longer bake than needed | Start checking sooner next time |
| Top looks pale | Often completely normal | Use the doneness cues above; broil briefly only after it’s cooked |
| Wet fruit pockets | Too much fruit or excess surface moisture | Use less fruit and remove excess moisture before topping |
| One side thinner | Batter wasn’t level before baking | Spread gently and jiggle the pan before baking |
| Pancake stuck | The pan needed more grease or parchment | Butter thoroughly or line the base next time |
Need the deeper explanation? Check batter consistency · Check the pan guide · Check doneness.
Make Ahead, Freeze & Reheat
You can make the morning easier without leaving a bowl of mixed pancake batter in the refrigerator overnight. A little measuring the night before leaves much less to do once everyone is hungry.
Best Night-Before Prep
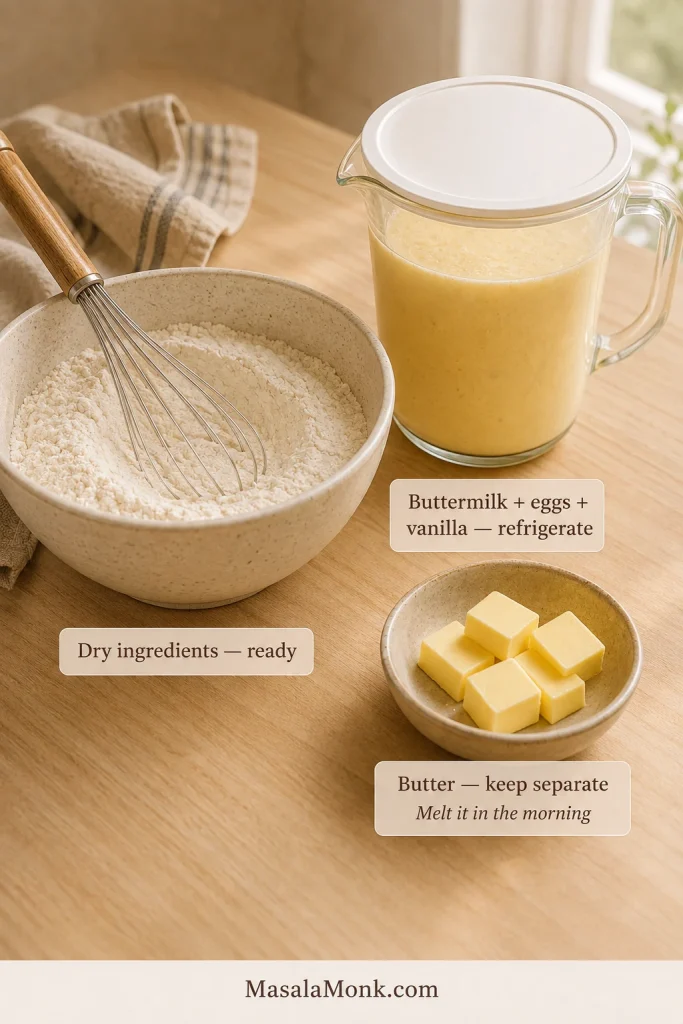
Measure the dry ingredients into one bowl. In another container, whisk together the buttermilk, eggs and vanilla, then cover and refrigerate that mixture overnight.
Keep the butter separate. In the morning, preheat the oven, melt the butter and whisk it into the cold wet mixture before combining wet and dry. A few tiny butter flecks are harmless and will melt during baking.
For a breakfast that really can be assembled before bed, an overnight French toast casserole shifts even more of the work to the night before.
Refrigerator Storage
Let the pancakes cool briefly, then cover and refrigerate them promptly. For the best texture, eat them within about 3 days. The USDA gives a general 3–4 day refrigerator window for properly stored cooked leftovers.
How to Freeze Sheet Pan Pancakes
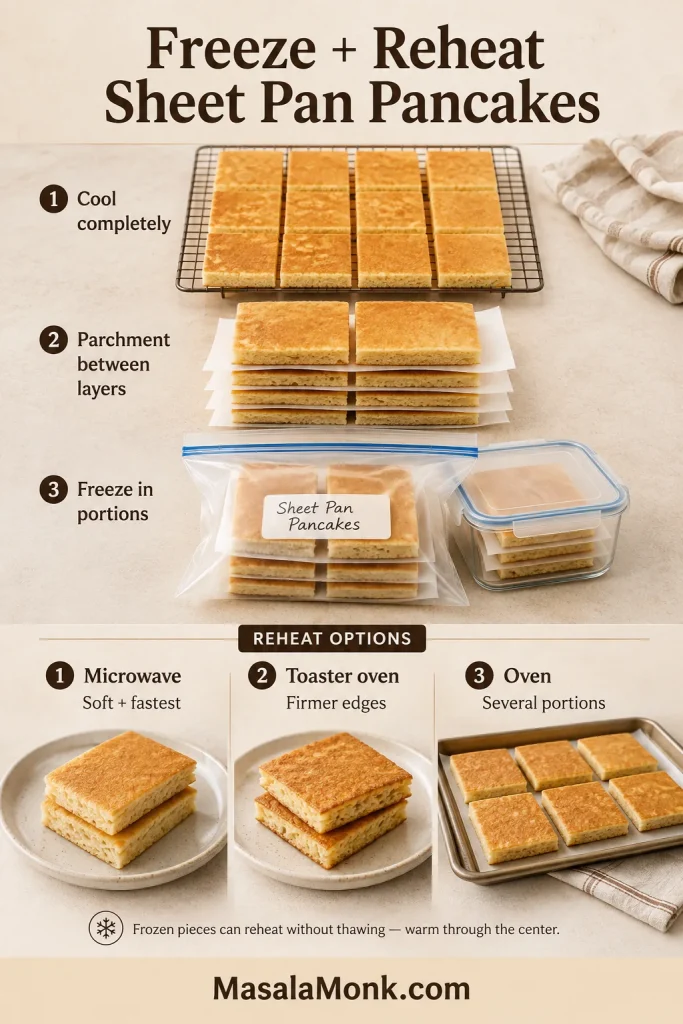
Cut the cooled pancake into portions and place parchment between layers, or freeze the pieces in a single layer until firm before transferring them to a freezer bag or container.
For the best results, use them within about 2 months.
Individual squares can go straight from the freezer to reheating; there’s no need to thaw them first. Frozen pieces simply need more time than refrigerated ones, so make sure they’re warm through the middle before serving.
Best Way to Reheat Them
| If You Want… | Use… | What You Get |
|---|---|---|
| Fastest breakfast | Microwave | Soft, quick pancakes |
| Firmer edges | Toaster oven | A slightly crisper surface |
| Several portions at once | Oven | Gentle, even reheating |
Microwave one or two refrigerated squares in 20–30-second bursts until warm through the middle. Frozen pieces can be reheated the same way; keep the bursts short, reposition the pancake between them if needed, and expect it to take longer.
If you want firmer edges, warm individual squares in a toaster oven at about 325°F / 165°C. Put them on a small tray and leave them uncovered for a drier surface, or cover loosely with foil if you want to preserve more tenderness. Frozen or heavily topped pieces will need longer, so check the center before serving.
Reheating several servings? Arrange the pancakes in a single layer on a baking sheet, cover loosely with foil and warm at 325°F / 165°C until hot through the middle. Remove the foil near the end if you want the surface a little drier.
Whichever method you use, a thin plain square will warm faster than a thick or heavily topped one. Let the temperature in the center—not just the warmth on the surface—be your guide.
How Many People Does One Pan Serve?
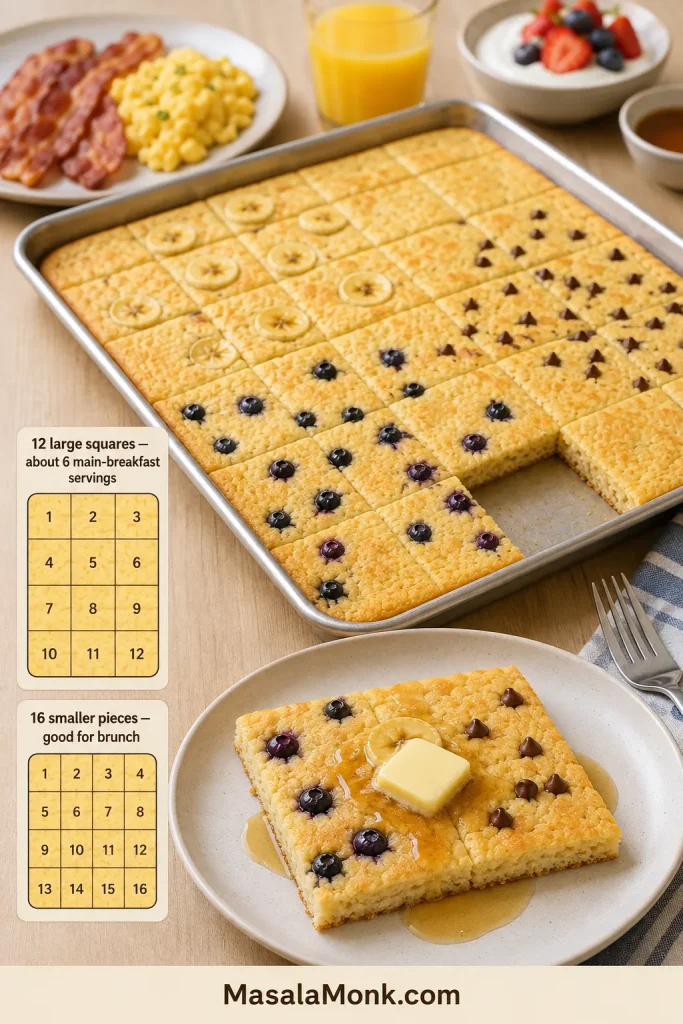
The tray cuts neatly into 12 generous squares. If pancakes are the main breakfast, plan on roughly two squares per adult, or about 6 servings.
For a brunch table with eggs, bacon, yogurt or fruit, cut the tray into 16 smaller pieces and let people come back for seconds.
What to Serve With Them
A simple breakfast needs little more than salted butter, maple syrup and fresh berries. The butter softens almost immediately on the warm surface, and syrup settles into the tender crumb instead of simply running off the plate.
For brunch, add eggs, breakfast sausage, Greek yogurt, fresh fruit or toasted nuts. If bacon is on the table too, cooking bacon in the oven lets you handle a full pack at once without standing over another skillet.
The batter isn’t overly sweet, so it works just as comfortably beside something savory as it does under a generous pour of maple syrup.
Frequently Asked Questions
Can I Use Regular Milk Instead of Buttermilk?
Yes. Because the batter uses baking soda, give regular milk some acidity first.
Add 2 tablespoons / 30 ml lemon juice or white vinegar to a measuring jug, then add milk until the total reaches 2 cups / 480 ml. Stir and let it stand for about 5 minutes.
This homemade buttermilk substitute can be thinner than cultured buttermilk, so use the batter-consistency cues above before deciding it needs any adjustment.
Can I Double the Recipe?
Yes. Use two half-sheet pans. Putting twice as much batter into one pan changes the depth too much.
If both pans bake at the same time, place the racks in the upper and lower thirds of the oven. If your oven browns unevenly, swap rack positions and rotate the pans during the second half of baking. Use the usual doneness cues instead of adding a fixed number of minutes.
Can I Bake These in a Fan or Convection Oven?
Yes. Use 400°F / 205°C fan/convection unless your oven automatically adjusts temperatures for you. Start checking earlier than you would in a conventional oven.
Can I Use Pancake Mix?
Yes. Make the pancake batter according to the package directions; don’t swap a boxed mix cup-for-cup for the flour in this recipe. Complete mixes, Bisquick-style baking mixes and higher-protein mixes such as Kodiak can all need different amounts of liquid, eggs and fat.
If you adapt a prepared mix to a half-sheet, keep the batter layer shallow and use the same visual doneness cues described above. Exact proportions depend on the mix, so a dedicated mix-based recipe is more reliable than trying to make one ratio fit every brand.
The Payoff Is More Than No Flipping
The best thing about sheet pan pancakes isn’t really that they save you from using a spatula.
It’s that breakfast stops arriving in shifts.
Once you know the few cues that matter—the right batter depth, gentle mixing and a cooked center—the rest is simple.
Then cut the tray, pass the syrup and sit down while everybody’s breakfast is still warm—including yours.