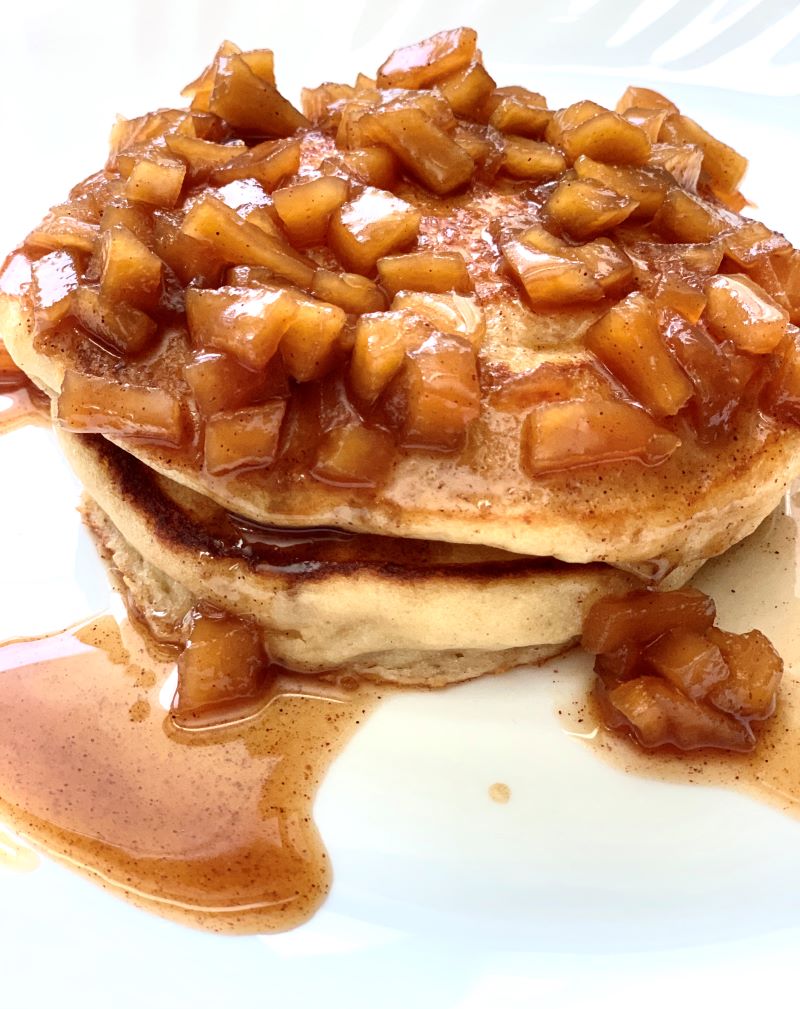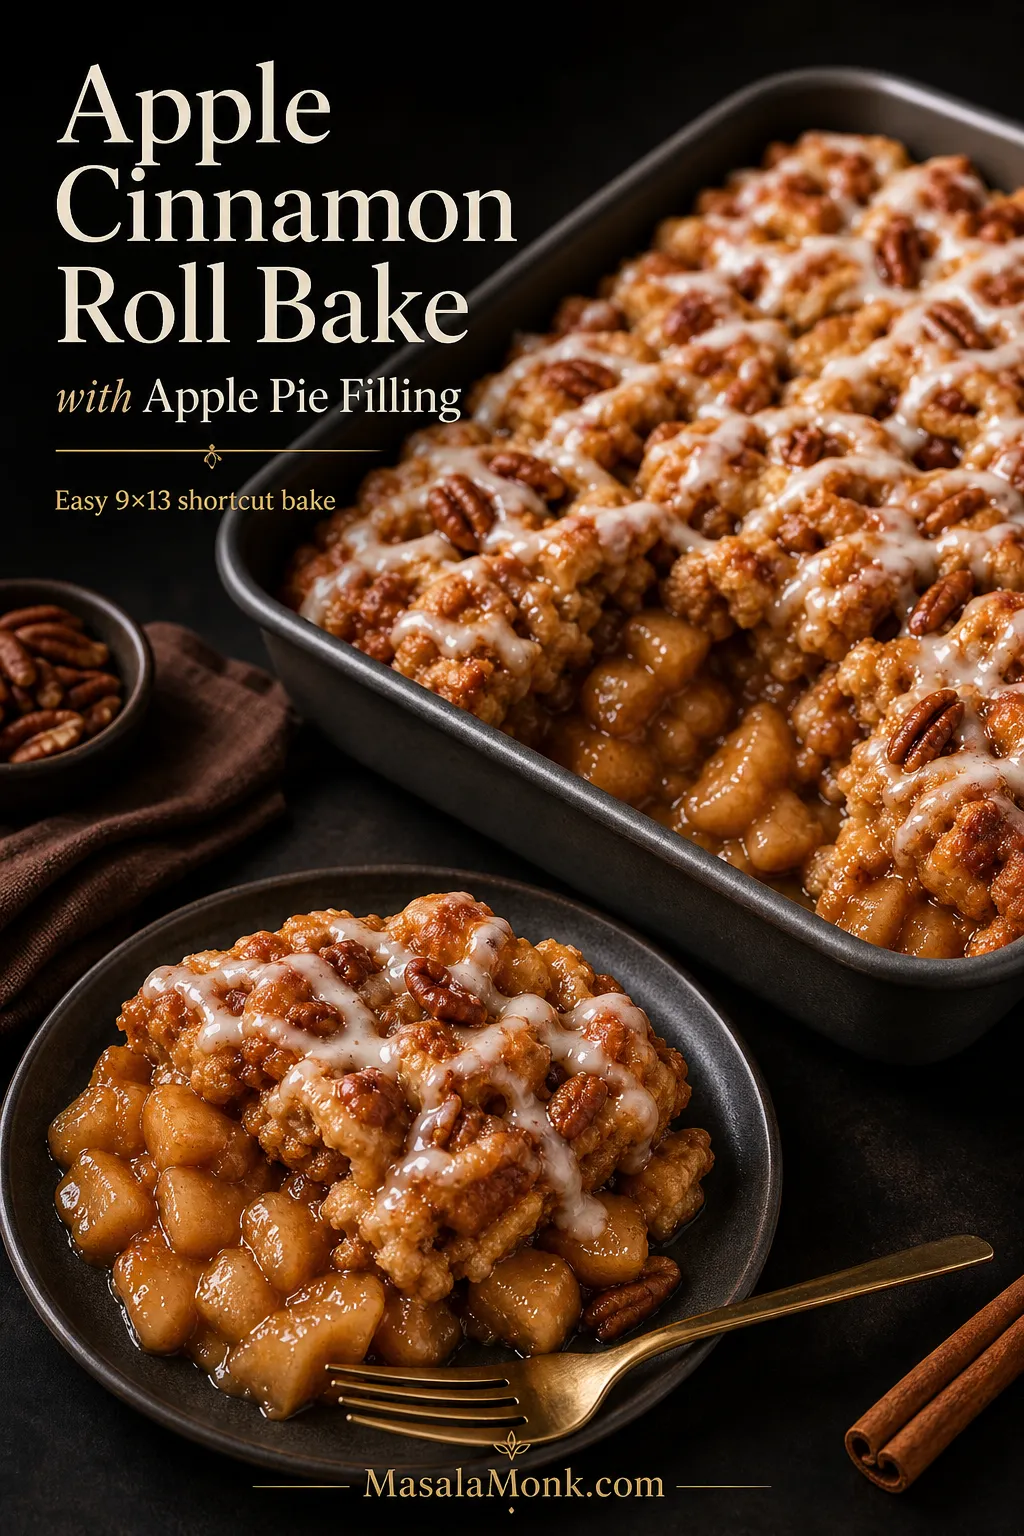
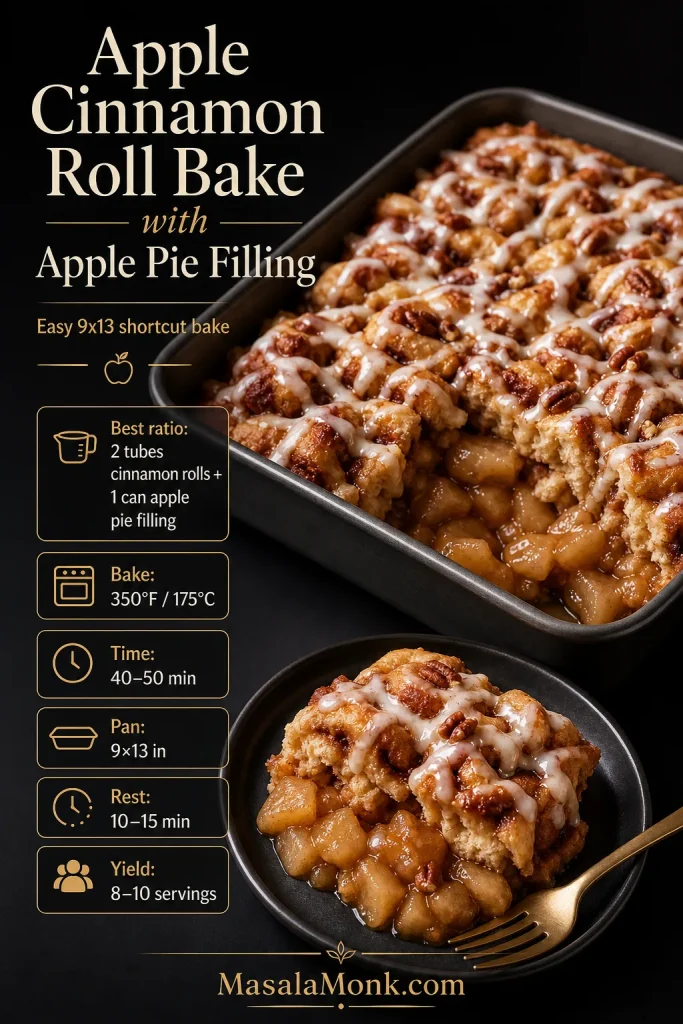
Apple cinnamon roll bake with apple pie filling is the shortcut dessert you make when you want warm apple pie flavor without rolling pie crust, peeling apples, or making cinnamon roll dough from scratch.
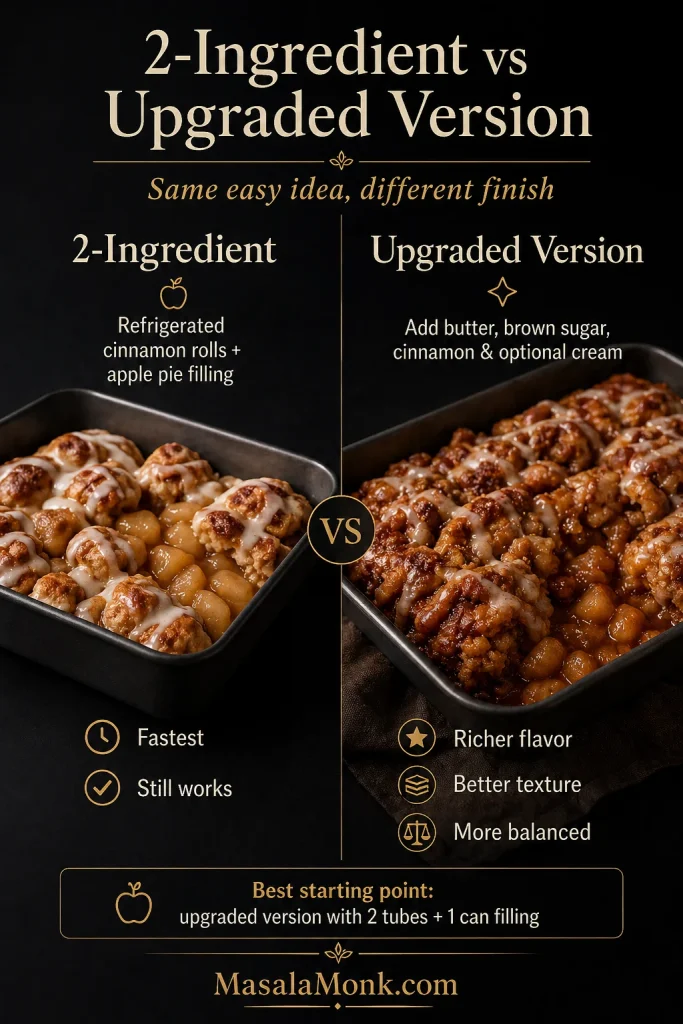
At its simplest, this can be a 2-ingredient apple cinnamon roll bake made with refrigerated cinnamon rolls and apple pie filling. This version keeps that easy shortcut, then adds a few small upgrades — butter, brown sugar, cinnamon, optional cream, and better ratio guidance — so the pan tastes more finished and bakes more evenly.
If you are looking for apple cinnamon rolls with apple pie filling, this is the easy bake-style version: soft cinnamon roll pieces, warm apple filling, sticky icing, and clear fixes for the common problem of wet or doughy centers.
What’s in this guide
Make the Bake
Quick Answer: Apple Cinnamon Roll Bake with Apple Pie Filling
Cut refrigerated cinnamon rolls into pieces, toss them with melted butter, cinnamon, brown sugar, and apple pie filling, then bake everything in a greased 9×13 inch pan at 350°F / 175°C until the center is puffed and cooked through. For the most reliable texture, use 2 tubes of cinnamon rolls with 1 can of apple pie filling. Use 1½ to 2 cans only if you want a very gooey, apple-heavy bake and are comfortable baking it a little longer.
This is not a from-scratch cinnamon roll recipe. It is the easy refrigerated cinnamon roll bake, and the best way to make it taste more homemade is to upgrade the filling first. Diced homemade apple pie filling gives better texture without turning the recipe into a full dough project.
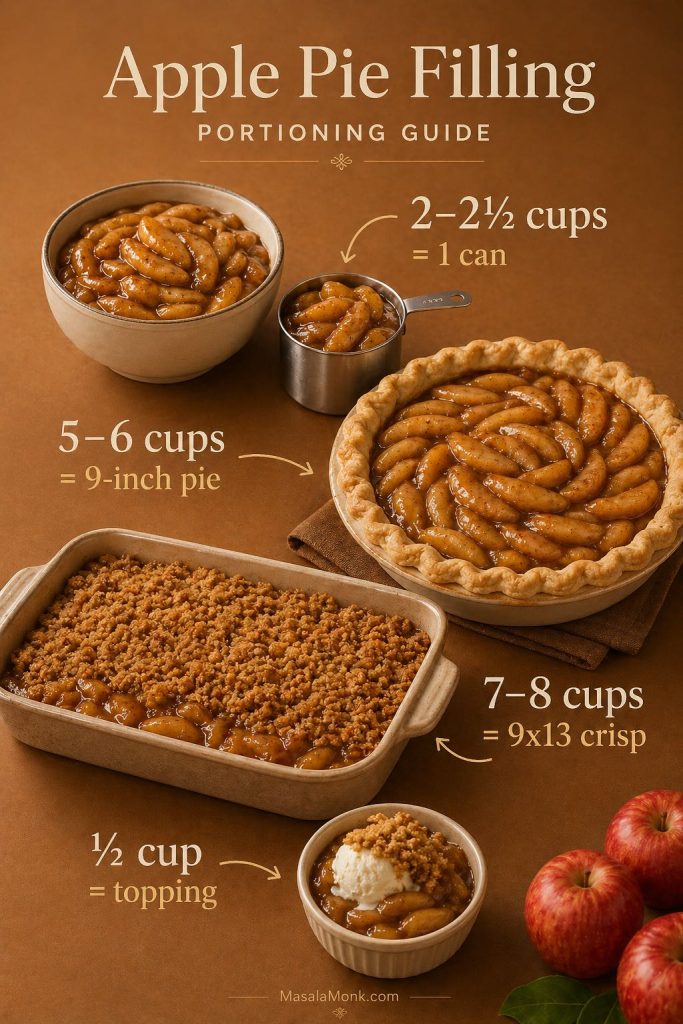
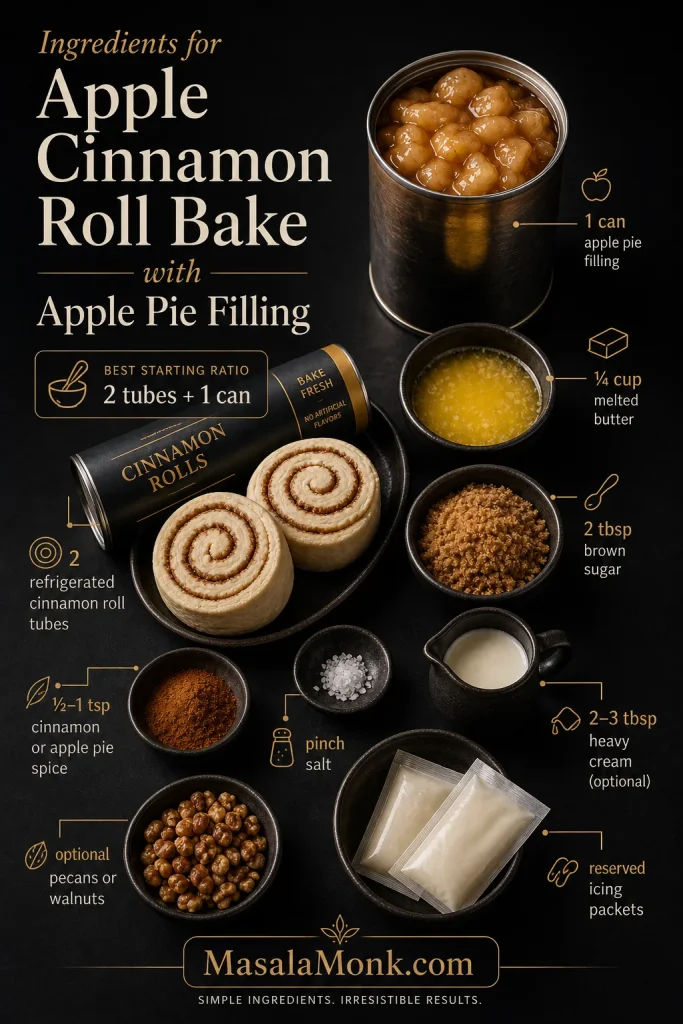
Best default ratio: 2 large tubes refrigerated cinnamon rolls, about 35 oz / 990 g total, plus 1 can apple pie filling, 21 oz / 595 g. This gives you a soft, gooey bake without overloading the pan.
Need exact amounts? Jump to the recipe. Still choosing filling amount? Check the ratio guide.
Apple Cinnamon Roll Bake at a Glance
| Best pan | 9×13 inch / 23×33 cm baking dish for a full batch |
|---|---|
| Oven temperature | 350°F / 175°C |
| Best cinnamon rolls | Refrigerated cinnamon rolls, cut into quarters; jumbo rolls can be cut into 6 pieces |
| Best filling ratio | 2 tubes cinnamon rolls + 1 can apple pie filling |
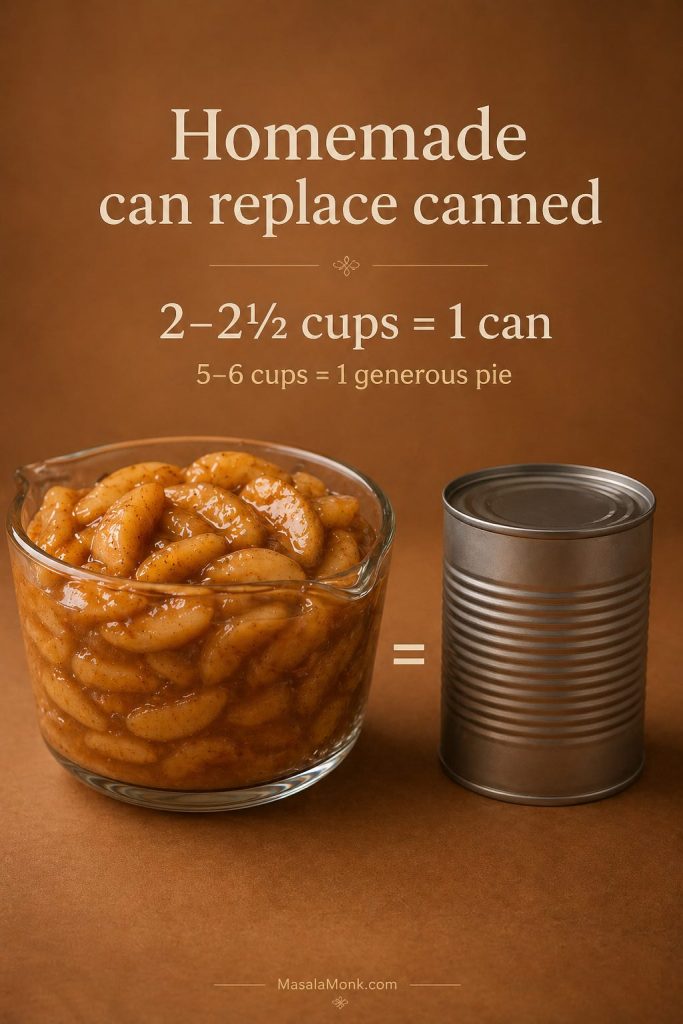
| Homemade filling replacement | Use 2 to 2½ cups homemade apple pie filling to replace one 20–21 oz can |
| Bake time | Usually 40–50 minutes for a 9×13 pan |
| Center cue | The middle should be puffed, set, and no longer wet or raw |
| Rest time | 10–15 minutes before adding icing |
| Yield | 8–10 servings |
Why This Apple Cinnamon Roll Bake Works
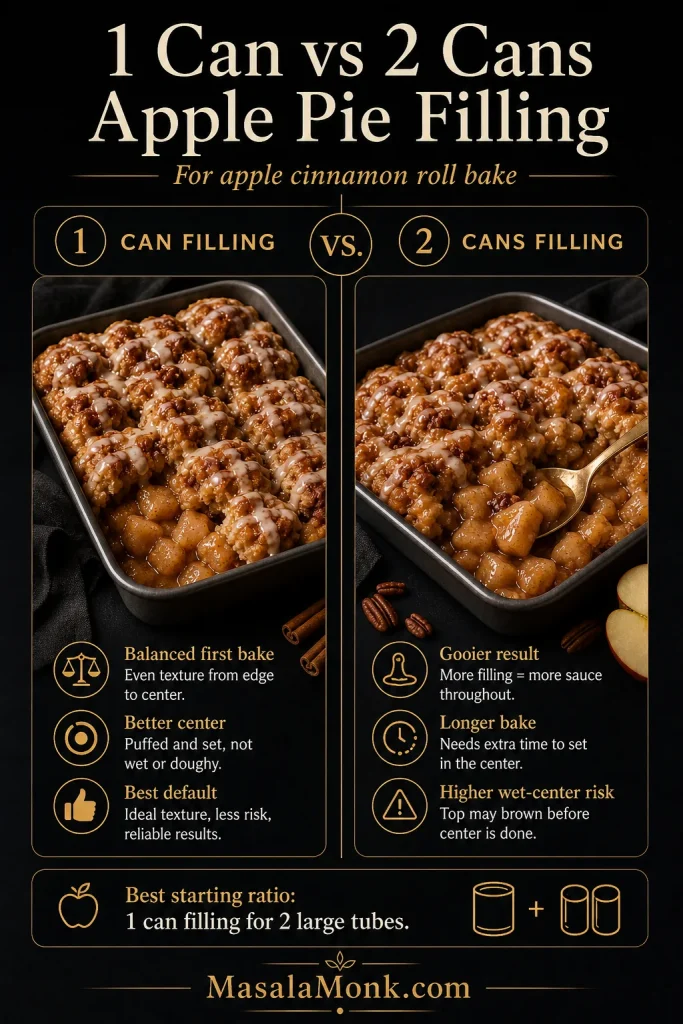
This recipe works because it treats the filling ratio as the main decision, not an afterthought. Apple pie filling is sweet, saucy, and heavy, so using too much can keep the cinnamon roll pieces from baking evenly in the center. Starting with 1 can of filling for 2 tubes of cinnamon rolls gives you enough apple flavor without turning the middle wet.
Cutting the rolls into smaller pieces also matters. Smaller pieces bake through faster, hold the apple filling better, and give you more soft edges for the icing to settle into. A wide 9×13 pan helps the dough spread instead of steaming in a deep pile.
The result is still gooey, cozy, and generous, but the center cooks through properly.
Before mixing the pan, compare the best filling ratios and choose the right version for your pan.
Ingredients You Need
This recipe starts with the easy version: refrigerated cinnamon rolls and apple pie filling. The small upgrades — butter, brown sugar, cinnamon, salt, and optional cream — make it taste more like a finished bake and less like two packaged ingredients stirred together.
Using smaller tubes or extra filling? Check the filling ratio before mixing the pan.
Refrigerated Cinnamon Rolls
Use 2 tubes of refrigerated cinnamon rolls for a full 9×13 pan. Large tubes are often about 17.5 oz / 496 g each, giving you about 35 oz / 990 g total dough. If your tubes are smaller, use the ratio guide below instead of guessing.
Use any brand of refrigerated cinnamon rolls you like. The important part is the total dough weight, not the brand name. If your tubes are smaller than the large 17.5 oz / 496 g size, reduce the filling slightly or use the small-batch guide.
Reserve the icing packets. Drizzle the icing after the bake has rested, not before it goes into the oven.
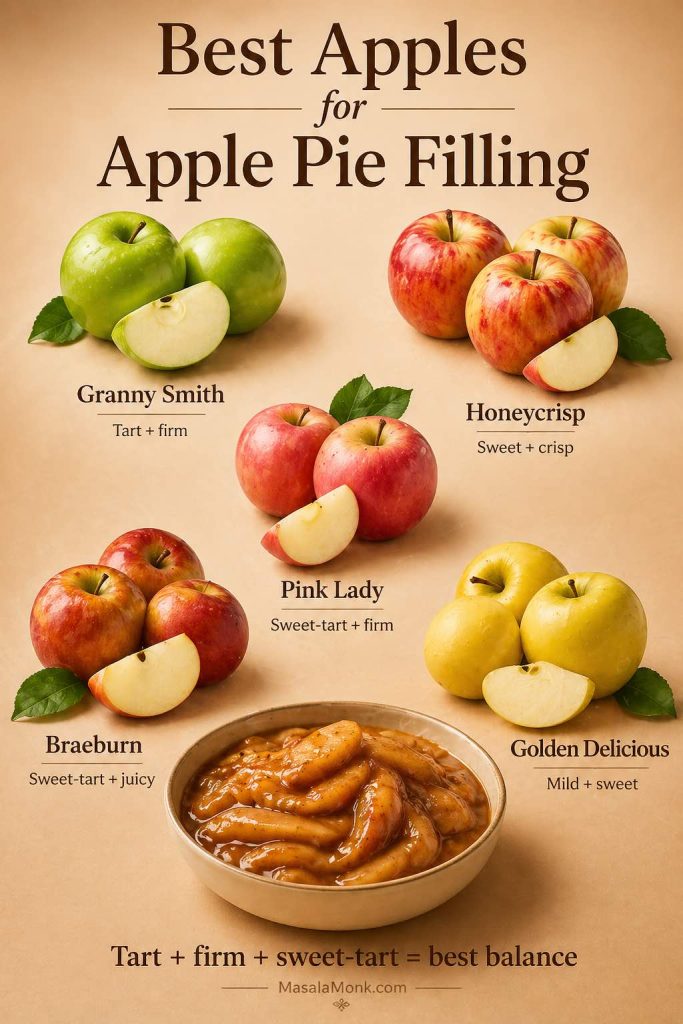
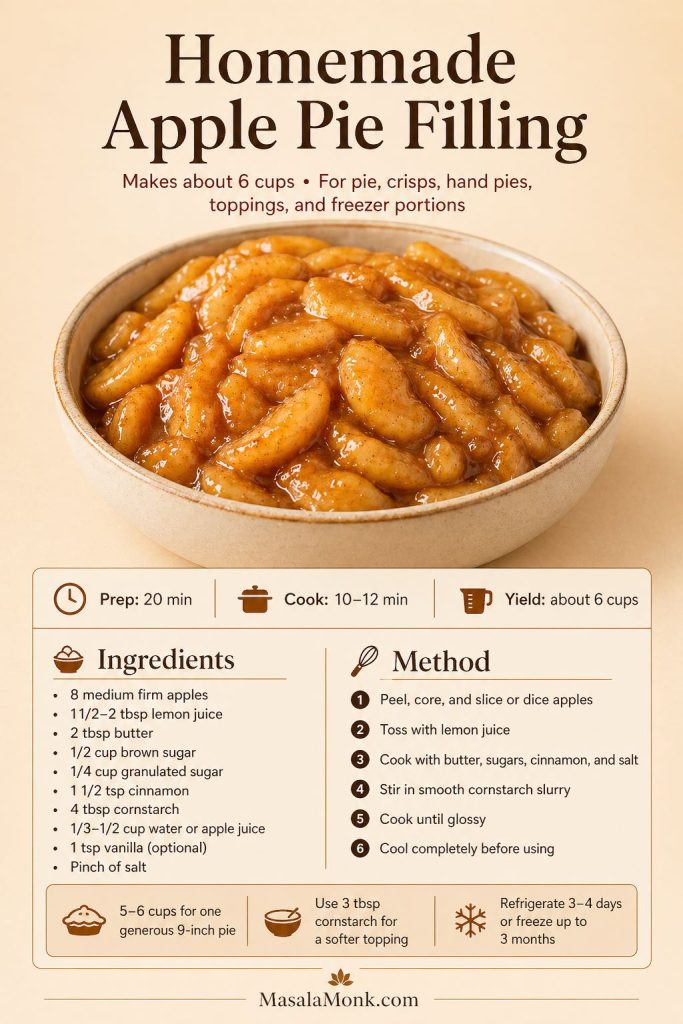
Apple Pie Filling
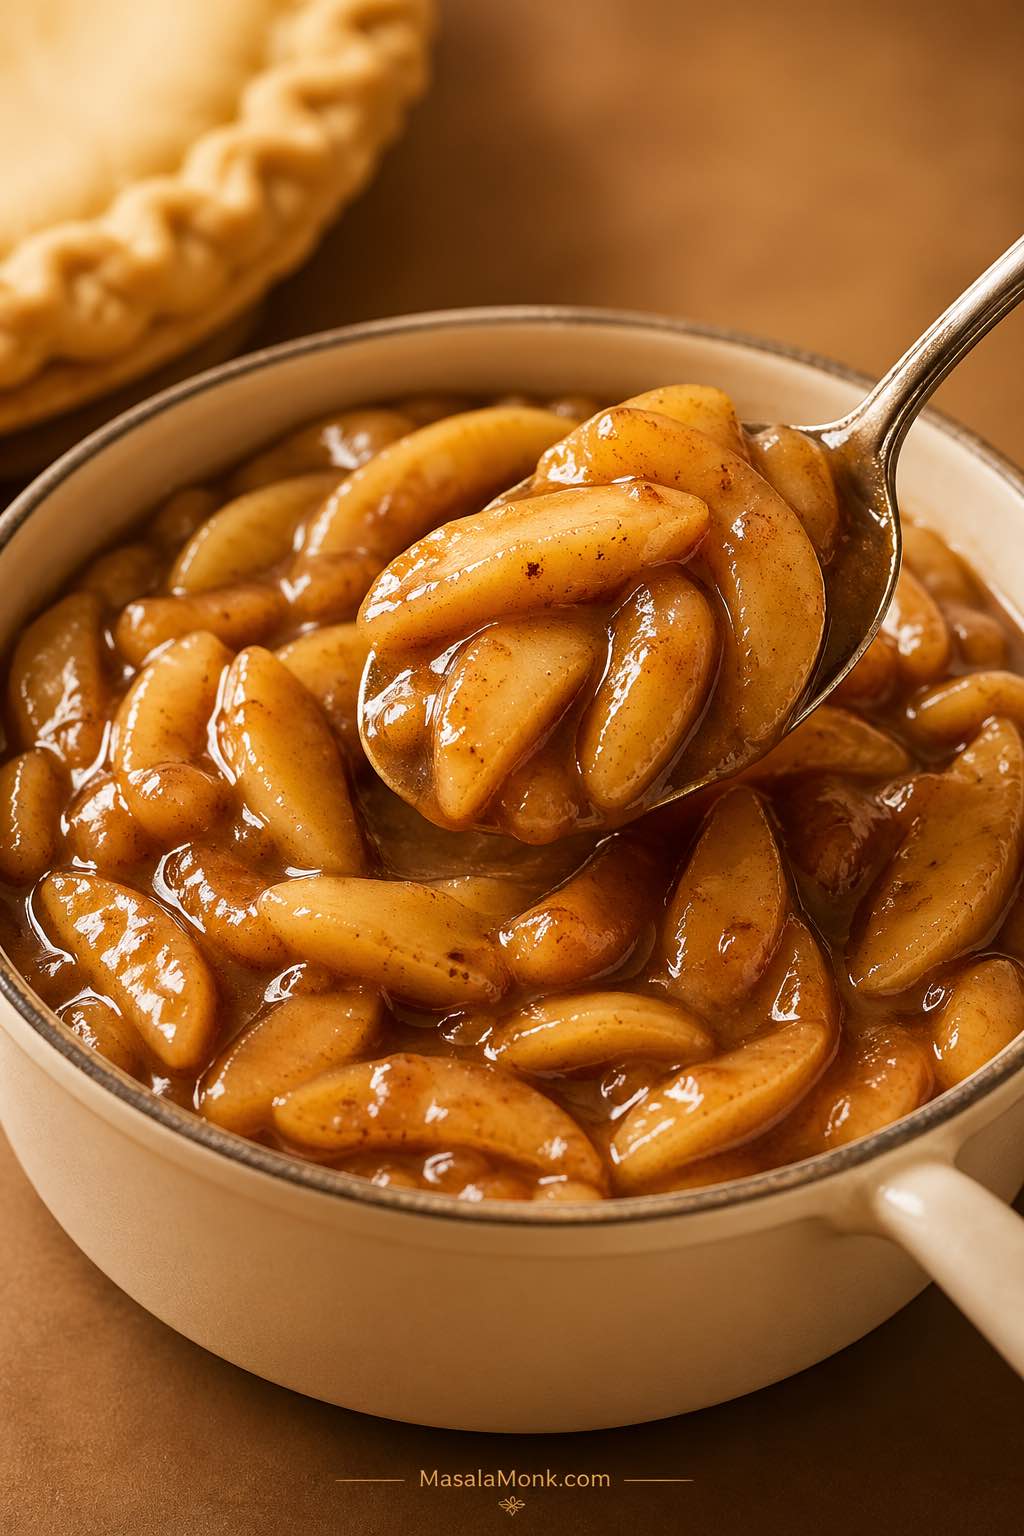
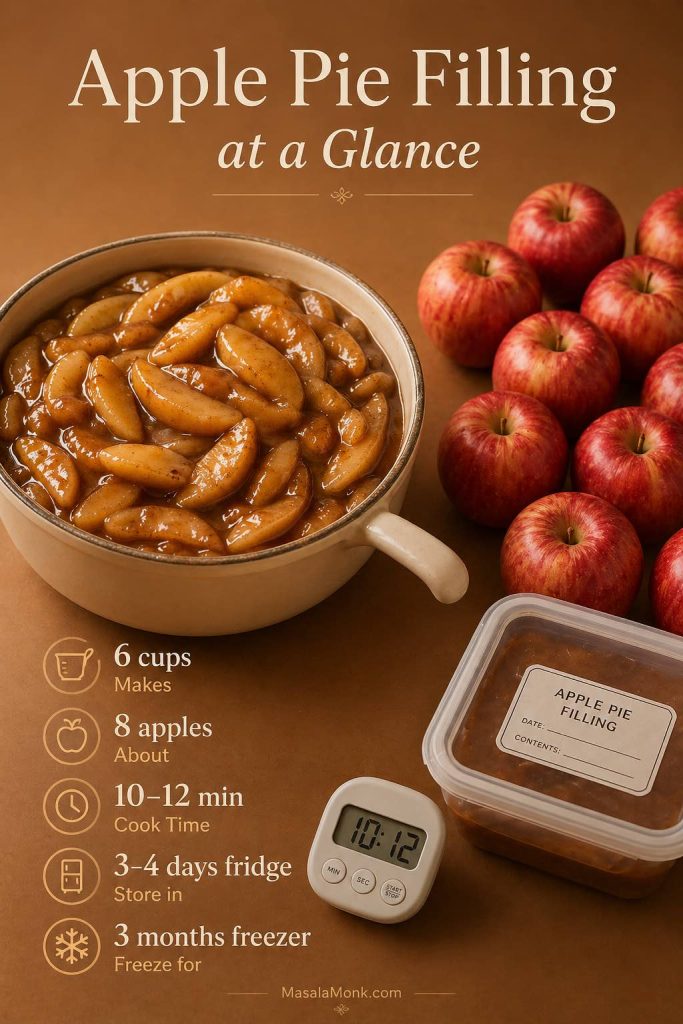
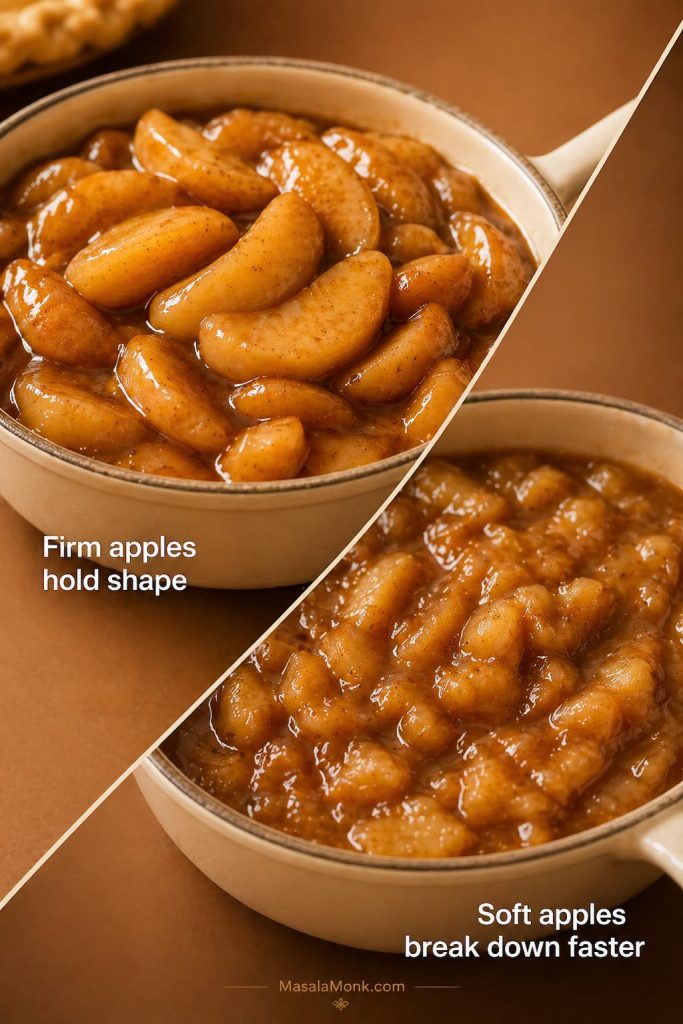
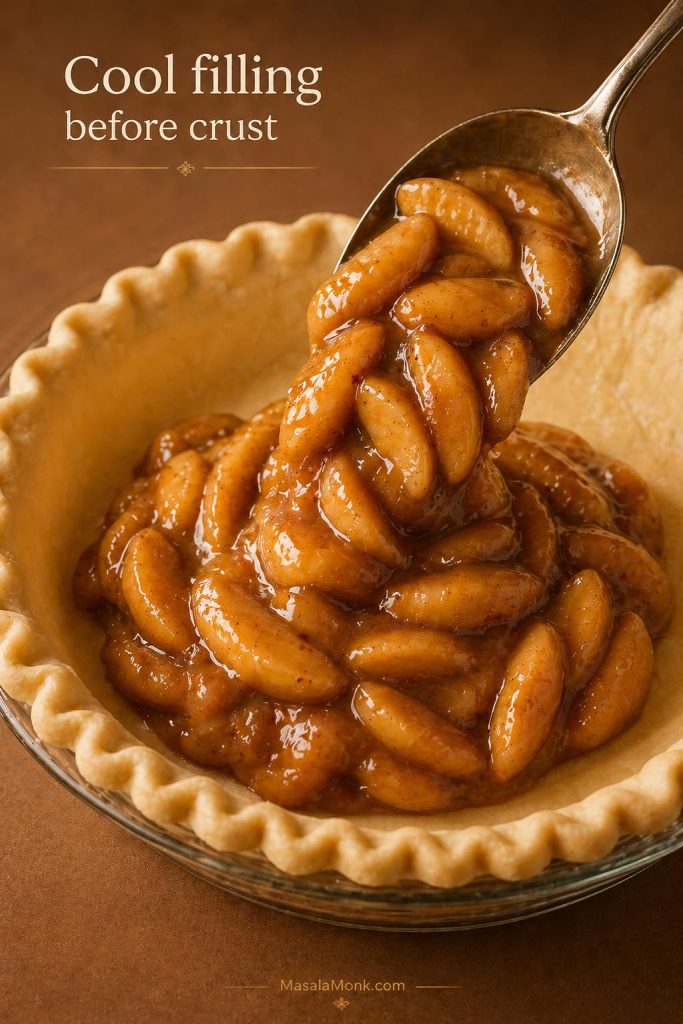
Use 1 can of apple pie filling, usually 21 oz / 595 g, for the most reliable full-pan bake. If the apple slices are large, chop them into smaller pieces before mixing. Smaller apple pieces distribute better and reduce wet pockets in the center.
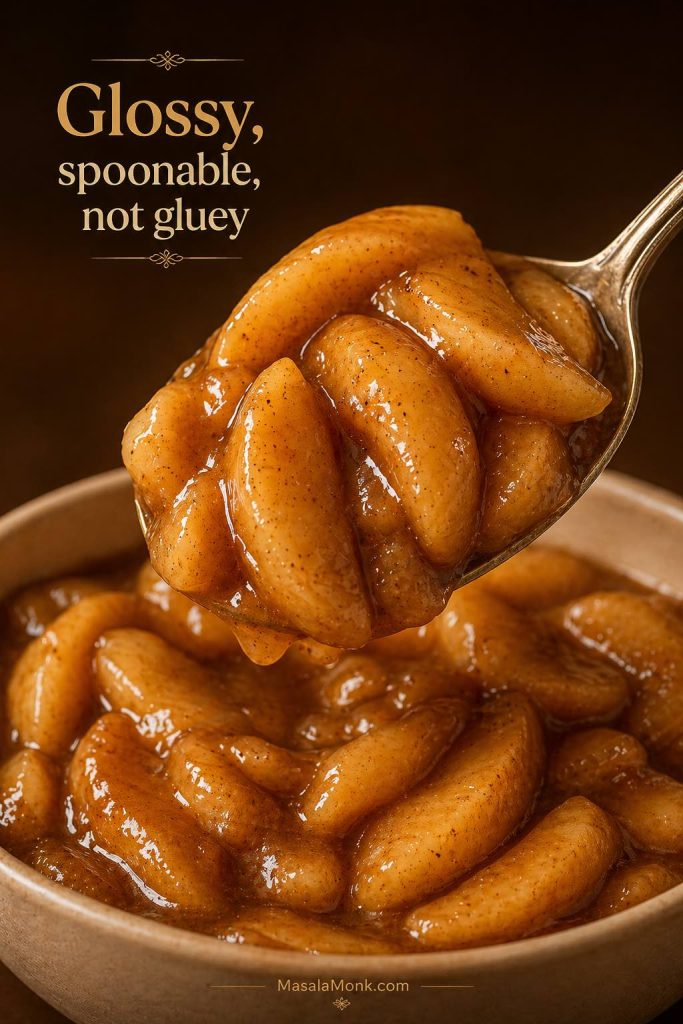
You do not need to drain the apple pie filling. If the can looks extremely saucy, spoon off a little excess gel, but do not strain it dry. The sauce is part of what makes the bake soft and gooey.
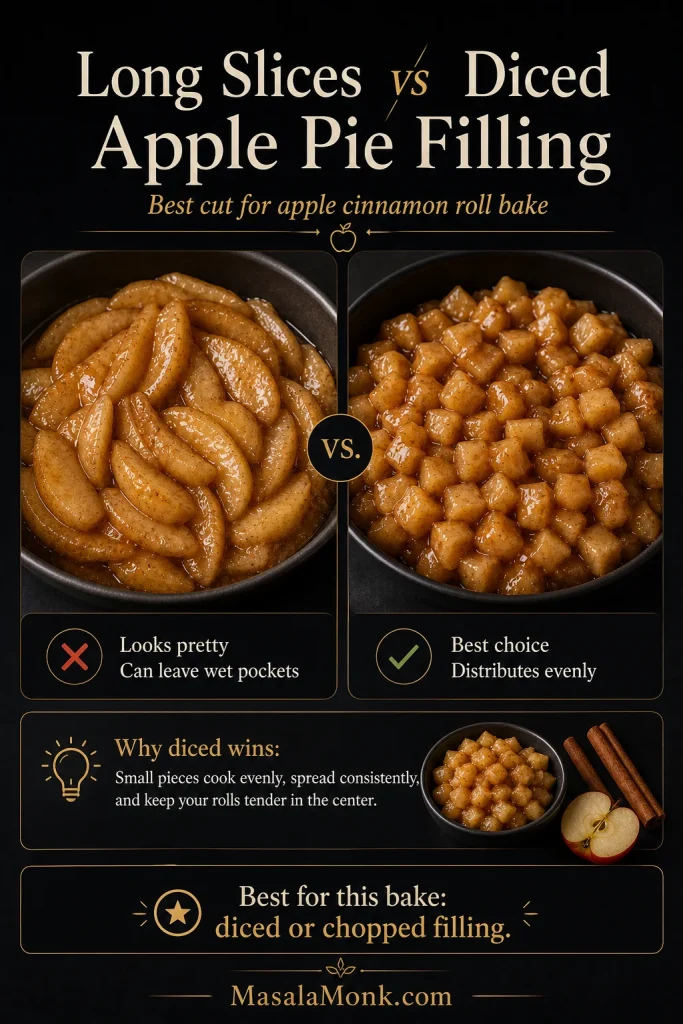
You can also use homemade apple pie filling. For this recipe, diced apple pie filling works better than long slices because it spreads evenly between the cinnamon roll pieces.
Butter, Brown Sugar and Cinnamon
Melted butter coats the dough pieces and helps the edges bake up richer. Brown sugar adds a light caramel note, while cinnamon or apple pie spice reinforces the apple-pie flavor.
- Melted butter: ¼ cup / 4 tablespoons / 57 g
- Light brown sugar: 2 tablespoons / about 25 g
- Cinnamon or apple pie spice: ½ to 1 teaspoon
- Fine salt: a small pinch, optional but useful
Heavy Cream, Optional
Heavy cream can make the bake softer and more gooey, but too much can slow down the center. For this recipe, use only 2–3 tablespoons / 30–45 ml if you want the cream upgrade.
Icing or Cream Cheese Glaze
The easiest option is the icing that comes with the cinnamon rolls. For a thicker finish, make the quick cream cheese glaze in the recipe card. Add icing while the bake is warm, not piping hot, so it melts slightly without disappearing completely.
Pecans or Walnuts, Optional
Chopped pecans or walnuts add crunch and make the bake feel more holiday-ready. Use about ½ cup / 55–60 g, and sprinkle some inside the bake or over the top before baking.
Best Ratio of Cinnamon Rolls to Apple Pie Filling
This is where many apple cinnamon roll bakes go wrong. One version may call for two cans of apple pie filling, while another uses one can for the same amount of dough. Both can work, but they do not give the same result.
For the most reliable center, use 1 can of apple pie filling with 2 large tubes of cinnamon rolls. If you want a wetter, cobbler-style bake, increase the filling and bake longer.
If you want visible apple pieces in every bite, chop the filling smaller before adding a second full can. Smaller pieces distribute better without flooding the center.
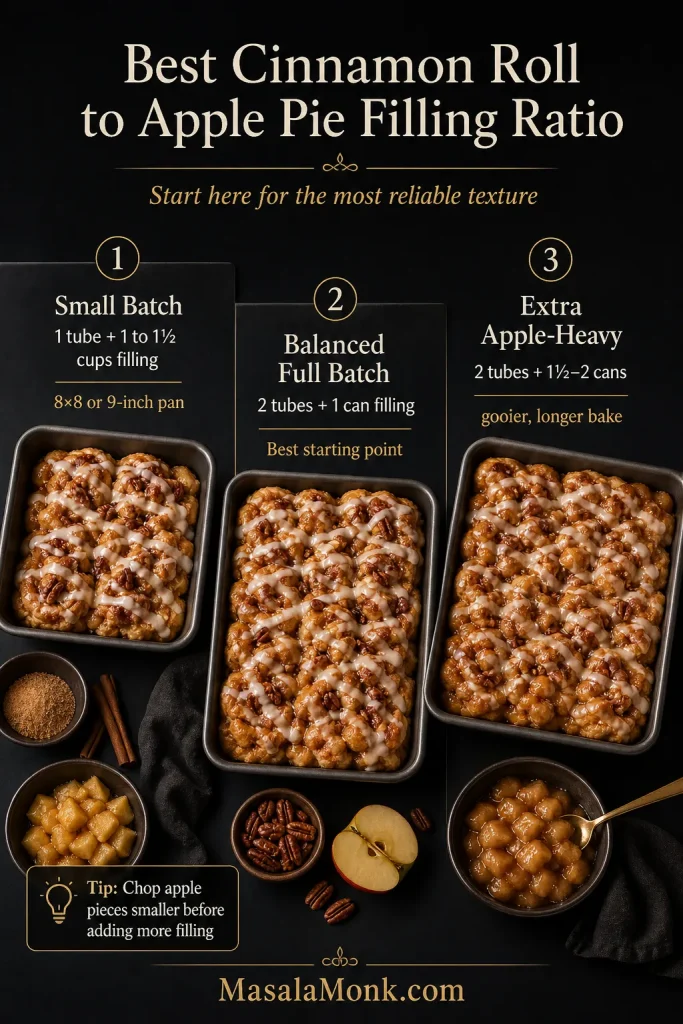
| Version | Cinnamon rolls | Apple pie filling | Pan | Bake time |
|---|---|---|---|---|
| Small batch | 1 tube / 12–17.5 oz / 340–500 g | 1 to 1½ cups | 8×8 inch or 9-inch round | 22–30 minutes |
| Balanced full batch | 2 large tubes / about 35 oz / 990 g total | 1 can / 21 oz / 595 g | 9×13 inch / 23×33 cm | 40–50 minutes |
| Extra apple-heavy | 2 large tubes / about 35 oz / 990 g total | 1½ to 2 cans / 31–42 oz / 880–1190 g | 9×13 inch / 23×33 cm | 45–55 minutes |
| Homemade filling version | 2 large tubes | 2 to 2½ cups homemade filling per can replacement | 9×13 inch / 23×33 cm | 40–50 minutes |
One Can vs Two Cans of Apple Pie Filling
If you are making this apple cinnamon roll bake for the first time, one can of apple pie filling is the safer starting point. Two cans can taste extra gooey, but the added sauce makes the center slower to bake and easier to undercook.
Want the simplest shortcut? See the 2-ingredient version. Ready to bake? Jump to the method.
Small-roll note: If your cinnamon roll tubes are smaller than 17.5 oz / 496 g each, do not automatically use a full can of filling for every tube. Smaller tubes need less filling, or the pan can turn wet before the dough cooks through.
Can You Make This with Just 2 Ingredients?
Yes. You can make a 2-ingredient apple cinnamon roll bake with only refrigerated cinnamon rolls and apple pie filling. Cut the rolls, fold them with the filling, bake until the center is cooked through, then drizzle with the icing. The butter, brown sugar, cinnamon, and salt in this recipe are small upgrades that make the bake taste more finished, but they are not required.
Which Version Should You Make?
The best version depends on what you want from the pan. If this is your first time making it, start with the balanced 9×13 bake. Once you know how your oven, pan, and cinnamon rolls behave, you can make it more apple-heavy or richer with cream.
| Choose this version | Use it when | What to expect |
|---|---|---|
| Balanced 9×13 bake | You want the safest first try | Soft rolls, clear apple flavor, less risk of a doughy center |
| Extra apple-heavy bake | You want a gooier dessert-style casserole | More filling, more sauce, longer bake time |
| Small batch | You are using 1 tube of cinnamon rolls | Better for an 8×8 pan or 9-inch round pan |
| Homemade filling version | You want better apple texture and less canned sweetness | Best flavor, especially with diced apple pie filling |
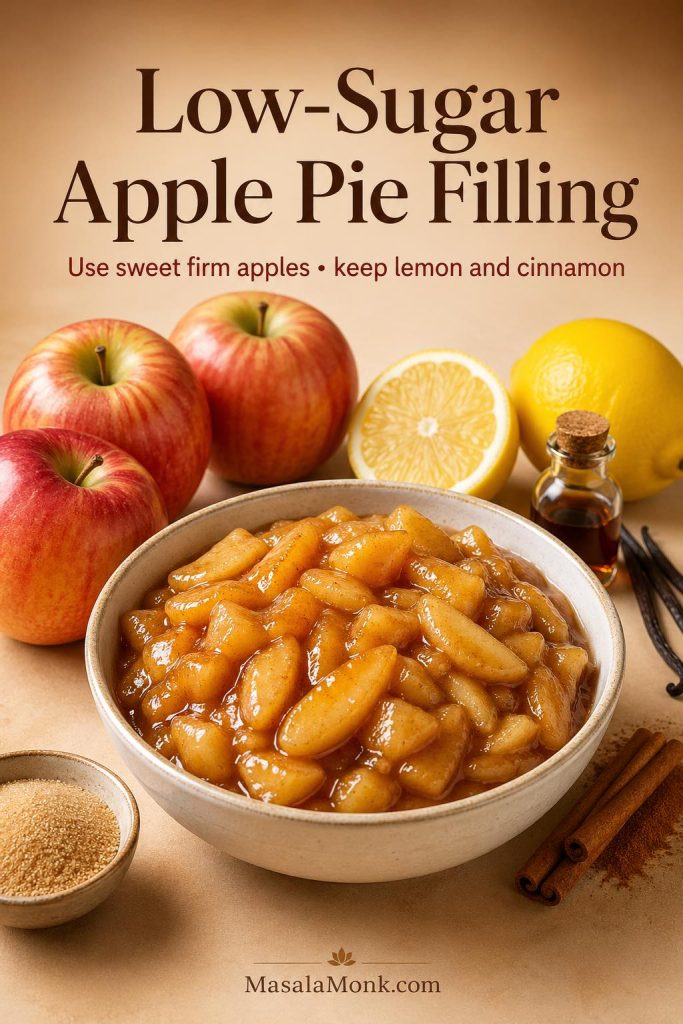
Canned vs Homemade Apple Pie Filling
Canned apple pie filling is the fastest option, and it works well for this recipe. Homemade filling gives you better control over sweetness, apple texture, and spice. The best homemade version for this bake is diced or chopped, not long slices.

| Filling | Best for | How much to use |
|---|---|---|
| Canned apple pie filling | Fastest shortcut bake | 1 can / 21 oz / 595 g for a balanced 9×13 bake |
| Homemade diced apple pie filling | Better texture and less canned sweetness | 2 to 2½ cups to replace one can |
| Extra saucy filling | Gooey casserole-style bake | Use carefully; too much sauce can delay the center |
| Fresh raw apples | Not the best direct swap | Cook them first or use a proper apple pie filling method |
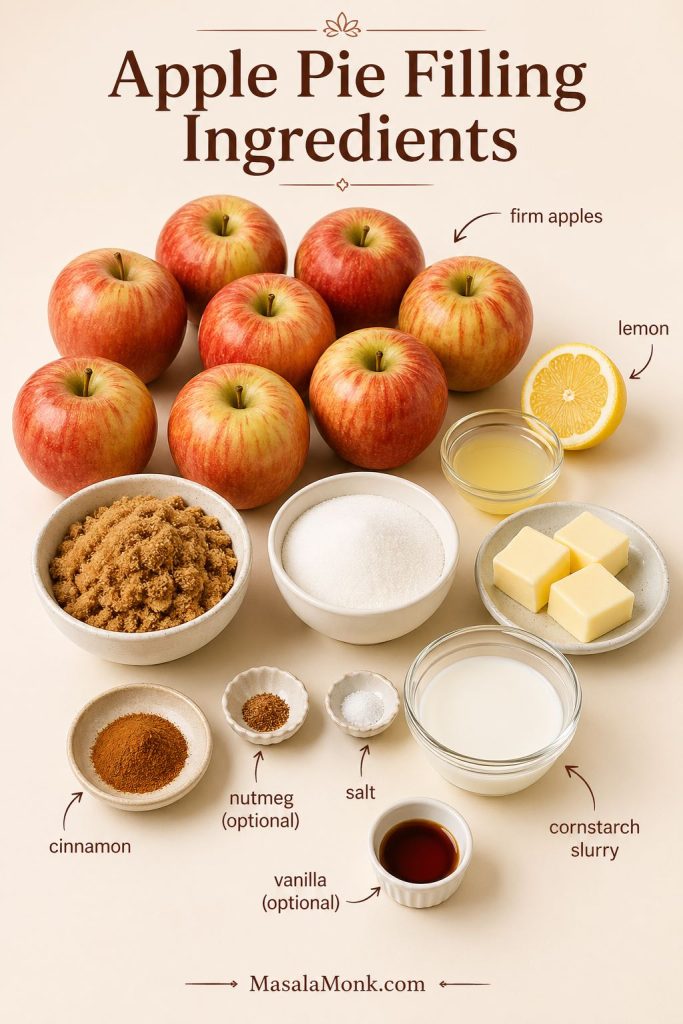
If you want to make the filling from scratch, use this apple pie filling recipe and dice the apples for this bake. Use about 2 to 2½ cups homemade filling for every 20–21 oz can you are replacing.
Long Slices vs Diced Apple Pie Filling
For this bake, diced or chopped apple pie filling works better than long slices. Smaller pieces spread between the cinnamon roll pieces more evenly, which gives you apple flavor throughout the pan without creating wet pockets.
Filling ready? Go to the step-by-step method. Worried about the center? Check the doughy-center fixes.
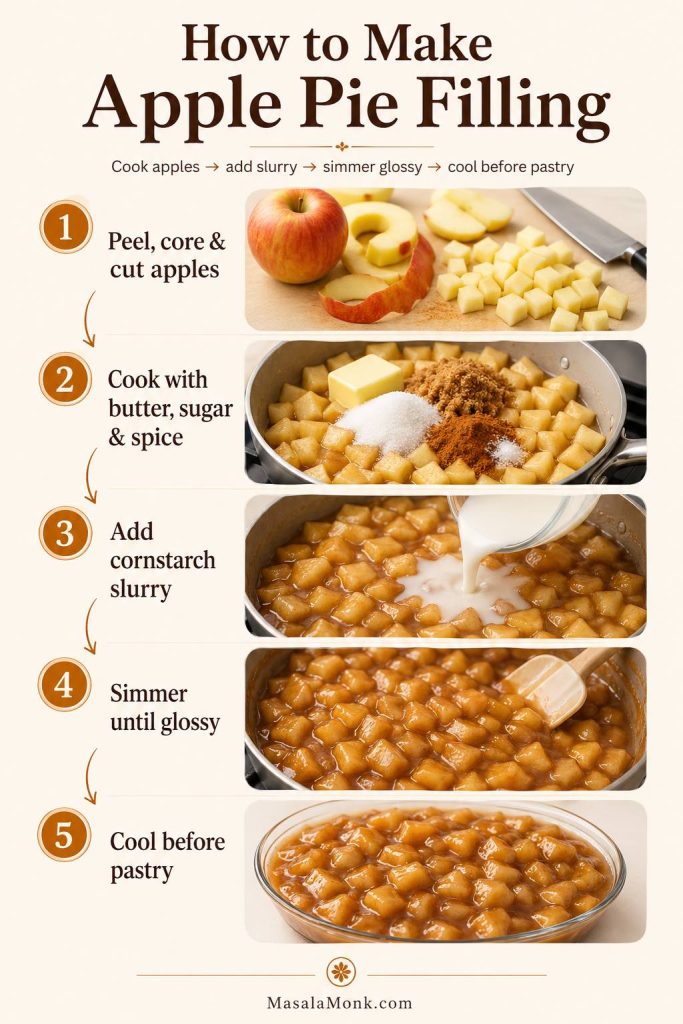
How to Make Apple Cinnamon Roll Bake with Apple Pie Filling
The goal is simple: keep the dough pieces small, spread the filling evenly, and give the center enough time to bake through. The apple filling should sit around and between the cinnamon roll pieces rather than forming one thick layer over the top.
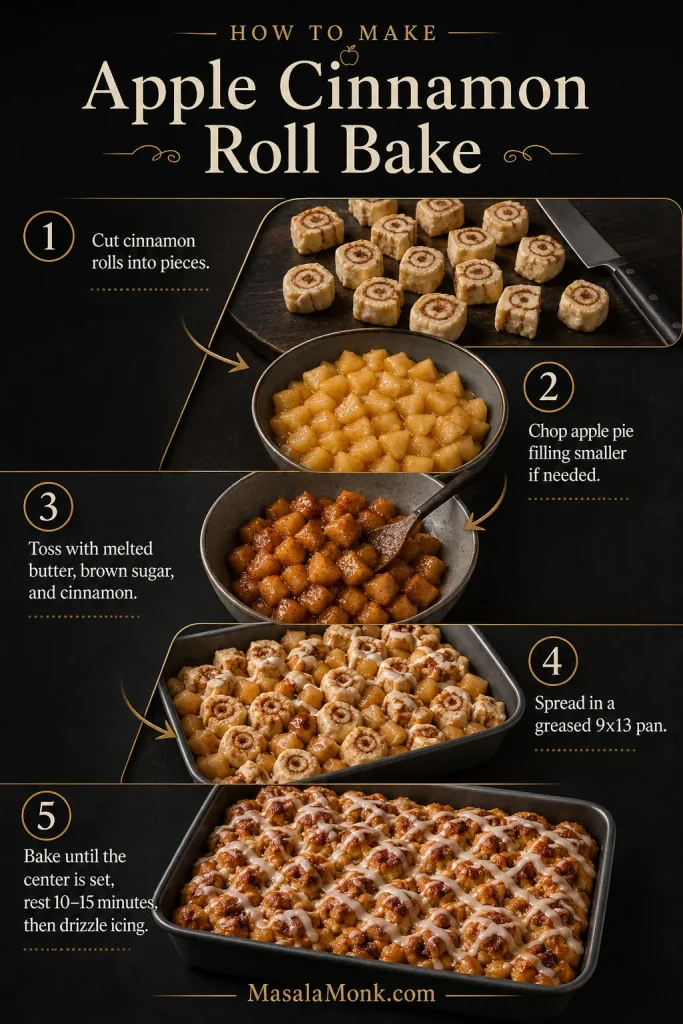
- Preheat the oven. Heat oven to 350°F / 175°C. Grease a 9×13 inch / 23×33 cm baking dish.
- Reserve the icing. Open the cinnamon roll tubes and set the icing aside for later.
- Cut the cinnamon rolls. Cut regular rolls into quarters. If using jumbo rolls, cut each roll into 6 pieces.
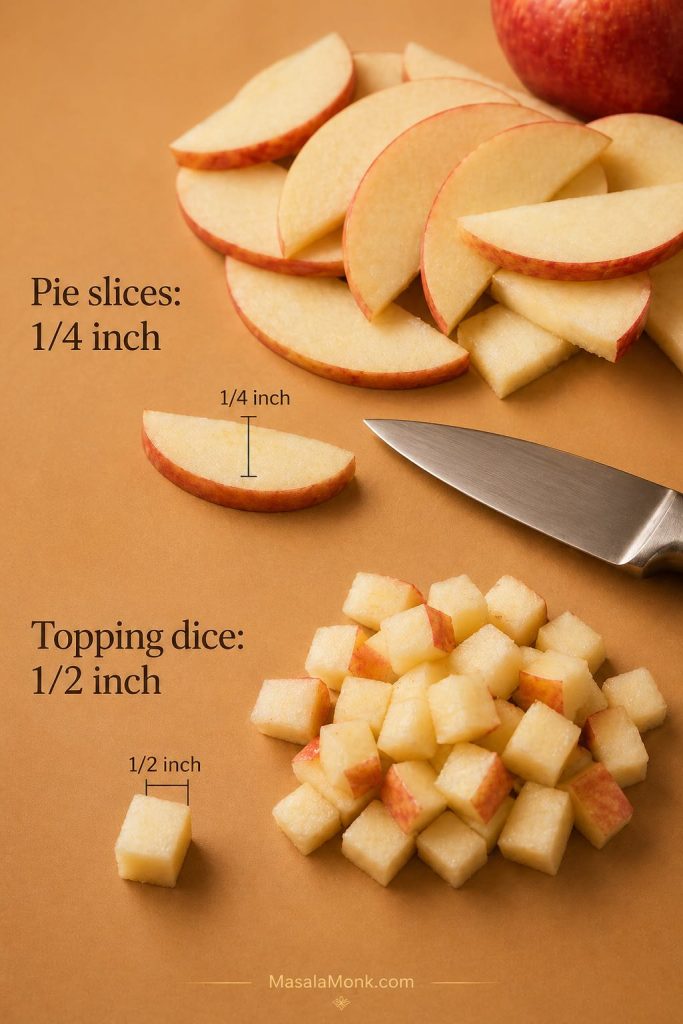
- Chop the apple filling. If the apple slices are large, chop them into roughly ½-inch / 1.25 cm pieces.
- Season the dough. In a large bowl, toss the cinnamon roll pieces with melted butter, brown sugar, cinnamon or apple pie spice, and a small pinch of salt.
- Add the apple pie filling. Fold in the filling gently so the dough pieces are coated but not crushed.
- Spread in the pan. Transfer the mixture to the baking dish and spread it in one even layer.
- Add cream, if using. Drizzle 2–3 tablespoons / 30–45 ml heavy cream over the top. Keep it light so the center still bakes through cleanly.
- Bake. Bake for 40–50 minutes, checking the center around 35–40 minutes. Tent loosely with foil if the top browns before the middle is done.
- Rest and ice. Let the bake rest for 10–15 minutes, then drizzle with the reserved icing or cream cheese glaze.
Center still looks soft? Use the doughy-center checklist. Different pan size? Check pan sizes.
Common Mistakes to Avoid
- Using too much filling the first time. Two cans can work, but 1 can is the better starting point for a full 9×13 bake.
- Leaving the cinnamon rolls too large. Big pieces brown on the outside before the middle cooks through.
- Using a deep pan for a full batch. A deep dish traps steam and slows the center.
- Adding icing too early. If the pan is piping hot, the icing melts away instead of sitting on top.
- Judging only by the edges. The edges cook first. Always check the center before pulling the pan from the oven.
How to Keep Apple Cinnamon Rolls from Staying Doughy
A doughy center is the most common problem with this kind of shortcut bake. It usually happens because the dough pieces are too large, the pan is too deep, or there is too much wet filling sitting over the middle.
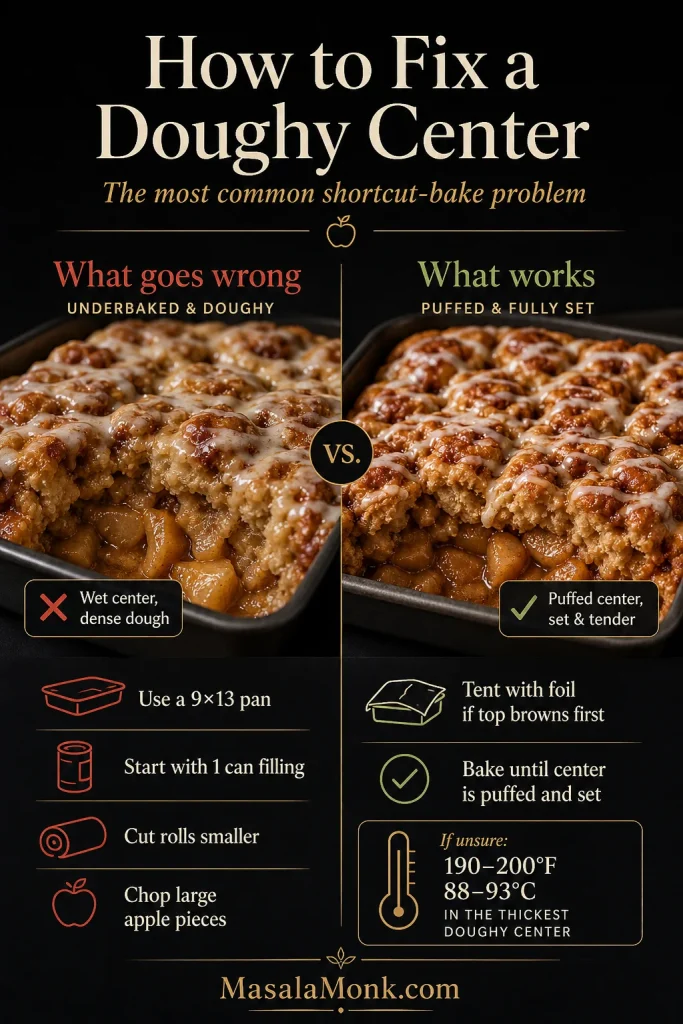
- Use a wide pan. A 9×13 pan is safer for a full batch than a deep round dish.
- Cut the rolls small enough. Quarter regular rolls; cut jumbo rolls into 6 pieces.
- Start with 1 can of filling. Two cans can work, but the bake becomes wetter and needs more time.
- Chop large apple slices. Big apple pieces create wet pockets around the dough.
- Spread everything evenly. Avoid leaving a mound of filling in the center.
- Tent with foil if needed. If the top is browning but the center is not done, cover loosely and keep baking.
- Check the middle, not just the edges. The center should be puffed and no longer raw or collapsed.
- Use a thermometer if unsure. The thickest doughy part should be about 190–200°F / 88–93°C, a helpful doneness range for soft baked dough.
- Rest before icing. Resting helps the filling settle and keeps the icing from disappearing into the hottest parts of the pan.
Glass and ceramic pans: These may need a little longer than metal pans. If the edges look done but the middle is still soft, tent with foil and continue baking in 5-minute intervals.
For other texture issues, see the taste and texture fixes. For pan-specific help, check the pan guide.
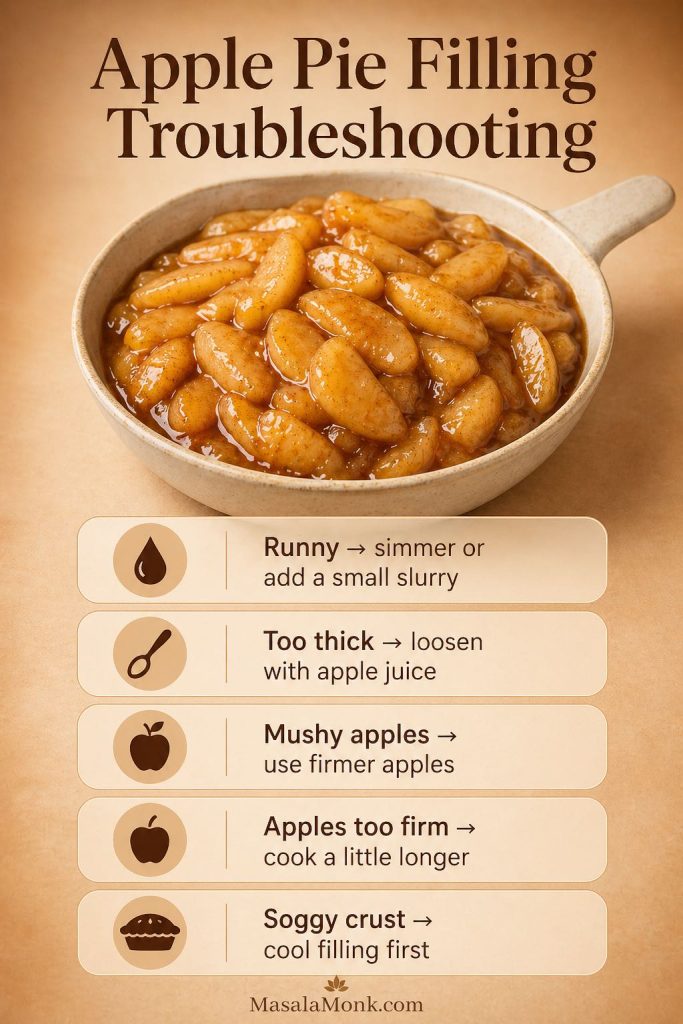
How to Fix the Taste and Texture
If the first pan is not exactly how you like it, the fix is usually simple. Adjust the filling, pan, or bake time rather than changing the whole recipe.
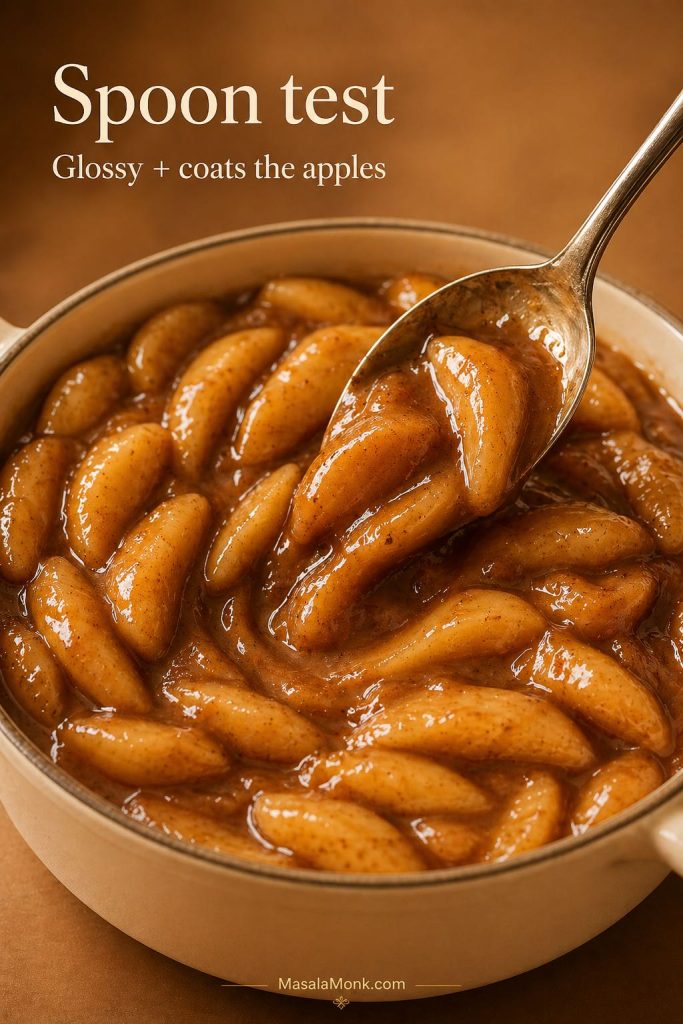
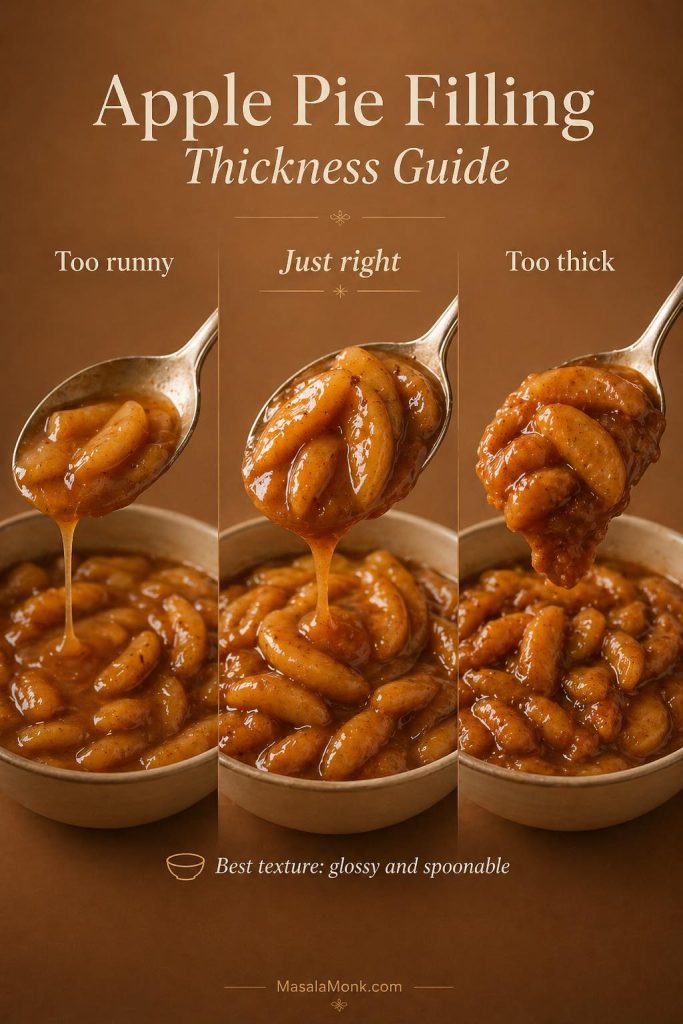
Texture Guide: Too Wet, Just Right or Too Dry
The texture should be soft and gooey, but the center should still look set. Use the visual cues below to decide whether the bake needs more time, less filling next time, or a little more moisture.
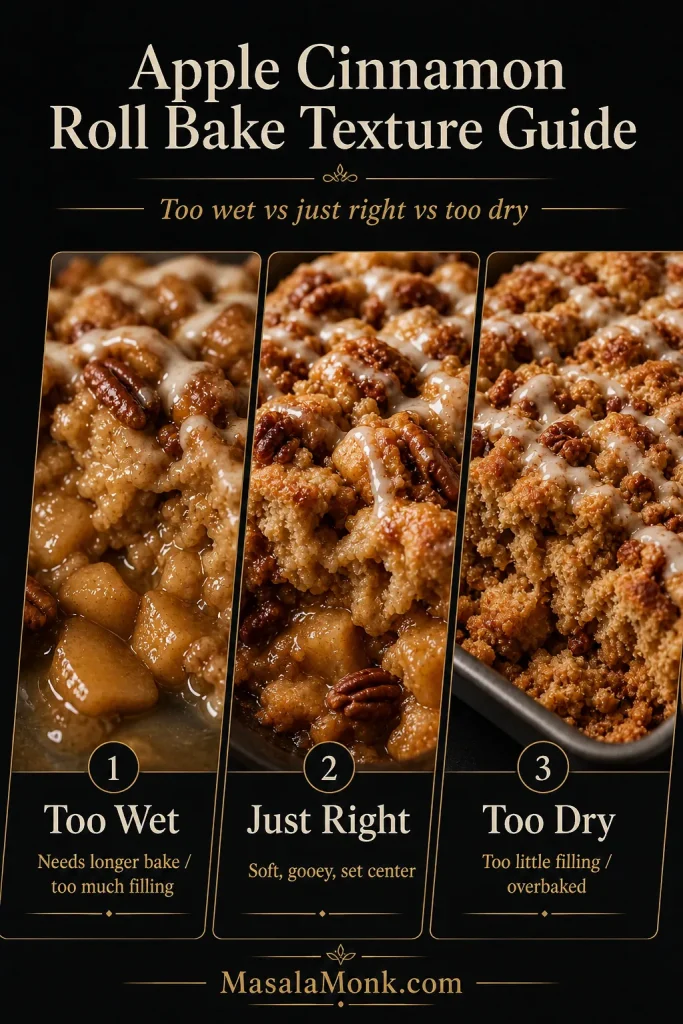
| Problem | Why it happened | Fix it next time |
|---|---|---|
| Center is doughy | Too much filling, large dough pieces, or deep pan | Use a 9×13 pan, cut rolls smaller, start with 1 can filling |
| Top is too brown | Top cooked before the center finished | Tent loosely with foil and keep baking |
| Bake is too wet | Too much apple filling or heavy cream | Use less filling or skip cream next time |
| Rolls feel dry | Too little filling or baked too long | Use the balanced ratio and check earlier |
| Too sweet | Sweet filling plus icing plus caramel or extra sugar | Skip caramel, reduce brown sugar, or use homemade filling |
| Not enough apple flavor | Filling pieces were too sparse or too large | Chop the apples smaller and spread them evenly |
Pan Sizes and Bake Times for Apple Cinnamon Roll Bake
The pan changes everything. A full batch needs room to spread. A smaller batch can work beautifully in an 8×8 pan, but a full 2-tube recipe crowded into a deep dish is more likely to stay doughy.
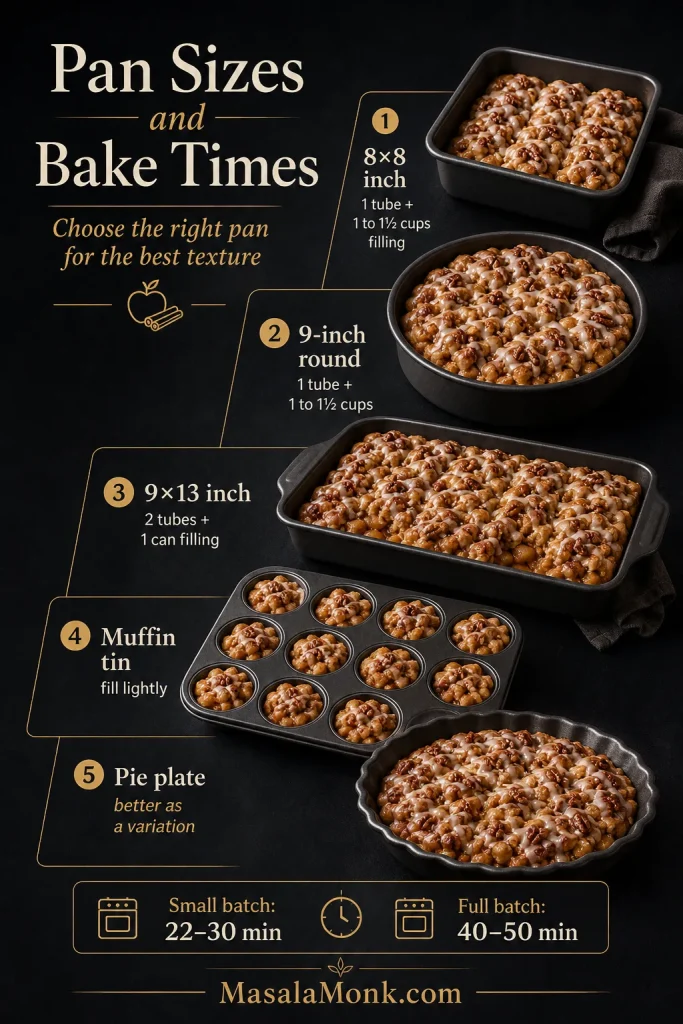
| Pan | Best for | Suggested amount | Bake cue |
|---|---|---|---|
| 8×8 inch / 20×20 cm | Small batch | 1 tube rolls + 1 to 1½ cups filling | Center puffed and no raw dough |
| 9-inch / 23 cm round | Small pull-apart style bake | 1 tube rolls + 1 to 1½ cups filling | Keep the dough in an even layer |
| 9×13 inch / 23×33 cm | Full batch | 2 tubes rolls + 1 can filling | Best all-around option |
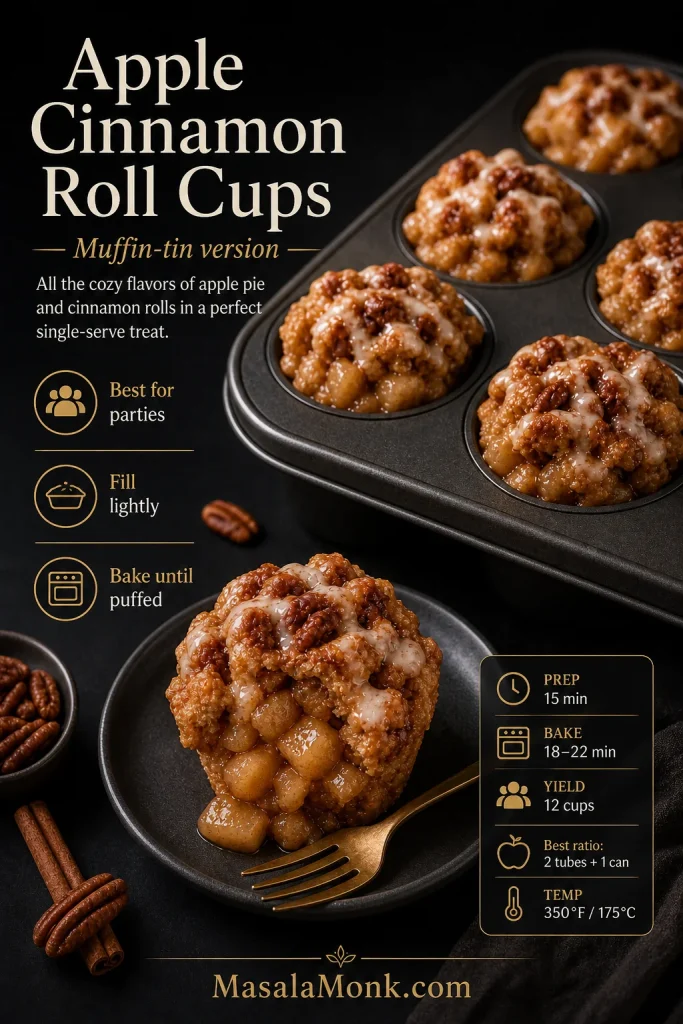
| 12-cup muffin tin | Apple cinnamon roll cups | Flatten rolls into cups and fill lightly | Do not overfill |
| 9-inch pie plate | Cinnamon roll apple pie variation | Pressed cinnamon roll crust + filling | Better as a separate pie-style version |
Small-Batch Apple Cinnamon Roll Bake
A small batch is best when you only have one tube of cinnamon rolls or do not want a full 9×13 pan. Use an 8×8 pan or 9-inch round dish so the dough sits in an even layer and bakes through cleanly.
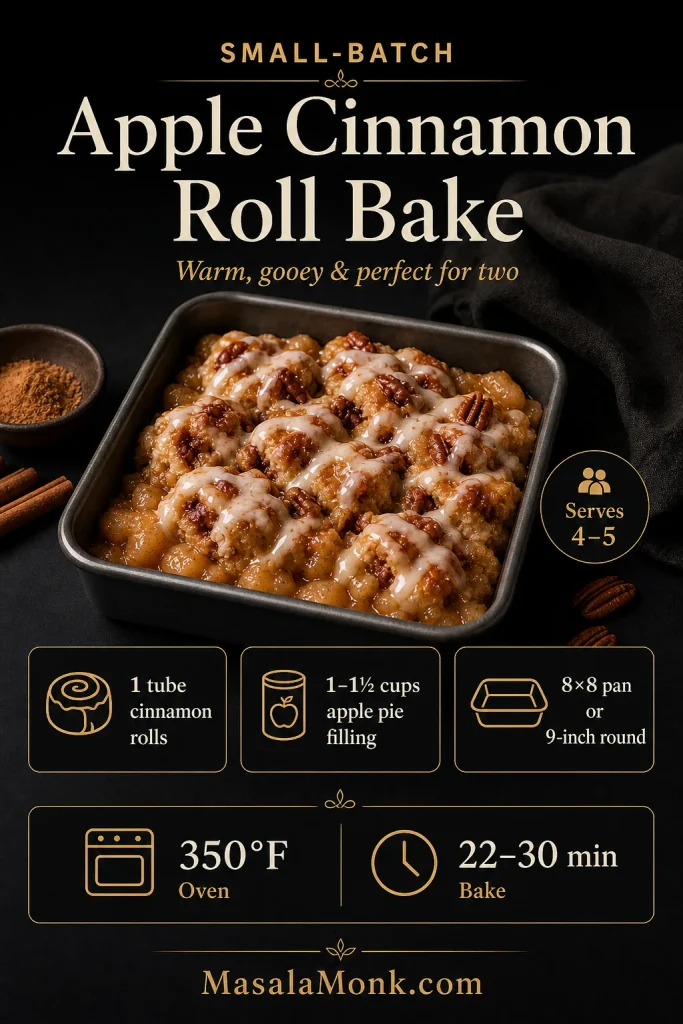
Making the full version instead? Return to the ratio guide. Need exact amounts? Jump to the recipe card.
Should You Add Heavy Cream?
Heavy cream is optional. It can make cinnamon rolls softer and richer, but it also adds moisture. For this apple filling version, a small amount is enough.
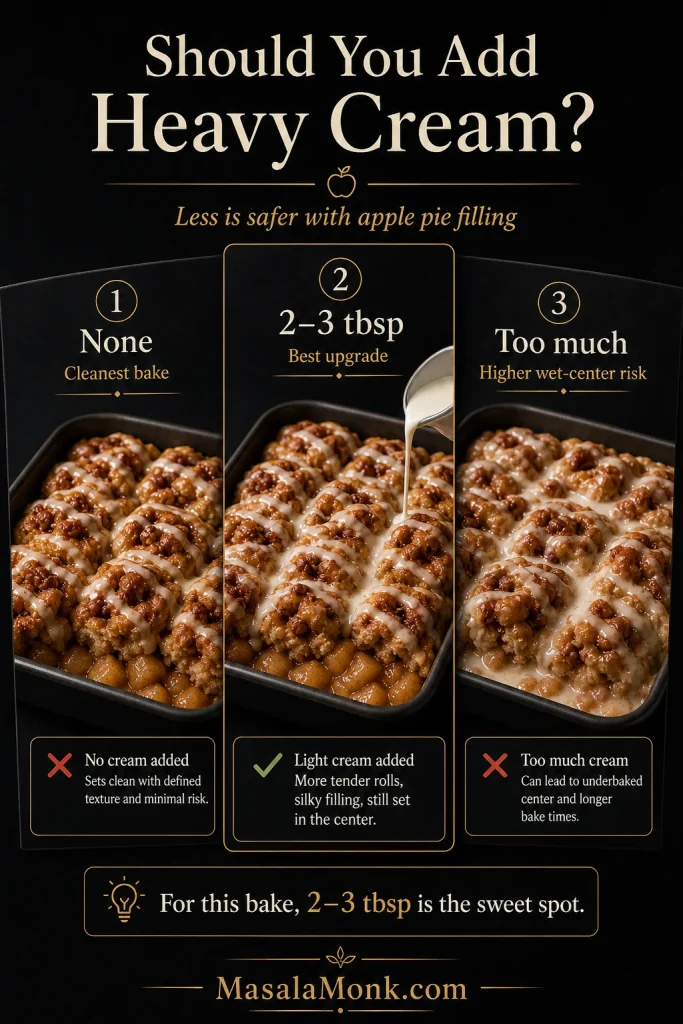
| Heavy cream amount | Result | Best use |
|---|---|---|
| None | Cleanest, most reliable bake | Best default if you worry about a doughy center |
| 2–3 tbsp / 30–45 ml | Softer, slightly gooier | Best controlled cream option |
| ⅓ cup / 80 ml | Richer and wetter | Works, but watch the center carefully |
| ½ cup / 120 ml or more | Very gooey, casserole-like | Higher risk of a wet center with apple filling |
If you use extra apple pie filling, skip the heavy cream the first time. The filling already brings moisture and sauce.
Not sure about texture yet? Compare the texture fixes. Ready to bake? Go to the recipe card.
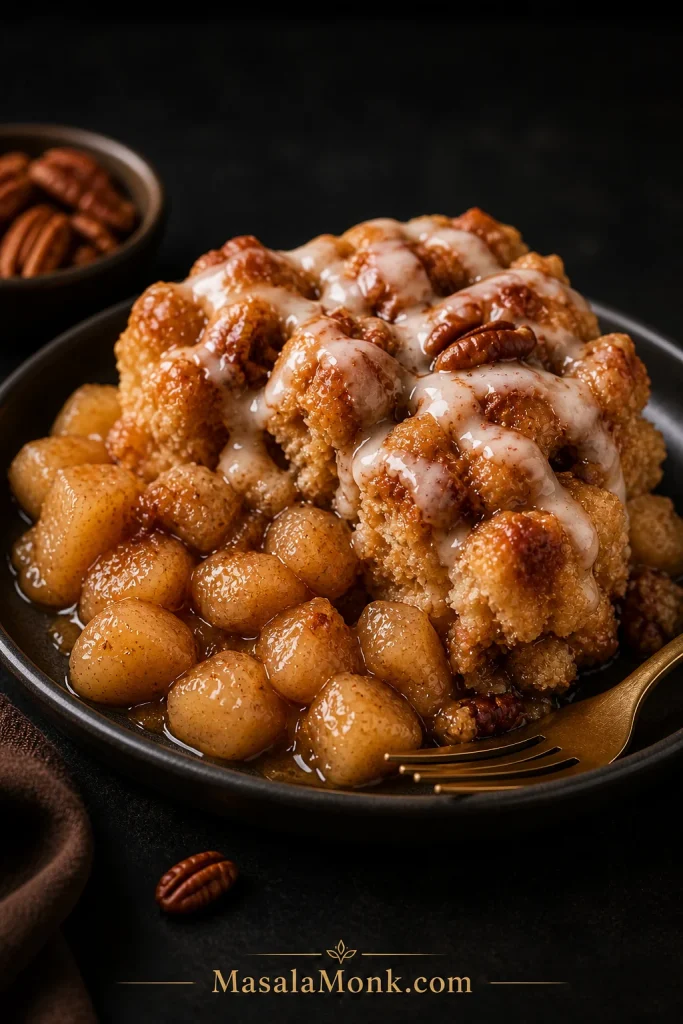
Icing, Cream Cheese Glaze and Caramel Drizzle
The icing packet that comes with refrigerated cinnamon rolls is the easiest finish. Let the bake rest first, then drizzle the icing over the top while the rolls are still warm.
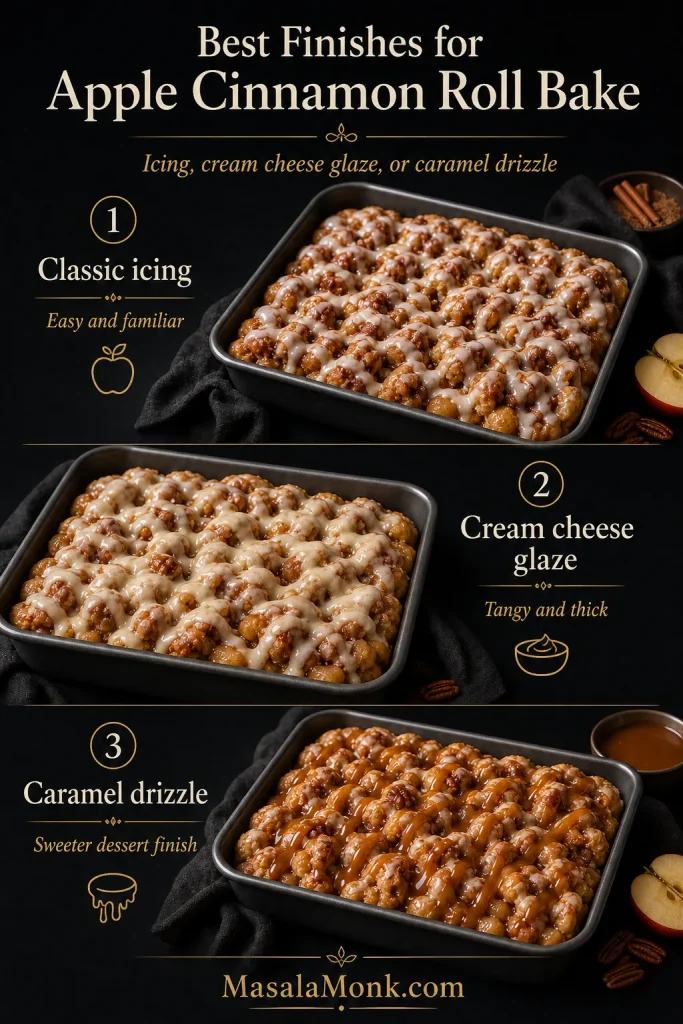
For a thicker glaze, stir together:
- 2 oz / 55 g softened cream cheese
- 1 tablespoon / 14 g softened butter
- ½ cup / 60 g powdered sugar
- 1–2 tablespoons / 15–30 ml milk
- ½ teaspoon vanilla extract
- Small pinch of salt
Caramel drizzle also works well, especially if you are making a fall dessert or holiday brunch bake. Use it lightly so the pan does not become too sweet.
Variations
Once the basic method is clear, you can change the finish, pan, or serving style without changing the whole recipe. These variations are useful when you want more crunch, more caramel flavor, or a portioned version for guests.
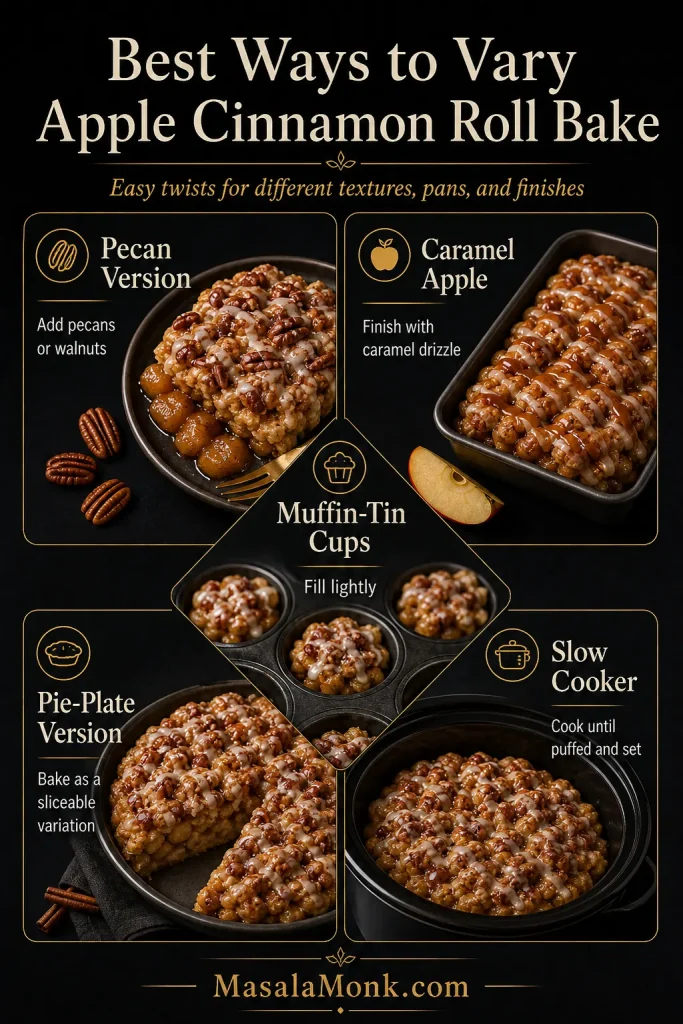
Apple Cinnamon Roll Casserole with Pie Filling
Use the same 9×13 method, but make it extra gooey with 1½ cans of apple pie filling and a slightly longer bake. Tent with foil if the top browns too quickly.
Caramel Apple Cinnamon Rolls
Drizzle caramel sauce over the rested bake after icing. Add chopped pecans for a caramel-apple-pie flavor.
Apple Pie Cinnamon Roll Bake with Pecans
Fold ½ cup chopped pecans or walnuts into the mixture before baking, or scatter them over the top for crunch.
Cinnamon Roll Apple Pie Cups
For a portioned version, flatten individual cinnamon rolls into a greased muffin tin, add a spoonful of chopped apple pie filling, and bake until puffed and golden. Keep the filling light so the cups rise properly instead of bubbling over.
Prefer the main 9×13 version? Use the recipe card. Looking for serving ideas? See how to serve it.
Cinnamon Roll Apple Pie Crust
For a pie-style variation, flattened cinnamon rolls can be pressed into a pie plate and filled with apple pie filling. If you want a classic pie instead, use this apple pie crust recipe.
Apple Cinnamon Roll Monkey Bread
Use smaller pieces of cinnamon roll dough, toss with butter and cinnamon sugar, and layer with chopped apple pie filling in a Bundt pan. This is a separate bake style and usually needs careful timing so the center cooks.
Crock Pot Apple Cinnamon Roll Bake
A slow cooker version can work, but the top will not brown the same way. Use less filling, line or grease the cooker well, and cook until the dough is fully set in the center.
How to Serve This Apple Cinnamon Roll Bake
Serve this warm while the icing is still soft. It works as a sweet brunch bake, a holiday breakfast, or an easy apple dessert with very little prep.
- For breakfast or brunch, serve it with coffee, tea, fresh fruit, or something salty like eggs or breakfast potatoes.
- For dessert, add vanilla ice cream, whipped cream, or a light caramel drizzle. Keep the topping light if your bake is already extra apple-heavy or very sweet.
- For a holiday table, sprinkle chopped pecans over the top and serve it straight from the baking dish.
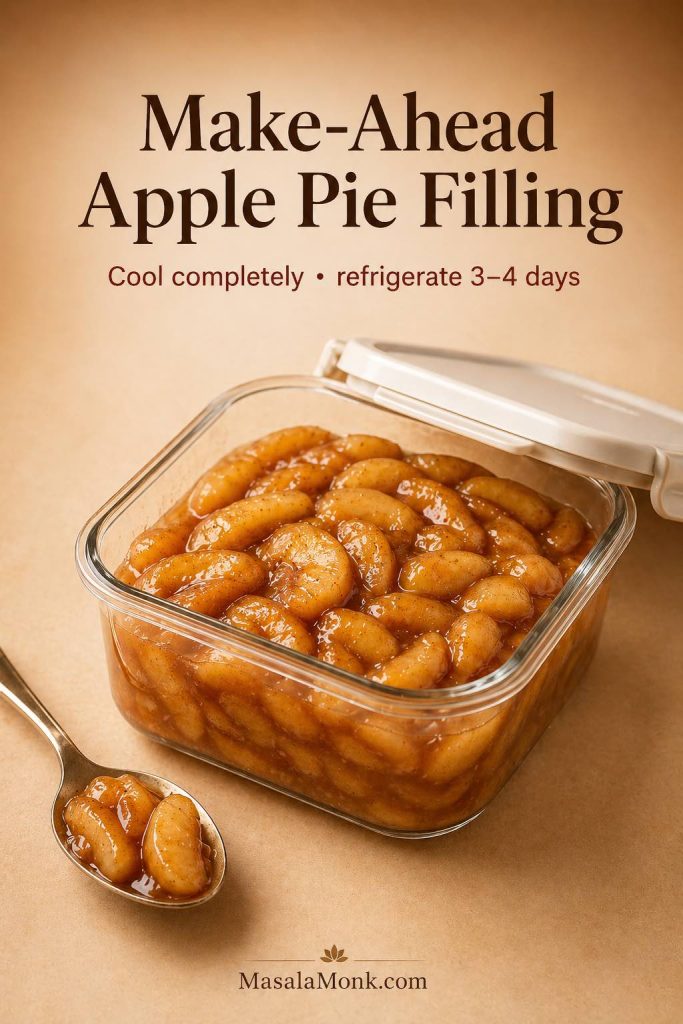
Make Ahead, Storage, Freezing and Reheating
Because this bake is soft and saucy, the best make-ahead approach is to keep the icing separate and reheat gently. That way, the rolls stay tender instead of drying out or turning overly sticky.
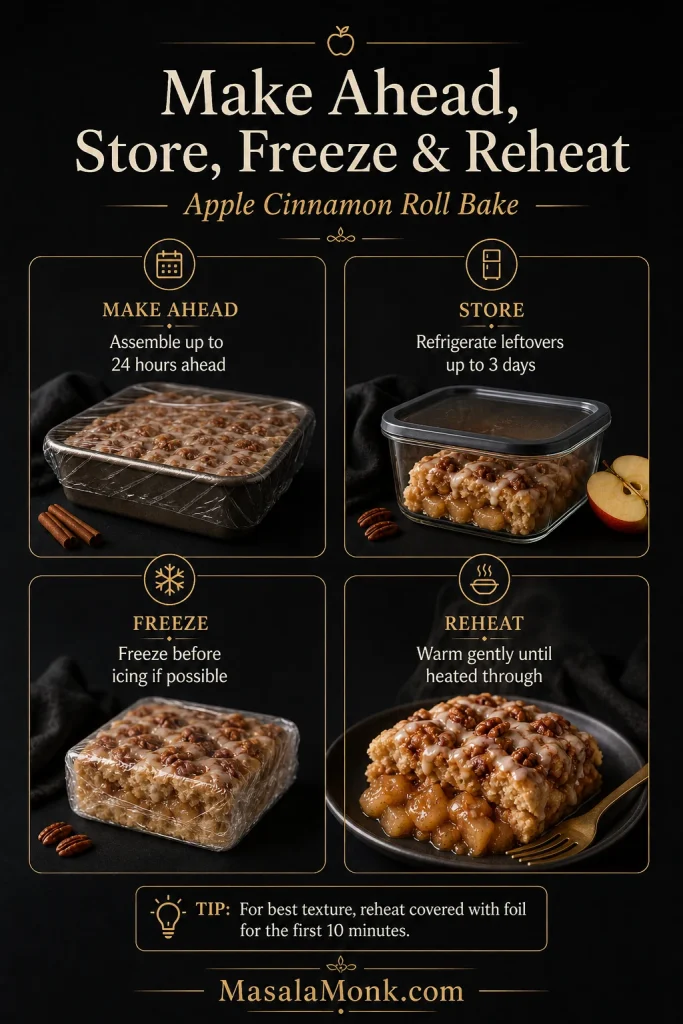
Can You Make It Ahead?
Yes. Assemble the bake up to 24 hours ahead, cover tightly, and refrigerate. For the most even bake, let the pan sit at room temperature for 20–30 minutes while the oven preheats. If baking straight from the fridge, add a few extra minutes.
When Should You Add the Icing?
Add icing after baking, not before. If you are making the bake ahead, keep the icing separate until the pan is baked and rested.
How Long Do Leftovers Keep?
Store leftovers covered in the refrigerator for up to 3 days. This fits within the USDA’s 3-to-4-day leftover storage guidance. The rolls will soften as they sit because of the apple filling, but they reheat well.
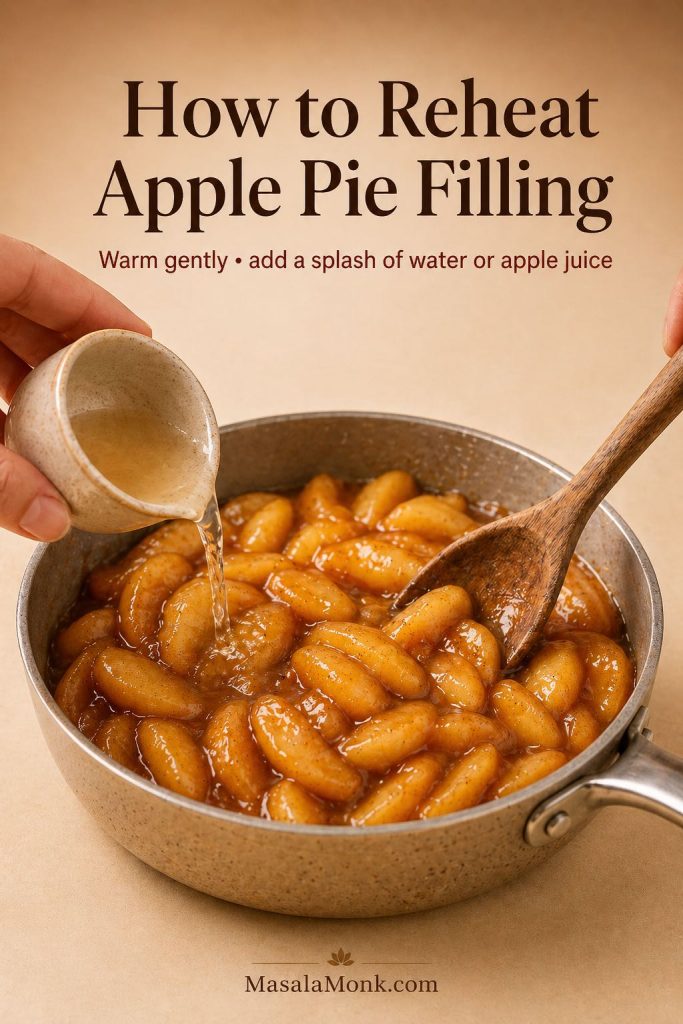
How Do You Reheat It?
Reheat individual portions in short microwave bursts until warm. For a larger portion, cover loosely with foil and warm in a low oven until heated through.
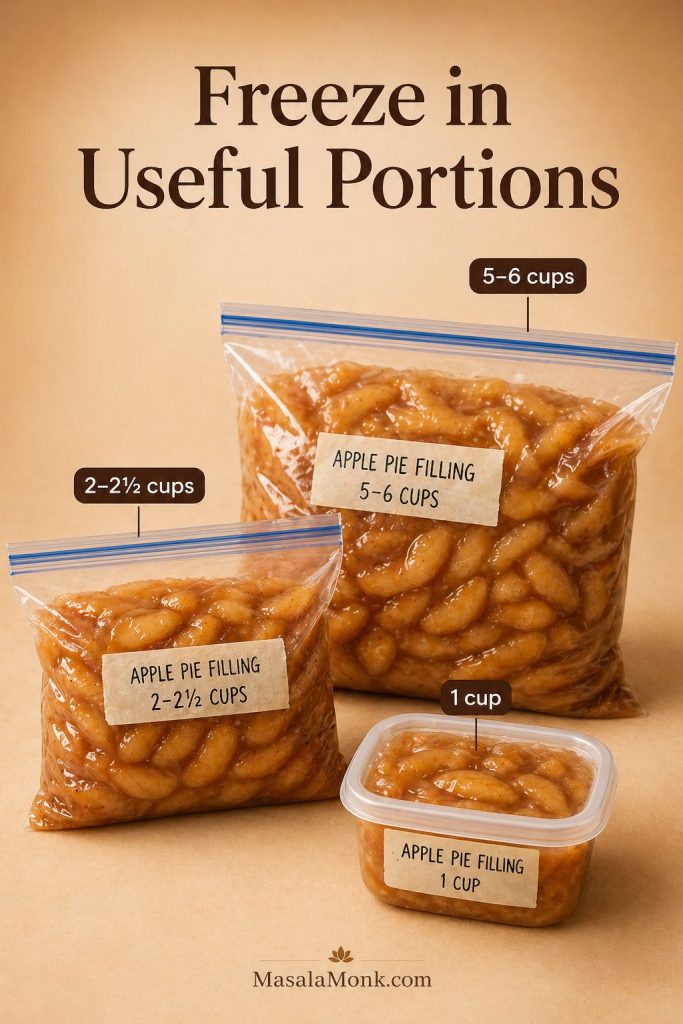
Can You Freeze Apple Cinnamon Roll Bake?
You can freeze it, but the texture is best fresh. If freezing, freeze before icing. Thaw overnight in the refrigerator, reheat gently, and add icing after warming.
Making it now? Return to the recipe card. Need quick answers? Jump to FAQs.
Apple Cinnamon Roll Bake with Apple Pie Filling Recipe
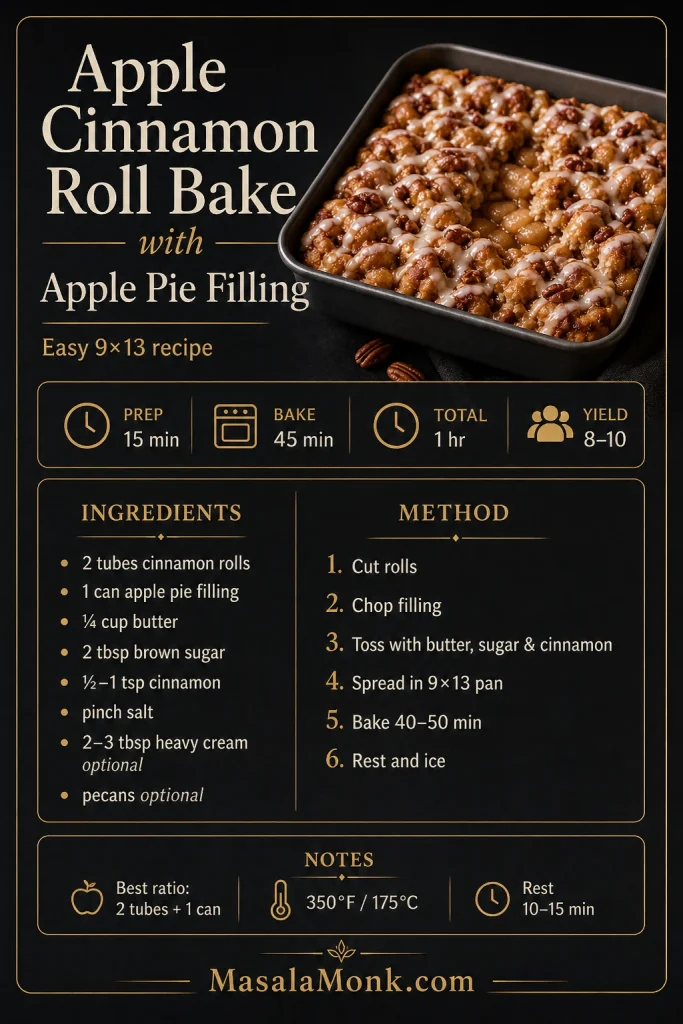
Description: Easy apple cinnamon roll bake made in a 9×13 pan with refrigerated cinnamon rolls, apple pie filling, optional heavy cream, and icing drizzle. The recipe uses a reliable filling ratio so the rolls stay soft and gooey without leaving the center raw.
Equipment
- 9×13 inch / 23×33 cm baking dish
- Large mixing bowl
- Knife or kitchen shears
- Spatula or large spoon
- Foil for tenting, if needed
- Optional instant-read thermometer
Ingredients
- 2 tubes refrigerated cinnamon rolls, about 17.5 oz / 496 g each, about 35 oz / 990 g total, icing reserved
- 1 can apple pie filling, 21 oz / 595 g, chopped if slices are large
- ¼ cup / 4 tablespoons / 57 g unsalted butter, melted
- 2 tablespoons / about 25 g light brown sugar
- ½ to 1 teaspoon ground cinnamon or apple pie spice
- Small pinch fine salt, optional
- 2–3 tablespoons / 30–45 ml heavy cream, optional
- ½ cup / 55–60 g chopped pecans or walnuts, optional
Homemade filling option: Replace one 20–21 oz can with 2 to 2½ cups homemade diced apple pie filling.
Optional Cream Cheese Glaze
- 2 oz / 55 g cream cheese, softened
- 1 tablespoon / 14 g butter, softened
- ½ cup / 60 g powdered sugar
- 1–2 tablespoons / 15–30 ml milk
- ½ teaspoon vanilla extract
- Small pinch salt
Instructions
- Preheat oven to 350°F / 175°C. Grease a 9×13 inch / 23×33 cm baking dish.
- Open the cinnamon roll tubes and reserve the icing for later.
- Cut regular cinnamon rolls into quarters. If using jumbo rolls, cut each roll into 6 pieces.
- Chop large apple slices in the apple pie filling into smaller pieces, about ½ inch / 1.25 cm.
- In a large bowl, toss cinnamon roll pieces with melted butter, brown sugar, cinnamon or apple pie spice, and salt.
- Fold in the apple pie filling gently until the dough pieces are evenly coated.
- Spread the mixture in one even layer in the prepared baking dish.
- Drizzle 2–3 tablespoons heavy cream over the top, if using. Sprinkle with nuts, if using.
- Bake for 40–50 minutes, checking the center around 35–40 minutes. Tent loosely with foil if the top browns before the center is done.
- The bake is ready when the center is puffed, set, and no longer wet or raw. If using a thermometer, the thickest doughy center should be about 190–200°F / 88–93°C.
- Let the pan rest for 10–15 minutes.
- Drizzle with reserved icing or cream cheese glaze. Serve warm.
Notes
- For the most reliable texture, start with 1 can of apple pie filling for 2 large tubes of cinnamon rolls.
- For an extra apple-heavy bake, use 1½ to 2 cans filling and bake longer.
- Glass and ceramic pans may need extra time compared with metal pans.
- If the top browns too quickly, tent with foil and continue baking until the center is done.
- Add icing after the bake rests, not immediately out of the oven.
FAQs
Can I use homemade apple pie filling?
Yes. Use 2 to 2½ cups homemade apple pie filling to replace one 20–21 oz can. Diced filling works best because it spreads evenly between the cinnamon roll pieces.
Should I use one can or two cans of apple pie filling?
Use one can for the most reliable 9×13 bake. Use 1½ to 2 cans if you want a very gooey, apple-heavy version, but expect a longer bake time and check the center carefully.
Can I make this with only cinnamon rolls and apple pie filling?
Yes. You can make a 2-ingredient version with only refrigerated cinnamon rolls and apple pie filling. The butter, brown sugar, cinnamon, and salt are optional upgrades that make the bake taste richer and more balanced, but the shortcut version still works without them.
Why are my cinnamon rolls doughy in the middle?
The most common reasons are too much filling, dough pieces that are too large, a pan that is too deep, or not enough bake time. Use a wide 9×13 pan, cut the rolls smaller, spread the filling evenly, and bake until the center is puffed and set.
Can I make this with one tube of cinnamon rolls?
Yes. Use an 8×8 inch pan or 9-inch round pan with 1 tube of cinnamon rolls and about 1 to 1½ cups apple pie filling. Bake until the center is cooked through, usually 22–30 minutes depending on the dough size and pan.
Can I use jumbo cinnamon rolls?
Yes. Cut jumbo rolls into 6 pieces instead of quarters so the center cooks more evenly. Jumbo rolls often need a longer bake time.
Do I need heavy cream?
No. Heavy cream is optional. Use 2–3 tablespoons if you want a softer, richer bake. Skip it if you are using extra apple pie filling or if you are worried about a wet center.
Can I make apple cinnamon rolls with apple pie filling overnight?
Yes. Assemble the pan, cover it tightly, and refrigerate for up to 24 hours. Let it sit at room temperature for 20–30 minutes while the oven heats, or bake straight from chilled with a little extra time.
Can I make this in a muffin tin?
Yes. Flatten individual cinnamon rolls into greased muffin cups, spoon in chopped apple pie filling, and bake until puffed and cooked through. Keep the filling light so the cups do not overflow.
Can I use fresh apples instead of apple pie filling?
Fresh raw apples are not the best direct swap because they release moisture and may not soften enough before the dough bakes. For better results, cook the apples into a quick apple pie filling first.
Can I freeze apple cinnamon roll bake?
Yes, but the texture is best fresh. Freeze before icing if possible. Thaw overnight in the refrigerator, reheat gently, and add icing after warming.