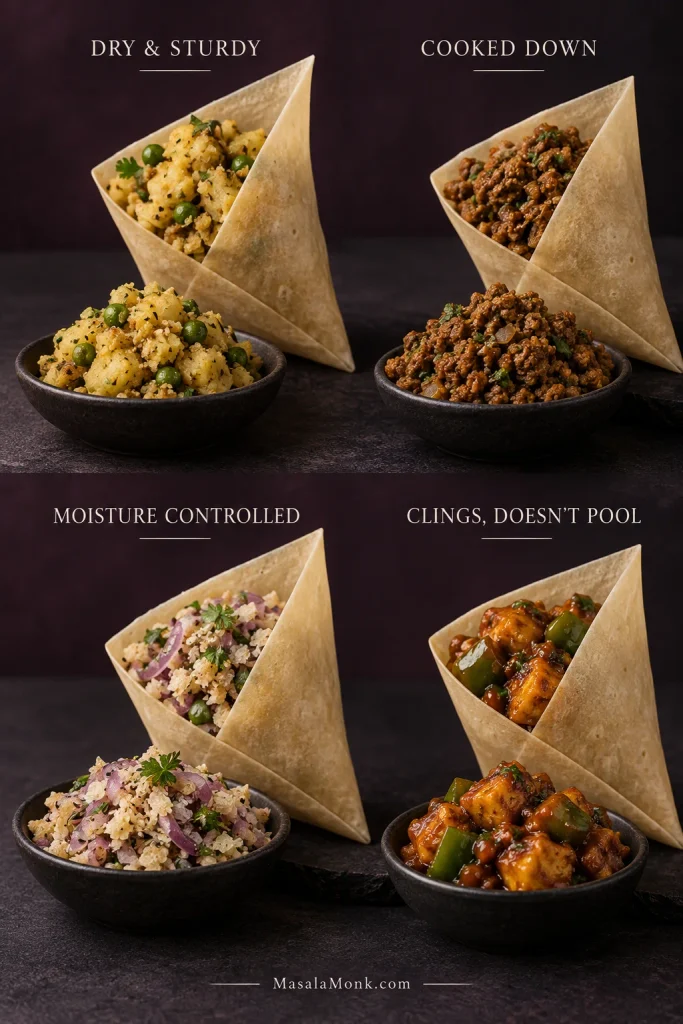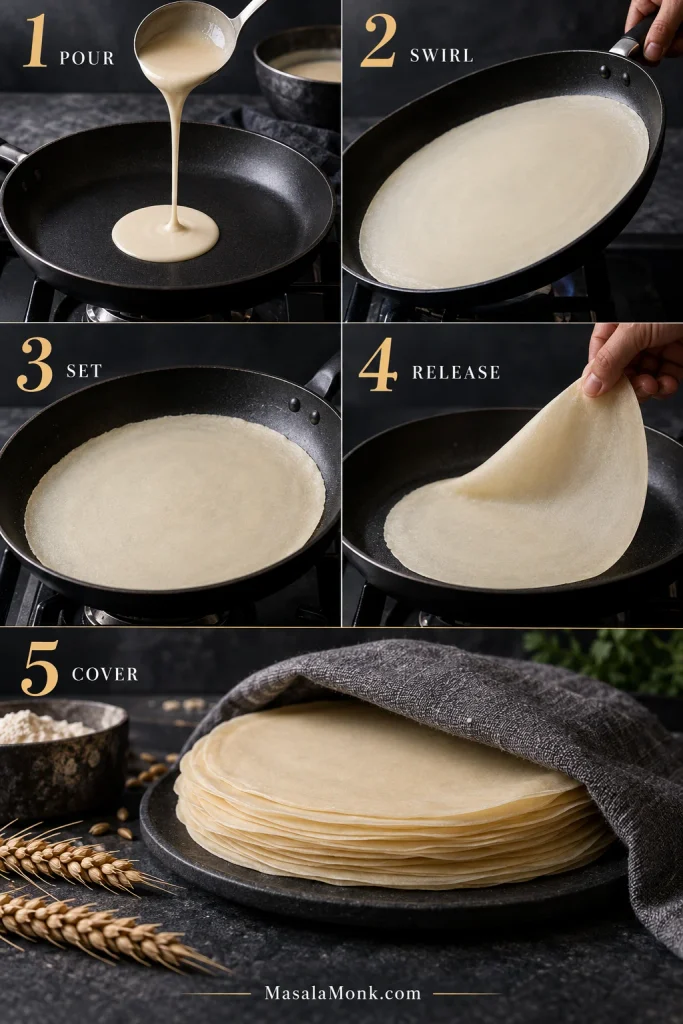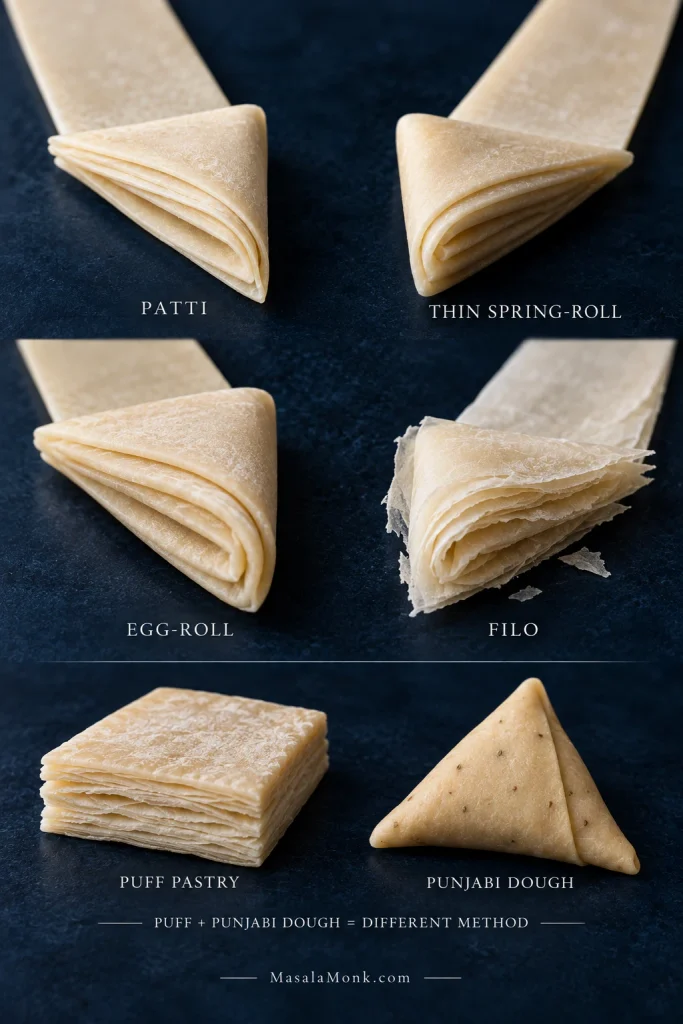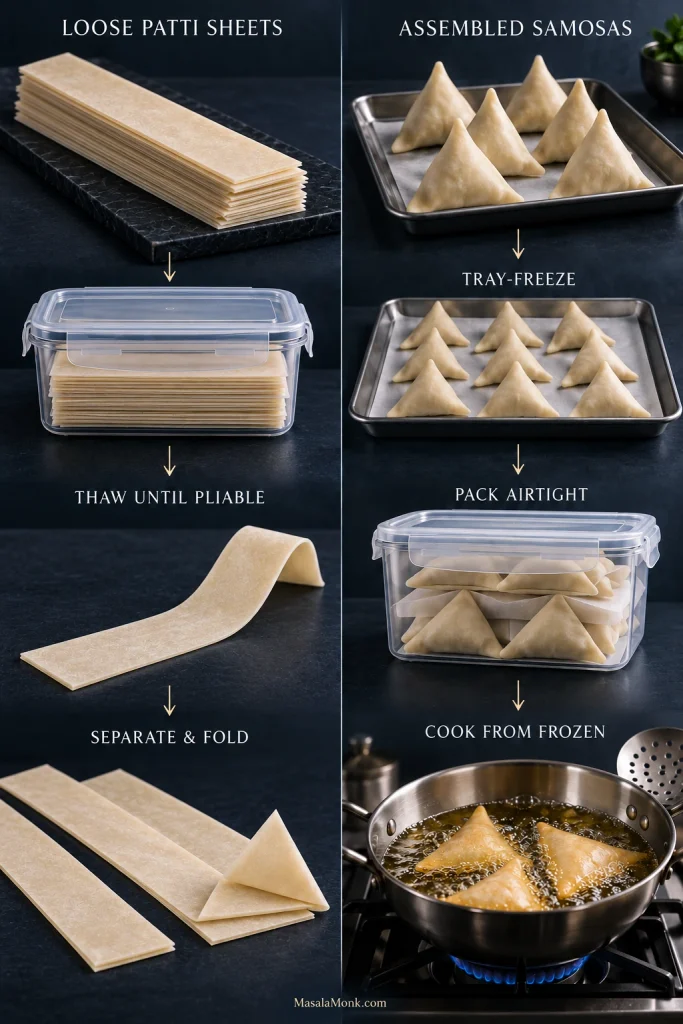
Posted on — Leave a comment

Potatoes Au Gratin Recipe: Creamy, Cheesy & Foolproof

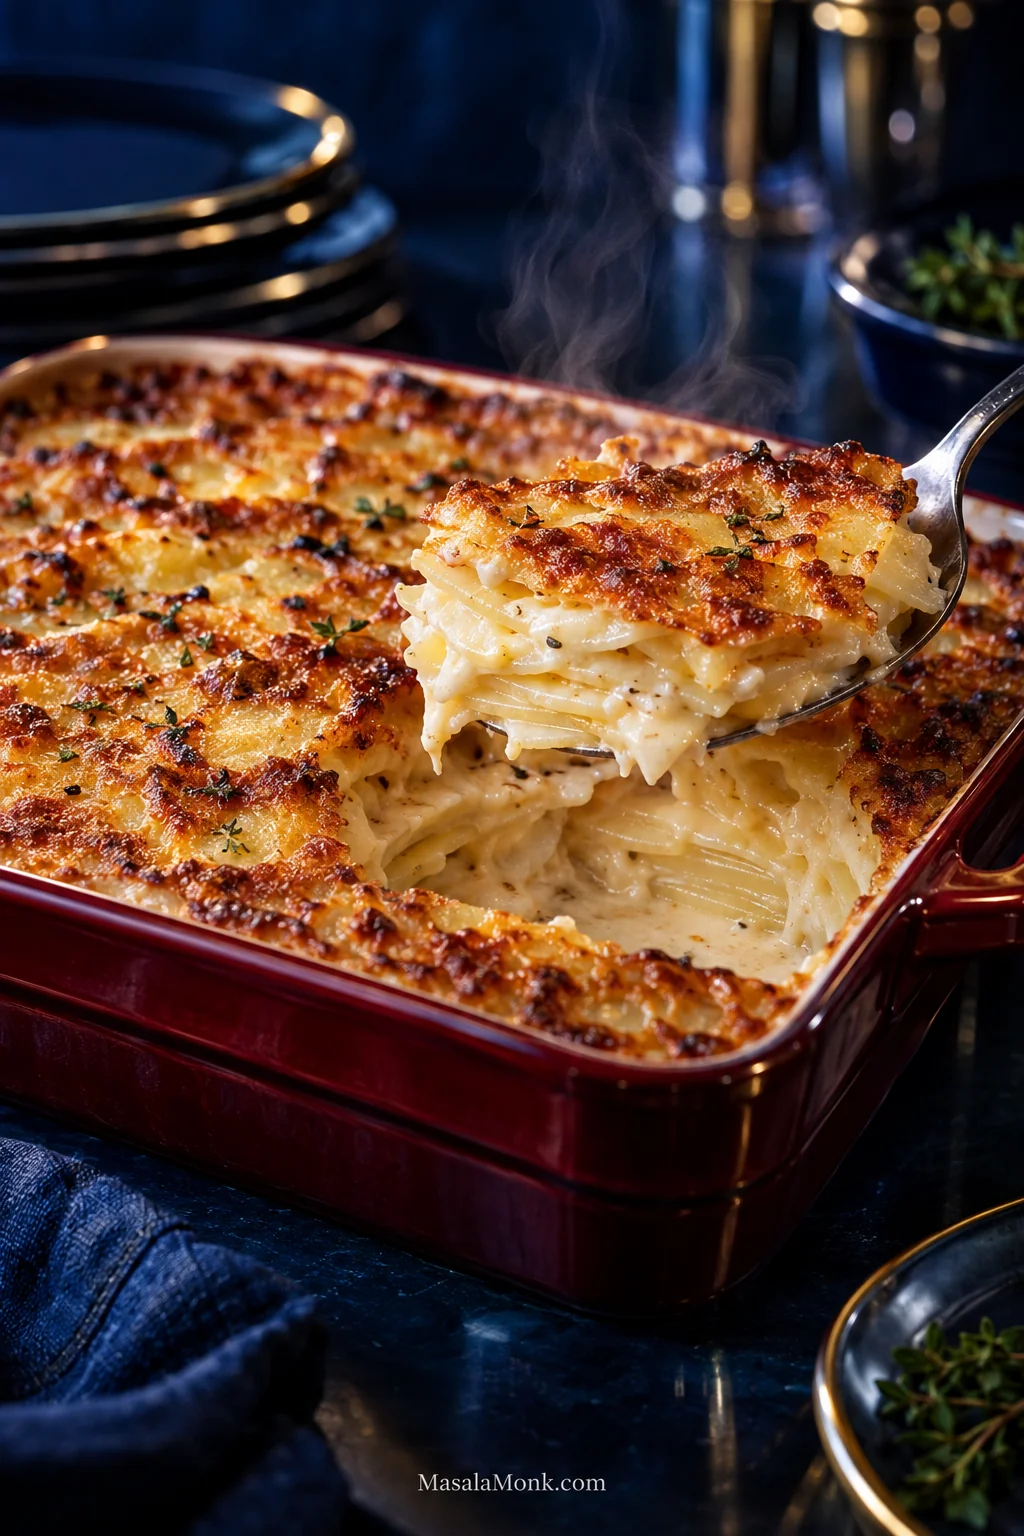
A spoon lifts a steaming portion of golden potatoes au gratin from a shallow dark red casserole, revealing thin potato layers coated with creamy sauce beneath a deeply browned cheese crust.

A good spoonful of potatoes au gratin breaks through a deeply browned top and lifts tender layers with silky cream caught between them. The potatoes still hold their shape, the sauce clings, and the space left by that first serving does not immediately flood with thin cream.

The frustrating part is that gratin can look finished before it actually is. Cheese colors quickly; a stack of potatoes takes longer. A beautiful top can hide a firm middle, and adding more cream does not automatically make the finished dish creamier.

This from-scratch potatoes au gratin recipe uses Russets sliced to ⅛ inch (3 mm), a short simmer in garlic-thyme cream, Gruyère and Parmesan, then a covered bake until the center is tender before the final browning.

The timer helps. The potatoes get the final say.

Jump To

Before You Slice the Potatoes

For This GratinUse
PotatoRusset
Slice thickness⅛ inch / 3 mm
Baking dishShallow 9 × 13 in / 23 × 33 cm, about 3 qt / 2.8 L
Oven350°F / 175°C conventional / 160°C fan
Oven rackCenter
Rest before serving15 minutes

Slice thickness is only half of the story. Even perfectly sliced 3 mm potatoes cook more slowly in a deep casserole because the center takes longer to heat through. If your dish is noticeably smaller than 9 × 13 inches, move some potatoes to a second dish rather than piling them higher.

Two dark red casseroles compare a shallow potato gratin with a deeper stack; on-image text says deeper stacks cook more slowly at the center.
Compare the finished stack depth, not just pan capacity. Similar-volume dishes can create very different potato heights, and the taller stack usually needs more covered time at the center.

A mandoline makes those thin slices easy to repeat, but use the hand guard; a cut-resistant glove adds another layer of protection. Alternatively, a sharp chef’s knife works too.

Put the casserole on a rimmed sheet pan before it goes into the oven. Bubbling cream is much easier to clean from a tray than from the oven floor.

Potatoes, Cream and Cheese

Russet or Yukon Gold?

Russets are the better fit for this method because starch released from their cut surfaces helps the cream gain body while the layers soften. Yukon Golds work too, but stay firmer and more defined.

You can taste the same contrast in our creamy mashed potatoes, where Russets turn out lighter and Yukon Golds naturally stay denser and more buttery.

Why the Potatoes Go Into the Cream First

The short stovetop simmer starts cooking the potatoes and brings some of their surface starch into the cream, so the sauce begins gaining body before the casserole reaches the oven.

Don’t rinse the slices. We want that starch here.

Heavy cream brings richness and enough fat for a smooth sauce, while a smaller amount of whole milk keeps it from feeling quite so rich. Replacing all the cream with low-fat milk would give you a much thinner result because there is no roux to compensate.

Gruyère for Melt, Parmesan for the Top

Gruyère has enough nutty, savory character to flavor a whole pan of potatoes without overwhelming them, and it melts smoothly into the sauce as the gratin bakes. Parmesan is stronger and saltier, so a smaller amount on top brings extra depth and better browning.

Sharp cheddar can stand in if Gruyère is difficult to find; the flavor will shift noticeably toward cheddar. Whichever cheese you use, grate it from a block if you can.

Before the potatoes go in, taste the hot cream. More than two pounds of potato can turn seasoning surprisingly quiet once everything is baked, while Gruyère and Parmesan bring salt of their own.

How to Make Potatoes Au Gratin

The oven has two jobs. Covered, it cooks the potatoes through. Uncovered, it concentrates the sauce and browns the cheese.

1. Slice the Potatoes and Warm the Cream

Peel the Russets; their thicker skins interrupt the soft layered texture we’re after. Slice the potatoes ⅛ inch (3 mm) thick. A few noticeably thicker pieces can remain firm after everything around them is ready, so consistency matters here.

A peeled potato slice is measured edge-on with a digital caliper reading 3.0 mm beside a visibly thicker slice.
Use the caliper only to calibrate the first few slices. Once 3 mm feels familiar, consistency matters more than measuring every potato.

Combine the heavy cream, milk, garlic, thyme, salt, black pepper and nutmeg in a wide saucepan or Dutch oven. Warm over medium-low heat until steaming, with the first gentle bubbles appearing around the edge. The raw edge of the garlic will soften as the cream heats and the thyme becomes more noticeable.

2. Give the Potatoes a Head Start

Add the potatoes and gently separate the slices in the hot cream. Keep everything at a quiet simmer for about 5–7 minutes, lifting and turning them once or twice so the bottom doesn’t catch.

At first the cream moves freely around the slices. After a few minutes it becomes silkier and leaves a light coating when you lift a potato from the pan. The slice itself bends more easily than it did raw without becoming fragile.

Three-stage graphic shows peeled potato slices entering cream, simmering 5–7 minutes, then bending gently on a spoon while holding their shape.
Treat 5–7 minutes as a window. Burner strength and pan width vary, so stop when the slices bend easily but still hold together.

3. Build the Gratin

Butter the baking dish. Arrange roughly half of the potatoes in overlapping layers, close together without packing them into a solid mass. Scatter over half of the Gruyère, then add the remaining potatoes.

Pour the cream mixture over and between the slices. The potatoes need to be well surrounded, but the uppermost layer should remain visible. If a smaller or deeper dish would force you to bury the top just to use every last drop, stop pouring.
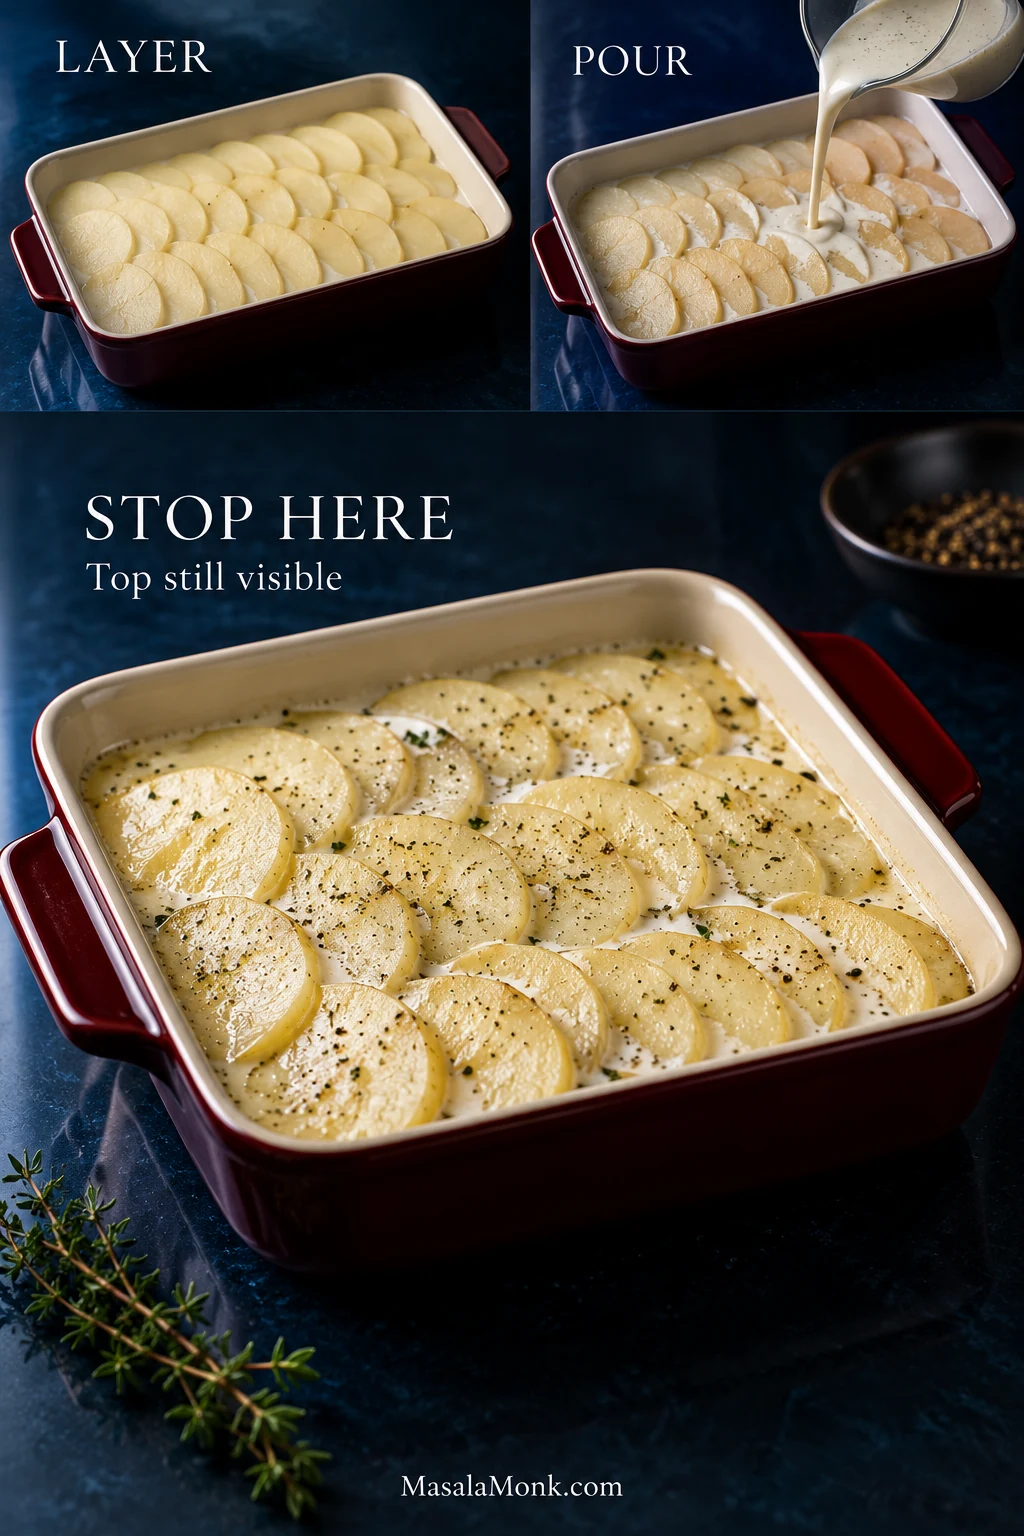
Three-stage graphic shows layered potatoes, cream being poured, and the finished assembly with the top potato layer still visible.
Let the casserole decide when to stop pouring. If the top layer starts disappearing, hold back the extra cream rather than flooding the gratin.

4. Cook Until the Middle Is Tender

Cover tightly with foil and bake on the center rack at 350°F (175°C; 160°C fan). Begin checking at 35 minutes.

The covered bake is finished when a thin knife slides through the very center with almost no resistance. The potatoes around the outside soften first, so don’t use an easy edge test to judge the middle.

If the middle is still firm, nothing has gone wrong.

This stage is especially tempting to rush when the rest of dinner is nearly ready. But a few extra covered minutes are much better than carrying a casserole to the table with crunchy potatoes hidden underneath.

Foil is folded back from a red casserole while a thin knife tests the center of the pale, creamy potato layers.
Check tenderness before color. If the center still resists, cover again; the final browning can wait until the potatoes are fully tender.

5. Brown the Cheese and Let the Gratin Settle

Once the potatoes are tender, remove the foil and scatter over the remaining Gruyère and Parmesan. Bake uncovered for about 20–25 minutes, until the sauce bubbles slowly around the edges and the cheese develops deep golden patches rather than simply looking melted.

If everything underneath is ready but the surface is still pale, a brief blast under the broiler/grill can finish the color—but only if your baking dish is broiler-safe. Watch closely.

Now wait 15 minutes.

The sauce is at its loosest straight from the oven. After the rest, the first serving should lift with glossy cream clinging around the potatoes rather than leave thin sauce rushing into the space behind it.

Comparison shows the same gratin just baked and after 15 minutes, with less loose cream in the rested serving cavity.
Resting changes the sauce, not the doneness. The potatoes should already be tender; the 15-minute pause simply helps the cream settle around the layers.

If the Gratin Isn’t Behaving

Why Are My Au Gratin Potatoes Still Hard?

Usually the slices are thicker than expected, the casserole is deeper, the foil isn’t sealing well, or the oven is running a little cool. Cover the dish again, give it another 10–15 minutes, then test the middle.

If the potatoes are still firm and the edges look visibly dry, moisten those dry areas with a little warm cream or milk before covering the dish again. The center needs time more than it needs a hotter oven.

Why Is My Potato Gratin Watery?

First check the potatoes. If they are tender but thin cream is still pooling, leave the gratin uncovered a little longer so more moisture can evaporate. Then give it the full rest before deciding the sauce is too loose.

A deeper pan, lower-starch potatoes, too much liquid for the dish or simply too little uncovered baking can all leave excess sauce behind.

The Sauce Looks Oily or Grainy

Clear yellow fat around a grainy-looking sauce points toward separation rather than simple looseness. Excessive heat, too much cheese or aggressive reheating can all encourage it; pre-shredded cheese may also melt less smoothly.

A badly split sauce is difficult to make completely smooth again, so prevention matters more here: keep the heat moderate and grate the cheese fresh when you can.
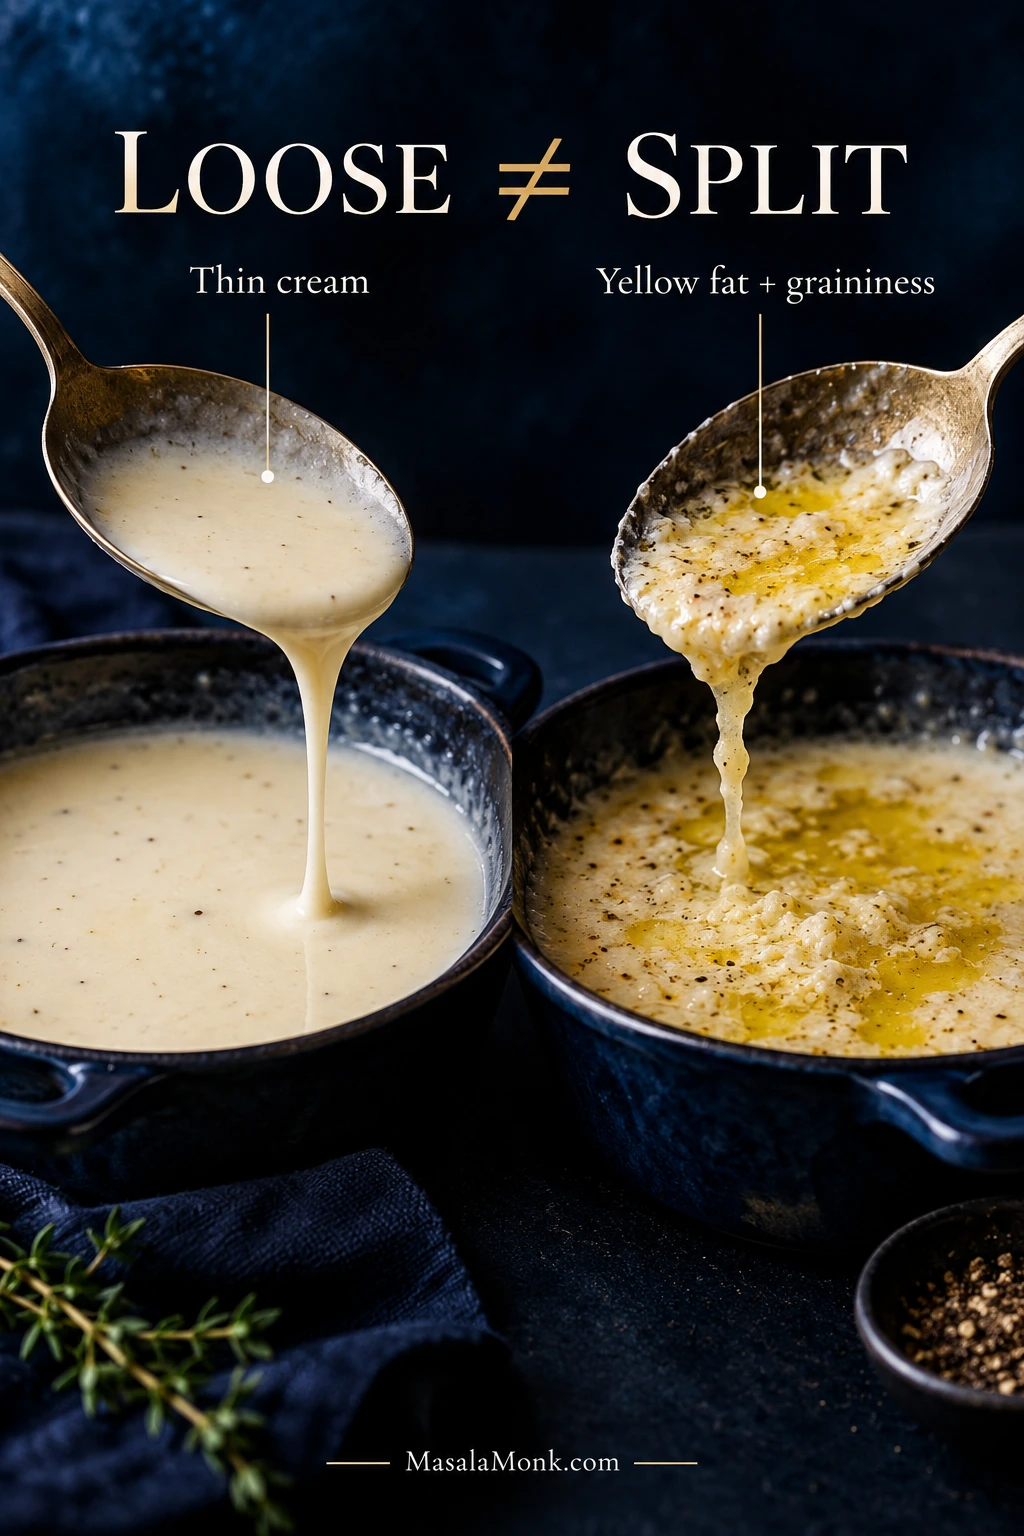
Comparison shows smooth thin cream on one side and a grainy broken sauce with visible yellow fat on the other.
Smooth but thin cream is still intact. Graininess with visible yellow fat signals separation, so looseness and splitting are different problems.

The Potatoes Taste Bland

Potatoes mute seasoning quickly. Taste the hot cream before adding the slices, especially if you change either cheese. A particularly salty Parmesan may call for less added salt; a mild Gruyère substitute may need a little more.

Making Potatoes Au Gratin Ahead? Do This Tonight

For this method, the cleanest place to stop is after the short stovetop cook and assembly, before the gratin goes through its full oven bake. You finish the actual tenderizing and browning on the day it is served.
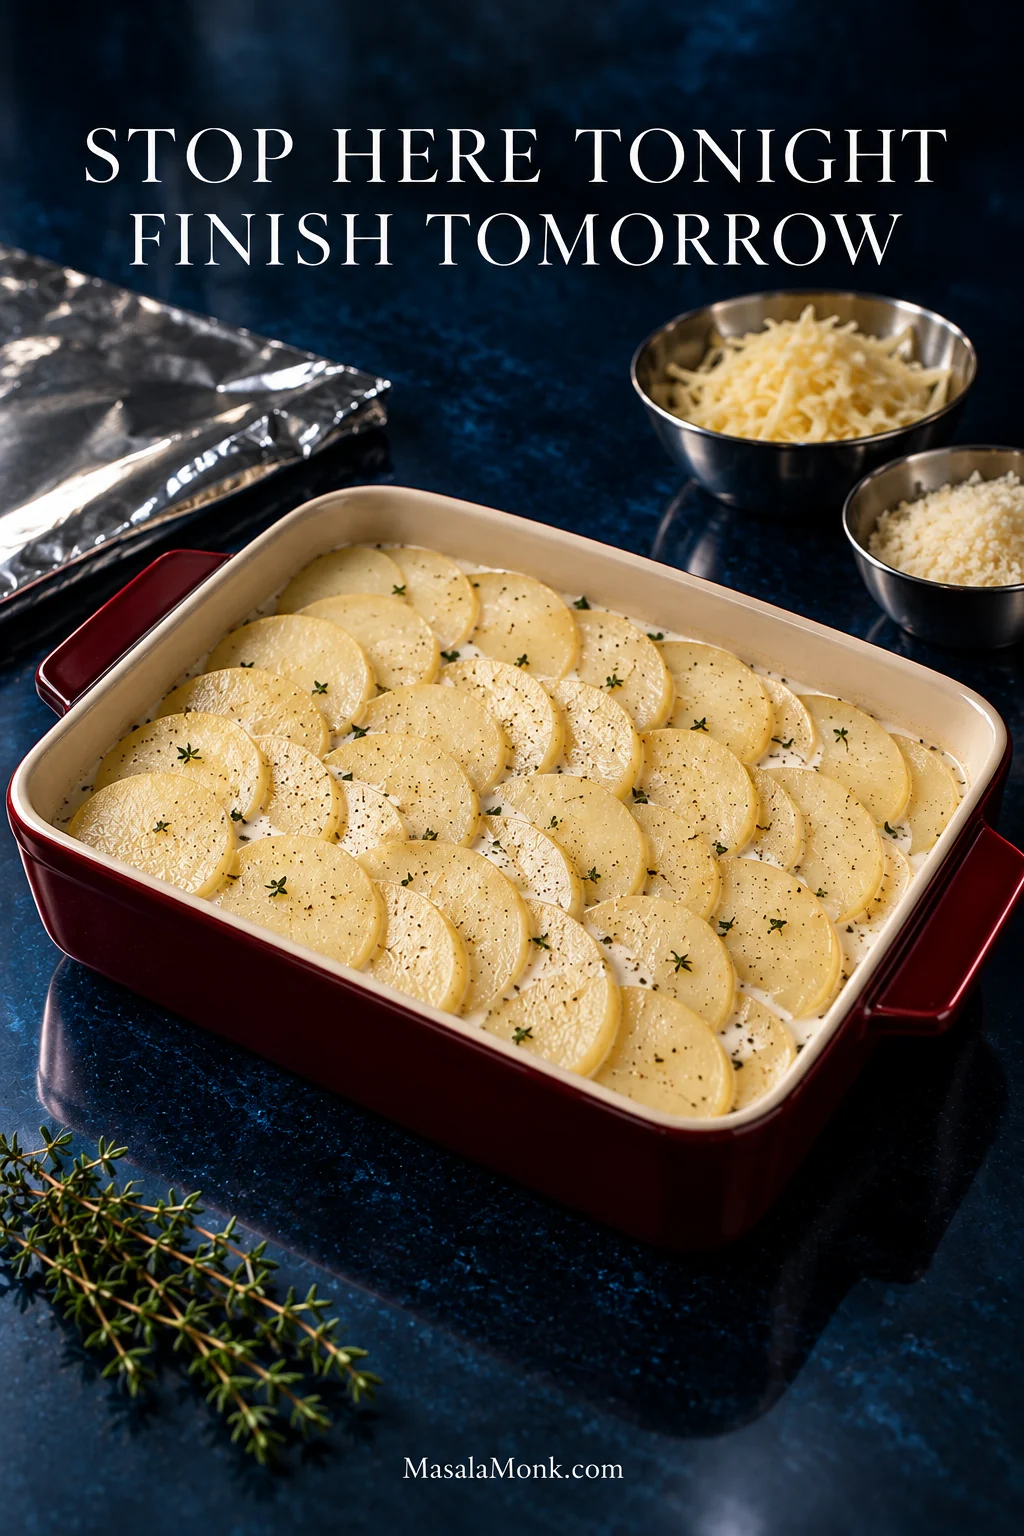
Unbaked layered potatoes sit in a red casserole with cream between the slices, reserved grated cheese in bowls, and foil nearby.
Think “assembled, not finished.” Keep the reserved Gruyère and Parmesan separate overnight so the topping can go on fresh before the final uncovered bake.
  1. Simmer the sliced potatoes in the seasoned cream for 5–7 minutes and assemble the gratin as directed.
  2. Add the first half of the Gruyère, keeping the remaining Gruyère and Parmesan refrigerated separately.
  3. Let the most vigorous steaming subside briefly, then cover and refrigerate promptly for up to 24 hours. Don’t leave the casserole at room temperature to cool completely.
  4. If you’re using glass or ceramic bakeware, follow the manufacturer’s guidance before moving a refrigerator-cold dish into a hot oven.
  5. Bake covered and begin checking at 50 minutes. Continue until a thin knife passes through the middle with almost no resistance.
  6. Add the reserved Gruyère and Parmesan, uncover and brown as usual.

Reheating and Freezing Potatoes Au Gratin

USDA leftovers guidance recommends using refrigerated cooked leftovers within 3–4 days and reheating them to 165°F / 74°C. Reheat a larger portion covered at 325–350°F (165–175°C), then uncover briefly if you want to refresh the top.

If the gratin looks dry before reheating, add a spoonful or two of cream around the edge. Individual portions can be reheated gently in short microwave intervals.

Freezing is possible, but it is not my first choice if texture matters. Potatoes can become grainier or release water after thawing, and cream-and-cheese sauces are more likely to separate.

Is This the Same as Scalloped Potatoes?

In modern American recipe usage, potatoes au gratin usually include cheese and a browned top, while classic scalloped potatoes are generally baked in milk or cream without cheese.

Modern recipe names are much less tidy. Plenty of dishes called scalloped potatoes contain cheese, and many families use the two names almost interchangeably. With Gruyère between the potatoes and a browned cheese crust on top, this one sits comfortably on the au gratin side.

Gratin dauphinois is another close French relative, centered on potatoes and dairy and not necessarily the generous cheese topping common in modern American au gratin recipes.

What to Serve With Potatoes Au Gratin

A rich gratin does not need an equally complicated main course. A prime rib roast gives you deeply browned beef and pan juices against the soft potatoes. Ham, lamb, pork or a simple roast chicken are equally at home beside it.

Something green keeps the plate from becoming one long note of richness. Roasted Brussels sprouts bring caramelized edges and a little bitterness, while green beans, asparagus, broccoli or a sharp leafy salad work just as well.

Golden potatoes au gratin are plated with sliced medium-rare roast beef and green broccolini on a dark green plate.
Let the gratin be the rich element on the plate. A simple protein plus something green, crisp or acidic keeps the meal balanced.

Potatoes Au Gratin Recipe

Tender 3 mm slices of Russet potato baked in garlic-thyme cream with Gruyère and Parmesan. A brief stovetop simmer starts cooking the potatoes and brings their starch into the cream before the casserole reaches the oven.

Serves: 8 as a side
Prep: about 25 minutes
Cook: usually about 65–90 minutes; occasionally longer if the middle needs extra covered time
Rest: 15 minutes
Total: usually about 1 hour 45 minutes to 2 hours 10 minutes

Whole rectangular casserole of potatoes au gratin with overlapping potato slices and a deeply golden, patchy cheese top.
The top should be deeply golden in patches, but center tenderness must already be confirmed before browning. This visual is the finish cue, not the doneness test.

Equipment: shallow 9 × 13-inch (23 × 33 cm), approximately 3-quart / 2.8-liter ceramic or glass baking dish; rimmed sheet pan; wide saucepan or Dutch oven; mandoline or sharp chef’s knife; foil; cheese grater.

Ingredients

  • 2½ lb / 40 oz / 1.13 kg Russet potatoes, weight before peeling
  • 1½ cups / 12 fl oz / 360 mL heavy cream
  • ½ cup / 4 fl oz / 120 mL whole milk
  • 2 garlic cloves, finely grated or minced
  • 1 teaspoon fresh thyme leaves
  • 8 g fine sea salt, about 1½ teaspoons depending on brand
  • ½ teaspoon freshly ground black pepper
  • ⅛ teaspoon freshly grated nutmeg, optional
  • 6 oz / 170 g Gruyère, freshly grated and divided
  • 1½ oz / 43 g Parmesan, finely grated
  • 1 tablespoon / 14 g unsalted butter, for the baking dish

Instructions

  1. Heat the oven. Set a rack in the center and heat to 350°F / 175°C conventional / 160°C fan. Butter a shallow 9 × 13-inch (23 × 33 cm) baking dish and place it on a rimmed sheet pan.
  2. Slice the potatoes. Peel the Russets and cut them evenly to ⅛ inch / 3 mm. Leave the slices unrinsed.
  3. Warm the cream. Combine the heavy cream, milk, garlic, thyme, salt, pepper and nutmeg in a wide saucepan or Dutch oven. Bring to a gentle simmer over medium-low heat.
  4. Give the potatoes a head start. Add the slices and separate them gently in the cream. Simmer for 5–7 minutes, lifting and turning once or twice. They should bend easily and carry a light coating of cream without becoming fragile.
  5. Assemble. Layer half the potatoes, half the Gruyère, then the remaining potatoes. Pour the cream around them, keeping the uppermost slices visible. Reserve the remaining Gruyère and all of the Parmesan.
  6. Cover and cook until tender. Cover tightly with foil and bake for 35 minutes, then test the center with a thin knife. If the potatoes resist, cover again and continue in 10–15 minute increments until the knife passes through with almost no resistance.
  7. Brown the top. Remove the foil, add the remaining Gruyère and Parmesan, and bake uncovered for 20–25 minutes until the sauce bubbles slowly at the edges and the cheese is deeply golden in patches. If needed, broil/grill briefly only in broiler-safe bakeware, watching closely.
  8. Rest. Leave the gratin for 15 minutes before serving so the sauce can settle around the potatoes.

Recipe Notes

  • Keep the slices close to 3 mm. Thicker pieces can stay firm long after their neighbors are ready.
  • Yukon Golds give a firmer result. They hold cleaner layers and release less starch into the cream than Russets.
  • No flour is used. The recipe contains no added gluten as written; if you need it strictly gluten-free, check labels on packaged ingredients such as cheese and seasonings.
  • For a double batch, use two pans. Keeping the gratin shallow makes the cooking much more predictable.
Posted on — Leave a comment

Rack of Lamb Recipe with Garlic, Rosemary & Dijon

Whole roasted eight-rib rack of lamb with a deeply browned rosemary-garlic crust on a dark slate serving board.

A good rack of lamb comes to the table with deeply browned edges, rosemary and garlic clinging around the fat, and a juicy center revealed when the first chop is cut away.

The awkward part is that the outside and middle do not always become ready together. The fat can still look pale while the meat is moving quickly, or the rack can look beautifully roasted while the thickest part needs a few more minutes. And because rack of lamb is not exactly an everyday cut, that first cut can feel higher-stakes than it should.

This method gets the outside browned first, then lets the oven finish the meat more evenly. An instant-read thermometer handles the last decision instead of asking the clock to guess.

The flavor stays classic: Dijon, fresh rosemary and garlic. They go on after the lamb has browned, when the surface already has color and the garlic is far less likely to scorch.

Before the Pan: 3 Things to Check

Before heat enters the picture, three checks prevent most avoidable problems: make sure the rack is fully thawed, sensibly trimmed and ready to measure once it cooks.

Raw eight-rib rack of lamb on gray stone with the loin, exposed rib bones and outer fat cap clearly visible.
Before cooking, use the raw rack to orient yourself: the thick loin runs beneath the ribs, while the outer fat varies from useful to excessive. Clean-looking rib bones are mostly presentation; the more important prep work is on the meat and fat.

Fully Thawed

Check the middle, not just the surface. A partly frozen rack can brown beautifully while the meat around the ribs stays stubbornly cool.

Sensibly Trimmed

Leave some fat over the loin, but trim an unusually thick, hard layer and remove visible silver skin.

Thermometer Within Reach

Keep an instant-read thermometer beside the stove. With so little meat between the browned surface and the ribs, a small change in probe placement can change the reading.

Not sure what you should trim? See the rack anatomy, fat, silver skin and Frenching guide.

Rack of Lamb Recipe

This method is written around a standard 8-rib rack close to 1¾ lb / 800 g. Racks around 1½–2 lb / 680–900 g can use the same approach, but the thickness of the meat matters more than weight alone when it comes to timing.

Garlic-Rosemary Dijon Rack of Lamb

A whole rack browned in a skillet, brushed with Dijon, rosemary and garlic, then roasted until the thick center reaches the doneness you want.

Rack size
8 ribs
about 1¾ lb / 800 g

Yield
8 chops
serves about 2–4

Oven
400°F / 200°C conventional
180°C fan

Prep
About 15 minutes

First temperature check
About 12 minutes
after searing

Rest
About 10 minutes

Ingredients

  • Rack of lamb: 1 standard 8-rib rack, ideally around 1¾ lb / 800 g
  • Kosher salt: 4–5 g; about 1 tsp Morton kosher salt or roughly 1½ tsp Diamond Crystal
  • Black pepper: ¾ tsp freshly ground
  • Olive oil: 1 tbsp / 15 ml, plus a little more if needed
  • Dijon mustard: 1½ tbsp / about 22 ml
  • Garlic: 3 cloves, finely grated or minced
  • Fresh rosemary: 1 tbsp, finely chopped

Salt by weight if you can. Kosher-salt brands pack differently by volume, which is why the teaspoon amounts are not identical.

The Dijon adds a little tang and gives the rosemary and garlic something to cling to. Rack of lamb is already tender, so this coating is here for flavor rather than tenderizing; there is no need for an overnight wet marinade.

Equipment That Matters

  • Heavy oven-safe skillet
  • Instant-read meat thermometer
  • Tongs
  • Sharp knife for carving

If your skillet cannot go into the oven, brown the lamb there and transfer it to a small roasting pan or rimmed baking sheet. Start checking at the same point, but expect the oven timing to shift.

Instructions

1. Dry, Trim and Season

Heat the oven to 400°F / 200°C conventional or 180°C fan.

Pat the lamb thoroughly dry. Remove silver skin and trim a very thick or hard layer of fat down to a thinner covering. If the fat cap is especially heavy, score it lightly in a shallow crosshatch without cutting into the meat.

Season all over with salt and pepper. You can salt several hours ahead and refrigerate the rack, or simply season while the oven heats. Make sure the meat is fully thawed; it does not need a long spell on the counter in pursuit of a room-temperature center.

2. Render and Brown the Outside

Heat a heavy oven-safe skillet over medium-high heat and add the olive oil. Lay the rack in fat-side down.

At first the fat may look pale and firm. Give it time. The surface will turn glossier, clear rendered fat will begin collecting in the pan, and the underside should move toward a deep golden brown. That usually takes around 3–5 minutes, depending on the rack.

Rack of lamb searing fat-side down in a cast-iron skillet as the fat browns and renders into the pan.
Next, watch what happens in the skillet rather than chasing color alone. Clear rendered fat collecting around the rack tells you the cap is actually softening; if the surface darkens rapidly while little fat has melted, reduce the heat and give it more time.

A little smoke is not unusual. If the pan starts throwing off thick clouds while the fat is still pale, lower the heat rather than letting the surface scorch.

Turn the rack and brown the meaty side for another 1–2 minutes. Give very pale ends a brief touch against the pan if they need it. Once the outside looks right, move on.

3. Add the Garlic-Rosemary Dijon

Take the skillet off the burner. Mix the Dijon, garlic and rosemary, then spread a thin coating over the fat cap and exposed meaty surfaces. Keep heavy clumps of garlic off the pan-facing underside, where they can scorch against the hot skillet.

Spoon spreading a thin Dijon, garlic and rosemary coating over the browned upper surface of a rack of lamb.
Once the sear is finished, Dijon becomes a light binder for the garlic and rosemary. Keep the layer thin enough that the browned lamb still shows through; the goal is to season the crust, not cover it with a heavy herb paste.
4. Roast and Start Checking Early

Put the skillet in the oven with the rack fat-side up.

For a rack around this size, begin checking at about 12 minutes. A thinner rack may already be close. A thicker loin—or a higher target temperature—will take longer.

Slide an instant-read thermometer in from the side toward the thickest meat running along the ribs, avoiding the bones. If the number looks implausible, move the probe slightly and check again.

USDA food-safety guidance for whole cuts of lamb is 145°F / 63°C before removal from the heat, followed by at least a 3-minute rest. Pinker culinary ranges are explained below.

Checking the center now? See exactly where the thermometer tip should land, or open the full temperature guide.

5. Rest and Carve

Move the rack to a cutting board and rest it for about 10 minutes. Some carryover cooking is normal, but the exact rise varies from rack to rack.

Finish the sides while it sits, then look at the ribs before you cut. They curve. Guide a sharp knife through the spaces between them, changing the angle as the bones change direction. Hit something hard? Back out slightly and find the gap rather than forcing the blade through the rib.

Then comes the part everyone watches: the first center chop. If it is where you want it, carve the rest. If it is a little too pink, you still have options.

First chop not where you wanted it? Go straight to the fixes for temperature and doneness problems.

Center lamb chop cut from the rack, showing a rosy cooked interior, browned crust and thin rendered fat edge.
After resting, cut one center chop before carving the entire rack. Because the middle is usually thicker than the ends, that first cut gives you the most useful look at doneness—and leaves the rest of the rack intact if it needs another brief return to the heat.

Rack of Lamb Cooking Time & Internal Temperature

For an 8-rib rack around 1¾ lb / 800 g, begin checking the center after about 12 minutes at 400°F / 200°C once the lamb has been seared. Thickness and the doneness you’re aiming for matter more than a fixed finishing time. If the rack is not there yet, return it to the oven and check again in another 2–3 minutes.

Use time to decide when to start checking. From there, let the meat tell you when it is done.

If you’re roasting two racks, sear them separately so the skillet stays hot, then roast them together with space around each one. Check each rack independently; similar-looking pieces do not always finish together.

That variability becomes even more obvious with a roast leg of lamb, where shape and thickness can differ substantially from one roast to another. The same temperature-first approach matters there too.

Where to Put a Thermometer in Rack of Lamb

The loin is the thick oval of meat that runs along the ribs. Insert the thermometer horizontally from the side so the tip lands near the center of that thickest section.

Too shallow and you can end up reading the hotter browned edge. Too close to a rib and the reading can mislead you in another direction. There is not much room inside a rack, so one suspicious number is worth checking again from a slightly different angle.

Guide showing correct thermometer placement through the side of rack of lamb, plus examples that are too shallow or too close to a rib.
For a reliable rack of lamb temperature check, pay attention to where the probe tip finishes, not merely where it enters. If nearby readings change sharply, reposition through the thick loin; the browned edge and a rib can both give you a misleading result.

Rack of Lamb Internal Temperature Guide

The first three rows show temperature ranges commonly associated with pinker lamb. They are not universal temperatures at which you should remove the rack from the oven. The center can continue to warm during the rest, and the amount of carryover varies.

Measured center temperature — not a universal pull targetCommon culinary descriptionUSDA context
125–130°F / 52–54°C Rare / very pink Below USDA recommendation
130–135°F / 54–57°C Common medium-rare range Below USDA recommendation
135–140°F / 57–60°C Medium to medium-pink Below USDA recommendation
145°F / 63°C USDA recommended minimum for whole cuts Reach 145°F before removal, then rest at least 3 minutes

USDA source: safe minimum internal temperatures for meat.

Four lamb chop cross-sections comparing rare, medium-rare, medium and the USDA 145°F minimum temperature example.
As rack of lamb internal temperature rises, the center generally shifts from deeply pink toward progressively more cooked shades. Yet color varies with the meat, lighting and cooking conditions, so these examples are visual context—not a replacement for measuring the thickest part.

The Rack Itself: What You’re Looking At

A rack of lamb is a row of connected rib chops. Seven or eight ribs is common; this recipe is written around an 8-rib rack. If yours has already been separated into individual chops, our lamb chops recipe is a better fit.

Annotated raw rack of lamb identifying the loin, rib bones, soft fat, thick fat cap, silver skin and chine, with Frenched and un-Frenched examples.
Think of rack-of-lamb prep as three separate decisions: Frenching changes presentation, fat and silver skin affect what cooks and how each chop eats, and the chine matters later because it can block a clean knife path between the ribs.

Frenching Changes the Look, Not the Loin

Frenching removes meat and fat from the ends of the ribs to give the rack its familiar clean-bone appearance. The thick loin underneath cooks the same whether those rib ends are spotless or not.

If the exposed bones darken in the oven, that’s harmless. Foil is only useful if you particularly want to keep them pale for presentation.

One less obvious bone matters more. Look along the base of the ribs: if a solid strip of backbone prevents a knife from passing cleanly between them, the chine is still attached. Ask the butcher to remove it before cooking. Carving individual chops is much easier without it.

Know What to Trim

The soft white layer over the loin is fat, and some of it is worth keeping. It turns glossy in the skillet, browns and leaves a rich edge around the finished chop.

Silver skin looks shiny and membrane-like. It doesn’t melt away during roasting, so remove it. Trim a very thick, firm slab of fat down to a thinner layer too; a quick roast does not give a heavy cap much time to render.

If Your Rack Isn’t Behaving Like the Recipe

While the Rack Is Still Cooking

What you seeWhat’s probably happeningWhat to do
The first temperature check says the middle is still too cool.The loin may simply be thicker, or you’re cooking toward a higher final temperature.Keep roasting and check again in 2–3 minutes.
The outside is dark but the middle still needs time.The exterior browned faster than the center cooked. A partly frozen middle can make the difference bigger.Stop chasing more browning in the skillet; let the oven finish the center.
The rack isn’t browning.The surface may still be damp, or the skillet may have lost too much heat.Dry the meat well and let the pan recover before continuing.
The fat is pale or rubbery.The cap may be thicker than this short cook can easily render.If you notice it during searing, leave the fat side against the skillet a little longer before adding the Dijon-herb coating. If the rack is already coated, don’t press that garlic-covered surface back onto a hot pan; finish the meat to temperature and trim a heavy cap more closely next time.
The garlic is going black.Garlic has ended up against too much direct heat.Remove badly burnt loose pieces. Keep the coating on the exposed upper surfaces next time rather than underneath the rack.

After You Check or Carve the First Chop

What you seeWhat’s probably happeningWhat to do
The thermometer says done, but the first cut looks much less cooked.The probe may have stopped near the hot surface or too close to a rib.Check again from the side and aim for the center of the thick loin meat.
The first center chop is too rare for your table.The middle simply needed more time.Return the rack briefly if all of it needs more cooking, or finish only the underdone chops in a hot skillet.
Some people want pink lamb and others don’t.The thinner end pieces generally cook a little further than the thick middle chops.Give the more-done end chops to those who want them, then cook individual pieces further only where needed.

A slightly underdone chop is usually easy to fix. An overcooked rack gives you far fewer options.

Carve With the Bones, Not Against Them

The ribs curve through the meat. Look at their direction before making the first cut, then guide the knife through the soft gap between two bones. If the blade keeps hitting something hard, change the angle rather than trying to muscle through.

Hands carving a roasted rack of lamb with a knife passing between curved rib bones while one chop rests on the board.
After the rack rests, let the bones determine the portions. Each lamb chop naturally sits between two ribs, so the rib spacing provides the carving map; this is more useful than trying to force perfectly equal, ruler-straight slices.

Once that first chop comes free, you finally see what all the thermometer checking was for: a browned edge, tender meat through the middle, rosemary and garlic around the outside, and a thin rendered strip of fat rather than a waxy slab.

What to Serve With Rack of Lamb

How Many People Does One Rack Feed?

An 8-rib rack makes a generous main course for 2 people, comfortably serves about 3 with sides, or can stretch to 4 as part of a larger meal. For most dinners, that works out to roughly 2–3 chops per person.

Rack of lamb is rich enough that the rest of the plate does not need to compete with it. Garlic mashed potatoes make a natural partner for the lamb and any juices that collect while it rests.

With mash on the plate, skip another heavy starch. Something green and a little crisp does more for the meal. Green beans almondine work particularly well, as do bitter greens or a simple salad.

Then give the lamb something sharp. Mint sauce is traditional; chimichurri goes greener and more garlicky, with enough vinegar to cut through the fat. Lemon and fresh herbs can do the job without another sauce.

Two roasted lamb chops served with garlic mashed potatoes, green beans almondine and a small amount of green herb sauce.
Finally, preserve the contrast you worked for. Keep sharp herb sauce beside or partly beneath the lamb instead of flooding the crust; mashed potatoes can catch the resting juices, while green beans bring freshness and texture without adding another heavy side.

You don’t need three starches and five vegetables around a rack that already has plenty of presence.

Make Ahead & Leftovers

If you’re serving the rack to other people, do the trimming and seasoning ahead and refrigerate it. Mix the garlic, rosemary and Dijon separately. Then the only real work near dinner is browning, roasting and resting the meat.

Keep the actual cooking close to serving rather than half-cooking the rack, chilling it and trying to finish the center later.

Refrigerate cooked lamb within 2 hours and use refrigerated leftovers within 3–4 days. USDA guidance is to reheat leftovers to 165°F / 74°C throughout. Its leftovers and food-safety guide covers cooling, storage and reheating in more detail.

That reheating temperature will naturally take pink lamb further. Properly chilled leftover lamb is also very good cold: slice it thin for flatbread, salad or a grain bowl with cucumber, tomato and a spoonful of tzatziki.


Once you know what the fat should look like, where the thermometer needs to go and how the meat behaves as it cooks, that first cut between the ribs stops feeling like a reveal you have to hope for. You already have a good idea what you’re going to find.

Posted on — Leave a comment

Green Shakshuka Recipe with Spinach, Herbs, Feta & Eggs

Scoop through this green shakshuka and the spoon should catch soft spinach and herbs, salty feta and enough warm yolk to coat the greens underneath. Tear off a piece of bread and you get all three in one bite. Instead of the familiar tomato base, this version builds the pan around spinach, leek and herbs.

The spinach starts as a heap and quickly folds down around the sweet leek and warm spices. Watch the pan most closely before the eggs: the greens should still be juicy, but there should not be loose water underneath them. After that, the skillet is forgiving. Feta, reserved herbs and a little extra lemon turn a handful of ordinary ingredients into a meal that feels surprisingly generous.

Green Shakshuka Recipe

Spinach and leek cook down with warm spices, herbs and lemon before four eggs settle into deep wells and cook gently under a lid. The whole skillet comes together in about 30 minutes, with feta, the remaining herbs and extra lemon added at the end.

Serves
2 as a main dish or 4 smaller brunch portions

Prep
About 10 minutes

Cook
About 20 minutes

Total
About 30 minutes

Pan
10-inch / 25 cm skillet with lid

Eggs
Covered stovetop

Useful equipment: a 10-inch / 25 cm skillet, a lid (clear if you have one), a flexible spatula or wooden spoon, and a small bowl or ramekin for cracking the eggs. Without a matching lid, use another heatproof lid that covers the skillet or tent it snugly with foil.

Ingredients

For the skillet

  • 2 tablespoons / 30 ml extra-virgin olive oil
  • 1 large leek, about 6 oz / 170 g trimmed white and light-green parts, washed thoroughly and thinly sliced
  • 3 garlic cloves, about 9 g, finely chopped
  • 1 teaspoon ground cumin
  • ½ teaspoon ground coriander
  • ½ teaspoon Aleppo pepper, optional
  • 10 oz / 285 g baby spinach
  • ½ oz / 15 g flat-leaf parsley, roughly one generous handful, chopped and divided
  • ⅓ oz / 10 g fresh dill, roughly one small handful, chopped and divided
  • Finely grated zest of ½ lemon
  • 1 tablespoon / 15 ml fresh lemon juice, plus more to taste
  • ¼ teaspoon fine salt, plus more to taste
  • Freshly ground black pepper
  • 4 large eggs

For the table

  • 3 oz / 85 g feta, crumbled
  • Lemon wedges
  • Harissa, Aleppo pepper or chile oil, optional
  • Warm pita or crusty bread
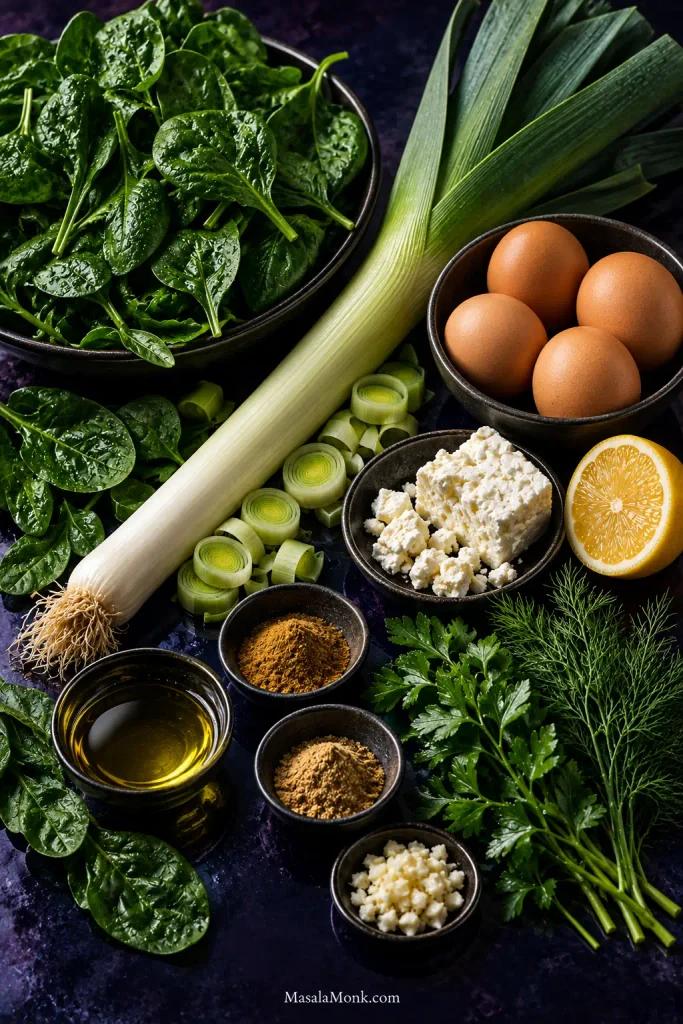
Baby spinach, leek, four eggs, feta, lemon, parsley, dill, olive oil, chopped garlic and small bowls of ground spices arranged on a dark blue-purple surface.
Leek and warm spices build the base; meanwhile, lemon, herbs and feta arrive later so the spinach stays fresh and distinctly green.

Method

Build the Green Base

  1. Soften the leek. Heat the olive oil over medium heat. Add the leek and ¼ teaspoon salt. Cook for 5–7 minutes, until soft and sweet-smelling. A little color is fine.
  1. Add the garlic and spices. Stir in the garlic, cumin, coriander and optional Aleppo pepper. Cook for about 30 seconds, until fragrant.
  1. Wilt the spinach in batches. Add several handfuls at a time, folding them into the leek as they collapse.
  1. Cook away the loose water. Leave the skillet uncovered and stir occasionally. Make a hollow with the back of a spoon. Thin liquid rushing straight into it means the spinach needs longer.
  1. Season, then check the pan. Stir in about half of the parsley and dill, the lemon zest and 1 tablespoon / 15 ml lemon juice. Add black pepper, taste, and add more salt only if needed. Make another hollow with the spoon. The spinach is ready for the eggs when no loose puddle remains, the spoon-made well mostly holds, and the spinach tastes properly seasoned.
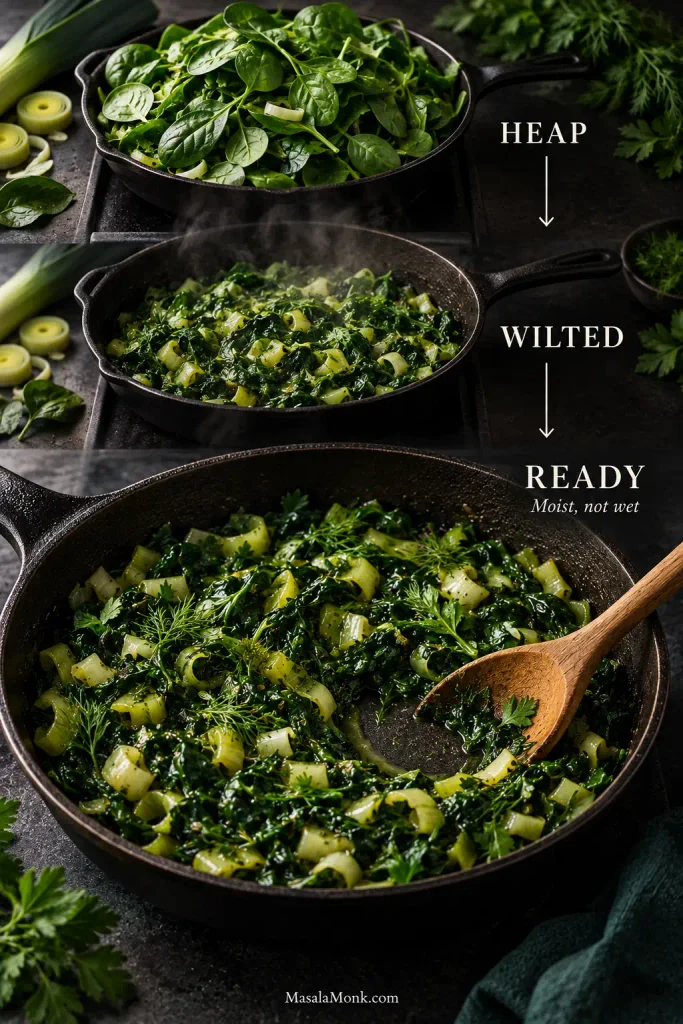
Three stages of spinach cooking in a skillet: a large heap of fresh spinach, wilted spinach with visible moisture, and cooked spinach with a spoon making a hollow that holds its shape. Labels read “HEAP,” “WILTED,” “READY,” and “Moist, not wet.”
Use the right-hand “READY” stage as the cue: the greens should look glossy rather than puddled, and the spoon track should stay visible for a moment. Volume alone is misleading because spinach collapses long before all of its released water is gone.

Load the Eggs

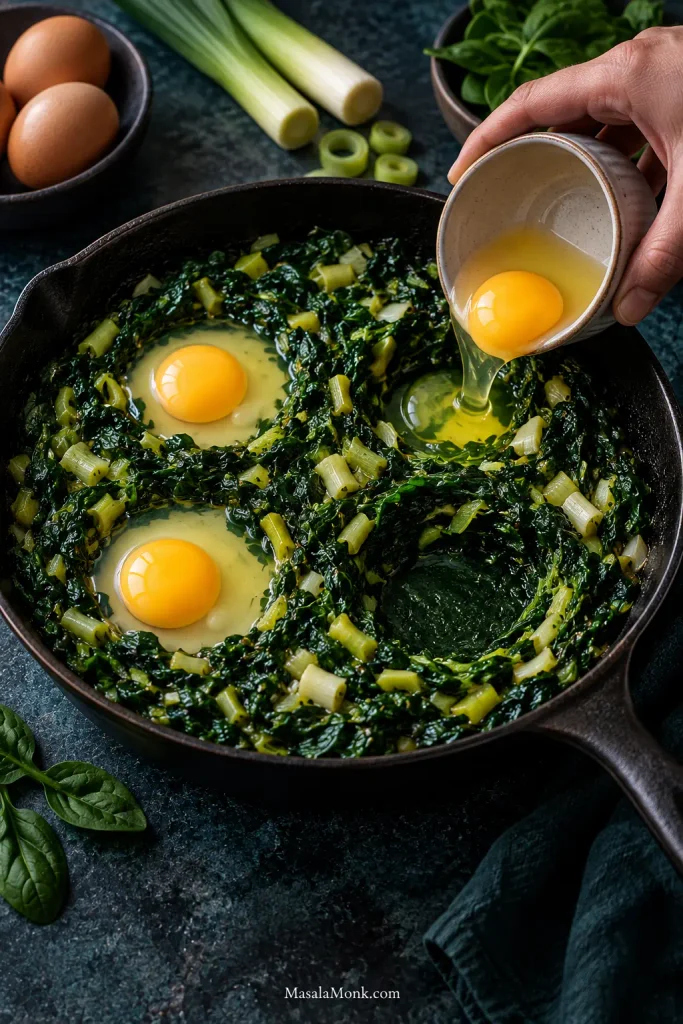
  1. Make four deep wells. Take the skillet off the heat. Crack each egg into a small bowl first, then slide it into a well. Loading all four eggs off heat keeps the first from cooking far ahead of the last.
Raw eggs being added to deep wells in cooked spinach and leek. Two eggs are already in place, another is being poured from a small bowl, and one empty well is visible.
Aim to keep most of each white inside its well while the yolk sits near the surface. If a white starts running sideways, deepen the next well rather than trying to push the egg back through the greens.

Cook and Finish

  1. Cover and cook gently. Return the skillet to low or medium-low heat and check at around 3 minutes. For soft yolks, look for set whites and moving yolks. Rotate the pan if one side is cooking faster, then remove it just before the yolks reach the texture you want. The hot skillet will carry them a little farther.
  1. Add the feta and serve. Scatter over the feta and remaining herbs. Taste the spinach around an egg, then add more lemon, salt or chile if needed.

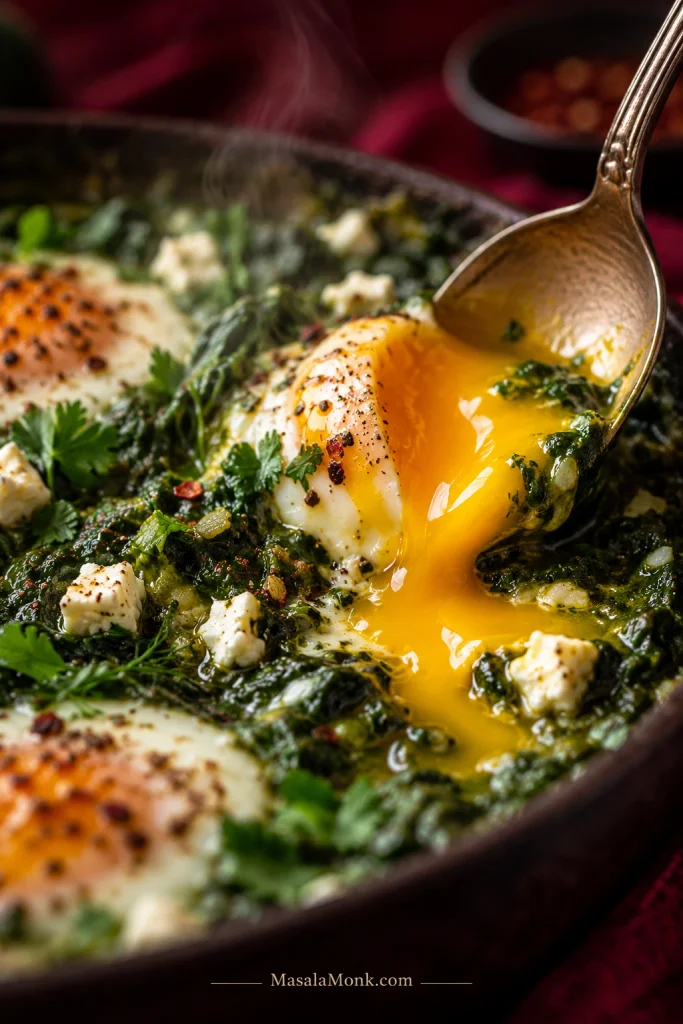
Spoon into one of the eggs while the skillet is still hot and let the yolk run through the spinach.

Close-up of a spoon breaking a soft egg yolk in green shakshuka, with golden yolk flowing through cooked spinach, herbs and small pieces of feta.
Once the yolk breaks, it becomes part of the sauce. That is why a little lemon at the finish matters: its acidity keeps the combination of soft yolk, feta and cooked greens rich without feeling heavy.

Want softer yolks? See the egg-doneness guide ↓

Pan Size Changes How the Spinach Cooks

A 10-inch / 25 cm skillet gives this amount of spinach enough depth without trapping too much water underneath it. Wider skillets dry the greens faster; smaller ones hold water longer.

The same principle matters when scaling up. Twice the spinach packed into the original skillet takes longer to reduce, so a wider pan—or two skillets—is easier to manage.

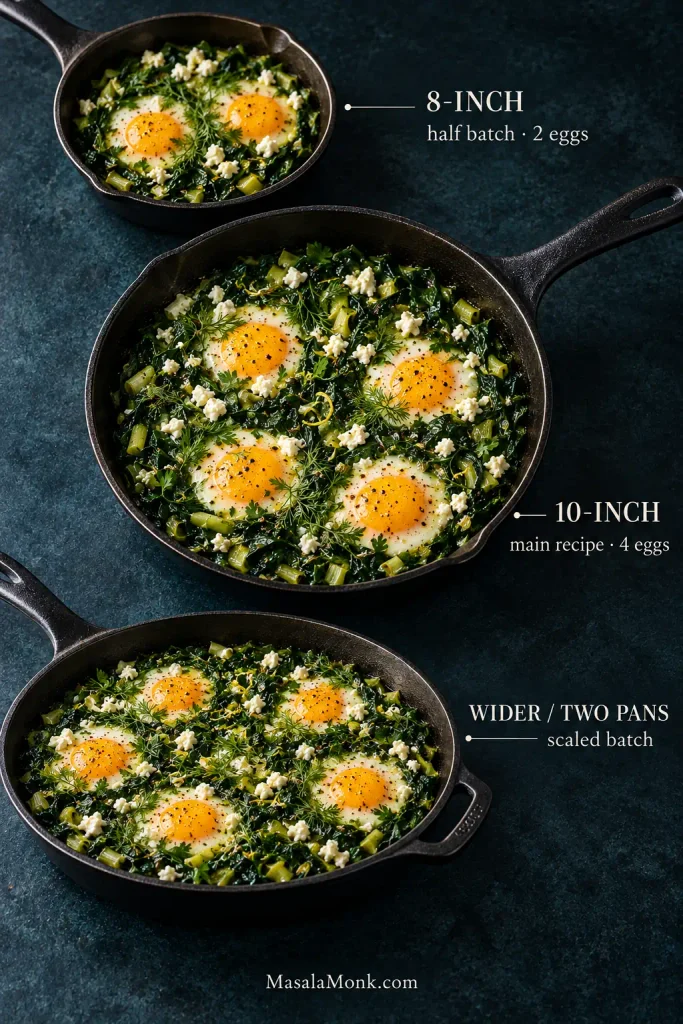
Smaller Batches

Reduce the pan size along with the food. For roughly half the spinach and two eggs, an 8-inch / 20 cm skillet is a useful starting point. Spread that smaller amount through the original 10-inch pan and it will reduce faster.

Three skillets showing green shakshuka at different scales: an 8-inch pan with two eggs for a half batch, a 10-inch pan with four eggs for the main recipe, and a wider pan for a larger batch.
Use the 10-inch pan as the depth reference when scaling: the greens should spread in a similarly shallow layer. Keeping roughly the same depth preserves evaporation better than simply adding more cooking time.

The target is simple: not soup, and not a pan of dry sautéed spinach. Get that balance right and the yolk clings to the greens instead of disappearing into liquid underneath them.

Set Whites, Soft Yolks

For soft yolks, pull the skillet when the whites are set but the yolks still move when the pan is gently nudged.

Close view of eggs in green shakshuka with opaque set whites and glossy soft yolks. Callouts identify “WHITE: SET” and “YOLK: SOFT.”
With a clear lid, watch the whites turn opaque without releasing the steam that sets their tops. Pull the pan while the yolks are still glossy; carryover heat will firm them further.

A little unevenness is normal when four eggs share one skillet. Heat reaches the eggs from below while steam sets the tops, and some burners or pans run hotter on one side.

If one side gets ahead, rotate the skillet. A heavy pan keeps cooking after it leaves the burner, too. Cast iron makes this especially obvious: a yolk that looks loose when you switch off the heat can be noticeably firmer by the time the pan reaches the table.
If everyone wants roughly the same doneness, add the eggs together as in the main recipe. When preferences differ, stagger them deliberately: give the eggs destined for firm yolks a short head start, then add the softer-yolk eggs later. Dinner survives and everyone gets the yolk they wanted.

Egg safety: When cooking for someone who needs fully cooked eggs, take both whites and yolks through until firm. FDA guidance recommends firm whites and yolks; pasteurized eggs are the safer choice when eggs are served undercooked, especially for people at higher risk from foodborne illness.

When the Burner Is Too Uneven

An oven can take the burner out of the equation. Preheat it to 375°F / 190°C, use an oven-safe skillet and transfer the pan once the eggs are in. Start checking at about 4 minutes; many pans will need longer, so judge the eggs by the whites and yolks rather than the clock.

Still fighting uneven eggs? Go to troubleshooting ↓

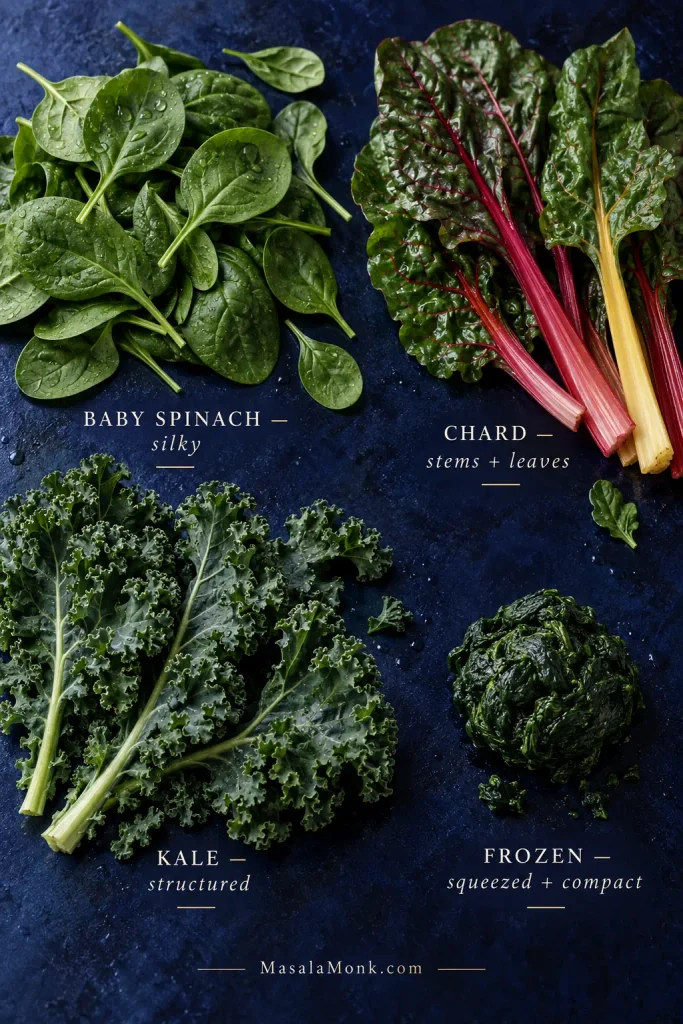
Spinach, Chard or Kale?

GreenHow It BehavesWhat to Change
Baby spinachSoftest and fastest; collapses dramatically and releases plenty of water.Cook uncovered until the loose liquid is gone.
Swiss chardMore structure, with tender leaves and useful stems.Slice the stems finely and cook them with the leek before adding the leaves.
KaleHeartier and chewier; keeps more of its shape.Remove tough stems, slice finely and give it longer to soften.
Frozen spinachAlready collapsed and much more compact than fresh spinach.Use about 6–7 oz / 170–200 g by package weight as a starting point. Thaw completely, squeeze very dry and add it after the aromatics. Brands vary, so treat this as a practical starting quantity rather than an exact fresh-spinach equivalent.
Baby spinach, Swiss chard with colored stems, curly kale and a compact portion of squeezed frozen spinach arranged on a dark blue surface with labels identifying each green.
Choose greens by the cooked texture you want: baby spinach turns silky, chard stays more substantial, kale keeps the most structure, and squeezed frozen spinach starts compact.

Frozen spinach looks surprisingly small after a proper squeeze. That’s useful here: the water left in the towel is water you no longer have to drive out of the skillet. The same issue shows up in homemade spanakopita, where wet spinach can soften both the filling and the pastry around it.

When mixing greens, give chard or kale a head start and add tender spinach later. Save some parsley and dill for scattering over the cooked eggs so the herbs still taste lively when the skillet reaches the table.
What You Can Swap

Leek: a medium yellow or white onion is fine. Let it soften before adding the garlic.

Feta: goat cheese gives a similar tangy contrast. Thick yogurt or labneh works better spooned alongside than stirred into the spinach.

Dill: use more parsley, some cilantro, or a smaller amount of mint.

Heat: skip the Aleppo pepper for a mild skillet, or add harissa or chile oil to individual portions.

Back to the recipe ↑

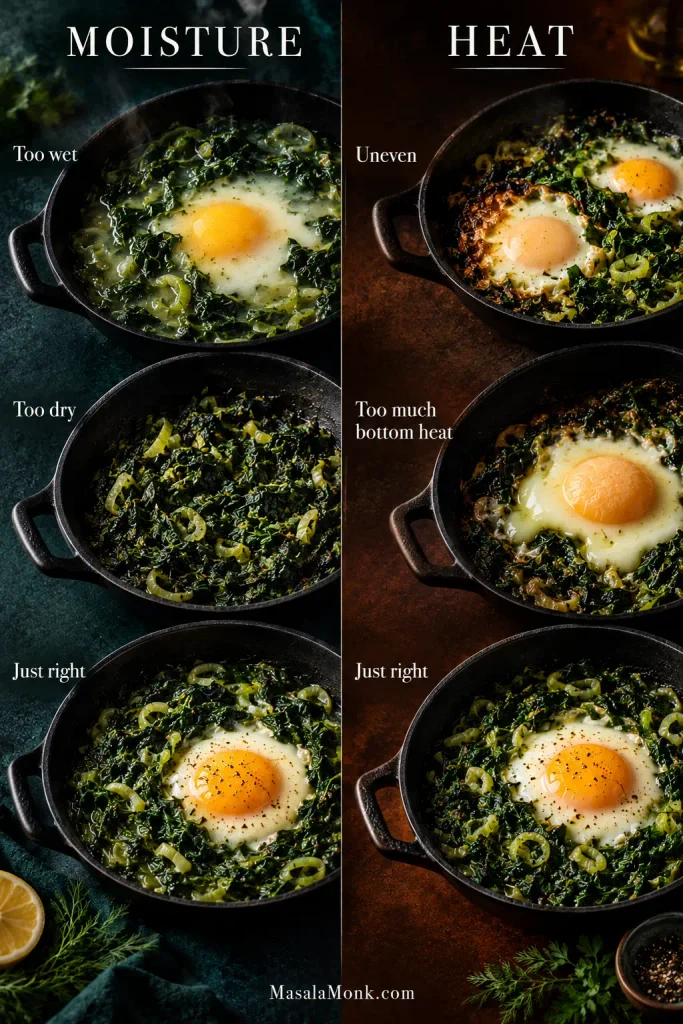
Fix My Green Shakshuka

Most problems here come down to two things: moisture and heat. If the greens are swimming, deal with the water before the eggs go in. Eggs racing ahead usually mean the heat needs lowering or redistributing.

Two-column guide comparing moisture and heat problems in green shakshuka. The moisture side shows a wet base, dry greens and a properly moist base; the heat side shows uneven cooking, excessive bottom heat and properly cooked eggs.
Use timing to diagnose the pan: problems before the eggs usually point to moisture; problems during egg cooking usually point to heat. Fix the cause, not the clock.
What You SeeLikely CauseWhat to Do
Water pooling under the spinachThe leaves have wilted but their released liquid has not evaporated.Keep cooking uncovered before adding the eggs.
Spinach looks dryThe pan reduced too far.Add water 1 tablespoon / 15 ml at a time until the greens loosen.
The spinach tastes flatIt may need freshness or acidity more than another layer of seasoning.Try lemon and fresh herbs before reaching for more spice or salt.
An egg spreads through the spinachThe greens are too wet, the well is too shallow, or both.Reduce remaining liquid and make the next wells deeper.
One side cooks much fasterThe burner or skillet has a hot spot.Rotate the skillet or move it to the oven.
Yolk is firm while the white still looks looseStrong bottom heat is cooking the yolk faster than steam sets the top, or the egg is sitting too high.Use deeper wells, gentler heat and a snug cover. Move to the oven if the same problem keeps returning.

Fixed it? Back to the recipe ↑

Make the Spinach Ahead, Not the Eggs

Yes, you can make green shakshuka ahead—just stop before the eggs. Cook the leek, spices and spinach, cool and refrigerate the mixture, then reheat it and add fresh eggs shortly before serving. Add the feta after the eggs are cooked.

Keep the cooked spinach refrigerated and use it within 3–4 days. That matches USDA guidance for most cooked leftovers.

Leftover shakshuka can be reheated, but the yolks will firm up. For freezing, portion the cooked spinach mixture without eggs or feta, thaw it in the refrigerator, reheat thoroughly and add fresh eggs at the end.

If you want an egg dish that reheats well as a whole, an oven-baked frittata is a better fit.

What to Serve With Green Shakshuka

Bread earns its place here. Warm homemade pita, sourdough or another crusty loaf is ideal for scooping the greens and wiping up the yolk left around the edges of the skillet.

Greek lemon potatoes turn it into a more substantial meal. Thick yogurt, labneh or a plate of crisp raw vegetables bring something cool alongside.

Green shakshuka with four eggs served in a skillet on a dark wooden table, with hands tearing bread and serving the dish beside labneh or yogurt and roasted lemon potatoes.
Green shakshuka suits the middle of the table: every scoop lands a little differently—more yolk, more feta, more greens—while bread turns whatever is left in the skillet into the best part of the meal.

Put the skillet in the middle and let the bread do most of the serving.

At that point, stop cooking and eat.

Back to the recipe ↑  ·  Back to top ↑

Posted on — Leave a comment

Garlic Butter Steak Bites Recipe: Juicy, Tender & Ready in 15 Minutes

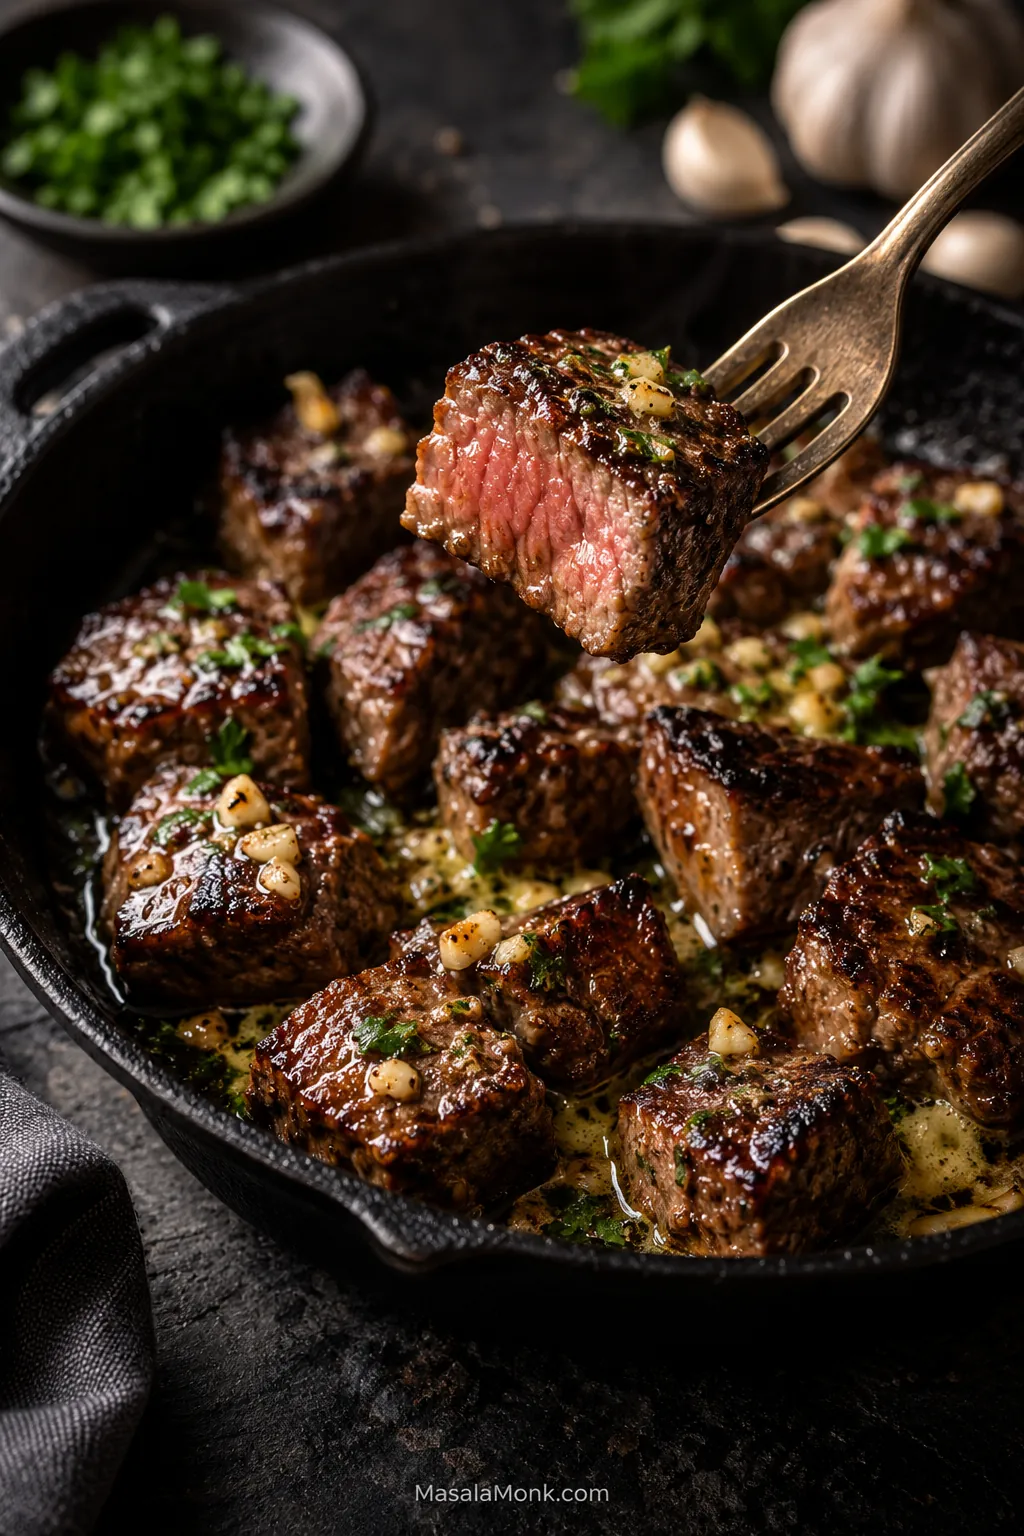
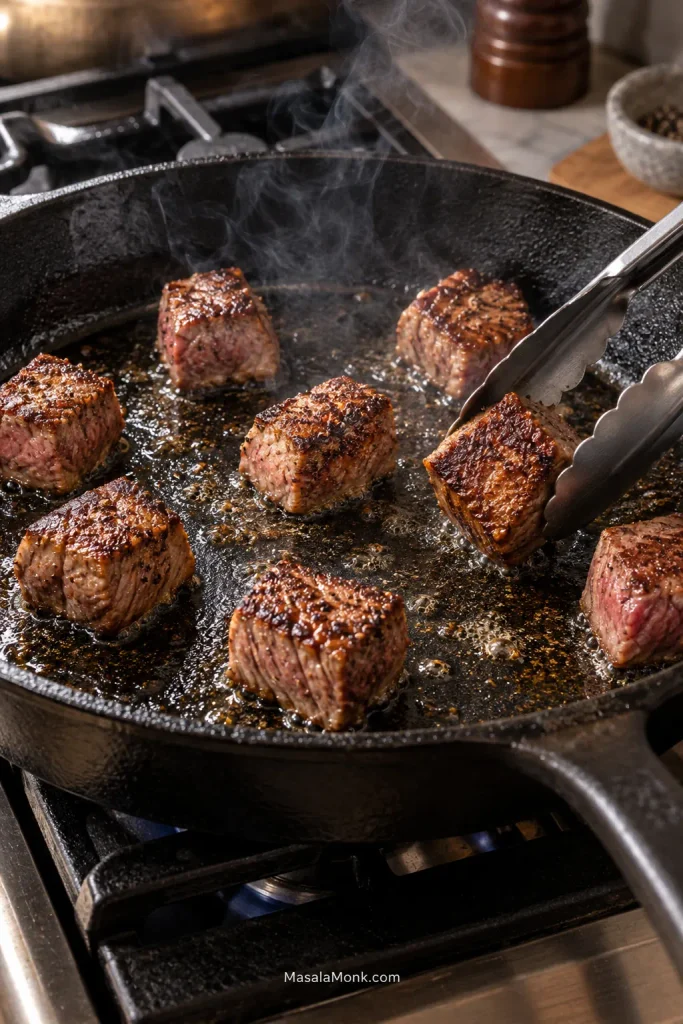
Garlic butter steak bites in a cast-iron skillet, with one lifted bite showing a dark seared crust and juicy pink center.

Garlic butter steak bites are really a two-temperature recipe disguised as a one-pan dinner. The beef wants a hot skillet so its cut surfaces can brown while the centers stay juicy. Butter and finely minced garlic want that heat turned down before they ever reach the pan.

Get the handoff right and you get deeply browned, savory edges, a tender center and warm garlic butter glossing the steak instead of drowning it. There is a sharp sizzle at the pan, then that unmistakable smell of garlic hitting melted butter a few minutes later.

Steak is also expensive enough that turning a good piece of sirloin gray or chewy is particularly annoying. Fortunately, most of the risk comes down to one easy rhythm: Sear hot. Steak out. Butter low. There is no marinade to remember hours ahead and no long room-temperature wait.

Think of the pan in four moves:

  1. Hot panDry steak meets shimmering oil and gets a chance to brown.
  2. Steak outMove those small pieces away from the stored heat before they overshoot.
  3. Heat downThe butter should melt and foam, not race straight toward brown.
  4. Quick returnToss the steak through the glossy garlic butter and get dinner onto the plate.

Garlic Butter Steak Bites Recipe

The skillet can preheat while you mince the garlic and chop the parsley, so there is very little dead time. Cut and dry the steak first; season it when the pan is nearly ready.

Yield3 hearty servings or 4 with sides

TotalAbout 15 minutes for one batch

Steak size1 in / 2.5 cm

Pan12 in / 30 cm skillet

First searAbout 1½–2 minutes untouched

Garlic30–45 seconds over low heat

Useful equipment: a 12-inch / 30 cm cast-iron or heavy stainless-steel skillet, sharp knife, cutting board, paper towels and tongs or a sturdy spatula. An instant-read thermometer is useful for checking doneness without cutting into several pieces.

Ingredients

  • 1¼ lb / 20 oz / about 570 g top sirloin steak, preferably about 1 inch / 2.5 cm thick or thicker
  • ¾ tsp / about 4 g fine sea salt, plus more to season at the end if needed
  • ½ tsp freshly ground black pepper
  • 1 tbsp / 15 ml high-smoke-point oil, such as avocado, grapeseed, canola or vegetable oil
  • 3 tbsp / about 42 g unsalted butter
  • 5 large garlic cloves
  • Small handful fresh parsley leaves, chopped to make about 2 tbsp

Method

Prep the Steak and Pan

  1. Cut and dry the steak. Trim away any hard exterior gristle, then cut the sirloin into reasonably even pieces about 1 inch across. If the grain is obvious, make your last cut across it. A few cubes will inevitably be smaller than the others. Pick one of the largest as your test piece, then pat all of the beef thoroughly dry with paper towels.
  2. Heat the skillet while you finish the prep. Put a 12-inch cast-iron or heavy stainless-steel skillet over medium-high heat. Mince the garlic and chop the parsley while the pan heats. High-heat steak searing can create some smoke, so get the vent hood running or open a nearby window before the pan is fully hot.
  3. Season just before cooking. Sprinkle the dry steak evenly with the salt and black pepper. Add the oil and swirl it around the hot skillet. It should shimmer. Touch one piece of beef to the pan—you want an immediate, energetic sizzle—then add the rest.

Sear and Pull the Steak

  1. Give the first face time to brown. Arrange the steak in a loose single layer with visible space around most of the pieces. If it does not fit comfortably, cook in two batches. Leave the first side alone for about 1½–2 minutes, until the underside has a deep brown crust. Turn or toss and cook for roughly another 1–2 minutes. Start checking that larger cube after about 3 minutes total. Your skillet may move faster or slower, so trust the color and the steak more than the stopwatch. Six perfectly browned faces are not the goal.
Steak bites spaced apart in a hot cast-iron skillet as metal tongs turn one piece to reveal its deeply browned underside.
At the first turn, pink sides are fine. What matters is the contact face underneath: a dark, dry crust plus visible space around the pieces tells you the pan is searing rather than steaming.
  1. Move the steak to a clean plate. Take the pieces out while they are still slightly shy of the doneness you want; you will check again after the garlic-butter toss. Once the steak is safely off that hot metal, the stressful part is basically over. Cast iron in particular stays fiercely hot even after the burner is turned down.

Finish With Garlic Butter

  1. Lower the heat and make the garlic butter. Turn the burner to low and add the butter. It should melt and foam while staying golden. If it starts turning brown almost as soon as it hits the skillet, pull the pan off the heat until things calm down before adding the garlic. Scrape the browned steak bits into the foaming butter, then stir in the garlic for about 30–45 seconds. You want a sweet, fragrant garlic smell and pieces that are pale to lightly golden—not dark brown.
  2. Coat and serve. Return the steak and any juices from the plate. Toss just long enough to gloss the browned surfaces with garlic butter, then take the skillet off the heat. Add the parsley and check that larger cube again. Taste one while everything is hot and add a small pinch of salt if the batch needs it.

Doneness at a glance: use one of the larger cubes for your thermometer check. About 130–135°F / 54–57°C is a common final medium-rare range; roughly 135–140°F / 57–60°C is a common medium range. These are culinary targets; see the USDA guidance below.

Let spacing decide whether you need two batches. A 12-inch pan is a useful starting point, but cooking surfaces vary. If most of the steak cannot sit in one loose layer with visible room around it, split the batch and allow a few extra minutes. Two browned batches beat one steaming pan.

What Is the Best Steak for Steak Bites?

Top sirloin is the practical sweet spot. It is tender enough for a short, hot sear, but it still tastes properly beefy once the garlic butter goes on. You also avoid paying tenderloin or ribeye prices for meat that is about to be cut into small pieces.

CutWhat it gives youHow it works here
Top sirloinBeefy, reasonably tender, moderately lean and comparatively affordableThe best all-round choice
RibeyeMore marbling, richness and juicy fatExcellent for a richer batch
New York stripStrong beef flavor with a slightly firmer textureVery good
TenderloinVery soft, lean and mildBeautifully tender, but expensive for cubing
Skirt or flankPronounced grain and strong flavorUsually better cooked whole and sliced thinly across the grain
Chuck / stew meatMore connective tissue and a firmer quick-cooked textureBetter suited to long, moist cooking

If you’ve got top sirloin, you can stop thinking about cuts and cook. Flank is usually happier in thin cross-grain slices, as in beef and broccoli. For steak bites, buy something thick enough to make roughly 1-inch cubes.

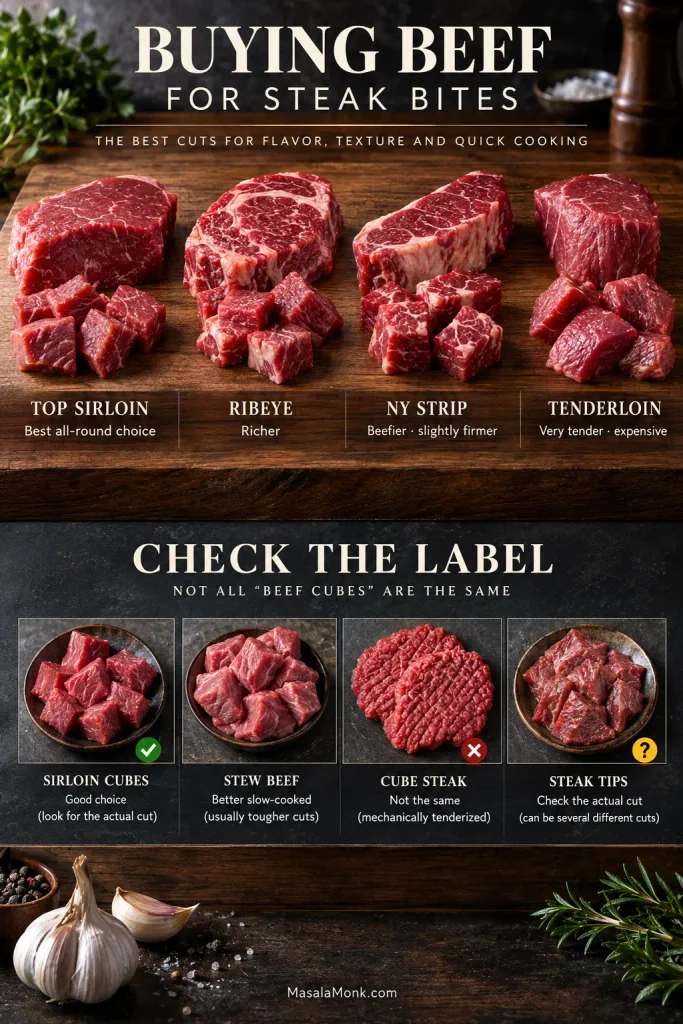
Before You Buy Pre-Cut Beef, Check the Label

Sirloin cubes can save knife work. Stew beef may contain tougher pieces chosen because they soften during long cooking, and a three- or four-minute sear will not give them that time.

Cube steak is something else again: usually a thin piece of beef that has been mechanically tenderized. “Steak cubes” means steak cut into chunks. By contrast, steak tips is a looser term and can refer to small pieces of steak or particular regional cuts and preparations. Similar names, different beef—check the actual cut on the package when you can.

Beef-buying guide comparing top sirloin, ribeye, New York strip and tenderloin, with examples of sirloin cubes, stew beef, cube steak and steak tips.
For quick-cooked steak bites, consistency matters almost as much as tenderness. Top sirloin is easy to cube evenly; mixed stew beef can vary in thickness, grain and connective tissue, so the pieces may finish at different times.

Do Steak Bites Need a Marinade?

No. With top sirloin, salt, pepper, a good sear and the garlic butter are enough. That is part of the appeal: you can decide to make these at dinnertime instead of planning hours ahead.

Marinated steak can still work. Drain it well and pat the surface dry before searing; wet beef spends its first minutes steaming off liquid instead of browning. A salty marinade also means you will need less added salt.

For herbs and acidity without wetting the raw steak, spoon chimichurri over the cooked bites. The cold, bright sauce is excellent against warm beef and garlic butter.

In this 15-minute version, season immediately before searing. Salting ahead can work too; give the steak at least 45 minutes. Serious Eats goes into the timing in detail. For dinner tonight, though, season and cook.

Steak-Bite Doneness Moves Fast

For 1-inch steak bites, expect roughly 3–4 minutes of initial searing in a properly hot skillet, followed by only a brief garlic-butter toss. Pan heat and cube size vary, so treat that window as a guide and use the crust and internal temperature to decide when the steak is ready.

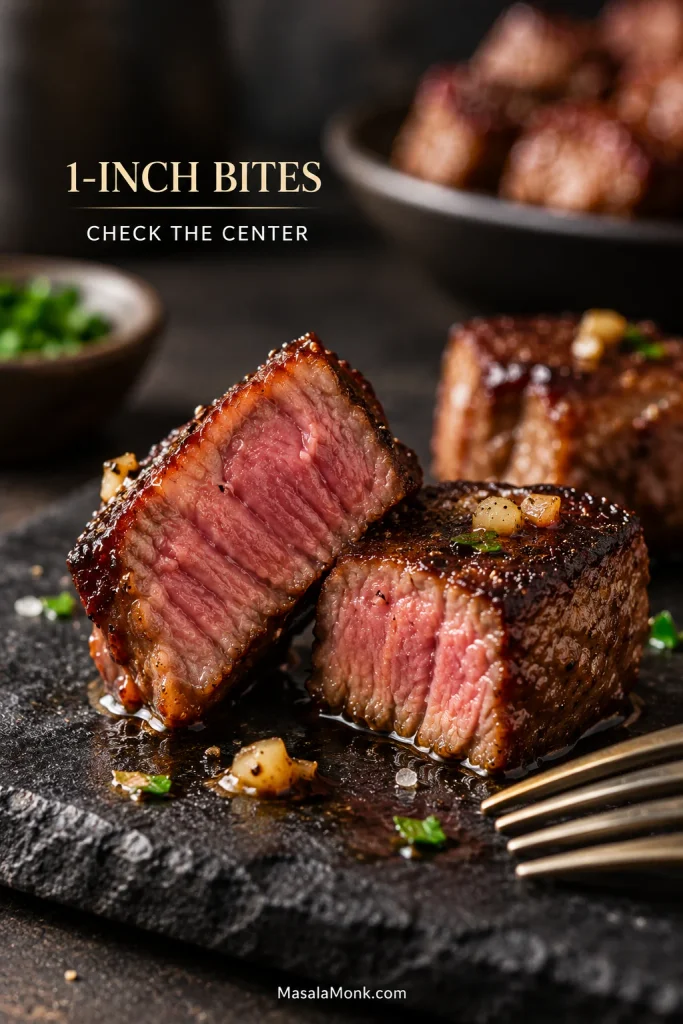
Steak bites have very little runway between pink and overdone. A small cube has only a short distance between its browned surface and its center, so one of the larger pieces makes the most useful thermometer check.

Slide an instant-read thermometer into that cube from the side toward the center. For reference, about 130–135°F / 54–57°C is a common final medium-rare range and roughly 135–140°F / 57–60°C is a common medium range. The garlic-butter toss adds another small burst of heat, so check again afterward.

Once that cube is where you want it, the batch is done. Do not trade the center you wanted for one more patch of crust.

Two 1-inch steak bites cut open to show deeply browned crusts and rosy, juicy centers, with text reminding cooks to check the center.
Use one of the larger cubes as your doneness check, but pull smaller pieces sooner if they reach the center you want first.

USDA food-safety guidance for beef steak: cook to at least 145°F / 63°C before removal from heat, followed by a 3-minute rest. Lower steak temperatures commonly used for rare or medium-rare are culinary choices below that recommendation. Count the garlic-butter toss as part of the cooking before beginning that rest.

Cooking now? Back to the Searing Step · Full Recipe

Cast Iron Holds Heat Longer Than You Think

Cast iron is excellent when you want a hard sear because it hangs onto heat after the cool beef hits the pan. Heavy stainless steel works beautifully too, and it usually responds a little faster when you lower the burner.

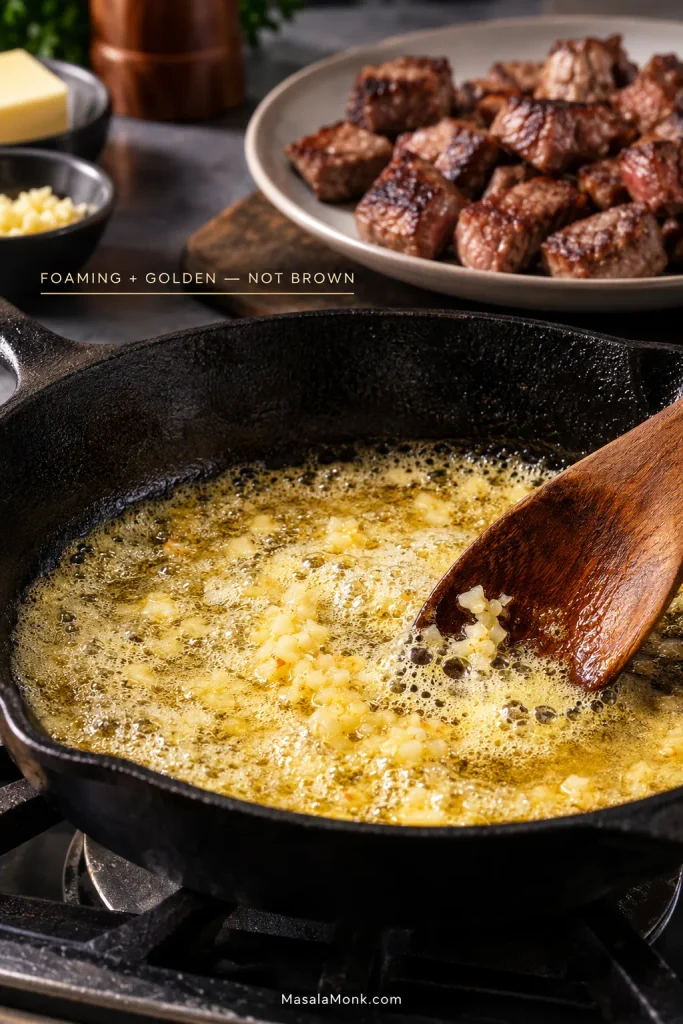
The catch with cast iron comes after the steak leaves. Even with the flame low, the skillet itself can still be extremely hot. Butter tells you what the dial cannot: if it melts into a golden foam, you are in much better territory for garlic; if it races straight toward brown, the pan needs more time away from the heat.

When the temperature is right, the browned steak bits loosen into the foaming butter and the garlic stays sweet and fragrant. That is the handoff the whole recipe is built around.

Golden foaming butter and pale minced garlic in a cast-iron skillet, with browned steak bites resting on a plate behind it.
Dark specks can be a good sign when they are browned steak fond loosening into the butter. Watch the garlic instead: it should stay pale to light gold while the butter foams around it.

A large nonstick skillet can do the job in a pinch, though the crust may be less aggressive. Treat it more gently during preheating than cast iron or stainless steel.

At the skillet? Garlic Butter Step · Troubleshooting

Give Mushrooms and Onions the Empty Pan First

Mushrooms with browned beef and garlic butter are a great combination. What they are not good at is sharing the steak’s searing stage: as they soften, they release the water the beef is trying to avoid.

Cook mushrooms first until most of that moisture has disappeared, then move them out and sear the steak. Onions can be softened the same way. Bring either one back when the steak returns to the garlic butter.

For a saucier version, keep the mushrooms in their own cooking stage and serve the beef with creamy mushroom sauce.

Fix My Steak Bites: Tough, Gray, Watery or Burned

A disappointing batch does not always have the same cause. Start with what you can actually see, hear and taste.

What happenedLikely causeWhat to do
Gray or wateryWet beef or crowded panDry well; give the pieces room
No real crustMoved too soon or pan too coolWait for a strong sizzle; leave the first face alone
Brown but dryUneven pieces or too much pan timeCut more evenly; pull smaller cubes sooner
Pink but chewyCut, grain or connective tissueChoose tender steak; cut across grain
Stew meat stays toughWrong cut for a quick searUse sirloin here; slow-cook stew beef
Garlic tastes bitterPan still too hotKeep the steak out; make the garlic butter again
Butter blackensToo much heat stored in skilletTake the pan off heat before starting again
Steak overcooks in garlic butterStayed in the hot pan too longReturn only long enough to coat
It tastes flatNeeds more seasoningTaste hot; add a little salt

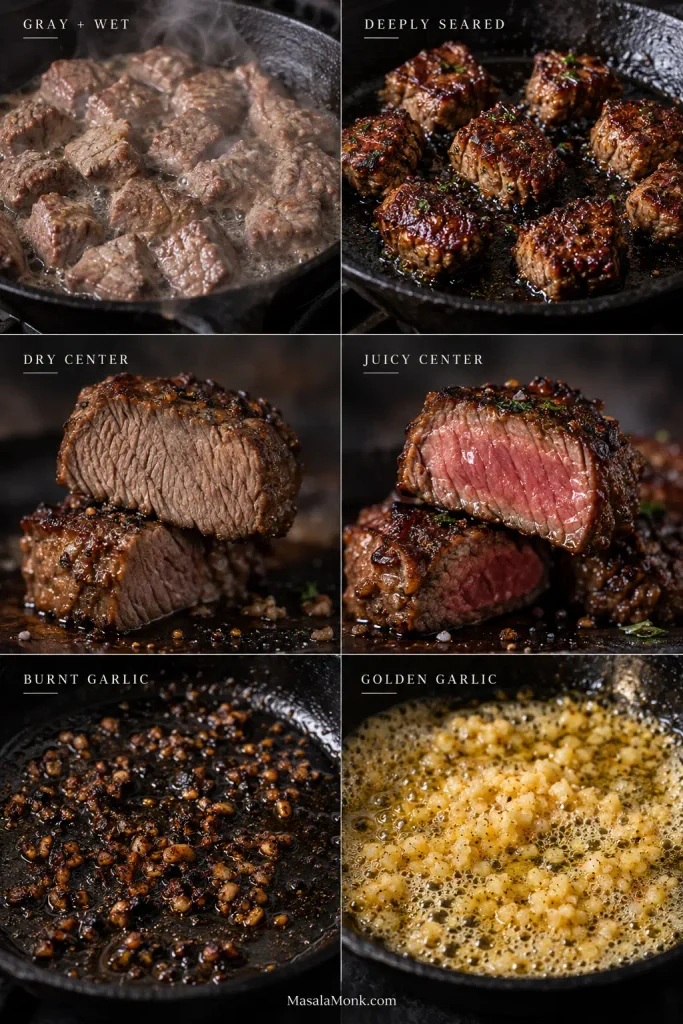
Gray and Wet?

Listen as well as look. Proper searing sounds sharp and energetic. When liquid pools around the beef and the sound softens toward bubbling, the pan is busy boiling water instead of building crust. Dry steak and more space fix most of the problem.

Brown but Dry?

Look at the pieces themselves. If the smallest cubes are dry while the bigger ones are still juicy, size—not seasoning—is probably the problem. Cut the next batch more evenly, and do not be afraid to pull an undersized piece out before the rest.

Pink but Chewy?

Pink does not guarantee tenderness. Cut and grain still matter. A tender piece of sirloin cut across its muscle fibers will eat very differently from a tougher piece cooked to exactly the same temperature.

Garlic or Butter Burned?

If the garlic is already dark and bitter, do not toss the steak through it and hope the beef will hide the taste. Leave the steak on its clean plate, discard the burned garlic butter and let the skillet lose some heat. Then make the garlic butter again. That small reset is a much better trade than giving the whole batch a bitter coating.

Troubleshooting guide comparing gray wet steak with deeply seared steak, dry and juicy centers, and burnt versus golden minced garlic.
Different failures leave different clues: pooled moisture keeps steak pale, extra pan time dries the center, and excess residual heat darkens garlic.

Back to Recipe · Choosing Steak · Back to Top

Turn the Steak Bites Into Dinner

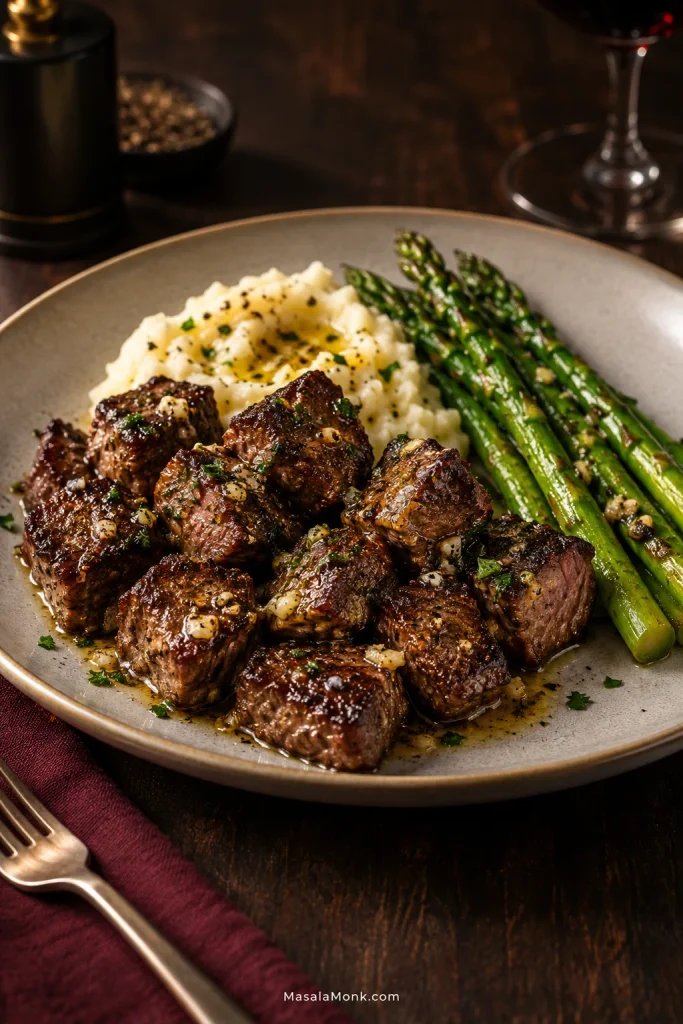
For a steakhouse-style plate, put the bites next to creamy mashed potatoes and something green—beans, asparagus or a simple salad. The potatoes catch the garlicky butter left on the plate particularly well.

Garlic butter steak bites served with creamy mashed potatoes and asparagus on a restaurant-style plate over a dark wooden table.
On an ordinary weeknight, rice and broccoli are hard to beat. The rice stretches the steak and catches whatever buttery juices reach the bottom of the bowl. Cauliflower mash, zucchini or crisp-edged vegetables make a lighter plate without leaving dinner feeling spare.

They also work well as a warm appetizer. Put out toothpicks and something bright or sharp alongside—chimichurri or horseradish cream is plenty.

A Couple of Good Finishes

For a darker, more steakhouse-like version, lower the heat after the steak comes out. If the skillet is still fiercely hot, move it off the burner for a moment. Splash in a little Worcestershire, let it sizzle down briefly to a thin glaze, then add the butter and continue with the garlic.

A richer option is to leave the skillet method alone and spoon béarnaise over the cooked steak. Tarragon and acidity give you a very different plate without interfering with the sear.

Leftovers: Reheating Cooks the Steak Again

Refrigerate cooked steak bites promptly and use them within about 3–4 days. Planning leftovers? Cook the steak fully the first time rather than deliberately half-cooking it for later.

Reheat the bites in a skillet over medium-low to medium heat with a small knob of butter or a splash of oil. Turn them often and keep the reheating brief. USDA guidance calls for leftovers to reach 165°F / 74°C, which will push the centers further toward well done.

Cold steak is genuinely good rather than a consolation prize. Slice it thin and pile it over a crisp cucumber salad with vinegar, dill and onion, tuck it into a sandwich or wrap, or add it to a leafy salad with something sharp and crunchy.

The best moment is still the first one: steak just out of the garlic butter, browned edges fresh, garlic fragrant and the surface still glossy. Get it onto the plate while that contrast between crust, tender center and warm butter is still there.

Back to Recipe · Troubleshooting · Back to Top

Posted on — Leave a comment

Samosa Patti (Samosa Sheets): Homemade Recipe, Folding, Freezing & How to Use Them

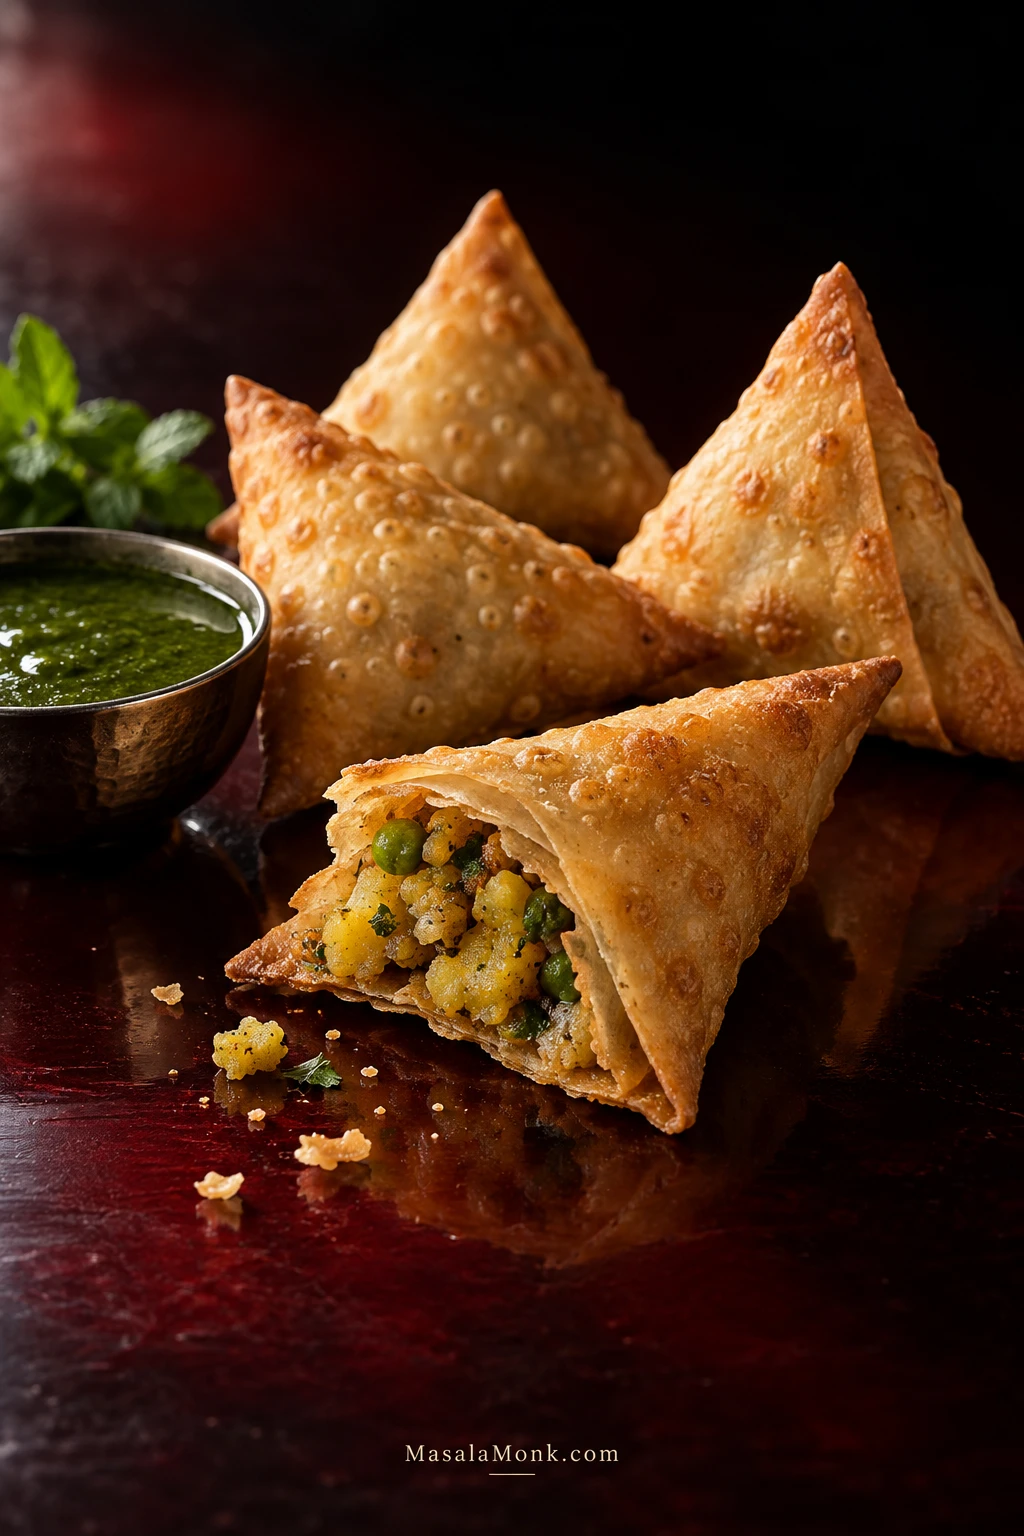
Broken fried samosa patti showing thin crisp folded layers and potato filling, with whole samosas and green chutney on a dark red-black surface.

Break open a good patti samosa while it is still hot and the wrapper should give way almost instantly: thin, crisp layers around a filling that has stayed exactly where you put it. The corners should be crisp all the way through, without a thick doughy fold or a hidden pocket of frying oil.

The frustrating part is getting there. Frozen sheets crack halfway through the first fold. Thawed wrappers stick together. Homemade layers refuse to peel. A tiny opening at the pointed corner lets oil inside, or a flap that looked secure lifts as soon as it reaches the fryer.

Most of those failures are connected. Wrapper condition, filling moisture, the first fold, the final seal and the heat all affect what happens next. Get those five things under control and patti stops feeling nearly as fragile as it first appears.

This is the thin wrapper behind many little onion samosas, tea-shop triangles and big batches for sharing—not the thicker pastry shell of a Punjabi samosa. You can buy patti frozen, make it at home, or adapt the right kind of spring-roll wrapper.

Quick Answer: What Makes Patti Samosas Work

  • Wrapper: wait until frozen patti bends sharply without whitening, splitting or cracking.
  • Filling: use it cool or chilled and fairly dry, with no loose liquid underneath.
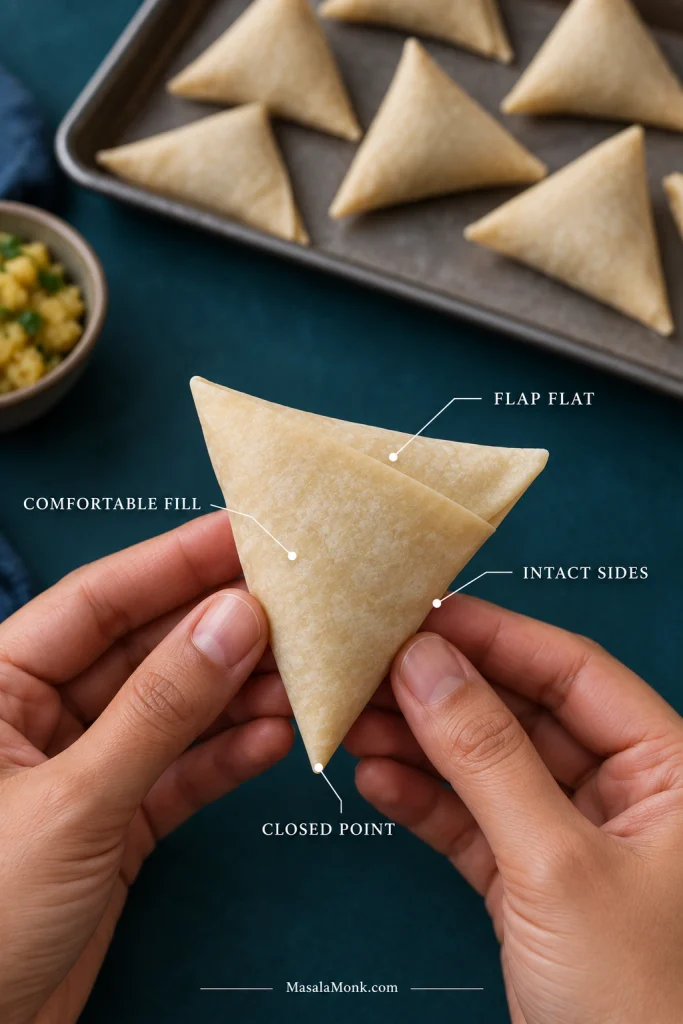
  • First fold: close the pointed corner completely before filling the pocket.
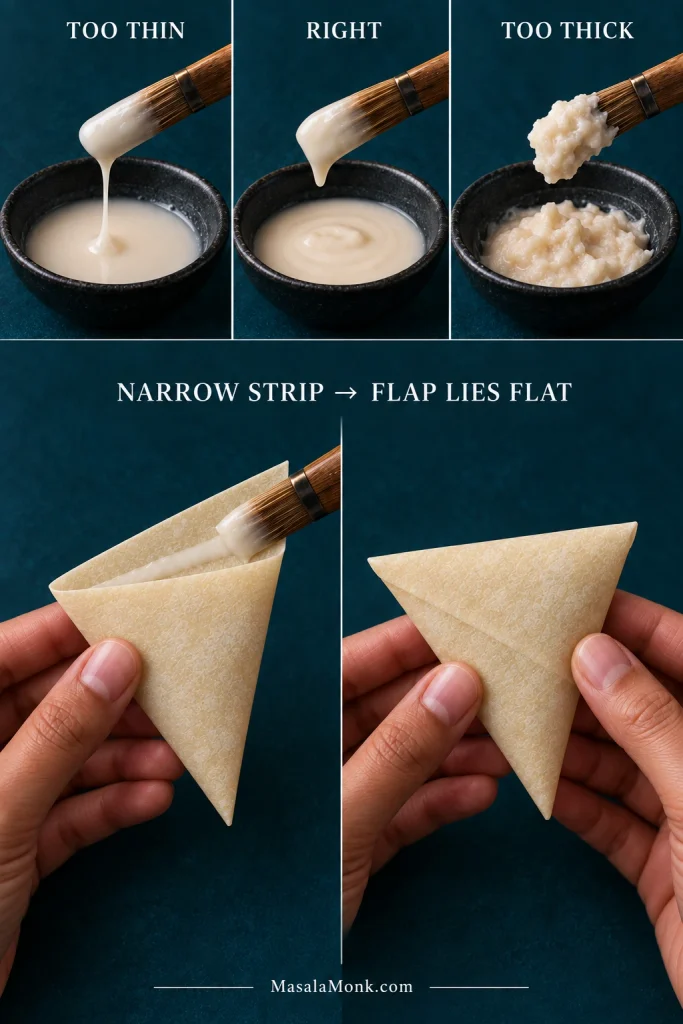
  • Final seal: keep the edge clean and use a thick flour-and-water paste.
  • Frying: begin around 165–175°C / 330–350°F; very thin patti often does better toward the lower end.

If the first frozen sheet cracks, stop there. Give the stack more time instead of sacrificing the next five.

↓ Jump to the Homemade Patti Recipe Card

What Is Samosa Patti?

Samosa patti is a thin flour wrapper, usually cut or sold as a long rectangle, used for folding triangular samosas. Depending on the market or manufacturer, the same wrapper may be labelled samosa sheets, samosa pastry sheets, samosa leaves, samosa wrappers, roll patti or manda patti. “Samosa leaves” simply means thin samosa wrappers; it does not refer to a literal leaf.

Frozen patti normally comes as narrow strips ready for triangular folding. Spring-roll wrappers are more often square. Homemade patti starts as rolled dough that is briefly set on a tawa, peeled into thin sheets and then cut into strips.

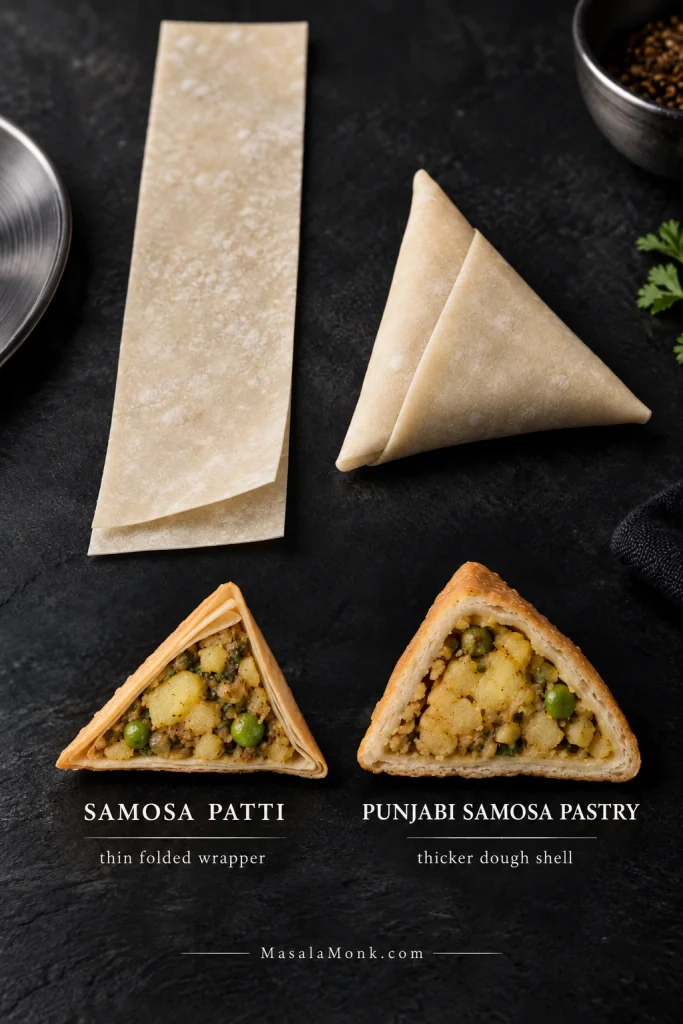
Patti samosa vs Punjabi samosa

Patti is thin and folded over itself several times, giving the finished shell a light, layered crunch. Punjabi samosa pastry has much more body: it is rolled thicker, shaped into a cone and cooked as raw pastry around the filling.

Comparison of a long raw samosa patti strip and thin folded patti shell with the thicker dough shell used for Punjabi samosas.
For shopping or prep, format is the fastest clue: samosa patti is a thin folding strip; Punjabi samosa pastry starts as dough.

If what you want is that larger potato-and-pea samosa with a substantial flaky shell, use our Punjabi Samosa Recipe. Its dough and frying method are deliberately different.

Homemade Samosa Patti Recipe

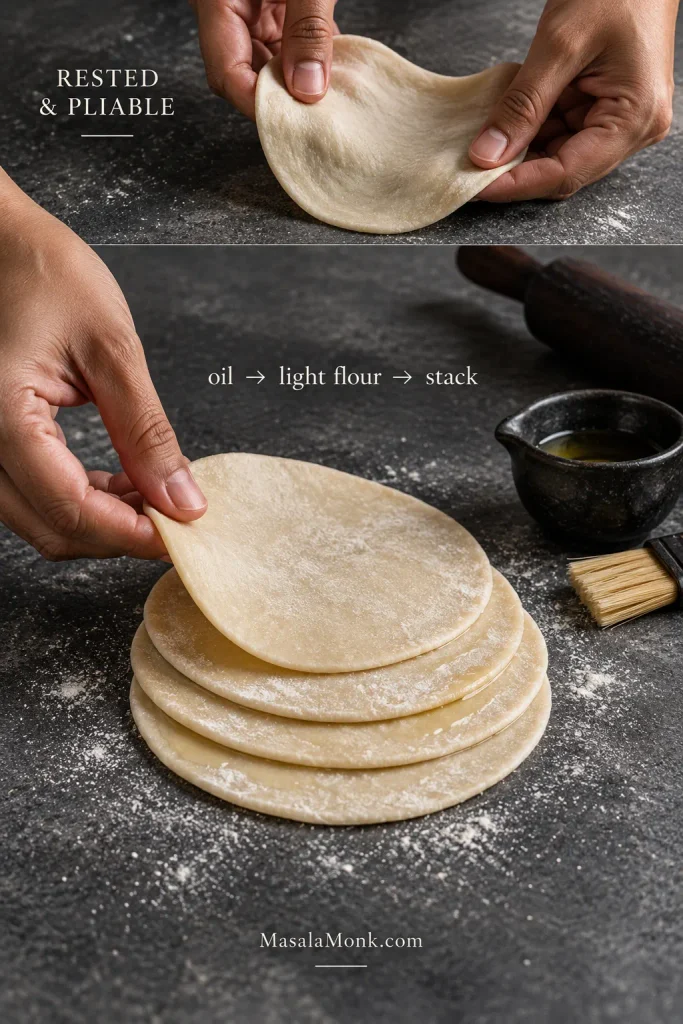
The layered method is simpler on the counter than it sounds: roll four small discs, stack them with a little oil and flour between each one, roll the stack thin, then warm it just enough to peel the layers apart.

Rested samosa patti dough beside four thin dough discs being layered with a light film of oil and flour on a dark work surface.
The oil-and-flour layer is for release, not lamination. Too much can make homemade samosa sheets dry, dusty or harder to separate.

The first stack gets most of your attention. Once it separates cleanly, the next stacks usually go much faster.

Homemade Samosa Patti

Thin homemade samosa sheets made from a flexible flour dough, layered four at a time and briefly set on a tawa before peeling and cutting.

  • Yield: about 24 regular strips, plus smaller pieces from the trimmings
  • Regular strip size: about 7.5 × 23–25 cm / 3 × 9–10 inches
  • Dough rest: 20–30 minutes
  • Active time: about 45–60 minutes
  • Total elapsed time: about 1–1½ hours

Ingredients

  • 250 g / 8.8 oz all-purpose flour or maida
  • 5 g fine salt, roughly ¾–1 teaspoon depending on the salt
  • 30–35 ml / about 2–2⅓ tablespoons neutral oil
  • 115–125 ml / about ½ cup water, added gradually
  • Extra neutral oil for brushing between the layers
  • Extra all-purpose flour for a light dusting between the layers

Equipment

  • Mixing bowl
  • Digital kitchen scale
  • Rolling pin
  • Large flat tawa, griddle or skillet
  • Pastry brush
  • Knife or pizza cutter
  • Clean kitchen towel or covered container

Make, Rest and Layer the Dough

  1. Make the dough. Mix the flour and salt. Add the oil and work it through the flour, then pour in about 110 ml water. Add more only as needed until no dry flour remains and the dough comes together.
  2. Knead for 8–10 minutes. Keep going until the dough becomes smooth and elastic and stretches before it tears. It should feel pliable without becoming sticky.
  3. Rest for 20–30 minutes. Cover the dough. It should roll without immediately pulling itself smaller. Dough that still fights the rolling pin needs another 10 minutes under cover.
  4. Divide into 12 pieces. Each piece will be roughly 34 g. Keep the unused pieces covered.
  5. Roll four small discs. Work with four pieces at a time and roll each to around 11–13 cm / 4½–5 inches across.
  6. Layer them. Brush the first disc with a very thin film of oil, dust lightly with flour and place the next disc on top. Repeat until you have a four-layer stack.

Roll, Set, Peel and Cut the Patti

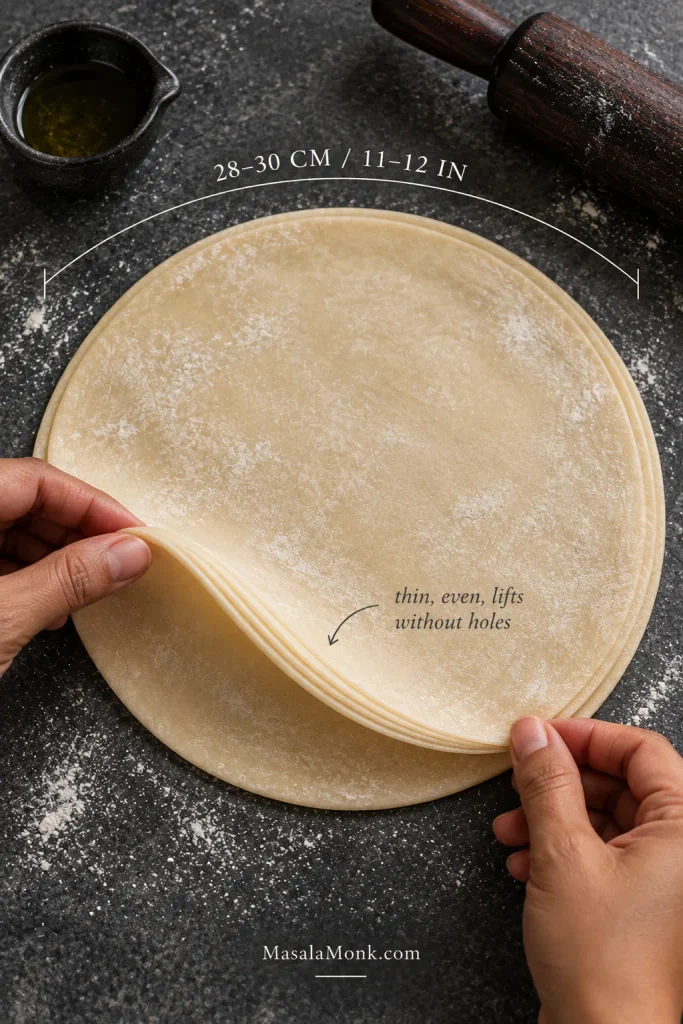
Thin rolled samosa patti dough stack measuring about 28–30 cm across, with one edge lifted to show its even thinness.
Look for even thickness from centre to edge; a slightly imperfect circle matters less than thin spots that later tear or bulk up.
  1. Roll the stack thin. Dust the outside lightly and roll to roughly 28–30 cm / 11–12 inches across, or as large as your tawa comfortably takes. Rotate as you work so the centre and edges stay reasonably even. The stack should lift without developing holes.
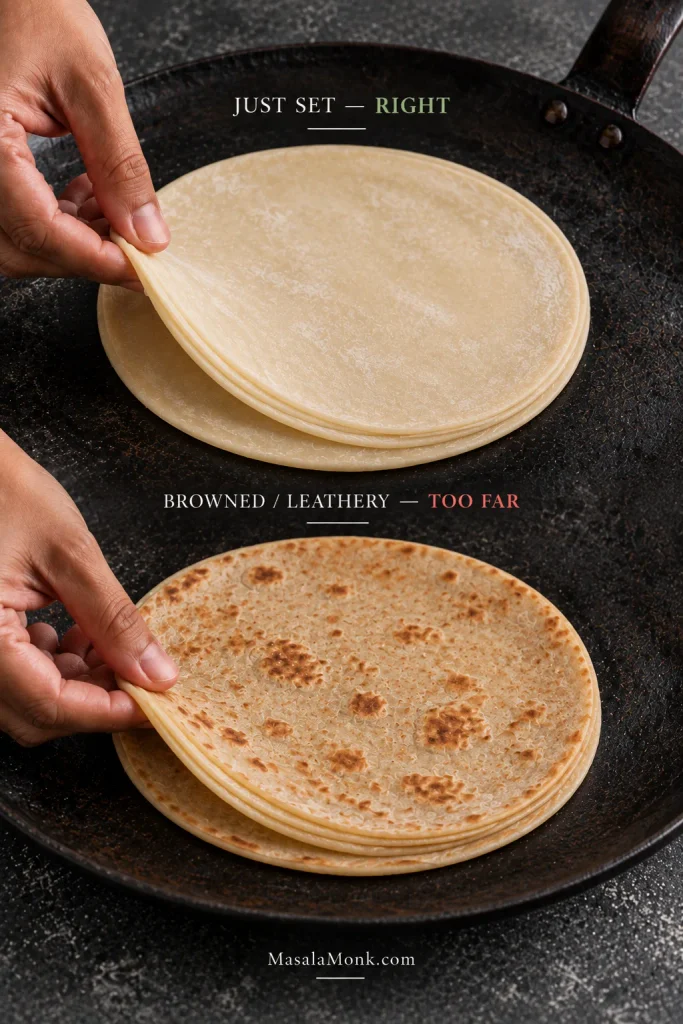
  2. Set the surfaces. Warm the stack over low heat for roughly 10–30 seconds per side. The raw wet look should disappear and the layers should begin loosening. Keep the pastry pale.
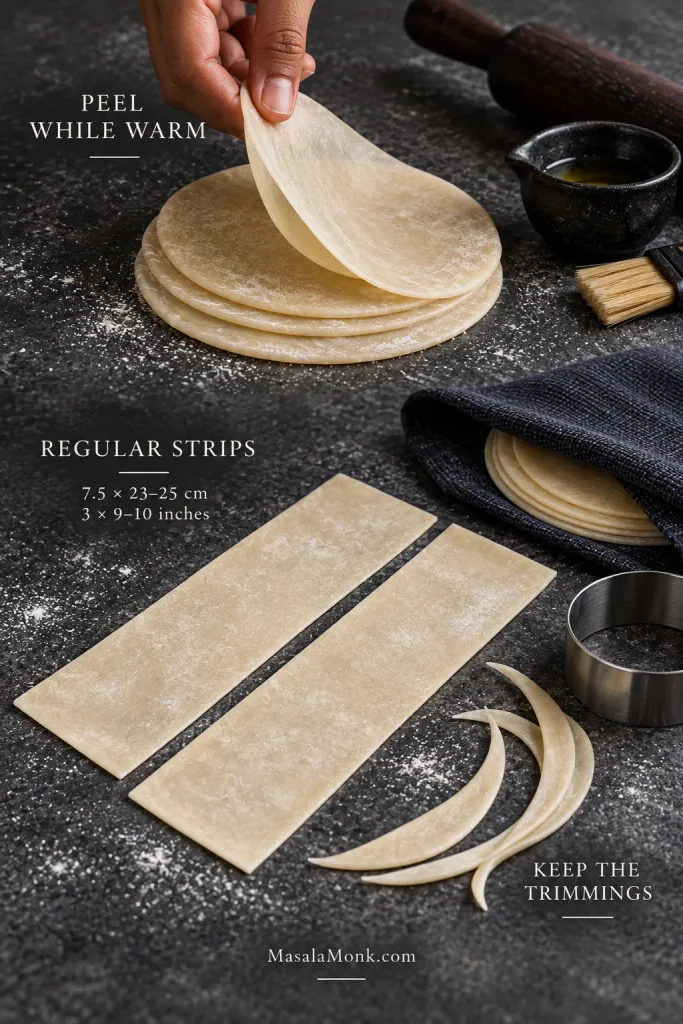
  3. Peel while warm. Lift an edge and separate one sheet gently. Work around an edge that already wants to release instead of pulling hard through the middle. A stubborn stack can go back onto the warm tawa for a few seconds.
  4. Cut and cover. Each large peeled sheet should give about two regular strips around 7.5 × 23–25 cm / 3 × 9–10 inches. Keep the curved pieces for mini samosas or small repairs. Cover everything immediately.

Watch the pastry, not only the stopwatch: it should come off the tawa pale, warm and easy to peel. Brown patches and a cooked-flatbread feel mean the stack has gone farther than necessary.

Side-by-side samosa patti stacks showing the correct pale, just-set stage and an overcooked stack with brown patches and drier edges.
If browning starts before the layers loosen, lower the heat and shorten the next side rather than waiting for more colour.

A good finished sheet almost drapes over your hand, but still lifts without tearing. That balance matters more than chasing an exact thickness with a ruler.

Warm homemade samosa patti being peeled into a thin sheet, then cut into long rectangular strips with curved trimmings kept alongside.
Peel from an edge that already wants to release, then cover the cut strips quickly so the fresh edges do not dry.

Why the Dough Rolls So Thin

The clearest sign is what happens under the rolling pin. A tense piece keeps shrinking after every pass. Give it another short rest and the same dough spreads with far less resistance.

Kneading gives the dough enough strength to become thin without falling apart; resting lets it relax. Between the discs, use only a fine film of oil and a light dusting of flour. Heavy flouring leaves dry patches, while poor separation can make the layers fuse.

Using frozen patti? · Patti ready? Start folding →

Using Ready-Made or Frozen Samosa Patti

Look in the frozen or chilled section of South Asian, Middle Eastern and international grocery stores, often near frozen parathas and spring-roll sheets. Patti may also be labelled samosa sheets, samosa pastry, samosa leaves, roll patti or manda patti.

Size and thickness

StyleStarting strip sizeGood for
MiniAbout 5 × 15 cm / 2 × 6 inCocktail and party samosas
Small pattiAbout 5–6 × 20 cm / 2–2½ × 8 inTea-time and onion samosas
Regular pattiAbout 7.5 × 23–25 cm / 3 × 9–10 inPotato, chicken, keema and larger patti samosas

Check dimensions before relying on the number of sheets printed on the packet. For regular patti, start around 3 inches / 7.5 cm wide. Very delicate sheets can fry beautifully, but a slightly sturdier wrapper often gives a first-time folder more margin.

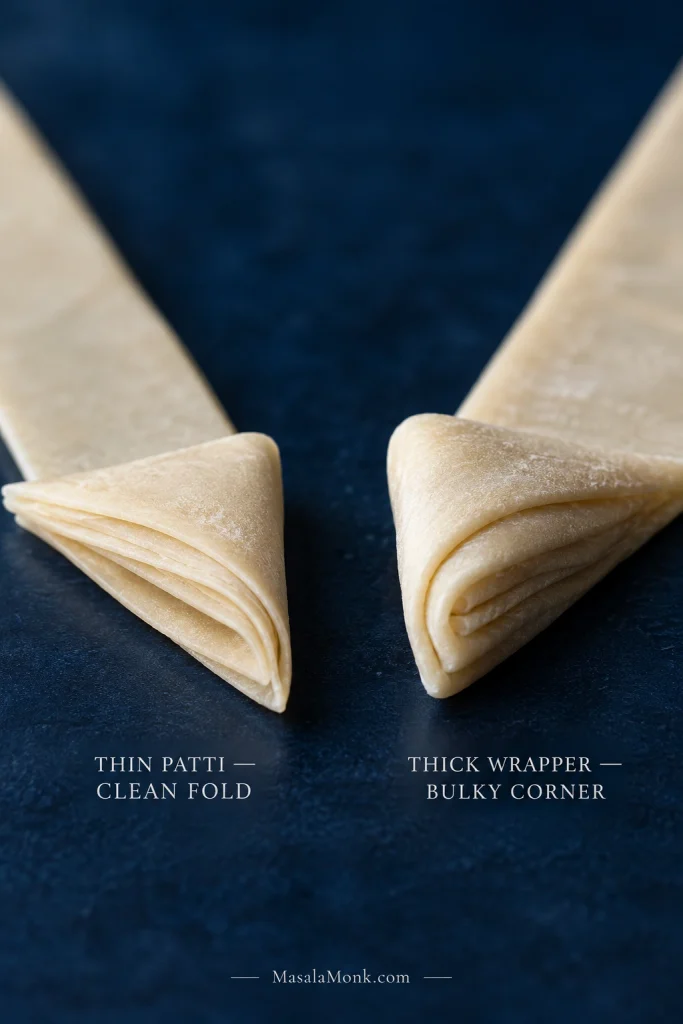
The flat sheet can also hide how thick it will feel later. Fold one corner several times. If that little stack already feels bulky, the finished samosa will have a heavy corner.

Macro comparison of thin samosa patti forming a compact folded corner and a thicker wrapper forming a visibly bulky layered corner.
Fold thickness reveals what the flat sheet hides: thin patti stays compact, while heavier wrappers build hard, bulky corners.

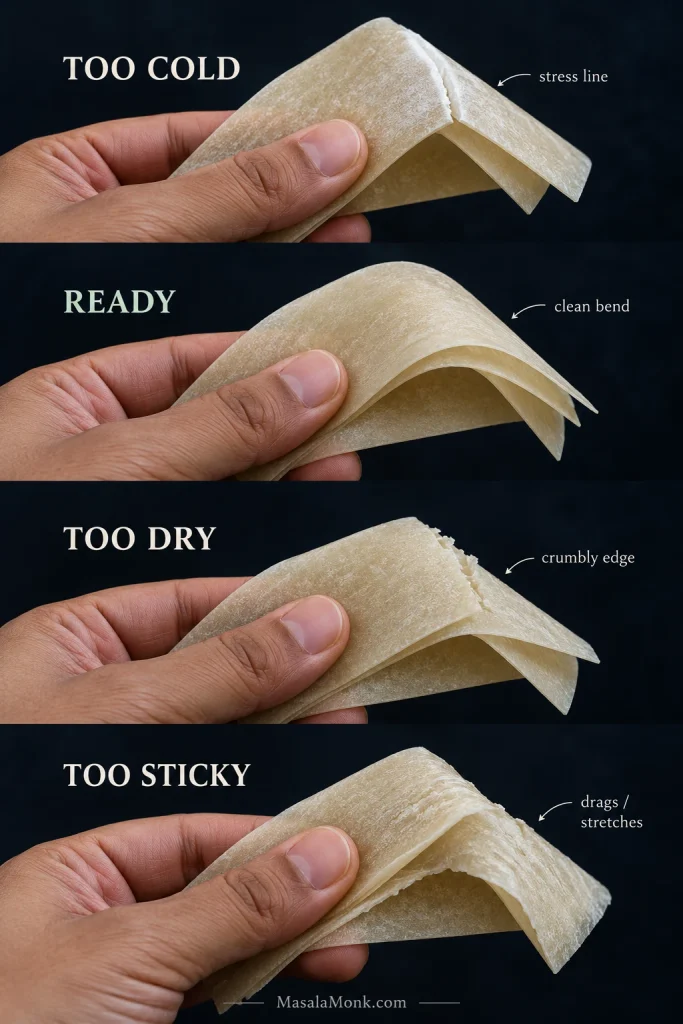
Frozen patti: cold, ready, dry or sticky?

Packet thawing times are only estimates. The wrapper itself tells you when to start. A thick stack can remain cold in the centre even after the outside feels soft.

ConditionWhat you will noticeWhat to do
Too coldStiff; pale stress line at the bend; crackingGive the closed pack more time
ReadyFlexible; bends cleanly; layers release without forceStart folding
Too dryCrumbly edge; random splitting after thawingKeep covered; reject badly damaged sheets
Too stickyLayers drag, stretch or tearHandle gently and avoid adding moisture
Four-state frozen samosa patti comparison showing a cold cracking sheet, flexible ready sheet, dry crumbly sheet and sticky stretching sheet.
Test one sheet first. Cracking, crumbling or dragging apart means the packet needs more thawing, cover or gentler handling before folding.

A sheet that starts tearing halfway across is usually still too cold. Cover the stack again instead of forcing the layers apart.

Take out only the sheets you can fill immediately and keep the rest covered. A clean, slightly damp towel or a covered container slows drying without leaving the pastry wet.

Fully thawed patti should not crumble in your fingers. Several sheets splitting or flaking in the same way usually points to the packet rather than your technique.

Patti ready? Start folding → · Still cracking or sticking? Troubleshoot →

How to Fold Samosa Patti: Fill, Fold and Seal the Triangle

The first two turns do most of the thinking. The first gives you the angle; the second turns a flat strip into an actual pocket. Once that shape makes sense in your hands, the rest becomes much more repetitive.

Before you fold: use cool or chilled filling with no loose liquid underneath. Chicken, keema and other meat fillings should already be fully cooked.

Eight-step samosa patti folding sequence from a flat strip through the first triangle and pocket to filling, turning, pasting and a sealed samosa.
If later folds drift, the error usually began with the first triangle. Correct the starting angle rather than compensating turn by turn.

1. Make the first triangle

Lay the strip vertically. Bring the bottom-left corner diagonally upward to the right edge. The lower end now forms a neat triangle. You can mirror the direction and start from the bottom-right if that feels more natural.

Get this angle right now. A crooked first fold carries the mistake through every turn that follows.

2. Fold again to make the pocket

Turn the first triangle upward once along its straight edge. This is the moment the strip starts looking less like a wrapper and more like a samosa: you now have a pocket with an opening at the top and a pointed corner underneath.

Slip a fingertip gently into the opening and check the bottom point. It needs to be closed. A tiny tunnel here gives frying oil a direct route inside.

Samosa patti folding close-ups showing the first diagonal fold, formed pocket, a tightly closed pointed end and a small open seam that can let oil enter.
Inspect the pointed end from inside before filling; even a tiny channel between layers can give frying oil a direct route in.

3. Fill without stretching the pocket

A small strip may need only 1–2 teaspoons. A regular-width wrapper can start with around 1 tablespoon.

Then look at the pocket rather than the spoon. Stop around two-thirds to three-quarters full. It should look comfortably filled, not swollen.

Two samosa patti pockets with potato filling, comparing a comfortable two-thirds to three-quarters fill with an overfilled pocket.
Watch the pocket walls, not just the spoonful. Bowing outward means there is too little relaxed wrapper left for clean turns and sealing.

4. Keep turning the triangle

Fold the filled triangle over itself, following the straight edges of the strip. Keep the shape triangular and avoid squeezing the filling outward. After a few samosas, this part usually becomes the quickest step.

5. Seal the final flap

Keep the last edge clean. Potato, onion juice, rendered fat, melted cheese or sauce between the flap and the pastry can weaken the bond.

Mix 30 g all-purpose flour with about 20–22 ml / about 1½ tablespoons water to start. Add more water a teaspoon at a time until the paste is thick, smooth and brushable.

  • Too thin: runs away from the sealing edge.
  • Right: spreads in a narrow strip and stays where you brush it.
  • Too thick: sits in lumps and stops the flap lying flat.
Samosa sealing guide comparing runny, correct and overly thick flour paste, followed by a narrow paste strip and a flat sealed patti flap.
A clean flap matters as much as paste thickness; filling, fat or sauce between the layers can weaken the seal.

Press the flap onto clean pastry. A finished triangle should sit on the tray without your fingers holding it closed.

6. Give it a 10-second check

  • Pointed corner: closed, with no visible tunnel?
  • Sides: intact, with no filling showing?
  • Final flap: flat and holding?
  • Filling: sitting comfortably rather than forcing the wrapper outward?
Finished raw samosa patti held in both hands with callouts for a closed point, intact sides, flat flap and comfortable filling level.
A raw samosa should stay closed on the tray by itself. Fix lifted flaps, open points or stretched wrappers before frying.

By this point the tray should begin looking more regular than the first few pieces did. That is normal: folding patti is one of those jobs your hands learn faster than your head expects.

Ready to cook? Fry, air fry or bake → · Flap or seam failing? Troubleshoot →

Fry, Air Fry or Bake

MethodStarting temperatureWhat success looks like
Deep fry165–175°C / 330–350°FSteady bubbling; gradual golden colour; light crisp layers
Air fryer180°C / 350°FEven browning with a light oil coating; crisp corners
Oven180°C / 350°FCrisp wrapper with no chewy fold lines
Three matching samosa patti triangles comparing the appearance of deep-fried, air-fried and baked shells on a dark surface.
The three methods produce visibly different surfaces; judge each by crisp folds and a fully heated filling rather than expecting identical browning.

A properly cooked patti samosa feels light when you lift it. Break a corner and the wrapper should crack rather than bend.

Deep frying

Use enough neutral, high-smoke-point frying oil for the samosas to float without resting against the bottom of the pot.

Start around 165–175°C / 330–350°F. Very thin commercial patti often does better toward the lower end. Frying time varies with wrapper thickness, samosa size and whether the filling is chilled or frozen.

Two thin patti samosas frying in bubbling golden oil in a dark metal pan with a wire skimmer beside them.
If bubbling drops sharply when a batch goes in, let the oil recover before adding more patti samosas.

No thermometer? Drop in a small patti trimming. It should bubble and rise steadily without racing to dark brown: a sluggish scrap means the oil needs more heat; immediate colour means it needs less. Then fry one samosa before loading the pot. Its colour should build gradually while bubbling remains active around the folds, giving you a much better read on your particular wrapper than a universal timer will.

Three-panel oil test showing the same samosa patti scrap bubbling slowly in cool oil, steadily at the right heat and browning quickly in overly hot oil.
Repeat the scrap test when bubbling changes; larger batches and frozen fillings can pull the oil out of range without changing the burner setting.

Frozen samosas pull the temperature down quickly, so begin with a small batch and let the oil recover. Brush away loose frost or visible ice before deep frying, and never lower a wet or ice-coated samosa into hot oil.

Lift finished samosas onto a wire rack when possible. Steam escapes instead of collecting under the pastry and softening the base.

For hot-oil handling and fryer safety, see the USDA deep-fat frying safety guide.

Air fryer

Brush or spray the samosas lightly with oil and air fry at about 180°C / 350°F. Begin checking around 10 minutes; many batches take roughly 12–15 minutes. Turn once so both faces and the layered edges crisp.

Pale, papery patches usually need better oil coverage, more airflow or more cooking time. These common air fryer mistakes are useful for checking crowding, airflow and preheating.

Oven

Brush or spray the samosas lightly with oil and bake at about 180°C / 350°F. Begin checking around 12–15 minutes, turn if needed and continue until the layered corners are crisp.

Reheating cooked samosas

Reheat fried samosas in an oven or air fryer around 165°C / 330°F, beginning to check after about 5–8 minutes. Continue until the wrapper is crisp again and the filling is hot.

For leftovers filled with cooked meat or another perishable filling, reheat the centre to 74°C / 165°F. A microwave heats the middle quickly but usually leaves thin patti soft.

More filling ideas → · Frying or finishing problem? Troubleshoot →

What Can You Fill Patti Samosas With?

Patti works best with fillings that are already cooked or need only brief cooking, and that do not leave loose liquid sitting in the bowl. Meat fillings are best fully cooked before wrapping; onion-style fillings can go in uncooked when their moisture is properly controlled.

  • Dry and sturdy: spiced potato is naturally forgiving. Chicken and keema also work beautifully when cooked down until no liquid or rendered fat is pooling in the pan.
  • Fresh and punchy: onion or Irani-style fillings give patti samosas their tea-shop character, but excess onion moisture needs to be controlled before folding.
  • Saucy: Chinese-style vegetables or chicken work when the sauce clings instead of collecting underneath. Our stir fry sauce guide goes deeper into that glossy, coating consistency.
  • Rich and melty: cheese-corn and similar fillings need a little extra room. Hot cheese finds an overfilled seam quickly.
Four samosa patti filling examples showing dry potato, cooked-down minced meat, moisture-controlled onion mixture and glossy sauce coating ingredients without pooling.
After the filling rests, check what collects underneath. Free water, sauce or rendered fat predicts wrapper trouble better than surface moistness.

The smaller pieces left after cutting homemade patti are ideal for mini samosas. Nobody minds an extra tray of those.

As the first batch comes out, the smell of hot fried pastry and spiced filling finally catches up with all that careful folding. Serve them while the edges still crackle; a bright coriander-mint green chutney gives the hot pastry a fresh, sharp contrast.

Platter of crisp golden patti samosas in mixed sizes served with green chutney, a fried green chilli and a glass of hot chai.
Do not pile just-fried patti samosas deeply; trapped steam softens the lower wrappers. Hold them in a shallow layer or on a rack.

Other Ways to Get a Thin Samosa Wrapper

Rolled patti gives you the wrapper described above, but it is not the only way to get a thin sheet that folds well.

Batter-Made Samosa Sheets

If rolling very thin dough is the part you would rather skip, batter-made sheets are another option. Their texture differs slightly from rolled patti, but they fold and crisp well.

Whisk together 240 g all-purpose flour, 15–20 g cornstarch, 3 g salt and about 480 ml water. Add more water gradually, up to roughly 600 ml if needed. The batter needs to flow easily enough to form a very thin layer in the pan.

Wipe a nonstick skillet with a trace of oil. Pour just enough batter to cover the base in a very thin layer, tilting or swirling the pan immediately. In a small skillet, about 2 tablespoons is a reasonable starting amount; larger pans will need more.

Once the wet shine disappears and the edge releases cleanly, lift the sheet. A tacky top needs only a few seconds on the second side. Keep the wrapper pale and flexible, and cover finished sheets as you work.

Five-step batter-made samosa sheet process showing batter poured into a pan, swirled thin, set pale, lifted cleanly and stacked under a cover.
For batter-made sheets, release without browning is the cue. Early colour usually means the pan is too hot, the layer too thick, or both.

Can You Use Spring-Roll Sheets Instead?

Yes. Thin wheat spring-roll wrappers are one of the easiest substitutes when proper patti is unavailable. Square sheets may need cutting into strips before folding.

WrapperDoes it work?What changes?
Samosa pattiYes — idealNarrow strip already suited to triangular folding
Thin spring-roll sheetYesUsually square; may need cutting
Thick egg-roll wrapperPossibleHeavier shell and bulkier corners
Filo/phylloPossible, with a different methodFragile layered pastry rather than a direct patti substitute
Puff pastryNot equivalentPuffs and flakes instead of forming the same thin shell
Punjabi samosa doughA different samosa styleThicker raw pastry shaped into a cone
Comparison of folded samosa patti, thin spring-roll wrapper, thicker egg-roll wrapper, fragile filo, puff pastry and Punjabi samosa dough.
Test substitutes by folding them, not judging them flat. Thin spring-roll wrappers stay compact; thicker or fragile sheets reveal problems after a few turns.

For the closest result, choose a thin, flexible wheat wrapper. Thick egg-roll-style wrappers become heavy quickly at the folded corners.

If square wrappers are what you have, our crispy spring roll recipe goes deeper into handling thin wrappers, controlling filling moisture and sealing them before frying.

Wrapper chosen? Start folding → · Making them ahead? Store or freeze →

Make Ahead, Refrigerate and Freeze

Cooking within a few hours? Arrange shaped samosas in a single layer, cover them and refrigerate them. For a longer hold, freezing preserves the wrapper better because even covered patti gradually softens as moisture moves from the filling into the pastry. The filling itself can be cooked, cooled promptly and refrigerated until you are ready to fold.

Two-lane freezing guide showing long samosa patti strips stored and thawed before folding, alongside assembled raw samosas tray-frozen, packed and cooked from frozen.
Loose samosa sheets need flexibility before folding; assembled samosas hold their shape better when cooked from frozen rather than fully thawed.

Loose homemade sheets

Cool the briefly set sheets completely, stack them neatly and seal them in a freezer-safe bag or airtight container. For the best texture, aim to use homemade patti within about 1 month. Thaw until pliable before separating and folding.

Commercial frozen patti

Follow the packet’s storage and refreezing directions. Commercial patti is commonly kept around −18°C / 0°F, and repeated thawing can leave thin wrappers drier, stickier or more fragile.

For general guidance on freezer temperature, thawing and refreezing, see the USDA guide to freezing and food safety.

Uncooked filled samosas

Freeze shaped samosas in a single layer until firm, then transfer them to an airtight container or freezer bag. They are generally cooked straight from frozen. Before deep frying, inspect the seams and brush away loose frost or visible ice.

A frozen filling heats more slowly than the thin wrapper crisps. If the samosas contain previously cooked meat, make sure the centre reaches 74°C / 165°F.

Already fried samosas

Let excess steam escape before packing fried samosas, but refrigerate cooked samosas within 2 hours. Reheat them with dry circulating heat when you want the exterior crisp again.

Cooking from frozen? Deep-frying guide → · Freezer or wrapper problem? Troubleshoot →

Troubleshooting: Cracks, Leaks and Open Seams

There is no reason to troubleshoot a batch that is already behaving itself. Come here when the same failure keeps repeating.

Nine-panel samosa patti troubleshooting atlas showing cracking, tearing, lifted flap, side tear, greasy shell, fast browning, bulky fold, pale air-fried shell and a correct reference samosa.
Start with the visible symptom. Cracks, lifted flaps, grease and pale shells point to different causes, so diagnose before changing the recipe.

Wrapper and dough problems

ProblemLikely reasonWhat to do now
Sheet cracks on first foldToo cold, too dry or damagedCover the remaining sheets and let them soften further
Sheet tears while separatingStack still too cold or layers stickingStop pulling and give the covered stack more time
Sheets stick togetherCondensation, incomplete thawing or packet qualityWork from naturally releasing edges and avoid extra moisture
Fully thawed sheet crumblesLikely dehydrated or freezer-damagedTry another sheet or packet
Homemade dough springs backDough still tenseCover and rest another 10–15 minutes
Homemade layers will not peelLayers fused, under-set or cooled too farWarm briefly and try a naturally releasing edge
Homemade sheet feels leatheryToo much time on the tawaShorten the pre-set on the next stack

Folding and sealing problems

  • A hole at the pointed corner: reopen the pocket and correct the first folds before adding filling.
  • If the final flap keeps lifting: wipe the edge clean and reseal with thicker flour paste.
  • Side tears while closing: remove some filling. A tiny split can be patched with a scrap of patti and flour paste; a badly torn wrapper is better replaced.
  • The samosa softens while waiting: moisture is moving into the wrapper. Cook or freeze the batch sooner.
  • The edges dry before frying: keep shaped samosas covered while the rest of the batch is folded.

Where the failure begins matters. A loose final flap and an open bottom corner can both leak, but they need different fixes.

Frying and finishing problems

ProblemLikely reasonWhat to do now
Samosa opens in oilCorner, flap or steam pressure failedFind the exact opening before frying the next batch
Oil gets insideOpen pointed corner or seam tunnelInspect the next pockets before filling
Oil splatters badlySurface water/ice or wet filling escapingKeep wet pieces out of the fryer, brush away frost and remove any samosa that is visibly leaking
Samosa feels greasyOil too cool or batch too largeLet the oil recover before adding more
Wrapper darkens immediatelyOil too hot for that pattiReduce the heat before the next batch
Folded corners are hardWrapper too thickChoose or roll thinner patti next time
Air-fried shell stays pale and paperyToo little oil, crowding or too little cooking timeAdd a light oil coat, leave more space and continue until the folds crisp

One failed samosa can be useful. Look at where it failed before you fry the next six.

↑ Frozen patti · ↑ Folding & sealing · ↑ Cooking methods

Samosa Patti FAQs

1. What is samosa patti called in English?

Common English labels include samosa sheet, samosa wrapper and samosa pastry sheet. Depending on the market, you may also see samosa leaves, roll patti or manda patti.

2. Is samosa patti the same as a spring-roll sheet?

Not always. Patti is commonly sold as long strips, while spring-roll wrappers are usually square and vary in thickness. Thin wheat spring-roll sheets are the closest substitute.

3. Should frozen filled samosas be thawed before frying?

Usually not. Loose sheets need thawing before folding, but assembled samosas are generally cooked from frozen. Brush away visible frost or loose ice first and fry in small batches so the oil can recover.

The Fold Should Disappear Into the Bite

The first triangle can feel fiddly. Then you make another, and another, and somewhere along the tray your hands stop thinking about the geometry and simply follow the strip.

That is when the technique changes character. A pile of delicate sheets has become a row of neat little triangles, the later ones usually quicker and cleaner than the first.

Fry them, let the steam escape for a moment, then break one at the pointed end. The wrapper should crack into thin layers rather than fight back, leaving the filling hot inside and the fold almost disappearing into the bite.

If these are headed to the table for tea time, start the masala chai before the final batch so both arrive hot.

← Recipe card · ↑ Quick Answer · ↑ Back to Top