Posted on Leave a comment

Samosa Patti (Samosa Sheets): Homemade Recipe, Folding, Freezing & How to Use Them

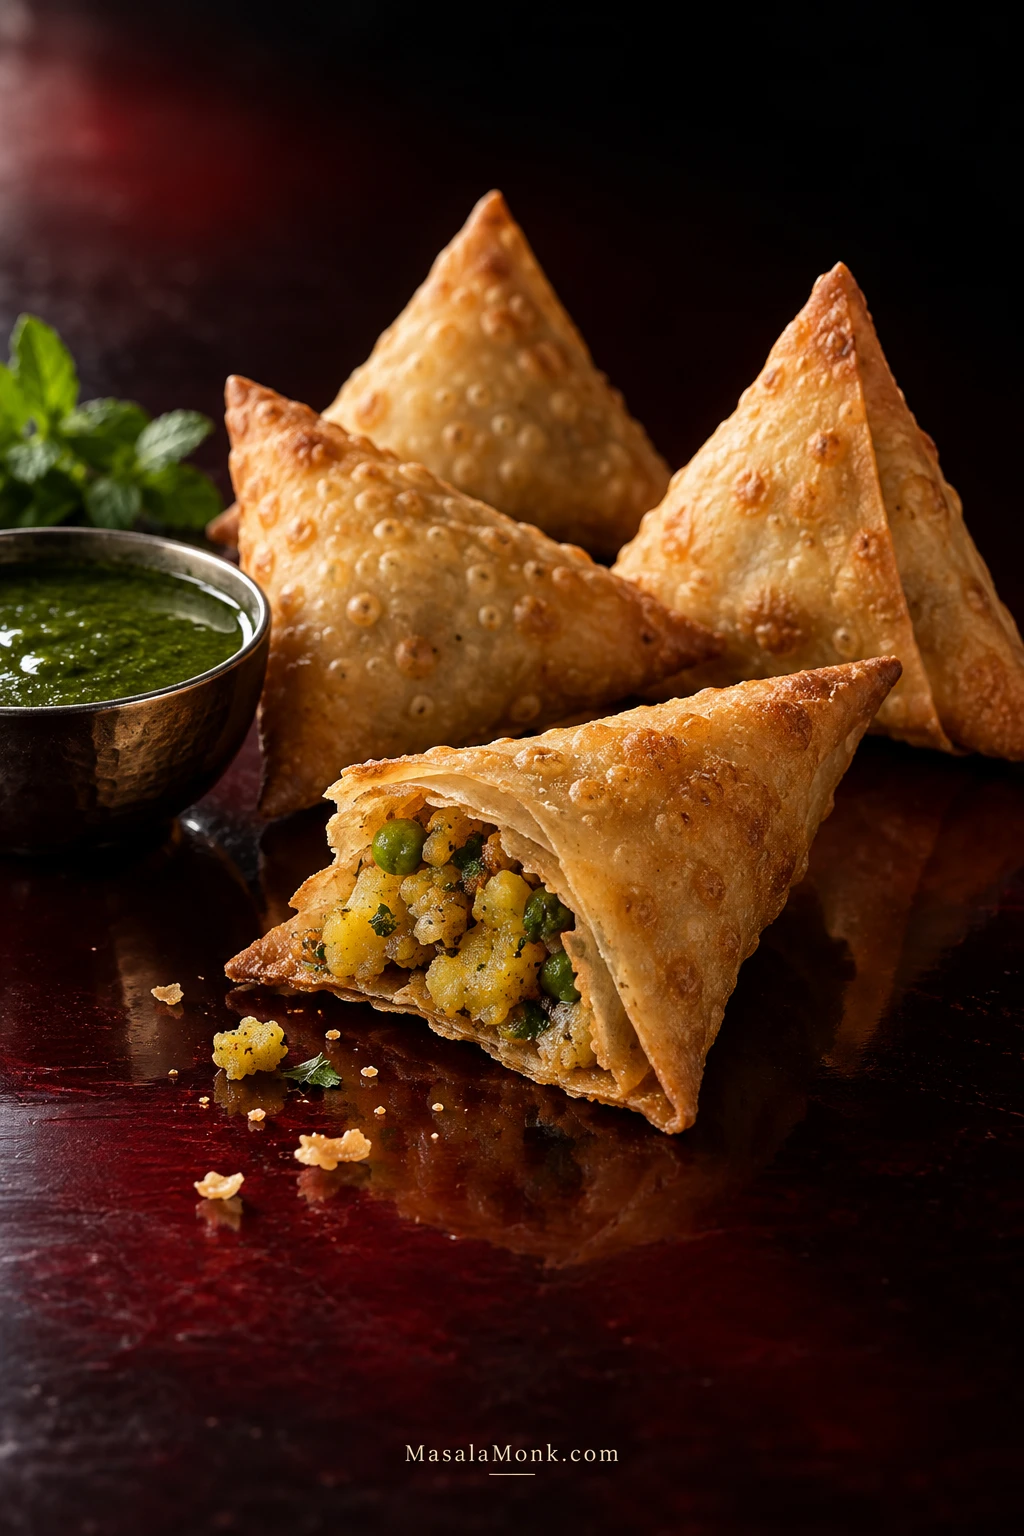
Broken fried samosa patti showing thin crisp folded layers and potato filling, with whole samosas and green chutney on a dark red-black surface.

Break open a good patti samosa while it is still hot and the wrapper should give way almost instantly: thin, crisp layers around a filling that has stayed exactly where you put it. The corners should be crisp all the way through, without a thick doughy fold or a hidden pocket of frying oil.

The frustrating part is getting there. Frozen sheets crack halfway through the first fold. Thawed wrappers stick together. Homemade layers refuse to peel. A tiny opening at the pointed corner lets oil inside, or a flap that looked secure lifts as soon as it reaches the fryer.

Most of those failures are connected. Wrapper condition, filling moisture, the first fold, the final seal and the heat all affect what happens next. Get those five things under control and patti stops feeling nearly as fragile as it first appears.

This is the thin wrapper behind many little onion samosas, tea-shop triangles and big batches for sharing—not the thicker pastry shell of a Punjabi samosa. You can buy patti frozen, make it at home, or adapt the right kind of spring-roll wrapper.

Quick Answer: What Makes Patti Samosas Work

  • Wrapper: wait until frozen patti bends sharply without whitening, splitting or cracking.
  • Filling: use it cool or chilled and fairly dry, with no loose liquid underneath.
  • First fold: close the pointed corner completely before filling the pocket.
  • Final seal: keep the edge clean and use a thick flour-and-water paste.
  • Frying: begin around 165–175°C / 330–350°F; very thin patti often does better toward the lower end.

If the first frozen sheet cracks, stop there. Give the stack more time instead of sacrificing the next five.

↓ Jump to the Homemade Patti Recipe Card

What Is Samosa Patti?

Samosa patti is a thin flour wrapper, usually cut or sold as a long rectangle, used for folding triangular samosas. Depending on the market or manufacturer, the same wrapper may be labelled samosa sheets, samosa pastry sheets, samosa leaves, samosa wrappers, roll patti or manda patti. “Samosa leaves” simply means thin samosa wrappers; it does not refer to a literal leaf.

Frozen patti normally comes as narrow strips ready for triangular folding. Spring-roll wrappers are more often square. Homemade patti starts as rolled dough that is briefly set on a tawa, peeled into thin sheets and then cut into strips.

Patti samosa vs Punjabi samosa

Patti is thin and folded over itself several times, giving the finished shell a light, layered crunch. Punjabi samosa pastry has much more body: it is rolled thicker, shaped into a cone and cooked as raw pastry around the filling.
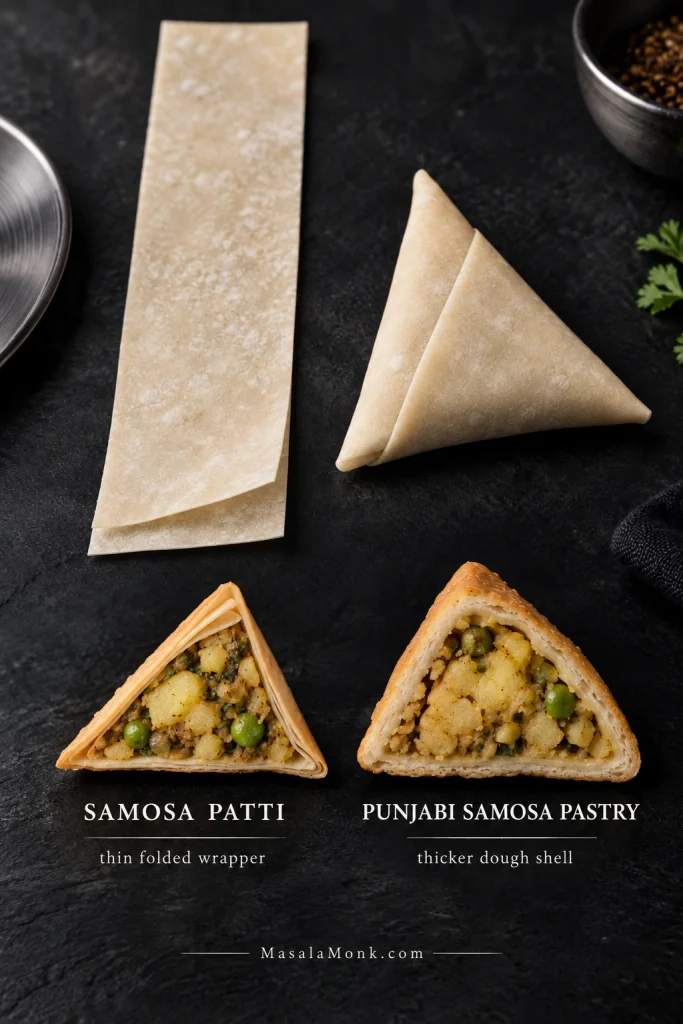
Comparison of a long raw samosa patti strip and thin folded patti shell with the thicker dough shell used for Punjabi samosas.
For shopping or prep, format is the fastest clue: samosa patti is a thin folding strip; Punjabi samosa pastry starts as dough.

If what you want is that larger potato-and-pea samosa with a substantial flaky shell, use our Punjabi Samosa Recipe. Its dough and frying method are deliberately different.

Homemade Samosa Patti Recipe

The layered method is simpler on the counter than it sounds: roll four small discs, stack them with a little oil and flour between each one, roll the stack thin, then warm it just enough to peel the layers apart.
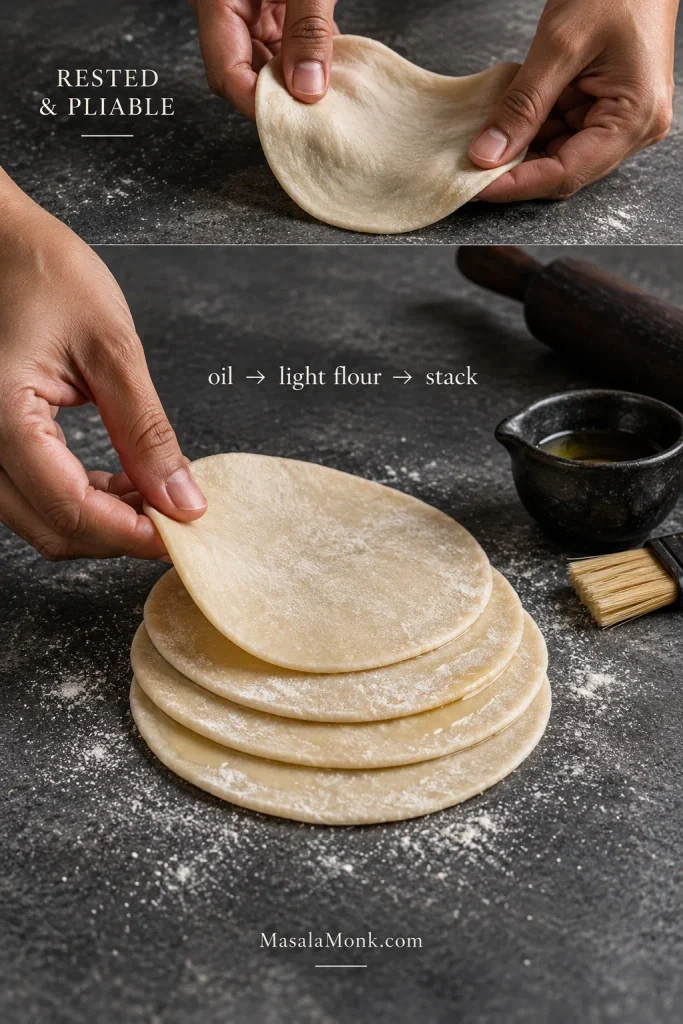
Rested samosa patti dough beside four thin dough discs being layered with a light film of oil and flour on a dark work surface.
The oil-and-flour layer is for release, not lamination. Too much can make homemade samosa sheets dry, dusty or harder to separate.

The first stack gets most of your attention. Once it separates cleanly, the next stacks usually go much faster.

Homemade Samosa Patti

Thin homemade samosa sheets made from a flexible flour dough, layered four at a time and briefly set on a tawa before peeling and cutting.

  • Yield: about 24 regular strips, plus smaller pieces from the trimmings
  • Regular strip size: about 7.5 × 23–25 cm / 3 × 9–10 inches
  • Dough rest: 20–30 minutes
  • Active time: about 45–60 minutes
  • Total elapsed time: about 1–1½ hours

Ingredients

  • 250 g / 8.8 oz all-purpose flour or maida
  • 5 g fine salt, roughly ¾–1 teaspoon depending on the salt
  • 30–35 ml / about 2–2⅓ tablespoons neutral oil
  • 115–125 ml / about ½ cup water, added gradually
  • Extra neutral oil for brushing between the layers
  • Extra all-purpose flour for a light dusting between the layers

Equipment

  • Mixing bowl
  • Digital kitchen scale
  • Rolling pin
  • Large flat tawa, griddle or skillet
  • Pastry brush
  • Knife or pizza cutter
  • Clean kitchen towel or covered container

Make, Rest and Layer the Dough

  1. Make the dough. Mix the flour and salt. Add the oil and work it through the flour, then pour in about 110 ml water. Add more only as needed until no dry flour remains and the dough comes together.
  2. Knead for 8–10 minutes. Keep going until the dough becomes smooth and elastic and stretches before it tears. It should feel pliable without becoming sticky.
  3. Rest for 20–30 minutes. Cover the dough. It should roll without immediately pulling itself smaller. Dough that still fights the rolling pin needs another 10 minutes under cover.
  4. Divide into 12 pieces. Each piece will be roughly 34 g. Keep the unused pieces covered.
  5. Roll four small discs. Work with four pieces at a time and roll each to around 11–13 cm / 4½–5 inches across.
  6. Layer them. Brush the first disc with a very thin film of oil, dust lightly with flour and place the next disc on top. Repeat until you have a four-layer stack.

Roll, Set, Peel and Cut the Patti
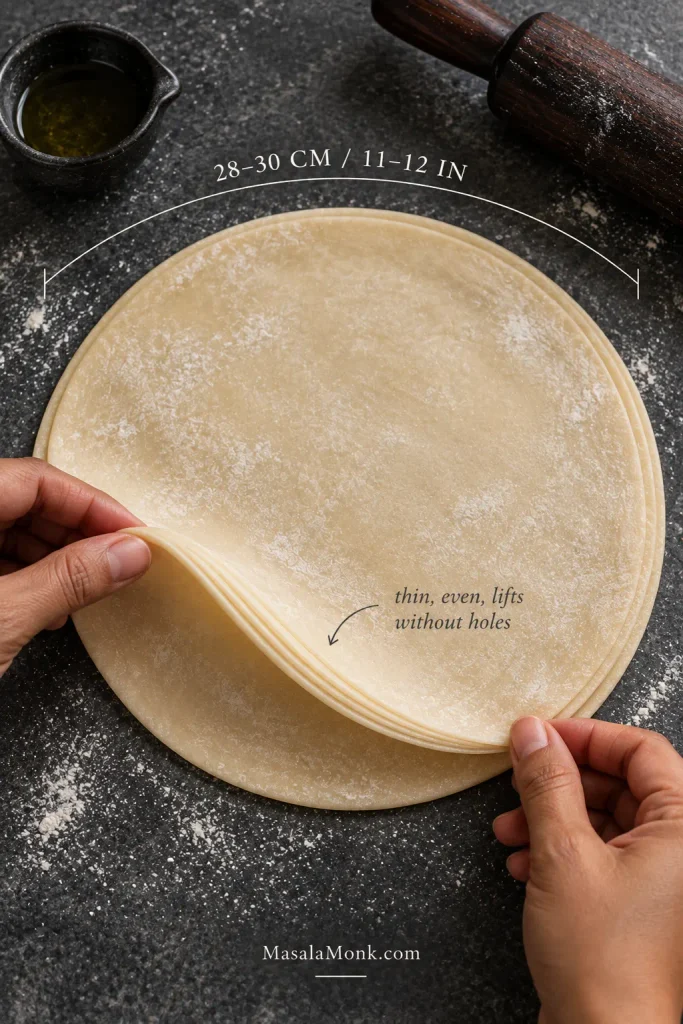
Thin rolled samosa patti dough stack measuring about 28–30 cm across, with one edge lifted to show its even thinness.
Look for even thickness from centre to edge; a slightly imperfect circle matters less than thin spots that later tear or bulk up.
  1. Roll the stack thin. Dust the outside lightly and roll to roughly 28–30 cm / 11–12 inches across, or as large as your tawa comfortably takes. Rotate as you work so the centre and edges stay reasonably even. The stack should lift without developing holes.
  2. Set the surfaces. Warm the stack over low heat for roughly 10–30 seconds per side. The raw wet look should disappear and the layers should begin loosening. Keep the pastry pale.
  3. Peel while warm. Lift an edge and separate one sheet gently. Work around an edge that already wants to release instead of pulling hard through the middle. A stubborn stack can go back onto the warm tawa for a few seconds.
  4. Cut and cover. Each large peeled sheet should give about two regular strips around 7.5 × 23–25 cm / 3 × 9–10 inches. Keep the curved pieces for mini samosas or small repairs. Cover everything immediately.

Watch the pastry, not only the stopwatch: it should come off the tawa pale, warm and easy to peel. Brown patches and a cooked-flatbread feel mean the stack has gone farther than necessary.
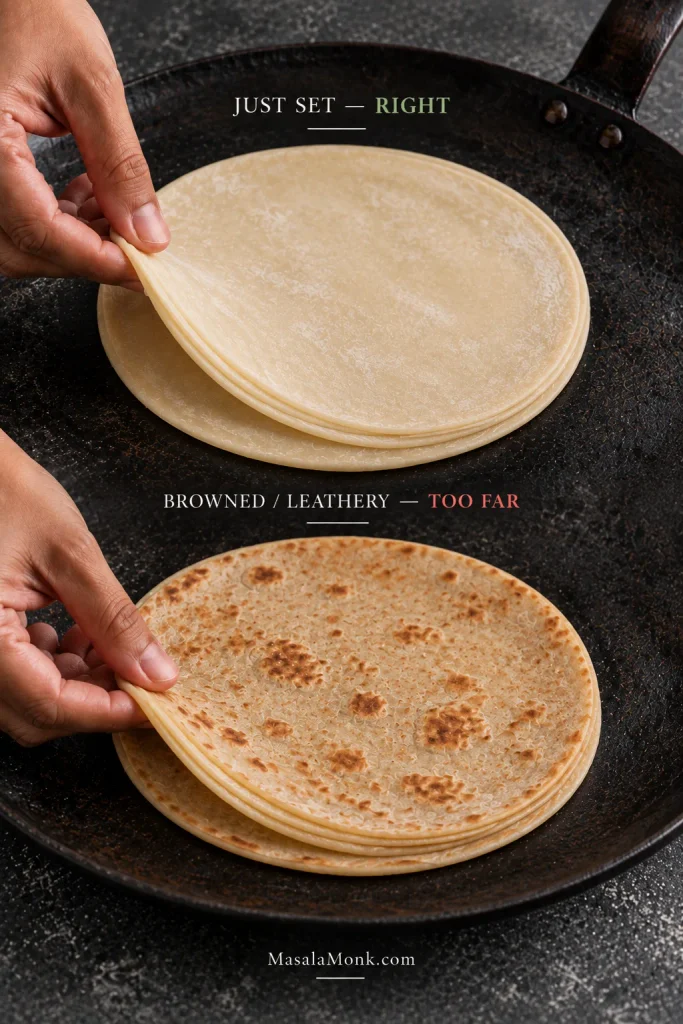
Side-by-side samosa patti stacks showing the correct pale, just-set stage and an overcooked stack with brown patches and drier edges.
If browning starts before the layers loosen, lower the heat and shorten the next side rather than waiting for more colour.

A good finished sheet almost drapes over your hand, but still lifts without tearing. That balance matters more than chasing an exact thickness with a ruler.
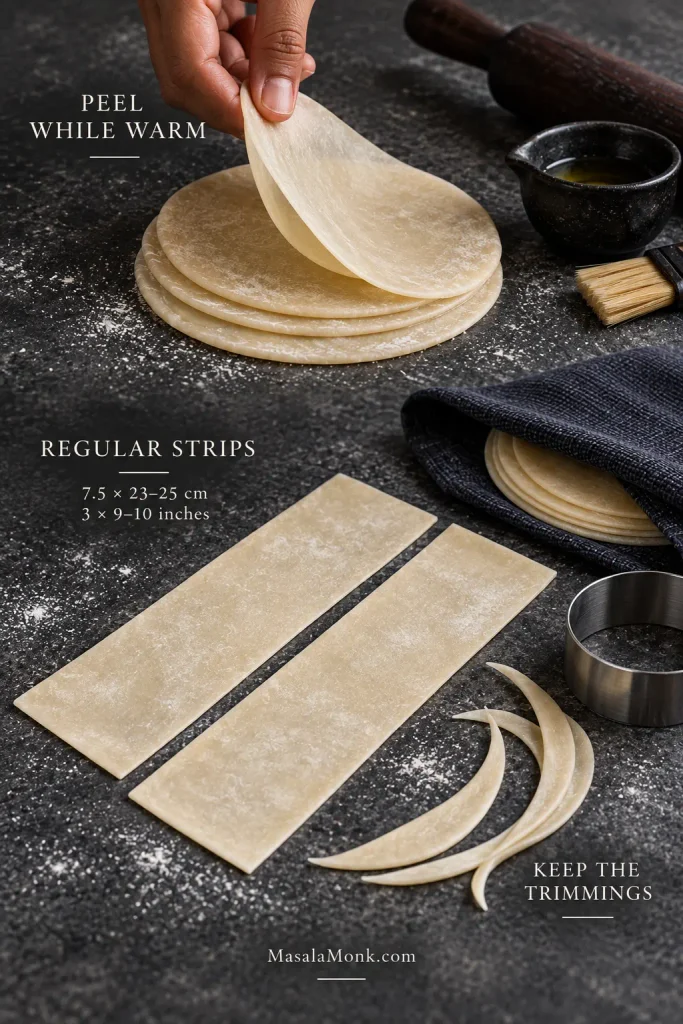
Warm homemade samosa patti being peeled into a thin sheet, then cut into long rectangular strips with curved trimmings kept alongside.
Peel from an edge that already wants to release, then cover the cut strips quickly so the fresh edges do not dry.

Why the Dough Rolls So Thin

The clearest sign is what happens under the rolling pin. A tense piece keeps shrinking after every pass. Give it another short rest and the same dough spreads with far less resistance.

Kneading gives the dough enough strength to become thin without falling apart; resting lets it relax. Between the discs, use only a fine film of oil and a light dusting of flour. Heavy flouring leaves dry patches, while poor separation can make the layers fuse.

Using frozen patti? · Patti ready? Start folding →

Using Ready-Made or Frozen Samosa Patti

Look in the frozen or chilled section of South Asian, Middle Eastern and international grocery stores, often near frozen parathas and spring-roll sheets. Patti may also be labelled samosa sheets, samosa pastry, samosa leaves, roll patti or manda patti.

Size and thickness

StyleStarting strip sizeGood for
MiniAbout 5 × 15 cm / 2 × 6 inCocktail and party samosas
Small pattiAbout 5–6 × 20 cm / 2–2½ × 8 inTea-time and onion samosas
Regular pattiAbout 7.5 × 23–25 cm / 3 × 9–10 inPotato, chicken, keema and larger patti samosas

Check dimensions before relying on the number of sheets printed on the packet. For regular patti, start around 3 inches / 7.5 cm wide. Very delicate sheets can fry beautifully, but a slightly sturdier wrapper often gives a first-time folder more margin.

The flat sheet can also hide how thick it will feel later. Fold one corner several times. If that little stack already feels bulky, the finished samosa will have a heavy corner.
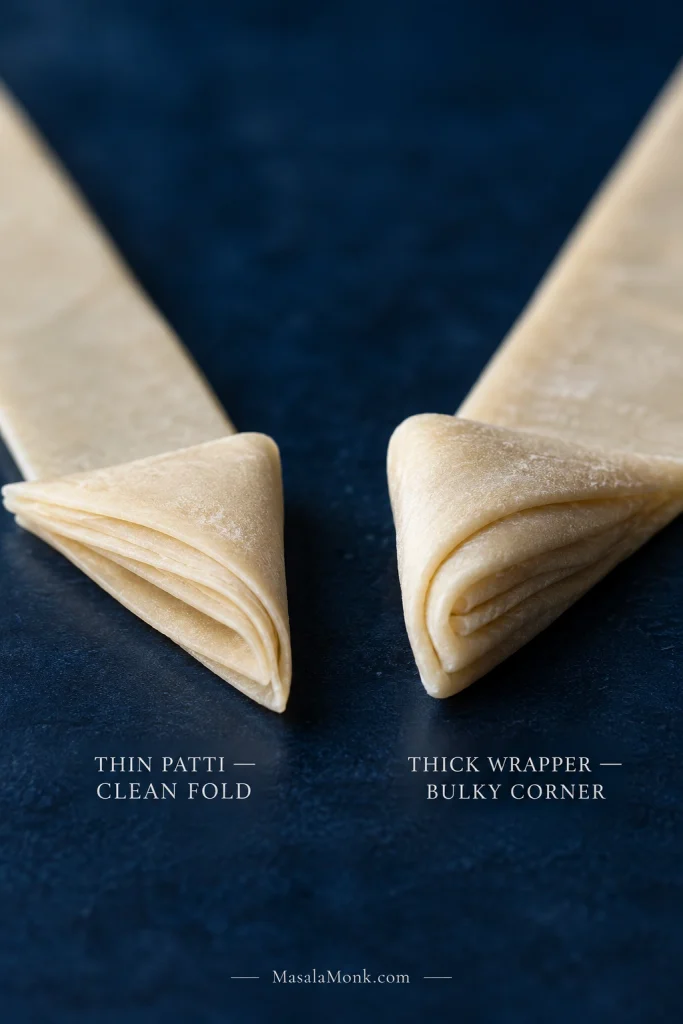
Macro comparison of thin samosa patti forming a compact folded corner and a thicker wrapper forming a visibly bulky layered corner.
Fold thickness reveals what the flat sheet hides: thin patti stays compact, while heavier wrappers build hard, bulky corners.

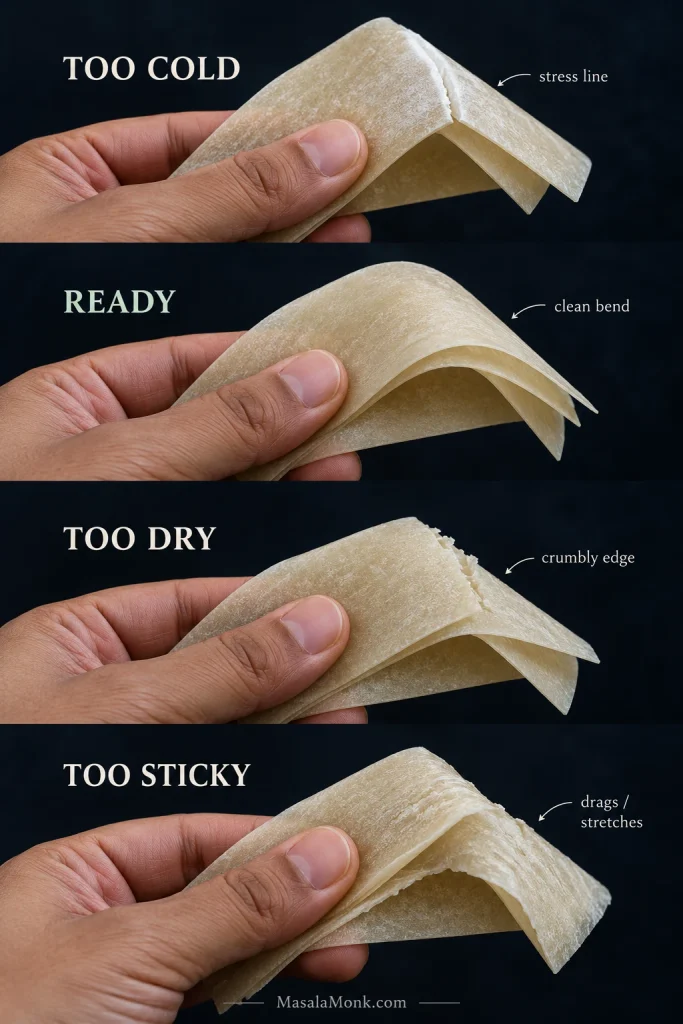
Frozen patti: cold, ready, dry or sticky?

Packet thawing times are only estimates. The wrapper itself tells you when to start. A thick stack can remain cold in the centre even after the outside feels soft.

ConditionWhat you will noticeWhat to do
Too coldStiff; pale stress line at the bend; crackingGive the closed pack more time
ReadyFlexible; bends cleanly; layers release without forceStart folding
Too dryCrumbly edge; random splitting after thawingKeep covered; reject badly damaged sheets
Too stickyLayers drag, stretch or tearHandle gently and avoid adding moisture
Four-state frozen samosa patti comparison showing a cold cracking sheet, flexible ready sheet, dry crumbly sheet and sticky stretching sheet.
Test one sheet first. Cracking, crumbling or dragging apart means the packet needs more thawing, cover or gentler handling before folding.

A sheet that starts tearing halfway across is usually still too cold. Cover the stack again instead of forcing the layers apart.

Take out only the sheets you can fill immediately and keep the rest covered. A clean, slightly damp towel or a covered container slows drying without leaving the pastry wet.

Fully thawed patti should not crumble in your fingers. Several sheets splitting or flaking in the same way usually points to the packet rather than your technique.

Patti ready? Start folding → · Still cracking or sticking? Troubleshoot →

How to Fold Samosa Patti: Fill, Fold and Seal the Triangle

The first two turns do most of the thinking. The first gives you the angle; the second turns a flat strip into an actual pocket. Once that shape makes sense in your hands, the rest becomes much more repetitive.

Before you fold: use cool or chilled filling with no loose liquid underneath. Chicken, keema and other meat fillings should already be fully cooked.
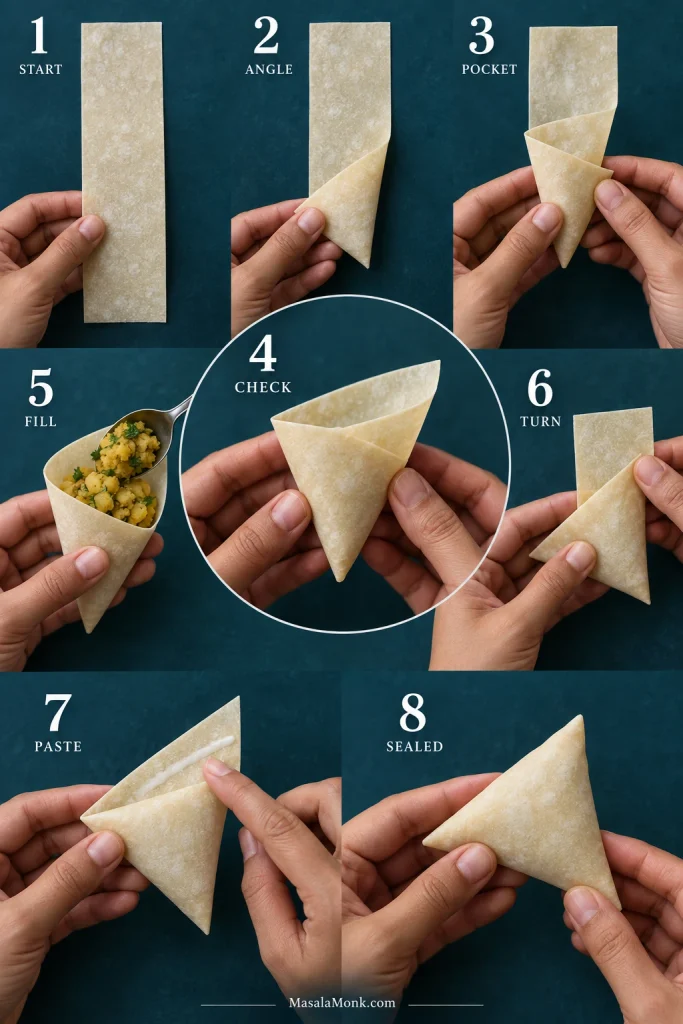
Eight-step samosa patti folding sequence from a flat strip through the first triangle and pocket to filling, turning, pasting and a sealed samosa.
If later folds drift, the error usually began with the first triangle. Correct the starting angle rather than compensating turn by turn.

1. Make the first triangle

Lay the strip vertically. Bring the bottom-left corner diagonally upward to the right edge. The lower end now forms a neat triangle. You can mirror the direction and start from the bottom-right if that feels more natural.

Get this angle right now. A crooked first fold carries the mistake through every turn that follows.

2. Fold again to make the pocket

Turn the first triangle upward once along its straight edge. This is the moment the strip starts looking less like a wrapper and more like a samosa: you now have a pocket with an opening at the top and a pointed corner underneath.

Slip a fingertip gently into the opening and check the bottom point. It needs to be closed. A tiny tunnel here gives frying oil a direct route inside.
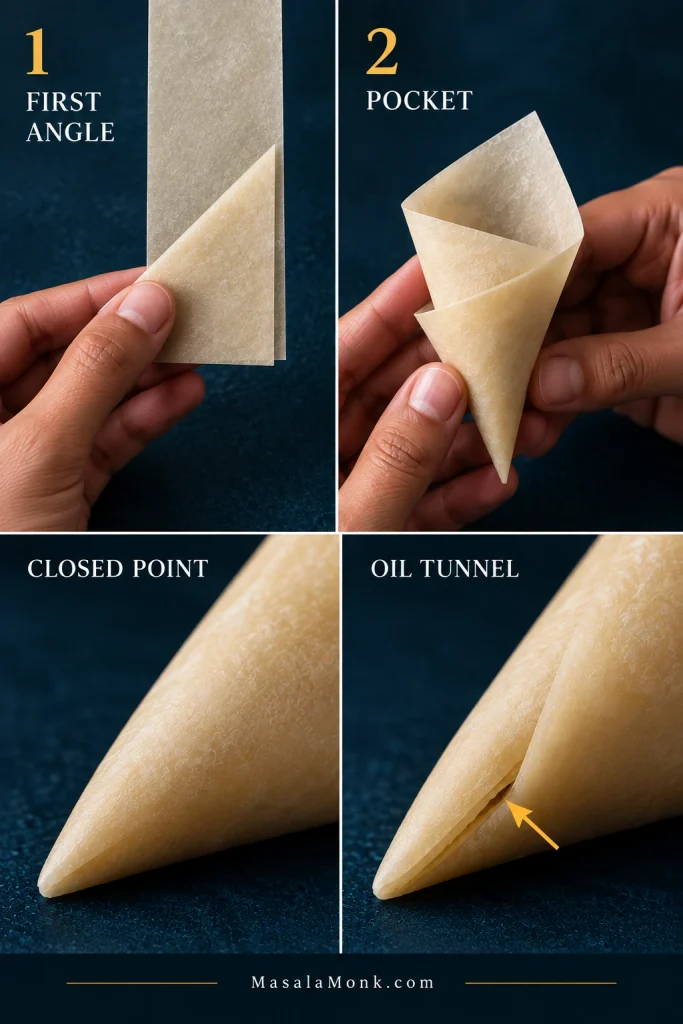
Samosa patti folding close-ups showing the first diagonal fold, formed pocket, a tightly closed pointed end and a small open seam that can let oil enter.
Inspect the pointed end from inside before filling; even a tiny channel between layers can give frying oil a direct route in.

3. Fill without stretching the pocket

A small strip may need only 1–2 teaspoons. A regular-width wrapper can start with around 1 tablespoon.

Then look at the pocket rather than the spoon. Stop around two-thirds to three-quarters full. It should look comfortably filled, not swollen.
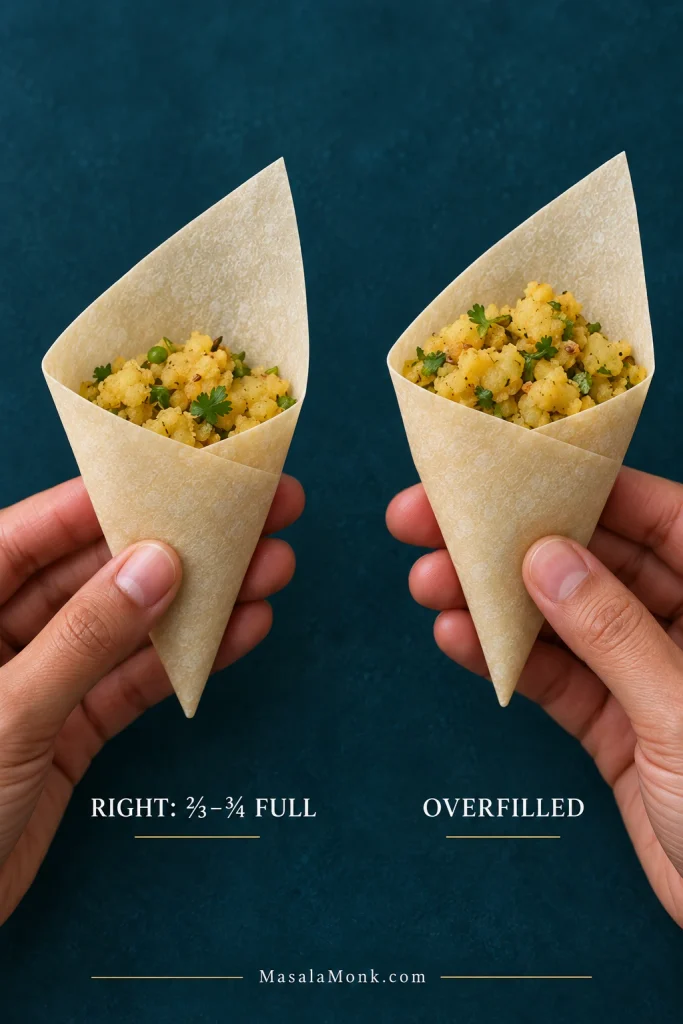
Two samosa patti pockets with potato filling, comparing a comfortable two-thirds to three-quarters fill with an overfilled pocket.
Watch the pocket walls, not just the spoonful. Bowing outward means there is too little relaxed wrapper left for clean turns and sealing.

4. Keep turning the triangle

Fold the filled triangle over itself, following the straight edges of the strip. Keep the shape triangular and avoid squeezing the filling outward. After a few samosas, this part usually becomes the quickest step.

5. Seal the final flap

Keep the last edge clean. Potato, onion juice, rendered fat, melted cheese or sauce between the flap and the pastry can weaken the bond.

Mix 30 g all-purpose flour with about 20–22 ml / about 1½ tablespoons water to start. Add more water a teaspoon at a time until the paste is thick, smooth and brushable.

  • Too thin: runs away from the sealing edge.
  • Right: spreads in a narrow strip and stays where you brush it.
  • Too thick: sits in lumps and stops the flap lying flat.
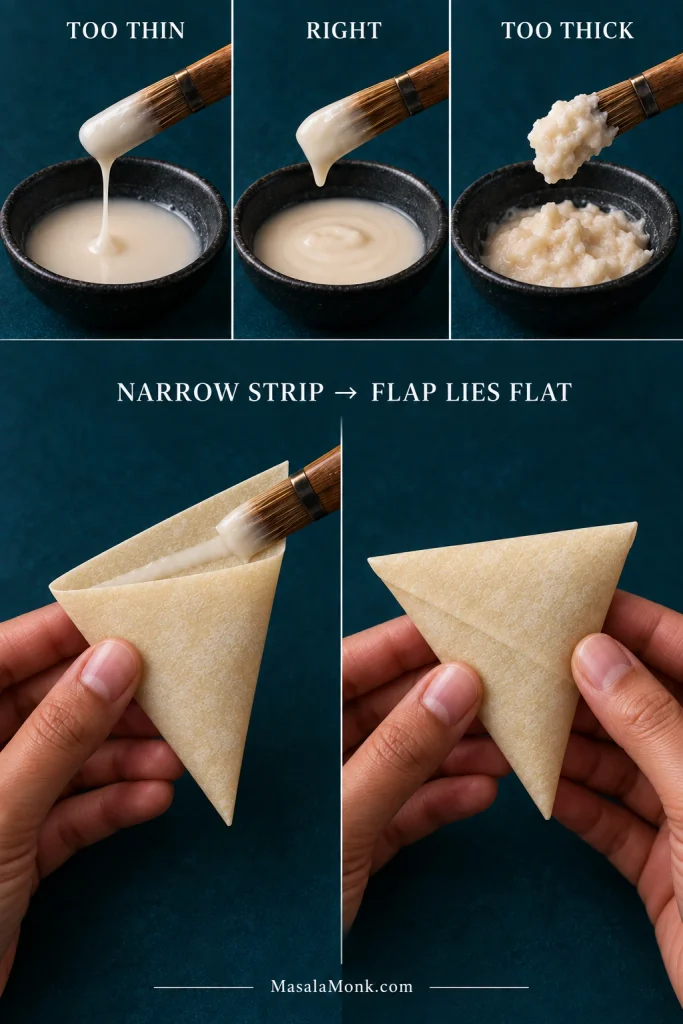
Samosa sealing guide comparing runny, correct and overly thick flour paste, followed by a narrow paste strip and a flat sealed patti flap.
A clean flap matters as much as paste thickness; filling, fat or sauce between the layers can weaken the seal.

Press the flap onto clean pastry. A finished triangle should sit on the tray without your fingers holding it closed.

6. Give it a 10-second check

  • Pointed corner: closed, with no visible tunnel?
  • Sides: intact, with no filling showing?
  • Final flap: flat and holding?
  • Filling: sitting comfortably rather than forcing the wrapper outward?
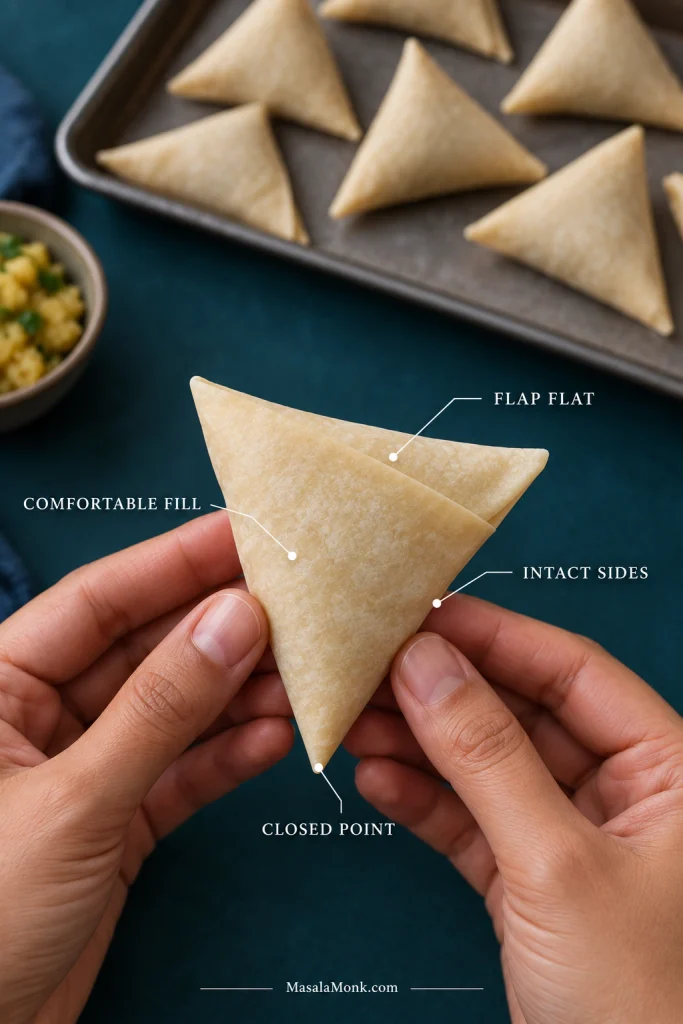
Finished raw samosa patti held in both hands with callouts for a closed point, intact sides, flat flap and comfortable filling level.
A raw samosa should stay closed on the tray by itself. Fix lifted flaps, open points or stretched wrappers before frying.

By this point the tray should begin looking more regular than the first few pieces did. That is normal: folding patti is one of those jobs your hands learn faster than your head expects.

Ready to cook? Fry, air fry or bake → · Flap or seam failing? Troubleshoot →

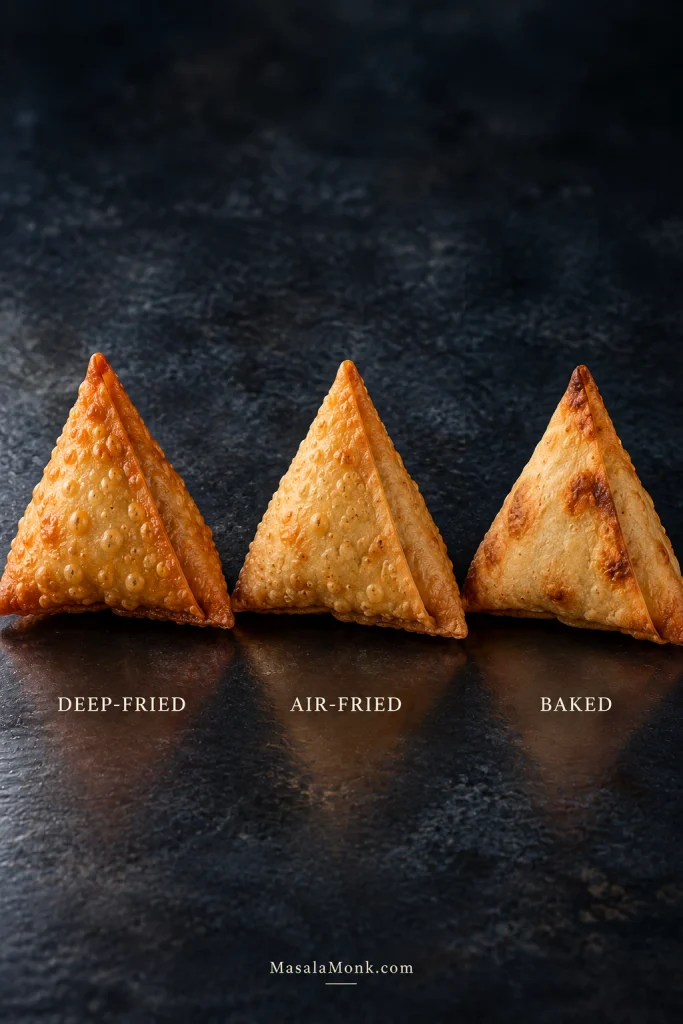
Fry, Air Fry or Bake

MethodStarting temperatureWhat success looks like
Deep fry165–175°C / 330–350°FSteady bubbling; gradual golden colour; light crisp layers
Air fryer180°C / 350°FEven browning with a light oil coating; crisp corners
Oven180°C / 350°FCrisp wrapper with no chewy fold lines
Three matching samosa patti triangles comparing the appearance of deep-fried, air-fried and baked shells on a dark surface.
The three methods produce visibly different surfaces; judge each by crisp folds and a fully heated filling rather than expecting identical browning.

A properly cooked patti samosa feels light when you lift it. Break a corner and the wrapper should crack rather than bend.

Deep frying

Use enough neutral, high-smoke-point frying oil for the samosas to float without resting against the bottom of the pot.

Start around 165–175°C / 330–350°F. Very thin commercial patti often does better toward the lower end. Frying time varies with wrapper thickness, samosa size and whether the filling is chilled or frozen.
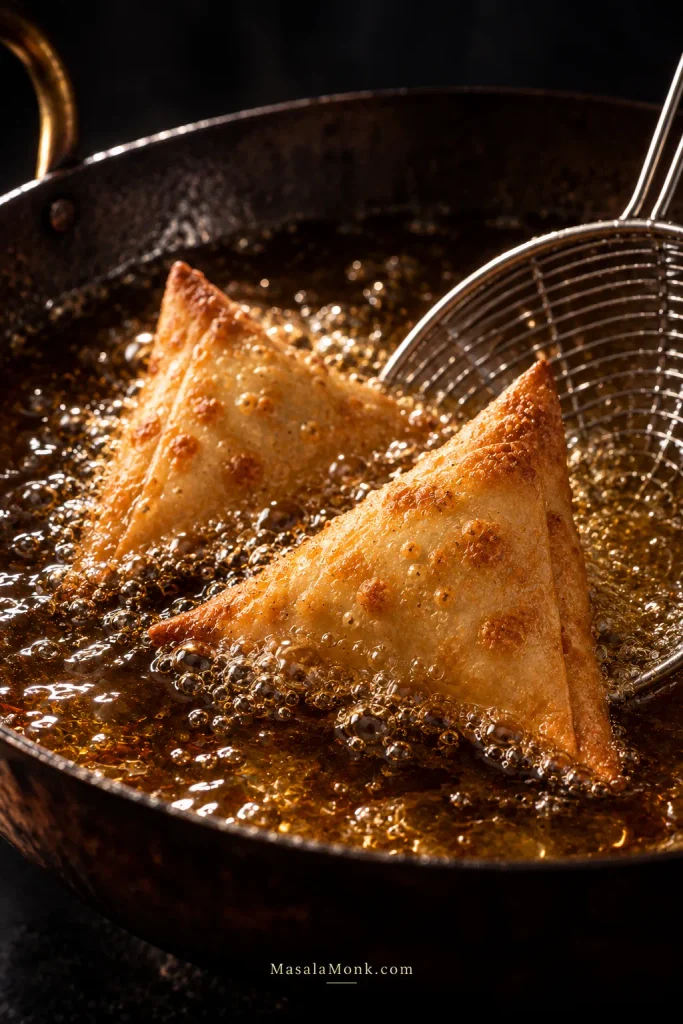
Two thin patti samosas frying in bubbling golden oil in a dark metal pan with a wire skimmer beside them.
If bubbling drops sharply when a batch goes in, let the oil recover before adding more patti samosas.

No thermometer? Drop in a small patti trimming. It should bubble and rise steadily without racing to dark brown: a sluggish scrap means the oil needs more heat; immediate colour means it needs less. Then fry one samosa before loading the pot. Its colour should build gradually while bubbling remains active around the folds, giving you a much better read on your particular wrapper than a universal timer will.
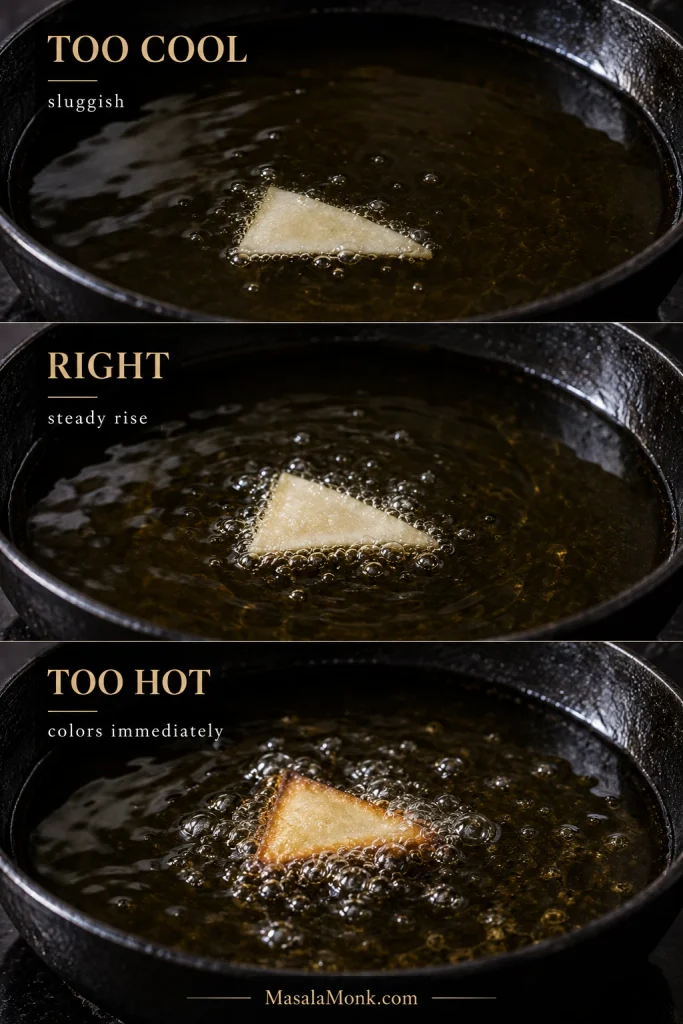
Three-panel oil test showing the same samosa patti scrap bubbling slowly in cool oil, steadily at the right heat and browning quickly in overly hot oil.
Repeat the scrap test when bubbling changes; larger batches and frozen fillings can pull the oil out of range without changing the burner setting.

Frozen samosas pull the temperature down quickly, so begin with a small batch and let the oil recover. Brush away loose frost or visible ice before deep frying, and never lower a wet or ice-coated samosa into hot oil.

Lift finished samosas onto a wire rack when possible. Steam escapes instead of collecting under the pastry and softening the base.

For hot-oil handling and fryer safety, see the USDA deep-fat frying safety guide.

Air fryer

Brush or spray the samosas lightly with oil and air fry at about 180°C / 350°F. Begin checking around 10 minutes; many batches take roughly 12–15 minutes. Turn once so both faces and the layered edges crisp.

Pale, papery patches usually need better oil coverage, more airflow or more cooking time. These common air fryer mistakes are useful for checking crowding, airflow and preheating.

Oven

Brush or spray the samosas lightly with oil and bake at about 180°C / 350°F. Begin checking around 12–15 minutes, turn if needed and continue until the layered corners are crisp.

Reheating cooked samosas

Reheat fried samosas in an oven or air fryer around 165°C / 330°F, beginning to check after about 5–8 minutes. Continue until the wrapper is crisp again and the filling is hot.

For leftovers filled with cooked meat or another perishable filling, reheat the centre to 74°C / 165°F. A microwave heats the middle quickly but usually leaves thin patti soft.

More filling ideas → · Frying or finishing problem? Troubleshoot →

What Can You Fill Patti Samosas With?

Patti works best with fillings that are already cooked or need only brief cooking, and that do not leave loose liquid sitting in the bowl. Meat fillings are best fully cooked before wrapping; onion-style fillings can go in uncooked when their moisture is properly controlled.

  • Dry and sturdy: spiced potato is naturally forgiving. Chicken and keema also work beautifully when cooked down until no liquid or rendered fat is pooling in the pan.
  • Fresh and punchy: onion or Irani-style fillings give patti samosas their tea-shop character, but excess onion moisture needs to be controlled before folding.
  • Saucy: Chinese-style vegetables or chicken work when the sauce clings instead of collecting underneath. Our stir fry sauce guide goes deeper into that glossy, coating consistency.
  • Rich and melty: cheese-corn and similar fillings need a little extra room. Hot cheese finds an overfilled seam quickly.
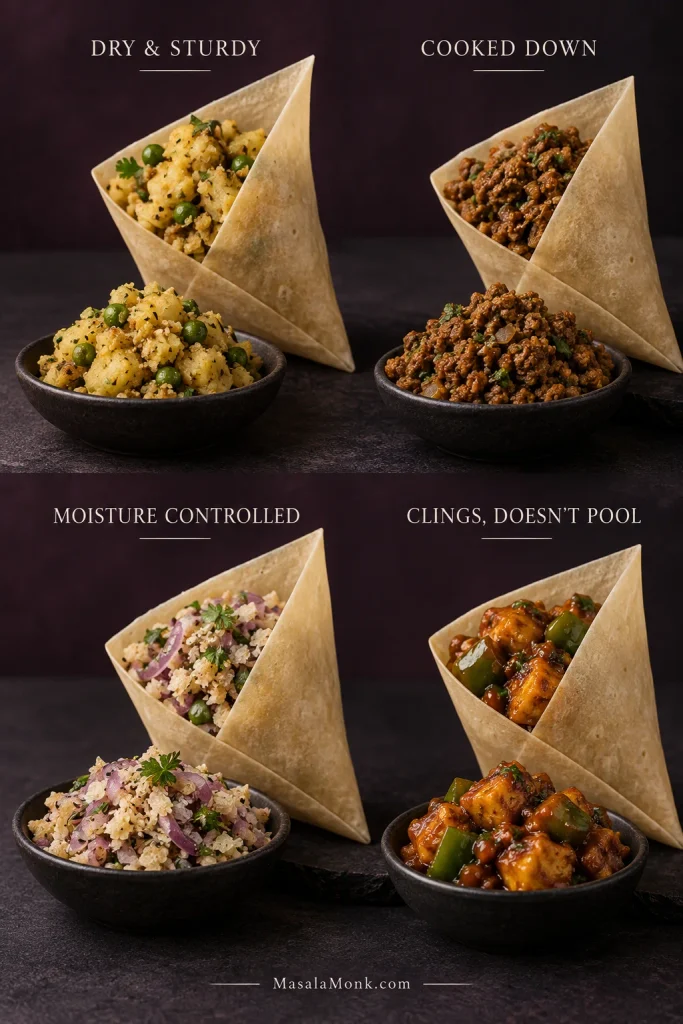
Four samosa patti filling examples showing dry potato, cooked-down minced meat, moisture-controlled onion mixture and glossy sauce coating ingredients without pooling.
After the filling rests, check what collects underneath. Free water, sauce or rendered fat predicts wrapper trouble better than surface moistness.

The smaller pieces left after cutting homemade patti are ideal for mini samosas. Nobody minds an extra tray of those.

As the first batch comes out, the smell of hot fried pastry and spiced filling finally catches up with all that careful folding. Serve them while the edges still crackle; a bright coriander-mint green chutney gives the hot pastry a fresh, sharp contrast.
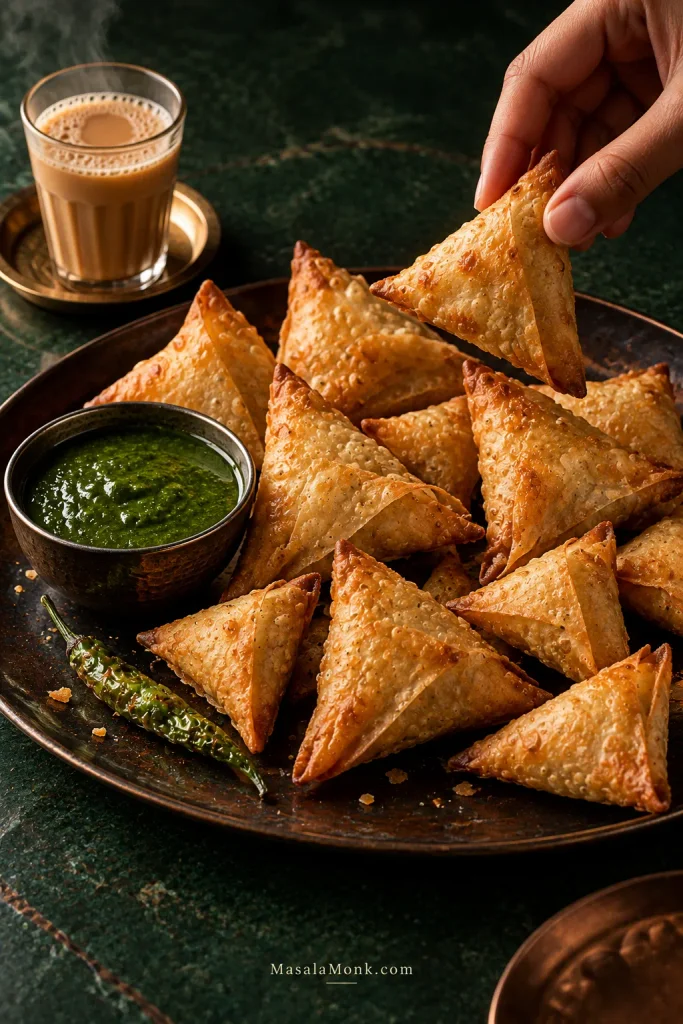
Platter of crisp golden patti samosas in mixed sizes served with green chutney, a fried green chilli and a glass of hot chai.
Do not pile just-fried patti samosas deeply; trapped steam softens the lower wrappers. Hold them in a shallow layer or on a rack.

Other Ways to Get a Thin Samosa Wrapper

Rolled patti gives you the wrapper described above, but it is not the only way to get a thin sheet that folds well.

Batter-Made Samosa Sheets

If rolling very thin dough is the part you would rather skip, batter-made sheets are another option. Their texture differs slightly from rolled patti, but they fold and crisp well.

Whisk together 240 g all-purpose flour, 15–20 g cornstarch, 3 g salt and about 480 ml water. Add more water gradually, up to roughly 600 ml if needed. The batter needs to flow easily enough to form a very thin layer in the pan.

Wipe a nonstick skillet with a trace of oil. Pour just enough batter to cover the base in a very thin layer, tilting or swirling the pan immediately. In a small skillet, about 2 tablespoons is a reasonable starting amount; larger pans will need more.

Once the wet shine disappears and the edge releases cleanly, lift the sheet. A tacky top needs only a few seconds on the second side. Keep the wrapper pale and flexible, and cover finished sheets as you work.
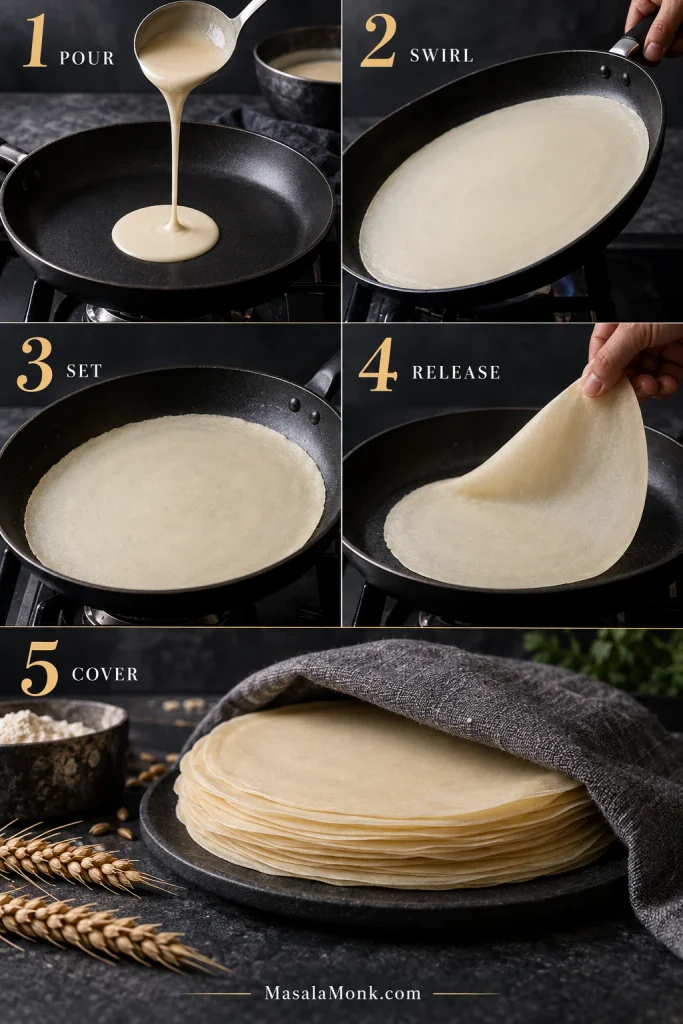
Five-step batter-made samosa sheet process showing batter poured into a pan, swirled thin, set pale, lifted cleanly and stacked under a cover.
For batter-made sheets, release without browning is the cue. Early colour usually means the pan is too hot, the layer too thick, or both.

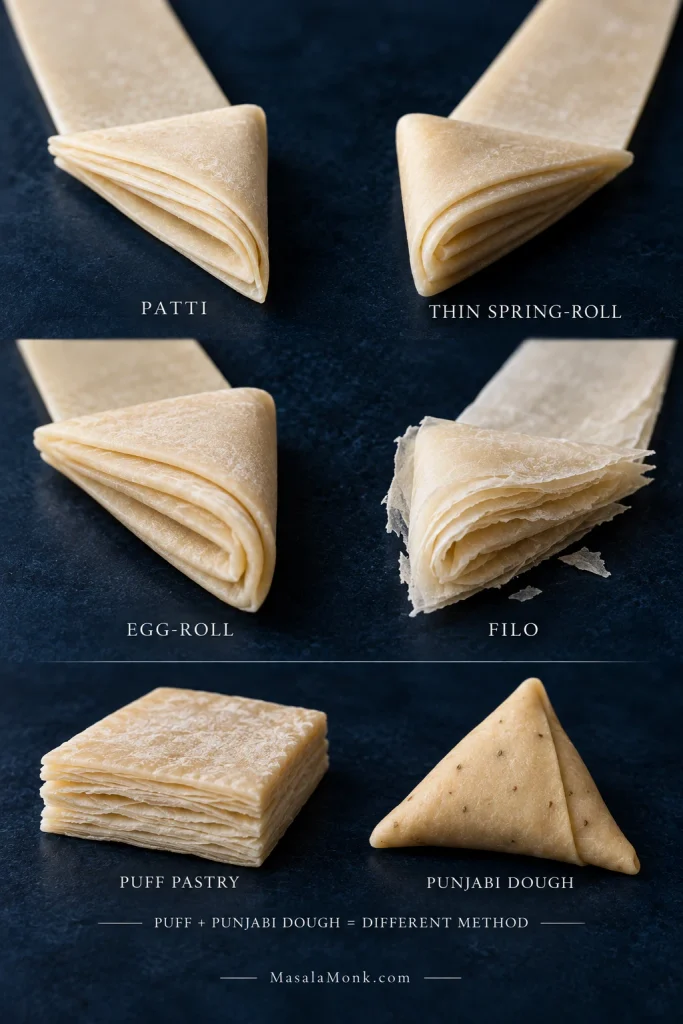
Can You Use Spring-Roll Sheets Instead?

Yes. Thin wheat spring-roll wrappers are one of the easiest substitutes when proper patti is unavailable. Square sheets may need cutting into strips before folding.

WrapperDoes it work?What changes?
Samosa pattiYes — idealNarrow strip already suited to triangular folding
Thin spring-roll sheetYesUsually square; may need cutting
Thick egg-roll wrapperPossibleHeavier shell and bulkier corners
Filo/phylloPossible, with a different methodFragile layered pastry rather than a direct patti substitute
Puff pastryNot equivalentPuffs and flakes instead of forming the same thin shell
Punjabi samosa doughA different samosa styleThicker raw pastry shaped into a cone
Comparison of folded samosa patti, thin spring-roll wrapper, thicker egg-roll wrapper, fragile filo, puff pastry and Punjabi samosa dough.
Test substitutes by folding them, not judging them flat. Thin spring-roll wrappers stay compact; thicker or fragile sheets reveal problems after a few turns.

For the closest result, choose a thin, flexible wheat wrapper. Thick egg-roll-style wrappers become heavy quickly at the folded corners.

If square wrappers are what you have, our crispy spring roll recipe goes deeper into handling thin wrappers, controlling filling moisture and sealing them before frying.

Wrapper chosen? Start folding → · Making them ahead? Store or freeze →

Make Ahead, Refrigerate and Freeze

Cooking within a few hours? Arrange shaped samosas in a single layer, cover them and refrigerate them. For a longer hold, freezing preserves the wrapper better because even covered patti gradually softens as moisture moves from the filling into the pastry. The filling itself can be cooked, cooled promptly and refrigerated until you are ready to fold.
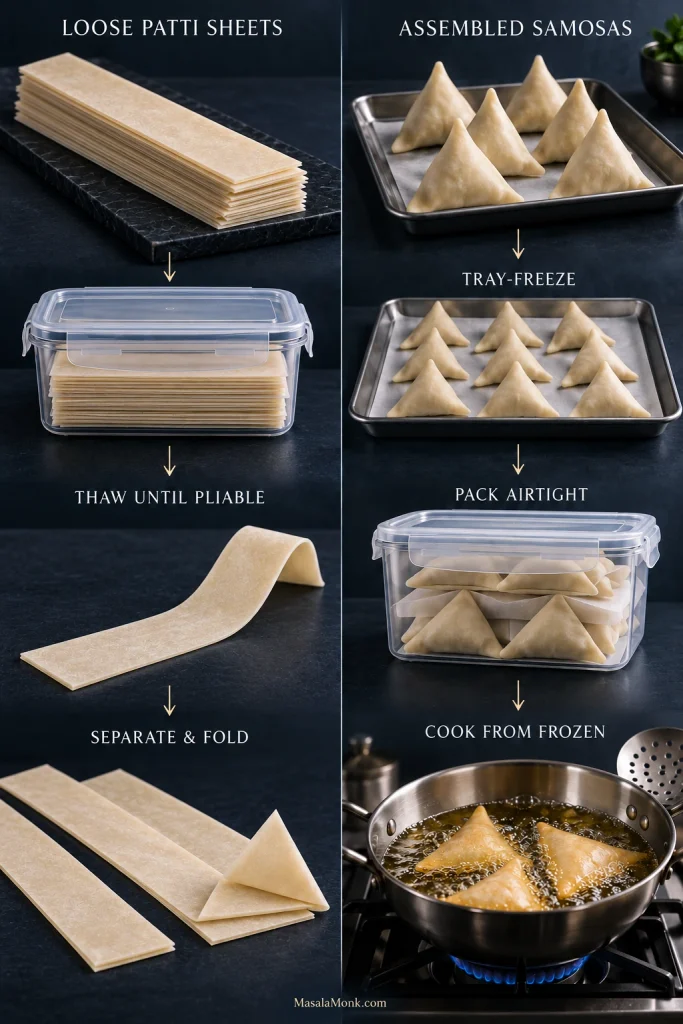
Two-lane freezing guide showing long samosa patti strips stored and thawed before folding, alongside assembled raw samosas tray-frozen, packed and cooked from frozen.
Loose samosa sheets need flexibility before folding; assembled samosas hold their shape better when cooked from frozen rather than fully thawed.

Loose homemade sheets

Cool the briefly set sheets completely, stack them neatly and seal them in a freezer-safe bag or airtight container. For the best texture, aim to use homemade patti within about 1 month. Thaw until pliable before separating and folding.

Commercial frozen patti

Follow the packet’s storage and refreezing directions. Commercial patti is commonly kept around −18°C / 0°F, and repeated thawing can leave thin wrappers drier, stickier or more fragile.

For general guidance on freezer temperature, thawing and refreezing, see the USDA guide to freezing and food safety.

Uncooked filled samosas

Freeze shaped samosas in a single layer until firm, then transfer them to an airtight container or freezer bag. They are generally cooked straight from frozen. Before deep frying, inspect the seams and brush away loose frost or visible ice.

A frozen filling heats more slowly than the thin wrapper crisps. If the samosas contain previously cooked meat, make sure the centre reaches 74°C / 165°F.

Already fried samosas

Let excess steam escape before packing fried samosas, but refrigerate cooked samosas within 2 hours. Reheat them with dry circulating heat when you want the exterior crisp again.

Cooking from frozen? Deep-frying guide → · Freezer or wrapper problem? Troubleshoot →

Troubleshooting: Cracks, Leaks and Open Seams

There is no reason to troubleshoot a batch that is already behaving itself. Come here when the same failure keeps repeating.
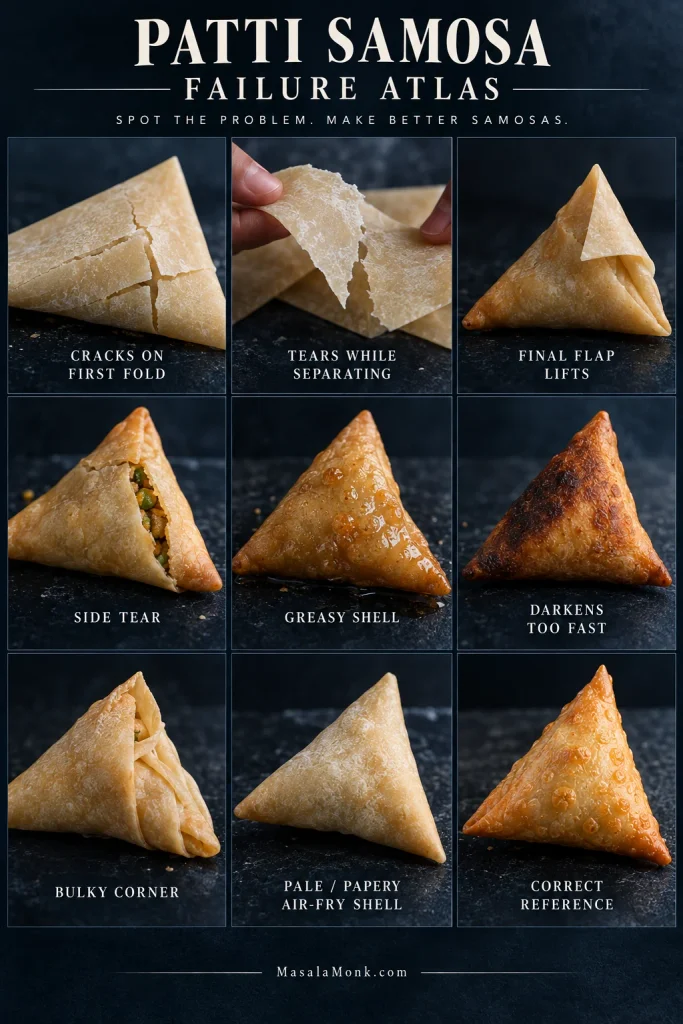
Nine-panel samosa patti troubleshooting atlas showing cracking, tearing, lifted flap, side tear, greasy shell, fast browning, bulky fold, pale air-fried shell and a correct reference samosa.
Start with the visible symptom. Cracks, lifted flaps, grease and pale shells point to different causes, so diagnose before changing the recipe.

Wrapper and dough problems

ProblemLikely reasonWhat to do now
Sheet cracks on first foldToo cold, too dry or damagedCover the remaining sheets and let them soften further
Sheet tears while separatingStack still too cold or layers stickingStop pulling and give the covered stack more time
Sheets stick togetherCondensation, incomplete thawing or packet qualityWork from naturally releasing edges and avoid extra moisture
Fully thawed sheet crumblesLikely dehydrated or freezer-damagedTry another sheet or packet
Homemade dough springs backDough still tenseCover and rest another 10–15 minutes
Homemade layers will not peelLayers fused, under-set or cooled too farWarm briefly and try a naturally releasing edge
Homemade sheet feels leatheryToo much time on the tawaShorten the pre-set on the next stack

Folding and sealing problems

  • A hole at the pointed corner: reopen the pocket and correct the first folds before adding filling.
  • If the final flap keeps lifting: wipe the edge clean and reseal with thicker flour paste.
  • Side tears while closing: remove some filling. A tiny split can be patched with a scrap of patti and flour paste; a badly torn wrapper is better replaced.
  • The samosa softens while waiting: moisture is moving into the wrapper. Cook or freeze the batch sooner.
  • The edges dry before frying: keep shaped samosas covered while the rest of the batch is folded.

Where the failure begins matters. A loose final flap and an open bottom corner can both leak, but they need different fixes.

Frying and finishing problems

ProblemLikely reasonWhat to do now
Samosa opens in oilCorner, flap or steam pressure failedFind the exact opening before frying the next batch
Oil gets insideOpen pointed corner or seam tunnelInspect the next pockets before filling
Oil splatters badlySurface water/ice or wet filling escapingKeep wet pieces out of the fryer, brush away frost and remove any samosa that is visibly leaking
Samosa feels greasyOil too cool or batch too largeLet the oil recover before adding more
Wrapper darkens immediatelyOil too hot for that pattiReduce the heat before the next batch
Folded corners are hardWrapper too thickChoose or roll thinner patti next time
Air-fried shell stays pale and paperyToo little oil, crowding or too little cooking timeAdd a light oil coat, leave more space and continue until the folds crisp

One failed samosa can be useful. Look at where it failed before you fry the next six.

↑ Frozen patti · ↑ Folding & sealing · ↑ Cooking methods

Samosa Patti FAQs

1. What is samosa patti called in English?

Common English labels include samosa sheet, samosa wrapper and samosa pastry sheet. Depending on the market, you may also see samosa leaves, roll patti or manda patti.

2. Is samosa patti the same as a spring-roll sheet?

Not always. Patti is commonly sold as long strips, while spring-roll wrappers are usually square and vary in thickness. Thin wheat spring-roll sheets are the closest substitute.

3. Should frozen filled samosas be thawed before frying?

Usually not. Loose sheets need thawing before folding, but assembled samosas are generally cooked from frozen. Brush away visible frost or loose ice first and fry in small batches so the oil can recover.

The Fold Should Disappear Into the Bite

The first triangle can feel fiddly. Then you make another, and another, and somewhere along the tray your hands stop thinking about the geometry and simply follow the strip.

That is when the technique changes character. A pile of delicate sheets has become a row of neat little triangles, the later ones usually quicker and cleaner than the first.

Fry them, let the steam escape for a moment, then break one at the pointed end. The wrapper should crack into thin layers rather than fight back, leaving the filling hot inside and the fold almost disappearing into the bite.

If these are headed to the table for tea time, start the masala chai before the final batch so both arrive hot.
← Recipe card · ↑ Quick Answer · ↑ Back to Top

Posted on Leave a comment

Samosa Recipe: Crispy, Flaky Punjabi Potato Samosas

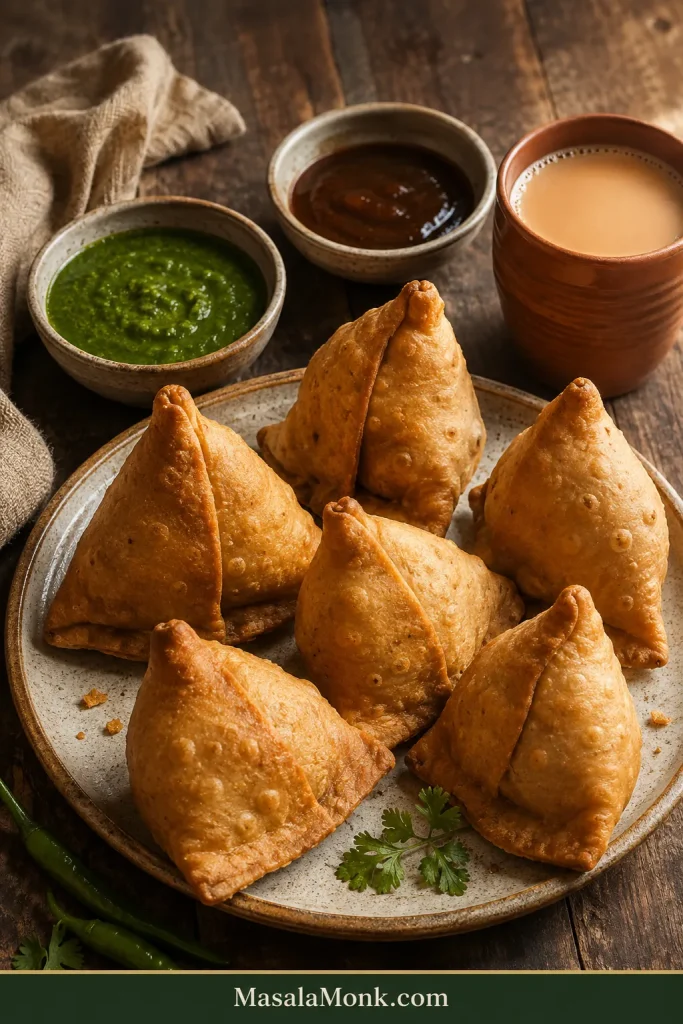
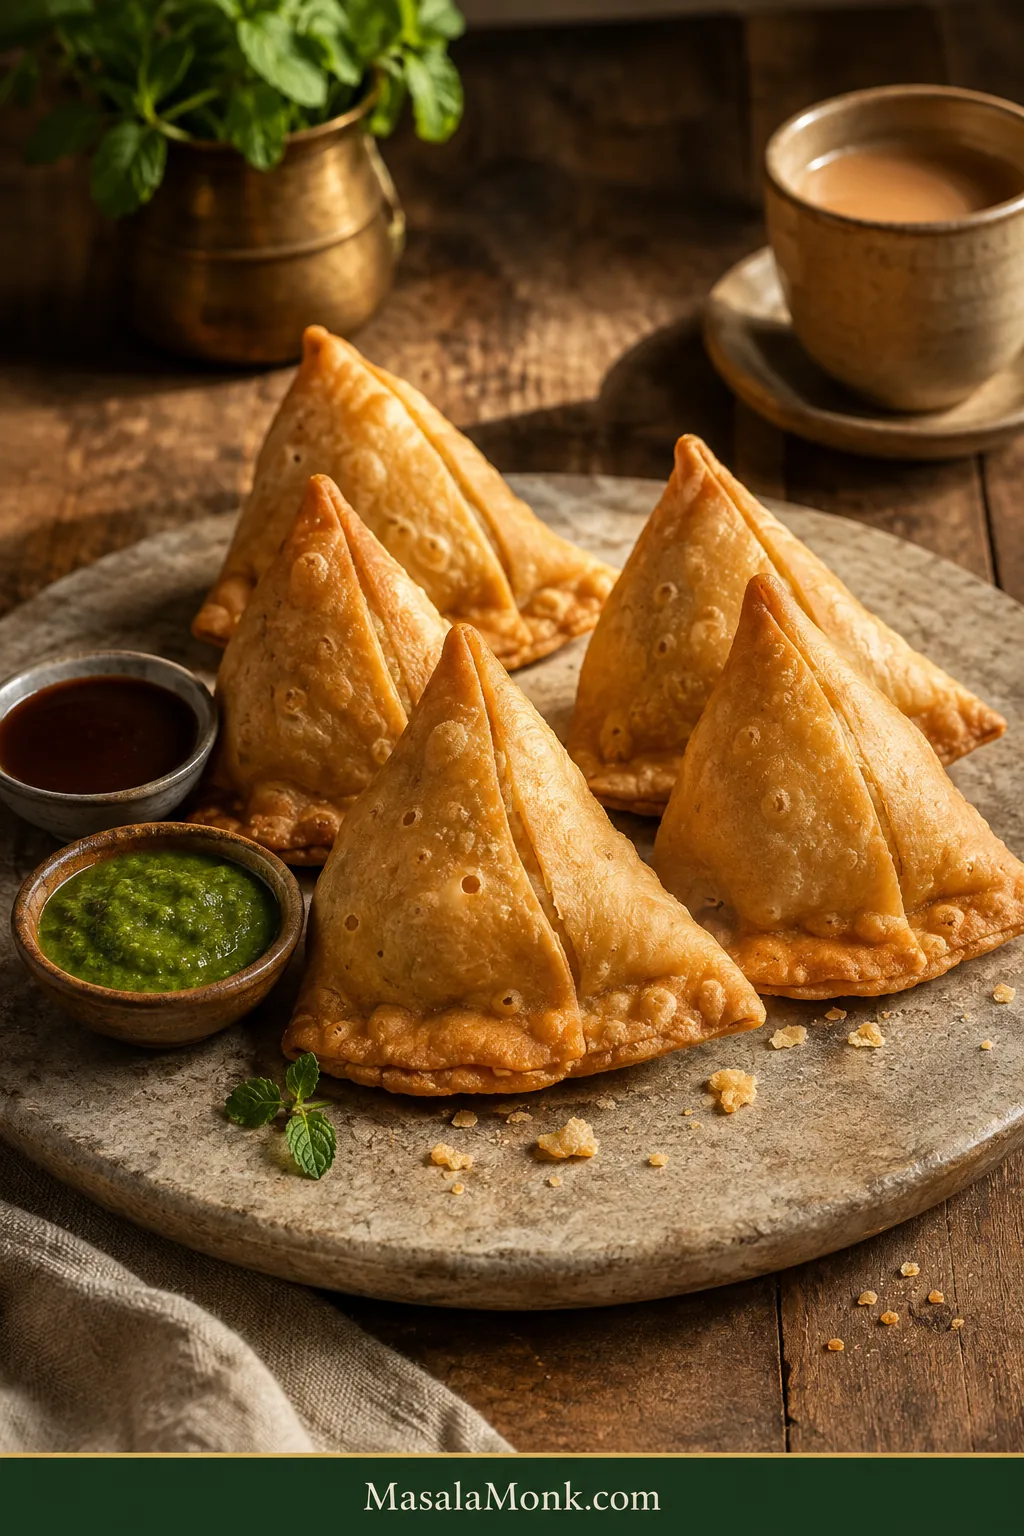
Five golden handmade Punjabi samosas served with green chutney, tamarind chutney and chai on a rustic wooden table.

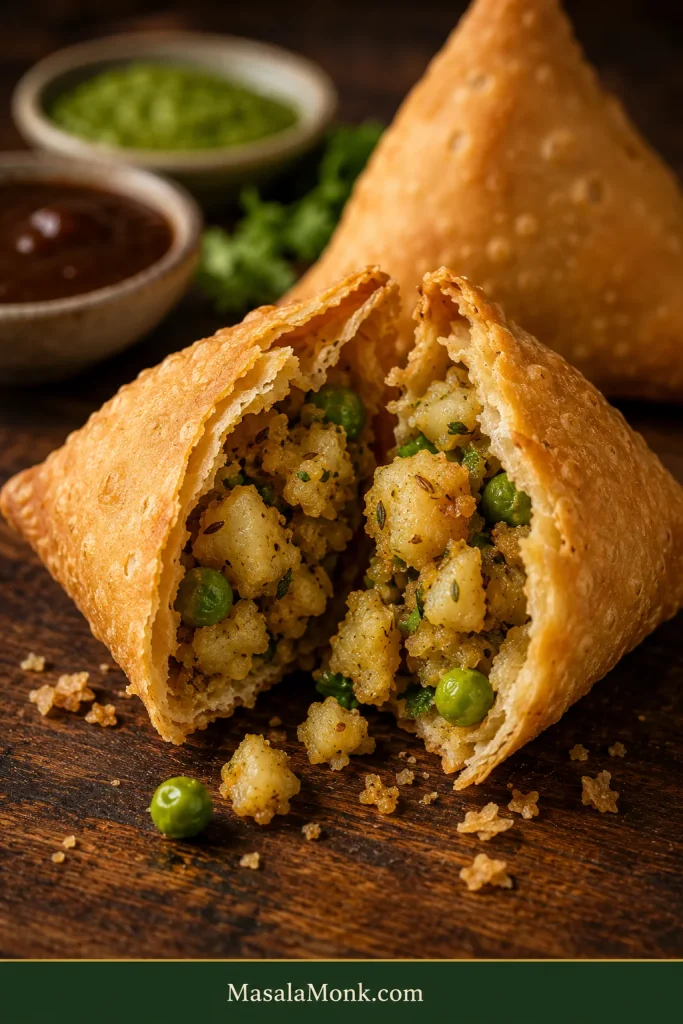
Break open a good Punjabi samosa while it is still warm and the shell should crack cleanly around the edge. A little steam escapes. The potato filling stays soft and fragrant. And that broken corner suddenly looks made for a swipe of green chutney.

The trickier parts of homemade samosas are surprisingly predictable: getting the dough firm enough, keeping the cone sealed, and giving the crust time to cook before it browns. Once you know those checkpoints, the whole process becomes much easier to read.

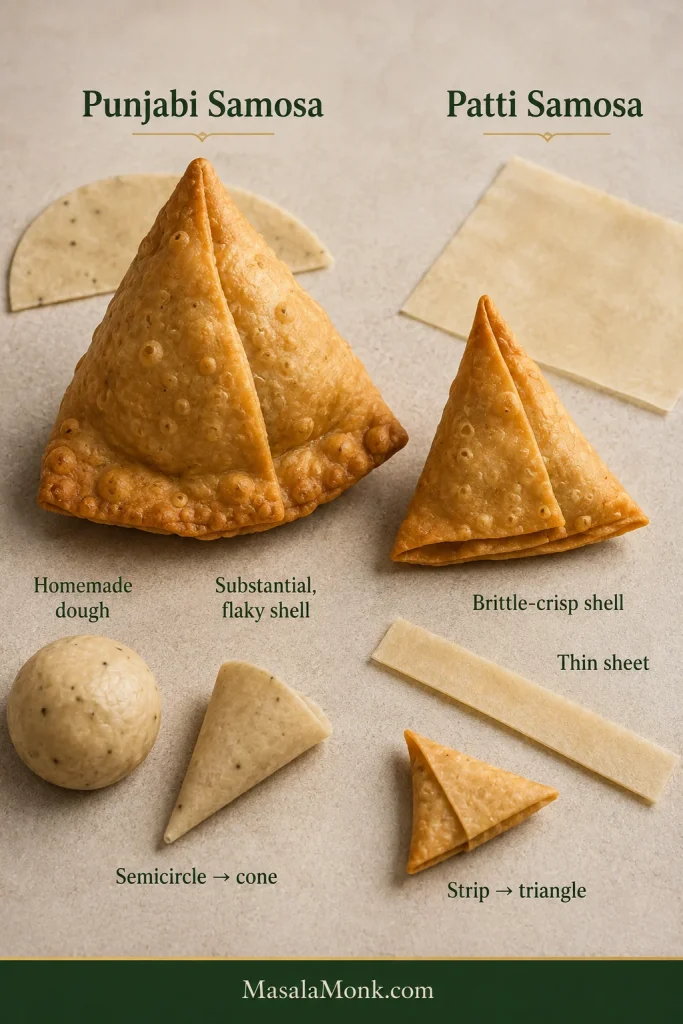
We are making the substantial Punjabi potato-and-pea samosa with homemade pastry—the large, flaky kind that feels at home beside chai and chutney. It is different from the thinner, brittle-crisp samosas folded from ready-made samosa patti or spring-roll sheets. The target here is a shell with enough substance to crack cleanly when you break it open, but never so thick that the pastry feels heavy beside the potato filling.

No single step is especially complicated. The recipe takes time because the dough needs to rest, the filling needs to cool and the samosas need to fry slowly—not because the technique requires expert hands. Your first cone does not need to be beautiful. After a couple, the shape starts making much more sense.

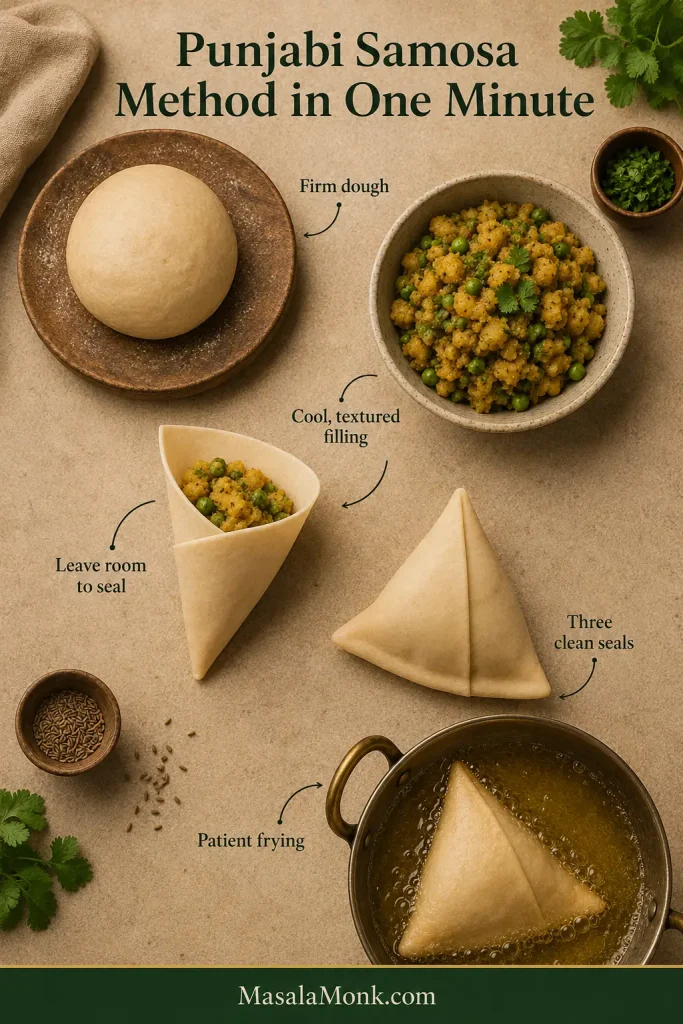
The Punjabi Samosa Method in One Minute

Firm dough: rub the fat thoroughly into the flour, then add water gradually. For this style of samosa, the dough should feel noticeably firmer than chapati dough.

Cool, textured filling: keep small pieces of potato, cook away loose moisture and cool the filling before shaping.

Leave room to seal: about 50 g filling gives these large samosas enough filling without forcing the pastry to stretch.

Three clean seals: check the cone overlap, pointed tip and final top seam.

Patient frying: start these large samosas around 145°C / 295°F, cook the shell slowly, then raise the heat for colour and crispness.

Punjabi samosa process overview showing firm dough, textured potato filling, a filled cone, a sealed raw samosa and gentle frying.
Think of the method as a chain: dough affects shaping, filling moisture affects sealing, and secure seals buy the pastry time to fry properly.

Make It Now: Punjabi Potato Samosa Recipe

Crispy, Flaky Punjabi Potato Samosas

Large homemade Punjabi samosas with a crisp, flaky maida shell and a warmly spiced potato-and-pea filling.

Yield: 10 large samosas

Prep and shaping: about 60–75 minutes

Dough rest: 30 minutes, largely overlapping with filling prep

Frying: about 45–70 minutes total

Batches: usually 4 batches in a 24–26 cm / 9½–10-inch pan (up to 3 samosas at a time), or about 3 batches in a wider pan (up to 4 at a time)

Total elapsed time: about 2 hours 30 minutes; allow roughly 2 hours 15 minutes–2 hours 45 minutes depending on shaping speed and oil recovery between batches

Plan the cook

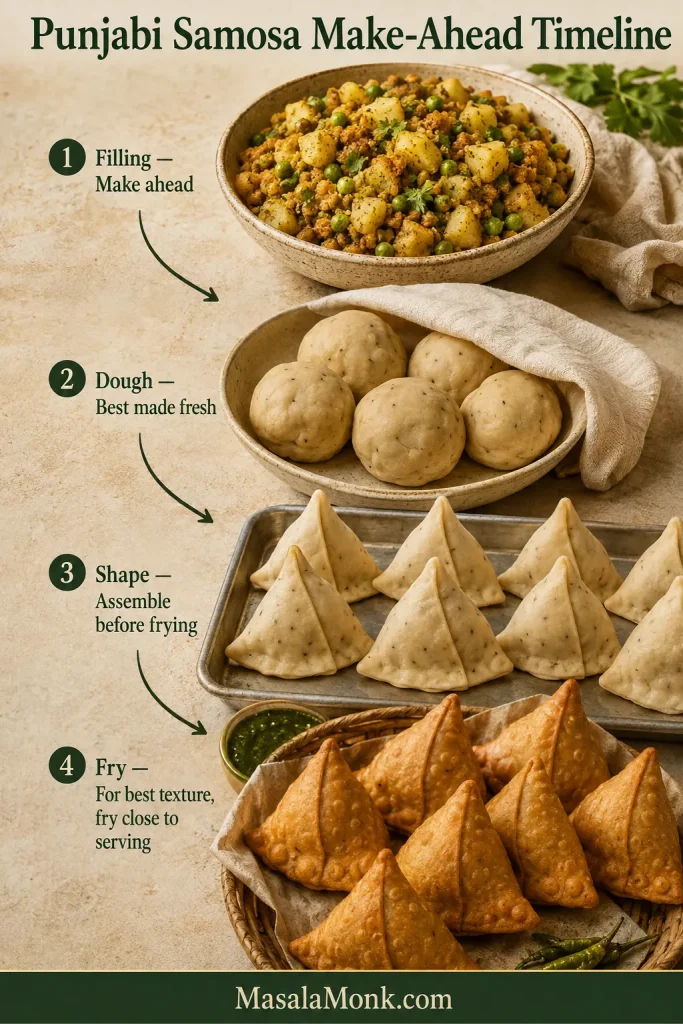
Put the potatoes on first. Make the dough while they cook, then let it rest while you season the filling. Spread the filling out to cool, shape the samosas and fry in batches.

The long cooking time is partly because 10 large samosas need to fry slowly in 3–4 batches. That gentle frying is part of how the crust cooks through before it browns.

Equipment

  • Mixing bowl
  • Kitchen scale, especially useful for the first few samosas
  • Rolling pin
  • Flat work surface or chakla
  • Wide pan for the filling
  • Heavy kadai, Dutch oven or deep heavy-bottomed pot
  • Slotted spoon or spider
  • Wire cooling rack
  • Deep-fry/candy thermometer, or an instant-read thermometer suitable for checking hot oil, optional

Samosa dough

  • 250 g (about 2 cups) maida or all-purpose flour
  • ¾ teaspoon fine salt
  • 1 teaspoon ajwain (carom seeds), lightly crushed
  • 55 g (about 4 tablespoons) melted ghee, or 60 ml (4 tablespoons) neutral oil
  • 85–95 ml cool water, starting with 85 ml

Potato-pea filling

  • 500 g / 1.1 lb whole raw potatoes, weighed before cooking and peeling
  • 80 g (about ½ cup) frozen peas, thawed, or cooked fresh peas
  • 1 tablespoon ghee or neutral oil
  • 1 teaspoon cumin seeds
  • 1½ teaspoons coriander seeds, coarsely crushed
  • 1 teaspoon fennel seeds, coarsely crushed
  • 1½ teaspoons finely grated or minced ginger
  • 1–2 green chillies, finely chopped, to taste
  • Small pinch asafoetida (hing), optional
  • ½ teaspoon Kashmiri chilli powder or another mild red chilli powder
  • ½ teaspoon garam masala
  • 1 teaspoon amchur (dry mango powder), plus more to taste
  • ¾–1 teaspoon fine salt, or to taste
  • 2 tablespoons chopped fresh coriander

Sealing paste

  • 1 tablespoon flour
  • Enough water to make a smooth, brushable paste that clings rather than runs

Frying oil

  • Neutral refined frying oil, enough for a depth of about 5 cm / 2 inches

1. Cook the potatoes

Place the whole potatoes in a saucepan and cover with water. Bring to a boil, then lower to a steady simmer.

Begin checking medium potatoes after about 20 minutes of simmering. Larger potatoes may need 25–30 minutes. They are ready when a thin knife reaches the centre without meeting a hard core while the potatoes still hold their shape.

Drain immediately. Cool until comfortable to handle, then peel.

2. Make the dough

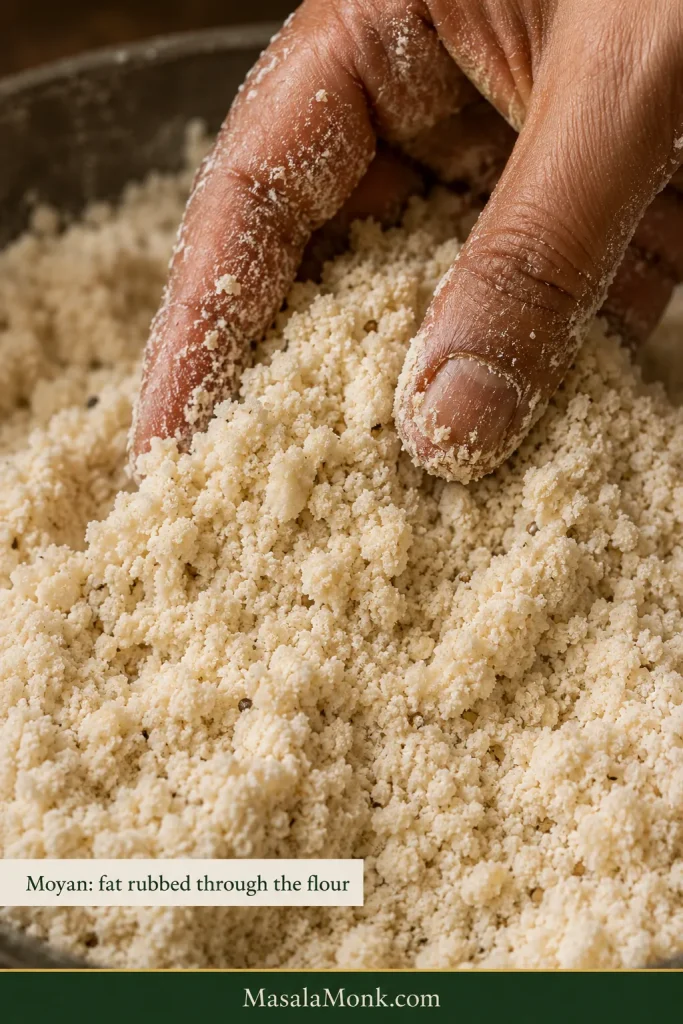
Mix the flour, salt and ajwain. Add the melted ghee or oil and rub it through the flour with your fingertips for 2–4 minutes, until the mixture resembles coarse, slightly damp crumbs.

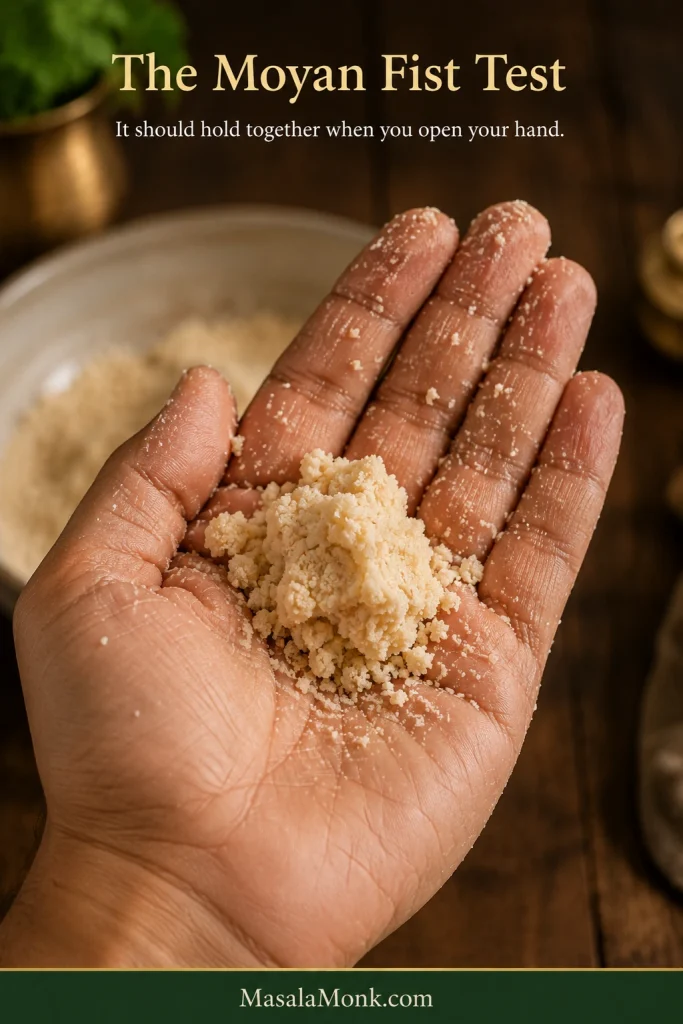
Squeeze a handful. It should stay together when you open your fist.

Add 85 ml water and bring the dough together. If dry flour still won’t come together, add more water 5 ml / 1 teaspoon at a time.

Stop when the dough is firm, cohesive and non-sticky. Knead for only 2–3 minutes, then cover and rest for 30 minutes.

3. Make the filling

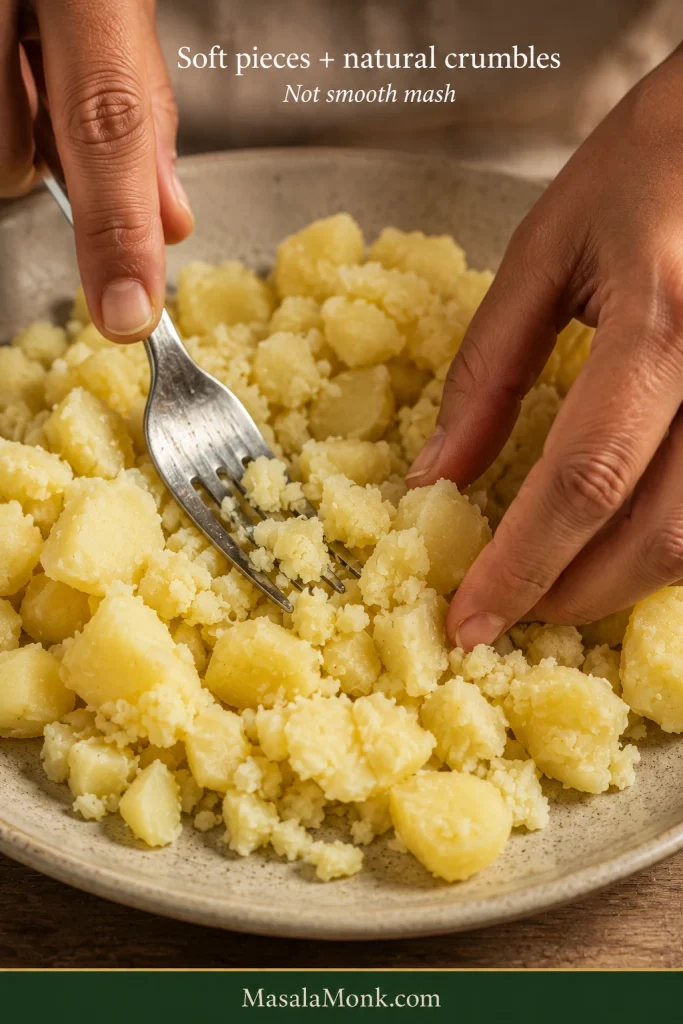
Break the peeled potatoes into small irregular pieces with your fingers or a fork. Aim for a mixture of soft pieces and natural crumbles rather than smooth mash.

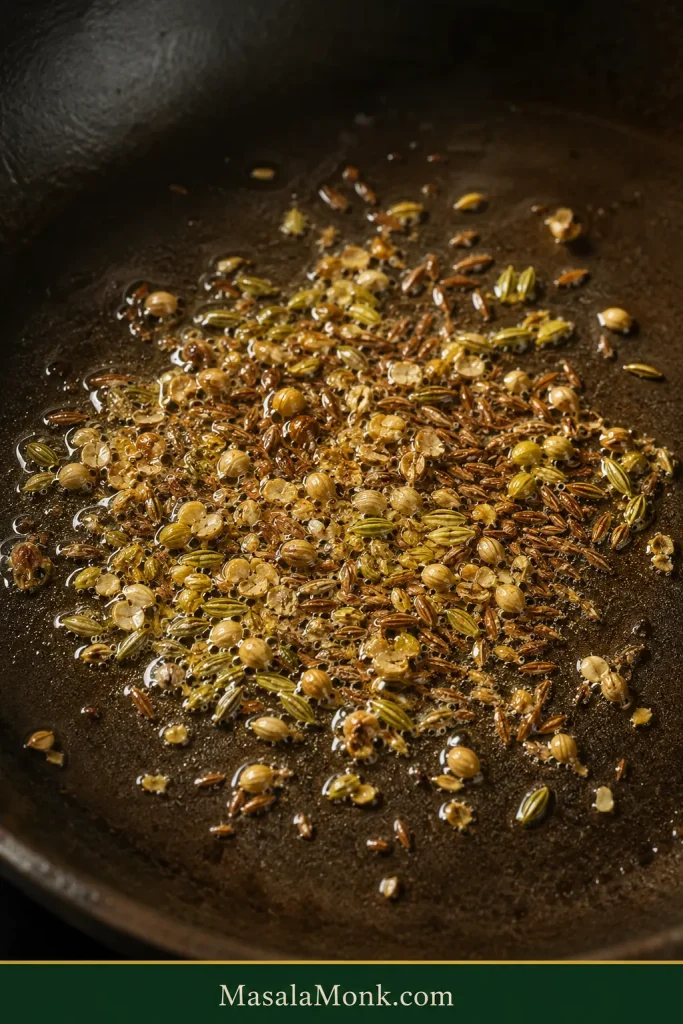
Heat 1 tablespoon ghee or oil in a wide pan over medium heat. Tip in the cumin, crushed coriander and fennel and cook for 30–45 seconds, until fragrant.

Next, stir in the ginger, green chilli and hing, if using, for another 20–30 seconds. Add the peas and cook for 1–2 minutes.

Fold in the potatoes, chilli powder, garam masala, amchur and salt. Cook for 3–4 minutes, until the spices coat the potatoes and no loose moisture remains.

Stir through the fresh coriander, taste and adjust the seasoning.

No amchur? Take the pan off the heat and add 1–2 teaspoons lemon juice to taste. Chaat masala also works; reduce the added salt if your blend is already salty.

Spread the filling over a large plate or tray and cool to room temperature.

4. Divide and roll

Divide the rested dough into 5 equal pieces, roughly 80 g each. Keep the pieces you are not using covered.

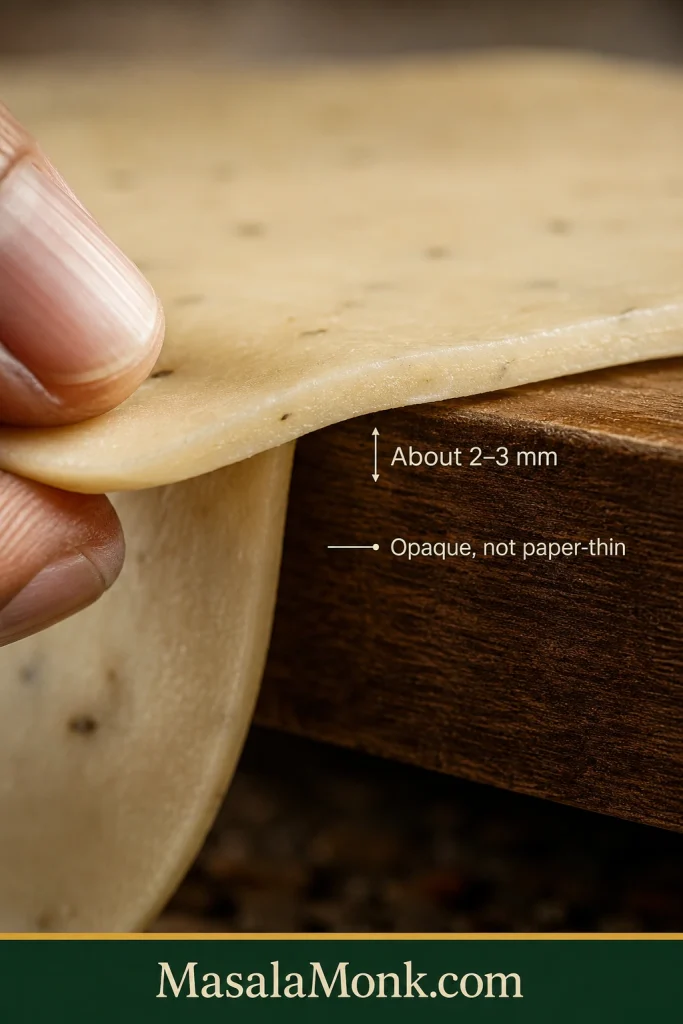
Roll one piece into an oval roughly 20 × 15 cm / 8 × 6 inches and about 2–3 mm thick. The pastry should look opaque and sturdy rather than paper-thin.

Use little or no dry flour while rolling. A very light film of oil on the board or rolling pin is enough when the dough begins to stick. Brush away loose flour before frying.

Cut the oval across the middle to make 2 semicircles.

5. Form, fill and seal

Mix the flour with enough water to make a smooth sealing paste that brushes easily but does not run.

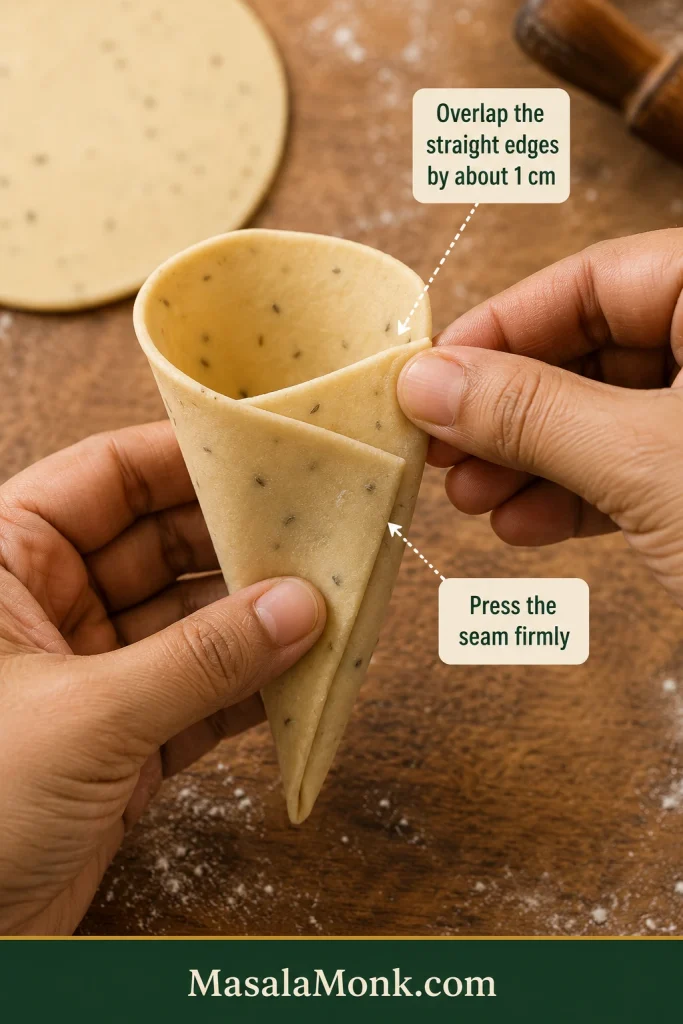
Take one semicircle with the straight edge facing you. Brush a narrow strip of paste along half of that edge, then bring the two ends together with about 1 cm / ⅜ inch overlap to make a cone.

Press the cone seam firmly from top to bottom and pinch the pointed end completely closed.

Add about 50 g filling. Leave at least 1.5 cm / a little over ½ inch of clean pastry above the filling.

The cone may look as though it can take another spoonful. Leave that space—it is what lets the seam close without stretching.

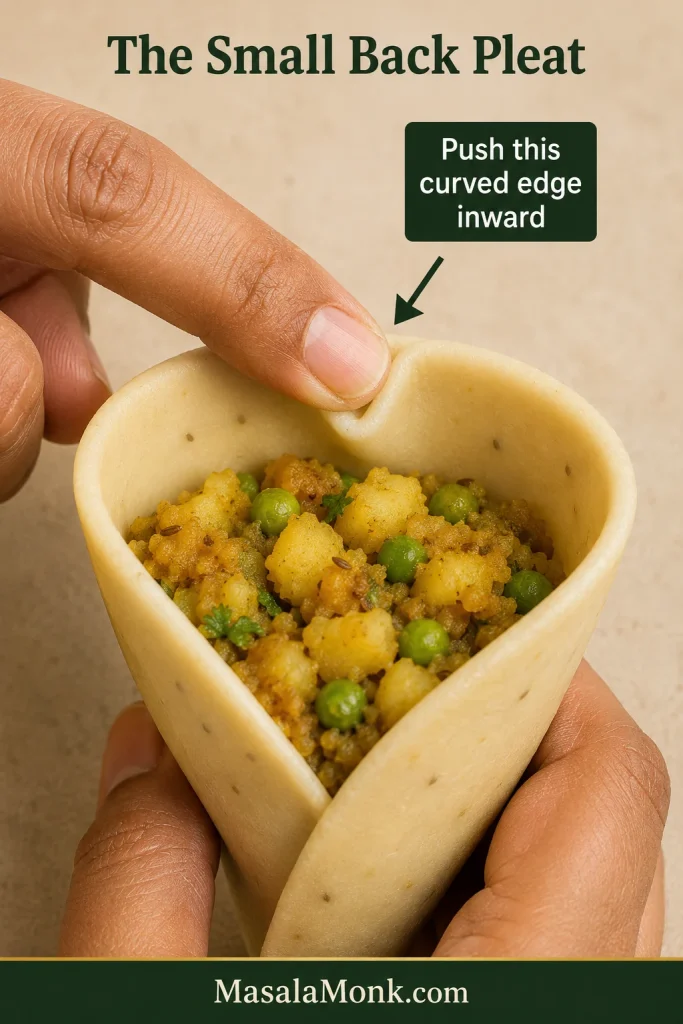
Pinch a small inward pleat in the curved back edge to help shape the base. Brush the open edge lightly with flour paste and press the top seam firmly closed.

Check the cone seam, pointed tip and top seam. A wrapper that needs stretching to close has too much filling inside; take some back out.

Depending on the potatoes and how much is lost during peeling, you may have a little filling left. Do not force it into the last few samosas.

6. Fry gently first

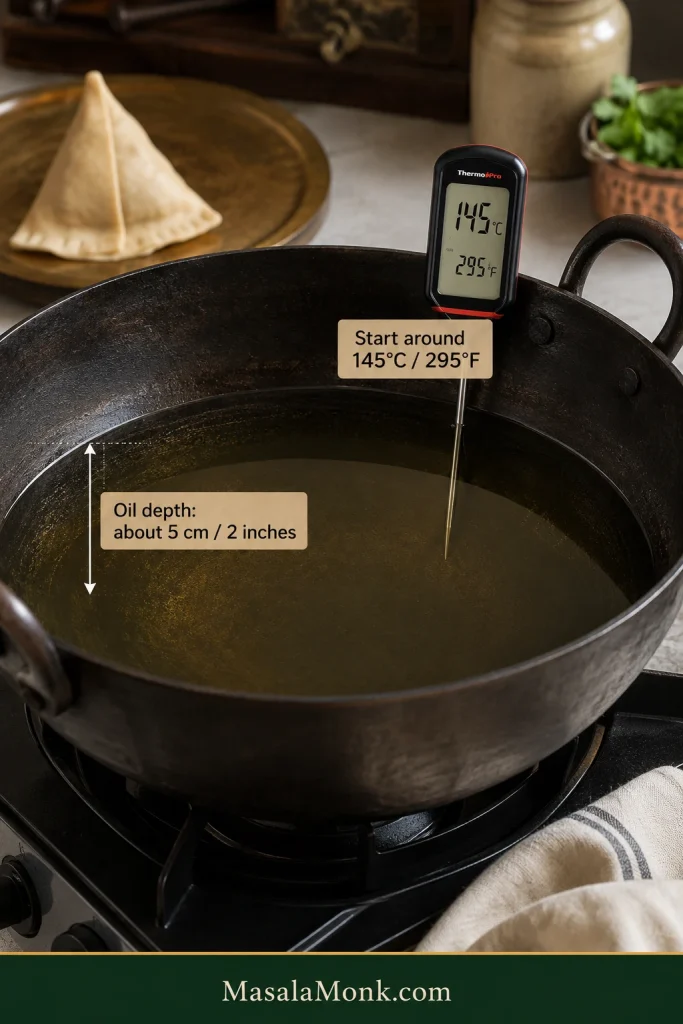
Add oil to a heavy kadai or pot to a depth of about 5 cm / 2 inches. For these large Punjabi samosas, bring it to approximately 145°C / 295°F.

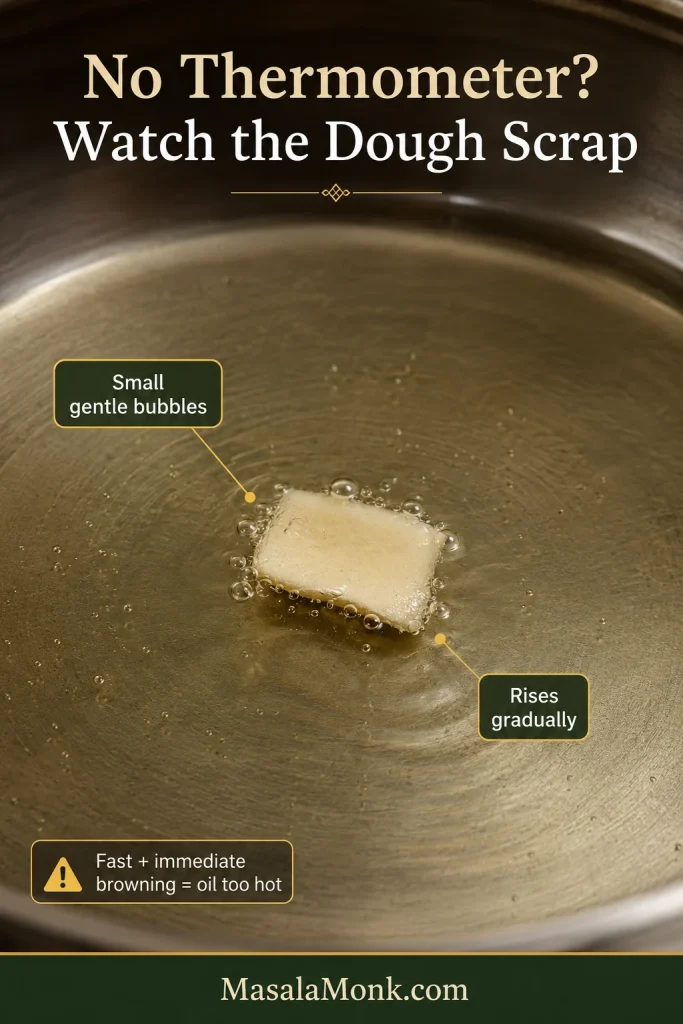
No thermometer? A tiny scrap of dough should sink, release small gentle bubbles and rise gradually. A scrap that shoots up and colours immediately means the oil needs to cool.

Add 3 large samosas to a typical 24–26 cm / 9½–10-inch pan. A wider pan may comfortably take 4.

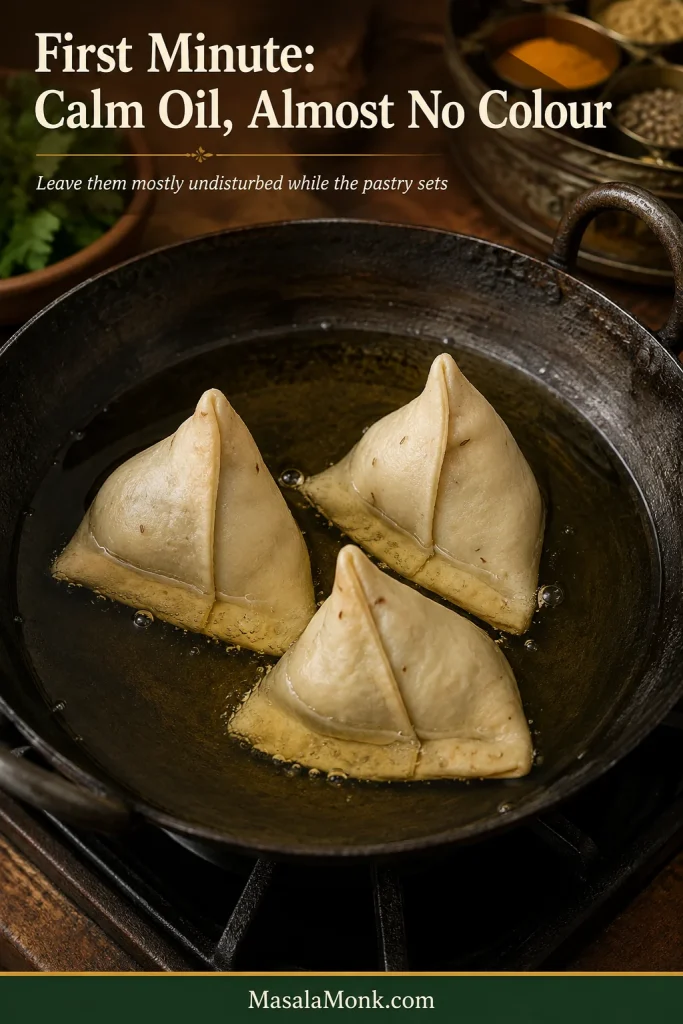
Fry gently for 10–12 minutes total. During the first minute, leave the samosas mostly alone while the pastry and seams set; after that, turn them gently as needed.

By the end of this first stage, the shells should feel firm and have developed very little colour.

7. Finish hotter

Raise the heat and let the oil climb toward 165–170°C / 330–340°F. At that range, give the samosas about 3–5 minutes, turning as needed, until the shells are evenly deep golden and crisp.

Transfer them to a wire rack.

Before adding the next raw batch, return the oil to the recipe’s starting temperature.

Recipe notes

  • Ajwain is optional. It gives the pastry a characteristic warm aroma, but the dough still works without it.
  • Peas can be omitted. No other adjustment is needed.
  • No onion or garlic is intentional. Whole spices, ginger, chilli, amchur and coriander carry the filling here.
  • For vegan samosas: use neutral oil instead of ghee in both the dough and filling.

Punjabi Samosa Technique Guide

If you are cooking right now, the recipe card above is enough. If something feels uncertain, jump straight to the part you need.

← Back to Recipe Card

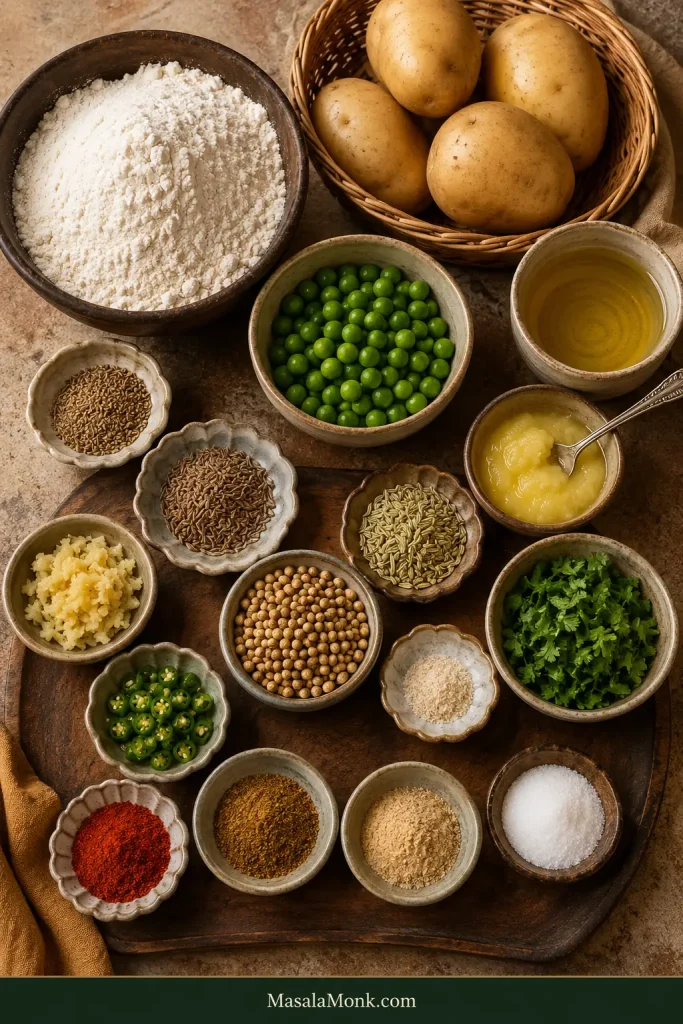
Ingredient Choices for Punjabi Samosas

Ingredients for Punjabi potato samosas arranged on a work surface, including flour, potatoes, peas, spices, ginger, green chilli, ghee and oil.
No onion, garlic or tomato here: the relatively dry potato filling relies on ajwain, cumin, coriander and fennel for its characteristic flavour.

Maida or atta?

For the crisp, flaky texture often described as khasta, use maida or regular all-purpose flour. Atta produces a sturdier, more wheaty pastry. It can be delicious, but the bite is different.

Ghee or oil?

Both work. Ghee gives the shell a richer aroma and a slightly more tender, pastry-like bite; neutral oil keeps the flavour cleaner. How thoroughly you rub the fat through the flour matters more than which one you choose.

Which potatoes work best?

Choose potatoes that drain cleanly and break into soft pieces without turning watery. Russet-style floury potatoes tend to break up readily, while good all-purpose potatoes work well too.

If your local varieties use different names, this guide to russet, Yukon Gold and other potato textures can help you match the texture rather than the label.

What gives the filling its samosa flavour?

  • Coriander, cumin and fennel bring warm aromatic bursts.
  • Ginger and green chilli give fresher heat.
  • Amchur adds tang without adding moisture.
  • Garam masala rounds out the background.
  • Fresh coriander lifts everything at the end.

If the garam masala in your jar has lost most of its aroma, you can also make garam masala from whole spices.

When the crushed coriander, fennel and cumin hit warm fat, the kitchen starts smelling unmistakably like samosa filling. Keep moving while that aroma is fresh instead of waiting for the spices to darken.

Close-up of cumin, crushed coriander and fennel seeds gently sizzling in a shallow layer of hot fat.
Bloom the cumin, coriander and fennel only until fragrant; letting them darken pushes the filling toward bitterness.

Punjabi Samosa vs Patti Samosa

If you are picturing a plump samosa with a substantial homemade shell around potato and peas, you are in the right place. Patti samosas use a much thinner sheet, so they fold, fry and eat differently.

Punjabi samosa Patti samosa
Wrapper Homemade flour dough Thin ready-made or homemade sheet
Bite Crisp, flaky and substantial Thin and brittle-crisp
Folding Semicircle formed into a cone Strip folded into a triangle
Side-by-side comparison of a large Punjabi samosa with substantial homemade pastry and a smaller patti samosa made from a thin folded sheet.
Punjabi samosas use substantial homemade dough; patti samosas rely on thin sheets folded into tighter, more brittle triangles.

A spring-roll wrapper can certainly hold samosa filling, but it will not make this crust. If thin ready-made sheets are what you have, the crispy veg spring roll recipe goes deeper into keeping thin wrappers flexible, controlling filling moisture and sealing them cleanly.

Can I bake or air fry these samosas? Baking and air frying change the crust enough that they work best with methods developed specifically for them rather than as straight swaps for the frying instructions below. Whole-wheat dough and thin patti wrappers likewise need their own adjustments.

What Samosa Dough Should Feel Like

For the large Punjabi shell in this recipe, the dough should be firm, non-sticky and noticeably stiffer than roti or chapati dough.

Different samosa styles use different doughs. For this large Punjabi shell, do not chase roti-like softness.

When the dough first comes together, it may feel a touch firmer than seems comfortable. That is okay. Give it the full 30-minute rest before deciding it needs more water.

The moyan test

Fingers working flour and fat into a coarse, crumbly moyan mixture before any water is added.
Proper moyan coats the flour with fat before water arrives, helping the fried shell stay crisp and flaky rather than bread-like.

Moyan is the fat rubbed through the flour before water is added. Squeeze some of the flour-fat mixture in your fist. If it holds together when you open your hand, it is ready for water. If it falls straight back into powder, keep rubbing for another minute.

Hand holding a compressed clump of flour-and-fat mixture that keeps its shape while loose crumbs remain around the edges.
The clump should hold after one squeeze but remain fragile enough to crumble when pressed again.

That coating of fat helps the fried shell break into crisp layers instead of behaving like lean bread dough.

When to stop adding water

Start with 85 ml, then judge the dough rather than the measuring cup. Flour and humidity vary, so stop as soon as everything comes together into a firm cohesive mass—even if a little reserved water remains.

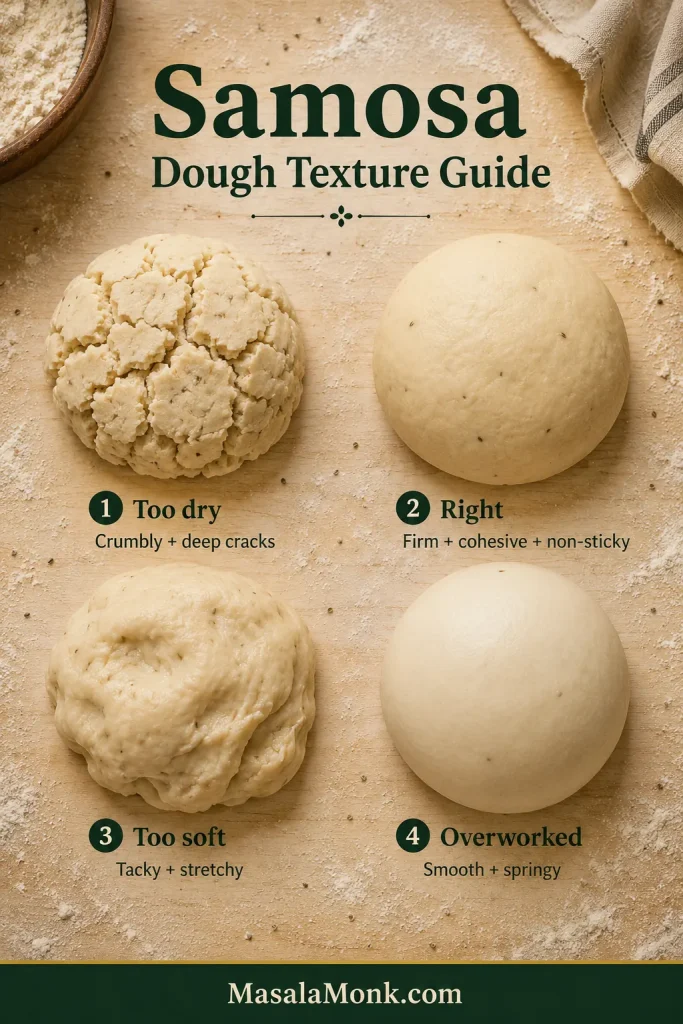
Dough state What you see or feel What to do now
Too dry Crumbly; deep cracks; hard to roll Cover and rest. If it still crumbles, add water 5 ml / 1 teaspoon at a time.
Right Firm, cohesive and non-sticky Stop adding water and let it rest.
Too soft Tacky or stretchy like chapati dough Give it the full rest first. Still sticky? Sprinkle in 1 tablespoon flour and fold it through gently. Add more only if necessary.
Overworked Very smooth, springy and elastic Stop kneading, cover and let it rest.

After resting, the dough should roll more willingly while still feeling distinctly firm.

Four samosa dough samples comparing cracked dry dough, correct firm dough, soft tacky dough and overly smooth springy dough.
Correct samosa dough is firm, not dry: it should resist slightly yet roll without deep cracking or sticky stretch.

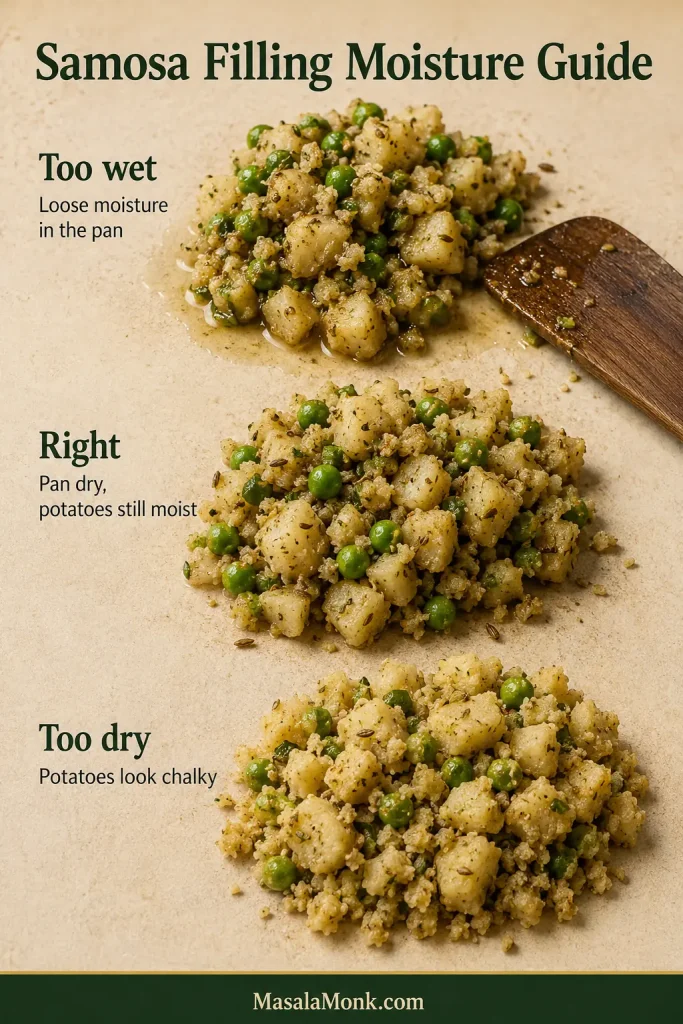
Potato Filling: Dry Enough for Pastry, Moist Enough to Eat

The finished filling should have no loose water, while the potatoes themselves should still taste soft and moist.

Three portions of potato-and-pea samosa filling showing overly wet, properly moist and overly dry textures.
The target is a dry pan with tender potato—not loose moisture, but not chalky filling either.

Drain the potatoes as soon as a knife reaches the centre comfortably and let some steam escape before breaking them up. Small soft pieces mixed with natural crumbles give the filling more character than smooth mash; oversized chunks can press awkwardly against the pastry.

Cooked potatoes being broken into irregular soft pieces and smaller crumbles for samosa filling instead of mashed smooth.
Keep both pieces and crumbles: the smaller bits catch seasoning while the larger ones keep the filling from becoming paste-like.

Taste a piece once the pan looks dry. The potato should still be soft and moist; after that, more cooking only dries the filling out.

Spread the filling over a plate or tray and let it reach room temperature before shaping.

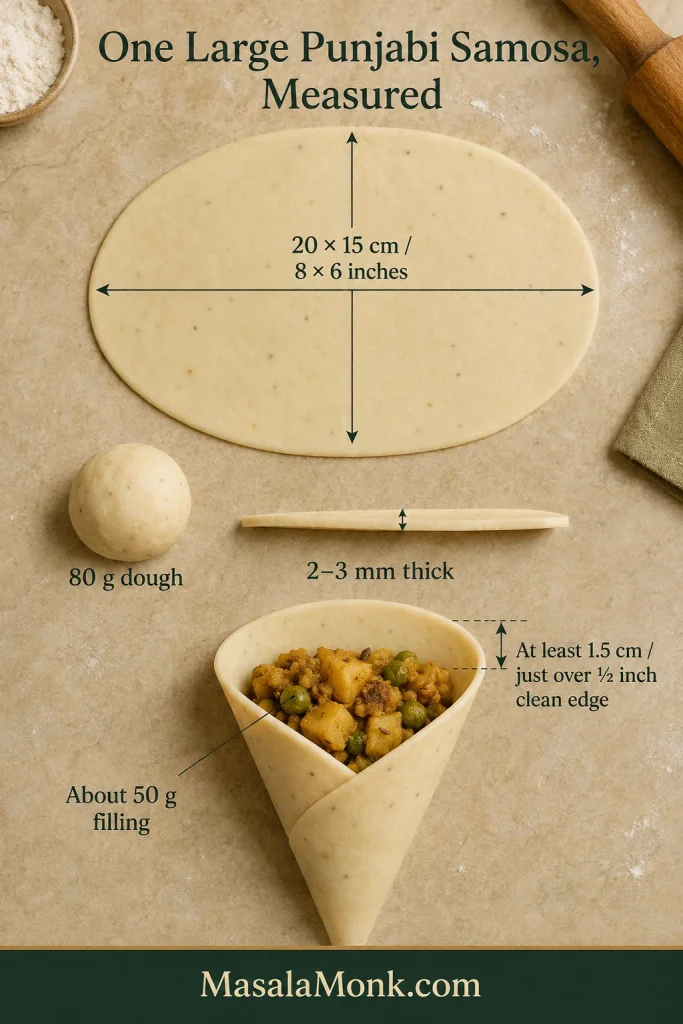
One Large Punjabi Samosa, Measured

For the first two or three samosas, these measurements give you a useful reference.

Dough per rolled oval: about 80 g

Rolled oval: about 20 × 15 cm / 8 × 6 inches

Wrapper: roughly 2–3 mm thick

Filling: about 50 g; use less if the wrapper needs stretching to close

Clean edge above filling: at least 1.5 cm / just over ½ inch

Measured Punjabi samosa assembly showing 80 g dough, a 20 × 15 cm rolled oval, 2–3 mm wrapper thickness, about 50 g filling and a clean 1.5 cm sealing margin.
Consistent dough, wrapper and filling proportions make large samosas easier to seal and help the batch fry at a similar pace.

That amount of filling leaves enough clean pastry for a strong seam. After you have shaped a few, the space around the filling becomes more useful than the number on the scale.

Too thick? The outside can look finished while the pastry beside the filling is still heavy. Too thin? The wrapper becomes more vulnerable around potato pieces, the cone tip and the seams.

Close side view of opaque rolled samosa pastry showing a wrapper about 2–3 mm thick.
Aim for about 2–3 mm: sturdy enough to hold the filling, thin enough to fry through without a heavy crust.

How to Fold and Seal a Punjabi Samosa

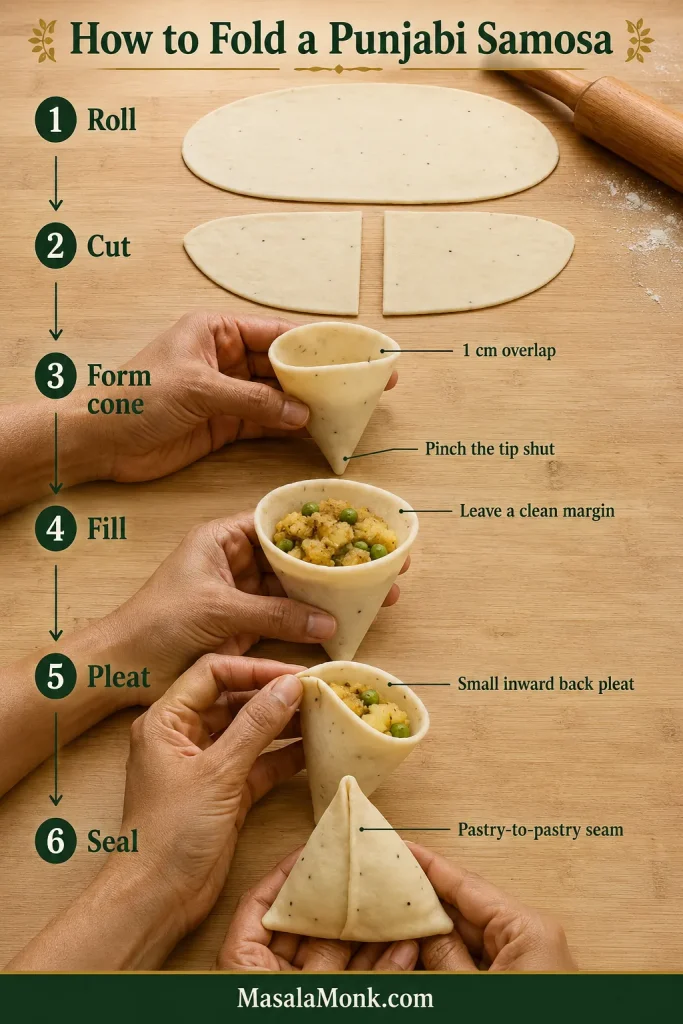
The fold sounds more complicated in words than it feels in practice. It comes down to seven movements.

Six-step Punjabi samosa folding guide showing rolling, cutting, cone formation, filling, the small back pleat and final sealing.
Keep filling and oil off the sealing surfaces; clean pastry-to-pastry contact is far more dependable in hot oil.
  1. Roll an oval and cut it into two semicircles.
  2. Moisten part of the straight edge.
  3. Overlap the straight edges to make a cone.
  4. Press the cone seam and pinch the tip shut.
  5. Add the filling, leaving a clean margin above it.
  6. Pinch a small inward pleat in the curved back edge to help form the base.
  7. Moisten and press the final top seam closed.
Hands forming a samosa cone by overlapping the straight edges of a semicircle of rolled dough.
A small overlap creates a stronger cone seam than simply touching the straight edges together.

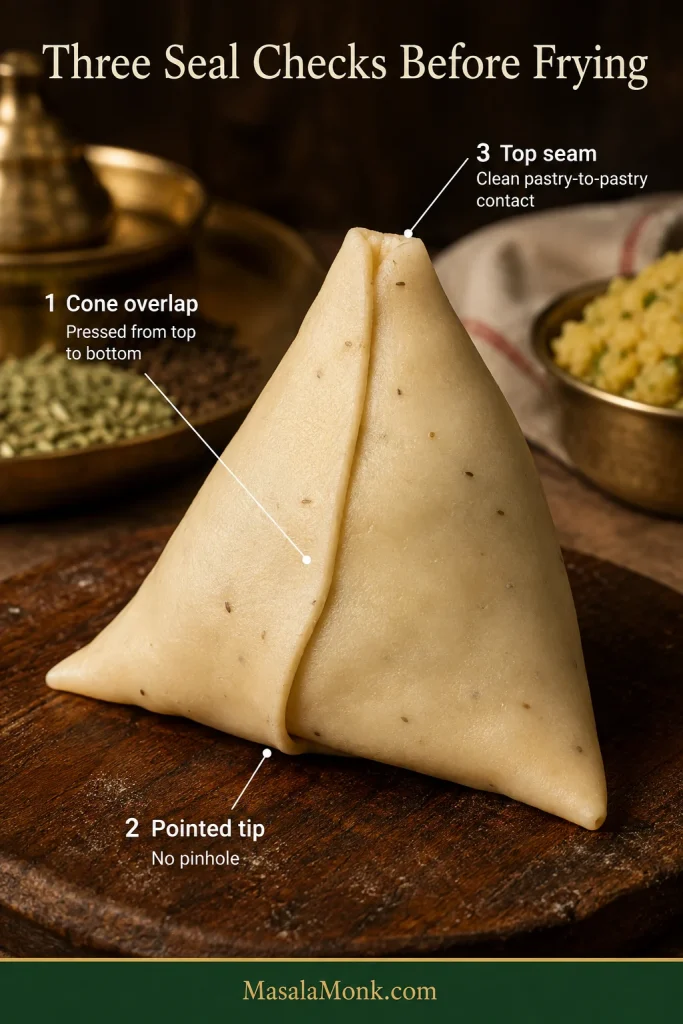
Three places deserve a final check

1. Cone overlap: press the whole seam, not just the top.

2. Pointed tip: pinch even a pinhole closed.

3. Top seam: keep potato away from the joining surfaces so pastry meets pastry.

Annotated raw Punjabi samosa marking the cone overlap seam, pointed bottom tip and final top seam to check before frying.
Tiny pinholes matter most at the tip and seams; fix them before the samosa reaches the oil.

A wrapper that needs stretching around the filling is too full. Take some filling back out. Keep unused dough and shaped samosas loosely covered while you work so their surfaces do not dry out.

Finger pressing a small section of the curved back edge inward on a filled samosa cone to form the back pleat.
The back pleat is functional, not decorative: the small tuck helps the filled cone sit flatter and seal more cleanly.

Once the seams are secure, the hardest-looking part is over.

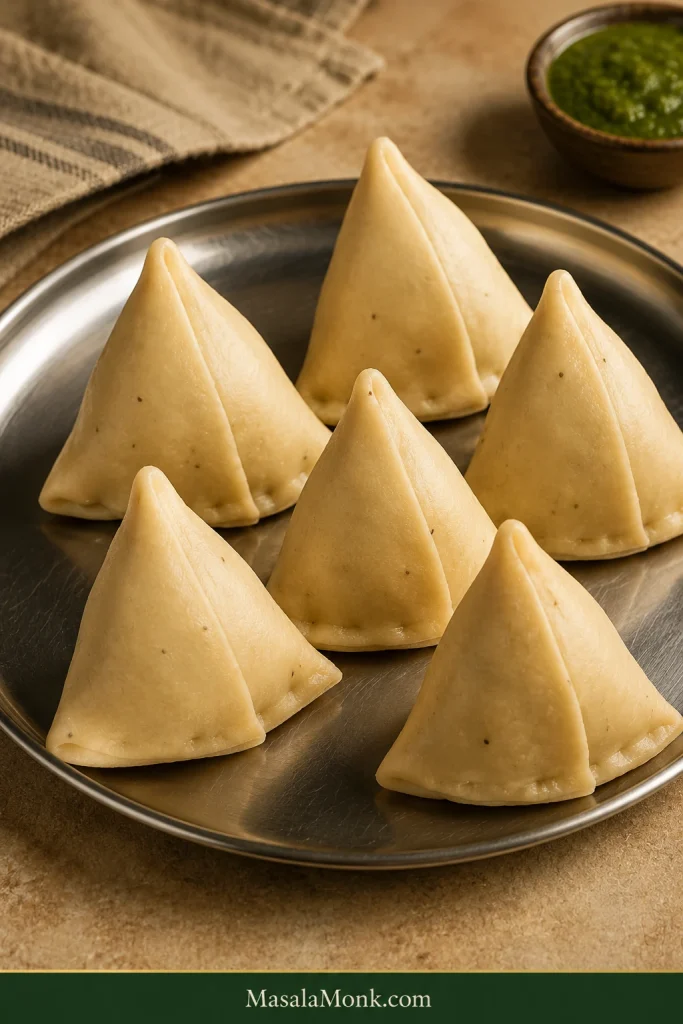
Six pale uncooked Punjabi samosas with slightly varied handmade shapes arranged on a metal plate before frying.
Handmade variation is normal. Drying cracks are not; shaped samosas should stay pale, firm and securely sealed before frying.

The Frying Method: Cook the Crust Before You Brown It

This is the part that feels wrong the first time: for the first several minutes, you do not want the samosas looking especially appetizing.

The pastry needs time to cook and firm before deep colour develops. Browning belongs to the end.

Oil, depth and two temperatures

Use a neutral refined oil suitable for deep frying. Refined groundnut/peanut, rice bran and sunflower oil are practical choices; canola or rapeseed also work where those are easier to find.

Add about 5 cm / 2 inches of oil to a heavy kadai or pot. Three large samosas are a comfortable batch in many 24–26 cm / 9½–10-inch vessels; a wider pan may take 4.

Heavy pot containing about 5 cm or 2 inches of frying oil with a thermometer indicating a starting temperature around 145°C or 295°F.
Oil depth promotes even frying, while the low starting temperature gives the pastry time to set before it browns.

For these large Punjabi samosas, remember two temperatures: about 145°C / 295°F to start and 165–170°C / 330–340°F to finish.

The temperature will drop when the raw samosas go in. Do not immediately turn up the heat to chase that drop; let the gentler oil help the shell set before it colours.

Small scrap of samosa dough rising gradually through frying oil with gentle bubbles around it.
No thermometer? Gentle bubbles and a gradual rise are the cue; a scrap that races upward and colours quickly means the oil is too hot.

New to deep-frying? The USDA deep-fat frying safety guidance is worth reading before working with a large pot of hot oil.

The Slow First Fry

Fry for 10–12 minutes total at the gentle first stage, including the first minute when you leave the samosas mostly undisturbed. After that first minute, turn them gently as needed.

Three very pale Punjabi samosas frying gently in a heavy pan with small bubbles during the first minute.
Small bubbles hugging the pastry are enough; a loud, furious boil in the first minute means the oil is starting too hot.

The bubbles should remain small and calm. Near the end of this stage, the samosas should feel much more structured when moved with the spoon while remaining light in colour.

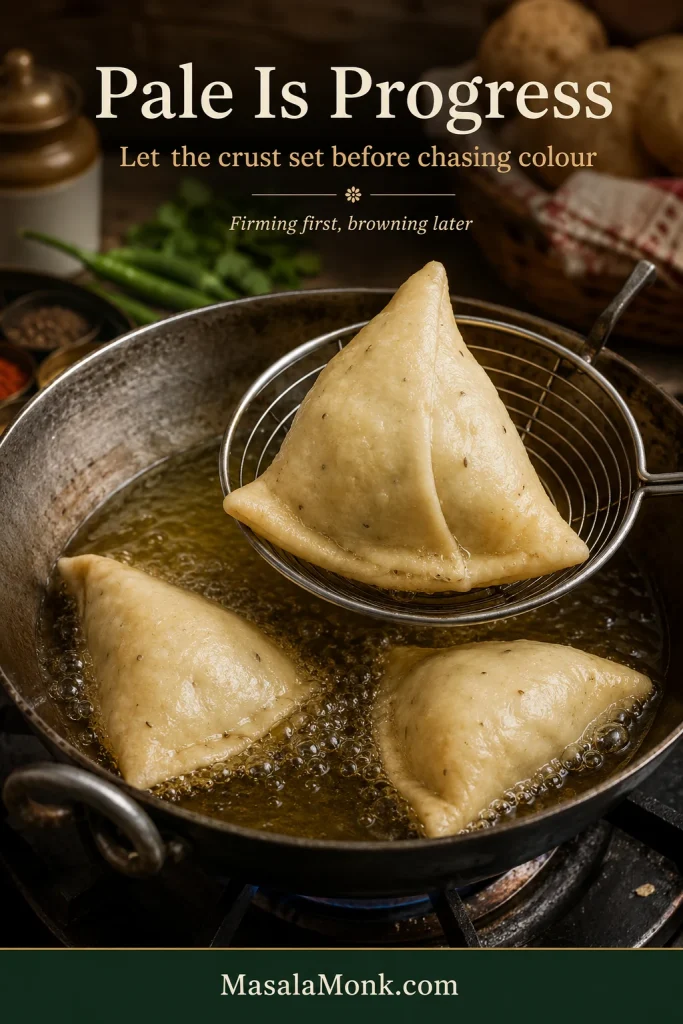
If the lack of colour makes you nervous, resist the urge to rush them. Pale is progress here.

Pale samosas several minutes into gentle frying, with one lifted from the oil to show a firm but barely browned crust.

Judge structure before colour: the shell should feel noticeably firmer before the hotter finishing stage begins.

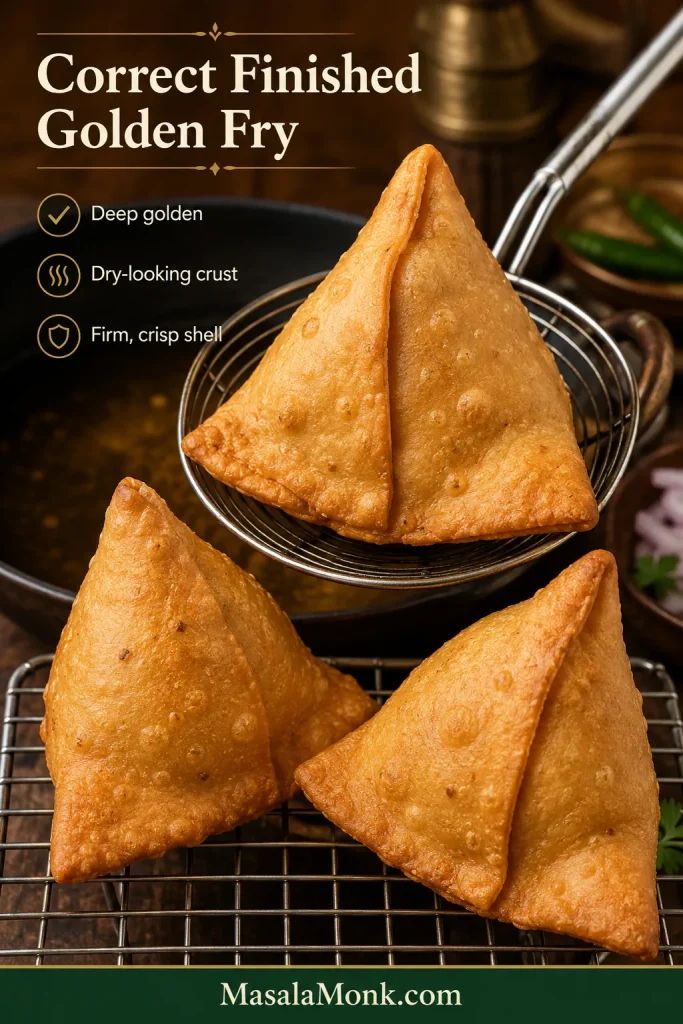
Raise the heat and let the oil climb toward 165–170°C / 330–340°F. At that range, give the samosas about 3–5 minutes, turning as needed, until the shells are evenly deep golden and crisp.

Deep-golden Punjabi samosas with firm, dry-looking crisp shells, including one freshly lifted on a wire skimmer.
Finished samosas should look dry as well as golden, with firm shells rather than a glossy, oil-soaked surface.

Lift them onto a wire rack. For a moment, you can hear the pastry faintly crackling as it cools in the open air.

A suddenly darker or more blistered second batch usually means the oil has not cooled enough. Return it to the starting temperature before adding fresh raw samosas.

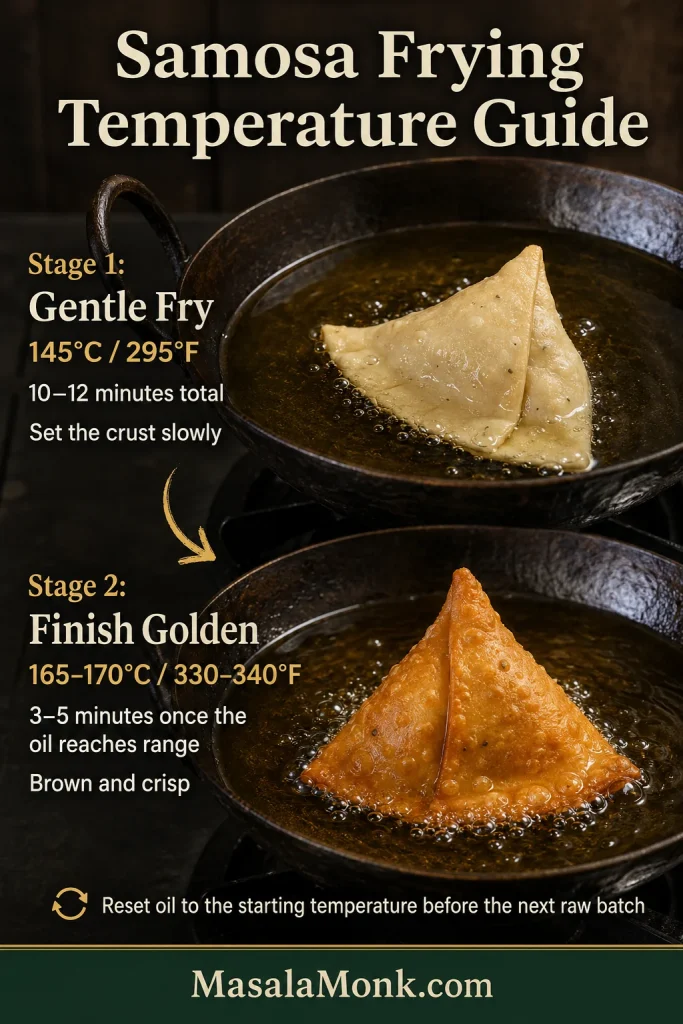
Samosa Frying Temperature and Batch Guide

Stage Temperature Approx. time What to look for
Gentle first fry Start around 145°C / 295°F; roughly 140–150°C / 285–300°F while frying 10–12 min total First minute mostly undisturbed; small, calm bubbles; shell firms with little colour
Finish 165–170°C / 330–340°F 3–5 min once oil reaches range Deep golden, firm and crisp
Reset Back to about 145°C / 295°F As needed Oil is ready for the next raw batch
Samosa frying guide showing a gentle fry around 145°C or 295°F for 10–12 minutes, followed by a 165–170°C or 330–340°F finish for about 3–5 minutes.
The first stage sets the pastry; the hotter finish builds colour and crispness. Reset the oil before the next raw batch.

Without a thermometer, keep one visual rule in mind: the samosa should fry calmly before it fries beautifully.

Is the Samosa Done? Look Beyond the Colour

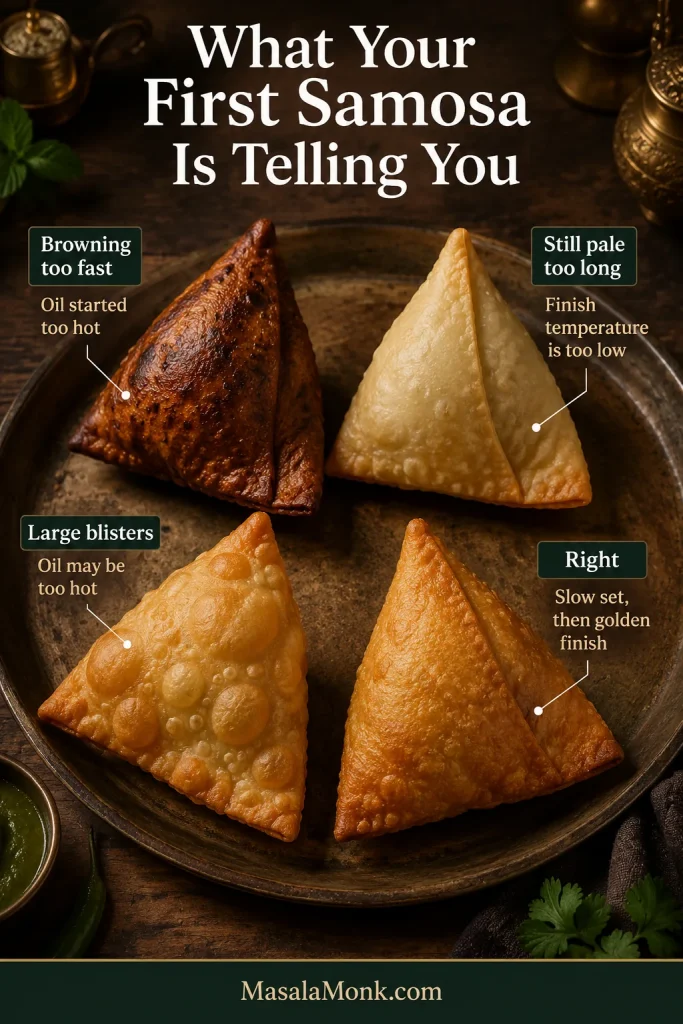
The first samosa tells you what, if anything, to adjust for the rest of the batch. Let it sit for a few minutes before breaking it open, then look beyond the colour of the outside.

Four fried samosas comparing one that browned too fast, one that stayed too pale, one with large blisters and one with the correct golden crust.
Use the first samosa to read the batch: browning speed, blister size and shell structure tell you what to adjust next.
  • The shell feels firm, not flexible like bread.
  • It cracks cleanly without feeling dense or hard.
  • The broken edge is cooked through, with no gummy band beside the filling.
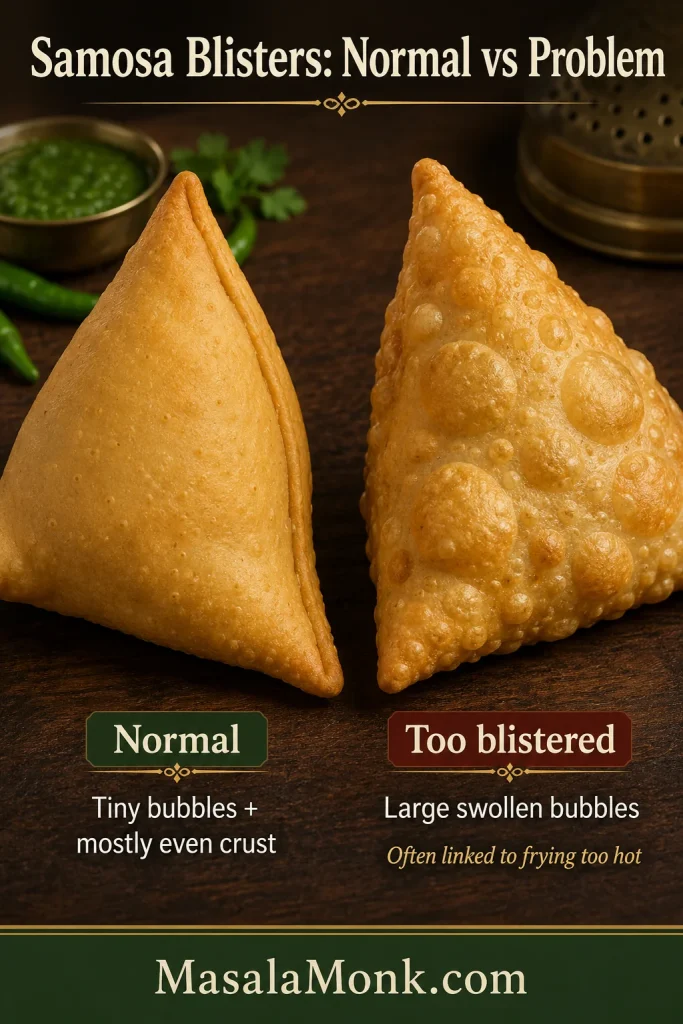
  • A few small bubbles or blisters are normal. A crust covered in large swollen blisters points more strongly toward softer dough or an overly hot start.
  • The filling stays distinct from the shell instead of visibly soaking into it.
  • Your fingers should not be left slick with oil.
Two golden samosas comparing a mostly even crust with tiny bubbles against a crust covered in large swollen blisters.
Scattered tiny blisters are normal; large raised patches dominating the shell point to a frying or dough problem.

The pastry is easier to judge after the strongest burst of steam has escaped—and considerably easier to eat.

Something looks wrong? Troubleshoot the Next Batch →

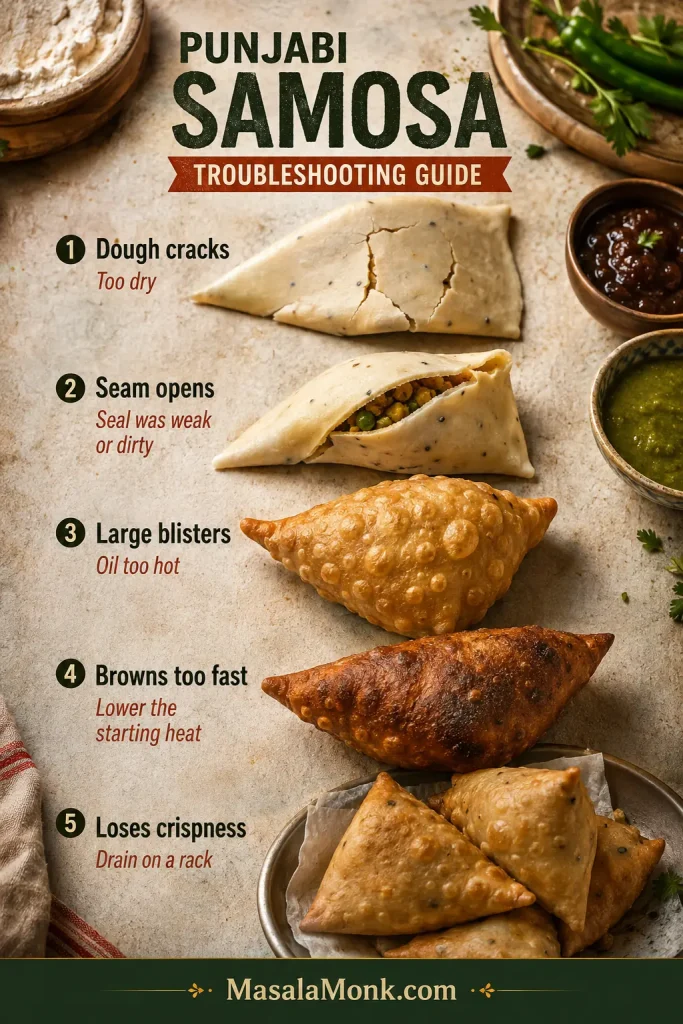
Samosa Troubleshooting: Find the Problem, Fix the Next Batch

Use this table when something looks or feels wrong. Most samosa problems trace back to one of four places: dough, filling, sealing or oil temperature.

Punjabi samosa troubleshooting guide showing cracked dough, an opening seam, large blisters, overly fast browning and loss of crispness after frying.
Change one variable at a time; random fixes make the next batch harder to diagnose.

On a phone, swipe sideways to see the full table.

Dough, Crust and Frying Problems

Problem Likely cause Do now Next time
Why is my samosa dough cracking? Too dry; dried surface; short rest Cover and rest. Add a few drops of water if it still crumbles. Add water 5 ml at a time and keep unused dough covered.
Why is my dough sticky or stretchy? Too much water Give it the full rest. If it remains sticky, fold in a little flour with minimal handling. Stop adding water sooner.
Why is my samosa crust hard instead of crisp and flaky? Too little moyan; fat not rubbed through thoroughly; dry or overworked dough Let one cool slightly before judging the final texture; serve this batch with chutney. Use the fist test, keep the dough firm rather than dry, and knead only briefly.
Why does my samosa crust have large bubbles or blisters? Soft dough or oil too hot Let the oil cool before loading more samosas. Keep the dough firm and reset the oil between batches.
Why is my samosa dark outside but raw inside? Oil too hot or wrapper too thick Lower the oil temperature before continuing. Roll evenly and give the crust a gentler first stage.
Why isn’t my freshly fried samosa crispy? Dough too soft; first frying stage too hot or too short Give the remaining samosas a gentler, longer first stage. Keep the dough firm and use the full slow first fry.
Why are my samosas oily? Oil cooled too far; crowded pan; soft dough Let the oil recover and give the samosas more room. Use smaller batches and firmer dough.

Filling, Sealing and After-Frying Problems

Problem Likely cause Do now Next time
Why did my samosa open in the oil? Weak seam, unsealed tip, filling caught in the seam or overfilling Remove leaking pieces from the oil. Keep the sealing surfaces clean and close the cone without stretching it.
Why is my samosa wrapper tearing? Too thin; overfilled; large potato pieces; pastry surface dried out Handle the remaining samosas gently and keep them covered. Roll a little thicker, reduce the filling or protect the dough from drying.
Why is the filling gluey? Potatoes overcooked or mashed too much Stop working the filling. Cook only until tender and keep some texture.
Why does the filling taste dry? Cooked too long after seasoning Serve with chutney. Stop when the pan is dry but the potatoes remain soft.
Why did batch two brown too quickly? Oil never cooled after batch one Pause and let the oil cool. Return to the starting temperature before adding raw samosas.
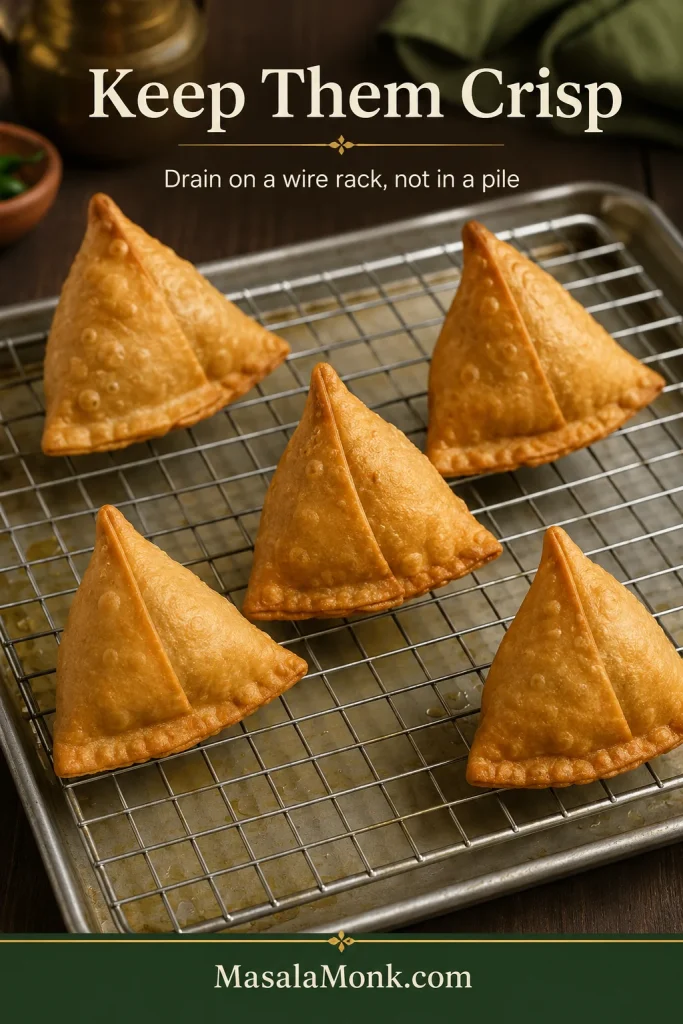
Why did crisp samosas turn soft later? Steam trapped after frying Move the samosas to a rack and leave them uncovered. Give steam somewhere to escape.

Check Dough Folding & Sealing Frying Method ↑ Back to Top

How to Keep Samosas Crispy After Frying

Keep fried samosas on a wire rack and leave them uncovered while the strongest steam escapes. Once they leave the oil, trapped steam becomes the enemy of the crust.

Freshly fried golden Punjabi samosas spaced apart on an elevated wire rack over a metal tray.
Airflow under the rack prevents condensation from softening the base; piling hot samosas traps that moisture against the crust.
  • Do not stack hot samosas on top of one another.
  • Wait before closing warm samosas inside an airtight container.
  • For travel, let some heat escape before packing.
  • For a short party hold, keep them on a rack in a low oven around 95°C / 200°F.

The rack matters in the oven too: air underneath helps protect the bottom crust from condensation.

Make Ahead, Scale, Freeze and Reheat Samosas

A few hours ahead: shape the samosas, arrange them in a single layer, cover well and refrigerate. Take them out while the frying oil heats so they lose a little of the refrigerator chill before frying.

A day ahead: the filling is the easiest part to make early. Cool it promptly, cover and refrigerate, then let it sit out briefly before shaping so it is no longer fridge-cold.

Make-ahead sequence showing cooled potato-pea filling, fresh samosa dough, shaped raw samosas and finished fried samosas.
Prep can happen early, but keeping the final fry close to serving protects the crisp crust.

Making 20, 30 or 40 samosas? Scale the dough, potatoes and peas directly, but season a large batch of filling gradually and taste as you go. Keep the frying batches the same size; make more batches instead of crowding more samosas into the oil.

For a party: shape the samosas ahead and keep them refrigerated until close to frying time. Fry as near to serving as practical; finished samosas can wait briefly on a rack using the low-oven holding method above.

How to Freeze Samosas for Later

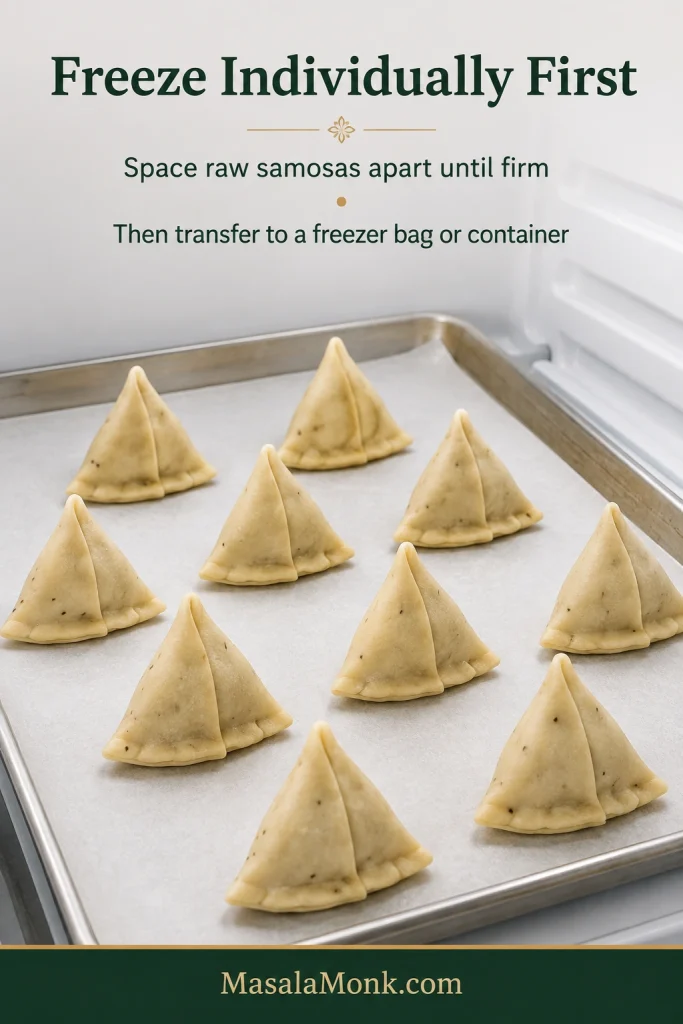
For this recipe, the simplest freezer route is to freeze the samosas fully fried. Cool them completely on a wire rack, freeze in a single layer until firm, then transfer to a freezer-safe bag or container.

For the fully fried route, use frozen samosas within about 2–3 months for the best texture. Freezing them individually first prevents ten useful samosas from turning into one frozen samosa sculpture.

Can I Freeze Raw Samosas?

Yes, but treat raw freezing as a separate workflow. Freeze shaped raw samosas individually until firm, then bag them. Frying from frozen needs instructions designed for raw frozen samosas rather than the reheating timings used for the fully fried route above.

Raw Punjabi samosas spaced apart on a parchment-lined tray in a freezer before being packed together.
This image shows the raw-freezing alternative: freeze shaped samosas separately until firm before bagging, then use instructions designed for frying from frozen.

Reheating

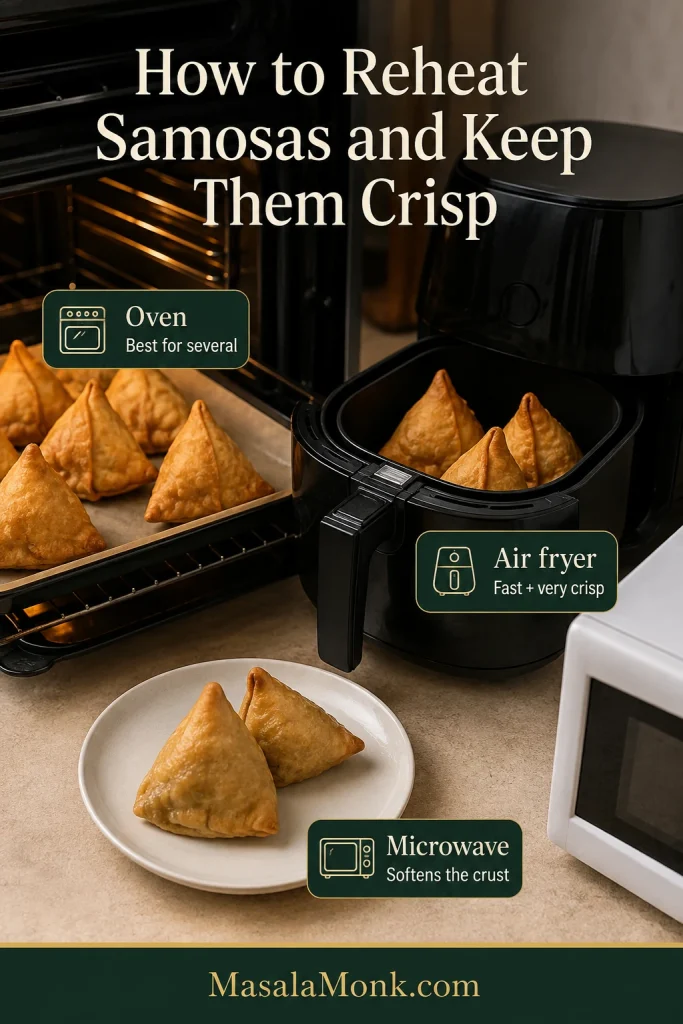
The times below assume a preheated oven or air fryer.

  • Oven, refrigerated: 180°C / 350°F for about 8–12 minutes on a wire rack over a tray.
  • Oven, frozen: 180°C / 350°F for roughly 20–30 minutes. Start checking around 20 minutes; smaller samosas and convection ovens may be ready sooner.
  • Air fryer, refrigerated: 175–180°C / about 350°F; begin checking after 4–6 minutes.
  • Air fryer, frozen: begin checking after 10–12 minutes and continue until hot through the centre.
  • Microwave: useful for heating the filling, but the pastry becomes soft rather than crisp.
Reheating comparison showing samosas in an oven, an air-fryer basket and on a plate beside a microwave.
Dry heat drives off surface moisture; microwave steam warms the filling but softens the pastry.

Reheating times are guides rather than finish lines. Samosa size, refrigerator temperature, oven accuracy and convection all change the clock; the centre being hot through matters more than hitting an exact minute.

Using a thermometer? Reheated leftovers should reach 74°C / 165°F in the centre.

Refrigerate cooked samosas within 2 hours, or within 1 hour when the surrounding temperature is above 32°C / 90°F.

Keep refrigerated leftovers for up to 3–4 days. The USDA leftovers and food-safety guidance has more detail on safe storage and reheating.

← Recipe Card ↑ Back to Top

What to Serve with Punjabi Samosas

Hot samosas do not need a crowded plate. Something fresh, something sweet-tangy and a hot cup alongside are usually enough.

  • Green chutney brings coriander, chilli and freshness.
  • Sweet tamarind (saunth) chutney adds dark, tangy sweetness.
  • Masala chai turns samosas into the afternoon plan rather than merely a snack.
  • Chole makes the plate more substantial and takes you naturally toward samosa chaat.
Six golden Punjabi samosas served with green chutney, dark tamarind chutney and a cup of chai.
Both chutneys and hot chai give the rich, crisp pastry contrasting fresh heat, sweet tang and warmth.

Put both chutneys on the table and everyone finds their own rhythm: a little green chutney on one bite, tamarind on the next, chai somewhere in between.

The Crack Is the Final Test

Your first samosa usually takes the longest to shape. The second makes more sense. By the fourth, the cone has stopped feeling like origami and started feeling like lunch.

When the fried samosas have rested just long enough to handle comfortably, break one open.

The shell should snap rather than bend, leaving a few crisp flakes behind.

Inside, the potatoes should still have some shape, with peas and crushed spices sitting in the gaps instead of disappearing into smooth mash. Take the first bite while everything is still warm; the cone that felt awkward at the beginning now looks like something you know how to make.

Cracked-open golden Punjabi samosa revealing chunky spiced potato and green pea filling, with crisp crumbs and a whole samosa behind it.
A good bite brings crisp, flaky pastry, tender potato pieces, softer spiced crumbles and peas together.

A little fresh coriander-mint green chutney alongside is enough. Chai can take it from there.

That is the samosa we were trying to make.

← Recipe Card ↑ Back to Top

Posted on 8 Comments

Cheese Balls: 5 Irresistible Indian-Inspired Variations

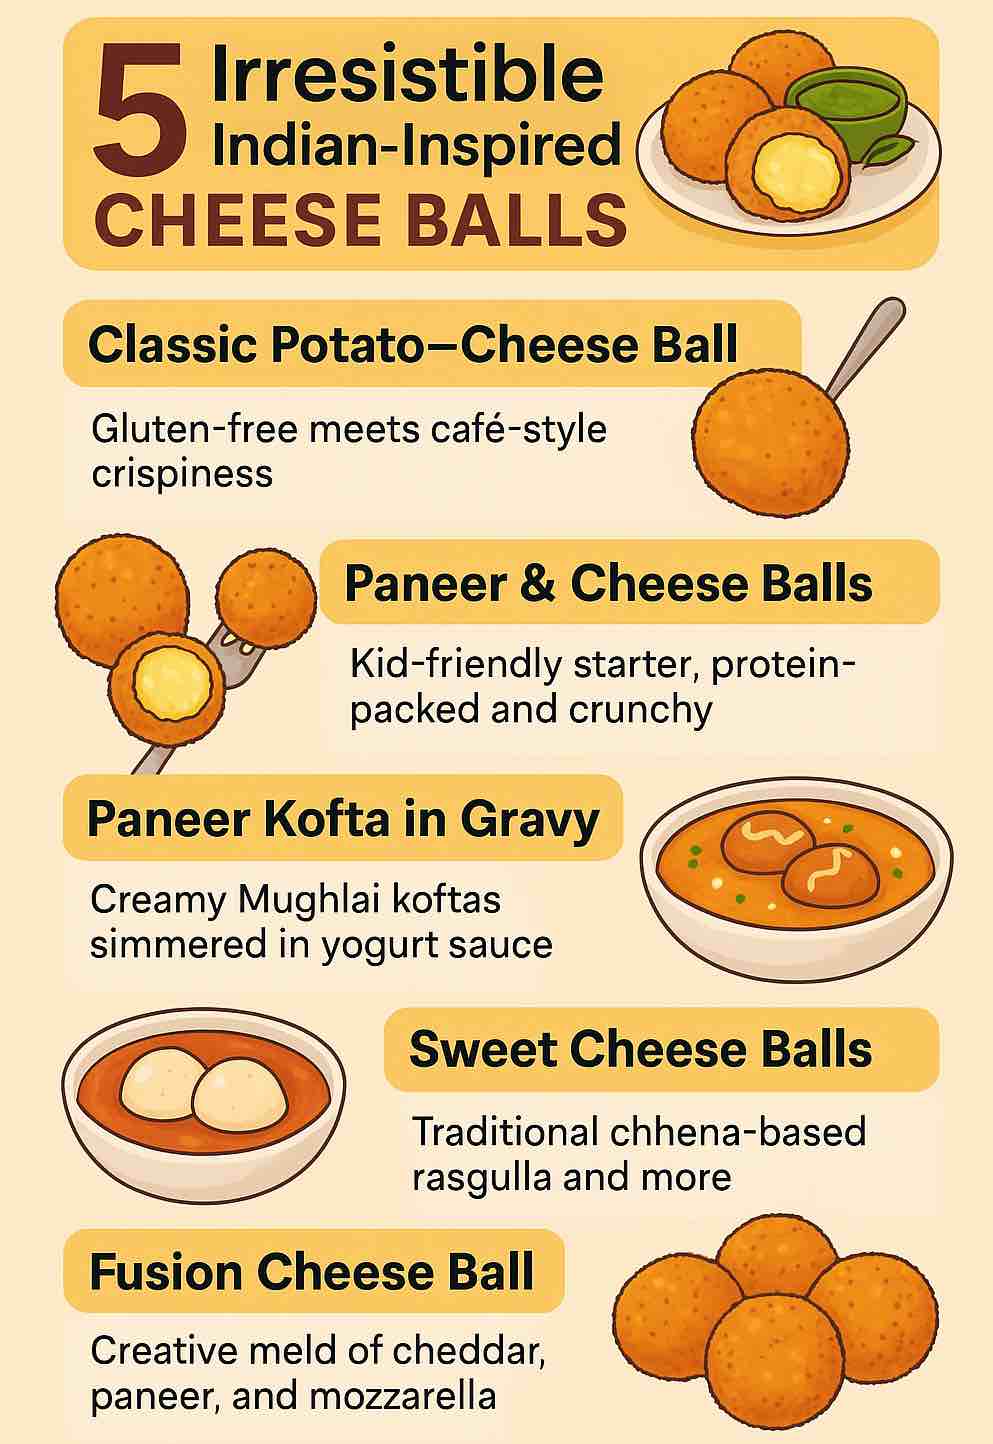
Indian-Inspired CHEESE BALLS

Cheese balls are the perfect bite-sized indulgence, combining creamy cheese with crispy exteriors and irresistible flavor. While cheese balls are a global favorite, the Indian kitchen brings a flavorful twist to this beloved snack. Whether you’re planning a party, preparing a weekend treat, or looking for a quick yet satisfying appetizer, these Indian-inspired cheese ball recipes have something for everyone.

In this blog, we explore five standout variations that marry the comforting taste of cheese with the bold, diverse flavors of Indian cuisine. Let’s dive right in.


1. Masala Cheese Balls

Flavor Profile:

Spicy, tangy, and aromatic

Why It Works:

These are an elevated version of the classic cheese balls with a desi punch. Think of it as aloo tikki meets molten cheese.

Ingredients:

  • 1 cup grated processed cheese
  • 2 medium boiled potatoes (mashed)
  • 1 tsp red chili powder
  • ½ tsp garam masala
  • ½ tsp chaat masala
  • 1 tbsp chopped coriander
  • 1 chopped green chili
  • Salt to taste
  • Cornflour (for binding)
  • Bread crumbs (for coating)
  • Oil (for deep frying)

Preparation:

  1. In a mixing bowl, combine mashed potatoes, cheese, spices, coriander, and green chili.
  2. Add cornflour to form a soft, pliable dough.
  3. Shape into small balls and roll in breadcrumbs.
  4. Chill for 15 minutes to firm up.
  5. Deep-fry until golden and crispy.

Serving Tip:

Serve hot with green chutney or a tangy tamarind dip.


2. Paneer & Spinach Cheese Balls

Flavor Profile:

Earthy, creamy, and subtly spiced

Why It Works:

This healthier option uses spinach and paneer, making it rich in protein and iron while still being indulgent.

Ingredients:

  • 1 cup grated paneer
  • ½ cup grated cheese
  • 1 cup finely chopped blanched spinach
  • ½ tsp cumin powder
  • 1 tsp ginger-garlic paste
  • Salt and pepper to taste
  • 1 tbsp cornflour
  • Bread crumbs
  • Oil (for shallow frying)

Preparation:

  1. Squeeze out excess water from spinach.
  2. Mix paneer, cheese, spinach, spices, and cornflour.
  3. Shape into small balls and roll in breadcrumbs.
  4. Pan-fry or air-fry until golden.

Serving Tip:

Pair with yogurt-mint dip or serve on a skewer for a canapé-style appetizer.


3. Schezwan Cheese Balls

Flavor Profile:

Spicy, umami, and Indo-Chinese

Why It Works:

If you love spice and fusion, this one’s for you. Schezwan sauce adds a fiery depth that balances the creamy cheese.

Ingredients:

  • ½ cup grated mozzarella
  • ½ cup chopped bell peppers and spring onions
  • 2 tbsp Schezwan sauce
  • 1 tsp soy sauce
  • 2 tbsp cornflour
  • Salt to taste
  • Bread crumbs

Preparation:

  1. Combine all ingredients to form a dough.
  2. Shape into balls, coat in breadcrumbs.
  3. Deep-fry or air-fry for 8–10 minutes.

Serving Tip:

Serve with extra schezwan sauce or chili mayo for dipping.


4. Tandoori Cheese Balls

Flavor Profile:

Smoky, spiced, and bold

Why It Works:

Bringing in the magic of tandoori masala, this version captures that smoky restaurant-style flavor in a compact snack.

Ingredients:

  • ½ cup paneer, crumbled
  • ½ cup grated cheese
  • 2 tbsp thick yogurt (hung curd preferred)
  • 1 tsp tandoori masala
  • ½ tsp kasuri methi
  • ½ tsp chili powder
  • Salt to taste
  • Semolina or bread crumbs

Preparation:

  1. Marinate the paneer and cheese with yogurt and spices.
  2. Shape into balls and coat with semolina or breadcrumbs.
  3. Shallow-fry or bake until golden.

Serving Tip:

Garnish with onion rings, mint chutney, and lemon wedges.


5. Aloo-Makhani Cheese Balls

Flavor Profile:

Rich, buttery, and luxurious

Why It Works:

Inspired by the iconic makhani (butter) sauce, this version is indulgent and flavor-packed.

Ingredients:

  • 1 cup mashed potatoes
  • Cheese cubes (for stuffing)
  • ½ cup makhani gravy (can be store-bought or homemade)
  • Salt, garam masala, and kasuri methi
  • Cornflour for binding
  • Bread crumbs for coating

Preparation:

  1. Mix mashed potatoes with spices and a spoonful of makhani gravy.
  2. Encase cheese cubes within the mixture and shape into balls.
  3. Coat with breadcrumbs and fry until golden.
  4. Warm remaining makhani sauce for serving.

Serving Tip:

Serve on a platter with a spoonful of makhani sauce under each ball. Garnish with coriander and cream.


Final Thoughts

Cheese balls are more than just party snacks—they can be canvases for creativity. These five Indian-inspired variations offer options for every taste and occasion. Whether you’re going for spicy, healthy, indulgent, or fusion, there’s a version here that will wow your guests and satisfy your cravings.

Ready to try these at home? Let us know which one stole your heart. And if you have a twist of your own, share it in the comments—we’d love to feature it in a future post!

FAQs

1. Can I make these cheese balls ahead of time?
Yes, you can shape and coat the cheese balls, then refrigerate them for up to 24 hours. For longer storage, freeze them uncooked and fry directly from frozen when needed.

2. What is the best cheese to use for Indian-style cheese balls?
Processed cheese, mozzarella, or a mix of mozzarella and cheddar works best. Paneer is also ideal when used in combination for Indian flavors.

3. How do I prevent cheese balls from breaking while frying?
Ensure the dough is firm and not too moist. Chill the shaped balls before frying and avoid overcrowding the pan. Double-coating with breadcrumbs helps too.

4. Can I bake or air-fry these instead of deep frying?
Absolutely. Brush with oil and bake at 200°C (392°F) for 15–20 minutes or air-fry at 180°C (356°F) for 10–12 minutes, flipping halfway.

5. Are these cheese balls gluten-free?
Some versions can be made gluten-free by using gram flour (besan) and gluten-free breadcrumbs. Avoid maida (all-purpose flour) if you need a gluten-free recipe.

6. What are good vegetarian substitutes for eggs in the coating?
Use a slurry of cornflour and water or all-purpose flour and water for binding and coating. These help the breadcrumbs stick just like egg wash.

7. Can I make these cheese balls spicy or mild?
Yes, you can adjust the spice level easily. Skip green chilies and reduce chili powder for mild versions, or add chili flakes and spicy sauces for a kick.

8. What sauces or dips go best with these cheese balls?
Indian green chutney, mint yogurt dip, tamarind chutney, schezwan sauce, or even spicy mayo all work well depending on the variation.

9. How can I stuff the cheese balls without the cheese leaking out?
Make sure the outer potato or paneer layer is thick enough to fully seal the cheese cube. Chilling them before frying helps keep the stuffing intact.

10. Can I reuse leftover makhani gravy or sabzis for any variation?
Yes! Leftover makhani gravy is perfect for the Aloo-Makhani balls. Leftover dry sabzis like aloo-matar can also be mashed and repurposed into the mix.