Posted on — Leave a comment

Refried Beans Recipe: Easy Homemade Refried Beans From Pinto Beans

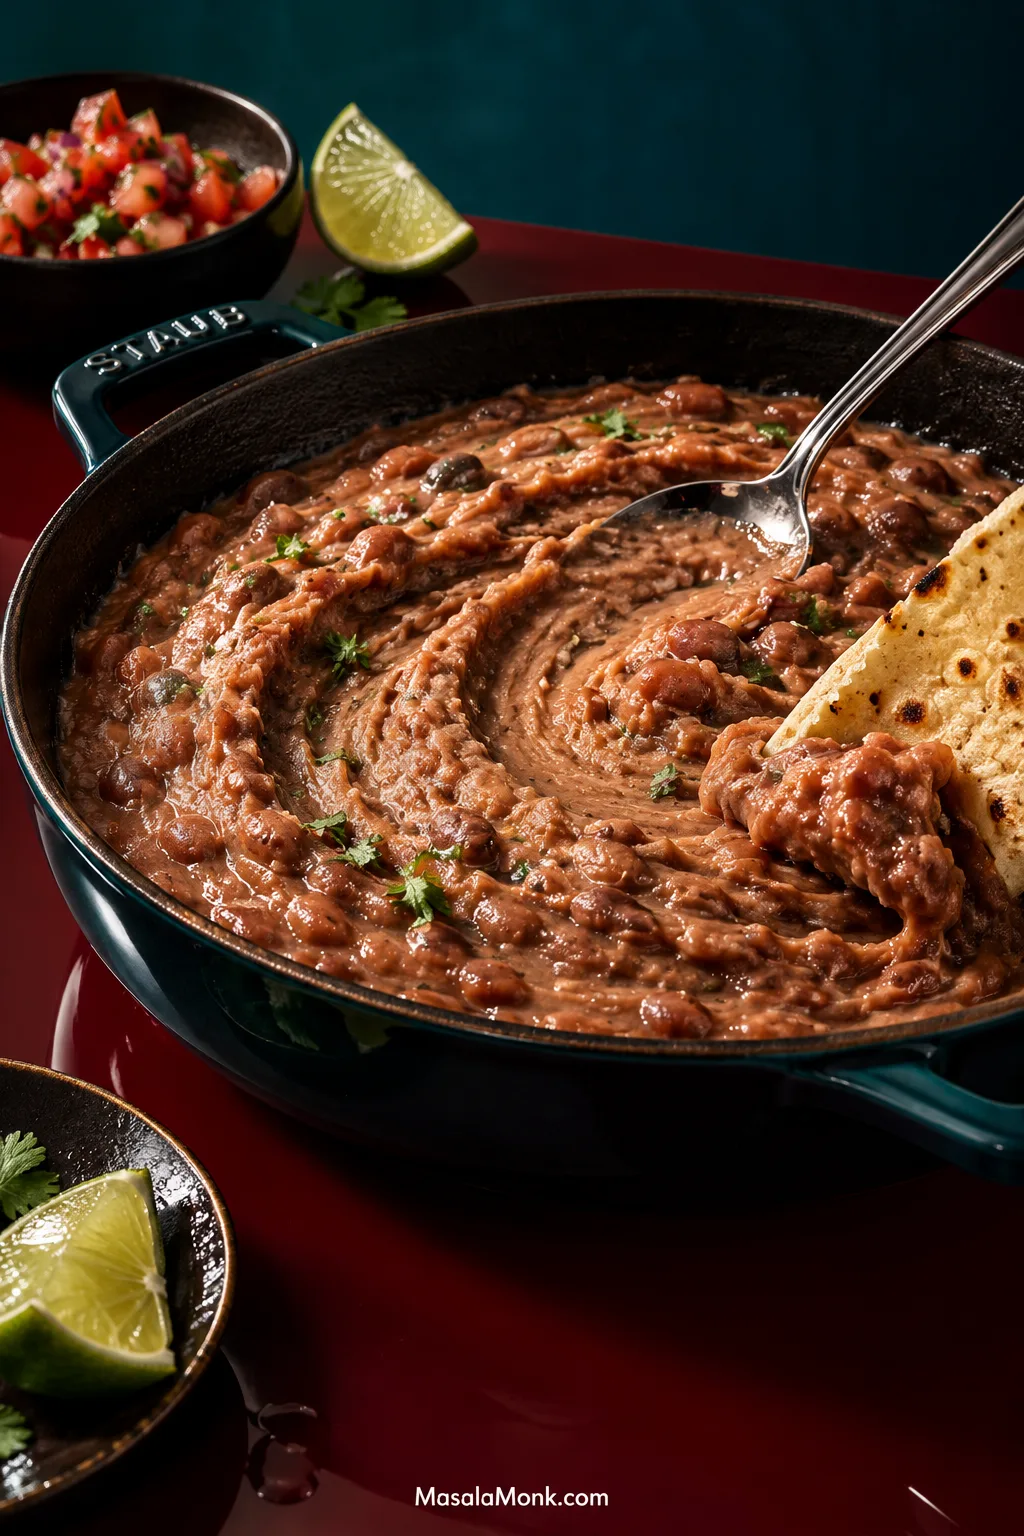
Creamy refried pinto beans in a dark skillet with a spoon trail through the surface and a warm tortilla beside them on a petrol-blue and oxblood set.

A skillet of whole pinto beans does not look much like refried beans at first. Then the beans hit warm fat and softened onion, the masher breaks them open, and the liquid in the pan turns glossy as their starch thickens it. Within minutes, you have creamy beans with enough body for a spoon to leave a trail through them, but enough liquid to stay soft on the plate.

How far you take them depends on dinner. Leave them loose and silky for a side dish. Give them a few more minutes for tacos and burritos. Cook them down farther for tostadas or molletes, where you need a spread that stays put instead of soaking the base. At the right point, a warm tortilla drags through them easily and the beans spread rather than sit in a stiff mound.

This refried beans recipe works from two starting points: whole canned pintos for the fast route, or dried pintos cooked until completely tender. Once either one reaches the skillet, the same basic method takes over.

Refried Beans Recipe

20–25-Minute Canned-Pinto Route: Soften ½ cup onion in 2 tablespoons lard or neutral oil, stir in 2 minced garlic cloves, then add two cans of whole pinto beans with ½ cup bean liquid, water, or unsalted broth. Mash, simmer gently until creamy and still slightly loose, then season to taste.

If your can already contains prepared refried beans rather than whole pintos, use our refried beans from a can guide instead. Those beans have already been mashed and cooked into their final form, so they need a different kind of help.

Refried beans can be frustrating because the ingredient list is so short. When a homemade batch turns stiff, gritty, or strangely flat, it can feel as though some restaurant secret is missing. Usually the bigger differences are simpler: fully tender beans, enough fat, enough liquid, and reading what the pan is doing.

The same beans can be soft and spoonable one minute, then dense enough to stand on a spoon after a little more cooking. That stopping point matters more than another shake of cumin.

Onion, garlic, cooked pintos, fat, and bean broth or water are the foundation. Add liquid gradually until the beans move the way you want.

Easy Homemade Refried Beans From Pinto Beans

Whole pinto beans mashed and refried with onion, fat, and enough liquid to stay creamy. Keep them loose for a plated side or reduce them farther for tacos, burritos, and tostadas.

Prep
8–10 minutes

Cook
12–15 minutes

Total
20–25 minutes

Yield
About 2½–3 cups

Serves
About 5–6 as a side

The final yield shifts a little depending on how loose or thick you leave the beans.

Ingredients
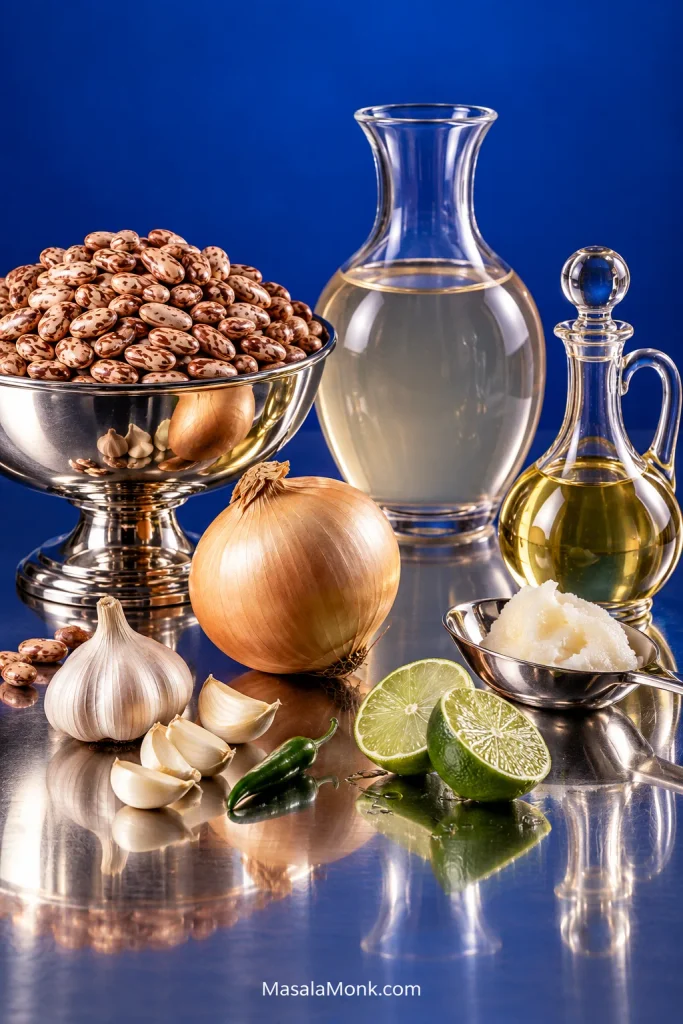
Whole pinto beans, onion, garlic, cooking fat, bean broth, and cut lime arranged on a cobalt-blue background with polished metal vessels.
A short ingredient list leaves more room for each component to matter: onion builds the base, fat carries richness, and bean liquid controls how the finished mash moves.
  • 2 cans whole pinto beans, 15 oz (425 g) each
  • 2 tbsp (30 ml) lard, avocado oil, or another neutral cooking oil
  • ½ cup (about 75 g) white or yellow onion, finely diced
  • 2 garlic cloves, finely minced
  • ½ cup (120 ml) reserved bean liquid, water, or unsalted broth to start
  • Up to another ½ cup (120 ml) bean liquid, water, or unsalted broth, as needed
  • ¼ tsp fine salt, only if needed, plus more to taste
  • 1–2 tsp (5–10 ml) fresh lime juice, optional

Optional Tex-Mex seasoning: ½ tsp ground cumin plus ¼ tsp Mexican oregano. Add them with the garlic.

How to Make Refried Beans From Canned Pinto Beans
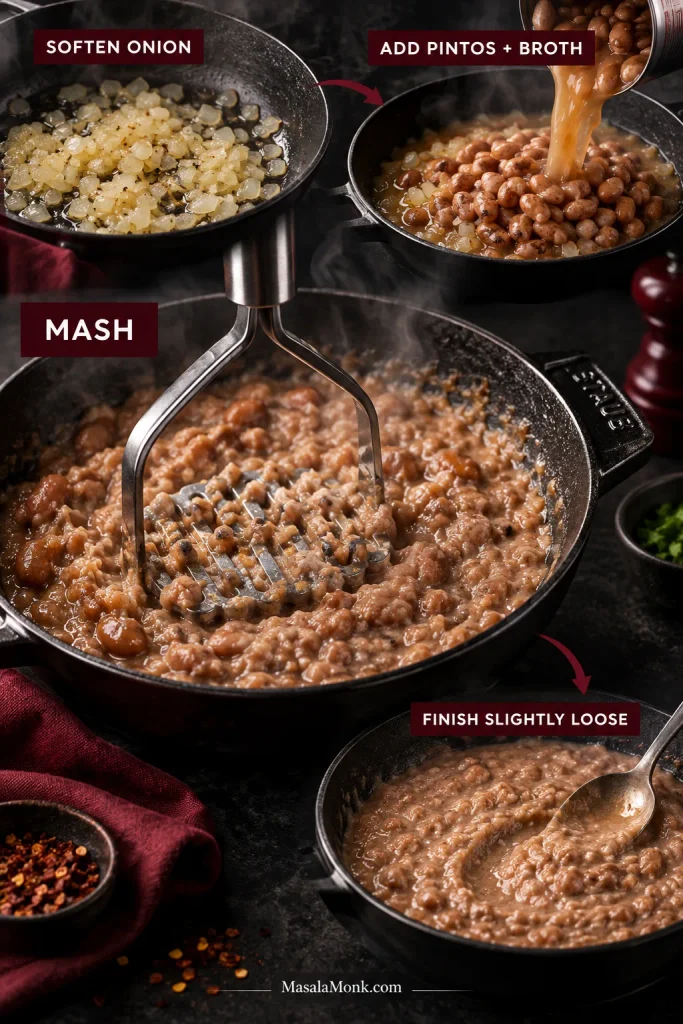
Four-stage process showing softened onion, whole pinto beans with broth, beans being mashed, and finished creamy refried beans.
Because the pintos are already cooked, the skillet is really doing two jobs: building flavor and moving the beans toward the texture you want.

Build the Flavor Base

  1. Drain the beans over a bowl. Taste the reserved liquid. Keep it unless very salty, metallic, or strongly canned; otherwise rinse the beans and use water or unsalted broth.
  2. Soften the onion. Heat the lard or oil over medium heat. Cook the onion for 4–6 minutes, until the sharpness mellows and the pieces are soft enough to disappear into the mash.
  3. Add the garlic. Stir in the garlic and, if using them, the cumin and oregano. Cook for about 30 seconds, just until fragrant.
  4. Add the beans carefully. Lower the heat if the fat is very hot, then add the drained beans close to the surface of the skillet. Wet beans can spit when they meet hot fat.
  5. Add ½ cup (120 ml) reserved bean liquid, water, or broth. Simmer for 1–2 minutes. Beans that still resist the masher need another 3–5 minutes with a splash more before mashing.

Mash and Finish

  1. Mash the beans. Leave some pieces intact for a rustic texture, or keep going until most have broken down.
  2. Turn the heat down to medium-low. Let the mash bubble gently for another 3–5 minutes. Add more bean broth or water only when needed, working 1–2 tbsp (15–30 ml) at a time.
  3. Taste before salting. Canned bean liquid or regular broth may already have seasoned the pan. Add lime if the beans taste rich but flat.
  4. Turn off the heat while the beans still look a touch loose. They keep thickening after the flame is off. A pan that looks right over the heat can feel stiff five minutes later.

Recipe Notes

  • For the richest savory flavor: use lard. Increase it to 3 tbsp (45 ml) for a richer batch.
  • Vegetarian or vegan: avocado oil or another neutral vegetable oil works well. Olive oil adds more flavor of its own.
  • Very smooth beans: mash first, then use an immersion blender briefly while the mixture is loose enough to move freely.
  • Small batch: use one 15 oz (425 g) can and halve the remaining ingredients.
  • Starting from dry: cook about 8 oz (225 g) dried pintos until completely creamy inside, reserve some broth, then measure roughly 3 cups cooked beans into the recipe.
  • Using unsalted home-cooked beans: expect to need more salt than the canned version. Season gradually after mashing; the ¼ teaspoon above is not a target for completely unsalted beans.

Equipment

A 10- to 12-inch (25- to 30-cm) skillet and potato masher do the main work. For a small batch, a sturdy fork works; an immersion blender is optional when you want an especially smooth finish.

Mash. Loosen gradually. Stop early.

Once the beans are mashed, add broth or water a splash at a time until they move the way you want. Gentle frying does the rest.

What the Pan Should Look Like

The clock gets you close; the skillet tells you where you actually are.
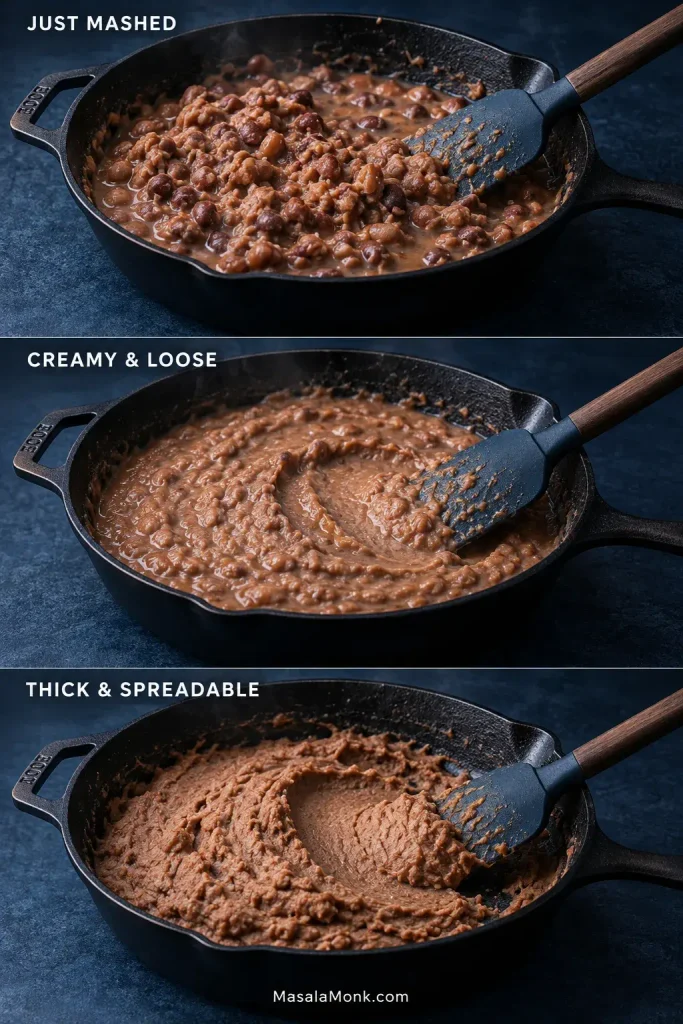
Three views of the same skillet showing refried beans just mashed, creamy and loose, and thick and spreadable.
The same pan can move from chunky to silky to spreadable in minutes; the surface changes before the clock does.

Just Mashed

The beans are broken but still noticeably chunky. Some liquid may sit around them, and a spoonful does not quite hold together yet.

A loose-looking skillet at this point is normal. Give it a few minutes before changing anything.

Creamy & Loose

The mixture looks cohesive and glossy. Pull a spatula through the skillet and the trail stays visible briefly before the edges slowly soften back into place.

Stir it and the mash should move as one soft mass—neither sloshing like soup nor sitting stiffly like mashed potatoes.

Thick & Spreadable

The spatula trail stays open much longer. A spoonful holds a soft mound and spreads where you push it instead of flowing back across the skillet.

For a deeper fried flavor, let a very thin film catch lightly on the skillet, then scrape it back into the mash. The aroma turns toastier and nuttier almost immediately; get it up before that edge becomes bitter.

How Thick Should Refried Beans Be?

Thick enough for what? Side-dish beans should be loose and spoonable. A burrito needs enough body that the filling stays inside the tortilla, while a tostada needs a spread that will not soften the crisp base underneath.

What You Are MakingStop WhenTexture
Side-dish beansA spoon trail slowly relaxes backLoose, creamy and spoonable
Nachos or dippingThe beans still move readily when stirredCreamy enough to scoop easily
TacosThe beans hold on a spoon but still spread readilyMedium-thick
BurritosThe trail holds and the beans no longer flowThick enough to stay inside the tortilla
Tostadas or molletesThe beans hold a stable spreadThick enough to protect the crisp base
Make-ahead beansSlightly looser than you want to serve themThey’ll firm more as they chill
Five serving examples showing loose refried beans as a side dish, scoopable beans for nachos, medium-thick beans in a taco, thicker beans in a burrito, and a stable spread on a tostada.
Think of thickness as a job rather than a single ideal: the more the beans need to stay put, the farther you take the pan.

For ground beef tacos, the middle texture is especially forgiving: the beans spread beneath the meat but stay inside the tortilla.

Soft Restaurant-Style Refried Beans

Very smooth restaurant-style beans begin with completely tender pintos. Mash them thoroughly—or briefly use an immersion blender—then add enough bean broth that the beans relax across the plate instead of sitting in a stiff mound. Take the skillet off the heat earlier than you would for burrito or tostada beans.

Lard gives the deepest savory richness. Tender beans, released starch, broth, and that looser stopping point create the texture; dairy is optional rather than necessary.
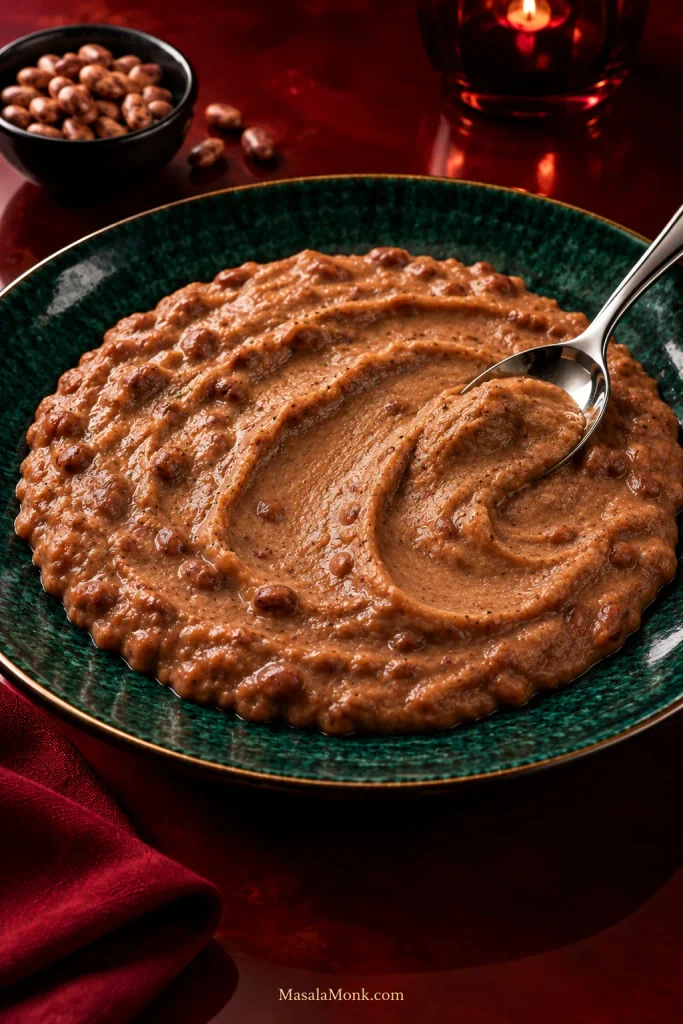
Very smooth refried pinto beans spread across a deep green glazed plate with a spoon on a dark red surface.
A silky restaurant-style finish starts before the blender or masher: if the pinto beans are not completely tender, no amount of smoothing will make the center creamy.

Starting With Dried Pinto Beans?

Using canned beans? Skip ahead to seasoning.

Soaking shortens the wait, but tenderness decides when dried pintos are ready for the skillet. For smooth refried beans, the centers need to become completely creamy before frying and mashing.

Sort through 8 oz (225 g) dried pintos, discard any stones or badly damaged beans, and rinse them well. Once cooked, you’ll need roughly 3 cups. Any extra can go into another meal, including a simple bean stew.

Do You Need to Soak Pinto Beans?

No. An 8- to 12-hour soak can shorten the cooking time and help pintos cook more evenly, but unsoaked beans work too.

After an overnight soak, drain and rinse the beans, then cook them in fresh water. Forgot to soak them? Keep going—unsoaked beans simply need longer.

Cook Them Until the Centers Are Creamy

Put the pintos in a roomy saucepan or Dutch oven and cover them with fresh water by roughly 2–3 inches (5–7.5 cm). Onion, garlic, or a bay leaf can flavor the pot if you like.

Bring the water to a boil, then reduce it to a gentle simmer. Keep the pintos comfortably submerged and top up with hot water as needed.

Start checking soaked pintos after about 1 hour. Many finish within 1–2 hours; unsoaked beans commonly need closer to 2–3 hours. Old beans can take longer, so tenderness matters more than the clock.

Take one out, let it cool for a few seconds, then crush it between your fingers or press it against the side of the pot with a spoon. It should give way easily and feel creamy all the way through, with no pale, chalky center.
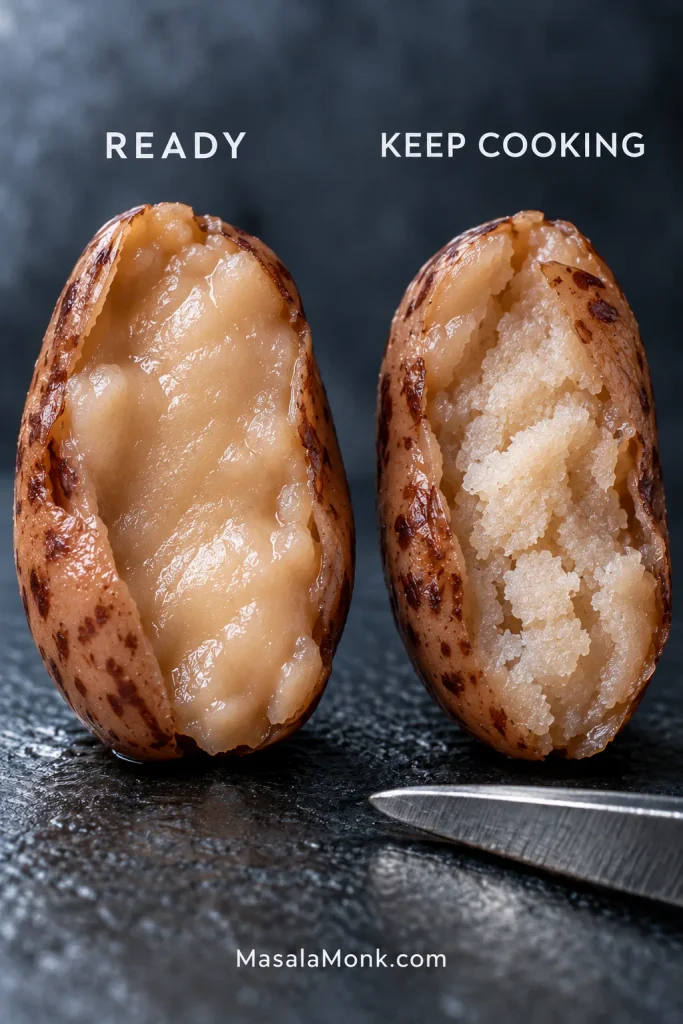
Two split pinto beans in close-up, one with a smooth creamy center labeled ready and one with a pale grainy center labeled keep cooking.
Before draining dried pinto beans, split one open; the center tells you more about readiness than the clock does.

A potato masher can change their shape; it can’t turn a chalky center creamy. Keep cooking until the pintos are genuinely soft.

Before draining them, save plenty of the bean broth. It already carries bean flavor and released starch, so reach for it first when the mash needs loosening later. Remove any bay leaf or large aromatics, then measure about 3 cups cooked pintos for the skillet.

When Dried Beans Refuse to Soften

Dry beans do not read recipe clocks. An old bag of pintos may take much longer than a fresher one, and very hard water can slow softening too. Strongly acidic ingredients such as tomatoes or vinegar are best saved until the beans are tender.

If the beans stay stubbornly firm, don’t assume salt is the culprit. Check bean age, very hard water, acidic ingredients, water level, and whether the pot has maintained a steady simmer.
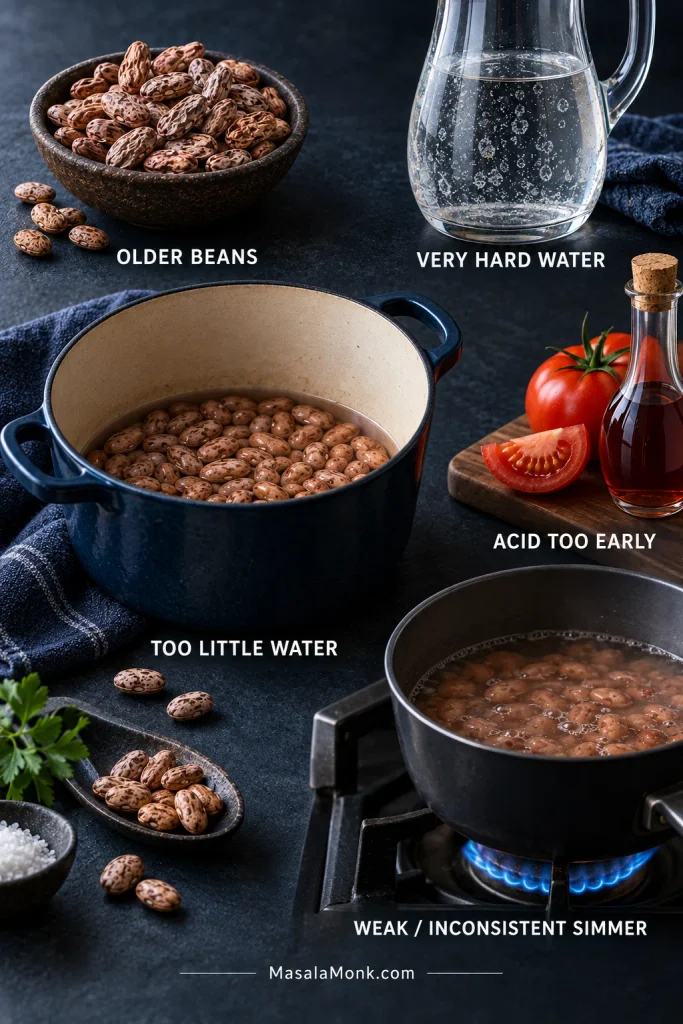
Diagnostic board showing older dried pinto beans, hard-water cues, acidic ingredients added early, a pot with too little water, and a weak simmer.
Dried pinto beans do not all soften on the same schedule, so stubborn beans are a cue to check age, water, acidity, and simmer before changing course.

Where hard water repeatedly causes trouble, cooking with softer or distilled water can help. North Dakota State University’s dry-bean guidance also discusses hard water and delaying acidic ingredients until the beans are tender.

How to Season Refried Beans

Once the beans are genuinely tender, seasoning gets much simpler. Onion, fat, and salt do most of the work. Garlic can join them; cumin, oregano, fresh chile, and lime take the beans in different directions rather than fixing a weak base.

Choose the Fat

Lard gives the deepest savory flavor. Two tablespoons (30 ml) is enough for the base recipe; 3 tablespoons (45 ml) makes the richness more pronounced.

Keeping the beans vegetarian or vegan is simple: use avocado oil or another mild vegetable oil. Olive oil is more noticeable, while bacon drippings take the pan somewhere smokier.

Does This Pan Need More Liquid or More Fat?

Dry-looking beans don’t automatically need more fat. Stiff or crumbly beans usually need liquid. Beans that are already soft and moist but taste thin may need more fat.
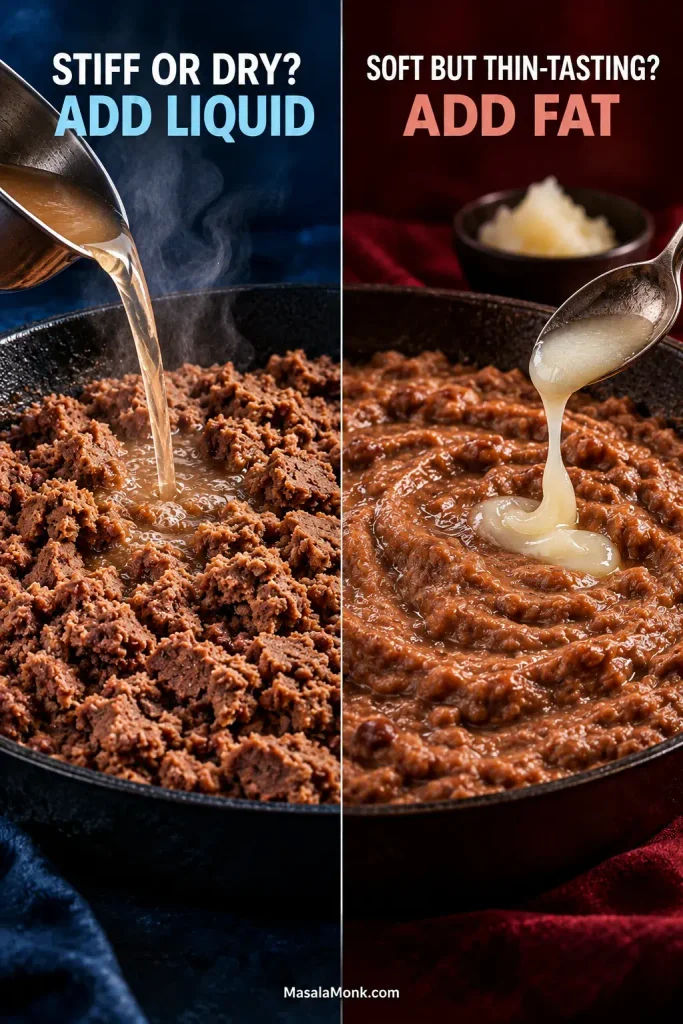
Split comparison showing stiff refried beans being loosened with liquid on the left and soft refried beans receiving a small amount of fat on the right.
Look at the bean texture first, then taste: moisture controls movement, while fat changes richness.

Spice, Heat and Brightness

For a Tex-Mex batch, use ½ tsp ground cumin and ¼ tsp Mexican oregano with the garlic. More cumin isn’t automatically the answer to bland beans; salt and properly softened onion matter first.

Fresh heat comes from ½–1 small jalapeño or serrano cooked with the onion. About ½–1 tsp finely chopped chipotle in adobo brings smoke instead.

Or leave the skillet mild and put the heat on the table. Roasted salsa verde brings tomatillo acidity and green-chile heat without changing the whole batch.

Well-salted beans that still taste heavy usually need brightness. Add 1–2 tsp (5–10 ml) lime juice; the next bite should feel livelier rather than overtly citrusy.

If the Canned Beans Are Salty

Drain and rinse them, then use water or unsalted broth in the skillet. Regular broth, bacon drippings, bouillon, cheese, and extra salt can pile up quickly.

For a lower-sodium batch, wait until the beans have reduced before deciding whether they need salt at all.

Why Mexican Refried Beans Vary

Those choices—bean variety, fat, aromatics, chile, and final consistency—change from one kitchen to the next. Refried beans are easiest to understand as another life for beans that are already cooked. In Mexican cooking, pot beans—frijoles de la olla—can be eaten as they are and later become frijoles refritos when they’re cooked with fat and mashed.

Canned whole pintos simply arrive with that first cooking stage already done.

Pintos are common in many northern and border traditions; black beans and numerous other varieties appear across regional Mexican cooking.

Two households can put noticeably different beans on the table and both be making something completely familiar to them. There does not have to be one universal seasoning list or one correct finished texture.

If Your Refried Beans Look Wrong

Most batches are easy to rescue. Watery? Simmer uncovered. Too thick? Add hot liquid a tablespoon at a time. Gritty? Cook longer. Bland? Check the salt first. Greasy? More cooked beans are the most useful fix.
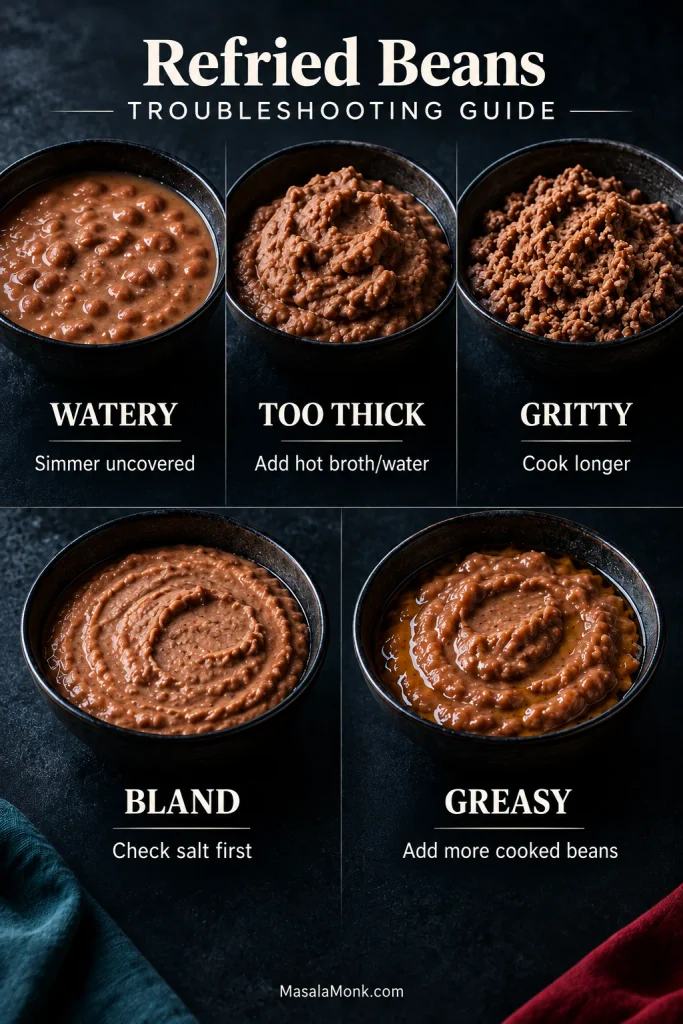
Five refried-bean states showing watery beans, overly thick beans, gritty beans, bland beans, and greasy beans, with a short corrective action for each.
Fix the first problem you can identify, then taste again; otherwise a texture mistake can easily turn into a salt, fat, or seasoning mistake too.
The beans are too loose or soupy

Give them time. Simmer uncovered over gentle heat and stir regularly. Excess water usually cooks away on its own.

The beans are too thick or paste-like

Stir in hot bean broth or water 1–2 tbsp (15–30 ml) at a time. Pause after each addition; the beans need a moment to loosen.

The beans are gritty

Tiny gritty pieces usually mean some of the beans need more cooking. Give them more liquid and more time, then mash again.

The beans taste bland

Check the salt first. If that’s right, taste for richness, fully softened onion, chile heat, or brightness from lime.

The beans are too salty

The strongest fix is more unsalted cooked beans. A looser batch can also take unsalted water or broth, but boiling all of that liquid away simply concentrates the salt again. Plain rice, tortillas, avocado, or other unsalted foods can make a mildly oversalted serving easier to balance on the plate.

When Texture Isn’t the Whole Problem

The beans are soft and moist but still taste thin

This is where more fat helps. Stir in a little lard or oil, let it disappear into the hot mash, then taste again.

The beans look greasy

If the pan is genuinely greasy, broth will not fix the ratio. Add more cooked beans. A small splash of broth can help a slightly oily mash come together, but genuinely excessive fat needs more cooked beans.

They were perfect in the skillet but stiffened on the plate

They went a little too far. Stir in hot broth or water now. Next time, stop while the beans still look slightly softer than you want to eat them.

Heat and Handling Problems

The onion is still crunchy

For the next batch, dice it finely and let it soften fully before the beans go in. Properly cooked onion should disappear into the mash rather than announce itself in every bite.

The bottom of the skillet is scorching

Reduce the heat and add a splash of hot broth or water. Mashed beans expose much more surface to the skillet than whole beans do, so they scorch quickly.

The beans splatter when they hit the fat

Add the wet beans close to the surface of the skillet after lowering the heat briefly. Keep your hands and face back from the first burst of steam and fat.

Leftovers Get Thicker—Here’s How to Bring Them Back

Refried beans keep about 3–4 days in the refrigerator and freeze well for about 3 months. They firm considerably when cold, so reheating usually begins with a splash of water or bean broth.

Refrigerate the beans promptly: cool them, cover, and refrigerate. That firmer next-day texture is handy inside a breakfast burrito, where the filling needs to stay where you spread it.

When freezing: portion the cooled beans into smaller containers or freezer bags rather than one large block. They’ll be easier to thaw and reheat.

To reheat: warm them over medium-low heat on the stove and add water or bean broth 1–2 tbsp (15–30 ml) at a time. In the microwave, cover loosely, heat in short bursts, stir, and add a splash between rounds as needed.
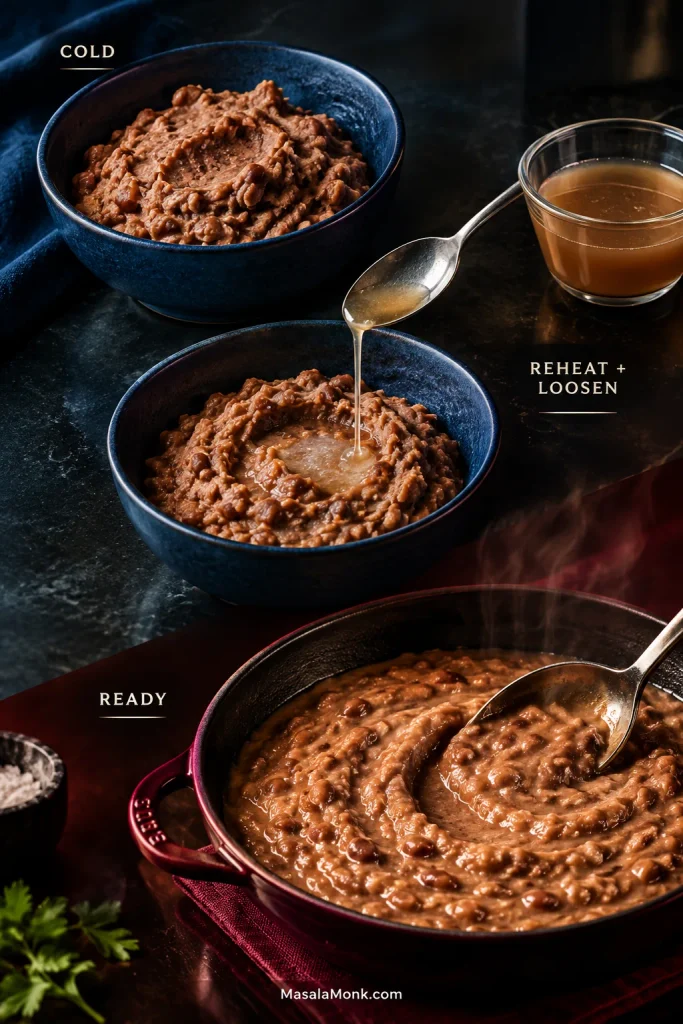
Three-stage image showing cold stiff refried beans, broth being added during reheating, and warm glossy beans steaming in a skillet.
Start with less liquid than you think you need, then add more only after the beans warm through; they loosen gradually and can thicken again as they cool.

The USDA recommends reheating leftovers to 165°F (74°C). Its leftovers and food-safety guidance also covers cooling and refrigeration.

What to Serve With Refried Beans

Spoon them onto a plate next to warm rice and eggs, tuck them beside enchiladas or grilled meat, or bring them to the table with tortillas and something sharp and fresh. Salsa, crisp cabbage, radish, chopped onion, cool avocado, cilantro, and lime all wake up a rich scoop of beans.

A thicker batch works just as well inside quesadillas and burritos. Spread it across warm corn tortillas, or layer it onto a tostada before adding salsa, avocado, cheese, cabbage, or whatever else dinner calls for.

And dinner can be much simpler than that: warm tortillas, a soft scoop of beans, salsa, and something cool or crisp on top.
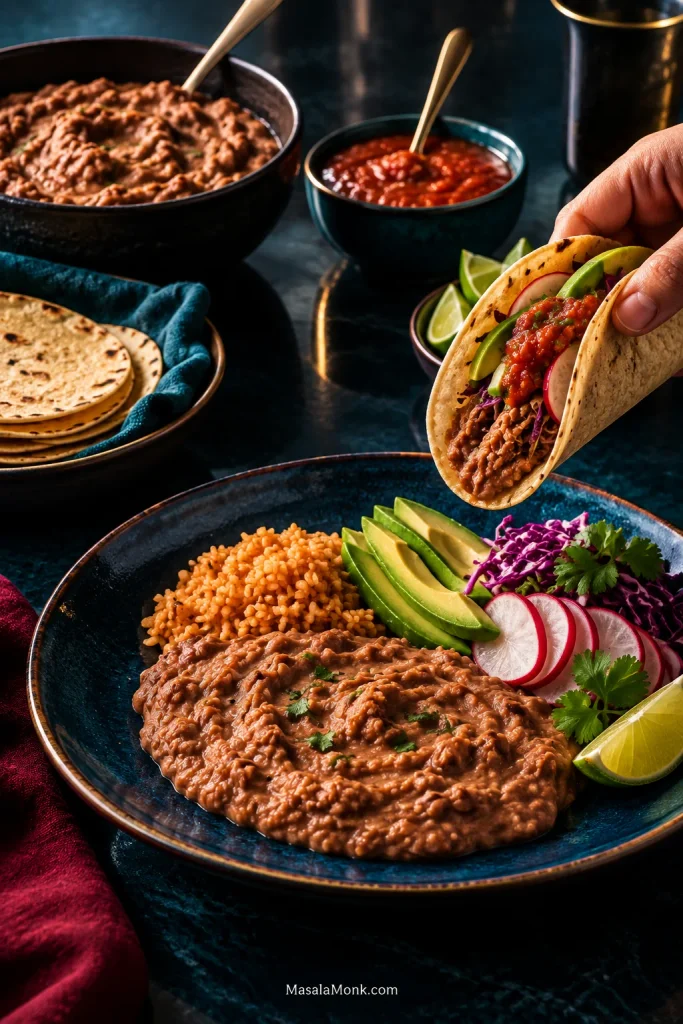
Dinner scene with refried beans, warm tortillas, salsa, avocado, cabbage, radishes, lime, and a hand holding a filled taco.
Warm tortillas, bright salsa, avocado, lime, and something crisp give creamy beans the contrast that makes a simple dinner feel complete.

For a party, a thick batch makes a sturdy base for an easy 7 layer dip. The beans stay underneath the toppings instead of traveling across the plate with the first scoop.

Frequently Asked Questions

1. What are the best beans for refried beans?

Pinto beans are an easy all-purpose choice because they soften well and mash readily. Black beans and many other varieties also appear in regional Mexican cooking.

2. Can you make refried beans from canned pinto beans?

Yes. Whole canned pintos are the fastest route in this refried beans recipe: cook them with onion and fat, mash, then add enough broth or water to reach the texture your meal needs.

3. Should you drain and rinse canned pinto beans?

Drain them over a bowl first. Keep the liquid unless it is very salty, metallic, or strongly canned; otherwise rinse the beans and use water or unsalted broth.

4. Do refried beans need lard?

No. Lard gives the deepest savory flavor, while neutral oil makes an excellent vegetarian or vegan version.

5. Can you freeze refried beans?

Yes. Freeze cooled beans in practical portions, then thaw and reheat them with a splash of water or bean broth.

6. Does “refried” mean the beans are fried twice?

Not necessarily. Spanish refreír can mean to fry again, but it can also mean to fry something thoroughly or very well. In frijoles refritos, the name does not require the beans to go through two separate frying stages.

Once You Know What to Look For

Once you can recognize a fully tender bean, a mash that needs another splash of broth, and a skillet that’s one minute from becoming too stiff, the measurements stop doing all the work.

Mash. Loosen gradually. Stop early. Once that rhythm makes sense, the recipe stops feeling like a formula; you can look at the pan and know what it needs.
Posted on — Leave a comment

Roasted Cauliflower Recipe: Crispy, Golden & Easy to Make in the Oven

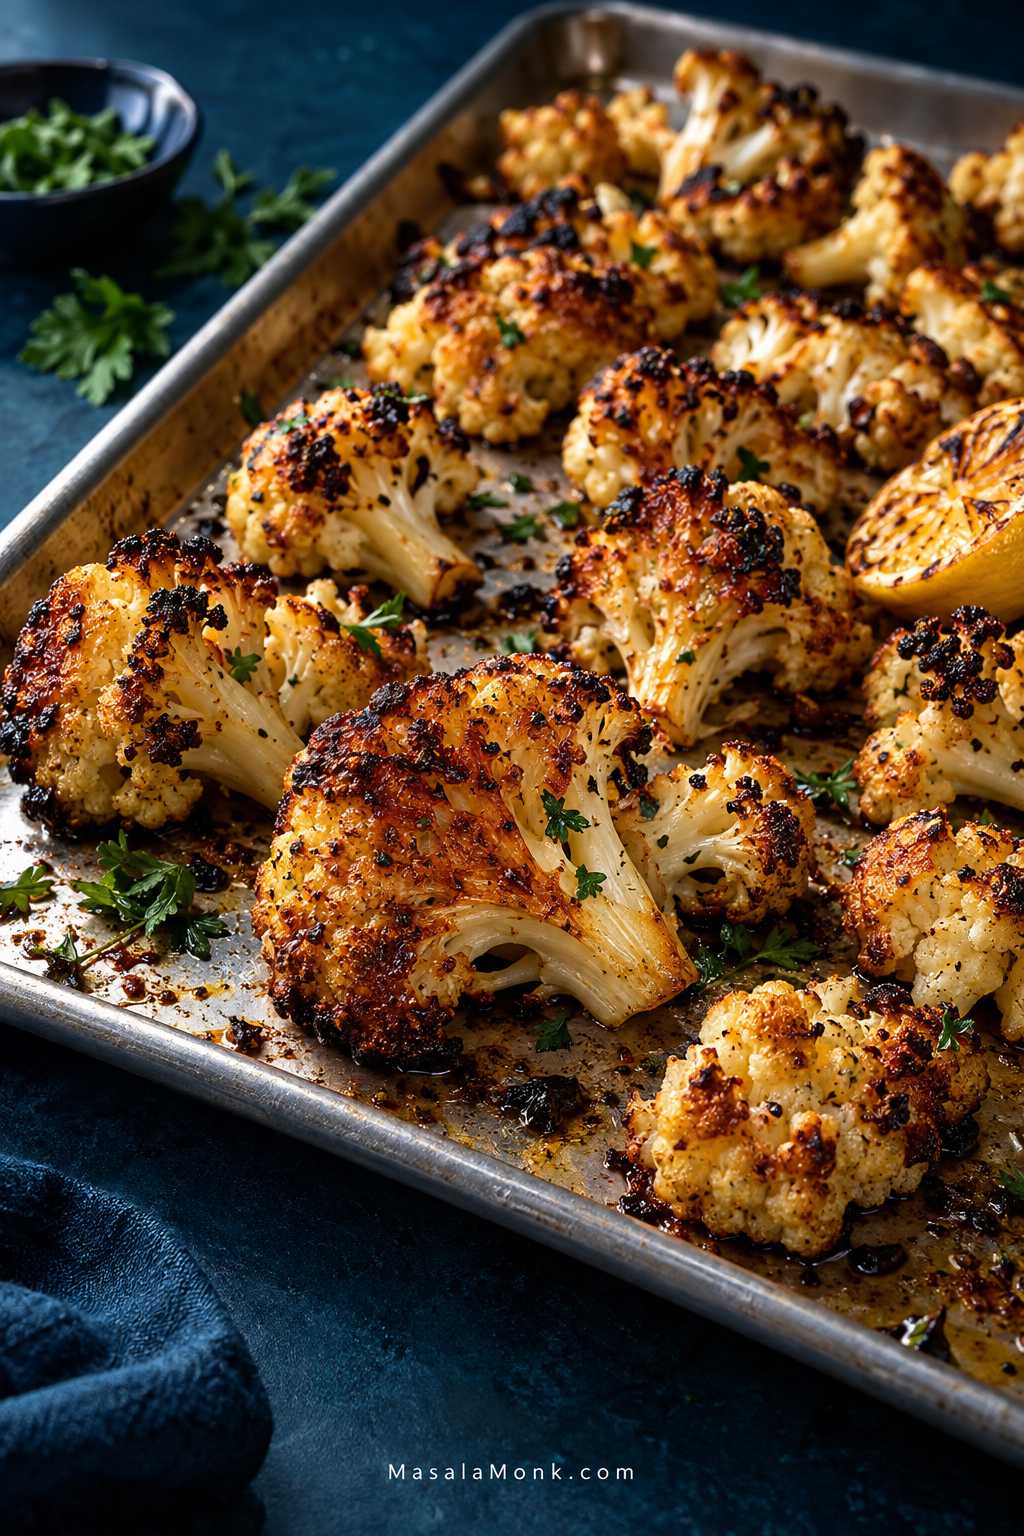
A brushed-metal sheet pan filled with irregular roasted cauliflower florets, showing deep golden-brown edges, darker roasted tips, tender stems, fresh green herbs, and a small lemon garnish against a deep teal background.

Good roasted cauliflower has crisp, deeply golden edges while the thicker stems stay tender. As it browns, the flavor changes too—sweeter, nuttier and much more savory than plain steamed cauliflower. The darkest little pieces tend to disappear first.

It can also be surprisingly frustrating for something so simple. Sometimes the cauliflower softens while it is still pale. At other times, the delicate tips burn while the thicker stems stay firm. And sometimes everything looks as though it needs another five minutes—until those five minutes turn it mushy.

None of this needs a complicated trick. Dry cauliflower, broad flat sides for browning, enough room on the pan, and enough time against hot metal do most of the work.

For this roasted cauliflower recipe, 425°F / 220°C is a good default. It is hot enough for deep browning, but gives the delicate tips more breathing room than 450°F / 230°C.

Quick Answer: How to Roast Cauliflower

Roast medium cauliflower florets at 425°F / 220°C for about 22–30 minutes, checking the underside after the first 15 minutes rather than relying on the timer alone.

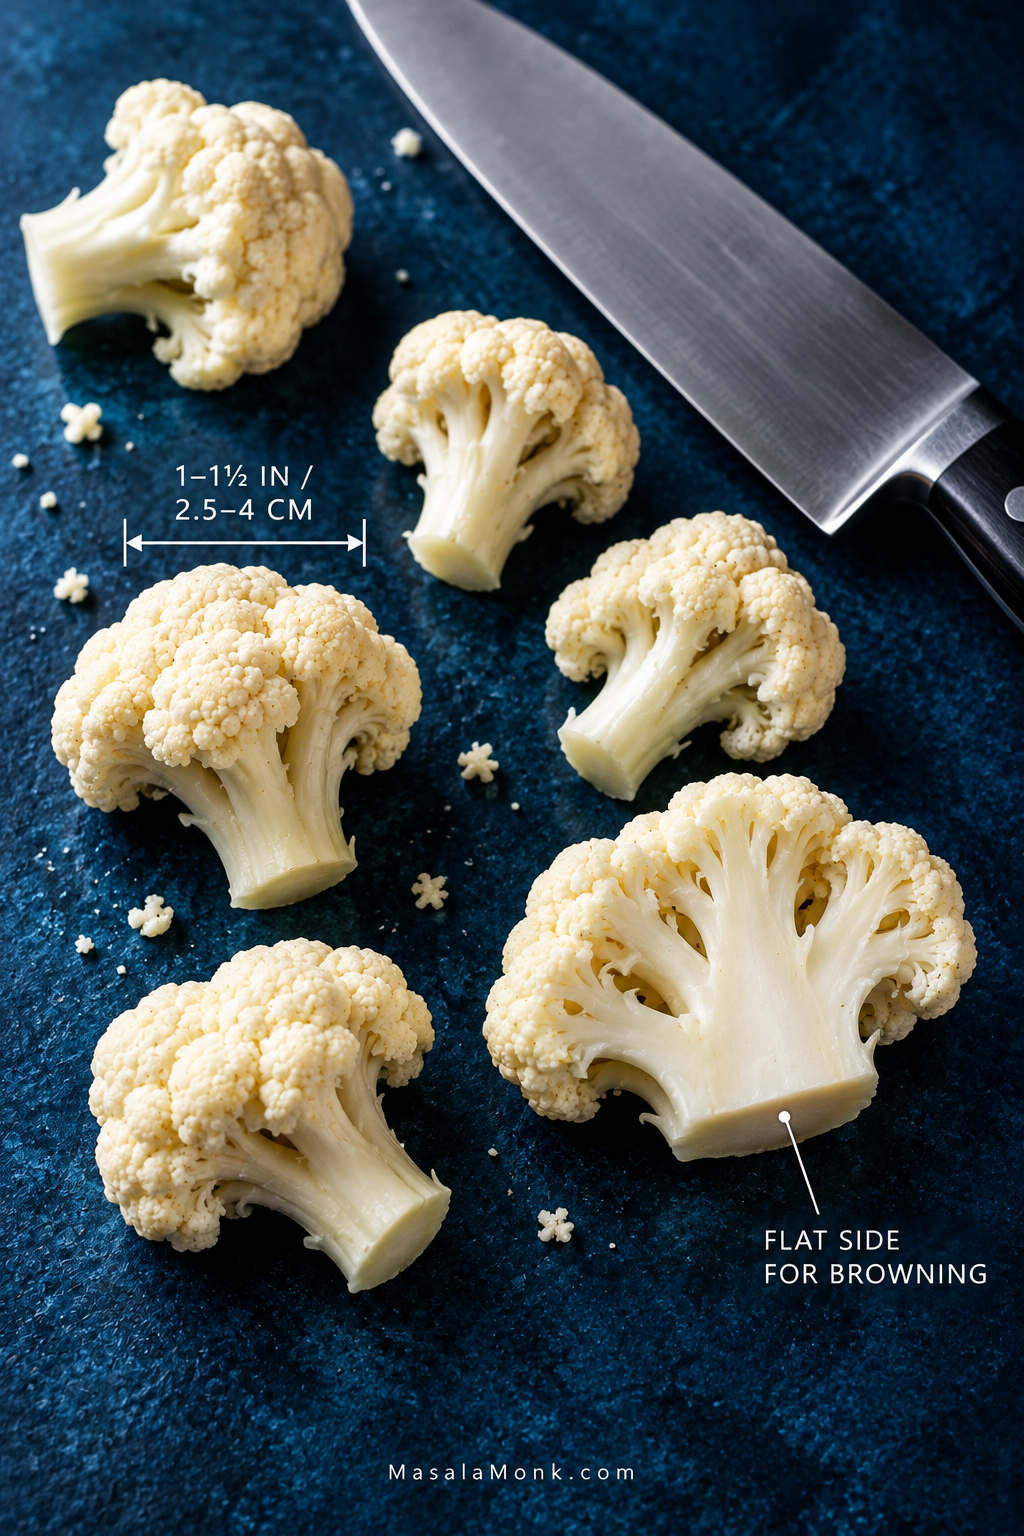
Cut one medium-large cauliflower—about 2 lb / 32 oz / 900 g whole—into florets around 1–1½ inches / 2.5–4 cm. Halve the larger pieces through the stem so they have a flat side for browning.

Dry well, toss with 2 tbsp / 1 fl oz / 30 ml olive oil and the seasonings, then spread everything loosely across a large metal sheet pan with the cut sides against the metal.

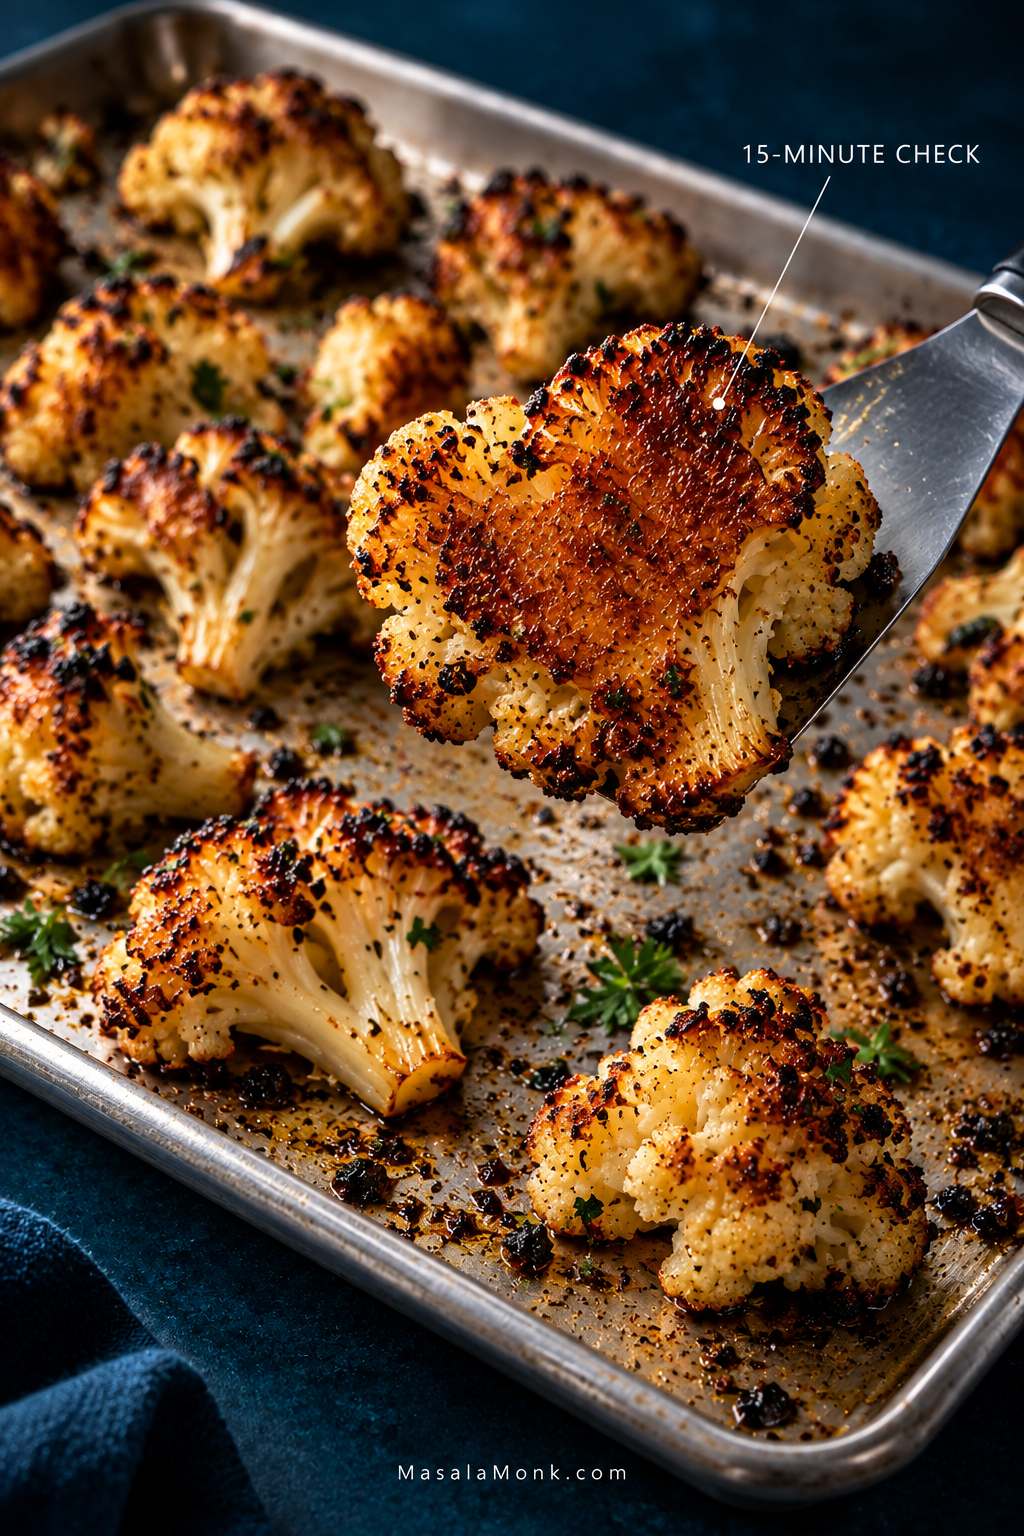
After 15 minutes, lift a large piece. Deeply golden underneath? Turn the bigger florets. Still pale? Give that first side another 3–5 minutes. Continue until a fork slips easily into the stems and the edges are well browned.

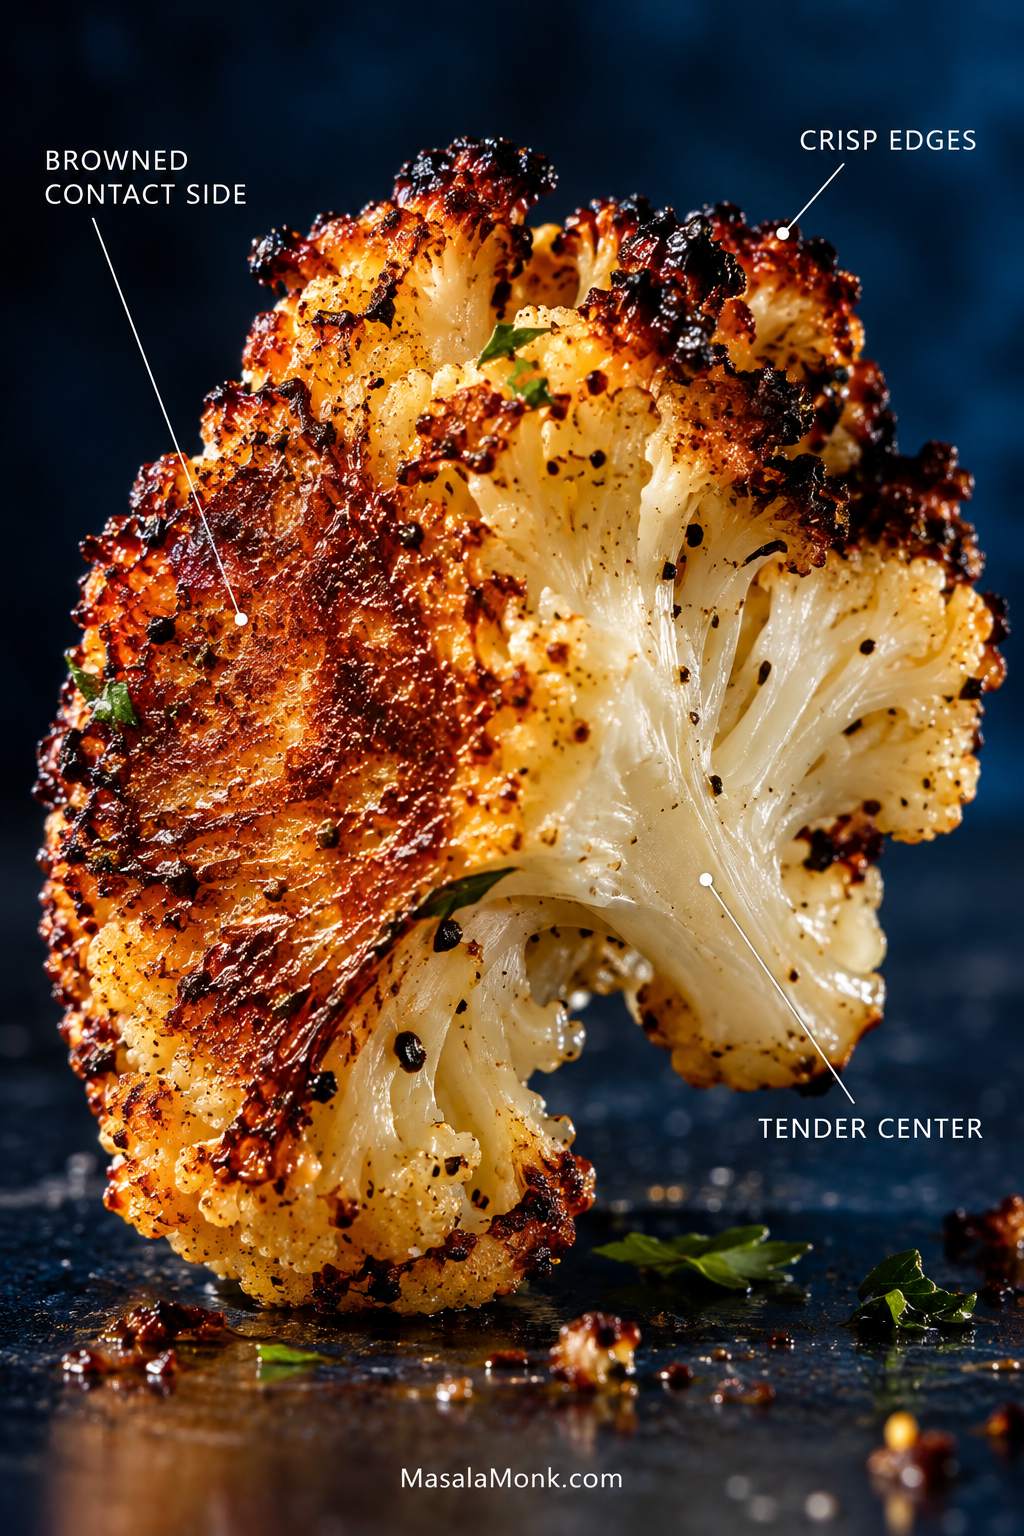
For plain roasted cauliflower, “crispy” means browned cut surfaces and crisp edges around a tender center. It will not have the dry crunch of breaded or deep-fried cauliflower.

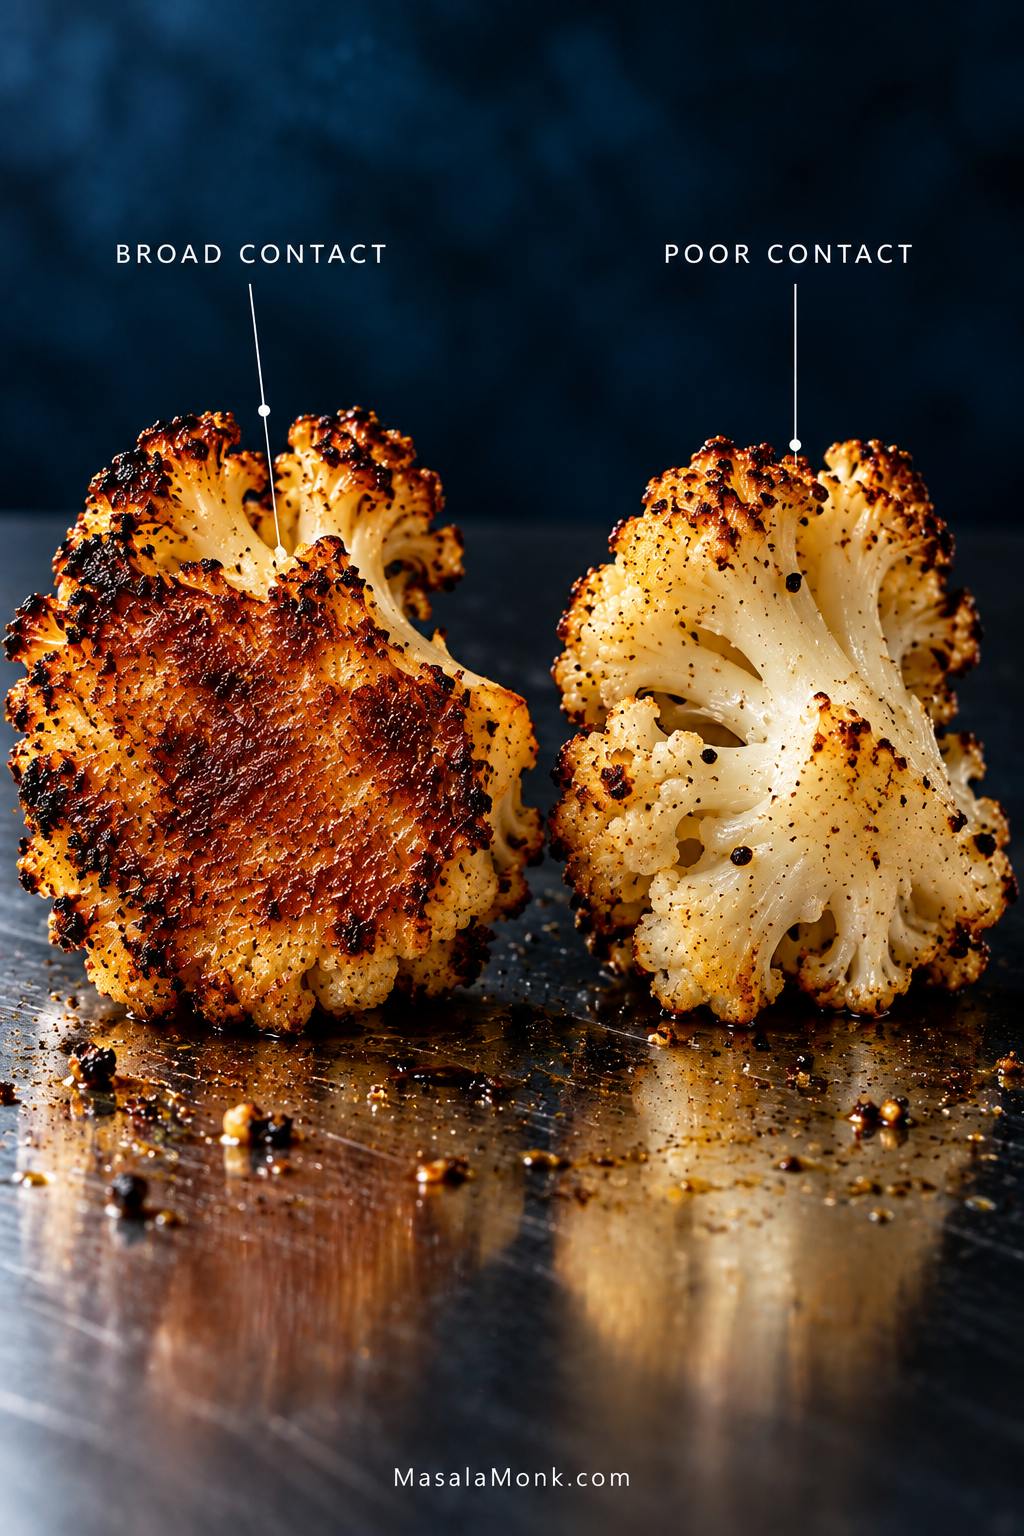
Close-up of a roasted cauliflower floret showing a deeply browned contact surface, dark crisp edges, and a pale tender center, with small labels identifying each texture.
The browned underside should be firm and toasted while the thicker stem still yields easily to a fork.

Make It Now: Crispy Oven-Roasted Cauliflower

Recipe at a Glance

Prep10–15 minutes
RoastUsually 22–30 minutes
TotalAbout 35–45 minutes
Oven425°F / 220°C conventional
RackMiddle
Yield4 generous or 6 smaller side servings

Ingredients

  • 1 medium-large cauliflower, about 2 lb / 32 oz / 900 g whole
  • 2 tbsp / 1 fl oz / 30 ml extra-virgin olive oil, plus another 1 tsp / 5 ml only if needed
  • 3.5–4 g salt; see the equivalents below
  • ½ tsp garlic powder
  • ¼ tsp freshly ground black pepper
  • ¼–½ tsp smoked paprika, optional
  • 1–2 tsp / 5–10 ml fresh lemon juice, optional, plus more to taste
  • Chopped parsley, cilantro or another fresh herb, optional

No scale? For roughly 3.5–4 g salt, use about 1¼ tsp Diamond Crystal kosher salt, about ¾ tsp Morton kosher salt, or roughly ½–⅔ tsp fine or table salt. Different crystal sizes mean these salts are not interchangeable by volume.

The Pan Matters

Use a large, sturdy, rimmed metal sheet pan, ideally light-colored uncoated aluminum, about 18 × 13 in / 46 × 33 cm. A dark nonstick sheet browns food faster, so check the cauliflower sooner if that is what you use.

Instructions

1. Heat the Oven

Put a rack in the middle position and heat a conventional oven to 425°F / 220°C. The regular Bake setting is all you need.

2. Rinse and Cut for Better Browning

Rinse the cauliflower under cool running water, then shake off the excess. Remove the leaves and thick base of the core, and cut the cauliflower into roughly 1–1½ inch / 2.5–4 cm florets. Slice larger florets through the stem so each gets a broad flat side.

Using pre-cut florets? Halve the biggest pieces so the tray cooks more evenly, and pat away any condensation before seasoning. The tender inner stem is edible too; cut it into bite-size pieces and roast it with the florets.

Raw cauliflower florets on a dark blue preparation surface beside a chef’s knife, including a larger floret cut through the stem to reveal its broad flat side and pieces around 1 to 1½ inches in size.
A broader cut face gives the thicker part of each floret somewhere useful to brown, so the tips are not doing all the roasting while the body stays pale.

3. Dry, Oil and Season

Dry the cauliflower very thoroughly before adding oil. A kitchen towel works well; a salad spinner is handy for a larger batch.

Put the florets in a large bowl and add 2 tbsp / 30 ml olive oil, the salt, garlic powder, black pepper and optional paprika. Toss until the stems and branches have a light, even sheen.

Add another 1 tsp / 5 ml oil only if obvious dry patches remain. There should not be a puddle at the bottom of the bowl.

4. Give Every Floret Some Room

Spread the cauliflower in one loose layer, leaving visible gaps. Put the broad cut sides against the metal wherever possible.

Roasting two heads? Use two pans.

5. Leave the First Side Alone

Roast for 15 minutes without stirring or shaking the tray.

Lift one of the larger pieces. The underside should be broadly golden, with darker patches gathering around the edges—closer to deeply toasted bread than steamed cauliflower.

Already well browned? Turn the larger florets. Still pale or damp underneath? Give them another 3–5 minutes before turning.

A spatula lifts one roasted cauliflower floret above a metal sheet pan, revealing a broad golden-brown underside while other florets remain spaced across the tray.
A broad golden patch means the first side has done its job; pale and damp means leave it against the pan a little longer.

6. Turn Once and Finish

Turn the larger florets and rotate the pan. Roast for another 7–12 minutes. If the first side needed an extra 3–5 minutes to brown, start checking the stems toward the early end of that range.

A fork should slide readily into a thicker stem while the floret still holds together. Darker branch tips are part of the roast, not something to fear.

Most dry, well-spaced trays finish in about 22–30 minutes. A wetter head, larger pieces or a cooler-running oven can push the total a few minutes beyond that.

7. Finish While It Is Hot

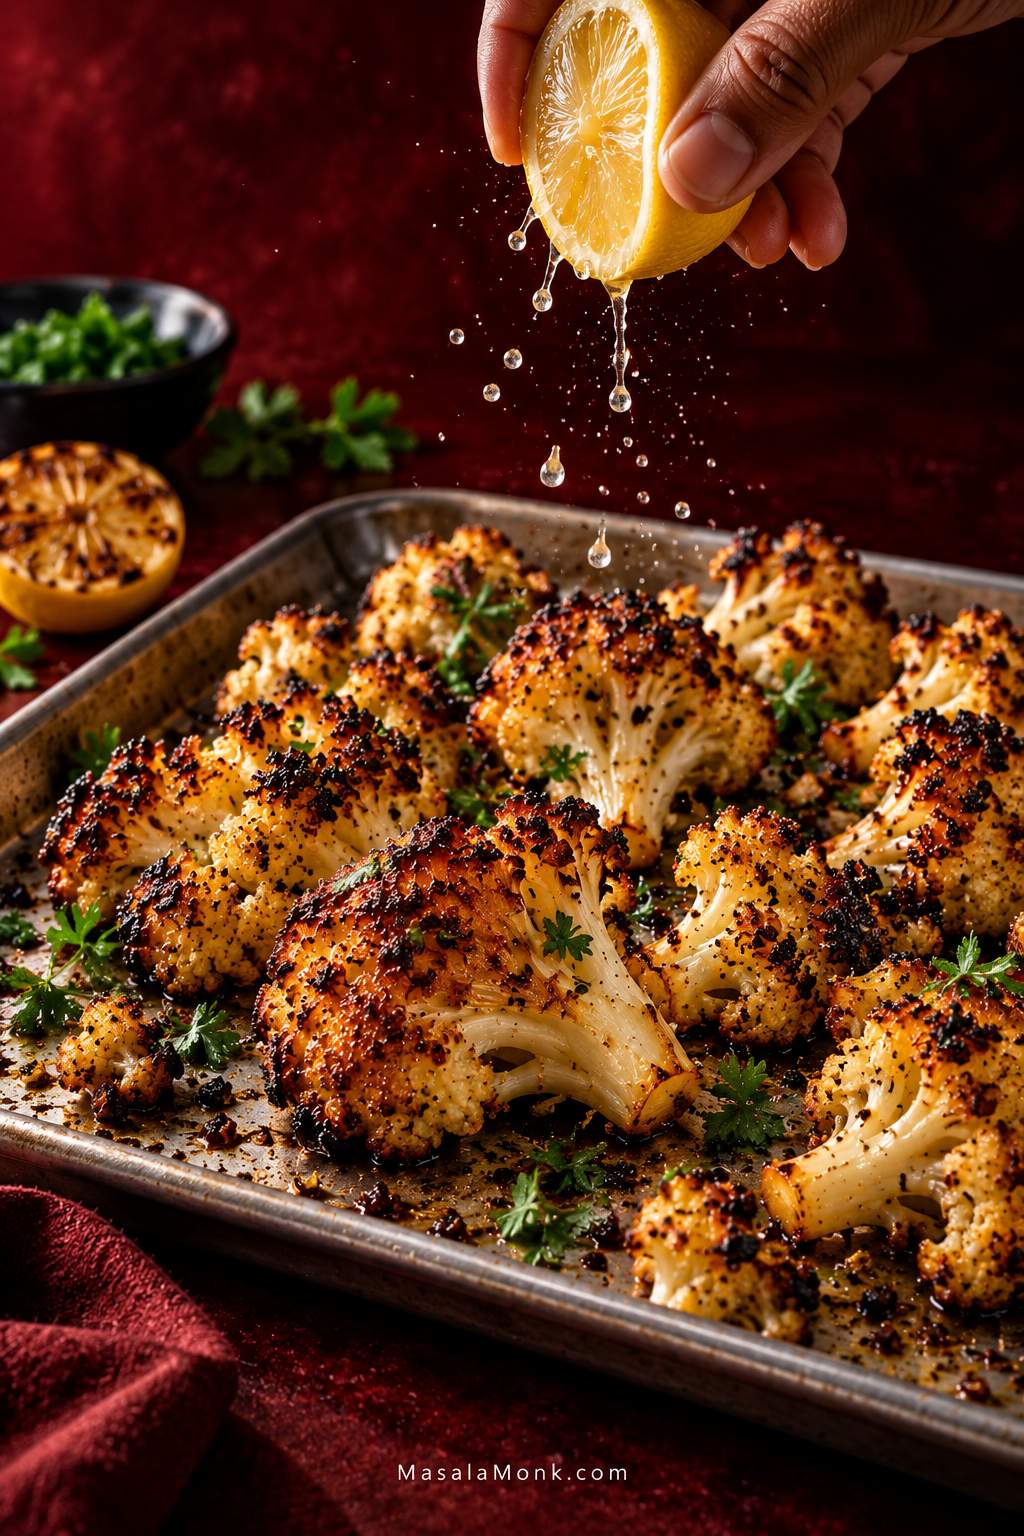
Taste before adding more salt. Then squeeze over 5–10 ml lemon juice if you like. The acidity brightens the sweet, toasted flavor without turning the cauliflower into a wet, saucy side.

Add fresh herbs now too. For stronger garlic flavor, grate a small amount of fresh garlic over the hot cauliflower rather than exposing tiny pieces to the entire high-heat roast.

A hand squeezes a lemon half over deeply roasted cauliflower on a metal tray, with small lemon droplets falling onto browned florets against a dark burgundy background.
Lemon hits differently on a hot tray: the aroma lifts immediately while the deeply roasted flavor stays underneath.

Doneness beats the timer. The clock tells you when to look. Color and stem tenderness tell you when to stop.

Once those cues make sense, cauliflower becomes much less temperamental. From there, the useful questions are why one tray browns while another steams, how oven temperature changes the result, and what can still be rescued when dinner is not going to plan.

What Makes Roasted Cauliflower Crispy and Brown?

Browning starts once surface moisture has evaporated and a broad side stays against hot metal long enough to toast. That is why drying, spacing and cut shape matter more than simply turning the oven hotter.

Why Wet Cauliflower Stays Pale

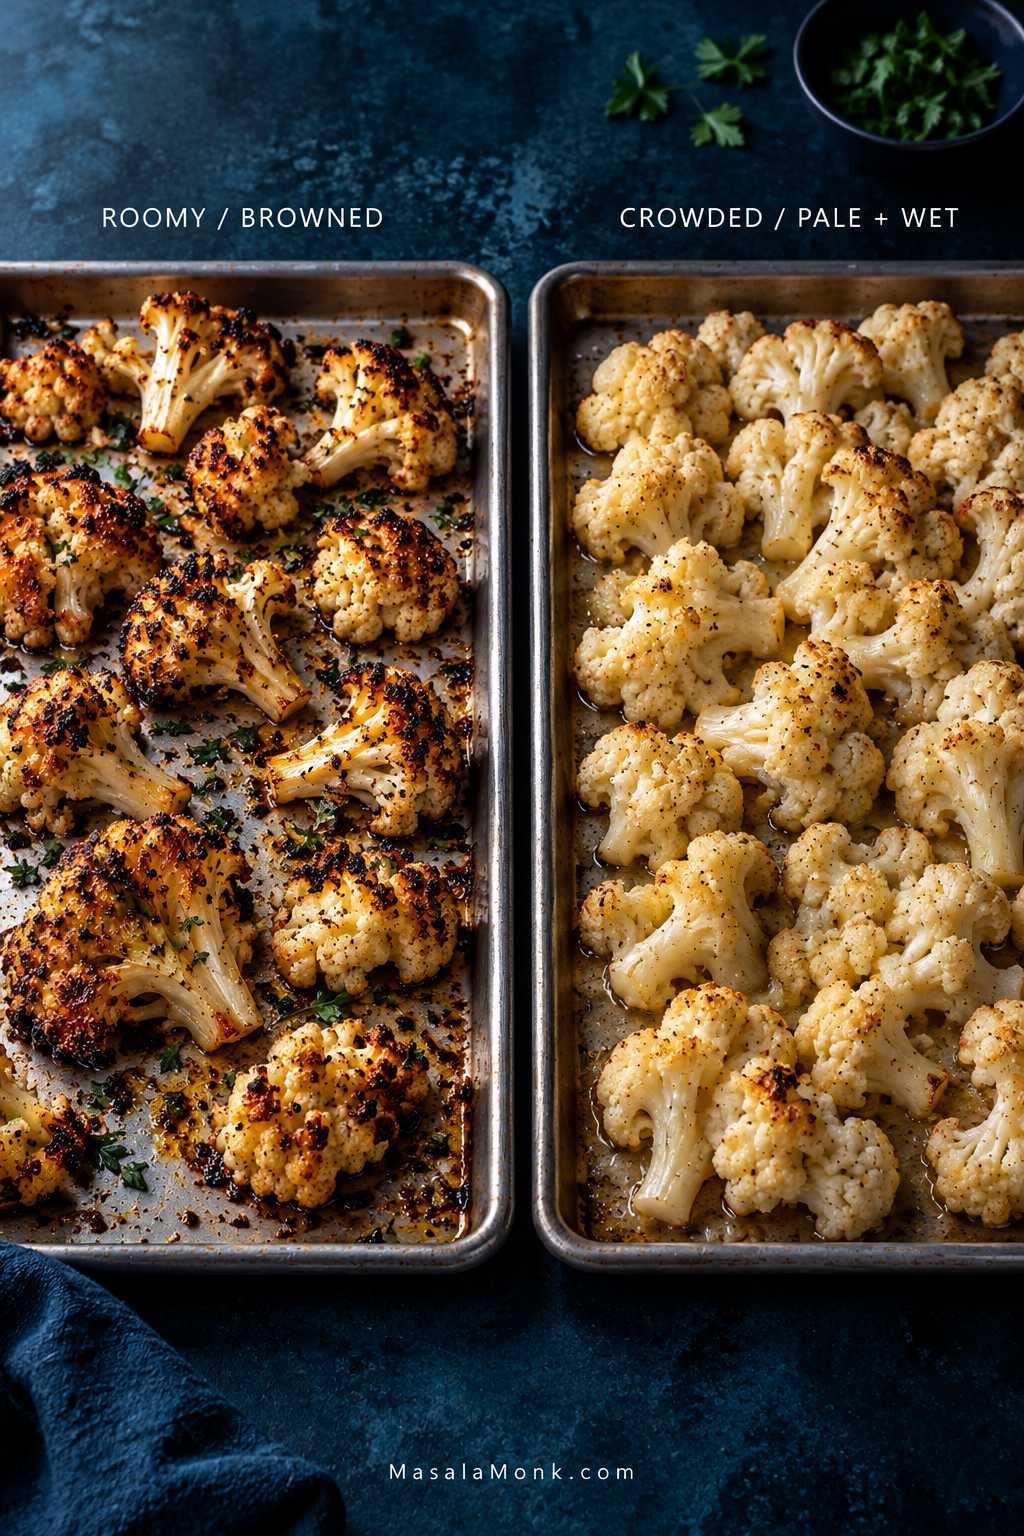
Pack the pan tightly and even a 450°F / 230°C oven can leave cauliflower steaming in its own moisture. Water left from washing has to evaporate before the surface can really brown, and crowded florets release still more moisture into the same small space.

A second sheet pan often helps more than another 15 minutes in the oven.

Two roasting trays compare cauliflower spacing: one has widely separated florets with deep browning, while the other has crowded florets that look paler and softer.
If one tray stays pale despite a hot oven, check the spacing before blaming the temperature. Crowded florets hold steam around one another, while open space gives browning a chance to begin.

Why the Tips Burn Before the Rest Browns

You may have seen it already: the tips are nearly black while most of the floret is still pale. Those delicate branches sit directly in hot oven air, while the side against the pan gets steady heat from the metal.

Slice a large floret through the stem and you give that pale body a broad surface that can actually toast against the pan.

Why the Flat Side Belongs Against the Pan

For the darkest crust underneath, bare metal works best. Foil is a useful cleanup compromise, while parchment gives a gentler underside. Serious Eats similarly recommends a sturdy uncoated pan, plenty of space and direct contact for stronger browning.

The oil should leave a light sheen, not a puddle. Too much pushes the cauliflower toward greasy and soft.

Then leave it alone. Turn once for more even color, or keep that first side against the pan longer when you want a darker crust.

Two roasted cauliflower florets are shown from below; one has a wide caramelized brown contact patch from a flat pan-facing side, while the other has much less browning.
Metal contact browns differently from hot circulating air, which is why a broad pan-facing surface can develop a much deeper crust than the branching sides.

Roasted Cauliflower Time & Temperature

Roast medium cauliflower florets at 425°F / 220°C for about 22–30 minutes, checking the underside after the first 15 minutes. At 400°F they brown more gently; at 450°F they color faster.

SettingTypical RangeBest For
400°F / 200°CAbout 28–35 minGentler roasting or sharing the oven with another dish
425°F / 220°CUsually 22–30 minA good balance of browning and tenderness
450°F / 230°CAbout 20–30 minFaster, darker browning
Fan / convectionUse your oven’s usual convection conversion; start checking around 15–18 minFaster surface browning

Dinner Is Already at 400°F? Keep It There

Chicken, fish or a casserole already has the oven at 400°F / 200°C? Leave it there. Give the cauliflower a roomy pan and expect the color to build more slowly, usually over about 28–35 minutes.

If chicken is sharing the oven, 425°F is convenient: our baked chicken breast uses the same temperature, so each dish can cook on its own pan.

At 450°F / 230°C, watch the tray more closely. The edges darken faster, and fine spices or bits of fresh garlic have less time before they scorch.

Using convection? Start checking around 15–18 minutes. Use your oven’s usual convection conversion if it calls for one.

Look at the Cauliflower, Not Just the Clock

Pull the tray earlier if you like more bite. For the crisp-tender middle ground, wait until a fork goes in easily and the underside has strong brown patches. If you prefer very tender cauliflower, keep going—but stop before the florets begin collapsing.

The smell shifts too. As roasting continues, the sharper brassica aroma softens and the tray begins to smell sweeter, nuttier and properly toasted.

Seasoning Roasted Cauliflower

Once the cauliflower itself is well browned, it does not need much help. Keep the oil and salt from the basic recipe, then choose the direction that sounds right for dinner.

FlavorAdditional Flavor AdditionsFinish With
Black Pepper + Lemon¼ tsp black pepper1–2 tsp / 5–10 ml lemon juice or zest
Smoked Paprika + Lemon½ tsp smoked paprika + ¼ tsp black pepper1–2 tsp / 5–10 ml lemon juice
Cumin + Coriander½ tsp ground cumin + ½ tsp ground corianderCilantro + 1–2 tsp / 5–10 ml lemon juice
Turmeric + Chile + Lime½ tsp cumin + ¼ tsp turmeric + pinch of chileCilantro + 1–2 tsp / 5–10 ml lime juice
Four portions of roasted cauliflower in jewel-toned dishes labeled black pepper and lemon, smoked paprika and lemon, cumin and coriander, and turmeric with chile and lime.
Once the roast itself is right, seasoning becomes a choice of direction rather than a rescue—bright lemon and pepper, smoky paprika, warm cumin and coriander, or sharper chile and lime.

If you want cauliflower with a fuller Indian spice profile, aloo gobi pairs it with potatoes, cumin and turmeric in a more substantial dish.

When Garlic or Spices Turn Bitter

Bitter dark specks usually mean fresh garlic or fine spices scorched during the high-heat roast. More seasoning will not fix that.

Garlic powder is more forgiving for the full roast. Add fresh herbs, lemon juice, grated fresh garlic and most sauces after the cauliflower comes out or very near the end.

How to Roast Frozen Cauliflower Without Making It Mushy

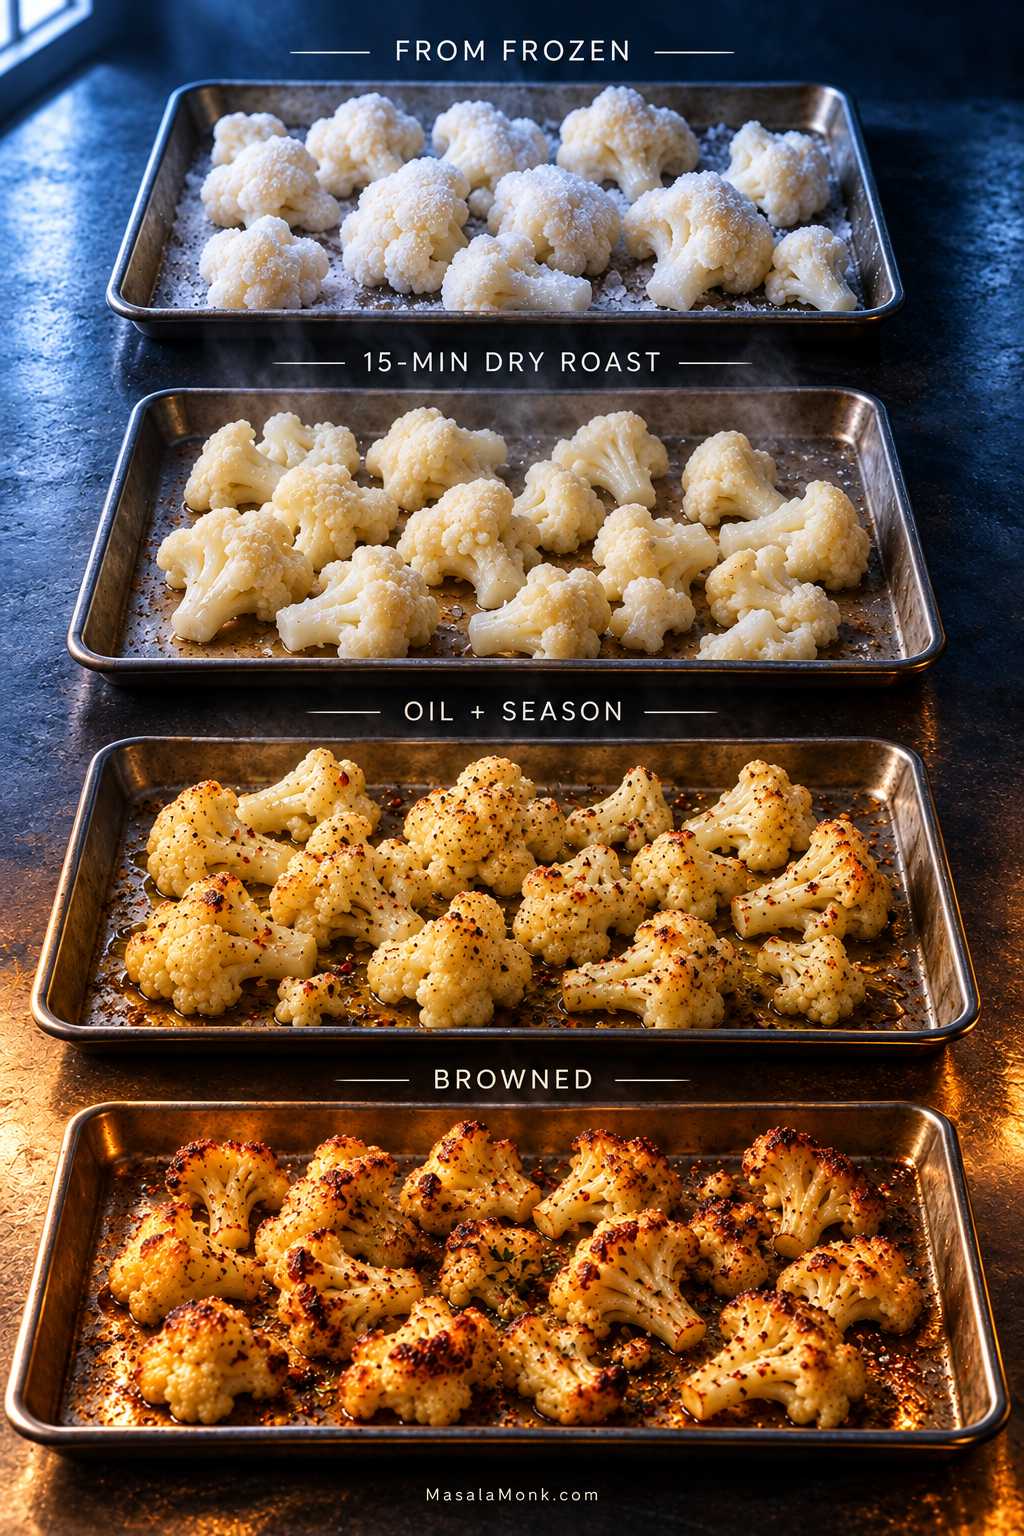
Yes. Roast frozen cauliflower straight from frozen—do not thaw it first. For a 1 lb / 16 oz / 450 g bag, use 425°F / 220°C: roast for 15 minutes first, then season and continue for another 15–20 minutes.

A vertical four-stage sequence showing frozen cauliflower, partially roasted florets after a 15-minute dry roast, seasoned florets with a light oil coating, and finished browned cauliflower.
Frozen cauliflower needs a different order of operations: first let excess surface moisture escape, then add oil and seasoning so the second stage can build better roasted color.
  1. Spread the frozen florets in one uncrowded layer. Lightly greased bare metal gives the strongest browning; foil is a useful compromise, while parchment gives easier release but gentler color.
  2. Roast for 15 minutes without oil or seasoning.
  3. Toss with 1 tbsp / 15 ml olive oil, about 2 g salt—roughly half the fresh-recipe salt amount, ¼ tsp garlic powder and ⅛ tsp black pepper, then spread the florets out again.
  4. Roast for another 15–20 minutes, until browned and tender.

Expect about 30–35 minutes total. Frozen cauliflower will usually be softer than fresh, but the edges should still pick up good roasted color.

When Roasted Cauliflower Goes Wrong

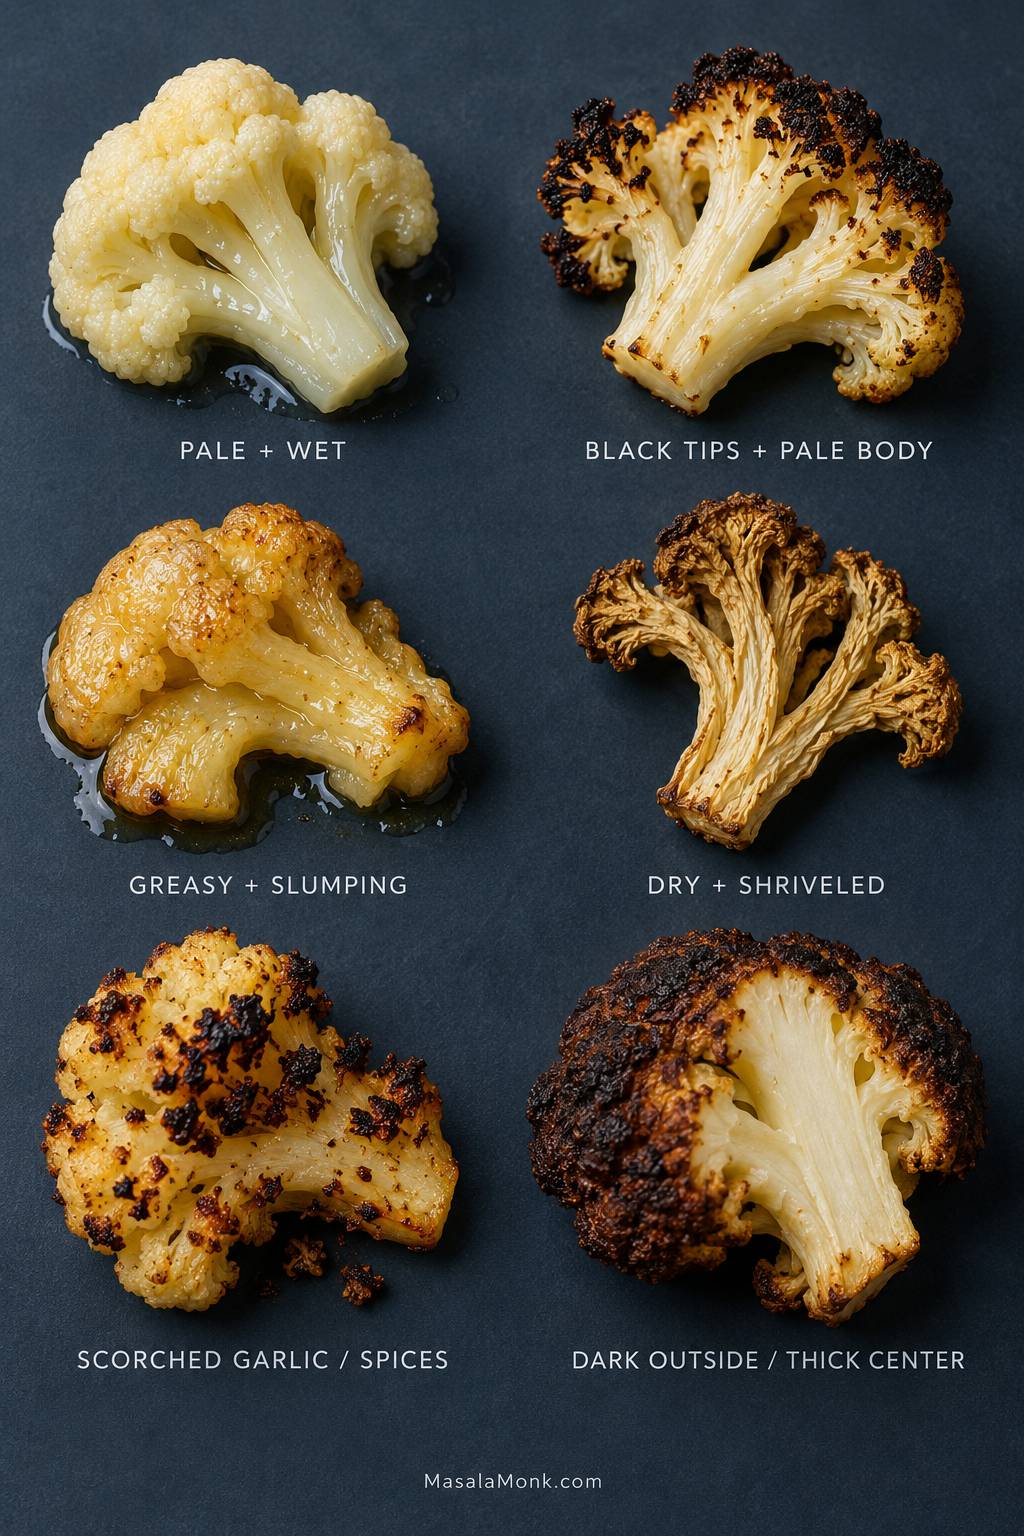
Pale and wet, tender but pale, black at the tips, greasy, shriveled—those trays may all look disappointing, but they are not the same problem.

A visual guide showing six roasted cauliflower problems: pale and wet florets, black tips with a pale body, greasy slumping florets, dry shriveled florets, scorched garlic or spices, and dark exteriors around a thick pale center.
Start with the visual symptom that looks closest to your tray, then work backward through the troubleshooting table to find the likely cause and the quickest useful response.
What You See or TasteWhat It Usually MeansWhat to Do
Pale + wetToo much moisture or crowdingSpread the pieces farther apart and continue roasting
Tender + paleThe inside cooked before enough color developedUse a brief broiler finish
Black tips + white bodyThe tips browned in hot air but the body had poor pan contactCreate broader flat sides and put them against the pan next time
Hard center + dark exteriorPieces are too large or uneven, or the oven runs hotCut more evenly and give thick stems enough time
Greasy + softToo much oilUse a lighter coating next time
Dry + shriveledSmall pieces, uneven oil coverage or too much timeCoat more evenly and pull the tray sooner
Bitter dark specksGarlic or spices scorchedAdd vulnerable aromatics later
Strong sulfur smell + collapsing floretsThe cauliflower has gone too farPull the next tray earlier
Timing is way offFloret size, pan color, convection, crowding or oven calibrationAdjust when you start checking; if it keeps happening, verify the oven temperature

Can You Rescue the Tray You Have?

Tender but pale: give it a short broiler finish and watch continuously. If the pan is lined with parchment, remove the parchment first, and follow the heat limits for any liner you use.

Wet but still fairly firm: spread the pieces farther apart—onto a second hot pan if necessary—and continue roasting.

Already mushy: stop trying to crisp it. Turn the batch into soup, mash or curry, or add a smooth homemade cheese sauce and let that softness work for the dish.

Pale cauliflower can often be browned. Overcooked cauliflower cannot be uncooked.

Once the tray is right, the contrast is obvious: toasted edges, tender stems and that sweeter roasted smell that was missing when the cauliflower was still steaming.

Turn Roasted Cauliflower Into Dinner

Roasted this deeply, cauliflower does not have to sit at the edge of dinner as the obligatory vegetable. Keep it simple with lemon and black pepper alongside chicken, fish, beans or lentils, or make it part of the meal itself with grains and something cool and crunchy.

When you want a heartier roasted side, roasted cauliflower and potatoes gives the cauliflower a more substantial partner without burying its browned edges.

A handful of roasted florets also fits naturally beside warm rice, cucumber and avocado in a salmon bowl. Those browned edges bring enough flavor to hold their own among the other components.

Add Sauce Without Softening Every Edge

Tahini-lemon sauce, garlicky yogurt, romesco, pesto or chimichurri all work with the toasted sweetness of cauliflower.

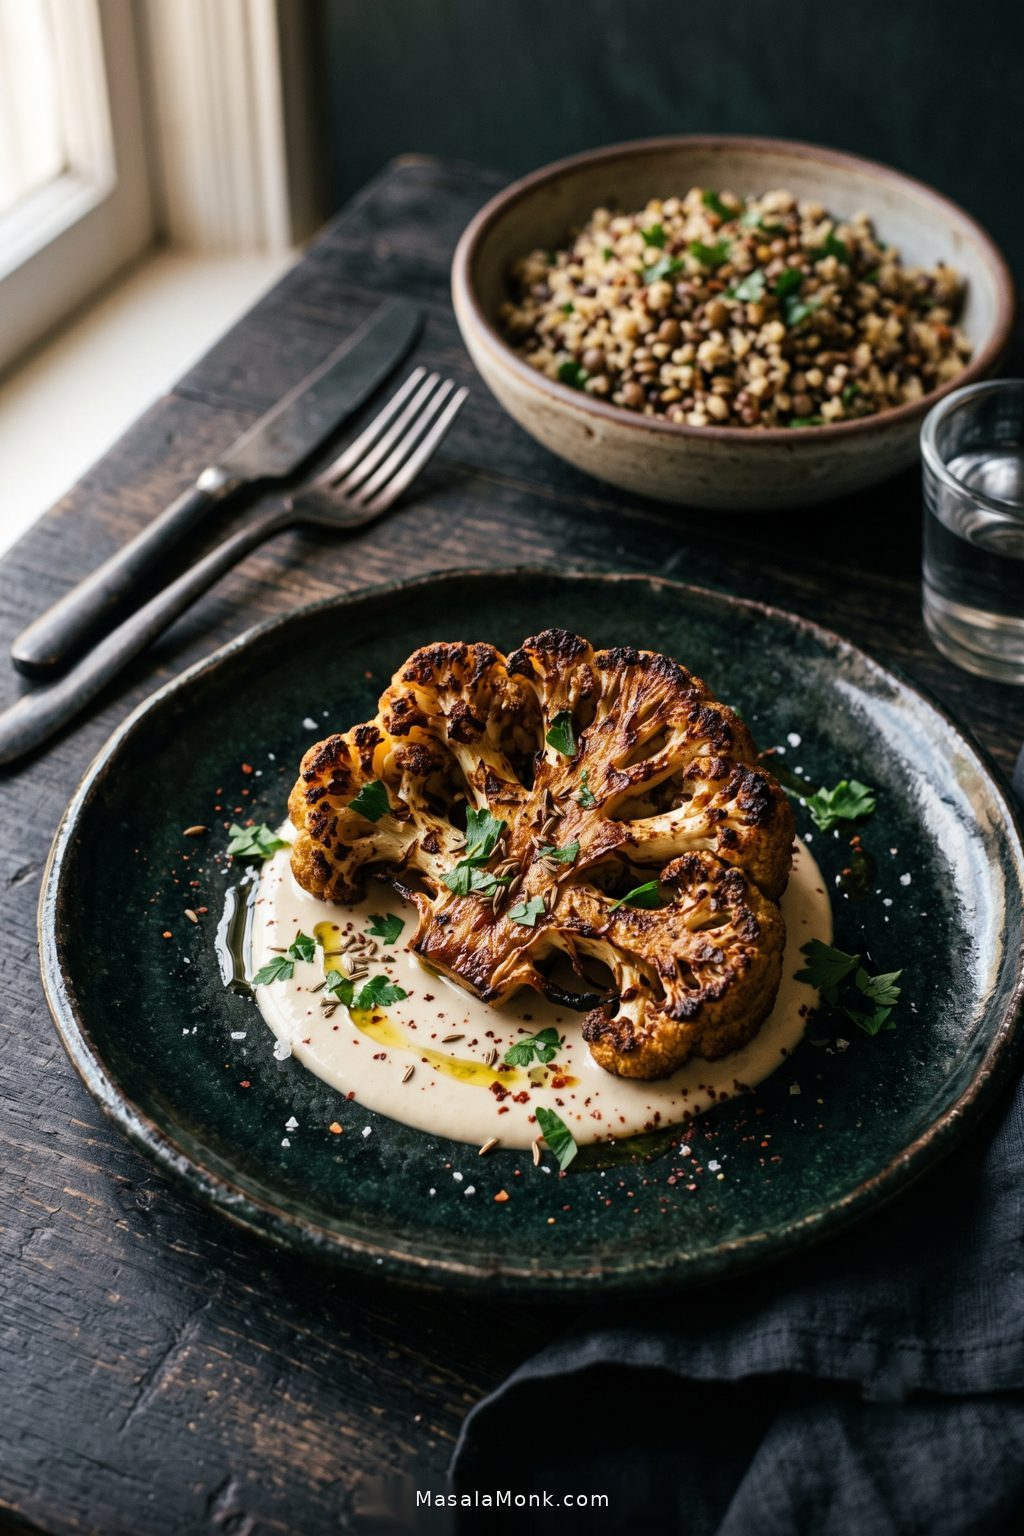
A dark ceramic plate of deeply roasted cauliflower served with pale sauce underneath and beside the florets, with a fork and subtle dinner components softly visible behind the plate.
Treat sauce as contrast rather than camouflage: leave enough roasted surface exposed that the cauliflower’s browned edges still register in every bite.

Spoon the sauce underneath, drizzle lightly, or serve it alongside. Those crisp edges soften quickly once they sit in moisture.

How to Store and Reheat Roasted Cauliflower

Store roasted cauliflower in the refrigerator and use it within about 3–4 days. Transfer leftovers to a shallow container and refrigerate promptly; you do not need to wait for them to cool all the way to room temperature.

Let the first rush of steam escape briefly before sealing the container tightly. USDA guidance recommends refrigerating cooked leftovers within 2 hours.

The Best Ways to Reheat It

  • Air fryer: about 375°F / 190°C for 3–5 minutes for a small portion.
  • Oven: spread it out and heat at about 400°F / 200°C for 8–12 minutes.
  • Skillet: medium to medium-high heat for roughly 4–6 minutes.
  • Microwave: heat in short bursts until hot. It is quickest, but the edges will be softer.

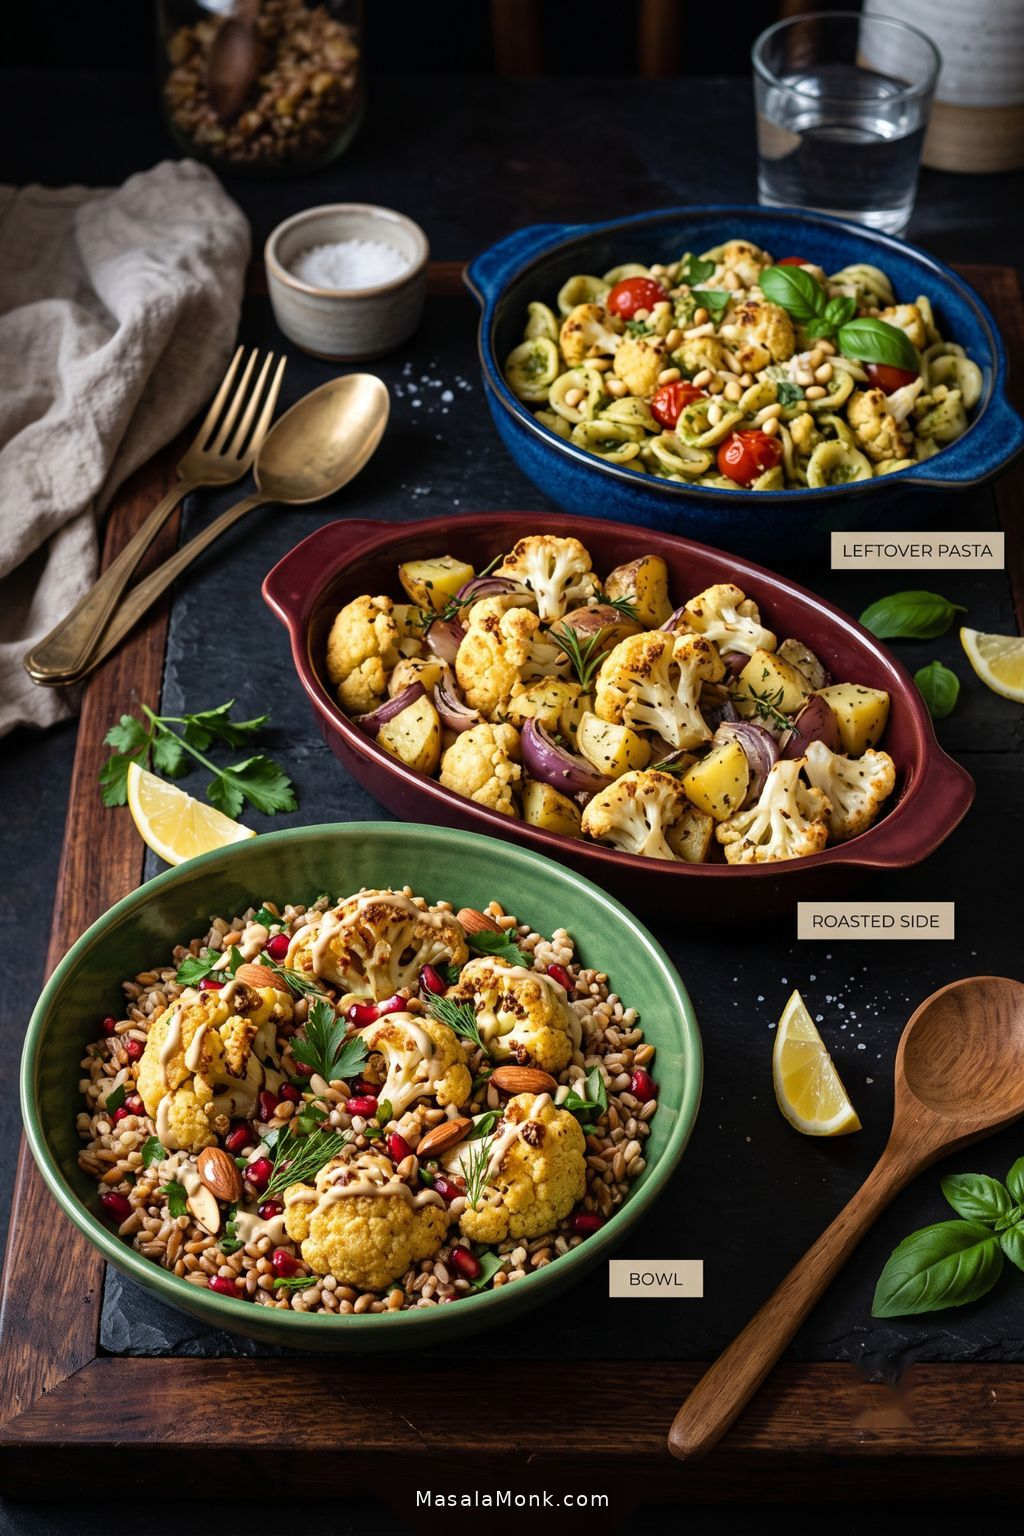
Once the crisp edges soften, leftovers are still useful in dishes where roasted flavor matters more than crunch. Roughly chop the florets and fold them into pesto pasta, grain bowls or salads instead of treating reheating as the only option.

Three serving ideas featuring roasted cauliflower: a grain bowl, a plate of roasted cauliflower with potatoes, and pesto pasta containing chopped roasted cauliflower.
The roast keeps paying off after the first meal because its concentrated flavor survives even when some crispness fades—use it in bowls, heartier vegetable plates, or leftover pasta.

A Few Common Roasted Cauliflower Questions

1. Do You Need to Boil Cauliflower Before Roasting?

No. Medium florets become tender during the 425°F / 220°C roast without boiling or blanching first.

Parcooking is useful only when you deliberately want an unusually soft center; otherwise it creates more moisture to deal with before browning begins.

2. Is Roasted Cauliflower the Same as Baked Cauliflower?

Baked cauliflower and roasted cauliflower often describe the same basic method when plain florets are cooked uncovered in a hot oven. In that sense, this works as a straightforward baked cauliflower recipe too.

A cauliflower bake can mean something quite different: a creamy or cheesy casserole made with sauce, breadcrumbs or other ingredients.

3. Can I Roast Two Heads of Cauliflower at Once?

Yes. Use two large sheet pans rather than squeezing both heads onto one.

If both pans are in the oven together, swap their positions and rotate them partway through if your oven browns unevenly.

4. Can I Make This Roasted Cauliflower Recipe Ahead?

Yes. Cut the florets ahead and refrigerate them in a covered container. Keep them dry and check for condensation before roasting.

Add the oil and seasonings shortly before the tray goes into the oven. Fully roasted cauliflower reheats well too, although its crispest edges will always be on the freshly roasted batch.

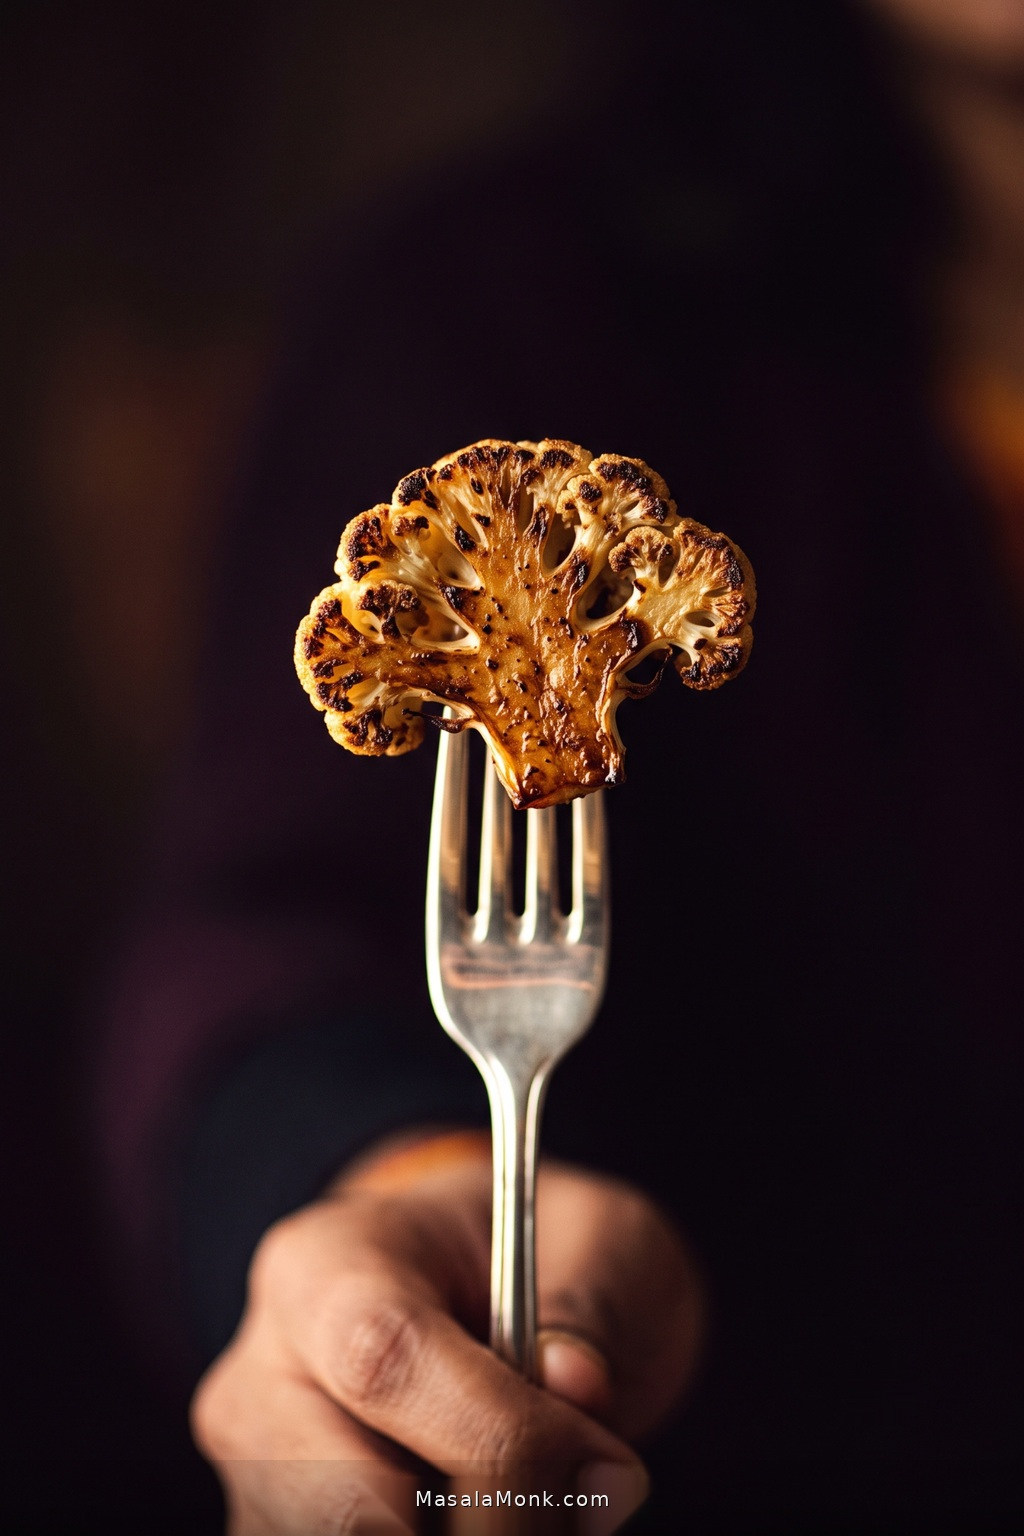
The finished tray should look a little more roasted than many people instinctively expect: proper brown patches underneath, darker tips and stems that yield to a fork without collapsing.

A silver fork lifts one deeply roasted cauliflower piece toward the viewer, showing dark browned edges and a pale tender interior against a deep plum background.
That first hot bite is the payoff, when the roasted edges are deepest, the centers are still tender, and the contrast between the two is at its sharpest.

Add the lemon while everything is still hot and get it onto the table. The darkest pieces rarely stay there for long.

Posted on — Leave a comment

Roast Turkey Recipe: How to Cook a Juicy Turkey in the Oven

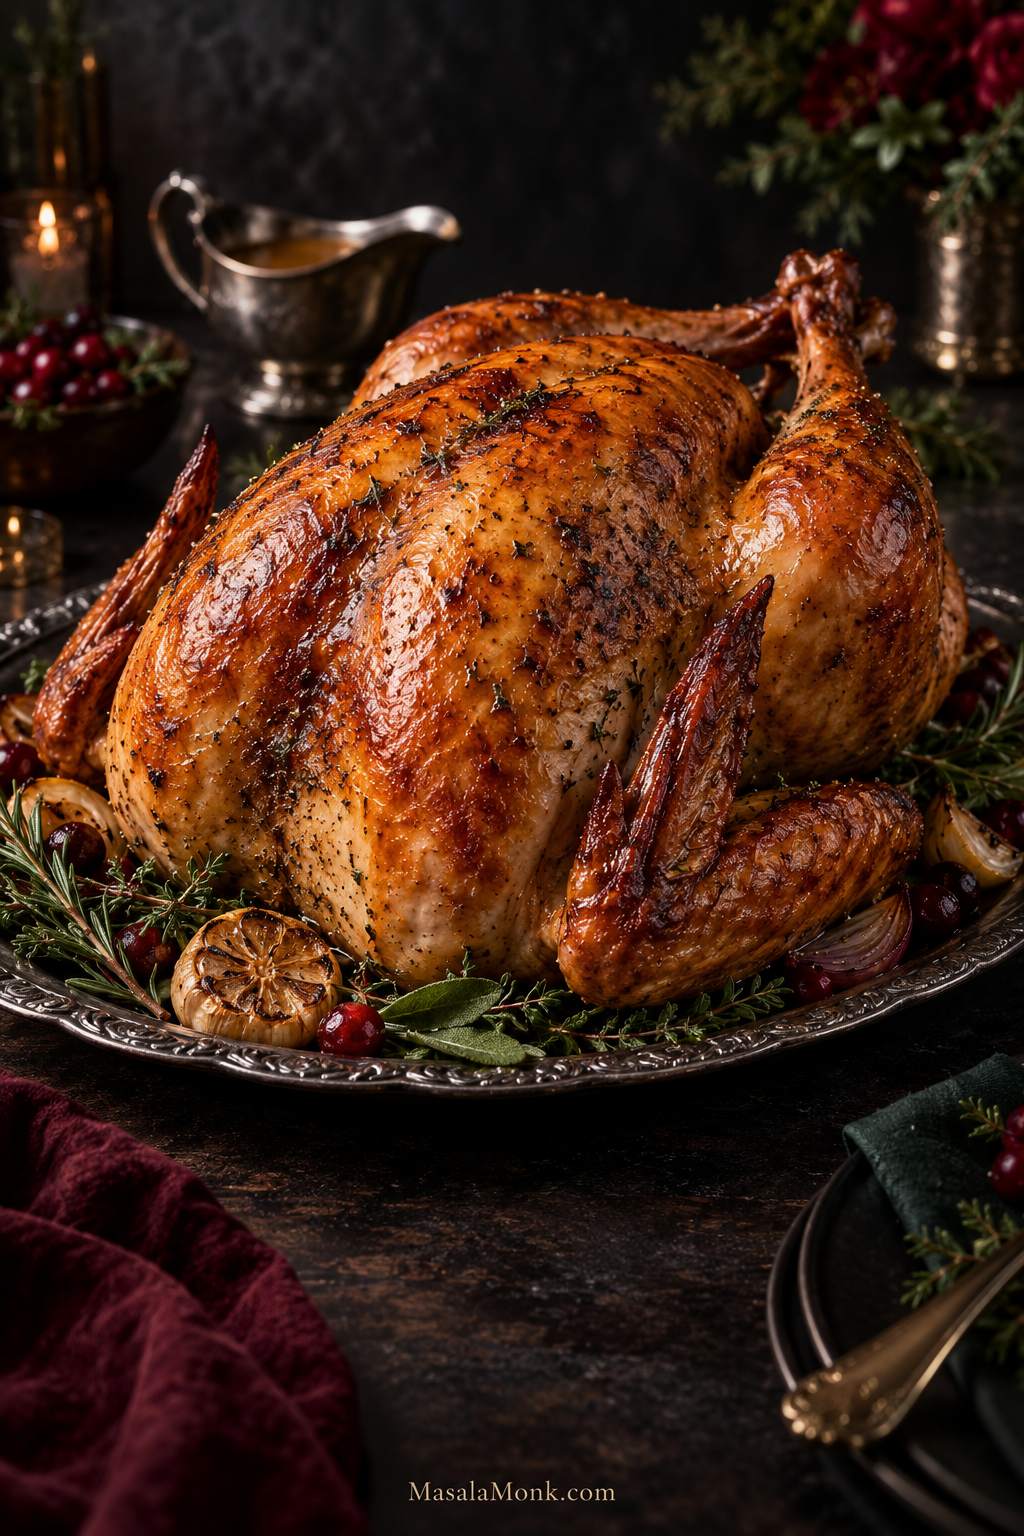
Whole roasted turkey on a dark serving platter with deeply browned, crisp-looking skin, roasted herbs, gravy in the background, and dramatic warm lighting.

A turkey can look finished before it is actually ready. The breast is deeply browned, dinner is getting close, and then the thermometer says one thigh still has a way to go. That mismatch—lean breast attached to slower-cooking dark meat—is most of what makes a whole turkey tricky.

Most of us do not get many practice runs with a whole turkey. It is big, expensive enough that you care about getting it right, and usually the one dish everyone else is waiting for.

This roast turkey recipe keeps the cooking straightforward: roast breast-side up at 325°F / 163°C, keep the skin dry, skip routine basting, and start checking before you expect the bird to be finished. The target is breast meat that still glistens when sliced, tender thighs, bronzed skin with crisp edges, and savory drippings ready for gravy. The turkey here is 12–14 lb / 5.4–6.4 kg; the timing table also covers other common sizes.

Quick Answer: How to Cook a Juicy Turkey in the Oven

For this roast turkey recipe, cook a 12–14 lb / 5.4–6.4 kg unstuffed turkey at 325°F / 163°C for about 3–3¾ hours. Begin checking around 2½ hours, and remove the turkey only after the thickest breast, inner thigh and inner wing area have each reached at least 165°F / 74°C. Rest for 30–45 minutes before carving.

Start with a fully thawed bird and read the package before adding salt. Pat the turkey dry, season according to how much time you have, spread herb butter beneath the breast skin, and keep the cavity aromatics loose.

Before roasting: thaw completely and check whether the turkey is already salted or enhanced.
Position: breast-side up, with room around the legs.
Covering: mostly uncovered; foil once the skin has enough color.
Basting: optional.
Doneness: use the thermometer for the final decision.
Rest: 30–45 minutes.

The clock plans dinner. The thermometer decides when the turkey is done.

Even when the timing is not predictable, the basic roast is simple: get the salt right, dry the skin, roast steadily, protect the breast once it is brown enough, and check the temperature in the right places.

If the breast finishes first, loosely shield it and let the thighs keep cooking.

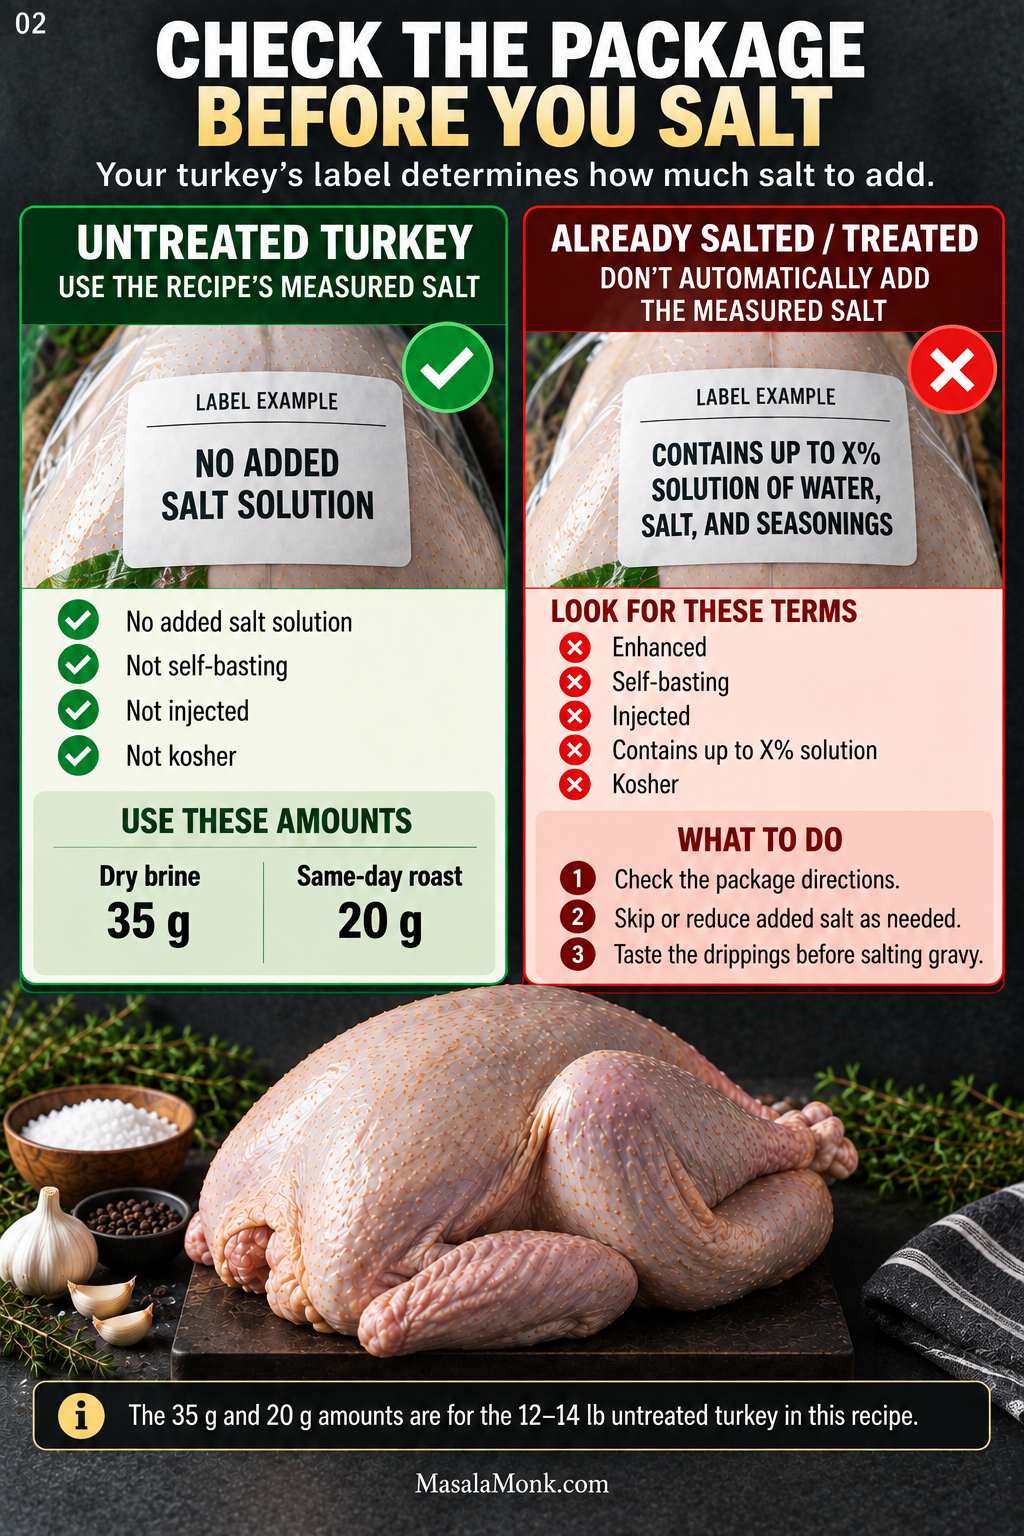
Before You Salt It: Check the Label

Untreated turkey: no added salt solution and not kosher. Use the measured salt amounts in this recipe.

Self-basting, enhanced, injected, or “contains up to X% solution”: salt has already been added during processing.

Kosher turkey: salting is already part of the processing.

Do not use the measured 35 g or 20 g salt amounts on an enhanced, injected, self-basting or kosher turkey unless its package specifically directs you to add more salt. Use the unsalted herb butter, herbs and pepper, then taste the drippings before seasoning the gravy.

Instructional graphic comparing an untreated turkey with an already salted or treated turkey, including measured salt amounts for dry-brine and same-day seasoning.
A quick label check can prevent the easiest turkey mistake to make: giving the full recipe salt to a bird that was already salted during processing.

Roast Turkey Recipe

A whole herb-butter turkey with bronzed skin, juicy breast meat, tender dark meat and plenty of flavorful drippings for gravy.

Prep: about 30 minutes
Preferred dry brine: 24–48 hours
Turkey: 12–14 lb / 5.4–6.4 kg
Oven: 325°F / 163°C
Approximate roast time: 3–3¾ hours
Start checking: about 2½ hours
Rest: 30–45 minutes
Serves: about 8–12

Ingredients

  • 1 whole turkey, 12–14 lb / 5.4–6.4 kg, completely thawed
  • For dry-brining (12–48 hours; 24–48 preferred): about 35 g kosher salt, for an untreated turkey only
  • For same-day seasoning: about 20 g kosher salt, for an untreated turkey only
  • 8 tbsp / 4 oz / 113 g unsalted butter, very soft
  • 1 tbsp / 15 ml olive oil or neutral oil
  • 4 garlic cloves, finely grated or minced
  • 1 tbsp finely chopped fresh rosemary
  • 1 tbsp finely chopped fresh thyme
  • 1 tbsp finely chopped fresh sage
  • 1 tsp freshly ground black pepper
  • 1 medium onion, quartered
  • 1 lemon, quartered
  • ½ head garlic, cut crosswise
  • A few fresh herb sprigs, optional
  • ½ cup / 4 fl oz / 120 ml unsalted turkey or chicken stock, or water, plus more if the pan begins to dry

Using dried herbs? Use about 1 teaspoon dried herb for each 1 tablespoon fresh rosemary, thyme or sage.

The 35 g and 20 g salt amounts are for the 12–14 lb turkey in this recipe. For a substantially larger or smaller bird, do not simply reuse the same amount.

By volume, 35 g is approximately 4 tbsp + ½ tsp Diamond Crystal or 2 tbsp + 1¼ tsp Morton kosher salt. For 20 g, use roughly 2 tbsp + 1 tsp Diamond Crystal or 1 tbsp + 1¼ tsp Morton. A scale is more dependable because kosher salts vary substantially in density.

Instructions

Prepare and Season

  1. Check the label and choose the seasoning. For an untreated turkey, use 35 g kosher salt when you have at least 12 hours to dry-brine; 24–48 hours is preferred. Cooking within the next several hours? Use the lighter 20 g same-day amount. Skip these measured amounts on enhanced, self-basting, injected or kosher birds unless the package says otherwise.
  2. Dry-brine ahead, when time allows. Pat the turkey dry and distribute the 35 g salt over the exterior, beneath the breast skin and lightly around the cavity. Set the bird on a rack over a rimmed tray or roasting pan, keep the refrigerator at 40°F / 4°C or colder, and place the turkey where raw juices cannot drip onto other food.
  3. Prepare the oven and bird. Position the rack so the turkey will sit near the center of the oven and heat to 325°F / 163°C. Remove the neck, giblets, gravy packet and loose packaging from both cavities, then pat the turkey thoroughly dry. There is no need to bring the whole bird to room temperature; keep it refrigerated until you are ready to season and roast it.
  4. Season. Mix the softened butter with garlic, herbs and pepper. For same-day seasoning, distribute the 20 g salt over the exterior, beneath the breast skin and lightly around the cavity first. Loosen the breast skin, spread most of the herb butter underneath, rub the remainder over the legs and lightly oil the exterior.

Roast and Finish

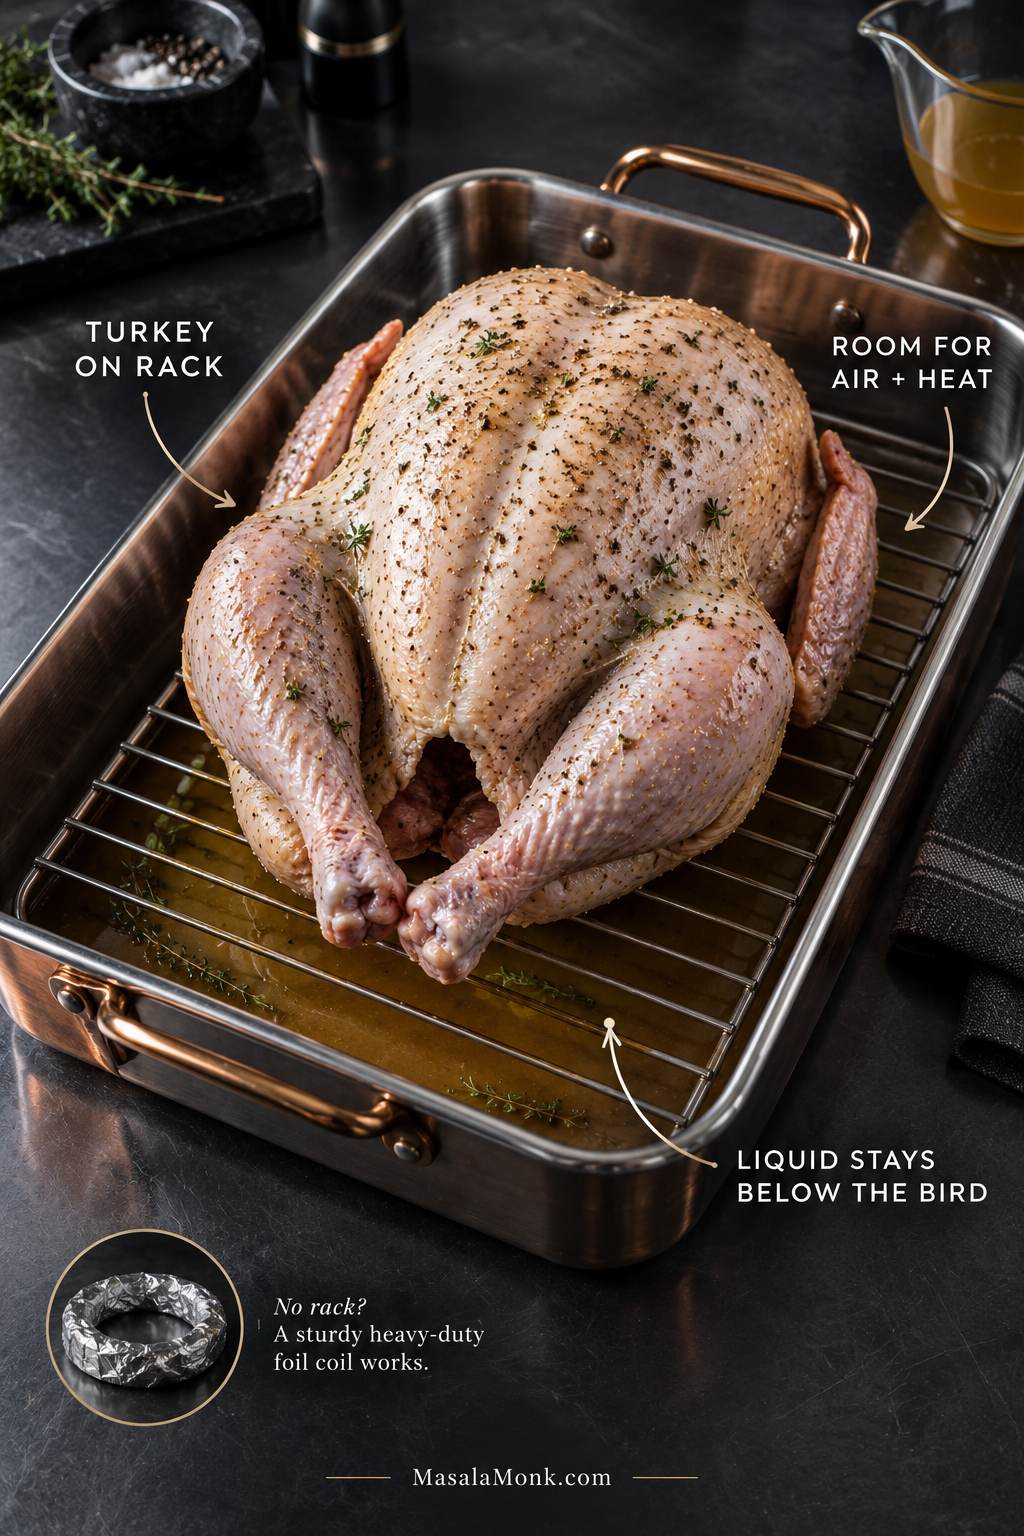
  1. Set it in the pan. Add the onion, lemon, garlic and herbs loosely to the cavity. Tuck the wing tips back, leave the legs fairly loose, place the turkey breast-side up on the rack and pour ½ cup / 120 ml unsalted stock or water into the bottom of the pan. The liquid stays below the rack to keep the drippings from scorching; it is not there to baste or steam the bird.
  2. Roast. Cook mostly uncovered. Once the breast is deeply and evenly bronzed, loosely shield it with foil. Add another ½ cup / 120 ml hot water or unsalted stock if the pan begins to dry or smoke.
  3. Check early. At about 2½ hours, begin checking the thickest breast, thick inner thigh where the leg meets the body, and inner wing area.
  4. Finish and rest. The breast, inner thighs and inner wing areas should all reach at least 165°F / 74°C. When the breast finishes first, shield it while the thighs continue. Rest for 30–45 minutes before carving.

Equipment and Pan Setup

You need a shallow roasting pan, a rack or substitute, a reliable instant-read thermometer, foil, paper towels, sturdy oven mitts and a sharp carving knife. A leave-in probe thermometer, oven thermometer, fat separator, kitchen twine and grooved carving board are useful extras.

Raw whole turkey breast-side up on a rack inside a shallow roasting pan, with a small amount of liquid below the rack and space around the bird.
What matters here is separation: the turkey stays above the liquid, while the small pool underneath protects the flavorful drippings before they scorch.

No rack? Use a sturdy coil of heavy-duty foil, or make a bed from extra onion, carrot and celery pieces. For a smaller turkey, a strong rimmed sheet pan with an oven-safe rack can work if it can safely contain the drippings.

Check the fit before roast day. The turkey should sit roughly in the vertical center of the oven—usually around the lower third—with clear space above and around it. A 20-pound turkey is a bad time to discover that the pan barely clears the oven door.

Need help with a specific part? Thawing · Salt · Prep · Time & Temperature · Thermometer · Browning & Foil · Troubleshooting · Rest & Carve

Plan the Turkey Backward From Dinner

A whole turkey needs more than oven time. It has to thaw, perhaps dry-brine, roast and then rest before carving. Work backward from dinner and leave some room for the bird to surprise you.

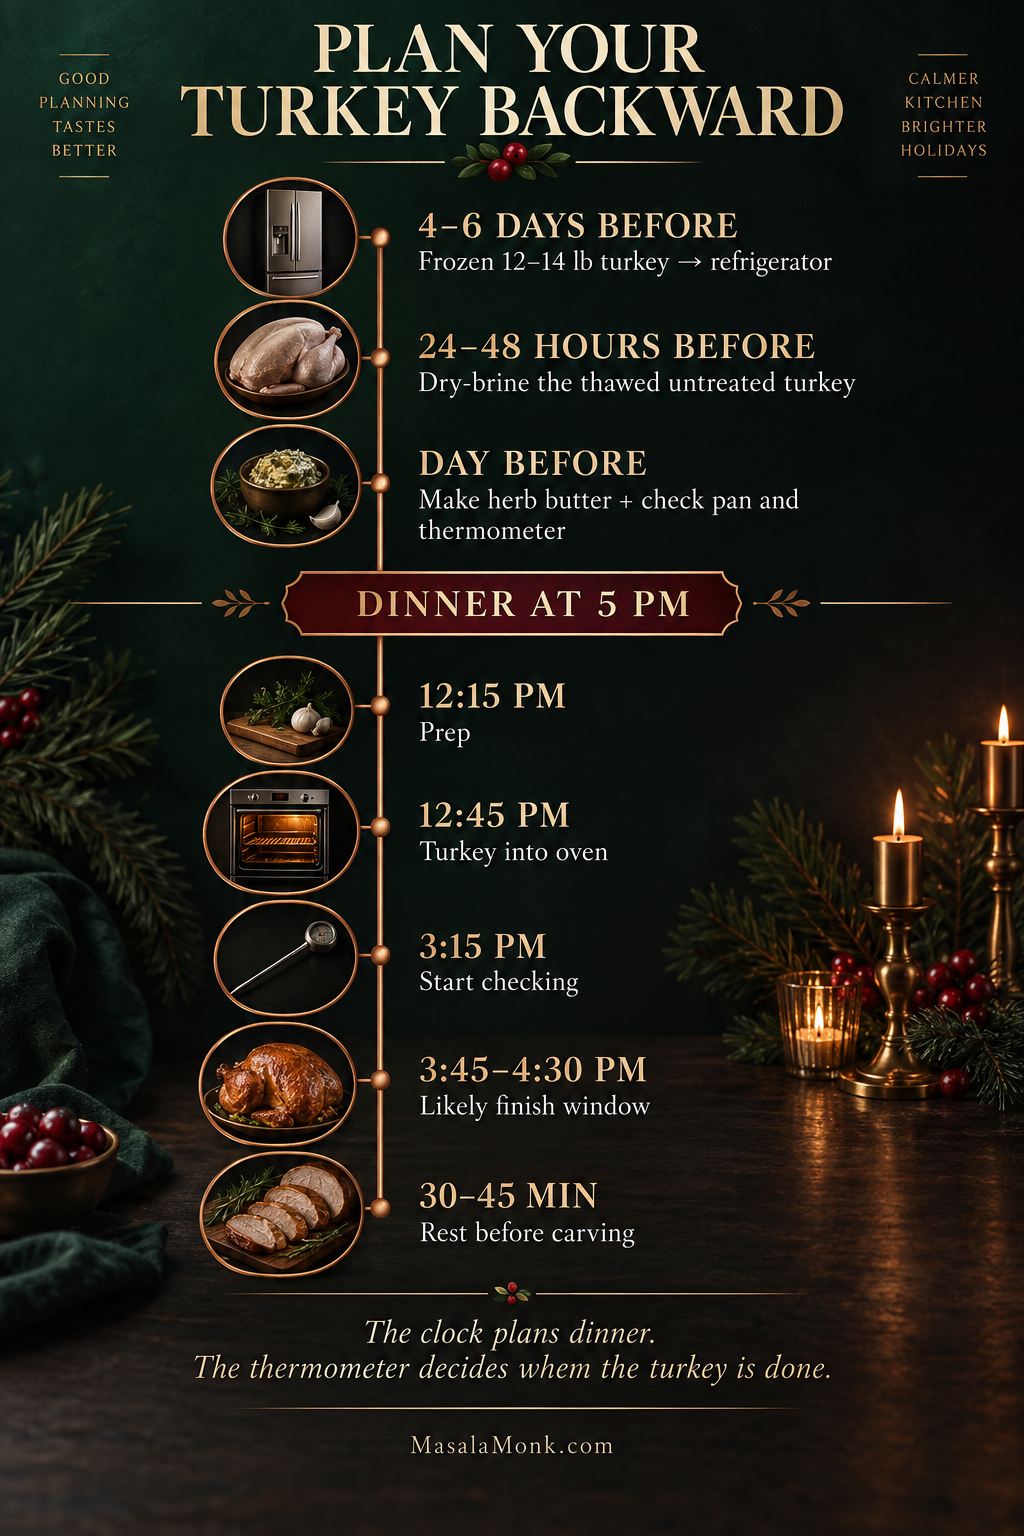
If your 12–14 lb turkey starts frozen and you also want the preferred 24–48 hour dry brine, move it to the refrigerator roughly 4–6 days before dinner. Larger birds need longer to thaw, so build that extra day or two into the schedule.

A Simple Turkey-Day Timeline

When What to Do
4–6 days before For a frozen 12–14 lb turkey that you want to dry-brine, move it to the refrigerator.
24–48 hours before Once thawed, dry-brine an untreated turkey. Even 12–24 hours is worthwhile if that is the time you have.
Day before Make and refrigerate the herb butter, check the roasting pan and thermometer, and finish dishes that can be made ahead.
Roast day Take the herb butter out early enough to become very soft. Dry and season the bird, set up the pan and roast.
Before the expected finish Begin checking internal temperature.
30–45 minutes before carving Rest the turkey while you make gravy and finish the last hot dishes.
Vertical turkey planning timeline showing refrigerator thawing several days ahead, a 24–48 hour dry brine, roast-day timing, an early temperature check, and resting before dinner.
Build slack into turkey day before you need it; starting the temperature checks early gives you time to react if the turkey is running behind.

The turkey does not have to carry the entire meal. Move cold sauces and make-ahead dishes off roast day when you can. Cranberry sauce with orange juice is perfectly happy waiting in the refrigerator.

Dinner at 5:00 PM?

For the turkey used here, aim to have it in the oven by about 12:45 PM. Begin prep around 12:15 PM, then start checking the bird around 3:15 PM.

No start time guarantees an exact 30–45 minute rest because the normal roasting range itself spans about 45 minutes. A fast three-hour bird could be ready around 3:45 PM and need the early-finish plan below; a slower one may come out near 4:30 PM and still rest for half an hour.

Starting earlier protects dinner from running late. Starting later reduces the chance of a long hold. Choose which risk matters more for your meal.

For detailed weight-by-weight planning, including larger and stuffed birds, use the full turkey cooking-time guide.

How Much Turkey Do You Need?

About 1–1¼ lb / 454–567 g of whole turkey per person works well for comfortable portions. Move closer to 1½ lb / 680 g per person when leftovers are part of the plan.

Guests Comfortable Portions More Leftovers
6–810–12 lb / 4.5–5.4 kg12–14 lb / 5.4–6.4 kg
8–1012–14 lb / 5.4–6.4 kg14–16 lb / 6.4–7.3 kg
10–1214–16 lb / 6.4–7.3 kg16–18 lb / 7.3–8.2 kg
12–1416–18 lb / 7.3–8.2 kg18–20 lb / 8.2–9.1 kg
14–1618–20 lb / 8.2–9.1 kg20–24 lb / 9.1–10.9 kg

These are rounded buying ranges for common whole-turkey sizes, not exact portion math. A side-heavy table, several children or a room full of enthusiastic turkey eaters can move the numbers.

Hosting a very large gathering? Two medium turkeys are often easier to thaw, lift and cook evenly than one enormous bird. For a smaller holiday dinner, a turkey tenderloin gives you a much smaller roast without committing to a whole turkey.

Make Sure the Turkey Is Fully Thawed

For refrigerator thawing, allow roughly 24 hours for every 4–5 lb / 1.8–2.3 kg of turkey.

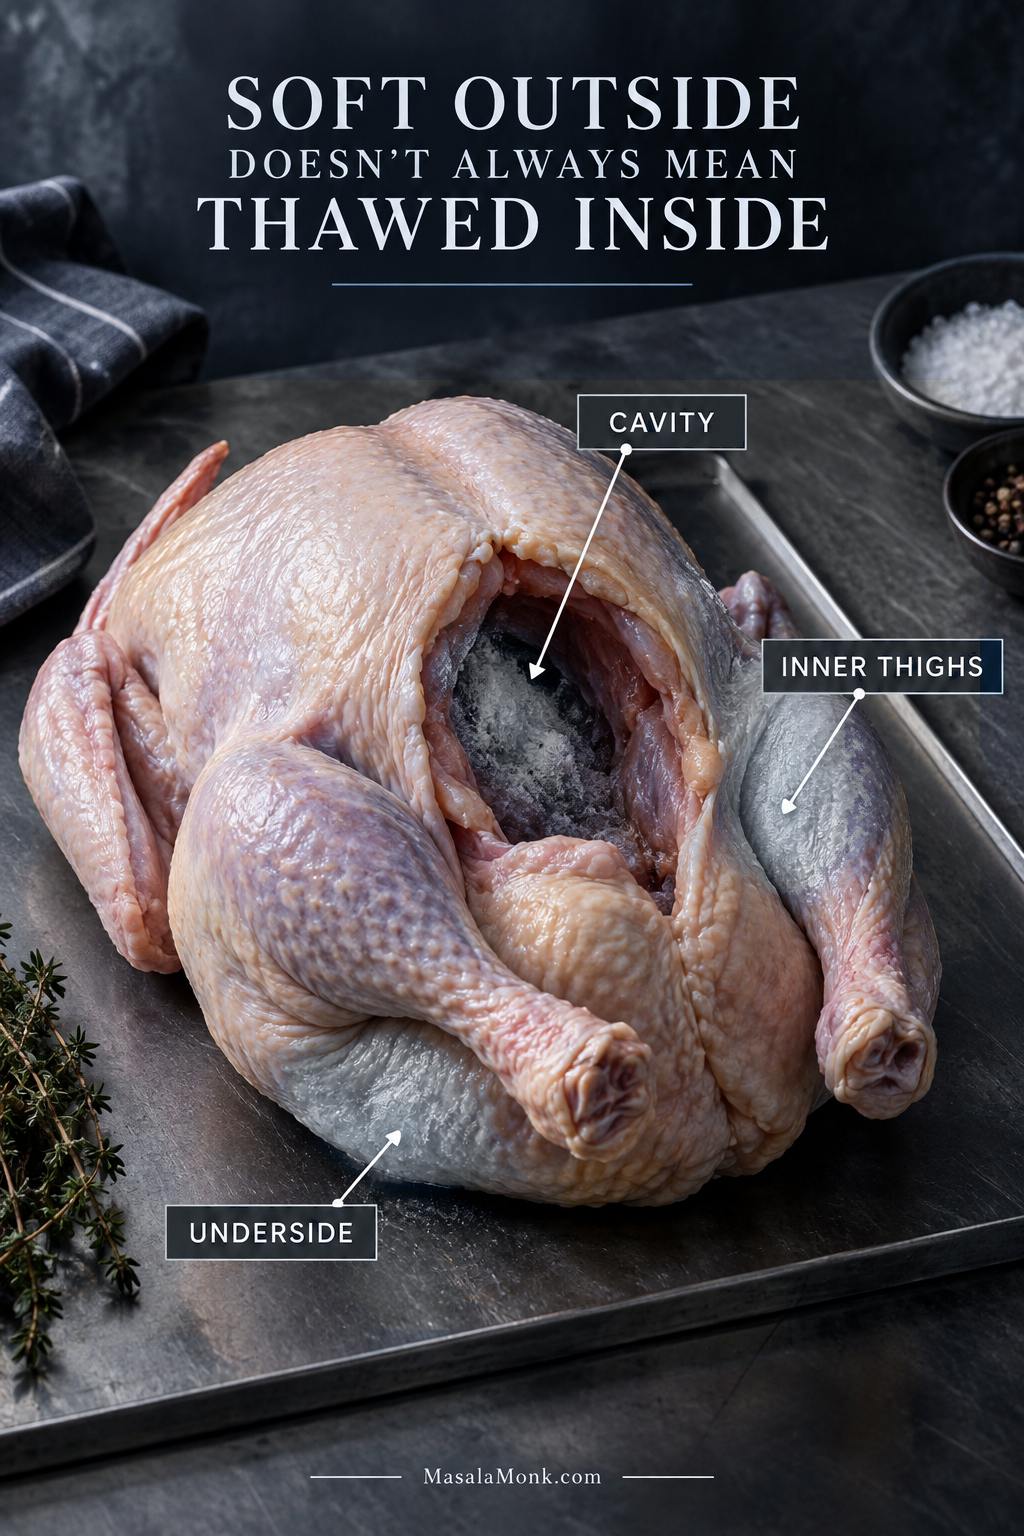
The outside can feel soft while ice still hides around the cavity, underside and inner thighs. That hidden ice can slow the colder parts enough for the breast to seem to race ahead.

Partially thawed raw turkey with callouts marking the body cavity, inner thighs, and underside as areas where ice may remain.
Residual ice acts like a cold brake inside the turkey, so the breast can seem to race ahead even when the bird felt thawed from the outside.
Turkey Weight Approx. Refrigerator Thawing Time
4–12 lb / 1.8–5.4 kg1–3 days
12–16 lb / 5.4–7.3 kg3–4 days
16–20 lb / 7.3–9.1 kg4–5 days
20–24 lb / 9.1–10.9 kg5–6 days

These ranges follow USDA turkey-thawing guidance. Once thawed in the refrigerator, the turkey can remain there for another 1–2 days before cooking.

Need a Faster Thaw?

Keep the bird in a leakproof package, submerge it in cold water, and change the water every 30 minutes. Allow about 30 minutes per pound and cook it immediately afterward.

A little ice near the cavity changes the schedule, not the whole dinner. Give the turkey more time and check temperatures carefully. If it is still substantially frozen at roast time, jump to Turkey Still Frozen?

Get the Salt Right

Read the label first. An untreated turkey and a bird injected with salty solution need different seasoning.

Have 24–48 hours? Dry-brine it. That is the preferred method here: the meat seasons while the uncovered skin dries in the refrigerator. Even 12–24 hours is worth doing. Dinner only a few hours away? Use the lighter same-day amount.

Dry-Brining Ahead

For the untreated turkey used here, distribute about 35 g kosher salt over the skin, beneath the breast skin and lightly around the cavity. Set it on a rack over a rimmed tray or roasting pan, keep the refrigerator at 40°F / 4°C or colder, and place it where accidental drips cannot land on other food.

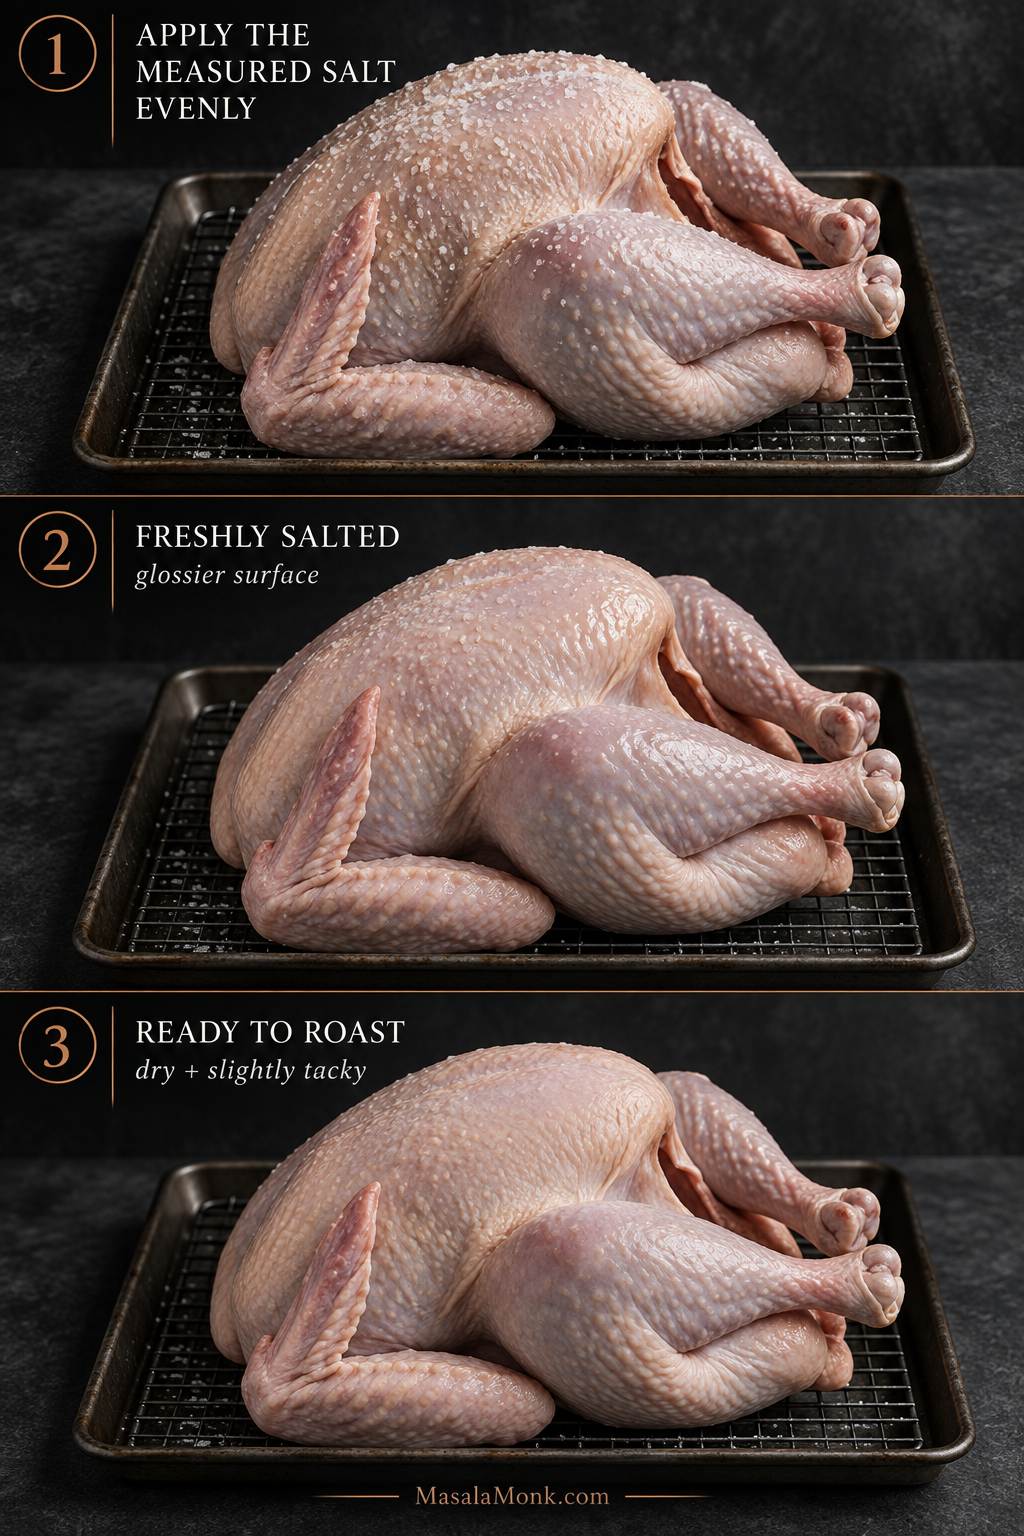
By roast day, the glossy wet look should be gone. The skin will feel drier and slightly tacky—exactly what you want before it meets the oven.

Three-stage dry-brining sequence showing measured salt applied to a raw turkey, a glossier freshly salted surface, and drier slightly tacky skin ready for roasting.
That drier, slightly tacky skin is not a dried-out turkey; instead, it is the surface condition that helps the oven build better browning.

Seasoning the Turkey the Same Day

For the untreated turkey used here, distribute about 20 g kosher salt over the exterior, beneath the breast skin and lightly around the cavity. Then add the herb butter.

You lose some of the deeper seasoning and skin-drying time of an overnight brine. That’s okay. If dinner is only a few hours away, season the turkey and move on.

Why Dry Brine Instead of Wet Brine?

A wet brine works. It also asks you to find room for a large container of salty liquid in an already crowded refrigerator. Dry brining is cleaner, easier to manage and leaves the skin exposed while the turkey seasons.

Prepare the Turkey for Even Cooking

Get the Bird Ready

Check both cavities. The neck may be tucked into one end while the giblets or gravy packet sit in the other. Save anything useful for stock or gravy.

A manufacturer-installed hock lock or leg clamp may be designed to stay during roasting, so follow the package directions.

Skip rinsing. Pat the turkey thoroughly dry with paper towels; rinsing raw poultry can spread poultry juices around the sink.

Dry skin browns. Wet skin steams.

Add the Herb Butter

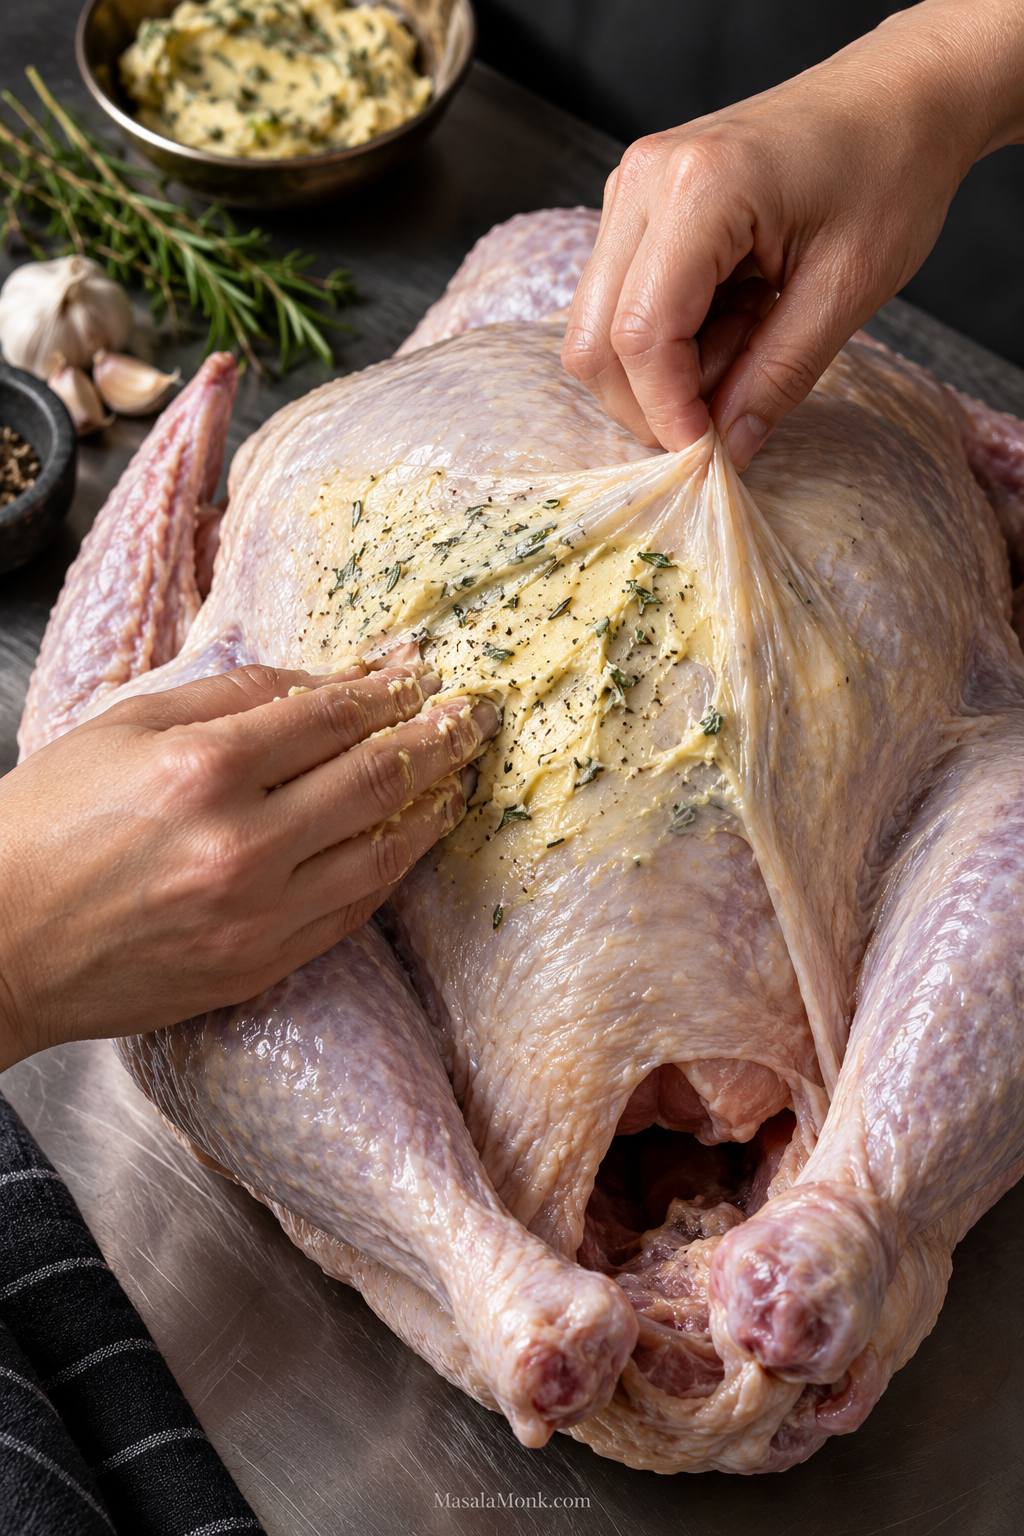
Slide your fingers gently between the breast meat and skin, starting near the cavity opening. Spread most of the garlic-herb butter directly over the breast meat and the remainder over the legs.

The butter should spread easily without dragging or tearing the skin. If it skates over a wet surface, blot again. If it feels stiff, give it a little more time to soften.

Close-up of hands gently spreading garlic-and-herb butter underneath the breast skin of a raw turkey.
Butter beneath the skin puts the herbs and fat directly against the lean breast meat, while the exposed skin can still lose moisture and brown.

Once the herbs and turkey fat start roasting together, the kitchen finally smells like dinner.

Finish the Setup

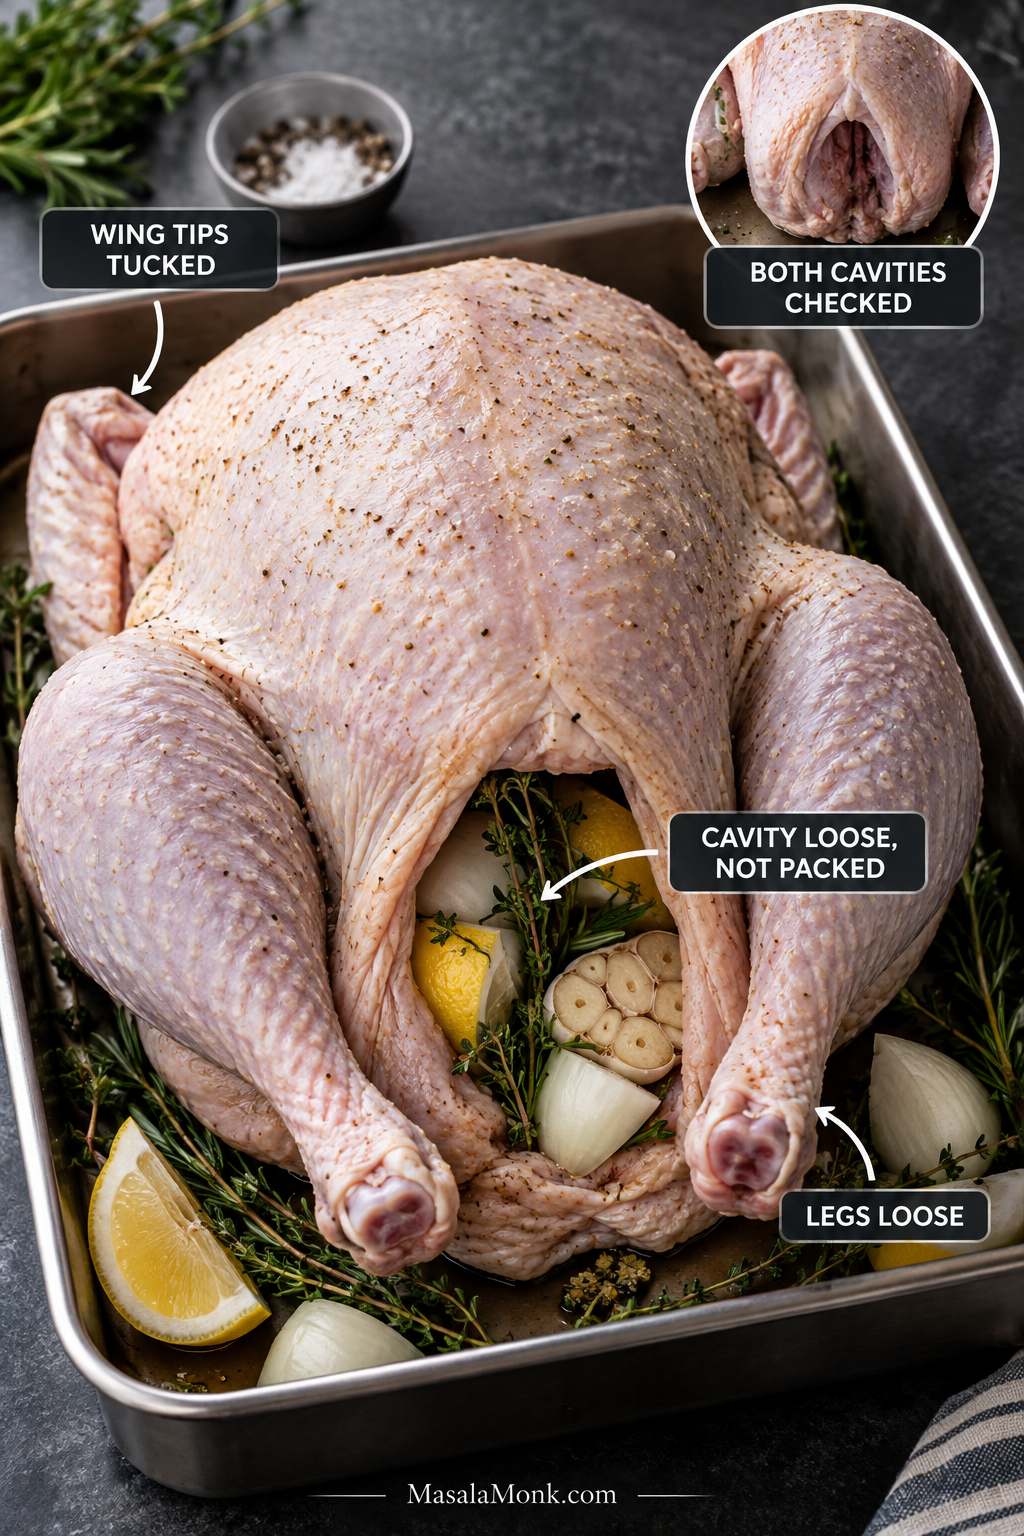
Add the onion, lemon, garlic and herb sprigs with open space around them. The cavity should look occupied, not packed.

Keep the turkey unstuffed for the easiest timing. A separate pan of sausage stuffing gets crisp browned edges while the bird stays on the simpler unstuffed schedule.

Tuck the thin wing tips behind the shoulders and leave some space between the legs so heat can reach the inner thighs. If you use twine, tie it loosely.

Prepared raw turkey breast-side up with loose onion, lemon, garlic, and herbs in the cavity, wing tips tucked, and legs left loose.
Loose aromatics can perfume the cavity without turning it into a dense center that heats more slowly; think fragrance and open space, not stuffing.

Once the pan goes into the oven, most of the hands-on work is over. From here, you are mainly watching two things: color and temperature.

How Long to Cook a Turkey at 325°F

Most 12–14 lb unstuffed turkeys need about 3–3¾ hours at 325°F / 163°C. Start checking before that range because birds do not all cook at the same speed.

You do not need to memorize a minutes-per-pound formula. Use the table to plan your day, then start checking early.

Turkey Weight Approx. Cooking Time Start Checking Around
8–12 lb / 3.6–5.4 kg2¾–3 hours2¼ hours
12–14 lb / 5.4–6.4 kg3–3¾ hours2½ hours
14–18 lb / 6.4–8.2 kg3¾–4¼ hours3 hours
18–20 lb / 8.2–9.1 kg4¼–4½ hours3½ hours
20–24 lb / 9.1–10.9 kg4½–5 hours3¾ hours

The cooking ranges come from USDA conventional-oven turkey guidance. Oven calibration, bird shape, pan depth, incomplete thawing and repeated door opening can all shift the finish.

These times are for an open-pan turkey in a conventional oven. Oven bags, electric roasters, convection ovens and spatchcocked birds follow different timing.

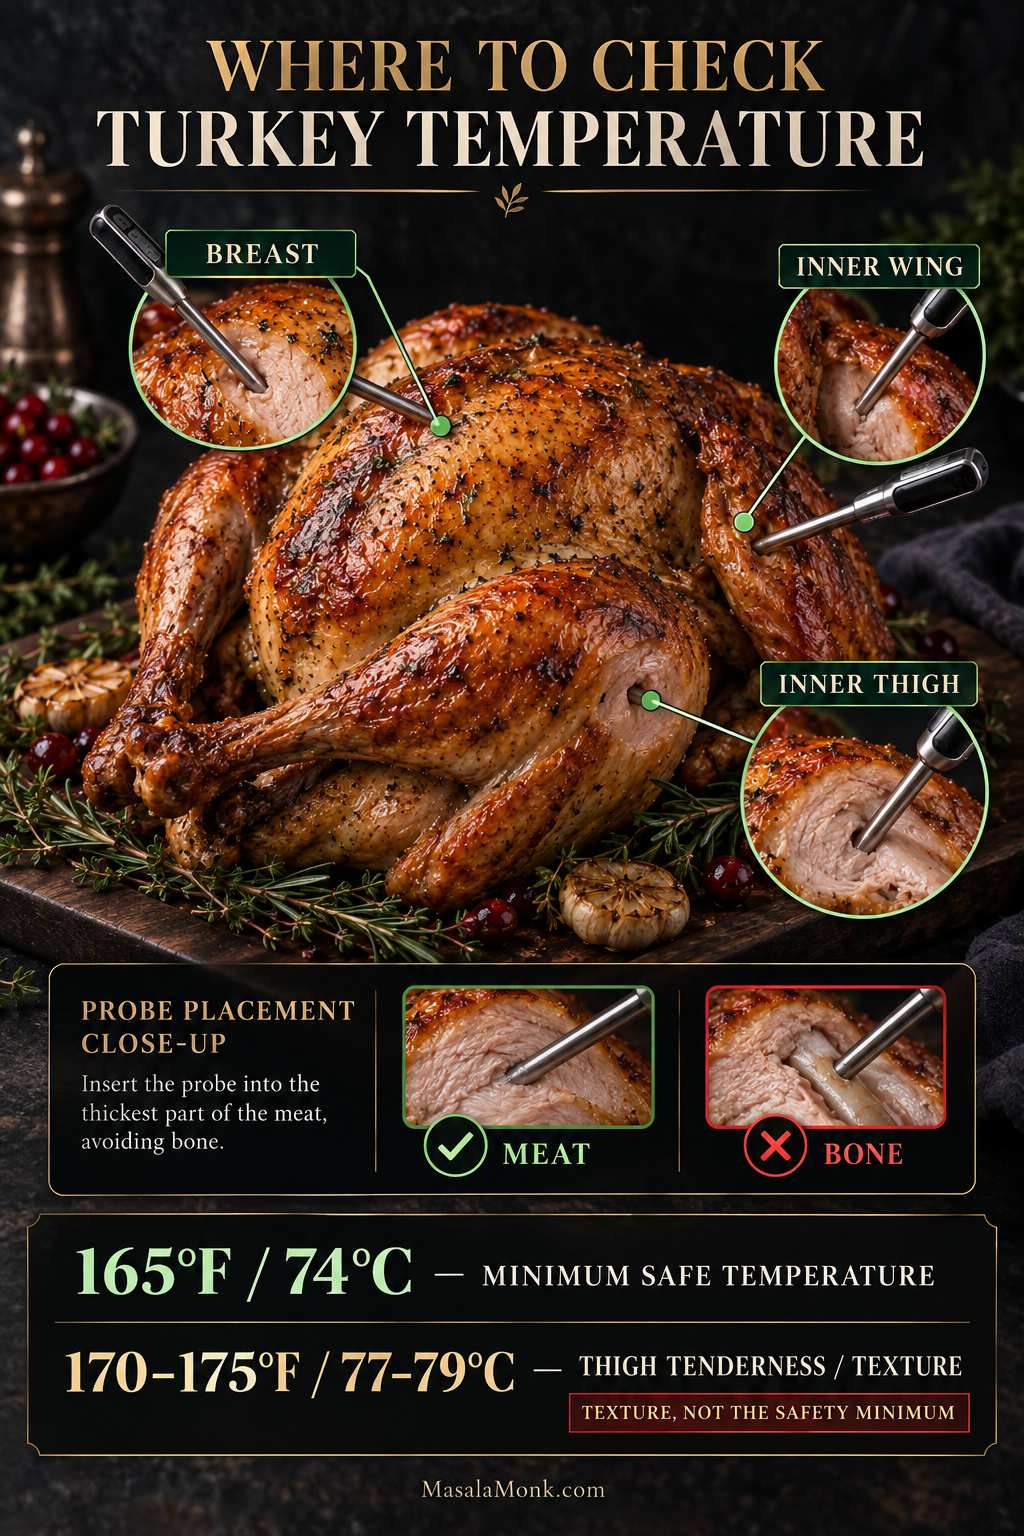
Where to Put the Thermometer

  • Breast: insert the thermometer into the thickest part without touching the breastbone.
  • Thigh: slide it into the thick inner thigh where the leg meets the body, stopping short of bone.
  • Wing: check the thick inner area where the wing joins the body.
Roasted turkey with thermometer placement illustrated in the thickest breast, inner thigh, and inner wing, including guidance to keep the probe in meat rather than against bone.
One strange turkey temperature does not automatically mean more oven time; first move the probe into nearby meat and rule out bone contact or a thin spot.

A strange reading deserves a second look. If one spot is dramatically colder than another nearby, move the probe, compare both sides and make sure the tip is sitting in meat instead of touching bone.

What Temperature Is Turkey Done?

The minimum safe internal temperature is 165°F / 74°C in the thickest breast, inner thigh and inner wing area.

Dark thigh meat often becomes softer and more yielding around 170–175°F / 77–79°C. When the breast reaches its safe temperature first, shield it while the legs finish.

What If the Meat Looks Pink?

Once the breast, inner thighs and inner wing areas have all reached at least 165°F / 74°C, pink color by itself is not evidence that the turkey is undercooked. If the appearance still worries you, verify another nearby spot before putting the bird back in the oven.

How to Keep the Turkey Juicy While the Skin Browns

Juicy meat and crisp skin are separate jobs. Salt and careful temperature control protect the meat; a dry surface and mostly uncovered heat build the skin. Herb butter adds richness, but it cannot undo an overcooked breast.

Early in the roast, the skin may still look pale and taut. Leave it alone.

Somewhere in the middle, that pale surface begins turning bronze, the herbs darken around the edges, and the juices in the pan look richer and more concentrated. Foil becomes useful once the breast is a deep, even brown and the highest points are approaching the color you would be happy to serve.

Basting Is Optional

You can leave the baster in the drawer. Repeatedly opening the oven loses heat, and watery juices keep wetting the skin. An occasional spoonful of rendered fat is enough if basting is part of your holiday ritual.

Use Foil When the Color Is Right

Once the breast has the color you want, cover it loosely and let the darker meat continue. Individual wing tips or high spots can be shielded separately.

Three-stage roast turkey sequence showing pale skin, deep golden browning, and a browned turkey with foil loosely covering the breast while the legs remain exposed.
Foil protects color that is already finished: cover the breast when it looks ready to serve, not simply because a certain amount of time has passed.

If the Pan Starts Smoking

Add about ½ cup / 120 ml hot water or unsalted stock around the rack. The liquid protects the concentrated drippings from scorching; keep it below the turkey instead of pouring it over the skin.

Turkey Not Following the Plan? Start Here

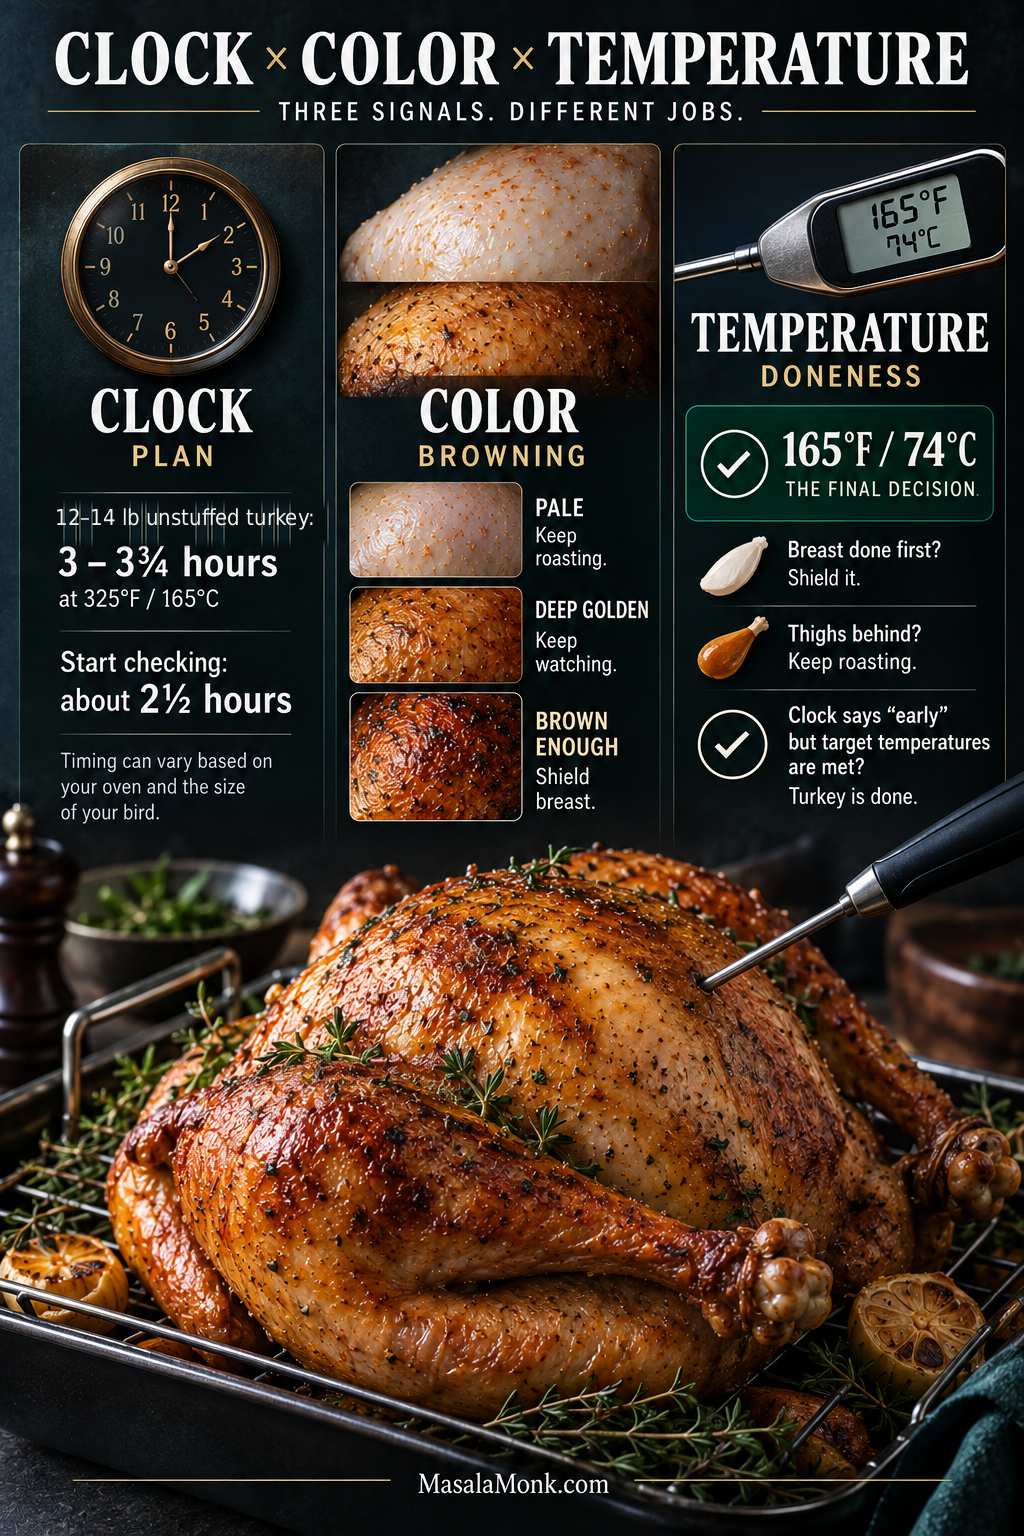
This is the part to use when the clock, color and thermometer stop agreeing.

Three-part turkey doneness guide showing the clock for planning, skin color for browning decisions, and an instant-read thermometer for final doneness.
The clock predicts the schedule, color tells you when to protect the skin, and the thermometer tells you whether cooking can actually stop.
What You’re Seeing What to Do Now
Turkey is cooking much faster than expected Recheck the breast and both thighs in several spots, then verify the oven temperature. If the readings agree, trust them.
Turkey is running late Check the actual oven temperature and whether the bird was fully thawed. Protect browned skin and keep cooking to temperature.
Breast is done before the thighs Loosely cover the breast with foil and continue cooking the dark meat.
One thigh reads much colder Check both thighs in several locations. Bone contact or a thin spot can distort the reading.
Skin is dark but the meat is not ready Shield the browned areas. Lower the pan one rack if the turkey sits very close to the top heat.
Meat is done but the skin is pale Use a brief burst of higher heat or the broiler and watch continuously.
Skin is soft Uncover the turkey and stop wetting the surface. Let dry heat work while the meat still has cooking room.
Pan drippings are smoking Add about ½ cup / 120 ml hot water or unsalted stock directly to the pan.
Drippings taste too salty Leave additional salt out of the gravy and dilute with unsalted liquid as needed.
Turkey finished early A short lead is easy to manage. Longer delays need hot holding or chilling; use the detailed guidance below.

The Turkey Finished Early

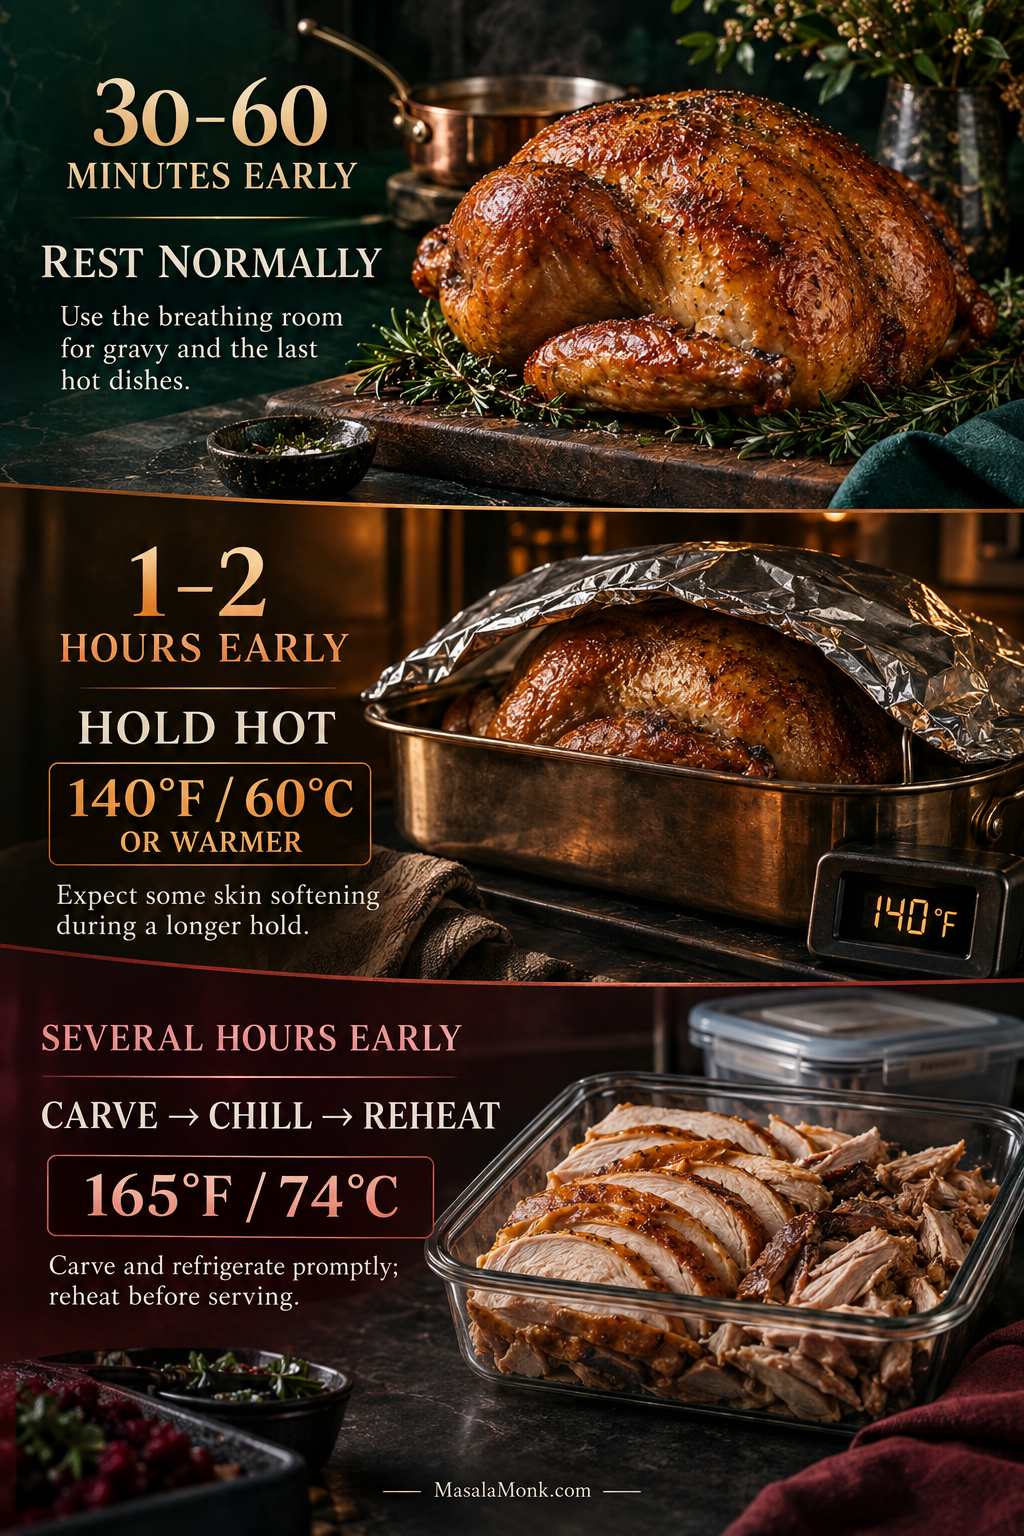
Thirty to sixty minutes early: excellent. Rest it normally and use the breathing room for gravy and the last hot dishes.

One to two hours early: hold the turkey at 140°F / 60°C or warmer. A reliable low or warm oven setting can work; monitor the temperature and expect the skin to soften somewhat during a long hold.

Several hours early: stop treating it as a rest. Carve the turkey, refrigerate the meat promptly in shallow containers, and reheat it to 165°F / 74°C before serving.

Can’t keep it safely hot? Carve and chill it instead.

Three-stage turkey timing guide showing normal resting for a short early finish, hot holding for a longer delay, and carving, chilling, and reheating for a several-hour delay.
The longer the gap before dinner, the more the strategy changes: resting becomes hot holding, and eventually safe chilling becomes the better choice.

Done roasting? Carving · Reheating Later · Recipe Card

Resting, Carving and Gravy

Once the turkey is resting, the uncertain part is over.

You can stop chasing temperatures and watching the clock. The next 30–45 minutes are for gravy, hot sides and clearing enough room to carve without balancing a huge bird between casserole dishes.

By now the skin should be deeply bronzed and the pan juices dark and savory. Leave the turkey uncovered for the crispest skin, or use a very loose foil tent in a cool kitchen. A tight cover traps steam and softens the surface.

The oven is free again too. A quick high-heat tray such as roasted Brussels sprouts can cook while the turkey rests.

Use the Drippings for Gravy

Taste the drippings before adding salt. Dry-brined, kosher, enhanced and self-basting birds can all leave a saltier pan than an untreated turkey.

Turn the usable fat, browned fond and juices into turkey gravy from the drippings. This is where the roasted herbs, turkey fat and browned pan juices finally come together.

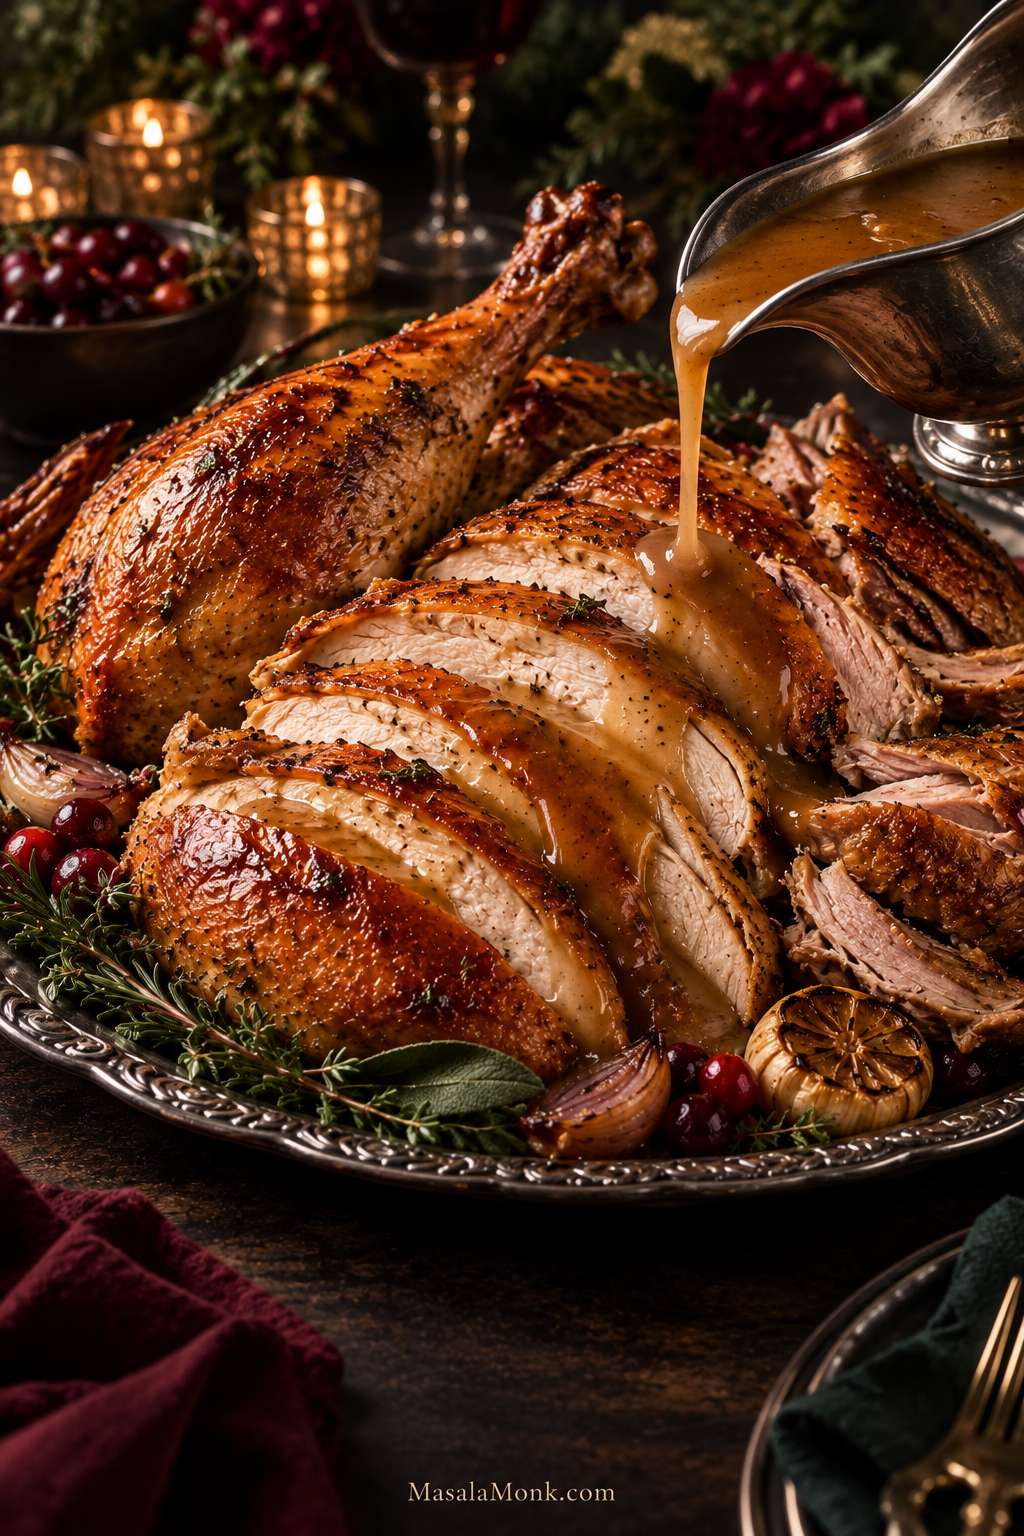
Close-up platter of carved roast turkey with crisp browned skin, moist sliced breast meat, dark meat, and glossy brown gravy being poured over the slices.
Look for a slight sheen on the breast rather than a matte, fibrous cut surface; crisp skin and glossy pan gravy complete the contrast.

Carve After the Rest

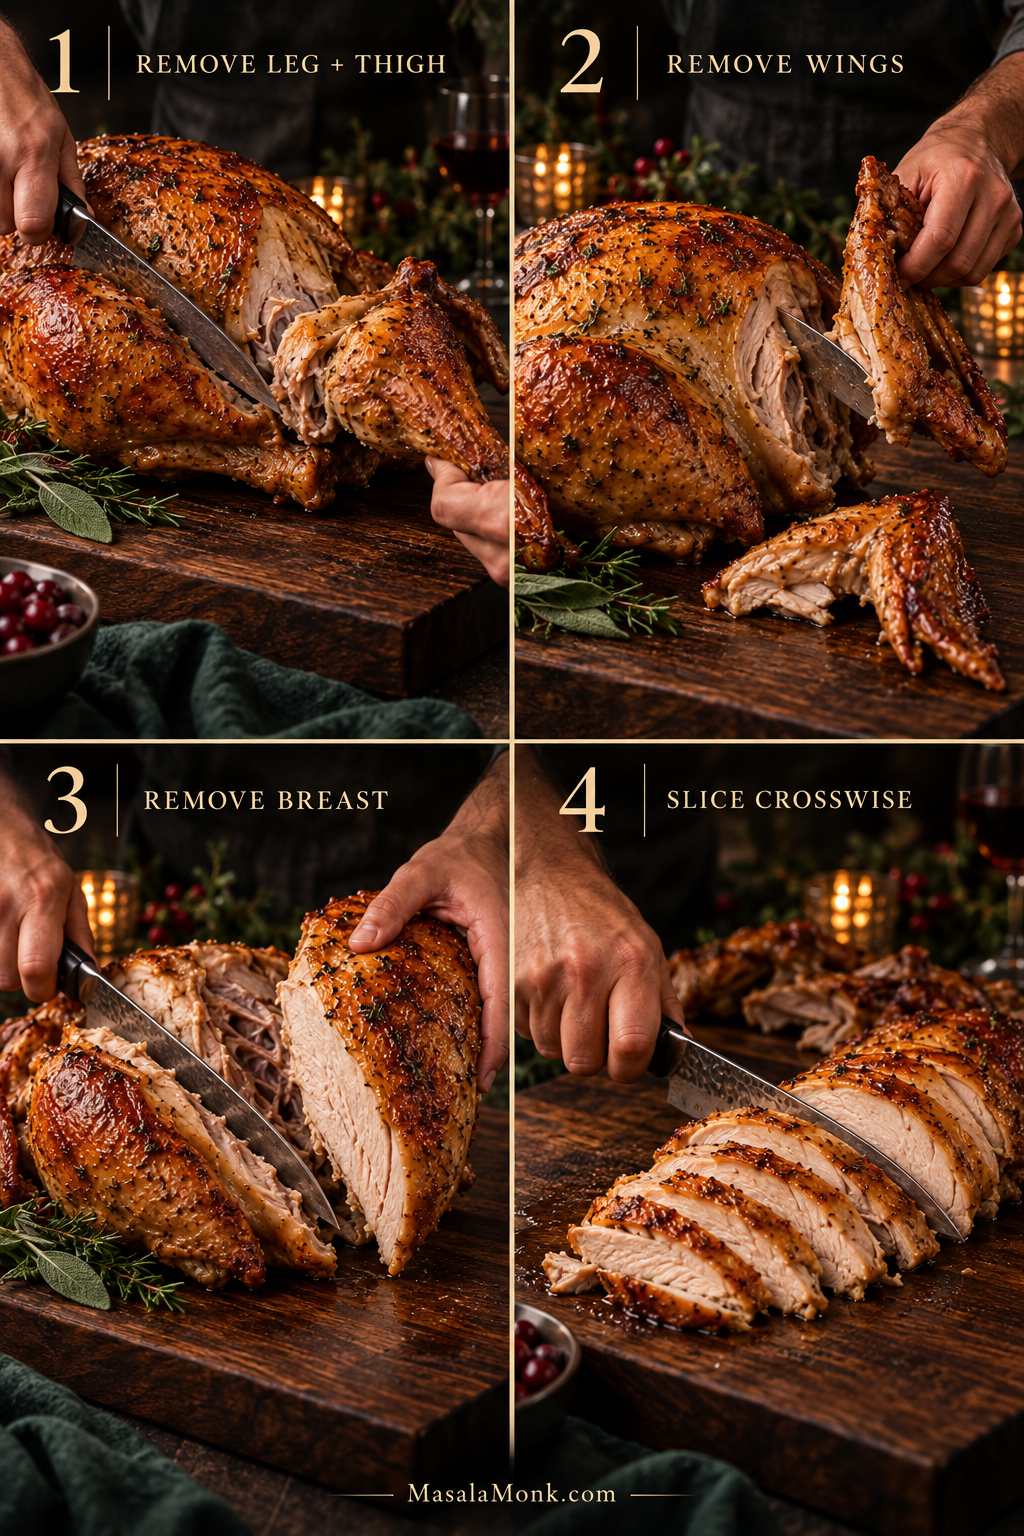
Remove the legs and thighs first, followed by the wings. For cleaner breast slices, take each breast half off the carcass in one piece and slice it crosswise on the cutting board.

Four-step turkey carving sequence showing removal of the leg and thigh, wings, and breast, followed by crosswise slicing of the breast on a wooden carving board.
Starting at the joints reduces resistance and keeps the breast intact; once that whole breast half is on the board, clean crosswise slices become much easier.

The knife should pass through crisp skin into breast meat that still looks moist, with a little sheen on the cut surface instead of a cottony or fibrous texture. This is where the dry skin, steady roast, early temperature checks and patient rest finally pay off.

If the meat tastes slightly underseasoned, season the slices lightly and let the gravy do some of the work.

Once the breast is sliced and the legs are separated, you’re done managing the turkey. Move everything to a warm platter, bring the gravy, and get dinner to the table.

Special Situations: Frozen, Stuffed or Convection Turkey

Turkey Still Frozen?

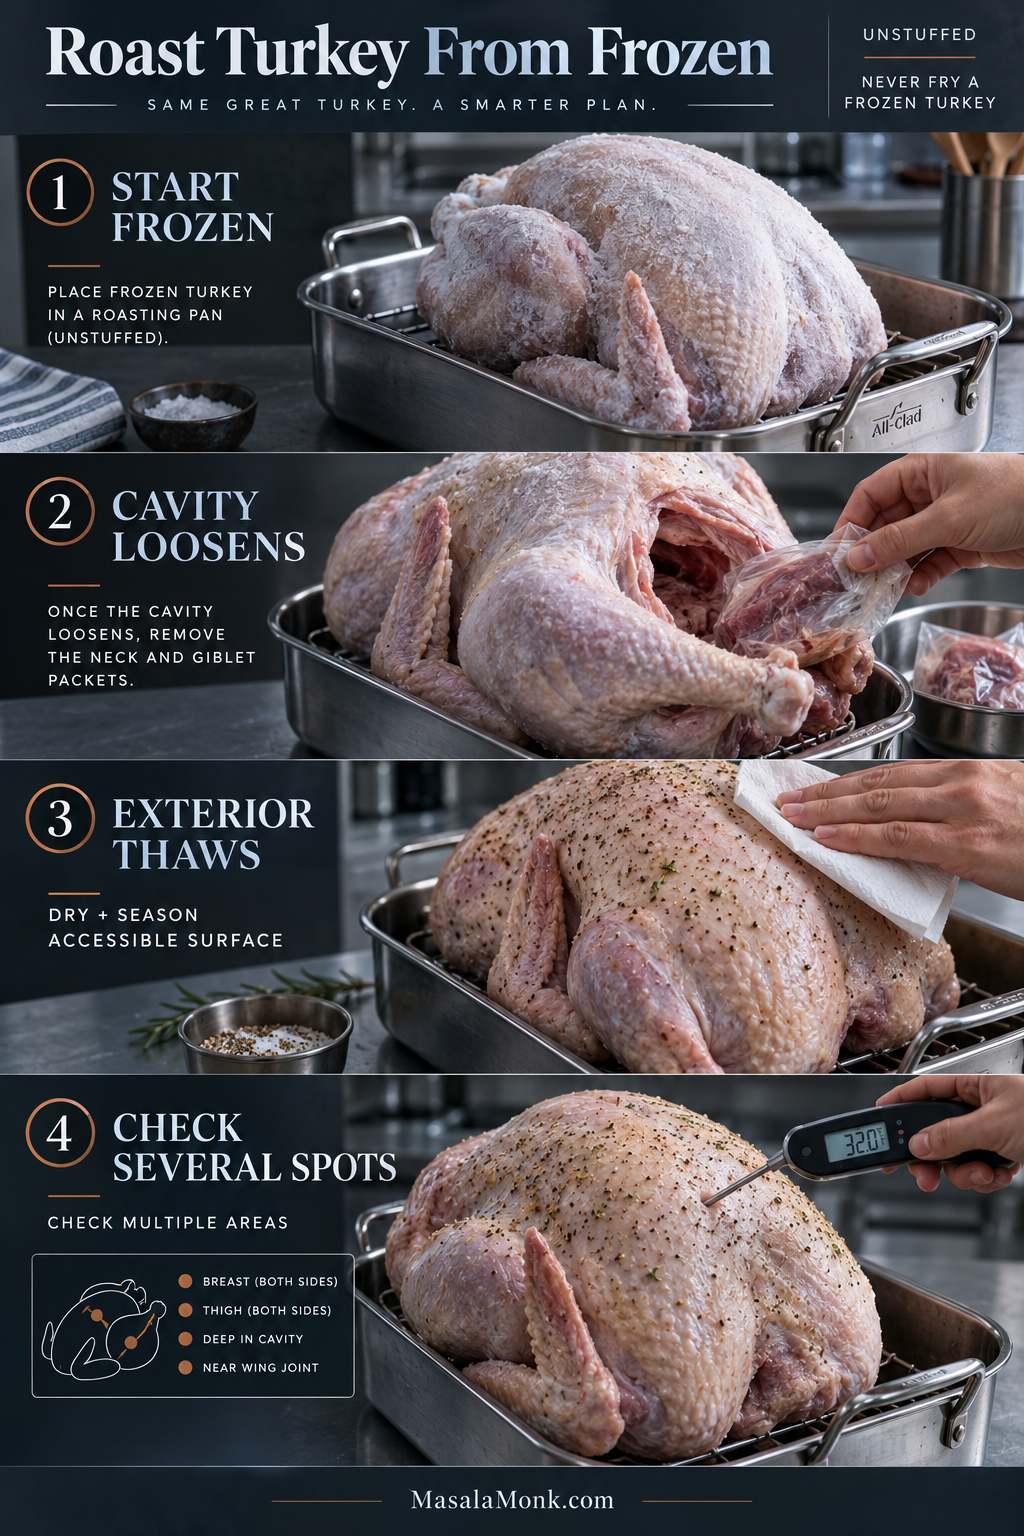
Yes—you can roast a whole turkey from frozen in a conventional oven. Cook it unstuffed and allow at least 50% more cooking time than for a fully thawed bird.

Seasoning beneath frozen skin will be difficult at first, and different areas will heat at different speeds. This is the backup method for the day the thaw simply did not finish.

Partially frozen: the exposed breast may heat much faster than icy areas around the cavity and inner thighs. Check several locations and shield anything that gets ahead.

Completely frozen: as the cavity loosens, carefully remove the neck and giblet packets with tongs once you can reach them. Continue roasting until the breast, thighs and inner wing areas have all reached at least 165°F / 74°C.

Once the exterior has thawed enough to handle safely, pat the accessible skin dry and brush it with unsalted butter or oil, herbs and pepper. For an untreated bird, season the exposed surface lightly with salt; enhanced, injected, self-basting and kosher turkeys may already have enough. There is no need to imitate a full dry brine after roasting has begun.

Four-step guide showing a frozen whole turkey in a roasting pan, removal of packets after the cavity loosens, seasoning the thawed exterior, and checking several areas with a thermometer.
A frozen turkey is mainly a timing problem, not a reason to abandon dinner; keep it unstuffed and expect different parts of the bird to heat unevenly.

Never put a frozen or partially frozen turkey into hot frying oil.

Cooking a Stuffed Turkey

A stuffed 12–14 lb turkey needs roughly 3½–4 hours at 325°F / 163°C. Add the stuffing just before roasting, keep it loose, and make sure the center also reaches at least 165°F / 74°C.

Separate dressing is easier to time and gives you more browned edges. A pan of Southern cornbread dressing also keeps the turkey on the simpler unstuffed schedule.

Using a Convection Oven

Convection cooks and browns turkey faster. USDA guidance allows reducing the conventional oven temperature by 25°F / about 14°C, but not below 300°F / 150°C. Follow your oven manufacturer’s poultry guidance and begin checking substantially earlier.

Make Ahead, Store and Reheat Turkey

Same-day roasting gives you the best skin. If the schedule demands a day-ahead turkey, let it rest, carve it and refrigerate the meat promptly in shallow containers.

How to Reheat Turkey Without Drying It Out

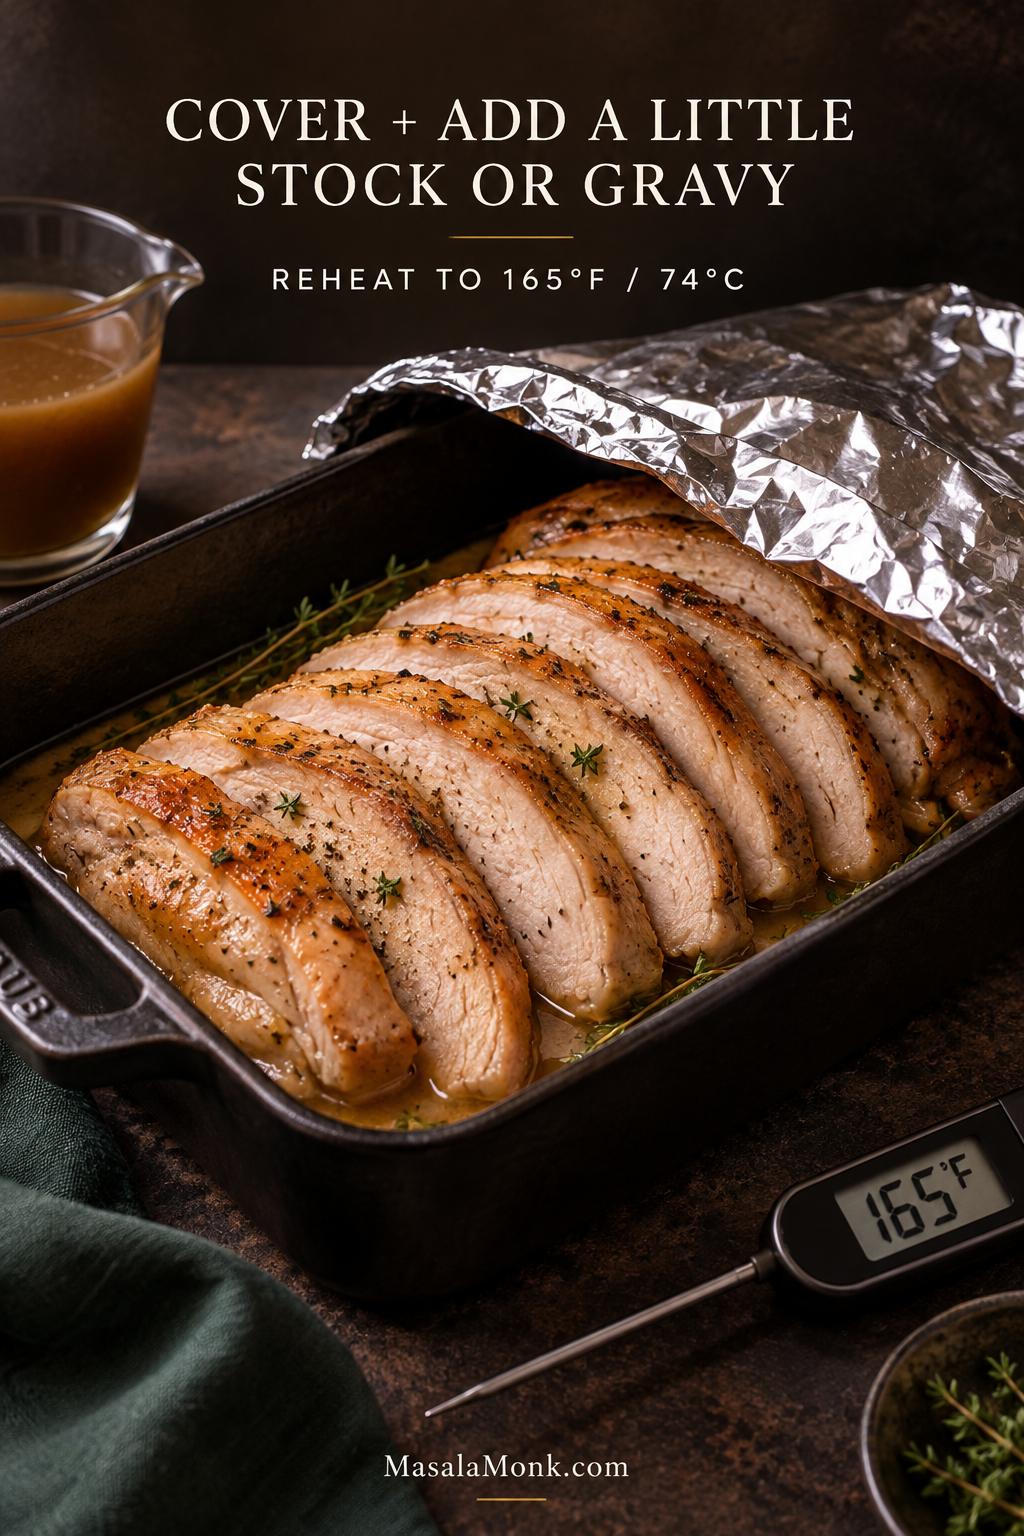
Reheat covered portions with enough unsalted stock or gravy to keep the slices moist until they reach 165°F / 74°C.

Sliced cooked turkey in a dark baking dish with a small amount of stock or gravy and a loose foil cover for reheating.
A little unsalted stock or gravy adds moisture around the slices while they heat, helping the exposed cut surfaces stay supple instead of drying at the edges.

Storing Leftovers

Refrigerate cooked turkey within 2 hours. Shallow containers help it cool efficiently.

Use refrigerated leftovers within about 3–4 days. For longer storage, freeze cooked turkey for about 3–4 months for best quality. Reheat leftovers to 165°F / 74°C.

Once another plate of sliced turkey has lost its appeal, leftover meat and gravy can become a turkey pot pie under a crisp pastry top.

Frequently Asked Questions

1. Is It Better to Cook a Turkey at 325°F or 350°F?

Both can work, but 325°F / 163°C is the better fit for this roast turkey recipe because the timing, browning strategy and troubleshooting guidance here are built around it. At 350°F / 177°C, expect faster cooking and browning and begin checking sooner.

2. Do You Cook a Turkey Covered or Uncovered?

Mostly uncovered. Loosely foil the breast or other exposed areas once they are brown enough.

3. Should You Baste a Turkey?

No routine basting is needed. An occasional spoonful of rendered fat is fine if basting is part of your tradition.

4. Can You Roast a Turkey Without a Rack?

Yes. Use a sturdy coil of heavy-duty foil, or extra onion, carrot and celery pieces, to lift the turkey above the bottom of the pan.

5. Should You Cook a Turkey Upside Down?

This method keeps the bird breast-side up throughout. Flipping a large hot turkey is awkward, risks damaging the browned skin and is unnecessary here.

6. Should You Trust the Pop-Up Timer?

No—not as your primary doneness test. Confirm the temperature with a reliable thermometer in the thickest breast, inner thigh and inner wing area.

7. Can You Cook a Turkey the Day Before Thanksgiving?

Yes. Carve the rested turkey, chill it promptly in shallow containers, and reheat covered portions with a little stock or gravy to 165°F / 74°C.

Posted on — Leave a comment

Creamed Spinach Recipe: Easy, Creamy, Fresh or Frozen

Creamed spinach with visible leafy greens coated in a smooth cream sauce, served in an oval silver dish on a deep red background.

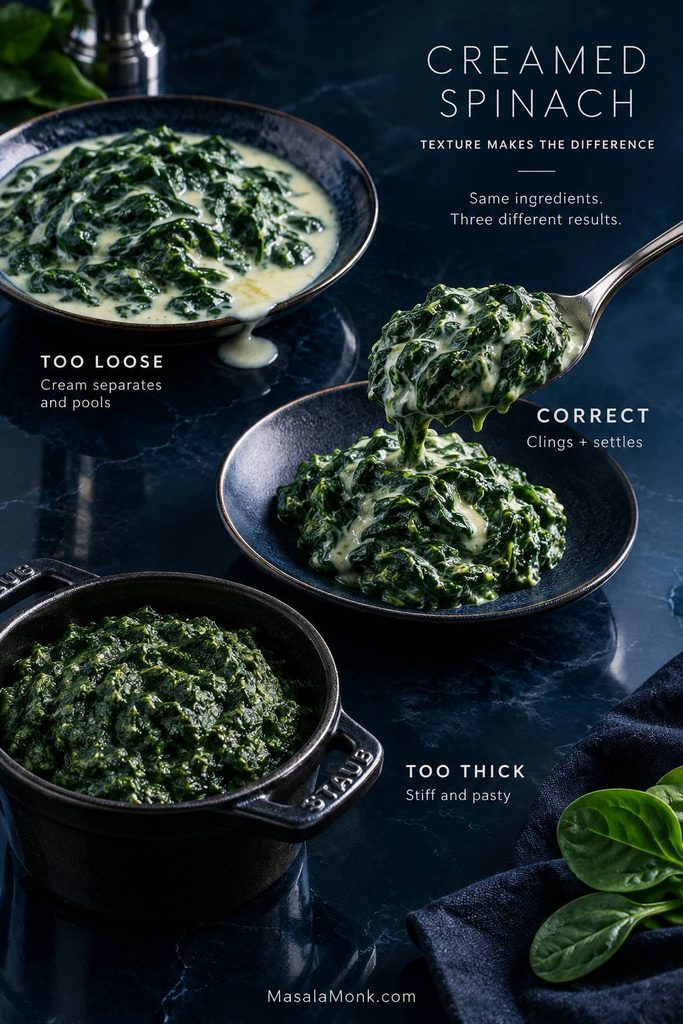
Spoon creamed spinach onto a plate and it should settle softly—not spread into a puddle or sit there like a scoop of dip. The leaves should still taste unmistakably of spinach, with butter, Parmesan, garlic, and cream wrapped around them rather than taking over.

If creamed spinach makes you picture stringy greens buried under too much dairy, that is exactly the result to avoid. Good creamed spinach tastes green and savory, with cream softening the spinach instead of smothering it.

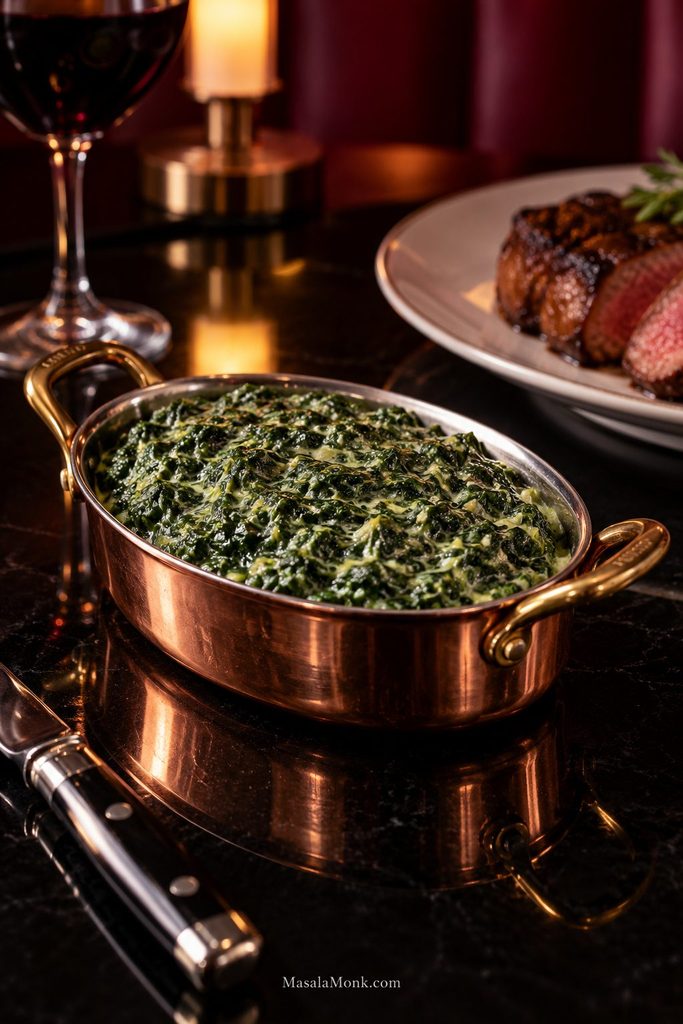
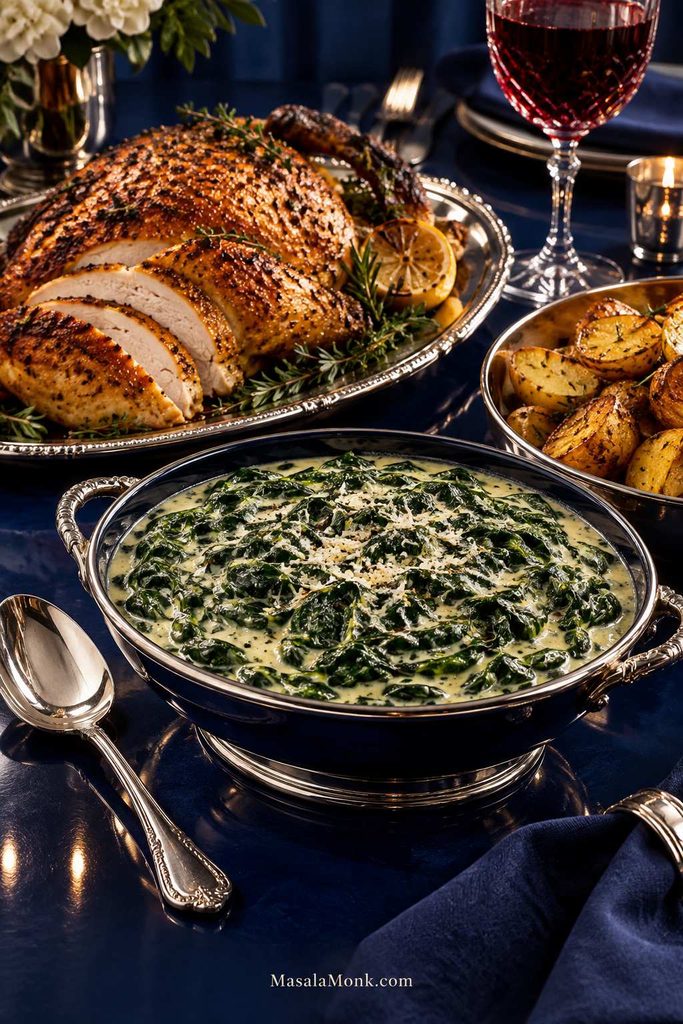
Parmesan brings a nutty edge, while black pepper cuts through the cream. Put that beside steak, roast chicken, or a holiday dinner and the spinach feels like part of the meal rather than something green added to the side.

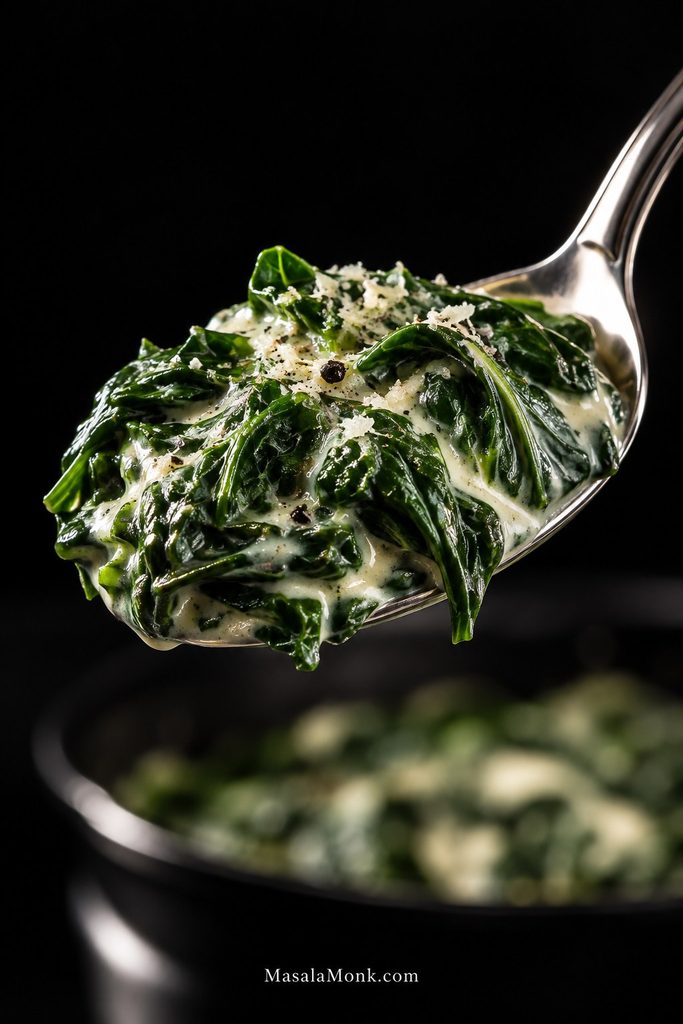
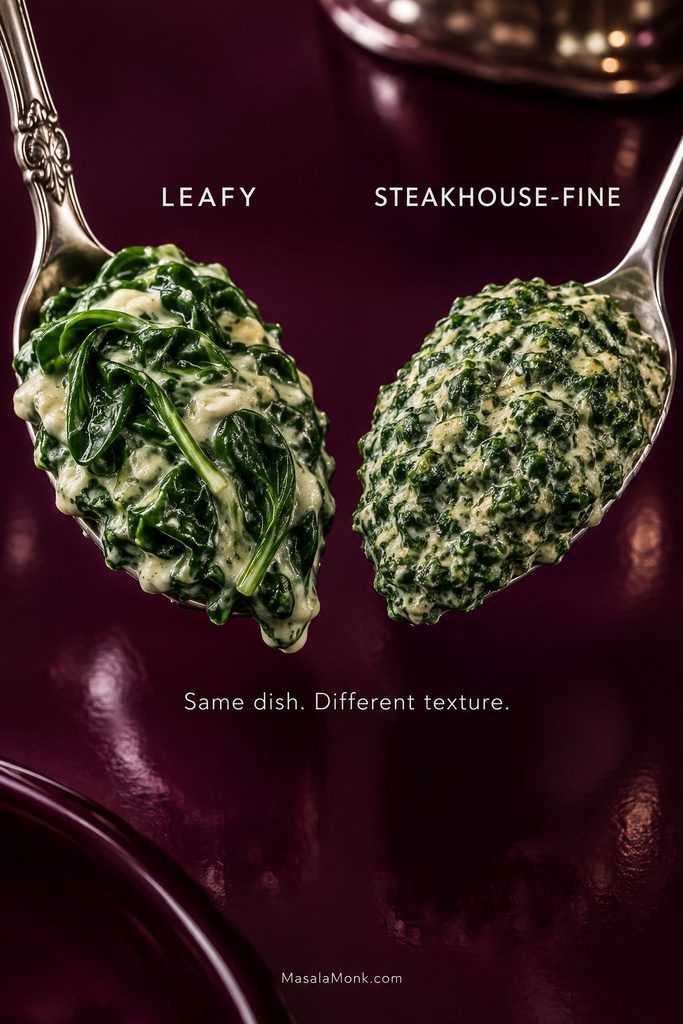
Close-up of leafy creamed spinach on a silver spoon, showing cream coating the leaves while their edges remain distinct.
Look at the leaf edges: they should stay distinct under the cream. That visible structure is a quick check that the spinach has not been cooked into a paste.

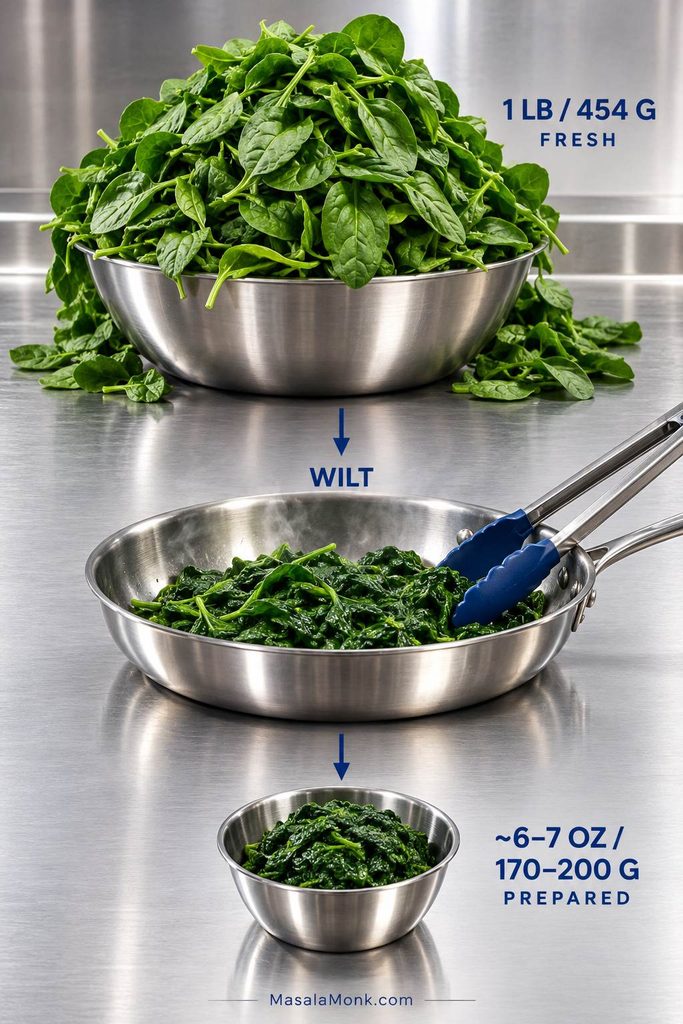
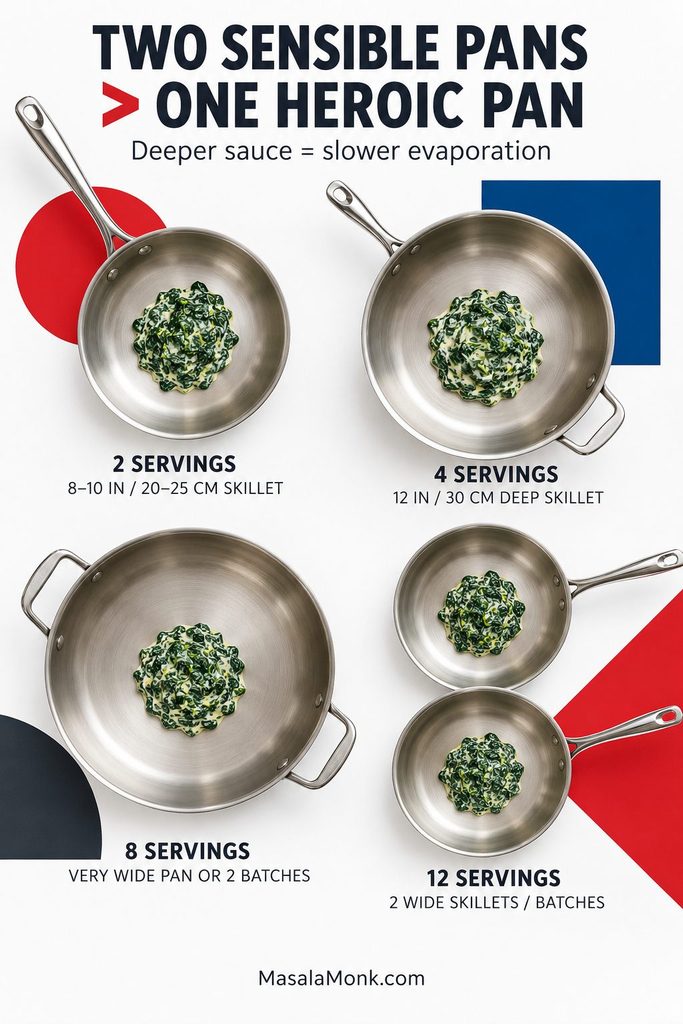
For a dependable creamed spinach recipe, use 16 oz / 1 lb / 454 g fresh spinach or 10 oz / 283 g frozen spinach. Drain it well, then add it only after the cream sauce has thickened. With prewashed fresh spinach or already-thawed frozen spinach, dinner is about 20–25 minutes away. Allow longer for bunch spinach that needs washing and trimming.

The recipe gives you times, but the checkpoints tell you when to move on. The spinach needs to lose water while the sauce gains body; once those two things meet in the skillet, the dish becomes much easier to judge by sight.

Before You Start: Two Things Matter

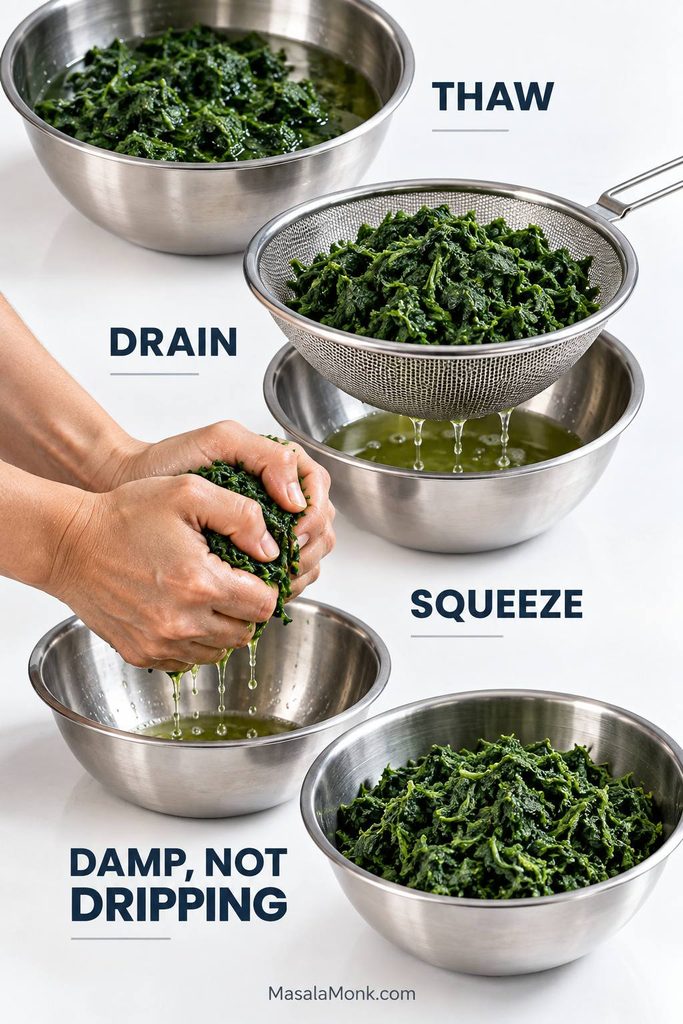
Drain the Spinach

Fresh spinach releases moisture as it wilts, while frozen spinach gives up plenty once thawed. Before either reaches the cream sauce, remove enough water that the leaves feel damp, not dripping.

Rough chopping keeps the spinach leafier. A finer chop gives you a tighter, more steakhouse-like texture.

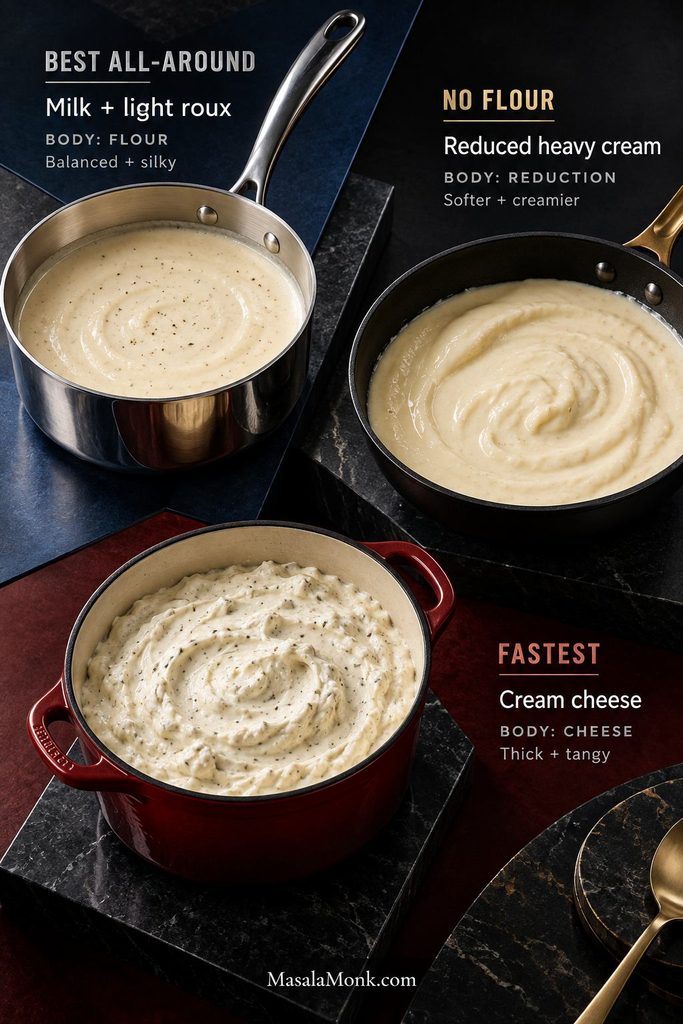
Thicken the Sauce First

Let the sauce thicken before the spinach goes in. It should coat the back of a spoon and look thicker than the result you want on the plate.

The spinach may loosen it briefly. That’s normal. Uncovered cooking lets the last moisture escape.

Creamed Spinach Recipe

Start here. This formula uses mostly whole milk, a modest amount of heavy cream, and just enough roux to stay silky after the spinach joins the pan. There is enough sauce to coat the greens generously, but not enough to make you hunt for them.

Easy Creamed Spinach With Fresh or Frozen Spinach

Fresh or frozen spinach in a balanced Parmesan cream sauce, with clear texture cues that keep the spinach tender and the sauce glossy—not watery or buried under dairy.

Method: Stovetop
Prep: 10 minutes
Cook: 12–15 minutes
Total: About 20–25 minutes with prewashed fresh or already-thawed frozen spinach
Yield: About 2 cups / 480 ml
Servings: 4 side servings
Spinach: Fresh or frozen
Pan: 12-inch / 30-cm deep skillet or wide sauté pan

Spinach — Choose One

  • Fresh: 16 oz / 1 lb / 454 g baby spinach or trimmed mature spinach
  • Frozen: 10 oz / 283 g frozen spinach, fully thawed

After wilting or thawing and removing the excess water, you’ll usually have roughly 6–7 oz / 170–200 g spinach. Don’t chase the number too hard. Different leaves and frozen brands hold different amounts of moisture.

Cream Sauce

  • Unsalted butter: 2 tbsp / 1 oz / 28 g
  • Shallot or yellow onion: 1/3 cup / about 1.5 oz / 45 g, finely chopped
  • Garlic: 2 cloves / about 6 g, finely minced
  • All-purpose flour: 1 1/2 tbsp / about 12 g
  • Whole milk: 3/4 cup / 6 fl oz / 180 ml
  • Heavy cream: 1/4 cup / 2 fl oz / 60 ml
  • Parmesan: 1/4 cup / 1 oz / 28 g, finely grated
  • Ground nutmeg: 1/8 tsp
  • Fine salt: 1/4 tsp to start, plus more to taste
  • Freshly ground black pepper: 1/4 tsp, plus more to taste
  • Cayenne: pinch, optional
  • Fresh lemon juice: optional, to finish

Equipment

  • 12-inch / 30-cm deep skillet or wide sauté pan
  • Fine-mesh strainer or colander
  • Tongs
  • Whisk
  • Clean kitchen towel or cheesecloth, optional

Instructions

1. Prepare the Spinach

Fresh spinach: Wash it thoroughly unless it is already washed and ready to cook. Remove thick, fibrous stems from mature bunch spinach. Tender baby-spinach stems can stay.

A pound of fresh spinach looks slightly ridiculous beside one skillet. Don’t worry—it collapses fast. Heat the pan over medium-high and add the leaves in batches as room opens up, turning them with tongs.

The leaves normally release enough moisture on their own. Add 1 tbsp / 15 ml water only when the first batch threatens to catch before it begins wilting.

Cook for about 2–4 minutes total, just until everything has collapsed and remains vivid green. Transfer to a strainer. After it cools enough to handle, press or gently squeeze away the extra water, then chop roughly or finely.

Three-stage visual showing a large pile of fresh spinach collapsing in a skillet and ending as a much smaller portion of drained cooked spinach.
For **fresh spinach**, the useful comparison is the drained yield, not the intimidating raw pile. That makes fresh and frozen much easier to scale side by side.

Frozen spinach: Thaw it completely, then drain off the obvious liquid. Squeeze firmly by hand, press it against a fine-mesh strainer, or wrap it in a clean towel.

It may look surprisingly compact afterward. That’s fine. Pull it apart with your fingers so it spreads through the sauce instead of landing in one dense lump.

Checkpoint 1: damp is fine; dripping is not. A firm squeeze should no longer send out a stream of water.

Four-step frozen spinach process showing thawing, draining in a strainer, squeezing by hand, and loosening the drained greens.
With **frozen spinach**, drain first and squeeze second. That separates surface liquid from the moisture held inside the compacted leaves without drying the greens unnecessarily.
2. Soften the Onion and Garlic

Wipe any standing water from the skillet and return it to medium heat. Melt the butter, add the shallot or onion, and cook for 2–3 minutes until soft and translucent.

Add the garlic and cook for about 30 seconds, just until its sharp raw smell softens into the butter and onion. Deeply browned or scorched garlic can make the cream sauce bitter.

3. Add the Flour

Sprinkle in the flour and stir for 30–45 seconds. It should absorb the butter and bubble gently.

There is no need to brown the roux. That small amount of flour gives the dairy enough body to cling to the spinach instead of pooling around it.

4. Whisk in the Milk and Cream

Whisk in the milk a little at a time. Add the cream once the mixture is smooth. Bring the pan to a gentle simmer and cook for about 2–4 minutes, stirring regularly.

Don’t rely on the clock alone. A broad skillet may get there quickly, while cold dairy or a gentler burner can need another minute.

Checkpoint 2: dip in a spoon. The sauce should cling to the back instead of running straight off like milk. Let it get thicker than you want the finished spinach.

Three-stage sauce guide showing a pale roux, milk whisked into it, and a smooth sauce thick enough to coat the back of a spoon.
The finished sauce should coat the spoon evenly, with no loose milk running away from the edges.
5. Add the Spinach

Fold in the drained spinach and lower the heat to medium-low. Cook for another 2–3 minutes.

Everything may suddenly look looser. Give it a moment. Moisture is still leaving the leaves, and an uncovered skillet lets it escape. Adding flour or more cheese immediately can leave you with a stiff pan a few minutes later.

Creamed spinach in a skillet before final reduction, with visible liquid between the leaves and steam rising from the pan.
Watch the liquid itself. Clear moisture gathering around the greens points toward spinach water; meanwhile, a uniformly creamy but loose pan usually needs a little more uncovered reduction.
6. Finish With Parmesan

Turn the heat to low or take the skillet off the burner. Stir in the Parmesan, black pepper, nutmeg, optional cayenne, and the first 1/4 tsp salt.

Now taste. More salt may be all it needs. Parmesan can deepen the flavor, while a few drops of lemon can lift a sauce that tastes heavy even after the seasoning is right.
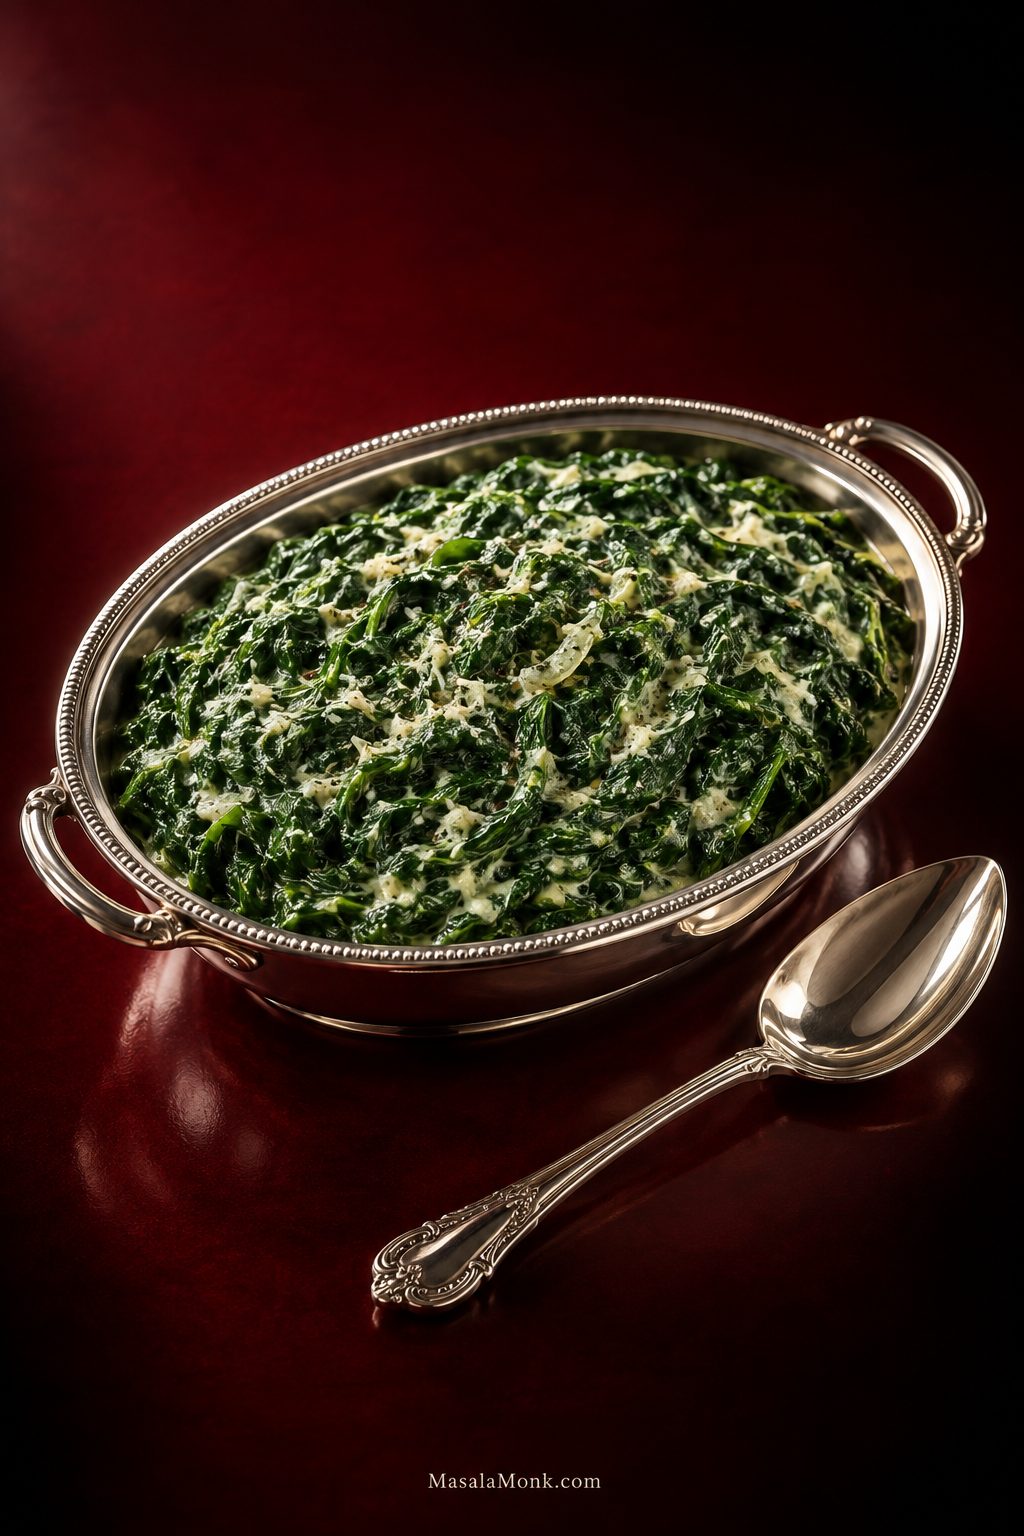
Checkpoint 3: drag a spatula across the bottom. The gap should stay open for a moment before the sauce slowly moves back in. Spoon some onto a plate; it should settle without leaking cream around the edges.
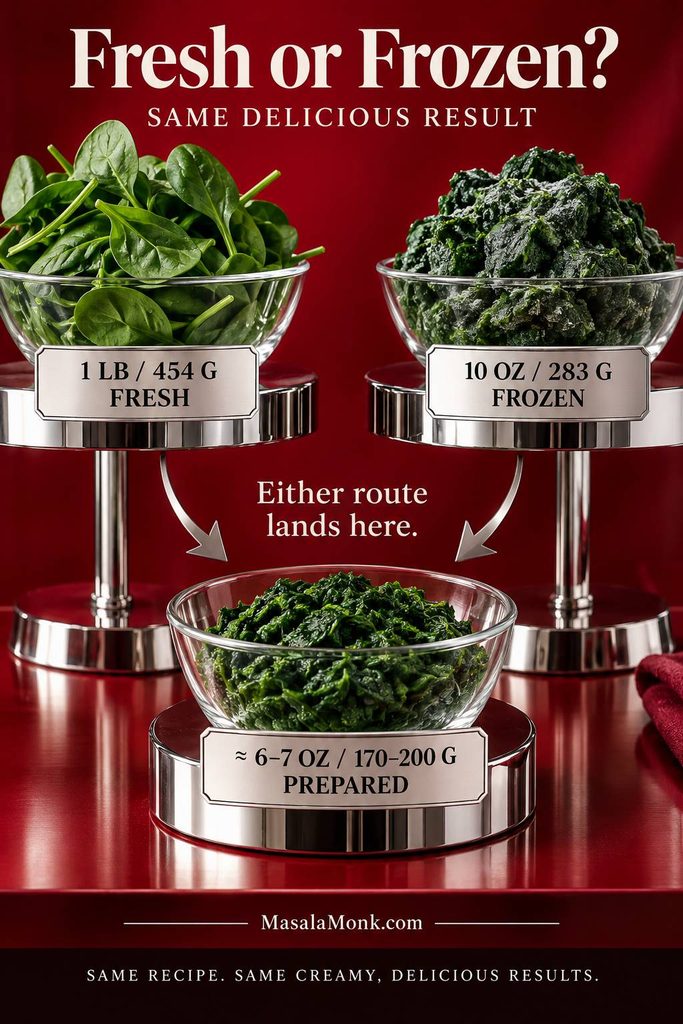
Spatula drawn through finished creamed spinach, leaving a temporary open trail that exposes the bottom of the skillet.
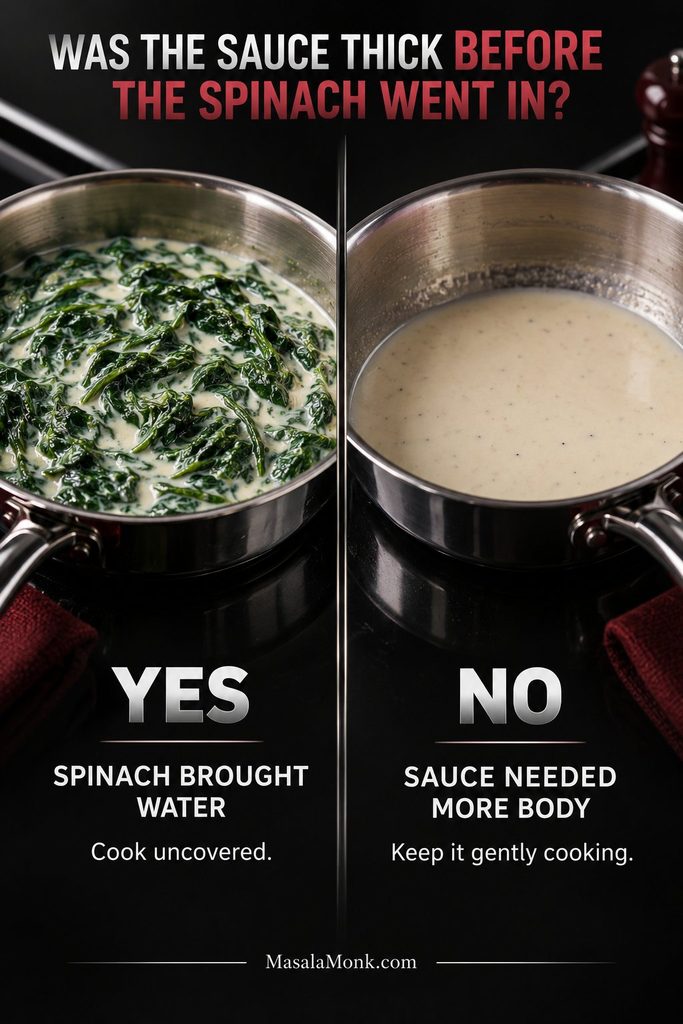
Drag the spatula through the center of the skillet, where the sauce is deepest. The outer edge reduces faster and can make a still-loose pan look more finished than it really is.
7. Adjust the Texture

Too thick? Stir in warm milk or cream 1 tbsp / 15 ml at a time. Still loose? Give it another minute or two uncovered.

Stop while it is creamy and relaxed. It will tighten on the way to the table.

Recipe Notes

  • No heavy cream: use 1 cup / 240 ml whole milk total.
  • Have half-and-half? Use 1 cup / 240 ml half-and-half in place of the milk and heavy cream, keeping the same roux.
  • Want a finer texture? Chop the spinach more finely before adding it to the sauce.
  • Once the cheese goes in: keep the heat gentle. A hard boil makes graininess more likely.
In This Creamed Spinach Guide

Fresh, Frozen or Canned Spinach?

All three can work, but they don’t eat the same. Fresh baby spinach gives the leafiest result, while frozen cut-leaf is the best all-around shortcut. The table shows where the other options fit.

SpinachPreparationFinished textureBest use
Fresh baby spinachWilt, drain, then chopTender and leafyEasiest fresh option
Fresh mature spinachWash well, remove tough stems, wilt or blanchLeafier and slightly firmerWhen you want stronger spinach character
Frozen cut-leaf spinachThaw, drain and squeezeSoft but visibly leafyBest all-around frozen choice
Frozen chopped spinachThaw and squeeze thoroughlyFine and compactSteakhouse-style texture
Canned spinachDrain very well; rinse if very saltyVery soft and finePantry convenience
Five prepared spinach textures compared: baby, mature, cut-leaf frozen, chopped frozen, and canned, from leafier to softer and finer textures.
Cut size changes the sauce-to-spinach ratio in every bite. Finer pieces carry cream and seasoning more evenly, while larger leaves preserve more contrast between vegetable and sauce.

How Much Frozen Spinach Replaces Fresh?

For this recipe, 10 oz / 283 g frozen spinach works well in place of 1 lb / 454 g fresh spinach. Package size matters less after draining: roughly 6–7 oz / 170–200 g prepared spinach fits the main sauce nicely.

Quantity guide showing 1 pound of fresh spinach and 10 ounces of frozen spinach converging on about 6 to 7 ounces of prepared spinach after draining.
Think of fresh and frozen spinach as yield equivalents, not gram-for-gram substitutes. Very different starting weights can produce similar amounts once excess water is removed.

Cut-leaf is the best frozen choice when you want convenience without losing the feel of the leaves. Chopped frozen spinach is better when you deliberately want a denser, finer texture.

When Does Blanching Fresh Spinach Help?

Baby spinach does not need it; wilt it straight in the skillet. Blanching helps with a very large pile of greens or tougher mature spinach. For a finer steakhouse texture, squeeze the cooked spinach well afterward and chop it finely.

Canned spinach needs even less cooking. Drain enough to end up with roughly 6–7 oz / 170–200 g well-drained spinach for this amount of sauce. Rinse first if the packing liquid is especially salty, then fold the spinach into the sauce only after it has thickened.

Water Out, Body In

Watery creamed spinach has two main causes: excess water from the leaves or a sauce that was too thin before they met. Fresh and frozen spinach release that water differently, while a wide skillet helps steam escape faster.

If the finished pan still looks loose, the troubleshooting section shows which side needs attention.

Read the Pan: Troubleshooting Creamed Spinach

A loose skillet looks alarming when dinner is almost ready, but don’t start throwing flour into it yet. First work out whether the trouble began with the spinach or the sauce.

Why Is My Creamed Spinach Watery?

Was the sauce already thick before the spinach went in?

A sauce that looked right until the spinach joined it probably isn’t broken. The leaves simply brought more water than expected. Keep the skillet uncovered over medium-low heat and let that moisture cook away.

A pan that was thin and milky beforehand needs more cooking of its own. Roux-thickened sauce gains body as it gently simmers; flourless cream needs time to reduce.

Troubleshooting decision graphic separating watery creamed spinach caused by moisture from the spinach from sauce that was too thin before the spinach was added.
With watery creamed spinach, fix the source before adding another thickener. Evaporate excess leaf moisture uncovered; however, a sauce that never developed body needs more cooking of its own.

Quick Fixes

ProblemWhat probably happenedFix / Next time
Too thickToo much reduction or a cold, tightened sauceAdd warm milk or cream 1 tbsp / 15 ml at a time
Tastes flatUsually under-seasonedFix the salt first; then consider Parmesan, pepper, cayenne, or a few drops of lemon
Grainy or brokenCheese or dairy overheatedTake the pan off the heat. Warm dairy may improve it, though a badly split sauce may not become perfectly smooth again
Too much sauceNot enough spinach for the dairyWilt and drain extra spinach separately, then fold it in
Too saltySalt stacked with Parmesan or another salty ingredientAdd unsalted cooked spinach or a splash of unsalted dairy
BitterStrong mature leaves, scorched garlic, or excessive cookingScorched garlic and badly overcooked greens are difficult to rescue; avoid deep browning and shorten the spinach cook next time
Lumpy white sauceMilk did not mix smoothly into the rouxWhisk firmly; strain before adding spinach if necessary
Tough or stringyCoarse leaves or thick stemsRemove stems and chop the cooked spinach more finely
Soft and slimyThe spinach cooked too longThe leaf structure will not fully recover; shorten the initial wilt or blanch next time
Three creamed spinach consistency examples: loose with pooling cream, correctly coated and relaxed, and overly thick and stiff.
Correct the texture before making the final seasoning call. Further reduction concentrates salt and Parmesan, whereas loosening an over-thick pan with dairy dilutes them again.

One rescue deserves special care. A dairy-heavy pan may need more spinach, but raw leaves added straight to the finished sauce release fresh water. Wilt the extra spinach separately, drain it well, then fold it in. You fix the ratio without creating another puddle.

Three Ways to Make Creamed Spinach Sauce

The choice is straightforward: use a light roux for the best all-around version, reduced heavy cream when you want no flour, or cream cheese when you want the fastest route.

MethodWhat gives it bodyFinished feel
Milk + light rouxFlourBalanced and silky
Reduced heavy creamReductionSofter and creamier
Cream cheeseCheeseThick and tangy
Three creamed spinach sauce methods compared: milk with light roux, reduced heavy cream, and thick cream cheese sauce.
The three creamed spinach sauce methods also shift the flavor balance: roux keeps spinach forward, reduced cream leans richer, and cream cheese brings more tang.

Lighter Creamed Spinach With Milk, No Heavy Cream

Use 1 cup / 240 ml whole milk instead of the milk-and-cream combination, keeping the butter and flour exactly as written in the main recipe. The result is lighter, but the roux gives the milk the body it needs to cling to the leaves.

It’s the same basic technique behind a smooth béchamel sauce, only with much less sauce because the spinach should remain the point of the dish.

Flourless Creamed Spinach

Heavy cream is the straightforward flourless choice when you want a softer, creamier coating. Melt 1 tbsp / 14 g butter, soften the onion and garlic, then add 1/2 cup / 120 ml heavy cream.

Simmer gently for about 4–7 minutes, stirring now and then. The cream is ready when it visibly thickens and coats a spoon. Fold in the drained spinach from the main recipe, warm it through, take the pan off the heat, and stir in 1/4 cup / 28 g Parmesan.

The finished sauce is softer and richer than the roux version. If it tightens too far, loosen it with cream a tablespoon at a time.

Don’t simply remove the flour from the milk method. With that amount of milk and such a short cooking time, the sauce needs something else to thicken it. Heavy cream works because it reduces more readily.

Cream Cheese Creamed Spinach

Cream cheese is the fastest route to a thick, tangy sauce without building a roux. Use 3 oz / 85 g softened cream cheese and 1/4 cup / 60 ml whole milk instead of the flour, milk, and cream from the main sauce.

Soften the onion and garlic in 1 tbsp / 14 g butter, lower the heat, and melt in the cream cheese. Add the milk gradually, then fold in the spinach. Finish with up to 1/4 cup / 28 g Parmesan.

Three ounces keeps this firmly in side-dish territory. Push the cream cheese much higher and the pan starts drifting toward spinach dip.

3-Ingredient Creamed Spinach

If speed matters more than aromatics or a separate sauce, strip that same cream-cheese idea down to its essentials. This weeknight version uses spinach, cream cheese, and Parmesan, with salt and pepper added to taste.

  • 10 oz / 283 g frozen spinach, thawed and squeezed well, or 16 oz / 454 g fresh spinach, wilted and drained
  • 3 oz / 85 g cream cheese, softened
  • 1/4 cup / 1 oz / 28 g finely grated Parmesan

Warm the spinach over medium-low heat and fold in the cream cheese. A stiff mixture can be loosened with 1 tbsp / 15 ml hot water. Take the pan off the heat, stir in the Parmesan, then season.

Three-ingredient creamed spinach visual showing spinach, cream cheese and grated Parmesan above the finished thick sauce.
For 3-ingredient creamed spinach, cream cheese supplies the body quickly. Choose the roux version when you want a lighter sauce and more control over the spinach-to-sauce balance.

Steakhouse-Style Creamed Spinach

For steakhouse-style creamed spinach, chop the cooked spinach finely, take the sauce slightly thicker, and lean on Parmesan, black pepper, restrained nutmeg, and a fuller cream sauce.

Steakhouse character comes more from texture and seasoning than from one magic ingredient. Restaurants use different formulas, from seasoned white sauces to cream-heavy versions, so chasing one supposed “secret” matters less than getting the finish right.

Finely chopped steakhouse-style creamed spinach in a silver serving dish, with browned steak softly blurred in the background.
For steakhouse creamed spinach, squeeze the cooked greens before chopping them finely. Drier leaves chop more cleanly and bring less unwanted moisture into the richer sauce.

A few quick pulses in a food processor can give you the fine chop, but stop before the leaves become a smooth green purée.

Two spoonfuls compare leafy creamed spinach with a finer, denser steakhouse-style chop.
Chop size changes more than appearance. Fine spinach distributes cream, pepper, and Parmesan through almost every bite, while larger leaves create stronger contrasts of spinach and sauce.

For more creaminess, add another 2 tbsp / 30 ml heavy cream with the other dairy and let the sauce reach the same spoon-coating stage before adding the spinach. Or finish with another 2 tbsp finely grated Parmesan.

A pinch of cayenne gives quiet warmth, while about 1/2 tsp Dijon mustard gives the sauce a sharper edge. Keep the nutmeg subtle.

This style is especially good with steak or a prime rib roast, where peppery cream and finely chopped greens balance the browned crust of the meat.

For a Golden Top

Spoon the finished spinach into a shallow oven-safe dish, then mix 2 tbsp breadcrumbs with 2 tbsp / about 10–12 g finely grated Parmesan and scatter them over the top.

Broil until golden, usually only a minute or two depending on your broiler. Stay close. The crisp top is a good contrast to the soft spinach underneath, but breadcrumbs can go from pale to burned very quickly.

Flavor and Cheese Options

Parmesan is the best default. It brings saltiness and a nutty edge without making the dish feel cheese-heavy.

For a more noticeable Gruyère note, replace half of the Parmesan: use 1/2 oz / 14 g Parmesan + 1/2 oz / 14 g finely grated Gruyère instead of the full 1 oz / 28 g Parmesan.

Boursin is better treated as a cream-cheese variation than as an extra cheese piled onto the main sauce. Use 3 oz / 85 g Boursin in place of the cream cheese in the cream-cheese method. Taste before adding Parmesan or extra salt because Boursin is already seasoned.

For seasoning, think Parmesan and black pepper first, nutmeg quietly behind them. Cayenne adds warmth. Dijon adds sharpness. Lemon belongs at the end, and only in drops; obvious lemon flavor quickly takes over.

Whatever cheese you choose, keep the heat gentle once it goes in. The same rule matters in a smooth cheese sauce: prolonged boiling makes a glossy sauce much more likely to turn grainy.

Scaling for 2, 4, 8 or 12

Doubling the ingredients is simple. The pan is where big batches get tricky.

Side servingsFresh spinachFrozen spinachSauceCookware
28 oz / 227 g5 oz / 142 g1/2 recipe8–10 inch / 20–25 cm skillet
416 oz / 454 g10 oz / 283 g1 recipe12-inch / 30-cm deep skillet
832 oz / 907 g20 oz / 567 g2 recipesVery wide sauté pan or two batches
1248 oz / 1.36 kg30 oz / 850 g3 recipesTwo wide skillets or cook in batches
Pan-size guide showing 2 servings in a small skillet, 4 in a 12-inch skillet, 8 in a wide pan or two batches, and 12 in two wide skillets or batches.
When scaling creamed spinach, cooking time does not rise neatly with ingredient quantity. Once the sauce sits deeper, evaporation slows; therefore, wider pans or separate batches are more predictable.

Crowd twice as much sauce into the same skillet and it sits deeper, so it takes longer to reduce. For eight or more servings, two sensible pans are often easier than one heroic pan.

Fresh spinach behaves better in batches too. Wilt it, drain it, set it aside, and keep going until the pile of leaves has collapsed into something manageable.

When this is one of several sides, plan roughly 3–4 oz / 85–115 g finished creamed spinach per person. Serve more when it is the main vegetable on the plate.

Make Ahead, Store and Reheat

What You Can Make Ahead

Spinach: Wilt or thaw, drain, squeeze, and chop it up to 1 day ahead.

Cream sauce: Make the roux-based sauce separately up to 2 days ahead. Cool and refrigerate it, then rewarm gently before adding the spinach and Parmesan.

Complete dish: The whole pan can be made 1 day ahead. Cool it promptly, cover, and refrigerate. The sauce firms up when cold, so loosen it during reheating only if it needs it.

On a holiday table, that means one less creamy side demanding attention just as everything else needs to be carved, drained, or carried to the table.

Make-ahead timeline showing spinach 1 day ahead, sauce 2 days ahead, the finished dish 1 day ahead, refrigerated leftovers for 3 to 4 days, and frozen leftovers for about 3 to 4 months.
With make-ahead creamed spinach, do not thin the dish while it is still refrigerator-cold. Reheat gently first, because the sauce often loosens naturally as the dairy warms.

Reheating

Stovetop: warm over low heat, stirring regularly. Loosen with warm milk or cream 1 tbsp / 15 ml at a time.

Microwave: heat in 30-second intervals and stir between them.

Oven: reheat covered at 350°F / 177°C. Start checking a chilled shallow dish around 20 minutes; deeper dishes can take longer.

Storage safety: Refrigerate promptly and use within 3–4 days. Reheat leftovers to 165°F / 74°C. Don’t leave the dish out for more than 2 hours, or more than 1 hour above 90°F / 32°C. See the USDA leftover-safety guidance for details.

Freezing Creamed Spinach

You can freeze creamed spinach, though the sauce may be less smooth after thawing. Cool it promptly, pack it airtight, thaw overnight in the refrigerator, then reheat gently.

For best quality, USDA recommends using frozen leftovers within about 3–4 months. Creamy sauces can lose smoothness during storage, so creamed spinach is usually nicest sooner.

What to Serve With Creamed Spinach

Steak and roast beef are the obvious matches, but pork chops, roast chicken, lamb, salmon, and simply cooked fish work too. The creamy greens are especially useful beside something deeply browned or crisp.

Add garlic mashed potatoes or crisp roasted potatoes for the classic plate. Browned meat, fluffy or crunchy potato, and glossy spinach each bring a different texture.

Creamed spinach also earns its place on Thanksgiving and Christmas tables. Because it is heavier than plain greens, a modest spoonful is plenty beside stuffing, potatoes, roast meat, and everything else competing for space.

Creamed spinach served with sliced roast chicken and golden roasted potatoes as part of a complete dinner.
Serve the spinach late in the plating sequence because it tightens as it cools. A last-minute spoonful keeps the sauce glossy instead of stiff.

Leftover Ideas

Stir leftovers through hot pasta with a splash of pasta water, spoon them over a baked potato, fold them into eggs, tuck them into stuffed mushrooms, or use a thick batch in a toasted sandwich or pastry.

For something deliberately scoopable with bread, crackers, or chips, make a proper spinach dip.

Creamed Spinach FAQs

1. Can I Use Frozen Spinach Instead of Fresh?

Absolutely. For this recipe, use about 10 oz / 283 g frozen spinach in place of 1 lb / 454 g fresh. Thaw it completely, then drain and squeeze well.

2. Can I Use Milk or Half-and-Half Instead of Heavy Cream?

Yes. Use 1 cup / 240 ml whole milk with the same roux for a lighter sauce, or 1 cup / 240 ml half-and-half for a richer one.

3. Why Is My Creamed Spinach Watery?

If the sauce was thick before the spinach went in, extra moisture from the spinach is usually responsible. Keep the skillet uncovered and let it reduce. A sauce that was already thin needs more cooking of its own.

4. Can I Make Creamed Spinach Ahead or Freeze It?

Yes. Prepare the spinach a day ahead, the roux-based sauce up to 2 days ahead, or the whole dish 1 day ahead. Leftovers can be frozen too, although the sauce may be less smooth after thawing.

5. Why Does Spinach Make My Teeth Feel Gritty or Chalky?

Thoroughly washed spinach can still leave a temporary rough or chalky sensation often called “spinach teeth.” Spinach naturally contains oxalate, which is associated with that mouthfeel. Cornell discusses the same phenomenon in its research on spinach and its gritty sensation. Actual soil or sand is different, so fresh bunch spinach still needs careful washing.

6. Is Creamed Spinach the Same as Spinach Dip?

No. Creamed spinach is a vegetable side with sauce coating the greens. Spinach dip contains a much larger proportion of creamy ingredients and is designed for scooping.

When a spoonful settles softly without leaking cream around the edges, you’re there: tender spinach that still tastes green, Parmesan and black pepper, and cream supporting the vegetable instead of hiding it.

Posted on — Leave a comment

H1: Corn Casserole Recipe: Creamy, Buttery Cornbread Casserole

Golden corn casserole in a glossy deep-green baking dish with one serving removed, showing browned edges, visible corn kernels, and a moist, soft center beside a silver serving spoon.

A good corn casserole has browned, buttery edges and a middle soft enough for a serving spoon to sink straight through. Sweet kernels pop through the creamy base, while the top tastes closer to tender cornbread.

The tricky part is knowing when that softness is actually done. Pull it too soon and you have wet batter; leave it until it looks like ordinary cornbread and the part that makes the casserole special has disappeared.

This corn casserole recipe lands between those two extremes. Everything comes together in one mixing bowl in about 10 minutes—no stovetop step, no mixer, and no need to prepare the corn muffin mix separately.

The classic Jiffy corn casserole uses one 8.5-oz / 240-g package of mix, added dry. A from-scratch version is included farther down if you do not have Jiffy or prefer to skip the box.

Corn Casserole in 30 Seconds

Corn casserole is a soft, spoonable baked corn side that usually combines corn with a creamy base and cornmeal or cornbread mix. For this corn casserole recipe, heat the oven to 350°F / 175°C. Combine an 8.5-oz / 240-g package of dry corn muffin mix with one drained can of whole-kernel corn, one full can of cream-style corn, 1 cup sour cream, ½ cup melted butter, and 2 eggs. Bake in a 9×9-inch (23×23-cm) dish and begin checking around 45 minutes. Rest for 10 minutes before serving.

The middle should stay soft, but it should no longer behave like liquid. Soft is right. Sloshy is not.

Make It Now

Classic Creamy Corn Casserole

This corn casserole recipe gives you sweet corn in every scoop, buttery browned edges, and enough egg to hold everything together without turning the casserole cakey.

Prep: About 10 minutes

Bake: Usually 45–55 minutes in a 9×9 pan

Rest: 10 minutes

Oven: 350°F / 175°C

Pan: 9×9 in / 23×23 cm

Method: One mixing bowl

Yield: About 8 side servings

Before You Mix

Drain the whole-kernel corn.

Keep the cream-style corn and its thick liquid.

Add the corn muffin mix dry. Do not prepare muffins according to the box directions first.

Whole-kernel corn draining in a metal sieve beside cream-style corn kept with its thick liquid.
Drain the whole-kernel corn, but keep the cream-style corn and its thick liquid. One removes excess water; the other supplies body.

Ingredients

  • 1 package corn muffin mix, 8.5 oz / 240 g
  • 1 can whole-kernel corn, about 15 oz / 425 g before draining, well drained
  • 1 can cream-style corn (often called creamed corn), 14.75–15 oz / 418–425 g, undrained
  • 1 cup full-fat sour cream, about 8 oz / 227 g
  • ½ cup unsalted butter, 4 oz / 113 g, melted and cooled slightly
  • 2 large eggs
  • ¼ teaspoon freshly ground black pepper, optional
  • Up to 1 cup shredded cheddar, about 4 oz / 113 g, optional

If you’re using a larger package of the same corn muffin mix, weigh out 240 g rather than using the whole package. The muffin mix and canned corn are already seasoned, so the base recipe does not automatically need extra salt.

Vegetarian cooks should check the package before buying. The original JIFFY Corn Muffin Mix contains lard, while its Vegetarian Corn Muffin Mix uses vegetable shortening.

Method

  1. Heat the oven. Set a conventional oven to 350°F / 175°C. Lightly grease a 9×9-inch (23×23-cm) baking dish.
  2. Mix the wet ingredients. Whisk the eggs and sour cream together. Once the melted butter has cooled from very hot to warm, whisk it in.
  3. Add the corn and muffin mix. Stir in the whole-kernel corn and cream-style corn. Fold in the dry muffin mix just until no obvious dry pockets remain. A few small lumps are fine; there is no need to keep stirring until the batter is perfectly smooth. Add cheddar now if you want cheese throughout.

Check the batter before baking: it should be thick but still pourable or easily spoonable. It should look cohesive, not watery, with no loose liquid pooling around the corn.

Thick corn casserole batter with visible kernels falling from a spatula into a metal bowl.
The batter can stay slightly lumpy. What matters is that it looks cohesive, with no loose liquid separating around the corn.
  1. Bake. Pour or spoon the batter into the dish and bake uncovered. Begin checking around 45 minutes. The edges should be lightly golden and the surface should have lost its raw, glossy look. For an egg casserole, USDA guidance gives 160°F / 71°C as the minimum center temperature. If you want cheddar on top, add it for roughly the final 8–10 minutes.
  2. Rest. Leave the casserole in the pan for 10 minutes before scooping.

How to Tell When Corn Casserole Is Done

If you are staring through the oven door wondering whether the loose-looking middle is still raw, watch what happens when the pan moves. The top can brown before the inside is ready, so color alone is not enough.

Still Raw

The center looks glossy and loose. Nudge the dish and liquid ripples through the middle on its own. A tester comes out coated in wet batter.

Ready

The perimeter is set and beginning to brown. The middle can move gently, but it moves with the rest of the casserole instead of sloshing independently. Moist crumbs on a tester are fine.

You may also notice a toasted butter-and-corn aroma around the edge. After the rest, a serving spoon should lift a cohesive scoop rather than leave wet batter behind.

Gone Too Far

The middle has become bread-like, the perimeter feels hard, and spoonfuls crumble instead of yielding. It will still taste good, but you have lost the contrast between the browned edge and tender center.

Raw, ready and overbaked corn casserole compared by center texture, from loose and glossy to moist-set to dry and crumbly.
Watch the center, not just the color. Ready casserole moves gently as one mass; sloshing means raw, while a dry crumb means overbaked.

Why Corn Casserole Recipes Disagree

Corn casserole recipes differ mainly because they aim for different textures, carry different amounts of moisture, and sit at different depths in the pan. That is why one recipe uses no eggs while another uses two, or why a broad shallow casserole can finish much sooner than a deeper one.

If dinner is already underway, the recipe above is enough.

Softer or Firmer? Egg vs No Egg

Using no eggs gives you a softer, more pudding-like casserole; two eggs make it firmer and easier to scoop.

For this recipe—and especially for a holiday table—two eggs are the better default. The casserole holds together on the spoon and stays where you put it on the plate. Sour cream and cream-style corn keep it tender.

Leave the eggs out for the familiar 5-ingredient corn casserole: corn muffin mix, whole-kernel corn, cream-style corn, sour cream, and butter. It is intentionally looser and more pudding-like. One egg lands somewhere between those two styles.

Side-by-side corn casserole servings showing a softer no-egg version and a firmer, moist two-egg version.
The 5-ingredient version stays softer without eggs. Two eggs give a cleaner scoop while the creamy base keeps the center tender.

Corn Casserole vs Corn Pudding: What’s the Difference?

Ask three families for corn casserole and you may get three noticeably different dishes. One is eggless and spoon-soft, another is firmer, and a third may be called corn pudding.

The names overlap, so texture is usually more useful than the label. Cornbread casserole is often another name for this same broad family of corn-and-cornbread-mix dishes. Spoonbread is another name you may encounter for this soft corn-casserole family.

Cornbread itself is firmer and sliceable. Corn pudding usually leans softer and more custard-like. A true corn soufflé is lighter and more egg-driven, often using whipped whites for lift. Scalloped corn overlaps too, although many versions use crackers or breadcrumbs and a different creamy base.

Canned, Frozen or Fresh Corn?

This recipe uses corn for two different jobs. One portion gives you whole kernels to bite into. The cream-style corn brings both corn solids and the thick liquid that keeps the casserole spoonable.

Part of the RecipeChoiceHow to Use ItResult
Whole-kernel portionCanned cornDrain wellClassic texture and the most straightforward option
Whole-kernel portionFrozen cornThaw, drain, blot if wetSimilar texture once the thawing water is removed
Whole-kernel portionFresh cornCut from the cob and measureBrighter corn flavor and more distinct kernels
Creamy corn portionCream-style cornUse the full canSupplies the thick corn-rich base

Fresh corn works at about 1½ cups / 220 g kernels in place of the drained canned whole corn. That is roughly 3 medium ears, though ear size varies enough that measuring the kernels is more dependable.

Frozen kernels work well too, but thaw them before they reach the bowl. Meltwater left clinging to the corn goes straight into the batter and can make an already-soft casserole noticeably wetter.

Why Cream-Style Corn Is Different

Another drained can of whole corn cannot replace cream-style corn by itself. You would be replacing the kernels but losing the thick corn liquid that helps produce the characteristic spoonable texture.

Canned, frozen, fresh and cream-style corn shown with their different preparation roles for corn casserole.
Canned, frozen and fresh kernels all work here. Dry thawed corn well, but keep the thick liquid that comes with cream-style corn.

Corn Casserole Without Jiffy

To make corn casserole without Jiffy, replace the 8.5-oz / 240-g boxed mix with flour, cornmeal, sugar, baking powder, salt, and a little neutral oil.

  • 80 g all-purpose flour, about ⅔ cup
  • 75–80 g yellow cornmeal, about ½ cup
  • 40 g granulated sugar, about 3 tablespoons
  • 12 g baking powder, about 1 tablespoon
  • ½ teaspoon fine salt

Whisk those ingredients together and use them in place of the boxed mix. Add 2 tablespoons / 30 ml neutral oil with the melted butter. The boxed mix already contains added fat, so the oil replaces some of what disappears when you make the mix from scratch.

Measured flour, cornmeal, sugar, baking powder, salt and oil arranged for homemade corn muffin mix.
For corn casserole without Jiffy, only the boxed muffin mix changes. The corn, sour cream, butter and eggs stay the same.

A more savory version needs only 20–25 g sugar. Cornmeal grind varies, so follow the same doneness cues as the main recipe rather than expecting the scratch version to finish at exactly the same minute.

If what you actually want is a firm slice with a bread-like crumb, use a dedicated Southern cornbread recipe instead.

Ingredient Changes That Work

ChangeWhat to DoWhat to Expect
Full-fat Greek yogurt for sour creamUse the same amountTangier flavor and a slightly firmer scoop
Frozen corn for canned whole cornThaw and remove the water firstWorks well once excess moisture is gone
More or fewer eggsChoose deliberatelyChanges how firmly the casserole sets
Milk or half-and-half for sour creamAvoid as a direct swapThins the batter much more than yogurt does
Different gluten-free cornbread mixUse a recipe built for that mixDifferent mixes absorb liquid differently

Full-fat Greek yogurt is the cleanest sour-cream replacement; use 1 cup / about 225–230 g. It is thick enough to keep the batter from turning runny. Milk or half-and-half loosens it much more, which can leave the edges browned before the middle is ready.

If You Do Not Have Cream-Style Corn

Use one additional 15-oz / 425-g can of whole-kernel corn, separate from the can used for the whole-kernel portion of the recipe. Reserve the liquid before draining it.

Blend all of those kernels with about one-third of the reserved canning liquid and 1 tablespoon all-purpose flour. Stop when no intact kernels remain but the mixture is still coarse and chunky, not smooth. If the blender needs help moving, add a little more of the reserved liquid. Use the entire mixture in place of the cream-style corn.

Cream-style corn substitute shown from whole kernels and reserved liquid to a coarse, chunky blended mixture.
The substitute needs to replace body as well as kernels, so stop blending while the mixture is still coarse and chunky.

Changing either the baking mix or the dairy is manageable. Change both at once, though, and you are better off starting with a gluten-free or dairy-free corn casserole recipe built for those ingredients.

Cheddar, Jalapeño and Other Add-Ins

For a cheesy corn casserole, add up to 1 cup / 4 oz / 113 g shredded cheddar. Fold it into the batter for cheese throughout, or add it near the end for a browned, salty layer on top.

Finely chopped jalapeño, well-drained green chiles, scallions, chives, and black pepper all work without substantially changing the batter. A cheddar-jalapeño version is especially good beside smoky food such as slow cooker pulled pork.

Extra sugar is rarely necessary with a sweet corn muffin mix. Add 1–2 tablespoons only when you deliberately want a sweeter casserole. Tart cranberry sauce with orange juice is particularly good against that buttery sweetness.

Cheddar jalapeño corn casserole with a browned cheesy top, visible corn kernels and sliced green jalapeño.
Cheddar makes the top richer and saltier; jalapeño keeps the sweetness in check. The base method stays the same.

Your Pan Is Part of the Recipe

Bake time is not just about the dimensions printed on the pan. What matters is how deeply the batter sits inside it. Spread the same amount across more surface area and it heats through faster. Stack twice as much into the same footprint and the center has much farther to go.

Same batter, deeper pan, longer bake.

SetupWhat ChangesWhen to Begin Checking
1 batch in 9×9Baseline depthAbout 45 min
1 batch in 8×8Deeper than the baselineAround 45 min; it may run toward the longer end of the range
1 batch in 9×13Shallower, broader layerAround 35 min; judge by the same doneness cues
2 batches in one 9×13Much deeperAbout 55–60 min, then judge the center
2 batches in two standard pansDepth stays close to the originalAbout 45 min

Those are checkpoints, not guaranteed finish times. Pan material, starting temperature, and the behavior of your oven still matter.

Three pans compare corn casserole batter depth: shallow 9 by 13, baseline 9 by 9, and deep double-batch 9 by 13.
Pan size alone does not determine bake time. Batter depth does: a deeper center simply needs longer to heat through.

One Batch in a 9×13 Is Not the Same as Two

A single batch spread through a 9×13-inch (23×33-cm) pan is relatively shallow, so start looking at it around 35 minutes. Double the recipe in that same pan and you can end up staring at beautifully browned edges while a loose patch in the middle is still catching up.

That is why a statement such as “a 9×13 takes 30 minutes” tells you very little unless you also know how much batter was in it.

Doubling the Recipe

For a double batch, use two 9×9 pans if possible. One high-sided 9×13 works too; begin checking that deeper casserole around 55–60 minutes.

Keeping roughly the original batter depth makes the result easier to predict. With one deeper 9×13, leave some headroom above the batter. If the top and edges brown before the middle is ready, tent the dish loosely with foil and keep baking.

Two 9 by 9 pans beside a deeper double-batch 9 by 13 corn casserole with loose foil partly tenting the larger pan.
Two 9×9 pans keep a double batch close to the original depth. One deep 9×13 can brown before its center catches up.

One batch makes about 8 side servings. At a meal with several other sides, a double batch generally covers around 14–16 people. Two moderate pans are also easier to work around another 350°F dish such as sweet potato casserole.

Metal pans can brown the edges sooner. Heavy ceramic and glass take longer to warm but hold heat well once hot. With a fan-assisted oven, use your oven’s normal temperature conversion and start watching a little earlier.

Making Corn Casserole for Thanksgiving When the Oven Is Full

On a weeknight, the casserole can have the oven to itself. Thanksgiving is another story: the turkey is roasting, dressing needs a rack, rolls want a final blast of heat, and the door keeps opening.

The casserole does not know the recipe promised roughly 50 minutes. It only knows the oven keeps losing heat.

Crowded oven with turkey, corn casserole, another casserole, rolls and vegetables baking on several racks.
A crowded Thanksgiving oven slows heat recovery. Let the center decide when the casserole is done, not the clock alone.

Bake It Ahead

Yes—corn casserole can be fully baked up to 2 days ahead. Cool it promptly, cover, and refrigerate, then reheat before serving. This is the simplest way to remove the casserole from the holiday oven traffic jam.

If Southern cornbread dressing is also on the menu, baking the corn casserole ahead leaves valuable oven space available for the dressing closer to dinner.

If You Want to Bake It Fresh

The best texture comes from keeping the muffin mix dry until close to baking. Up to 24 hours ahead, combine the eggs, sour cream, butter, and corn, then cover and refrigerate promptly. When you are ready to bake, stir the chilled mixture well before folding in the dry mix.

You can also assemble the whole casserole the night before if convenience matters most. Cover it, refrigerate promptly, and bake it within about 24 hours. Cold batter normally needs more oven time, and batter that has sat overnight may rise a little differently from one mixed immediately before baking.

Make-ahead guide comparing fully baked casserole, separate wet and dry mixtures, and assembled raw casserole.
Want the freshest texture? Keep wet and dry separate. Want the easiest holiday? Bake the casserole ahead and reclaim oven space.

When the Oven Gets Crowded

Leave a little breathing room around the dish when possible. Adding another refrigerator-cold casserole—such as green bean casserole—at the same time slows the oven’s recovery.

The casserole can wait through its 10-minute rest, so there is no benefit in forcing every side to finish at exactly the same moment. If oven space disappears completely, use a slow-cooker corn casserole recipe built for that moist cooking environment rather than moving this exact batter straight into a slow cooker.

When Something Goes Wrong

A problem that looks mysterious in the oven is usually easier to diagnose once you separate excess moisture from insufficient baking and excessive batter depth.

What You SeeLikely CauseWhat to Do
Liquid centerNeeds more baking, too much moisture, or unusually deep batterContinue baking and review corn drainage or substitutions
Edges browned, center rawCenter is heating much more slowly than the perimeterTent loosely with foil and continue
Top browns too quicklyStrong top heat or a deep casseroleCover loosely with foil while the inside finishes
Dry or cakeyOverbaked, too much dry mix, or too much eggCheck package weight and pull the next batch sooner
Frozen-corn version is wateryThawing water went into the bowlThaw, drain, and blot before mixing
Dense or gummyDry-to-liquid ratio changedCheck the mix weight and any extra liquid or substitutions
OverflowPan is too small or too fullDivide the batter or use a larger, high-sided dish

Storage and Reheating

Cooked corn casserole keeps for 3–4 days in the refrigerator. Refrigerate leftovers within 2 hours of serving and keep them covered.

Reheat a larger portion covered at about 300°F / 150°C until hot through. A partially filled dish often warms in 15–20 minutes; a whole refrigerator-cold casserole takes longer. Uncover near the end if you want some color back on top. Reheated leftovers should reach 165°F / 74°C.

A single serving reheats well in short microwave bursts. The casserole will usually be a little softer after refrigeration and reheating than it was straight from the oven.

Freezing extends the useful storage window to about 2–3 months for best quality. Thaw overnight in the refrigerator before reheating.

Corn casserole leftovers shown in storage, reheating under loose foil, and served again with a moist center.
Reheat covered to protect the soft center. Uncover near the end only if you want a little browning back on top.

What to Serve With Corn Casserole

The casserole is rich, buttery, and naturally sweet. Salty gravy and tart cranberry sauce both work beautifully with it, while crisp green vegetables keep the plate fresh. Smoke and char keep the sweetness from dominating the savory side of the meal.

At Thanksgiving, it fits naturally beside turkey, dressing, green beans, cranberry sauce, and a spoonful of turkey gravy made from pan drippings. With a honey-glazed spiral ham, keep the casserole itself on the less-sweet side so the whole plate does not lean sugary.

Outside the holidays, serve it with chili, ribs, grilled chicken, pulled pork, or other smoky barbecue. Jalapeño, green chiles, or cheddar move the casserole even more comfortably in that direction.


Give the casserole its 10-minute rest, then go for a browned corner and a generous scoop. It is at its best hot, when the sweet corn, butter, tender center, and lightly crisp edge all land in the same bite.

Golden corn casserole scoop on a cobalt-blue plate with browned edges, a moist center, visible kernels and a silver spoon.
Corners give you more browned crust; the center stays softer. A generous scoop can give you both in the same bite.