
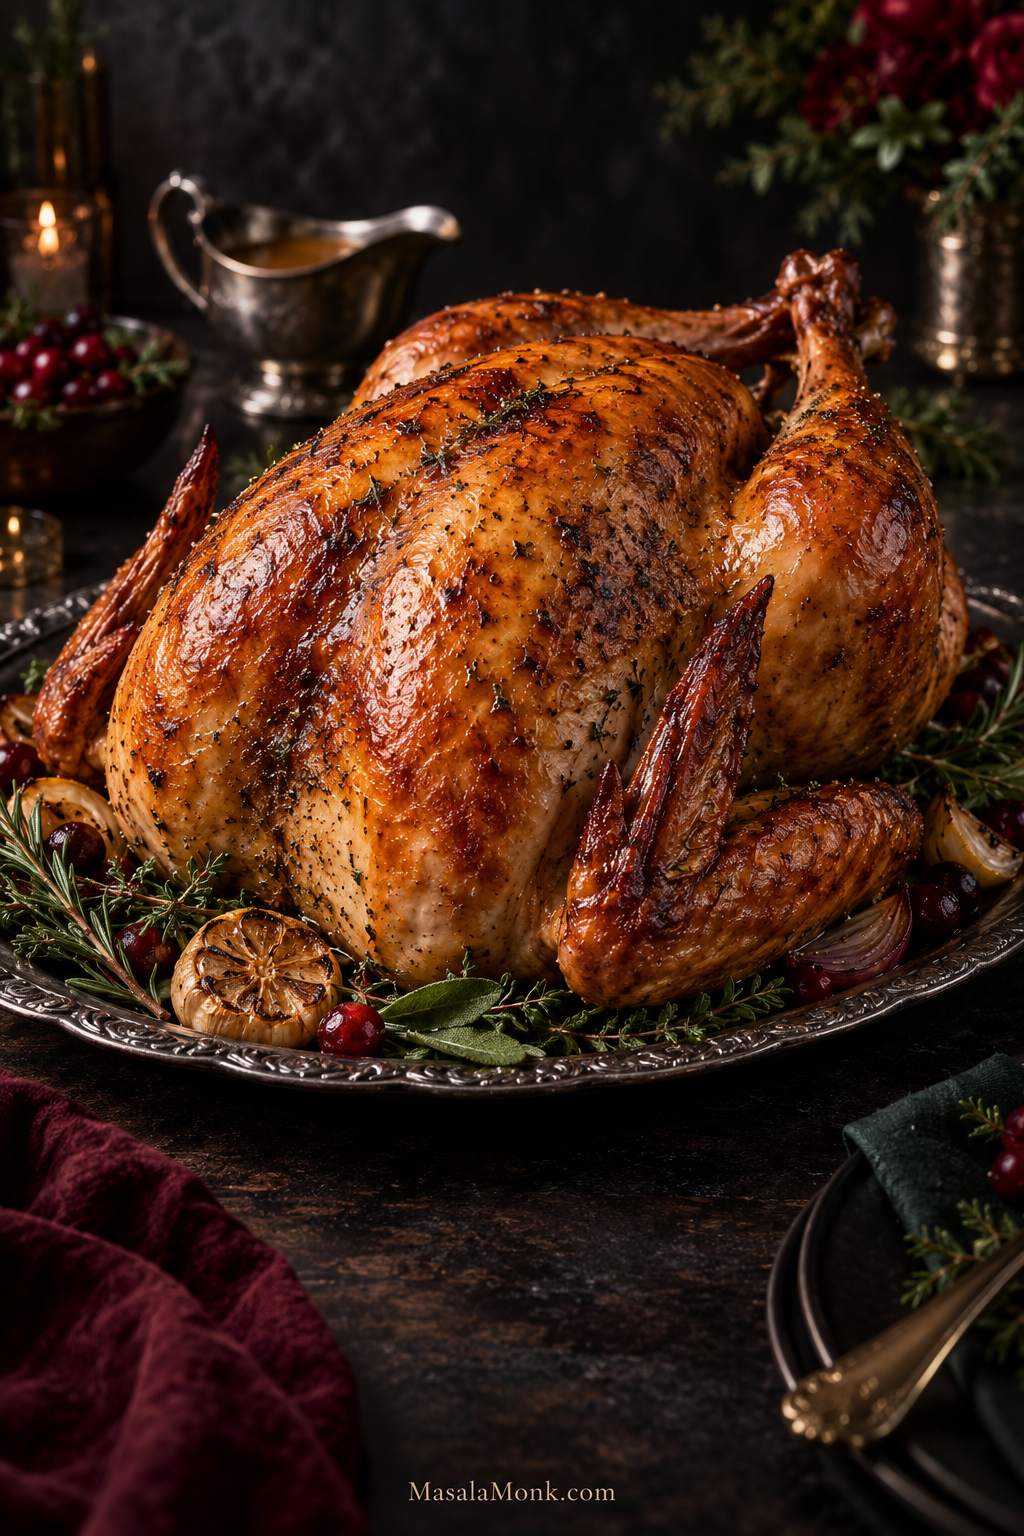
A turkey can look finished before it is actually ready. The breast is deeply browned, dinner is getting close, and then the thermometer says one thigh still has a way to go. That mismatch—lean breast attached to slower-cooking dark meat—is most of what makes a whole turkey tricky.
Most of us do not get many practice runs with a whole turkey. It is big, expensive enough that you care about getting it right, and usually the one dish everyone else is waiting for.
This roast turkey recipe keeps the cooking straightforward: roast breast-side up at 325°F / 163°C, keep the skin dry, skip routine basting, and start checking before you expect the bird to be finished. The target is breast meat that still glistens when sliced, tender thighs, bronzed skin with crisp edges, and savory drippings ready for gravy. The turkey here is 12–14 lb / 5.4–6.4 kg; the timing table also covers other common sizes.
Quick Answer: How to Cook a Juicy Turkey in the Oven
For this roast turkey recipe, cook a 12–14 lb / 5.4–6.4 kg unstuffed turkey at 325°F / 163°C for about 3–3¾ hours. Begin checking around 2½ hours, and remove the turkey only after the thickest breast, inner thigh and inner wing area have each reached at least 165°F / 74°C. Rest for 30–45 minutes before carving.
Start with a fully thawed bird and read the package before adding salt. Pat the turkey dry, season according to how much time you have, spread herb butter beneath the breast skin, and keep the cavity aromatics loose.
Before roasting: thaw completely and check whether the turkey is already salted or enhanced.
Position: breast-side up, with room around the legs.
Covering: mostly uncovered; foil once the skin has enough color.
Basting: optional.
Doneness: use the thermometer for the final decision.
Rest: 30–45 minutes.
The clock plans dinner. The thermometer decides when the turkey is done.
Even when the timing is not predictable, the basic roast is simple: get the salt right, dry the skin, roast steadily, protect the breast once it is brown enough, and check the temperature in the right places.
If the breast finishes first, loosely shield it and let the thighs keep cooking.
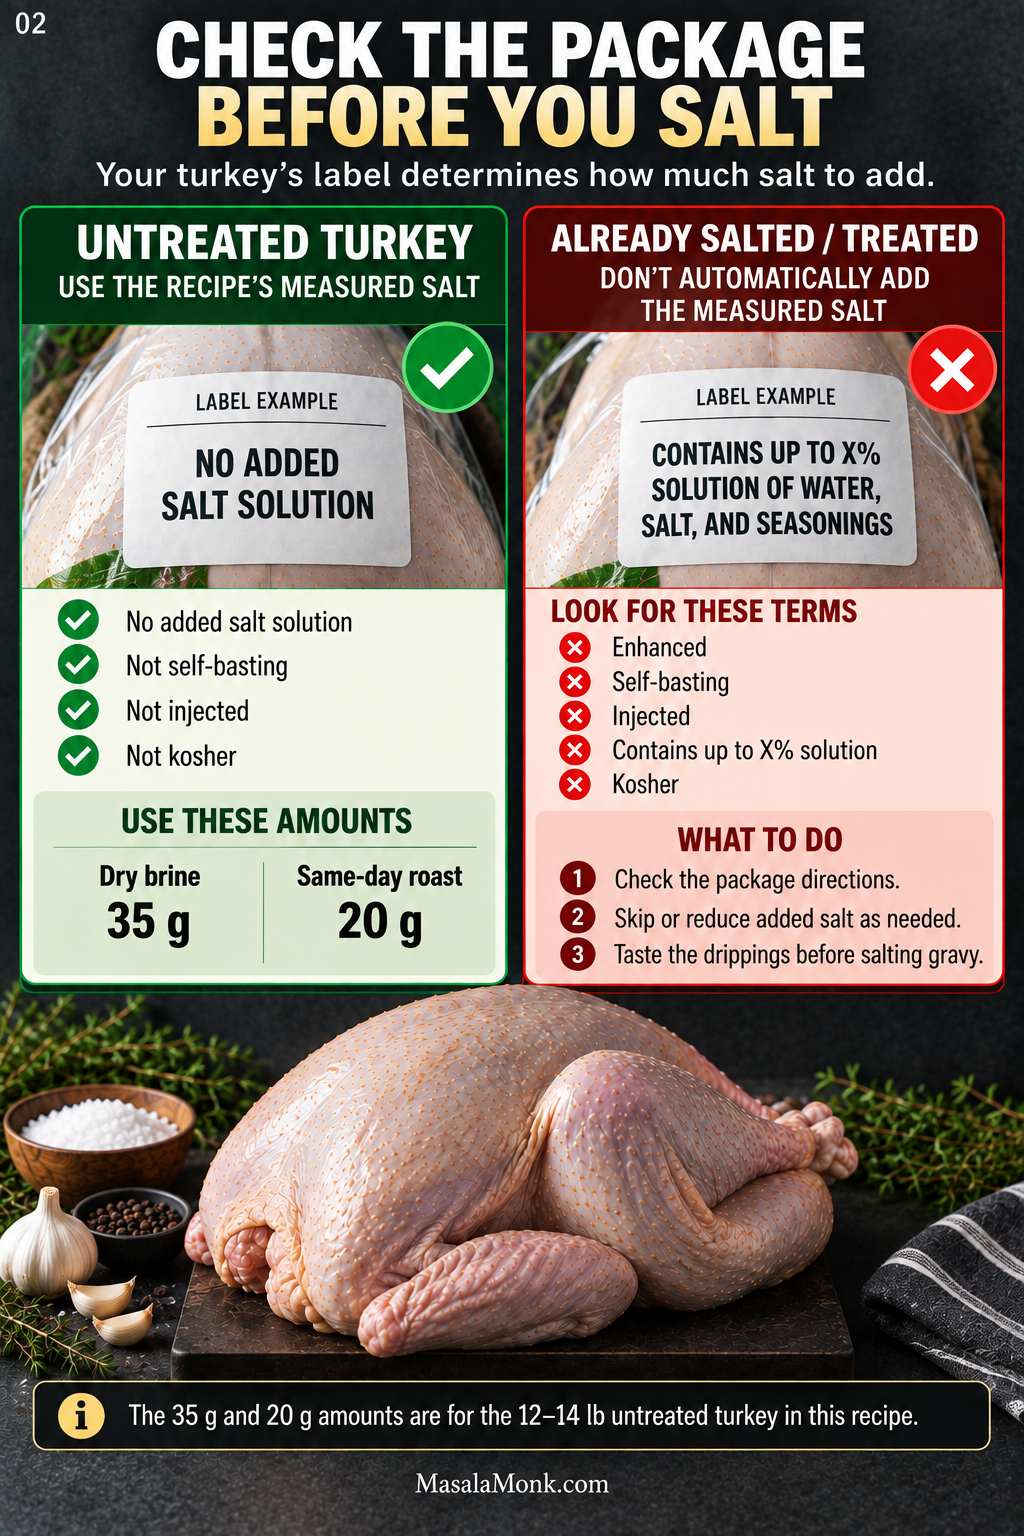
Before You Salt It: Check the Label
Untreated turkey: no added salt solution and not kosher. Use the measured salt amounts in this recipe.
Self-basting, enhanced, injected, or “contains up to X% solution”: salt has already been added during processing.
Kosher turkey: salting is already part of the processing.
Do not use the measured 35 g or 20 g salt amounts on an enhanced, injected, self-basting or kosher turkey unless its package specifically directs you to add more salt. Use the unsalted herb butter, herbs and pepper, then taste the drippings before seasoning the gravy.
Roast Turkey Recipe
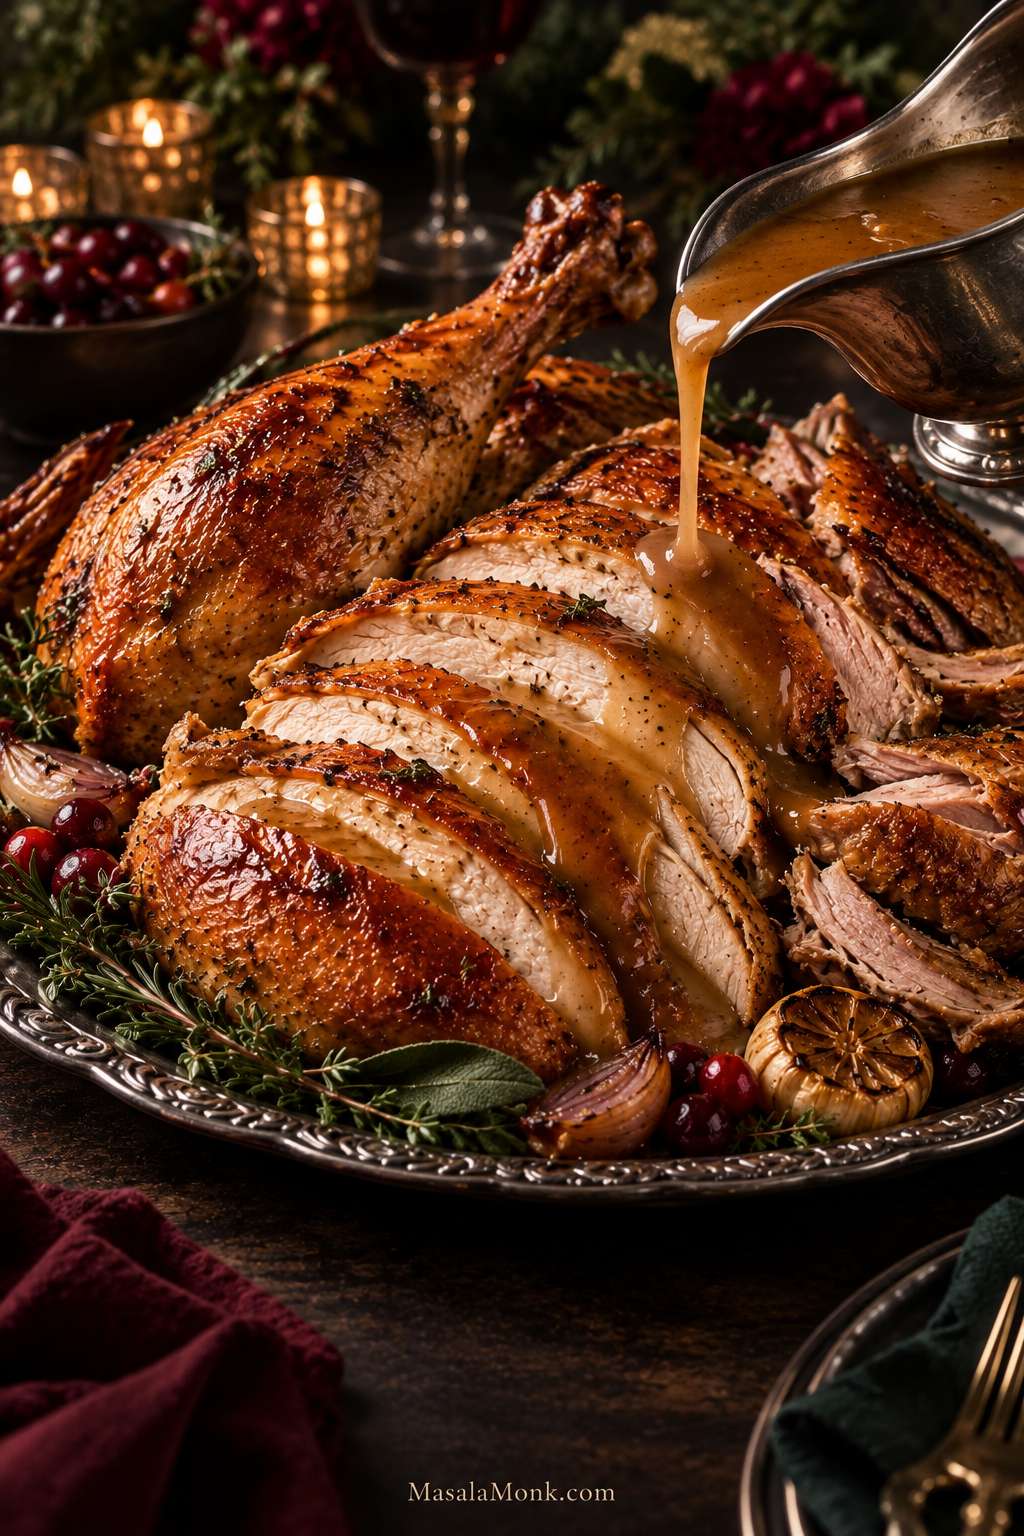
A whole herb-butter turkey with bronzed skin, juicy breast meat, tender dark meat and plenty of flavorful drippings for gravy.
Ingredients
- 1 whole turkey, 12–14 lb / 5.4–6.4 kg, completely thawed
- For dry-brining (12–48 hours; 24–48 preferred): about 35 g kosher salt, for an untreated turkey only
- For same-day seasoning: about 20 g kosher salt, for an untreated turkey only
- 8 tbsp / 4 oz / 113 g unsalted butter, very soft
- 1 tbsp / 15 ml olive oil or neutral oil
- 4 garlic cloves, finely grated or minced
- 1 tbsp finely chopped fresh rosemary
- 1 tbsp finely chopped fresh thyme
- 1 tbsp finely chopped fresh sage
- 1 tsp freshly ground black pepper
- 1 medium onion, quartered
- 1 lemon, quartered
- ½ head garlic, cut crosswise
- A few fresh herb sprigs, optional
- ½ cup / 4 fl oz / 120 ml unsalted turkey or chicken stock, or water, plus more if the pan begins to dry
Using dried herbs? Use about 1 teaspoon dried herb for each 1 tablespoon fresh rosemary, thyme or sage.
The 35 g and 20 g salt amounts are for the 12–14 lb turkey in this recipe. For a substantially larger or smaller bird, do not simply reuse the same amount.
By volume, 35 g is approximately 4 tbsp + ½ tsp Diamond Crystal or 2 tbsp + 1¼ tsp Morton kosher salt. For 20 g, use roughly 2 tbsp + 1 tsp Diamond Crystal or 1 tbsp + 1¼ tsp Morton. A scale is more dependable because kosher salts vary substantially in density.
Instructions
Prepare and Season
- Check the label and choose the seasoning. For an untreated turkey, use 35 g kosher salt when you have at least 12 hours to dry-brine; 24–48 hours is preferred. Cooking within the next several hours? Use the lighter 20 g same-day amount. Skip these measured amounts on enhanced, self-basting, injected or kosher birds unless the package says otherwise.
- Dry-brine ahead, when time allows. Pat the turkey dry and distribute the 35 g salt over the exterior, beneath the breast skin and lightly around the cavity. Set the bird on a rack over a rimmed tray or roasting pan, keep the refrigerator at 40°F / 4°C or colder, and place the turkey where raw juices cannot drip onto other food.
- Prepare the oven and bird. Position the rack so the turkey will sit near the center of the oven and heat to 325°F / 163°C. Remove the neck, giblets, gravy packet and loose packaging from both cavities, then pat the turkey thoroughly dry. There is no need to bring the whole bird to room temperature; keep it refrigerated until you are ready to season and roast it.
- Season. Mix the softened butter with garlic, herbs and pepper. For same-day seasoning, distribute the 20 g salt over the exterior, beneath the breast skin and lightly around the cavity first. Loosen the breast skin, spread most of the herb butter underneath, rub the remainder over the legs and lightly oil the exterior.
Roast and Finish
- Set it in the pan. Add the onion, lemon, garlic and herbs loosely to the cavity. Tuck the wing tips back, leave the legs fairly loose, place the turkey breast-side up on the rack and pour ½ cup / 120 ml unsalted stock or water into the bottom of the pan. The liquid stays below the rack to keep the drippings from scorching; it is not there to baste or steam the bird.
- Roast. Cook mostly uncovered. Once the breast is deeply and evenly bronzed, loosely shield it with foil. Add another ½ cup / 120 ml hot water or unsalted stock if the pan begins to dry or smoke.
- Check early. At about 2½ hours, begin checking the thickest breast, thick inner thigh where the leg meets the body, and inner wing area.
- Finish and rest. The breast, inner thighs and inner wing areas should all reach at least 165°F / 74°C. When the breast finishes first, shield it while the thighs continue. Rest for 30–45 minutes before carving.
Equipment and Pan Setup
You need a shallow roasting pan, a rack or substitute, a reliable instant-read thermometer, foil, paper towels, sturdy oven mitts and a sharp carving knife. A leave-in probe thermometer, oven thermometer, fat separator, kitchen twine and grooved carving board are useful extras.
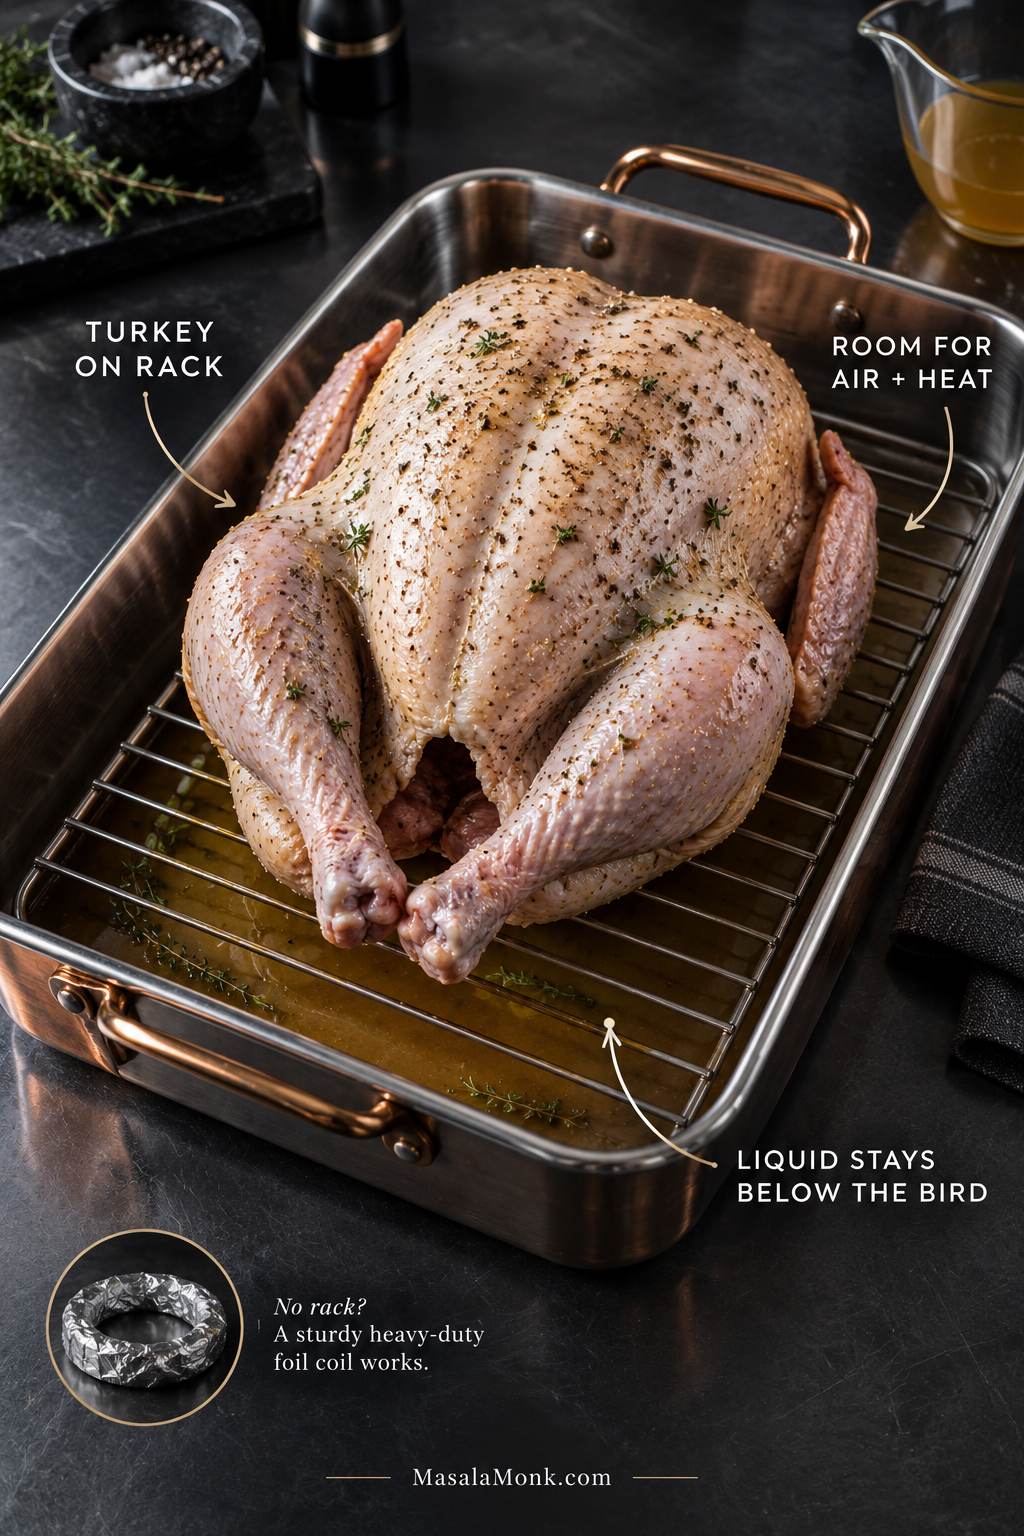
No rack? Use a sturdy coil of heavy-duty foil, or make a bed from extra onion, carrot and celery pieces. For a smaller turkey, a strong rimmed sheet pan with an oven-safe rack can work if it can safely contain the drippings.
Check the fit before roast day. The turkey should sit roughly in the vertical center of the oven—usually around the lower third—with clear space above and around it. A 20-pound turkey is a bad time to discover that the pan barely clears the oven door.
Need help with a specific part? Thawing · Salt · Prep · Time & Temperature · Thermometer · Browning & Foil · Troubleshooting · Rest & Carve
Plan the Turkey Backward From Dinner
A whole turkey needs more than oven time. It has to thaw, perhaps dry-brine, roast and then rest before carving. Work backward from dinner and leave some room for the bird to surprise you.
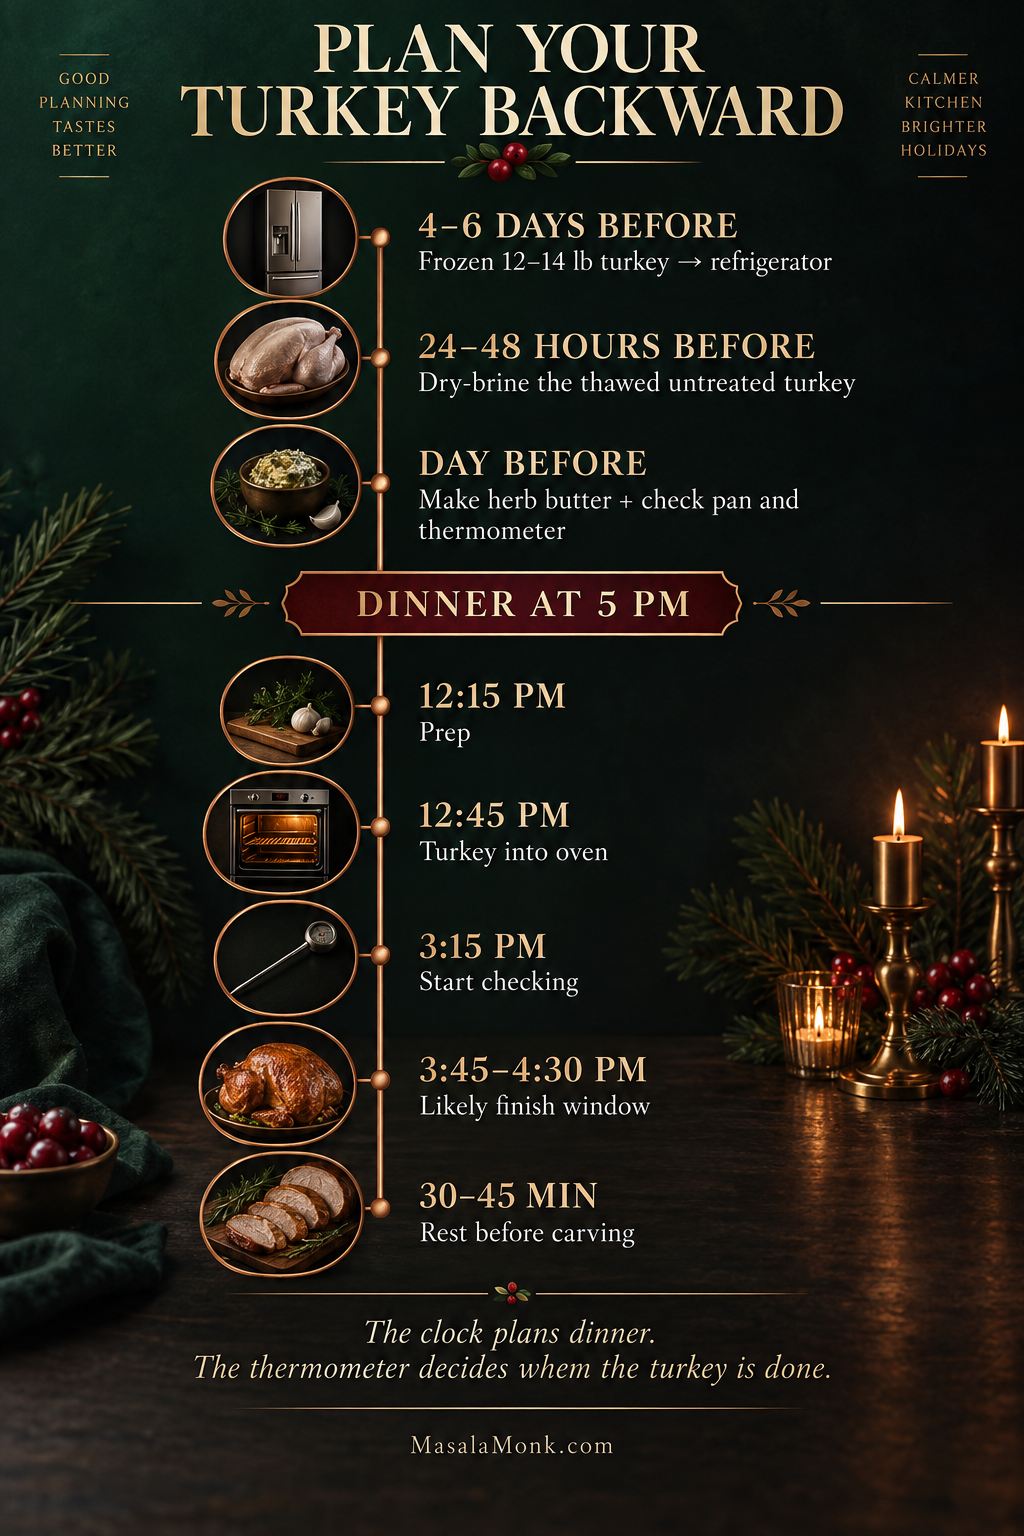
If your 12–14 lb turkey starts frozen and you also want the preferred 24–48 hour dry brine, move it to the refrigerator roughly 4–6 days before dinner. Larger birds need longer to thaw, so build that extra day or two into the schedule.
A Simple Turkey-Day Timeline
| When | What to Do |
|---|---|
| 4–6 days before | For a frozen 12–14 lb turkey that you want to dry-brine, move it to the refrigerator. |
| 24–48 hours before | Once thawed, dry-brine an untreated turkey. Even 12–24 hours is worthwhile if that is the time you have. |
| Day before | Make and refrigerate the herb butter, check the roasting pan and thermometer, and finish dishes that can be made ahead. |
| Roast day | Take the herb butter out early enough to become very soft. Dry and season the bird, set up the pan and roast. |
| Before the expected finish | Begin checking internal temperature. |
| 30–45 minutes before carving | Rest the turkey while you make gravy and finish the last hot dishes. |
The turkey does not have to carry the entire meal. Move cold sauces and make-ahead dishes off roast day when you can. Cranberry sauce with orange juice is perfectly happy waiting in the refrigerator.
Dinner at 5:00 PM?
For the turkey used here, aim to have it in the oven by about 12:45 PM. Begin prep around 12:15 PM, then start checking the bird around 3:15 PM.
No start time guarantees an exact 30–45 minute rest because the normal roasting range itself spans about 45 minutes. A fast three-hour bird could be ready around 3:45 PM and need the early-finish plan below; a slower one may come out near 4:30 PM and still rest for half an hour.
Starting earlier protects dinner from running late. Starting later reduces the chance of a long hold. Choose which risk matters more for your meal.
For detailed weight-by-weight planning, including larger and stuffed birds, use the full turkey cooking-time guide.
How Much Turkey Do You Need?
About 1–1¼ lb / 454–567 g of whole turkey per person works well for comfortable portions. Move closer to 1½ lb / 680 g per person when leftovers are part of the plan.
| Guests | Comfortable Portions | More Leftovers |
|---|---|---|
| 6–8 | 10–12 lb / 4.5–5.4 kg | 12–14 lb / 5.4–6.4 kg |
| 8–10 | 12–14 lb / 5.4–6.4 kg | 14–16 lb / 6.4–7.3 kg |
| 10–12 | 14–16 lb / 6.4–7.3 kg | 16–18 lb / 7.3–8.2 kg |
| 12–14 | 16–18 lb / 7.3–8.2 kg | 18–20 lb / 8.2–9.1 kg |
| 14–16 | 18–20 lb / 8.2–9.1 kg | 20–24 lb / 9.1–10.9 kg |
These are rounded buying ranges for common whole-turkey sizes, not exact portion math. A side-heavy table, several children or a room full of enthusiastic turkey eaters can move the numbers.
Hosting a very large gathering? Two medium turkeys are often easier to thaw, lift and cook evenly than one enormous bird. For a smaller holiday dinner, a turkey tenderloin gives you a much smaller roast without committing to a whole turkey.
Make Sure the Turkey Is Fully Thawed
For refrigerator thawing, allow roughly 24 hours for every 4–5 lb / 1.8–2.3 kg of turkey.
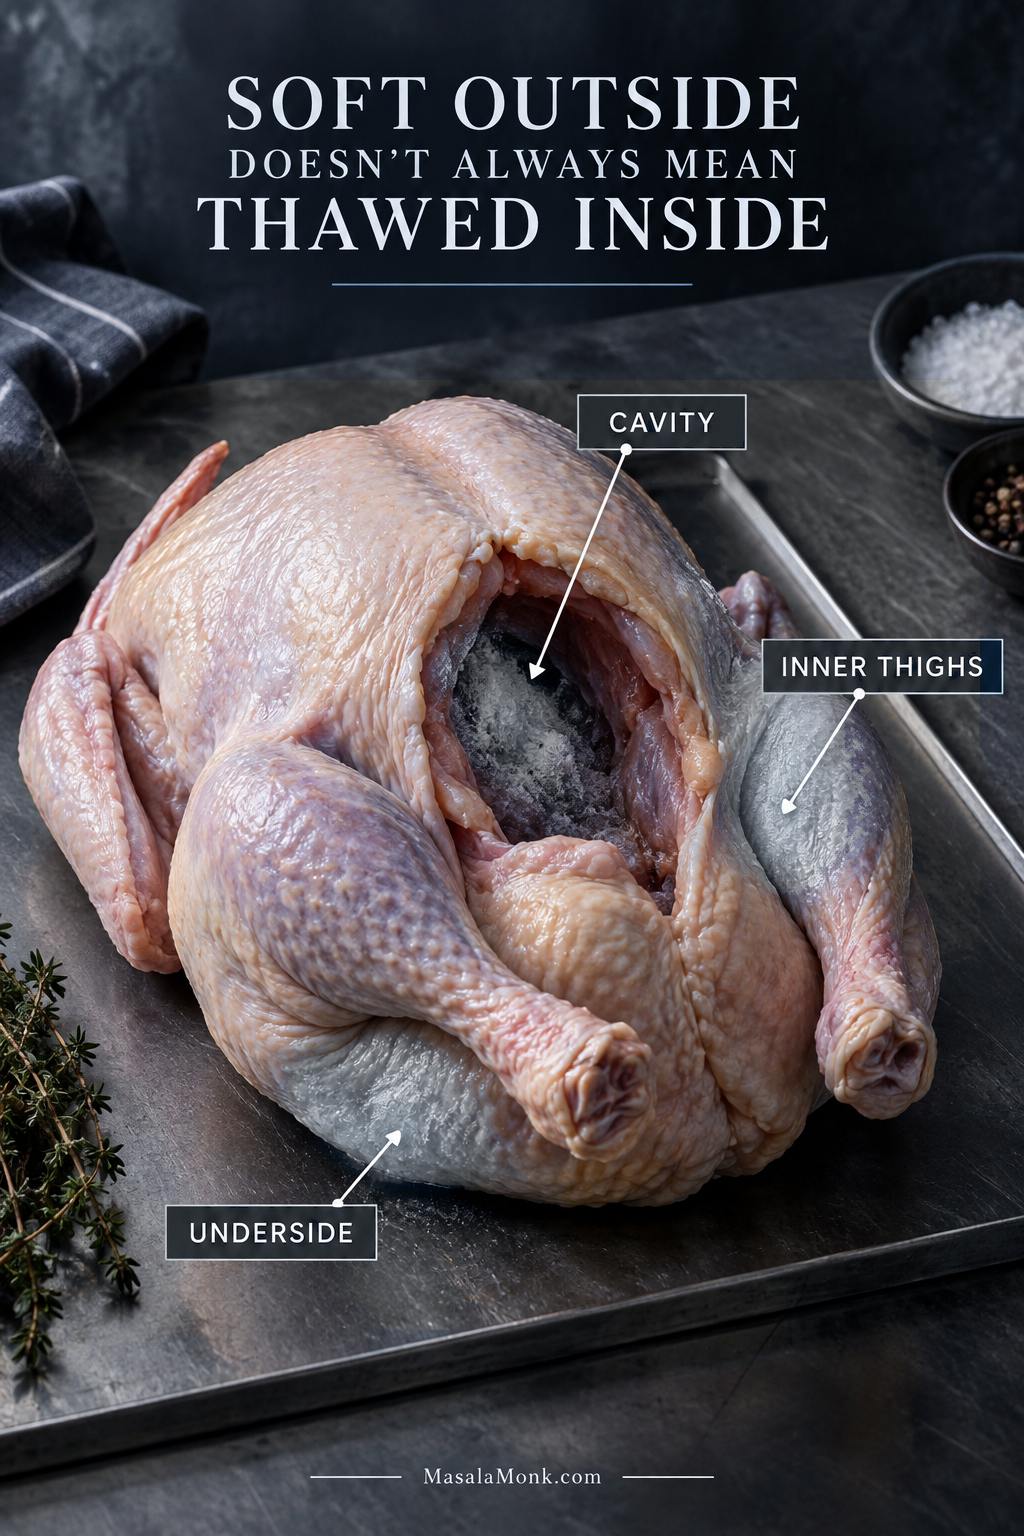
The outside can feel soft while ice still hides around the cavity, underside and inner thighs. That hidden ice can slow the colder parts enough for the breast to seem to race ahead.
| Turkey Weight | Approx. Refrigerator Thawing Time |
|---|---|
| 4–12 lb / 1.8–5.4 kg | 1–3 days |
| 12–16 lb / 5.4–7.3 kg | 3–4 days |
| 16–20 lb / 7.3–9.1 kg | 4–5 days |
| 20–24 lb / 9.1–10.9 kg | 5–6 days |
These ranges follow USDA turkey-thawing guidance. Once thawed in the refrigerator, the turkey can remain there for another 1–2 days before cooking.
Need a Faster Thaw?
Keep the bird in a leakproof package, submerge it in cold water, and change the water every 30 minutes. Allow about 30 minutes per pound and cook it immediately afterward.
A little ice near the cavity changes the schedule, not the whole dinner. Give the turkey more time and check temperatures carefully. If it is still substantially frozen at roast time, jump to Turkey Still Frozen?
Get the Salt Right
Read the label first. An untreated turkey and a bird injected with salty solution need different seasoning.
Have 24–48 hours? Dry-brine it. That is the preferred method here: the meat seasons while the uncovered skin dries in the refrigerator. Even 12–24 hours is worth doing. Dinner only a few hours away? Use the lighter same-day amount.
Dry-Brining Ahead
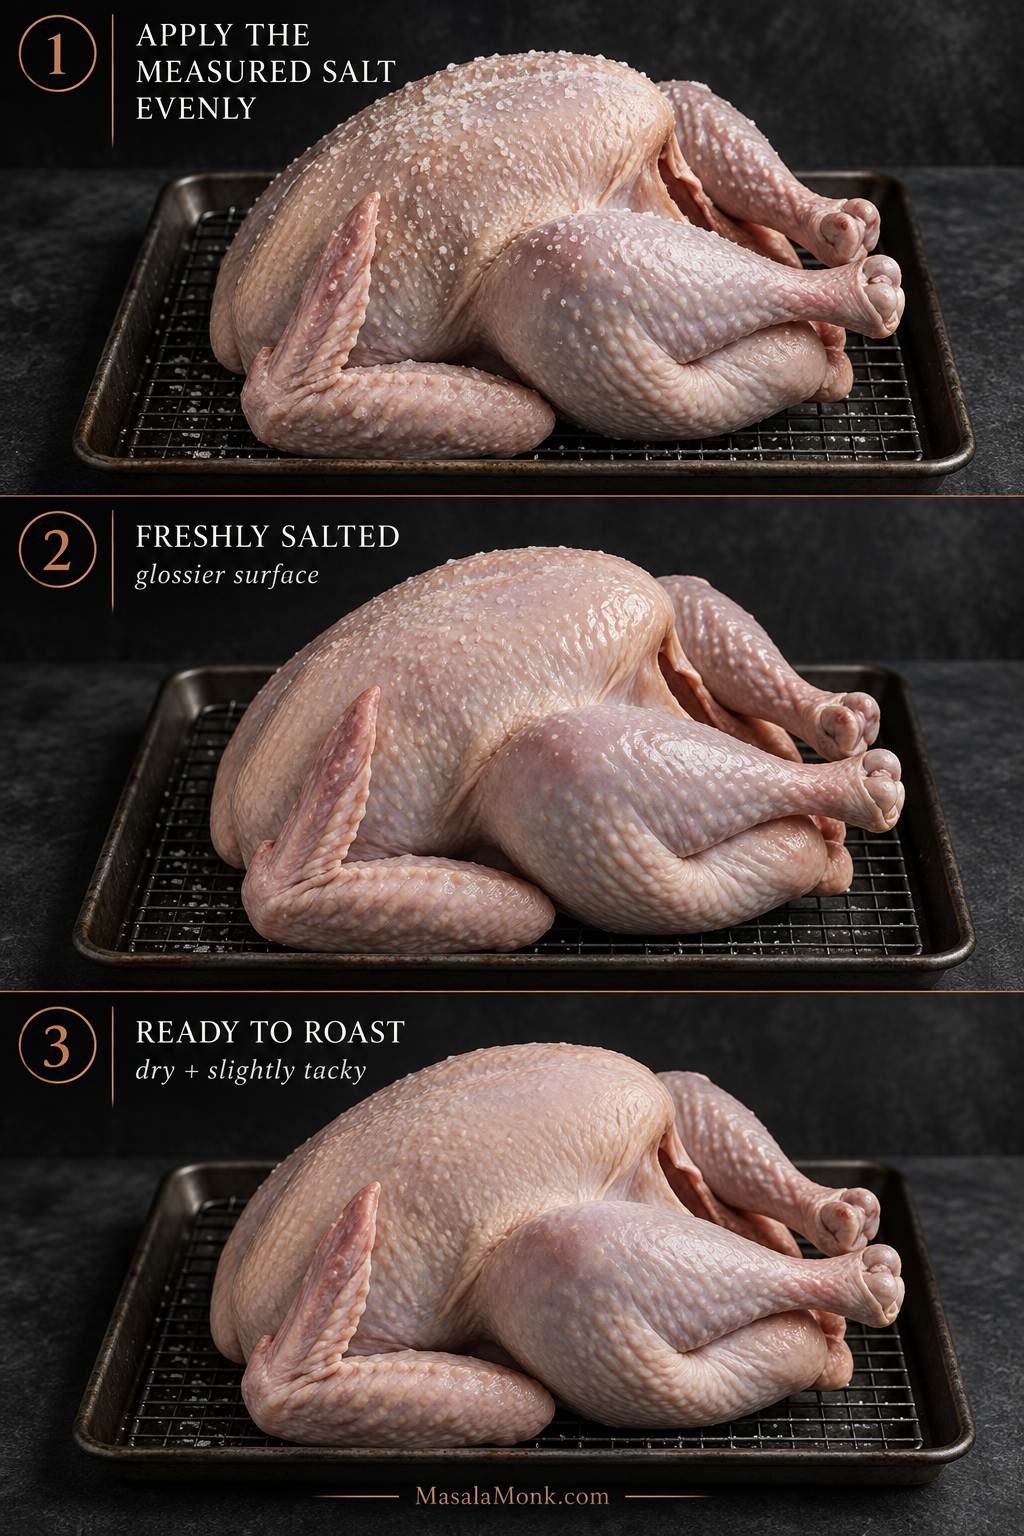
For the untreated turkey used here, distribute about 35 g kosher salt over the skin, beneath the breast skin and lightly around the cavity. Set it on a rack over a rimmed tray or roasting pan, keep the refrigerator at 40°F / 4°C or colder, and place it where accidental drips cannot land on other food.
By roast day, the glossy wet look should be gone. The skin will feel drier and slightly tacky—exactly what you want before it meets the oven.
Seasoning the Turkey the Same Day
For the untreated turkey used here, distribute about 20 g kosher salt over the exterior, beneath the breast skin and lightly around the cavity. Then add the herb butter.
You lose some of the deeper seasoning and skin-drying time of an overnight brine. That’s okay. If dinner is only a few hours away, season the turkey and move on.
Why Dry Brine Instead of Wet Brine?
A wet brine works. It also asks you to find room for a large container of salty liquid in an already crowded refrigerator. Dry brining is cleaner, easier to manage and leaves the skin exposed while the turkey seasons.
Prepare the Turkey for Even Cooking
Get the Bird Ready
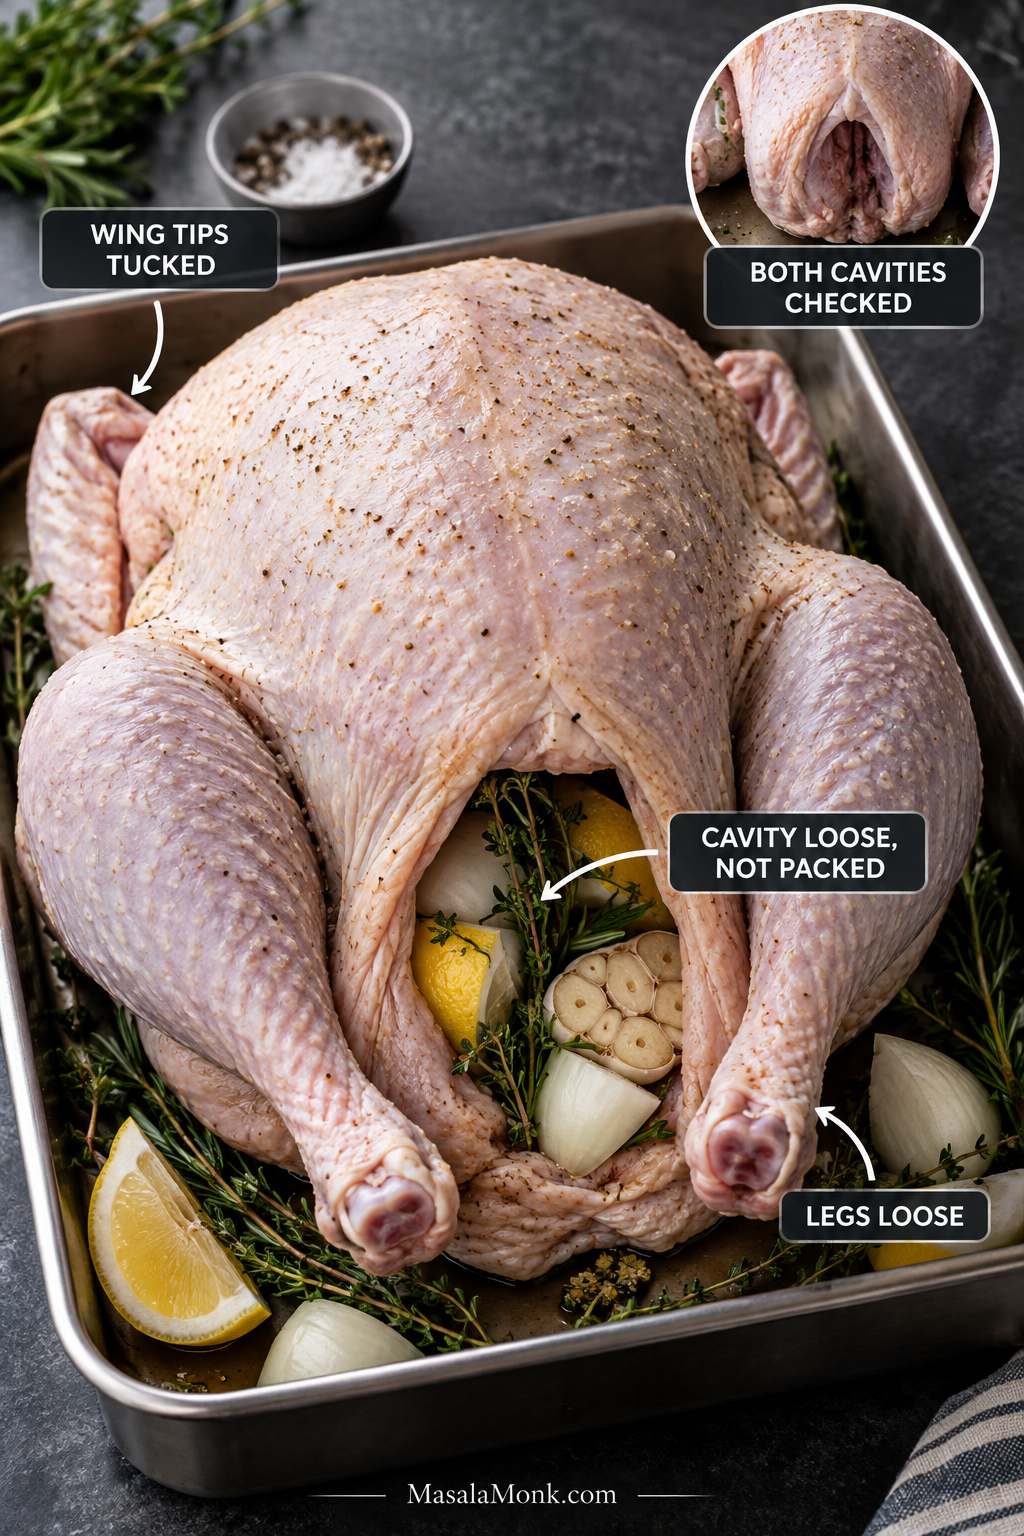
Check both cavities. The neck may be tucked into one end while the giblets or gravy packet sit in the other. Save anything useful for stock or gravy.
A manufacturer-installed hock lock or leg clamp may be designed to stay during roasting, so follow the package directions.
Skip rinsing. Pat the turkey thoroughly dry with paper towels; rinsing raw poultry can spread poultry juices around the sink.
Dry skin browns. Wet skin steams.
Add the Herb Butter
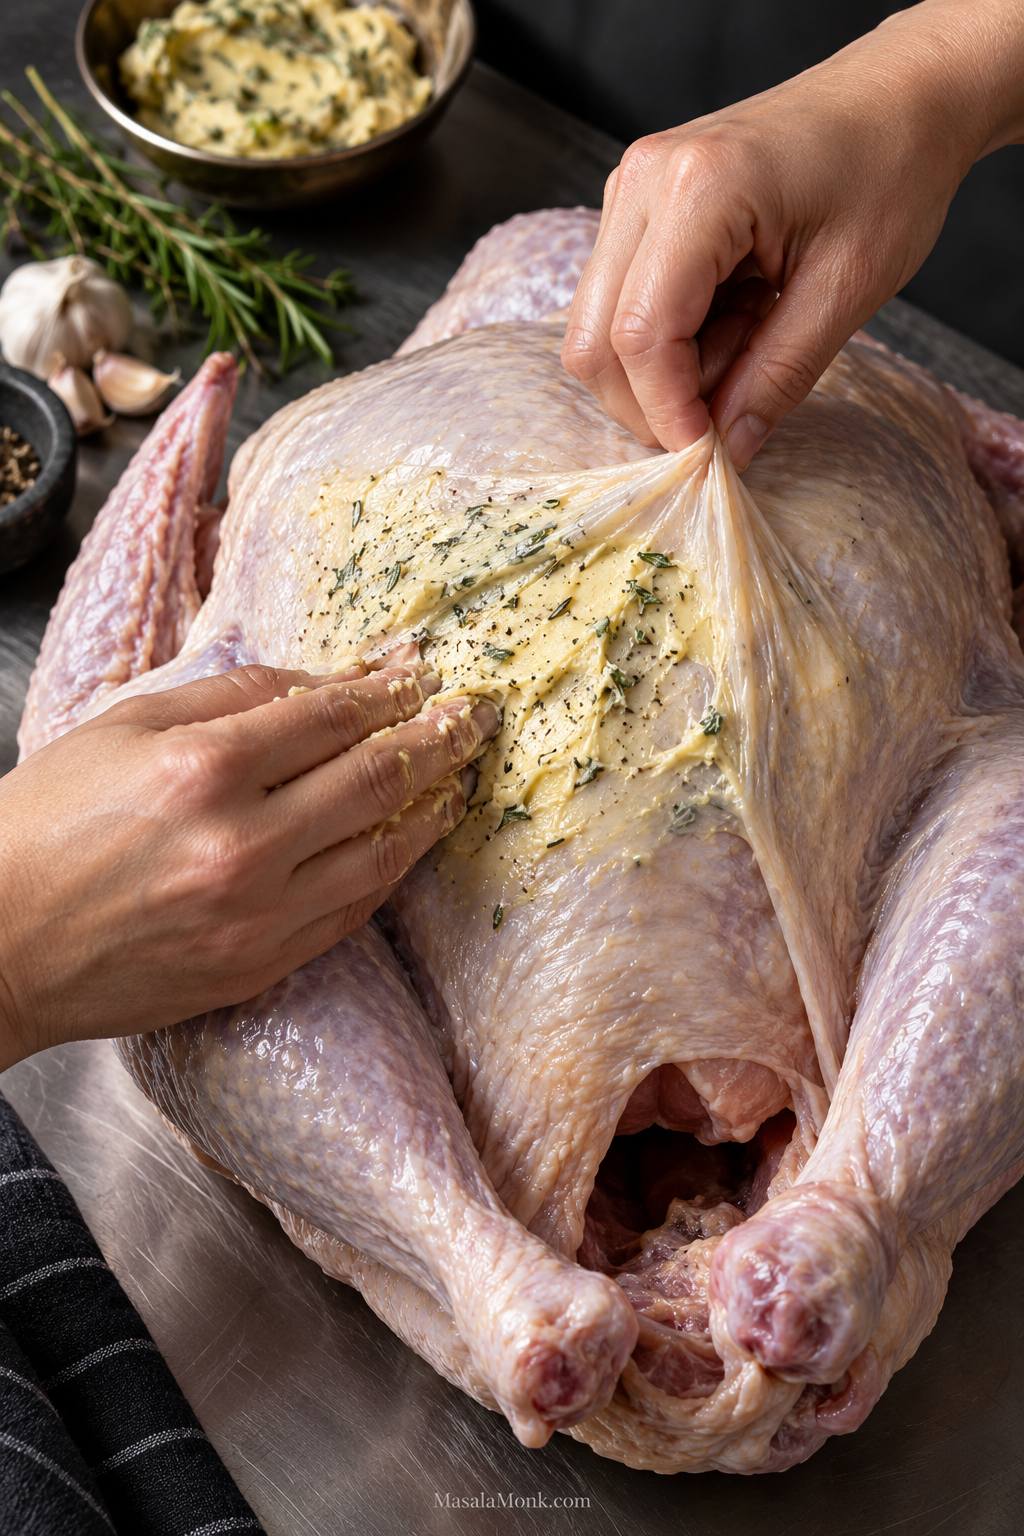
Slide your fingers gently between the breast meat and skin, starting near the cavity opening. Spread most of the garlic-herb butter directly over the breast meat and the remainder over the legs.
The butter should spread easily without dragging or tearing the skin. If it skates over a wet surface, blot again. If it feels stiff, give it a little more time to soften.
Once the herbs and turkey fat start roasting together, the kitchen finally smells like dinner.
Finish the Setup
Add the onion, lemon, garlic and herb sprigs with open space around them. The cavity should look occupied, not packed.
Keep the turkey unstuffed for the easiest timing. A separate pan of sausage stuffing gets crisp browned edges while the bird stays on the simpler unstuffed schedule.
Tuck the thin wing tips behind the shoulders and leave some space between the legs so heat can reach the inner thighs. If you use twine, tie it loosely.
Once the pan goes into the oven, most of the hands-on work is over. From here, you are mainly watching two things: color and temperature.
How Long to Cook a Turkey at 325°F
Most 12–14 lb unstuffed turkeys need about 3–3¾ hours at 325°F / 163°C. Start checking before that range because birds do not all cook at the same speed.
You do not need to memorize a minutes-per-pound formula. Use the table to plan your day, then start checking early.
| Turkey Weight | Approx. Cooking Time | Start Checking Around |
|---|---|---|
| 8–12 lb / 3.6–5.4 kg | 2¾–3 hours | 2¼ hours |
| 12–14 lb / 5.4–6.4 kg | 3–3¾ hours | 2½ hours |
| 14–18 lb / 6.4–8.2 kg | 3¾–4¼ hours | 3 hours |
| 18–20 lb / 8.2–9.1 kg | 4¼–4½ hours | 3½ hours |
| 20–24 lb / 9.1–10.9 kg | 4½–5 hours | 3¾ hours |
The cooking ranges come from USDA conventional-oven turkey guidance. Oven calibration, bird shape, pan depth, incomplete thawing and repeated door opening can all shift the finish.
These times are for an open-pan turkey in a conventional oven. Oven bags, electric roasters, convection ovens and spatchcocked birds follow different timing.
Where to Put the Thermometer
- Breast: insert the thermometer into the thickest part without touching the breastbone.
- Thigh: slide it into the thick inner thigh where the leg meets the body, stopping short of bone.
- Wing: check the thick inner area where the wing joins the body.
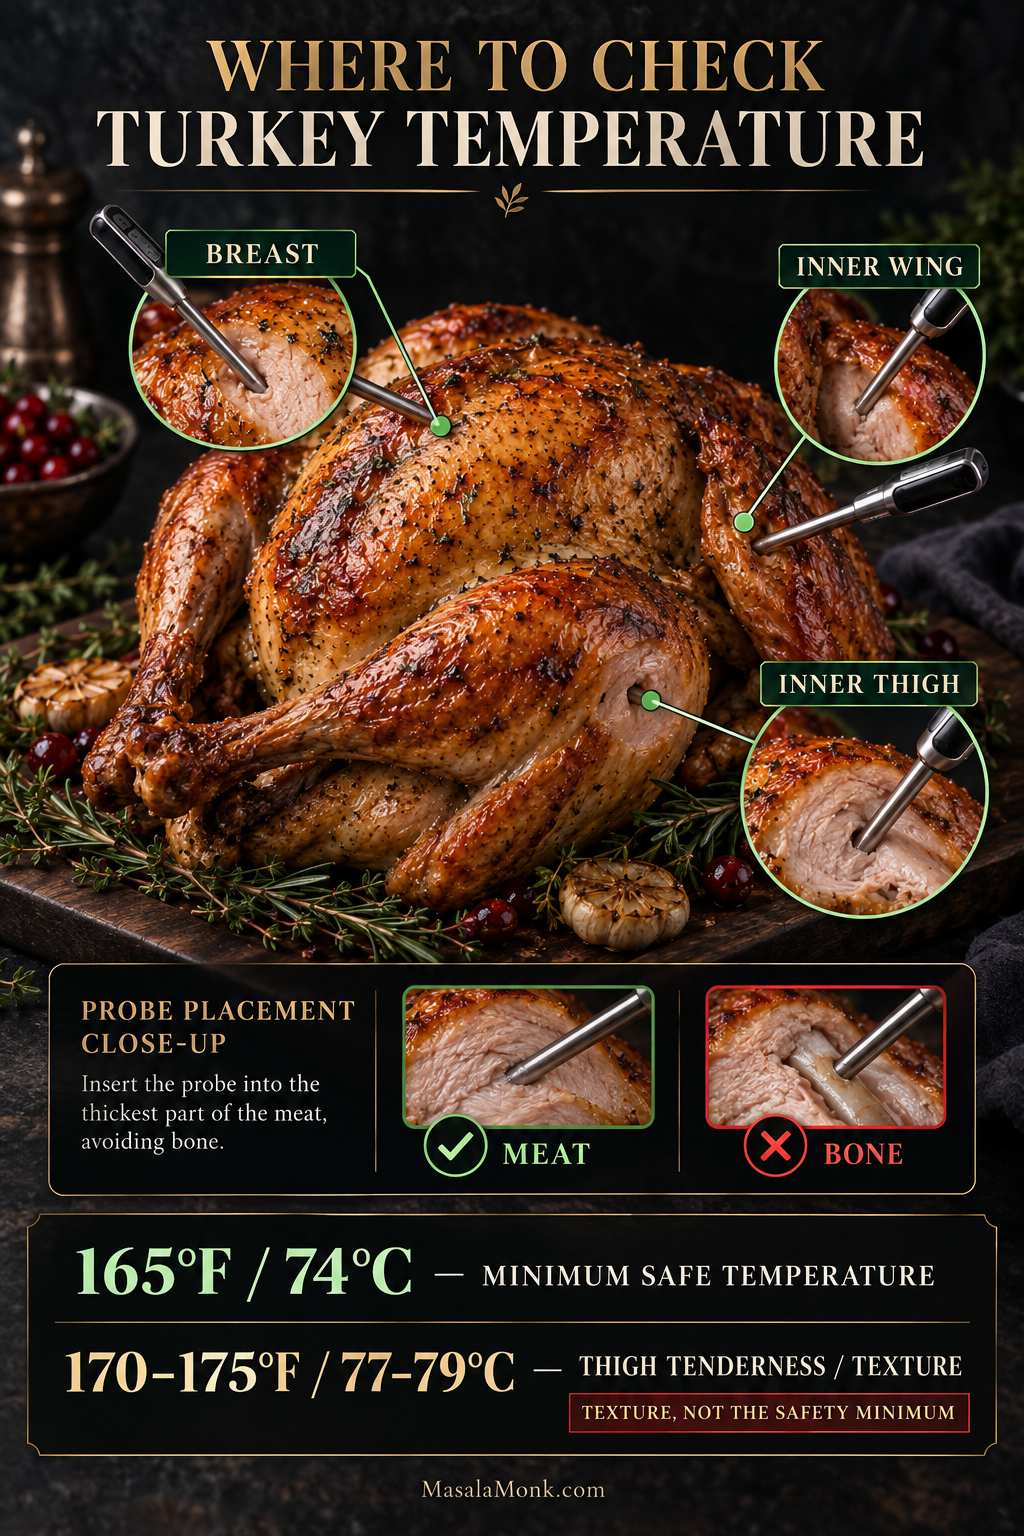
A strange reading deserves a second look. If one spot is dramatically colder than another nearby, move the probe, compare both sides and make sure the tip is sitting in meat instead of touching bone.
What Temperature Is Turkey Done?
The minimum safe internal temperature is 165°F / 74°C in the thickest breast, inner thigh and inner wing area.
Dark thigh meat often becomes softer and more yielding around 170–175°F / 77–79°C. When the breast reaches its safe temperature first, shield it while the legs finish.
What If the Meat Looks Pink?
Once the breast, inner thighs and inner wing areas have all reached at least 165°F / 74°C, pink color by itself is not evidence that the turkey is undercooked. If the appearance still worries you, verify another nearby spot before putting the bird back in the oven.
Something off? Troubleshooting · Finished Early · Recipe Card
How to Keep the Turkey Juicy While the Skin Browns
Juicy meat and crisp skin are separate jobs. Salt and careful temperature control protect the meat; a dry surface and mostly uncovered heat build the skin. Herb butter adds richness, but it cannot undo an overcooked breast.
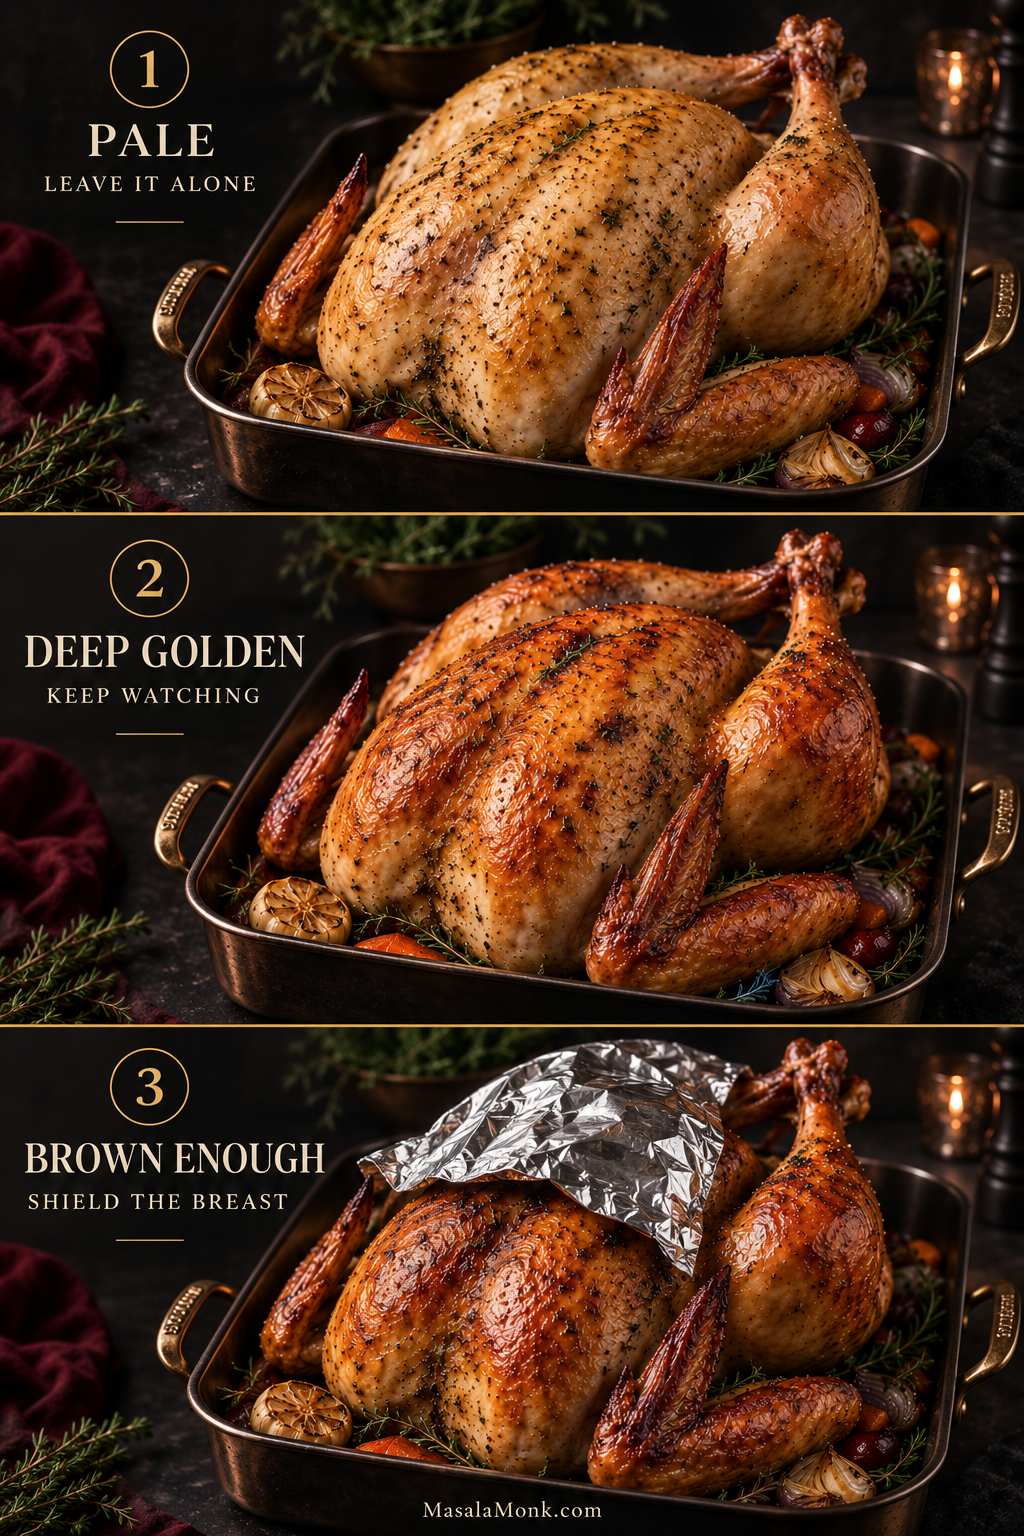
Early in the roast, the skin may still look pale and taut. Leave it alone.
Somewhere in the middle, that pale surface begins turning bronze, the herbs darken around the edges, and the juices in the pan look richer and more concentrated. Foil becomes useful once the breast is a deep, even brown and the highest points are approaching the color you would be happy to serve.
Basting Is Optional
You can leave the baster in the drawer. Repeatedly opening the oven loses heat, and watery juices keep wetting the skin. An occasional spoonful of rendered fat is enough if basting is part of your holiday ritual.
Use Foil When the Color Is Right
Once the breast has the color you want, cover it loosely and let the darker meat continue. Individual wing tips or high spots can be shielded separately.
If the Pan Starts Smoking
Add about ½ cup / 120 ml hot water or unsalted stock around the rack. The liquid protects the concentrated drippings from scorching; keep it below the turkey instead of pouring it over the skin.
Turkey Not Following the Plan? Start Here
This is the part to use when the clock, color and thermometer stop agreeing.
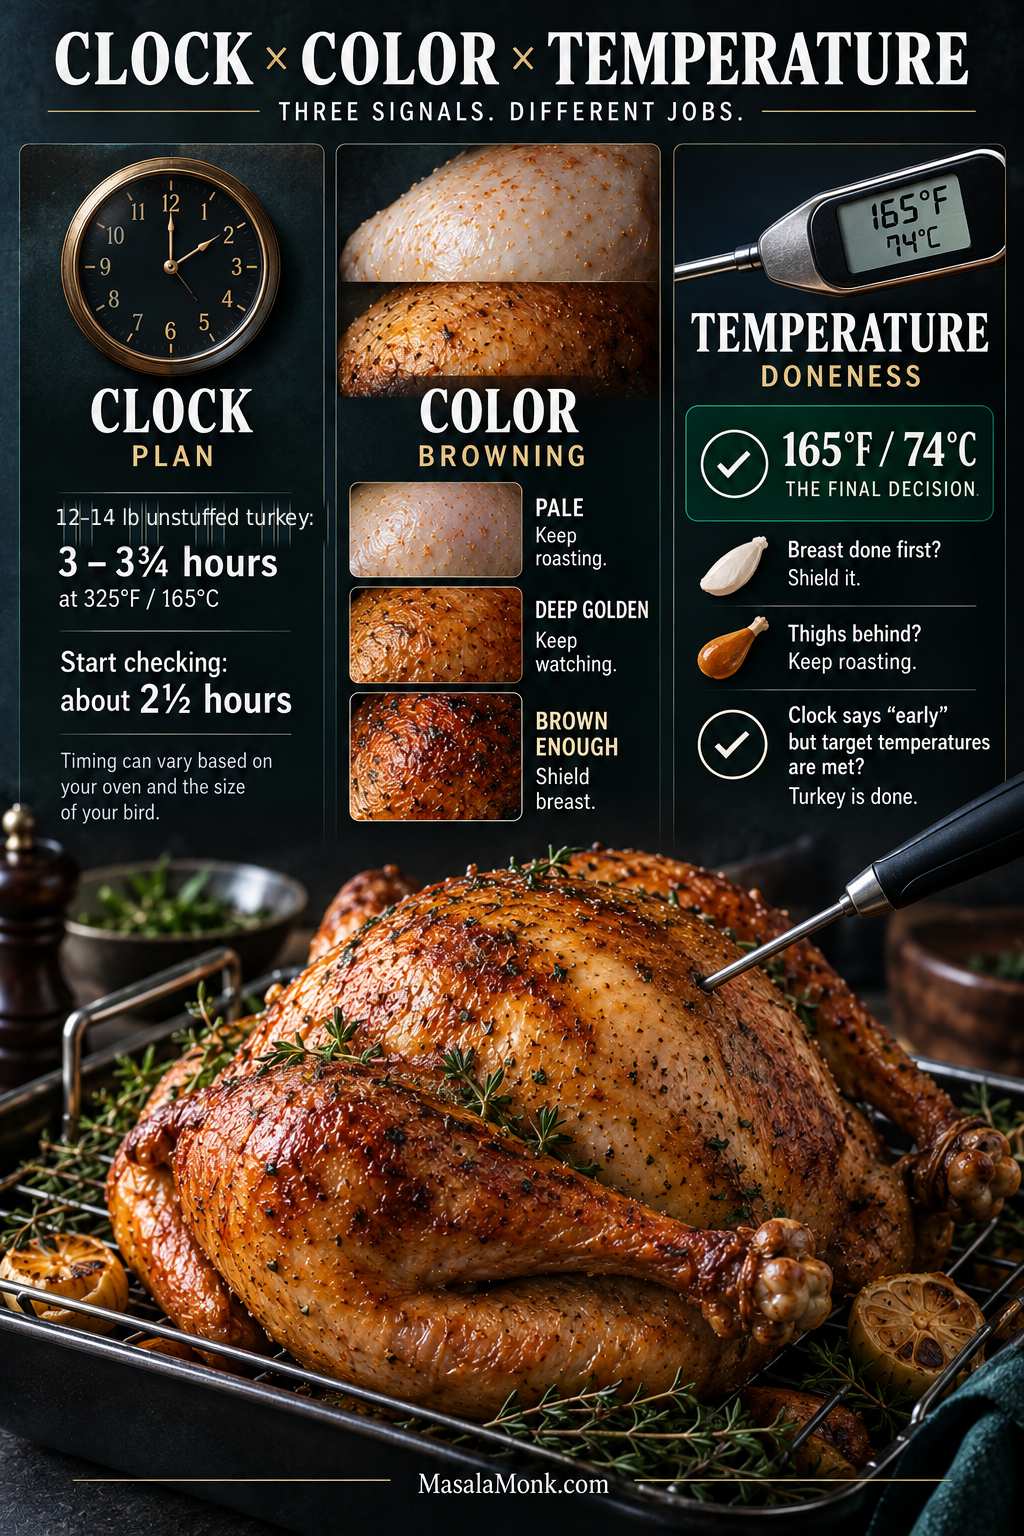
| What You’re Seeing | What to Do Now |
|---|---|
| Turkey is cooking much faster than expected | Recheck the breast and both thighs in several spots, then verify the oven temperature. If the readings agree, trust them. |
| Turkey is running late | Check the actual oven temperature and whether the bird was fully thawed. Protect browned skin and keep cooking to temperature. |
| Breast is done before the thighs | Loosely cover the breast with foil and continue cooking the dark meat. |
| One thigh reads much colder | Check both thighs in several locations. Bone contact or a thin spot can distort the reading. |
| Skin is dark but the meat is not ready | Shield the browned areas. Lower the pan one rack if the turkey sits very close to the top heat. |
| Meat is done but the skin is pale | Use a brief burst of higher heat or the broiler and watch continuously. |
| Skin is soft | Uncover the turkey and stop wetting the surface. Let dry heat work while the meat still has cooking room. |
| Pan drippings are smoking | Add about ½ cup / 120 ml hot water or unsalted stock directly to the pan. |
| Drippings taste too salty | Leave additional salt out of the gravy and dilute with unsalted liquid as needed. |
| Turkey finished early | A short lead is easy to manage. Longer delays need hot holding or chilling; use the detailed guidance below. |
The Turkey Finished Early
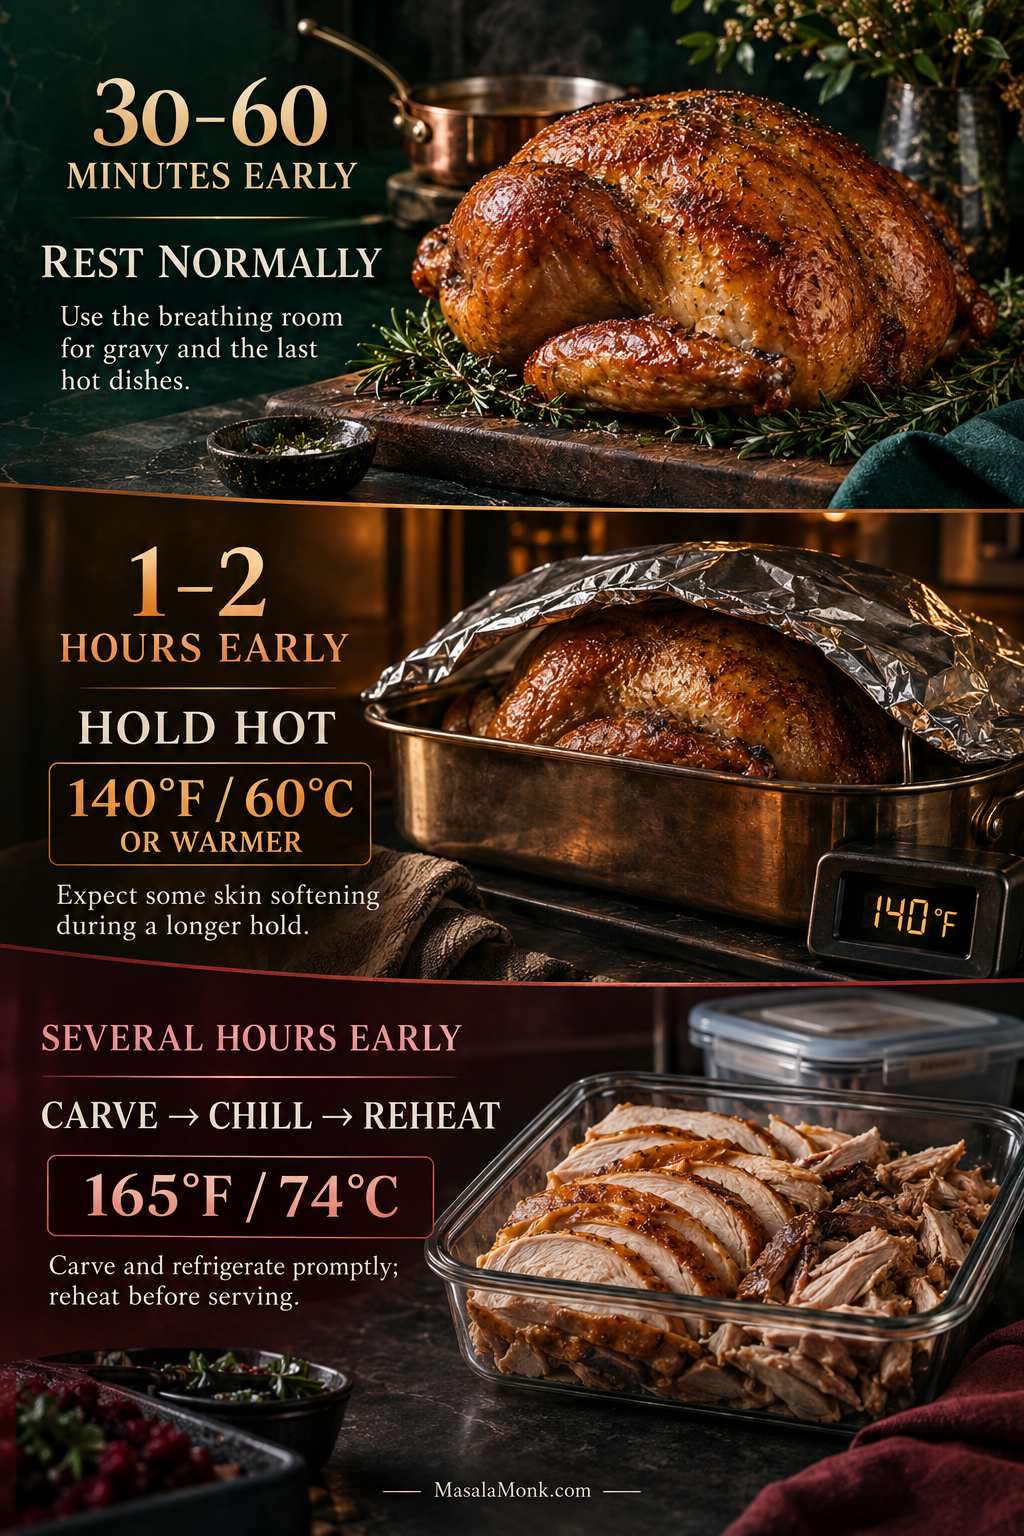
Thirty to sixty minutes early: excellent. Rest it normally and use the breathing room for gravy and the last hot dishes.
One to two hours early: hold the turkey at 140°F / 60°C or warmer. A reliable low or warm oven setting can work; monitor the temperature and expect the skin to soften somewhat during a long hold.
Several hours early: stop treating it as a rest. Carve the turkey, refrigerate the meat promptly in shallow containers, and reheat it to 165°F / 74°C before serving.
Can’t keep it safely hot? Carve and chill it instead.
Done roasting? Carving · Reheating Later · Recipe Card
Resting, Carving and Gravy
Once the turkey is resting, the uncertain part is over.
You can stop chasing temperatures and watching the clock. The next 30–45 minutes are for gravy, hot sides and clearing enough room to carve without balancing a huge bird between casserole dishes.
By now the skin should be deeply bronzed and the pan juices dark and savory. Leave the turkey uncovered for the crispest skin, or use a very loose foil tent in a cool kitchen. A tight cover traps steam and softens the surface.
The oven is free again too. A quick high-heat tray such as roasted Brussels sprouts can cook while the turkey rests.
Use the Drippings for Gravy
Taste the drippings before adding salt. Dry-brined, kosher, enhanced and self-basting birds can all leave a saltier pan than an untreated turkey.
Turn the usable fat, browned fond and juices into turkey gravy from the drippings. This is where the roasted herbs, turkey fat and browned pan juices finally come together.
Carve After the Rest
Remove the legs and thighs first, followed by the wings. For cleaner breast slices, take each breast half off the carcass in one piece and slice it crosswise on the cutting board.
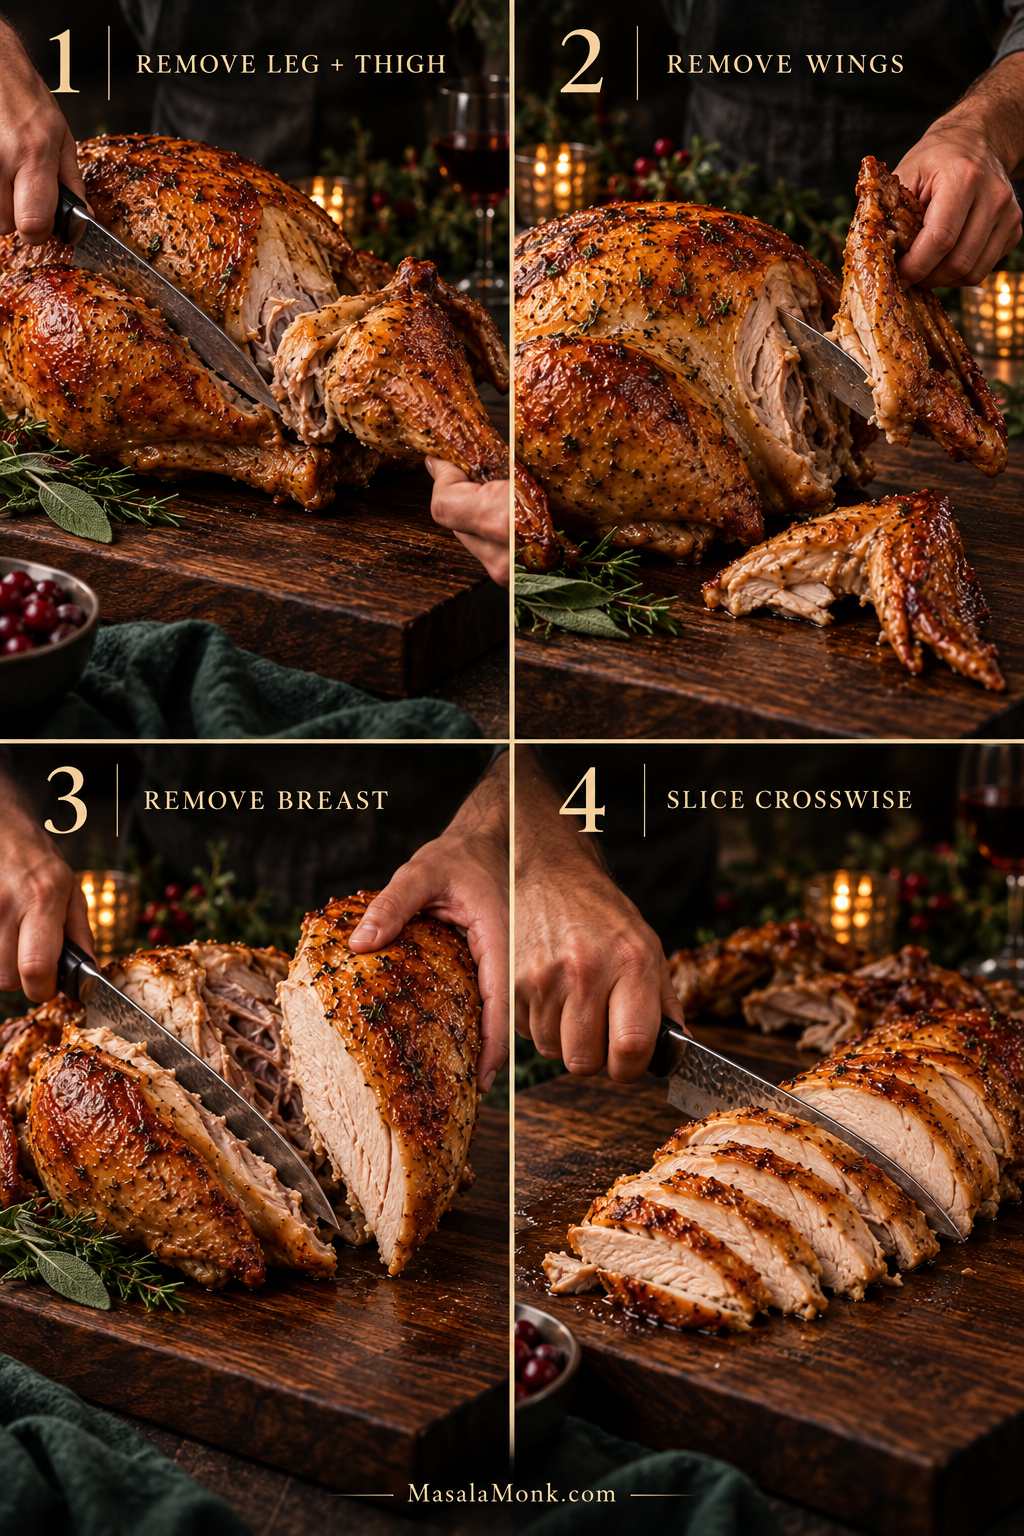
The knife should pass through crisp skin into breast meat that still looks moist, with a little sheen on the cut surface instead of a cottony or fibrous texture. This is where the dry skin, steady roast, early temperature checks and patient rest finally pay off.
If the meat tastes slightly underseasoned, season the slices lightly and let the gravy do some of the work.
Once the breast is sliced and the legs are separated, you’re done managing the turkey. Move everything to a warm platter, bring the gravy, and get dinner to the table.
Special Situations: Frozen, Stuffed or Convection Turkey
Turkey Still Frozen?
Yes—you can roast a whole turkey from frozen in a conventional oven. Cook it unstuffed and allow at least 50% more cooking time than for a fully thawed bird.
Seasoning beneath frozen skin will be difficult at first, and different areas will heat at different speeds. This is the backup method for the day the thaw simply did not finish.
Partially frozen: the exposed breast may heat much faster than icy areas around the cavity and inner thighs. Check several locations and shield anything that gets ahead.
Completely frozen: as the cavity loosens, carefully remove the neck and giblet packets with tongs once you can reach them. Continue roasting until the breast, thighs and inner wing areas have all reached at least 165°F / 74°C.
Once the exterior has thawed enough to handle safely, pat the accessible skin dry and brush it with unsalted butter or oil, herbs and pepper. For an untreated bird, season the exposed surface lightly with salt; enhanced, injected, self-basting and kosher turkeys may already have enough. There is no need to imitate a full dry brine after roasting has begun.
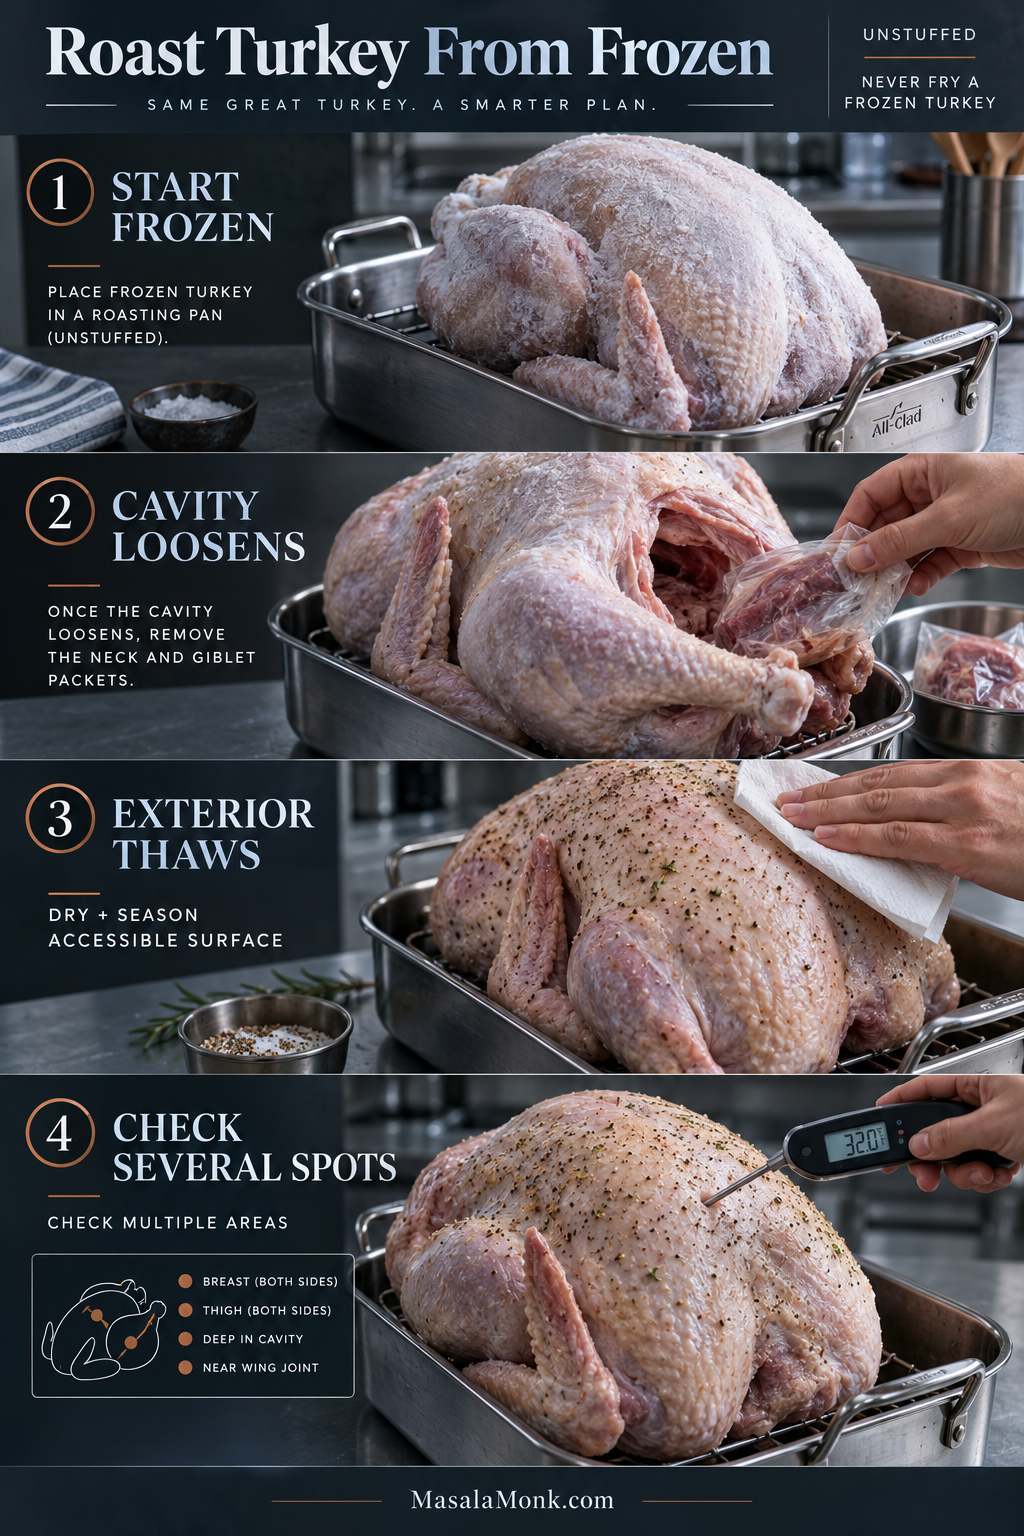
Never put a frozen or partially frozen turkey into hot frying oil.
Cooking a Stuffed Turkey
A stuffed 12–14 lb turkey needs roughly 3½–4 hours at 325°F / 163°C. Add the stuffing just before roasting, keep it loose, and make sure the center also reaches at least 165°F / 74°C.
Separate dressing is easier to time and gives you more browned edges. A pan of Southern cornbread dressing also keeps the turkey on the simpler unstuffed schedule.
Using a Convection Oven
Convection cooks and browns turkey faster. USDA guidance allows reducing the conventional oven temperature by 25°F / about 14°C, but not below 300°F / 150°C. Follow your oven manufacturer’s poultry guidance and begin checking substantially earlier.
Make Ahead, Store and Reheat Turkey
Same-day roasting gives you the best skin. If the schedule demands a day-ahead turkey, let it rest, carve it and refrigerate the meat promptly in shallow containers.
How to Reheat Turkey Without Drying It Out
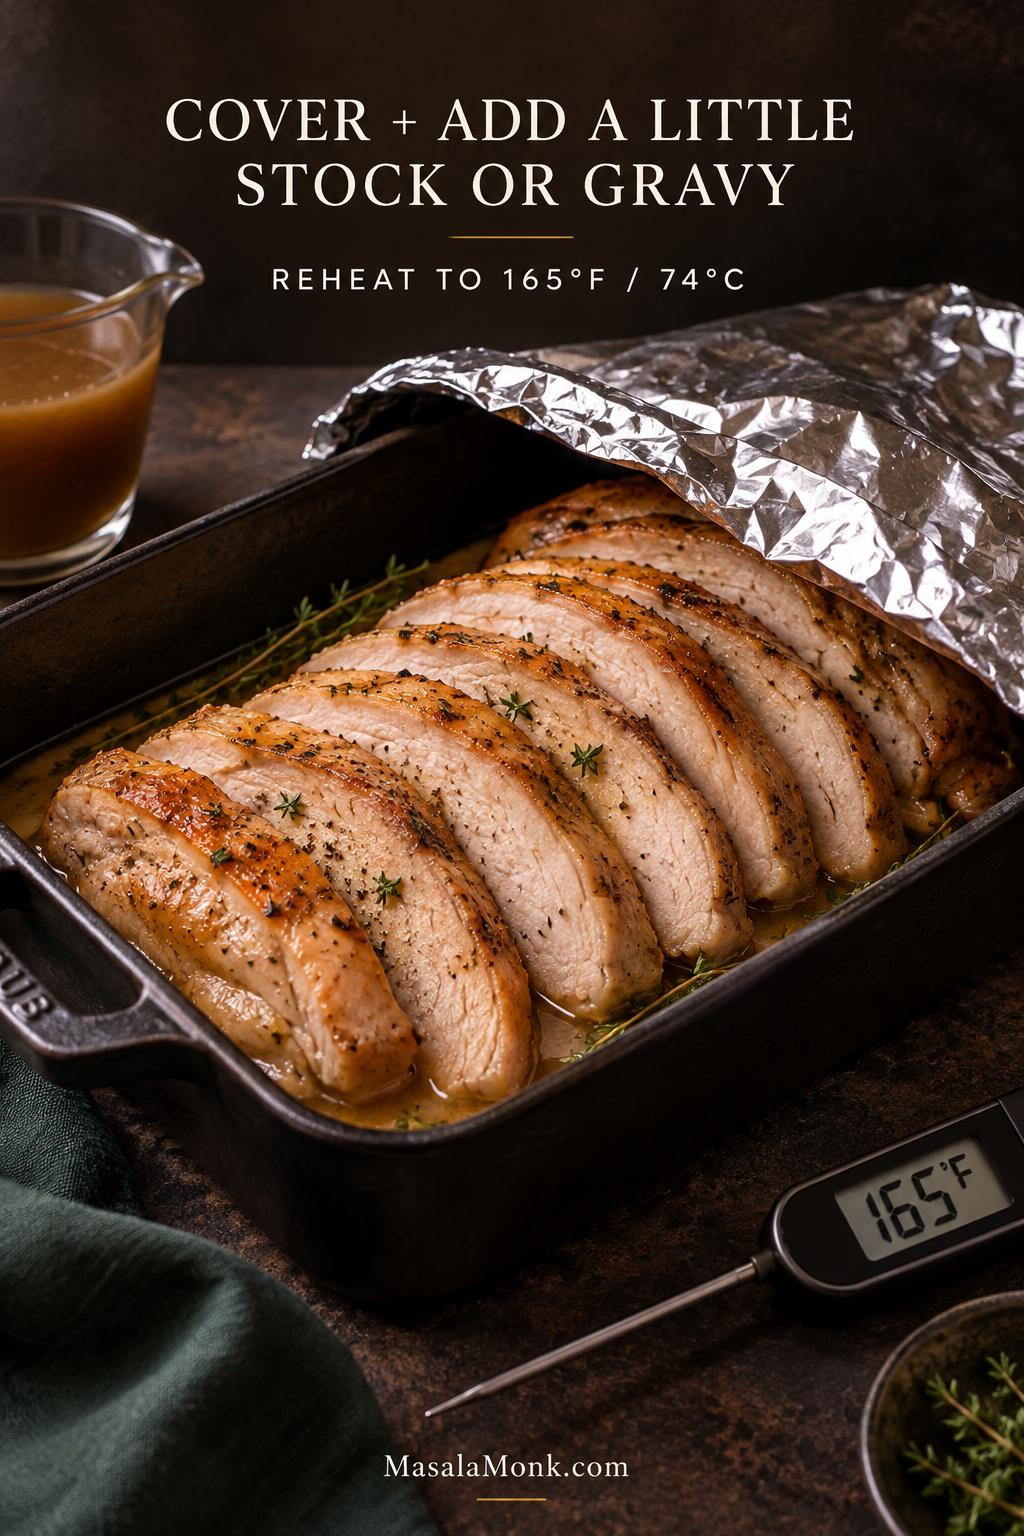
Reheat covered portions with enough unsalted stock or gravy to keep the slices moist until they reach 165°F / 74°C.
Storing Leftovers
Refrigerate cooked turkey within 2 hours. Shallow containers help it cool efficiently.
Use refrigerated leftovers within about 3–4 days. For longer storage, freeze cooked turkey for about 3–4 months for best quality. Reheat leftovers to 165°F / 74°C.
Once another plate of sliced turkey has lost its appeal, leftover meat and gravy can become a turkey pot pie under a crisp pastry top.
Frequently Asked Questions
1. Is It Better to Cook a Turkey at 325°F or 350°F?
Both can work, but 325°F / 163°C is the better fit for this roast turkey recipe because the timing, browning strategy and troubleshooting guidance here are built around it. At 350°F / 177°C, expect faster cooking and browning and begin checking sooner.
2. Do You Cook a Turkey Covered or Uncovered?
Mostly uncovered. Loosely foil the breast or other exposed areas once they are brown enough.
3. Should You Baste a Turkey?
No routine basting is needed. An occasional spoonful of rendered fat is fine if basting is part of your tradition.
4. Can You Roast a Turkey Without a Rack?
Yes. Use a sturdy coil of heavy-duty foil, or extra onion, carrot and celery pieces, to lift the turkey above the bottom of the pan.
5. Should You Cook a Turkey Upside Down?
This method keeps the bird breast-side up throughout. Flipping a large hot turkey is awkward, risks damaging the browned skin and is unnecessary here.
6. Should You Trust the Pop-Up Timer?
No—not as your primary doneness test. Confirm the temperature with a reliable thermometer in the thickest breast, inner thigh and inner wing area.
7. Can You Cook a Turkey the Day Before Thanksgiving?
Yes. Carve the rested turkey, chill it promptly in shallow containers, and reheat covered portions with a little stock or gravy to 165°F / 74°C.








