How long to cook a turkey depends mostly on its weight, whether it is stuffed, how completely it is thawed, and the oven temperature. At 325°F / 163°C, a fully thawed, unstuffed 8–24 lb turkey generally takes about 2¾ to 5 hours. Stuffing adds time.
Seeing 325°F in one recipe, 350°F in another, and different times for the same 14-pound bird? That does not necessarily mean one chart is wrong. Different recipes use different temperatures, methods and assumptions. First make sure you’re comparing the same cooking method.
A useful schedule should leave you with browned skin, juicy breast meat, properly cooked dark meat and enough breathing room to finish the rest of dinner—not force the turkey to hit one magic minute.
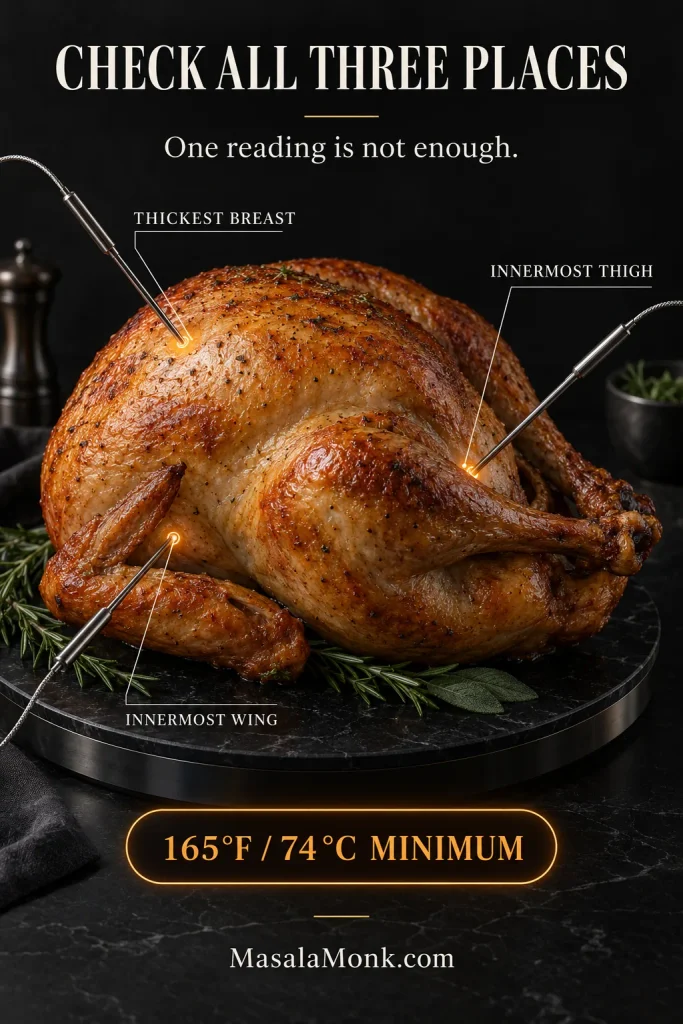
Start taking temperatures toward the early end of the appropriate range. That gives you the chance to stop when the turkey is safely cooked instead of giving an already-finished breast another half hour just because the clock says so. Check the thickest part of the breast, the innermost part of the thigh, and the innermost part of the wing; each should reach at least 165°F / 74°C.
The chart tells you when to check. The thermometer tells you when dinner is cooked.
This guide covers an intact turkey roasted in the oven. Turkey breast, tenderloin, legs and wings have different cooking times. Convection ovens, oven bags, electric roasters, smokers and spatchcocked birds have their own timing too; those routes are covered farther down.
Updated September 2026. Timing and food-safety details were checked against current USDA/FSIS and FoodSafety.gov guidance.
Turkey Cooking Time Chart at 325°F
For a fully thawed turkey in a conventional oven, start here.
| Turkey weight | Unstuffed at 325°F | Stuffed at 325°F | Unstuffed: first check |
|---|---|---|---|
| 8–12 lb / 3.6–5.4 kg | 2¾–3 hours | 3–3½ hours | From 2¾ hr |
| 12–14 lb / 5.4–6.4 kg | 3–3¾ hours | 3½–4 hours | From 3 hr |
| 14–18 lb / 6.4–8.2 kg | 3¾–4¼ hours | 4–4¼ hours | From 3¾ hr |
| 18–20 lb / 8.2–9.1 kg | 4¼–4½ hours | 4¼–4¾ hours | From 4¼ hr |
| 20–24 lb / 9.1–10.9 kg | 4½–5 hours | 4¾–5¼ hours | From 4½ hr |
These ranges follow the FoodSafety.gov turkey roasting chart. For a stuffed turkey, begin checking near the early end of the stuffed range rather than using the unstuffed first-check column.
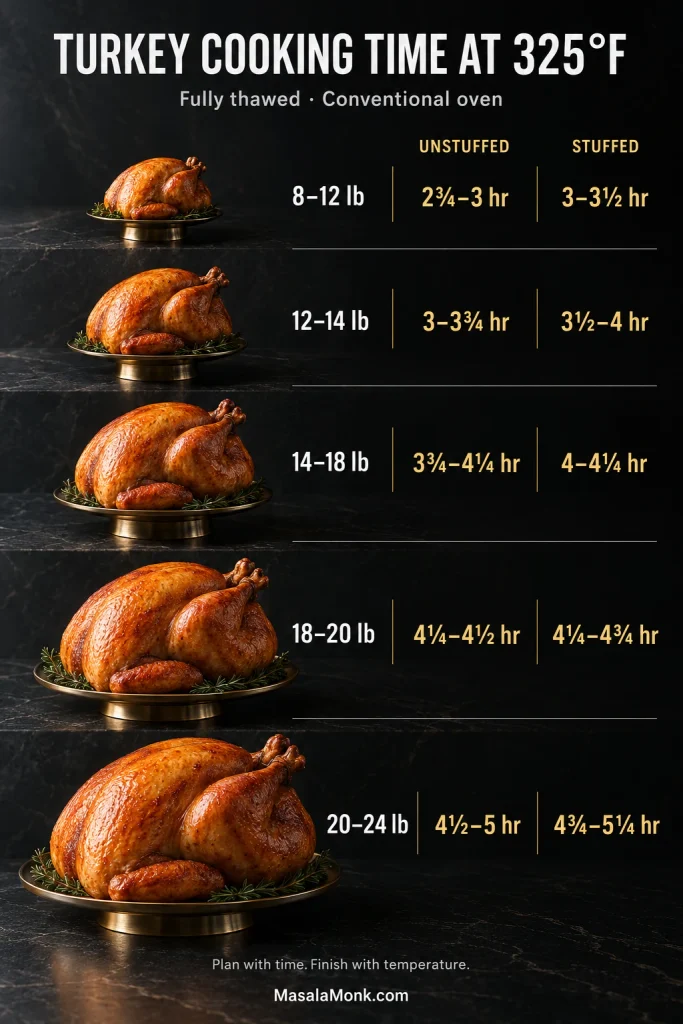
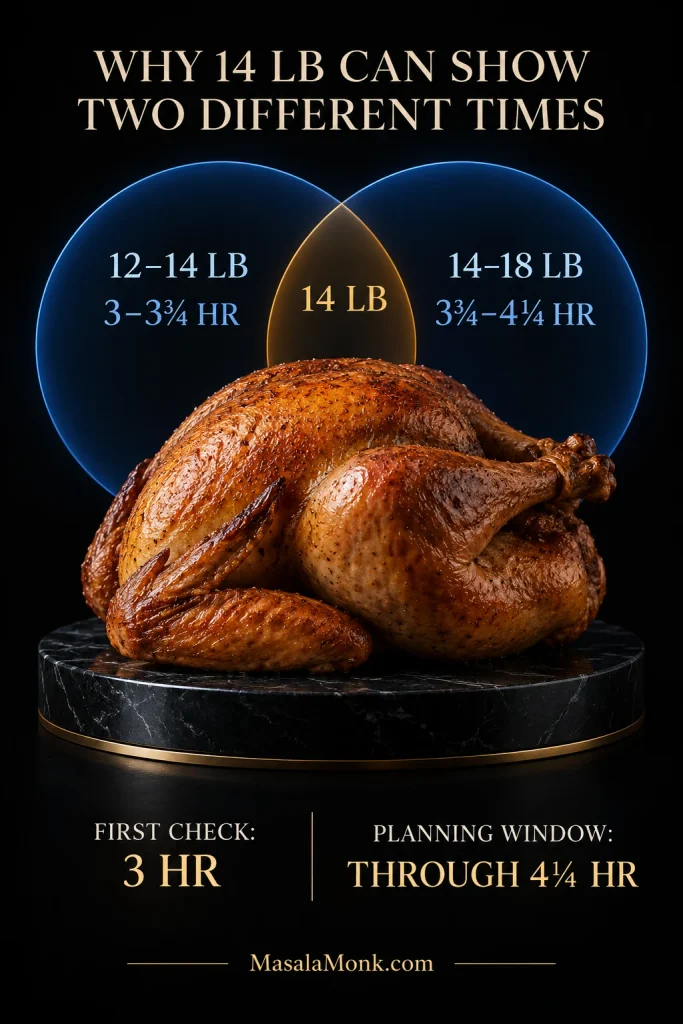
The times are approximate. Two birds with the same label weight can still finish differently. And 12, 14, 18 and 20 pounds sit where two published rows touch, which is why those exact weights can produce different-looking answers on reliable charts.
Already at 165°F earlier than expected? Recheck the breast, thigh and wing. All three safely there? Take the turkey out. More oven time is not automatically better.
How Long to Cook Your Exact Turkey Weight
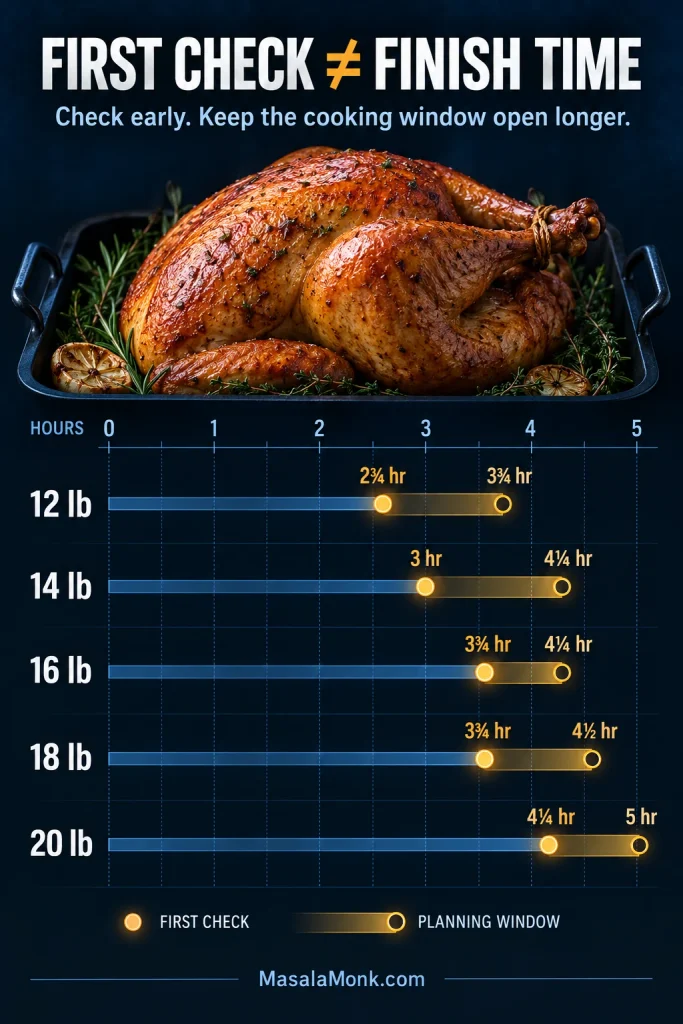
Your turkey has an exact weight, while the official chart uses ranges. The table below turns those ranges into two useful planning points for an unstuffed turkey at 325°F: when to take the first temperature reading and how long to keep the cooking window open.
First Check and Planning Window by Weight
| Your turkey | Approx. metric | First check | Planning window |
|---|---|---|---|
| 8 lb | 3.6 kg | 2¾ hr | Through 3 hr |
| 9 lb | 4.1 kg | 2¾ hr | Through 3 hr |
| 10 lb | 4.5 kg | 2¾ hr | Through 3 hr |
| 11 lb | 5.0 kg | 2¾ hr | Through 3 hr |
| 12 lb | 5.4 kg | 2¾ hr | Through 3¾ hr |
| 13 lb | 5.9 kg | 3 hr | Through 3¾ hr |
| 14 lb | 6.4 kg | 3 hr | Through 4¼ hr |
| 15 lb | 6.8 kg | 3¾ hr | Through 4¼ hr |
| 16 lb | 7.3 kg | 3¾ hr | Through 4¼ hr |
| 17 lb | 7.7 kg | 3¾ hr | Through 4¼ hr |
| 18 lb | 8.2 kg | 3¾ hr | Through 4½ hr |
| 19 lb | 8.6 kg | 4¼ hr | Through 4½ hr |
| 20 lb | 9.1 kg | 4¼ hr | Through 5 hr |
| 21 lb | 9.5 kg | 4½ hr | Through 5 hr |
| 22 lb | 10.0 kg | 4½ hr | Through 5 hr |
| 23 lb | 10.4 kg | 4½ hr | Through 5 hr |
| 24 lb | 10.9 kg | 4½ hr | Through 5 hr |
The planning window is time you leave available, not a guaranteed finish time or a maximum. At the boundary weights—12, 14, 18 and 20 lb—it deliberately uses the longer adjoining official range so dinner is not built around the most optimistic possibility.
How Long to Cook a 12 lb Turkey
Begin checking a 12 lb / 5.4 kg unstuffed turkey around 2¾ hours, but keep the planning window open through about 3¾ hours. Twelve pounds sits where two official weight ranges overlap.
How Long to Cook a 14 lb Turkey
Start checking a 14 lb / 6.4 kg unstuffed turkey around 3 hours and keep the planning window open through roughly 4¼ hours. Fourteen pounds is shared by two published rows, which is why reliable charts can appear to give different answers.
How Long to Cook a 16 lb Turkey
Allow about 3¾–4¼ hours at 325°F for a 16 lb / 7.3 kg unstuffed turkey. Once rest and carving are included, a 6 PM dinner usually means getting this bird into the oven around early afternoon.
How Long to Cook an 18 lb Turkey
Start checking an 18 lb / 8.2 kg turkey around 3¾ hours and keep the planning window open through about 4½ hours. Eighteen pounds is another overlap between two published rows.
How Long to Cook a 20 lb Turkey
Begin checking a 20 lb / 9.1 kg turkey around 4¼ hours and keep the planning window open through about 5 hours. On a bird this large, check several locations before calling it done.
Already have a 25–30 lb turkey? The National Turkey Federation’s 24–30 lb range is roughly 5–5¼ hours unstuffed or 5¼–6¼ hours stuffed at 325°F. Still shopping? Two smaller birds are usually easier to cook evenly, time and carve than one enormous turkey.
Planning dinner? → Work backward from serving time
Turkey Cooking Time Per Pound: Why One Number Does Not Fit Every Bird
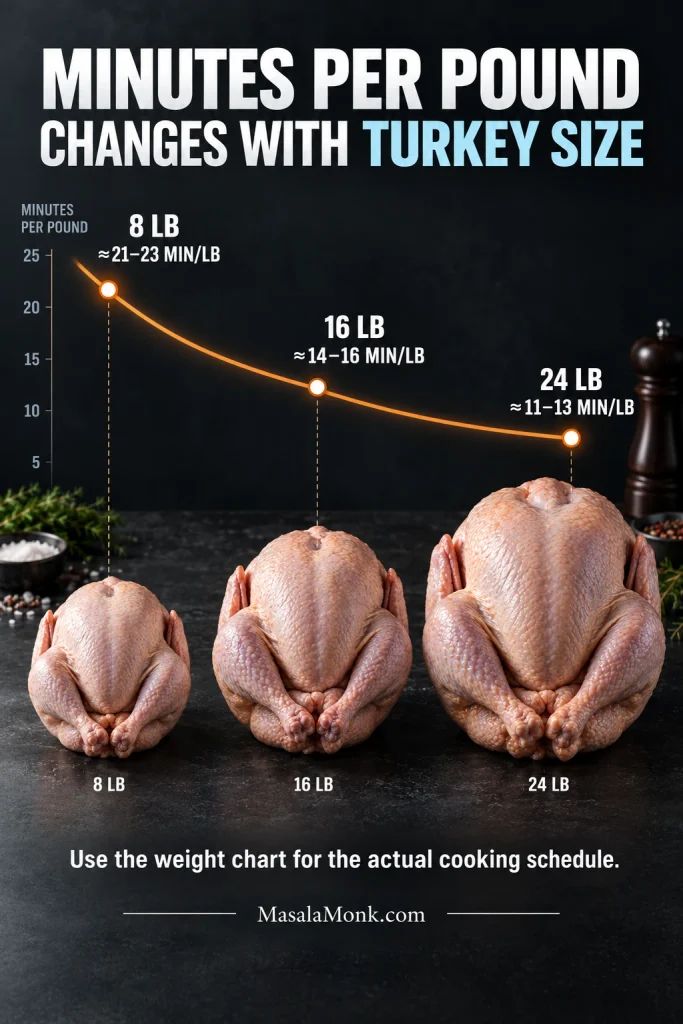
At 325°F, don’t use one fixed minutes-per-pound number. The USDA ranges work out to roughly 21–23 minutes per pound for an 8 lb turkey, 14–16 minutes per pound at 16 lb, and about 11–13 minutes per pound at 24 lb. Use the weight chart for the actual schedule.
A bigger turkey does not simply take the same number of minutes multiplied by more pounds. Stuffing, ice remaining in the cavity, oven accuracy, bird shape, pan depth and repeated door opening can move the finish further.
Can You Cook Turkey at 350°F or 375°F?
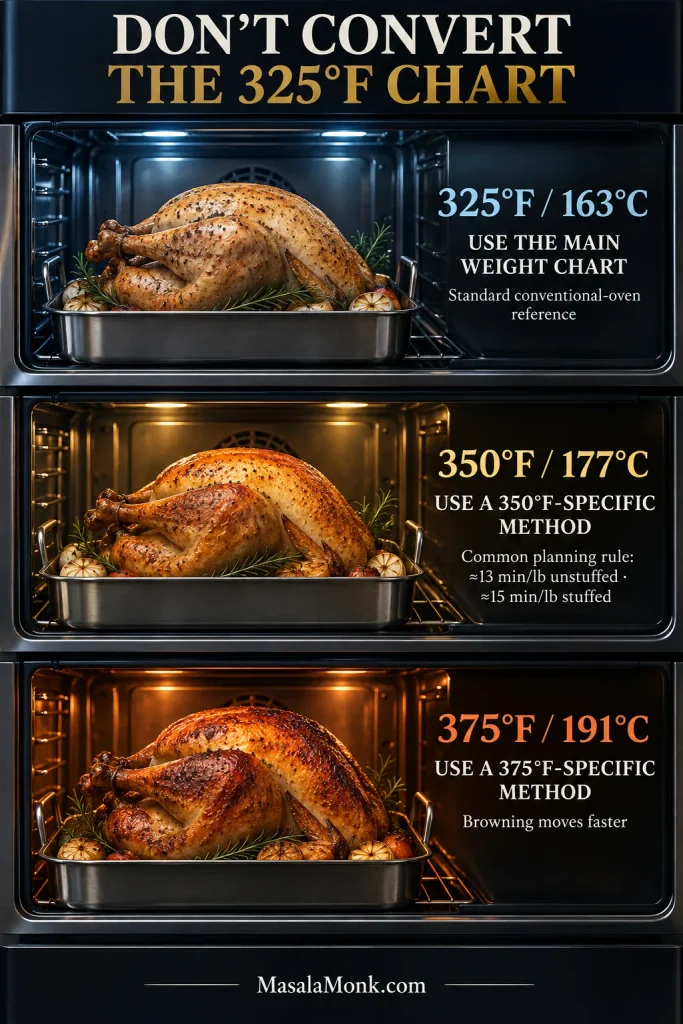
Using 350°F or 375°F? Don’t convert the 325°F chart. Follow a complete turkey method written for that temperature. Higher-temperature recipes have their own timing, browning and foil decisions.
| Oven approach | How to use it | What changes |
|---|---|---|
| 325°F / 163°C | Use the main chart on this page | Standard conventional-oven reference |
| 350°F / 177°C | Use timing written for that recipe | Usually a shorter cook |
| 375°F / 191°C | Use a 375°F-specific method | Cooking and browning move faster |
| High-heat start | Follow the complete recipe | Fast initial browning before heat is usually reduced |
Why 325°F Is the Main Chart
The 325°F / 163°C table gives us one authoritative conventional-oven reference across multiple weights and both stuffed and unstuffed birds. USDA guidance says a conventional oven should be set no lower than 325°F.
Turkey at 350°F
A common 350°F planning rule is about 13 minutes per pound for an unstuffed turkey and 15 minutes per pound for a stuffed one. That belongs to recipes designed around 350°F; it is not a mathematical conversion of the USDA 325°F table.
Published 350°F schedules vary. Once you’ve chosen one of those recipes, keep its approximate timing and cooking instructions together.
Turkey at 375°F
There is no universal 375°F timetable to substitute for the 325°F chart. Use the schedule supplied with the 375°F method. Faster browning is the predictable part: honey, maple syrup and sugary rubs need earlier watching, and foil can protect skin that reaches a deep golden color before the meat is ready.
Temperature-scale check: 180°C is about 356°F, not 180°F. Check the scale when moving between recipes, ovens or countries; that mistake can turn a normal roast into an all-day wait.
Using convection, an oven bag, roaster or smoker? → See the method-specific timetable
Stuffed vs Unstuffed Turkey: How Much Longer Does Stuffing Take?
Stuffing makes a turkey take longer and adds another doneness checkpoint: the center of the stuffing must reach 165°F / 74°C. For the easiest holiday schedule and better browning, bake the dressing separately.
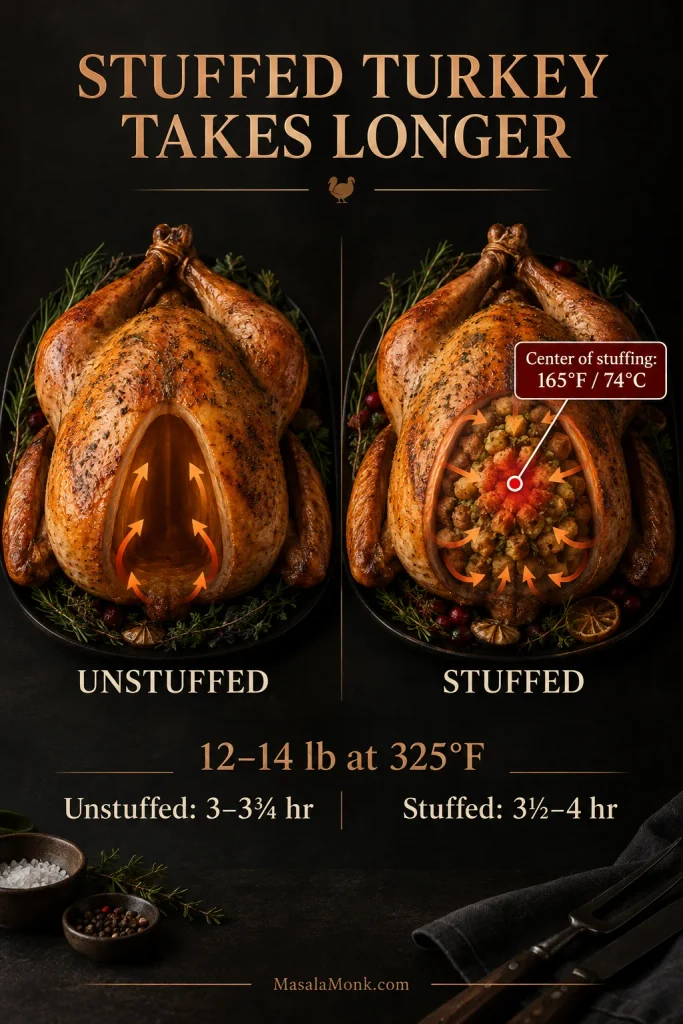
At 325°F, a 12–14 lb turkey takes roughly 3–3¾ hours unstuffed versus 3½–4 hours stuffed. At 20–24 lb, the ranges are about 4½–5 hours and 4¾–5¼ hours.
Stuffing the bird? Add it immediately before roasting and keep it loose rather than packing the cavity tightly.
Baked in its own dish, the dressing gets the chance to develop a browned top instead of steaming inside the turkey. Our Southern cornbread dressing is built for that separate-pan approach.
Turkey Still Frozen? Here Is the Safe Path
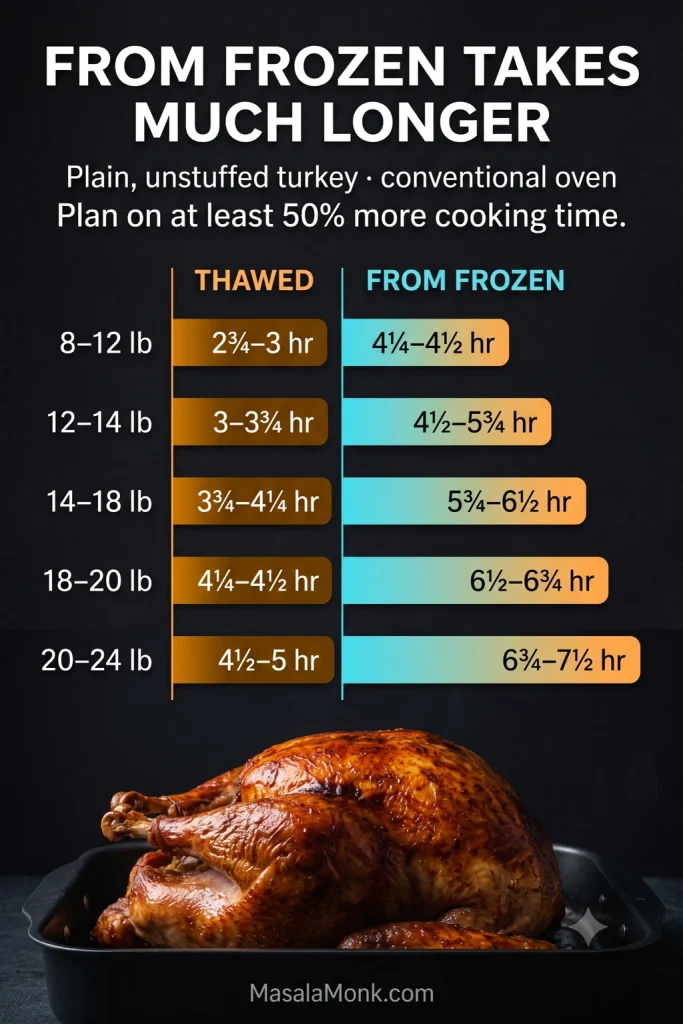
No time left to thaw? A plain, unstuffed frozen turkey can go directly into a conventional oven. Plan on at least 50% more cooking time than for a thawed bird. Dinner may move later, but the turkey can still be cooked safely.
Turkey Thawing Times
| Turkey weight | Refrigerator at 40°F / 4°C or below | Cold-water thawing |
|---|---|---|
| 4–12 lb / 1.8–5.4 kg | 1–3 days | 2–6 hours |
| 12–16 lb / 5.4–7.3 kg | 3–4 days | 6–8 hours |
| 16–20 lb / 7.3–9.1 kg | 4–5 days | 8–10 hours |
| 20–24 lb / 9.1–10.9 kg | 5–6 days | 10–12 hours |
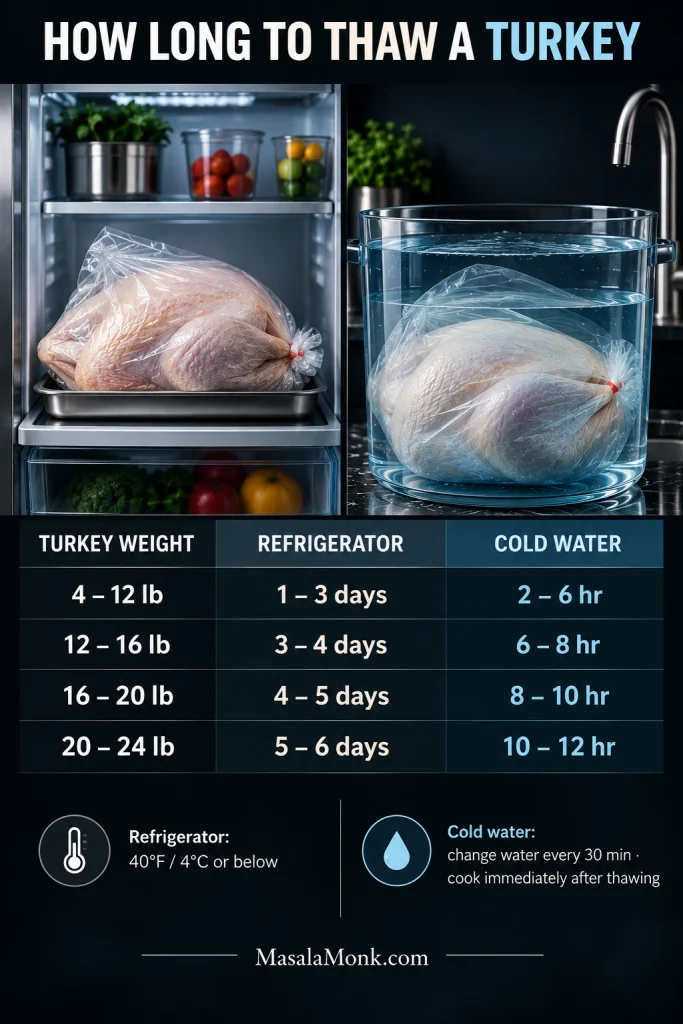
Exactly 12, 16 or 20 lb? Those weights sit where the published refrigerator-thaw rows overlap too. For holiday planning, give yourself the longer window rather than making dinner depend on the shortest possible thaw.
In the refrigerator, the broader rule is about 24 hours for every 4–5 pounds. A turkey thawed there can remain refrigerated for another 1–2 days before cooking.
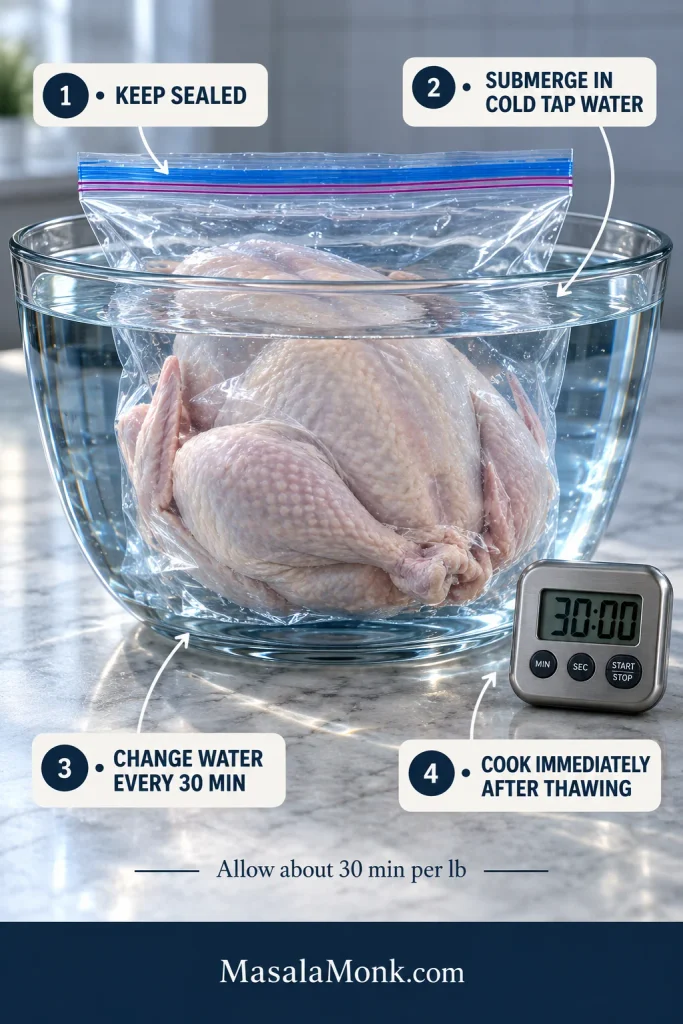
For cold-water thawing, keep the turkey in leak-proof packaging or a food-safe leak-proof bag, submerge it in cold tap water, allow roughly 30 minutes per pound, and replace the water every 30 minutes. Cook immediately after thawing.
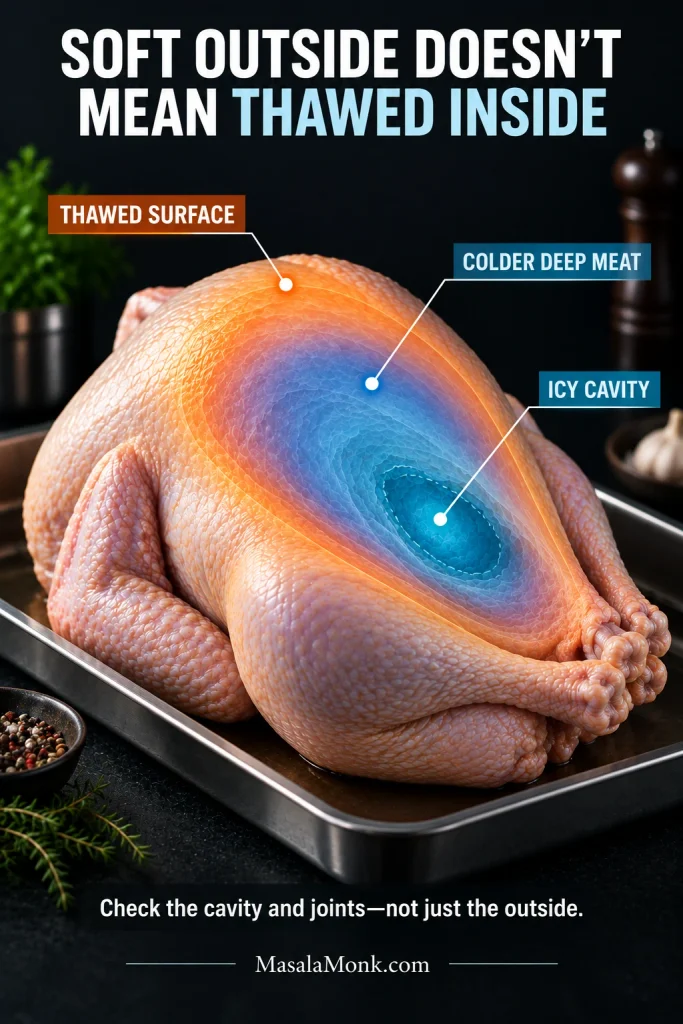
The Outside Is Soft but the Cavity Is Still Icy
A soft breast doesn’t prove the whole bird is thawed. Check the cavity. The neck and giblet packet should come free, and the joints should no longer feel locked by ice.
Ice still inside means the fully thawed timetable no longer fits neatly. The outside warms first, so a reassuring shallow reading can coexist with much colder meat deeper in the bird. Give the turkey extra time and check more than one location as it cooks.
A microwave can also thaw a turkey that fits, provided you follow the appliance’s defrost instructions and cook it immediately afterward. Hot water, warm water and the kitchen counter are not safe thawing methods.
Cooking a Turkey From Frozen
FoodSafety.gov gives these approximate conventional-oven times for a turkey that starts frozen:
| Frozen turkey | Approximate oven time |
|---|---|
| 8–12 lb / 3.6–5.4 kg | 4¼–4½ hours |
| 12–14 lb / 5.4–6.4 kg | 4½–5¾ hours |
| 14–18 lb / 6.4–8.2 kg | 5¾–6½ hours |
| 18–20 lb / 8.2–9.1 kg | 6½–6¾ hours |
| 20–24 lb / 9.1–10.9 kg | 6¾–7½ hours |
The giblet packet may still be frozen in place when the bird goes into the oven. Once the cavity loosens enough, remove it carefully with tongs or a fork and continue roasting.
From-frozen rescue means the conventional oven. Don’t cook a still-frozen turkey in an oven bag, smoker, grill or deep fryer. Microwave thawing is different: thaw according to the appliance instructions and cook immediately afterward.
Commercially frozen pre-stuffed turkey: do not thaw it. Keep it frozen and cook it according to the package cooking directions. The turkey and center of the stuffing must both reach 165°F / 74°C.
Turkey ready for the oven? → Build the dinner schedule
What Time Should You Put the Turkey in the Oven?
Once you know the weight, oven method, stuffing situation and thaw state, work backward from dinner. Doing the math earlier than that can give you a beautifully precise schedule for the wrong turkey.
Quick formula: serving time − carving time − resting time − the longer realistic cooking estimate = when the turkey should go into the oven.
Turkey Start-Time Examples
The examples below leave about 40 minutes between the planned oven-out time and dinner for resting, carving and getting the platter to the table.
| Turkey | Serve | Put it in by | First check |
|---|---|---|---|
| 12 lb unstuffed | 5 PM | About 12:35 PM | About 3:20 PM |
| 14 lb unstuffed | 5 PM | About 12:05 PM | About 3:05 PM |
| 16 lb unstuffed | 6 PM | About 1:05 PM | About 4:50 PM |
| 20 lb unstuffed | 6 PM | About 12:20 PM | About 4:35 PM |
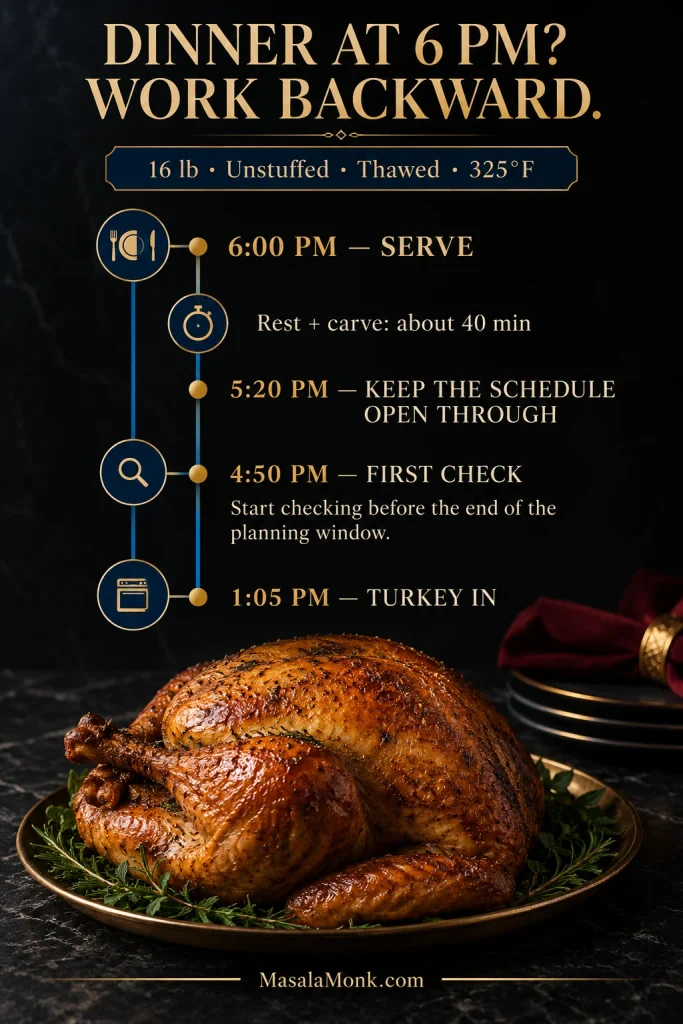
The 12-, 14- and 20-pound examples deliberately use the longer adjoining range for their oven-in time. Their first checks come from the earlier range.
Schedule from the longer end and check from the shorter end. An early turkey gives you options. An underdone turkey when every side dish is hot gives you fewer.
First whole turkey? Don’t try to memorize the page. Get the bird into the oven on schedule, set an alarm for the first temperature check, and keep the thermometer nearby.
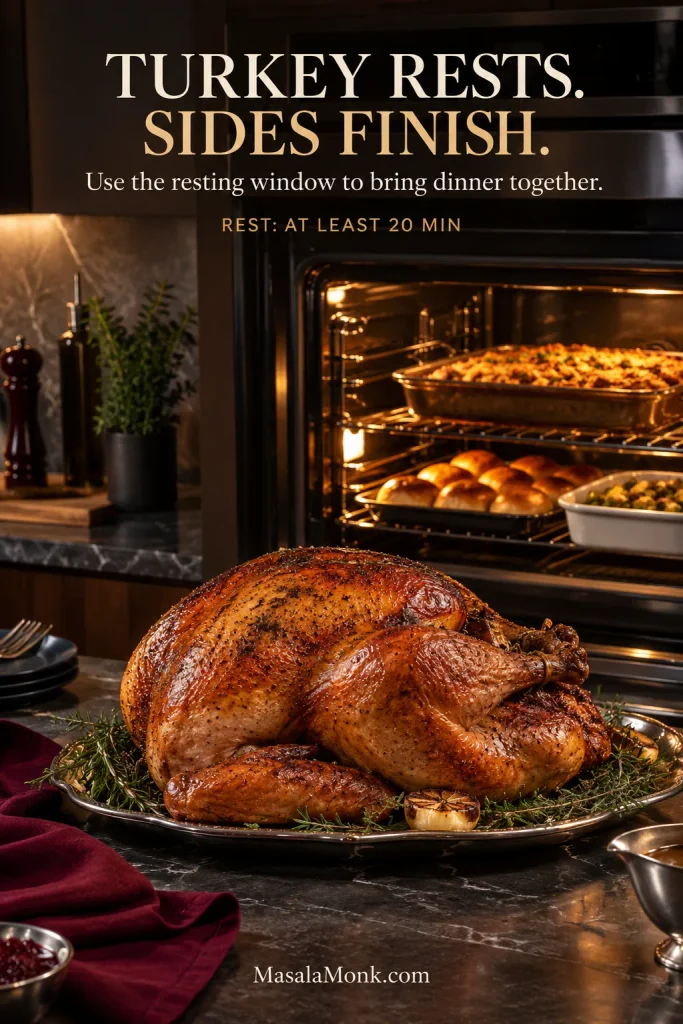
The rest period is useful kitchen time. Assemble or partly cook oven-heavy sides earlier, then use the freed oven to reheat, brown or finish them. A green bean casserole, for example, can make its final trip through the oven while the turkey rests.
Already cooking? → Go to the doneness check
How to Cook a Turkey at 325°F: The Short Version
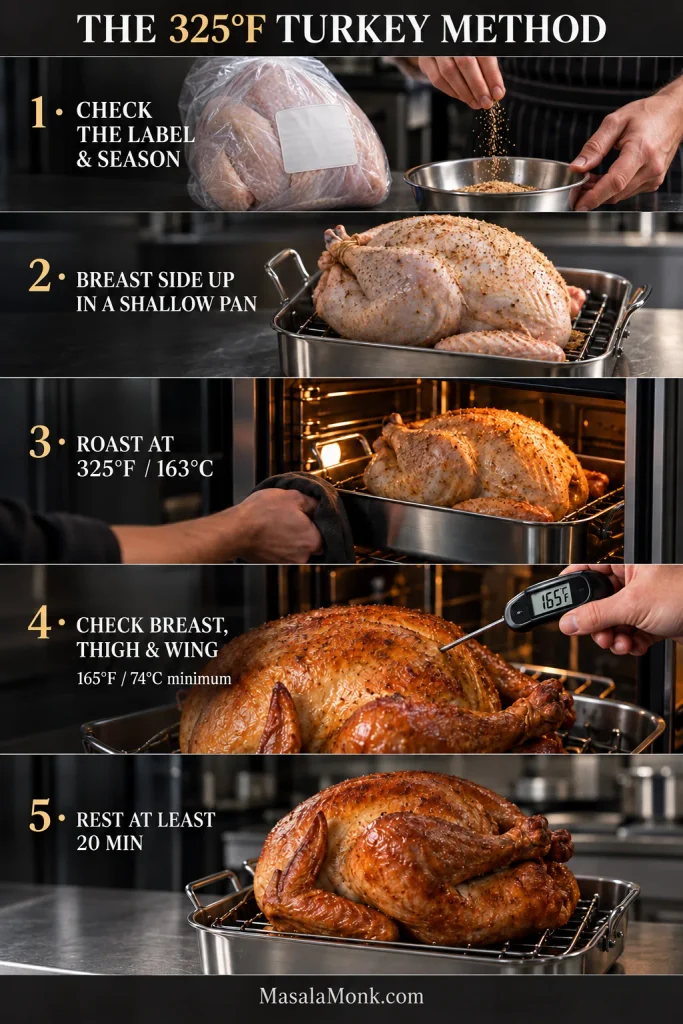
Got your timing sorted? Here’s the whole 325°F method in five steps.
- Check the label before adding salt. Remove the neck and giblets, pat the turkey dry and season it appropriately.
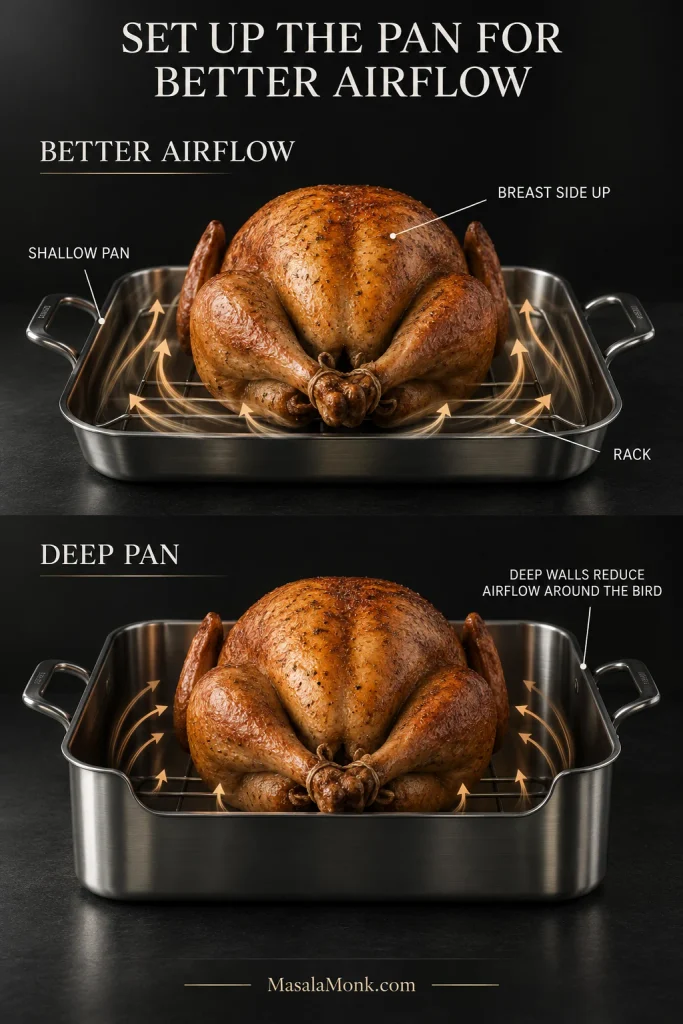
- Set the bird breast side up in a shallow roasting pan, preferably on a rack.
- Roast at 325°F / 163°C using the weight chart as your approximate time range.
- Begin checking near the early end and continue until the breast, thigh and wing each reach at least 165°F / 74°C. If the turkey is stuffed, check that the center of the stuffing reaches 165°F / 74°C too.
- Rest the turkey for at least 20 minutes, then carve.
Cooking for a much smaller table? The oven-baked Turkey Tenderloin Recipe gives you a smaller cut with a much shorter cook.
Set Up the Turkey for an Easier Roast
Check the Label, Cavities and Seasoning
Enhanced, self-basting, basted, pre-brined, or “contains up to a stated percentage of solution” on the label? The turkey already contains added seasoned liquid. That percentage is not simply the salt percentage, but it is a reason to go easy before stacking a dry brine, salted butter, salty seasoning and bouillon onto the same bird.
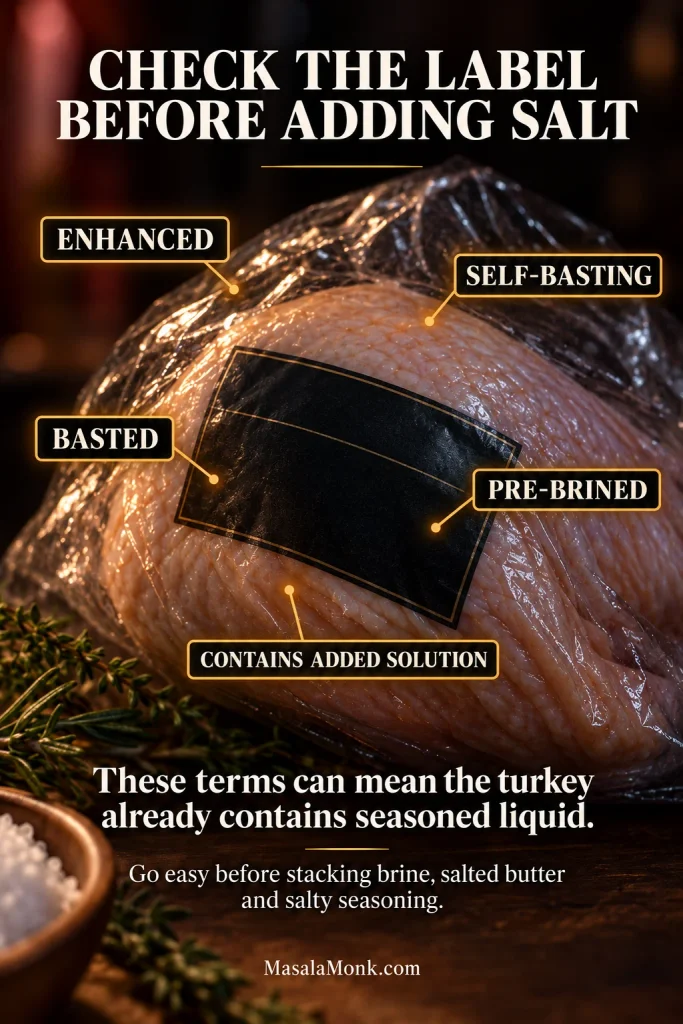
Check both cavities for the neck and giblet package. Pat the turkey dry instead of rinsing it; splashing raw-poultry juices around the sink can spread contamination. After handling the bird, wash your hands with soap and water for at least 20 seconds and clean the countertop, sink, utensils and anything else the raw turkey touched.
Pre-seasoned birds can leave salty drippings too. Taste before concentrating them into gravy. Our Turkey Gravy Recipe From Drippings shows how to balance the pan juices with stock.
Set Up the Pan
A roasting rack is helpful, not mandatory. It lifts the turkey above pooled drippings and improves airflow around the lower bird. No rack? A bed of sturdy vegetables or another food-safe support can keep the turkey off the bottom.
Very deep roasting pans can reduce airflow around the bird and push the cook later, another reason the timetable is only approximate.
Keep the bird breast side up for this method. The skin gets direct heat for browning, and you don’t have to wrestle a large, hot turkey halfway through the cook.
Manage the Browning Without Babysitting the Oven
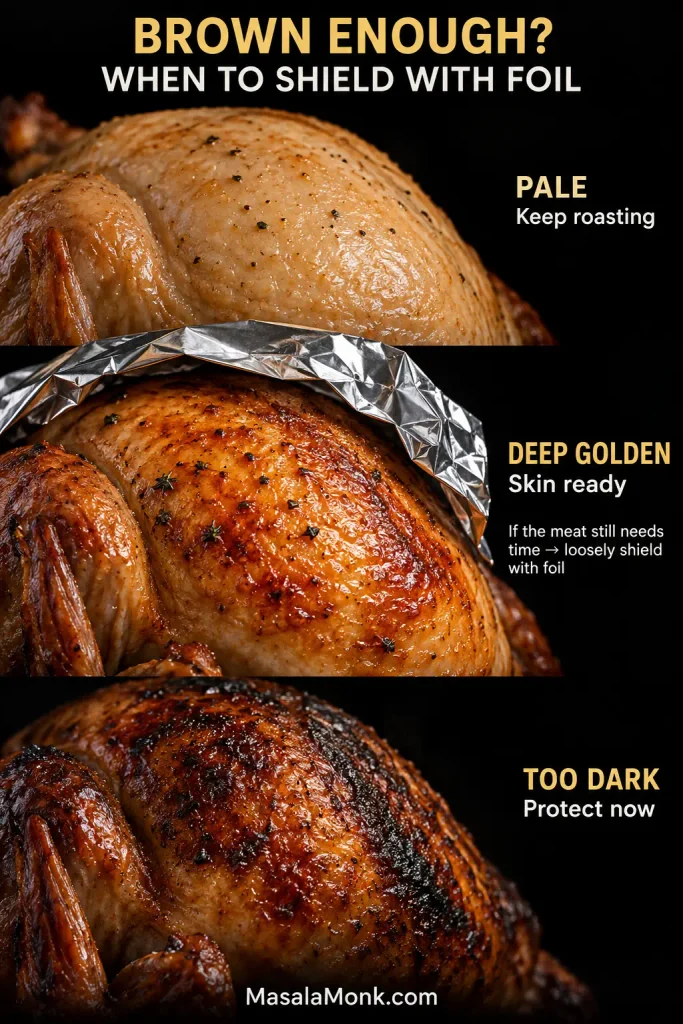
Once the skin is as deeply golden as you’d be happy to put on the table, foil can protect the darkening areas while the meat finishes. Sweet rubs and glazes may get there sooner.
Basting is optional. It can add surface flavor and color, but it doesn’t replace temperature control for keeping the breast juicy. Opening the oven every 20 minutes also dumps heat; occasional basting is plenty when a recipe calls for it.
Ready to check the turkey? → See where and how to take the temperature
How to Know When Turkey Is Done
This is the moment that matters: can the turkey come out now?
Turkey is done when the thickest breast, innermost thigh and innermost wing each reach at least 165°F / 74°C. If the bird is stuffed, the center of the stuffing must reach 165°F too.
| Where to check | Where the probe goes | Safety-first target |
|---|---|---|
| Breast | Center of the thickest breast meat, away from bone and cavity | 165°F / 74°C |
| Thigh | Innermost thick thigh where the leg meets the body, away from bone | 165°F / 74°C minimum |
| Wing | Innermost wing area, away from bone | 165°F / 74°C |
| Stuffing | Center of the stuffing, if used | 165°F / 74°C |
This follows current USDA turkey roasting guidance.
Dark meat can benefit from additional heat, while pushing the breast unnecessarily high can turn juicy slices dry and chalky. Some advanced methods deliberately use controlled carryover cooking below 165°F; this guide uses the simpler 165°F-before-serving rule for the breast, thigh and wing.
Put the Probe in Thick Meat, Away From Bone
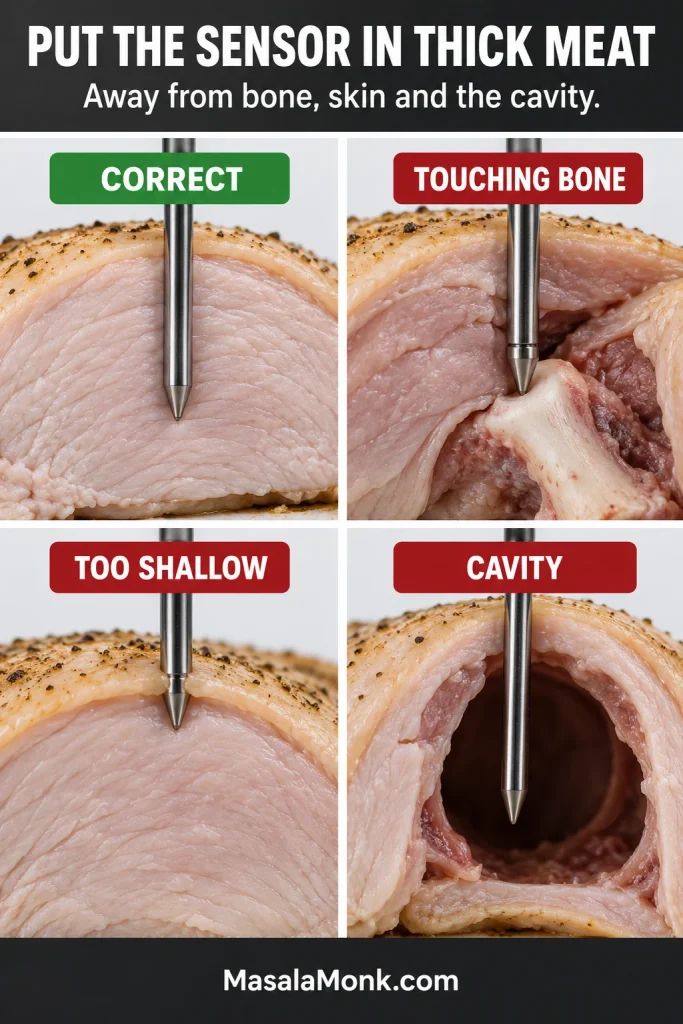
A strange reading deserves a second check nearby. The sensor should be in thick meat—not against bone, just beneath the skin, or hanging into the hollow cavity.
A leave-in probe is useful for watching one spot during the roast. An instant-read thermometer is better for checking the other breast, thighs and wing areas once you’re close.
Start Checking Before You Expect It to Be Done
Set your timer for the first check, not for when the turkey is supposed to be done.
Pink Meat and Pop-Up Timers
Safely cooked turkey can retain some pink, especially around joints or after smoking. Color alone is not a dependable doneness test. Breast, thigh and wing safely at temperature? Slight pinkness by itself is not a reason to keep roasting.
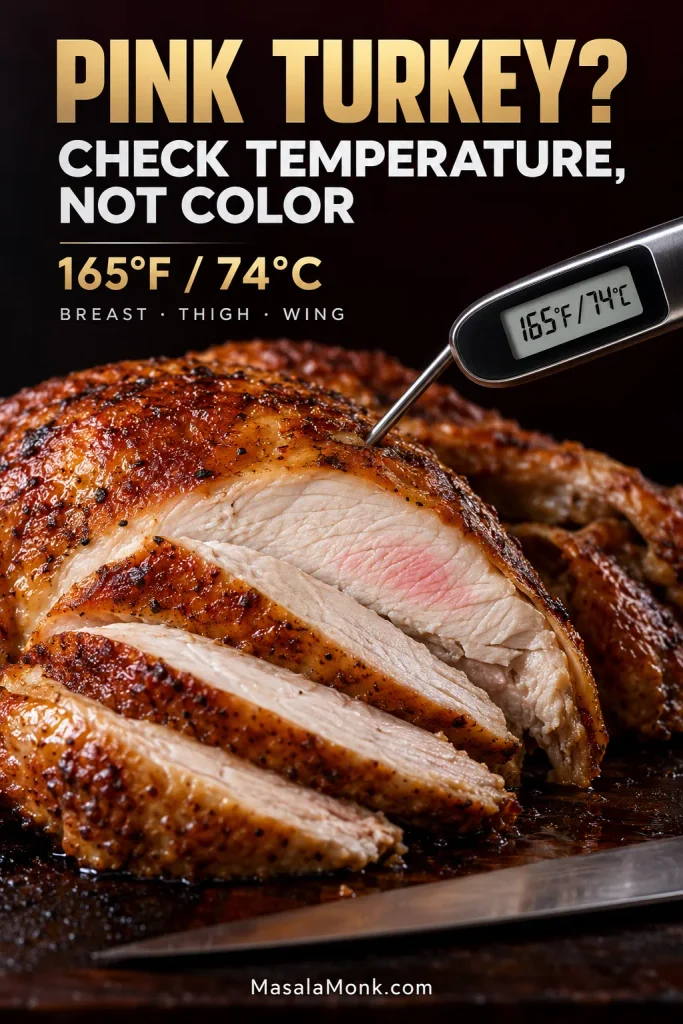
A pop-up timer is another clue, not the final answer. It measures one location. When it pops, check the turkey with your thermometer.
Give the Turkey Time to Rest
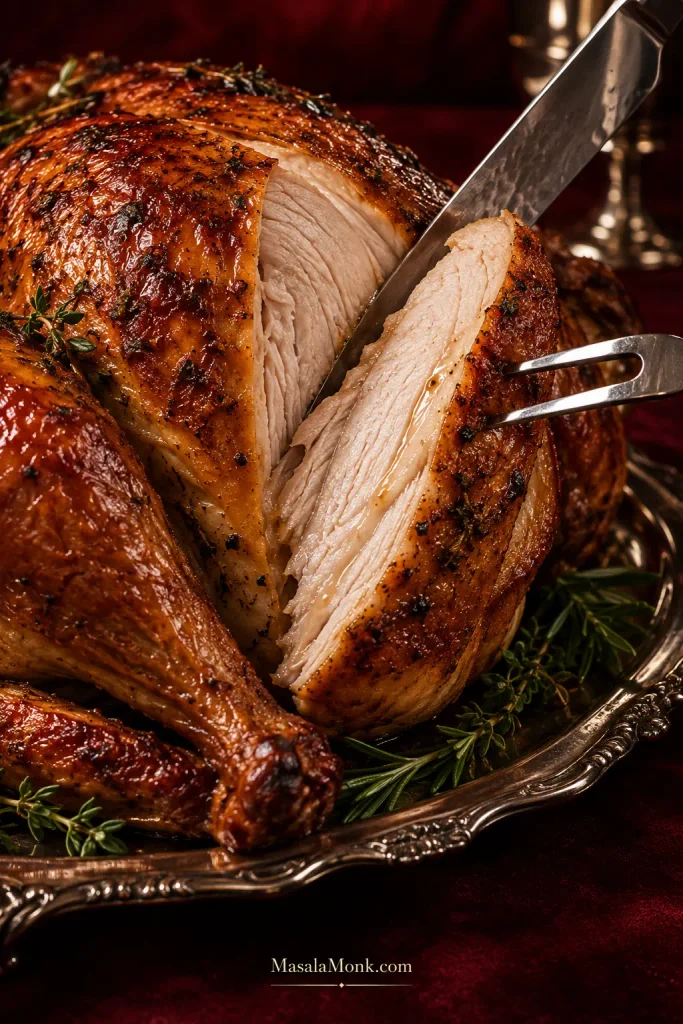
Rest the turkey for at least 20 minutes before carving. Twenty to thirty minutes is comfortable for many birds: carving is less rushed, and the last dishes can make it to the table.
Those minutes are also enough time to warm or bake soft dinner rolls without making them compete with the turkey earlier in the day.
An hour-long delay is different. That’s holding cooked food, not simply resting it.
Turkey not behaving as expected? → Troubleshoot it
What Is Your Turkey Doing Right Now?
Most turkey trouble begins when two signals disagree: the clock says one thing and the thermometer another; the breast is ready while the thigh lags; or the skin looks finished while the center still needs time.
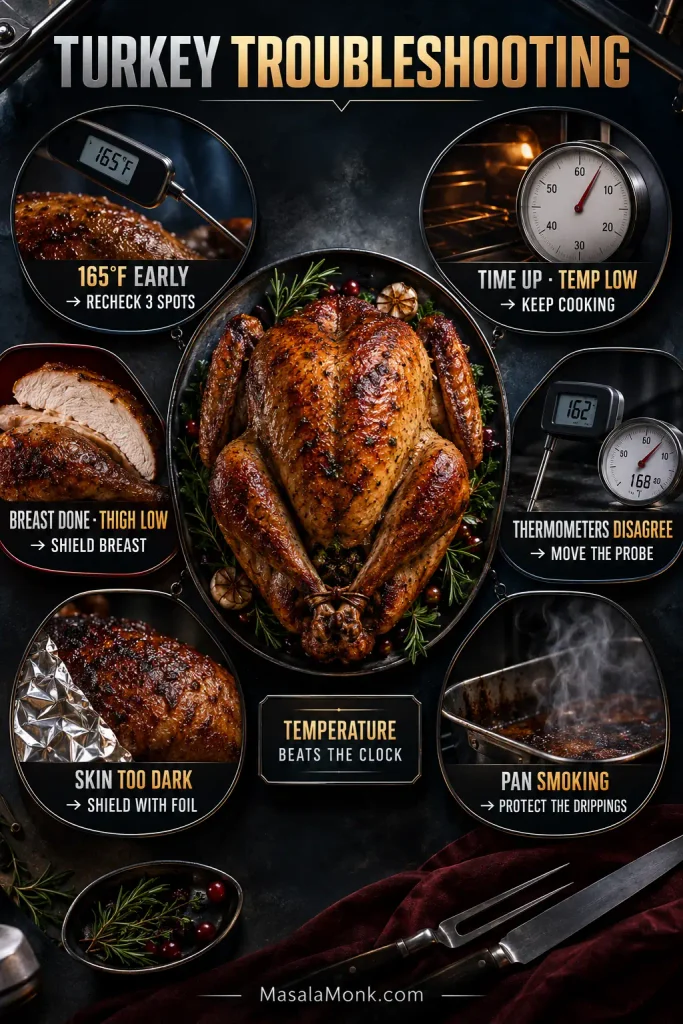
| What you see | What to do first |
|---|---|
| 165°F much earlier than expected | Recheck breast, thigh and wing; remove if all are ready |
| Time is up, temperature is low | Keep cooking; check thawing, oven and probe placement |
| Breast done, thigh low | Shield breast and keep checking the thigh |
| Thigh hot, breast low | Recheck the breast in more than one spot |
| Thermometers disagree | Move probes away from bone and cavity; verify accuracy if needed |
| Skin too dark | Loosely shield the dark area with foil |
| Turkey is pink | Check breast, thigh and wing for 165°F |
| Finished early | Rest, then move to safe holding if needed |
| Dinner ready, turkey not | Keep roasting the underdone area until it reaches 165°F |
| Pan is smoking | Protect the drippings without shocking hot cookware |
| Forgot the giblet package | Check the package material and condition |
| Turkey is dry | Next time begin temperature checks sooner |
It Reached 165°F Much Earlier Than Expected
Take another set of readings before assuming the thermometer is wrong. Breast, thigh and wing all safely at temperature? The turkey is finished. Oven calibration, airflow, bird shape and ordinary variation can all move the finish forward.
The Time Is Up but the Turkey Is Still Below Temperature
Keep cooking it.
Then find out why it is behind. Common reasons include ice in the cavity, stuffing, an oven running cool, repeated door opening, an unusually deep pan, a different appliance, or a thermometer sitting against bone instead of in thick meat.
When the readings are valid and still low, the schedule has to move; the safe-temperature target does not.
The Breast and Thigh Are Finishing at Different Times
Breast done but thigh low? Loosely shield the breast and keep roasting. Take a second thigh reading nearby before adding a long stretch of oven time, just in case the first probe touched bone. Dark meat can handle—and often benefits from—more heat, so don’t drag the breast upward just because the thigh needs longer.
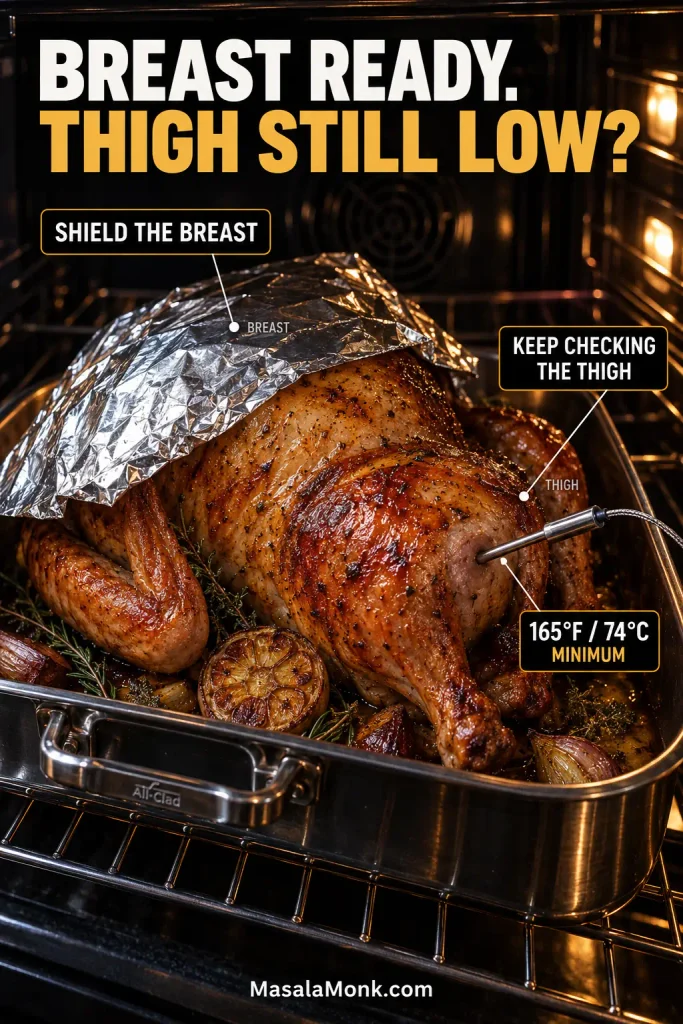
A hot thigh with a low breast needs the opposite response: check the breast in more than one spot and continue until it is safe. Turkey shape and oven hot spots do not guarantee that the thighs always finish last.
The Thermometers Disagree
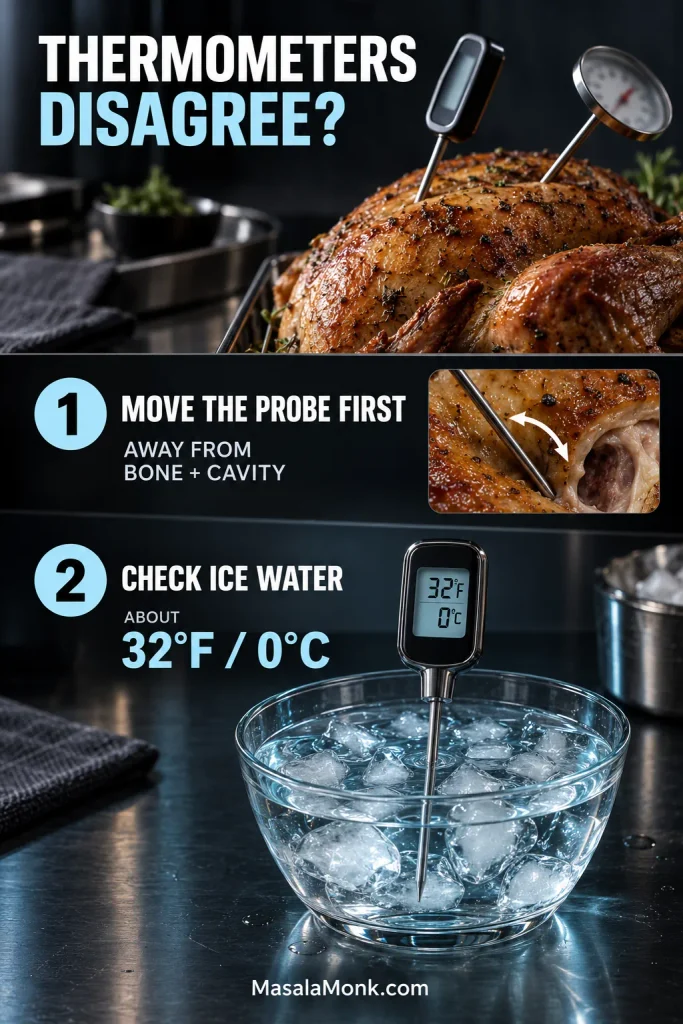
Move the probe first. Keep it away from bone and the cavity and give the reading a moment to settle.
Not sure which thermometer to trust? Check it in well-stirred ice water. The sensing area should read about 32°F / 0°C without touching the sides or bottom of the container; follow the manufacturer’s calibration instructions if it does not.
An oven thermometer is also worth checking when every turkey seems to finish implausibly early or late.
The Skin Is Getting Too Dark
Loosely cover the darkening area with foil and keep cooking. Sweet rubs and glazes can brown especially quickly at higher temperatures.
The Turkey Finished an Hour Early
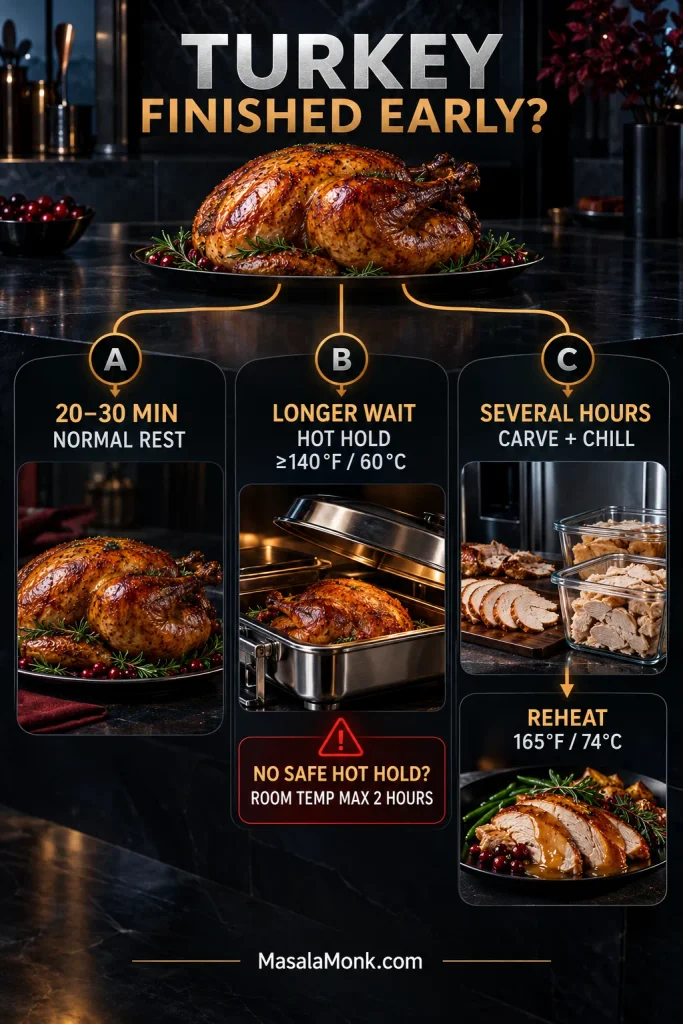
Twenty or thirty minutes early is useful; that’s largely the rest the turkey needed anyway. Let it sit while you finish gravy, warm serving dishes or bring the mashed potatoes to the table.
A much longer wait becomes a holding problem. Keep hot-held turkey at 140°F / 60°C or above. Without safe hot holding, cooked turkey should not sit at room temperature for more than 2 hours.
Several hours to wait? Carve and refrigerate the meat promptly in shallow containers, then reheat it to 165°F / 74°C. Holding the whole bird hot indefinitely is hard on both the meat and the skin.
Dinner Is Ready and the Turkey Is Not
Underdone meat needs more cooking. A safely cooked breast with a lagging thigh or leg can be loosely shielded with foil while the underdone area continues toward 165°F.
The Pan Is Smoking
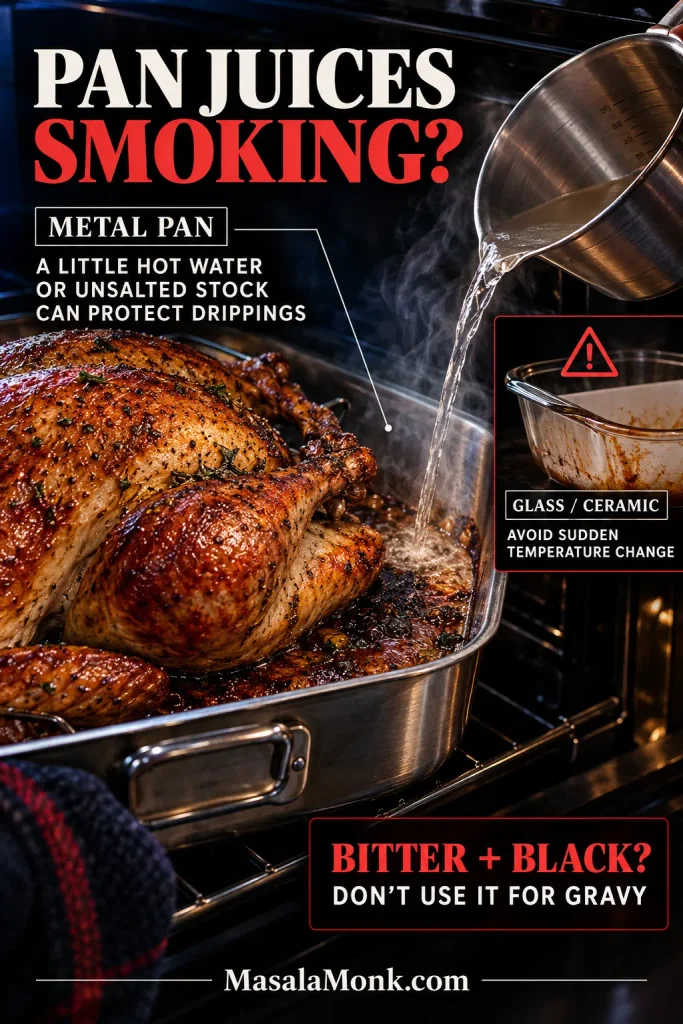
Drippings can scorch before the turkey is finished, particularly with high heat, a dry pan or sugary seasoning. With a metal roasting pan, a small amount of hot water or unsalted stock can help protect the drippings when your roasting setup allows it.
Glass and ceramic cookware need more caution: avoid sudden temperature changes and follow the cookware manufacturer’s guidance rather than pouring liquid blindly into a screaming-hot dish. Once the pan juices are bitter and black, don’t build gravy around them.
You Forgot the Giblet Bag
A paper-wrapped giblet packet cooking inside the turkey is not, by itself, a reason to discard a safely cooked bird.
Plastic is different. A packet that remained intact and unchanged does not automatically ruin the turkey. Melted, warped or broken-down plastic is a different situation: do not use the turkey.
The Turkey Came Out Dry
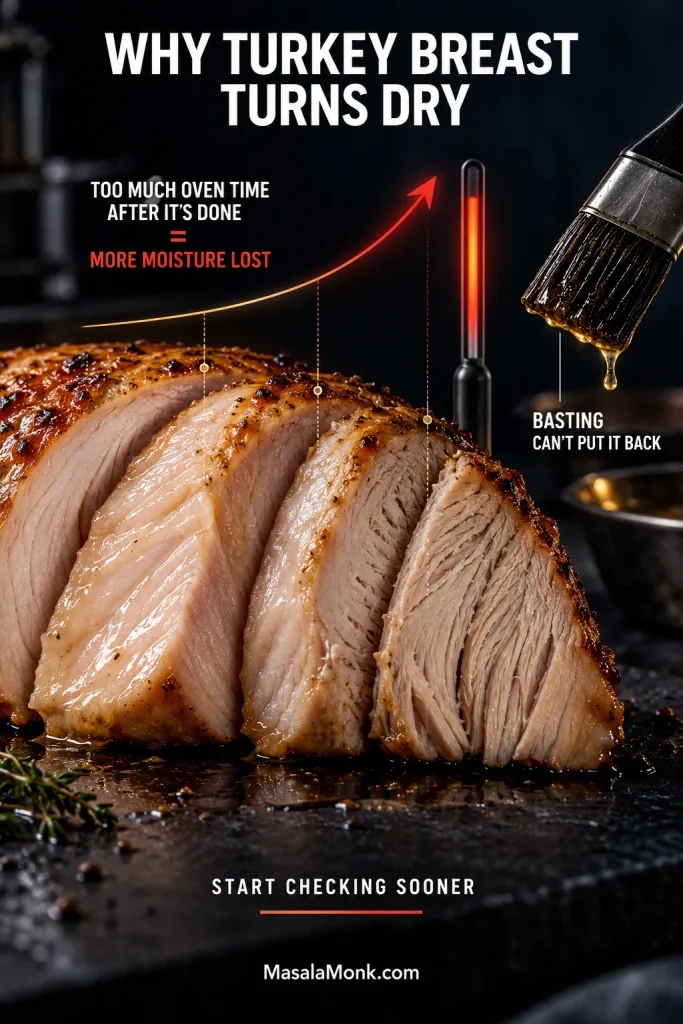
Dry breast meat usually points back to excessive internal temperature, not too little basting. Once the breast has overshot its finish, spooning pan juices over the surface cannot put that moisture back inside.
Next time, start checking sooner.
Need the core timing numbers again? ↑ Back to the main 325°F chart
Using a Different Cooking Method? Follow Its Own Timetable
Not using the standard oven method? Treat this section as a routing guide. Its job is to keep you from applying the main 325°F chart to a cooking method that behaves differently.
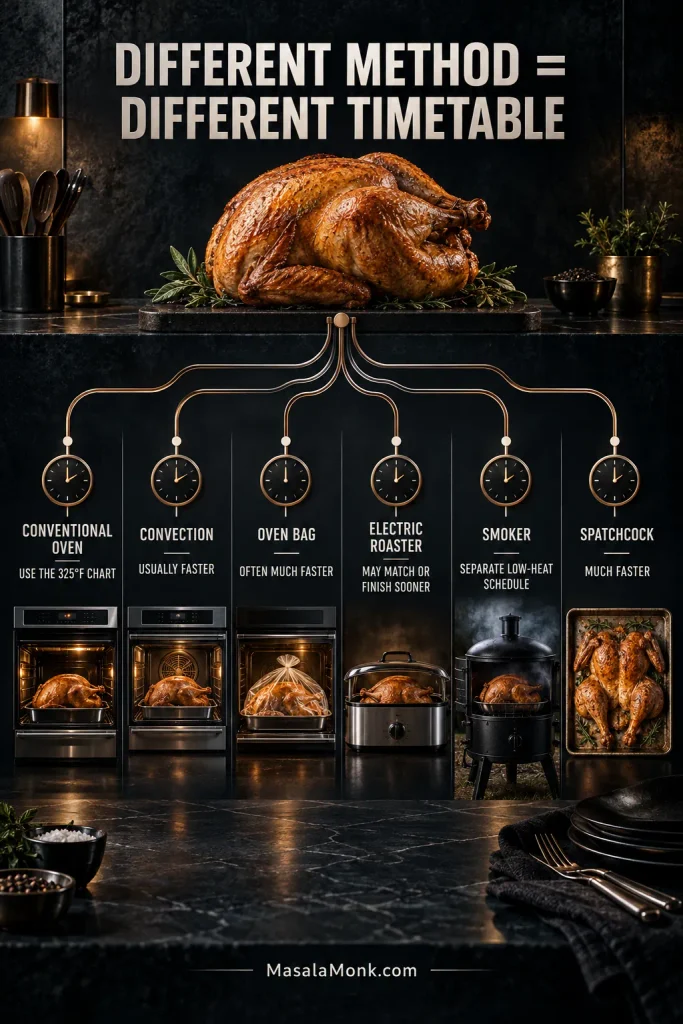
| Method | Timing difference | Main tradeoff |
|---|---|---|
| Conventional oven | Use the main 325°F chart | Standard reference method |
| Convection oven | Usually faster | Begin checking earlier |
| Oven cooking bag | Often much faster | Moist cooking, softer skin |
| Electric roaster | May match conventional timing or finish sooner | Frees oven space, usually less browning |
| Smoker | Separate low-heat schedule | Smoke flavor; skin can soften |
| Spatchcock | Much faster | Flatter, more even roasting |
Convection Oven
Convection can shorten the cook. USDA guidance says you may reduce the oven temperature by 25°F, but a convection oven should be set no lower than 300°F / 149°C.
| Convection turkey | Approximate time |
|---|---|
| 14–18 lb unstuffed | 2½–3¼ hours |
| 18–22 lb unstuffed | 3¼–3½ hours |
| 14–18 lb stuffed | 3–3¼ hours |
| 18–22 lb stuffed | 3¼–3¾ hours |
Check the oven manufacturer’s guidance too, then verify doneness in the breast, thigh and wing.
Oven Cooking Bag
A cooking bag traps steam and heat around the turkey, so it can roast much faster than in an open pan. USDA gives these approximate times for an unstuffed turkey at 350°F / 177°C:
| Turkey in oven bag | Approximate time |
|---|---|
| 8–12 lb | 1½–2 hours |
| 12–16 lb | 2–2½ hours |
| 16–20 lb | 2½–3 hours |
| 20–24 lb | 3–3½ hours |
Add about 30 minutes for a stuffed bird and follow the bag manufacturer’s directions. Trapped steam contains splatter and helps retain moisture, but deeply crisp skin is harder to achieve.
Electric Roaster
Electric roasters vary, and some finish considerably sooner than a conventional oven. Follow the appliance manual and begin checking early.
The practical win is oven space. The main oven stays available for candied yams, casseroles and rolls; covered roasters often give you paler, softer skin in return.
Smoked or Spatchcocked Turkey
For a thawed, unstuffed 8–12 lb turkey, USDA’s alternate-method guidance uses roughly 20–30 minutes per pound as a smoker planning estimate. Weather, smoker temperature and airflow can move that number substantially, so use a dedicated smoking method.
Spatchcocking needs its own timetable too. Flattening the bird exposes more of it to heat and shortens the cook dramatically.
Using the standard oven method? ↑ Back to the main 325°F chart
Turkey Cooking Time FAQs
1. Can You Cook Two Turkeys at the Same Time?
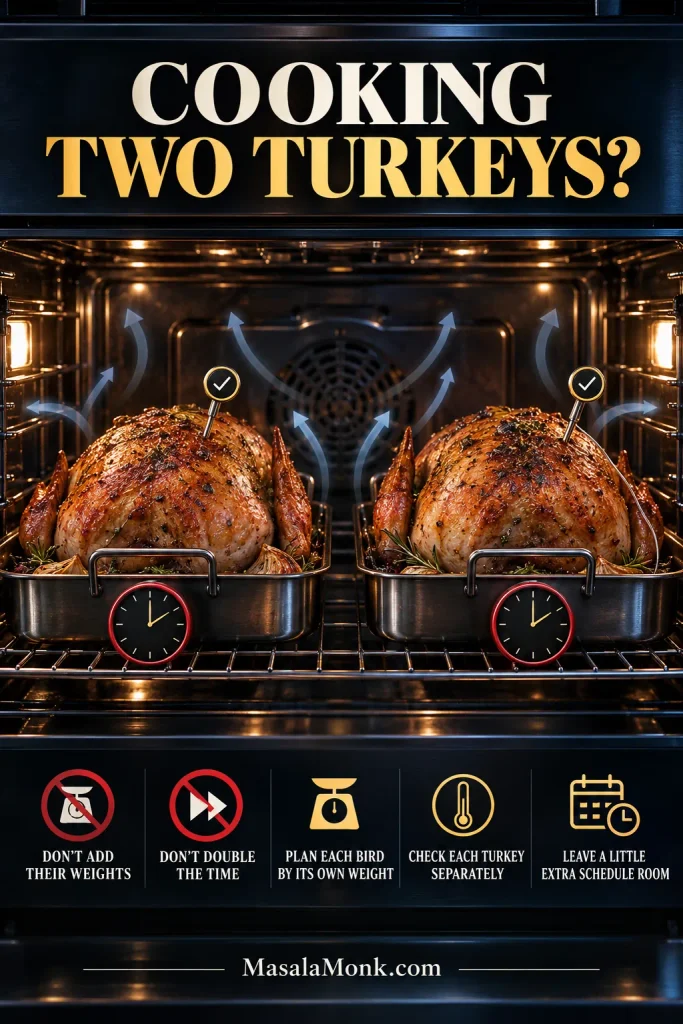
Cooking two turkeys does not mean doubling the cook time or adding their weights together. If the oven can hold two similarly sized birds in separate shallow pans with enough space for hot air to circulate, plan each turkey by its own weight. Leave a little extra scheduling room for airflow and oven recovery, and temperature-check each bird separately.
2. Does a Turkey Cook Faster Covered or Uncovered?
Don’t use covering as a shortcut for the cook time in this guide. Roast the turkey uncovered, then use foil once the skin is brown enough. Fully covered methods and oven bags have different heat and moisture conditions and need their own timetable.
3. Can You Cook a Turkey the Day Before?
Yes. Cook it fully, carve or portion it, refrigerate promptly in shallow containers, then reheat the meat to 165°F / 74°C before serving.
Extra cooked meat can become turkey pot pie the next day rather than disappearing into a week of identical sandwiches.
4. Can You Cook a Turkey Overnight?
Don’t improvise a very-low overnight roasting temperature just so the turkey can cook unattended. For the conventional method in this guide, use 325°F / 163°C or above and monitor the cook. Cooking ahead and reheating safely is a more predictable way to free the oven.
Once the first temperature check is on your schedule, most of the uncertainty is gone. Give the finished turkey its rest, use that window to bring the sides together, then carve and get it to the table. A bird that finishes a little earlier or later than the planning window suggested is normal; it doesn’t have to throw the rest of dinner off course.