
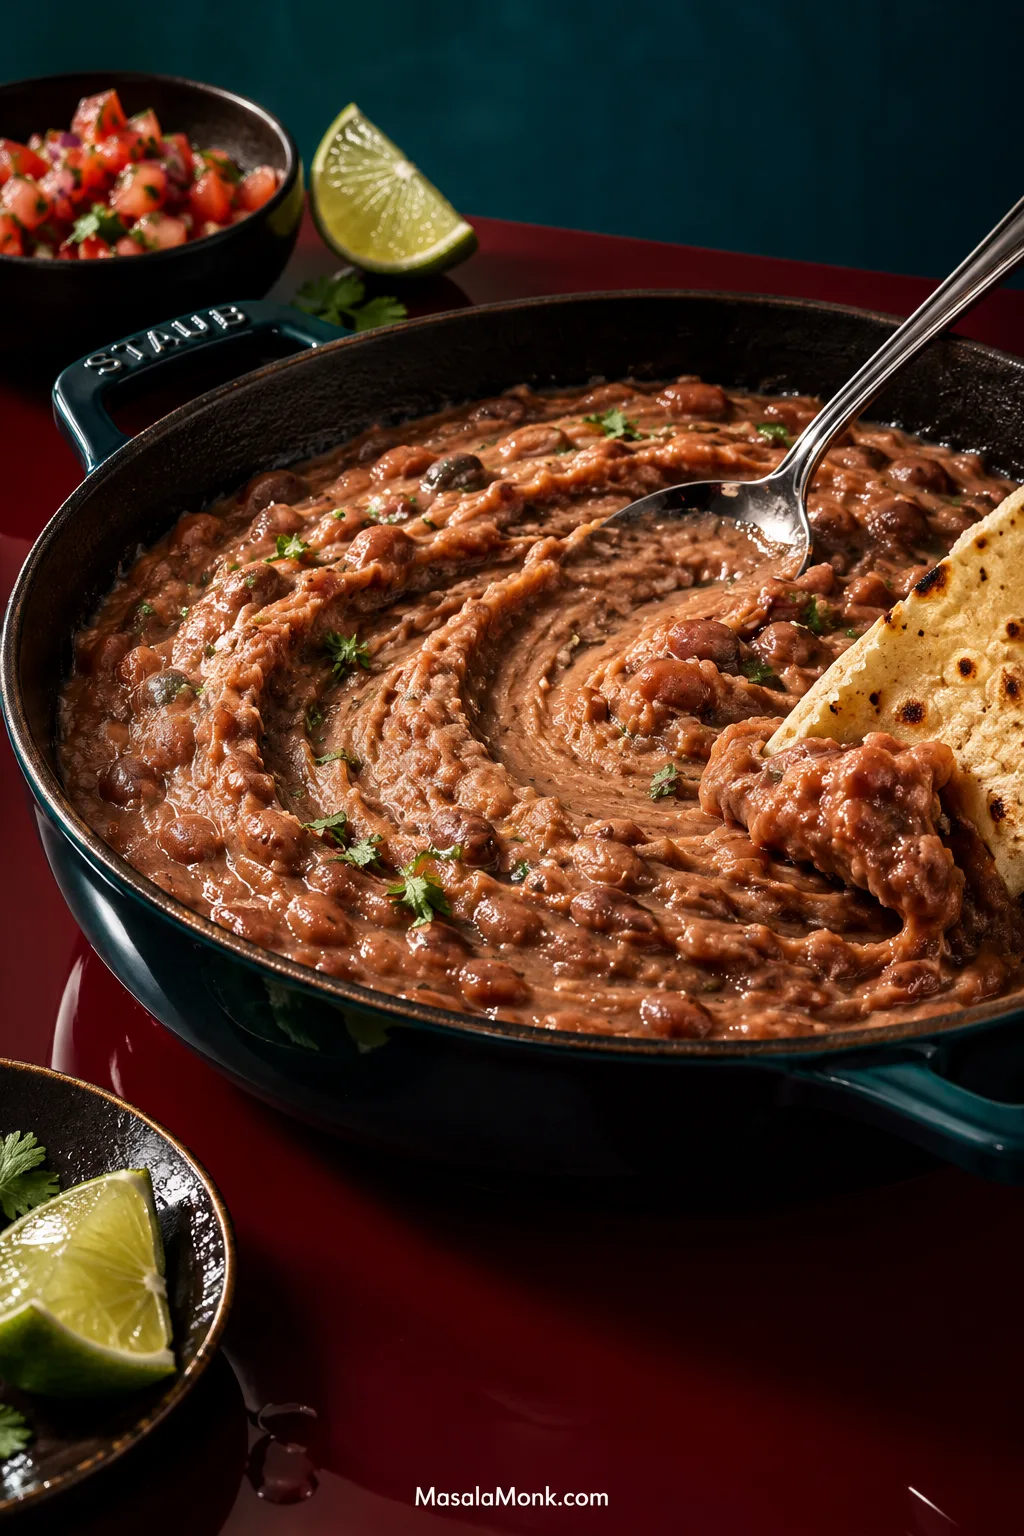
A skillet of whole pinto beans does not look much like refried beans at first. Then the beans hit warm fat and softened onion, the masher breaks them open, and the liquid in the pan turns glossy as their starch thickens it. Within minutes, you have creamy beans with enough body for a spoon to leave a trail through them, but enough liquid to stay soft on the plate.
How far you take them depends on dinner. Leave them loose and silky for a side dish. Give them a few more minutes for tacos and burritos. Cook them down farther for tostadas or molletes, where you need a spread that stays put instead of soaking the base. At the right point, a warm tortilla drags through them easily and the beans spread rather than sit in a stiff mound.
This refried beans recipe works from two starting points: whole canned pintos for the fast route, or dried pintos cooked until completely tender. Once either one reaches the skillet, the same basic method takes over.
Refried Beans Recipe
20–25-Minute Canned-Pinto Route: Soften ½ cup onion in 2 tablespoons lard or neutral oil, stir in 2 minced garlic cloves, then add two cans of whole pinto beans with ½ cup bean liquid, water, or unsalted broth. Mash, simmer gently until creamy and still slightly loose, then season to taste.
If your can already contains prepared refried beans rather than whole pintos, use our refried beans from a can guide instead. Those beans have already been mashed and cooked into their final form, so they need a different kind of help.
Refried beans can be frustrating because the ingredient list is so short. When a homemade batch turns stiff, gritty, or strangely flat, it can feel as though some restaurant secret is missing. Usually the bigger differences are simpler: fully tender beans, enough fat, enough liquid, and reading what the pan is doing.
The same beans can be soft and spoonable one minute, then dense enough to stand on a spoon after a little more cooking. That stopping point matters more than another shake of cumin.
Onion, garlic, cooked pintos, fat, and bean broth or water are the foundation. Add liquid gradually until the beans move the way you want.
Easy Homemade Refried Beans From Pinto Beans
Whole pinto beans mashed and refried with onion, fat, and enough liquid to stay creamy. Keep them loose for a plated side or reduce them farther for tacos, burritos, and tostadas.
The final yield shifts a little depending on how loose or thick you leave the beans.
Ingredients
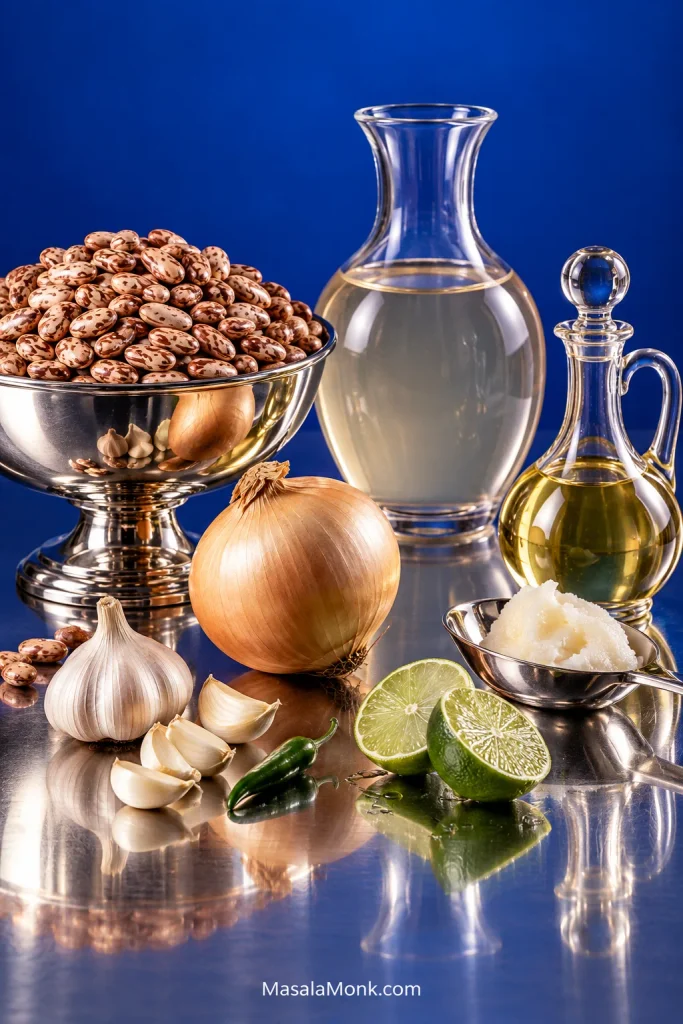
- 2 cans whole pinto beans, 15 oz (425 g) each
- 2 tbsp (30 ml) lard, avocado oil, or another neutral cooking oil
- ½ cup (about 75 g) white or yellow onion, finely diced
- 2 garlic cloves, finely minced
- ½ cup (120 ml) reserved bean liquid, water, or unsalted broth to start
- Up to another ½ cup (120 ml) bean liquid, water, or unsalted broth, as needed
- ¼ tsp fine salt, only if needed, plus more to taste
- 1–2 tsp (5–10 ml) fresh lime juice, optional
Optional Tex-Mex seasoning: ½ tsp ground cumin plus ¼ tsp Mexican oregano. Add them with the garlic.
How to Make Refried Beans From Canned Pinto Beans
Build the Flavor Base
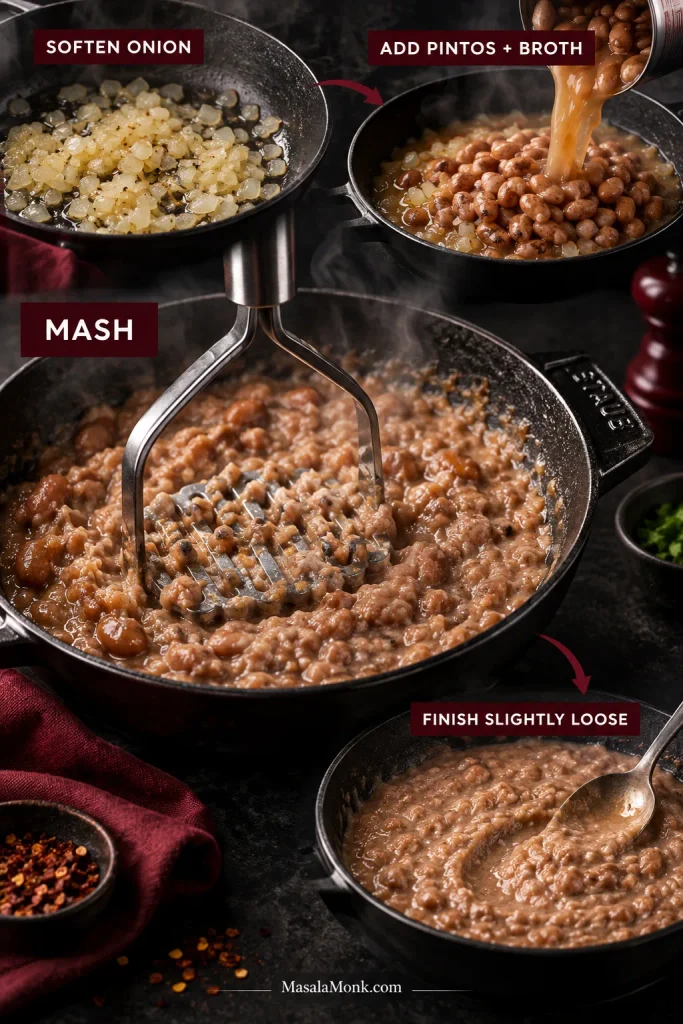
- Drain the beans over a bowl. Taste the reserved liquid. Keep it unless very salty, metallic, or strongly canned; otherwise rinse the beans and use water or unsalted broth.
- Soften the onion. Heat the lard or oil over medium heat. Cook the onion for 4–6 minutes, until the sharpness mellows and the pieces are soft enough to disappear into the mash.
- Add the garlic. Stir in the garlic and, if using them, the cumin and oregano. Cook for about 30 seconds, just until fragrant.
- Add the beans carefully. Lower the heat if the fat is very hot, then add the drained beans close to the surface of the skillet. Wet beans can spit when they meet hot fat.
- Add ½ cup (120 ml) reserved bean liquid, water, or broth. Simmer for 1–2 minutes. Beans that still resist the masher need another 3–5 minutes with a splash more before mashing.
Mash and Finish
- Mash the beans. Leave some pieces intact for a rustic texture, or keep going until most have broken down.
- Turn the heat down to medium-low. Let the mash bubble gently for another 3–5 minutes. Add more bean broth or water only when needed, working 1–2 tbsp (15–30 ml) at a time.
- Taste before salting. Canned bean liquid or regular broth may already have seasoned the pan. Add lime if the beans taste rich but flat.
- Turn off the heat while the beans still look a touch loose. They keep thickening after the flame is off. A pan that looks right over the heat can feel stiff five minutes later.
Recipe Notes
- For the richest savory flavor: use lard. Increase it to 3 tbsp (45 ml) for a richer batch.
- Vegetarian or vegan: avocado oil or another neutral vegetable oil works well. Olive oil adds more flavor of its own.
- Very smooth beans: mash first, then use an immersion blender briefly while the mixture is loose enough to move freely.
- Small batch: use one 15 oz (425 g) can and halve the remaining ingredients.
- Starting from dry: cook about 8 oz (225 g) dried pintos until completely creamy inside, reserve some broth, then measure roughly 3 cups cooked beans into the recipe.
- Using unsalted home-cooked beans: expect to need more salt than the canned version. Season gradually after mashing; the ¼ teaspoon above is not a target for completely unsalted beans.
Equipment
A 10- to 12-inch (25- to 30-cm) skillet and potato masher do the main work. For a small batch, a sturdy fork works; an immersion blender is optional when you want an especially smooth finish.
Mash. Loosen gradually. Stop early.
Once the beans are mashed, add broth or water a splash at a time until they move the way you want. Gentle frying does the rest.
What the Pan Should Look Like
The clock gets you close; the skillet tells you where you actually are.
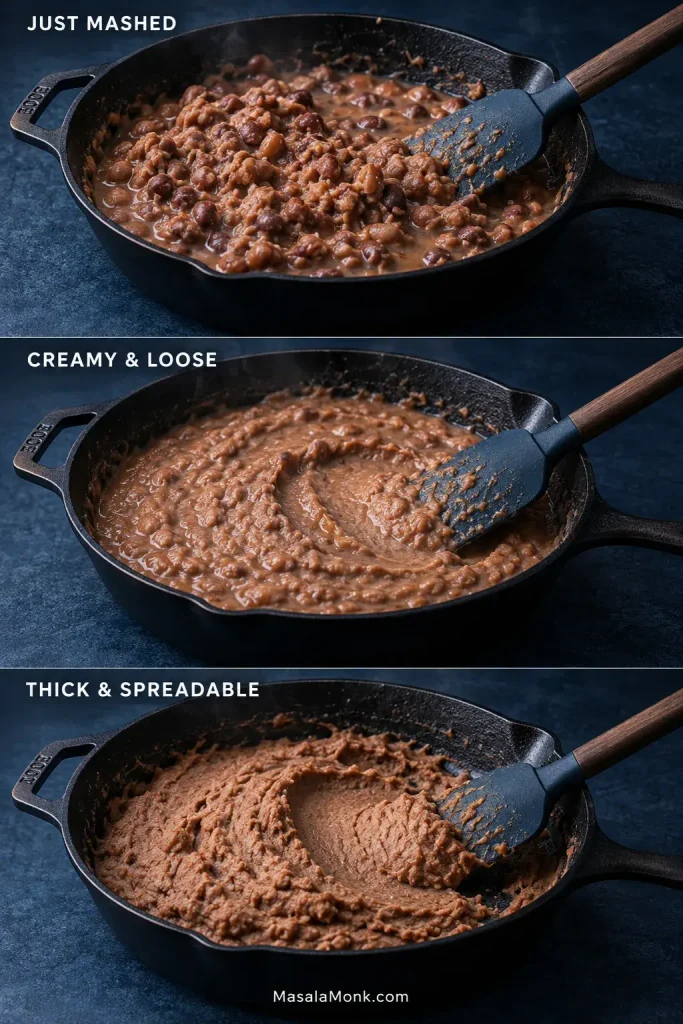
Just Mashed
The beans are broken but still noticeably chunky. Some liquid may sit around them, and a spoonful does not quite hold together yet.
A loose-looking skillet at this point is normal. Give it a few minutes before changing anything.
Creamy & Loose
The mixture looks cohesive and glossy. Pull a spatula through the skillet and the trail stays visible briefly before the edges slowly soften back into place.
Stir it and the mash should move as one soft mass—neither sloshing like soup nor sitting stiffly like mashed potatoes.
Thick & Spreadable
The spatula trail stays open much longer. A spoonful holds a soft mound and spreads where you push it instead of flowing back across the skillet.
For a deeper fried flavor, let a very thin film catch lightly on the skillet, then scrape it back into the mash. The aroma turns toastier and nuttier almost immediately; get it up before that edge becomes bitter.
How Thick Should Refried Beans Be?
Thick enough for what? Side-dish beans should be loose and spoonable. A burrito needs enough body that the filling stays inside the tortilla, while a tostada needs a spread that will not soften the crisp base underneath.
| What You Are Making | Stop When | Texture |
|---|---|---|
| Side-dish beans | A spoon trail slowly relaxes back | Loose, creamy and spoonable |
| Nachos or dipping | The beans still move readily when stirred | Creamy enough to scoop easily |
| Tacos | The beans hold on a spoon but still spread readily | Medium-thick |
| Burritos | The trail holds and the beans no longer flow | Thick enough to stay inside the tortilla |
| Tostadas or molletes | The beans hold a stable spread | Thick enough to protect the crisp base |
| Make-ahead beans | Slightly looser than you want to serve them | They’ll firm more as they chill |
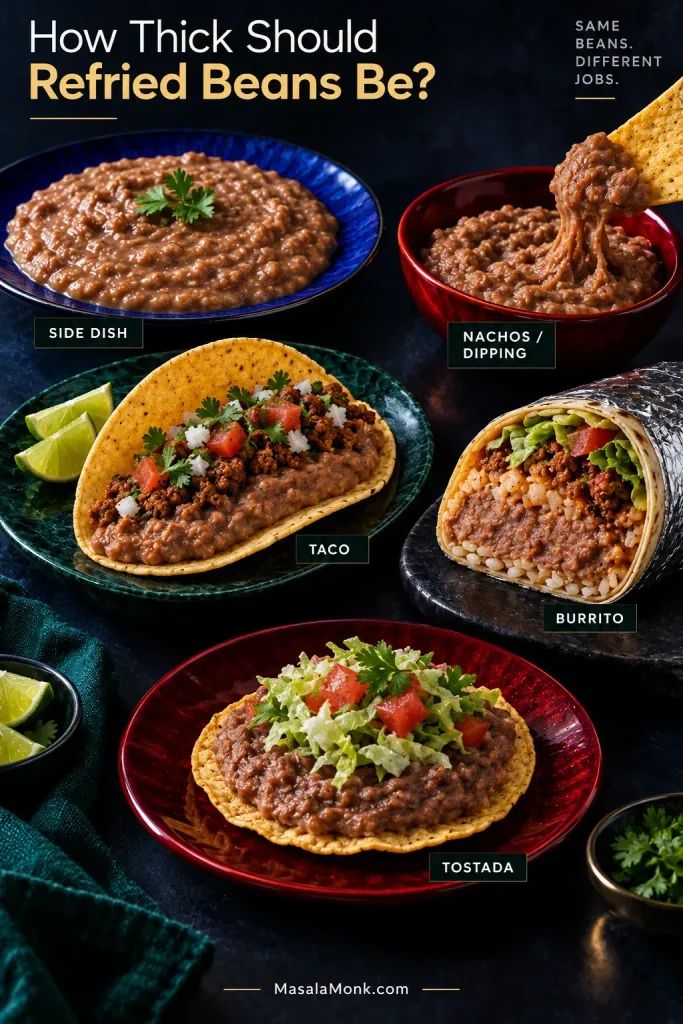
For ground beef tacos, the middle texture is especially forgiving: the beans spread beneath the meat but stay inside the tortilla.
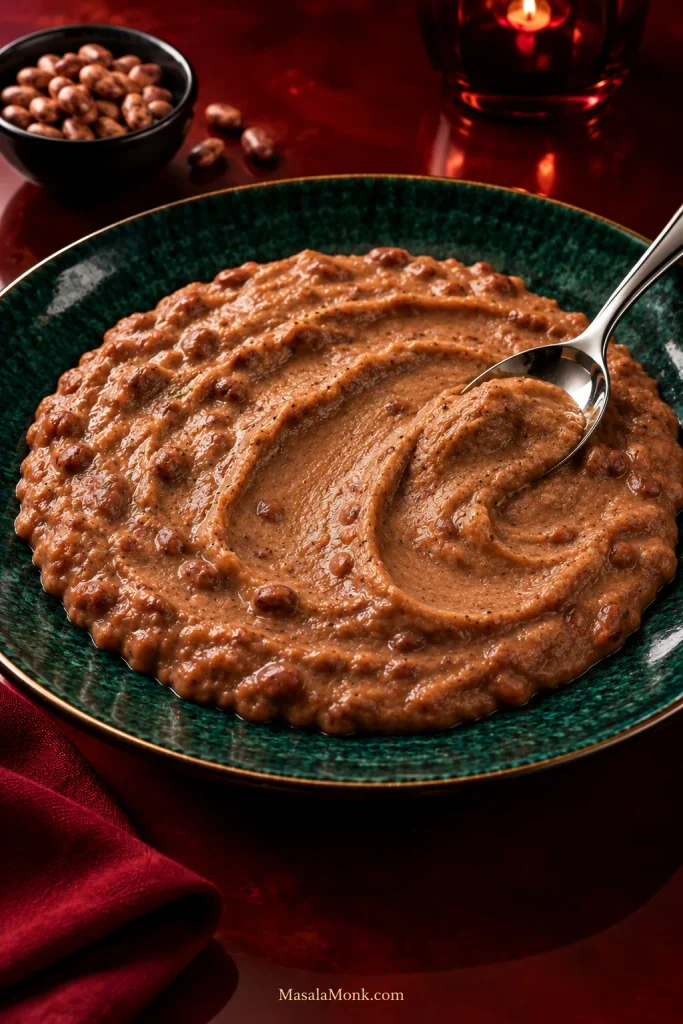
Soft Restaurant-Style Refried Beans
Very smooth restaurant-style beans begin with completely tender pintos. Mash them thoroughly—or briefly use an immersion blender—then add enough bean broth that the beans relax across the plate instead of sitting in a stiff mound. Take the skillet off the heat earlier than you would for burrito or tostada beans.
Lard gives the deepest savory richness. Tender beans, released starch, broth, and that looser stopping point create the texture; dairy is optional rather than necessary.
Starting With Dried Pinto Beans?
Using canned beans? Skip ahead to seasoning.
Soaking shortens the wait, but tenderness decides when dried pintos are ready for the skillet. For smooth refried beans, the centers need to become completely creamy before frying and mashing.
Sort through 8 oz (225 g) dried pintos, discard any stones or badly damaged beans, and rinse them well. Once cooked, you’ll need roughly 3 cups. Any extra can go into another meal, including a simple bean stew.
Do You Need to Soak Pinto Beans?
No. An 8- to 12-hour soak can shorten the cooking time and help pintos cook more evenly, but unsoaked beans work too.
After an overnight soak, drain and rinse the beans, then cook them in fresh water. Forgot to soak them? Keep going—unsoaked beans simply need longer.
Cook Them Until the Centers Are Creamy
Put the pintos in a roomy saucepan or Dutch oven and cover them with fresh water by roughly 2–3 inches (5–7.5 cm). Onion, garlic, or a bay leaf can flavor the pot if you like.
Bring the water to a boil, then reduce it to a gentle simmer. Keep the pintos comfortably submerged and top up with hot water as needed.
Start checking soaked pintos after about 1 hour. Many finish within 1–2 hours; unsoaked beans commonly need closer to 2–3 hours. Old beans can take longer, so tenderness matters more than the clock.
Take one out, let it cool for a few seconds, then crush it between your fingers or press it against the side of the pot with a spoon. It should give way easily and feel creamy all the way through, with no pale, chalky center.
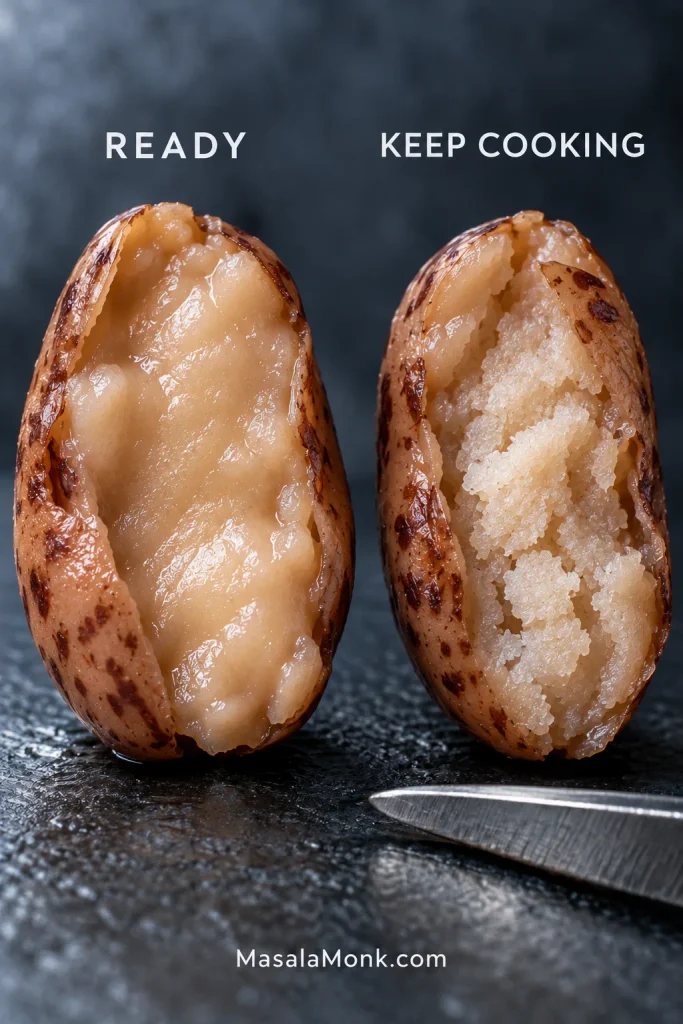
A potato masher can change their shape; it can’t turn a chalky center creamy. Keep cooking until the pintos are genuinely soft.
Before draining them, save plenty of the bean broth. It already carries bean flavor and released starch, so reach for it first when the mash needs loosening later. Remove any bay leaf or large aromatics, then measure about 3 cups cooked pintos for the skillet.
When Dried Beans Refuse to Soften
Dry beans do not read recipe clocks. An old bag of pintos may take much longer than a fresher one, and very hard water can slow softening too. Strongly acidic ingredients such as tomatoes or vinegar are best saved until the beans are tender.
If the beans stay stubbornly firm, don’t assume salt is the culprit. Check bean age, very hard water, acidic ingredients, water level, and whether the pot has maintained a steady simmer.
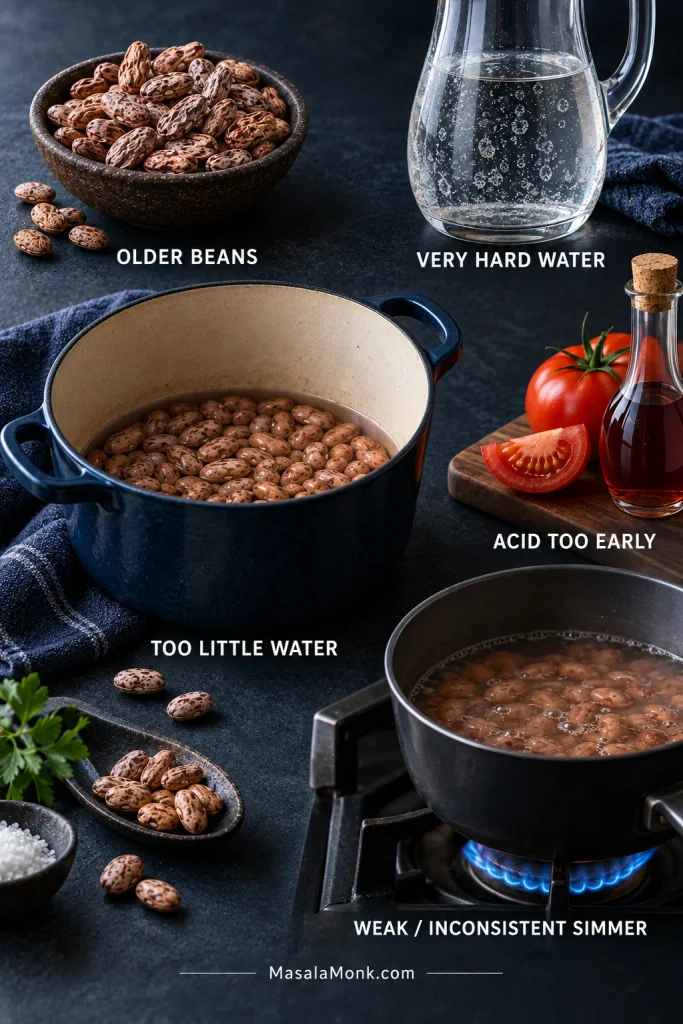
Where hard water repeatedly causes trouble, cooking with softer or distilled water can help. North Dakota State University’s dry-bean guidance also discusses hard water and delaying acidic ingredients until the beans are tender.
Beans tender? Back to the skillet method · Choose your final texture · Back to top
How to Season Refried Beans
Once the beans are genuinely tender, seasoning gets much simpler. Onion, fat, and salt do most of the work. Garlic can join them; cumin, oregano, fresh chile, and lime take the beans in different directions rather than fixing a weak base.
Choose the Fat
Lard gives the deepest savory flavor. Two tablespoons (30 ml) is enough for the base recipe; 3 tablespoons (45 ml) makes the richness more pronounced.
Keeping the beans vegetarian or vegan is simple: use avocado oil or another mild vegetable oil. Olive oil is more noticeable, while bacon drippings take the pan somewhere smokier.
Does This Pan Need More Liquid or More Fat?
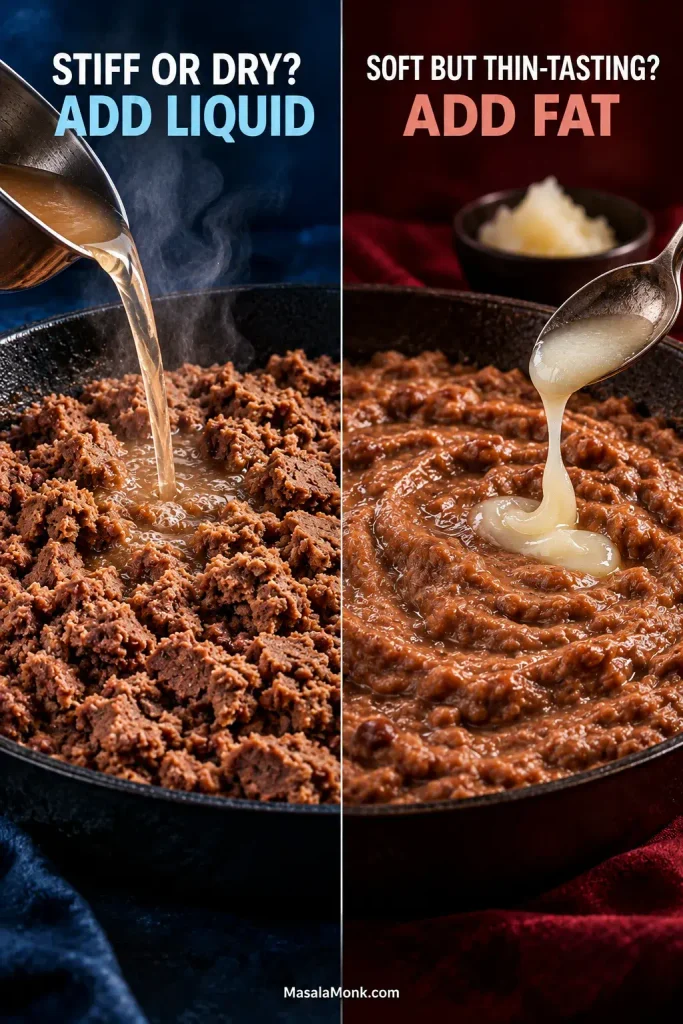
Dry-looking beans don’t automatically need more fat. Stiff or crumbly beans usually need liquid. Beans that are already soft and moist but taste thin may need more fat.
Spice, Heat and Brightness
For a Tex-Mex batch, use ½ tsp ground cumin and ¼ tsp Mexican oregano with the garlic. More cumin isn’t automatically the answer to bland beans; salt and properly softened onion matter first.
Fresh heat comes from ½–1 small jalapeño or serrano cooked with the onion. About ½–1 tsp finely chopped chipotle in adobo brings smoke instead.
Or leave the skillet mild and put the heat on the table. Roasted salsa verde brings tomatillo acidity and green-chile heat without changing the whole batch.
Well-salted beans that still taste heavy usually need brightness. Add 1–2 tsp (5–10 ml) lime juice; the next bite should feel livelier rather than overtly citrusy.
If the Canned Beans Are Salty
Drain and rinse them, then use water or unsalted broth in the skillet. Regular broth, bacon drippings, bouillon, cheese, and extra salt can pile up quickly.
For a lower-sodium batch, wait until the beans have reduced before deciding whether they need salt at all.
Why Mexican Refried Beans Vary
Those choices—bean variety, fat, aromatics, chile, and final consistency—change from one kitchen to the next. Refried beans are easiest to understand as another life for beans that are already cooked. In Mexican cooking, pot beans—frijoles de la olla—can be eaten as they are and later become frijoles refritos when they’re cooked with fat and mashed.
Canned whole pintos simply arrive with that first cooking stage already done.
Pintos are common in many northern and border traditions; black beans and numerous other varieties appear across regional Mexican cooking.
Two households can put noticeably different beans on the table and both be making something completely familiar to them. There does not have to be one universal seasoning list or one correct finished texture.
If Your Refried Beans Look Wrong
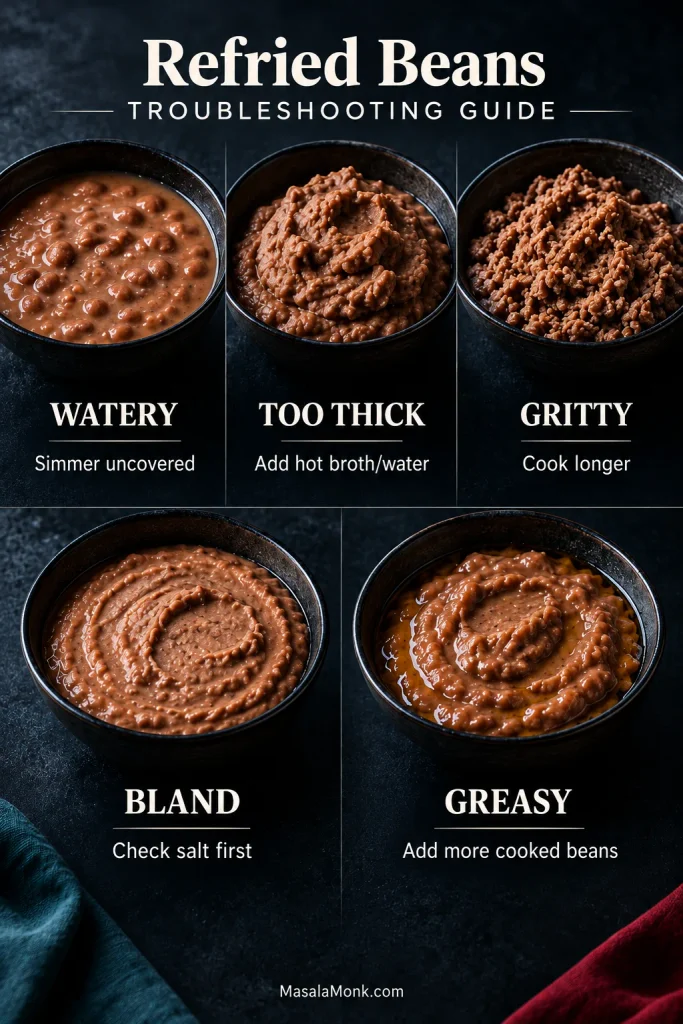
Most batches are easy to rescue. Watery? Simmer uncovered. Too thick? Add hot liquid a tablespoon at a time. Gritty? Cook longer. Bland? Check the salt first. Greasy? More cooked beans are the most useful fix.
The beans are too loose or soupy
Give them time. Simmer uncovered over gentle heat and stir regularly. Excess water usually cooks away on its own.
The beans are too thick or paste-like
Stir in hot bean broth or water 1–2 tbsp (15–30 ml) at a time. Pause after each addition; the beans need a moment to loosen.
The beans are gritty
Tiny gritty pieces usually mean some of the beans need more cooking. Give them more liquid and more time, then mash again.
The beans taste bland
Check the salt first. If that’s right, taste for richness, fully softened onion, chile heat, or brightness from lime.
The beans are too salty
The strongest fix is more unsalted cooked beans. A looser batch can also take unsalted water or broth, but boiling all of that liquid away simply concentrates the salt again. Plain rice, tortillas, avocado, or other unsalted foods can make a mildly oversalted serving easier to balance on the plate.
When Texture Isn’t the Whole Problem
The beans are soft and moist but still taste thin
This is where more fat helps. Stir in a little lard or oil, let it disappear into the hot mash, then taste again.
The beans look greasy
If the pan is genuinely greasy, broth will not fix the ratio. Add more cooked beans. A small splash of broth can help a slightly oily mash come together, but genuinely excessive fat needs more cooked beans.
They were perfect in the skillet but stiffened on the plate
They went a little too far. Stir in hot broth or water now. Next time, stop while the beans still look slightly softer than you want to eat them.
Heat and Handling Problems
The onion is still crunchy
For the next batch, dice it finely and let it soften fully before the beans go in. Properly cooked onion should disappear into the mash rather than announce itself in every bite.
The bottom of the skillet is scorching
Reduce the heat and add a splash of hot broth or water. Mashed beans expose much more surface to the skillet than whole beans do, so they scorch quickly.
The beans splatter when they hit the fat
Add the wet beans close to the surface of the skillet after lowering the heat briefly. Keep your hands and face back from the first burst of steam and fat.
Problem fixed? Back to the recipe · Storage & reheating · Back to top
Leftovers Get Thicker—Here’s How to Bring Them Back
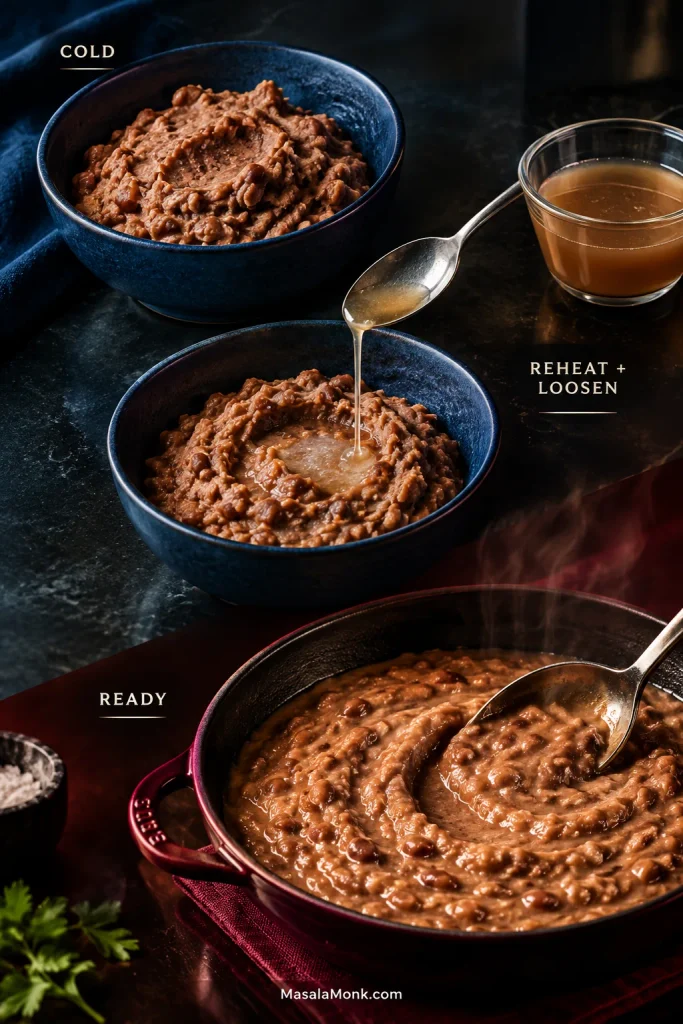
Refried beans keep about 3–4 days in the refrigerator and freeze well for about 3 months. They firm considerably when cold, so reheating usually begins with a splash of water or bean broth.
Refrigerate the beans promptly: cool them, cover, and refrigerate. That firmer next-day texture is handy inside a breakfast burrito, where the filling needs to stay where you spread it.
When freezing: portion the cooled beans into smaller containers or freezer bags rather than one large block. They’ll be easier to thaw and reheat.
To reheat: warm them over medium-low heat on the stove and add water or bean broth 1–2 tbsp (15–30 ml) at a time. In the microwave, cover loosely, heat in short bursts, stir, and add a splash between rounds as needed.
The USDA recommends reheating leftovers to 165°F (74°C). Its leftovers and food-safety guidance also covers cooling and refrigeration.
What to Serve With Refried Beans
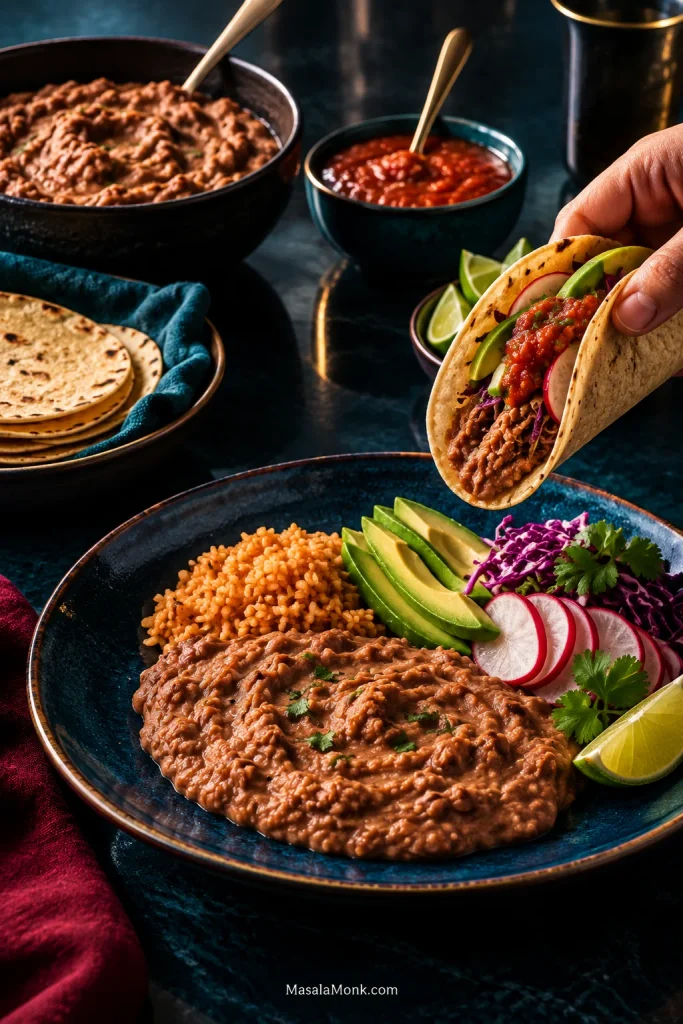
Spoon them onto a plate next to warm rice and eggs, tuck them beside enchiladas or grilled meat, or bring them to the table with tortillas and something sharp and fresh. Salsa, crisp cabbage, radish, chopped onion, cool avocado, cilantro, and lime all wake up a rich scoop of beans.
A thicker batch works just as well inside quesadillas and burritos. Spread it across warm corn tortillas, or layer it onto a tostada before adding salsa, avocado, cheese, cabbage, or whatever else dinner calls for.
And dinner can be much simpler than that: warm tortillas, a soft scoop of beans, salsa, and something cool or crisp on top.
For a party, a thick batch makes a sturdy base for an easy 7 layer dip. The beans stay underneath the toppings instead of traveling across the plate with the first scoop.
Frequently Asked Questions
1. What are the best beans for refried beans?
Pinto beans are an easy all-purpose choice because they soften well and mash readily. Black beans and many other varieties also appear in regional Mexican cooking.
2. Can you make refried beans from canned pinto beans?
Yes. Whole canned pintos are the fastest route in this refried beans recipe: cook them with onion and fat, mash, then add enough broth or water to reach the texture your meal needs.
3. Should you drain and rinse canned pinto beans?
Drain them over a bowl first. Keep the liquid unless it is very salty, metallic, or strongly canned; otherwise rinse the beans and use water or unsalted broth.
4. Do refried beans need lard?
No. Lard gives the deepest savory flavor, while neutral oil makes an excellent vegetarian or vegan version.
5. Can you freeze refried beans?
Yes. Freeze cooled beans in practical portions, then thaw and reheat them with a splash of water or bean broth.
6. Does “refried” mean the beans are fried twice?
Not necessarily. Spanish refreír can mean to fry again, but it can also mean to fry something thoroughly or very well. In frijoles refritos, the name does not require the beans to go through two separate frying stages.
Once You Know What to Look For
Once you can recognize a fully tender bean, a mash that needs another splash of broth, and a skillet that’s one minute from becoming too stiff, the measurements stop doing all the work.
Mash. Loosen gradually. Stop early. Once that rhythm makes sense, the recipe stops feeling like a formula; you can look at the pan and know what it needs.








