Posted on 4 Comments

Cucumber Salad Recipe with Vinegar, Dill, and Onion

Bowl of cucumber salad with thin cucumber slices, red onion, fresh dill, black pepper, and a light vinegar dressing.

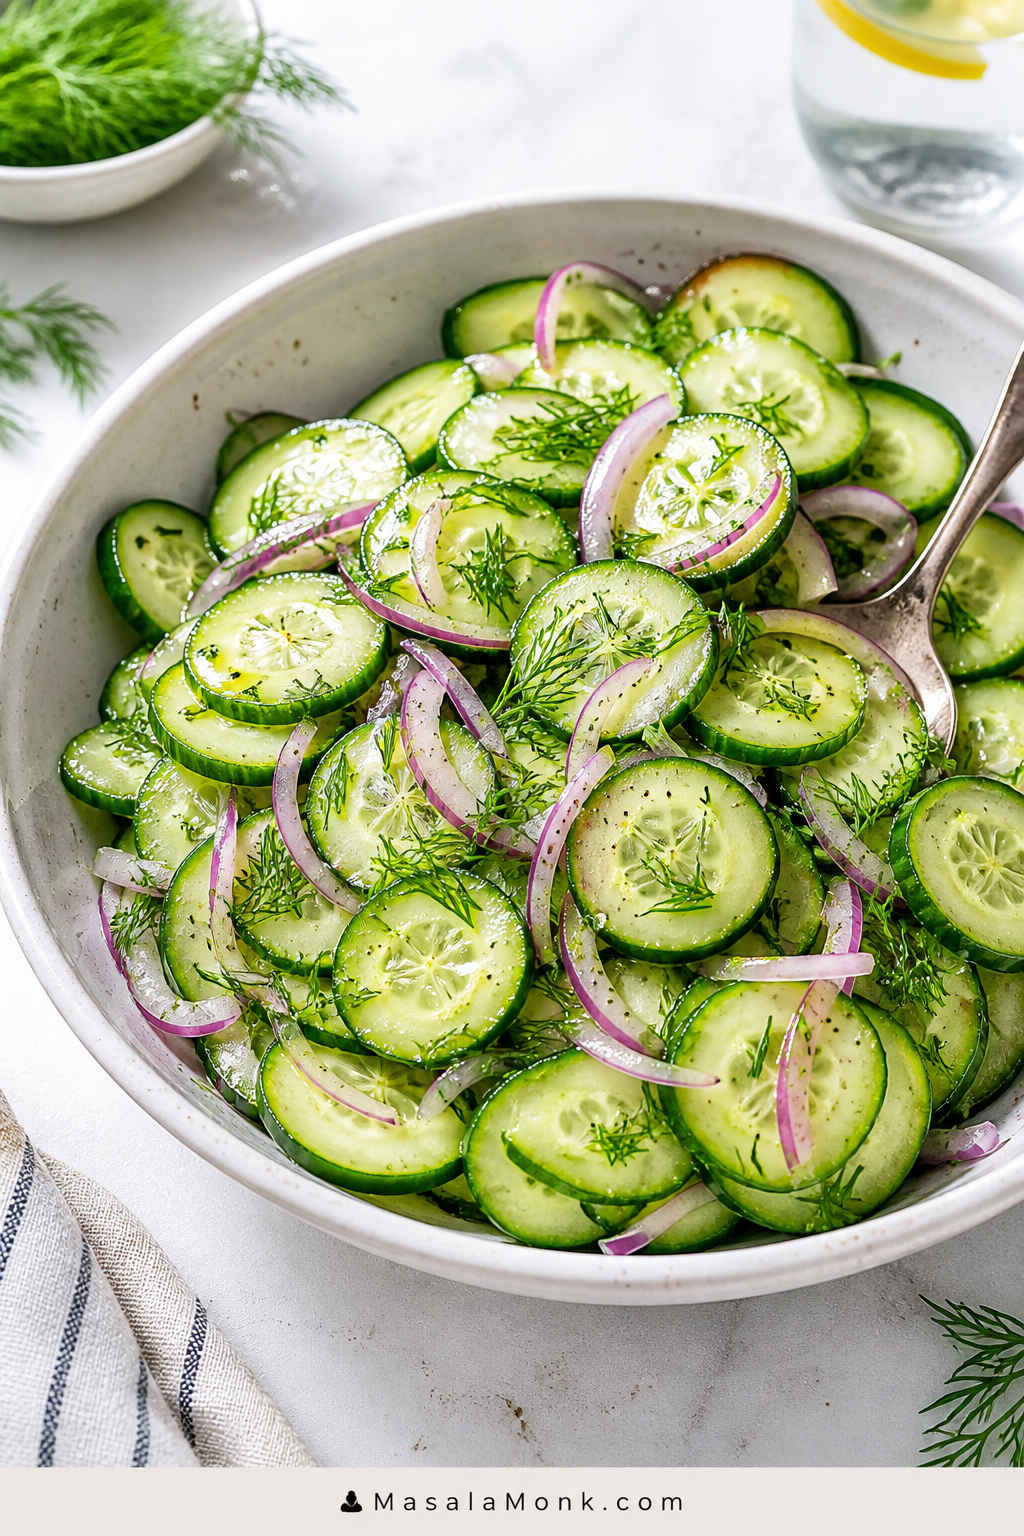
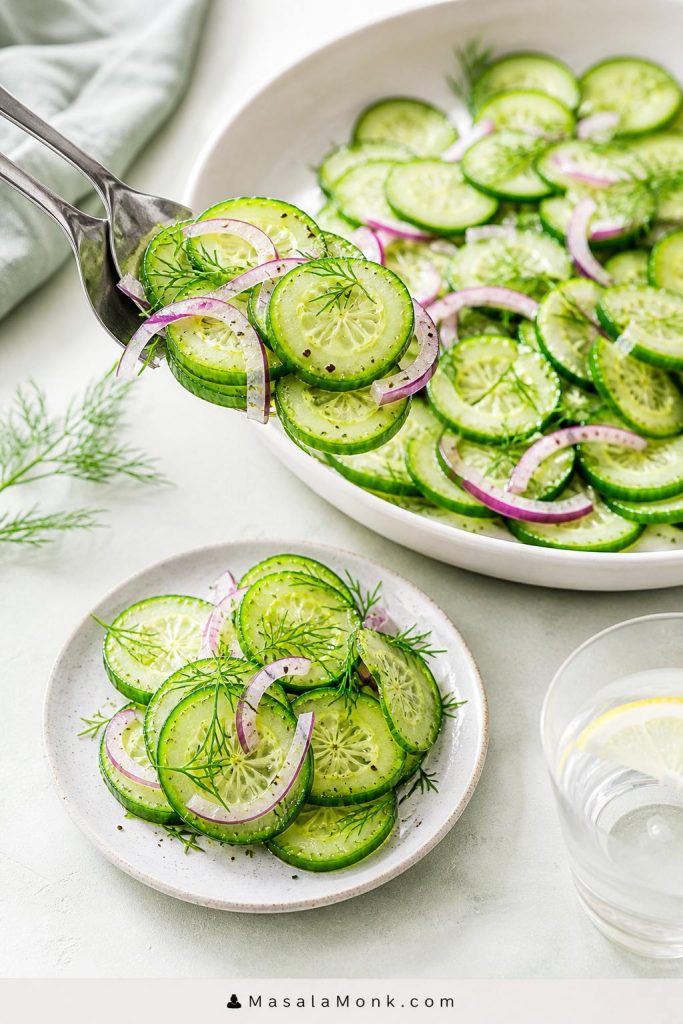
This cucumber salad recipe is cold, crisp, tangy, and exactly the kind of no-cook side dish you want when a meal needs something fresh. Thin cucumber slices, red onion, fresh dill, and a bright vinegar dressing come together quickly, without mayo, heavy cream, or cooking.

Ideally, the finished salad should taste cool and snappy, with enough vinegar to wake up the cucumbers but not so much that every bite feels sharp.

Because the method is flexible, you can make it in 10 minutes when dinner is already on the table, chill it for 15–20 minutes when the dressing needs time to settle into the cucumbers, or salt and drain the slices first for a crisper make-ahead version.

Although the simple version is refreshing on its own, the recipe gets better when you understand the small details: which cucumbers to choose, how thin to slice them, when to peel or seed them, what vinegar tastes best, and how to keep the salad from turning watery in the fridge.

Table of Contents

Use the quick sections to make the salad now, then use the deeper notes to adjust the dressing, keep the cucumbers crisp, and make it ahead without losing texture.

Quick Answer: How to Make Cucumber Salad

At a glance: Start with 2 large cucumbers, ½ red onion, ¼ cup vinegar, 1 tablespoon sugar or honey, ½ teaspoon salt, black pepper, and fresh dill. Toss and serve right away for speed, chill 15–20 minutes for better flavor, or salt and drain the cucumbers first for the crispest make-ahead version.

To make an easy cucumber salad recipe, thinly slice 2 large English cucumbers and ½ red onion. Toss them with ¼ cup vinegar, 1 tablespoon sugar or honey, ½ teaspoon salt, black pepper, and 2–3 tablespoons fresh dill. Serve the salad right away for maximum crunch, or chill it for 15–20 minutes for better flavor.

Quick guide showing how to make cucumber salad three ways: serve immediately, chill briefly, or salt and drain first.
If you need speed, toss and serve right away; for better flavor, chill briefly, and for the crispest make-ahead cucumber salad, salt and drain the slices first.

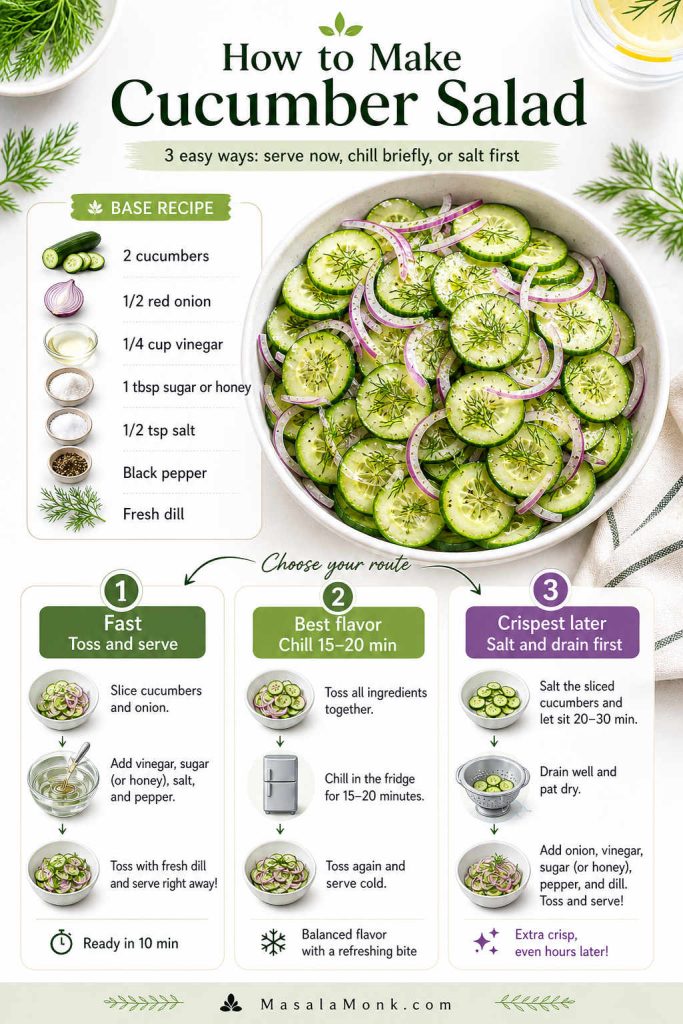
For the crispest version, especially when making the salad ahead, salt the cucumber slices first. Let them drain for 20–30 minutes, pat them dry, and then add the dressing. This removes excess water before it can thin out the vinegar dressing.

Version Best for Total time
Fast cucumber salad Last-minute side dish 10 minutes
Best-flavor cucumber salad Fresh salad with better dressing absorption 25–30 minutes
Crispest make-ahead cucumber salad Parties, picnics, meal prep, less watery texture 40–50 minutes

Why This Cucumber Salad Works

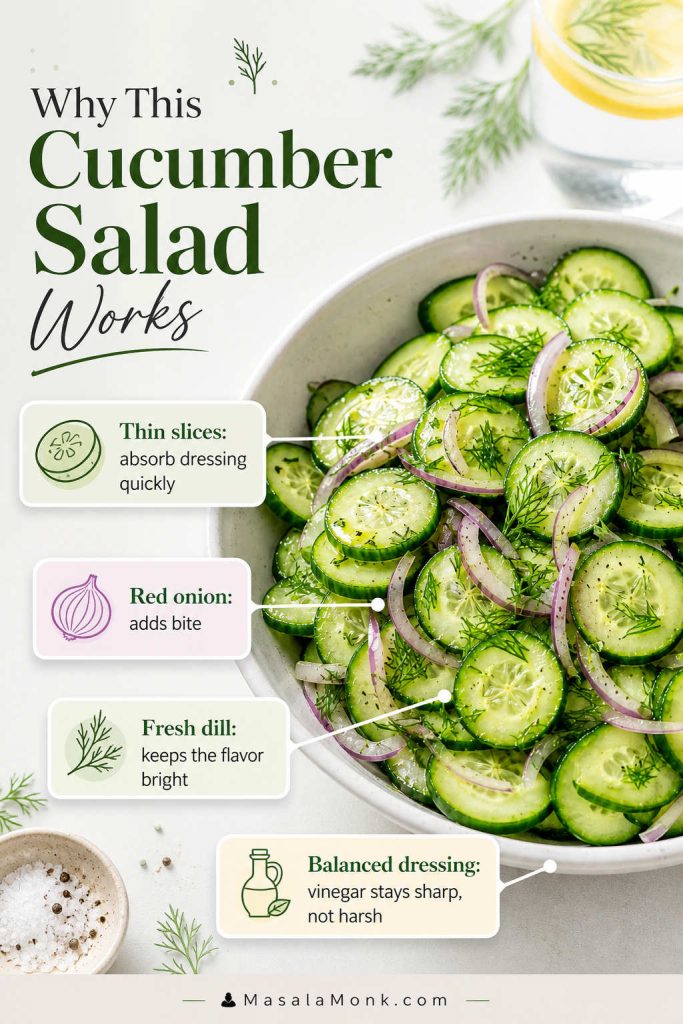
This recipe works because the flavor stays clean and balanced. Thin cucumber slices soak up the dressing quickly, while red onion adds bite, dill brings freshness, and a little sweetness softens the vinegar without making the salad taste sugary.

Explainer board showing thin cucumber slices, red onion, fresh dill, and balanced vinegar dressing as the main reasons the salad works.
Thin slices absorb the dressing quickly, while onion, dill, and a little sweetness keep the vinegar bright without making the salad harsh.

The recipe also gives you control over texture. For the fastest version, toss and serve. For better flavor, chill the salad briefly. When you need a snappier make-ahead texture, salt and drain the cucumber slices before dressing them.

That flexibility matters because cucumbers naturally release water after slicing. Instead of letting the dressing turn diluted, you can choose the method that fits your timing.

Cucumber Salad Ingredients

Cucumbers, onion, vinegar, dill, salt, pepper, and a small amount of sweetener do most of the work here. Still, each ingredient affects the final bite, so it helps to choose carefully.
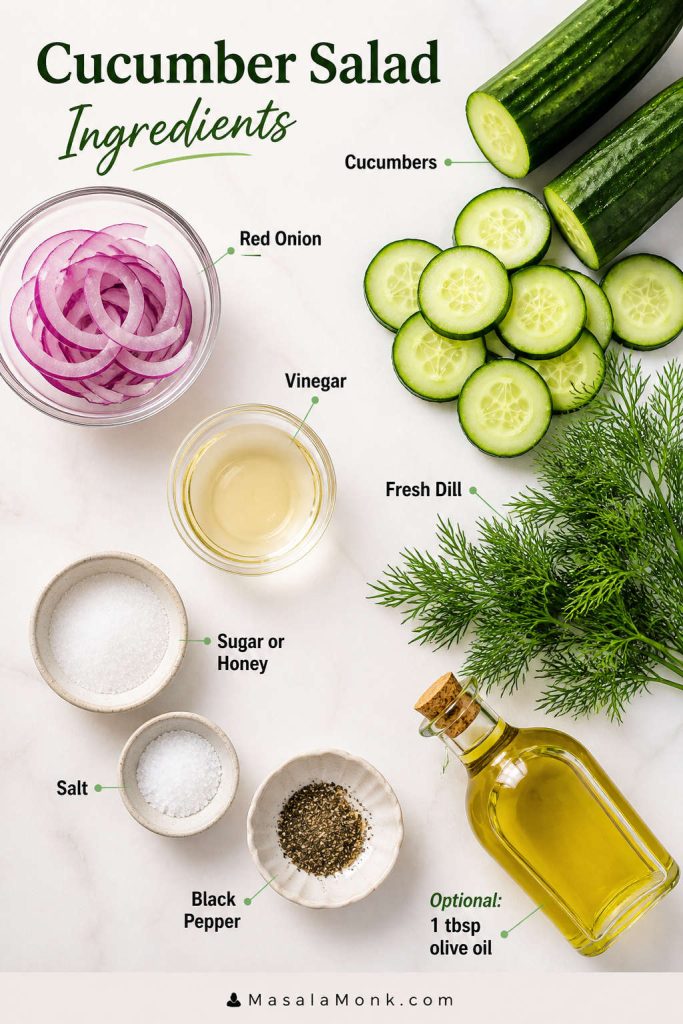
Ingredients for cucumber salad arranged on a light surface: cucumbers, red onion, vinegar, dill, sugar or honey, salt, pepper, and optional olive oil.
Since the ingredient list is short, each choice matters: the cucumber brings crunch, the vinegar brings tang, and the dill keeps everything fresh.

Cucumbers

English cucumbers and Persian cucumbers are the easiest choices because they have thin skins, fewer seeds, and a clean crunch. Regular garden cucumbers also work, but they may need peeling, seeding, and salting when the skin is thick or the center is watery.

For the coldest, crunchiest salad, use chilled cucumbers straight from the fridge. Room-temperature cucumbers still work, though the finished salad will taste fresher after a short chill.

Onion

Red onion gives cucumber salad color and bite. Sweet onion or Vidalia onion tastes softer and more old-fashioned. White onion works especially well in cucumbers and onions in vinegar, while scallions are useful when you want a milder onion flavor.

If raw onion tastes too strong, soak the slices in cold water for 10 minutes, then drain them well. Alternatively, let the onion sit in the vinegar dressing for a few minutes before adding the cucumbers.

Vinegar

White wine vinegar is the best balanced first choice. Rice vinegar is milder and lightly sweet, while apple cider vinegar tastes fruitier and distilled white vinegar gives a sharper old-fashioned flavor. If you use distilled white vinegar, dilute it with a little water so the dressing does not overpower the cucumbers.

Sweetener

A small amount of sugar or honey balances the vinegar. In most batches, one tablespoon is enough. For no-sugar cucumber salad, skip the sweetener or use rice vinegar, which tastes gentler on its own.

Dill and Herbs

Fresh dill is the classic herb for cucumber dill salad. It tastes cool, grassy, and bright. Chives, parsley, or a little basil can also work, but dill gives this version its most familiar flavor.

If you only have dried dill, start with 1 teaspoon. Although fresh dill tastes brighter, dried dill is useful when you need a pantry-friendly version.

Salt and Pepper

Salt seasons the salad and helps manage water. For the fast version, use ½ teaspoon salt in the dressing. For the crispest version, salt the cucumbers separately, drain them, and season lightly at the end.

Optional Olive Oil

This cucumber vinegar salad is best without oil when you want the lightest, sharpest, most refreshing version. However, 1 tablespoon olive oil gives the dressing a rounder vinaigrette feel for a softer bite.

Cucumber Salad Dressing

The dressing should coat the cucumber slices lightly, so the salad tastes tangy, lightly sweet, and fresh rather than wet or heavy.

If you are not sure which vinegar to choose, start with white wine vinegar for balance, rice vinegar for a milder salad, or apple cider vinegar for a fruitier bite. The full vinegar comparison below gives you more options.

Simple Cucumber Salad Dressing Ratio

For every 2 large English cucumbers or 5–6 Persian cucumbers, use this simple dressing ratio:

Dressing ratio guide for cucumber salad with cucumbers, vinegar, sugar or honey, salt, pepper, dill, and optional olive oil.
Start with this cucumber salad dressing ratio, then fine-tune it after tossing because the cucumbers naturally soften the vinegar and loosen the seasoning balance.
Ingredient Amount Metric
Vinegar ¼ cup 60 ml
Sugar or honey 1 tablespoon 12–13 g sugar or about 21 g honey
Fine sea salt ½ teaspoon if not pre-salting about 3 g
Black pepper ¼ teaspoon, or to taste about 0.5 g
Fresh dill 2–3 tablespoons about 3–6 g, loosely packed
Optional olive oil 1 tablespoon 15 ml

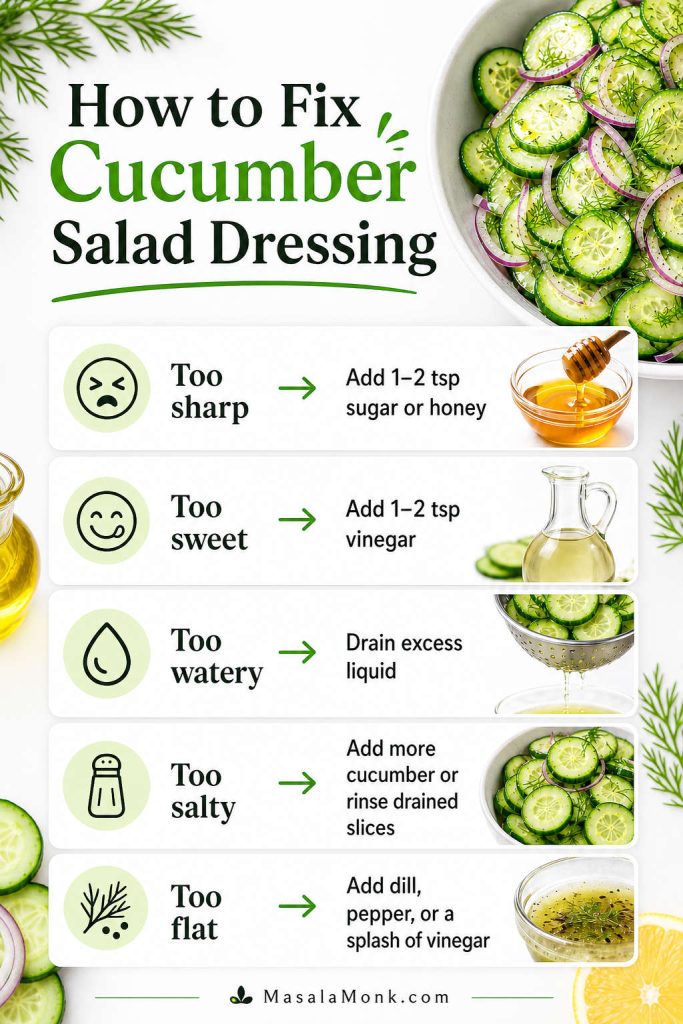
How to Adjust the Dressing

Problem Fix
Sharp dressing Balance it with 1–2 teaspoons sugar or honey.
Sweet dressing Brighten it with 1–2 teaspoons vinegar.
Watery salad First, drain excess liquid; then serve with tongs or a slotted spoon.
Salty salad Add more sliced cucumber. If needed, briefly rinse drained cucumbers and pat them dry.
Flat flavor Finish with more dill, black pepper, a splash of vinegar, or a squeeze of lemon.
Troubleshooting board showing fixes for cucumber salad dressing that is too sharp, too sweet, too watery, too salty, or too flat.
Instead of starting over, fix the dressing in small steps: add sweetness for sharpness, vinegar for sweetness, or fresh dill and pepper when the salad tastes flat.

Equipment You Need

You do not need special equipment for this cucumber salad recipe, but the right tools make the texture easier to control, especially when you want very even slices or plan to salt and drain the cucumbers first.

Basic tools for making cucumber salad, including a knife, mandoline, cutting board, mixing bowl, dressing jar, colander, and tongs.
You do not need special equipment, although a mandoline, colander, and tongs make even slicing, draining, and serving much easier.
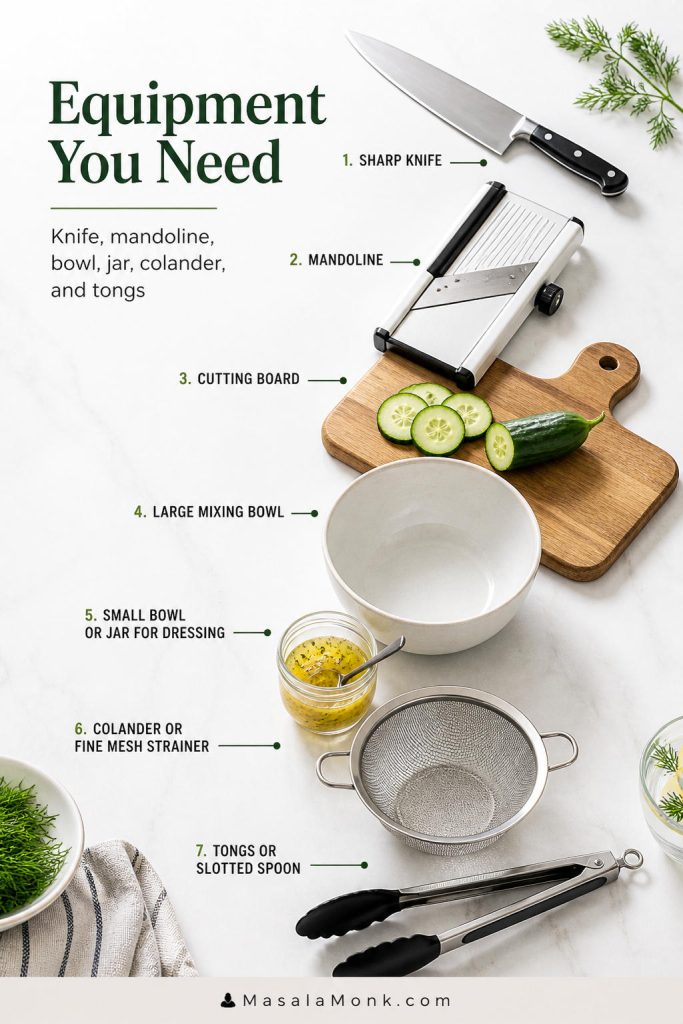
  • Sharp knife or mandoline
  • Cutting board
  • Large mixing bowl
  • Small bowl or jar for the dressing
  • Colander or fine mesh strainer if salting the cucumbers
  • Tongs or a slotted spoon for serving

Use this base recipe when you want cucumber salad for a quick dinner, a picnic table, or a make-ahead meal. Keep the formula as your starting point, then adjust the vinegar, herbs, onion, and salting method as needed.

Saveable cucumber salad recipe card with prep time, chill time, servings, ingredients, method steps, and a salt-and-drain note.
Use this recipe card when you want the full cucumber salad recipe in one glance, especially if you need the ingredient amounts, short method, and make-ahead note together.

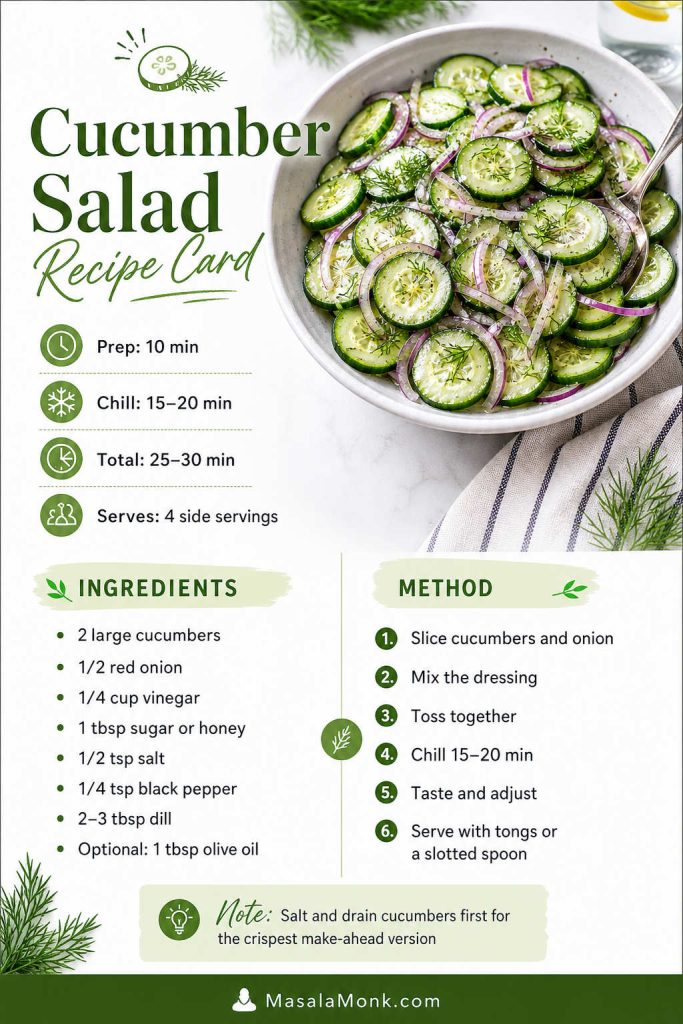
Cucumber Salad Recipe Card

A crisp, no-cook cucumber salad with thin cucumbers, red onion, fresh dill, and a tangy vinegar dressing. Serve it right away, chill it briefly for better flavor, or salt the cucumbers first for the crispest make-ahead version.

Prep Time 10 minutes
Cook Time 0 minutes
Chill Time 15–20 minutes
Total Time 25–30 minutes
Servings 4 side servings or 6 small servings

Ingredients

  • 2 large English cucumbers, about 600–680 g / 21–24 oz, thinly sliced, or 5–6 Persian cucumbers, about 600 g / 21 oz
  • ½ small to medium red onion, about 50–75 g / 1.8–2.6 oz, very thinly sliced
  • ¼ cup / 60 ml white wine vinegar, rice vinegar, or apple cider vinegar
  • 1 tablespoon sugar, or 1 tablespoon honey
  • ½ teaspoon fine sea salt, plus more to taste
  • ¼ teaspoon black pepper, or to taste
  • 2–3 tablespoons chopped fresh dill, loosely packed
  • Optional: 1 tablespoon / 15 ml olive oil for a softer vinaigrette
  • Optional: 1–2 tablespoons chopped chives or parsley

Salt note: Use ½ teaspoon salt for the regular version. If you salt and drain the cucumbers first, use 1 teaspoon salt for draining, then add extra salt to the dressing only after tasting.

Instructions: Best-Flavor Version

  1. Slice the cucumbers about ⅛ inch / 3 mm thick. Slice the red onion very thinly.
  2. In a small bowl or jar, mix the vinegar, sugar or honey, salt, black pepper, and dill. Add olive oil only if using.
  3. Add the cucumbers and onion to a large bowl. Pour the dressing over the top.
  4. Toss gently until the cucumber slices are evenly coated.
  5. Chill for 15–20 minutes so the cucumbers absorb the dressing.
  6. Toss once more, then taste and adjust with more vinegar, salt, pepper, or dill if needed.
  7. Serve with tongs or a slotted spoon, leaving excess liquid behind in the bowl.

Fast 10-Minute Version

Slice the cucumbers and onion, mix the dressing, toss everything together, and serve immediately. The salad will taste lighter and crunchier, but less marinated.

Crispest Make-Ahead Version

  1. Toss the sliced cucumbers with 1 teaspoon fine sea salt.
  2. Place them in a colander or fine mesh strainer for 20–30 minutes.
  3. Pat them dry with a clean towel or paper towels.
  4. Mix the dressing without adding the extra ½ teaspoon salt at first.
  5. Toss the drained cucumbers with onion, dressing, dill, and pepper.
  6. Taste and add salt only if needed.
  7. Do not add the full dressing salt automatically after pre-salting; the cucumbers will already carry some salt.

Notes

  • This amount makes about 4 generous side servings or 6 smaller picnic-style servings.
  • Use English or Persian cucumbers for the easiest texture.
  • Use chilled cucumbers for the coldest, crunchiest salad.
  • Use white wine vinegar for the cleanest balanced flavor.
  • Use rice vinegar for a milder, slightly sweeter salad.
  • Use distilled white vinegar only if you like a sharper old-fashioned style; dilute it with water if needed.
  • For no-sugar cucumber salad, skip the sweetener or use rice vinegar.
  • For low-calorie cucumber salad, skip the optional oil.
  • Best eaten the same day, but leftovers keep 2–3 days in the fridge.

How to Make Cucumber Salad Step by Step

This recipe gives cucumber salad the best balance of speed, flavor, and texture because a short rest seasons the slices without turning them limp. You get a brighter salad without needing a long marinade.

Step-by-step board showing seven steps for cucumber salad: slice cucumbers, slice onion, mix dressing, toss, chill, taste, and serve.
This step overview helps you see the whole cucumber salad recipe at once, so the timing, chilling, and final serving steps make sense before you begin.

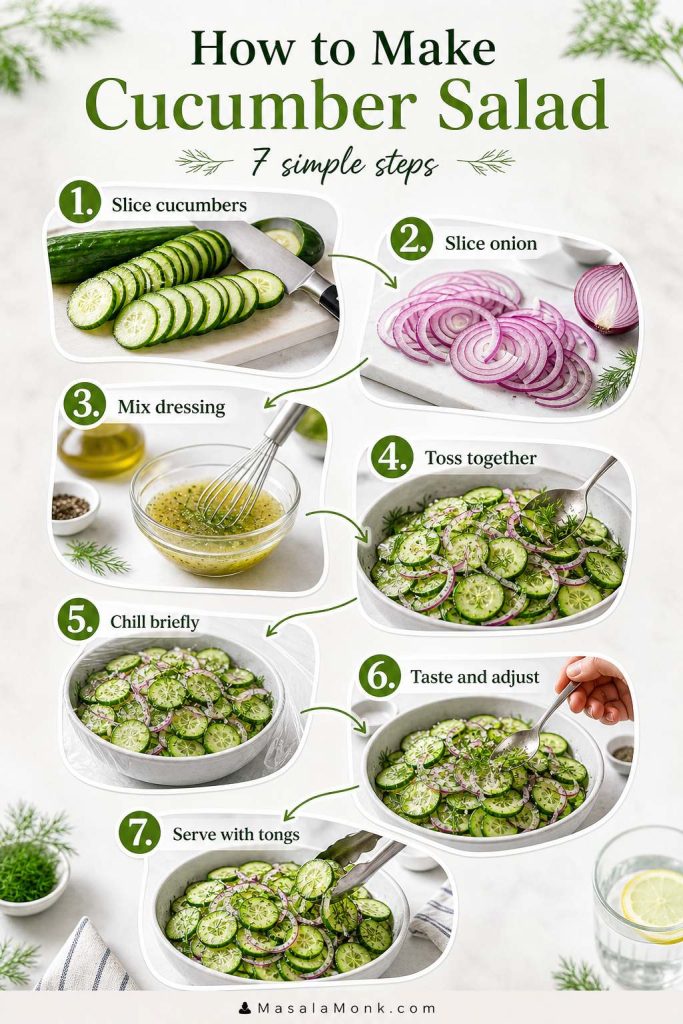
Step 1: Slice the Cucumbers

Wash and dry the cucumbers, then slice them about ⅛ inch / 3 mm thick. A mandoline gives the most even slices, although a sharp knife works well too. If you are using large garden cucumbers, peel them first if the skin is thick, then cut them lengthwise and scrape out the seeds if the center looks watery.

Thin cucumber rounds being sliced evenly on a clean surface for cucumber salad.
Even cucumber slices season more consistently; as a result, every bite has the same crunch, tang, and freshness.

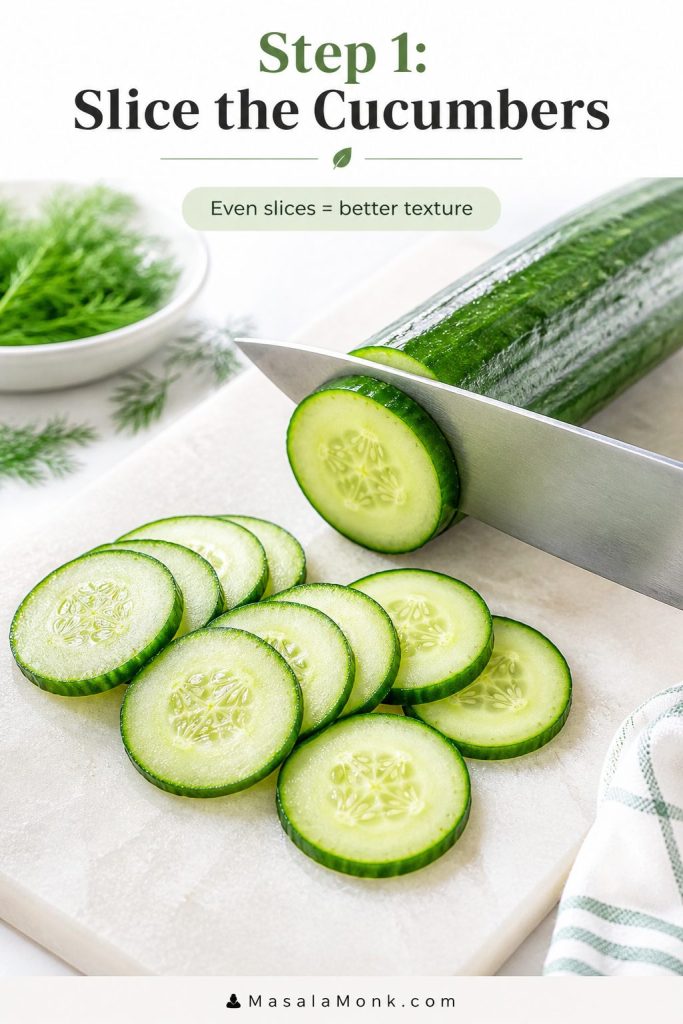
Even slices matter because they help the salad marinate evenly. Very thin slices absorb flavor faster, while slightly thicker slices stay firmer.

Step 2: Slice the Onion Thinly

Thinly slice the red onion so it blends into the salad rather than overpowering it. If raw onion tastes too strong to you, soak the slices in cold water for 10 minutes, then drain and pat dry before adding them.

Thinly sliced red onion for cucumber salad, with cucumber and dill nearby.
Thin onion slices blend into the salad better, whereas thick pieces can taste sharp and dominate the cucumbers.

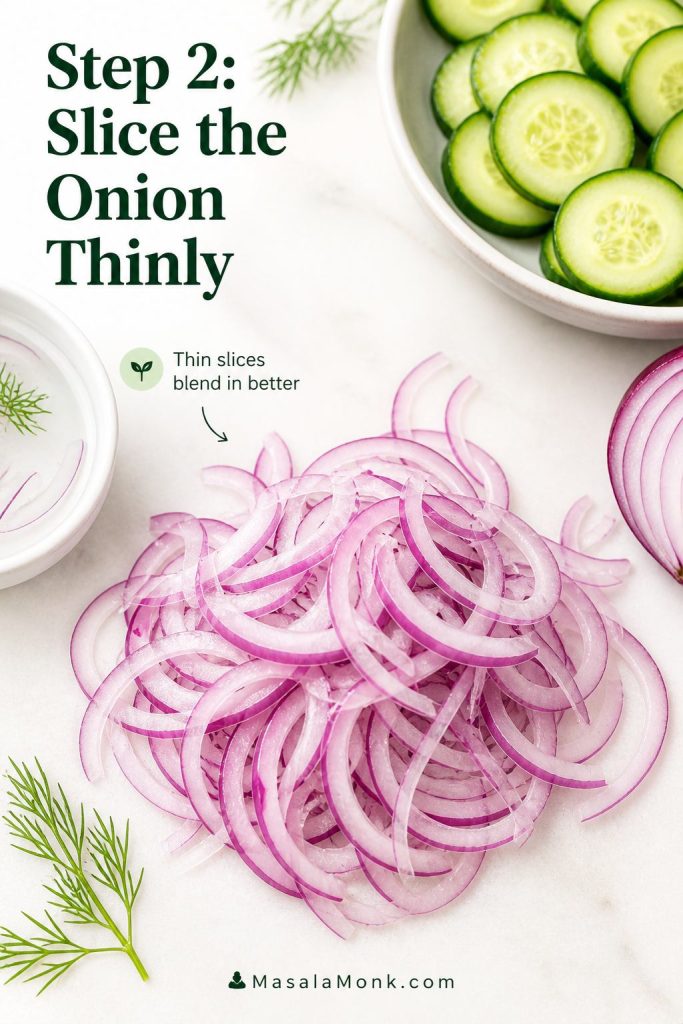
That way, the onion keeps its crunch while losing some of its harsh bite.

Step 3: Mix the Dressing

In a small bowl or jar, combine the vinegar, sugar or honey, salt, black pepper, and fresh dill. Stir or shake until the sweetener is dissolved. If you prefer a rounder dressing, add the optional olive oil here.

Light vinegar dressing being mixed with dill, pepper, salt, and sweetener for cucumber salad.
Taste the dressing before tossing because it should seem slightly sharper at first; the cucumbers will soften it as they sit.

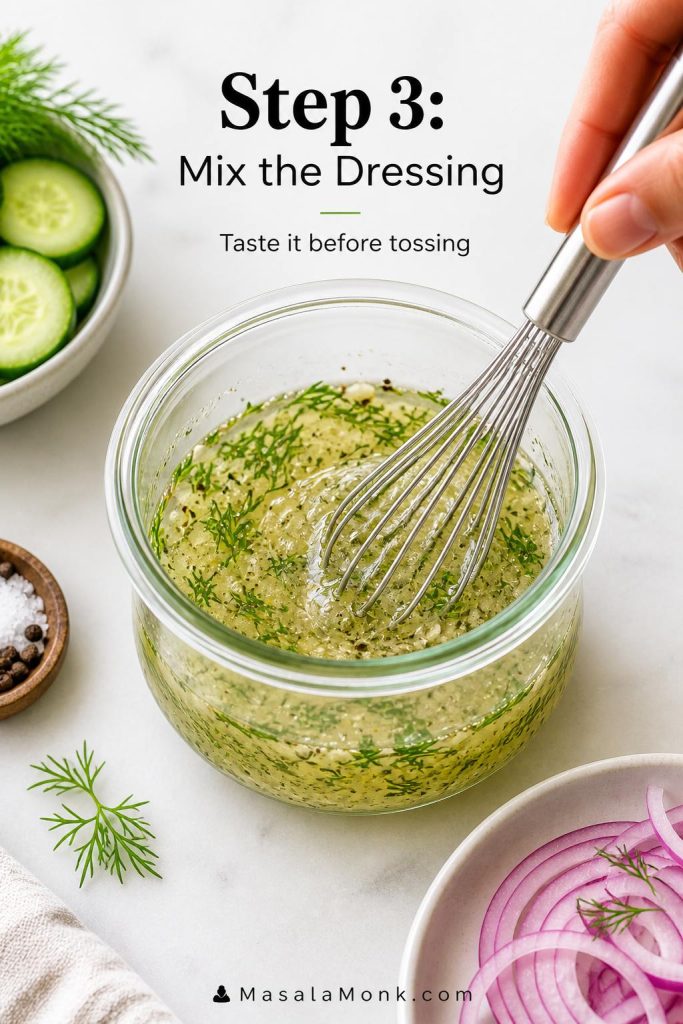
Taste the dressing before adding it to the vegetables. Ideally, it should taste slightly sharper and saltier than you want the finished salad to taste, because the cucumbers will dilute it a little as they rest.

Step 4: Toss the Cucumbers and Onion with the Dressing

Add the sliced cucumbers and onion to a large bowl, pour the dressing over the top, and toss gently until everything is evenly coated. Use your hands, salad tongs, or two large spoons so the slices stay intact.

Cucumber slices, red onion, dill, and vinegar dressing being gently tossed in a bowl.
Toss gently so the dressing coats the slices without bruising them or turning the salad watery too quickly.

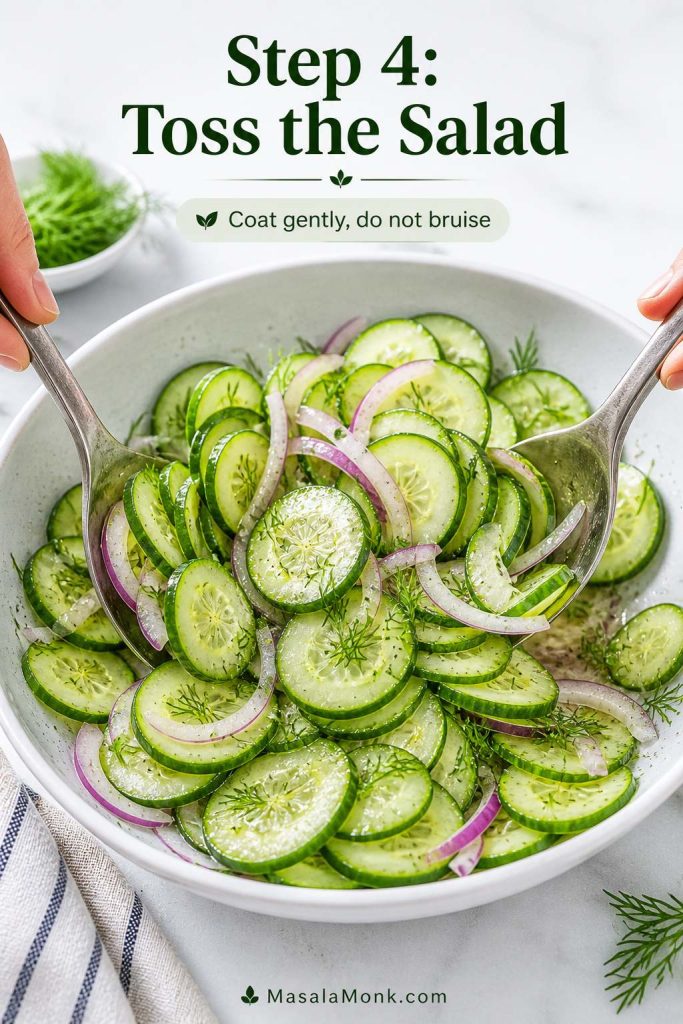
At this point, the salad is already good enough to serve when you need a very fast version.

Step 5: Chill Briefly for Better Flavor

For the best everyday version, chill the salad for 15–20 minutes. That short rest helps the cucumber slices absorb the dressing and lets the onion mellow slightly.

Bowl of cucumber salad chilling briefly with a 15 to 20 minute timing cue.
A short 15–20 minute chill lets the vinegar dressing settle in, yet the cucumber salad still keeps its fresh crunch.

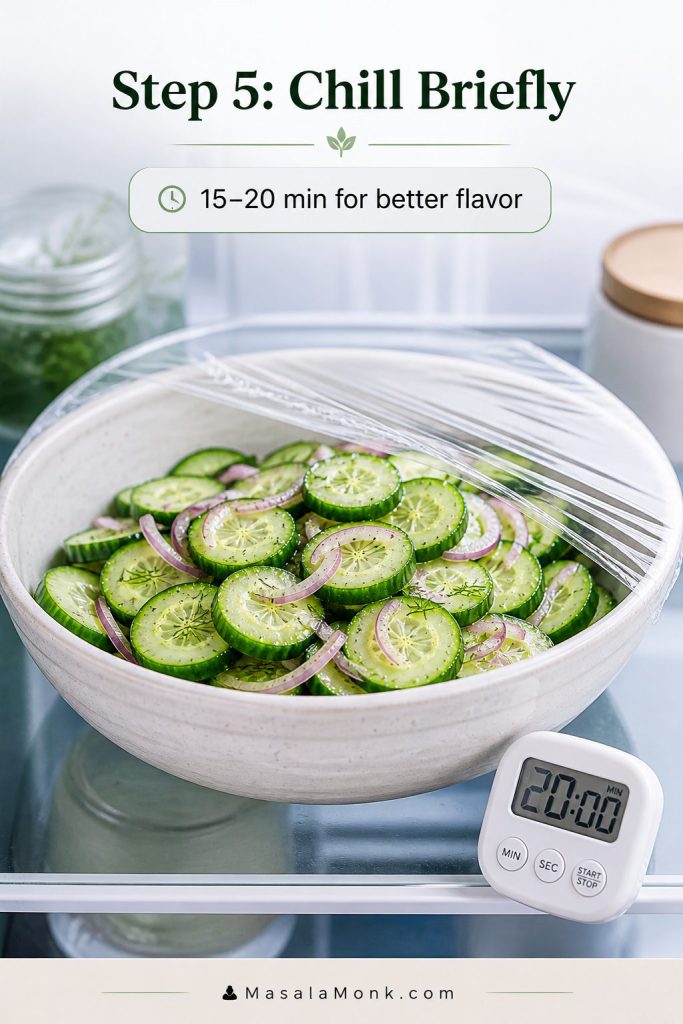
If you are in a rush, you can skip this and serve the salad right away. The texture will be a little crisper, while the flavor will be a little lighter.

Step 6: Taste and Adjust Before Serving

After the salad has rested, toss it once more and taste it again. Add a splash more vinegar if it needs brightness, a small pinch of salt if it tastes flat, or more dill if you want a fresher herbal note.

Cucumber salad being tasted and adjusted with extra vinegar, dill, pepper, and salt nearby.
Once the salad rests, taste it again because the cucumbers release water and the balance may need a small final adjustment.

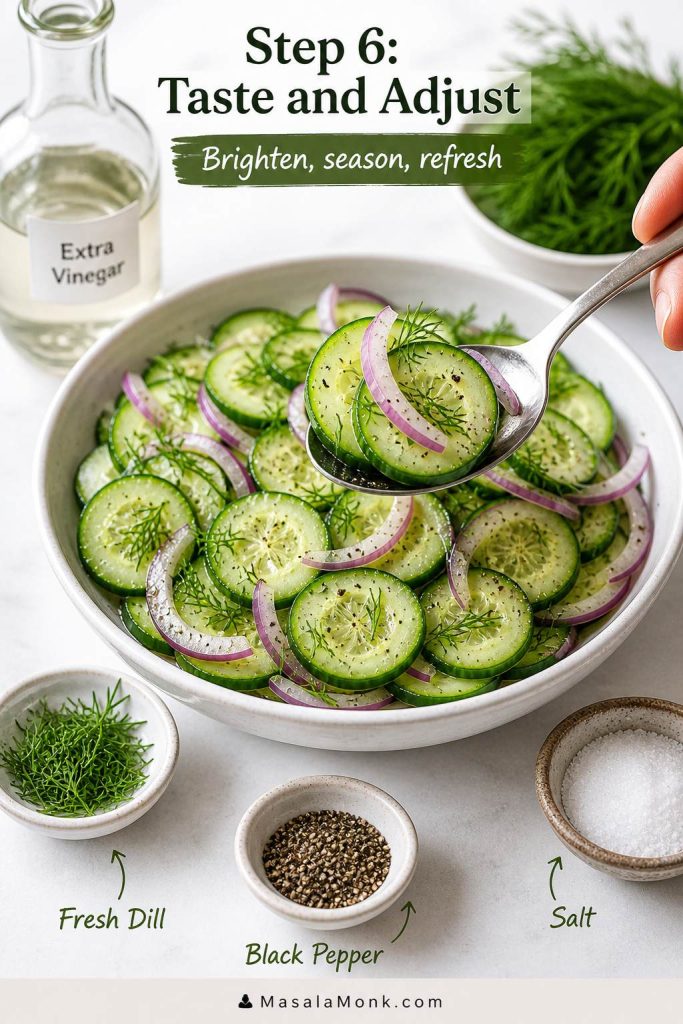
This second taste matters because the cucumber slices release water as they sit, which can change the balance of the dressing before serving.

Step 7: Serve with a Slotted Spoon or Tongs

Lift the salad out of the bowl with tongs or a slotted spoon instead of pouring everything out at once. That way, you leave behind excess liquid and the finished serving looks cleaner and tastes brighter.

Cucumber salad being lifted from a bowl with tongs or a slotted serving utensil.
Use tongs or a slotted spoon when serving so the salad tastes fresh on the plate instead of sitting in extra liquid.

Serve cold, ideally on the same day, for the best crunch.

Quick tip: If you are making this salad for dinner right now, the short-chill method is enough. If you are making it for a party or later in the day, salt and drain the cucumbers first.

Best Cucumbers for Cucumber Salad

The best cucumbers for cucumber salad are English cucumbers and Persian cucumbers. They are crisp, thin-skinned, and less seedy, so they can usually be sliced without peeling or seeding.

Garden cucumbers and regular slicing cucumbers can still make a good salad. However, because they are often thicker-skinned and more watery, they may need a little extra prep before they go into the bowl.
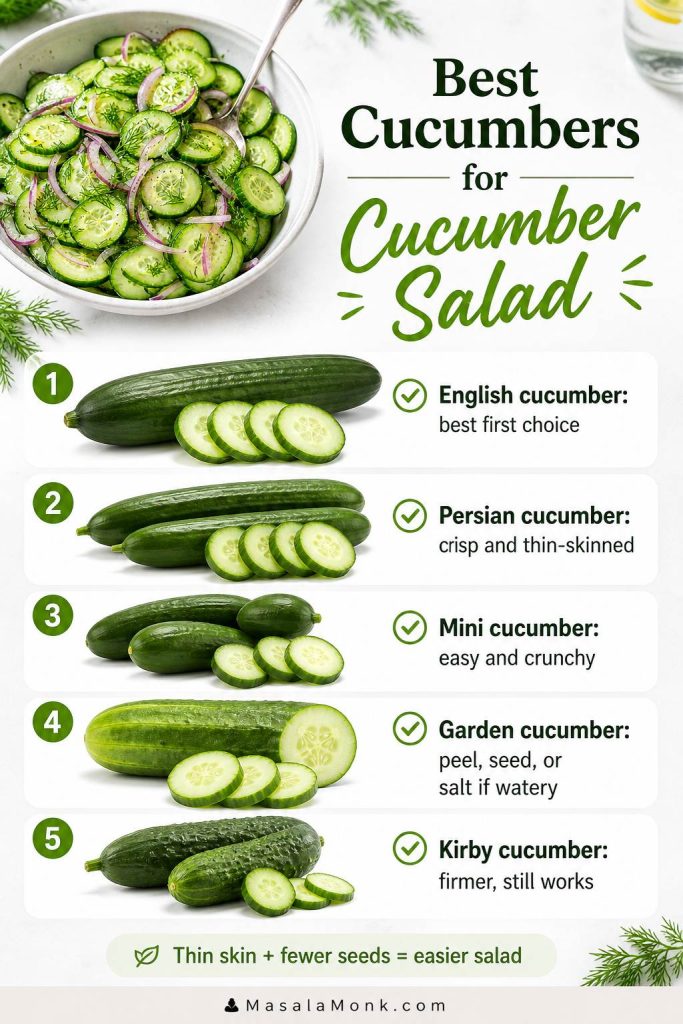
Guide comparing English, Persian, mini, garden, and Kirby cucumbers for cucumber salad.
English and Persian cucumbers are the easiest for cucumber salad, although garden cucumbers still work when you peel, seed, or salt them to control excess water.
Cucumber type Use it? Peel? Seed? Salt/drain?
English cucumber Best first choice Usually no No Optional
Persian cucumber Best crisp choice No No Optional
Mini cucumber Good choice Usually no No Optional
Garden cucumber Good if handled well If thick or waxy If seedy or watery Yes, for best texture
Regular slicing cucumber Works Often yes Often yes Yes, especially for make-ahead
Kirby or pickling cucumber Works, but firmer Usually no No Optional

Should You Peel or Seed Cucumbers?

You do not need to peel English or Persian cucumbers unless the skin tastes bitter. Their skins are usually tender enough for salad.

Regular garden cucumbers are different. First, remove the peel if it feels thick, waxy, or tough. Next, if the center looks watery or full of large seeds, cut the cucumber lengthwise and scrape out the seeds with a small spoon. Then, slice the cucumber into half-moons.

Decision guide showing when to peel or seed English, Persian, garden, or regular cucumbers for salad.
Usually, thin-skinned cucumbers need little prep; however, thick-skinned or watery garden cucumbers may need peeling or seeding.

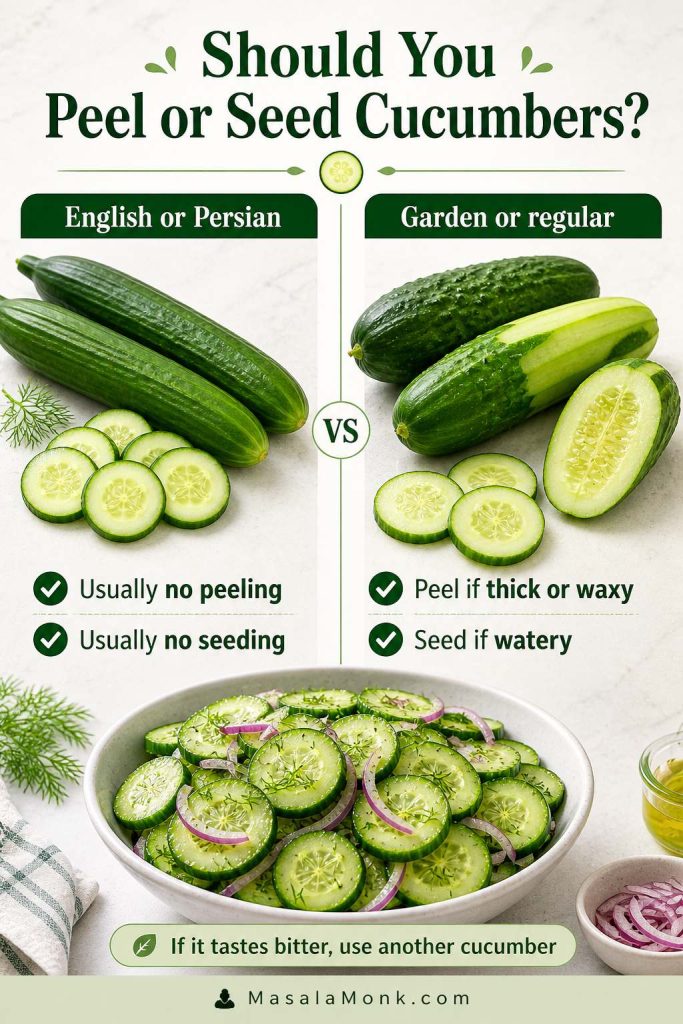
If a cucumber tastes very bitter, peeling can help slightly, but it may be better to use another cucumber. A harsh cucumber can overpower the clean vinegar dressing.

How Thin Should You Slice Cucumbers?

Slice thickness changes the whole salad. Very thin slices taste more marinated. Slightly thicker slices stay crunchier. For the best all-purpose cucumber salad, aim for about ⅛ inch / 3 mm.
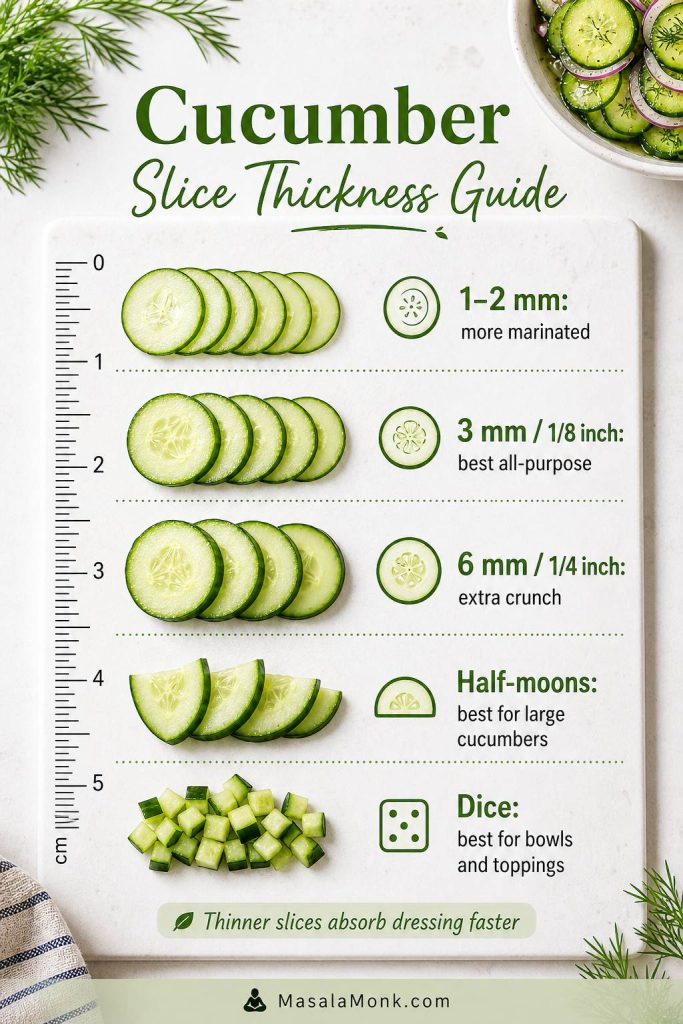
Measurement guide showing cucumber slices at 1 to 2 millimeters, 3 millimeters, 6 millimeters, half-moons, and dice.
Slice thickness changes the whole cucumber salad: thinner slices taste more marinated, while thicker slices stay crunchier.
Slice style Approximate thickness Best for
Paper-thin 1–2 mm Quick marinated cucumber salad
Thin slices ⅛ inch / 3 mm Best all-purpose cucumber salad
Crunchy slices ¼ inch / 6 mm Immediate serving and extra crunch
Half-moons ⅛–¼ inch / 3–6 mm Large garden cucumbers
Cubes Small dice Lunch bowls and less traditional versions

Mandoline note: A mandoline gives even slices, but always use the guard. Cucumbers become slippery once they start releasing moisture.

Should You Salt Cucumbers First?

You do not always need to salt cucumbers before making cucumber salad. For example, if you are serving the salad right away or chilling it for only 15–20 minutes, you can usually skip this step, especially with English or Persian cucumbers.

However, salting is worth it when you are making cucumber salad ahead, using watery garden cucumbers, or trying to keep the dressing from becoming diluted. Salt pulls excess water from the cucumber slices before they go into the salad, so the finished bowl tastes brighter instead of watered down. For a deeper look at the technique, see this guide on how to drain cucumbers.

Salt-or-skip guide showing when to salt cucumbers first and when salting is optional.
Salting first matters most for make-ahead cucumber salad or watery cucumbers, whereas a quick same-day version often does fine without it.

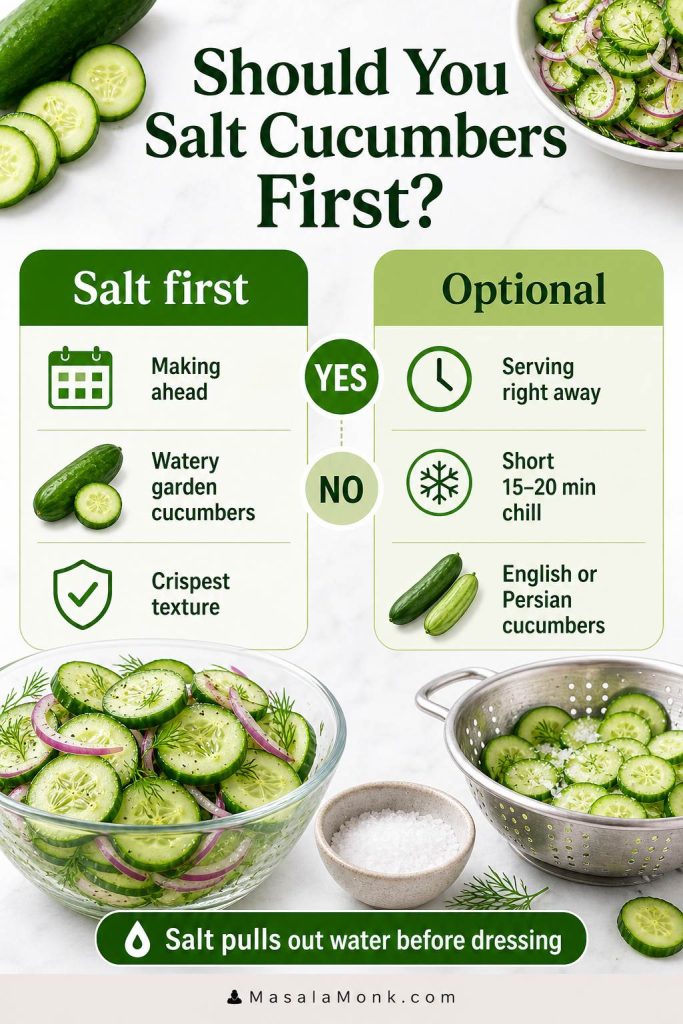
How to Salt Cucumbers for Salad

  1. Slice the cucumbers.
  2. Toss them with 1 teaspoon fine sea salt.
  3. Place them in a colander or fine mesh strainer.
  4. Let them drain for 20–30 minutes.
  5. Pat them dry with a clean towel or paper towels.
  6. Toss with dressing, then taste before adding more salt.
Process board showing cucumber slices being salted, drained for 20 to 30 minutes, patted dry, and dressed.
For a crisper make-ahead cucumber salad, salt the slices, drain them for 20–30 minutes, and pat them dry before dressing so the bowl stays bright instead of diluted.

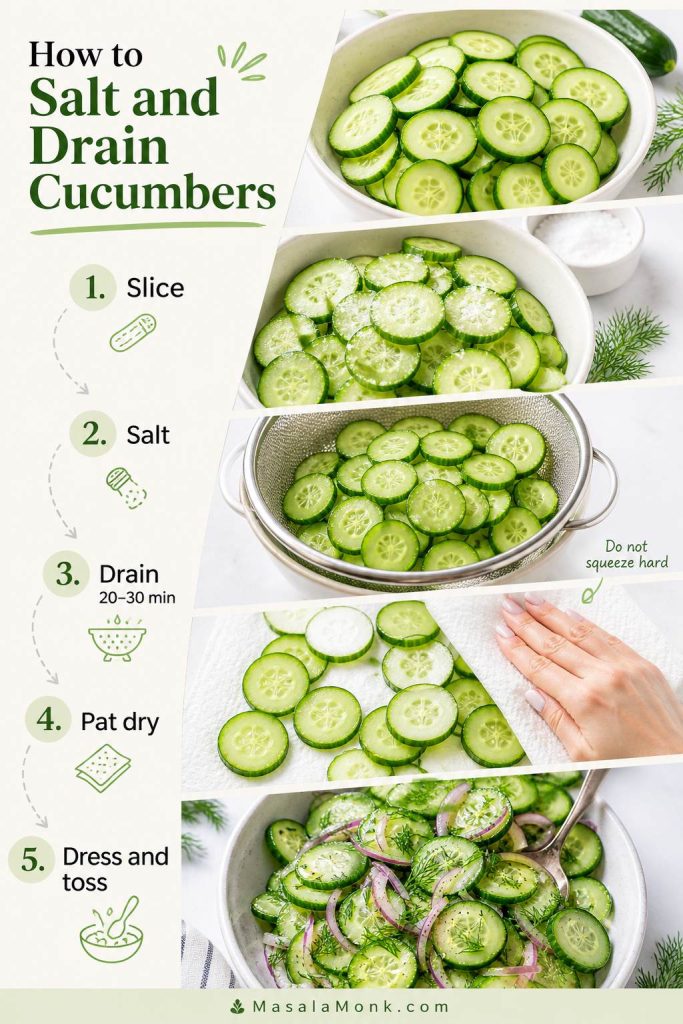
After salting, do not squeeze the cucumber slices aggressively. Pat them dry instead, since pressing too hard can bruise the slices and make the texture less pleasant.

Situation Salt first?
Serving immediately Optional
Chilling 15–20 minutes Optional
Making ahead Yes
Using garden cucumbers Yes
Using English or Persian cucumbers Optional
Wanting the crispest texture Yes

How to Keep Cucumber Salad from Getting Watery or Soggy

Cucumber salad gets soggy when the cucumber slices release too much water into the dressing. Fortunately, the fix is simple: manage the water before serving, especially if the salad needs to sit.
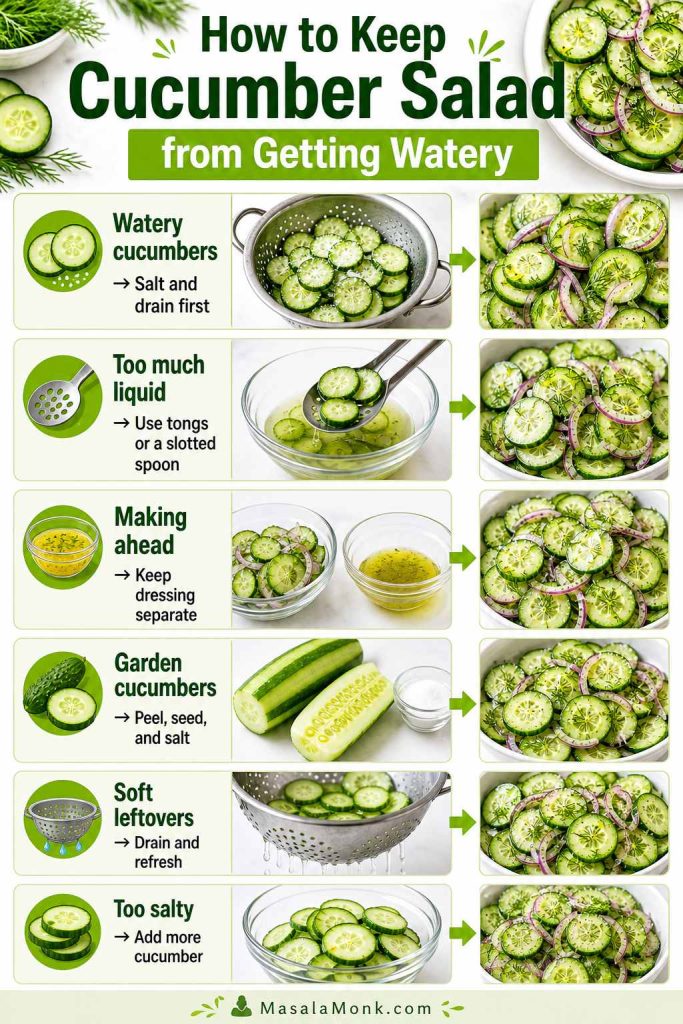
Troubleshooting board showing ways to keep cucumber salad from getting watery, including salting, draining, serving with tongs, and keeping dressing separate.
Watery cucumber salad is usually a timing or cucumber-choice issue, so draining well, serving with tongs, and keeping the dressing separate can all help preserve texture.
Problem Best fix
Watery cucumbers Salt and drain the sliced cucumbers before dressing.
Too much liquid in the bowl Serve with tongs or a slotted spoon, leaving liquid behind.
Making cucumber salad ahead Keep the dressing separate or salt/drain the cucumbers first.
Using garden cucumbers Peel if thick-skinned, seed if watery, and salt before dressing.
Leftovers softened overnight Drain excess liquid and refresh with dill, pepper, or a splash of vinegar.
Salad became too salty Add more cucumber, or briefly rinse drained cucumbers and pat them dry.

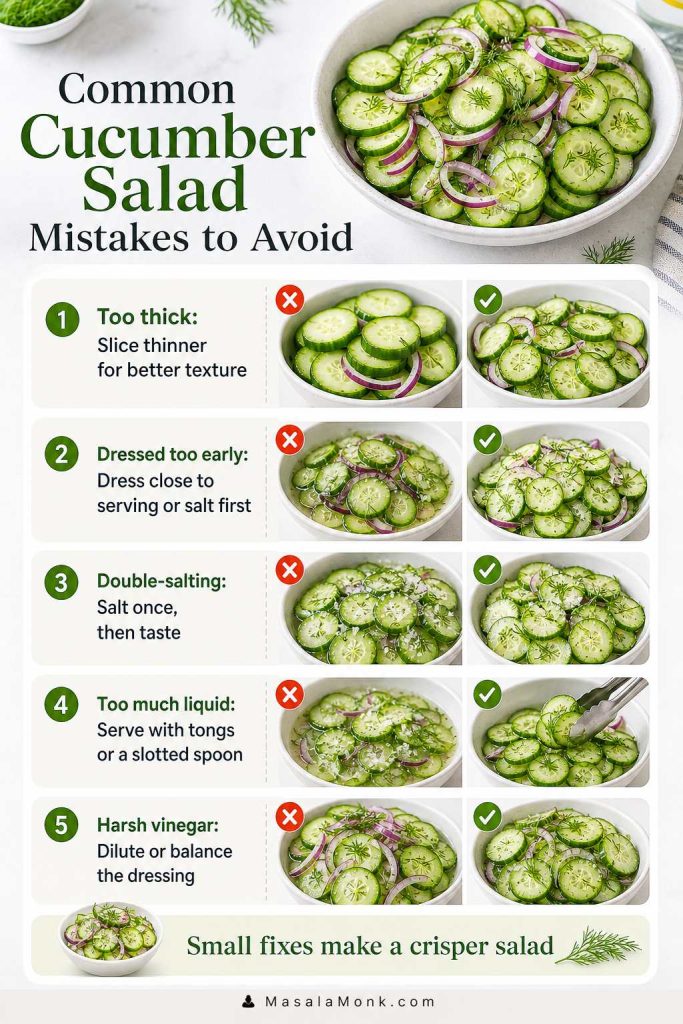
Common Cucumber Salad Mistakes to Avoid

  • Slicing too thick for a quick salad: thick slices need more time to absorb dressing.
  • Dressing too early for make-ahead: cucumbers release water as they sit, so keep dressing separate if making the salad the day before.
  • Adding all the salt twice: if you pre-salt the cucumbers, taste before salting the dressing.
  • Pouring all the bowl liquid onto the plate: serve with tongs or a slotted spoon for a cleaner salad.
  • Using harsh vinegar without balancing it: dilute strong white vinegar or add a little sweetener.
Mistakes guide showing fixes for thick slices, dressing too early, double salting, too much liquid, and harsh vinegar.
Small technique changes make a big difference: slice thinner, salt only once, and serve without pouring all the liquid onto the plate.

How Long Should Cucumber Salad Sit Before Serving?

Cucumber salad can be eaten right away, but a short rest improves the flavor. As it sits longer, it becomes more marinated and less crunchy.
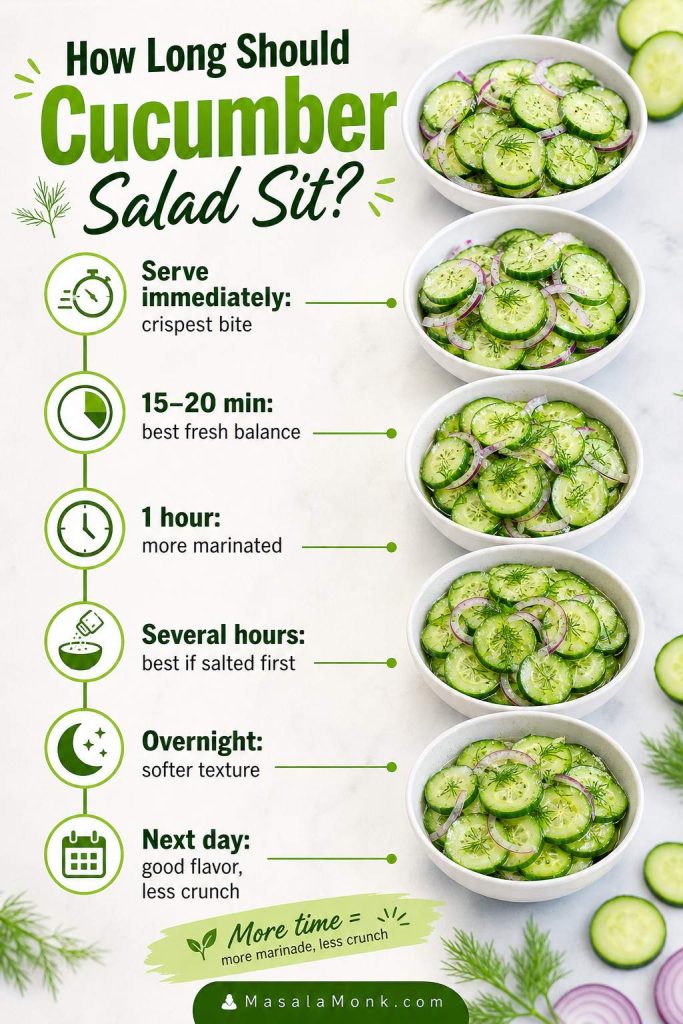
Timing guide showing how cucumber salad changes from immediate serving to 15–20 minutes, 1 hour, overnight, and the next day.
The longer cucumber salad sits, the more marinated it becomes, so serve it sooner for crunch or later for a softer, more vinegary bite.
Timing Result
Serve immediately Crispest bite, lighter flavor
15–20 minutes Best fresh-salad balance
1 hour More marinated, stronger vinegar flavor
Several hours Good if cucumbers were salted and drained first
Overnight Softer texture, still usable for vinegar-style salad
Next day Good flavor, less crunch

Best Vinegar for Cucumber Salad

The best vinegar for cucumber salad depends on whether you want the dressing balanced, mild, fruity, or old-fashioned. White wine vinegar is the safest first choice because it tastes bright without becoming too sharp.
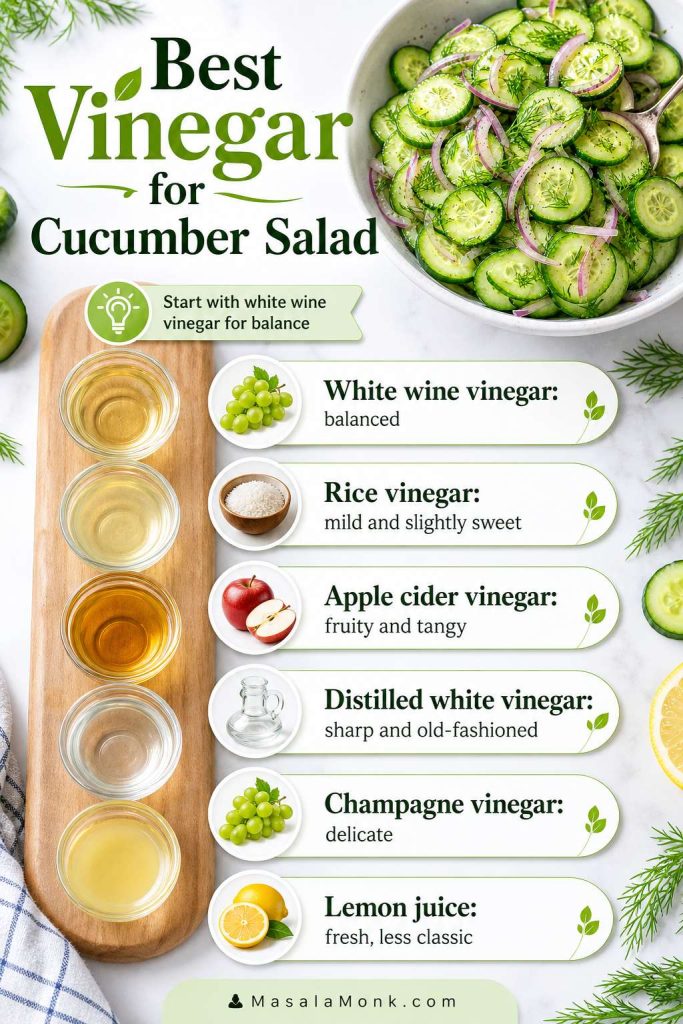
Vinegar guide comparing white wine vinegar, rice vinegar, apple cider vinegar, distilled white vinegar, champagne vinegar, and lemon juice for cucumber salad.
White wine vinegar gives the most balanced classic flavor, while rice vinegar is softer and distilled white vinegar tastes sharper and more old-fashioned.
Vinegar Flavor Best use
White wine vinegar Clean, bright, balanced Best first choice for classic cucumber salad
Rice vinegar Mild, lightly sweet Gentler salad and no-sugar versions
Apple cider vinegar Fruity, sharper Rustic tangy cucumber salad
Distilled white vinegar Strong, sharp, old-fashioned Cucumbers and onions in vinegar; best diluted with water
Champagne vinegar Delicate, elegant Lighter premium variation
Lemon juice Fresh and citrusy Works, but tastes less like classic vinegar cucumber salad

Old-Fashioned Cucumbers and Onions in Vinegar

Old-fashioned cucumbers and onions in vinegar are slightly different from the fresh cucumber salad recipe above. Instead of a light toss, the cucumbers and onions sit in a vinegar-water-sugar brine until they taste more marinated.

Think of this as a brinier, more marinated cucumber onion salad, not a shelf-stable pickle. It still belongs in the fridge and is best eaten within a few days.

Glass bowl of old-fashioned cucumbers and onions in clear vinegar brine with dill and a slotted spoon.
This old-fashioned cucumber onion salad is brinier than the fresh version, but it still belongs in the fridge and is not a shelf-stable pickle.

This version is especially good with barbecue, pulled pork, burgers, sandwiches, grilled chicken, and summer cookout meals. It is also useful when you want a sharper, pickle-like cucumber side.

Old-Fashioned Vinegar Cucumber Salad Formula

  • ½ cup distilled white vinegar
  • ½ cup water
  • 1–2 tablespoons sugar
  • 1 teaspoon salt
  • 2 large cucumbers or 5–6 small cucumbers, sliced
  • ½ sweet onion or white onion, thinly sliced
  • Optional: garlic, dill, celery seed, or mustard seed

Mix the vinegar, water, sugar, and salt until dissolved. Add the cucumbers and onion, then refrigerate for at least 1 hour. Serve with a slotted spoon because this style is intentionally brinier than the fresh cucumber salad recipe.

For the best texture, eat this old-fashioned version within 2–3 days. The flavor gets stronger as it sits, but the cucumber slices soften over time.

Easy Cucumber Salad Variations

Once you know the basic cucumber salad formula, you can adjust it in several directions without losing the fresh, cooling character of the dish. Use the table as a quick map, then read the notes below for the variations that need extra handling.
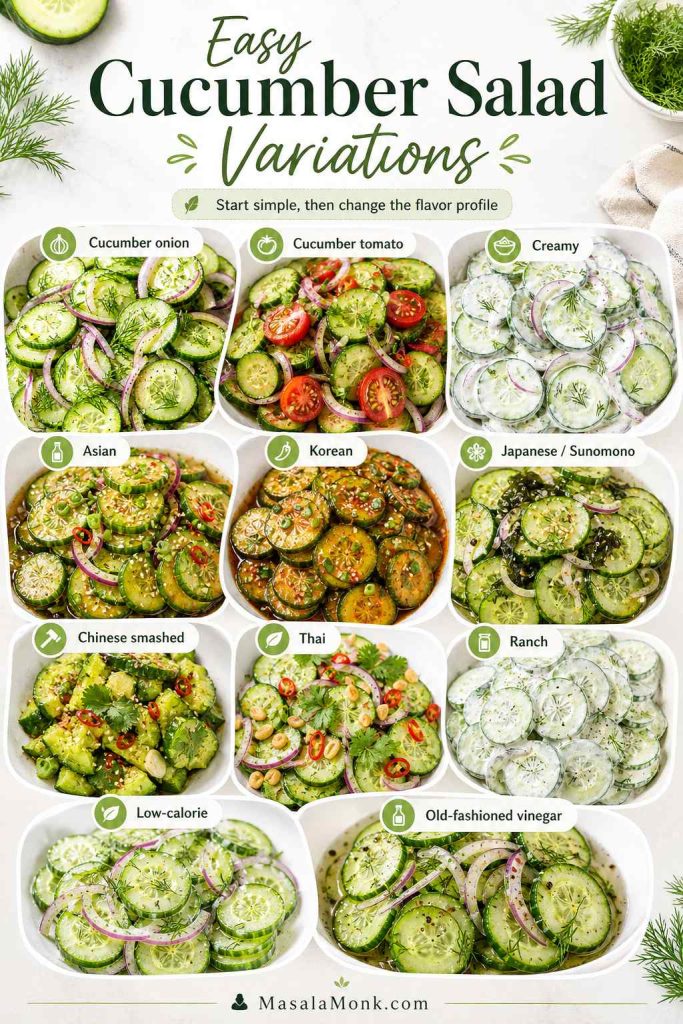
Variation board showing cucumber onion, cucumber tomato, creamy, Asian, Korean, Japanese sunomono, Chinese smashed, Thai, ranch, low-calorie, and old-fashioned vinegar cucumber salads.
Once the base cucumber salad works for you, it becomes easy to branch into creamy, tomato, sesame, spicy, ranch, or old-fashioned vinegar versions.
Variation How to adjust it
Cucumber onion salad Use extra red onion, sweet onion, or white onion.
Cucumber dill salad Increase fresh dill to 3–4 tablespoons.
Cucumber vinegar salad Skip the oil and keep the dressing vinegar-forward.
No-sugar cucumber salad Skip sweetener or use mild rice vinegar.
Low-calorie cucumber salad Use no oil and reduce or skip the sugar.
Creamy cucumber salad Use sour cream, yogurt, or mayo.
Cucumber tomato salad Add tomatoes shortly before serving because they release juice.
Asian cucumber salad Use rice vinegar, sesame, soy sauce, ginger, and scallions.
Spicy cucumber salad Add chili flakes, fresh chili, chili crisp, or chili oil.
German cucumber salad / Gurkensalat Use dill and either a vinegar dressing or a creamy sour cream-style dressing.

Cucumber Onion Salad

For a stronger cucumber onion salad, increase the onion to ¾ cup and use red onion for bite, sweet onion for a softer flavor, or white onion for an old-fashioned vinegar version. Slice the onion very thinly so it blends into the cucumbers instead of taking over the bowl.

If the onion tastes too sharp, soak the slices in cold water for 10 minutes or let them sit in the vinegar dressing for a few minutes before adding the cucumbers.

Cucumber Tomato Salad

For cucumber tomato salad, add 1½–2 cups halved cherry tomatoes or chopped ripe tomatoes to the base salad. Add them shortly before serving because tomatoes release juice quickly and can soften the dressing.

This version works best with red onion, dill, parsley, or basil. If the tomatoes are very juicy, serve with a slotted spoon and refresh the bowl with a little extra vinegar, salt, and pepper.

Creamy Cucumber Salad

For creamy cucumber salad, replace the vinegar dressing with ½ cup sour cream, Greek yogurt, or a yogurt-mayo mix. Then add 1 tablespoon vinegar or lemon juice, 1 small grated garlic clove, 2–3 tablespoons dill, salt, and black pepper.

Because creamy dressings loosen as cucumbers release water, salt and drain the slices first for the best texture. For a yogurt-cucumber direction, see this Greek tzatziki sauce recipe.

Asian Cucumber Salad

For Asian cucumber salad, use rice vinegar instead of white wine vinegar, then add 1 tablespoon soy sauce, 1 tablespoon toasted sesame oil, 1 teaspoon grated ginger, 1 small garlic clove, scallions, and sesame seeds.

This variation works best with Persian or English cucumbers and a short chill. If you want a spicy cucumber salad, add chili oil, chili crisp, or red pepper flakes after tossing.

Spicy Cucumber Salad

For spicy cucumber salad, keep the base vinegar dressing and add red pepper flakes, sliced fresh chili, chili oil, or chili crisp. Start small, then taste again after 10 minutes because the heat spreads as the cucumbers sit.

For a more savory version, use rice vinegar, soy sauce, sesame oil, garlic, scallions, and sesame seeds instead of the classic dill dressing.

Korean Cucumber Salad

For Korean cucumber salad, use rice vinegar, sesame oil, soy sauce, garlic, scallions, sesame seeds, and gochugaru. Because the dressing is bold, keep the cucumber slices slightly thicker so the salad stays crunchy after tossing.

This version works especially well with rice bowls, grilled meats, tofu, noodles, and spicy meals because the cucumber keeps the salad cool while the dressing brings heat.

Japanese Cucumber Salad / Sunomono

For Japanese cucumber salad, keep the dressing lighter: rice vinegar, a small amount of sugar, a pinch of salt, and optional sesame seeds. Then slice the cucumbers very thinly and let them rest briefly so they soften just enough to absorb the dressing.

This version is cleaner and more delicate than spicy Asian or Korean cucumber salad. For that reason, avoid heavy garlic, chili oil, or strong herbs here.

Chinese Smashed Cucumber Salad

For Chinese smashed cucumber salad, lightly smash the cucumbers before cutting them into bite-size pieces. The cracked edges catch more dressing than smooth slices, which makes the salad taste bolder.

Use rice vinegar, soy sauce, sesame oil, garlic, a little sugar, chili oil, and sesame seeds. Serve this version soon after tossing so the cucumber pieces stay crisp.

Thai Cucumber Salad

For Thai cucumber salad, use rice vinegar, lime juice, a little sugar, sliced shallot or red onion, fresh chili, cilantro, and crushed roasted peanuts. If you are not keeping the salad vegetarian, a small splash of fish sauce can add depth.

This version works especially well with grilled foods, satay-style meals, fried snacks, rice bowls, and spicy mains because the salad tastes sweet, sharp, crunchy, and fresh at the same time.

Ranch Cucumber Salad

For ranch cucumber salad, toss sliced cucumbers with a creamy ranch-style dressing, extra dill, black pepper, and red onion or scallions. Serve it soon after mixing because creamy dressings loosen as cucumbers release water.

For a lighter ranch-style recipe, use Greek yogurt, lemon juice, garlic powder, onion powder, dill, parsley, salt, and pepper instead of bottled dressing.

German Cucumber Salad / Gurkensalat

For German cucumber salad, keep the dill but choose either a light vinegar dressing or a creamy sour cream-style dressing. Slice the cucumbers thinly, salt and drain them first if possible, then toss with dill, onion, vinegar or sour cream, salt, pepper, and a small amount of sugar if needed.

This version tastes softer and more old-fashioned than the Asian or spicy variations, so keep the seasoning simple and let the cucumber, dill, and tangy dressing lead.

Low-Calorie Cucumber Salad

For low-calorie cucumber salad, skip the olive oil and reduce or omit the sugar. Because rice vinegar tastes naturally milder, the dressing does not need as much sweetener to feel balanced.

Instead, add more dill, black pepper, lemon juice, scallions, or chili flakes when you want bigger flavor without making the dressing heavier.

If you want a more snack-style Indian salad with cucumber, onion, tomato, roasted peanuts, lemon, cumin, and chaat masala, try this crunchy tangy spicy salad.

Classic Add-Ins for Cucumber Salad

These add-ins keep the salad close to the classic cucumber salad lane. Use one or two at a time instead of crowding the bowl.

Add-ins for cucumber salad arranged in small bowls, including garlic, celery seed, mustard seed, Dijon mustard, chives, parsley, red pepper flakes, and sesame seeds.
Add-ins work best in small amounts because garlic, chives, sesame, or mustard can deepen the flavor without covering up the cucumber itself.
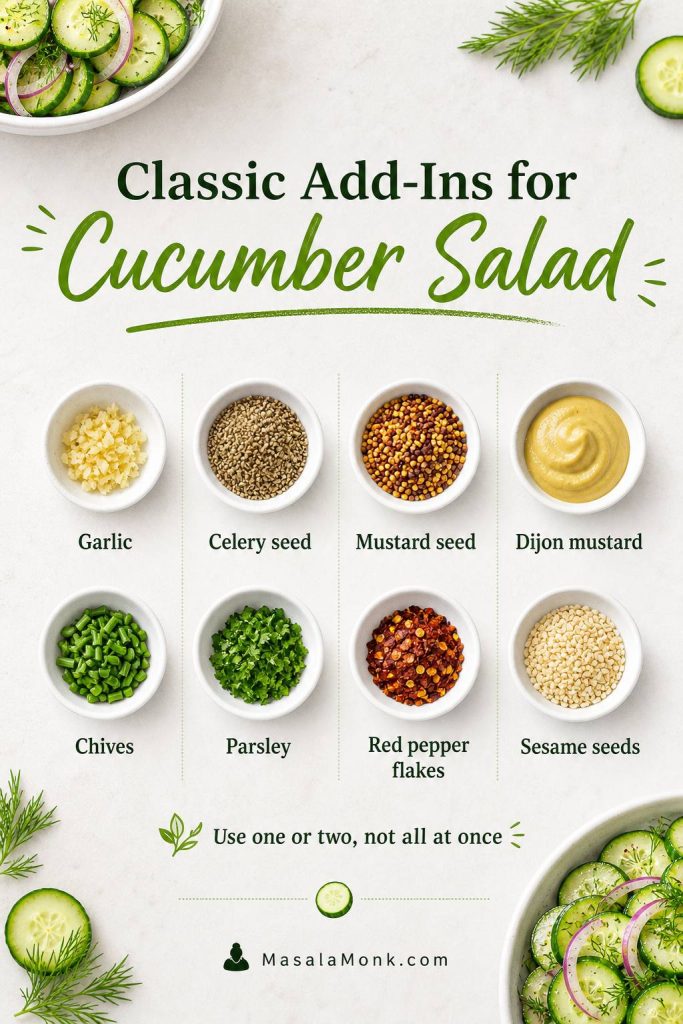
  • Garlic: for a sharper dressing.
  • Celery seed: for old-fashioned deli-style flavor.
  • Mustard seed: for a pickle-like note.
  • Dijon mustard: for a more vinaigrette-style dressing.
  • Chives: for mild onion flavor.
  • Parsley: for a cleaner herbal flavor.
  • Red pepper flakes: for gentle heat.
  • Sesame seeds: for light crunch, though the flavor starts leaning Asian.

What to Serve with Cucumber Salad

Cucumber salad works especially well next to rich, spicy, smoky, grilled, or fried foods because it brings coolness and acidity. It can also act like a quick pickle-style topping when you want crunch without making actual pickles.

Serving ideas board showing cucumber salad with burgers, grilled chicken, barbecue, sandwiches, falafel, rice bowls, spicy meals, and picnic sides.
Because cucumber salad is cool, crisp, and tangy, it balances richer foods like burgers, barbecue, grilled chicken, falafel, and spicy meals.

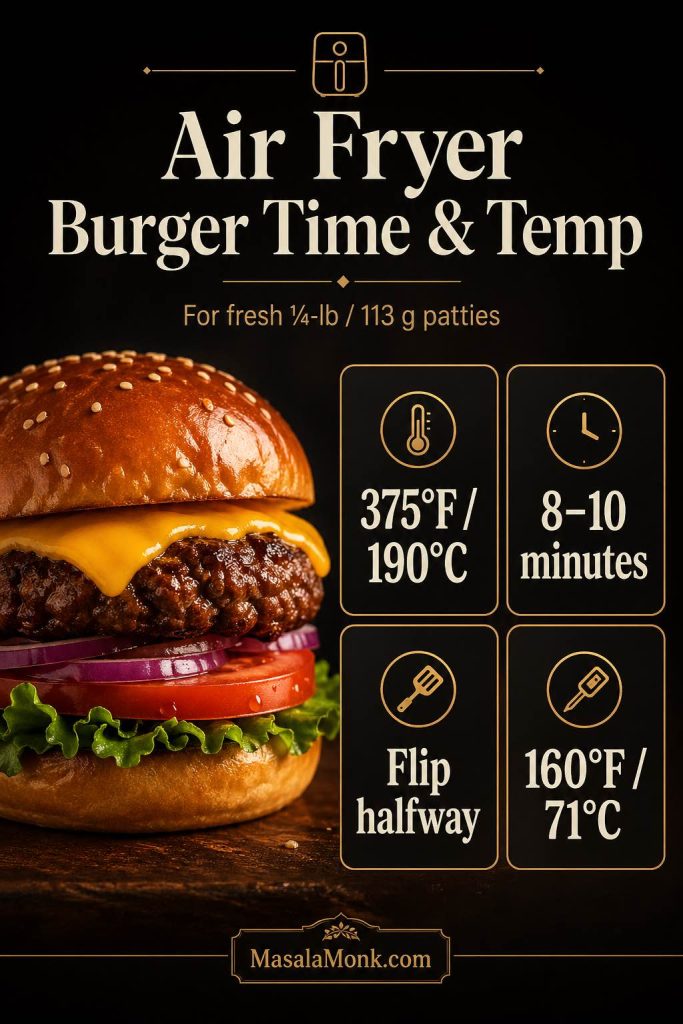
For example, it works especially well beside air fryer burgers, where the cool vinegar crunch balances the richness of the patty and cheese. It also makes sense with sandwiches, including a chicken salad sandwich, because the tangy cucumbers cut through creamy fillings.

For a fuller cookout or picnic table, pair this crisp cucumber salad with a heartier side from MasalaMonk’s potato salad recipe guide. The fresh vinegar crunch also works well beside other cold picnic sides.

It also works well with pita meals, wraps, and homemade falafel.

  • Grilled chicken
  • Salmon or other fish
  • Barbecue and pulled pork
  • Rice bowls
  • Spicy curries
  • Dal and rice
  • Roti or paratha meals
  • As a pickle-like topping for sandwiches

How to Store Cucumber Salad

This recipe tastes best the day the cucumber salad is made because the slices soften as they sit in the dressing. For whole cucumbers before you slice them, Purdue Extension has practical cucumber storage guidance; once the salad is sliced and dressed, however, it is best eaten sooner for texture.
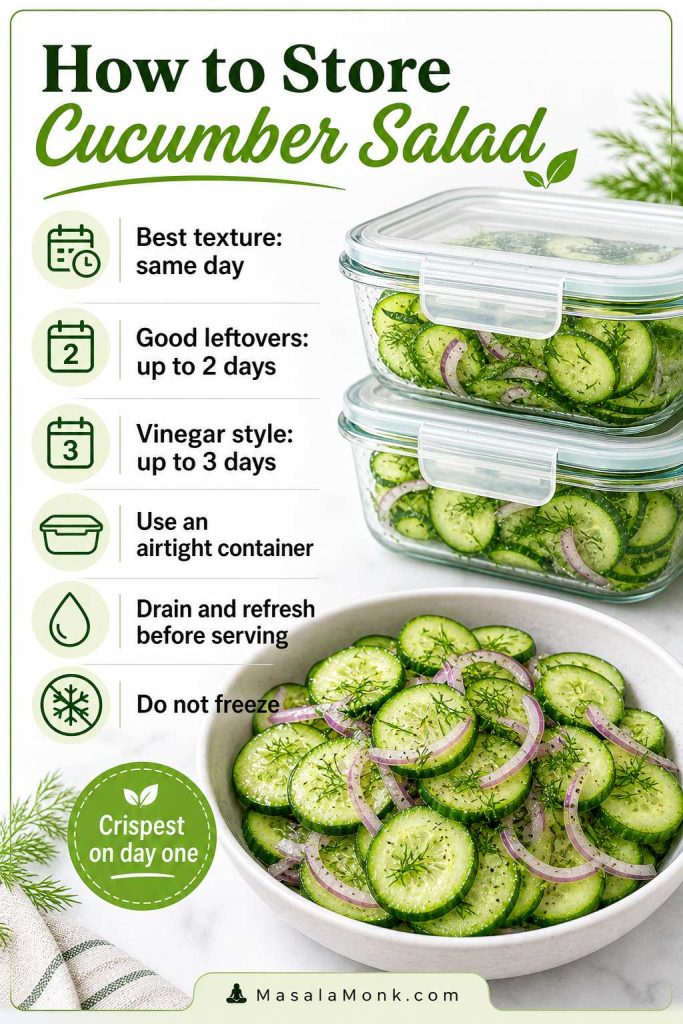
Storage guide for cucumber salad showing airtight containers, same-day best texture, up to 2 days for leftovers, up to 3 days for vinegar style, and do not freeze.
Cucumber salad is best on day one, although airtight storage and a quick drain before serving can still keep leftovers worth eating for another day or two.
Storage need Best guidance
Best texture Eat the same day.
Good leftovers Store up to 2 days in the fridge.
Still usable Up to 3 days for vinegar cucumber salad, though softer.
Container Use an airtight container.
Before serving leftovers Drain excess liquid and refresh with dill, pepper, or vinegar.
Freezing Do not freeze; cucumbers turn mushy.

Can You Make Cucumber Salad Ahead?

Yes, you can make cucumber salad ahead, but the best method depends on how far ahead you are preparing it. For the crispest texture, keep the cucumbers and dressing separate until shortly before serving. It can also work as a fresh side for high-protein Indian vegetarian meal prep, especially when you want something cool and sharp beside richer components.
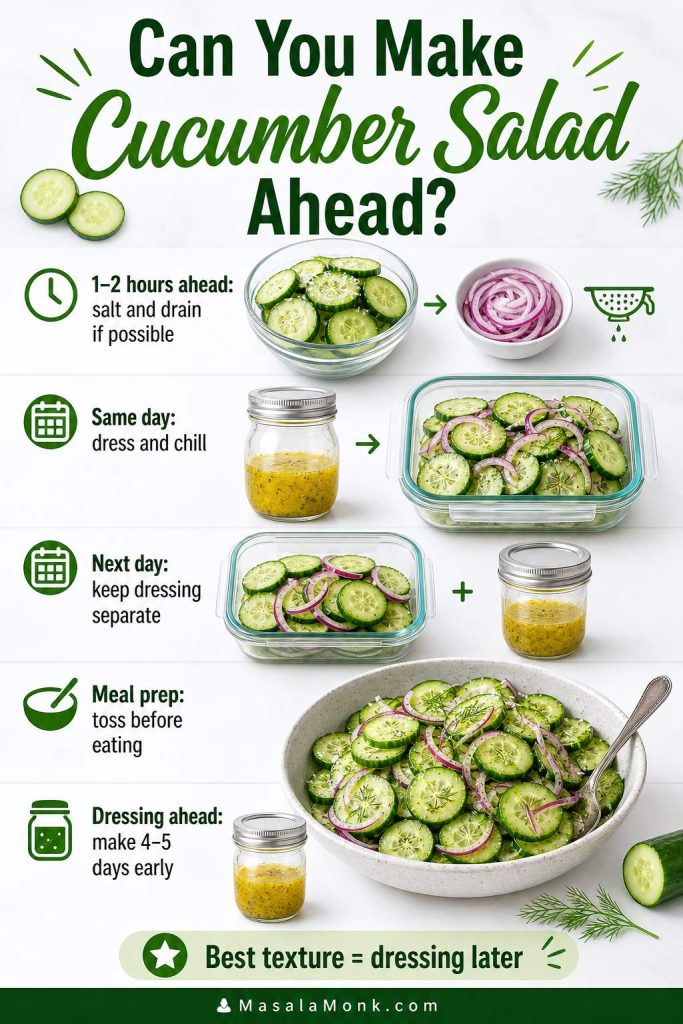
Make-ahead guide showing sliced cucumbers, red onion, dressing in jars, airtight containers, and final tossed cucumber salad.
For the best make-ahead cucumber salad, prep the cucumbers and dressing separately, then toss them closer to serving so the slices stay crisp longer.
Make-ahead need Best method
1–2 hours ahead Salt and drain cucumbers if possible, then dress.
Same day Dress and chill, then serve with tongs or a slotted spoon.
Next day Keep sliced cucumbers/onion and dressing separate.
Meal prep Slice cucumbers and onion, store dressing separately, and toss before eating.
Dressing ahead Mix vinegar, sweetener, salt, pepper, and optional oil in a jar 4–5 days ahead. Add dill closer to serving.

Diet Notes: Low-Calorie, Keto, Vegan, Gluten-Free, and No Sugar

This vinegar cucumber salad is naturally light because it is built around cucumbers, herbs, and a simple dressing instead of mayo or cream. A few small swaps can also make it fit different preferences without changing the basic recipe.

Diet notes board for cucumber salad showing low-calorie, no sugar, vegan, gluten-free, keto or low-carb, and no-mayo options.
This cucumber salad stays flexible because you can skip oil, adjust the sweetener, or keep it mayo-free while still holding onto the same fresh, crisp texture.
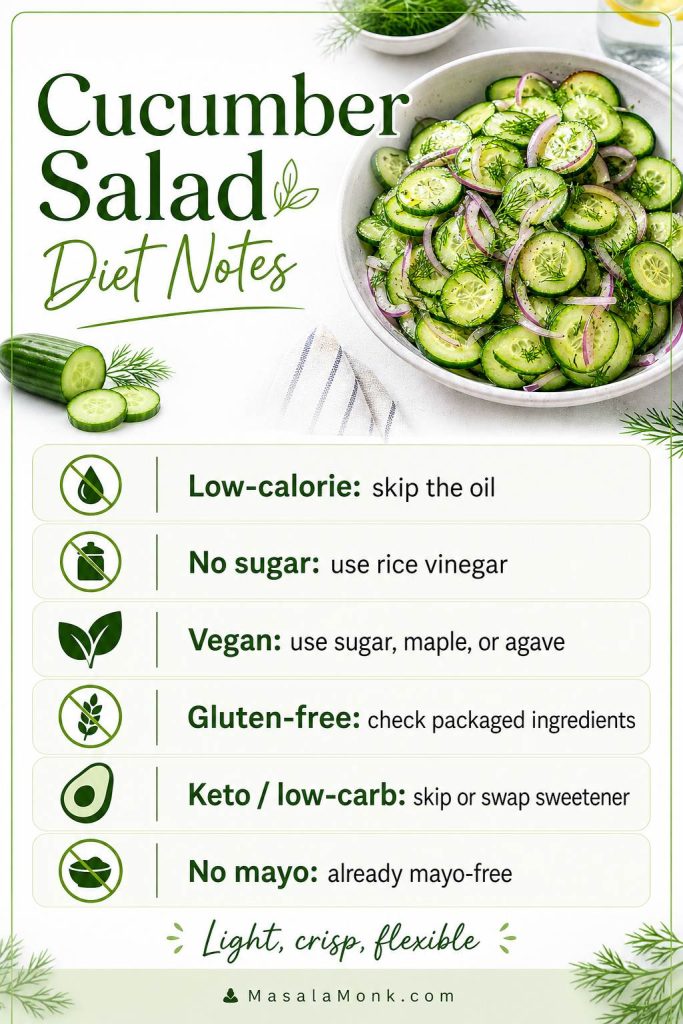
  • Low-calorie cucumber salad: skip the optional olive oil and reduce or skip the sugar.
  • No-sugar cucumber salad: use rice vinegar and leave out the sweetener, or add only a tiny pinch.
  • Vegan cucumber salad: use sugar, maple syrup, or agave instead of honey.
  • Gluten-free cucumber salad: the recipe is naturally gluten-free if you use plain vinegar and check packaged ingredients.
  • Keto or low-carb cucumber salad: use a keto-friendly sweetener such as monk fruit or erythritol, or skip the sweetener.
  • No-mayo cucumber salad: this recipe is already mayo-free.

For more on why cucumbers are such a light, hydrating ingredient, read MasalaMonk’s guide to cucumber nutrition and weight loss.

FAQs About Cucumber Salad

Cucumber salad being served from a large bowl onto a small plate with thin cucumber slices, red onion, dill, and a light vinegar sheen.
This is the texture to aim for: glossy cucumber slices, fresh dill, thin onion, and just enough dressing to coat the salad without pooling at the bottom.

Do you peel cucumbers for cucumber salad?

You do not need to peel English or Persian cucumbers because their skins are thin. Peel regular garden cucumbers if the skin is thick, waxy, tough, or bitter.

What cucumber is best for cucumber salad?

English cucumbers are the best all-purpose choice. Persian cucumbers are also excellent because they are small, crisp, and thin-skinned. Garden cucumbers work well if you peel, seed, and salt them when needed.

Should you seed cucumbers for cucumber salad?

Seed cucumbers if the center is watery or full of large seeds. English and Persian cucumbers usually do not need seeding, but regular garden cucumbers often benefit from it.

How thin should cucumbers be sliced?

For the best all-purpose cucumber salad, slice cucumbers about ⅛ inch / 3 mm thick. Slice them thinner for a more marinated salad, or thicker if you want more crunch.

Should you salt cucumbers before making cucumber salad?

Salt cucumbers first if you are making the salad ahead, using watery garden cucumbers, or trying to prevent a diluted dressing. If you are serving it right away, salting is optional.

How do you keep cucumber salad from getting watery?

Salt and drain the cucumber slices for 20–30 minutes, then pat them dry before adding dressing. Also, serve the salad with tongs or a slotted spoon so extra liquid stays behind in the bowl.

What vinegar is best for cucumber salad?

White wine vinegar is the best balanced choice. Rice vinegar is milder, apple cider vinegar is fruitier, and distilled white vinegar gives a sharper old-fashioned flavor when diluted with water.

Can I make cucumber salad without sugar?

Yes. Skip the sugar completely or use rice vinegar for a milder dressing. You can also use a small amount of monk fruit, erythritol, maple syrup, or agave depending on your preference.

Can I use dried dill instead of fresh dill?

Yes, but use less. Start with 1 teaspoon dried dill for this recipe, then add more only if needed. Fresh dill tastes brighter and is better when available.

How long does cucumber salad last in the fridge?

This salad is best the day it is made. However, the cucumbers can still hold up for about 2 days, and leftovers may be usable up to 3 days, although the texture softens over time.

Can cucumber salad be made ahead?

Yes. For the best make-ahead cucumber salad, keep the dressing separate or salt and drain the cucumbers before dressing them. Toss everything 15–20 minutes before serving when possible.

Can you freeze cucumber salad?

No. Cucumber salad does not freeze well because cucumbers become soft and watery after thawing.

What onion is best for cucumber salad?

Red onion is best for color and bite. Sweet onion is best for a milder old-fashioned cucumber salad. White onion works well in cucumbers and onions in vinegar.

Is cucumber salad healthy?

Vinegar cucumber salad is a light, hydrating side dish, especially when made without oil or mayo. To keep it lighter, reduce the sugar and skip the optional olive oil.

Is cucumber salad the same as pickled cucumbers?

No. Cucumber salad is usually a fresh side dish tossed with vinegar dressing and eaten soon. Pickled cucumbers sit in a stronger brine and are meant to taste more preserved or pickle-like.

Posted on 4 Comments

Apple Pie Crust Recipe: Flaky Homemade Pie Dough for Apple Pie

A flaky apple pie crust starts with cold butter, gentle handling, and enough baking time. Once it is deeply golden, the crust can hold the apple filling without turning soft or heavy.

A good apple pie crust recipe should give you dough that is buttery, flaky, and strong enough to hold a juicy apple filling without turning tough or soggy. The crust is often the part that makes people nervous: butter softens, dough cracks, bottoms turn pale, and filling leaks where it should not. However, once the dough is cold enough and hydrated just enough, the whole process becomes much calmer.

This homemade pie dough is made for a classic 9-inch / 23-cm apple pie. It gives you enough for a bottom crust and a top crust, so you can make a full double-crust pie, a lattice pie, or a single-crust pie if you want to save the second disk for later. Because apple filling is heavier and juicier than many dessert fillings, the dough needs to be tender without being weak.

The method is simple, but the details matter. Keep the butter cold, add the water slowly, chill the dough before rolling, and avoid stretching it into the pie plate. Then, when you are ready to fill it, use a thick and cooled filling like this homemade apple pie filling recipe so the bottom crust has a better chance of baking up crisp and flaky.

The goal here is not a fancy pastry-school crust. It is a reliable apple pie crust that rolls without falling apart, seals cleanly around the filling, and bakes up flaky enough for a holiday pie. If the dough cracks a little or needs a patch, that is fine. Pie crust is more forgiving than it looks once you keep the butter cold and stop trying to make the dough perfectly smooth.

Quick Answer: The Best Crust for Apple Pie

The best crust for apple pie is a flaky, buttery pie dough that can hold fruit filling without collapsing, cracking apart, or turning soggy on the bottom. For a classic 9-inch / 23-cm apple pie, make a double batch of dough: one round for the bottom crust and one for the top crust or lattice.

This apple pie crust recipe uses all-purpose flour, cold butter, salt, a little sugar, and ice water. The butter gives the crust its rich flavor and flaky layers. Meanwhile, the chill time helps the dough relax, roll more cleanly, and shrink less once it hits the oven.

For a traditional double-crust apple pie, you usually do not need to prebake the bottom crust. Instead, use a filling that is thick rather than watery, let it cool before adding it to the pastry, vent the top crust, and bake until the crust is deeply golden. If you are making a single-crust apple pie with crumb topping, partial prebaking can sometimes help the bottom stay crisp.

A crust choice is not just decoration. It changes how the pie bakes, how steam escapes, and how sturdy the slices feel later. A double-crust pie, a crumb-topped pie, a graham cracker crust pie, and a puff pastry apple dessert all need slightly different handling, so it helps to choose the direction before you start rolling dough.

Apple Pie Crust at a Glance

Yield: this recipe makes enough crust for one 9-inch / 23-cm apple pie or two single-crust pies
Best for: classic apple pie, lattice pie, and crumb-topped single-crust pie
Dough chill time: at least 1 hour
Rest before rolling: 5 to 10 minutes if the dough is very firm
Assembled pie chill: 15 to 20 minutes if the dough has softened
Full pie bake time: about 55 to 65 minutes, plus 2 to 3 hours cooling
Filling amount: 5 to 6 cups / about 1.1 to 1.4 kg / 2.5 to 3 lb cooled apple pie filling
Prebake? Usually no for double-crust apple pie; sometimes yes for single-crust crumb pies
At-a-glance apple pie crust recipe board showing yield, chill time, bake time, filling amount, and best uses.
Before you start, check the timing and yield. This apple pie crust recipe makes one double crust, needs at least 1 hour of chilling, and works best with thick cooled apple filling.

Apple Pie Crust Help

Use these sections to make flaky pie dough, choose the right crust style, and fix the most common apple pie crust problems.

Why This Apple Pie Dough Works

Apple pie is harder on crust than it looks. The filling is juicy, the bake time is long, and the bottom pastry has to hold up while the apples soften and bubble. Because of that, a crust that works for a cream pie or a tiny tart may not always behave the same way under a heavy apple filling.

In this apple pie crust recipe, cold butter, careful hydration, and enough chill time work together. None of those details is complicated on its own, but together they make the dough easier to roll and much less likely to bake up tough or greasy.

Cold butter creates flaky layers

Cold butter does most of the visible work. As the pie bakes, the butter melts and releases steam, which helps separate the dough into flaky layers. That is why you want sandy crumbs, pea-size butter pieces, and a few flat flakes instead of a perfectly smooth mixture.

If the butter gets too warm before baking, it can melt into the flour too early. Then the crust may taste rich, but it will not have the same light, flaky structure. So whenever the dough feels soft or greasy, chilling is the fix.

Gentle handling keeps the crust tender

Flour gives the pastry enough structure to hold apple filling, but too much mixing can make the crust tough. The goal is to bring the dough together just until it holds when pressed, not to knead it until it looks smooth.

A little sugar helps with browning, while salt keeps the crust from tasting flat. Meanwhile, slow hydration helps you avoid adding too much water, which is one of the most common reasons homemade pie dough turns hard instead of tender.

Chill time makes the dough easier to roll

Resting the dough gives the flour time to hydrate and the butter time to firm up again. As a result, the dough rolls more smoothly, seals more easily, and shrinks less in the oven.

You do not need a food processor for this dough. A bowl, your fingertips, a pastry cutter, or two forks are enough, and working by hand also makes it easier to feel when the butter and water are right.

Once those details are handled, the crust becomes reliable enough for a classic apple pie: sturdy around the fruit filling, tender at the bite, and flaky enough to feel properly homemade.

Apple pie crust explanation board with dough, butter, flaky crust, and callouts for cold butter, gentle handling, chill time, and apple filling support.
This dough works because the butter stays cold, the dough is handled gently, and the chill time lets it relax. As a result, the crust rolls more easily and bakes into flaky layers.

Before You Start: What Matters Most

If you remember only three things, keep the butter cold, add water slowly, and do not stretch the dough into the pie plate. Everything else is easier to fix. A small crack can be patched, a sticky dough can be chilled, and uneven edges can be trimmed after the crust is in the plate.

A perfect-looking dough disk is not the goal. You want dough that is cold, lightly hydrated, and just gathered enough to roll. Once it rests, it becomes easier to handle.

Equipment You Need

You do not need special equipment for this apple pie crust recipe, but a few basic tools make the dough easier to handle. If you do not have a pastry cutter, use your fingertips or two forks instead.

Tool Why it helps
Large mixing bowl Gives you enough room to toss the flour, butter, and water without overworking the dough.
Pastry cutter, fork, or fingertips Helps cut cold butter into the flour without needing a food processor.
Rolling pin Rolls the dough into a 12- to 13-inch / 30- to 33-cm round.
9-inch / 23-cm pie plate The recipe is sized for a standard 9-inch apple pie.
Baking sheet Catches drips and can help give the bottom crust stronger heat.
Foil or pie shield Protects the edges if they brown before the center is done.
Apple pie crust equipment guide showing mixing bowl, rolling pin, pastry cutter or forks, 9-inch pie plate, baking sheet, and pie shield or foil.
You do not need fancy pastry tools for homemade apple pie crust. However, a rolling pin, mixing bowl, pie plate, baking sheet, and simple shield for the edges make the process much easier.

Can You Make Pie Crust in a Food Processor?

Yes, a food processor can make apple pie crust faster, but it also makes overmixing easier. Pulse the flour, salt, and sugar first, then add the cold butter and pulse only until pea-size pieces remain. After that, add ice water slowly and stop as soon as the dough begins to clump.

By hand, you get more control because you can feel the butter and dough changing as you work. In a food processor, the key is restraint: do not let the dough turn into a smooth ball in the machine. Once it reaches the shaggy stage, finish gathering it by hand.

Comparison board showing pie crust made in a food processor and by hand, with pea-size butter pieces and do-not-overmix reminders.
A food processor is faster, but mixing by hand gives you more control. Either way, stop when pea-size butter pieces remain, because overmixing can make the crust tough.

Apple Pie Crust Ingredients

You only need a few ingredients for this apple pie crust recipe, but each one affects the final texture. Since pie dough is so simple, measuring carefully and keeping everything cold will make a noticeable difference.

Apple pie crust ingredients board with flour, cold butter, salt, sugar, ice water, optional vinegar, and egg wash.
Because pie dough has so few ingredients, each one matters. Cold butter creates flakiness, flour gives structure, and ice water brings the dough together without making it tough.

All-purpose flour

All-purpose flour gives the crust enough strength to hold apple filling without making the pastry heavy. If you use cups, spoon the flour into the measuring cup and level it off. Otherwise, too much flour can make the dough dry, crumbly, and difficult to roll.

Cold unsalted butter

Butter gives the crust its best flavor. It also helps create those flaky layers that make homemade pastry worth the effort. Cut the butter into small cubes, then keep it cold until you are ready to mix. You want a mix of sandy crumbs, pea-size butter pieces, and a few flatter flakes of butter in the dough.

Most importantly, do not work the butter in until it disappears completely. Those visible butter pieces may look imperfect, but they help the crust bake up flaky instead of dense.

Close-up pie dough mixture showing sandy crumbs, pea-size butter pieces, flat butter flakes, and a do-not-blend-smooth reminder.
Instead of blending the butter completely into the flour, leave a mix of sandy crumbs, pea-size pieces, and a few flat flakes. Those uneven butter pieces help create a flaky pie crust.

Salt

Salt keeps the pastry from tasting dull. Even though apple pie is sweet, the crust still needs balance. Without enough salt, the butter flavor and apple filling will both taste flatter.

A little sugar

Sugar is not always necessary in pie crust, but it works well here because it helps the dough brown and adds a gentle warmth to the pastry. Use only a small amount, though. The crust should still taste like pastry, not like a cookie.

The crust itself stays simple, but the filling can lean warmer if you like more spice. Cinnamon is usually enough for apple pie, although a small pinch of homemade pumpkin pie spice can add ginger, nutmeg, allspice, and clove notes.

Ice water

Ice water brings the dough together. Add it slowly, because flour does not always absorb the same amount of water every time. On a humid day, you may need less. In a dry kitchen, you may need a little more. So the feel of the dough matters more than the exact tablespoon count.

The dough is ready when it holds together after you squeeze it in your hand. It should still look shaggy, not wet or smooth.

Optional apple cider vinegar

A small splash of apple cider vinegar can make the dough a little more forgiving. It is optional, and the crust will not taste sour. However, if you often end up with tough pastry, it can be a helpful backup.

Egg wash

Egg wash is used after the pie is assembled, not inside the dough. It helps the top crust bake up glossy and golden. For a simple finish, beat one egg with a tablespoon / 15 ml of milk or water, then brush it lightly over the chilled top crust before baking.

How to Make Apple Pie Crust

The main rule in any good apple pie crust recipe is simple: keep the butter cold and handle the dough gently. You are not kneading bread dough. Instead, you are bringing pastry together just enough so it can roll, chill, and bake into flaky layers.

If pie dough has ever cracked on you or turned sticky halfway through rolling, you are not doing anything unusual. Most crust problems are temperature problems. Chill the dough, use a little flour, patch what tears, and keep going.

Step-by-step apple pie crust board showing dry ingredients, cold butter, ice water, gathered dough, and chilled dough disks.
The method is simple, but the order matters. First mix the dry ingredients, then cut in cold butter, add ice water slowly, gather gently, and chill before rolling.

1. Mix the dry ingredients

Add the flour, salt, and sugar to a large mixing bowl. Then whisk them together so the salt and sugar are evenly distributed before the butter goes in.

This step is quick, but it matters. If the salt is not mixed evenly, some bites of crust can taste bland while others taste too salty.

2. Cut in the cold butter

Add the cold butter cubes to the flour mixture. Use your fingertips, a pastry cutter, or two forks to work the butter into the flour. Stop when the mixture has sandy crumbs, pea-size butter pieces, and a few thin, flat flakes of butter.

At this stage, the mixture should not look smooth. In fact, a little unevenness is useful because those butter pieces create steam pockets in the oven. If the butter starts to soften or smear, place the bowl in the refrigerator for 10 to 15 minutes before moving on.

3. Add ice water slowly

Drizzle in 1 tablespoon / 15 ml of ice water at a time, tossing the mixture with a fork after each addition. At first, the dough will look dry and loose. After several tablespoons, it will begin to clump together.

Stop adding water when a handful of dough holds together when squeezed. If the dough is sticky in the bowl, it has probably gone too far. On the other hand, if it falls apart completely, add another teaspoon or two of water and toss again.

4. Bring the dough together

Turn the shaggy dough onto a lightly floured surface. Then gather it gently with your hands and press it together until no large dry patches remain. Avoid kneading it smooth, because too much handling can make the crust tough.

If a few crumbly spots remain, press them into the dough with your hands. If needed, dampen your fingers lightly and pat the dry spots together. However, do not add water just to make the dough look neat. Pie dough should look a little rough before it chills.

5. Divide and chill the dough

Divide the dough into two equal pieces. Shape each piece into a flat disk about 1 inch / 2.5 cm thick. A disk chills faster and rolls more evenly than a ball of dough, so this small step makes rolling easier later.

Wrap each disk tightly and refrigerate for at least 1 hour. During that time, the flour hydrates, the butter firms up again, and the gluten relaxes. As a result, the dough becomes easier to roll and less likely to shrink in the oven.

Apple Pie Dough Texture Checkpoints

Pie dough is easier when you know what each stage should feel like. Instead of trying to make it look perfect, use these checkpoints as you work.

Stage What it should look or feel like What to do if it is wrong
Butter mixed into flour Sandy crumbs with pea-size pieces and a few flat flakes of butter If the butter smears, chill the bowl for 10 to 15 minutes.
After adding water Shaggy dough that holds together when squeezed If it falls apart, add water 1 teaspoon at a time.
Before chilling Rough but gathered, not smooth or sticky If sticky, dust lightly with flour and chill sooner.
After chilling Firm but rollable after a few minutes at room temperature If it cracks hard, rest it 5 more minutes before rolling.
Apple pie dough texture checkpoint board showing butter mixed in, shaggy dough after water, gathered dough before chilling, and firm chilled dough.
Each stage should look rough, cold, and workable rather than smooth or wet. Press a small handful together; when it holds without smearing, the dough is usually hydrated enough.
Comparison board showing too-dry crumbly pie dough, just-right shaggy dough held in a hand, and too-wet sticky dough.
Crumbly dough usually needs ice water a teaspoon at a time. Sticky or smeary dough usually needs chilling instead. The best pie dough is shaggy, cool, and firm enough to hold when squeezed.

How to Roll Apple Pie Dough

Let the chilled dough soften slightly

Once the dough has chilled, let one disk sit at room temperature for 5 to 10 minutes if it feels too firm to roll. It should be cool but not rock-hard. If it cracks immediately under the rolling pin, give it another minute or two.

Lightly flour your work surface and rolling pin. Then roll from the center outward, rotating the dough a quarter turn every few rolls. This keeps the round even and helps prevent sticking without forcing the dough into shape.

Hands rolling round apple pie dough with callouts for rolling from the center, quarter-turning, 12 to 13 inch size, and 1/8 inch thickness.
For a 9-inch apple pie, roll the dough from the center outward and turn it as you go. This keeps the crust round, even, and wide enough to fit the pie plate without stretching.

Roll to the right size and thickness

For a 9-inch / 23-cm apple pie, roll the bottom crust into a 12- to 13-inch / 30- to 33-cm round. Aim for a crust that is about 1/8 inch / 3 mm thick. If it is much thicker, it may bake up heavy; if it is much thinner, it can tear or soften under the filling.

For this apple pie crust recipe, that size gives you enough dough to settle into the pie plate and still leave a little overhang for trimming and crimping. Add small amounts of flour only as needed, because too much loose flour can make the crust dry.

Fit the dough without stretching it

To transfer the dough, loosely roll it around the rolling pin, then unroll it over the pie plate. After that, ease the dough into the bottom and sides without pulling it tight. Stretching may seem harmless, but it is one of the most common reasons pie crust shrinks while baking.

Three-step guide showing pie dough rolled onto a pin, unrolled over a pie plate, and gently eased into the dish without stretching.
Once the dough is rolled, move it gently instead of pulling it into place. Rolling it over the pin, unrolling it over the plate, and easing it in helps prevent shrinking.

If the dough tears, patch it with a small piece from the edge and press it gently into place. Once the filling goes in and the pie bakes, small patches will not matter.

Double Crust vs Single Crust Apple Pie

Classic apple pie is usually a double-crust pie, which means it has a bottom crust and a top crust. However, not every apple pie needs two pastry layers. A crumb-topped pie, for example, only needs a bottom crust, while a graham cracker crust pie behaves more like a no-roll dessert.

Crust style Best for What to know
Double crust Classic apple pie Uses one crust on the bottom and one on top. It is the most traditional choice for homemade apple pie.
Lattice crust Apple pies with juicy filling Looks beautiful and lets steam escape through the open spaces, which can help the filling bake evenly.
Single crust Crumb topping or Dutch apple pie Easier than a double crust and useful when you do not want to roll a top crust.
Graham cracker crust No-roll apple pie Better for crumb-topped apple pie than for a classic sealed double-crust pie.
Puff pastry Quick apple desserts More tart-like or turnover-like than traditional apple pie crust.
Comparison of double-crust apple pie, lattice apple pie, and single-crust crumb-topped apple pie on a dark background.
A double crust gives apple pie its classic look, while lattice helps steam escape. Meanwhile, a single crust works beautifully when you want a crumb-topped apple pie.

If you are making homemade apple pie for the first time, a double crust or lattice crust is the safest place to start. Both use the same dough, and both pair well with a thick apple filling.

Full Top Crust, Lattice, or Crumb Topping?

A full top crust gives apple pie its most traditional look. After adding the filling, roll out the second disk of dough, lay it over the apples, trim the overhang, seal the edges, and cut vents in the top. Those vents are important because apple filling releases steam as it bakes.

A lattice crust is slightly more decorative, but it is not only for looks. Because the top is open in places, steam can escape naturally. To make a lattice, roll the second disk of dough, cut it into strips, weave the strips over the filling, and then seal and crimp the edges.

A crumb topping changes the pie completely. Instead of covering the apples with pastry, you cover them with a buttery crumble. This is closer to Dutch apple pie or apple crumble pie. It is also a good choice when you want a single-crust apple pie or when you do not feel like rolling a top crust.

For a classic apple pie, this crust works as a full top, lattice, or single bottom layer with crumb topping. If you use only one disk for a crumb-topped pie, wrap and freeze the second disk for another bake.

Top crust options for apple pie showing a full top crust, lattice crust, and crumb topping with labels.
The top crust changes more than appearance. A full crust feels classic, a lattice lets steam escape, and crumb topping gives a softer, buttery contrast to the apple filling.

Should You Prebake Apple Pie Crust?

For a traditional double-crust apple pie, you usually should not fully prebake the bottom crust. Once the bottom crust is baked, it becomes harder to seal it to a raw top crust. In addition, a classic apple pie bakes long enough for the bottom crust to cook through as long as the filling is not too wet.

Instead of fully prebaking, focus on the details that help this apple pie crust recipe bake properly: use cooled filling, keep the dough cold, avoid stretching it, bake long enough, and place the pie where it gets enough bottom heat.

Single-crust apple pie is different. If you are making a pie with crumb topping, partial prebaking can help when your bottom crust often turns pale or soft. Since there is no raw top crust to seal, you have more flexibility. King Arthur’s guide to prebaking pie crust makes the same practical distinction between single-crust pies and double-crust fruit pies.

Also, do not poke holes in the bottom crust for a raw fruit pie unless you are blind baking it first. Docking is useful for some empty crusts, but in a juicy apple pie, those holes can let filling leak underneath the pastry.

Simple rule: do not fully prebake crust for classic double-crust apple pie. However, consider partial prebaking for a single-crust apple pie with crumb topping if soggy bottoms are a recurring problem.
Decision board explaining that double-crust apple pie usually does not need prebaking, while single-crust crumb pie sometimes does.
For classic double-crust apple pie, prebaking is usually not needed. However, a single-crust crumb pie may benefit from a partial prebake if soggy bottoms are a recurring problem.

How to Keep Apple Pie Crust from Getting Soggy

Soggy bottom crust usually comes from excess moisture, hot filling, weak bottom heat, or underbaking. Fortunately, most of those problems are easy to prevent once you know where the moisture is coming from.

Soggy apple pie crust prevention guide with thick cooled filling, lower oven rack, hot baking sheet, vented top crust, and cooling before slicing.
To avoid a soggy bottom crust, start with thick cooled filling, bake with enough bottom heat, vent the top, and let the pie cool before slicing. Together, these steps protect the crust.

Start with thick, cooled filling

First, use thick apple pie filling. If the filling is loose and watery, the crust will absorb that liquid before it has time to set. A cooked, glossy filling gives you more control because the apples have already released some of their moisture before the pie goes into the oven.

Second, cool the filling before adding it to the crust. Hot filling melts the butter in the dough too early, which can make the pastry soft or greasy before baking even begins. So the filling should be spoonable and glossy, not steaming hot, when it goes into the pie shell.

Give the bottom crust enough heat

Third, bake the pie long enough for the bottom crust to cook through. A golden top does not always mean the bottom is done. If your oven runs cool or your pie plate is thick, the bottom may need more time.

Finally, use bottom heat to your advantage. Bake on a lower oven rack or place the pie plate on a preheated baking sheet. For another helpful reference, this apple pie crust guidance from Martha Stewart also emphasizes giving the bottom crust enough heat and enough time to brown properly.

Choose the right pie plate

Pie plate material also matters. A glass pie plate makes it easier to check whether the bottom crust is browning, while metal usually conducts heat more quickly. Thick ceramic dishes can work beautifully, but they often need enough time and a lower oven rack so the bottom crust can finish baking.

Pie plate material guide comparing glass, metal, and ceramic dishes for apple pie crust browning and baking time.
The pie plate affects how the bottom crust bakes. Glass makes browning easier to check, metal conducts heat well, and ceramic may need a little more time.
Problem Best fix
Filling is watery Use thick apple pie filling and avoid pouring loose liquid into the crust.
Filling is hot Cool the filling before adding it to the dough.
Bottom crust is pale Bake on a lower rack or place the pie on a preheated baking sheet.
Top crust traps steam Cut vents in a full top crust or use a lattice crust.
Pie is sliced too soon Let the pie cool for at least 2 to 3 hours so the filling can thicken and settle.

For the easiest pairing, use this crust with cooled apple pie filling. The filling should be glossy and spoonable, not loose, watery, or steaming hot.

How to Know Apple Pie Crust Is Fully Baked

Apple pie is done when the top crust is deeply golden, the filling is bubbling through the vents or lattice, and the bottom crust has had enough time to brown. If the top looks ready but the bottom still seems pale, cover the edges loosely with foil and give the pie more time on the lower rack.

After baking, let the pie cool for at least 2 to 3 hours before slicing. Otherwise, even a well-baked crust can seem soft because the filling has not had time to thicken and settle.

Finished apple pie with callouts for deep golden top crust, bubbling filling, browned bottom crust, and cooling 2 to 3 hours before slicing.
A finished apple pie should be more than lightly golden. Look for a deep golden top, bubbling filling, and a browned bottom crust; then let it cool so the filling can settle.

Other Crusts You Can Use for Apple Pie

Homemade butter crust is the best choice for a classic apple pie, but it is not the only option. Sometimes convenience matters. Other times, you may want a no-roll crust, a crumb topping, or a quicker apple dessert. In those cases, the main thing is to match the crust to the kind of pie you are actually making.

For classic apple pie, use this homemade butter crust. If speed matters, store-bought crust can still make a good apple pie when the filling is thick and the crust stays cold. For a no-roll version, graham cracker crust works better with crumb topping than with a sealed top crust. For a faster pastry-style dessert, puff pastry is useful, although it behaves more like a tart or turnover than classic pie crust.

Other crusts for apple pie board showing homemade butter crust, store-bought crust, graham cracker crumb pie, and puff pastry turnovers.
Homemade butter crust is best for classic apple pie. Still, store-bought crust, graham cracker crust, and puff pastry can work when you match each one to the right style of dessert.

Can I use store-bought crust?

Yes. Keep the crust cold, use a filling that is thick rather than runny, and cut vents in the top so steam can escape. Homemade dough tastes better and usually bakes flakier, but a premade crust can still make a solid apple pie when the filling and baking are handled well.

Can I use graham cracker crust?

Yes, although it works better for a single-crust apple pie with crumb topping than for a traditional double-crust pie. Graham cracker crust cannot form a sealed pastry top, so treat it as a different dessert style rather than a direct swap for pie dough.

Can I use puff pastry?

Yes, but puff pastry gives you a quicker, more tart-like apple dessert. It works well for turnovers, slab-style bakes, and apple pie-inspired pastries. However, it does not have the same tender, sturdy bite as homemade apple pie crust.

Is shortcrust pastry the same thing?

In many kitchens, pie crust, pie dough, pie pastry, shortcrust pastry, and pie shell describe similar flour-and-fat doughs. The exact formula can vary, but the goal for apple pie is the same: a tender crust that can hold fruit filling and bake into a flaky shell.

Using This Dough for Mini Apple Pies and Hand Pies

This apple pie crust dough also works for mini apple pies and hand pies, but the handling changes slightly. Smaller pastries need a thinner roll, less filling, tighter sealing, and a closer eye in the oven because they bake faster than a full 9-inch / 23-cm apple pie.

For mini apple pies, roll the dough a little thinner than you would for a deep pie, then cut rounds large enough to fit a muffin pan, mini pie pans, or small tart tins. Press the dough in gently without stretching it, add a small spoonful of cooled apple filling, and avoid overfilling so the juices do not leak over the edges.

For hand pies, diced cooled apple filling works better than long apple slices because it fits neatly inside the dough and seals more easily. After filling, press the edges firmly with a fork, cut a small vent in the top, and chill the shaped pies briefly before baking. That short chill helps the crust hold its shape and gives the filling less chance to burst out.

The same rules still matter: keep the dough cold, use thick filling, and do not stretch the pastry. Since mini pies and hand pies are smaller, start checking them earlier and pull them when the crust is golden and the filling is bubbling.

Mini apple pies and hand pies made with golden flaky dough, diced apple filling, sealed edges, and one cut-open hand pie showing filling.
This same dough can also make mini apple pies and hand pies. Because smaller pastries bake faster, use diced cooled filling, seal the edges well, and watch the crust color closely.
Most apple pie crust problems come from five things: warm butter, too much water, overworking the dough, stretching the crust into the pie plate, or adding hot/watery filling.

Apple Pie Crust Troubleshooting

Pie crust problems are common, especially if your kitchen is warm or you are making dough for the first time. Still, most issues come from a few fixable causes: warm butter, too much water, overworking, stretching the dough, or using filling that is too wet.

What went wrong Likely cause How to fix it next time
Dough cracks while rolling Too dry or too cold Let it rest for 5 minutes, then patch small cracks with damp fingers.
Dough feels sticky Too much water or butter is warming Dust lightly with flour and chill the dough before continuing.
Crust is tough Too much water or too much handling Add water slowly and stop mixing once the dough holds together.
Crust shrinks Dough was stretched or not chilled Ease the dough into the plate without pulling, then chill before baking.
Butter leaks out Dough got too warm Keep the butter cold and chill the assembled pie before baking.
Bottom crust is soggy Wet filling, hot filling, or not enough bottom heat Use cooled thick filling and bake on a lower rack or hot baking sheet.
Edges brown too fast Edges are thinner than the rest of the crust Use a pie shield or loose foil once the edges are golden.
Filling bubbles over Pie is overfilled or not vented well Leave a little space, cut vents, and bake on a lined sheet pan.
Apple pie crust troubleshooting board showing cracked dough, sticky dough, tough crust, shrinking crust, butter leaks, soggy bottom, and over-browned edges.
Most apple pie crust problems trace back to temperature, moisture, or handling. Therefore, many fixes begin with colder dough, less water, gentler mixing, and enough time to chill.

If the dough gives you trouble, do not panic. Chill it, patch it, and keep going. Small cracks and rough edges usually disappear once the pie is filled, sealed, brushed with egg wash, and baked until golden.

Make Ahead, Freeze, and Store

Apple pie crust is a good make-ahead recipe because the dough actually benefits from chilling. You can make the disks in advance, keep them wrapped in the refrigerator, and roll them when you are ready to assemble the pie.

For short-term storage, wrap the dough disks tightly and refrigerate them for up to 3 days. For longer storage, place the wrapped disks in a freezer bag and freeze them for up to 3 months.

When you are ready to use frozen dough, thaw it overnight in the refrigerator. If it feels too firm to roll, let it sit at room temperature for a few minutes. However, do not let it become warm or greasy, because softened butter can make the crust bake up heavy.

You can also roll the bottom crust, fit it into the pie plate, cover it well, and refrigerate it before filling. This is useful when you want to prepare the crust ahead but assemble the apple pie closer to baking time.

If you have extra cooked apples or leftover filling, you do not have to make another pie right away. Spoon them over buttermilk pancakes with stewed cinnamon apples for a softer breakfast-style use.

Make-ahead apple pie crust storage guide showing wrapped dough disks, fridge storage, freezer storage, thawing overnight, and keeping dough cold.
Pie dough is a good make-ahead recipe because chilling helps it relax. For best results, refrigerate it up to 3 days, freeze it up to 3 months, and thaw it overnight in the fridge.

Apple Pie Crust Recipe Card

Apple Pie Crust Recipe: Flaky Homemade Pie Dough

This buttery apple pie crust recipe makes enough dough for one 9-inch / 23-cm double-crust apple pie or two single-crust pies.

Prep Time20 minutes
Chill Time1 hour
Total Dough Time1 hour 20 minutes
Yield1 double crust

Ingredients

  • 2 1/2 cups all-purpose flour, or 315 g / about 11 oz
  • 1 teaspoon fine salt
  • 1 tablespoon granulated sugar, or about 12 g
  • 1 cup cold unsalted butter, cut into cubes, or 226 g / 8 oz
  • 6 to 8 tablespoons ice water, or 90 to 120 ml / 3 to 4 fl oz, plus more only if needed
  • Optional: 1 teaspoon / 5 ml apple cider vinegar

For finishing and filling

  • 5 to 6 cups cooled apple pie filling, about 1.1 to 1.4 kg / 2.5 to 3 lb, if baking a full 9-inch / 23-cm apple pie
  • 1 egg
  • 1 tablespoon / 15 ml milk or water
  • Optional coarse sugar for sprinkling

Instructions

  1. Whisk the flour, salt, and sugar together in a large bowl.
  2. Add the cold butter cubes and cut them into the flour until the mixture has sandy crumbs, pea-size butter pieces, and a few flatter butter flakes.
  3. Add ice water 1 tablespoon / 15 ml at a time, tossing with a fork after each addition.
  4. Stop adding water when the dough holds together when squeezed. It should look shaggy, not wet or smooth.
  5. Turn the dough onto a lightly floured surface and gather it gently with your hands. Do not knead it smooth.
  6. Divide the dough into two equal pieces, flatten each into a disk about 1 inch / 2.5 cm thick, wrap tightly, and refrigerate for at least 1 hour.

To use this crust for a full apple pie

  1. Place a rack in the lower third of the oven and preheat to 425°F / 220°C. For extra bottom heat, place a baking sheet in the oven while it preheats.
  2. Roll one disk into a 12- to 13-inch / 30- to 33-cm round, about 1/8 inch / 3 mm thick, and fit it into a 9-inch / 23-cm pie plate without stretching.
  3. Add 5 to 6 cups cooled apple pie filling, about 1.1 to 1.4 kg / 2.5 to 3 lb, or enough to fill the pie without mounding it too aggressively.
  4. Roll the second disk for a full top crust, or cut it into strips for lattice. Then seal and crimp the edges.
  5. Chill the assembled pie for 15 to 20 minutes if the dough has softened.
  6. Beat the egg with milk or water, then brush lightly over the top crust. Sprinkle with coarse sugar if using.
  7. Bake at 425°F / 220°C for 20 minutes. Then reduce the heat to 375°F / 190°C and continue baking for 35 to 45 minutes, or until the crust is deeply golden and the filling is bubbling. If the edges brown too quickly, cover them loosely with foil or a pie shield.
  8. Let the pie cool for at least 2 to 3 hours before slicing so the filling can thicken and settle.

Notes

  • Keep the butter cold for the flakiest crust.
  • Add water slowly; too much water can make the crust tough.
  • Do not knead the dough until smooth. Gentle handling keeps the pastry tender.
  • For classic double-crust apple pie, do not fully prebake the bottom crust.
  • Use thick, cooled apple pie filling to help prevent a soggy bottom crust.
  • The dough can be refrigerated for up to 3 days or frozen for up to 3 months.
Apple pie crust recipe card with yield, prep time, chill time, bake time, key ingredients, short method, and a finished apple pie.
Use this quick recipe card when you need the basic apple pie crust steps in one place: mix, cut in butter, add ice water, gather gently, and chill before rolling.

FAQs

What makes this a good apple pie crust recipe?

It uses cold butter for flaky layers, enough dough for a 9-inch / 23-cm apple pie, and clear chilling, rolling, and baking cues so the crust stays tender instead of tough.

Is apple pie crust the same as pie dough?

Usually, yes. Apple pie crust, pie dough, pie pastry, and pie shell often mean the same basic flour-and-fat dough. For apple pie, however, the dough should be flaky but sturdy enough to hold fruit filling.

Do I need two crusts for apple pie?

For a classic double-crust pie, yes. You need one crust on the bottom and one on top. However, if you are making a crumb-topped or Dutch-style apple pie, one bottom crust is enough.

Should apple pie crust be prebaked?

For a traditional double-crust pie, usually no. Instead, use cooled filling, keep the dough cold, and bake the pie long enough for the bottom crust to brown. For a single-crust pie with crumb topping, partial prebaking can help if the bottom often turns soft.

Why is my apple pie crust tough?

Tough crust usually comes from too much water, too much mixing, or kneading the dough until smooth. So add water slowly and stop handling the dough once it holds together.

Why is my bottom crust soggy?

The filling may have been too wet or too hot, or the pie may not have baked long enough. Use cooled, thick filling and bake on a lower rack or preheated baking sheet so the bottom gets enough heat.

Can I use this crust for lattice apple pie?

Yes. This dough makes enough for a bottom crust and lattice top. Roll the second disk, cut it into strips, weave the strips over the filling, and then seal the edges well.

Can I use store-bought crust instead?

Yes. Keep the crust cold, use thick filling, and vent the top so steam can escape. Homemade dough usually tastes better, but premade crust can still make a good apple pie.

Can I use graham cracker crust for apple pie?

Yes, but it works best for a crumb-topped apple pie rather than a sealed double-crust pie. Since graham cracker crust cannot form a pastry top, treat it as a separate no-roll apple pie style.

Can I use puff pastry for apple pie?

Yes, but puff pastry works better for apple turnovers, slab-style apple desserts, or tart-like bakes than for a classic deep apple pie. Keep it cold, avoid overfilling it, seal the edges well, and cut vents so steam can escape.

Can I make apple pie crust ahead?

Yes. Wrap the dough disks tightly and refrigerate them for up to 3 days or freeze them for up to 3 months. Then thaw frozen dough overnight in the refrigerator before rolling.

Final Tips for Flaky Apple Pie Crust

A reliable apple pie crust recipe comes down to cold butter, gentle handling, enough chill time, and filling that is thick rather than watery. Once the dough is ready, add cooled apple pie filling, seal the edges well, vent the top, and bake until the crust is deeply golden.

Close-up of flaky golden apple pie crust layers with glossy apple filling inside.
A good apple pie crust should look flaky at the edges and sturdy around the filling. When the layers are golden and crisp, every slice feels more homemade.

If your first pie is not perfect, the fix is usually simple. Next time, chill the dough longer, add less water, avoid stretching the crust into the plate, and make sure the filling is not hot when it touches the pastry.

A perfect-looking crust is not the goal. A crust that tastes buttery, holds the filling, and flakes when you cut into it is already a win.

If you try this crust with a different apple pie filling, crumb topping, or pie plate, leave a note with what changed. Those small details often help the next baker more than a perfect-looking slice ever could.

Posted on Leave a comment

Slow Cooker Sausage Casserole Recipe

Slow cooker sausage casserole recipe with browned sausages, white beans, carrots and thick tomato gravy in a dark bowl.

A good slow cooker sausage casserole recipe should give you tender sausages, soft vegetables, creamy beans and a thick sauce that feels like proper comfort food — not a watery tomato stew. This version uses browned sausages, carrots, onions, beans, chopped tomatoes, stock, Worcestershire sauce and herbs to make a rich tomato-gravy casserole that is made for mashed potatoes, rice, baked potatoes or crusty bread.

If you call it a crock pot sausage casserole, the method is the same. You build the sauce, add the sausages and vegetables, let everything cook slowly, then thicken the gravy near the end so it coats the sausages instead of pooling at the bottom of the bowl.

Because a sausage casserole recipe can turn thin in the slow cooker if the liquid is not controlled, this guide also covers the details that make it reliable: whether to brown the sausages, how long to cook it on HIGH or LOW, how to thicken the sauce, which beans work best, how to make it without tomatoes, and how to add dumplings without making them heavy.

At a glance: Serves 4 • Prep 15 minutes • Cook 4–5 hours on HIGH or 6–8 hours on LOW • Best in a 4–6 litre / 4–6 quart slow cooker • Start with 250 ml / 1 cup stock to avoid watery sauce • Thicken at the end if needed.

Slow Cooker Sausage Casserole Recipe: Quick Answer

To make slow cooker sausage casserole, brown the sausages for 5–7 minutes if you have time, then add them to the slow cooker with onion, carrots, beans, chopped tomatoes, stock, tomato purée, Worcestershire sauce, garlic, smoked paprika and herbs. Cook on LOW for 6–8 hours or HIGH for 4–5 hours, depending on your slow cooker and sausage size. By the end, the vegetables should be tender, the sausages should be cooked through, and the sauce should look rich and spoonable.

When the sauce still looks loose, stir in a cornflour slurry and cook uncovered on HIGH for 15–30 minutes. Serve the casserole with mashed potatoes, rice, pasta, baked potatoes, steamed greens or bread for soaking up the gravy.

For a sausage casserole slow cooker method that stays thick, follow one simple rule: brown the sausages for deeper flavor when you can, start with less stock than an oven casserole, and thicken only after the slow cooker has done its work.

Spoon lifting thick sausage casserole with sausage, white beans, carrots and glossy tomato sauce.
A slow cooker sausage casserole should look glossy and spoonable rather than thin. If the sauce slides off the spoon like broth, it still needs finishing.

Crock Pot Sausage Casserole

If you call this a crock pot sausage casserole, you do not need a different method. Many readers use crock pot as shorthand for a slow cooker, especially in the US, so the same timing, liquid control and thickening steps apply.

If you need a reliable sausage casserole recipe in a slow cooker, the main thing is to use less liquid than you would in an oven casserole. Because the lid traps steam, start with 250 ml / 1 cup stock, let the sausages and vegetables cook slowly, then thicken the sauce near the end if it needs more body.

Crock pot sausage casserole guide showing less stock, trapped steam and cornflour slurry for thickening.
Crock pot sausage casserole follows the same method as slow cooker sausage casserole; however, the liquid needs tighter control because the lid traps moisture instead of letting it reduce away.

Why This Slow Cooker Sausage Casserole Works

This works because it gives the sausages time to become savory, the vegetables time to soften, and the sauce time to turn rich instead of thin. The beans make the dish more filling, while the carrots and onions slowly melt into the tomato-gravy base.

Meanwhile, the tomato purée, stock, Worcestershire sauce, smoked paprika and herbs create a deeper casserole base than tomatoes alone. Since slow cookers trap moisture, the sauce is thickened near the end rather than overloaded with flour at the beginning. That way, the gravy stays glossy and spoonable instead of dull or pasty.

In this recipe, the slow cooker gives the sausage casserole time to soften, deepen and thicken without needing much hands-on cooking. The appeal is similar to making a whole chicken in a crock pot: you do a little prep up front, then the cooker turns simple ingredients into a complete dinner.

Ingredients You Need

The best slow cooker sausage casserole starts with everyday ingredients, but each one has a job. Pork sausages give the casserole its main flavor. From there, the beans make the dish more filling, while the carrots and onions slowly soften into the sauce and add natural sweetness.

That balance is what keeps this recipe from tasting like plain sausages in sauce; the slow cooker turns it into a proper casserole with body, warmth and enough sauce to spoon over a side.

Ingredients for slow cooker sausage casserole including sausages, carrots, onion, garlic, tomatoes, beans, stock, herbs and cornflour slurry.
This ingredient list works because each part earns its place: sausages build flavor, beans add body, vegetables soften gently, and cornflour helps turn the cooking liquid into a proper gravy.

Sausages

Use 8 pork sausages, about 600–700 g / 1.3–1.5 lb, for the classic version. A good everyday pork sausage works well, especially one with enough fat to stay juicy through slow cooking. Chipolatas also work, though they may finish closer to the shorter end of the cooking time.

Cumberland-style or herby sausages can be excellent, but reduce the added herbs slightly so the casserole does not become overpowering. Chicken or turkey sausages make a lighter version, although they are leaner and can dry out if cooked too long. For a meat-free version, use firm vegetarian sausages and handle them gently because some soften quickly in sauce.

Beans

Cannellini beans are the cleanest all-round choice because they hold their shape and make the casserole more filling without adding much sweetness. Butter beans make the dish softer and creamier, while haricot beans keep it classic. For a sweeter family-style sausage and bean casserole, baked beans are useful too.

Use one 400 g / 14 oz can of beans, drained and rinsed. The drained weight is usually about 235–250 g / 8–9 oz. For a heartier bean-heavy version, use two cans and reduce the stock slightly.

When the sausage-and-bean combination is what you love most, you may also like red beans and rice with sausage for a smokier, Louisiana-style comfort meal.

Vegetables

Onion and carrots are the base. Use one large onion, about 180–200 g / 6–7 oz, and two medium carrots, about 150–180 g / 5–6 oz. Celery, mushrooms, peppers, potatoes or sweet potatoes can also be added, depending on how full and chunky you want the casserole to be.

Cut firm vegetables into similar-sized pieces so they cook evenly. Potatoes and sweet potatoes should be kept chunky enough to hold their shape. Smaller pieces will break down more and naturally thicken the sauce, which can be useful, but they will not stay neat.

Sauce Base

The sauce uses one 400 g / 14 oz can of chopped tomatoes, 2 tablespoons / 30 g tomato purée, 250 ml / 1 cup stock, Worcestershire sauce, garlic, smoked paprika, mixed herbs and black pepper. Together, these create a tomato-gravy base rather than a plain red sauce.

For a deeper casserole sauce, keep the stock, Worcestershire sauce, smoked paprika and herbs in the mix. They make the tomatoes taste rounder and more savory, which is what keeps the finished dish from feeling like plain sausages in tomato sauce.

Thickener

Cornflour, also called cornstarch, is the easiest thickener. Mix 1 tablespoon / 8 g cornflour with 1 tablespoon / 15 ml cold water first, then stir the slurry into the hot casserole near the end. Gravy granules or slow cooker thickening granules can also work, although they change the flavor more than cornflour does.

Important: Do not sprinkle dry cornflour directly into the slow cooker. It can clump. Always mix it with cold water first, then stir the slurry into the hot sauce.

Best Sausages for Slow Cooker Sausage Casserole

The best sausages depend on the style of casserole you want. Pork sausages with enough fat and seasoning give the most classic result and stay juicy as they slow cook. Chipolatas are a good choice for a milder family dinner because they brown quickly and portion easily. Herby sausages, meanwhile, bring a stronger savory flavor that works especially well with mashed potatoes or crusty bread.

Sausage choices for slow cooker sausage casserole including pork sausages, chipolatas, herby sausages and vegetarian sausages.
Pork sausages give the most classic result, chipolatas suit a milder family dinner, and herby sausages bring a stronger savory note. Vegetarian sausages can work too, provided they are firm enough to hold their shape.
Sausage Type Best For Note
Pork sausages Classic sausage casserole Best all-round flavor and texture.
Chipolatas Quicker family dinners Brown easily and cook evenly; start checking earlier.
Cumberland or herby sausages Deeper savory flavor Reduce extra herbs slightly.
Chicken or turkey sausages Lighter casserole Can dry out if cooked too long.
Vegetarian sausages Meat-free version Choose firm sausages and handle gently.
Smoked sausage or kielbasa A different style of slow cooker meal Works, but changes the dish away from classic sausage casserole.

Smoked sausage and kielbasa are delicious in a slow cooker, but they create a different kind of dish. For this slow cooker sausage casserole recipe, fresh sausages give the most traditional comfort-food result.

Do You Have to Brown Sausages Before Slow Cooking?

You do not have to brown sausages before slow cooking, but browning gives the best flavor and appearance. It adds color, renders a little fat, and stops the sausages from looking pale after several hours in sauce.

For this recipe, browning is the step that makes a slow cooker sausage casserole taste more rounded, even though the casserole will still cook without it. Use a large frying pan over medium to medium-high heat, then brown the sausages in one layer for 5–7 minutes, turning until they have color on most sides. They do not need to cook through in the pan because they will finish in the slow cooker.

Comparison showing browned sausages in a pan and thawed sausages added directly to a slow cooker.
Browning first adds color and deeper flavor, whereas skipping that step saves time. Both methods work, so the better choice depends on whether you want maximum flavor or maximum convenience.

Dump-and-Go Option

For the quickest version, skip the browning and add the thawed sausages straight to the slow cooker with the vegetables, beans and sauce. The casserole will still cook, but the sausages will be softer and paler. For the best dump-and-go result, use good-quality sausages, avoid adding too much stock, and thicken the sauce near the end.

Thawed sausages being added to a slow cooker with beans, carrots and tomato sauce for a dump-and-go casserole.
A dump-and-go slow cooker sausage casserole can still turn out well, but it helps to start with thawed sausages and a restrained amount of stock so the finished sauce does not turn watery.
Method Best For Result
Brown the sausages first Best flavor and color Richer, more savory casserole.
Skip browning Fastest prep Softer, paler sausages but still convenient.
Brown sausages only Best compromise Good flavor without extra vegetable sautéing.

For the best balance, brown only the sausages, then let the slow cooker handle the vegetables and sauce. The same timing-first mindset matters in other slow cooker pork dinners too, especially when you want tender meat rather than dry results, as in crock pot pork chops and sauerkraut.

How to Make Sausage Casserole in a Slow Cooker

Once the sausages are browned, the rest is mostly hands-off. The slow cooker does the heavy lifting while the vegetables soften, the beans absorb flavor, and the sauce turns rich and savory.

Method snapshot: Brown sausages → add vegetables and beans → pour over tomato-gravy sauce → cook LOW or HIGH → thicken if needed → rest and serve.
Step-by-step method for slow cooker sausage casserole showing browning, adding vegetables and beans, slow cooking, thickening and resting.
The method is simple once you see the flow: build flavor first, let the slow cooker do the gentle cooking, and then finish the sauce only after the sausages and vegetables are tender.

Step 1: Brown the sausages

Heat 1 tablespoon / 15 ml oil in a large frying pan over medium to medium-high heat. Brown the sausages for 5–7 minutes, turning until colored on most sides. They only need color on the outside at this stage.

Step 2: Add the vegetables

Add the sliced onion, chopped carrots, garlic and celery, if using, to the slow cooker. Mushrooms, peppers, potatoes or sweet potatoes can go in now too. Try to keep the pieces fairly even so everything softens at the same pace.

Step 3: Add the beans

Drain and rinse the cannellini beans or butter beans, then add them to the slow cooker. Baked beans can be added with their sauce, but reduce the stock slightly because they already bring liquid and sweetness.

Step 4: Mix the sauce

In a jug or bowl, mix the chopped tomatoes, tomato purée, stock, Worcestershire sauce, smoked paprika, mixed herbs, bay leaf if using, and black pepper. Pour the sauce over the vegetables and beans, then nestle the browned sausages into the mixture.

Step 5: Slow cook

Cook on LOW for 6–8 hours or HIGH for 4–5 hours. Try not to lift the lid repeatedly because slow cookers lose heat quickly when opened. Instead, check near the end, when the vegetables should be tender, the carrots should pierce easily with a fork, and the sausages should be cooked through.

Step 6: Thicken the sauce

By the end of cooking, the sauce may already be thick and glossy. In that case, leave it alone. When it looks thin, stir together 1 tablespoon / 8 g cornflour and 1 tablespoon / 15 ml cold water, then mix the slurry into the casserole. Cook uncovered, or with the lid slightly ajar, on HIGH for 15–30 minutes.

Step 7: Rest, taste and serve

Let the casserole sit for 5–10 minutes before serving. As it rests, the sauce settles and thickens slightly. Taste before adding salt because sausages, stock cubes, Worcestershire sauce and packet mixes can already be salty.

Slow Cooker Sausage Casserole Cook Times

Slow cooker sausage casserole is forgiving, but timing still matters. Small chipolatas, finely chopped vegetables or a hotter slow cooker may finish earlier. Larger sausages, chunky carrots, potatoes or a very full pot may need the longer end of the range.

Setting or Step Time Best For
Browning sausages 5–7 minutes Better color and flavor before slow cooking.
LOW 6–8 hours Best texture, deeper sauce, easiest hands-off option.
HIGH 4–5 hours Faster dinner when you start later in the day.
Thickening after slurry 15–30 minutes on HIGH Finishing a loose sauce.
Resting before serving 5–10 minutes Lets the sauce settle and thicken slightly.
Keep warm 1–2 hours after cooking Holding only after the casserole is fully cooked.
Cook time chart for slow cooker sausage casserole showing low 6 to 8 hours, high 4 to 5 hours, thickening time and resting time.
LOW gives the fullest flavor and softest texture, while HIGH is useful when time is tighter. Either way, the last few minutes matter because thickening and resting improve the final casserole.

LOW gives the best texture because the sauce has more time to mellow and the vegetables soften gently. HIGH is still useful for weeknights, but start checking near the 4-hour mark so the sausages do not overcook.

Slow cooker size: This recipe fits best in a 4–6 litre / 4–6 quart slow cooker. For even cooking, aim for the slow cooker to be about half to two-thirds full once everything is added.
Food safety note: Do not use the “keep warm” setting to cook raw sausages. Use LOW or HIGH to cook the casserole, then use keep warm only after the sausages are fully cooked.
Slow cooker setup guide showing a 4 to 6 litre cooker, half to two-thirds fill level, 250 millilitres of stock and thawed sausages.
Getting the setup right prevents most texture problems. A 4–6 litre slow cooker, a moderate fill level and just 250 ml stock give the casserole room to cook without flooding the sauce.

How to Thicken Slow Cooker Sausage Casserole

Slow cooker casseroles often turn watery because the lid traps steam. Unlike oven casseroles, the liquid does not reduce quickly. Therefore, start with 250 ml / 1 cup stock and avoid adding extra liquid at the beginning unless your slow cooker runs dry.

This is one of the most important parts of the recipe because a sausage casserole in the slow cooker often looks thinner than expected until it is finished properly. The target is a glossy gravy texture: thick enough to coat the sausages and vegetables, but still loose enough to spoon over mashed potatoes, rice or bread.

Guide to thickening slow cooker sausage casserole with cornflour slurry, lid ajar, mashed beans and reduced stock.
When a sausage casserole looks thin, small fixes usually work better than drastic ones. A cornflour slurry, a slightly open lid or a few mashed beans can thicken the gravy without changing the whole recipe.

Best thickening method: cornflour slurry

Mix 1 tablespoon / 8 g cornflour with 1 tablespoon / 15 ml cold water until smooth. Stir it into the hot casserole, then cook uncovered, or with the lid slightly ajar, on HIGH for 15–30 minutes. Add more slurry only if the sauce still looks too thin after that.

When the sauce is ready, it should coat the back of a spoon and cling lightly to the sausages and vegetables. It should not look like soup, but it should still be loose enough to spoon over mash, rice or bread.

Spoon coated with thick sausage casserole sauce above a slow cooker filled with sausages, beans and carrots.
Use the spoon test before serving: the sauce should coat the spoon in a glossy layer instead of running off immediately. That is the easiest visual check for the right casserole texture.

Other ways to thicken the sauce

  • Cook with the lid slightly ajar: this helps steam escape near the end.
  • Mash a few beans: this adds body without extra thickener.
  • Use gravy granules: helpful for a darker gravy-style casserole, but they can add salt.
  • Use less stock next time: especially if your slow cooker always makes sauces watery.
  • Add potatoes or sweet potatoes: they release starch and naturally thicken the sauce.

Rather than adding lots of flour at the beginning, let the casserole cook first. At that point, you can see how much liquid your slow cooker has created and adjust the texture properly.

Do This Not This
Start with 250 ml / 1 cup stock. Do not flood the slow cooker with extra liquid early.
Brown the sausages if you want better flavor. Do not expect unbrowned sausages to look golden later.
Thicken near the end with cornflour slurry. Do not add dry cornflour straight into the sauce.
Add dumplings only when the casserole is hot. Do not add dumplings at the beginning of the cook.

Slow Cooker Sausage Casserole Variations

The main recipe gives you a tomato-gravy sausage and bean casserole, but the slow cooker method is flexible. From there, you can make it sweeter, darker, spicier, meat-free or more old-fashioned without changing the whole method.

Slow Cooker Sausage and Bean Casserole

For a stronger slow cooker sausage and bean casserole, use two tins of beans and reduce the stock slightly. Cannellini beans give the cleanest result, butter beans make the sauce softer and richer, and baked beans make the dish sweeter and more family-style.

Slow cooker sausage and bean casserole with browned sausages, white beans, carrots and thick tomato gravy.
Adding extra beans turns this into a fuller sausage and bean casserole, and it also helps the sauce feel naturally thicker. That makes it especially useful for a hearty, budget-friendly dinner.

Baked beans already bring sauce and sweetness, so start with less stock and adjust near the end. They are especially useful when you want a kid-friendly casserole with a softer tomato flavor.

Bean options for sausage casserole including cannellini beans, butter beans, baked beans and chickpeas.
Bean choice changes the character of the dish more than many people expect: cannellini beans stay neutral, butter beans feel creamier, baked beans add sweetness, and chickpeas hold the firmest bite.

No-Tomato / Gravy-Style Sausage Casserole

For a no-tomato slow cooker sausage casserole, skip the chopped tomatoes and use extra stock instead. Add mushrooms, onions, Worcestershire sauce, black pepper and a little mustard if you like. Then thicken at the end with cornflour slurry so the sauce becomes more like sausage gravy than tomato stew.

No-tomato sausage casserole with sausages, mushrooms, onions and rich brown gravy.
A no-tomato sausage casserole leans on stock, mushrooms, onions and Worcestershire sauce for depth. As a result, the flavor feels darker and more gravy-led than the usual tomato version.

A small spoon of tomato purée can still be useful for depth, even in a gravy-style version. It will not make the casserole taste tomato-heavy, but it helps the sauce feel rounder.

How to Stretch the Casserole Further

To stretch the casserole further, add a second tin of beans, extra carrots, mushrooms, peppers or diced potatoes. Keep the stock at 250 ml / 1 cup to start, then add more only if the sauce looks too thick near the end. This keeps the casserole hearty without turning it watery.

Sausage casserole being extended into more portions with beans, carrots, mushrooms and potatoes.
Stretching sausage casserole works best when you add body before you add liquid. Beans, potatoes, mushrooms and carrots all help create extra servings without diluting the flavor.

Packet Mix vs Homemade Seasoning

You can use a sausage casserole packet mix in the slow cooker, but treat it as both seasoning and sauce body. Packet mixes often contain salt and thickener, so reduce extra salt and check the liquid before adding more stock.

Comparison of packet mix and homemade seasoning for sausage casserole using herbs, stock, paprika and cornflour slurry.
A packet mix is the faster route, yet homemade seasoning gives you far more control over salt, thickness and flavor. That is especially helpful if you want a richer slow cooker sausage casserole without guesswork.
Option Best For Watch Out For
Homemade seasoning Best flavor control Needs a few pantry spices.
Packet mix Fastest prep Can be salty or overly thick.
Stock cube + herbs + paprika Best middle ground May still need thickening at the end.
Gravy granules Darker gravy-style casserole Can overpower the tomato base.

Slow Cooker Sausage Casserole with Dumplings

To make slow cooker sausage casserole with dumplings, add the dumplings near the end, not at the beginning. The casserole should already be hot, the sauce should be bubbling around the edges, and the slow cooker should be set to HIGH.

Slow cooker sausage casserole topped with puffed dumplings and visible sausages in thick tomato gravy.
Dumplings turn sausage casserole into an even more comforting dinner, although they work best when the base underneath is already thick enough to support them.

Use small dumplings, about 35–45 g / 1.2–1.6 oz each, and leave space between them so they can expand. Place them on top of the casserole, keep the lid on, and cook for 45–60 minutes on HIGH, or until puffed and cooked through. For the best result, thicken a watery sauce before adding dumplings so they do not sink into loose liquid.

Dumplings being added to hot slow cooker sausage casserole during the final 45 to 60 minutes on high.
Add dumplings near the end, once the casserole is hot and bubbling. Otherwise, they can sit too long in the sauce and lose the light, fluffy texture you want.

Spicy Sausage Casserole

For a spicier casserole, add chilli flakes, cayenne, hot smoked paprika or a spoon of chilli sauce. Start small because sausages can already be salty and seasoned. A little heat works especially well when you are serving the casserole with rice or baked potatoes.

Spicy slow cooker sausage casserole with browned sausages, white beans, carrots, chilli flakes and glossy tomato sauce.
A spicy sausage casserole should add warmth without overwhelming the base flavor. Start modestly with chilli flakes or hot smoked paprika, then build the heat only after tasting the sauce.

Vegetarian Sausage Casserole

For a vegetarian version, use firm vegetarian sausages, vegetable stock, and a Worcestershire-style sauce that is suitable for vegetarians. Brown the sausages gently if the package allows it. When the sausages are delicate, add them later in the cooking time so they do not break apart.

Vegetarian slow cooker sausage casserole with meat-free sausages, beans, carrots and thick tomato gravy.
A vegetarian slow cooker sausage casserole still needs structure, so firmer meat-free sausages are the safest choice. Softer ones can work, but they are more likely to break during long cooking.

What to Serve with Slow Cooker Sausage Casserole

Mashed potatoes are the classic choice because they catch the sauce and turn the casserole into a proper comfort-food plate. However, you have plenty of options depending on how rich, light or casual you want the meal to feel.

  • Mashed potatoes: the best classic pairing.
  • Baked potatoes: easy, filling and good for leftovers.
  • Rice: useful when the casserole is extra saucy.
  • Pasta: good for a tomato-forward version.
  • Crusty bread: simple and excellent for soaking up sauce.
  • Steamed greens: peas, broccoli, cabbage or green beans balance the richness.
  • Cauliflower mash: lighter than potato mash but still sauce-friendly.
Serving suggestions for sausage casserole including mashed potatoes, rice, baked potato, crusty bread and steamed greens.
The best side depends on how you want to eat the gravy: mash and bread catch the most sauce, rice keeps things lighter, and greens balance the richness of the casserole.

Crusty bread works beautifully, especially if you make homemade garlic bread. For a simple plate, serve the casserole over mash or rice; for a more filling meal, spoon it over baked potatoes with greens on the side.

Storage, Freezing and Reheating

Slow cooker sausage casserole keeps well, which makes it useful for meal prep. Once the casserole has cooled, portion it into airtight containers. Keep it in the fridge for 3–4 days or freeze it for up to 3 months for best quality.

Storage guide for sausage casserole showing chilled container, freezer portions and reheated steaming serving.
Sausage casserole is excellent for leftovers because the flavor settles well overnight. Once cooled, refrigerate portions for 3–4 days or freeze them for longer meal-prep use.

To reheat, thaw frozen portions overnight in the fridge when possible. Reheat gently on the stovetop or in the microwave until steaming hot throughout. The sauce will thicken in the fridge, so add a splash of stock or water when reheating if needed.

For even reheating, stir halfway through, especially when using the microwave. As a general rule, reheat leftovers only once when possible and make sure the centre is hot before serving.

For thermometer checks, FoodSafety.gov’s safe minimum internal temperature chart lists ground meat and sausage at 160°F / 71°C and casseroles at 165°F / 74°C.

Leftover mash or extra cooked potatoes beside the casserole can also become something new. A croquettes recipe is a smart way to turn the next meal into something crisp instead of simply reheated.

Troubleshooting Slow Cooker Sausage Casserole

If your casserole looks a little thin or tastes a bit flat at the end, do not worry. Most slow cooker sausage casserole problems are easy to fix before serving.

Troubleshooting chart for sausage casserole showing watery sauce, bland flavor, overly thick sauce, pale sausages and firm vegetables.
Most slow cooker sausage casserole problems can be fixed with one targeted adjustment. Thin sauce, flat flavor, pale sausages and firm vegetables each point to a different next step rather than a failed recipe.
Problem Why It Happened Fix
Sauce is watery Slow cooker trapped moisture. Add cornflour slurry and cook uncovered on HIGH.
Sauce is too thick Too much thickener or too many beans. Add hot stock or water a little at a time.
Sausages look pale They were not browned first. Brown them next time for better color.
Casserole tastes bland Weak stock, mild sausages or under-seasoning. Add Worcestershire sauce, smoked paprika, pepper or a stock cube.
Sauce tastes sharp Tomatoes are acidic. Add a pinch of sugar or use baked beans for a sweeter variation.
Vegetables are too firm Pieces were too large or the slow cooker runs cool. Cook longer and cut vegetables smaller next time.
Beans are mushy Soft beans cooked for too long. Use firmer beans or add them later.
Sausages split Heat was too aggressive or sausages were browned too hard. Brown gently and avoid overcooking.

Slow Cooker Sausage Casserole Recipe Card

Slow Cooker Sausage Casserole Recipe

This easy slow cooker sausage casserole recipe gives you browned sausages, tender carrots, beans and a rich tomato-gravy sauce that is made for mashed potatoes, rice, baked potatoes or crusty bread.

Servings4
Prep Time15 minutes
Cook Time4–8 hours
Slow Cooker4–6 litre / 4–6 quart

Best served with: mashed potatoes, rice, baked potatoes, pasta, steamed greens or crusty bread.

Ingredients

  • 8 pork sausages, about 600–700 g / 1.3–1.5 lb
  • 1 tablespoon / 15 ml oil, for browning
  • 1 large onion, about 180–200 g / 6–7 oz, sliced
  • 2 medium carrots, about 150–180 g / 5–6 oz, chopped
  • 2 garlic cloves, about 6 g, minced
  • 1 celery stick, about 40–50 g / 1.5–2 oz, chopped, optional
  • 1 x 400 g / 14 oz can chopped tomatoes
  • 1 x 400 g / 14 oz can cannellini beans or butter beans, drained and rinsed, about 235–250 g / 8–9 oz drained weight
  • 2 tablespoons / 30 g tomato purée / tomato paste
  • 250 ml / 1 cup chicken, beef or vegetable stock
  • 1 tablespoon / 15 ml Worcestershire sauce
  • 1 teaspoon / 2–3 g smoked paprika
  • 1 teaspoon / about 1 g mixed herbs or dried thyme
  • 1 bay leaf, optional
  • Black pepper, to taste
  • Salt, only if needed after cooking
  • 1 tablespoon / 8 g cornflour / cornstarch mixed with 1 tablespoon / 15 ml cold water, optional for thickening

Instructions

  1. Heat the oil in a large frying pan over medium to medium-high heat. Brown the sausages for 5–7 minutes, turning until colored on most sides. They do not need to be cooked through.
  2. Add the onion, carrots, garlic, celery if using, and drained beans to the slow cooker.
  3. In a jug, mix the chopped tomatoes, tomato purée, stock, Worcestershire sauce, smoked paprika, herbs, bay leaf if using, and black pepper.
  4. Pour the sauce into the slow cooker and stir gently.
  5. Nestle the browned sausages into the sauce.
  6. Cook on LOW for 6–8 hours or HIGH for 4–5 hours, until the vegetables are tender and the sausages are cooked through.
  7. If the sauce is thin, stir in the cornflour slurry. Cook uncovered, or with the lid slightly ajar, on HIGH for 15–30 minutes, until thickened.
  8. Rest for 5–10 minutes, remove the bay leaf, taste, adjust seasoning, and serve.

Notes

  • This recipe fits best in a 4–6 litre / 4–6 quart slow cooker. Aim for the cooker to be about half to two-thirds full once everything is added.
  • Browning is optional but recommended for better flavor and color.
  • Use 250 ml / 1 cup stock to start. Slow cookers trap steam, so avoid adding extra liquid early unless your cooker runs dry.
  • The sausages should be cooked through and the casserole should be bubbling hot. For thermometer checks, sausage should reach 160°F / 71°C and casseroles or reheated leftovers should reach 165°F / 74°C.
  • For baked bean sausage casserole, replace the cannellini beans with baked beans and reduce the stock slightly.
  • For a no-tomato version, replace chopped tomatoes with extra stock, mushrooms, onions and Worcestershire sauce, then thicken at the end.
  • For dumplings, use small dumplings of about 35–45 g / 1.2–1.6 oz each and add them for the final 45–60 minutes on HIGH.
  • Do not slow cook frozen sausages; thaw them safely first.
  • When reheating, stir halfway through and reheat until steaming hot throughout.
Recipe card for slow cooker sausage casserole showing serving size, prep time, cook time, main ingredients and short method.
This recipe works best when you think in stages: brown for flavor, slow cook until tender, thicken only at the end, and give the casserole a short rest before serving.

More Slow Cooker Sausage Recipes and Ideas

If you came here looking for more slow cooker sausage recipes, this casserole is the best place to start because it covers the classic tomato-gravy version. Other useful sausage crock pot ideas include slow cooker sausage and peppers, cabbage and sausage, crock pot kielbasa, curried sausages, sausage hot pot and slow cooker sausage gravy. Those are related meals, but they are different enough to deserve their own recipes instead of being forced into one casserole.

Slow cooker sausage meal ideas including sausage and peppers, kielbasa and cabbage, curried sausages and sausage hot pot.
Once you have mastered sausage casserole, other slow cooker sausage ideas open up naturally. Sausage and peppers, kielbasa with cabbage, curried sausages and hot pot each deserve their own flavor direction.

If you want slow cooker sausage and peppers, use Italian sausages, sliced peppers, onions and a marinara-style sauce instead. That is a related crock pot sausage dinner, but it eats more like a sausage-and-pepper sandwich or pasta sauce than a classic sausage casserole.

Comparison of sausage casserole with beans and gravy beside sausage and peppers in Italian-style sauce.
These dishes may sound similar, but they serve different cravings. Sausage casserole is a bean-and-gravy comfort meal, whereas sausage and peppers is more of an Italian-style sauce dish.

For now, try easy crock pot chicken breast recipes when you want another hands-off dinner. For faster comfort food outside the slow cooker, air fryer burgers and ground pork recipes are useful backups.

Plated serving of sausage casserole over mashed potatoes with beans, carrots, thick tomato gravy, greens and bread.
Serving sausage casserole over mash turns the gravy into part of the meal rather than just a sauce. Add greens or bread on the side, and the result feels complete and properly comforting.

FAQs About Slow Cooker Sausage Casserole

Can you put raw sausages in a slow cooker?

Yes, you can put raw thawed sausages in a slow cooker as long as they cook fully and reach a safe internal temperature. Browning them first gives better color and flavor, but it is not required. Without browning, the sausages will be softer and paler.

Do you have to brown sausages before slow cooking?

No, browning is not compulsory. However, it is recommended because it adds savory flavor and makes the sausages look more appetizing. The best shortcut is to brown only the sausages, then add everything else straight to the slow cooker.

Can you put frozen sausages in a slow cooker?

No. Thaw sausages before adding them to the slow cooker. The USDA slow cooker food safety guidance recommends thawing meat or poultry before putting it into a slow cooker.

How long does sausage casserole take in the slow cooker?

Most slow cooker sausage casserole recipes take 6–8 hours on LOW or 4–5 hours on HIGH. The exact timing depends on sausage size, vegetable size, how full the pot is, and how hot your slow cooker runs.

Can I cook sausage casserole on HIGH?

Yes. Cook sausage casserole on HIGH for about 4–5 hours. LOW gives a slightly deeper, softer result, but HIGH is useful when you need dinner sooner.

How do you thicken slow cooker sausage casserole?

The easiest way is to stir in a cornflour slurry near the end. Mix 1 tablespoon / 8 g cornflour with 1 tablespoon / 15 ml cold water, stir it into the hot casserole, then cook uncovered on HIGH for 15–30 minutes until the sauce thickens.

Why is my slow cooker sausage casserole watery?

Slow cookers trap moisture, so sauces often look thinner than oven casseroles. Start with only 250 ml / 1 cup stock, then thicken at the end with cornflour slurry or by cooking uncovered on HIGH.

Can I make sausage casserole without tomatoes?

Yes. Replace the chopped tomatoes with extra stock, mushrooms, onions, Worcestershire sauce and a little mustard if you like. Then thicken the sauce at the end to make a gravy-style sausage casserole.

Can I add baked beans?

Yes. Baked beans make a sweeter, family-style slow cooker sausage and bean casserole. Because baked beans already include sauce, reduce the stock slightly and taste before adding extra salt.

Can I add dumplings?

Yes, but add dumplings near the end. Put small dumplings on top of the hot casserole, set the slow cooker to HIGH, keep the lid on, and cook for 45–60 minutes until the dumplings are cooked through.

What beans are best in sausage casserole?

Cannellini beans are the best all-round option because they hold their shape and taste clean. Butter beans make the casserole softer and creamier. Baked beans make it sweeter, while chickpeas give a firmer texture.

Can I use vegetarian sausages?

Yes, but use firm vegetarian sausages and handle them gently. Some meat-free sausages soften quickly, so you may prefer to brown them separately and add them later in the cooking time.

Can I cook this sausage casserole in the oven instead?

Yes. Brown the sausages, combine everything in a covered casserole dish, and bake at 180°C / 350°F for about 60–75 minutes, or until the vegetables are tender and the sausages are cooked through. Check the liquid halfway through and add a splash of stock if the sauce looks too thick.

Can I freeze slow cooker sausage casserole?

Yes. Cool the casserole fully, portion it into airtight containers, and freeze for up to 3 months for best quality. Thaw overnight in the fridge before reheating.

How long does it last in the fridge?

Slow cooker sausage casserole keeps in the fridge for 3–4 days in an airtight container. Reheat until steaming hot throughout, adding a splash of stock or water if the sauce has thickened.

Is crock pot sausage casserole the same as slow cooker sausage casserole?

Yes. Crock pot sausage casserole and slow cooker sausage casserole usually mean the same style of recipe. Crock pot is often used as shorthand for a slow cooker, especially in the US, while slow cooker is the broader term.

Posted on Leave a comment

Air Fryer Burgers Recipe: Juicy Hamburgers, Time & Temp

Juicy air fryer cheeseburger with melted cheddar, lettuce, tomato, red onion, pickles, and toasted bun on a dark surface, with an air fryer basket in the background.

A good air fryer burger recipe should give you juicy patties, clear timing, and a reliable way to know when the burgers are done. This guide to air fryer hamburgers starts with fresh ground beef patties, then covers thicker burgers, frozen patties, cheeseburgers, toasted buns, smoke prevention, toppings, storage, and a full recipe card with US and metric details.

The best default is simple: cook fresh ¼-lb / 113 g hamburger patties at 375°F / 190°C for 8–10 minutes, flipping halfway, until the center reaches 160°F / 71°C. From there, adjust by thickness, starting temperature, and air fryer model instead of relying on one fixed minute for every burger.

For a bunless version, the same patties can become lettuce-wrap burgers, burger bowls, or low-carb cheeseburger plates. For more ideas in that direction, see these keto hamburger recipes.

How Long to Cook Hamburgers in the Air Fryer

Best default: Use 1 lb / 454 g ground beef for 4 patties. Shape each patty about 4 oz / 113 g and ½ inch / 1.25 cm thick. Air fry at 375°F / 190°C for 8–10 minutes, flipping halfway, until the center reaches 160°F / 71°C. Add cheese only at the end.

Air fryer burger timing guide showing 375°F or 190°C, 8 to 10 minutes, flipping halfway, and a 160°F center temperature for fresh quarter-pound patties.
For most fresh ¼-lb patties, 375°F for 8–10 minutes is the best starting point; the center temperature is what confirms the burger is done.

Start checking early the first time

If you are making these for the first time, start checking at 8 minutes rather than waiting for the full range to pass. That way, you learn how your air fryer handles your patties without overcooking the first batch.

Put simply, the 8–10 minute range works best for patties that are about 4 oz / 113 g each and about ½ inch / 1.25 cm thick. Thinner patties may finish closer to 6–8 minutes, while thicker patties may need 10–12 minutes. Because air fryer baskets, patty thickness, and beef fat percentage all vary, the time range is only the starting point.

Use temperature, not color, to check doneness

For that reason, the thermometer matters more than the clock. Ground beef can look brown before it is safe, or stay slightly pink after it reaches temperature, so do not judge doneness by color alone.

For the most accurate reading, insert the thermometer through the side of the patty so the tip reaches the center instead of stopping near the surface. That way, you are checking the part of the burger that takes the longest to cook.

Food safety note: Ground beef burgers should reach 160°F / 71°C in the center. FoodSafety.gov lists 160°F as the safe minimum internal temperature for ground meat, so a thermometer is the clearest way to avoid guessing. See the safe minimum internal temperature chart.

Why this air fryer method works

In practice, the air fryer is good at burgers because it cooks fast, drains extra fat, and keeps the process cleaner than a skillet. The tradeoff is that patties can dry out if they are too lean, too thin, or cooked too long. That is why thickness, beef choice, spacing, and internal temperature matter more than chasing one exact minute.

Air Fryer Burger Time and Temperature Chart

Best default temperature

For most fresh patties, 375°F / 190°C is the best first setting. It is hot enough to cook the burgers quickly and help the outside brown. However, it is not so aggressive that the edges dry out before the center is done.

If this is your first time making burgers in the air fryer, use the quarter-pounder row as your starting point. After that, adjust by thickness instead of changing everything at once.

Fresh burger time chart

Because patty size changes the answer, start with the row that matches your burger instead of forcing every patty into the same time. Once you know how your air fryer handles one batch, adjust the next batch by 1–2 minutes rather than changing the temperature immediately.

Fresh air fryer burger timing chart comparing sliders, thin patties, quarter-pound patties, thicker three-quarter-inch patties, and half-pound patties with their cook times.
Fresh burger timing changes most with patty size and thickness, so match your patty to the closest size instead of using one fixed cook time for every batch.
Fresh burger type Air fryer temp Approx. time Flip? Internal temp
Fresh quarter-pounder / ¼-lb / 113 g patties, about ½ inch / 1.25 cm thick 375°F / 190°C 8–10 minutes Yes, halfway 160°F / 71°C
Fresh thicker patties, about ¾ inch / 2 cm thick 375°F / 190°C 10–12 minutes Yes 160°F / 71°C
Fresh ½-lb / 225 g thick patties 360–370°F / 182–188°C 14–18 minutes Yes 160°F / 71°C
Thin fresh patties 375°F / 190°C 6–8 minutes Yes 160°F / 71°C
Mini burgers or sliders 375°F / 190°C 5–7 minutes Yes 160°F / 71°C

Frozen Burger, 400°F, and Cheeseburger Timing

However, frozen burgers need a wider range because the center has to thaw before it can safely finish cooking. Before adding cheese to any burger, check the center first. Otherwise, the cheese may melt while the patty still needs more time.

Frozen air fryer burger guide showing timing for quarter-pound and third-pound patties, flipping halfway, checking for 160°F, and adding cheese at the end.
Frozen burgers need a wider timing range because the center has to thaw first; check the temperature before adding cheese.
Burger type Air fryer temp Approx. time Flip? Internal temp
Frozen ¼-lb / 113 g patties 360–375°F / 182–190°C 10–14 minutes Yes 160°F / 71°C
Frozen ⅓-lb / 150 g patties 360–375°F / 182–190°C 12–16 minutes Yes 160°F / 71°C
Thin fresh patties at 400°F / 200°C 400°F / 200°C 6–8 minutes Yes 160°F / 71°C
Frozen burgers at 400°F / 200°C 400°F / 200°C 11–15 minutes Yes 160°F / 71°C; check early because the outside may brown first
Cheeseburgers Same as burger Add cheese last 30–60 seconds 160°F / 71°C before cheese

Should you air fry burgers at 375°F or 400°F?

For most homemade patties, 375°F is the better first choice because it gives the center time to cook before the edges dry out. However, 400°F can work for thinner patties or for people who like a firmer browned outside. In that case, start checking early and use a thermometer, because the outside can look done before the center reaches 160°F.

Comparison chart for air fryer burgers showing 375°F as the best default for control and 400°F as an option for thinner patties with earlier checking.
Use 375°F as the most reliable starting point for homemade burgers, and treat 400°F as an option for thinner patties or stronger browning with an early temperature check.

In short, 375°F is the better beginner setting, while 400°F is an alternate for thinner patties or cooks who already know their air fryer runs evenly. That said, once you know how your air fryer behaves, you can fine-tune the temperature without guessing.

How to adjust the time

If your air fryer runs hot, start checking a minute early. On the other hand, if your patties are thick, cold, or crowded, they may need longer. In either case, do not press the burgers while they cook; pressing squeezes out the juices you are trying to keep.

If you are not sure which row fits your burger, choose the lower end of the time range first. Then check the center and add 1–2 minutes only if the patty has not reached 160°F / 71°C.

Back to table of contents ↑

Hamburger Patties in the Air Fryer

For your first batch, keep the patties simple: 1 lb / 454 g ground beef divided into 4 loose patties, about 4 oz / 113 g each. Shape each patty about 4–4½ inches / 10–11.5 cm wide and about ½ inch / 1.25 cm thick. That size cooks evenly, fits most air fryer baskets, and gives you a better chance of hitting 160°F without drying out the edges.

Raw air fryer burger patties showing 4-ounce portions, 4 to 4 and a half inch width, half-inch thickness, a shallow center dimple, and a bun size comparison.
Even patty size is what makes the timing chart work: aim for 4 oz patties that are about ½ inch thick, slightly wider than the bun, and gently dimpled in the center.

Because burgers shrink as they cook, shape each patty slightly wider than the bun. Then press a shallow dimple in the center so the patty stays flatter instead of puffing up into a dome.

When the patties are the same size, they finish at about the same time. Otherwise, the smaller patties can dry out while the thicker ones are still catching up.

If one patty is noticeably larger, place it where your air fryer runs hottest, or give it an extra minute after removing the smaller patties. That way, the thinner burgers do not dry out while the thickest one finishes.

This same method works for fresh beef patties, homemade burger patties, and plain hamburger patties from the butcher counter. However, the main adjustment is thickness: thin patties cook faster, while thick patties need more time to reach 160°F in the center.

For best texture, avoid mixing the beef too much. Once ground beef is overworked, the cooked patty can turn dense and springy instead of tender and juicy.

Can you cook raw ground beef patties in the air fryer?

Yes. Raw ground beef patties can go straight into the air fryer as long as they are shaped evenly, cooked in a single layer, and checked for 160°F in the center. However, loose ground beef mixtures and very wet patties can cook unevenly, so formed patties work best.

Ingredients for Air Fryer Hamburgers

You only need a few ingredients for classic burgers. Since the cooking method is simple, the beef, seasoning, patty shape, and cheese timing matter more than a long ingredient list. In other words, better patties matter more than more ingredients.

Since the ingredient list is short, each choice matters. The beef controls juiciness, the salt controls flavor, and the patty shape controls how evenly the burger cooks.

Air fryer burger ingredients including ground beef, salt, black pepper, garlic powder, onion powder, Worcestershire sauce, cheese slices, burger buns, lettuce, tomato, onion, and pickles.
The ingredient list stays simple because the success of air fryer burgers comes from good beef, even patties, enough seasoning, and adding cheese only at the end.

Ground beef

Use 1 lb / 454 g ground beef for 4 regular burgers. For the juiciest result, choose 80/20 ground beef. For a slightly leaner patty with less smoke, 85/15 is a good middle ground.

Seasoning

A simple mix of salt, black pepper, garlic powder, and onion powder is enough. If the beef is good and the patties are shaped well, the seasoning should support the burger rather than cover it up. Since kosher salt brands vary, start with a little less if you are using fine table salt. Worcestershire sauce or steak sauce is optional, but a small amount adds savory depth without turning the burger into meatloaf.

Cheese

American cheese melts the easiest. Cheddar, pepper jack, Swiss, provolone, and mozzarella also work, but thicker slices may need the full final minute to soften. Because the air fryer fan is strong, add cheese only at the end so it does not slide off, burn, or blow around inside the basket.

Buns and toppings

Use burger buns, brioche buns, potato buns, lettuce wraps, or bowls. Classic toppings include lettuce, tomato, onion, pickles, mustard, ketchup, and a creamy burger sauce. For a homemade creamy base, use this homemade mayonnaise recipe and turn it into burger sauce with ketchup, mustard, pickle juice, and a little seasoning.

Do you need oil, parchment, or foil?

Fresh 80/20 or 85/15 patties usually do not need oil because the beef has enough fat. However, if you are using very lean fresh patties or dry-surfaced frozen patties, a light oil spray can help browning.

If you use parchment, choose perforated parchment made for air fryers and never block airflow under the patties. Likewise, use foil only if your air fryer manual allows it. Otherwise, trapped grease and blocked airflow can slow cooking, create smoke, and make the burgers cook unevenly.

In short, airflow matters more than lining the basket. If a liner blocks the holes or traps grease under the patties, skip it.

Best Ground Beef for Air Fryer Burgers

If juiciness matters most, start with 80/20. If your air fryer smokes easily or you prefer a slightly lighter burger, 85/15 is the safer everyday choice. Very lean beef can work, but it needs more care because it dries out faster.

Best ground beef guide for air fryer burgers comparing 80/20 beef for juicy burgers, 85/15 beef for balanced burgers, and 90/10 or leaner beef that can dry out faster.
For the juiciest air fryer burgers, 80/20 is the most forgiving, while 85/15 is a good everyday choice when you want less smoke without losing too much moisture.
Ground beef Best for What to know
80/20 Juiciest classic burgers Rich, flavorful, and forgiving, but it can drip more fat and create more smoke in some air fryers.
85/15 Balanced everyday burgers Still juicy, usually less smoky, and a good choice for indoor air fryer cooking.
90/10 or leaner Leaner burgers Can dry out faster. Add moisture and check the temperature early.

As a result, 80/20 or 85/15 is the most reliable choice for a first batch. Shape the patties gently, keep them even in thickness, and add a center dimple so they do not puff into domes as they cook.

If you are using very lean beef, add a little moisture with Worcestershire sauce, grated onion, mustard, or a small amount of oil. Then start checking early, because lean patties can move from done to dry quickly.

For a thinner burger with a harder griddled crust instead of a thicker air fryer patty, try this classic smash burger method.

How to Make Air Fryer Hamburgers

This method is for fresh ground beef patties. Once the patties are shaped, the rest is mostly about spacing, flipping, and checking the center. After that, assembly is quick because the burgers only need a short rest.

Step-by-step air fryer burger guide showing preheating, shaping patties, making a dimple, seasoning, cooking in one layer, flipping halfway, checking the center, and resting before assembly.
The method is simple once the order is clear: shape the patties evenly, cook them in one layer, flip halfway, check the center, then rest and assemble.

1. Preheat the air fryer

Preheat the air fryer to 375°F / 190°C for about 3 minutes. Although some models heat quickly, preheating helps the patties start cooking evenly.

If you skip preheating, add 1–2 minutes and start checking at the low end of the range. Once you know your air fryer, the timing becomes easier to repeat.

2. Shape the patties gently

Divide 1 lb / 454 g ground beef into 4 loose portions, about 4 oz / 113 g each. Then shape each portion into a patty about 4–4½ inches / 10–11.5 cm wide and ½ inch / 1.25 cm thick. Because the patties shrink as they cook, starting a little wider helps them fit the bun better later.

3. Make a center dimple

Press a shallow dimple into the center of each patty with your thumb or the back of a spoon. This small step helps the burgers stay flatter instead of puffing up in the middle.

4. Season both sides

Season the outside of the patties with salt, pepper, garlic powder, and onion powder. If using Worcestershire sauce, mix it in lightly before shaping, or brush a tiny amount over the patties before seasoning.

5. Air fry in a single layer

Place the patties in the basket in a single layer. Then leave space between them so hot air can move around each burger. Do not stack patties, and do not crowd the basket.

If all 4 patties do not fit with space between them, cook in batches. Otherwise, the burgers may steam instead of brown. Later batches may cook slightly faster because the air fryer is already fully hot.

6. Flip halfway

Air fry for 8–10 minutes total, flipping halfway through. Even if your model usually cooks without flipping, turning the patties makes the result more reliable across different basket styles.

7. Check the center

Check the thickest part of each patty. The burgers are done when the center reaches 160°F / 71°C. For the cleanest reading, insert the thermometer from the side so the tip lands in the center of the patty.

Digital thermometer inserted from the side into an air fryer burger patty showing 160°F and 71°C as the internal temperature for ground beef burgers.
Color is not a reliable doneness check for ground beef, so insert the thermometer from the side and make sure the center of the patty reaches 160°F.

If one patty is thicker than the others, it may need an extra minute or two. In that case, remove the finished patties and let the thicker one continue cooking until it reaches temperature.

8. Rest and assemble

Let the patties rest for about 2 minutes before assembling. Meanwhile, toast the buns, slice the toppings, or stir together a quick sauce.

Can you toast burger buns in the air fryer?

Yes. After the patties come out, place the buns cut-side up in the basket and air fry at 350–375°F / 175–190°C for 1–2 minutes. Watch closely because buns go from toasted to dry quickly.

How to Make Air Fryer Cheeseburgers

To make cheeseburgers, cook the patties first, then add cheese at the very end. The easiest method is to place a slice of cheese on each cooked patty during the final 30–60 seconds of cooking.

Air fryer cheeseburger guide showing cheese added at the end of cooking, melted cheese on the patty, and a reminder not to add cheese halfway.
Add cheese only after the burger is almost done; the final 30–60 seconds or residual basket heat is usually enough to melt it without making a mess.

Instead of running the fan longer just to melt cheese, you can also use the heat that is already trapped in the basket. Turn the air fryer off, place cheese on the hot patties, close the basket, and let the residual heat melt the cheese for about 1 minute.

If your cheese slides, folds, or blows off, do not fight the fan. Instead, melt the cheese with leftover heat after cooking. That way, the cheese softens over the patty instead of ending up on the basket.

Do not add cheese halfway through cooking. It can melt off the burger, stick to the basket, burn at the edges, or blow around inside the air fryer.

Frozen Burgers in the Air Fryer

Frozen patties are perfect for nights when nothing was thawed. They can go straight from freezer to basket; however, they need a little more patience because the center has to thaw before it can safely finish cooking.

That is why frozen burgers usually need a lower-to-moderate temperature and a wider time range than fresh patties. In practice, smaller ¼-lb / 113 g patties finish sooner, while thicker ⅓-lb / 150 g patties need the longer end of the range.

Fresh versus frozen air fryer burger guide comparing fresh patties cooked at 375°F with frozen patties cooked from frozen, including cook times, flipping, and 160°F internal temperature.
Fresh patties give you the most control, while frozen patties need extra time because the center must thaw before the burger can safely finish cooking.

How to air fry frozen burger patties

  1. Preheat the air fryer to 360–375°F / 182–190°C.
  2. Place frozen patties in a single layer.
  3. Air fry for 10–16 minutes, depending on patty size and thickness.
  4. Flip halfway through.
  5. Season after the surface warms slightly if seasoning will not stick at the beginning.
  6. Cook until the center reaches 160°F / 71°C.
  7. Add cheese during the final 30–60 seconds if making cheeseburgers.

For exact ranges by patty size, use the frozen burger timing chart above. Before adding cheese to frozen burgers, check the center first. Otherwise, the cheese may look melted while the patty still needs more time inside.

What about Bubba-style frozen burgers?

Bubba-style frozen burgers can go straight from freezer to air fryer. However, they are often thick and fatty, so they may need the longer end of the timing range. Start at 360–375°F, flip halfway, and check for 160°F in the center.

If you cook frozen burgers at 400°F / 200°C, start checking early. The outside can brown before the center is fully done, especially with thicker frozen patties. In that case, a thermometer prevents the most common mistake: serving a burger that looks done outside but is not finished inside.

Back to table of contents ↑

Ninja Foodi, Air Fryer Oven and Basket Air Fryer Notes

The basic method is the same in most basket-style air fryers: cook fresh ¼-lb / 113 g patties at 375°F / 190°C, flip halfway, and check for 160°F / 71°C in the center. However, stronger models, smaller baskets, dual-zone air fryers, and air fryer ovens can change the timing by a minute or two.

Likewise, air fryer ovens may need slightly longer because the cooking space is larger than a compact basket. That means the best approach is to use the chart first, then adjust the next batch based on your specific model.

Air fryer model notes for burgers comparing basket air fryers, Ninja Foodi style models, and air fryer ovens with timing adjustments and 160°F internal temperature guidance.
Use the timing chart as your starting point, then adjust by model: stronger basket air fryers may finish sooner, while air fryer ovens can need a minute or two longer.
Air fryer type What to adjust Best starting point
Ninja air fryer or Ninja Foodi air crisp These can cook efficiently, so check early. 375°F / 190°C, 8 minutes, then check the center.
Ninja Foodi Grill Air crisp and grill mode behave differently. Use air crisp for this method; follow grill-plate timing if using grill mode.
Cosori, Instant Vortex, Gourmia, PowerXL, and similar basket air fryers Basket size and airflow vary. Use the chart first, then adjust by 1–2 minutes after your first batch.
Air fryer oven or toaster oven air fryer The larger cavity may cook slightly slower. Use the middle rack, flip halfway, and check the center early.

Back to table of contents ↑

How to Keep Air Fryer Burgers Juicy

These burgers stay juicy when the beef has enough fat, the patties are handled gently, and the cooking time does not run too long. As a result, a few small details make the difference between a tender burger and a dry one.

  • Use 80/20 or 85/15 beef. A little fat keeps the burger tender.
  • Do not overmix. Handle the meat gently and stop once the patties hold together.
  • Make even patties. Uneven patties cook unevenly.
  • Add a center dimple. This helps prevent puffing.
  • Do not press the burgers. Pressing forces juices out.
  • Flip once. It improves even cooking without overhandling.
  • Check temperature early. Start checking at the low end of the timing range.
  • Rest briefly. Two minutes is enough for most burgers.

In other words, juicy burgers come from control, not extra steps. Once the patties are shaped well and cooked to temperature, the air fryer does most of the work.

Finished air fryer cheeseburger with melted cheese, toasted bun, lettuce, tomato, onion, and pickles, shown with an air fryer basket in the background.
A juicy air fryer burger comes from control, not extra steps: shape the patty evenly, avoid overcooking, and stop once the center reaches temperature.

When using lean beef, add a little moisture with Worcestershire sauce, grated onion, mustard, or a small amount of oil. Also, check the temperature earlier because lean patties move from done to dry quickly.

The goal is a patty with browned edges, melted cheese, and a tender center — not a dry puck that only tastes like seasoning. So, once the burger reaches temperature, stop cooking and let it rest.

Troubleshooting Air Fryer Hamburgers

If the burgers turn out dry, smoky, uneven, or messy, do not change everything at once. In most cases, one small adjustment fixes the next batch: use slightly fattier beef, make the patties thinner, clean the basket, or add cheese later.

What not to do when air frying burgers

Before changing the recipe, check the most common mistakes first. These are the small things that usually cause dry burgers, uneven cooking, smoking, or messy cheese.

Air fryer burger mistakes to avoid, including stacking patties, pressing burgers, adding cheese too early, blocking airflow, judging doneness by color, and using one timing for every patty.
Most air fryer burger problems come from blocked airflow, uneven patties, early cheese, or guessing doneness by color instead of checking the center.
  • Do not stack patties in the basket.
  • Avoid pressing the burgers while they cook.
  • Add cheese only at the end, not halfway through cooking.
  • Never block the basket holes with solid parchment or foil.
  • Do not judge doneness by color alone.
  • Avoid using the same timing for thin fresh patties and thick frozen patties.

Air fryer burger troubleshooting chart

Once you know what went wrong, use the chart below to fix the next batch. Instead of changing the beef, temperature, timing, and basket setup all at once, adjust one thing first.

Problem Likely cause Fix
Dry burgers Lean beef or overcooking Use 80/20 or 85/15 beef, and check the temperature earlier.
Smoking air fryer Fat dripping onto a hot base, old grease, or very fatty beef Clean the basket, avoid overcrowding, and try 85/15 beef if smoke is frequent.
Burger puffed up No center dimple Press a shallow dimple in each patty before cooking.
Undercooked center Patty too thick or too cold Cook longer at 375°F and check for 160°F in the center.
Cheese blew off Cheese added too early or fan too strong Add cheese during the final 30–60 seconds, or melt it with residual heat after cooking.
Uneven cooking Basket overcrowded Cook in a single layer and leave space between patties.
Air fryer burger troubleshooting guide showing fixes for dry burgers, smoking, outside browning before the center finishes, puffing in the middle, and checking for 160°F internal temperature.
The best fix depends on the problem: dry burgers need more moisture control, smoking needs cleaner airflow, and underdone centers need a thermometer check instead of more browning.

How to fix the next batch

If you are not sure what went wrong, start with the simplest fix first. Next time, change only one thing at a time. If the burgers were dry, check earlier or use fattier beef; if they smoked, clean the basket or use a slightly leaner blend.

If smoke happens, do not panic. Usually, it means fat is hitting a very hot surface or old grease is still in the basket. Before cooking the next batch, clean the basket, avoid overcrowding, and use the lower end of the temperature range if your air fryer runs hot.

The next batch becomes easier to control because you are matching the fix to the actual problem instead of guessing.

If this happens often with air fryer recipes, it is worth checking these common air fryer mistakes. Overcrowding, blocked airflow, old grease, and wrong timing can affect burgers, fries, wings, and almost everything else you cook in the basket.

Jump to recipe card → | Back to table of contents ↑

Best Sauces and Toppings for Air Fryer Hamburgers

A good burger only needs a few toppings, but the sauce can change the whole direction of the meal. For that reason, keep the patty simple and use the sauce to make it classic, spicy, Indian-style, or bowl-friendly.

Air fryer burger sauce and topping guide showing classic burger sauce, mango habanero sauce, mango mustard sauce, green chutney, pickles, onion, tomato, and lettuce.
Keep the burger patty simple and use the sauce to change the direction: classic, spicy-sweet, tangy, or fresh and herby.

Classic burger sauce is the easiest place to start: mix mayonnaise, ketchup, mustard, finely chopped pickles or pickle juice, garlic powder, onion powder, and a little black pepper. If you want a fresh base, use this homemade mayonnaise; if you need an egg-free spread, use eggless mayonnaise.

When you want heat, brush the cooked patty lightly with mango habanero sauce or serve it on the side for fries. Meanwhile, mango mustard sauce gives the burger a tangy, fruity change from plain mustard.

An Indian-style burger works especially well with green chutney, onion, tomato, mayo, and a pinch of chaat masala. Because the chutney is bright and herb-heavy, it cuts through the richness of the patty.

Air Fryer Burger Variations

Once the basic method is set, you can change the toppings and sauces without changing the cooking technique. That way, one reliable patty method can turn into several different dinners.

Air fryer burger variations guide showing a classic cheeseburger, spicy mango habanero burger, mango mustard burger, green chutney burger, and a low-carb lettuce-wrap option.
Once the basic air fryer patty is reliable, the easiest way to change the burger is through the sauce: classic, spicy-sweet, tangy, herby, or low-carb.
  • Classic cheeseburger: American cheese, pickles, onion, lettuce, tomato, and burger sauce.
  • Spicy mango habanero burger: Cheddar, onions, pickles, and mango habanero sauce.
  • Mango mustard burger: Lettuce, pickles, onion, and mango mustard sauce.
  • Green chutney burger: Green chutney, mayo, onion, tomato, and chaat masala.
  • Low-carb burger bowl: Lettuce, pickles, cheese, onions, tomato, and sauce without the bun.
  • Pesto cheeseburger: Pesto mayo, tomato, mozzarella or provolone, and roasted peppers.

For a lower-carb plate, keep the same patty method and build the meal around lettuce, pickles, cheese, onions, tomato, and sauce instead of a bun.

What to Serve With Air Fryer Hamburgers

For an easy burger-night plate, pick one sauce, one crispy side, and something fresh to cut through the richness. That way, the meal feels complete without turning dinner into a project.

For the classic burger-and-fries plate, serve the patties with homemade fries, wedges, or potato snacks. If a make-ahead side is easier, potato salad is one of the best choices. For a party-style spread, add one or two ideas from these potato appetizers.

If the air fryer is already out, keep the sides easy. Air fryer mozzarella sticks make the meal feel like a game-day plate, while air fryer croquettes are a good option when you want something crispy that is not fries.

For something fresh, add a cabbage slaw, cucumber salad, onion-tomato salad, or raw papaya salad. A crisp fresh side helps balance the richness of the burgers and cheese.

Storage and Reheating

Make-ahead tip: You can shape the raw patties up to 24 hours ahead and refrigerate them in a covered container with parchment between layers. Keep them cold until cooking, then air fry straight from the fridge and check the center for 160°F / 71°C.

Air fryer burger storage guide showing raw patties made ahead with parchment, cooked patties stored separately from buns and toppings, and patties reheated in the air fryer.
Store patties, buns, and toppings separately so leftovers reheat cleanly; warm the patty first, then assemble the burger fresh.

Cooked hamburger patties store better than fully assembled burgers. If you know you will have leftovers, store the patties, buns, cheese, sauces, and toppings separately. Otherwise, the bun can turn soggy while the lettuce and tomato lose their texture.

Once the patties are cooked, refrigerate leftovers within 2 hours. If the room is very hot, refrigerate them within 1 hour. After that, reheat only the patties and assemble the burgers fresh so the buns and toppings stay in better shape.

  • Refrigerate: Cool cooked patties, then store in an airtight container for 3–4 days.
  • Freeze: Wrap cooked patties individually and freeze for up to 2 months.
  • Reheat in the air fryer: Reheat patties at 350°F / 175°C until warmed through.
  • Add cheese after reheating: Cheese melts better when added at the end instead of reheated from cold.
  • Avoid reheating assembled burgers: The bun can dry out while lettuce, tomato, and sauce turn soggy.

For more air fryer recipes with ground beef, this burger method is the easiest starting point because the patties cook quickly, portion neatly, and can be served on buns, in bowls, or over salad.

Air Fryer Burgers Recipe Card

Air Fryer Burgers

These air fryer burgers are built for a quick, juicy first batch: fresh ground beef, simple seasoning, 375°F heat, one flip, and cheese added only at the end.

Yield 4 burgers
Prep Time 10 minutes
Cook Time 8–10 minutes
Total Time 18–20 minutes

Ingredients

  • 1 lb / 454 g ground beef, preferably 80/20 or 85/15
  • ¾ tsp kosher salt, or to taste
  • ½ tsp black pepper
  • ½ tsp garlic powder
  • ½ tsp onion powder
  • 1 tsp / 5 ml Worcestershire sauce or steak sauce, optional
  • 4 cheese slices, about 3 oz / 85 g total, optional
  • 4 burger buns
  • Lettuce, tomato, onion, pickles, sauce, or toppings of choice

Instructions

  1. First, preheat the air fryer to 375°F / 190°C.
  2. Next, divide the beef into 4 loose portions, about 4 oz / 113 g each.
  3. Then shape each portion into a patty about 4–4½ inches / 10–11.5 cm wide and ½ inch / 1.25 cm thick.
  4. After that, press a shallow dimple into the center of each patty so the burgers stay flatter as they cook.
  5. Once the patties are shaped, season both sides with salt, pepper, garlic powder, and onion powder. If using Worcestershire sauce, mix it in gently before shaping or brush a tiny amount over the patties before seasoning.
  6. Then place the patties in the air fryer basket in a single layer, leaving space between them.
  7. As the burgers cook, flip them halfway through the 8–10 minute cooking time.
  8. Once the time is close, check the center of each patty. For the most accurate reading, insert the thermometer through the side of the patty so the tip reaches the center. The burgers are done when they reach 160°F / 71°C.
  9. If making cheeseburgers, add cheese during the final 30–60 seconds, or place cheese on the hot cooked patties and close the warm basket briefly until melted.
  10. Finally, rest the patties for 2 minutes, then assemble with buns, sauce, and toppings.

Notes

  • Best beef: Use 80/20 for the juiciest burgers or 85/15 for a slightly leaner burger with less smoke.
  • Salt: Kosher salt brands vary. If using fine table salt, start with less and adjust to taste next time.
  • Preheating: If you skip preheating, add 1–2 minutes and start checking early.
  • Batch cooking: If the patties do not fit in a single layer with space between them, cook in batches. Later batches may cook slightly faster.
  • Oil: Fresh 80/20 or 85/15 patties usually do not need oil. Use a light spray only for very lean or dry-surfaced patties.
  • Frozen patties: Cook frozen ¼-lb / 113 g patties at 360–375°F for 10–14 minutes and frozen ⅓-lb / 150 g patties for 12–16 minutes, flipping halfway.
  • Bubba-style burgers: Start at 360–375°F and use the longer end of the timing range for thick frozen patties.
  • Cheese: Add cheese at the end only. Adding it too early can make it slide off or blow around.
  • Doneness: Ground beef burgers should reach 160°F / 71°C in the center.
  • Parchment or foil: Use only if your air fryer manual allows it, and never block airflow or trap grease under the patties.
  • Storage: Refrigerate cooked patties within 2 hours, or within 1 hour if the room is very hot. Store patties separately from buns and toppings for the best leftovers.

If you are cooking a different patty size, use the recipe card as the base and the timing chart above as the adjustment guide. That way, the method stays simple while the timing changes to match the burger.

One rule matters most: timing can change, but doneness should be checked with a thermometer. Use the chart for timing, then use the center temperature to decide when the burgers are done.

Air fryer burgers time and temperature guide showing 375°F or 190°C, 8 to 10 minutes for fresh patties, flip halfway, cook to 160°F or 71°C, and adjust timing for frozen burgers.
Use this as the quick visual summary: fresh patties, frozen patties, cheeseburgers, and the center-temperature check that keeps air fryer burgers reliable.

Back to table of contents ↑

FAQs About Air Fryer Burgers and Hamburgers

Can you cook hamburgers in an air fryer?

Yes. When cooked in a single layer, hamburgers cook well in an air fryer because the hot circulating air reaches the top, bottom, and sides of each patty. For the best result, leave space between the patties and flip halfway.

What temperature do you cook hamburgers in the air fryer?

For most fresh hamburger patties, use 375°F / 190°C. This temperature gives the center enough time to cook while still helping the outside brown.

How long do hamburgers take in the air fryer?

In most cases, fresh ¼-lb / 113 g hamburger patties take 8–10 minutes at 375°F / 190°C. However, thinner patties may finish in 6–8 minutes, while thicker patties may need 10–12 minutes.

How long do you cook ½-pound burgers in the air fryer?

Fresh ½-lb / 225 g burgers usually need about 14–18 minutes at 360–370°F / 182–188°C, depending on thickness and air fryer strength. Flip halfway and check that the center reaches 160°F / 71°C.

Do you flip burgers in the air fryer?

Yes. Although some air fryers cook fairly evenly without flipping, flipping halfway gives more reliable results across different basket styles and patty thicknesses.

What internal temperature should air fryer hamburgers reach?

Ground beef burgers should reach 160°F / 71°C in the center. Since color can be misleading, use a food thermometer rather than judging by appearance alone. For the best reading, insert the thermometer from the side so the tip reaches the center of the patty.

How long do frozen burgers take in the air fryer?

Usually, frozen burger patties take 10–16 minutes. A ¼-lb / 113 g frozen patty often takes 10–14 minutes, while a thicker ⅓-lb / 150 g frozen patty may take 12–16 minutes.

Can I cook frozen burgers at 400°F in the air fryer?

Yes, but check early. At 400°F, the outside can brown before the center is fully done, especially with thick frozen patties. For more control, use 360–375°F and cook until the center reaches 160°F.

When should you add cheese to air fryer burgers?

Once the burger is almost done, add cheese during the final 30–60 seconds. If the fan blows the cheese around, turn the air fryer off and let the residual heat melt the cheese instead.

Why did my air fryer burger smoke?

Usually, smoke comes from fat dripping onto a hot base, old grease in the basket, overcrowding, or very fatty beef. To prevent it next time, clean the basket before cooking, avoid crowding, and use 85/15 beef if smoke is a recurring problem.

Can I make these burgers in a Ninja, Cosori, Instant Vortex, Gourmia, or PowerXL air fryer?

Yes. The method is the same: cook fresh ¼-lb patties at 375°F, flip halfway, and check for 160°F in the center. However, smaller or stronger air fryers may finish a minute or two faster, while crowded baskets or thicker patties may need longer. For Ninja Foodi Grill-style models, use the air-fry function unless you are intentionally using the grill plate.

Can you cook burgers in an air fryer oven?

Yes. Use the air fry setting, place the patties on a rack or tray with space between them, flip halfway, and start with the same time and temperature chart. Air fryer ovens may need 1–2 extra minutes because the cooking space is larger.

Can I cook more than four burgers at once?

Only if they fit in a single layer with space between them. Otherwise, cook in batches. Crowding the basket slows cooking, blocks airflow, and can make the burgers steam instead of brown.

Do I need to spray the air fryer basket for burgers?

Usually, no. If you are using 80/20 or 85/15 beef, the patties release enough fat as they cook. However, if your patties are very lean or your basket tends to stick, use a light spray instead of adding extra oil to the burgers.

Can I make turkey burgers this way?

Yes, but turkey burgers are leaner and need different doneness guidance. Since ground poultry should reach 165°F / 74°C, do not use the 160°F ground beef temperature for turkey burgers.

Can I use foil or parchment under air fryer burgers?

Use foil or parchment only if your air fryer manual allows it. Also, never block airflow under the patties, because blocked airflow can slow cooking, trap grease, create smoke, and make the burgers cook unevenly.

Back to table of contents ↑ | Back to top ↑

Posted on 4 Comments

Fish Tacos Recipe: Best Fish, Sauce, Slaw & Easy Methods

Three cod fish tacos in warm corn tortillas with cabbage slaw, lime crema, cilantro, and lime wedges.

A good fish tacos recipe should answer more than one question. Yes, you need tender fish, warm tortillas, crunchy slaw, and a creamy sauce. However, the real decision usually starts before you cook: what is the best fish for fish tacos, and should you pan-sear, grill, fry, bake, or air fry it?

This recipe for fish tacos starts with the most useful default: pan-seared cod fish tacos with lime crema and cabbage slaw. Cod is mild, flaky, easy to find, and flexible enough for weeknight tacos, Baja-style fried tacos, baked fish tacos, and air fryer fish tacos. When you have mahi mahi, tilapia, halibut, snapper, haddock, salmon, or frozen fish, this guide also shows you how to adjust.

The goal is simple: make fish tacos that taste fresh, bright, and balanced instead of soggy, bland, dry, or overloaded. Use this fish tacos recipe when you need easy fish tacos for dinner, then use the fish guide, sauce options, slaw tips, toppings, and method variations to make the tacos fit what you have.

Quick Answer: Best Fish for This Fish Tacos Recipe

The best fish for fish tacos is a firm, mild white fish such as cod, mahi mahi, halibut, snapper, haddock, or tilapia. Cod is the easiest all-purpose choice because it is mild, flaky, widely available, and works pan-seared, baked, air fried, or beer-battered. Meanwhile, mahi mahi is best for grilled fish tacos, tilapia is the best budget choice, halibut and snapper feel more premium, and salmon works best when blackened or boldly seasoned.

For the easiest fish tacos, season cod or another white fish with chili powder, cumin, smoked paprika, garlic, salt, lime, and a little oil. Then, cook it quickly until just flaky and serve it in warm corn tortillas with cabbage slaw, creamy lime sauce, cilantro, jalapeño, avocado, and fresh lime. For Baja-style fish tacos, use beer-battered cod with chipotle crema and crunchy slaw.

Fish Tacos at a Glance

Best default fishCod
Best other fishMahi mahi, tilapia, halibut, snapper, haddock, salmon
Best methodPan-seared for easiest, Baja-style fried for crispy, grilled for firm fish, baked for hands-off cooking, air fryer for lighter crispy tacos
Best tortillasCorn for classic flavor, flour for softer tacos
Best sauceLime crema or chipotle crema
Best toppingCabbage slaw, cilantro, lime, avocado, mango salsa, jalapeño
Biggest mistakeWet fish, cold tortillas, too much sauce, or assembling too early

Which Fish Tacos Should I Make?

Choose the fish taco style based on the texture and cooking method you need. The pan-seared cod version is the easiest default, while Baja-style tacos are best when crispy fried fish is the main goal.

A vertical fish taco chooser guide with six options: easy weeknight cod tacos with lime crema, crispy Baja fish tacos, grilled mahi mahi tacos with mango salsa, blackened salmon tacos, air fryer cod tacos, and fish stick shortcut tacos.
Not sure which version to make first? Start with cod for the easiest weeknight fish tacos, choose Baja when you want crispy fried fish, use mahi mahi for grilled tacos, and go with salmon when you want a bolder blackened version. Air fryer cod and fish stick tacos are the fastest shortcut paths when convenience matters.
When You NeedMake This VersionBest FishBest Topping
Easiest weeknight tacosPan-seared fish tacosCod or tilapiaCabbage slaw + lime crema
Crispy restaurant-style tacosBaja fish tacosCod or haddockChipotle crema + slaw
Grilled tacosGrilled fish tacosMahi mahi or halibutMango salsa + avocado
Bold spicy tacosBlackened fish tacosSalmon, cod, or mahi mahiAvocado + lime crema
Lighter crispy tacosAir fryer fish tacosCod or tilapiaSlaw + lime crema
Shortcut tacosFish stick tacosFrozen breaded fishFresh slaw + lime

The Simple Fish Taco Formula

The easiest way to build a good recipe for fish tacos is to use one fish, one crunchy topping, one creamy sauce, one fresh finish, and warm tortillas. This keeps the taco balanced instead of overloaded.

PartBest Choices
FishCod, mahi mahi, tilapia, halibut, snapper, haddock, salmon
Cooking methodPan-seared, grilled, baked, air fried, blackened, or Baja-style fried
CrunchCabbage slaw, radish, pickled onions, shredded lettuce when needed
SauceLime crema, chipotle crema, avocado crema, Greek yogurt sauce
Fresh finishCilantro, lime, mango salsa, pico de gallo, jalapeño
TortillaCorn for classic flavor, flour for softer tacos
A vertical guide titled “Simple Fish Taco Formula” showing the key parts of a balanced fish taco: fish, crunch, sauce, fresh finish, and warm tortillas, with examples like cod, mahi mahi, cabbage slaw, lime crema, cilantro, salsa, and corn or flour tortillas.
Use this formula to keep fish tacos balanced instead of overloaded: start with one fish, add one crunchy element, choose one creamy sauce, finish with something fresh, and serve it all in warm tortillas. It is the easiest way to build tacos that taste bright, layered, and clean without turning soggy or heavy.

Why This Fish Tacos Recipe Works

This fish tacos recipe works because every part has a job. The cod stays mild and flaky, the spice mix gives the fish enough flavor without hiding it, the cabbage slaw adds crunch, the lime crema adds fat and acidity, and the warm tortillas hold everything together.

  • Cod is easy to control: it cooks quickly, flakes cleanly, and works with most toppings.
  • The slaw is lightly dressed: it stays crisp instead of turning wet and heavy.
  • The sauce is tangy, not just creamy: lime keeps the taco bright.
  • The toppings are flexible: you can keep the tacos simple or build toward Baja, grilled, blackened, air fryer, or mango salsa versions.
  • The assembly happens last: warm tortillas, hot fish, crisp slaw, and fresh toppings keep the tacos from getting soggy.

Fish Taco Ingredients

This fish tacos recipe is built in parts: seasoned fish, warm tortillas, crunchy slaw, creamy sauce, and fresh toppings. Because each part has a job, the tacos taste clean instead of heavy when you keep the pieces simple.

A vertical fish taco ingredients guide showing cod or firm white fish, chili powder, paprika, cumin, garlic, lime, corn and flour tortillas, cabbage slaw, lime crema, chipotle crema, avocado, jalapeño, cilantro, and lime.
Great fish tacos are built in parts: mild flaky fish, warm tortillas, crisp slaw, creamy sauce, and fresh toppings. Keep each part simple and balanced so the tacos taste bright and fresh instead of heavy, soggy, or overloaded.

Fish

Use 1 pound of cod for the default recipe. You can also use mahi mahi, tilapia, haddock, halibut, snapper, grouper, bass, or another firm white fish. When using salmon, season it more boldly because it has a richer flavor than mild white fish.

Seasoning

The fish seasoning uses chili powder, smoked paprika, cumin, garlic powder, onion powder, salt, black pepper, lime juice, and oil. As a result, the fish tastes warm, bright, and lightly smoky without becoming aggressively spicy.

Fish Taco Seasoning

The easiest fish taco seasoning is chili powder, smoked paprika, cumin, garlic powder, onion powder, salt, black pepper, and a little lime. For a smokier flavor, add chipotle powder. For blackened fish tacos, increase the paprika, black pepper, and cayenne.

Flaky white fish needs enough seasoning to avoid tasting flat, but not so much that the fish disappears. Tilapia needs a slightly bolder hand, while salmon works best with a blackened-style spice blend.

A vertical fish taco seasoning guide showing chili powder, cumin, garlic, smoked paprika, chipotle, lime, salt, cayenne, jalapeño, mild white fish, salmon, and tilapia, with tips for base seasoning, smoky flavor, heat, and bolder fish.
Seasoning is what keeps fish tacos from tasting flat. Use chili powder, cumin, garlic, smoked paprika, lime, and salt for the base blend, then adjust the heat with cayenne or jalapeño. Mild white fish needs enough seasoning to taste bright, while salmon and tilapia benefit from a bolder hand.

Tortillas

Corn tortillas give fish tacos the most classic flavor. However, flour tortillas are softer and less likely to crack, so they are useful for bigger tacos. Whichever you use, warm them before filling so they bend instead of breaking.

Corn vs Flour Tortillas for Fish Tacos

Use corn tortillas for the most classic fish taco flavor. They taste more toasty and earthy, which works especially well with Baja fish tacos, cod fish tacos, and chipotle crema. Use flour tortillas for a softer, more flexible taco that is less likely to crack.

When corn tortillas break, warm them longer and keep them covered. For saucier tacos or heavy fillings, double up small corn tortillas.

Slaw

Cabbage is better than lettuce here because it stays crunchy under warm fish and sauce. Use green cabbage, red cabbage, or a bagged slaw mix. Then, add lime, cilantro, salt, and jalapeño to keep it fresh.

Sauce

A good fish taco recipe with cabbage slaw needs a creamy, tangy sauce to tie the fish, tortilla, and toppings together. The default sauce uses sour cream or Greek yogurt, a little mayonnaise, lime juice, garlic powder, salt, and hot sauce or chipotle.

Toppings

Good fish taco toppings add contrast. Use cilantro, jalapeño, avocado, pico de gallo, mango salsa, pickled onions, radish, cotija, hot sauce, or extra lime. However, avoid piling on too many wet toppings at once or the tortillas can turn soggy.

Best Fish for Fish Tacos

The best fish for this fish tacos recipe depends on the style of taco you want. In most cases, mild white fish is the safest choice because it cooks quickly, flakes easily, and lets the sauce, slaw, lime, and toppings shine.

FishBest UseTextureBest Method
CodBest all-purpose fish tacosMild, flaky, cleanPan-seared, baked, air fryer, Baja-style
Mahi mahiGrilled fish tacos and mango salsa tacosFirm, meaty, mildGrilled, blackened, skillet
TilapiaBudget-friendly easy fish tacosSoft, mild, thinSkillet, baked, air fryer
HalibutPremium fish tacosFirm, clean, meatyGrilled, pan-seared
SnapperRestaurant-style fish tacosDelicate, sweet, freshGrilled, pan-seared
HaddockCod substituteFlaky, mildBaked, pan-seared, fried
SalmonBold fish tacosRich, stronger flavorBlackened, grilled, air fryer
CatfishFried fish tacosSturdy, earthy, moistFried, cornmeal-crusted, blackened

Best overall fish: cod. Best fish for grilling: mahi mahi or halibut. Best budget fish: tilapia. Best fish for Baja tacos: cod. Best premium fish: halibut or snapper. Best bold fish taco: salmon with blackened seasoning.

A vertical guide titled “Best Fish for Fish Tacos” comparing cod, mahi mahi, tilapia, halibut, snapper, salmon, and catfish, with each fish matched to its best taco use such as all-purpose, grilled, budget, premium, restaurant-style, blackened, or fried.
The best fish for fish tacos depends on the style you want. Use cod when you want the easiest all-purpose taco, mahi mahi when you want grilled fish, tilapia when you need a budget-friendly option, salmon when you want bold blackened flavor, and catfish when crispy fried tacos are the goal.

Buying tip: choose fish that looks moist, smells clean rather than strongly fishy, and fits your budget. For the easiest result, choose a firm, mild fish that will hold together when cooked and still taste clean with lime, slaw, and sauce.

Can You Use Frozen Fish for Fish Tacos?

Yes, frozen fish works well for this fish tacos recipe as long as you thaw it completely and pat it very dry before seasoning. Otherwise, extra surface moisture makes fish steam instead of sear, which can make the tacos taste watery. Frozen cod, tilapia, haddock, mahi mahi, and halibut are all useful choices.

For best texture, thaw frozen fish overnight in the refrigerator. When the fish releases a lot of liquid after thawing, drain it and dry the surface again before adding oil, lime, and spices. The FDA seafood safety guidance also recommends thawing frozen seafood gradually in the refrigerator overnight when possible.

A vertical frozen fish for fish tacos guide showing six steps: thaw frozen fish overnight, drain extra liquid, pat the fish very dry, season right before cooking, cook hot and fast, and choose frozen cod, tilapia, haddock, or mahi mahi.
Frozen fish can make excellent fish tacos, but moisture is the part to control. Thaw it fully, drain any released liquid, pat the fish very dry, and season right before cooking so it sears instead of steaming and keeps the tacos fresh rather than watery.

Fish to Avoid for Fish Tacos

Avoid very delicate fillets that fall apart before they reach the tortilla, such as very thin sole or flounder, unless you are comfortable handling them. Also be careful with very lean, steak-like fish such as tuna or swordfish because they can turn dry in tacos when overcooked. When in doubt, choose cod, mahi mahi, tilapia, haddock, halibut, snapper, or another mild white fish.

Fish Taco Sauce

The sauce for these fish tacos ties everything together. Since the fish is lean, the cabbage is crunchy, and the tortilla is soft, a creamy, tangy sauce gives every bite balance.

Easy Lime Crema

  • 1/3 cup sour cream or Greek yogurt
  • 2 tablespoons mayonnaise
  • 1 tablespoon fresh lime juice
  • 1/2 teaspoon garlic powder
  • 1 teaspoon hot sauce or finely chopped chipotle in adobo
  • Pinch of salt

Stir until smooth. Then, taste and adjust with more lime for brightness, more hot sauce for heat, or a tiny pinch of sugar or honey when the sauce tastes too sharp.

Fish Taco Sauce Variations

  • Chipotle crema: add chopped chipotle in adobo or chipotle powder.
  • Avocado crema: blend the sauce with half a ripe avocado.
  • No-mayo sauce: use all Greek yogurt or sour cream.
  • Spicy sriracha sauce: use sriracha instead of chipotle.
  • Extra-lime crema: add more lime zest and lime juice for a sharper finish.
  • Dairy-free sauce: use thick plant-based mayo and season it with lime, garlic, and chipotle.

For a smokier or richer sauce, use this lime crema as the base and borrow the spicy mayo direction from our homemade mayo recipe.

A vertical fish taco sauce guide comparing lime crema, chipotle crema, avocado crema, Greek yogurt sauce, dairy-free sauce, and chutney crema, with notes on which sauces work best for default, Baja, grilled, lighter, plant-based, and MasalaMonk-style fish tacos.
Choose the sauce based on the taco style: lime crema is the easiest default, chipotle crema is best with crispy Baja fish tacos, avocado crema works well with grilled fish, and chutney crema adds a bright MasalaMonk-style twist when you want something fresher and more herb-forward.

MasalaMonk-Style Chutney Crema

For a brighter Indian-inspired fish taco sauce, stir 1 to 2 teaspoons of green chutney into Greek yogurt or sour cream with a squeeze of lime. It works especially well with crispy fish, grilled fish, or a lightly spiced cod filling.

Fish Taco Slaw

The slaw for this fish taco recipe with cabbage slaw should be crisp, bright, and lightly dressed. It should not taste like heavy coleslaw. Instead, the cabbage should add crunch and help protect the tortilla from the warm fish and sauce.

Simple Cabbage Slaw Formula

  • 2 cups shredded cabbage or slaw mix
  • 1 tablespoon fresh lime juice
  • 2 tablespoons chopped cilantro
  • 1 tablespoon thinly sliced jalapeño, optional
  • Pinch of salt

Toss the slaw 10 to 15 minutes before serving. That gives the cabbage enough time to soften slightly without collapsing or turning watery.

When making the tacos ahead, shred the cabbage early but wait to add lime and salt until closer to serving. That way, the slaw stays crisp instead of limp.

A fish taco slaw guide showing a bowl of crisp green and purple cabbage slaw with lime, cilantro, jalapeño, a timing tip to dress 10 to 15 minutes before serving, and a warning not to salt too early.
Cabbage slaw keeps fish tacos crisp, bright, and balanced, but timing matters. Add lime and salt close to serving so the cabbage softens slightly without turning watery, then use cilantro and jalapeño for freshness and gentle heat.

How to Make Fish Tacos

This fish tacos recipe works best when you control the timing. First, make the sauce. Next, toss the slaw. Then, cook the fish quickly, warm the tortillas, and assemble right before eating.

A step-by-step fish tacos guide showing six stages: make lime crema, toss cabbage slaw, season fish with oil, lime and spices, cook fish hot and fast, warm tortillas, and assemble the tacos right before serving.
Fish tacos turn out best when the timing is right: make the sauce and slaw first, season and cook the fish quickly, keep the tortillas warm, and assemble everything at the end. That order keeps the fish tender, the slaw crisp, and the tacos fresh instead of soggy.

1. Make the Sauce

Stir together the sour cream or Greek yogurt, mayonnaise, lime juice, garlic powder, hot sauce or chipotle, and salt. Then, refrigerate the sauce while you prepare the rest of the recipe.

2. Toss the Slaw

Combine the shredded cabbage, lime juice, cilantro, jalapeño, and salt. Keep it lightly dressed. When liquid collects at the bottom of the bowl, leave it behind while assembling the tacos.

3. Season the Fish

Pat the fish dry, then coat it with oil, lime juice, chili powder, smoked paprika, cumin, garlic powder, onion powder, salt, and black pepper. However, do not leave the fish sitting in lime juice for a long time because the acid can change the texture.

4. Cook the Fish

Heat a skillet over medium-high heat. Cook the fish until lightly browned and just flaky, usually 2 to 4 minutes per side depending on thickness. Fish is safely cooked when it reaches 145°F / 63°C, or when the flesh is no longer translucent and separates easily with a fork, according to FoodSafety.gov.

5. Warm the Tortillas

Warm the tortillas in a dry skillet, over a gas flame, or wrapped in a damp towel in the microwave. Then, keep them covered so they stay soft.

6. Assemble the Tacos

Add slaw to each tortilla, then fish, sauce, cilantro, avocado, jalapeño, and lime. Serve immediately. Fish tacos are best when the fish is hot, the tortilla is warm, and the slaw is still crisp.

For the best texture, do not overfill each tortilla. A small layer of slaw, a few pieces of fish, a drizzle of sauce, and one or two fresh toppings usually taste better than a taco packed with everything at once.

How Much Fish Do You Need for Fish Tacos?

Plan on about 4 ounces of raw fish per person, or 1 pound of fish for 4 people. That usually makes about 8 small tacos if each person gets 2 tacos. For bigger appetites, parties, or taco-bar serving, plan closer to 5 to 6 ounces of fish per person.

Fish Taco Cooking Times by Thickness

Fish cooks quickly, so thickness matters more than the exact species. Use these times as a guide, then check that the fish is opaque, flakes easily, and reaches 145°F / 63°C.

Fish ThicknessSkillet TimeBest Use
Thin fillets1 to 2 minutes per sideTilapia, thin cod, small snapper fillets
Medium fillets2 to 4 minutes per sideCod, haddock, mahi mahi pieces
Thick fillets4 to 5 minutes per side, or finish covered brieflyHalibut, thick cod, salmon
A fish taco cooking times guide showing thin fillets cooked 1 to 2 minutes per side, medium fillets cooked 2 to 4 minutes per side, thick fillets cooked 4 to 5 minutes per side, and doneness cues of opaque, flaky fish at 145°F or 63°C.
Fish cooks quickly, so thickness matters more than the exact type of fish. Thin fillets like tilapia need only a minute or two per side, while thicker cod, halibut, or salmon may need longer. Stop when the fish is opaque, flakes easily, and reaches 145°F / 63°C.

Fish Tacos Recipe Card

Pan-Seared Cod Fish Tacos with Lime Crema and Cabbage Slaw

This easy fish tacos recipe uses mild cod, warm tortillas, crunchy cabbage slaw, and a creamy lime sauce. Use cod as the default, or swap in mahi mahi, tilapia, haddock, halibut, snapper, or another firm white fish.

Yield: 4 servings / 8 small tacos

Prep time: 20 minutes

Cook time: 10 minutes

Total time: 30 minutes

Equipment

  • Large skillet
  • Mixing bowls
  • Tongs or fish spatula
  • Instant-read thermometer, optional

Ingredients

For the fish

  • 1 pound cod or firm white fish, cut into large pieces
  • 1 tablespoon olive oil, plus more for the pan if needed
  • 1 tablespoon fresh lime juice
  • 1 teaspoon chili powder
  • 1 teaspoon smoked paprika
  • 1/2 teaspoon ground cumin
  • 1/2 teaspoon garlic powder
  • 1/4 teaspoon onion powder
  • 3/4 teaspoon kosher salt, or to taste
  • 1/4 teaspoon black pepper
  • Pinch of cayenne, optional

For the lime crema

  • 1/3 cup sour cream or Greek yogurt
  • 2 tablespoons mayonnaise
  • 1 tablespoon fresh lime juice
  • 1/2 teaspoon garlic powder
  • 1 teaspoon hot sauce or finely chopped chipotle in adobo
  • Pinch of salt

For the slaw

  • 2 cups shredded cabbage or slaw mix
  • 1 tablespoon fresh lime juice
  • 2 tablespoons chopped cilantro
  • 1 tablespoon thinly sliced jalapeño, optional
  • Pinch of salt

For serving

  • 8 small corn tortillas or flour tortillas
  • Fresh cilantro
  • Lime wedges
  • Avocado slices, optional
  • Mango salsa or pico de gallo, optional
  • Crumbled cotija, optional
  • Hot sauce, optional

Method

  1. Make the sauce. Stir together the sour cream or Greek yogurt, mayonnaise, lime juice, garlic powder, hot sauce or chipotle, and salt. Refrigerate until needed.
  2. Make the slaw. Toss cabbage with lime juice, cilantro, jalapeño, and salt. Set aside for 10 to 15 minutes while you cook the fish.
  3. Season the fish. Pat the fish dry. Toss with olive oil, lime juice, chili powder, smoked paprika, cumin, garlic powder, onion powder, salt, black pepper, and cayenne if using.
  4. Cook the fish. Heat a large skillet over medium-high heat. Add a little oil if needed. Cook the fish for 2 to 4 minutes per side, depending on thickness, until browned in spots and just flaky.
  5. Warm the tortillas. Warm tortillas in a dry skillet, over a flame, or wrapped in a damp towel in the microwave.
  6. Assemble. Add slaw to each tortilla, then fish, lime crema, cilantro, avocado, lime, and any extra toppings. Serve immediately.

Notes

  • Best fish swap: mahi mahi, tilapia, haddock, halibut, snapper, or another firm white fish.
  • For salmon tacos: use a stronger blackened-style seasoning and cook until just done.
  • For mild tacos: skip cayenne, use plain lime crema, and serve hot sauce on the side.
  • For spicy tacos: add cayenne to the fish, chipotle to the crema, and jalapeño or serrano to the toppings.
  • For crispier fish: dust the seasoned fish lightly with cornstarch or use the air fryer/panko method below.
A saveable recipe card for pan-seared cod fish tacos with cabbage slaw, lime crema, warm tortillas, lime wedges, avocado, and quick notes for fish, seasoning, slaw, sauce, cooking time, and serving.
Save this base version when you want easy fish tacos without overthinking the choices. Cod gives you mild, flaky fish, cabbage slaw keeps the tacos crisp, lime crema adds brightness, and a quick 2–4 minute skillet cook keeps the fish tender instead of dry.

Best Way to Cook Fish for Tacos

The best way to cook fish for tacos depends on the texture you need. Pan-searing is the easiest everyday method, Baja-style frying gives the crispiest fish, grilling adds smoky flavor, baking is hands-off, and the air fryer gives a lighter crispy shortcut.

MethodBest FishBest ForReader Tip
Pan-searedCod, tilapia, haddock, snapperEasy weeknight fish tacosPat fish dry and cook hot and fast.
Baja-style friedCod, haddock, halibutCrispy fish tacosKeep fried fish uncovered briefly so steam does not soften the coating.
GrilledMahi mahi, halibut, salmon, snapperSmoky fish tacosUse firmer fish that can handle flipping.
BakedCod, haddock, tilapia, halibutHands-off cookingAdd crunchy slaw and bright sauce because baked fish is softer.
Air fryerCod, tilapia, haddock, salmonLighter crispy tacosDo not overcrowd the basket.
BlackenedCod, mahi mahi, salmon, snapperBold spicy fish tacosUse high heat, but do not burn the spices.
A cooking method guide for fish tacos comparing pan-seared, Baja fried, grilled, baked, air fryer, and blackened fish tacos with notes for easiest weeknight, crispiest, smoky, hands-off, lighter crispy, and bold spicy methods.
Choose the cooking method based on the texture you want. Pan-seared fish is the easiest weeknight option, Baja fried fish gives the crispiest tacos, grilled fish adds smoky flavor, baked fish is hands-off, air fryer fish is lighter and crisp, and blackened fish brings the boldest spice.

Baja Fish Tacos: Crispy, Fried and Beer-Battered

For a Baja-style recipe for fish tacos, focus on crisp texture: beer-battered white fish, cabbage slaw, chipotle crema, lime, and warm corn tortillas. Cod is the easiest choice because it is mild, flaky, and sturdy enough for batter.

What Makes Fish Tacos Baja Style?

  • Crispy battered fish, usually cod or another white fish
  • Cabbage or slaw for crunch
  • Chipotle crema or a creamy white sauce
  • Warm corn tortillas
  • Fresh lime

Quick Baja-Style Beer Batter Formula

For 1 pound of cod, whisk 1 cup all-purpose flour, 2 tablespoons cornstarch, 1 teaspoon baking powder, 1 teaspoon chili powder, 3/4 teaspoon salt, black pepper, and about 1 cup cold beer until just combined. Dip dry fish strips into the batter, fry until golden and crisp, then serve immediately with cabbage slaw, chipotle crema, lime, and warm corn tortillas.

Keep the fried fish uncovered for a few minutes before assembling so steam does not soften the coating. Also, assemble Baja fish tacos right before serving because fried fish loses crunch once it sits under sauce and slaw.

A Baja fish tacos guide showing crispy beer-battered cod in warm corn tortillas with crunchy cabbage, chipotle crema, fresh lime, and a reminder to serve immediately so the coating stays crisp.
Baja fish tacos work because every part adds contrast: crisp beer-battered cod, crunchy cabbage, smoky chipotle crema, warm corn tortillas, and fresh lime. Assemble them right before serving so the coating stays crisp instead of softening under the slaw and sauce.

Fried Fish Tacos

For a fried fish taco recipe that is not fully beer-battered, coat cod, haddock, halibut, or catfish in seasoned flour, egg, and panko or cornmeal. Fry until crisp, drain briefly on a rack, then serve with cabbage slaw, chipotle crema, lime, and warm tortillas. This gives you crunchy fish tacos without making a wet batter.

No-Beer Baja Fish Tacos

When beer is not an option, make a simple batter with flour, cornstarch, baking powder, salt, spices, and cold sparkling water or club soda. The bubbles help keep the coating lighter. For the best texture, fry the fish right after dipping so the batter stays airy instead of heavy.

Crispy Fish Tacos Without Deep-Frying

For a crispy fried fish taco recipe without deep-frying, dust the seasoned fish lightly with cornstarch before pan-searing, use the panko air fryer method below, or bake panko-coated fish on a rack so air can circulate around the pieces. Frozen breaded fish or fish sticks can also work as a shortcut when fresh slaw, lime, and sauce keep the tacos bright.

A crispy fish tacos guide comparing four ways to get crunch without deep-frying: cornstarch skillet fish, panko air fryer fish, baked fish on a rack, and a frozen breaded fish shortcut, with a reminder to assemble right before serving.
Crispy fish tacos do not always need deep-frying. A cornstarch skillet method gives quick light crisp, panko works well in the air fryer, a rack helps baked fish stay crunchy, and frozen breaded fish can become a better shortcut when you finish it with fresh slaw, lime, and sauce. Assemble right before serving so the coating stays crisp.

When the crispy battered fish is your favorite part, our fish and chips with Indian twists goes deeper into crisp coating logic, battered fish, spice-forward coatings, and chutney-style dips.

Air Fryer Fish Tacos

An air fryer recipe for fish tacos is useful when you need crispier fish without deep-frying. Cod, tilapia, mahi mahi, haddock, and halibut all work.

Unbreaded Air Fryer Fish Tacos

Season the fish as written in the main recipe. Then, lightly spray the fish and air fryer basket with oil. Cook in a single layer at 400°F for about 7 to 10 minutes for most cod or white fish pieces, checking early for thin fillets. The fish is done when it is opaque and flakes easily.

Panko Air Fryer Fish Tacos

For crispy air fryer fish tacos, coat seasoned cod pieces in flour, egg, and panko. Then, spray lightly with oil and air fry in a single layer at 400°F until golden and crisp, usually about 8 to 10 minutes depending on thickness. Serve immediately with slaw and lime crema.

The biggest air fryer mistake is overcrowding. When the pieces touch too much, the coating steams instead of crisping.

An air fryer fish tacos guide showing unbreaded seasoned fish, panko-coated fish, a 400°F cooking temperature for 7 to 10 minutes, fish pieces arranged in a single layer, and an air fryer fish taco served with slaw, lime crema, and lime.
Air fryer fish tacos can go two ways: use seasoned fish for a lighter taco or panko-coated fish when you want more crunch. Either way, cook the pieces in a single layer at 400°F so they crisp instead of steaming, then serve with cabbage slaw, lime crema, and fresh lime.

Baked Fish Tacos

For a baked fish taco recipe with flaky white fish, use cod, haddock, tilapia, halibut, or another mild white fish. Pat the fish dry, season it as written in the main recipe, place it on a lightly oiled baking sheet, and bake at 400°F for about 10 to 14 minutes, depending on thickness, until the fish is opaque, flakes easily, and reaches 145°F / 63°C.

Baked fish will not brown as deeply as skillet fish or turn as crisp as Baja-style fried fish. Therefore, finish the tacos with crunchy slaw, lime crema, fresh lime, cilantro, and a bright topping like mango salsa or pico de gallo.

Grilled Fish Tacos

For a grilled fish taco recipe with mahi mahi, halibut, snapper, salmon, or thick cod, choose firm fish that can handle being flipped. Very delicate or thin fillets are easier to cook in a skillet.

  • Pat the fish dry before seasoning.
  • Oil the fish and the grill grates.
  • Use medium-high heat.
  • Wait until the fish releases naturally before flipping.
  • Pair grilled fish with mango salsa, avocado, cabbage slaw, lime, or chipotle crema.

Most firm fish fillets need about 3 to 4 minutes per side on a hot grill, depending on thickness. When the fish sticks, wait a little longer before flipping; properly seared fish usually releases more easily from the grate.

Mahi mahi is especially good for grilled fish tacos because it is firm and meaty without tasting heavy.

Blackened Fish Tacos

For a bold salmon fish taco recipe or blackened taco recipe with cod, mahi mahi, tilapia, halibut, or snapper, use extra smoked paprika, chili powder, garlic, black pepper, and a little cayenne. This is the best option when you need a spicier taco without frying.

Blackened does not mean burnt. Instead, the goal is a dark, spice-coated surface with juicy fish underneath. Balance the heat with cabbage slaw, lime crema, avocado, mango salsa, or extra lime.

A fish taco method comparison guide showing baked fish tacos, grilled fish tacos, and blackened fish tacos, with notes for hands-off cooking, smoky firm fish, bold spicy fish, and a reminder to finish with slaw, lime crema, and fresh lime.
Use this comparison when you want fish tacos without frying. Baked fish tacos are the easiest hands-off option, grilled fish tacos work best with firmer fish like mahi mahi or halibut, and blackened fish tacos are best when you want bold spice balanced by slaw, lime crema, and fresh lime.

Fish Taco Recipe Variations

Once you know the base recipe, you can change the fish, cooking method, sauce, or topping without rebuilding the whole meal. Use this table when you need a different fish taco recipe from the same basic formula.

A fish taco recipe variations guide showing six options: cod fish tacos with lime crema, Baja fish tacos with chipotle crema, mahi mahi tacos with mango salsa, salmon tacos with avocado, air fryer fish tacos, and fried fish tacos with cabbage slaw.
Use the base recipe as your starting point, then change the fish, cooking method, sauce, and toppings to match the taco style you want. Cod is the easiest default, Baja and fried fish tacos bring the crunch, mahi mahi works well grilled with mango salsa, salmon is best blackened, and air fryer fish tacos give you a lighter crispy option.
VariationUse This FishCooking MethodBest Sauce or Topping
Cod fish taco recipeCodPan-seared, baked, air fryer, or friedLime crema + cabbage slaw
Baja fish taco recipeCod or haddockBeer-battered and friedChipotle crema + slaw
Mahi mahi taco recipeMahi mahiGrilled or blackenedMango salsa + avocado
Salmon fish taco recipeSalmonBlackened, grilled, or air friedAvocado + lime crema
Air fryer fish taco recipeCod, tilapia, or haddockAir fried, plain or panko-coatedCabbage slaw + lime
Fried fish taco recipeCod, haddock, halibut, or catfishBattered, panko-coated, or cornmeal-crustedChipotle sauce + crunchy slaw

Fish Taco Variations by Fish Type

A fish taco variations by fish guide comparing cod, mahi mahi, tilapia, halibut, snapper, salmon, and catfish with suggested flavor and texture pairings such as flaky, grilled, budget-friendly, premium, blackened, and fried.
Different fish change the whole taco. Cod is the easiest mild and flaky choice, mahi mahi works best when grilled, tilapia needs brighter toppings, halibut and snapper are best kept simple, salmon needs bold seasoning, and catfish is strongest when fried and paired with slaw.

Cod Fish Tacos

Cod is the best default for this page because it is mild, flaky, and flexible. Therefore, you can use it for pan-seared fish tacos, baked fish tacos, air fryer fish tacos, or Baja-style beer-battered fish tacos.

For a simple recipe for cod fish tacos, keep the toppings clean: cabbage slaw, lime crema, cilantro, lime, and avocado. For crispy cod tacos, dust the fish lightly with cornstarch before cooking or use the Baja-style beer batter.

A cod fish tacos guide showing flaky cod in warm tortillas with cabbage slaw, lime crema, avocado, cilantro, and lime, with notes that cod is mild, all-purpose, and works baked, air fryer, or Baja-style.
Cod is the safest fish to start with because it is mild, flaky, and easy to pair with almost any fish taco topping. Keep the build simple with cabbage slaw, lime crema, warm tortillas, cilantro, avocado, and fresh lime, then use the same cod filling for pan-seared, baked, air fryer, or Baja-style tacos.

Mahi Mahi Tacos

Mahi mahi is best grilled, blackened, or cooked in a hot skillet. For a grilled fish taco recipe with mahi mahi, season the fish with the same spice blend, grill it for about 3 to 4 minutes per side, and serve it with mango salsa, avocado, cilantro, and lime.

Mahi mahi is firm enough to hold together on the grill, so it is one of the best choices when you need smoky tacos with fish that does not fall apart. Keep the salsa chunky and not too wet when the tacos already have sauce.

A grilled mahi mahi tacos guide showing firm grilled mahi mahi with mango salsa, avocado, cabbage slaw, lime, and cilantro, with callouts for grill marks, fresh toppings, and why mahi mahi works well for grilled fish tacos.
Mahi mahi is one of the best fish for grilled fish tacos because it is firm enough to hold its shape and meaty enough to carry smoky grill marks. Pair it with chunky mango salsa, avocado, cabbage slaw, cilantro, and fresh lime for a taco that tastes bright without becoming watery.

Tilapia Fish Tacos

Tilapia is budget-friendly and mild. For budget-friendly tilapia fish tacos, season the fillets well, cook them gently in a skillet or air fryer, and use bold toppings like chipotle crema, pickled onions, mango salsa, or extra lime.

Because tilapia is delicate, handle it gently and avoid overcooking it. The seasoning and toppings do more of the flavor work, so do not skip the lime and slaw.

A tilapia fish tacos guide showing mild tilapia in warm tortillas with chipotle crema, pickled onions, cabbage slaw, cilantro, jalapeño, and lime, with notes to season tilapia well and handle the delicate fillets gently.
Tilapia is a great budget-friendly fish for tacos, but it needs help from seasoning and bright toppings. Use chipotle crema, pickled onions, cabbage slaw, cilantro, jalapeño, and fresh lime so the mild fish tastes lively instead of flat.

Halibut Fish Tacos

Halibut is a premium choice for fish tacos. Since it is firm, clean, and meaty, keep the toppings simple. Slaw, lime crema, cilantro, avocado, and lime are enough.

For a premium taco recipe with fish that feels restaurant-style, pan-sear or grill halibut until just flaky, then avoid burying it under too many wet toppings.

Snapper Fish Tacos

Snapper tastes fresh and slightly sweet. It works well grilled or pan-seared. Because the flavor is delicate, use light toppings so the fish stays the focus.

Snapper fish tacos are especially good with lime crema, cilantro, avocado, and a small amount of pico de gallo or mango salsa.

Salmon Tacos

Salmon is not the most traditional fish taco fish, but it works when the seasoning is bold. For a salmon fish taco recipe, use blackened seasoning instead of the milder cod seasoning. Salmon has a richer flavor, so it works best with avocado, lime crema, cabbage, jalapeño, and a bright salsa rather than very delicate toppings.

When making air fryer salmon tacos, use the seasoning direction here and follow the timing logic in our air fryer salmon recipe so the salmon stays juicy instead of dry.

A blackened salmon tacos guide showing spice-crusted salmon in warm tortillas with avocado, cabbage slaw, lime crema, jalapeño, cilantro, and fresh lime, with notes that salmon works best blackened, grilled, or air fried.
Salmon works best in fish tacos when the seasoning is bold enough to balance its richness. Use a blackened spice crust, then add cabbage slaw for crunch, avocado for creaminess, lime crema to cool the heat, and fresh lime to keep the tacos bright.

Fish Stick Tacos or Frozen Breaded Fish Tacos

Fish stick tacos are the shortcut version. First, bake or air fry the fish sticks or frozen breaded fish until very crisp. Then, use the same slaw, lime crema, cilantro, and lime. The fresh toppings matter here because they make frozen fish taste more like real fish tacos.

For the best texture, do not assemble the tacos until the fish is fully crisp and the tortillas are warm. When the frozen fish is already salty, keep the sauce bright and the slaw lightly seasoned so the taco does not taste heavy.

A fish stick tacos guide showing crispy frozen breaded fish in warm tortillas with fresh slaw, lime crema, cilantro, and lime, with tips to bake or air fry the fish until crisp and assemble the tacos last.
Fish stick tacos can taste fresh when the frozen breaded fish is cooked until crisp and balanced with bright toppings. Use warm tortillas, crunchy slaw, lime crema, cilantro, and fresh lime, then assemble the tacos right before serving so the coating stays crisp instead of softening under the sauce.

Best Toppings for Fish Tacos

The best toppings for this fish tacos recipe add crunch, creaminess, freshness, heat, or a salty finish. However, you do not need all of them. Choose two or three that balance the fish.

When choosing one essential fish taco topping, start with cabbage slaw. It adds crunch, protects the tortilla, and balances creamy sauce and flaky fish.

A best toppings for fish tacos guide showing cabbage slaw, lime crema, chipotle crema, avocado, mango salsa, pico de gallo, pickled onions, radish, cilantro, jalapeño, cotija, lime wedges, and finished fish tacos.
The best toppings for fish tacos add balance instead of bulk. Start with cabbage slaw for crunch, add one creamy sauce like lime crema or chipotle crema, then finish with something fresh such as cilantro, lime, mango salsa, pico de gallo, jalapeño, pickled onions, avocado, or cotija.
PurposeBest Toppings
CrunchCabbage, radish, red onion, pickled onions
CreamyLime crema, chipotle sauce, avocado, guacamole
FreshCilantro, lime, pico de gallo, mango salsa, pineapple salsa
HeatJalapeño, serrano, hot sauce, chipotle
Salty finishCotija, flaky salt, salted avocado

For an even better match, choose toppings based on the fish and cooking method.

Fish Taco StyleBest ToppingsWhy It Works
Cod fish tacosCabbage slaw, lime crema, cilantro, limeSimple toppings let mild cod stay clean and flaky.
Baja fish tacosChipotle crema, cabbage slaw, pico de gallo, limeCreamy, crunchy, and bright toppings balance fried fish.
Mahi mahi tacosMango salsa, avocado, cilantro, limeFirm grilled fish works well with fruit and creaminess.
Salmon tacosAvocado, jalapeño, cabbage, lime cremaRich salmon needs acid, crunch, and heat.
Tilapia fish tacosChipotle crema, mango salsa, pickled onionsMild tilapia benefits from bolder toppings.
Fish stick tacosFresh slaw, lime crema, cilantro, hot sauceFresh toppings make frozen breaded fish taste brighter.

How to Keep Fish Tacos from Getting Soggy

This fish tacos recipe stays fresh when you control moisture. Soggy fish tacos usually come from wet fish, watery salsa, overdressed slaw, cold tortillas, or too much sauce. Once you fix those parts, the tacos stay much better.

A guide showing how to keep fish tacos from getting soggy with crisp fish, cabbage slaw, lime crema, warm tortillas, drained salsa, lime, and tips to pat fish dry, dress slaw late, drain salsa, use sauce lightly, and assemble last.
Keep fish tacos from getting soggy by controlling moisture before you assemble. Pat the fish dry, dress the slaw close to serving, drain watery salsa, warm the tortillas, use sauce lightly, and build the tacos right before eating so the fish stays crisp, the slaw stays fresh, and the tortillas do not turn wet.
  • Pat the fish dry before seasoning so it sears instead of steaming.
  • Do not over-marinate fish in lime juice.
  • Cook hot and fast so the outside gets flavor before the fish dries out.
  • Drain salsa before adding it to tacos.
  • Use cabbage slaw instead of watery lettuce.
  • Warm tortillas so they bend without cracking.
  • Use sauce lightly and serve extra sauce on the side.
  • Assemble right before serving instead of letting filled tacos sit.
  • Keep fried fish uncovered briefly so steam does not soften the coating.

If the Fish Tastes Bland

Add more salt, lime, chili powder, or hot sauce. Usually, bland fish tacos need either more seasoning on the fish or more acidity at the end.

If the Fish Is Dry

Cook it for less time next round and use a slightly thicker fillet. However, dry fish can still be saved with lime crema, avocado, slaw, and a squeeze of fresh lime.

If the Tortillas Break

Warm them properly and keep them covered. When corn tortillas still crack, double them up or switch to flour tortillas.

If the Slaw Gets Watery

Dress the slaw closer to serving and use less salt at the beginning. When liquid collects in the bowl, lift the cabbage out with tongs instead of pouring the liquid into the tacos.

What to Serve with Fish Tacos

Fish tacos work best with fresh, bright sides rather than heavy ones. Try chips and salsa, mango salsa, guacamole, cilantro lime rice, black beans, corn salad, cabbage slaw, pickled onions, or a simple cucumber salad.

For drinks, a citrusy mango margarita is a natural fit with grilled fish tacos, mahi mahi tacos, or any version topped with mango salsa.

A what to serve with fish tacos guide showing fish tacos with mango salsa, guacamole, cilantro lime rice, black beans, corn salad, tortilla chips, pickled onions, cucumber salad, lime wedges, and a mango margarita.
Serve fish tacos with fresh, bright sides instead of heavy ones. Mango salsa, guacamole, cilantro lime rice, black beans, corn salad, tortilla chips, pickled onions, cucumber salad, lime wedges, and a citrusy mango margarita all help turn fish tacos into a complete taco-night meal.

How to Build a Fish Taco Bar

This fish tacos recipe also works well as a fish taco bar. For the best texture, keep every part separate: cooked fish, warm tortillas, slaw, sauce, lime wedges, cilantro, jalapeño, avocado, mango salsa, and any cheese or hot sauce. As a result, the tortillas stay fresher and everyone can build their own taco.

A fish taco bar guide showing cooked fish, warm tortillas, cabbage slaw, lime crema, chipotle crema, mango salsa, avocado, cilantro, jalapeño, pickled onions, lime wedges, hot sauce, and assembled fish tacos.
Set up a fish taco bar by keeping every part separate until serving. Cook the fish last, keep the tortillas warm, serve slaw in its own bowl, keep sauces on the side, and add wet toppings like salsa, lime, crema, and pickled onions at the table so everyone can build fresh tacos without soggy tortillas.
  • Cook the fish last: fish tastes best hot and freshly cooked.
  • Prep sauce ahead: lime crema and chipotle crema can be made earlier.
  • Prep cabbage ahead: shred it early, but dress it closer to serving.
  • Keep tortillas warm: wrap them in a clean towel after heating.
  • Serve wet toppings separately: salsa, crema, and lime should go on at the table.

For seafood safety at parties, do not leave cooked seafood out for more than 2 hours, or more than 1 hour when temperatures are above 90°F.

Storage and Make-Ahead Tips

Fish tacos are best fresh, but you can prep the parts ahead. That way, dinner comes together quickly without making the tortillas soggy.

A fish tacos make-ahead guide showing lime crema, cabbage slaw, cooked fish, warm tortillas, mango salsa, pickled onions, avocado, lime, and a leftover fish taco bowl, with tips to prep parts ahead and store them separately.
Fish tacos are easiest to prep when you keep every part separate. Make the sauce ahead, shred the cabbage early but dress it later, cook the fish close to serving, warm the tortillas right before eating, and store leftovers separately. For the next day, turn leftover fish into a bowl instead of trying to save assembled tacos.
  • Sauce: make 2 to 3 days ahead and refrigerate.
  • Cabbage: shred ahead, but add lime and salt closer to serving.
  • Fish: season right before cooking for the best texture.
  • Tortillas: warm right before serving.
  • Leftovers: store fish, slaw, sauce, and tortillas separately.

Do not store assembled fish tacos. Otherwise, the tortillas will absorb moisture from the fish, sauce, and slaw.

For raw seafood, the FDA recommends storing seafood in the refrigerator at 40°F or below if you plan to use it within 2 days; otherwise, wrap it tightly and freeze it.

Leftover Fish Taco Bowls

When you have leftover fish, slaw, sauce, or toppings, turn them into a bowl instead of trying to rebuild tacos the next day. Add rice, beans, cabbage, avocado, mango salsa, lime crema, and the leftover fish. Bowls are more forgiving than reheated tortillas and help use the parts without making the meal soggy.

Are Fish Tacos Healthy?

A healthy fish taco recipe usually starts with pan-seared, grilled, baked, or air-fried fish instead of deep-fried fish. Then, cabbage slaw, lime, avocado, and a moderate amount of sauce keep the tacos balanced.

For a lighter version, use grilled or pan-seared cod, Greek yogurt lime crema, cabbage slaw, corn tortillas, and avocado or mango salsa instead of extra cheese.

A healthy fish tacos guide showing grilled or pan-seared fish in corn tortillas with cabbage slaw, Greek yogurt lime crema, avocado, mango salsa, cilantro, lime, and lighter cooking tips.
Healthy fish tacos should still taste fresh and satisfying. Use pan-seared, grilled, baked, or air-fried fish, then build the tacos with cabbage slaw, Greek yogurt lime crema, avocado, mango salsa, cilantro, and fresh lime so they stay lighter without losing flavor.

Final Tips for the Best Fish Tacos

Use this fish tacos recipe as the base, then choose the fish that matches your style. Start with cod for the easiest version. Use mahi mahi for grilled fish tacos, tilapia for a budget-friendly version, halibut or snapper for something more premium, and salmon for a bolder taco. Finally, keep the slaw crisp, the sauce bright, the tortillas warm, and the toppings fresh.

The best fish tacos are not complicated. They just need the right fish, enough seasoning, a crunchy slaw, a creamy sauce, and careful assembly so every bite tastes fresh instead of wet or heavy.

Fish Tacos FAQs

What is the best fish for fish tacos?

Cod is the best all-purpose fish for fish tacos because it is mild, flaky, easy to find, and works with pan-seared, baked, air fryer, or Baja-style methods. However, mahi mahi, tilapia, halibut, snapper, haddock, and salmon also work.

Is cod good for fish tacos?

Yes. Cod is one of the best fish for fish tacos. It has a mild flavor, flakes easily, and works with lime crema, cabbage slaw, chipotle sauce, mango salsa, and Baja-style batter.

Is mahi mahi good for fish tacos?

Yes. Mahi mahi is excellent for grilled fish tacos because it is firm and meaty. It also works well blackened or pan-seared with mango salsa, avocado, cabbage, and lime.

Can you use salmon for fish tacos?

Yes, but salmon needs stronger seasoning than mild white fish. Therefore, use blackened seasoning, grilled salmon, or air fryer salmon with cabbage, avocado, lime, and a fresh salsa.

Are fish tacos better with corn or flour tortillas?

Corn tortillas give fish tacos a more classic flavor. However, flour tortillas are softer and less likely to break. Use corn for a more traditional taco and flour when you need a softer, easier wrap.

What sauce goes on fish tacos?

A creamy lime sauce is the easiest choice. Mix sour cream or Greek yogurt with a little mayonnaise, lime juice, garlic, salt, and hot sauce or chipotle. Chipotle crema, avocado crema, chutney crema, and no-mayo yogurt sauce also work.

What toppings go best with fish tacos?

The best toppings are cabbage slaw, lime crema, cilantro, jalapeño, avocado, pico de gallo, mango salsa, pickled onions, cotija, hot sauce, and fresh lime.

What makes Baja fish tacos different?

Baja fish tacos usually use crispy beer-battered white fish, cabbage slaw, creamy chipotle sauce, lime, and corn tortillas. As a result, they are crunchier and more fried-focused than simple pan-seared fish tacos.

Can I make fish tacos in the air fryer?

Yes. Air fryer fish tacos work well with cod, tilapia, mahi mahi, haddock, or halibut. Use seasoned fish for a lighter version or panko-coated fish for a crispier version.

Can I bake fish for fish tacos?

Yes. Baked fish tacos are useful when you need a hands-off method. Season cod, haddock, tilapia, or another white fish, bake at 400°F until opaque and flaky, then serve with slaw, sauce, and fresh lime.

Can I use frozen fish for fish tacos?

Yes. Thaw frozen fish completely, then pat it very dry before seasoning. Otherwise, the fish can steam instead of sear.

Can I use fish sticks for fish tacos?

Yes. Bake or air fry fish sticks until very crisp, then serve them in warm tortillas with cabbage slaw, lime crema, cilantro, and lime. Fresh toppings help frozen fish stick tacos taste brighter and more balanced.

How much fish do I need per person for fish tacos?

Plan on about 4 ounces of raw fish per person for a normal serving. One pound of fish usually makes about 8 small tacos, enough for 4 people if you serve 2 tacos each.

How do I keep fish tacos from getting soggy?

Pat the fish dry, do not over-marinate it, drain wet salsa, use lightly dressed cabbage slaw, warm the tortillas, go easy on sauce, and assemble the tacos right before serving.

Are fish tacos healthy?

Fish tacos can be healthy, especially when the fish is pan-seared, grilled, baked, or air fried instead of deep-fried. For a lighter version, use cabbage slaw, Greek yogurt sauce, avocado, lime, and corn tortillas.

Back to top