Posted on Leave a comment

Cinnamon Roll Recipe

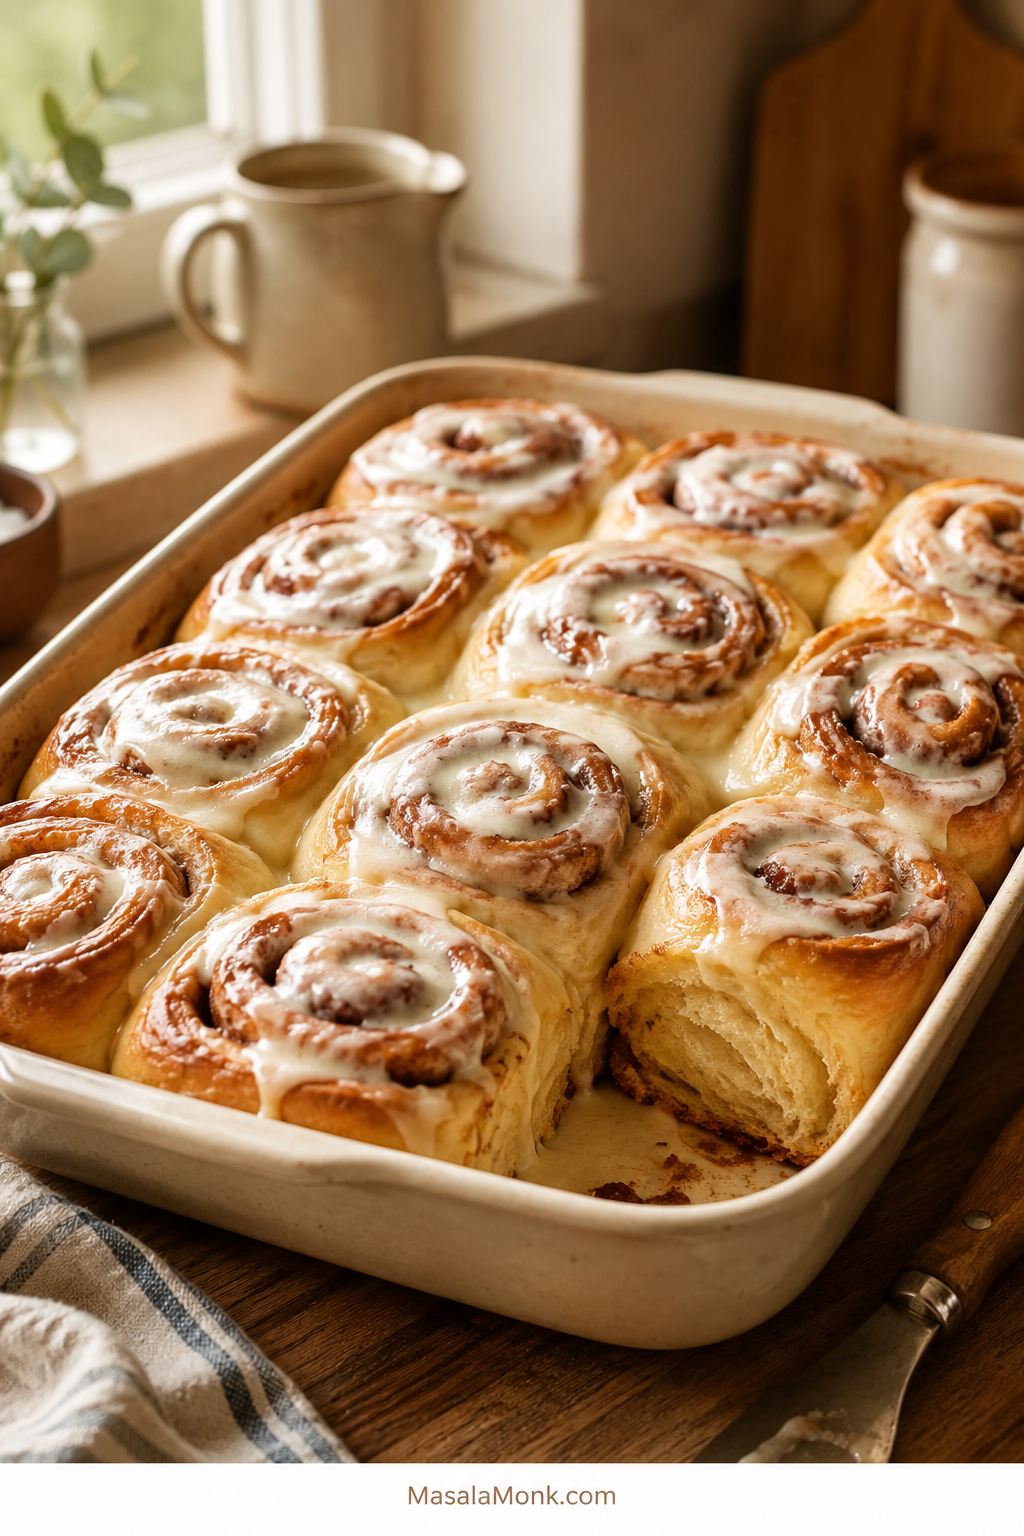
Rectangular pan of homemade cinnamon rolls with cream cheese icing melting into the swirls.

These homemade cinnamon rolls are for the exact moment you want warm, pull-apart rolls with gooey cinnamon centers, tender edges, and cream cheese icing melting into the swirls — without the raw-dough gamble in the middle of the pan.

Most cinnamon rolls go wrong in two quiet ways: the dough gets over-floured, or the pan comes out when the tops look done but the center is still underbaked. This recipe keeps both in check with soft elastic dough, a full second rise, and a clear center-roll doneness cue.

You can make them the same day for a cozy baking project, or shape them at night and bake them fresh in the morning. They fit a slow weekend, a holiday morning, a birthday breakfast, or any day when a warm pan of cinnamon rolls is the whole point.

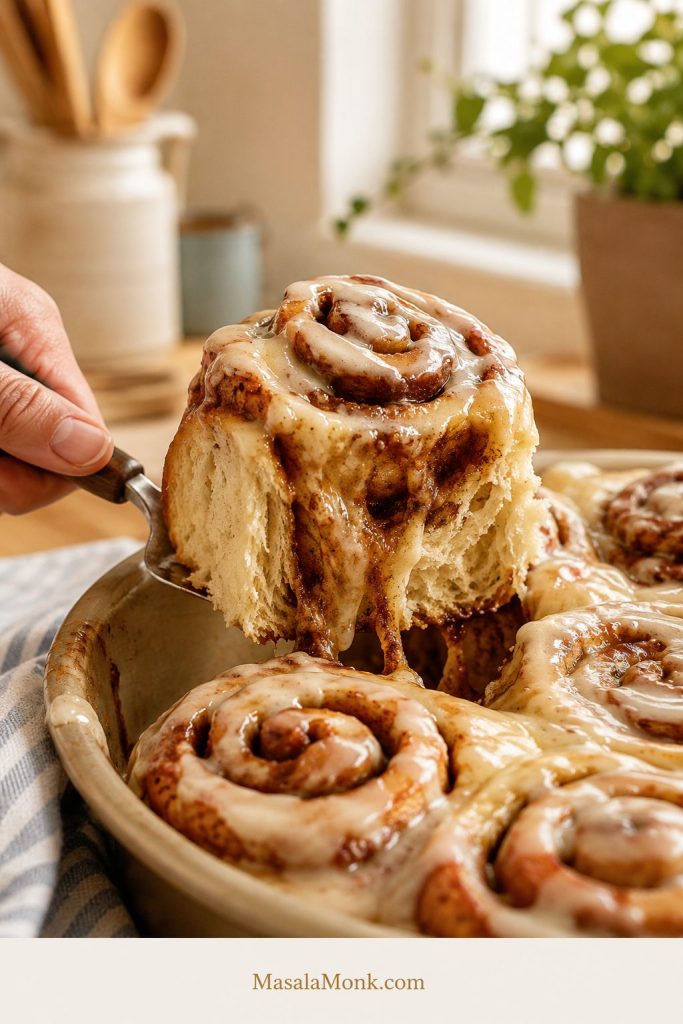
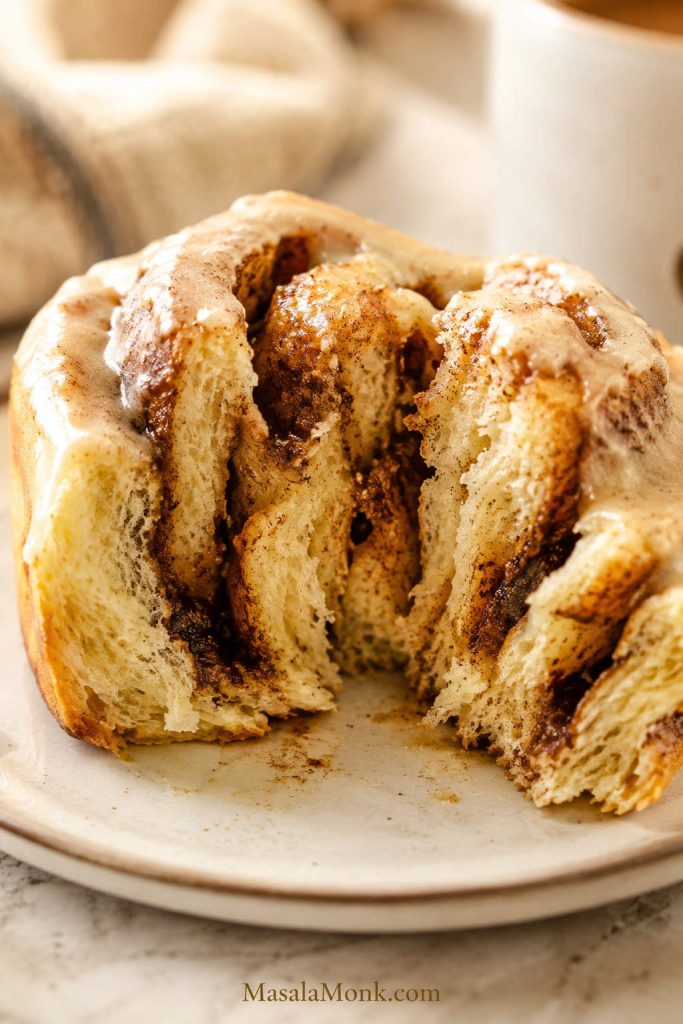
Gooey cinnamon roll pulled apart to show a soft baked center
This is the key promise: gooey cinnamon swirls with a center that looks baked and soft, not wet or raw.

Quick Answer: How to Make Soft Cinnamon Rolls

To make soft homemade cinnamon rolls, mix a rich yeast dough with warm milk, butter, egg, sugar, flour, and yeast. Knead until the dough is smooth and a little tacky, then let it rise until doubled. Roll it out, spread with softened-butter cinnamon sugar filling, cut into 12 rolls, and let the shaped rolls rise again until rounded and puffy.

Bake in a 9×13-inch pan at 350°F / 175°C for 24–28 minutes. Look for lightly golden tops, but use the center roll as the better cue. The best target is about 190°F / 88°C, which means the rolls are baked through while staying tender.

Spread cream cheese icing over the warm rolls after 5–10 minutes. For extra-moist centers, pour ⅓ cup / 80 ml warm heavy cream around the risen rolls just before baking, or use up to ½ cup / 120 ml for a richer, gooier pan.

The promise: soft, gooey cinnamon rolls with tender edges, creamy icing, and a center that bakes through without turning the pan dry.
Avoid the three big mistakes: do not add flour just to make the dough dry, do not melt the filling butter, and do not pull the pan just because the tops look golden.

Cinnamon Roll Recipe Card

Soft, gooey homemade cinnamon rolls that bake through in the center, with plush yeast dough, a brown sugar cinnamon swirl, optional warm cream for extra-moist centers, and cream cheese icing that melts into the rolls while they are still warm. Serve them while the icing is still soft and the centers are warm enough to pull apart in ribbons.

Prep Time35 minutes
Rise Time1 hour 45 minutes to 2 hours 30 minutes
Bake Time24–28 minutes
Total TimeAbout 2 hours 50 minutes to 3 hours 45 minutes
Yield12 rolls

Ingredients

Dough Ingredients

  • 1 cup / 240 ml warm whole milk
  • 2¼ teaspoons / 7 g instant yeast or active dry yeast
  • ⅓ cup / 65–70 g granulated sugar
  • 5 tablespoons / 70 g unsalted butter, melted and slightly cooled
  • 1 large egg
  • 1 large egg yolk
  • 4 cups / about 480 g flour, preferably bread flour for taller rolls or all-purpose flour for a softer homemade texture, plus 1–2 tablespoons only if needed
  • 1 teaspoon / 6 g fine salt
  • Butter or neutral oil, for greasing the bowl and pan

Cinnamon Filling

  • ⅓ cup / 75 g unsalted butter, softened
  • ¾ cup / 150 g packed brown sugar
  • 2 tablespoons / 14–16 g ground cinnamon
  • ¼ teaspoon fine salt
  • Optional: 1 teaspoon flour or cornstarch to help hold the filling together

Cream Cheese Icing

  • 4 oz / 113 g cream cheese, softened
  • 4 tablespoons / 55 g unsalted butter, softened
  • Powdered sugar, 1 cup / 120 g, plus ¼ cup / 30 g more for thicker icing
  • Vanilla extract, 1 teaspoon
  • Milk or cream, 1–3 tablespoons as needed
  • Pinch of salt

Optional Heavy Cream Upgrade

  • ⅓ cup / 80 ml heavy cream for softer rolls, or up to ½ cup / 120 ml for a richer, gooier pan

Instructions

Dough, Filling, and First Rise

  1. Warm the milk. The milk needs to feel comfortably warm, not hot. For active dry yeast, stir the yeast into the warm milk with a pinch of sugar and rest for 5–10 minutes, until foamy. Instant yeast can go directly into the dough.
  2. Make the dough. In a large bowl or stand mixer bowl, combine warm milk, yeast, sugar, melted butter, egg, and egg yolk. Add flour and salt. Mix until a rough dough forms.
  3. Knead. Knead for 8–10 minutes by hand or 5–7 minutes in a stand mixer on low-medium speed, until the dough is smooth, stretchy, and slightly tacky. Add extra flour only 1 tablespoon at a time if the dough is sticking heavily.
  4. First rise. Place the dough in a lightly greased bowl. Cover with plastic wrap, a damp clean towel, or a lid so the surface does not dry out. Let rise for 60–90 minutes, or until doubled. Active dry yeast may rise a little more slowly than instant yeast, so give the dough extra time if needed.

Shape, Bake, and Ice

  1. Make the filling. Mix softened butter, brown sugar, cinnamon, and salt into a thick paste. When the filling is hard to spread, let it sit at room temperature for a few minutes rather than melting it.
  2. Roll and fill. Roll the dough into a rectangle about 12×18 inches. Spread the filling evenly, leaving a small border on one long edge.
  3. Shape. Roll from the long side into a snug log. Cut into 12 even rolls using unflavored dental floss, clean thread, or a sharp knife. Aim for pieces about 1½ inches thick.
  4. Second rise. Place rolls in a greased 9×13-inch pan. Cover and let rise for 45–60 minutes, until puffy and lightly touching.
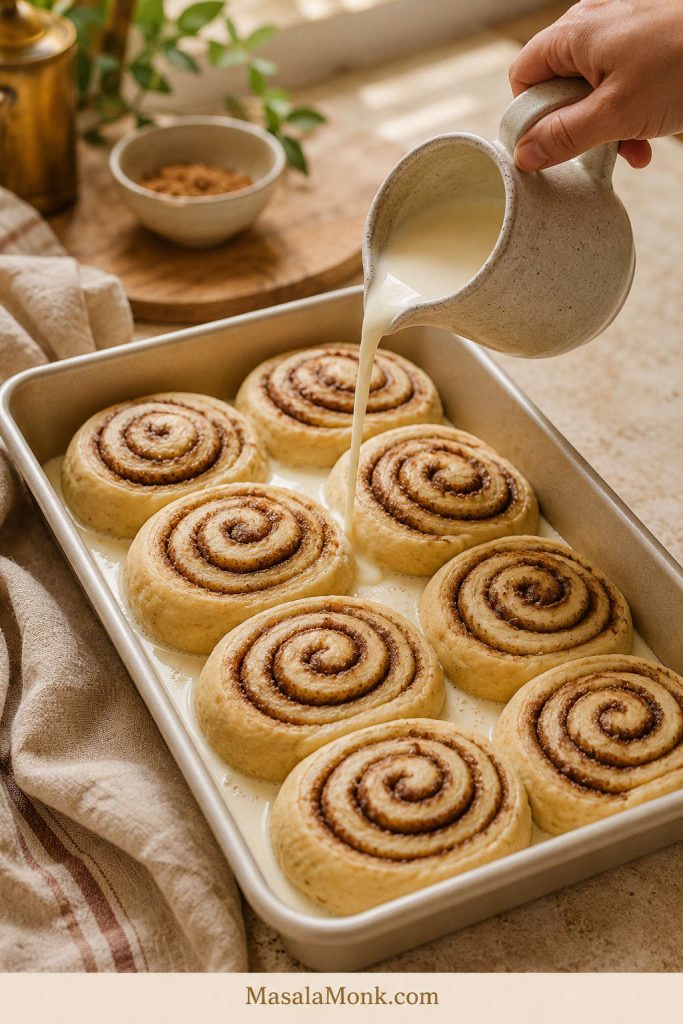
  5. Add heavy cream, if using. Pour warm heavy cream around the risen rolls. You should see cream around the base, not a flooded pan.
  6. Bake. Bake at 350°F / 175°C for 24–28 minutes, until lightly golden and the center roll reaches about 190°F / 88°C.
  7. Make icing. Beat cream cheese and butter until smooth. Add powdered sugar, vanilla, salt, and enough milk or cream to make a soft, spreadable icing.
  8. Ice and serve. Cool rolls for 5–10 minutes, then spread icing over the warm rolls.

Success Notes

  • Softer rolls: Start with the listed flour and add more only if the dough is sticking heavily.
  • Extra-gooey rolls: Use the warm heavy cream option, but keep it to ½ cup / 120 ml or less.
  • Thicker frosting: Wait 10–15 minutes before icing.
  • Overnight option: Shape, cover, refrigerate, then let the rolls become puffy at room temperature before baking.

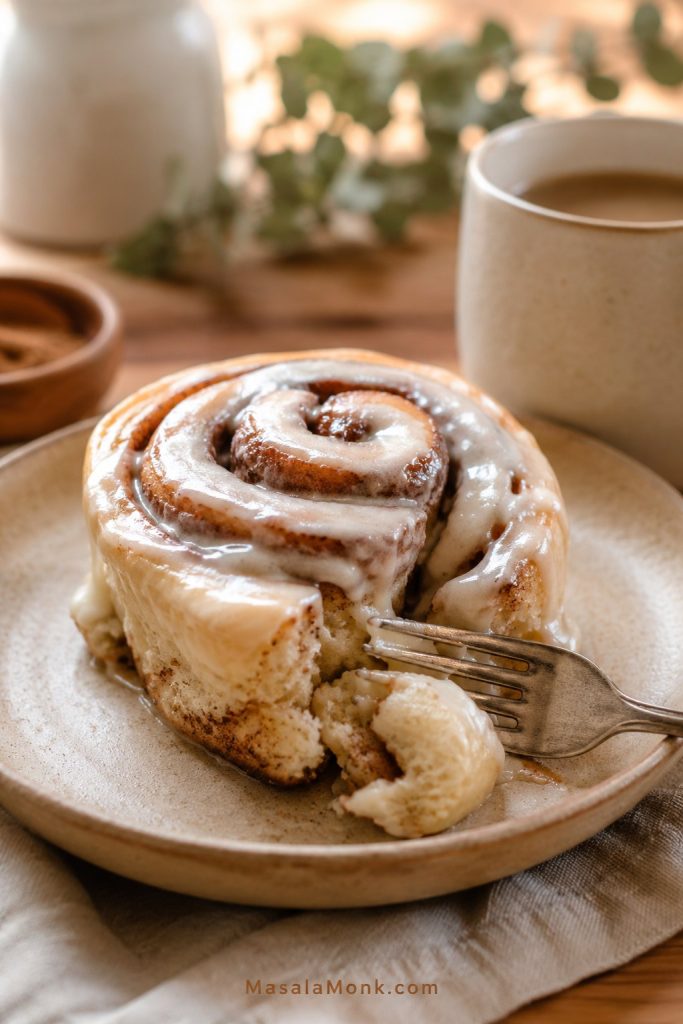
This is the finished serving cue: soft dough, a visible cinnamon swirl, and cream cheese icing that still looks creamy rather than dry.

Single homemade cinnamon roll with cream cheese icing and soft cinnamon swirl
A single iced roll shows the serving texture: soft dough, visible cinnamon swirl, and creamy icing.

Cinnamon Rolls at a Glance

Question Answer
Yield 12 cinnamon rolls
Pan size 9×13-inch baking dish
Oven temperature 350°F / 175°C
Bake time 24–28 minutes
Total time About 2 hours 50 minutes to 3 hours 45 minutes, including cooling before icing
Doneness cue Center roll reaches about 190°F / 88°C
Flour choice Bread flour for taller rolls; all-purpose flour for a softer homemade texture
Yeast choice Instant yeast for ease; active dry yeast also works
Filling style Softened-butter brown sugar cinnamon paste
Icing Cream cheese icing, with a no-cream-cheese option below
Make-ahead option Shape and refrigerate overnight before baking

Choose Your Cinnamon Roll Path

Use the same base recipe, then adjust the timing or finish depending on the kind of cinnamon rolls you want today. Pick the path that matches what you care about most: a same-day bake, brunch timing, extra-gooey centers, thicker frosting, or avoiding a doughy middle.

If you want… Do this
Same-day soft cinnamon rolls Start earlier in the day and bake after two complete rises.
Overnight cinnamon rolls for brunch Shape tonight, chill, then bake once puffy in the morning.
Gooey cinnamon rolls with heavy cream Pour warm cream around the risen rolls before baking.
Cinnamon rolls with thick cream cheese frosting Cool the rolls 10–15 minutes before icing.
Cinnamon rolls without a doughy middle Check the center roll; golden tops are not enough.

What This Recipe Is Built Around

Recipe notes: this cinnamon roll recipe is built around a 9×13-inch pan, 12 rolls, a soft enriched dough, and a center-roll doneness cue. Bread flour gives taller rolls; all-purpose flour gives a softer homemade crumb. The heavy cream option is kept moderate so the rolls stay gooey without turning soggy at the bottom.

This is not a no-yeast shortcut roll and not a canned-roll hack. It is a soft yeast cinnamon roll recipe built for a gooey swirl, tender edges, and a center that bakes through properly.

The goal is simple: gooey, not doughy. Look for rolls that smell warm and cinnamon-sweet, pull apart softly, and have a center that feels baked and plush instead of wet or heavy.

Why This Cinnamon Roll Recipe Works

This recipe works because it protects both sides of the cinnamon-roll problem: enough moisture for gooey swirls, but enough structure and bake time for the middle to finish properly.

Enriching the dough with milk, butter, egg, and egg yolk gives you tenderness without turning the bread part heavy. The lightly sweet dough still has enough strength to rise well, hold its shape, and support the cinnamon filling.

Careful flour guidance prevents dry rolls. Starting with the listed amount and adding more only when the dough is truly sticking heavily keeps the dough soft enough to bake into pull-apart rolls instead of dense, dry spirals.

A softened-butter filling helps prevent leaks. When butter, brown sugar, cinnamon, and salt are mixed into a paste, the swirl stays more even. The optional spoonful of flour or cornstarch helps bind the filling so it does not immediately run into the bottom of the pan.

Pan size and oven temperature protect the center. A 9×13-inch pan gives 12 rolls enough room to rise while keeping them close enough to stay tender. Baking at 350°F / 175°C gives the center time to finish before the tops over-brown.
For the heavy cream option, the amount is controlled rather than flooded. A moderate pour adds moisture and a gooey finish while keeping the pan from turning soggy at the bottom.

The center roll is the clearest test. Top color helps, but the middle roll tells you when the pan is truly done. Aim for about 190°F / 88°C in the center.

Ingredients You Need

Every good cinnamon roll comes down to three parts working together: dough that rises soft, filling that stays in the swirl, and icing that melts just enough into the warm rolls.

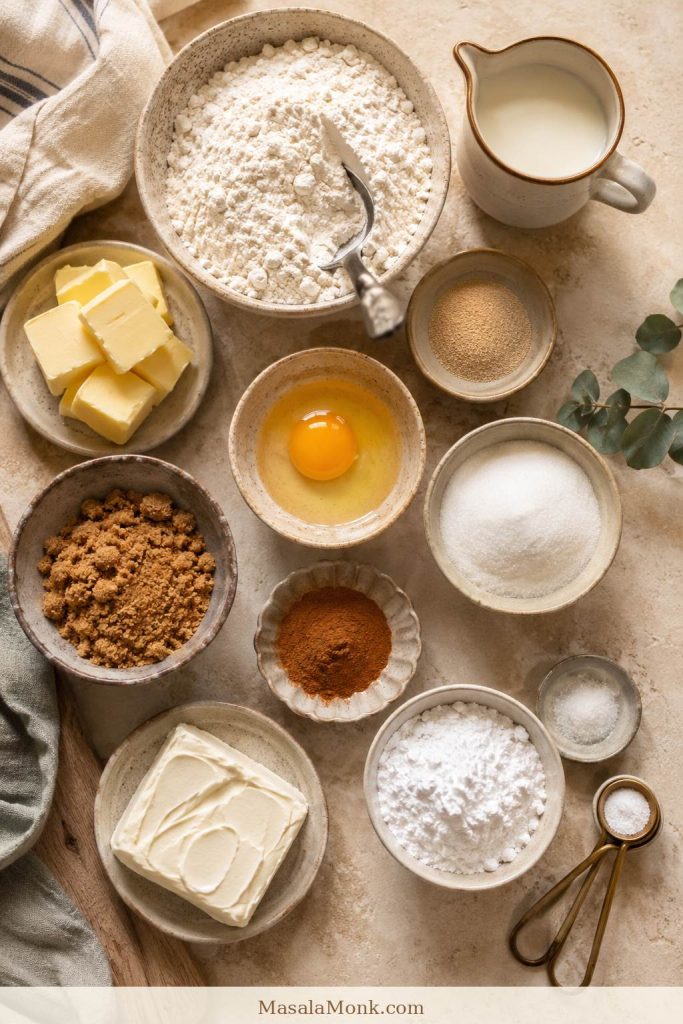
Ingredients for homemade cinnamon rolls including flour, milk, butter, eggs, yeast, sugar, and cinnamon
The dough, filling, and icing are simple pantry ingredients; the texture comes from how they are handled.

Dough Ingredients

The dough uses flour, milk, yeast, sugar, butter, egg, egg yolk, and salt.

Milk makes the dough softer than water. Butter adds richness. The egg and yolk help the rolls bake up tender, while sugar lightly sweetens the dough and helps the yeast work.

Together, they make the kind of dough that bakes up soft enough to pull apart, but strong enough to hold the cinnamon swirl.

Salt is small but important. It balances the sweetness and makes the cinnamon flavor taste fuller.

Filling Ingredients

The filling uses softened butter, brown sugar, cinnamon, and a pinch of salt.

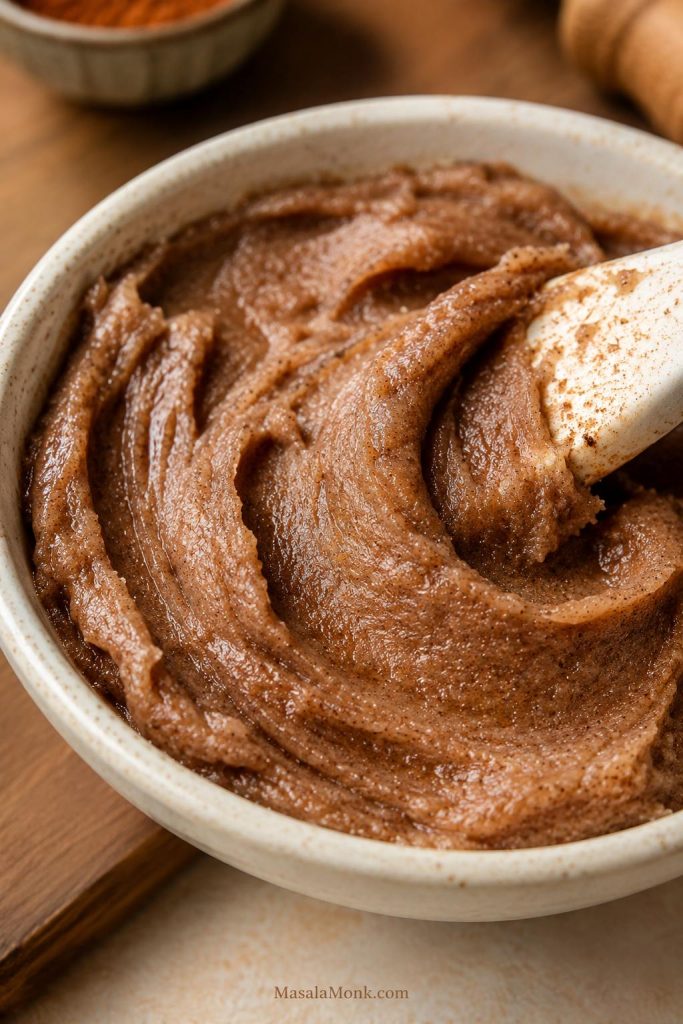
Softened butter is easier to spread and less likely to leak out. Brown sugar gives the filling a deeper, caramel-like sweetness. Light or dark brown sugar both work, though dark brown sugar gives a stronger molasses flavor.

When the filling is right, it should spread like soft cinnamon butter, not pour like syrup.

Brown sugar cinnamon filling mixed with softened butter for cinnamon rolls
Softened butter makes a spreadable cinnamon-sugar paste that is less likely to leak than melted butter.

Icing Ingredients

Cream cheese icing uses cream cheese, butter, powdered sugar, vanilla, milk or cream, and salt.

It gives the icing its tang, while butter makes it smooth. Powdered sugar thickens it, and milk or cream lets you adjust the texture.

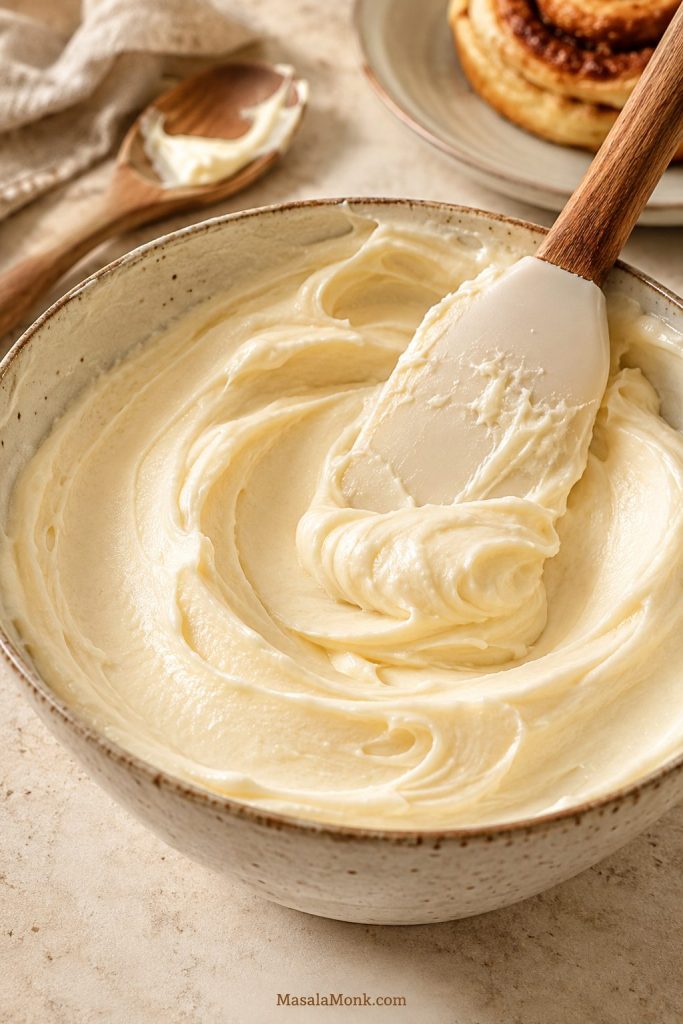
Smooth cream cheese icing for homemade cinnamon rolls
The icing looks right when it is smooth and spreadable, not thin or watery.
Flavor tip: A tiny pinch of salt in both the filling and the icing keeps the rolls from tasting only sweet.

Useful Equipment

You do not need a professional bakery setup for homemade cinnamon rolls, but a few tools make the recipe easier and more reliable.

  • Large mixing bowl or stand mixer: either works; a mixer saves effort, but hand-kneading is fine.
  • 9×13-inch pan: the most reliable size for 12 rolls that bake evenly.
  • Rolling pin: helps roll the dough into an even rectangle.
  • Unflavored dental floss, clean thread, or a sharp knife: gives clean cuts without squashing the spirals.
  • Instant-read thermometer: useful for checking warm milk and the center roll.
  • Foil: helpful if the tops brown before the center is done.
No thermometer? You can still make these. The milk needs to feel warm, not hot. For doneness, gently pull at a seam in the center roll; it should look baked and bread-like, not wet, shiny, or paste-like.

Flour Choice for Cinnamon Rolls

Before you start mixing, flour is the one ingredient worth slowing down for. An over-floured dough is the fastest way to lose that pull-apart cinnamon roll texture.

Bread flour and all-purpose flour both work in this recipe. The choice depends on the texture you like.

Flour Works well for What to expect
Bread flour Taller, bakery-style rolls More structure, slightly chewier texture, good rise
All-purpose flour Plush homemade rolls More tender texture, easy everyday option
Excess flour Dry rolls Heavy dough, dry edges, dense texture
Gluten-free flour Separate gluten-free recipe Not a simple 1:1 swap for this dough

Think of flour as the difference between a roll that tears softly and one that feels heavy. The goal is not a dry, easy-to-handle dough; the goal is a dough that bakes up tender.

Start with the listed amount and give the dough a minute to come together before adding more. If you measure by cups, spoon flour into the cup and level it instead of scooping directly from the bag. A little tackiness is what keeps the finished rolls soft.

Instant Yeast vs Active Dry Yeast

Instant yeast keeps the dough simple because it can be mixed straight in, with no separate proofing step.

Active dry yeast also works. For reliable results, proof it first by stirring it into warm milk with a pinch of sugar. After 5–10 minutes, look for foam on the surface. If it stays flat, the yeast may be old or the milk temperature may be off.

Aim for milk around 105–115°F / 40–46°C. Warm milk helps yeast wake up, while hot milk can damage it and slow or stop the rise. In a cold kitchen, slow movement does not mean failure; the dough just needs more time. Wait for puffiness, not the timer.

How the Dough Feels When It Is Right

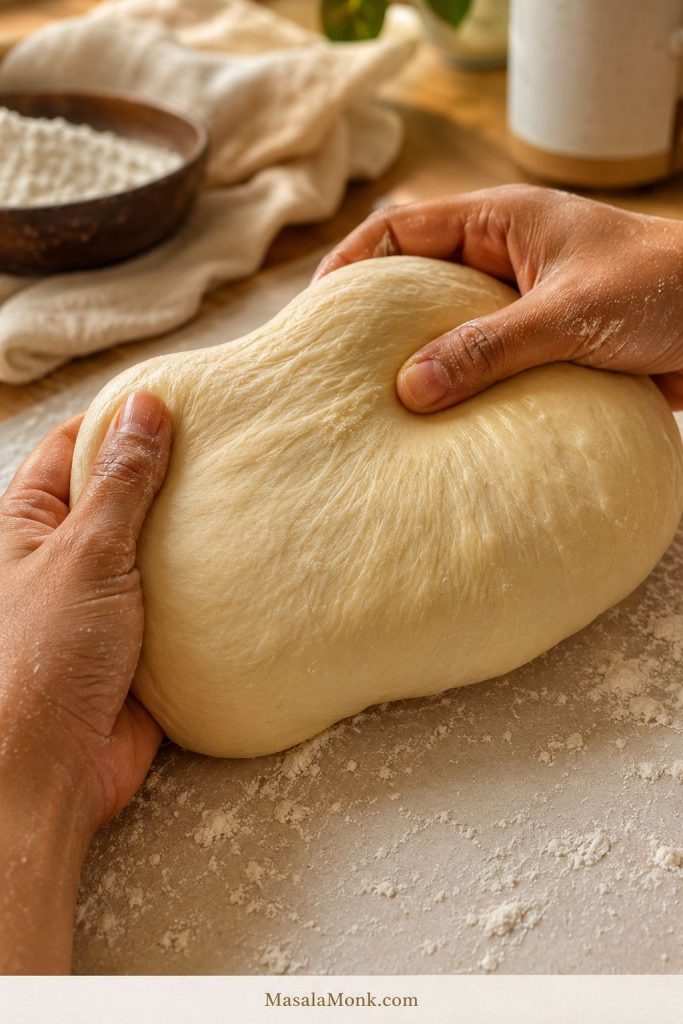
Dough texture is one of the biggest clues in this recipe. A soft, elastic dough gives the rolls their pull-apart texture; a dry, over-floured dough makes them heavy.

Soft elastic cinnamon roll dough after kneading
The ideal dough is smooth, elastic, and slightly tacky, not dry or stiff.
Dough cue What it means What to do
Soft, smooth, slightly tacky Ideal dough Keep going with the recipe
Sticking heavily to hands or bowl Slightly wet Add flour 1 tablespoon at a time only after kneading
Dry, stiff, or tearing Excess flour Stop adding flour and give the dough enough rise time
Tight and shrinking while rolling Gluten needs to relax Rest the dough for 5–10 minutes, then continue
Not rising after 90 minutes Cold kitchen, weak yeast, or overheated milk Move to a warmer spot and wait longer; if there is no movement, the yeast may be inactive

A little tackiness is your friend here. If the dough feels slightly messier than expected, that is usually better than a dough that feels dry and stiff.

Once the dough feels soft and elastic, the recipe gets easier. From here, you are not fighting the dough anymore — you are shaping it into the warm, cinnamon-filled pan you actually came for.

How to Make Cinnamon Rolls Step by Step

The method is simple once you know what to look for. The clock is only a guide; risen dough and a properly baked center matter more than exact minutes.

1. Make the Dough

Warm the milk until it feels comfortably warm, not hot. Combine the milk, yeast, sugar, melted butter, egg, and egg yolk. Add the flour and salt, then mix until a rough dough forms.

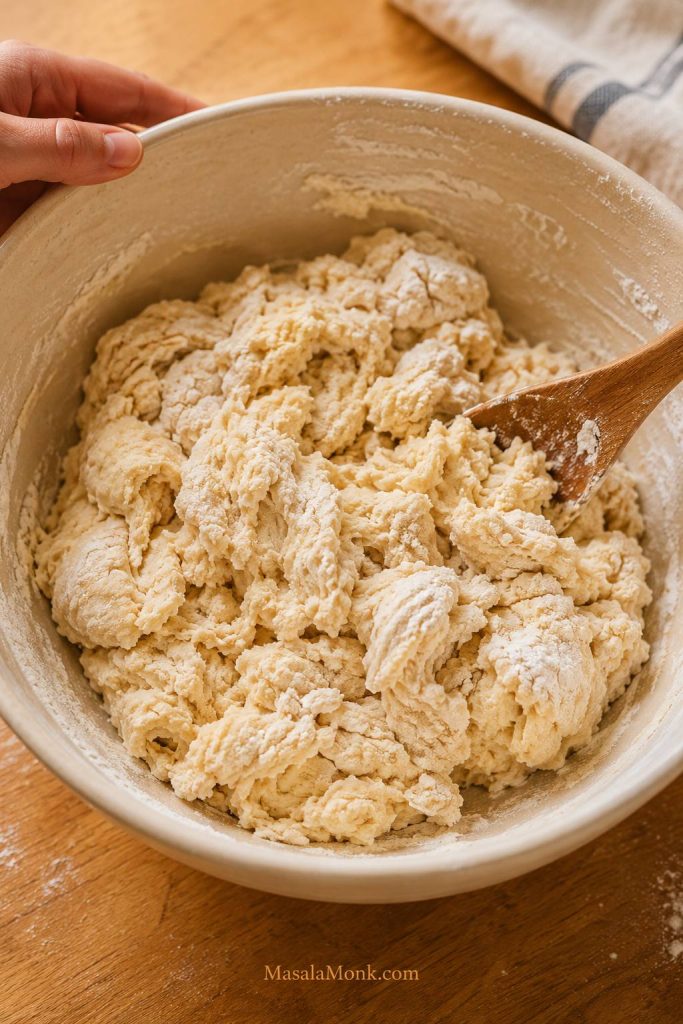
At first, the dough may look shaggy. As it kneads, it will become smoother and more elastic.

Shaggy cinnamon roll dough before kneading
A rough, shaggy dough is normal before kneading; it smooths out as the gluten develops.

2. Knead Until Smooth

Knead by hand for 8–10 minutes, or use a stand mixer for 5–7 minutes on low-medium speed.

Before adding more flour: keep kneading for another minute or two. Enriched dough often looks sticky before it turns smooth and elastic. Add flour only if it is still smearing heavily on the bowl or hands after kneading.

You are aiming for dough that feels soft, stretchy, and slightly tacky — not dry and stiff. This is the moment many bakers reach for extra flour, so pause before you do. If the dough is soft but manageable, you are probably on the right track.

When the dough is ready, it stretches a little before tearing and feels elastic, responsive, and light rather than stiff.

3. Let the Dough Rise

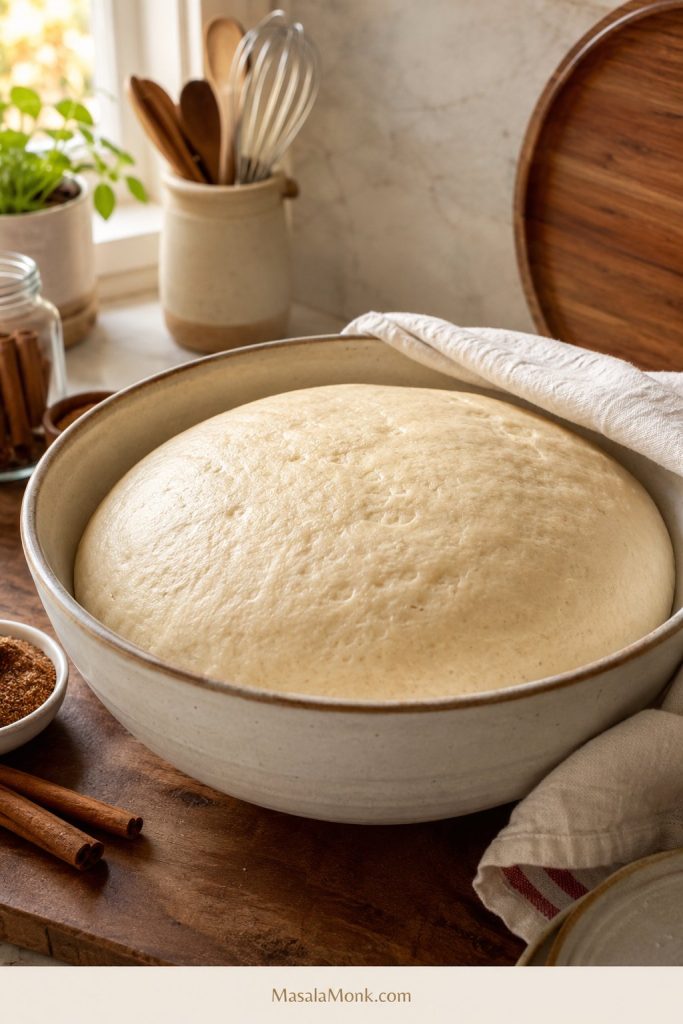
Place the dough in a lightly greased bowl. Cover the bowl with plastic wrap, a damp clean towel, or a lid so the surface does not dry out. Let it rise until doubled. This usually takes 60–90 minutes, but the dough matters more than the clock.

A cold kitchen slows the rise, while a warm kitchen speeds it up. The dough should look airy, expanded, and relaxed before you move on.

Cinnamon roll dough after the first rise, doubled and airy
After the first rise, the dough looks doubled, airy, and soft.

4. Make the Cinnamon Filling

Mix softened butter, brown sugar, cinnamon, and salt into a spreadable paste.

Softened butter keeps the filling thick enough to stay in place. When the filling is hard to spread, let it sit at room temperature for a few minutes. Avoid melting it, because melted butter is more likely to leak out.

5. Roll Out the Dough

Lightly flour the counter and roll the dough into a rectangle about 12×18 inches.

The rectangle does not need perfect corners. Even thickness matters more. If the dough keeps shrinking back, let it rest for 5–10 minutes, then continue rolling.

6. Fill, Roll, and Cut

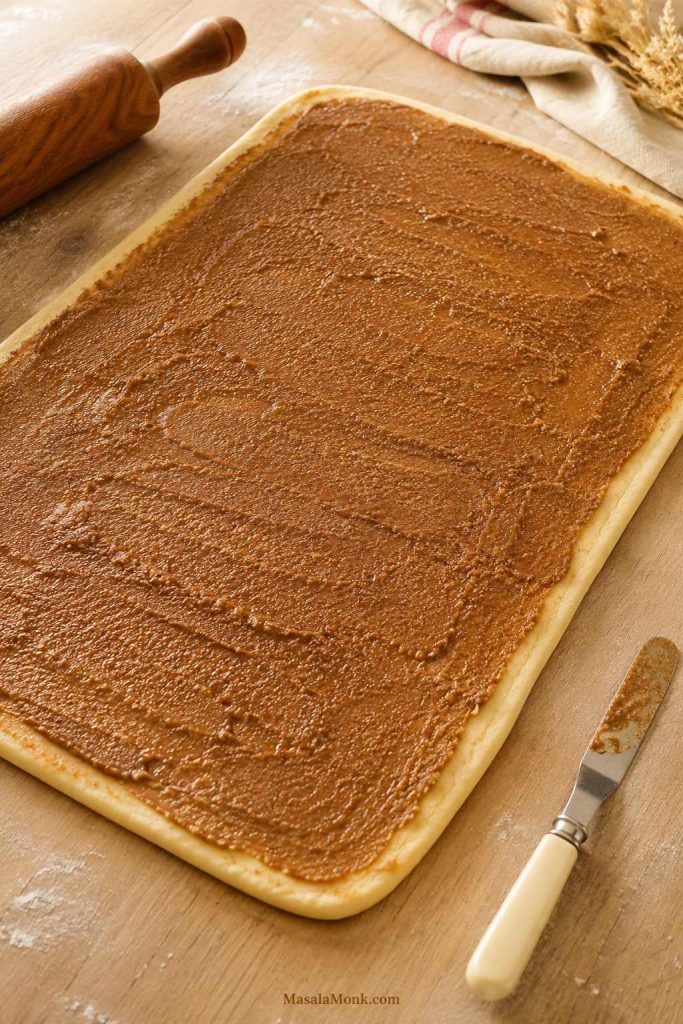
Spread the filling evenly over the dough, leaving a small border along one long edge so the log seals cleanly.

Rolled cinnamon roll dough with brown sugar cinnamon filling spread evenly
Spread the filling evenly and leave a small border so the log seals cleanly.

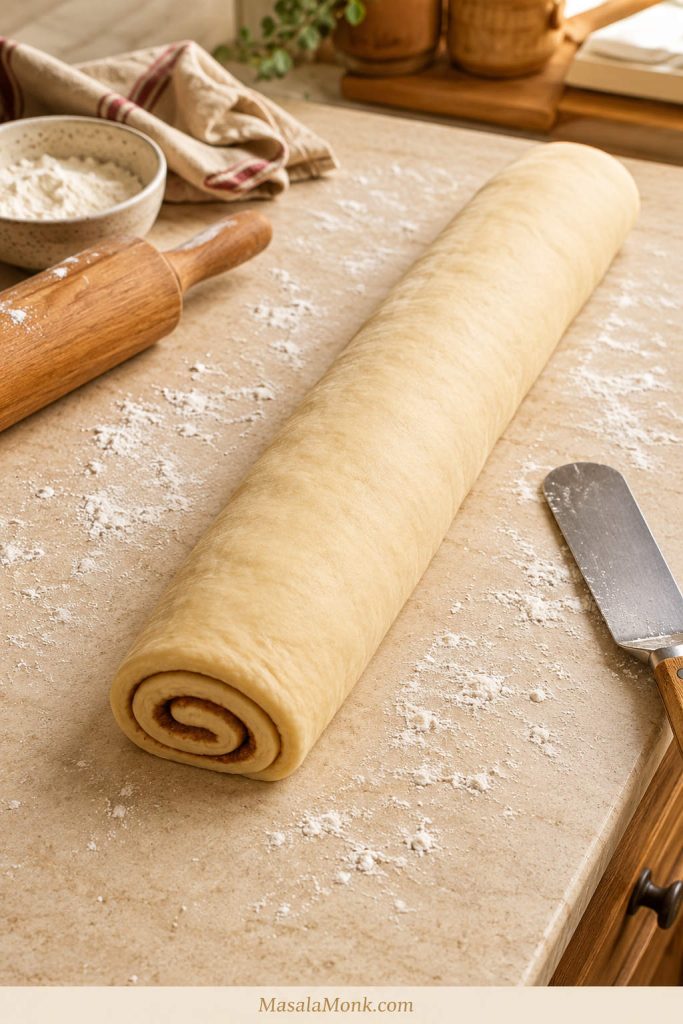
Roll from the opposite long side into a snug log, then turn the seam down before cutting so the rolls hold their shape.

Cinnamon roll dough rolled into a log before cutting
A snug dough log helps the rolls hold their swirl without compressing the centers.

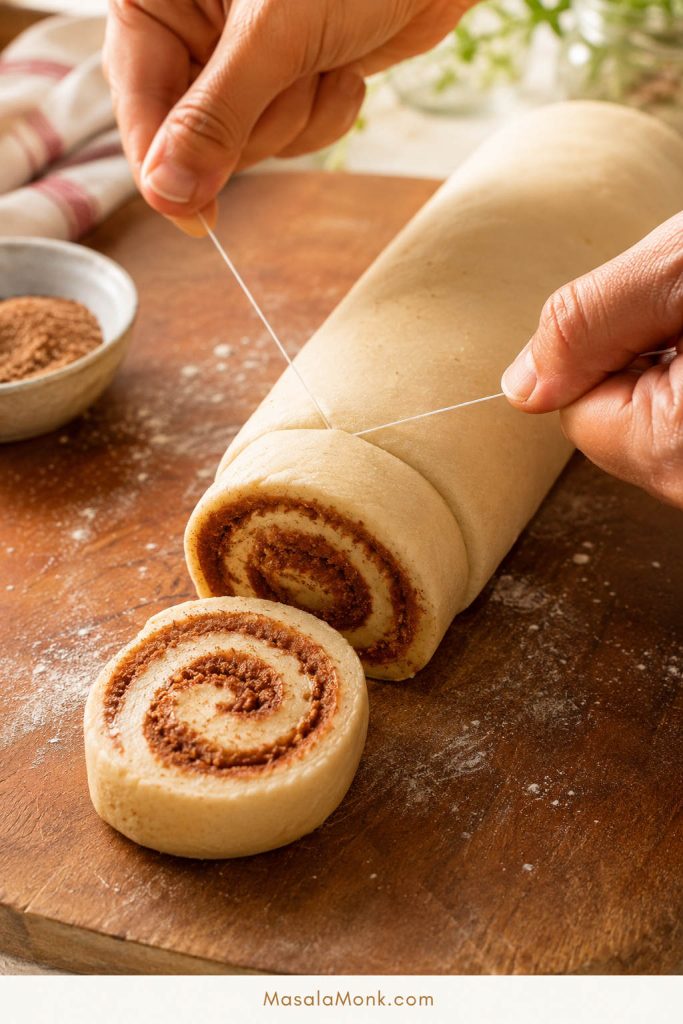
Cut into 12 even rolls. Dental floss or clean thread gives the neatest cuts, but a sharp knife also works. Each roll will be about 1½ inches thick, which helps the batch bake at the same pace.

Cutting cinnamon rolls with floss for clean even slices
Floss or clean thread cuts neat rolls without squashing the spiral.

The spirals do not need to look bakery-perfect before they rise. Even rolls and a little breathing room matter more than perfect swirls.

7. Let the Rolls Rise Again

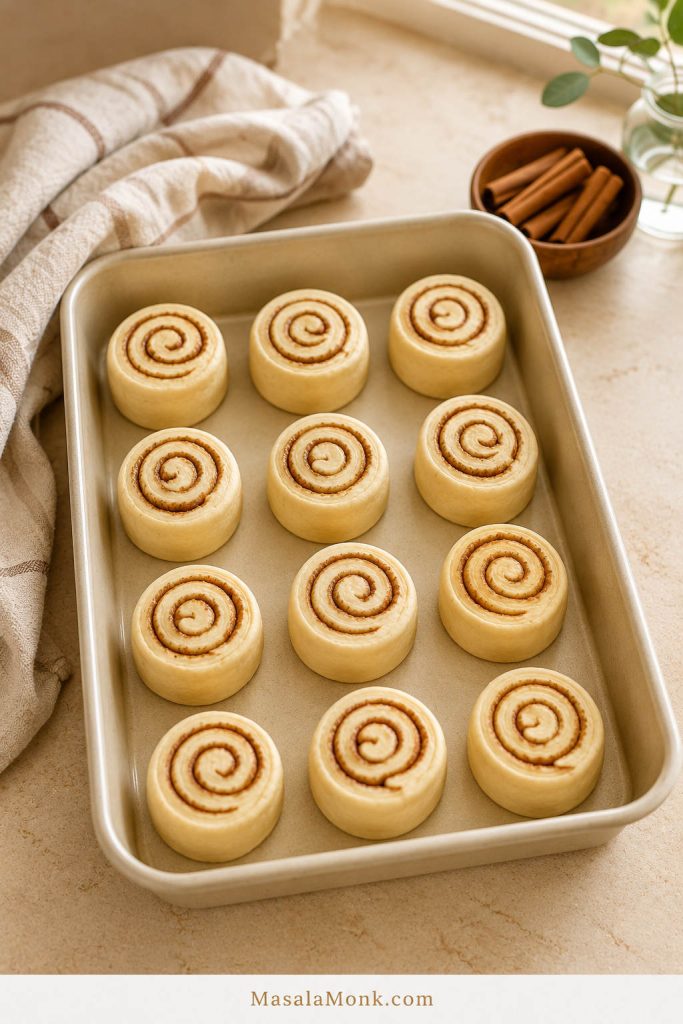
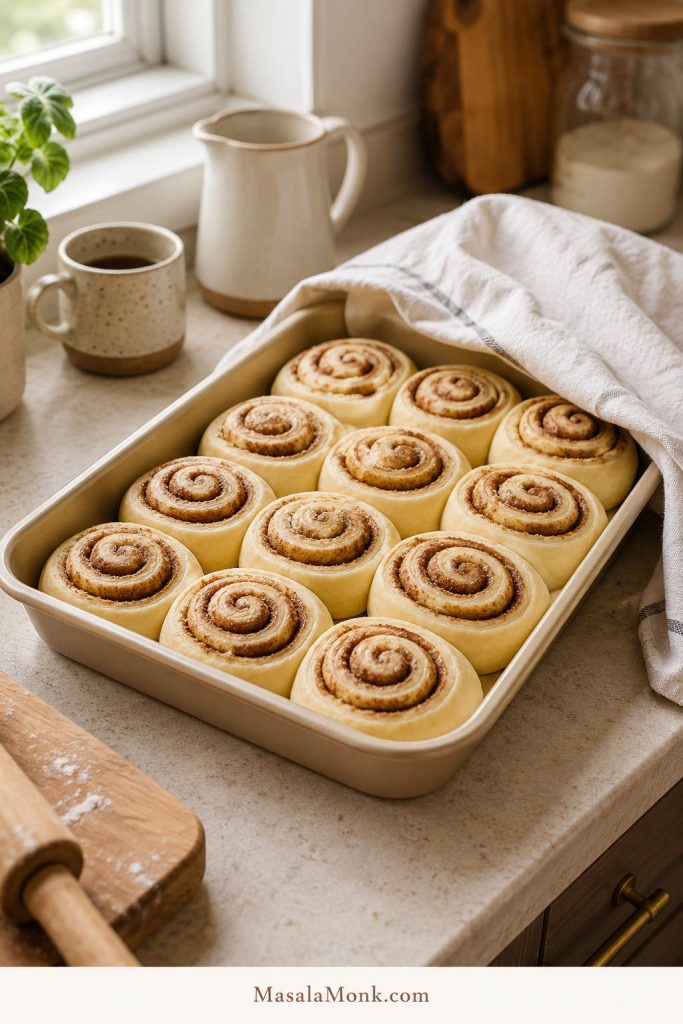
Place the rolls in a greased 9×13-inch pan. Cover and let them rise until rounded and lightly touching, about 45–60 minutes.

Cinnamon rolls arranged in a 9x13 pan before the second rise
Leave a little space between the cut rolls so they can expand during the second rise.

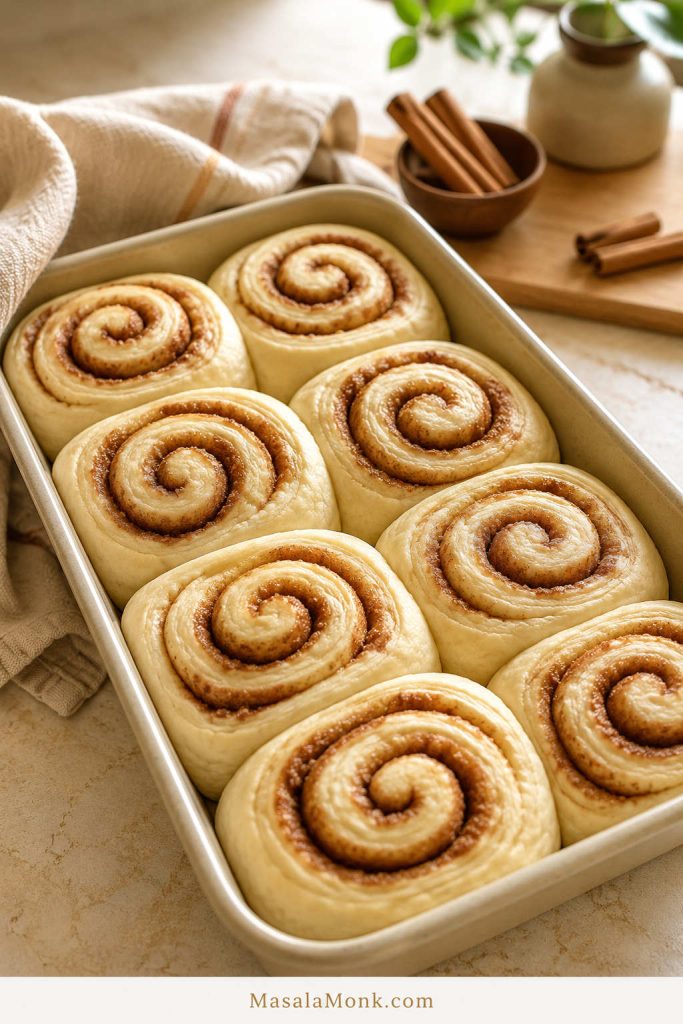
If the rolls still look tight and small, give them more time. Look for rolls that have relaxed, expanded, and lightly pressed against each other.

Puffy cinnamon rolls after the second rise ready to bake
Before baking, the rolls look puffy, rounded, and lightly touching.

Once the dough has risen, the hard part is mostly over. From here, you are shaping, waiting for puffiness, and protecting the center of the pan.

Before baking, check this: the rolls need to look puffy, rounded, and lightly touching. This is the point where patience pays off; puffy rolls going into the oven become softer rolls coming out. If you are using heavy cream, warm it first rather than pouring it in cold.

8. Bake

Bake at 350°F / 175°C for 24–28 minutes. Look for lightly golden tops and a center roll at about 190°F / 88°C.

A better doneness moment is not just when the tops turn golden. It is when the center roll gives you a soft, steamy pull instead of a wet doughy tear.

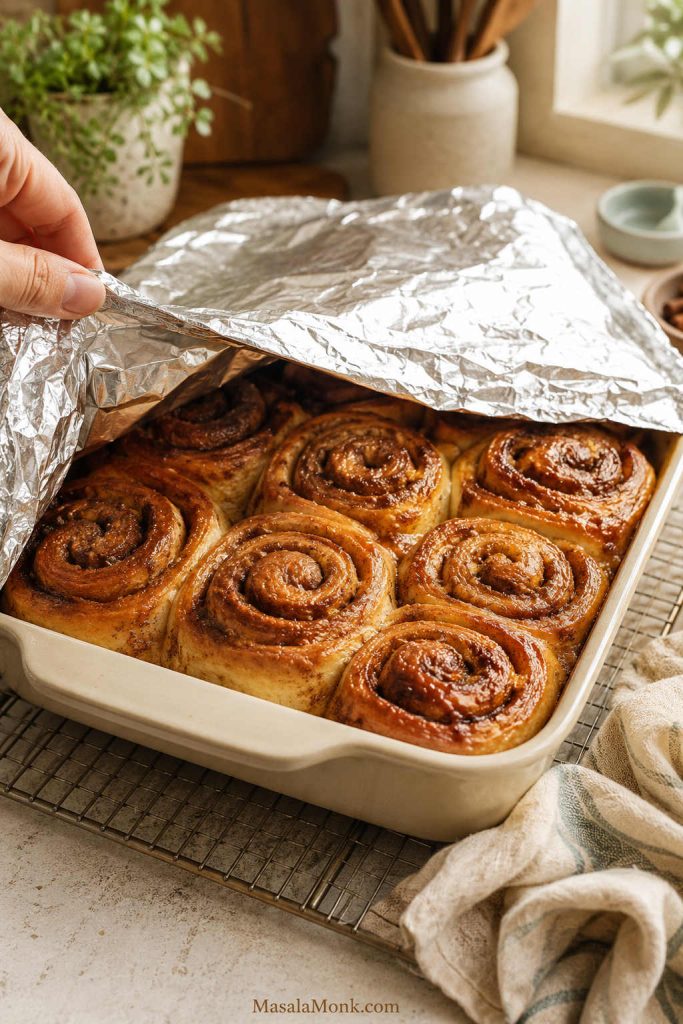
If the tops are golden but the center is not done, cover the pan loosely with foil and bake for a few more minutes. A few extra minutes under foil is better than serving rolls that look golden on top but stay underbaked in the middle.

The kitchen will smell warm and cinnamon-sweet before the tops get deeply browned.

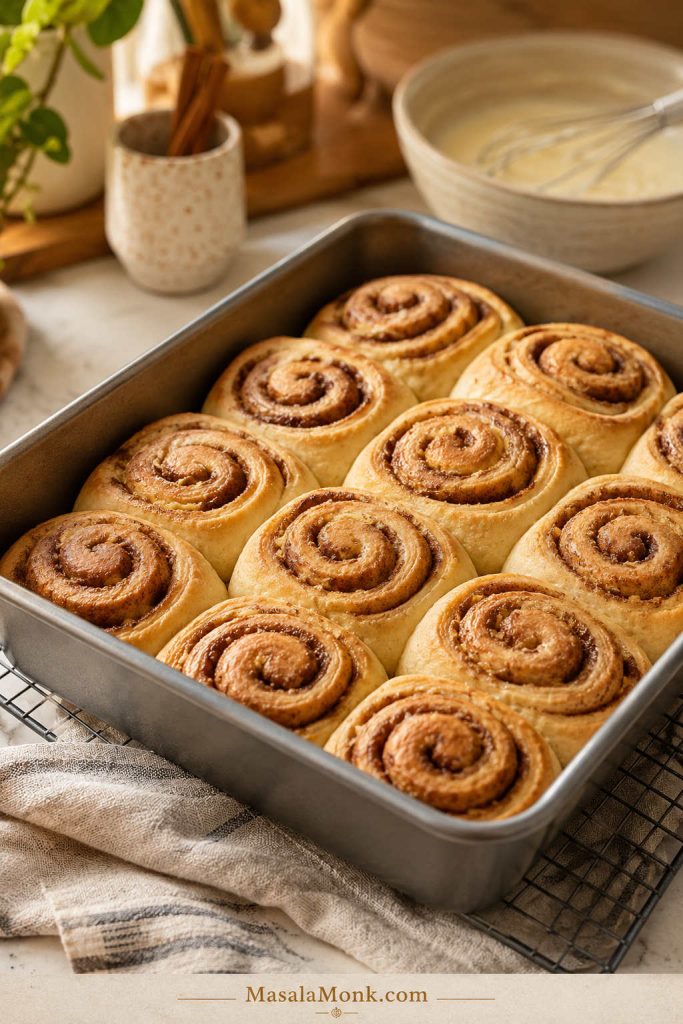
Baked cinnamon rolls before icing with lightly golden tops
The baked rolls look lightly golden before icing, not dark or dry-looking.

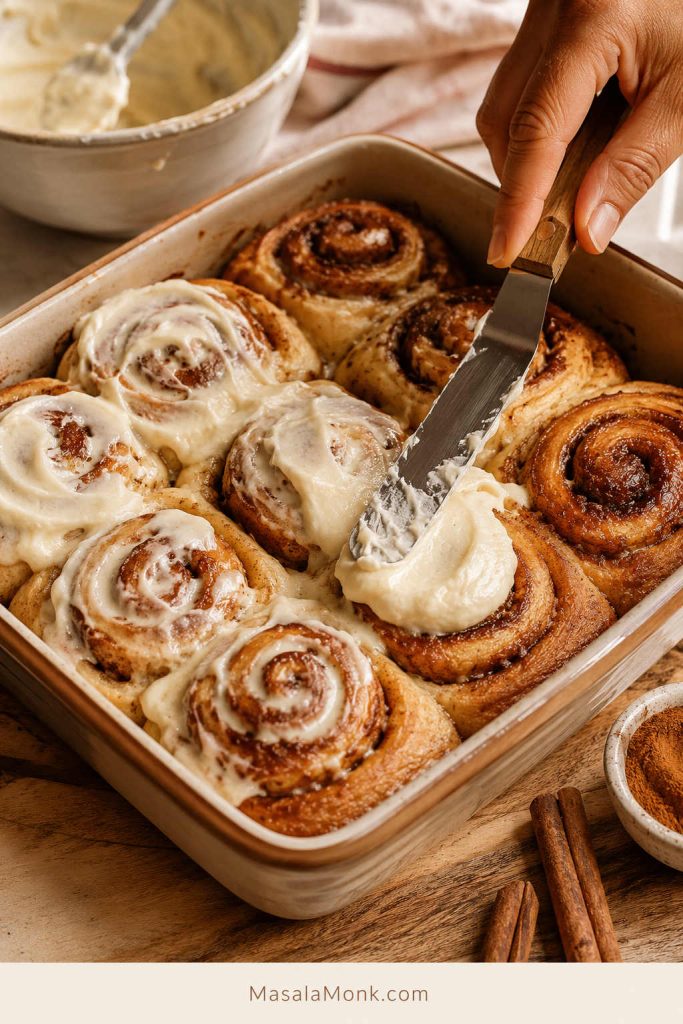
9. Ice While Warm

Let the rolls cool for 5–10 minutes before icing. The icing softens into the warm spirals, leaving some creamy pockets on top and some melted sweetness in the cinnamon layers.

Pan Size, Bake Time, and Internal Temperature

The pan affects how quickly the edges brown and how long the center needs to bake. For this recipe, a 9×13-inch pan is the safest default.

Pan Result Note
9×13-inch pan Even bake for 12 rolls Recommended for this recipe
9×9-inch pan Taller, gooier rolls Centers may need more time because the pan is crowded
Two 9-inch round pans Good for gifting or freezing Split the batch evenly
Dark metal pan Faster browning Check early and tent with foil if needed
Glass or ceramic dish Softer edges May need a few extra minutes

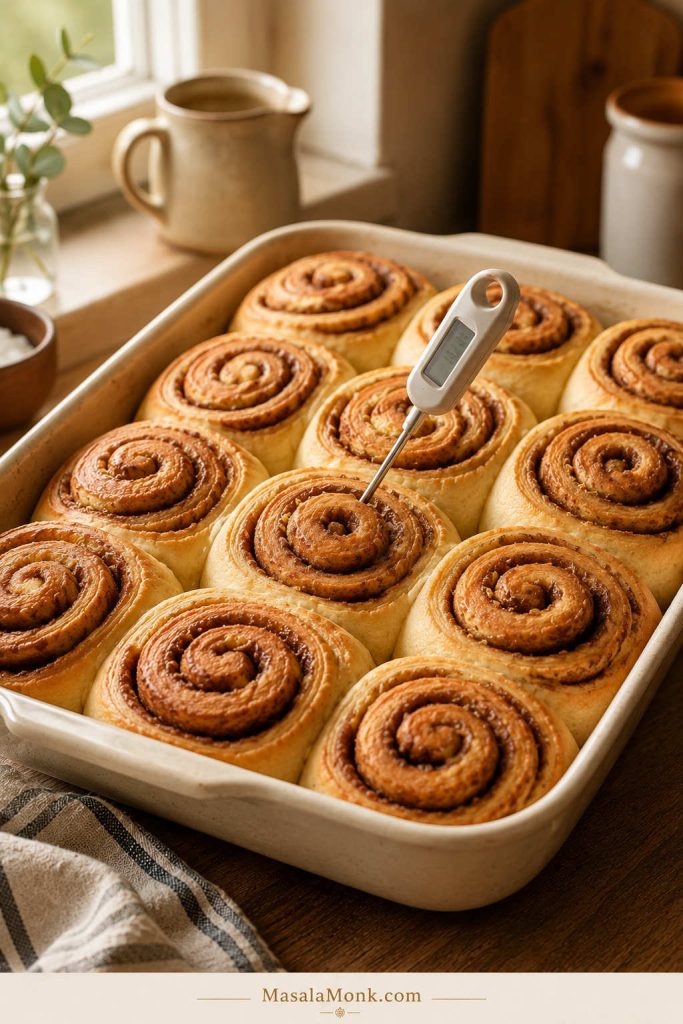
A reliable internal temperature for homemade cinnamon rolls is about 190°F / 88°C in the center roll. Check the middle of the pan, not an edge roll, because the outside rolls bake faster and can look done while the center still needs a few minutes.

Instant-read thermometer checking the center roll for cinnamon roll doneness
Check the center roll, not an edge roll, when using internal temperature as the doneness cue.

If you do not have a thermometer, check the middle roll by gently pulling at a seam. Look for a baked, bread-like center, not shiny, wet, or paste-like. A gooey cinnamon swirl is good; raw-looking dough in the center is not.

If the tops are browning before the center is done, tent the pan loosely with foil and keep baking for a few more minutes. This lets the middle finish without drying out the top.

Gooey Cinnamon Rolls with Heavy Cream

Warm heavy cream is a popular way to make cinnamon rolls richer and more moist. It helps soften the rolls as they bake and can turn some of the cinnamon sugar into a syrupy bottom layer. The key in this recipe is using a moderate amount so the rolls stay gooey without turning soggy.

After the second rise, warm ⅓ cup / 80 ml heavy cream until just warm. Pour it around the risen rolls before baking. For extra-gooey rolls, you can use up to ½ cup / 120 ml.

Warm heavy cream poured around cinnamon rolls before baking
Pour warm cream around the risen rolls; the pan needs only a modest pour.
Heavy cream question Answer
Cold cream? No. Warm it first so it does not slow the dough or shock the risen rolls.
Milk instead of cream? Yes, but it will be less rich and less gooey than cream.
Where to pour it Pour it around and lightly over the risen rolls. Do not flood the pan.
Skipping the cream The rolls still work; cream is only for a softer, gooier finish.

This works best in the 9×13-inch pan because the cream can spread evenly around the rolls. When it works well, you get a softer center and a little cinnamon-sugar syrup at the bottom without losing the shape of the rolls.

Cream Cheese Icing for Cinnamon Rolls

Cream cheese icing is the classic finish for homemade cinnamon rolls. It is creamy, tangy, and rich enough to balance the sweet cinnamon filling.

Beat the softened cream cheese and butter together first. Once smooth, add powdered sugar, vanilla, salt, and a little milk or cream. Add the liquid slowly so the icing stays spreadable instead of runny.

For that bakery-window look, wait longer. If you want icing that slips into the cinnamon seams and makes the center taste almost custardy, ice earlier. When some of the frosting disappears into the warm rolls, that is not a mistake — that is the part people go back for.

Cream cheese icing spread over warm homemade cinnamon rolls
Spread icing while the rolls are warm so some melts into the cinnamon seams.

When to Ice Cinnamon Rolls

Desired result When to ice What happens
Gooey, melted icing About 5 minutes after baking Icing melts into the spirals
Thick, visible frosting 10–15 minutes after baking Icing stays creamier on top
Gooey with visible frosting Thin layer warm, second layer before serving Gooey center with visible frosting

Cinnamon Roll Icing Without Cream Cheese

For a simple vanilla icing, whisk together:

  • 1 cup / 120 g powdered sugar
  • 2 tablespoons / 28 g melted butter
  • 1 teaspoon vanilla extract
  • 1–2 tablespoons milk or cream
  • Pinch of salt

Add more milk for a thinner drizzle or more powdered sugar for thicker icing. This version is sweeter and lighter than cream cheese icing, and it works well when you want a quick glaze. For a fuller butter-based frosting that can be spread or piped, use this Buttercream Frosting Recipe.

Overnight Cinnamon Rolls

Overnight cinnamon rolls are perfect when you want fresh rolls in the morning without making the dough from scratch at sunrise.

This is the easiest way to make cinnamon rolls feel relaxed for brunch: the messy work is done the night before, and the morning is mostly rise, bake, and ice.

In the morning, your job is mostly patience: let the rolls lose their chill, puff up, and then bake into something that feels fresh instead of rushed.

Overnight cinnamon rolls resting in the morning before baking
Overnight rolls need time to lose their chill and puff before baking if they still look tight.

Make the dough, let it complete the first rise, roll it out, add the filling, cut the rolls, and place them in the pan. Cover tightly and refrigerate for 8–12 hours.

Do Overnight Cinnamon Rolls Need to Come to Room Temperature?

Not always. If the rolls already look puffy, relaxed, and lightly touching when they come out of the refrigerator, let them sit while the oven preheats. When they still look tight, cold, and small, give them 45–90 minutes at room temperature before baking. The goal is puffy rolls, not a fixed clock time.

For reliable overnight results:

  • Do not refrigerate the shaped rolls much longer than 12 hours.
  • Let the cold rolls puff before baking instead of putting tight, cold rolls straight into the oven.
  • Bake at 350°F / 175°C for 24–28 minutes, checking the center before serving.

Very long refrigeration can overproof the rolls, making them weaker or syrupy at the bottom. For the softest texture, bake them the next morning.

How to Store, Freeze, and Reheat Cinnamon Rolls

Need Method
Bake tomorrow morning Shape, cover, and refrigerate overnight after the first rise.
Save leftovers Refrigerate cream-cheese-iced rolls and reheat gently.
Freeze for later Freeze baked rolls for the easiest serving later.
Fresh-baked texture Freeze shaped unbaked rolls before the second rise, then thaw and proof before baking.

Room Temperature

Un-iced rolls or rolls with simple vanilla glaze can sit covered at room temperature for 1–2 days if your kitchen is cool.

Refrigerator

Because cream cheese icing is dairy-based, refrigerate iced rolls within 2 hours of serving. They keep for 3–4 days, though the refrigerator can dry them out a little, so reheat gently before eating.

Food safety note: For general leftover guidance, the USDA recommends refrigerating leftovers for 3–4 days: USDA leftovers and food safety.

Freezer

Freeze baked cinnamon rolls with or without icing. Let them cool completely, wrap tightly, and freeze for up to 2 months.

You can also freeze shaped unbaked rolls before the second rise. Thaw overnight in the refrigerator, then let them sit at room temperature until puffy before baking.

Reheating

Reheat individual rolls in the microwave for 10–15 seconds at a time. For a full pan, cover loosely with foil and warm in a low oven.

If a roll seems dry, add a small spoon of milk or cream near the roll before reheating. It helps soften the bread without making it soggy.

Troubleshooting Cinnamon Rolls

If something looks off, do not panic. Cinnamon rolls usually give you clues before they fail: stiff dough, tight-looking rolls, filling that starts to run, or tops that brown before the middle is done.

Even careful bakers get a batch that rises slowly, leaks filling, or browns early. Use these cues to understand what happened and what to change next time.

Quick Cinnamon Roll Fixes

Problem Likely cause Fix
Cinnamon rolls are dry Excess flour, overbaking, dark pan, or not enough icing while warm Weigh flour, keep dough slightly tacky, bake until the middle is set, and tent if tops brown early
Cinnamon rolls are dense Weak yeast, short rise, under-kneading, or cold kitchen Use fresh yeast, knead until smooth, rise until doubled, and let shaped rolls get puffy
Centers are doughy Crowded pan, thick cuts, short second rise, or underbaking Use a 9×13 pan, cut evenly, finish the second rise, and bake until the center is done
Filling leaked out Melted butter, loose roll, filling spread to edge, or overfilled dough Use softened butter paste, leave a border, roll snugly, and place seam side down
Rolls did not rise Old yeast, hot milk, or cold room Use fresh yeast, keep milk warm not hot, and give dough more time in a warm spot
Icing disappeared Rolls were very hot Wait 10–15 minutes for visible frosting or use a thin warm layer plus a second layer
Centers popped up Tight rolling or a small pan Roll snugly but gently, and use a 9×13 pan
Bottoms are soggy Heavy cream overload, underbaking, or overproofing overnight Use less cream, bake until the center is done, and avoid very long refrigeration

Use the table for a quick diagnosis, then read the notes below for the problems that most often affect texture.

The good news: most of these problems are easy to prevent next time once you know the cue to watch for.

Dry Cinnamon Rolls

Dry rolls usually mean the dough was over-floured or the pan baked too long. Keep the dough soft and slightly tacky after kneading.

A dark pan can also brown the edges quickly. If the tops or edges are browning before the center is done, cover the pan loosely with foil and keep baking.

Cinnamon rolls tented with foil when tops brown before the center is done
Loosely tent the pan with foil if the tops brown before the center finishes baking.

Doughy Middle in Cinnamon Rolls

The center rolls bake last. Crowded rolls, thick cuts, or an early pull from the oven can leave the middle doughy.

Check the center of the pan instead of relying only on the edge rolls. A center temperature of about 190°F / 88°C is the clearest sign that the pan is done.

Cinnamon roll center showing a baked interior with gooey cinnamon swirl
A fully baked center looks bread-like and soft with gooey cinnamon, not wet raw dough.

Filling Leaking Out

The butter may have melted, or the dough may have been rolled loosely. A softened-butter filling paste stays in place better.

Leaving a small border along one long edge also helps seal the log.

Rolls Not Rising

Old yeast, overheated milk, or a cold room can slow the rise. When the dough is slowly expanding, give it more time. No movement at all usually means the yeast was probably inactive.

Cinnamon Roll Variations

These are flavor and format ideas, not full conversion formulas. The base dough is designed for classic soft yeast cinnamon rolls, so bigger changes may need their own tested recipe.

Pumpkin Cinnamon Rolls

Add pumpkin puree and warm spices to the dough or filling, then finish with maple cream cheese icing. Pumpkin adds moisture, so use a tested pumpkin version or adjust flour carefully.

Apple Cinnamon Rolls

Add finely chopped apples or a controlled amount of apple pie filling. A heavy apple layer can make the centers wet, so keep the filling modest. For homemade filling, use this Apple Pie Filling Recipe and keep the amount modest inside the rolls.

Sourdough Cinnamon Rolls

Use active sourdough starter or discard for a tangier dough and longer fermentation. Sourdough timing depends on starter strength and room temperature. If you are still building your starter, start with this Sourdough Starter Recipe.

For more starter-based bakes, this Sourdough Recipe guide covers loaves, rolls, buns, and bagels.

Cinnamon Roll Cookies

For cookies, use cinnamon sugar swirl flavor in a buttery cookie dough. This gives you cinnamon roll flavor without yeast or rise time, but it will not have the soft pull-apart crumb of this recipe.

Puff Pastry Cinnamon Rolls

Puff pastry works when you want fast, flaky cinnamon rolls instead of soft yeast rolls. Bake them spaced apart, not crowded like this dough, because puff pastry needs room to expand.

Vegan Cinnamon Rolls

For vegan cinnamon rolls, use plant-based milk and butter, and replace the egg carefully rather than simply leaving it out. This Flax Egg guide explains the classic flaxseed meal ratio for vegan baking, though a fully vegan cinnamon roll still needs its own dough balance.

Cinnamon Rolls vs Cinnamon Buns vs Cinnamon Scrolls

Whatever you call them — cinnamon rolls, cinnamon buns, or cinnamon scrolls — the craving is usually the same: soft spiral dough, warm cinnamon sugar, and something sweet on top.

In the US, “cinnamon rolls” is the most common term. “Cinnamon buns” may mean the same thing, though some versions include sticky toppings, nuts, or caramel. “Cinnamon scrolls” is common in some regions outside the US.

For this recipe, the method is the same: soft yeast dough, cinnamon sugar filling, spiral shape, and icing or glaze.

Shortcut Cinnamon Roll Questions

Yeast-Free Cinnamon Rolls

You can, but the texture changes. Yeast gives these rolls their fluffy, stretchy, pull-apart crumb. No-yeast cinnamon rolls are faster, but they usually bake up more like soft biscuits or scones.

For these bakery-style rolls, yeast is worth using. If you want something faster, a biscuit-style cinnamon roll is a better direction, but it will not have the same pull-apart crumb.

Using Canned Cinnamon Rolls Instead

Canned cinnamon rolls are great when you want a shortcut brunch or dessert. They will not have the same homemade yeast-dough texture, but they can still be turned into a cozy bake with fruit filling, cream, or extra cinnamon sugar.

For a quick dessert using refrigerated rolls, try this Apple Cinnamon Roll Bake with Apple Pie Filling. It is better for shortcut baking, while this recipe is better when you want homemade cinnamon rolls from scratch.

What to Serve with Cinnamon Rolls

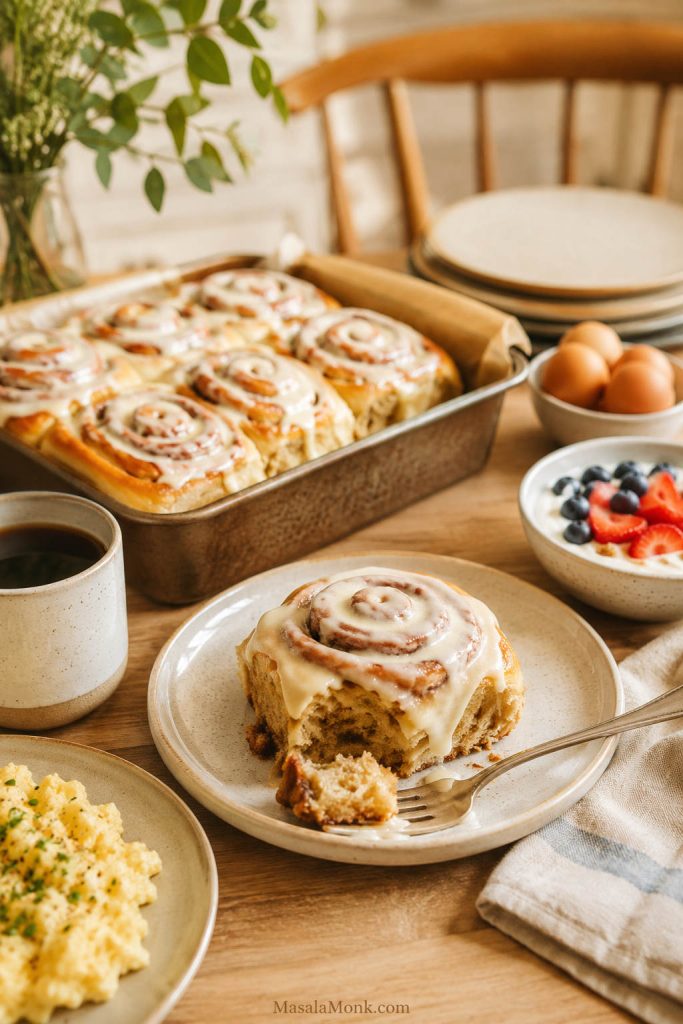
At brunch, cinnamon rolls work well beside something simple and lightly sweet. Serve them with coffee, fruit, eggs, yogurt, or something cool and café-style like an Iced Matcha Latte. With a sweeter spread, keep the sides fresh and light; for a more balanced breakfast, add something savory.

Cinnamon rolls served for brunch with coffee, fruit, and a simple breakfast side
Keep brunch sides simple and fresh so the cinnamon rolls stay the centerpiece.

Frequently Asked Questions

All-Purpose Flour for Cinnamon Rolls

Absolutely. All-purpose flour gives a softer homemade texture and works well when extra flour is kept under control.

Is bread flour better for cinnamon rolls?

Bread flour gives taller, slightly chewier rolls with more structure. Use it if you want a more bakery-style result.

Active Dry Yeast Instead of Instant Yeast

Use the same amount, but proof active dry yeast in warm milk with a little sugar for 5–10 minutes before mixing the dough.

Milk Temperature for Yeast

Aim for milk around 105–115°F / 40–46°C. It should feel warm, not hot.

Using 2% Milk Instead of Whole Milk

Whole milk gives a richer dough, but 2% milk works. Avoid skim milk if you want the softest texture.

Internal Temperature for Cinnamon Rolls

Aim for about 190°F / 88°C in the center roll. This helps confirm the middle is baked through even if the tops already look golden.

How do I tell if cinnamon rolls are done without a thermometer?

Gently pull at a seam in the middle roll. Look for a baked, bread-like center, not wet, shiny, or paste-like.

Dry Cinnamon Rolls

They were likely over-floured, baked too long, or browned quickly in a dark pan. Keep the dough soft and avoid pulling the pan before the middle is done.

Dense Cinnamon Rolls

Dense rolls usually come from weak yeast, short rise time, under-kneading, or excess flour. Let the dough double and let the shaped rolls puff before baking.

Doughy Middle

They may be underbaked, crowded, cut thick, or not risen enough. The center should look set before serving.

Preventing Doughy Centers

Use a 9×13-inch pan for 12 rolls, cut the rolls evenly, let them complete the second rise, and check the center roll before pulling the pan from the oven.

Cinnamon Rolls Popping Up in the Center

The log may have been rolled tightly, the pan may have been crowded, or the rolls may have needed more room to expand.

Adding Heavy Cream Before Baking

You can. Warm heavy cream makes the rolls richer and gooier. Use ⅓ cup / 80 ml for a softer pan or up to ½ cup / 120 ml for extra-gooey rolls.

Overnight Cinnamon Rolls

For overnight cinnamon rolls, make the dough, complete the first rise, shape the rolls, cover the pan tightly, and refrigerate for 8–12 hours. In the morning, let the rolls sit until puffy if they still look tight and cold, then bake.

Freezing Cinnamon Rolls

Freezing works well. Baked rolls can be frozen after cooling, or you can freeze shaped unbaked rolls before the second rise. Thaw and let them get puffy before baking.

Doubling This Recipe

To double the recipe, use two 9×13-inch pans and rotate them if your oven has hot spots.

Choosing Cinnamon Roll Icing

Cream cheese icing is the classic choice because it is creamy, tangy, and rich. A simple vanilla glaze without cream cheese also works.

Icing Without Cream Cheese

For a simple glaze, mix powdered sugar, melted butter, vanilla, milk or cream, and a pinch of salt. Add more milk for a thin glaze or more powdered sugar for thicker icing.

No Stand Mixer Method

A stand mixer helps, but hand kneading works. Mix the dough in a large bowl and knead for 8–10 minutes, until it turns smooth and stretchy.

Final Tips for Soft, Gooey Cinnamon Rolls

Great cinnamon rolls are not about rushing the dough or baking until the tops are dark. Once you understand the cues, homemade cinnamon rolls stop feeling like a gamble. You are not just waiting for a timer; you are watching the dough, the rise, and the center of the pan.

The goal is gooey, not doughy: fluffy edges, cinnamon-rich swirls, creamy icing, and a middle that pulls apart warm instead of feeling heavy, wet, or underbaked.

Did you make these? Leave a comment with the flour you used, whether you baked them same-day or overnight, and whether you added the warm cream. Those details help other readers choose their own cinnamon roll path.
Posted on Leave a comment

Buttercream Frosting Recipe

Bowl of fluffy vanilla buttercream frosting with a frosted cupcake, partial cake, and offset spatula in a warm bakery setting.

This buttercream frosting recipe is the one to make when the cake is cooling, the cupcakes are waiting, and you need frosting that will behave. It is classic American vanilla buttercream: fluffy, creamy, sweet, stable enough to pipe, and soft enough to spread.

The ingredients are simple — butter, powdered sugar, vanilla, cream or milk, and a little salt — but the real difference comes from butter temperature, gradual mixing, and knowing what the bowl is telling you.

This guide gives you the base recipe first, then the texture cues, quantity guide, piping help, storage notes, and practical fixes for the moments when the frosting looks too thick, too soft, or not quite right.

What finished buttercream should look like

Finished buttercream should look pale and creamy, feel soft but not loose, and hold a gentle swirl without slumping. That visual target matters more than the exact minute count on the mixer.

Close-up of pale vanilla buttercream on a spatula with smooth ridges and a soft peak.
Use this soft peak as your visual target; the frosting should look creamy and lifted, not shiny, wet, dry, or jagged.

Quick Answer: The Best Buttercream Frosting Ratio

The easiest American buttercream ratio to remember is 1 cup butter to 4 cups powdered sugar, with just enough milk or cream to make it smooth. That gives you a classic homemade buttercream frosting that is fluffy, stable, and strong enough for cakes and cupcakes.

Quick ratio: Beat 1 cup / 226g softened butter with 4 cups / 480g powdered sugar, then add 3–4 tablespoons / 45–60ml milk or heavy cream, 2 teaspoons vanilla extract, and 1/4 teaspoon fine salt. This makes about 2.5–3 cups of fluffy frosting.

The buttercream ratio at a glance

Use this as the base batch, then adjust the final spoonfuls of milk or cream for spreading, piping, or decorating.

Buttercream frosting ratio board with butter, powdered sugar, milk or cream, vanilla, and salt measured for the recipe.
Think of this as the base batch: butter and powdered sugar build structure, while milk or cream turns it into frosting you can actually spread or pipe.

That ratio gives you a frosting that tastes rich, pipes cleanly, and still spreads without tearing soft cake.

Ingredient Amount Why it matters
Unsalted butter 1 cup / 2 sticks / 226g / 8 oz Gives the frosting richness, body, and buttery flavor.
Powdered sugar / icing sugar 4 cups / 480g / about 1 lb Sweetens and thickens the frosting so it can hold shape.
Milk or heavy cream 3–4 tbsp / 45–60ml / 1.5–2 fl oz Loosens the texture so the frosting can spread or pipe smoothly.
Vanilla extract 2 tsp / 10ml Adds the classic vanilla buttercream flavor.
Fine salt 1/4 tsp Balances the sweetness and makes the flavor taste fuller.

One base batch is enough for about 12 cupcakes with generous swirls, 18 cupcakes with a spread finish, or the top of one 9×13 sheet cake. For a full layer cake or heavy piping, check the quantity guide before you start.

Buttercream Frosting at a Glance

Quick recipe overview

Here is the practical snapshot before you start mixing.

StyleAmerican vanilla buttercream
Time10 minutes
YieldAbout 2.5–3 cups
Best forCakes, cupcakes, piping
Main controlCool-soft butter
Texture targetSoft peak, no oily shine
Best fixesLiquid, sugar, or chill time
DifficultyBeginner-friendly

What Is American Buttercream Frosting?

American buttercream is a thick, creamy frosting made by beating butter and powdered sugar together, then loosening the mixture with milk or cream and flavoring it with vanilla and salt. It is the simplest buttercream style because it does not need egg whites, sugar syrup, cooking, a double boiler, or a thermometer.

You may also see similar recipes called buttercream icing, butter icing, butter frosting, vanilla frosting, or cake frosting. The wording changes by region and habit, but home bakers are usually looking for the same thing: a simple, sweet, fluffy frosting that works for cakes and cupcakes.

American buttercream is sweet by design. Powdered sugar does more than sweeten the batch; it also gives the frosting structure, stability, and pipeable body. That sweetness is why a little salt, good vanilla, and a careful layer matter so much.

Good to know: This is not Swiss meringue buttercream, Italian buttercream, ermine frosting, whipped cream frosting, or cream cheese frosting. It is the easiest American-style version made with butter, powdered sugar, vanilla, milk or cream, and salt.

If you actually need a lighter topping for pies, fruit desserts, hot chocolate, pancakes, or no-bake desserts, MasalaMonk’s whipped cream recipe is a better fit than buttercream.

How American buttercream compares to other frostings

Use American buttercream when you need something fast, dependable, and easy to pipe. Choose another frosting family when the main goal is a silkier texture, lower sweetness, or tangy flavor.

Comparison board of American buttercream, Swiss meringue buttercream, ermine frosting, and cream cheese frosting.
American buttercream is the quick, pipeable choice; however, Swiss meringue or ermine may suit you better when a silkier, less-sweet frosting is the priority.
Frosting style Best for Sweetness Difficulty
American buttercream Quick cakes, cupcakes, piping, sheet cakes High Easy
Swiss meringue buttercream Silky layer cakes, less-sweet finish Medium Medium
Ermine frosting Soft, less-sweet cakes Medium-low Medium
Cream cheese frosting Carrot cake, red velvet, spice cake Medium Easy

Start here when you need something fast and dependable. Choose Swiss meringue buttercream or ermine frosting when you want a silkier, less-sweet finish and do not mind a more involved method.

Before You Start: 4 Things That Matter

Buttercream is forgiving, but a few small choices make the whole process easier.

  • Use cool-soft butter, not greasy butter. The butter should press easily with a finger but still hold its shape.
  • Add powdered sugar gradually. This keeps the frosting smoother and stops sugar from flying around the bowl.
  • Sift only if the sugar is lumpy. Fresh powdered sugar usually mixes in fine, but clumpy icing sugar can leave tiny dry pockets.
  • Do not add all the liquid at once. Start with less milk or cream, then add more only after the frosting has come together.

A calm buttercream is usually a better buttercream: slow sugar, small liquid additions, and short chill breaks beat panic-fixing almost every time.

Buttercream Frosting Ingredients

The ingredient list is short, so the recipe has nowhere to hide: butter texture, sugar texture, and liquid control do most of the work.

Overhead board of buttercream frosting ingredients: butter, powdered sugar, milk or heavy cream, vanilla extract, and fine salt.
The ingredient list is short, so each choice matters: soft butter, smooth powdered sugar, good vanilla, and a little salt all shape the final flavor.

Butter

Use unsalted butter if possible. It gives you better control over the final flavor because you can add salt separately. Salted butter can still work, but different brands vary in saltiness, so reduce or skip the added salt if your butter already tastes salty.

The butter should be softened, not melted. It should press easily when touched, but it should not look shiny, oily, or greasy. Cold butter can leave lumps; overly warm butter can make the frosting loose, greasy, or weak for piping.

Comparison of butter states for buttercream frosting, showing too cold, just right, too warm, and melted butter.
Butter sets the tone for the whole bowl; too cold makes frosting heavy, while too warm makes it loose, greasy, and harder to rescue.

If you are not sure whether your butter has gone too far, use the butter-temperature guide before mixing the batch.

Powdered Sugar / Icing Sugar

Use powdered sugar, confectioners’ sugar, or icing sugar. It gives American buttercream its sweetness and structure. If it looks lumpy, sift it before adding it to the butter.

For the most consistent texture, weigh the powdered sugar if you can. Cups are fine for everyday baking, but packed or very fluffy cups can change how stiff the frosting feels.

Do not use granulated sugar in this recipe. It will not dissolve the same way and can leave the frosting gritty. Frosting without powdered sugar is a different style and needs a different method.

Milk or Heavy Cream

Both milk and heavy cream work. Heavy cream makes the frosting a little richer and fuller. Milk keeps it lighter and is easier if you do not keep cream at home.

Start with 3 tablespoons, then add more only if needed. The mixture loosens quickly, so it is better to add liquid slowly at the end than to pour in too much at the beginning.

Split board comparing milk and heavy cream for buttercream frosting with lighter and richer texture cues.
Milk gives a lighter finish, whereas heavy cream makes buttercream fuller and richer; either way, small additions keep the texture under control.

For spreadable, pipeable, and stiffer uses, use the texture guide before adding more liquid.

Vanilla

Vanilla gives this frosting its classic flavor. Use a good vanilla extract if you can because vanilla is one of the main flavors in a plain buttercream. Vanilla bean paste can also work if you like visible vanilla specks.

If you want a very white frosting, use clear vanilla. Regular vanilla extract often tastes better, but it can add a slightly beige tint.

Salt

Do not skip the salt. A small amount balances the sweetness and makes the butter and vanilla taste more rounded. Without salt, American buttercream can taste flat and sugary.

Equipment You Need

You do not need fancy tools, but the right mixer attachment can make the frosting smoother and less bubbly. A stand mixer with a paddle attachment is easiest, especially for a larger batch. A hand mixer works well for one batch, but you will need to scrape the bowl more often.

Buttercream equipment board with a stand mixer, paddle, whisk, hand mixer, spatulas, piping bag, piping tip, and bowl.
The right tool changes the finish: a paddle helps reduce air bubbles, while a spatula lets you press, fold, and polish the frosting before decorating.
Tool Best use
Stand mixer with paddle attachment Best for smooth, fluffy frosting with fewer air bubbles.
Hand mixer Works well for a single batch; scrape the bowl often.
Large mixing bowl Prevents powdered sugar from flying everywhere.
Rubber spatula Useful for scraping the bowl and pressing out air bubbles.
Piping bag and star tip Optional, but helpful for cupcake swirls, rosettes, and borders.
Offset spatula Helpful for spreading frosting over cakes and sheet cakes.
Paddle or whisk? Use the paddle attachment if you have one. A whisk can make the frosting fluffy, but it also adds more air. The paddle gives better control and usually creates a smoother finish for spreading and piping.

The Butter Temperature That Makes or Breaks Buttercream

If your frosting has ever turned greasy, lumpy, or strangely loose, the butter was probably the reason. “Room temperature” is not always clear because kitchens vary. In a warm kitchen, butter can move from perfectly soft to too greasy faster than expected.

If you like numbers, aim for about 65–67°F / 18–19°C: cool to the touch, easy to dent, but not shiny or greasy. If you remember only one thing from this section, remember this: soft butter is good, greasy butter is not. Buttercream needs butter that bends, not butter that melts.

Butter temperature guide with softened butter, thermometer cue, and finger-press test showing 65 to 67 degrees Fahrenheit.
Cool-soft butter around 65–67°F gives you the best starting point because it blends smoothly without melting into a greasy frosting.

The butter should be soft enough to press with a finger, but not shiny, oily, or melted. It should still hold its shape. If it slumps, looks greasy, or has oily edges, it is too warm.

Butter state What happens What to do
Too cold Frosting can turn lumpy, hard to mix, or grainier. Let the butter sit longer, or cut it into small cubes to soften faster.
Just right Butter blends smoothly and holds enough structure for piping. Use it now.
Too warm The frosting can become greasy, loose, or weak. Cool the butter briefly until it is soft-solid again.
Melted The frosting will not hold properly. Do not use melted butter. Chill until it becomes soft-solid again.

In a warm kitchen, keep an eye on the bowl as you mix. Even a good batch can soften if the mixer, bowl, or your hands warm it too much. When that happens, pause and let the frosting cool before continuing.

How to Make Buttercream Frosting

This is the point where buttercream gets easier: once the butter is right, the rest is mostly small adjustments. The method is simple, but the order matters: cream the butter first, add sugar slowly, whip only once the mixture is combined, then smooth it down at the end.

Texture target: Finished buttercream should look pale and creamy, hold a soft peak, spread without tearing cake, and pipe without slumping. It should not look shiny, oily, wet, or stiff and jagged.
Step-by-step buttercream frosting process showing butter being beaten, sugar added, liquid added, frosting whipped, adjusted, and smoothed.
Build the frosting in stages: cream the butter, bring in the sugar, loosen only as needed, then finish gently so the bowl turns smooth instead of bubbly.

Step 1: Beat the Butter

Add the softened butter to a large mixing bowl. Beat for 2–3 minutes until it looks creamy, smooth, and slightly paler. This first step removes lumps and creates a better base.

Step 2: Add Powdered Sugar Gradually

Add the powdered sugar in 3–4 additions, mixing on low speed after each addition. Do not dump it all in at once. Gradual mixing keeps the texture smoother and prevents powdered sugar from flying out of the bowl.

Step 3: Add Vanilla, Salt, and Liquid

Add vanilla, salt, and 3 tablespoons of milk or cream. Mix on low until everything comes together. It may look thick at first; that is normal. Wait until the sugar is fully mixed in before deciding whether it needs more liquid.

Step 4: Whip Until Fluffy

Increase to medium speed and beat for about 2 minutes, or until the frosting looks lighter, creamier, and softer around the edges of the bowl. Scrape the sides and bottom so no butter or sugar pockets are left behind.

Step 5: Adjust the Texture

If the frosting is too thick, add milk or cream a little at a time. If it is too loose, add powdered sugar in small additions. Make one correction, mix, then check the bowl again before adding more. For use-by-use consistency, see the texture guide.

Step 6: Smooth on Low Speed

Mix on low speed for 1–2 minutes at the end. This helps knock out some air bubbles and gives the frosting a smoother finish. For an even cleaner texture, press and fold it with a rubber spatula before spreading or piping. If the bowl still looks wrong, jump to troubleshooting.

Why This Buttercream Frosting Works

The formula works because nothing is there by accident. Butter gives the frosting richness and body. Powdered sugar thickens it, sweetens it, and helps it hold shape for spreading or piping. Milk or cream loosens the texture just enough to make it workable. Vanilla gives the familiar bakery-style flavor, while salt keeps the sweetness from tasting flat.

Once you understand those jobs, the recipe stops feeling fragile. You can look at the bowl and know whether it needs more structure, more softness, or just a few minutes to cool down.
The real goal: Do not chase one perfect texture for every use. Make the base frosting first, then adjust it softer for spreading, medium for cupcake swirls, or stiffer for sharper decorating.

Buttercream Texture Guide: Spreadable, Pipeable, and Stiff

This is where buttercream becomes less mysterious: the same bowl can be adjusted for spreading, piping, or sharper decorating. The trick is not to keep fixing everything at once, but to match the texture to the job in front of you.

One batch can be made softer for spreading, medium for cupcake swirls, or stiffer for borders and simple decorations. Use this table as a control panel rather than a strict rulebook.

Buttercream texture guide showing soft, medium, and stiff frosting consistencies for spreading, cupcake swirls, and sharper piping.
One buttercream batch can do several jobs once you choose the right consistency: softer for sheet cakes, medium for swirls, and firmer for sharp details.
Texture Best for How to adjust
Soft and spreadable Sheet cakes, simple layer cakes, crumb coats Add milk or cream in tiny amounts.
Medium and pipeable Cupcake swirls, rosettes, borders Use the recipe as written, then test with a spatula.
Stiff Flowers, sharper borders, more defined piping Add powdered sugar in small additions.
Extra smooth Cake sides, clean spreading, polished finish Mix on low with the paddle, then press with a spatula.

Use the spatula test before piping

A quick lift from the bowl shows whether the frosting is loose, pipeable, or too stiff before it goes into a piping bag.

Spatula test showing buttercream frosting that is too loose, just right, and too stiff.
A spatula lift is a quick reality check; ideal buttercream holds a gentle curl instead of sliding off or breaking into stiff peaks.
Spatula test: For pipeable buttercream, lift some frosting on a spatula. It should hold a peak with a soft curl. If it collapses, it is too loose. If it stands stiff and jagged, it may be too thick for smooth cupcake swirls.

For cake decorating, do not thin the whole bowl immediately. Set aside a portion and adjust only what you need. A softer texture spreads more easily over a cake, while a slightly stiffer one gives cleaner piping. For exact cake and cupcake amounts, use the quantity guide.

Once you move into borders, rosettes, writing, and thin cake coverage, consistency matters more than the base recipe itself. Wilton’s buttercream frosting guide is useful here because it shows how stiff, medium, and thin frosting behave differently.

How Much Buttercream Frosting Do You Need?

A single batch gives you about 2.5–3 cups, which is plenty for cupcakes or a simple sheet cake but not always enough for a fully decorated layer cake.

Frosting amounts are not a test of precision. They are a planning tool, and it is almost always safer to have a little extra. Tall cupcake swirls, thick cake filling, and decorative borders all use more frosting than a simple spread layer.

Buttercream quantity guide for cupcakes, sheet cakes, two-layer cakes, three-layer cakes, and heavy piping.
Quantity planning saves the cake later; tall cupcake swirls, thick borders, and taller layer cakes all use more frosting than a thin spread.
Use Approximate buttercream needed
12 cupcakes, spread or low swirl 1.5–2 cups
12 cupcakes, tall swirls 2.5–3 cups
18 cupcakes, spread generously About 3 cups
24 cupcakes, modest swirl 3–4 cups
9×13 sheet cake, top only 2.5–3 cups
8-inch 2-layer cake, light filling and outside 3–4 cups
8-inch 2-layer cake with piping 4–5 cups
8-inch 3-layer cake 5–6 cups
Heavy piping or decorating Make 1.5x batch

How to Scale This Buttercream Recipe

Scaling is where a lot of frosting stress happens. It is better to make a slightly larger batch than to scrape the bowl halfway through a cake. Half a cup extra feels much better than frosting the final side too thin.

Scaling guide for 1x, 1.5x, and 2x buttercream frosting batches with butter, powdered sugar, and milk or cream amounts.
When scaling buttercream, increase the butter and sugar together first; after that, use the liquid as the final texture adjustment.
Batch size Butter Powdered sugar Milk or cream Best for
1x batch 1 cup / 2 sticks / 226g 4 cups / 480g / about 1 lb 3–4 tbsp / 45–60ml 12 cupcakes with tall swirls or one 9×13 top layer
1.5x batch 1 1/2 cups / 3 sticks / 339g 6 cups / 720g / about 1.5 lb 4 1/2–6 tbsp / 67–90ml Layer cake with some piping
2x batch 2 cups / 4 sticks / 452g 8 cups / 960g / about 2 lb 6–8 tbsp / 90–120ml Tall cakes, extra piping, or make-ahead frosting

If you are unsure, make a little extra. Running out halfway through a cake is more frustrating than having leftover frosting to freeze. Extra buttercream can also be used on cookies, brownies, cinnamon rolls, cupcakes, or a small snack cake.

Using Buttercream Frosting for Cakes and Cupcakes

Cakes and cupcakes do not all need the same buttercream texture. A cupcake swirl needs lift, a sheet cake needs glide, and a layer cake needs enough structure to hold filling, crumb coat, and final coat.

Buttercream for cupcakes

For cupcakes, the goal is a medium buttercream that holds ridges but still looks soft and creamy. If the swirl breaks at the edges, the frosting is probably too stiff. If the ridges melt into each other, it is probably too soft.

Cupcakes topped with pale vanilla buttercream swirls beside a piping bag and piping tip.
Cupcake swirls need a middle-ground texture: loose enough to pipe smoothly, yet firm enough for the ridges to stay defined.

Buttercream for sheet cakes

For sheet cakes, use a slightly softer texture so the frosting glides instead of dragging crumbs across the top. If the cake is tender, stiff frosting can tear the surface before it spreads.

Offset spatula spreading pale buttercream frosting over a rectangular sheet cake.
A sheet cake benefits from slightly softer frosting because it glides over the crumb instead of pulling up bits of tender cake.

Buttercream for layer cakes

For layer cakes, think in stages: medium frosting for filling, slightly softer frosting for the crumb coat, and medium-smooth frosting for the final coat. A short chill after the crumb coat helps trap loose crumbs and makes the final layer easier to spread.

Layer cake guide showing buttercream filling, crumb coat, and final coat stages with cake-decorating tools.
Layer cakes look cleaner when you work in stages; first fill, then crumb coat, chill briefly, and only then add the final buttercream coat.

Crumb coat vs final coat

The crumb coat is not meant to be pretty. It is a thin working layer that traps crumbs, so the final coat can look cleaner and smoother.

Side-by-side cake comparison showing a thin crumb coat and a smooth final buttercream coat.
A crumb coat does not need to look perfect; its job is to trap crumbs so the final coat can go on smoother, cleaner, and more polished.

For a fruit-forward cake direction, MasalaMonk’s mango cake guide is useful because mango buttercream shows how fruit puree changes frosting flavor and texture. If you are decorating with swirls or borders, go to the piping section before filling the bag.

The table below is not meant to make frosting feel fussy. It simply helps you choose the texture that matches the job in front of you.

Use Best texture Tip
Cupcake swirls Medium / pipeable The frosting should hold a soft peak without collapsing.
Sheet cake Soft / spreadable Add liquid slowly so it spreads without tearing the cake.
Layer cake filling Medium Do not overfill or the layers may slide.
Crumb coat Slightly soft A softer texture spreads thinly and traps crumbs more easily.
Final cake coat Medium-smooth Mix on low and press with a spatula to reduce air bubbles.

Buttercream Frosting for Piping and Decorating

Good piping texture sits in the middle: firm enough to hold shape, but soft enough that you are not fighting the bag. If the frosting breaks at the edges of the swirl, it is usually too stiff. If the ridges melt into each other, it is usually too soft.

Piping bag forming a ridged buttercream swirl with pale frosting that holds its shape.
Good piping texture should feel cooperative, not forceful: the frosting holds ridges, but still moves through the tip without cracking.

Which piping tip should you use?

The same buttercream can look very different depending on the tip. Use the table and image together to choose a shape before you fill the bag.

Look Piping tip Best consistency
Tall cupcake swirl Open star Medium
Rosettes Closed star Medium
Shell border Star tip Medium-stiff
Writing Small round tip Slightly softer
Piping tip guide showing open star, closed star, star tip, and round tip results in buttercream frosting.
The piping tip changes the design more than the recipe does; stars build swirls and borders, while a round tip gives cleaner writing.
Warm hands and warm rooms: If the frosting softens in the piping bag, place the filled bag in the refrigerator for 5–10 minutes. For very warm kitchens, outdoor parties, or sharp decorating, all-butter buttercream may soften; if the bag already feels too soft, use the troubleshooting guide before adding more sugar. Chill the cake, avoid direct sun, and consider a dedicated crusting or partial-shortening buttercream for heat-heavy decorating.

For smoother piping, mix on low speed before filling the bag. Air bubbles can cause broken lines, uneven swirls, or small holes in piped frosting. Pressing the batch with a spatula before filling the bag also helps.

How to Make Buttercream Less Sweet

American buttercream is naturally sweet because powdered sugar is not just there for flavor; it gives the frosting body and helps it hold shape. You can make it taste more balanced, but you cannot remove most of the sugar and expect the same structure.

That said, a few small choices make a big difference:

Board showing salt, vanilla, cream, thinner frosting layers, and cake pairing ideas for making buttercream taste less sweet.
American buttercream needs powdered sugar for structure, but salt, vanilla, cream, thinner layers, and balanced cakes can make it taste less flatly sweet.
  • Add salt. Even 1/4 teaspoon helps reduce the flat sugary taste.
  • Use good vanilla. Better vanilla makes the flavor fuller.
  • Use cream instead of only milk. Cream gives a rounder, richer finish.
  • Whip the butter properly. A fluffy texture tastes lighter than a dense one.
  • Use a thinner layer. A sweet cake plus thick sweet frosting can feel heavy.
  • Pair it with less-sweet cake. Dark chocolate, coffee, citrus, spice, or lightly sweet cakes balance buttercream well.
Honest answer: Balance this version when you need speed, stability, and easy piping. Choose ermine or Swiss meringue buttercream when your real goal is a softer, less-sweet frosting.

If you know you dislike sweet buttercream, it may be kinder to choose a different frosting instead of fighting this one. RecipeTin Eats has a less-sweet fluffy vanilla frosting that shows why some bakers move away from American buttercream when they want a softer, less sugary finish.

Buttercream Frosting Troubleshooting

A bad-looking bowl is not always a failed bowl. Most buttercream problems are texture problems, and texture can usually be brought back.

Troubleshooting board for runny, thick, grainy, greasy, bubbly, and too-sweet buttercream frosting problems.
Troubleshooting works best when you name the problem first; once you know the texture issue, the fix is usually simple and controlled.

First, check the temperature

Before adding more sugar or liquid, check whether the frosting is simply too warm or too cold. Warm buttercream can look loose, greasy, or weak. Cold buttercream can look stiff, heavy, or slightly rough. If you are unsure, let the bowl sit for a few minutes, then mix again before making a bigger correction. If you are reviving a chilled batch, use the storage and make-ahead section instead.

How to fix runny or stiff buttercream

Runny and stiff buttercream are the two most common texture problems, but they need opposite fixes. Check temperature first, then adjust the bowl in small steps.

Two-column guide showing runny buttercream and stiff buttercream with fixes using cooling, powdered sugar, milk, or cream.
Runny frosting often needs cooling before more sugar, while stiff frosting needs tiny splashes of milk or cream before another texture check.

How to fix grainy, greasy, or bubbly buttercream

Grainy, greasy, and bubbly frosting can look dramatic, but they are usually signs of mixing, temperature, or air — not a ruined batch.

Rescue board showing grainy, greasy, and airy buttercream textures with fixes for mixing, cooling, and pressing with a spatula.
Grainy, greasy, and bubbly buttercream are not the same problem; matching the fix to the texture helps you avoid overcorrecting the batch.

Common buttercream problems and fixes

Start with the symptom you see in the bowl, then make one small correction at a time. Big fixes often create a second problem.

ProblemWhy it happensHow to fix it
Too runnyButter is too warm, or too much liquid was added.Cool the bowl briefly and mix again. If needed, add powdered sugar in small additions.
Too thickToo much powdered sugar or not enough liquid.Loosen with milk or cream, adding only a little at a time.
GrainyLumpy sugar, cold liquid, or not enough mixing.Sift powdered sugar next time. For this batch, mix longer on low and add a small splash of room-temperature milk.
GreasyButter is too warm or the kitchen is hot.Cool briefly, then mix again. Avoid adding more liquid.
Air bubblesToo much high-speed mixing or whisk attachment use.Mix on low with the paddle and press/fold with a rubber spatula.
Too sweetAmerican buttercream is powdered-sugar based.Add salt, vanilla, or cream. Use a thinner layer, or choose a less-sweet frosting style.
Yellow colorButter and vanilla both add color.Use pale butter, clear vanilla, and whip longer. A tiny dot of violet gel can neutralize yellow, but add it cautiously.
Will not hold pipingToo soft, too warm, or over-thinned.Add powdered sugar gradually, cool briefly, and avoid holding the piping bag too long.
Split or curdledTemperature mismatch or ingredients too cold/warm.Let it come to cool room temperature and mix again. If it is very cold, wait before mixing more.

After fixing, smooth the frosting

If the frosting still tastes good, it is usually worth saving. Once the texture looks close, mix on low speed for 1–2 minutes and press it with a spatula to remove extra air bubbles. Texture problems often look worse than they are before the batch has been cooled, softened, or smoothed.

Coloring and whitening buttercream

Color is easiest to control once the texture is right. Use gel color for strong shades, and start with pale butter and clear vanilla when you want the cleanest white base.

Coloring and whitening buttercream guide with pale frosting, gel color, clear vanilla, pale butter, violet correction, and color swatches.
Gel color gives stronger color with less liquid, while pale butter and clear vanilla help when you want a cleaner white buttercream base.

Buttercream Frosting Variations

Once you know the base recipe, you can turn it into many flavors. Think of these as direction changes, not full new recipes. Once you add cocoa, fruit, cookies, or Nutella, the texture may need a little rebalancing.

Six buttercream frosting variations in bowls labeled chocolate, strawberry, lemon, coffee, cookies and cream, and Nutella.
Flavor comes after texture; once the base is right, cocoa, fruit powder, coffee, cookie crumbs, or spreads can be added and adjusted.
Variation What to add Texture note
Chocolate Start with 1/3–1/2 cup unsweetened cocoa powder For a thicker chocolate frosting, add cocoa on top of the base. For a slightly less sweet version, replace part of the powdered sugar with cocoa. Either way, add cream as needed.
Strawberry Freeze-dried strawberry powder or very thick reduced puree Freeze-dried powder is best for piping. Reduced puree gives fruit flavor but can loosen the frosting if it is not thick enough.
Lemon Lemon zest first, then a little lemon juice Zest gives flavor without thinning; juice should be minimal and added slowly.
Coffee Espresso powder dissolved in cream or milk Dissolve espresso before adding it so the frosting tastes smooth instead of gritty.
Cookies & Cream Very finely crushed dark sandwich cookies Crush finely if piping so the tip does not clog.
Nutella Nutella beaten into the butter Adjust sugar and liquid because Nutella adds sweetness and fat.
Vegan Firm vegan butter and dairy-free milk Best treated as its own recipe because vegan butter behaves differently.
Swiss meringue Egg whites, sugar, and butter Silkier and less sweet, but more technical.

If you want a dairy-free chocolate dessert to pair with a future vegan or chocolate frosting, MasalaMonk’s vegan chocolate cake recipes are a natural next stop.

How to Store, Freeze, and Make Buttercream Ahead

Buttercream can be made ahead, which makes it useful for birthdays, parties, cupcakes, and layered cakes. The important thing is to separate storage time from serving texture: cold buttercream is safe and sturdy, but it needs time before it feels creamy again.

Storage guide showing covered buttercream at room temperature, an airtight fridge container, freezer storage, and a frosted cake.
Storage depends on both the frosting and the cake; plain buttercream is flexible, but fillings, heat, and serving time can change the best plan.
Storage situation How long What to do before serving or using
Plain buttercream, covered at cool room temperature Same day Stir smooth if needed. In a warm kitchen, refrigerate instead.
Plain buttercream, refrigerated airtight Up to 1 week Bring to room temperature, then beat again until creamy.
Plain buttercream, frozen airtight Up to 3 months Thaw in the fridge, soften at room temperature, then beat smooth.
Frosted cake in a cool room Same day Keep covered and away from heat. Refrigerate if the filling is perishable.
Chilled frosted cake Depends on the cake and filling Let it sit briefly before serving so the buttercream softens again.

How to revive make-ahead or frozen buttercream

For the easiest make-ahead plan, refrigerate the buttercream airtight, then let it soften before mixing. If it looks firm, rough, or slightly uneven straight from the fridge, wait before judging it; the texture usually comes back once it softens and gets mixed again.

Make-ahead workflow showing buttercream thawing in the fridge, softening at room temperature, beating smooth, and adjusting texture.
Make-ahead buttercream usually comes back beautifully, but only after it thaws, softens, and gets beaten smooth before final adjusting.

For the base batch and exact amounts, return to the recipe card.

Buttercream Frosting Recipe Card

Once you understand the butter temperature, the ratio, and the small fixes, this becomes the kind of frosting you can make without second-guessing every spoonful.

Saveable buttercream frosting recipe card with yield, time, ingredients, method summary, a bowl of frosting, and a frosted cupcake.
Save this base recipe for future cakes and cupcakes; once the butter is soft but not greasy, the frosting is easy to whip, correct, and use.

Buttercream Frosting Recipe

Easy American vanilla buttercream for cakes, cupcakes, piping, and decorating. This frosting is fluffy, stable, spreadable, and easy to adjust softer or stiffer.

Prep Time10 minutes
Cook Time0 minutes
Total Time10 minutes
YieldAbout 2.5–3 cups

Best for: 12 cupcakes with generous swirls, 18 cupcakes with a spread finish, or the top of one 9×13 sheet cake.

Method: Mixing / whipping

Category: Dessert, frosting

Cuisine: American

Ingredients

  • 1 cup / 2 sticks / 226g / 8 oz unsalted butter, softened but not greasy
  • 4 cups / 480g / about 1 lb powdered sugar, sifted if lumpy
  • 3–4 tablespoons / 45–60ml / 1.5–2 fl oz heavy cream or milk
  • 2 teaspoons / 10ml vanilla extract
  • 1/4 teaspoon fine salt

Instructions

  1. Beat the softened butter for 2–3 minutes until creamy, smooth, and slightly paler.
  2. Add the powdered sugar in 3–4 additions, mixing on low speed after each addition.
  3. Add vanilla, salt, and 3 tablespoons milk or cream. Mix on low until combined.
  4. Beat for about 2 minutes on medium speed until fluffy and creamy.
  5. Adjust the texture. Add more milk or cream a little at a time to loosen, or powdered sugar in small additions to thicken.
  6. Mix on low speed for 1–2 minutes to smooth the frosting and reduce air bubbles.
  7. Use immediately, or store airtight and re-whip before using.

Notes

  • Butter should be soft enough to press with a finger, but not oily or melted.
  • If using a thermometer, aim for about 65–67°F / 18–19°C butter.
  • Finished frosting should look pale and creamy, hold a soft peak, and spread smoothly without oily shine.
  • Use heavy cream for richer frosting and milk for a lighter finish.
  • For whiter frosting, use pale butter and clear vanilla.
  • For less-sweet frosting, add salt and good vanilla, but do not remove too much powdered sugar or the frosting will lose structure.
  • For stiffer decorating buttercream, add more powdered sugar gradually.

FAQs

These are the questions that usually come up once the frosting is mixed, the texture is close, and the cake is waiting.

What is the best butter for buttercream frosting?

Unsalted butter gives the best control over flavor and salt. Salted butter can work, but reduce or skip the added salt so the frosting does not become too salty.

How do I make buttercream frosting fluffy?

Start by beating the butter until it looks creamy and slightly paler, then add powdered sugar gradually. Once everything is combined, beat for about 2 minutes on medium speed, then finish on low speed to smooth the frosting after whipping.

How do I make buttercream frosting thicker?

Powdered sugar thickens buttercream. Add it in small amounts until the frosting holds the texture you need. For piping, stop when it holds a peak with a soft curl.

How do I make buttercream frosting softer?

Milk or cream softens the texture. Add only a little at a time because buttercream can loosen quickly.

Why is my buttercream frosting grainy?

Graininess usually comes from lumpy powdered sugar, cold liquid, or not enough mixing. Sift the sugar if needed, use room-temperature milk or cream, and mix on low until the texture becomes smoother.

Can I color buttercream frosting?

Gel food coloring works better than liquid coloring because it gives stronger color without thinning the frosting too much. Start with a small amount, mix well, and let the color deepen for a few minutes before adding more.

How do I make buttercream frosting whiter?

Use pale butter, clear vanilla, and beat the butter well before adding powdered sugar. A tiny dot of violet gel can help neutralize yellow, but add it carefully because too much can tint the frosting.

Can I use milk instead of heavy cream?

Milk works well and gives a slightly lighter finish than heavy cream. Heavy cream makes the frosting richer and fuller. Start with the smaller amount either way, then add more only if the frosting needs loosening.

Does buttercream frosting harden?

American buttercream firms up when chilled and may form a light crust as it sits, but all-butter buttercream does not harden like royal icing. For a firmer crusting finish, use a dedicated crusting buttercream with shortening.

Can I make buttercream frosting with margarine?

Butter gives the best flavor and structure. Margarine can make frosting softer, looser, or less stable because it often contains more water and less fat than butter. If you use it, expect a softer frosting and avoid heavy piping.

Is buttercream frosting good for cupcakes?

Cupcakes are one of the easiest uses for this recipe because the frosting is fluffy enough to pipe but stable enough to hold a swirl.

Is buttercream frosting good for layer cakes?

Layer cakes work well with this buttercream as long as you make enough for filling, crumb coating, and covering. For tall cakes or heavy piping, scale the batch up.

Does buttercream frosting need to be refrigerated?

For same-day use in a cool kitchen, it can usually stay covered at room temperature. For longer storage, warm kitchens, or cakes with perishable fillings, refrigerate it airtight and bring it back to room temperature before using.

Can buttercream frosting be frozen?

Buttercream freezes well in an airtight container for up to 3 months. Thaw it in the refrigerator, bring it to room temperature, and re-whip before spreading or piping.

How do I make buttercream less sweet?

Salt, good vanilla, cream, and a thinner layer can make American buttercream taste more balanced. For a truly less-sweet frosting, compare buttercream styles above and choose Swiss meringue buttercream or ermine frosting instead.

What is the difference between buttercream frosting and icing?

Buttercream frosting is thick, creamy, and spreadable. Icing is usually thinner, glossier, and more likely to set firm. Many home bakers use “buttercream frosting” and “buttercream icing” to mean the same thing.

Back to top

Posted on Leave a comment

Orange Sauce for Duck Recipe

Sliced duck breast with crisp skin served over glossy orange sauce on a dark plate.

Duck already feels like the kind of dinner you do not want to waste: crisp skin, rich meat, maybe guests at the table. This orange sauce for duck gives you the classic sweet-sharp citrus lift without turning the plate sticky, syrupy, or restaurant-complicated.

Use it with pan-seared duck breast, roast duck, duck legs, leftover duck, or a simple duck à l’orange-style dinner. It comes together on the stovetop in about 25 minutes and should taste bright, savory, lightly sweet, and clean enough to wake up the duck rather than cover it.

You may also see this called orange gravy for duck, although the texture here is closer to a polished pan sauce than a flour-thickened gravy. It should be glossy and pourable, not gloppy, with enough body to sit beside the meat without soaking the crisp skin.

Quick Answer

For about 1 cup / 240 ml sauce, simmer 1 cup / 240 ml orange juice, 1 cup / 240 ml duck or chicken stock, 1 1/2 tablespoons vinegar, 1 tablespoon honey or sugar, and 2 teaspoons orange zest until lightly reduced. Finish with 2 tablespoons / 28 g cold butter for a smooth citrus sauce that coats the spoon without turning sticky.

Base ratio for orange sauce for duck showing orange juice, stock, vinegar, zest, sweetener, and butter
Use this base ratio for orange sauce for duck as your starting point. Once it reduces, small adjustments with vinegar, stock, or butter can shift the flavor quickly.

Before serving, taste and adjust. Too sweet? Add a splash of vinegar. Too sharp? Add a little honey or butter. Too thin? Simmer it a few minutes longer before using cornstarch.

The target: glossy, pourable, orange-forward, and sharp enough to taste like dinner, not marmalade.

The point is not to make the sweetest orange sauce. The point is to make a sauce that feels right with duck: clean citrus edge, savory depth, gentle sweetness, and a finish that makes the plate feel special.

You can also make the base ahead, then warm it gently and whisk in the butter before serving. That takes pressure off the final minutes, especially when the duck itself already needs your attention.

Need the full measurements in one place? Jump to the recipe card. If your sauce is already too sweet, too sharp, or too thin, go straight to the fix guide.

Three rules for better duck sauce: reduce before thickening, taste before butter, and sauce the plate instead of the crisp skin.

What Is Orange Sauce for Duck?

Orange sauce for duck is a warm citrus sauce served with rich duck meat. It usually combines orange juice or zest with stock, vinegar, a little sweetness, and butter. Some versions are simple and quick, while classic French versions use a sweet-sour base with rich duck or veal stock.

Sauce boat with orange sauce, oranges, stock, vinegar, butter, and duck on a dark surface
Orange sauce for duck is a warm savory citrus sauce, not a sweet dipping sauce. Stock and vinegar are what make the orange taste dinner-ready instead of syrupy.

For home cooking, the goal is simpler: make a sauce that brightens the duck without turning the plate sweet. Orange brings freshness, vinegar keeps the richness in check, and stock gives the sauce enough body to feel like part of the dish rather than a sweet topping.

This recipe is designed as an all-purpose duck sauce. It works with duck breast, roast duck, duck legs, leftover duck, and a simplified duck à l’orange plate. If you like bright sauces for rich holiday mains, MasalaMonk’s cranberry sauce with orange juice follows a similar sweet-tart logic, but this one is warmer and more savory.

Comparing it with the French classic? See the duck à l’orange section before choosing a variation.

Why This Sauce Works with Duck

A good duck sauce has to do two things at once: cut through the richness and still taste like dinner. Orange brings the lift, vinegar keeps it from turning candied, stock gives it a savory backbone, and cold butter makes it feel polished on the plate.

  • Orange brightens rich meat: citrus gives the duck a clean edge instead of letting each bite feel heavy.
  • Vinegar controls the sweetness: it keeps the sauce sweet-sharp, not jammy.
  • Stock gives it backbone: it turns orange juice into a real pan sauce instead of a topping.
  • Cold butter finishes the texture: it softens the acidity and gives the sauce that silky, spoon-coating finish.
Board showing orange, vinegar, stock, and butter as the key parts of sauce for duck
The sauce works because it does more than add orange flavor. It cuts the richness, adds savory depth, and finishes smooth enough to belong on a dinner plate.

The good news is that this is not a one-shot sauce. Before the butter goes in, you can still pull it brighter, softer, saltier, thinner, or thicker.

Is This the Same as Duck à l’Orange Sauce?

This is a simplified duck à l’orange-style sauce. Classic duck à l’orange often starts with a more formal sweet-sour base, sometimes called a gastrique, then builds flavor with orange, stock, and sometimes orange liqueur. It is beautiful, but it can feel like one more moving part when the duck itself already needs care.

This recipe keeps the part home cooks usually want most: citrus lift, controlled sweetness, savory depth, and a smooth finish. It skips the restaurant-style steps unless you want to dress it up with Grand Marnier, port, marmalade, or blood orange. For a more traditional, fully developed version, Serious Eats has a detailed guide to duck à l’orange.

Think of this as the calmer sauce-first version: familiar enough for duck à l’orange cravings, but simple enough to make while dinner is still moving.

Comparison board showing classic duck à l’orange and a simpler orange sauce for duck
Duck à l’orange is the more classical route, while this sauce-first version keeps the same sweet-sharp idea simpler. Both work best when citrus is balanced with a savory base.

Ingredients You Need

Ingredients for orange sauce for duck including orange juice, zest, stock, vinegar, honey, butter, shallot, salt, and pepper
This sauce is short on ingredients, but each one matters. Orange brings aroma, stock makes it savory, vinegar keeps it bright, and cold butter smooths the finish.

Orange Juice and Zest

Fresh orange juice gives the sauce its main flavor. Orange zest is just as important because it adds concentrated citrus aroma without making the sauce watery. You will usually need 2 to 3 medium oranges for 1 cup / 240 ml juice, depending on size and juiciness, plus zest. Zest one orange before juicing it, and avoid the bitter white pith underneath the peel.

Bottled orange juice can work in a pinch, but fresh juice gives a cleaner, brighter sauce. If your oranges are very sweet, start with less honey or sugar and adjust after the sauce reduces.

Navel, Cara Cara, blood orange, and mandarin oranges for making orange sauce for duck
The orange you choose changes the finished sauce. Navel is balanced, Cara Cara is sweeter, blood orange is deeper and tarter, and mandarin gives a softer citrus note.

Duck Stock or Chicken Stock

Stock is the quiet ingredient that makes the sauce taste like dinner, not dessert. Duck stock is ideal if you have it, but low-sodium chicken stock is easier to find and works well. Low-sodium stock is especially helpful because the sauce reduces as it cooks.

If you are cooking duck breast in a pan, you can also add a spoonful of the rendered duck juices or pan drippings. Skim or pour off excess fat first so the sauce tastes rich, not greasy.

Duck stock and chicken stock comparison for orange sauce
Duck stock gives the deepest flavor, but low-sodium chicken stock is easier to find and still works well. Since the sauce reduces, starting with low-sodium stock gives you more control.

Vinegar for Balance

Duck needs acidity. Sherry vinegar and red wine vinegar are both excellent because they bring a rounded sharpness. White wine vinegar also works. Lemon juice can help in a pinch, although vinegar gives a more classic sweet-sour profile.

Use 1 1/2 tablespoons for a balanced base. Use closer to 2 tablespoons if your oranges are very sweet, if you are serving fatty roast duck, or if the finished sauce tastes too round and heavy.

Vinegar choices for orange sauce for duck including sherry vinegar, red wine vinegar, white wine vinegar, and lemon juice
Vinegar is the quiet fix that keeps orange duck sauce from tasting like marmalade. Sherry vinegar and red wine vinegar give rounded acidity, while lemon juice works when that is what you have.

Honey, Sugar, or Marmalade

You only need a little sweetness. Honey gives a rounded flavor, while sugar keeps the sauce cleaner. Start with 1 tablespoon, then add more only after the sauce has reduced and you have tasted it.

Orange marmalade can be used for a shortcut variation, but it should support the duck sauce rather than take over. Too much can push the flavor toward sticky glaze, so keep the base savory with stock and vinegar.

Honey and sugar comparison for sweetening orange sauce for duck
Sweetness should support the orange, not lead the plate. Honey tastes rounder, sugar tastes cleaner, and both should be added lightly until the sauce is reduced and tasted.

Butter for a Smooth Finish

Cold butter goes in at the end. It softens the acidity, gives the sauce a polished finish, and helps it feel complete. Add it off the heat or over very low heat and whisk until smooth.

Once the butter is added, avoid hard boiling. Butter should make the sauce silky, not oily. If the pan starts bubbling hard after the butter goes in, lower the heat immediately.

Equipment You Need

You only need a small saucepan, whisk, citrus zester, and juicer for the basic sauce. A fine-mesh sieve helps if you want a restaurant-smooth finish. A skillet only matters if you are making the orange pan sauce from duck drippings.

  • Small saucepan or saucier
  • Whisk
  • Fine grater or Microplane
  • Citrus juicer
  • Fine-mesh sieve, optional
  • Small bowl for cornstarch slurry, if using

Once the ingredients and basic tools are ready, start the step-by-step method.

How to Make Orange Sauce for Duck

The sauce is most flexible before the butter goes in. Taste there, adjust there, and the finish becomes much easier.

Step-by-step board showing orange sauce simmering, stock being added, sauce being tasted, thickened, and finished with butter
Think of the method as a sequence of control points. Build the citrus base, add savory body, correct the flavor, and only then decide whether the sauce needs help thickening.

1. Reduce the Orange Base

Add the orange juice, orange zest, vinegar, and honey or sugar to a small saucepan. If you are using shallot, add it here too. Bring to a simmer over medium heat, then cook for 5 to 7 minutes, until the mixture smells bright and citrusy and has reduced slightly.

You are not trying to make caramel or a thick syrup at this stage. You just want to concentrate the orange flavor and soften the sharp edge of the vinegar.

Orange sauce gently reducing in a saucepan
The sauce should simmer gently until the orange flavor concentrates. If it boils hard, it can turn sticky before the stock and butter have a chance to round it out.

2. Add Stock and Simmer

Add the duck stock or chicken stock. Simmer for 8 to 12 minutes, stirring occasionally, until the sauce tastes savory and leaves a thin coating on the spoon.

If the sauce still feels thin, keep simmering. Reduction gives better flavor than thickening too early.

3. Balance Sweetness, Acidity, and Salt

Taste before adding butter. This is the moment where the sauce becomes yours: a little sharper for fatty roast duck, a little softer for leaner duck breast, or a touch sweeter if the oranges are tart.

  • Too sweet? Add a small splash of vinegar or lemon juice.
  • Too sharp? Add a little more honey or sugar.
  • Flat? Add a pinch of salt and a little more orange zest.
  • Thin? Simmer longer before using slurry.

4. Thicken Only If Needed

If the sauce is still too thin after reducing, mix 1 teaspoon cornstarch or cornflour with 1 tablespoon cold water. Whisk a small amount of this slurry into the simmering sauce and cook for 30 to 60 seconds.

Do not add dry cornstarch directly to the pan. It can clump and make the texture uneven. Use only enough slurry to help the sauce coat the spoon lightly.

Thickening guide showing reduced sauce, cornstarch slurry, and a warning not to add dry cornstarch
Reduction gives better flavor than rushing to thicken. However, if the sauce still feels thin, mix cornstarch with cold water first so it blends smoothly instead of clumping.

If the sauce has already gone too thin, too thick, bitter, greasy, or broken, use the troubleshooting guide before adding more ingredients.

5. Finish with Butter

Lower the heat or remove the pan from the heat. Whisk in the cold butter, one small piece at a time, until the sauce is smooth. Taste again and adjust salt, pepper, vinegar, or sweetness as needed.

For a very smooth finish, strain it through a fine-mesh sieve before serving. For a more rustic sauce, leave the shallot and zest in.

Glossy orange sauce lightly coating the back of a spoon
The right texture is glossy and pourable, not thick like glaze. When the sauce lightly coats a spoon, it is ready to finish or serve.
Do not worry if the sauce is not perfect on the first taste. As long as you taste before adding the butter, you can pull it back from too sweet, too sharp, too thin, or too flat without starting over.

Orange Sauce for Duck Recipe

Orange Sauce for Duck Recipe

This citrus sauce gives duck the classic sweet-sharp orange lift without turning the plate syrupy. It is smooth enough for duck breast, savory enough for roast duck, and simple enough for a duck à l’orange-style dinner at home.

Prep Time
10 minutes
Cook Time
15–20 minutes
Total Time
25–30 minutes
Yield
About 1 cup / 240 ml

Servings: 4, with about 1/4 cup sauce each

Category: Sauce

Method: Stovetop reduction

Cuisine: French-inspired

Ingredients

  • 1 cup / 240 ml fresh orange juice, from about 2–3 medium oranges, depending on size and juiciness
  • 2 teaspoons finely grated orange zest
  • 1 cup / 240 ml duck stock or low-sodium chicken stock
  • 1 1/2 tablespoons sherry vinegar or red wine vinegar, plus more to taste
  • 1 tablespoon honey or 12 g sugar, plus more only after tasting
  • 1 small shallot, finely chopped, optional, about 2 tablespoons
  • 2 tablespoons / 28 g cold unsalted butter, cut into small pieces
  • 1/4 teaspoon fine salt, plus more to taste
  • Freshly ground black pepper or white pepper, to taste

Optional Thickener

  • 1 teaspoon cornstarch / cornflour
  • 1 tablespoon cold water

Optional Upgrades

  • 1–2 tablespoons / 15–30 ml Grand Marnier, Cointreau, or another orange liqueur
  • 2–4 tablespoons / 30–60 ml port for a richer sauce
  • 1 tablespoon / about 20 g orange marmalade for a sweeter shortcut version

Instructions

  1. Start the orange base. Add orange juice, orange zest, vinegar, honey or sugar, and the optional shallot to a small saucepan. Bring to a simmer over medium heat.
  2. Reduce slightly. Simmer for 5 to 7 minutes, until the orange mixture smells bright and has reduced a little. Do not reduce it to a thick syrup yet.
  3. Add stock. Pour in the duck stock or chicken stock. Simmer for 8 to 12 minutes, stirring occasionally, until the sauce tastes savory and leaves a thin coating on the spoon.
  4. Balance the sauce. Taste before adding butter. Add a little more vinegar if it tastes too sweet, more honey or sugar if it tastes too sharp, or a pinch of salt if it tastes flat.
  5. Thicken only if needed. If the sauce is still too thin after reducing, stir cornstarch with cold water in a small bowl. Whisk a little slurry into the simmering sauce and cook for 30 to 60 seconds. Do not add dry cornstarch directly to the sauce.
  6. Finish with butter. Lower the heat or remove the pan from the heat. Whisk in the cold butter until the sauce is smooth. Do not hard-boil after adding butter.
  7. Strain and serve. Strain through a fine-mesh sieve for a smooth sauce, or leave the shallot and zest in for a more rustic sauce. Serve warm with duck.

Notes

  • Yield: About 1/4 cup sauce per person for 4 servings. Double it if you like extra sauce at the table or are serving roast duck.
  • Texture: Aim for glossy and pourable, with enough body to coat a spoon lightly.
  • Best adjustment point: Taste before adding butter, while the sauce is still easy to correct.
  • Optional upgrades: Choose one at a time. Add marmalade or port with the stock, or orange liqueur after the sauce has reduced.
  • Serving: For crisp duck breast, sauce the plate or spoon around the slices. For roast duck, serve the sauce warm on the side.
Saveable orange sauce for duck recipe card with yield, time, ingredients, and method cues
This saveable card keeps the sauce method simple at the stove. The important moment is tasting before the butter, while the sauce is still easy to adjust.

Making sauce for cooked duck? Use the quick 10-minute version. Cooking duck breast in the pan? Use the duck drippings version.

Quick 10-Minute Version

Use this when the duck is already cooked and you need a fast, warm citrus finish, not a full restaurant-style reduction. It is brighter and lighter than the main recipe, but it still gives the meat the orange lift it needs.

Quick version: Simmer 3/4 cup / 180 ml orange juice, 1/2 cup / 120 ml stock, 1 tablespoon vinegar, 1 tablespoon marmalade or 1 to 2 teaspoons honey, and 1 teaspoon orange zest for 8 to 10 minutes. Finish with 1 tablespoon cold butter and adjust with salt, vinegar, or honey.
Quick orange sauce for duck in a saucepan with sliced cooked duck nearby
The quick version is best when the duck is already cooked and you need a warm citrus finish. Keep the sauce in the pan or spoon, then add it lightly to the plate.

If you are cooking duck breast from scratch, the pan-sauce version below gives better flavor because it uses the browned bits and juices left in the skillet.

Orange Pan Sauce from Duck Drippings

If you are cooking duck breast, this is where the skillet gives you flavor you cannot get from orange juice alone. After cooking the duck, transfer the breast to a board to rest. Pour off most of the rendered duck fat, leaving the browned bits and about 1 teaspoon of fat in the pan.

Add the shallot, if using, and cook for 30 to 60 seconds over medium-low heat, just until softened. Pour in the orange juice, then scrape up the browned bits from the bottom of the pan. Add the zest, vinegar, honey or sugar, and stock, then simmer until the sauce tastes savory and lightly coats a spoon. Lower the heat, whisk in the cold butter, and strain if you want a smoother finish.

This route is especially good for duck breast because it captures the savory flavor left in the skillet. Just avoid leaving too much duck fat in the pan, or the sauce can taste greasy.

Orange pan sauce being made in a skillet with duck drippings, shallots, and browned bits
Duck drippings add savory depth that orange juice alone cannot give. Pour off excess fat first, then use the browned bits to build a richer orange pan sauce.

Once the sauce is ready, see how to serve it with duck breast without soaking the crisp skin.

How to Serve the Sauce with Duck Breast

Duck breast is one of the best uses for this sauce because the contrast is so good: crisp skin, tender meat, and citrus sauce underneath. The skin is the prize. Once it is soaked, the plate loses its best texture.

Spoon the sauce onto the plate first, then lay the sliced duck breast over it. You can also spoon a little sauce around the slices and serve extra on the side. That way the first bite still has that crisp edge.

Sliced duck breast served over orange sauce with crisp skin kept dry
Duck breast needs contrast: crisp skin, tender meat, and citrus sauce below. Serving the sauce underneath gives flavor without softening the best texture.

If you are cooking duck breast from scratch, score the skin in a shallow crosshatch pattern without cutting into the meat. Start the breast skin-side down in a cold pan, then render the fat slowly over low to medium-low heat. This gives the fat time to melt and the skin time to crisp before the meat overcooks.

For the full meat-cooking method, use this duck breast recipe with crispy skin and orange sauce as the companion guide. This page focuses on the sauce, while that guide walks through the duck itself in more detail.

If you are only making the sauce for already-cooked duck, you can skip the temperature notes. If you are cooking duck breast at the same time, this section helps you time the meat before saucing the plate.

Duck Breast Temperature Guide

In restaurants and many home kitchens, duck breast is often served pink, but official U.S. poultry guidance is 165°F / 74°C. These lower temperatures are common doneness preferences, not official safety recommendations. If you choose a lower doneness target, use your own judgment and consider who you are serving, especially if cooking for children, pregnant guests, older adults, or anyone immunocompromised. You can also refer to the USDA’s safe minimum internal temperature chart for official guidance.

Duck breast temperature guide showing medium-rare, medium, and official United States poultry safety guidance
Duck breast is often served pink, but official U.S. poultry safety guidance is 165°F / 74°C. Use an instant-read thermometer and choose the doneness that suits your table.
Duck Breast Doneness Common Restaurant/Home Target Texture
Medium-rare 130–135°F / 54–57°C Pink, tender, steak-like
Medium 140°F / 60°C Lightly pink, firmer
Well done 155°F+ / 68°C+ Much firmer, less pink
Official U.S. poultry safety temperature 165°F / 74°C Fully cooked by official guidance

How to Keep the Duck Skin Crisp

  • Render the skin slowly instead of blasting it with high heat.
  • Rest the duck breast before slicing so juices settle.
  • Spoon sauce under or around the duck, not heavily over the skin.
  • Serve extra citrus sauce on the side so each person can add more.
  • If reheating leftovers, re-crisp the duck skin separately from the sauce.
Do and don’t comparison showing orange sauce under duck versus sauce poured over duck skin
The skin is the prize. Sauce the plate first, then set the duck on top so the meat gets the citrus lift and the skin keeps its crackle.

How to Use It with Roast Duck or Duck Legs

Roast duck can take a little more sauce than duck breast, especially once it is carved at the table. Still, crisp skin deserves respect. Keep the sauce warm and serve it beside the meat so people can add enough citrus lift without softening every piece.

If you have pan juices from roasting duck, add a spoonful to the sauce for deeper flavor. Skim off excess fat first; a little duck fat tastes luxurious, but too much can turn the sauce greasy.

Duck legs are more forgiving. Because the meat is darker and richer, you can spoon the sauce a little more generously, especially with roasted, braised, or confit-style legs.

Orange sauce served with sliced roast duck and duck legs on dark plates
This citrus sauce works beyond duck breast. With roast duck or duck legs, serve it warm on the side so guests can add more without softening all the skin.

For a bigger holiday table, keep the duck rich and the sides familiar: one citrus sauce, one potato dish, and one green side usually feel complete. If you want a classic make-ahead green side, MasalaMonk’s green bean casserole recipe ideas work better than adding another fussy main-style dish.

Orange Sauce Variations: Marmalade, Grand Marnier, Port, and Blood Orange

Orange sauce variation guide with marmalade, Grand Marnier, port, and blood orange options
Choose the variation by the dinner you want: marmalade for speed, Grand Marnier for elegance, port for depth, and blood orange for a sharper seasonal finish.

Marmalade Shortcut

Marmalade is the fast shortcut, not the whole personality of the sauce. Add 1 tablespoon with the stock for body, sweetness, and a slight orange-peel bitterness.

Too much marmalade pushes the sauce toward sticky glaze. Start small, keep the vinegar close, and remember: if it tastes good on toast, it is probably too sweet for duck.

Orange marmalade sauce for duck with marmalade, a saucepan, and sliced duck
Marmalade can make a fast orange sauce, but it is powerful. Start small, then use vinegar or stock if the flavor begins leaning more like jam than dinner.

Grand Marnier or Cointreau

This is the dinner-party version: still bright and pourable, but with a warmer orange aroma that feels more dressed up. Add 1 to 2 tablespoons of Grand Marnier, Cointreau, or another orange liqueur after the sauce has reduced.

Simmer briefly to mellow the alcohol, then finish with butter. The result should feel fragrant, not perfumey, and richer without becoming heavy.

Grand Marnier orange sauce for duck with plated duck, glossy sauce, and a subtle liqueur glass
Grand Marnier or Cointreau gives the sauce a warmer orange aroma. Simmer briefly before finishing with butter so it tastes elegant rather than sharp.

Port and Orange

Port moves the sauce into a deeper, darker lane. Add 2 to 4 tablespoons with the stock, then taste before serving because port can make the orange feel rounder and sweeter.

This version suits roast duck especially well. If the sauce starts leaning too soft or sweet, a few extra drops of vinegar will wake it back up.

Port and orange sauce served with sliced duck and a darker glossy sauce
Port moves the sauce into a deeper dinner-party lane. Because it can add sweetness, taste before serving and sharpen with a few drops of vinegar if needed.

Blood Orange

Blood orange gives the sauce a ruby-orange color and a slightly berry-like citrus note. Use it exactly as you would regular orange juice, then taste carefully because some blood oranges are less sweet and more tart.

If the finish tastes too sharp, soften it with a little honey or an extra piece of cold butter.

Blood orange sauce for duck with ruby-orange sauce, sliced duck, and cut blood oranges
Blood orange gives duck sauce a deeper color and a tarter citrus edge. If the finish tastes too sharp, soften it with honey or an extra piece of cold butter.

Use the table below as a quick chooser, then follow the same core method: reduce first, taste before butter, and keep the finish pourable rather than sticky.

Version Best For Flavor What to Adjust
Classic base Duck breast, roast duck, duck legs Bright, savory, balanced Taste vinegar and sweetness before butter
Marmalade Fast shortcut Sweeter, peel-like, slightly bitter Add extra vinegar if it tastes jammy
Grand Marnier or Cointreau Dinner-party plates Fragrant, festive, orange-forward Simmer briefly before butter
Port Roast duck or richer plates Darker, rounder, deeper Add acid if it becomes too sweet
Blood orange Seasonal dinners Tart, ruby-colored, berry-citrus Add honey if too sharp

If a variation tastes too sweet, too sharp, or too heavy after reducing, check the sauce fixes before serving.

Common Mistakes to Avoid

These are the small moves that usually separate a polished orange duck sauce from one that tastes too sweet, too heavy, or slightly clumsy on the plate.

  • Adding too much sweetness early: reduce the sauce first, then decide if it needs more honey, sugar, or marmalade.
  • Boiling after butter: once the butter goes in, use gentle heat so the sauce stays smooth.
  • Covering crisp duck skin: spoon the sauce under or around duck breast instead of soaking the skin.
  • Thickening too soon: simmer first, then use cornstarch only if reduction is not enough.
  • Zesting too deeply: use only the colored orange peel, not the bitter white pith.
Common mistakes board for orange sauce for duck showing over-sweetening, boiling butter, over-saucing skin, thickening early, and zesting too deeply
Most orange sauce mistakes start small: too much sweetener, too much heat, or sauce poured over crisp skin. Add gently, taste often, and keep the crisp parts dry.

How to Fix Orange Sauce for Duck

Most problems with this sauce are balance problems, not failures. A splash of acid, a little sweetness, more reduction, or gentler heat can usually bring it back.

Use the table as a quick rescue guide rather than a second recipe. Find the problem, make the smallest adjustment, then taste again before adding more.

Troubleshooting board for orange sauce for duck with sweet, sharp, thin, thick, bitter, greasy, and broken sauce problems
Troubleshooting works best one fix at a time. Adjust sweetness, acidity, thickness, or fat gently, then taste again before changing anything else.
Problem Why It Happened How to Fix It
Too sweet Too much honey, sugar, marmalade, or very sweet orange juice Add a splash of vinegar or lemon juice, then loosen with a little stock if needed.
Too sharp Too much vinegar or very tart oranges Add a little honey or sugar, then finish with butter to round the edges.
Too thin Not reduced enough, or stock was very light Simmer longer. If still thin, whisk in a small amount of cornstarch slurry.
Too thick or sticky Over-reduced or too much marmalade/sugar Whisk in warm stock, water, or orange juice a tablespoon at a time.
Bitter Too much white pith from the orange peel, or over-reduced citrus Strain the sauce, add a little honey, and finish with butter.
Flat Not enough salt, zest, or acid Add a pinch of salt, more orange zest, and a few drops of vinegar.
Greasy Too much duck fat in the pan sauce Skim excess fat or whisk in a splash of warm stock to loosen the sauce.
Broken after butter The sauce boiled hard after the butter was added Take the pan off the heat and whisk in warm stock 1 teaspoon at a time until the sauce looks smoother.

Make-Ahead, Storage, and Reheating

You can make the citrus base ahead of time. Cook the sauce through the reduction stage, then cool and refrigerate it. For the best texture, add the butter when reheating, not before storing.

  • Fridge: Store in an airtight container for 3 to 4 days.
  • Freezer: Freeze before adding butter, and preferably before adding cornstarch slurry, for up to 2 months.
  • Reheating: Warm gently in a small saucepan. Add a splash of stock or water if it has thickened too much.
  • Butter finish: Whisk in cold butter after reheating for the smoothest sauce.
Make-ahead and storage board for orange sauce with container, saucepan, butter, and storage times
For a calmer dinner, make the sauce base ahead and finish it with butter after reheating. Gentle heat protects the texture better than boiling it hard.

When the sauce is ready, build the plate with sides that catch, freshen, or round out the duck.

If the sauce looks slightly separated after chilling, warm it gently and whisk well. A small splash of stock can help bring it back together.

Avoid boiling the sauce hard when reheating, especially after the butter has been added. Gentle heat keeps the finish smoother.

What to Serve with Duck and Orange Sauce

For duck breast, the best plate is usually simple: crisp skin, sliced meat, a spoonful of orange sauce, something potato-based, and one green side. That lets the sauce feel polished without making the plate busy.

Because duck and citrus sauce already bring richness, sweetness, and acidity, choose sides by the job they do on the plate.

Side Job Best Choices Why It Works
Catch the sauce Mashed potatoes, potato gratin, wild rice, rice pilaf Soft or starchy sides hold the orange pan sauce without competing with it.
Freshen the plate Green beans, bitter salad leaves, orange-fennel salad, wilted greens Green or bitter sides keep the duck from feeling too heavy.
Match a holiday table Roasted carrots, Brussels sprouts, hashbrown casserole, green bean casserole These make the meal feel generous without adding another complicated main.

MasalaMonk’s garlic mashed potatoes are especially useful when you want a soft, buttery side that can hold sauce without feeling dry. For a holiday table where you want one rich, make-ahead side, this hashbrown casserole recipe can sit beside roast duck without stealing attention.

Duck with orange sauce served with potatoes, green beans, roasted vegetables, and holiday side dishes
Build the plate by function: something starchy to catch the sauce, something green to freshen the richness, and a warm side if the meal is more festive.

Duck can feel like a high-stakes dinner, but the sauce does not have to be fragile. Reduce it, taste it before the butter, adjust the sweet-sharp balance, and keep it warm. Once the skin is crisp and the sauce is glossy, let the orange lift the duck instead of covering it.

FAQs

What is orange sauce for duck made of?

It is usually made with orange juice, orange zest, stock, vinegar, a small amount of sweetness, and butter. Some versions also include shallot, port, marmalade, wine, or orange liqueur.

Why does orange work so well with duck?

Orange cuts through duck’s richness. The sauce still needs stock and vinegar, though, so it tastes like a savory dinner sauce instead of a sweet glaze.

Should the sauce be sweet?

Lightly sweet, yes. Syrupy, no. The best version is bright, rounded, and savory, with enough acidity to keep the orange from tasting like candy.

What can I use instead of duck stock?

Low-sodium chicken stock is the easiest substitute. It gives the sauce savory depth without overpowering the orange.

Does bottled orange juice work?

It works in a pinch, but fresh juice and fresh zest give a cleaner flavor. If using bottled juice, add fresh zest if possible and taste before adding extra sugar.

How do I thicken orange sauce for duck?

Reduce it first. If it is still too thin, mix 1 teaspoon cornstarch with 1 tablespoon cold water, then whisk in a little slurry and simmer briefly.

Why does my orange duck sauce taste bitter?

Bitterness usually comes from white pith or over-reduced citrus. Use only the colored zest, strain if needed, then soften the sauce with a little honey and butter.

Do I need alcohol?

No. Grand Marnier, Cointreau, and port are optional upgrades. The base sauce gets its balance from orange, stock, vinegar, sweetness, and butter.

How do I scale it for more people?

Double all the ingredients and use a wider saucepan if possible. The sauce may take a few extra minutes to reduce to the same spoon-coating texture.

Is this the same as Chinese duck sauce?

No. This is a warm savory citrus sauce for cooked duck breast, roast duck, or duck à l’orange-style dishes. Chinese-American duck sauce is usually a sweet condiment or dipping sauce.

Comparison of savory orange sauce for duck and Chinese duck sauce as a sweet dipping condiment
Orange sauce for duck is a warm savory citrus sauce for cooked duck. Chinese duck sauce is usually a sweet dipping condiment, so the two are not interchangeable.

How far ahead can I make it?

Make it 3 to 4 days ahead and refrigerate it. For the smoothest finish, reheat gently and whisk in the cold butter just before serving.

What duck dishes work with this citrus sauce?

Use it with pan-seared duck breast, roast duck, duck legs, duck à l’orange, leftover duck, or sliced duck served with potatoes and greens.

Should I pour it over crispy duck skin?

Use a light hand. Spoon the sauce under or around sliced duck breast so the skin stays crisp, then serve extra sauce on the side.

Back to Quick Answer

Posted on Leave a comment

Banana Bread with Applesauce Recipe

Sliced banana bread with applesauce on parchment, showing a soft set crumb with ripe bananas and applesauce nearby.

This banana bread with applesauce recipe is for the moment when the bananas on the counter are almost too soft for the fruit bowl but perfect for baking. The loaf comes out moist, sliceable, and a little lighter than classic banana bread, while still holding together after it cools.

The texture comes down to balance. Applesauce is wonderful in banana bread because it adds moisture and lets you use less fat, but it also brings water into the batter. With the wrong ratio, the top can look beautifully baked while the center stays heavy, damp, or gummy.

The goal is a loaf that smells like ripe bananas and cinnamon, slices without dragging, and feels plush rather than damp when you pick up a piece.

Quick Answer: Banana Bread with Applesauce

For one moist loaf, the sweet spot is 1½ cups mashed ripe banana plus ½ cup unsweetened applesauce, with 3 tablespoons oil or melted butter to keep each slice from feeling rubbery or fragile. Bake it in a 9×5-inch loaf pan at 350°F / 175°C until the middle bakes through and the crumb looks even, not shiny or wet.

This is not a fully no-oil loaf by default because applesauce replaces moisture better than it replaces tenderness. The small amount of fat keeps the crumb softer, cleaner, and easier to slice neatly.

This version is built around the texture problem applesauce banana bread often has: plenty of moisture, but not enough structure to slice cleanly. That is why the banana and applesauce are measured, a little fat stays in the batter, and the loaf gets time to bake through and cool before slicing.

At a glance: For one 9×5-inch loaf, use 1½ cups mashed ripe banana, ½ cup unsweetened applesauce, 2 cups flour, 2 eggs, and 3 tablespoons oil or melted butter. Bake at 350°F / 175°C for 55–65 minutes, until the center reaches about 200–205°F / 93–96°C.

For the first bake, make the recipe as written before reducing the oil, cutting the sugar further, or swapping in more whole wheat flour. Once you know how the batter should look and how the cooled loaf should slice, the variations become much easier to control.

Quick answer ratio board for banana bread with applesauce showing mashed banana, applesauce, oil or butter, bake temperature, and time.
Make the first loaf with the full ratio before tweaking. Once you know this baseline, lower-fat and variation decisions become much easier.

What This Loaf Tastes Like

This is a banana-forward loaf first, with gentle apple sweetness in the background. It does not taste like apple cake. The applesauce mostly shows up in the texture: an even crumb, a little extra moisture, and slices that still taste pleasant the next day.

Cinnamon, vanilla, and brown sugar make the banana flavor warmer. If you add walnuts or pecans, the loaf becomes more classic and bakery-style. If you skip them, it stays simple, easy to slice, and lunchbox-friendly.

It should taste like a cozy banana loaf with a softer crumb, not like applesauce trying to take over. It is still a quick bread, so expect a soft, sturdy crumb rather than an airy cake texture.

Close-up of banana bread slices showing an even, moist crumb with no gummy center or shiny wet line.
Look for a crumb that is evenly baked from edge to middle. That is the difference between fruit-rich banana bread and underdone banana bread.

Why You’ll Love This Recipe

  • Moist without the gummy middle: the banana, applesauce, flour, fat, and bake time are balanced so the loaf sets properly.
  • Still tastes like real banana bread: applesauce lightens the loaf, but a small amount of oil or butter keeps each slice from feeling rubbery or fragile.
  • Uses the bananas you were about to lose: heavily speckled bananas give the deepest flavor and natural sweetness.
  • Easy to adjust after the first bake: make it nuttier, less sweet, lower fat, dairy-free, vegan, or muffin-style without starting from scratch.

Why Applesauce Works in Banana Bread

Banana bread already depends on fruit puree, so applesauce fits naturally into the batter. It adds gentle sweetness and helps the loaf stay fresh-tasting for longer.

The catch is that applesauce is not the same as butter or oil. Fat helps coat the flour, which gives the crumb a softer bite. Applesauce brings extra water and fruit solids, which is why the batter needs the right balance. When the batter gets too wet, quick breads can turn dense, chewy, or gummy.

For that reason, this recipe keeps a small amount of oil or melted butter in the batter. It still feels lighter than a classic loaf, but it slices more cleanly once cooled.

You see the same idea in a good applesauce cake, where the applesauce keeps the crumb moist and even without making the cake feel wet.

Ingredients for Banana Bread with Applesauce

The ingredients are familiar, but measuring them makes the loaf much more reliable. A little too much banana or applesauce can make the crumb feel compressed instead of tender.

Labeled ingredients for banana bread with applesauce, including ripe bananas, applesauce, eggs, flour, brown sugar, oil, spices, and nuts.
The ingredient list is simple, but the recipe depends on balance: ripe bananas for flavor, applesauce for moisture, and a little fat for tenderness.

Very Ripe Bananas

Use bananas that are heavily speckled or mostly brown on the outside. They mash easily, taste sweeter, and give the loaf its deep banana flavor. If the bananas are still too yellow, use the ripening shortcuts before you start.

Banana ripeness guide showing bananas from too firm to heavily speckled and mostly brown for banana bread.
Heavily speckled bananas give banana bread the deepest flavor. However, measuring the mashed fruit still keeps the applesauce loaf from getting too wet.

If a banana looks too far gone for eating out of hand, it may be exactly right for this batter. For this recipe, measure 1½ cups mashed banana, which is usually about 3 large bananas or 4 smaller ones. Too little banana gives a bland loaf, while too much can make the middle heavy, especially with applesauce in the batter. Using freezer bananas? Drain them before measuring.

Mashed banana measured to 1½ cups in a glass measuring cup with ripe bananas and a fork nearby.
Banana size changes from bunch to bunch, so measure after mashing. This one step makes banana bread with applesauce much more reliable.

Frozen bananas also work. Thaw them first, drain off excess liquid, then mash and measure. They can release a lot of moisture, so measuring is even more important if you are using bananas from the freezer.

Frozen banana process guide showing thawed bananas, drained liquid, mashed banana, and 1½ cups measured for banana bread.
Frozen bananas work well, but they release extra liquid. Drain first, then mash and measure so the loaf stays soft instead of gummy.

How to Ripen Bananas Faster

If your bananas are yellow but not soft yet, place them in a paper bag and leave them at room temperature until the peels become heavily speckled. For a same-day option, bake unpeeled bananas on a lined baking sheet at 300°F / 150°C until the peels darken and the fruit softens, then cool before mashing.

This shortcut helps with texture, but it does not create the same deep flavor as bananas that ripen naturally over several days. Use it when you need banana bread today, not when you are chasing the strongest banana flavor.

If the bananas release liquid as they cool, leave that liquid behind before measuring so you do not add extra water to the batter.

Two-method guide for ripening bananas faster, showing the paper bag method and oven-ripened bananas at 300°F.
A paper bag is better when you have time; meanwhile, the oven shortcut helps when banana bread needs to happen today.

Unsweetened Applesauce

Plain unsweetened applesauce is best because it adds moisture without making the loaf too sweet. Homemade or store-bought both work, as long as the applesauce is smooth enough to blend evenly into the batter.

Sweetened applesauce is fine, but reduce the brown sugar slightly if you prefer a less sweet loaf. Cinnamon applesauce works too, especially if you want a warmer, spiced flavor.

A Small Amount of Oil or Melted Butter

The few tablespoons of fat are not there by accident. You can make a no-oil version, but the texture is usually more fragile. Three tablespoons of neutral oil or melted butter give the crumb a better bite while keeping the recipe lighter than a traditional butter-heavy loaf.

Use neutral oil when you want the banana flavor to stay clean and simple, with a softer next-day slice. Use melted butter if you want a richer, more classic banana bread flavor and a slightly firmer bite once the loaf cools. Trying to reduce more fat? Compare the applesauce-oil options later in the post.

Oil versus melted butter comparison for banana bread with applesauce, showing texture and flavor differences.
Oil keeps the banana flavor cleaner and softer the next day, while melted butter gives the loaf a richer, more classic banana bread taste.

Flour, Eggs, Sugar, and Leavening

All-purpose flour gives the most reliable loaf. You can replace up to half of it with whole wheat flour for a heartier flavor, but using all whole wheat flour will make the bread denser and may need a little extra moisture.

Whole wheat flour swap guide showing all-purpose flour, whole wheat flour, and a banana bread slice.
A partial whole wheat swap adds heartier flavor without taking over the loaf. Start with half so the crumb still stays tender.

If you want a banana loaf built around oats instead of regular flour, try this healthy banana bread with oat flour for a more oat-forward version.

Brown sugar is doing more than sweetening here. It brings a light caramel note that makes the banana taste rounder, especially when the applesauce is plain and unsweetened. Eggs help the batter set, and a mix of baking soda plus a little baking powder helps lift the fruit-heavy batter.

Walnuts, Pecans, or Chocolate Chips

Walnuts and pecans turn this into banana nut bread with applesauce. Use ½ cup for a lighter crunch or up to ¾ cup for a more classic banana nut loaf. Chocolate chips also work, but they make the bread sweeter and more dessert-like.

Mix-in chooser for banana bread with applesauce showing plain, walnuts, pecans, and chocolate chips.
Mix-ins change the personality of the loaf. Still, keep them under 1 cup so the banana-applesauce batter stays balanced and sliceable.

Equipment for This Loaf

You do not need a mixer for this loaf. In fact, mixing by hand is better because it helps prevent a rubbery crumb. A few small banana lumps are fine; beaten batter is not what you want here.

  • 9×5-inch loaf pan
  • Large mixing bowl
  • Medium bowl for dry ingredients
  • Fork or potato masher for the bananas
  • Whisk
  • Flexible spatula
  • Parchment paper, optional
  • Cooling rack
  • Digital thermometer, optional

The important part is not special equipment. It is gentle mixing, the right pan, and enough cooling time before slicing. A digital thermometer removes the guesswork from fruit-heavy loaves, where the top can brown before the center is ready.

Equipment for banana bread with applesauce, including loaf pan, bowls, fork, whisk, spatula, parchment, rack, and thermometer.
A bowl, whisk, spatula, and loaf pan are enough. The thermometer is the only optional tool that can save an uncertain center.

What Kind of Applesauce Should You Use?

The applesauce you use changes more than sweetness. It can change how loose the batter feels and how quickly the middle bakes through. If you are trying to avoid a damp center, this is one of the easiest places to stay in control.

Applesauce chooser board with smooth unsweetened, sweetened, cinnamon, chunky, and watery applesauce options.
Smooth unsweetened applesauce is the safest choice. If your applesauce is chunky or watery, adjust it before mixing so the crumb bakes evenly.
Applesauce Type Works? What to Adjust
Unsweetened smooth applesauce Best choice No change needed
Sweetened applesauce Yes Reduce the brown sugar slightly if you want a less sweet loaf
Cinnamon applesauce Yes Reduce or skip the extra cinnamon if needed
Homemade applesauce Yes Use smooth applesauce that is not watery
Chunky applesauce Sometimes Mash or blend first for a more even crumb
Very watery applesauce Risky Drain slightly or use 1–2 tablespoons less

If your applesauce looks loose and watery, hold back a little instead of adding extra. The batter may seem thick at first, but extra water shows up later in the baked crumb. The finished batter should mound softly in the pan, not pour like pancake batter.

Best Banana-to-Applesauce Ratio

The best starting ratio for one standard loaf is 1½ cups mashed banana to ½ cup applesauce. That gives enough banana flavor and enough applesauce moisture without flooding the batter.

Applesauce is not the problem. The problem is stacking too much banana and applesauce without giving the loaf enough flour, eggs, bake time, and cooling time.

Loaf Style Mashed Banana Applesauce Result
Balanced classic 1½ cups ½ cup Moist and sliceable
More banana-forward 1⅔ cups ⅓ cup Stronger banana flavor with slightly less added moisture
Lower-fat style 1½ cups ½ cup Lighter and more delicate, especially if you reduce the oil
Risky wet loaf 2 cups or more ½ cup or more More likely to bake up dense or gummy in the center

When the balance is right, the loaf tastes fruit-rich without feeling heavy. The first slice should smell warm, hold together, and look set rather than damp or compressed.

Banana and applesauce ratio guide showing balanced, banana-forward, lower-fat, and risky wet loaf options.
The banana-to-applesauce ratio controls moisture before the loaf ever reaches the oven. Too much fruit can make the crumb slow to set.

That balance is what keeps the loaf tasting like real banana bread, not like a lighter version where the texture feels like a compromise.

Best Pan Size and Pan Type for Banana Bread with Applesauce

Pan size changes how deep the batter sits, which changes how quickly the center sets. For this fruit-rich batter, a 9×5-inch loaf pan is the safest default.

Pan What Changes How to Bake It
9×5-inch loaf pan Best default; bakes most evenly 55–65 minutes at 350°F / 175°C
8½x4½-inch loaf pan Taller loaf; center takes longer Start checking around 55 minutes, but expect extra time
8×5-inch loaf pan Works, but the center can be slower Use a thermometer if possible and avoid pulling early
Dark metal loaf pan Browns faster on the outside Check early, tent if needed, and reduce the oven by 25°F / about 15°C if it over-browns
Glass or ceramic loaf pan Can bake more slowly through the center Expect extra time and use a thermometer; tent if the top browns before the middle is done
Mini loaf pans Smaller loaves bake faster Start checking around 30–35 minutes
Muffin tin Fastest bake with more edges 20–25 minutes at 350°F, or 18–20 minutes at 375°F
Pan size and pan type guide for banana bread with applesauce, including loaf pans, dark metal, glass, mini loaves, and muffin tin.
Pan size and material change how the middle bakes. Because this batter is fruit-rich, the safest default is a 9×5-inch loaf pan.

If the top browns before the middle is done, tent the loaf loosely with foil and continue baking. This is especially useful with smaller loaf pans, dark metal pans, glass pans, ceramic pans, or very ripe bananas.

Dark metal versus glass or ceramic loaf pan comparison for banana bread, with browning and center-baking cues.
Dark metal browns faster, while glass and ceramic can bake more slowly through the center. As a result, doneness cues matter more than color alone.

How to Make Banana Bread with Applesauce

Once the fruit and applesauce are measured, the method is simple. The main thing is to mix gently and give the center enough time to bake through. If you are unsure near the end, use the doneness guide instead of judging by color alone.

Step-by-step process for banana bread with applesauce, showing pan prep, mashed banana, wet ingredients, dry ingredients, folding, baking, and cooling.
The method is simple, but the order helps: measure the fruit, mix wet and dry separately, fold gently, then let the loaf cool before slicing.

1. Prepare the Pan

Heat the oven to 350°F / 175°C. Grease a 9×5-inch loaf pan and line it with parchment if you want to lift the loaf out easily.

2. Mash and Measure the Bananas

Mash the ripe bananas with a fork, then measure 1½ cups. A few small banana lumps are fine. They make the loaf feel homemade and keep the crumb from becoming too uniform.

3. Mix the Wet Ingredients

Whisk the mashed banana, applesauce, eggs, brown sugar, oil or melted butter, and vanilla until combined. The mixture will look loose and glossy.

4. Mix the Dry Ingredients Separately

In another bowl, whisk the flour, baking soda, baking powder, cinnamon, and salt. This helps the leavening spread evenly through the thick fruit-based batter.

5. Fold Gently

Add the dry ingredients to the wet ingredients and fold with a spatula until no dry flour remains. A mixer is not needed here; overmixing is one of the easiest ways to make the crumb rubbery.

The batter should be thick enough to mound on the spatula. If it looks loose before it goes into the oven, the finished crumb is more likely to feel heavy.

Batter texture guide showing banana bread batter mounding on a spatula compared with batter that is too loose.
The batter should mound instead of pour. If it spreads too easily, the baked banana bread is more likely to feel compressed.

6. Add Nuts if Using

Fold in walnuts or pecans at the end. For a prettier top, save a small handful and scatter them over the batter before baking.

7. Bake Until the Center Is Set

Spread the batter into the prepared pan and bake for 55 to 65 minutes. A browned top is only part of the story; this fruit-heavy batter still needs time for the center to finish baking.

Near the end, the loaf should smell deeply banana-rich, and the center should look set rather than glossy. The bread is done when a toothpick inserted into the center comes out with moist crumbs but no wet batter. For the most reliable check, use a digital thermometer; the center should register about 200°F to 205°F / 93°C to 96°C. King Arthur Baking also recommends this internal-temperature range for banana bread doneness in its banana bread doneness guide.

Doneness guide for banana bread with applesauce showing toothpick crumbs, a thermometer reading, and a set center.
A few moist crumbs are fine, but wet batter is not. For extra confidence, check for 200–205°F in the center before cooling the loaf.

8. Cool Before Slicing

Let the loaf cool in the pan for 10 to 15 minutes, then move it to a rack. Banana bread continues to set as it cools, especially when applesauce is in the batter.

Cutting too early can make a properly baked loaf look underdone, because the crumb has not had time to settle. Waiting is annoying, but it is one of the easiest ways to get clean slices.

Once cooled, the slices should look even and plush, with tiny banana flecks through the crumb instead of a shiny wet line in the center.

Cooling timeline for banana bread showing cooling in the pan, cooling on a rack, and clean slices after resting.
Cooling is part of the recipe, not an afterthought. Once the crumb settles, the slices cut cleaner and hold their shape.

Before you use the recipe card, remember the three texture cues that matter most: measured banana, batter that mounds instead of pours, and a fully cooled loaf before the first cut.

Clean slices of banana bread with applesauce showing an even crumb and no wet line.
This is the texture to look for after cooling: even crumb, clean edges, and slices that hold together without crumbling.

Banana Bread with Applesauce Recipe

This fruit-rich loaf is lighter than classic banana bread but still soft, fragrant, and sturdy enough to slice cleanly once cooled.

Yield1 standard loaf
Prep Time15 minutes
Cook Time55–65 minutes
Total TimeAbout 1 hour 20 minutes, plus 45–60 minutes cooling

Pan: 9×5-inch loaf pan
Oven: 350°F / 175°C

Ingredients

  • 1½ cups mashed very ripe banana, about 340 g
  • ½ cup unsweetened applesauce, about 120 g
  • 2 large eggs
  • ½ cup packed light brown sugar, about 105 g
  • 3 tablespoons neutral oil, about 45 ml, or 3 tablespoons melted butter, about 42 g
  • 2 teaspoons vanilla extract
  • 2 cups all-purpose flour, 240 g
  • 1 teaspoon baking soda
  • ½ teaspoon baking powder
  • 1 teaspoon ground cinnamon
  • ½ teaspoon fine salt
  • ½ cup chopped walnuts or pecans, optional, about 55–65 g

Method

  1. Heat the oven to 350°F / 175°C. Grease a 9×5-inch loaf pan and line it with parchment if you want easier lifting.
  2. Mash the bananas, then measure 1½ cups. Banana size varies so much that measuring gives you a more reliable loaf than counting bananas alone.
  3. In a large bowl, whisk the mashed banana, applesauce, eggs, brown sugar, oil or melted butter, and vanilla.
  4. In a separate bowl, whisk the flour, baking soda, baking powder, cinnamon, and salt.
  5. Add the dry ingredients to the wet ingredients and fold gently until no dry flour remains. The batter should be thick enough to mound on the spatula, not runny.
  6. Fold in walnuts or pecans if using.
  7. Spread the batter into the prepared pan. Bake for 55–65 minutes, or until a toothpick inserted in the center comes out with moist crumbs but no wet batter. For the most reliable check, the center should read about 200–205°F / 93–96°C.
  8. If the top browns before the center is done, tent the loaf loosely with foil and keep baking.
  9. Cool in the pan for 10–15 minutes, then move to a rack. Let the loaf cool for at least 45–60 minutes before slicing so the crumb can finish setting.

Notes

  • For your first loaf, use the full 3 tablespoons oil or melted butter. Once you know the texture, you can reduce it to 2 tablespoons for a lighter but more delicate loaf.
  • Use up to ¾ cup nuts, about 85 g, if you want a more classic banana nut loaf.
  • For a less sweet loaf, reduce the brown sugar to ⅓ cup if your bananas are very ripe.
  • If using frozen bananas, thaw and drain off excess liquid before measuring.
  • For the cleanest slices, cool the loaf fully before cutting.

After the first loaf, the best tweak is personal: richer with butter, cleaner with oil, crunchier with walnuts, softer as muffins, or lighter with a little less fat. The sections below help you adjust without losing the clean-slicing texture.

How to Avoid Gummy Banana Bread with Applesauce

A good slice should hold together, with an even crumb and a set center. If your last loaf looked beautiful on top but cut into a compressed middle, you probably do not need a completely different recipe. You usually need better measurement, a little more bake time, and enough cooling before cutting.

Most gummy loaves come from a combination of too much wet fruit, heavy mixing, not enough time in the oven, or slicing before the crumb has set. The good news is that it usually does not mean you are bad at banana bread; it comes down to one of a few fixable choices.

Troubleshooting board for gummy banana bread, showing fixes for gummy middle, rubbery crumb, fast browning, dense loaf, wet slices, and dry edges.
Most gummy banana bread problems come from moisture, mixing, bake time, or cooling. Once you know the cause, the fix is usually simple.

Texture Problems and Fixes

Problem Likely Cause How to Fix It
Gummy middle Too much banana or applesauce, or the loaf was underbaked Measure the banana, keep applesauce to ½ cup, and bake until the middle no longer looks shiny or wet
Rubbery texture The batter was overmixed Fold gently by hand and stop when the flour disappears
Top browns too fast The outside is browning before the center finishes Tent loosely with foil and continue baking
Dense loaf Too much wet ingredient or weak leavening Use fresh baking soda and baking powder, and follow the banana-to-applesauce ratio
Wet-looking slices The loaf was sliced too hot Cool at least 45 minutes before slicing
Dry edges Dark pan, overbaking, or too little wet ingredient Check earlier, use parchment, and try a lighter pan next time if the edges keep drying out
Side-by-side comparison of gummy compressed banana bread crumb and properly set sliceable crumb.
A compressed crumb is a clue, not a disaster. Next time, check the fruit amount, bake time, and cooling window.

Wet Center vs Fully Baked Crumb

A clean toothpick is not always the best goal for banana bread. A few soft crumbs on the toothpick are fine. Wet batter, shiny streaks, or a sunken center mean the loaf needs more time.

Banana bread center guide showing wet batter, shiny streaks, and a fully set crumb.
Moist crumbs are normal in banana bread, but shiny streaks or wet batter mean the center still needs more time.

What to Do If the Top Browns Too Fast

If the top is dark but the center still has wet batter, lay a loose piece of foil over the loaf and continue baking. This keeps the crust from getting too dark while the middle finishes.

Foil tent sequence for banana bread showing a darkening top, loose foil over the loaf, and continued baking.
If the top browns early, do not pull the loaf too soon. Tent it loosely with foil so the crust is protected while the center finishes.

Can Applesauce Replace Oil or Butter in Banana Bread?

Applesauce can lighten banana bread beautifully, but it cannot do everything butter or oil does. It brings moisture; fat brings richness, tenderness, and a cleaner bite.

Because banana bread already contains mashed fruit, it handles applesauce better than many cakes or cookies. Even so, a small amount of oil or melted butter helps prevent the loaf from becoming springy, tough, or too delicate in the middle.

Think of applesauce as a helper, not a perfect stand-in for every bit of fat. Bon Appétit explains this tradeoff in its guide to using applesauce instead of oil or butter.

Version What to Use Texture
Best balanced ½ cup applesauce + 3 tablespoons oil or melted butter Moist, rich enough, and sliceable
Lower-fat ½ cup applesauce + 1–2 tablespoons oil Lighter and more delicate
No-oil ½ cup applesauce and no added fat Moist but more delicate, with a higher risk of a soft center
Richer loaf ⅓ cup applesauce + ¼ cup melted butter or oil More classic banana bread texture

After the first loaf, you can reduce the oil slightly if you prefer a softer, lower-fat version.

Applesauce instead of oil decision board showing balanced, lower-fat, no-oil, and richer banana bread options.
Applesauce adds moisture, but fat adds tenderness. That is why the best banana bread with applesauce usually keeps a small amount of oil or butter.

Banana Bread with Applesauce and Yogurt

Yogurt works best as a small swap, not a big extra addition, because banana, applesauce, and yogurt all bring moisture. For a tangier, softer loaf, replace 2 tablespoons of the applesauce with plain Greek yogurt or regular plain yogurt.

Yogurt variation for banana bread with applesauce showing yogurt, applesauce, measuring spoon, and a loaf slice.
Use yogurt as a swap, not an add-on. A small amount adds tang, while too much extra moisture can slow the center.

It gives the loaf a little tang and softness without turning it into a completely different bake.

Adding a full extra ½ cup yogurt can make this batter too wet unless you also adjust the flour or bake time. The flavor may be good, but the center can turn heavy.

Banana Nut Bread with Applesauce

For banana nut bread with applesauce, fold ½ to ¾ cup chopped walnuts or pecans, about 55–85 g, into the batter just before baking. Walnuts make the loaf taste more old-school; pecans make it a little softer and sweeter.

Banana nut bread with applesauce showing sliced loaf with walnuts, pecans, applesauce, and toasted nut cues.
Toast the nuts, cool them, then fold them in last. That keeps the crunch clear without overworking the batter.

This is the version to make when you want the loaf to feel more classic and bakery-style, with a little crunch against the soft fruit-rich crumb.

Toasting the nuts first gives deeper flavor without changing the recipe. Warm them in a dry skillet for 3–5 minutes, or on a baking sheet for 6–8 minutes at 350°F / 175°C, then cool before folding them into the batter.

Too many nuts can make the loaf crumbly and weigh down an already-moist batter. Keep it under 1 cup if you want neat slices.

No Added Sugar Banana Bread with Applesauce

A no-added-sugar version works best when the bananas are deeply ripe, but it will taste more like a breakfast loaf than a dessert loaf. The bananas carry most of the sweetness, so this is not the place for pale, barely ripe fruit.

This version is not truly sugar-free because bananas and applesauce contain natural sugars. However, you can skip the brown sugar or reduce it to 2 to 3 tablespoons if your bananas are very sweet and heavily speckled.

No added sugar banana bread with applesauce showing ripe bananas, a sliced loaf, cinnamon, vanilla, and reduced sugar cue.
For a no-added-sugar version, very ripe bananas do the heavy lifting. However, the loaf will taste more breakfast-style than dessert-like.

For better flavor in a no-added-sugar loaf, use extra cinnamon, vanilla, and a pinch more salt. These small touches make the banana flavor taste fuller even without much added sugar.

Eggless or Vegan Banana Bread with Applesauce

For a vegan version, use neutral oil instead of butter and replace the eggs with 2 flax eggs. To make 2 flax eggs, mix 2 tablespoons ground flaxseed with 5 tablespoons water and let it thicken for about 10 minutes before adding it to the batter.

Eggless or vegan banana bread with applesauce showing flax egg, neutral oil, applesauce, and a sliced loaf.
Flax eggs help bind the batter, but the crumb is more delicate. Let the loaf cool fully before slicing for the cleanest texture.

It is a helpful option when the loaf needs to work for more people at the table, but full cooling matters even more because the crumb is more delicate.

Applesauce helps with moisture and a little binding, but it does not behave exactly like eggs. An eggless loaf will usually be more delicate and slightly denser, so let it cool completely before slicing.

If you only need the recipe to be dairy-free, the fix is easier: use neutral oil instead of melted butter. The rest of the main recipe can stay the same.

Banana Muffins with Applesauce

This batter also works as banana muffins with applesauce. Divide it into a lined muffin tin, filling each cup about ¾ full. Bake at 350°F / 175°C for about 20 to 25 minutes, or until the tops spring back and a toothpick comes out with moist crumbs.

Banana muffins with applesauce in a lined muffin tin, with bake times, fill level, cooling cue, and split muffins showing crumb.
The same banana-applesauce batter can become muffins. Because they bake faster than a loaf, check early and let them rest briefly in the pan.

Muffins are the better choice when you want faster cooling, easy freezing, or smaller grab-and-go portions with the same banana-applesauce flavor. Overbaking while waiting for a dark top can dry the edges, so look for tops that are set and spring back lightly.

For slightly taller muffin tops, bake at 375°F / 190°C and start checking around 18 to 20 minutes. Muffins bake faster than a loaf, so watch them closely near the end.

This recipe usually makes about 12 standard muffins. Let them sit in the pan for 5 minutes, then move them to a rack so the bottoms do not steam and turn damp.

For a more filling meal-prep bake, these high protein muffins are a good next step.

Storage and Freezing

How to Store the Loaf

Because this loaf is fruit-rich, storage matters almost as much as baking. Wrap it too soon and the outside can turn sticky; cool it fully and the slices keep beautifully. Want smaller portions instead? Use the muffin conversion.

  • Room temperature: keep tightly wrapped or in an airtight container for 2–3 days once fully cool.
  • Refrigerator: store for 5–6 days if your kitchen is warm, though the crumb may firm slightly.
  • Freezer: freeze slices for up to 3 months with parchment between them for easier thawing. For the cleanest setup, use the slice-freezing method below.
Storage guide for banana bread with applesauce showing wrapped loaf, fridge container, and freezer bag.
Cool the loaf fully before storing. Otherwise, trapped steam can soften the crust and make the slices feel sticky.

How to Freeze Slices

To serve frozen slices, thaw at room temperature or warm gently. A quick warm-up makes the banana flavor taste fresher and softens the crumb again.

Freezing guide for banana bread slices showing parchment between slices, a freezer container, a freezer bag, and a warmed slice.
Freeze slices with parchment between them so you can thaw one piece at a time. Then warm gently to bring back the soft crumb.

It is especially good the next day, when the banana flavor has had time to settle into the crumb.

If you are baking through ripe bananas often, this sourdough banana bread recipe is another good make-ahead loaf for the same breakfast-and-snack lane.

The Next-Day Slice

Once you know the texture cues, this becomes the kind of banana bread you stop overthinking: ripe bananas, a measured scoop of applesauce, a thick batter, and enough cooling time for clean slices. The first slice is soft and fragrant, but the next-day slice may be even better — more settled, more banana-rich, and exactly the reason those spotted bananas were worth saving.

Next-day banana bread slices on a plate with coffee, applesauce, bananas, and warm morning light.
The next-day slice is often the reward for waiting: the banana flavor deepens, the crumb settles, and the loaf feels even easier to enjoy.

After the first bake, pay attention to your favorite version: oil for a cleaner banana flavor, melted butter for a richer slice, walnuts for a classic banana bread feel, or plain for a softer breakfast loaf. That little preference is what turns the recipe into your house version.

FAQs About Banana Bread with Applesauce

How much applesauce belongs in one loaf of banana bread?

For one standard 9×5-inch loaf, ½ cup applesauce is the best starting point. It adds moisture without making the batter too loose, especially when paired with about 1½ cups mashed banana.

Does applesauce replace all the oil or butter?

Applesauce can replace some of the fat, but the best texture usually comes from keeping a small amount of oil or melted butter in the batter. A fully no-oil loaf can work, although it will be more delicate.

Why did my applesauce banana bread turn gummy?

The usual causes are too much wet ingredient, overmixing, underbaking, or slicing while the loaf is still hot. Measure the banana, keep the applesauce to ½ cup, fold gently, and bake until the middle no longer looks shiny or wet.

Do frozen bananas work?

They do, but thawing and draining matter. Frozen bananas release extra liquid, so drain off the excess, mash the fruit, and then measure the 1½ cups.

How much whole wheat flour can I use?

Up to half is the safest swap. Replacing all the all-purpose flour with whole wheat flour makes the loaf heartier and denser, so start with a partial swap before changing the whole recipe.

What happens if I skip the added sugar?

The loaf will taste more breakfast-style than dessert-style. Very ripe bananas help, but bananas and applesauce still contain natural sugars, so “no added sugar” is the more accurate description.

How do I make this into banana nut bread?

Fold ½ to ¾ cup chopped walnuts or pecans into the batter before baking. Toasted walnuts give the most classic banana nut bread flavor.

Which applesauce types work best?

Unsweetened smooth applesauce is the easiest choice. Sweetened applesauce works if you reduce the sugar slightly, cinnamon applesauce adds warmth, and chunky applesauce should be mashed or blended first.

How do I make it eggless or vegan?

For a vegan loaf, use neutral oil instead of butter and replace the eggs with 2 flax eggs. The loaf will be more delicate and slightly denser, so cool it completely before slicing.

Where does yogurt fit into the recipe?

A small amount works best. Replace 2 tablespoons of the applesauce with plain yogurt for a tangier loaf, but avoid adding much more unless you adjust the flour or bake time.

How do I know the middle is fully baked?

A toothpick should come out with moist crumbs, not wet batter or shiny streaks. For a more precise check, the center should register about 200°F to 205°F / 93°C to 96°C on a digital thermometer.

Back to top ↑

{ “@context”: “https://schema.org”, “@graph”: [ { “@type”: “Organization”, “@id”: “https://masalamonk.com/#organization”, “name”: “MasalaMonk.com”, “url”: “https://masalamonk.com/”, “logo”: { “@type”: “ImageObject”, “@id”: “https://masalamonk.com/#logo”, “url”: “https://masalamonk.com/wp-content/uploads/2018/04/masala-monk-logo.png”, “contentUrl”: “https://masalamonk.com/wp-content/uploads/2018/04/masala-monk-logo.png” } }, { “@type”: “WebSite”, “@id”: “https://masalamonk.com/#website”, “url”: “https://masalamonk.com/”, “name”: “MasalaMonk.com”, “publisher”: { “@id”: “https://masalamonk.com/#organization” }, “inLanguage”: “en-US” }, { “@type”: “ImageObject”, “@id”: “https://masalamonk.com/banana-bread-with-applesauce-recipe/#primaryimage”, “url”: “https://masalamonk.com/wp-content/uploads/2026/05/banana-bread-with-applesauce-recipe.jpg”, “contentUrl”: “https://masalamonk.com/wp-content/uploads/2026/05/banana-bread-with-applesauce-recipe.jpg”, “caption”: “Banana bread with applesauce sliced to show a soft, set crumb.” }, { “@type”: “WebPage”, “@id”: “https://masalamonk.com/banana-bread-with-applesauce-recipe/#webpage”, “url”: “https://masalamonk.com/banana-bread-with-applesauce-recipe/”, “name”: “Banana Bread with Applesauce Recipe”, “headline”: “Banana Bread with Applesauce Recipe”, “description”: “A moist banana bread with applesauce recipe that uses ripe bananas, measured applesauce, and a little oil or butter for tender slices without a gummy center.”, “isPartOf”: { “@id”: “https://masalamonk.com/#website” }, “publisher”: { “@id”: “https://masalamonk.com/#organization” }, “primaryImageOfPage”: { “@id”: “https://masalamonk.com/banana-bread-with-applesauce-recipe/#primaryimage” }, “mainEntity”: { “@id”: “https://masalamonk.com/banana-bread-with-applesauce-recipe/#recipe” }, “datePublished”: “2026-05-28”, “dateModified”: “2026-05-28”, “isAccessibleForFree”: true, “inLanguage”: “en-US” }, { “@type”: “Recipe”, “@id”: “https://masalamonk.com/banana-bread-with-applesauce-recipe/#recipe”, “mainEntityOfPage”: { “@id”: “https://masalamonk.com/banana-bread-with-applesauce-recipe/#webpage” }, “url”: “https://masalamonk.com/banana-bread-with-applesauce-recipe/”, “name”: “Banana Bread with Applesauce Recipe”, “headline”: “Banana Bread with Applesauce Recipe”, “description”: “Moist banana bread with applesauce, ripe bananas, and a small amount of oil or butter for tender slices without a gummy center.”, “image”: [ { “@type”: “ImageObject”, “@id”: “https://masalamonk.com/banana-bread-with-applesauce-recipe/#image-finished-loaf”, “url”: “https://masalamonk.com/wp-content/uploads/2026/05/banana-bread-with-applesauce-recipe.jpg”, “contentUrl”: “https://masalamonk.com/wp-content/uploads/2026/05/banana-bread-with-applesauce-recipe.jpg”, “caption”: “Sliced banana bread with applesauce showing a soft, set crumb.” }, { “@type”: “ImageObject”, “@id”: “https://masalamonk.com/banana-bread-with-applesauce-recipe/#image-slice-texture”, “url”: “https://masalamonk.com/wp-content/uploads/2026/05/banana-bread-with-applesauce-slice-texture-683×1024.jpg”, “contentUrl”: “https://masalamonk.com/wp-content/uploads/2026/05/banana-bread-with-applesauce-slice-texture-683×1024.jpg”, “caption”: “Close-up of banana bread with applesauce slices showing an even crumb.” }, { “@type”: “ImageObject”, “@id”: “https://masalamonk.com/banana-bread-with-applesauce-recipe/#image-clean-slices”, “url”: “https://masalamonk.com/wp-content/uploads/2026/05/clean-slices-of-banana-bread-with-applesauce-683×1024.jpg”, “contentUrl”: “https://masalamonk.com/wp-content/uploads/2026/05/clean-slices-of-banana-bread-with-applesauce-683×1024.jpg”, “caption”: “Clean slices of banana bread with applesauce showing no wet line.” }, { “@type”: “ImageObject”, “@id”: “https://masalamonk.com/banana-bread-with-applesauce-recipe/#image-next-day-slice”, “url”: “https://masalamonk.com/wp-content/uploads/2026/05/banana-bread-with-applesauce-next-day-slice-683×1024.jpg”, “contentUrl”: “https://masalamonk.com/wp-content/uploads/2026/05/banana-bread-with-applesauce-next-day-slice-683×1024.jpg”, “caption”: “Next-day banana bread with applesauce served as a breakfast slice.” } ], “thumbnailUrl”: “https://masalamonk.com/wp-content/uploads/2026/05/banana-bread-with-applesauce-recipe.jpg”, “author”: { “@id”: “https://masalamonk.com/#organization” }, “publisher”: { “@id”: “https://masalamonk.com/#organization” }, “datePublished”: “2026-05-28”, “dateModified”: “2026-05-28”, “inLanguage”: “en-US”, “prepTime”: “PT15M”, “cookTime”: “PT1H5M”, “totalTime”: “PT2H20M”, “recipeYield”: “1 standard loaf (about 10 slices)”, “recipeCategory”: [ “Quick Bread”, “Breakfast”, “Snack” ], “recipeCuisine”: “American”, “keywords”: “banana bread with applesauce, applesauce banana bread, moist banana bread, banana bread recipe, banana nut bread with applesauce, no added sugar banana bread, eggless banana bread, vegan banana bread, banana muffins with applesauce”, “recipeIngredient”: [ “1½ cups mashed very ripe banana, about 340 g”, “½ cup unsweetened applesauce, about 120 g”, “2 large eggs”, “½ cup packed light brown sugar, about 105 g”, “3 tablespoons neutral oil, about 45 ml, or 3 tablespoons melted butter, about 42 g”, “2 teaspoons vanilla extract”, “2 cups all-purpose flour, 240 g”, “1 teaspoon baking soda”, “½ teaspoon baking powder”, “1 teaspoon ground cinnamon”, “½ teaspoon fine salt”, “½ cup chopped walnuts or pecans, optional, about 55–65 g” ], “recipeInstructions”: [ { “@type”: “HowToStep”, “@id”: “https://masalamonk.com/banana-bread-with-applesauce-recipe/#prepare-the-pan”, “position”: 1, “name”: “Prepare the pan”, “url”: “https://masalamonk.com/banana-bread-with-applesauce-recipe/#prepare-the-pan”, “text”: “Heat the oven to 350°F / 175°C. Grease a 9×5-inch loaf pan and line it with parchment if you want easier lifting.”, “image”: “https://masalamonk.com/wp-content/uploads/2026/05/how-to-make-banana-bread-with-applesauce-step-by-step-683×1024.jpg” }, { “@type”: “HowToStep”, “@id”: “https://masalamonk.com/banana-bread-with-applesauce-recipe/#mash-and-measure-bananas”, “position”: 2, “name”: “Mash and measure the bananas”, “url”: “https://masalamonk.com/banana-bread-with-applesauce-recipe/#mash-and-measure-bananas”, “text”: “Mash the bananas, then measure 1½ cups. Banana size varies, so measuring gives you a more reliable loaf than counting bananas alone.”, “image”: “https://masalamonk.com/wp-content/uploads/2026/05/measure-mashed-bananas-for-banana-bread-683×1024.jpg” }, { “@type”: “HowToStep”, “@id”: “https://masalamonk.com/banana-bread-with-applesauce-recipe/#mix-wet-ingredients”, “position”: 3, “name”: “Mix the wet ingredients”, “url”: “https://masalamonk.com/banana-bread-with-applesauce-recipe/#mix-wet-ingredients”, “text”: “In a large bowl, whisk the mashed banana, applesauce, eggs, brown sugar, oil or melted butter, and vanilla.”, “image”: “https://masalamonk.com/wp-content/uploads/2026/05/how-to-make-banana-bread-with-applesauce-step-by-step-683×1024.jpg” }, { “@type”: “HowToStep”, “@id”: “https://masalamonk.com/banana-bread-with-applesauce-recipe/#mix-dry-ingredients”, “position”: 4, “name”: “Mix the dry ingredients”, “url”: “https://masalamonk.com/banana-bread-with-applesauce-recipe/#mix-dry-ingredients”, “text”: “In a separate bowl, whisk the flour, baking soda, baking powder, cinnamon, and salt.”, “image”: “https://masalamonk.com/wp-content/uploads/2026/05/how-to-make-banana-bread-with-applesauce-step-by-step-683×1024.jpg” }, { “@type”: “HowToStep”, “@id”: “https://masalamonk.com/banana-bread-with-applesauce-recipe/#fold-gently”, “position”: 5, “name”: “Fold the batter gently”, “url”: “https://masalamonk.com/banana-bread-with-applesauce-recipe/#fold-gently”, “text”: “Add the dry ingredients to the wet ingredients and fold gently until no dry flour remains. The batter should be thick enough to mound on the spatula, not runny.”, “image”: “https://masalamonk.com/wp-content/uploads/2026/05/banana-bread-batter-texture-guide-683×1024.jpg” }, { “@type”: “HowToStep”, “@id”: “https://masalamonk.com/banana-bread-with-applesauce-recipe/#add-nuts-if-using”, “position”: 6, “name”: “Add nuts if using”, “url”: “https://masalamonk.com/banana-bread-with-applesauce-recipe/#add-nuts-if-using”, “text”: “Fold in walnuts or pecans if using.”, “image”: “https://masalamonk.com/wp-content/uploads/2026/05/mix-ins-for-banana-bread-with-applesauce-683×1024.jpg” }, { “@type”: “HowToStep”, “@id”: “https://masalamonk.com/banana-bread-with-applesauce-recipe/#bake-until-center-is-set”, “position”: 7, “name”: “Bake until the center is set”, “url”: “https://masalamonk.com/banana-bread-with-applesauce-recipe/#bake-until-center-is-set”, “text”: “Spread the batter into the prepared pan. Bake for 55–65 minutes, or until a toothpick inserted in the center comes out with moist crumbs but no wet batter. For the most reliable check, the center should read about 200–205°F / 93–96°C.”, “image”: “https://masalamonk.com/wp-content/uploads/2026/05/banana-bread-doneness-guide-683×1024.jpg” }, { “@type”: “HowToStep”, “@id”: “https://masalamonk.com/banana-bread-with-applesauce-recipe/#foil-tent-banana-bread”, “position”: 8, “name”: “Tent with foil if needed”, “url”: “https://masalamonk.com/banana-bread-with-applesauce-recipe/#foil-tent-banana-bread”, “text”: “If the top browns before the center is done, tent the loaf loosely with foil and keep baking.”, “image”: “https://masalamonk.com/wp-content/uploads/2026/05/top-browning-too-fast-banana-bread-fix-683×1024.jpg” }, { “@type”: “HowToStep”, “@id”: “https://masalamonk.com/banana-bread-with-applesauce-recipe/#cool-before-slicing-step”, “position”: 9, “name”: “Cool before slicing”, “url”: “https://masalamonk.com/banana-bread-with-applesauce-recipe/#cool-before-slicing-step”, “text”: “Cool in the pan for 10–15 minutes, then move to a rack. Let the loaf cool for at least 45–60 minutes before slicing so the crumb can finish setting.”, “image”: “https://masalamonk.com/wp-content/uploads/2026/05/cool-banana-bread-before-slicing-683×1024.jpg” } ] } ] }
Posted on Leave a comment

Apple Tart Recipe

Rectangular apple tart with thin sliced apples, glossy glaze, and a golden puff pastry border on parchment.

This apple tart recipe is for the moment when you want something prettier than a basic apple dessert but easier than a full apple pie. Store-bought puff pastry, thin apple slices, cinnamon sugar, melted butter, and a glossy apricot finish bake into a crisp, bakery-style tart that smells like cinnamon apples and slices cleanly enough to serve with pride.

The method is simple, but the details matter. Keep the pastry cool, slice the apples evenly, and bake the tart until the base feels firm enough to lift with a spatula. The best slices have flaky pastry, soft cinnamon-scented apples, and just enough glaze to catch the light.

Start with the puff pastry version, then use the notes below when you want a round shortcrust tart, a French-style applesauce layer, mini tarts, or a fix for a base that keeps turning soft.

Quick Answer: How to Make Apple Tart

To make an easy apple tart, place cold puff pastry on parchment, score a border around the edge, dock the center with a fork, and arrange thin apple slices in one overlapping layer. Brush the apples with melted butter, sprinkle with cinnamon sugar, then bake at 400°F / 200°C, or 180°C fan, for 30–35 minutes, until the pastry is well browned and the apples are tender. Brush the warm tart with apricot jam or apple jelly for a glossy finish.

When it is right, the edges will puff into a flaky frame, the apples will look glossy and slightly curled at the tips, and the bottom will feel firm instead of bendy. The goal is not a mountain of apples. The goal is a crisp sheet of pastry with enough fruit to taste generous, but not so much that the juices flood the base.

For the full printable-style version, go straight to the recipe card. If your main worry is texture, the crisp base tips explain how to avoid a soggy apple tart.

Slice of apple tart lifted from a rectangular puff pastry tart, showing glossy apples and flaky pastry layers.
Once the tart cools slightly, a clean slice should show tender apples on top and a firm pastry base underneath.

Apple Tart at a Glance

Best pastry for the simple version Store-bought all-butter puff pastry
Apple amount 3 medium apples, about 450–550 g / 1–1¼ lb before peeling and coring
Apple slice thickness ⅛–¼ inch / 3–6 mm
Oven temperature 400°F / 200°C, or 180°C fan
Bake time 30–35 minutes for puff pastry
Best finish Warm apricot jam or apple jelly glaze
Most important texture cue The pastry should be crisp, browned underneath, and firm enough to lift
Apple tart at-a-glance guide showing bake temperature, apple amount, slice thickness, bake time, and apricot glaze.
Use these numbers as guardrails: three apples, thin slices, a hot oven, and apricot glaze keep the tart balanced.

Why This Apple Tart Works

The secret is giving puff pastry the conditions it likes: cold dough, a hot oven, a scored edge, and a thin apple layer that does not weigh down the center. Store-bought puff pastry is the shortcut here; it gives you a flaky, bakery-style apple tart without making dough from scratch.

  • Puff pastry keeps the recipe approachable. You get flaky layers without a homemade dough project.
  • A scored border gives the tart structure. The edge rises around the apples and creates a clean frame.
  • Docking the center keeps it flatter. The middle stays lower while the border puffs.
  • Thin apples bake quickly. Slices around ⅛–¼ inch / 3–6 mm soften before the pastry overbrowns.
  • A hot baking sheet helps the bottom set. This gives the pastry a better chance to crisp before apple juices collect.
  • A light glaze makes it look finished. Apricot jam or apple jelly gives shine without making the tart heavy.

The result is the kind of dessert that feels dressed up without being fussy: crisp enough to lift neatly, tender enough to eat with a fork, and glossy enough to look finished even if your apple rows were not perfect.

This is the tart you make when pie sounds too heavy but sliced apples on buttery pastry still feels special. It looks like it took more effort than it did, which is exactly the charm.

Ingredients You Need

The ingredient list is short, so each piece has to pull its weight: buttery pastry, flavorful apples, a little sugar, a little butter, and a glossy finish at the end.

Apple tart ingredients including puff pastry, apples, cinnamon sugar, lemon, butter, apricot jam, egg, and salt.
With a short ingredient list, choose flavorful apples and good puff pastry because there is nowhere for weak ingredients to hide.

If you are still choosing apples, the best apples for apple tart section gives a quick variety guide before you start slicing.

Store-Bought Puff Pastry

Use one sheet of all-butter puff pastry if you can find it. It bakes with better flavor and cleaner flaky layers than pastry made mostly with shortening. Thaw frozen puff pastry in the refrigerator, not on a warm counter, so it unfolds without getting greasy. Soft pastry should go back into the fridge before baking.

Cold pastry matters because firm butter layers create better lift in the oven. King Arthur Baking’s puff pastry guidance explains the same cold-dough, hot-oven principle in more detail.

Store-bought puff pastry unfolded on parchment with sliced apples and a pastry brush nearby.
Store-bought puff pastry gives the shortcut, but keeping it cold is what helps the tart rise cleanly in the oven.

Not sure whether puff pastry or shortcrust is better for your tart? See the puff pastry vs shortcrust comparison before you choose.

Apples

You need about 3 medium apples, or 450–550 g / 1–1¼ lb before peeling and coring. That amount covers one rectangular puff pastry tart without weighing down the center. Pink Lady and Honeycrisp give an easy sweet-tart balance, while Granny Smith makes a sharper tart when mixed with a sweeter apple.

Fresh Apples vs Apple Pie Filling

This tart works best with fresh thin apple slices, not thick cooked filling. A saucy apple pie filling recipe is better for pies, crisps, hand pies, and spoonable toppings because it has more moisture and body than this thin pastry base needs.

Fresh apple slices on puff pastry compared with saucy apple pie filling for an apple tart.
Fresh apple slices suit a thin puff pastry tart because cooked pie filling brings more sauce than this base can handle.

For a deeper, saucier apple dessert instead, compare this with the apple tart vs pie section.

Sugar

Granulated sugar gives a clean, light sweetness. Light brown sugar adds a warmer caramel note. Use 3 tablespoons for sweet apples or 4 tablespoons for sharper apples.

Butter

A little melted butter helps the apple edges soften, shine, and brown. You do not need much because puff pastry already contains fat.

Lemon Juice

Lemon keeps the apples bright so the tart does not taste flat or overly sweet. It also buys you a little time while you arrange the slices.

Cinnamon and Salt

Cinnamon gives warmth without making the tart taste like heavy apple pie filling. A pinch of salt makes the apples and pastry taste fuller.

Apricot Jam or Apple Jelly

A warm glaze brushed over the baked tart gives it shine. Apricot jam is classic because it looks glossy and does not overpower the apples. Apple jelly works well for a more apple-forward finish.

Egg Wash, Optional

Egg wash helps the pastry border brown and shine. Brush it only on the top of the border, not down the cut or scored sides, so the pastry layers can rise cleanly. The tart still works without egg wash; the edge will simply look a little softer.

Best Apples for Apple Tart

The best apples for apple tart should taste good, slice neatly, and soften without collapsing. Because this tart is thin, the apples do not need to stay as firm as apples in a deep pie. Flavor matters just as much as structure.

For the easiest first tart, use Pink Lady or Honeycrisp. They slice neatly, taste bright, and do not need much adjustment. For a sharper flavor, mix Granny Smith with a sweeter apple so the tart tastes lively without becoming too sour.

Apple variety guide for apple tart with Pink Lady, Honeycrisp, Granny Smith, Braeburn, Gala, Fuji, and Golden Delicious apples.
Pair a tart apple with a sweeter one when you want bright flavor, gentle sweetness, and slices that still hold together.
Apple Best For Flavor and Texture
Pink Lady Best overall apple tart Sweet-tart, firm, neat slices
Honeycrisp Sweet-tart, familiar flavor Juicy, crisp, and easy to like
Granny Smith Tarter apple tart Firm and sharp; best mixed with a sweeter apple
Braeburn Balanced baking flavor Warm, aromatic, holds shape well
Gala or Fuji Sweeter puff pastry tart Softer and sweeter; good for quick tarts
Golden Delicious Classic French-style tart Soft, mellow, aromatic

A mix of one tart apple and one sweeter apple often gives the best flavor. For example, use Granny Smith with Honeycrisp, Pink Lady, or Fuji. For a deeper baking-apple guide, see best apples for apple pie; the same flavor logic applies, but tart apples should be sliced thinner and arranged more evenly.

Puff Pastry vs Shortcrust for Apple Tart

For this specific recipe, puff pastry is the best first choice. It gives flaky, dramatic edges with very little work, and it keeps the tart feeling light instead of heavy. Shortcrust or pie crust gives a more classic tart-pan texture, but it needs a little more care.

Puff pastry apple tart compared with a shortcrust apple tart in a round fluted tart pan.
Choose puff pastry for a lighter, flakier apple tart, while shortcrust gives a sturdier, more classic tart-pan base.
Pastry Best For Texture Notes
Puff pastry Easy apple tart, French-style sheet tart Flaky, light, crisp edges Great for a quick, flaky tart; keep it cold and bake on a hot tray.
Shortcrust pastry Classic round apple tart Buttery, tender, sturdier Best in a 9–10 inch tart pan.
Pie crust Homemade tart-pan version Flaky but less puffy Works well if rolled thin and chilled.
Store-bought pie crust Shortcut tart-pan version Softer, simpler Chill before baking so it holds shape.

To make the tart with homemade crust, use a buttery pie dough and roll it thin. This apple pie crust recipe is a good base for a shortcrust-style apple tart when you want something more homemade than puff pastry.

How to Make a Shortcrust Apple Tart

For a shortcrust apple tart, line a 9–10 inch tart pan with chilled dough, prick the base with a fork, and chill the lined pan before adding apples. With especially juicy apples or an applesauce layer, partially blind bake the crust until it looks dry and lightly set before adding the fruit.

Shortcrust pastry in a fluted tart pan with a fork-pricked base and apple slices nearby.
Before the apples go in, a chilled and pricked shortcrust base gives the tart a better chance to bake evenly.

Shortcrust usually needs longer than puff pastry. Plan on 40–55 minutes, depending on the pan, crust thickness, and apple slice thickness. The tart is ready when the apples are tender and the crust is golden all the way through, not just browned at the rim.

How to Slice Apples for Apple Tart

For a neat apple tart, slice the apples evenly. Aim for ⅛–¼ inch / 3–6 mm. Thinner slices give a polished French-style look, while slices closer to ¼ inch / 6 mm feel more rustic and apple-forward. Whatever thickness you choose, keep the slices similar so they soften at the same pace.

Apple slice thickness guide showing thin and slightly thicker apple slices for an apple tart.
Aim for thinner slices when you want a polished French-style apple tart; go thicker for a softer, more rustic bite.

For easier prep, cut the apples into cheeks first, then slice each piece thinly. You can peel the apples or leave the skin on. Peeled apples give a softer, more classic finish. Unpeeled apples add color and a little bite, especially with Pink Lady, Honeycrisp, or another red-skinned apple. A little browning before baking is harmless, especially once cinnamon and glaze go on.

Need to slice the apples a little ahead of time? Lemon water or lemon juice can slow browning. This guide on how to keep sliced apples from turning brown is useful when you are prepping fruit before baking.

Once the apples are sliced, move to the arranging step for simple rows, shingles, or fans.

How to Make Apple Tart Step by Step

Do not worry about making every slice identical. Even slices help the tart bake evenly, but a slightly rustic pattern still looks lovely once the apples soften and the glaze goes on.

1. Preheat the oven and baking sheet

Heat the oven to 400°F / 200°C, or 180°C fan. Place a rimmed baking sheet on the middle rack while the oven preheats. A hot tray helps the pastry bottom set instead of steaming underneath the apples.

Empty rimmed baking sheet preheating in an oven with puff pastry and sliced apples ready on the counter.
A preheated sheet pan gives puff pastry heat from below, so the base starts setting before the apples release juice.

2. Prepare the puff pastry

Place the cold puff pastry on parchment paper. Roll it lightly to smooth creases or even out the shape. Keep it close to a standard sheet-pan tart size; pastry rolled too thin will not puff as well.

Score a ¾–1 inch / 2–2.5 cm border around the edge with a knife, without cutting all the way through. Dock the center with a fork, leaving the border untouched so it can rise.

Puff pastry scored around the border and docked in the center with fork marks for apple tart.
Score for lift and dock for control; together, those two small steps shape the raised border and flatter center.

3. Slice and season the apples

Slice the apples thinly and toss them with lemon juice, sugar, cinnamon, and a pinch of salt. When the apples release a lot of juice while they sit, leave the extra liquid behind instead of pouring it onto the pastry.

Thin apple slices tossed with cinnamon sugar and lemon juice, with extra liquid left in the bowl.
After seasoning the apples, lift the slices out of the bowl instead of pouring extra cinnamon-lemon juice onto the pastry.

4. Arrange the apples

Arrange the apple slices inside the scored border in overlapping rows, shingles, fans, or a simple diagonal pattern. Keep them in one tidy layer. Brush the apples with melted butter. Brush egg wash on the top border if using, but avoid the cut sides.

Rows, shingles, fans, or a loose spiral all work. The pattern matters less than keeping the apples in an even layer, so do not worry if it looks a little rustic before baking.

Hands arranging thin apple slices in overlapping rows on puff pastry for apple tart.
A neat apple tart comes from an even layer first; the exact pattern matters less once the apples soften and shine.

5. Chill the assembled tart

Refrigerate the assembled tart for 10–15 minutes while the oven finishes heating. This keeps the butter layers firm and helps the pastry puff more cleanly.

Unbaked apple tart on a baking sheet being chilled in the refrigerator before baking.
That quick fridge rest firms the butter layers, which helps the puff pastry hold its border instead of slumping.

6. Bake until crisp and browned

Carefully slide the parchment with the tart onto the hot baking sheet. Bake for 30–35 minutes, until the edges are puffed, the bottom is browned, and the apples are tender at the edges.

By the last 10 minutes, the kitchen should smell buttery and cinnamon-warm. Do not pull the tart when the border is only lightly golden; puff pastry tastes best when it has real color, and a pale base is the first sign it may soften as it cools.

Baked apple tart with browned puff pastry, tender apple slices, and a lifted edge showing the base.
Look underneath before you call it done; a pale base can turn soft even when the apples already look glossy.

For ovens that brown pastry quickly, bake on the middle rack or slightly lower. A lower rack can help the base cook before the top gets too dark. If the pastry is browning unevenly or the center looks soft, check the troubleshooting guide before changing the recipe next time.

7. Glaze and cool

Warm the apricot jam with a teaspoon of water until loose, then brush it mostly over the apples while the tart is still warm. For the smoothest glaze, strain out large fruit pieces before brushing, and avoid soaking the pastry border so the edge stays crisp.

Warm apple tart brushed with apricot glaze while the puff pastry border stays crisp.
Glaze adds shine after baking, but brushing mostly over the apples keeps the puff pastry edge crisp.

Let the tart cool for at least 10–15 minutes before slicing so the pastry can settle. Serve it warm when the apples are soft and fragrant, or at room temperature when you want cleaner slices for a dessert table.

Larger pastry sheet note: Puff pastry sheets vary by brand and country. If your sheet is closer to 300–320 g instead of 240–260 g, use 4 medium apples and add 3–5 minutes to the bake time if the center needs it.

How to Keep Apple Tart from Getting Soggy

A soggy apple tart usually comes from warm pastry, too many apples, excess apple juice, or underbaking. The fix is not one trick; it is a small chain of good habits that keep the pastry cool, the fruit layer controlled, and the base properly baked.

Crisp-base guide for apple tart showing cold pastry, a hot tray, one apple layer, excess juice control, and full baking.
Crispness is built in stages: cool pastry, controlled apple juice, heat from below, and enough time in the oven.

If you are still assembling the tart, the preheated baking sheet step, apple seasoning step, and chilling step are the most important places to prevent sogginess.

Before Baking: Keep the Pastry Cold and the Apples Controlled

  • Keep the pastry cool and firm. Warm puff pastry tends to slump before it rises.
  • Use a hot baking sheet. The heat hits the bottom quickly and helps the base set.
  • Score the border. This encourages the edges to puff around the apples.
  • Dock the center only. The middle stays flatter while the border rises.
  • Use one layer of apples. A heavy pile releases too much juice.
  • Leave excess juice behind. Season the apples, then avoid dumping watery liquid onto the pastry.
  • Add a light barrier when needed. For very juicy apples, sprinkle 1 tablespoon almond flour, fine breadcrumbs, or flour over the pastry center before adding apples.
  • Bake until the bottom is firm. The pastry should flake instead of bend.

After Baking: Diagnose What Went Wrong

If the tart has already gone wrong, use the table below to work out what happened. Most texture problems come back to the same few causes: soft pastry, too much moisture, thick apple slices, or pulling the tart from the oven too early.

Apple tart troubleshooting guide showing soggy center, flat edges, burnt edges, firm apples, leaking juice, and greasy pastry fixes.
Use the texture problem first, then fix the cause; apple tart issues usually trace back to moisture, heat, or slice thickness.
Problem Likely Cause Fix
Soggy center Too much apple juice or underbaked pastry Leave excess liquid behind and bake until the base is browned.
Flat edges Border was docked, cut too deeply, or pastry got too warm Dock only the center and chill the assembled tart before baking.
Burnt edges Oven too hot, sugar on the border, or tart baked too high in the oven Brush sugar off the border before baking and move the tart lower if needed.
Apples still firm Slices were too thick Slice apples ⅛–¼ inch / 3–6 mm thick.
Juice leaking everywhere Too many apples or too much liquid added to pastry Use one overlapping layer and leave extra apple liquid in the bowl.
Pastry tastes greasy Pastry was warm before baking Chill the tart for 10–15 minutes before it goes into the oven.

Final Texture Cue

Texture cue: The apple tart is done when the edges are puffed, the bottom feels firm when lifted slightly with a spatula, and the apple edges look tender and lightly caramelized.
Apple tart slice lifted sideways to show a browned underside and flaky puff pastry layers.
The underside tells the truth: if the pastry feels firm and layered, the tart will slice and eat better.

Apple Tart vs Pie, Tarte Tatin, and Galette

An apple tart gives you the apple-and-pastry feeling of pie, but in a lighter, neater form. Instead of a deep layer of saucy filling, the apples are sliced thin and baked right on top of the pastry.

Apple tart, apple pie, Tarte Tatin, and apple galette arranged together as a dessert comparison.
Apple tart is the lighter open-faced dessert, while pie, Tarte Tatin, and galette each bring a different apple texture.
Dessert What It Is Main Difference
Apple tart Open-faced pastry with sliced apples on top Thin, elegant, less filling-heavy
Apple pie Deeper apple filling baked in pie crust Juicier, taller, usually more filling
Tarte Tatin Upside-down caramelized apple tart Apples cook in caramel, then the tart is flipped
Apple galette Free-form rustic apple tart No tart pan or neat border needed

For a deeper, softer dessert with a fuller filling, make a pie instead. This apple pie with apple pie filling is better when you want a shortcut pie with a thicker apple center. For this apple tart recipe, fresh thin apple slices are the better choice because they bake neatly and do not flood the pastry.

French-Style Apple Tart: What Makes It Different?

A French-style apple tart is usually open-faced, neat, and lighter than apple pie. The apples are sliced thin, arranged in rows, shingles, spirals, or fans, and often brushed with apricot glaze after baking. Some versions use puff pastry, while others use shortcrust or a sweet tart dough.

A very thin puff pastry apple tart like this is close to tarte fine aux pommes, the slim French-style apple tart built on pastry, thin apples, and a glossy finish. Deeper tart-pan versions often use shortcrust and sometimes a thin applesauce or compote layer.

Thin French-style apple tart with overlapping apple slices, glossy glaze, and a slim puff pastry border.
Tarte fine aux pommes keeps the idea elegant: thin apples, slim pastry, glossy finish, and very little heaviness.

The classic look is polished but not complicated. Keep the apple layer even, leave a clear pastry border, and glaze the tart while it is still warm. That gives you the glossy bakery finish without turning the recipe into a pastry-school project.

Apple Tart Variations

Use these variations when you want the same apple-and-pastry idea in a different shape: quicker, richer, more classic, more party-friendly, or better suited to a specific diet.

Apple tart variations including puff pastry, shortcrust, applesauce layer, caramel, crumb topping, and mini tarts.
Once the basic apple tart works, you can shift it toward shortcrust, caramel, crumb topping, mini tartlets, or French-style layers.

For the simplest version, stay with the main apple tart recipe. For a more classic tart-pan version, jump back to the shortcrust apple tart notes.

Puff Pastry Apple Tart

Choose this when you want the flakiest apple tart with the least dough work. Store-bought puff pastry does most of the heavy lifting, so this is the best starting point for a weeknight dessert, a last-minute guest dessert, or a simple French-style tart.

Shortcrust Apple Tart

Choose shortcrust when you want a more classic round apple tart in a 9–10 inch tart pan. Chill the lined pan before baking. With juicy apples, a light partial blind bake helps the base set before the fruit goes in.

French-Style Apple Tart with Applesauce

For a more classic French-style apple tart, spread a thin layer of smooth, unsweetened applesauce or apple compote over the pastry before arranging the apple slices. For a puff pastry tart, use only 2–3 tablespoons. A tart-pan shortcrust version can take a slightly thicker layer, but keep it controlled because too much applesauce will soften the base.

Thin applesauce layer spread over puff pastry before apple slices are added for French-style apple tart.
If you add applesauce, spread it thinly because too much moisture can soften the pastry before it crisps.

Caramel Apple Tart

Drizzle a little caramel sauce over the baked tart just before serving. Avoid adding too much caramel before baking because it can burn around the pastry edges.

Apple Crumb Tart

Add a light crumb topping over the apples before baking if you want a Dutch-style feel. For a fuller crumb-topped apple dessert, this Dutch apple pie recipe is the better route.

Mini Apple Tarts

Mini apple tarts are the party-friendly version. Cut puff pastry into smaller squares or rounds, top each piece with a few apple slices, and start checking around 15–18 minutes because small tarts brown faster than one large sheet tart.

Mini apple tarts with glossy sliced apples on puff pastry, cooling on parchment and a wire rack.
Mini apple tarts brown faster than a full sheet tart, so start checking early once the edges puff and deepen.

Apple Frangipane Tart

For a richer bakery-style tart, add a thin layer of almond frangipane under the apples. Because the almond filling needs time to cook through, it is better treated as its own tart style rather than a quick add-on.

Prepared Apple Filling Dessert

Prepared apple pie filling is better in desserts designed for a softer, saucier texture. An apple cinnamon roll bake with apple pie filling is a much better fit when you want a quick dessert using ready-made filling.

Vegan Apple Tart

For a vegan apple tart, choose vegan puff pastry, brush the border with plant milk, and use vegan butter or a neutral oil on the apples. Most of the method stays the same; just check the jam if you are cooking for strict vegans.

Gluten-Free Apple Tart

Use a tested gluten-free puff pastry or a gluten-free tart crust. Do not assume regular pie dough can be swapped one-for-one with gluten-free flour, because pastry structure changes quickly without gluten.

For apple flavor without pastry at all, make an apple crisp recipe instead. It gives you tender cinnamon apples and a crunchy topping without worrying about tart dough.

Storage, Freezing, and Reheating

How to store apple tart

Apple tart is best the day it is baked, when the pastry is crispest. Store leftovers in an airtight container in the refrigerator for up to 3 days; this also stays in line with the USDA’s general leftovers and food safety guidance.

How to reheat apple tart

Reheat slices in a 325°F / 160°C oven or toaster oven for 8–12 minutes, until the pastry feels crisp again. Avoid microwaving if you care about texture; it softens puff pastry quickly.

Apple tart storage and reheating guide showing a slice in an airtight container, oven reheating, and a refreshed slice.
Refrigerate leftovers airtight, then use the oven to revive texture because the microwave softens puff pastry quickly.

Can you freeze apple tart?

You can freeze baked apple tart slices, but the pastry will not be quite as crisp after thawing. Reheat from chilled or partially thawed in the oven until warm and crisp at the edges.

Can you make apple tart ahead?

The best make-ahead plan is to prepare the small pieces, then assemble close to baking. Mix the cinnamon sugar ahead, measure the jam or jelly ahead, and keep thawed puff pastry cold in the refrigerator. Slice the apples shortly before assembly for the freshest texture and color, then warm the glaze just before brushing it over the tart.

For guests, bake the tart the same day and let it sit at room temperature before serving. It slices more neatly once it has cooled slightly, but still tastes special with ice cream, cream, coffee, or tea.

For serving ideas, jump to what goes well with apple tart near the FAQs.

Apple Tart Recipe Card

Apple tart recipe card with a tart slice, puff pastry, apples, bake temperature, bake time, and apricot glaze.
The core method stays simple: cold puff pastry, thin apples, a hot oven, full color, and a warm glaze.

Apple Tart Recipe

This easy apple tart recipe bakes thin apple slices over store-bought puff pastry with cinnamon sugar and a glossy apricot glaze. It looks bakery-style, but the method is simple enough for a casual dessert.

Prep Time20 minutes
Chill Time10–15 minutes
Cook Time30–35 minutes
Cooling Time10–15 minutes
Total Time1 hour 10 minutes to 1 hour 25 minutes
Yield6–8 servings

Ingredients

  • 1 sheet all-butter puff pastry, about 8–9 oz / 240–260 g, thawed but cold
  • 3 medium apples, about 450–550 g / 1–1¼ lb before peeling and coring
  • 1 tablespoon lemon juice / 15 ml
  • 3–4 tablespoons granulated sugar or light brown sugar / 38–50 g
  • ½ teaspoon ground cinnamon
  • Pinch of fine salt
  • 2 tablespoons unsalted butter / 28 g, melted
  • 2 tablespoons apricot jam or apple jelly / 35–40 g
  • 1 teaspoon water / 5 ml, for loosening the glaze
  • Optional egg wash: 1 egg beaten with 1 teaspoon water
  • Optional base barrier: 1 tablespoon almond flour, fine breadcrumbs, or all-purpose flour for juicy apples

Instructions

  1. Preheat the oven. Heat the oven to 400°F / 200°C, or 180°C fan. Place a rimmed baking sheet on the middle rack while the oven preheats.
  2. Prepare the pastry. Place the cold puff pastry on parchment paper. Roll lightly if needed to even it out. Score a ¾–1 inch / 2–2.5 cm border around the edge without cutting all the way through. Dock the center with a fork, leaving the border untouched.
  3. Slice the apples. Peel the apples if you like, then slice them ⅛–¼ inch / 3–6 mm thick.
  4. Season the apples. Toss the apple slices with lemon juice, sugar, cinnamon, and salt. Leave extra juice behind if the apples release a lot of liquid.
  5. Arrange the tart. If using the optional base barrier, sprinkle it lightly over the docked center of the pastry. Arrange the apples in overlapping rows or shingles inside the scored border. Brush the apples with melted butter. Brush egg wash only on the top border if using.
  6. Chill. Refrigerate the assembled tart for 10–15 minutes.
  7. Bake. Carefully slide the parchment and tart onto the hot baking sheet. Bake for 30–35 minutes, until the edges are puffed, the bottom is browned, and the apples are tender.
  8. Glaze. Warm the apricot jam with 1 teaspoon water until loose. Brush mostly over the warm apples.
  9. Cool and serve. Let the tart cool for 10–15 minutes before slicing. Serve warm or at room temperature.

Notes

  • For a sharper tart, use Granny Smith or mix Granny Smith with Honeycrisp or Pink Lady.
  • Honeycrisp, Gala, Fuji, and Golden Delicious make a sweeter, softer tart.
  • A larger 300–320 g puff pastry sheet can take 4 medium apples and may need 3–5 extra minutes in the oven.
  • Shortcrust or pie crust works best in a 9–10 inch tart pan and usually needs 40–55 minutes.
  • Do not overload the pastry with apples. One generous overlapping layer is enough.
  • For a French-style applesauce layer, use only 2–3 tablespoons of smooth, unsweetened applesauce on puff pastry so the base does not soften.
  • Leftovers keep in the refrigerator for up to 3 days. Reheat in the oven, not the microwave, for the best texture.

FAQs

Can I use puff pastry for apple tart?

Yes. Puff pastry works especially well for apple tart because it gives a flaky base and raised edge without homemade dough. The key is to bake it from cold and avoid piling on too many apples.

Do the apples need to be cooked first?

No. For this style of apple tart, thin raw apple slices bake directly on the pastry. Pre-cooked apple pie filling is usually too wet and thick for a thin puff pastry tart.

Can apple pie filling be used for apple tart?

Apple pie filling is not the best choice for this tart. It is saucier and heavier, so it can make puff pastry soggy. Use fresh thin apple slices for this recipe and save cooked filling for deeper pies, crisps, hand pies, cinnamon roll bakes, or shortcut desserts.

What temperature is best for apple tart?

For puff pastry apple tart, 400°F / 200°C, or 180°C fan, is reliable. It is hot enough to puff and brown the pastry, but not so aggressive that the apple edges burn before the base cooks.

How thin should apples be for apple tart?

Slice apples about ⅛–¼ inch / 3–6 mm thick. Thin slices soften quickly and create a neater tart. Thicker slices work, but they make the tart more rustic and may need a few extra minutes in the oven.

Should apples be peeled for apple tart?

Peeling is optional. Peeled apples give a softer, more classic tart. Unpeeled apples add color and a little bite, especially with red-skinned apples like Pink Lady or Honeycrisp.

Why is my apple tart soggy?

The most common reasons are warm pastry, too many apples, too much apple juice, or underbaking. Keep the pastry cold, bake on a hot sheet pan, leave excess apple juice behind, and bake until the bottom is crisp.

Does shortcrust pastry work for apple tart?

Shortcrust pastry works well for a classic round apple tart in a tart pan. Chill the lined pan before baking, prick the base, and bake long enough for the crust to turn fully golden.

Can apple tart be made in an air fryer?

Small puff pastry apple tarts can be made in an air fryer, but a full rectangular tart is usually better in the oven. For mini versions, use parchment, leave room for the pastry to puff, and check early because air fryers brown quickly.

What goes well with apple tart?

Warm slices love vanilla ice cream because the cold cream melts into the glossy apples. At room temperature, the tart is lovely with whipped cream, crème fraîche, plain Greek yogurt, coffee, or tea, especially once the pastry has settled and the apple flavor tastes a little deeper.

Apple tart slice served with vanilla ice cream, coffee, and the remaining tart in the background.
Serve apple tart warm when you want the ice cream to melt into the glossy apples, or let it cool slightly when clean dessert-table slices matter more.

Back to top