Posted on Leave a comment

Overnight French Toast Casserole: Easy Make-Ahead Baked French Toast

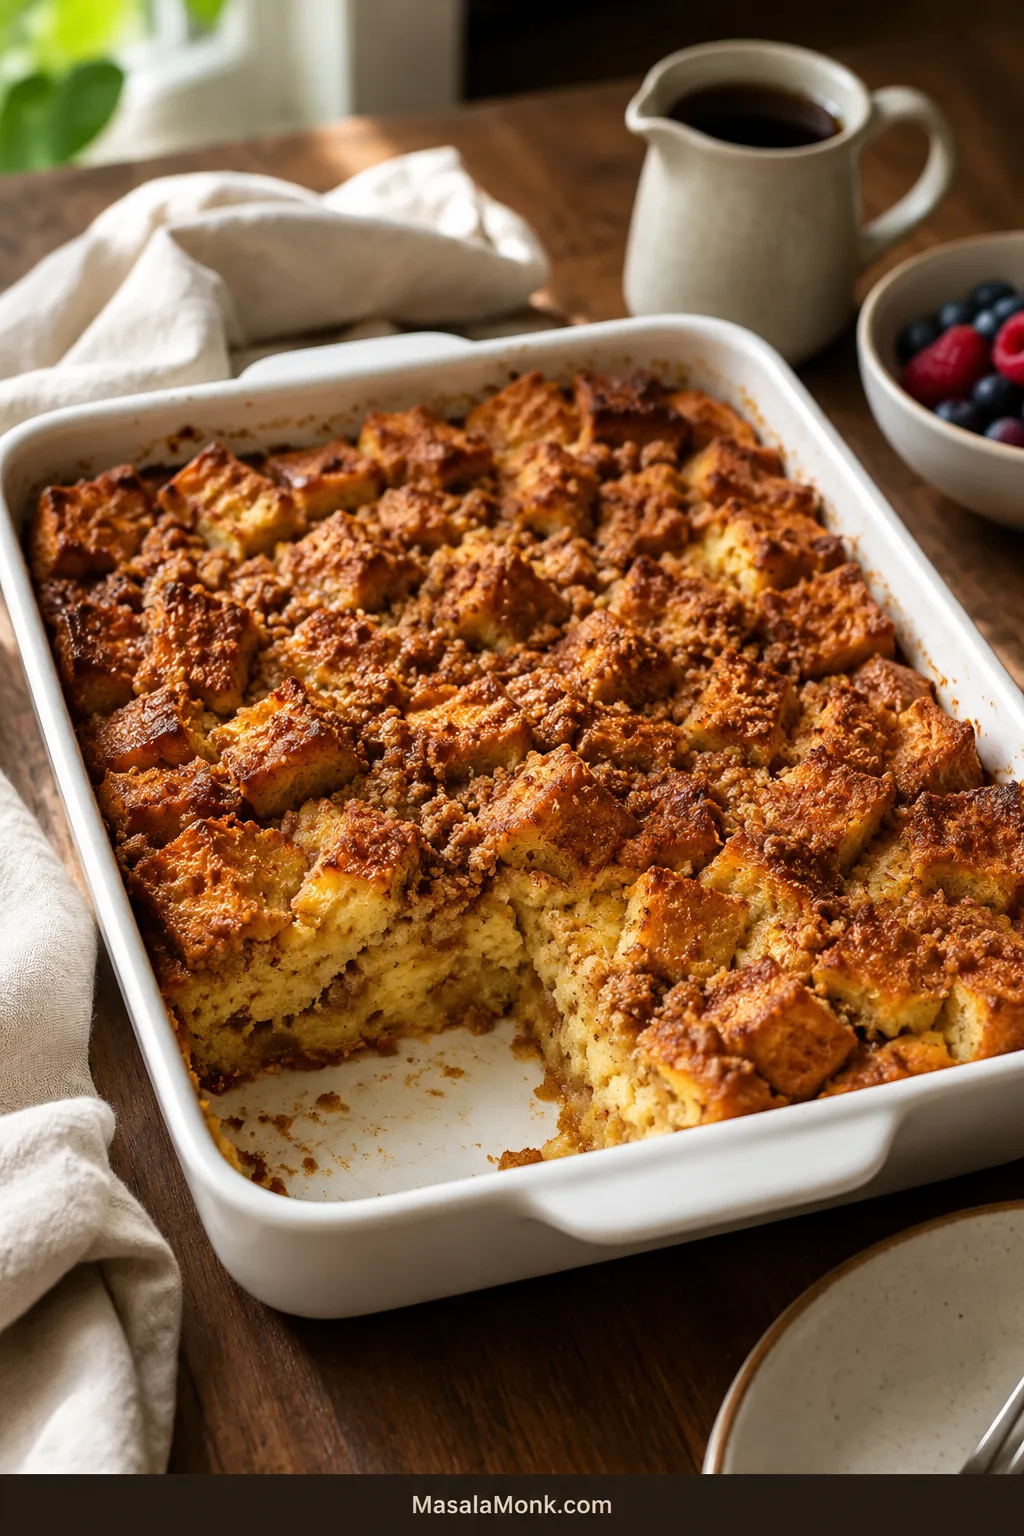
Overnight French toast casserole with golden cinnamon streusel and one serving removed from the baking dish.

By the time the oven begins to warm, breakfast should already be decided. The bread has spent the night soaking in cinnamon-vanilla custard, the streusel is cold and crumbly, and the morning work is little more than scattering the topping, baking the pan and pouring the coffee.

The easy morning only pays off when an overnight French toast casserole comes out properly: crisp and buttery across the top, tender where the bread has absorbed the custard, and set enough that the first spoonful holds together. Here, the bread is weighed rather than guessed, the sweetness stays balanced, and the middle—not merely the golden topping—decides when the pan is ready.

Day-old French bread absorbs the custard without collapsing, which makes it the easiest loaf to use here. Brioche, challah, sourdough, plain Texas toast and sturdy gluten-free bread can also work with a few adjustments. Once the bread amount, pan depth and final doneness are right, the method is highly forgiving.

Start here

The Version to Make First

Use 16 oz / 450 g day-old French bread—about 10–12 loosely filled cups after cutting it into 1-inch / 2.5 cm pieces. Soak it overnight in a mixture of 8 eggs, 2 cups / 480 ml whole milk and ½ cup / 120 ml half-and-half or cream. Keep the streusel cold and separate until morning.

Bake in a standard 9×13-inch / 23×33 cm dish at 350°F / 175°C. Begin checking near 40 minutes; many pans finish in approximately 45–55 minutes. The topping should be golden, the middle should look set rather than fluid, and the thickest central area should reach at least 160°F / 71°C.

The clock tells you when to check; the center tells you when to stop.

This is the texture to aim for: recognizable bread pieces held together by softly set custard, with a crisp top and no liquid collecting beneath the serving.
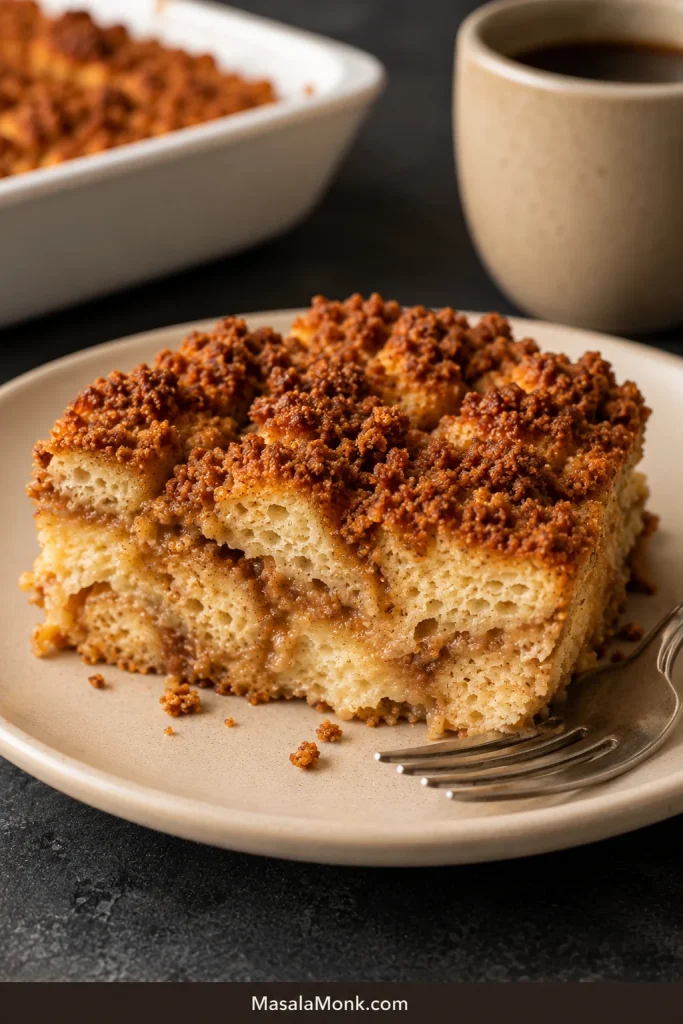
Slice of overnight French toast casserole with crisp cinnamon streusel, distinct bread pieces and a softly set custardy center
The cut face should show moist seams between recognizable bread pieces—not a smooth pudding layer or a dry, cake-like crumb.

Make it tonight

Overnight French Toast Casserole Recipe

A make-ahead French toast bake with cinnamon-vanilla custard, crisp exposed bread edges and a cold brown sugar streusel added just before baking. It is moderately sweet on its own, leaving room for warm maple syrup at the table.

Recipe at a Glance

  • Yield: 10 standard servings, 8 generous servings or up to 12 smaller brunch portions
  • Active preparation: About 20 minutes at night, plus 5 minutes in the morning
  • Chilling: 8–12 hours
  • Bake and rest: Approximately 45–55 minutes, plus 10 minutes
  • Total elapsed time: Approximately 9–13½ hours, mostly unattended
  • Pan: Standard 9×13-inch / 23×33 cm dish, about 3 quarts / 2.8 liters
  • Oven: 350°F / 175°C
  • Doneness: The center looks set, a thin knife shows no raw custard, and the thickest area reaches at least 160°F / 71°C

Equipment

  • Standard 9×13-inch / 23×33 cm baking dish, about 3 quarts / 2.8 liters
  • Large mixing bowl and whisk
  • Serrated bread knife and cutting board
  • Kitchen scale
  • Measuring cups and spoons
  • Rimmed sheet pan if the bread needs drying
  • Foil
  • Instant-read thermometer, recommended

Ingredients

For the Bread and Custard

  • 16 oz / 450 g French bread, preferably day-old, about 10–12 loosely filled cups after cutting
  • 8 large eggs
  • 2 cups / 480 ml whole milk
  • ½ cup / 120 ml half-and-half or heavy cream
  • ⅓ cup / 70 g packed light brown sugar
  • 1 tablespoon / 15 ml vanilla extract
  • 2 teaspoons ground cinnamon
  • ¼ teaspoon ground nutmeg
  • ¾ teaspoon fine salt
  • Unsalted butter or nonstick cooking spray, for the dish

For the Cinnamon Streusel

  • ½ cup / 60 g all-purpose flour
  • ⅓ cup / 70 g packed light brown sugar
  • 1 teaspoon ground cinnamon
  • Pinch of fine salt
  • 6 tablespoons / 85 g cold unsalted butter, cut into small cubes
  • ½ cup / about 55 g chopped pecans, optional

For Serving

  • Warm maple syrup
  • Fresh berries, sliced apples or another fresh fruit
  • Powdered sugar, optional

Measure the custard and streusel ingredients separately before beginning, especially the two portions of brown sugar.
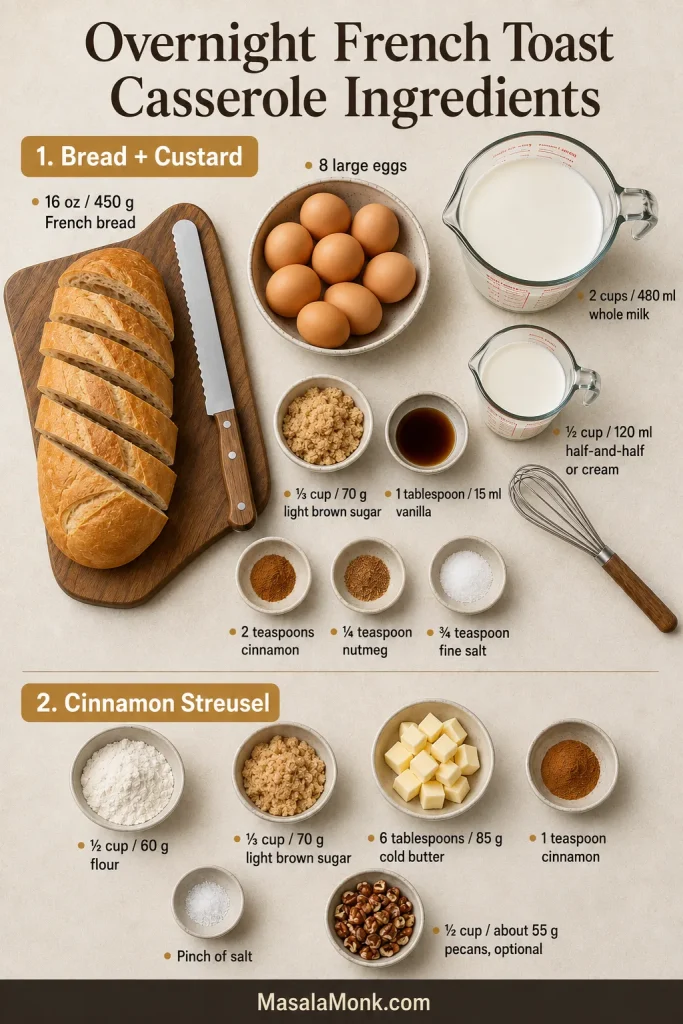
Measured French bread, eggs, milk, cream, brown sugar, spices, flour, cold butter and optional pecans arranged for French toast casserole.
Keep the two brown-sugar portions separate: one sweetens the cinnamon-vanilla custard, whereas the second combines with flour and cold butter to form the streusel.

Instructions

Before Bed

  1. Prepare the dish. Butter the base, sides and especially the corners of a standard 9×13-inch / 23×33 cm baking dish generously. Custard-soaked bread can cling where the pan is only lightly coated. Nonstick cooking spray can be used instead.
  2. Cut the bread. Cut the French bread into pieces around 1 inch / 2.5 cm. Keep the crusts unless they are unusually hard or thick; they add structure and create some of the crispest exposed edges. If the bread is fresh and soft, dry it using the method in the notes, then let it cool.
  3. Fill the pan loosely. Spread the bread through the dish. The pan should look comfortably full, with the pieces sitting loosely instead of being pressed into a dense layer.
  4. Whisk the custard. Whisk the eggs until the whites and yolks are fully blended. Add the milk, half-and-half or cream, brown sugar, vanilla, cinnamon, nutmeg and salt. Continue whisking until the sugar is mostly dissolved and no visible streaks of egg white remain.
Coat, Cover and Chill
  1. Coat the bread. Pour the custard in stages, pausing to turn the pieces gently so the liquid reaches the middle and corners. Press lightly until the dry edges touch the custard. Packing the bread down firmly can make the casserole dense.
  2. Check the pan. The bread should look well moistened, with a little custard visible near the bottom. It should not be floating in a deep pool.
  3. Cover and refrigerate. Cover tightly and refrigerate for 8–12 hours.
  4. Make the streusel. Mix the flour, brown sugar, cinnamon and salt. Work in the cold butter until it is coated and the topping contains fine crumbs with a few pea-sized clumps. Mix in the pecans when using, then cover and refrigerate separately.

Before covering the pan, make sure the bread still sits loosely, looks evenly moistened and rises above the small amount of custard at the base.
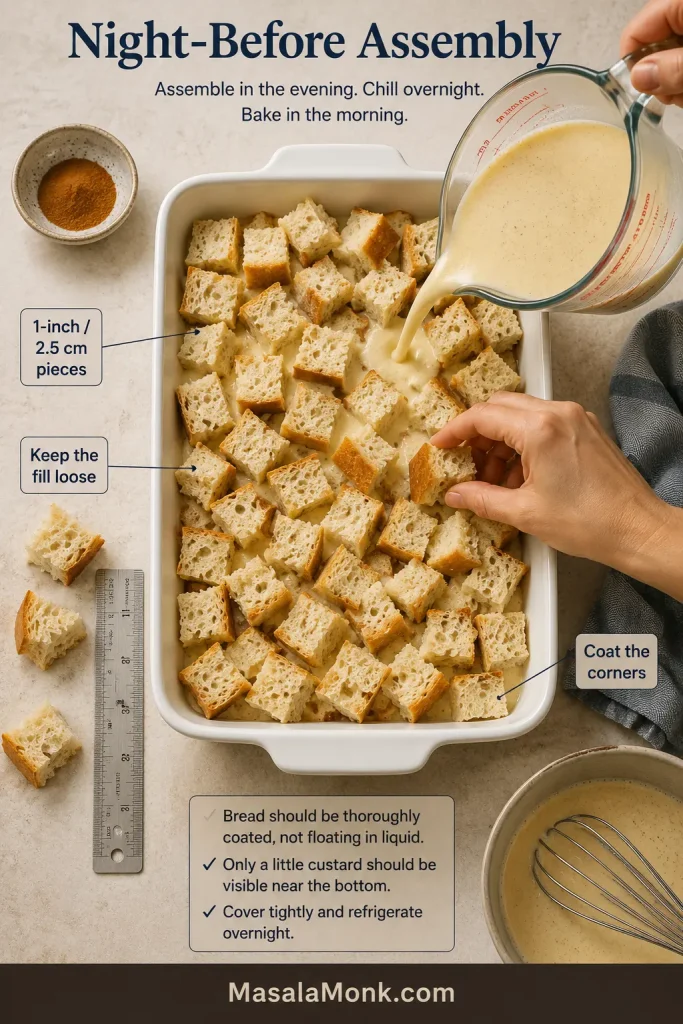
Overhead assembly guide showing evenly cut bread loosely arranged in a white baking dish while custard is poured between the pieces.
Pour the custard in several passes, pausing between them; dry-looking corners and pale upper surfaces reveal where the next pour should go.

The Next Morning

By morning, the bread should look fuller and darker with custard, while the dish remains stable rather than sloshing when moved.
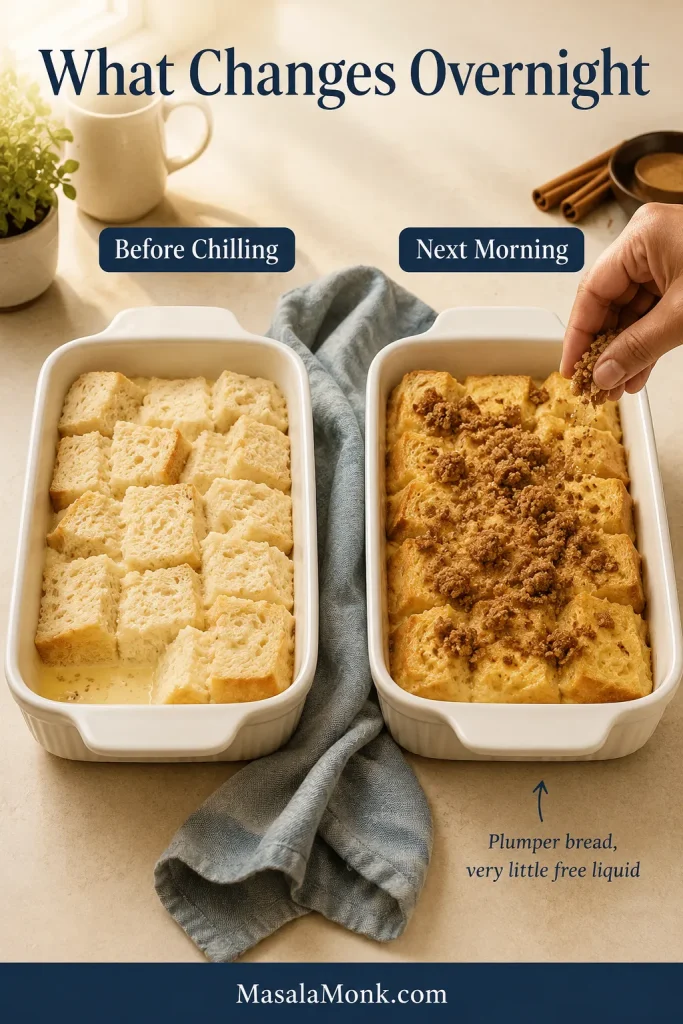
Two baking dishes compare freshly assembled French toast casserole with an overnight-soaked pan being topped with cold streusel.
Check the corners as well as the center: pale, dry pieces there suggest the custard was not distributed evenly before chilling.
  1. Heat the oven. Preheat to 350°F / 175°C. A metal pan can come out of the refrigerator while the oven heats. For glass or ceramic, first check the cold-bakeware guidance below.
  2. Check the overnight absorption. The pieces should look plumper and slightly darker with custard. A little liquid may remain visible low in the pan, but pressing the top should not make it surge across the dish.
  3. Add the topping. Uncover the dish and scatter the cold streusel over the bread. Leave a few edges exposed so they can crisp.
  4. Bake. Place the dish on the center rack and begin checking around 40 minutes.
Protect the Top and Check the Center
  1. Protect the top when needed. If the streusel and exposed bread are deeply golden while the center is still loose, tent the dish with foil and continue baking.
  2. Check the center. The edges should look puffed, and the middle should no longer appear shiny or liquid. Insert a thin knife through an area with less streusel; it should show moist crumbs, not raw custard.
  3. Confirm the temperature. The thickest central area should reach at least 160°F / 71°C. Melted butter and brown sugar may cling to the knife even when the custard underneath is set.
  4. Rest before serving. Let the pan stand for 10 minutes. Use that time to warm the maple syrup, put out the fruit and call everyone to the table.

Cold Glass and Ceramic Bakeware

Avoid exposing very cold glass or ceramic bakeware to sudden high heat unless the manufacturer specifically approves refrigerator-to-oven use. Letting the dish stand while the oven preheats may reduce the temperature difference, but it does not replace the manufacturer’s instructions. A metal pan avoids this thermal-shock concern.

Success Notes

  • Fresh bread: Dry the pieces at 300°F / 150°C for 10–15 minutes, turning once. Very soft, freshly baked bread may need up to 20 minutes. Stop while the pieces remain pale.
  • Without cream: Replace the half-and-half or heavy cream with an equal amount of whole milk.
  • Dairy-free: Use 2½ cups / 600 ml oat milk and plant-based butter; see the complete dairy-free adaptation below.
  • Gluten-free: Use 450 g sturdy gluten-free bread and 1:1 gluten-free flour in the streusel; see the complete gluten-free adaptation below.
  • Nut-free: Leave out the pecans. No replacement is needed.
  • Same-day version: Dry the bread thoroughly and soak it for 45–60 minutes before baking.
  • Sweetness: Keep the casserole moderately sweet and add more maple syrup at the table.

After a 10-minute rest, the casserole should scoop cleanly enough for the plate while still looking soft between the bread pieces.
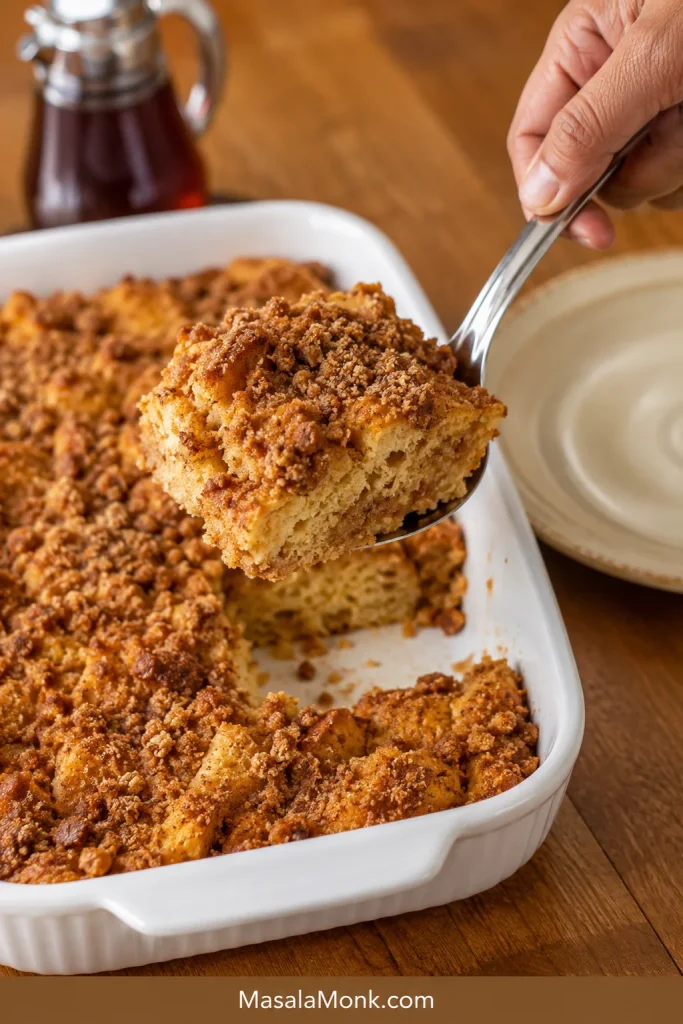
A serving spoon lifts a tender portion of French toast casserole from a white baking dish, exposing the moist center beneath the topping.
A broad serving spoon supports the tender base better than a narrow utensil, helping the rested casserole reach the plate without splitting through the middle.

Cooking now? The recipe above is all you need. Keep reading when you want help choosing bread, shortening the soak, scaling the pan or rescuing a soggy center.

Day-old bread has enough dryness to absorb the custard while still holding its shape. Weighing the loaf makes sure there is enough bread for the custard, and a shallow 9×13-inch dish gives the center time to set before the edges dry. When the top looks ready first, a thermometer removes the remaining guesswork.

The Best Bread for French Toast Casserole

French bread has an open crumb that accepts the custard, while its crust and firmer interior help the pieces hold their shape overnight. With another type of loaf, start with 450 g and use the pan’s fill level as the final check. The cut pieces should loosely fill the dish to approximately the same level as 10–12 cups of French bread.
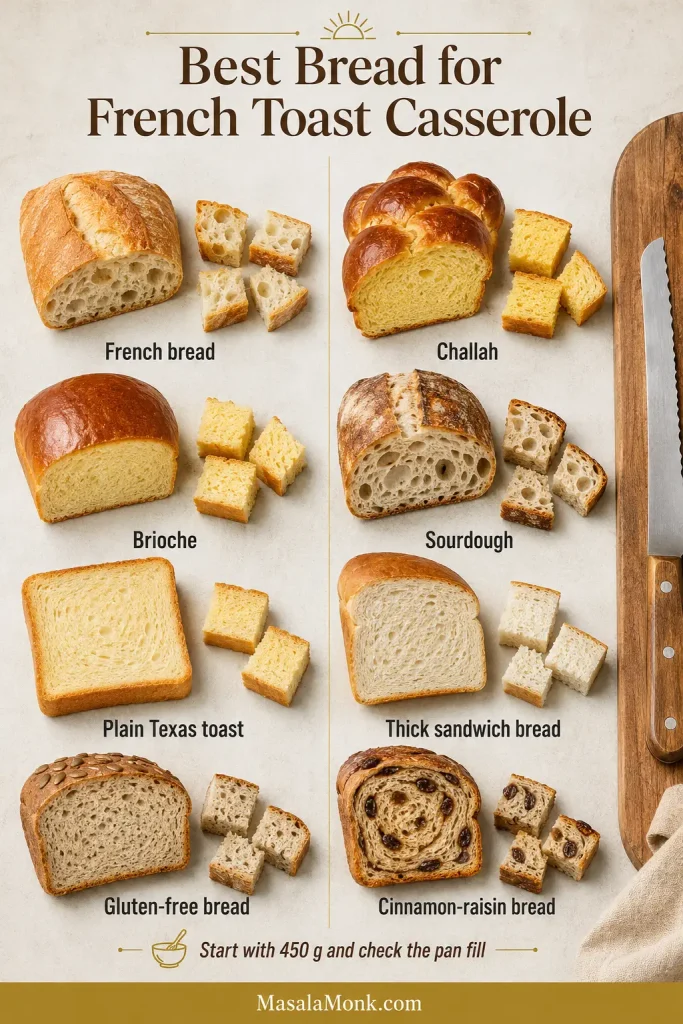
French bread, challah, brioche, sourdough, Texas toast, sandwich bread, gluten-free bread and cinnamon-raisin bread arranged for comparison.
Use the loaf lineup as a texture map: chewy, open crumbs tolerate a long soak, while soft enriched breads need more drying and gentler handling.

How Each Bread Changes the Casserole

BreadResultHandling
French breadClear bread-and-custard contrast with crisp exposed edgesUse day-old bread or dry fresh pieces briefly
ChallahA softer, richer result with a slightly eggier flavorDry well; when noticeably sweet, reduce the custard sugar to ¼ cup / 50 g
BriocheA very buttery, tender resultDry thoroughly; when sweetened, reduce the custard sugar to ¼ cup / 50 g
SourdoughFirmer pieces with a light tangAllow the full overnight soak; especially good for a less-sweet pan
Plain Texas toastA soft, familiar casserole with even piecesUse plain thick-cut bread—not prepared garlic toast—and dry it when very fresh
Thick sandwich breadA softer bake with less contrast from the crustsDry well and leave the pieces loose in the pan
Gluten-free breadResults vary considerably by brand and loaf densityChoose a sturdy loaf, weigh it, dry it well and turn gently
Cinnamon-raisin breadBuilt-in spice, sweetness and pockets of dried fruitUse ¼ cup / 50 g custard sugar and reduce the custard cinnamon to 1 teaspoon

No special bakery loaf is required. The bread already in your kitchen can usually work once you know whether it needs a little drying first.

Croissants soften and compress much faster than French bread. They need their own bread-to-custard ratio, so they are not a direct swap in this recipe.

Fresh, Stale or Oven-Dried?

Day-old bread usually needs no extra drying. If the loaf has become very hard, trim any unusually tough crust and allow the full overnight soak.

Fresh bread should feel dry and slightly firm on the outside while the pieces still give when squeezed. Spread it over a rimmed sheet pan and bake at 300°F / 150°C for 10–15 minutes, turning once. Very soft bread may need up to 20 minutes. Keep the pieces pale instead of toasting them brown, then let them cool before adding the eggs.
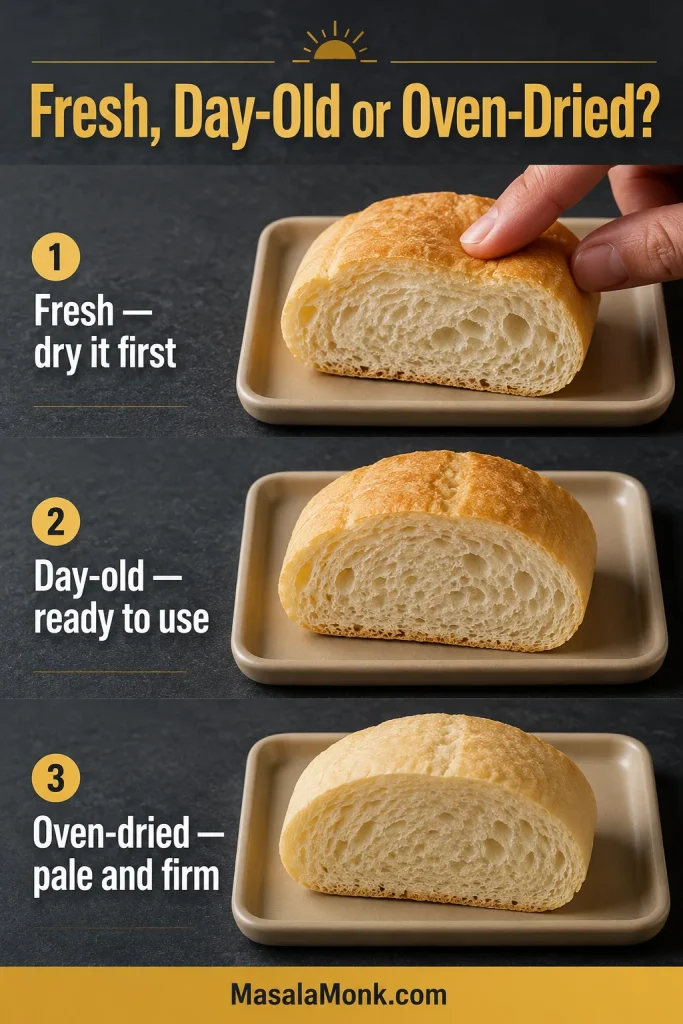
The same French bread compared when fresh and soft, day-old and resilient, and pale after oven-drying.
The oven-dried sample should look almost unchanged; the useful difference is a dry, firm surface that absorbs custard without compressing.

What the Custard Ingredients Do

Eggs set the custard around the bread. Whole milk gives it enough richness without making the casserole unusually heavy, while a smaller amount of cream makes the baked custard richer and more tender. Whisk the eggs first so visible streaks of white do not bake into firm patches.

  • Whole milk: Gives the custard body while keeping the casserole breakfast-like.
  • Half-and-half or cream: Adds richness and a softer finish.
  • Unsweetened oat milk: Gives the custard more body than most everyday plant milks.
  • Unsweetened almond milk: Produces a lighter result.
  • Evaporated milk: Can replace up to half of the whole milk for a richer dairy flavor.

Brown sugar brings a light caramel note without turning the casserole fully into dessert. Vanilla and cinnamon supply the familiar French toast aroma, nutmeg adds warmth underneath, and salt keeps the whole pan from tasting flat.

How Long Should French Toast Casserole Soak?

Soak the casserole for 8–12 hours when you can. That gives the custard time to reach the center of the bread and leaves almost nothing to do in the morning. Thoroughly dried bread can still produce a good same-day version after 45–60 minutes.
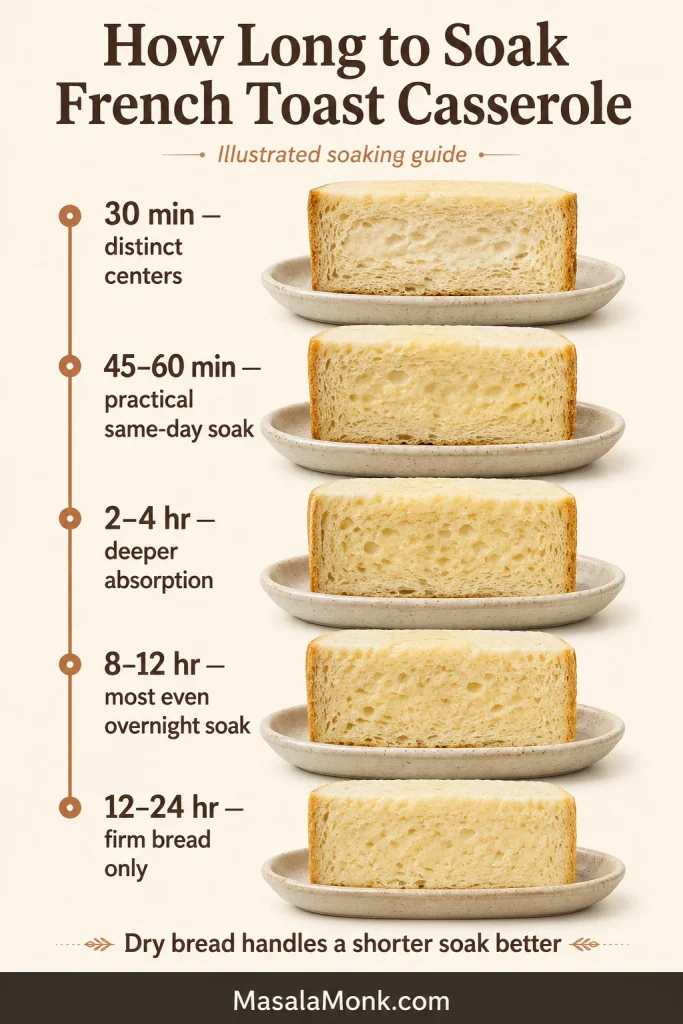
Illustrated timeline comparing bread absorption after 30 minutes, one hour, several hours, overnight and up to 24 hours.
The change is gradual rather than dramatic: longer soaking narrows the pale dry core while the bread still keeps its edges.
Soaking timeWhen it worksWhat to expect
30 minutesWhen time is very short and the bread has been dried thoroughlyMore distinct bread centers and less complete absorption
45–60 minutesA practical same-day casseroleGood results when the bread is dried and turned once
2–4 hoursFirm or moderately dry breadThe custard reaches farther into the center of each piece
8–12 hoursThe easiest overnight scheduleVery little morning work and the most consistent soak
12–24 hoursFirm, dry French bread or sourdoughUsually workable; softer breads may begin losing their shape

Before Refrigerating: Three Assembly Checks

This is the last real bit of work for the night. Three details make the biggest difference once the pan is covered.

  • Keep the bread pieces similar in size. Pieces around 1 inch / 2.5 cm absorb at a similar rate. Tiny pieces can compact into a soft layer, while oversized chunks may remain dry inside.
  • Whisk the eggs completely. Blend the whites and yolks before adding the dairy and flavorings so firm patches of egg white do not appear in the finished custard.
  • Distribute the custard throughout the pan. Add it in stages and turn the bread gently so the upper pieces and corners receive their share.

None of these checks has to be perfect. When the bread is well coated, the pan is not swimming in custard and the center is allowed to finish baking, the casserole is very forgiving.

In the Morning: Bake Until the Center Is Set

By morning, the pieces should look plumper and slightly darker with custard. A little liquid may remain low in the pan, but the dish should not slosh when nudged. Scatter over the cold streusel and begin baking uncovered so the exposed bread edges and topping can crisp.

As the streusel turns deep gold, cinnamon, vanilla and warm butter begin to fill the kitchen. By then, the smell has usually reached the rest of the house.

A golden top can look ready while the middle still needs time. Once the surface is dark enough, a loose foil tent lets the center continue baking without taking the streusel any further.
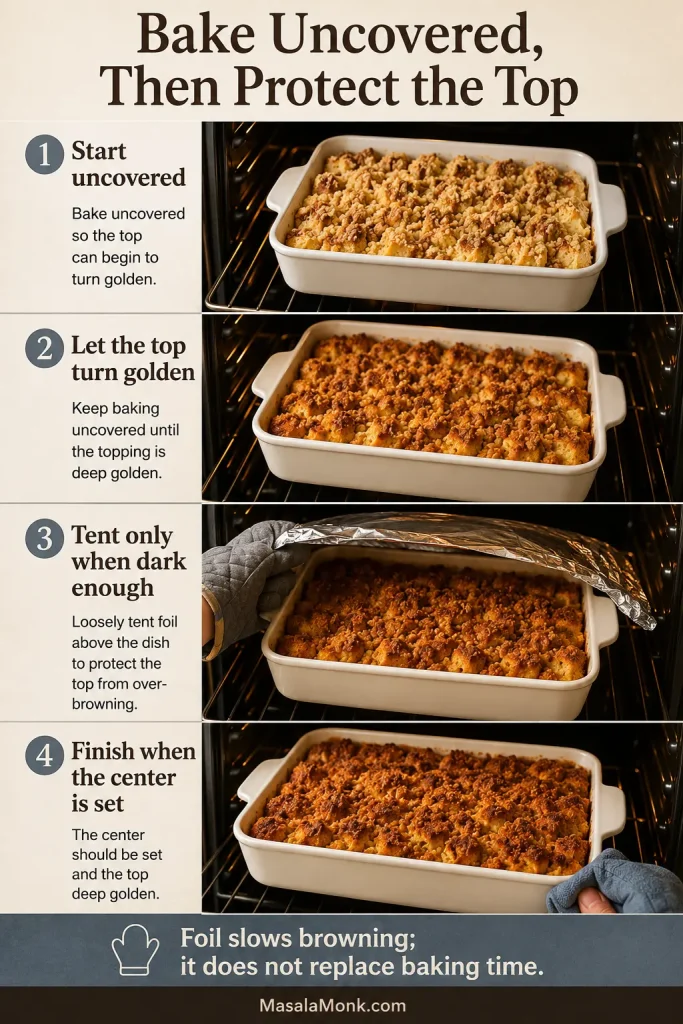
Four-stage guide showing French toast casserole starting uncovered, browning, loosely tented with foil and finishing fully baked.
A loose foil tent should sit above the streusel instead of pressing against it, slowing browning while preserving the crumbly surface.

How to Tell When the Casserole Is Done

  • Look: The center no longer appears glossy or filled with liquid custard.
  • Nudge the dish: A gentle wobble through the center is fine; a flowing wave means it needs longer.
  • Use a thin knife: Moist crumbs are expected. Raw custard coating the knife means the casserole needs more time.
  • Check the temperature: Insert an instant-read thermometer into the thickest central area, avoiding the base of the dish.
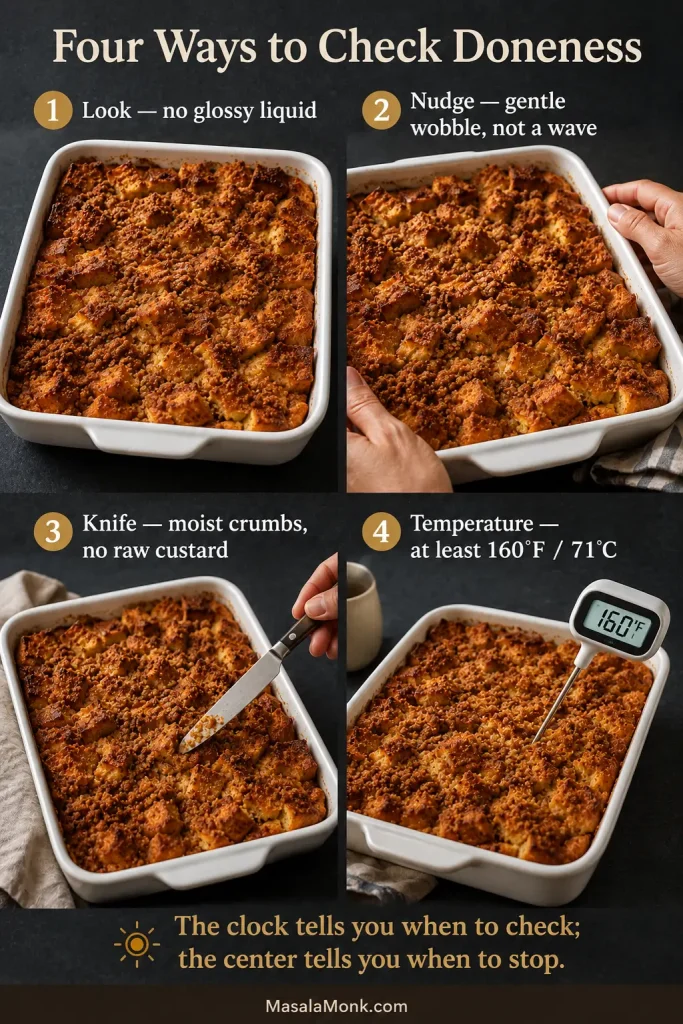
Doneness guide showing the casserole’s appearance, gentle wobble, knife test and a thermometer reading 160 degrees Fahrenheit or 71 degrees Celsius.
To tell when French toast casserole is done, use the cues in order—look, nudge, knife and temperature—so the oven loses as little heat as possible between checks.

The USDA recommends 160°F / 71°C for casseroles and other dishes containing eggs (opens in a new tab). Let that temperature confirm what you can already see: a set center, no flowing wave and no raw custard on the knife.
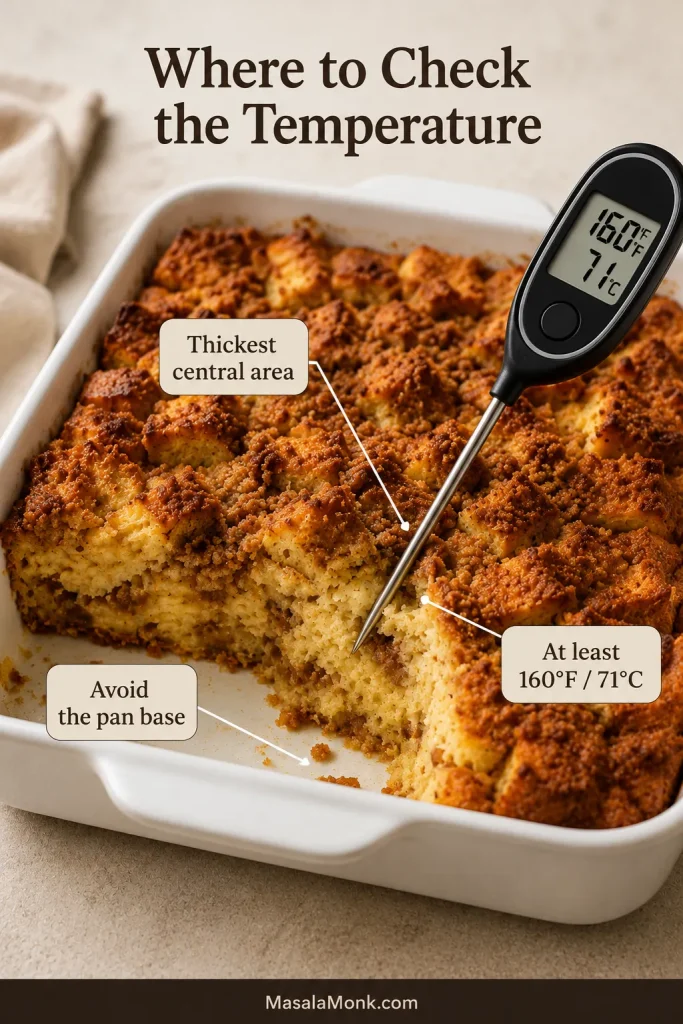
Instant-read thermometer inserted into the thick center of French toast casserole without touching the ceramic pan.
Angle the thermometer into solid bread and custard in the thickest central area; an air gap or contact with the hot dish can produce a misleading reading.

Forgot Last Night? Use the Same-Day Method

Remembered after waking? A full overnight soak is no longer possible, but the morning does not have to become a scramble. Thoroughly dried bread gives a shorter soak a much better chance to work.

  1. Cut the bread into pieces around 1 inch / 2.5 cm.
  2. Dry it using the oven method above, allowing up to 20 minutes when the bread is especially fresh and soft.
  3. Cool the bread before adding the egg mixture.
  4. Toss thoroughly so every piece makes contact with the custard.
  5. Let the assembled casserole stand for 45–60 minutes.
  6. Turn the upper pieces gently once midway through the soak.
  7. Add the streusel and bake using the same center-of-the-pan cues as the overnight version.
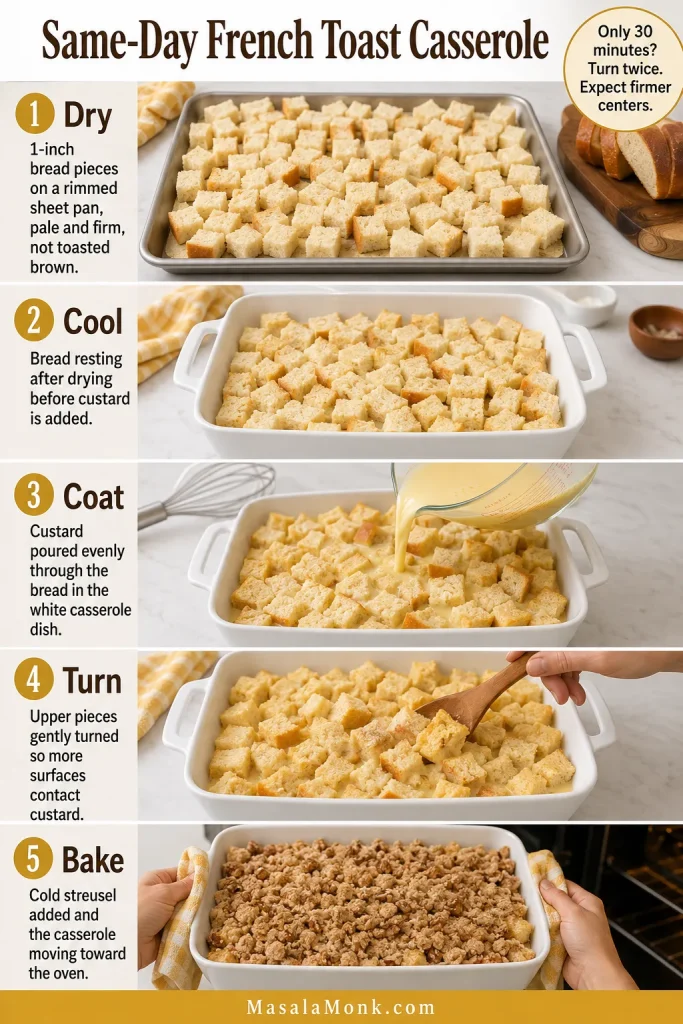
Five-step guide showing bread being dried, cooled, coated with custard, gently turned and topped before same-day baking.
For same-day French toast casserole, cool the dried bread before adding custard; otherwise, trapped steam can soften the surface you just worked to dry.

The casserole will still bake up warm and crisp-topped; the bread will simply keep more of its individual shape.

The 30-Minute Backup

Dry the bread thoroughly, keep the pieces close to 1 inch and turn them twice during the short soak. Those two turns help more of the surface meet the custard before the pan goes into the oven.

Whether the bread soaked for an hour or overnight, the same moisture cues determine whether the center finishes custardy or remains wet.

How to Keep French Toast Casserole From Getting Soggy

Softness belongs in the dish. Free liquid does not. Most soggy pans come back to four causes.

  • Too little bread. An unusually small loaf leaves more custard than the pan can absorb. Use the full 16 oz / 450 g.
  • Bread that was too soft or moist. Very fresh pieces lose their shape more easily during a long soak. Dry them until the surface feels firm but remains pale.
  • A dish that is too deep. The edges can finish before enough heat reaches the middle. Two standard pans are more dependable than one very deep casserole.
  • A center that needed more baking. A brown top does not guarantee that the custard underneath has set. Cover the surface with foil when it is dark enough and continue until the middle passes the visual, knife and temperature checks.
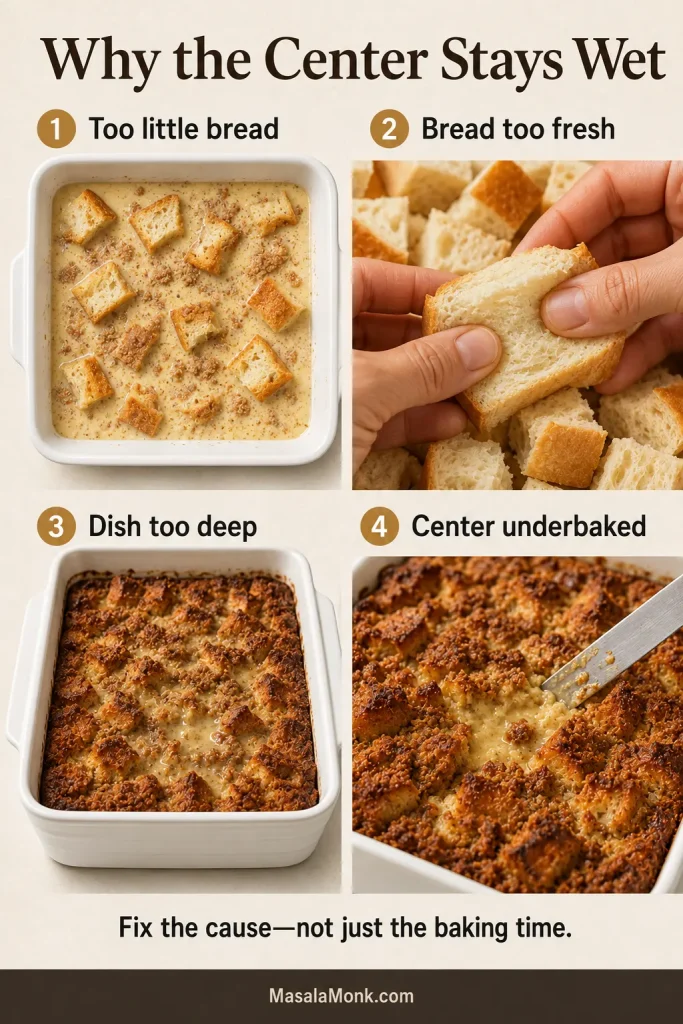
Four-panel guide showing too little bread, overly soft fresh bread, a deep casserole dish and a golden but underbaked center.
Before changing the egg-and-milk ratio, check the four more likely causes of a wet French toast casserole: bread quantity, starting moisture, pan depth and center doneness.

Custardy or Still Wet?

Custardy means the bread is tender and moist, with no liquid collecting around the serving spoon. Still wet means custard flows when the dish moves or coats a knife in the center.
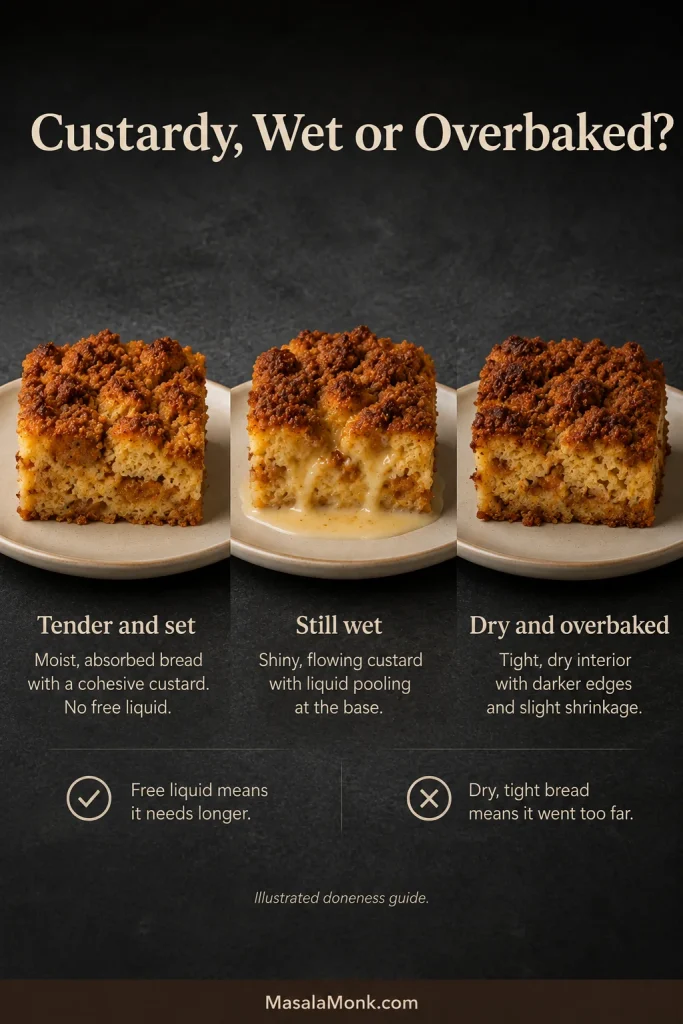
Three servings compare French toast casserole that is properly set, still wet with visible liquid and dry from overbaking.
Compare the cut faces: the correct center glistens lightly and holds, the wet sample slumps, and the overbaked sample fractures.

Dietary Adaptations

These adaptations work best when the substitutes preserve the original structure: sturdy bread by weight, enough body in the custard and a firm fat that can still form streusel crumbs.
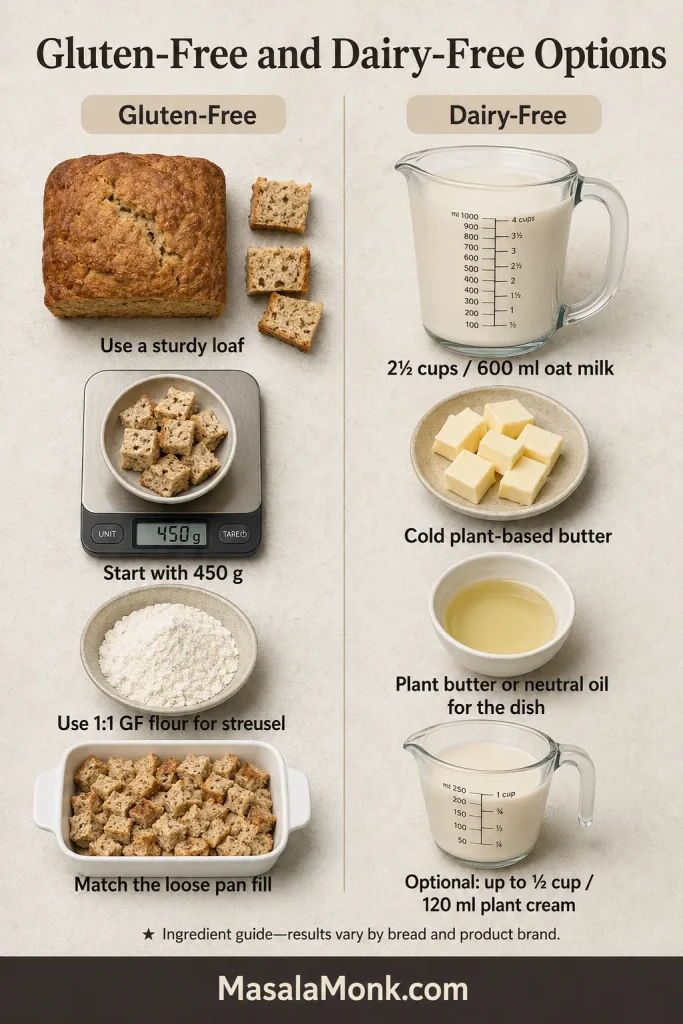
Gluten-free bread, a scale reading 450 grams, gluten-free flour, oat milk, plant-based butter, oil and optional plant cream.
For gluten-free and dairy-free French toast casserole, keep the structure intact: weigh the bread, use oat milk for body and choose firm plant butter for crisp streusel.

Gluten-Free

Use a certified gluten-free loaf and replace the all-purpose flour in the streusel with ½ cup / 60 g 1:1 gluten-free baking flour. Begin with 450 g bread and check that the pieces loosely fill the pan to roughly the same level as 10–12 cups of French bread.

A thick, sturdy loaf usually holds up better overnight than thin packaged slices. When cooking for someone with celiac disease or significant cross-contact concerns, check the certification of all packaged ingredients.

Dairy-Free

Use 2½ cups / 600 ml unsweetened oat milk. Replace the streusel butter with an equal weight of cold, firm plant-based butter, and grease the dish with plant-based butter or neutral oil. For a richer custard, replace up to ½ cup / 120 ml of the oat milk with an unsweetened plant-based cream suitable for cooking.

Egg-Free or Vegan

Eight eggs do most of the setting in this recipe, so replacing them changes the whole custard—not only the flavor. A general egg replacer is unlikely to hold a full 9×13-inch casserole together on its own. Begin with a vegan baked-French-toast custard designed for a full casserole. This vegan French toast guide explains several egg-free custard approaches and how each one helps the mixture set.

Pan Size, Servings and Scaling

A half batch suits a smaller table and still leaves room for one easy breakfast the following day. For a larger gathering, two ordinary pans bake more consistently and are easier to serve than one extra-deep casserole.
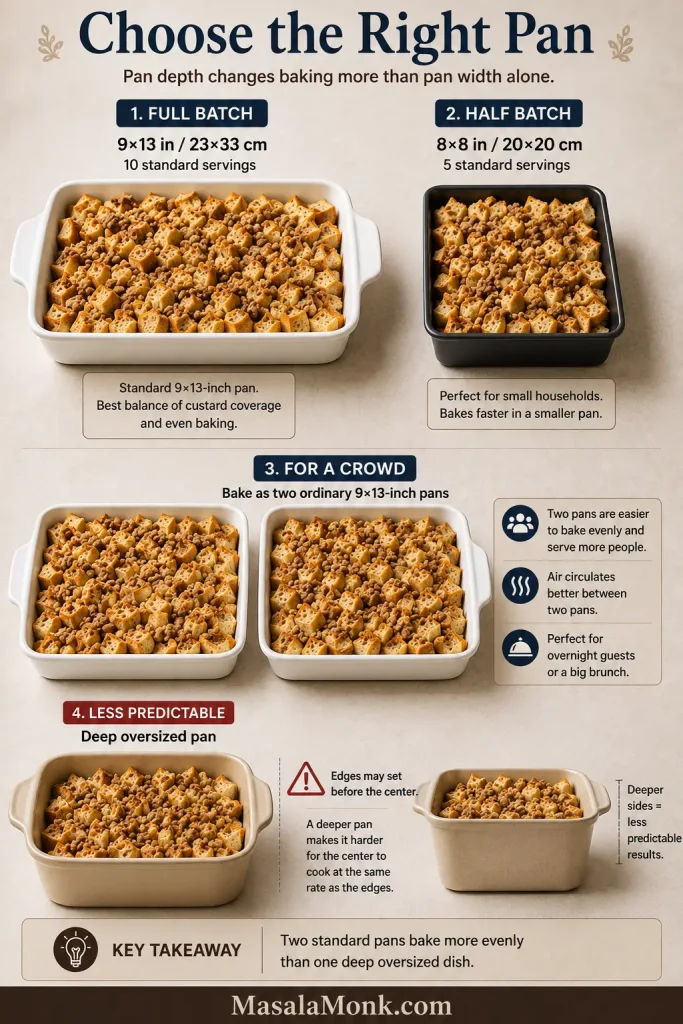
A 9-by-13-inch dish, an 8-by-8-inch pan, two crowd-size pans and one deeper casserole dish compared by size.
The side profile matters more than the footprint alone: a deeper custard layer needs longer for heat to reach its center.
SetupYieldBegin checkingWatch for
9×13-inch full batch10 standard servings, 8 generous or up to 12 smaller brunch portionsAbout 40 minutesThe center setting before the top becomes too dark
8×8-inch / 20×20 cm half batch5 standard, 4 generous or up to 6 smaller portionsAbout 30 minutesMany dishes finish around 35–45 minutes
Two 9×13-inch pans20 standard servings, or 16–24 depending on the menuCheck each pan on its ownOne pan finishing several minutes before the other
One deeper oversized batchVaries with dish sizeLater than the standard batchThe edges setting before the center

Half Batch for an 8×8-Inch / 20×20 cm Dish

Quick guide: This smaller pan makes 5 standard, 4 generous or up to 6 smaller servings. Begin checking at 30 minutes; many half batches finish in approximately 35–45 minutes.
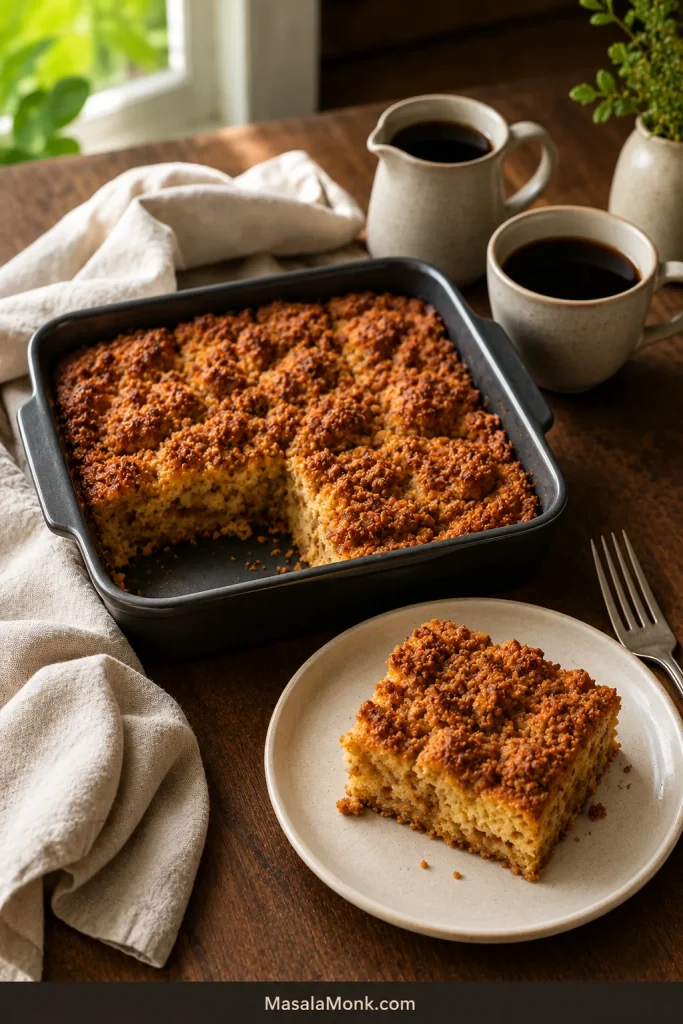
Half-batch French toast casserole in a dark square pan with servings removed and one portion plated for a smaller breakfast.
A half-batch French toast casserole still bakes at 350°F / 175°C; only the quantity and checking time change, so resist lowering the oven temperature.

Follow the same night-before assembly, morning topping and center-doneness cues as the full recipe.

  • 8 oz / 225 g bread
  • 4 large eggs
  • 1 cup / 240 ml whole milk
  • ¼ cup / 60 ml half-and-half or cream
  • 2 tablespoons plus 2 teaspoons / 35 g brown sugar
  • 1½ teaspoons vanilla
  • 1 teaspoon cinnamon
  • ⅛ teaspoon nutmeg
  • ⅜ teaspoon fine salt, or ¼ teaspoon plus ⅛ teaspoon

For the smaller streusel, use ¼ cup / 30 g flour, 35 g brown sugar, ½ teaspoon cinnamon, a pinch of salt, 3 tablespoons / 43 g butter and ¼ cup / about 28 g pecans when using.

Baking Two Pans for a Crowd

Leave space around both pans for airflow and rotate their positions when the oven browns unevenly. When guests are staying over, two pans also let breakfast reach the table without anyone cooking individual batches at the stove.
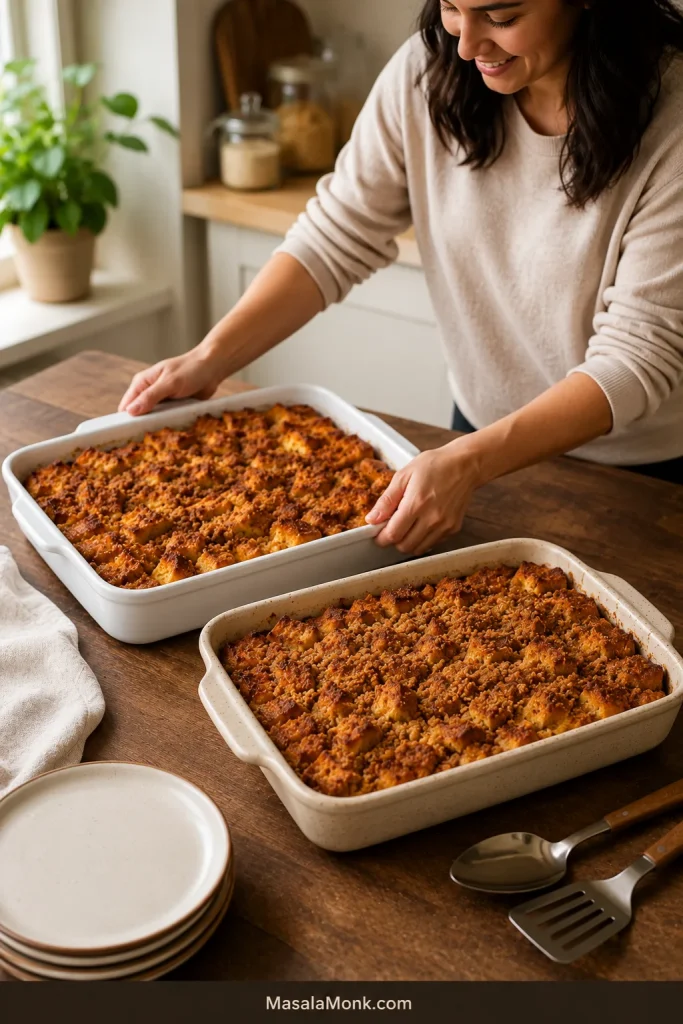
Two rectangular pans of golden French toast casserole arranged with space between them in a bright kitchen.
Treat two pans as separate bakes: rotate only when needed and remove each pan when its own center reaches doneness.

When the table needs one sweet pan and one savory pan, this breakfast casserole with hash browns can also be assembled ahead.

Blueberry, Apple and Cream Cheese Variations

Blueberry

Blueberries add tart, juicy pockets against the cinnamon custard and brown sugar topping. Scatter 1 cup / 140 g through the bread. Fresh blueberries hold their shape better and release less juice. Frozen berries also work; add them straight from the freezer and expect the surrounding bread to become slightly softer.
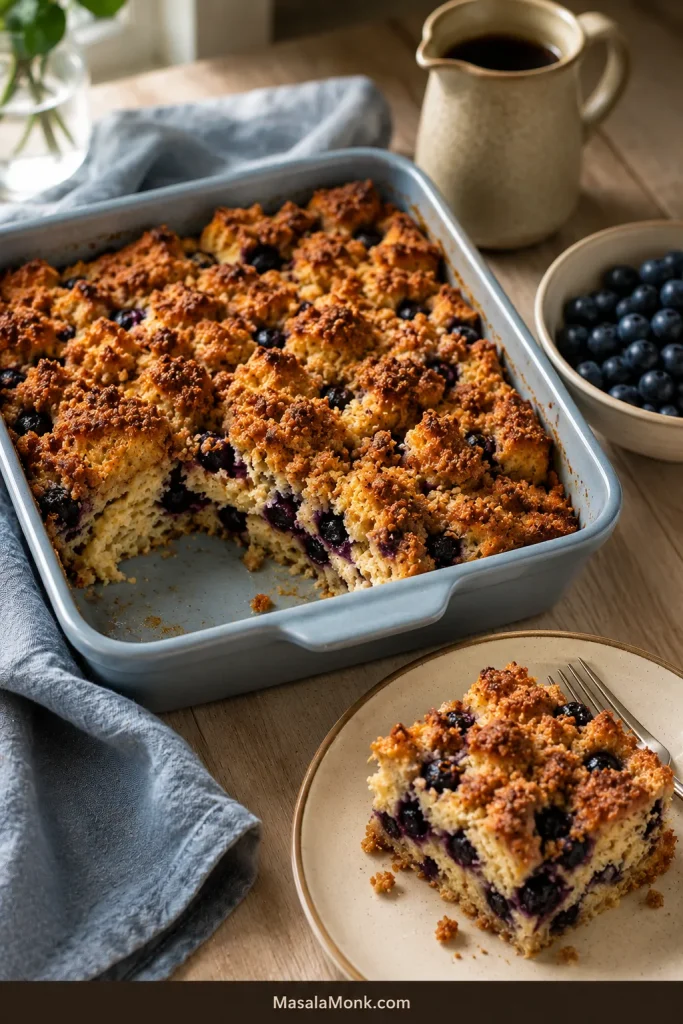
Blueberry French toast casserole in a blue-grey dish with berries visible inside the bread beneath golden streusel.
For blueberry French toast casserole, tuck berries between several bread layers instead of piling them on top, reducing scorched fruit and concentrated pockets of juice.

Apple-Cinnamon

Soft cinnamon apples make the casserole warmer, fruitier and especially well suited to an autumn or holiday brunch. Cook 1½ cups / approximately 180–200 g peeled, diced apples in 1 tablespoon / 14 g butter with a pinch of cinnamon until just tender but still holding their shape. Cool them on a plate before distributing them through the bread.
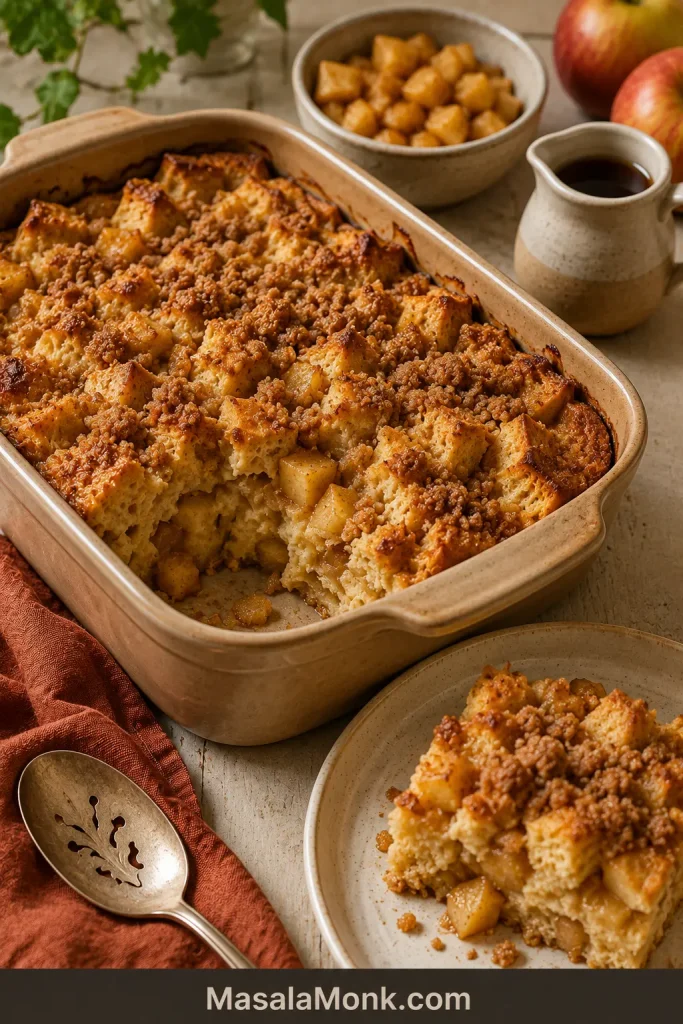
Apple-cinnamon French toast casserole with small cooked apple pieces visible inside the bread and in a plated serving.
Spread the cooked, cooled apples through several shallow layers; this gives every serving fruit without creating one heavy pocket that weakens the custard structure.

Cream Cheese

Cream cheese adds small tangy pockets that break up the sweetness of the custard and streusel. Use 4–6 oz / 115–170 g cold full-fat block cream cheese, cut into small pieces. Tuck them throughout the bread so every serving gets a few creamy pockets. Avoid whipped or spreadable tub cream cheese, which brings more moisture.
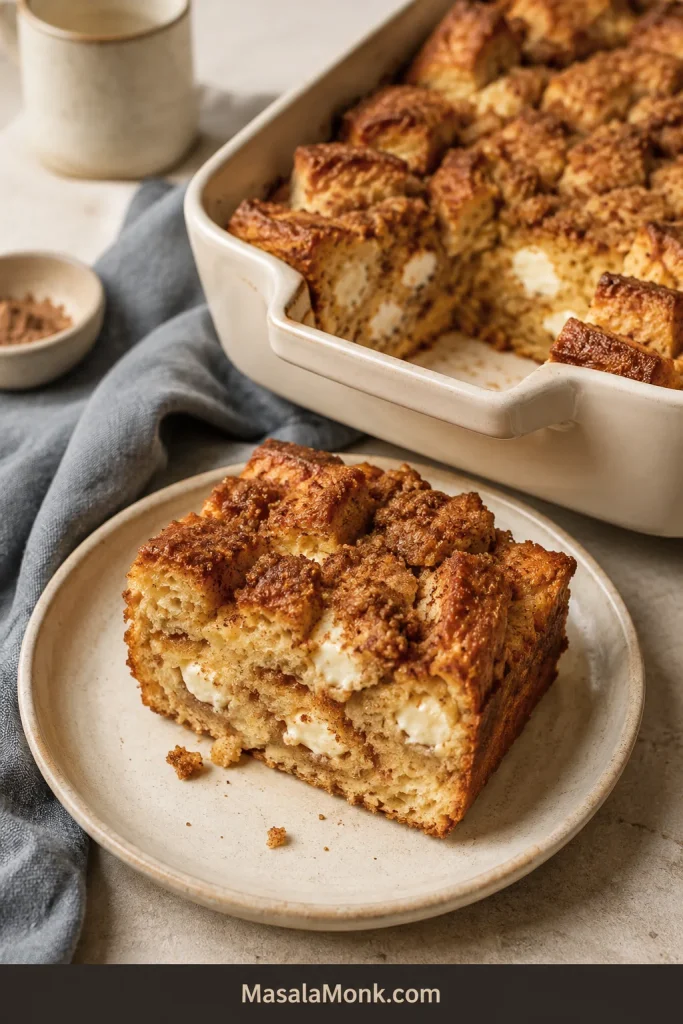
French toast casserole with small white cream-cheese pockets distributed between defined bread pieces beneath a golden topping.
Keep the cream-cheese pieces smaller than a walnut so they stay scattered instead of melting into one heavy stripe.

Less-Sweet Version

For a more breakfast-like pan, reduce the brown sugar in the custard to ¼ cup / 50 g and leave the crisp streusel unchanged.

What to Serve With French Toast Casserole

The casserole is rich, soft and sweet enough that the best sides usually bring freshness, salt or a crisper texture. Air-fryer hash browns add crisp potatoes without competing for oven space.

  • Fresh fruit: Berries, orange segments, melon or lightly tart apples brighten the plate.
  • Maple syrup: Warm it separately so each person can decide how sweet the serving should be.
  • Eggs: Soft scrambled eggs or a simple egg bake make the meal feel more balanced.
  • Breakfast meat: Bacon or breakfast sausage provides a salty contrast to the cinnamon topping.
  • Holiday main: Sliced honey glazed ham works especially well for Christmas or Easter brunch.
  • Yogurt: Plain or lightly sweetened yogurt adds tang and pairs naturally with berries.
  • Coffee or tea: Often the only other thing a quiet weekend breakfast needs.
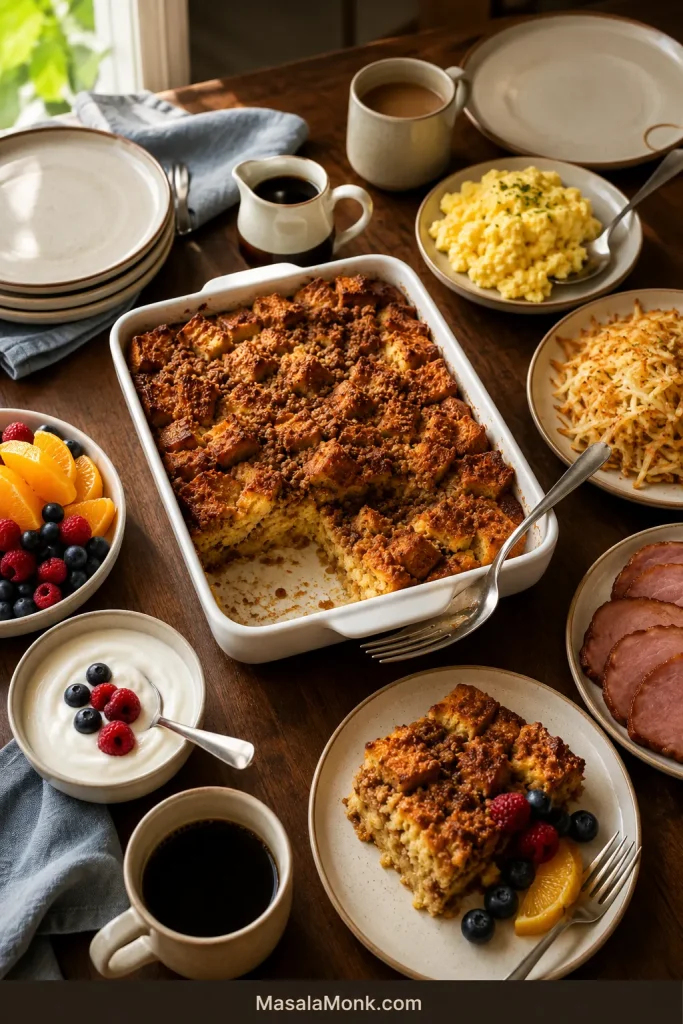
Brunch table with French toast casserole, fruit, yogurt, scrambled eggs, hash browns, sliced ham, maple syrup and coffee.
Build the brunch around contrast: pair the soft, sweet casserole with at least one fresh side, one crisp side and one savory side, then serve maple syrup separately.

For a holiday spread with more than one sweet centerpiece, homemade cinnamon rolls can also be prepared the night before.

For a buffet, cut smaller portions first; people can always return for another spoonful. When the casserole is the main event, plan on eight generous servings.

Leftovers, Freezing and Reheating

The top softens in the refrigerator, but a little dry heat brings back enough crispness to make leftovers worth looking forward to.

Refrigerate or Freeze

Leftovers. Refrigerate within two hours of serving, then keep in covered containers for 3–4 days. The USDA leftovers guidance (opens in a new tab) recommends rapid cooling, covered storage and reheating leftovers to 165°F / 74°C.

Freeze before baking. Assemble the bread and custard in a freezer-safe pan, wrap tightly and freeze the streusel separately. Thaw overnight in the refrigerator before topping and baking. Follow the cold-bakeware guidance in the recipe when choosing the pan.

Freeze after baking. Let the casserole cool briefly, then cut it into portions and refrigerate until cold. Wrap the chilled portions well and freeze for up to about two months for the best texture.
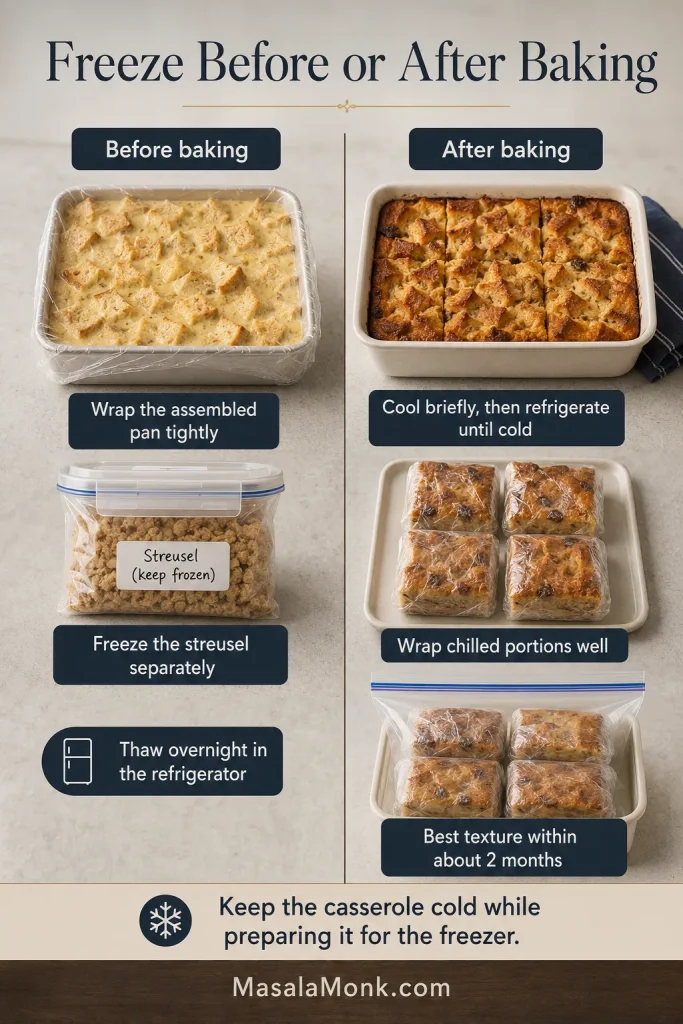
Freezing guide showing an unbaked wrapped casserole with separate streusel and baked portions chilled, wrapped and placed in a freezer bag.
To freeze French toast casserole before baking, keep the streusel separate; after baking, chill individual portions before wrapping so less condensation becomes trapped inside.

Reheat One Portion or Several

One portion. Microwave in 30-second intervals until nearly heated through. To restore the top, begin checking after about 2 minutes in a 350°F / 175°C air fryer or after about 5 minutes in a conventional oven. Confirm that the center has reached 165°F / 74°C before serving.

Several portions. Cover and reheat at 325°F / 165°C. Begin checking after 15 minutes and continue until the thickest part reaches 165°F / 74°C. Uncover for the final few minutes to refresh the streusel.
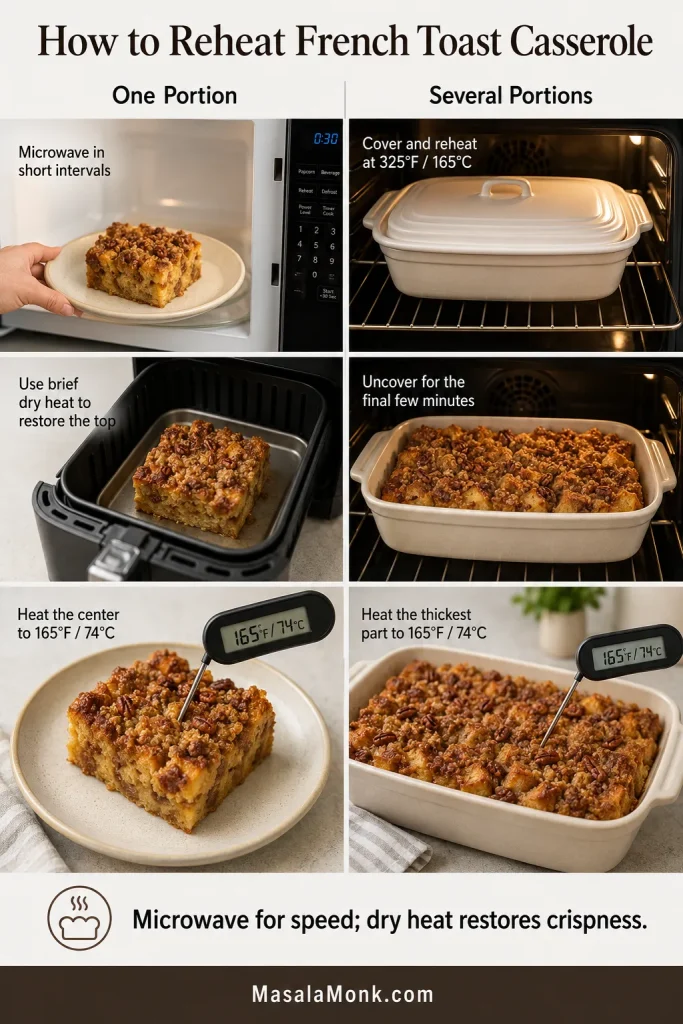
Guide showing one casserole portion microwaved and crisped separately, alongside several portions reheated covered and then uncovered in the oven.
Heat and crisp are separate jobs: covered or microwave heating warms the center, while a brief uncovered finish refreshes the streusel.

For the best second breakfast, chill the remaining casserole promptly and reheat only the portion you plan to serve.
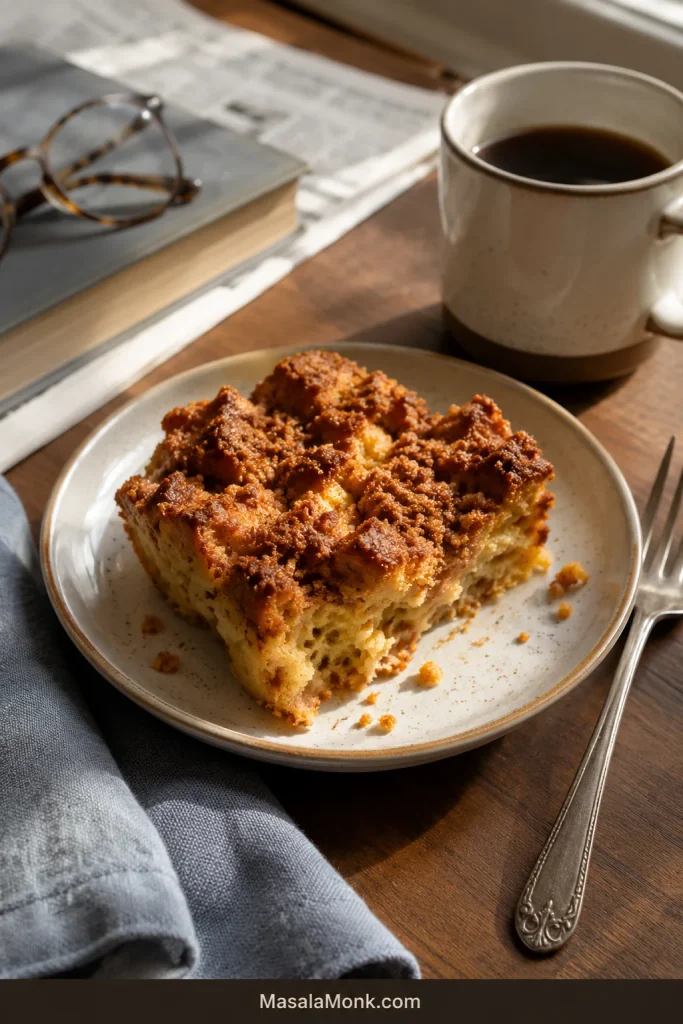
Reheated French toast casserole serving with a crisp cinnamon topping beside coffee, a fork, glasses and a book in morning light.
A chilled portion reheated once can bring back enough crispness for an easy second breakfast.

Troubleshooting Overnight French Toast Casserole

Most problems are recoverable: cover a dark top, give a loose center more time, or revive dry pieces with warm syrup.

ProblemFix it nowNext time
Center is wetReturn the casserole to the oven and continue baking. Add a loose foil tent only if the top is already brown enoughUse the stated bread weight and check the thickest area; time alone can mislead
Top is dark but center is looseCover loosely with foil and continue bakingKeep the pan on the center rack and begin checking earlier
Casserole is dryServe with warm syrup, fruit or yogurtUse the full custard amount and remove the pan once the center is set
Flavor is overly eggyTart fruit and maple syrup can make the egg flavor less noticeableAvoid adding extra eggs, and whisk the custard thoroughly before pouring
Edges are rubberyTrim only the driest edge when servingBegin checking sooner, especially in dark metal pans
Some bread is still drySpoon warm syrup over those piecesPour in stages and turn the bread during assembly
Bread collapsed into mushLet the casserole rest longer, then serve it by the spoonful instead of cutting clean portions. Add fresh fruit or toasted pecans for contrastUse firmer or better-dried bread and avoid adding extra liquid
Streusel disappearedAdd a light dusting of cinnamon sugar after bakingRefrigerate the topping separately and add it in the morning

Frequently Asked Questions

Can I assemble it more than one night ahead?
Firm, dry French bread or sourdough can usually remain refrigerated for up to about 24 hours. Softer breads may begin losing their shape, so 8–12 hours remains the usual target.

Can I bake it directly from the refrigerator?
Check the manufacturer’s guidance before moving cold glass or ceramic bakeware into a hot oven. A metal pan avoids that thermal-shock concern.

Should French toast casserole bake covered or uncovered?
Bake this streusel-topped version uncovered so the exposed bread and topping can crisp. If the top becomes dark before the center is set, tent it loosely with foil and continue baking.

Breakfast Is Waiting

The cinnamon streusel and soft vanilla custard make this pan feel special, but the real reward happened the night before. The bread was cut, the eggs were whisked and most of the kitchen was already cleaned while the morning was still hours away.

Now the top is crisp, the center is properly set and breakfast can be carried to the table all at once. No skillet line, no stack growing cold while the next pieces cook—just one warm casserole and a morning that began with the difficult part already handled.

What bread did you use? Tell us whether you made the casserole overnight or used the same-day method—and what you might add next time.
↑ Back to the top

Posted on Leave a comment

Cinnamon Roll Recipe

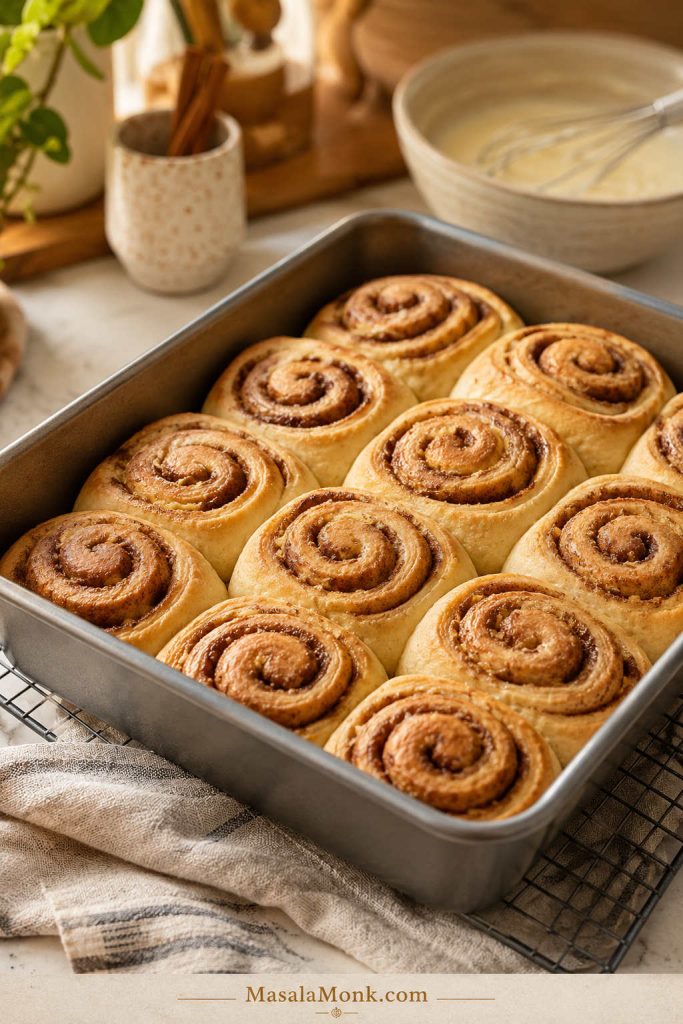
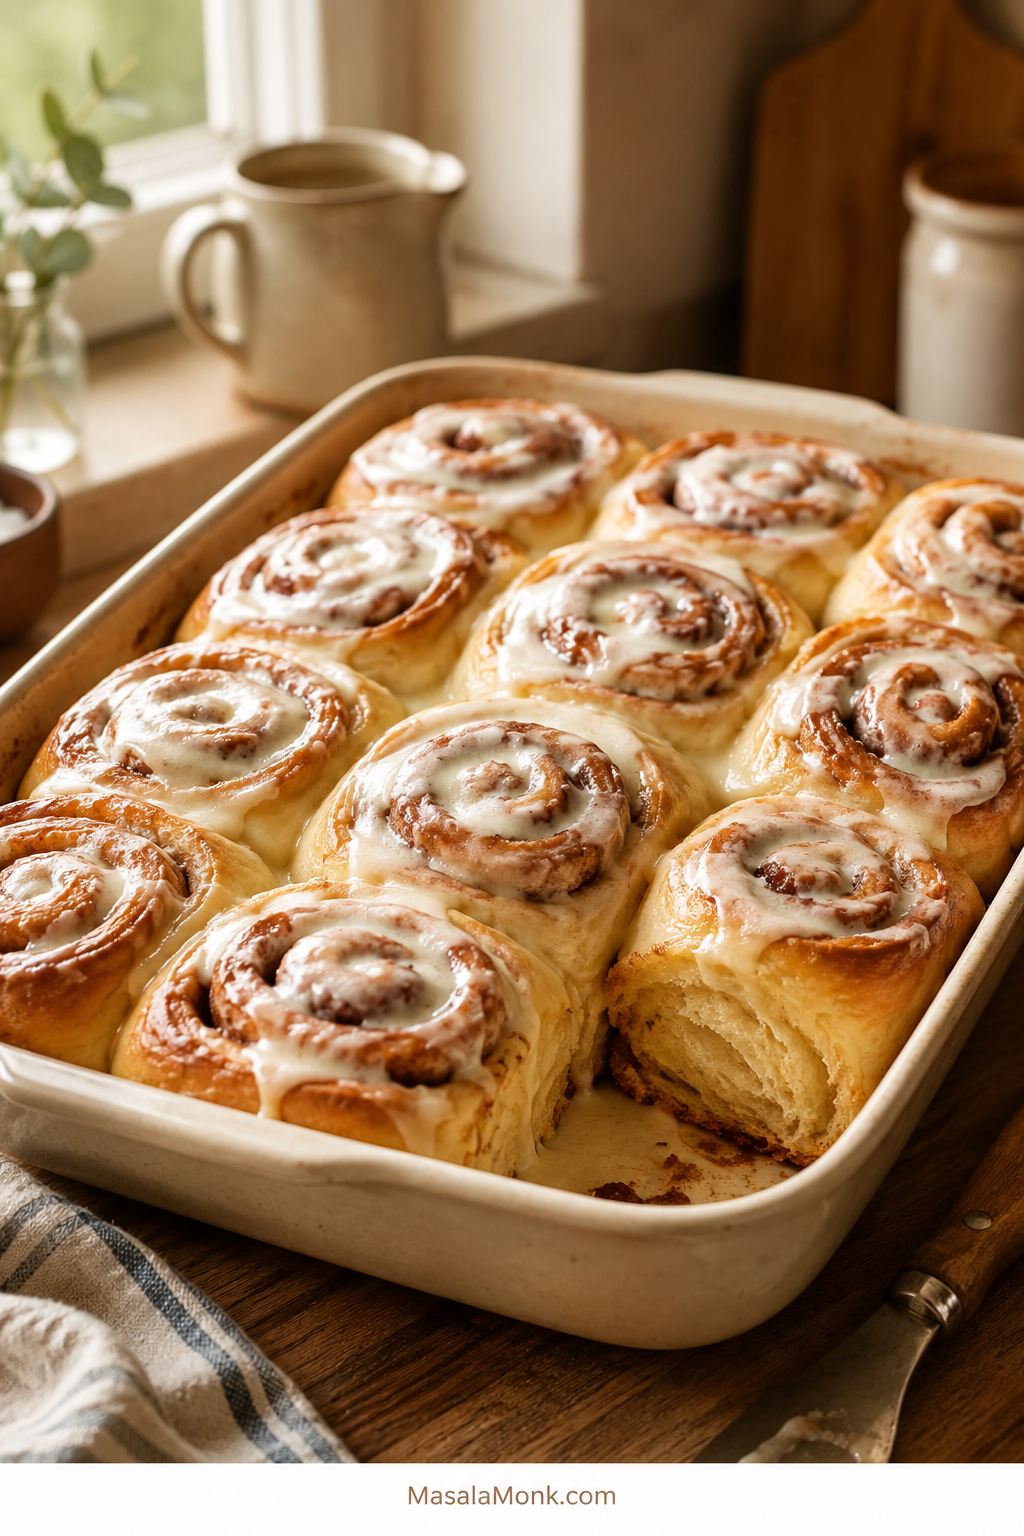
Rectangular pan of homemade cinnamon rolls with cream cheese icing melting into the swirls.

These homemade cinnamon rolls are for the exact moment you want warm, pull-apart rolls with gooey cinnamon centers, tender edges, and cream cheese icing melting into the swirls — without the raw-dough gamble in the middle of the pan.

Most cinnamon rolls go wrong in two quiet ways: the dough gets over-floured, or the pan comes out when the tops look done but the center is still underbaked. This recipe keeps both in check with soft elastic dough, a full second rise, and a clear center-roll doneness cue.

You can make them the same day for a cozy baking project, or shape them at night and bake them fresh in the morning. They fit a slow weekend, a holiday morning, a birthday breakfast, or any day when a warm pan of cinnamon rolls is the whole point.

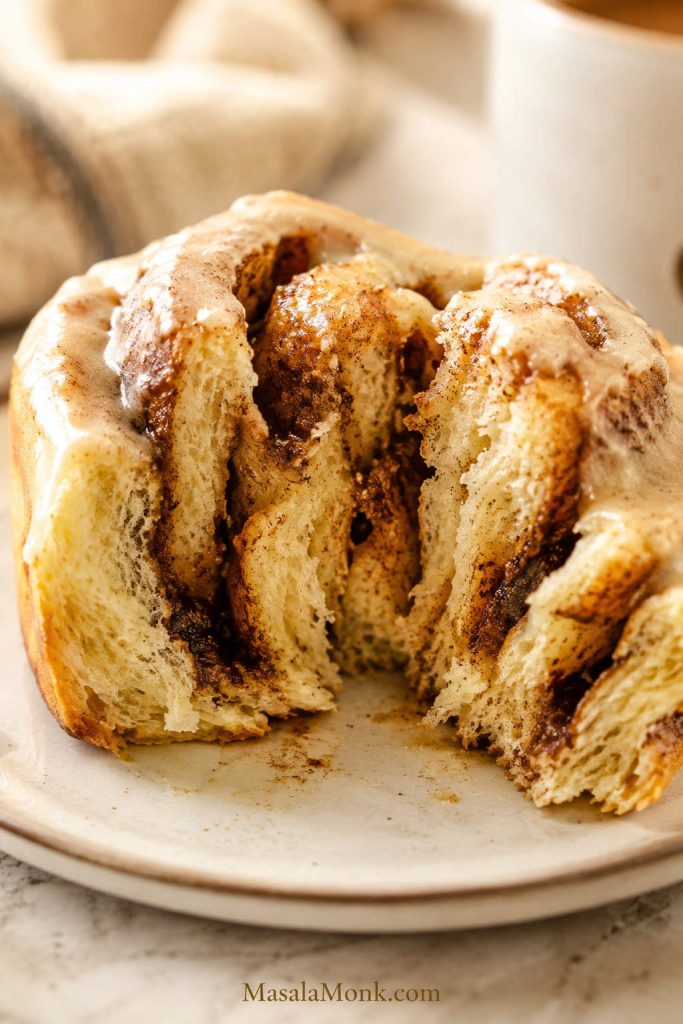
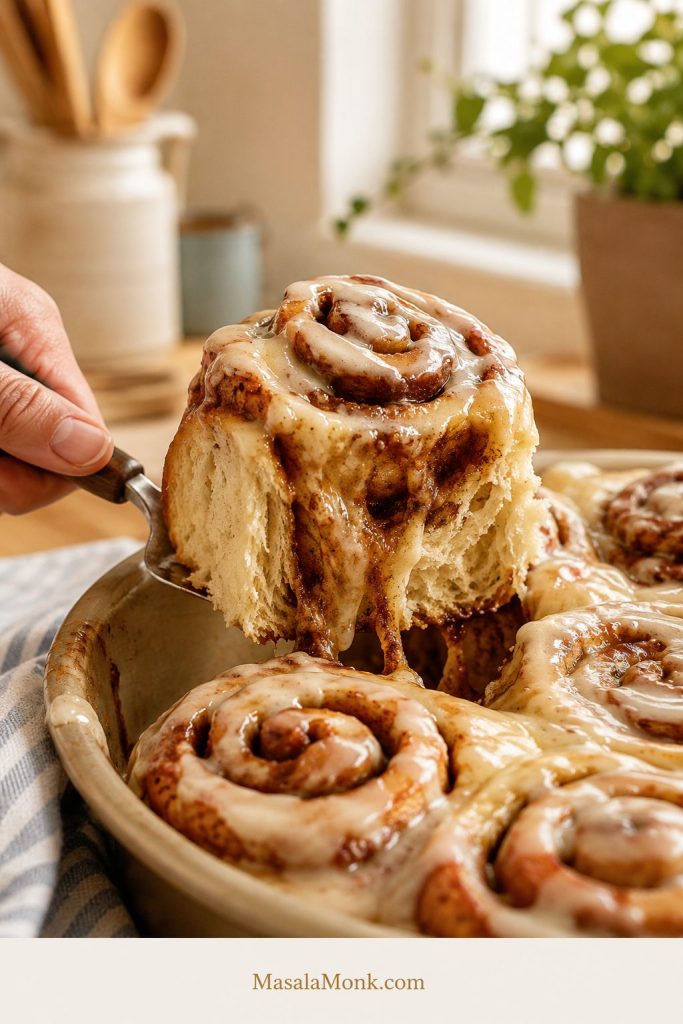
Gooey cinnamon roll pulled apart to show a soft baked center
This is the key promise: gooey cinnamon swirls with a center that looks baked and soft, not wet or raw.

Quick Answer: How to Make Soft Cinnamon Rolls

To make soft homemade cinnamon rolls, mix a rich yeast dough with warm milk, butter, egg, sugar, flour, and yeast. Knead until the dough is smooth and a little tacky, then let it rise until doubled. Roll it out, spread with softened-butter cinnamon sugar filling, cut into 12 rolls, and let the shaped rolls rise again until rounded and puffy.

Bake in a 9×13-inch pan at 350°F / 175°C for 24–28 minutes. Look for lightly golden tops, but use the center roll as the better cue. The best target is about 190°F / 88°C, which means the rolls are baked through while staying tender.

Spread cream cheese icing over the warm rolls after 5–10 minutes. For extra-moist centers, pour ⅓ cup / 80 ml warm heavy cream around the risen rolls just before baking, or use up to ½ cup / 120 ml for a richer, gooier pan.

The promise: soft, gooey cinnamon rolls with tender edges, creamy icing, and a center that bakes through without turning the pan dry.
Avoid the three big mistakes: do not add flour just to make the dough dry, do not melt the filling butter, and do not pull the pan just because the tops look golden.

Cinnamon Roll Recipe Card

Soft, gooey homemade cinnamon rolls that bake through in the center, with plush yeast dough, a brown sugar cinnamon swirl, optional warm cream for extra-moist centers, and cream cheese icing that melts into the rolls while they are still warm. Serve them while the icing is still soft and the centers are warm enough to pull apart in ribbons.

Prep Time35 minutes
Rise Time1 hour 45 minutes to 2 hours 30 minutes
Bake Time24–28 minutes
Total TimeAbout 2 hours 50 minutes to 3 hours 45 minutes
Yield12 rolls

Ingredients

Dough Ingredients

  • 1 cup / 240 ml warm whole milk
  • 2¼ teaspoons / 7 g instant yeast or active dry yeast
  • ⅓ cup / 65–70 g granulated sugar
  • 5 tablespoons / 70 g unsalted butter, melted and slightly cooled
  • 1 large egg
  • 1 large egg yolk
  • 4 cups / about 480 g flour, preferably bread flour for taller rolls or all-purpose flour for a softer homemade texture, plus 1–2 tablespoons only if needed
  • 1 teaspoon / 6 g fine salt
  • Butter or neutral oil, for greasing the bowl and pan

Cinnamon Filling

  • ⅓ cup / 75 g unsalted butter, softened
  • ¾ cup / 150 g packed brown sugar
  • 2 tablespoons / 14–16 g ground cinnamon
  • ¼ teaspoon fine salt
  • Optional: 1 teaspoon flour or cornstarch to help hold the filling together

Cream Cheese Icing

  • 4 oz / 113 g cream cheese, softened
  • 4 tablespoons / 55 g unsalted butter, softened
  • Powdered sugar, 1 cup / 120 g, plus ¼ cup / 30 g more for thicker icing
  • Vanilla extract, 1 teaspoon
  • Milk or cream, 1–3 tablespoons as needed
  • Pinch of salt

Optional Heavy Cream Upgrade

  • ⅓ cup / 80 ml heavy cream for softer rolls, or up to ½ cup / 120 ml for a richer, gooier pan

Instructions

Dough, Filling, and First Rise

  1. Warm the milk. The milk needs to feel comfortably warm, not hot. For active dry yeast, stir the yeast into the warm milk with a pinch of sugar and rest for 5–10 minutes, until foamy. Instant yeast can go directly into the dough.
  2. Make the dough. In a large bowl or stand mixer bowl, combine warm milk, yeast, sugar, melted butter, egg, and egg yolk. Add flour and salt. Mix until a rough dough forms.
  3. Knead. Knead for 8–10 minutes by hand or 5–7 minutes in a stand mixer on low-medium speed, until the dough is smooth, stretchy, and slightly tacky. Add extra flour only 1 tablespoon at a time if the dough is sticking heavily.
  4. First rise. Place the dough in a lightly greased bowl. Cover with plastic wrap, a damp clean towel, or a lid so the surface does not dry out. Let rise for 60–90 minutes, or until doubled. Active dry yeast may rise a little more slowly than instant yeast, so give the dough extra time if needed.

Shape, Bake, and Ice

  1. Make the filling. Mix softened butter, brown sugar, cinnamon, and salt into a thick paste. When the filling is hard to spread, let it sit at room temperature for a few minutes rather than melting it.
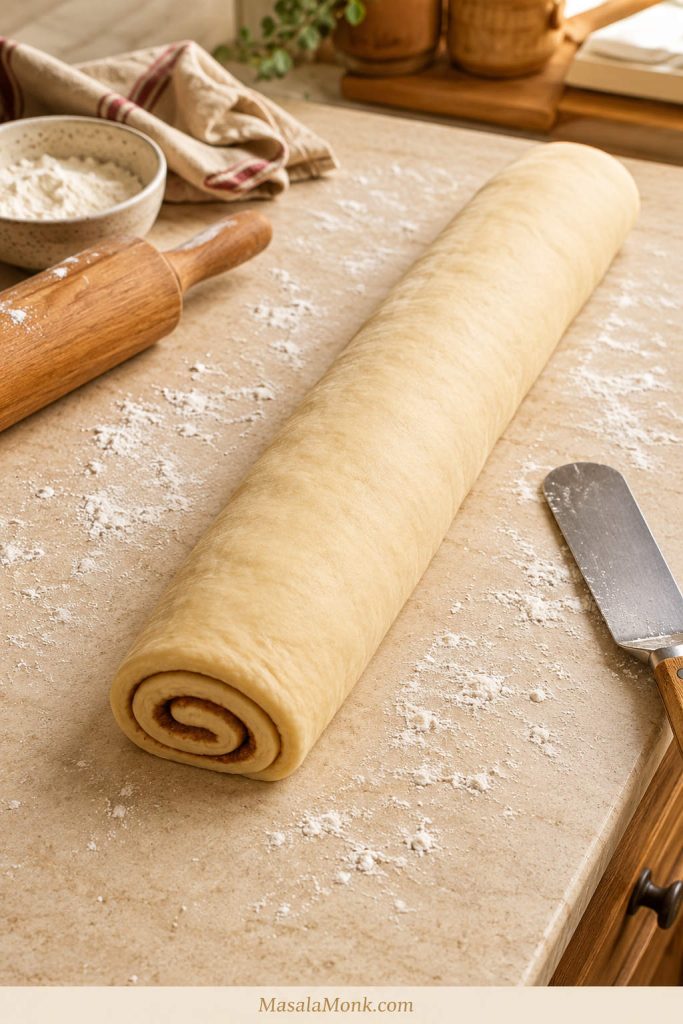
  2. Roll and fill. Roll the dough into a rectangle about 12×18 inches. Spread the filling evenly, leaving a small border on one long edge.
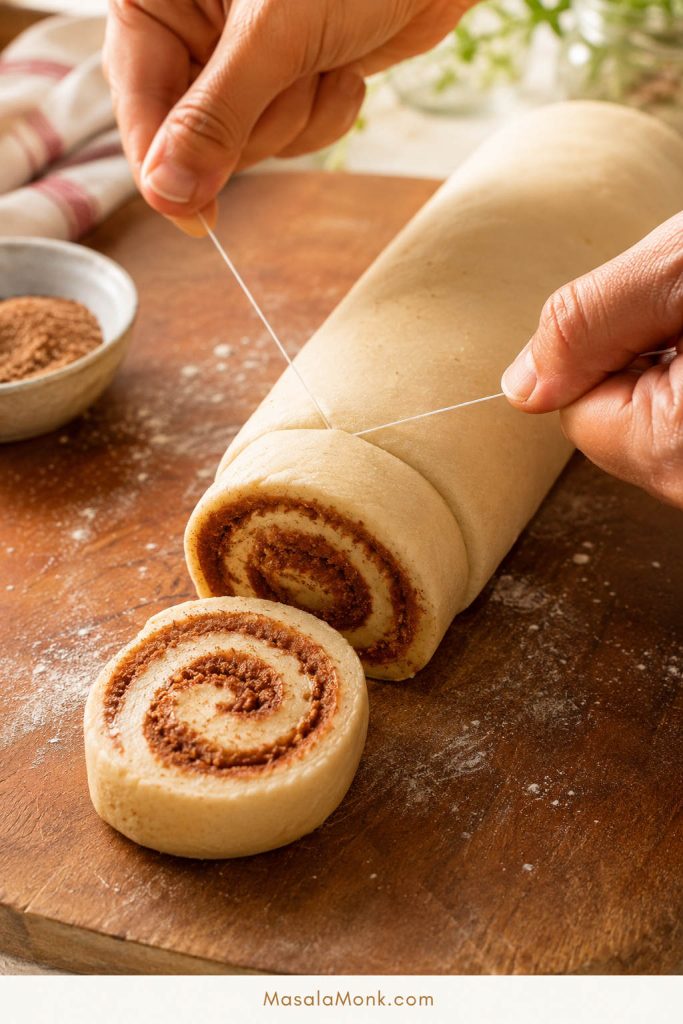
  3. Shape. Roll from the long side into a snug log. Cut into 12 even rolls using unflavored dental floss, clean thread, or a sharp knife. Aim for pieces about 1½ inches thick.
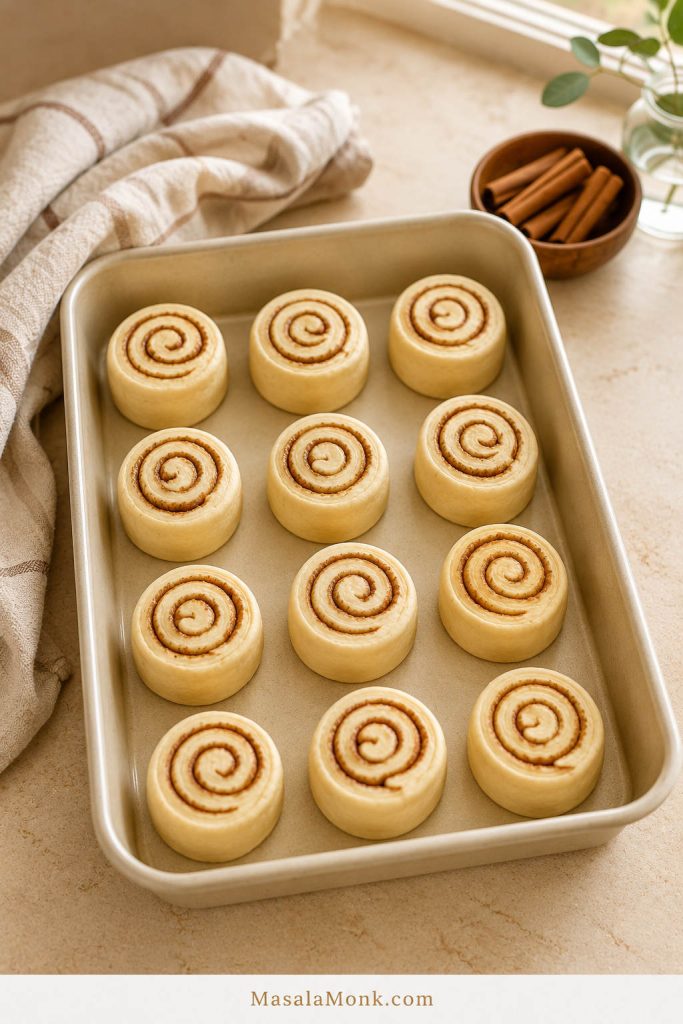
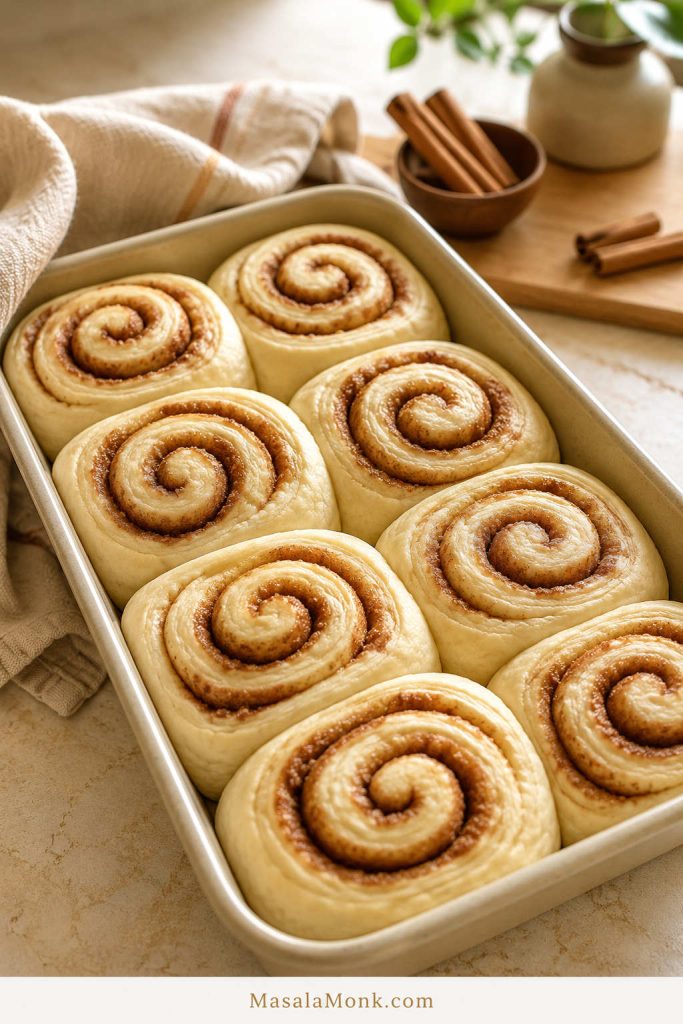
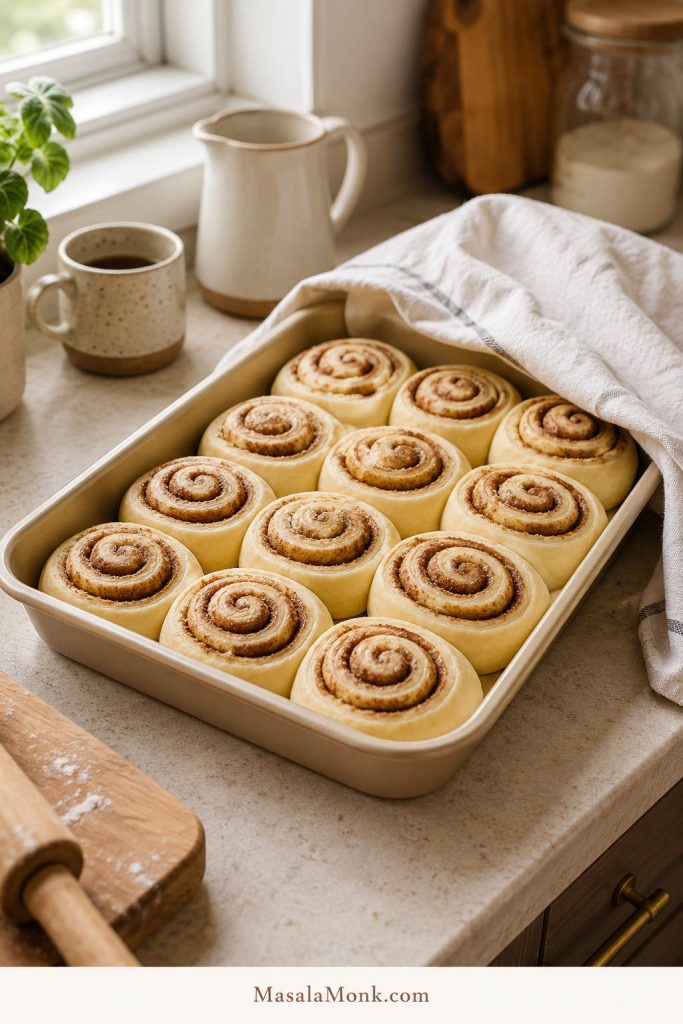
  4. Second rise. Place rolls in a greased 9×13-inch pan. Cover and let rise for 45–60 minutes, until puffy and lightly touching.
  5. Add heavy cream, if using. Pour warm heavy cream around the risen rolls. You should see cream around the base, not a flooded pan.
  6. Bake. Bake at 350°F / 175°C for 24–28 minutes, until lightly golden and the center roll reaches about 190°F / 88°C.
  7. Make icing. Beat cream cheese and butter until smooth. Add powdered sugar, vanilla, salt, and enough milk or cream to make a soft, spreadable icing.
  8. Ice and serve. Cool rolls for 5–10 minutes, then spread icing over the warm rolls.

Success Notes

  • Softer rolls: Start with the listed flour and add more only if the dough is sticking heavily.
  • Extra-gooey rolls: Use the warm heavy cream option, but keep it to ½ cup / 120 ml or less.
  • Thicker frosting: Wait 10–15 minutes before icing.
  • Overnight option: Shape, cover, refrigerate, then let the rolls become puffy at room temperature before baking.

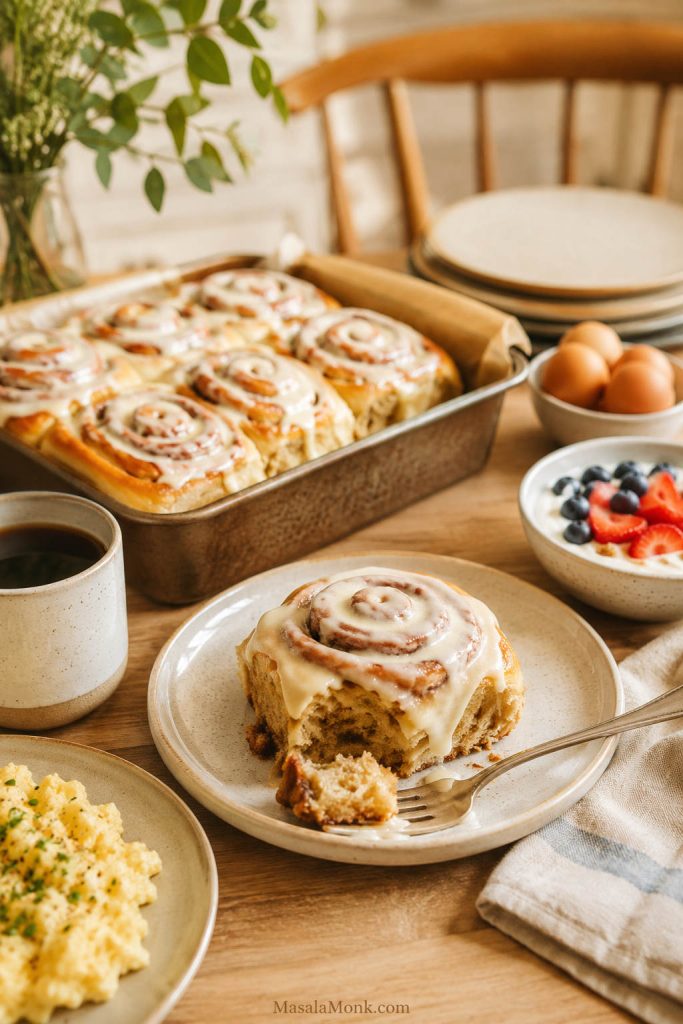
This is the finished serving cue: soft dough, a visible cinnamon swirl, and cream cheese icing that still looks creamy rather than dry.

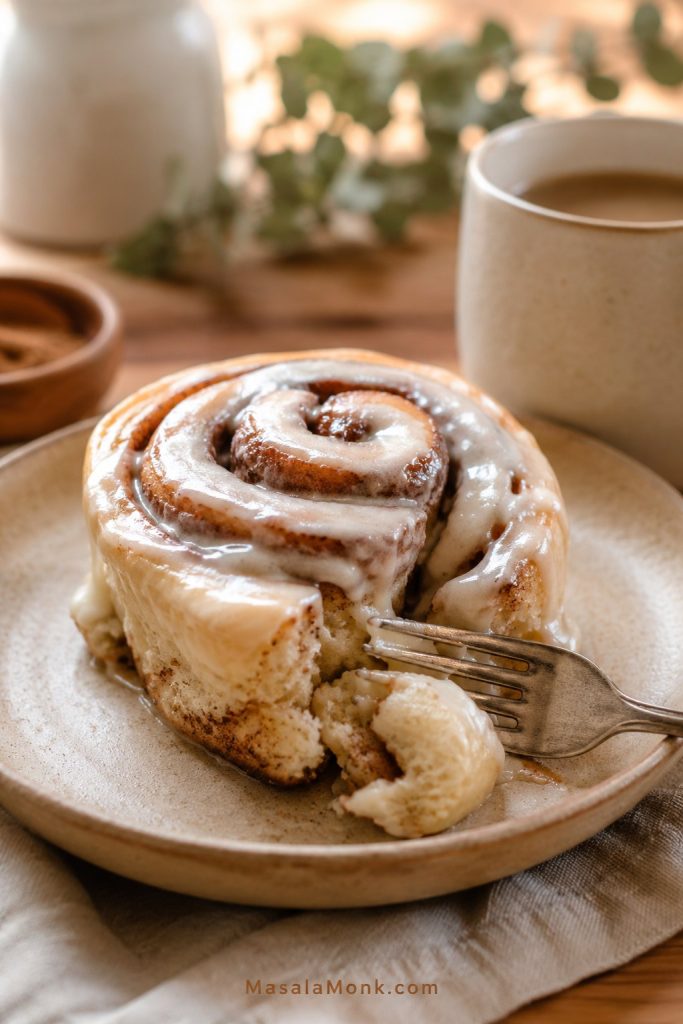
Single homemade cinnamon roll with cream cheese icing and soft cinnamon swirl
A single iced roll shows the serving texture: soft dough, visible cinnamon swirl, and creamy icing.

Cinnamon Rolls at a Glance

Question Answer
Yield 12 cinnamon rolls
Pan size 9×13-inch baking dish
Oven temperature 350°F / 175°C
Bake time 24–28 minutes
Total time About 2 hours 50 minutes to 3 hours 45 minutes, including cooling before icing
Doneness cue Center roll reaches about 190°F / 88°C
Flour choice Bread flour for taller rolls; all-purpose flour for a softer homemade texture
Yeast choice Instant yeast for ease; active dry yeast also works
Filling style Softened-butter brown sugar cinnamon paste
Icing Cream cheese icing, with a no-cream-cheese option below
Make-ahead option Shape and refrigerate overnight before baking

Choose Your Cinnamon Roll Path

Use the same base recipe, then adjust the timing or finish depending on the kind of cinnamon rolls you want today. Pick the path that matches what you care about most: a same-day bake, brunch timing, extra-gooey centers, thicker frosting, or avoiding a doughy middle.

If you want… Do this
Same-day soft cinnamon rolls Start earlier in the day and bake after two complete rises.
Overnight cinnamon rolls for brunch Shape tonight, chill, then bake once puffy in the morning.
Gooey cinnamon rolls with heavy cream Pour warm cream around the risen rolls before baking.
Cinnamon rolls with thick cream cheese frosting Cool the rolls 10–15 minutes before icing.
Cinnamon rolls without a doughy middle Check the center roll; golden tops are not enough.

What This Recipe Is Built Around

Recipe notes: this cinnamon roll recipe is built around a 9×13-inch pan, 12 rolls, a soft enriched dough, and a center-roll doneness cue. Bread flour gives taller rolls; all-purpose flour gives a softer homemade crumb. The heavy cream option is kept moderate so the rolls stay gooey without turning soggy at the bottom.

This is not a no-yeast shortcut roll and not a canned-roll hack. It is a soft yeast cinnamon roll recipe built for a gooey swirl, tender edges, and a center that bakes through properly.

The goal is simple: gooey, not doughy. Look for rolls that smell warm and cinnamon-sweet, pull apart softly, and have a center that feels baked and plush instead of wet or heavy.

Why This Cinnamon Roll Recipe Works

This recipe works because it protects both sides of the cinnamon-roll problem: enough moisture for gooey swirls, but enough structure and bake time for the middle to finish properly.

Enriching the dough with milk, butter, egg, and egg yolk gives you tenderness without turning the bread part heavy. The lightly sweet dough still has enough strength to rise well, hold its shape, and support the cinnamon filling.

Careful flour guidance prevents dry rolls. Starting with the listed amount and adding more only when the dough is truly sticking heavily keeps the dough soft enough to bake into pull-apart rolls instead of dense, dry spirals.

A softened-butter filling helps prevent leaks. When butter, brown sugar, cinnamon, and salt are mixed into a paste, the swirl stays more even. The optional spoonful of flour or cornstarch helps bind the filling so it does not immediately run into the bottom of the pan.

Pan size and oven temperature protect the center. A 9×13-inch pan gives 12 rolls enough room to rise while keeping them close enough to stay tender. Baking at 350°F / 175°C gives the center time to finish before the tops over-brown.

For the heavy cream option, the amount is controlled rather than flooded. A moderate pour adds moisture and a gooey finish while keeping the pan from turning soggy at the bottom.

The center roll is the clearest test. Top color helps, but the middle roll tells you when the pan is truly done. Aim for about 190°F / 88°C in the center.

Ingredients You Need

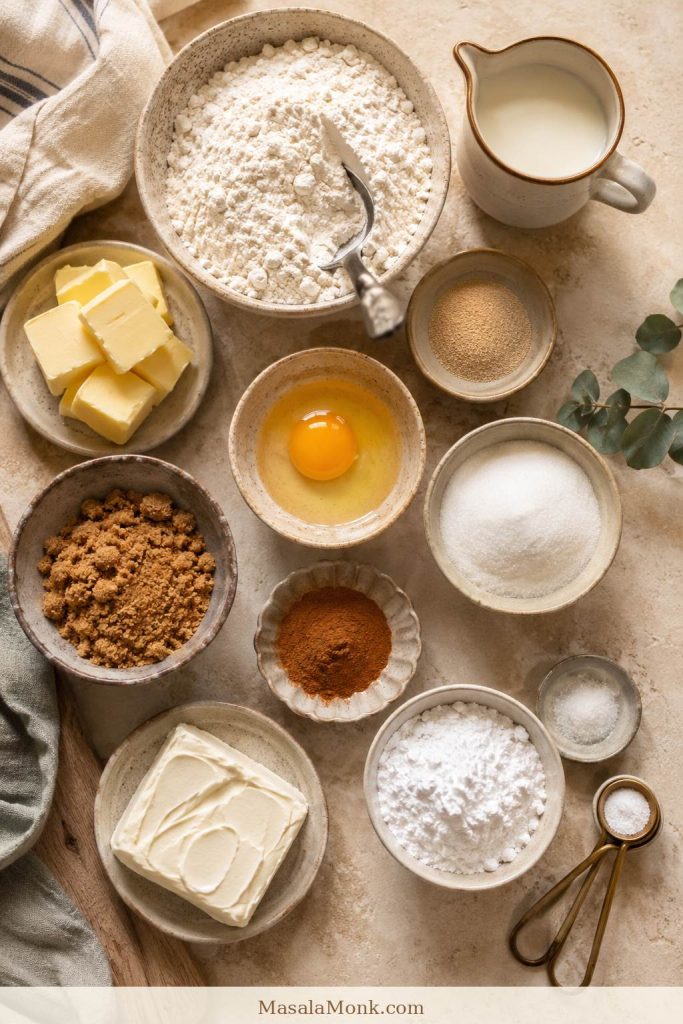
Every good cinnamon roll comes down to three parts working together: dough that rises soft, filling that stays in the swirl, and icing that melts just enough into the warm rolls.

Ingredients for homemade cinnamon rolls including flour, milk, butter, eggs, yeast, sugar, and cinnamon
The dough, filling, and icing are simple pantry ingredients; the texture comes from how they are handled.

Dough Ingredients

The dough uses flour, milk, yeast, sugar, butter, egg, egg yolk, and salt.

Milk makes the dough softer than water. Butter adds richness. The egg and yolk help the rolls bake up tender, while sugar lightly sweetens the dough and helps the yeast work.

Together, they make the kind of dough that bakes up soft enough to pull apart, but strong enough to hold the cinnamon swirl.

Salt is small but important. It balances the sweetness and makes the cinnamon flavor taste fuller.

Filling Ingredients

The filling uses softened butter, brown sugar, cinnamon, and a pinch of salt.

Softened butter is easier to spread and less likely to leak out. Brown sugar gives the filling a deeper, caramel-like sweetness. Light or dark brown sugar both work, though dark brown sugar gives a stronger molasses flavor.

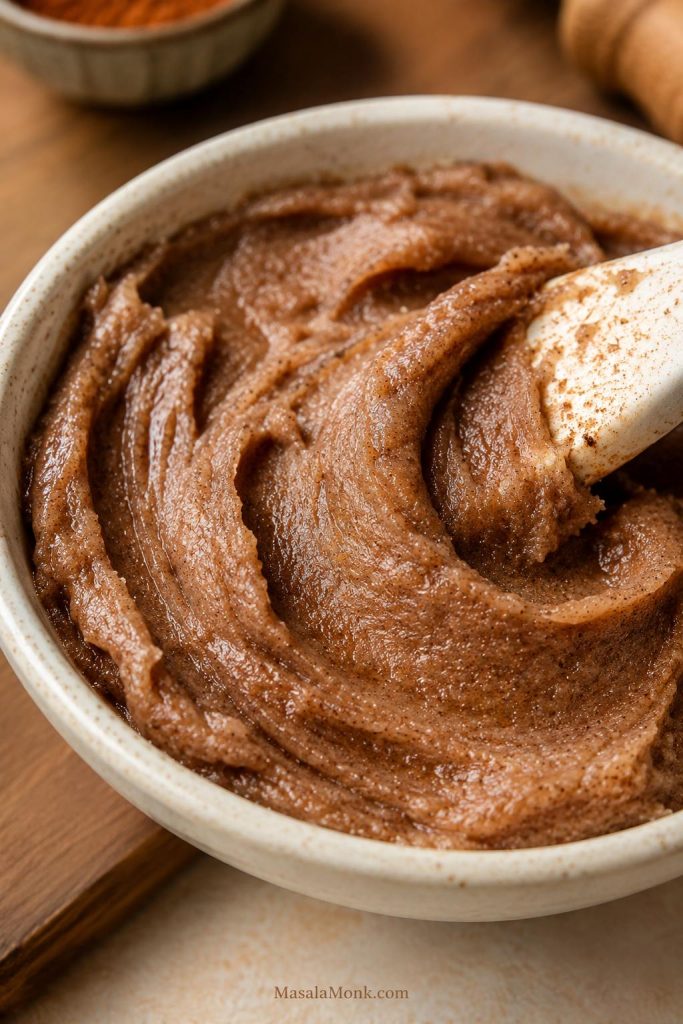
When the filling is right, it should spread like soft cinnamon butter, not pour like syrup.

Brown sugar cinnamon filling mixed with softened butter for cinnamon rolls
Softened butter makes a spreadable cinnamon-sugar paste that is less likely to leak than melted butter.

Icing Ingredients

Cream cheese icing uses cream cheese, butter, powdered sugar, vanilla, milk or cream, and salt.

It gives the icing its tang, while butter makes it smooth. Powdered sugar thickens it, and milk or cream lets you adjust the texture.

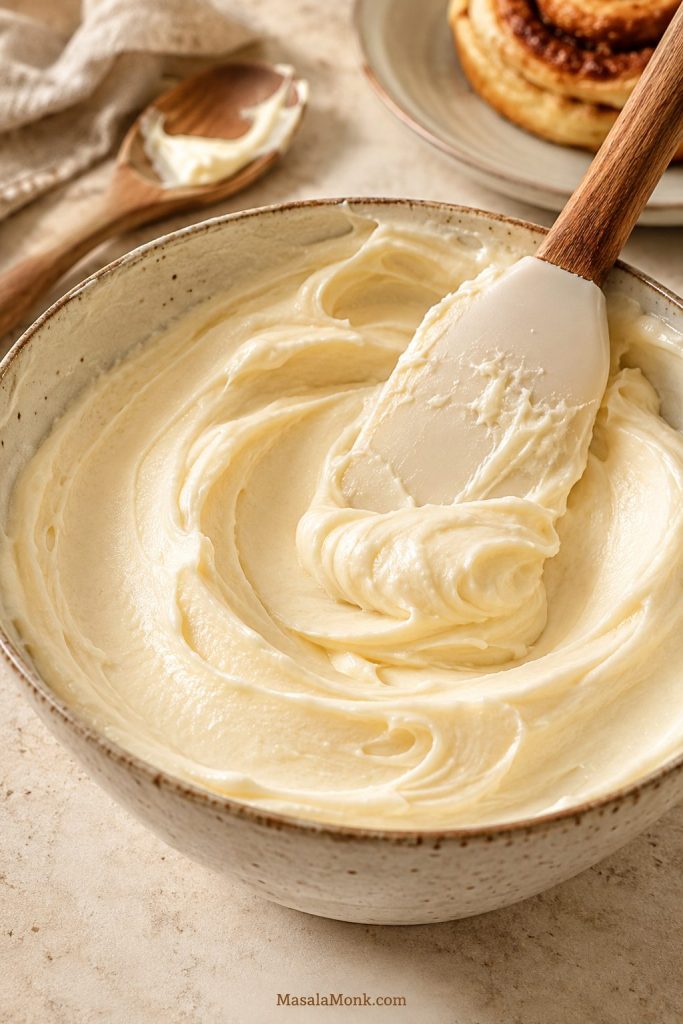
Smooth cream cheese icing for homemade cinnamon rolls
The icing looks right when it is smooth and spreadable, not thin or watery.
Flavor tip: A tiny pinch of salt in both the filling and the icing keeps the rolls from tasting only sweet.

Useful Equipment

You do not need a professional bakery setup for homemade cinnamon rolls, but a few tools make the recipe easier and more reliable.

  • Large mixing bowl or stand mixer: either works; a mixer saves effort, but hand-kneading is fine.
  • 9×13-inch pan: the most reliable size for 12 rolls that bake evenly.
  • Rolling pin: helps roll the dough into an even rectangle.
  • Unflavored dental floss, clean thread, or a sharp knife: gives clean cuts without squashing the spirals.
  • Instant-read thermometer: useful for checking warm milk and the center roll.
  • Foil: helpful if the tops brown before the center is done.
No thermometer? You can still make these. The milk needs to feel warm, not hot. For doneness, gently pull at a seam in the center roll; it should look baked and bread-like, not wet, shiny, or paste-like.

Flour Choice for Cinnamon Rolls

Before you start mixing, flour is the one ingredient worth slowing down for. An over-floured dough is the fastest way to lose that pull-apart cinnamon roll texture.

Bread flour and all-purpose flour both work in this recipe. The choice depends on the texture you like.

Flour Works well for What to expect
Bread flour Taller, bakery-style rolls More structure, slightly chewier texture, good rise
All-purpose flour Plush homemade rolls More tender texture, easy everyday option
Excess flour Dry rolls Heavy dough, dry edges, dense texture
Gluten-free flour Separate gluten-free recipe Not a simple 1:1 swap for this dough

Think of flour as the difference between a roll that tears softly and one that feels heavy. The goal is not a dry, easy-to-handle dough; the goal is a dough that bakes up tender.

Start with the listed amount and give the dough a minute to come together before adding more. If you measure by cups, spoon flour into the cup and level it instead of scooping directly from the bag. A little tackiness is what keeps the finished rolls soft.

Instant Yeast vs Active Dry Yeast

Instant yeast keeps the dough simple because it can be mixed straight in, with no separate proofing step.

Active dry yeast also works. For reliable results, proof it first by stirring it into warm milk with a pinch of sugar. After 5–10 minutes, look for foam on the surface. If it stays flat, the yeast may be old or the milk temperature may be off.

Aim for milk around 105–115°F / 40–46°C. Warm milk helps yeast wake up, while hot milk can damage it and slow or stop the rise. In a cold kitchen, slow movement does not mean failure; the dough just needs more time. Wait for puffiness, not the timer.

How the Dough Feels When It Is Right

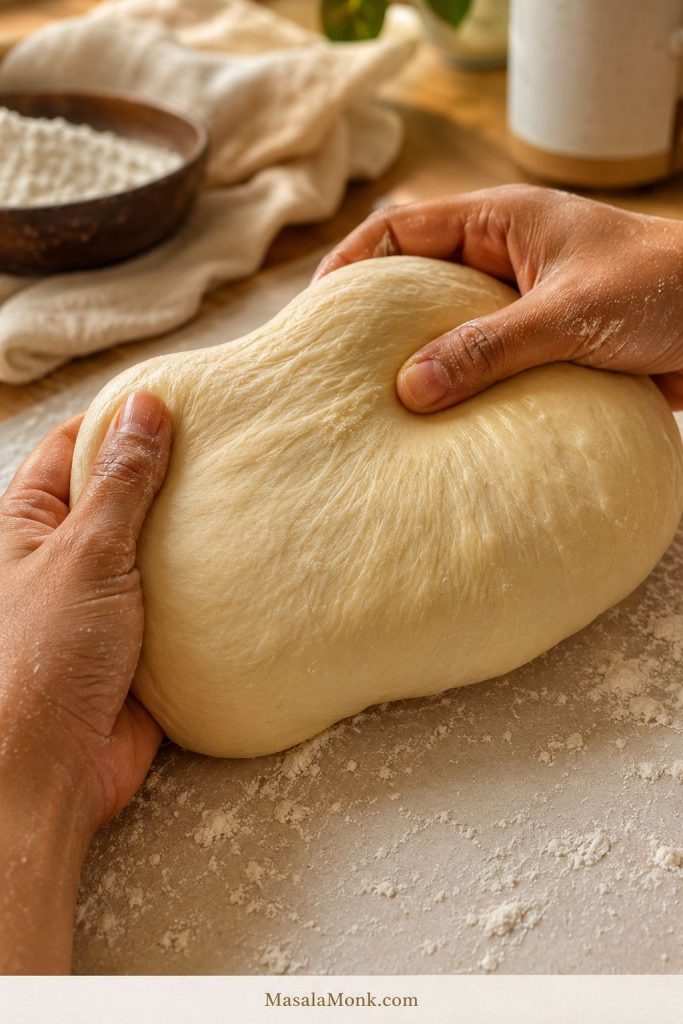
Dough texture is one of the biggest clues in this recipe. A soft, elastic dough gives the rolls their pull-apart texture; a dry, over-floured dough makes them heavy.

Soft elastic cinnamon roll dough after kneading
The ideal dough is smooth, elastic, and slightly tacky, not dry or stiff.
Dough cue What it means What to do
Soft, smooth, slightly tacky Ideal dough Keep going with the recipe
Sticking heavily to hands or bowl Slightly wet Add flour 1 tablespoon at a time only after kneading
Dry, stiff, or tearing Excess flour Stop adding flour and give the dough enough rise time
Tight and shrinking while rolling Gluten needs to relax Rest the dough for 5–10 minutes, then continue
Not rising after 90 minutes Cold kitchen, weak yeast, or overheated milk Move to a warmer spot and wait longer; if there is no movement, the yeast may be inactive

A little tackiness is your friend here. If the dough feels slightly messier than expected, that is usually better than a dough that feels dry and stiff.

Once the dough feels soft and elastic, the recipe gets easier. From here, you are not fighting the dough anymore — you are shaping it into the warm, cinnamon-filled pan you actually came for.

How to Make Cinnamon Rolls Step by Step

The method is simple once you know what to look for. The clock is only a guide; risen dough and a properly baked center matter more than exact minutes.

1. Make the Dough

Warm the milk until it feels comfortably warm, not hot. Combine the milk, yeast, sugar, melted butter, egg, and egg yolk. Add the flour and salt, then mix until a rough dough forms.

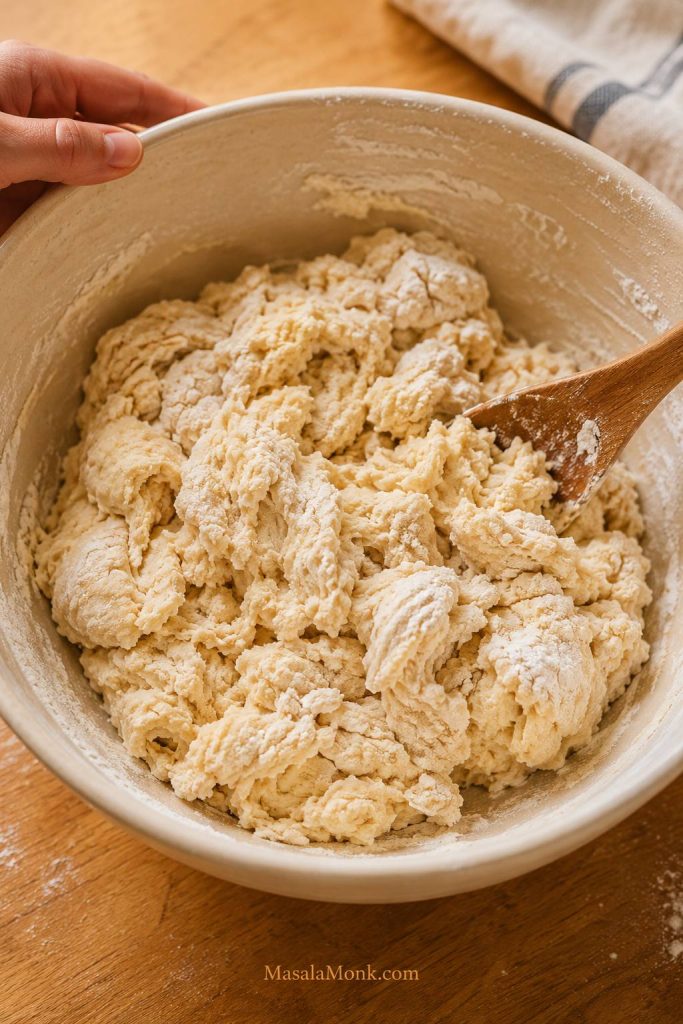
At first, the dough may look shaggy. As it kneads, it will become smoother and more elastic.

Shaggy cinnamon roll dough before kneading
A rough, shaggy dough is normal before kneading; it smooths out as the gluten develops.

2. Knead Until Smooth

Knead by hand for 8–10 minutes, or use a stand mixer for 5–7 minutes on low-medium speed.

Before adding more flour: keep kneading for another minute or two. Enriched dough often looks sticky before it turns smooth and elastic. Add flour only if it is still smearing heavily on the bowl or hands after kneading.

You are aiming for dough that feels soft, stretchy, and slightly tacky — not dry and stiff. This is the moment many bakers reach for extra flour, so pause before you do. If the dough is soft but manageable, you are probably on the right track.

When the dough is ready, it stretches a little before tearing and feels elastic, responsive, and light rather than stiff.

3. Let the Dough Rise

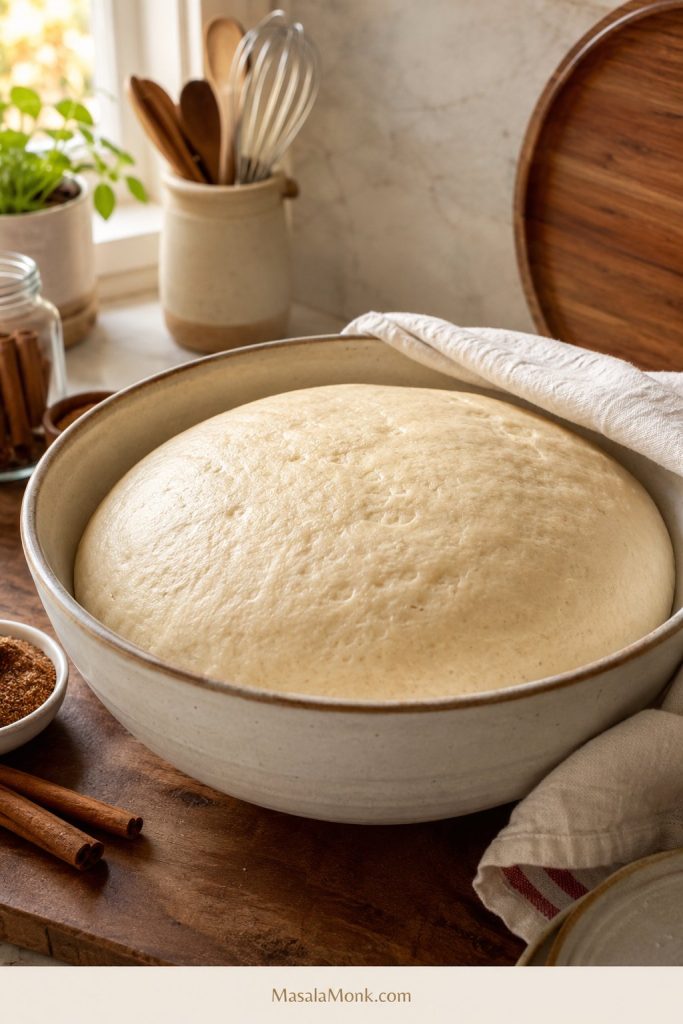
Place the dough in a lightly greased bowl. Cover the bowl with plastic wrap, a damp clean towel, or a lid so the surface does not dry out. Let it rise until doubled. This usually takes 60–90 minutes, but the dough matters more than the clock.

A cold kitchen slows the rise, while a warm kitchen speeds it up. The dough should look airy, expanded, and relaxed before you move on.

Cinnamon roll dough after the first rise, doubled and airy
After the first rise, the dough looks doubled, airy, and soft.

4. Make the Cinnamon Filling

Mix softened butter, brown sugar, cinnamon, and salt into a spreadable paste.

Softened butter keeps the filling thick enough to stay in place. When the filling is hard to spread, let it sit at room temperature for a few minutes. Avoid melting it, because melted butter is more likely to leak out.

5. Roll Out the Dough

Lightly flour the counter and roll the dough into a rectangle about 12×18 inches.

The rectangle does not need perfect corners. Even thickness matters more. If the dough keeps shrinking back, let it rest for 5–10 minutes, then continue rolling.

6. Fill, Roll, and Cut

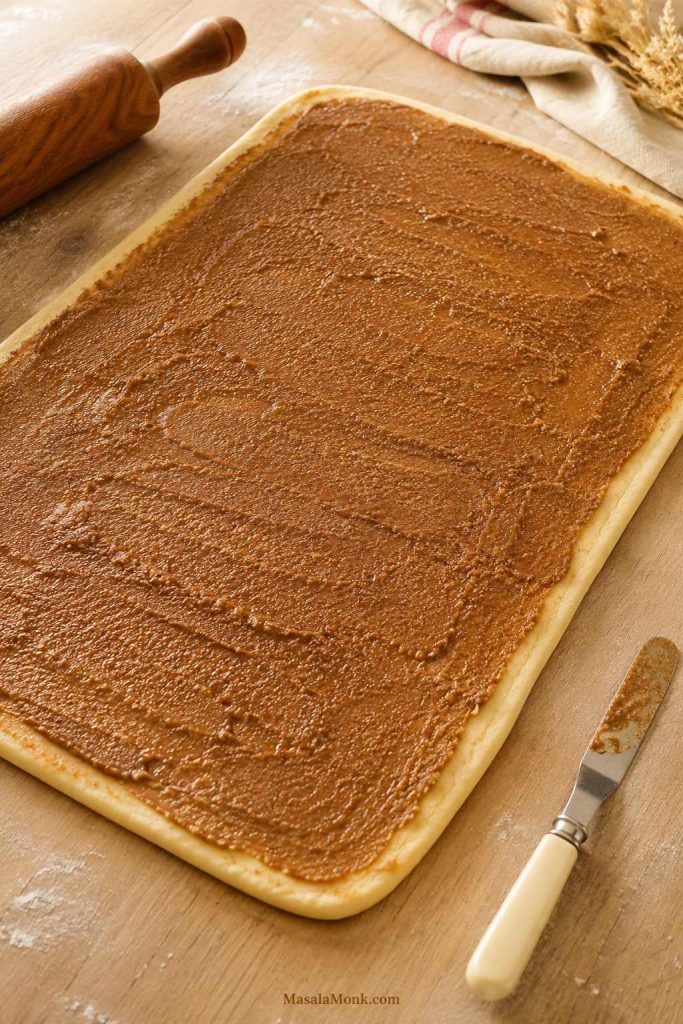
Spread the filling evenly over the dough, leaving a small border along one long edge so the log seals cleanly.

Rolled cinnamon roll dough with brown sugar cinnamon filling spread evenly
Spread the filling evenly and leave a small border so the log seals cleanly.

Roll from the opposite long side into a snug log, then turn the seam down before cutting so the rolls hold their shape.

Cinnamon roll dough rolled into a log before cutting
A snug dough log helps the rolls hold their swirl without compressing the centers.

Cut into 12 even rolls. Dental floss or clean thread gives the neatest cuts, but a sharp knife also works. Each roll will be about 1½ inches thick, which helps the batch bake at the same pace.

Cutting cinnamon rolls with floss for clean even slices
Floss or clean thread cuts neat rolls without squashing the spiral.

The spirals do not need to look bakery-perfect before they rise. Even rolls and a little breathing room matter more than perfect swirls.

7. Let the Rolls Rise Again

Place the rolls in a greased 9×13-inch pan. Cover and let them rise until rounded and lightly touching, about 45–60 minutes.

Cinnamon rolls arranged in a 9x13 pan before the second rise
Leave a little space between the cut rolls so they can expand during the second rise.

If the rolls still look tight and small, give them more time. Look for rolls that have relaxed, expanded, and lightly pressed against each other.

Puffy cinnamon rolls after the second rise ready to bake
Before baking, the rolls look puffy, rounded, and lightly touching.

Once the dough has risen, the hard part is mostly over. From here, you are shaping, waiting for puffiness, and protecting the center of the pan.

Before baking, check this: the rolls need to look puffy, rounded, and lightly touching. This is the point where patience pays off; puffy rolls going into the oven become softer rolls coming out. If you are using heavy cream, warm it first rather than pouring it in cold.

8. Bake

Bake at 350°F / 175°C for 24–28 minutes. Look for lightly golden tops and a center roll at about 190°F / 88°C.

A better doneness moment is not just when the tops turn golden. It is when the center roll gives you a soft, steamy pull instead of a wet doughy tear.

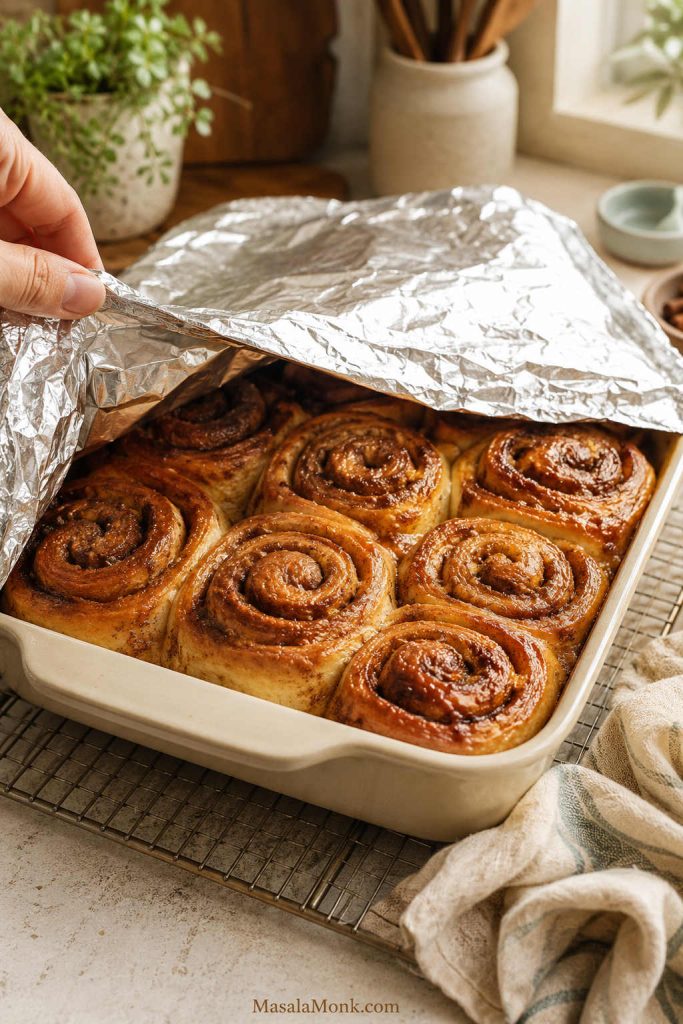
If the tops are golden but the center is not done, cover the pan loosely with foil and bake for a few more minutes. A few extra minutes under foil is better than serving rolls that look golden on top but stay underbaked in the middle.

The kitchen will smell warm and cinnamon-sweet before the tops get deeply browned.

Baked cinnamon rolls before icing with lightly golden tops
The baked rolls look lightly golden before icing, not dark or dry-looking.

9. Ice While Warm

Let the rolls cool for 5–10 minutes before icing. The icing softens into the warm spirals, leaving some creamy pockets on top and some melted sweetness in the cinnamon layers.

Pan Size, Bake Time, and Internal Temperature

The pan affects how quickly the edges brown and how long the center needs to bake. For this recipe, a 9×13-inch pan is the safest default.

Pan Result Note
9×13-inch pan Even bake for 12 rolls Recommended for this recipe
9×9-inch pan Taller, gooier rolls Centers may need more time because the pan is crowded
Two 9-inch round pans Good for gifting or freezing Split the batch evenly
Dark metal pan Faster browning Check early and tent with foil if needed
Glass or ceramic dish Softer edges May need a few extra minutes

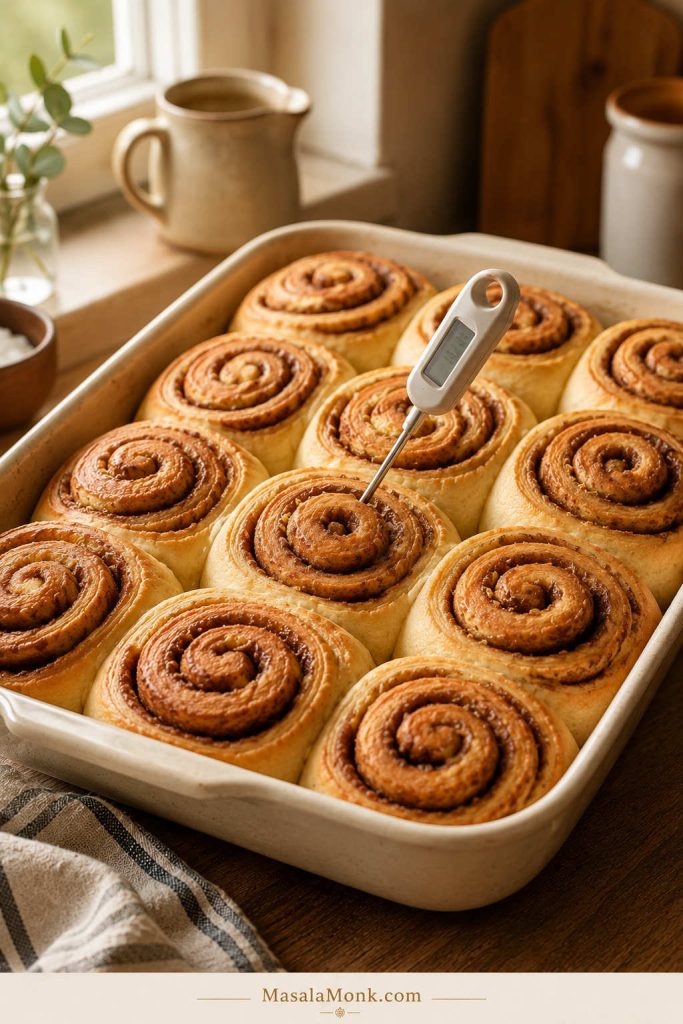
A reliable internal temperature for homemade cinnamon rolls is about 190°F / 88°C in the center roll. Check the middle of the pan, not an edge roll, because the outside rolls bake faster and can look done while the center still needs a few minutes.

Instant-read thermometer checking the center roll for cinnamon roll doneness
Check the center roll, not an edge roll, when using internal temperature as the doneness cue.

If you do not have a thermometer, check the middle roll by gently pulling at a seam. Look for a baked, bread-like center, not shiny, wet, or paste-like. A gooey cinnamon swirl is good; raw-looking dough in the center is not.

If the tops are browning before the center is done, tent the pan loosely with foil and keep baking for a few more minutes. This lets the middle finish without drying out the top.

Gooey Cinnamon Rolls with Heavy Cream

Warm heavy cream is a popular way to make cinnamon rolls richer and more moist. It helps soften the rolls as they bake and can turn some of the cinnamon sugar into a syrupy bottom layer. The key in this recipe is using a moderate amount so the rolls stay gooey without turning soggy.

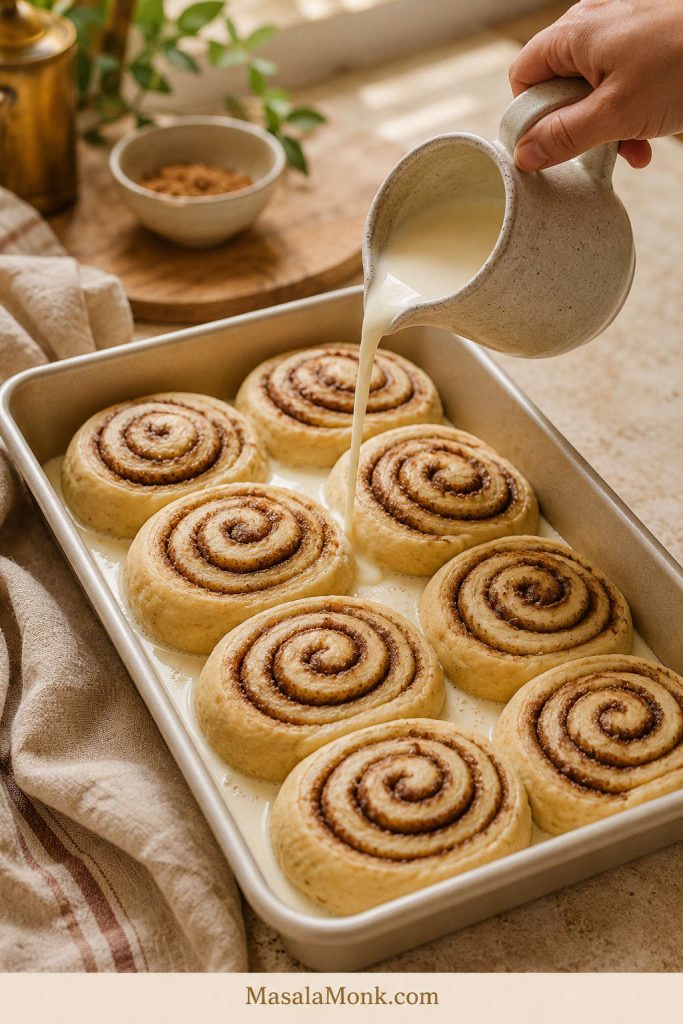
After the second rise, warm ⅓ cup / 80 ml heavy cream until just warm. Pour it around the risen rolls before baking. For extra-gooey rolls, you can use up to ½ cup / 120 ml.

Warm heavy cream poured around cinnamon rolls before baking
Pour warm cream around the risen rolls; the pan needs only a modest pour.
Heavy cream question Answer
Cold cream? No. Warm it first so it does not slow the dough or shock the risen rolls.
Milk instead of cream? Yes, but it will be less rich and less gooey than cream.
Where to pour it Pour it around and lightly over the risen rolls. Do not flood the pan.
Skipping the cream The rolls still work; cream is only for a softer, gooier finish.

This works best in the 9×13-inch pan because the cream can spread evenly around the rolls. When it works well, you get a softer center and a little cinnamon-sugar syrup at the bottom without losing the shape of the rolls.

Cream Cheese Icing for Cinnamon Rolls

Cream cheese icing is the classic finish for homemade cinnamon rolls. It is creamy, tangy, and rich enough to balance the sweet cinnamon filling.

Beat the softened cream cheese and butter together first. Once smooth, add powdered sugar, vanilla, salt, and a little milk or cream. Add the liquid slowly so the icing stays spreadable instead of runny.

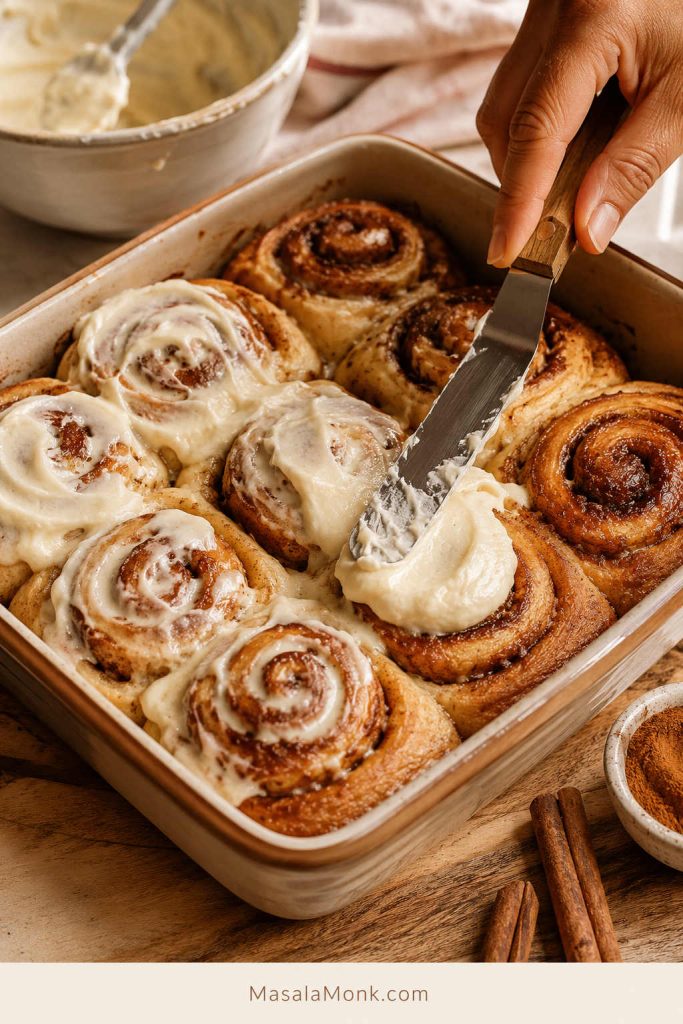
For that bakery-window look, wait longer. If you want icing that slips into the cinnamon seams and makes the center taste almost custardy, ice earlier. When some of the frosting disappears into the warm rolls, that is not a mistake — that is the part people go back for.

Cream cheese icing spread over warm homemade cinnamon rolls
Spread icing while the rolls are warm so some melts into the cinnamon seams.

When to Ice Cinnamon Rolls

Desired result When to ice What happens
Gooey, melted icing About 5 minutes after baking Icing melts into the spirals
Thick, visible frosting 10–15 minutes after baking Icing stays creamier on top
Gooey with visible frosting Thin layer warm, second layer before serving Gooey center with visible frosting

Cinnamon Roll Icing Without Cream Cheese

For a simple vanilla icing, whisk together:

  • 1 cup / 120 g powdered sugar
  • 2 tablespoons / 28 g melted butter
  • 1 teaspoon vanilla extract
  • 1–2 tablespoons milk or cream
  • Pinch of salt

Add more milk for a thinner drizzle or more powdered sugar for thicker icing. This version is sweeter and lighter than cream cheese icing, and it works well when you want a quick glaze. For a fuller butter-based frosting that can be spread or piped, use this Buttercream Frosting Recipe.

Overnight Cinnamon Rolls

Overnight cinnamon rolls are perfect when you want fresh rolls in the morning without making the dough from scratch at sunrise.

This is the easiest way to make cinnamon rolls feel relaxed for brunch: the messy work is done the night before, and the morning is mostly rise, bake, and ice.

In the morning, your job is mostly patience: let the rolls lose their chill, puff up, and then bake into something that feels fresh instead of rushed.

Overnight cinnamon rolls resting in the morning before baking
Overnight rolls need time to lose their chill and puff before baking if they still look tight.

Make the dough, let it complete the first rise, roll it out, add the filling, cut the rolls, and place them in the pan. Cover tightly and refrigerate for 8–12 hours.

Do Overnight Cinnamon Rolls Need to Come to Room Temperature?

Not always. If the rolls already look puffy, relaxed, and lightly touching when they come out of the refrigerator, let them sit while the oven preheats. When they still look tight, cold, and small, give them 45–90 minutes at room temperature before baking. The goal is puffy rolls, not a fixed clock time.

For reliable overnight results:

  • Do not refrigerate the shaped rolls much longer than 12 hours.
  • Let the cold rolls puff before baking instead of putting tight, cold rolls straight into the oven.
  • Bake at 350°F / 175°C for 24–28 minutes, checking the center before serving.

Very long refrigeration can overproof the rolls, making them weaker or syrupy at the bottom. For the softest texture, bake them the next morning.

How to Store, Freeze, and Reheat Cinnamon Rolls

Need Method
Bake tomorrow morning Shape, cover, and refrigerate overnight after the first rise.
Save leftovers Refrigerate cream-cheese-iced rolls and reheat gently.
Freeze for later Freeze baked rolls for the easiest serving later.
Fresh-baked texture Freeze shaped unbaked rolls before the second rise, then thaw and proof before baking.

Room Temperature

Un-iced rolls or rolls with simple vanilla glaze can sit covered at room temperature for 1–2 days if your kitchen is cool.

Refrigerator

Because cream cheese icing is dairy-based, refrigerate iced rolls within 2 hours of serving. They keep for 3–4 days, though the refrigerator can dry them out a little, so reheat gently before eating.

Food safety note: For general leftover guidance, the USDA recommends refrigerating leftovers for 3–4 days: USDA leftovers and food safety.

Freezer

Freeze baked cinnamon rolls with or without icing. Let them cool completely, wrap tightly, and freeze for up to 2 months.

You can also freeze shaped unbaked rolls before the second rise. Thaw overnight in the refrigerator, then let them sit at room temperature until puffy before baking.

Reheating

Reheat individual rolls in the microwave for 10–15 seconds at a time. For a full pan, cover loosely with foil and warm in a low oven.

If a roll seems dry, add a small spoon of milk or cream near the roll before reheating. It helps soften the bread without making it soggy.

Troubleshooting Cinnamon Rolls

If something looks off, do not panic. Cinnamon rolls usually give you clues before they fail: stiff dough, tight-looking rolls, filling that starts to run, or tops that brown before the middle is done.

Even careful bakers get a batch that rises slowly, leaks filling, or browns early. Use these cues to understand what happened and what to change next time.

Quick Cinnamon Roll Fixes

Problem Likely cause Fix
Cinnamon rolls are dry Excess flour, overbaking, dark pan, or not enough icing while warm Weigh flour, keep dough slightly tacky, bake until the middle is set, and tent if tops brown early
Cinnamon rolls are dense Weak yeast, short rise, under-kneading, or cold kitchen Use fresh yeast, knead until smooth, rise until doubled, and let shaped rolls get puffy
Centers are doughy Crowded pan, thick cuts, short second rise, or underbaking Use a 9×13 pan, cut evenly, finish the second rise, and bake until the center is done
Filling leaked out Melted butter, loose roll, filling spread to edge, or overfilled dough Use softened butter paste, leave a border, roll snugly, and place seam side down
Rolls did not rise Old yeast, hot milk, or cold room Use fresh yeast, keep milk warm not hot, and give dough more time in a warm spot
Icing disappeared Rolls were very hot Wait 10–15 minutes for visible frosting or use a thin warm layer plus a second layer
Centers popped up Tight rolling or a small pan Roll snugly but gently, and use a 9×13 pan
Bottoms are soggy Heavy cream overload, underbaking, or overproofing overnight Use less cream, bake until the center is done, and avoid very long refrigeration

Use the table for a quick diagnosis, then read the notes below for the problems that most often affect texture.

The good news: most of these problems are easy to prevent next time once you know the cue to watch for.

Dry Cinnamon Rolls

Dry rolls usually mean the dough was over-floured or the pan baked too long. Keep the dough soft and slightly tacky after kneading.

A dark pan can also brown the edges quickly. If the tops or edges are browning before the center is done, cover the pan loosely with foil and keep baking.

Cinnamon rolls tented with foil when tops brown before the center is done
Loosely tent the pan with foil if the tops brown before the center finishes baking.

Doughy Middle in Cinnamon Rolls

The center rolls bake last. Crowded rolls, thick cuts, or an early pull from the oven can leave the middle doughy.

Check the center of the pan instead of relying only on the edge rolls. A center temperature of about 190°F / 88°C is the clearest sign that the pan is done.

Cinnamon roll center showing a baked interior with gooey cinnamon swirl
A fully baked center looks bread-like and soft with gooey cinnamon, not wet raw dough.

Filling Leaking Out

The butter may have melted, or the dough may have been rolled loosely. A softened-butter filling paste stays in place better.

Leaving a small border along one long edge also helps seal the log.

Rolls Not Rising

Old yeast, overheated milk, or a cold room can slow the rise. When the dough is slowly expanding, give it more time. No movement at all usually means the yeast was probably inactive.

Cinnamon Roll Variations

These are flavor and format ideas, not full conversion formulas. The base dough is designed for classic soft yeast cinnamon rolls, so bigger changes may need their own tested recipe.

Pumpkin Cinnamon Rolls

Add pumpkin puree and warm spices to the dough or filling, then finish with maple cream cheese icing. Pumpkin adds moisture, so use a tested pumpkin version or adjust flour carefully.

Apple Cinnamon Rolls

Add finely chopped apples or a controlled amount of apple pie filling. A heavy apple layer can make the centers wet, so keep the filling modest. For homemade filling, use this Apple Pie Filling Recipe and keep the amount modest inside the rolls.

Sourdough Cinnamon Rolls

Use active sourdough starter or discard for a tangier dough and longer fermentation. Sourdough timing depends on starter strength and room temperature. If you are still building your starter, start with this Sourdough Starter Recipe.

For more starter-based bakes, this Sourdough Recipe guide covers loaves, rolls, buns, and bagels.

Cinnamon Roll Cookies

For cookies, use cinnamon sugar swirl flavor in a buttery cookie dough. This gives you cinnamon roll flavor without yeast or rise time, but it will not have the soft pull-apart crumb of this recipe.

Puff Pastry Cinnamon Rolls

Puff pastry works when you want fast, flaky cinnamon rolls instead of soft yeast rolls. Bake them spaced apart, not crowded like this dough, because puff pastry needs room to expand.

Vegan Cinnamon Rolls

For vegan cinnamon rolls, use plant-based milk and butter, and replace the egg carefully rather than simply leaving it out. This Flax Egg guide explains the classic flaxseed meal ratio for vegan baking, though a fully vegan cinnamon roll still needs its own dough balance.

Cinnamon Rolls vs Cinnamon Buns vs Cinnamon Scrolls

Whatever you call them — cinnamon rolls, cinnamon buns, or cinnamon scrolls — the craving is usually the same: soft spiral dough, warm cinnamon sugar, and something sweet on top.

In the US, “cinnamon rolls” is the most common term. “Cinnamon buns” may mean the same thing, though some versions include sticky toppings, nuts, or caramel. “Cinnamon scrolls” is common in some regions outside the US.

For this recipe, the method is the same: soft yeast dough, cinnamon sugar filling, spiral shape, and icing or glaze.

Shortcut Cinnamon Roll Questions

Yeast-Free Cinnamon Rolls

You can, but the texture changes. Yeast gives these rolls their fluffy, stretchy, pull-apart crumb. No-yeast cinnamon rolls are faster, but they usually bake up more like soft biscuits or scones.

For these bakery-style rolls, yeast is worth using. If you want something faster, a biscuit-style cinnamon roll is a better direction, but it will not have the same pull-apart crumb.

Using Canned Cinnamon Rolls Instead

Canned cinnamon rolls are great when you want a shortcut brunch or dessert. They will not have the same homemade yeast-dough texture, but they can still be turned into a cozy bake with fruit filling, cream, or extra cinnamon sugar.

For a quick dessert using refrigerated rolls, try this Apple Cinnamon Roll Bake with Apple Pie Filling. It is better for shortcut baking, while this recipe is better when you want homemade cinnamon rolls from scratch.

What to Serve with Cinnamon Rolls

At brunch, cinnamon rolls work well beside something simple and lightly sweet. Serve them with coffee, fruit, eggs, yogurt, or something cool and café-style like an Iced Matcha Latte. With a sweeter spread, keep the sides fresh and light; for a more balanced breakfast, add something savory.

Cinnamon rolls served for brunch with coffee, fruit, and a simple breakfast side
Keep brunch sides simple and fresh so the cinnamon rolls stay the centerpiece.

Frequently Asked Questions

All-Purpose Flour for Cinnamon Rolls

Absolutely. All-purpose flour gives a softer homemade texture and works well when extra flour is kept under control.

Is bread flour better for cinnamon rolls?

Bread flour gives taller, slightly chewier rolls with more structure. Use it if you want a more bakery-style result.

Active Dry Yeast Instead of Instant Yeast

Use the same amount, but proof active dry yeast in warm milk with a little sugar for 5–10 minutes before mixing the dough.

Milk Temperature for Yeast

Aim for milk around 105–115°F / 40–46°C. It should feel warm, not hot.

Using 2% Milk Instead of Whole Milk

Whole milk gives a richer dough, but 2% milk works. Avoid skim milk if you want the softest texture.

Internal Temperature for Cinnamon Rolls

Aim for about 190°F / 88°C in the center roll. This helps confirm the middle is baked through even if the tops already look golden.

How do I tell if cinnamon rolls are done without a thermometer?

Gently pull at a seam in the middle roll. Look for a baked, bread-like center, not wet, shiny, or paste-like.

Dry Cinnamon Rolls

They were likely over-floured, baked too long, or browned quickly in a dark pan. Keep the dough soft and avoid pulling the pan before the middle is done.

Dense Cinnamon Rolls

Dense rolls usually come from weak yeast, short rise time, under-kneading, or excess flour. Let the dough double and let the shaped rolls puff before baking.

Doughy Middle

They may be underbaked, crowded, cut thick, or not risen enough. The center should look set before serving.

Preventing Doughy Centers

Use a 9×13-inch pan for 12 rolls, cut the rolls evenly, let them complete the second rise, and check the center roll before pulling the pan from the oven.

Cinnamon Rolls Popping Up in the Center

The log may have been rolled tightly, the pan may have been crowded, or the rolls may have needed more room to expand.

Adding Heavy Cream Before Baking

You can. Warm heavy cream makes the rolls richer and gooier. Use ⅓ cup / 80 ml for a softer pan or up to ½ cup / 120 ml for extra-gooey rolls.

Overnight Cinnamon Rolls

For overnight cinnamon rolls, make the dough, complete the first rise, shape the rolls, cover the pan tightly, and refrigerate for 8–12 hours. In the morning, let the rolls sit until puffy if they still look tight and cold, then bake.

Freezing Cinnamon Rolls

Freezing works well. Baked rolls can be frozen after cooling, or you can freeze shaped unbaked rolls before the second rise. Thaw and let them get puffy before baking.

Doubling This Recipe

To double the recipe, use two 9×13-inch pans and rotate them if your oven has hot spots.

Choosing Cinnamon Roll Icing

Cream cheese icing is the classic choice because it is creamy, tangy, and rich. A simple vanilla glaze without cream cheese also works.

Icing Without Cream Cheese

For a simple glaze, mix powdered sugar, melted butter, vanilla, milk or cream, and a pinch of salt. Add more milk for a thin glaze or more powdered sugar for thicker icing.

No Stand Mixer Method

A stand mixer helps, but hand kneading works. Mix the dough in a large bowl and knead for 8–10 minutes, until it turns smooth and stretchy.

Final Tips for Soft, Gooey Cinnamon Rolls

Great cinnamon rolls are not about rushing the dough or baking until the tops are dark. Once you understand the cues, homemade cinnamon rolls stop feeling like a gamble. You are not just waiting for a timer; you are watching the dough, the rise, and the center of the pan.

The goal is gooey, not doughy: fluffy edges, cinnamon-rich swirls, creamy icing, and a middle that pulls apart warm instead of feeling heavy, wet, or underbaked.

Did you make these? Leave a comment with the flour you used, whether you baked them same-day or overnight, and whether you added the warm cream. Those details help other readers choose their own cinnamon roll path.