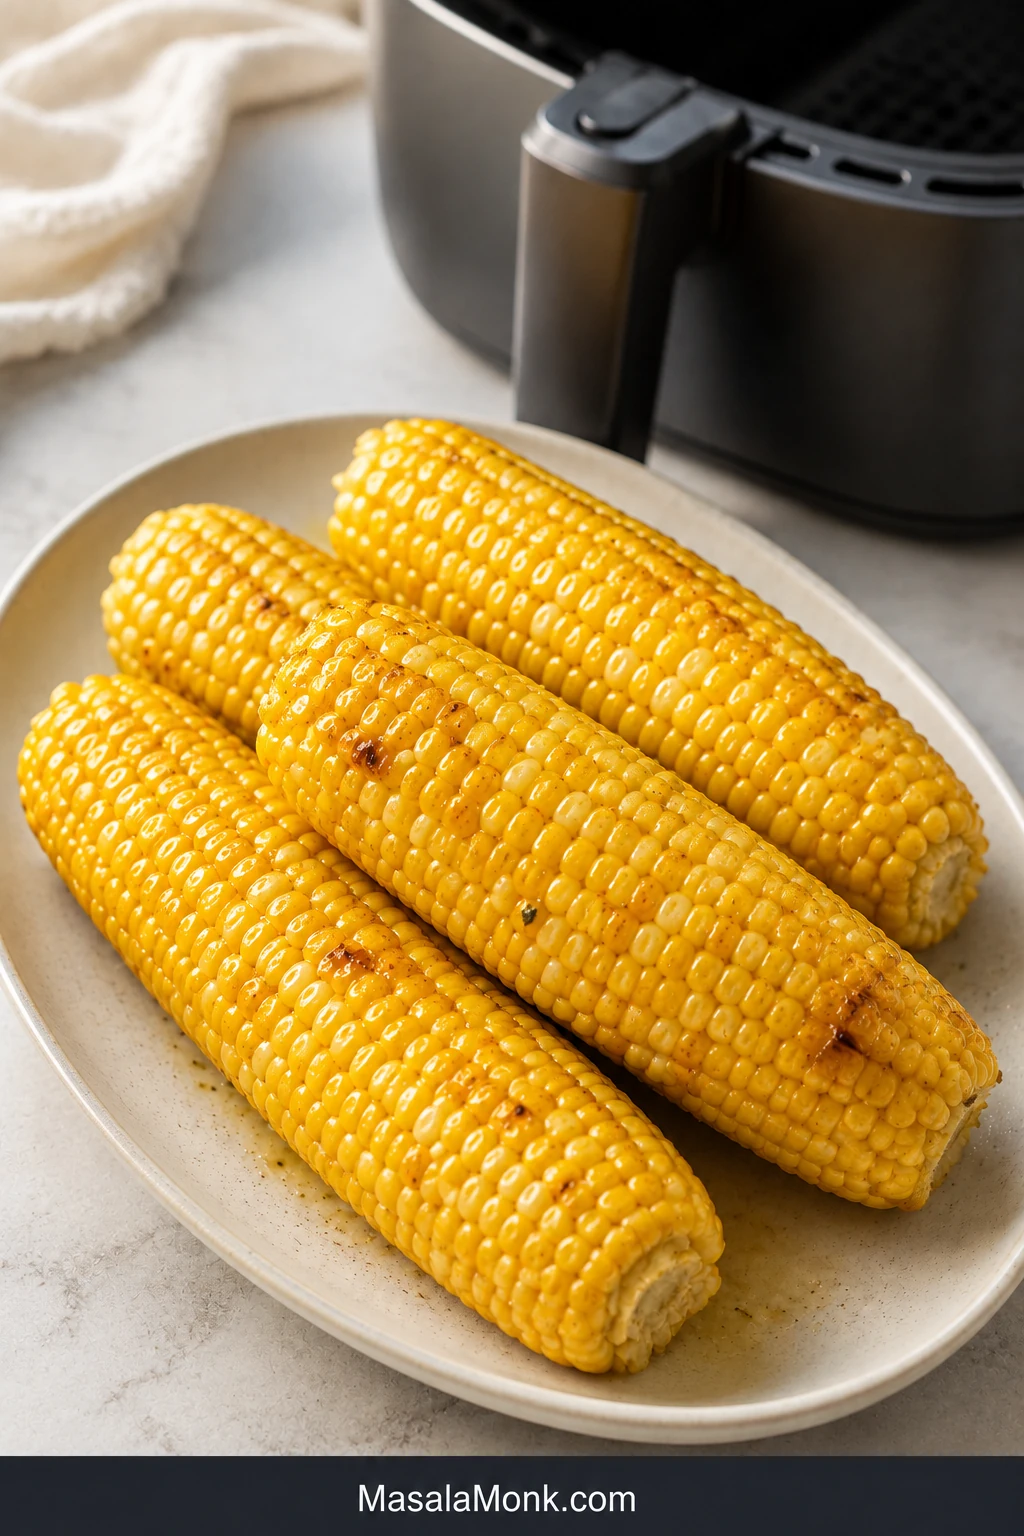
Air fryer corn on the cob should be one of the easiest sides you make all summer. You can skip the pot of boiling water, leave the grill unlit and cook only the number of ears dinner actually needs.
The confusing part is the timer. One recipe says six minutes, another says twelve, and a third keeps the corn cooking for nearly twenty. Thick ears may still feel firm after a fast recipe, while slim ears can turn wrinkled if you wait too long for dramatic black spots.
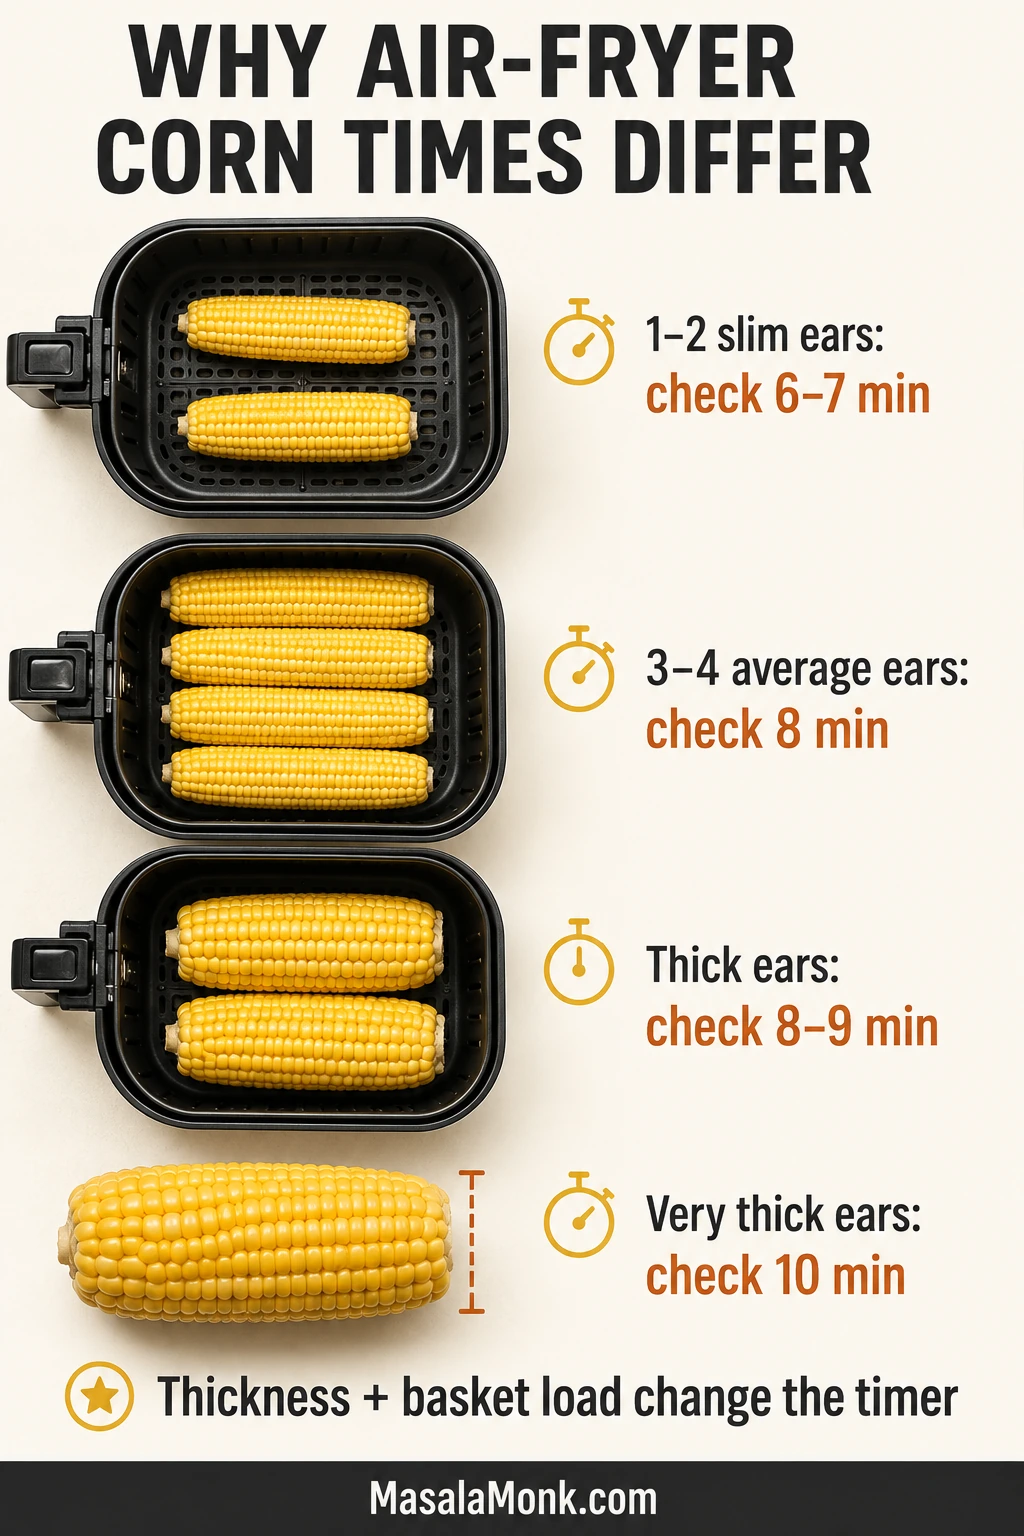
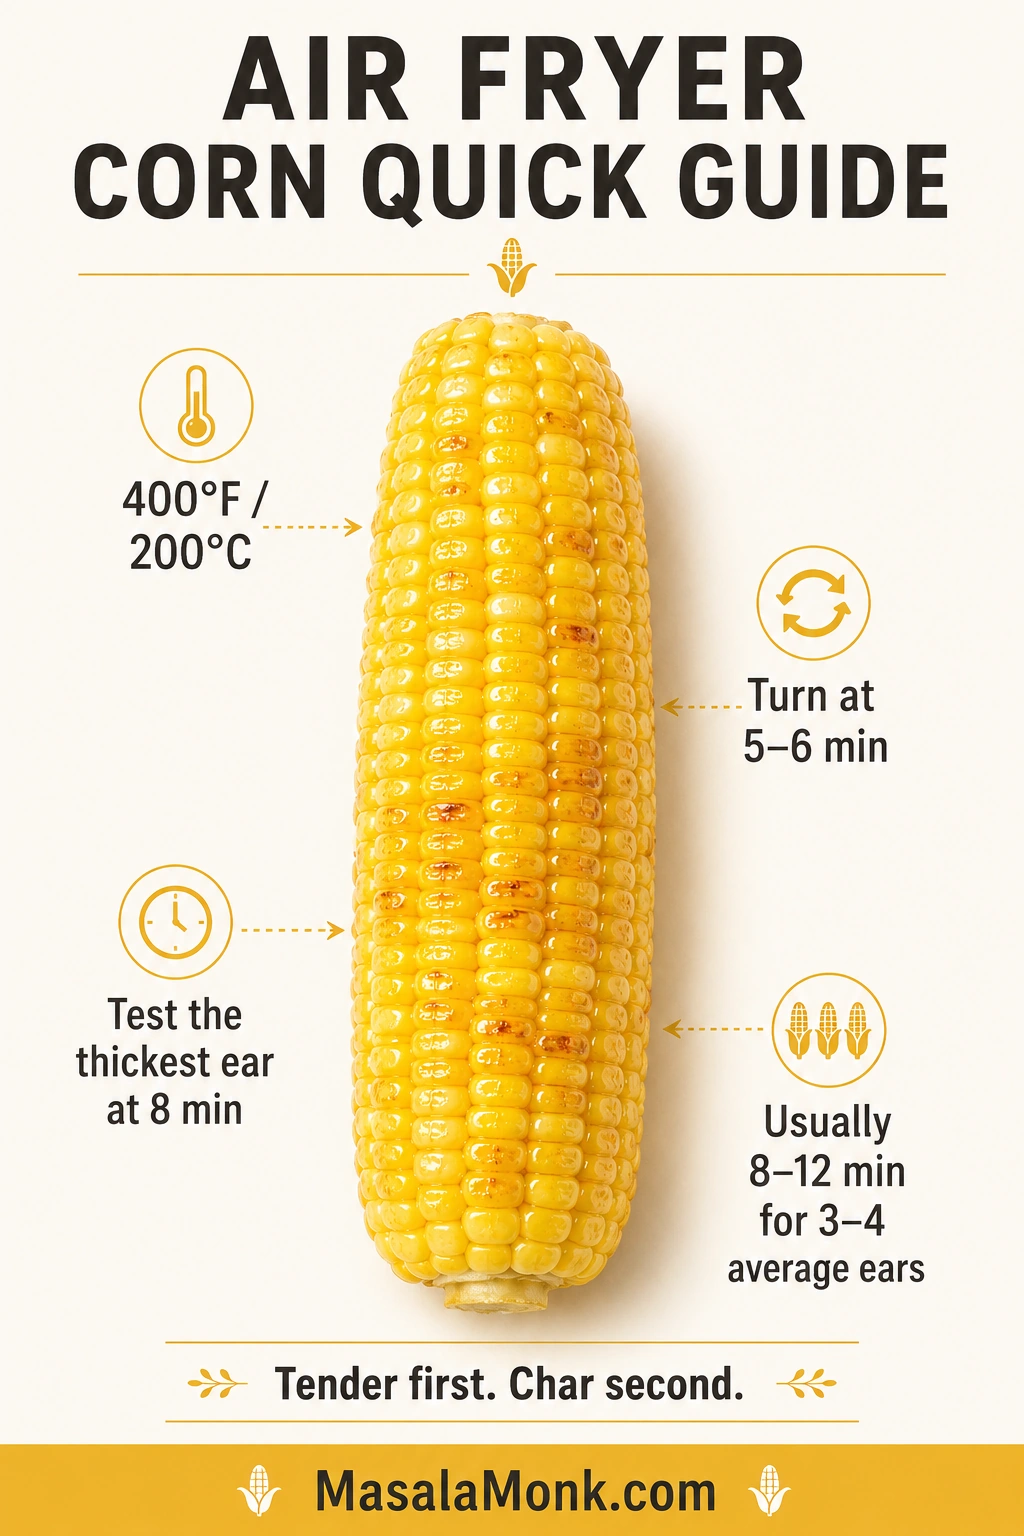
Air fry three or four average-thickness ears at 400°F / 200°C for 8–12 minutes, turning once. Test the thickest ear at eight minutes; one or two slim ears may be ready around 6–7 minutes.
The MasalaMonk rule: tenderness decides when the corn is cooked; extra time decides how deeply browned and charred it becomes.
Once a pierced kernel gives with gentle resistance and beads with juice, the ear can leave the basket. Add colour afterward, one minute at a time, for up to 3 extra minutes. Brush on the butter at the end so it melts between the hot rows instead of scorching beside the heating element.
Inspect the broad centre rows rather than the tapered tip, since the smaller end can colour and dry sooner.
Air Fryer Corn on the Cob Recipe
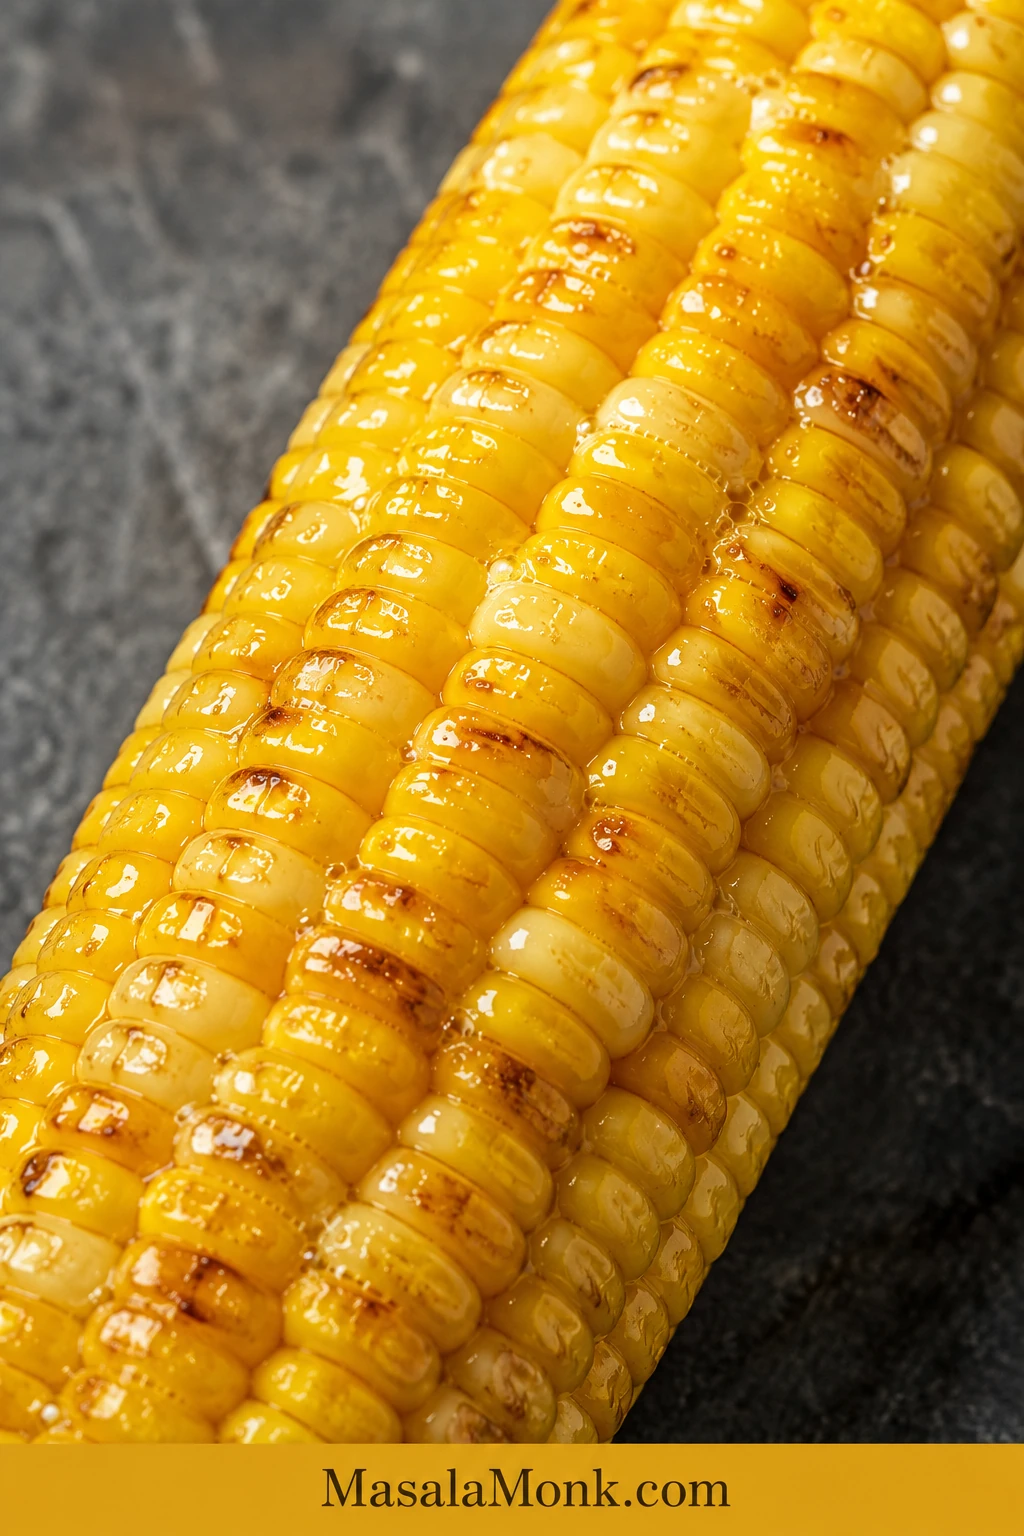
Fresh sweet corn with juicy kernels and lightly blistered edges. Check the thickest ear early and remove each one as soon as it becomes tender.
PrepAbout 5 minutes
Cook8–12 minutes
TotalAbout 13–17 minutes
Yield4 side servings
Temperature400°F / 200°C
First Check8 minutes
Want deeper roasted colour? Allow another 1–3 minutes after the kernels are tender.
Ingredients
For the Corn
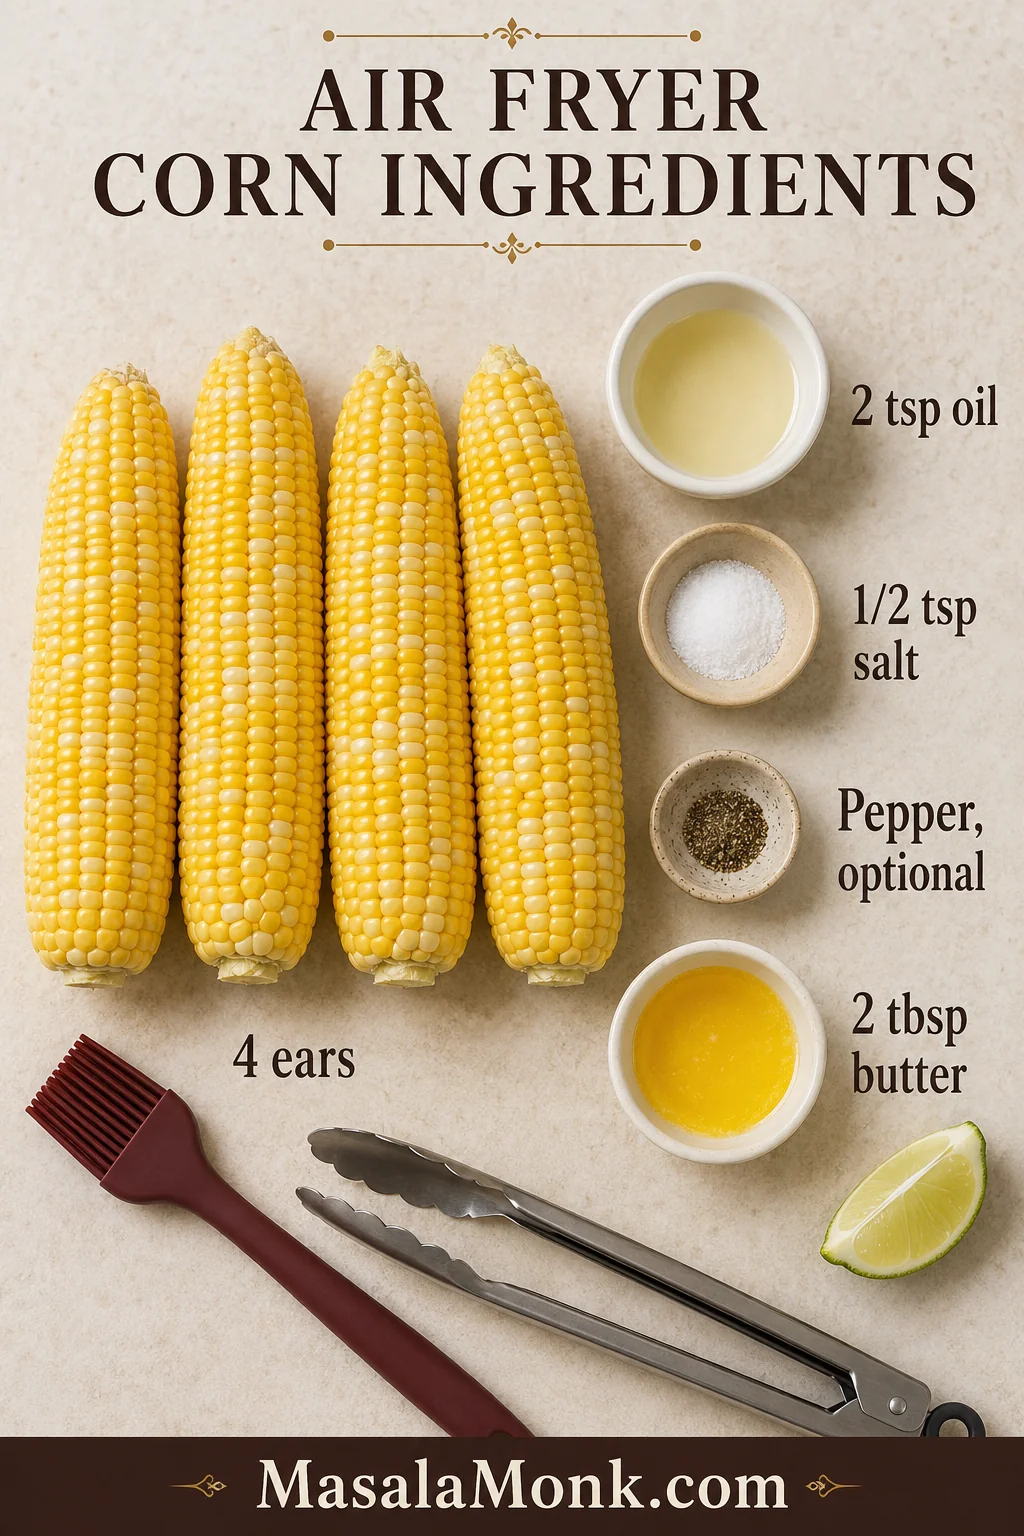
4 average-thickness ears of fresh sweet corn
2 teaspoons neutral oil or olive oil
½ teaspoon fine salt, about 3 g
¼ teaspoon black pepper, optional
For Serving
2 tablespoons unsalted butter, melted, 28 g / 1 oz
Lemon or lime wedges, optional
Additional salt and pepper, only after tasting
Properly oiled corn should have a faint sheen, not visible droplets; excess fat can pool between the rows instead of improving browning.
Equipment
Basket-style air fryer large enough to hold the corn in one layer
Tongs
Small bowl
Pastry or silicone brush
Knife and cutting board when the ears need trimming or halving
Method
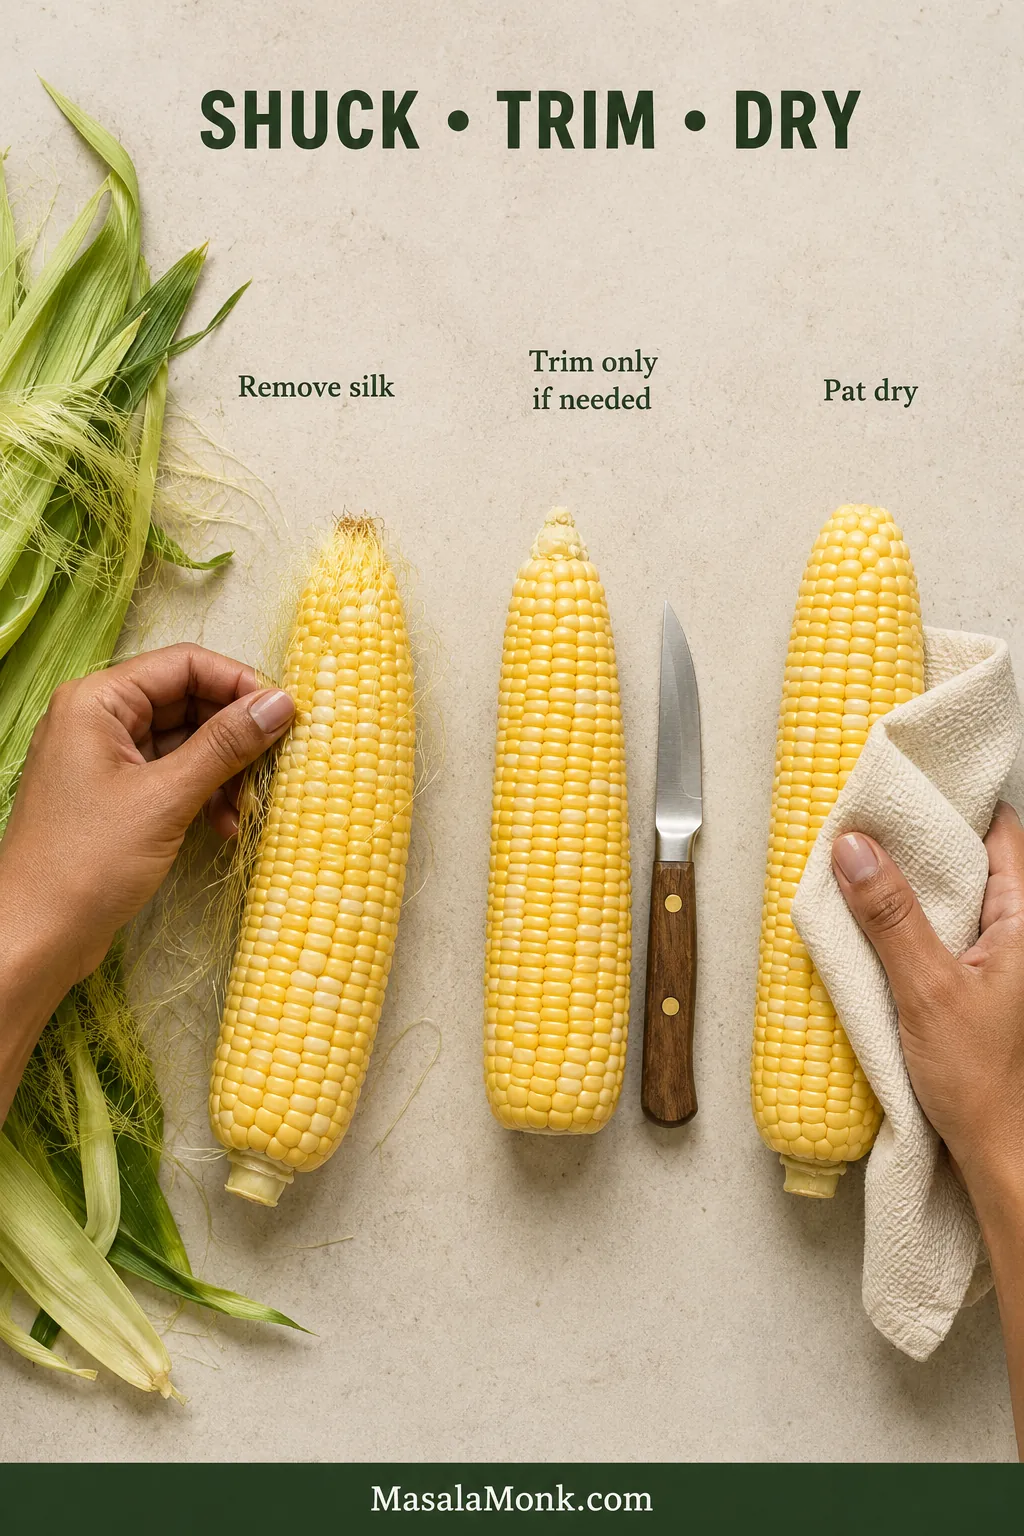
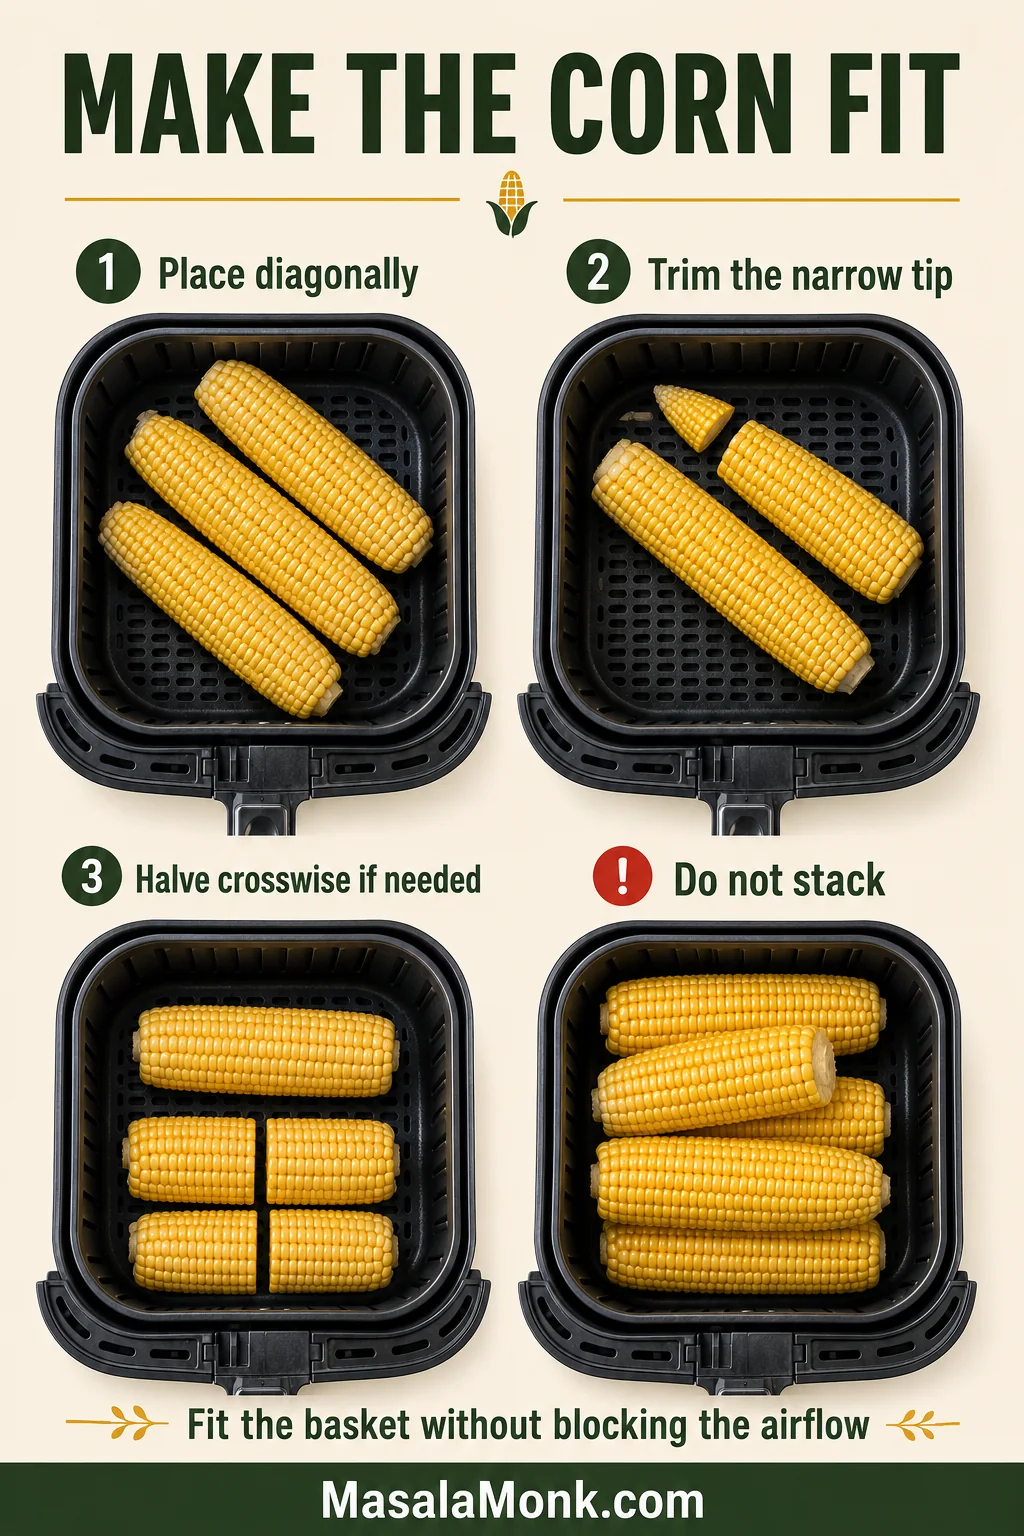
Prepare the corn. Remove the husks and silk. Trim the narrow tip or halve the ears only when needed to fit. Pat the kernels dry.
Preheat if recommended for your model. Heat the air fryer to 400°F / 200°C for up to 3 minutes. Prepare the ears while the basket heats.
Season lightly. Brush the ears with oil until they look lightly glossy rather than wet. Add the salt and optional pepper.
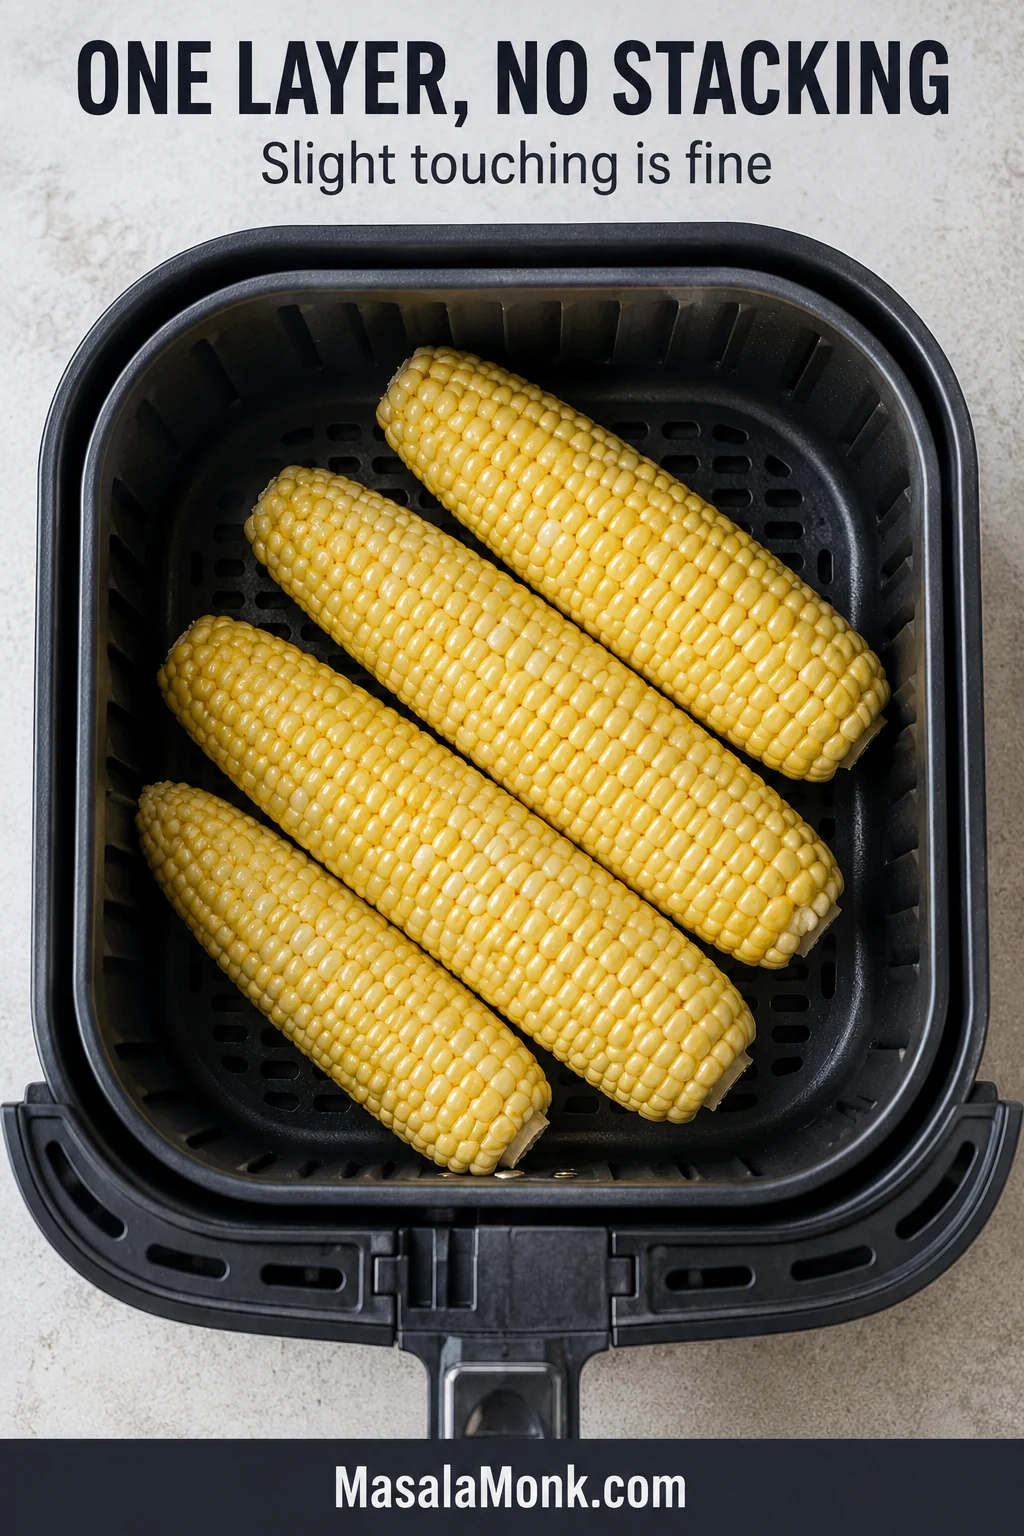
Arrange the basket. Place the corn in one layer. A little touching is fine, but do not stack the ears or force them close to the upper element.
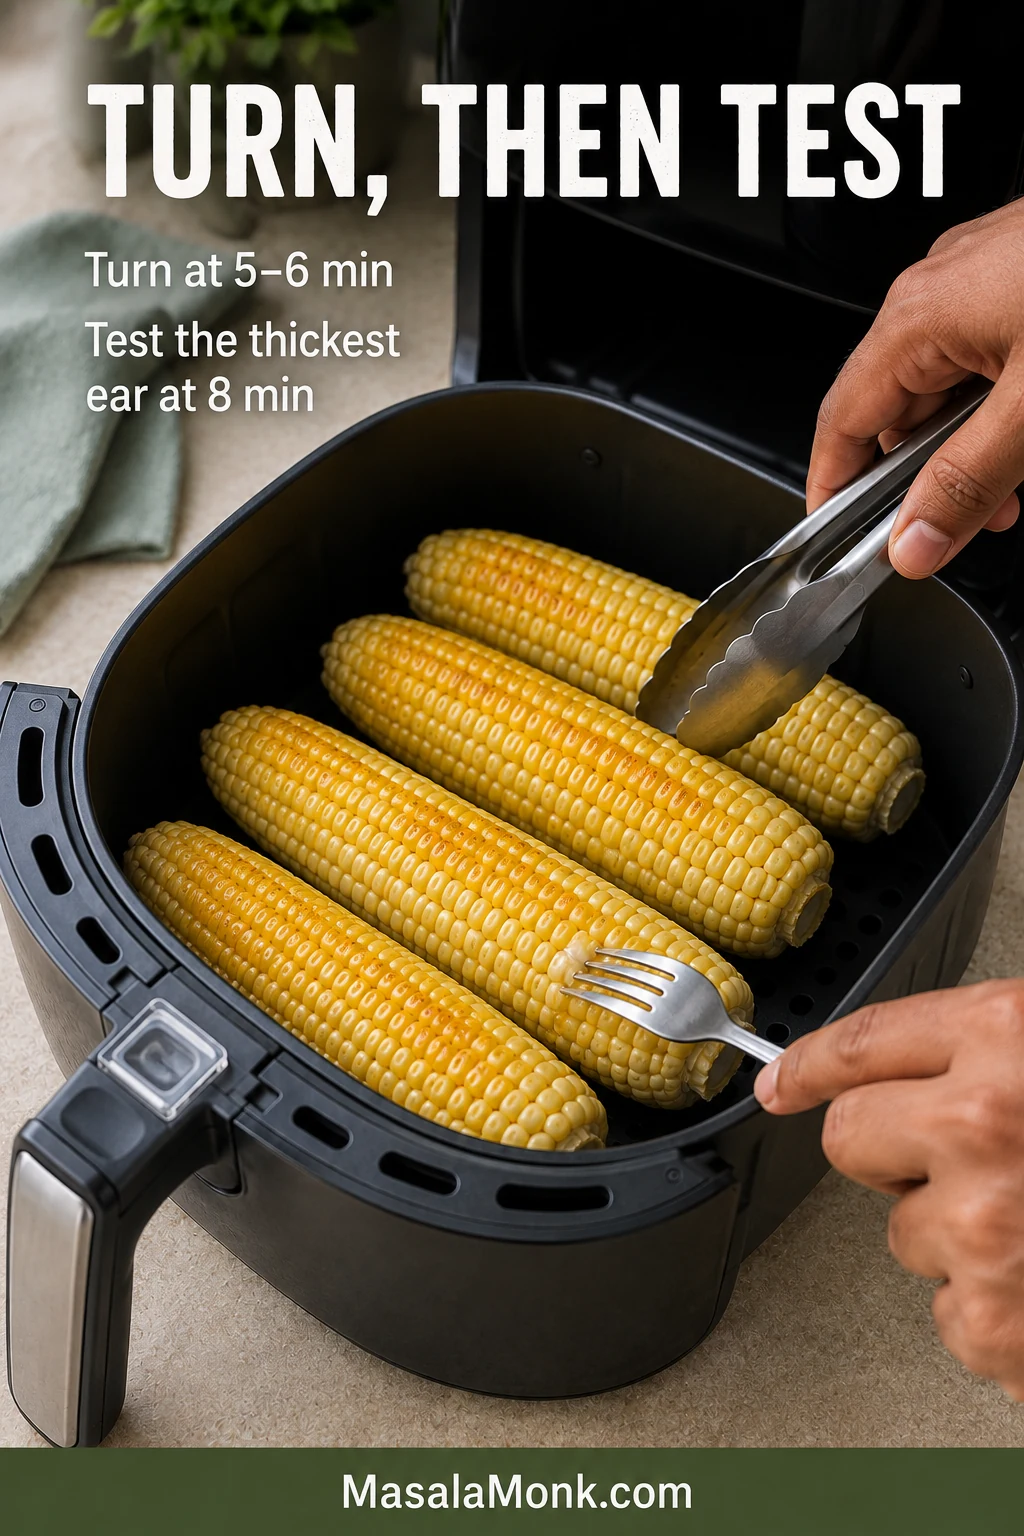
Air fry. Cook at 400°F / 200°C and turn or roll the ears after 5–6 minutes.
Test the thickest ear. At 8 minutes, pierce a kernel near the middle. Continue until the kernel looks full, releases a little juice and offers only gentle resistance.
Choose the colour. Once tender, cook for another minute at a time when you want darker roasted patches. Stop after 3 additional minutes.
Serve hot. Brush with melted butter, taste and add more seasoning only as needed.
Recipe notes:
Cooking only 1–2 slim ears? Start checking at 6–7 minutes.
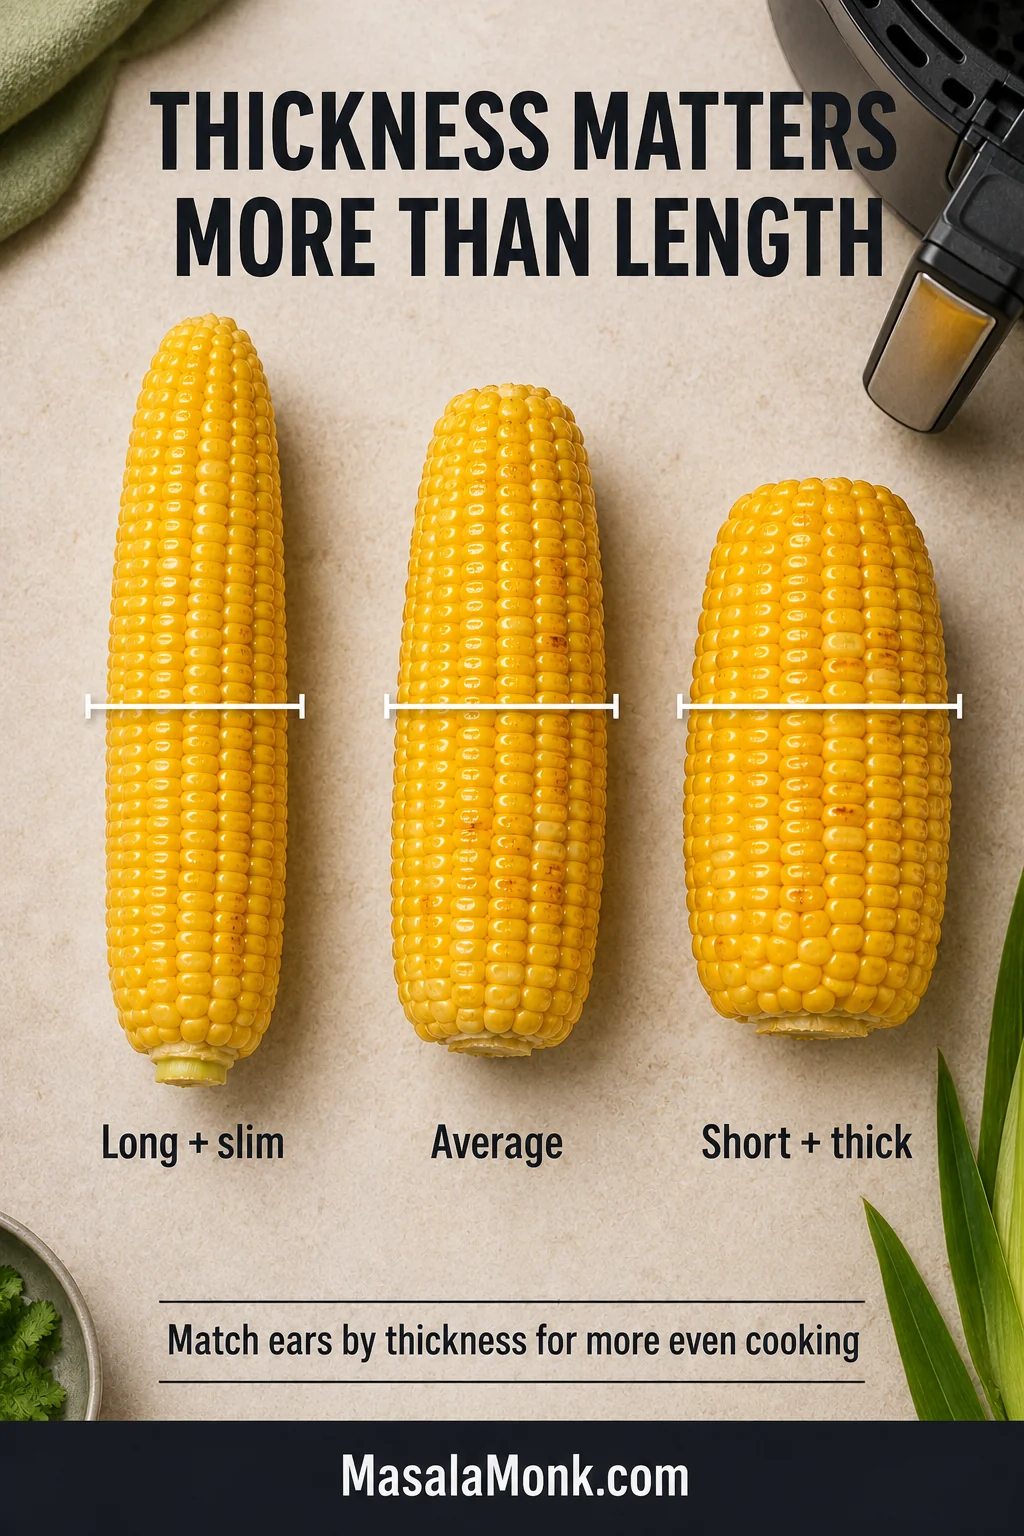
Matching ear thickness is more useful than matching length.
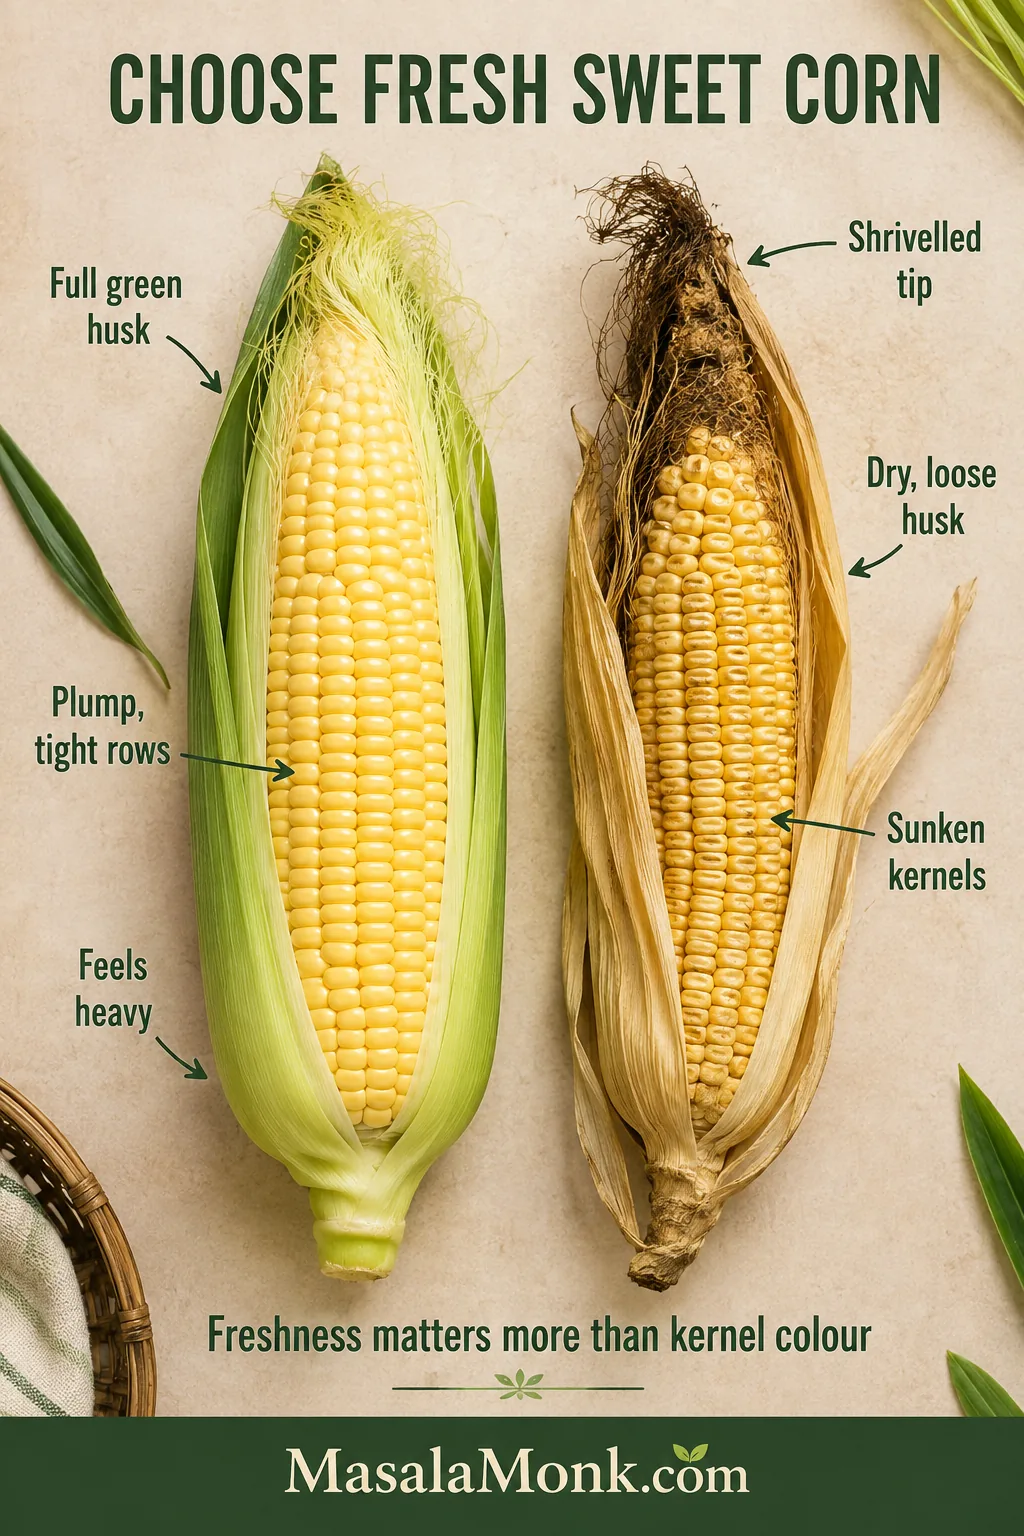
Yellow, white and bicolour sweet corn all work. Freshness matters more than kernel colour.
Kosher salt crystals vary by brand, so begin lightly and adjust after adding butter.
For three or four average ears, air fry at 400°F / 200°C for 8–12 minutes. Turn at 5–6 minutes and test the thickest ear at 8.
Air fryers vary, so treat those times as checking points rather than guaranteed finishing times. Ear thickness and basket load explain most of the variation; if you are unsure what “tender” should look and feel like, use the visual doneness cues.
The listed minute starts the check; the thickest ear’s texture determines when the cook ends.
How to use this table: Start with the listed first-check time, test the thickest ear and continue only until its kernels are tender.
Air fryer corn cooking times by ear thickness and basket load
Your basket
First check
Typical range at 400°F / 200°C
1–2 slim ears
6–7 minutes
7–10 minutes
3–4 average-thickness ears
8 minutes
8–12 minutes; a closely fitted basket often lands near 10–12
1–2 noticeably thick ears
8–9 minutes
10–12 minutes
Very thick ears
10 minutes
12–15 minutes
How to Tell When the Corn Is Done
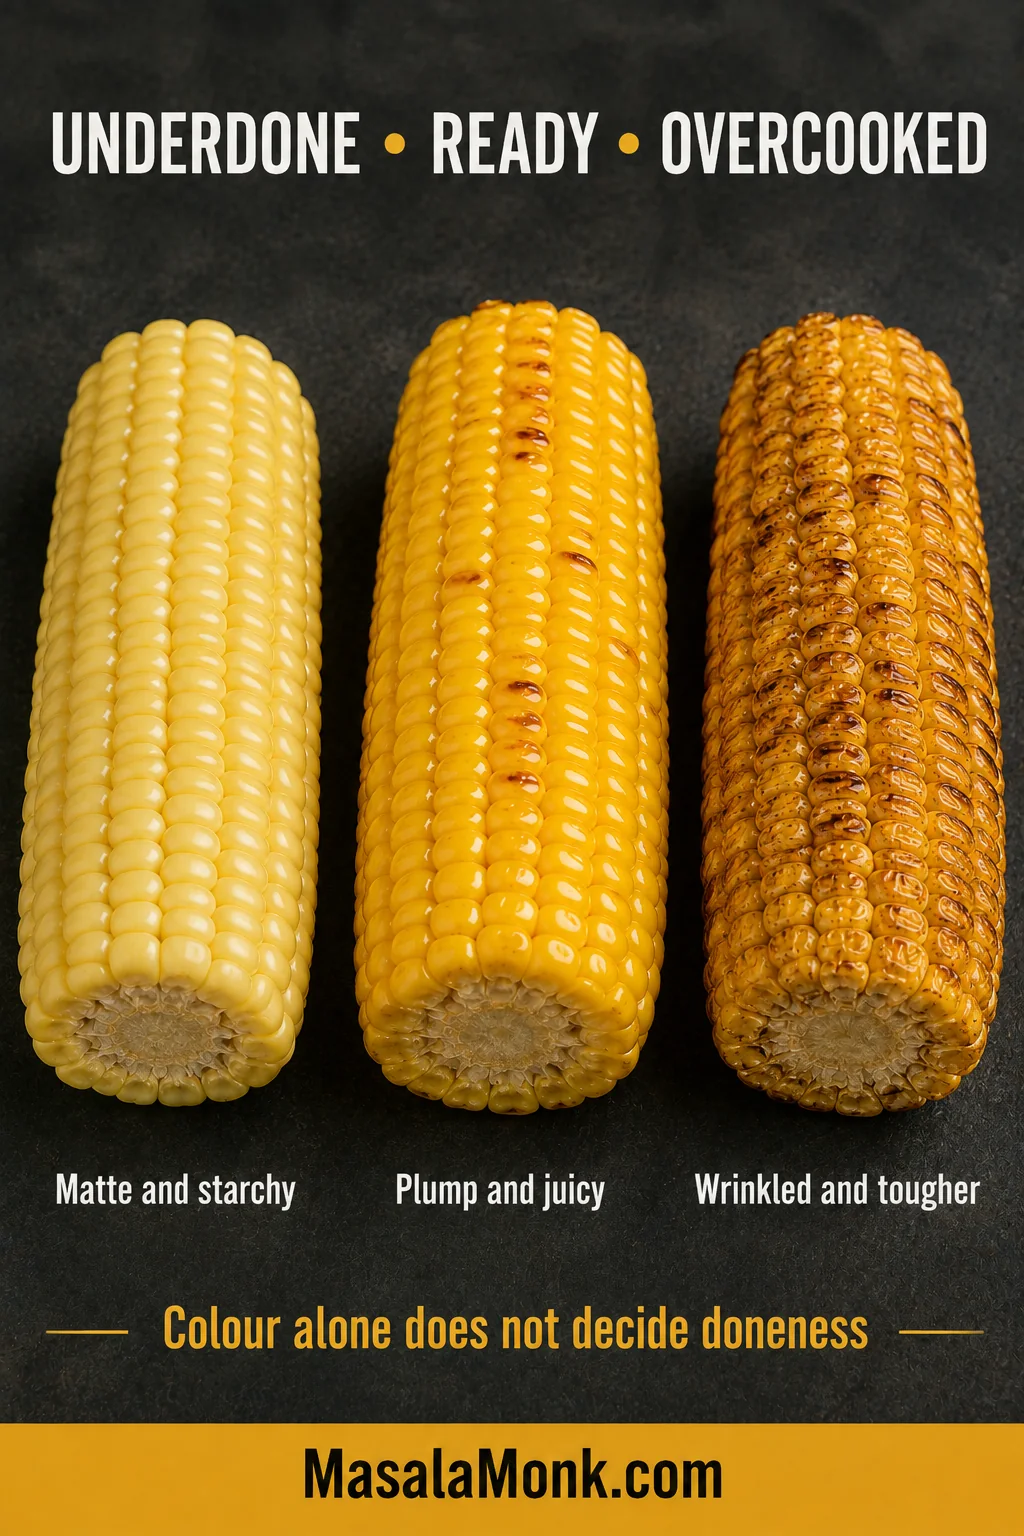
Otherwise-good corn often stays in the basket too long because someone is waiting for every row to turn dark. Colour can deepen after the centre is already cooked.
Underdone
The kernels look matte, resist a fork and taste dense or starchy.
Ready to Serve
The rows look full and glossy. A pierced kernel gives easily and beads with juice.
Overcooked
The kernels begin to wrinkle or lose their plump shape, and the skins become noticeably tougher.
If one person wants deeper char, remove the other tender ears and leave theirs in a little longer. Dinner does not improve by making every cob wait for the darkest one.
Because wrinkling cannot be reversed, pull a ready ear early instead of waiting for every cob to develop matching colour.
For more roasted colour without drier kernels, wait until the centre is tender, then continue uncovered. Turn frequently near the end and stop as soon as the blistered patches are as dark as you want.
Roll each ear onto a less-coloured side rather than simply nudging it; meanwhile, remove any thinner ear that becomes tender early.
Choosing, Preparing and Arranging the Corn
Start with ears that feel full and heavy, with close-fitting green husks and no badly dried or mushy tip. Older corn can taste starchier and remain less juicy even when the timing is right.
When the husk cannot be opened, feel through it for firmly packed rows without soft gaps, missing kernels or a hollow tip.
Next, match the ears by thickness rather than length. Similar diameters are more likely to become tender together, while a tapered tip can make a substantial ear look slimmer than it really is.
A shorter thick ear can take longer than a long slim one, so compare the widest middle sections rather than overall size.
Sweet summer corn already brings most of the flavour; the air fryer’s job is to deepen the edges without taking the juice from the centre.
Remove the husks and stubborn silk, trim only what prevents the ear from fitting and pat the exposed kernels dry. Surface water must evaporate before browning can begin.
A barely damp towel can help lift fine strands of silk; pat the kernels dry afterward so surface moisture does not delay browning.
Oil: A thin coating helps seasoning cling and encourages more even colour. Two teaspoons across four ears is enough. Oil-free corn still cooks.
Butter: Save it for the moment the ears leave the basket. It melts into the hot rows without risking burnt milk solids near the upper element.
Make the Ears Fit Without Crowding
Halving creates extra exposed ends for browning and can make a closely fitted basket easier to arrange.
Trim the narrow tip first. The tapered end may be all that prevents an ear from fitting.
Halve the ear when needed. A crosswise cut improves fit and may create more open airflow.
Keep the corn in one layer. Slight touching and diagonal placement are fine; stacking is not.
Leave room below the element. Do not force an oversized ear close to the upper heater.
Remove loose silk and husk. Lightweight dry pieces can move in the fan.
Save cheese, honey, sugar and fresh garlic for after cooking. They can scorch before the centre softens; instead, add them through one of the finishing options once the ears are tender.
Should You Use a Paper or Silicone Liner?
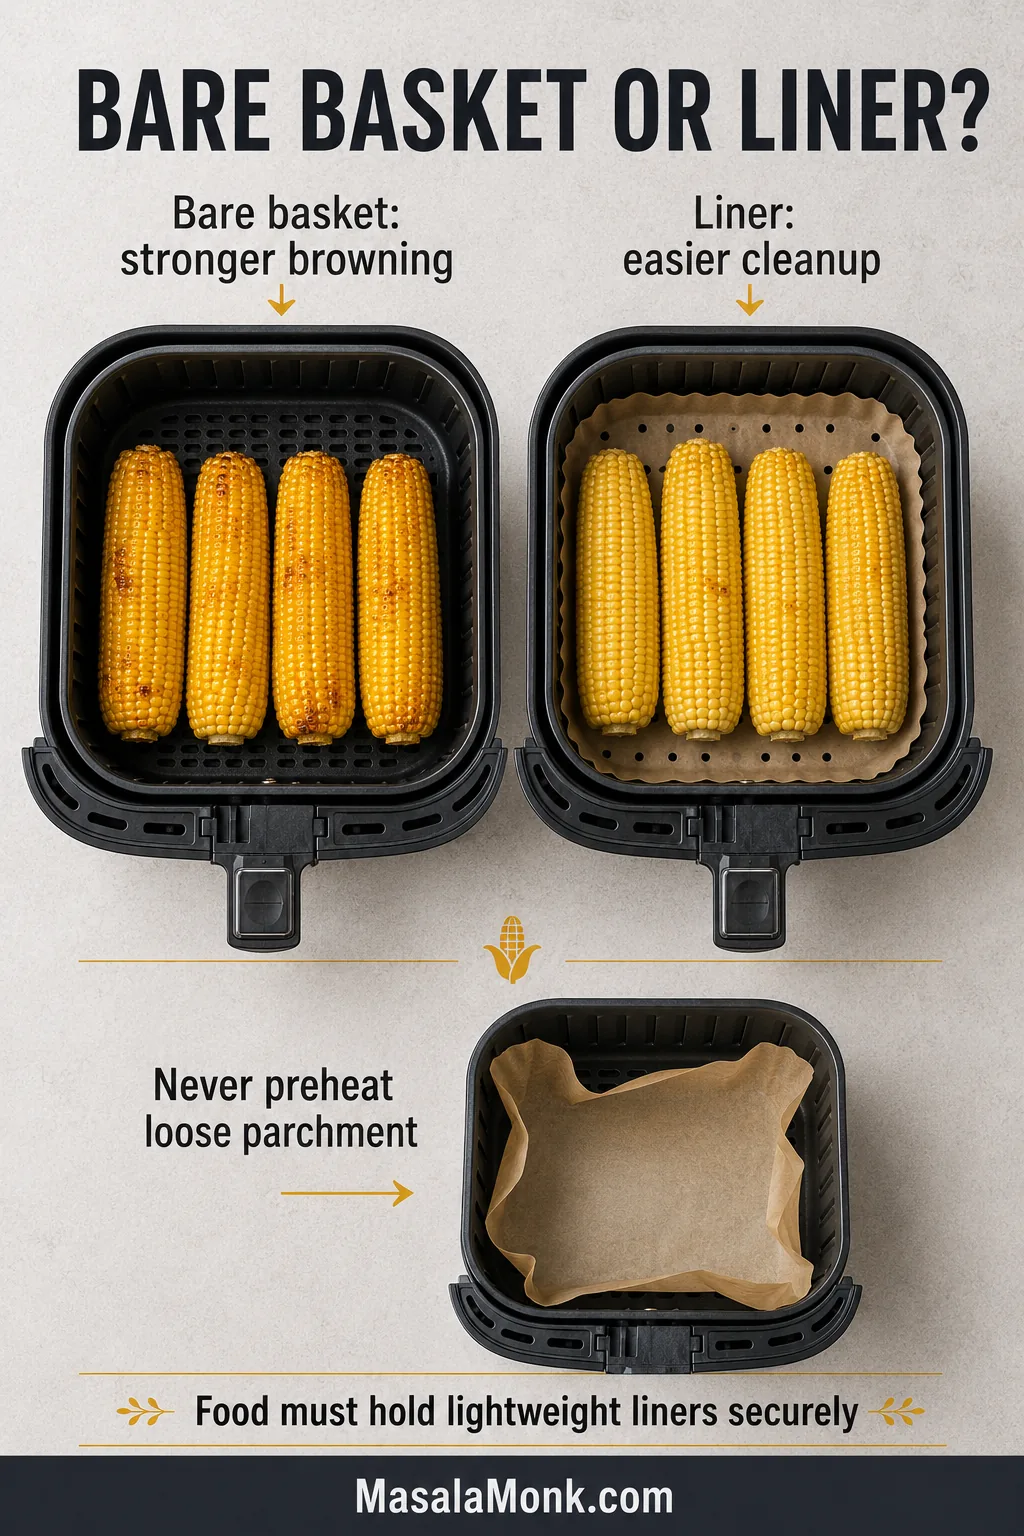
Liners make cleanup easier. Direct basket contact gives the exposed kernels better airflow and stronger browning, so the lower side may stay paler when a liner is used.
Use the bare air-fryer basket when underside colour matters most; choose a fitted liner when easier cleanup is the greater priority.
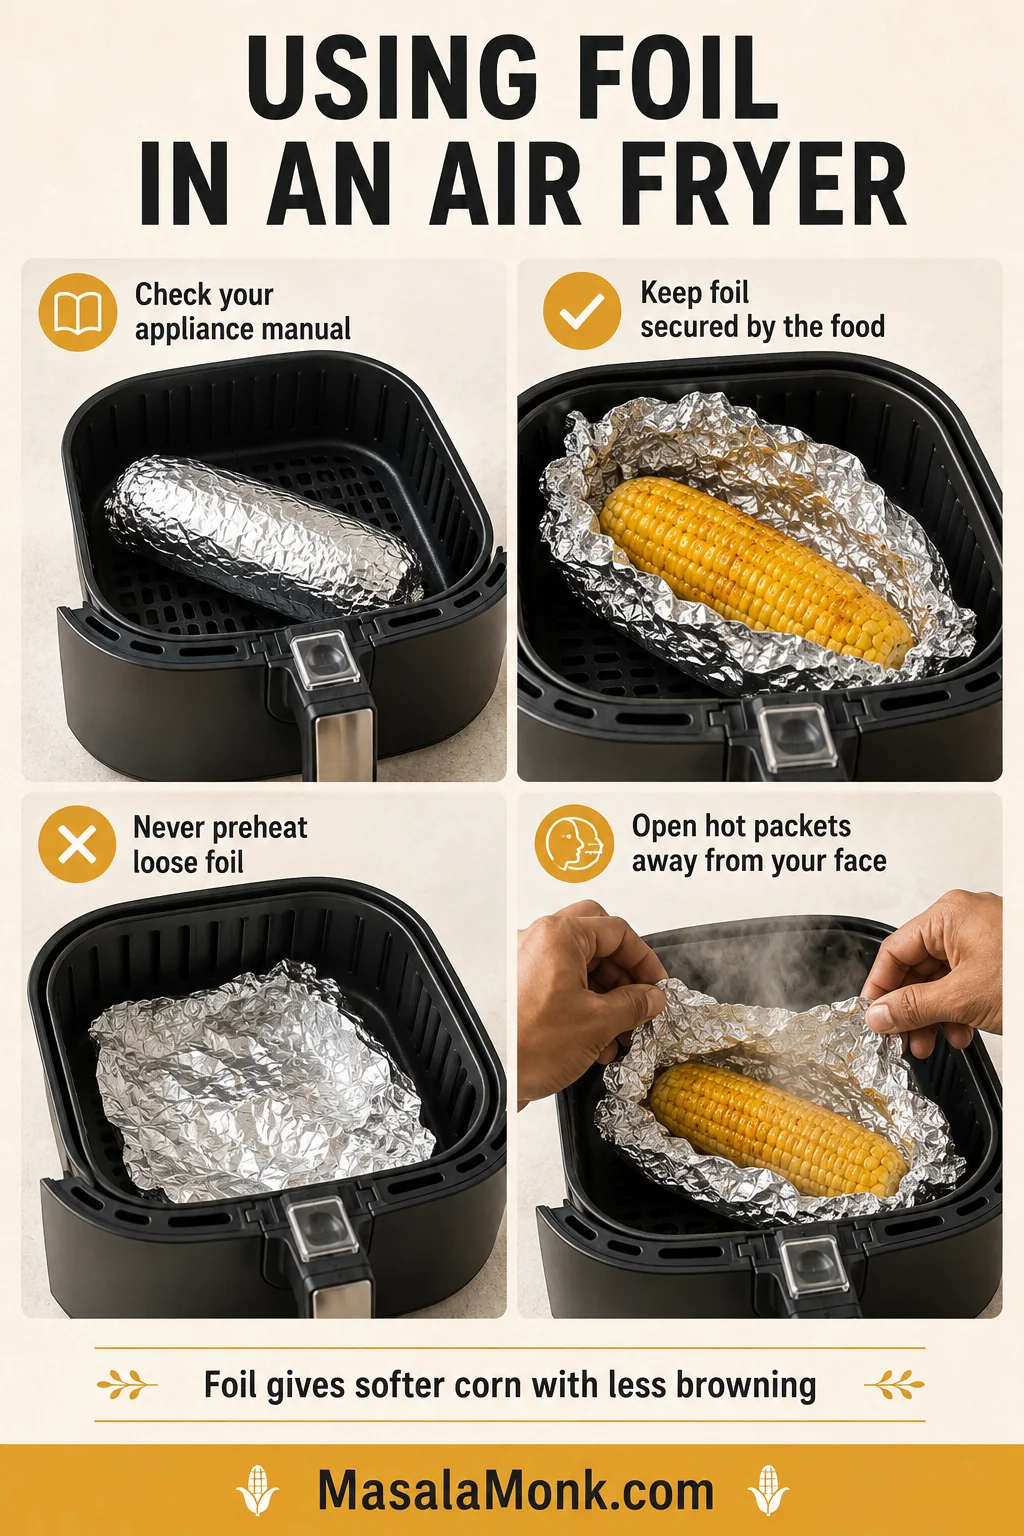
Never preheat loose parchment without food securing it. A lightweight sheet can lift toward the heating element. The guide to common air fryer mistakes goes further into crowding, wet food, blocked airflow and basket smoke.
Adjusting for Thick Ears and Different Air Fryers
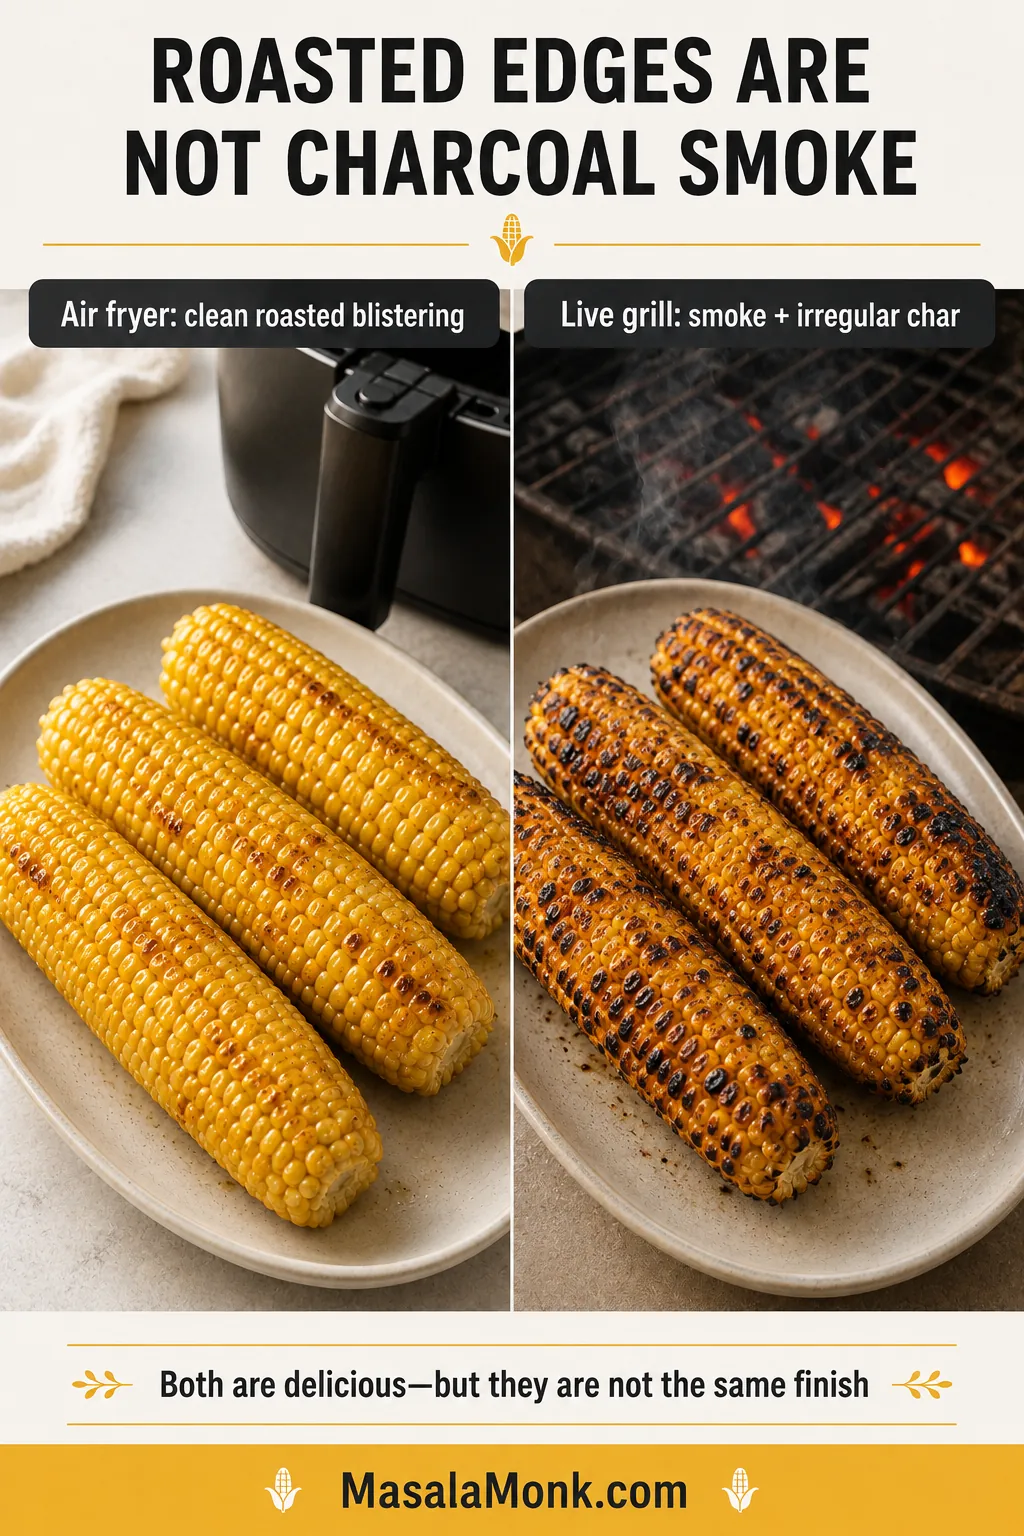
Moving heat gives the exposed rows roasted, blistered patches as the centre warms. It creates more browning than a microwave, but it will not reproduce the smoke of corn cooked over charcoal or a live grill.
Choose the air fryer for controlled tenderness and convenient roasting; choose live fire when genuine smoke is central to the flavour.
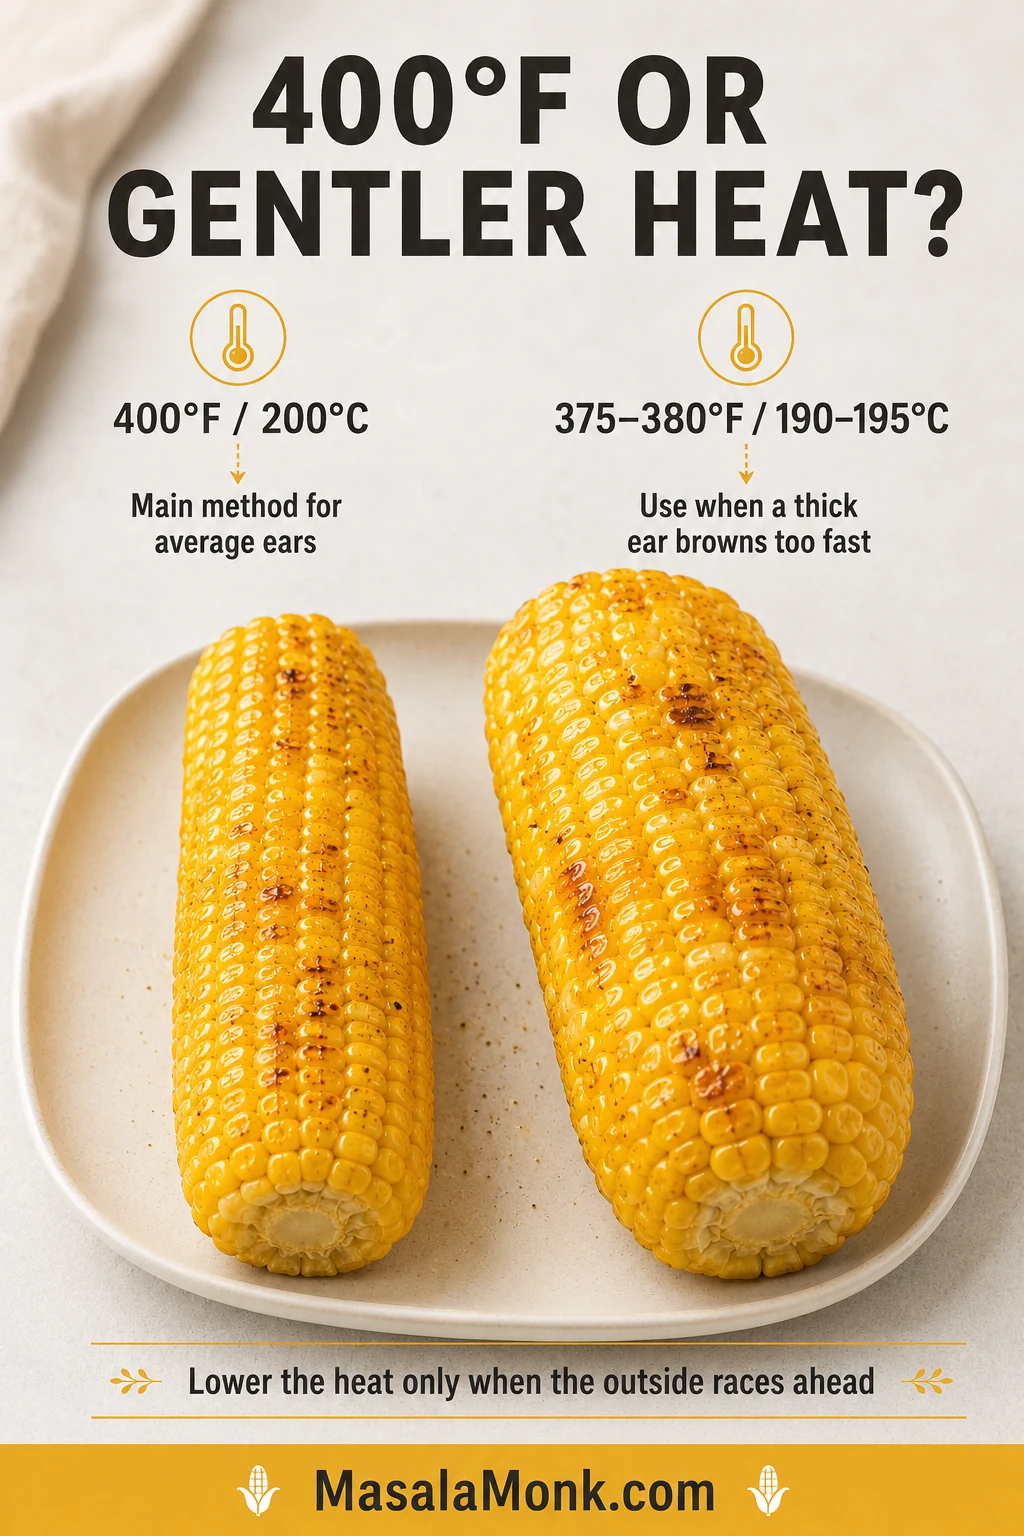
Use 400°F / 200°C for the main method. Lower the heat only when the outside is colouring faster than the centre is softening.
400°F / 200°C — Main Method
Best for average fresh ears and stronger roasted patches. Check early.
375–380°F / 190–195°C — Gentler Adjustment
Use for very thick ears or a compact fryer that darkens the outside before the centre becomes tender.
Treat gentler air-fryer temperature as a correction for premature browning, not the default starting point for every batch.
How Different Air Fryer Styles Change the Timing
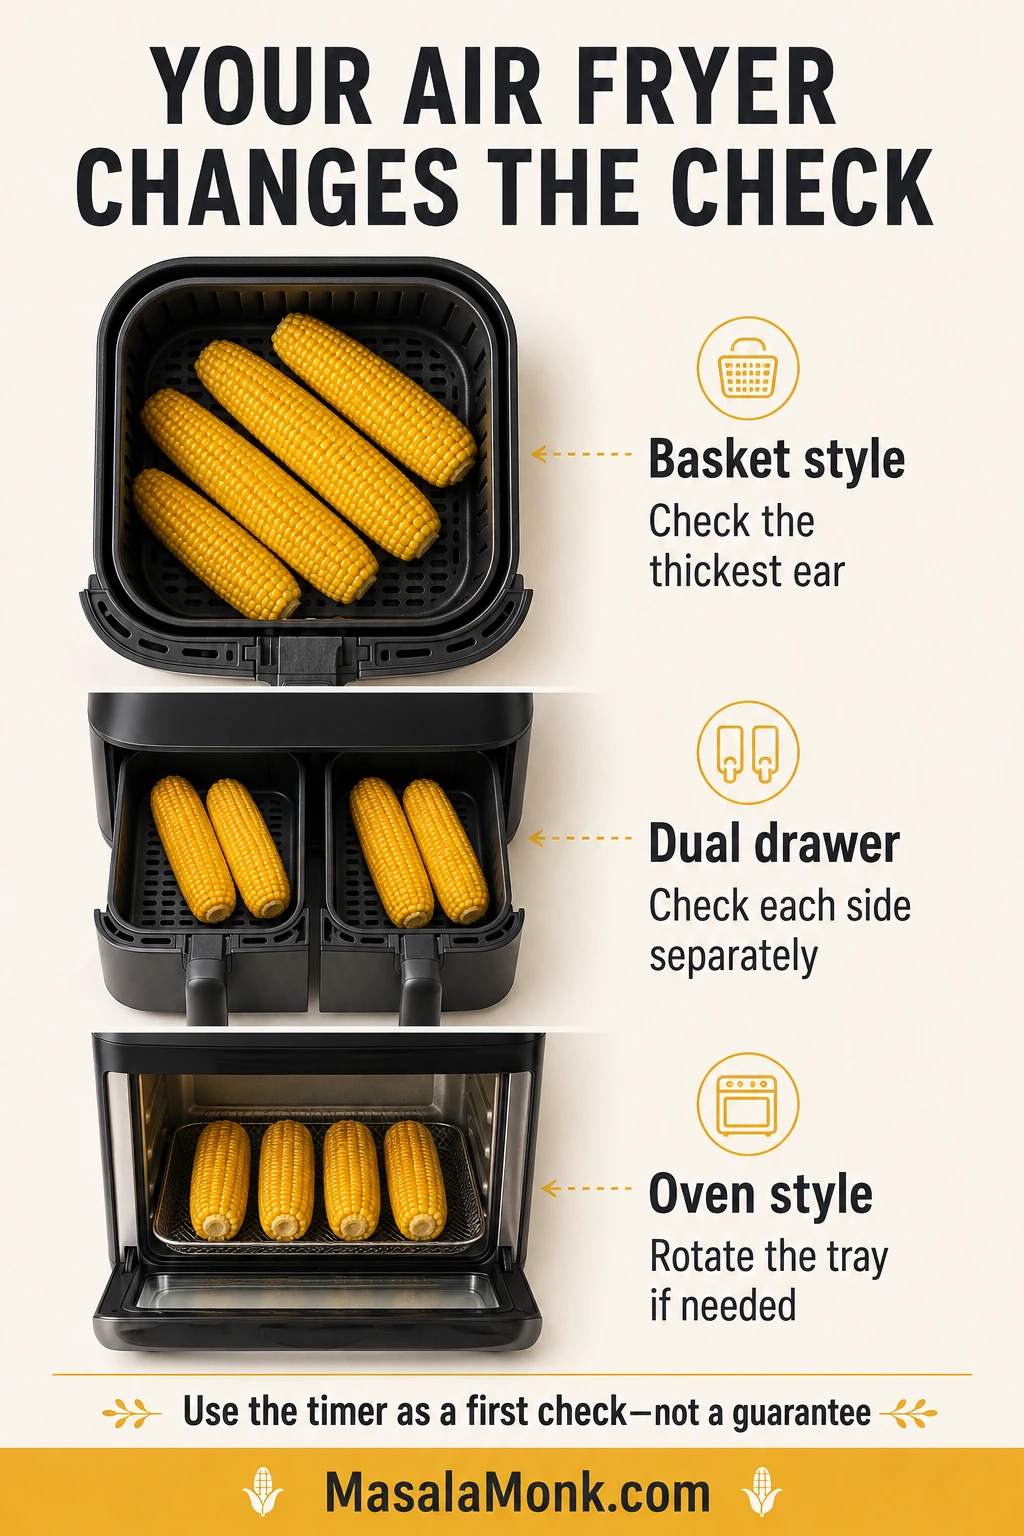
Timings may shift between basket, dual-drawer and oven-style models; however, the same kernel texture cues still determine doneness.
Thick ears: allow more time for heat to reach the centre.
A full basket: expect the later end of the timing range.
A compact fryer: check sooner because the corn may sit closer to the element.
Dual drawers: inspect both sides separately; they may not finish together.
Oven-style fryer: allow a little longer and rotate the tray if one side colours faster.
A broil, max-crisp or extra-high setting is much more aggressive than Air Fry. Use it only as a brief finishing boost when the appliance manual permits it.
Once you find the timing that suits your machine, note the number and approximate thickness of the ears. That result will be more useful next time than trying to match somebody else’s exact minute.
Fresh, Frozen or Foil-Wrapped Corn
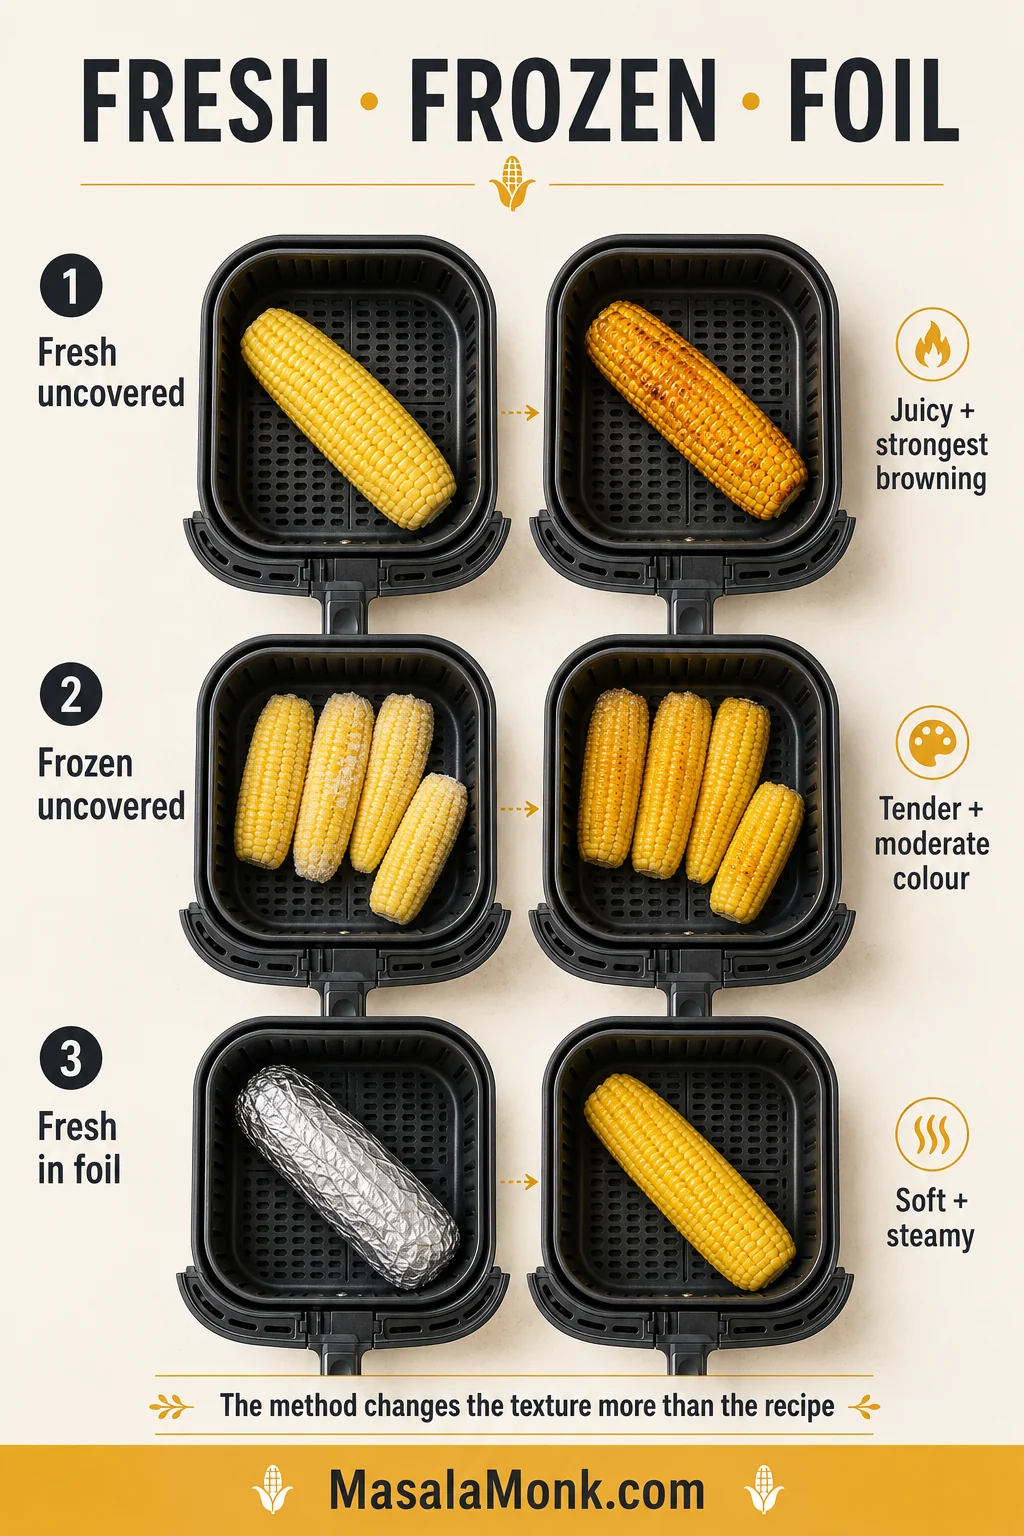
Fresh uncovered corn gives the strongest browning. Frozen corn needs time to shed its icy coating, while foil shifts the result toward soft, buttery and steamy.
Foil is primarily a texture decision—not a speed shortcut—because trapped steam softens the kernels while limiting roasted colour.
Air fryer cooking times and textures for fresh uncovered corn, fresh foil-wrapped corn and frozen uncovered corn
Corn
Method
First check
Usual time
Texture
Fresh
Uncovered
8 minutes
8–12 minutes
Juicy with the strongest browning
Fresh
Foil-wrapped
11 minutes
11–15 minutes
Soft and steamy with little colour
Frozen
Uncovered
12 minutes
12–15 minutes for half-cobs or average ears
Tender with moderate colour
How to Air Fry Frozen Corn on the Cob
Frozen corn releases water as the ice melts. Butter and dry seasoning can slide away during that early stage, and the extra moisture slows browning.
After the warming stage, blot away any collected meltwater before seasoning; otherwise, the new coating may still slide from the corn.
Arrange frozen half-cobs or average ears in one layer.
Air fry at 400°F / 200°C.
Turn once the outside has thawed and begun to dry.
Test a kernel at 12 minutes.
Continue until tender, usually 12–15 minutes. Large whole frozen ears may need longer.
Add butter and seasoning once the corn is hot and no longer icy.
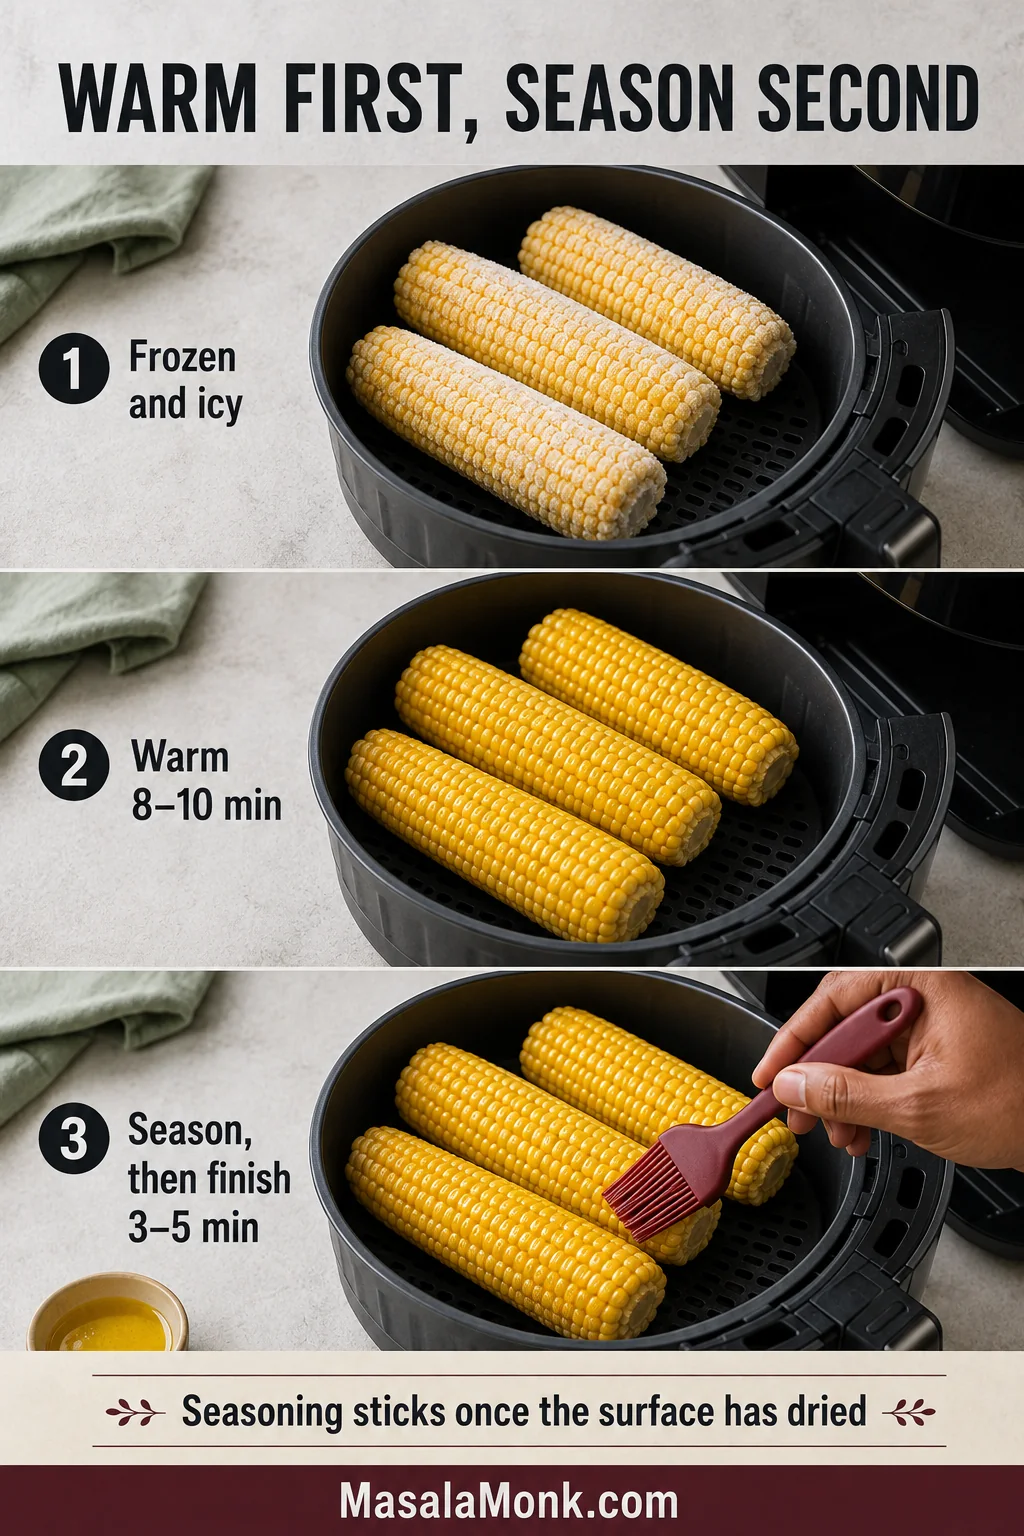
For better seasoning adhesion: warm the frozen corn for 8–10 minutes first. Once the icy surface has dried, brush with butter or oil, season and finish at 400°F / 200°C for another 3–5 minutes, or until tender. Then choose a buttery, spicy or tangy finish.
Thawed corn cooks faster than fully frozen corn. Start near the early end of the fresh-corn range and check frequently.
How to Air Fry Corn in Foil
Foil traps steam and butter around each ear, giving you softer kernels with much less roasted colour. Some manufacturers permit foil when food holds it securely; others advise against it.
Philips, for example, warns that foil or baking paper can restrict airflow or lift toward the heating element. Check the Philips Airfryer foil and paper guidance, then follow the manual for your own model.
Even when foil is permitted, keep basket vents exposed so hot air can circulate instead of turning the appliance into a sealed steamer.
Spread ½ tablespoon / 7 g butter over each fresh ear and season lightly. This butter replaces the 2 tablespoons used for serving in the main recipe.
Wrap each ear securely without covering the entire basket base.
Air fry at 400°F / 200°C, turning once.
Test the corn at 11 minutes and expect 11–15 minutes.
Open the packet away from your face because hot steam will escape.
For more colour, remove the foil and cook uncovered for another 1–3 minutes.
Add lemon or lime after cooking for the brightest flavour.
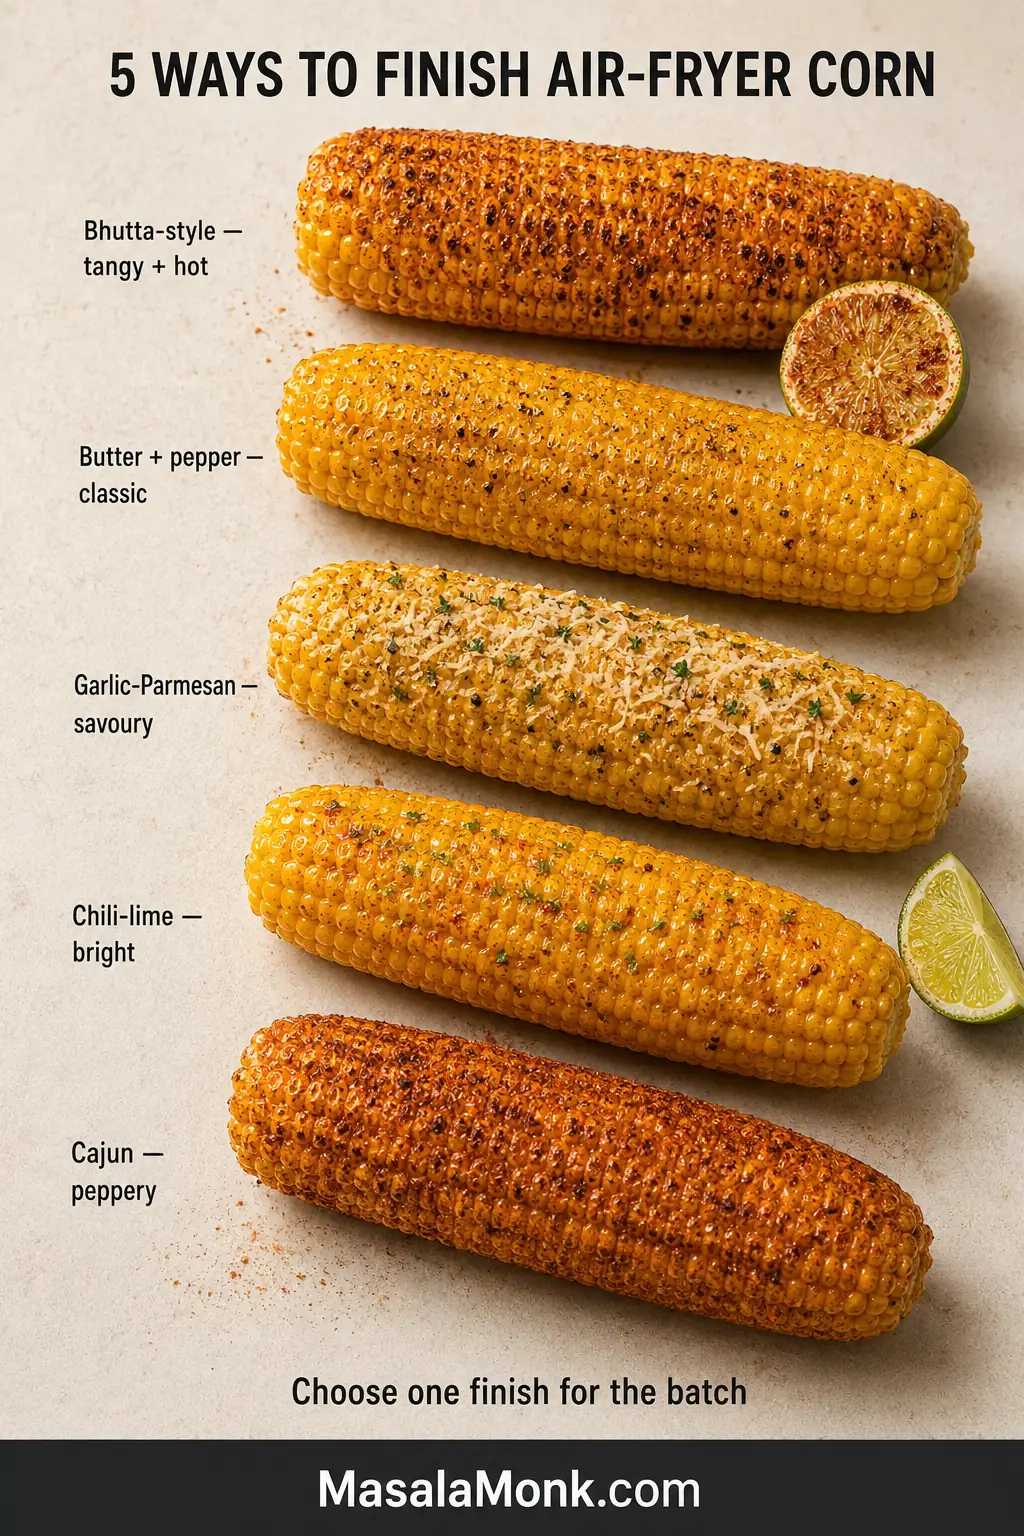
Five Easy Ways to Season the Corn
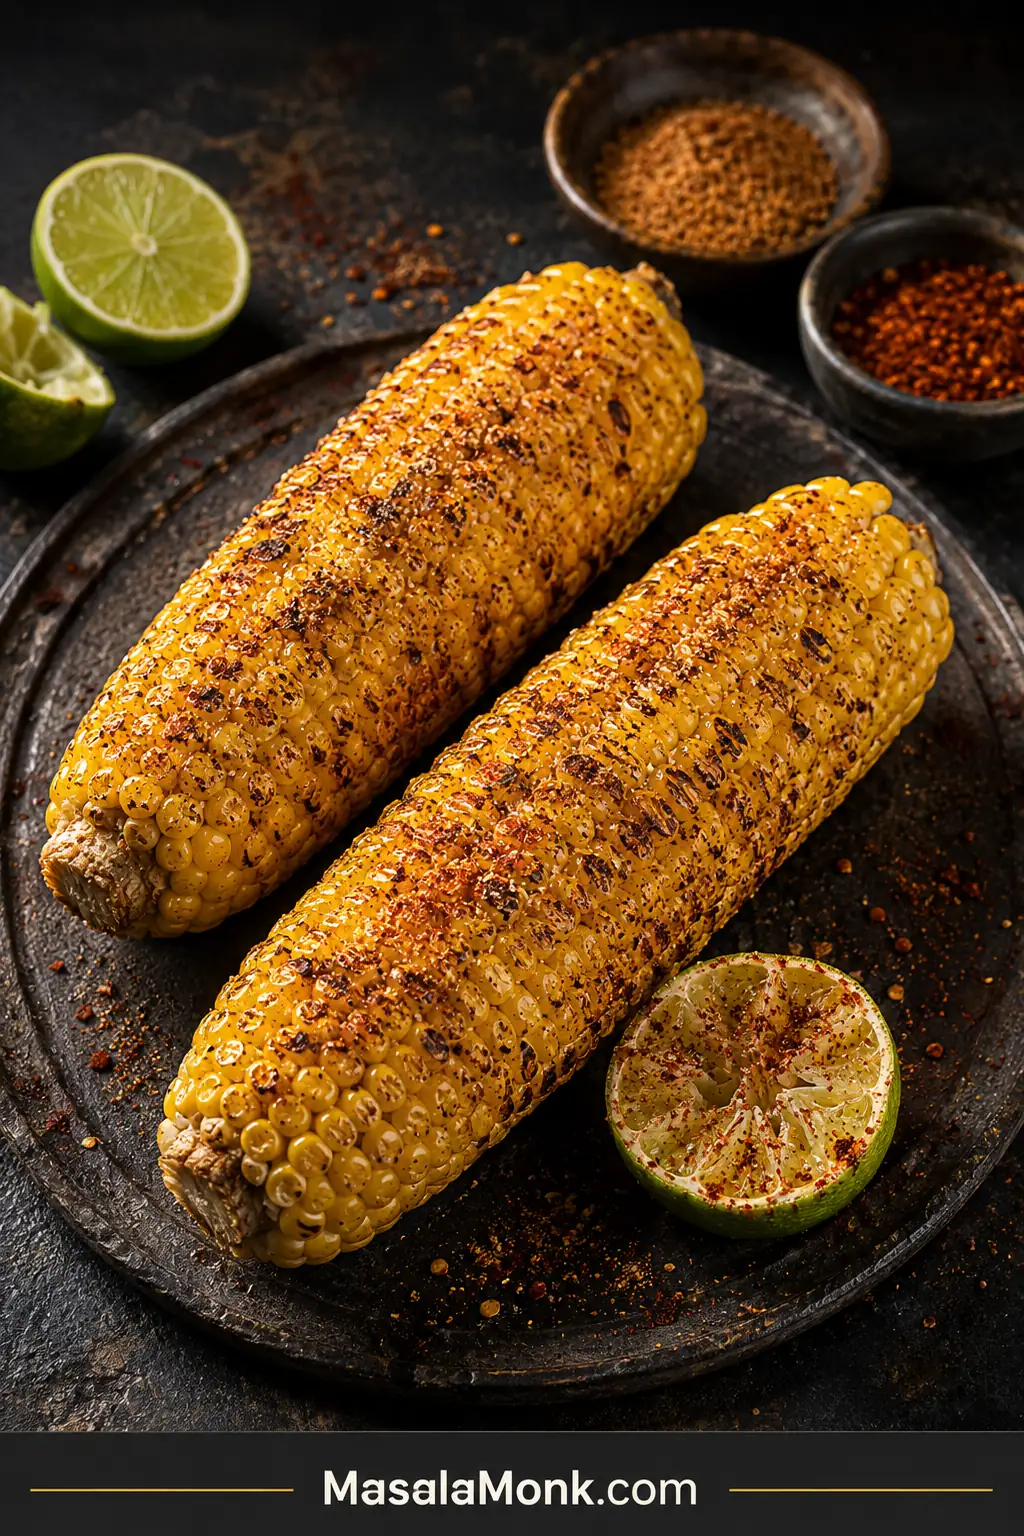
Keep it buttery and simple when everyone wants something familiar, use chili-lime beside a rich main dish, choose Cajun seasoning for a peppery edge, or reach for lime and chaat masala when the plate needs something sharp and bright.
Before choosing a finish: each variation below seasons four ears and replaces the 2 tablespoons of serving butter in the main recipe. Bhutta-style corn uses no butter unless you choose to add it. When using Parmesan, Cajun seasoning or chaat masala, reduce or omit the salt added before cooking and adjust after tasting.
Bhutta-Style Lime and Chaat Masala
Use: 1 lime, 1 teaspoon chaat masala and ¼ teaspoon red chili powder. Butter is optional.
This is the brightest finish in the set—tangy, salty and hot rather than rich and buttery. Place the spices on the cut side of the lime, then rub it over the hot corn. The juice carries the seasoning between the rows.
Apply the lime-and-spice rub after cooking so the citrus stays bright and the damp masala does not scorch against the hot basket.
Classic Butter and Pepper
Use: 2 tablespoons / 28 g melted butter, black pepper and salt to taste.
Brush the butter over the hot corn, add pepper and taste before adding more salt. Simple, sweet and buttery.
Garlic-Parmesan
Use: 2 tablespoons / 28 g melted butter, ½ teaspoon garlic powder, ¼ cup finely grated Parmesan and 1 tablespoon chopped parsley.
Mix the garlic into the butter, brush it over the corn, then add the Parmesan and parsley for a savoury, nutty finish.
Chili-Lime
Use: 2 tablespoons / 28 g melted butter, ½ teaspoon mild chili powder, plus the zest and juice of 1 lime.
Brush with chili butter, then add the lime zest and juice for a bright finish that cuts through richer main dishes.
Cajun Corn
Use: 2 tablespoons / 28 g melted butter and 1–1½ teaspoons Cajun seasoning.
Brush with butter, sprinkle lightly and taste before adding separate salt. The result is warm, peppery and lightly smoky.
What Went Wrong—and How to Fix It
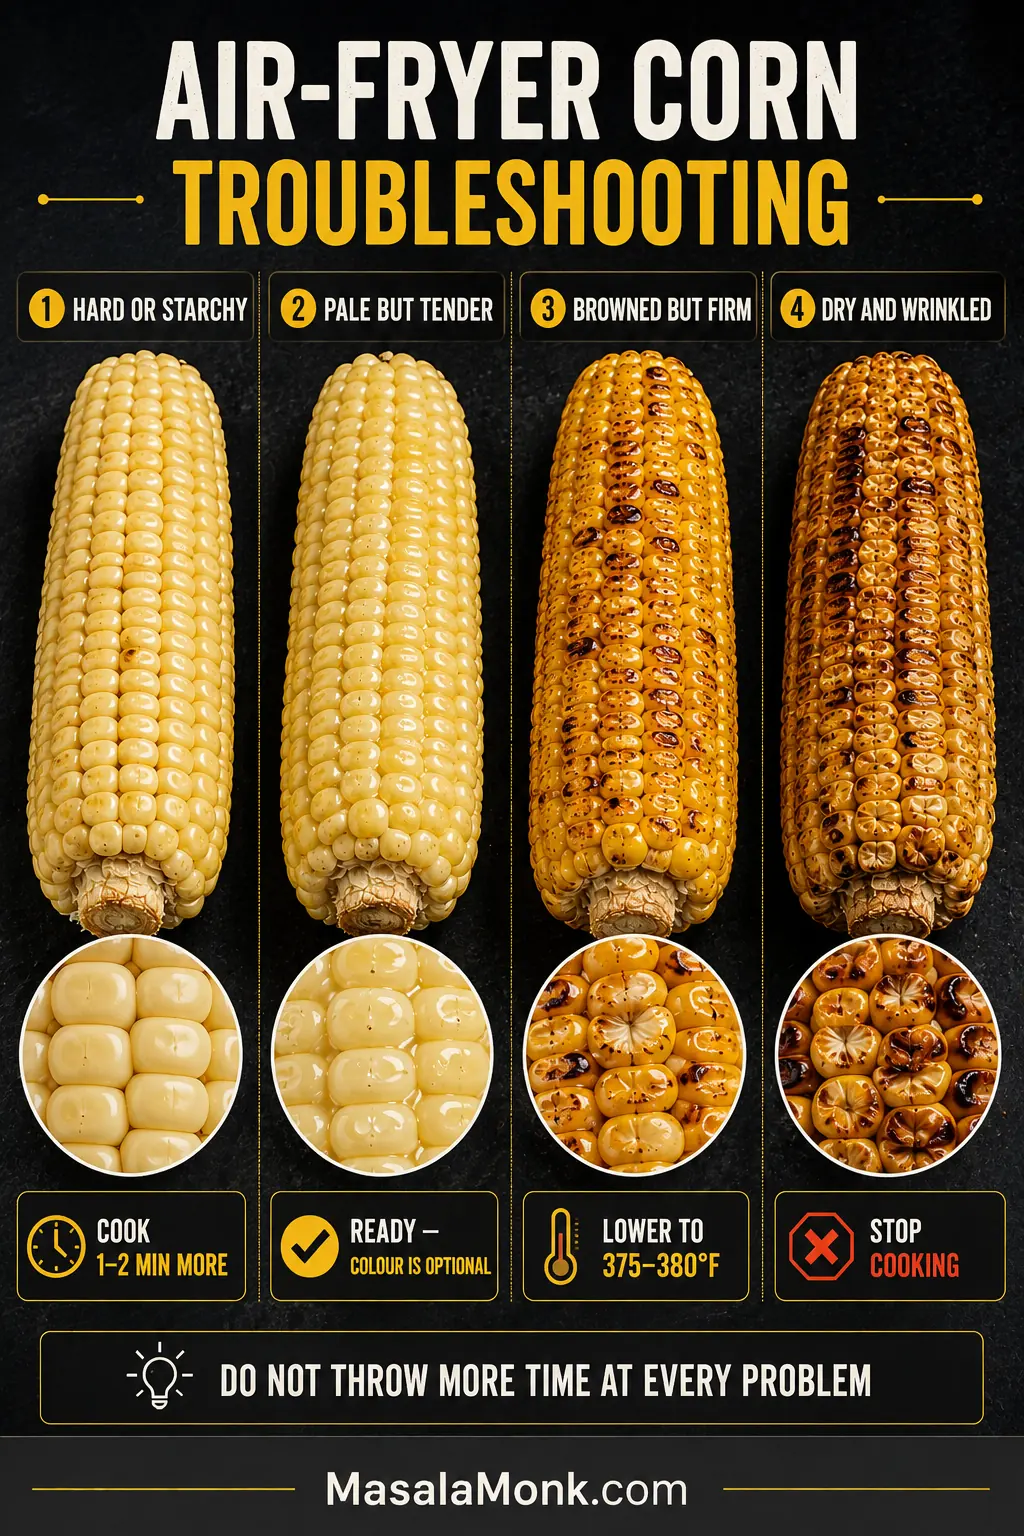
Plump kernels that still feel hard or dense usually need more cooking. Pale but tender corn is ready—add colour only if you want it. Browned but firm corn needs gentler heat. If tender corn still tastes starchy, the ear may simply be older rather than undercooked.
Do not throw more time at every problem. Many batches can still be improved while dinner comes together.
Use the first correction only when the centre is still hard or dense; tender corn that tastes starchy is more likely an age issue than a timing issue.
Texture and Doneness Problems
Air fryer corn troubleshooting for undercooked, pale, browned, dry and starchy kernels
What you see
Why it happened
What to do now
Kernels look plump but remain hard or starchy
Thick ears, a full basket or too little cooking time
Continue in 1–2-minute intervals and test the thickest ear again.
Corn is pale but tender
Wet kernels, foil, a liner or limited airflow
Serve it as it is, or uncover and create more space for another minute when you want deeper colour.
Corn is pale and firm
It needs more cooking and better surface drying
Continue uncovered and roll the ears once more.
The browned side is dark but the centre is firm
The outside heated faster than the middle
Lower the temperature to 375–380°F / 190–195°C and continue in short intervals.
Kernels are dry or wrinkled
Too much time, slim ears or older corn
Remove immediately. Butter adds richness but cannot replace lost moisture.
Kernels look full but still taste starchy
The corn may have been older or less sweet before cooking
Serve with butter and a bright seasoning; more cooking is unlikely to restore sweetness.
Uneven Browning, Seasoning and Smoke Problems
Air fryer corn troubleshooting for uneven cooking, burnt toppings, frozen seasoning and basket smoke
What you see
Why it happened
What to do now
One side is burning
The ear is close to the element or was turned too late
Roll the ear, lower the heat if needed and check more frequently.
Different ears are cooking at different speeds
The batch contains mixed thicknesses
Remove tender ears and leave the thicker ones to continue.
Butter, garlic, cheese or sugar is burning
Delicate ingredients were added too early
Remove badly burnt bits and add a fresh topping after cooking.
Seasoning slides off frozen corn
The icy outside is melting
Warm the corn first, then season it once the ears are hot and the surface has dried.
The basket is smoking
Fat, sugary seasoning or old residue is reaching the base
Stop the air fryer if smoke is heavy or persistent. Let it cool, remove burnt residue or excess fat, and clean the basket before continuing.
Make Ahead, Storage and Reheating
Air fryer corn is best as soon as it leaves the basket, while the kernels are hot and the blistered patches still taste roasted.
Reheat only the portion being served, then refresh it with butter, lime or seasoning rather than repeatedly drying the entire stored batch.
Prepare ahead: shuck the corn earlier in the day and refrigerate it tightly covered so the exposed kernels do not dry out.
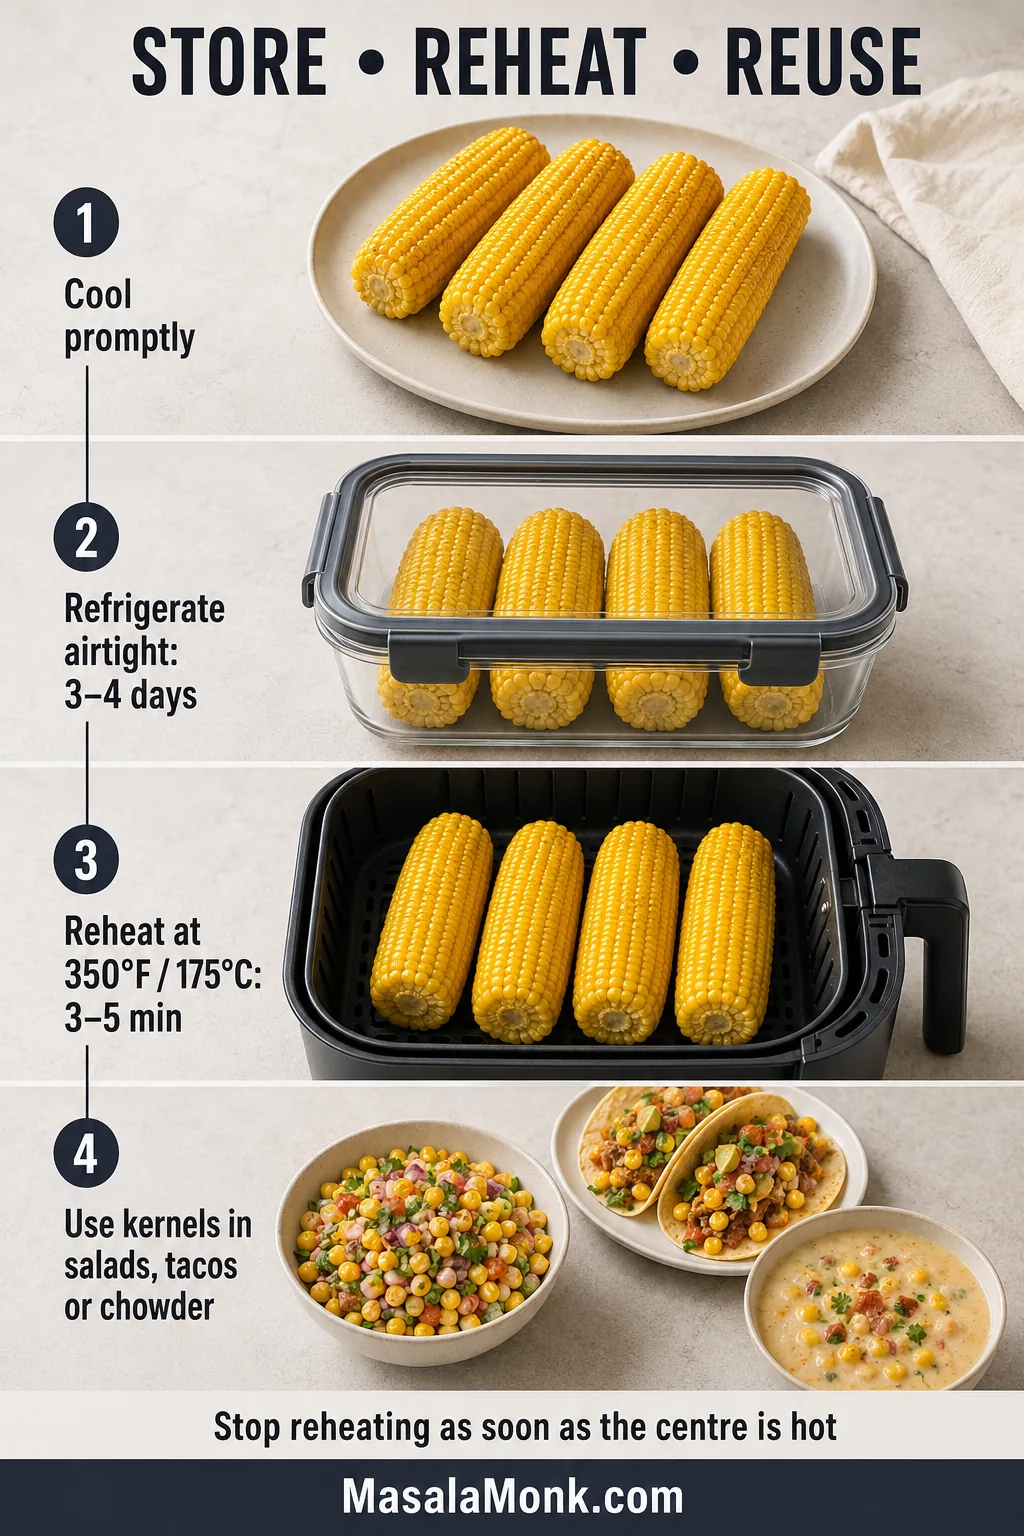
Refrigerate: cool cooked corn promptly and store it in an airtight container for up to 3–4 days.
Reheat: air fry at 350°F / 175°C for 3–5 minutes, checking early.
Serve again: add a little fresh butter after reheating rather than warming the corn in a pool of butter.
Stop as soon as the centre is hot; extended reheating tightens the kernel skins. For broader refrigerator and freezer guidance, see the FoodSafety.gov cold-storage chart.
Have several ears left? Slice off the kernels for salsa, salads, tacos or grain bowls, or turn a larger amount into creamy vegetarian corn chowder.
What to Serve With Air Fryer Corn
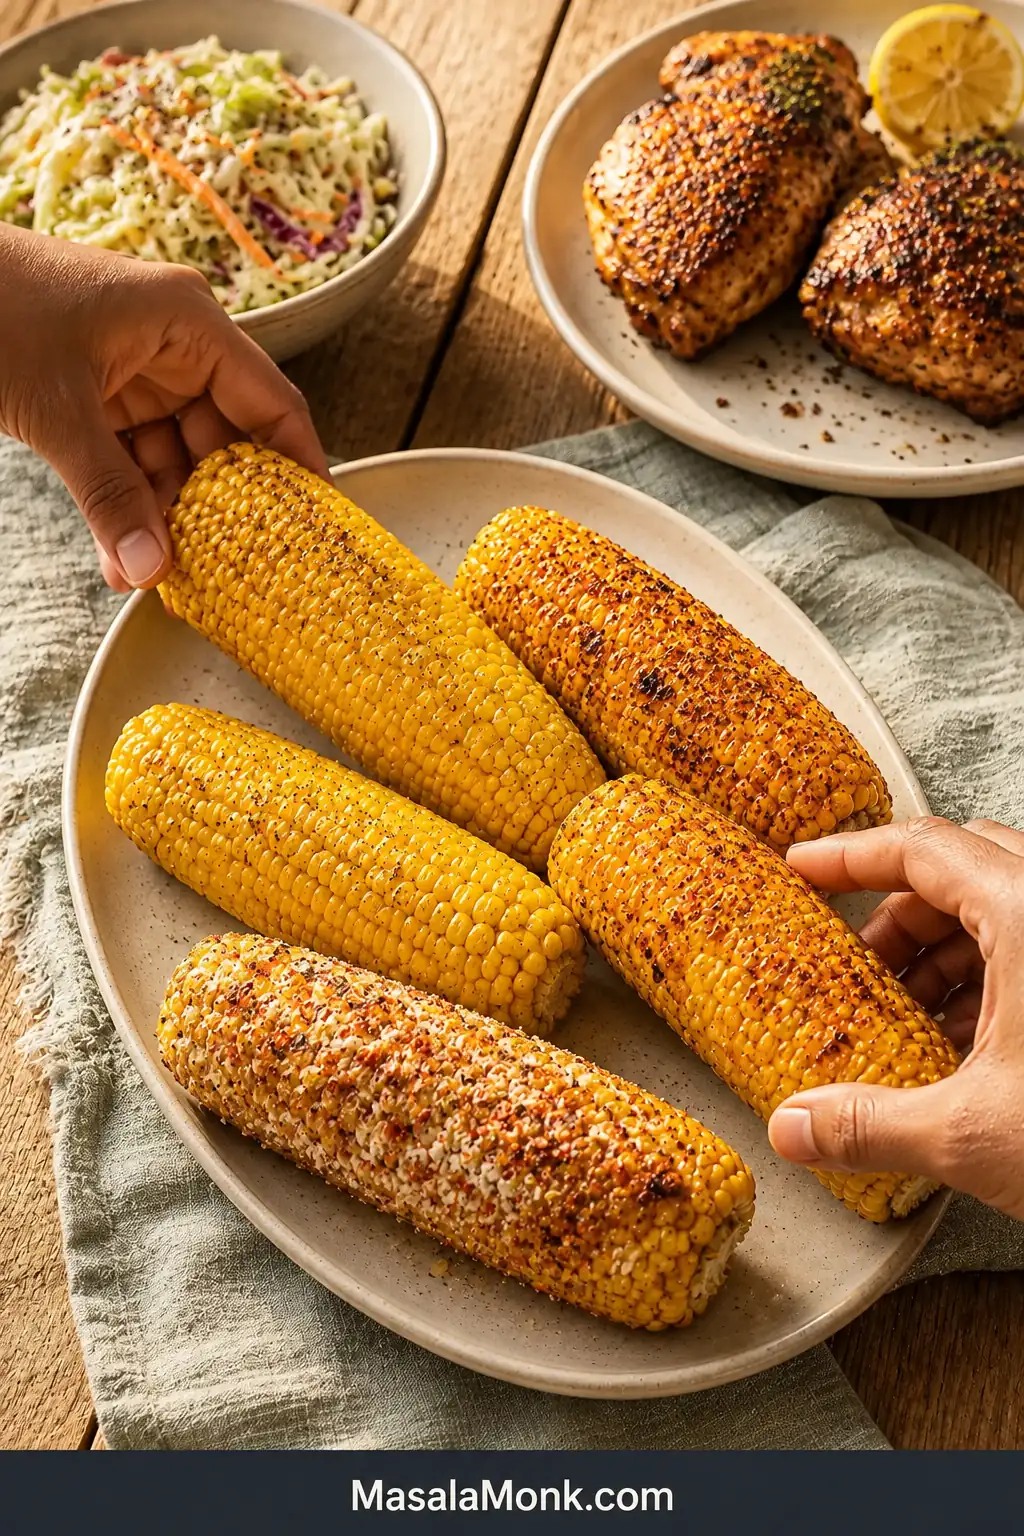
For a cookout or summer dinner, make a bowl of crisp homemade coleslaw first and refrigerate it while the meal comes together. Air fry the corn last so the slaw stays cold and crunchy while the ears reach the table hot.
Chili-lime corn works especially well with honey garlic salmon because the lime cuts through the sweet glaze.
For a vegetarian plate, pair bhutta-style corn with a sturdy black bean burger. Lime and chaat masala brighten the burger’s earthy filling.
When one finish will cover the whole batch, use the chart below to match the corn to the meal. For mixed preferences, season individual ears separately after cooking.
Use this chart when all four ears will share one finish; for mixed preferences, season individual ears separately after cooking.
Frequently Asked Questions
Why Do Air-Fryer Corn Recipes Give Such Different Cooking Times?
Ear thickness, basket load, preheating, appliance shape and the desired amount of browning all affect the final time. Treat a published time as a first-check point, then stop when the thickest ear is tender and juicy.
For a single-screen recap, use this guide after identifying the approximate thickness and basket load. It condenses the checkpoints, while tenderness still decides the finish.
A brief early basket check costs less than several unattended extra minutes, especially when slim and thick ears cook together.
Do You Need to Soak Corn Before Air Frying?
No. Soaking adds moisture to the exposed kernels and delays browning. Remove the husks and silk, dry the ears and cook them directly.
Do You Need to Boil or Microwave Corn First?
No. Fresh average ears cook completely in the air fryer. If very thick ears brown before the centre softens, lower the temperature to 375–380°F / 190–195°C and continue in short intervals.
Should You Salt Corn Before or After Air Frying?
A light seasoning before cooking gives the kernels a base layer of flavour. Reduce or omit it when the finish contains Parmesan, Cajun seasoning or chaat masala, then adjust after tasting.
Can You Cook More Than Four Ears?
Cook only as many ears as fit in one layer. For a larger batch, work in rounds and check the second batch slightly earlier because the air fryer is already fully hot.
This basket shows the practical limit: the ears may touch at narrow points, but the fuller middle sections still need open space for moving air.
The narrow ends may touch, but leave breathing room around the fuller middle sections where the ears occupy the most basket space.
Can You Air Fry Corn Without Oil?
Yes. Place dry, shucked ears directly in the basket and follow the fresh-corn timing. The kernels soften normally, though the exposed rows may brown less evenly and dry seasoning will not cling as readily.
Can You Air Fry Corn in the Husk?
Some appliances permit husk-on corn, but loose silk and dry husk can move toward the heating element. Because timing and appliance guidance vary, fully shucked corn is the more predictable choice for this recipe.
Once the rest of the meal is ready, bring the corn out last and let each person add butter, lime or spice at the table. The point is not matching every ear; it is serving each one while the kernels are still hot and juicy.
Serve the ears as soon as they are tender; finishing choices can happen at the table.
Tender First, Char Second
For three or four average fresh ears, begin at 400°F / 200°C and test the thickest ear at eight minutes. Turn once, stop when the kernels are juicy and tender, and add only a short final burst when you want darker roasted patches.
Bring the corn to the table while the butter is still disappearing between the rows. Some ears may be only lightly browned while others are more deeply blistered; tenderness is the part that matters.
How long did your corn need? Share the time below—and add your air-fryer model if you know it.
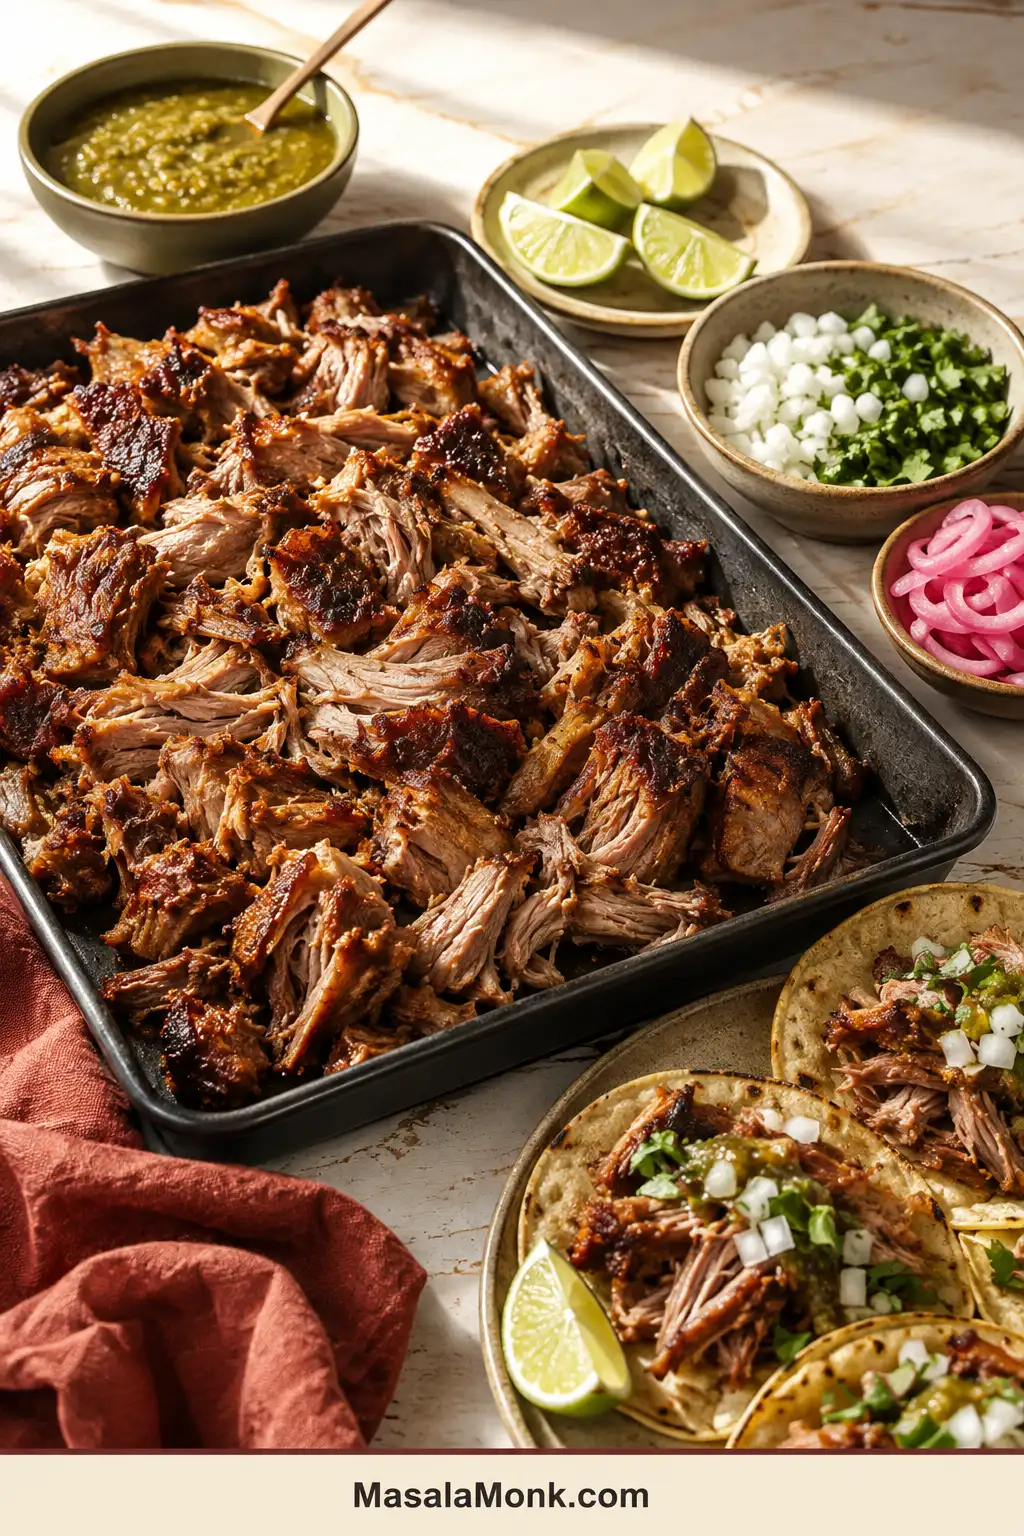
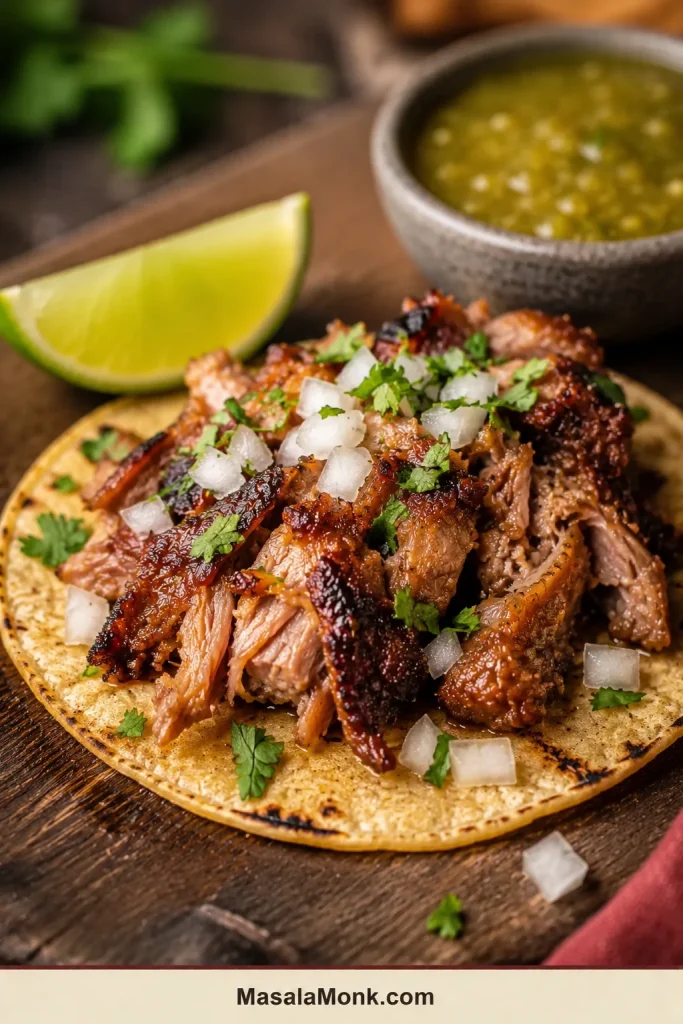
Slow cooker pork carnitas can turn out beautifully tender and still miss the reason you wanted carnitas in the first place: dark, crisp edges around pieces that remain juicy in the middle.
Lift the lid and you may find plenty of soft pork, but no crust anywhere. Add too much liquid and it tastes like wet taco filling. Pull it into fine threads, and the broiler can dry those strands before the meat develops a proper browned edge.
The easiest solution is to stop asking the slow cooker to do two opposite jobs. Let it soften the shoulder slowly with orange, lime, garlic, oregano, cumin and ancho chile. Once the thickest section yields easily to a fork, move the pork into dry, intense heat for the finish.
Quick Answer: How to Make Crispy Slow Cooker Carnitas
Cook large pieces of pork shoulder with a small amount of citrus until a fork turns easily through the thickest section. No initial searing or added broth is required. Lift out the pork, strain the cooking juices and reduce them only when they taste thin.
Pull the meat into broad pieces, then broil or skillet-crisp it in a loose layer. Spoon a little reserved juice over the pork only after it has browned. Leave any pork you are saving uncrisped, then brown each portion fresh when you reheat it.
Essential slow cooker pork carnitas decisions
Decision
Best starting point
Pork and cooker
4 lb / 1.8 kg trimmed pork shoulder in a 6 qt / 5.7 L slow cooker
Cooking time
Begin checking at 6 hours on LOW or 3½–4 hours on HIGH
Doneness
A fork turns through the thickest section with little resistance
Best finish
Broiler for a full batch; skillet for the deepest crust
Slow cooking builds tenderness; dry heat creates the final crust.
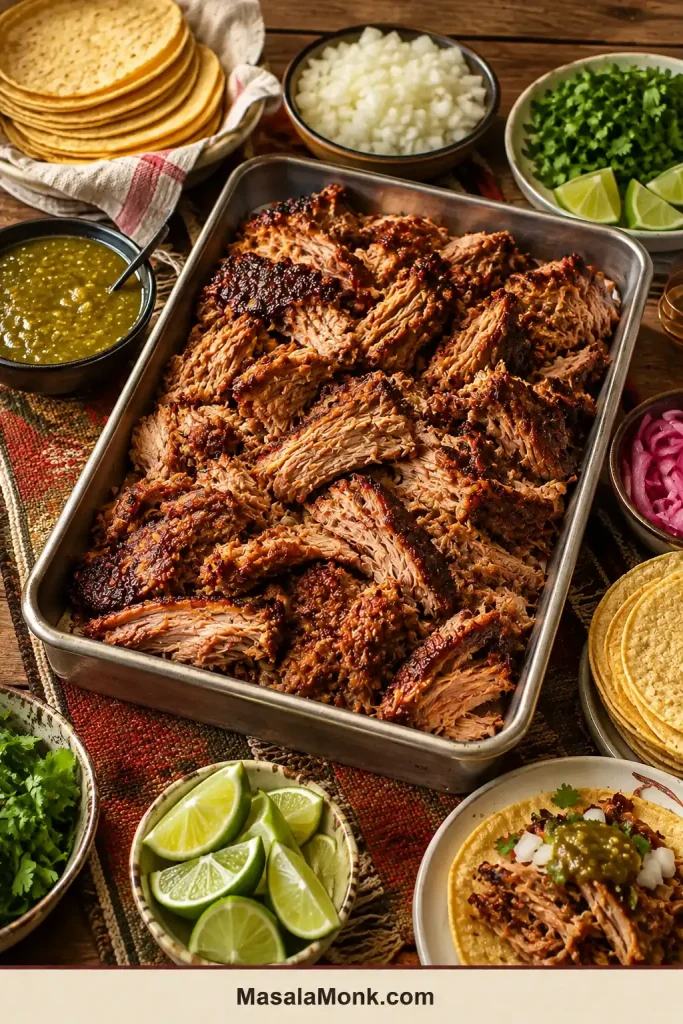
Pork shoulder cooks with a small amount of citrus, garlic, onion and warm spices until it separates easily but still holds broad pieces. The finished tray should contain deeply browned tips, crisp flat edges and thicker pieces that remain soft enough to pull apart.
Use the broiler for a full batch or a skillet for the deepest crust. Allow about 25 minutes to trim, weigh, cut and season the pork. Once the lid is closed, the long cook is hands-off.
Prep25 minutes
LOW Cook6½–8½ hours
HIGH Cook4–5½ hours
Broiler Crisping5–9 minutes per pan; 15–20 minutes for the batch
Skillet Crisping3–4 minutes per batch; 20–35 minutes for the recipe
Estimated Yield2½–3 lb / 1.15–1.35 kg cooked pork
Planning window: Allow about 7½–10 hours on LOW or 5–6¾ hours on HIGH, including preparation, resting and broiling. Allow additional time if the cooking juices need reducing.
Expect approximately 8–11 hearty servings, 10–14 taco-bar servings or 20–30 small tacos.
For serving: warm tortillas, chopped white onion, cilantro, lime wedges and roasted salsa verde or another bright salsa.
Essential Equipment
6 qt / 5.7 L slow cooker or Crock-Pot
Kitchen scale
Cutting board and chef’s knife
Tongs or a large slotted spoon
Fine-mesh strainer and wide saucepan
One or two uncoated, broiler-safe rimmed metal sheet pans
An instant-read thermometer, fat separator and heavy skillet are helpful but optional.
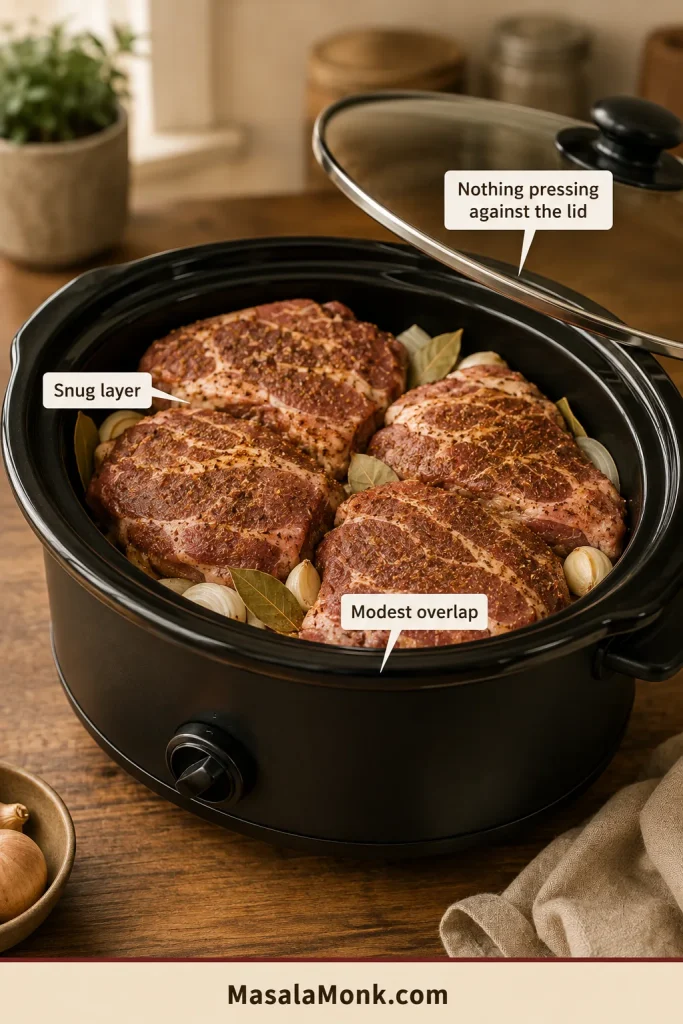
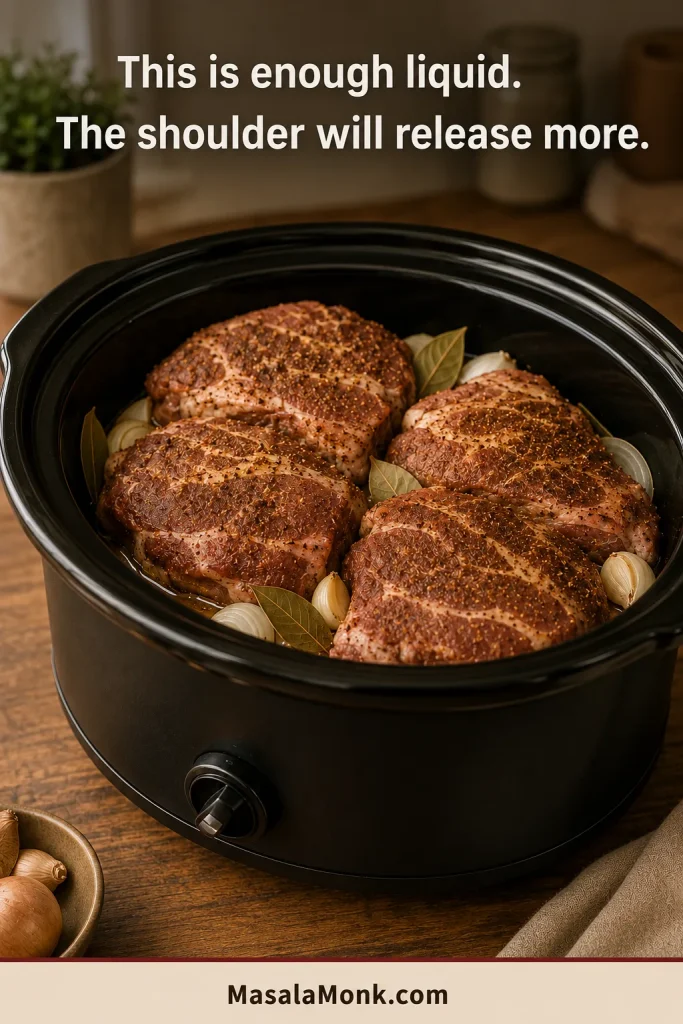
Cooker fit: Arrange the pork in a snug layer with modest overlap. It may touch the sides, but it should not press against the lid. The cooker may look almost dry at first. That is expected—the shoulder will release plenty of moisture and fat.
Modest overlap is fine; a raised lid or compressed pork is not.
Ingredients
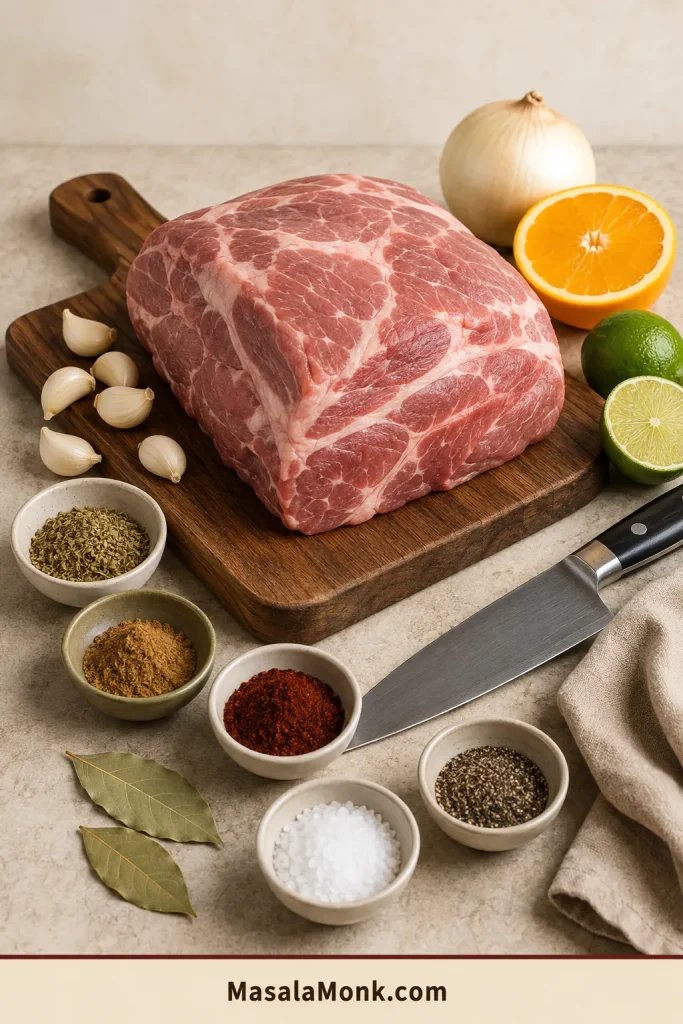
Pork shoulder provides the body; citrus, aromatics and spices shape the flavor.
4 lb / 1.8 kg boneless pork shoulder, pork butt or Boston butt, weighed after removing skin and unusually thick external fat
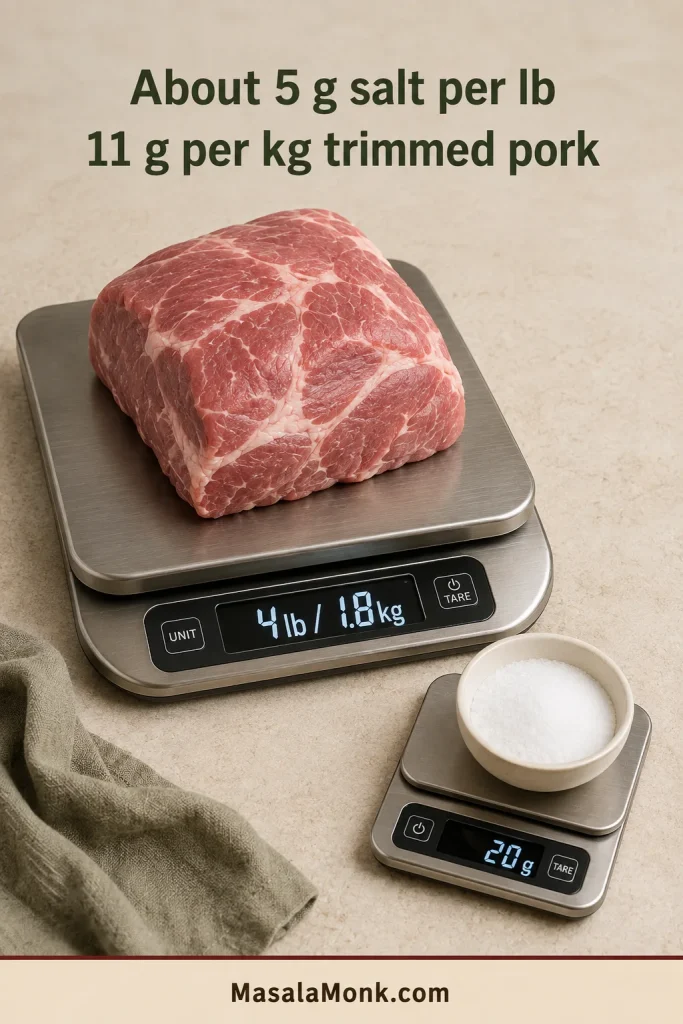
20 g fine sea salt
2 teaspoons dried Mexican oregano, crushed between your fingers
1½ teaspoons ground cumin
1 teaspoon freshly ground black pepper
1 teaspoon ancho chile powder
1 large yellow or white onion, about 8–9 oz / 225–250 g, cut into thick wedges
8 garlic cloves, peeled and lightly crushed
½ cup / 120 ml fresh orange juice
2 tablespoons / 30 ml fresh lime juice
2 bay leaves
Buying note: Choose a slightly larger roast when it has skin or a very thick fat cap, so approximately 4 lb / 1.8 kg remains after trimming.
Scaling salt: Use approximately 5 g per pound or 11 g per kilogram of trimmed pork. Salt volume varies significantly by brand and crystal size.
For Crisping
Reserved cooking juices
Reserved pork fat, lard or neutral oil for skillet crisping, if needed
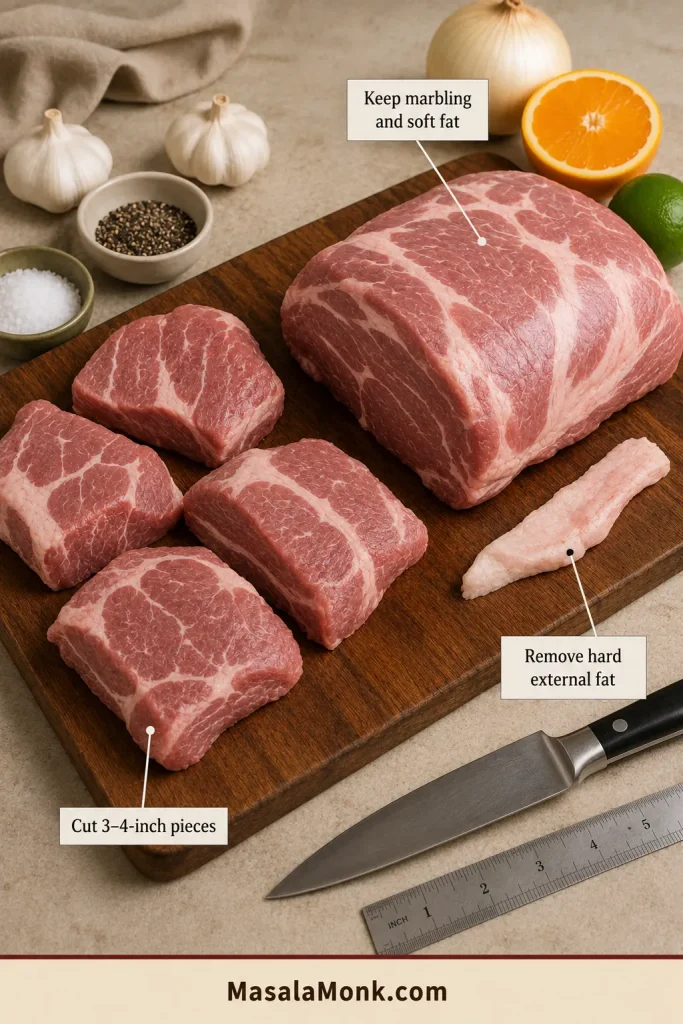
Prepare the pork. Thaw completely in the refrigerator and pat dry. Remove skin and unusually thick, hard external fat, keeping the softer fat and marbling.
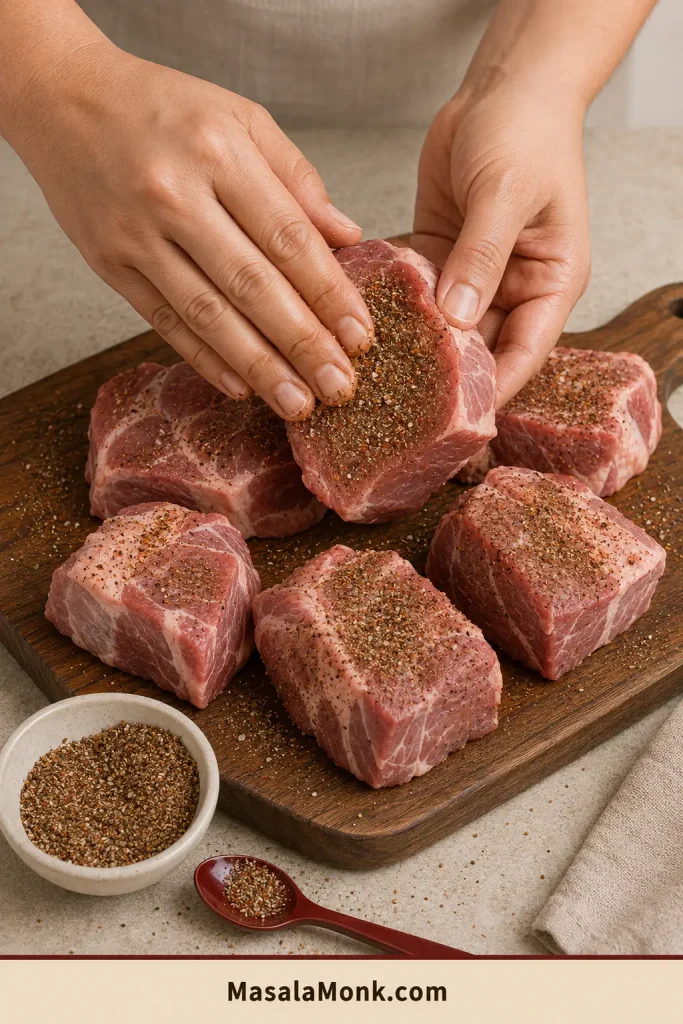
Cut and season. Divide the shoulder into roughly 3–4-inch / 7.5–10 cm pieces of similar thickness. Combine the salt, oregano, cumin, pepper and ancho chile, then coat every cut side and fold.
Load the cooker. Scatter the onion and garlic across the bottom. Arrange the pork over them, tuck in the bay leaves and pour the citrus around the meat.
Cook until tender. Cover and cook on LOW, beginning to check at 6 hours, or on HIGH, beginning to check at 3½–4 hours.
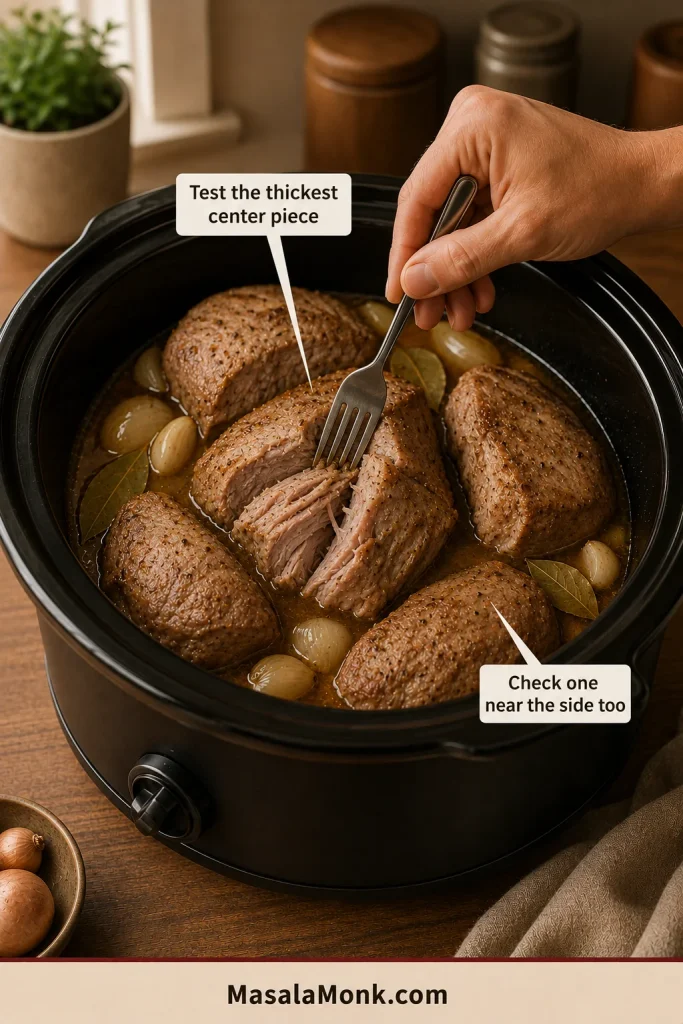
Use the fork test. Test a thick central piece and one near the side. The pork is ready when the fork turns easily and separates a broad section without force.
After the Slow Cook: Rest, Strain and Pull
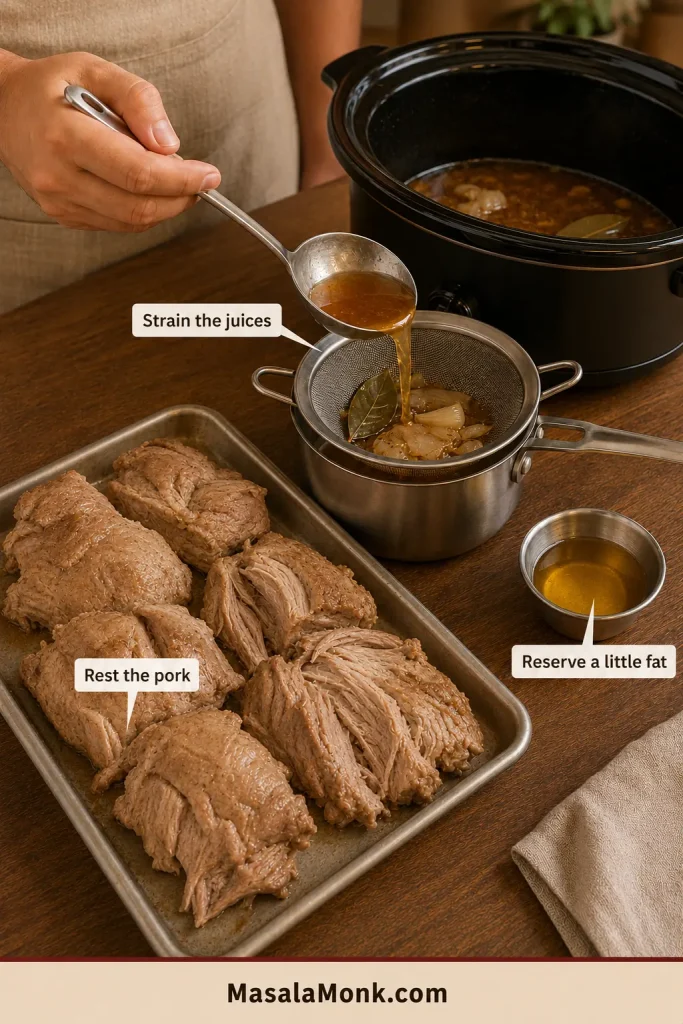
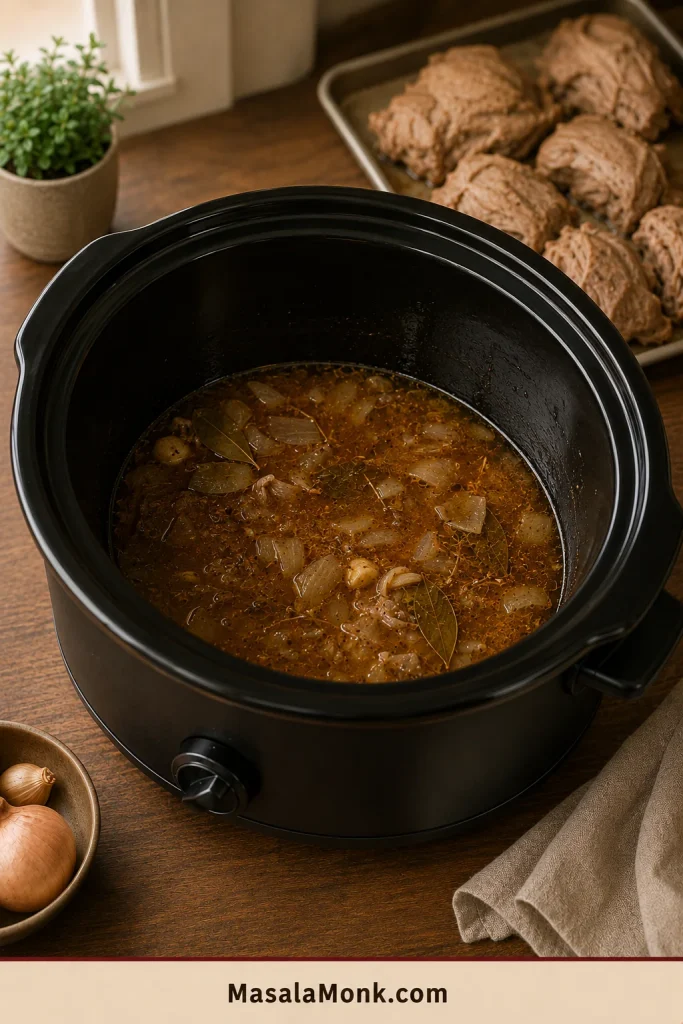
Rest and strain. Transfer the pork to a rimmed tray and let it rest for about 10 minutes while you strain the cooking liquid into a saucepan. Discard the bay leaves; discard the softened onion and garlic or save them for beans, rice or soup.
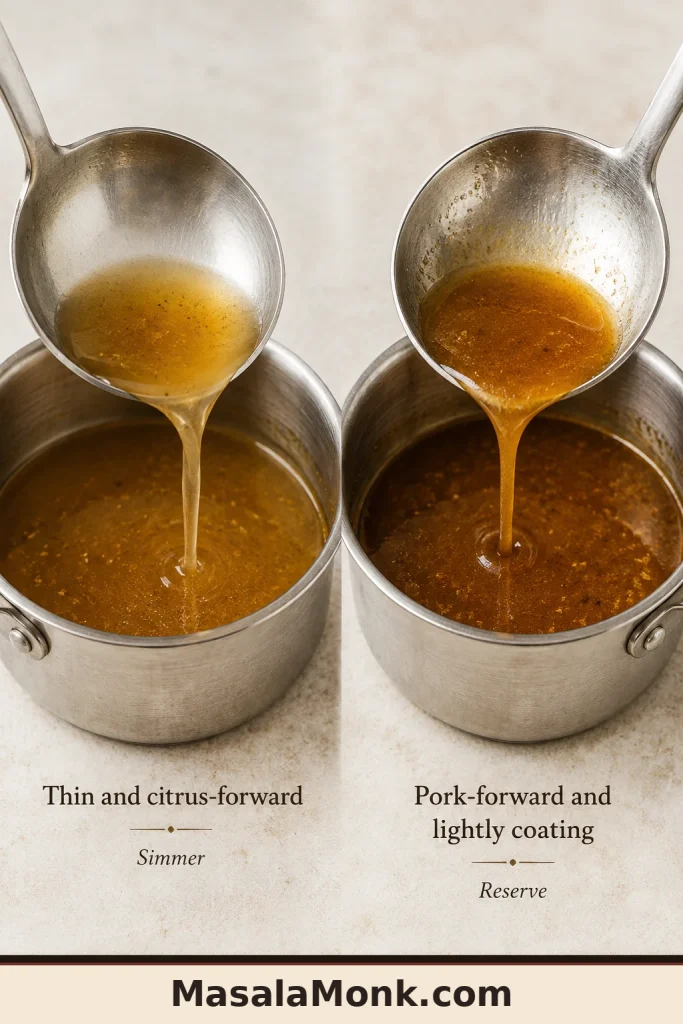
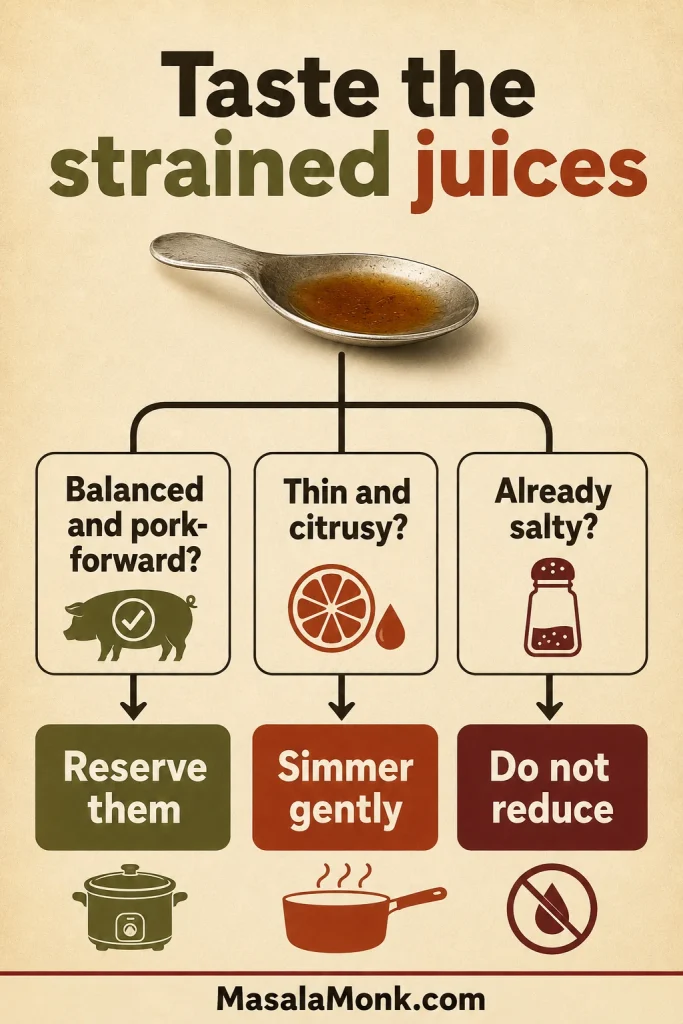
Adjust the juices. Spoon off excess fat, reserving a little for skillet crisping. Taste the strained cooking juices once they are cool enough. If they taste thin and citrusy, simmer until the orange settles into the background and the juices taste fuller and lightly coat a spoon. Set them aside as the reserved juices.
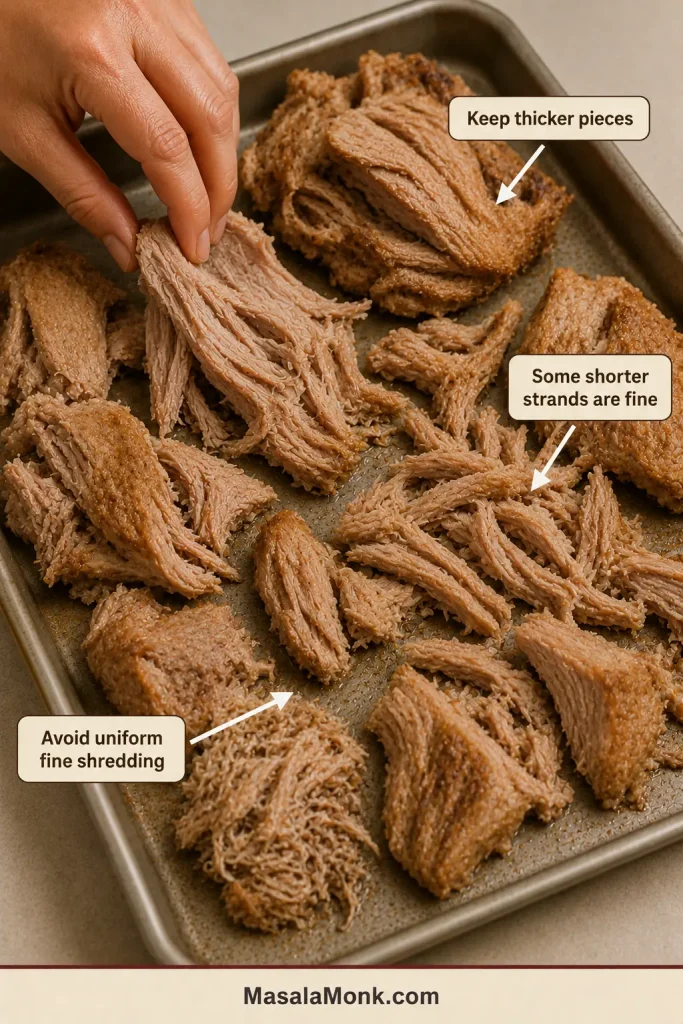
Pull the pork. Leave a mixture of meaty chunks, shorter strands and soft interior pieces.
Crisp and finish. Use the broiler for the full batch or a skillet for deeper browning. Add a measured amount of reserved juice after the crust develops. Keep the rest for serving, storage and reheating.
Use the resting window: keep the pork in broad sections while the juices are strained and a small amount of clean fat is reserved.
Rest the pork while the juices are strained, skimmed and tasted.
Broiler Finish for the Full Batch
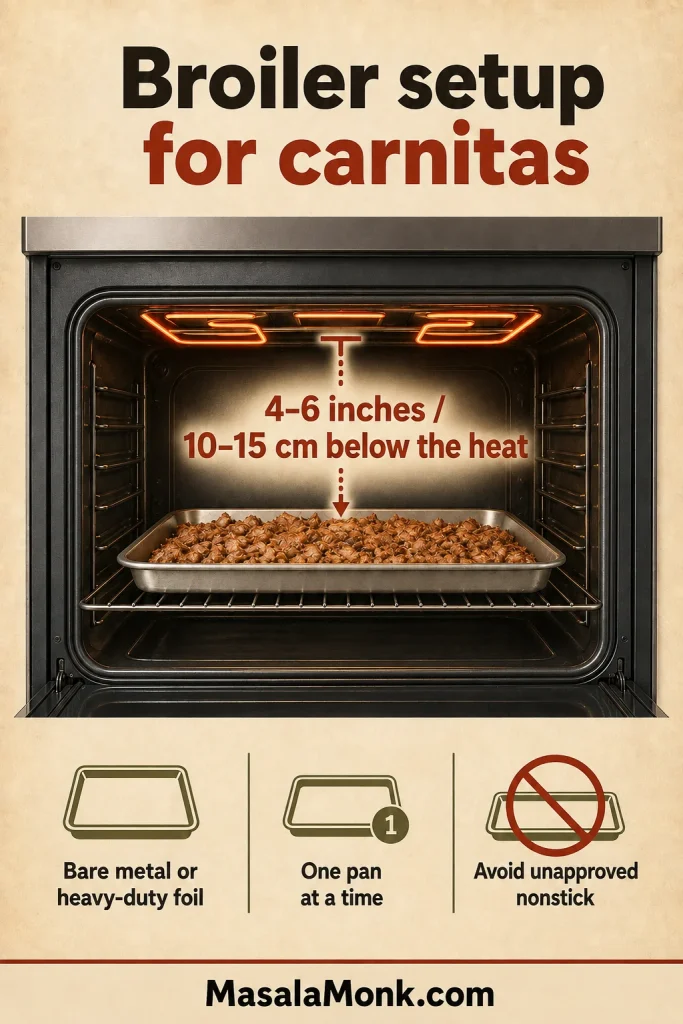
Position an oven rack so the pork will sit approximately 4–6 inches / 10–15 cm beneath the broiler. Preheat the broiler fully.
Use a bare broiler-safe metal sheet pan, or line the pan with heavy-duty foil. Avoid nonstick pans unless the manufacturer explicitly rates them for broiler use.
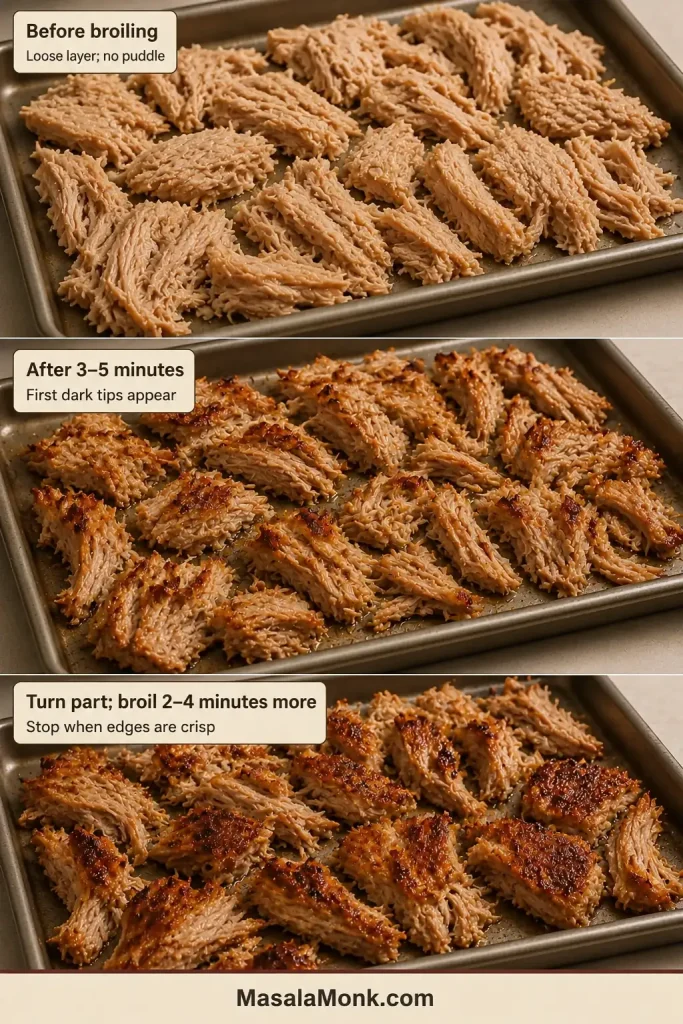
Divide the pork between two pans in loose single layers. Broil one pan at a time for the most even browning. With only one pan, work in two rounds.
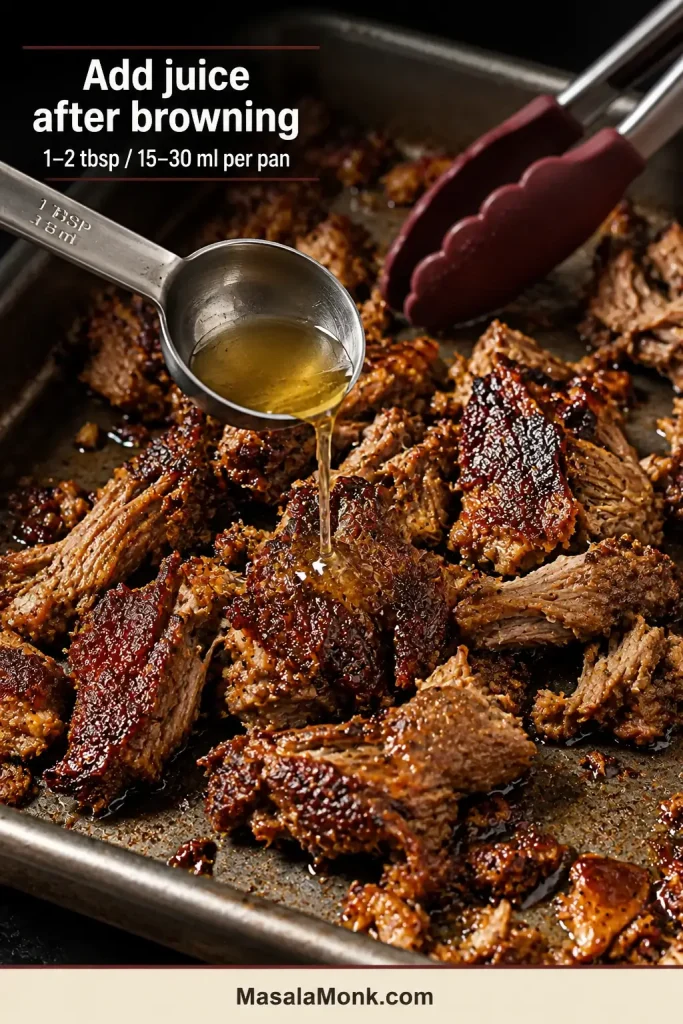
If the pork already glistens, begin without adding liquid. If it looks unusually dry, drizzle with no more than 1 tablespoon / 15 ml reserved juice per pan.
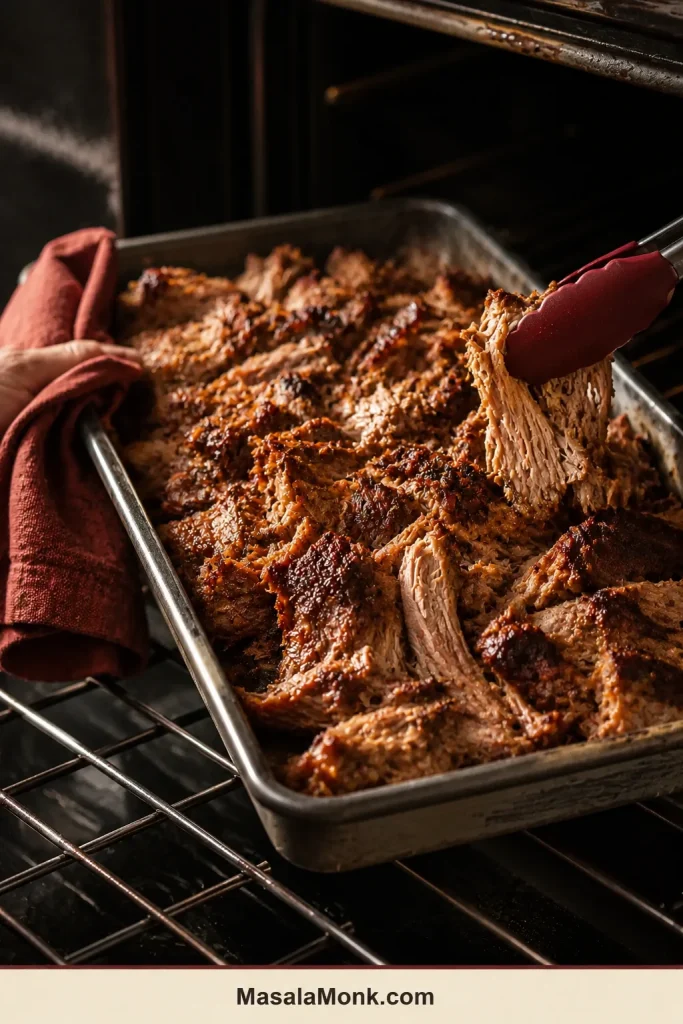
Broil for 3–5 minutes. Turn roughly half the pieces, leaving some browned surfaces facing upward, then broil for another 2–4 minutes.
Finish each pan with 1–2 tablespoons / 15–30 ml hot reserved juices. Toss briefly and serve promptly.
Broiler Browning Cues
First dark tips mean redistribute the pork; they do not always mean stop.
The pork should already taste well seasoned before it reaches the broiler. This final step is mainly about browning.
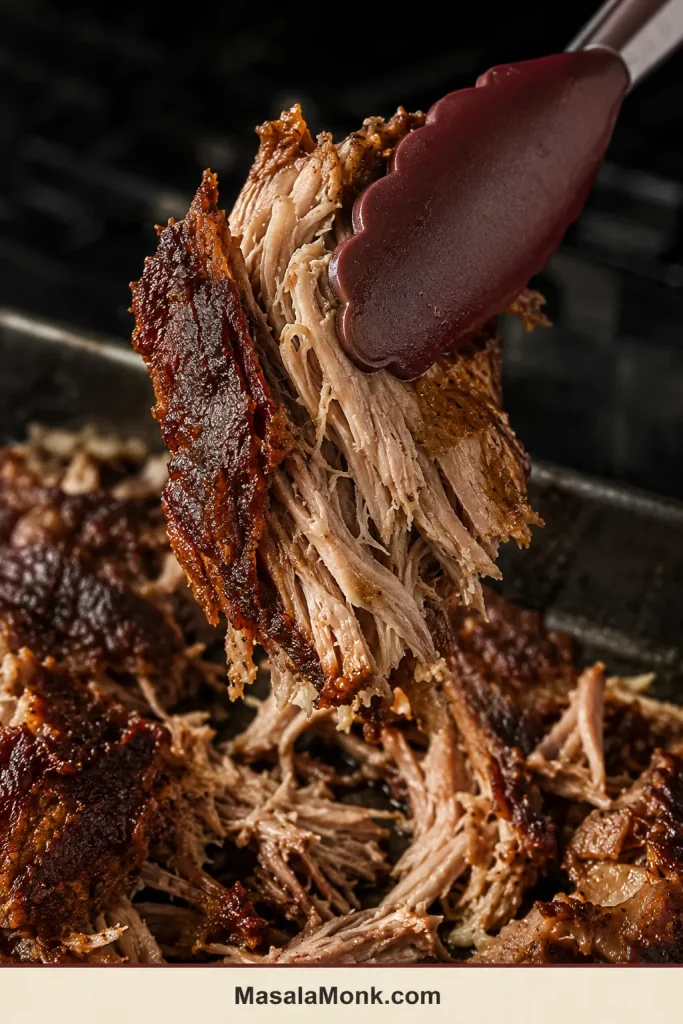
Judge the finished tray by its range of textures rather than by one uniform shade of brown.
Stop with deeply crisp tips and thicker pieces that remain soft and juicy.
Skillet Finish for Smaller Batches
Heat a heavy skillet over medium-high heat. Add a teaspoon of reserved pork fat, lard or neutral oil if the pan is dry.
Add about 8 oz / 225 g pork to a 10-inch / 25 cm skillet, or 10 oz / 285 g to a 12-inch / 30 cm skillet.
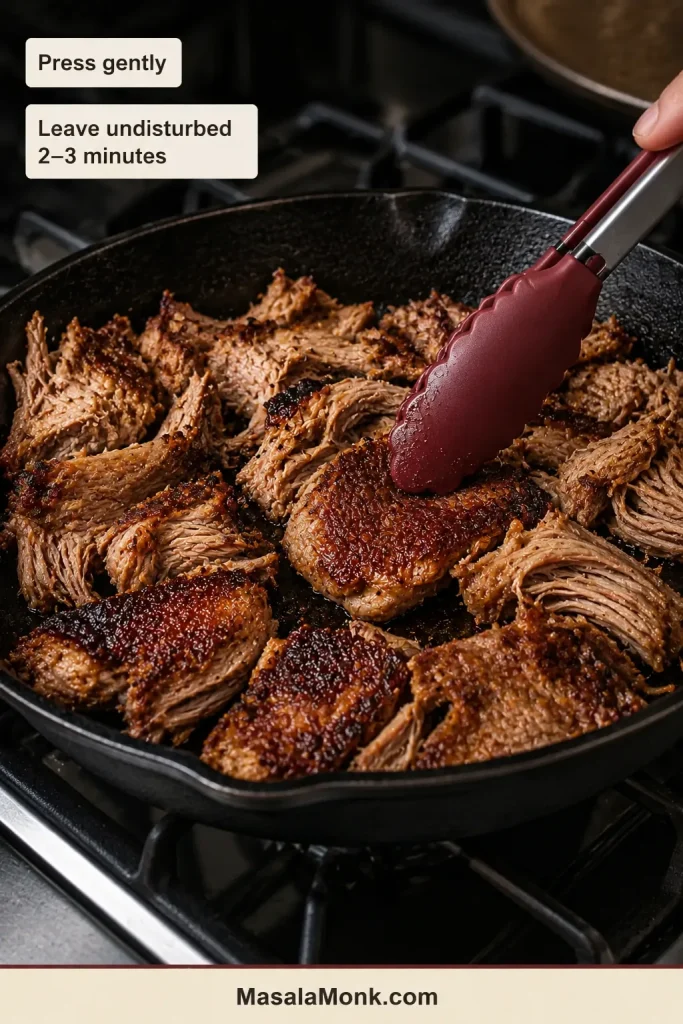
Press gently and leave undisturbed for 2–3 minutes.
Turn part of the pork and cook for another 30–60 seconds.
Remove from the heat, add about 1 tablespoon / 15 ml reserved juice and repeat with the remaining pork.
Success cue: Stop when the exposed edges are dark and crisp but the larger pieces still bend and pull apart softly. Carnitas should have contrast, not uniform crunch.
How this recipe was developed: This slow-cooker adaptation is based on established pork-shoulder cooking principles, measured salt, restrained added liquid and sensory doneness cues. Slow cookers and shoulder cuts vary, so the stated times are checking windows rather than guarantees.
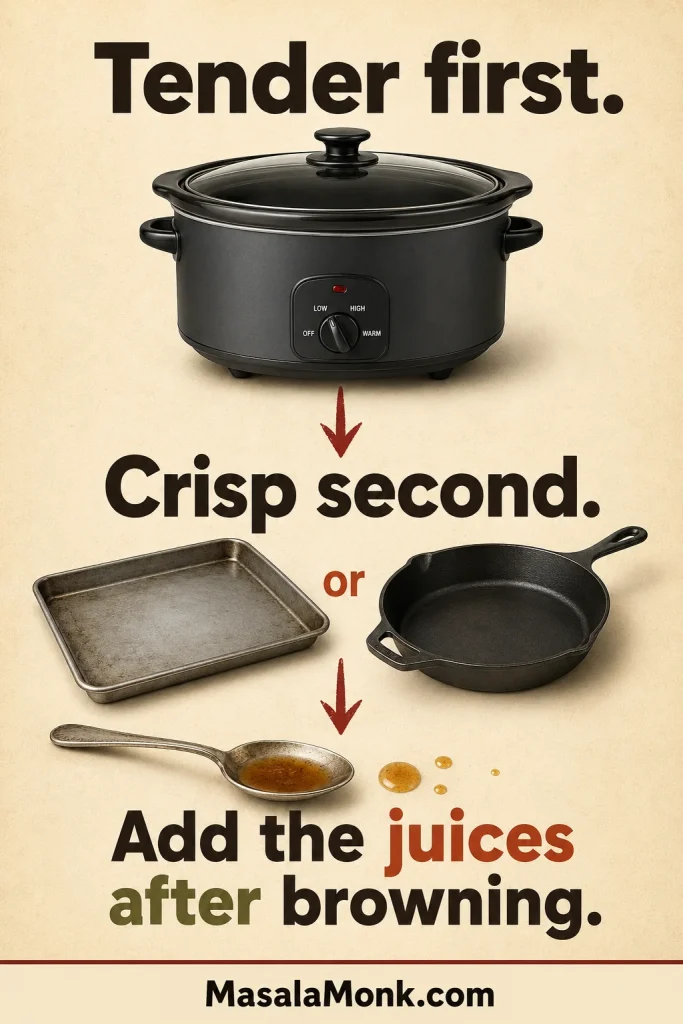
Tender first. Crisp second.
Dark crust outside, moist pork inside—the texture carnitas should keep.
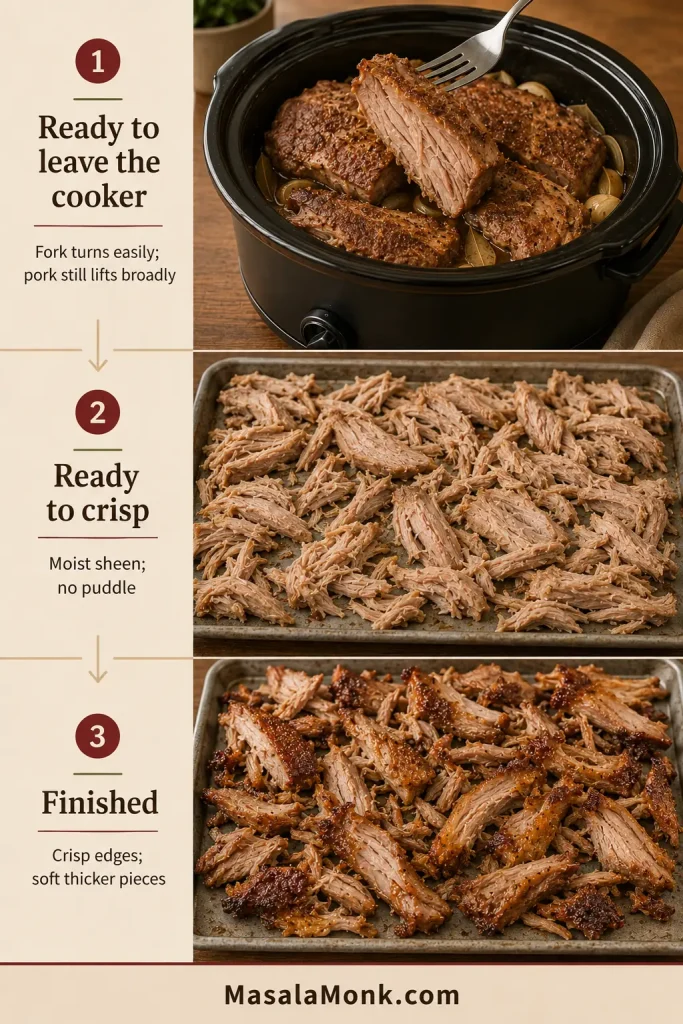
Three Signs Your Carnitas Are on Track
Watch for these three changes as the pork moves from the slow cooker to the crisping tray.
Check tenderness, surface moisture and final crust at three separate stages.
Carnitas appearance and texture checkpoints
Stage
What to look for
Ready to leave the slow cooker
A fork turns easily, but the pork still lifts in large sections
Ready to crisp
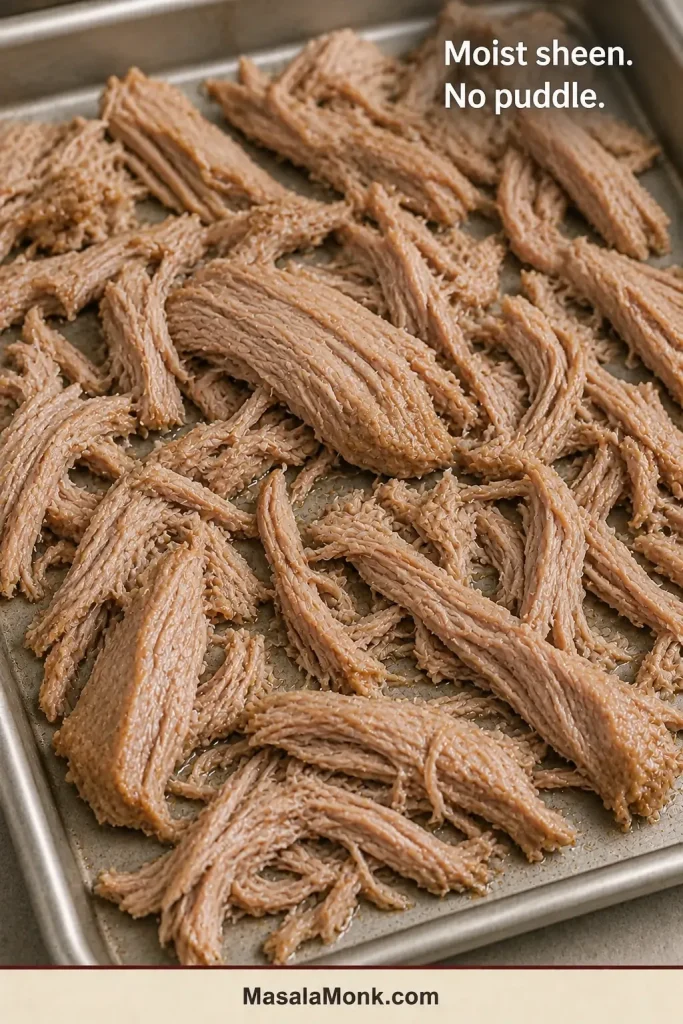
The pieces have a moist sheen, with no puddle collecting underneath
Finished
Browned undersides and crisp tips surround soft, juicy centers
Choosing the Best Pork for Carnitas
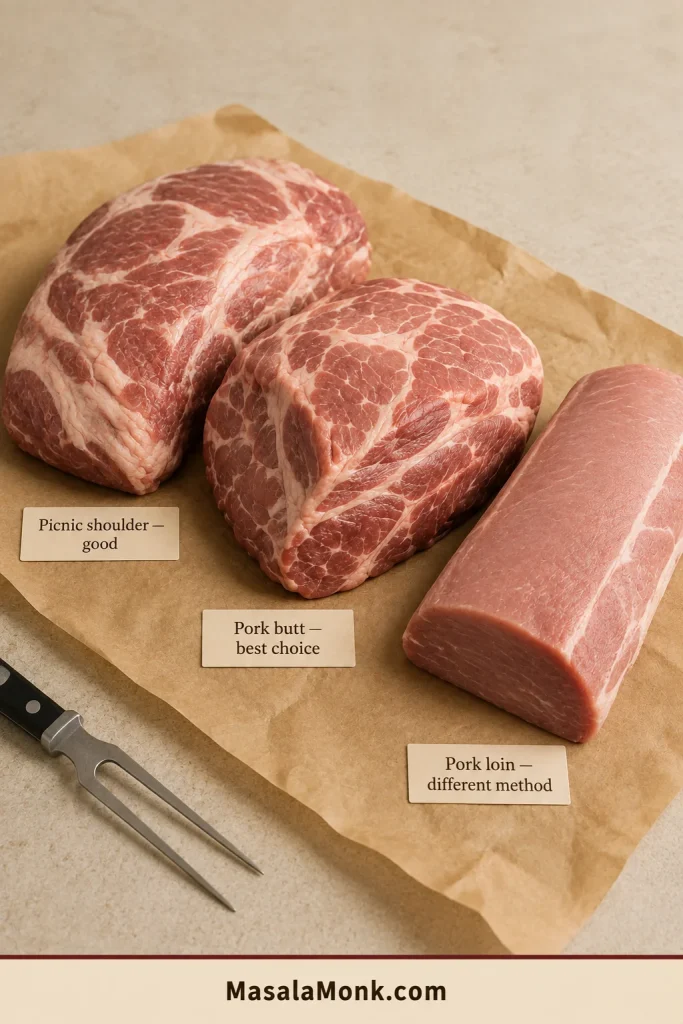
A marbled shoulder gives the slow cooker what it needs: fat for juiciness and connective tissue that softens during the long cook.
Visible marbling protects the pork through slow cooking and final crisping.
On a phone, swipe sideways to see the full table.
Pork cuts suitable for slow cooker carnitas
Pork cut
Verdict
What changes
Pork butt, Boston butt or shoulder blade roast
Best choice
Well marbled, forgiving and easy to divide into large pieces
Picnic shoulder
Good
May need more trimming and can include skin or bone
Bone-in shoulder
Good but slower
Use more raw weight and expect a wider timing window
Pork loin
Separate method
Leaner and better with a shorter, gentler cook
Tenderloin or pork chops
Not suitable for this timing
Too lean and too quick-cooking for the shoulder method
Pork butt and Boston butt come from the upper shoulder. Picnic shoulder comes from lower on the front leg. Both work, but pork butt is usually more compact, well marbled and easier to prepare.
Boneless shoulder is easier to weigh, season and divide. For a roughly 5 lb / 2.25 kg bone-in shoulder, 20 g salt is a sensible starting point because part of the packaged weight is bone. Expect a later first check, and taste the reserved juices before making any final seasoning adjustment.
Remove skin and unusually thick, hard fat, but keep the softer fat and marbling.
Match the thickest sections; the pieces do not need perfect shapes.
Carnitas Ingredients and Substitutions
Salt and Seasoning
The recipe uses 20 g salt for 4 lb / 1.8 kg trimmed pork—about 1.1% by weight. Salt crystals vary too much for one universal teaspoon conversion, so a scale is the clearest option.
Salt by weight to avoid the density differences between fine, coarse and flaky crystals.
Mexican oregano brings an earthy, citrusy note. Mediterranean oregano is a practical substitute, although its flavor is more minty and herbal. Cumin stays in the background, while ancho chile adds mild warmth rather than sharp heat.
Using a carnitas seasoning packet? Check the sodium first. With a salted packet, leave out the recipe salt initially and adjust only after tasting the reserved juices.
Citrus and Added Liquid
Orange rounds out the garlic and spices without making the pork taste sweet. Lime brings a sharper edge, so most of it is better saved for the table. Fresh juice is best, and there is no need to add peel—the long cook can draw bitterness from it.
No orange juice? Replace it with the same amount of unsalted chicken broth or water. Use only 1 tablespoon / 15 ml lime juice in the cooker, then brighten the finished pork with fresh lime.
A shallow layer of liquid is enough. Starting with cups of broth gives the pork a weaker flavor and leaves much more moisture to manage before browning.
Do You Need to Sear the Pork?
No. Searing can add another layer of browned flavor, but that crust softens during hours of moist cooking. Skip it for a simpler start; the final crisping stage matters more.
Want to change the flavor?
More Pork-Forward Carnitas
Reduce the cumin to ¾ teaspoon, leave out the ancho chile powder and use only 1 tablespoon / 15 ml lime juice. Offer more lime at the table and use reserved pork fat for skillet crisping.
Smoky Chipotle Carnitas
Add 1 finely chopped chipotle pepper in adobo with 1–2 teaspoons of the sauce. Leave out the ancho chile powder at first because the chipotle will taste stronger after the juices reduce.
A spoonful of fresh mango salsa gives the smoky pork a cool, bright contrast.
Beer or Mexican Coke
Beer: Replace ¼ cup / 60 ml orange juice with the same amount of mild lager.
Mexican Coke: Replace ¼ cup / 60 ml orange juice with cane-sugar cola for a sweeter finish.
Keep the total liquid unchanged so the pork does not take longer to brown.
Half-Batch Slow Cooker Carnitas
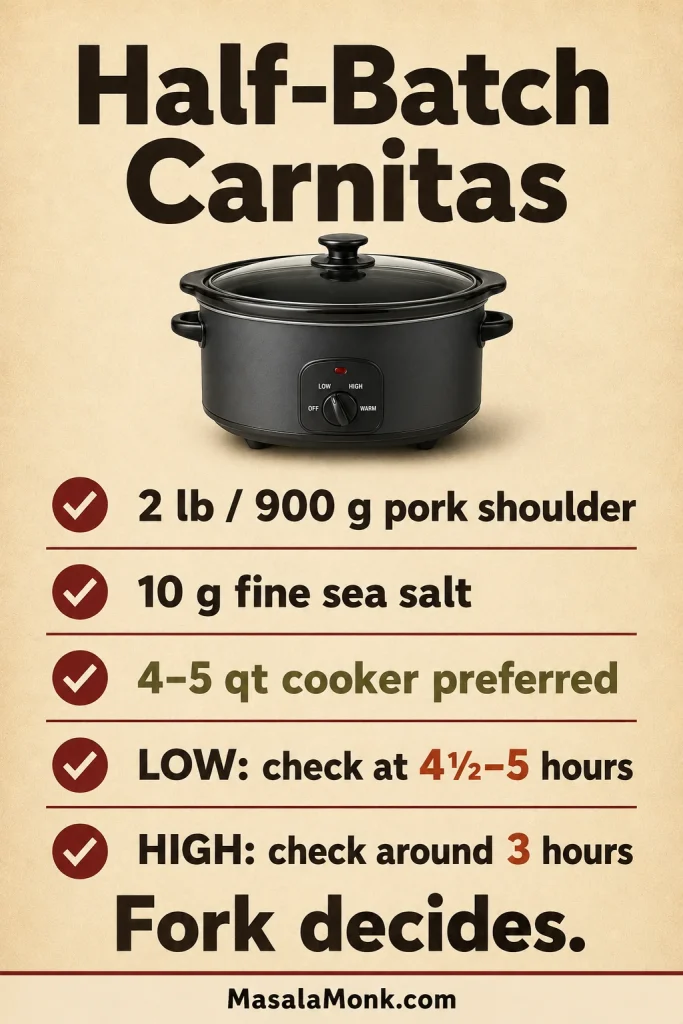
Cooking for fewer people? Make the 2 lb / 900 g half batch
A 4–5 qt / 3.8–4.7 L slow cooker gives a half batch the best fit. A 6-quart model also works, but the shallower fill may alter evaporation and timing.
2 lb / 900 g pork shoulder, weighed after major trimming
10 g fine sea salt
1 teaspoon Mexican oregano
¾ teaspoon ground cumin
½ teaspoon black pepper
½ teaspoon ancho chile powder
½ large onion, about 4–4½ oz / 110–125 g
4 garlic cloves
¼ cup / 60 ml orange juice
1 tablespoon / 15 ml lime juice
1 bay leaf
Begin checking at 4½–5 hours on LOW or around 3 hours on HIGH. A common window is 5½–7 hours on LOW or 3½–4½ hours on HIGH, but the fork still decides.
Half-batch planning: quantities scale directly, but cooker fit and the first tenderness check still need their own adjustment.
Use a smaller cooker and begin checking earlier; cooking time does not halve.
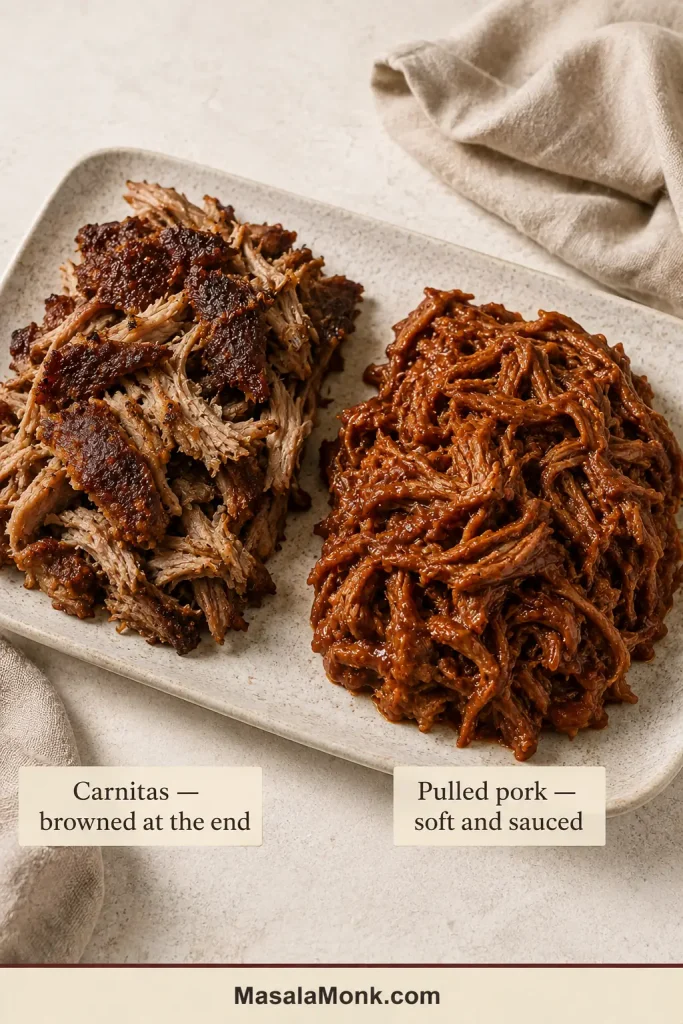
Carnitas vs Slow Cooker Pulled Pork
Carnitas are often described as Mexican pulled pork, but the comparison only goes so far. Both can begin with pork shoulder; the seasoning, texture and finish move in different directions.
Carnitas need exposed browned surfaces, not merely separated pork fibers.
This slow-cooker version uses citrus, oregano and restrained spices; barbecue pulled pork leans more heavily on rub, smoke, vinegar and sauce.
Broader, irregular pieces are typical of carnitas; pulled pork is usually separated into finer strands.
Dry heat gives carnitas their browned finish; pulled pork generally stays soft and coated with sauce.
Tacos, tostadas and bowls suit carnitas naturally; barbecue pork fits buns, sliders and barbecue plates.
This slow-cooker version uses moist heat for tenderness, then adds a separate browning stage for the crisp-soft finish.
Why Each Step Matters for Juicy, Crisp Carnitas
Cut and Season Large Pieces
Large pieces reach tenderness more predictably than one compact roast while keeping enough mass to stay succulent. Similar thickness matters more than perfect shape. Mix the salt and spices before applying them, then press the seasoning into the freshly cut surfaces and folds.
Season every cut face so flavor reaches beyond the original exterior.
Load the Cooker and Leave It Closed
Put the onion and garlic beneath the shoulder, where the released juices will collect. Pour the citrus around the edges. The cooker may look almost dry, but the pork will release moisture and fat as it cooks. Early stirring and repeated lid lifting only slow the process.
The liquid starts low, then rises as the shoulder releases fat and juices.
Check the Center and the Edge
Slow cookers often run hotter near the walls, so test the thickest central piece and one near the side. If the fork still meets resistance at the expected time, close the lid and give the pork another 30 minutes. Nothing has gone wrong; the connective tissue simply needs longer.
If the edge yields but the thick center resists, keep cooking.
When the fork finally turns easily, the uncertain part is over. The bright citrus aroma should have softened, and the cooker should smell much more deeply of pork, garlic and oregano. The shoulder is ready for the high-heat finish that gives carnitas their contrast.
Taste the Juices Before Reducing Them
When you lift the lid, there may be far more cooking liquid than expected. Most of it came from the shoulder itself. Strain it, spoon off only the excess fat and taste once it has cooled enough.
Much of the final liquid rendered directly from the pork shoulder.
If the strained juices taste thin and citrusy, simmer until the orange settles into the background and the flavor becomes fuller and more savory. The finished juices should taste primarily of pork and garlic, with the citrus supporting the flavor rather than leading it.
Reduce for fuller flavor, stopping before the juices turn sticky or overly salty.
Stop when the liquid lightly coats a spoon. Juices that already taste balanced do not need reducing.
Reduce only thin juices; balanced or salty juices should stay as they are.
Preserve Some Thicker Pieces
Keep some meaty pieces among the shorter strands, then pull only as much as needed for the first tray or skillet batch. Their edges can brown while their centers remain soft, and larger pieces can always be separated further at the table.
Thin strands crisp first; thicker pieces protect the juicy interior.
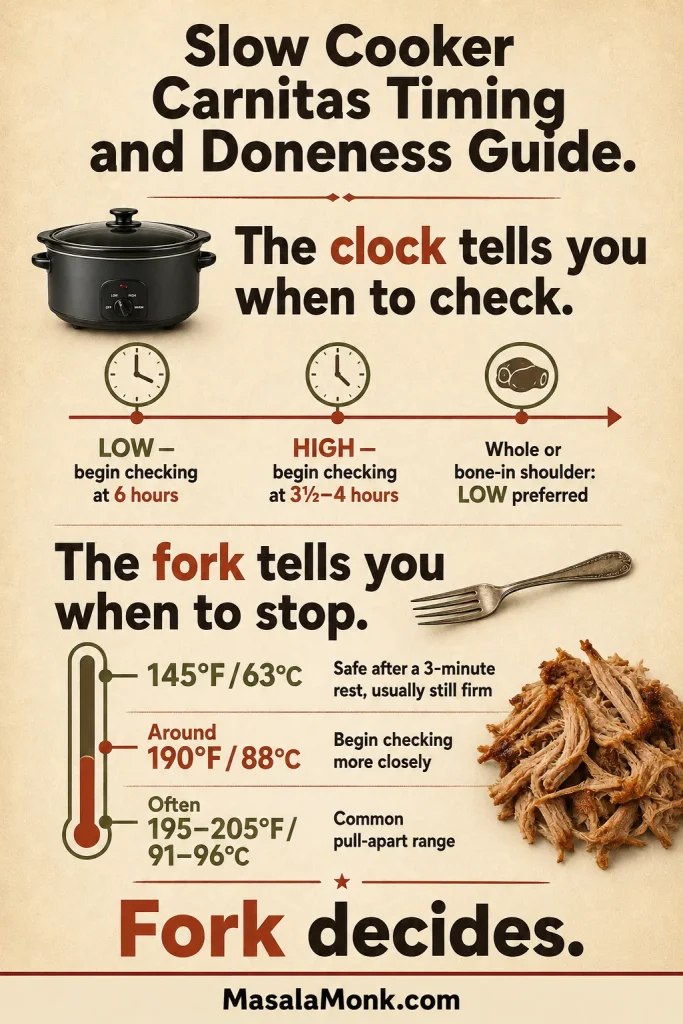
The clock tells you when to start checking. The fork tells you when to stop.
Temperature guides the check; fork resistance decides when the shoulder is tender.
On a phone, swipe sideways to see the full table.
Slow cooker pork carnitas cooking times
Pork size and shape
Setting
Begin checking
Common working window
2 lb / 900 g large pieces
LOW
4½–5 hours
5½–7 hours
2 lb / 900 g large pieces
HIGH
About 3 hours
3½–4½ hours
4 lb / 1.8 kg large pieces
LOW
About 6 hours
6½–8½ hours
4 lb / 1.8 kg large pieces
HIGH
3½–4 hours
4–5½ hours
4 lb / 1.8 kg whole boneless roast
LOW recommended
About 8 hours
8–10 hours
Bone-in shoulder
LOW recommended
Later than equivalent boneless pieces
Depends on bone, thickness and roast shape
LOW is the better choice for whole and bone-in shoulders because their thickness makes HIGH timing less predictable. All of these times are checking guides rather than guarantees; cooker shape, starting temperature and batch depth also affect the finish.
Safe Temperature Is Not the Same as Tenderness
Whole-muscle pork is considered safe at 145°F / 63°C followed by a three-minute rest, but shoulder is normally still firm at that point. Begin checking more closely around 190°F / 88°C. Pull-apart tenderness commonly arrives around 195–205°F / 91–96°C, but the fork makes the final decision.
Thaw pork before slow cooking and keep the lid closed until the first planned check. USDA slow-cooker safety guidance also recommends reheating cold leftovers outside the slow cooker before transferring them to a cooker for hot holding.
Use the Fork Test
Not ready: The fork needs pressure, twisting feels tight, or the meat springs back.
Ready: The fork enters easily, turns with little resistance and separates a broad section.
Very soft: The pork collapses into fine strands with almost no pressure. Remove it promptly and handle it gently; it can still taste excellent, but it will not hold larger pieces as well.
How to Make Carnitas Crispy Without Drying the Pork
Once the pork is tender, its surface needs strong heat and enough space for moisture to escape.
Choose the Best Crisping Method
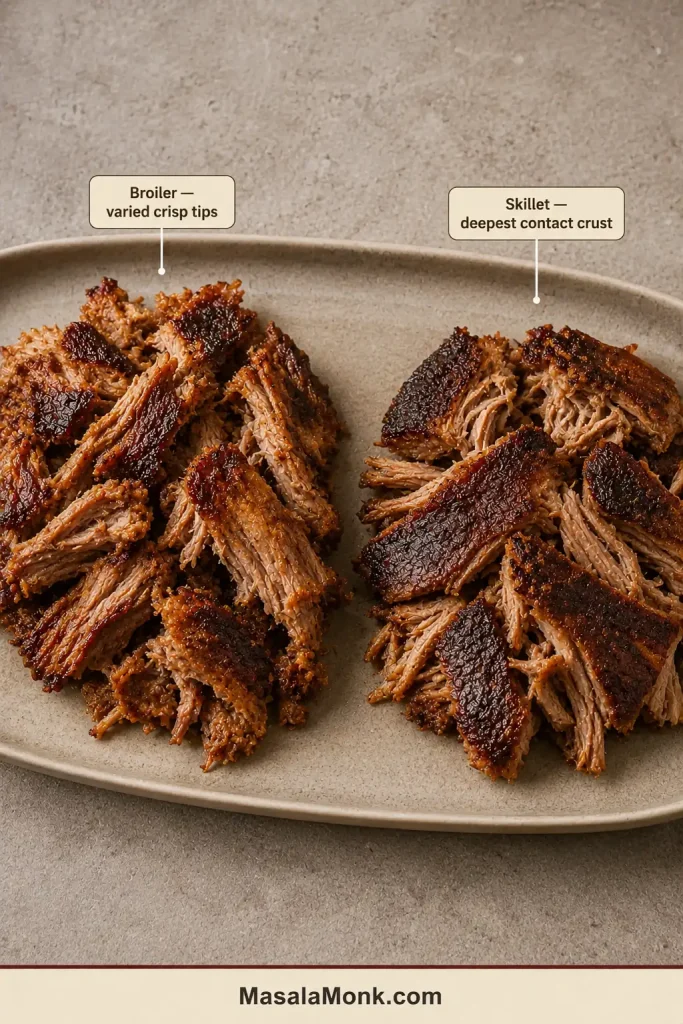
Broiler: Best for a full family or party batch. It handles the most pork at once and produces varied crisp edges.
Skillet: Best for smaller portions and the deepest contact browning. Work in batches so the meat fries instead of steaming.
Air fryer: Best for freshly cooked pork or a small portion of refrigerated leftovers. It can reheat and crisp the pork in the same step.
Set the broiler rack before the pork reaches the tray. Position the meat 4–6 inches / 10–15 cm below the element so the edges brown quickly without scorching.
Four to six inches balances fast browning with enough control to avoid scorching.
How Wet Should the Pork Be?
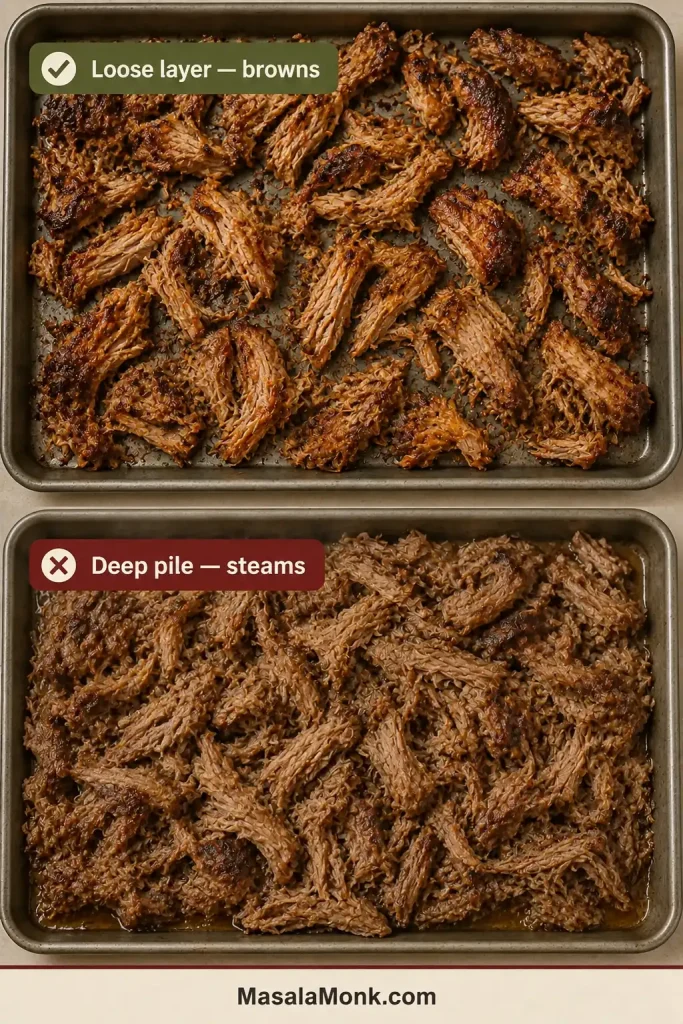
The pieces should glisten, with no puddle collecting underneath. If the tray begins looking soupy, divide the pork before giving it more heat. As the surface dries, the soft hiss of steam becomes a sharper sizzle. That is when the crust begins to form.
A light sheen is useful; a puddle traps steam and prevents browning.
A loose layer browns; a deep pile steams.
Open gaps release steam and let the pork surface grow hotter.
Reserved juices belong in the finishing stage, after dry heat has already done the work of building a crust.
Add measured juice after browning so the finished crust stays intact.
What skillet browning should look like: the deepest color develops on the flat surfaces that remain in contact with the hot pan.
Stillness against the skillet creates the deepest contact crust.
Air-Fryer Carnitas
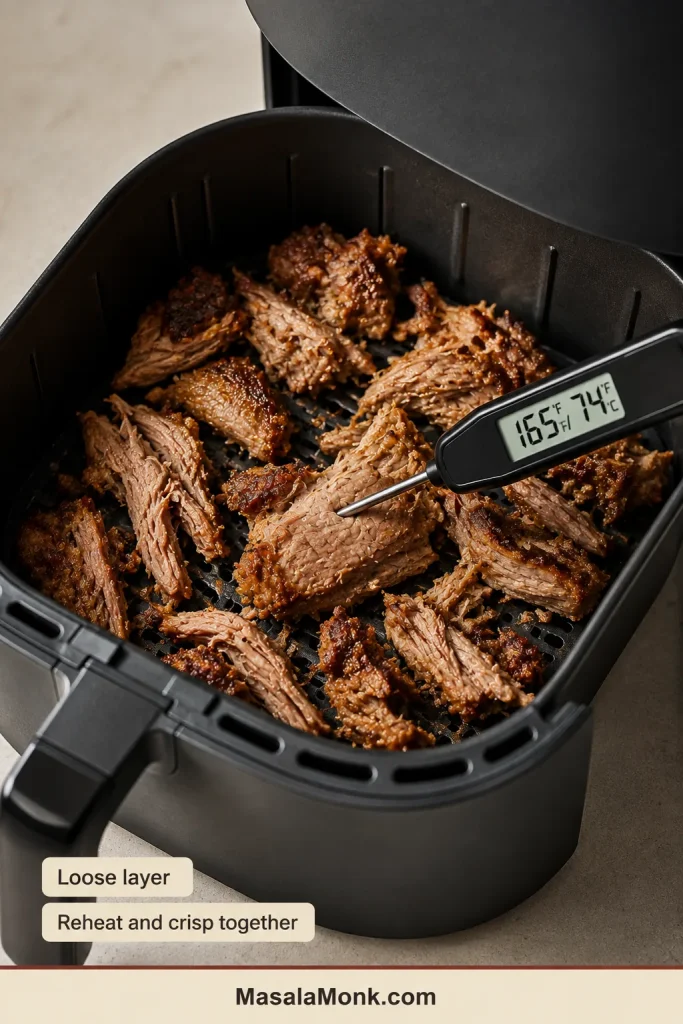
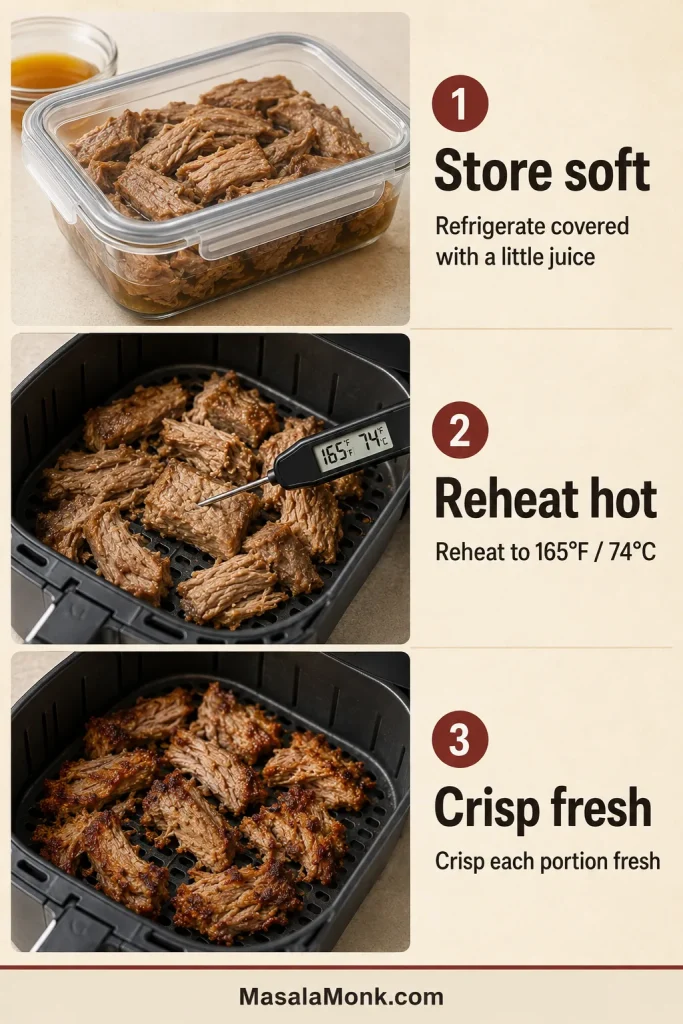
For refrigerated leftovers, use the air fryer to reheat and crisp the pork at the same time. Continue cooking until the center reaches 165°F / 74°C and the edges are browned. Cold pork may need longer than freshly cooked pork.
Preheat the air fryer to 400°F / 200°C.
Add about 8 oz / 225 g pork in a loose layer. If it looks dry, toss it with 1–2 teaspoons of reserved juice.
Air-fry for 3 minutes, then toss or turn part of the pork.
Continue until the center reaches 165°F / 74°C and the edges are crisp. Freshly cooked pork commonly needs another 1–3 minutes; refrigerated pork may need longer.
Air circulation crisps small portions quickly, so watch the thinnest strands.
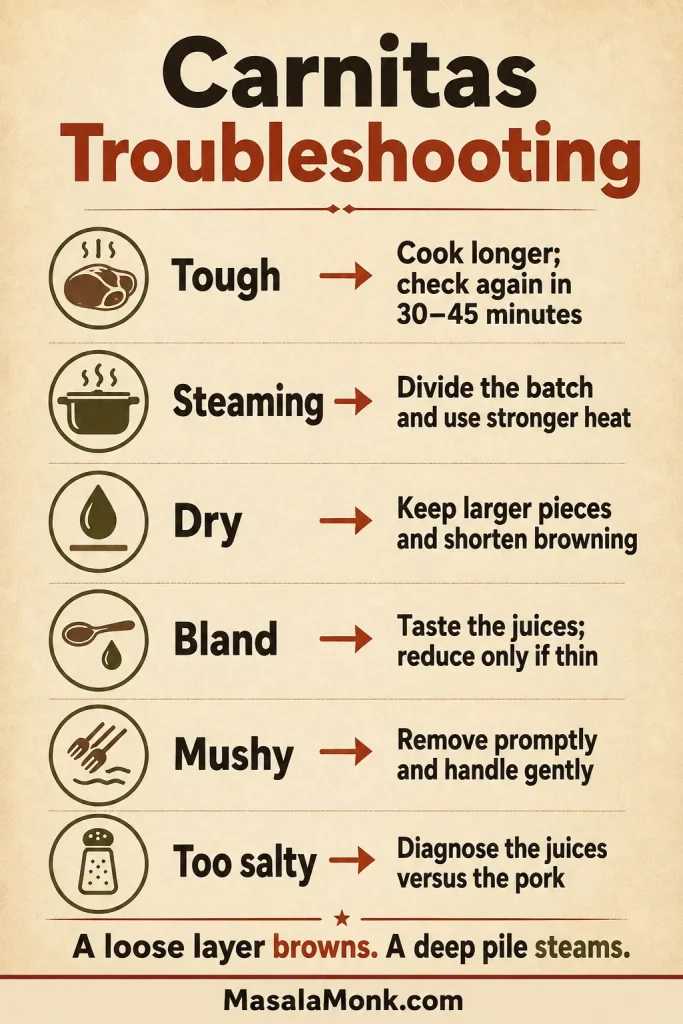
Slow Cooker Carnitas Troubleshooting
Most problems trace back to tenderness, tray moisture or high-heat timing.
On a phone, swipe sideways to see the full table.
Common slow cooker carnitas problems and fixes
Problem
Likely cause
What to do
Pork is still tough
The connective tissue has not softened
Cover and continue cooking; check again in 30–45 minutes
Pork is mushy
Small pieces, overcooking or a long hold in hot liquid
Drain promptly and crisp broad portions carefully
Too much liquid
The shoulder released moisture and fat
Strain, skim and reduce only what you need
Pork will not crisp
Wet surface, crowding or weak heat
Divide it into loose batches and fully preheat the broiler or skillet
Pork dries beneath the broiler
Pieces are too fine or the second pass is too long
Keep larger pieces and finish with a measured spoonful of juice
Carnitas taste bland
Watery juices or no final seasoning check
Reduce the strained juices if needed, then adjust salt and lime
Carnitas are too salty
The juices are too salty, or the pork itself is over-seasoned
When the juices are too salty, use less of them. Balance over-seasoned pork with plain tortillas, unsalted beans, avocado or rice
The Pork Is Still Tough
A shoulder that is hot but still stubborn simply needs more time. Fully cooked pork can remain tight before its connective tissue has softened enough to pull apart.
If the cooker also looks unusually dry, add a small amount of hot water or unsalted broth around the meat. This is most likely with a small batch in a large cooker.
The Pork Turned Mushy
Mushiness usually comes from small pieces, a long hold after tenderness, repeated stirring or leaving fine strands submerged in all the cooking liquid. Remove finished shoulder promptly and rest it in larger sections. Browning can improve a soft exterior, but it cannot rebuild the meat’s structure.
The Pork Is Steaming Instead of Browning
Move half the pork to another tray or skillet. Let pooled moisture evaporate, then leave the pieces alone long enough for a crust to form.
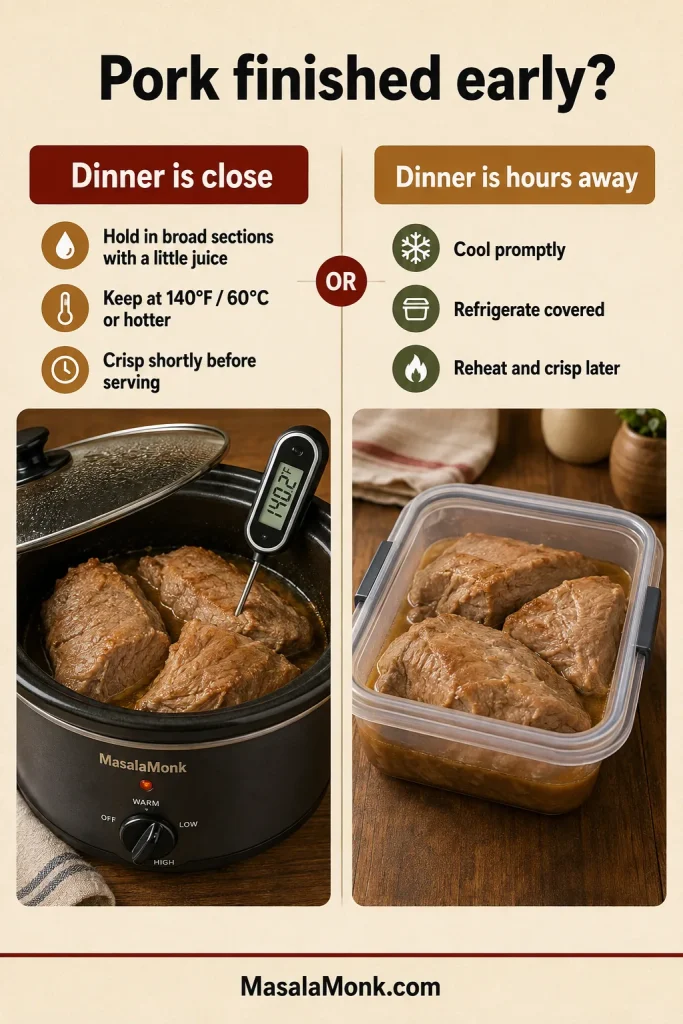
The Pork Finished Early
If dinner is close, hold the pork in large sections with a modest amount of juice on WARM only when a thermometer confirms that it remains at 140°F / 60°C or hotter. Crisp it shortly before serving.
If the meal is still several hours away, cool and refrigerate the pork promptly. Reheat and crisp it closer to dinner instead of leaving it on a long hot hold.
Hold briefly above 140°F / 60°C; chill promptly for a longer delay.
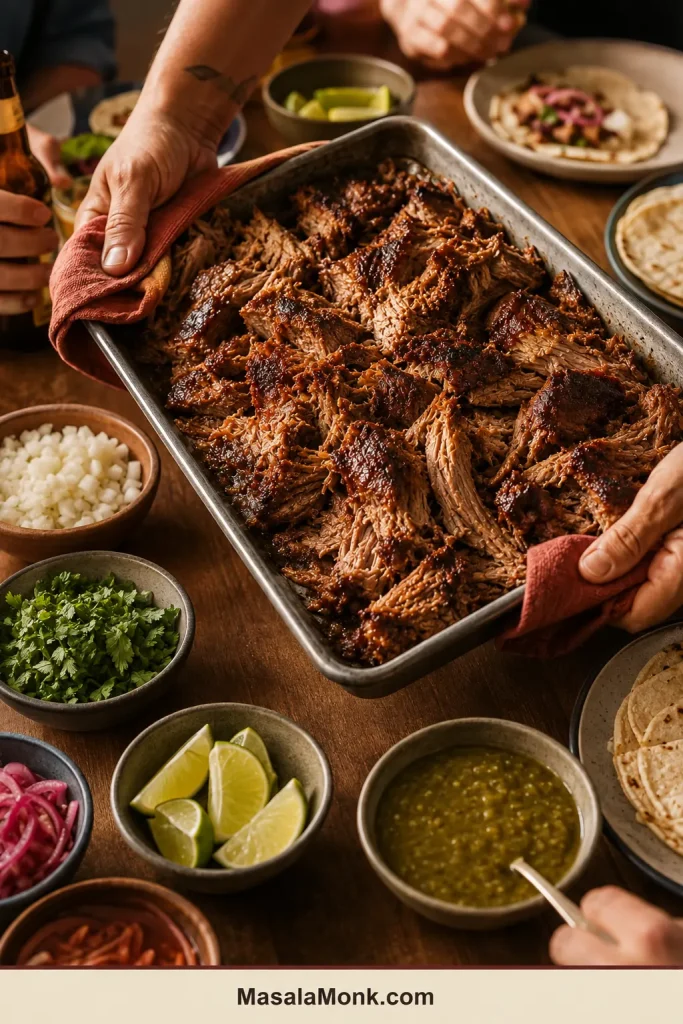
Bring the first tray straight to the table rather than covering it. Warm tortillas, chopped onion, cilantro, lime and one bright salsa are enough; the pork should still be the part everyone notices first.
Let everyone take the crispest pieces while the next batch browns. The last person to build a taco still gets pork fresh from the heat.
Serve in waves so each tray reaches the table with crisp edges.
The Simplest Carnitas Taco
Warm corn tortilla
Crisp-edged carnitas
Finely chopped white onion
Fresh cilantro
A squeeze of lime
Roasted salsa verde or a bright red salsa
Fresh, restrained toppings keep the browned pork in focus.
For a creamier taco, add one rich element rather than several. A small spoonful of fresh guacamole softens the crisp edges without burying the pork.
Build a Carnitas Taco Bar
Warm corn and flour tortillas
Pickled red onions and radish slices
Guacamole or diced avocado
Pico de gallo
Cotija or another crumbly cheese
Black beans or refried beans
Lime wedges
Separate components protect the crust and let guests build to taste.
Add black beans and a bowl of fluffy rice for guests who would rather build a carnitas bowl.
How Much Carnitas Per Person?
On a phone, swipe sideways to see the full table.
Estimated carnitas serving portions
Serving style
Pork quantity
Approximate yield
Small taco
1½–2 oz / 40–55 g per taco
20–30 tacos
Taco meal with sides
3–4 oz / 85–115 g per person
10–14 people
Hearty tacos or bowl
4–5 oz / 115–140 g per person
8–11 people
Large plated main
5–6 oz / 140–170 g per person
7–9 people
Other Ways to Use Carnitas
Use leftovers in quesadillas, burrito bowls, tostadas, breakfast hash or loaded potatoes, crisping the pork before adding it whenever the dish allows. For breakfast meal prep, the cooling and reheating approach in these breakfast burritos helps keep the tortillas from becoming wet or chewy.
Storing, Freezing and Reheating Carnitas
Carnitas are unusually good make-ahead food—as long as you save the crisping for later.
Keep any pork you are not serving soft and juicy. Tomorrow, warm one portion with a little juice, let the surface dry and crisp it fresh so the browned edges return.
Store the pork soft and juicy, then crisp each portion before serving.
Refrigerating Carnitas
Divide the pork into shallow containers and refrigerate within two hours.
Add enough reserved juice to keep it moist without submerging it.
Keep the remaining juices in a separate container.
Use refrigerated carnitas within 3–4 days.
Crisp only the portion you are about to serve.
Freezing Carnitas
Freeze the pork before crisping in practical meal portions. About 1 lb / 454 g suits a family meal, while 8 oz / 225 g works well for one or two people.
Place each portion in a freezer-safe bag or container.
Add 2–4 tablespoons / 30–60 ml reserved juice per pound / 454 g pork.
Press freezer bags flat to remove excess air.
Label each portion with its date and weight.
Freeze the remaining juices in small portions.
For best quality, use frozen carnitas within about three months.
Reheat Without Drying the Pork
Thaw frozen carnitas in the refrigerator when time allows.
Reheat with a little reserved juice on the stove, in the microwave, in a conventional oven or in the air fryer until the pork reaches 165°F / 74°C.
Allow excess surface moisture to evaporate.
Crisp the pork in a skillet, beneath the broiler or in the air fryer.
Add a small spoonful of hot juice after browning.
Reheat cold leftovers outside the slow cooker. Once fully hot, the pork can be transferred to a preheated cooker and held at 140°F / 60°C or above.
Slow Cooker Pork Carnitas FAQ
Can You Put Frozen Pork in a Slow Cooker?
Thaw pork completely in the refrigerator before slow cooking. Frozen or partly frozen meat may take too long to heat through safely in a slow cooker, and it also makes the cooking window difficult to predict.
Should the Pork Be Covered With Liquid?
No. A shallow layer is enough. The shoulder releases substantial moisture and fat as it cooks.
Can You Cook the Shoulder Whole?
Yes, as long as it fits without pressing against the lid. Place a whole boneless roast with the fattier side facing upward, season it all over and pour the citrus around it. Use LOW and expect a later first check and a wider timing window.
Is LOW or HIGH Better?
LOW gives the broadest and most forgiving window. HIGH works for large boneless pieces when time is limited, but begin checking earlier and watch closely once the meat starts separating.
Can You Halve the Recipe?
Yes. Use the 2 lb / 900 g half-batch quantities above. A 4–5-quart slow cooker gives the smaller batch the best fit, although a 6-quart cooker can also work with a wider timing window.
Tender First, Crisp Second
Serve the pork straight from the tray while the dark edges are crisp and the larger pieces still pull apart softly inside.
Made these carnitas? Tell us whether you cooked them on LOW or HIGH and which crisping method you preferred. If you noted the pork weight, cooker size or fork-tender time, include those too—they may help the next person making dinner.
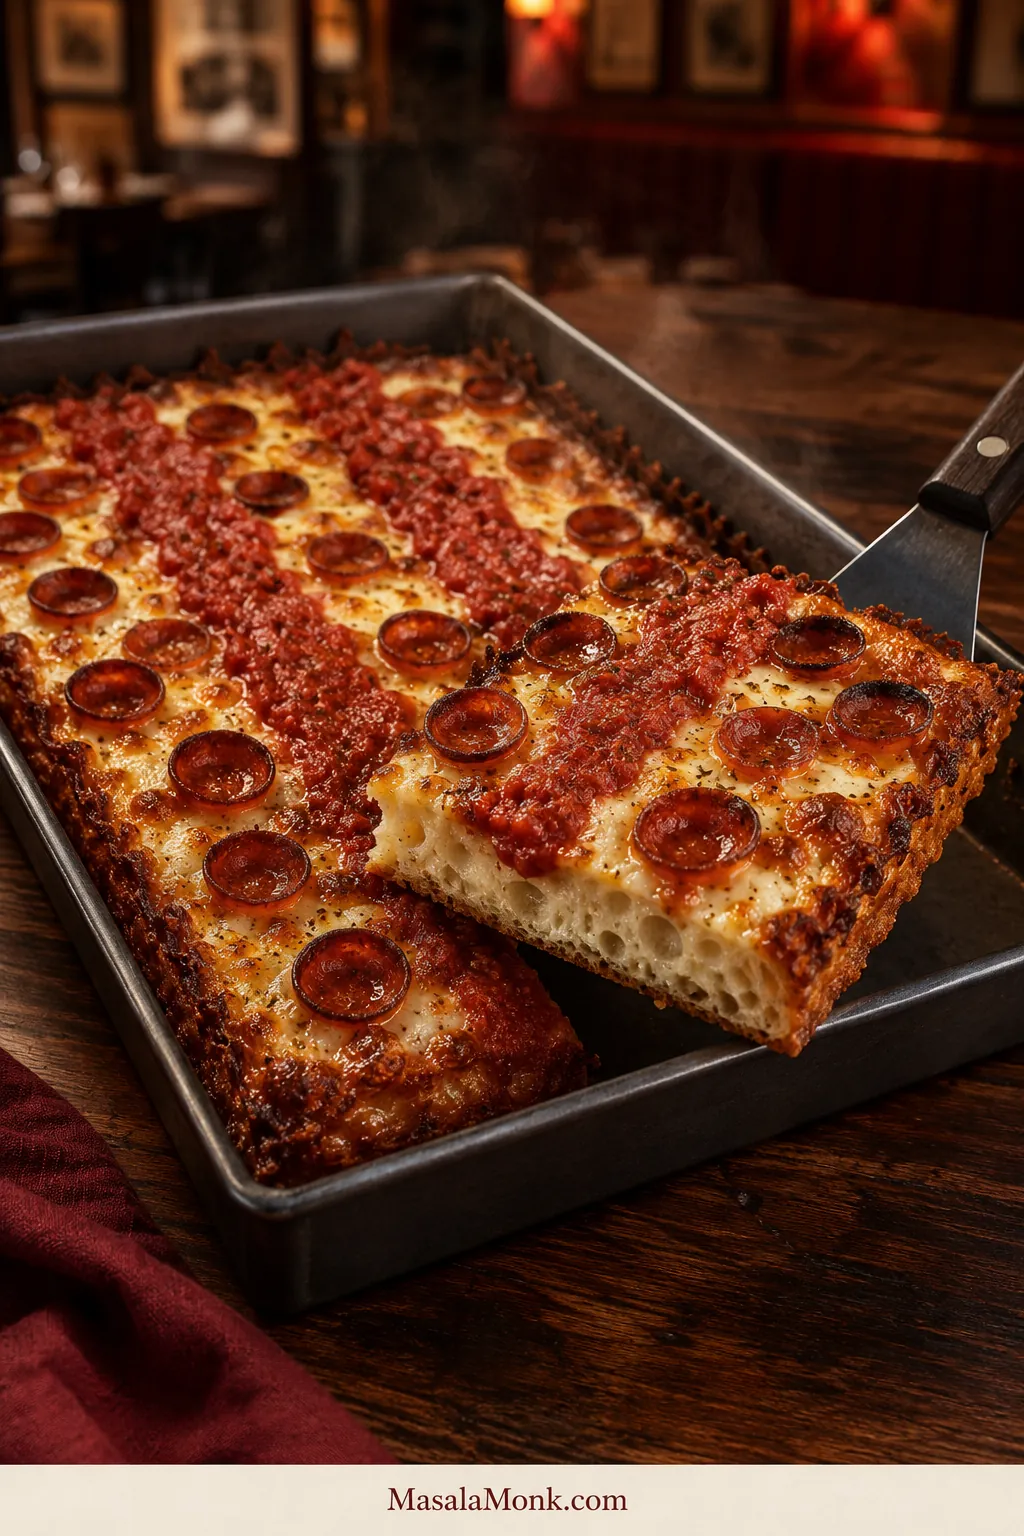
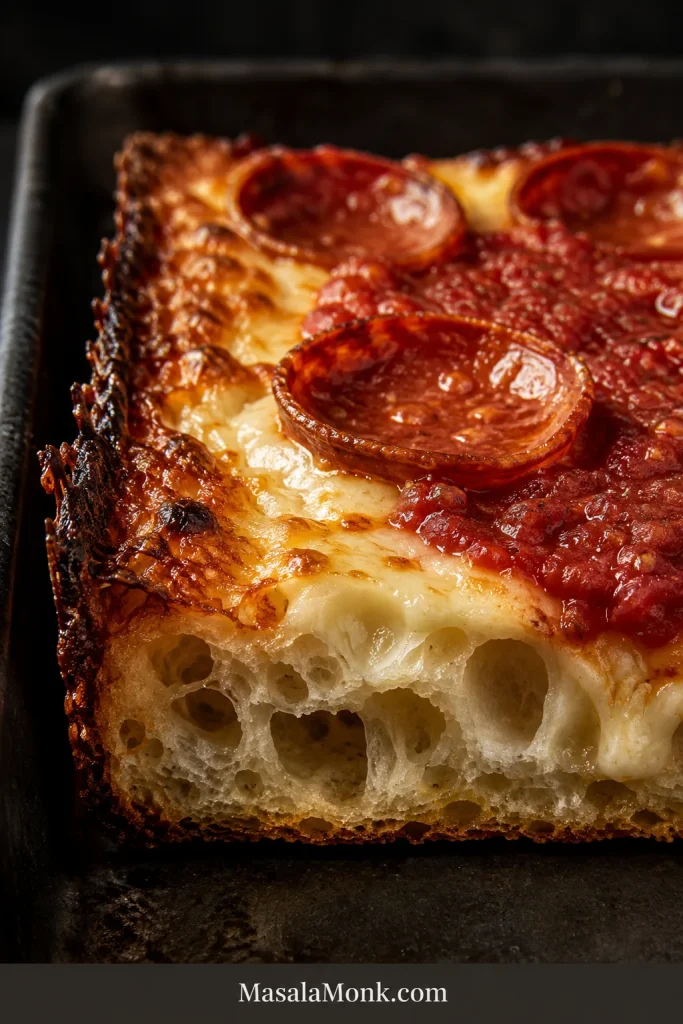
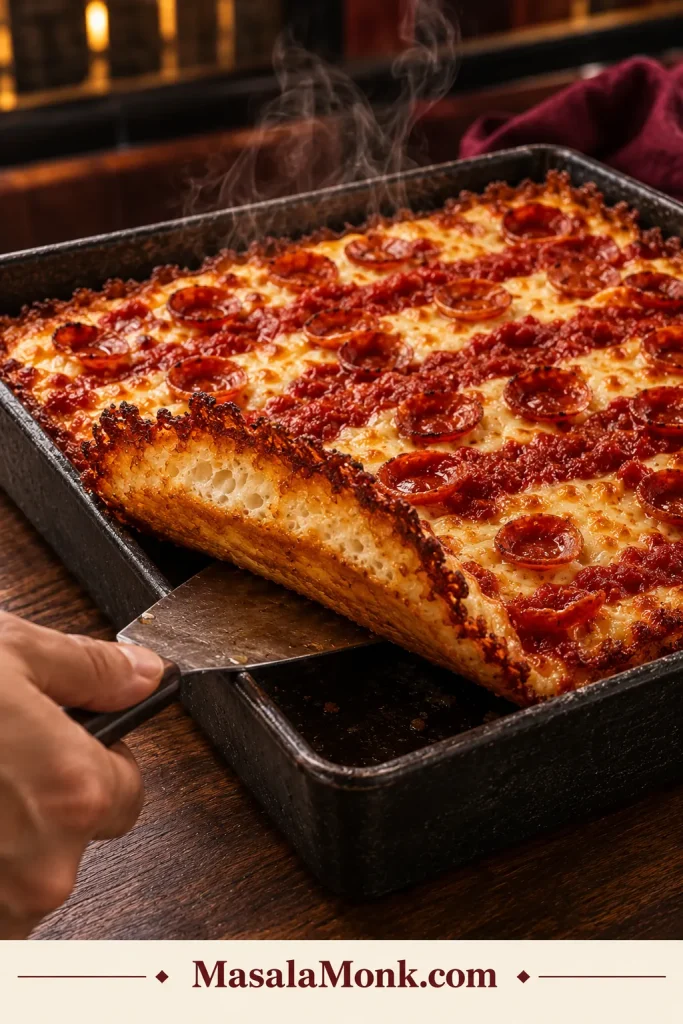
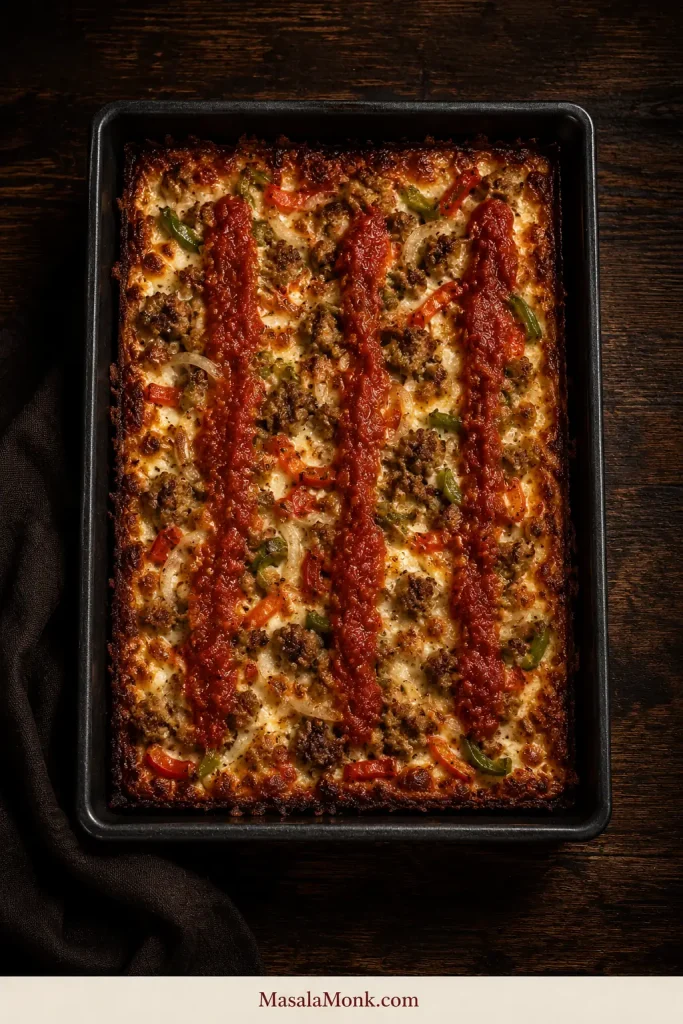
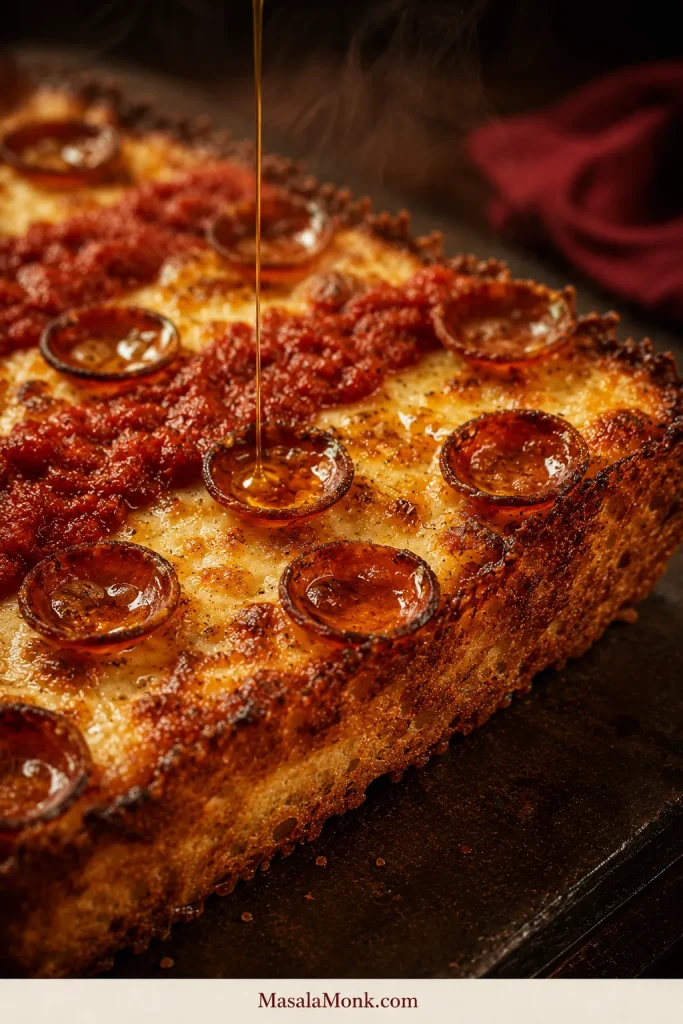
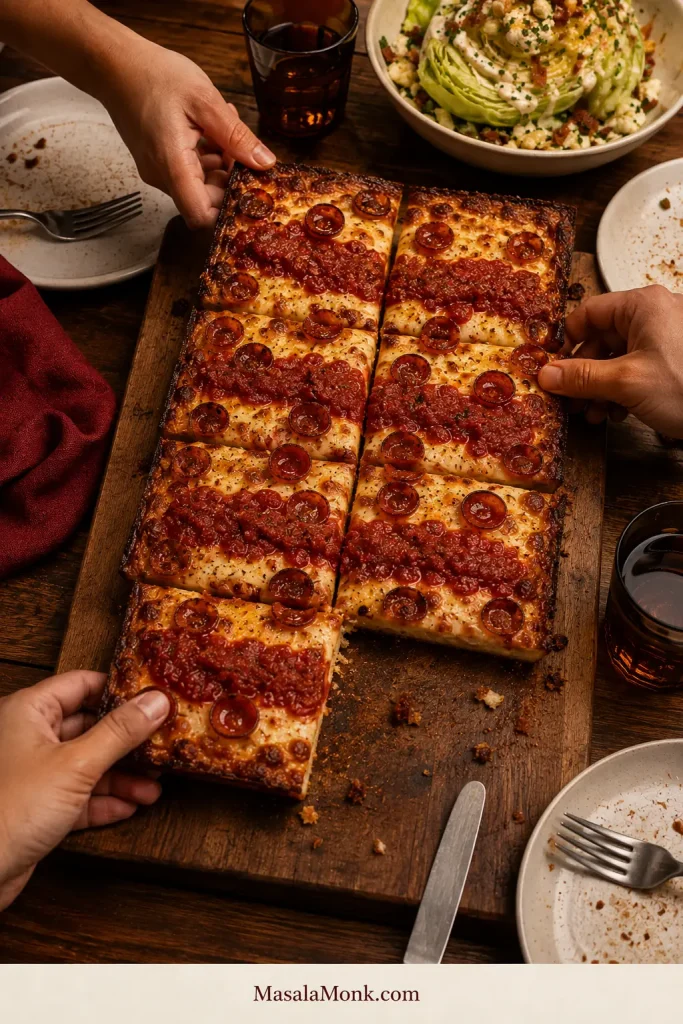
The corner slice is the one everyone reaches for first: deeply caramelized cheese welded to the edge, an airy middle underneath and a crisp bottom that stays firm when you pick it up. Tomato sauce sits in bright stripes across the top, leaving plenty of bubbling cheese exposed.
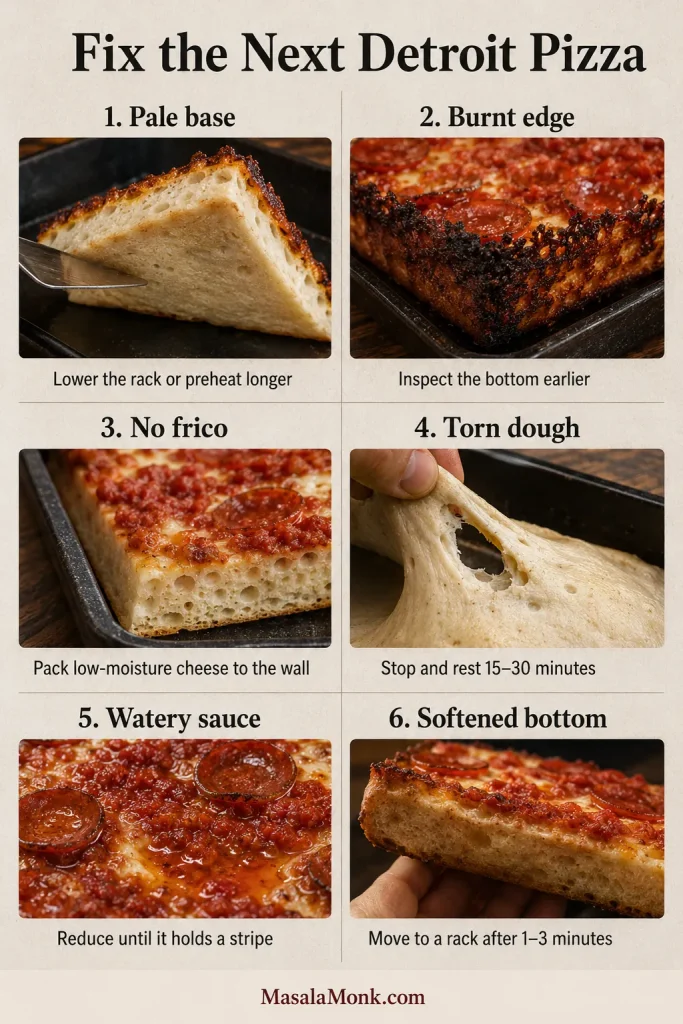
Yet the most dramatic part of Detroit-style pizza can also be misleading. The cheese may look spectacular several minutes before the dough beneath it is ready. Pull the pan too soon and the bottom stays pale or the center feels gummy. Leave it too long and the edge turns bitter while you wait for the middle to catch up.
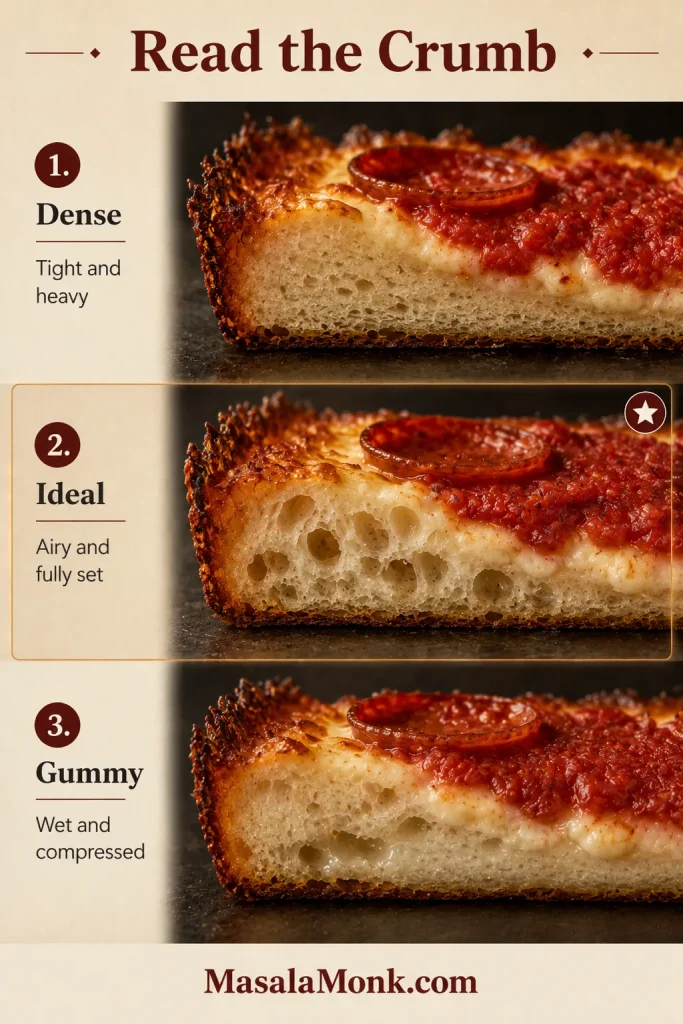
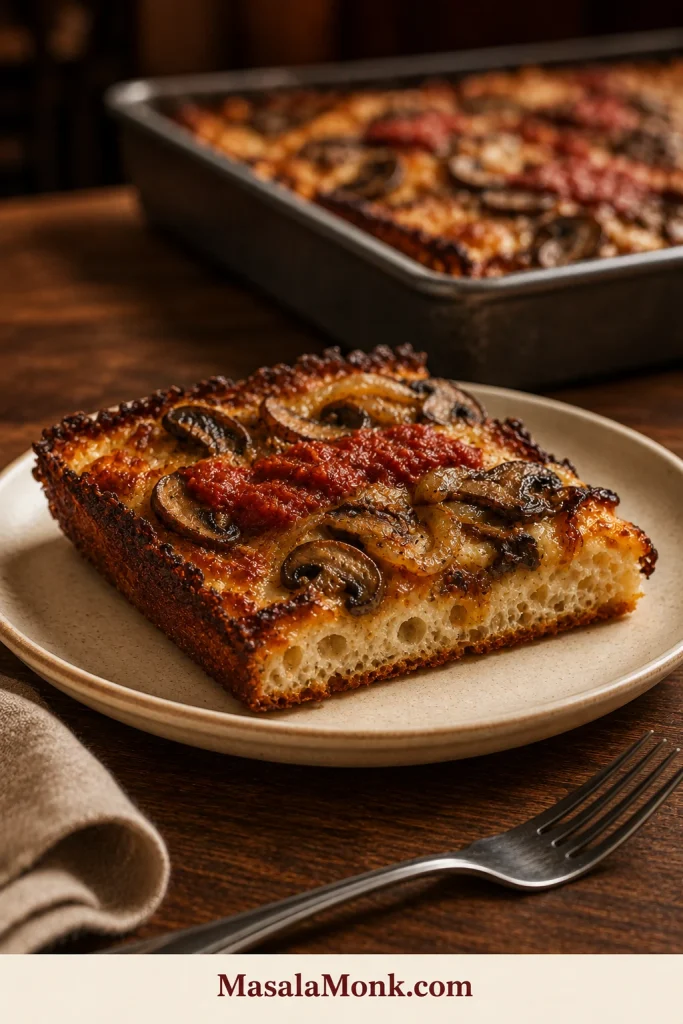
Notice how the bubbles grow larger above the thin base. That uneven, open pattern signals controlled oven spring rather than a uniformly tight, bread-like crumb.
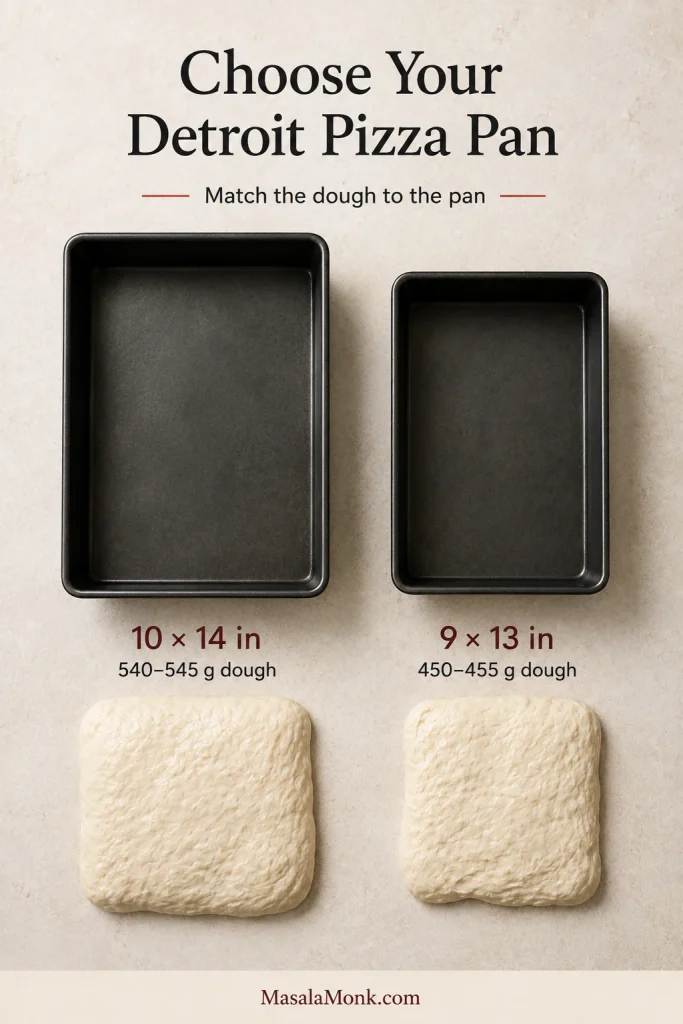
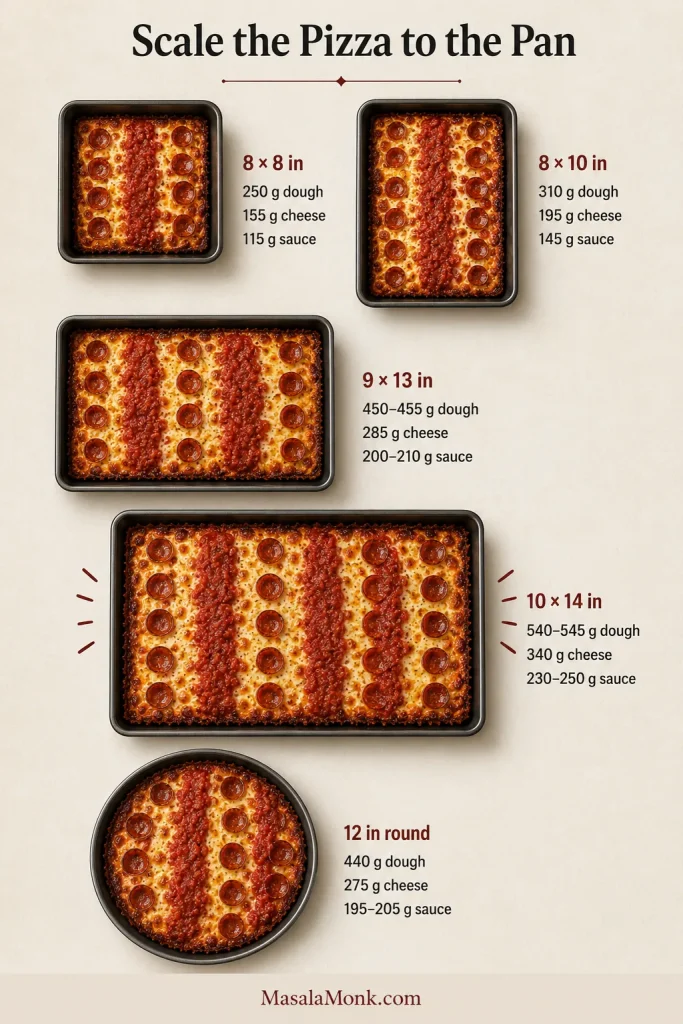
The good news is that this Detroit-style pizza recipe is more forgiving than a free-form round pizza that must be shaped and launched from a peel. Once the dough is in the pan, most of the time is hands-off. The same method works in a 10 × 14-inch/25 × 36 cm Detroit pan or an ordinary 9 × 13-inch/23 × 33 cm metal pan because each gets its own dough quantity.
Quick answer
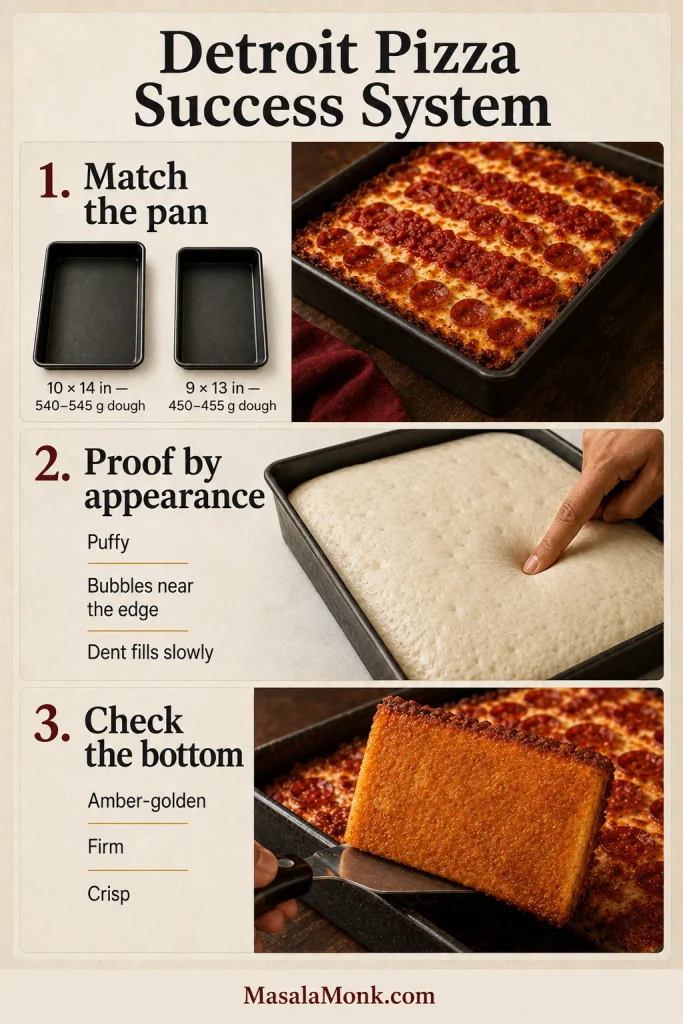
Match the dough to the pan. Proof by appearance. Judge the bake by the bottom, not the edge.
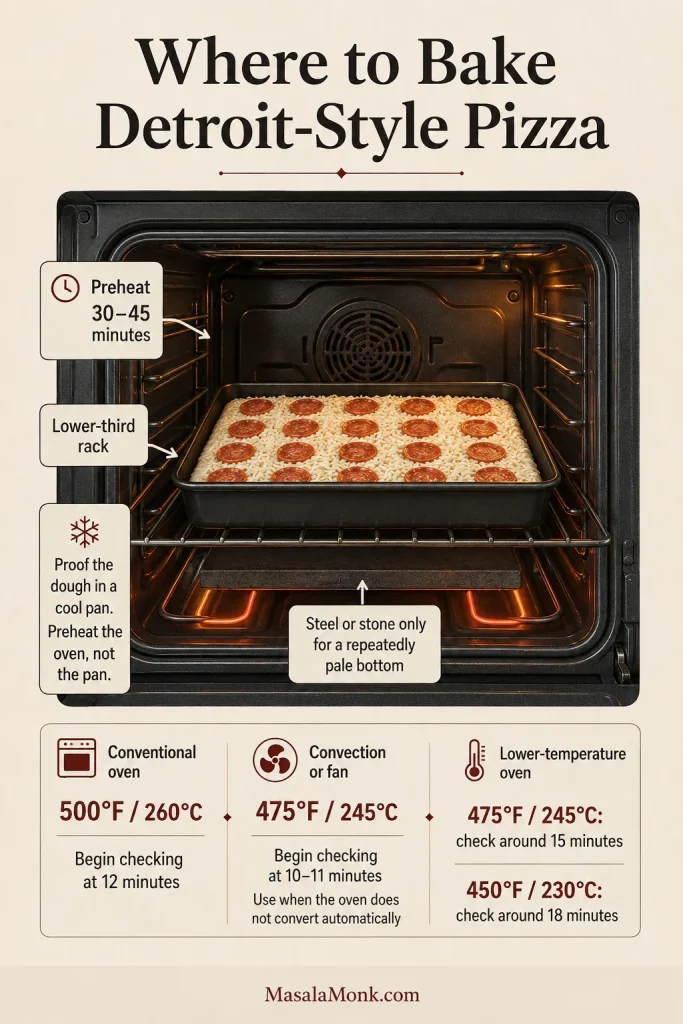
Bake on a lower-third rack in a thoroughly preheated 500°F/260°C conventional oven. Begin checking at 12 minutes and lift a corner before trusting the color of the cheese.
Each checkpoint prevents a different failure: pan size controls thickness, proofing creates internal lift, and the underside confirms whether heat reached the dough completely.
Choose your pan and dough schedule
Two choices shape the pizza before you mix anything: the pan underneath it and when you want to eat. Pick both now, then follow the matching quantities in the recipe card.
The pan area determines how much dough you need. Scaling the portion keeps the crust depth—and therefore the bake—consistent.
Best pan for this recipe
10 × 14 inches / 25 × 36 cm
Use about 540–545 g dough in a dark pan about 2½ inches/6 cm deep. Anodized aluminum or well-maintained steel gives the most reliable crisp bottom and caramelized edge.
9 × 13 inches / 23 × 33 cm
Use about 450–455 g dough in a dark, straight-sided pan at least 2 inches/5 cm deep. If this is the pan already in your kitchen, it isn’t a second-best version—the smaller batch keeps the crust light instead of unexpectedly thick.
Bake today
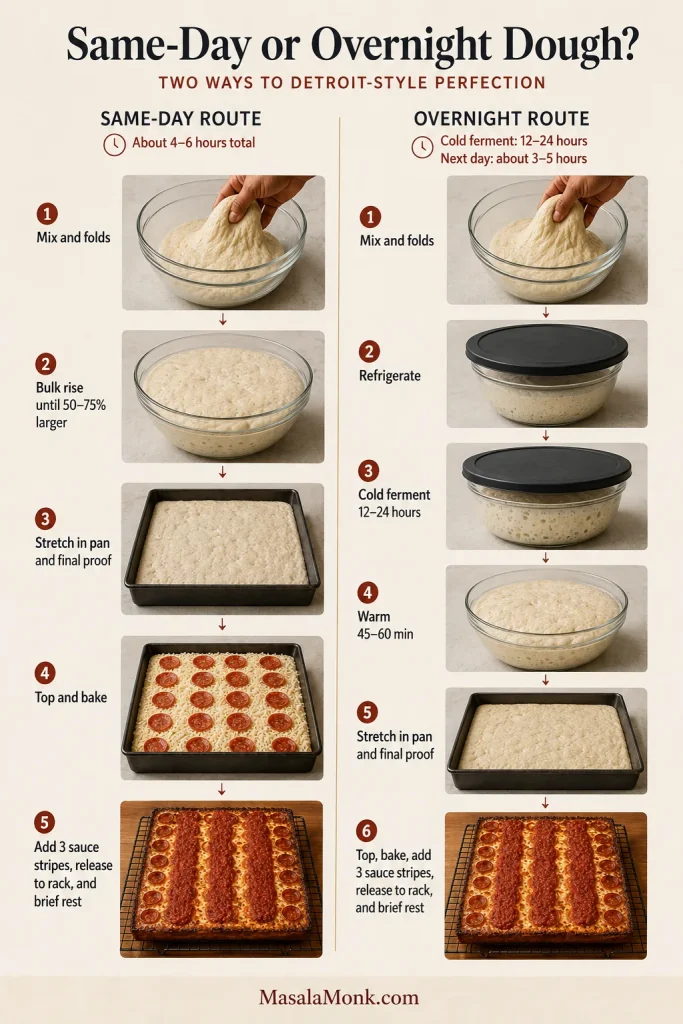
Same-day dough
Allow about 4–6 hours from mixing to slicing. Most of that time is hands-off, and a warm kitchen may move faster than a cool one.
Plan ahead
Cold fermentation: 12–24 hours. Next-day warming, proofing, baking and resting: about 3–5 hours.
Ready to cook? Choose your pan and schedule, then follow the recipe card. The longer guide is there whenever you want to understand a step or fix a result.
Detroit-style pizza recipe
Home-oven Detroit pizza
Crispy cheese edges with an airy, chewy crust
A moderately thick pan pizza with a golden, lightly fried underside, a dark caramelized rim and warm tomato sauce spooned over the top after baking.
Active work35–45 minutes
Same-day totalAbout 4–6 hours
Overnight totalAbout 15–29 hours
Baking14–18 minutes
Yield: 8 rectangular slices; about 4–6 servings
Oven: 500°F/260°C conventional
Best pan: Dark 10 × 14-inch/25 × 36 cm Detroit-style pan, about 2½ inches/6 cm deep
Equipment
Digital kitchen scale
Large mixing bowl
Flexible dough scraper or sturdy spatula
10 × 14-inch/25 × 36 cm Detroit pan, about 2½ inches/6 cm deep, or a dark straight-sided 9 × 13-inch/23 × 33 cm metal pan at least 2 inches/5 cm deep
Small saucepan
Two heat-safe spatulas or turners—at least one thin-edged for checking beneath the corner and one wide enough to support the center; use metal only when the pan manufacturer permits it
Wire cooling rack
Check an ordinary coated pan before baking. Confirm that the manufacturer permits its use at 500°F/260°C. When its limit is lower, use the highest permitted temperature and follow the lower-temperature guidance in the FAQ.
Dough ingredients
Detroit-style pizza dough ingredients by pan size
Ingredient
10 × 14 pan
9 × 13 pan
Bread flour
300 g / 10.6 oz
250 g / 8.8 oz
Water
224 g / 224 ml / 7.9 oz
187 g / 187 ml / 6.6 oz
Fine salt
8 g
7 g
Instant yeast, same-day
3 g / about 1 tsp
2.5 g / about ¾ tsp
Instant yeast, overnight
1 g / about ⅓ tsp
0.8 g / scant ¼ tsp
Extra-virgin olive oil in dough
9 g / about 2 tsp
8 g / about 1¾ tsp
Approximate dough yield
540–545 g
450–455 g
Use the gram weights whenever possible. A scale is strongly recommended for this sticky dough because flour scoops and salt crystals vary too much for volume measurements to be equally precise.
For the pan
10 × 14 pan: 30 ml / 2 tbsp olive oil or neutral high-heat oil
9 × 13 pan: 25 ml / 1 tbsp plus 2 tsp olive oil or neutral high-heat oil
For the sauce
400 g / 14 oz canned crushed tomatoes
15 ml / 1 tbsp extra-virgin olive oil
2 garlic cloves, finely grated or minced
1 tsp dried oregano
½ tsp fine salt, plus more if needed
¼ tsp red pepper flakes, optional
½ tsp sugar, optional and only if the tomatoes taste sharply acidic
The sauce makes enough for the 10 × 14 pizza. Use about 200–210 g for the 9 × 13 pizza and refrigerate or freeze the remainder.
Cheese and toppings
Cheese and pepperoni quantities by pan size
Ingredient
10 × 14 pan
9 × 13 pan
Young Wisconsin brick cheese, cut into ½-inch/1.25 cm cubes or coarsely grated
340 g / 12 oz
285 g / 10 oz
Or equal parts low-moisture whole-milk mozzarella and Monterey Jack, coarsely grated or cut into small cubes
170 g / 6 oz + 170 g / 6 oz
142 g / 5 oz + 142 g / 5 oz
Pepperoni, optional
150 g / about 5¼ oz
125 g / about 4½ oz
Natural-casing pepperoni cups and crisps more readily, but any sliced pepperoni works.
Method
1. Reduce the sauce
Heat the olive oil in a small saucepan over medium-low heat. Add the garlic and stir for about 30 seconds, until the sharp raw smell softens. Stir in the tomatoes, oregano, salt and optional red pepper flakes.
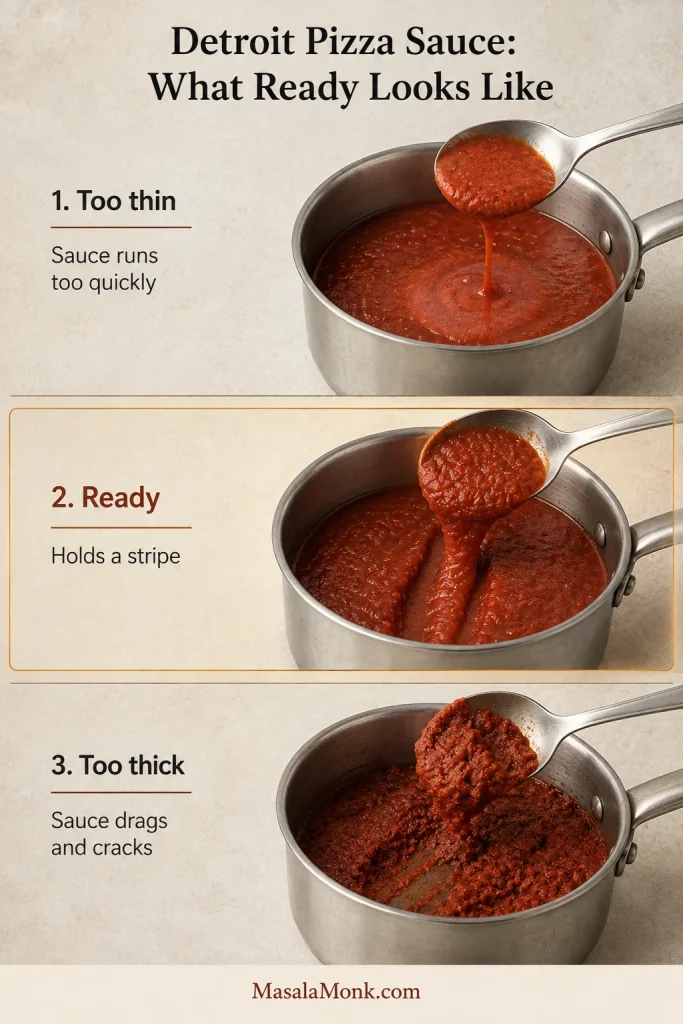
Simmer for 15–25 minutes, stirring occasionally, until the sauce sits in a mound on a spoon instead of running from it. You should have about 250–280 g.
Taste once the sauce has thickened and adjust the salt. Add the optional sugar only if the tomatoes still taste sharply acidic. Set aside.
Ready cue: glossy, spoonable and thick enough to hold a stripe.
2. Mix and fold the dough
Combine the flour, water, salt and the yeast quantity for your schedule. Stir until no dry flour remains, then cover and rest for 15 minutes.
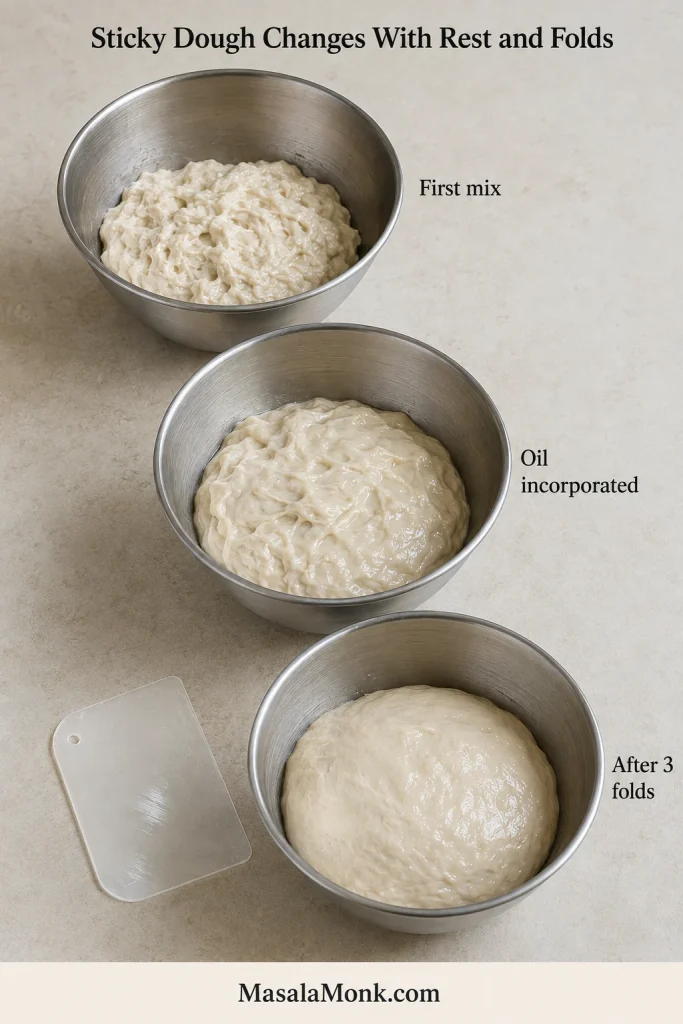
It may look far too sticky at first. Let it rest before deciding it needs more flour.
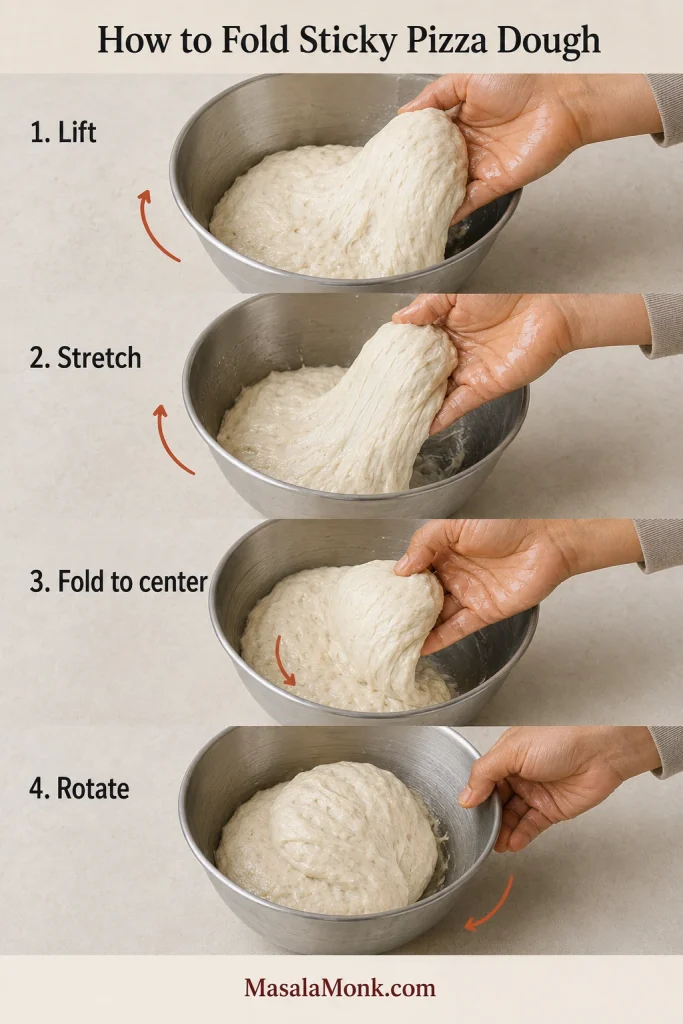
Drizzle the olive oil over the dough, then squeeze and fold until it is mostly absorbed. The dough may slide apart briefly before coming back together.
Perform three fold sets in total, lifting all four sides toward the center and resting for 15 minutes between each set.
Ready cue: smoother, springier dough that holds together for longer.
3. Let the dough rise
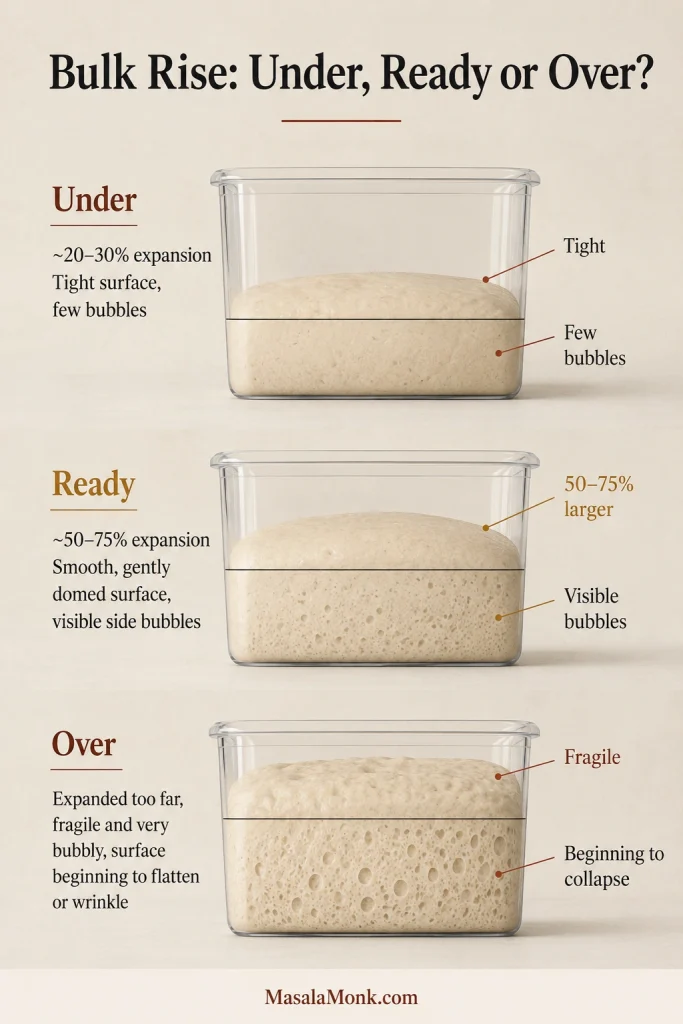
Same day: Cover and leave in a comfortably warm room. Begin checking after 1½ hours. Move on when it has expanded by roughly 50–75% and contains visible bubbles.
Overnight: Refrigerate for 12–24 hours after the final fold. Using less yeast prevents the dough from rising too far during the cold rest. The next day, let it stand at room temperature for 45–60 minutes before panning. It should feel cool but pliable rather than refrigerator-firm.
4. Oil the pan and stretch once
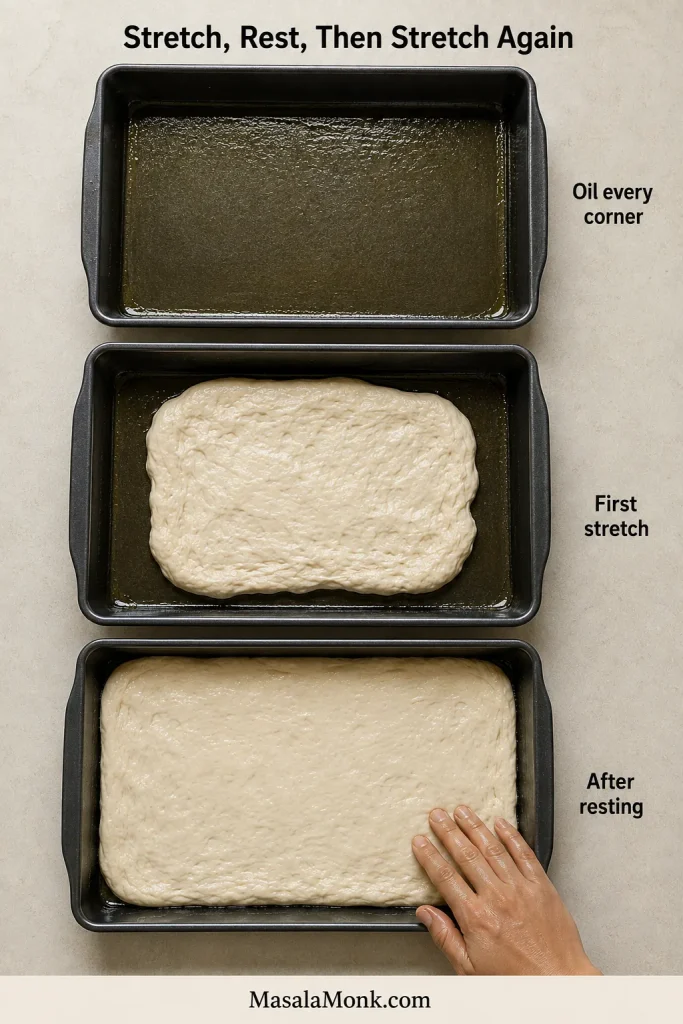
Coat the base, corners and lower walls with the measured oil. Transfer the dough to the center and turn it once.
Press gently toward the corners with oiled fingertips. After the first stretch, the dough often looks far too small for the pan. Stop when it pulls back, cover and rest for 20–30 minutes.
5. Stretch again, finish the rise and preheat the oven
Press the relaxed dough into the corners. When it resists, wait another 15 minutes instead of forcing it.
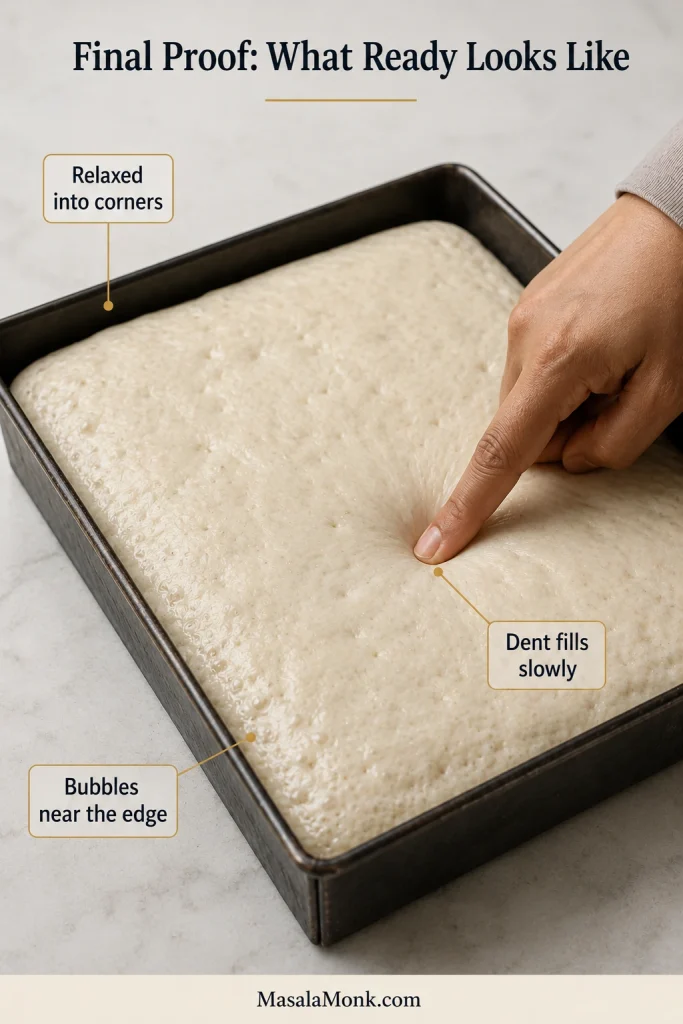
Cover and let rise until visibly puffy. Same-day dough usually needs another 60–90 minutes. Chilled dough may take 60–120 minutes because it must warm as it rises.
When dinner is waiting: another 20–30 minutes is usually more useful than topping flat dough early. A rushed final rise tends to produce a tighter, heavier middle.
During the final 30–45 minutes of the rise, set a rack in the lower third and preheat a conventional oven to 500°F/260°C.
For a convection or fan-assisted oven that doesn’t automatically convert temperatures, use 475°F/245°C and begin checking around 10–11 minutes. Check the oven manual when you’re unsure whether it converts automatically.
Ready cue: dough resting in the corners, bubbles near the edge and a height of about ½–¾ inch/roughly 1.5–2 cm.
6. Add the toppings and cheese
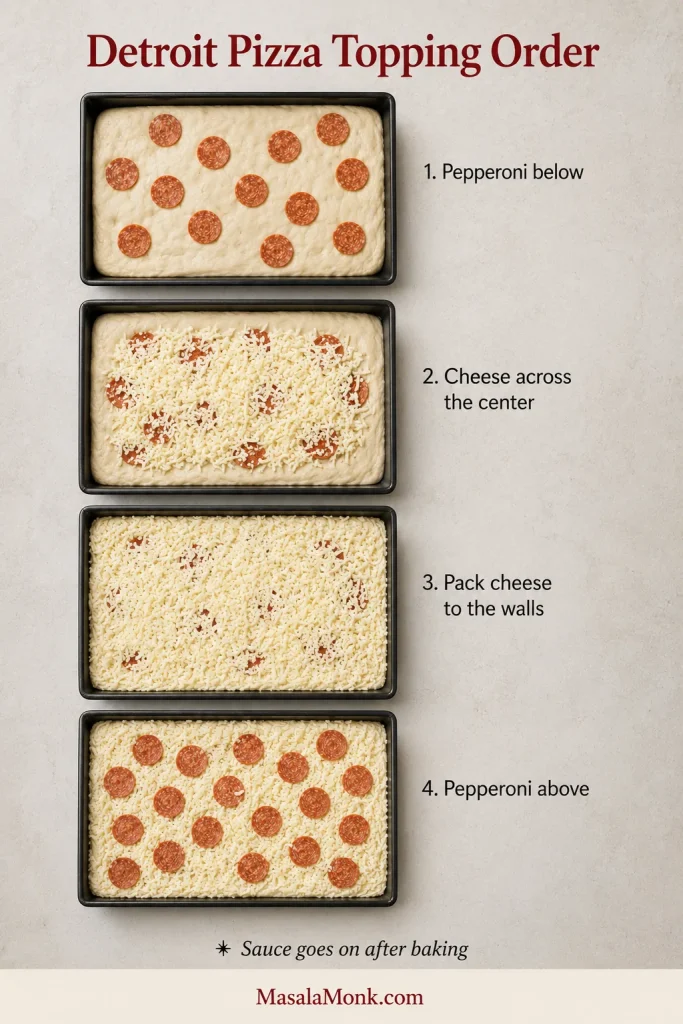
Place half the pepperoni over the risen dough. Spread about three-quarters of the cheese across the surface.
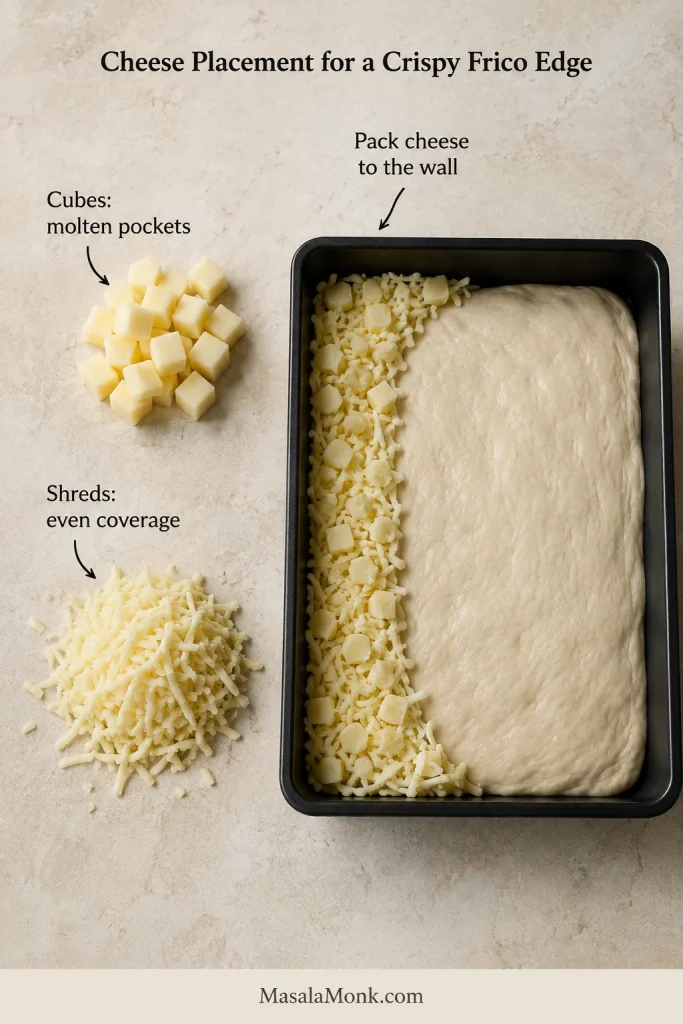
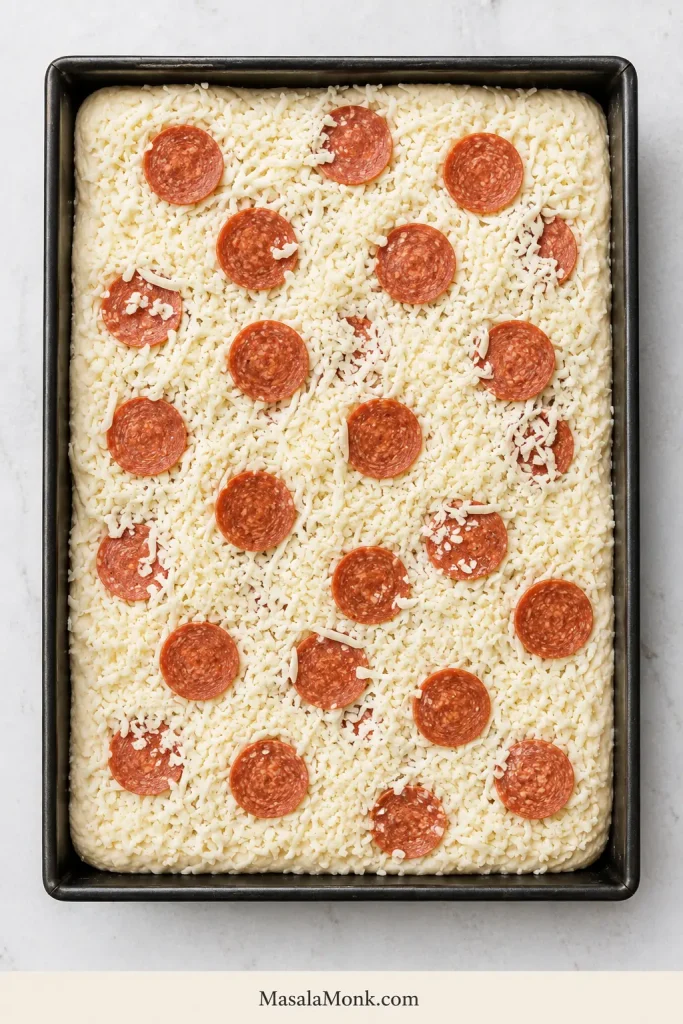
Use the final quarter around all four walls and corners. No bread-colored gap should remain. Add the remaining pepperoni.
Once the cheese fills the corners and touches every wall, the pan finally begins to look like Detroit pizza.
7. Bake and inspect the bottom
Bake on the lower-third rack. Check a conventional oven at 12 minutes or a convection oven around 10–11 minutes.
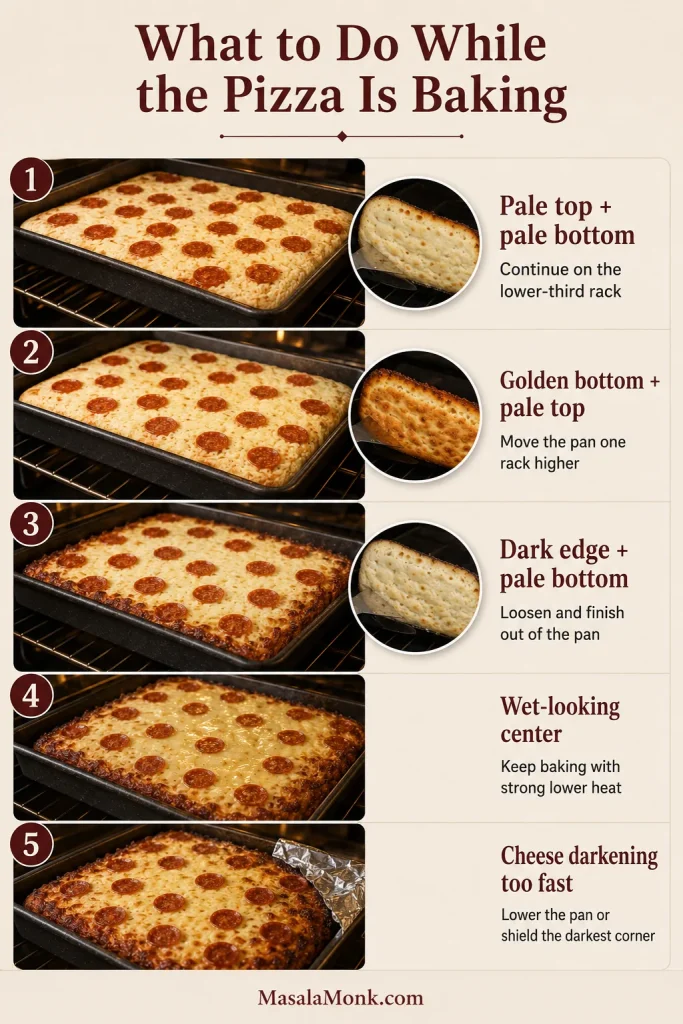
The edge may already look finished. Lift one corner with a thin heat-safe spatula before trusting the color on top.
Continue until the edge is deeply browned, the center looks set and the underside is evenly golden brown, usually 14–18 minutes in a conventional oven.
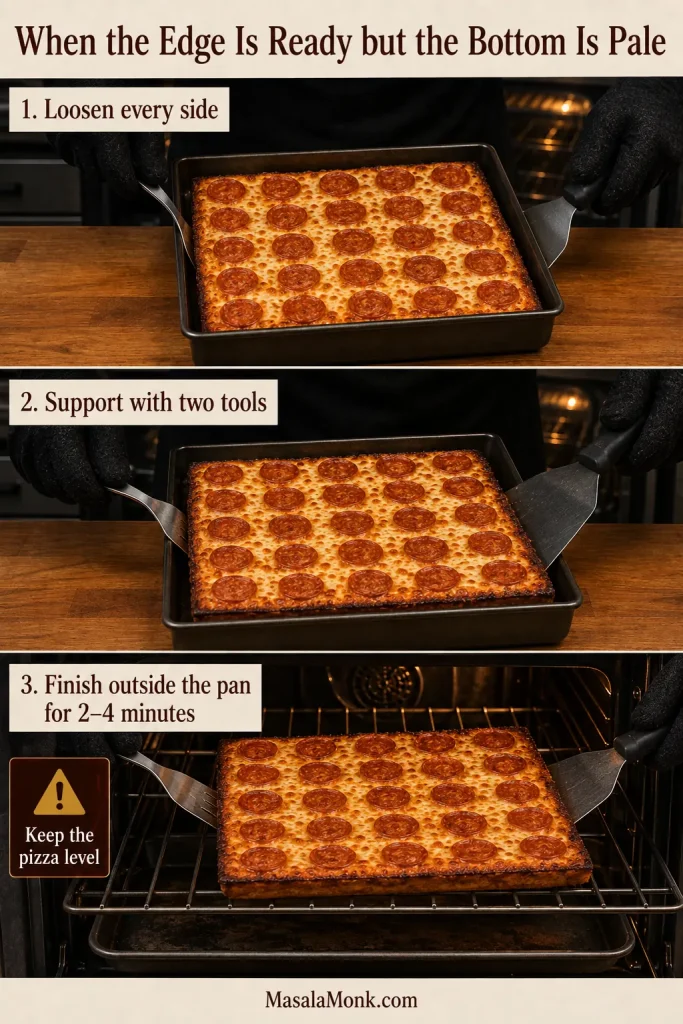
If the edge is ready but the bottom remains pale, loosen the pizza completely. Wearing oven gloves, support the center with two heat-safe spatulas and carefully slide it onto a preheated steel, stone or bare oven rack for 2–4 minutes. Place a sheet pan on the rack below when rendered oil may drip.
During the final few minutes of baking, warm the reduced sauce over low heat.
8. Add the warm sauce
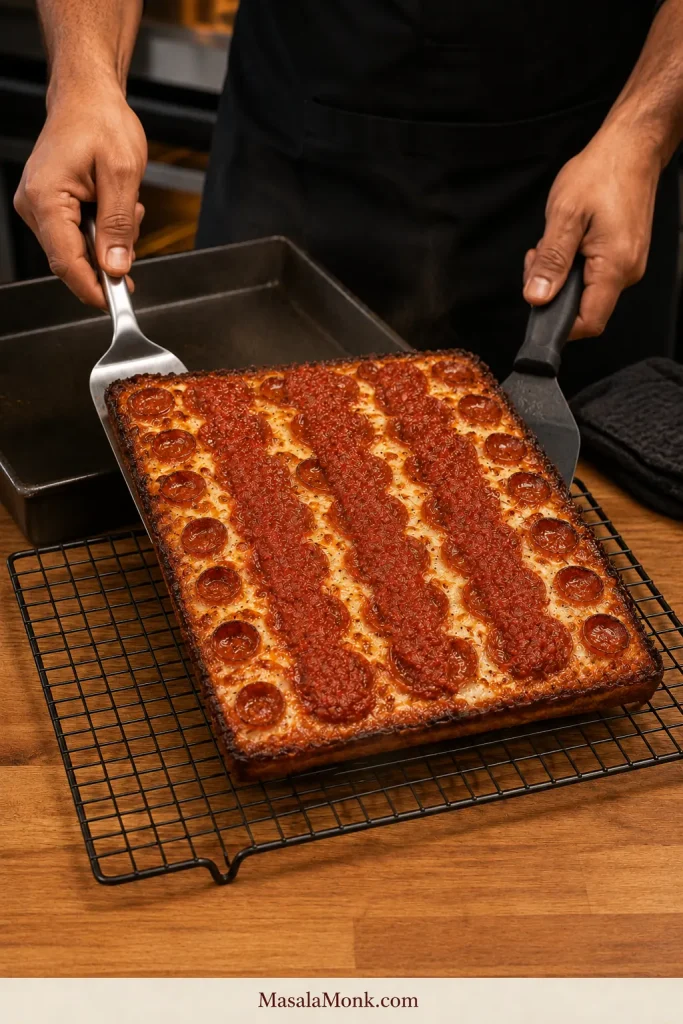
Spoon about 230–250 g sauce over the 10 × 14 pizza, or 200–210 g over the 9 × 13 pizza, in two or three broad “racing stripes,” leaving browned cheese visible between them.
Leave about ½ inch/1.25 cm clear around the perimeter.
9. Release, rest and cut
Rest in the pan for 1–3 minutes. Loosen all four sides, support the center with two spatulas and transfer the pizza to a wire rack.
Rest for another 3–5 minutes, then move it to a cutting board and cut into eight rectangular slices.
Recipe notes
All-purpose flour: Begin with 210 g water for the 10 × 14 batch or 176 g for the 9 × 13 batch. Add the withheld water gradually after the first rest only when the dough remains cohesive.
Stand mixer: After the first 15-minute rest, add the oil and mix on medium-low for 5–7 minutes, until smoother and elastic.
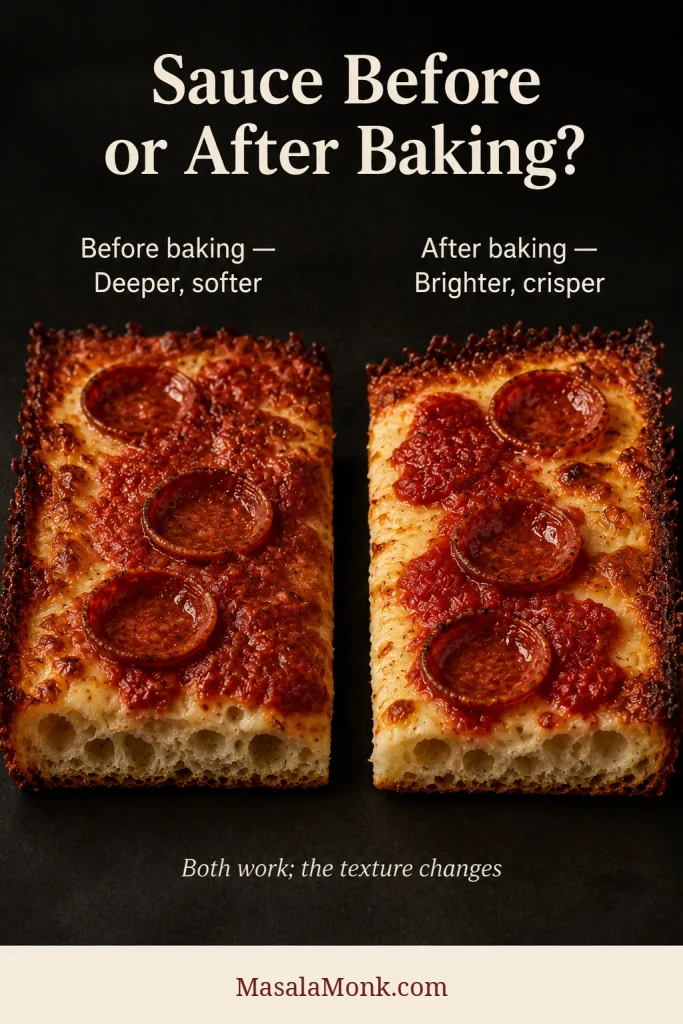
Sauce baked onto the pizza: Use slightly less sauce and spoon it over the cheese before baking. The flavor becomes more concentrated, but the covered areas may remain softer.
Default bake and fallbacks: Most pizzas need only the direct bake. If the edge finishes before the bottom during the current bake, use the out-of-pan finish. Save a preheated steel, stone or parbake for a pale or gummy bottom that keeps returning with the same pan and oven. For a parbake, bake the risen dough for 8–10 minutes, until set but pale, before adding the toppings.
Optional thermometer check: The thickest exposed crumb should reach at least about 190°F/88°C and may finish higher. Still inspect the underside, because temperature confirms that the center is baked—not that the bottom is crisp.
Keep the pan cool before baking: Preheat the oven and any optional steel, but let the dough stretch and rise inside the cool, oiled pan.
What makes Detroit-style pizza different?
A rectangular pan alone doesn’t make Detroit-style pizza. The crust should feel surprisingly light for its height, the bottom should crisp in oil, and the cheese should bake directly against the metal until the edge turns dark and lacy. Detroit-style pizza began at Buddy’s Pizza (opens in a new tab) in Detroit in 1946, using seasoned steel pans, brick cheese and sauce over the top.
It isn’t the same as Chicago deep dish, where a tall crust holds layers of cheese and sauce like a pie. Many Sicilian pizzas are baked on a sheet pan with softer edges and a more bread-forward profile. Detroit pizza depends heavily on the narrow meeting point between cheese, dough and hot metal.
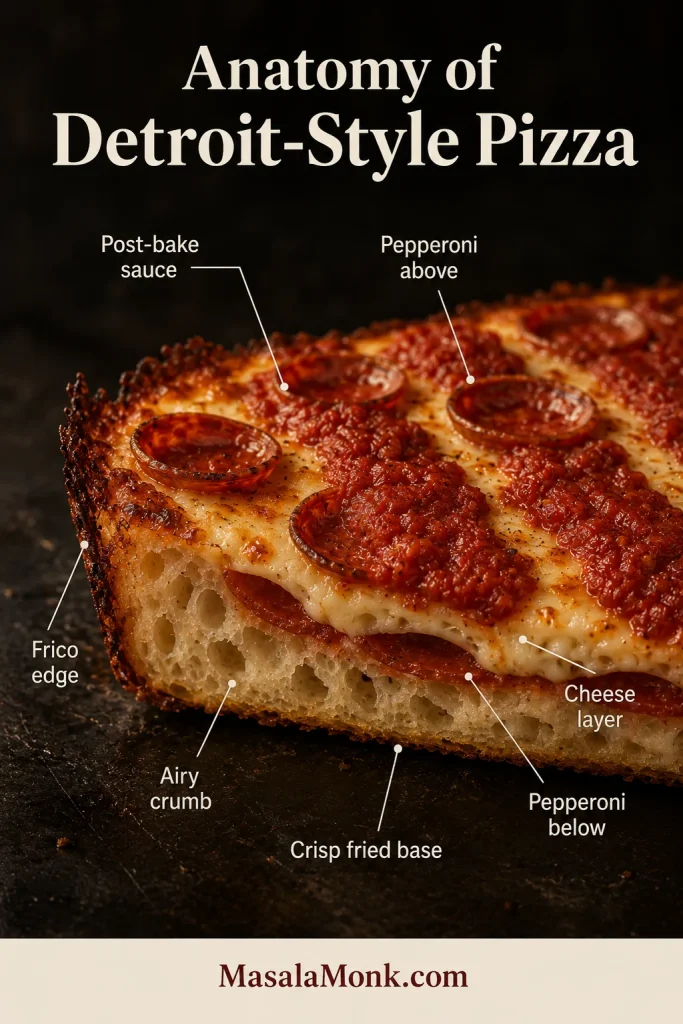
The layers do different jobs rather than merely adding height: the oiled base conducts heat, the cheese-lined wall fries, and the exposed top stays ready for bright sauce.
The crust is substantial, but it shouldn’t feel heavy
Detroit-style dough formulas vary widely in hydration. More water can help a home-oven crust open, but it can’t compensate for too much dough in the pan or an incomplete final rise.
This formula uses about 75% hydration. The dough layer is deep enough to rise into an airy crumb but shallow enough to bake through before the cheese edge goes too far.
The caramelized edge is where the style comes alive
That edge is more than decoration. Cheese melts into the narrow gap beside the dough, its fat runs downward and the exposed surface browns against the hot metal. The result is the dark, lacy perimeter often called frico.
Leave a bare section around the pan and you get an ordinary bread edge instead. Complete coverage matters more than whether the cheese is cubed or grated.
This is why moving the same dough into a smaller household pan changes far more than its shape.
Pan size and how much dough to use
A difference of one inch can quietly turn an airy pizza into a much heavier one. The dough must be scaled to the area underneath it, not simply squeezed into whichever rectangular pan is nearby.
Why the 9 × 13 pan needs its own batch
A 10 × 14-inch/25 × 36 cm pan has 140 square inches of surface area. By comparison, a 9 × 13-inch/23 × 33 cm pan has 117. Put the full larger batch into the smaller pan and the crust becomes almost 20% thicker—the kind of change that can leave the center heavy while the edge looks completely finished.
Some cooks deliberately prefer a taller crust. For a lighter Detroit-style slice, the smaller batch keeps the depth close to the 10 × 14-inch pizza.
Dough, cheese and sauce quantities for alternate pans
Pan
Dough
Cheese
Finished sauce
Area
8 × 8 in / 20 × 20 cm
250 g
155 g
115 g
64 sq in
8 × 10 in / 20 × 25 cm
310 g
195 g
145 g
80 sq in
9 × 13 in / 23 × 33 cm
450–455 g
285 g
200–210 g
117 sq in
10 × 14 in / 25 × 36 cm
540–545 g
340 g
230–250 g
140 sq in
12 in / 30 cm round
440 g
275 g
195–205 g
About 113 sq in
Similar pan areas can still produce different eating experiences. Narrower shapes create more edge per slice, while wider pans devote a greater share of each piece to the airy center.
How to scale a different pan
To make one differently sized pizza, multiply every dough ingredient by the same scaling percentage. When mixing one larger batch for several pans, divide the dough immediately after mixing—before the bulk rise—and ferment each portion separately.
Use a straight-sided metal pan about 2 inches/5 cm deep for the alternatives above. Pan dimensions vary slightly by manufacturer, so a difference of 5–10 g dough isn’t important. Round or square pans can reproduce the crisp-bottomed technique, although they won’t create the traditional rectangular slices and corner structure.
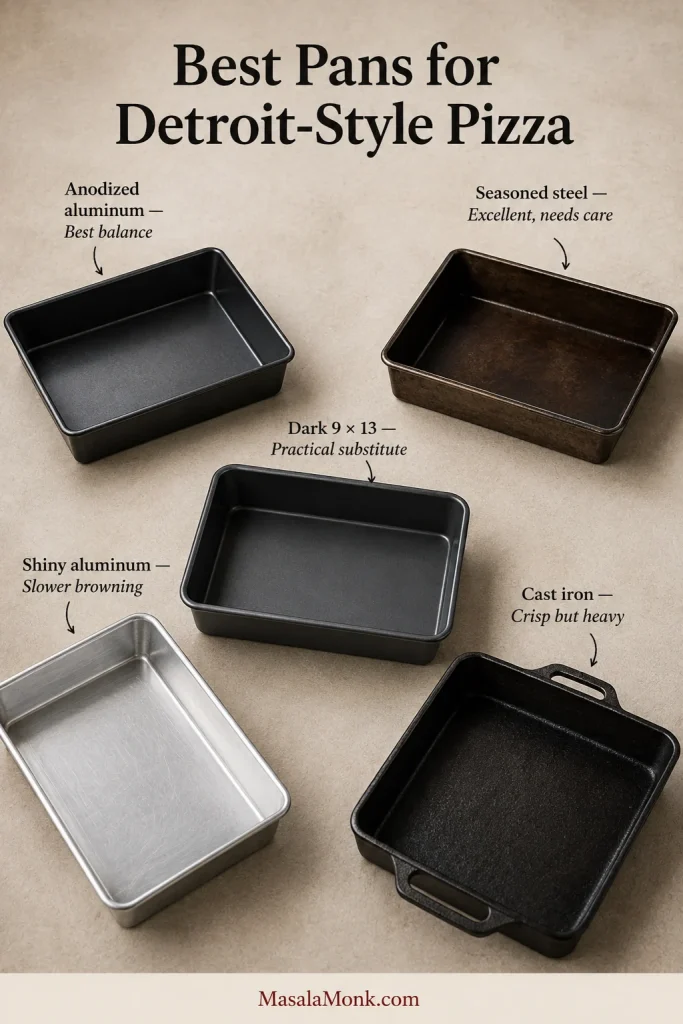
Which pan material works best?
A dark anodized-aluminum Detroit pan offers the easiest balance of browning, release and maintenance. Traditional steel also performs well but needs seasoning and careful drying to prevent rust.
Dark heavy-gauge 9 × 13-inch metal is the most practical substitute. Cast iron can also crisp the bottom, though its slower heat response makes the timing less predictable.
Shiny aluminum generally browns more slowly. A preheated steel or stone is a correction for a repeated pale-bottom problem, not part of the default method. Glass and ceramic are last-resort choices because they respond slowly to heat and may not tolerate the full baking temperature.
Preheat the oven or optional baking steel—not the pan holding the dough. The dough needs to stretch and rise inside a cool, oiled pan.
Shiny metal usually browns the base more slowly. Correct the heat underneath before changing the dough amount or cheese.
Once the dough amount matches the pan, the pizza becomes much easier to trust. Many heavy or gummy centers begin with that mismatch.
Ingredients and useful substitutions
You can change the flour, cheese or toppings, but each substitution affects a different part of the pizza. Flour changes strength, while moisture in the cheese, sauce or toppings changes how quickly the center bakes.
Bread flour gives the wet dough enough strength
Bread flour helps the dough hold the bubbles created during fermentation instead of spreading into a wet, compressed layer. Its extra gluten strength supports both the height and the open crumb.
All-purpose flour can work, especially a stronger brand, but it may not absorb the full water quantity comfortably. The recipe note gives reduced starting amounts. After the flour has rested, add the withheld water only when the dough remains cohesive.
Resist adding handfuls of flour when the dough feels sticky. Damp hands, a scraper and short rests preserve the airy formula far better than turning it into a firm bread dough.
Oil in the dough and oil in the pan do different jobs
A little oil makes the sticky dough easier to handle and keeps the crumb tender. Most of the oil belongs in the pan, where it carries heat across the base and helps fry the underside.
Spread the pan oil into every corner and slightly up the walls. A single dry patch can hold onto the crust even when the rest releases cleanly.
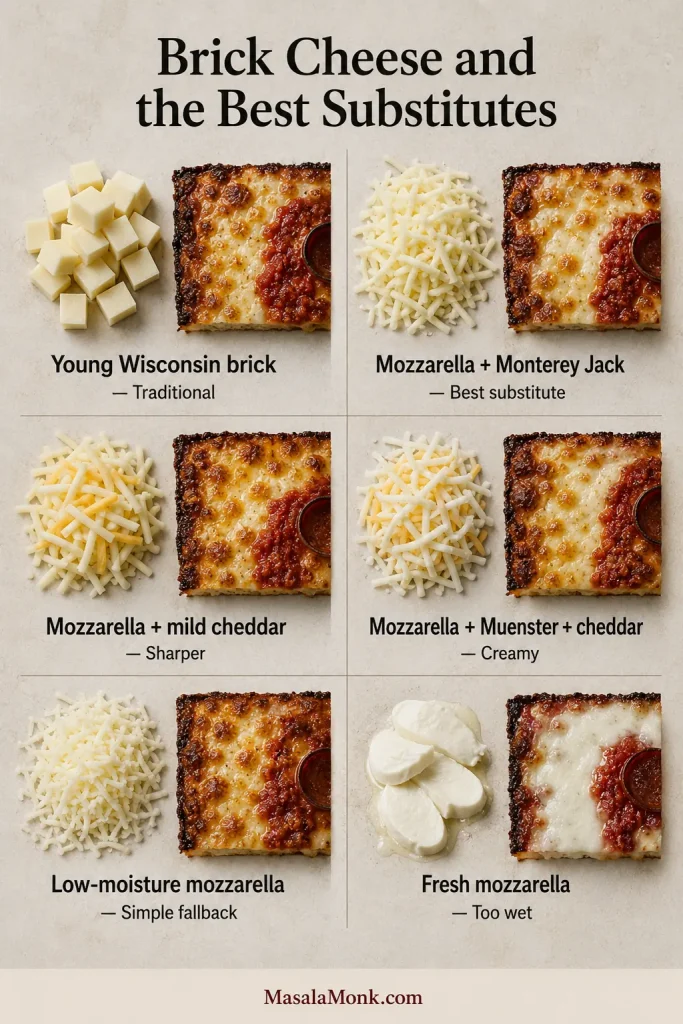
Brick cheese and the best substitutes
Young Wisconsin brick cheese is the traditional choice because it melts smoothly, browns readily and brings a mild buttery flavor. If you can’t find it, the pizza is still well worth making.
Low-moisture whole-milk mozzarella provides stretch, while Monterey Jack, mild cheddar or American Muenster brings richer melting and stronger edge browning.
Detroit-style pizza cheese comparison
Cheese or blend
Melt
Edge browning
Flavor
Best use
Young Wisconsin brick
Smooth and creamy
Excellent
Mild, buttery and lightly tangy
Traditional choice
Whole-milk mozzarella + Monterey Jack
Very smooth and stretchy
Very good
Mild and creamy
Best broadly available substitute
Whole-milk mozzarella + mild cheddar
Stretchy with slightly less flow
Strong
Sharper and more savory
Good where Monterey Jack is difficult to find
Mozzarella + American Muenster + cheddar
Creamy
Very good
More complex
Useful three-cheese alternative
Low-moisture mozzarella alone
Very stretchy
Good
Mild
Simple fallback
Fresh mozzarella
Soft and wet
Weak
Fresh and milky
Not recommended as the main cheese
The best brick cheese substitute combines roles instead of asking one cheese to do everything: mozzarella stretches, Jack or American Muenster melts smoothly, and a little cheddar adds character.
Cheese can be cubed, grated or split between both forms. Cubes create deeper molten pockets. Shreds make the pan-wall coverage easier. Placement matters more than the cut.
This is a placement demonstration: cover the whole pizza, then press extra cheese against all four walls and into every corner. Bare dough at the edge stays pale.
Why the sauce goes on after baking
Warm post-bake sauce lets the dough set without wet tomato stripes pressing into the center, and the exposed cheese can brown freely in the oven.
Watch the trail behind the spoon: if it closes immediately, the sauce is still watery; if rough ridges remain, it has reduced beyond a smooth, spoonable texture.
The sauce also tastes brighter because it is reduced separately and warmed rather than baked for the full cooking time. Keep it in broad stripes and leave the crisp perimeter uncovered.
Adding sauce before baking is still a valid variation. It gives a more cooked, integrated tomato flavor, but the covered sections may remain softer. Use less sauce and reduce it thoroughly.
Sauce added before baking partly insulates the cheese beneath it. By contrast, post-bake sauce preserves more exposed browning while keeping its tomato flavor fresher.
Prefer a different finish? The MasalaMonk pizza sauce guide includes several thicker sauces that work well over baked cheese.
Control moisture in the toppings
Pepperoni is forgiving because it releases fat rather than large amounts of water. Mushrooms, peppers, onions, sausage and leafy vegetables need more preparation.
Cook watery vegetables first, drain meat thoroughly and cool every topping before it touches the risen dough. A generous topping should add flavor, not become a lid that traps steam inside the crust.
The dough is the only part that may feel unfamiliar. It begins sticky and untidy, then changes noticeably with each rest and fold.
Mix and ferment the dough
This dough is wetter than ordinary hand-stretched pizza dough. It should feel sticky and supple during the first mix. Short rests and folds organize the gluten without prolonged kneading or extra flour.
The dough may briefly look split and slippery when the oil goes in. Once folding reconnects it into one elastic mass, that awkward stage has done no harm.
Choose the yeast quantity for your schedule
The same-day dough needs enough yeast to be ready that afternoon. For an overnight batch, use much less yeast so the dough can spend 12–24 hours in the refrigerator without rising too far.
Refrigerated dough develops slowly, but it still needs time to warm before it can complete the final rise efficiently.
Aim for comfortably warm dough
A useful finished-dough target is about 75–79°F/24–26°C. In a cool kitchen, the rise may take 30–60 minutes longer, while a very warm room can shorten it considerably. You’re not chasing an exact water temperature; the goal is simply to keep the mixed dough comfortably warm rather than hot.
Use cooler water in a hot kitchen and slightly warmer water in a cold one. Hot water can accelerate the yeast before the dough has developed enough strength.
Why the fold-based method works
Each time you lift a side toward the center, the dough gains structure without being forced across a dry worktop. The first fold may feel loose and messy.
By the third fold, the rough mixture should begin to feel like real dough—smoother, springier and much easier to lift.
It doesn’t need to become a dry ball that cleans the bowl. A little sticking at the base is normal. Look for elasticity and cohesion, not dryness.
Look for greater cohesion and elasticity, not a perfectly smooth dough. Once each fold feels stronger, the dough has enough structure.
When sticky dough becomes frustrating: wet or oil your fingers, use the scraper and give it another short rest. More flour may make the dough easier to touch, but it will also tighten the final crumb.
Judge the bulk rise by activity
Begin checking the same-day dough after about 1½ hours. It doesn’t need to double. A 50–75% increase in volume, a smoother surface and visible bubbles show that fermentation is well underway.
Underfermented dough feels tight and springs back strongly. An overfermented batch may look impressively inflated but feel fragile, excessively sticky and difficult to lift without collapsing.
Read the dough’s tension as well as its size. Ready dough looks aerated but still supported, whereas overfermented dough loses its dome and struggles to hold the bubbles it created.
An active starter changes the timing, acidity and dough strength. The MasalaMonk sourdough pizza dough guide explains that separate process; replacing the instant yeast with starter by guesswork is unlikely to preserve this formula.
Stretch the dough in stages
This is where patience becomes visible: dough that looked too small begins reaching the corners with less and less help.
Use the pads of your fingers and work from the center outward. Move gas gently toward the perimeter instead of flattening the whole dough.
The dough won’t reach every corner in one press. As soon as it resists, cover the pan and wait 20–30 minutes. The next press should carry it much farther. A cold or especially strong batch may need one more 15-minute rest.
Let rest do the work. Pulling harder usually creates a tear. Waiting allows the dough to reach the same corner while preserving its bubbles.
Resistance is useful feedback. After resting, the same dough should reach farther with less pressure, which protects the trapped gas instead of squeezing it from the future crumb.
The final rise creates the airy middle
Once the dough reaches the corners, cover the pan and leave it until the surface looks puffy and small bubbles appear around the perimeter. It should stand about ½–¾ inch/roughly 1.5–2 cm high.
This is the moment the pizza begins to look promising: the dough sits calmly in the corners, bubbles show at the edge and the surface has a soft, airy lift.
A fingertip pressed gently into an inconspicuous area should leave an impression that fills slowly. If it snaps back immediately, give it more time. A dent that stays deep while the dough feels fragile can signal overproofing.
Compare the dough with the pan wall: properly proofed dough looks lifted and aerated, not simply spread across a larger area while remaining flat.
Layer the toppings, cheese and sauce
Place half the pepperoni directly on the dough, where it seasons the cheese as its fat renders. Keep the remaining slices exposed on top so their edges can curl and crisp.
Use the same idea carefully with cooked sausage or other dry toppings, but avoid covering the dough with a heavy layer before the cheese is added.
Layering gives the pepperoni two different textures. Covered slices release savory fat into the middle, while exposed slices lose moisture and develop crisp, curled rims.
Build the crisp edge deliberately
Spread about three-quarters of the cheese across the center. Keep the remaining quarter for the seam around all four walls.
It may look like a generous amount around the perimeter. That thick cheese collar is exactly what creates the dark, lacy edge.
The corner slice becomes special because two caramelized cheese walls meet there. Take a few extra seconds to fill each corner completely.
This is the last opportunity to inspect the perimeter. Bare dough touching the pan cannot become a cheese crust later, so even small wall gaps will remain visible after baking.
Keep the warm sauce away from the perimeter
Warm the sauce while the pizza finishes. Spoon it in broad stripes after the pan leaves the oven, keeping about ½ inch/1.25 cm clear around the edge.
The sauce should stay where it lands. If it runs across the cheese, return it to the saucepan and reduce it a little longer.
Check the top, center and bottom before you pull the pan
By now the kitchen smells ready, the cheese is bubbling and the corners may look almost alarmingly dark. The edge announces itself first. Meanwhile, the quieter underside tells you whether the slice will actually hold.
Look for even color across the lifted corner rather than one dark patch caused by pooled oil. Patchy browning can expose uneven pan contact or an oven hot spot.
Give the oven time to become fully hot
Set the rack in the lower third and preheat for at least 30 minutes; 45 minutes is preferable, especially when a steel or stone is in the oven.
A dark Detroit pan usually needs nothing beneath it. If the same pan repeatedly gives you a pale base, preheat a steel or stone beneath it next time.
Rack position changes the balance of heat reaching the pizza. Moving the pan can correct a top-to-bottom mismatch more effectively than simply adding time.
Use 12 minutes as a checkpoint, not a promise
At 12 minutes in a conventional oven, slide a thin spatula under one corner and lift gently.
A pale underside needs more lower heat. An evenly golden bottom with a pale top needs a higher rack for the final minutes. A dark edge with a pale bottom needs the careful out-of-pan finish rather than more time inside the hot cheese-lined walls.
Judge color and flexibility together: a pale base bends, a ready base supports the slice, and an overbaked base hardens before its bitterness is obvious.
When the top and bottom finish at different speeds
What to do while the pizza is still baking
What you see
What it means
What to do now
Pale top and pale bottom
Both still need time
Continue on the lower-third rack
Golden bottom but pale top
The base has enough heat
Move the pan one level higher for the final minutes
Dark edge but pale bottom
The edge raced ahead of the center
Loosen and carefully slide the pizza out of the pan for a 2–4-minute finish
Wet-looking center
The middle still needs time
Continue with strong lower heat and watch the edge
Cheese darkening too quickly
Upper heat is outpacing the center
Lower the pan or loosely cover only the darkest corner with a narrow strip of foil
The useful clue is the mismatch between surfaces. Move or shield the pizza only when the top, center, and bottom are progressing at noticeably different rates.
When the edge is ready before the bottom
Use this rescue only when the cheese edge is already deeply browned but the underside is still pale. Supporting the center with two tools keeps the soft middle level during the transfer.
Removing the pizza changes the heat path: the pale base receives direct heat while the finished cheese edge stops frying against the pan walls.
Parbake only when the direct bake keeps failing. Bake the risen dough for 8–10 minutes, until set but pale. Add the toppings and finish the pizza as directed.
Release, rest and cut without softening the bottom
The bake is finished, but the bottom can still soften while the pizza sits in the pan. Ten minutes may make it easier to handle, but it also traps steam against the underside you worked to crisp.
Rest in the pan for 1–3 minutes, then loosen all four sides thoroughly.
Support the center with two wide spatulas and move the pizza to a wire rack.
Rest for another 3–5 minutes before transferring to a board and cutting into eight rectangular slices.
Here, the rack is part of the finishing method rather than ordinary cooling equipment. Airflow prevents residual steam from undoing the crispness developed in the oven.
Once the corner lifts cleanly, the dramatic edge and crisp bottom finally agree. If the base feels firm against the spatula, you can relax—the bake has worked.
Detroit-style pizza troubleshooting: read the finished slice
Even when the first pizza misses the mark, the slice usually shows you why. Look at the crumb, edge and underside before changing the whole recipe at once.
Read the vertical pattern: dense crumb stays uniformly tight, gummy crumb forms a shiny compressed band, and properly baked dough holds set bubbles down to the base.
Start with the stage where the result changed
Dough, proofing and crumb problems
Dough, proofing and crumb problems
Problem
Most likely causes
What to change
Dense or tight crumb
Underproofed dough, weak gluten development, cold dough or excessive degassing
Extend fermentation, use visible cues and press more gently
Gummy center
Too much dough for the pan, thin sauce, heavy toppings or weak bottom heat
Use the scaled batch, reduce moisture and strengthen the heat underneath
Dough will not reach the corners
It is cold, tight or insufficiently rested
Cover and wait 15–30 minutes before pressing again
Dough tears
It was forced before relaxing or lacks enough development
Stop, rest it and patch small tears gently
Dough overproofed
Too much yeast, excessive warmth or a long delay before baking
Reduce yeast, shorten the rise or use a cooler location next time
Baking, moisture and release problems
Baking, moisture and release problems
Problem
Most likely causes
What to change
Pale bottom
Light pan, short preheat or high rack position
Use a lower rack, longer preheat or the steel correction when the problem repeats
Burnt cheese edge
The edge finished before the center, or the pizza remained in the pan too long
Check the underside earlier and use the careful out-of-pan finish
No crisp cheese edge
Cheese did not touch the walls or the cheese was too wet
Pack low-moisture cheese directly against all four sides
Pizza sticks
Dry corners, damaged seasoning, insufficient oil or delayed loosening
Coat the entire pan and loosen the edge after the short rest
Greasy surface
Excess cheese, fatty toppings or uneven distribution
Reduce the cheese slightly and drain cooked meat
Watery tomato layer
Sauce was too thin or used too generously
Reduce until spoonable and apply controlled stripes
Crust softens after baking
The pizza sat steaming in the pan
Move it to a wire rack after 1–3 minutes
Troubleshooting at a glance
Group the failure by timing before changing the recipe: stretching and proofing problems begin before baking, heat imbalance appears in the oven, and softness often develops afterward.
Water alone doesn’t create an airy crumb, and sauce isn’t the only cause of a gummy center. When the slice is both pale underneath and wet near the top, dry the sauce more thoroughly and give the pan stronger lower heat. One imperfect pizza is usually enough to teach you how your own pan and oven behave.
Detroit-style pizza variations
The crust can carry plenty of flavor when the toppings remain fairly dry and restrained. Each version below begins with the same crisp cheese collar around the pan.
Classic pepperoni
Salty, crisp-edged pepperoni cups make this the familiar pizzeria favorite. Use 150 g, placing half below and half above the cheese. Increase to about 170 g for a heavily topped pizza.
Cooked toppings: sausage or mushrooms
Sausage, pepper and onion. Savory sausage, sweet peppers and softened onion turn the pizza into a full pizzeria-style dinner. Brown and drain the sausage, then cook the vegetables until their raw moisture is gone.
Browning the sausage and vegetables does more than protect the crust. It concentrates their savory sweetness, so the finished topping tastes fuller without needing a thicker layer.
Mushroom and caramelized onion. Deeply browned mushrooms and a little sweet onion sit beautifully against the dark cheese edge. Cook the mushrooms until the pan is dry and use the onion with restraint.
Mushroom browning doubles as a moisture test: once the pan looks dry and the sizzling quiets, their water has evaporated and their flavor has become more concentrated.
Other vegetarian variations
Cheese-only. This is the cleanest way to taste the buttery edge and airy crust. Finish with a little Parmesan or pecorino after baking for extra savory depth.
Pesto, mushroom and mozzarella. Earthy mushrooms and bright basil make a fresher, greener version. Use thoroughly cooked mushrooms and spoon over a little thick pesto after baking.
A sweet-heat finish
Hot honey pepperoni. Sweet heat settles into the crisp pepperoni cups and offsets the salty cheese edge. Drizzle lightly after the pizza leaves the pan so the honey doesn’t scorch.
The curled pepperoni cups hold small bursts of hot honey while the exposed frico and pizza bottom stay dry and crisp.
Gluten-free flour, sourdough starter and vegan cheese each require their own dough or baking adjustments. Replacing them directly here is unlikely to give the same crust.
Make ahead, store and reheat
Prepare the components ahead
Sauce: Prepare up to four days ahead and refrigerate in a covered container.
Cheese: Cube or grate one day ahead and refrigerate tightly covered.
Dough: Refrigerate the smaller-yeast overnight version for 12–24 hours.
Cooked toppings: Prepare one day ahead, cool completely and refrigerate separately.
Refrigerate or freeze leftover slices
Transfer leftover slices to a shallow airtight container and refrigerate promptly, within two hours. They don’t need to cool completely first; letting the heaviest steam subside for a few minutes is enough. The USDA storage guidance (opens in a new tab) gives pizza three to four days in the refrigerator and one to two months in the freezer.
Freeze slices on a tray until firm, then transfer them to a freezer container or bag. Separating the slices with parchment makes it easier to remove only what you need.
Best way to reheat Detroit-style pizza
For one or two refrigerated slices, place them in a dry skillet over medium-low heat. Cover loosely at first so the center warms, then uncover for the final minutes to restore the crisp underside.
For several slices, use an oven or air fryer at about 375°F/190°C. Reheat until hot throughout and the bottom feels crisp, usually 5–10 minutes depending on slice thickness and appliance strength. When checking with a thermometer, the center should reach 165°F/74°C.
A microwave warms the center quickly but softens the crust. Use it only when speed matters more than the original texture.
Cold storage moves moisture into the crust; dry skillet, oven, or air-fryer heat drives it back out far better than a microwave.
Yes. A 1-pound/454 g dough ball is almost exactly right for a 9 × 13-inch/23 × 33 cm pan. For a 10 × 14-inch/25 × 36 cm pan, aim for about 540–545 g; anything close to 550 g changes the height very little. A common 20-ounce/567 g dough ball also works and produces a slightly taller crust.
Let refrigerated dough lose its chill, press it into the oiled pan in stages and wait until it looks visibly puffy before topping it. Commercial formulas containing added sugar may brown faster, so inspect the edge and underside slightly earlier.
Can I use all-purpose flour instead of bread flour?
Yes. Follow the reduced-water quantities in the recipe notes. The dough may need less water than bread flour, and the finished crumb may be slightly finer and less chewy.
What cheese is closest to Wisconsin brick cheese?
Equal weights of low-moisture whole-milk mozzarella and Monterey Jack make the most practical substitute. The mozzarella supplies stretch, while the Jack improves creamy melting and edge browning. Mild cheddar can replace the Monterey Jack for a sharper flavor.
What if my conventional oven only reaches 450°F or 475°F?
Use the highest permitted setting and preheat for a full 45 minutes. Keep the pan on a lower-third rack. In a conventional oven limited to 475°F/245°C, begin checking around 15 minutes. At 450°F/230°C, begin around 18 minutes.
A dark pan becomes especially helpful at these temperatures. Use a preheated steel or stone only when the same pan and oven repeatedly produce a pale bottom.
The corner slice tells the story
When the dough has been given enough room and enough time, the corner slice tells you immediately. The edge breaks cleanly, the base stays firm and the crumb underneath still feels unexpectedly light.
For a complete dinner, the pizza needs very little beside it. A cold iceberg wedge salad adds crisp lettuce, tomato and tangy dressing.
That empty corner offers practical proof as well as appetite appeal: the slice released cleanly, stayed firm enough to lift, and disappeared before the rest of the pan.
Did the edge or the bottom finish first—and which corner disappeared before the pizza reached the table? Tell us which pan, cheese blend and dough schedule you used. Those details can help the next cook know what to watch for.
An Anzac biscuit reveals its true texture only after it cools. Straight from the oven, every version feels soft. One bends at the centre. Another crisps around the edge but stays chewy inside. A deeply golden one settles into a clean snap. All three carry the warm, toasty scent of oats, coconut, butter and golden syrup.
Judge texture after cooling: bend means chewy, a crisp rim means balanced, and a clean snap means crunchy.
Better still, you do not need three separate recipes. One oat-and-coconut mixture can produce every finish, so everyone at the table can have the biscuit they prefer.
One stage that often makes bakers hesitate is the mixture itself. The bowl will look rougher than ordinary cookie dough, and that is exactly right. When a firmly squeezed spoonful holds together, you are ready to shape. If it falls apart, a teaspoon of water is often enough to bring it back.
Shape: Use 28 g portions and press them to about 8 mm / ⅓ inch thick. They should be roughly 5–5.5 cm / 2–2¼ inches wide.
Bake: Use 170°C conventional or 150°C fan. Begin checking at 14 minutes, then continue in 1-minute increments and let the colour, not just the clock, make the final call.
Remove: Take them out when the edges are clearly golden and the centre no longer looks wet. They will feel soft at first, then settle into crisp edges with a chewy centre.
Remember: the oven sets the colour; cooling reveals the texture.
This middle texture is the most forgiving starting point: crisp enough at the edge, still chewy in the centre.
Make it now
Anzac Biscuits Recipe
Rolled oats, coconut, brown sugar, butter and golden syrup make the classic oat-and-coconut biscuit. Keep the portions thicker for a softer bend, use the middle timing range for crisp edges and a chewy centre, or press them flatter and let the colour deepen for a clean snap.
Recipe at a glance
Yield: About 24 medium biscuits
Portion: 28 g / 1 oz each
Preparation: About 20 minutes
Bake: 11–19 minutes per tray, depending on texture
Tray rest: 5 minutes for chewy; 8–10 minutes for crunchy
Rack cooling: 10–15 minutes after the tray rest
Total for two trays baked one at a time: About 60–80 minutes
150 g / 5.3 oz plain flour or all-purpose flour — about 1 Australian cup or 1¼ US cups; weight is strongly recommended
90 g / 3.2 oz traditional rolled oats — about 1 cup; called old-fashioned oats in the US
60 g / 2.1 oz unsweetened desiccated coconut — about ¾ cup
150 g / 5.3 oz light brown sugar — approximately ¾ Australian cup or a scant ¾ US cup when packed; use the weight for consistency
¼ teaspoon fine salt
125 g / 4.4 oz unsalted butter, cut into pieces
60 g / 2.1 oz golden syrup — about 40 ml
30 ml boiling water
½ teaspoon / approximately 2.5 g bicarbonate of soda, also called baking soda
Important regional measurement note: cup measures vary with country, ingredient and packing, so the gram weights are the reliable standard here. An Australian tablespoon holds 20 ml, while a standard US, UK or New Zealand tablespoon generally holds about 15 ml. For the golden syrup and boiling water, use the gram or millilitre quantities above.
Method
Mix the base mixture
Prepare the oven and trays. Heat to 170°C conventional, 150°C fan, 340°F conventional or 300°F convection. Put a rack in the centre and line two light-coloured trays with baking paper or parchment paper.
Combine the dry ingredients. Stir together the flour, rolled oats, coconut, brown sugar and salt, breaking up any firm sugar lumps.
Melt the butter and syrup. Warm them gently until smooth, then remove from the heat. Stir the bicarbonate into the boiling water and add it carefully; the saucepan mixture will foam briefly.
Mix and check the bowl. Pour the warm liquid over the dry ingredients and stir until no dry flour remains. The mixture may look glossy while warm, but a firmly squeezed spoonful should hold together without pooled oil. If it falls apart, add 5 ml / 1 teaspoon boiling water and check again.
Portion and shape the tray
Portion and shape. Use 28 g / 1 oz pieces and leave at least 4 cm / 1½ inches of clear space between their shaped edges.
Soft and chewy biscuits: about 5 cm / 2 inches wide and 1 cm / ⅜ inch thick.
Crisp-edged and chewy-centred biscuits: about 5–5.5 cm / 2–2¼ inches wide and 8 mm / ⅓ inch thick.
Deeply golden and crunchy biscuits: about 5.5–6 cm / 2¼ inches wide and 6 mm / ¼ inch thick.
Equal 28 g portions and clear spacing keep spread more predictable across the tray.
Bake, rest and cool
Bake one tray at a time. Check soft and chewy biscuits at 11 minutes, crisp-edged and chewy-centred biscuits at 14 minutes, and deeply golden and crunchy biscuits at 17 minutes. Continue in 1-minute increments until the edge and centre match the guide.
Let the biscuits set. Rest soft or chewy biscuits on the tray for 5 minutes and crunchy biscuits for 8–10 minutes. Transfer to a wire rack and cool completely before judging the final bend or snap.
Recipe notes
For even colour: one tray on the centre rack gives the most predictable result. If baking two together, rotate them front to back and swap positions once the biscuits have begun setting.
Start each batch on a cool tray: hot reused metal increases spread and darkens the base.
Test biscuit, if needed: the standard recipe can go straight into the oven. Bake one first only when changing the syrup or oats, measuring mainly by cups, using a dark tray or learning an unfamiliar oven; see when a test biscuit helps.
The recipe above is enough to begin. The sections below show how to choose the exact texture, recognise the mixture and adjust the next tray when your oats or oven behave differently.
Choose the finish before shaping: a soft bend, crisp edges with a chewy centre, or a deeply golden snap. Keep the portion size and oven temperature steady, then use thickness, bake time and removal colour to guide the result.
Shape for the texture you want
Thickness decides texture early: thicker for chew, medium for balance, flatter for crunch.
Check timing and removal colour
Texture
Shape before baking
Start checking
Remove when
After cooling
Soft and chewy
About 5 cm / 2 inches wide and 1 cm / ⅜ inch thick
11 minutes; continue in 1-minute increments
Edges are set and lightly golden; centre still looks soft
Tender centre with an easy bend
Crisp-edged and chewy-centred
About 5–5.5 cm / 2–2¼ inches wide and 8 mm / ⅓ inch thick
14 minutes; continue in 1-minute increments
Edges are medium golden; centre is just set
Crisp edge with a yielding centre
Deeply golden and crunchy
About 5.5–6 cm / 2¼ inches wide and 6 mm / ¼ inch thick
Connect shape, colour and cooling: each texture needs a slightly different starting disc and removal cue.
Soft and chewy
Shape: About 5 cm / 2 inches wide and 1 cm / ⅜ inch thick.
Check: From 11 minutes.
Remove: Lightly golden edges; centre still looks soft.
After cooling: Tender centre with an easy bend.
Crisp-edged and chewy-centred
Shape: About 5–5.5 cm / 2–2¼ inches wide and 8 mm / ⅓ inch thick.
Check: From 14 minutes.
Remove: Medium-golden edge; centre just set.
After cooling: Crisp edge with a yielding centre.
Deeply golden and crunchy
Shape: About 5.5–6 cm / 2¼ inches wide and 6 mm / ¼ inch thick.
Check: From 17 minutes.
Remove: Deep, even gold moving towards the centre.
After cooling: Crisp throughout with a clean snap.
Use one mixture for different preferences
How the three textures are controlled: the ingredient formula and 28 g portion stay the same. The starting thickness, first-check time and removal colour change. Oat absorption, tray colour and ovens vary, so the timings are starting points and the visual cues make the final decision.
If your household is divided: shape one tray thicker and the next flatter. Bake the thicker tray first, then use its colour and spread to fine-tune the second. All three can come from the same bowl.
Keep the formula fixed, then change thickness, first-check timing and removal colour.
This mixture does not need an egg to hold together. Golden syrup, melted butter and a small amount of water coat the oats and coconut, while the flour gives the biscuit enough structure to set as it cools. Bicarbonate helps the portions spread and brown, contributing to their crisp structure as they cool.
The moderate oven gives the melted butter and syrup time to spread before the edges set too firmly. Thicker discs hold more moisture in the centre, while flatter discs heat through and dry sooner. The biscuits leave the oven soft because their sugars and fats continue firming as they cool.
Do not decide too early; hot biscuits firm into their final bend or snap as they cool.
What each Anzac biscuit ingredient does
Most of the texture comes from two balances: flour, oats and coconut decide how firmly the mixture holds, while sugar, butter and syrup influence spread, moisture and caramel flavour. Bicarbonate encourages spread and browning, water gives the dry mixture enough moisture to press together, and salt balances the caramel sweetness.
Flour, oats and coconut build body; butter and golden syrup bring spread and caramel flavour.
Flour, oats and coconut
Plain flour or all-purpose flour helps the biscuits hold their shape. Too much makes the mixture dry and limits spread, so use 150 g when possible. For volume measuring, use about 1 Australian cup or 1¼ US cups, spooned lightly into the cup and levelled.
Traditional rolled oats—often labelled old-fashioned oats in the US—give the clearest oat texture. Those names usually describe the same product; this guide to old-fashioned oats and rolled oats explains the regional wording. Quick oats are finer and may absorb the liquid faster, changing spread and chew; instant or minute oats are less predictable here.
Rolled oats give the clearest texture; quick or instant oats change absorption and spread.
Unsweetened desiccated coconut gives the biscuits their fine coconut texture and toasted aroma while absorbing part of the butter-and-syrup mixture. Sweetened shredded coconut is usually moister, sweeter and stringier, so it is not an invisible swap.
Sugar, butter and golden syrup
Light brown sugar adds caramel flavour, moisture and browning, helping a shorter bake retain a yielding centre. A large reduction can leave the biscuits thicker, drier and less crisp.
Butter carries flavour and helps the biscuits spread and crisp. Melt it gently with the syrup and stop as soon as the mixture is smooth. Salted butter is fine; omit the added salt.
Golden syrup is thick, caramel-like and central to the classic flavour and amber colour. Look for it in the baking aisle, an imported-food section or online. When it is unavailable, the treacle-and-honey option below comes closer to its thickness and caramel depth than maple syrup alone.
Gentle melting keeps the golden-syrup flavour clean before the bicarbonate reaction begins.
Bicarbonate, water and salt
Bicarbonate of soda is the same ingredient as baking soda, not baking powder. It encourages browning and spread, contributing to the biscuit’s crisp structure as it cools. Dissolve it in the boiling water, then add it to the warm butter and syrup, where the mixture will foam briefly. The measured water gives the dry mixture just enough moisture to press together, so use the full 30 ml.
Fine salt sharpens the toasted oat, coconut and caramel flavours. It is a flavour choice rather than a historical requirement and can be omitted when using salted butter.
Small ingredients matter: bicarbonate browns, water binds and salt balances the caramel sweetness.
The equipment that matters
No electric mixer is needed. Most ordinary baking tools will work, but four choices make the result easier to read and repeat.
Digital kitchen scale: keeps the ingredient amounts and 28 g portions consistent.
Light-coloured metal trays: make the bases easier to judge than dark-coated metal.
Medium saucepan: leaves room for the brief foam when the bicarbonate mixture is added.
Wire rack: lets air move beneath the biscuits after their tray rest.
Before mixing, confirm the oven mode and decide which texture you want. Keep every biscuit on a tray close to the same thickness, and shape while the warm mixture still compacts easily.
A scale, light tray, medium saucepan and wire rack make the result easier to repeat.
This is the stage when the bowl often looks less convincing than it really is. Coarse is normal; collapsing crumbs, pooled fat or a scorched base are not.
1. The brief foam
Once the bicarbonate water reaches the warm butter and golden syrup, expect a light foam that rises briefly and stays contained inside the saucepan. A fiercely boiling or darkening mixture means the pan is too hot.
The useful foam is pale and brief; dark aggressive boiling means the pan is too hot.
After the foam settles, pour the warm syrup mixture into the dry ingredients and stir only until the bowl looks rough and coated.
Stop mixing once the oats and coconut are coated and the bowl looks rough but compactable.
2. A coarse mixture that compacts
The oats and coconut should remain visible, with no pockets of dry flour or pooled fat. The mixture should look rough, but it should not collapse into loose crumbs.
A rough oat-filled mixture is correct when it clumps without dry flour or pooled fat.
A heaped spoonful should compress into one piece in your hand, even if a few cracks remain on the surface. If it collapses immediately, add water in tiny increments and squeeze again.
A rough clump that holds under pressure usually needs no correction.
3. The shaped disc from above and the side
The starting width and thickness work together. Flatter discs heat through and dry sooner, while thicker discs protect more moisture in the centre. The biscuits will spread further in the oven, and the exact amount depends on the mixture, tray and heat. Aim for the overall shape rather than perfect geometry.
4. Three removal colours
Soft biscuits have lightly golden edges and a soft-looking centre. The crisp-edged version has a medium-golden perimeter and no wet shine. Deeply golden biscuits are evenly coloured towards the centre. A very dark base beneath a pale top signals excess heat from below rather than a properly crunchy finish.
Use colour before firmness: lighter for chew, amber for balance, deeper gold for crunch.
Simple fixes for dry, hard or spreading Anzac biscuits
A disappointing first tray does not mean the whole bowl is lost. Most problems show themselves early and are easy to correct in the next batch. Adjust one thing at a time so you can see what helped.
First decide whether one tray misbehaved or the whole batch needs adjustment.
When a test biscuit helps
The standard recipe on a light tray can go straight into the oven. A test biscuit is most useful with cup measurements, a syrup substitute, quick oats, a dark tray or an unfamiliar oven.
While it bakes, loosely portion the remaining mixture and keep it covered. Use the cooled test mainly to adjust flattening and bake time. Oats and coconut continue absorbing moisture as they stand, so reassess the bowl before adding flour or water.
Bake one test biscuit when a new oven, syrup swap or oat type makes the result uncertain.
Is the mixture genuinely too dry or oily?
Crumbly but binding: normal. A portion that collapses in your hand needs a little more moisture. Add 5 ml / 1 teaspoon boiling water, mix and squeeze again; repeat only in the same small increment.
Glossy while warm: usually normal. If the mixture still slumps and leaves visible oil after 2–3 minutes—and the butter and syrup were weighed correctly—mix in no more than 8 g / 1 tablespoon flour.
Match the fix to the bowl: holding, crumbling and oily mixtures need different corrections.
Match the tray pattern to the next fix
What you see
Most likely explanation
What to change next
Wide, thin or merging biscuits
A later tray spreading often points to warmer metal. If every tray spreads, check shaping, measurements and oat type.
Start with a cool tray, flatten less and verify the butter and syrup weights.
Thick biscuits with very little spread
A few thick biscuits usually mean uneven shaping. A whole thick tray points to a dry mixture or inaccurate measurements.
Check that a squeezed portion binds; if it does, flatten the next biscuits slightly more.
Hard after cooling
The portions were too thin or baked beyond the intended colour.
Keep more thickness and remove the next tray earlier.
Break when moved
The hot biscuits have not set enough on the tray.
Give chewy biscuits about 5 minutes and crunchy biscuits 8–10 minutes before transferring.
Crumble after cooling
The mixture was genuinely too dry or the portions were not compacted firmly enough.
Add boiling water 1 teaspoon at a time and squeeze before adding more.
Dark bases with paler tops
Dark metal, a low rack, strong fan heat or a hot reused tray.
Use a light-coloured tray on the centre rack; raise the rack or place an empty tray underneath if needed.
Use the first tray to identify the pattern, then change one control for the next.
Separate hot softness from real failures
Hot softness is normal; breakage, hardness and dark bases point to different fixes.
On smaller screens, scroll horizontally to compare all columns.
A substitute can still make a good biscuit, but it will not behave exactly like the original ingredient. Weigh the replacement and expect some change in spread, colour, flavour or texture.
Changes that can work with care
Change
Likely result
Best guidance
Light brown sugar to caster or granulated sugar
Lighter caramel flavour with a different spread and cooled texture
Use the same weight, bake one biscuit first and judge it only after cooling
Rolled oats to quick oats
Finer texture with less predictable absorption, spread and chew
Rolled oats are preferred; if using quick oats, keep the weight the same and bake one biscuit first. Avoid instant or minute oats.
Unsalted butter to salted butter
Similar spread with a saltier finish
Use the same weight and omit the added salt
Ingredient changes that may work with care and the effects to expect.
On smaller screens, scroll horizontally to compare all columns.
Can I make Anzac biscuits without golden syrup?
Yes, although no substitute behaves exactly like golden syrup. The closest practical alternative is 15 g mild treacle or light molasses plus 45 g mild honey. A full 60 g of mild runny honey is workable but gives a more pronounced flavour and often a softer finish. Maple syrup is thinner and the least predictable option for spread, so check the first biscuit’s spread and cooled texture before shaping the rest.
Golden syrup is the benchmark; substitutes should be judged by thickness, flavour and spread.
Changes that need their own formula
Sweetened shredded coconut: it is usually moister, sweeter and stringier than desiccated coconut.
Vegan block fat: different melting behaviour can alter spread and crispness.
Gluten-free flour: the flour blend changes structure, and oats also require separate consideration.
Can I make Anzac biscuits without coconut?
Coconut-free Anzac biscuits are possible, and some documented early oat-based recipes omitted coconut. This particular batch, however, uses 60 g coconut as part of its dry balance. Removing it alone would leave too much butter and syrup for the remaining ingredients, so a coconut-free version needs different oat, flour and liquid amounts.
Looking for a different kind of oat biscuit? These easy healthy oat cookies use a deliberately lower-sugar, butter-free balance rather than relying on several substitutions in this formula.
How to store, freeze and serve Anzac biscuits
Room-temperature storage
Cool the biscuits completely before sealing them in a container; trapped warmth creates condensation and softens the edges. Store airtight at cool room temperature for about one week for the best texture and flavour.
If you baked more than one texture, give them separate containers. Otherwise, the chewy biscuits gradually lend their moisture to the crunchy ones. Humid weather can soften even a well-baked crisp biscuit.
Store chewy and crunchy biscuits separately so moisture does not dull the crisp batch.
How to restore crunch
Arrange softened biscuits in a single layer on a lined tray. Warm at 150°C conventional, 135°C fan, 300°F conventional or 275°F convection for 5–8 minutes, checking at 5 minutes. Cool completely on a wire rack before judging the restored snap.
A low oven can revive softened crisp biscuits, but cooling on a rack finishes the snap.
Freezing baked Anzac biscuits
Once completely cool, layer the biscuits between baking paper in a freezer-safe container and freeze for up to three months for best quality. Thaw chewy biscuits in their container at room temperature. Thaw crunchy biscuits in a single layer so moisture can escape, then re-crisp if needed.
Freeze between baking paper; thaw chewy biscuits covered and crunchy biscuits in one layer.
Serving and packing
Pack any version only after it has cooled completely. The chewy-centred biscuits travel especially well in lunchboxes, while the crisp batch is ideal with tea or coffee. Broken pieces are lovely over vanilla ice cream, yogurt or warm stewed apples.
Pack only fully cooled biscuits; trapped warmth shortens the life of the texture.
This is a traditional-style modern Anzac biscuit: eggless, oat-rich and made with butter, golden syrup and bicarbonate of soda, with coconut in the version most people recognise today. It is not presented as one uncontested “original 1914 recipe,” because the historical record is more varied than that phrase suggests.
The Department of Veterans’ Affairs Anzac Portal notes that many recipe variations exist and that early recipes could include ingredients such as eggs and jam while omitting coconut.
Do not confuse the sweet homemade biscuit with the hard army biscuit or “Anzac wafer” used as a bread substitute. Because the name is tied to remembrance as well as baking, the history deserves more care than a neat but unsupported origin story. Over time, the familiar biscuit emerged through several recipes, and those variations are part of what community cookbooks and home kitchens preserved.
Documented recipes show changing ingredients over time, not one fixed original formula.
A note on the name
The DVA also notes that many Australians prefer the customary term Anzac biscuit. Discussing “Anzac cookies” or making recipe variations is not itself a breach, although, under Australian regulations, commercially sold Anzac biscuits need a permit to use the word “Anzac.”
Frequently asked questions
Can I use quick oats instead of rolled oats?
Rolled or old-fashioned oats are recommended for the spread and texture described here. Quick oats can be used as a variation, but their finer particles may absorb the liquid faster and change spread and chew, so bake one biscuit before shaping the entire batch. Avoid instant or minute oats, which are less predictable; this guide to quick oats and instant oats explains the distinction.
Can I bake two trays at once?
Yes, although one tray on the centre rack usually colours more evenly. For two trays, wait until the biscuits have begun setting, then turn each tray and trade rack levels for more even colour.
One centre-rack tray colours most evenly; two trays need turning and rack-swapping after the biscuits begin setting.
Why do Anzac biscuits usually contain no egg?
The warm syrup mixture gives the dry ingredients enough moisture to bind, while the flour sets the biscuit without egg. Some earlier recipes associated with the name did contain egg.
Is bicarbonate of soda the same as baking soda?
Yes. Bicarbonate of soda is the Australian and UK term for baking soda; it encourages browning, spread and crispness. It is not baking powder, which behaves differently.
Why are they called biscuits rather than cookies?
International readers may recognise this style of bake as a cookie, but Anzac biscuit is the customary name in Australia and New Zealand. The DVA naming guidance is summarised in the historical section above.
Make the Anzac biscuit your household loves
Part of the pleasure of Anzac biscuits is the small debate around the biscuit tin: the soft bend, the crisp edge or the deep golden snap. Whichever tray disappears first, the toasted oats, coconut and golden syrup will still taste unmistakably like an Anzac biscuit.
The biscuit tin usually reveals the winning texture faster than any chart.
Which texture wins in your kitchen: soft and chewy, crisp around the edges, or deeply golden and crunchy?
The first meatball is usually eaten beside the tray: browned at the edges, tender enough to split with a fork and still moist in the middle.
Ground pork is naturally suited to that balance. These meatballs have rich pork flavor, gentle garlic and onion, fresh parsley and a golden-brown exterior around a tender center.
They are especially useful on nights when the ground pork is ready but dinner is not. Make one simple mixture, then turn it into a marinara dinner, a gravy plate, a rice bowl or an appetizer with dipping sauce.
One pork mixture, three ways to cook it—and a tender center whichever you choose. Soften the breadcrumbs first, handle the pork gently, keep the portions even and stop cooking as soon as the centers are ready.
Baking is the easiest place to begin. It cooks all 16 meatballs at once, asks for the least attention and is the most forgiving method.
The process is only four moves: soften the panko, mix gently, shape 16 even meatballs and bake. From there, the oven does the hands-off cooking, and the baked version takes about 40 minutes from bowl to table.
Hydrate the crumbs, mix gently, shape evenly and check the center—the four controls behind tender baked pork meatballs.
For the simplest dinner, bake them, warm four per person in marinara and serve with spaghetti or toasted bread. Choose the skillet when you want the deepest crust, or air-fry six to ten meatballs when speed matters. Whichever method you choose, a moist mixture needs gentle handling—not extra kneading.
The recipe
Ground Pork Meatballs: Baked, Pan-Fried or Air-Fried
A little milk-softened panko keeps these all-pork meatballs tender without making them too soft to shape or brown.
Recipe at a glance
Yield: About 16 medium meatballs; serves 4
Portion: 35–36 g / 1¼ oz each, about 1½ inches / 4 cm
Preparation: About 20 minutes
Total time, baked: About 40 minutes, including a 3-minute rest
Oven: 15–18 minutes
Skillet: 10–12 minutes per batch; up to 14 with the covered finish
Air fryer: 10–13 minutes per batch
Ground pork doneness: 160°F / 71°C
Ingredients
1 lb (454 g) plain ground pork or pork mince, preferably regular rather than extra-lean
25 g panko breadcrumbs (begin with about ⅓ cup when measuring without a scale)
½ teaspoon (about 1 g) freshly ground black pepper
1 tablespoon (15 ml) neutral oil, for pan-frying
Oil for greasing the tray, rack or air-fryer basket, as needed
Equipment: a large mixing bowl, fork or flexible spatula, instant-read thermometer and the pan or air fryer needed for your chosen method. A scale or 2-tablespoon scoop helps keep the portions even.
Mix and shape
Make the panade. Stir the panko and milk together in the mixing bowl. Leave for 5 minutes, until the crumbs are evenly damp and no loose milk remains.
Season the binder. Add the egg, parsley, onion powder, garlic powder, salt and black pepper. Mix until even.
Add cold pork. Keep the pork refrigerated until the panade is ready, then fold it in with a fork, flexible spatula or your fingertips just until no large unmixed patches remain. Do not knead the mixture smooth.
Check the seasoning, if needed. Cook a 20 g tester patty completely, cool briefly and taste. Scatter any adjustment evenly over the bowl and fold once or twice. Never taste raw pork.
Portion first. Divide into 16 portions weighing about 35–36 g / 1¼ oz each. A rounded 2-tablespoon scoop is a useful starting point. After removing a 20 g tester, divide the remaining mixture into 16 portions of about 35 g each.
Shape gently. Roll each portion only until it holds a ball about 1½ inches / 4 cm across. The surface should feel slightly sticky but still hold a rounded shape; it should not slump flat or feel liquid.
Chill only if needed. If the mixture is warm or the balls begin to flatten, refrigerate them for 15–20 minutes before cooking.
After shaping, follow one cooking method below.
Choose one: Bake
Heat the oven. Set the oven to 400°F / 200°C conventional / 180°C fan. Line a rimmed sheet pan with parchment or place a lightly greased wire rack over the pan.
Space the meatballs. Arrange in one layer with about 1 inch / 2.5 cm between them.
Bake and begin checking early. Start checking at 14 minutes. Most 35–36 g meatballs will need about 15–18 minutes.
Check the center. Take them out when two of the largest meatballs reach 160°F / 71°C. Use color as a clue, but let the thermometer decide.
Rest briefly. Leave for 3 minutes before serving or transferring to sauce so the juices settle and the surface firms slightly.
Choose one: Pan-Fry
Heat the skillet. Warm 1 tablespoon (15 ml) neutral oil in a 12-inch / 30 cm heavy skillet over medium heat.
Work in two batches. Add 8 meatballs, leaving room to turn them. Let the first side cook for about 2 minutes before moving.
Brown several surfaces. Turn gradually. Once browned, reduce the heat to medium-low.
Finish the centers. Continue cooking and turning until the meatballs reach 160°F / 71°C, about 10–12 minutes in total, or up to 14 minutes when the covered finish is needed.
Rescue early darkening. Move the pan off the heat, add 2 tablespoons / 30 ml water down the side, cover and return to low heat for 1–2 minutes. Uncover for the final 30–60 seconds.
Reset for the remaining eight. Wipe out burnt bits, leave a thin film of rendered fat and add 1 teaspoon oil only if the skillet looks dry. The second panful may finish slightly sooner because the skillet is already hot.
Choose one: Air-Fry
Preheat when recommended. Set a basket-style air fryer to 375°F / 190°C and follow the manufacturer’s preheating guidance.
Leave room for airflow. Lightly oil the basket and arrange the meatballs in one layer without touching. Cook in batches, and never preheat with loose parchment inside.
Begin checking at 9 minutes. Turn after about 6 minutes if the appliance browns more strongly on one side.
Cook to temperature. Most 35–36 g meatballs will need about 10–13 minutes. Remove at 160°F / 71°C.
Pause between batches. Rest the cooked meatballs for 3 minutes while the next round cooks.
Recipe notes
Panko volume varies by brand. Without a scale, begin with about ⅓ cup, hydrate it fully and add more only if the chilled mixture still slumps. For fine dry breadcrumbs, begin with 20 g, wait 5 minutes and add up to 5 g more only if needed.
Use the 5 g salt weight for consistent seasoning; fine and coarse crystals fill a spoon differently.
Unsweetened, unflavored non-dairy milk or water may replace the 2 tablespoons / 30 ml milk.
Ground chicken or turkey substitutions must reach 165°F / 74°C.
To double: double every ingredient by weight, mix in two bowls if needed and use spaced trays or separate cooking batches.
The recipe above is all you need to start cooking. Keep reading for why the mixture works, how the methods differ and what to do if something goes wrong.
Plain ground pork—or pork mince in the UK, Australia and several other markets—has enough fat and natural richness to make tender meatballs without beef, veal or sausage.
A light panko-and-milk panade protects the center without making it bready, while keeping the portions even makes every cooking time more useful. The raw mixture will feel softer than a lean beef mixture; if a scoop stays rounded on the tray, trust it before reaching for more crumbs.
Seasoning stays simple but not bland: garlic and onion sit quietly behind the pork, parsley adds freshness and enough salt makes the meatballs satisfying before any sauce is added. Simmer a few in marinara tonight, glaze a few for tomorrow’s rice bowl and freeze the rest for another dinner.
Think of this as an everyday savory base. Swedish gravy meatballs, sweet-and-sour versions and Vietnamese xíu mại each need their own balance of binder, seasoning and sauce. For other ways to use the package, browse MasalaMonk’s ground pork recipes.
Ingredients for Ground Pork Meatballs
The base seasoning stays neutral, so one batch can move toward marinara, gravy, rice bowls or appetizers.
Ground Pork or Pork Mince
Use plain ground pork, not breakfast or Italian sausage, which already contains salt, spices and often extra fat. Regular pork is more forgiving than the leanest package; when the label gives a percentage, roughly 15–20% fat suits an everyday meatball.
A regular-fat package gives a wider margin before dryness; extra-lean pork needs earlier checking.
The Panade: Panko, Milk and Egg
Soaking the panko in milk creates a light panade that holds moisture more effectively than dry crumbs mixed straight into the pork. Just 2 tablespoons / 30 ml milk tenderizes the center without making the mixture slump or flatten.
Fine dry breadcrumbs absorb faster than panko, so add them gradually. Unsweetened non-dairy milk or water can replace the milk in the same 2-tablespoon / 30 ml quantity.
Hydrate the panko first so it softens and distributes moisture evenly through the pork.
The egg helps the pork and breadcrumbs hold together. It is not the ingredient that makes the meatball juicy, and adding more does not automatically make the center softer. Too much egg relative to the crumbs and meat can create a loose raw mixture and a springy cooked texture.
Aromatics and Seasoning
Powdered aromatics distribute evenly without adding the variable moisture of raw onion, which helps one mixture work across all three methods. Prefer fresh onion? A measured version appears below; large pieces can stay firm and create weak points.
Parsley adds freshness without tying the meatballs to one sauce or cuisine, while black pepper gives the pork gentle background warmth. Salt must reach the center, and crystal sizes vary, so use the 5 g weight when possible.
If you add salty Parmesan, soy sauce or another assertive ingredient, cook a small tester before shaping. It is the safest way to correct the bowl without gambling on the whole tray.
Choose Your Meatball Binder
The main recipe uses a light panade. Because the alternatives below change the finished texture, treat them as separate versions rather than direct swaps. Pork meatballs can be made with or without breadcrumbs, but the results will not be identical.
Binder choice changes the bite: no binder is firmest, dry crumbs are tighter, and a light panade gives the most tender center.
No binder
Texture: Firm and pork-forward
Forgiveness: Lowest
Best for: Regular-fat pork and cooks who prefer a firmer bite
Dry breadcrumbs and egg
Texture: Cohesive and slightly firmer
Forgiveness: Moderate
Best for: Quick everyday meatballs
Light panade
Texture: Tender without becoming very soft
Forgiveness: Highest
Best for: Baking, pan-frying, air frying, spaghetti and freezing
The light panade keeps the center tender across the oven, skillet and air fryer without making the meatballs difficult to shape, brown or reheat.
Binder-Free Pork Meatballs: No Breadcrumbs or Egg
For a firmer binder-free meatball, use regular ground pork—preferably near 20% fat when labeled—and omit the panko, milk and egg together. Mix only until the pork feels slightly tacky and cohesive, then portion the same 35–36 g size, shape without compressing and chill for about 20 minutes.
Baking gives this variation the widest cooking window. Use the same 160°F / 71°C endpoint; if pan-frying, let the first surface set fully before turning. Expect a firmer, more pork-forward center and a narrower margin between ready and dry.
Gluten-Free Pork Meatballs
Use gluten-free panko in the same gram weight. That preserves a texture much closer to the original than replacing the breadcrumbs with a large amount of almond flour.
Before adding more crumbs: give the panko its full hydration time. If the quantities are correct and the mixture is merely warm, chill it for 15–20 minutes first. When the chilled mixture still slumps rather than merely feeling sticky, fold in 1 teaspoon panko, wait 3 minutes and reassess. Repeat only as needed, up to 1 tablespoon.
Stir the panko and milk together and wait about 5 minutes. The crumbs should swell and look evenly damp, not float in a pool of milk.
Mix in the egg, parsley, onion powder, garlic powder, salt and pepper before the pork enters the bowl. The seasoning spreads more evenly, so the meat needs less handling later.
2. Fold in the Cold Pork
Keep the pork refrigerated while the panade hydrates, then fold it in only until no large plain patches remain. Stop while the mixture still looks loose and softly textured—not glossy, smeared or paste-like.
Fold only until the pork is evenly combined; a pasty mixture cooks firmer and springier.
The mixture may feel softer than you expected. That is normal. Scoop one portion onto the tray: if it stays rounded rather than spreading, keep going instead of reaching for more crumbs.
A sticky mixture is workable when it still holds a rounded scoop after resting.
3. Cook a Seasoning Tester
A small cooked tester is the safest way to correct the seasoning before shaping all 16 meatballs. If it needs adjustment, scatter the extra seasoning evenly over the bowl and fold only once or twice; never taste raw pork mixture.
Cook one small tester before shaping so seasoning corrections happen safely.
4. Portion, Shape and Chill Only if Needed
Scoop or weigh all 16 portions before rolling. Without a tester, use 35–36 g / about 1¼ oz per meatball; after a 20 g tester, portion the remainder at about 35 g each. A rounded 2-tablespoon scoop and a diameter near 1½ inches / 4 cm are useful visual checks.
Even 35 g portions help the full tray finish at the same time.
Roll each portion only until the surface closes and the ball holds together. Dampen your palms if the mixture clings. If the portions flatten on the tray or the kitchen is warm, chill them for 15–20 minutes; when they already hold their shape, cook them without adding an automatic delay.
Close the surface with light pressure without compressing the center into a dense ball.
Choose the oven for calm, the skillet for crust or the air fryer for speed. The mixture stays the same; only the capacity, browning and attention change.
Bake for ease. The full recipe cooks at once with moderate browning and very little hands-on work.
Pan-fry for the deepest crust. Work in two batches when you want strong browning and flavorful skillet fond for gravy or sauce.
Air-fry six to ten for speed. This works best when the basket has enough open space for hot air to move around every meatball.
Baking is hands-off, skillet cooking builds crust, and air frying favors small, well-spaced batches.
Baked Ground Pork Meatballs
Baking is the calmest way to cook the whole tray. Bake 35–36 g meatballs at 400°F / 200°C conventional / 180°C fan. Begin checking at 14 minutes; most take 15–18 minutes. Take them out at 160°F / 71°C. Use parchment for easy cleanup and deeper browning underneath, or a greased rack when you want air to circulate around more of each meatball.
Baked pork meatballs often brown more underneath than on top, so let temperature make the final call.
Parchment vs Wire Rack
Parchment: easiest cleanup and minimal sticking, though the bottoms may sit in a little rendered fat.
Wire rack: more even browning, but longer cleanup and a very soft mixture may settle into the wires.
Use parchment for cleanup or a rack for airflow; both can work well with the same mixture.
Flipping is optional when the meatballs have room around them. Turn them once near the end only if the undersides color much faster than the tops. When they are close, the tops should look dry and lightly golden, with deeper browning underneath; rest the meatballs for 3 minutes before serving or adding them to sauce.
Pan-Fried Ground Pork Meatballs
Pan-frying gives the meatballs their deepest crust and leaves browned flavor in the skillet for gravy or sauce. For 35–36 g meatballs, begin checking at 9 minutes; most need 10–12 minutes per batch, or up to 14 minutes with the covered finish. Take them out at 160°F / 71°C. This method needs more attention than baking because the surface can color before the middle is ready.
Brown Them in Two Batches
A 12-inch / 30 cm heavy skillet holds about eight standard meatballs with room to turn. Heat a thin film of neutral oil over medium, add the first eight and leave the first side alone for about 2 minutes. If a meatball resists the turn, give it another 20–30 seconds; a firm golden-brown patch usually releases more cleanly than a pale surface.
A stuck skillet meatball usually needs more time, not more force.
Turn gradually so several sides develop color, then lower the heat to medium-low. Before the second eight, remove any burnt bits, leave a thin film of rendered fat and add only about 1 teaspoon oil if the skillet looks dry. They may finish slightly sooner because the pan is already hot.
When the Outside Browns Too Fast
A dark crust with an underdone middle does not mean the meatballs are lost. Reduce the heat, move the skillet briefly away from the burner and add about 2 tablespoons (30 ml) water carefully down the side. Cover immediately and return to low heat for 1–2 minutes.
Uncover for the final 30–60 seconds so the crust does not stay wet. The sizzling should settle as the water evaporates and the browned surface firms again.
Covered low heat finishes the center when the crust browns too quickly.
Browned is not the same as done. A meatball can have a deep crust and still be undercooked in the middle. Browning tells you about flavor; the thermometer tells you when the ground pork is safely cooked.
Air Fryer Ground Pork Meatballs
A basket-style air fryer is useful for six to ten meatballs or a quick dinner for two. Cook 35–36 g meatballs at 375°F / 190°C. Begin checking at 9 minutes; most need 10–13 minutes per load. Take them out at 160°F / 71°C. Its concentrated heat creates good color quickly, but it also makes the center easier to overshoot.
Give the hot air room to move. Follow the manufacturer’s preheating guidance, never preheat with loose parchment inside and arrange six to ten oiled meatballs in one layer with visible space between them.
Visible air gaps help air-fryer pork meatballs brown instead of steam.
Turn after about 6 minutes only when the appliance browns more strongly from one direction. Look for a dry, browned exterior and rounded sides rather than waiting for every surface to become deeply dark; oven-style air fryers may need several additional minutes.
Ground Pork Meatball Cooking Times and Doneness
The following ranges apply to raw meatballs weighing about 35–36 g / 1¼ oz and measuring roughly 1½ inches / 4 cm across. Use 400°F / 200°C conventional / 180°C fan for the oven and 375°F / 190°C for the air fryer; every method finishes at 160°F / 71°C.
Here are all three methods side by side.
Method
Setting / load
Check from
Time
Oven
400°F; full recipe
14 min
15–18 min
Skillet
Medium, then medium-low; about 8
9 min
10–12 min per batch, plus a brief pan reset
Air fryer
375°F; 6–10
9 min
10–13 min per load
These are times to start checking, not promises that every appliance will finish at the same minute. Chilled meatballs, crowded pans and larger portions need longer; powerful air fryers and smaller portions may finish sooner.
Mini Pork Meatballs
Mini meatballs weighing around 18–20 g cook much faster. Begin checking baked meatballs around 9 minutes, skillet meatballs around 6 minutes and air-fried meatballs around 6–7 minutes.
They work well in soup, on appetizer platters and in meals where every spoonful should contain a meatball. Use the thermometer for the final decision.
For larger 50–60 g meatballs, keep the same cooking temperature and begin checking several minutes after the standard size. Their timing varies more by method, so use 160°F / 71°C as the endpoint.
Size changes timing; the safe center temperature does not.
How to Check Pork Meatball Doneness
Ground pork meatballs are ready when their centers reach 160°F / 71°C. The familiar 145°F / 63°C guidance applies to intact pork chops, steaks and roasts—not ground pork. See the USDA safe minimum temperature chart.
Choose two of the largest meatballs, preferably from different parts of the tray, skillet or basket.
Insert an instant-read thermometer through the side rather than straight down from the top.
Aim for the center without pushing the probe through into the hot cooking surface.
Take them out when both meatballs have reached the safe temperature in the middle.
Probe from the side to reach the center; ground pork meatballs are done at 160°F / 71°C.
Color alone is not a reliable safety test. A faint pink tone does not mean you need to cook away all the moisture: pork can remain slightly pink after reaching a safe temperature, while a dry meatball can still look moist when sliced. Use a thermometer for a more useful answer than cutting several meatballs apart. The center should split easily with a fork and look moist rather than wet or springy.
These meatballs are mild enough for tomato sauce but savory enough to serve without it. Keep them near the standard size so they heat evenly and sit comfortably beside each forkful of pasta. Use MasalaMonk’s homemade marinara sauce or a well-seasoned jarred sauce.
For fully cooked meatballs: simmer gently in marinara for 5–10 minutes, stirring around them rather than repeatedly pushing them against the pan. Extra cooked meatballs can also become meatball baked ziti.
When meatballs are browned but undercooked: transfer them directly from the skillet into gently simmering marinara and continue cooking without interruption. Do not cool or refrigerate partially cooked ground pork to finish later.
Can raw meatballs cook directly in sauce? They can, but this soft panade mixture is easier to handle and develops better browned flavor when baked or seared first. The timings here are therefore written for fully cooked meatballs or for meatballs browned and moved straight into sauce while cooking continues.
Warm cooked meatballs gently; keep browned or raw meatballs cooking until their centers reach 160°F / 71°C.
Check one of the largest meatballs from the side and keep simmering until the center reaches 160°F / 71°C. Meatball size and sauce temperature vary, so the thermometer matters more than a fixed number of minutes.
Ground Pork Meatball Troubleshooting
If something went wrong, start with what you saw. Dry, loose, pale and dark-on-the-outside meatballs have different causes; several can still be rescued tonight, and the rest are straightforward to prevent next time.
Texture and Structure
Match the symptom first; texture fixes depend on moisture, binder, mixing and turning.
Match the Texture Symptom
Dry
Likely cause: Very lean pork or cooking past the safe center temperature
Rescue now: Warm briefly in marinara, gravy or a little broth.
Next time: Use regular ground pork and start checking earlier.
Tough or rubbery
Likely cause: Overmixing, tight shaping or cooking too long
Rescue now: Slice or crumble into sauce, soup or a baked pasta.
Next time: Fold only until combined, shape without compressing and stop cooking at temperature.
Bready or spongy
Likely cause: Too many breadcrumbs, too much egg or an overextended binder
Rescue now: Serve with a strongly seasoned sauce or break into a tomato-based dish.
Next time: Weigh the panko and keep the egg-and-milk quantities unchanged.
Falling apart
Likely cause: Excess liquid, unevenly mixed binder or a first surface that has not set
Rescue now: Stop turning and finish gently under a lid or directly in simmering sauce.
Next time: Measure the liquid, distribute the binder evenly and wait before the first turn.
Too soft or slumping
Likely cause: A warm mixture, excess liquid or panko that has not fully hydrated
Rescue now: Chill for 15–20 minutes. If it still slumps, add panko 1 teaspoon at a time as described above.
Next time: Keep the pork cold, hydrate the panko fully and measure every liquid.
When Meatballs Crack
Small surface lines usually mean the portions were shaped a little dry or loose. Dampen your hands and close the surface gently. Deep cracks with crumbling point to a mixture that is too dry or not evenly combined.
Browning and Pan Problems
Heat, space, surface moisture and fat usually explain browning problems before the recipe needs changing.
Fix the Browning Problem
Sticking to the pan
Likely cause: Too little oil, an unsuitable surface or turning before the crust releases
Rescue now: Leave the meatball another 20–30 seconds, then loosen it gently with a thin spatula.
Next time: Use a thin film of oil and let the first side brown before moving it.
Pale or steamed
Likely cause: Crowding, wet surfaces or insufficient heat and airflow
Rescue now: Create more space and, while the centers are still below temperature, give the meatballs brief higher heat.
Next time: Dry the cooking surface and leave visible room around every meatball.
Greasy
Likely cause: Particularly fatty pork or meatballs sitting in rendered fat
Rescue now: Drain or blot the excess fat, then move the meatballs to a clean pan or rack if they still need cooking.
Next time: Drain the skillet between batches or bake on a rack when the pork releases a lot of fat.
Dark outside, undercooked inside
Likely cause: Heat too high or meatballs larger than the recipe size
Rescue now: Lower the heat and finish under a lid or directly in simmering sauce.
Next time: Keep the portions even and reduce the heat once the crust forms.
Flavor and Fat Checks
If they taste bland: finish them with a well-seasoned sauce, glaze or a small pinch of finishing salt. Next time, weigh the salt and cook the optional tester before shaping.
A little rendered fat is normal. If a large amount collects, use a rack in the oven or drain the skillet between batches so the meatballs brown instead of sitting in it.
The gentle garlic, onion and parsley base leaves room for several different meals. Keep it as written when you want options later, or choose one flavor direction instead of combining every appealing seasoning in the same bowl.
Flavor directions let the same pork base become marinara-friendly, bowl-ready, glazed or aromatic.
Italian-Style Pork Meatballs
Stir in 1 teaspoon dried oregano or Italian seasoning.
Fold in ¼ cup (about 22 g) finely grated Parmesan.
Keep the parsley and add an extra ¼ teaspoon black pepper.
Reduce the fine salt to ½ teaspoon (about 3 g), then confirm with a cooked tester.
Oregano, Parmesan and extra pepper make these fuller and saltier, especially good with marinara or toasted subs.
Replace the parsley with 2 tablespoons (about 10 g) sliced scallions.
Use 1 tablespoon (15 ml) soy sauce.
Finish with ½ teaspoon toasted sesame oil.
Reduce the fine salt to ¼ teaspoon (about 1.5 g), then confirm with a cooked tester.
Ginger and scallions make the pork brighter and more aromatic, especially with rice, peanut noodles or crisp vegetables. Sweet-and-sour and Vietnamese-style meatballs need their own binder, aromatics and sauce rather than one extra seasoning stirred into this base.
Smoky and Spicy Pork Meatballs
Stir in 1 teaspoon smoked paprika.
Use ¼–½ teaspoon chili flakes, depending on how much heat you want.
For rice, flatbreads or yogurt sauce, include ⅛ teaspoon ground cumin.
Smoked paprika warms the browned edges before the chili arrives. For a sweet-hot finish, spoon or brush on mango habanero sauce after cooking so the glaze does not scorch.
Fresh Onion and Garlic
Replace the onion powder with 2 tablespoons (about 20 g) very finely grated onion and the garlic powder with 1 small finely grated garlic clove (about 3 g). Reduce the milk to 1 tablespoon (15 ml) to account for the onion’s moisture, then chill the mixture if it still feels soft.
Fresh onion gives the meatballs a softer, slightly sweeter aromatic flavor, although the extra moisture makes the mixture a little looser.
For a brighter herb-led plate, serve this version with fresh chimichurri. Its parsley, garlic and vinegar echo the meatball seasoning while cutting through the pork’s richness.
All-Pork Meatballs vs Beef-and-Pork Meatballs
All-pork and pork-beef finish at 160°F; pork mixed with poultry needs 165°F.
Pork only
Texture and flavor: Rich, tender and juicy
Best for: The main recipe, rice bowls, gravy and flexible meal prep
Pork and beef
Texture and flavor: Firmer with deeper beef flavor
Best for: Tomato sauces and meatball sandwiches
Pork and turkey or chicken
Texture and flavor: Lighter but less forgiving
Best for: Leaner meal prep; cook to 165°F / 74°C
For a straightforward beef-and-pork version, use 8 oz / 227 g ground pork plus 8 oz / 227 g ground beef and keep the base binder unchanged; expect a firmer bite and deeper beef flavor. Lean poultry may need more moisture, while seasoned sausage usually needs much less added salt. Pork and veal can produce a delicate mixed-meat result, but it belongs to recipes designed for that softer texture. Any mixture containing ground poultry requires the higher 165°F / 74°C endpoint.
The softer all-pork version is particularly good under a spoonful of creamy mushroom sauce, while the firmer beef-and-pork version stands up well to a thicker tomato sauce.
What to Serve With Ground Pork Meatballs
One recipe can become more than one dinner. Simmer four meatballs in marinara tonight, glaze four for tomorrow’s rice bowl and freeze the rest for another evening.
Four medium meatballs make a generous serving with spaghetti, marinara and a crisp salad.
Pasta and Sandwiches
Serve with marinara, spaghetti, Parmesan and a crisp salad.
Tuck them into a toasted roll with marinara and melted mozzarella.
Turn leftovers into a comforting meatball baked ziti.
Pair baked meatballs with ranch roasted potatoes and a simple green salad.
Serve with creamy mashed potatoes and onion or mushroom gravy.
Gravy rewards a deeper skillet crust because the browned flavor carries into the sauce.
Rice Bowls and Lighter Meals
Add ginger-soy meatballs to rice with roasted or steamed vegetables.
Build a lower-carb plate with roasted vegetables, cauliflower mash or a cool tzatziki sauce.
Balance the richness with cucumber salad or crisp homemade coleslaw.
Appetizers and Meal Prep
Serve mini meatballs with mustard, tomato or yogurt sauce; for a sweet-savory party version, make grape jelly meatballs.
Pack medium meatballs with a grain, roasted vegetables and the sauce in a separate container.
The same mixture can become a rice bowl dinner or mini appetizer meatballs for dipping.
As a main dish, plan on about 4 medium meatballs per person; with spaghetti or a substantial grain bowl, 3 may be enough. For appetizers, allow 3–4 mini meatballs per person among several snacks, or 5–6 when the meatballs are the main party bite.
Make Ahead, Store, Freeze and Reheat
Make Ahead and Refrigerate
Shape the meatballs up to 24 hours ahead. Keep the total refrigerated time for the raw ground pork within 1–2 days of purchase or refrigerator thawing, and do not exceed the package date.
Cover and refrigerate at 40°F / 4°C or colder in one layer, or separate stacked layers with parchment. Begin checking the cold meatballs at the normal time.
Refrigerate cooked meatballs within 2 hours in a shallow, covered container and use them within 3–4 days. A small amount of sauce helps protect the surfaces from drying.
Freeze Raw or Cooked Meatballs
To freeze raw meatballs:
Arrange the shaped raw meatballs on a parchment-lined tray without letting them touch.
Leave them until firm.
Transfer to a freezer-safe container or bag.
Label clearly as raw and add the date.
For the best texture, use within 3–4 months. Thaw overnight in the refrigerator before cooking because the oven, skillet and air fryer timings in this recipe are written for thawed meatballs.
If the pork thawed safely in the refrigerator, it may be refrozen raw, although the texture can lose quality. Pork thawed in cold water or the microwave should be cooked before refreezing. See the USDA freezing guidance.
To freeze cooked meatballs:
Cool promptly, tray-freeze in one layer and transfer to a sealed freezer container once firm. Use within about 3 months for the best texture. Stash a few now and one future bowl of pasta, rice or soup is already halfway solved.
Freeze raw meatballs separately before bagging, and cool cooked meatballs completely before storage.
Reheat Without Drying Them Out
Sauce: warm gently in a covered pan.
Oven: cover and reheat at 325°F / 160°C with a spoonful of water or sauce.
Air fryer: reheat near 350°F / 175°C and start checking after 3 minutes.
Microwave: cover loosely and use short intervals, turning between intervals.
Reheat gently with moisture when possible, and bring leftovers to 165°F / 74°C.
Reheated leftovers should reach 165°F / 74°C. Warm only what you need instead of repeatedly reheating all of them.
The Rule to Remember
Ground pork does not need another meat to make a good meatball. Let the panko absorb the milk, spread the seasoning through the binder and stop mixing as soon as the pork is evenly combined.
From there, keep the portions consistent and pull them from the heat as soon as the centers are safely cooked. The best method is the one that gets a tender meatball onto your plate without making dinner harder than it needs to be.
Which method did you choose—and did the meatballs go into spaghetti, gravy, a rice bowl or straight from the tray?