Posted on — Leave a comment

Greek Moussaka Recipe with Eggplant, Lamb & Béchamel

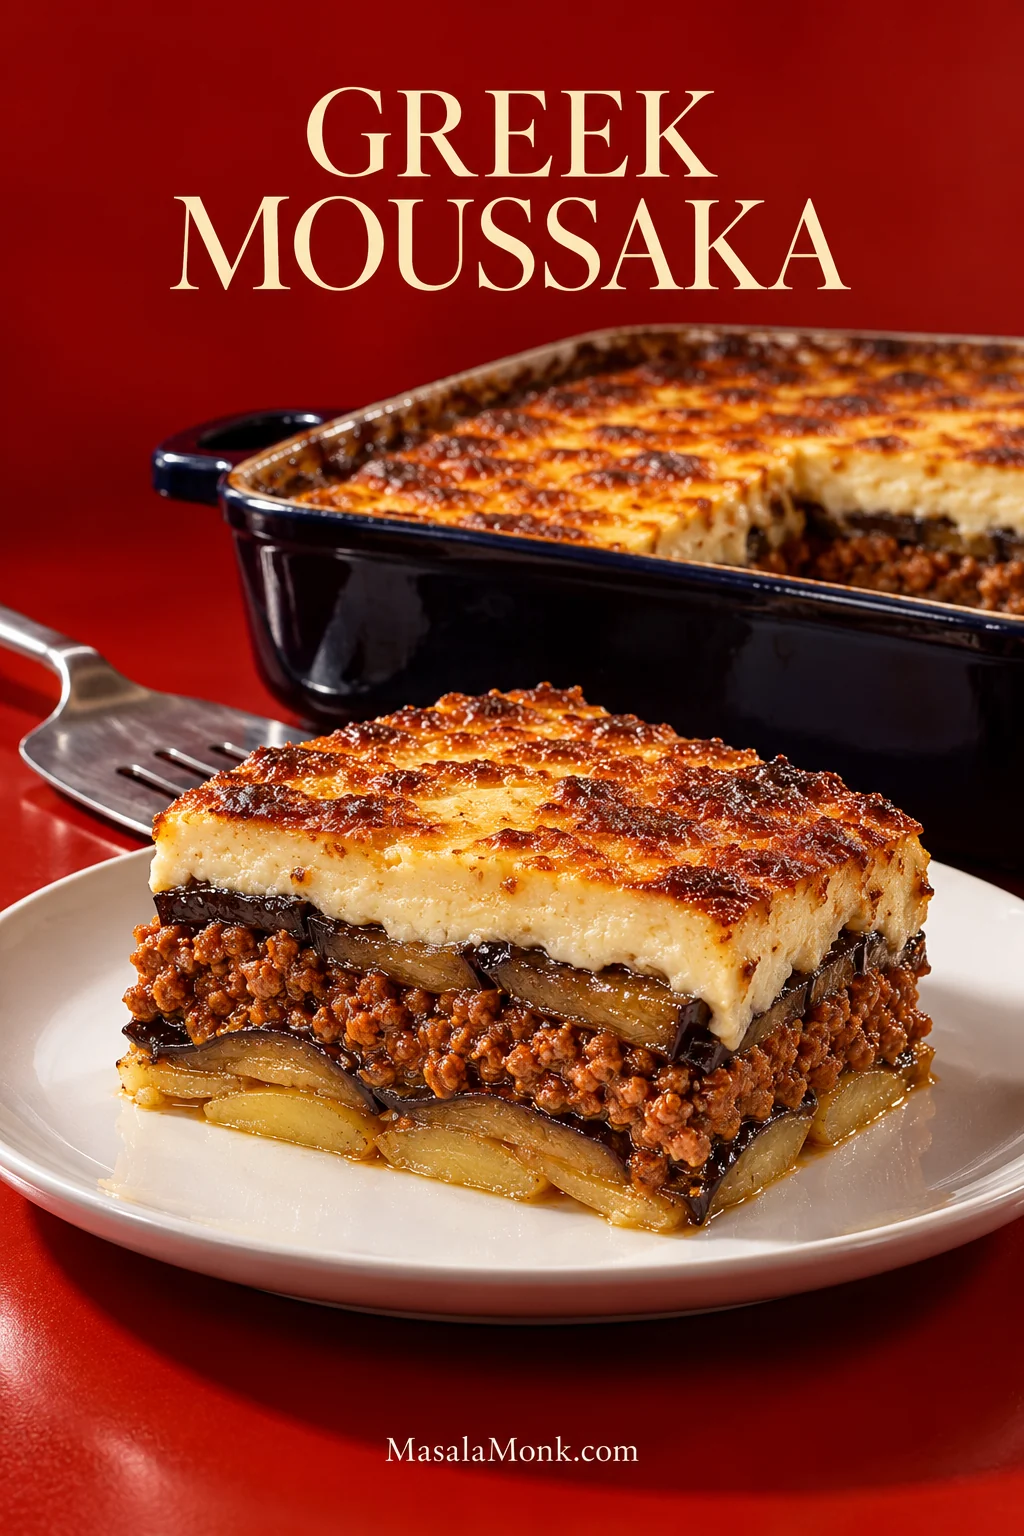
Slice of Greek moussaka on a white plate with a thin potato base, roasted eggplant, ground lamb and browned béchamel, with the casserole behind it.

A good moussaka comes to the table with a deeply browned top, tender eggplant underneath and lamb that has cooked down until it almost clings to the layers around it. Cut through the béchamel and those layers should still be visible: soft eggplant, savoury lamb and a thin potato base, all yielding without collapsing into one another.

Getting there takes a few separate jobs. Eggplant needs to soften without becoming oily, the lamb has to reduce into a concentrated sauce, the potatoes need a head start, and the béchamel must be thick before it ever reaches the oven. Done one after another, those jobs can make moussaka feel like an all-day undertaking.

The easiest way to make Greek moussaka feel manageable is to overlap the work: start the lamb while the eggplant salts, roast the vegetables while the sauce reduces, then make the béchamel last.

This is good food for a weekend dinner, a long lunch or a table where several people are properly hungry. Much of the work can happen before anyone arrives, which is one of the reasons moussaka rewards planning more than rushing.

Quick Answer

Greek moussaka is a baked casserole of eggplant (aubergine), seasoned minced meat and thick béchamel; many Greek versions also include a thin potato base. This Greek moussaka recipe uses ground lamb, roasted eggplant and potato, finished with an egg-and-cheese-enriched béchamel.

Four things matter before assembly: tender eggplant, partly cooked potatoes, lamb with no loose tomato liquid and béchamel thick enough to spread rather than pour. Get those right and the oven has a much easier job.
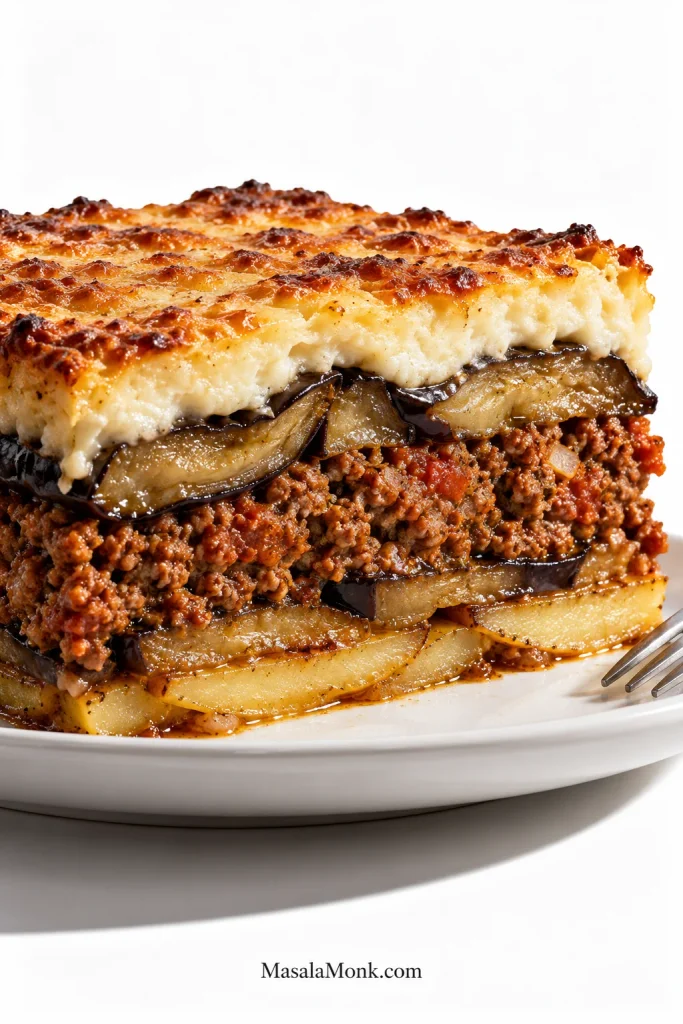
Close side view of a rested moussaka slice showing potato, two roasted eggplant layers, ground lamb filling and thick browned béchamel.
Real moussaka layers should look naturally irregular: overlapping eggplant, crumbly lamb and softly compressed potato, not ruler-straight bands.

Why This Moussaka Uses Lamb, Potato & Roasted Eggplant

Traditional Greek moussaka varies from kitchen to kitchen. Meat choices, potatoes, seasoning, cheese and vegetable preparation are not identical in every version. The Visit Greece moussaka recipe, for example, layers potatoes, eggplant, minced meat and béchamel.

Lamb tastes deeper and a little sweeter than beef here, which suits the tomato, oregano and eggplant particularly well. It also renders plenty of flavourful fat; we keep a little in the pan and remove any obvious pool before building the sauce. Ground beef can replace it at the same weight if you prefer a milder meat layer.

Potato catches some of the juices moving down from the meat and eggplant and gives the first slice a little support. About 1¼ lb / 550 g, cut 5–6 mm / roughly ¼ inch thick, is enough for one lightly overlapping layer in a 9 × 13-inch pan.

Roasting the eggplant makes the richness easier to control. Fried eggplant can be wonderfully silky, but it absorbs oil eagerly; roasting still gives us tender slices and useful browning without making the finished casserole unnecessarily oily.


Greek Moussaka Recipe with Eggplant, Lamb & Béchamel

Serves
8 generously
up to 10 with sides

Pan
9 × 13 in
23 × 33 cm, deep

Active prep
About
40 minutes

Cooking & baking
About
1 hr 20 min–1 hr 50 min

Final bake
40–45 minutes
included above

Resting
About
45 minutes

Total elapsed time: about 3 hours, typically 2 hours 45 minutes to 3 hours 15 minutes. The biggest variable is whether your oven can roast all the eggplant efficiently at once or needs another batch.

Oven temperatures: roast the vegetables at 425°F / 220°C conventional / 200°C fan, then bake the assembled moussaka at 375°F / 190°C conventional / 170°C fan.

Equipment

  • Deep 9 × 13-inch / approximately 23 × 33 cm casserole dish, ideally about 3 inches / 7–8 cm deep
  • 2–3 large rimmed sheet pans, or 2 pans plus time for another eggplant batch
  • Wide heavy skillet, sauté pan or Dutch oven
  • Heavy-bottomed saucepan
  • Balloon whisk
  • Kitchen scale

Also handy: a large colander, heatproof spatula, wide serving spatula and a mandoline for evenly slicing the potatoes.

Greek Moussaka Ingredients
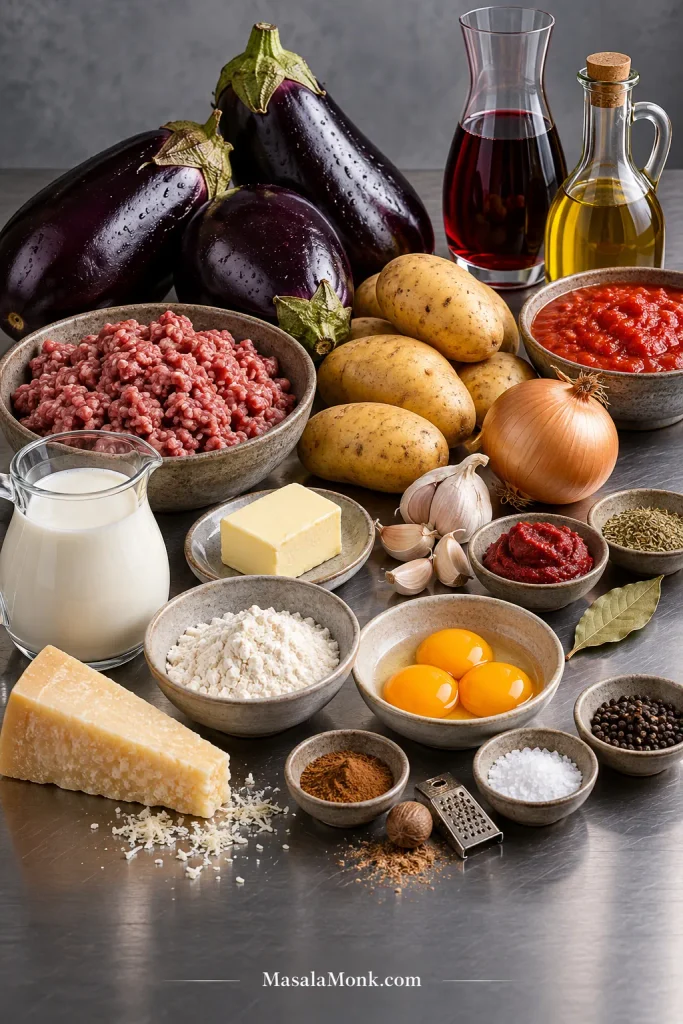
Moussaka ingredients arranged on a metal worktop, including eggplants, potatoes, ground lamb, tomato, onion, garlic, wine, milk, butter, flour, egg yolks, hard cheese and seasonings.
Eggplant, lamb, potato and béchamel build the structure; tomato, wine, cinnamon and nutmeg deepen the filling without taking over.

Eggplant & Potatoes

  • 2¾ lb / 1.25 kg globe eggplant (aubergine), about 3 large; buy by weight if possible
  • 1¼ lb / 550 g Yukon Gold, Russet, Maris Piper or another all-purpose/starchy potato
  • 1½ teaspoons / about 9 g fine sea salt, divided
  • ¼ cup / 60 ml olive oil, plus up to 1 tablespoon / 15 ml more if needed for a light coating

Lamb Sauce

  • 1¾ lb / 800 g ground lamb
  • 1 large yellow onion, about 7 oz / 200 g, finely diced
  • 4 garlic cloves, finely minced
  • 1 tablespoon / 15 ml olive oil, only if the lamb is very lean and the pan remains dry
  • 3 tablespoons / 45 g tomato paste — use the thick concentrated tomato product, not pourable tomato purée or passata; in the UK, the equivalent may be labelled concentrated tomato purée
  • ½ cup / 120 ml dry red wine
  • 1 can crushed tomatoes, 14 oz / 400 g; finely chopped canned tomatoes can be pulsed briefly if crushed tomatoes are unavailable
  • 1 teaspoon dried oregano
  • 1 bay leaf
  • ¼ teaspoon ground cinnamon
  • 1¼ teaspoons / about 7 g fine sea salt, then adjust to taste
  • ½ teaspoon freshly ground black pepper

Béchamel

  • ½ cup / 113 g unsalted butter
  • 1 cup / 120 g all-purpose flour
  • 4 cups / 950 ml whole milk, warmed but not boiling
  • 3 large egg yolks
  • 3½ oz / 100 g finely grated Kefalotyri, Pecorino Romano or Parmesan
  • ¼ teaspoon freshly grated nutmeg
  • ½ teaspoon / about 3 g fine sea salt, then adjust to taste
  • ¼ teaspoon black or white pepper

For the Top

  • 1½ oz / 40 g finely grated Kefalotyri, Pecorino Romano or Parmesan

How to Make Greek Moussaka

1. Salt the Eggplant

Trim the eggplants and cut them lengthways into slices about 8–10 mm / roughly ⅓ inch thick. Very skin-heavy end pieces can be discarded. For unusually mature eggplants with tough skin, peel a few narrow strips instead of removing all of it.

Arrange the slices in a colander or over trays and sprinkle both sides lightly with about 1 teaspoon of the measured salt. Leave them for 30 minutes.

Start the lamb while the eggplant sits.

The measured amount of salt here does not need rinsing; blotting is enough. A much heavier salting can be rinsed off briefly, followed by very thorough drying.
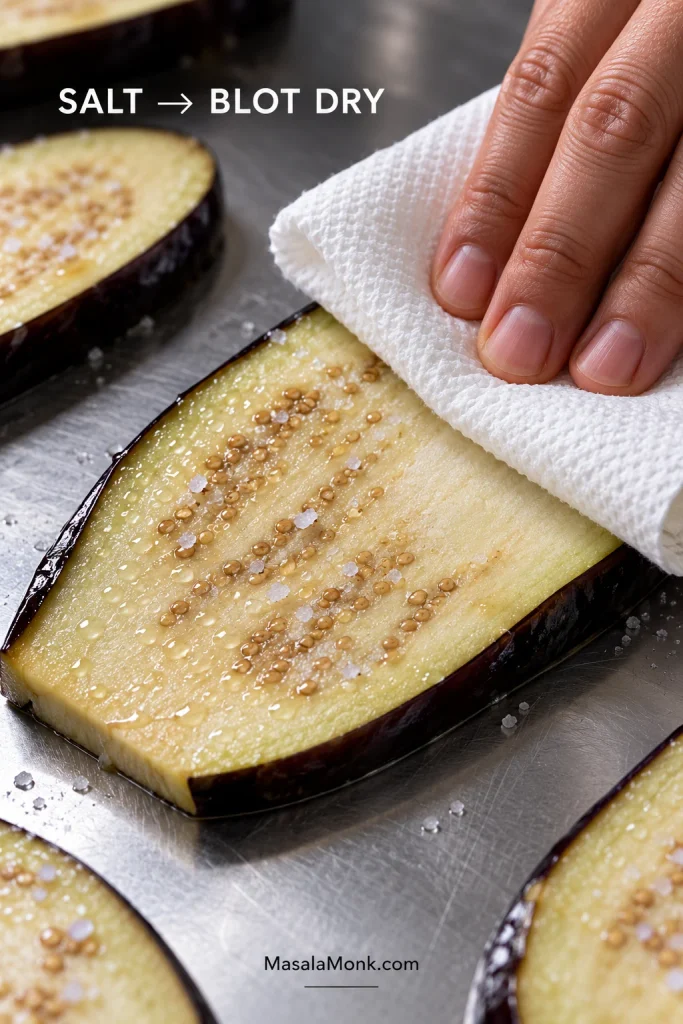
Hand blotting moisture from a salted lengthwise eggplant slice with a white towel before roasting.
A dry eggplant surface takes oil more evenly. If the towel still lifts obvious moisture, keep blotting before roasting.

2. Brown the Lamb and Start the Sauce

Heat a wide heavy skillet, sauté pan or Dutch oven over medium-high heat. Add the lamb and spread it into an even layer. Leave it undisturbed for 2–3 minutes so part of the meat can brown against the pan, then break it into smaller crumbles.

Continue cooking until no raw pink remains and browned patches appear among the crumbles, usually another 5–7 minutes. Very lean lamb may need the optional tablespoon / 15 ml olive oil; otherwise let its own fat do the work.

Look at the bottom of the pan. A sheen of lamb fat is useful; a visible pool is not. Spoon off the obvious excess.
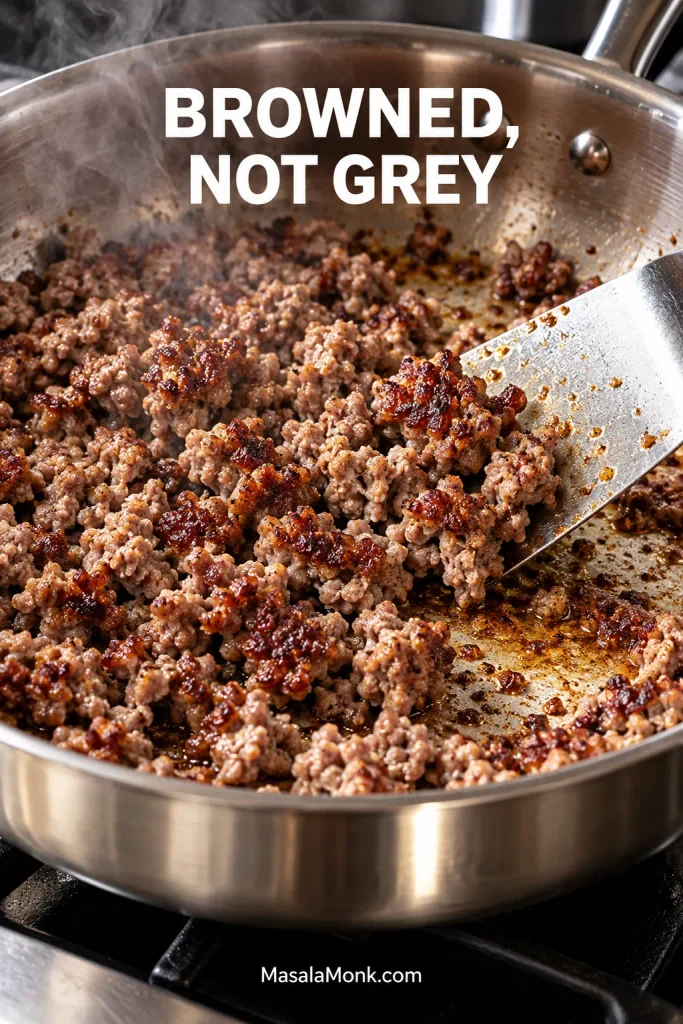
Ground lamb with caramelised brown patches cooking in a stainless-steel pan while a metal spatula turns the crumbles.
You do not need every crumble deeply browned. Scattered caramelised patches build flavour; chasing a uniform dark crust can dry the lamb before the sauce finishes.

Add the onion and cook for 5–7 minutes until soft and beginning to colour. Stir in the garlic for about 30 seconds. Add the tomato paste and cook for another 1–2 minutes, scraping it over the hot surface until it darkens slightly.

Pour in the wine and scrape up the browned bits. Let it bubble until reduced by roughly half. Add the crushed tomatoes, oregano, bay leaf, cinnamon, salt and pepper.

Bring to a simmer, then lower the heat enough to maintain steady uncovered bubbling. Leave the sauce reducing while you return to the vegetables.

3. Dry and Roast the Vegetables

Heat the oven to 425°F / 220°C conventional / 200°C fan. Arrange the racks so two sheet pans can roast with reasonable airflow.

Blot the salted eggplant thoroughly with clean kitchen towels or paper towels. The surfaces should feel dry.

Peel the potatoes, then slice them 5–6 mm / about ¼ inch thick. Toss with 1 tablespoon / 15 ml olive oil and the remaining ½ teaspoon salt, then arrange them on one sheet pan.

Give the Vegetables Room to Roast

Arrange the eggplant in a single layer on the remaining pans. Do not stack it. An oven that struggles with three trays will give better results if the extra eggplant is roasted as a second batch.
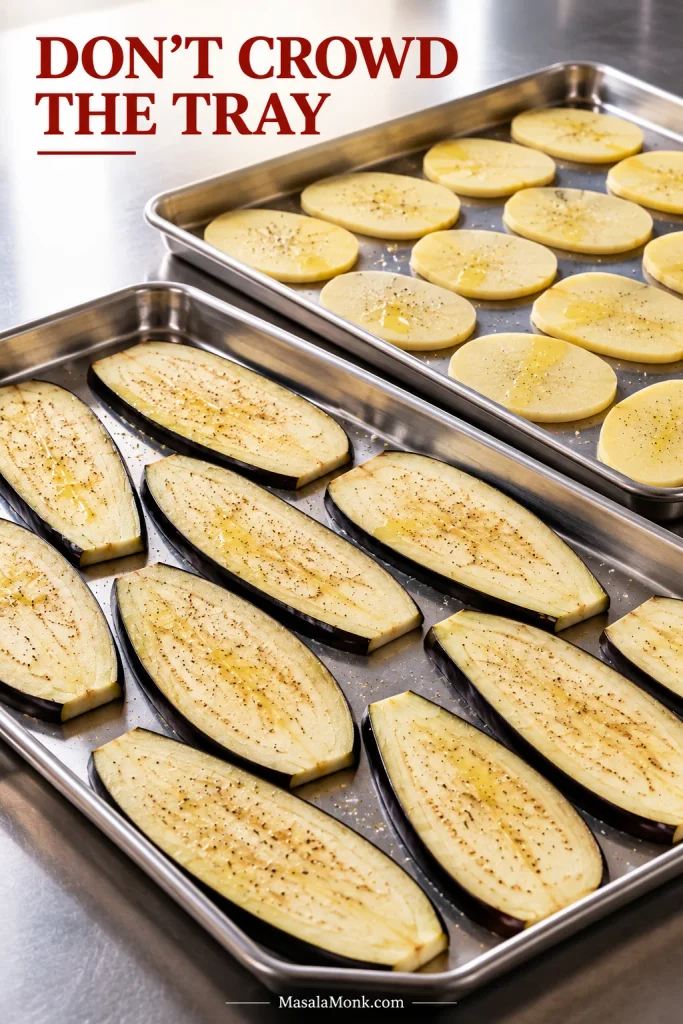
Separate metal trays of lengthwise eggplant slices and thin peeled potato slices arranged in uncrowded single layers.
Crowded trays trap steam. Use another tray or roast in batches so the eggplant can brown instead of merely soften.

Divide the remaining oil between the eggplant batches so the first tray does not use all of it. Brush or rub a thin sheen over both sides. The full 1.25 kg can take up to the extra tablespoon / 15 ml if needed.

Roast, swapping pan positions after about 10 minutes if your oven browns unevenly.

If the lamb sauce reaches the consistency described in Step 4 while the vegetables roast, take it off the heat rather than letting it reduce unnecessarily.

Check the Vegetables, Not Just the Clock

The potatoes usually need around 15–20 minutes. A ready slice bends without snapping and is partly tender while still lifting cleanly from the tray.

The eggplant usually needs about 20–25 minutes per batch. Pick up a slice with tongs. A properly roasted piece sags under its own weight, feels tender through the middle and has picked up a little browning around the edges.
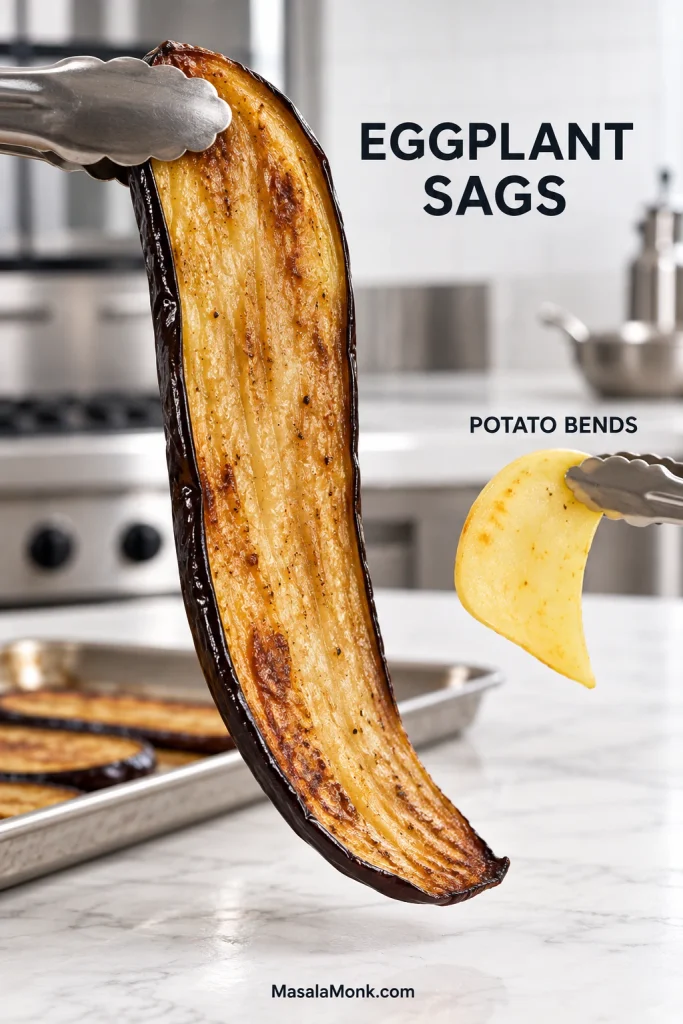
Roasted eggplant slice drooping from metal tongs beside a thin cooked potato slice bending while remaining intact.
Potato should be only partly tender; eggplant should be fully tender through the centre before assembly.

Still firm in the middle? Give it another few minutes. There is no prize for hitting exactly 20 or 25 minutes. The eggplant needs to be fully tender before it goes into the casserole.

Reduce the oven to 375°F / 190°C conventional / 170°C fan once the vegetables are finished.

4. Finish the Lamb Sauce

Return to the lamb. If it already reached the right consistency while the vegetables were roasting, leave it off the heat. Otherwise, simmer uncovered until the sauce becomes dense and spoonable.

Drag a spatula across the bottom once to check. The gap should remain visible briefly instead of immediately filling with thin tomato liquid, and a spoonful pushed to one side should mound instead of spreading.
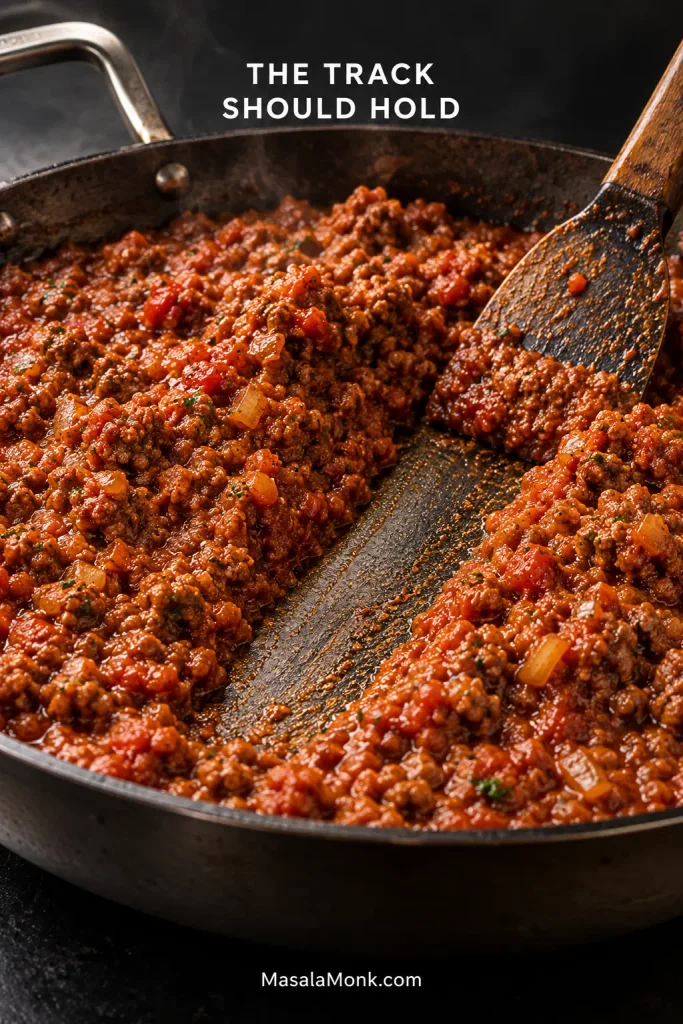
Thick ground-lamb tomato sauce pushed aside with a spatula, leaving an exposed strip of pan between two mounds of sauce.
The spatula track tests free liquid, not just thickness. If watery tomato juices rush back across the pan, the moussaka meat sauce needs more reduction.

A loose sauce may need another 5–15 minutes, depending on pan width, burner strength and the tomatoes you used. Trust what is happening in the pan more than the clock.

Remove the bay leaf, taste and adjust the seasoning. The sauce should smell primarily of browned lamb and concentrated tomato, with onion and warm spice underneath. Leave it uncovered while you make the béchamel.

5. Make the Béchamel Last

Warm the milk until steaming but not boiling.

Melt the butter in a heavy saucepan over medium heat. Add the flour and whisk for about 2 minutes. The roux should foam gently and lose its raw flour smell without browning.

Add roughly one-quarter of the warm milk and whisk until smooth. Add another quarter, whisk smooth again, then add the remaining milk in two additions.

Cook over medium to medium-low heat, whisking frequently and scraping the bottom corners of the saucepan. Once all the milk is incorporated, expect another 6–10 minutes before it becomes properly thick.

Lift the whisk. The sauce is ready when it falls back in thick, slow ribbons and leaves a spoon heavily coated. It should look smooth and rich rather than pourable.

It may look almost too thick compared with an everyday white sauce. That is what you want here.
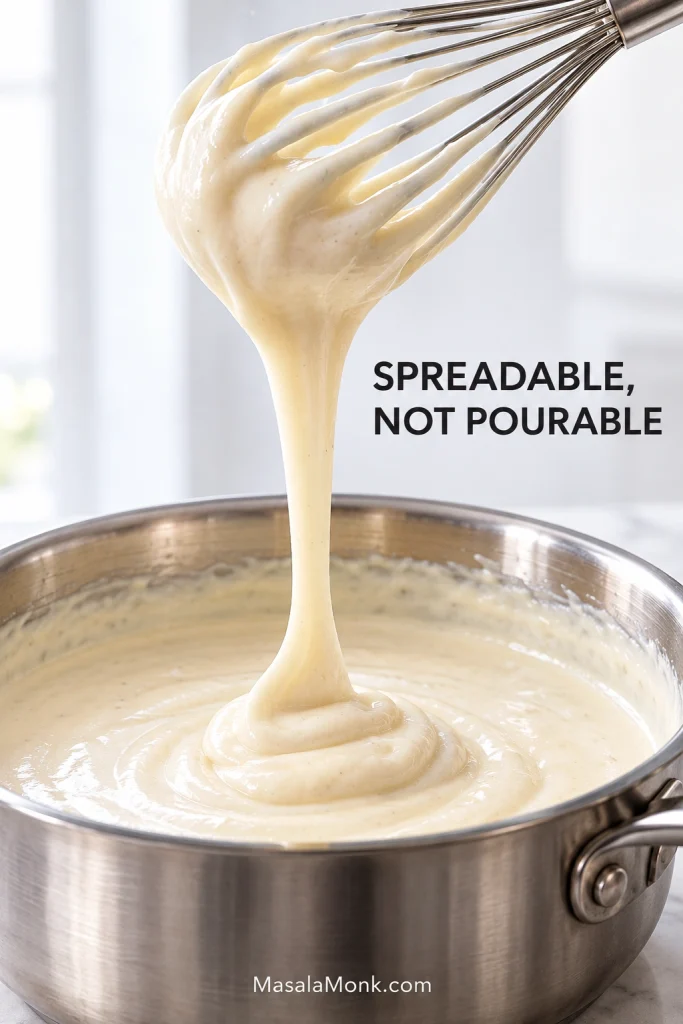
Thick pale béchamel falling from a whisk in a broad ribbon and folding onto the surface of the sauce in a stainless-steel pan.
After the ribbon lands, watch the surface. Properly thick moussaka béchamel should hold the fold briefly before slowly smoothing out.
Check All Four Components Before Assembly

Once the béchamel reaches this consistency, take it off the heat.

ComponentReady When…If It Needs More Work
PotatoFlexible and partly tender while still holding its shape.Give it a few more minutes in the oven.
EggplantBends easily, feels tender through the centre and looks surface-dry.Keep roasting until the centre softens.
LambDense and spoonable with no loose tomato liquid in the pan.Reduce uncovered for longer.
BéchamelHeavy enough to coat a spoon and fall from the whisk in slow ribbons.Return it to moderate heat and cook a little longer before adding the yolks.

If another component needs a few extra minutes, leave the béchamel off the heat and give it a brief whisk before finishing it. Assembly can wait.

When everything is ready, stir 3½ oz / 100 g grated cheese, nutmeg, salt and pepper into the béchamel. Let it stand for about 5 minutes before tempering the yolks.

Whisk the egg yolks in a small bowl. Gradually whisk about ½ cup of hot béchamel into them, then pour the tempered yolks back into the saucepan and whisk until smooth and glossy. Once the yolks are in, do not bring the sauce back to a hard boil.

6. Layer the Moussaka

Lightly oil a deep 9 × 13-inch / approximately 23 × 33 cm baking dish.

After all the separate pans and pots, this is the satisfying part: everything finally becomes one moussaka.

  1. Potato: cover the base in one lightly overlapping layer.
  2. Eggplant: arrange roughly half the slices over the potatoes.
  3. Lamb: spread the reduced meat sauce evenly over the eggplant.
  4. Eggplant: cover the lamb with the remaining slices.
  5. Béchamel: spread it right to the sides and corners in a generous layer about ½ inch / 1.5 cm deep.
  6. Cheese: scatter the remaining 1½ oz / 40 g hard cheese across the top.
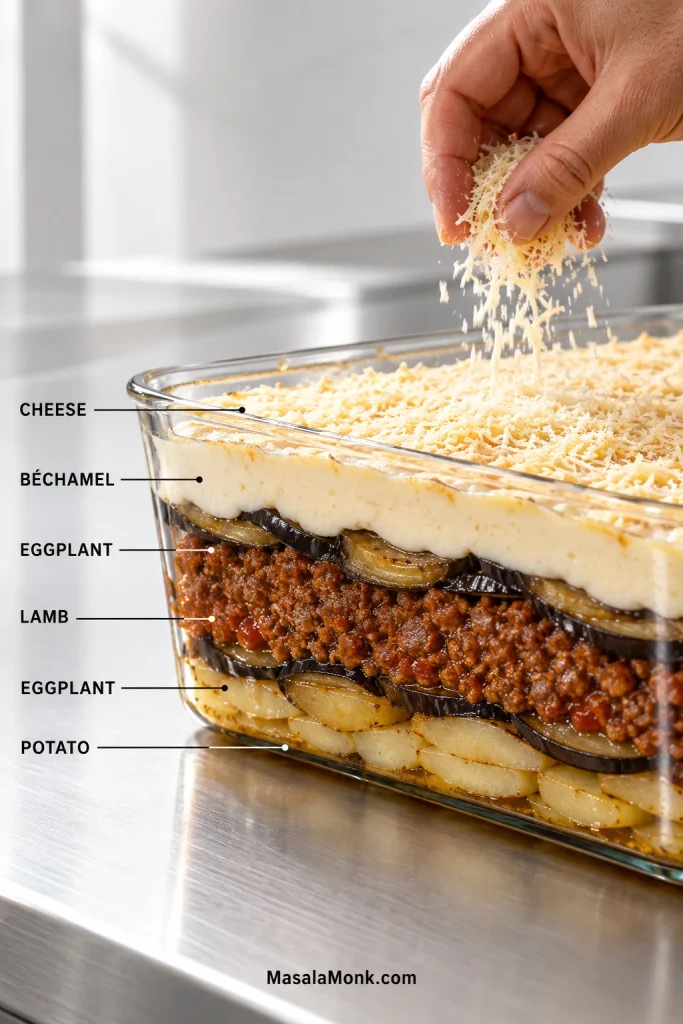
Clear casserole showing layers of potato, eggplant, ground lamb, eggplant and béchamel with finely grated hard cheese over the top.
The upper eggplant layer separates the concentrated lamb from the béchamel, while potato gives the base support.

Leave about ½ inch / 1.5 cm of headspace below the rim. Anything that will not fit comfortably is better baked in a small second dish than piled right to the top.

7. Bake Until the Centre Is Set

Once the pan is assembled, the busy part is over. The oven does the next job, which also gives you a welcome chance to clear the counters.

Bake uncovered until the béchamel is deeply golden, the edges are gently bubbling and the centre no longer sloshes. At 375°F / 190°C conventional / 170°C fan, this usually takes about 40–45 minutes.

As it bakes, the pale béchamel turns golden and the cheese begins to smell toasted, with warm nutmeg and lamb coming up underneath. A top that browns early can be loosely covered with foil while the centre finishes.

For anyone checking with a thermometer, the centre should reach 165°F / 74°C.
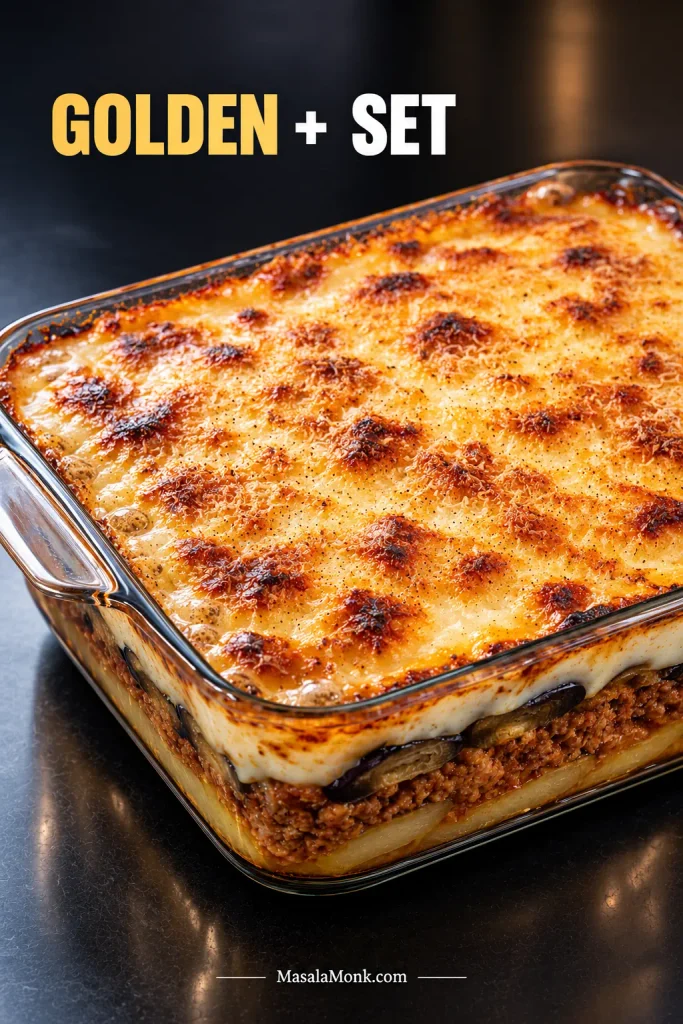
Whole baked moussaka in a rectangular glass casserole with a deeply golden béchamel surface and irregular darker toasted patches.
Do not judge doneness by the darkest corner; casserole edges brown first. The centre matters more than the perimeter.

8. Let the Pan Settle Before Cutting

Rest the moussaka for about 45 minutes before slicing. Cut sooner and the first piece will simply be hotter and softer.

Move the pan to a heat-safe rack or trivet as soon as it comes out. After the rest, cut straight down with a sharp knife and lift each portion with a wide spatula.
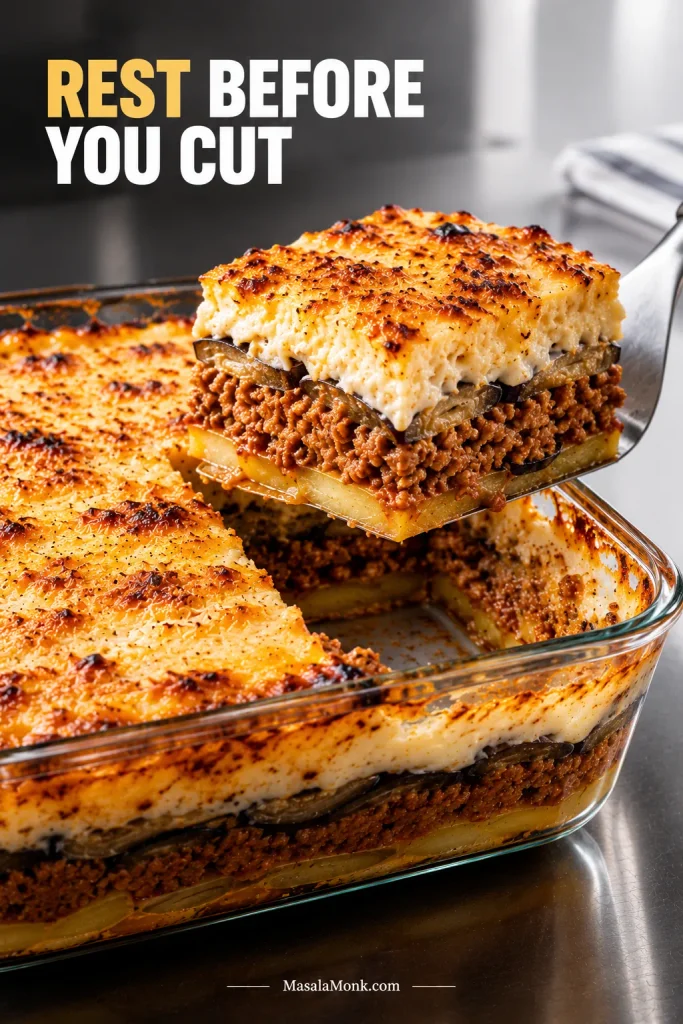
Rectangular moussaka slice being lifted from the casserole on a wide metal spatula, leaving an empty space behind it in the pan.
The first slice is hardest to lift cleanly because there is no empty space beside it yet.

Why the Layers Hold Together

Do You Need to Salt Eggplant for Moussaka?

Most supermarket eggplants today are not especially bitter, so salting here is mainly about drawing out moisture that can be blotted away before roasting.

Slice thickness matters just as much. Paper-thin pieces can disappear after two rounds of cooking, while very thick slices may stay fibrous even when their surfaces look done. Around 8–10 mm gives the aubergine enough substance to stay recognisable in the finished slice.

Why the Lamb Sauce Needs to Be Well Reduced

A moussaka meat sauce has a different job from a pasta sauce. It has to sit between soft vegetables without sending tomato liquid into the bottom of the casserole. That is why we reduce it until concentrated and spoonable rather than stopping as soon as the meat is cooked.

Pan width and burner strength can move the reduction time considerably, so use the physical endpoint rather than expecting every batch to finish in exactly the same number of minutes.

Cinnamon should be background, not headline. Browning the lamb and concentrating the tomato give the sauce most of its depth. The cinnamon should arrive quietly behind them.

How Thick Should Moussaka Béchamel Be?

Moussaka béchamel is much thicker than an everyday white sauce. It needs enough body to sit above the eggplant instead of disappearing into the layers below, while the egg yolks help it set further during baking.

If you want the fundamentals of making a smooth roux-based sauce, the béchamel sauce guide goes deeper into adding milk and fixing consistency. For this dish, stop only when the sauce is unmistakably spreadable rather than pourable.

How Long Should Moussaka Rest Before Cutting?

About 45 minutes is a good target. Straight from the oven, fat is fluid, steam is still moving through the vegetables and the béchamel is at its softest. As the pan cools, everything becomes less mobile and the slice gains structure without needing to be served cold.

The same thing happens with a hot classic lasagna: waiting is part of getting clean layers, not dead time after the cooking is finished.
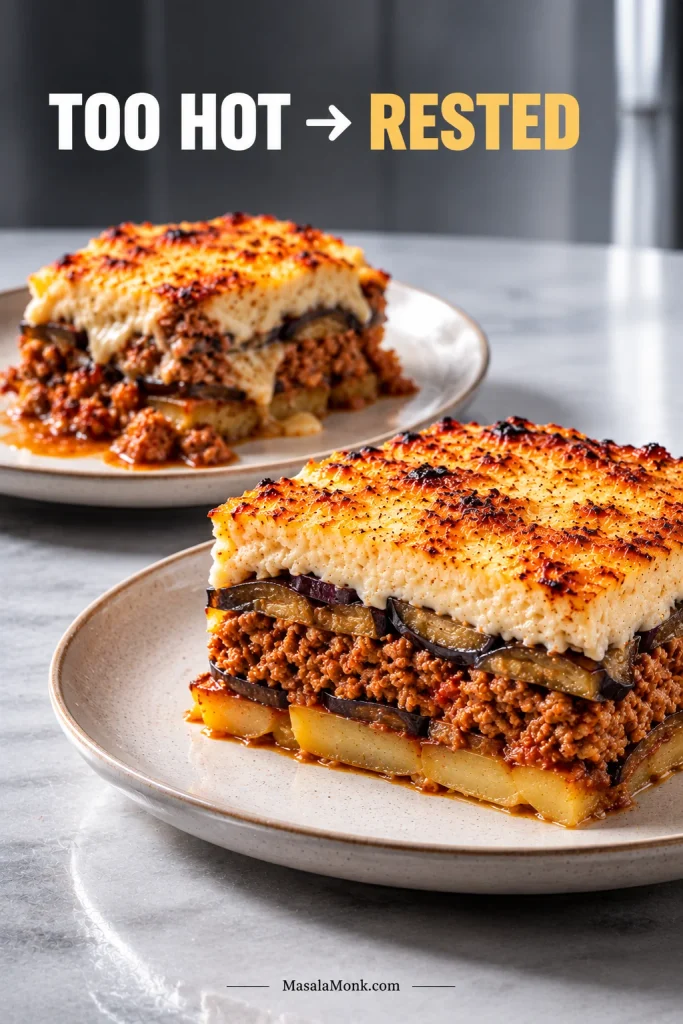
Firm rested moussaka slice in front with a softer, slumped slice of the same casserole behind it.
If later slices become noticeably cleaner as the pan cools, serving temperature—not automatically wet eggplant or loose sauce—was probably the issue.

Moussaka Troubleshooting: Fix the Problem You Can See

Most problems come back to moisture, excess fat, béchamel consistency or cutting the casserole too soon. The symptom matters because watery liquid, oily liquid and a hot collapsing slice do not have the same cause.

What You SeeWhat Probably HappenedWhat to Change
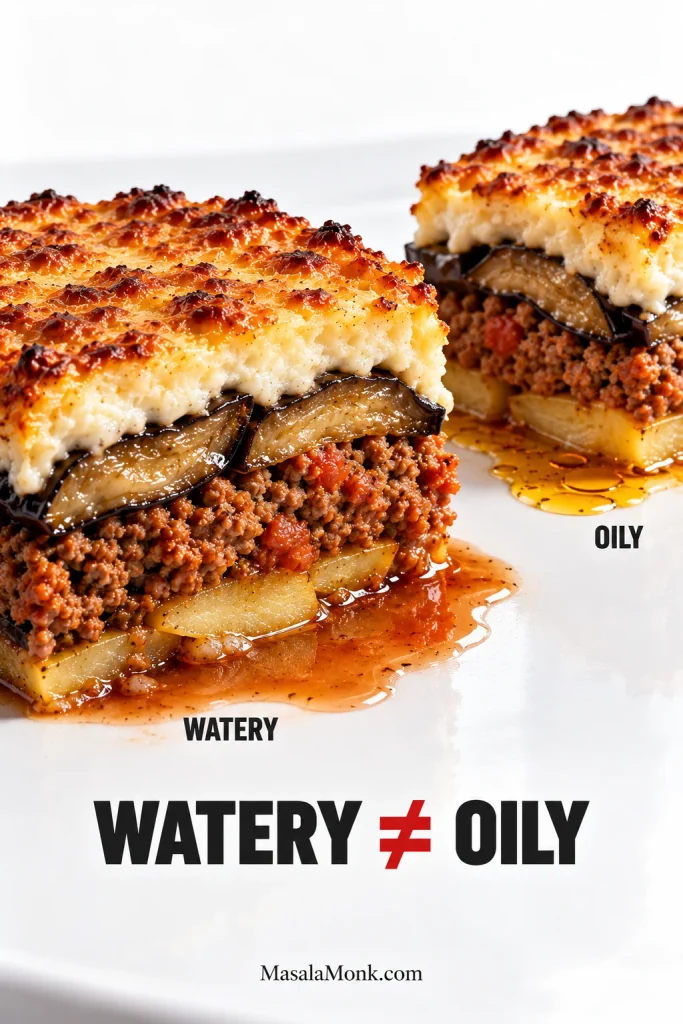
Red or watery liquid beneath the sliceEggplant went in wet, the meat sauce was loose, or the casserole was cut extremely hot.Dry and fully cook the eggplant, reduce the sauce well and give the pan time to settle.
Clear or orange oily liquidToo much rendered lamb fat or excess oil in the eggplant.Spoon off visible lamb fat and measure the roasting oil.
A good-tasting slice collapsesThe moussaka is still too hot.Let it rest longer before judging the structure.
Béchamel sinks into the fillingThe sauce was too thin, or the lower layers carried too much moisture.Thicken the béchamel properly and reduce the meat sauce fully.
Eggplant is difficult to cutSlices were too thick, under-roasted or very tough-skinned.Cut 8–10 mm and roast until tender throughout.
Eggplant almost disappearsSlices were too thin or overcooked.Keep them around 8–10 mm and remove them once tender.
Potatoes are firmThey were too thick or not pre-cooked enough.Keep them around 5–6 mm and roast until partly tender.
Two moussaka portions showing thin reddish watery liquid beneath one slice and clear golden-orange oily liquid beneath the other.
Judge leaked liquid after the pan settles. Hot lamb fat is very fluid, so a small clear sheen can look more alarming than it does once cooled.

Watery Right Now: Bake Longer or Let It Rest?

A centre that is still visibly loose or sloshing needs more oven time. A centre that is set but releases liquid when sliced straight from the oven usually needs more rest instead.

If the casserole has cooled properly and still leaves obvious watery liquid beneath the slices, look back to the earlier stages: the eggplant probably carried too much moisture, the meat sauce needed more reduction, or both.

Béchamel Thin, Lumpy or Curdled?

A thin béchamel needs more cooking over moderate heat before the yolks are added. Lumps can usually be dealt with at that same stage by vigorous whisking, passing the sauce through a fine sieve or giving it a brief pass with an immersion blender.

Curdling is a different problem: the yolks have met too much heat. Let the sauce cool briefly before tempering them, then avoid a hard boil once they are incorporated.

Can You Make Moussaka Ahead?

Yes. You can prepare the components a day ahead, assemble the full moussaka up to about 24 hours before baking, or bake it the day before and reheat it.

Moussaka is a much nicer dinner when you are not roasting eggplant, reducing lamb and whisking béchamel while people are already arriving.

Prepare the components the day before: roast the eggplant and potatoes, cook the lamb sauce, cool everything promptly and refrigerate the components separately. The next day, make the béchamel while they lose some of their refrigerator chill, then assemble and bake. Cold components may add a little oven time, so use the doneness cues in Step 7 rather than the clock alone.

Assemble it ahead: build the full casserole, cover it and refrigerate it promptly for up to about 24 hours. Bake from chilled, allowing extra time; if using glass or ceramic bakeware, follow the manufacturer’s fridge-to-oven guidance.
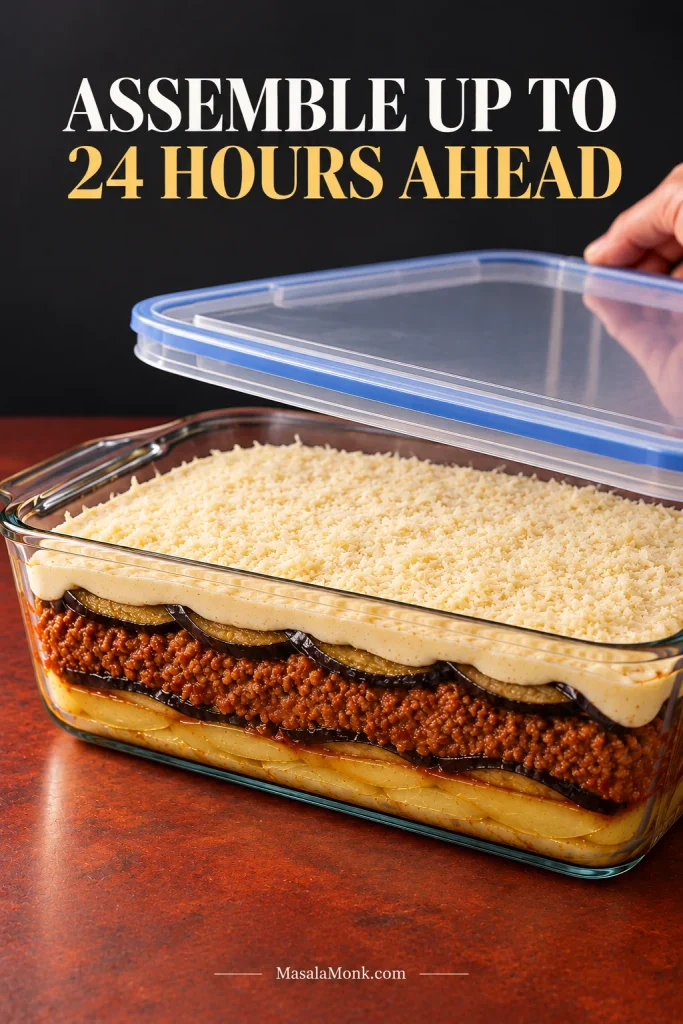
Unbaked layered moussaka in a clear rectangular casserole as a hand lowers a transparent lid over the dish.
Chilling changes the starting temperature, not the recipe. Keep the same layers and consistency, then allow extra baking time for the centre.

Bake it the day before: this is especially useful for a party. Once chilled, moussaka cuts very cleanly. Portion it cold, then reheat the pieces before serving.

What to Serve with Moussaka

If you make only one side, choose a sharp cucumber-tomato salad with plenty of acidity. Its crispness gives the lamb and béchamel exactly the contrast they need; lemon-dressed greens or tomatoes with red onion and olives follow the same idea.

For something cool and creamy, add a small spoonful of Greek tzatziki. A larger shared spread can also include warm homemade pita for tearing alongside salads, olives and dips.
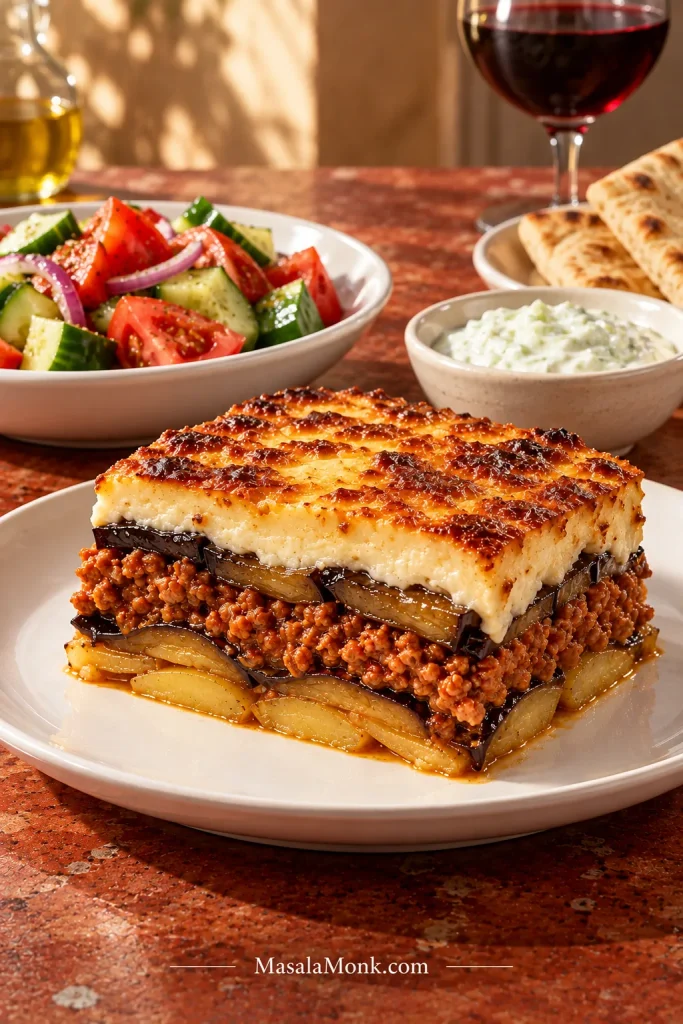
Plated moussaka slice served with cucumber-tomato salad, tzatziki and warm pita on a rust-coloured table.
A sharp salad and cool tzatziki balance the rich lamb and béchamel; keep pita a modest extra.

Storage, Freezing & Reheating

The USDA leftovers guidance recommends refrigerating perishable leftovers within 2 hours. For this moussaka, start that clock when the casserole comes out of the oven, not when the meal ends.

How long does moussaka last in the fridge? Cover the dish well or transfer portions to shallow airtight containers and refrigerate for up to 3–4 days.

Can you freeze moussaka? Yes. Wrap cooled portions well and aim to use them within roughly 2–3 months for the best texture. The eggplant will soften somewhat after freezing and thawing.

For a whole make-ahead moussaka, cool the cooked potato, eggplant and lamb promptly. Once cool, assemble those layers without the béchamel, wrap tightly and freeze. Thaw overnight in the refrigerator, make the béchamel fresh, then top and bake. Because the base is chilled, allow extra baking time as needed and use the doneness cues in Step 7.

For reheating: 350°F / 175°C conventional / 160°C fan works well. Individual chilled portions generally need around 20–30 minutes; a larger chilled casserole may need 30–45 minutes or longer. Keep it loosely covered for most of the reheating time, then uncover near the end if the surface needs refreshing. Reheated leftovers should reach 165°F / 74°C in the centre.
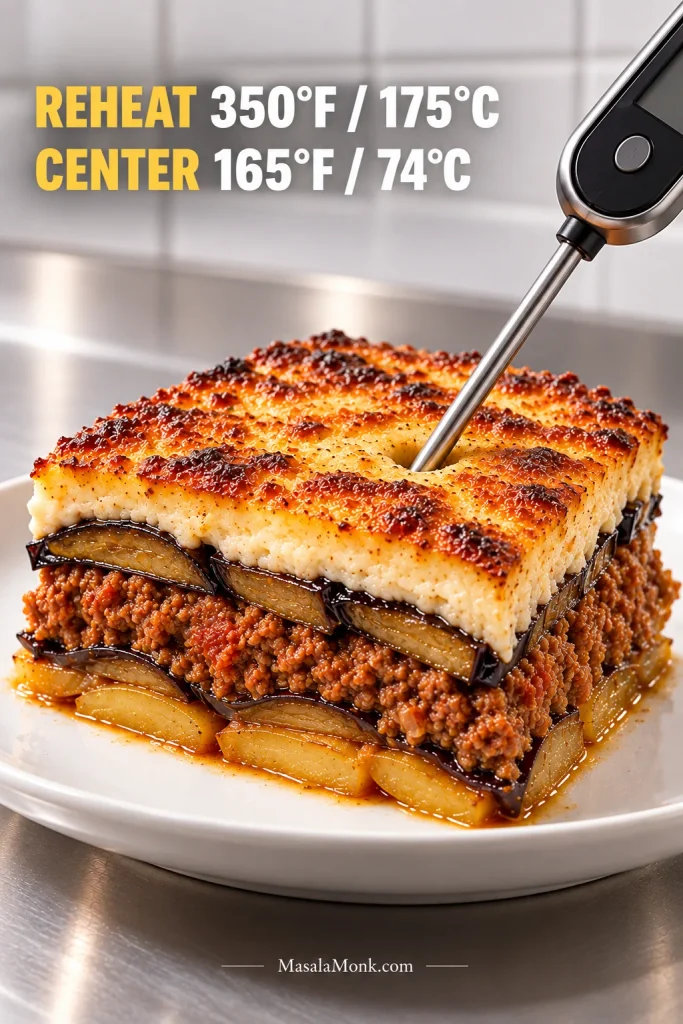
Reheated moussaka slice with a food thermometer probe inserted deeply into the thick central part of the portion.
Probe the thickest central part when reheating; the browned béchamel warms faster than the middle.

For the most even reheating, thaw frozen portions overnight in the refrigerator. You can also reheat them from frozen; keep them covered for most of the heating time so the centre warms through before the béchamel dries out.

Useful Moussaka Substitutions

  • Beef instead of lamb: replace the lamb with the same 1¾ lb / 800 g ground beef for a milder flavour, or use 14 oz / 400 g each lamb and beef for a middle ground.
  • No potatoes: begin directly with eggplant. The base will be softer, so proper sauce reduction and cooling matter even more. If you would rather serve potatoes separately, Greek lemon potatoes are a natural option.
  • No red wine: use the same ½ cup / 120 ml of unsalted or low-sodium beef stock. Once the lamb has reduced, a small splash of red wine vinegar can replace some of the lost brightness.
  • No Kefalotyri: Pecorino Romano is an excellent substitute, and Parmesan also works well. Avoid soft, high-moisture or particularly stretchy cheeses in the béchamel.
  • Prefer fried eggplant: salt and dry the slices first, then shallow-fry in additional olive oil until tender and golden. Drain very well before assembly because the finished casserole is already rich.

Bring the moussaka to the table warm instead of scorching hot and cut straight through the browned top. Do not worry if the first piece is not restaurant-perfect. What matters is underneath: tender eggplant, savoury lamb, soft potato and a thick béchamel that stays creamy as you eat it.
Posted on — Leave a comment

Potatoes Au Gratin Recipe: Creamy, Cheesy & Foolproof

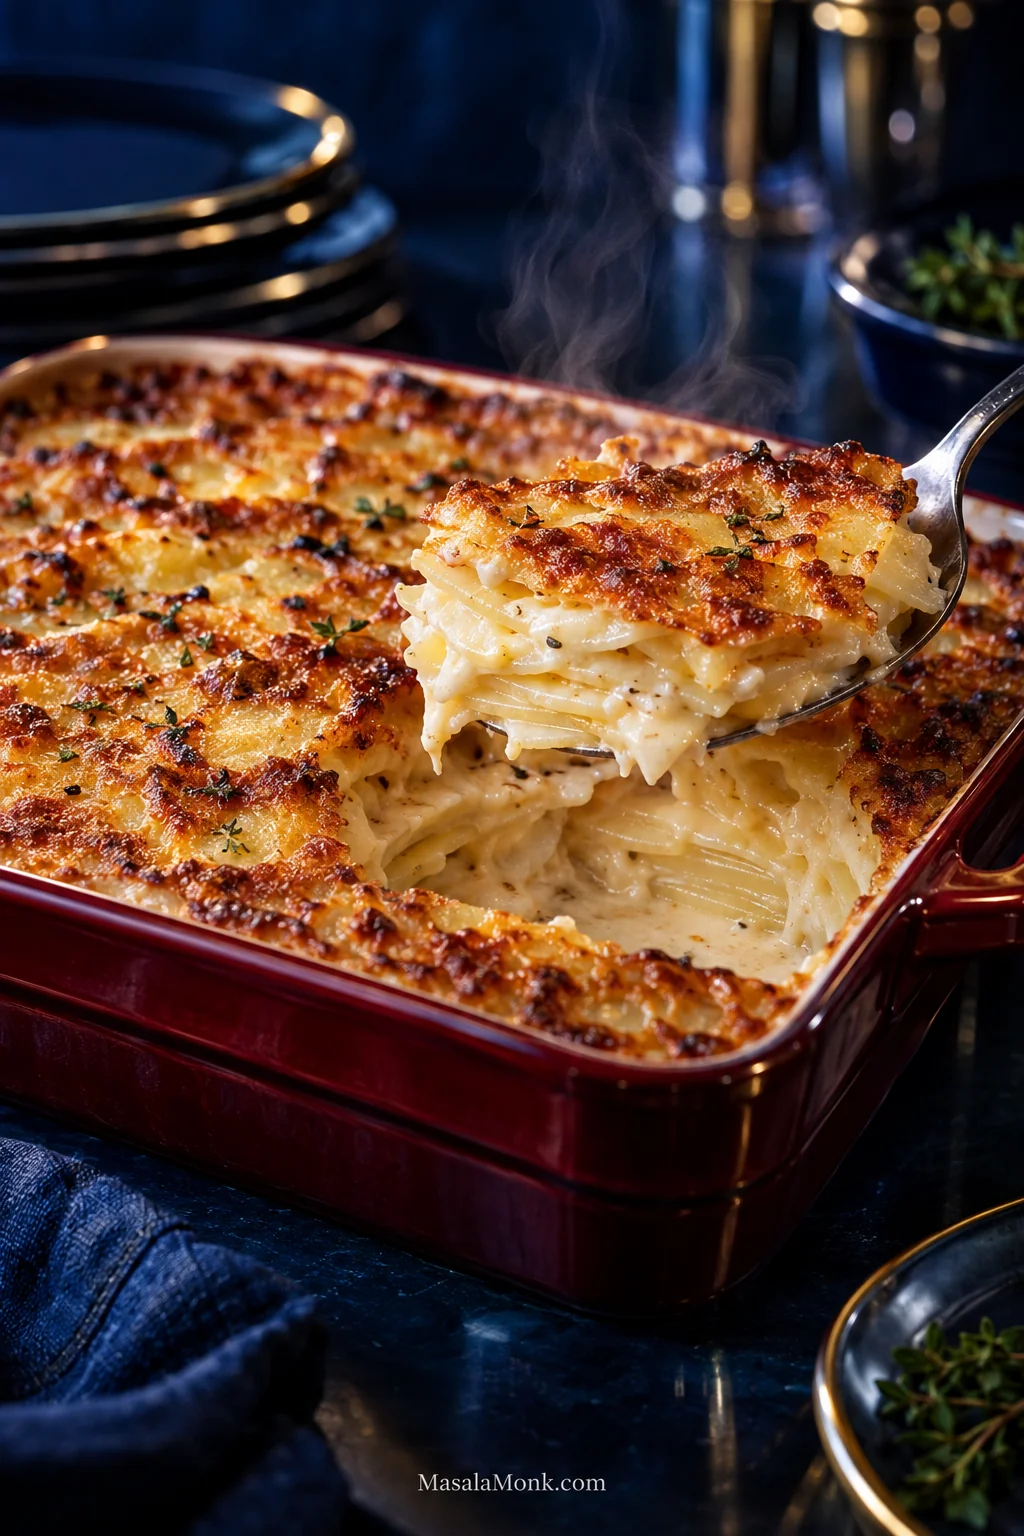
A spoon lifts a steaming portion of golden potatoes au gratin from a shallow dark red casserole, revealing thin potato layers coated with creamy sauce beneath a deeply browned cheese crust.

A good spoonful of potatoes au gratin breaks through a deeply browned top and lifts tender layers with silky cream caught between them. The potatoes still hold their shape, the sauce clings, and the space left by that first serving does not immediately flood with thin cream.

The frustrating part is that gratin can look finished before it actually is. Cheese colors quickly; a stack of potatoes takes longer. A beautiful top can hide a firm middle, and adding more cream does not automatically make the finished dish creamier.

This from-scratch potatoes au gratin recipe uses Russets sliced to ⅛ inch (3 mm), a short simmer in garlic-thyme cream, Gruyère and Parmesan, then a covered bake until the center is tender before the final browning.

The timer helps. The potatoes get the final say.

Jump To

Before You Slice the Potatoes

For This GratinUse
PotatoRusset
Slice thickness⅛ inch / 3 mm
Baking dishShallow 9 × 13 in / 23 × 33 cm, about 3 qt / 2.8 L
Oven350°F / 175°C conventional / 160°C fan
Oven rackCenter
Rest before serving15 minutes

Slice thickness is only half of the story. Even perfectly sliced 3 mm potatoes cook more slowly in a deep casserole because the center takes longer to heat through. If your dish is noticeably smaller than 9 × 13 inches, move some potatoes to a second dish rather than piling them higher.

Two dark red casseroles compare a shallow potato gratin with a deeper stack; on-image text says deeper stacks cook more slowly at the center.
Compare the finished stack depth, not just pan capacity. Similar-volume dishes can create very different potato heights, and the taller stack usually needs more covered time at the center.

A mandoline makes those thin slices easy to repeat, but use the hand guard; a cut-resistant glove adds another layer of protection. Alternatively, a sharp chef’s knife works too.

Put the casserole on a rimmed sheet pan before it goes into the oven. Bubbling cream is much easier to clean from a tray than from the oven floor.

Potatoes, Cream and Cheese

Russet or Yukon Gold?

Russets are the better fit for this method because starch released from their cut surfaces helps the cream gain body while the layers soften. Yukon Golds work too, but stay firmer and more defined.

You can taste the same contrast in our creamy mashed potatoes, where Russets turn out lighter and Yukon Golds naturally stay denser and more buttery.

Why the Potatoes Go Into the Cream First

The short stovetop simmer starts cooking the potatoes and brings some of their surface starch into the cream, so the sauce begins gaining body before the casserole reaches the oven.

Don’t rinse the slices. We want that starch here.

Heavy cream brings richness and enough fat for a smooth sauce, while a smaller amount of whole milk keeps it from feeling quite so rich. Replacing all the cream with low-fat milk would give you a much thinner result because there is no roux to compensate.

Gruyère for Melt, Parmesan for the Top

Gruyère has enough nutty, savory character to flavor a whole pan of potatoes without overwhelming them, and it melts smoothly into the sauce as the gratin bakes. Parmesan is stronger and saltier, so a smaller amount on top brings extra depth and better browning.

Sharp cheddar can stand in if Gruyère is difficult to find; the flavor will shift noticeably toward cheddar. Whichever cheese you use, grate it from a block if you can.

Before the potatoes go in, taste the hot cream. More than two pounds of potato can turn seasoning surprisingly quiet once everything is baked, while Gruyère and Parmesan bring salt of their own.

How to Make Potatoes Au Gratin

The oven has two jobs. Covered, it cooks the potatoes through. Uncovered, it concentrates the sauce and browns the cheese.

1. Slice the Potatoes and Warm the Cream

Peel the Russets; their thicker skins interrupt the soft layered texture we’re after. Slice the potatoes ⅛ inch (3 mm) thick. A few noticeably thicker pieces can remain firm after everything around them is ready, so consistency matters here.

A peeled potato slice is measured edge-on with a digital caliper reading 3.0 mm beside a visibly thicker slice.
Use the caliper only to calibrate the first few slices. Once 3 mm feels familiar, consistency matters more than measuring every potato.

Combine the heavy cream, milk, garlic, thyme, salt, black pepper and nutmeg in a wide saucepan or Dutch oven. Warm over medium-low heat until steaming, with the first gentle bubbles appearing around the edge. The raw edge of the garlic will soften as the cream heats and the thyme becomes more noticeable.

2. Give the Potatoes a Head Start

Add the potatoes and gently separate the slices in the hot cream. Keep everything at a quiet simmer for about 5–7 minutes, lifting and turning them once or twice so the bottom doesn’t catch.

At first the cream moves freely around the slices. After a few minutes it becomes silkier and leaves a light coating when you lift a potato from the pan. The slice itself bends more easily than it did raw without becoming fragile.

Three-stage graphic shows peeled potato slices entering cream, simmering 5–7 minutes, then bending gently on a spoon while holding their shape.
Treat 5–7 minutes as a window. Burner strength and pan width vary, so stop when the slices bend easily but still hold together.

3. Build the Gratin

Butter the baking dish. Arrange roughly half of the potatoes in overlapping layers, close together without packing them into a solid mass. Scatter over half of the Gruyère, then add the remaining potatoes.

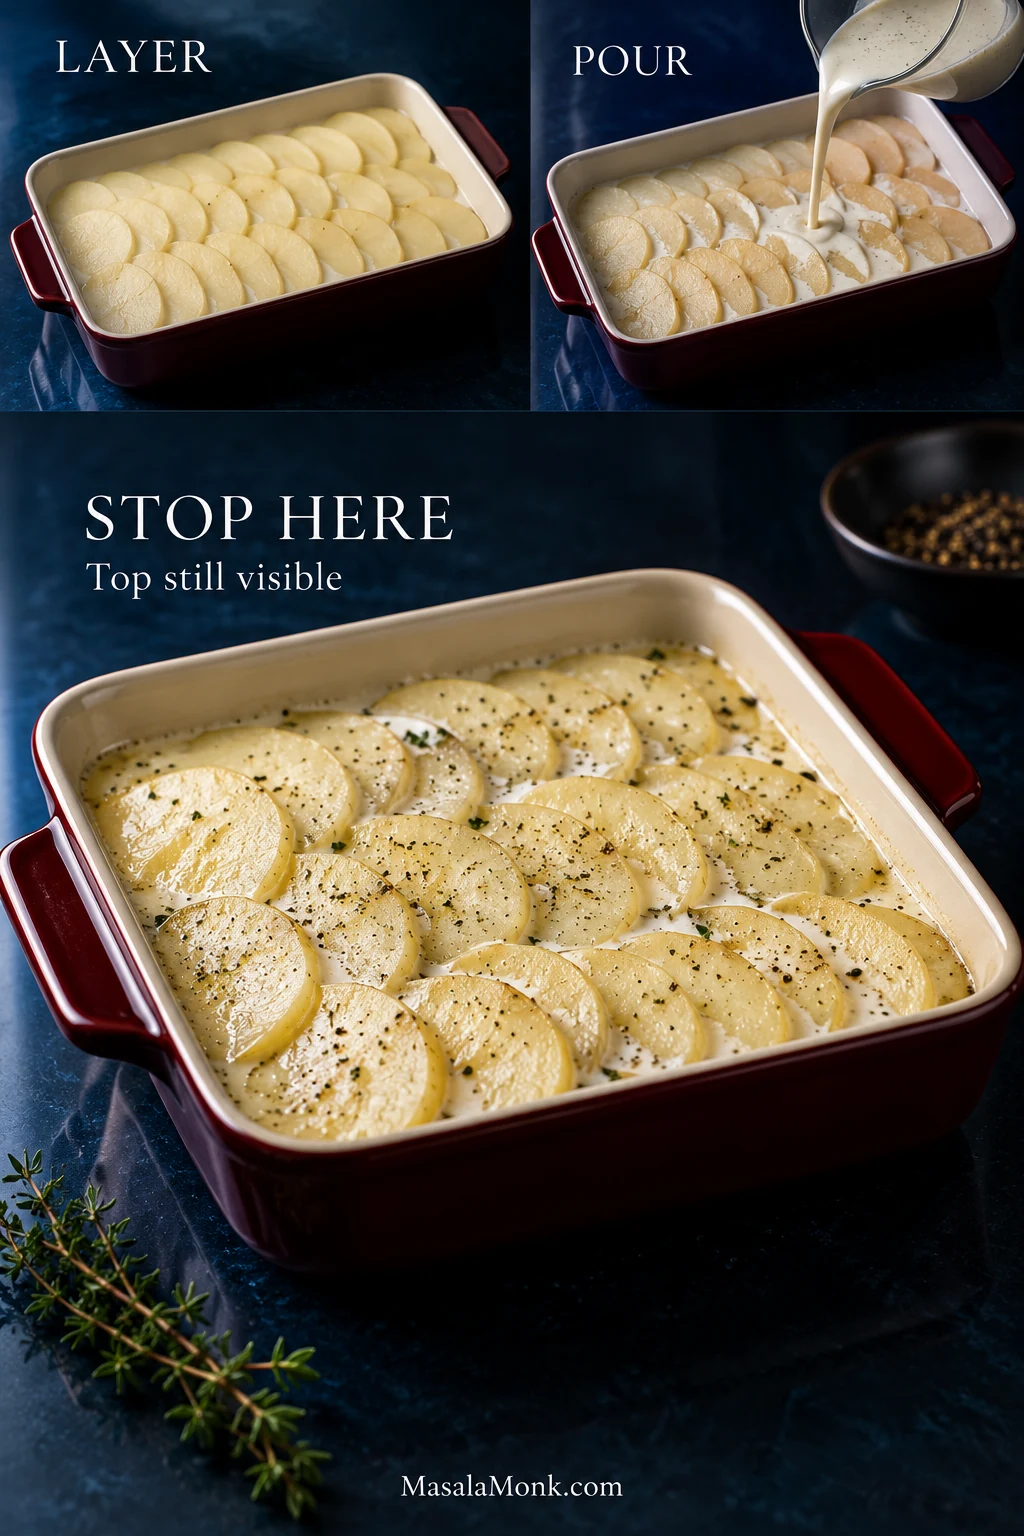
Pour the cream mixture over and between the slices. The potatoes need to be well surrounded, but the uppermost layer should remain visible. If a smaller or deeper dish would force you to bury the top just to use every last drop, stop pouring.

Three-stage graphic shows layered potatoes, cream being poured, and the finished assembly with the top potato layer still visible.
Let the casserole decide when to stop pouring. If the top layer starts disappearing, hold back the extra cream rather than flooding the gratin.

4. Cook Until the Middle Is Tender

Cover tightly with foil and bake on the center rack at 350°F (175°C; 160°C fan). Begin checking at 35 minutes.

The covered bake is finished when a thin knife slides through the very center with almost no resistance. The potatoes around the outside soften first, so don’t use an easy edge test to judge the middle.

If the middle is still firm, nothing has gone wrong.

This stage is especially tempting to rush when the rest of dinner is nearly ready. But a few extra covered minutes are much better than carrying a casserole to the table with crunchy potatoes hidden underneath.

Foil is folded back from a red casserole while a thin knife tests the center of the pale, creamy potato layers.
Check tenderness before color. If the center still resists, cover again; the final browning can wait until the potatoes are fully tender.

5. Brown the Cheese and Let the Gratin Settle

Once the potatoes are tender, remove the foil and scatter over the remaining Gruyère and Parmesan. Bake uncovered for about 20–25 minutes, until the sauce bubbles slowly around the edges and the cheese develops deep golden patches rather than simply looking melted.

If everything underneath is ready but the surface is still pale, a brief blast under the broiler/grill can finish the color—but only if your baking dish is broiler-safe. Watch closely.

Now wait 15 minutes.

The sauce is at its loosest straight from the oven. After the rest, the first serving should lift with glossy cream clinging around the potatoes rather than leave thin sauce rushing into the space behind it.

Comparison shows the same gratin just baked and after 15 minutes, with less loose cream in the rested serving cavity.
Resting changes the sauce, not the doneness. The potatoes should already be tender; the 15-minute pause simply helps the cream settle around the layers.

If the Gratin Isn’t Behaving

Why Are My Au Gratin Potatoes Still Hard?

Usually the slices are thicker than expected, the casserole is deeper, the foil isn’t sealing well, or the oven is running a little cool. Cover the dish again, give it another 10–15 minutes, then test the middle.

If the potatoes are still firm and the edges look visibly dry, moisten those dry areas with a little warm cream or milk before covering the dish again. The center needs time more than it needs a hotter oven.

Why Is My Potato Gratin Watery?

First check the potatoes. If they are tender but thin cream is still pooling, leave the gratin uncovered a little longer so more moisture can evaporate. Then give it the full rest before deciding the sauce is too loose.

A deeper pan, lower-starch potatoes, too much liquid for the dish or simply too little uncovered baking can all leave excess sauce behind.

The Sauce Looks Oily or Grainy

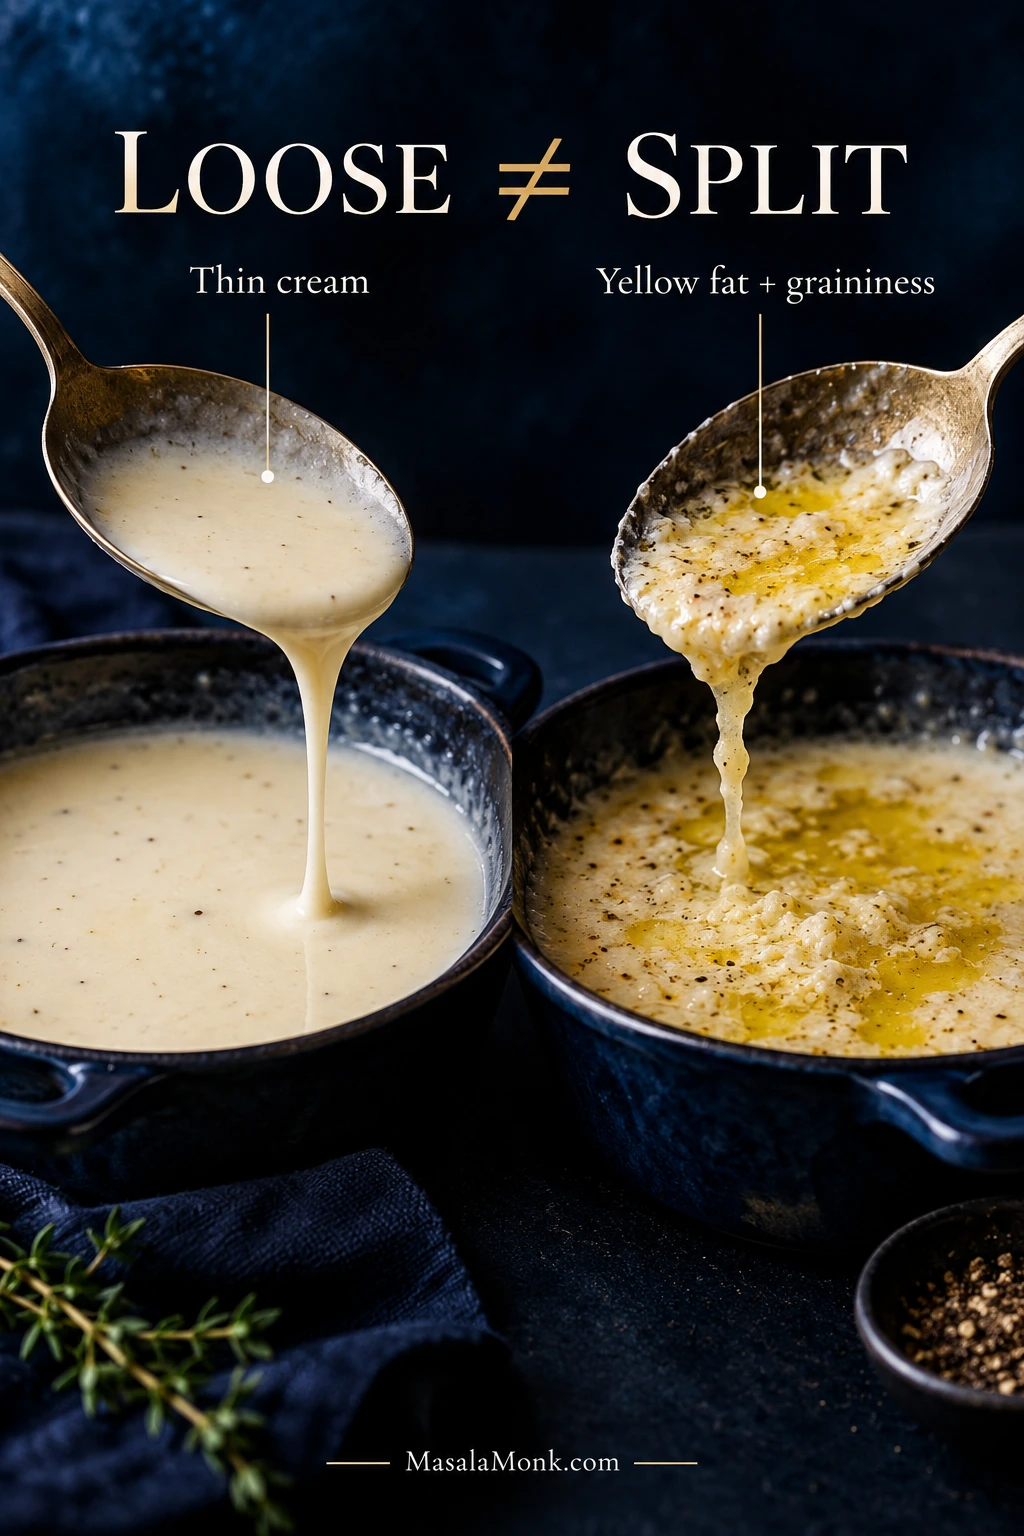
Clear yellow fat around a grainy-looking sauce points toward separation rather than simple looseness. Excessive heat, too much cheese or aggressive reheating can all encourage it; pre-shredded cheese may also melt less smoothly.

A badly split sauce is difficult to make completely smooth again, so prevention matters more here: keep the heat moderate and grate the cheese fresh when you can.

Comparison shows smooth thin cream on one side and a grainy broken sauce with visible yellow fat on the other.
Smooth but thin cream is still intact. Graininess with visible yellow fat signals separation, so looseness and splitting are different problems.

The Potatoes Taste Bland

Potatoes mute seasoning quickly. Taste the hot cream before adding the slices, especially if you change either cheese. A particularly salty Parmesan may call for less added salt; a mild Gruyère substitute may need a little more.

Making Potatoes Au Gratin Ahead? Do This Tonight

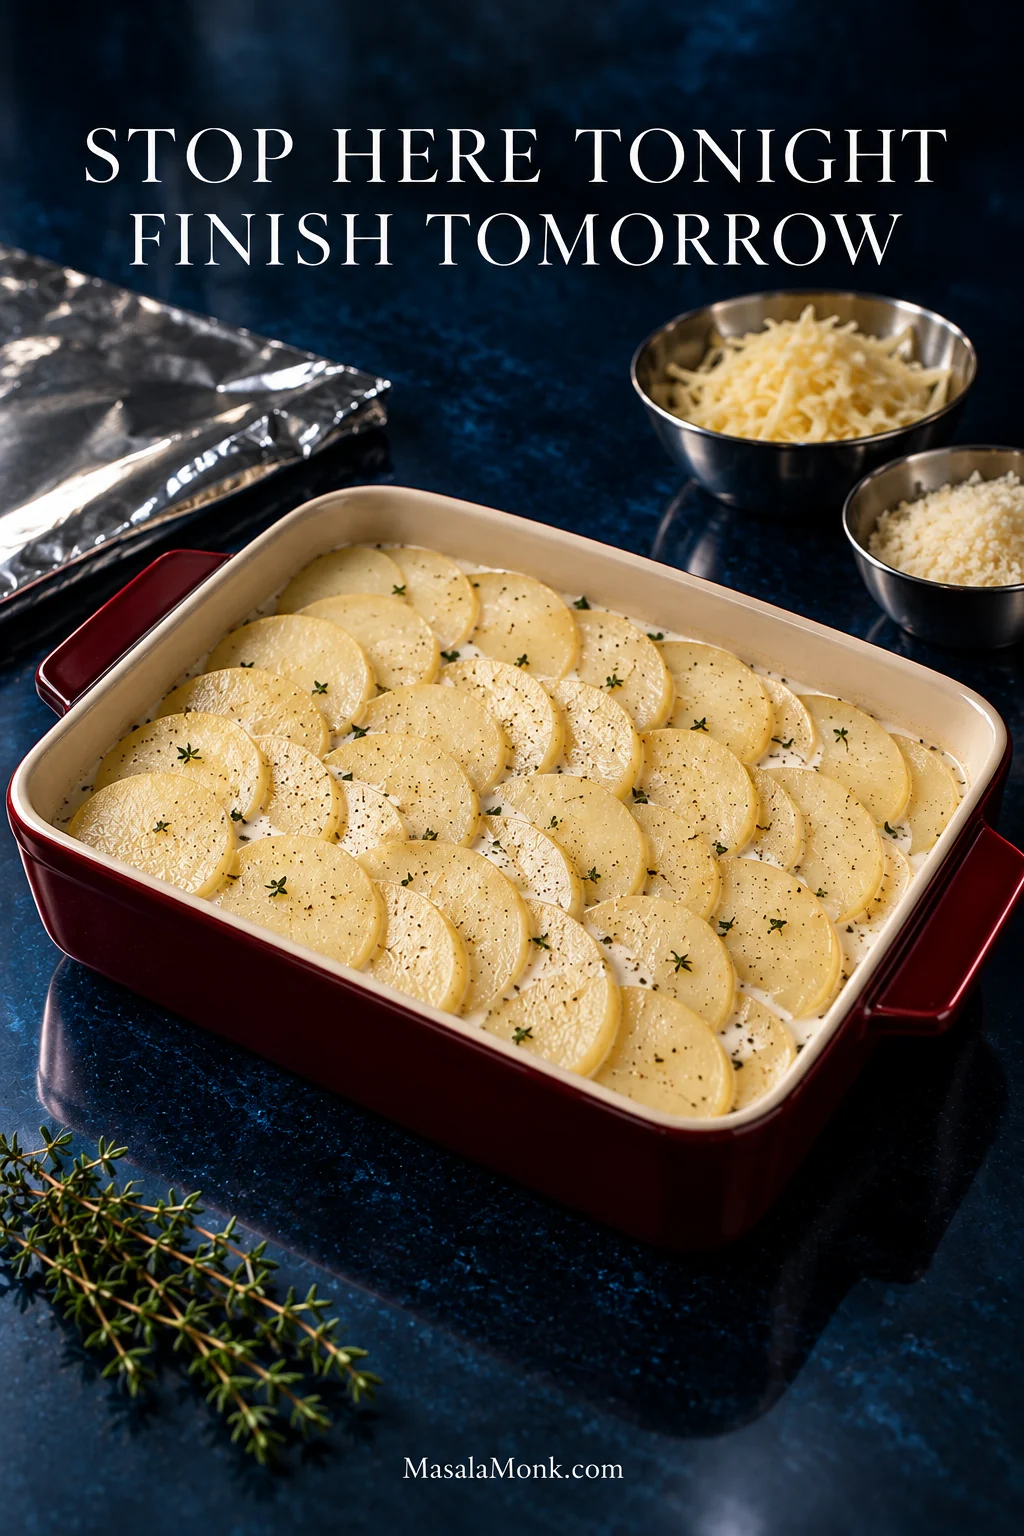
For this method, the cleanest place to stop is after the short stovetop cook and assembly, before the gratin goes through its full oven bake. You finish the actual tenderizing and browning on the day it is served.

Unbaked layered potatoes sit in a red casserole with cream between the slices, reserved grated cheese in bowls, and foil nearby.
Think “assembled, not finished.” Keep the reserved Gruyère and Parmesan separate overnight so the topping can go on fresh before the final uncovered bake.
  1. Simmer the sliced potatoes in the seasoned cream for 5–7 minutes and assemble the gratin as directed.
  2. Add the first half of the Gruyère, keeping the remaining Gruyère and Parmesan refrigerated separately.
  3. Let the most vigorous steaming subside briefly, then cover and refrigerate promptly for up to 24 hours. Don’t leave the casserole at room temperature to cool completely.
  4. If you’re using glass or ceramic bakeware, follow the manufacturer’s guidance before moving a refrigerator-cold dish into a hot oven.
  5. Bake covered and begin checking at 50 minutes. Continue until a thin knife passes through the middle with almost no resistance.
  6. Add the reserved Gruyère and Parmesan, uncover and brown as usual.

Reheating and Freezing Potatoes Au Gratin

USDA leftovers guidance recommends using refrigerated cooked leftovers within 3–4 days and reheating them to 165°F / 74°C. Reheat a larger portion covered at 325–350°F (165–175°C), then uncover briefly if you want to refresh the top.

If the gratin looks dry before reheating, add a spoonful or two of cream around the edge. Individual portions can be reheated gently in short microwave intervals.

Freezing is possible, but it is not my first choice if texture matters. Potatoes can become grainier or release water after thawing, and cream-and-cheese sauces are more likely to separate.

Is This the Same as Scalloped Potatoes?

In modern American recipe usage, potatoes au gratin usually include cheese and a browned top, while classic scalloped potatoes are generally baked in milk or cream without cheese.

Modern recipe names are much less tidy. Plenty of dishes called scalloped potatoes contain cheese, and many families use the two names almost interchangeably. With Gruyère between the potatoes and a browned cheese crust on top, this one sits comfortably on the au gratin side.

Gratin dauphinois is another close French relative, centered on potatoes and dairy and not necessarily the generous cheese topping common in modern American au gratin recipes.

What to Serve With Potatoes Au Gratin

A rich gratin does not need an equally complicated main course. A prime rib roast gives you deeply browned beef and pan juices against the soft potatoes. Ham, lamb, pork or a simple roast chicken are equally at home beside it.

Something green keeps the plate from becoming one long note of richness. Roasted Brussels sprouts bring caramelized edges and a little bitterness, while green beans, asparagus, broccoli or a sharp leafy salad work just as well.

Golden potatoes au gratin are plated with sliced medium-rare roast beef and green broccolini on a dark green plate.
Let the gratin be the rich element on the plate. A simple protein plus something green, crisp or acidic keeps the meal balanced.

Potatoes Au Gratin Recipe

Tender 3 mm slices of Russet potato baked in garlic-thyme cream with Gruyère and Parmesan. A brief stovetop simmer starts cooking the potatoes and brings their starch into the cream before the casserole reaches the oven.

Serves: 8 as a side
Prep: about 25 minutes
Cook: usually about 65–90 minutes; occasionally longer if the middle needs extra covered time
Rest: 15 minutes
Total: usually about 1 hour 45 minutes to 2 hours 10 minutes

Whole rectangular casserole of potatoes au gratin with overlapping potato slices and a deeply golden, patchy cheese top.
The top should be deeply golden in patches, but center tenderness must already be confirmed before browning. This visual is the finish cue, not the doneness test.

Equipment: shallow 9 × 13-inch (23 × 33 cm), approximately 3-quart / 2.8-liter ceramic or glass baking dish; rimmed sheet pan; wide saucepan or Dutch oven; mandoline or sharp chef’s knife; foil; cheese grater.

Ingredients

  • 2½ lb / 40 oz / 1.13 kg Russet potatoes, weight before peeling
  • 1½ cups / 12 fl oz / 360 mL heavy cream
  • ½ cup / 4 fl oz / 120 mL whole milk
  • 2 garlic cloves, finely grated or minced
  • 1 teaspoon fresh thyme leaves
  • 8 g fine sea salt, about 1½ teaspoons depending on brand
  • ½ teaspoon freshly ground black pepper
  • ⅛ teaspoon freshly grated nutmeg, optional
  • 6 oz / 170 g Gruyère, freshly grated and divided
  • 1½ oz / 43 g Parmesan, finely grated
  • 1 tablespoon / 14 g unsalted butter, for the baking dish

Instructions

  1. Heat the oven. Set a rack in the center and heat to 350°F / 175°C conventional / 160°C fan. Butter a shallow 9 × 13-inch (23 × 33 cm) baking dish and place it on a rimmed sheet pan.
  2. Slice the potatoes. Peel the Russets and cut them evenly to ⅛ inch / 3 mm. Leave the slices unrinsed.
  3. Warm the cream. Combine the heavy cream, milk, garlic, thyme, salt, pepper and nutmeg in a wide saucepan or Dutch oven. Bring to a gentle simmer over medium-low heat.
  4. Give the potatoes a head start. Add the slices and separate them gently in the cream. Simmer for 5–7 minutes, lifting and turning once or twice. They should bend easily and carry a light coating of cream without becoming fragile.
  5. Assemble. Layer half the potatoes, half the Gruyère, then the remaining potatoes. Pour the cream around them, keeping the uppermost slices visible. Reserve the remaining Gruyère and all of the Parmesan.
  6. Cover and cook until tender. Cover tightly with foil and bake for 35 minutes, then test the center with a thin knife. If the potatoes resist, cover again and continue in 10–15 minute increments until the knife passes through with almost no resistance.
  7. Brown the top. Remove the foil, add the remaining Gruyère and Parmesan, and bake uncovered for 20–25 minutes until the sauce bubbles slowly at the edges and the cheese is deeply golden in patches. If needed, broil/grill briefly only in broiler-safe bakeware, watching closely.
  8. Rest. Leave the gratin for 15 minutes before serving so the sauce can settle around the potatoes.

Recipe Notes

  • Keep the slices close to 3 mm. Thicker pieces can stay firm long after their neighbors are ready.
  • Yukon Golds give a firmer result. They hold cleaner layers and release less starch into the cream than Russets.
  • No flour is used. The recipe contains no added gluten as written; if you need it strictly gluten-free, check labels on packaged ingredients such as cheese and seasonings.
  • For a double batch, use two pans. Keeping the gratin shallow makes the cooking much more predictable.
Posted on — Leave a comment

Stromboli Recipe with Pizza Dough: Easy, Crispy & Cheesy

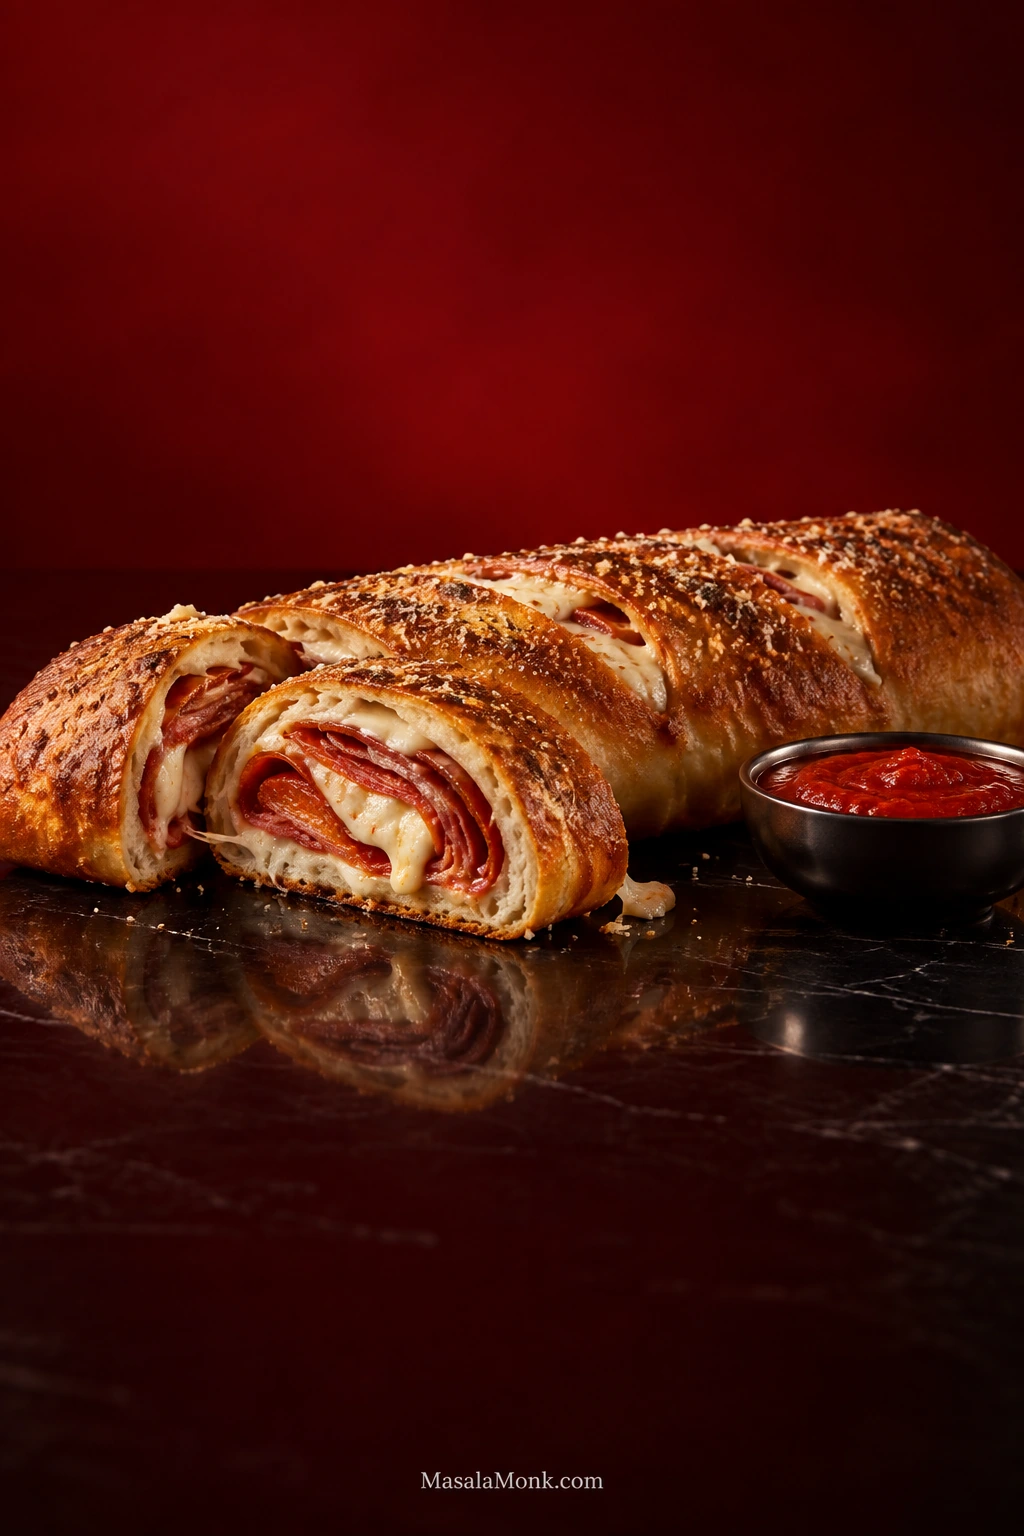
Golden baked Stromboli partly sliced to reveal pepperoni, salami and melted cheese, with a small bowl of marinara beside it.

This Stromboli recipe starts with a pound of pizza dough, so if you’ve already got one ready, you’re most of the way there. Roll it thin, layer in pepperoni, salami and cheese, and it bakes into a long golden roll with crisp edges, melted cheese between the layers and warm marinara waiting on the side.

Regular homemade pizza dough, supermarket dough or fresh dough from a pizza shop will all work. You don’t need a special Stromboli dough. What matters is stretching the dough thin enough that the layers inside can bake through.

That is where Stromboli can fool you. The crust may look beautifully done while a thick patch of dough near the center is still gummy. Put too much inside and the roll can swell, split at the seam and leave its bottom sitting in rendered fat.

For This Stromboli

Pizza dough1 lb / 16 oz / 454 g
Roll toAbout 12 × 16 inches / 30 × 40 cm
Filling8 oz / 225 g meat + 8 oz / 225 g mozzarella and provolone, plus Parmesan
Oven400°F / 200°C
Bake25–30 minutes
Useful doneness checkAround 200°F / 93°C in the thickest central dough layer
Total timeAbout 1 hour with ready-to-shape dough; around 1½ hours, sometimes longer, when starting refrigerator-cold

For this version, the marinara stays outside the roll. That keeps the filling drier while it bakes and leaves plenty of hot sauce for dipping at the table.


Stromboli Recipe

Pepperoni and salami bring the salty, savory filling; mozzarella melts into long strands; provolone adds a deeper cheese flavor. One large Stromboli makes about 8–10 slices, serving roughly 4 as a main dish or more as part of a larger spread.

  • Hands-on time: about 20 minutes
  • Rest after baking: 10–15 minutes
  • Yield: 1 large Stromboli, about 8–10 slices

Equipment

  • 13 × 18-inch / 33 × 46-cm metal baking sheet
  • Parchment paper
  • Rolling pin, if needed
  • Pastry brush
  • Sharp knife for cutting the vents
  • Instant-read thermometer
  • Serrated knife for slicing

Ingredients

  • Pizza dough: 1 lb / 16 oz / 454 g, homemade or store-bought
  • Pepperoni: 4 oz / 113 g, thinly sliced
  • Salami: 4 oz / 113 g, thinly sliced
  • Low-moisture mozzarella: 4 oz / 113 g, shredded or thinly sliced
  • Provolone: 4 oz / 113 g, thinly sliced
  • Parmesan or Pecorino Romano: ¼ cup / 25–30 g, finely grated, plus more for the top if you like
  • Egg: 1 large
  • Water: 1 tbsp / 15 ml
  • Italian seasoning: ½ tsp, optional
  • Marinara or pizza sauce: ¾ cup / 180 ml, warmed for serving

Method

Prepare the Dough

  1. Let the dough relax. Leave refrigerated dough covered at room temperature for 30–45 minutes. Try stretching it gently. If it snaps back or quickly shrinks smaller, cover it again and give it another 5–10 minutes. Dough that is already soft and easy to stretch can go straight to the next step.
  1. Heat the oven. Preheat to 400°F / 200°C. Line a 13 × 18-inch / 33 × 46-cm metal baking sheet with parchment paper.
  1. Shape the dough. Stretch and roll it on the parchment to roughly 12 × 16 inches / 30 × 40 cm, with a long edge facing you. The corners don’t need to be neat. Aim for fairly even thickness, especially along the edge nearest you; that strip of dough will eventually sit close to the center of the roll.
Rectangular pizza dough measuring about 12 by 16 inches, or 30 by 40 centimeters, on a blue work surface.
Before adding anything, run your fingertips over the pizza dough and flatten an obvious ridge now. Once the meat and cheese cover it, that hidden thick patch becomes much harder to spot.

Fill and Roll

  1. Layer the filling. Arrange the mozzarella, provolone, pepperoni and salami in thin overlapping layers. Scatter the Parmesan or Pecorino over the top. The filling should stay low enough that you can still see the shape of the rectangle beneath it. A mound down the middle is a sign to take some off.
Pizza dough covered with a broad, flat layer of pepperoni, salami, mozzarella and provolone.
Keep the deli slices flat rather than folded or ruffled. The first turn of dough can then travel over the Stromboli filling without catching a thick ridge and pushing it forward.
  1. Leave room for the seam. Leave about 1 inch / 2.5 cm bare along the short sides and the long edge nearest you. At the far long edge, leave a clean strip roughly 2½–3 inches / 6–7.5 cm wide. The filling will creep forward as you roll.
Filled Stromboli dough beginning to roll from the near long edge, with a marked 2½-to-3-inch bare strip at the far edge.
If filling has already reached the far clean strip before you start rolling, move it back now. The first turn will carry some of it forward on its own.
  1. Roll from the long side. Bring the edge nearest you over the filling and continue rolling away from yourself. Roll snugly so the layers stay together, but don’t squeeze the log or push the filling ahead of you. The finished roll should hold its shape without becoming a tight, bulky spiral.
Hands rolling filled pizza dough away from the viewer from its long edge to form an elongated Stromboli.
Starting from the long edge keeps the finished Stromboli longer and reduces the number of dough turns around the center; by contrast, starting from the short edge creates a shorter, thicker spiral.

Seal and Vent

  1. Seal it. Tuck the short ends inward only as far as needed to contain the filling. Beat the egg with 1 tbsp / 15 ml water. Brush egg wash over the clean final edge, finish rolling and pinch the seam closed. Set the Stromboli seam-side down.
  1. Finish the top. Brush lightly with egg wash. Sprinkle with Italian seasoning and, if you like, extra Parmesan. Cut 3–4 shallow diagonal vents through the top layer. Once shaped, it can go straight into the oven.
Raw egg-washed Stromboli on dark baking steel with three to four shallow diagonal vents across the top.
Space the shallow vents along the length instead of clustering them in one area. Steam then has several escape points without one section of the crust becoming unnecessarily weak.

Bake It Through

  1. Bake. Bake for 25–30 minutes, starting your checks around the 25-minute mark. The crust should be deeply golden and the underside set and baked, not soft or pale. Near the end, cheese may bubble through the vents and the Parmesan on top should begin to smell toasted. Insert an instant-read thermometer from the side toward the thickest part of the center, aiming for dough rather than a pocket of melted cheese. A reading around 200°F / 93°C is a useful confirmation. If the crust already has enough color but the center needs more time, cover the top loosely with foil and keep baking.
Whole baked Stromboli on parchment with deep golden browning, opened vents and a small patch of caramelized leaked cheese.
Do not chase perfectly uniform browning. Egg wash and Parmesan naturally create darker high spots, so judge the baked Stromboli by the whole crust rather than its darkest patch.

Rest, Slice and Serve

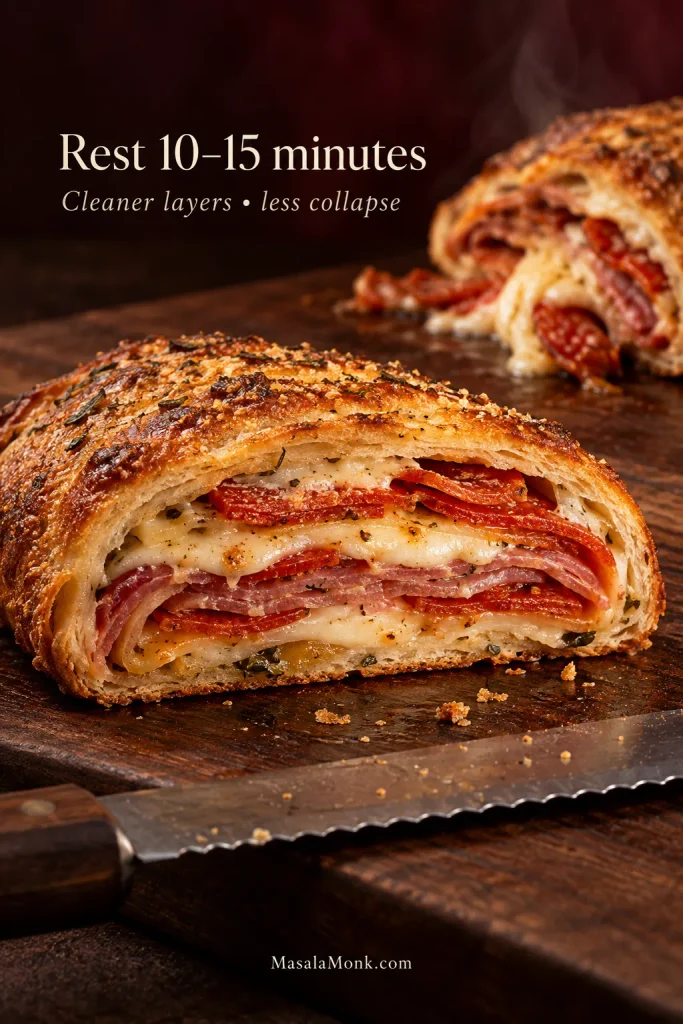
  1. Rest and slice. Leave the Stromboli for 10–15 minutes. If rendered fat has collected on the tray, use the parchment or a wide spatula to move the roll onto a clean section of the pan or onto a board. Slice with a serrated knife and serve with warm marinara.

The center slice tells you a lot. You want baked dough separating distinct layers of meat and cheese, not a pale gummy stripe. After the rest, those layers should stay together when you lift a slice rather than spilling straight onto the board. Cheese escaping through a vent is fine. Let the bits touching the pan turn brown and crisp.

Close-up Stromboli center slice showing baked dough between pepperoni, salami and melted cheese layers.
Check one of the thickest center slices rather than an end piece. The ends heat through sooner, so the middle gives you the more demanding test of whether the Stromboli baked through.

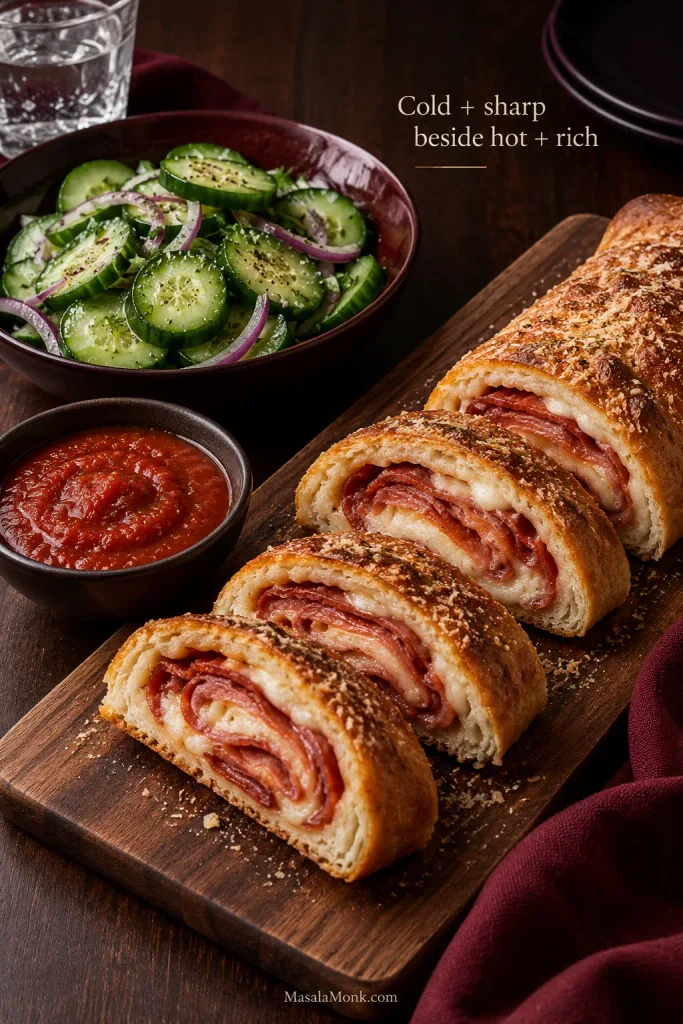
For a full dinner, something cold and sharp is good beside the warm slices. A crisp cucumber salad brings vinegar, herbs and crunch to a plate already rich with cured meat and melted cheese.

Stromboli slices served with red marinara and a fresh cucumber salad on a dark wooden table.
Keep the cucumber salad properly chilled until serving. That cold, crisp contrast makes the rich Stromboli feel lighter between bites.

Pizza Dough & Filling

Store-bought pizza dough works

Yes, store-bought pizza dough works well for Stromboli. If it is refrigerator-cold, let it sit at room temperature for 30–45 minutes so it becomes easier to stretch. Check the package weight too; this version is built around roughly a pound of dough.

Dough that keeps pulling itself smaller usually needs more time, not more flour or force. Cover it for another few minutes and try again.

Partly rectangular pizza dough recoiled inside a larger reference outline on a dark green work surface.
Pizza dough is ready to shape when it can stretch a few inches without immediately pulling itself smaller. If the edges recoil within seconds, another short covered rest is usually worth more than more flour.

Other ready-made doughs won’t behave exactly like a standard pizza-dough ball. With refrigerated canned pizza crust, use the thinner sheet you have instead of forcing it to 12 × 16 inches. For frozen bread dough, follow the package’s thaw-and-rise directions until the dough is soft, relaxed and ready to shape. Sourdough pizza dough can work at a similar dough weight; let it relax fully before rolling.

How much filling to use

With a pound of pizza dough, 8 oz meat and 8 oz mozzarella/provolone makes a generous filling without building an oversized roll. Parmesan adds a salty layer without adding much bulk.

The numbers are useful, but the shape tells you more. Spread the filling broadly across the dough and keep it low rather than heaped. Too much creates a thick center and puts pressure on the seam; too little leaves you with plenty of bread and not much happening inside it.

Low-moisture mozzarella melts into stretchy layers without releasing much water. Provolone melts alongside it and brings a fuller cheese flavor. Parmesan or Pecorino Romano seasons the filling, while Parmesan scattered on top can toast against the egg-washed crust. Fresh mozzarella can work too, but drain it well and blot the pieces first.

Keep the Filling Dry

Moisture doesn’t only come from cheese or sauce. Mushrooms release plenty of water. Spinach holds onto it. Sausage can leave fat behind, and some pepperoni is much oilier than others. Cook raw meat fillings fully before they go into the Stromboli, drain rendered fat and let hot fillings cool before assembly. Cook vegetables first when needed, let mushrooms shed their liquid and squeeze cooked spinach dry. Anything sitting in liquid in the skillet is better dealt with there than inside the Stromboli.

Browned mushrooms lifted with a slotted spoon while visible cooking liquid remains in the stainless-steel pan below.
For any cooked Stromboli filling, tilt the pan before assembly. If liquid runs into a visible pool, drain it first and let the filling cool before it touches the dough.

Sauce Inside or on the Side?

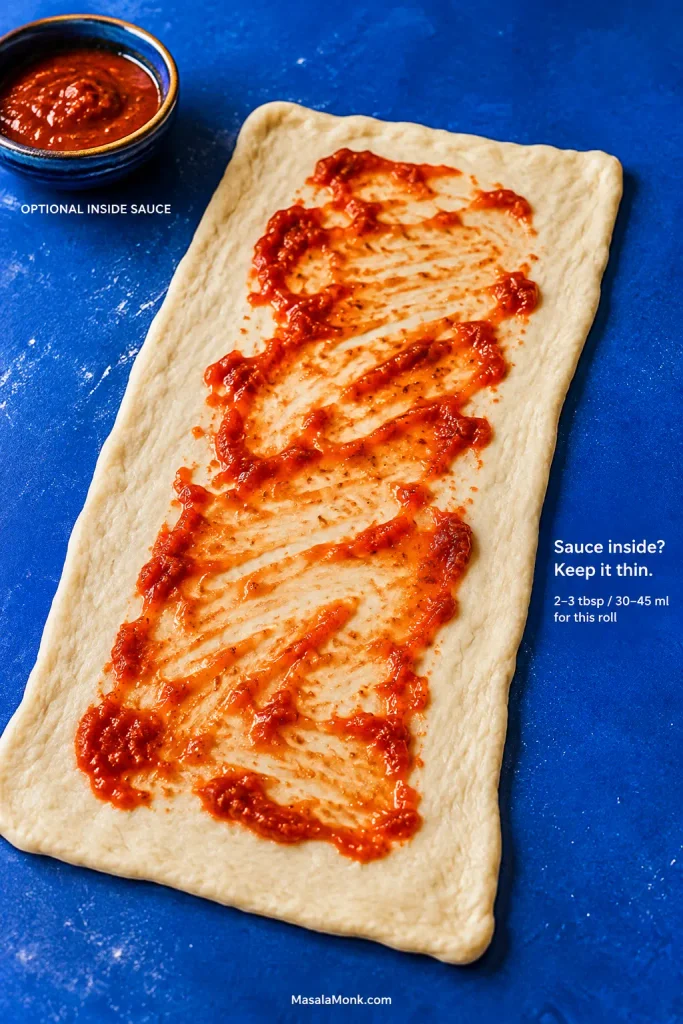
Yes, you can put sauce inside Stromboli. For this version, use about 2–3 tablespoons of thick sauce. Serving marinara on the side leaves the filling drier and the crust crisper.

A thick pizza sauce is easier to control than loose marinara. If yours runs quickly from a spoon, simmer it until it has more body. Leave the final sealing strip clean so the dough can stick to itself.

Rectangular pizza dough with a sparse, streaky layer of marinara and large areas of bare dough still visible.
A thin sauce layer should look patchy rather than painted edge to edge. If the pizza dough disappears beneath a continuous red coating, you have added more moisture than this Stromboli needs.

Why Stromboli Can Brown Before the Center Bakes

Once pizza dough is wrapped around meat and cheese, the center heats more slowly than the exposed crust. Egg wash makes that difference easier to miss because the outside can take on a deep golden color before the dough buried inside has finished baking.

That is why color is only one doneness cue. Check the underside, then use the center temperature as a second opinion. If the crust is where you want it but the middle still needs time, a loose foil cover lets the center keep baking without pushing the top much darker.

Deeply browned Stromboli with an instant-read thermometer inserted from the side and displaying 200 degrees Fahrenheit.
Take the Stromboli temperature near its thickest central section because the ends finish sooner. A number is useful only when the probe is actually reading dough rather than a pocket of melted cheese.

Fix My Stromboli

Before It Goes In

Dough keeps shrinking? Cover it for another 5–10 minutes. Tight, chilly dough usually becomes much easier to stretch after a short rest.

The filled roll looks enormous? Take some filling out before you seal it if you still can. You want a substantial roll, not one already straining at the seams before it reaches the oven.

The seam will not stick? Check the dough itself. Sauce, cheese or rendered fat on that final strip can stop it sealing. Wipe it clean, brush the edge with egg wash, pinch it closed and turn the seam underneath.

The ends are mostly bread? Trim obvious excess and tuck in only what you need to enclose the filling. The ends don’t have to look perfectly symmetrical.

While It Bakes

The top is already dark? Check the center before taking the Stromboli out. If it still needs time, lay foil loosely over the top and keep baking.

The side split? Too much filling, a thin spot in the dough or a greasy seam are the usual causes. A small split isn’t the end of dinner. Let the Stromboli finish baking; next time, reduce the filling, watch for thin spots or make sure the seam is clean.

Cheese is coming through a vent? Some leakage is normal, and the bits that brown against the pan are hardly a tragedy. A seam opening wide enough for the filling to spill out usually points to overfilling, a weak seal or a thin patch of dough.

Intact Stromboli with a small browned cheese leak in front and a second roll behind with a wide split seam.
If only a little cheese escapes, leave it alone and let it brown. Trying to repair hot dough in the middle of baking is more likely to disturb the crust than improve a harmless leak.

Grease is collecting underneath? Move the baked Stromboli onto a dry area before it rests. Especially oily pepperoni or salami can also be blotted before assembly next time.

After You Slice It

The middle is gummy? The roll may have been too thick or simply needed more time in the oven. On the next one, avoid compressing the roll and check the center temperature before taking it out.

The bottom is soggy? Work backward from the filling. Wet vegetables, too much sauce, fresh mozzarella and rendered meat fat can all soften the dough from inside.

Stromboli slice lifted on a metal spatula to show a thin, baked but pale and soft-looking underside.
When the Stromboli bottom is soft, investigate moisture before simply extending the bake. Otherwise, the exterior can keep darkening while wet filling or rendered fat continues working against the crust.

Too much bread? Stretch the dough to about 12 × 16 inches and spread the filling across most of the surface. Making the rectangle smaller and simply stuffing more inside creates a thicker center, not a better ratio.

The filling falls out as you cut? Give the roll its full resting time. If the slices still collapse after 10–15 minutes, use less filling or spread it more evenly next time.

Rested Stromboli slice with clean layers in front while a freshly cut slice behind appears softer and less stable.
After the rest, use a serrated knife with a light sawing motion instead of pressing straight down. Less downward pressure helps the Stromboli layers stay where they belong.

Change the Filling

Once the base Stromboli makes sense, changing the filling is the easy part. Keep the overall amount close to the base recipe, then pay attention to what the new ingredients bring with them: water, fat, residual heat or extra bulk.

FillingWhat changesHow to handle it
Ham & cheese
Ham, provolone, mozzarella or Swiss
Deli ham is easy to layer but can carry surface moistureUse thin slices and blot noticeably wet ham before filling
Sausage & peppers
Cooked sausage, sautéed peppers, mozzarella
More rendered fat and vegetable moistureDrain well and let everything cool before filling
Spinach & cheese
Spinach, mozzarella, provolone; ricotta if desired
Spinach hides a surprising amount of waterSqueeze it very dry and use ricotta sparingly
Philly cheesesteak
Thin beef, onion, peppers, provolone
Residual heat and pan juices can soften the dough before bakingCool the filling completely and drain any liquid left in the pan
Buffalo chicken
Cooked chicken, mozzarella, buffalo sauce
The sauce can loosen the filling quicklyUse only enough sauce to coat the chicken and serve extra alongside

Pesto works particularly well with chicken, spinach or mozzarella. Use a thin layer; homemade basil pesto already brings garlic, herbs and Parmesan with it.

Make Ahead, Store, Freeze & Reheat

To assemble ahead: fill and roll the Stromboli, cover it well and refrigerate for up to 8 hours. Add the exterior egg wash and cut the vents shortly before baking. Start checking at the usual time and leave it longer if the cold center needs it.

To freeze before baking: shape and seal the Stromboli but leave off the egg wash and vents. Wrap it well and freeze for up to 3 months for best quality. Thaw it completely in the refrigerator, allowing overnight to 24 hours for a dense filled roll, then brush, vent and bake. Use the crust and center temperature rather than the clock alone to judge when it is ready.

For leftovers: refrigerate promptly and use within 3–4 days, in line with USDA leftovers guidance.

To reheat: use an oven or air fryer at about 350°F / 175°C if you want the crust to crisp again. Reheat cooked leftovers until hot throughout; USDA reheating guidance uses 165°F / 74°C as the target.

To freeze after baking: cool the Stromboli completely, wrap it well and freeze for up to 3 months for best quality. Thaw it in the refrigerator, then reheat at about 350°F / 175°C until hot through and the crust has crisped again. Freezing individual slices makes it easier to reheat only what you need.

Stromboli vs Calzone & Where It Came From

Stromboli is rolled into a long log and sliced; a calzone is folded into a half-moon pocket. Both can use pizza dough and many of the same cheeses, meats and vegetables, but the different shape changes how the filling sits inside and how the finished dish is served.

Sliced rolled Stromboli beside a smaller folded half-moon calzone, labeled rolled and folded.
A Stromboli slice exposes several rolled layers of dough and filling across the cut face; a calzone keeps one larger filling pocket enclosed by folded dough.

Despite its Italian name and flavors, Stromboli is an Italian-American creation closely associated with the Philadelphia area in the middle of the twentieth century. The Philadelphia Inquirer’s history of Stromboli traces the Romano family’s account of the dish at their pizzeria in Essington, Pennsylvania, around 1950. Deli meats and cheese remain classics, but sausage, chicken, steak and vegetables all fit naturally into the same rolled idea.


Give one of the center slices a dip while the crust is still crisp and the cheese is warm enough to stretch. Pepperoni, salami, provolone, mozzarella and hot marinara do the rest.

Close-up Stromboli slice with pepperoni, salami and melted cheese being dipped at the cut edge into thick red marinara.
Dip the cut edge rather than soaking the whole slice. You get warm marinara against the filling while more of the baked Stromboli crust stays crisp for the next bite.
Posted on — Leave a comment

Salmon Patties Recipe: Easy, Crispy & Made with Canned Salmon

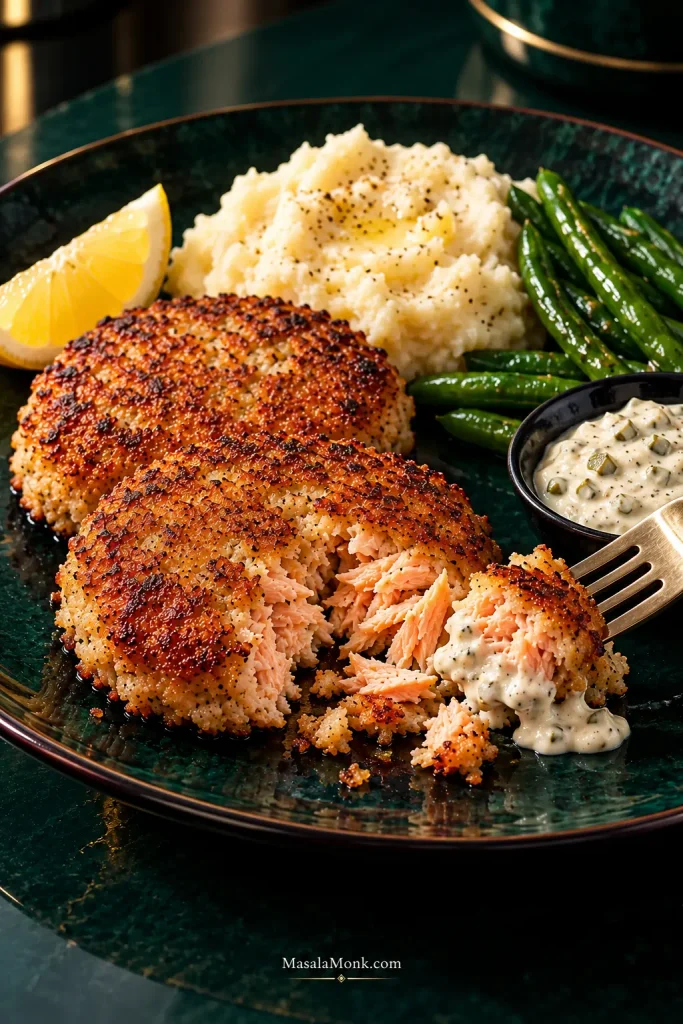
Three broad, thin golden-brown salmon patties on a dark plate; one is torn open to show moist pink salmon flakes, with lemon and tartar sauce behind.

The first salmon patty is usually the one that tells you whether dinner is going to be easy.

You slide a spatula underneath, start to turn it, and the middle threatens to split. The natural response is to add more crackers or breadcrumbs next time. Keep doing that and the patties may eventually hold beautifully while tasting more like the binder than the salmon.

In this salmon patties recipe, the mixture should stay soft enough for a moist, flaky center while still holding together in your hand. Canned salmon keeps dinner practical, and a short rest gives the Saltine crumbs time to absorb the moisture around them.

Get that balance right and the reward is simple: deeply browned, crisp edges around a tender center with visible flakes of salmon.

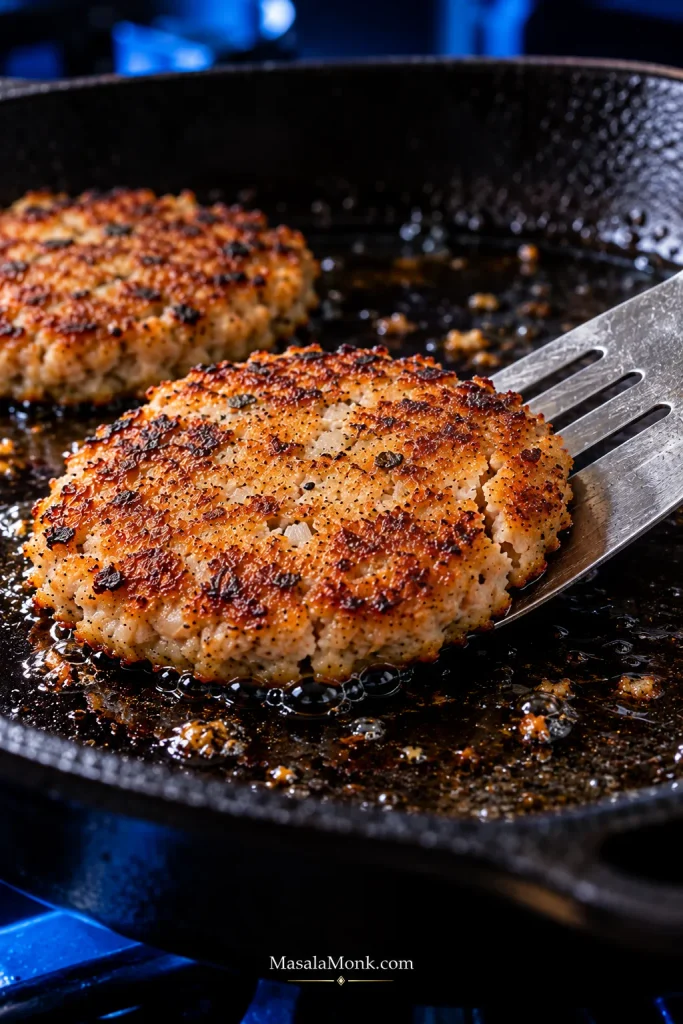
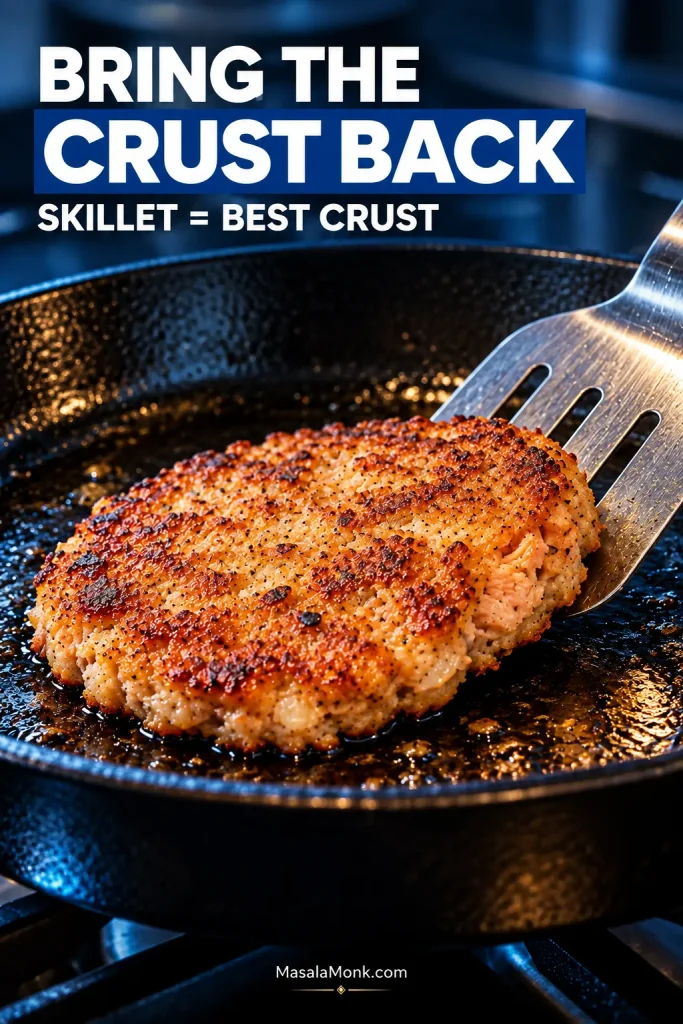
Close-up of a thin salmon patty in a cast-iron skillet being lifted with a wide metal spatula; a small crack begins near one edge.
A crack on the first turn is not automatically a binder failure. If the patty still flexes, the first crust may simply need more time to become the outer support that carries it through the flip.

Salmon Patties Recipe

Yield: 6 medium patties
Prep: about 15 minutes
Rest: 5–10 minutes
Cook: about 12–16 minutes for two batches, plus a quick test piece
Total: about 35–40 minutes
Method: skillet

Ingredients

  • 1 can (14.75 oz / 418 g) pink salmon
  • 1 large egg
  • About 12 standard Saltine crackers (roughly 36 g; brands vary), finely crushed, plus more only if needed
  • 2 tablespoons very finely minced or grated onion
  • 1 tablespoon (15 g) mayonnaise
  • 1 teaspoon Dijon mustard
  • 1 tablespoon (15 ml) fresh lemon juice
  • ¼ teaspoon freshly ground black pepper
  • Fine salt, as needed after tasting the test piece
  • 2–3 tablespoons (30–45 ml) neutral cooking oil, or enough to coat the skillet generously, plus more between batches if needed

The base is intentionally simple. Dill or parsley takes the flavor in a fresher direction, while Old Bay or Cajun seasoning makes the patties warmer and spicier. Choose one direction rather than piling several onto the salmon.

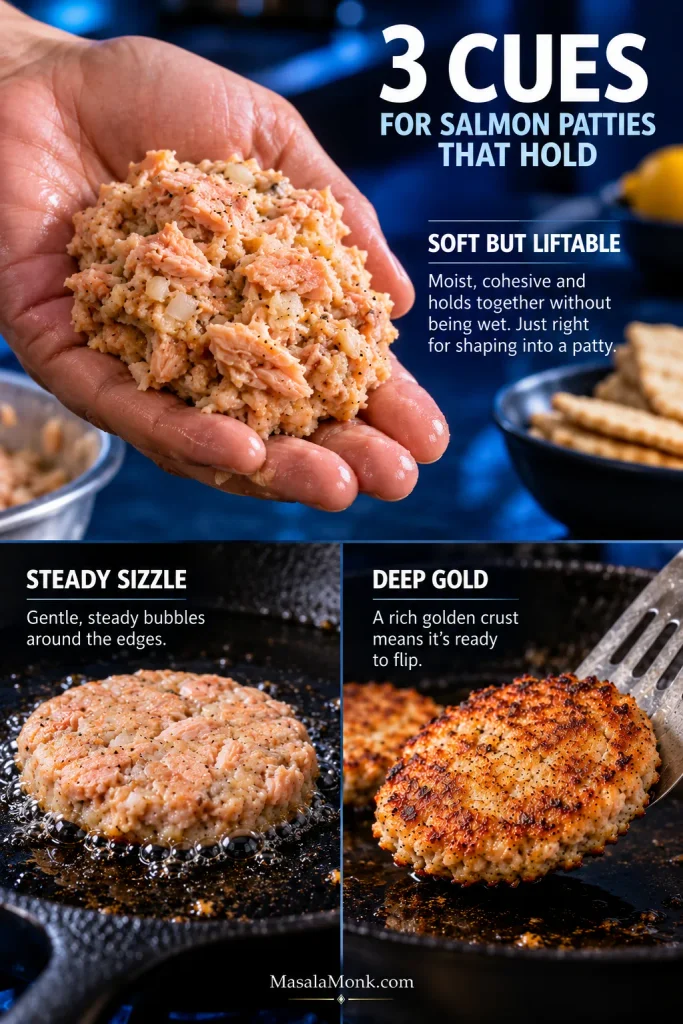
Three cues are worth remembering: soft but liftable in the bowl, an immediate steady sizzle in the skillet, and deep gold before the first flip.

Teaching graphic showing cohesive salmon mixture held in a hand, a patty sizzling in a skillet, and a deep-golden underside, labeled Soft But Liftable, Steady Sizzle, and Deep Gold.
These cues answer three different questions: does the mixture hold, is the pan hot enough, and has the first crust become strong enough for a clean flip?

How to Make Salmon Patties

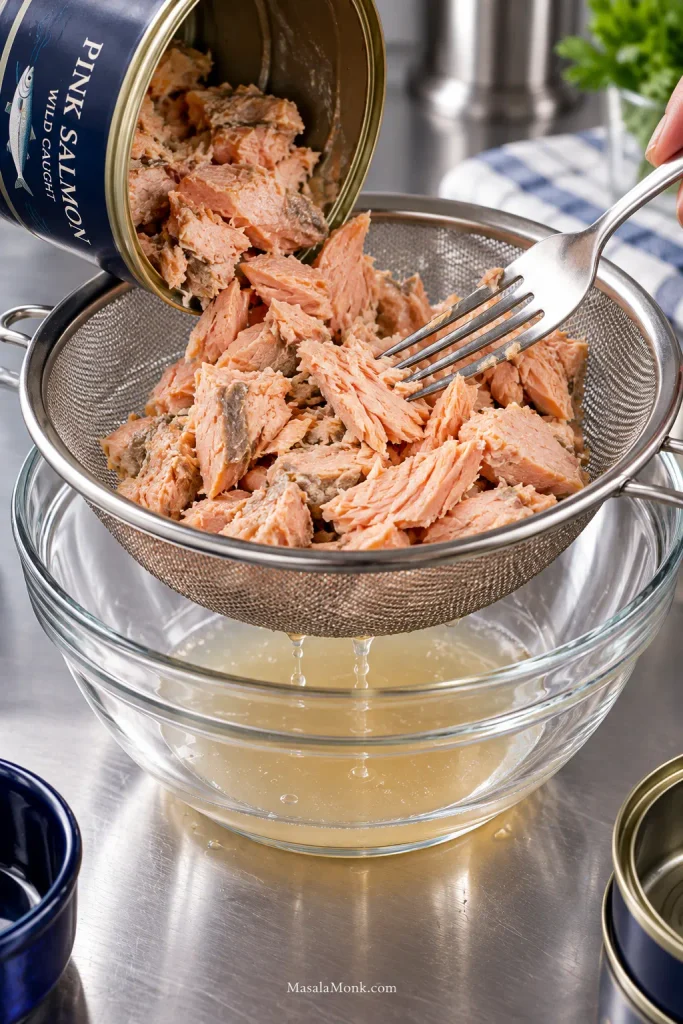
  1. Drain and flake the salmon. Set a small bowl underneath as you drain it, and save a tablespoon or two of the liquid for now. Transfer the salmon to a mixing bowl. Remove visible skin or larger bones if you prefer, then break the fish into flakes with a fork, leaving some larger pieces for texture.
Cooked canned salmon draining through a metal strainer into a clear bowl while a fork separates the fish into flakes; a small amount of liquid collects below.
Because canned salmon varies in how much liquid it carries, keeping a spoonful aside gives you a controlled way to correct a dry bowl later without automatically reaching for more egg or mayonnaise.
  1. Mix. Add the egg, very finely minced or grated onion, mayonnaise, Dijon mustard, lemon juice, and black pepper. Keep the onion pieces small; these patties cook quickly, and larger pieces can stay sharp. Fold gently, then mix in the crushed Saltines just until everything comes together.
  2. Rest for 5–10 minutes. Give the crumbs time to absorb moisture. During the final 2–3 minutes, set a 10- to 12-inch skillet over medium heat and add enough oil to coat the bottom generously.
  3. Check and taste. Press a small handful in your palm. It should hold when lifted while still feeling moist. A bowl that is noticeably wetter or drier can be corrected with the 30-second mixture check below. Once the oil gives you a steady sizzle, fry a teaspoon-sized test piece. Make sure it holds together, taste it while hot, and adjust salt, pepper, lemon, or seasoning now.
A teaspoon-sized piece of salmon mixture frying in shallow oil, with the bowl of mixture behind; on-image text asks Holds? and Taste Right?
The test piece also checks the skillet. Gentle, immediate bubbling with gradual browning means the heat is useful; fast scorching or no response tells you to adjust before all six patties go in.

Shape, Fry and Flip

  1. Shape. Divide the salmon into 6 equal portions and form patties about ½ inch / 1.25 cm thick. Press only as much as needed to bring them together.
Six raw salmon patties on a red tray; the front patty is shown from the side with a marker indicating one-half inch, or 1.25 centimeters, thickness.
For salmon patties, reach the ½-inch profile by widening the portion rather than pressing harder. That preserves a looser interior while giving the skillet more surface area to brown.
  1. Fry in two batches of three. Bring the oil back to a steady sizzle if needed, then add 3 patties with space around them. Cook for roughly 3–4 minutes, until the underside is deeply golden and the outer edge looks set.
  2. Turn once. Slide a wide, thin spatula fully underneath each patty. If it still clings to the skillet, give it another 30–60 seconds. Flip and cook another 3–4 minutes, until the second side is golden and the center is hot and set. If you check with a thermometer, aim for 160°F / 71°C in the center; that’s the USDA safe temperature for dishes containing egg. Transfer to a plate, add a little more oil if the pan needs it, and repeat with the remaining 3 patties.
  3. Eat them while they’re crisp. Keep the cooked patties in a single layer so steam doesn’t soften the crust. Break one open; the center should look moist and flaky, with recognizable pieces of salmon rather than a dense paste.

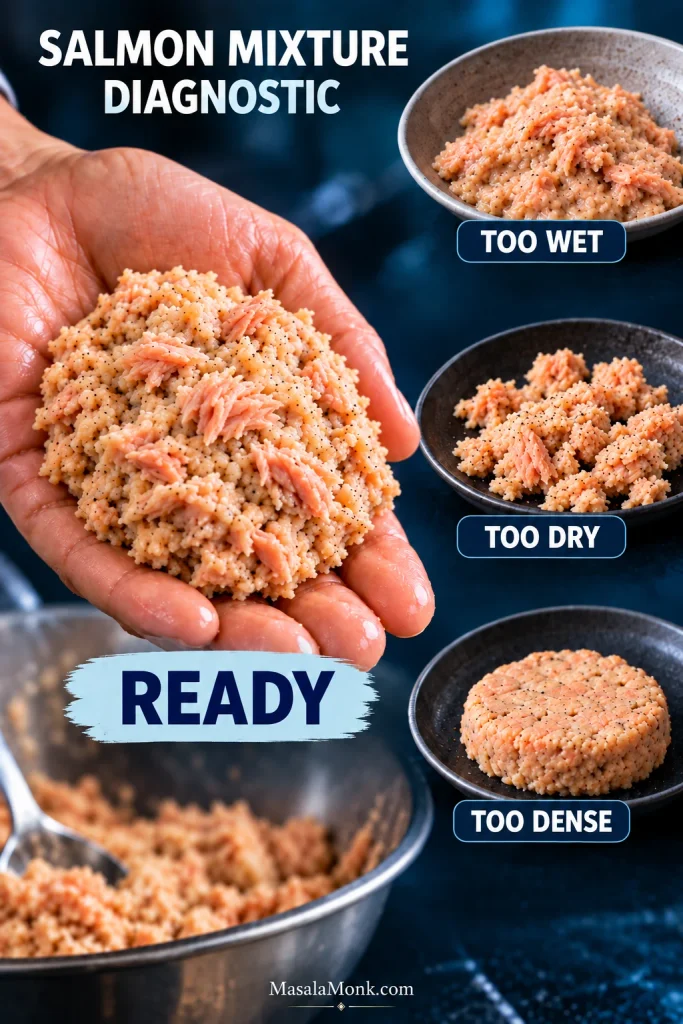
The 30-Second Mixture Check

Give the crumbs their full rest before changing the mixture. A loose, wet bowl may need more binder; a dry one needs moisture, not another handful of crackers.

What you noticeWhat it meansWhat to do
Slumps, smears, or loses its edgeToo wet, or not fully restedFinish the rest. If it still slumps, add crushed Saltines about 1 tablespoon at a time.
Presses together, lifts intact, stays moistReadyFry the test piece, then shape the patties.
Cracks badly or crumblesToo dryAdd mayonnaise or reserved salmon liquid about 1 teaspoon at a time.
Feels stiff and denseProbably too much binderStop adding crumbs. Loosen with a small amount of moisture if necessary.
Diagnostic graphic showing Ready salmon mixture in a hand, Too Wet mixture slumping, Too Dry mixture crumbling, and Too Dense mixture formed into a compact flattened puck.
Ready salmon patty mixture can look rougher than an over-bound one—and that is a good sign. Instead of chasing a smooth puck, look for just enough cohesion to lift while the salmon flakes stay distinct.

A dry salmon patty can still fall apart. You want something soft enough to stay tender and cohesive enough to lift cleanly.

Mixture ready? Shape the patties →

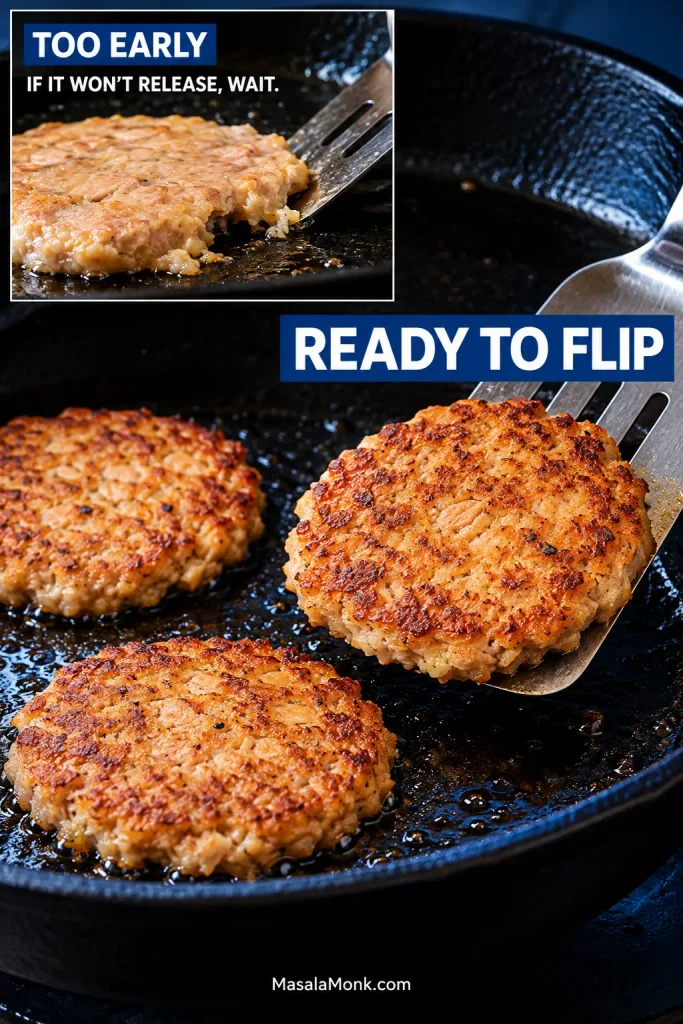
If It Won’t Release, Don’t Flip It Yet

A patty that still sticks to the skillet or bends in the middle when you slide a spatula underneath needs more time on the first side. Use the color underneath as your guide; burner settings vary from stove to stove.

When a Salmon Patty Is Ready to Flip

  • Look for deep gold underneath rather than pale yellow.
  • At the edge, the surface should look set instead of glossy.
  • The patty should begin releasing cleanly from the skillet.
  • Use a wide spatula so the whole patty is supported during the turn.
Comparison graphic showing a pale sticking patty labeled Too Early and three browned patties labeled Ready to Flip, with one lifting cleanly on a metal spatula.
When deciding when to flip salmon patties, treat clean release as feedback from the crust. Once the underside lifts without resistance, that browned surface can support the softer center through the turn.

Cast iron gives you a strong crust; nonstick makes release especially easy. Stainless steel works when it is properly preheated and has enough oil.

Already cooked them? If the texture still seems off, troubleshoot the finished patties.

If the Finished Patties Still Aren’t Right

The mixture check handles the raw bowl, and the crust cues handle the first flip. Once the patties are cooked, their texture shows you what to change next time.

What happenedLikely reasonNext batch
Dry and mealyToo much binder, naturally dry salmon, or too much cookingUse less crumb and stop cooking once the center is set.
Soft or mushy insideToo much moisture, thick patties, or not enough cookingKeep them around ½ inch thick and cook until the center is set.
Pale, soft or greasy crustOil too cool, crowded skillet, or moving the patties too soonWait for a steady sizzle, leave room around each patty, and let the first side brown before turning.

What a Good Salmon Patty Looks Like Inside

Extreme close-up of a cooked salmon patty broken open, showing a crisp dark-golden crust and separate moist pink salmon flakes inside.
Distinct flakes inside suggest the salmon was handled gently, while the irregular crust shows that the browning came from direct skillet contact rather than an external breadcrumb coating.

Back to the recipe ↑

Saltines, Panko or Breadcrumbs?

The egg and crushed Saltines do most of the holding in this version. A spoonful of mayonnaise keeps the mixture from feeling dry while the crumbs rest.

Saltines are the default here. They disappear into the salmon easily, absorb moisture well, and already bring some salt to the bowl.

Panko gives the mixture a looser texture. Start conservatively, let it sit, and add more only after you see how well the salmon holds.

Plain breadcrumbs are dependable but easy to overdo. Once the bread becomes more noticeable than the salmon, adding more won’t improve the patty.

Ritz crackers make a richer, more buttery version. Different crumbs and crackers absorb differently, so I would not treat them as automatic cup-for-cup substitutes before checking the rested mixture.

Binder comparison showing Saltines and crushed Saltines prominently, with panko, plain breadcrumbs and buttery round crackers arranged beside salmon mixture.
With Saltines, panko, breadcrumbs or Ritz, the useful comparison starts after the crumbs hydrate. Judging them dry can tempt you to add more binder before the mixture has had time to settle.

For the flour-and-cornmeal style often associated with Southern salmon croquettes, our salmon croquettes recipe follows that branch much further.

One Can of Salmon Isn’t Always One Can

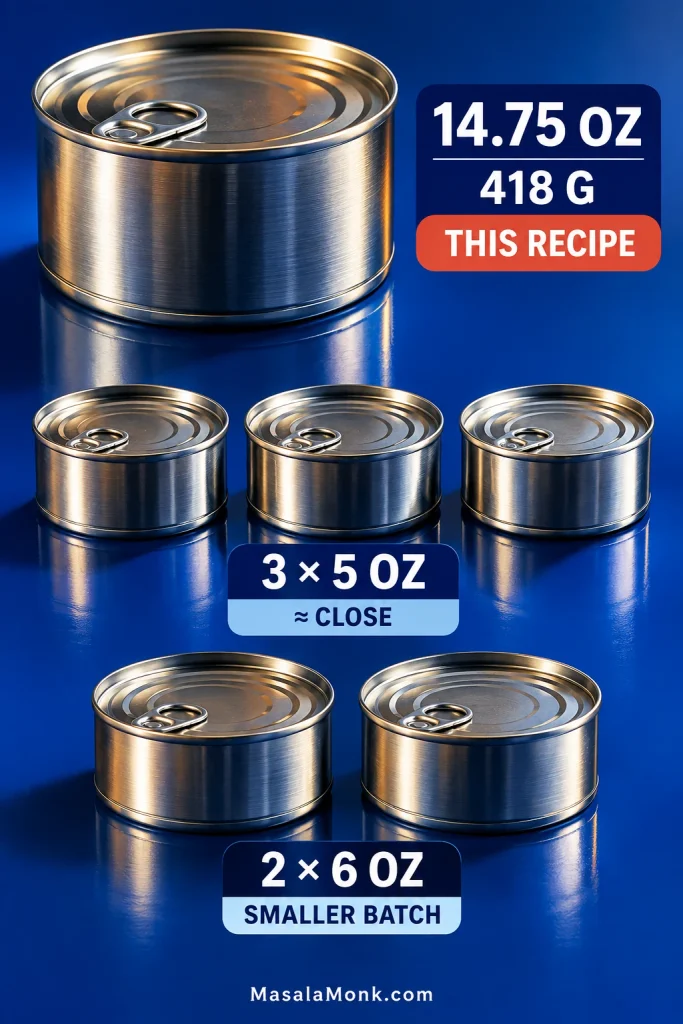
This recipe starts with one 14.75-ounce / 418 g can before draining. Can sizes vary enough that “one can” is no longer a useful measurement by itself.

Package weight includes the packing liquid, so two cans with similar labelled weights may not leave exactly the same amount of salmon after draining.

Three 5-ounce cans are close to the labelled amount used here. Two 6-ounce cans make a smaller batch, so scale the egg as well as the crumbs instead of using a full egg and then adding extra dry binder to compensate. Beating the egg first makes it easier to use only part of it.

Can-size guide showing one 14.75-ounce / 418-gram can labeled This Recipe, three 5-ounce cans marked approximately close, and two 6-ounce cans marked smaller batch.
Use can size as a starting point, not the final adjustment. Because different packs shed different amounts of liquid, the rested mixture still decides whether the bowl needs a little more crumb or moisture.

Which Canned Salmon Works Best?

Pink or red? For a milder, generally less expensive option, pink salmon works well with the lemon, onion, and mustard in this recipe. Red salmon or sockeye gives you a stronger salmon flavor. Canned salmon can also smell much stronger straight from the can than it tastes after frying; the lemon, mustard, onion, and browned crust make the finished flavor noticeably more balanced.

Using a pouch? Pouch salmon can be drier than salmon packed with more liquid. Begin with less crumb and check the mixture after it rests.

Skin and bones? The soft canned bones are edible and can be mashed into the salmon. You do not have to make yourself enjoy them, though. Pull out the obvious bones and skin if you’d rather not deal with them.

Changed the package size? Before shaping, run the mixture check again.

What to Serve with Salmon Patties

You can lean into the comfort-food side of the dish or put something cool and crisp next to the hot patties.

  • Classic comfort: creamy mashed potatoes with peas, green beans, or corn.
  • Southern-style supper: a wedge of Southern cornbread with greens, slaw, or green beans.
  • Cold and crunchy: creamy coleslaw, either alongside the patties or tucked into a sandwich with lettuce and pickles.
  • Lighter: a sharp cucumber salad gives the plate cool crunch without another rich element.
  • Breakfast or brunch: smaller patties with eggs and grits or biscuits.

For the plate I’d make first: hot salmon patties, mashed potatoes, something green, a wedge of lemon, and cold homemade tartar sauce. Crisp crust, soft potatoes, something fresh, something sharp. Nothing on the plate is doing the same job.

Dark green dinner plate with golden salmon patties, mashed potatoes, green beans, lemon and tartar sauce; one patty is broken open near the sauce.
Keep cold tartar sauce beside hot salmon patties rather than over them. That way, each bite can pick up acidity and creaminess without softening the crust before it reaches the fork.

Make Ahead, Freeze & Reheat

Make ahead. Shape the patties up to 24 hours ahead, cover them, and refrigerate until you’re ready to cook. This matches USDA guidance for dishes containing raw egg.

Refrigerate leftovers. Cool cooked patties promptly, keep them covered, and use them within about 3–4 days, which is also the refrigerated storage window in USDA fish-storage guidance.

Freeze after cooking. Cool the patties, freeze them in a single layer until firm, then transfer them to a freezer-safe container with parchment between layers. USDA storage guidance lists cooked fish at up to about 3 months in the freezer for best quality. That is storage guidance rather than a promise that the crust will be identical after freezing.

Best Way to Reheat Salmon Patties

A skillet does the best job of bringing the fried crust back. An air fryer works well too, and the oven is handy for several patties at once. The microwave is fastest but softens the outside. Whichever method you use, USDA leftover guidance recommends reheating to 165°F / 74°C throughout.

A salmon patty reheating in a dark skillet while a metal spatula lifts one edge; the browned surface appears beneath text reading Bring the Crust Back and Skillet = Best Crust.
When you reheat salmon patties, leave space around them in the skillet. Otherwise, trapped steam works against the crisp surface you are trying to bring back.

Salmon Patties FAQ

Can salmon patties be made without eggs?

Not by simply leaving the egg out of this exact recipe. This formula relies on egg for structure, so an eggless version is better made from a recipe designed around a different binder.

Can I use fresh salmon instead of canned?

Yes—cooked fresh salmon can replace canned salmon, but raw salmon is not a direct 1:1 substitute for this recipe. Flake leftover cooked salmon gently and expect to adjust the moisture because it may be drier than canned fish. Raw salmon needs a formula built around uncooked fish.

What’s the difference between salmon patties, salmon cakes, and salmon croquettes?

There is no universally fixed difference between salmon patties and salmon cakes; the names often overlap. In American home cooking, especially in the South, “salmon croquettes” often refers to a closely related style that may lean more heavily on flour, cornmeal, coating, or a distinct frying method.


There is something satisfying about turning a can from the cupboard into six hot, golden patties. This is the kind of dinner that asks very little from the refrigerator and still gets to the table crisp, warm, and substantial.

The next can may be wetter, and another brand of crackers may absorb differently. What matters is learning what the salmon should feel like before it reaches the pan—and what the first side looks like when it’s ready to turn.

Once you know those two things, you’ll probably need the measurements less than you expect.

Posted on — Leave a comment

Tamale Casserole With Tamales: Easy Cheesy Baked Dinner

A serving of tamale casserole lifted from a red baking dish, showing browned cheese, red chile sauce, pale masa and shredded meat filling inside an unwrapped tamale.

Tamales have a way of arriving by the dozen, which is wonderful until you’ve reheated them the same way for the third time. This tamale casserole with tamales turns actual cooked tamales into a different dinner: hot filling wrapped in tender masa, sauce tucked around the edges, bubbling cheese across the top, and a few exposed spots getting lightly toasted in the oven.

The basic idea is simple: arrange fully cooked tamales in a shallow dish with a modest amount of sauce and cheese, then bake until the center is hot and the top is golden and bubbling. There is no cornbread mix, cornmeal crust, or raw masa topping here; this is simply a baked way to use tamales that are already cooked.

The leftovers do not need to be perfect. One tamale split in half? Tuck the pieces into a gap. Different fillings in the same batch? That’s fine too.

Start With the Tamales You Have

Beef, pork, chicken, cheese, green chile, beans, or a mixed box can all go into the casserole. What matters more at the beginning is whether the tamales are chilled and easy to lift, freshly cooked, frozen, or delicate from a can.

Four-panel comparison of refrigerated, frozen, freshly steamed and canned tamales, showing the different textures and conditions before making tamale casserole.
Handle tamales according to firmness: chilled ones tolerate arranging; freshly steamed and canned ones need less movement; frozen ones only need enough thawing to unwrap.

Leftover, Refrigerated or Store-Bought Cooked Tamales

The easiest kind to use. Unwrap them while they’re cold enough to hold their shape, then arrange them straight in the dish.

Frozen

They do not need to thaw completely. Get them soft enough to separate and unwrap; a colder casserole will simply need more covered heating time.

Freshly Cooked or Steamed

Let them cool until the masa is set enough to unwrap and lift cleanly. Fresh-from-the-steamer tamales can be fragile while they’re very hot.

Canned

These behave differently. They’re usually more delicate, and their packing sauce may already provide much of the moisture the casserole needs.

If you’re starting with a fresh homemade batch rather than leftovers, these pork tamales with red chile cover the tamale-making process first.

Use the formula below for fully cooked, cool or refrigerated tamales, weighed without their wrappers. Frozen tamales mostly just need more covered heating time. Canned tamales are different enough that it’s better to judge their sauce separately.

The 24-Ounce Tamale Casserole Formula

24 oz / 680 g cooked, unwrapped tamales
+ 1 cup / 240 ml thick sauce
+ 6 oz / 170 g shredded cheese
→ shallow ~2 qt / 1.9 L dish
→ 350°F / 175°C
→ cover first, uncover to finish

Weight matters more than count. Twenty-four ounces of unwrapped tamales may mean six large handmade tamales or eight to twelve smaller ones.

Add the first cup of sauce and look at the dish. You want a light coating over the tamales and a little sauce settling between them. Sauced, not flooded.

Visual formula showing 24 oz or 680 g cooked unwrapped tamales, 1 cup or 240 ml sauce, 6 oz or 170 g shredded cheese, a shallow 2-quart dish, and a 350°F oven with covered then uncovered baking.
Use 24 oz / 680 g as the baseline, then let the tamales decide whether you need the full sauce allowance.

Easy Tamale Casserole Recipe

This base recipe assumes cool or refrigerated fully cooked tamales. Tamales that are still very cold or partly frozen will need longer under cover before the final uncovered bake.

Prep 10–15 minutes

Bake about 30–35 minutes for cool or refrigerated tamales

Rest 10 minutes

Total about 50–60 minutes

Serves 4 as a main dish, or about 6 lighter portions with sides

Ingredients

  • 24 oz / 680 g cooked, unwrapped tamales, roughly 6 large or 8–12 smaller tamales
  • 1 cup / 240 ml thick red or green enchilada sauce, salsa roja, or salsa verde, plus up to ¼ cup / 60 ml more if the tamales are unusually dry
  • 6 oz / 170 g shredded cheese, roughly 1½ cups depending on the grate; Monterey Jack, cheddar, Oaxaca, or a mixture
  • To stretch the casserole, optional: up to 1 cup total well-drained corn and/or rinsed, drained black or pinto beans
  • For serving, optional: guacamole or avocado, sour cream, lime, and cilantro

Green chiles, a little onion, jalapeño, or sliced olives can join the casserole if they suit the filling. Keep those as flavor additions rather than another full cup of bulk.

Monterey Jack and Oaxaca melt especially smoothly. Cheddar brings a sharper flavor and more noticeable browning, so a Jack-cheddar blend is an easy middle ground.

Hold the extra salt for now. Tamales, enchilada sauce, cheese, beans, and chiles may already bring plenty. Taste what you’re using before seasoning the whole pan.

Equipment: a shallow ~2 qt / 1.9 L baking dish, foil or an oven-safe lid, and ideally an instant-read thermometer. With the full cup of corn or beans, a roomier ~2½ qt / 2.4 L dish may be easier to work with.

How to Make It

1. Heat the Oven

Heat a conventional oven to 350°F / 175°C. Lightly grease the baking dish if yours tends to stick.

2. Unwrap the Tamales

Remove every corn husk, paper wrapper, or other wrapping. If you’re weighing the tamales yourself, the 24 oz / 680 g refers to the cooked tamales after those wrappers are removed.

Newly steamed tamales should cool until the masa is set enough to lift without slumping apart.

3. Fit Them Into the Dish

Arrange the tamales snugly, mostly in a single layer. Keep them whole when they fit. Large tamales can be halved lengthwise, and broken pieces can fill the gaps.

Don’t chase a perfectly neat arrangement. A split tamale or one lying sideways in the corner will bake just fine.

Overhead view of unwrapped tamales arranged mostly in one layer in a shallow baking dish, including whole, halved and broken tamales filling the gaps.
Broken pieces are fine in the gaps; a mostly single layer matters more than neat rows because stacked tamales heat less evenly.

4. Add the Sauce

Spoon 1 cup / 240 ml sauce over and around the tamales. Add any well-drained corn or beans now.

The sauce should coat the tamales without collecting in a deep pool underneath. Very dry tamales may need some or all of the extra ¼ cup / 60 ml; moist tamales may need none of it.

Three tamale casserole pans labeled Too Dry, Just Right and Flooded, comparing too little sauce, a light coating between visible tamales, and excessive pooled sauce.
You should still see masa before baking. Visible ridges leave room for sauce to settle without drowning the tamales.

5. Add the Cheese

Scatter the 6 oz / 170 g cheese evenly over the pan, leaving a few tamale edges exposed so they can toast a little at the end.

Quick pan check: you should still be able to see the tamales, and moving the dish should not send a wave of sauce across the bottom.

6. Cover and Bake

Cover and bake for about 20 minutes. Tent foil slightly so it does not sit heavily on the cheese; lightly grease the underside if the pan is very full.

7. Uncover and Finish

Remove the foil or lid and bake for another 10–15 minutes. The cheese should melt completely and pick up a few golden spots while exposed masa edges toast lightly.

Three-stage tamale casserole comparison showing the dish covered with foil, then uncovered with melted cheese, and finally browned and ready to serve.
Cover first to warm the tamales gently; uncover at the end so moisture can escape and the cheese and exposed masa can brown.

Check the temperature in the center of a tamale near the middle of the dish—not just in the hot sauce bubbling around it. It should reach 165°F / 74°C.

Food thermometer inserted into the center of an unwrapped tamale in a casserole, with the display reading 165°F and 74°C and text directing the reader to check the tamale rather than the sauce.
Check a center tamale, not the bubbling sauce. Reheated leftovers should reach 165°F / 74°C in the middle.

The tamales should still be easy to recognize beneath the cheese: tender masa, hot filling, and sauce gathered around them rather than swallowing them.

8. Rest for 10 Minutes

Let the casserole stand for 10 minutes. The bubbling settles and the tamales become easier to lift without pulling apart.

On the plate, you should still be able to recognize the tamale: tender masa around a hot filling, melted cheese above it, and enough sauce nearby to swipe up with each forkful.

Starting with canned tamales? Check the canned-tamale notes before using the full base amount of sauce.

Adjust This Batch · Frozen Tamales · Canned Tamales · Back to Top

Adjusting the Casserole

Most batches only need small adjustments: a roomier pan, a little less sauce, or more covered heating time.

Weight and Pan Fit

“Six tamales” can mean very different things. Six small supermarket tamales may barely fill a pan that six generous handmade tamales completely cover. That’s why the recipe scales by cooked, unwrapped weight first and count second.

Cooked, unwrapped tamalesSauce guideCheese guidePan
24 oz / 680 g1 cup / 240 mlAbout 6 oz / 170 gShallow ~2 qt / 1.9 L
36 oz / ~1 kgUp to 1½ cups / 360 mlAbout 9 oz / 255 gShallow 2½–3 qt / 2.4–2.8 L
48 oz / 1.36 kgUp to 2 cups / 480 mlAbout 12 oz / 340 g9×13 in / 23×33 cm if the tamales fit mostly in one layer

The larger amounts scale directly from the base recipe, but that does not mean every drop of sauce belongs in the dish. Moist tamales, saucy fillings, canned ingredients, and wet add-ins can all justify holding some back.

Choose the next-size-up dish before you start stacking tamales. When very large tamales make the pan awkward, halving a few lengthwise is better than building a second layer.

Working with the base batch instead? Return to the 24-ounce formula or go back to the recipe.

Scaling guide for 24, 36 and 48 ounces of cooked unwrapped tamales, showing increasing sauce and cheese amounts and progressively larger shallow baking dishes.
When the batch grows, go wider before going deeper; keeping a similar depth helps larger pans heat like the base recipe.

Sauce and Moisture

Keep enough sauce nearby for the batch, but stop when the dish looks right. Before baking, tilt it slightly. A little sauce moving between the tamales is fine; a noticeable wave rushing to one side means the pan already has plenty.

Corn, beans, and chiles bring moisture of their own. Drain canned ingredients well and leave behind any puddle from thawed frozen corn.

Red enchilada sauce or salsa roja gives beef and red-chile pork a deeper chile note. Salsa verde works especially well with cheese and green-chile pork, while chicken is good with either.

A thicker roasted salsa verde is particularly useful here because it clings to the tamales instead of running to the bottom of the pan.

Red and green tamale sauce pairing display with red chile sauce beside meat-filled tamales and salsa verde beside cheese and green-chile tamales, with chicken shown as suitable for either.
Choose red or green by filling, then watch consistency: a thicker sauce clings to masa instead of pooling underneath.

Keep the casserole moderate when different people want different levels of heat. The pepper sauce guide can help with something hotter for the table.

If the pan is already looking too wet, dry, or uneven, skip ahead to tamale casserole troubleshooting before adding more heat or sauce.

Frozen Tamales

Yes, fully cooked frozen tamales work here. They only need to thaw enough to separate, unwrap, and arrange in the dish.

Refrigerator thawing gives the neatest handling. For a quicker route, microwave-defrost only until the tamales separate, then assemble and bake the casserole immediately.

Packages labeled uncooked—or those that tell you to steam or cook the tamales before serving—need that cooking step first.

Freezer-dried edges can take a little of the reserved sauce. A cold center simply needs more covered time before the browning stage.

Three-stage guide showing fully cooked frozen tamales from frozen solid to separable and finally unwrapped and ready for tamale casserole.
Frozen tamales are ready for assembly once they separate and unwrap cleanly; the covered bake can handle the remaining chill.

Canned Tamales

Yes, canned tamales can work, but they need gentler handling and usually less added sauce. They’re delicate before they ever reach the baking dish, and the sauce packed around them changes how much more moisture the casserole needs.

Two 15–16 oz cans would give roughly 30–32 oz / about 850–910 g total canned product, including the packing sauce. The weight printed on the can includes that sauce, so do not plug it directly into the 24-ounce formula for cooked, unwrapped tamales.

  • Remove paper or other wrappers carefully and keep the tamales whole or in large pieces.
  • Add extra sauce only after the canned tamales and their packing sauce are in the dish.
  • Set the tamales into the dish gently. Stirring them through the other ingredients is more likely to break them apart.
Three-part canned tamale guide showing tamales in packing sauce, one delicate tamale being lifted gently, and large canned tamale pieces arranged in a shallow casserole dish.
Packing sauce already changes the moisture balance, so handle canned tamales gently and decide on extra sauce only after they are in the dish.

Expect a softer finished casserole than you would get from chilled husk-wrapped tamales. A side of quick refried beans from a can can make the meal more substantial without making the casserole itself heavier or wetter.

Want to Stretch the Casserole?

For the 24-ounce base casserole, ½ cup well-drained corn + ½ cup rinsed, drained black or pinto beans is about the most extra bulk worth adding if you still want the tamales to remain the point of the dish.

Or leave the casserole simpler and put homemade refried pinto beans on the side.

Cooking for a Crowd

A 9×13-inch / 23×33 cm dish works for many batches around 48 oz / 1.36 kg, provided the tamales still fit mostly in one layer. Once they start piling up, use a second shallow dish instead.

Two pans also make it easy to serve different tastes: one red and one green, or a meat-filled batch alongside a cheese version.

For the exact 24-, 36-, and 48-ounce amounts, see the pan-and-weight scaling guide.

Two shallow tamale casseroles served side by side, one with red chile sauce in a red pan and one with green sauce in a green pan, both topped with browned cheese.
Two shallow pans heat more predictably than one deep pan and make it easy to keep red, green, meat and cheese versions separate.

What to Serve With Tamale Casserole

The casserole already brings warm masa, melted cheese, chile sauce, and plenty of soft texture. Something fresh or crisp alongside keeps the plate from feeling heavy.

For freshness, try lime wedges, pico de gallo, pickled red onions, cilantro, jalapeños, shredded cabbage with lime, or a simple green salad. A spoonful of fresh guacamole is especially good with red chile and browned cheese.

For a more substantial meal, serve refried beans, black beans, or plain rice alongside rather than loading more into the baking dish.

Tamale casserole serving with two groups of sides: lime, cabbage, pico de gallo, guacamole and pickled onions for freshness, and rice, black beans and refried beans for a more substantial meal.
Use fresh, acidic sides to cut richness; choose rice or beans when the meal needs more substance instead.

Tamale Casserole Troubleshooting: What Happened to My Tamales?

If something went sideways, start with the pan: how wet it is, how deeply the tamales are stacked, and how delicate they were before baking.

Texture and Heating Problems

What happenedLikely reasonWhat helps
Tamales turned very softToo much free liquid or a long wet bakeNow: Let the casserole rest fully before serving. Next time: Use less sauce and drain add-ins more thoroughly.
Sauce is pooling underneathExtra sauce or water from beans, vegetables, or frozen ingredientsNow: Give the casserole a few more uncovered minutes, then rest it. Next time: Hold some sauce back or drain the add-ins better.
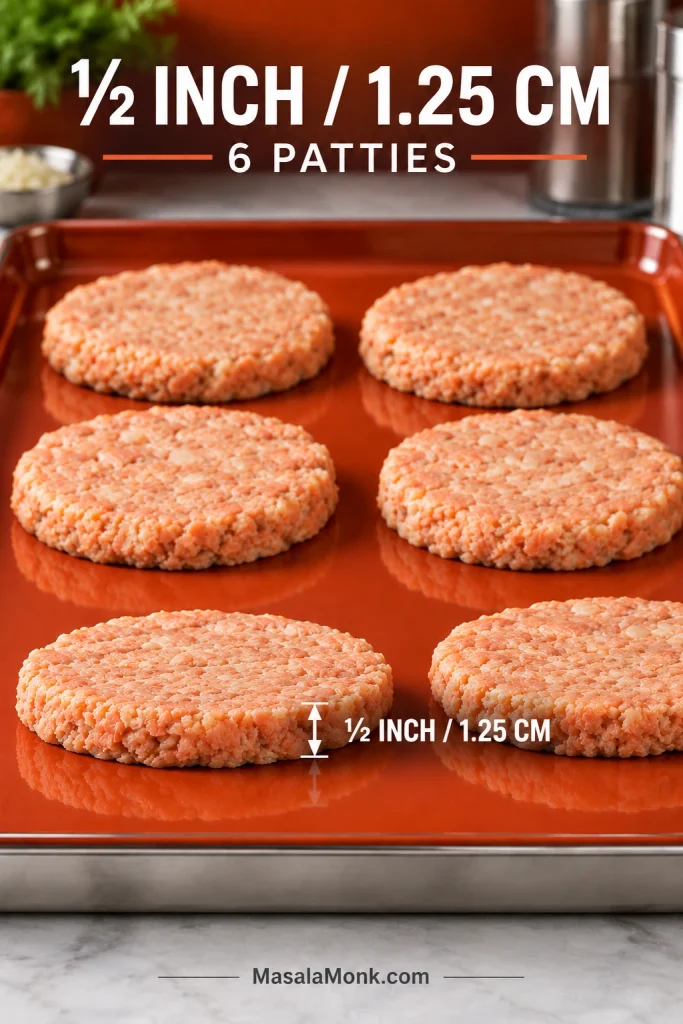
Masa is dry and crumblyFreezer drying or too much uncovered heatNow: Spoon a little warm sauce or salsa over the serving. Next time: Keep the first phase covered longer or use a little more sauce.
Cheese is browned but the middle is coldVery cold tamales or a deep, crowded panNow: Re-cover the casserole and keep heating until a center tamale reaches 165°F / 74°C. Next time: Use a shallower dish or allow more covered time.
Four-panel tamale casserole troubleshooting guide showing an overly wet casserole, dry crumbly masa, a browned casserole with a 122°F cold center, and broken canned tamales, with brief fixes for each.
Diagnose the texture before adding more heat: the fix for a cold center can make dry masa or a wet bottom worse.

Handling and Flavor Problems

What happenedLikely reasonWhat helps
Tamales broke while assemblingFresh masa had not set enough to handle cleanlyNow: Tuck the pieces into the gaps and keep going. Next time: Let a freshly cooked batch cool longer.
Canned tamales fell apartDelicate tamales plus excess handling or liquidNow: Leave the pieces where they are and finish the casserole. Next time: Move them less and check the packing sauce before adding more liquid.
Casserole tastes flatMild filling paired with mild sauceNow: Finish with lime, salsa, hot sauce, cilantro, or pickled jalapeños. Next time: Season the sauce with garlic, cumin, or extra chile before baking.
Everything tastes too saltySalt accumulated from tamales, sauce, cheese, and canned ingredientsNow: Serve smaller portions with unsalted beans, avocado, cabbage, sour cream, or plain rice. Next time: Taste the components before adding extra salt, cheese, or salty sauce.

A hot casserole that is simply a little loose may only need a few more uncovered minutes followed by the full 10-minute rest. Baking indefinitely will eventually dry the exposed masa while the bottom stays soft.
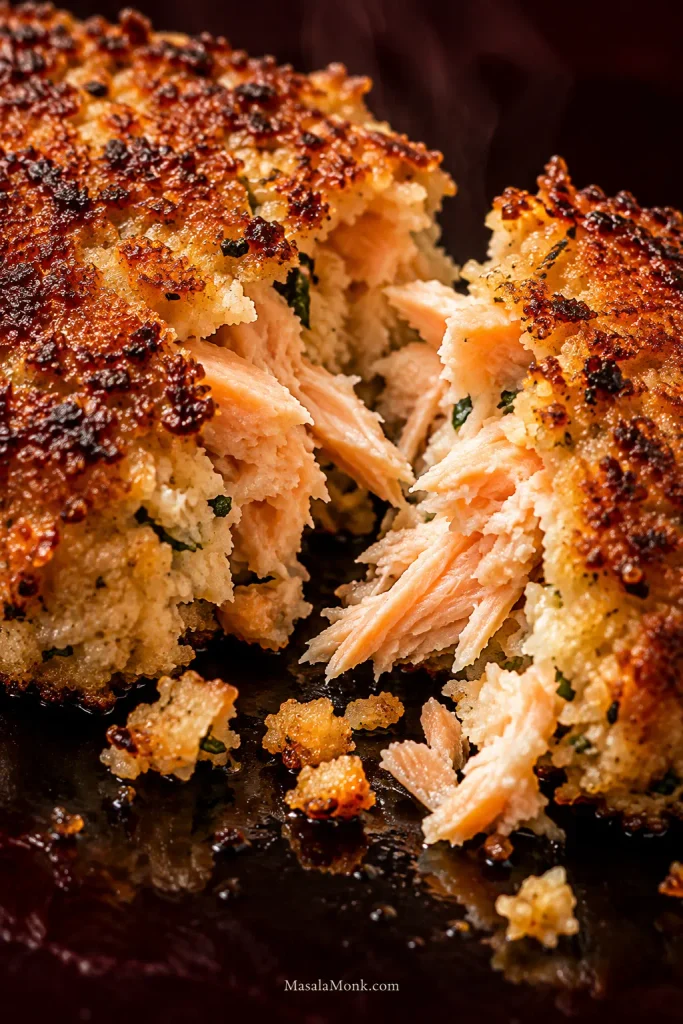
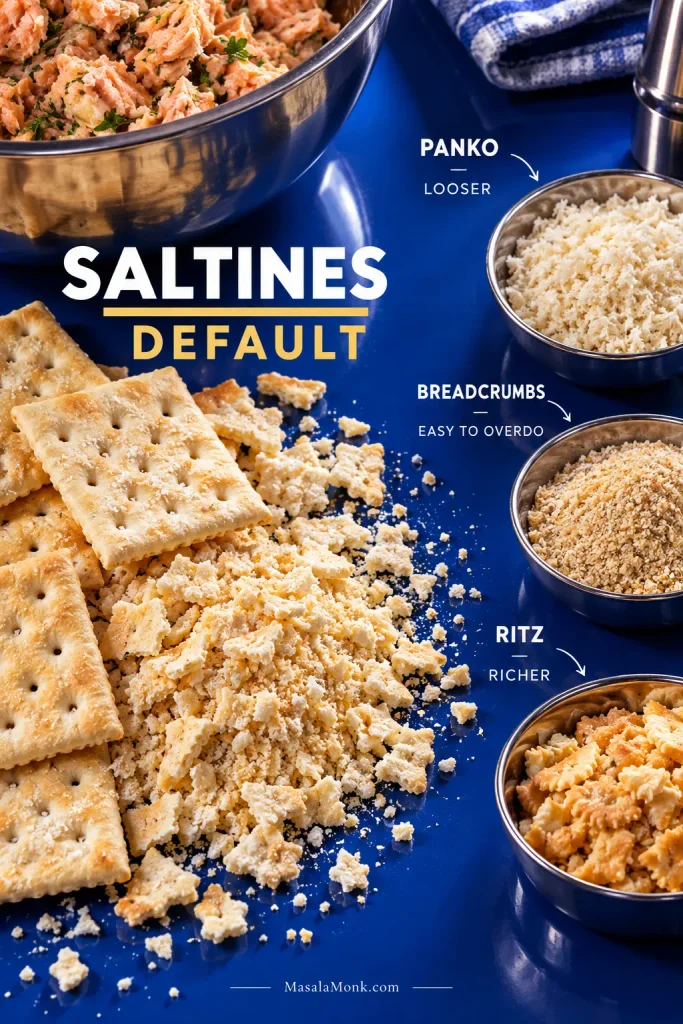
Back to Recipe · Storage & Reheating · Back to Top

Making Ahead, Storing and Reheating

Making It Ahead

You can assemble the casserole the night before. If firmer masa matters, wait to add the sauce until closer to baking. If convenience matters most, refrigerate the whole assembled dish and expect slightly softer tamales the next day.

Refrigerating and Freezing

Cooked leftovers are generally kept refrigerated for 3–4 days. This casserole, however, may begin with tamales that have already spent time in the refrigerator.

Keep their original cooking and storage date in mind instead of treating the casserole as a brand-new 3–4-day window. Freeze portions if you will not finish them promptly.

USDA FSIS recommends reheating leftovers to 165°F / 74°C and using frozen leftovers within about 3–4 months for best quality. Its leftovers and food-safety guidance also covers safe cooling, thawing, and reheating.

Wrap frozen portions well so exposed masa does not dry out in the freezer.

Reheating

Cover larger portions and reheat at 350°F / 175°C until the center reaches 165°F / 74°C. Keeping the dish covered for most of the reheat helps the masa stay soft; uncover briefly at the end if you want the top to pick up some color again.

For one serving, microwave it covered in shorter intervals, rotating the plate if your microwave heats unevenly, until the center reaches 165°F / 74°C.

What About Tamale Pie?

This casserole starts with cooked tamales. Tamale pie usually starts with seasoned meat, beans, or chile and adds a cornbread, cornmeal, polenta, or masa layer. The names overlap, but they solve different dinner problems.

If what you want next is another saucy baked dinner without individual rolling, a chicken enchilada casserole is a natural next stop.

By the time the cheese has browned and the exposed masa edges have toasted, the tamales you were tired of reheating have become a very different dinner.

Close plated serving of tamale casserole showing pale masa around shredded meat filling, browned melted cheese, red chile sauce, cilantro, pickled onion and lime on a dark green plate.

Back to Recipe · Frozen Tamales · Canned Tamales · Troubleshooting · Back to Top