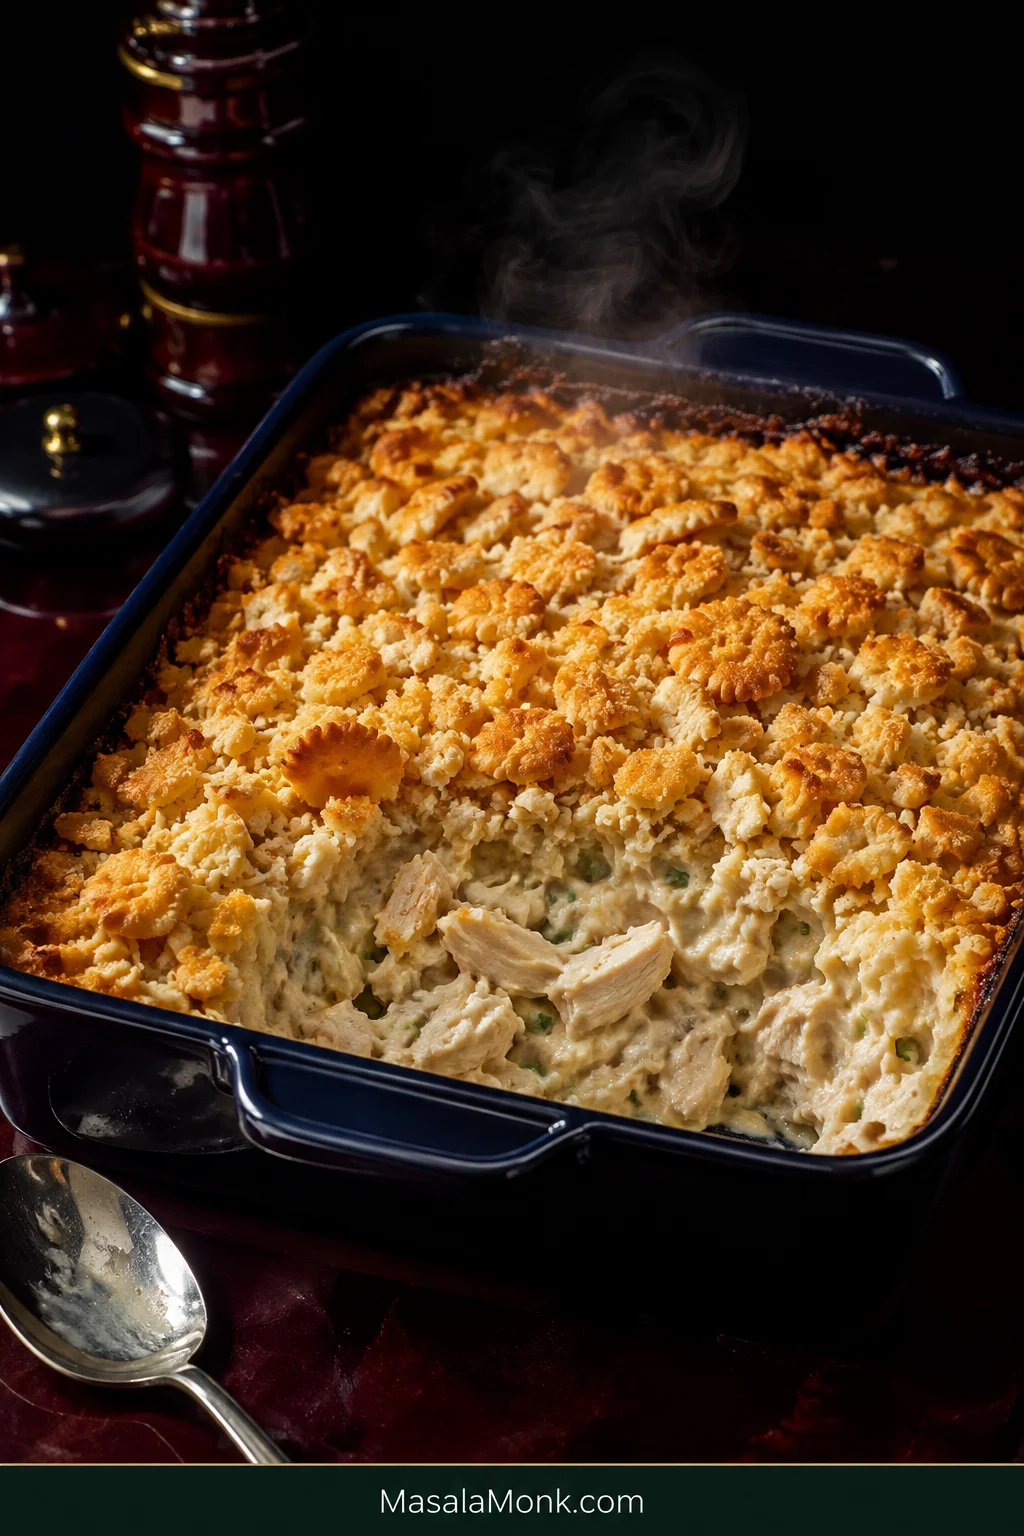
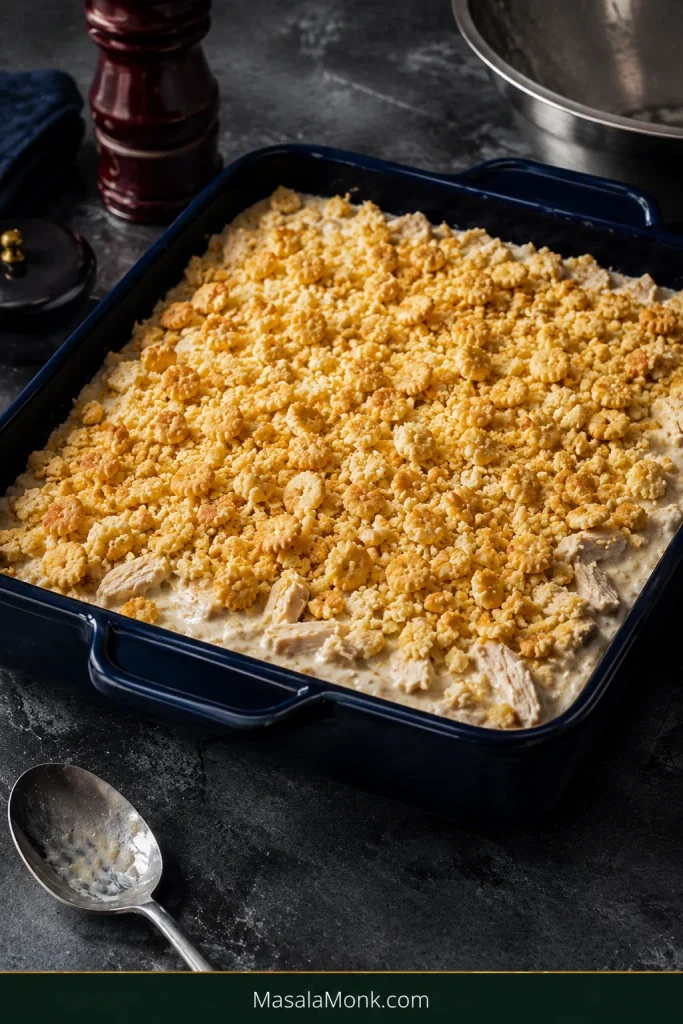
Million Dollar Chicken Casserole brings tender chicken, a rich, savory sauce and buttery golden crackers together in the kind of dinner that asks very little from you.
The best version isn’t the one with the most dairy piled into it. It’s the one where everything lands in balance: chicken with some texture, enough sauce to coat every piece, plenty of savory flavor, and crisp crumbs breaking through all that softness.
That balance is especially handy when there’s cooked chicken in the fridge and you want tonight’s dinner to feel like a new meal rather than leftovers again.
With the chicken ready, plan on about 15 minutes of prep. Mix, spread, top and bake at 350°F / 175°C. Then give the casserole 10 minutes before you scoop it so the bubbling sauce has time to settle around the chicken.
Quick Answer: How to Make Million Dollar Chicken Casserole
Mix: Combine 4½ loosely packed cups cooked shredded chicken, about 1⅓ lb / 600 g, with softened cream cheese, cottage cheese, sour cream, undiluted condensed cream of chicken soup and savory seasonings.
Spread: Spoon the thick chicken mixture into a 9×9-inch baking dish.
Top: Coarsely crush 3½ oz / 100 g buttery round crackers—roughly 30–32 Ritz crackers—and toss with 4 tbsp / 57 g melted unsalted butter.
Bake: Bake uncovered at 350°F / 175°C for 35–40 minutes, until the edges bubble, the crackers are golden and the center reaches 165°F / 74°C.
Rest: Leave the casserole for 10 minutes before serving.
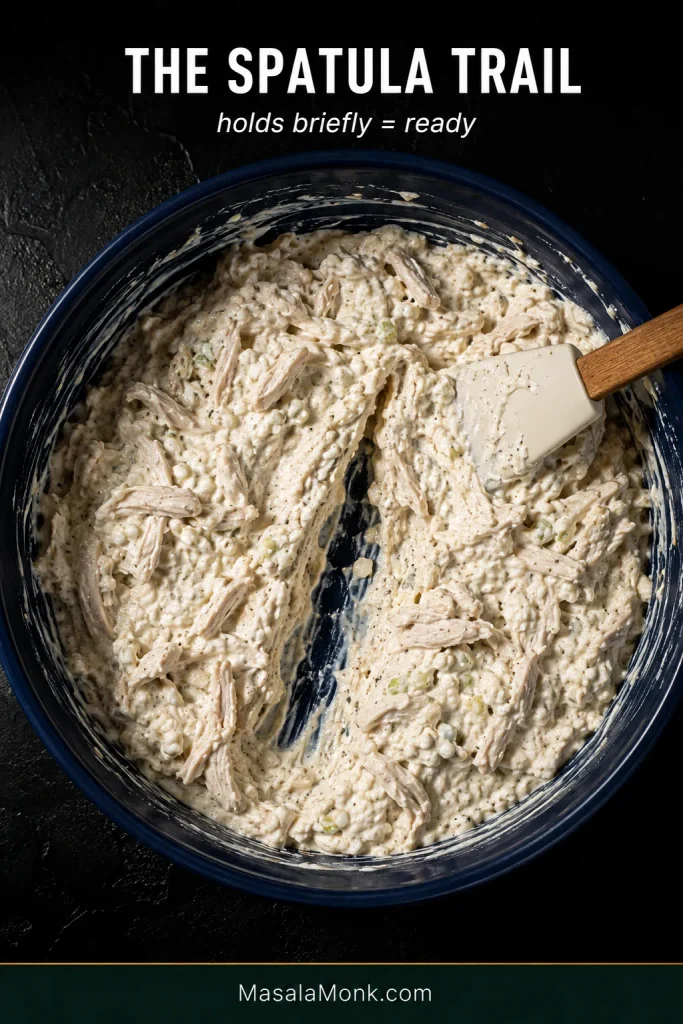
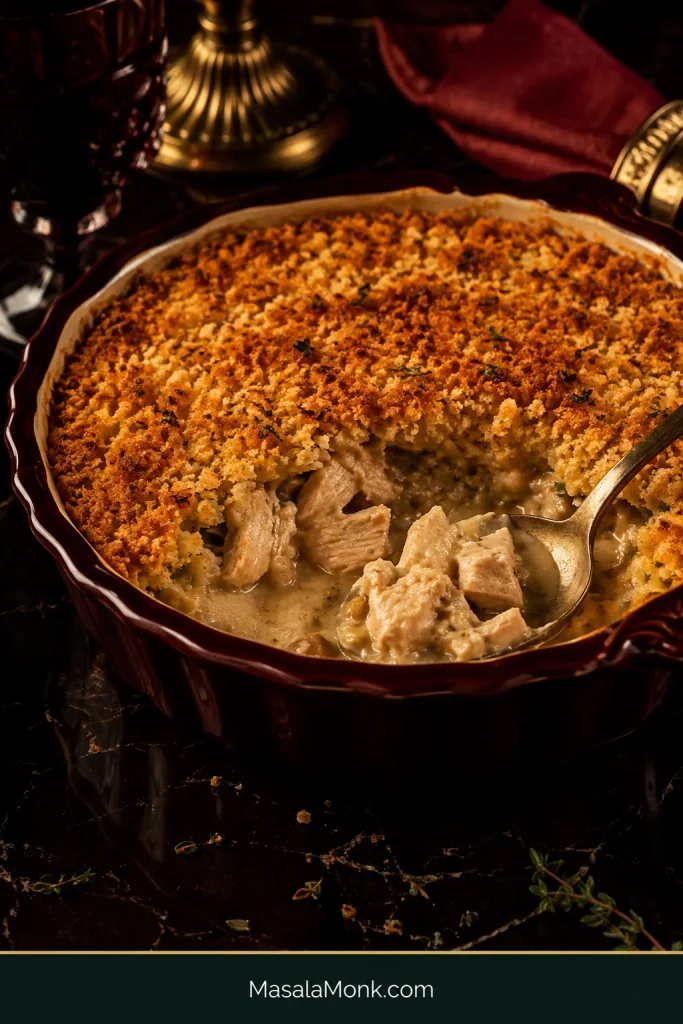
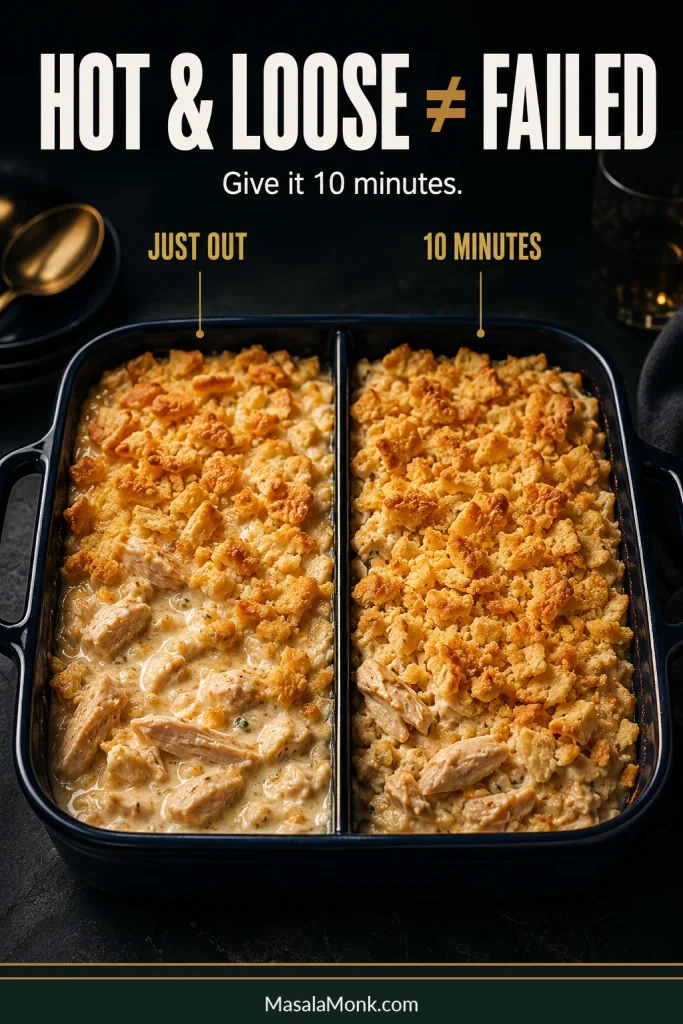
Before baking, drag a spatula through the mixture. The trail should remain visible for a moment. After resting, the finished casserole should be creamy and easy to scoop, without liquid pooling around the serving.
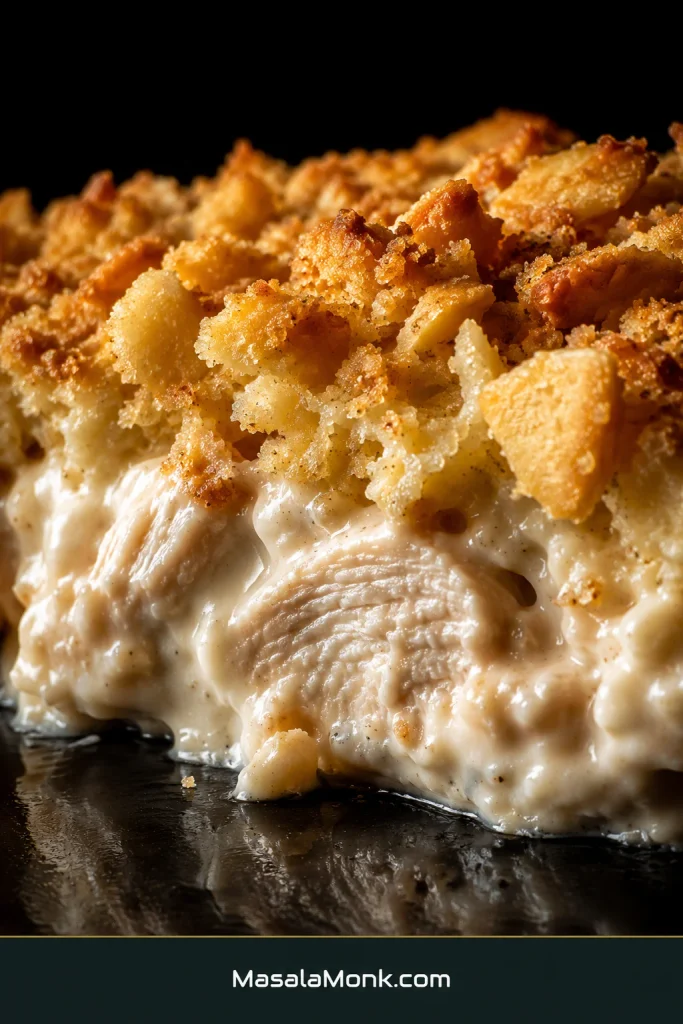
Notice the boundary between the layers: crisp crumbs stay above the sauce instead of forming a damp, soaked band where topping and filling meet.
Million Dollar Chicken Casserole Recipe
Recipe at a Glance
Prep
15 minutes
Bake
35–40 minutes
Rest
10 minutes
Oven
350°F / 175°C
Best dish
9×9 in / 23×23 cm / roughly 2 qt
Yield
6 hearty main-dish servings or up to 8 smaller portions with substantial sides
Look for
Bubbling edges, golden crackers and sauce that settles around the chicken after resting
Equipment
9×9-inch / 23×23 cm baking dish, roughly 2-quart capacity
Large mixing bowl
Small bowl for the cracker topping
Spatula or sturdy spoon
An instant-read thermometer helps with the center, especially when the casserole starts refrigerator-cold. If the dish is filled close to the rim, a sheet pan underneath can catch bubbling drips.
Ingredients
For the chicken filling
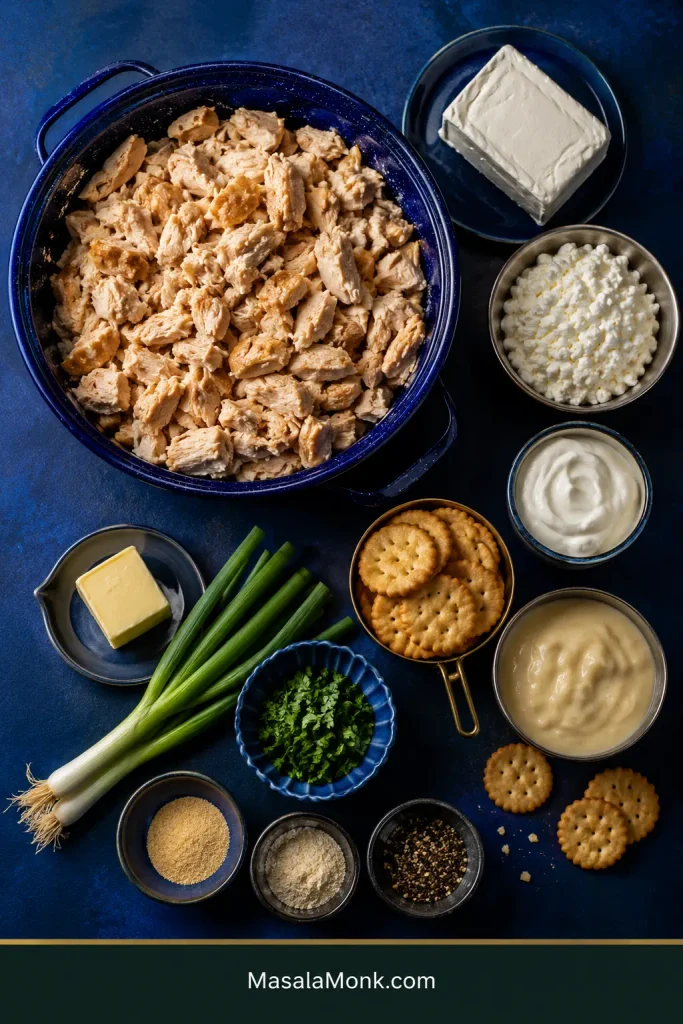
4½ loosely packed cups cooked shredded chicken, about 1⅓ lb / 600 g
1 can condensed cream of chicken soup, 10.5 oz / 298 g, undiluted; reduced-sodium is helpful when the chicken is already fairly salty
4 oz / 113 g cream cheese, fully softened
¾ cup / about 170 g small-curd cottage cheese
½ cup / about 120 g sour cream
¾ tsp garlic powder
¾ tsp onion powder
½ tsp freshly ground black pepper
2 tbsp thinly sliced scallions, optional but recommended
1 tbsp chopped fresh parsley, optional
Fine salt, only if needed after tasting
½ cup / 2 oz / 55–60 g shredded mozzarella, Monterey Jack or mild cheddar, optional for a more visibly cheesy casserole
For the buttery cracker topping
3½ oz / 100 g buttery round crackers, roughly 30–32 Ritz crackers
4 tbsp / 2 oz / 57 g unsalted butter, melted
Chicken should supply most of the bulk; the dairy is the creamy binder, not the main event.
Before you start: use the condensed soup straight from the can, without added water or milk. The cream cheese needs to be soft enough for a spatula to press through easily, while remaining creamy rather than melted or oily.
Method
Heat the oven to 350°F / 175°C and lightly grease a 9×9-inch baking dish.
Mix the sauce. Stir the softened cream cheese, sour cream and condensed cream of chicken soup until mostly smooth. Stir in the cottage cheese, garlic powder, onion powder, black pepper, scallions and parsley.
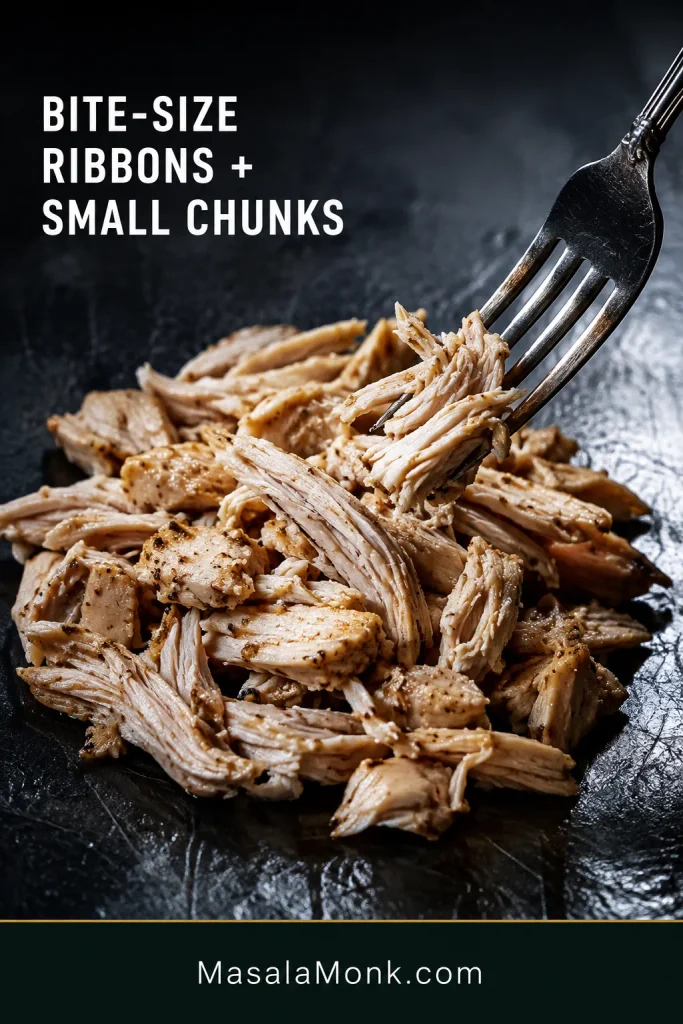
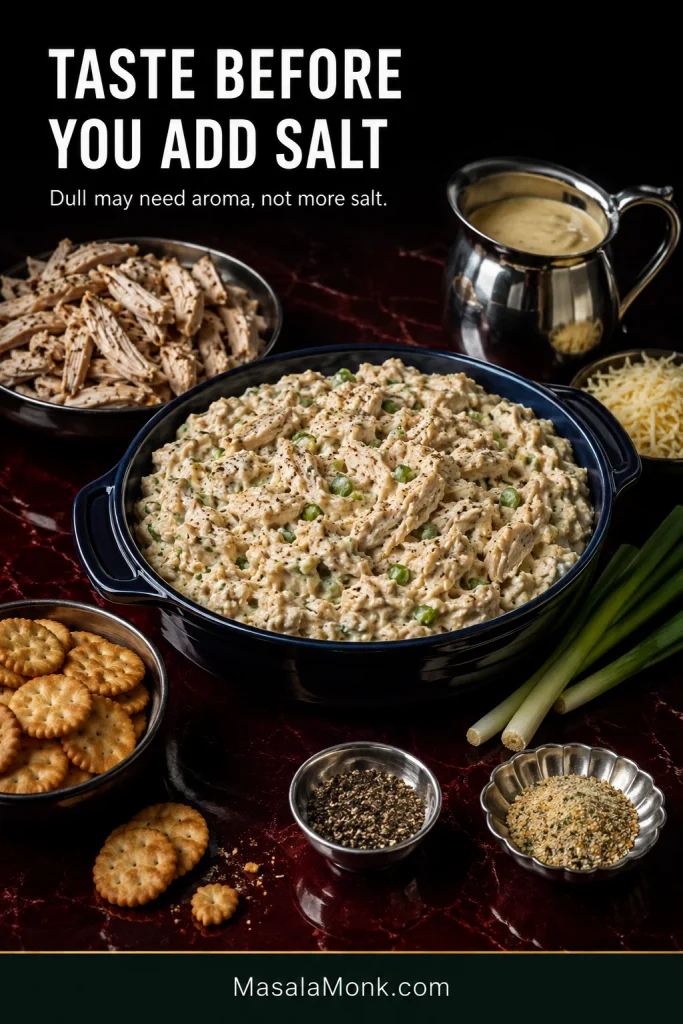
Add the chicken and taste. Keep the chicken in bite-size ribbons and small chunks so you get distinct pieces in every scoop. Fold it through the sauce gently. Taste before adding salt; if the filling is salty enough but tastes dull, pepper, garlic, onion or herbs can bring more flavor without adding more salt.
Check the Spatula Trail. Drag the spatula through the bowl once. The path needs to stay open briefly. If thin liquid immediately runs back in, check for obvious cottage-cheese whey, wet chicken or another ingredient carrying excess moisture. Spread the thick mixture evenly into the baking dish. Sprinkle the optional shredded cheese over the filling now, if using.
This check becomes especially valuable when chicken, cottage cheese or brands vary in moisture; instead of guessing from ingredients, you judge the consistency in the bowl.
Top, Bake & Rest
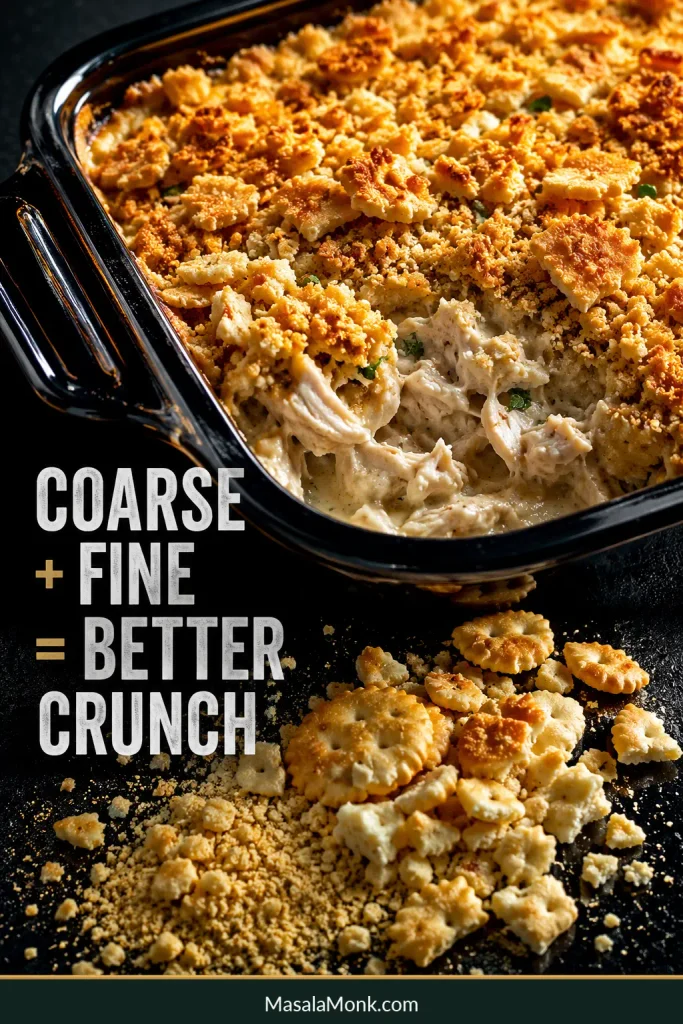
Add the cracker topping. Crush the crackers coarsely so fine crumbs sit alongside small irregular pieces. Toss with the melted butter and scatter over the chicken.
Before baking, the topping should still look dry and sit above the filling—not pasted down or saturated.
Bake uncovered for 35–40 minutes. Look for bubbling around the edges and crackers that have turned golden and toasted.
Check the center. It needs to reach 165°F / 74°C. If the topping gets deeply browned first, cover the dish loosely with foil and keep baking.
Rest for 10 minutes, then scoop and serve.
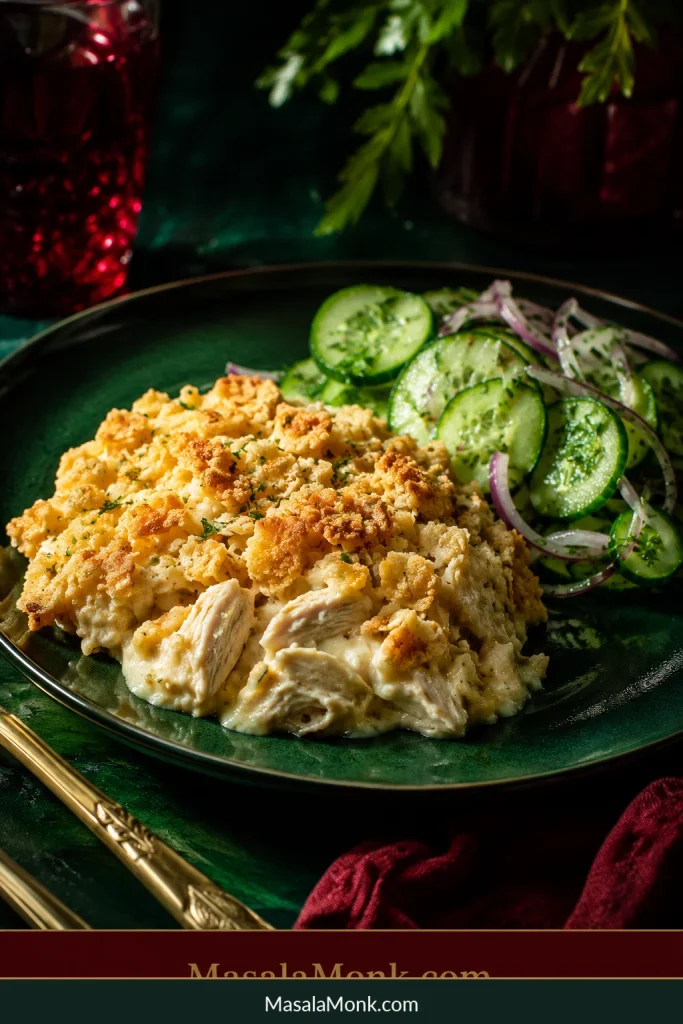
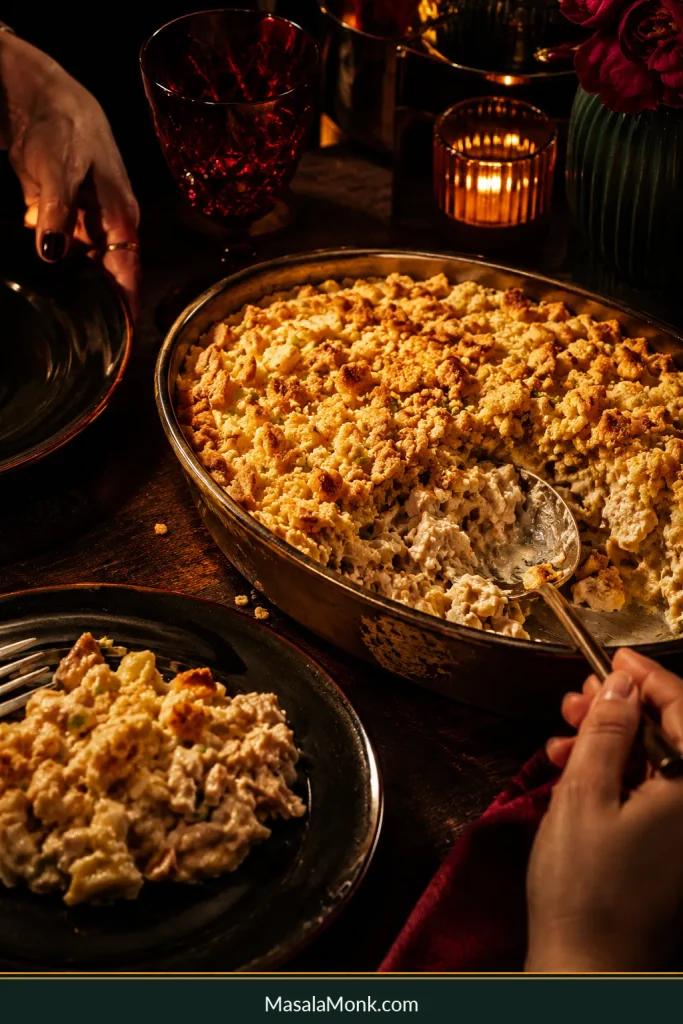
When it is right, a spoon breaks through crisp golden crumbs into tender pieces of chicken coated in a thick, pale sauce. The serving can relax a little on the plate; what you don’t want is a puddle of liquid left around it.
A little slump is normal. What matters is that the sauce stays with the chicken instead of pooling separately.
Cooking right now? Stop here—you have everything you need. The rest is optional help for substitutions, make-ahead cooking and anything that looks different from what you expected.
Million Dollar Chicken Casserole is cooked shredded chicken baked in a rich sauce of cream cheese, cottage cheese, sour cream and condensed cream of chicken soup, with buttery cracker crumbs across the top.
The “million dollar” name signals indulgent comfort food made from ordinary ingredients. Creamy dairy coats the chicken, while the toasted crackers break up all that softness with a crisp, buttery bite.
Choose Your Chicken: Rotisserie, Leftovers or Freshly Cooked
Rotisserie chicken, cooked breast, thigh and leftovers all work here. Measure the cooked meat instead of relying on “one rotisserie chicken,” since whole birds vary widely in size.
Rotisserie chicken is the quickest route. Plain or lightly seasoned meat gives you the most control; a strongly flavored bird brings those seasonings into the casserole too. Remove the skin before shredding and taste the mixture before adding salt.
Leftover roasted or baked chicken works just as well. Leave excess pan juices behind so yesterday’s chicken doesn’t carry unnecessary liquid into tonight’s dinner.
Canned chicken can work in a pinch too. Drain it very well, expect a softer texture, and taste the filling before adding salt.
Freshly cooked breast is milder and leaner; thigh is richer and more forgiving. Let either cool until comfortable to handle, then tear or shred it into bite-size ribbons with a few small chunks.
Think of this as the stopping point for shredding. Once the chicken reaches irregular bite-size pieces, pulling it further only makes those pieces easier to lose in the sauce.
Cooking chicken specifically for this dish? This baked chicken breast recipe gives you juicy cooked meat that is easy to cool and shred.
Can You Use Raw Chicken?
Not in this version. The timing assumes the chicken is already cooked. Here, the oven’s job is to heat the creamy filling through and brown the cracker topping.
Raw chicken breasts baked under cream cheese, cheddar or bacon belong to a different Million Dollar Chicken Bake style with its own timing and proportions.
The Cottage Cheese Question
If you’re already looking suspiciously at the tub of cottage cheese, this is usually the ingredient that makes people pause.
Can You Taste the Cottage Cheese?
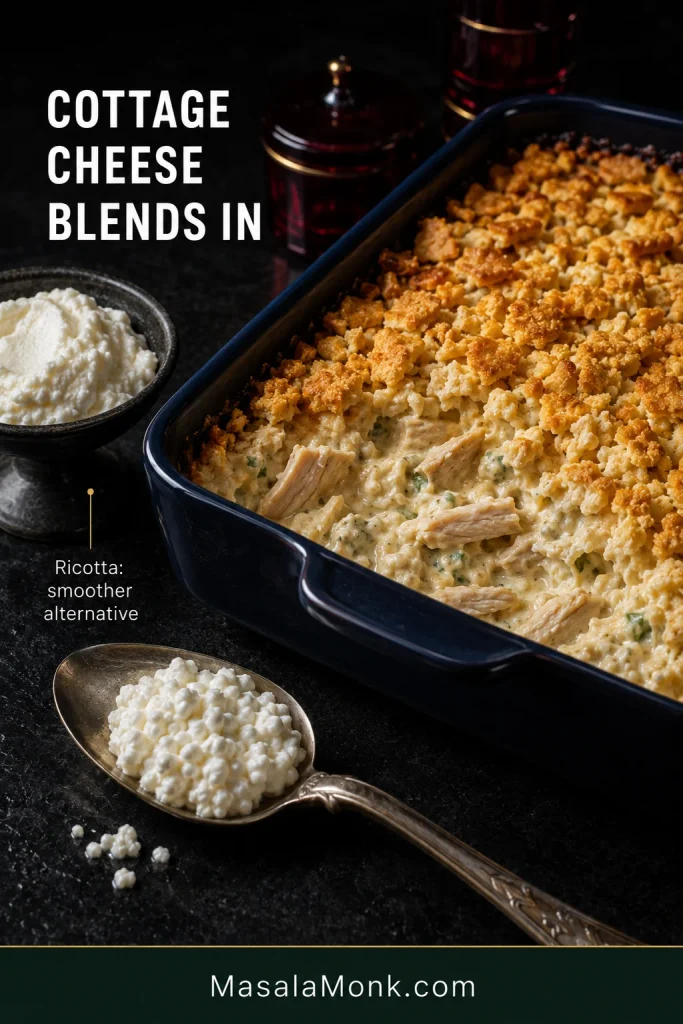
Usually not as a distinct cottage-cheese flavor. Baked with the cream cheese, sour cream, soup and chicken, it blends into the sauce and contributes mild tang and richness.
Small-curd cottage cheese is the easiest choice because the curds disappear more readily among the chicken. See a puddle of watery whey in the container? Leave the obvious liquid behind. There’s no need to squeeze the cottage cheese dry.
No Cottage Cheese? Use Ricotta
Whole-milk ricotta is a practical replacement. Start with roughly the same volume, leave behind obvious excess liquid and check that the chicken mixture remains thick and spreadable before baking.
Ricotta produces a smoother, slightly denser casserole. Simply omitting the cottage cheese removes a substantial part of the creamy base.
Blending cottage cheese is another option when you mainly want to hide the curds, although brands vary in moisture. Ricotta is the simpler choice when a completely smooth texture matters most.
Cottage cheese looks much more obvious before baking. Afterward, the curds largely disappear into the creamy filling.
The 3 Controls of a Better Casserole
For a recipe this simple, three details do most of the work: moisture, flavor and cracker texture.
1. Moisture: Creamy, Not Watery
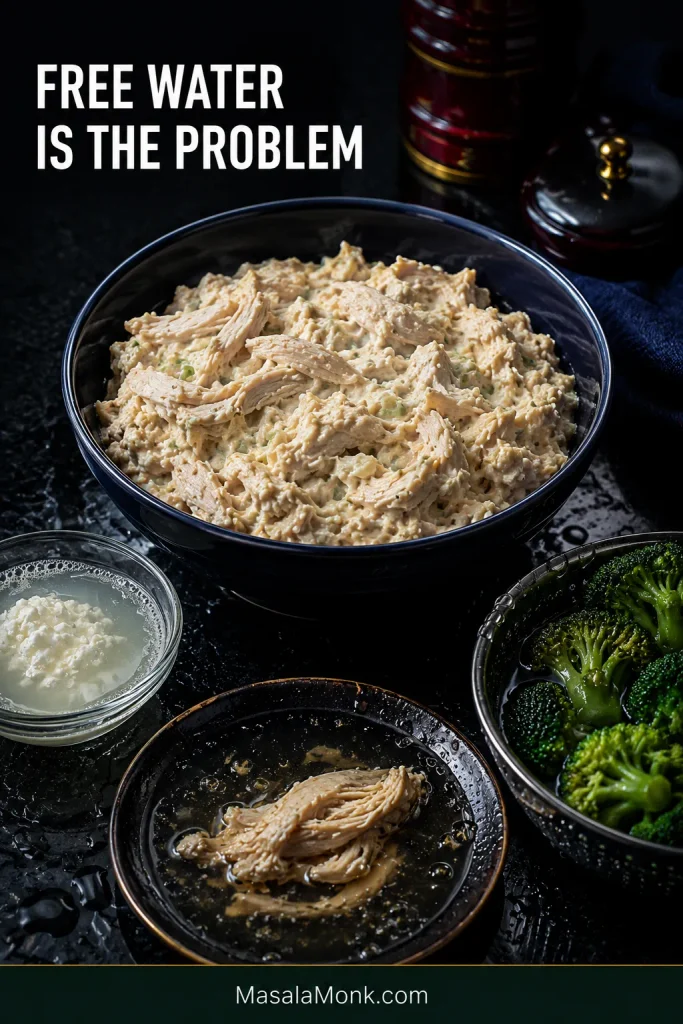
Broccoli isn’t the problem. Cottage cheese isn’t the problem. Even rotisserie chicken isn’t the problem. Free water is.
Condensed soup stays undiluted. Obvious cottage-cheese whey stays in the container. Cooking juices stay out of the bowl. Watery vegetables get drained or cooked before they go in.
A better way to judge moisture is to look for liquid that moves independently. An ingredient can be naturally moist without being a problem; free-running liquid is what changes the casserole’s balance.
The same Spatula Trail from the recipe is your quickest final check before the bowl is scraped clean. A thick mixture keeps the path visible briefly; a thin mixture closes over almost immediately.
Already baked and looking watery? Jump to Troubleshooting and judge it after the 10-minute rest.
2. Flavor: More Salt Isn’t Always the Answer
Rotisserie chicken arrives seasoned. Condensed soup and crackers bring seasoning of their own. Taste the mixed filling before adding more salt.
If the filling is salty enough but tastes dull, wake it up with pepper, garlic, onion, scallions, parsley or another salt-free seasoning.
Seasoning is cumulative. Once seasoned chicken and condensed soup are combined, ask whether the filling actually needs salt—not simply whether you have added any yet.
For a little extra spice, ½–1 tsp Creole or Cajun seasoning works well. Check the label first because the salt level varies considerably between blends.
3. Cracker Crunch: Butter Them Late
Crush and butter the crackers when you’re ready to bake. A mixture of fine crumbs and small irregular pieces gives the top a better bite than pulverized crumbs alone.
The two crumb sizes do different jobs: fine crumbs improve coverage, while larger shards add height, exposed edges and more places for the buttery topping to toast.
For make-ahead and freezer versions, store the cracker topping separately until baking day.
None of this makes the casserole delicate. Cooked chicken, condensed soup, a thick filling and freshly buttered crackers will take you most of the way there.
Look for bubbling edges, a golden cracker topping and a center temperature of 165°F / 74°C.
By then the kitchen smells buttery and toasted, and the sauce underneath has noticeably more body than it did when it first began bubbling.
Stage
What Success Looks Like
Before baking
Thick filling with a brief spatula trail
Near the end
Bubbling edges and a golden cracker topping
Center
165°F / 74°C
After resting
Creamy, scoopable filling with no puddle around the serving
When color, bake time and center temperature disagree, trust the center. Refrigerator-cold or deeper casseroles can brown beautifully before the middle has fully caught up.
Golden top, cool center? Cover the casserole loosely with foil and keep baking until the middle catches up. This comes up most often with a refrigerator-cold or unusually deep dish.
What You Can Change—and What Needs Another Recipe
Some substitutions leave the basic casserole intact. Others change moisture, starch or cooking time enough to need a different formula.
Change
Use It Here?
What to Know
Cooked breast ↔ cooked thigh
Yes
Both work; thigh gives a richer result
Ritz ↔ similar buttery crackers
Yes
Match approximately by weight because sleeve sizes vary
Sour cream → thick plain Greek yogurt
Usually
Start with roughly the same amount; choose a genuinely thick plain Greek yogurt and expect a tangier, slightly less rich result
Gluten-free soup + crackers
Yes
Check every packaged ingredient when strict gluten avoidance matters
Cottage-cheese replacement
Needs adjustment
Use another dairy such as whole-milk ricotta instead of simply omitting it
Homemade cream-of-chicken replacement
Needs adjustment
Keep it thick like condensed soup
Raw chicken
Different recipe
Cooking time and method change substantially
Pasta, noodles or rice inside the casserole
Different recipe
Those starches need additional liquid and their own cooking plan
Can You Make It Without Canned Cream of Chicken Soup?
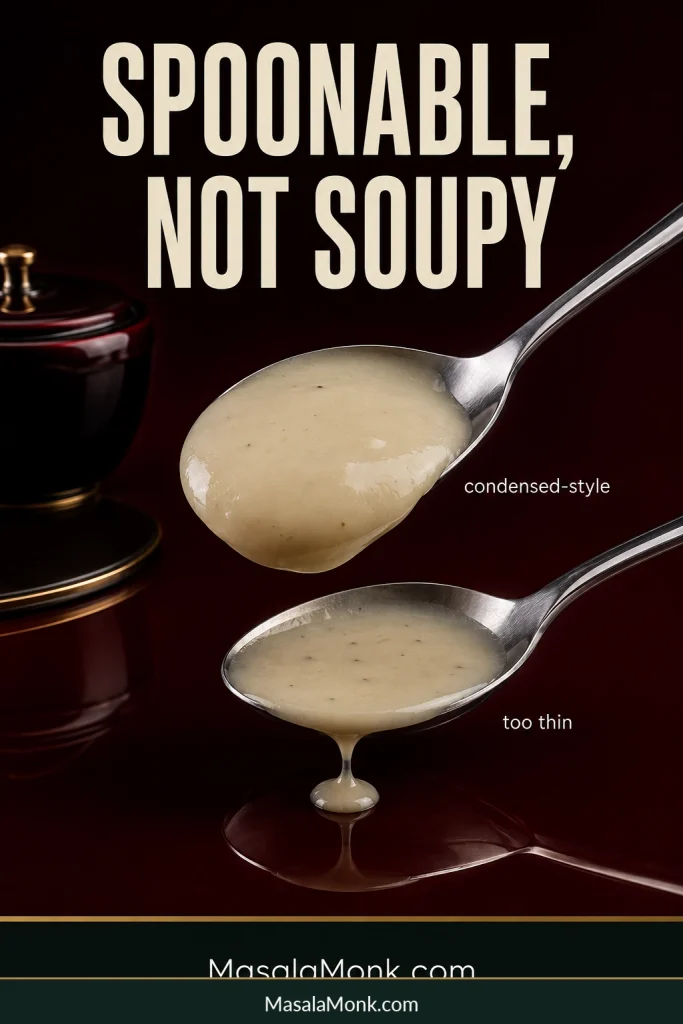
Yes, but keep the replacement thick and spoonable. Prepared cream soup is generally too loose for a direct swap.
Use about 10½ oz / 300 g of a condensed-style homemade chicken sauce with enough body to cling to a spoon.
Matching the amount of canned soup isn’t enough—the replacement also has to match its concentration. Two equal weights of sauce can carry very different amounts of free water.
Adding Vegetables Without Making It Watery
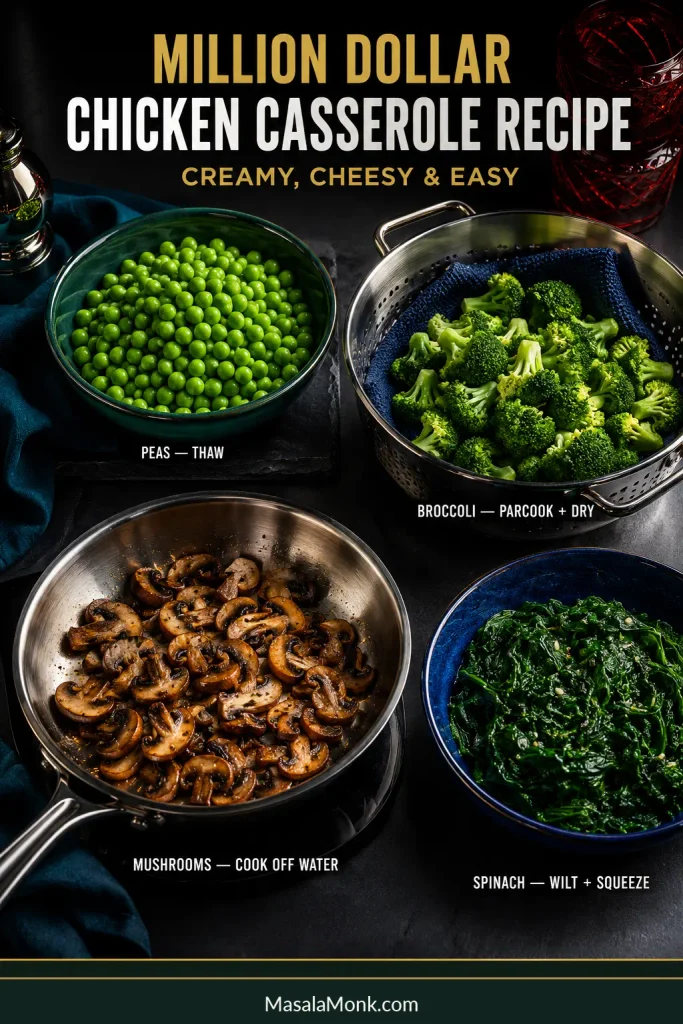
Peas are the easiest addition. Broccoli, mushrooms and spinach work too once any excess water is dealt with before they reach the casserole.
For a first try, around 1 cup of prepared vegetables is a sensible starting point for the base batch. That adds color and texture without pushing the chicken into the background.
Peas: fold them straight in; thaw first if they’re heavily coated in ice.
Broccoli: cut into small florets, blanch or parcook for 1–2 minutes, drain and pat dry.
Mushrooms: sauté until the moisture they release has cooked away.
Spinach: wilt first and squeeze well.
Measure vegetables after thawing, cooking and draining whenever possible. That way, the roughly 1-cup guideline reflects what actually enters the casserole rather than water or volume lost during prep.
If broccoli and rice are what you really want for dinner, cheesy chicken broccoli rice is built for that combination from the start.
Or keep the vegetable beside the casserole. Crispy roasted Brussels sprouts bring dark caramelized edges and a little bitterness that works especially well with the creamy chicken.
Troubleshooting
A casserole that looks loose while it is still bubbling may only need its 10-minute rest. Give it that time first. If something is still off afterward, the pattern usually points to the cause.
Troubleshooting begins after the rest, not at the oven door. Waiting those few minutes prevents a normally hot, mobile filling from being mistaken for a genuinely watery casserole.
Problem
Likely Cause
What to Do
Still watery after resting
Extra whey, wet chicken, diluted soup or a watery add-in
Serve it if needed; next time remove that excess moisture before baking
Too salty
Seasoned chicken, soup, crackers, cheese or spice blends have stacked their sodium
Use unsalted butter, consider reduced-sodium soup and taste the filling before adding salt
Salty enough but still bland
The casserole needs more aromatic seasoning
Add pepper, garlic, onion, scallions, parsley or another salt-free seasoning
Soggy cracker topping
The crackers sat on the moist filling too long or softened during reheating
Add the buttered topping just before baking; use the oven when restoring crunch matters
Cream-cheese lumps
The cream cheese went into the bowl too cold
Soften it fully and mix it into the sour cream and soup before adding chicken
Looser after reheating
Chilled dairy can release a little moisture as it reheats
Heat gently and let the portion stand briefly before serving
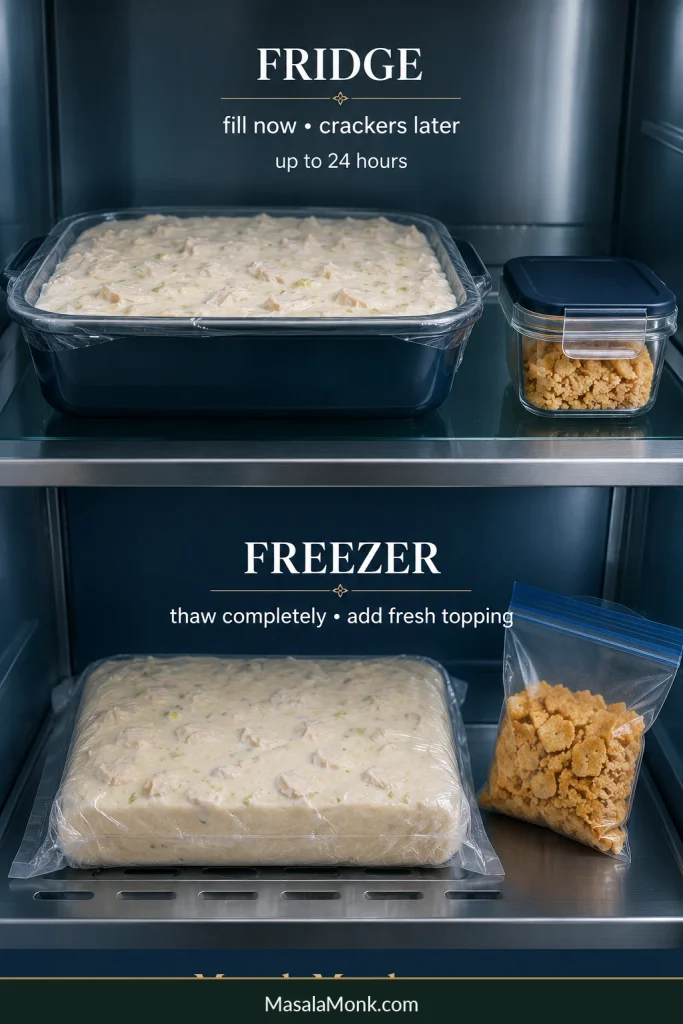
Yes. Assemble the chicken filling up to 24 hours ahead, cover and refrigerate it, then add the buttered cracker topping just before baking.
This is the useful kind of make-ahead dinner: the messy part can be finished before anyone is hungry.
A refrigerator-cold casserole often needs about 5–10 extra minutes, and a deeper dish can take longer. Start checking in that range, then let the center temperature and visual cues decide when dinner is ready.
Using glass bakeware? Follow the manufacturer’s guidance on moving the dish between refrigerator and oven temperatures.
Can You Freeze It?
The casserole freezes best without the cracker topping. Wrap it well and use it within about 3 months for best quality.
Thaw completely in the refrigerator; depending on the depth of the casserole, allow overnight or longer. Add freshly buttered crackers before baking.
Fresh gives you the smoothest sauce and crispest top. Freezing makes sense when having dinner ready matters more than getting the very crispiest topping.
Refrigerate for tomorrow; freeze for later. In either case, keep the buttery crackers separate until baking day.
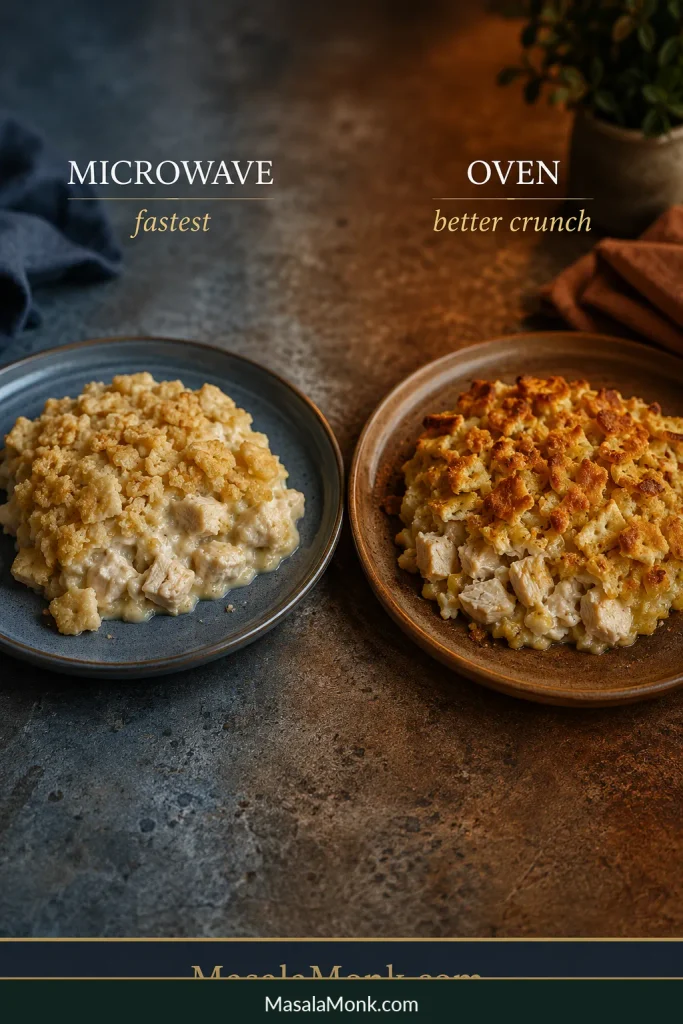
The microwave is fastest for individual portions, although the crackers soften. Oven reheating takes longer but brings back more of that toasted texture. Reheated leftovers should reach 165°F / 74°C.
For leftovers, the filling isn’t really the deciding factor—the topping is. Choose the microwave when time matters most and the oven when preserving cracker texture matters more.
Pan Size, Doubling & Feeding a Crowd
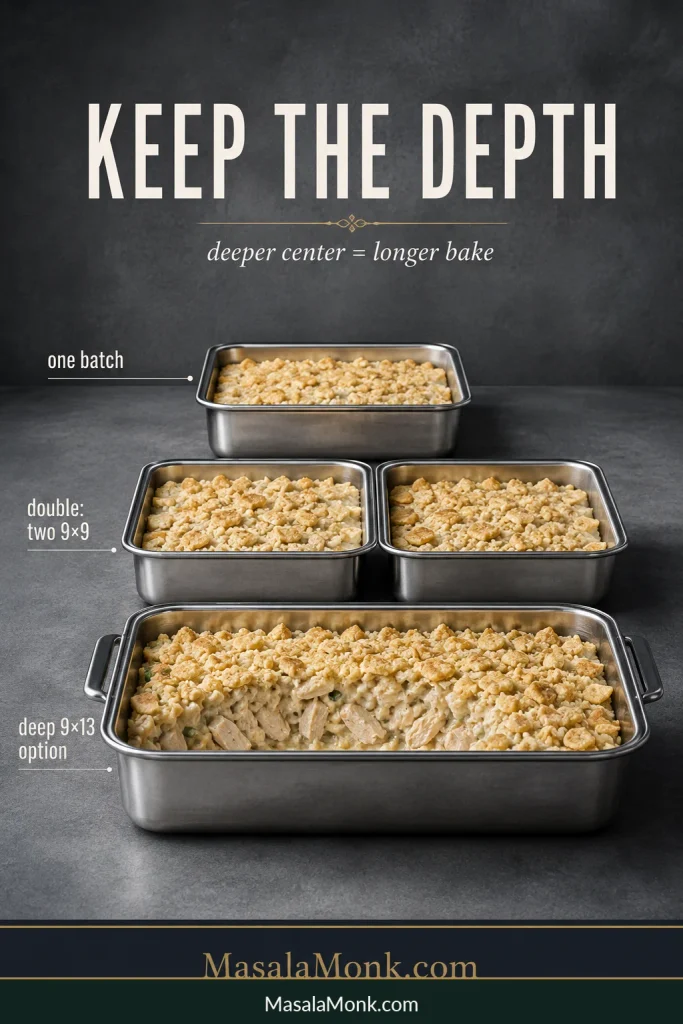
For one batch, use a 9×9-inch baking dish. When doubling, two 9×9 dishes give the most predictable result because each casserole keeps roughly the same depth as the original.
Pan / Batch
Recommendation
What Changes
9×9 in / ~2 qt
Best for one batch
Good filling depth and topping-to-chicken balance
11×7 in
Good alternative when capacity is similar
Result stays close to the base recipe
9×13 with one batch
Possible but not preferred
The casserole becomes noticeably shallower and may heat faster
Two 9×9 dishes, doubled recipe
Most predictable double batch
Depth and bake behavior stay closest to the original
Deep 9×13, doubled recipe
One-pan option
The casserole is deeper, needs good headroom and usually takes longer to heat through
Pan depth is often more informative than total area when scaling a chicken casserole. It tells you how far heat must travel before the center reaches serving temperature.
The ingredients double; the baking time usually doesn’t. Two 9×9 dishes can stay close to the original timing. A doubled batch in one deep 9×13 needs longer because the center has farther to heat.
For dinner, count on roughly 6 hearty main-course portions from the base batch. With substantial sides, it can stretch to around 8 smaller servings. A basket of soft dinner rolls makes an easy addition when you’re feeding a larger table.
What to Serve With It
Serve Million Dollar Chicken Casserole with a crisp salad or green vegetable for contrast, or add rice, rolls, egg noodles or bread for a fuller comfort-food meal.
The casserole already brings plenty of richness, so smaller portions often feel better beside something fresh, green or lightly acidic.
If vegetables are mainly there to bring freshness, keeping them beside the casserole has another advantage: you gain contrast without introducing extra moisture into the creamy filling.
Roasted broccoli, green beans, asparagus or a simple green salad work for the same reason. They don’t compete with the casserole; they give it some space.
For the full comfort-food plate, mashed potatoes, buttered egg noodles or crusty bread all fit naturally beside it.
Rice works beautifully too. Keep it on the side; if you need help with the pot itself, this guide to cooking rice covers stovetop, rice-cooker and Instant Pot methods. Dry rice or noodles baked into the casserole need their own liquid and cooking plan.
Easy Comfort Food Should Still Be Reliable
There is a reason casseroles like this get assembled before busy evenings, carried to potlucks and dropped off when somebody could use a dinner they don’t have to think about.
After you’ve made it once, most of the details turn into routine: bowl, baking dish, buttery crumbs, oven.
Then comes the best part—the smell of those crackers turning buttery and toasted, the sauce bubbling around the edges, and a few quiet minutes on the counter before the serving spoon goes in.
Once rested, the casserole should need nothing more—just a serving spoon and a place at the table.
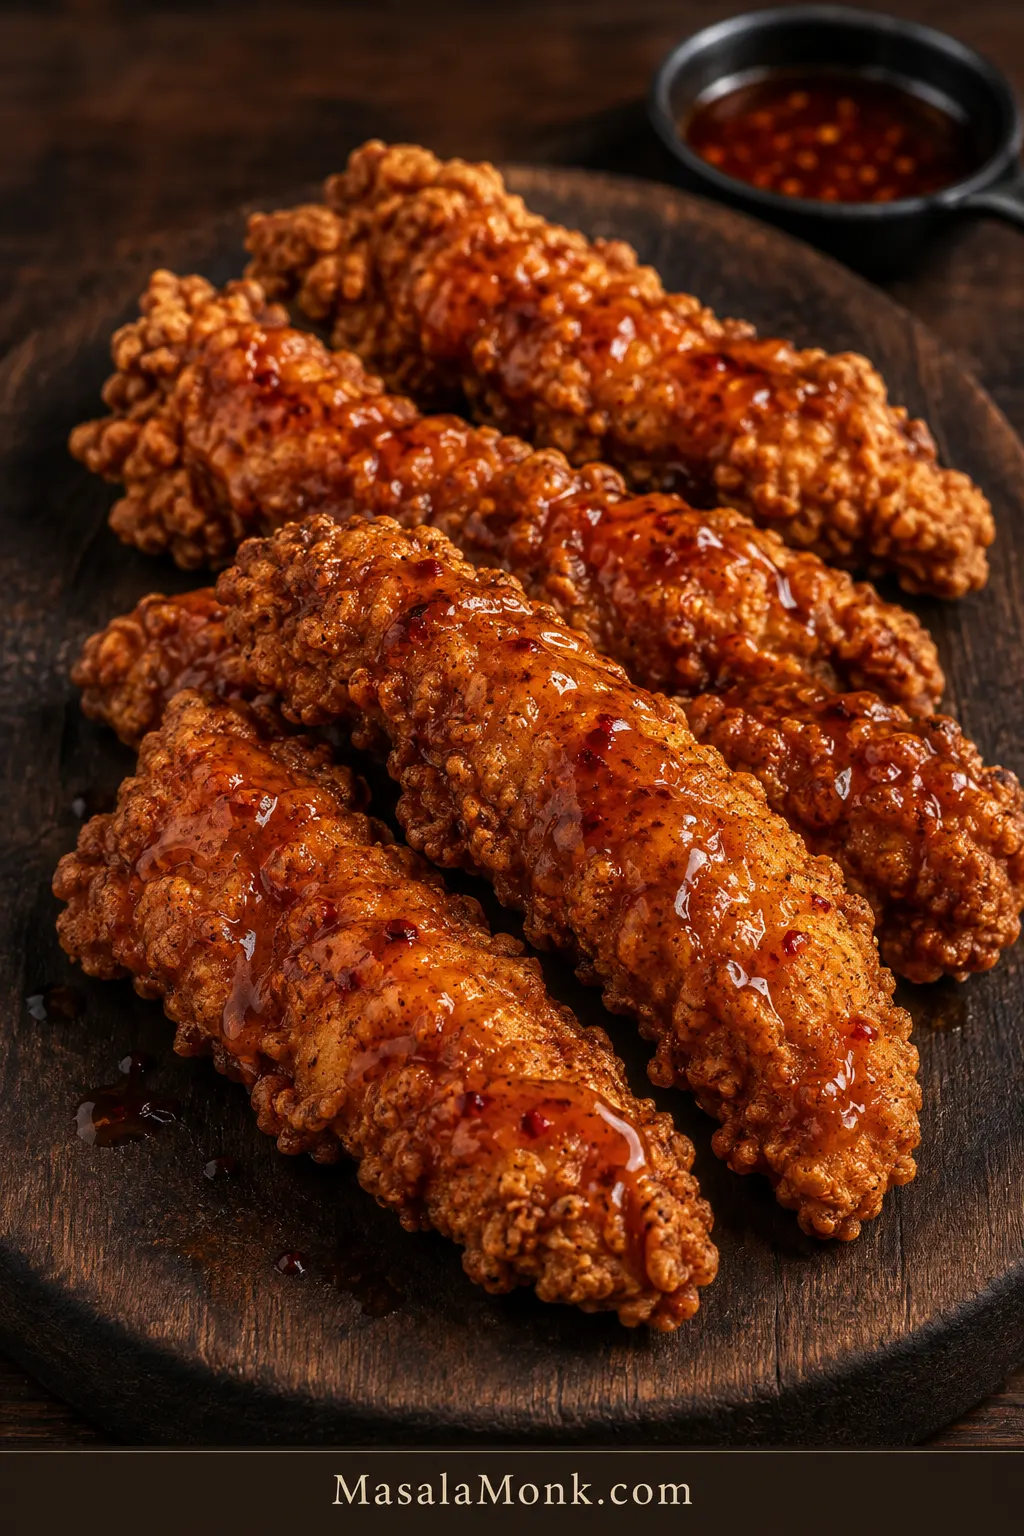
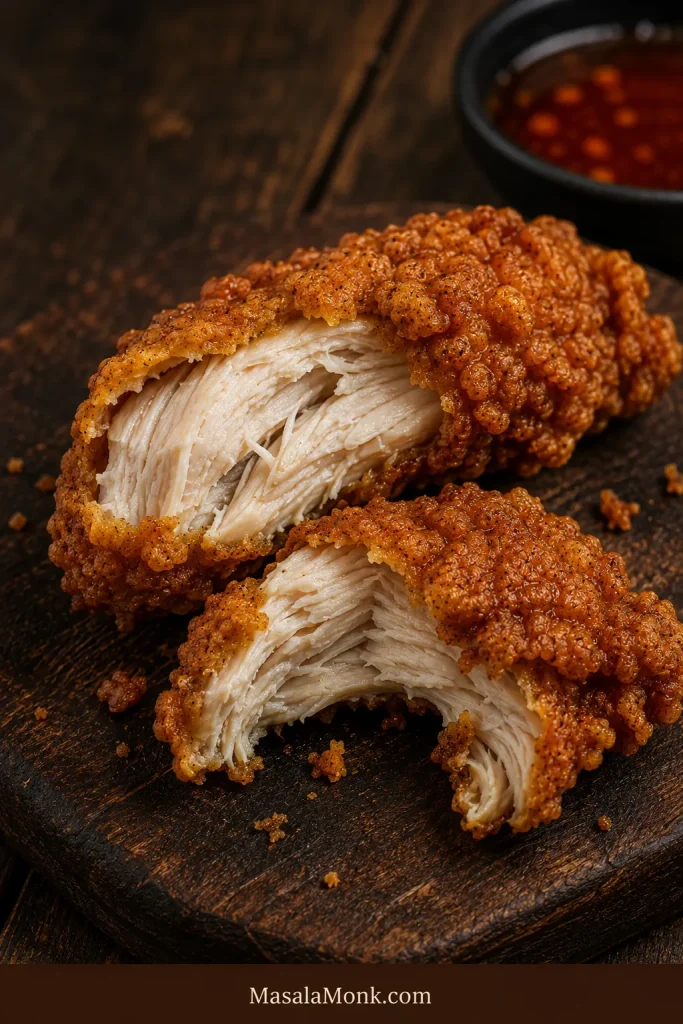
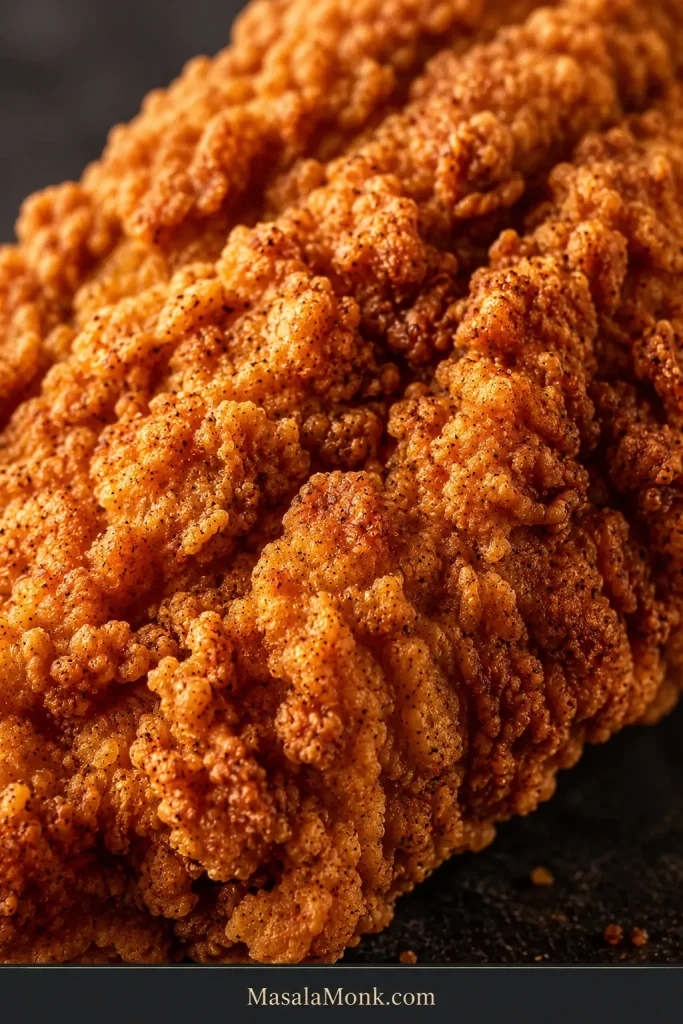
The best hot honey chicken tenders crackle when you bite through the coating, then give way to juicy chicken, sticky honey and a little heat that arrives just after the sweetness. Those rough golden ridges matter—they give the honey somewhere to catch without covering every bit of crunch.
Homemade tenders usually go wrong in a few predictable places. The breading slips off, too much chicken cools the oil, a thick piece stays underdone while the outside darkens, or the hot honey goes on so heavily that a beautiful crust turns soft almost immediately.
This version keeps those trouble spots under control without turning fried chicken into a project. The chicken is seasoned before breading, the coating gets rough little flour flakes for extra crunch, and only a few similarly sized pieces go into the oil at a time. Once the tenders hit the rack, you can drizzle, brush or toss them depending on how much crunch you want to keep.
Quick Answer: How to Make Crispy Hot Honey Chicken Tenders
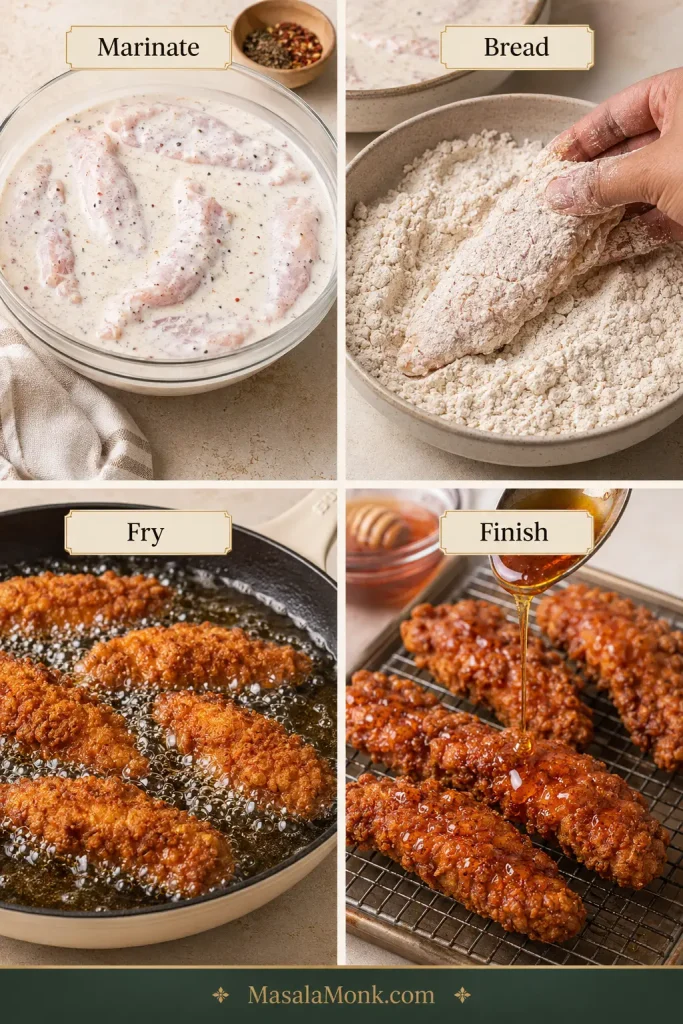
Marinate: Season 1½ lb (680 g) chicken tenders in buttermilk for at least 30 minutes; 2–4 hours gives the seasoning more time to work.
Bread: Press the chicken into a flour-cornstarch dredge with small damp flour flakes, then rest the breaded tenders for 10 minutes.
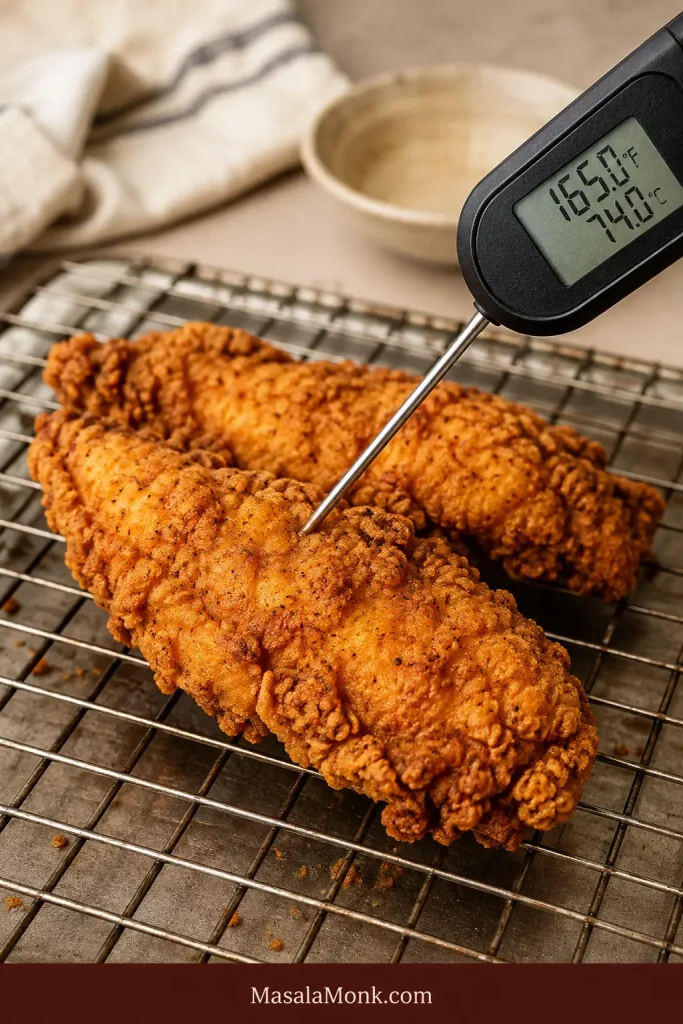
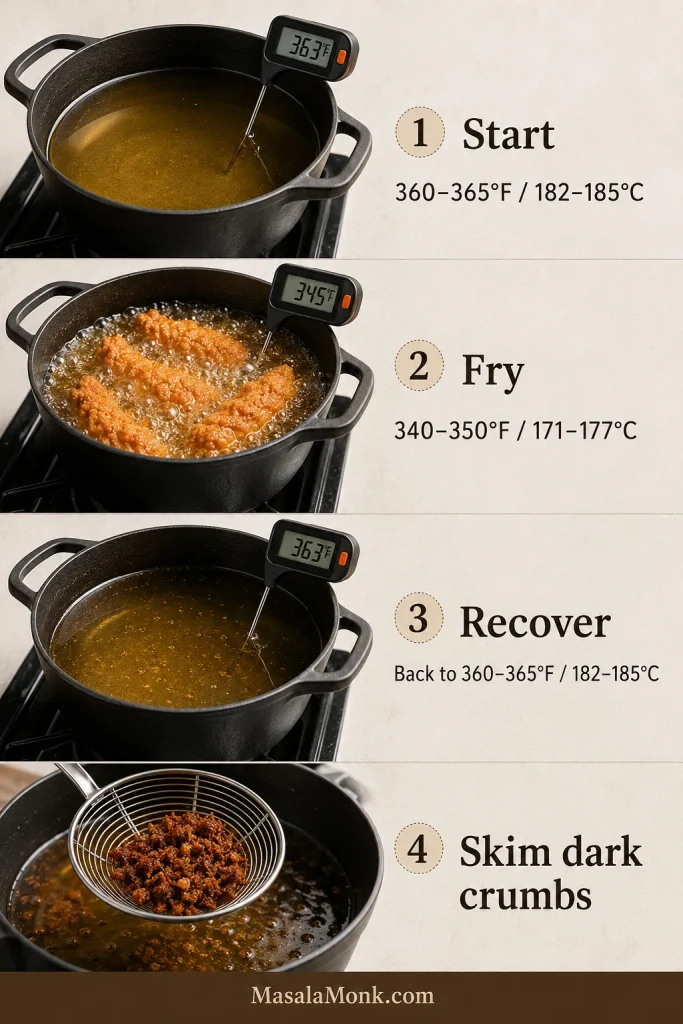
Fry: Start the oil at 360–365°F (182–185°C), keep it around 340–350°F (171–177°C) while the chicken cooks, and cook the thickest piece to 165°F (74°C).
Finish: Rest the fried chicken on a wire rack for 2–3 minutes, then add warm hot honey.
Build the crunch before frying, protect it afterward, and add the hot honey last.
Choose Your Hot Honey Finish
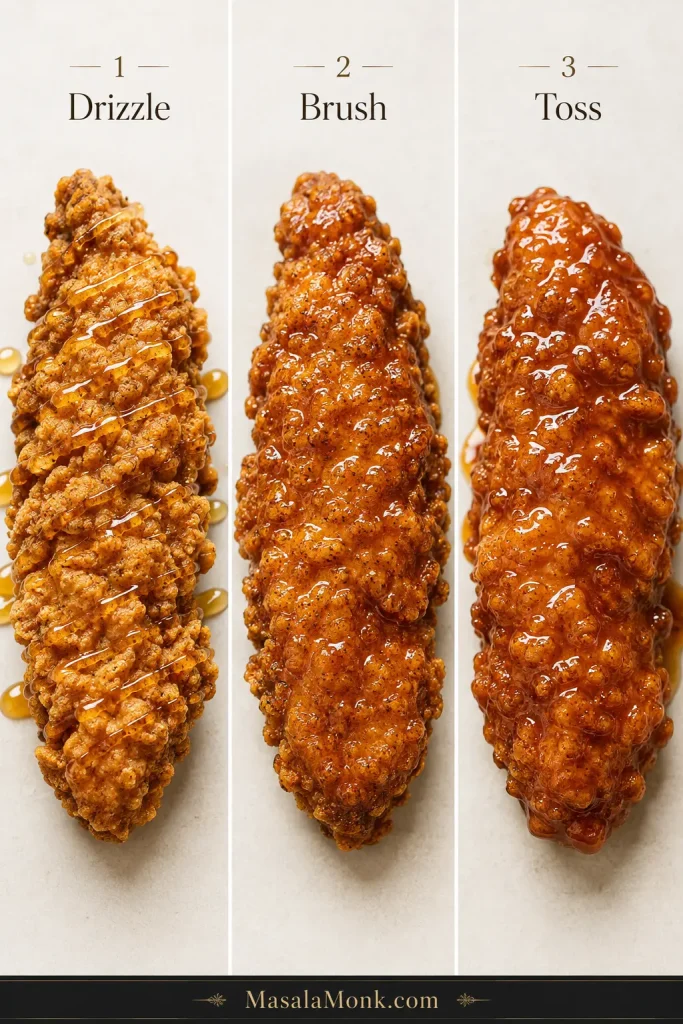
How you add the hot honey changes the bite. A drizzle leaves plenty of golden ridges exposed; a full toss fills almost every crevice with sauce.
You want
Finish
What to expect
Maximum crunch
Drizzle
Sweet heat with plenty of crisp breading still exposed. Recommended.
More even sauce
Brush
Broader coverage while much of the coating stays crisp.
Sticky glazed chicken
Toss
Maximum sauce coverage; eat it right away.
The main recipe uses the drizzle method.
Hot Honey Chicken Tenders Recipe
Craggy, deeply golden chicken tenders with juicy centers and warm hot honey that catches in the ridges instead of soaking the whole crust.
Yield: 10–12 tenders
Serves: about 4
Hands-on time: about 50 minutes
Marinate: 30 minutes minimum; 2–4 hours preferred
Total time: about 1 hour 20 minutes with the 30-minute marinade
Doubling: double the ingredients, but keep the same small frying batches
Equipment
5–6-quart heavy Dutch oven or similarly deep pot
Deep-fry thermometer or other clip-on oil thermometer
Instant-read thermometer for the chicken
Wire rack set over a rimmed tray
You will also need a parchment-lined tray or large plate for the raw breaded chicken, shallow bowls, a small saucepan and tongs or a spider/skimmer. Keep a clean utensil ready for transferring the cooked chicken.
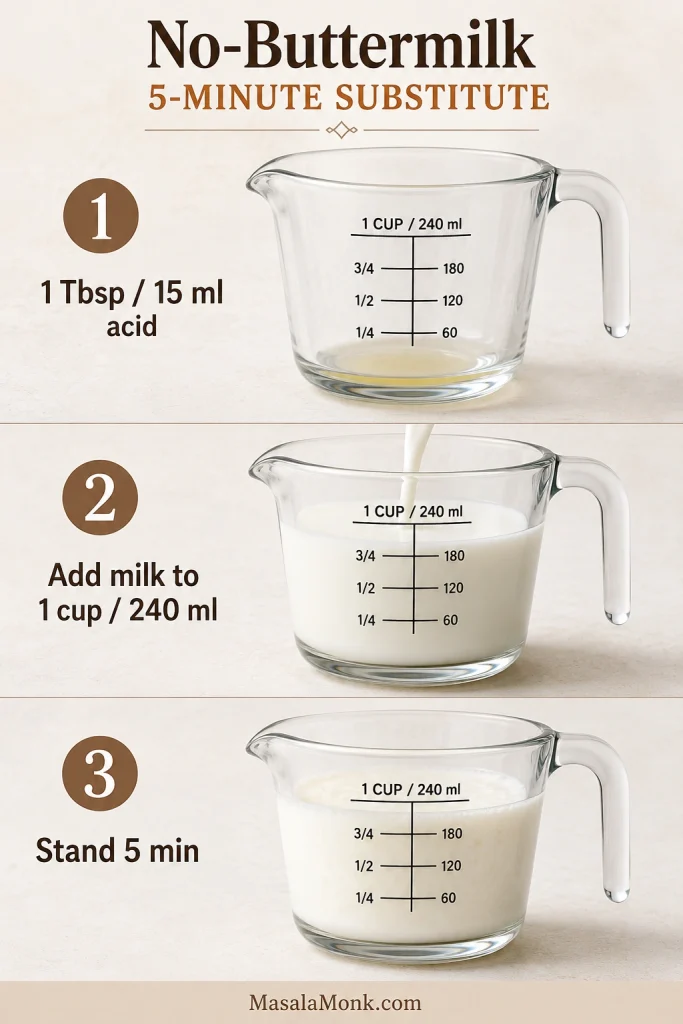
No buttermilk? Put 1 tablespoon (15 ml) lemon juice or white vinegar in a measuring cup, then add enough whole milk to reach 1 cup (240 ml). Stir and let it stand for 5 minutes.
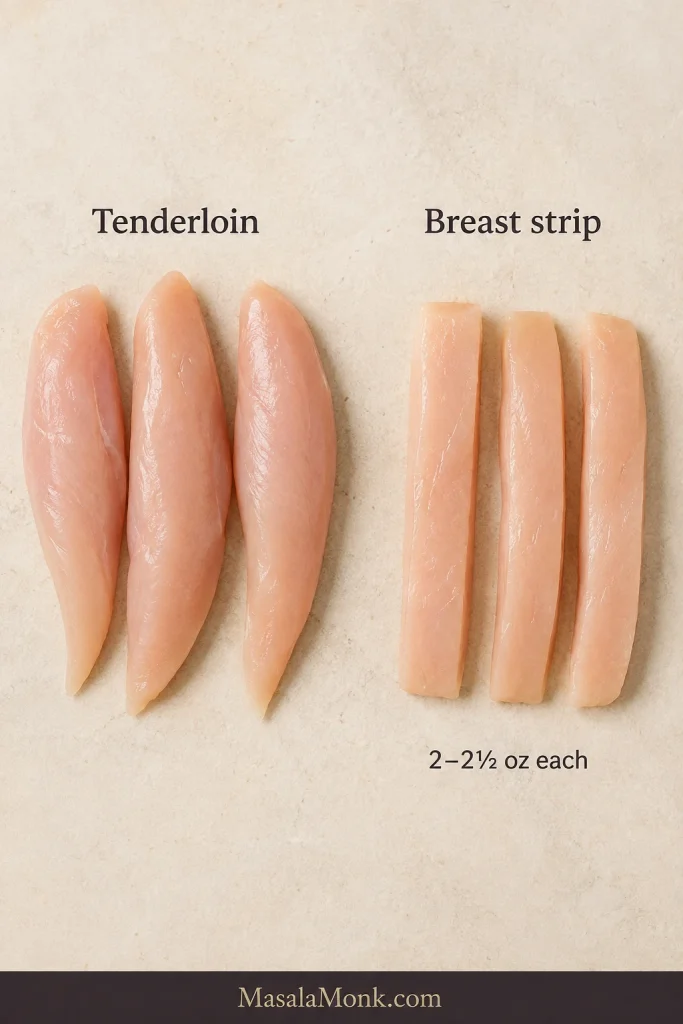
Using chicken breast? Cut it into strips ¾–1 inch (2–2.5 cm) wide and ½–¾ inch (1.25–2 cm) thick. Aim for 2–2½ oz (55–70 g) per strip.
For the Crispy Coating
1½ cups (180 g) all-purpose flour
½ cup (60–65 g) cornstarch
1½ teaspoons baking powder
8 g fine sea salt, about 1⅓ teaspoons
1 teaspoon garlic powder
1 teaspoon onion powder
1 teaspoon sweet paprika
1 teaspoon freshly ground black pepper
¼ teaspoon cayenne pepper, optional
3 tablespoons (45 ml) seasoned buttermilk mixture, removed before the raw chicken is added
If you use kosher salt, follow the gram weights rather than the teaspoon estimates because crystal size varies by brand.
For the Medium Hot Honey
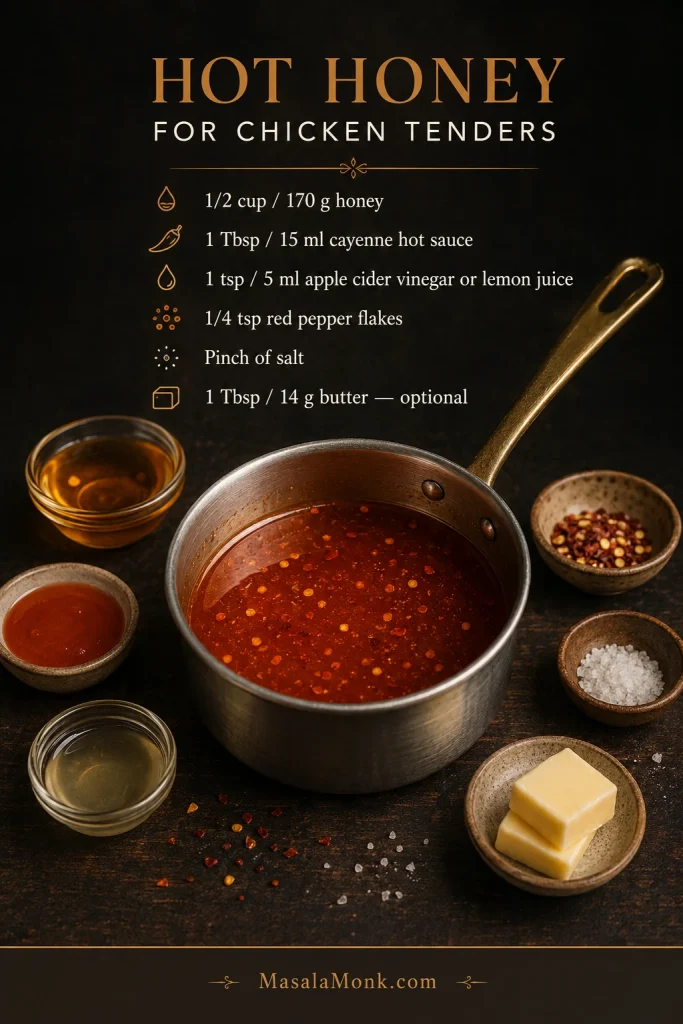
½ cup (170 g) honey
1 tablespoon (15 ml) cayenne-style hot sauce
1 teaspoon (5 ml) apple cider vinegar or fresh lemon juice
¼ teaspoon crushed red pepper flakes
Small pinch fine salt
1 tablespoon (14 g) unsalted butter, optional
Use a thin, vinegar-forward cayenne hot sauce here. Thick sriracha, chili crisp and highly concentrated pepper sauces behave differently and are not tablespoon-for-tablespoon substitutes.
1½–2 quarts (1.4–1.9 L) neutral frying oil, or enough to reach 1¼–1½ inches (3–4 cm) deep in your pot while leaving plenty of empty space above the oil
Peanut, canola, sunflower or standard vegetable oil all work well. Let the depth in your pot determine the exact amount. Fresh oil—or clean, well-filtered oil that still smells neutral—gives the cleanest flavor.
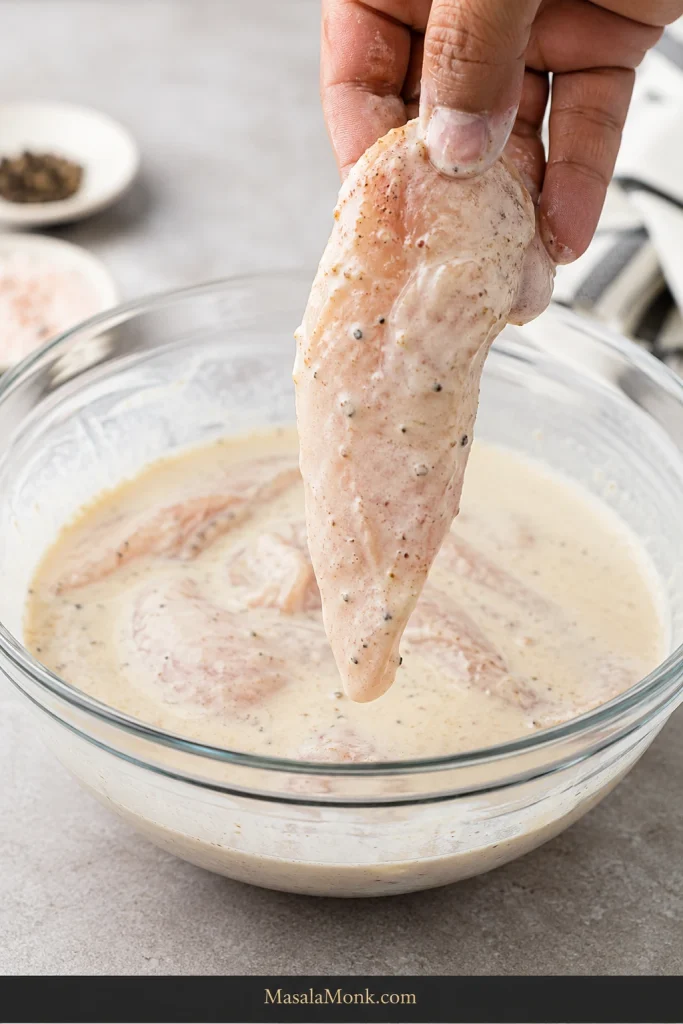
Season and marinate the chicken. Whisk together the buttermilk, hot sauce, salt, garlic powder and black pepper. Before raw chicken enters the bowl, spoon 3 tablespoons (45 ml) into a separate clean bowl for the dredge. Add the chicken, turn to coat, cover and refrigerate for at least 30 minutes. Two to four hours is ideal; these thin pieces gain little from a much longer soak.
While the chicken marinates, make the hot honey. Combine the honey, hot sauce, vinegar or lemon juice, red pepper flakes and salt in a small saucepan. Warm over low heat for 1–2 minutes, just until loose and fragrant. Do not boil. Stir in the butter if using, taste and set aside. Rewarm briefly before serving if the sauce thickens.
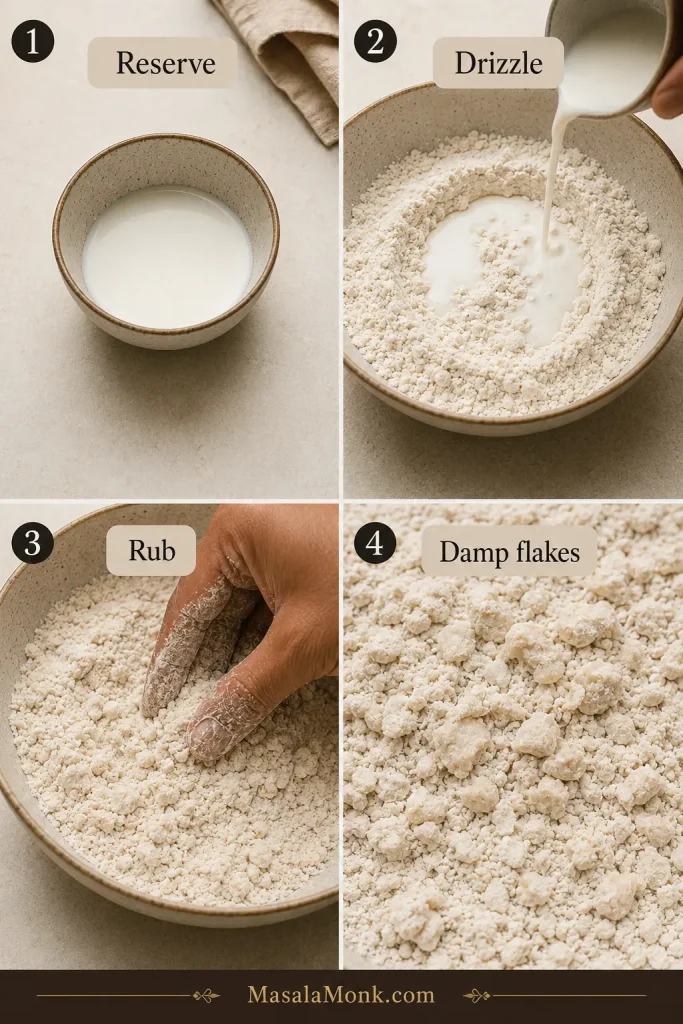
Mix the dredge while the chicken finishes marinating. Whisk together the flour, cornstarch, baking powder, salt, garlic powder, onion powder, paprika, black pepper and cayenne. Drizzle the clean reserved buttermilk over the flour mixture and rub lightly with your fingertips until small damp flakes and pebbly pieces form. Break apart anything that resembles wet dough.
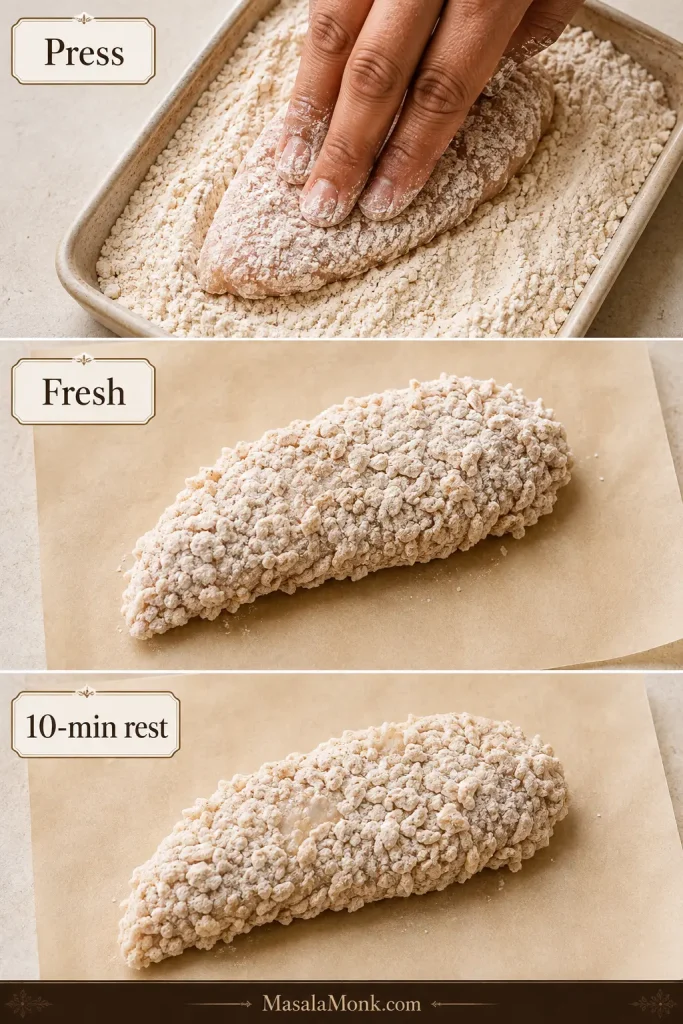
Bread the chicken. Lift one tender from the marinade and let the excess drip back into the bowl. Do not pat it dry. The surface should stay tacky without dripping in streams. Press the chicken firmly into the dredge on every side, picking up some of the rough flour flakes, then place it on the parchment-lined tray. Repeat with the remaining pieces. Discard the remaining raw-chicken marinade and any dredge that touched raw chicken.
Fry the Chicken
Rest the breading and start heating the oil. Begin heating the oil to 360–365°F (182–185°C). Let the breaded chicken rest for at least 10 minutes while the oil comes up to temperature. The coating should look shaggy and slightly hydrated in patches. If the oil needs another few minutes, the chicken can simply stay on the tray.
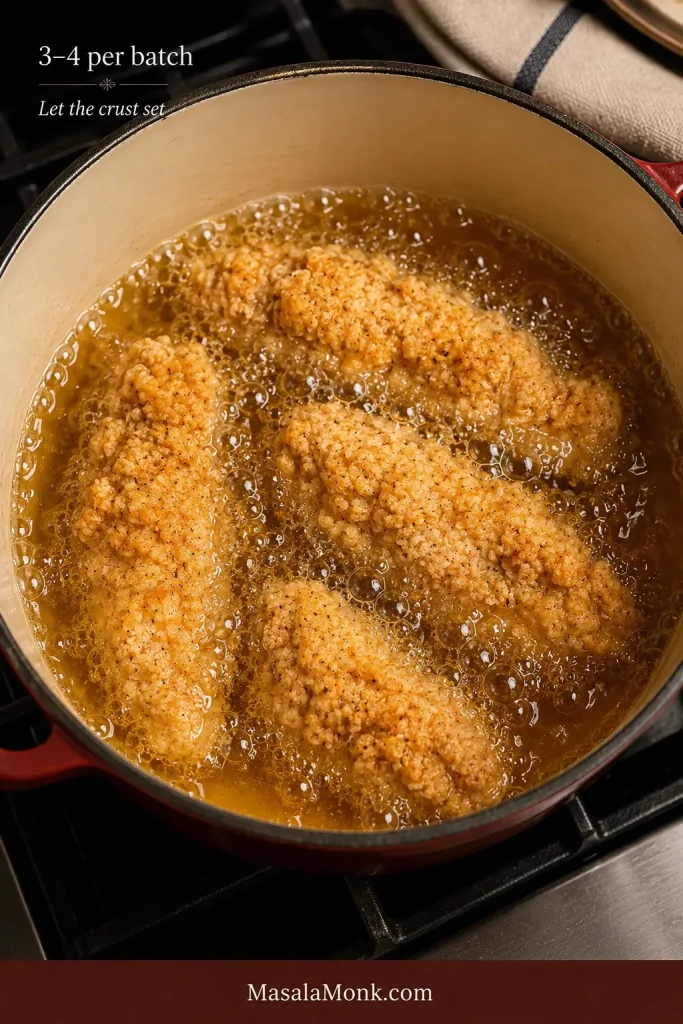
Fry the first batch and let the coating set. Lower 3–4 tenders gently into the oil, leaving visible space between them. Do not keep nudging or turning them as soon as they land; give the crust time to set. Aim to keep the oil around 340–350°F (171–177°C).
Cook until deep gold and 165°F. Pieces in the 2–2½ oz (55–70 g) range usually need 5–7 minutes total. Turn once when needed. The bubbling should stay energetic while the ridges move gradually from pale to deep gold. Start checking the largest piece near the early end of the range; poultry should reach 165°F (74°C) in the thickest part.
Once a batch comes out deep gold, crisp at the edges and 165°F (74°C) in the center, you have your pot figured out. The remaining batches are mostly repetition.
Rack, Reset and Finish
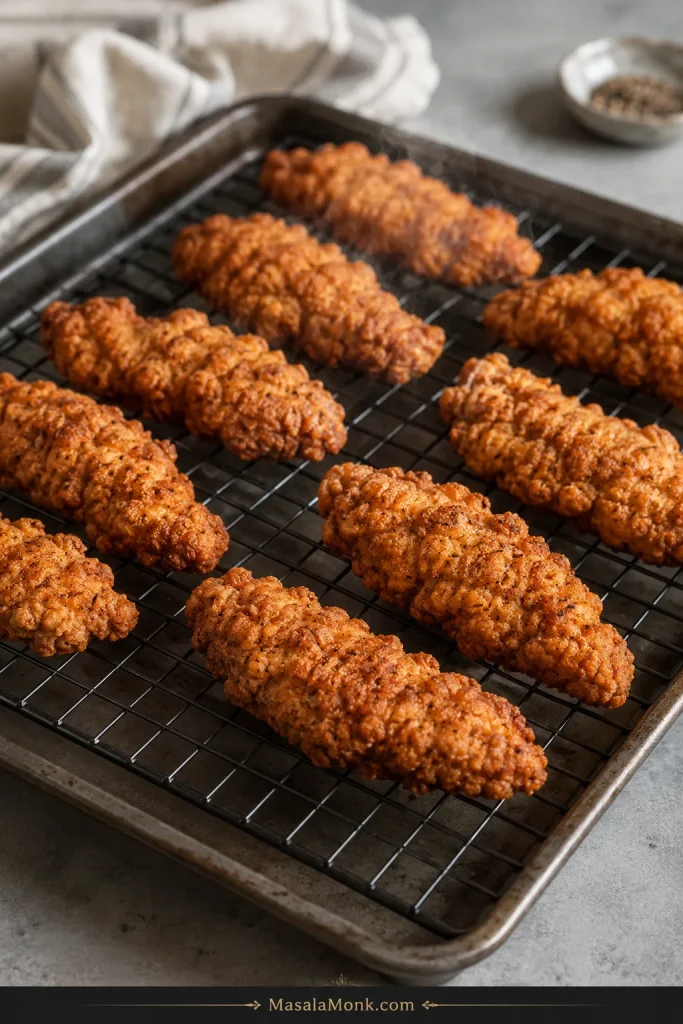
Move the cooked chicken to the rack. Transfer the tenders with clean tongs or a clean spider/skimmer and keep them in one layer so steam can escape underneath.
Reset the oil between batches. Let it return to the starting range before adding more chicken. If recovery is slow, make the next batch smaller. Skim out loose breading once it turns dark so burnt crumbs do not make later batches bitter.
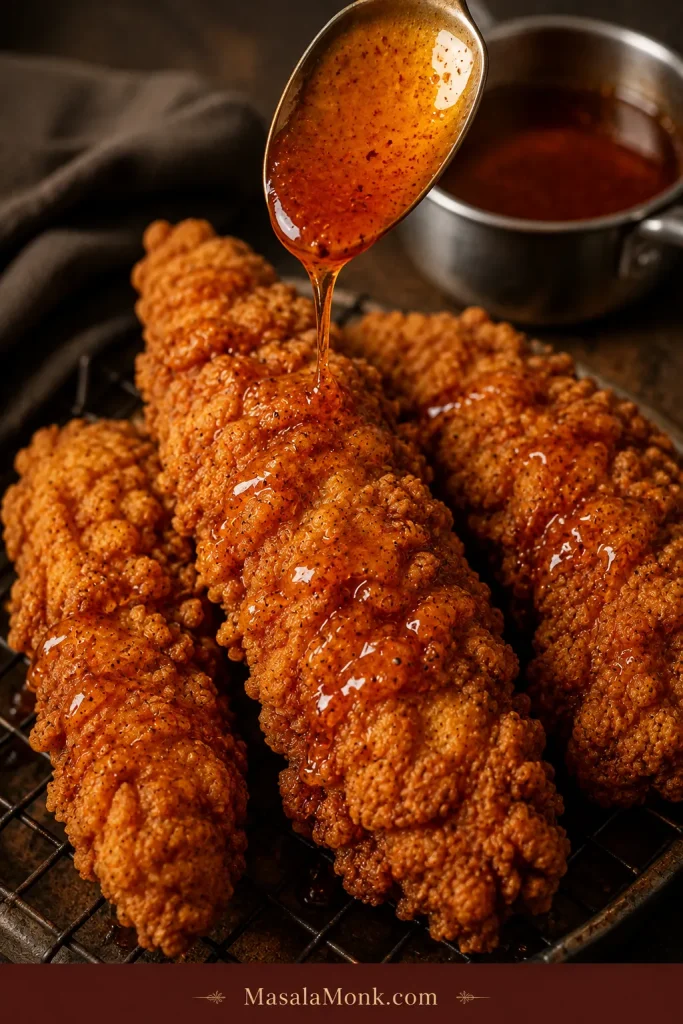
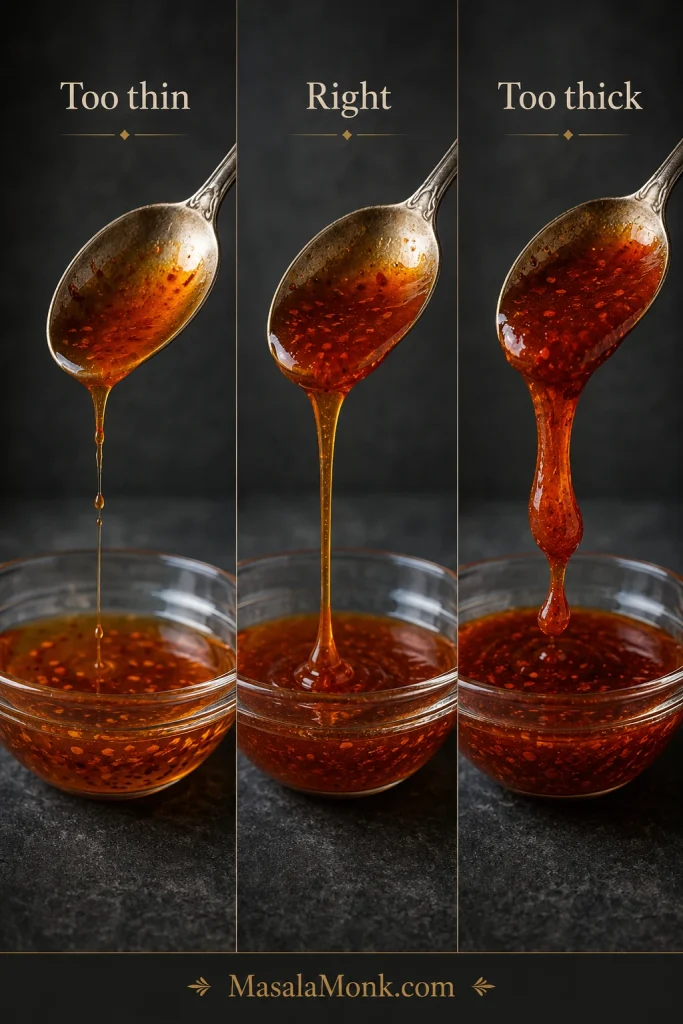
Add the hot honey last. Give each fried batch 2–3 minutes on the rack, until the strongest steam has eased. Rewarm the sauce if needed, then drizzle it over only the tenders you expect to eat right away. The honey should fall in glossy ribbons and catch on the rough ridges. Keep the rest of the sauce at the table.
Give the steam somewhere to go: the rack keeps the bottom from softening while the crust settles before the hot honey goes on.
For the first serving, drizzle a few tenders and listen for that first crunch before deciding whether the rest need more honey.
Break one open while it is still hot: the center should be moist white chicken beneath a closely attached craggy crust, not a thick hollow shell.
Tenderloins are already close to the shape you want. Split or gently flatten any unusually thick ones so they finish alongside the rest.
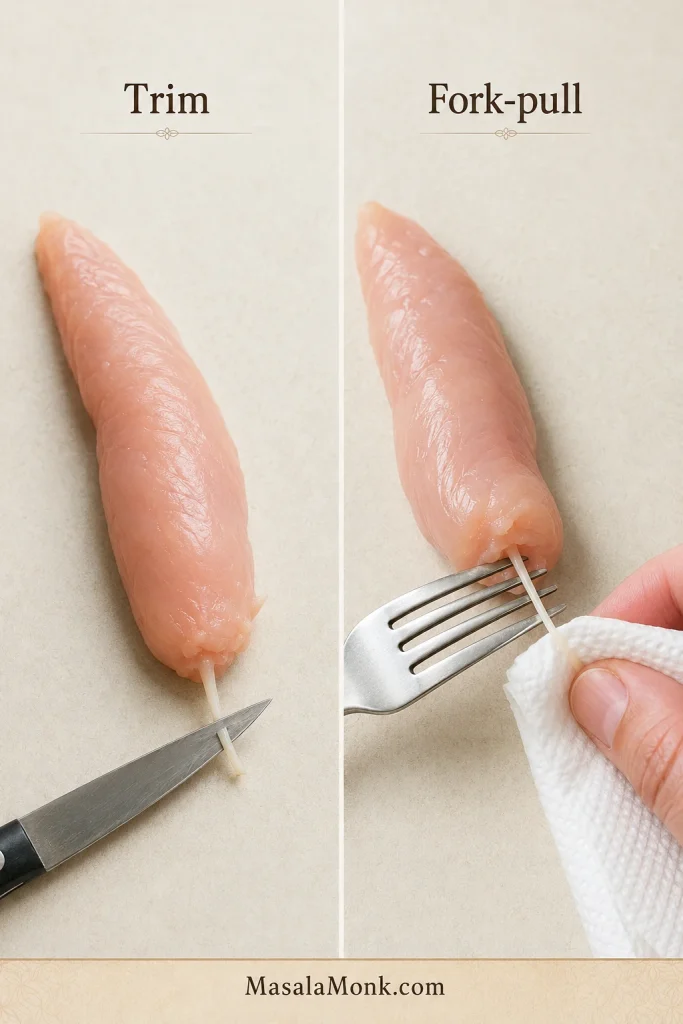
The firm white tendon is harmless. Trim the exposed portion, or grip it with paper towel and gently pull it through the tines of a fork if you prefer to remove more. Stop if the tender begins tearing.
Chicken breast is an easy substitute. Cut it to the size given in the recipe rather than making long, thick strips. Similar-size pieces are what keep the frying time predictable.
If you would rather cook the breasts whole, our baked chicken breast recipe goes deeper into thickness, timing and keeping lean chicken juicy.
Chicken fingers, strips and tenders are often used loosely for the finished dish. Here, size matters more than the label on the package.
The Ingredients That Actually Change the Result
Buttermilk
Buttermilk carries seasoning, adds mild tang and leaves a naturally tacky surface for the flour. The milk-and-acid substitute in the recipe is thinner than cultured buttermilk, but it still gives the coating something to grip.
If the recipe leaves most of a carton behind, save it for flaky Southern buttermilk biscuits. Fried chicken and warm biscuits rarely need much persuasion to share a plate.
Flour, Cornstarch and Baking Powder
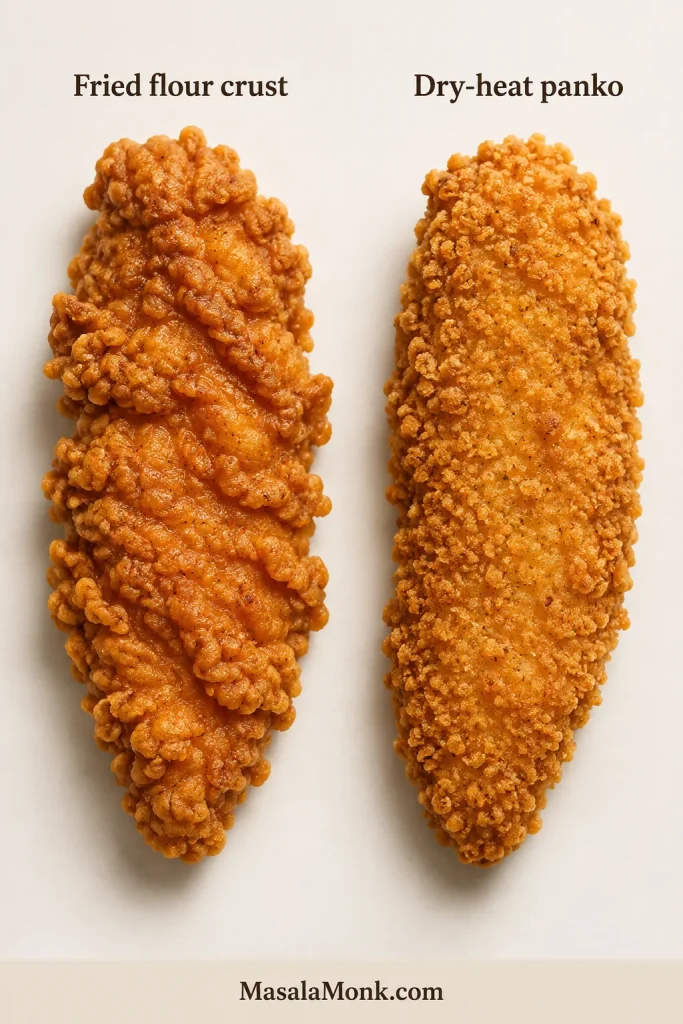
Flour gives the coating enough structure to cling to the chicken, while cornstarch keeps the fried edges lighter and crisper. A little baking powder helps keep the surface rough instead of dense and smooth. When the clean reserved buttermilk is rubbed lightly through this mixture, the small damp flakes become the craggy pieces you want the chicken to pick up.
What you are building toward: a fried crust with thin ridges, folds and blisters rather than one thick, smooth shell. Those irregular edges create more crisp surface without burying the chicken in breading.
Seasoning the Chicken and the Coating
Seasoning in the marinade reaches the meat itself; seasoning in the dredge flavors the crust. Once the honey goes on, that distinction matters. Sweet, spicy sauce should finish good fried chicken rather than cover a bland center.
Sweet paprika brings color and mild pepper flavor. Cayenne in the dredge is optional, especially when several people at the table have different ideas about what “hot” means.
How to Keep Breading on Chicken Tenders
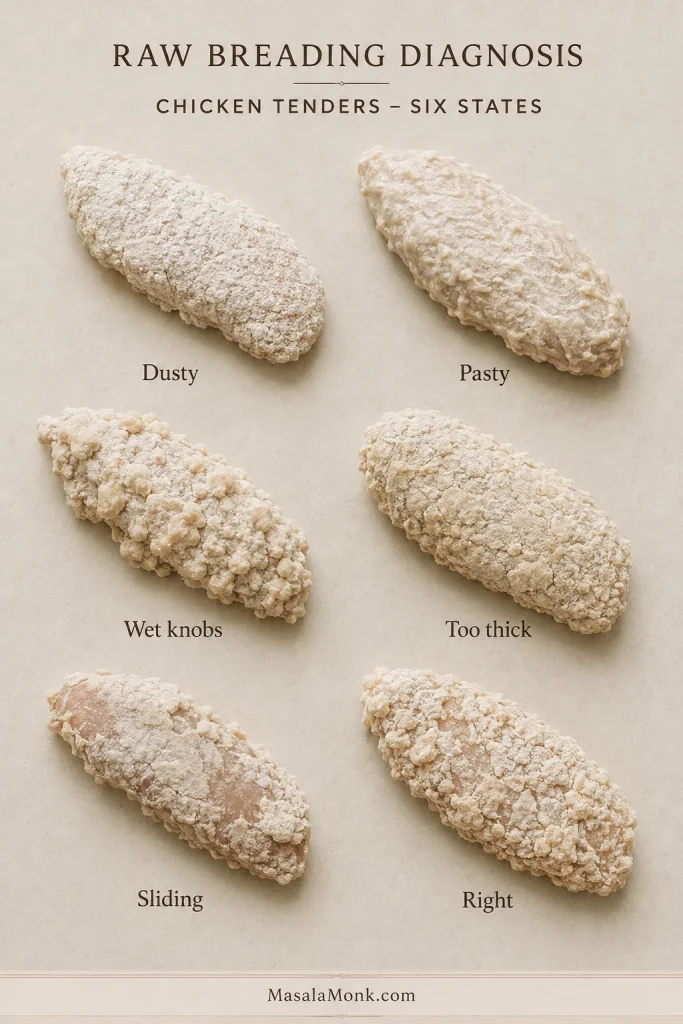
Before frying, the coating can tell you a lot. Good breading looks rough and patchy, with some flour hydrated against the chicken and little shaggy ridges still standing up.
Still dusty almost everywhere after resting? A few floury spots are fine. On the next tender, let slightly less marinade drip away before dredging; do not try to wet an already breaded piece.
Smooth and pasty? Too much marinade followed the chicken into the flour. Let the next piece drip a little longer.
Huge wet knobs? Break the damp flour clumps smaller so they fry into crisp ridges rather than hard chunks.
A thick shell forming around the meat? The coating is too heavy. One well-pressed dredge is enough for this recipe.
Coating slides when you lift the tender? Press it on more firmly and give the breading its full resting time.
Rough, patchy and a little untidy? Good. Leave it alone.
Keeping one hand for wet chicken and the other for dry dredge also prevents the breading process from turning into a bowl full of floury fingerprints.
After the breading rests: the coating should still look rough and shaggy, with only a few slightly hydrated patches. It should not turn uniformly shiny, smooth or wet.
How to Control the Oil Temperature Between Batches
A thermometer makes home frying much less mysterious. The useful number is not only where the oil starts; it is what happens after cold chicken enters the pot.
Stage
Target
What you want to see
Before chicken enters
360–365°F (182–185°C)
Enough stored heat for the initial temperature drop
While frying
340–350°F (171–177°C)
Steady bubbling and gradual golden browning
Before the next batch
Back near 360–365°F (182–185°C)
Oil recovered before more cold chicken enters
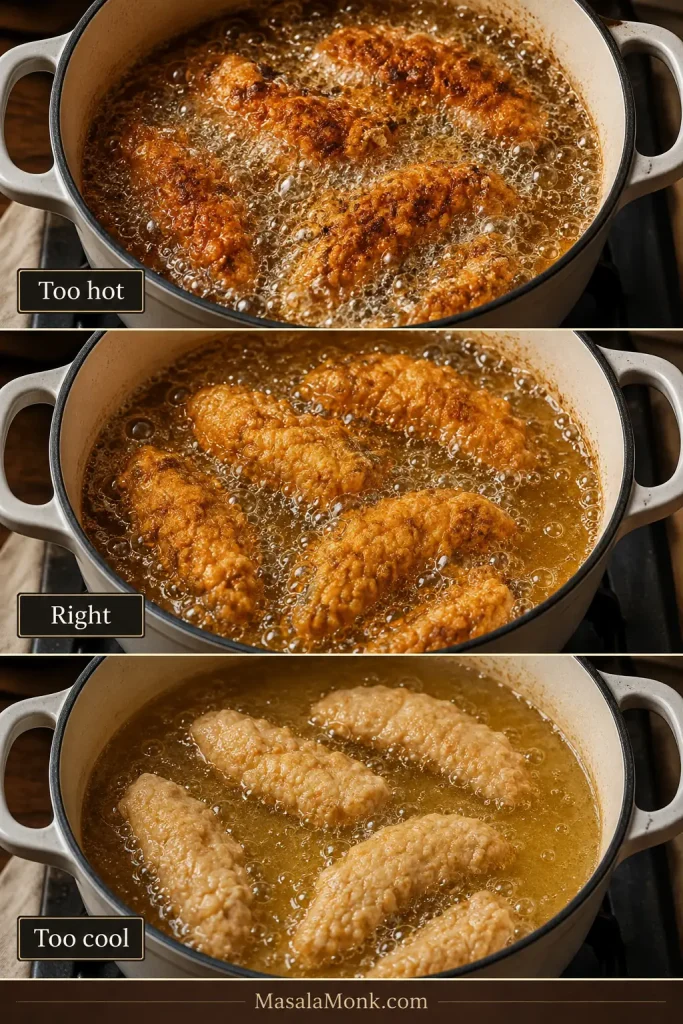
Little flour peaks that darken almost immediately mean the oil is running too hot. Pale chicken sitting in weak bubbles points the other way. Small crumbs in the pot are normal, but remove them once they turn dark.
Use the first batch to learn your pot. Once the bubbling and browning settle into the right rhythm, the remaining batches become much easier to repeat.
A deep cast-iron skillet is another good option. A Dutch oven gives you higher sides and a little more protection from splatter. An electric fryer is fine too; resist filling the basket just because there is room.
Use the bubbling as a batch-size check: leave visible oil between the tenders, and if active bubbling weakens sharply after loading the pot, make the next batch smaller rather than squeezing in another piece.
Keep the whole frying cycle in view: start near 360–365°F (182–185°C), let the oil work around 340–350°F (171–177°C), then give it time to recover before the next batch.
The flour coating used for frying relies on hot oil to set those craggy edges. Dry heat does better with panko. Use the air fryer when you want to avoid a pot of oil; the oven is easier when you need more tenders at once.
For the cooking times below, use 10–12 similarly sized tenderloins or chicken breast strips around 2–2½ oz (55–70 g) each. Very thick pieces will need longer.
Marinate for at least 30 minutes; 2–4 hours is ideal. Unlike the fried version, you do not need to reserve any marinade for the coating.
If you are cooking with dry heat anyway, our honey mustard chicken tenders use a similar panko approach with a tangier finish.
Panko Coating
½ cup (60 g) all-purpose flour
2 large eggs
1½ cups (95 g) panko breadcrumbs
1 tablespoon (15 ml) neutral oil
Oil spray or a little extra neutral oil for the basket, rack and any dry crumb patches
6 g fine sea salt, about 1 teaspoon
1 teaspoon garlic powder
1 teaspoon onion powder
1 teaspoon sweet paprika
½ teaspoon freshly ground black pepper
⅛ teaspoon cayenne, optional
Mix the dry seasonings together. Stir roughly one-third into the flour and the rest into the panko, then work the tablespoon of oil through the crumbs.
Air Fryer
Let excess marinade drip from the chicken.
Coat lightly in seasoned flour, dip in beaten egg, then press firmly into the panko.
Preheat the air fryer to 400°F (205°C) if your model benefits from preheating.
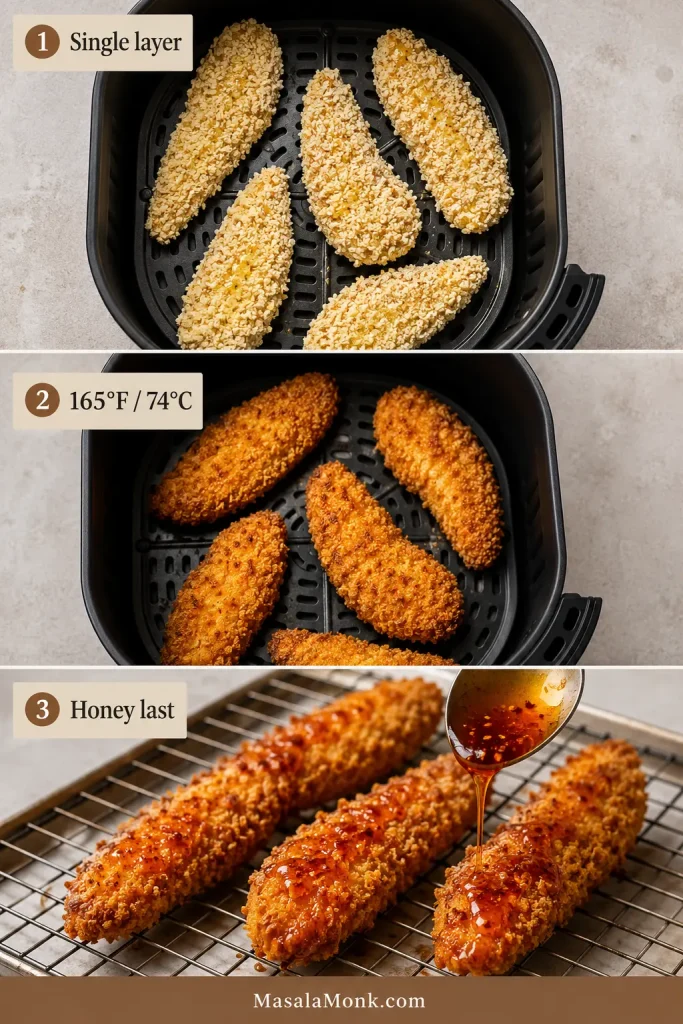
Lightly oil the basket and arrange the tenders in one layer with space around them. Mist any visibly dry crumb patches.
Air fry for 8–11 minutes, turning halfway, until golden and 165°F (74°C) in the thickest piece.
Transfer the tenders to a wire rack and rest for 2–3 minutes, until the initial steam has eased. Drizzle with warm hot honey just before serving.
Later batches may finish a little sooner once the air fryer is thoroughly hot.
Oven
Heat the oven to 425°F (220°C).
Set a lightly greased wire rack over a rimmed baking sheet.
Bread the chicken with the panko mixture and arrange the pieces in one layer. Mist any dry-looking crumb patches.
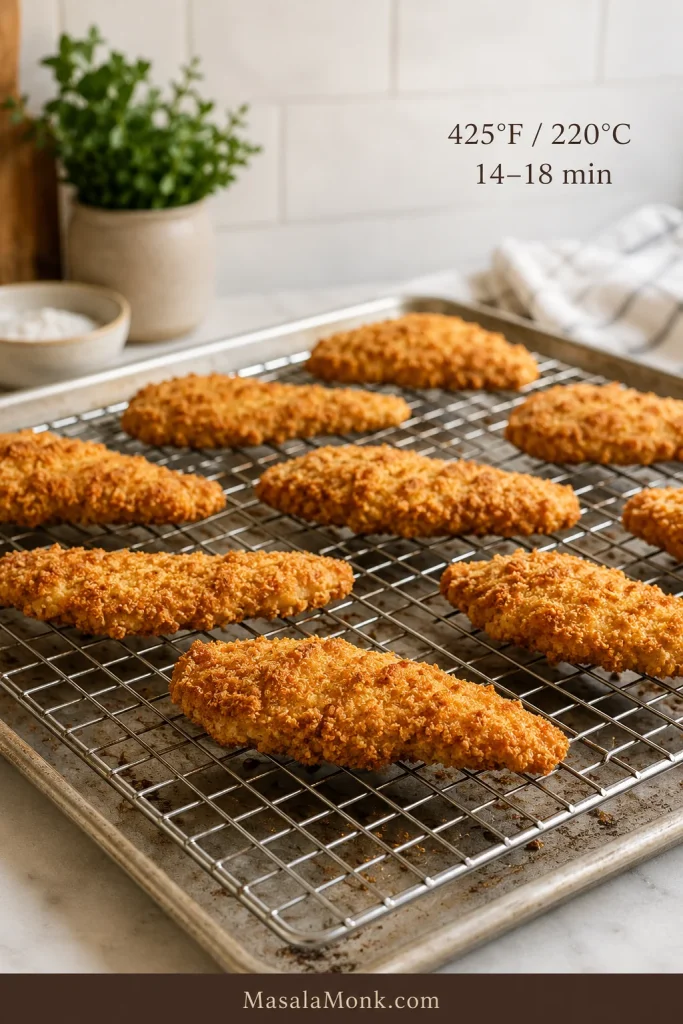
Bake for 14–18 minutes, depending on thickness, until golden and 165°F (74°C) inside.
Leave the tenders on the rack for 2–3 minutes, until the initial steam has eased, then drizzle with warm hot honey.
Adjust the Hot Honey: Mild, Medium or Hot
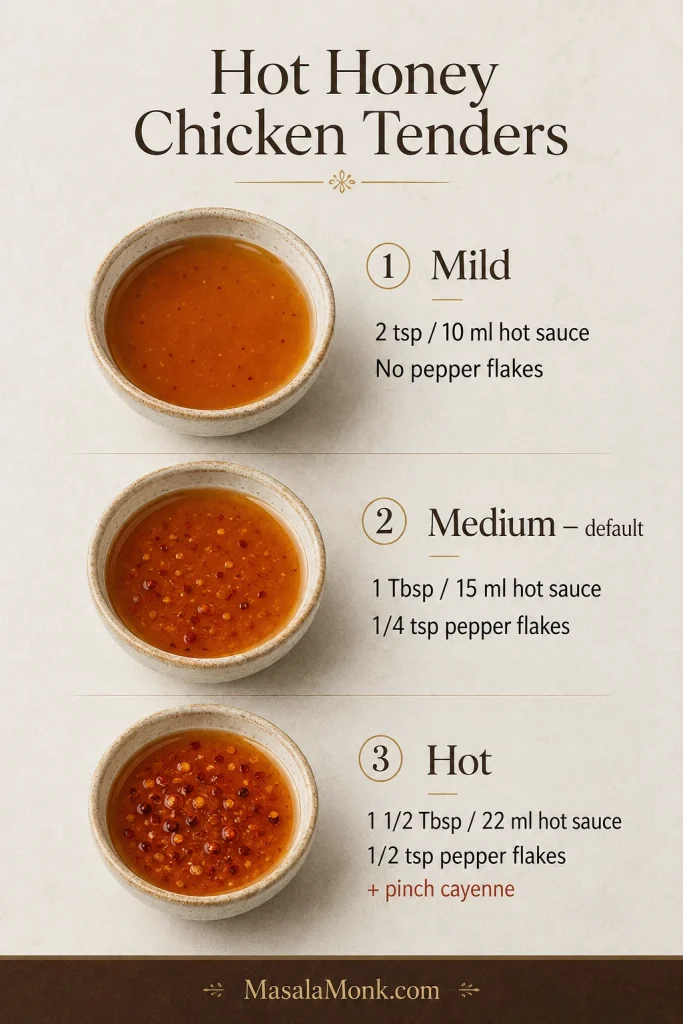
The recipe is medium as written. Keep the ½ cup (170 g) honey, teaspoon of acid and pinch of salt the same, then choose the heat level below.
Heat level
Use this
Mild
2 teaspoons (10 ml) cayenne hot sauce; no pepper flakes
Medium — default
1 tablespoon (15 ml) cayenne hot sauce + ¼ teaspoon red pepper flakes
Hot
1½ tablespoons (22 ml) cayenne hot sauce + ½ teaspoon red pepper flakes + a small optional pinch of cayenne
Taste the sauce warm before adding more heat; hot sauces and pepper flakes vary quite a bit.
One batch can easily cover two heat preferences. Divide the warm honey between two bowls and increase the chili in only one; there is no need to make the fried chicken itself aggressively spicy.
Butter is optional. One tablespoon (14 g) makes the glaze richer and slightly softens the heat; keep the sauce over low heat so it stays smooth.
How Much Hot Honey Do You Need?
Drizzle: start with ¼ cup (60 ml)
Brush: use roughly ⅓ cup (80 ml)
Toss: use most or all of the basic sauce batch
Make 1½ batches when you want heavily glazed chicken and extra sauce at the table. The sauce should be warm enough to fall in ribbons, but not thin or watery.
Already have bottled hot honey? Start with ½ cup (120 ml). A few drops of vinegar or lemon juice can sharpen it if the sweetness feels flat.
If a batch goes wrong, do not change five things at once. Start with what you can see; the crust, color and oil usually point toward the problem.
Breading and Frying Problems
What you see
What it means and what to change
Breading falls off
Too much marinade, weak pressing or too little resting time. Let excess drip, press firmly and give the coating time to settle.
Breading is thick and hard
The wet flour pieces are too large or the dredge is too heavy. Use smaller flakes and one substantial coating.
Chicken is pale and greasy
The oil spent too much of the batch too cool. Fry fewer pieces and let it recover before reloading.
Outside is dark, center underdone
The oil is too hot or the chicken is too thick. Lower the heat and make the pieces more even.
Chicken is dry
It cooked too long. Start checking the largest piece sooner.
Bottom turns soft
Steam is trapped underneath. Move cooked tenders to a wire rack in one layer.
Later batches taste bitter
Loose breading has burned in the oil. Skim out dark crumbs between batches.
A pot that starts at 360°F but spends most of the batch near 300°F is still frying too cool. What the thermometer does after the chicken enters matters more than the starting number alone.
Hot Honey and Crispness Problems
What you see
What it means and what to change
Sauce softens the crust quickly
The chicken was sauced too soon or too heavily. Give it a brief rack rest and start with a drizzle.
Hot honey is too sweet or too hot
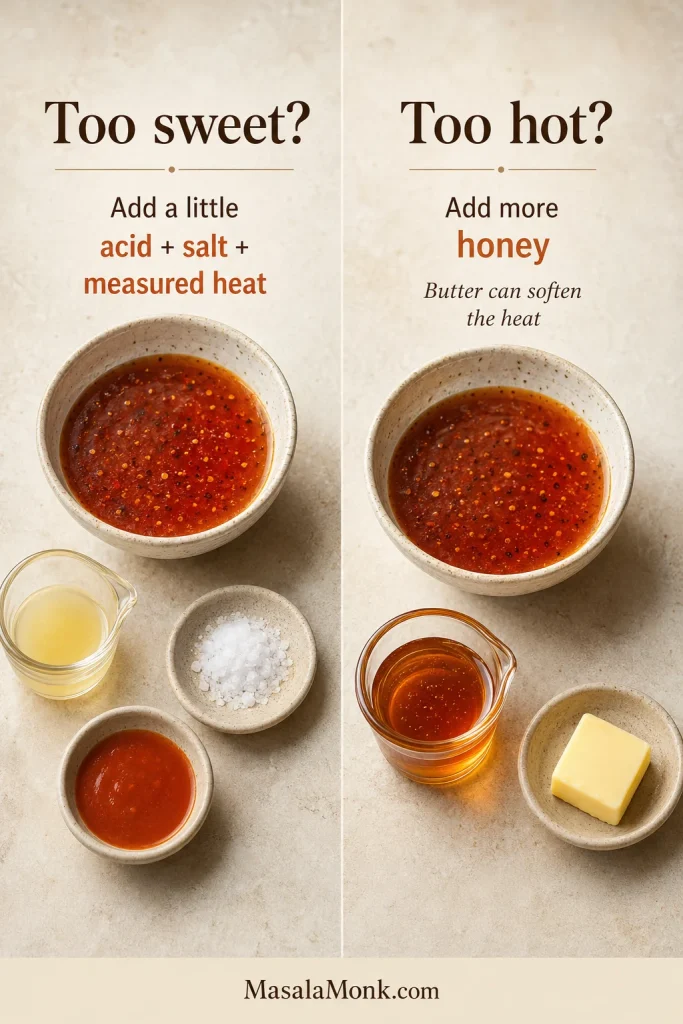
Too sweet: add a little acid, salt and measured heat. Too hot: stir in more honey; butter can soften the heat too.
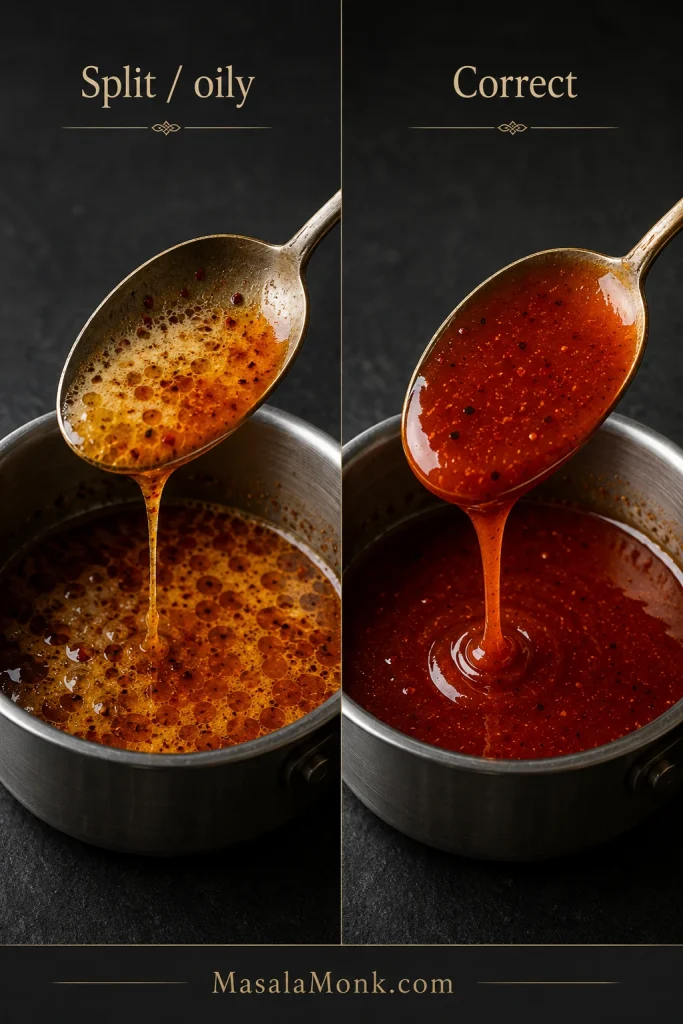
Hot honey looks oily or split
Butter-containing sauce may have overheated. Take it off the heat, whisk gently and rewarm only over low heat.
Sauce runs off
It is too hot or thin. Let it cool until it falls from the spoon in ribbons.
If buttered hot honey turns oily or streaky: take it off the heat, whisk gently and rewarm only over low heat. The finished sauce should look smooth and cohesive rather than separated.
Correct one thing at a time while the sauce is warm: use a little acid, salt and measured heat when it is too sweet; add more honey when it is too hot. If someone at the table simply wants a gentler creamy option, our easy yum yum sauce gives them another path without changing the whole batch.
Make Ahead, Store and Reheat
Hot honey: Make it up to 1 week ahead, refrigerate it in a covered container and warm it gently before serving. Low heat is especially important when butter is included.
Chicken: Marinate 2–4 hours ahead when convenient. Bread it close to frying; the short 10-minute rest helps the coating settle, while a long breaded hold works against that rough, crisp texture.
If coleslaw is part of dinner, this is a good moment to make it too. Our creamy coleslaw recipe can chill while the chicken marinates.
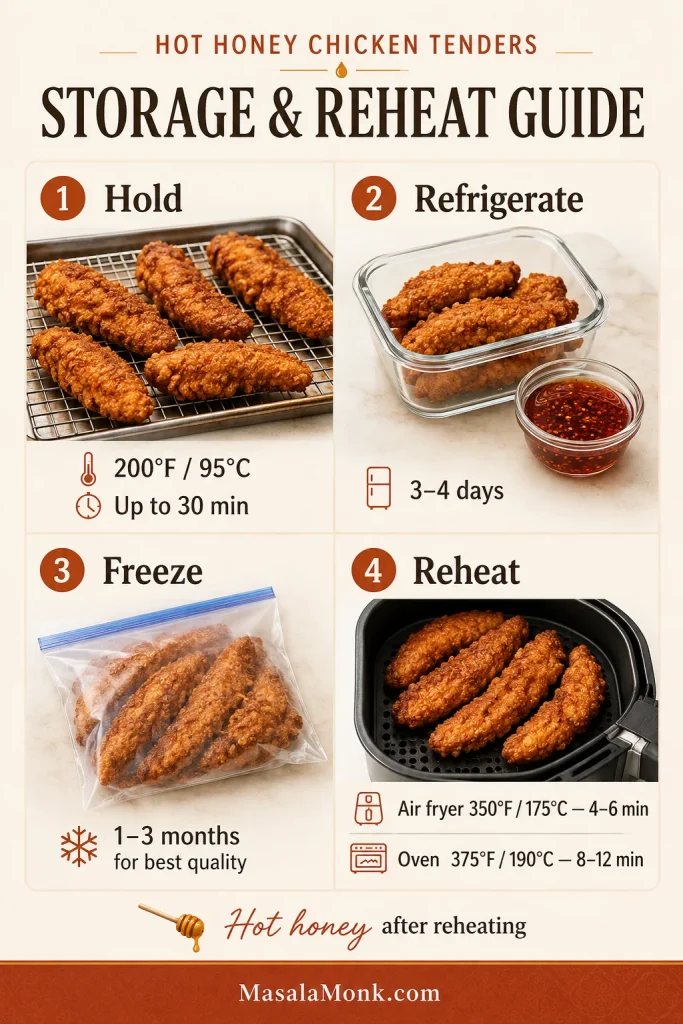
Holding fresh batches: Keep the tenders unsauced on their rack in a 200°F (95°C) oven for up to 30 minutes while you finish frying. A short hold works, but straight from frying is still best.
Leftovers: Refrigerate cooked chicken for 3–4 days, with extra hot honey stored separately whenever possible.
Freezing: Freeze cooked tenders unsauced. For best quality, use them within roughly 1–3 months, then re-crisp before adding fresh hot honey.
Air fryer: 350°F (175°C) for 4–6 minutes
Oven: 375°F (190°C) on a rack for 8–12 minutes
Microwave: quickest, but the coating will be softer
Whichever method you choose, reheat the center of the chicken to 165°F (74°C), then add fresh hot honey.
What to Serve With Hot Honey Chicken Tenders
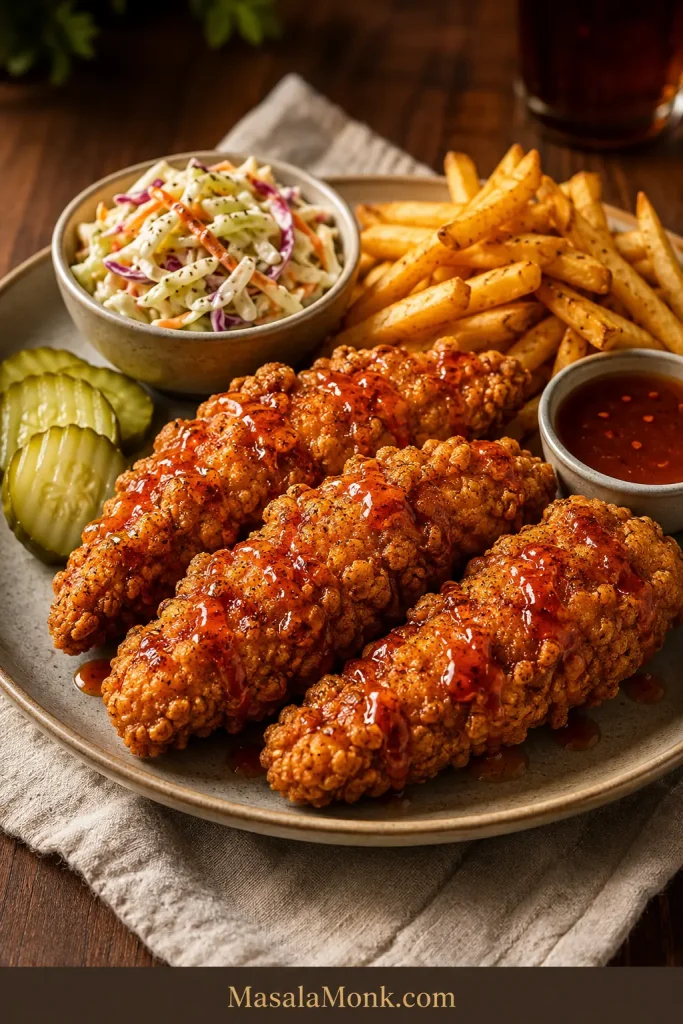
You do not need an elaborate plate. Something cold and crunchy, creamy, tart or pickled is usually enough to balance rich fried chicken and sticky sweet heat.
Sandwich night: Add slaw, pickles and a little hot honey to a toasted bun. Our chicken sandwich recipes have more ideas for building around crisp chicken.
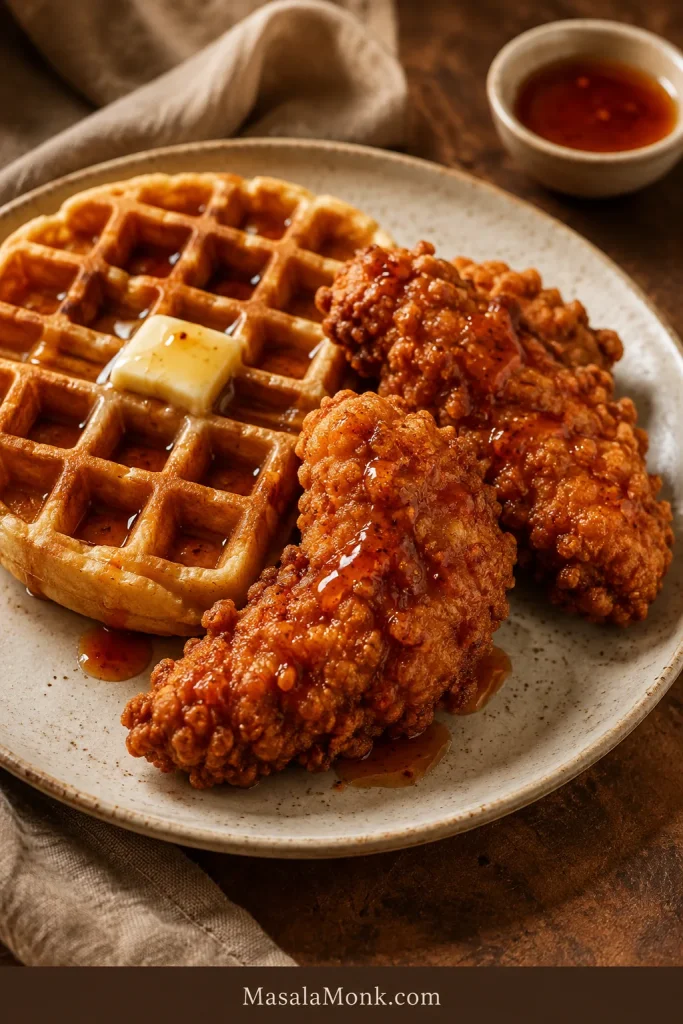
Sweet-savory: Pile the tenders onto waffles and drizzle the honey over both while leaving plenty of fried ridges exposed.
The best plate of these still lets you see rough dark-gold ridges beneath thin glossy streaks of honey. The first bite should give you crunch and juicy chicken, then sweetness, then the chili catching up a moment later.
If you make them, tell us whether you used tenderloins or breast strips, how you cooked them, and whether you drizzled, brushed or tossed the hot honey. Your notes may help the next person standing over a batch of chicken wondering whether theirs looks right.
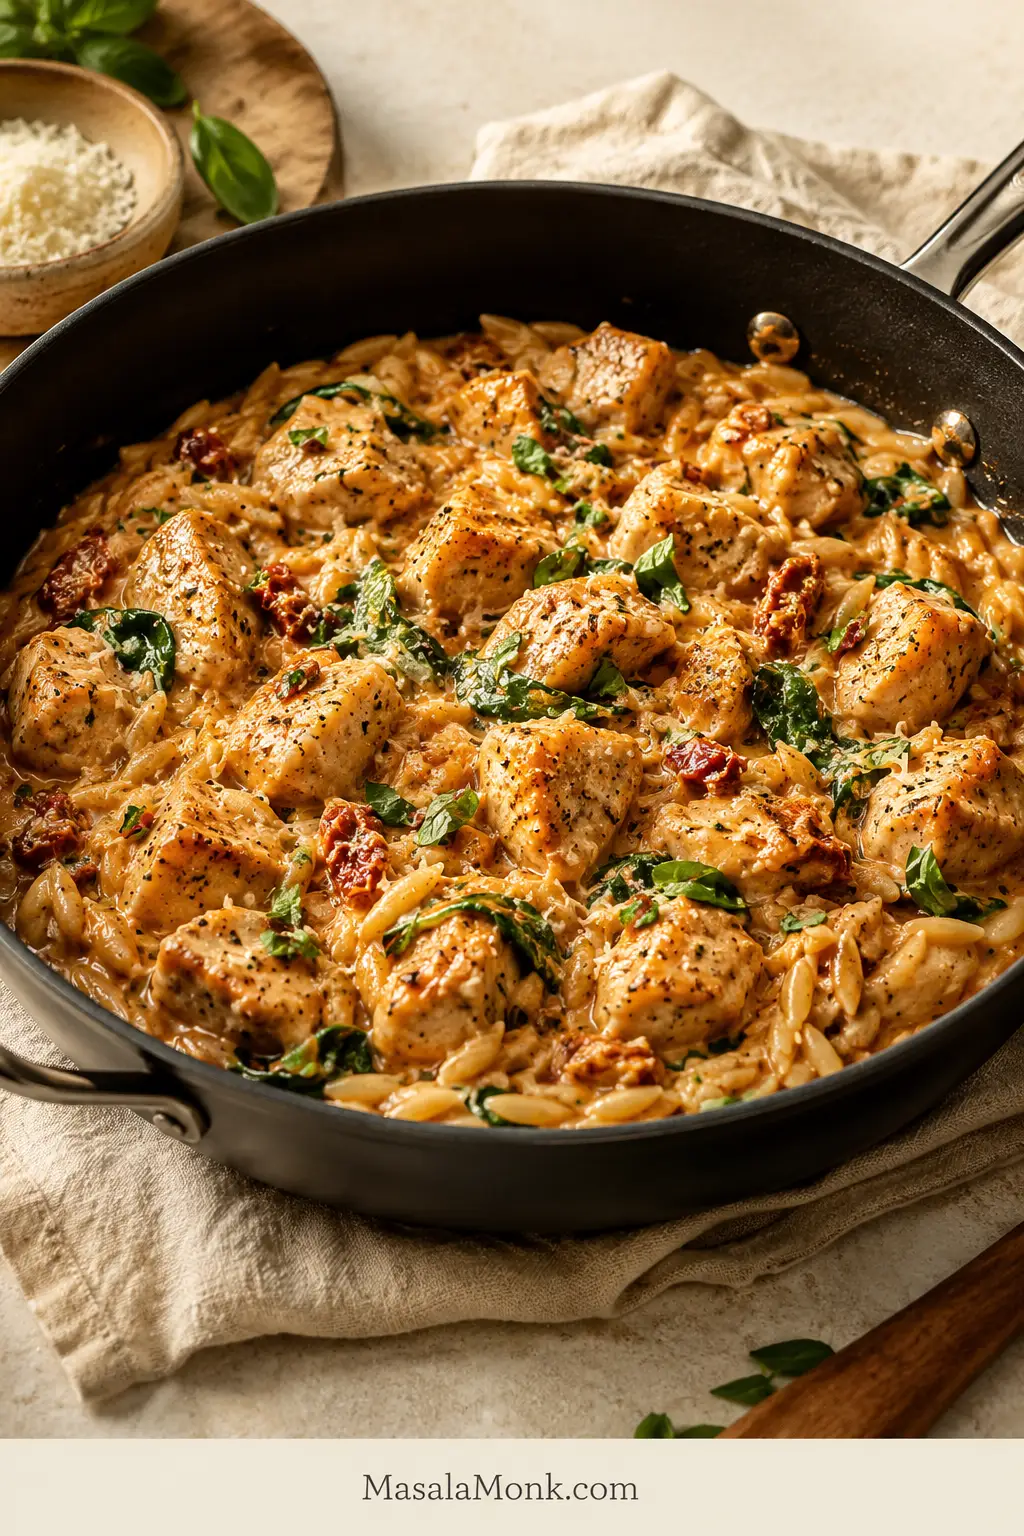
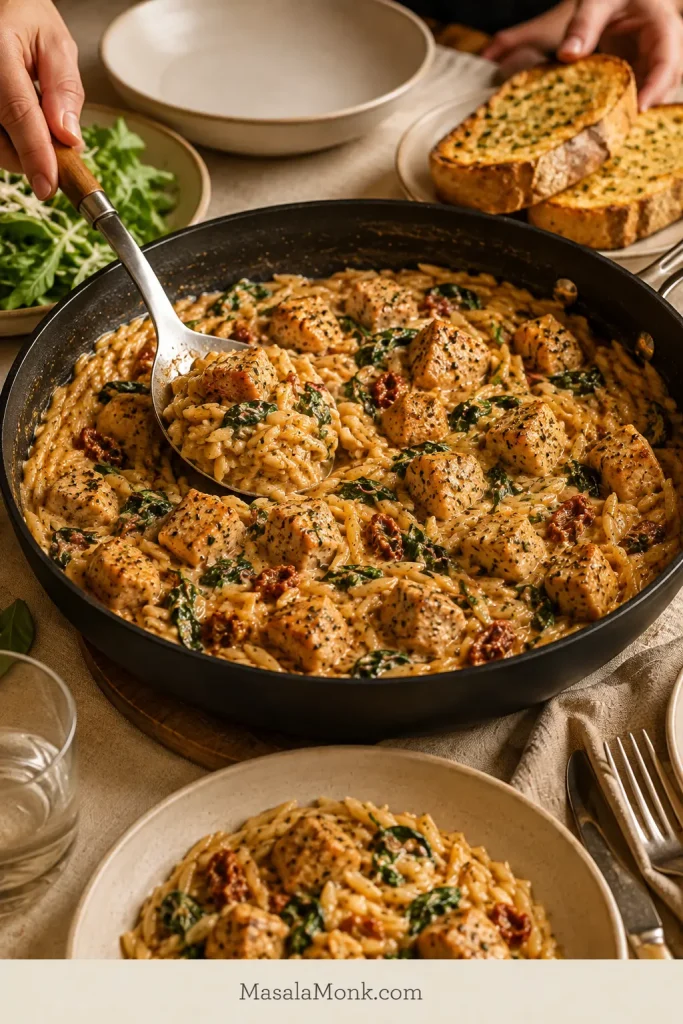
This Marry Me Chicken Orzo comes out of one skillet with golden chicken, tender orzo, spinach and sun-dried tomatoes wrapped in a creamy garlic-Parmesan sauce.
It is an easy one-pan dinner that feels a little more special than the effort suggests. The concentrated tang of sun-dried tomatoes and a squeeze of lemon keep the creamy sauce bright, while the whole skillet comes together in about 30 minutes with no separate pasta pot and nothing to drain.
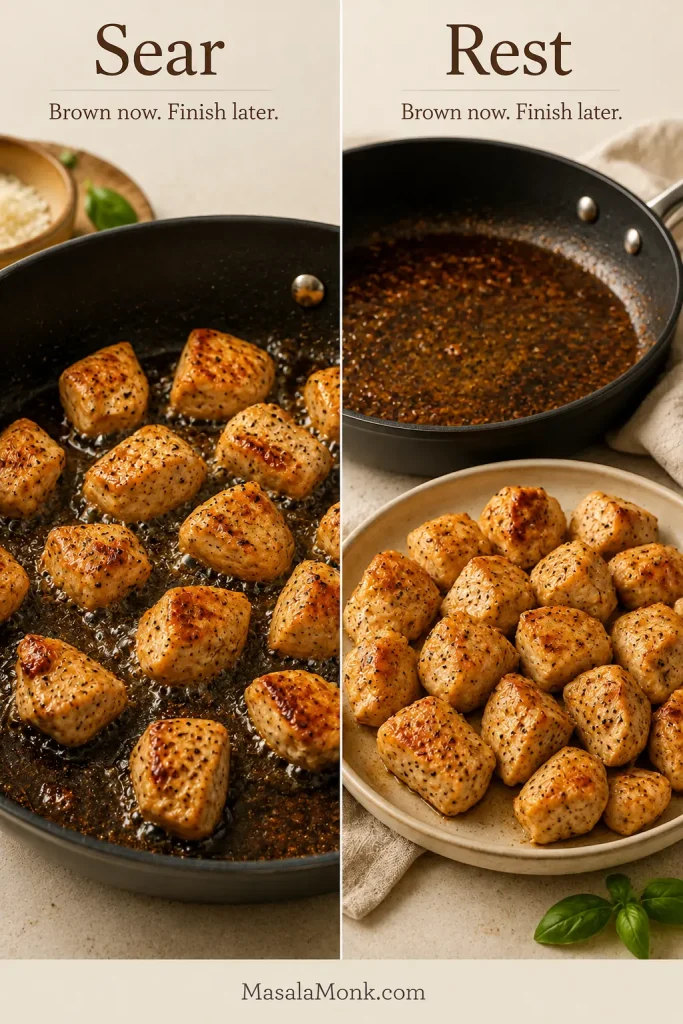
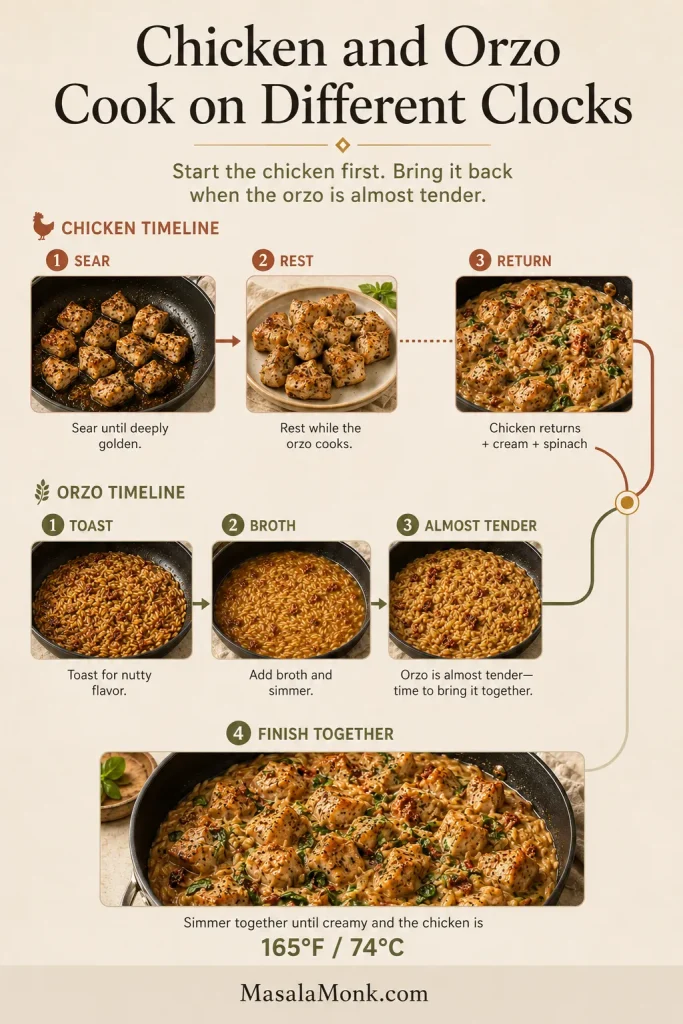
Chicken and orzo cook on different clocks. The chicken can dry out while the pasta finishes, so it gets a quick sear and then waits on a plate while the orzo catches up. It is a small change in order that makes the whole recipe feel much more relaxed at the stove.
Quick Answer: How to Make Marry Me Chicken Orzo in One Pan
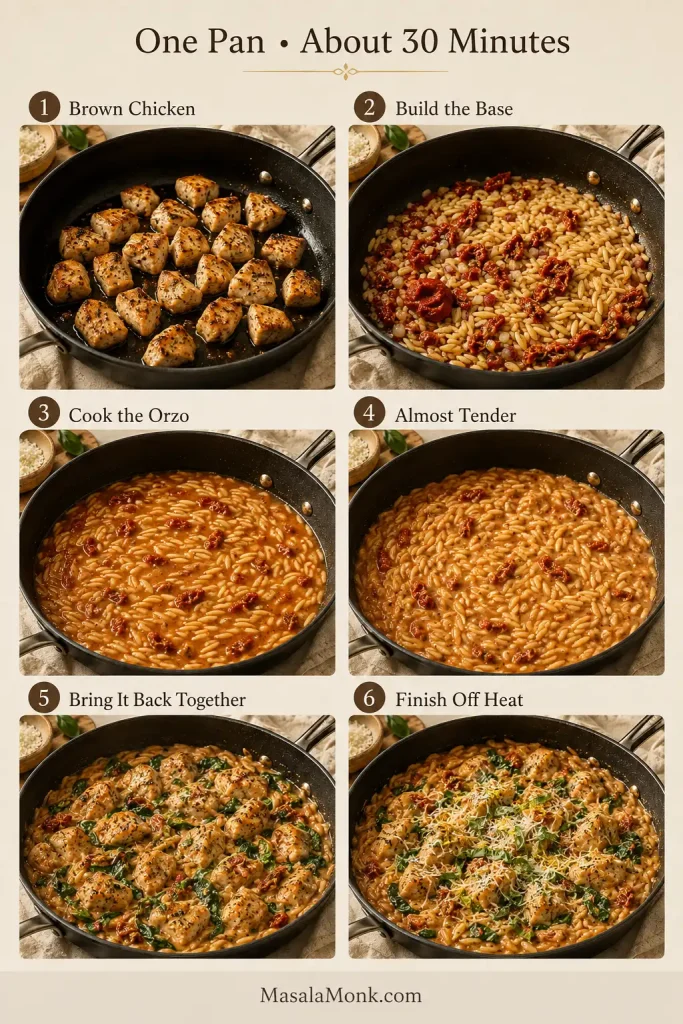
Brown the chicken and remove it, then soften the shallot, garlic, tomato paste and sun-dried tomatoes in the same skillet. Toast the dry orzo, add hot broth and cook until the pasta is almost tender. Return the chicken with the cream and spinach so both finish together. Take the pan off the heat, stir in Parmesan, lemon and basil, then rest briefly before serving.
Two planned checkpoints keep the orzo manageable: stir around minute 4, then taste and check the liquid around minute 8.
Marry Me Chicken Orzo Recipe
Prep: about 10 minutes Cook: about 18–20 minutes Rest: 2 minutes Total: about 30–32 minutes Serves: 4 generously
Equipment
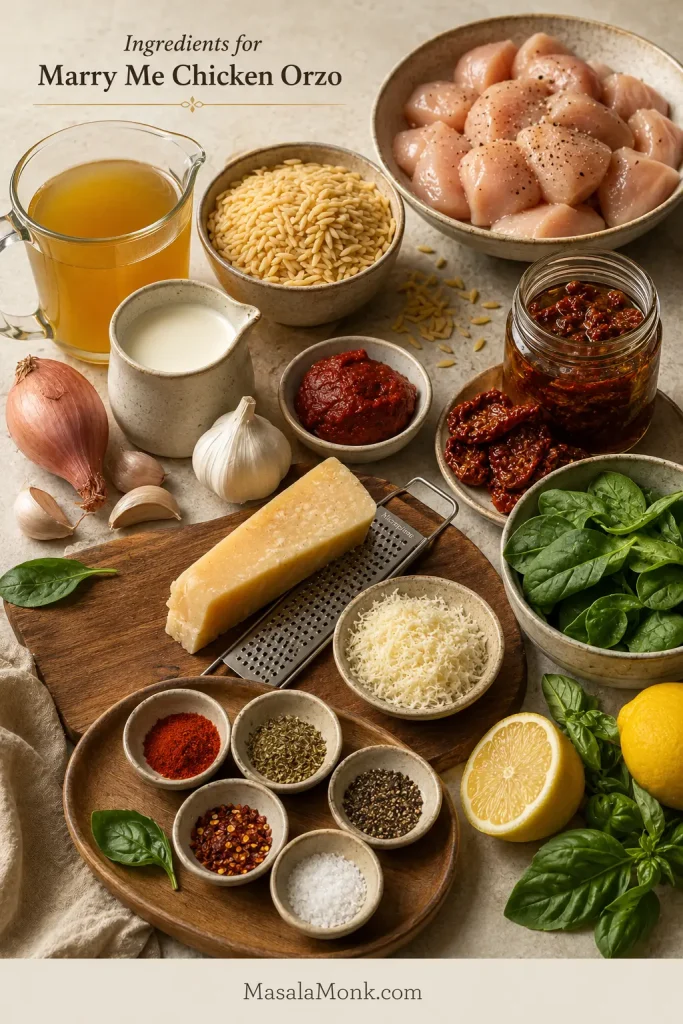
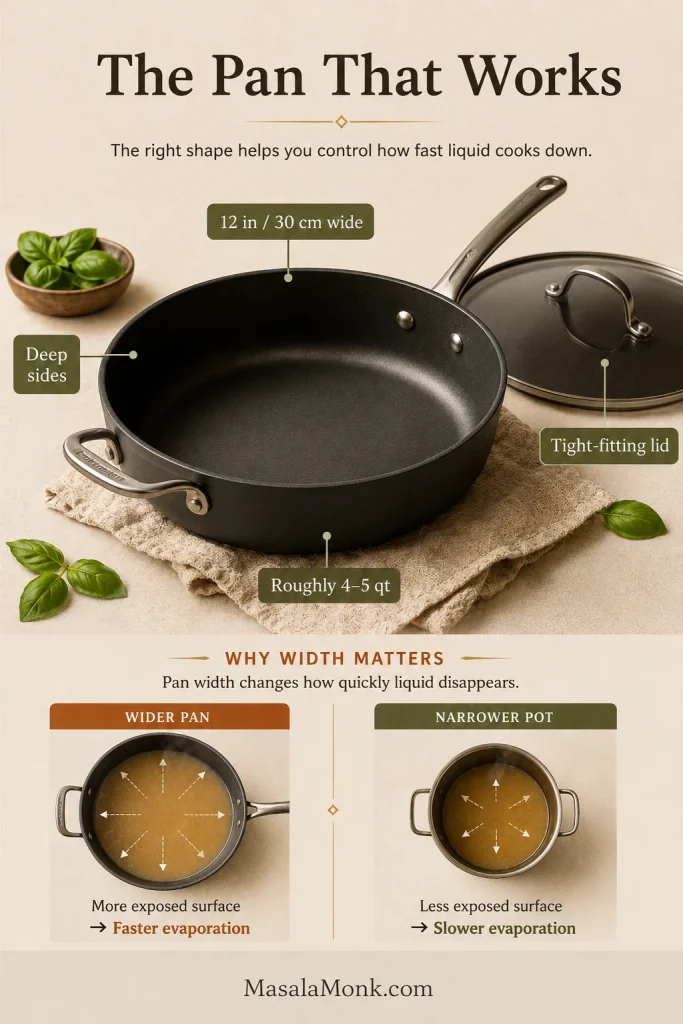
Deep 12-inch / 30-cm skillet or sauté pan with a tight-fitting lid, roughly 4–5 qt
Wooden spoon or silicone spatula
Fine grater for the Parmesan
Instant-read thermometer
Ingredients
1¼ lb / 570 g boneless, skinless chicken breast, cut into roughly 1-inch / 2.5-cm pieces
1 tablespoon / 15 ml oil from the sun-dried tomato jar, or olive oil
¾ teaspoon fine sea salt, divided, plus more if needed
¾ teaspoon freshly ground black pepper, divided, plus more if needed
1 teaspoon paprika
1 teaspoon dried oregano
¼ teaspoon red pepper flakes, optional
1 medium shallot, about 2 oz / 60 g, finely chopped, or ½ small yellow onion
4 medium garlic cloves, finely minced
2 teaspoons / 10 g tomato paste
4¼ oz / 120 g drained oil-packed sun-dried tomatoes, sliced
9 oz / 250 g dry orzo, roughly 1½ cups
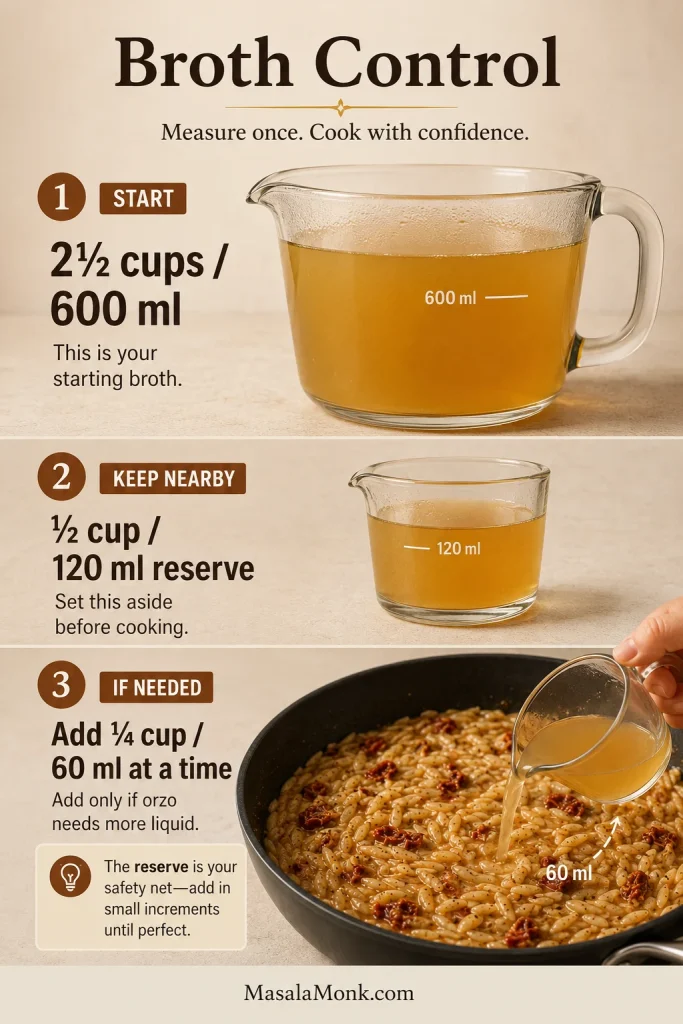
2½ cups / 600 ml hot low-sodium chicken broth
½ cup / 120 ml additional hot chicken broth, kept in reserve
½ cup / 120 ml heavy cream
3½ oz / 100 g baby spinach, about 3 packed cups
2 oz / 60 g Parmesan, finely and freshly grated
2 teaspoons / 10 ml fresh lemon juice, plus more if needed
A small handful fresh basil, torn or chopped, plus more for serving
One-pan shortcut: warm the broth in a microwave-safe measuring jug while you prepare the chicken.
Method
Brown the chicken and build the flavor base
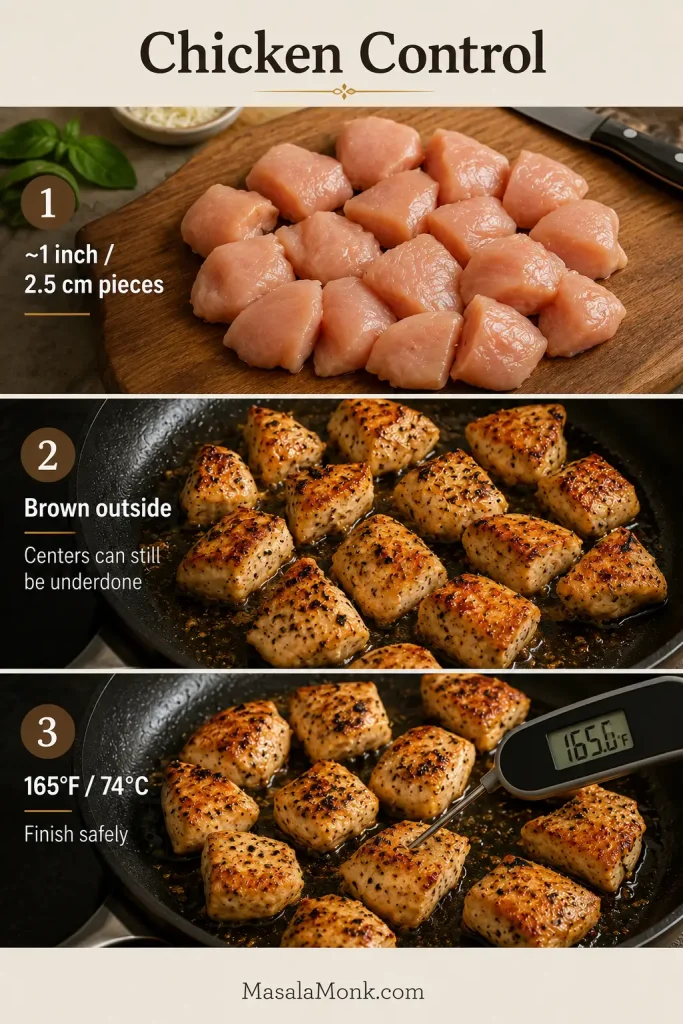
Season and brown the chicken. Pat the chicken dry, then toss with ½ teaspoon salt, ½ teaspoon black pepper, the paprika and oregano. Heat the sun-dried tomato oil in a deep 12-inch / 30-cm skillet over medium-high heat. Add the chicken in an even layer and cook for 3–4 minutes, turning once or twice, until golden in places. The centers can still be underdone. Transfer to a clean plate.
The plate is part of the method: resting the browned chicken gives the orzo time to cook without leaving lean meat simmering beside it.
Build the tomato-garlic base and toast the orzo. Reduce the heat to medium. Add the shallot and cook for 1 minute. Stir in the garlic, tomato paste, red pepper flakes and remaining ¼ teaspoon black pepper. Cook for 30 seconds, until the garlic smells fragrant and the tomato paste has darkened slightly. Stir in the sun-dried tomatoes and dry orzo, then cook for another 1 minute.
Work the tomato paste through the aromatics rather than leaving it in red clumps; a brief cook deepens its flavor without making the sauce tomato-heavy.
Cook the orzo and finish the skillet
Cook the orzo in the broth. Pour in 2½ cups / 600 ml hot broth, scraping across the bottom to loosen the browned bits. Add the remaining ¼ teaspoon salt. Bring to a gentle simmer, cover and reduce the heat to medium-low.
At minute 4: stir across the bottom and around the edges, then cover again.
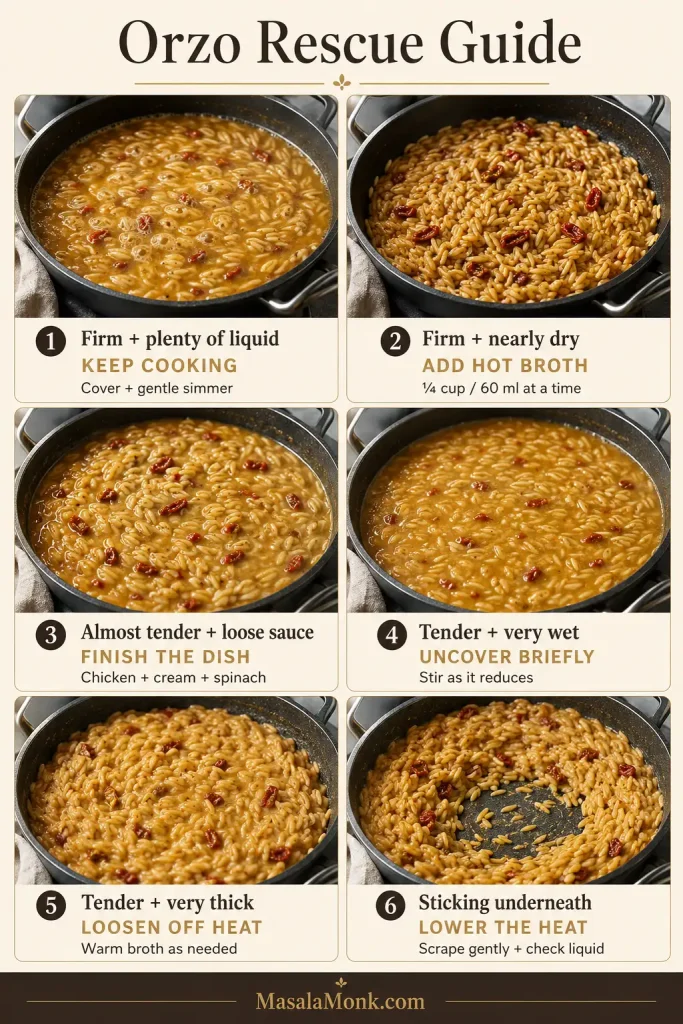
At minute 8: taste a grain and check the liquid. Firm orzo with plenty of broth needs more time. If it is still firm and nearly dry, add reserve broth ¼ cup / 60 ml at a time, as needed. Continue until the pasta is almost tender, with only faint firmness in the center and some loose sauce remaining. The covered broth phase usually takes 9–11 minutes.
Bring the chicken back. Reduce the heat to low. Return the chicken and any juices from the plate, then stir in the cream and spinach. Cook until the spinach wilts, the orzo is fully tender and the thickest pieces of chicken reach 165°F / 74°C.
Add the Parmesan off the heat. Remove the skillet from the burner. Stir in the Parmesan, lemon juice and basil until the cheese melts and the sauce is smooth and glossy. Loosen with a splash of reserve broth if needed.
Rest, taste and serve. Let the skillet sit off the heat for 2 minutes so the sauce can settle around the pasta. Taste after the rest, then add more salt, pepper or lemon only if it needs it.
Let the food overrule the timer. Pan width, burner strength and brands of orzo all change the pace slightly.
If your skillet looks good, you can stop here and eat.
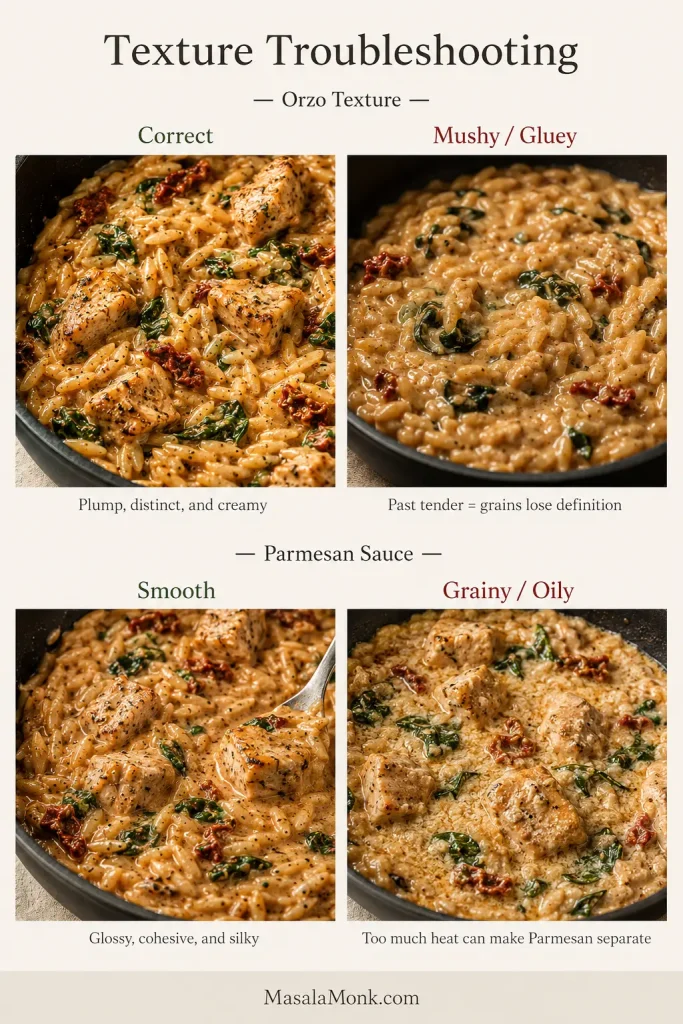
At the table, you want juicy chicken, tender but distinct orzo and enough creamy sauce to move easily between the grains. Pull a spoon through and the sauce should slowly settle back into the trail.
Creaminess should not erase the pasta: each plump orzo grain still holds its shape beneath the garlic-Parmesan sauce.
The sun-dried tomatoes bring concentrated sweetness and tang, Parmesan gives the sauce savory depth, and lemon lifts everything at the end. It is rich, but bright enough that the next spoonful still sounds good.
Watch the Orzo, Not Just the Clock
Your skillet does not have to match these stages minute for minute. Think of them as landmarks.
As starch leaves the orzo, the liquid starts clinging to the grains. That change in coating tells you more than simply watching the liquid level fall.
When the broth goes in
Everything looks loose and brothy—almost excessively so. That is normal. The dry pasta still has plenty of liquid to absorb.
Around minute 4
The grains look noticeably plumper and the broth turns cloudier as starch moves into it. Stir across the bottom, cover again and let the orzo keep going. This is a good moment to grate the Parmesan if you have not already.
At minute 8, taste a grain and check the liquid. Firm pasta can need either more time or more broth—the liquid level tells you which.
Firm pasta does not automatically need more broth. Check the liquid level too; doneness and moisture are two separate decisions.
Ready for the chicken and cream
Bite into a grain. It should be almost tender, with only faint firmness left in the center, and there should still be loose sauce moving between the grains.
A faint bite is useful here. If the orzo is already completely tender before finishing, the next few minutes can only push it past its best texture.
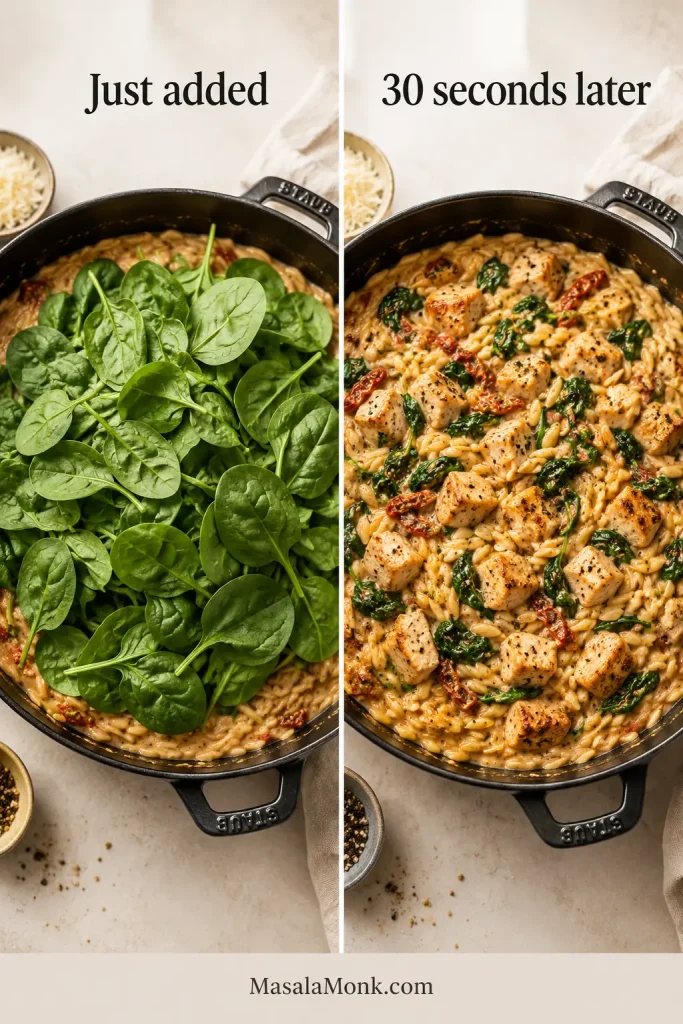
Once the spinach goes in, the handfuls look comically large for about thirty seconds before collapsing into the sauce while the pasta finishes cooking.
Three packed cups shrink dramatically, which is why the greens can disappear into a four-serving skillet without overwhelming the pasta.
Ready to serve
The orzo is fully tender but still distinct, the chicken is juicy and cooked through, and the sauce is glossy and creamy enough to flow slowly back after you stir.
If the spoon trail stays open instead of slowly relaxing, the sauce is too tight; loosen it with a small splash of warm broth before serving.
Fix the Orzo While It’s Still Cooking
If the orzo seems too dry, too wet or slower to soften than expected, match what you see to the fix below.
Orzo gets much easier to rescue once you judge two things separately: how tender the grain is and how much free liquid remains.
What you see
Why it happens
Best fix
Firm orzo + plenty of liquid
It needs more time
Cover and keep cooking at a gentle simmer
Firm orzo + nearly dry
Liquid is disappearing too quickly
Add hot reserve broth ¼ cup / 60 ml at a time, as needed, stir and cover
Almost tender + loose sauce
Ready for the chicken, cream and spinach
Move on to the next step
Tender orzo + very wet
The pasta finished before enough liquid reduced
Cook uncovered briefly, stirring
Tender orzo + sauce very thick
It has gone a little too far
Remove from heat and loosen with warm broth
Orzo sticking underneath
The heat is too high or there is too little liquid
Lower the heat, scrape carefully and check the broth
Once those few cues make sense, this stops feeling like temperamental orzo and starts feeling like an ordinary skillet dinner.
The second trip to the skillet should be brief: enough to finish the chicken through, not long enough to harden its browned edges.
Chicken pieces around 1 inch / 2.5 cm brown quickly without drying out as easily as smaller pieces. Taking them out after the initial sear lets the pasta cook without leaving lean chicken breast simmering the whole time.
Check the thickest chicken piece through its center; 165°F / 74°C is the finish line.
Let broth cook the pasta
Skillets lose liquid at different rates, which is why the reserve broth is there. If the orzo needs it, use it; if the pasta is softening nicely with enough liquid left, leave it alone.
Reserve broth is insurance, not a target—use it only when the orzo is still firm and the pan is nearly dry.
Bring everything together gently
The cream spends only a short time over low heat, while the Parmesan melts into the residual heat after the skillet leaves the burner. That sequence keeps the final sauce smooth and avoids simmering the dairy longer than necessary.
Finely grated Parmesan disappears into residual heat faster and more evenly than coarse shreds, which helps the sauce stay cohesive.
Ingredients That Make the Difference
The richness has counterweights: concentrated sun-dried tomato, lemon, spinach and basil keep the cream and Parmesan lively rather than one-note.
Chicken breast, thighs or cooked chicken?
Chicken
Why choose it
What changes
Breast
Lean and quick
Keep the pieces even and use the thermometer
Boneless thighs
Stay juicy through a wider cooking window
They may take a little longer depending on size
Rotisserie or cooked chicken
Fastest shortcut
Skip the sear and add it near the end
Cooked chicken only needs warming through, whether it comes from a rotisserie bird or leftovers.
For cooked chicken, use 14–16 oz / 400–450 g, roughly 3 cups chopped or shredded. Let the orzo cook first, then fold the chicken in with the cream and spinach so it only needs heating through.
Orzo
Orzo looks like rice, but it is pasta. It goes into this recipe dry, absorbs the seasoned broth and releases starch that helps the sauce cling. Do not pre-boil it.
Got some left in the box? Orzo also works well in minestrone soup, where it cooks in a much larger volume of broth.
Oil-packed sun-dried tomatoes
Oil-packed tomatoes are already soft enough to slice straight from the jar, and a spoonful of their seasoned oil makes excellent cooking fat for the chicken. Drain the tomatoes, but do not rinse them.
If yours are dry-packed, soften them in hot water for about 10 minutes, then drain before slicing and adding them.
Rehydrating dry-packed tomatoes is mostly about texture: softened pieces settle naturally into each spoonful instead of staying chewy against the tender orzo.
Fresh or canned tomatoes are not direct substitutes: they contain far more water and produce a different sauce.
Cream, Parmesan, spinach and broth
The orzo starch and Parmesan already give the sauce plenty of body, so ½ cup / 120 ml cream is enough for richness without flooding the pasta. Freshly grated Parmesan melts most smoothly off the heat.
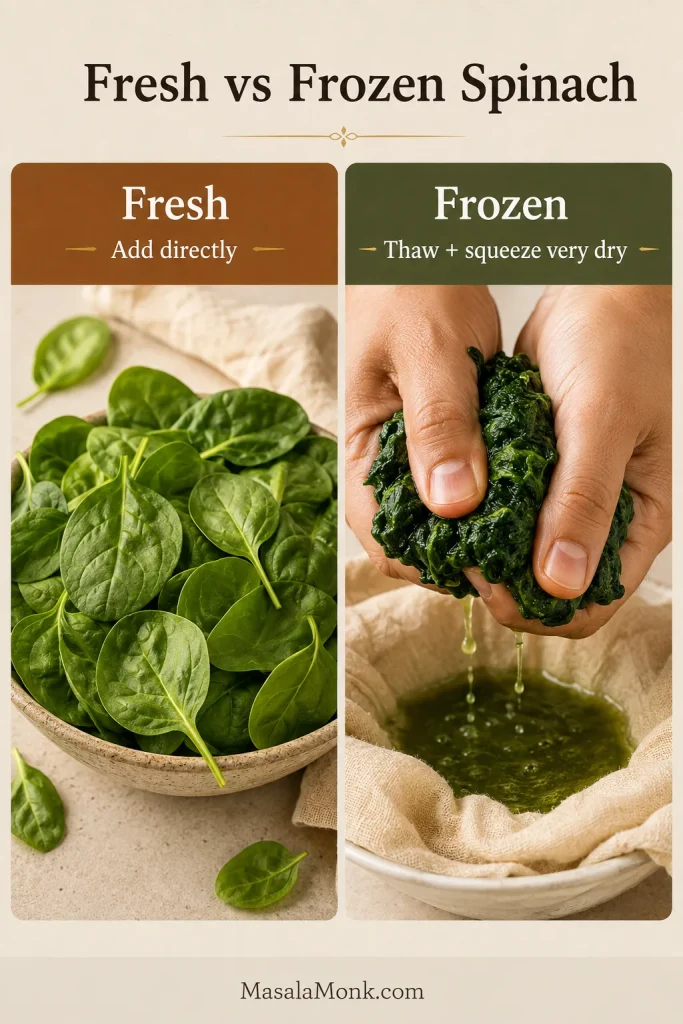
Fresh baby spinach wilts quickly. Frozen spinach works too, but thaw and squeeze it thoroughly first. Low-sodium broth leaves room to adjust the seasoning once the Parmesan and sun-dried tomatoes are in.
Even a little trapped spinach water has to go somewhere; here, it ends up thinning a sauce built from only a modest amount of cream.
Best Pan for Chicken Orzo: Use a Deep Skillet With a Lid
A deep 12-inch / 30-cm skillet or sauté pan, roughly 4–5 qt, gives the chicken room to brown and still has enough depth for the broth, pasta and spinach.
A similarly wide, deep pan with a lid works too. Width matters because a broad surface loses liquid faster than a narrow pot. A loose lid may have you reaching for the reserve broth sooner, while heavy cast iron may need the burner lowered promptly once the broth starts simmering.
Using a narrower pot? Expect the liquid to linger longer, and resist adding reserve broth merely because the suggested check time has arrived.
Substitutions and Add-Ins That Work
Change
What to expect
Chicken thighs
Juicier meat with a wider cooking window
Rotisserie chicken
Skip the sear and add it with the cream and spinach
Half-and-half
Use the same ½ cup / 120 ml; the sauce will be a little lighter and looser
Frozen spinach
Works once thawed and squeezed very dry
Dry-packed sun-dried tomatoes
Soften them in hot water before using
Mushrooms
Brown them first so their released water cooks away
With half-and-half, judge the sauce after the short rest before calling it too loose; warm orzo continues absorbing liquid as the skillet settles.
Gluten-free orzo: start tasting early. Different blends can soften and absorb broth differently from standard wheat pasta, so follow the texture rather than assuming the same timing.
Whole milk: it is not a straight 1:1 replacement for heavy cream if you want the same texture. The sauce will be noticeably looser.
Rice or another pasta shape: neither is a straight swap. Liquid needs and cooking times can change substantially.
Adding mushrooms? Brown them before the shallot until most of the moisture they release has cooked away. If yours usually steam rather than brown, the cues in this creamy mushroom sauce can help you judge when they are ready.
Troubleshooting the Finished Dish
Still at the stove? If the orzo is too wet, too dry or still firm, use the Orzo Rescue Guide instead.
First decide whether the pasta or sauce texture failed; fixing the wrong problem can make the dish worse.
The orzo is mushy or gluey. It probably cooked beyond tender while the sauce was still reducing. You cannot make overcooked orzo firm again, but a spoonful or two of warm broth can loosen it enough to make serving easier.
The chicken is dry. The usual causes are pieces cut too small, an initial sear that ran too long, or chicken left in throughout the pasta cook. Keep the pieces near 1 inch / 2.5 cm and let the thermometer—not the clock—decide when they are done.
The Parmesan looks grainy or oily. The skillet was probably too hot when the cheese went in. Finely grate the Parmesan and stir it through after removing the pan from the burner.
Frozen spinach made the sauce watery. Thaw it completely and squeeze out as much water as you can before adding it. That one step keeps a surprising amount of extra liquid out of the sauce.
The sun-dried tomatoes taste too strong. Some jars are much saltier or more intensely seasoned than others. A splash of cream or broth, extra spinach, fresh basil and black pepper can soften that intensity.
The dish tastes too rich. Try a little more lemon, black pepper or basil first. If the sauce itself tastes good but the plate needs contrast, a cold cucumber salad will help more than thinning a sauce that was already right.
Make Ahead, Store and Reheat
Prep ahead
For the best texture, prepare the ingredients ahead but cook the orzo fresh. Chop the shallot and tomatoes, mince the garlic, grate the Parmesan and wash the spinach earlier in the day. Cut the chicken too, then keep it covered and refrigerated separately until cooking.
Prep everything ahead, but keep dry orzo and broth apart until cooking begins.
If you need to cook the whole dish ahead, stop with the orzo just tender and leave the sauce slightly looser than usual. The pasta will absorb more as it sits.
Store and reheat
Cool leftovers promptly, cover and refrigerate. USDA guidance recommends using cooked leftovers within 3–4 days.
For meal prep, divide the cooled chicken orzo into individual containers. Before reheating, stir in 1–2 tablespoons / 15–30 ml broth per serving.
Microwave in short intervals, stirring between each one, or warm gently on the stovetop with the added broth until the sauce loosens. Reheated leftovers should reach 165°F / 74°C in the center.
Warm leftovers before judging thickness; add broth gradually because cold orzo loosens as it reheats.
Freezing
You can freeze it, but refrigeration gives the better texture. Frozen and thawed orzo tends to soften further, and the dairy sauce may not return to quite the same smooth consistency.
What to Serve With Marry Me Chicken Orzo
You do not really need another side. Chicken, pasta and spinach already make this a full dinner.
When you do want something alongside it, choose freshness, crunch or bread for catching the sauce.
This creamy chicken orzo needs little beside it—something crisp for freshness, something crusty for the sauce, and bowls on the table.
It is just as comfortable eaten straight from the skillet on a weeknight as it is spooned into warm bowls when you want dinner to feel a little more special.
Marry Me Chicken Orzo FAQs
Do you cook the orzo first?
No. The dry orzo cooks directly in the broth, so there is no separate pasta pot and nothing to drain.
Can I use rotisserie chicken?
Yes. Use 14–16 oz / 400–450 g cooked chicken, roughly 3 cups, and add it with the cream and spinach near the end.
Can I make it without heavy cream?
Yes. Use the same ½ cup / 120 ml half-and-half for a lighter, slightly looser sauce. Whole milk will make the sauce thinner and is not a direct replacement if you want the same consistency.
Can I bake this instead?
Not by moving this exact stovetop formula into the oven unchanged. Baking changes evaporation and timing, so an oven version needs its own broth ratio and method.
Why is it called Marry Me Chicken?
According to Delish recipe creator Lindsay Funston, the dish was developed in 2016 under the working title “Sicilian Chicken Skillet.” A marriage-themed reaction during the video shoot inspired the name that stuck. Adding orzo turns those creamy garlic, sun-dried tomato and Parmesan flavors into a complete one-pan meal.
Made it? Tell us how your skillet behaved, which chicken you used, or what you served alongside it. And if you reached for some of that reserve broth, you are definitely not the only cook whose pan had its own ideas.
Two Cooking Cues Worth Remembering
Almost tender + loose sauce: bring back the chicken and add the cream and spinach.
Fully tender + chicken at 165°F / 74°C: take the skillet off the heat, then stir in the Parmesan, lemon and basil.
After the short rest, the sauce should be glossy, creamy and still moving easily between the grains. Put the bowls on the table and give it those two quiet minutes; by the time you spoon everything out, the chicken should still be juicy and the sauce should cling without turning stiff.
The right finish leaves a little creamy sauce behind—just enough reason not to clear the bread from the table yet.
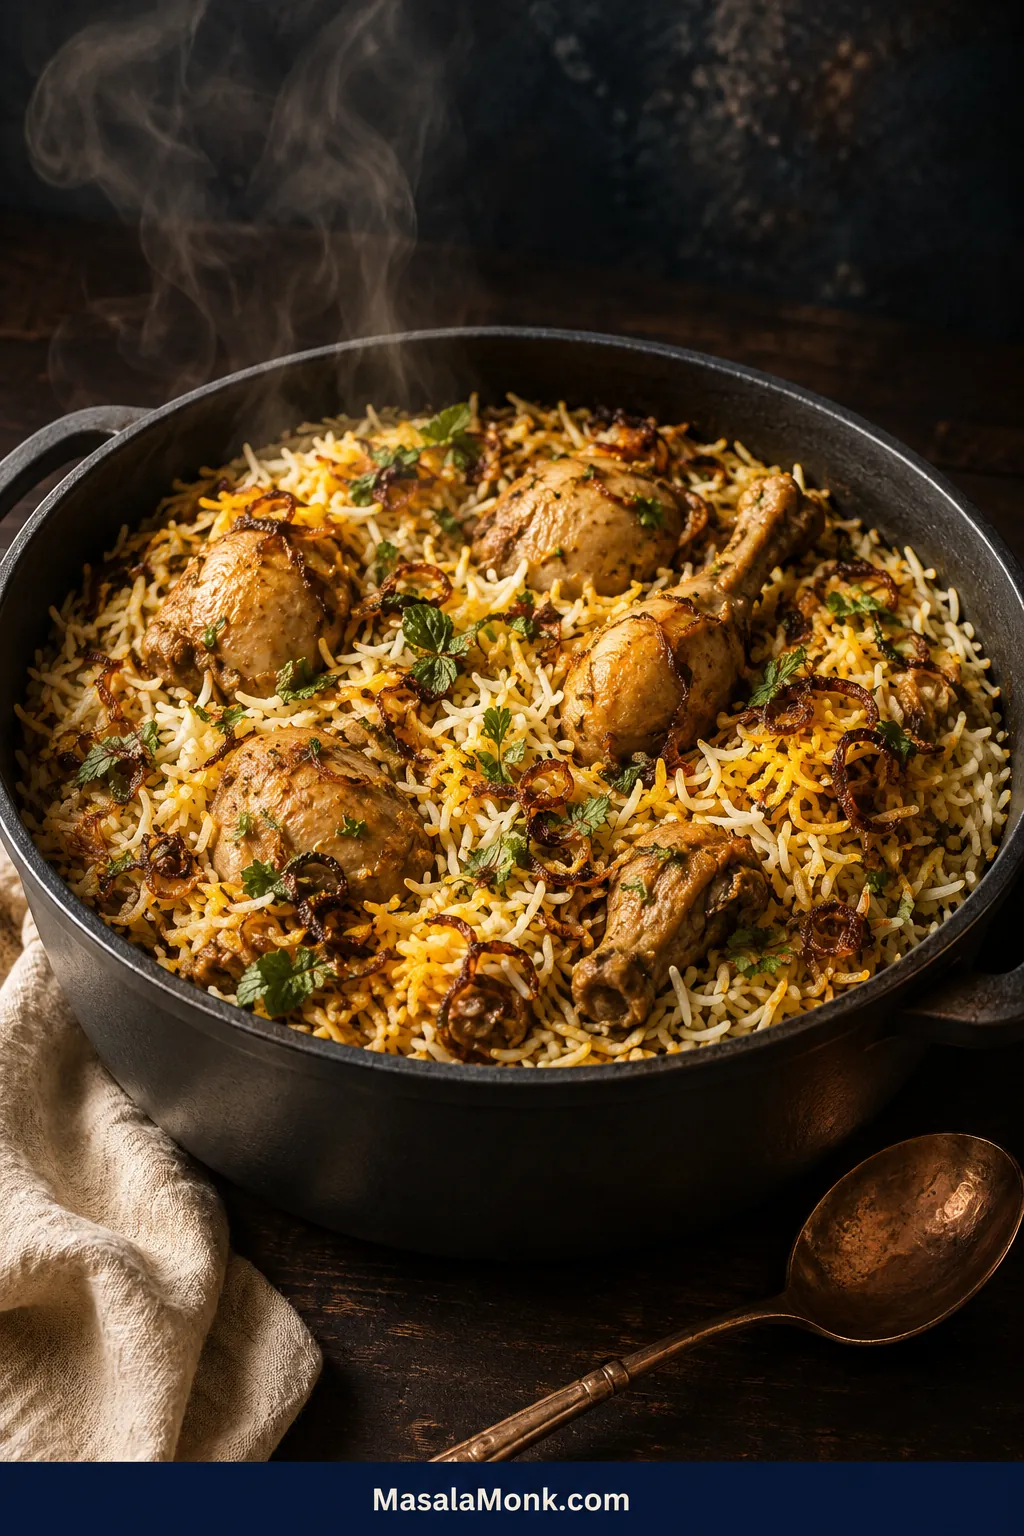
Lift the lid on a good chicken biryani and the first thing you notice is separation. Long grains move apart, browned onion and saffron rise with the steam, and a drumstick underneath stays juicy beside the bone.
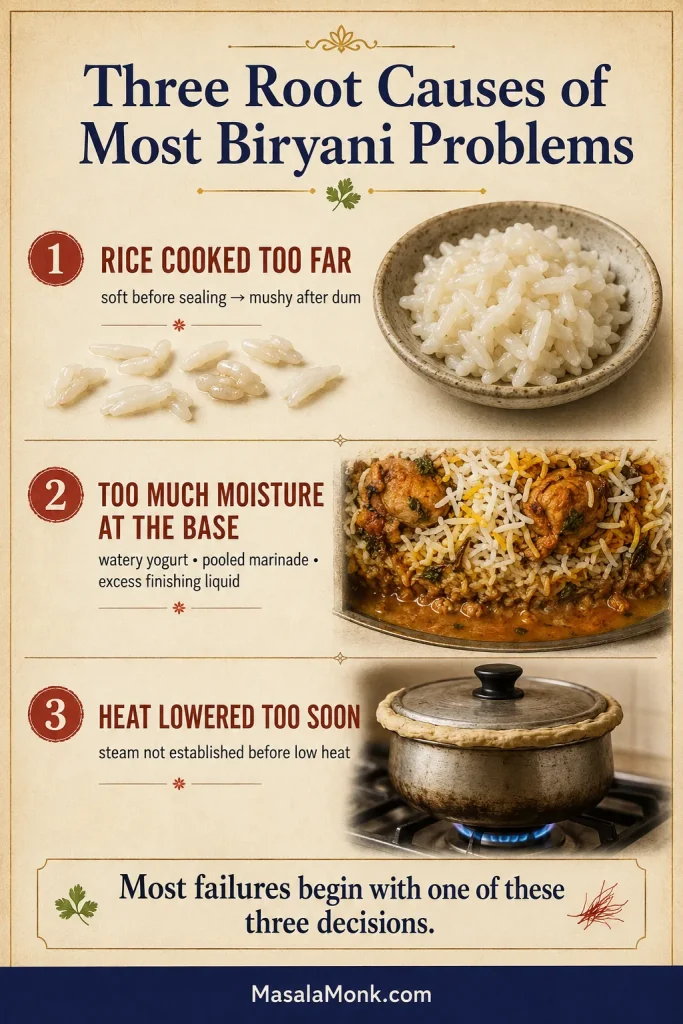
A disappointing pot can smell just as promising—until the serving spoon reaches wet rice at the bottom or the largest chicken piece is still tight and undercooked.
This chicken biryani recipe uses a Hyderabadi-style kacchi dum method: raw marinated chicken beneath partially cooked basmati rice. It is not a one-pot shortcut, but most of the elapsed time is marinating or waiting. The few moments that need close attention—the onions, rice and sealed pot—are brief and clearly marked.
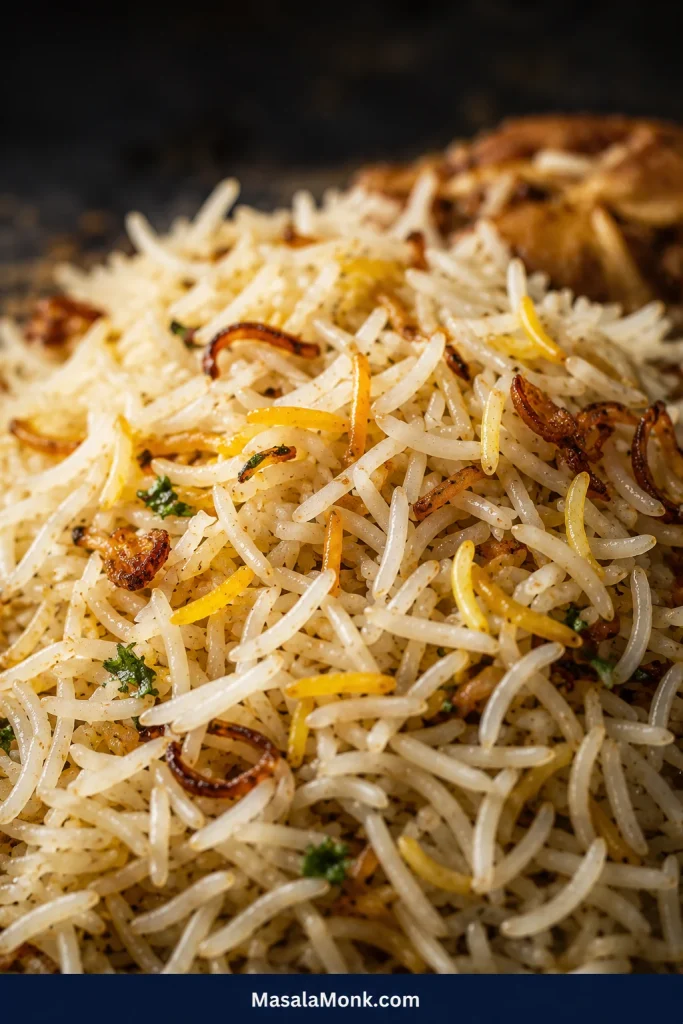
The finished biryani is meat-forward and moderately spiced, with separate grains, juicy bone-in chicken, fried-onion sweetness and a rich lower layer.
Fresh herbs and saffron keep the aroma lifted, while patches of pale, golden and darker rice make every serving slightly different. This version leaves out tomatoes, potatoes, nuts and food colour; its richness comes from yogurt, onion, ghee and the chicken itself.
Base batch: 750 g / 1 lb 10 oz bone-in chicken with 400 g / 14 oz aged basmati rice
Marinate: at least 2 hours; 8–12 hours is better
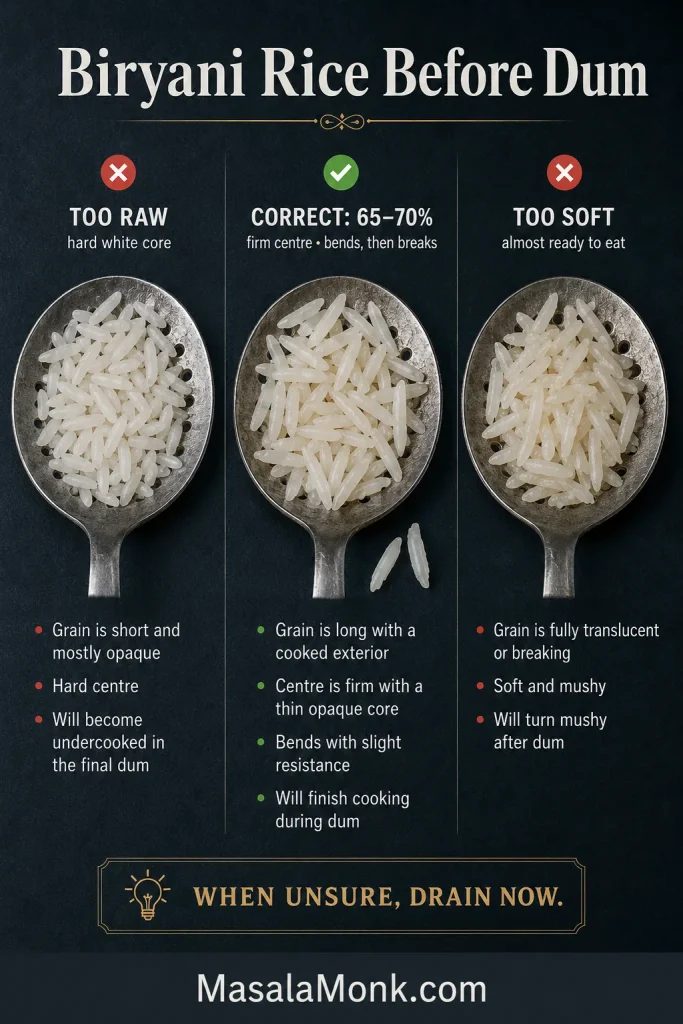
Rice: soak 30 minutes, then boil until tender outside but distinctly firm in the centre
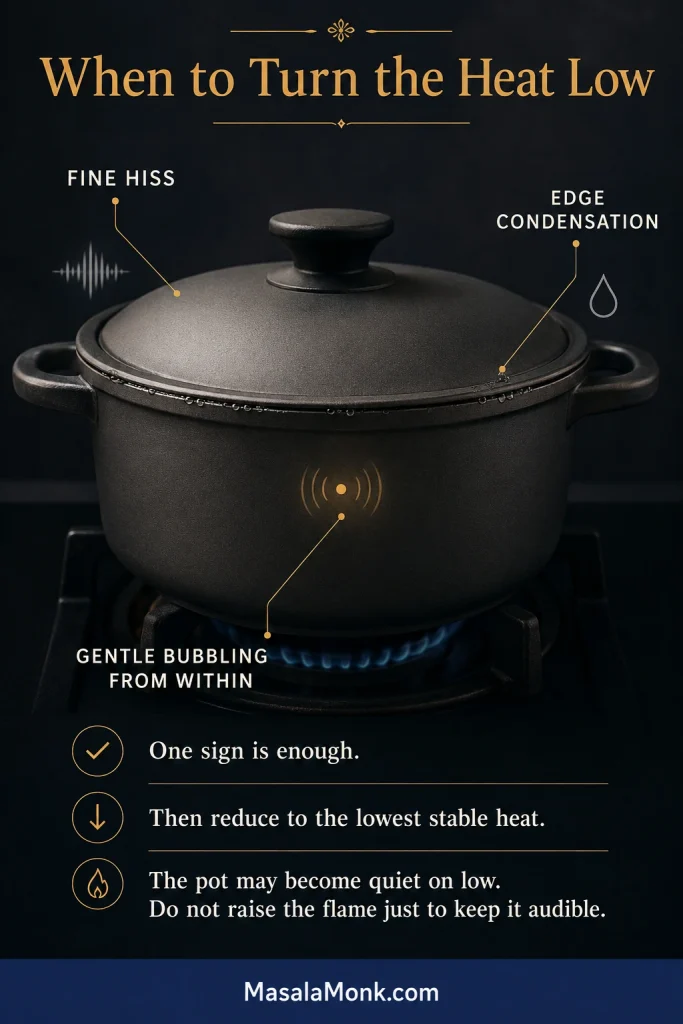
Dum: keep the pot sealed over medium heat until one clear sign—a fine hiss, gentle bubbling or edge condensation—confirms steam is building; then go low and begin checking after about 25 minutes
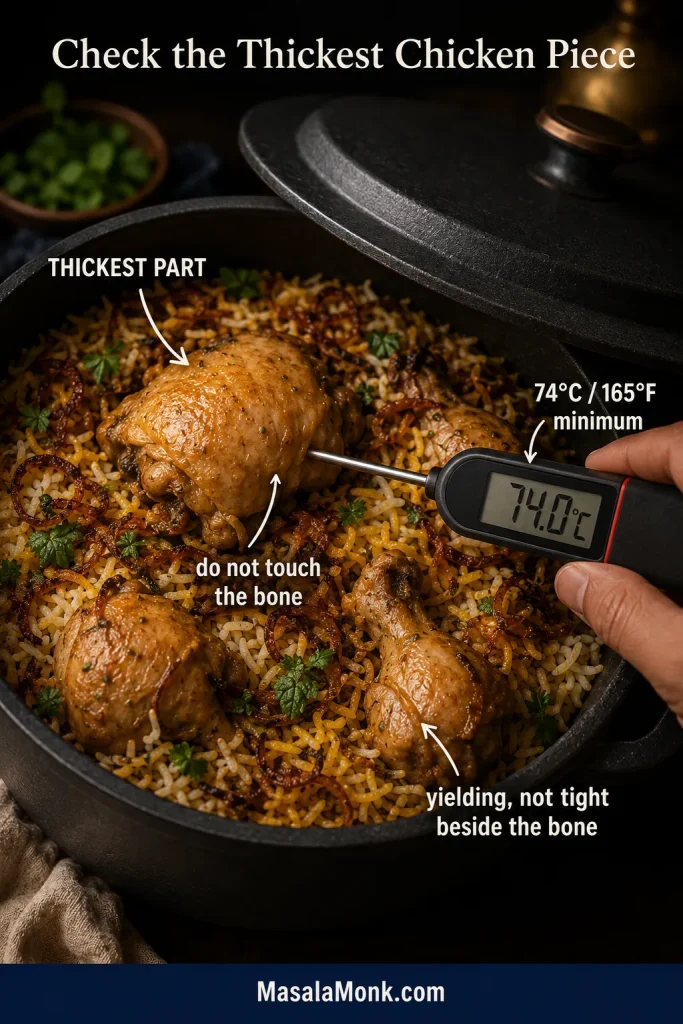
Finish: check the largest chicken piece with a thermometer, then rest the sealed pot before lifting servings
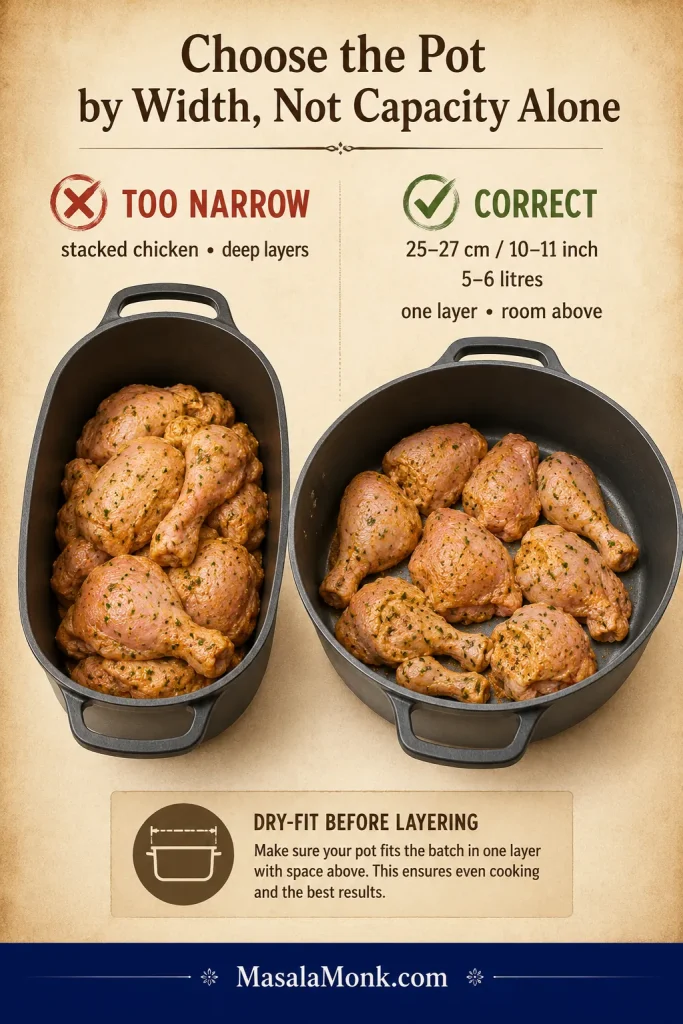
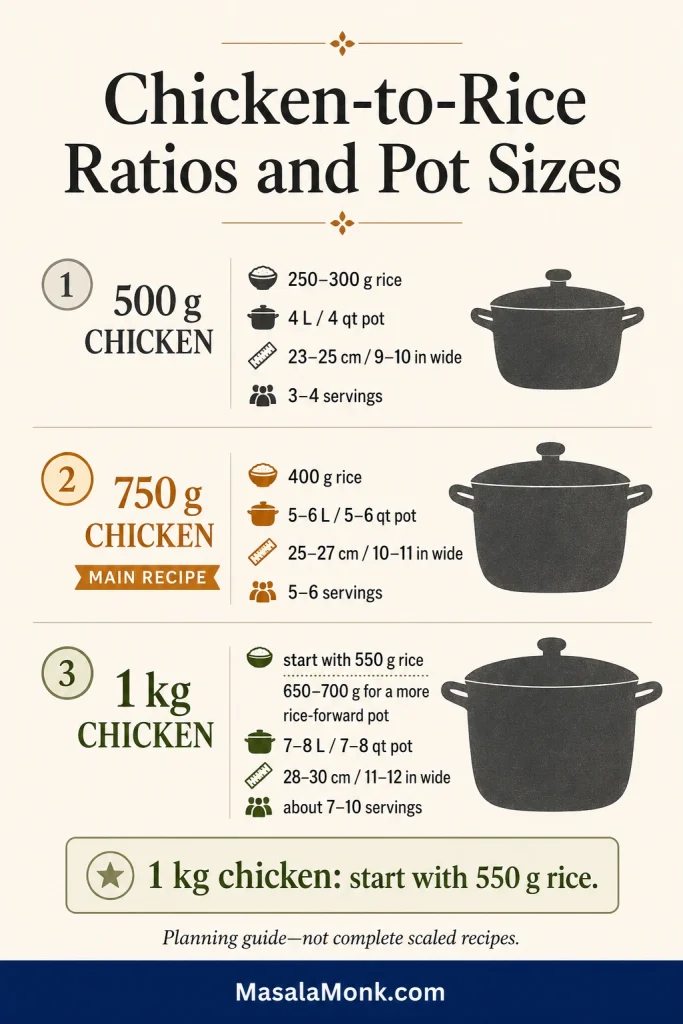
Use a wide, heavy 5–6 litre / 5–6 quart pot. The batch serves 5–6 as a substantial main. Raw marinated chicken cooks beneath partially boiled rice, so the rice stage and dum schedule are designed specifically for the kacchi method.
The MasalaMonk rule: stop the rice before it feels ready, establish steam before going low, and let the thermometer decide when the chicken is done.
How this guide was developed: this research-led guide reconciles recurring kacchi-dum methods and makes four often-vague decisions—rice texture, pot width, base moisture and chicken temperature—explicit for home cooks.
Make it now
Chicken Biryani Recipe: Hyderabadi-Style Kacchi Dum
Raw marinated chicken cooks beneath partially boiled basmati rice in a sealed, heavy pot. Fried onion, herbs and saffron remain in fragrant patches, so the finished rice keeps natural variations of colour and flavour.
Active prep About 45 minutes, including onions
Marinate 2–12 hours
Rice soak 30 minutes
Rice + dum About 45–60 minutes before final rest
Rest 10–15 minutes
Yield 5–6 substantial servings
Total elapsed time: allow about 4 hours with the minimum marinade or up to 14 hours with a longer refrigerated marinade. Soak the rice during the final 30 minutes.
Use a 5–6 litre / 5–6 quart pot, 25–27 cm / 10–11 inches wide. The chicken is done at a minimum of 74°C / 165°F. Weights are primary; 1 US cup equals 240 ml.
Plan the cook
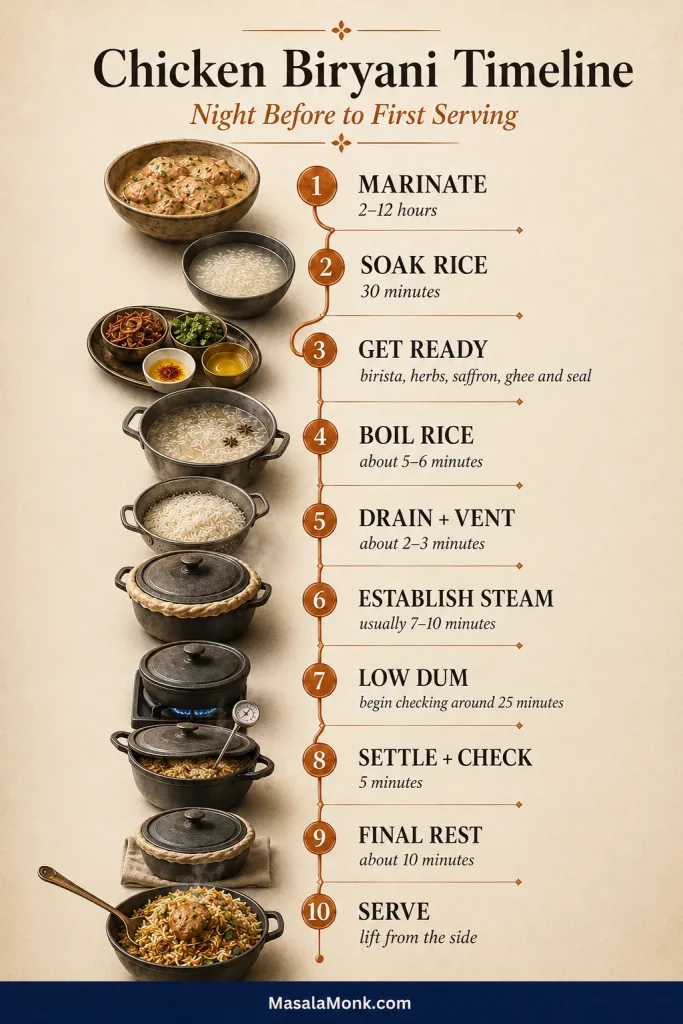
5–6 minutes rice boiling → 2–3 minutes draining and venting → about 7–10 minutes to establish steam → about 25 minutes on low → 5 minutes to settle → check → 10 minutes final rest.
Start the low-heat timer only after steam is established. The pot may become much quieter on low; do not raise the flame merely to keep it audible. Larger chicken pieces, a deeper pot or a weaker burner may need another 5–8 minute cycle.
Fry the onions first, then start the marinade. While the chicken rests, measure the rice spices, wash and dry the herbs, check the pot fit and make the raita if serving it. Begin the rice soak as the marinade enters its final 30 minutes.
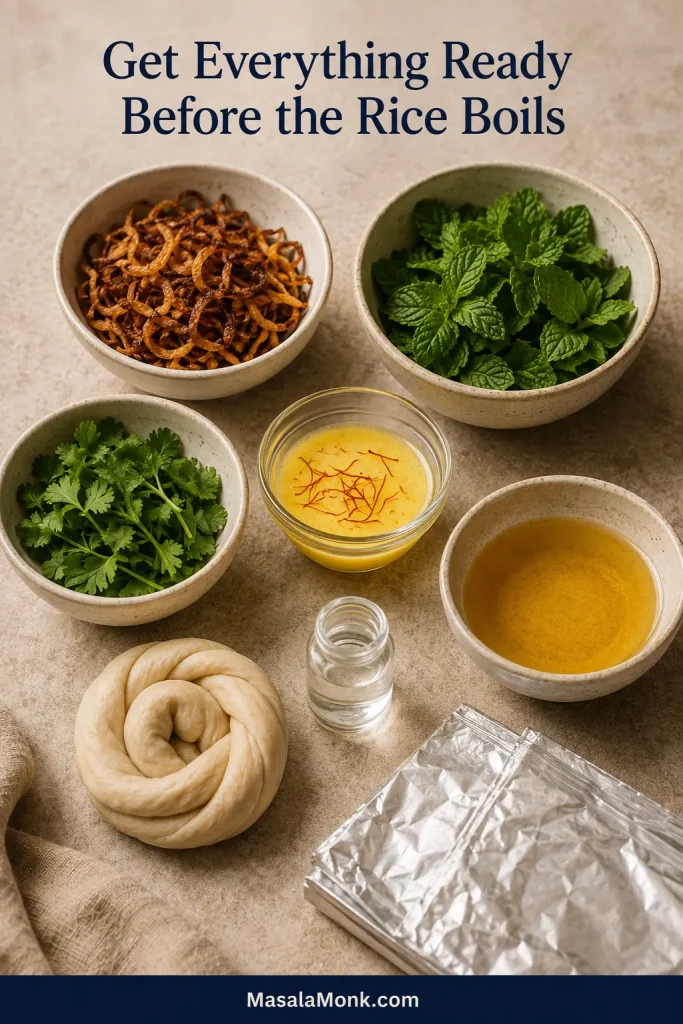
Before the rice boils, place the saffron milk, ghee, herbs, fried onions, colander and sealing material within reach. That keeps the only rushed part of the cook calm.
Equipment
Wide heavy-bottomed pot with a tight lid, approximately 5–6 litres / 5–6 quarts and 25–27 cm / 10–11 inches across
Large pot for boiling rice
Fine-mesh colander
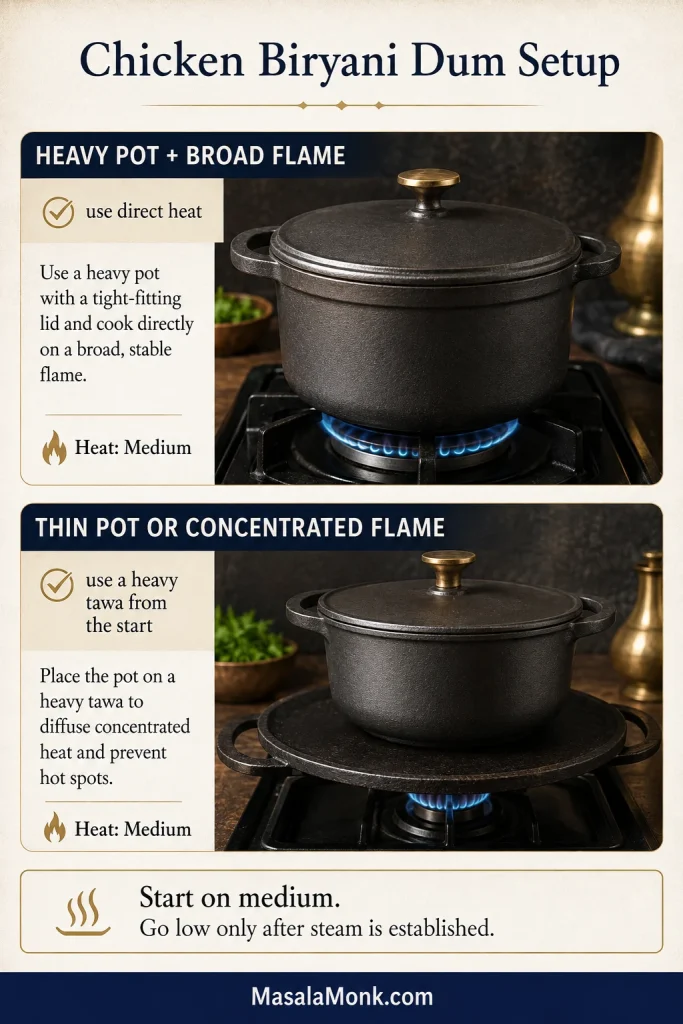
Heavy tawa, cast-iron skillet or heat diffuser, useful for a thin pot or sharply concentrated flame
Kitchen scale
Instant-read thermometer
Foil or soft dough for improving the seal, if needed
Flat rice spoon or wide serving spoon
For the fried onions
300 g / 10½ oz onions, about 2 large, halved and thinly sliced
300 ml / 1¼ cups neutral oil, or enough for the onions to move freely while frying in batches
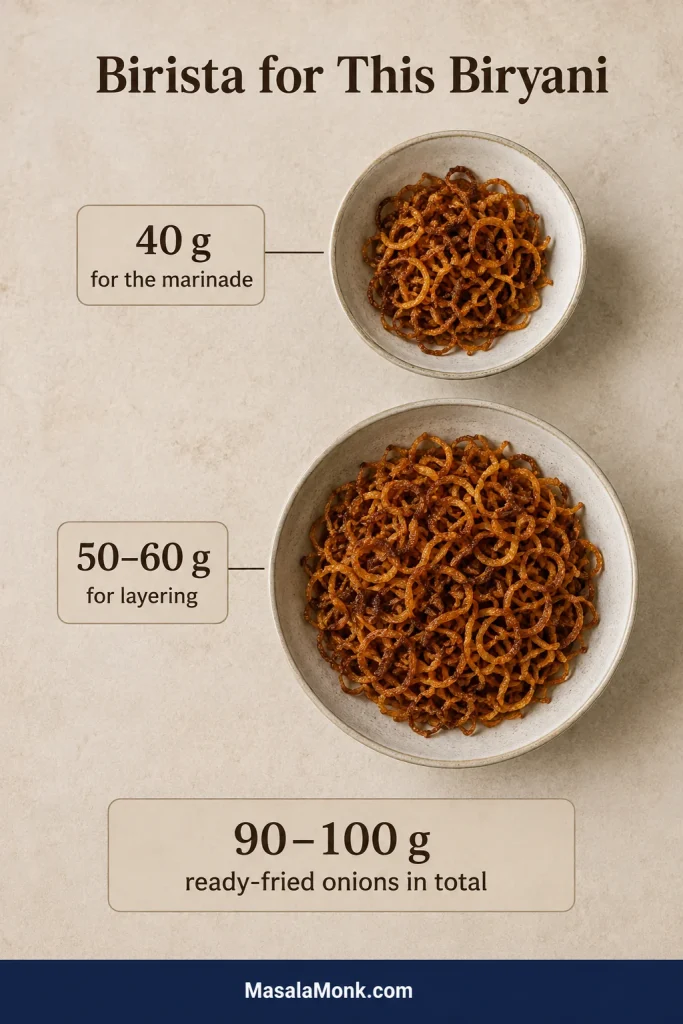
Weigh 40 g fried onions for the marinade and reserve the rest for layering. When using ready-fried onions, have about 90–100 g total: 40 g for the marinade and 50–60 g for layering. Reserve 30 ml / 2 tablespoons of the homemade onion-frying oil for the chicken; only that measured amount goes into the biryani.
For the chicken marinade
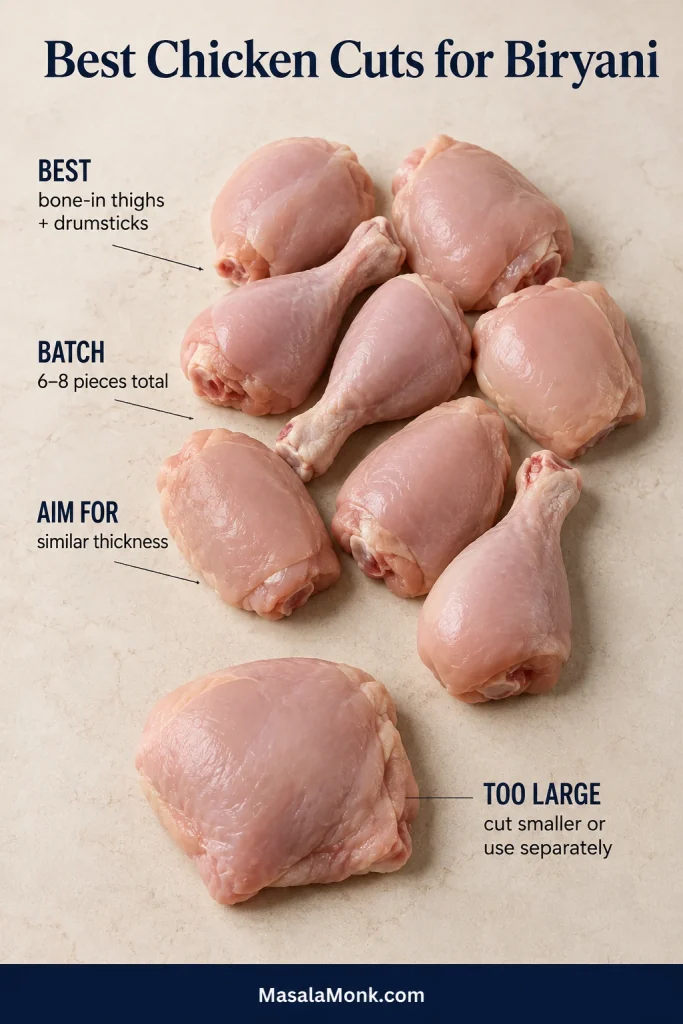
750 g / 1 lb 10 oz skinless bone-in chicken, 6–8 small-to-medium thighs and drumsticks of similar thickness; separate leg quarters at the joint and ask the butcher to halve unusually large thighs
200 g / 7 oz thick full-fat plain yogurt, about ¾ cup plus 1 tablespoon
25 g ginger-garlic paste, about 1½ tablespoons
15 ml / 1 tablespoon fresh lemon juice
9 g fine sea salt, about 1½ teaspoons
4 g Kashmiri chilli powder, about 1½ teaspoons
2 g ground coriander, about 1 teaspoon
1 g ground cumin, about ½ teaspoon
1 g ground turmeric, about ½ teaspoon
3 g unsalted biryani masala; use the entire defined blend below or a clearly labelled unsalted blend
2–3 green chillies, slit lengthwise; use 2 for moderate heat and 3 for a hotter biryani
40 g fried onions, lightly crushed
10 g mint leaves, roughly chopped
15 g coriander leaves and tender stems, chopped
30 ml / 2 tablespoons reserved onion-frying oil
Ground Spice Blend and Heat Level
Defined unsalted blend: combine ½ teaspoon ground black pepper, ¼ teaspoon ground green cardamom, ¼ teaspoon ground cinnamon, ⅛ teaspoon ground cloves, and a small pinch each of ground mace and nutmeg. The mixture makes roughly 3 g; use all of it.
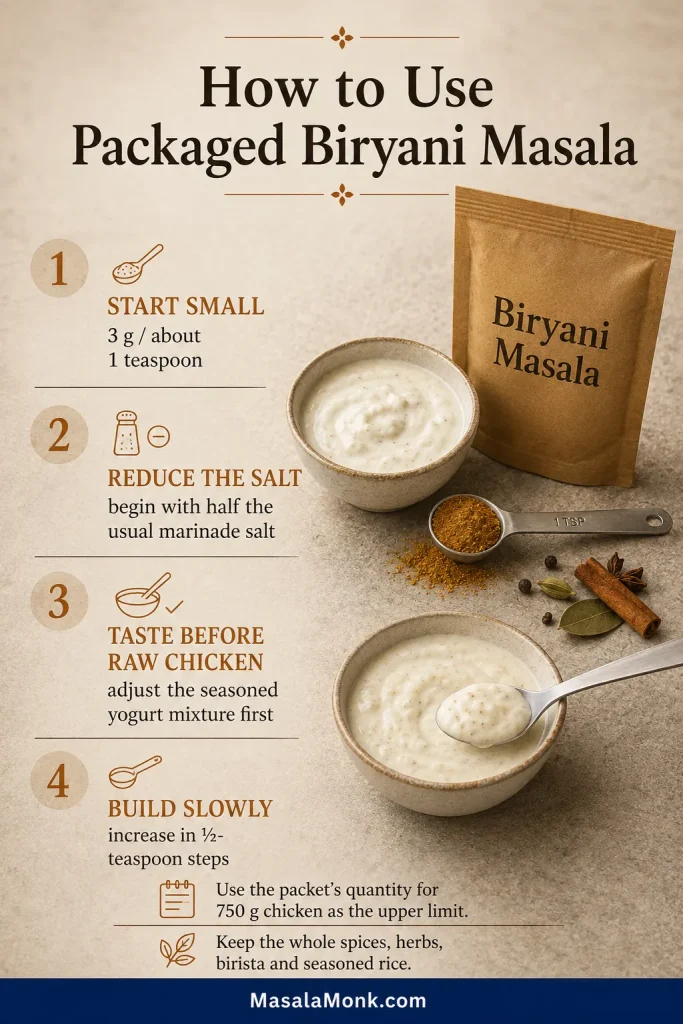
Using a salted packet masala: start with 3 g / about 1 teaspoon in the yogurt, add roughly half the usual marinade salt, and taste the yogurt mixture before adding raw chicken. Add more masala in ½-teaspoon increments only if needed, using the packet’s quantity for 750 g chicken as the upper limit.
Keep the measured herbs, fried onions, whole spices and rice seasoning; the packet replaces only the defined ground blend.
Choose the heat
Kashmiri chilli mainly adds colour and gentle warmth. Use 2 green chillies for a moderately spiced pot or 3 for more heat. When a packaged biryani masala already tastes hot, reduce the green chillies before reducing the Kashmiri chilli.
For the rice
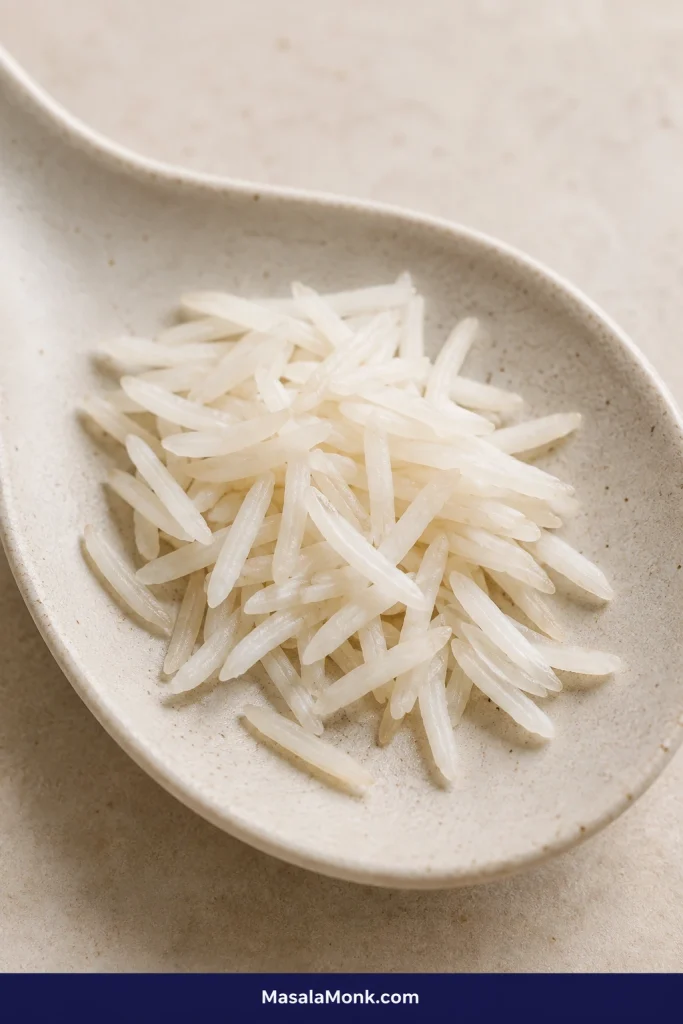
400 g / 14 oz aged basmati rice, approximately 2 US cups
3.5 litres / about 15 cups water
30 g fine sea salt, about 5 teaspoons
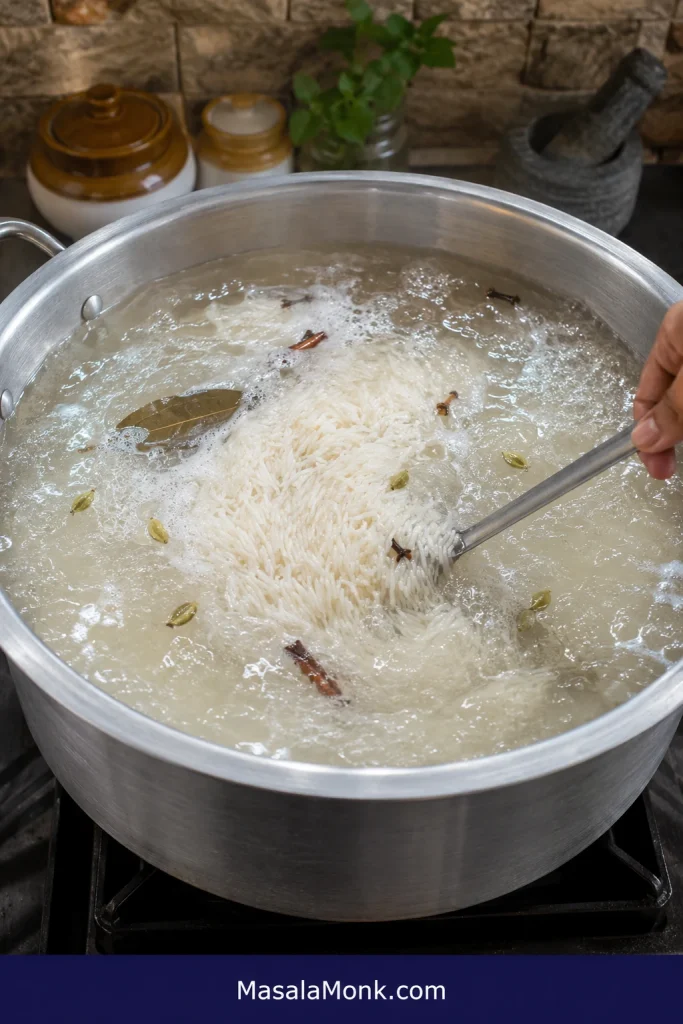
2 bay leaves
6 green cardamom pods, lightly cracked
1 black cardamom pod
6 cloves
1 cinnamon stick, about 5 cm / 2 inches
Shahi jeera or black cumin, 1 teaspoon
1 star anise, optional
For layering and finishing
Remaining homemade fried onions, or 50–60 g ready-fried onions, for layering
10 g mint leaves, roughly torn
15 g coriander leaves and tender stems, chopped
45 g / 3 tablespoons ghee, melted
45 ml / 3 tablespoons warm milk
A generous pinch saffron
2.5 ml / ½ teaspoon kewra water or 1.25 ml / ¼ teaspoon rose water, optional; use one for the first batch
Instructions
Prepare the Components
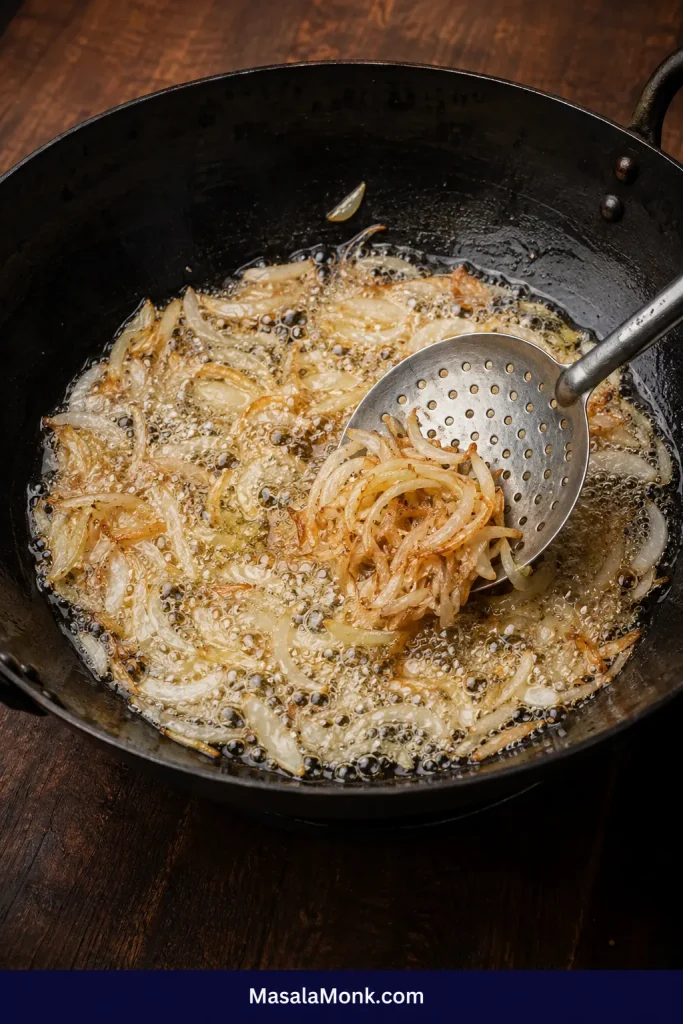
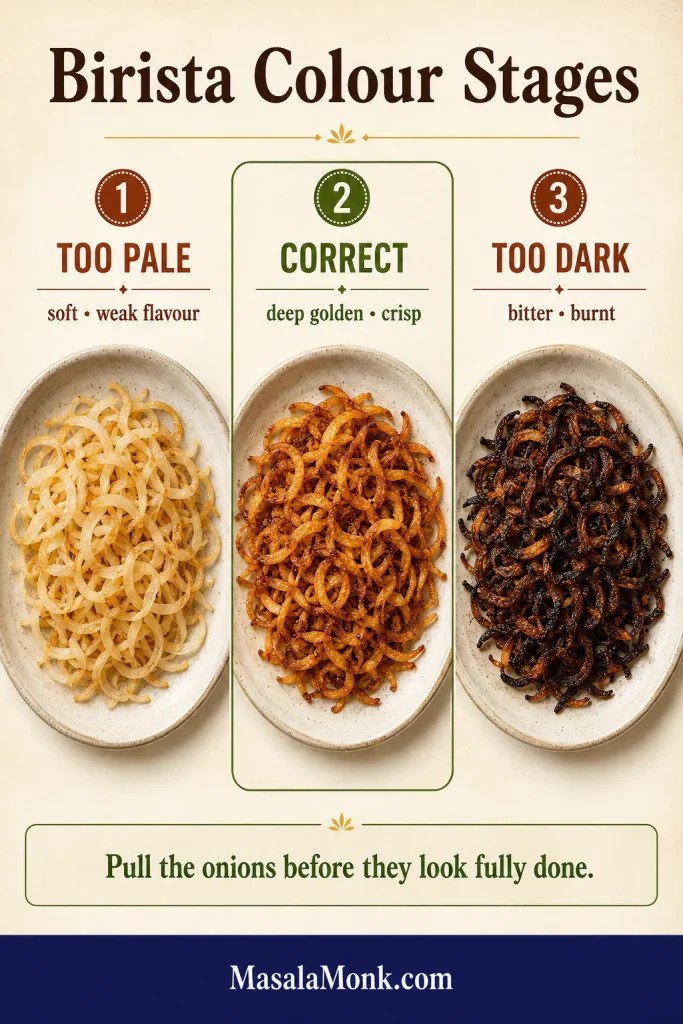
Fry the onions. Fry in two or three batches over medium heat until evenly deep golden. Remove before they turn dark brown; they continue colouring as they cool. Drain and let them crisp.
Marinate the chicken. Mix the yogurt, aromatics, salt, ground spices, green chillies, 40 g fried onions, herbs and 30 ml reserved onion oil. Coat the chicken, cover and refrigerate for at least 2 hours, preferably 8–12.
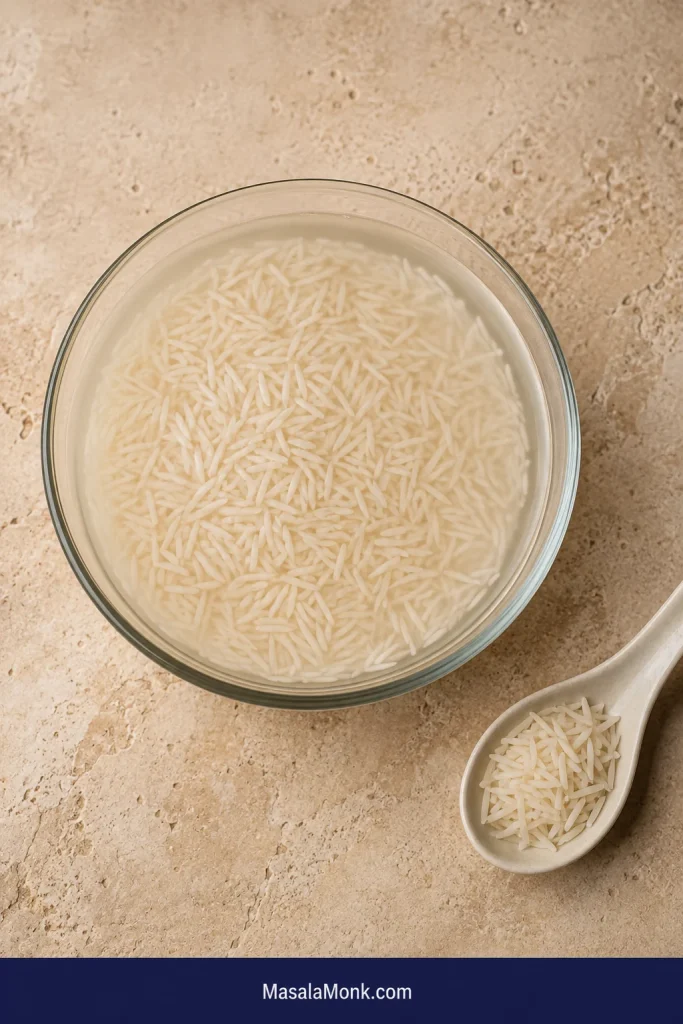
Rinse and soak the rice. Rinse gently until the water becomes much clearer, soak in fresh water for 30 minutes, then drain just before boiling.
Prepare the finishing ingredients. Infuse the saffron in warm milk and measure the ghee, herbs, fried onions and one optional aromatic water before the rice starts cooking.
Parboil the rice. Boil the drained rice in the salted, spiced water. Start checking at 4 minutes; soaked aged basmati often needs 5–6. Drain when the outside is tender but the centre still resists clearly.
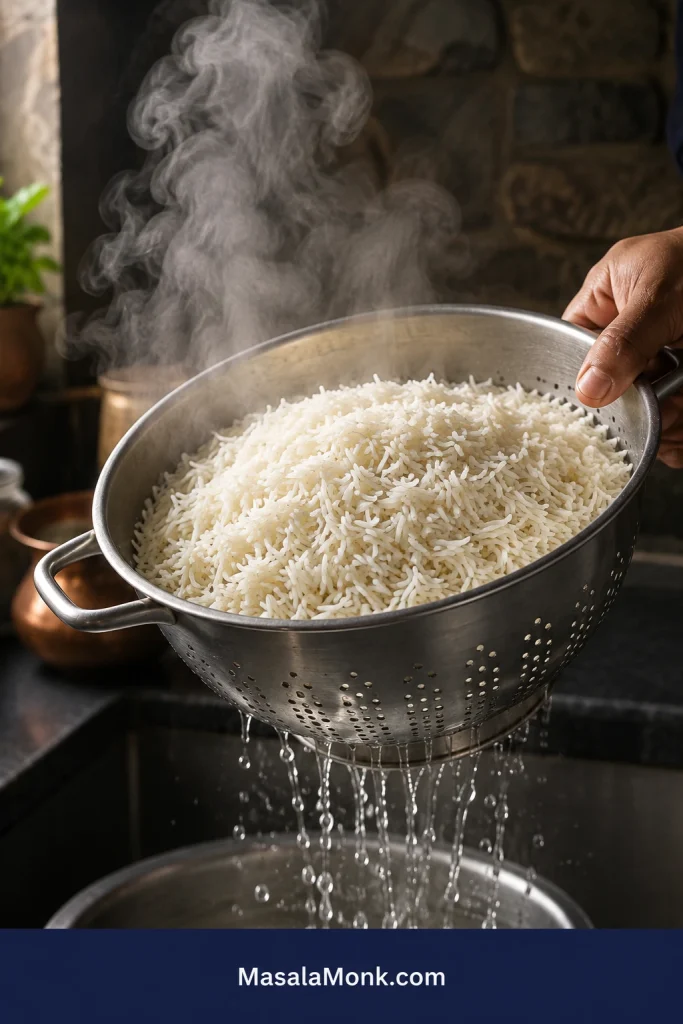
Drain and vent. Pour into the prepared colander immediately and leave uncovered for 2–3 minutes so surface moisture escapes.
Build, Seal and Finish
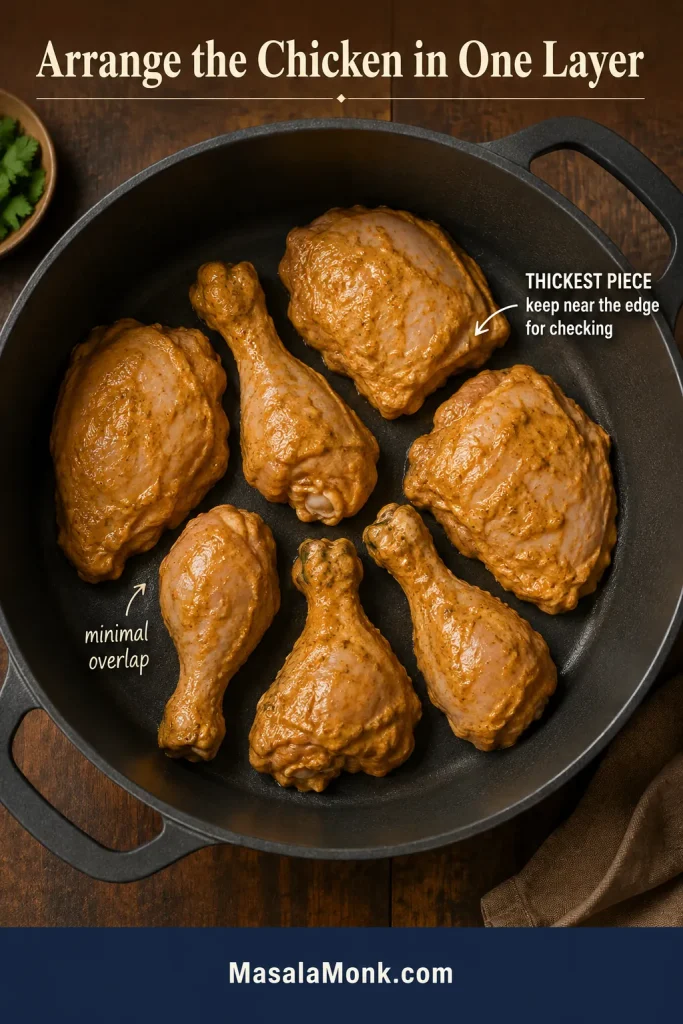
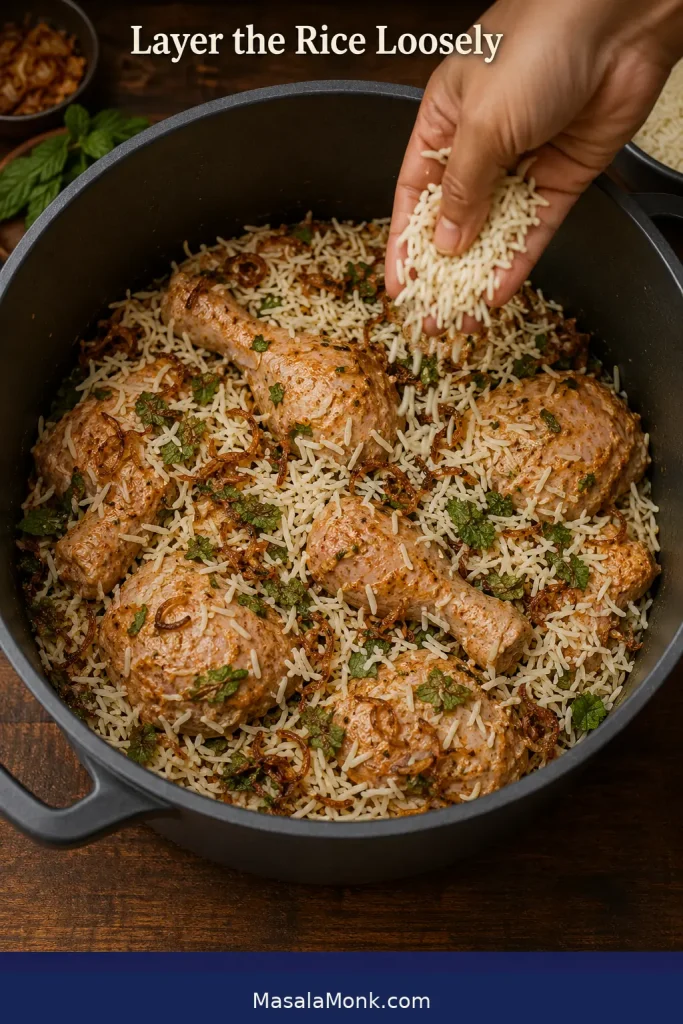
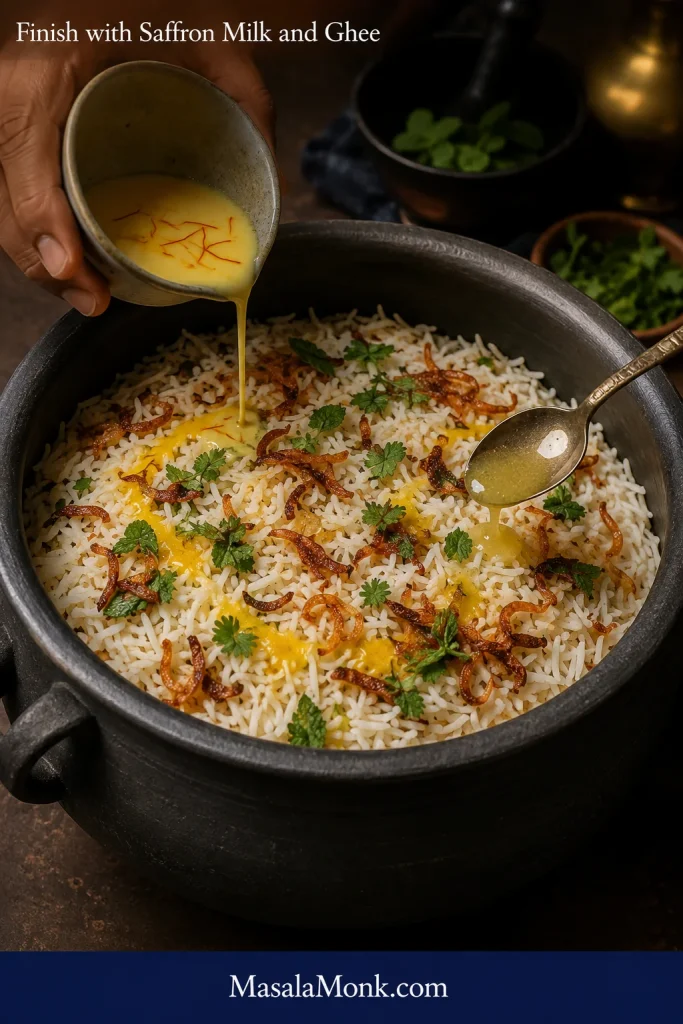
Layer the pot. Arrange the chicken in one even layer, placing the thickest piece near the side for later checking. Spread the rice loosely over it, then distribute the fried onions, herbs, saffron milk, ghee and optional aromatic water.
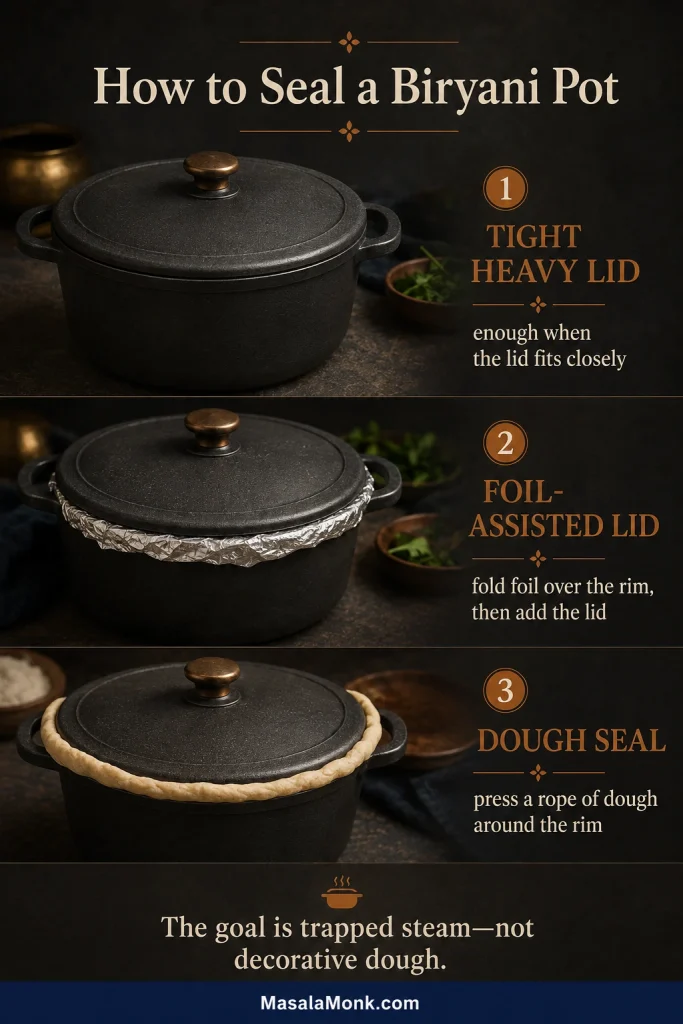
Seal the pot. Cover tightly, adding foil or dough beneath the lid only if needed. Put a thin pot or a pot over a concentrated flame on a heavy tawa or diffuser from the beginning.
Listen, then go low. Heat over medium with the lid closed until one clear sign—a fine hiss, gentle bubbling or edge condensation—confirms steam is building. Reduce to the lowest stable heat and begin checking after about 25 minutes. The pot may become much quieter on low.
Check the chicken, then rest. Move off heat for 5 minutes and probe the thickest piece without touching bone. It must reach at least 74°C / 165°F and feel yielding rather than tight beside the bone. If needed, reseal and continue in 5–8 minute low-heat cycles. Once done, rest sealed for 10 minutes.
Lift; do not churn. Open away from your face. Slide a wide spoon down the side and lift from the bottom so each serving receives chicken, pale rice, saffron-tinted rice and some of the richer lower layer.
The 65–70% rice stage belongs to this raw-chicken kacchi method. Pakki biryani needs more fully cooked rice and a shorter sealed finish.
Kewra and rose water are optional and powerful. Choose one, measure it, and never pour directly from the bottle.
The recipe above is enough to cook from. Continue with the guide for the few decisions—rice texture, bottom moisture and dum heat—that most affect the finished pot, or jump straight to troubleshooting when something looks different.
The timeline below shows where the cook can pause and where it cannot. Read it once before starting so the colander, finishing ingredients and seal are ready when the rice reaches its target.
The rushed window begins when the rice is drained: layer, finish and seal the pot before carryover heat softens the grains.
The ingredient list looks long, but each group has one job: bone-in dark meat cooks in one wide layer, thick yogurt seasons without becoming gravy, whole spices perfume the rice water, and herbs and fried onions brighten the finished pot. Measure each group before the rice boils and the method becomes much calmer.
Best chicken for biryani: bone-in thighs and drumsticks
Skinless bone-in thighs and drumsticks are the most forgiving choice for this method. Ask for small-to-medium biryani or curry-cut pieces. Separate leg quarters at the joint, and ask the butcher to halve unusually large thighs. Similar thickness matters more than the exact count.
Supermarket pieces can vary surprisingly within one pack. If one thigh is much thicker than the rest, move it to another meal or have it cut smaller so the pot can finish evenly.
Choose similarly thick thighs and drumsticks so the sealed cook finishes evenly and the final temperature check remains dependable.
Boneless thighs can be used when bone-in chicken is unavailable, but this formula is calibrated for thighs and drumsticks with the bone. Keep the pieces large and follow the limited thermometer-led guidance in the variations section.
Why aged basmati works better
Aged basmati generally lengthens well and is less likely to turn sticky than very fresh rice. Gentle handling still matters. Rinse with your fingers open, soak for a measured time, and have the colander ready before the rice enters boiling water.
Grams are the dependable measure here. “Two cups” can vary with the cup, the rice and how firmly it is filled, so the recipe is balanced around 400 g. Biryani rice boils in abundant water and is drained; absorption-method ratios belong to a different method.
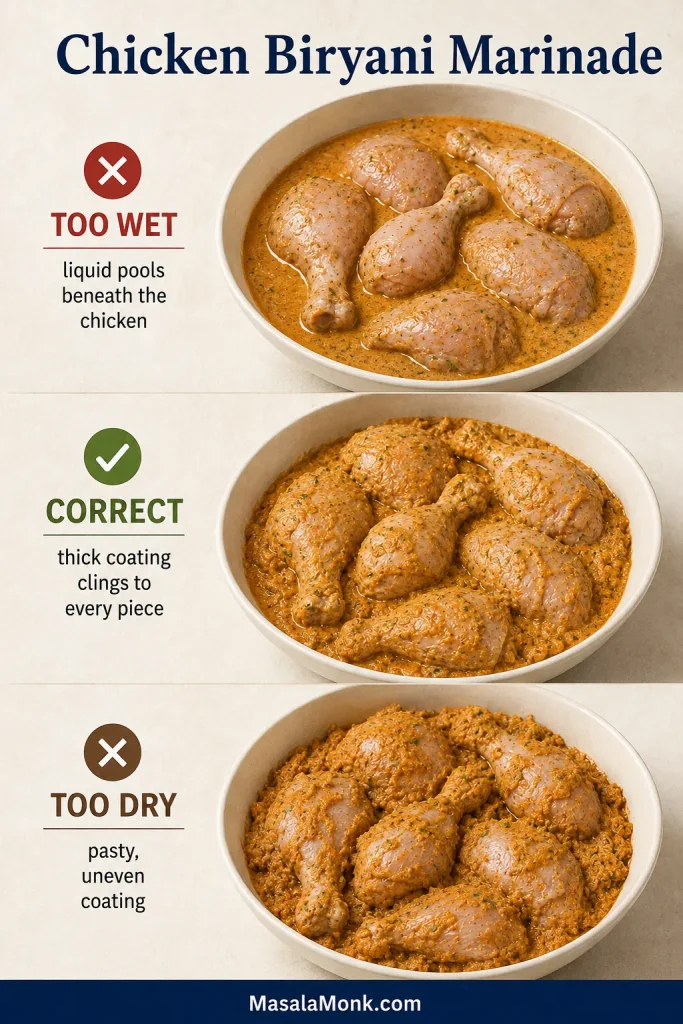
Chicken biryani marinade: thick enough to cling
Thick full-fat yogurt gives the marinade body without flooding the pot. Stir it before measuring. Watery yogurt or separated whey needs 20–30 minutes in a fine sieve. The finished marinade should visibly coat the chicken instead of collecting beneath it.
The marinade should cling and move slowly; leave watery runoff behind so the lower rice does not become heavy.
How to make birista for chicken biryani
Birista sweetens the marinade, deepens savoury flavour and leaves concentrated aromatic pockets through the upper rice. The final minute deserves attention: onions that look perfectly dark in the oil often become bitter after carryover browning.
Lift them while they are evenly deep golden, then spread them in a thin layer to cool. A hot heap continues browning in its own heat.
Ready-fried onions are a valid shortcut when their ingredient list is simple and they still smell fresh. Have about 90–100 g total: use 40 g in the marinade and 50–60 g for layering. Commercial onions can be saltier or sweeter than homemade birista, so taste them before adjusting the marinade.
Separate the fried onions before the rice boils: crush the marinade portion lightly, then keep the larger layering portion loose so it remains visible and aromatic in the finished pot.
Crush one birista portion into the marinade and reserve the rest for distinct savoury pockets through the rice.
Spices and where each one goes
Whole spices perfume the rice water, while chilli, coriander, cumin, turmeric and biryani masala season the chicken. Herbs, ghee and saffron finish the upper layer where their aroma can survive.
Dividing the spices across those stages creates complexity without coating every grain in ground masala. Garam masala and biryani masala overlap, but they are not automatically interchangeable; MasalaMonk’s homemade garam masala guide explains the warm-spice backbone.
Season the chicken, rice water and finishing layer separately; after sealing, bland meat or basmati cannot be corrected evenly.
Saffron, kewra and rose water: finish lightly
Saffron adds a warm floral aroma and creates small patches of golden rice; it does not need to colour the whole pot. Steep a measured pinch in warm milk and spoon it across a few areas.
MasalaMonk’s guide to saffron explains how to recognise and store whole threads. When saffron is unavailable, omit it and let the ghee, herbs and fried onions carry the finish.
Kewra and rose water are optional and far more forceful. For the first batch, choose one: up to ½ teaspoon kewra water or ¼ teaspoon rose water for the whole pot. Measure it before layering. Pouring directly from the bottle is how fragrant biryani turns medicinal.
Equipment and Pot Fit
The pot does not need to be special, but it should be wide enough for one layer of chicken and heavy enough to soften direct heat. Shape matters as much as capacity because a deep stack takes longer to heat and sends steam through more rice.
Choose a wide, heavy pot
For 750 g chicken and 400 g rice, use a 5–6 litre / 5–6 quart pot measuring about 25–27 cm / 10–11 inches across. Heavy stainless steel, an enameled Dutch oven or a sturdy handi works well.
A wide pot keeps the chicken in one layer, the rice looser above it and the heat path shallower during dum.
Before marinating, dry-fit the chicken in the pot. The pieces should cover most of the base in one reasonably even layer. A little overlap is fine; a tall central pile will cook less evenly.
Leave room above the rice. After layering, keep clear headroom below the lid. An overfilled pot leaks and compresses the grains; an oversized pot spreads a small batch so thinly that the rice can dry before the chicken finishes.
Check the chicken with a thermometer. Aroma tells you the spices are hot, but it cannot confirm that the largest chicken piece is cooked. An instant-read thermometer lets you stop guessing. Probe the thickest part without touching bone and look for at least 74°C / 165°F, the USDA minimum for poultry.
How Cooked Should Biryani Rice Be?
The rice is the shortest and least forgiving stage, so it helps to understand the target before the water boils.
“Cook the rice to 70%” sounds exact, but a beginner cannot see a percentage. The number only becomes useful when it is tied to the method and to physical signs.
Biryani Rice Before Dum: The Target
Biryani method
Chicken before layering
Rice before final cooking
Why
Kacchi dum
Raw and marinated
About 65–70%
The rice must survive a longer dum while the chicken cooks.
Pakki dum
Mostly or fully cooked
About 80–90%
The final sealed stage is shorter and mainly integrates the layers.
One-pot absorption
Raw or partly cooked
Raw soaked rice
Rice cooks in a measured volume of liquid rather than being drained.
Rice cooker
Method-dependent
Usually raw soaked rice
The appliance uses an absorption cycle and requires its own liquid ratio.
Drain while the centre is still firm; dum can finish slightly underdone rice, but already-soft grains cannot regain structure.
For this recipe, stop when the outside of the grain is tender but the centre is still firm. If you can comfortably eat a bowl of the rice as it is, it has gone too far for the intended dum time.
The boil-and-drain stage belongs specifically to biryani. Plain rice, rice-cooker rice and pressure-cooked rice use different liquid systems, so their absorption ratios should not be transferred to this pot.
How to Make Chicken Biryani, Step by Step
Most of the preparation is forgiving. Watch the onions, feel the rice and listen to the sealed pot; those three moments matter more than following the clock blindly.
Deep-golden onions, a firm rice centre and the first steam cue matter more than fixed minutes alone.
1. Fry the onions until deep golden
Slice the onions thinly and evenly. Thick pieces stay soft while very fine pieces burn, so consistency matters more than paper-thin slices. Fry in batches. If using a thermometer, begin around 165–170°C / 330–340°F; otherwise look for active bubbling without smoke or rapid darkening.
Freely moving slices and active bubbles mean frying; a crowded, quiet pan is steaming and needs smaller batches.
Stir more frequently as the onions lose moisture. Stay close once the colour changes: remove them deep golden with only a few darker edges, then let carryover heat finish the browning. Once cool, they should crumble between your fingers.
Remove birista at deep gold because residual heat keeps darkening it after the onions leave the oil.
This is usually the first moment the kitchen begins to smell like the biryani to come. Let colour decide when the onions leave the oil; aroma alone can make them seem ready too soon.
If they smell sharp or bitter, do not hide them in the biryani. Burnt birista can dominate an entire pot. It is better to fry another onion than spend hours building flavour around bitterness.
2. Marinate the chicken
Pat the chicken dry so surface water does not thin the yogurt. Mix the marinade completely before adding the pieces; this distributes salt and ground spices more evenly than sprinkling them separately over the chicken.
Properly mixed, the marinade looks thick and slightly coarse from the crushed fried onions and herbs. It should cling to the top and sides of each piece. When the bowl is tilted, a small amount may move, but there should not be a layer of thin liquid running away from the chicken.
Marinade state
What it looks like
What to do
Too watery
Thin yogurt or whey pools beneath the chicken.
Drain excess liquid or add a little more crushed fried onion. Do not add dry flour.
Correct
The mixture clings and slowly settles around the pieces.
Cover and refrigerate.
Too dry
Spices sit in patches and the chicken looks barely coated.
Add 1–2 tablespoons thick yogurt, not plain water.
Two hours is the practical minimum. Eight to twelve hours gives the salt and aromatics more time to move through the chicken. More lemon is not a substitute for more time; excessive acid can make the exterior soft before the interior is seasoned.
3. Rinse and soak the basmati
Rinse gently through several changes of cool water until it moves from opaque white to much clearer. Soak for 30 minutes, then drain. Set the colander in the sink before boiling because soaked rice moves quickly once it reaches the water.
Soaked aged basmati should look slightly lengthened but remain raw, narrow and firm before it reaches boiling water.
4. Prepare every finishing ingredient
Steep the saffron in warm milk, melt the ghee, chop the herbs and measure one aromatic water if using. Keep the remaining fried onions beside the stove. The saffron may colour only parts of the rice, which is exactly what you want.
This small act of organisation matters because the rice will not wait politely while you search for foil or wash coriander. Once it reaches the right stage, it must be drained, vented briefly and layered.
Keep the colander, saffron milk, ghee and seal ready before the rice boils so layering can begin without delay.
5. Parboil the rice, then stop early
Bring 3.5 litres water to a vigorous boil with the salt and whole spices. Cool a spoonful before tasting: it should be noticeably salty because most of the water will be drained, but never harsh or bitter.
Abundant boiling water lets basmati circulate evenly; this is a boil-and-drain method rather than absorption cooking.
Add the drained rice and stir once gently from the bottom. Start checking at four minutes. Soaked aged basmati often reaches the right stage in five to six minutes, although the brand, grain thickness and return to the boil can shift that window.
Use three rice tests
Look: the grain has lengthened, but a slightly opaque core remains.
Bite: the outside is tender while the centre still gives clear resistance.
Break: the grain breaks when pressed but does not smear into paste.
The outside should be tender and lengthened while the centre still resists clearly when the grain is bitten or pressed.
If you are caught between draining now and waiting another minute, drain now. Slightly firm rice can finish under dum; fully cooked rice cannot become firm again.
Rice that already tastes ready to serve has gone too far for this dum. Drain and spread it immediately, use only the measured saffron liquid, and assemble gently. Begin checking the chicken earlier while continuing until it is safely cooked. The rice will be softer, but draining now gives it the best chance.
6. Drain and let surface steam escape
Pour the rice into the prepared colander immediately. Shake gently once or twice, then leave it uncovered for two to three minutes. The brief vent releases surface moisture while the rice remains hot and ready for layering. Trust the firm centre now; the sealed pot will finish it. Handle the elongated grains as little as possible.
Vent the rice uncovered without rinsing or covering; both can weaken seasoning or trap carryover heat before layering.
7. Layer the chicken and rice
Spread the marinated chicken across the pot base in one even layer. Give each piece contact with the base and avoid stacking one thigh beneath another. Place the thickest piece near the side so it can be checked later without disturbing the centre.
Keep the chicken in one layer and the thickest thigh near the edge for an easier final temperature check.
Distribute the rice loosely without packing or pressing it. Leave small routes for steam rather than compressing the grains into one dense layer.
Scatter rather than press the rice so steam pathways remain open and the herbs and birista stay evenly distributed.
Scatter the remaining fried onions and herbs across several points, then spoon the saffron milk and ghee over different areas. Small pockets of colour and aroma are better than one orange stripe down the middle.
Drizzle saffron milk and ghee irregularly to create aromatic patches while most of the basmati remains naturally ivory.
Check the bottom moisture before sealing
The chicken should be surrounded by a thick coating of marinade, not standing in a pale pool. If liquid has separated during marination, stir the chicken first. When there is still obvious excess, leave a few spoonfuls behind rather than pouring all of it into the pot.
Before sealing
Likely result
Chicken almost dry, marinade barely visible
Higher risk of scorching and dry lower rice
Thick marinade clings with no broad pool
Best balance of steam, flavour and separation
Thin liquid surrounds the pieces
Higher risk of wet, compressed lower rice
Once the rice and finishing ingredients are in place, clear the counter and close the lid. The busy part of the cook is over.
8. Seal the pot
A heavy lid that fits tightly may be enough. When the lid rocks or leaves gaps, place a sheet of foil across the pot before closing it. A soft dough rope around the rim creates the strongest seal but is not compulsory for a home biryani.
A well-fitting heavy lid may need nothing extra; use foil or dough only where steam can escape.
9. Chicken biryani dum time: listen first, then go low
Keep the sealed pot over medium heat and the lid closed. A heavy Dutch oven or thick handi can sit directly over the burner; place a thin pot or a pot over a concentrated flame on a heavy tawa or diffuser from the beginning.
Use direct broad heat for a heavy pot; place a thin pot or narrow burner on a tawa from the start to prevent concentrated hot spots.
Your job now changes from looking to listening. One clear sign—a fine hiss, gentle bubbling or condensation gathering at the edge—is enough to confirm that steam is building inside. Steam may show only at the weakest edge of the seal. The counter is quiet now; the pot is doing the work behind the lid.
Reduce the heat after the first reliable hiss, internal bubbling or rim condensation; the pot may then become much quieter.
For this batch, those signs often appear in about seven to ten minutes. A cold heavy Dutch oven may take longer; a thin pot on a powerful gas burner may respond much sooner. Follow the pot, not the average.
Once steam is established, reduce to the lowest stable heat. Leave the same tawa or diffuser underneath and begin the low-heat timer. The sound may fade or become intermittent; do not raise the flame merely to keep it audible. Start checking after about 25 minutes.
When the pot behaves differently
No activity after 10–12 minutes: raise the heat slightly for two or three minutes and inspect the outside edge of the seal without lifting the lid.
Violent activity after only a few minutes: reduce the heat immediately. When the pot is sitting directly over a concentrated flame, move it off heat briefly, place a heavy tawa underneath, then continue on low.
Steam escapes heavily from one side: move the pot off the heat and wait for the jet to ease. Wearing oven gloves, reinforce the weak edge with folded foil, then return the pot to the burner. A faint leak is usually manageable.
A burnt smell appears: move the pot off direct heat immediately. Do not try to overpower it with more steam.
10. Check the chicken, then rest the biryani
After 25 minutes on low, move the pot off the burner and wait five minutes for the first rush of steam to settle. Open one edge carefully and probe the thickest piece near the side without touching bone. The centre must reach at least 74°C / 165°F, and the meat should feel yielding rather than tight beside the bone.
Probe the thickest meat from the side, avoid the bone and wait for a stable 74°C or 165°F reading.
If the chicken is below temperature, reseal and use medium heat only until steam is re-established. Reduce to low for another five to eight minutes, then recheck. Sustained high heat can scorch the base before a large piece catches up.
Once the largest piece reaches temperature, close the lid and rest for another ten minutes. The rice firms slightly and the bottom moisture redistributes. The remaining work is simply patience.
11. Lift; do not churn
Slide a wide spoon down the side and lift from the bottom. Place the first portions on a platter before mixing the entire pot. Each serving should receive pale rice, saffron-tinted rice, a little of the darker lower layer and a piece of chicken.
Lift from the side to reveal loose upper rice, a richer base and chicken without stirring the layers together.
The first lifted portion reveals more than the top surface. Look for separate grains, cooked chicken, no broad pool of liquid and only light browning at the base. A few caramelised rice grains are welcome; a black crust signals too much direct heat.
If the first serving is softer, wetter or drier than you hoped, pause before mixing the whole pot. Many biryani problems are uneven, which means part of the pot may still be excellent. Understand the pattern first, then protect the sections that cooked well instead of stirring the problem through them.
A rich lower layer is normal; standing liquid, chalky top grains or widespread dryness signal a cooking problem.
Most first-pot problems come back to three things: rice cooked too far, too much moisture at the base, or heat lowered before steam was established. Use the tables to identify which one affected your pot and protect the sections that cooked well.
Diagnose backwards: check the pre-dum rice stage, base moisture and whether steam formed before the heat was lowered.
Fix Rice Texture and Bottom Moisture
Problem
Likely cause
What to do now
Change next time
Rice is mushy throughout
Rice boiled too far, drained slowly or sat covered while hot.
Spread servings gently and avoid mixing the pot. The texture cannot be fully reversed.
Begin checking earlier, drain immediately and vent uncovered for 2–3 minutes.
Lower rice is wet; top is fine
Watery yogurt, excess marinade, too much finishing liquid or heat lowered before steam was established.
Lift the dry upper rice and chicken first. Spread the wet lower rice in a broad dish for a few minutes so excess steam can escape, and keep it separate from the drier grains.
Use thicker yogurt, leave separated liquid behind and wait until steam is established before lowering the heat.
Top rice is still firm
Weak seal, insufficient steam or rice entered too raw.
Sprinkle 2–3 tablespoons hot water lightly over the firm areas and reseal. If the chicken is already cooked, steam 5–8 minutes on low; if not, re-establish steam and continue until it is safely cooked.
Use the bite and break tests and strengthen the seal.
Rice grains break
Aggressive rinsing, over-soaking, rough stirring or forceful serving.
Stop mixing and lift in larger sections.
Handle gently at every stage and use a wide serving spoon.
Fix Chicken, Heat and Steam Problems
Problem
Likely cause
What to do now
Change next time
Chicken is undercooked
Pieces too large, pot too deep, weak heat or dum ended early.
Reseal, re-establish steam briefly over medium heat, then return to low in 5–8 minute intervals until the thickest piece reaches 74°C / 165°F.
Use similar-sized pieces in one layer and start the low-dum timer only after steam is established.
Bottom is burnt
Thin pot, concentrated flame, high heat for too long or too little base moisture.
Lift unburnt rice and chicken into another dish without scraping the black layer.
For a thin pot or concentrated flame, use a heavy tawa from the beginning; lower the heat once steam is established and avoid an overly dry marinade.
Chicken and upper rice are dry
Lean chicken, weak seal, too little marinade or overlong dum.
Serve with raita or salan and add a little warm ghee to individual portions.
Use thighs and drumsticks, check the seal and shorten the low-heat phase.
No sign of steam after 10–12 minutes
Heat too low, pot very cold or seal leaking badly.
Raise to medium for 2–3 minutes and inspect the outside edge without lifting the lid. For a large leak, move off heat, let the steam ease and reinforce the weak edge with folded foil and oven gloves.
Start on medium and move to low only after steam is established.
Fix Seasoning, Spice and Aroma
Problem
Likely cause
What to do now
Change next time
Rice tastes bland
Rice water was insufficiently salted or drained rice was rinsed after boiling.
Serve with a well-seasoned raita or salan; avoid sprinkling dry salt over the whole pot.
Weigh the rice-water salt and never rinse cooked rice.
Chicken tastes bland
Short marination, uneven salt distribution or very large pieces.
Serve with some of the seasoned lower rice and a sharp raita.
Mix the marinade before adding chicken and marinate for 8–12 hours.
The biryani tastes overly perfumed
Too much kewra, rose water, mace, cardamom or packet masala.
Serve with plain rice or a neutral raita to soften the concentration.
Measure aromatic waters and treat them as optional finishing notes.
Biryani is too spicy
Hot chilli powder, too many green chillies or a strong packet masala.
Serve with a generous plain cucumber raita and extra unseasoned rice.
Use Kashmiri chilli for colour, taste packet masala and reduce green chillies.
Make the next pot even better
Jot down the rice brand, chicken-piece size, pot diameter and low-heat dum time while the details are fresh. When you leave a comment, tell us whether the lower rice was dry, moist or wet; those clues make it easier to understand how the method behaved in your kitchen.
Different biryanis suit different days. Use the comparison below to choose the style you want, then keep that method’s rice and liquid logic together.
How kacchi dum differs from pakki and one-pot biryani
This version is kacchi dum: raw marinated chicken sits beneath partially cooked rice and finishes in trapped steam. Pakki and one-pot biryanis take different routes to the table.
Kacchi, pakki, one-pot and tikka biryani begin differently; follow one method rather than combining incompatible timings.
Style
How it is built
What it is best for
Kacchi dum
Raw marinated chicken sits below partially cooked rice and finishes under steam.
Deeply integrated flavour and a classic dum experience.
Pakki dum
The chicken is cooked before it is layered with more fully cooked rice.
Easier control over chicken doneness and bottom moisture.
One-pot biryani
Raw rice cooks by absorption with chicken and measured liquid.
Weeknight convenience and less washing up.
Chicken tikka or Chicken 65 biryani
Separately cooked chicken is combined with biryani masala and layered rice.
Smoky, fried or restaurant-style chicken textures.
In this kacchi method, raw chicken needs a longer dum, so the rice enters at roughly 65–70% cooked. By contrast, pakki biryani uses already-cooked chicken and can begin with rice closer to 80–90% because its sealed finish is shorter.
Boneless chicken biryani
This recipe is calibrated for bone-in thighs and drumsticks. Boneless thighs can be used as a thermometer-led adaptation, but this article does not provide a complete boneless dum schedule.
Cut them into large 5–6 cm / 2–2½ inch pieces, place the thickest piece near the side and begin checking before the 25-minute bone-in point. Stop at 74°C / 165°F when the meat feels yielding.
Using packaged biryani masala
An unsalted blend can replace the defined 3 g mixture directly. With a salted packet, start with 3 g / about 1 teaspoon and half the usual marinade salt, then adjust the yogurt mixture before adding raw chicken. Keep the packet’s quantity for 750 g chicken as the upper limit.
Keep the whole spices, fried onions, herbs and seasoned rice. Packaged masala supplies one part of the spice blend; it does not replace those other layers.
Treat packet masala as one concentrated layer: adjust its salt and heat while keeping birista, herbs and rice spices.
Chicken biryani without saffron
Omit the saffron and distribute 2–3 tablespoons warm milk or water with the ghee. The biryani will be less floral and colourful, while fried onions and herbs still give the top layer a generous finish.
Chicken-to-Rice Ratios and Pot Sizes
The 750 g recipe above is the fully measured version. Use the ranges below to choose the character of another batch and a pot wide enough to hold it.
Salt across the layers. Biryani is difficult to correct evenly after layering, so the chicken and rice should each taste properly seasoned before they meet in the pot.
Chicken marinade: 9 g fine sea salt seasons the chicken and the concentrated lower layer.
Rice water: 30 g fine sea salt in 3.5 litres water seasons the grains; most of the water is drained.
Salted packet masala: start with about 1 teaspoon masala and half the usual marinade salt, then adjust the yogurt mixture before adding raw chicken.
After cooking: avoid a routine final addition. Layered biryani is difficult to season uniformly after dum.
Salt crystals vary in size, so gram weights are more dependable than teaspoons. Weigh coarse kosher or flaky salt instead of converting the fine-salt spoon measure directly.
How much rice per kilogram of chicken?
Start with about 550 g raw rice for 1 kg chicken for a meat-forward but balanced home biryani. Move toward 650–700 g when you want a more rice-forward pot or additional servings; one kilogram of chicken does not automatically require one kilogram of rice.
Style of batch
Approximate raw rice per 1 kg chicken
What the plate feels like
Meat-forward
400–500 g
More chicken in each serving; richer lower layer
Balanced home biryani
550–700 g
Chicken and rice remain proportionate
Rice-forward crowd batch
750–1,000 g
Greater cooked yield per kilogram of chicken
The main recipe works out to about 533 g rice per kilogram, which is why 550 g is the clearest starting point for a 1 kg batch.
Match the Pot to the Chicken and Rice Batch
Choose the pot with the rice amount. The table below is for batch planning, not a second complete recipe. Salt, chilli, yogurt, herbs, aromatic water, serving yield and dum time all shift with the chosen ratio and layer depth.
Chicken
Raw rice starting point
Suggested pot
Approximate servings
500 g / 1 lb 2 oz
250–300 g / 9–10½ oz
About 4 litres / 4 quarts, 23–25 cm wide
3–4
750 g / 1 lb 10 oz
400 g / 14 oz, as used in the recipe
5–6 litres / 5–6 quarts, 25–27 cm wide
5–6
1 kg / 2 lb 3 oz
Start with 550 g / 1 lb 3½ oz; move toward 650–700 g / 1 lb 7 oz–1 lb 9 oz for a more rice-forward pot
About 7–8 litres / 7–8 quarts, 28–30 cm wide
About 7–10, depending on the rice amount
On a typical home burner, divide more than 1 kg chicken between two wide pots unless you have a broad, heavy handi and experience managing deeper batches.
About 550 g rice balances 1 kg chicken; more rice also requires a wider pot and carefully controlled layer depth.
Make-Ahead Plan
Prepare the parts that improve with time, then leave the rice and final dum for the day you serve. The chicken seasons as it rests, while parboiled rice becomes more fragile the longer it waits.
Done this way, the final hour stays calm: the onions are ready, the chicken is seasoned and only the rice, layering and dum need your attention.
The evening before: fry the onions, cool them fully and store airtight. Marinate the chicken for up to about 12 hours.
Several hours ahead: wash and dry the herbs, measure the spices and prepare the cooking equipment.
Thirty minutes ahead: rinse and soak the rice.
Just before boiling rice: steep the saffron and melt the ghee.
Avoid: parboiling rice several hours in advance. Partially cooked rice continues changing as it sits and becomes harder to handle without breakage.
What to Serve with Chicken Biryani
Chicken biryani already brings rice, meat, spice and richness to the plate. Bring the pot or platter to the table before mixing it heavily; the pale, saffron-tinted and darker grains are part of the pleasure of the first serving. The best sides add coolness, acidity or a little extra gravy.
Set aside bay leaves, cinnamon, cardamom pods and other whole spices as they appear on the plate rather than asking diners to eat them.
Cooling raita, crisp salad and green chutney balance the rich rice without competing with the chicken biryani.
Cucumber raita: cool, lightly salted and thick enough to stay beside the rice rather than flooding it.
Onion raita: sharper and especially useful when the biryani is rich or spicy.
Mirchi ka salan: a good match when diners want additional sauce without changing the biryani pot.
Sliced onions and lemon: simple acidity and crunch.
Green chutney: optional, but a coriander–mint chutney adds a fresh herbal edge for anyone who wants more heat. MasalaMonk’s green chutney recipe includes both coriander-led and mint-led versions.
A restrained salad: cucumber, onion, tomato and herbs with very little dressing.
Quick cucumber raita for this batch
Stir together 500 g / about 2 cups thick plain yogurt, 180–200 g / 6–7 oz diced or grated cucumber, ½ teaspoon roasted ground cumin, ½ teaspoon fine salt, a pinch of chilli, and 1–2 tablespoons chopped mint or coriander. Drain a watery cucumber first, then chill the raita while the biryani cooks.
This makes enough for 5–6 servings without drowning the plate. For a sharper yogurt-free side, use the MasalaMonk cucumber salad.
How to Store and Reheat Chicken Biryani
How to Store Chicken Biryani
After serving, transfer leftovers to shallow containers so the rice and chicken cool more quickly, then refrigerate within two hours. Use refrigerated biryani within three to four days, following the USDA guidance for leftovers.
Divide leftovers into shallow single-meal containers so they cool evenly and untouched portions remain safely cold.
How to Reheat Chicken Biryani Without Drying the Rice
Reheat only the portion you plan to eat. A small amount of water, a cover and gentle heat let steam refresh the rice while the remaining biryani stays cold.
Reheat one portion with a little moisture, a cover and gentle heat until steam refreshes the rice grains.
Microwave
Place one portion in a microwave-safe bowl, sprinkle with 1–2 teaspoons water, cover loosely and heat in intervals. Turn the chicken piece and lift the rice gently between intervals. Reheat until the centre reaches 74°C / 165°F.
Stovetop
Place the biryani in a small heavy pan with 1–2 tablespoons water per two servings. Cover and heat over a low flame until steaming hot, lifting once from the bottom and leaving the grains otherwise undisturbed.
Oven
Place the biryani in a covered ovenproof dish, add a small splash of water around the edges and warm at 160°C / 325°F until hot throughout. The time depends on portion depth and whether it begins refrigerator-cold.
Reheat only what you plan to eat so the remaining biryani stays cold. Repeated warming and cooling harms the rice and increases the chance of unsafe handling.
Start with about 550 g raw rice for 1 kg chicken. Move toward 650–700 g when you want a more rice-forward pot or additional servings; the main recipe works out to about 533 g per kilogram.
What does 70% cooked rice look like?
The grain is tender outside but still resists in the centre. It breaks under finger pressure without smearing and does not yet taste ready to serve on its own.
Can I use store-bought biryani masala?
Yes. Start with about 1 teaspoon and half the usual marinade salt, taste the yogurt mixture before adding raw chicken, and increase only in ½-teaspoon increments. Keep the whole spices, herbs, fried onions and seasoned rice.
Why is my biryani wet at the bottom?
Common causes are watery yogurt, excess separated marinade, too much finishing liquid, or lowering the heat before steam was established.
The First Serving Spoon Tells the Truth
The top should lift in light, fragrant grains. A little deeper, the rice should become richer without turning wet, and the spoon should find chicken that releases cleanly beside the bone. Let everyone see and taste those differences before mixing the remaining pot.
Use the first serving as the final texture check. The grains should remain distinct from top to bottom, even where the lower rice becomes darker and more deeply seasoned.
Finished grains should keep a light sheen and visible space, with saffron and birista appearing in occasional patches.
Serve the first plates with some light upper rice, some of the richer lower layer and a piece of chicken. The work of the onions, rice and sealed dum should still be visible in the bowl. Do not stir those layers away; they are the pleasure of the biryani.
A good air fryer chicken drumstick delivers the contrast bone-in chicken should have: browned skin that crackles under the tongs and dark meat that stays succulent right beside the bone.
The awkward part is timing. A small drumstick can be ready while a thicker one still needs several minutes, and a beautifully browned exterior cannot tell you what is happening at the deepest point. One fixed number will suit some packages and disappoint with others.
This recipe keeps the weeknight method simple without pretending every drumstick is identical. Start with thawed chicken; dry it well, leave room around each drumstick, turn once and check the largest one first.
For pieces weighing about 4–4½ oz / 113–128 g each, dinner is ready in about 30 minutes, including a short rest. Larger and frozen drumsticks need longer, while flour-coated or glazed versions need a small method adjustment.
The piece count matters less than the weight of the largest drumstick. Once that idea is clear, an uneven supermarket package becomes much easier to manage.
Drumsticks weighing about 4–4½ oz / 113–128 g each: cook at 400°F / 200°C and begin checking at 17 minutes. Most finish around 18–20 minutes.
Drumsticks above about 5½ oz / 156 g: use 380°F / 190°C and the weight chart below.
Chicken is safe at 165°F / 74°C; many people prefer the softer texture of dark meat closer to 175–180°F / 79–82°C. The timer starts the check; the thermometer ends it.
Use this as a first-check roadmap for drumsticks weighing about 4–4½ oz / 113–128 g each; the thermometer still decides the finish.
Make it now
Air Fryer Chicken Drumsticks Recipe
Start with this unbreaded version: crisp natural skin, a smoky paprika-garlic flavor and a cooking time based on actual drumstick weight—not a generic piece count. Here, “chicken legs” means drumsticks, not attached thigh-and-drumstick leg quarters.
Recipe at a glance
Yield: 6 drumsticks; serves 3 generously or 4 with substantial sides
Preparation: About 5–10 minutes
Air frying: 18–20 minutes
Resting: About 5 minutes
Total time: About 28–35 minutes
Temperature: 400°F / 200°C
Safe minimum: 165°F / 74°C
Ingredients
6 skin-on chicken drumsticks, thawed and refrigerator-cold Target weight: 4–4½ oz / 113–128 g each; 24–27 oz / 680–770 g total
Neutral cooking oil: 1 tablespoon / 15 ml
Paprika or smoked paprika: 1½ teaspoons / about 3 g
Garlic powder: 1 teaspoon / about 3 g
Onion powder: 1 teaspoon / about 2.5 g
Fine sea salt: 1 teaspoon / about 5–6 g, or about 2 teaspoons Diamond Crystal kosher salt
Black pepper: ½ teaspoon / about 1 g
Dried oregano or thyme: ½ teaspoon
Cayenne: ¼ teaspoon, optional
Baking powder: 1 teaspoon / about 4 g, optional for more blistered skin
Oil helps seasoning cling, while paprika and dry aromatics build color without adding moisture to the chicken skin.
Equipment: air fryer, instant-read thermometer, bowl, paper towels and smooth-edged tongs.
Instructions
Prepare and season
Preheat the air fryer. Set it to 400°F / 200°C. Let it heat for 3–5 minutes when your model recommends preheating; the chicken can be prepared during that time.
Dry the drumsticks. There is no need to bring raw chicken to room temperature. The USDA advises against washing raw poultry. Pat every side thoroughly dry, including beneath loose skin and around the broad end.
Dry skin browns faster. Pat away package moisture before oiling so steam does not soften the surface.
Add a thin coat of oil. Turn the drumsticks in the oil until the skin has a light sheen rather than wet patches.
Season evenly. Mix the paprika, garlic, onion, salt, pepper, oregano, optional cayenne and optional baking powder. Coat the drumsticks all over, including the narrow ends.
Aim for a light oil sheen and even seasoning, especially around the ends and folds before air frying.
Air fry, check and rest
Give them room. Arrange the drumsticks in one layer without stacking or wedging them together. Use two batches when necessary.
Visible gaps matter: crowded drumsticks steam, while spaced pieces brown more evenly in the air fryer basket.
Cook the first side. Air fry at 400°F / 200°C for 9 minutes.
Turn once. The exposed skin should look drier, deeper in color and lightly blistered, and the seasoning should smell toasted rather than scorched. If the skin still clings, wait another minute before turning.
At the turn, look for drying skin and early browning—not a finished surface—before flipping gently.
Cook the second side. Continue for 8 minutes, bringing the total to 17 minutes.
Check the thickest drumstick. Insert the thermometer from the fleshy side into the deepest meat without touching bone, then test another drumstick from a different part of the basket.
Let each one finish in its own time. Return undercooked drumsticks for 1–2 minutes at a time. If the skin is already dark, lower the air fryer to 380°F / 190°C while the inside catches up. Take the smaller drumsticks out as soon as they are ready.
Remove ready drumsticks as they finish instead of waiting for the largest piece, so smaller pieces stay juicy.
Rest for about 5 minutes. The skin should feel firm beneath the tongs while the meat remains plump around the bone. Keep the drumsticks loosely arranged so steam can escape.
Recipe notes
Scale the dry seasoning roughly with the package’s total weight; cooking time still follows the weight of each drumstick.
For a softer dark-meat texture, continue beyond the 165°F / 74°C safety floor toward roughly 175–180°F / 79–82°C, provided the skin is not becoming too dark.
Add BBQ sauce, honey glaze and other sugary finishes only during the final few minutes.
The dry seasoning can be mixed ahead. Keep the raw chicken refrigerated, then dry, oil and season it shortly before air frying.
A mixed package does not mean anything has gone wrong. Remove the smaller drumsticks as they become ready and give the largest one a few more minutes.
Why air-fryer drumstick recipes give different times
If a previous batch took longer than a recipe promised, that does not necessarily mean you did anything wrong. Six drumsticks can vary dramatically in weight, and two air fryers set to the same temperature may cook at different speeds.
That is why published cooking times disagree. Weight tells you when to begin checking, while the thermometer tells you when each drumstick is ready.
Estimate Drumstick Weight Without a Scale
No kitchen scale?
Divide the package weight by the number of drumsticks to estimate the average. A 2 lb / 907 g package containing six drumsticks averages about 5⅓ oz / 151 g each. Use that as the starting row, then move a visibly oversized drumstick into the next heavier range.
Use package weight as a starting estimate, then adjust for the heaviest-looking drumstick before choosing the chart row.
Size names vary between shops and recipes, so use the weight—not labels such as small or large—to choose when to begin checking.
Use the Time Chart Correctly
These are practical first-check starting points, not rigid cutoffs. Drumstick shape, air-fryer design and a cold start can all shift the timing.
The chart is for thawed, skin-on drumsticks in a preheated, wide basket-style air fryer.
These are first-check times for air fryer drumsticks by weight, not guaranteed finish times; after that, test the thickest meat.
Weight per drumstick
Temperature
Begin checking
Under 4 oz / 113 g
400°F / 200°C
15 minutes
4–4½ oz / 113–128 g
400°F / 200°C
17 minutes
4½–5½ oz / 128–156 g
400°F / 200°C
19 minutes
5½–7 oz / 156–198 g
380°F / 190°C
21 minutes
Over 7 oz / 198 g
380°F / 190°C
24 minutes
First-check starting points for thawed, skin-on drumsticks.
When a drumstick sits on the boundary between two rows, begin with the earlier check; then remove smaller pieces as they finish instead of waiting for the largest one.
Mixed-size packs cook better when smaller drumsticks leave early and the largest piece gets extra time instead of overcooking everything.
How to Know When Chicken Drumsticks Are Done
A deeply browned drumstick can still be behind at its thickest point. The thermometer makes bone-in chicken less stressful, not more technical. It lets you stop with confidence instead of cutting every drumstick open or adding precautionary minutes to the whole batch.
Where to place the thermometer
Start with the largest drumstick.
Insert the probe from the fleshy side into the deepest meat, keeping the tip away from the bone.
Check one more drumstick from a different part of the basket.
Probe the thickest meat from the side and keep the tip away from bone for a reliable temperature reading.
That higher range is a texture preference, not a different safety rule. Every drumstick should reach at least 165°F / 74°C before it leaves the air fryer.
165°F / 74°C is the safety floor; higher dark-meat temperatures are a texture choice, not a separate safety rule.
If that pink patch makes you hesitate, trust the thermometer rather than the color. You are not looking for perfectly white meat; you are looking for a safe temperature in the thickest flesh.
Pink near the bone can happen in cooked chicken; the thermometer is the deciding tool, not the color alone.
When one drumstick needs more time
Return only that drumstick for 1–2 minutes at a time. Keep the finished ones loosely arranged rather than sealing them under foil, which traps steam and softens the skin.
Once the base method feels clear, the more enjoyable decision is how you want the drumsticks to taste.
Choose the Version That Fits Your Dinner
The easiest way to keep the method dependable is to change one thing at a time—the crust, the seasoning or the final sauce.
Choose the finish first—crisp, coated, sauced, bright, spicy or Indian-spiced—then follow the matching dinner adjustment.
Version
What to expect
Natural crisp skin
Crisp, savory and uncomplicated.
Extra-blistered skin
Crisper, evenly browned skin with tiny blisters.
Thin flour coating
A light, craggy shell rather than thick breading.
BBQ, honey or teriyaki
A sticky, glossy, sweet-savory finish.
Buffalo
Buttery heat with a tangy finish.
Lemon pepper
Bright, peppery and fresh.
Indian-spiced
Aromatic, earthy and gently hot.
Choose the texture or flavor, then apply the matching adjustment.
For more blistered skin
Mix the optional 1 teaspoon / about 4 g baking powder thoroughly into the base seasoning. It raises the skin’s surface pH, helping it brown and form tiny blisters. A light, even amount avoids a chalky or alkaline taste; baking soda is much stronger and should not be used measure for measure.
Baking powder should add subtle blistering, not a thick crust; never swap in baking soda.
For a thin flour coating
Omit the optional baking powder from the base rub. Combine the base seasonings with ¼ cup / 30 g all-purpose flour and 1 teaspoon / about 4 g baking powder. Coat dried, lightly oiled drumsticks thinly, shake off the excess and mist only visible white patches.
For drumsticks weighing about 4–4½ oz / 113–128 g each, cook at 400°F / 200°C. Turn gently once the coating has begun to set and begin checking at about 20 minutes.
The coating is ready when no dry flour remains, the shell feels set beneath the tongs and the thickest meat has reached its target temperature.
Think thin dusting, not breading, so the air-fried shell turns craggy instead of heavy.
For BBQ, honey, teriyaki or Buffalo
For BBQ, honey or teriyaki: cook the drumsticks mostly dry. A batch of six drumsticks usually needs about ⅓ cup / 80 ml BBQ sauce. Brush BBQ sauce on during the final 3–5 minutes; add honey or a thin coat of homemade teriyaki sauce during the final 2–4 minutes.
For Buffalo: air fry the chicken completely, then toss it with about ¼ cup / 60 ml Buffalo sauce.
Keep serving sauce separate. Use a clean brush and a fresh portion for the final glaze rather than returning sauce or utensils that touched undercooked chicken to the table.
Sweet glazes go on late; Buffalo sauce works best after the chicken finishes cooking.
For lemon pepper or Indian spices
For lemon pepper, use a dry seasoning before cooking and squeeze fresh lemon over the drumsticks afterward. This lemon pepper chicken recipe gives the full seasoning balance.
For the Indian-spiced version, replace the oregano and cayenne with 1 teaspoon garam masala, ½ teaspoon ground cumin, ½ teaspoon ginger powder and ¼–½ teaspoon Kashmiri chili powder. Serve with rice, raita and lemon, then finish with chopped cilantro.
Skinless drumsticks work with the same seasoning, but this timing chart is calibrated for skin-on chicken. Oil them lightly, expect browned spices and juicy meat rather than crackly skin, and begin checking earlier than a skin-on drumstick of the same size.
Whatever seasoning or sauce you choose, the crispest natural skin still comes down to dryness, airflow and heat.
Crisp dry skin and glossy sauced skin are different successful finishes, depending on whether sauce is involved.
How to Get Crispy Skin
The air fryer has two jobs: brown the skin and carry heat into the meat around the bone. Crisp natural skin does not require flour, but the chicken must begin dry enough to brown before the inside overcooks.
Crisp-Skin Basics
Dry the skin: pat beneath folds and around the broad end until it feels tacky rather than wet.
Leave open space: pressed-together patches steam and stay pale.
Use a thin sheen of oil: enough for the seasoning to cling, not enough to pool under the chicken.
Match the heat to the weight: drumsticks around 4–4½ oz / 113–128 g suit 400°F / 200°C, while pieces above about 5½ oz / 156 g often brown more evenly at 380°F / 190°C.
Tiny blisters, rendered skin and toasted seasoning are the natural crisp-skin target for unsauced air fryer drumsticks.
Fix Pale or Soft Skin
If the underside stays pale. The underside receives less direct heat and may sit against the crisper plate. Turning once, keeping the basket holes open and resting on a rack all help. A solid liner makes cleanup easier but usually sacrifices some lower-skin browning.
If you used a wet marinade. Yogurt, coconut milk, soy-heavy mixtures and generous lemon juice add flavor and charred edges, but they also add moisture. Scrape away heavy excess before cooking. Expect tender chicken with a seasoned, lightly charred coating rather than dry, crackly skin.
If the cooked skin is still soft. Give unsauced chicken another 1–3 minutes at 400°F / 200°C, watching closely. Once the drumsticks are coated with BBQ, honey or another sugary glaze, aim for a glossy, tender finish rather than forcing the skin to become crackly. Rest the chicken on a rack so steam does not soften it further.
Use this quick blast only for cooked, unsauced drumsticks with soft skin, not sugary glazed pieces.
Oil: one tablespoon is enough to help the dry seasoning cling and give the skin more even color. The drumsticks can cook without it, but the base version browns more dependably with a light coating.
Paprika and aromatics: smoked paprika adds mild barbecue character, while sweet paprika is gentler. Garlic and onion powders build savory flavor without adding the surface moisture of fresh chopped aromatics.
Salt and baking powder: use about 5–6 g salt for the base batch—roughly 1 teaspoon fine sea salt or 2 teaspoons Diamond Crystal kosher salt. Baking powder is optional; used lightly, it encourages browning and small blisters.
Frozen Chicken Drumsticks in the Air Fryer
Frozen drumsticks need a short softening stage before the seasoning can cling and the skin can brown. Confirm that your air-fryer manual permits cooking raw poultry from frozen, and make sure the drumsticks become fully separable so hot air can reach every side.
Frozen dinner rescue
If the drumsticks are frozen into one solid block, thaw them in the refrigerator until they can be separated. Individually frozen pieces can go straight into the staged method below.
Loosen the drumsticks. Air fry at 360°F / 180°C for 5–10 minutes.
Separate and dry them. Once the drumsticks loosen, pull them apart with tongs and pat away the melted ice you can reach.
Oil and season. Add the oil and dry rub once the skin is dry enough for the seasoning to cling.
Continue at 380°F / 190°C. For individually frozen drumsticks around 4–4½ oz / 113–128 g each, begin checking the largest one when the total cooking time reaches about 25 minutes. Continue for 2–3 minutes at a time and test more than one drumstick.
Crisp only when needed. If the chicken is safely cooked but still pale, use 400°F / 200°C for the final 2–3 minutes.
Frozen drumsticks need staging: separate first, then dry, season and continue cooking so seasoning can actually stick.
Allow approximately 25–40 minutes from frozen, depending on weight and ice. The approximately 30-minute timing applies to fully thawed drumsticks in the base weight range.
How Different Air Fryers Change the Timing
Most timing differences come down to how close the chicken sits to the heating element, how much open cooking space the machine provides and whether different zones or levels heat evenly.
Match the Method to Your Air Fryer
Compact or narrow basket: cook fewer drumsticks or use batches so hot air can move freely around each one.
Hot-running machine: begin checking early. If the skin darkens before the inside is ready, continue at 380°F / 190°C.
Dual basket: divide the drumsticks evenly and check both zones; one side may finish first.
Oven-style or multi-level machine: follow the recommended rack position, rotate levels when needed and watch the drumsticks closest to the heating element.
Match the method to the machine: basket size, heat pattern and rack position all matter for air fryer chicken legs.
Preheating gives the first batch a more consistent start. From a cold machine, keep the same thermometer target and expect the first check to move by roughly 1–3 minutes.
Liners, Tools and Two Batches
Liners and tools: smooth or silicone-tipped tongs are less likely to tear the skin. A solid liner can simplify cleanup but may block lower airflow. Do not use or preheat parchment unless your appliance manual permits it, and never leave loose paper unweighted near the heating element.
Cooking two batches? Rest the first batch on a wire rack, where steam can escape. While the second batch cooks, keep the first on the rack in a 200°F / 95°C oven and avoid holding it longer than necessary. A final minute in the air fryer can refresh the skin before serving.
A rack and short low-oven hold protect the first batch while the second cooks, without steaming the skin.
Troubleshooting Soft Skin, Uneven Cooking and Smoke
Most disappointing batches are fixable. One undercooked drumstick can go back into the air fryer without delaying the rest of dinner.
Dark Outside, Low Inside
If the exterior is already dark but the center is still below target, lower the heat and finish the drumstick in short checks instead of pushing the whole batch harder.
When the outside races ahead, lower the heat and finish in short thermometer-led intervals rather than forcing a hotter cook.
Quick Fixes by Problem
Problem
What to do
Skin stayed soft or rubbery
Fix now: give unsauced chicken another 1–3 minutes at 400°F / 200°C, watching closely. Next time: dry the skin more thoroughly and leave more space between the drumsticks.
Skin burnt before the inside cooked
Lower the temperature to 380°F / 190°C and continue in short intervals. Large drumsticks often need gentler heat.
One drumstick is undercooked
Return only that drumstick. The others can rest while it cooks for another 1–2 minutes at a time.
Chicken turned dry
Remove smaller drumsticks earlier. They do not need to wait for the largest one.
Seasoning or flour looks patchy
Pat the skin dry, add a thin sheen of oil and mist only visible dry flour patches.
Coating fell off
Shake off excess flour and wait until the crust begins to set before turning with smooth tongs.
BBQ or honey glaze burnt
Sweet sauce went on too early. Cook mostly dry and glaze only during the final few minutes.
Chicken looks pink near the bone
Check the thickest flesh with a thermometer. Color alone cannot confirm whether poultry is safe.
Underside stayed pale
Turn once and keep the crisper-plate holes open. Solid liners reduce the hot air reaching the underside.
The air fryer is smoking
Stop and inspect the appliance safely. Clean old residue and rendered fat, reduce excess oil and keep sugary sauce away from the hottest part of the cook.
Fast fixes for skin, doneness, coating, smoke and sauce problems.
Smoke and Safe Inspection
Persistent or unusual smoke deserves a pause. Once the appliance is safe to inspect, clean the basket, crisper plate and collection area, then follow the manual if the problem continues.
Most smoke comes from residue, fat, excess oil or sugar added too early, so check those causes first.
What to Serve With Air Fryer Chicken Drumsticks
Once the drumsticks are crisp and rested, dinner only needs one comforting side and something fresh. Cool or acidic sides are especially good beside Buffalo, BBQ and honey-glazed versions because they cut through the richer coating.
Fast weeknight plate: smoky paprika-garlic drumsticks, roasted potatoes and green beans.
Cookout plate: BBQ drumsticks, corn and cold potato salad.
Indian-spiced plate: jeera rice, kachumber, mint yogurt, flatbread and lemon wedges.
The same air fryer chicken drumsticks can shift from weeknight plate to BBQ, Buffalo or Indian-spiced dinner.
Once the plates are planned, the final cue is the bite itself: browned skin, juicy dark meat and a drumstick that still feels like easy dinner.
The payoff is crisp-edged skin with juicy dark meat—not just a correct temperature—when the method is right.
Storage, Freezing and Reheating
Refrigerate cooked drumsticks in shallow covered containers within 2 hours—or within 1 hour when the surrounding temperature is above 90°F / 32°C. Use them within 3–4 days and store extra sauce separately when possible.
For reheating, arrange the drumsticks in one layer and air fry at 350–375°F / 180–190°C for 5–8 minutes, turning once, until the center reaches 165°F / 74°C. Use the lower end of the range for BBQ, honey or other sugary finishes.
Freeze cooled drumsticks in a freezer-safe container and thaw them in the refrigerator before reheating. For the best flavor and texture, use frozen cooked drumsticks within about 4 months. The skin may not return to its original crispness, but the air fryer usually restores it more successfully than a microwave.
For meal prep, keep sauce separate and reheat only the number you plan to eat. Cold meat can also be pulled from the bone for wraps or these chicken sandwich ideas. That often protects the texture better than reheating the same drumstick twice.
Chill promptly, reheat to 165°F / 74°C, and use the air fryer when leftover texture matters.
Frequently Asked Questions
Is 380°F or 400°F better for chicken drumsticks?
Use 400°F / 200°C for drumsticks under about 5½ oz / 156 g. Heavier pieces often cook more evenly at 380°F / 190°C.
Can I use parchment paper or foil?
Only use parchment or foil when your specific air-fryer manual permits it. Solid liners restrict airflow and lower-surface browning, while loose paper can be pulled toward the heating element. When a liner is permitted, keep it weighted beneath the food and avoid covering the basket’s airflow openings.
Why are my drumsticks pink beside the bone?
Bone pigments can color safely cooked meat, especially after freezing. Pinkness alone cannot confirm doneness, so check the thickest flesh with a thermometer.
Can I cook drumsticks from frozen?
Yes, when your appliance manual permits it. Loosen and separate the drumsticks first, then dry, oil and season them. Continue at 380°F / 190°C and begin checking drumsticks around 4–4½ oz / 113–128 g each at about 25 minutes total.
Use this card when weight, frozen chicken or sauce changes the base method.
Weight sets the first check, frozen chicken needs staging, and sugary sauces belong near the end.
The four drumstick decisions to remember
Dry first. Give them room. Sauce late. Check the largest piece. Those four decisions do more for crisp skin and juicy meat than chasing one supposedly perfect cooking time.
That is the small satisfaction of this dinner: an inexpensive package of chicken comes out smoky, properly browned and generous. The thermometer quietly removes the worry that usually comes with meat beside the bone.
Which version made it to your table—the smoky base, a sticky glaze, Buffalo or the Indian-spiced batch? If your drumsticks needed noticeably longer than the guide suggested, add the average weight and air-fryer model too. Those details can help the next cook understand why.