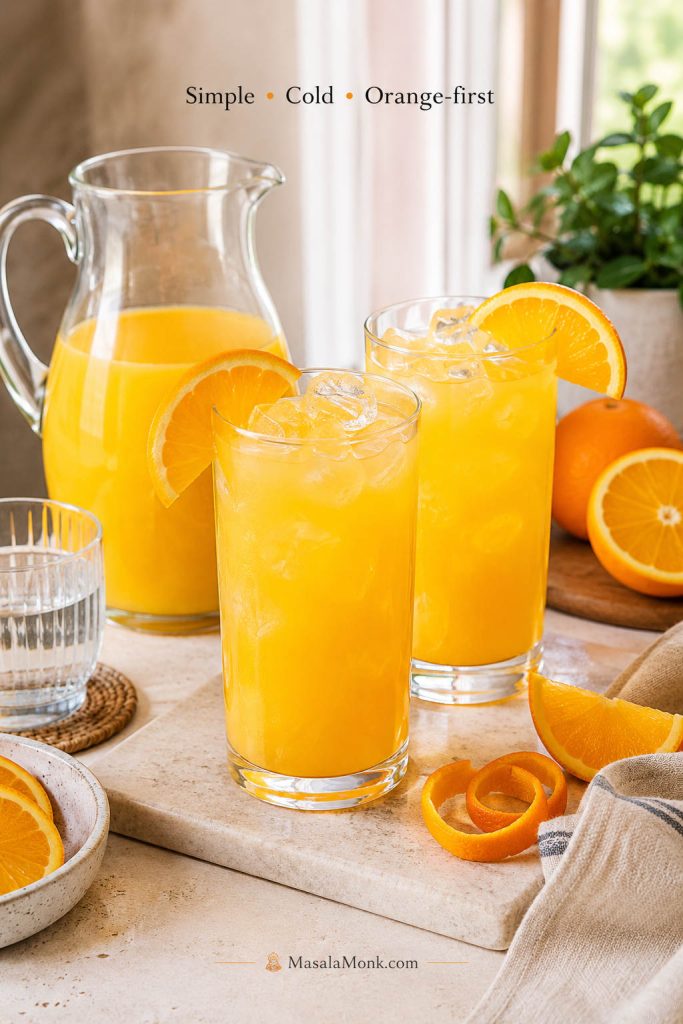
A screwdriver is only vodka and orange juice, which is exactly why the ratio matters. Too little juice and the vodka takes over. Too much juice, and it stops feeling like a cocktail at all. This screwdriver recipe keeps that simple balance clear: cold juice, enough ice, and the right pour, so the same two ingredients taste fresh, smooth, and properly mixed.
This screwdriver recipe gives you the classic vodka and orange juice cocktail first, then shows you how to adjust it for a stronger glass, a lighter brunch pour, or a pitcher for guests. You do not need syrup, liqueur, or a full home bar. You just need clean vodka, chilled orange juice, plenty of ice, and a ratio that fits the moment.
It is the kind of drink people make when they want something familiar, cold, and easy without turning the kitchen into a bar.
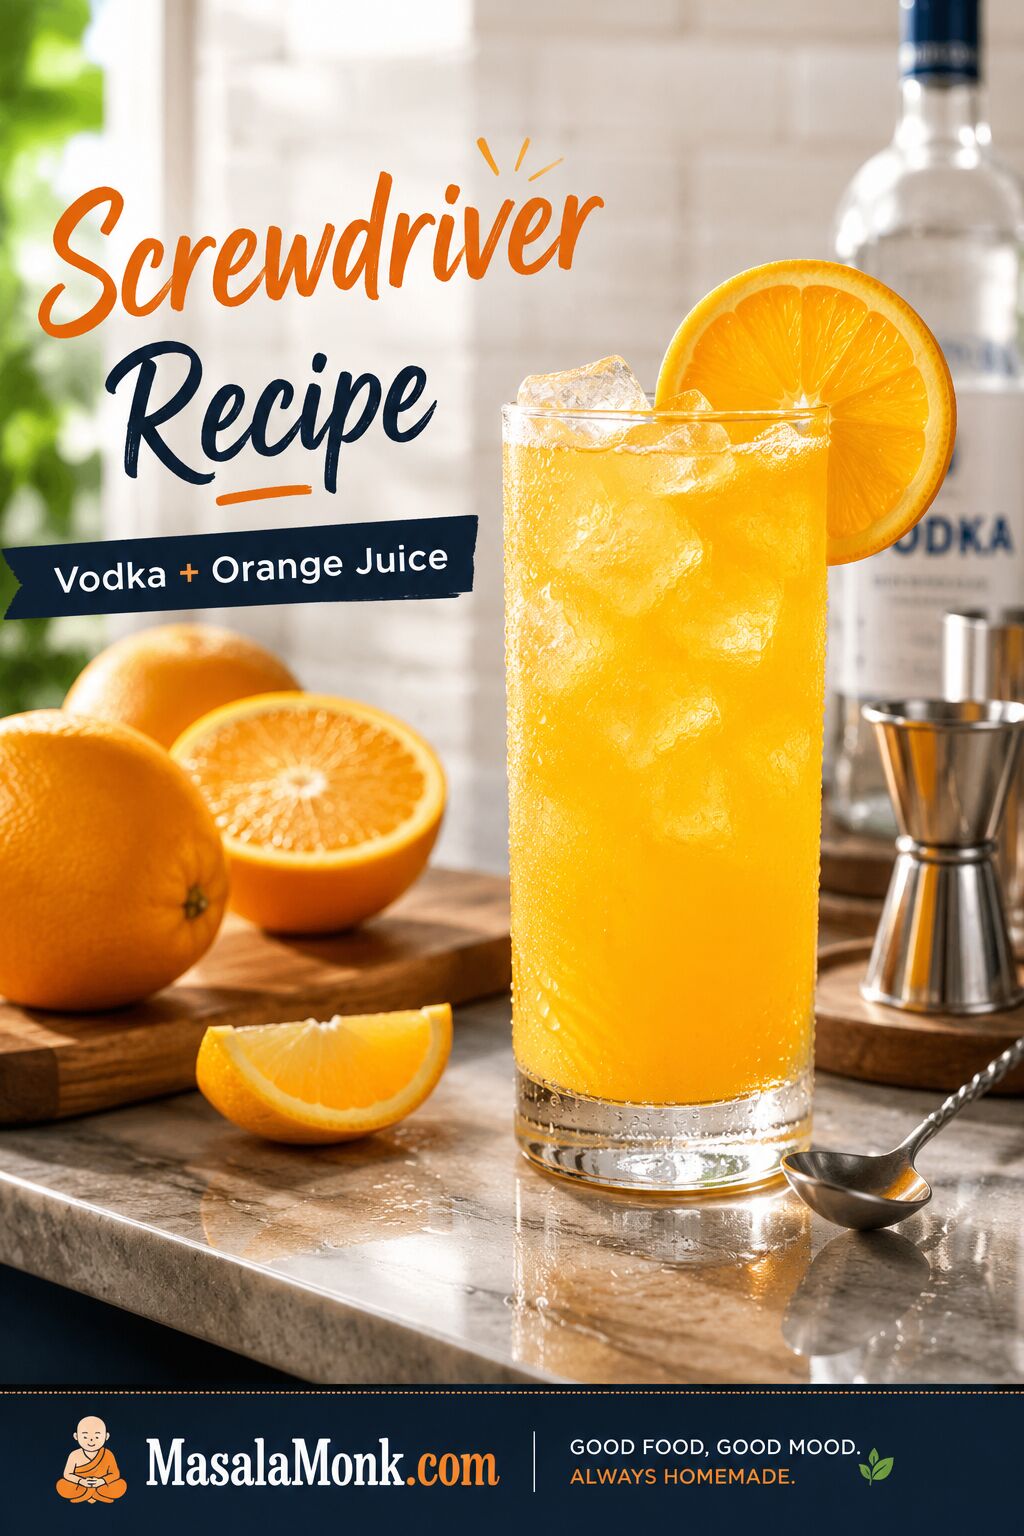
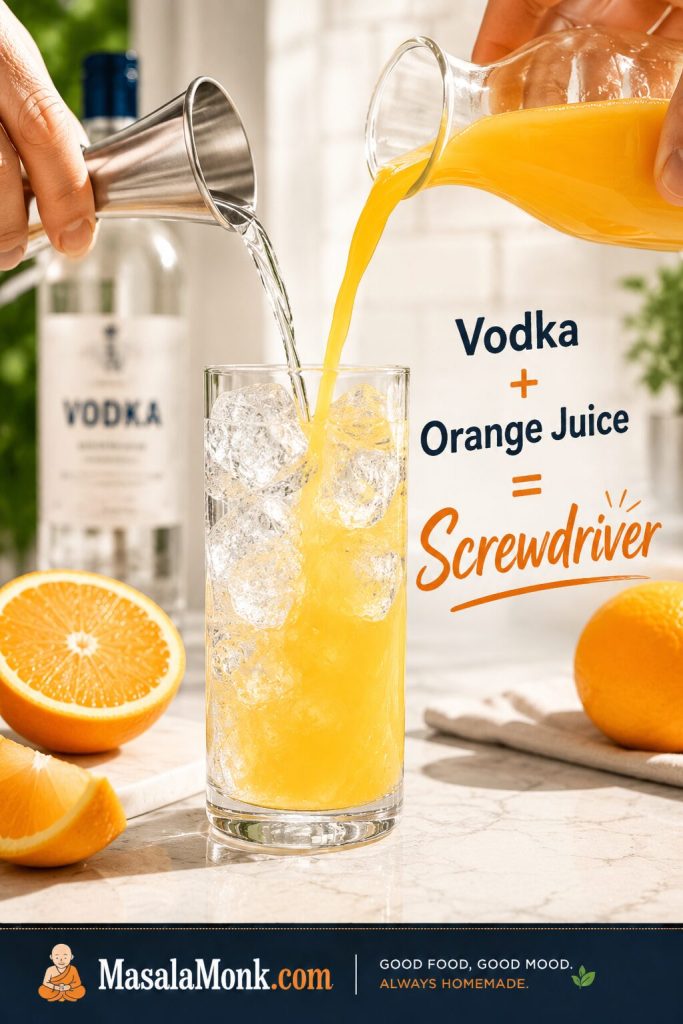
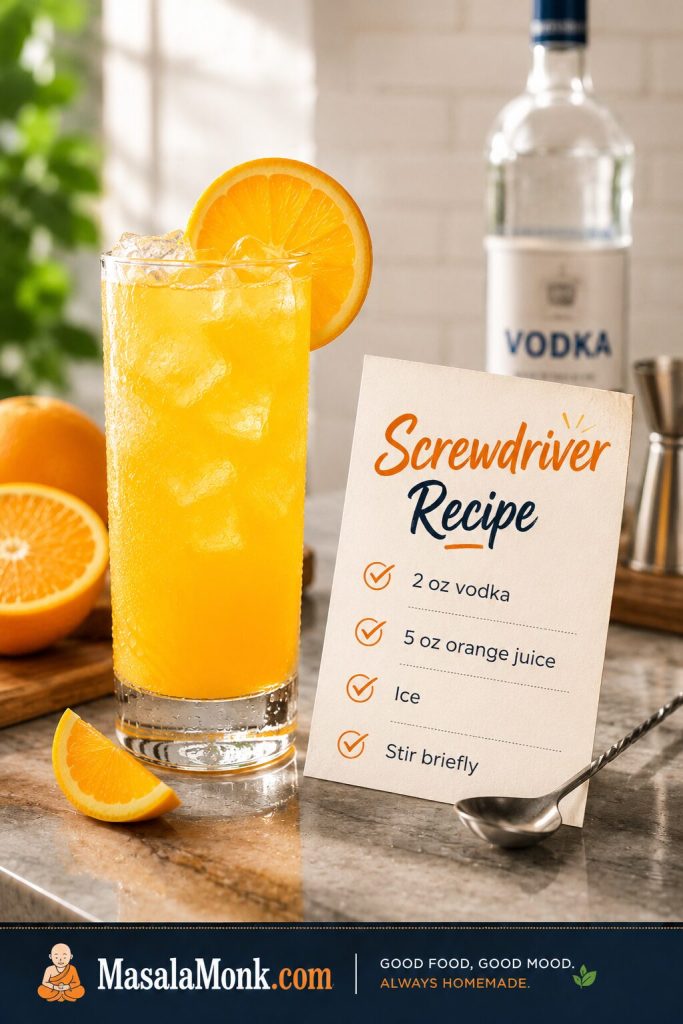
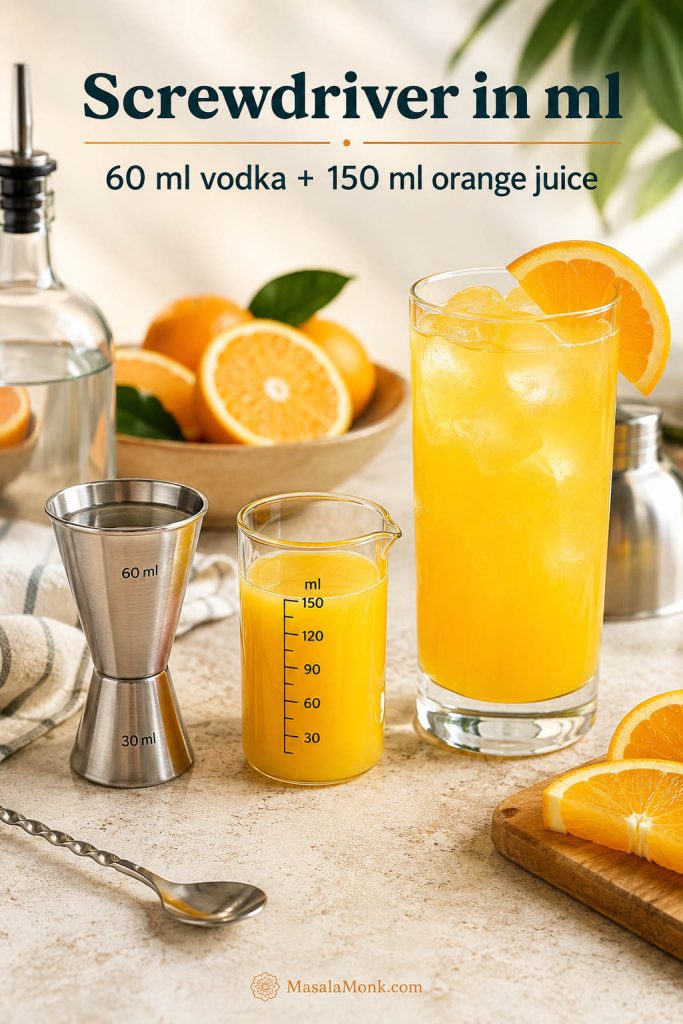
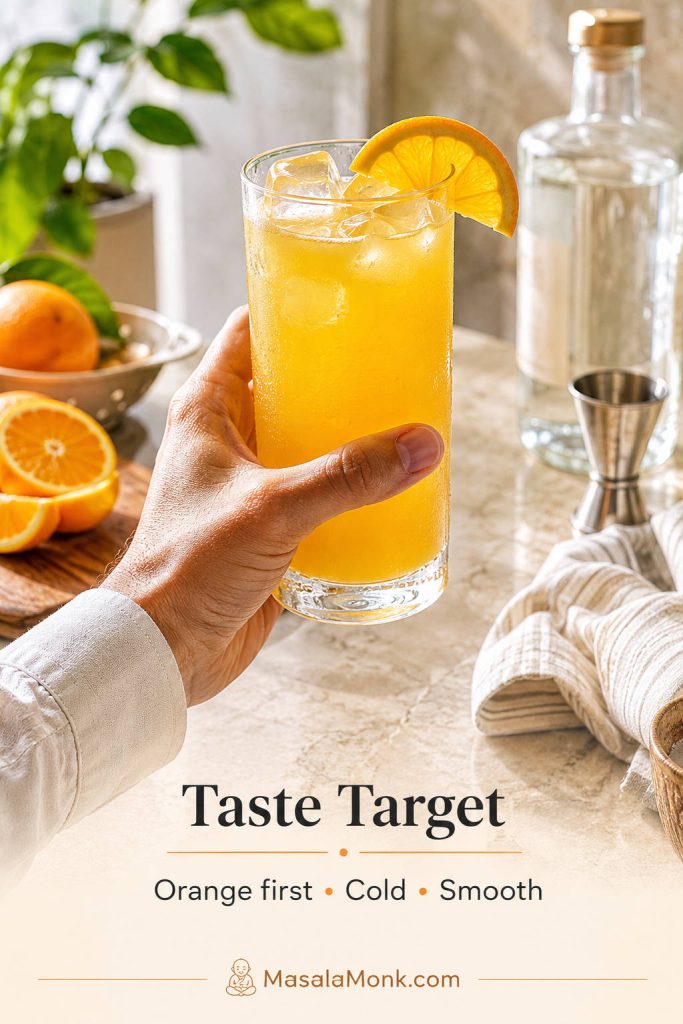
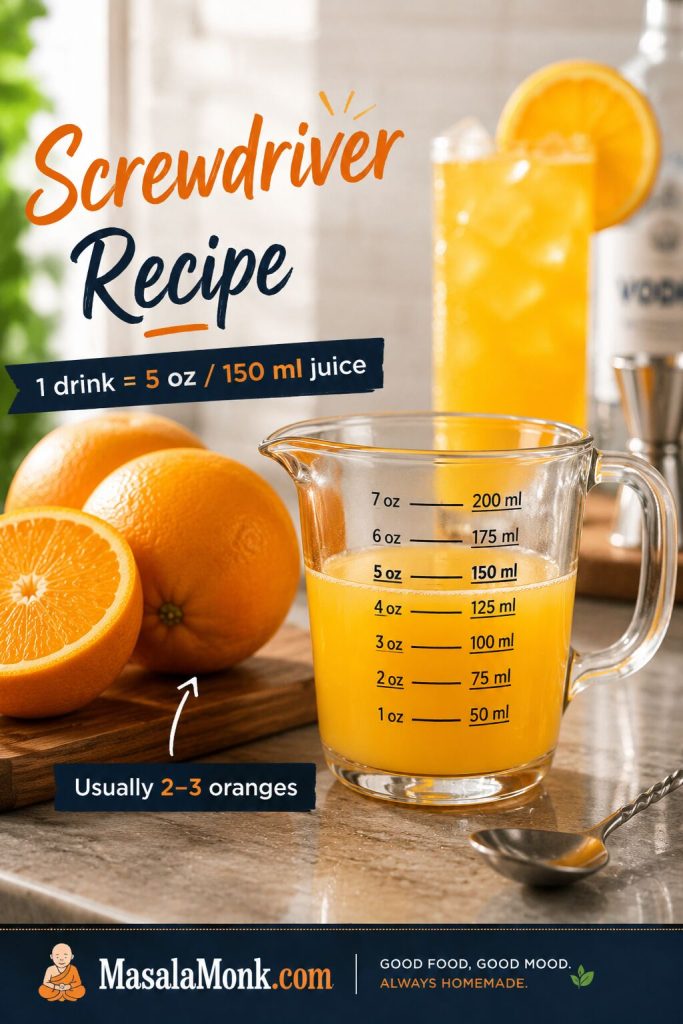
Vodka and orange juice is called a Screwdriver. Start with 2 oz / 60 ml vodka and 5 oz / 150 ml orange juice. The finished glass should smell like orange first, feel properly cold, and leave the vodka in the background rather than in charge.
Quick Answer: What Is Vodka and Orange Juice Called?
Vodka and orange juice is called a Screwdriver. The simple version is vodka and orange juice over ice, usually served in a highball or Collins glass with an optional orange slice, wedge, or wheel.
The easiest screwdriver ratio to start with is 1 part vodka to 2–3 parts orange juice. For one balanced drink, use 2 oz / 60 ml vodka and 5 oz / 150 ml orange juice. Build it directly in the glass and give it a brief stir.
Make One Now
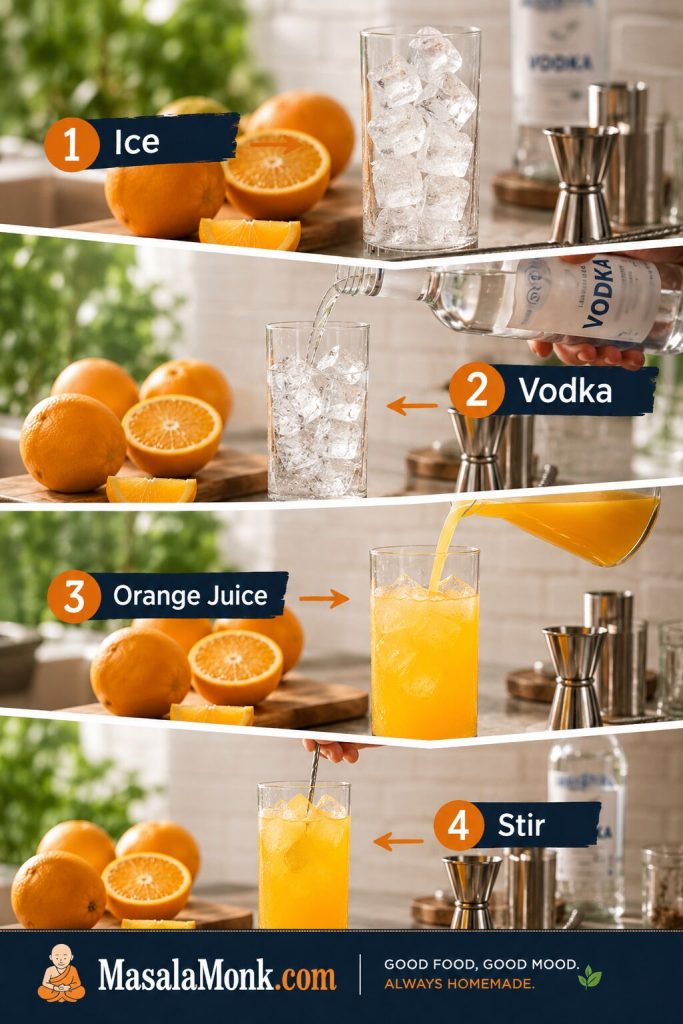
Fill a tall glass with ice. Add 2 oz / 60 ml vodka and 5 oz / 150 ml chilled orange juice. Stir just until combined, garnish with orange if you like, and serve right away.

Want it stronger or lighter? Use the ratio guide before your next pour.
Screwdriver Recipe
This is the balanced version: cold vodka, chilled orange juice, plenty of ice, and a simple orange garnish.
Glass: highball or Collins glass
Ratio: 2 oz / 60 ml vodka to 5 oz / 150 ml orange juice
Method: build over ice and stir briefly
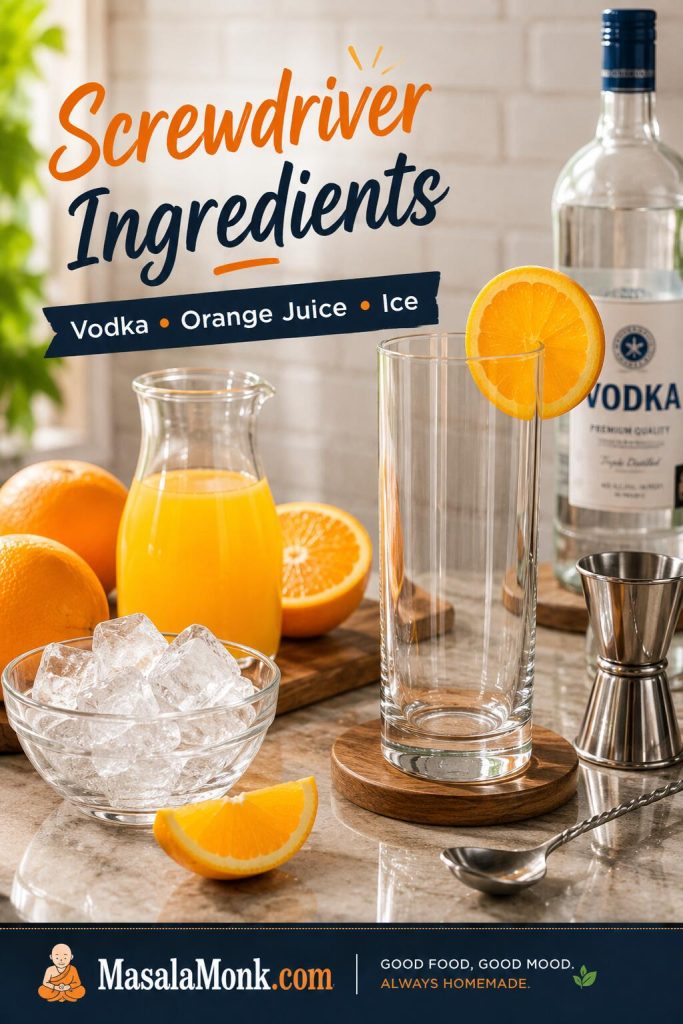
Ingredients
- 2 oz / 60 ml vodka
- 5 oz / 150 ml orange juice, chilled
- Ice, enough to fill the glass
- Orange wedge, wheel, or slice, optional
Instructions
- Fill a highball or Collins glass with ice.
- Pour in the vodka.
- Add the chilled orange juice.
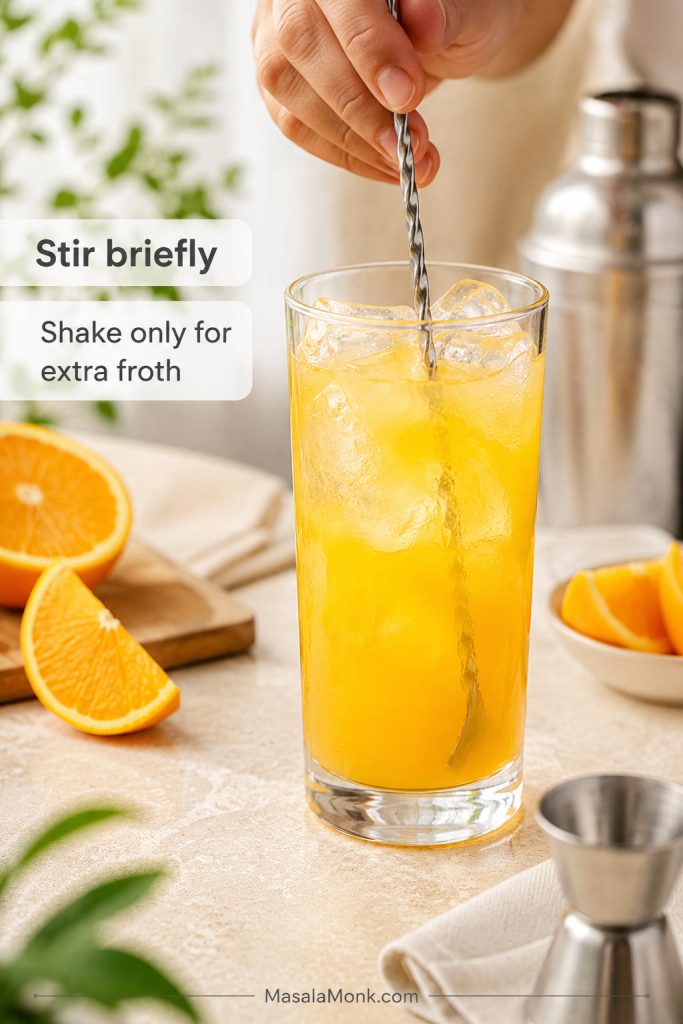
- Stir for 5–10 seconds, just enough to chill and combine. Do not churn it aggressively.
- Garnish with orange and serve immediately.
Notes
- For a stronger screwdriver, use 4 oz / 120 ml orange juice.
- For a lighter screwdriver, use 6 oz / 180 ml orange juice.
- If the first sip tastes sharp, add another ounce or two of orange juice.
- Fresh orange juice tastes brightest, but chilled 100% bottled orange juice works well when you need speed or consistency.
- For pitchers, mix vodka and orange juice ahead, but add ice to individual glasses. Making more than one? Use the pitcher amounts.
If your glass already tastes right, you can stop there. But if the first sip is too sharp, too flat, too sweet, or too much like plain orange juice, the rest of this guide shows you how to adjust the pour, choose better juice, batch it for guests, or turn it into a variation.
Keep Reading For
Make It Better
Serve It Well
From here, the best version depends on the glass you want: stronger, lighter, fresher, easier to batch, or more playful.
What Is a Screwdriver Drink?
A screwdriver works because orange juice does most of the flavor work while vodka gives the drink structure. That is why temperature, ice, and ratio matter more than complicated technique.
In the UK, many people simply call the same drink “vodka and orange.”
That simplicity is the charm. A good one should taste orange first, with the vodka supporting it. A weak one tastes watery; a badly balanced one tastes like orange juice with a rough spirit edge. The ratio fixes both problems.
If you like simple vodka cocktails, this sits in the same easy-mixing world as a crisp Moscow Mule or a citrusy vodka with lemon. The screwdriver is even simpler because the orange juice does most of the work.
Screwdriver Ingredients
You only need a few ingredients, so keep them cold and choose them well. This is not a drink that rewards overthinking, but it does reward balance.
Vodka
Because orange juice is the only real mixer here, choose a vodka that tastes clean rather than one you need to hide. You do not need an expensive bottle, but avoid anything very harsh.
Plain vodka keeps the drink simple. Citrus vodka can push the orange flavor forward, while vanilla or whipped cream vodka turns the drink toward orange cream.
Orange Juice
Fresh orange juice gives you that lifted orange smell before the first sip; bottled juice gives you consistency and speed. Chilled 100% bottled orange juice is especially useful for pitchers. Pulp or no pulp is personal: pulp feels fuller, while no-pulp juice makes a smoother glass. Choosing juice for a bigger batch? See the fresh vs bottled guide.
Orange drink can work in a pinch, but it pushes the cocktail toward sweet punch instead of fresh orange. For the cleanest flavor, use orange juice that tastes good cold on its own.
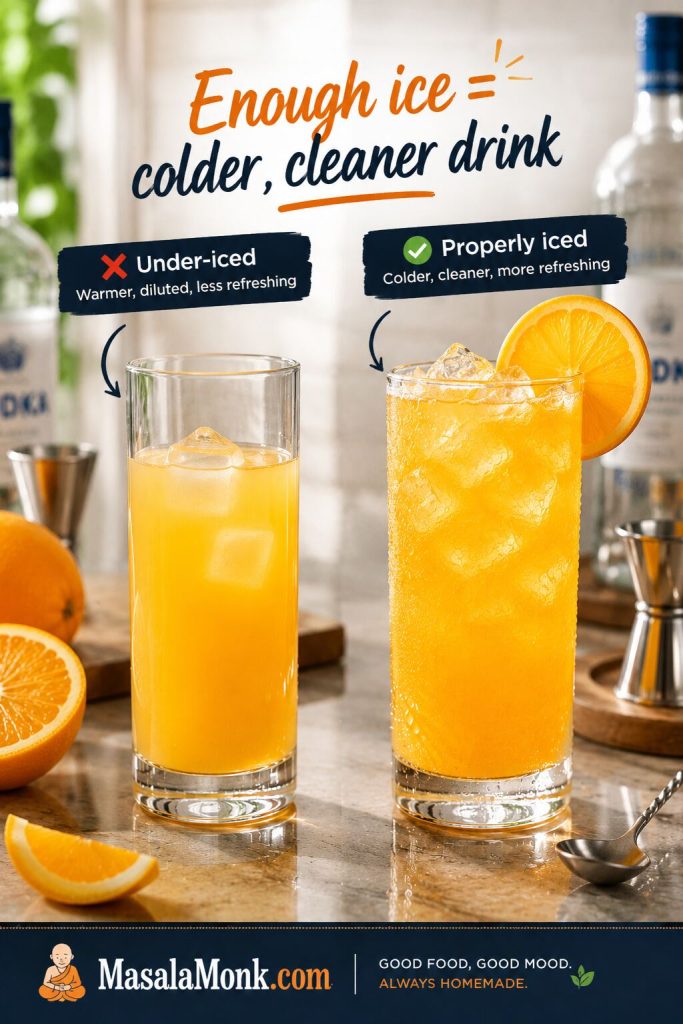
Ice and Garnish
Do not be shy with the ice. A tall glass filled with ice keeps the drink colder for longer and helps avoid that thin, warm-orange-juice taste. An orange wedge, wheel, slice, or peel twist is optional, but it adds aroma and makes the glass feel finished.
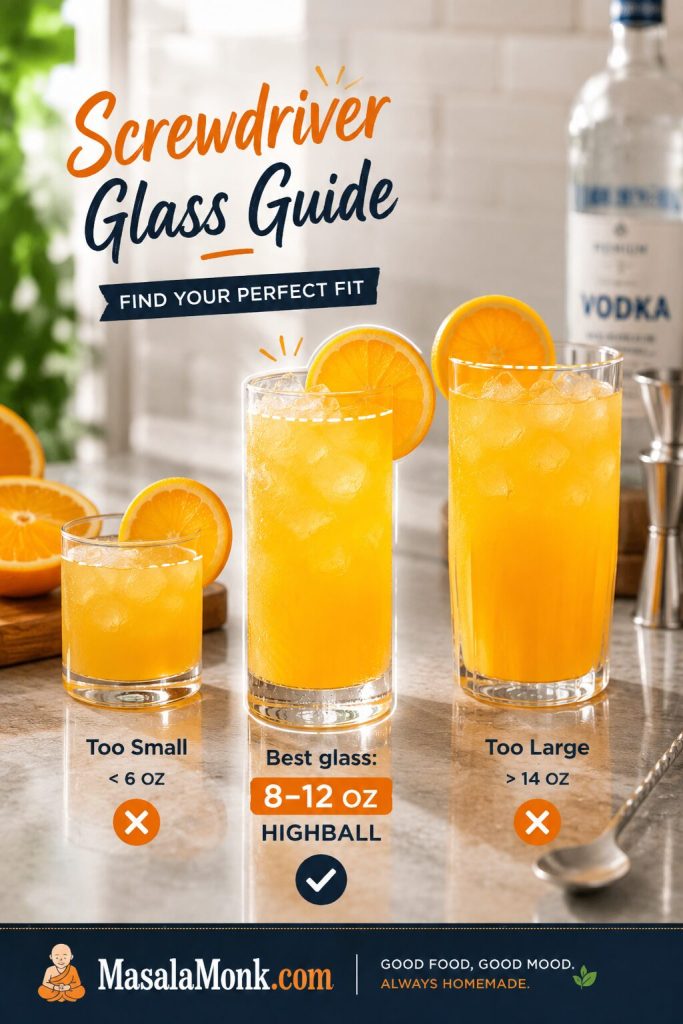
An 8–12 oz highball or Collins glass works best for the balanced pour. If your glass is smaller, use the stronger 2 oz vodka + 4 oz orange juice version or pour a slightly shorter drink.
What counts as the simple drink? Vodka, orange juice, ice, and optional orange garnish. Add-ins like Sprite, club soda, cranberry juice, pineapple juice, peach schnapps, Galliano, triple sec, grenadine, or bitters turn it into a twist.
Best Screwdriver Ratio
This is where screwdrivers usually go wrong: people pour by instinct, then wonder why the drink tastes either sharp or flat. The ratio decides whether the glass feels like a cocktail or just cold orange juice with a little vodka hiding in it.
Classic Screwdriver recipes vary because the drink can be built as a stronger cocktail or a lighter brunch highball. A 1:2 pour tastes more cocktail-forward; 1:3 or 1:4 tastes lighter and more orange-led. This recipe uses 2 oz vodka to 5 oz orange juice because it sits in the middle: clearly a cocktail, but still fresh, cold, and orange-first.
Choose your pour: Use 2 oz / 60 ml vodka + 4 oz / 120 ml orange juice for a stronger cocktail, 2 oz / 60 ml + 5 oz / 150 ml for the balanced house version, 1.5 oz / 45 ml + 5–6 oz / 150–180 ml for a lighter brunch glass, or mix the pitcher ahead and pour over ice in individual glasses.
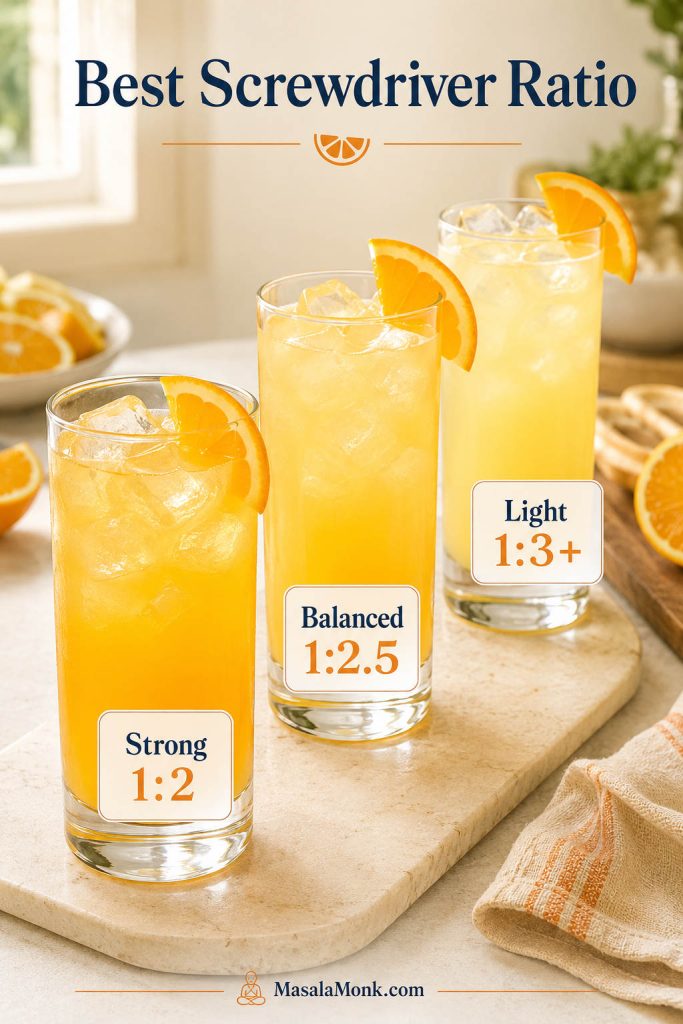
Screwdriver Ratio Chart
A useful starting range is 1 part vodka to 2–3 parts orange juice; go closer to 1:4 when you want a very light, mostly-orange glass. Use 1:2 for a stronger pour, 1:2.5 for the most balanced glass, and 1:3 for a lighter drink. The easiest formula to remember is 2 oz / 60 ml vodka + 5 oz / 150 ml orange juice.
| Style | Vodka | Orange juice | Ratio | Best for |
|---|---|---|---|---|
| Strong | 2 oz / 60 ml | 4 oz / 120 ml | 1:2 | A stronger glass |
| Balanced | 2 oz / 60 ml | 5 oz / 150 ml | 1:2.5 | Start here |
| Light brunch | 1.5 oz / 45 ml | 5–6 oz / 150–180 ml | About 1:3 to 1:4 | A lighter glass |
| Metric classic | 50 ml | 100 ml | 1:2 | A simple measured version |
| Very light | 1 oz / 30 ml | 4 oz / 120 ml | 1:4 | Mostly orange juice |
How strong is it? Even when it tastes orange-forward, a balanced Screwdriver with 2 oz vodka is still a full cocktail. Use the lighter version for brunch, slow sipping, or a longer glass.
Treat the table as a starting point, not a rule. Orange juice changes from carton to carton and orange to orange. Very sweet juice may need a squeeze of lemon or lime. Sharper vodka may need more juice and ice. The right ratio is the one that tastes smooth in your glass. For a group, use the pitcher table instead of multiplying by eye.
Screwdriver Measurements in ml
For metric measurements, start with the balanced version unless you already know you want a stronger or lighter glass.
| Version | Vodka | Orange juice |
|---|---|---|
| Balanced | 60 ml | 150 ml |
| Stronger | 60 ml | 120 ml |
| Lighter | 45 ml | 150–180 ml |
| Classic 1:2 formula | 50 ml | 100 ml |
Method Details
The standard order is ice first, vodka second, orange juice third, then a brief stir. Shaking is fine when you want it extra cold and slightly frothy, but the glass-built version is faster and cleaner.
- Fill the glass with ice. Use a highball or Collins glass if you have one.
- Add the vodka. Pour in 2 oz / 60 ml vodka for the balanced version.
- Add orange juice. Pour in 5 oz / 150 ml chilled orange juice.
- Stir briefly. Stir for 5–10 seconds, just enough to chill and combine. Do not churn it aggressively.
- Garnish and serve. Add an orange wedge, wheel, slice, or peel twist if you like.
You are not trying to whip or aerate the drink; you are just making the first sip taste even from top to bottom.
After stirring, the drink should smell like orange, feel cold against the glass, and taste citrusy first with the spirit supporting the orange, not dominating it. If the drink tastes too sharp, add more orange juice. For a flat glass, add a tiny squeeze of lemon or lime. If it tastes watery, use more ice next time and serve it right after mixing.
If the first sip still tastes off, jump to the fixes instead of starting over.
Fresh Orange Juice vs Bottled Orange Juice
Fresh juice is worth it when you are making one or two drinks and want that first sip to smell like real orange, not just cold sweetness. But for a pitcher, bottled 100% orange juice is usually the smarter move: consistent, already strained, and easy to chill.
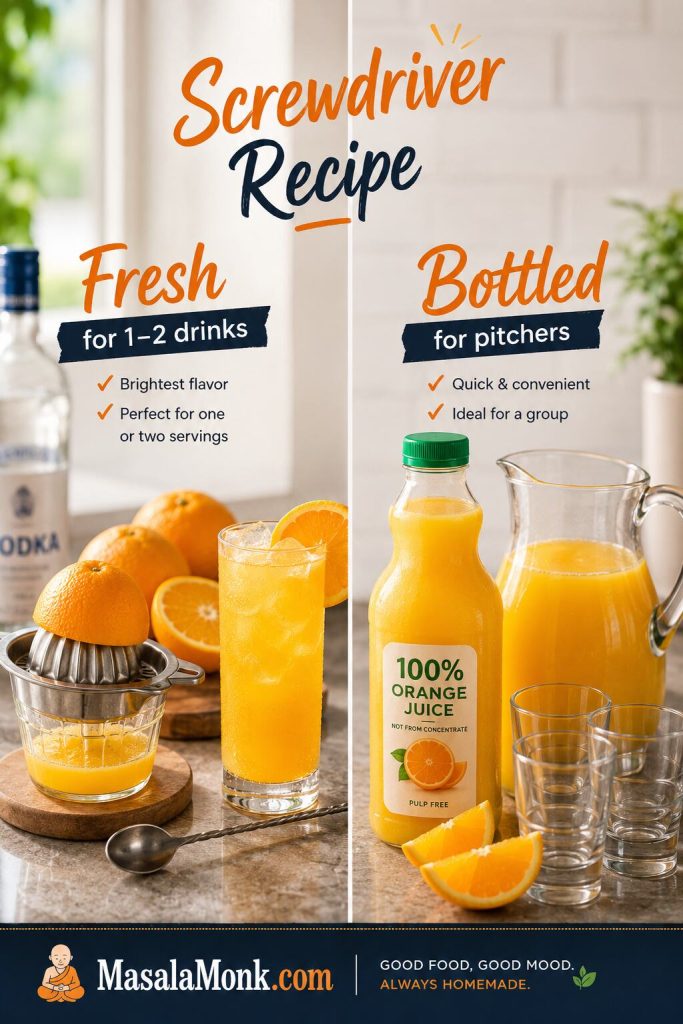
One balanced glass needs about 5 oz / 150 ml orange juice, which usually takes 2–3 medium oranges depending on size and juiciness.
If you are already using orange juice for brunch, the same bottle can work for a simple mimosa beside the screwdriver pitcher. Whatever you use, keep it well chilled. Warm orange juice makes the whole drink feel dull, even when the ratio is right.
- Freshly squeezed orange juice: brightest aroma and freshest finish for one or two drinks.
- Chilled 100% bottled orange juice: practical, consistent, and easy to scale for pitchers.
- No-pulp orange juice: smoother and cleaner in the glass.
- Pulp orange juice: fuller texture and a more natural orange feel.
- Blood orange juice: deeper color and a slightly tart twist.
- Warm or overly sweet orange drink: avoid it when you want a cleaner, fresher screwdriver.
Flat bottled juice wakes up with a tiny squeeze of lemon or lime. Tart juice works better with the lighter 1:3 ratio or a little more orange juice. Very sweet juice is best kept simple, without grenadine or lemon-lime soda.
Best Vodka for a Screwdriver
You do not need a luxury vodka here, but you do need one that smells clean. If the vodka smells harsh before it reaches the glass, the orange juice will soften it, not erase it. Use a bottle you would not feel the need to bury.
Plain vodka keeps the drink classic. Citrus vodka makes the orange flavor more direct. Vanilla or whipped cream vodka turns it toward an orange-cream flavor. Chill the bottle if you can, then let the orange juice do most of the work.
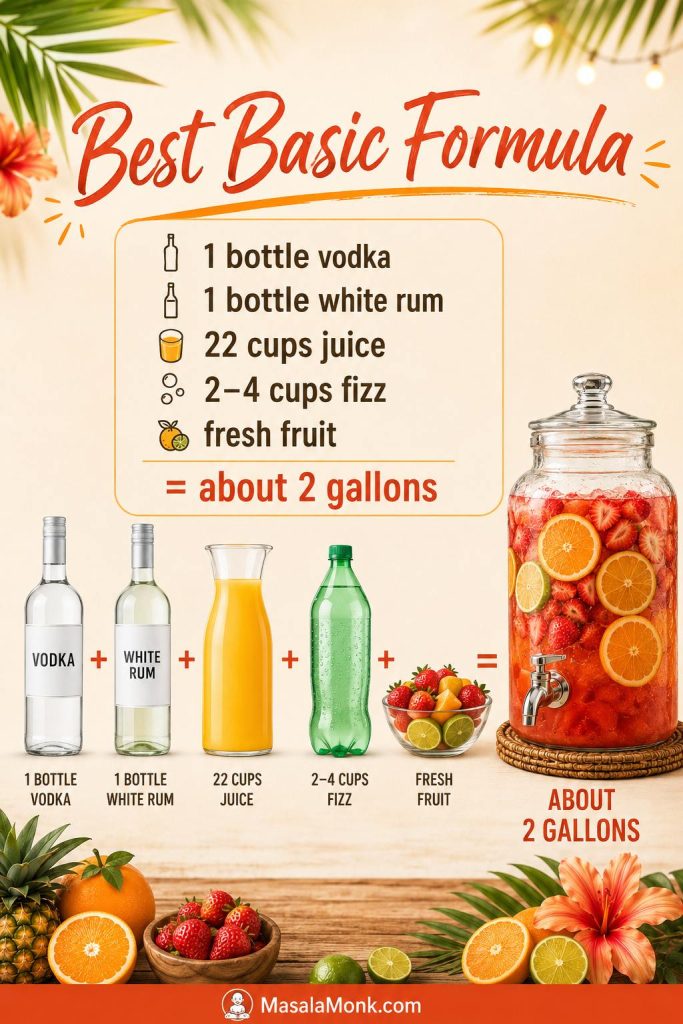
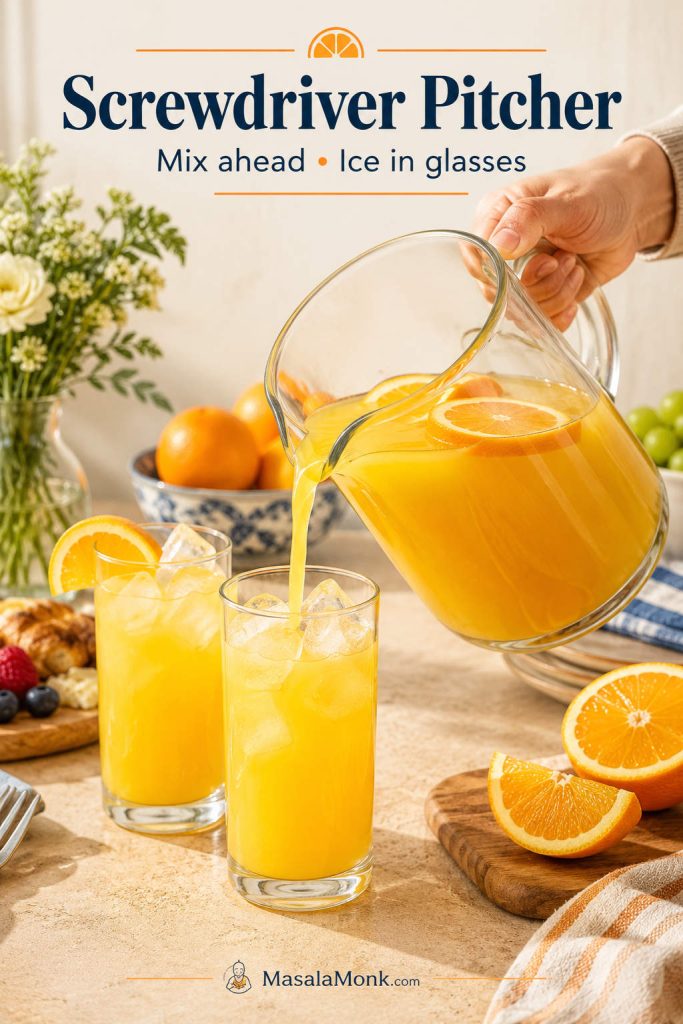
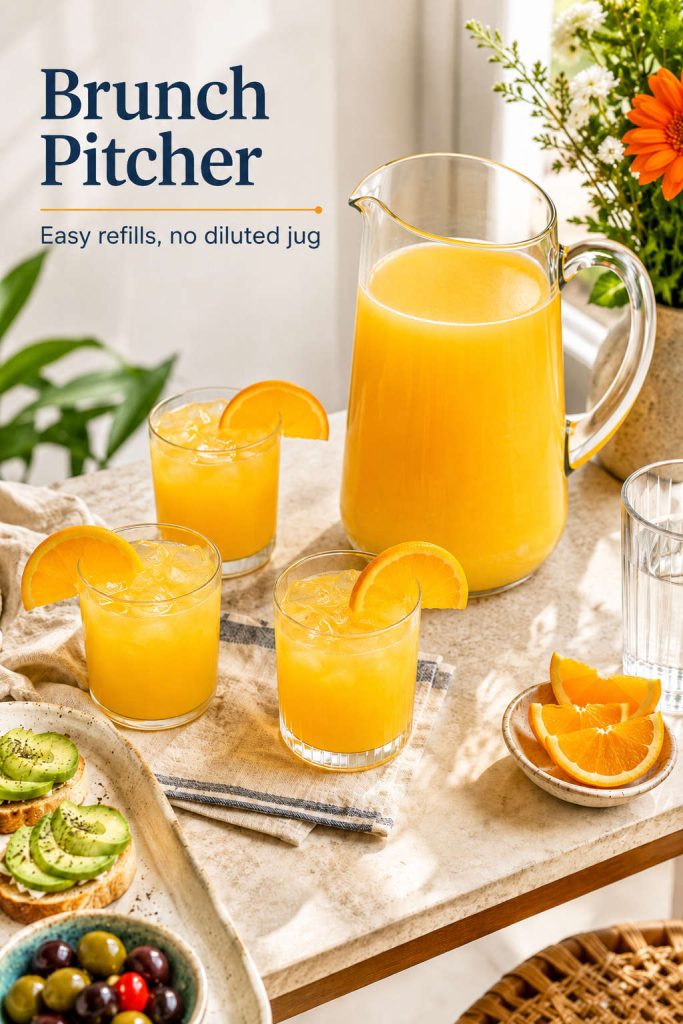
Screwdriver Pitcher Recipe
To make a pitcher, mix the vodka and orange juice ahead, but add ice to the glasses. That one choice keeps the batch fresher for longer and prevents a watered-down jug after ten minutes.
That is the version you want when people are arriving at different times, helping themselves, or choosing between a stronger and lighter pour. Keep a little extra orange juice nearby so guests can lighten their glass without remaking the batch.
For exact batches, use these pitcher amounts as your starting point instead of multiplying by eye.
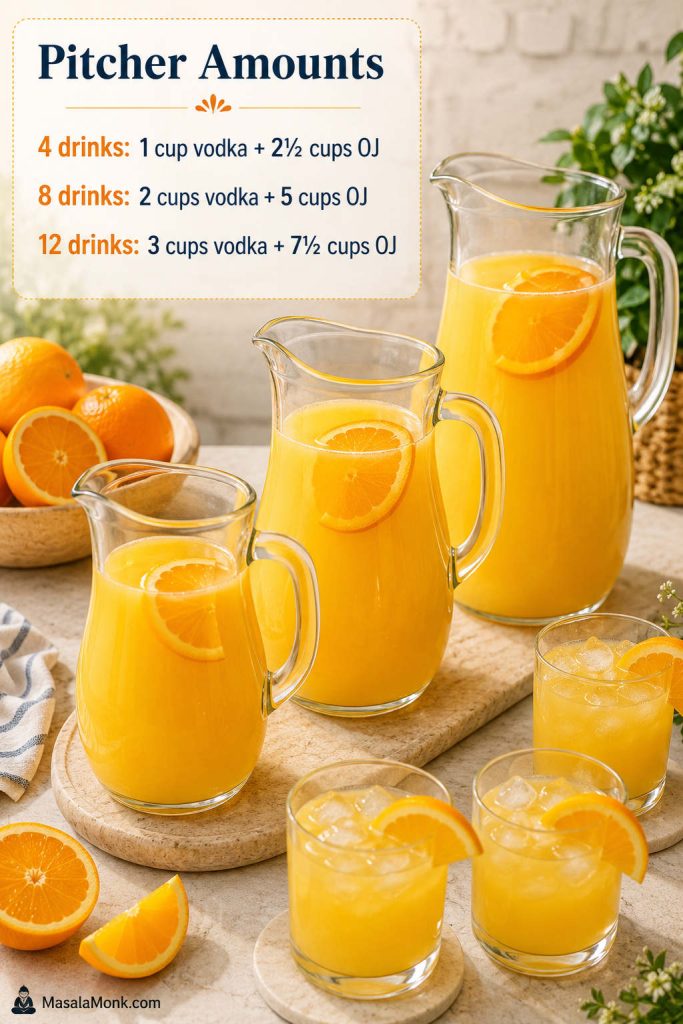
| Servings / style | Vodka | Orange juice | Use when |
|---|---|---|---|
| 4 drinks, balanced | 1 cup / 240 ml | 2½ cups / 600 ml | You want a small pitcher |
| 8 drinks, stronger | 2 cups / 480 ml | 4 cups / 960 ml | You want a bolder pitcher |
| 8 drinks, balanced | 2 cups / 480 ml | 5 cups / 1.2 L | Start here for a group |
| 8 drinks, lighter | 1½ cups / 360 ml | 5–6 cups / 1.2–1.4 L | You want a lighter brunch pitcher |
| 12 drinks, balanced | 3 cups / 720 ml | 7½ cups / 1.8 L | You are serving more guests |
These cup amounts use U.S. cups; the ml measurements are included for precision.
How to Make a Screwdriver Pitcher
- Chill the vodka and orange juice first if possible.
- Stir the vodka and orange juice together in a pitcher.
- Add a few orange slices to the pitcher when serving soon.
- Keep the pitcher refrigerated until ready to serve.
- Pour into ice-filled glasses and garnish each glass separately.
Pitcher tip: Do not add ice directly to the pitcher unless you are serving the entire batch immediately. Instead, keep the pitcher cold and add ice to individual glasses.
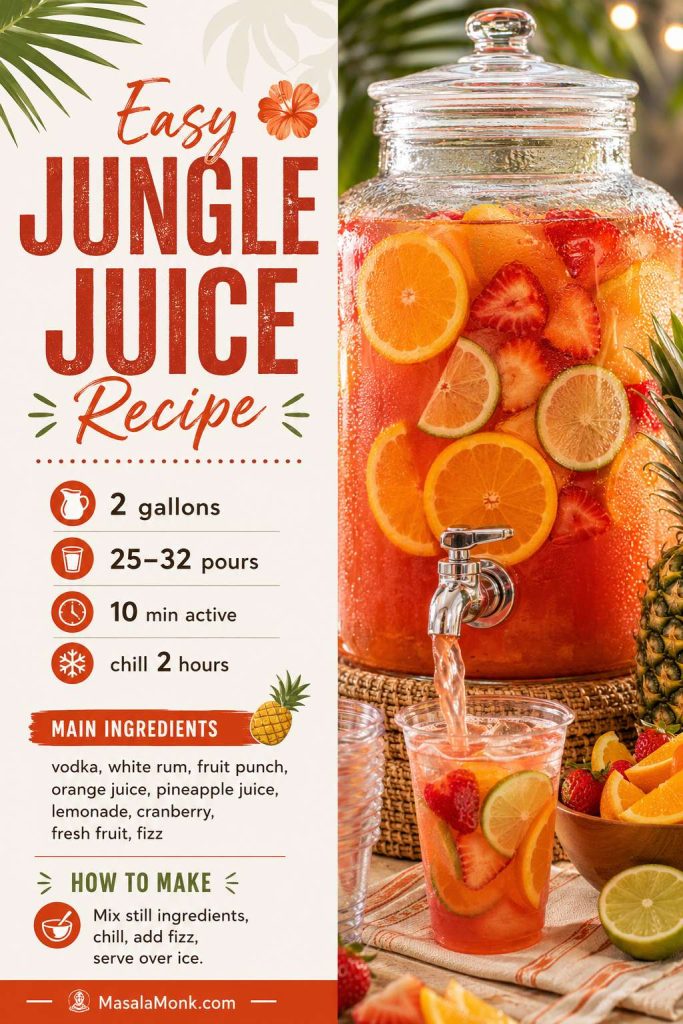
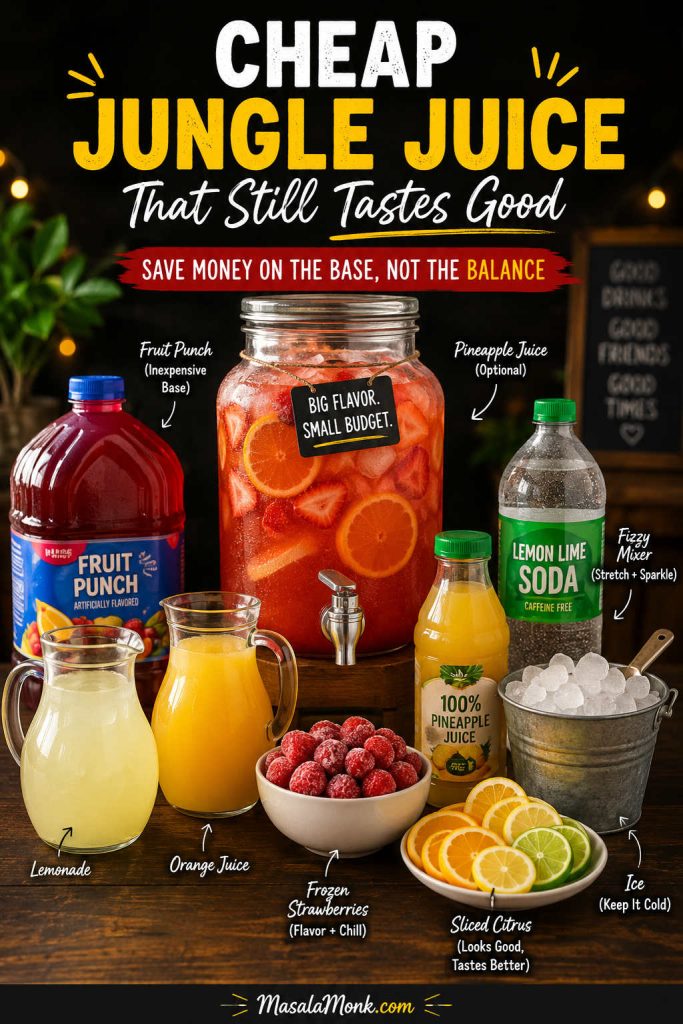
For brunch, a screwdriver pitcher works well beside Bloody Marys when you want one savory option. If the table needs a fruitier batch drink too, add something like jungle juice and let the screwdriver stay the clean orange option.
Screwdriver Variations
Once you know the base drink, variations are easy. But do not turn it into mystery punch. Instead, add one change at a time so the drink still tastes like orange first.
Think about what you want from the glass before you add anything. Bubbles make it lighter. Pineapple makes it tropical. Cranberry makes it tart. Galliano or peach schnapps moves it toward a known cocktail variation. Colorful add-ins are best when you are intentionally making something playful. Not sure what a twist becomes? Check the drink-name guide.
Keep the first batch simple, then let the second glass become the playful one. That way, you still know what made the drink better instead of turning every add-in into one loud glass.

| What you want | Add this | How to use it |
|---|---|---|
| Fizzy and lighter | Club soda, Sprite, 7UP, or sparkling water | Add after stirring the vodka and orange juice. |
| Tropical | Pineapple juice | Replace part of the orange juice with pineapple juice. |
| Tart and colorful | Cranberry juice | Use about 3 oz orange juice and 2 oz cranberry juice with 2 oz vodka. |
| Sunrise-style color | Grenadine | Add a small splash for sweetness and red-orange color. |
| Harvey Wallbanger-style | Galliano | Add a small float to the finished drink. |
| Fuzzy / peachy | Peach schnapps | Add a small pour and keep the orange juice cold. |
| Frozen | Ice and optional frozen orange | Blend vodka, orange juice, and ice until slushy. |
| Blood orange | Blood orange juice | Use it instead of regular orange juice or split the two. |
| Orange-cream | Vanilla or whipped cream vodka | Use in place of plain vodka for a dessert-like glass. |
| No alcohol | Orange juice, soda water, citrus, and garnish | Not a true screwdriver, but still a bright orange drink. |
Fizzy, Pineapple, and Cranberry Versions
For fizz, make the drink first, then top with Sprite, 7UP, club soda, or sparkling water. Sprite and 7UP make it sweeter; club soda keeps it lighter and drier.
For a pineapple version, use 2 oz / 60 ml vodka, 3 oz / 90 ml orange juice, and 2 oz / 60 ml pineapple juice. If pineapple is the direction you like, a punch for a pitcher with pineapple juice gives you a fruitier batch option for guests.
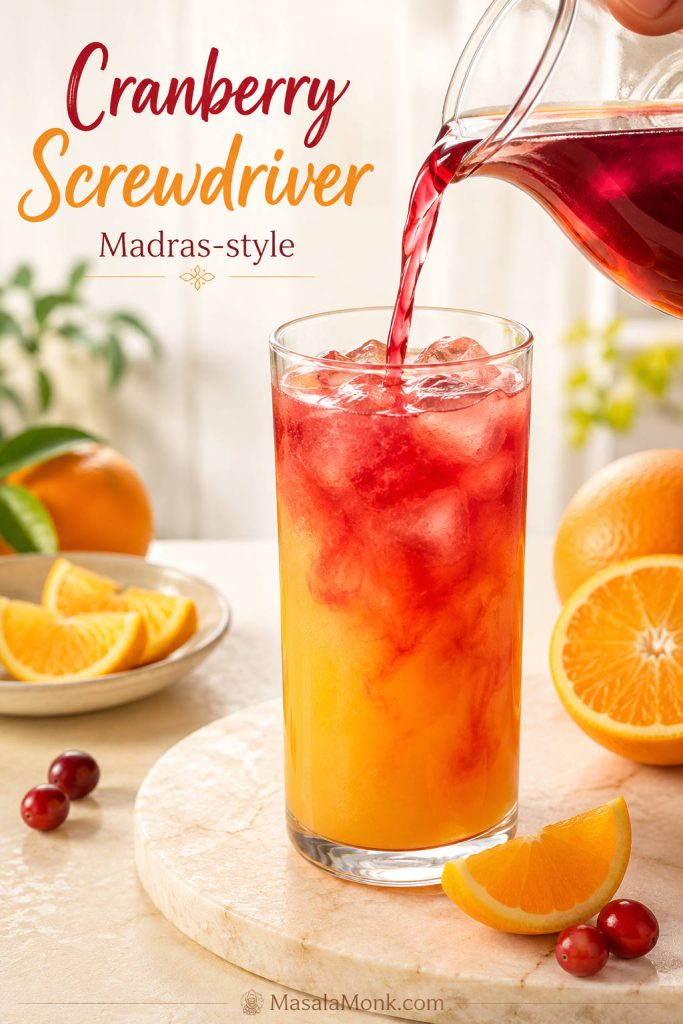
For a cranberry version, use 2 oz / 60 ml vodka, 3 oz / 90 ml orange juice, and 2 oz / 60 ml cranberry juice. This moves the drink close to a Madras. If cranberry is your favorite part, a cranberry Moscow Mule gives you the same tart-vodka direction with ginger beer instead of orange juice.
Frozen, Creamy, and Blood Orange Versions
For a frozen glass, blend vodka, orange juice, and ice until slushy. To make the orange flavor stronger, add frozen orange segments or a little frozen orange juice concentrate, then serve it immediately so it stays thick and cold.
For an orange-cream direction, use vanilla vodka or whipped cream vodka in place of plain vodka. Blood orange juice gives deeper color and a slightly tart edge, whether you use it alone or split it with regular orange juice.
Colorful and Non-Alcoholic Versions
Colorful versions are playful rather than standard. Pink can come from cranberry juice, blood orange juice, or grenadine. Blue or green versions usually depend on colored liqueurs or flavored mixers, so treat them as party-style riffs rather than classic Screwdrivers. For a no-alcohol orange drink, use orange juice, soda water, citrus, and a fresh garnish.
Vodka and Orange Juice Drink Names
Orange juice shows up in several familiar cocktails, so the names can blur together. Here is the quick way to keep the nearby drinks straight.
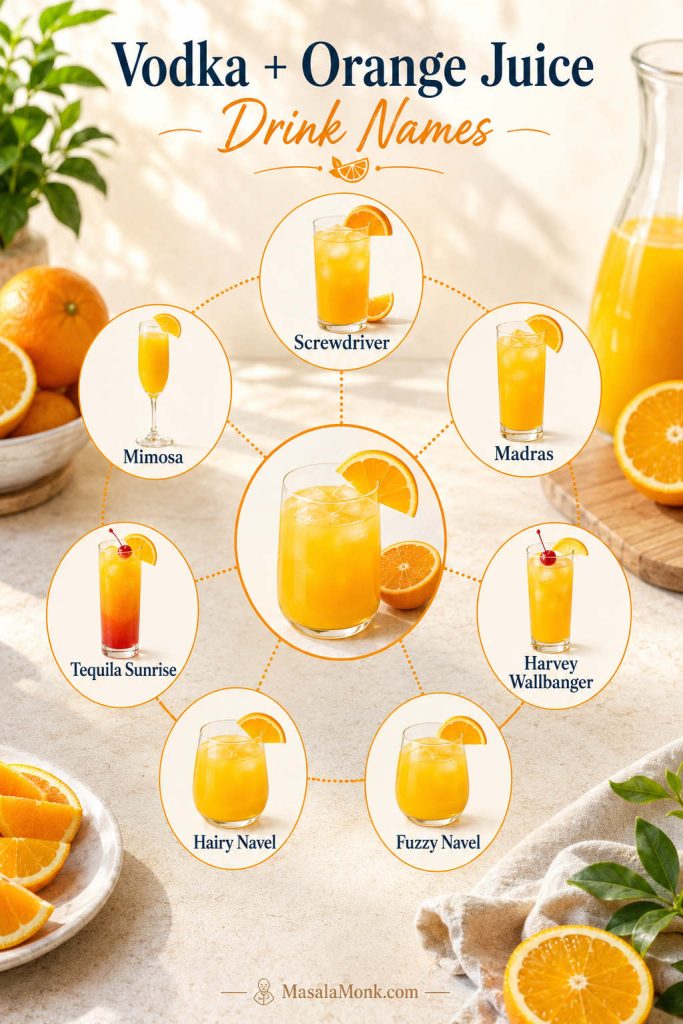
| If you mix… | It is usually called… |
|---|---|
| Vodka + orange juice | Screwdriver |
| Vodka + orange juice + cranberry juice | Madras-style drink |
| Vodka + orange juice + Galliano | Harvey Wallbanger |
| Peach schnapps + orange juice | Fuzzy Navel |
| Vodka + peach schnapps + orange juice | Hairy Navel / Fuzzy Screwdriver-style |
| Tequila + orange juice + grenadine | Tequila Sunrise |
| Sparkling wine + orange juice | Mimosa |
Names can vary by bar, region, and recipe style, but the screwdriver itself stays the straightforward vodka-orange drink.
Common Screwdriver Mistakes and Fixes
Most bad screwdrivers fail in obvious ways: the first sip burns, tastes dull, or feels like watered-down juice. The good news is that most fixes happen right in the glass.
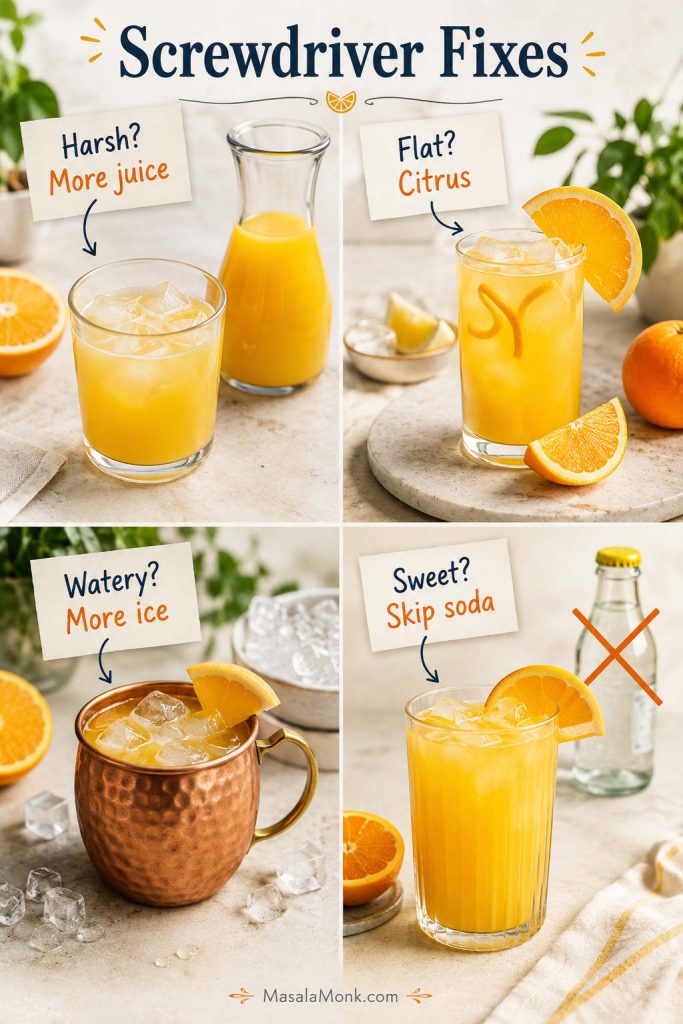
| Problem | What to do |
|---|---|
| Tastes harsh | Add more orange juice and stir briefly. Next time, use the 1:3 ratio. |
| Tastes flat | Add a tiny squeeze of lemon or lime, or use an orange peel twist. |
| Tastes watery | Use more ice and serve right after mixing. |
| Too sweet | Use less sweet orange juice and skip soda or grenadine. |
| Too warm | Chill the vodka and orange juice before mixing. |
| Pulp settles | Stir briefly before serving. |
| Pitcher is diluting | Add ice to glasses, not the pitcher. |
| Garnish tastes bitter | Avoid too much white pith on orange peel. |
Screwdriver Recipe FAQs
These quick answers cover the questions that usually come up after you know the basic vodka-orange ratio.
What is vodka and orange juice called?
Vodka and orange juice is called a Screwdriver when it is served simply over ice. The name usually refers to the vodka-orange drink, not a bottled ready-to-drink product.
What is the best screwdriver ratio?
For this screwdriver recipe, start with 2 oz vodka and 5 oz orange juice for a balanced glass. Move to 4 oz juice if you want it stronger, 6 oz if you want it lighter, and adjust after one sip because orange juice varies.
What are screwdriver measurements in ml?
Use 60 ml vodka + 150 ml orange juice for the balanced version. Go to 60 ml + 120 ml for stronger, or 45 ml + 150–180 ml for lighter.
How many oranges do I need for one screwdriver?
For one balanced screwdriver, you need about 5 oz / 150 ml orange juice, which usually takes 2–3 medium oranges depending on size and juiciness.
Do you shake or stir a screwdriver?
Stir it in the glass for the easiest version. Shake only if you want it extra cold and slightly frothy.
Can I make a screwdriver ahead of time?
Yes, for a pitcher. Mix the vodka and orange juice the same day, keep it chilled, and add ice only to the glasses.
How do I make a screwdriver pitcher?
For 8 balanced drinks, mix 2 cups / 480 ml vodka with 5 cups / 1.2 L orange juice. Keep the pitcher chilled, then pour into ice-filled glasses. For exact 4, 8, and 12 drink batches, use the pitcher amounts table.
Can I use Sprite in a screwdriver?
Yes, but treat it as a twist. Sprite makes the drink sweeter and fizzy; club soda or sparkling water keeps it lighter and drier. Add bubbles right before serving.
What is a screwdriver with cranberry juice called?
A screwdriver-style drink with cranberry juice often moves toward a Madras, which is made with vodka, orange juice, and cranberry juice. A small splash of cranberry can also simply be treated as a cranberry version.
Is a Harvey Wallbanger the same as a screwdriver?
Think of a Harvey Wallbanger as the screwdriver’s liqueur-finished cousin: vodka, orange juice, and a float of Galliano. It is closely related, but not the same as the plain drink.
Is a Fuzzy Navel the same as a screwdriver?
Not quite. A Fuzzy Navel skips the vodka and uses peach schnapps with orange juice. Add vodka as well, and you move closer to a Hairy Navel or fuzzy screwdriver-style drink.
Is Smirnoff Ice Screwdriver the same as a homemade screwdriver?
Not quite. A homemade screwdriver is freshly mixed in the glass, while ready-to-drink screwdriver-style products may be carbonated, sweetened, flavored, or made with a different alcohol base.
Final Tips for a Better Screwdriver
Use this screwdriver recipe as your starting point, taste once, then adjust. More orange juice makes the drink lighter; less orange juice makes it stronger. Keep everything cold, garnish simply, and add extras only after the vodka and orange juice taste right together.
The goal is not to make the fanciest cocktail in the room. It is to make the simple one people are happy to refill.
Good hosting is simple too: label the pitcher, keep food and water nearby, and offer a non-alcoholic option. For readers who want a reference point, the National Institute on Alcohol Abuse and Alcoholism U.S. standard-drink guide is useful.
Once the ratio is right, the drink should feel almost effortless: cold glass, fresh orange aroma, and a pour that tastes like a cocktail without asking much from you.