Posted on — Leave a comment

Focaccia Pizza Recipe: Crispy, Airy Sheet Pan Pizza

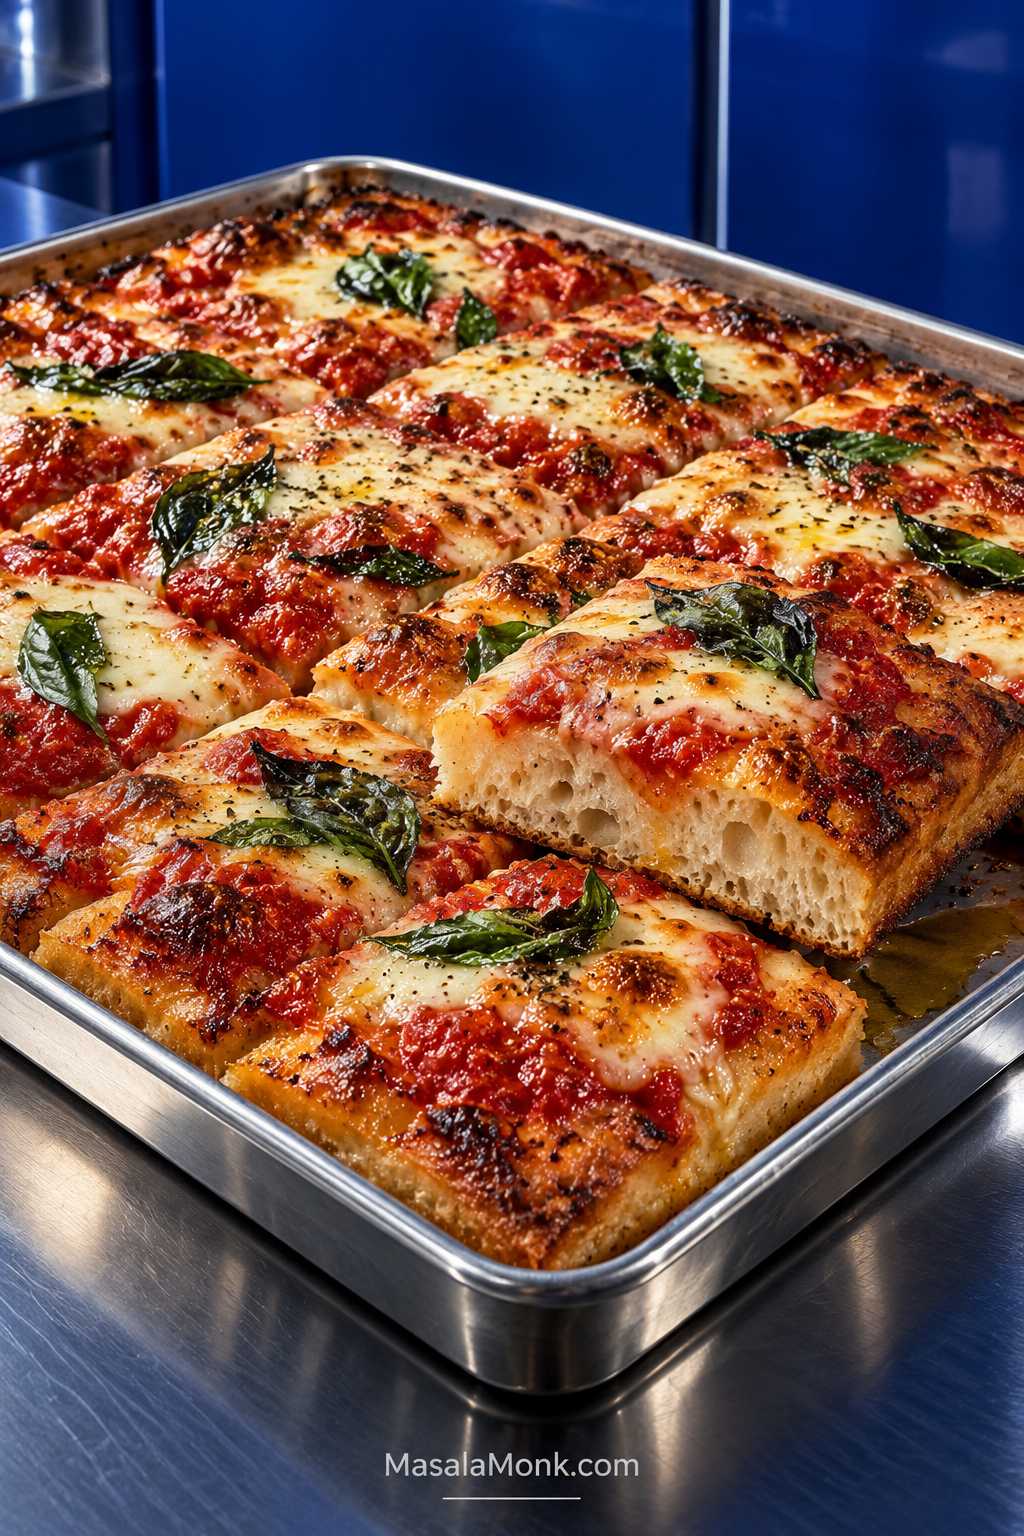
Sheet-pan focaccia pizza with browned edges, tomato sauce, melted mozzarella, basil, and one cut square showing the airy bread interior.

There is a particular moment when focaccia pizza gets everything right: the underside crackles as you cut through it, the middle stays airy and tender, and the sauce and bubbling mozzarella sit on top without leaving a wet band of dough underneath. The edges still have that olive-oil crunch, but the slice eats like proper pizza.

Most problems show up in the middle. Even spectacular edges can hide bread under the cheese that is still gummy. The usual culprits are too much dough for the pan, loose sauce, wet mozzarella, raw mushrooms, or simply not enough heat underneath.

This focaccia pizza recipe tackles that in two simple ways. About 1 kg of soft dough is spread across a 13 × 18-inch (33 × 46 cm) metal sheet pan, keeping it airy without making it excessively thick. Then the focaccia gets a short par-bake before the sauce and cheese go on.

This is the pizza to make when the crust is half the reason you’re excited about dinner. The bread is part of the meal, not merely something holding up the toppings. One half-sheet feeds six to eight comfortably, which also makes it useful for pizza night when one small round pie was never going to stretch far enough.

This is a no-knead focaccia pizza: three short sets of folds build the dough’s strength instead of conventional kneading. Make it in one afternoon or mix the dough the day before for an overnight cold ferment. You don’t need a stand mixer or pizza oven.

Quick Answer: How Do You Make Focaccia Pizza?

For a 13 × 18-inch sheet pan, this focaccia pizza recipe uses 550 g bread flour and 425 ml water—about 77% hydration. Proof the dough until puffy, par-bake it at 475°F (245°C) for 8–10 minutes, add the toppings, then finish for another 8–12 minutes.

By the end of proofing, bubbles should sit beneath the surface and the whole sheet should give a slight jiggle when the pan moves. At the end, look past the browned cheese: the crumb beneath the toppings needs to be set and airy, with good color underneath.

Give the focaccia a head start before the wet toppings go on. That short first bake is the easiest way to protect the airy middle and browned base.
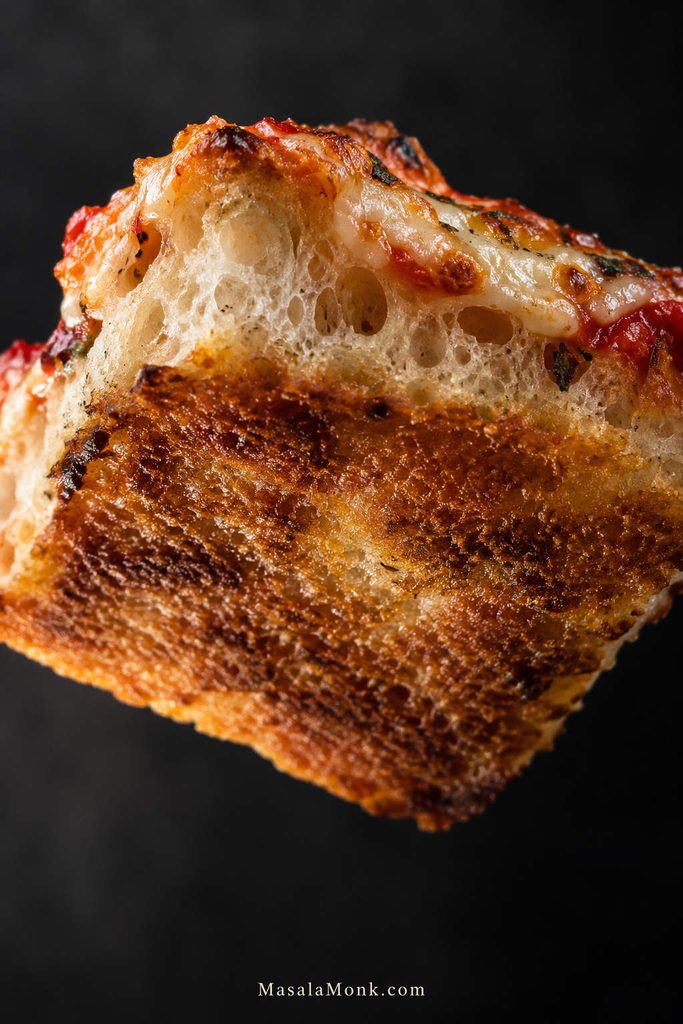
Focaccia pizza slice tilted upward to show a deeply browned underside, airy crumb, tomato sauce, and melted cheese.
Because cheese can look finished before the bread underneath is ready, the browned underside is one of the most reliable visual checks for a thick focaccia pizza.

Same-Day or Overnight?

Same-Day

4 g instant or active dry yeast (1¼ tsp)
Water: 85–95°F / 29–35°C

Choose this when the pizza needs to happen tonight. Plan on 3½–4½ hours from mixing to slicing. For a 7 PM dinner, starting around 2:30–3 PM gives you comfortable breathing room.

Overnight

1 g instant or active dry yeast (⅓ tsp)
Water: 68–75°F / 20–24°C

Choose this when planning ahead is easier and you want to give the dough more time to develop flavor slowly in the refrigerator. Complete the folds, chill for 12–24 hours, then pan and proof the next day.

Those times assume a kitchen around 70–75°F / 21–24°C. A warm room moves things along faster; a cool one stretches the schedule. Either way, let the dough’s changes make the final call rather than waiting for the clock to agree.

Make It Now: Sheet Pan Focaccia Pizza

Focaccia Pizza Recipe Snapshot

Pan13 × 18-inch / 33 × 46 cm rimmed metal half-sheet
Serves6–8
Yield8 generous or 12 smaller squares
Active time30–40 minutes
Same-day total3½–4½ hours
Overnight option12–24 hour cold ferment + final proof
HydrationAbout 77%
Oven475°F / 245°C
Bake8–10 min par-bake + 8–12 min finish

Equipment: large mixing bowl, digital scale, sturdy spoon or dough whisk, spatula or dough scraper, 13 × 18-inch sheet pan, and wire rack.

Pan choice: a heavy-gauge aluminum or aluminized-steel half-sheet is a reliable choice. Darker metal browns faster, so the underside may need an earlier check. Before using a nonstick-coated pan at 475°F / 245°C, confirm its maximum safe temperature.

A pizza steel or stone is optional.

Ingredients

Focaccia Pizza Dough

  • 550 g / 19.4 oz bread flour
  • 425 ml / 14.4 fl oz water — same-day: 85–95°F / 29–35°C; overnight: 68–75°F / 20–24°C
  • Same-day: 4 g instant or active dry yeast / 1¼ tsp
  • Overnight: 1 g instant or active dry yeast / ⅓ tsp
  • 11 g fine salt
  • 30 ml / 2 tbsp olive oil

Use instant or active dry yeast at the same weight. Active dry may begin a little more slowly, so let the dough cues—not the clock—decide when it is ready. Follow the package directions if your yeast specifically calls for dissolving first.

Using all-purpose flour? Start with 410 ml water and add the final 15 ml only if the dough is building strength comfortably.

For the Pan and Dimpling

  • Nonstick pan spray, optional
  • 30 ml / 2 tbsp olive oil for the pan
  • 15 ml / 1 tbsp olive oil for the surface

For the Pizza

  • 240–280 g / about 1 to 1¼ cups thick pizza sauce
  • 255 g / 9 oz low-moisture mozzarella, shredded
  • 30 g / 1 oz Parmesan or Pecorino, finely grated
  • 60–90 g / 2–3 oz pepperoni, cooked sausage, or another prepared topping, optional
  • Fresh basil, extra Parmesan or Pecorino, and olive oil for finishing
  • Red pepper flakes, optional

Quick Pizza Sauce

Start with 280 g thick crushed tomatoes or passata, then stir in 1 tsp olive oil, ½ tsp dried oregano, ¼ tsp garlic powder, and ¼–½ tsp fine salt. Start with less salt if the tomatoes are already seasoned, then taste.

Keep the sauce simple and tomato-forward; the focaccia already brings plenty of olive-oil richness. Drain watery crushed tomatoes in a fine sieve for 5–10 minutes, or briefly simmer loose passata. Use the concentrated amount you end up with rather than replacing the liquid you removed. The sauce should spread easily but stay where you put it.

How to Make Focaccia Pizza

1. Mix the Dough

Add the water, yeast, flour, salt, and 30 ml olive oil to a large bowl. Mix until no dry flour remains.

If you’re used to ordinary pizza dough, this can look unusually wet at first. That’s expected. It should be rough, loose, and sticky, but still behave like dough rather than something you could pour.

2. Rest and Fold

Cover the bowl and rest for 15 minutes. With a wet hand, pull one side of the dough upward and fold it across the center. Turn the bowl and repeat around the dough.

Complete 3 sets of folds 20 minutes apart. The first can feel messy. By the third, the dough lifts more cleanly, stretches farther, and feels springier while staying soft.

At that point, it should feel noticeably different: smoother, springier, and beginning to hold air without losing that soft, wet character.
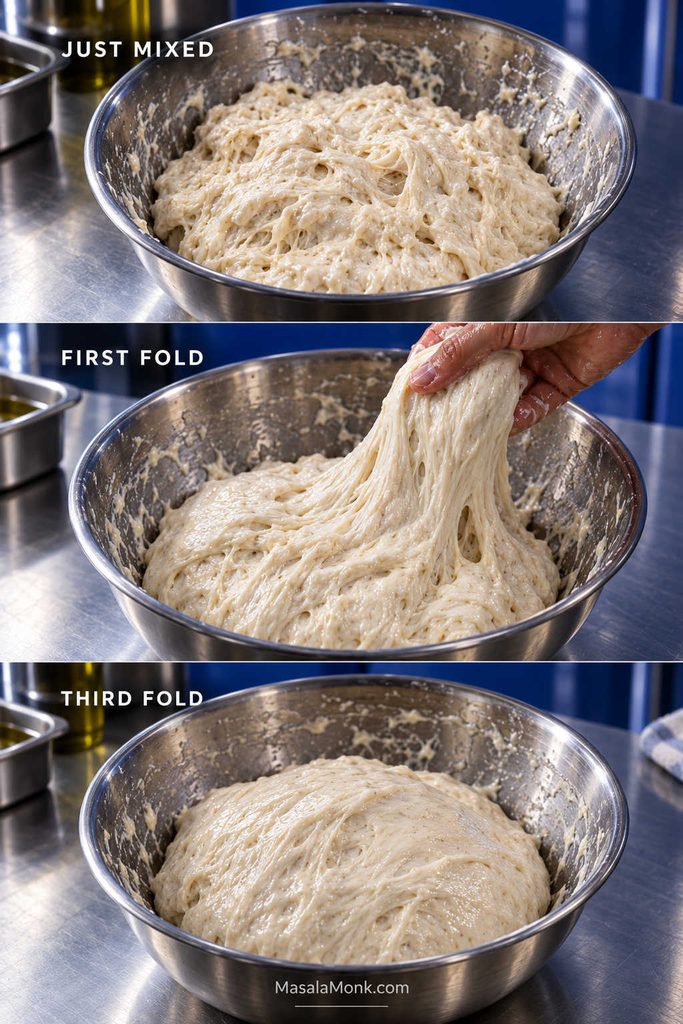
Three stages of focaccia pizza dough labeled just mixed, first fold, and third fold, showing the dough becoming smoother and more structured.
The goal of folding is stronger dough, not drier dough: even after the final fold, a high-hydration focaccia pizza dough should remain soft, supple, and slightly tacky.

3. Let It Rise

Same-day dough stays at room temperature for 60–90 minutes after the final fold. Look for visible expansion and a lighter, more aerated texture.

Cover overnight dough and refrigerate it for 12–24 hours after the folds.

4. Oil the Pan and Stretch

Coat a 13 × 18-inch metal half-sheet with nonstick spray if using it, then spread 30 ml / 2 tbsp olive oil across the base.

Transfer same-day dough into the pan and gently stretch it toward the corners with oiled fingertips. When it pulls back, cover it and wait 10–20 minutes before continuing.

For overnight dough, transfer it to the oiled pan straight from the refrigerator. It will relax as it warms. Stretch it gently in stages rather than forcing cold dough into the corners.

If the dough fights you, wait. Fifteen quiet minutes usually does more than fifteen seconds of wrestling.
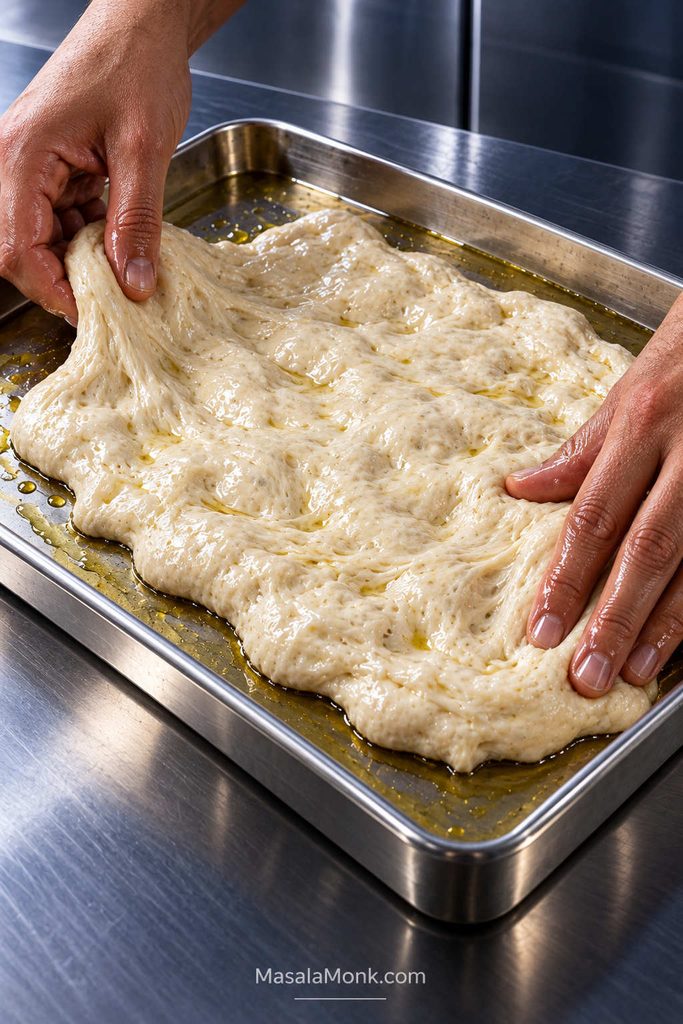
Hands gently stretching soft focaccia dough across an oiled metal sheet pan, with the dough still short of some corners.
If the dough keeps shrinking back, adding more flour can make the finished crumb heavier; instead, preserving the hydration and allowing the gluten to relax gives the dough more room to stretch.

5. Proof in the Pan

Cover the pan. Same-day dough may need another 45–75 minutes. Refrigerated dough commonly needs 1½–3 hours, depending on room temperature and how far it fermented overnight.

Start preheating the oven to 475°F (245°C) before the dough is fully ready. For a plain sheet-pan setup, allow 25–30 minutes of preheating. When using a steel or stone, give it 45–60 minutes to heat thoroughly.

By the end, the dough should look almost marshmallow-soft. Bubbles sit just beneath the surface, and the whole sheet gives a slight tremble when you nudge the pan.
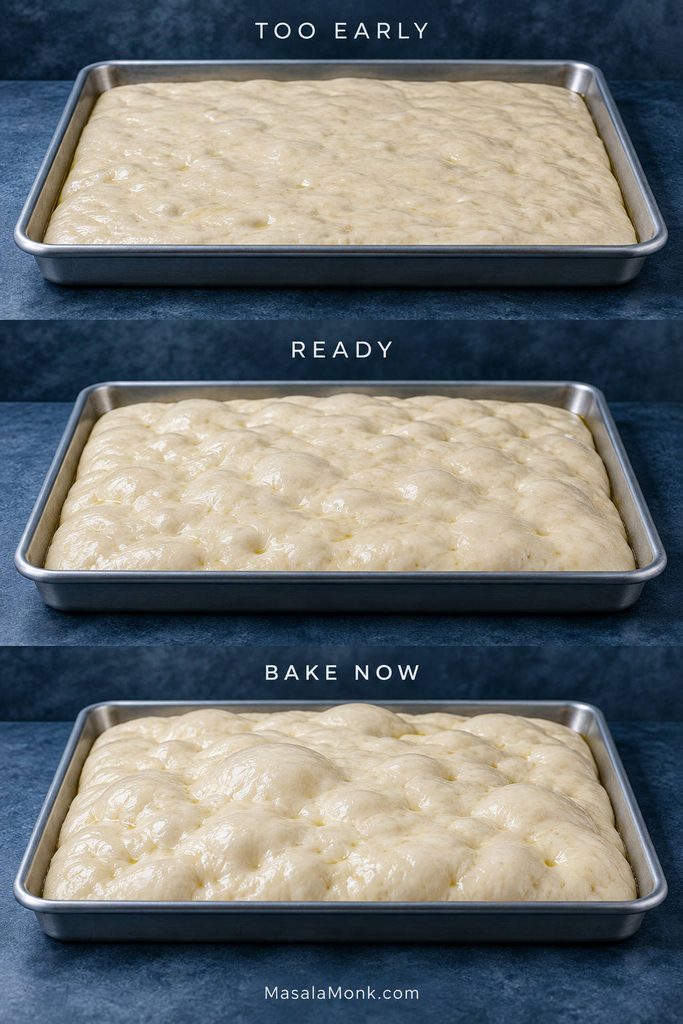
Three stages of focaccia dough in metal pans labeled too early, ready, and bake now, showing increasing puffiness and bubbling.
Use the clock to plan, but bake by the dough: puffy, bubbly, and gently jiggly.
  • Still flat and tight: keep waiting.
  • Puffy and jiggly: it is ready.
  • Very inflated and starting to sag: bake it now.

6. Set the Rack and Finish Preheating

Keep a rack in the lower third of the oven. The oven—and any steel or stone you’re using—should be thoroughly hot by the time the dough reaches its final proof.

7. Dimple and Par-Bake

Drizzle the surface with the remaining 15 ml / 1 tbsp olive oil. Press your oiled fingertips straight down through the dough. It should feel pillowy, with little pockets of air shifting around your fingers; you’re creating dimples, not squeezing the life out of the dough.

Par-bake for 8–10 minutes. The glossy raw sheen disappears, the surface turns matte, and the outer edge takes on its first faint color. It will smell like bread now, not raw dough.
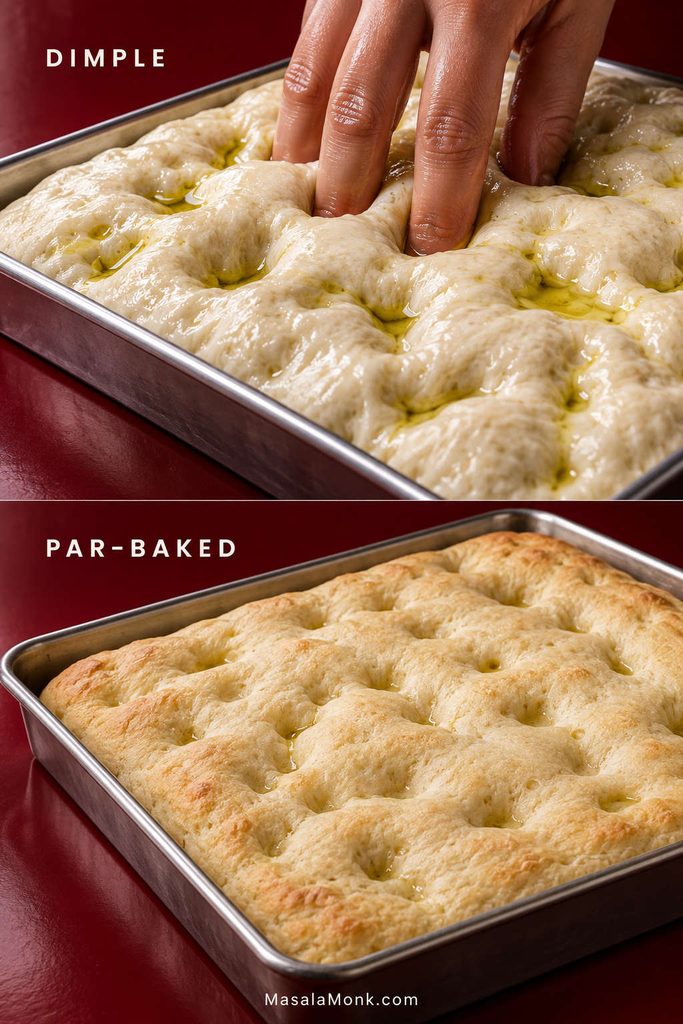
Oiled focaccia dough being pressed into dimples beside a lightly colored par-baked crust that is set but not fully finished.
Par-baking gives the focaccia a sturdier foundation before the sauce and cheese add their moisture.

8. Add the Toppings

Spread over 240–280 g / about 1 to 1¼ cups thick sauce, taking it close to the edges. Add the mozzarella, Parmesan or Pecorino, and any prepared toppings.

Low-moisture whole-milk mozzarella gives the classic bubbly, browned pizza top. Fresh mozzarella makes softer, creamier pockets; drain and blot it thoroughly and add it only for the final 5–7 minutes.
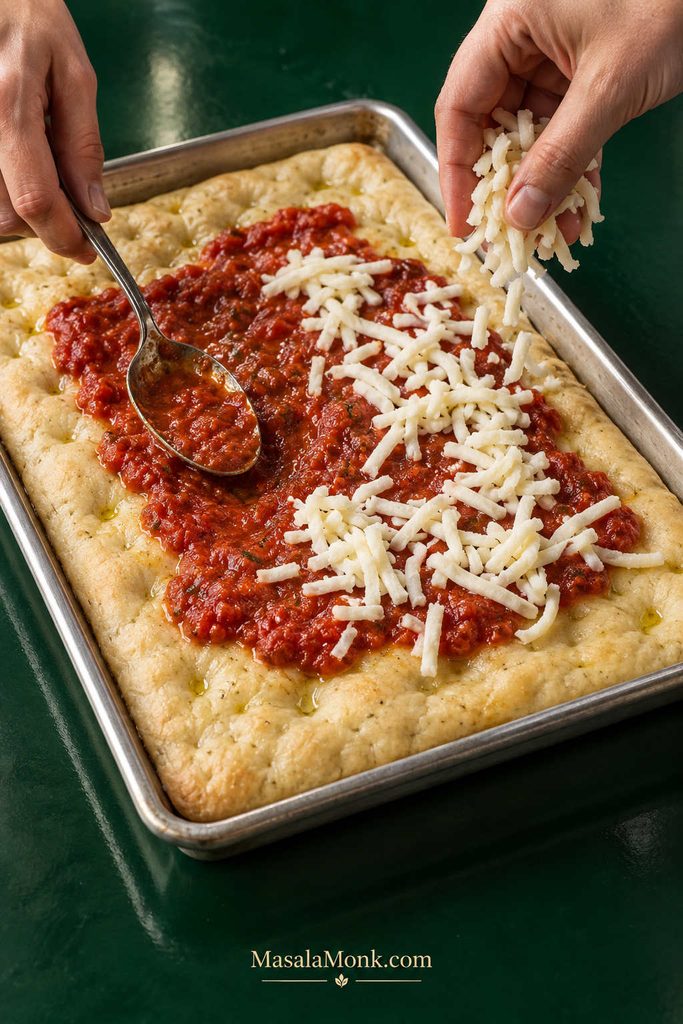
Thick tomato sauce and shredded mozzarella being added in a restrained layer to par-baked focaccia in a metal sheet pan.
Keeping the topping layer controlled protects both texture and identity: the bread still has room to rise, brown, and taste like focaccia instead of becoming only a thick base under pizza toppings.

9. Finish the Pizza

Bake for another 8–12 minutes. The cheese bubbles and blisters in places, the edges deepen toward bronze, and the kitchen starts smelling of toasted olive oil, tomato, and browned cheese.

It is tempting to pull the pizza as soon as the mozzarella looks ready. Check underneath first. The base needs color, while the bread beneath the toppings should look set and airy rather than shiny or compressed into a pasty band.

Finish the basic tomato-and-mozzarella version with torn basil, a light grating of Parmesan or Pecorino, and a thin drizzle of olive oil. Add red pepper flakes for heat.

10. Get It Out of the Pan

Rest the pizza in the pan for 2 minutes, then move it to a wire rack. Give it another 5–10 minutes before slicing so steam can escape instead of softening the bottom.

A good slice bends a little under its toppings, but the browned base still has enough structure to pick up in one hand. The corner pieces have the strongest olive-oil crunch; the center squares show off the biggest bubbles. Both belong on the platter.
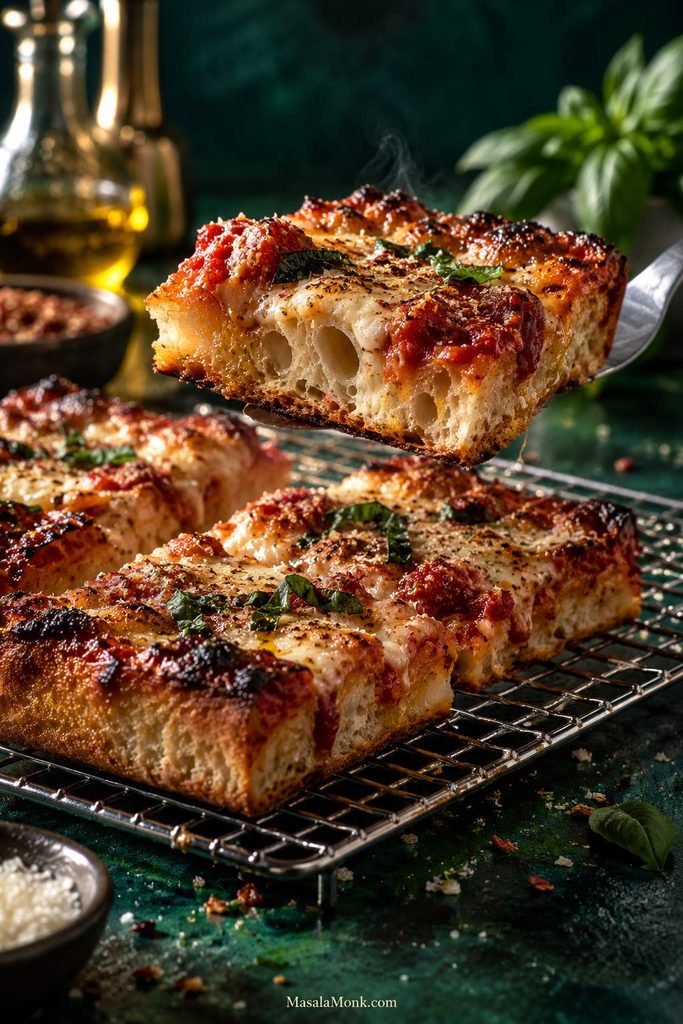
Fresh focaccia pizza resting on a wire rack while one square is lifted with a spatula, showing melted cheese, airy crumb, and browned crust.
A cooling rack preserves the contrast between crisp base and tender crumb, because steam can escape instead of collecting underneath the hot pizza.

Focaccia Pizza Topping Ideas

Different toppings change more than the flavor. Pepperoni is the easiest place to start; Margherita brings softer pockets of fresh mozzarella; mushrooms reward a little prep; and white or pesto versions put more attention back on the olive-oil crust.
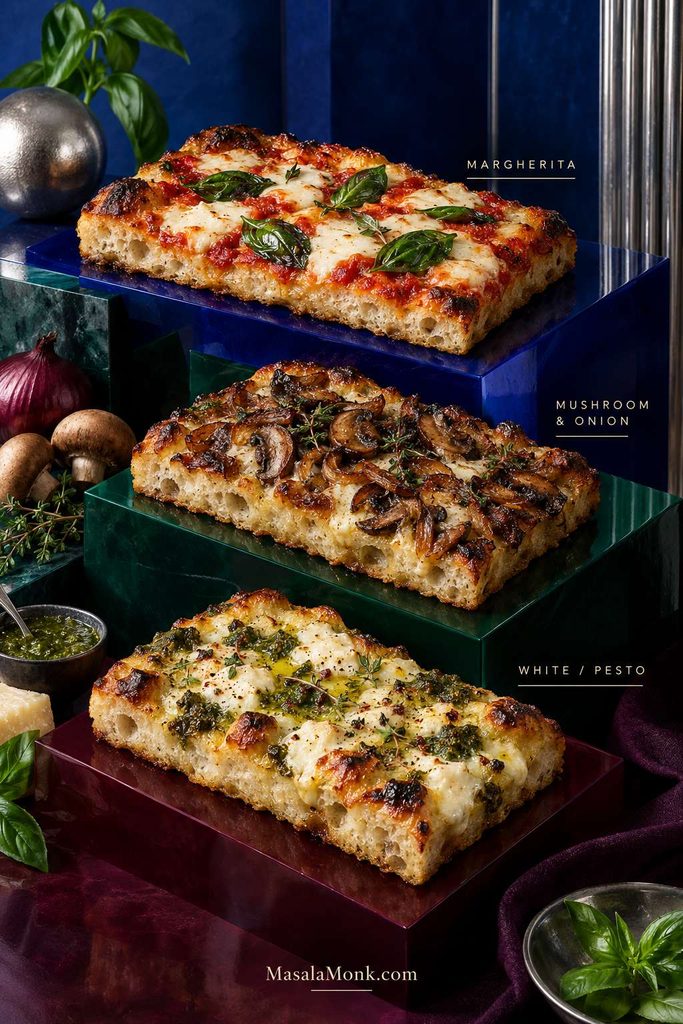
Three focaccia pizza variations shown together: Margherita with tomato, mozzarella and basil; mushroom and onion; and white pizza with pesto and cheese.
These variations show why topping choice changes more than flavor: fresh mozzarella adds moisture, cooked mushrooms concentrate before baking, and white or pesto toppings shift attention back toward the olive-oil crust.

Pepperoni

Pepperoni is the simplest place to start: salty cheese, curled slices with crunchy edges, little pools of spicy oil, and almost no extra water to worry about. Use the base sauce and mozzarella, then add 60–90 g / 2–3 oz pepperoni.

For sweet heat, finish with a thin drizzle of hot honey after baking, when it stays glossy and fragrant.
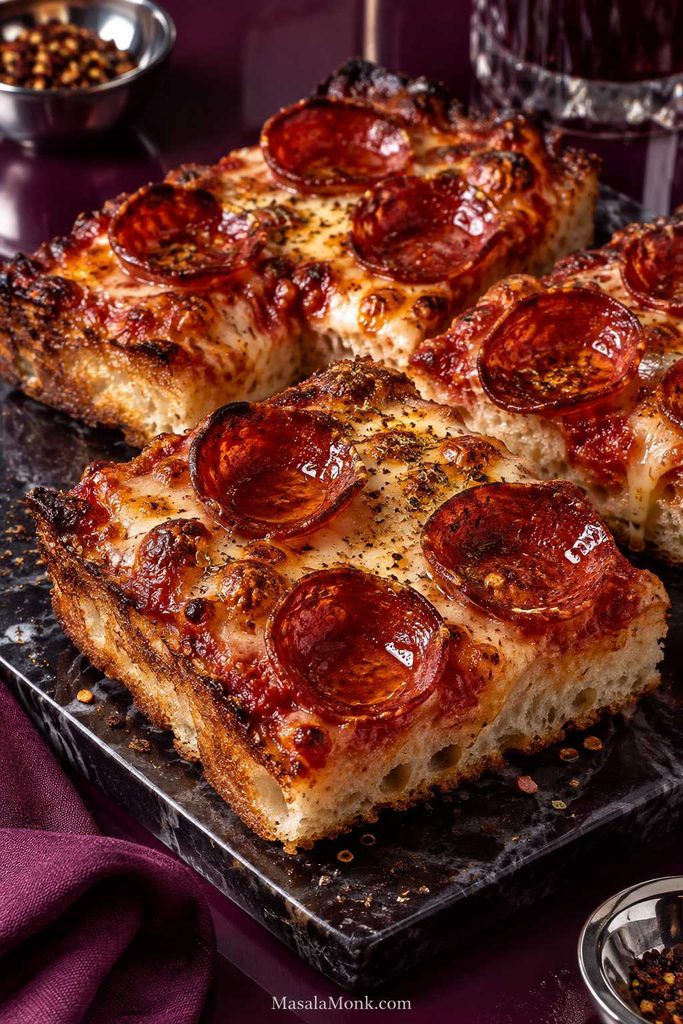
Pepperoni focaccia pizza with curled pepperoni slices, melted blistered cheese, tomato sauce, basil, and a browned airy crust.
Pepperoni is a useful reference topping for focaccia pizza because it contributes plenty of flavor without adding much extra water, making crust performance easier to judge.

Margherita

Tomato, creamy fresh mozzarella, basil, and olive oil make a brighter, softer pizza against the browned focaccia base. Use well-drained mozzarella and scatter basil over the pizza while it is still hot.

The Margherita pizza recipe takes the same tomato-mozzarella-basil combination onto a thinner conventional pizza crust.

Garlic Parmesan

Garlic carried through olive oil settles into the dimples while Parmesan browns over the top. Mix finely grated or minced garlic with a little olive oil, brush it over the par-baked crust, then add mozzarella and Parmesan.

Mushroom and Onion

Cook the mushrooms until their liquid has mostly disappeared and the edges begin to brown, then pair them with sautéed or caramelized onions. The sweet onions and browned mushrooms are especially good against the olive-oil crust.

Sausage and Pepper

Crumbled sausage browns at the edges while the peppers soften and sweeten beneath the cheese. Cook the sausage first; very juicy peppers benefit from a quick sauté too.

White or Pesto

White pizza uses mozzarella, Parmesan, black pepper, and small spoonfuls of ricotta instead of tomato sauce. The ricotta stays creamy in pockets while Parmesan browns across the top. Spinach, mushrooms, and caramelized onions all fit naturally here.

A thin layer of pesto adds a basil-and-garlic edge without hiding the focaccia underneath. Spread it on after the par-bake. The pesto recipe guide has classic basil pesto plus several variations.

How to Keep Focaccia Pizza Airy and Crisp

Once the basic pizza makes sense, you can start changing it without losing the crust that makes the whole thing worth doing.

A crisp, airy focaccia pizza comes down to three things: keep the dough thin enough for the pan, control the water going on top, and give the bottom enough heat to set before the surface gets too dark.

Get those three right and the recipe becomes flexible: you can change the pan, cheese, sauce, or toppings without losing the crust you came here for.
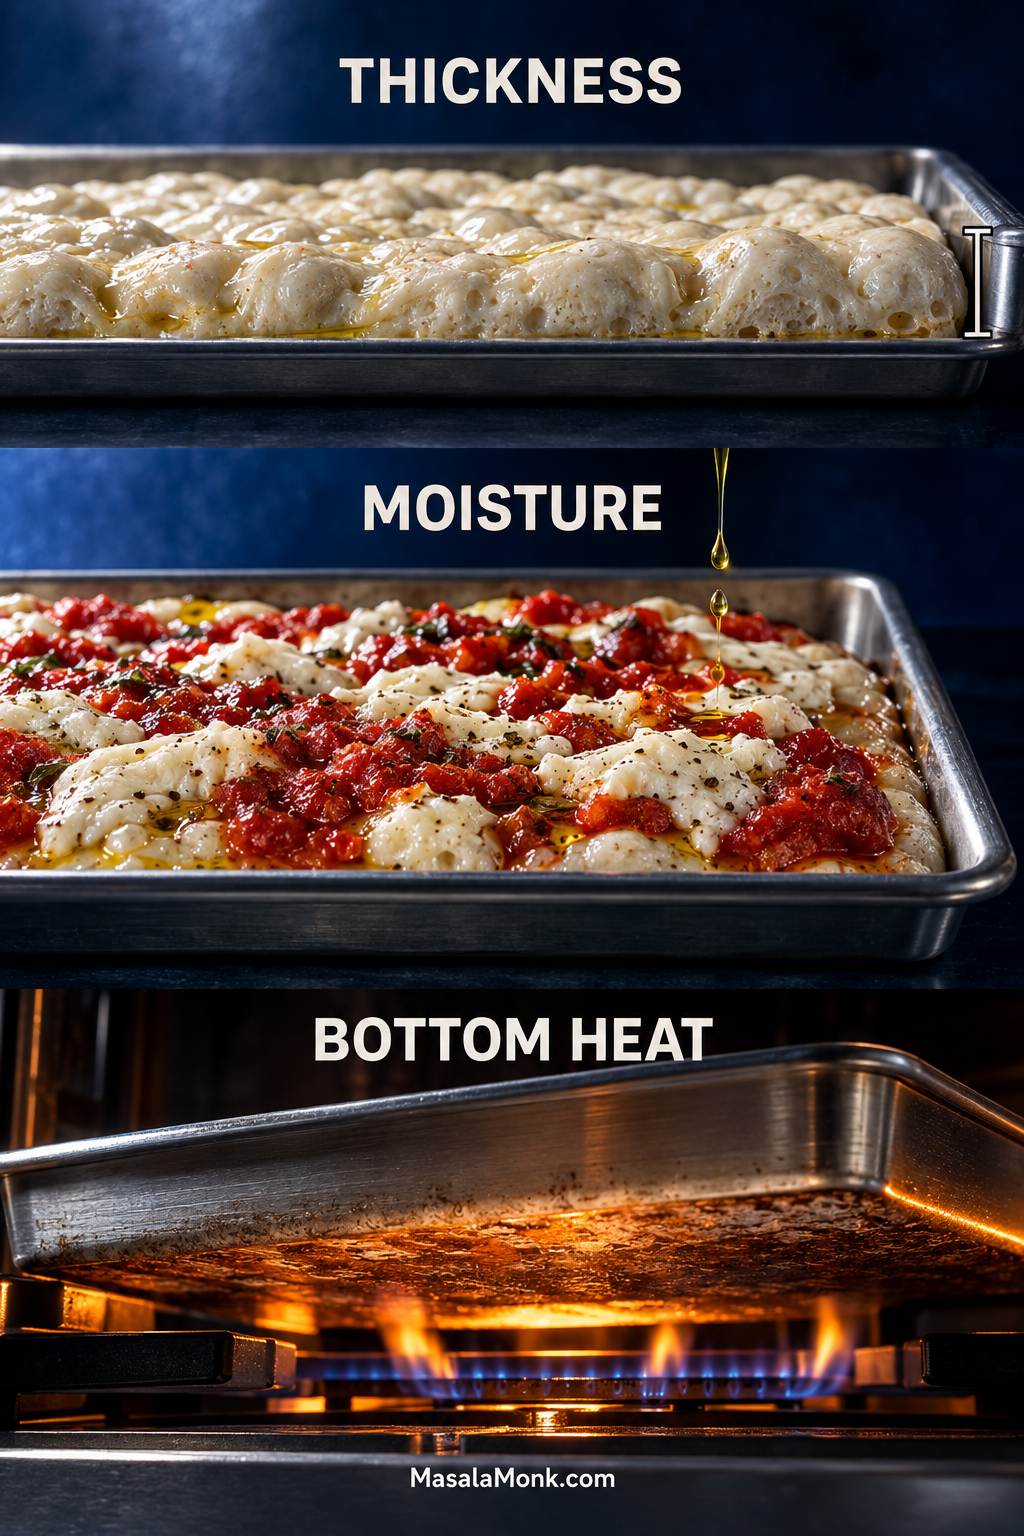
Three-part focaccia pizza guide illustrating dough thickness in the pan, moisture from sauce and toppings, and heat reaching the underside of the pan.
Thickness, topping moisture, and bottom heat are the three levers that control the crust.

Sticky or Actually Too Wet?

Before those three controls matter, the dough itself has to be behaving like dough. At about 77% hydration, it stays tacky. The important question is whether it becomes stronger as you fold it.

A healthy dough starts loose and awkward, then becomes more elastic and cohesive as the folds build strength. If it still pours like batter, tears immediately, and cannot hold itself together after several folds, the flour may simply be carrying more water than it can absorb comfortably.

Bread flour gives you more margin. Softer all-purpose flour often does better when that final splash of water is added only after the dough begins to strengthen.
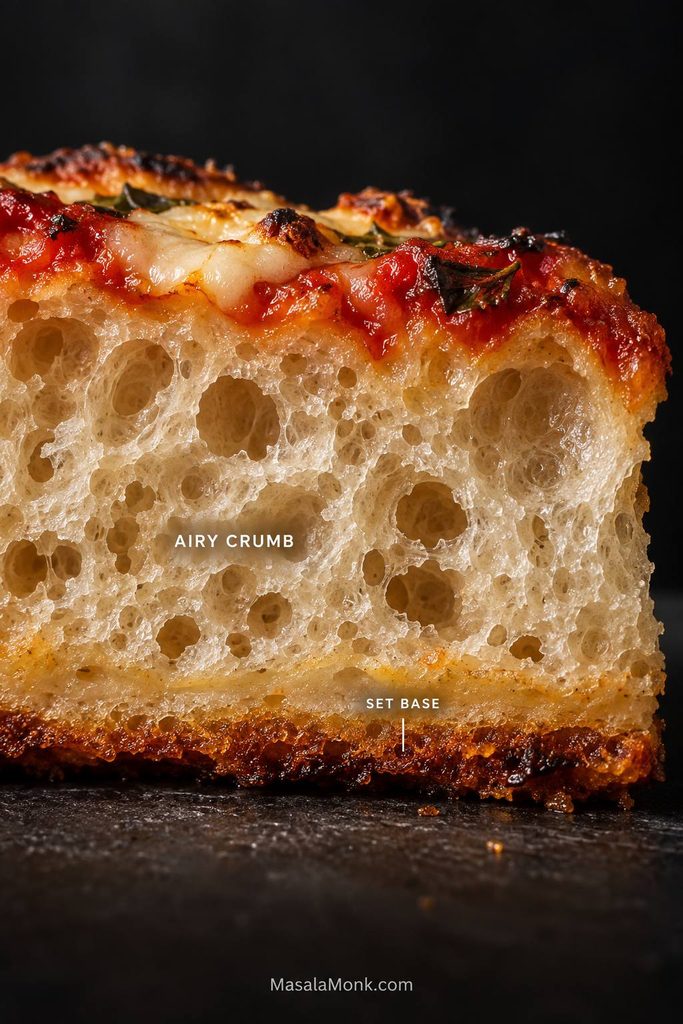
Macro cross-section of focaccia pizza showing irregular air pockets beneath tomato and melted cheese and above a browned, fully set base.
A good focaccia pizza crumb is not simply the one with the biggest holes; it is open enough to feel light, yet strong enough to support the toppings without leaving a gummy band above the crust.

Making the bread without sauce and cheese? That plain focaccia recipe goes deeper into proofing, dimpling, pan choice, and those golden olive-oil edges; it is the better place to start when the bread itself is the main event.

Use the Right Amount of Dough for Your Pan

The same dough behaves very differently at ¾ inch thick than it does at 1½ inches. Move the dough into a smaller pan and the pizza gets deeper, so the bread under the toppings has farther to go before it is fully baked.

The full batch weighs about 1 kg. A standard 9 × 13-inch pan has exactly half the surface area of a 13 × 18-inch half-sheet, so half the dough preserves almost the same thickness.

Pan Approx. dough What to expect
13 × 18 in / 33 × 46 cm Full batch, about 1 kg The intended airy-but-pizza-like thickness
9 × 13 in / 23 × 33 cm 500–550 g Very similar thickness to the half-sheet version
9 × 13 with full batch About 1 kg Much thicker focaccia; expect a longer, less forgiving bake
12-inch cast iron skillet 450–550 g Near the intended thickness around 500 g, with a more fried, deeply browned underside; follow doneness rather than the half-sheet clock

The half-sheet gives the cleanest balance of airy center and browned base. Cast iron is more interesting when what you really want is that almost-fried underside.
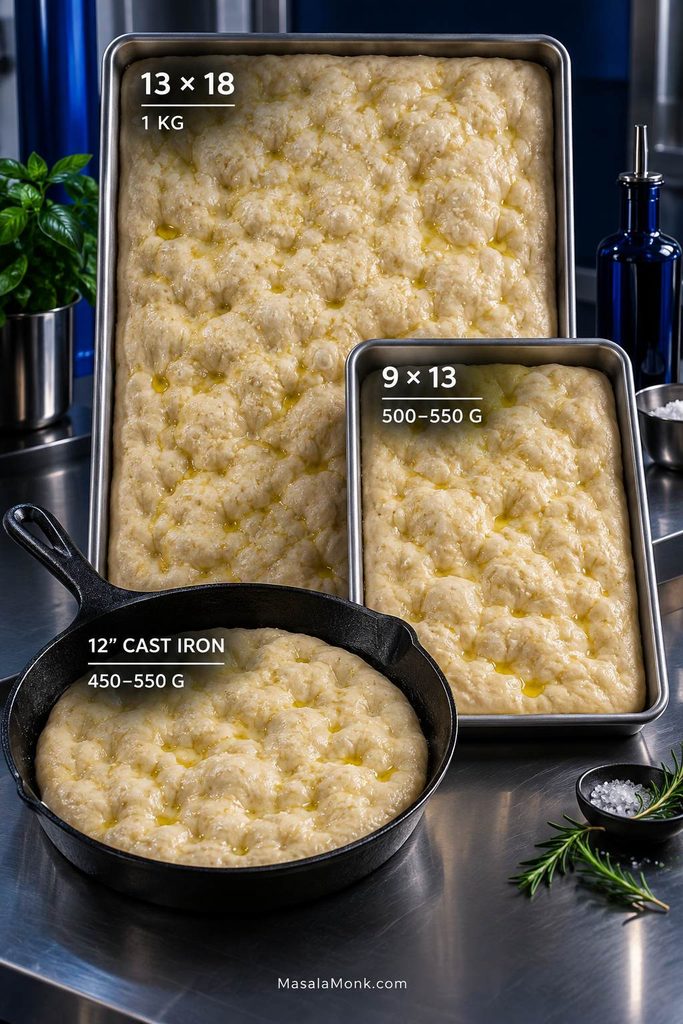
Comparison of a 13 × 18-inch half-sheet, 9 × 13-inch pan, and 12-inch skillet showing different focaccia dough amounts.
Smaller pan, deeper dough. Scale the dough with pan area to keep the bake closer to the original.

The Bottom Needs Heat

Once sauce and cheese cover the surface, the underside has to carry more of the bake. Metal helps. So does a thoroughly heated oven and a rack in the lower half.

Pale bottoms usually improve with a lower rack or a preheated steel or stone. A crust that burns before the bread finishes needs the opposite treatment: move the pizza higher or remove that extra thermal mass.
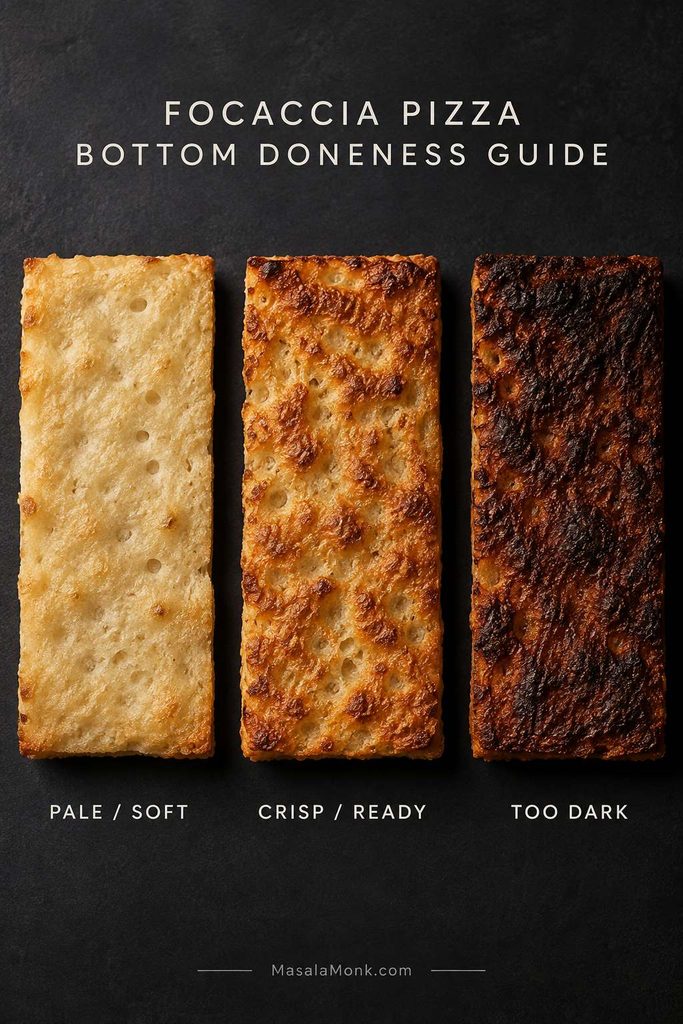
Three focaccia pizza bottoms labeled pale and soft, crisp and ready, and too dark, shown at the same angle for comparison.
Aim for even bronze: pale stays soft; very dark can outrun the middle.

Prep Toppings for a Better Crust

Sogginess is usually cumulative rather than mysterious. A little loose sauce may be fine, and so may a few mushrooms. Add fresh mozzarella and juicy tomatoes as well, though, and the bread suddenly has much more water to deal with.

The wetter the topping, the more preparation it needs before it reaches the dough. Keep the overall layer modest too. The focaccia should still feel like part of the pizza, not a thick bread base buried under everything else.
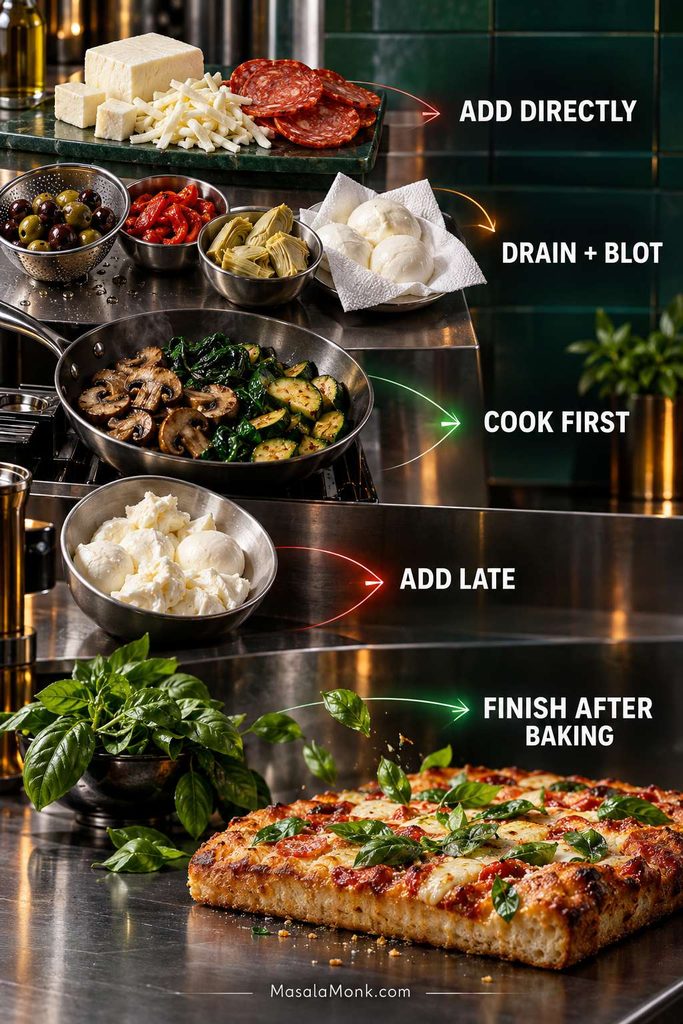
Topping guide grouping ingredients by preparation method, including add directly, drain and blot, cook first, add late, and finish after baking.
Prep by moisture: drain, blot, cook, or delay wet ingredients before they reach the crust.
Topping Prep Why
Low-moisture mozzarellaAdd directlyReliable melt with little excess water
PepperoniAdd directlyLow-moisture and forgiving
Cooked sausageAdd directlyAlready cooked and easier to control
OlivesDrainRemoves surface brine
Artichoke heartsDrain and pat dryJarred and canned pieces hold liquid
Roasted peppersDrain and pat dryKeeps packing liquid off the dough
MushroomsCook firstThey release water as they shrink
SpinachCook and squeeze dryRemoves water before it reaches the crust
ZucchiniPrecook or salt and dryHigh water content
Fresh tomatoesUse sparingly; drain juicy piecesFresh juice can soak the crumb
Fresh mozzarellaDrain, blot, add lateMuch wetter than low-moisture mozzarella
Fresh basilAdd after bakingBetter fragrance and color
Fresh garlicCoat with oil or tuck beneath cheeseExposed pieces scorch quickly
Sun-dried tomatoesProtect beneath cheese or add laterExposed edges can burn

Very juicy fresh tomatoes deserve particular attention. The fresh tomato sauce guide shows how draining and reduction can turn them into a richer, more concentrated base.

Want to Skip the Par-Bake? Put Cheese Down First

Par-baking is the default here because it gives the center more protection. A one-bake version can still work when the oven has strong bottom heat and the toppings are fairly dry.

After the dough has fully proofed and been dimpled, scatter most of the low-moisture mozzarella directly over the dough. Spoon a modest amount of thick sauce over the cheese, then finish with the remaining mozzarella and toppings. That first cheese layer slows the sauce from soaking straight into the raw dough.

The choice changes the eating experience slightly. A one-bake pizza lets sauce and cheese settle into the bread as everything cooks together. Par-baking, by contrast, gives you a more distinct focaccia layer underneath and a wider margin against a gummy middle.
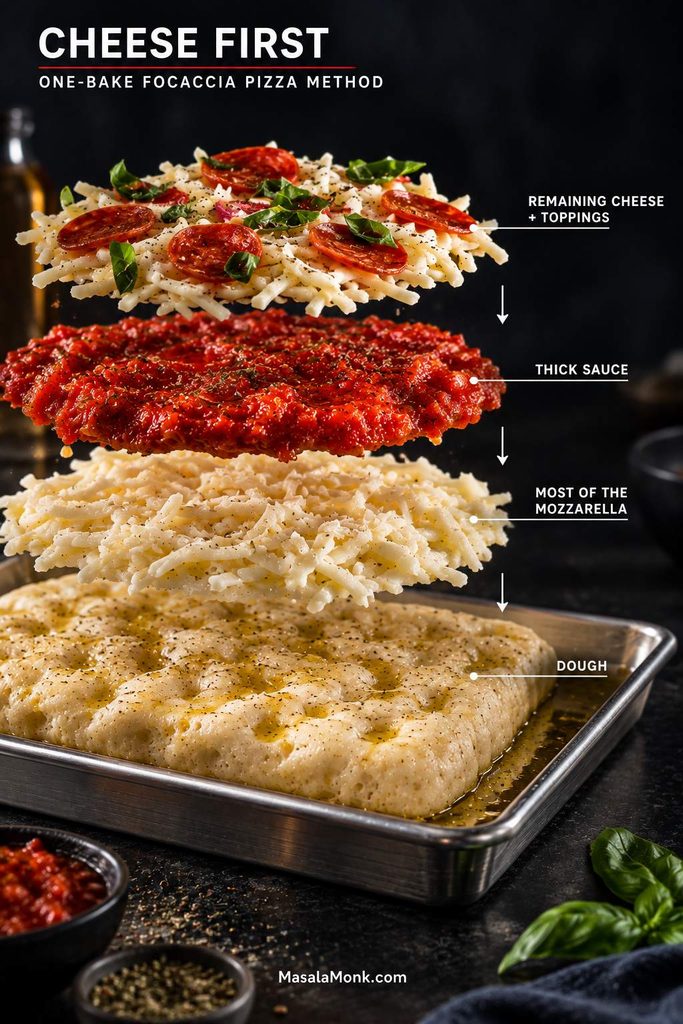
Exploded focaccia pizza assembly showing dough at the bottom, most of the mozzarella above it, thick tomato sauce, and remaining cheese and toppings at the top.
In the one-bake method, the first mozzarella layer acts as a moisture buffer, so the sauce reaches the raw focaccia more slowly while the bread begins to set underneath.

King Arthur Baking uses the cheese-first approach in its focaccia pizza method.

Shortcuts and Other Doughs

There are two useful shortcuts when you want the focaccia-pizza experience without starting from this exact dough: turn already-baked focaccia into pizza, or adapt conventional pizza dough to an oiled pan. Each route keeps the pan-pizza idea while changing how much dough work you need to do.
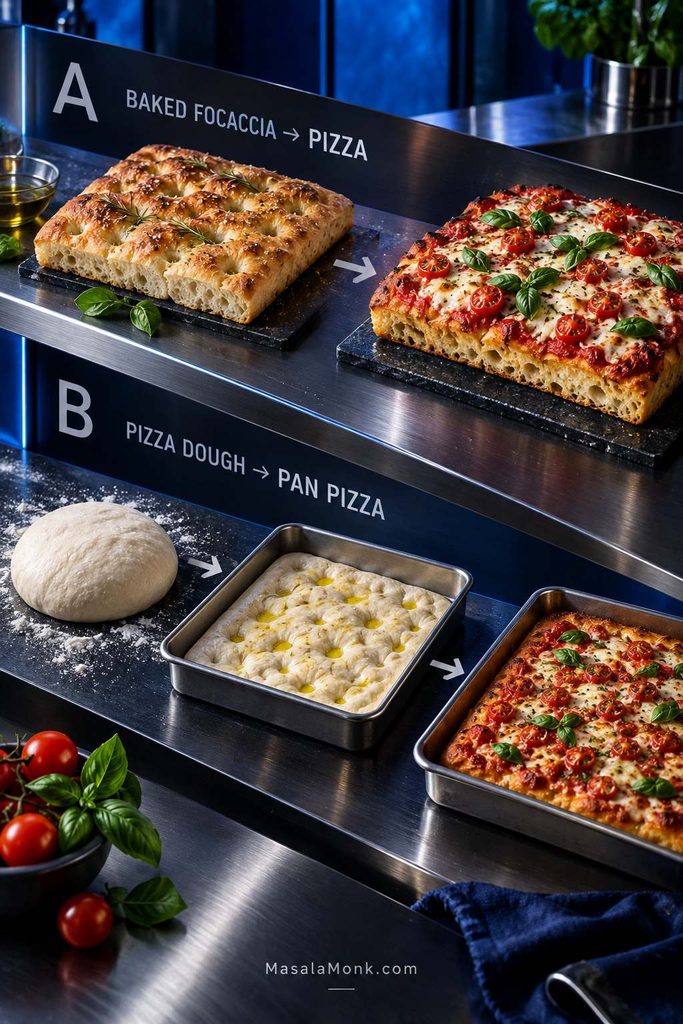
Two focaccia pizza routes shown together: baked focaccia turned into pizza, and pizza dough stretched into an oiled pan and baked as pan pizza.
Choose the shortcut by your starting point: baked focaccia is fastest, whereas conventional pizza dough keeps more of the dough-making process but can still be adapted to an oiled pan.

Already Have Baked Focaccia?

This is the quickest route to pizza on focaccia bread. Heat the oven to 425°F / 220°C. Focaccia thicker than 1½ inches / 4 cm is easier to turn into pizza if you split it horizontally.

For a 9 × 13-inch piece, use 120–150 g / ½–⅔ cup thick sauce and 90–120 g / 3–4 oz low-moisture mozzarella, plus cooked toppings.

Bake on a metal sheet pan for 8–12 minutes, until the cheese bubbles and the bread is hot and browned underneath. A base that needs more color can spend another minute or two directly on the oven rack once it is firm enough to move safely.

Day-old focaccia is excellent here. The edges recrisp at the same time the cheese melts, so leftovers suddenly feel intentional.

Using Pizza Dough

Conventional pizza dough is usually less hydrated and more elastic than focaccia dough, but it adapts well to an oiled pan.

For a 9 × 13-inch pan, start with 450–500 g / 16–18 oz pizza dough. Let refrigerated dough warm and relax, stretch it into the oiled pan in stages, and give it another 15–20 minutes whenever it snaps back.

Once the dough is visibly puffy, continue with the par-bake, topping, and finishing method. Start checking the color early because a lower-hydration dough may brown faster.

The easy pizza dough recipe gives you same-day and overnight options if you want to begin from scratch.

For sourdough: natural fermentation needs its own timing rather than a simple yeast swap. The sourdough focaccia recipe follows a starter-based dough through fermentation, proofing, dimpling, and baking.

Fix My Focaccia Pizza

Most of these problems look different, but they usually come back to fermentation, water on top, or heat underneath. If you want the logic first, revisit the three controls for an airy, crisp focaccia pizza. Something going wrong right now? Start with the rescue column; plenty can still be fixed before dinner reaches the table.

Dough and Proofing

Problem Likely cause Save this one Next time
Extremely sticky dough Often normal at this hydration Wet or oil your hands Let the folds build the strength
Dough behaves like soup Mismeasurement or flour unable to hold the water Give it another fold or two; add a little flour only if it cannot gain structure Weigh the flour and hold back 15 ml water with softer flour
Won’t reach the corners Cold or tight gluten Cover and wait 10–20 minutes Stretch in stages
Barely rises Cool room, slow fermentation, or weak yeast Give active dough more time somewhere comfortably warm Check yeast freshness and watch the dough rather than the clock
Dense crumb Underproofing, added flour, or heavy handling Enjoy it as a denser pan pizza Proof longer and handle mature dough gently
Rose and then collapsed Overproofing Bake it now; it may simply finish flatter Use less yeast for long ferments and catch the dough closer to its peak
One giant bubble A large trapped gas pocket Pierce that bubble gently Dimple evenly without crushing the rest

Baking and Crust

Problem Likely cause Save this one Next time
Gummy or raw middle Thick dough, weak bottom heat, wet toppings, or short bake Remove it from the pan. If the crust is firm enough to handle safely, finish it directly on the oven rack; loosely shield very dark cheese with foil Keep the par-bake, control wet toppings, and check the crumb beneath them
Pale, soft bottom Not enough heat underneath Once the crust is firm enough to move, finish it on the rack or a thoroughly heated steel or stone for 2–4 minutes Preheat longer, move lower, or add thermal mass
Burned bottom Strong lower heat, very dark pan, excess oil, or hot steel Move the pizza off the pan immediately Raise the rack or remove the steel/stone
Dark cheese, underdone bread The top is cooking faster than the bread Loosely cover with foil and keep baking Use the full par-bake or add vulnerable toppings later
Pizza sticks Pan surface or inadequate release layer Work a thin spatula gradually underneath Use spray plus oil on a suitable metal pan

Toppings and Cooling

Problem Likely cause Save this one Next time
Fresh mozzarella made it wet Too much water from the cheese Remove from the pan and continue baking briefly if needed Drain, blot, and add it late in the bake
Vegetables made the middle soggy They released water during baking Finish the crust out of the pan Cook and drain wet vegetables first
Garlic or sun-dried tomatoes burned Dry ingredients were exposed to high heat Remove badly scorched pieces Coat with oil, tuck beneath cheese, or add later
Firm bottom turned soft Steam became trapped under the pizza Recrisp slices in a skillet, air fryer, or oven Move the pizza to a rack soon after baking

Once you can read those three controls, the recipe stops feeling fragile and becomes much easier to steer.

Storage and Reheating

Let excess steam escape briefly, then cover and refrigerate promptly. Don’t leave pizza at room temperature for more than 2 hours.

  • Refrigerator: 3–4 days.
  • Freezer: best quality within 1–2 months. Freeze slices in a single layer first, then transfer them to a container or freezer bag.

USDA guidance lists pizza at 3–4 days refrigerated and 1–2 months frozen, and recommends reheating leftovers to 165°F / 74°C. See its food-safety guidance for more detail.

Best Ways to Reheat It

For the closest thing to a fresh slice, use the skillet or oven. Both restore the bottom instead of simply warming the cheese, which is what keeps focaccia pizza from turning soft and heavy the next day.

  • Skillet: heat over medium-low until the bottom firms and browns; cover briefly if the top still needs warming.
  • Oven: 375°F / 190°C for 8–12 minutes.
  • Air fryer: 350–375°F / 175–190°C for a few minutes.
  • Microwave: quickest, but the crust will be softer.
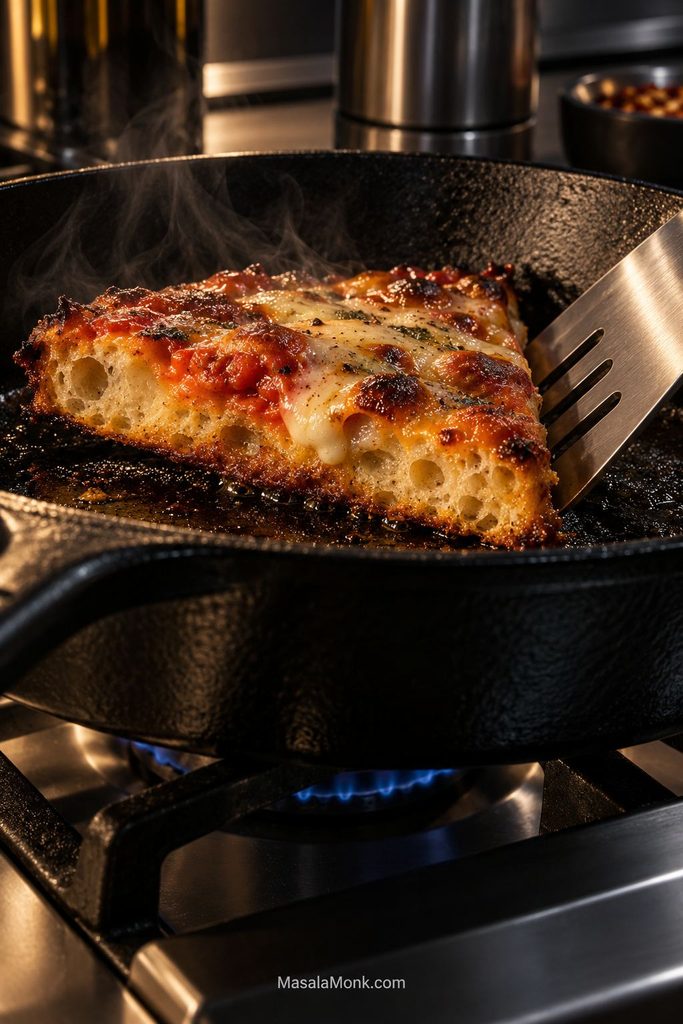
Cooked focaccia pizza slice reheating in a black cast-iron skillet with a metal spatula, browned crust against the pan and melted cheese on top.
A skillet changes the reheating method from passive warming to direct browning, so the bottom can regain crispness while the cheese warms more gradually above it.

Focaccia Pizza FAQs

1. What is focaccia pizza?

It is pizza made on a soft, olive-oil-rich focaccia-style dough. Compared with conventional pizza, the base is thicker and airier, with a browned underside and a tender crumb that still carries the toppings like pizza.

2. Is focaccia pizza the same as Sicilian pizza?

They overlap, but the names aren’t interchangeable. Traditional Sicily has several bread-based pizza and focaccia styles, including Palermo’s soft, spongy sfincione, while “Sicilian pizza” in the United States often means a thick rectangular Italian-American pan pizza. This recipe is specifically built around a high-hydration, olive-oil-rich focaccia dough with an airy crumb and dimpled structure.

3. Can I use Tipo 00 flour?

Yes, although you don’t need it. Tipo 00 describes how finely the flour is milled, not one fixed protein strength. Bread flour is the more predictable choice here because this wet dough also has to support pizza toppings.

4. Can I bake focaccia pizza in a pizza oven?

Yes, if the oven can safely accommodate the pan. Use the oven maker’s focaccia or bread guidance rather than Neapolitan-level heat. Keep the flame modest, rotate the pan as needed, watch the underside closely, and check the pan manufacturer’s maximum safe temperature. Many compact pizza ovens won’t fit a 13 × 18-inch half-sheet, so scale the dough to the pan you can use.


When the middle is airy and fully set, the underside is browned, and the knife meets a little resistance from that firm base, you’re there. Give the pizza a few minutes on the rack, cut it into squares, and listen to those olive-oil edges crackle. Here, the crust was never supposed to be an afterthought.
Posted on — Leave a comment

Roast Turkey Recipe: How to Cook a Juicy Turkey in the Oven

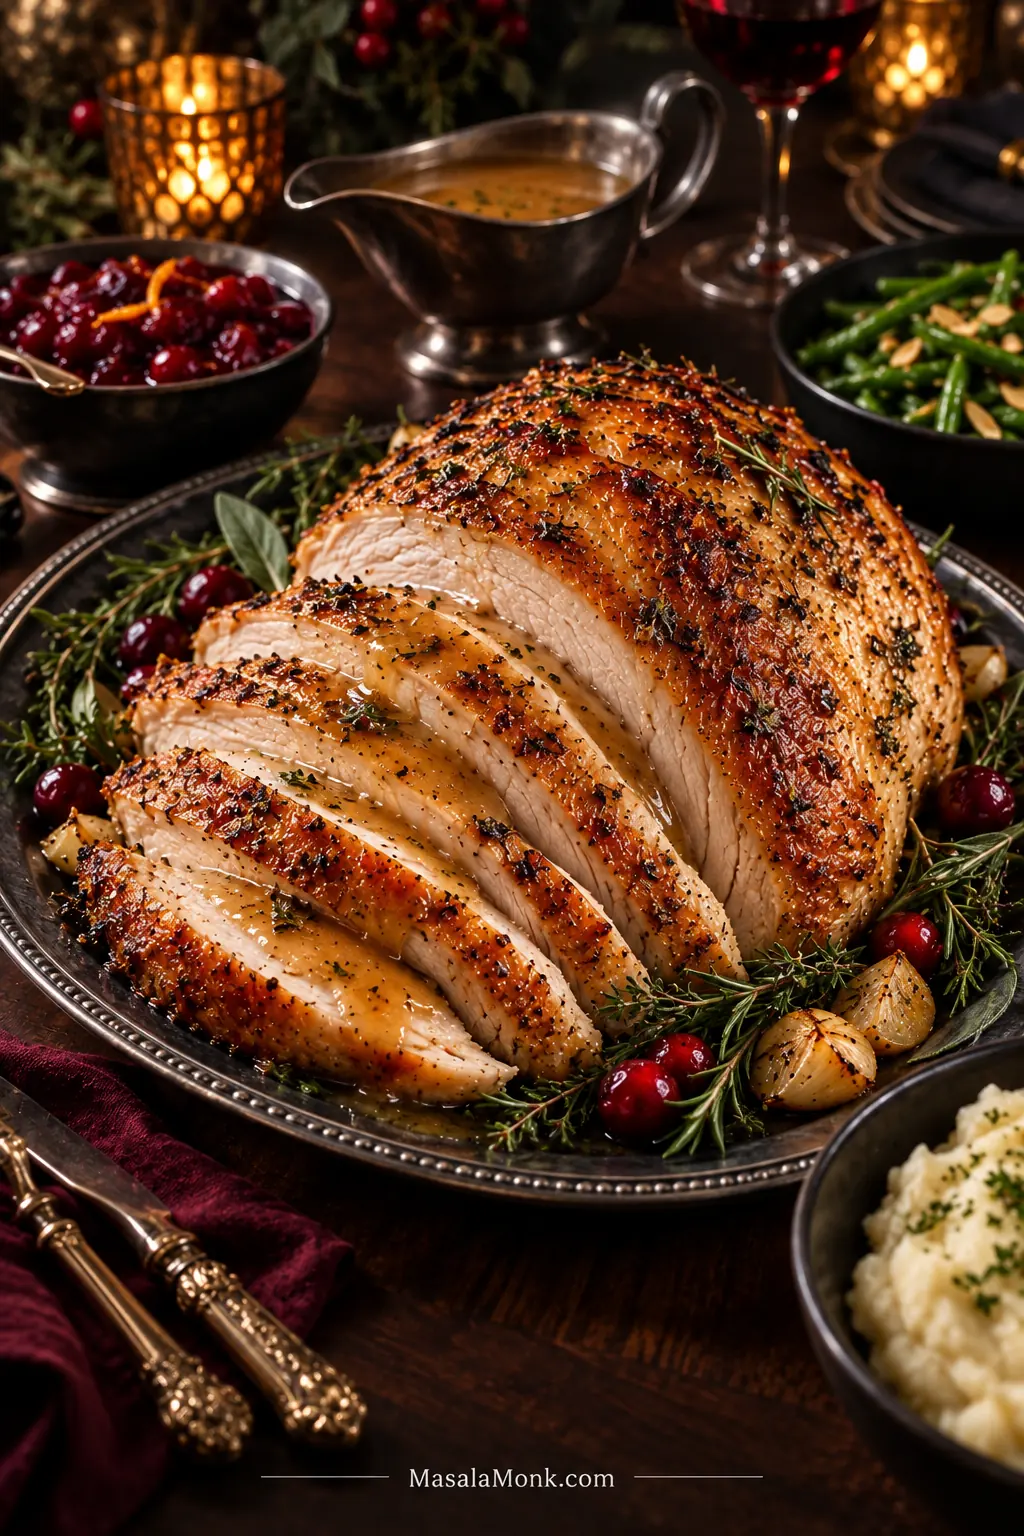
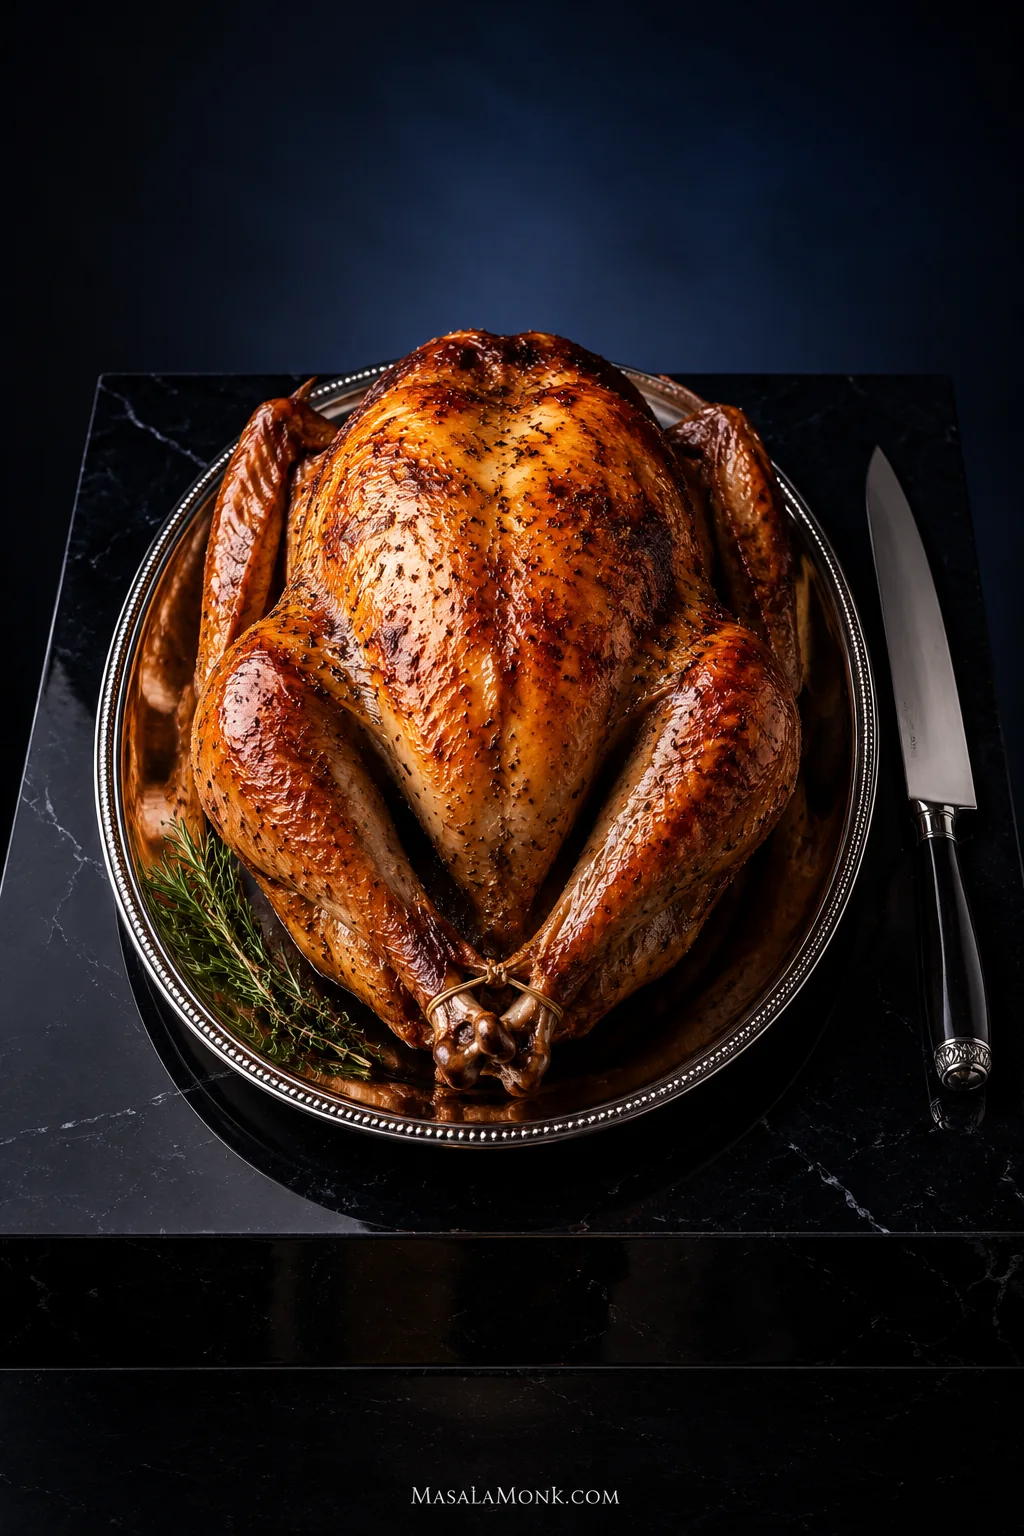
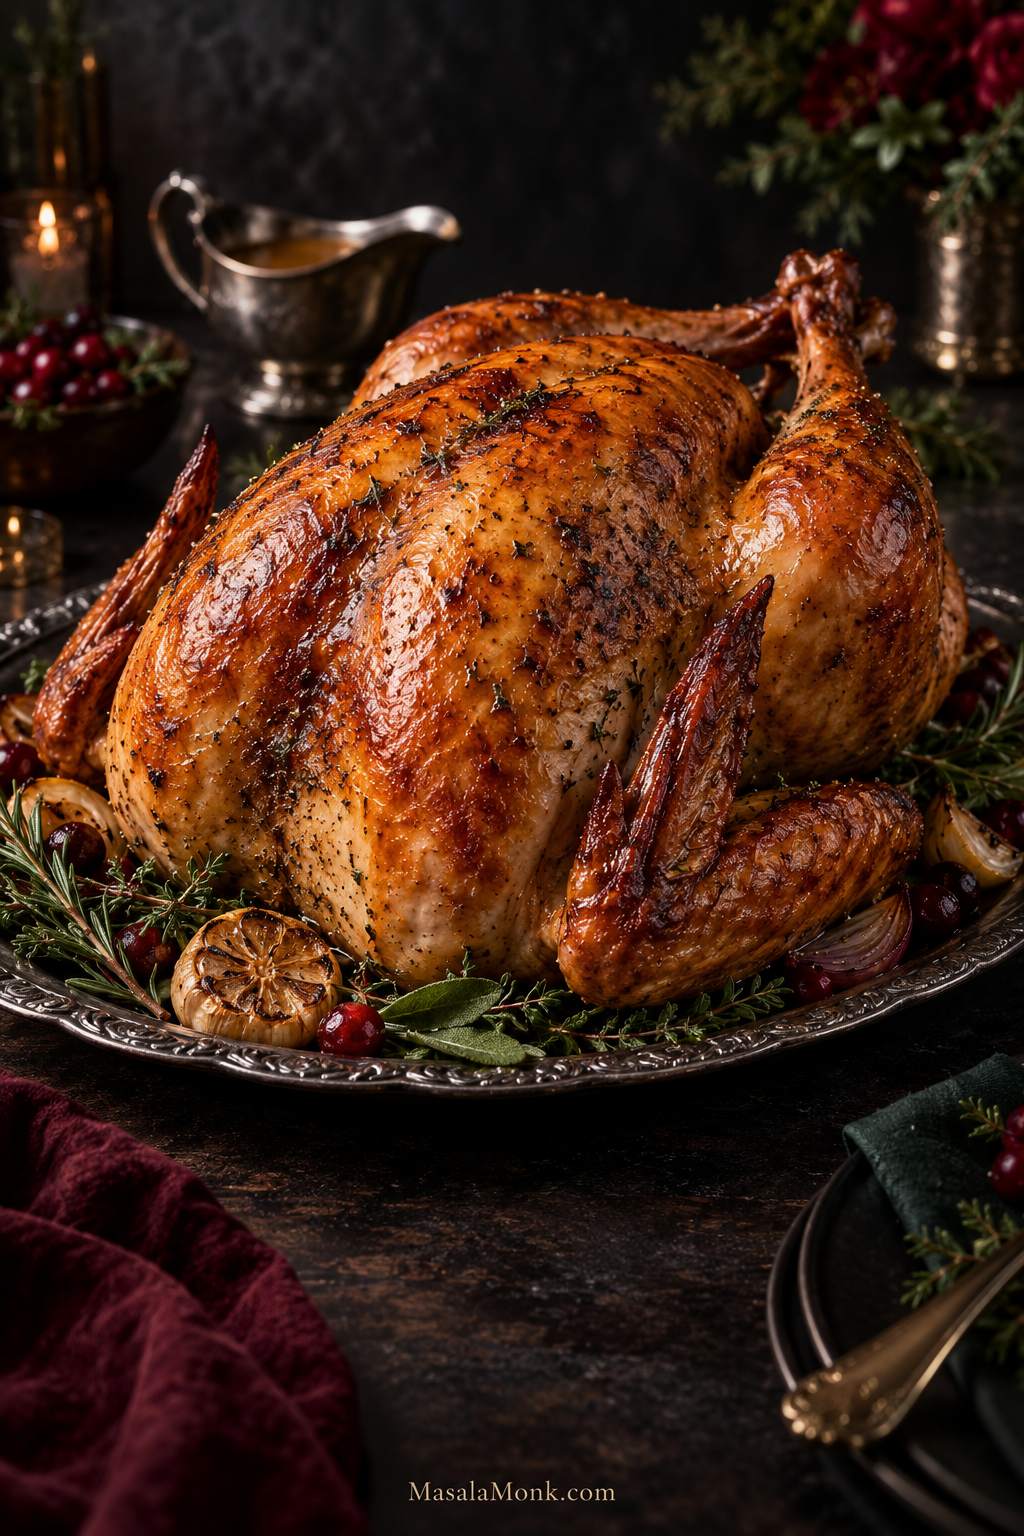
Whole roasted turkey on a dark serving platter with deeply browned, crisp-looking skin, roasted herbs, gravy in the background, and dramatic warm lighting.

A turkey can look finished before it is actually ready. The breast is deeply browned, dinner is getting close, and then the thermometer says one thigh still has a way to go. That mismatch—lean breast attached to slower-cooking dark meat—is most of what makes a whole turkey tricky.

Most of us do not get many practice runs with a whole turkey. It is big, expensive enough that you care about getting it right, and usually the one dish everyone else is waiting for.

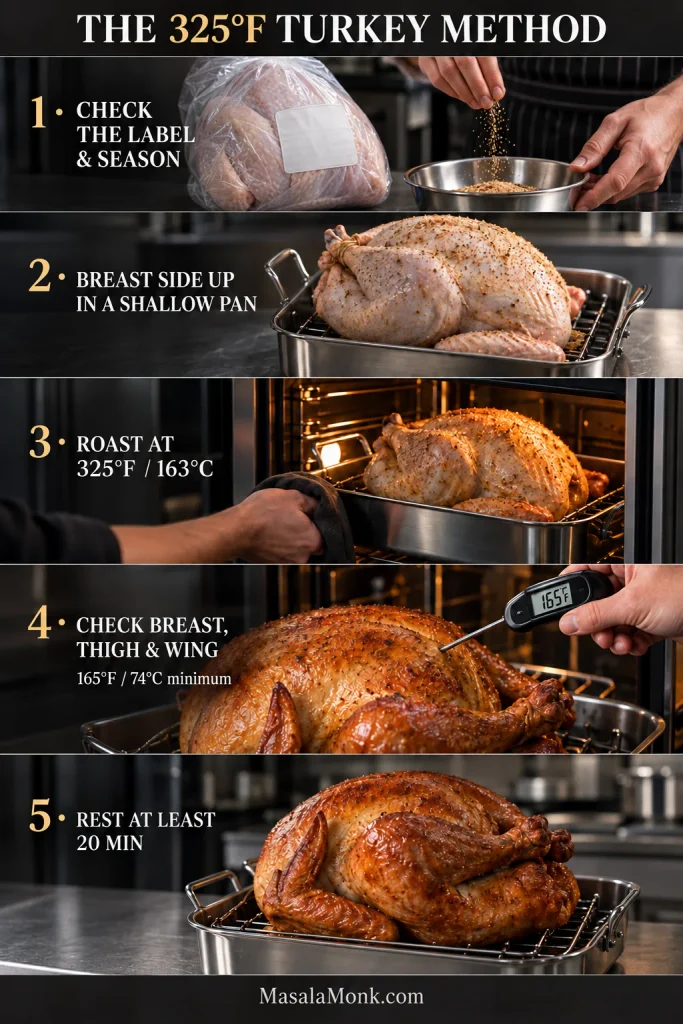
This roast turkey recipe keeps the cooking straightforward: roast breast-side up at 325°F / 163°C, keep the skin dry, skip routine basting, and start checking before you expect the bird to be finished. The target is breast meat that still glistens when sliced, tender thighs, bronzed skin with crisp edges, and savory drippings ready for gravy. The turkey here is 12–14 lb / 5.4–6.4 kg; the timing table also covers other common sizes.

Quick Answer: How to Cook a Juicy Turkey in the Oven

For this roast turkey recipe, cook a 12–14 lb / 5.4–6.4 kg unstuffed turkey at 325°F / 163°C for about 3–3¾ hours. Begin checking around 2½ hours, and remove the turkey only after the thickest breast, inner thigh and inner wing area have each reached at least 165°F / 74°C. Rest for 30–45 minutes before carving.

Start with a fully thawed bird and read the package before adding salt. Pat the turkey dry, season according to how much time you have, spread herb butter beneath the breast skin, and keep the cavity aromatics loose.

Before roasting: thaw completely and check whether the turkey is already salted or enhanced.
Position: breast-side up, with room around the legs.
Covering: mostly uncovered; foil once the skin has enough color.
Basting: optional.
Doneness: use the thermometer for the final decision.
Rest: 30–45 minutes.

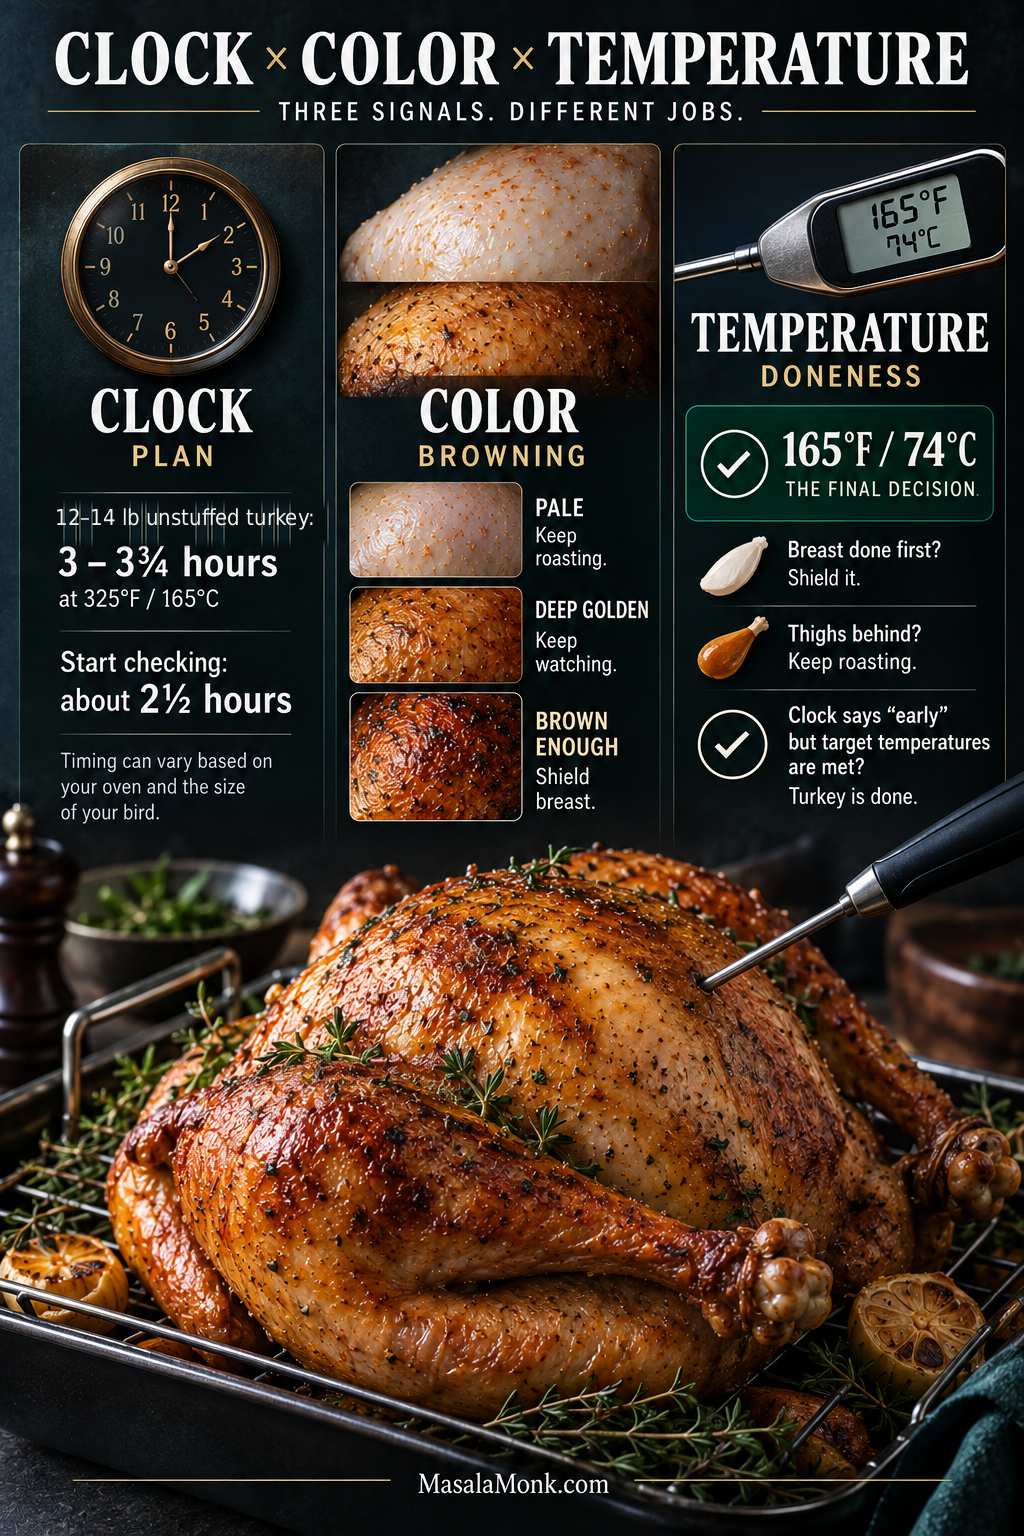
The clock plans dinner. The thermometer decides when the turkey is done.

Even when the timing is not predictable, the basic roast is simple: get the salt right, dry the skin, roast steadily, protect the breast once it is brown enough, and check the temperature in the right places.

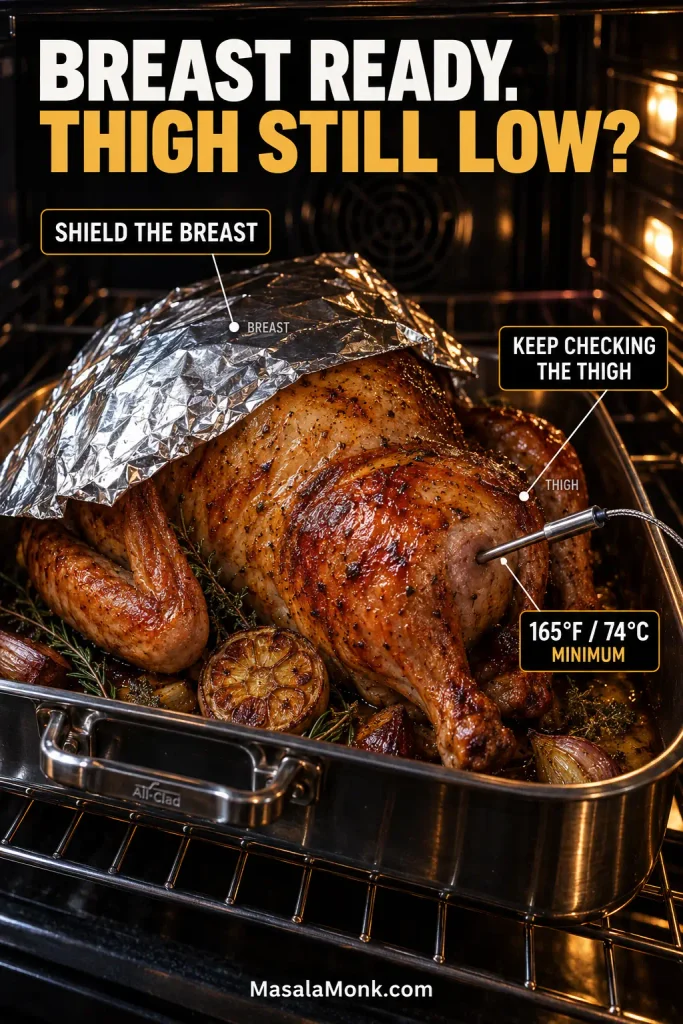
If the breast finishes first, loosely shield it and let the thighs keep cooking.

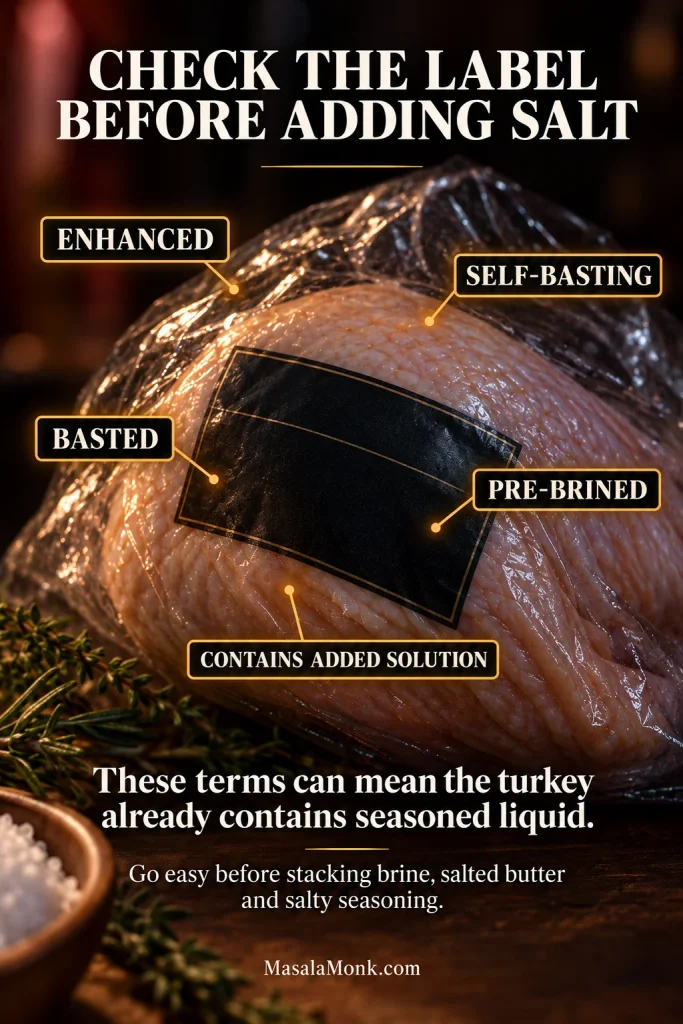
Before You Salt It: Check the Label

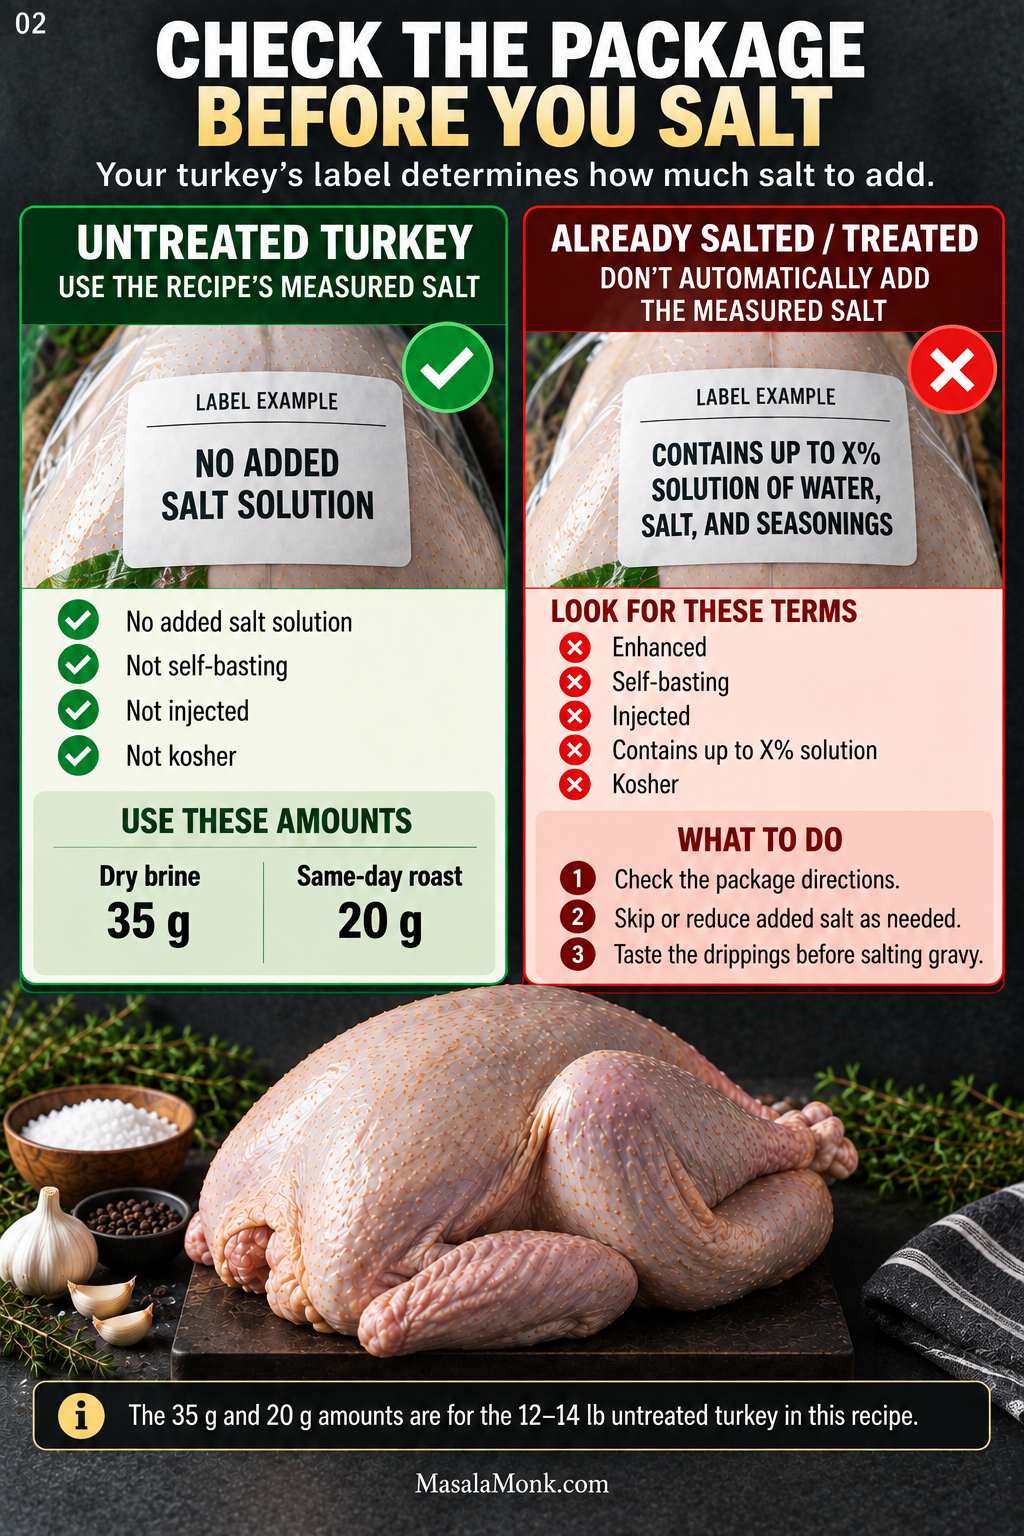
Untreated turkey: no added salt solution and not kosher. Use the measured salt amounts in this recipe.

Self-basting, enhanced, injected, or “contains up to X% solution”: salt has already been added during processing.

Kosher turkey: salting is already part of the processing.

Do not use the measured 35 g or 20 g salt amounts on an enhanced, injected, self-basting or kosher turkey unless its package specifically directs you to add more salt. Use the unsalted herb butter, herbs and pepper, then taste the drippings before seasoning the gravy.

Instructional graphic comparing an untreated turkey with an already salted or treated turkey, including measured salt amounts for dry-brine and same-day seasoning.
A quick label check can prevent the easiest turkey mistake to make: giving the full recipe salt to a bird that was already salted during processing.

Roast Turkey Recipe

A whole herb-butter turkey with bronzed skin, juicy breast meat, tender dark meat and plenty of flavorful drippings for gravy.

Prep: about 30 minutes
Preferred dry brine: 24–48 hours
Turkey: 12–14 lb / 5.4–6.4 kg
Oven: 325°F / 163°C
Approximate roast time: 3–3¾ hours
Start checking: about 2½ hours
Rest: 30–45 minutes
Serves: about 8–12

Ingredients

  • 1 whole turkey, 12–14 lb / 5.4–6.4 kg, completely thawed
  • For dry-brining (12–48 hours; 24–48 preferred): about 35 g kosher salt, for an untreated turkey only
  • For same-day seasoning: about 20 g kosher salt, for an untreated turkey only
  • 8 tbsp / 4 oz / 113 g unsalted butter, very soft
  • 1 tbsp / 15 ml olive oil or neutral oil
  • 4 garlic cloves, finely grated or minced
  • 1 tbsp finely chopped fresh rosemary
  • 1 tbsp finely chopped fresh thyme
  • 1 tbsp finely chopped fresh sage
  • 1 tsp freshly ground black pepper
  • 1 medium onion, quartered
  • 1 lemon, quartered
  • ½ head garlic, cut crosswise
  • A few fresh herb sprigs, optional
  • ½ cup / 4 fl oz / 120 ml unsalted turkey or chicken stock, or water, plus more if the pan begins to dry

Using dried herbs? Use about 1 teaspoon dried herb for each 1 tablespoon fresh rosemary, thyme or sage.

The 35 g and 20 g salt amounts are for the 12–14 lb turkey in this recipe. For a substantially larger or smaller bird, do not simply reuse the same amount.

By volume, 35 g is approximately 4 tbsp + ½ tsp Diamond Crystal or 2 tbsp + 1¼ tsp Morton kosher salt. For 20 g, use roughly 2 tbsp + 1 tsp Diamond Crystal or 1 tbsp + 1¼ tsp Morton. A scale is more dependable because kosher salts vary substantially in density.

Instructions

Prepare and Season

  1. Check the label and choose the seasoning. For an untreated turkey, use 35 g kosher salt when you have at least 12 hours to dry-brine; 24–48 hours is preferred. Cooking within the next several hours? Use the lighter 20 g same-day amount. Skip these measured amounts on enhanced, self-basting, injected or kosher birds unless the package says otherwise.
  2. Dry-brine ahead, when time allows. Pat the turkey dry and distribute the 35 g salt over the exterior, beneath the breast skin and lightly around the cavity. Set the bird on a rack over a rimmed tray or roasting pan, keep the refrigerator at 40°F / 4°C or colder, and place the turkey where raw juices cannot drip onto other food.
  3. Prepare the oven and bird. Position the rack so the turkey will sit near the center of the oven and heat to 325°F / 163°C. Remove the neck, giblets, gravy packet and loose packaging from both cavities, then pat the turkey thoroughly dry. There is no need to bring the whole bird to room temperature; keep it refrigerated until you are ready to season and roast it.
  4. Season. Mix the softened butter with garlic, herbs and pepper. For same-day seasoning, distribute the 20 g salt over the exterior, beneath the breast skin and lightly around the cavity first. Loosen the breast skin, spread most of the herb butter underneath, rub the remainder over the legs and lightly oil the exterior.

Roast and Finish

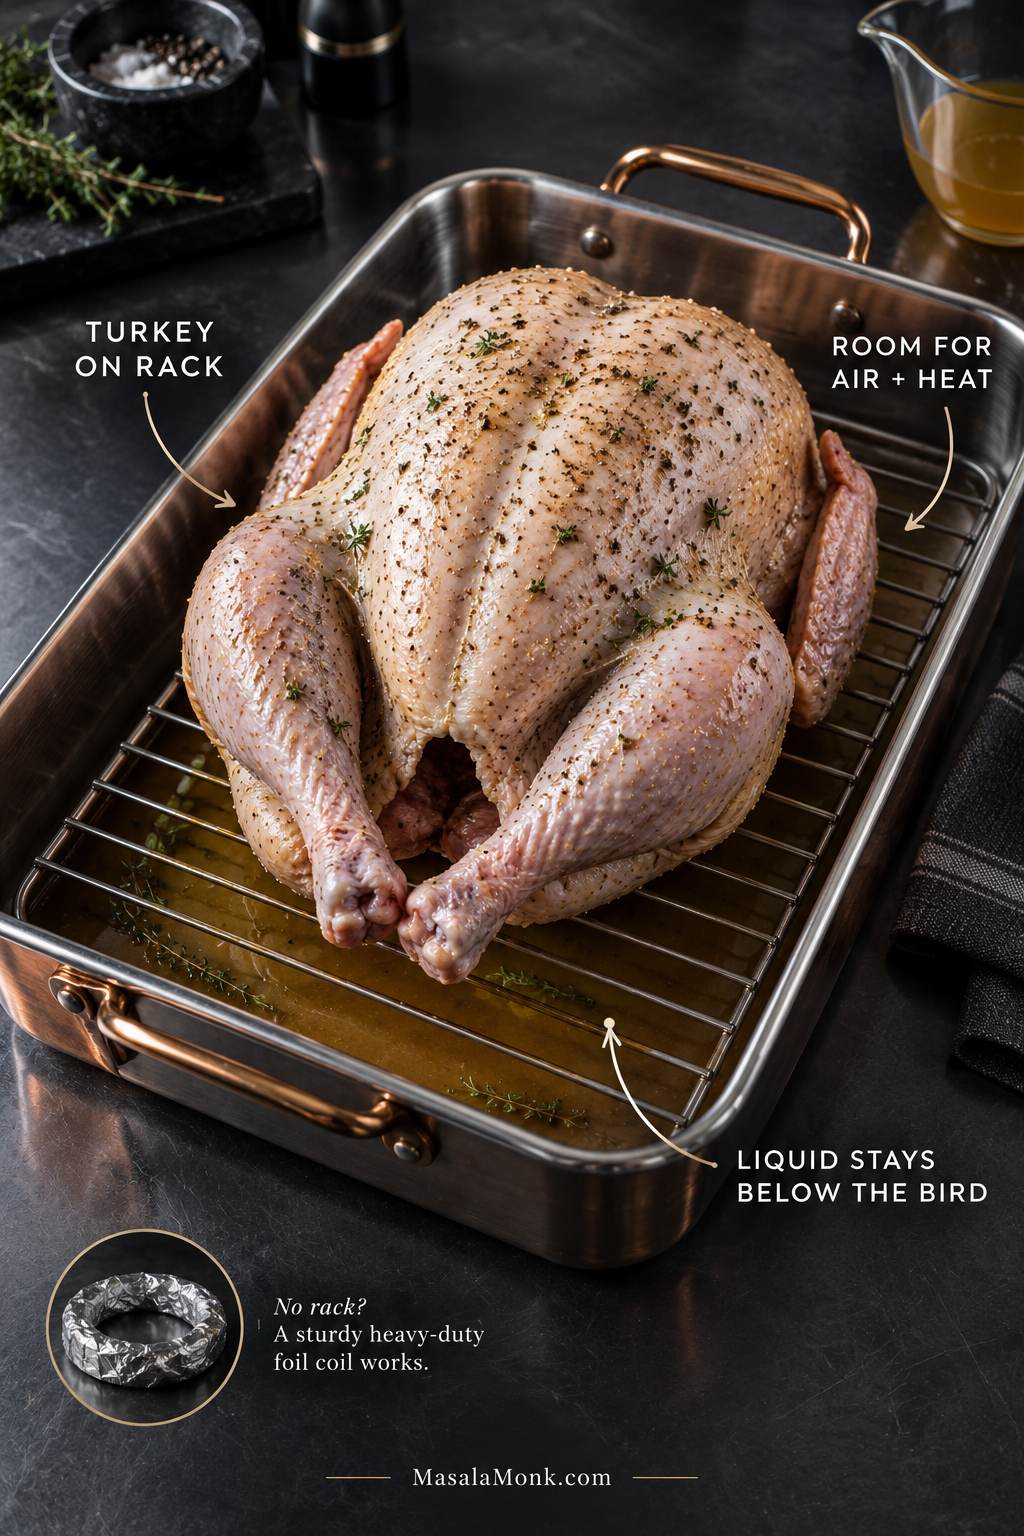
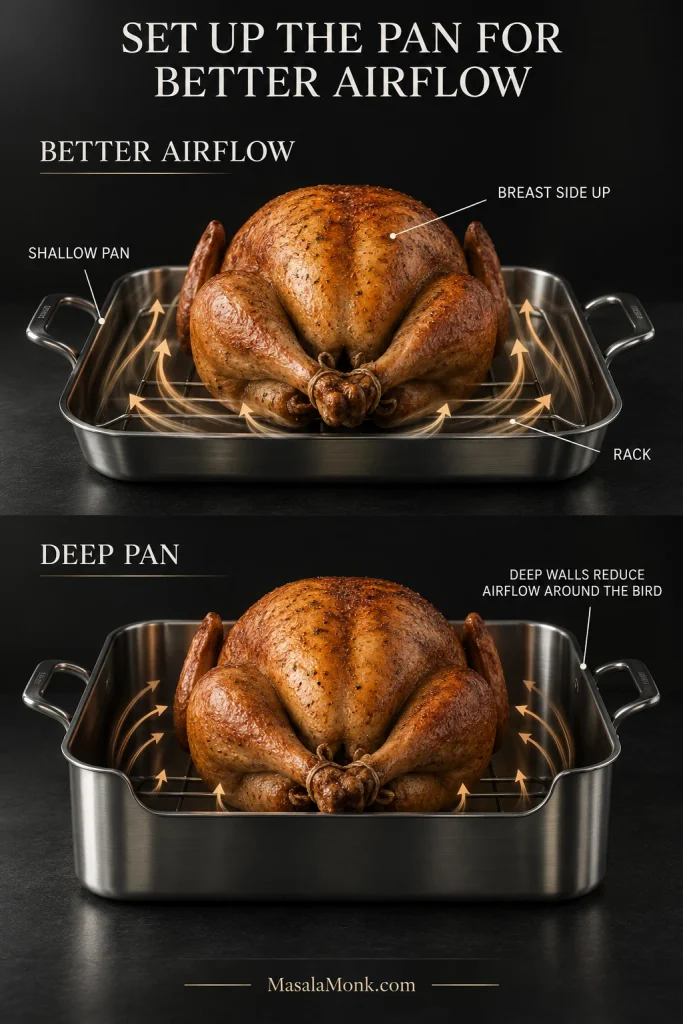
  1. Set it in the pan. Add the onion, lemon, garlic and herbs loosely to the cavity. Tuck the wing tips back, leave the legs fairly loose, place the turkey breast-side up on the rack and pour ½ cup / 120 ml unsalted stock or water into the bottom of the pan. The liquid stays below the rack to keep the drippings from scorching; it is not there to baste or steam the bird.
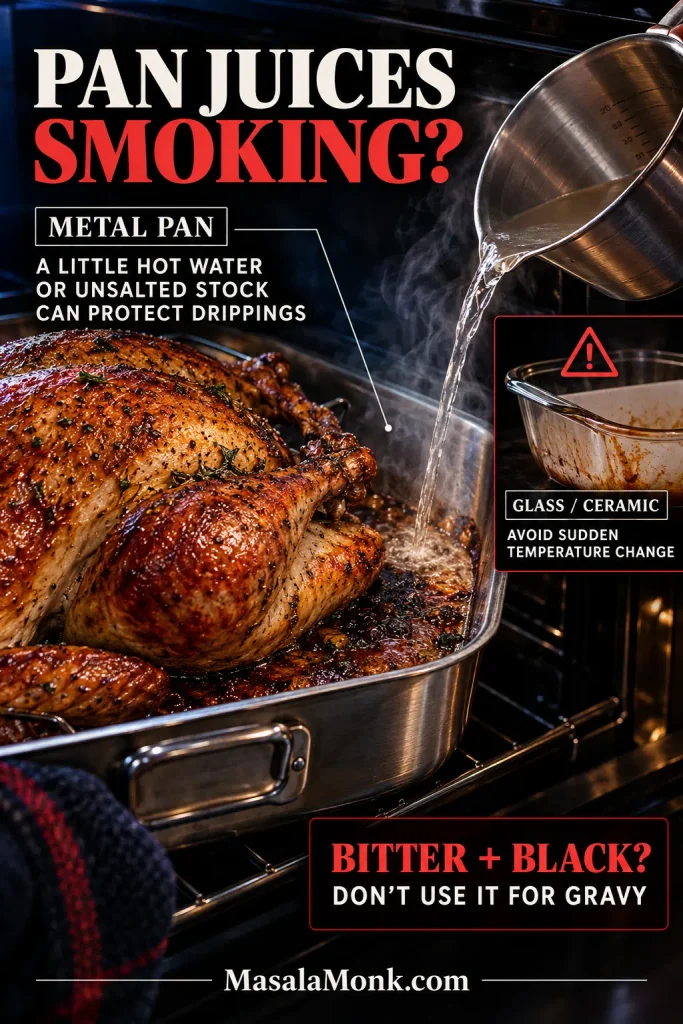
  2. Roast. Cook mostly uncovered. Once the breast is deeply and evenly bronzed, loosely shield it with foil. Add another ½ cup / 120 ml hot water or unsalted stock if the pan begins to dry or smoke.
  3. Check early. At about 2½ hours, begin checking the thickest breast, thick inner thigh where the leg meets the body, and inner wing area.
  4. Finish and rest. The breast, inner thighs and inner wing areas should all reach at least 165°F / 74°C. When the breast finishes first, shield it while the thighs continue. Rest for 30–45 minutes before carving.

Equipment and Pan Setup

You need a shallow roasting pan, a rack or substitute, a reliable instant-read thermometer, foil, paper towels, sturdy oven mitts and a sharp carving knife. A leave-in probe thermometer, oven thermometer, fat separator, kitchen twine and grooved carving board are useful extras.

Raw whole turkey breast-side up on a rack inside a shallow roasting pan, with a small amount of liquid below the rack and space around the bird.
What matters here is separation: the turkey stays above the liquid, while the small pool underneath protects the flavorful drippings before they scorch.

No rack? Use a sturdy coil of heavy-duty foil, or make a bed from extra onion, carrot and celery pieces. For a smaller turkey, a strong rimmed sheet pan with an oven-safe rack can work if it can safely contain the drippings.

Check the fit before roast day. The turkey should sit roughly in the vertical center of the oven—usually around the lower third—with clear space above and around it. A 20-pound turkey is a bad time to discover that the pan barely clears the oven door.

Need help with a specific part? Thawing · Salt · Prep · Time & Temperature · Thermometer · Browning & Foil · Troubleshooting · Rest & Carve

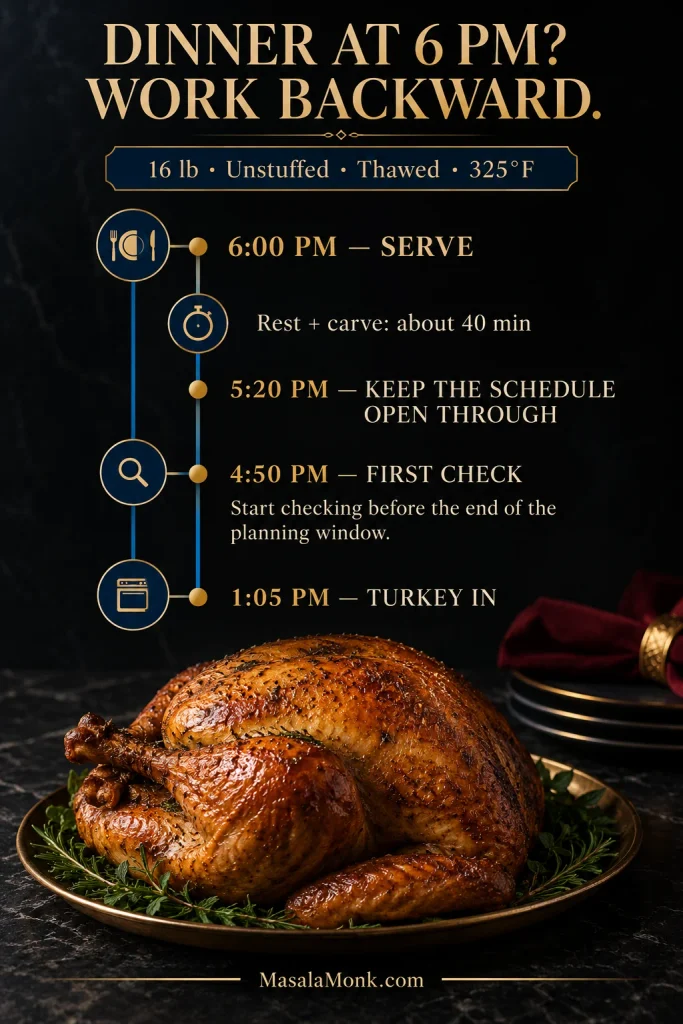
Plan the Turkey Backward From Dinner

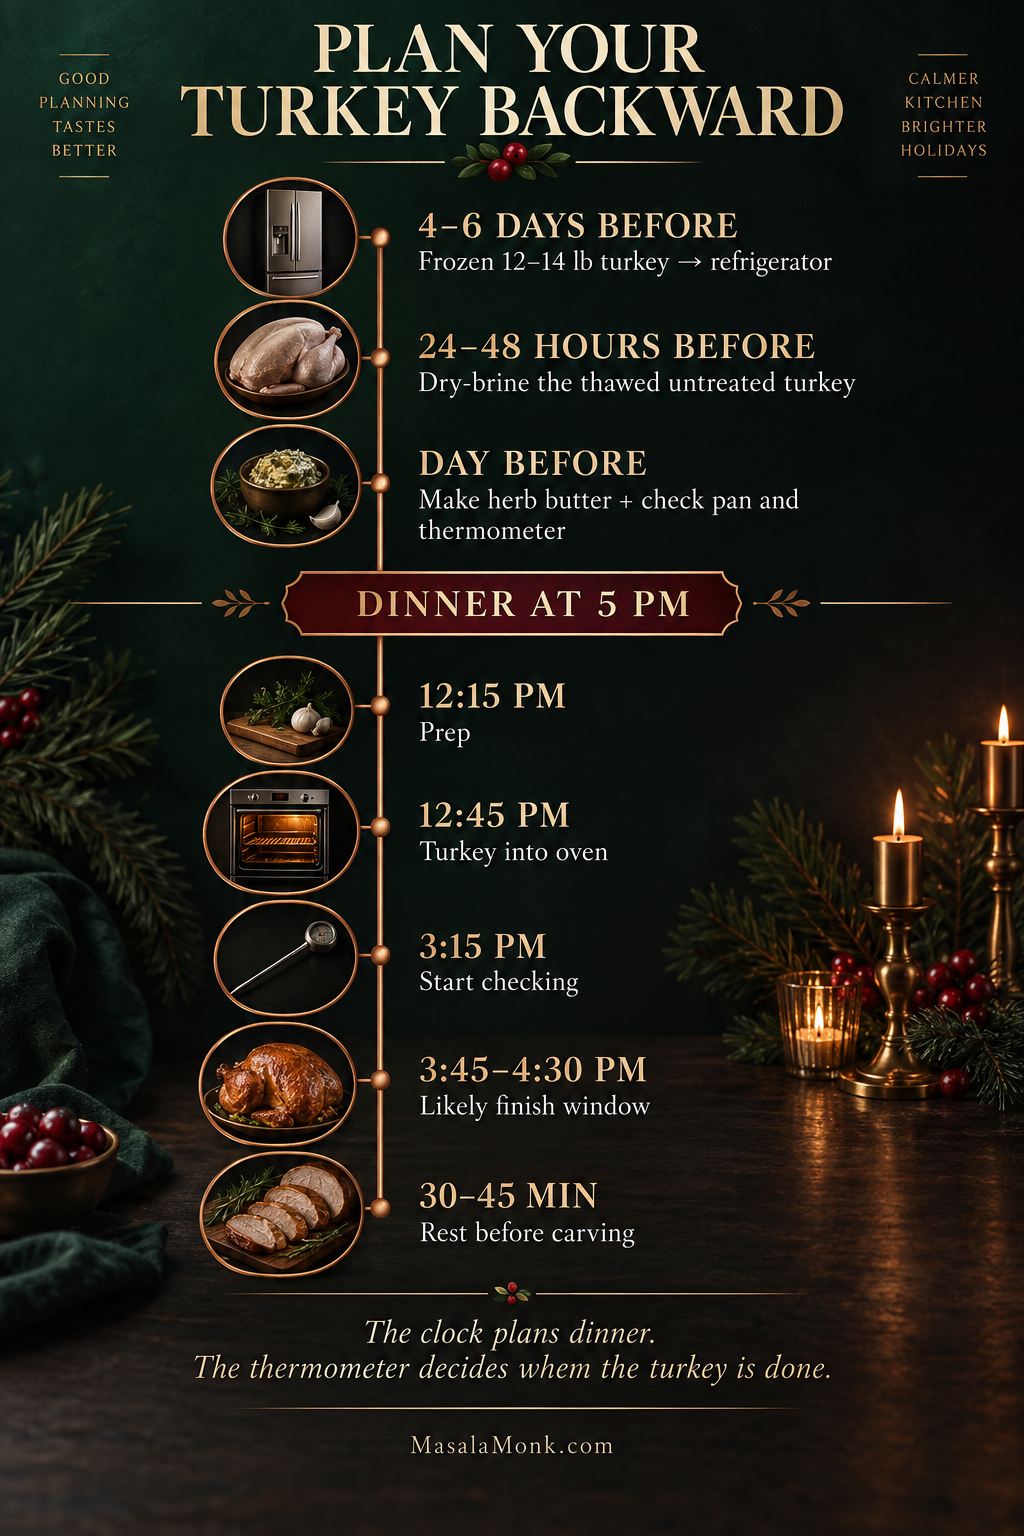
A whole turkey needs more than oven time. It has to thaw, perhaps dry-brine, roast and then rest before carving. Work backward from dinner and leave some room for the bird to surprise you.

If your 12–14 lb turkey starts frozen and you also want the preferred 24–48 hour dry brine, move it to the refrigerator roughly 4–6 days before dinner. Larger birds need longer to thaw, so build that extra day or two into the schedule.

A Simple Turkey-Day Timeline

When What to Do
4–6 days before For a frozen 12–14 lb turkey that you want to dry-brine, move it to the refrigerator.
24–48 hours before Once thawed, dry-brine an untreated turkey. Even 12–24 hours is worthwhile if that is the time you have.
Day before Make and refrigerate the herb butter, check the roasting pan and thermometer, and finish dishes that can be made ahead.
Roast day Take the herb butter out early enough to become very soft. Dry and season the bird, set up the pan and roast.
Before the expected finish Begin checking internal temperature.
30–45 minutes before carving Rest the turkey while you make gravy and finish the last hot dishes.
Vertical turkey planning timeline showing refrigerator thawing several days ahead, a 24–48 hour dry brine, roast-day timing, an early temperature check, and resting before dinner.
Build slack into turkey day before you need it; starting the temperature checks early gives you time to react if the turkey is running behind.

The turkey does not have to carry the entire meal. Move cold sauces and make-ahead dishes off roast day when you can. Cranberry sauce with orange juice is perfectly happy waiting in the refrigerator.

Dinner at 5:00 PM?

For the turkey used here, aim to have it in the oven by about 12:45 PM. Begin prep around 12:15 PM, then start checking the bird around 3:15 PM.

No start time guarantees an exact 30–45 minute rest because the normal roasting range itself spans about 45 minutes. A fast three-hour bird could be ready around 3:45 PM and need the early-finish plan below; a slower one may come out near 4:30 PM and still rest for half an hour.

Starting earlier protects dinner from running late. Starting later reduces the chance of a long hold. Choose which risk matters more for your meal.

For detailed weight-by-weight planning, including larger and stuffed birds, use the full turkey cooking-time guide.

How Much Turkey Do You Need?

About 1–1¼ lb / 454–567 g of whole turkey per person works well for comfortable portions. Move closer to 1½ lb / 680 g per person when leftovers are part of the plan.

Guests Comfortable Portions More Leftovers
6–810–12 lb / 4.5–5.4 kg12–14 lb / 5.4–6.4 kg
8–1012–14 lb / 5.4–6.4 kg14–16 lb / 6.4–7.3 kg
10–1214–16 lb / 6.4–7.3 kg16–18 lb / 7.3–8.2 kg
12–1416–18 lb / 7.3–8.2 kg18–20 lb / 8.2–9.1 kg
14–1618–20 lb / 8.2–9.1 kg20–24 lb / 9.1–10.9 kg

These are rounded buying ranges for common whole-turkey sizes, not exact portion math. A side-heavy table, several children or a room full of enthusiastic turkey eaters can move the numbers.

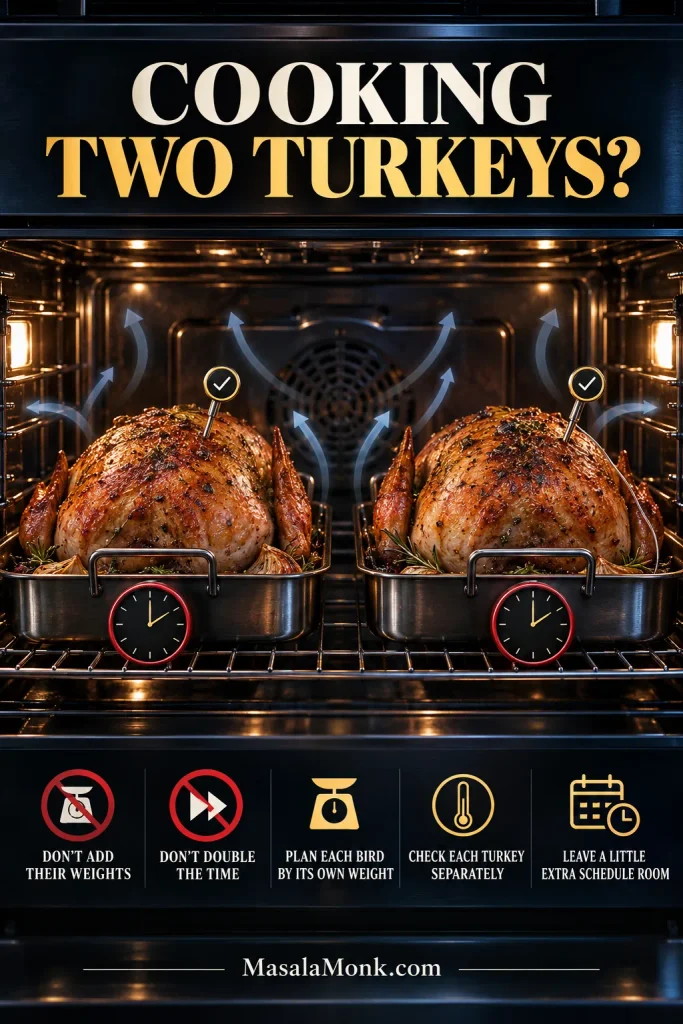
Hosting a very large gathering? Two medium turkeys are often easier to thaw, lift and cook evenly than one enormous bird. For a smaller holiday dinner, a turkey tenderloin gives you a much smaller roast without committing to a whole turkey.

Make Sure the Turkey Is Fully Thawed

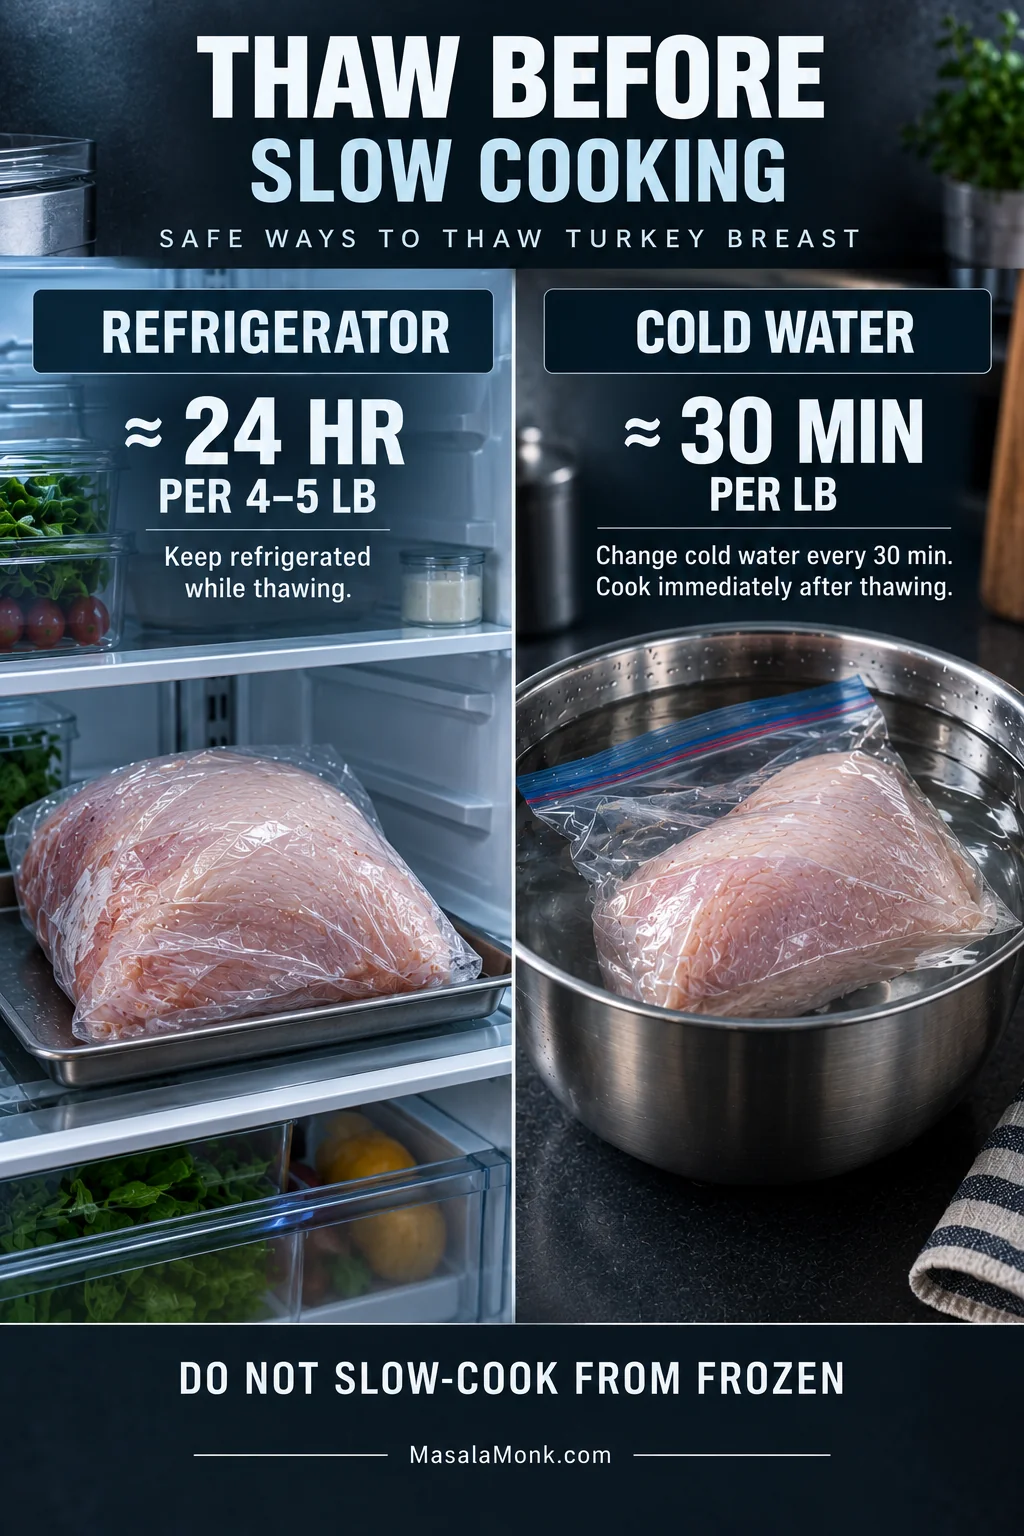
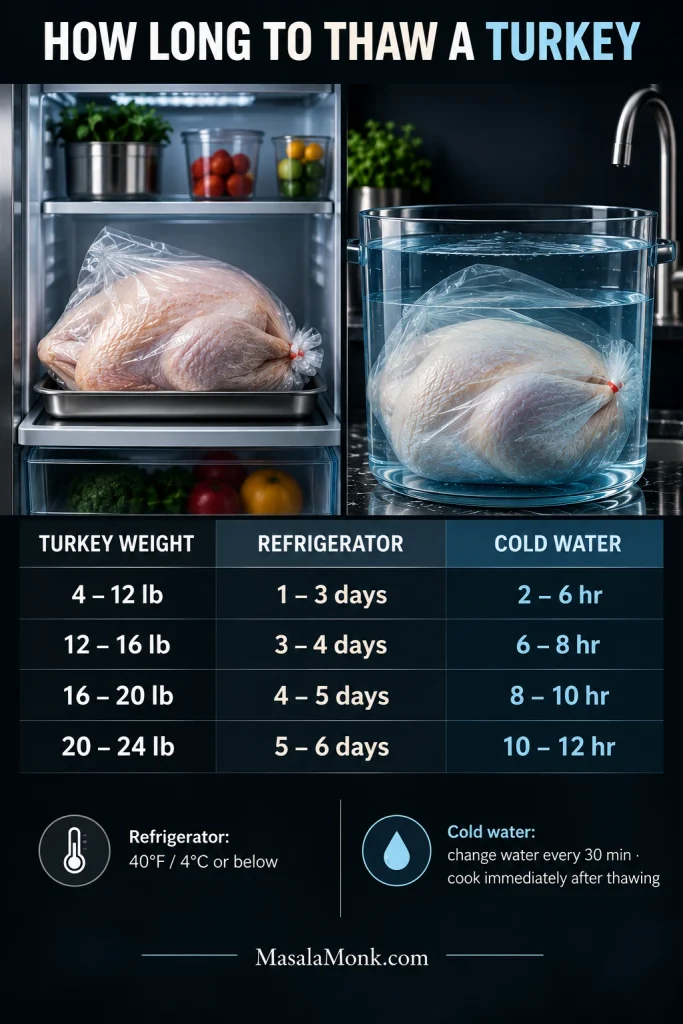
For refrigerator thawing, allow roughly 24 hours for every 4–5 lb / 1.8–2.3 kg of turkey.

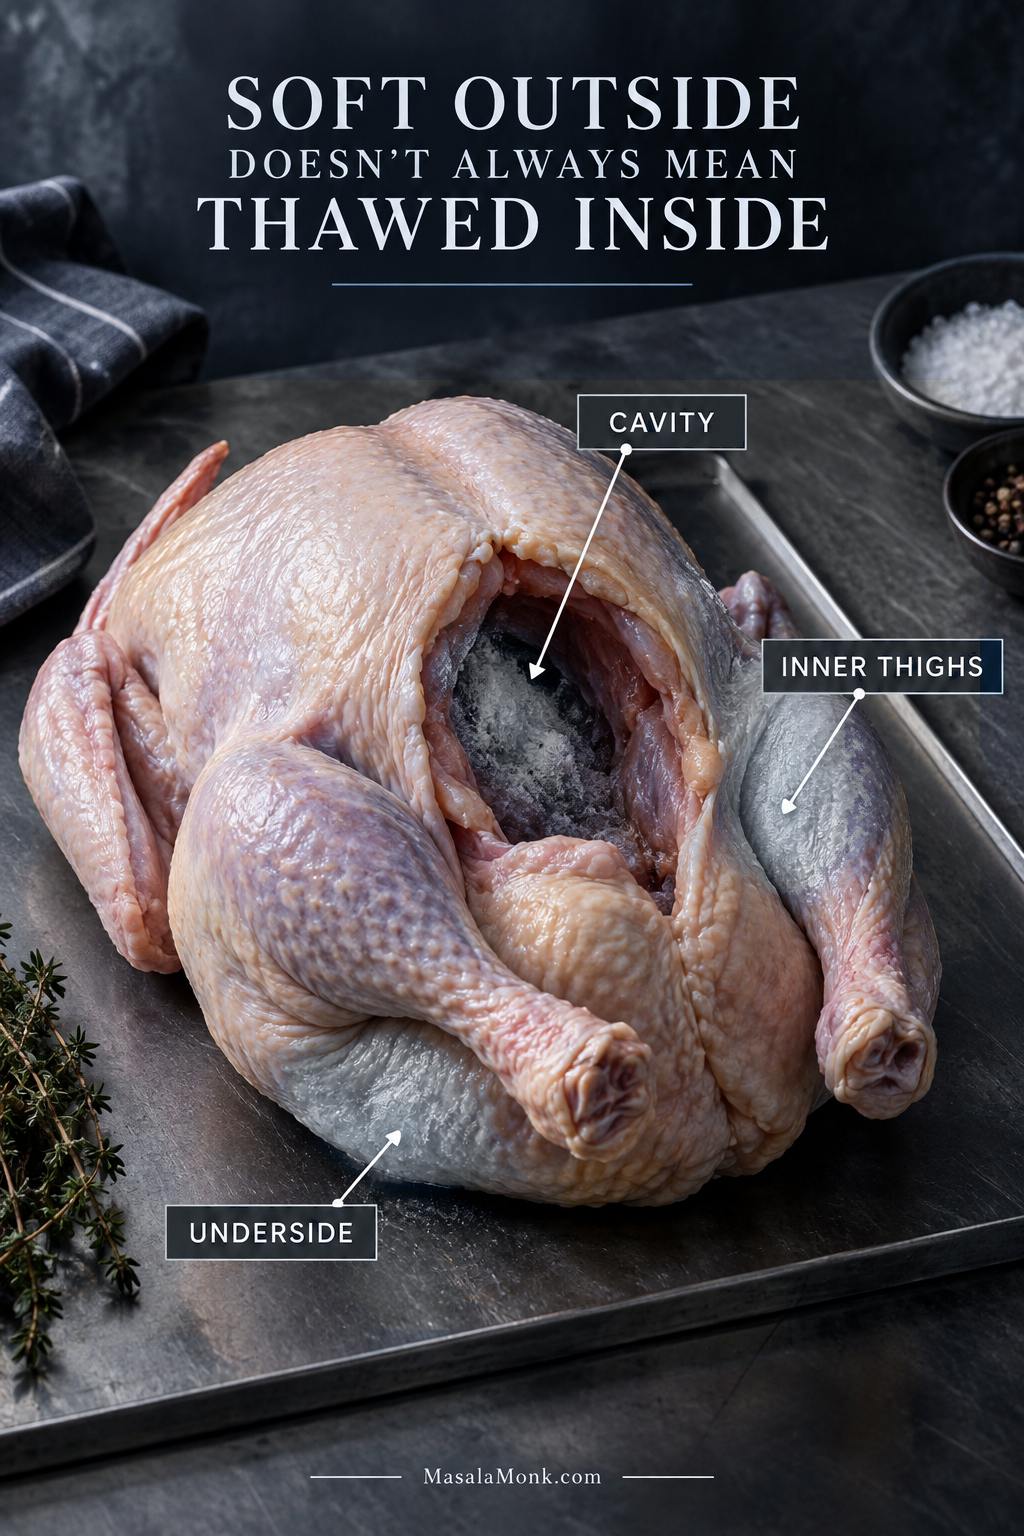
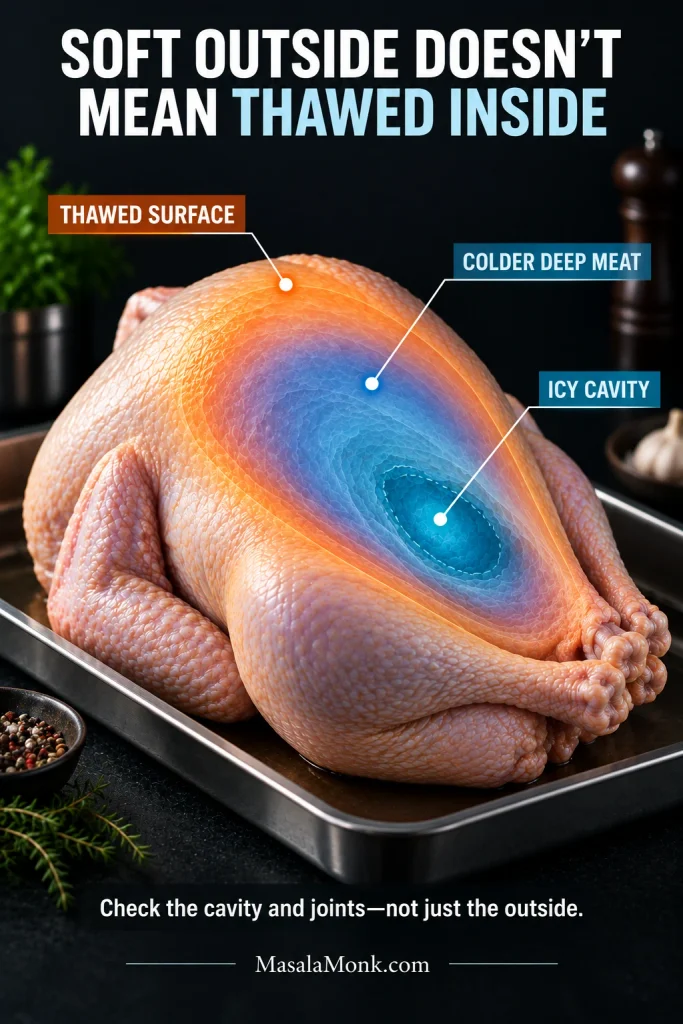
The outside can feel soft while ice still hides around the cavity, underside and inner thighs. That hidden ice can slow the colder parts enough for the breast to seem to race ahead.

Partially thawed raw turkey with callouts marking the body cavity, inner thighs, and underside as areas where ice may remain.
Residual ice acts like a cold brake inside the turkey, so the breast can seem to race ahead even when the bird felt thawed from the outside.
Turkey Weight Approx. Refrigerator Thawing Time
4–12 lb / 1.8–5.4 kg1–3 days
12–16 lb / 5.4–7.3 kg3–4 days
16–20 lb / 7.3–9.1 kg4–5 days
20–24 lb / 9.1–10.9 kg5–6 days

These ranges follow USDA turkey-thawing guidance. Once thawed in the refrigerator, the turkey can remain there for another 1–2 days before cooking.

Need a Faster Thaw?

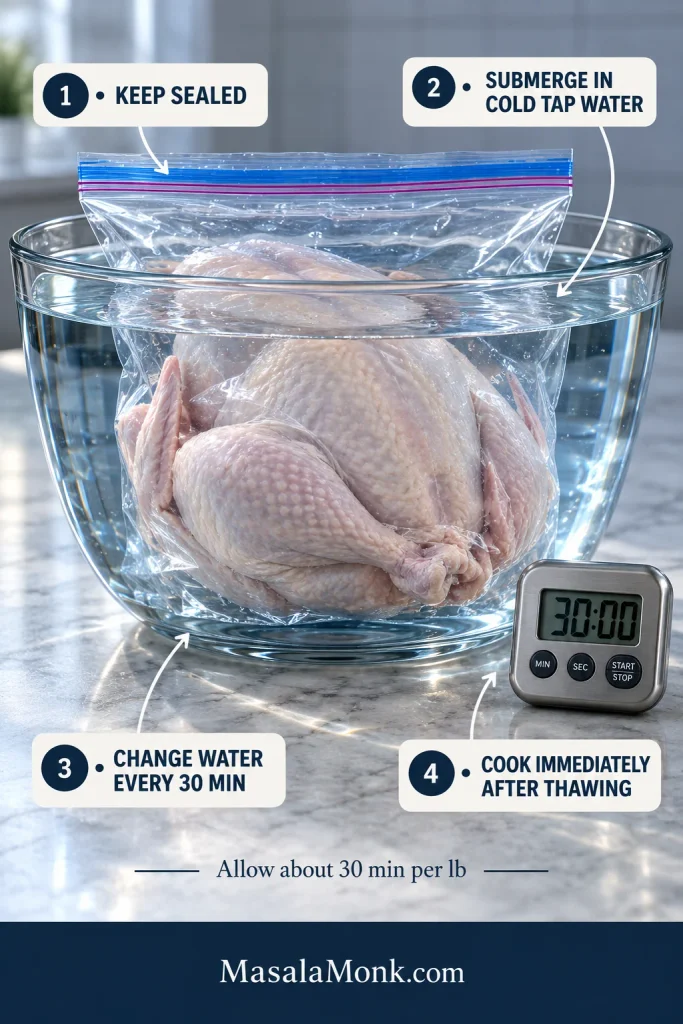
Keep the bird in a leakproof package, submerge it in cold water, and change the water every 30 minutes. Allow about 30 minutes per pound and cook it immediately afterward.

A little ice near the cavity changes the schedule, not the whole dinner. Give the turkey more time and check temperatures carefully. If it is still substantially frozen at roast time, jump to Turkey Still Frozen?

Get the Salt Right

Read the label first. An untreated turkey and a bird injected with salty solution need different seasoning.

Have 24–48 hours? Dry-brine it. That is the preferred method here: the meat seasons while the uncovered skin dries in the refrigerator. Even 12–24 hours is worth doing. Dinner only a few hours away? Use the lighter same-day amount.

Dry-Brining Ahead

For the untreated turkey used here, distribute about 35 g kosher salt over the skin, beneath the breast skin and lightly around the cavity. Set it on a rack over a rimmed tray or roasting pan, keep the refrigerator at 40°F / 4°C or colder, and place it where accidental drips cannot land on other food.

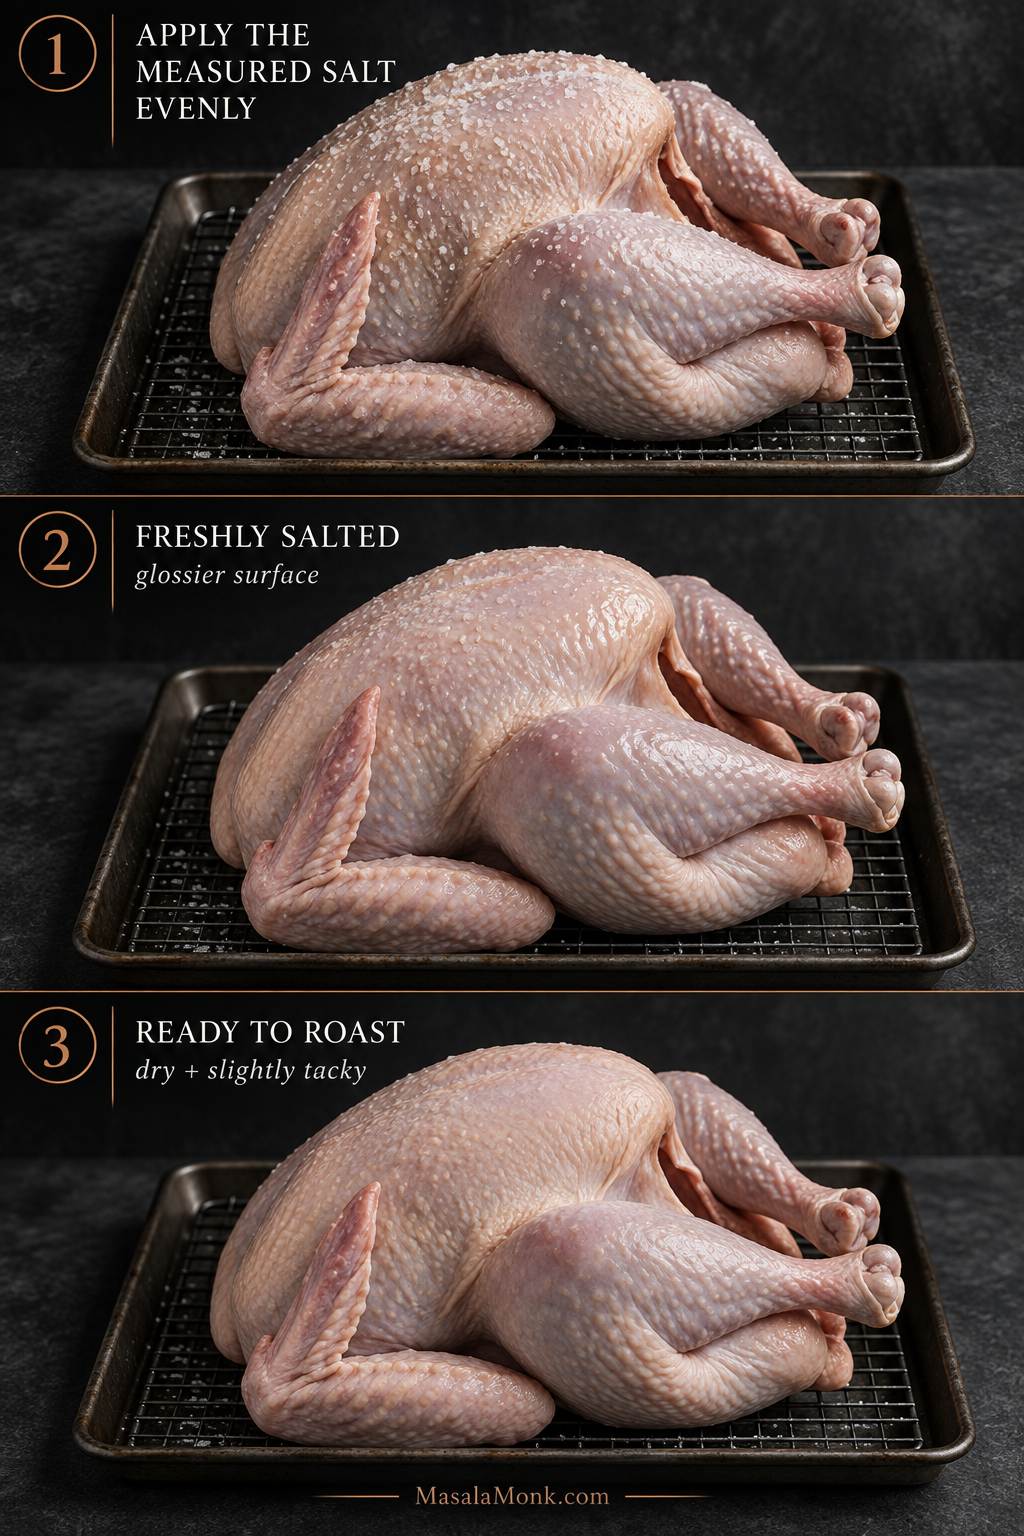
By roast day, the glossy wet look should be gone. The skin will feel drier and slightly tacky—exactly what you want before it meets the oven.

Three-stage dry-brining sequence showing measured salt applied to a raw turkey, a glossier freshly salted surface, and drier slightly tacky skin ready for roasting.
That drier, slightly tacky skin is not a dried-out turkey; instead, it is the surface condition that helps the oven build better browning.

Seasoning the Turkey the Same Day

For the untreated turkey used here, distribute about 20 g kosher salt over the exterior, beneath the breast skin and lightly around the cavity. Then add the herb butter.

You lose some of the deeper seasoning and skin-drying time of an overnight brine. That’s okay. If dinner is only a few hours away, season the turkey and move on.

Why Dry Brine Instead of Wet Brine?

A wet brine works. It also asks you to find room for a large container of salty liquid in an already crowded refrigerator. Dry brining is cleaner, easier to manage and leaves the skin exposed while the turkey seasons.

Prepare the Turkey for Even Cooking

Get the Bird Ready

Check both cavities. The neck may be tucked into one end while the giblets or gravy packet sit in the other. Save anything useful for stock or gravy.

A manufacturer-installed hock lock or leg clamp may be designed to stay during roasting, so follow the package directions.

Skip rinsing. Pat the turkey thoroughly dry with paper towels; rinsing raw poultry can spread poultry juices around the sink.

Dry skin browns. Wet skin steams.

Add the Herb Butter

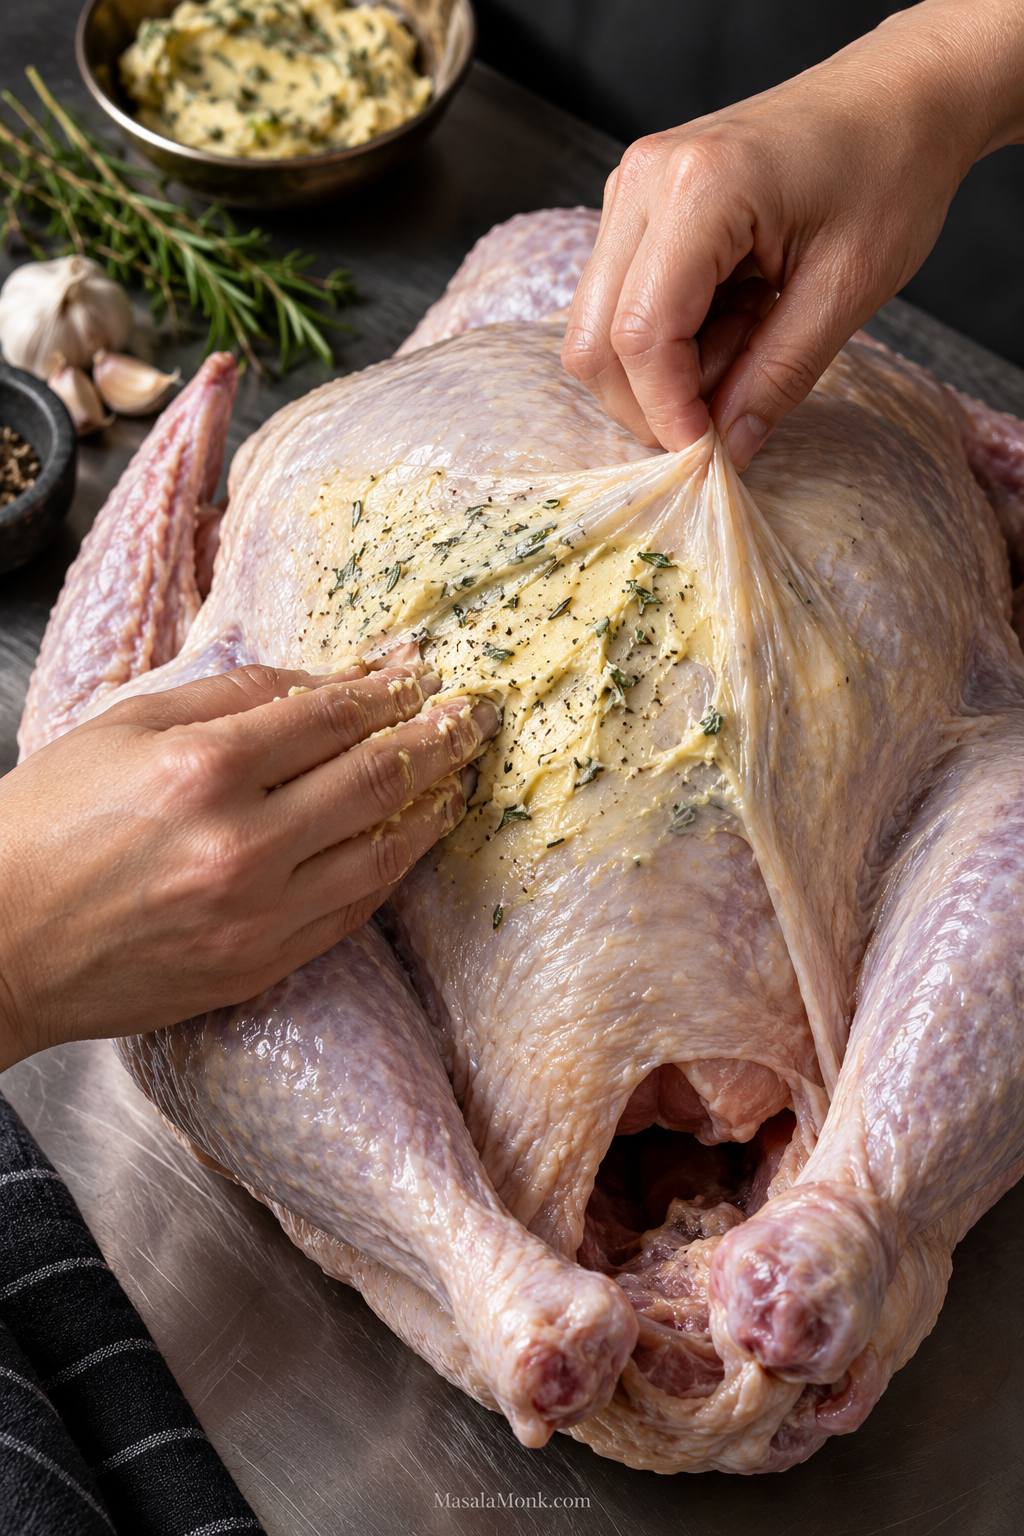
Slide your fingers gently between the breast meat and skin, starting near the cavity opening. Spread most of the garlic-herb butter directly over the breast meat and the remainder over the legs.

The butter should spread easily without dragging or tearing the skin. If it skates over a wet surface, blot again. If it feels stiff, give it a little more time to soften.

Close-up of hands gently spreading garlic-and-herb butter underneath the breast skin of a raw turkey.
Butter beneath the skin puts the herbs and fat directly against the lean breast meat, while the exposed skin can still lose moisture and brown.

Once the herbs and turkey fat start roasting together, the kitchen finally smells like dinner.

Finish the Setup

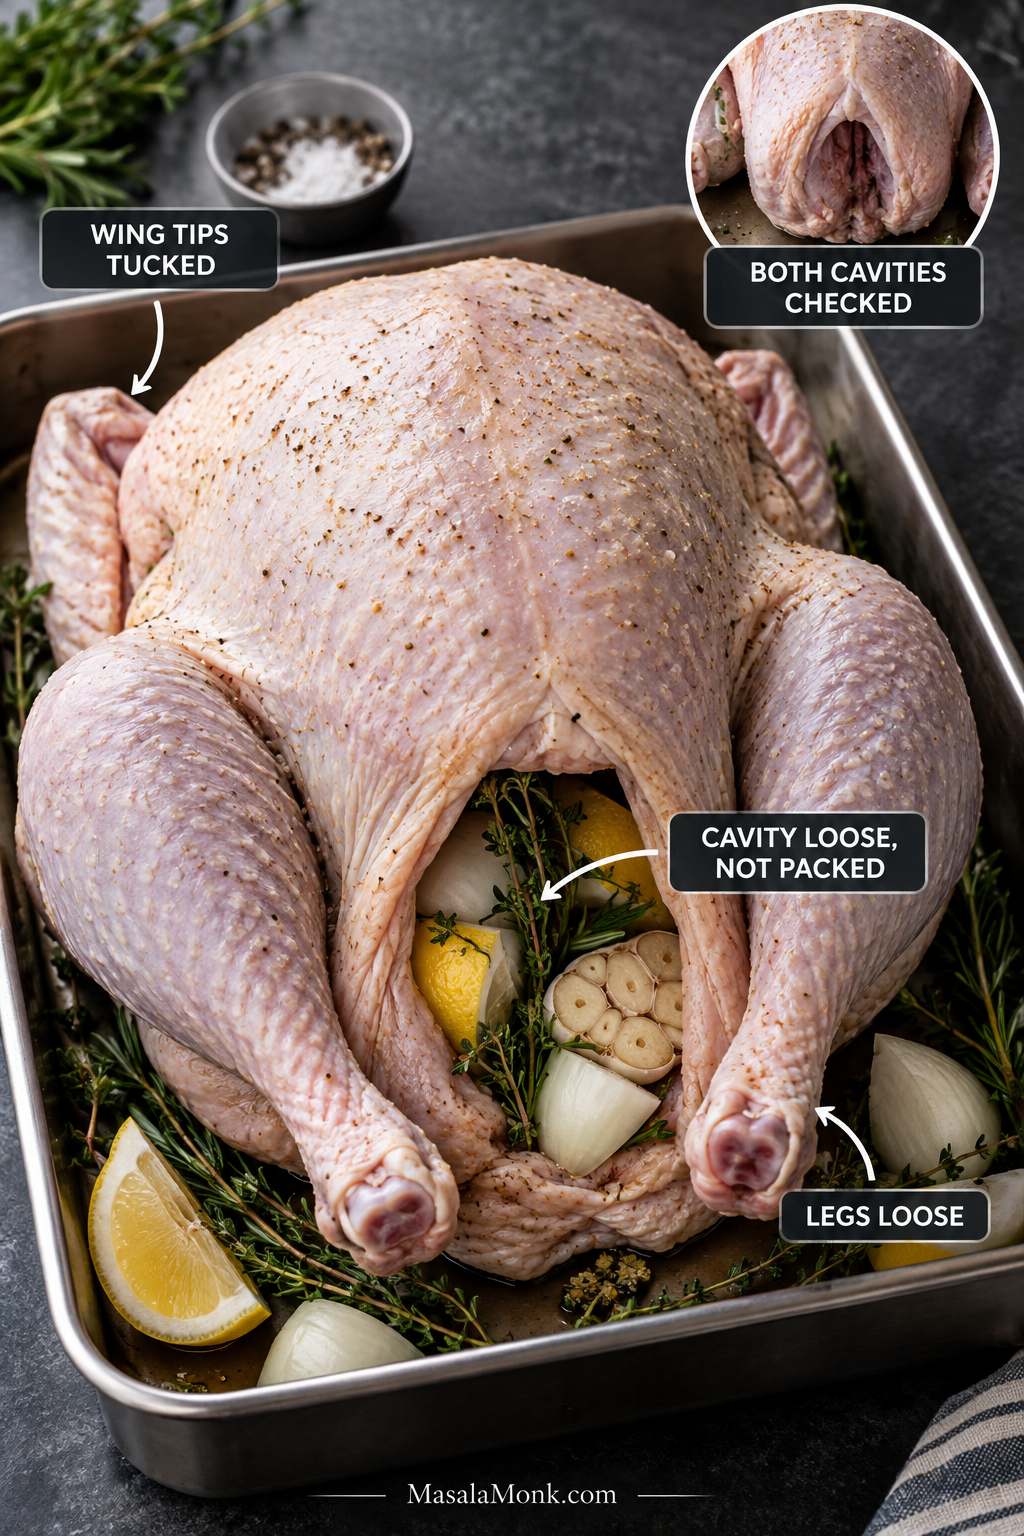
Add the onion, lemon, garlic and herb sprigs with open space around them. The cavity should look occupied, not packed.

Keep the turkey unstuffed for the easiest timing. A separate pan of sausage stuffing gets crisp browned edges while the bird stays on the simpler unstuffed schedule.

Tuck the thin wing tips behind the shoulders and leave some space between the legs so heat can reach the inner thighs. If you use twine, tie it loosely.

Prepared raw turkey breast-side up with loose onion, lemon, garlic, and herbs in the cavity, wing tips tucked, and legs left loose.
Loose aromatics can perfume the cavity without turning it into a dense center that heats more slowly; think fragrance and open space, not stuffing.

Once the pan goes into the oven, most of the hands-on work is over. From here, you are mainly watching two things: color and temperature.

How Long to Cook a Turkey at 325°F

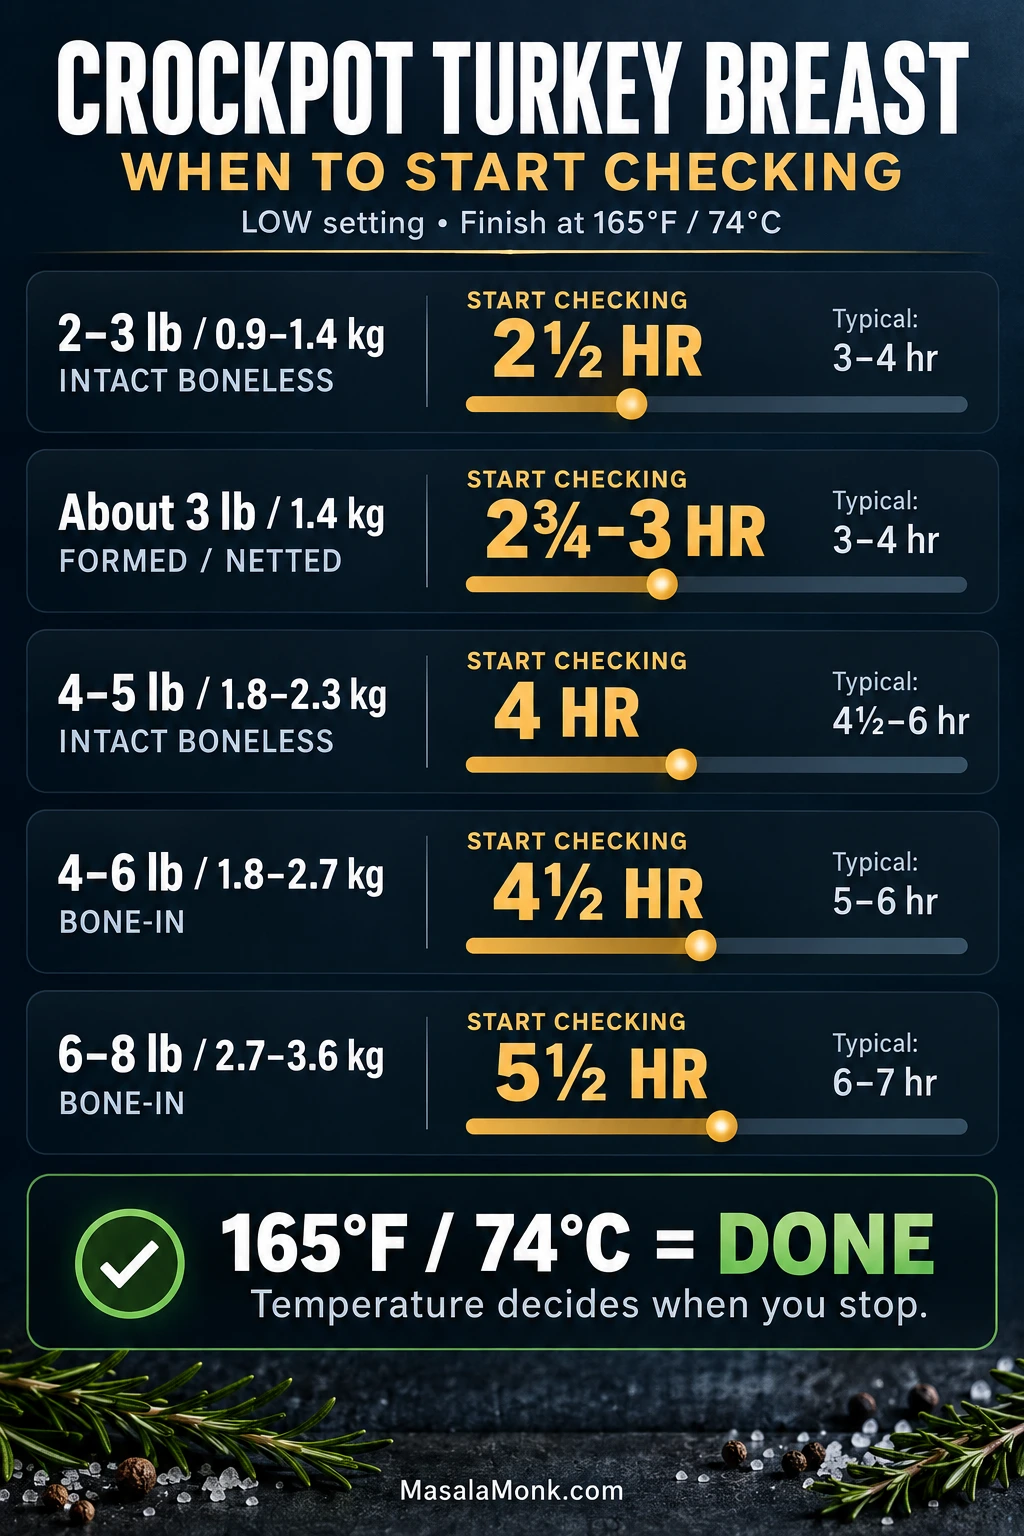
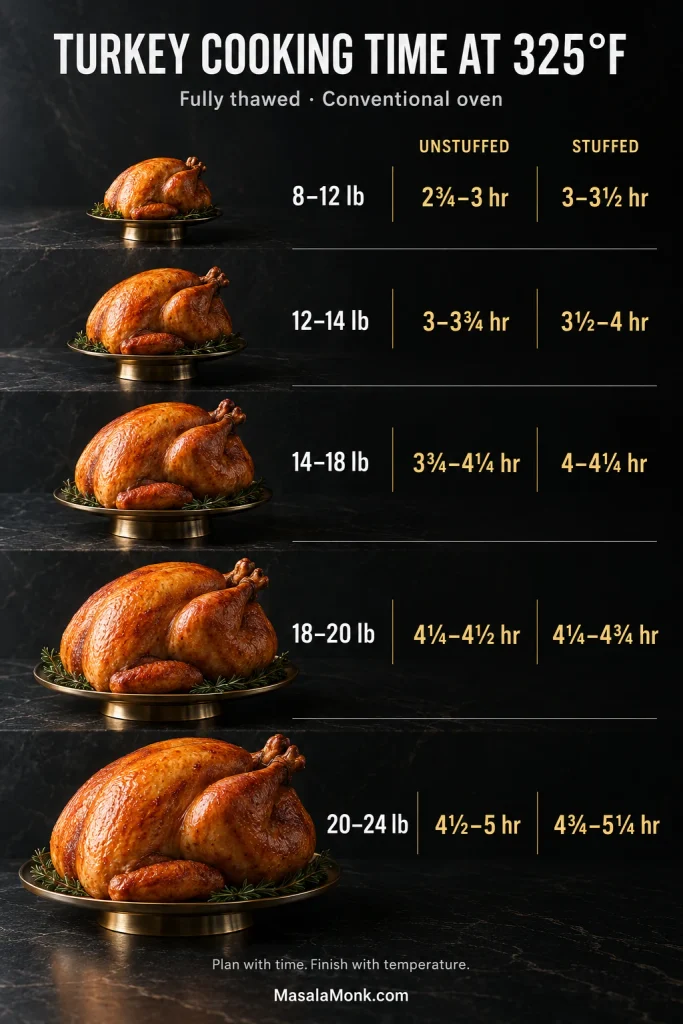
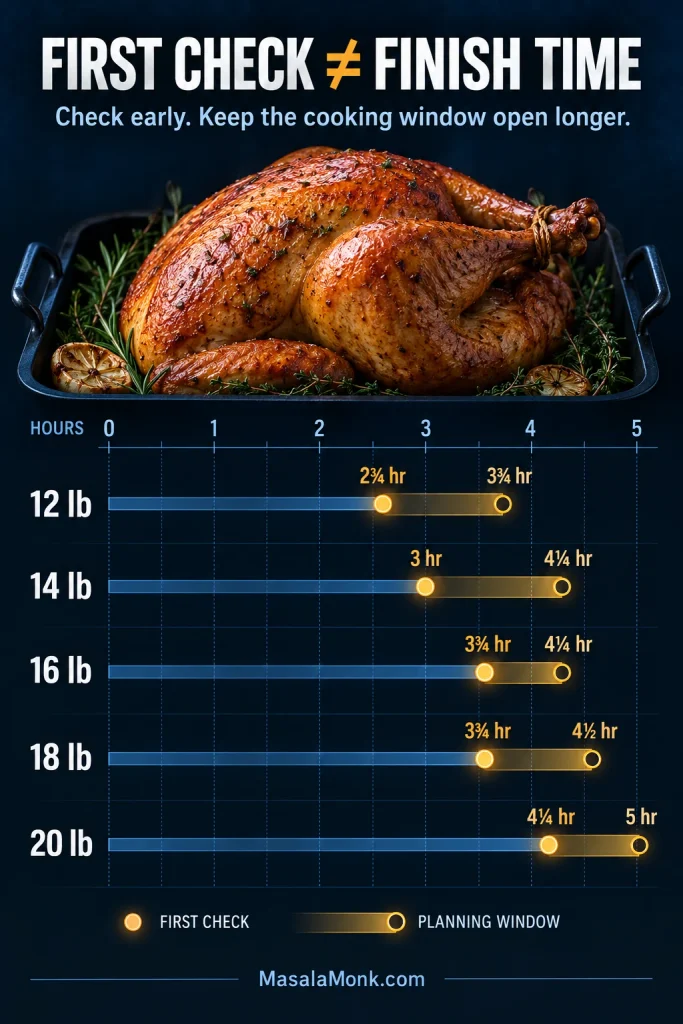
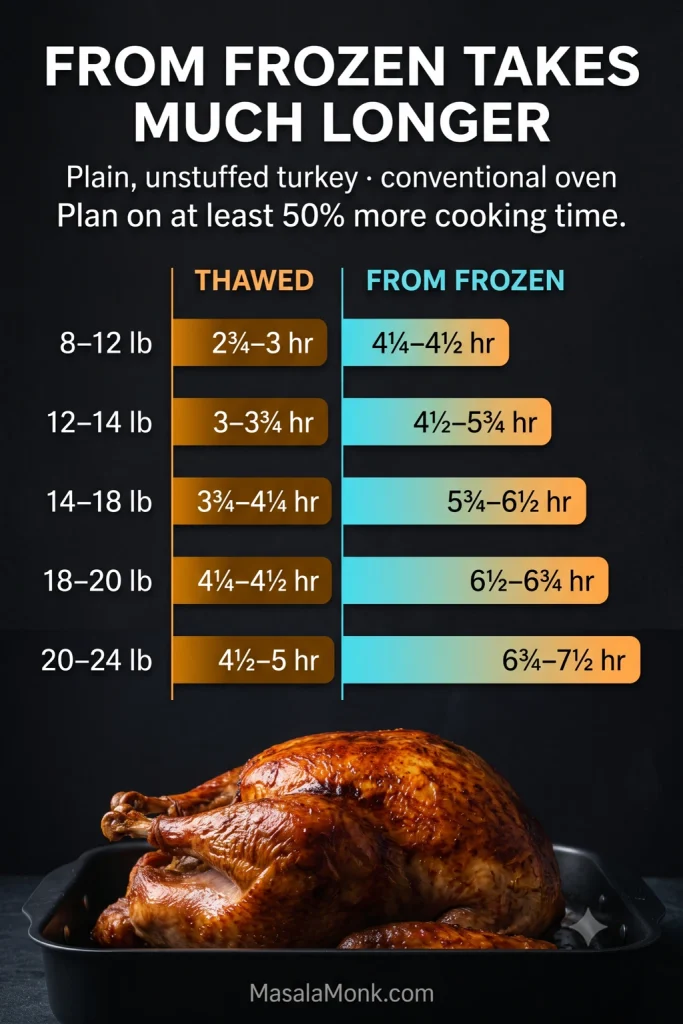
Most 12–14 lb unstuffed turkeys need about 3–3¾ hours at 325°F / 163°C. Start checking before that range because birds do not all cook at the same speed.

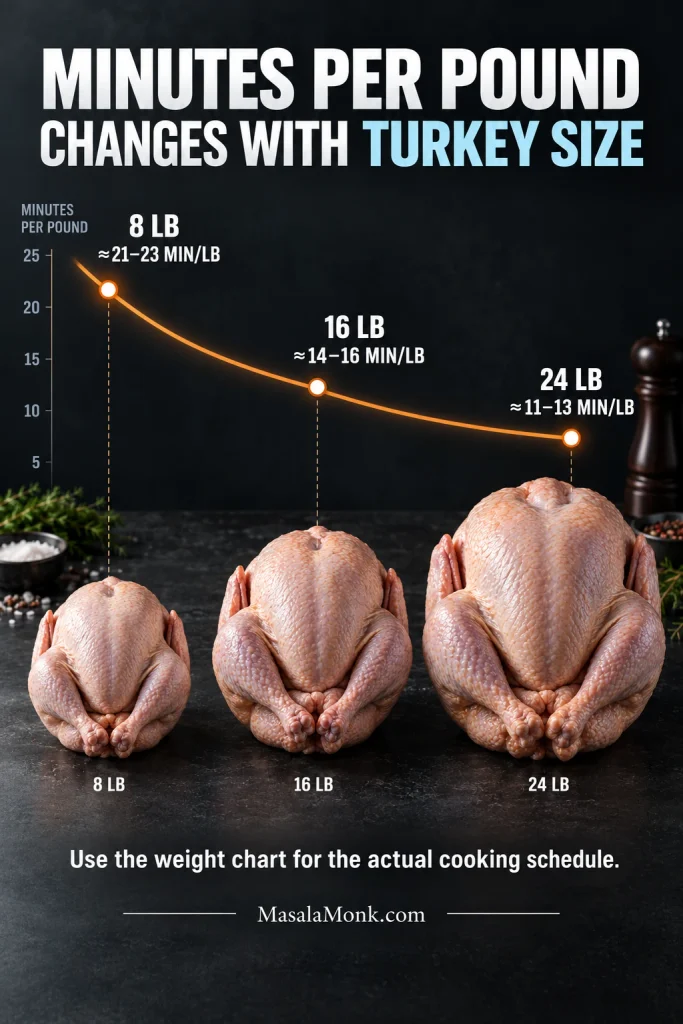
You do not need to memorize a minutes-per-pound formula. Use the table to plan your day, then start checking early.

Turkey Weight Approx. Cooking Time Start Checking Around
8–12 lb / 3.6–5.4 kg2¾–3 hours2¼ hours
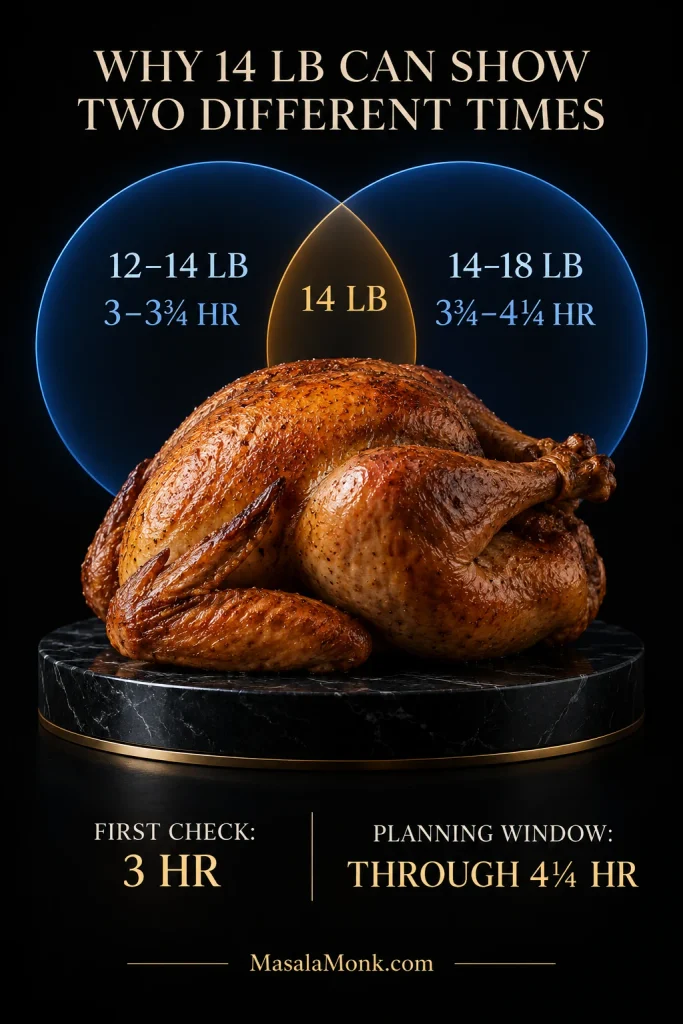
12–14 lb / 5.4–6.4 kg3–3¾ hours2½ hours
14–18 lb / 6.4–8.2 kg3¾–4¼ hours3 hours
18–20 lb / 8.2–9.1 kg4¼–4½ hours3½ hours
20–24 lb / 9.1–10.9 kg4½–5 hours3¾ hours

The cooking ranges come from USDA conventional-oven turkey guidance. Oven calibration, bird shape, pan depth, incomplete thawing and repeated door opening can all shift the finish.

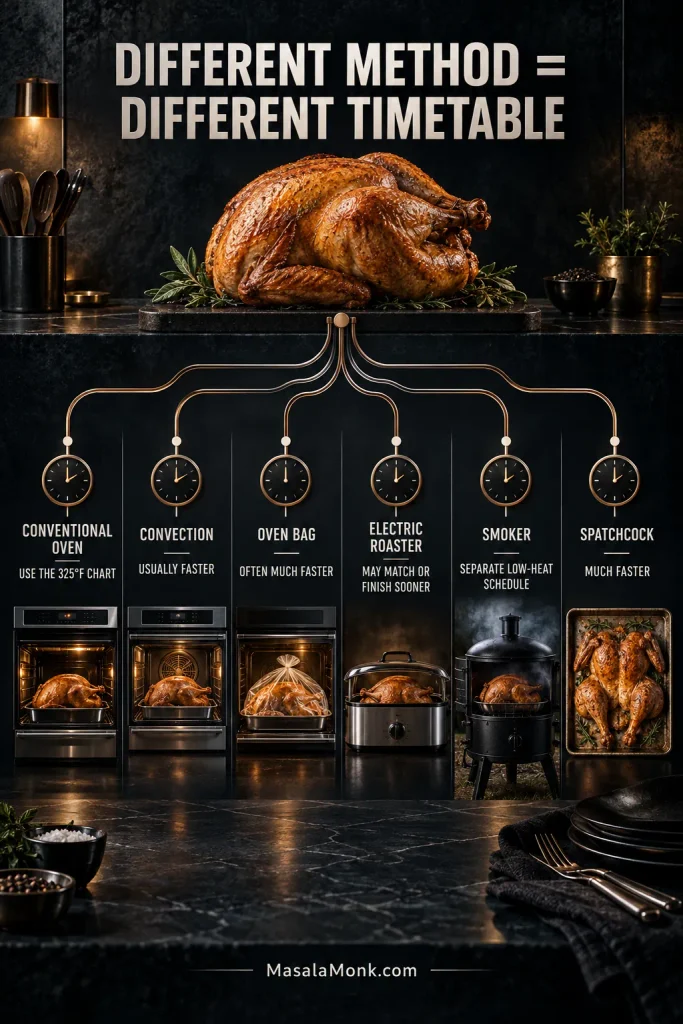
These times are for an open-pan turkey in a conventional oven. Oven bags, electric roasters, convection ovens and spatchcocked birds follow different timing.

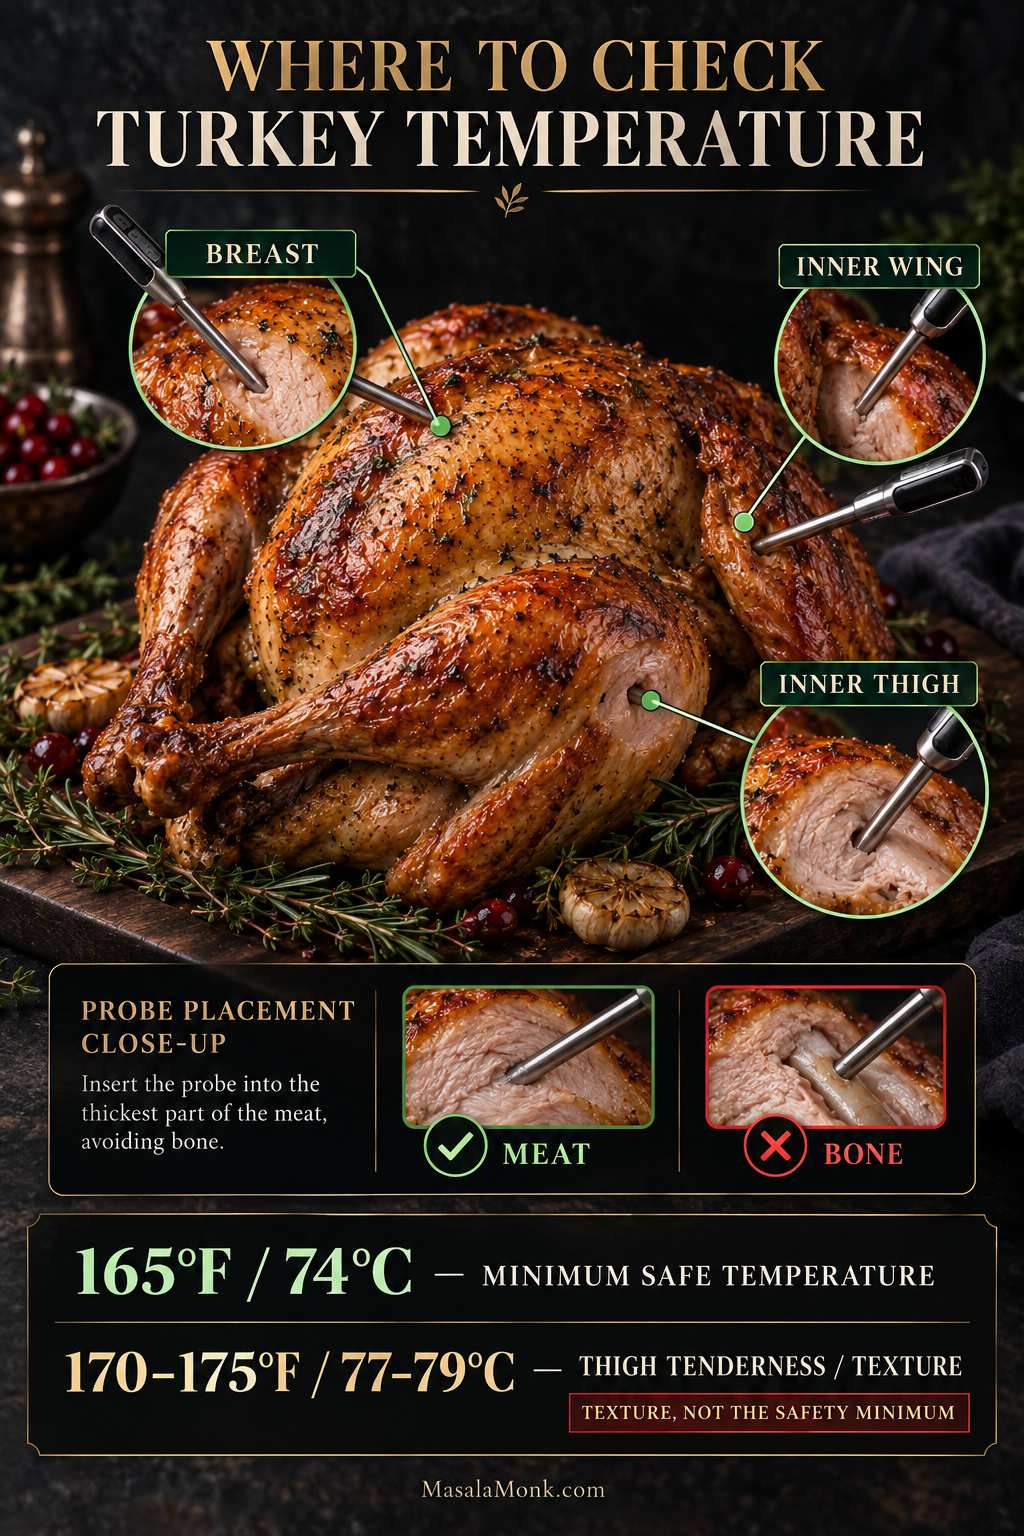
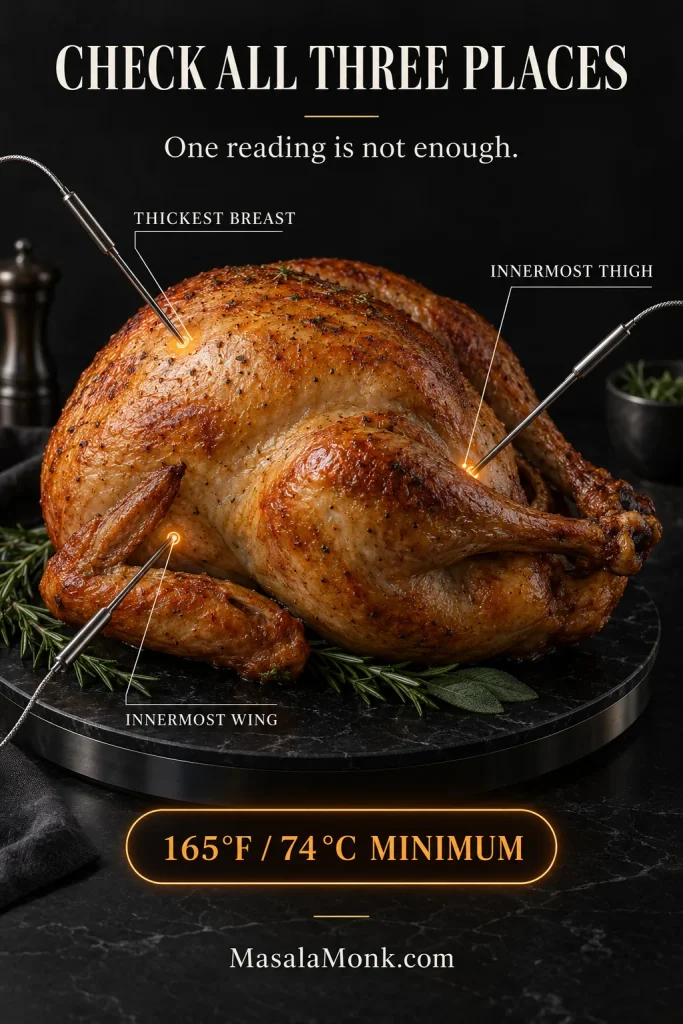
Where to Put the Thermometer

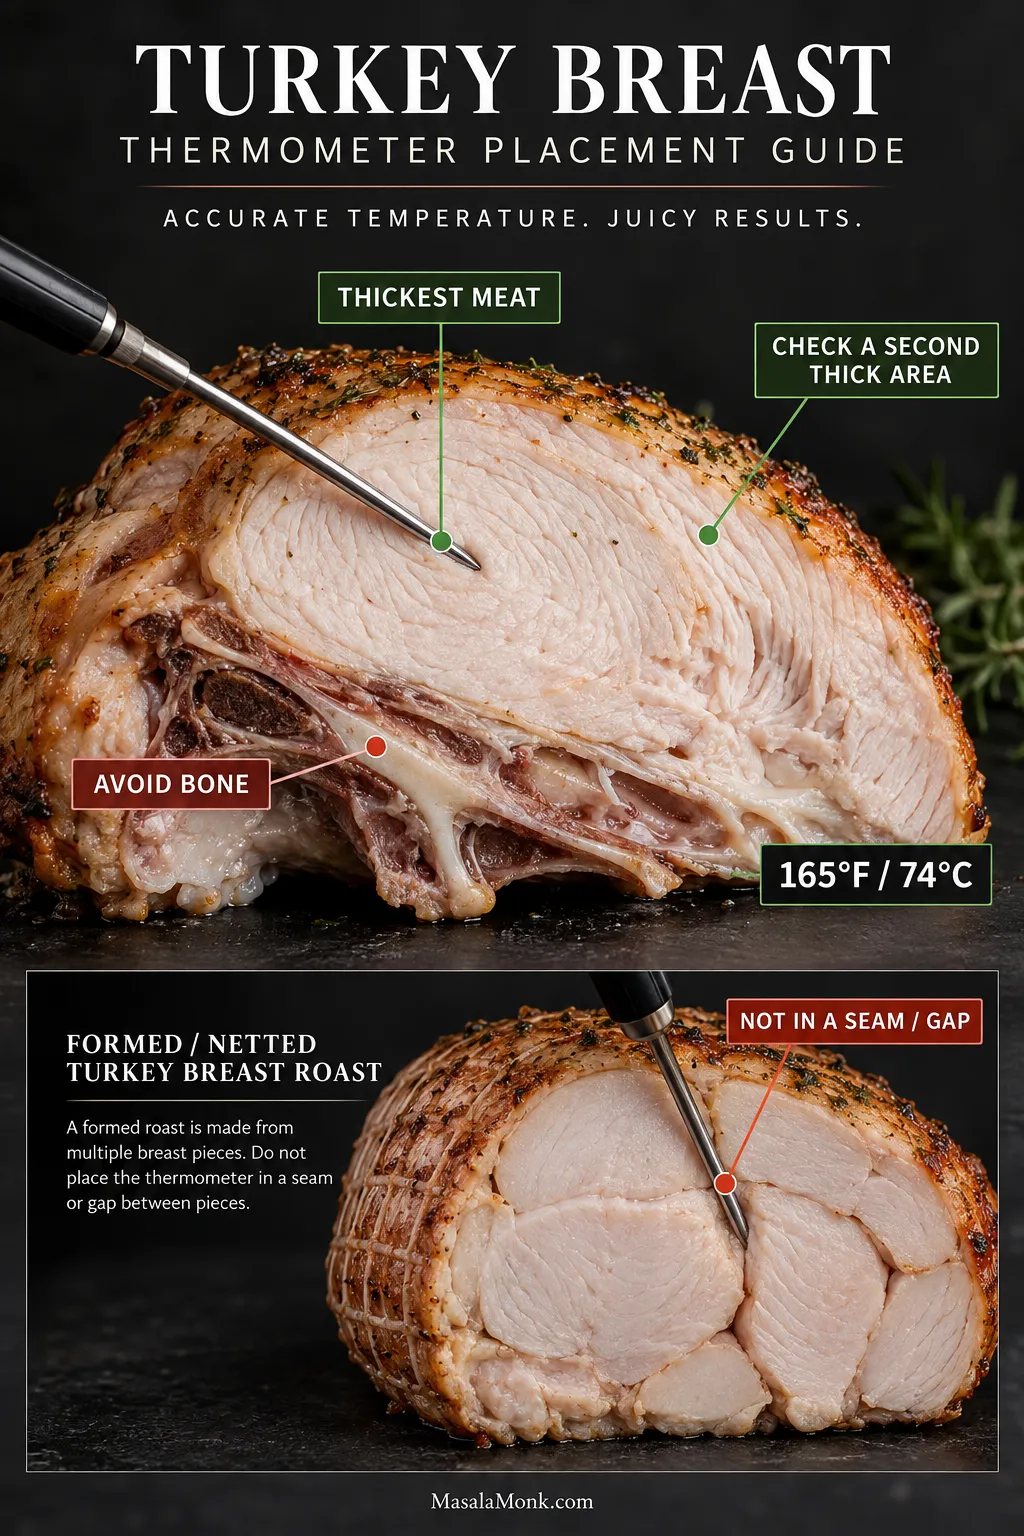
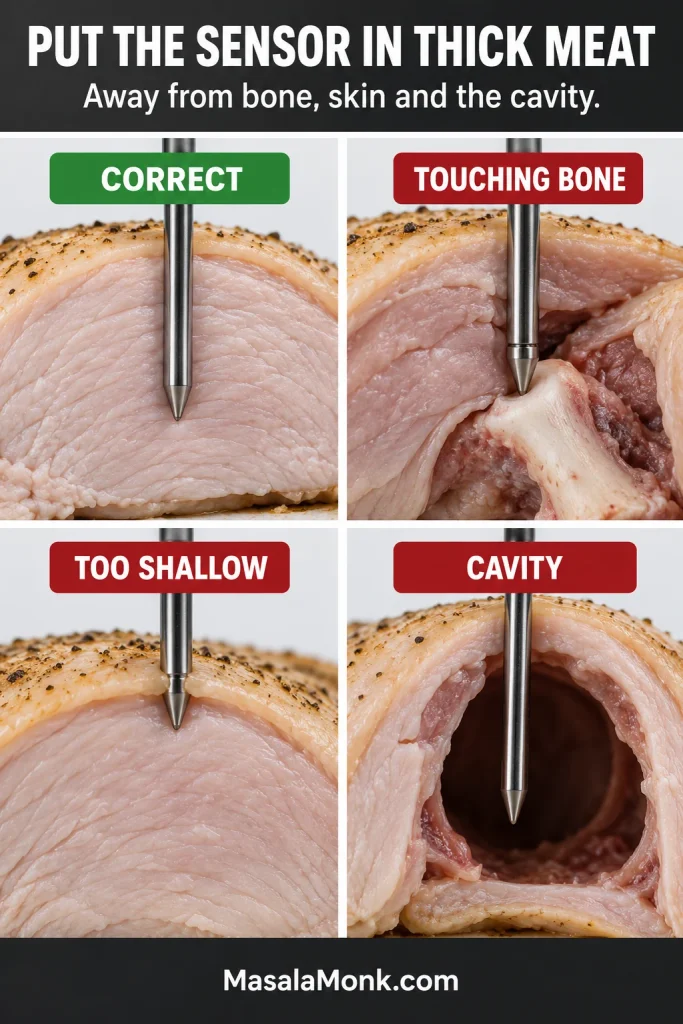
  • Breast: insert the thermometer into the thickest part without touching the breastbone.
  • Thigh: slide it into the thick inner thigh where the leg meets the body, stopping short of bone.
  • Wing: check the thick inner area where the wing joins the body.
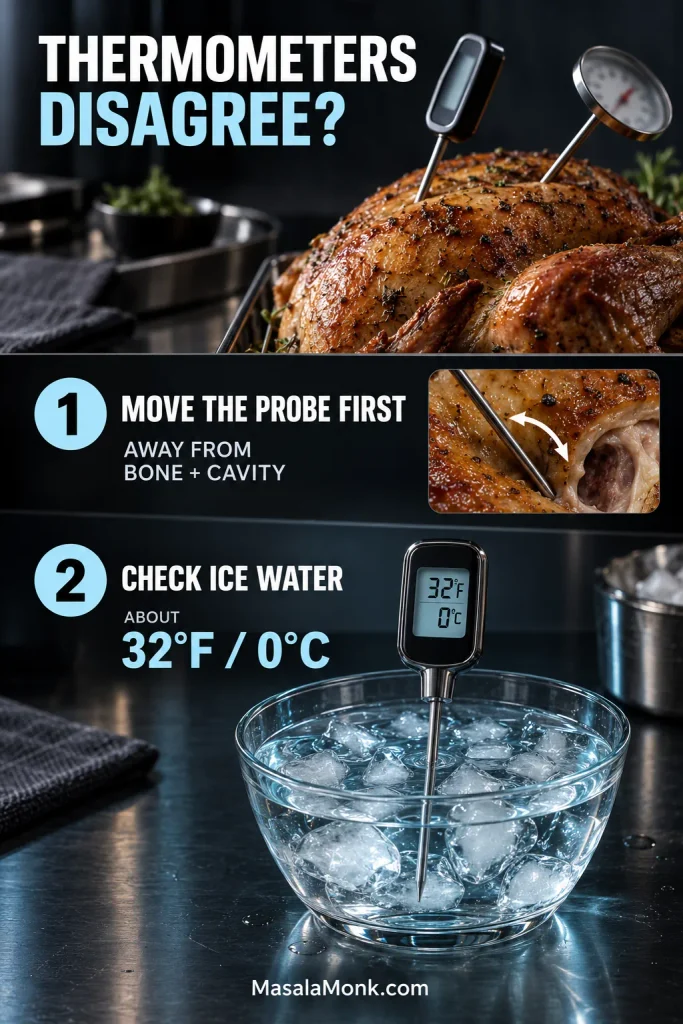
Roasted turkey with thermometer placement illustrated in the thickest breast, inner thigh, and inner wing, including guidance to keep the probe in meat rather than against bone.
One strange turkey temperature does not automatically mean more oven time; first move the probe into nearby meat and rule out bone contact or a thin spot.

A strange reading deserves a second look. If one spot is dramatically colder than another nearby, move the probe, compare both sides and make sure the tip is sitting in meat instead of touching bone.

What Temperature Is Turkey Done?

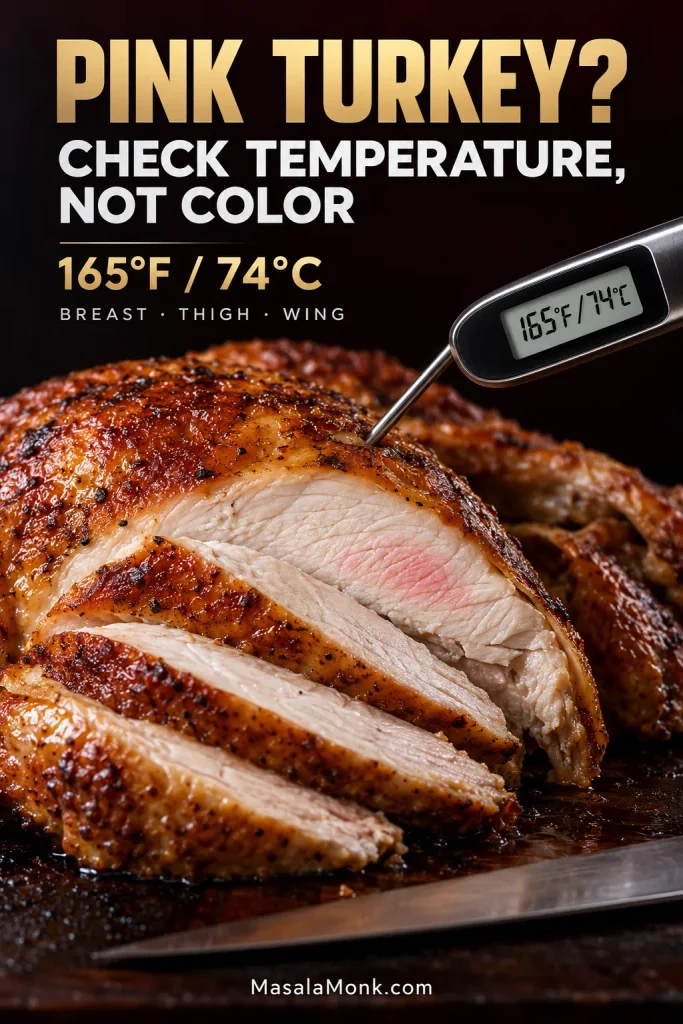
The minimum safe internal temperature is 165°F / 74°C in the thickest breast, inner thigh and inner wing area.

Dark thigh meat often becomes softer and more yielding around 170–175°F / 77–79°C. When the breast reaches its safe temperature first, shield it while the legs finish.

What If the Meat Looks Pink?

Once the breast, inner thighs and inner wing areas have all reached at least 165°F / 74°C, pink color by itself is not evidence that the turkey is undercooked. If the appearance still worries you, verify another nearby spot before putting the bird back in the oven.

How to Keep the Turkey Juicy While the Skin Browns

Juicy meat and crisp skin are separate jobs. Salt and careful temperature control protect the meat; a dry surface and mostly uncovered heat build the skin. Herb butter adds richness, but it cannot undo an overcooked breast.

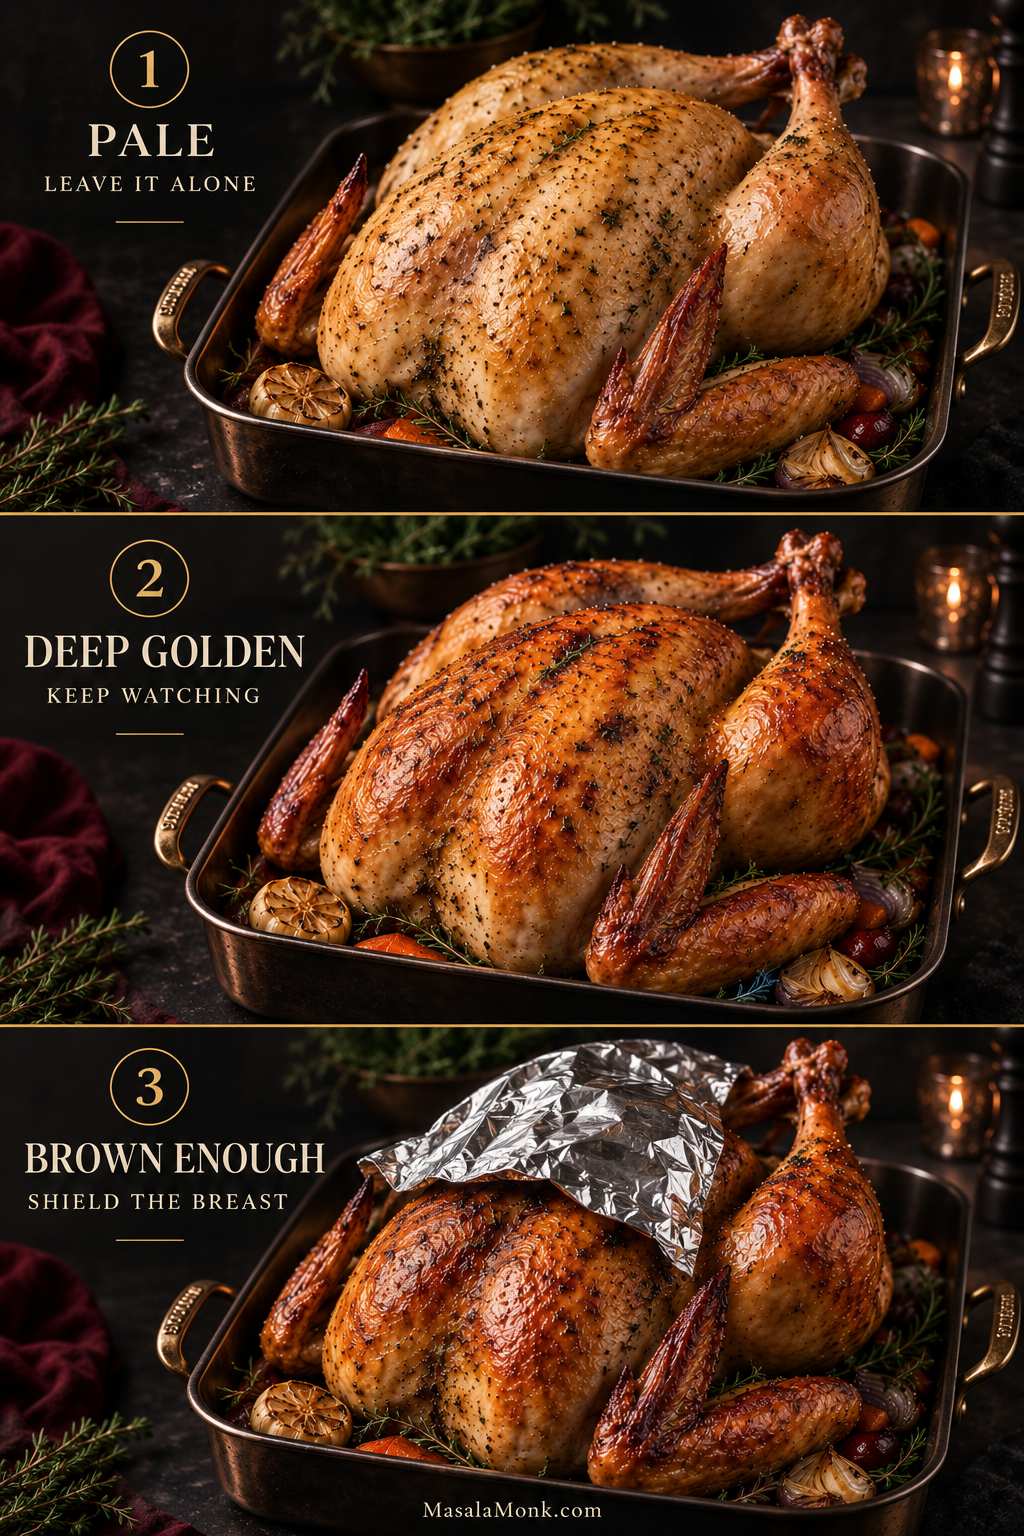
Early in the roast, the skin may still look pale and taut. Leave it alone.

Somewhere in the middle, that pale surface begins turning bronze, the herbs darken around the edges, and the juices in the pan look richer and more concentrated. Foil becomes useful once the breast is a deep, even brown and the highest points are approaching the color you would be happy to serve.

Basting Is Optional

You can leave the baster in the drawer. Repeatedly opening the oven loses heat, and watery juices keep wetting the skin. An occasional spoonful of rendered fat is enough if basting is part of your holiday ritual.

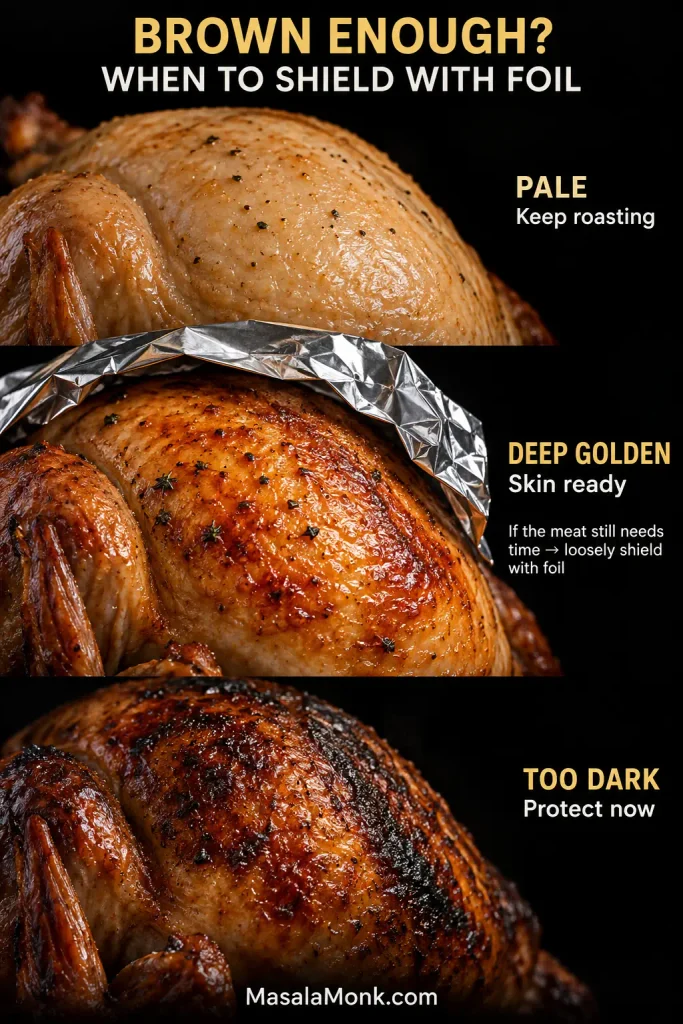
Use Foil When the Color Is Right

Once the breast has the color you want, cover it loosely and let the darker meat continue. Individual wing tips or high spots can be shielded separately.

Three-stage roast turkey sequence showing pale skin, deep golden browning, and a browned turkey with foil loosely covering the breast while the legs remain exposed.
Foil protects color that is already finished: cover the breast when it looks ready to serve, not simply because a certain amount of time has passed.

If the Pan Starts Smoking

Add about ½ cup / 120 ml hot water or unsalted stock around the rack. The liquid protects the concentrated drippings from scorching; keep it below the turkey instead of pouring it over the skin.

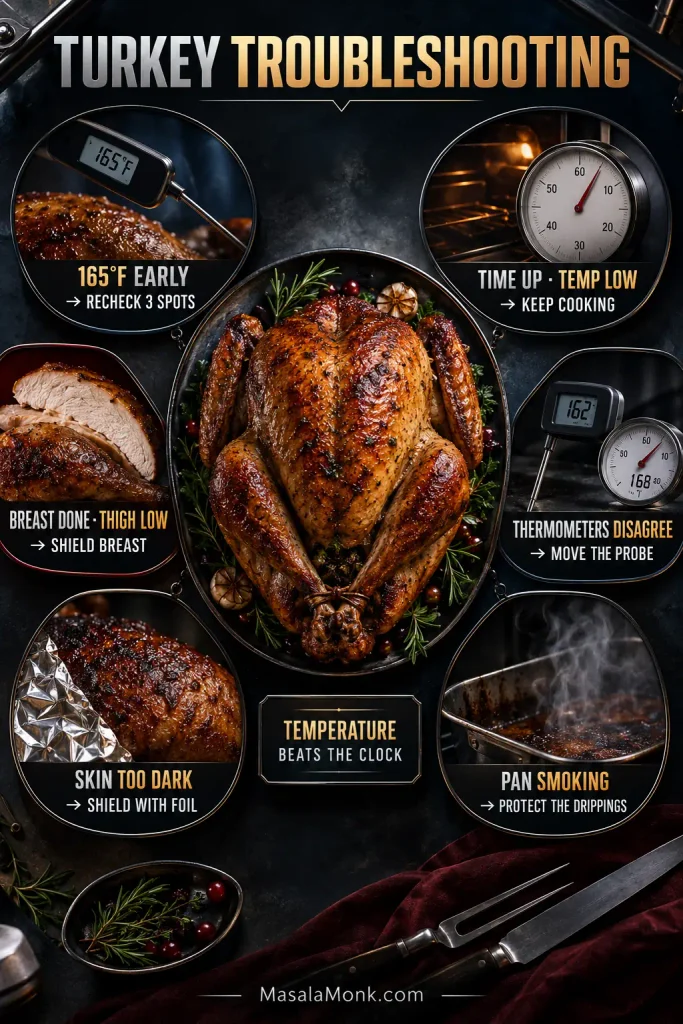
Turkey Not Following the Plan? Start Here

This is the part to use when the clock, color and thermometer stop agreeing.

Three-part turkey doneness guide showing the clock for planning, skin color for browning decisions, and an instant-read thermometer for final doneness.
The clock predicts the schedule, color tells you when to protect the skin, and the thermometer tells you whether cooking can actually stop.
What You’re Seeing What to Do Now
Turkey is cooking much faster than expected Recheck the breast and both thighs in several spots, then verify the oven temperature. If the readings agree, trust them.
Turkey is running late Check the actual oven temperature and whether the bird was fully thawed. Protect browned skin and keep cooking to temperature.
Breast is done before the thighs Loosely cover the breast with foil and continue cooking the dark meat.
One thigh reads much colder Check both thighs in several locations. Bone contact or a thin spot can distort the reading.
Skin is dark but the meat is not ready Shield the browned areas. Lower the pan one rack if the turkey sits very close to the top heat.
Meat is done but the skin is pale Use a brief burst of higher heat or the broiler and watch continuously.
Skin is soft Uncover the turkey and stop wetting the surface. Let dry heat work while the meat still has cooking room.
Pan drippings are smoking Add about ½ cup / 120 ml hot water or unsalted stock directly to the pan.
Drippings taste too salty Leave additional salt out of the gravy and dilute with unsalted liquid as needed.
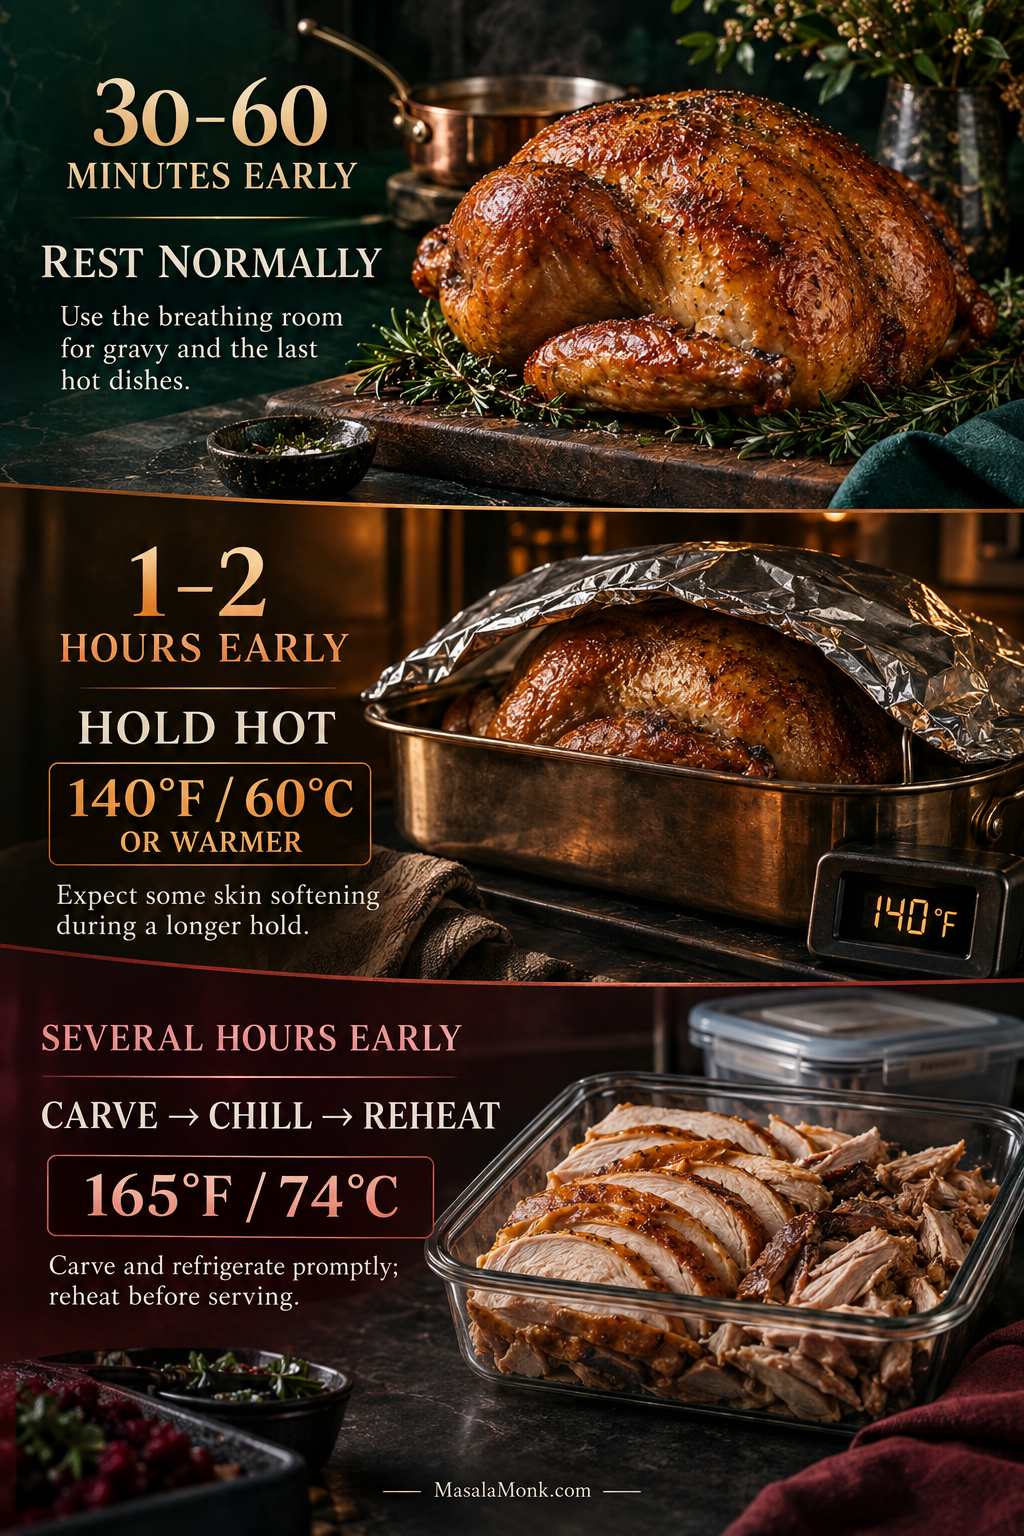
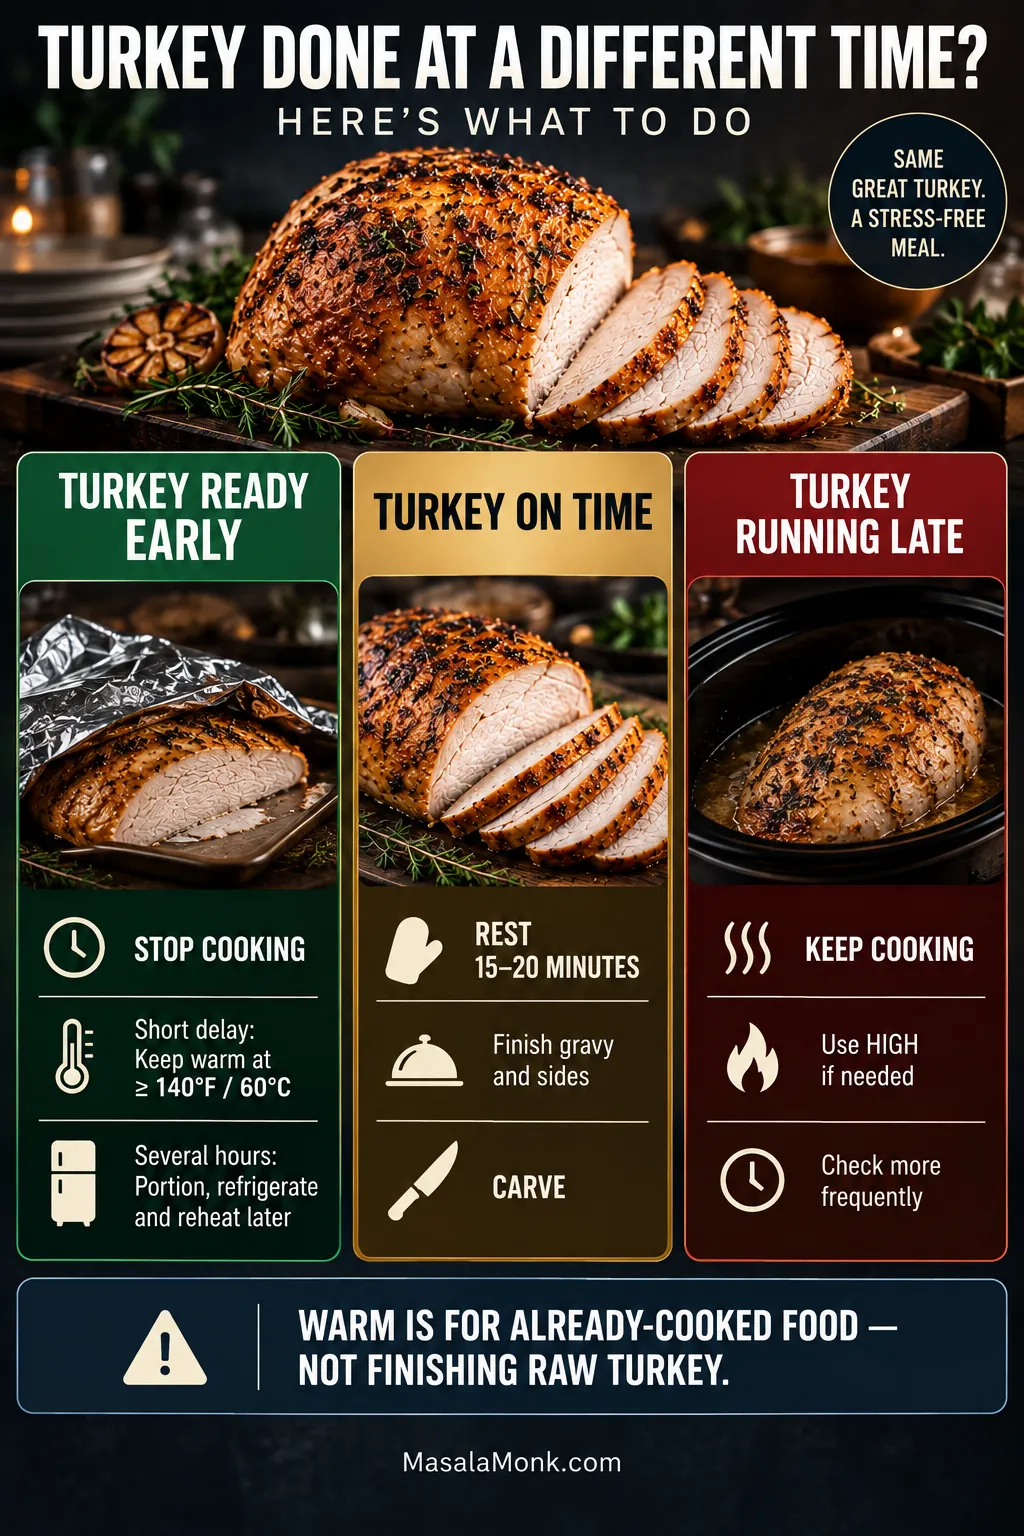
Turkey finished early A short lead is easy to manage. Longer delays need hot holding or chilling; use the detailed guidance below.

The Turkey Finished Early

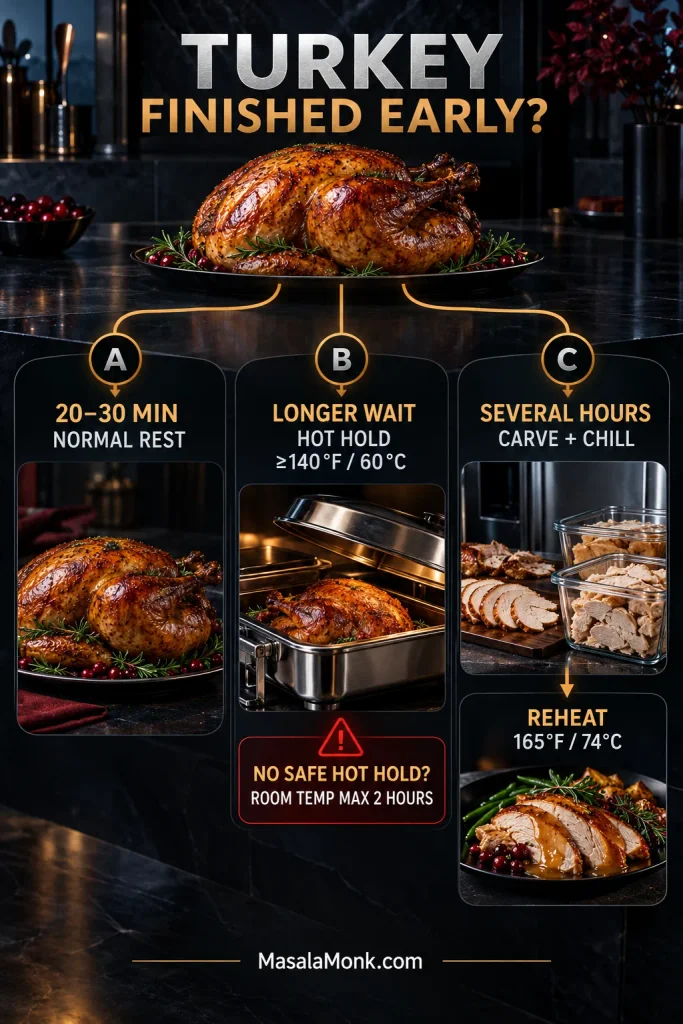
Thirty to sixty minutes early: excellent. Rest it normally and use the breathing room for gravy and the last hot dishes.

One to two hours early: hold the turkey at 140°F / 60°C or warmer. A reliable low or warm oven setting can work; monitor the temperature and expect the skin to soften somewhat during a long hold.

Several hours early: stop treating it as a rest. Carve the turkey, refrigerate the meat promptly in shallow containers, and reheat it to 165°F / 74°C before serving.

Can’t keep it safely hot? Carve and chill it instead.

Three-stage turkey timing guide showing normal resting for a short early finish, hot holding for a longer delay, and carving, chilling, and reheating for a several-hour delay.
The longer the gap before dinner, the more the strategy changes: resting becomes hot holding, and eventually safe chilling becomes the better choice.

Done roasting? Carving · Reheating Later · Recipe Card

Resting, Carving and Gravy

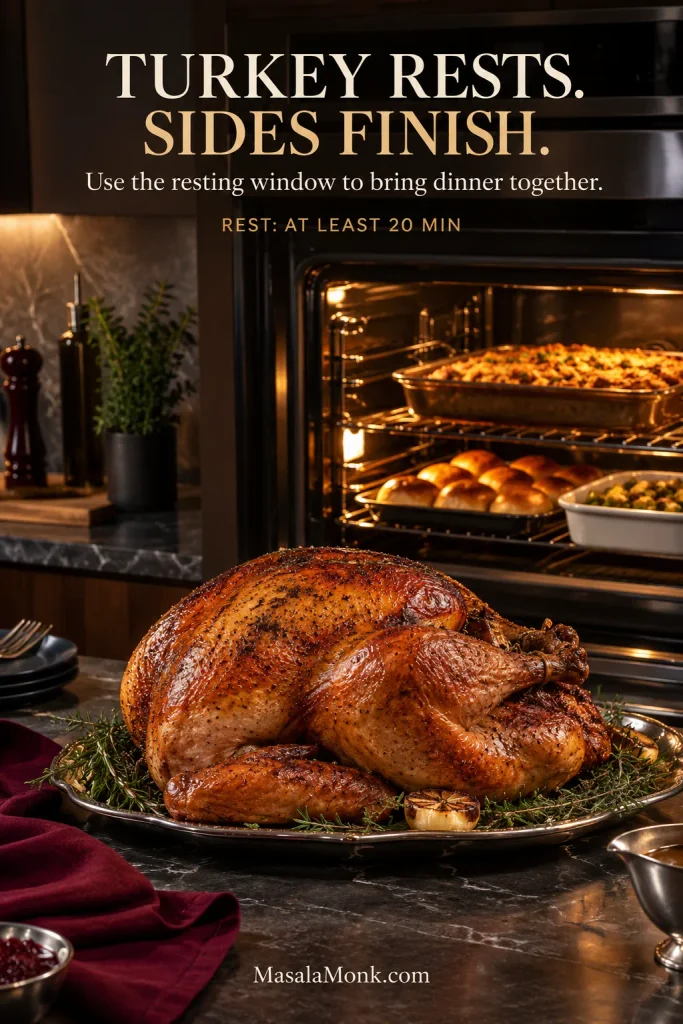
Once the turkey is resting, the uncertain part is over.

You can stop chasing temperatures and watching the clock. The next 30–45 minutes are for gravy, hot sides and clearing enough room to carve without balancing a huge bird between casserole dishes.

By now the skin should be deeply bronzed and the pan juices dark and savory. Leave the turkey uncovered for the crispest skin, or use a very loose foil tent in a cool kitchen. A tight cover traps steam and softens the surface.

The oven is free again too. A quick high-heat tray such as roasted Brussels sprouts can cook while the turkey rests.

Use the Drippings for Gravy

Taste the drippings before adding salt. Dry-brined, kosher, enhanced and self-basting birds can all leave a saltier pan than an untreated turkey.

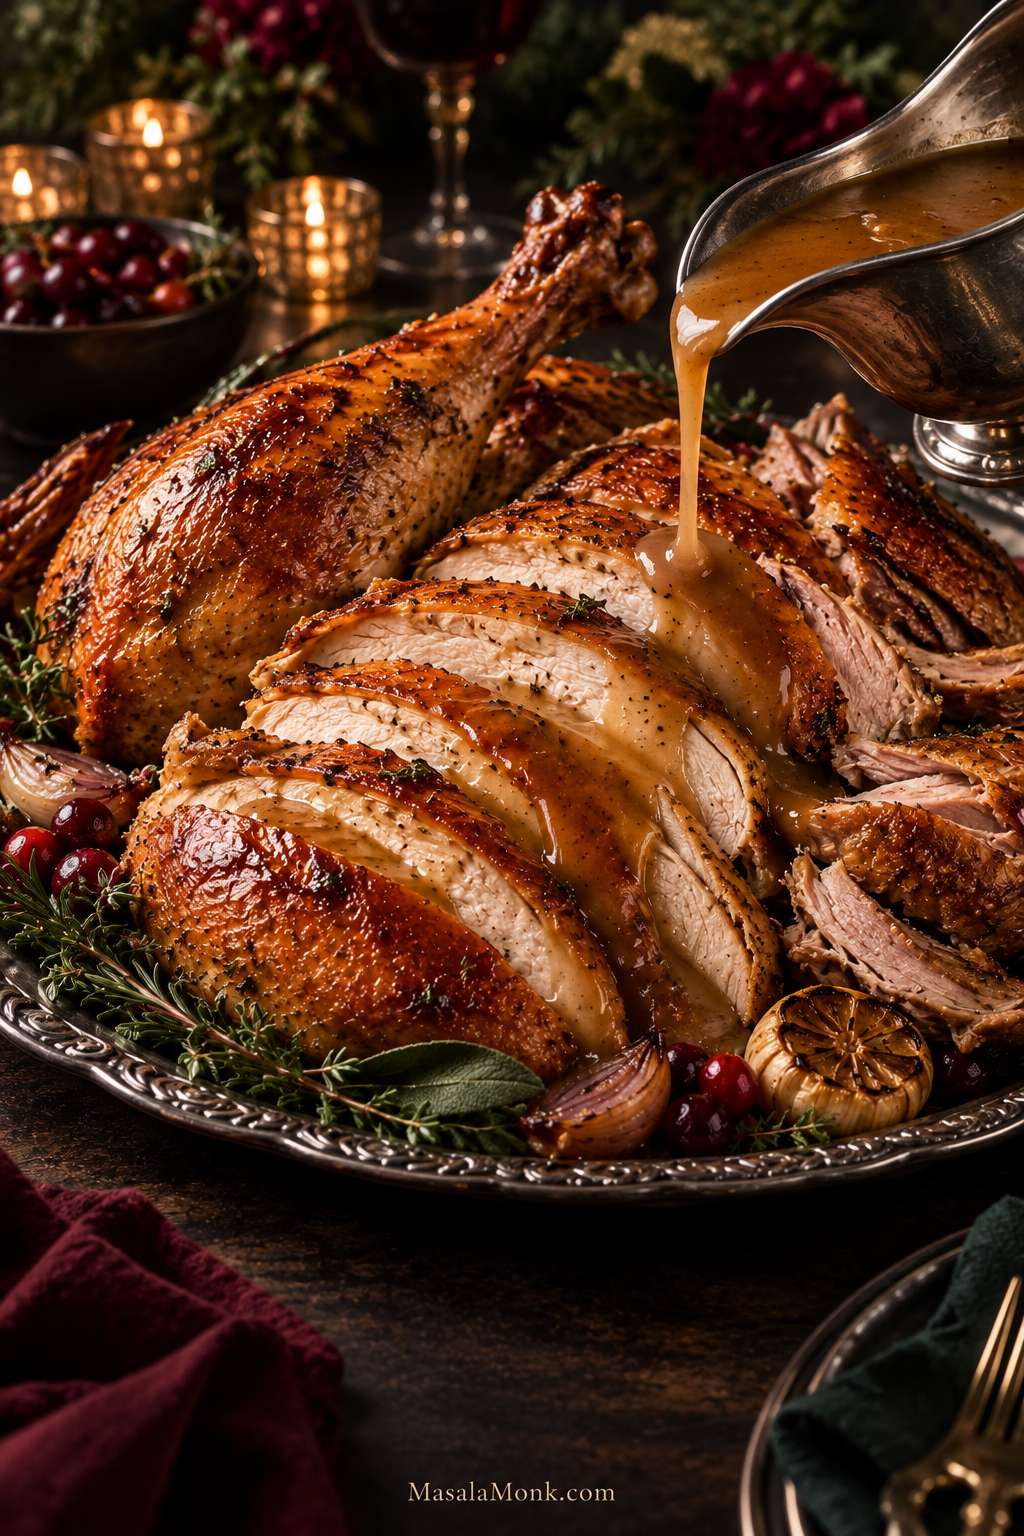
Turn the usable fat, browned fond and juices into turkey gravy from the drippings. This is where the roasted herbs, turkey fat and browned pan juices finally come together.

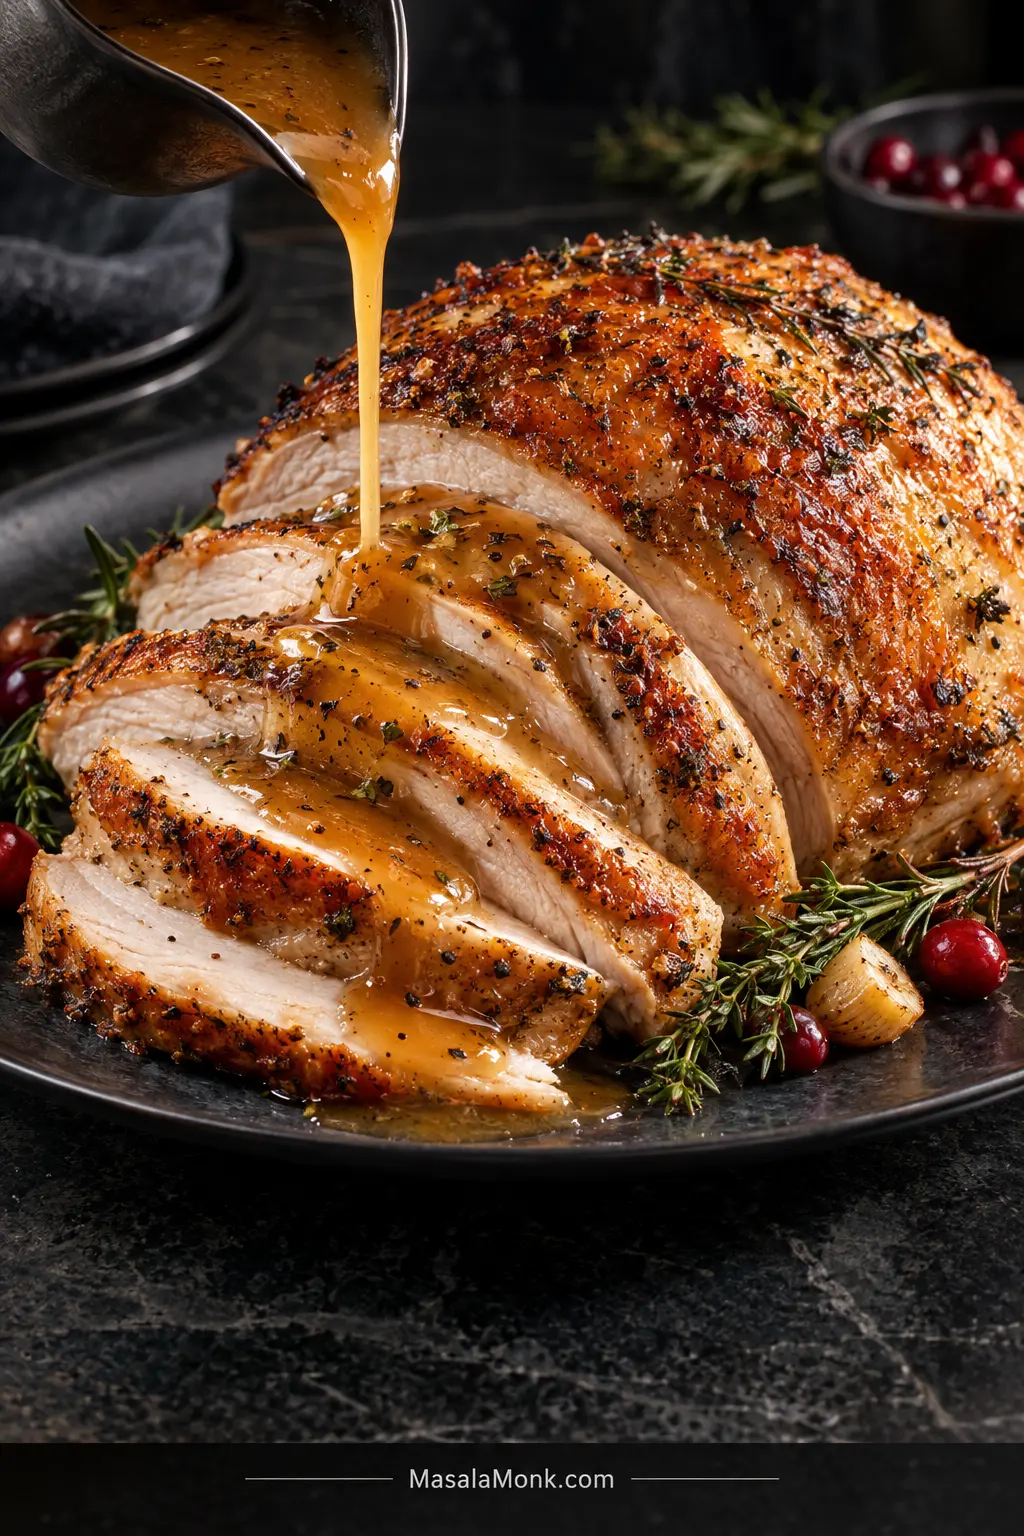
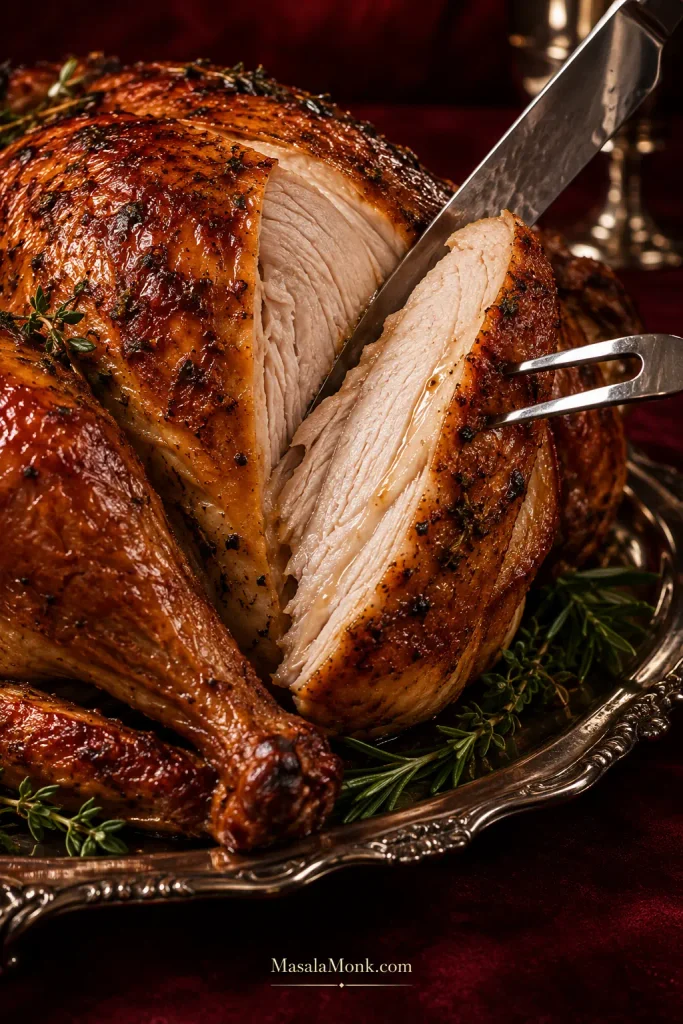
Close-up platter of carved roast turkey with crisp browned skin, moist sliced breast meat, dark meat, and glossy brown gravy being poured over the slices.
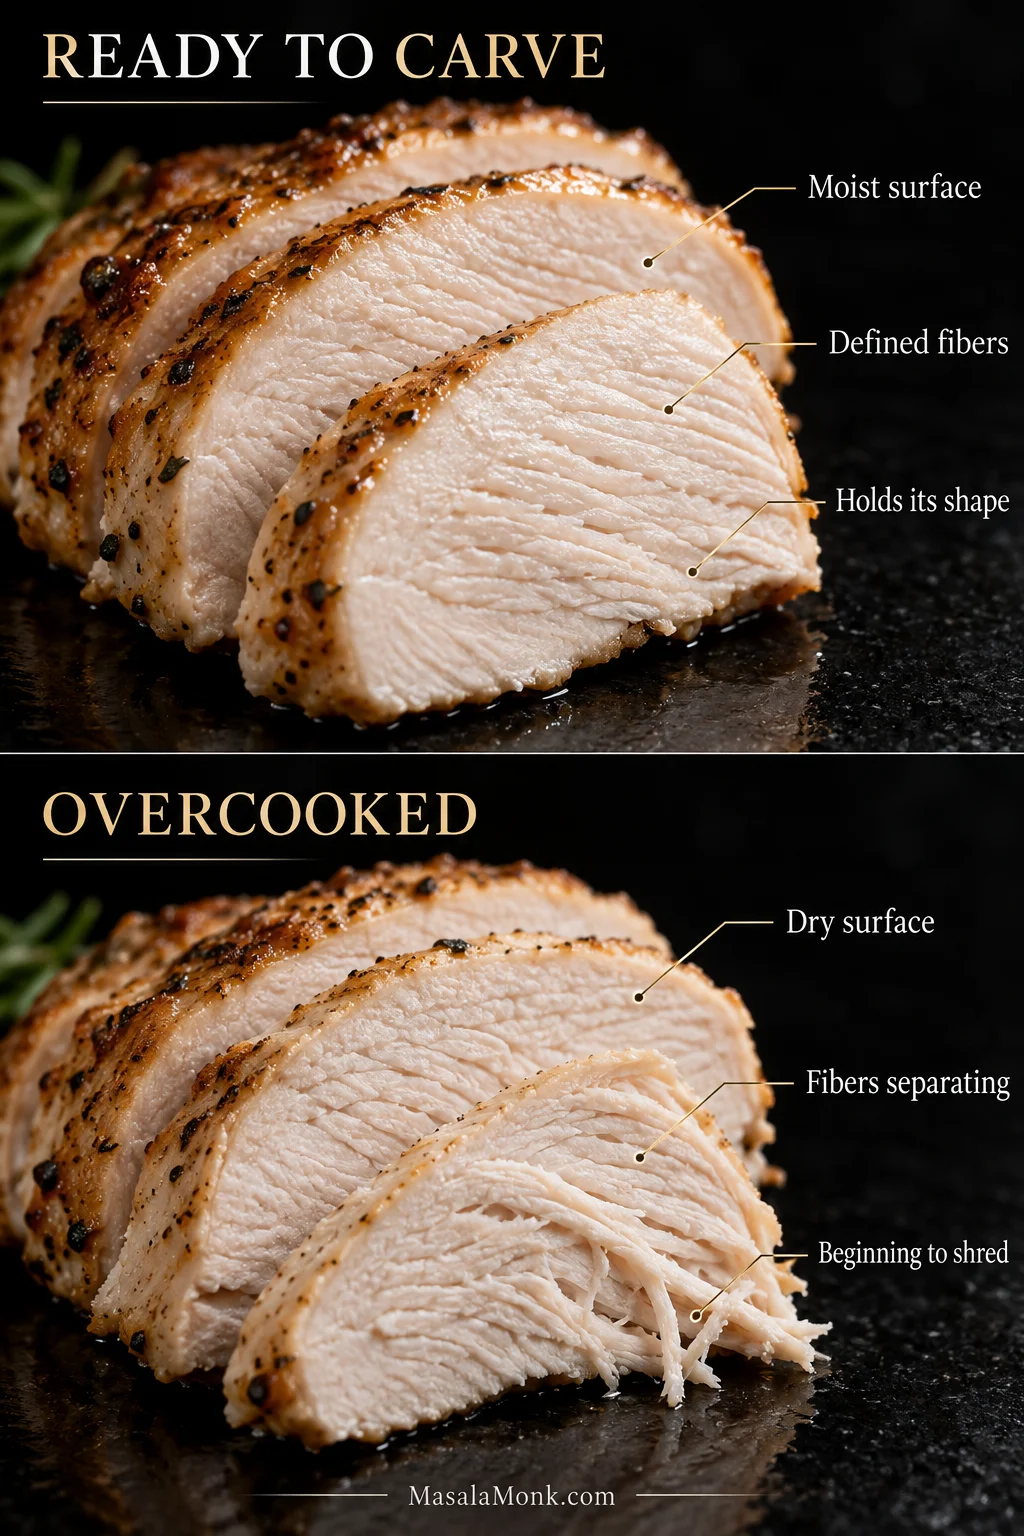
Look for a slight sheen on the breast rather than a matte, fibrous cut surface; crisp skin and glossy pan gravy complete the contrast.

Carve After the Rest

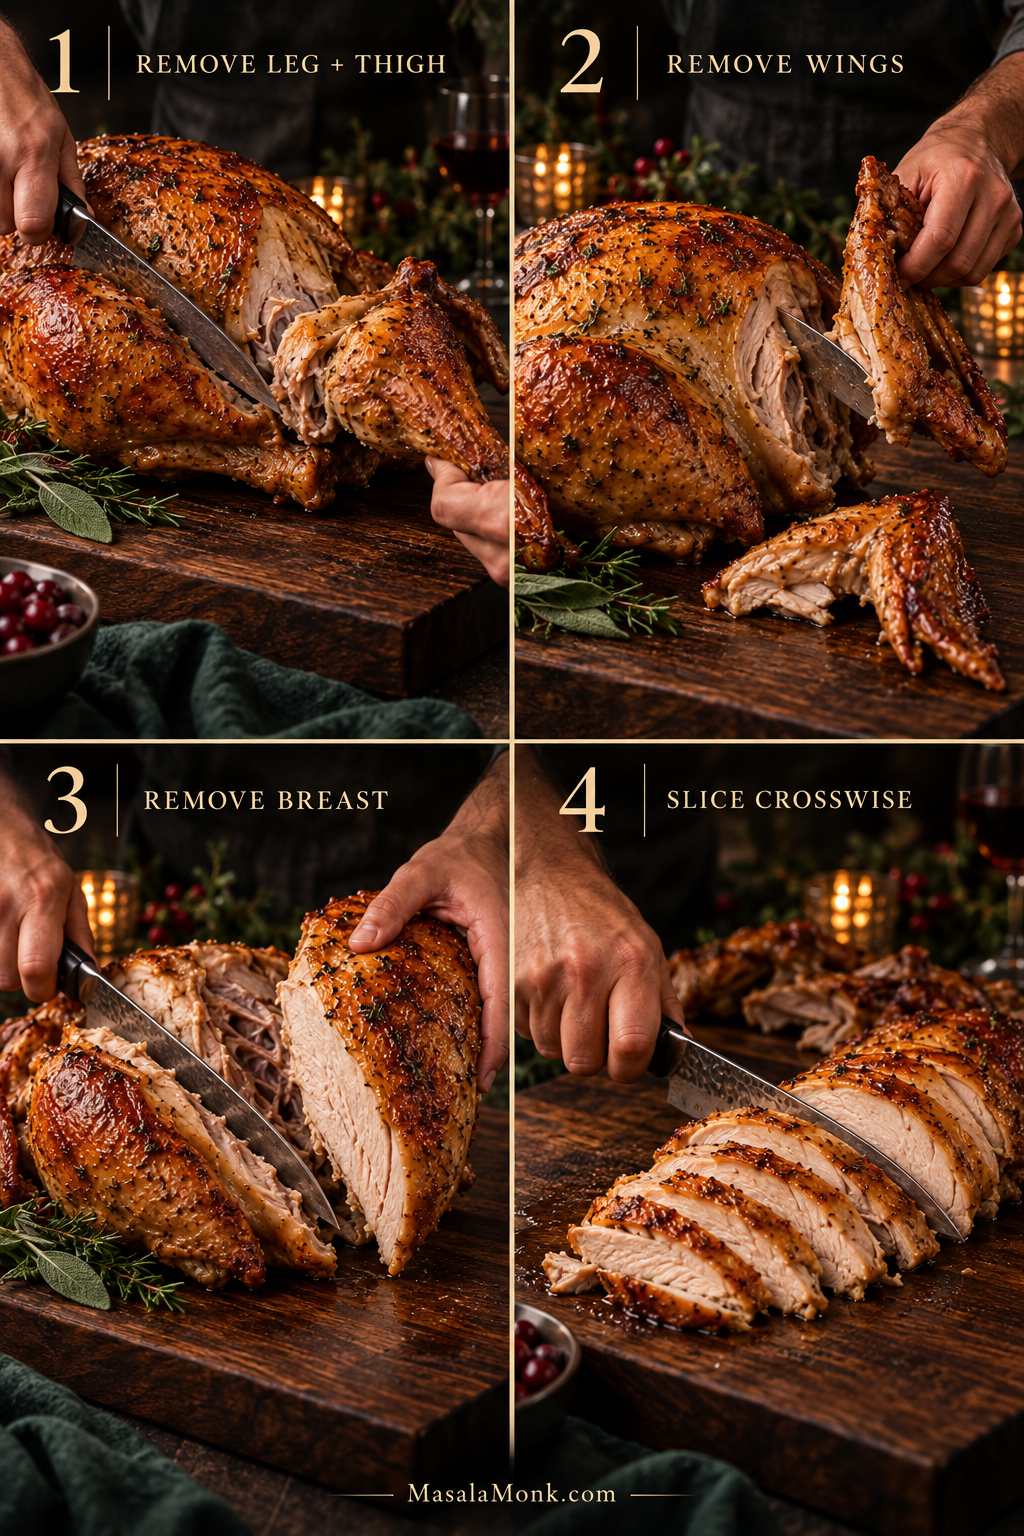
Remove the legs and thighs first, followed by the wings. For cleaner breast slices, take each breast half off the carcass in one piece and slice it crosswise on the cutting board.

Four-step turkey carving sequence showing removal of the leg and thigh, wings, and breast, followed by crosswise slicing of the breast on a wooden carving board.
Starting at the joints reduces resistance and keeps the breast intact; once that whole breast half is on the board, clean crosswise slices become much easier.

The knife should pass through crisp skin into breast meat that still looks moist, with a little sheen on the cut surface instead of a cottony or fibrous texture. This is where the dry skin, steady roast, early temperature checks and patient rest finally pay off.

If the meat tastes slightly underseasoned, season the slices lightly and let the gravy do some of the work.

Once the breast is sliced and the legs are separated, you’re done managing the turkey. Move everything to a warm platter, bring the gravy, and get dinner to the table.

Special Situations: Frozen, Stuffed or Convection Turkey

Turkey Still Frozen?

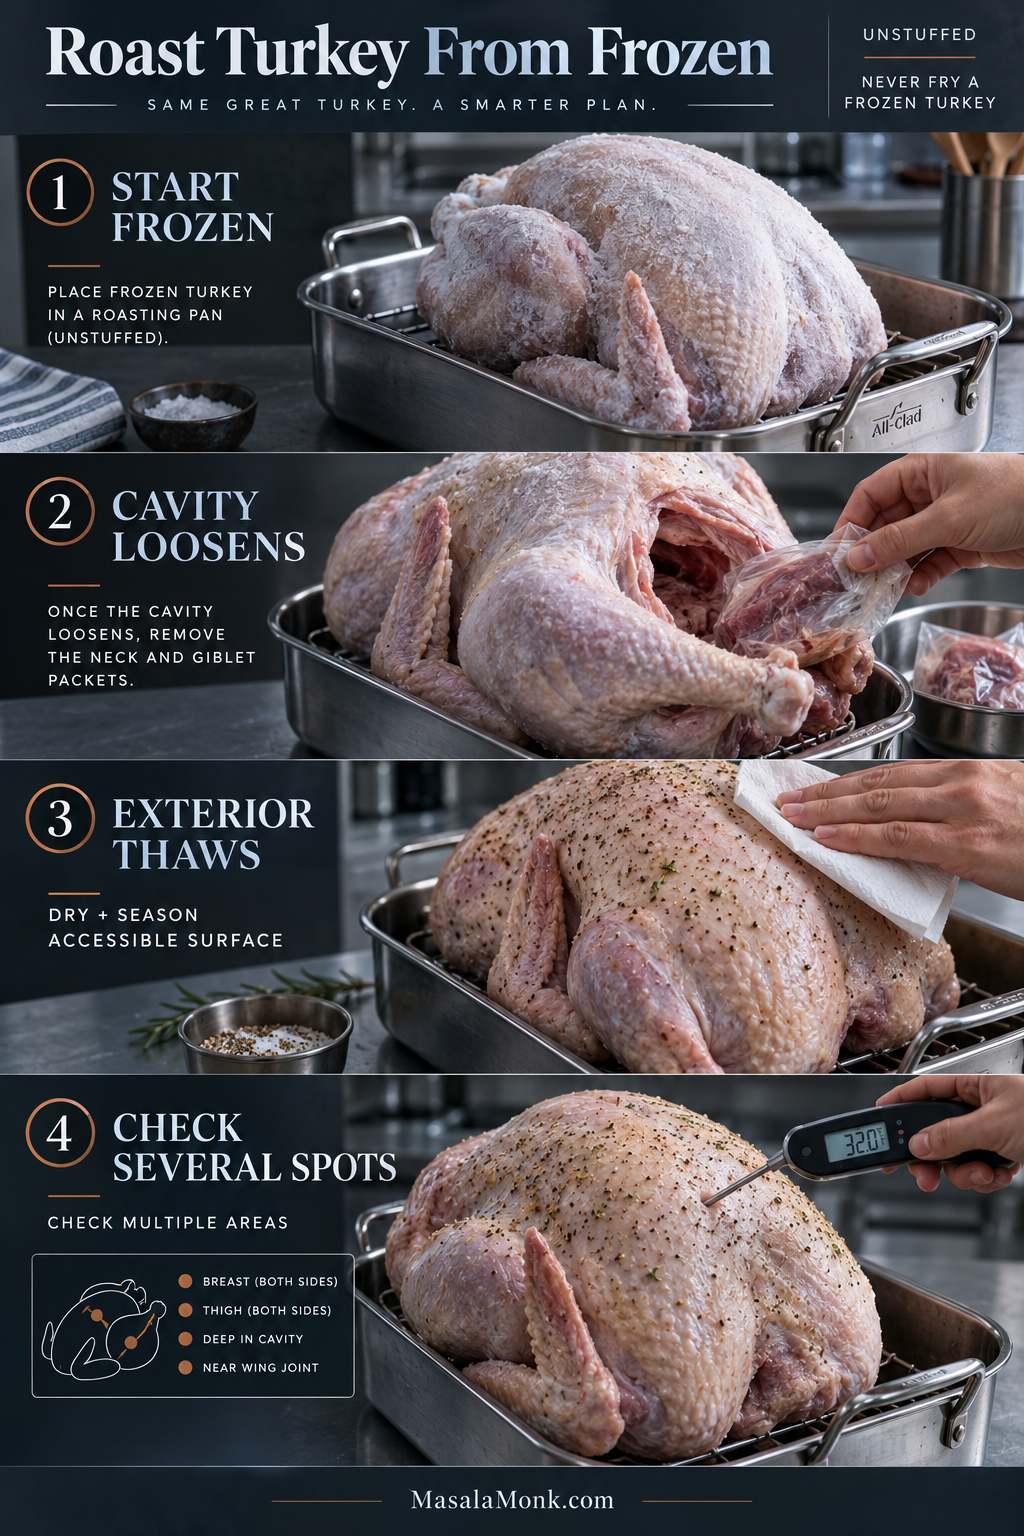
Yes—you can roast a whole turkey from frozen in a conventional oven. Cook it unstuffed and allow at least 50% more cooking time than for a fully thawed bird.

Seasoning beneath frozen skin will be difficult at first, and different areas will heat at different speeds. This is the backup method for the day the thaw simply did not finish.

Partially frozen: the exposed breast may heat much faster than icy areas around the cavity and inner thighs. Check several locations and shield anything that gets ahead.

Completely frozen: as the cavity loosens, carefully remove the neck and giblet packets with tongs once you can reach them. Continue roasting until the breast, thighs and inner wing areas have all reached at least 165°F / 74°C.

Once the exterior has thawed enough to handle safely, pat the accessible skin dry and brush it with unsalted butter or oil, herbs and pepper. For an untreated bird, season the exposed surface lightly with salt; enhanced, injected, self-basting and kosher turkeys may already have enough. There is no need to imitate a full dry brine after roasting has begun.

Four-step guide showing a frozen whole turkey in a roasting pan, removal of packets after the cavity loosens, seasoning the thawed exterior, and checking several areas with a thermometer.
A frozen turkey is mainly a timing problem, not a reason to abandon dinner; keep it unstuffed and expect different parts of the bird to heat unevenly.

Never put a frozen or partially frozen turkey into hot frying oil.

Cooking a Stuffed Turkey

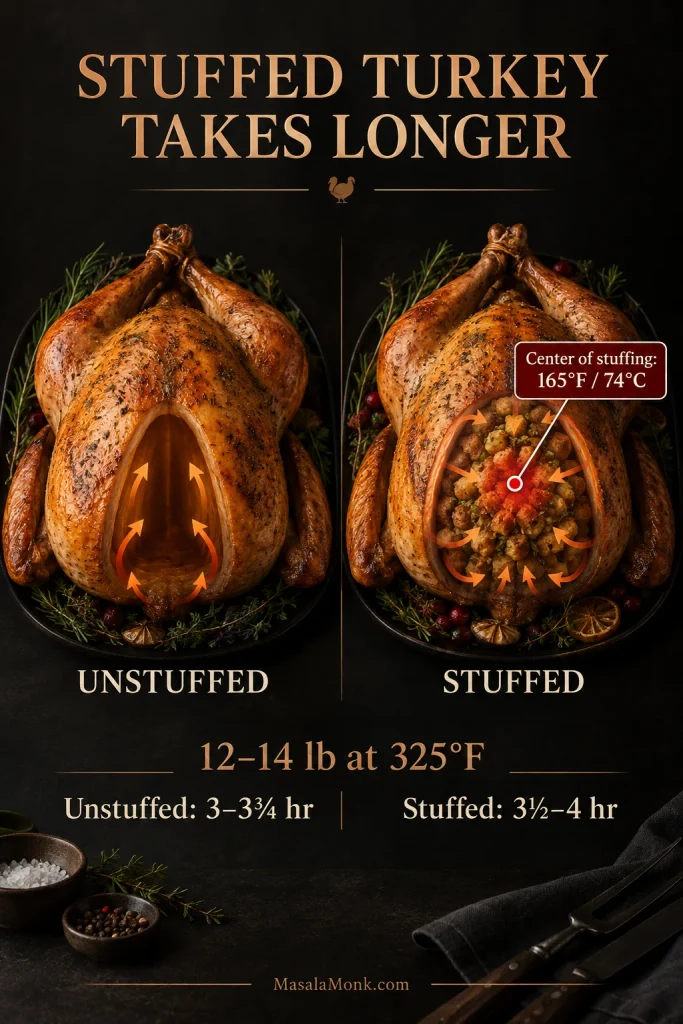
A stuffed 12–14 lb turkey needs roughly 3½–4 hours at 325°F / 163°C. Add the stuffing just before roasting, keep it loose, and make sure the center also reaches at least 165°F / 74°C.

Separate dressing is easier to time and gives you more browned edges. A pan of Southern cornbread dressing also keeps the turkey on the simpler unstuffed schedule.

Using a Convection Oven

Convection cooks and browns turkey faster. USDA guidance allows reducing the conventional oven temperature by 25°F / about 14°C, but not below 300°F / 150°C. Follow your oven manufacturer’s poultry guidance and begin checking substantially earlier.

Make Ahead, Store and Reheat Turkey

Same-day roasting gives you the best skin. If the schedule demands a day-ahead turkey, let it rest, carve it and refrigerate the meat promptly in shallow containers.

How to Reheat Turkey Without Drying It Out

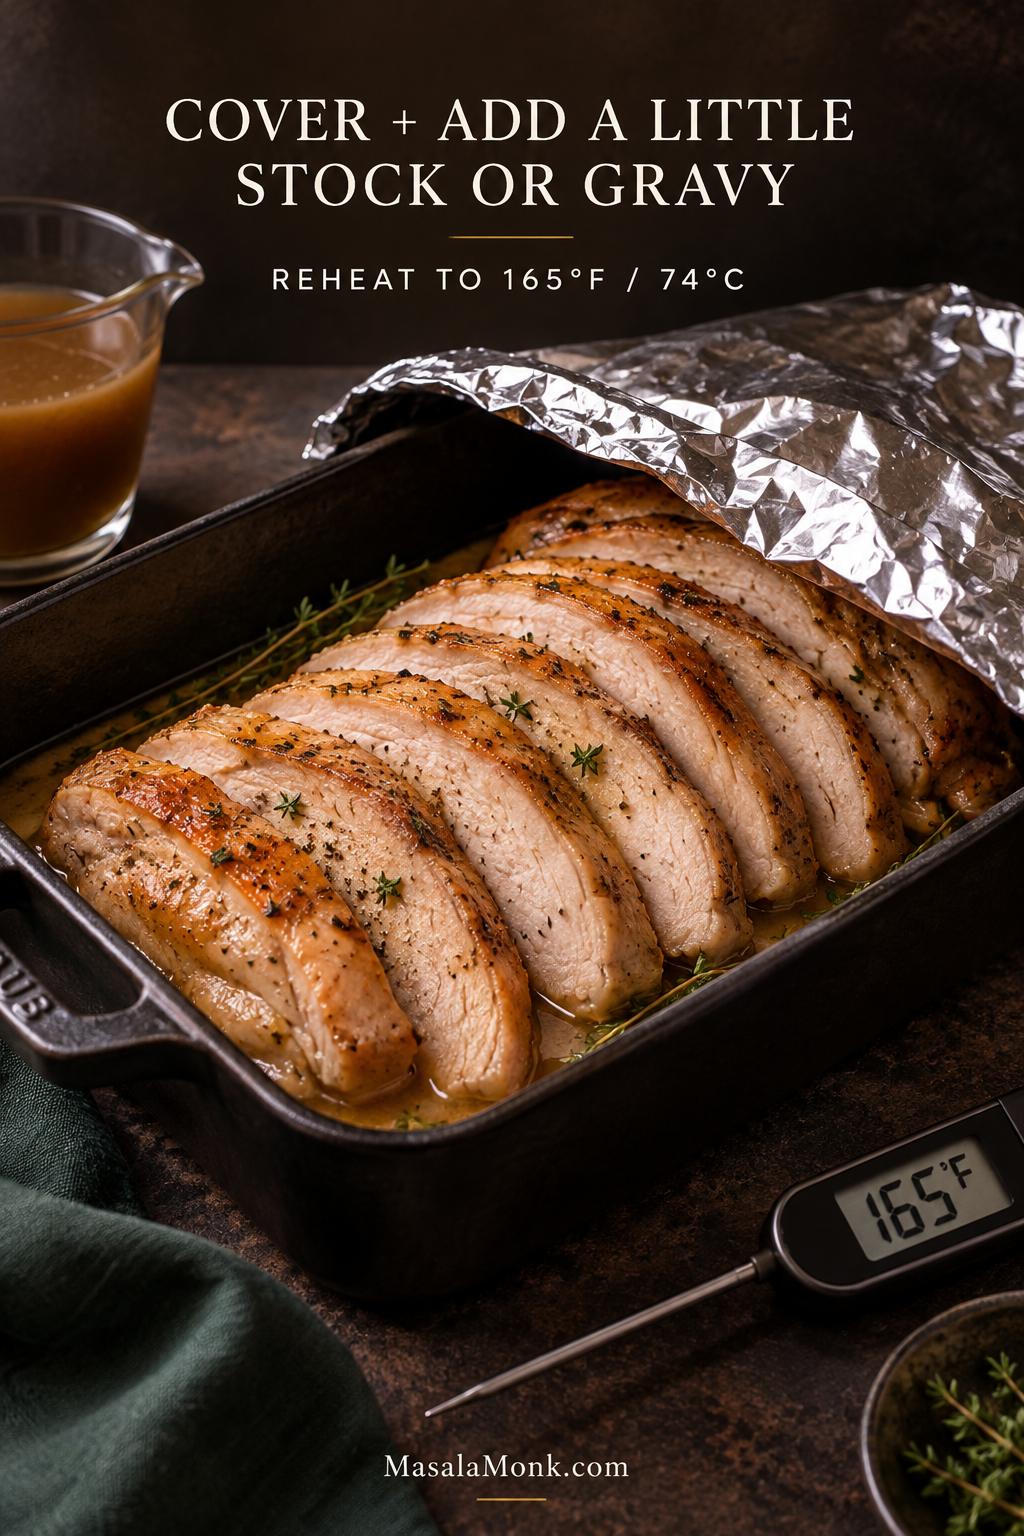
Reheat covered portions with enough unsalted stock or gravy to keep the slices moist until they reach 165°F / 74°C.

Sliced cooked turkey in a dark baking dish with a small amount of stock or gravy and a loose foil cover for reheating.
A little unsalted stock or gravy adds moisture around the slices while they heat, helping the exposed cut surfaces stay supple instead of drying at the edges.

Storing Leftovers

Refrigerate cooked turkey within 2 hours. Shallow containers help it cool efficiently.

Use refrigerated leftovers within about 3–4 days. For longer storage, freeze cooked turkey for about 3–4 months for best quality. Reheat leftovers to 165°F / 74°C.

Once another plate of sliced turkey has lost its appeal, leftover meat and gravy can become a turkey pot pie under a crisp pastry top.

Frequently Asked Questions

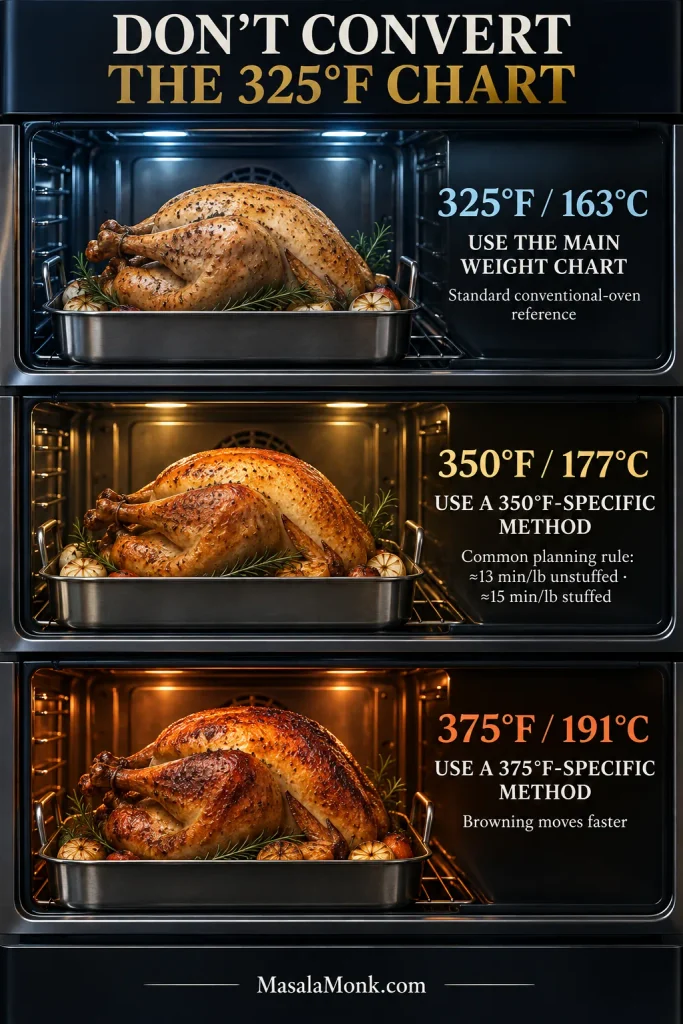
1. Is It Better to Cook a Turkey at 325°F or 350°F?

Both can work, but 325°F / 163°C is the better fit for this roast turkey recipe because the timing, browning strategy and troubleshooting guidance here are built around it. At 350°F / 177°C, expect faster cooking and browning and begin checking sooner.

2. Do You Cook a Turkey Covered or Uncovered?

Mostly uncovered. Loosely foil the breast or other exposed areas once they are brown enough.

3. Should You Baste a Turkey?

No routine basting is needed. An occasional spoonful of rendered fat is fine if basting is part of your tradition.

4. Can You Roast a Turkey Without a Rack?

Yes. Use a sturdy coil of heavy-duty foil, or extra onion, carrot and celery pieces, to lift the turkey above the bottom of the pan.

5. Should You Cook a Turkey Upside Down?

This method keeps the bird breast-side up throughout. Flipping a large hot turkey is awkward, risks damaging the browned skin and is unnecessary here.

6. Should You Trust the Pop-Up Timer?

No—not as your primary doneness test. Confirm the temperature with a reliable thermometer in the thickest breast, inner thigh and inner wing area.

7. Can You Cook a Turkey the Day Before Thanksgiving?

Yes. Carve the rested turkey, chill it promptly in shallow containers, and reheat covered portions with a little stock or gravy to 165°F / 74°C.

Posted on — Leave a comment

Vegetable Pot Pie Recipe: Easy, Creamy & Flaky With Puff Pastry or Pie Crust

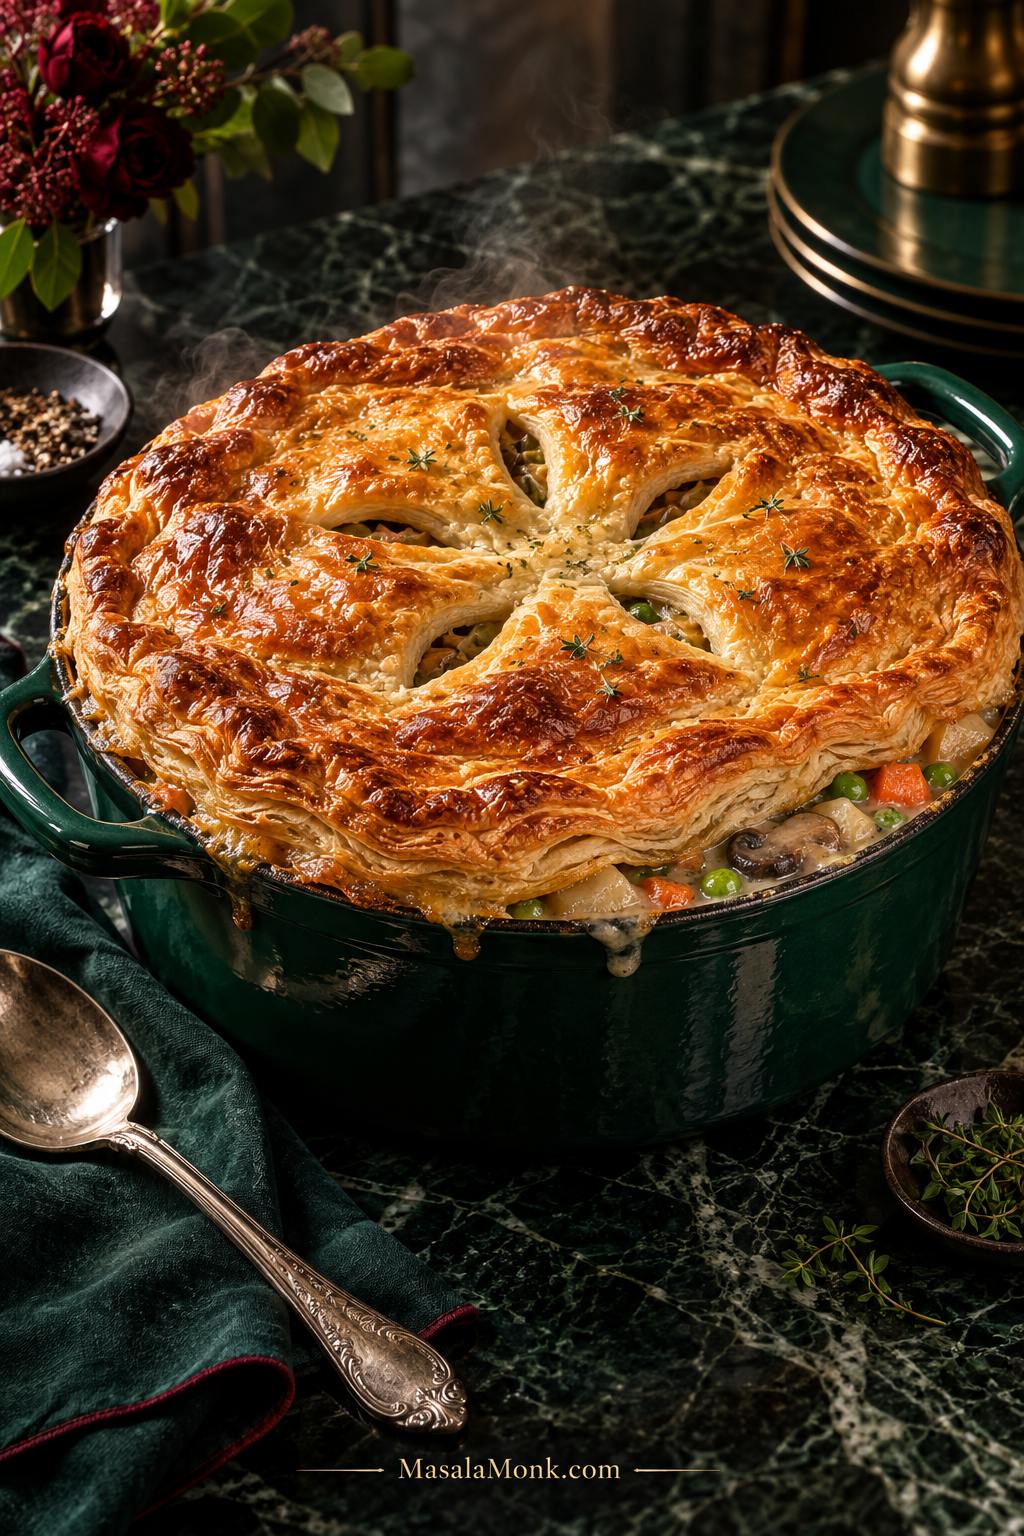
Vegetable pot pie in a deep green casserole with a deeply golden puff-pastry lid and creamy potato, carrot, pea, corn and mushroom filling visible around the rim.

Under a deeply golden pastry lid, the filling is creamy enough to cling to tender potatoes and carrots, with sweet peas, browned mushrooms and flaky crust in every spoonful.

That contrast is what makes vegetable pot pie worth baking: crisp pastry above, rich gravy underneath, and vegetables that stay distinct in the sauce. The key is getting those parts ready at the same time. Potatoes need a head start, mushroom water needs time to cook away, and puff pastry performs best when it reaches the oven still chilled.

This vegetable pot pie recipe handles most of that work before the dish reaches the oven. The cooking is straightforward: soften the vegetables, build the gravy, cover and bake. Once the filling is ready, the pastry turns a pan of creamy vegetables into a generous dinner with a crisp golden lid.

Vegetable Pot Pie Recipe

The recipe pairs a creamy thyme-and-sage vegetable filling with a deeply golden puff-pastry lid. Potatoes, mushrooms, carrots, peas and corn make this vegetarian pot pie substantial enough for dinner, while a single pie crust can replace the puff pastry for a sturdier finish.

Serves
About 6

Dish
2½–3 qt / 2.4–2.8 L

Oven
425°F / 220°C

Prep
20 minutes

Cook
60–70 minutes

Total
About 1 hr 30–1 hr 40 min

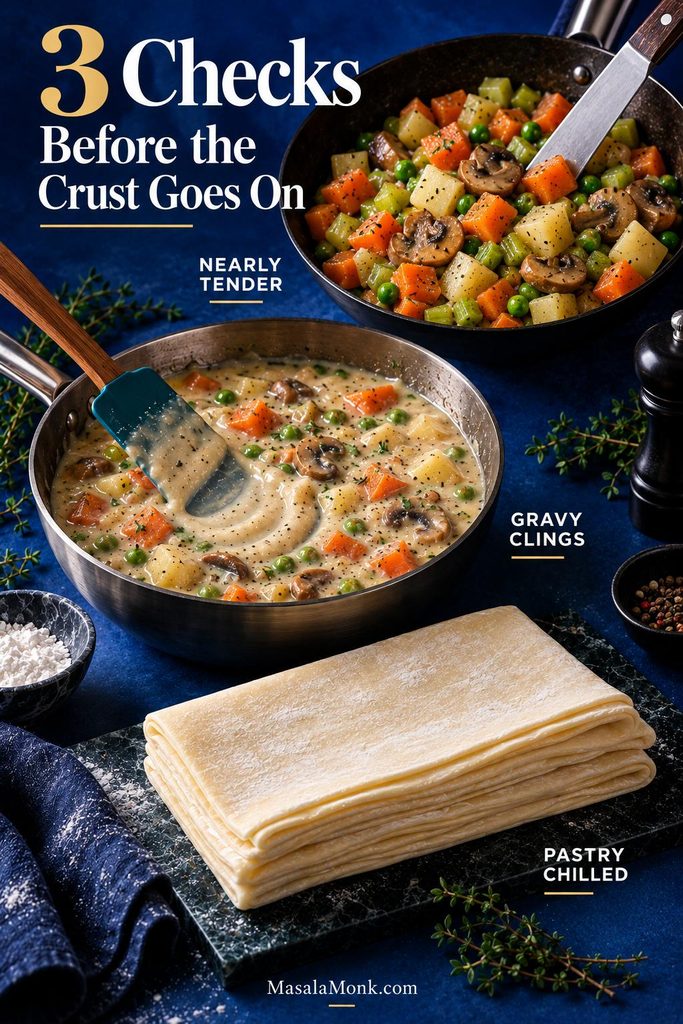
Three Checks Before the Crust Goes On

Cook firm vegetables until nearly tender, thicken the gravy until it clings, then add chilled pastry. Those three checks matter more than hitting every minute exactly.

Vegetables

Potatoes and other firm pieces are almost fork-tender. A knife meets only slight resistance.

Gravy

For the gravy, a spatula trail stays open for about 1–2 seconds before slowly closing.

Pastry

Puff pastry is cool and flexible, not sticky, greasy or floppy.

Three pre-baking checks for vegetable pot pie: nearly tender vegetables being tested, thick gravy that clings and leaves a brief trail, and chilled puff pastry ready for the dish.
These checks take pressure off the oven. Once the vegetables and gravy are ready, the bake is mainly about getting the chilled pastry properly puffed and browned.

Ingredients

Vegetables and Aromatics

  • 1 medium-large onion, diced — about 5 oz / 150 g
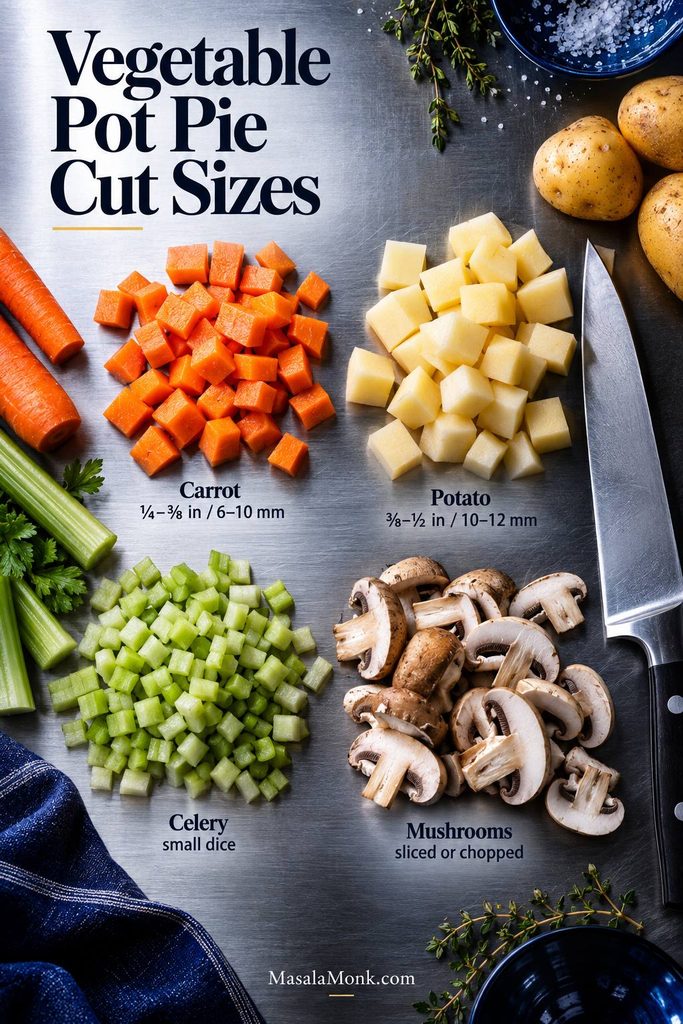
  • 2 medium carrots — about 5 oz / 150 gCut into ¼- to ⅜-inch / 6- to 10-mm pieces.
  • 2 celery stalks — about 3 oz / 80 gDice into small, even pieces.
  • 8 oz / 225 g mushroomsCremini or white mushrooms both work; slice or chop them.
  • 8 oz / 225 g Yukon Gold or other all-purpose potatoUsually 1 large or 2 small potatoes. Cut into ⅜- to ½-inch / 10- to 12-mm cubes.
  • 3 garlic cloves, minced
  • 1 tsp dried thyme
  • ½ tsp dried sage

For the Creamy Gravy

  • 4 tbsp / 2 oz / 56 g unsalted butter
  • ⅓ cup / about 1½ oz / 42 g all-purpose flour
  • 2 cups / 16 fl oz / 480 ml low-sodium vegetable broth, divided½ cup / 120 ml cooks the potato; the remaining 1½ cups / 360 ml builds the gravy.
  • ½ cup / 4 fl oz / 120 ml whole milkHeavy cream can replace the milk for a richer sauce.
  • 2 tsp / 10 ml soy sauce
  • 1½ cups / about 7½ oz / 210 g total frozen peas and corn
  • ¾ tsp fine salt, divided, plus more if needed
  • ½ tsp black pepper
  • 1 tsp / 5 ml apple cider vinegar or white wine vinegar

For the Puff-Pastry Top

  • Puff pastry — enough to cover the openingUsually one large sheet, often 8½–10½ oz / 240–300 g. Sheet dimensions matter more than package weight.
  • 1 large egg
  • 1 tbsp / 15 ml water or milk

Produce varies in size, so use the gram weights when your carrots, potatoes or onion look unusually large or small.

Overhead vegetable prep guide showing carrots cut about ¼ to ⅜ inch, potatoes about ⅜ to ½ inch, small-diced celery and sliced mushrooms.
Keep the firm vegetables small enough to finish before the pastry; a few oversized potato or carrot pieces can still be crunchy when the crust is already browned.

Equipment

  • Large deep skillet or Dutch oven
  • 2½–3 qt / 2.4–2.8 L oven-safe casserole or deep baking dish
  • Rimmed baking sheet
  • Whisk

A dish with an opening around 10–11 in / 25–28 cm works well with most large pastry sheets. Leave ½–¾ in / 1.25–2 cm between filling and rim so bubbling gravy has somewhere to go.

An oven-safe skillet can go straight from stovetop to oven when the filling fits with that headroom and the pastry covers the opening.

Instructions

  1. Heat the oven and chill the pastry. Preheat to 425°F / 220°C. Thaw puff pastry only until it unfolds without cracking, then return it to the refrigerator.
  2. Start the vegetables. Melt the butter over medium heat. Add onion, carrots, celery and ¼ tsp salt. Cook for 6–8 minutes, until the onion is translucent and the carrots have begun to soften.
  3. Brown the mushrooms. Add them and cook for 6–10 minutes. At first they will look wetter; keep going until that liquid evaporates and the pan returns to a clear sizzle. Add garlic, thyme, sage and pepper, then cook for 30–60 seconds, until the herbs smell distinctly savory.

Finish the Filling

  1. Get the potato nearly tender. Add potato and ½ cup / 120 ml broth. Cover for 6–8 minutes, then uncover and cook until the largest cubes offer only slight resistance and the broth has nearly disappeared. The oven is good at baking pastry; it is much less helpful with a raw potato buried under gravy.
  2. Build the gravy. Stir in the flour and cook for 1–2 minutes. Add ½ cup / 120 ml of the remaining broth and stir smooth. Gradually add the final 1 cup / 240 ml broth, then the milk, soy sauce and remaining salt. Simmer for 3–5 minutes.
  3. Add the peas and corn. Stir them in frozen and return the gravy to a gentle simmer for 2–3 minutes. Drag a spatula across the pan; the trail stays open briefly when the gravy is ready. A spoonful slumps back into the skillet, and the sauce clings to the vegetables instead of pooling underneath them.

Season and Add the Pastry

  1. Season the filling. Taste, adjust salt or pepper, then stir in the vinegar. The filling needs enough flavor to stand on its own before pastry covers it. If it is still bubbling vigorously, let it stand for about 5 minutes while the pastry stays refrigerated.
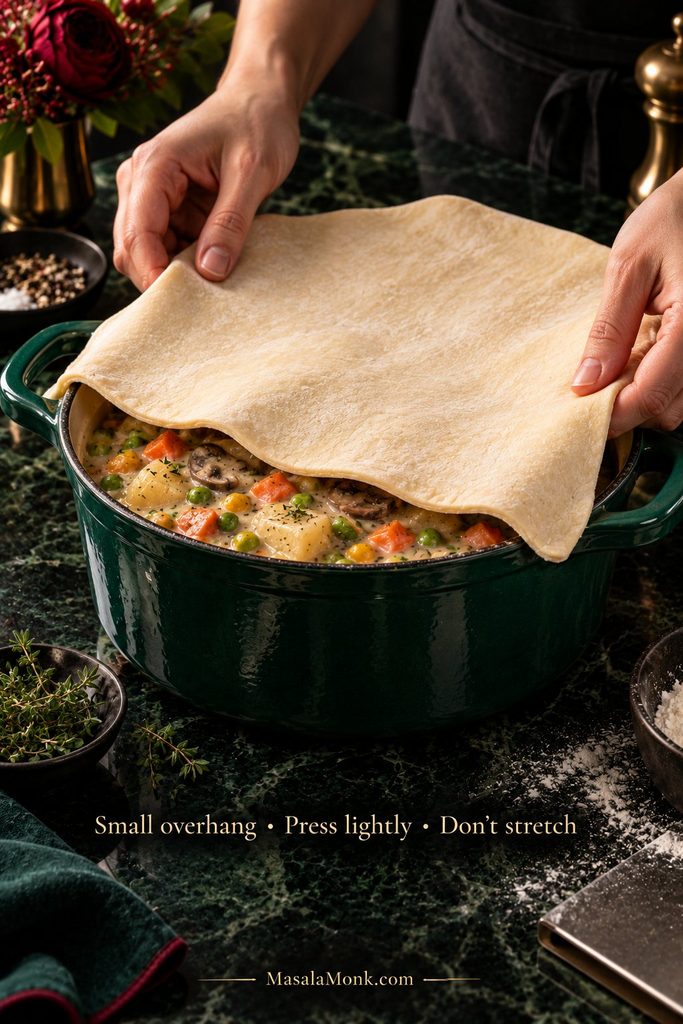
  2. Add the pastry. Transfer the filling if needed. Lay the pastry over the dish with a small overhang, press it lightly against the rim and trim only when necessary. Do not stretch the sheet to make it fit. Cut 3–5 vents, beat the egg with water or milk, and brush the top lightly.
Hands laying one sheet of raw puff pastry over creamy vegetable pot pie filling with a small overhang around a deep green casserole.
If the sheet fits only when it is stretched, change the fit rather than the pastry. Taut layers have less room to separate and lift in the oven.

Bake and Rest

  1. Bake for 22–30 minutes. Look at the center as well as the edge: properly baked pastry is puffed, visibly layered and deeply golden. Gravy bubbling through the vents or around the rim is a good sign that the filling underneath is thoroughly hot. Shield dark edges loosely with foil when needed.
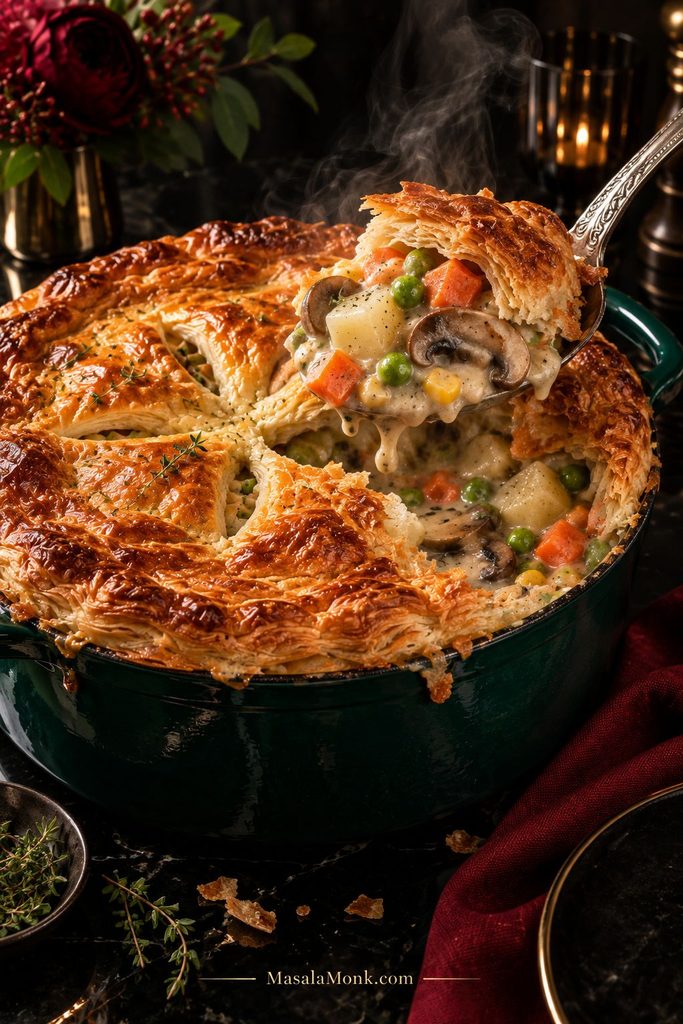
  2. Rest for 10 minutes. The gravy settles slightly while the lid stays crisp enough to break cleanly under a spoon.
Serving spoon lifting creamy vegetable pot pie filling with potatoes, carrots, peas, corn and mushrooms beneath broken flakes of golden puff pastry.
Ten minutes after baking, look for a filling that holds briefly on the spoon before settling. That soft hold matters more than getting a perfectly tidy first serving.

Pie-crust version: cover the warm or slightly cooled filling with one prepared pie-crust round, cut several vents and brush with egg wash. Bake at 400°F / 205°C for 30–35 minutes, until deeply golden and bubbling. Check packaged crust when the dish needs to stay vegetarian, since some products use animal fat.

Best Vegetables for Pot Pie

Onion, carrots, celery, potatoes, mushrooms, peas and corn make a dependable pot-pie mix. Green beans, cauliflower, broccoli, spinach, sweet potato and squash work too. Two things matter when you swap: how long the vegetable needs to become tender and how much water it carries into the pan.

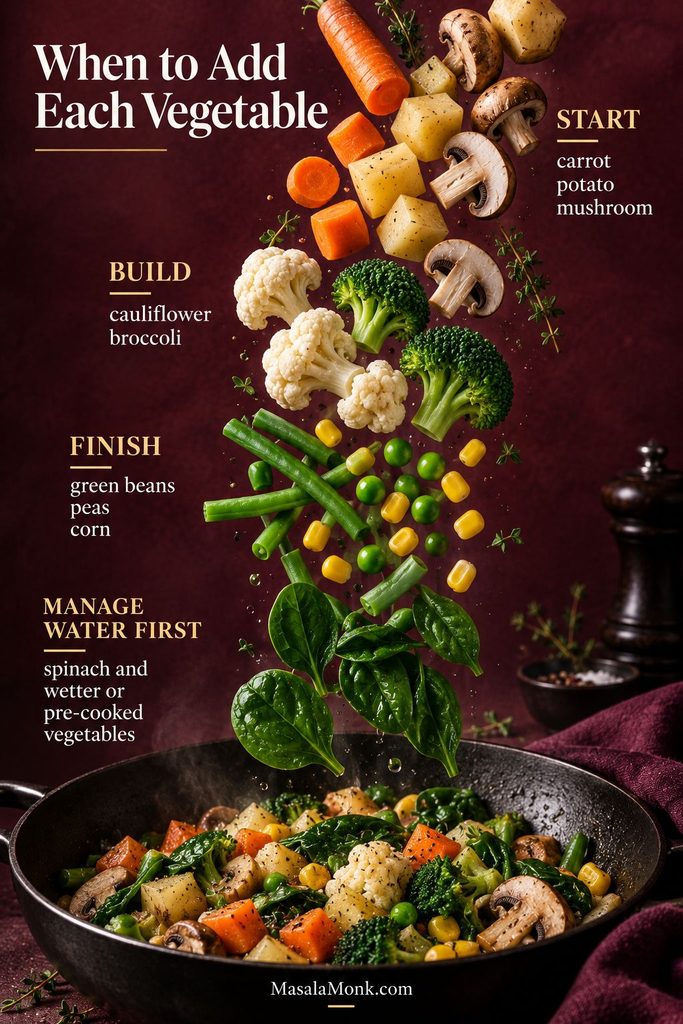
When to Add Each Vegetable

VegetableCut or PrepWhen to Add ItBefore Baking
Potato⅜–½ in / 10–12 mm diceAfter mushrooms, before flourAlmost tender
Carrot¼–⅜ in / 6–10 mm piecesWith onion and celeryMostly tender
CelerySmall diceWith onion and carrotSoftened
MushroomsSliced or choppedAfter aromatics softenWater gone; some browning
CauliflowerSmall floretsWith potato, before flourNearly tender
BroccoliSmall floretsAs the gravy thickensBright and slightly firm
Green beansShort piecesNear the end; slightly earlier if firmTender, not limp
PeasFresh or frozenAt the end, with cornHeated through
CornFresh or frozenNear the endHeated through
SpinachWilted or thawed and squeezedAt the endExcess water removed
Sweet potato½ in / 12 mm cubesWith potato; start checking earlyAlmost tender
Butternut squashSmall cubesWith potato, or roasted and added lateTender, not collapsing
Vegetable timing guide showing carrots, potatoes and mushrooms added early; cauliflower and broccoli next; green beans, peas and corn later; and spinach or wetter vegetables needing moisture control first.
Different vegetable swaps create different problems: sweet potato changes timing, spinach changes moisture, and roasted vegetables arrive with much of their cooking already finished.

Mushrooms and Potatoes Need the Head Start

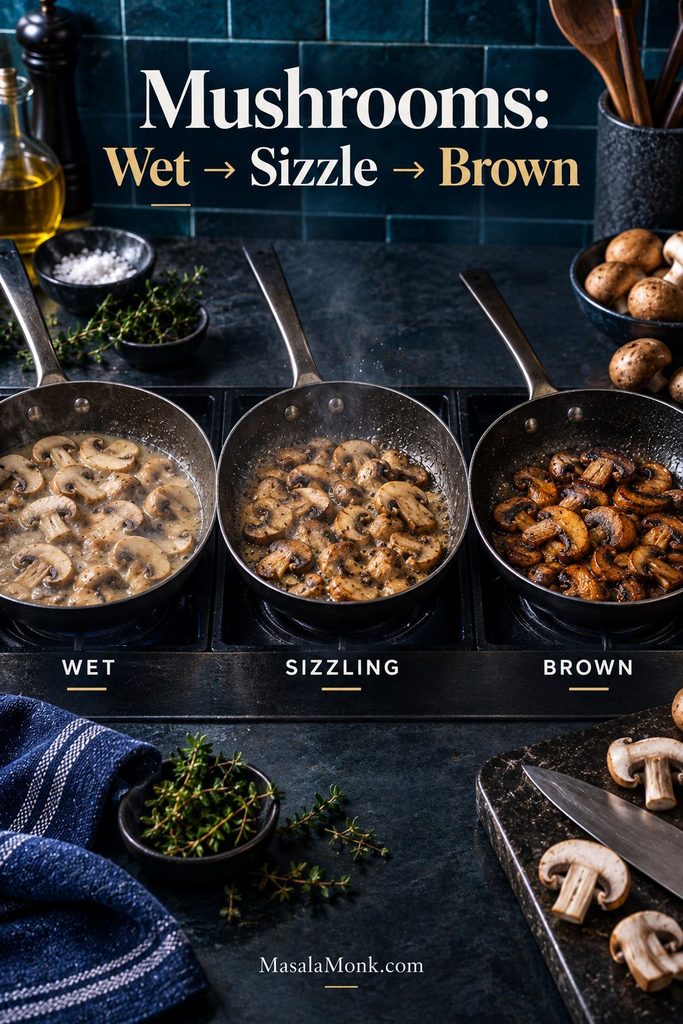
Mushrooms usually get wetter before they get browner. Once their released water cooks away, the quiet bubbling changes to a sharper sizzle. That is when browning really begins, giving the finished gravy more depth. The same moisture-first sequence matters in our creamy mushroom sauce.

Three pans showing mushrooms releasing liquid, mushrooms sizzling as the liquid evaporates, and mushrooms deeply browned after the excess moisture is gone.
Cook the released mushroom water away before building the gravy. You get better browning now and less excess liquid to reduce later.

Potatoes have the opposite problem: they release little water but need time. Pieces around ⅜–½ inch / 10–12 mm soften efficiently without disappearing into the gravy. When potato shares the filling with cauliflower, smaller potato pieces help their cooking times meet in the middle; the same size logic appears in our roasted cauliflower and potatoes.

Swaps That Work Well

The table handles most substitutions, but a few deserve extra attention. Sweet potato softens faster than regular potato. Frozen spinach is unusually wet, so thawing and squeezing it first is worth the trouble. Already-roasted vegetables belong near the end. Roasting squash, cauliflower, Brussels sprouts or mushrooms also drives off water before it can loosen the gravy—the same moisture-control principle used in our vegetable lasagna.

Canned vegetables can work too, but their softer texture means they are best drained well and folded in late.

Build More Flavor Into the Filling

Browning does more for a meatless pot pie than simply adding extra herbs. Once the mushrooms have browned and the thyme and sage hit the pan, the filling starts smelling like pot pie before the gravy is even finished. Soy sauce gives it savory weight, while a small splash of vinegar keeps the finish lively. Mushrooms help, but cauliflower, green beans or extra potato can replace them.

Easy Vegetable Pot Pie With Frozen Vegetables

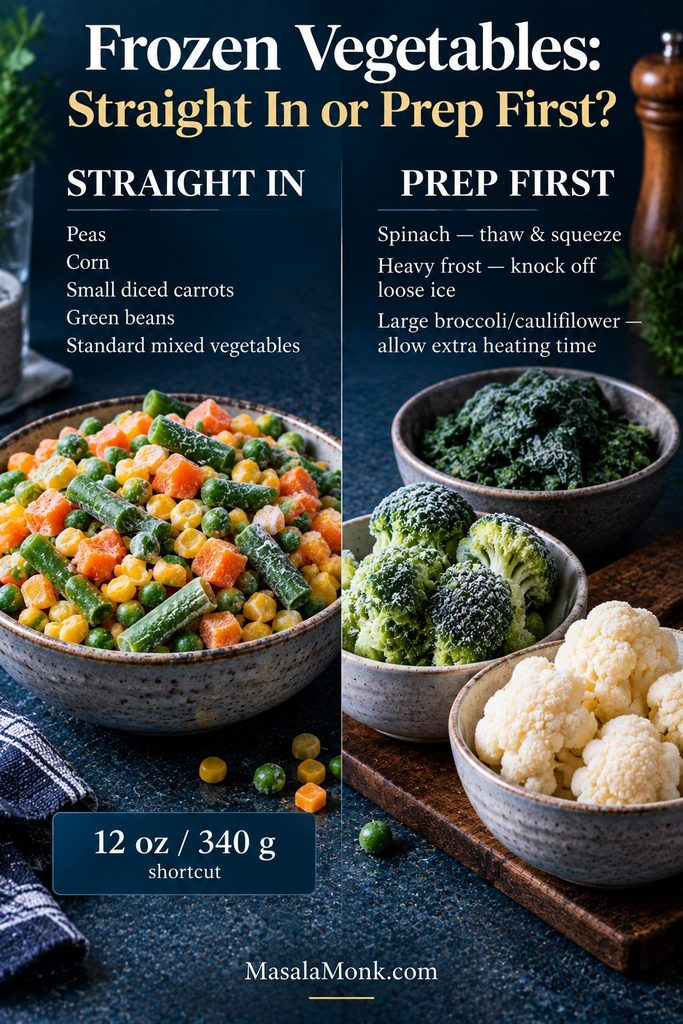
Yes. Most frozen mixed vegetables can go straight into the pot-pie filling without thawing. A few exceptions need a little prep first.

For less chopping, keep the onion, celery, mushrooms and potato, then use one 12 oz / 340 g bag of frozen peas, carrots, corn and green beans. Skip the fresh carrots and the separate peas-and-corn mixture from the main recipe.

Add the frozen mix after the gravy has thickened. The cold vegetables temporarily slow the simmer, so wait until the pan is bubbling gently again before judging thickness. Some bags barely change the sauce; heavily frosted ones can loosen it noticeably.

Straight From the Freezer

  • Peas
  • Corn
  • Small diced carrots
  • Green beans
  • Standard mixed-vegetable blends

Prep Before Adding

  • Spinach: thaw and squeeze dry.
  • Heavily frosted bags: knock away loose ice.
  • Large broccoli or cauliflower: give them more time to heat through before judging the gravy.
Frozen vegetable guide showing peas, corn, diced carrots and green beans used directly from frozen, while spinach, heavy frost and large broccoli or cauliflower pieces need extra preparation.
Loose freezer frost is extra water; knock it away before it reaches a gravy that is already close to finished thickness.

Jump to: Check filling thickness · Compare crusts · Back to recipe

Vegetable Pot Pie Filling: How Thick Should It Be?

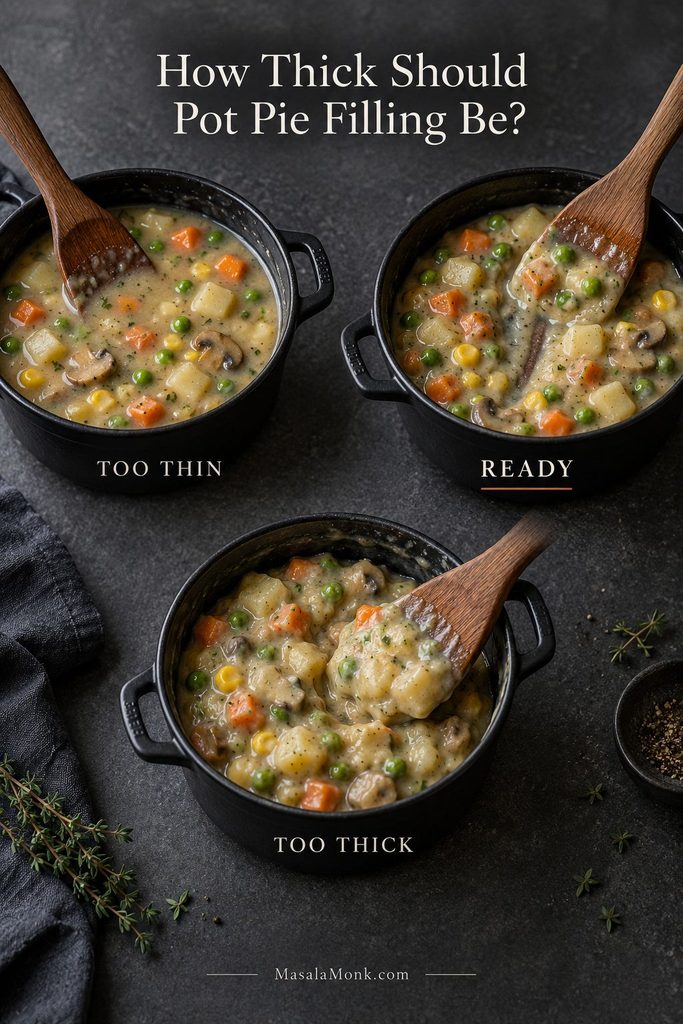
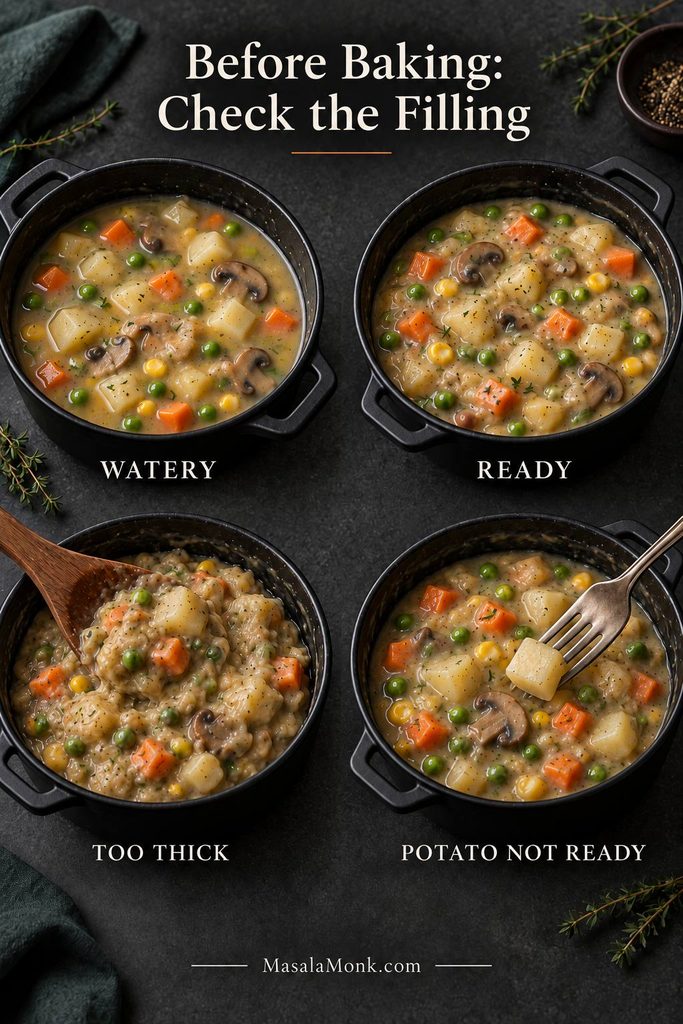
The gravy should cling to the vegetables but still move slowly when you tilt the pan. Drag a spatula across the bottom; the trail should stay open for about 1–2 seconds before slowly closing.

Vegetable moisture can change a gravy that looked perfect a few minutes earlier, so judge its final thickness only after mushrooms, spinach or frozen vegetables are fully hot.

Three vegetable pot pie fillings showing a loose watery consistency, a creamy ready consistency that coats the vegetables, and an overly thick stiff consistency.
Wait for the simmer to return after adding frozen vegetables. Cold pieces can briefly make a correctly thickened pot pie filling look thinner than it really is.

When the Gravy Ends Up Too Thin

Reduce it uncovered before reaching for more starch. A few extra minutes over the heat often solve water introduced by vegetables. When reduction is not enough, mix 1 tsp / about 3 g cornstarch with 2 tsp / 10 ml cold water, stir in part of the slurry and simmer before deciding whether the rest is necessary.

When It Gets Too Thick

Add warm broth or milk 1–2 tbsp / 15–30 ml at a time. Stop once the gravy coats the vegetables easily again.

Puff Pastry, Pie Crust or Biscuits?

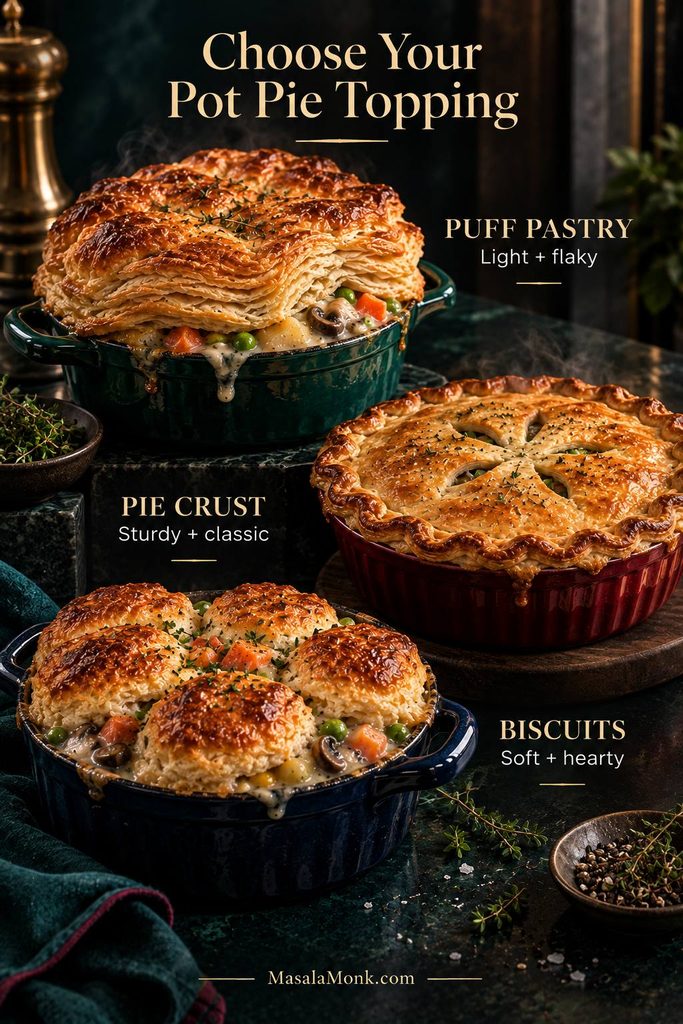
Puff pastry is the easiest default when you want a light, flaky lid without making dough. Choose pie crust for a sturdier top, or biscuits for a softer casserole-style finish. The filling itself can stay the same.

ToppingBest ForMain Adjustment
Puff pastryLight, flaky layersKeep chilled until assembly
Pie crustA sturdier classic lidBake around 400°F / 205°C
Double crustPastry underneath and on topCool filling and manage bottom moisture
BiscuitsA soft, hearty toppingCold dough over hot filling
Three vegetable pot pies comparing a tall flaky puff-pastry lid, a flatter crimped pie crust and separate golden biscuit topping.
Each topping changes the handling as well as the texture: keep puff pastry cold, use pie crust for structure, and give biscuits hot filling underneath.

Puff Pastry

For the puff pastry, the sheet is ready when it unfolds without cracking but still feels cool. Sticky, greasy or floppy pastry needs a few minutes back in the refrigerator.

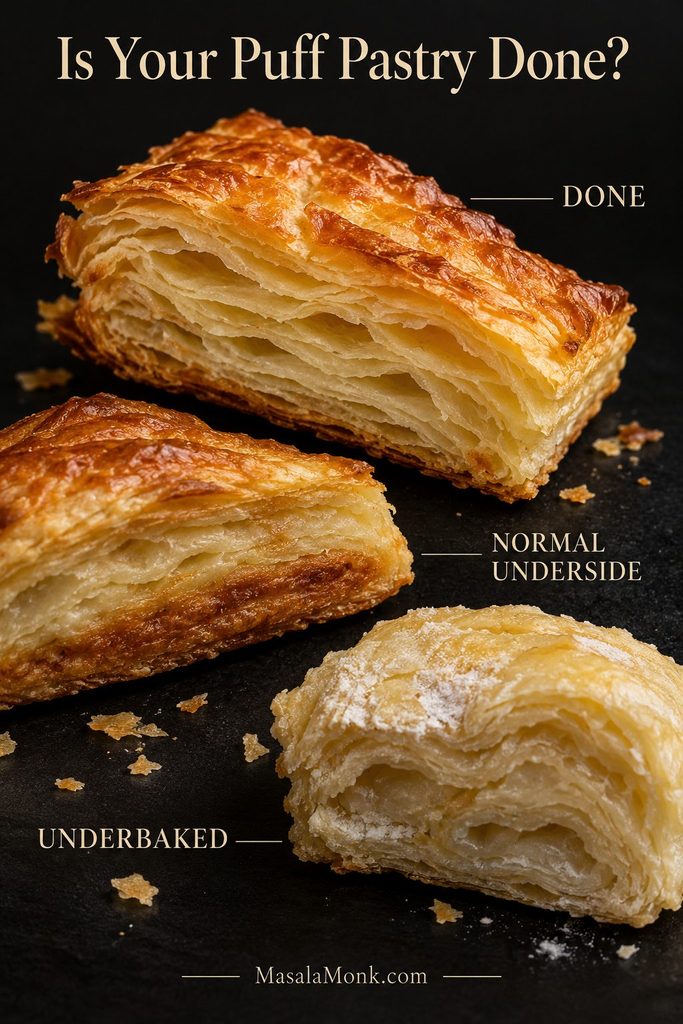
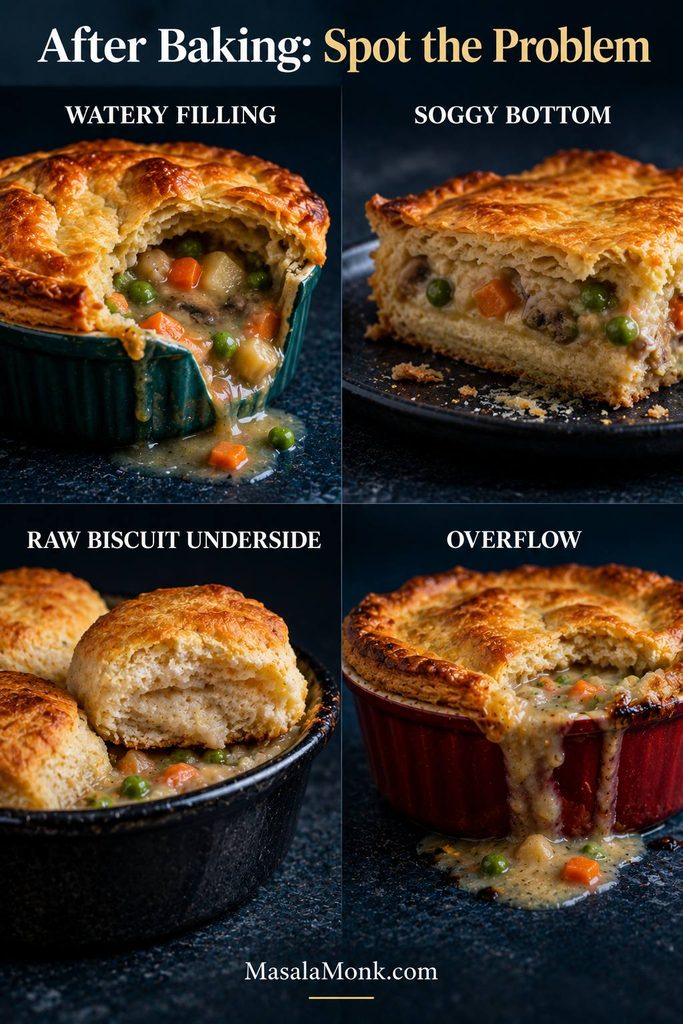
Watch the middle of the lid in the oven. The edge can brown beautifully while the pastry over the wettest part of the filling remains pale and compressed. Properly baked layers look distinct and break under a spoon instead of bending together like damp dough.

Soft underneath is not the same as raw puff pastry. Steam naturally softens the side touching the gravy. Pale, sticky or floury pastry through the center is different and still needs more baking.

Three puff-pastry cross-sections showing fully baked separated golden layers, a cooked but softer underside, and pale compressed underbaked pastry.
If the center layers are pale, fused or tacky, keep baking—even when the edges are already deeply browned.

For crisp pastry on both sides, bake the sheet separately. Cut it into squares, brush with egg wash and bake on parchment at 400°F / 205°C, starting your check around 15 minutes. Spoon hot filling into bowls or ramekins and set the crisp pastry on top.

Puff pastry is much less forgiving on the bottom of a wet pot pie. Regular pie dough is the easier route when pastry underneath matters.

Pie Crust

For the easiest reliable pie-crust version, use a single top crust. It generally needs about 30–35 minutes at 400°F / 205°C. Cover the rim loosely with foil when it colors well ahead of the center.

Our homemade pie crust guide covers cold butter, hydration, rolling and chilling in more detail. For a double-crust pot pie, cool the filling before it meets the bottom dough and consider partial prebaking when a crisp base matters. Metal pans and stronger bottom heat also help; King Arthur Baking explains the role of pan material and bottom heat.

Using Biscuits as the Topping

Set cold biscuit dough over hot gravy with a little room between the pieces. For medium homemade biscuits, 400°F / 205°C for about 25–30 minutes is a useful starting point. Refrigerated dough should follow its package temperature and timing first.

Check a biscuit near the middle instead of judging only the browned tops. The underside is ready when it is set and no longer gummy.

Individual Pot Pies

Use six 16 oz / 475 ml ramekins, or six to eight smaller 12–14 oz / 355–415 ml dishes. Fill them no more than about three-quarters full. Puff-pastry tops often finish in roughly 18–22 minutes at 400–425°F / 205–220°C, although the center layers remain the better doneness cue.

Changing the dish changes the bake. A shallow ramekin, deep casserole, bottom crust and thick biscuit topping all move heat and steam differently. Borrow another version’s timer cautiously when the vessel or topping changes.

Three individual vegetable pot pies in ramekins with golden puff-pastry tops, including one opened to show creamy vegetable filling.
Three-quarter-full ramekins leave useful headroom for bubbling gravy, so the pastry edge stays cleaner and the filling stays in the dish.

Jump to: Vegetarian variations · Serving ideas · Make ahead · Back to recipe

Vegetarian Pot Pie Variations

Make It Heartier

Add 1–1½ cups / 170–255 g drained white beans or chickpeas and remove roughly the same volume of vegetables. White beans soften into the sauce; chickpeas keep more bite.

Vegan

Use vegan butter or another suitable cooking fat, vegetable broth and unsweetened oat or soy milk. Check the pastry label because prepared puff pastry and pie crusts vary in the fats they contain. Plant milk or aquafaba can replace the egg wash; nutritional yeast or a little extra soy sauce can deepen the gravy.

Gluten-Free

A gluten-free all-purpose blend designed to replace wheat flour can work in the roux. Cornstarch is another straightforward option.

For cornstarch, omit the 42 g flour. Once the vegetables are ready, add the broth and milk and bring them to a simmer. Mix 2½ tbsp / about 20 g cornstarch with 2½ tbsp cold water. Start with roughly half, simmer, then add only as much more as the gravy needs.

Use certified gluten-free tamari or soy sauce and a gluten-free topping.

Making a meat version? Cooked turkey or leftover gravy changes the liquid balance, so start with our Turkey Pot Pie Recipe instead.

What to Serve With Vegetable Pot Pie

Pot pie already brings pastry, gravy and plenty of vegetables, so the best sides add freshness. A cucumber salad with vinegar and dill gives a cold, sharp contrast, while green beans almondine add lemon and toasted-almond crunch. For the same reason, a peppery arugula salad with a bright vinaigrette works well, while simply roasted asparagus keeps the plate warm without making it heavier.

Vegetable pot pie served with fresh sides including cucumber salad, leafy greens and green beans on a dark dining table.
One crisp, fresh or acidic side is usually enough; another starch mostly competes with the pastry.

Make Ahead, Freeze and Reheat

Yes. Make the filling up to 2 days ahead, but keep the pastry separate until you’re ready to bake. Raw puff pastry gradually absorbs moisture when it sits directly against the gravy.

Reheat refrigerated filling until hot before assembly. Chilled flour-thickened gravy often firms up, so loosen it with a small splash of broth or milk when needed. If the filling is bubbling vigorously, let it stand for a few minutes before covering and baking.

Freezing

Freeze the cooked, cooled filling without the crust and aim to use it within 2–3 months for best quality. Thaw overnight in the refrigerator, reheat, adjust the consistency, then add fresh pastry. A fully baked pie can also be frozen, although the reheated crust will be softer.

Make-ahead vegetable pot pie sequence showing cooked filling prepared and stored separately from raw puff pastry, followed by reheating, topping and baking.
For make-ahead pot pie, judge the gravy after reheating—not straight from the refrigerator, when the chilled sauce can look deceptively firm.

Leftovers

Refrigerated leftovers are best used within 3–4 days. Reheat in a 325–350°F / 165–175°C oven until the center reaches 165°F / 74°C. A microwave is quicker, but steam softens pastry. See the USDA FSIS leftovers guidance for cooling and reheating safety.

Vegetable Pot Pie Troubleshooting

A pot pie can go sideways for ordinary reasons: wetter vegetables, a deeper dish, cold filling or pastry that simply needs longer in the middle. Start with the stage where the problem appeared.

Before Baking

Before-baking troubleshooting guide showing watery filling, correctly thickened filling, overly thick filling and an undercooked potato being checked for tenderness.
Before the crust goes on, test the loosest-looking gravy and one of the largest potato cubes. Those are the two problems least likely to fix themselves in the oven.
What You SeeLikely CauseWhat to Do
Gravy is wateryVegetables released extra water or the sauce needs more reductionSimmer uncovered first; use a small cornstarch slurry only when reduction is not enough
Gravy is glueyToo much thickener or reductionAdd warm broth or milk 1–2 tbsp / 15–30 ml at a time
Flour formed lumpsLiquid reached the flour too quicklyWhisk if practical; next time smooth the first portion of broth in before adding the rest
Everything tastes blandNot enough salt, browning, herbs, umami or acidityCorrect the filling before pastry goes on
Potatoes still crunchPieces are too large or need longer on the stovetopCook longer and test one of the largest cubes

After Baking

After-baking troubleshooting guide showing watery pot pie filling, a soggy bottom crust, a biscuit with a raw or gummy underside and filling overflowing from a baking dish.
Match the symptom to the fix: more oven time can help raw dough, but it cannot undo excess liquid or an overfilled dish.
What You SeeLikely CauseWhat to Do
Gravy became wateryWet vegetables released more liquid in the ovenNext time cook them drier and judge thickness only after frozen vegetables are hot
Puff center is pale or doughyThe middle needs more time, or pastry started too warmBake longer and shield dark edges with foil
Puff is soft underneathSteam softened the side touching the gravyThis can be normal; bake pastry separately next time when a crisp underside matters
Puff is gummy or rawGravy was too wet, pastry too warm or center underbakedContinue baking when possible; next time use thicker gravy and chilled pastry
Bottom pie crust is soggyWet filling reached raw dough before the base setCool the filling and consider partial prebaking plus stronger bottom heat
Biscuits are raw underneathFilling was too cool or biscuits too thick and crowdedContinue under loose foil; next time use hot filling and leave more space
Pie overflowedDish was too small or too fullLeave ½–¾ in / 1.25–2 cm headroom and bake on a rimmed sheet

Quick links: Recipe · Make ahead & leftovers · Back to top


The first scoop does not need to be neat. Break through the lid while it is still crisp and make sure every serving gets some flaky pastry with the creamy vegetables underneath.

Posted on — Leave a comment

Crockpot Turkey Breast Recipe: Juicy Slow Cooker Turkey Breast, Time & Temp

Carved golden turkey breast with moist slices while warm gravy is poured over the front of the platter.

A Crockpot can give you juicy, sliceable turkey breast without tying you to the kitchen all afternoon. The confusing part is knowing when your particular breast is actually done.

Dinner may be at six while one recipe says four hours and another says seven. Often, those recipes are not cooking the same thing. An intact boneless breast, a compact netted roast and a larger bone-in breast can carry almost the same name on the package while needing different handling—and the same weight does not always mean the same checking time.

What you need is not a more confident clock. You need to know which timing applies to your turkey, when to start checking it and when to take it out.

This crockpot turkey breast recipe does exactly that. The goal is juicy slices that stay together, savory herb-and-onion drippings for gravy, and golden skin at the end if yours came skin-on. It is especially handy for a smaller Thanksgiving dinner, or whenever a whole turkey is more than the table needs and the oven is already busy with the sides.

Time tells you when to check. Temperature tells you when to stop. Start checking before the expected finish and take the turkey out when the thickest meat reaches 165°F / 74°C.

Find Your Turkey Breast Before You Start

You do not need to decode every word on the wrapper. Two quick checks tell you which advice matters.

1. What Kind of Breast Did You Buy?

  • Intact boneless breast: one boneless breast rather than a formed/netted roast; usually flatter and relatively quick to cook.
  • Formed or netted boneless roast: often compact and sometimes made from several pieces held together with cooking mesh.
  • Bone-in breast: usually taller and heavier, so both cooker space and cooking time matter.
Raw intact boneless, formed netted, and bone-in turkey breasts shown side by side to compare their different shapes.
A netted roast can change more than timing: it may also come with product-specific instructions for mesh and added seasoning. Therefore, identify the breast construction before choosing either the time row or the salt level.

2. Check What Else Changes the Cook

If the package says turkey tenderloin, use the Turkey Tenderloin Recipe instead. Tenderloin is a smaller cut with its own timing.

Crockpot Turkey Breast: The Fast Time & Temp Answer

A 2–3 lb / 0.9–1.4 kg intact boneless breast often finishes in about 3–4 hours on LOW. Meanwhile, a 4–5 lb / 1.8–2.3 kg intact boneless breast often takes about 4½–6 hours, while many 4–6 lb / 1.8–2.7 kg bone-in breasts land around 5–6 hours.

Have an approximately 3 lb / 1.4 kg formed or netted roast? Start checking around 2¾–3 hours on LOW, and follow the package directions for inner netting and seasoning.

Those are useful ranges, not appointments. Use the timing table later in this guide for the full set of checking points. Turkey ready sooner? Take it out.

If this is your first turkey breast, the thermometer is your safety net. You do not need to judge doneness from meat color, clear juices or whether the Crockpot timer has finished.

Timing guide showing when to begin checking different weights and types of turkey breast cooked on LOW, with 165°F as the finish temperature.
Use this chart to know when to start checking—not when dinner must be ready.

Juicy Crockpot Turkey Breast Recipe

For this crockpot turkey breast recipe, the seasoning quantities are built around a 4 lb / 1.8 kg breast. Cooking time depends on the breast you bought, so use the matching row in the timing table.

Before long, sage, thyme, rosemary and garlic make the kitchen smell like the holiday meal, even though most of the work is already done. At the right point, the breast carves into slices that hold their shape while the cut surface still looks moist rather than chalky or fibrous.

Slow Cooker Turkey Breast

Turkey4 lb / 1.8 kg

PrepAbout 15 minutes

Slow cookerAbout 6 qt / 5.7 L

Start checkingIntact boneless ~4 hr · Bone-in ~4½ hr

Done at165°F / 74°C

ServesAbout 7–8 boneless · 5–6 bone-in

Base recipe: this card is written around a plain, fully thawed 4 lb / 1.8 kg breast. The recipe and timing table use LOW throughout. For a formed/netted or enhanced breast, use its dedicated timing row and follow the package directions for inner netting, seasoning and any product-specific cooking restrictions.

Ingredients

  • 1 turkey breast, about 4 lb / 1.8 kg, fully thawed; intact boneless, bone-in, or formed/netted
  • 2 tbsp / 28 g unsalted butter, softened, or 2 tbsp / 30 ml olive oil
  • 1½ tsp garlic powder
  • 1 tsp onion powder
  • 1 tsp paprika
  • 1 tsp dried thyme
  • ½ tsp rubbed sage
  • ½ tsp dried rosemary, crushed between your fingers
  • ¾ tsp black pepper
  • about 1⅛ tsp / 7 g fine table salt, only for a plain, unenhanced 4 lb breast
  • 1 medium onion, about 7 oz / 200 g, cut into thick wedges
  • 4 garlic cloves, about 12 g, lightly crushed
  • 2 carrots, about 5 oz / 150 g, cut into large pieces, optional
  • 2 celery stalks, about 3 oz / 85 g, cut into large pieces, optional
  • ½ cup / 120 ml unsalted turkey or chicken stock, optional when you want more gravy

Read the label before adding salt. “Pre-brined,” “seasoned,” “enhanced,” or “contains up to X% solution” means the breast may already contain plenty. Formed/netted roasts are especially likely to come seasoned or enhanced, so package directions take priority for inner netting and added salt.

Four-pound turkey breast with butter, dried seasonings, onion, garlic, optional vegetables and optional unsalted stock arranged around it.
Optional stock gives you more gravy; it is not what keeps the breast moist.

Before You Start

Herbs: use about ¾ of the seasoning mixture for a 2–3 lb breast, the recipe as written around 4 lb, and roughly 1¼–1½ times the herbs for a 5–8 lb breast.

Salt: the 1⅛ tsp / 7 g amount is for a plain, unenhanced 4 lb breast. That amount does not scale cleanly with total turkey weight because bone, skin and product enhancement change how much meat you are actually seasoning. For a larger plain breast, increase cautiously; enhanced or pre-brined turkey may need little or none. If you use a coarse or kosher-style salt, weigh it rather than copying the fine-salt teaspoon amount.

Close-up of soft paprika herb butter with fine seasoning flecks and a smooth swipe showing its spreadable texture.
Look for a soft, spreadable mixture that leaves a thin, speckled film rather than stiff ridges.

Equipment: a slow cooker large enough for the breast, an instant-read thermometer or leave-in probe, a broiler-safe tray for skin-on turkey, a sharp knife, and a saucepan plus whisk for gravy.

Want to prep the night before? You can season a fully thawed breast, cover it and keep it refrigerated overnight. Or make the herb mixture ahead and refrigerate it separately; if you used butter, let it soften before rubbing it over the turkey. Keep raw turkey refrigerated until cooking begins, and do not use a delayed-start timer.

Prep & Season

  1. Check what you bought. Make sure the breast is fully thawed and identify whether it is intact boneless, formed/netted boneless or bone-in.
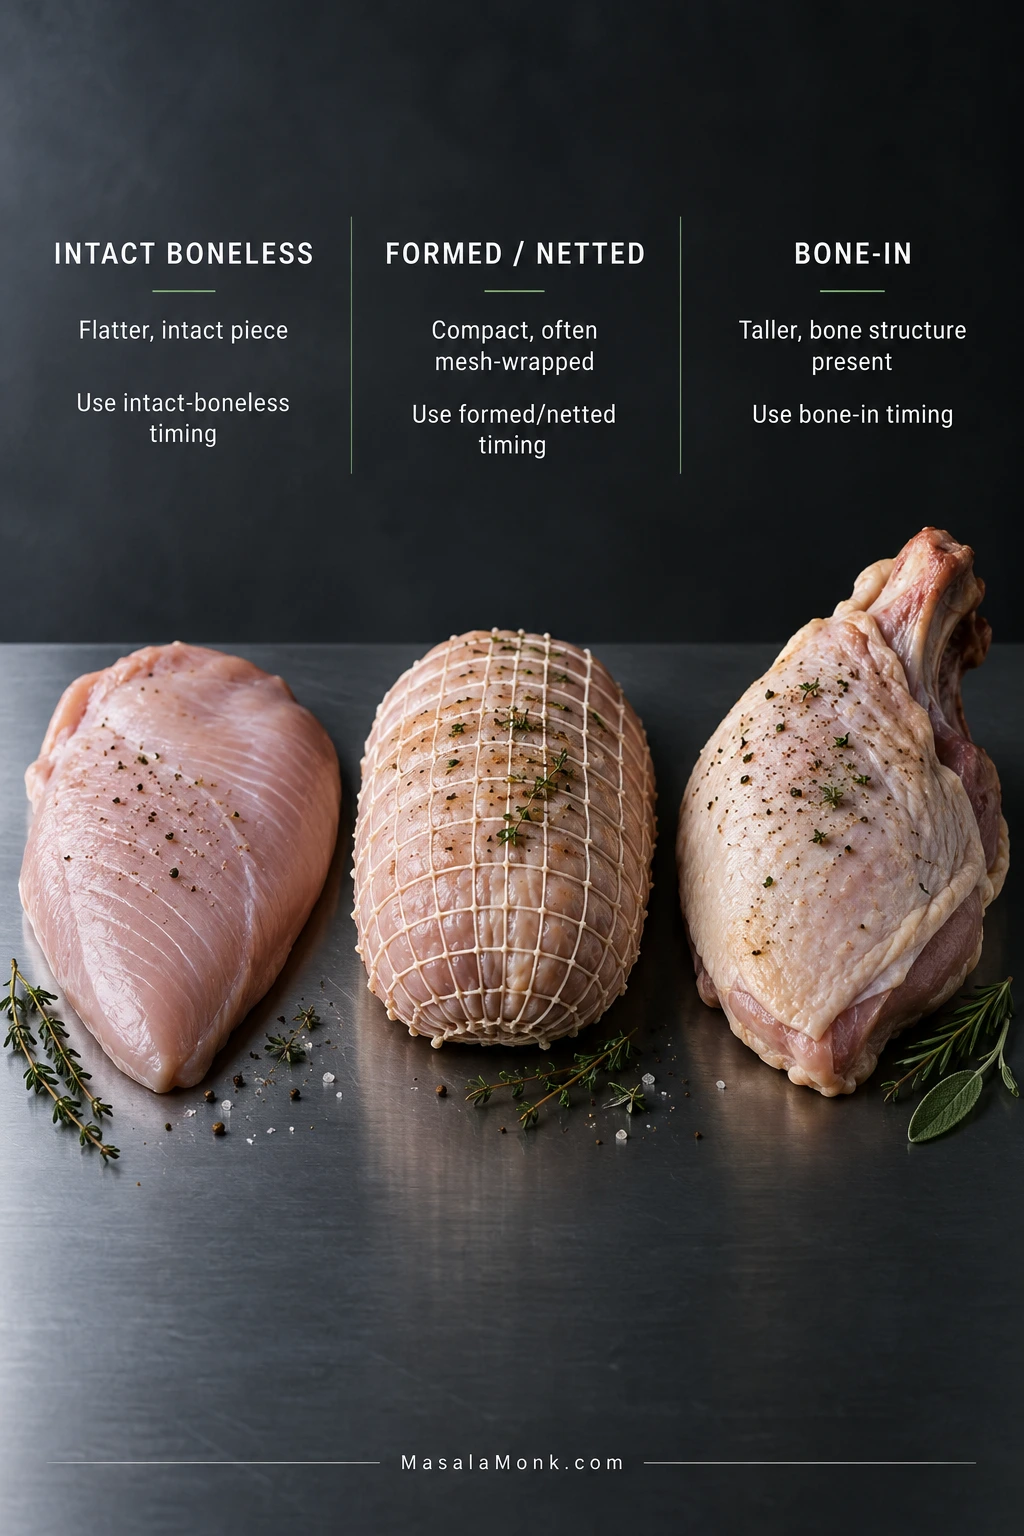
  2. Read the salt information. Enhanced, injected, brined and preseasoned breasts need much less added salt.
  3. Pat the turkey dry. Remove the outer packaging and blot the breast with paper towels. Do not rinse raw poultry.
  4. Mix the seasoning. Stir the butter or oil with garlic powder, onion powder, paprika, thyme, sage, rosemary, pepper and the appropriate amount of salt. It should spread in a thin, speckled layer rather than sit in heavy clumps.
  5. Season the breast. Rub the mixture over the exposed meat and skin. Work a little underneath loose skin if it lifts easily. Leave a formed roast together rather than pulling it apart to reach every surface.
Skin-on raw turkey breast being lightly brushed with herb butter while loose skin is lifted to season underneath.
Season underneath only where the skin opens easily; otherwise, keep it intact for the finishing broil.

Slow Cook & Finish

  1. Make the onion base. Spread onion and garlic across the bottom to lift the breast slightly and flavor the juices that collect. Add carrots or celery if using, then set the turkey on top with the skin facing up.
Seasoned raw turkey breast resting on large onion wedges and garlic cloves in a black slow cooker.
Thick onion wedges lift the turkey slightly while flavoring the drippings underneath.
  1. Check the fit. The turkey should sit below the rim with the proper lid closed normally. A breast that props the lid open needs a larger cooker or another cooking method.
  2. Slow cook on LOW with the lid closed. Use the matching start-check time in the table below rather than waiting for the end of the range.
  3. Check the thickest meat. Keep the thermometer away from bone and from gaps between pieces in a formed roast. On a large or uneven breast, check a second thick spot before calling it done. Take the turkey out at 165°F / 74°C.
  4. Finish according to the skin. For skinless turkey, rest immediately for 15–20 minutes. For skin-on turkey, move it straight to a broiler-safe tray, blot the skin and broil briefly until browned—usually about 2–4 minutes. Then rest for 15–20 minutes before carving.

LOW Setting, Lid & Liquid

USDA setting note: general USDA slow-cooker guidance says properly thawed food can cook safely on LOW throughout. Its turkey-specific guidance is more conservative: start turkey parts on HIGH for an hour or more, then switch to LOW. If you use that route, check earlier because the LOW table will not map exactly to your cook.

Keep the lid closed until you are near the first temperature check. A leave-in probe makes that easy.

No broth is required to keep the turkey moist in this method. The breast releases cooking liquid of its own. Add stock when you want more gravy. If your slow-cooker manual specifies a minimum amount of liquid for poultry, follow the appliance instructions.

Crockpot Turkey Breast Time & Temperature

Start with the kind of breast, then look at its weight. A compact 3 lb netted roast and an intact boneless breast can weigh the same without being identical cooking problems.
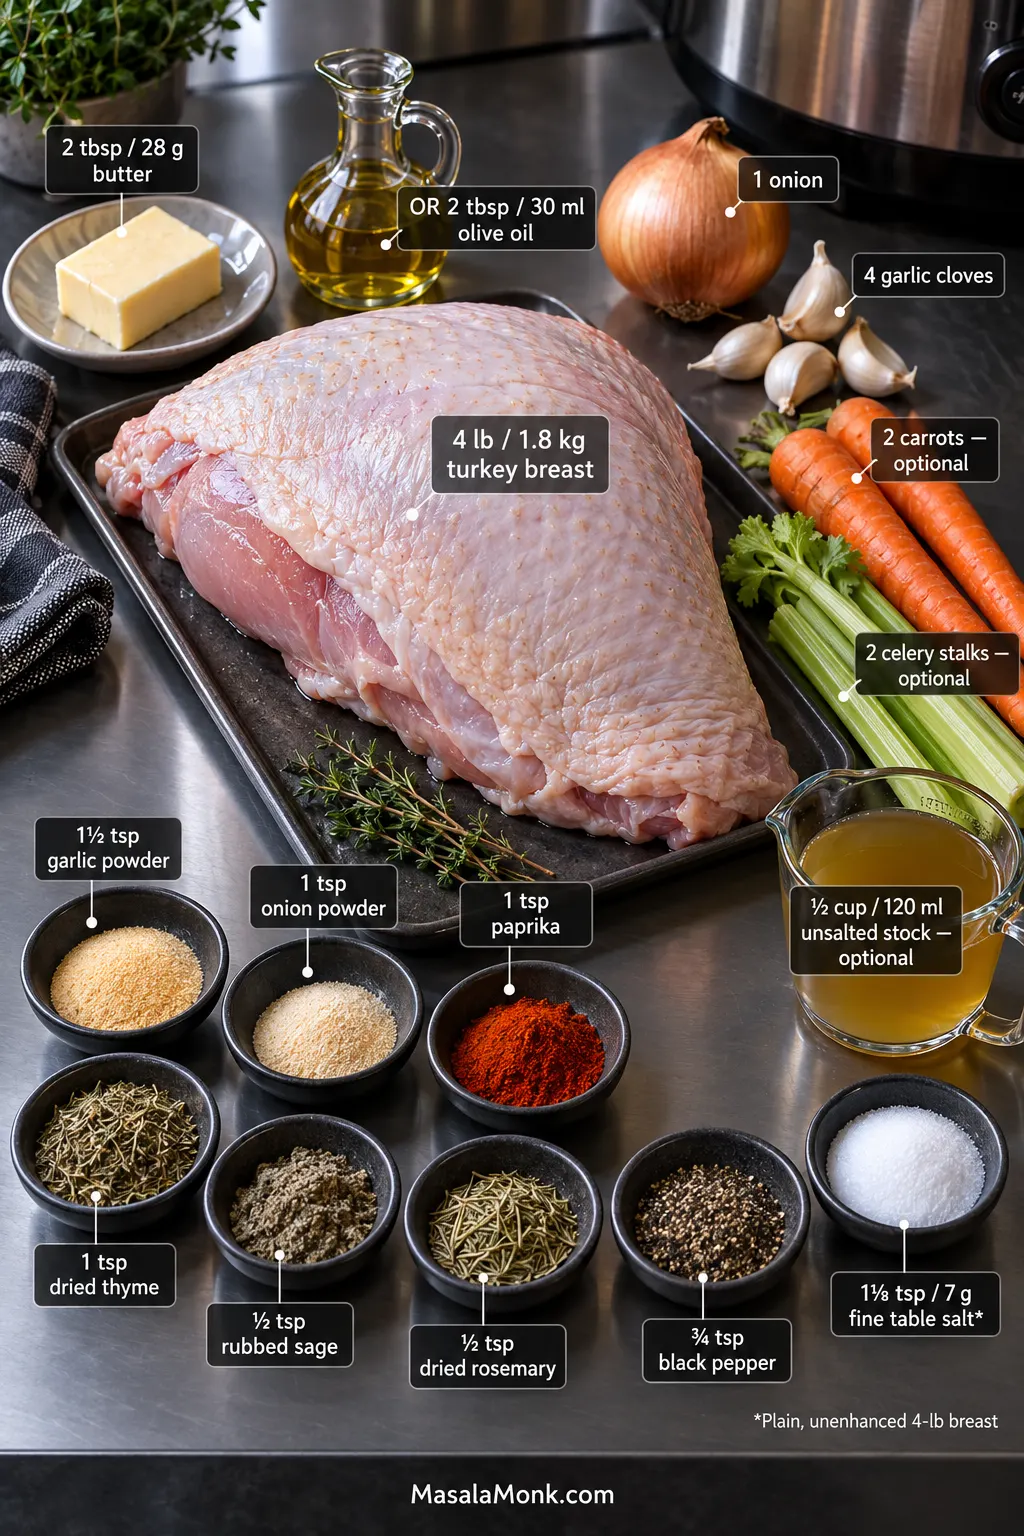
Every breast in the table finishes at 165°F / 74°C in the thickest meat. These are LOW times. The useful number is when to start checking.

Turkey breastStart checkingTypical LOW range
2–3 lb / 0.9–1.4 kg intact bonelessAbout 2½ hrAbout 3–4 hr
About 3 lb / 1.4 kg formed/netted roastAbout 2¾–3 hrAbout 3–4 hr
4–5 lb / 1.8–2.3 kg intact bonelessAbout 4 hrAbout 4½–6 hr
4–6 lb / 1.8–2.7 kg bone-inAbout 4½ hrAbout 5–6 hr
6–8 lb / 2.7–3.6 kg bone-inAbout 5½ hrAbout 6–7 hr

If a 5 lb breast reaches temperature at 4 hours 20 minutes, take it out. The clock does not get a vote after the turkey is done.

3 lb breast? Check whether it is intact boneless or a compact formed/netted roast. 9–10 lb breast? Cooker fit matters more than another timing estimate. A cramped breast or a lid that will not close normally is a sign to use a larger cooker or an oven method.

Boneless vs Bone-In: What Changes?

In general, boneless cooks faster; bone-in usually needs more room and more time. Intact boneless breasts tend to be flatter, while bone-in breasts are often taller. A 6-quart / 5.7-L oval cooker works for many average breasts, but fit matters more than the quart label.

Thickness matters as much as weight. Shape, bones, a formed versus intact roast, the amount of cold food around the turkey and the cooker itself can all move the finish time. Two smaller breasts are still two separate pieces, not one large roast.
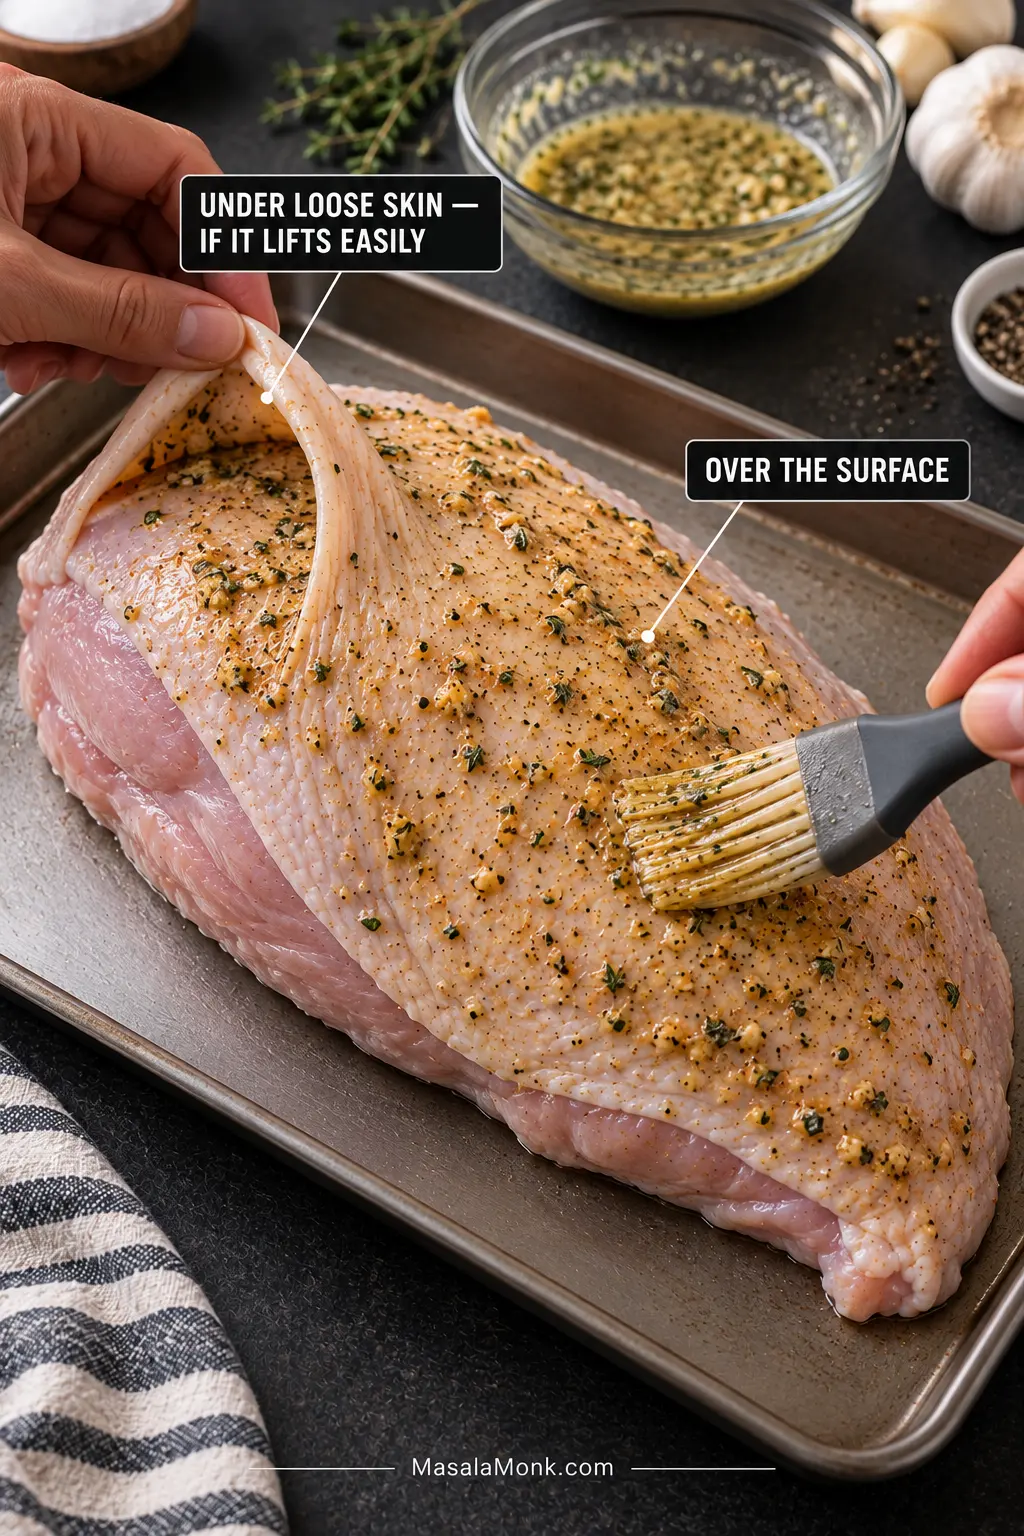
Comparison showing one turkey breast under a fully closed slow-cooker lid and an oversized breast preventing the lid from closing.
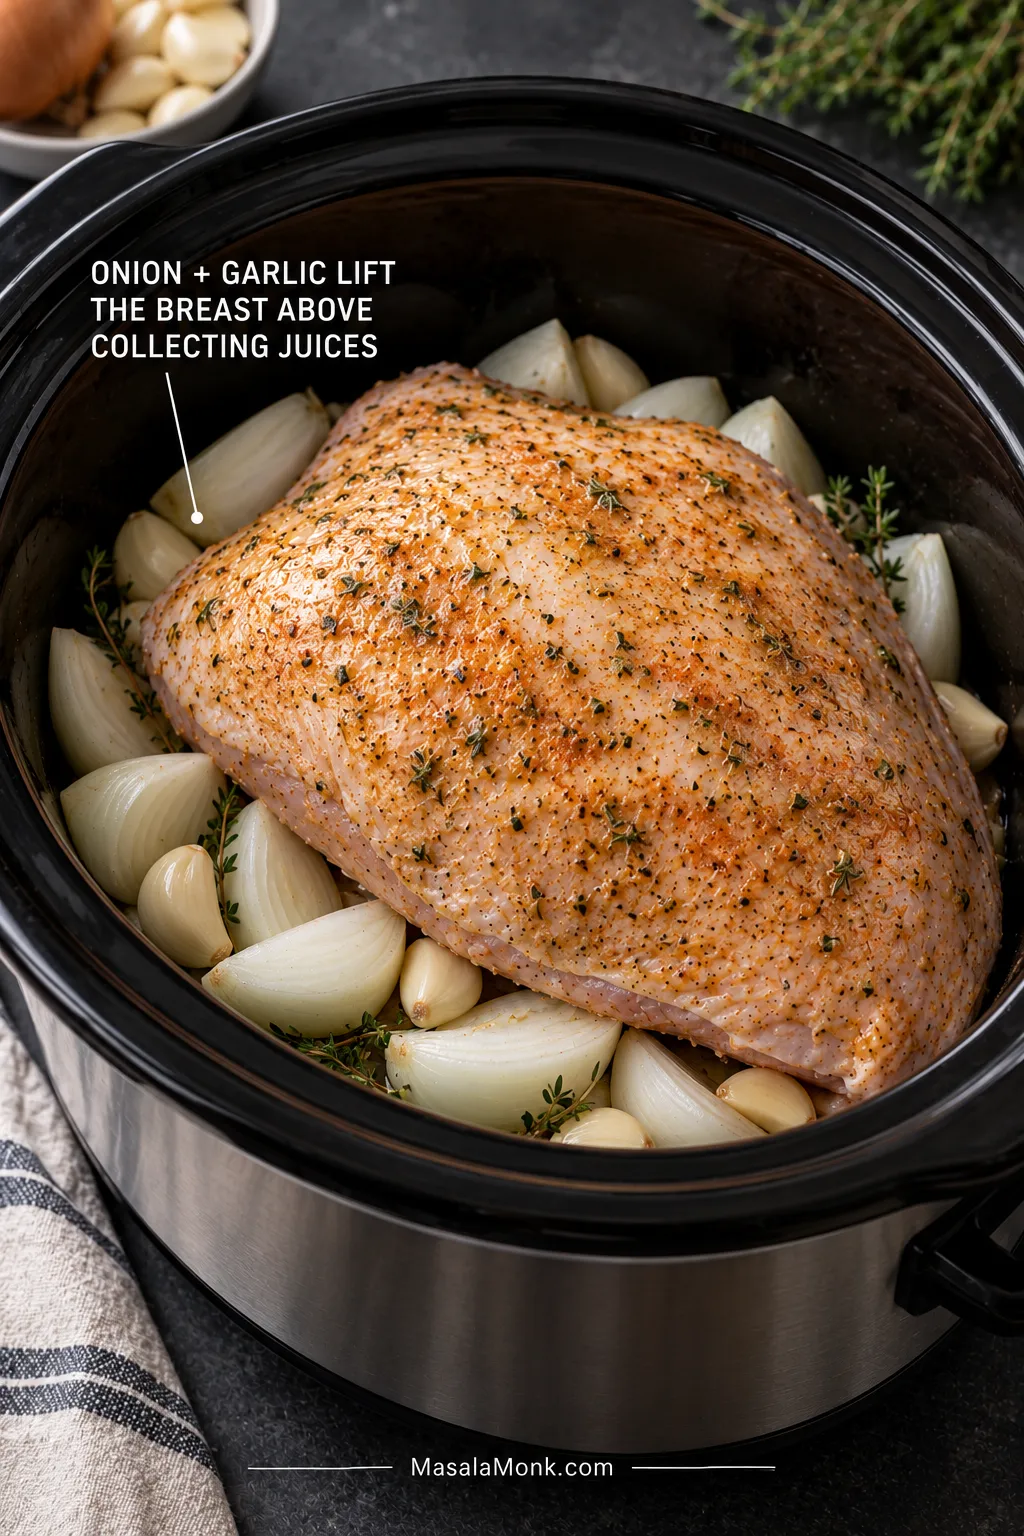
The real fit test is simple: the proper lid must close normally.

Seeing “LOW — 8 HOURS” on the display? That is the appliance program, not an instruction to cook a small turkey breast for eight hours.

Can You Cook Turkey Breast on HIGH?

Yes, but it can finish much sooner. A HIGH start is a different approach, so begin checking earlier rather than converting the LOW time with one fixed formula.

Back to Recipe · Thermometer Placement · Keep It Juicy · Back to Top

Where to Put the Thermometer

Turkey breast is done at 165°F / 74°C in the thickest meat. Put the sensing tip into the thickest part of the breast and keep it away from bone. With a formed roast, make sure the probe has not slipped into a gap between pieces.

Cutaway showing a thermometer in the thickest turkey breast meat, away from bone, plus a netted roast example where a seam can give a misleading reading.
When two valid readings disagree, let the lower reading decide when the turkey is ready.

On a large or uneven breast, check a second thick spot before calling it done. One side can get there before the other. If the meat still looks a little pink, let the thermometer settle the argument; color alone does not tell you whether poultry is safely cooked.

Good slices should hold together while the freshly cut surface still looks moist. Chalky, fibrous meat points toward overcooking. A breast that collapses easily into strands has moved into pulled-turkey territory.

What Actually Keeps Crockpot Turkey Breast Juicy?

Mostly, stopping at the right time. Broth does not protect lean breast meat from cooking too long.

Turkey can stay tender while its texture keeps changing. First, the slices are moist and hold together. With more cooking they soften, then eventually begin to shred. That’s useful when pulled turkey is the goal; for a carving breast, it means you went past the best stopping point.

Comparison of moist turkey slices holding their shape and drier turkey with fibers separating and beginning to shred.
Neat slices turning ragged and fibrous are a useful warning to check sooner next time.

The breast also releases plenty of its own juices. A little unsalted stock gives you more liquid for gravy; several cups push the bottom toward a softer braised texture. The onion and garlic underneath keep more of the turkey above the liquid that collects and season those juices at the same time.

No separate brine is required. Many supermarket breasts have already been treated with a salted solution anyway, which is another reason to read the package before adding salt.

Can You Cook Frozen Turkey Breast in a Crockpot?

No. Thaw it first.

Some packaged roasts make this confusing because their instructions say “cook from frozen.” Those directions apply to the cooking method printed for that particular product, often an oven method. They do not automatically carry over to a slow cooker.

For refrigerator thawing, allow roughly 24 hours for every 4–5 lb / 1.8–2.3 kg. A cold-water thaw takes about 30 minutes per pound. Keep the turkey sealed, change the cold water every 30 minutes, and cook it immediately after thawing.

Turkey breast thawing safely in a refrigerator and in a sealed bag submerged in cold water.
Refrigerator thawing is slower and hands-off; cold-water thawing is faster but needs attention.

Still frozen and dinner is close? If there is not enough time left to thaw and slow-cook it safely, use a faster cooking method after safe thawing instead of trying to make up the difference with extra Crockpot hours.

Do You Remove the Netting From a Boneless Turkey Breast Roast?

This section is for the common compact formed roast wrapped in mesh. Some are several pieces of breast shaped together, so the netting can affect both shape and cooking behavior.

Remove the outer wrapper. For mesh touching the meat, follow the package directions. Some roasts use cooking-safe inner netting specifically to hold the pieces together.

Netted raw turkey breast roast with the outer wrapper, inner cooking mesh, formed-meat cutaway and a package label for checking added solution or salt.
A netted roast can change both timing and seasoning. Check the package before choosing a timing row or adding salt.

When the package says that inner netting should stay on during cooking, leave it alone and remove it after the roast rests. Taking it off early may reveal several separate pieces that cook faster than one compact roast.

Check the seasoning label too. Formed roasts are often enhanced or preseasoned, and a packaged gravy concentrate can add another dose of salt.

Cooking Two Turkey Breasts

Two 3 lb breasts are two separate pieces, not one 6 lb roast. Check both according to their own thickness. When one is ready first, take it out.

Two separate three-pound turkey breasts compared with one six-pound roast to show that separate pieces retain their own thickness and doneness.
Two breasts share a cooker, but they do not have to share a finish time.

A fuller Crockpot can take longer to heat. Carrots, celery, onion and small potatoes can cook around the turkey, with slower vegetables toward the bottom. Turkey ready, potatoes still firm? Take the breast out and let the vegetables finish without it. Do not punish the turkey for the potato.

Keep stuffing on the side. It is easier to control and gives you crisp edges instead of an entirely soft slow-cooker texture. Stuffing cooked with poultry still needs to reach 165°F / 74°C in its center. For a separate holiday side, use the Southern Cornbread Dressing Recipe.

Back to Recipe · Time & Temp · Crisp the Skin · Back to Top

How to Crisp Crockpot Turkey Breast Skin

The Crockpot will not crisp the skin. When the lid comes off, expect pale skin, a deeply savory herb-and-onion smell and plenty of juices below. That is what slow-cooked turkey is supposed to look like at this stage; the broiler handles the color.

Same cooked turkey breast shown with pale soft skin from the slow cooker and golden crisp skin after brief broiling.
Blotting removes surface moisture so the broiler can brown the skin faster.

Once the thickest meat has reached 165°F / 74°C, move the breast straight to a broiler-safe tray and blot the skin dry. Broil for about 2–4 minutes, just until the raised areas turn deeply golden. This is primarily a browning step, so keep it brief—the breast is already safely cooked.

Stay nearby. This part moves much faster than the Crockpot did.

Then rest the breast for 15–20 minutes before carving. A skinless breast skips the broiler and goes straight from Crockpot to rest.

The brief finish leaves the oven free through almost the entire cook. A side such as Sweet Potato Casserole can use that space instead.

How to Carve Turkey Breast

For a boneless breast, remove cooking mesh or kitchen twine as appropriate, then slice across the grain about ¼–½ inch / 6–12 mm thick. A sharp knife and gentle sawing motion help a formed roast stay together.

For a bone-in breast, run the knife close to the breastbone and ribs and lift off each large section of meat. Put it flat-side down, then slice across the grain.

Boneless turkey sliced across the grain and bone-in turkey breast being separated from its ribs before slicing.
Remove a bone-in breast section from the ribs first; then slice across the grain.

Meat too soft for tidy slices? Stop fighting it. Serve larger pieces or pull it and pass the gravy. Dinner will still be good.

Turn the Crockpot Drippings Into Turkey Gravy

Measure the drippings, add unsalted stock if you need more, then use about 2 tbsp fat and 2 tbsp flour for each 1 cup / 240 ml of gravy liquid.

A small breast may leave less than a cup of liquid while a larger one can leave much more. Strain what you have into a measuring jug, let the rendered fat separate, and top up with stock to reach the amount of gravy you want.

A Gravy Ratio That Scales

LiquidButter or turkey fatAll-purpose flour
1 cup / 240 ml2 tbsp / 28 g2 tbsp / about 15–18 g
2 cups / 480 ml4 tbsp / 56 g4 tbsp / about 30–36 g
3 cups / 720 ml6 tbsp / 84 g6 tbsp / about 45–54 g

Melt the butter or turkey fat, whisk in the flour and cook for 1–2 minutes. Add the warm drippings and stock gradually while whisking, then simmer until the gravy looks glossy and lightly coats a spoon but still flows easily over the turkey and creamy mashed potatoes.

Turkey drippings being strained, thickened with a roux, whisked with liquid and finished as smooth pourable gravy.
Let the drippings settle before measuring the fat for your roux.

Stop while the gravy is still a little looser than you think you need; it thickens as it sits. Season at the end, especially when the breast was pre-brined. Too thick? Add hot unsalted stock. Too thin? Simmer longer. Greasy? Remove more fat. Too salty? Dilute with unsalted stock.

For more help with roux ratios and gravy rescue, continue with the Turkey Gravy Recipe.

Cranberry-Onion Turkey Breast

To make a tart-sweet holiday version, stir together 1 can whole-berry cranberry sauce, about 14–15 oz / 397–425 g, ¼ cup / 60 ml orange juice, 1 tbsp / 15 g Dijon mustard and 1 tsp finely grated orange zest for a 4 lb breast.

Spoon the mixture around the turkey rather than covering skin you plan to crisp. As it cooks, the cranberry loosens into the onion and juices below instead of forming a heavy blanket over the breast.

Golden sliced turkey breast surrounded by glossy cranberries, red onion, orange zest and herbs.
Dijon adds savory sharpness, while the cranberry-orange sauce brings acidity beside rich turkey and gravy.

If you already have homemade cranberry sauce with orange juice, use that as the base and taste before adding more citrus.

How Much Turkey Breast Per Person?

Plan on about ½ lb / 225 g raw boneless turkey per person, or roughly ¾ lb / 340 g raw bone-in turkey. For generous leftovers, move toward ¾ lb / 340 g boneless or 1 lb / 450 g bone-in per person.

A 4 lb boneless breast therefore feeds about seven or eight people with a full spread. By comparison, a 4 lb bone-in breast is more comfortable for roughly five or six.

Portion guide comparing raw boneless and bone-in turkey breast amounts per person and example servings from four-pound breasts.
These are buying weights, not plated portions; bone-in turkey needs more because some of the weight is rib structure.

For a smaller holiday table, a platter of neatly sliced breast with hot gravy can make far more sense than carving a whole bird nobody really needed. Add mashed potatoes, dressing, cranberry sauce, rolls and something green; a green bean casserole brings a crisp topping beside all those softer sides.

Something Went Wrong With My Crockpot Turkey Breast

Most timing and texture problems are salvageable. Find the symptom and deal with that problem—not the clock.

Troubleshooting guide showing dry turkey, falling-apart meat, early or late cooking, pale skin, excess liquid, poor lid fit and vegetables needing more time.
Name the problem first—temperature, texture, liquid, fit or timing—then choose the matching fix.

Timing & Texture Problems

What happenedLikely causeWhat to do
Turkey is running lateThicker breast, full cooker or cooler applianceKeep cooking; use HIGH if needed and check more often.
Turkey still looks slightly pinkColor can remain even in safely cooked poultryRecheck the thickest areas with a reliable thermometer.
Turkey finished hours earlySmall or thin breast; hotter cookerTake it out. Do not keep cooking just to match the schedule.
Breast is dryUsually overcookingSlice thinly and serve with warm gravy or drippings.
Turkey falls apartCooked beyond the clean-carving stageServe it pulled or in larger pieces.
Two breasts finish differentlyDifferent thicknesses or positionsRemove the finished one and leave the other cooking.
Vegetables are still firmLarge pieces or a heavily loaded cookerRemove the turkey and finish the vegetables while it rests.
Power went out during cookingInterrupted heatIf you were away and do not know how long the cooker was off, discard the food. If you are home and catch the outage promptly, finish the turkey immediately using another safe cooking method.

Salt, Liquid, Skin & Cooker Problems

What happenedLikely causeWhat to do
Turkey is extremely saltyEnhanced/pre-brined breast plus added saltUse unsalted gravy and sides; dilute salty drippings with stock.
Hardly any drippingsSmall or lean breastAdd unsalted stock when making gravy.
Turkey is sitting in lots of liquidNormal cooking juices collectedLift out the breast and use the liquid for gravy.
Skin is pale and softNormal Crockpot resultBroil briefly before resting.
Netting is stuckMesh tightened around the roastLet the roast rest, then remove the mesh gently according to the package directions.
Roast breaks into piecesIt is a formed roastHandle gently; separate pieces may also cook faster.
The proper lid will not closeBreast is too large or tallUse a larger cooker or another cooking method.
Display says LOW for 8 hoursThat is the appliance programStop cooking when the turkey is done; do not wait for the countdown.

Back to Recipe · Time & Temp · Dinner Timing · Back to Top

When the Turkey and Dinner Are on Different Schedules

Guide showing what to do when turkey breast finishes early, finishes on time or is still cooking as dinner approaches.
Once the turkey is cooked, stop cooking decisions and switch to safe holding, chilling or reheating.

Turkey finished early: dinner is not ruined. Take the turkey out. For a short delay, keep fully cooked turkey at 140°F / 60°C or above. WARM is for already-cooked food, not for finishing raw or undercooked poultry.

A delay of several hours is different. Divide or carve the turkey into manageable portions, refrigerate promptly in shallow containers, and reheat it closer to dinner rather than holding the whole breast hot all afternoon.

Turkey running late: 30–60 minutes behind is annoying, not catastrophic. Keep cooking, use HIGH if needed, and check more frequently. Thick meat and a crowded cooker can simply take longer.

The Crockpot was never turned on: this is the timing problem you cannot fix by turning up the heat. Raw turkey should not sit at room temperature for more than 2 hours, or more than 1 hour above 90°F / 32°C. Past that limit, discard it.

Turkey that stayed safely refrigerated is another matter. Missed the slow-cooker start time but kept the meat cold? Use a faster cooking method instead.

The 15–20-minute rest gives the rest of dinner time to catch up. Finish the gravy, move the sides to the table and warm soft dinner rolls. Then carve and serve.

Store & Reheat Leftover Turkey

Cooked turkey breast keeps in the refrigerator for about 3–4 days. Cool leftovers promptly and store them covered. For longer storage, freeze useful portions with a little gravy or reserved cooking liquid; for best quality, use frozen cooked turkey within about 3–4 months.

Reheat cold leftovers to 165°F / 74°C outside the slow cooker. Put slices or portions in a baking dish with a little gravy, broth or reserved drippings, cover tightly, and use an oven set no lower than 325°F / 163°C.

After reheating, a preheated Crockpot can hold the already-hot food at 140°F / 60°C or above.

Cold slices work in sandwiches and salads, while warm turkey can go into soups, pasta or casseroles. If you also have gravy and vegetables left, the Turkey Pot Pie Recipe turns them into something worth looking forward to again.

Crockpot Turkey Breast FAQs

1. How long does turkey breast take in a Crockpot?

A 2–3 lb intact boneless breast often needs about 3–4 hours on LOW; a 4–5 lb intact boneless breast about 4½–6 hours; and many 4–6 lb bone-in breasts about 5–6 hours.

2. Can frozen turkey breast go straight into the slow cooker?

No. Thaw it first. “Cook from frozen” instructions apply only to the cooking method specified for that particular product.

3. Do I remove the netting from a boneless turkey breast roast?

Remove the outer wrapper. For inner mesh touching the meat, follow the package directions; some formed roasts use cooking-safe netting to hold the pieces together.

4. What temperature is Crockpot turkey breast done?

In this crockpot turkey breast recipe, take the turkey out when the thickest breast meat reaches 165°F / 74°C.

Then you no longer need the clock. Carve across the grain, spoon the glossy gravy over the slices, and get dinner to the table while the skin is still crisp.

Holiday serving platter with carved golden turkey breast, gravy, cranberry sauce, green beans and mashed potatoes.
Spoon gravy over the cut surfaces and leave some crisp skin uncovered.

Back to Recipe · Time & Temp · Fix My Turkey · Back to Top

Posted on — Leave a comment

How Long to Cook a Turkey: Cooking Time Chart by Weight & Oven Temperature

Whole roasted turkey with deep golden-brown skin on a silver platter beside a carving knife against a dark blue-black background.

How long to cook a turkey depends mostly on its weight, whether it is stuffed, how completely it is thawed, and the oven temperature. At 325°F / 163°C, a fully thawed, unstuffed 8–24 lb turkey generally takes about 2¾ to 5 hours. Stuffing adds time.

Seeing 325°F in one recipe, 350°F in another, and different times for the same 14-pound bird? That does not necessarily mean one chart is wrong. Different recipes use different temperatures, methods and assumptions. First make sure you’re comparing the same cooking method.

A useful schedule should leave you with browned skin, juicy breast meat, properly cooked dark meat and enough breathing room to finish the rest of dinner—not force the turkey to hit one magic minute.

Start taking temperatures toward the early end of the appropriate range. That gives you the chance to stop when the turkey is safely cooked instead of giving an already-finished breast another half hour just because the clock says so. Check the thickest part of the breast, the innermost part of the thigh, and the innermost part of the wing; each should reach at least 165°F / 74°C.

The chart tells you when to check. The thermometer tells you when dinner is cooked.

This guide covers an intact turkey roasted in the oven. Turkey breast, tenderloin, legs and wings have different cooking times. Convection ovens, oven bags, electric roasters, smokers and spatchcocked birds have their own timing too; those routes are covered farther down.

Updated September 2026. Timing and food-safety details were checked against current USDA/FSIS and FoodSafety.gov guidance.

Turkey Cooking Time Chart at 325°F

For a fully thawed turkey in a conventional oven, start here.

Turkey weightUnstuffed at 325°FStuffed at 325°FUnstuffed: first check
8–12 lb / 3.6–5.4 kg2¾–3 hours3–3½ hoursFrom 2¾ hr
12–14 lb / 5.4–6.4 kg3–3¾ hours3½–4 hoursFrom 3 hr
14–18 lb / 6.4–8.2 kg3¾–4¼ hours4–4¼ hoursFrom 3¾ hr
18–20 lb / 8.2–9.1 kg4¼–4½ hours4¼–4¾ hoursFrom 4¼ hr
20–24 lb / 9.1–10.9 kg4½–5 hours4¾–5¼ hoursFrom 4½ hr

These ranges follow the FoodSafety.gov turkey roasting chart. For a stuffed turkey, begin checking near the early end of the stuffed range rather than using the unstuffed first-check column.

Infographic comparing 325°F cooking times for stuffed and unstuffed turkeys from 8 to 24 pounds, with progressively larger roasted turkeys.
Turkey cooking time by weight works in bands rather than exact promises. Find the row containing your bird, then use the early edge as the point where active checking begins.

The times are approximate. Two birds with the same label weight can still finish differently. And 12, 14, 18 and 20 pounds sit where two published rows touch, which is why those exact weights can produce different-looking answers on reliable charts.

Already at 165°F earlier than expected? Recheck the breast, thigh and wing. All three safely there? Take the turkey out. More oven time is not automatically better.

How Long to Cook Your Exact Turkey Weight

Your turkey has an exact weight, while the official chart uses ranges. The table below turns those ranges into two useful planning points for an unstuffed turkey at 325°F: when to take the first temperature reading and how long to keep the cooking window open.

First Check and Planning Window by Weight

Your turkeyApprox. metricFirst checkPlanning window
8 lb3.6 kg2¾ hrThrough 3 hr
9 lb4.1 kg2¾ hrThrough 3 hr
10 lb4.5 kg2¾ hrThrough 3 hr
11 lb5.0 kg2¾ hrThrough 3 hr
12 lb5.4 kg2¾ hrThrough 3¾ hr
13 lb5.9 kg3 hrThrough 3¾ hr
14 lb6.4 kg3 hrThrough 4¼ hr
15 lb6.8 kg3¾ hrThrough 4¼ hr
16 lb7.3 kg3¾ hrThrough 4¼ hr
17 lb7.7 kg3¾ hrThrough 4¼ hr
18 lb8.2 kg3¾ hrThrough 4½ hr
19 lb8.6 kg4¼ hrThrough 4½ hr
20 lb9.1 kg4¼ hrThrough 5 hr
21 lb9.5 kg4½ hrThrough 5 hr
22 lb10.0 kg4½ hrThrough 5 hr
23 lb10.4 kg4½ hrThrough 5 hr
24 lb10.9 kg4½ hrThrough 5 hr

The planning window is time you leave available, not a guaranteed finish time or a maximum. At the boundary weights—12, 14, 18 and 20 lb—it deliberately uses the longer adjoining official range so dinner is not built around the most optimistic possibility.

Infographic with timelines for 12, 14, 16, 18 and 20 pound turkeys, marking an earlier first temperature check and a longer planning window.
These two times solve different problems: the first-check marker helps prevent overcooking, while the wider planning window keeps a late-running turkey from throwing off dinner.

How Long to Cook a 12 lb Turkey

Begin checking a 12 lb / 5.4 kg unstuffed turkey around 2¾ hours, but keep the planning window open through about 3¾ hours. Twelve pounds sits where two official weight ranges overlap.

How Long to Cook a 14 lb Turkey

Start checking a 14 lb / 6.4 kg unstuffed turkey around 3 hours and keep the planning window open through roughly 4¼ hours. Fourteen pounds is shared by two published rows, which is why reliable charts can appear to give different answers.

Roasted 14 pound turkey beneath two intersecting timing bands for 12–14 lb and 14–18 lb, with first-check and planning-window times.
A 14 lb turkey sits exactly where two published weight bands meet. So check from the earlier range, but keep enough schedule room for the later one instead of treating either number as a promise.

How Long to Cook a 16 lb Turkey

Allow about 3¾–4¼ hours at 325°F for a 16 lb / 7.3 kg unstuffed turkey. Once rest and carving are included, a 6 PM dinner usually means getting this bird into the oven around early afternoon.

How Long to Cook an 18 lb Turkey

Start checking an 18 lb / 8.2 kg turkey around 3¾ hours and keep the planning window open through about 4½ hours. Eighteen pounds is another overlap between two published rows.

How Long to Cook a 20 lb Turkey

Begin checking a 20 lb / 9.1 kg turkey around 4¼ hours and keep the planning window open through about 5 hours. On a bird this large, check several locations before calling it done.

Already have a 25–30 lb turkey? The National Turkey Federation’s 24–30 lb range is roughly 5–5¼ hours unstuffed or 5¼–6¼ hours stuffed at 325°F. Still shopping? Two smaller birds are usually easier to cook evenly, time and carve than one enormous turkey.

Planning dinner? → Work backward from serving time

Turkey Cooking Time Per Pound: Why One Number Does Not Fit Every Bird

At 325°F, don’t use one fixed minutes-per-pound number. The USDA ranges work out to roughly 21–23 minutes per pound for an 8 lb turkey, 14–16 minutes per pound at 16 lb, and about 11–13 minutes per pound at 24 lb. Use the weight chart for the actual schedule.

A bigger turkey does not simply take the same number of minutes multiplied by more pounds. Stuffing, ice remaining in the cavity, oven accuracy, bird shape, pan depth and repeated door opening can move the finish further.

Graph with 8, 16 and 24 pound raw turkeys increasing in size while approximate cooking minutes per pound decrease.
Turkey cooking time per pound is not linear. Applying one fixed rate across every size can make a small bird seem faster—or a large bird much slower—than the weight-based ranges suggest.

Can You Cook Turkey at 350°F or 375°F?

Using 350°F or 375°F? Don’t convert the 325°F chart. Follow a complete turkey method written for that temperature. Higher-temperature recipes have their own timing, browning and foil decisions.

Three oven scenes showing turkeys at 325°F, 350°F and 375°F with progressively warmer lighting and method-specific guidance.
A 325°F chart cannot simply be recalculated for 350°F or 375°F. Once oven temperature changes, timing and browning behavior change together, so the method and its timetable need to stay paired.
Oven approachHow to use itWhat changes
325°F / 163°CUse the main chart on this pageStandard conventional-oven reference
350°F / 177°CUse timing written for that recipeUsually a shorter cook
375°F / 191°CUse a 375°F-specific methodCooking and browning move faster
High-heat startFollow the complete recipeFast initial browning before heat is usually reduced

Why 325°F Is the Main Chart

The 325°F / 163°C table gives us one authoritative conventional-oven reference across multiple weights and both stuffed and unstuffed birds. USDA guidance says a conventional oven should be set no lower than 325°F.

Turkey at 350°F

A common 350°F planning rule is about 13 minutes per pound for an unstuffed turkey and 15 minutes per pound for a stuffed one. That belongs to recipes designed around 350°F; it is not a mathematical conversion of the USDA 325°F table.

Published 350°F schedules vary. Once you’ve chosen one of those recipes, keep its approximate timing and cooking instructions together.

Turkey at 375°F

There is no universal 375°F timetable to substitute for the 325°F chart. Use the schedule supplied with the 375°F method. Faster browning is the predictable part: honey, maple syrup and sugary rubs need earlier watching, and foil can protect skin that reaches a deep golden color before the meat is ready.

Temperature-scale check: 180°C is about 356°F, not 180°F. Check the scale when moving between recipes, ovens or countries; that mistake can turn a normal roast into an all-day wait.

Using convection, an oven bag, roaster or smoker? → See the method-specific timetable

Stuffed vs Unstuffed Turkey: How Much Longer Does Stuffing Take?

Stuffing makes a turkey take longer and adds another doneness checkpoint: the center of the stuffing must reach 165°F / 74°C. For the easiest holiday schedule and better browning, bake the dressing separately.

Split infographic comparing an unstuffed turkey cavity with a stuffed turkey cavity, with heat-flow arrows and a 165°F stuffing-center marker.
Stuffing sits deep inside the bird, so its center can lag behind the hotter outer meat. That slow-heating center is why stuffed turkey cooking time needs its own schedule.

At 325°F, a 12–14 lb turkey takes roughly 3–3¾ hours unstuffed versus 3½–4 hours stuffed. At 20–24 lb, the ranges are about 4½–5 hours and 4¾–5¼ hours.

Stuffing the bird? Add it immediately before roasting and keep it loose rather than packing the cavity tightly.

Baked in its own dish, the dressing gets the chance to develop a browned top instead of steaming inside the turkey. Our Southern cornbread dressing is built for that separate-pan approach.

Turkey Still Frozen? Here Is the Safe Path

No time left to thaw? A plain, unstuffed frozen turkey can go directly into a conventional oven. Plan on at least 50% more cooking time than for a thawed bird. Dinner may move later, but the turkey can still be cooked safely.

Turkey Thawing Times

Turkey weightRefrigerator at 40°F / 4°C or belowCold-water thawing
4–12 lb / 1.8–5.4 kg1–3 days2–6 hours
12–16 lb / 5.4–7.3 kg3–4 days6–8 hours
16–20 lb / 7.3–9.1 kg4–5 days8–10 hours
20–24 lb / 9.1–10.9 kg5–6 days10–12 hours
Infographic showing refrigerator and cold-water turkey thawing times for 4–12, 12–16, 16–20 and 20–24 pound birds.
Turkey thawing times are really a planning choice between days and hands-on hours. Refrigerator thawing is easier to schedule ahead; cold-water thawing is faster but demands repeated attention.

Exactly 12, 16 or 20 lb? Those weights sit where the published refrigerator-thaw rows overlap too. For holiday planning, give yourself the longer window rather than making dinner depend on the shortest possible thaw.

In the refrigerator, the broader rule is about 24 hours for every 4–5 pounds. A turkey thawed there can remain refrigerated for another 1–2 days before cooking.

For cold-water thawing, keep the turkey in leak-proof packaging or a food-safe leak-proof bag, submerge it in cold tap water, allow roughly 30 minutes per pound, and replace the water every 30 minutes. Cook immediately after thawing.

Sealed raw turkey fully submerged in clear cold water in a large glass container beside a 30-minute timer and thawing-step labels.
The 30-minutes-per-pound estimate is only the clock. Cold-water turkey thawing also depends on keeping the package leak-proof, the bird submerged and the water cold throughout.

The Outside Is Soft but the Cavity Is Still Icy

A soft breast doesn’t prove the whole bird is thawed. Check the cavity. The neck and giblet packet should come free, and the joints should no longer feel locked by ice.

Ice still inside means the fully thawed timetable no longer fits neatly. The outside warms first, so a reassuring shallow reading can coexist with much colder meat deeper in the bird. Give the turkey extra time and check more than one location as it cooks.

Raw whole turkey on a roasting tray with a thermal-style overlay changing from warm orange at the surface to blue in deeper meat and the cavity.
Touching the breast only tells you about the surface. On a large turkey, flexible outer flesh can coexist with ice around the cavity and joints much deeper inside.

A microwave can also thaw a turkey that fits, provided you follow the appliance’s defrost instructions and cook it immediately afterward. Hot water, warm water and the kitchen counter are not safe thawing methods.

Cooking a Turkey From Frozen

FoodSafety.gov gives these approximate conventional-oven times for a turkey that starts frozen:

Frozen turkeyApproximate oven time
8–12 lb / 3.6–5.4 kg4¼–4½ hours
12–14 lb / 5.4–6.4 kg4½–5¾ hours
14–18 lb / 6.4–8.2 kg5¾–6½ hours
18–20 lb / 8.2–9.1 kg6½–6¾ hours
20–24 lb / 9.1–10.9 kg6¾–7½ hours
Comparison infographic with thawed and from-frozen cooking-time ranges for unstuffed turkeys from 8 to 24 pounds.
Frozen turkey cooking time can add several hours, not another few minutes. For the largest birds on this chart, that difference is big enough to reshape the entire dinner schedule.

The giblet packet may still be frozen in place when the bird goes into the oven. Once the cavity loosens enough, remove it carefully with tongs or a fork and continue roasting.

From-frozen rescue means the conventional oven. Don’t cook a still-frozen turkey in an oven bag, smoker, grill or deep fryer. Microwave thawing is different: thaw according to the appliance instructions and cook immediately afterward.

Commercially frozen pre-stuffed turkey: do not thaw it. Keep it frozen and cook it according to the package cooking directions. The turkey and center of the stuffing must both reach 165°F / 74°C.

Turkey ready for the oven? → Build the dinner schedule

What Time Should You Put the Turkey in the Oven?

Once you know the weight, oven method, stuffing situation and thaw state, work backward from dinner. Doing the math earlier than that can give you a beautifully precise schedule for the wrong turkey.

Quick formula: serving time − carving time − resting time − the longer realistic cooking estimate = when the turkey should go into the oven.

Turkey Start-Time Examples

The examples below leave about 40 minutes between the planned oven-out time and dinner for resting, carving and getting the platter to the table.

TurkeyServePut it in byFirst check
12 lb unstuffed5 PMAbout 12:35 PMAbout 3:20 PM
14 lb unstuffed5 PMAbout 12:05 PMAbout 3:05 PM
16 lb unstuffed6 PMAbout 1:05 PMAbout 4:50 PM
20 lb unstuffed6 PMAbout 12:20 PMAbout 4:35 PM
Vertical dinner-planning timeline for a 16 pound unstuffed turkey, showing oven-in time, first check, planning window and 6 PM serving.
Working backward from dinner protects the rest of the meal from an uncertain finish time. An early temperature check gives you room for a slower bird without sacrificing the resting-and-carving buffer.

The 12-, 14- and 20-pound examples deliberately use the longer adjoining range for their oven-in time. Their first checks come from the earlier range.

Schedule from the longer end and check from the shorter end. An early turkey gives you options. An underdone turkey when every side dish is hot gives you fewer.

First whole turkey? Don’t try to memorize the page. Get the bird into the oven on schedule, set an alarm for the first temperature check, and keep the thermometer nearby.

The rest period is useful kitchen time. Assemble or partly cook oven-heavy sides earlier, then use the freed oven to reheat, brown or finish them. A green bean casserole, for example, can make its final trip through the oven while the turkey rests.

Roasted turkey resting on a platter in front of an open oven containing dinner rolls and casseroles in a dark modern kitchen.
Use turkey resting time for jobs that need reheating, browning or a quick final bake. Long-cooking sides should already be well underway before the turkey leaves the oven.

Already cooking? → Go to the doneness check

How to Cook a Turkey at 325°F: The Short Version

Got your timing sorted? Here’s the whole 325°F method in five steps.

  1. Check the label before adding salt. Remove the neck and giblets, pat the turkey dry and season it appropriately.
  2. Set the bird breast side up in a shallow roasting pan, preferably on a rack.
  3. Roast at 325°F / 163°C using the weight chart as your approximate time range.
  4. Begin checking near the early end and continue until the breast, thigh and wing each reach at least 165°F / 74°C. If the turkey is stuffed, check that the center of the stuffing reaches 165°F / 74°C too.
  5. Rest the turkey for at least 20 minutes, then carve.
Five-panel infographic showing turkey preparation, breast-side-up roasting at 325°F, thermometer checking, and a final 20-minute rest.
The value of this five-step 325°F turkey method is the order: check the label before salting, set up the pan before roasting, and verify doneness before beginning the rest.

Cooking for a much smaller table? The oven-baked Turkey Tenderloin Recipe gives you a smaller cut with a much shorter cook.

Set Up the Turkey for an Easier Roast

Check the Label, Cavities and Seasoning

Enhanced, self-basting, basted, pre-brined, or “contains up to a stated percentage of solution” on the label? The turkey already contains added seasoned liquid. That percentage is not simply the salt percentage, but it is a reason to go easy before stacking a dry brine, salted butter, salty seasoning and bouillon onto the same bird.

Close-up of packaged raw turkey with callouts highlighting enhanced, self-basting, basted, pre-brined and contains added solution.
These label terms can change how aggressively you season. If the turkey already contains seasoned solution, stacking brine, salted butter and a salty rub can push both the bird and the drippings too far.

Check both cavities for the neck and giblet package. Pat the turkey dry instead of rinsing it; splashing raw-poultry juices around the sink can spread contamination. After handling the bird, wash your hands with soap and water for at least 20 seconds and clean the countertop, sink, utensils and anything else the raw turkey touched.

Pre-seasoned birds can leave salty drippings too. Taste before concentrating them into gravy. Our Turkey Gravy Recipe From Drippings shows how to balance the pan juices with stock.

Set Up the Pan

A roasting rack is helpful, not mandatory. It lifts the turkey above pooled drippings and improves airflow around the lower bird. No rack? A bed of sturdy vegetables or another food-safe support can keep the turkey off the bottom.

Very deep roasting pans can reduce airflow around the bird and push the cook later, another reason the timetable is only approximate.

Keep the bird breast side up for this method. The skin gets direct heat for browning, and you don’t have to wrestle a large, hot turkey halfway through the cook.

Comparison of a turkey in a shallow roasting pan with rack and airflow arrows versus the same turkey in a deep-sided pan with reduced airflow.
Pan shape is one reason equally weighted turkeys can finish at different times. A shallow roasting pan exposes more of the bird to circulating heat, while deep walls surround more of the lower turkey.

Manage the Browning Without Babysitting the Oven

Once the skin is as deeply golden as you’d be happy to put on the table, foil can protect the darkening areas while the meat finishes. Sweet rubs and glazes may get there sooner.

Basting is optional. It can add surface flavor and color, but it doesn’t replace temperature control for keeping the breast juicy. Opening the oven every 20 minutes also dumps heat; occasional basting is plenty when a recipe calls for it.

Three close-up turkey-skin stages labeled pale, deep golden and too dark, with loose aluminum foil shown at the deep-golden stage.
Once the skin reaches the color you want on the table, protect it if the meat still needs time. Foil manages browning; it does not turn a low internal temperature into a finished turkey.

Ready to check the turkey? → See where and how to take the temperature

How to Know When Turkey Is Done

This is the moment that matters: can the turkey come out now?

Turkey is done when the thickest breast, innermost thigh and innermost wing each reach at least 165°F / 74°C. If the bird is stuffed, the center of the stuffing must reach 165°F too.

Where to checkWhere the probe goesSafety-first target
BreastCenter of the thickest breast meat, away from bone and cavity165°F / 74°C
ThighInnermost thick thigh where the leg meets the body, away from bone165°F / 74°C minimum
WingInnermost wing area, away from bone165°F / 74°C
StuffingCenter of the stuffing, if used165°F / 74°C

This follows current USDA turkey roasting guidance.

Whole roast turkey with three thermometer probes marking the thickest breast, innermost thigh and innermost wing, plus a 165°F minimum label.
One hot spot cannot speak for the whole bird. A three-point turkey temperature check keeps a ready breast from being mistaken for a ready turkey when another area still needs heat.

Dark meat can benefit from additional heat, while pushing the breast unnecessarily high can turn juicy slices dry and chalky. Some advanced methods deliberately use controlled carryover cooking below 165°F; this guide uses the simpler 165°F-before-serving rule for the breast, thigh and wing.

Put the Probe in Thick Meat, Away From Bone

A strange reading deserves a second check nearby. The sensor should be in thick meat—not against bone, just beneath the skin, or hanging into the hollow cavity.

A leave-in probe is useful for watching one spot during the roast. An instant-read thermometer is better for checking the other breast, thighs and wing areas once you’re close.

Four-panel close-up showing correct turkey thermometer placement, a probe touching bone, a probe too shallow under the skin, and a probe ending in the cavity.
A thermometer only answers the question you ask it. If the sensor touches bone, sits just under the skin or slips into the cavity, reposition it before changing the cooking plan.

Start Checking Before You Expect It to Be Done

Set your timer for the first check, not for when the turkey is supposed to be done.

Pink Meat and Pop-Up Timers

Safely cooked turkey can retain some pink, especially around joints or after smoking. Color alone is not a dependable doneness test. Breast, thigh and wing safely at temperature? Slight pinkness by itself is not a reason to keep roasting.

Close-up of carved roast turkey with a small pink area in the breast beside a digital thermometer reading 165°F / 74°C, under the message “Check temperature, not color.”
A pink tint can survive even when turkey is safely cooked, so color is a weak final judge. When appearance and temperature disagree, trust a valid thermometer reading over the shade of the meat.

A pop-up timer is another clue, not the final answer. It measures one location. When it pops, check the turkey with your thermometer.

Give the Turkey Time to Rest

Rest the turkey for at least 20 minutes before carving. Twenty to thirty minutes is comfortable for many birds: carving is less rushed, and the last dishes can make it to the table.

Those minutes are also enough time to warm or bake soft dinner rolls without making them compete with the turkey earlier in the day.

An hour-long delay is different. That’s holding cooked food, not simply resting it.

Close-up of a thick slice being carved from a roasted turkey breast, showing moist pale meat beneath deeply browned skin with a carving knife and fork.
Proper timing shows up here: moist breast meat beneath deeply browned skin, after enough rest to carve cleanly.

Turkey not behaving as expected? → Troubleshoot it

What Is Your Turkey Doing Right Now?

Most turkey trouble begins when two signals disagree: the clock says one thing and the thermometer another; the breast is ready while the thigh lags; or the skin looks finished while the center still needs time.

Turkey troubleshooting infographic with a whole roasted turkey in the center and six surrounding problem-and-fix panels for early temperature, low temperature, breast-thigh mismatch, thermometer disagreement, dark skin and smoking pan.
When the turkey stops matching the timetable, diagnose the signal before changing course. Temperature, browning, timing and pan problems may look equally urgent, but they do not need the same fix.
What you seeWhat to do first
165°F much earlier than expectedRecheck breast, thigh and wing; remove if all are ready
Time is up, temperature is lowKeep cooking; check thawing, oven and probe placement
Breast done, thigh lowShield breast and keep checking the thigh
Thigh hot, breast lowRecheck the breast in more than one spot
Thermometers disagreeMove probes away from bone and cavity; verify accuracy if needed
Skin too darkLoosely shield the dark area with foil
Turkey is pinkCheck breast, thigh and wing for 165°F
Finished earlyRest, then move to safe holding if needed
Dinner ready, turkey notKeep roasting the underdone area until it reaches 165°F
Pan is smokingProtect the drippings without shocking hot cookware
Forgot the giblet packageCheck the package material and condition
Turkey is dryNext time begin temperature checks sooner

It Reached 165°F Much Earlier Than Expected

Take another set of readings before assuming the thermometer is wrong. Breast, thigh and wing all safely at temperature? The turkey is finished. Oven calibration, airflow, bird shape and ordinary variation can all move the finish forward.

The Time Is Up but the Turkey Is Still Below Temperature

Keep cooking it.

Then find out why it is behind. Common reasons include ice in the cavity, stuffing, an oven running cool, repeated door opening, an unusually deep pan, a different appliance, or a thermometer sitting against bone instead of in thick meat.

When the readings are valid and still low, the schedule has to move; the safe-temperature target does not.

The Breast and Thigh Are Finishing at Different Times

Breast done but thigh low? Loosely shield the breast and keep roasting. Take a second thigh reading nearby before adding a long stretch of oven time, just in case the first probe touched bone. Dark meat can handle—and often benefits from—more heat, so don’t drag the breast upward just because the thigh needs longer.

Roast turkey in an oven with the breast loosely covered in foil and a thermometer probe in the thigh, labeled to shield the breast and keep checking the thigh.
If the breast is already safe while the thigh still runs low, protect what is finished instead of driving the breast hotter. Shield the breast loosely, then keep checking the inner thigh.

A hot thigh with a low breast needs the opposite response: check the breast in more than one spot and continue until it is safe. Turkey shape and oven hot spots do not guarantee that the thighs always finish last.

The Thermometers Disagree

Move the probe first. Keep it away from bone and the cavity and give the reading a moment to settle.

Not sure which thermometer to trust? Check it in well-stirred ice water. The sensing area should read about 32°F / 0°C without touching the sides or bottom of the container; follow the manufacturer’s calibration instructions if it does not.

Two-step thermometer troubleshooting graphic showing probes in a roast turkey, then a probe moved away from bone and the cavity, followed by an ice-water check reading about 32°F / 0°C.
An ice-water test checks the thermometer, not the turkey. First rule out bad probe placement; if the readings still seem wrong, about 32°F / 0°C gives you a known reference point.

An oven thermometer is also worth checking when every turkey seems to finish implausibly early or late.

The Skin Is Getting Too Dark

Loosely cover the darkening area with foil and keep cooking. Sweet rubs and glazes can brown especially quickly at higher temperatures.

The Turkey Finished an Hour Early

Twenty or thirty minutes early is useful; that’s largely the rest the turkey needed anyway. Let it sit while you finish gravy, warm serving dishes or bring the mashed potatoes to the table.

A much longer wait becomes a holding problem. Keep hot-held turkey at 140°F / 60°C or above. Without safe hot holding, cooked turkey should not sit at room temperature for more than 2 hours.

Several hours to wait? Carve and refrigerate the meat promptly in shallow containers, then reheat it to 165°F / 74°C. Holding the whole bird hot indefinitely is hard on both the meat and the skin.

Three-path decision graphic for an early-finished turkey: a 20–30 minute rest, hot holding at 140°F / 60°C or above, or carving, chilling and reheating to 165°F / 74°C for a several-hour delay.
Finishing early is manageable once the delay is classified correctly. A short gap can be a normal rest, a longer wait needs safe hot holding, and a several-hour delay calls for chilling and reheating.

Dinner Is Ready and the Turkey Is Not

Underdone meat needs more cooking. A safely cooked breast with a lagging thigh or leg can be loosely shielded with foil while the underdone area continues toward 165°F.

The Pan Is Smoking

Drippings can scorch before the turkey is finished, particularly with high heat, a dry pan or sugary seasoning. With a metal roasting pan, a small amount of hot water or unsalted stock can help protect the drippings when your roasting setup allows it.

Glass and ceramic cookware need more caution: avoid sudden temperature changes and follow the cookware manufacturer’s guidance rather than pouring liquid blindly into a screaming-hot dish. Once the pan juices are bitter and black, don’t build gravy around them.

Roast turkey in a metal pan with smoking drippings as a small amount of hot liquid is added, beside a glass-or-ceramic cookware warning about sudden temperature change.
Darkening drippings can be rescued before they turn bitter, but the pan material changes what is safe to do next. Metal tolerates a little hot liquid; glass or ceramic needs protection from sudden temperature shock.

You Forgot the Giblet Bag

A paper-wrapped giblet packet cooking inside the turkey is not, by itself, a reason to discard a safely cooked bird.

Plastic is different. A packet that remained intact and unchanged does not automatically ruin the turkey. Melted, warped or broken-down plastic is a different situation: do not use the turkey.

The Turkey Came Out Dry

Dry breast meat usually points back to excessive internal temperature, not too little basting. Once the breast has overshot its finish, spooning pan juices over the surface cannot put that moisture back inside.

Next time, start checking sooner.

Close-up turkey breast slices progressing from moist to dry beside a rising heat-and-time line and a basting brush, illustrating moisture loss from extra oven time.
Basting can make the surface glossy and flavorful, but it cannot undo an overcooked center. Dry turkey breast is mainly a temperature-management problem, which is why earlier checking matters more than another spoonful of pan juices.

Need the core timing numbers again? ↑ Back to the main 325°F chart

Using a Different Cooking Method? Follow Its Own Timetable

Not using the standard oven method? Treat this section as a routing guide. Its job is to keep you from applying the main 325°F chart to a cooking method that behaves differently.

Routing infographic comparing six turkey cooking methods—conventional oven, convection, oven bag, electric roaster, smoker and spatchcock—with separate clocks showing that each method uses its own timetable.
Use this as a routing map: identify the equipment or turkey shape first, then follow that method’s timetable below. Conventional-oven numbers are not portable across convection, bags, roasters, smokers and spatchcocked birds.
MethodTiming differenceMain tradeoff
Conventional ovenUse the main 325°F chartStandard reference method
Convection ovenUsually fasterBegin checking earlier
Oven cooking bagOften much fasterMoist cooking, softer skin
Electric roasterMay match conventional timing or finish soonerFrees oven space, usually less browning
SmokerSeparate low-heat scheduleSmoke flavor; skin can soften
SpatchcockMuch fasterFlatter, more even roasting

Convection Oven

Convection can shorten the cook. USDA guidance says you may reduce the oven temperature by 25°F, but a convection oven should be set no lower than 300°F / 149°C.

Convection turkeyApproximate time
14–18 lb unstuffed2½–3¼ hours
18–22 lb unstuffed3¼–3½ hours
14–18 lb stuffed3–3¼ hours
18–22 lb stuffed3¼–3¾ hours

Check the oven manufacturer’s guidance too, then verify doneness in the breast, thigh and wing.

Oven Cooking Bag

A cooking bag traps steam and heat around the turkey, so it can roast much faster than in an open pan. USDA gives these approximate times for an unstuffed turkey at 350°F / 177°C:

Turkey in oven bagApproximate time
8–12 lb1½–2 hours
12–16 lb2–2½ hours
16–20 lb2½–3 hours
20–24 lb3–3½ hours

Add about 30 minutes for a stuffed bird and follow the bag manufacturer’s directions. Trapped steam contains splatter and helps retain moisture, but deeply crisp skin is harder to achieve.

Electric Roaster

Electric roasters vary, and some finish considerably sooner than a conventional oven. Follow the appliance manual and begin checking early.

The practical win is oven space. The main oven stays available for candied yams, casseroles and rolls; covered roasters often give you paler, softer skin in return.

Smoked or Spatchcocked Turkey

For a thawed, unstuffed 8–12 lb turkey, USDA’s alternate-method guidance uses roughly 20–30 minutes per pound as a smoker planning estimate. Weather, smoker temperature and airflow can move that number substantially, so use a dedicated smoking method.

Spatchcocking needs its own timetable too. Flattening the bird exposes more of it to heat and shortens the cook dramatically.

Using the standard oven method? ↑ Back to the main 325°F chart

Turkey Cooking Time FAQs

1. Can You Cook Two Turkeys at the Same Time?

Cooking two turkeys does not mean doubling the cook time or adding their weights together. If the oven can hold two similarly sized birds in separate shallow pans with enough space for hot air to circulate, plan each turkey by its own weight. Leave a little extra scheduling room for airflow and oven recovery, and temperature-check each bird separately.

Two similarly sized turkeys roasting in separate shallow pans inside one oven with airflow arrows, separate clocks and check markers showing that each bird is timed and checked independently.
A fuller oven may recover heat more slowly after the door opens, so leave a little extra schedule room. Still, each turkey keeps its own weight-based clock and its own temperature checks.

2. Does a Turkey Cook Faster Covered or Uncovered?

Don’t use covering as a shortcut for the cook time in this guide. Roast the turkey uncovered, then use foil once the skin is brown enough. Fully covered methods and oven bags have different heat and moisture conditions and need their own timetable.

3. Can You Cook a Turkey the Day Before?

Yes. Cook it fully, carve or portion it, refrigerate promptly in shallow containers, then reheat the meat to 165°F / 74°C before serving.

Extra cooked meat can become turkey pot pie the next day rather than disappearing into a week of identical sandwiches.

4. Can You Cook a Turkey Overnight?

Don’t improvise a very-low overnight roasting temperature just so the turkey can cook unattended. For the conventional method in this guide, use 325°F / 163°C or above and monitor the cook. Cooking ahead and reheating safely is a more predictable way to free the oven.


Once the first temperature check is on your schedule, most of the uncertainty is gone. Give the finished turkey its rest, use that window to bring the sides together, then carve and get it to the table. A bird that finishes a little earlier or later than the planning window suggested is normal; it doesn’t have to throw the rest of dinner off course.

Partially carved golden-brown roast turkey on a silver platter with juicy breast slices and dark meat, beside serving dishes on a dark dinner table.
Crisp skin and juicy slices are the payoff for planning early, checking temperature and giving the turkey time to rest.