Posted on — Leave a comment

Chile Relleno Casserole Recipe: Easy, Cheesy & Full of Roasted Poblano Flavor

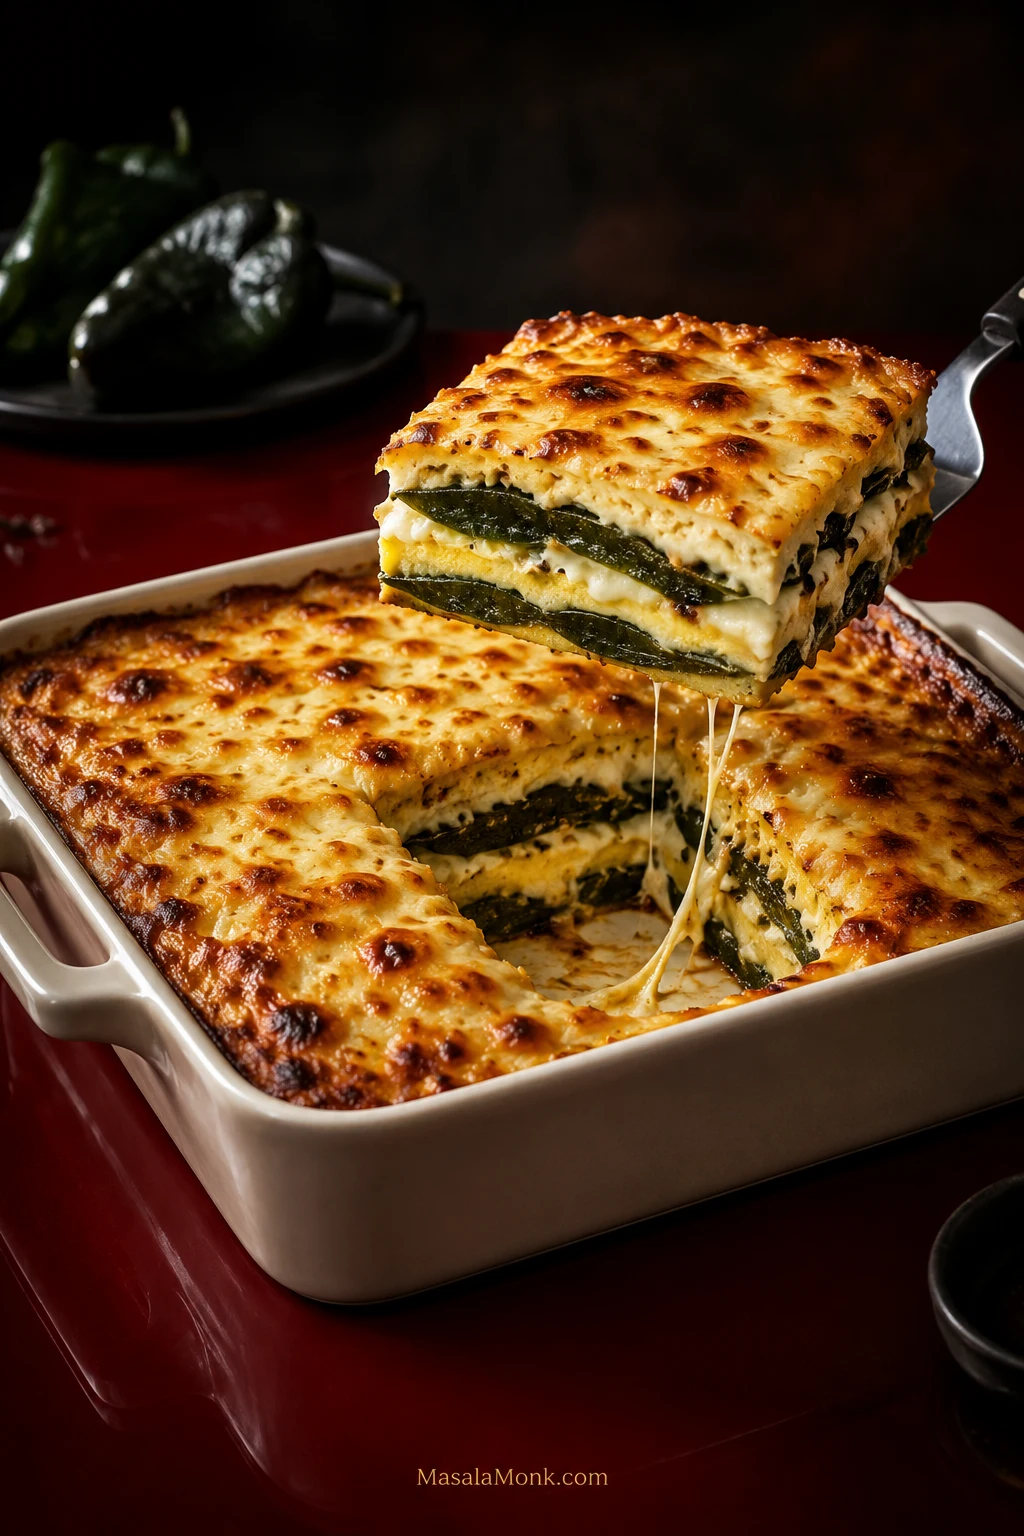
A lifted square of chile relleno casserole showing two broad roasted poblano layers, melted pale cheese, tender egg binder and a browned cheese top.

Cut into a good chile relleno casserole and you should still know where the poblanos are. Broad layers of roasted green chile run through the slice, molten cheese sits between them, and the egg around everything is tender and lightly puffed rather than taking over the plate.

Traditional chiles rellenos ask you to roast, peel, stuff, batter and fry individual peppers without letting them split or spill their cheese. This casserole is much less demanding. A poblano tears while you peel it? Piece it together in the dish and keep going. No toothpicks, no coating peppers one by one, and no pot of frying oil.

The payoff is a forkful with soft roasted poblano, stretchy Oaxaca or Monterey Jack and just enough tender egg around the edges to hold everything together.

The Chile Relleno Casserole Formula

Chile first. Cheese second. Eggs hold it together.

Roast 6–8 medium-large poblanos / about 700–900 g (1½–2 lb), open them flat and use enough for two nearly complete chile layers. Layer with 400 g / 14 oz Oaxaca or Monterey Jack, or a mixture of the two.

Whisk 6 large eggs + 60 ml / ¼ cup milk + 40 g / about ⅓ cup flour + ½ teaspoon baking powder until completely blended with a light layer of foam across the surface. Pour over the chile and cheese and bake in a 9-inch / 23 cm square dish at 350°F / 175°C conventional / 160°C fan.

Start checking at 35 minutes. Many casseroles in this pan finish around 35–45 minutes. The center should be set rather than wet or sloshy and should reach 160°F / 71°C if checked with a thermometer. Rest for 10 minutes before slicing.
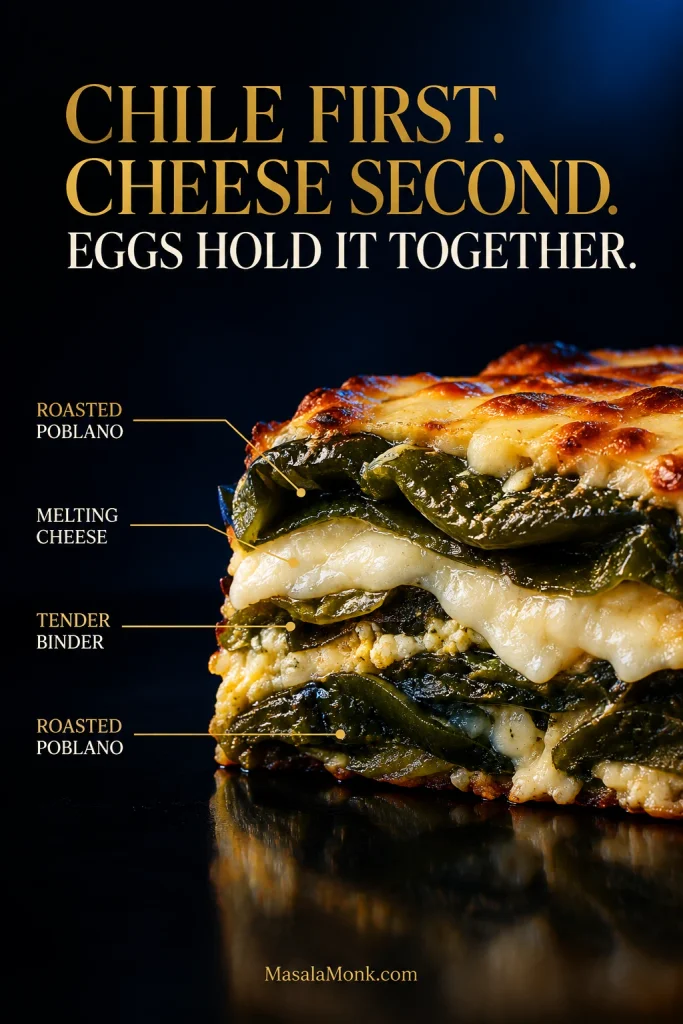
Labeled casserole cross-section with two dominant roasted poblano layers, generous melted cheese and small pockets of tender egg binder between them.
Poblano should read as the structure of the slice; cheese fills the seams, while the egg binder nearly disappears between them.

Choose Your Chile: Fresh, Canned or Frozen

Fresh poblanos give you the strongest roasted-pepper character. Whole canned green chiles turn the dish into a genuine shortcut. Frozen roasted green chiles save the roasting and peeling.

Easy does not mean instant when you start with fresh poblanos. They still need time to blister, steam and peel. The easy part is skipping the fiddly stuffing, battering and frying.

Canned chiles have their own good reason to exist. This is the route for a night when roasting peppers is the difference between making the casserole and not making it.

How Each Green Chile Changes the Casserole
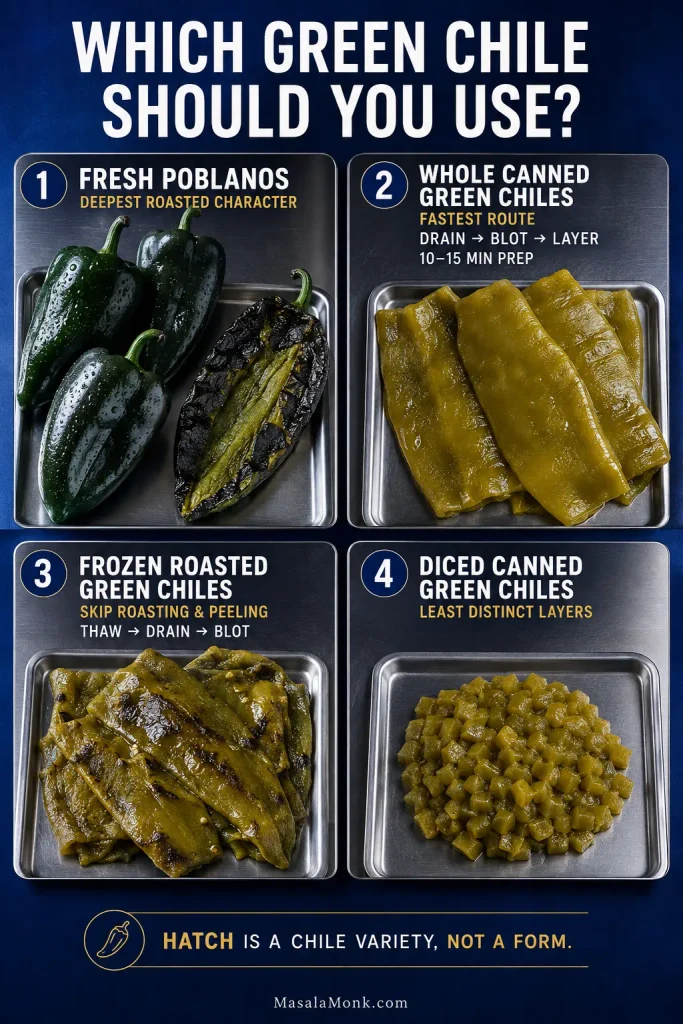
Guide comparing fresh poblanos, whole canned green chiles, frozen roasted green chiles and diced canned chiles for flavor, convenience and layer definition.
Whole chiles preserve recognizable layers; diced chiles disappear into the binder much more easily.
ChileBest forWhat to expect
Fresh poblanosRoasted-pepper depthFirm, distinct chile layers; requires roasting, steaming and peeling.
Whole canned green chilesThe fastest routeSofter and milder, with broad pieces that still layer well.
Frozen roasted green chilesSkipping the roasting and peelingAlready roasted and convenient; thaw completely before using.
Diced canned green chilesUsing what you already haveThe least layered choice. Small pieces mingle more readily with the egg.

Hatch chile can be used fresh, frozen roasted or canned; there is a fuller Hatch variation below. Whatever form you use, opened whole chiles should give you enough flesh to cover the baking dish twice with only small gaps.

Using canned or thawed frozen chiles? Drain them thoroughly and blot away surface moisture before layering.
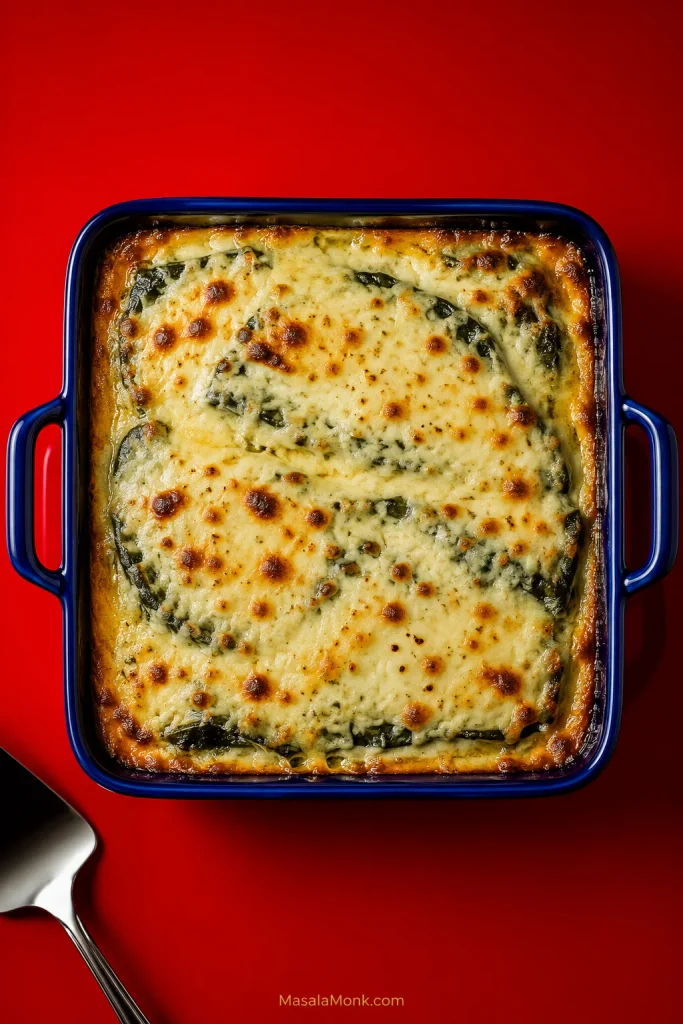
Whole square chile relleno casserole in a cobalt baking dish with a golden, blistered melted-cheese surface and browned edges.
Look for a deeply golden, blistered cheese top with dark roasted poblano edges peeking through around the pan.

Make It Now: Chile Relleno Casserole

Recipe at a Glance

Yield
6 generous or 8 smaller servings

Prep
About 30–40 minutes

Bake
About 35–45 minutes

Rest
10 minutes

Oven: 350°F / 175°C conventional / 160°C fan
Pan: 9-inch / 23 cm square baking dish
Total from raw poblanos: about 1 hour 15 minutes to 1 hour 35 minutes
Canned-chile shortcut: about 10–15 minutes prep and roughly 55–70 minutes total including the rest

Ingredients

  • 6–8 medium-large poblano peppers, about 700–900 g / 1½–2 lb
  • For the canned shortcut, use instead: 3–4 (7-ounce / about 200 g) cans whole green chiles, drained very well, or enough for two substantial layers
  • 400 g / 14 oz Oaxaca or Monterey Jack cheese, or a mixture of the two, shredded and divided
  • 6 large eggs
  • 60 ml / ¼ cup whole milk
  • 40 g / about ⅓ cup all-purpose flour
  • ½ teaspoon baking powder
  • ¾ teaspoon fine salt. Use closer to ½ teaspoon when both the canned chiles and cheese are particularly salty.
  • ¼ teaspoon freshly ground black pepper
  • ½ teaspoon garlic powder, optional
  • Butter or neutral oil, for the baking dish

For serving, optional: red chile or tomato sauce, salsa verde, avocado, crema or sour cream, cilantro and warm homemade corn tortillas.

Useful equipment: tongs, a rimmed sheet pan, a covered bowl for steaming, a 9-inch square baking dish and a whisk. An instant-read thermometer is handy but optional.

Making the canned-chile version? Drain the whole chiles very well and blot them dry. Skip Steps 1 and 2 and begin with Step 3: Layer the chile and cheese.

How to Make It

1. Char the poblanos

Set the broiler to high and arrange an oven rack about 5–6 inches / 13–15 cm from the heat. Line a rimmed sheet pan with foil and arrange the poblanos on it.

Broil, turning as needed, until the skins are well blistered and blackened in patches. Depending on pepper size and your broiler, this usually takes 8–15 minutes.

The skin should look loose and charred while the flesh underneath still has enough body to pick up with tongs. By now the kitchen should smell roasted and a little smoky. Stop before the peppers slump into shapeless bags.

No broiler? Char the poblanos directly over a gas flame or on a hot grill, turning with tongs until the skins blister well. A very hot oven works too; it usually takes longer and gives less concentrated charring.
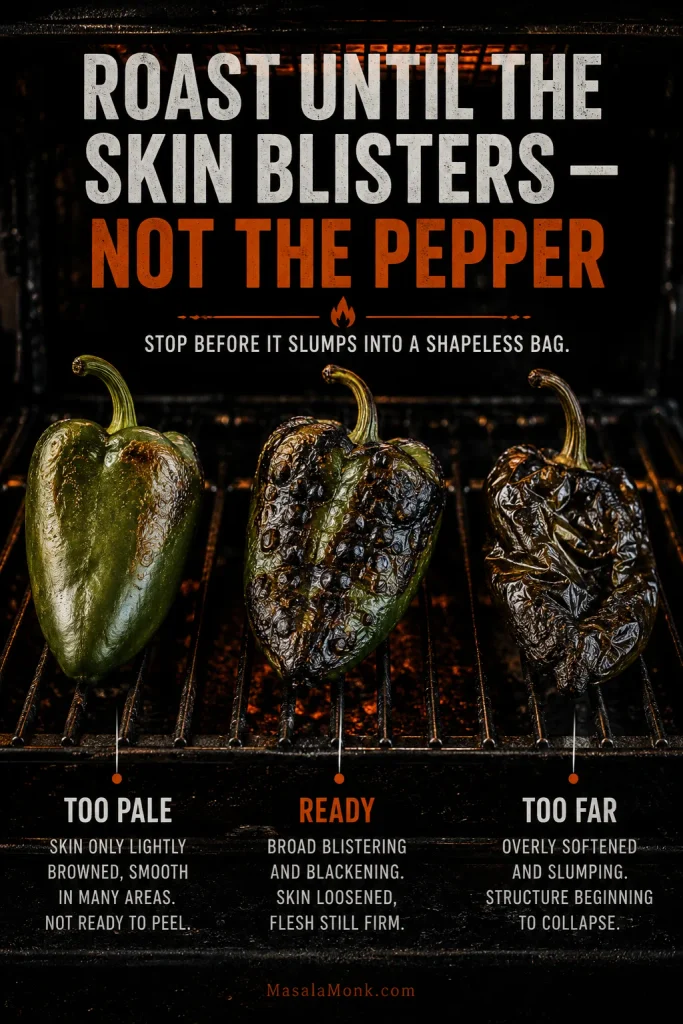
Three poblano peppers labeled too pale, ready and too far, showing the progression from lightly browned skin to well-blistered skin to a collapsed over-roasted pepper.
Use char coverage, not the clock: broad blistering with a pepper that still holds its shape is the target.

2. Steam, peel and dry

Move the hot peppers into a bowl and cover tightly with a plate, lid or foil. Leave them for about 10 minutes.

Peel away the loosened skin, then open each poblano lengthwise. Remove the stems, seeds and thick pale ribs.

A few stubborn black flecks are fine. Your fingers will probably get messy; that’s still easier than scraping so hard that half the pepper comes away with the skin. Lay the opened poblanos on paper towels and blot both sides well.

Anyone sensitive to chile oils may prefer kitchen gloves here, especially when cleaning a large batch. Either way, avoid touching your eyes until your hands are washed.
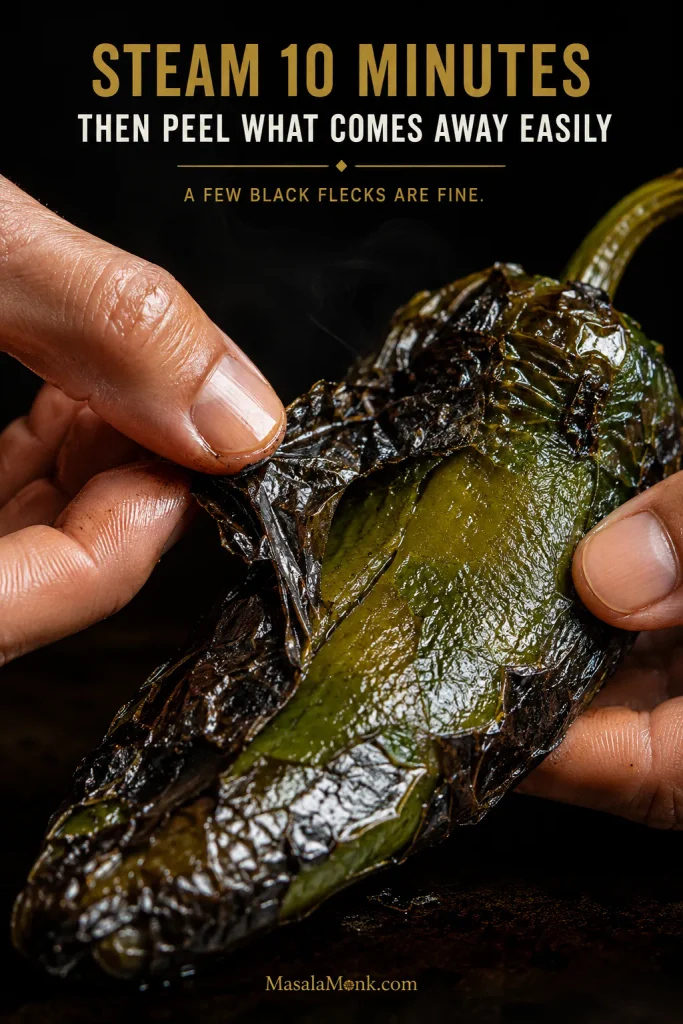
Hands peeling loosened blackened skin from a steamed roasted poblano, revealing the soft dark-green pepper underneath.
Don’t sacrifice pepper flesh for perfectly bare skin; a few charred flecks are harmless.

Are the skins still clinging? See why roasted poblanos sometimes refuse to peel cleanly.

3. Layer the chile and cheese

Lower the oven to 350°F / 175°C conventional / 160°C fan. Lightly grease the baking dish.

Cover the bottom with half of the opened chiles, overlapping torn pieces where needed. Scatter over about one-third of the cheese. Add the remaining chile layer, then another third of the cheese. Save the final third for the top.

It does not need to look tidy. The peppers can overlap and the cheese can fall where it falls; once everything melts and puffs in the oven, those rough edges disappear into the slice.
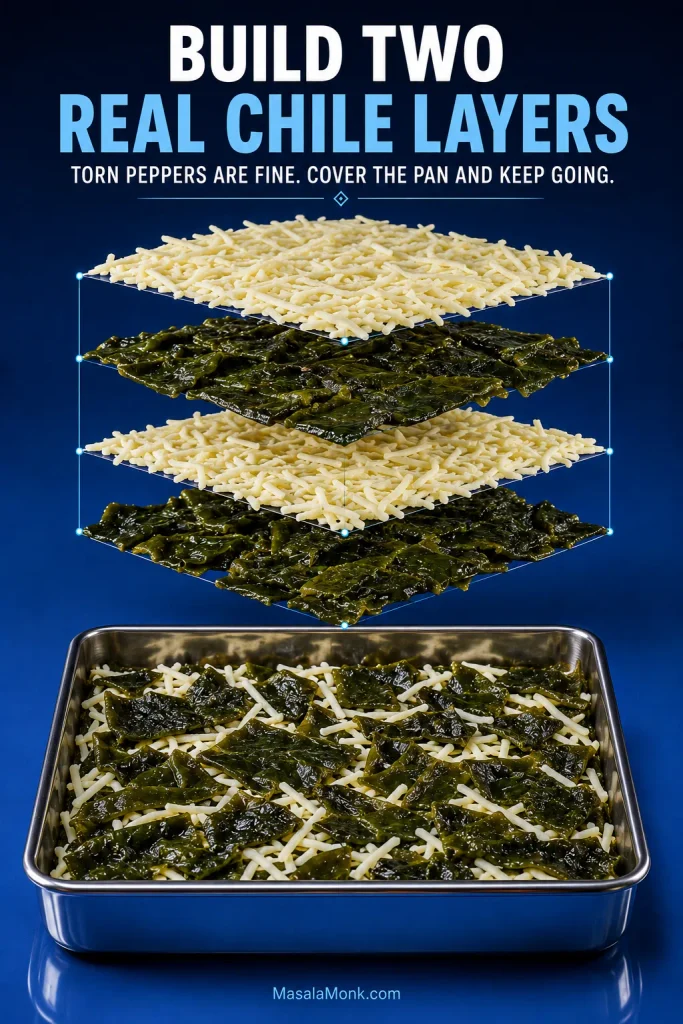
Layering guide showing two layers of broad roasted poblano pieces with shredded pale cheese, plus an assembled baking pan with overlapping torn peppers.
Aim for broad coverage rather than neat symmetry; overlaps and torn poblano pieces disappear into the finished casserole.

4. Mix the eggs last

With the casserole layered and the oven ready, whisk the flour, baking powder, salt, pepper and optional garlic powder together in a large bowl. Whisk in the milk until smooth, then add the eggs.

Whisk vigorously for about a minute, until everything is completely blended and a light layer of foam sits across much of the surface. There is no need to separate the eggs.

5. Pour, top and bake

Pour the egg mixture slowly over the chile and cheese, moving around the baking dish so it reaches the gaps. Give the dish a gentle jiggle, scatter over the remaining cheese and put it straight into the oven.
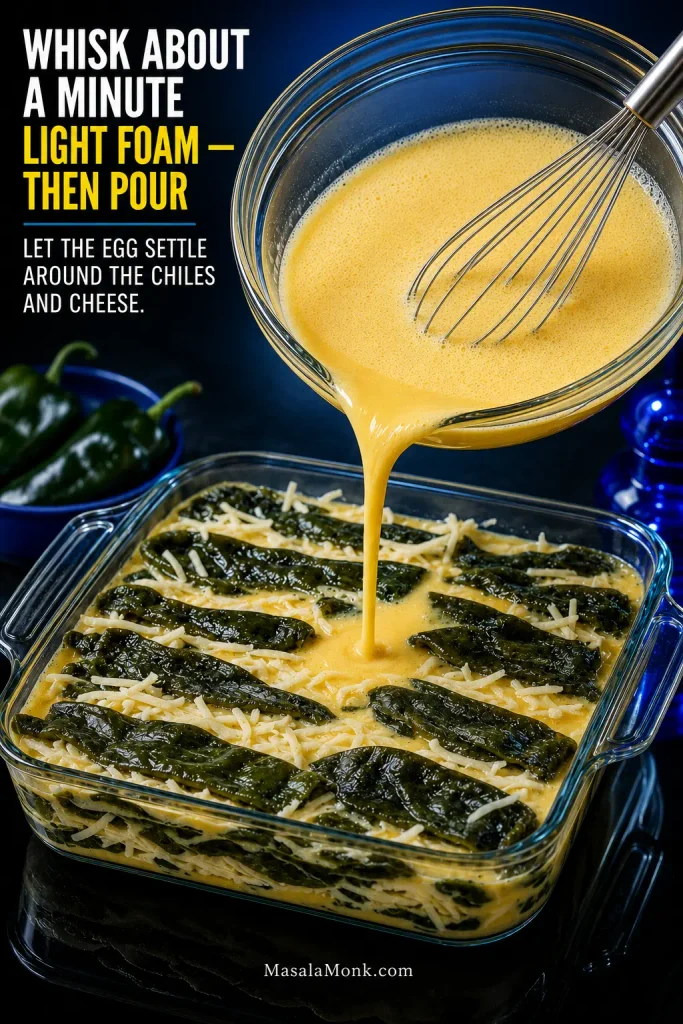
Lightly foamy egg mixture being poured from a glass bowl into a casserole layered with broad roasted poblanos and shredded pale cheese.
Fine bubbles are enough; pour slowly so the egg mixture slips into the gaps instead of forming a thick layer on top.

Start checking at 35 minutes. Many casseroles in this pan finish around 35–45 minutes. A refrigerator-cold casserole, juicier peppers or a heavy ceramic dish can push the bake a little longer.

Look past the melted cheese on top. The edges should be puffed and lightly golden. The middle should be set, with no obvious liquid sloshing when the dish moves gently. An instant-read thermometer should register 160°F / 71°C near the center.

A browned top with a loose middle simply needs more time. Cover loosely with foil if the color is already where you want it.

Unsure about the center? See the detailed doneness cues before you pull the casserole.

6. Rest before slicing

Leave the casserole alone for 10 minutes. Ten minutes feels annoyingly long when the cheese is bubbling, but cutting immediately is how a good casserole turns into a soft heap on the plate.

Wait closer to 15 minutes when neat slices matter more than maximum cheese stretch.
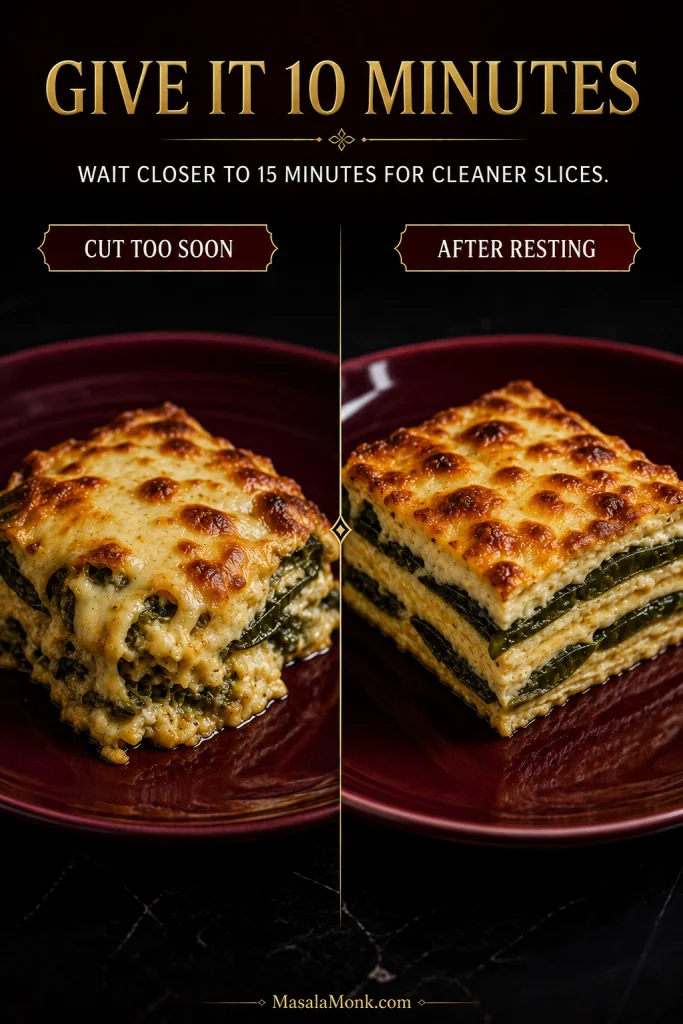
Comparison of a soft chile relleno casserole slice cut too soon and a cleaner, more structured slice after resting.
Resting can organize an already-set casserole, but it cannot rescue a liquid center. Ten minutes keeps more cheese stretch; 15 gives cleaner cuts.

Changing the Pan or Scaling the Recipe

The recipe is built around a 9-inch / 23 cm square dish. A deeper casserole takes longer to set in the middle; a shallower one gets there faster.
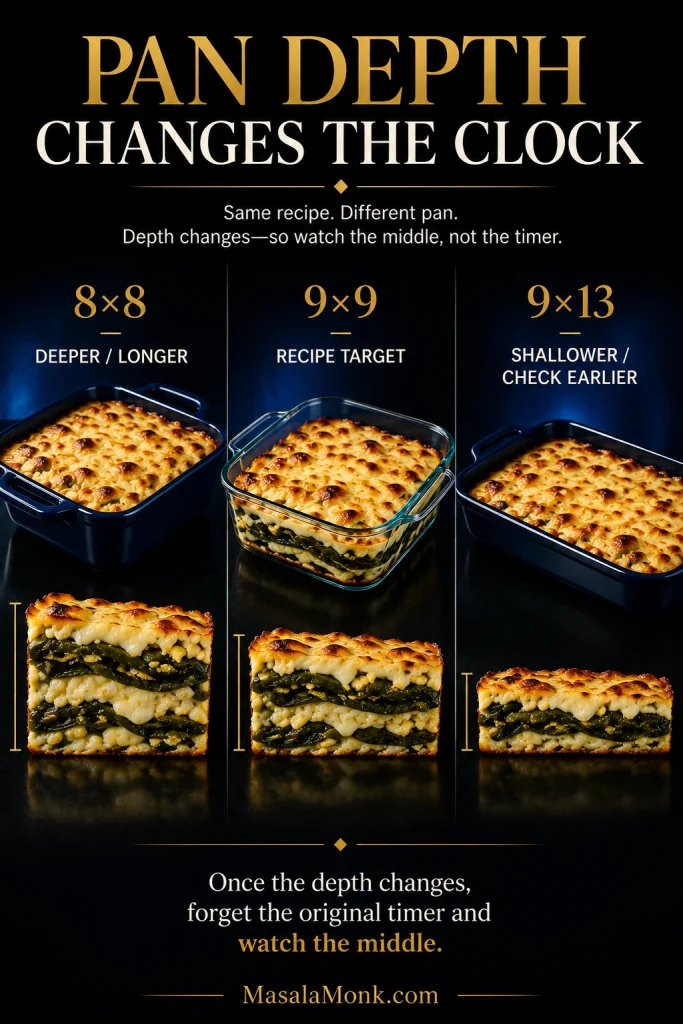
Comparison of chile relleno casserole in 8×8, 9×9 and 9×13 pans, showing the 8×8 as deepest and the 9×13 as shallowest.
Depth changes bake time: deeper casseroles need longer; shallower ones should be checked earlier.
ChangeWhat to expect
8-inch / 20 cm squareA deeper casserole. Expect the middle to need longer even after the top looks ready.
9×13-inch / 23×33 cmOne batch will be shallower, so begin checking earlier and expect thinner layers.
Half batchUse a smaller dish instead of spreading the mixture thinly across the standard pan.
Double batchTwo 9-inch square dishes are easier to judge than one very deep casserole. A full double batch in one 9×13 can brown well before the middle sets.

Once the depth changes, forget the original timer and watch the middle.

Choosing the Poblanos and Cheese

How Much Chile, and How Hot?

How much chile? Use the recipe count as a shopping guide, then let the baking dish make the final decision. Once the roasted peppers are opened flat, you want enough to cover the pan twice. Six big poblanos can easily give you more usable chile than eight small ones. Large bare patches in the second layer are a better reason to roast another pepper than any particular number.

How hot? Poblanos are generally much milder than jalapeños, though individual peppers vary. Most of the heat is concentrated around the pale inner ribs, so trim those away if you want a gentler casserole. Taste a little roasted chile when heat matters to your table; salsa or a few drops of pepper sauce can make one serving hotter without changing the whole pan.

Which Cheese Melts Best?

Oaxaca and Monterey Jack are the two choices that matter most here. Oaxaca gives you a soft, stretchy melt; Monterey Jack melts smoothly into creamy pockets and is easy to find. Asadero works well too. Use Pepper Jack when you deliberately want more heat.

Cheddar is best used in a blend rather than as the only cheese; too much shifts the flavor away from the mild melting-cheese profile. Cotija belongs on top after baking, not in place of the molten layer inside.

Block cheese generally melts more smoothly than pre-shredded cheese. Pre-shredded will still work, so use whichever makes sense for the night you’re cooking.
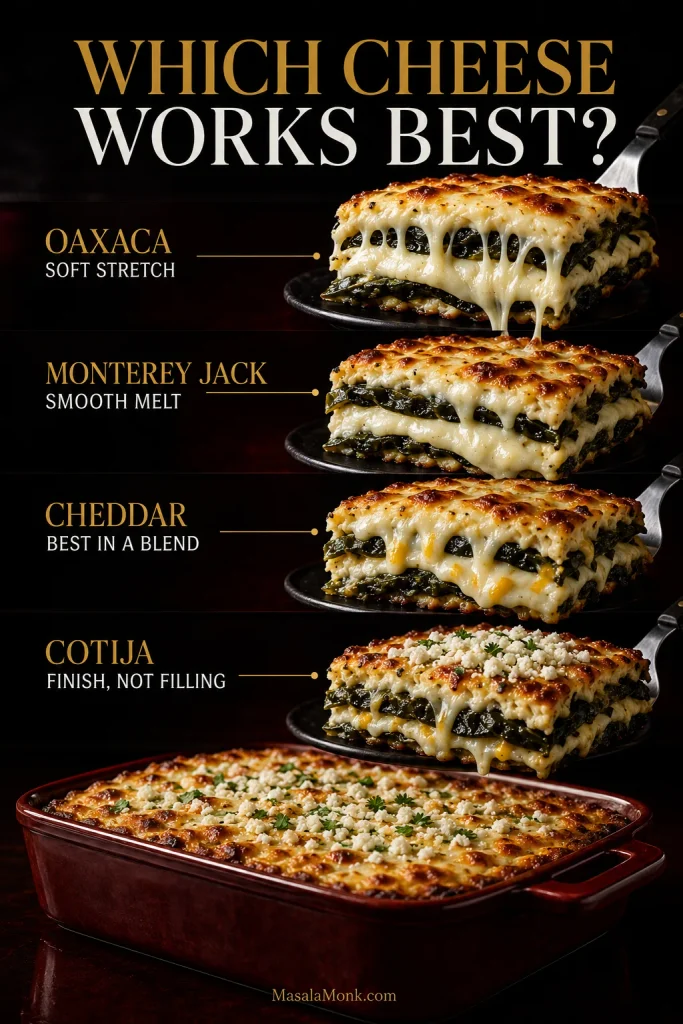
Cheese guide showing stretchy Oaxaca, smooth Monterey Jack, Cheddar used in a pale cheese blend and crumbled Cotija used as a topping.
For both creamy melt and stretch, combine Monterey Jack with Oaxaca; use Cheddar or Cotija as accents.

What the Egg Mixture Is Doing

The eggs settle into the spaces around the chile and cheese and hold the slice together. A little milk keeps them tender, flour helps the mixture set around the layers, and baking powder gives it some lift. The finished egg layer should fill the gaps rather than forming a thick, separate layer over the chiles.

Whisking whole eggs until lightly foamy is the easier route used in the recipe. Separating the eggs and whipping the whites can produce a lighter, more soufflé-like layer, though the method becomes more delicate. It is an option, not something this version needs.

Why Won’t My Roasted Poblanos Peel Cleanly?

Easy peeling starts during roasting. Skin that has only softened or lightly browned will still cling after steaming. Look for broad blistered, blackened areas while the flesh underneath still holds together, then cover the peppers while they are hot so the trapped steam can do its work.

New Mexico State University recommends the same basic sequence for green chile: blister the skin first, then place the hot chiles in a covered heat-safe container to help loosen it. Their green-chile handling guide has more detail.

A few patches may still refuse to cooperate. Leave them. Scraping aggressively just to get a perfectly bare pepper can remove more flesh than skin, and a few tiny charred flecks disappear into the finished casserole anyway.

How to Know When It’s Done

The top can fool you. If the cheese is already browned and the middle still ripples or sloshes when the pan moves gently, tent the dish with foil and keep baking. For certainty, the center should reach 160°F / 71°C, consistent with USDA guidance for egg dishes.
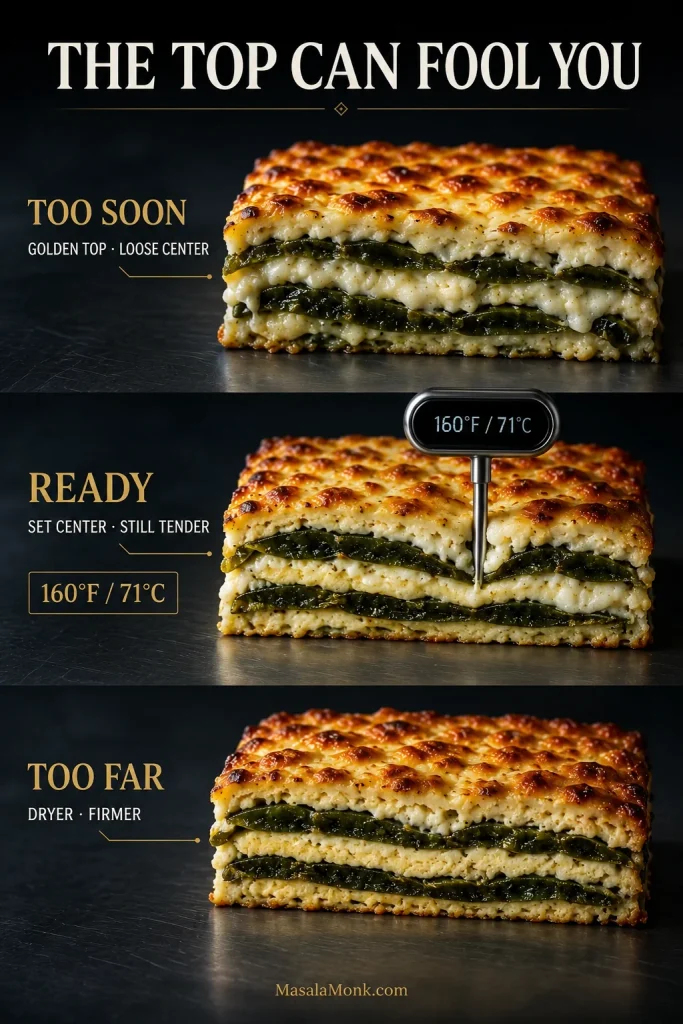
Three casserole doneness stages labeled too soon, ready and too far, with the ready center checked at 160°F / 71°C.
The center, not the browned top, decides doneness: stop when it no longer sloshes and reaches 160°F / 71°C.

After the rest, a good slice should lift cleanly without feeling stiff. The poblano should cut softly under the fork, the cheese should still pull a little from the middle, and there should be no puddle gathering at the cut edge. Spoon a little salsa around it and there is not much else it needs.

← Back to recipe · Something still wrong? Fix my casserole

Fix My Chile Relleno Casserole
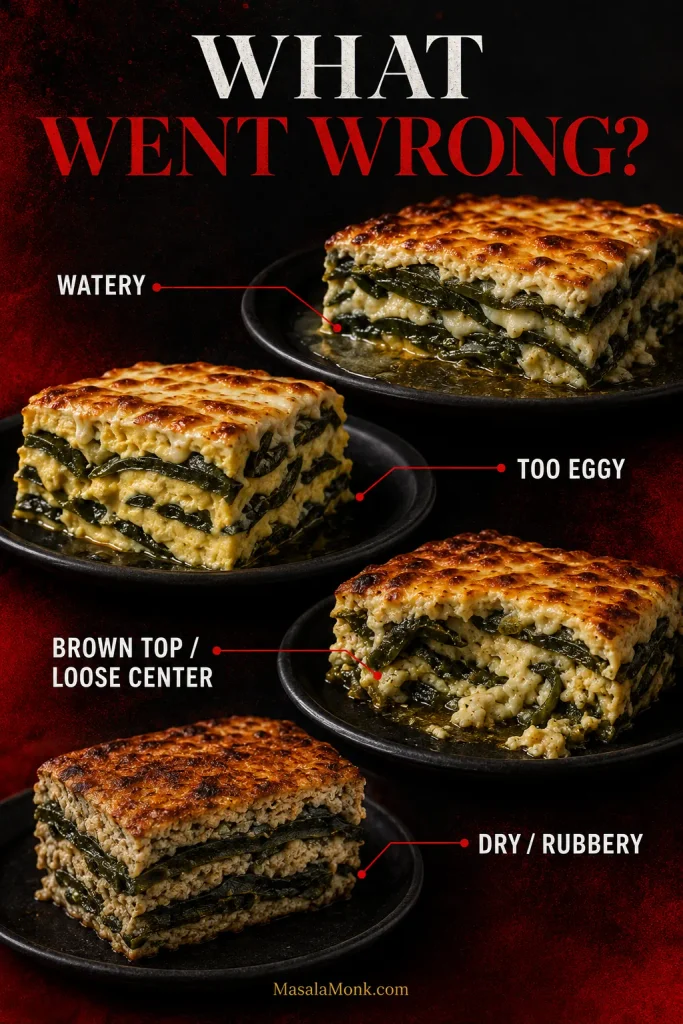
Four chile relleno casserole problems: released water, too much egg, a browned top with a loose center, and a dry overcooked slice.
Troubleshoot in order: is the center set, is moisture inside or around the slice, and is the egg tender or firm? Those clues separate the main failure modes.

Watery Casserole: Loose Center or Released Moisture?

A wet casserole, a dry one and an egg-heavy one are different problems. Look at what is actually happening before changing the recipe.
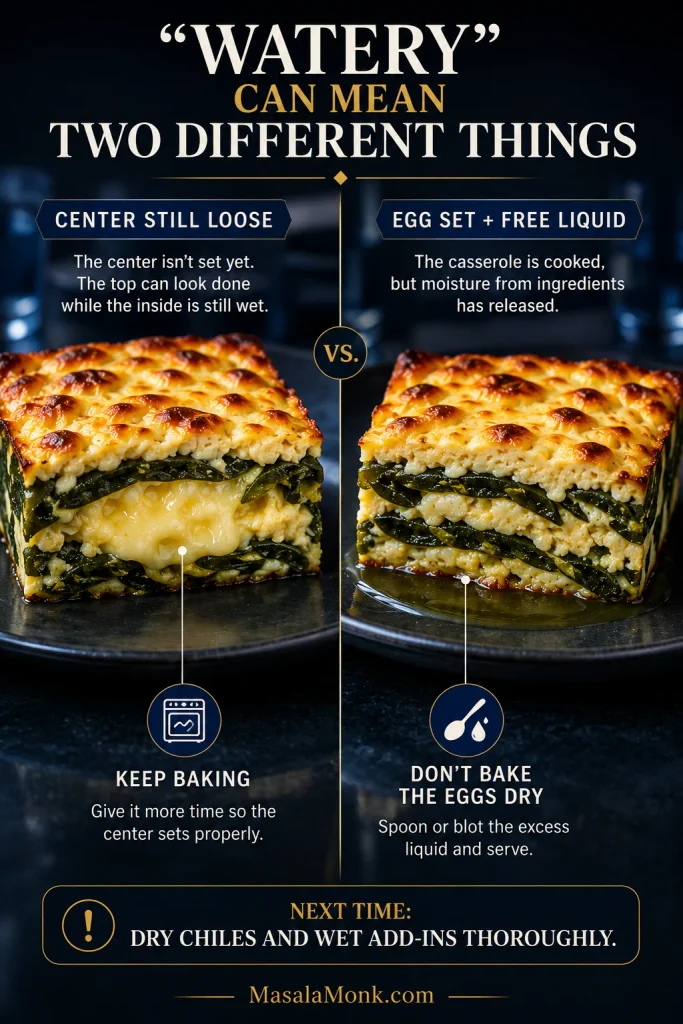
Comparison showing an underbaked casserole with a wet unset center beside a fully set slice with separate liquid pooled around the edge.
A loose wet center needs more heat; clear liquid around a slice that already holds together points to moisture released by chiles or add-ins.

Other Common Casserole Problems

ProblemLikely causeWhat to do
It tastes mostly like eggsToo little chile or cheese, extra milk or finely diced chile disappearing into the eggNow: a chile-forward salsa can bring some balance. Next time: build two generous pepper layers and don’t increase the dairy.
Brown top, loose middleA deep pan, cold ingredients, a larger batch or extra moistureNow: tent loosely with foil and continue baking. Next time: use the specified pan depth or adjust the bake for the new one.
Dense egg layerLittle aeration, weak or old baking powder, or too many heavy or wet additionsNow: once cooked through it is still perfectly usable; it simply will not be as light. Next time: use fresh baking powder, whisk until lightly foamy and bake shortly after mixing.
Poblanos won’t peelThe skins did not blister enough or the peppers cooled without steamingCover them while still hot and remove whatever skin releases easily. Do not scrape the flesh to pieces.
Greasy casseroleFatty meat, excess cheese or rendered fat left in an additionNow: blot obvious surface fat. Next time: drain meat before layering and keep additions modest.
Dry or rubberyThe eggs baked too long or leftovers were overheatedNow: serve with sauce or salsa. Next time: pull the casserole when the middle has just set.
Flavor seems flatIt may need salt or acidity rather than more dry spiceTaste with lime, salsa or a little additional salt before changing the base seasoning.

← Back to recipe · ↑ Back to help menu

Is Chile Relleno Casserole the Same as Chiles Rellenos?

No. Traditional chiles rellenos generally begin with whole roasted chiles that are peeled, stuffed and commonly coated in an airy egg batter before frying. Depending on the style, they may then be served with a tomato-based sauce or another accompaniment.

A casserole rearranges the same broad idea—roasted chile, melting cheese and egg—for a baking dish. You lose the crisp fried exterior. In return, you stop worrying about keeping every pepper whole or getting batter to cling in hot oil. Torn roasted poblanos simply disappear into the layers.
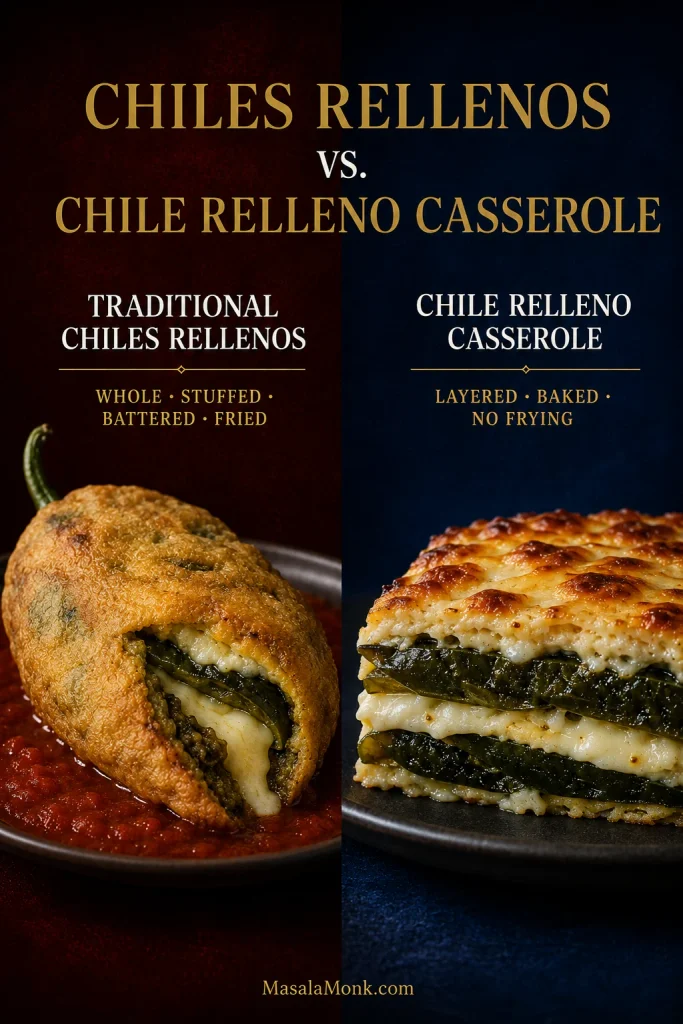
Traditional whole fried chile relleno with cheese and red sauce beside a baked chile relleno casserole with two roasted poblano layers and melted cheese.
Traditional rellenos keep the pepper whole and battered; the casserole opens roasted poblanos into broad baked layers.

Variations

The base casserole is vegetarian as written. Meat is entirely optional. If you do add anything, keep cooked additions to about 1½ cups or less. Much more makes the standard pan deeper, wetter and slower to set.

Hatch green chile

Fresh roasted, thawed and well-drained frozen roasted, or whole canned Hatch green chiles can replace the poblanos. Blot thawed or canned chile before layering, and taste it first: Hatch heat varies considerably from batch to batch. Cool avocado, crema or fresh salsa on the side is plenty when the chiles run hot.

Adding meat or vegetables

Chicken: about 1½ cups / 7 oz / 200 g cooked shredded chicken is plenty. Keep it fairly dry rather than adding meat dripping with broth or sauce.

Ground beef or chorizo: start with about 8 oz / 225 g, cook it fully and drain excess fat before layering. A full pound is too much for the standard pan if you want the original baking time to remain useful.

Tomatoes, spinach and mushrooms: deal with their water first. Cook tomatoes and mushrooms until obvious moisture has cooked away. Wilt spinach, cool it and squeeze it dry. Choose one or two additions rather than packing the dish with everything at once.
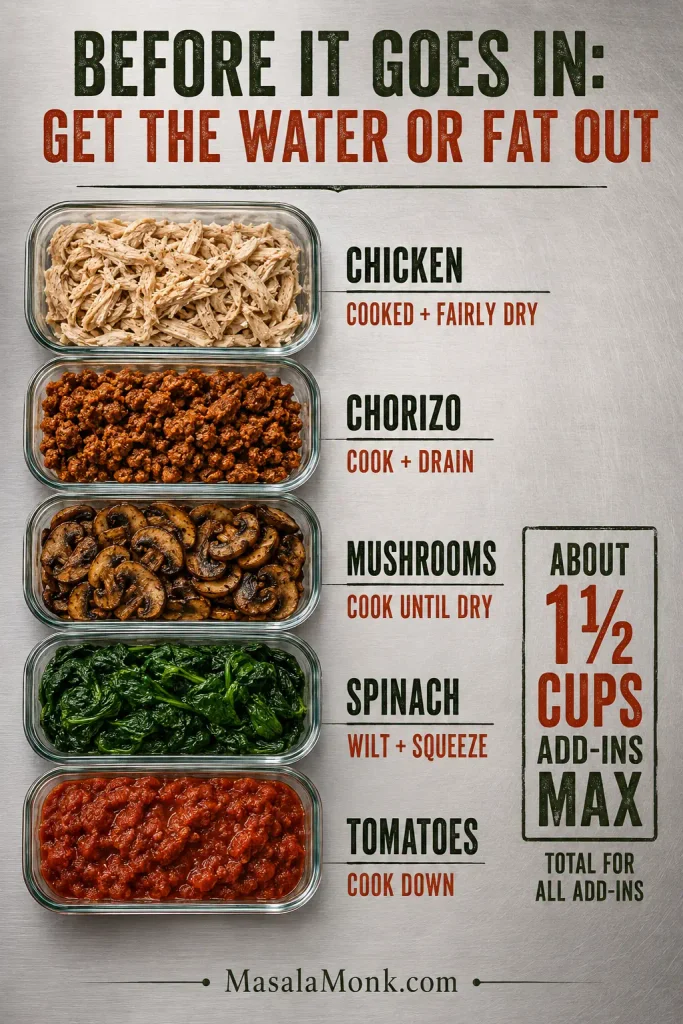
Prepared casserole add-ins including dry shredded chicken, drained chorizo, browned mushrooms, squeezed spinach and cooked-down tomatoes, with a 1½-cup total limit.
If an add-in leaves water or grease in the skillet, remove that excess before it reaches the casserole; keep total cooked add-ins near 1½ cups.

Did an add-in make the casserole wet? Use the watery-casserole diagnostic to tell excess moisture from underbaking.

Gluten-free

Replace the wheat flour with a gluten-free all-purpose blend intended for 1:1 baking. Different blends can give slightly different textures, but no other part of the method needs to change.

Sauce and Serving

Sauce works better on the plate than poured heavily through the casserole. You get cleaner slices, clearer poblano flavor and control over how saucy each serving becomes.

For a warm red option, spoon a little homemade red enchilada sauce onto the plate before setting the slice on top. For a brighter finish, roasted salsa verde brings tomatillo acidity and green-chile freshness.

Ranchero sauce, salsa roja, pico de gallo and a favorite hot sauce are easy alternatives.

What to serve with it

A scoop of creamy refried beans turns a slice into an easy dinner. Add Mexican-style or cilantro-lime rice when you want something more substantial.

Avocado or fresh guacamole is especially good beside a hot, sauced slice. A cabbage slaw or simple green salad brings the crispness the soft casserole itself does not have.

Black or pinto beans, pico de gallo and warm corn or flour tortillas fit easily on the table too. At brunch, add breakfast potatoes and fruit; at dinner, beans, rice and something fresh or acidic are usually enough.
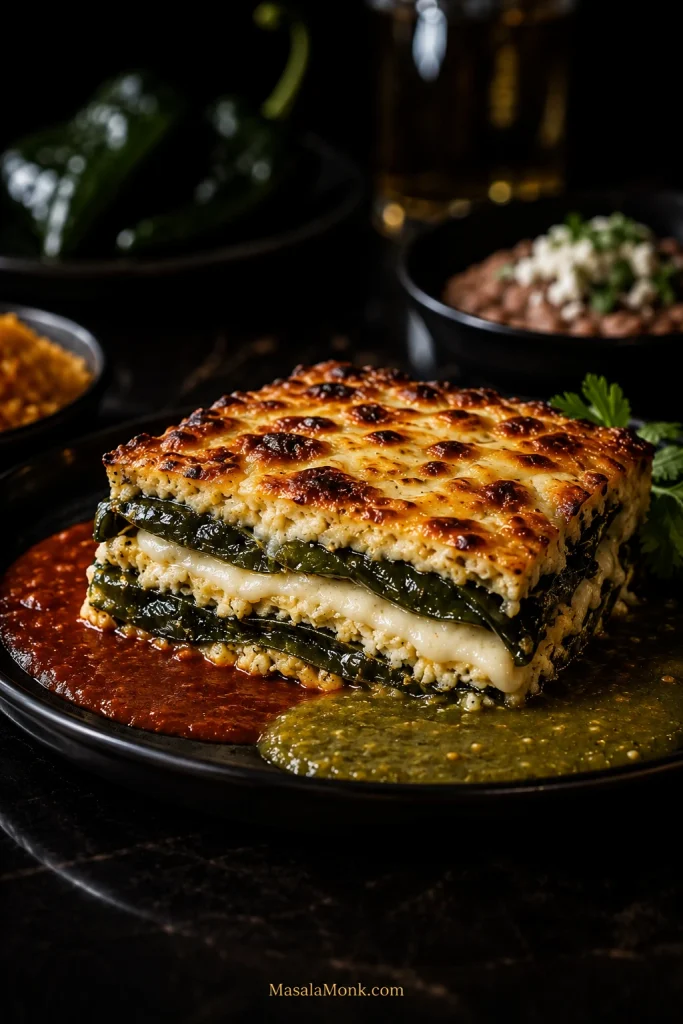
Chile relleno casserole slice with visible poblano and cheese layers, plated with red chile sauce and green salsa verde, with beans and rice in the background.
Keep red chile sauce and salsa verde outside the bake, then spoon either around each slice for richness or bright acidity.

Planning for leftovers? Jump to make-ahead, storage, freezing and reheating.

Make Ahead, Storage, Freezing and Reheating

Make-Ahead Prep

To get ahead: roast, peel, seed and dry the poblanos 1–2 days ahead. Cool and refrigerate the roasted peppers within 2 hours, then keep them covered in the refrigerator. You can also shred the cheese and arrange the chile-and-cheese layers in the baking dish the night before. Whisk and pour the egg mixture shortly before baking.

A refrigerator-cold casserole may need a little longer in the oven. Let the middle, rather than the original timer, decide when it is ready.

Store, Freeze and Reheat

For leftovers: cool the casserole promptly, cover and refrigerate for 3–4 days.

To freeze: cool the casserole promptly and refrigerate until chilled. Then cut it into portions, wrap well and freeze for about 2–3 months for best quality. Thaw overnight in the refrigerator. The egg layer may release a little moisture after freezing, so expect a softer slice than when freshly baked.

To reheat: microwave individual slices in short intervals, or cover several portions loosely and warm them in a 325–350°F / 165–175°C oven. Reheat leftovers to 165°F / 74°C; once they’re hot, more time only makes the egg firmer.
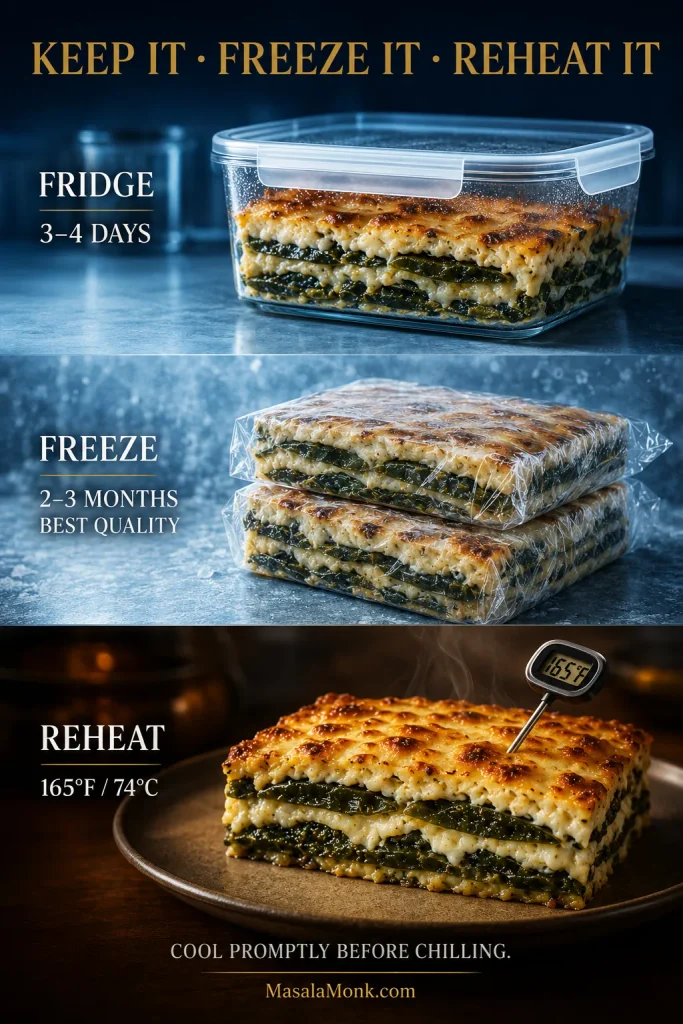
Storage guide showing chile relleno casserole refrigerated for 3–4 days, wrapped for freezing for 2–3 months, and reheated to 165°F / 74°C.
Chill before portioning so slices hold together cleanly; reheat only until the center is hot to avoid firming the egg further.

A leftover slice is also most of the filling for a breakfast burrito already done: chop it, warm it and roll it into a tortilla with salsa, avocado or beans.

FAQ

Can I use Anaheim peppers instead of poblanos?

Yes. Roast, steam, peel, seed and dry them the same way. Anaheims are often narrower, so judge the amount by how much roasted chile flesh you need to cover the pan rather than by pepper count.

Can I make chile relleno casserole without eggs?

Not by simply leaving the eggs out. They are the binder in this version, so an egg-free casserole needs a different binding system and different ratios.


Traditional chiles rellenos still have that crisp, just-fried coating a casserole cannot reproduce. Make them when that’s the experience you’re after.

But when what you really want is roasted poblano, molten cheese and that soft chile-filled middle—without stuffing and frying six individual peppers—this is the version to make. Give it those ten quiet minutes after the oven, then cut the first slice.
↑ Back to top · Back to recipe

Posted on — Leave a comment

Greek Lemon Potatoes Recipe (Patates Lemonates): Crispy, Golden & Garlicky

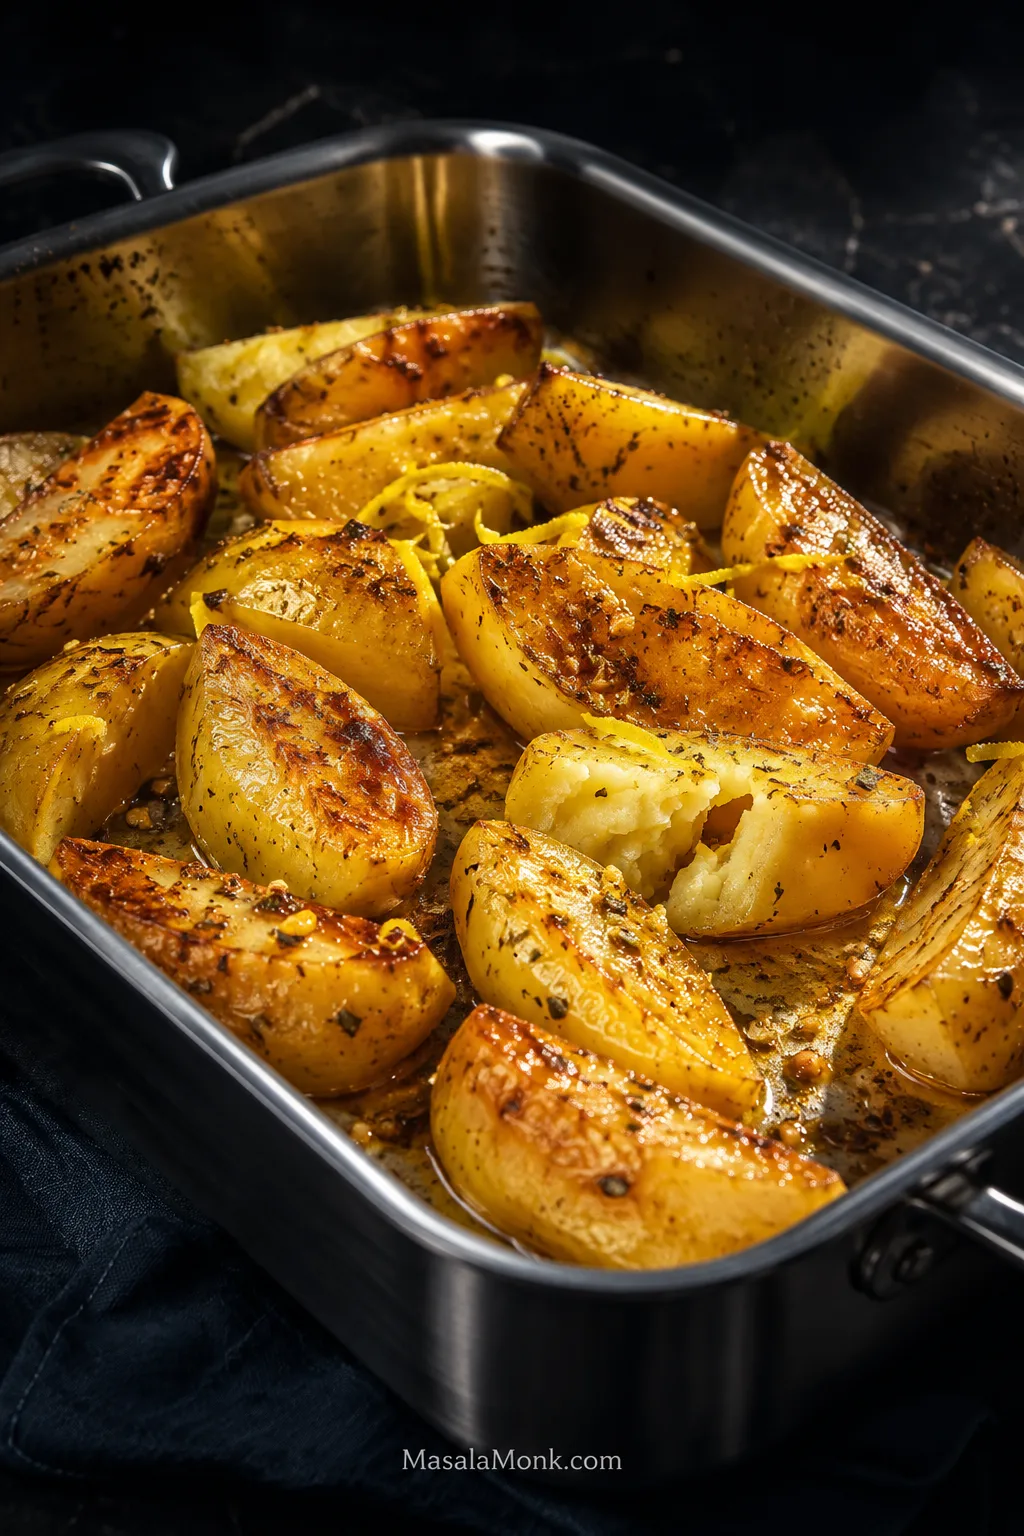
Finished Greek lemon potato wedges in a stainless roasting tray with deeply browned cut faces, softer glossy sides, oregano and concentrated pan juices; one split wedge shows the creamy interior.

Greek lemon potatoes don’t just taste lemony on the surface. Break open a wedge and the middle is seasoned too—creamy potato carrying lemon, garlic, oregano and olive oil all the way through. A few cut faces and corners go deeply golden where the juices reduce against them.

Maybe the potatoes you remember from a Greek restaurant, taverna or a meal on a trip were crisp around the edges. Maybe they were almost spoon-soft and sitting in lemony juices. Both versions exist. What matters is getting that flavor into the potato rather than leaving it on top.

Quick Answer

Greek lemon potatoes use a wet-to-dry roast. Thick wedges soften first with olive oil and stock; fresh lemon goes in partway through; then the tray dries enough for the exposed surfaces to brown. For 2 lb 10 oz / 1.2 kg potatoes, use ⅓ cup + 2 tablespoons / 110 ml olive oil and ¾ cup / 180 ml hot stock or water. Roast uncovered at 400°F / 205°C, add ¼ cup / 60 ml lemon juice after about 30 minutes, and finish with another 1 tablespoon / 15 ml once the centers are creamy and the remaining liquid has cooked down to lemon-garlic juices.

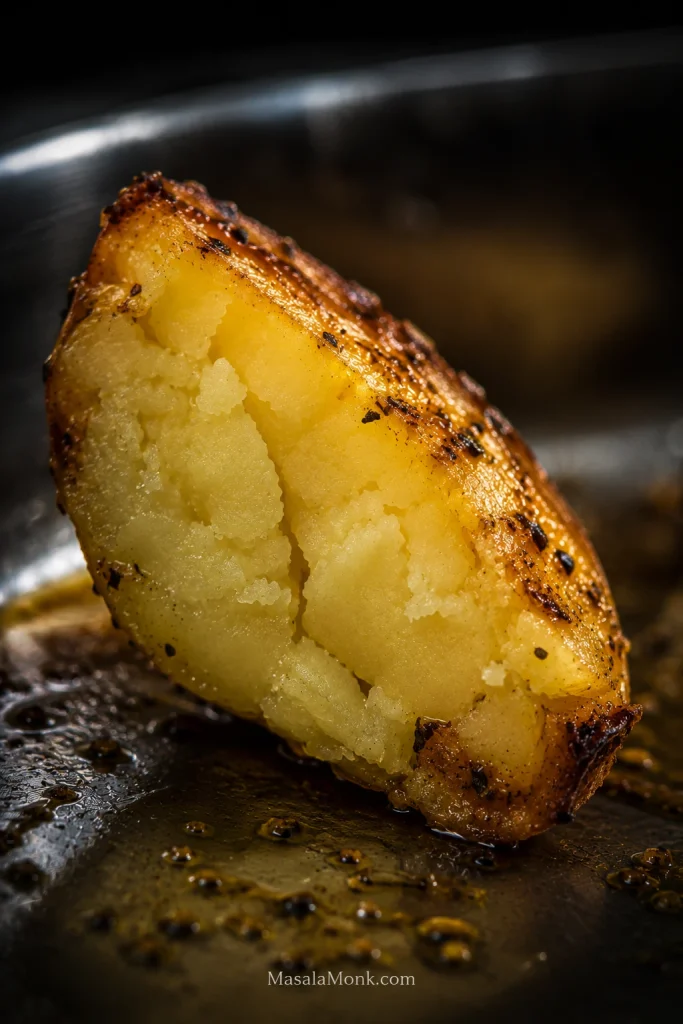
Close-up of a broken roasted potato wedge showing a creamy pale-yellow center, browned outer edge, oregano flecks and a light sheen of lemon-garlic pan juices.
Check one of the thickest wedges: the center should be moist and creamy, not chalky.

Greek Lemon Potatoes Recipe

These patates lemonates roast with olive oil, garlic, oregano, stock and fresh lemon, then get one last squeeze of lemon while the tray is still hot.

Serves6 as a side dish
PrepAbout 15 minutes
CookAbout 60–75 minutes, depending on the potatoes and final browning
Oven400°F / 205°C conventional
365°F / 185°C fan/convection
PanLarge rimmed metal roasting pan; around 12×16 in / 30×40 cm is a useful guide
Cut1–1¼ in / 2.5–3 cm thick wedges

Texture: creamy, well-seasoned centers with crisp, deeply browned patches around the edges. Because part of the roast happens in liquid, these stay softer than a completely dry-roasted potato.

Ingredients

  • 2 lb 10 oz / 1.2 kg Yukon Gold or similar all-purpose potatoes
  • ⅓ cup + 2 tablespoons / 110 ml extra-virgin olive oil
  • 5 garlic cloves, very finely grated or Microplaned
  • 1 tablespoon dried oregano, preferably Greek oregano
  • About 9 g fine sea salt / 1½ teaspoons, plus more if needed
  • ½ teaspoon freshly ground black pepper
  • ¾ cup / 180 ml hot low-sodium chicken or vegetable stock, or water
  • ¼ cup / 60 ml freshly squeezed lemon juice, for roasting
  • 1 tablespoon / 15 ml freshly squeezed lemon juice, for finishing, plus up to another tablespoon to taste
  • Finely grated zest of ½ lemon, optional
  • Fresh oregano or parsley, optional, for serving

Chicken stock gives the deepest savory flavor. Use vegetable stock for a vegan version, or water when you want the lemon and olive oil to come through most clearly.

You’ll usually need 2–3 medium lemons. Use fresh juice here; lemon is one of the main flavors, and bottled juice tends to taste flatter after a long roast. The 9 g of salt assumes low-sodium stock or water, so start with less if your broth, bouillon or stock concentrate is already salty.

Method

  1. Heat the oven. Set a rack in the middle and preheat to 400°F / 205°C conventional or 365°F / 185°C fan/convection.
  2. Prepare the potatoes. Peel them for a softer surface, or leave thin Yukon Gold skins on. Cut into wedges about 1–1¼ inches / 2.5–3 cm thick at the widest point. No soaking or parboiling is needed when you’re cooking them straight away.
  3. Season. Put the potatoes in the roasting pan with the olive oil, finely grated garlic, oregano, salt and pepper. Toss well, spread them into one layer and leave visible gaps between the wedges. Set one broad cut face down against the metal.
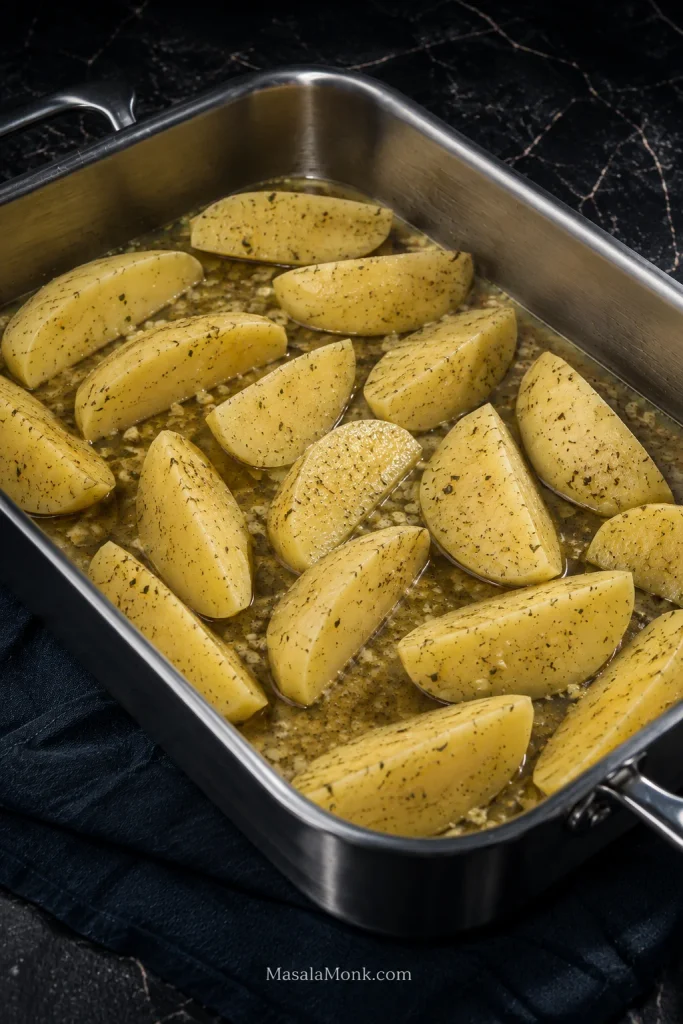
  4. Add the stock. Pour the hot liquid into the gaps rather than washing it over the seasoned tops. It should spread across the base and come only partway up the wedges. Most of each potato stays above the liquid.

What the Pan Should Look Like After Adding Stock

Use this stage as a calibration point rather than an exact liquid line. A wider pan can make the same amount of stock look shallower; what matters is that the wedge bases meet the liquid without the potatoes being submerged.

Raw peeled potato wedges arranged in one layer in a stainless roasting pan with visible gaps; seasoned stock covers the base and reaches only partway up the wedges.
Visible metal between the wedges is evaporation space. If the stock climbs too high or the wedges overlap, steam escapes more slowly and the wet phase lasts longer.
  1. Roast uncovered for about 30 minutes. The tray may still look pale and wet. Some loose stock will usually remain, and one of the larger wedges should be softening around the outside while still offering some resistance in the center. If the tray is nearly dry and the largest pieces are still hard, add about ¼ cup / 60 ml hot stock or water.
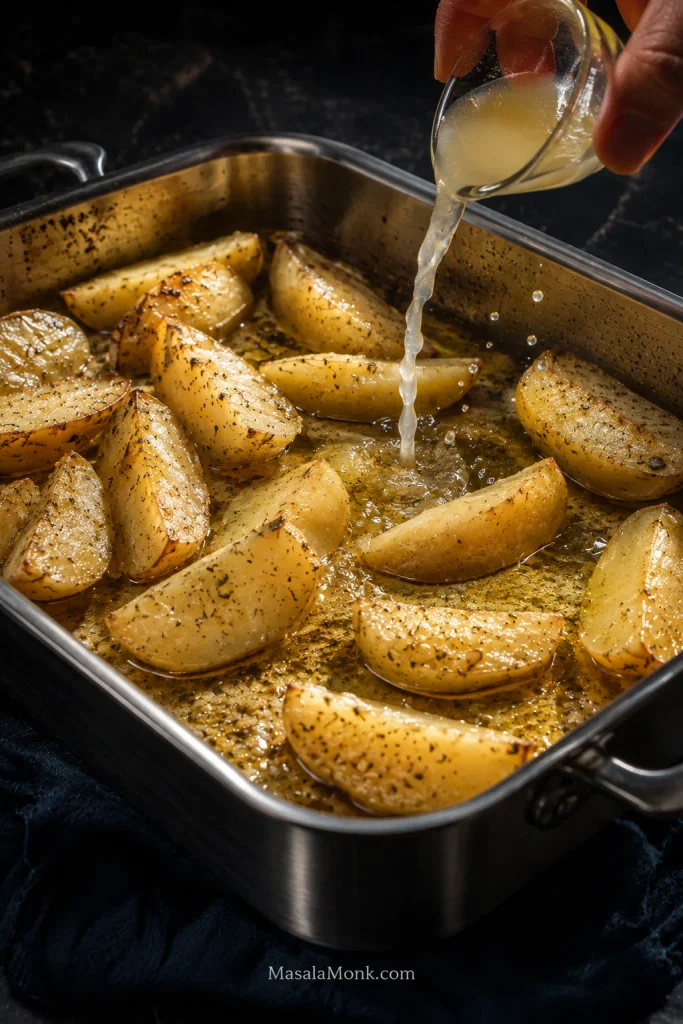
  2. Add the lemon and turn once. Pour ¼ cup / 60 ml lemon juice around the potatoes and carefully turn the wedges. That head start in the stock lets the centers begin softening before the main lemon goes in. Then leave them alone. Repeated stirring knocks soft edges off just as those surfaces are ready to start browning.

When the Lemon Goes In

Use the potato and pan state, not the 30-minute mark alone. The wedges should be softening, still fairly pale, with cooking liquid left in the pan.

Fresh lemon juice being poured into the spaces around partially roasted potato wedges in a stainless pan, with cooking liquid still visible around the softened potatoes.
Pour lemon into the open spaces so it disperses through the hot pan liquid.
  1. Roast uncovered for another 30–40 minutes. Start checking at 30 minutes. Push a thin knife into one of the thickest wedges, not the little corner piece. It should slide through easily. Break one open if you’re unsure: the middle should look moist and creamy, not chalky or dry.
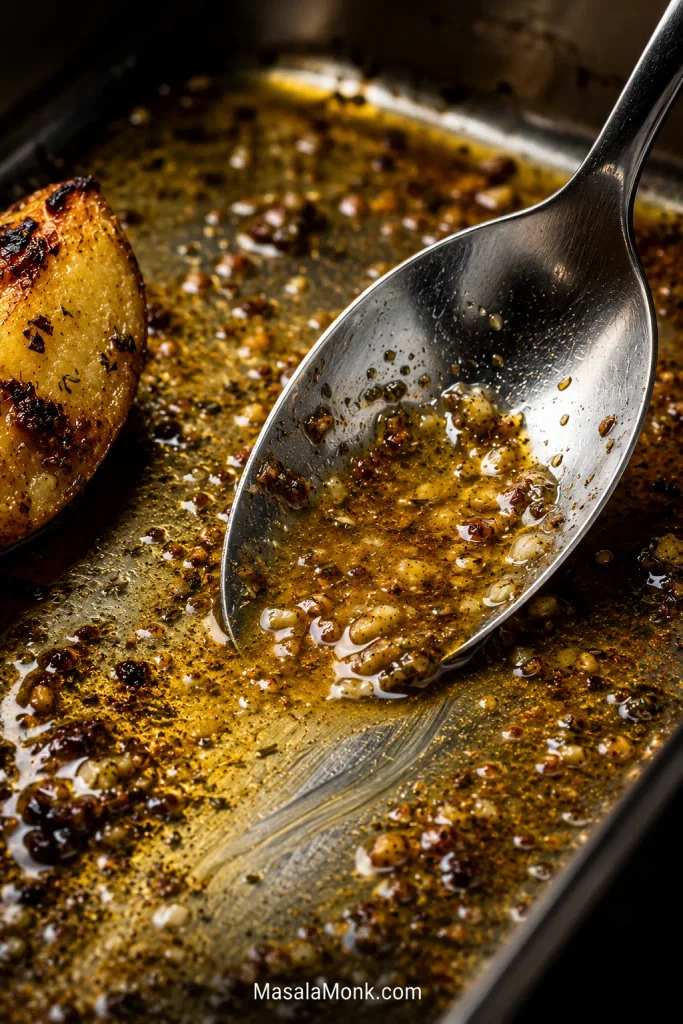
  2. Look at the tray. Tip it gently. Thin stock should no longer rush into the corner. Drag a spoon through the bottom; it should pick up oily, garlicky juices instead of a pool of thin cooking liquid. The smell should be more roasted garlic and oregano than steam.
  3. Brown if needed. Already well colored? Stop there. Pale but tender wedges can stay in the dry oven for a few more minutes or go under the broiler/grill for 2–4 minutes. Don’t chase perfectly even browning. Darker corners and softer sides are part of a good tray.
  4. Finish and taste. Squeeze over 1 tablespoon / 15 ml fresh lemon juice while the potatoes and oil are still hot. The tray should smell noticeably brighter almost immediately. Taste one for lemon and salt before adding more juice, zest or fresh herbs.

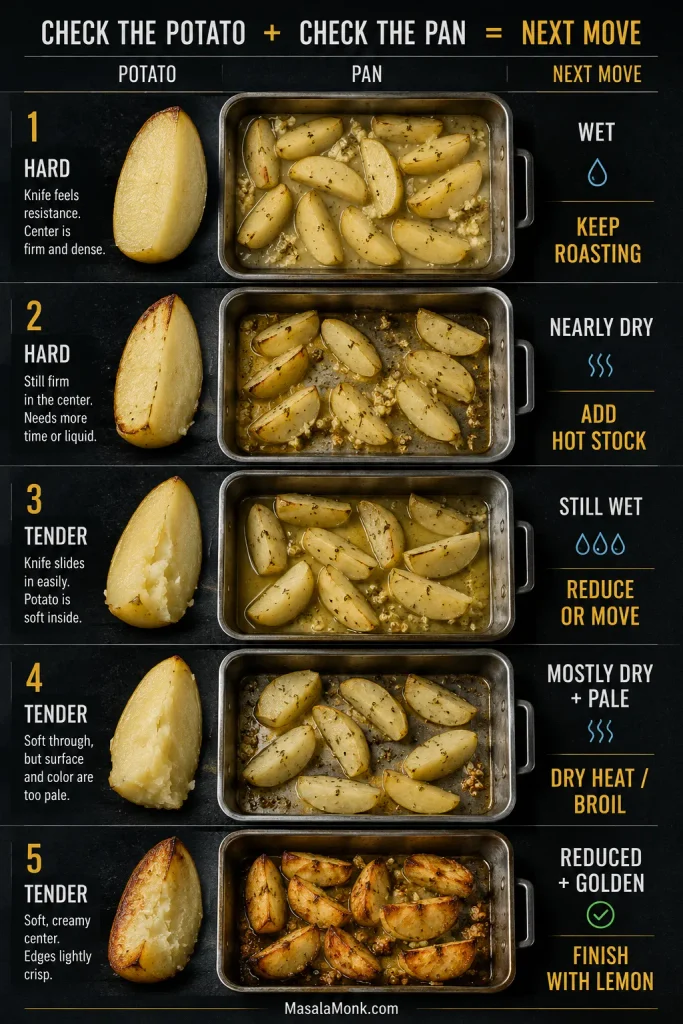
Check the Potato and the Pan

PotatoPanWhat to do next
HardWetKeep roasting. The middle needs more time.
HardNearly dryAdd about ¼ cup / 60 ml hot stock or water.
TenderStill wetLet the excess liquid cook away, or move the wedges to a wider hot tray.
Pale but tenderMostly dryGive them dry heat or a quick broil.
Golden and tenderReducedFinish with lemon and serve.
Five-stage cooking guide comparing potato tenderness with pan moisture to show when Greek lemon potatoes need more roasting, more stock, reduction, dry heat, or a final lemon finish.
Tenderness tells you whether the potato needs more cooking; the liquid tells you whether to add moisture or let the pan dry. Check both before simply adding more time.

Done looks like this: a knife slips easily through a thick wedge, the thin broth has cooked away, and a few cut faces and corners are deeply golden. One wedge may split when you turn it. Keep it. Those craggy broken edges often become some of the best bits in the pan.


More help: What makes them different · Best potatoes · Crisp edges · Troubleshooting · Storage & reheating · Serving ideas

What Makes Greek Lemon Potatoes Different?

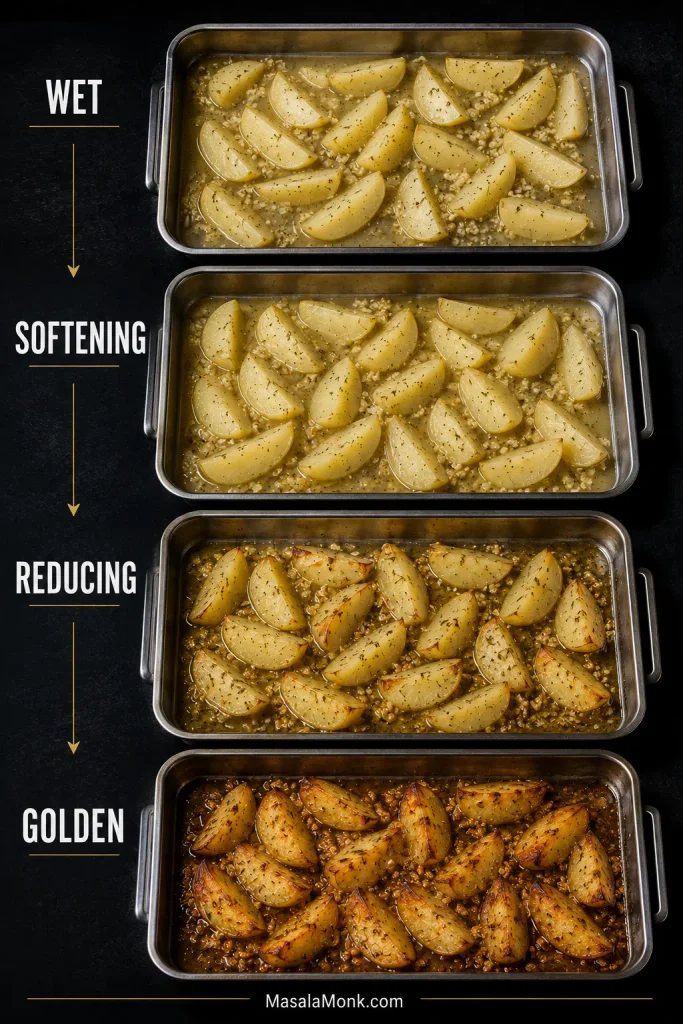
Ordinary roast potatoes rely mainly on dry heat. Greek lemon potatoes spend part of the cook in seasoned liquid, giving the flavor time to reach farther into each wedge before the exposed surfaces brown. That’s how you can end up with a creamy, lemony middle and roasted edges on the same potato.

Four-stage guide showing potato wedges progressing from pale and wet, to softening, to reducing with early browning, and finally to golden potatoes with concentrated pan juices.
The turning point comes when the loose liquid has mostly cooked away and hot metal and olive oil can take over the browning.

Patates means potatoes, while lemonates roughly means lemony or lemon-flavored. Olive oil, lemon and oregano sit at the heart of the dish, usually with garlic and water, stock or roasting juices. You may also see related names such as patates fournou for oven potatoes or patates riganates when oregano is emphasized. Greek kitchens don’t all arrive at exactly the same tray.

Best Potatoes for Greek Lemon Potatoes

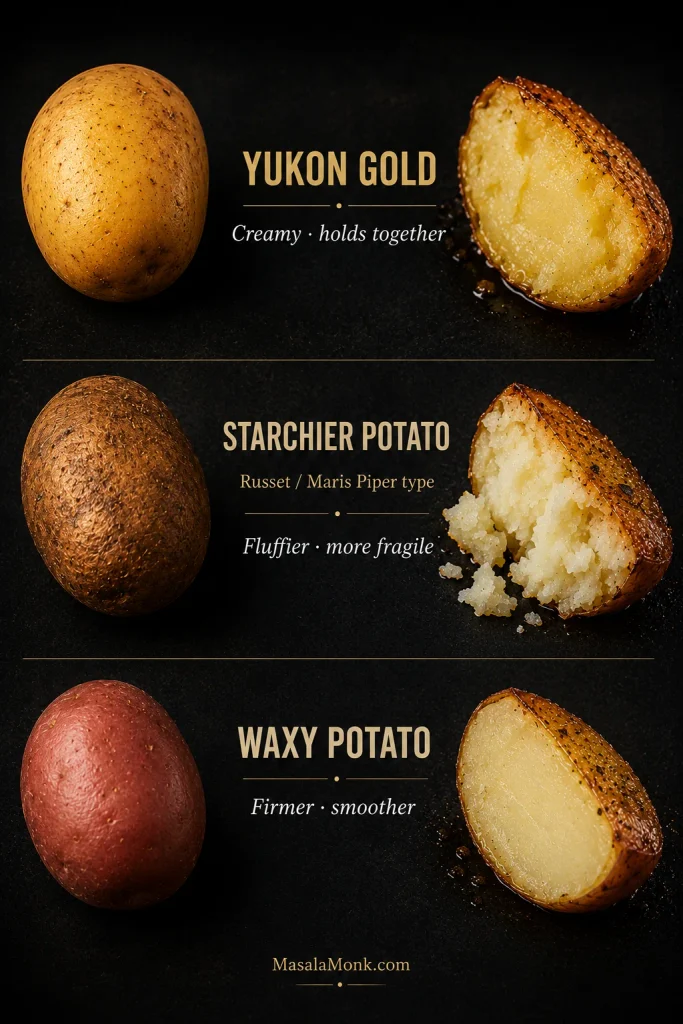
Yukon Gold is the easiest all-round choice. It holds together well, but the middle turns creamy and takes on plenty of the lemony cooking juices.

For an especially fluffy middle, try Maris Piper or Russet. Keep the wedges thick and handle them gently once tender; both become more fragile than Yukon Gold. Very waxy potatoes stay neat but hold onto a firmer, smoother interior.

Comparison of raw and cooked potato types: Yukon Gold with a creamy cohesive center, a starchier Russet or Maris Piper type with a fluffy crumbly interior, and a waxy potato with a smooth firm center.
Yukon Gold is the most forgiving when you turn and serve the wedges. Russet or Maris Piper turns fluffier and more fragile; waxy potatoes stay firmer.

In the US, Yukon Gold is the easy default. UK cooks can reach for Maris Piper. In Australia, Désirée or Sebago work well. Elsewhere, choose a potato sold for roasting, baking or general-purpose cooking rather than a very waxy salad potato.

Peeling is optional. Peeled wedges expose more potato to the seasoned liquid and develop a softer surface. Thin skins give the pieces a little more structure.

The Cut, the Pan and the Liquid

Cut the potatoes thick: about 1–1¼ inches / 2.5–3 cm at the widest point. Small pieces can start breaking before the juices have finished reducing. Huge wedges risk a firm or lightly seasoned middle.

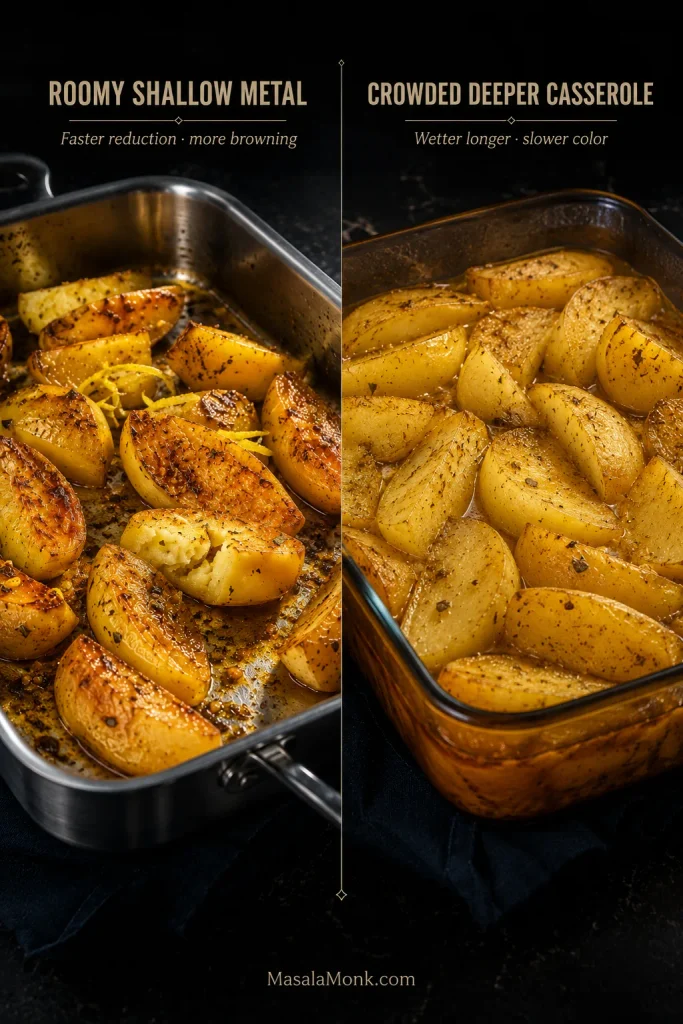
Give them room. Steam has to get out. A broad metal roasting pan exposes more potato to hot metal and gives moisture somewhere to escape. A deep glass or ceramic casserole can keep the dish wetter for longer, so browning may arrive later.

Side-by-side roasting comparison showing more browned potato wedges in a roomy shallow metal pan and wetter, softer-looking potatoes in a deeper crowded casserole.
Crowded or deep pans slow evaporation. If tender potatoes are still pale and wet, give the tray more reduction time.

Pan shape matters more than chasing an exact dimension. What matters is enough surface area for the wedges to sit in one layer with visible gaps between them.

Tray not matching the timing? Jump to troubleshooting and diagnose the wedge and pan together.

Lemon, Garlic and Oregano

Use fresh lemon. The juice added during roasting mellows into the garlic, stock and olive oil. The final squeeze restores the fresh citrus aroma that long oven heat softens. If you’ve kept adding juice and still can’t find the lemon aroma you remember, fresh zest often helps more than another splash of acid.

Leave thick lemon slices and squeezed halves out of the pan during the long roast; the pith and rind can become bitter. Grate the garlic very finely so it disappears into the cooking juices instead of leaving large pieces exposed once the liquid recedes.

Dried oregano handles the long roast beautifully. Greek oregano is excellent if you have it. Save fresh oregano or parsley for the finished tray.

The generous olive oil is intentional. As the stock cooks away, the oil takes over as the roasting fat and stays behind as part of the lemon-garlic sauce you spoon over the potatoes at the end.

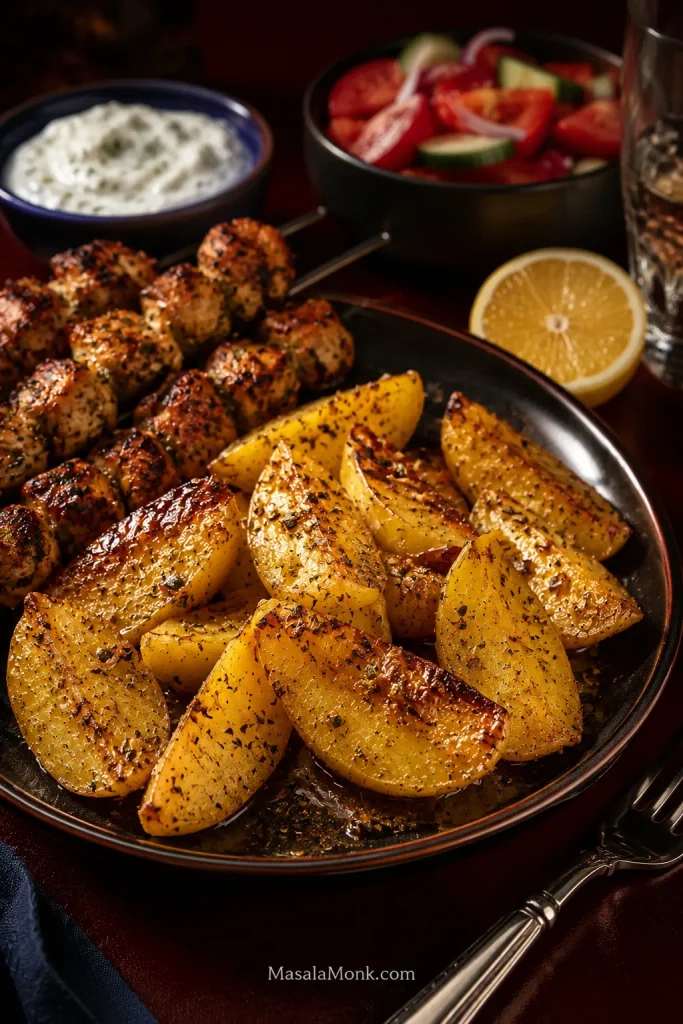
These potatoes are particularly good beside chicken souvlaki, where the same lemon, garlic and oregano meet juicy chicken and charred edges.

Getting More Golden, Crisp Edges

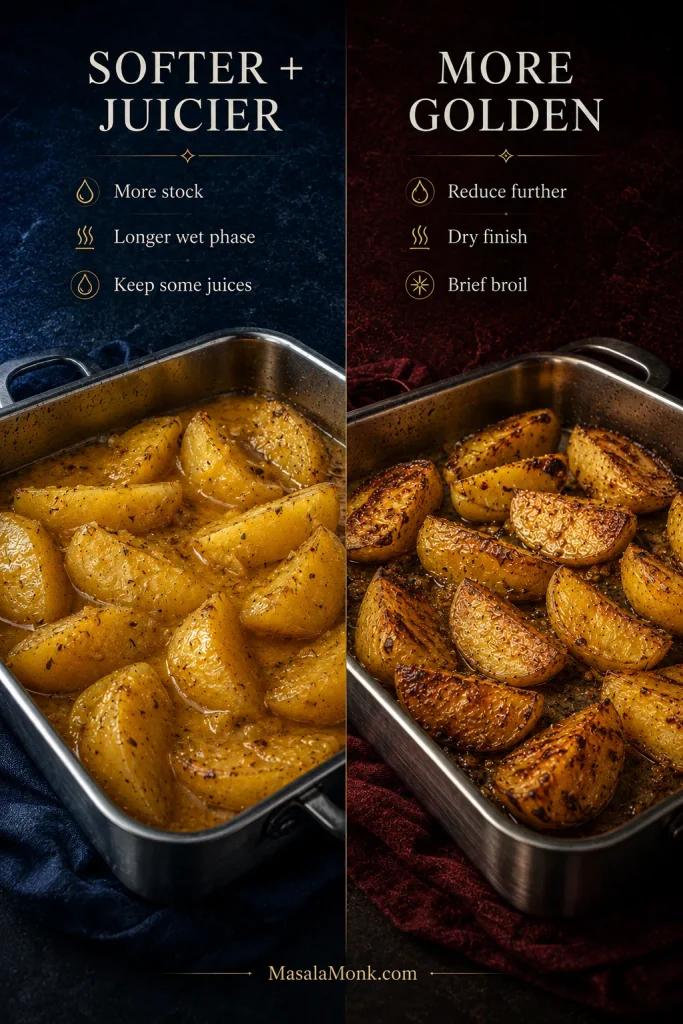
Once the thickest wedges are tender, stop protecting the moisture and start chasing color. The broad cut faces and rough corners brown first, giving you some of the darkest, best-tasting patches.

Two styles of Greek lemon potatoes shown side by side: softer, juicier wedges with more pan juices and a more reduced version with deeper golden-brown roasted surfaces.
Choose the finish after the centers are tender: stop with spoonable juices for softer taverna-style potatoes, or reduce further for deeper golden edges.

Keep Them in the Same Pan

Tender potatoes in an almost-dry pan can stay exactly where they are. Give them a few more minutes of roasting or a 2–4 minute broil.

Move Them When the Pan Is Holding Them Back

A wet pan can keep already-tender potatoes from browning. Move the wedges to a clean, hot metal sheet when they’re still sitting in plenty of liquid, or when the garlic-rich juices are getting too dark. Brown the potatoes on the clean tray, reduce the juices separately, then spoon them back over.

If all-over crunch is what you’re after, use a dry-roasted method instead; these ranch roasted potatoes are built for that texture.

Trying to Recreate Softer Restaurant Potatoes?

If the potatoes you remember were almost spoon-soft, with more lemony juice than crisp crust, you may be trying to recreate a softer style.

Use stock rather than water and increase the starting liquid toward 1 cup / 240 ml. Let the wetter phase run longer. Stop while there is still a spoonable amount of concentrated juice in the pan and skip the aggressive broiler finish.

That softer style is especially good beside a roast leg of lamb, where the lemony potato juices can mingle with the richer meat juices on the plate.

When the Potatoes Go Wrong

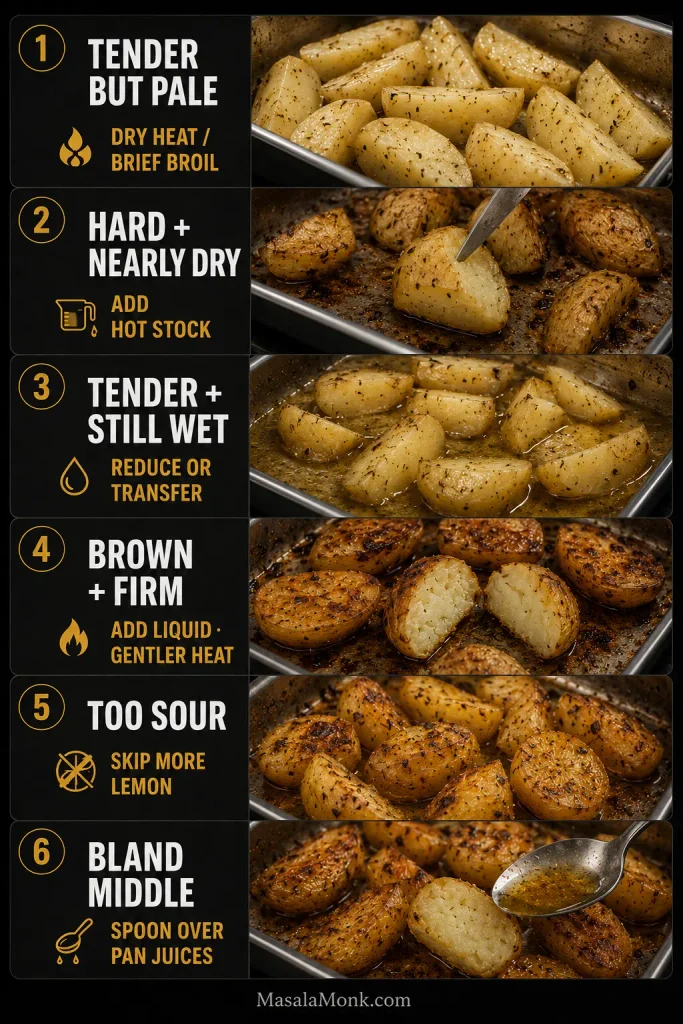
If the tray doesn’t match the clock, forget the clock for a moment. Check one of the larger wedges and look at what’s left in the pan.

Troubleshooting guide showing six Greek lemon potato problems: tender but pale, hard and nearly dry, tender and still wet, brown but firm, too sour, and a bland center.
A hard potato and a wet pan are different problems. Add moisture only when the center still needs it; otherwise, let evaporation do the work.
What you seeWhat to do now
Tender but paleGive them a few more minutes of dry oven heat or a quick broil.
Garlic or juices getting too darkStop the aggressive heat or move the potatoes to a clean tray.
Wedges falling apartStop turning them and finish the remaining pieces undisturbed.
Too sourSkip the extra finishing lemon and spoon over the savory juices instead.
Tart enough but not lemony enoughAdd fresh zest rather than more juice.

The Pan Is Dry but the Center Is Still Hard

That’s fixable. Add about ¼ cup / 60 ml hot stock or water around the wedges and keep roasting. Your pan or oven has lost moisture faster than the potatoes could soften. A broad pan or hot-running oven may need a little more liquid next time.

The Potatoes Are Tender but Still Swimming

The difficult part is already done. A little thin liquid can simply cook away uncovered. If the potatoes are genuinely sitting in a deep pool, move them to a broad hot tray and brown them there while the original juices reduce separately. Spoon those juices back over before serving.

They Are Brown Outside but Firm Inside

Add a little hot liquid and back away from aggressive top heat. Keep cooking until a knife slips easily through one of the thickest wedges. You can always add more color later.

The Middle Tastes Bland

A squeeze of lemon over the top can brighten a bland potato, but it can’t completely replace seasoning that never reached the middle. Very waxy potatoes, oversized wedges, under-seasoned liquid or a tray that dried too quickly can all contribute. Spoon the reduced juices over this batch; next time, focus on the potato choice, wedge size and first part of the roast.

Doubling the Recipe for a Crowd

A bigger batch needs more pan space, not twice as much time.

  • Use two pans and keep each tray in one layer.
  • If your oven browns unevenly, swap the pans between racks during cooking. Judge each tray separately by tenderness and how much liquid remains.
  • Broil one pan at a time unless your broiler heats the full oven evenly.

Make Ahead, Store and Reheat

To cut the potatoes ahead: prepare them several hours in advance and keep them fully submerged in cold water in the refrigerator. Drain and dry them well before seasoning.

To cook them ahead: you can roast Greek lemon potatoes in advance and reheat them. Expect softer edges. As the potatoes sit, they continue absorbing the pan juices, so cook them reasonably close to serving when crispness matters most.

Cool leftovers promptly and refrigerate them, together with any remaining juices, in a covered container for 3–4 days. USDA leftovers guidance gives the same refrigerator window.

Reheat in a 425°F / 220°C oven for about 10–15 minutes, until hot throughout. An air fryer is also useful for restoring browned edges; reheat the potatoes in a single layer until hot and crisp around the edges. The microwave works, but the browned surfaces will soften.

Freezing is possible, though the texture usually suffers. Potatoes can become grainier or more watery after thawing.

What to Serve With Greek Lemon Potatoes

Cold Greek tzatziki is a particularly good contrast: cool cucumber and yogurt against roasted garlic, lemon and browned potato edges.

For a lighter main, try lemon-garlic baked tilapia. The potatoes also sit naturally beside roast chicken, lamb chops, souvlaki or kebabs, grilled vegetables, and a crisp tomato-cucumber salad.

Golden Greek lemon potato wedges served with charred chicken souvlaki, a small bowl of tzatziki, tomato-cucumber salad and fresh lemon on a dark restaurant-style table.
Charred souvlaki, cool tzatziki and crisp tomato-cucumber salad turn the lemony potatoes into a complete Greek-inspired dinner.

One last spoonful: the pan juices.

Close-up of a stainless spoon scraping through reduced golden lemon-garlic pan juices with oregano and browned potato bits, leaving a clean streak across the metal roasting pan.
Drag a spoon through the pan: it should briefly reveal clean metal before the glossy juices settle back. If thin liquid floods the track, keep reducing.

Once the potatoes are creamy inside and the liquid in the tray has cooked down to salty lemon-garlic juices, you’re there. Add the last squeeze of lemon, spoon everything from the bottom of the pan over the potatoes, and get them to the table hot. Those browned edges are good; the last garlicky spoonful in the pan may be even better.

Posted on — Leave a comment

Prime Rib Roast Recipe: Juicy, Tender & Perfectly Pink

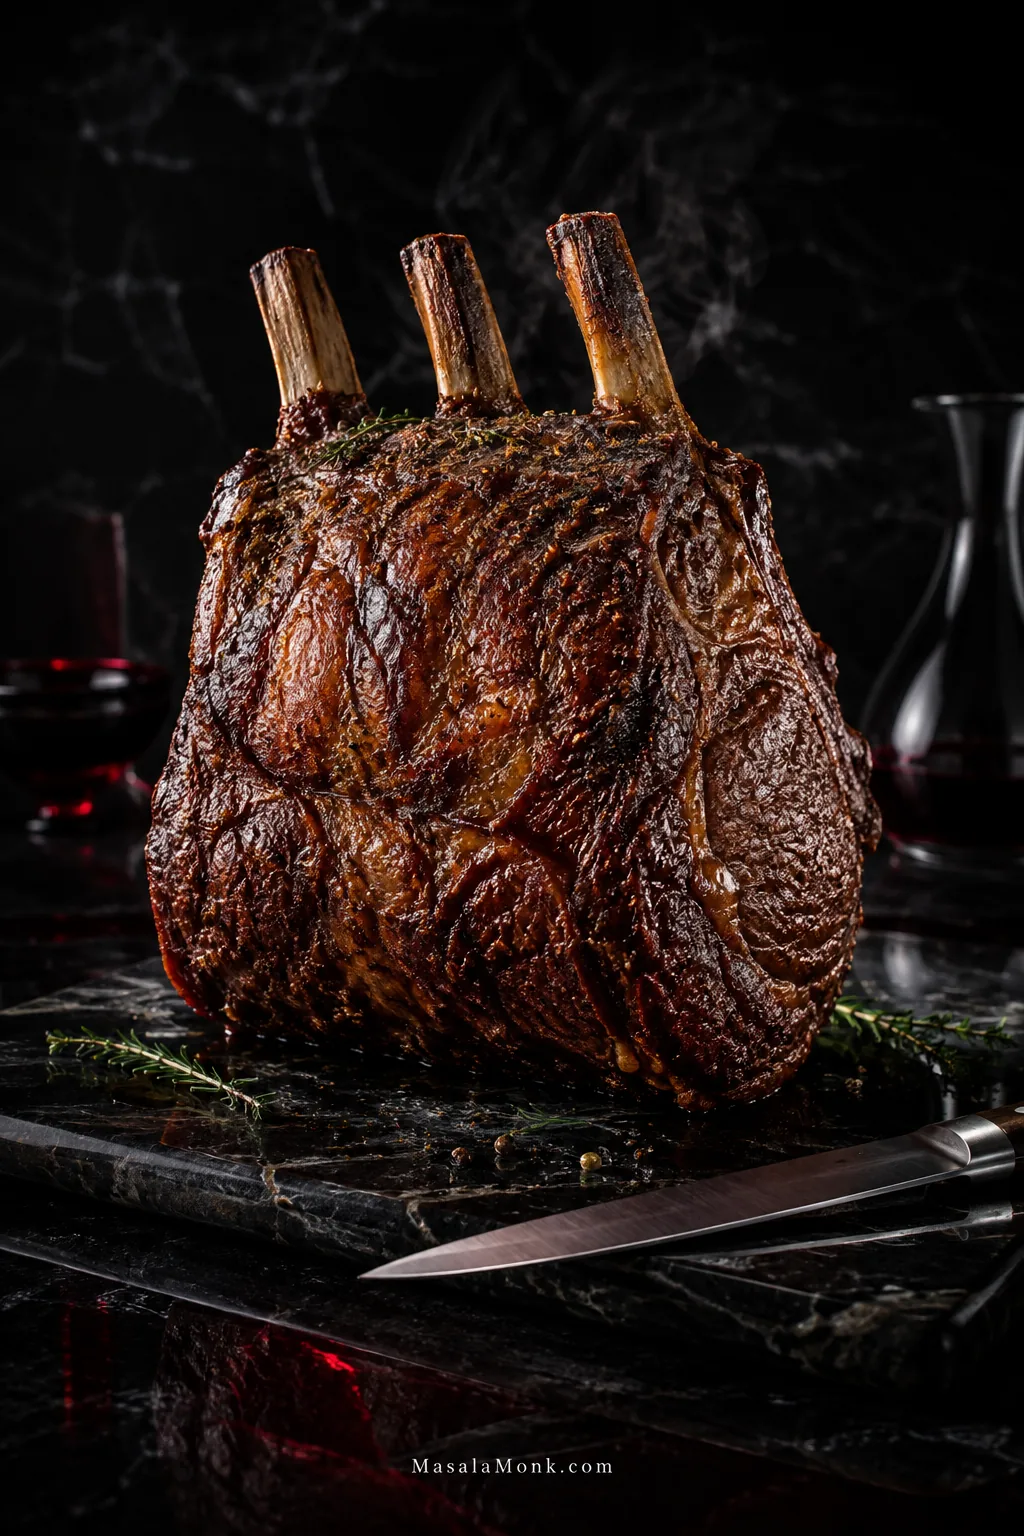
Whole three-rib bone-in prime rib roast with a dark pepper-and-herb crust on a carving board in an elegant restaurant setting.

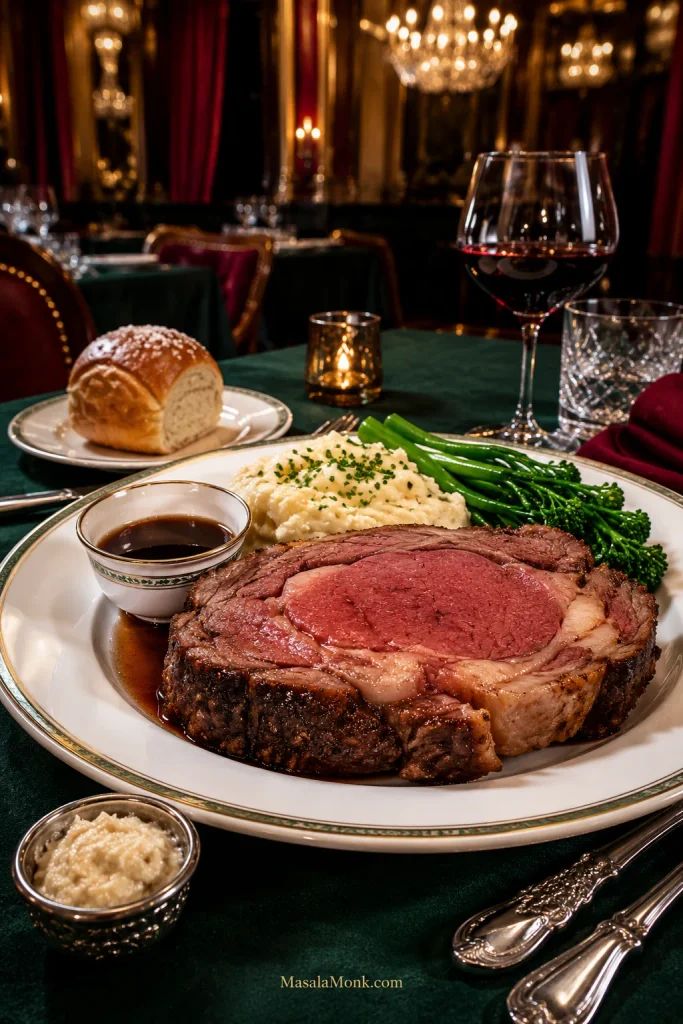
The moment that matters is the first cut. You want a dark, savory crust around warm pink beef, with softened fat at the edges and plenty of juice still inside the slice.
The difficult part is that you cannot see the middle while prime rib cooks. From the outside, the roast can look completely calm while the temperature inside is moving faster than expected. And when you’ve spent serious money on the beef and everyone is expecting dinner at seven, a minutes-per-pound formula only gets you so far.

So keep the process simple. Dry-brine a bone-in standing rib roast, give it a hot start for browning, lower the oven to 325°F (163°C), and watch the center as it approaches the doneness you actually want to eat.

Quick Answer

For a classic oven-roasted prime rib, start with a 7–8 lb (3.2–3.6 kg) bone-in standing rib roast. Dry-brine it uncovered for 24–48 hours if possible. Roast for 20 minutes at 450°F (232°C), lower the oven to 325°F (163°C), and continue until the center reaches your chosen pull temperature.

For a warm medium-rare center, use 123–125°F (51–52°C) as the reference pull range and rest for 25–35 minutes. That is intended to bring the center roughly into the 130–135°F (54–57°C) medium-rare zone after resting, although actual carryover varies from roast to roast.

Plan with time. Cook by temperature. Verify before you pull.

Make It Now

Prime Rib Roast

A bone-in prime rib with a deeply browned garlic-herb crust and tender pink center, cooked with a 450°F hot start and a gentler 325°F finish.

ServesAbout 8; up to 10 with plenty of sides
Active PrepAbout 20 min
Dry Brine24–48 hr preferred
Reference Roast7–8 lb / 3.2–3.6 kg
Oven450°F → 325°F
CookRoughly 2–3 hr*
Rest25–35 min
Medium-Rare Pull123–125°F / 51–52°C

*For the reference roast. Thickness, shape, starting temperature, oven behavior and desired doneness all affect the timing.

Equipment

  • Large, relatively shallow roasting pan, sturdy rimmed sheet pan or comparable oven-safe vessel
  • At least one accurate meat thermometer
  • Ideally, a leave-in probe thermometer plus an instant-read thermometer for cross-checking
  • Sharp carving knife and large cutting board

Ingredients

  • 1 bone-in standing rib roast, 7–8 lb (3.2–3.6 kg), usually 3 ribs
  • 20 g salt
  • 2 teaspoons coarsely ground black pepper
  • 6 large garlic cloves, finely minced
  • 1 tablespoon finely chopped fresh rosemary
  • 1 tablespoon fresh thyme leaves
  • 2 tablespoons (30 ml) avocado oil, extra-light olive oil or another neutral high-heat oil

Before You Start

  • If the roast is frozen, start several days early. A 7–8 lb roast commonly needs about 2–3 days to thaw fully in the refrigerator before the dry brine.
  • There is no need to leave the roast sitting out for hours. Take it from the refrigerator while you prepare the pan, seasoning and oven.
  • Not sure about the thermometer? Check it in a properly prepared ice bath; it should read close to 32°F / 0°C.
  • Position the oven rack so the center of the roast sits roughly around the middle of the oven.
  • Keep the roasting pan dry. Wine or stock goes in later only if you make jus.

Method

Prep & Set Up

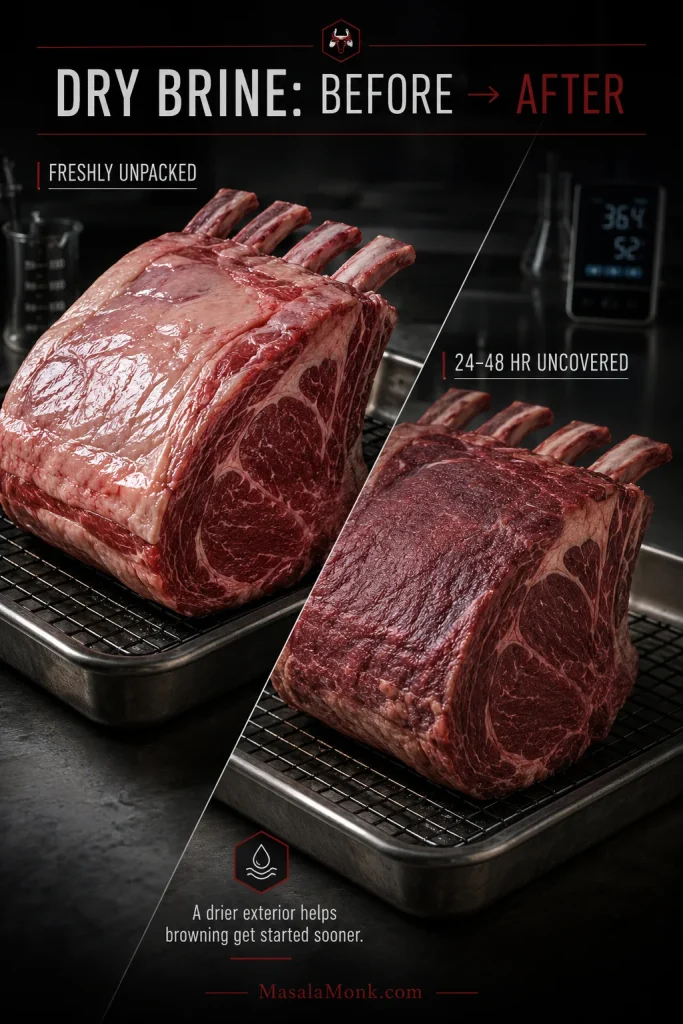
  1. Dry-brine the roast. Pat the beef dry and spread the measured salt evenly over the exposed meat and fat. Refrigerate bone-side down and uncovered for 24–48 hours. By cooking day, the surface should look matte rather than wet and feel dry or slightly tacky.
Before-and-after comparison of raw prime rib, showing a moist freshly unpacked surface becoming darker and matte after 24–48 hours uncovered in the refrigerator.
With dry-brined prime rib, compare the surface sheen rather than expecting a dramatic transformation: after refrigeration, the goal is dry and slightly tacky—not shriveled or crusted over.
  1. Tidy the fat if needed. Leave a modest, even layer in place. Trim only unusually thick, hard deposits. There is no need to score the fat cap.
  2. Heat the oven. Preheat to 450°F (232°C). An oven that routinely finishes recipes early or late is worth checking with a separate oven thermometer.
  3. Make the garlic-herb coating. Mix the black pepper, garlic, rosemary, thyme and oil. Spread it thinly over the top and exposed sides. The dry brine has already supplied the salt.
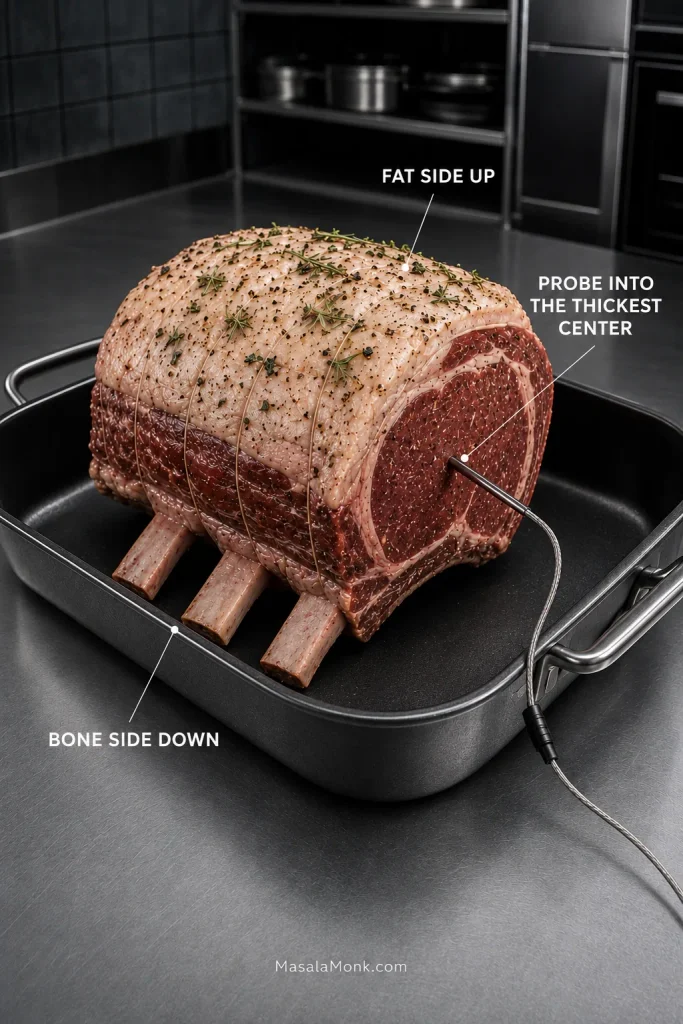
  4. Set up the roast. Place it bone-side down, fat-side up. Insert a leave-in probe, if using one, into the thickest central part of the meat, keeping the sensing tip away from bone and obvious fat seams.
Bone-in prime rib sitting directly on three rib bones in a roasting pan, fat side up, with a temperature probe inserted into the thick central meat.
Notice the open space around this bone-in prime rib: a relatively shallow pan exposes more surface to oven heat, while the ribs create natural clearance underneath.

Roast, Rest & Carve

  1. Give it a hot start. Roast at 450°F for 20 minutes. The fat should color and the kitchen should smell of roast beef, toasted pepper and herbs. Deep brown is good; loosely shield the darkest area if the garlic starts turning black.
  2. Lower the oven to 325°F (163°C). Continue roasting without removing the beef. A shallow pool of rendered fat is normal. If a deep pool starts smoking, remove some with a heatproof baster or ladle, leaving the browned bits behind.
  3. Start watching closely around 110–115°F (43–46°C) if you’re aiming for medium-rare. The roast may already look finished—dark crust, browned edges and glossy fat—even though the center still has its last stretch to go.
  4. Confirm the center before pulling. As the center approaches 123–125°F (51–52°C), check two or three nearby central spots before taking the roast out.
  5. Rest for 25–35 minutes. Move the roast to a carving board and rest it uncovered. Leaving it uncovered helps preserve the crust. This is a good time to make a bowl of creamy horseradish sauce for prime rib.
  6. Carve just before serving. Remove the twine and rib slab if needed, then slice across the grain. Around ½ inch (1.25 cm) works well for generous portions. A little juice on the board is normal.

Food-safety note: A 123–125°F pull temperature is below USDA’s recommendation for whole beef roasts. USDA advises 145°F / 63°C followed by at least a 3-minute rest. For higher-risk diners, follow USDA guidance rather than the rare or medium-rare culinary targets used here.

Different size or doneness? See the Time & Temperature Guide →

Explore the Prime Rib Guide

If the roast is already in your kitchen and dinner just needs to get moving, the recipe above is enough. The rest is here when you need a buying decision, a timing answer or help with something that is not going to plan.

Choosing the Right Prime Rib Roast

What Is Prime Rib?

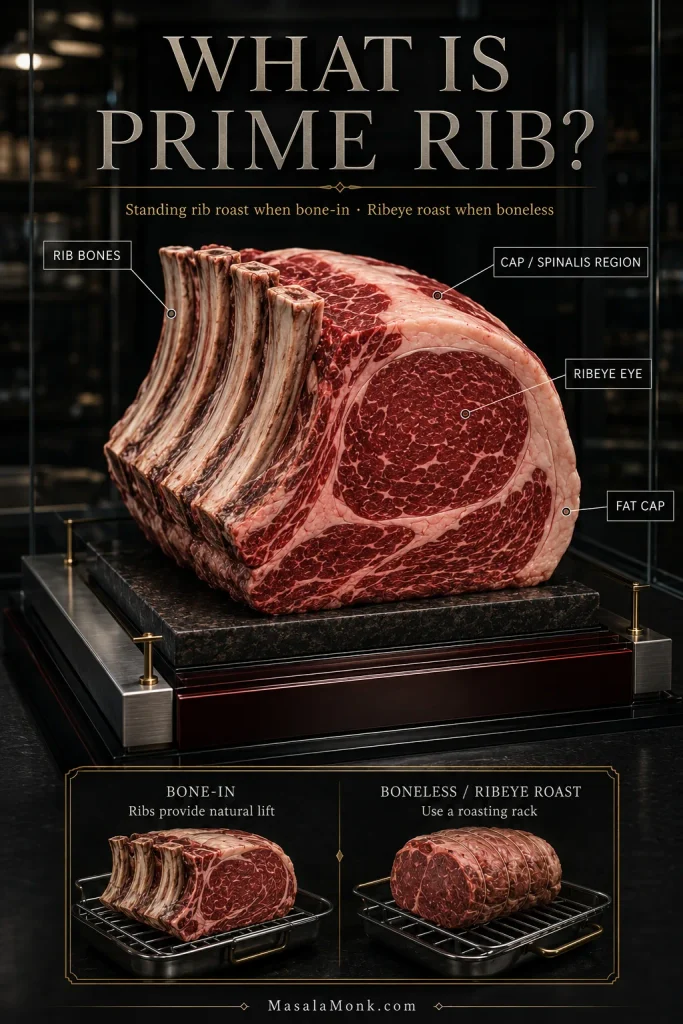
Prime rib is a large roast cut from the beef rib section. With the bones attached, it is commonly sold as a standing rib roast. Ribeye steaks come from the same broader section, and a boneless roast from this area may be labeled a ribeye roast.

The word “prime” in prime rib does not mean the beef has to carry a USDA Prime grade. USDA Prime generally has heavier marbling and a higher price. A well-marbled USDA Choice roast is also a very good option, so look at the meat as well as the grade on the label.

Look for fine streaks of fat running through the meat rather than focusing only on the fat cap outside. That internal marbling is a big part of the cut’s richness and tenderness.

Labeled prime rib anatomy identifying the rib bones, ribeye eye, cap or spinalis, fat cap, and bone-in versus boneless roasting setup.
This prime rib anatomy view shows the central ribeye eye, outer spinalis or cap, rib bones and the fat seams between them. On a bone-in roast, those ribs also create the natural stand that keeps much of the beef lifted from the roasting pan.

Small End or Large End?

CutWhat It Is Like
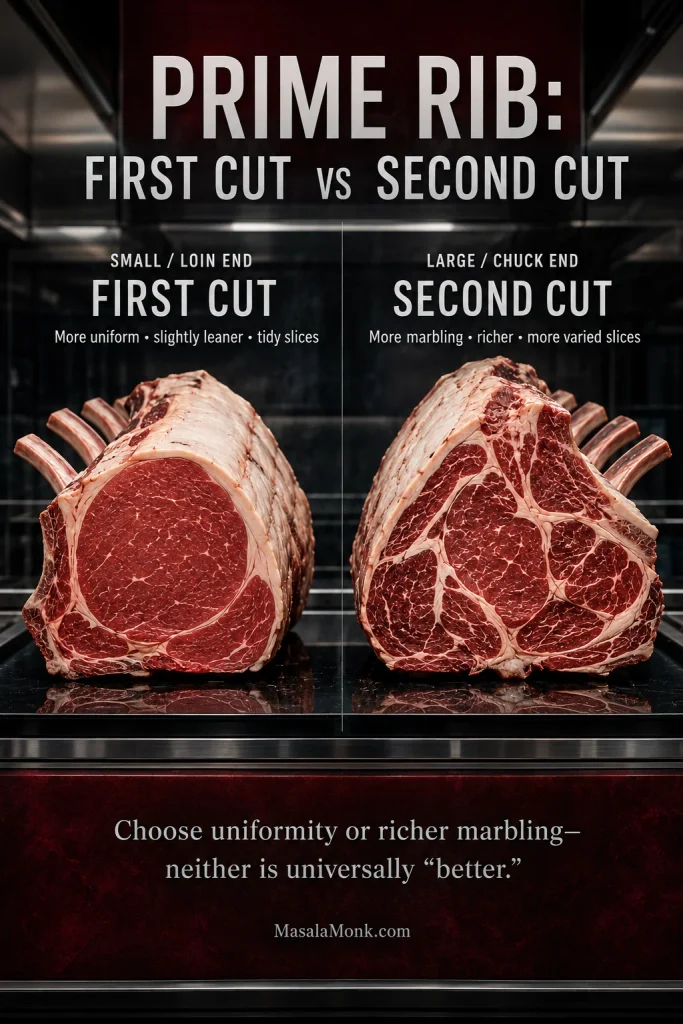
Small / loin end (first cut)More uniform in shape, a little leaner and particularly tidy when sliced
Large / chuck end (second cut)More seams and muscles, often richer in marbling with a beefier, more varied slice

If both are in the case, choose the small end when neat, uniform slices matter most. Choose the large end when you would rather have more marbling and don’t mind a more irregular slice.

Side-by-side first-cut and second-cut prime rib roasts, with the loin end appearing more uniform and the chuck end showing more marbling and muscle seams.
Look at the muscle structure in this first cut vs second cut comparison: the first cut has a cleaner, more uniform eye, while the second cut shows more cap, seams and internal fat.

Bone-In or Boneless?

The bone-in roast is the default here. Its ribs lift much of the meat from the pan and give you the classic standing-rib presentation.

Boneless rib roast works well too. Set it on a rack and don’t expect the bone-in timing table to match exactly; shape and thickness matter more than a simple bone-versus-no-bone rule.

Dry-aged beef and unusually thick or narrow roasts may not track neatly with a generic weight chart, so give yourself a wider timing window.

How Much Prime Rib Per Person?

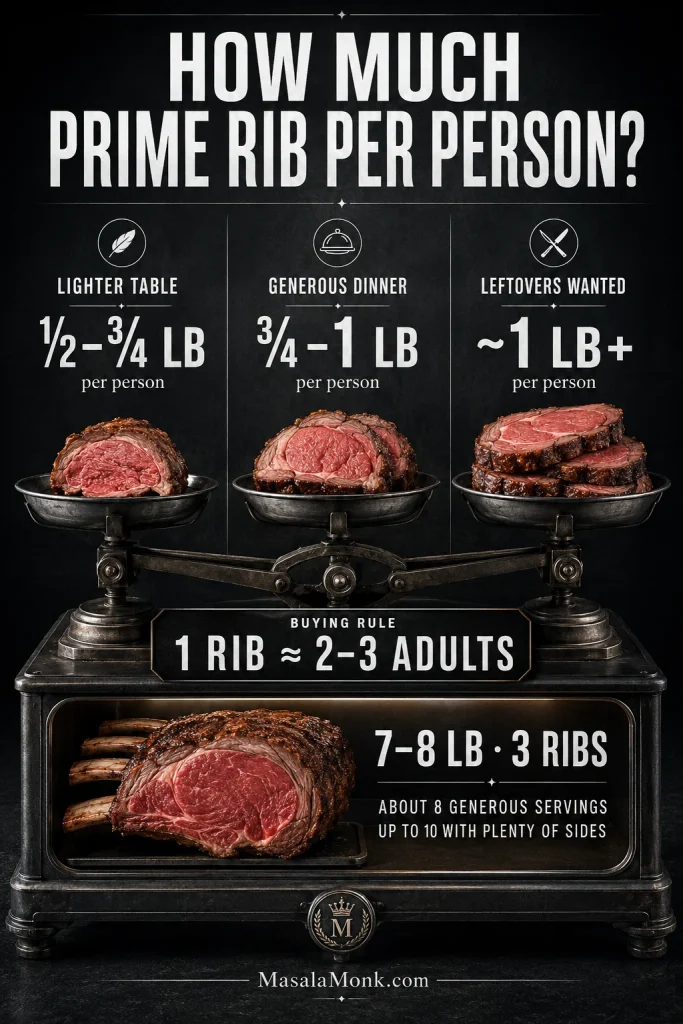
At the butcher counter, one rib for roughly every 2–3 adults is a useful starting point. Weight and the rest of the menu let you fine-tune from there.

MealBone-In Prime Rib to Buy
Lots of sides / lighter portions½–¾ lb (225–340 g) per person
Generous dinner¾–1 lb (340–450 g) per person
Big appetites / definite leftoversAbout 1 lb (450 g) or a little more per person

A 7–8 lb three-rib roast is comfortable for around 8 people at a generous dinner and can stretch toward 10 with plenty of substantial sides.

Prime rib portion guide showing lighter, generous and leftover-friendly amounts per person, plus a rough rule of one rib for every two to three adults.
Buying weight is not the same as plated beef: a bone-in prime rib includes rib bones and exterior fat, which is one reason the purchase allowance looks generous compared with the portion that finally reaches each plate.

What to Ask Your Butcher

“I’d like a 3-rib bone-in standing rib roast, around 7 to 8 pounds. If possible, please remove the chine bone, cut the rib bones away in one slab, and tie them back onto the roast.”

You may hear this called cut and tied. The ribs stay underneath while the beef roasts, but carving becomes much easier afterward. An intact roast cooks just fine too; remove the bones before slicing.

Frenching simply trims meat and fat from the exposed ends of the ribs for presentation. It is cosmetic.

Go to Recipe Card →·Season & Dry-Brine →

Prime Rib Seasoning, Salt & Dry Brining

Once the roast is sorted, seasoning is straightforward. Beef this rich does not need a complicated rub.

Salt does most of the important work. Black pepper, garlic, rosemary and thyme build the savory crust without burying the flavor of the beef.

How Much Salt?

Use about 0.6% salt by total bone-in weight, or roughly 6 g per kilogram, as the moderate baseline for this recipe. For the 7–8 lb reference roast, 20 g is the recipe amount.

Salt can always be added to a slice at the table. You can’t take it back out of the roast.

SaltApproximate Volume for 20 g
Diamond Crystal kosher saltAbout 2 Tbsp + 1¼–1⅓ tsp
Morton coarse kosher saltAbout 1 Tbsp + 1¼ tsp
Morton Fine Sea SaltAbout 1 Tbsp + ½ tsp

These salts pack very differently, so the spoon measures are approximate. Weighing the salt is simpler if you have a kitchen scale.

Give the Salt Time

Salt the roast 24–48 hours before cooking and leave it uncovered in the refrigerator. That uncovered refrigerator time dries the exterior, helping browning get started sooner once the roast reaches the oven.

Missed the overnight step? Season with the same amount of salt and carry on. You lose some dry-brining time, not the meal.

Garlic, Herbs, Butter and Marinades

Keep the later garlic-herb coating unsalted. Dry brine plus a salty steak rub, garlic salt or salted butter can add up quickly.

Herb butter works in plenty of prime rib recipes. For this hot-start version, a small amount of high-heat oil carries the garlic and herbs without putting a thick butter layer through the 450°F stage.

Skip the wet marinade here. The beef already has plenty of flavor, and a relatively dry surface is what we want for browning.

Roasting Pan, Rack & Thermometers

One accurate meat thermometer is the essential tool. A leave-in probe plus an instant-read thermometer is the ideal setup because one tracks the roast while the other lets you check nearby spots as the center gets close.

Choose a roasting vessel with some clearance around the beef and without very high sides crowding it. The bones lift much of a bone-in roast from the pan, so a separate rack usually isn’t necessary. Boneless roasts should sit on one.

Keep the pan dry during roasting. Water or stock goes in later, when the browned bits become jus.

← Recipe Card·Cooking Time & Temperature →

What This Cooking Method Gives You

The first 20 minutes push the outside toward browning. Lowering the oven to 325°F afterward gives you a gentler run toward the final center temperature.

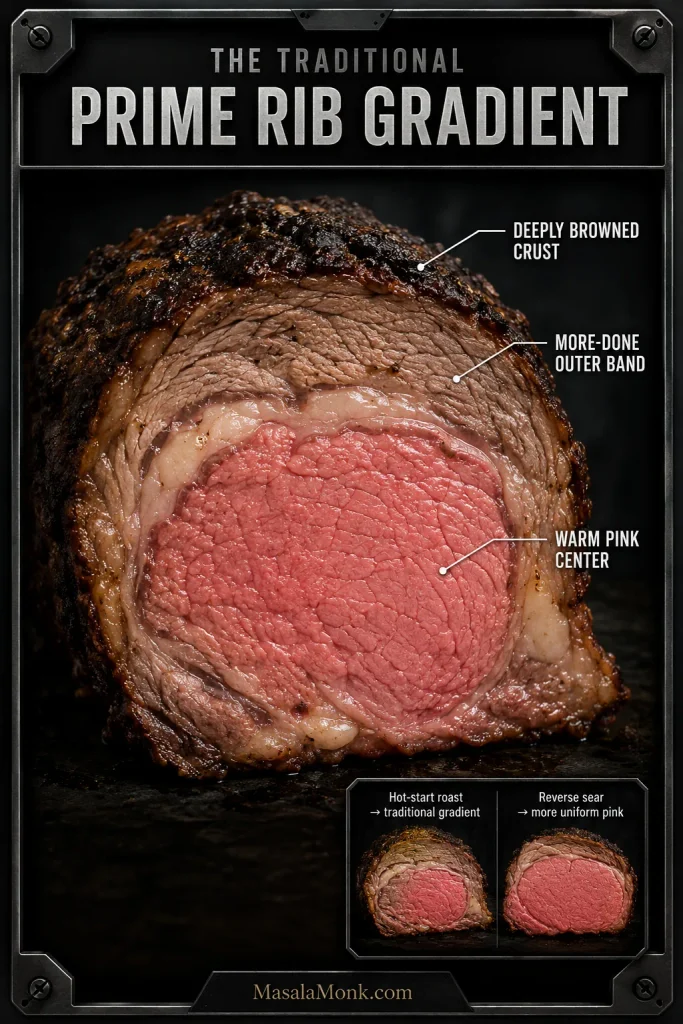
The result is a traditional doneness gradient: deeply browned outside, more-done beef near the edges, and progressively pinker meat toward the middle. That variation is useful when not everyone at the table likes their beef exactly the same way.

A low-temperature reverse sear is a better fit if your priority is an almost uniformly pink roast from edge to edge.

Keep one cooking method together. Several prime-rib methods work, but their timing, pull temperatures and resting logic aren’t interchangeable. The numbers below belong to this 450°F → 325°F approach.

Prime rib cross-section showing a dark crust, more-done outer band and warm pink center, with a smaller comparison showing the more uniform interior of a reverse-seared roast.
That more-done outer band is not automatically a mistake. With this hot-start prime rib method, it is part of the expected doneness gradient; edge-to-edge pink calls for a different cooking method.

Prime Rib Cooking Time & Temperature

Two roasts can weigh the same and still finish at different times because thickness matters. The table below is for planning the day, not deciding when the beef comes out of the oven.

These ranges assume a fully thawed roast taken from the refrigerator while you prepare the pan and oven, followed by 20 minutes at 450°F (232°C) and then 325°F (163°C). A roast left on the counter for hours is starting from different conditions.

That short setup period out of the refrigerator is intentional. Controlled testing of large cuts has found little meaningful advantage to leaving them out for hours before cooking.

Prime Rib Cooking Time by Weight

Bone-In RoastApprox. ServingsRough 325°F Stage — After 20-Min Hot Start
3–4 lb / 1.4–1.8 kg3–545–70 min
5–6 lb / 2.3–2.7 kg5–775–105 min
7–8 lb / 3.2–3.6 kgAbout 8; up to 10 with sides105–140 min
9–10 lb / 4.1–4.5 kg9–12135–175 min
11–12 lb / 5–5.4 kg11–14165–205 min

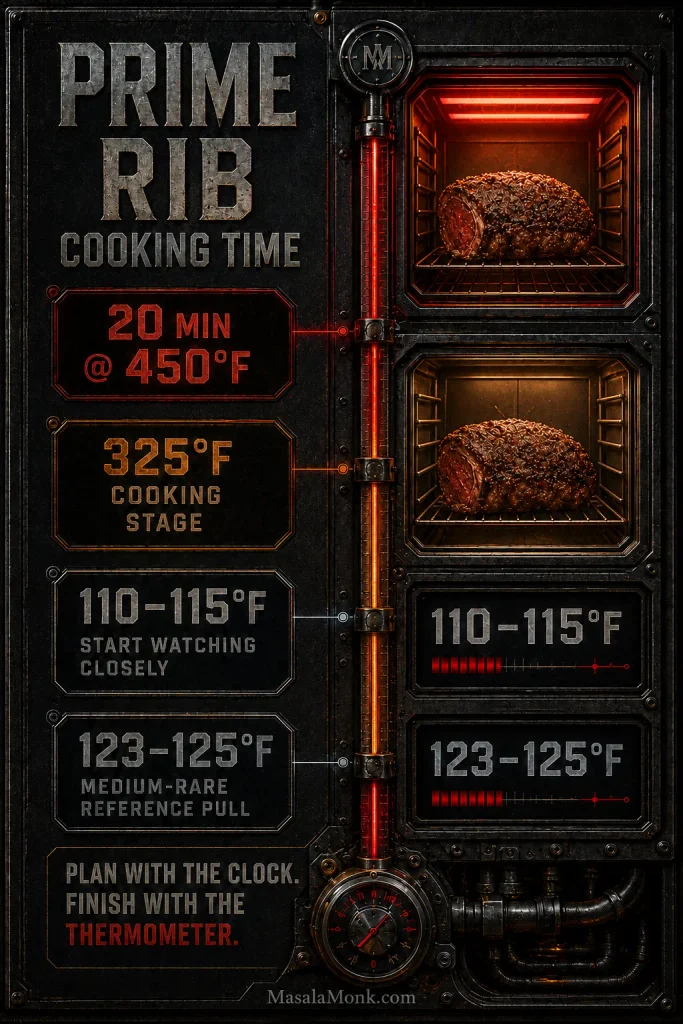
Begin checking is the useful idea, not a magic minute. With a leave-in probe, start paying close attention once the center reaches roughly 110–115°F (43–46°C). If you’re using only an instant-read thermometer, begin checking well before the earliest planning time instead of waiting for the chart to tell you the roast should be done.

Prime rib cooking guide showing 20 minutes at 450°F, then 325°F, closer monitoring at 110–115°F, and a 123–125°F medium-rare pull reference.
Once the center reaches 110–115°F, the final approach can move quickly enough that the thermometer matters more than the schedule.

Very small and very large roasts become harder to predict from weight alone because shape starts to dominate.

What about minutes per pound? You’ll often see a minutes-per-pound formula offered for prime rib, but published guidance varies considerably because starting temperature, roast shape, oven behavior and desired doneness all move the result. Use it only as rough scheduling shorthand—not as a stop rule.

Using convection or fan assist? Moving hot air can speed cooking and deepen browning. Give yourself an earlier checking window rather than expecting the conventional-oven timing above to transfer exactly.

Prime Rib Doneness & Pull Temperature

These are culinary doneness targets, not USDA food-safety minimums. The ranges assume this hot-start method and a substantial rest afterward.

DonenessApprox. Pull TemperatureWhat the Center Looks Like
Rare115–120°F / 46–49°CDeep red to red-pink
Medium-rare123–125°F / 51–52°CWarm red-pink
Medium130–133°F / 54–56°CWarm pink
Medium-well138–142°F / 59–61°CFaint pink to mostly browned

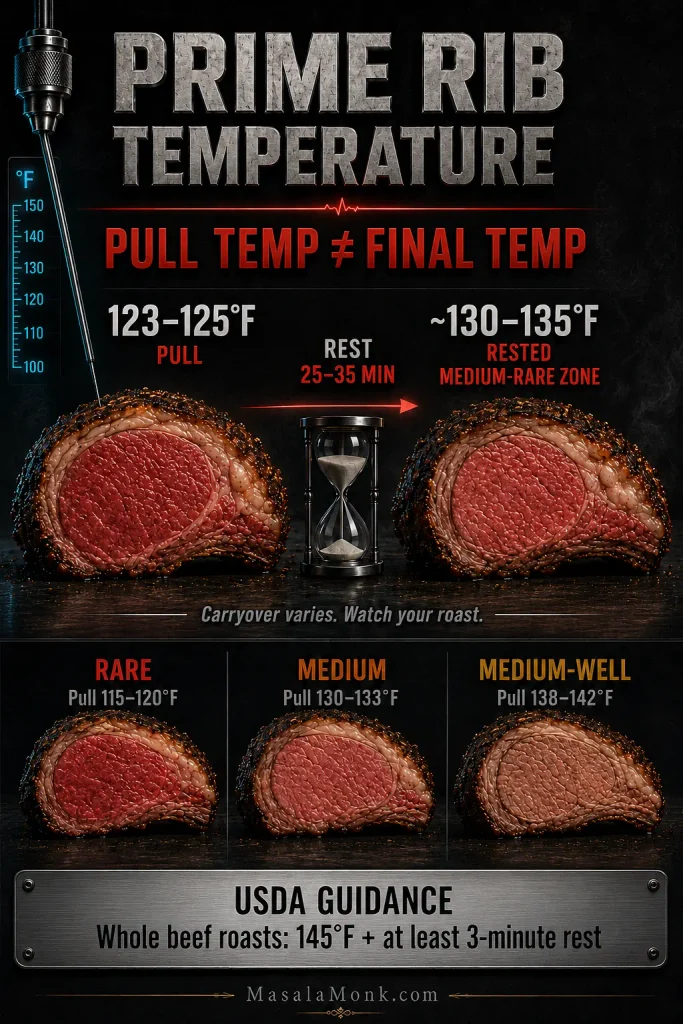
For this method, pulling around 123–125°F (51–52°C) for medium-rare is intended to bring the rested center roughly into the 130–135°F (54–57°C) range. Actual carryover varies with the roast and the heat it just left, so treat that rested range as an expectation rather than a guarantee.

Prime rib temperature guide showing a 123–125°F medium-rare pull, a 25–35 minute rest, a roughly 130–135°F rested zone, other pull temperatures, and separate USDA guidance.
Pull temperature is a decision point, not the temperature you expect to serve at. During the rest, hotter outer layers continue transferring heat toward the cooler center—so carryover happens without following one fixed formula.

Prefer the center noticeably rosier? Pulling closer to 120–122°F moves the result toward the rare side of medium-rare. Leave the probe in for the first few minutes of resting if your thermometer allows it and see how far your roast actually climbs.

USDA food-safety guidance: USDA recommends whole beef roasts reach 145°F / 63°C with at least a 3-minute rest. Traditional rare and medium-rare prime rib is served below that recommendation. For anyone at higher risk from foodborne illness, don’t use the rare or medium-rare culinary targets above; follow USDA guidance and any medical advice specific to that person.

Where the Thermometer Goes

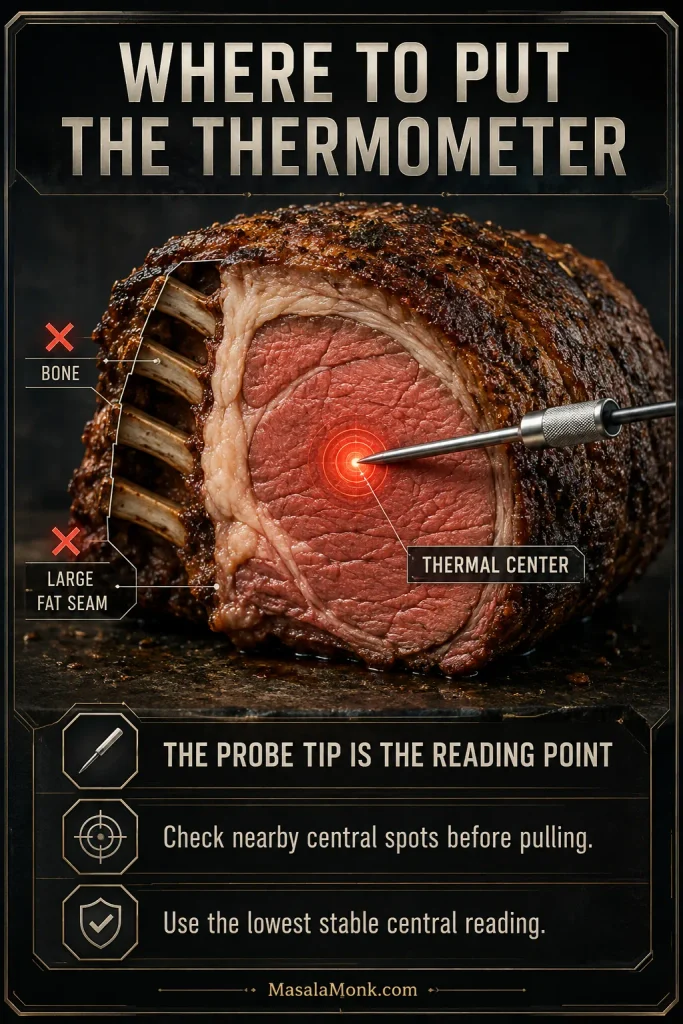
Insert the sensing tip into the thickest central part of the roast, clear of bone, the pan and large seams of fat. On a roast this thick, you are looking for the coolest thermal center.

Near your pull temperature, check a few nearby central spots. Use the lowest stable central reading rather than a hotter reading from closer to the exterior.

Cutaway of bone-in prime rib showing the thermometer tip in the thick central meat, with the rib bone and a large fat seam marked as places to avoid.
Why avoid bone and large fat seams? A probe sitting in either is sampling a different local environment instead of the central muscle whose doneness you are trying to judge.

If the Number Looks Wrong

A thermometer is essential. A thermometer can also be wrong.

An impossibly early or late number deserves a second look before you change the oven. Check another central spot, make sure the probe is clear of bone and fat, and cross-check with a second thermometer if you have one. A cool oven or incompletely thawed center can also explain strange timing.

← Recipe Card·Plan a 7 PM Dinner →·Fix a Problem →·↑ Back to top

When Should I Start Prime Rib for Dinner?

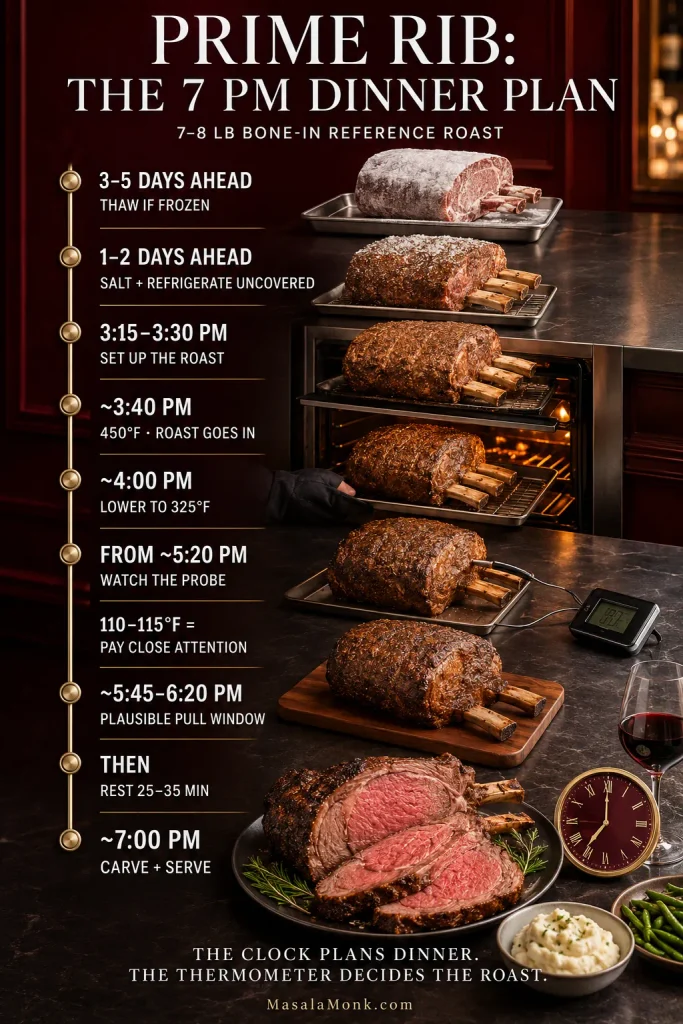
If dinner is at 7 PM, you need a window rather than one magic starting time. Nobody wants every side dish finished at 6:50 while the thermometer in the roast is still sitting at 108°F.

For the 7–8 lb reference roast, starting a little earlier gives you room for an unpredictable oven, a slower roast and the full resting time without turning the final hour into a race.

Approx. TimeWhat to Do
3–5 days ahead, if frozenBegin thawing the roast in the refrigerator
1–2 days aheadSalt and refrigerate uncovered
3:15–3:30 PMSet up the roast, pan, seasoning and thermometer
Around 3:40 PMRoast goes into the 450°F oven
Around 4:00 PMLower the oven to 325°F
From about 5:20 PM onwardKeep a closer eye on the probe; 110–115°F matters more than the clock
Roughly 5:45–6:20 PMPlausible pull window for the reference roast
Next 25–35 minRest the beef and finish the rest of dinner
By about 7 PMCarve and serve
Prime rib dinner timeline for a 7–8 pound bone-in roast, progressing from thawing and dry brining through roasting, temperature checks, resting and carving around 7 PM.
A useful prime rib dinner timeline works backward from carving time: thawing and dry brining can be scheduled days ahead, while the final pull window stays deliberately flexible.

Scalloped potatoes need a substantial bake of their own, so getting them largely finished before the prime rib takes over the oven makes the final hour much calmer.

If the Roast Is Early

Finishing 20–40 minutes ahead works beautifully because the beef needs that rest anyway. Around an hour is still manageable if you leave the roast whole; leave it uncovered unless the room is cool, then tent it loosely with foil.

Beyond that, food safety and doneness begin pulling in opposite directions. Avoid leaving cooked beef at room temperature for hours. Hot holding at 140°F / 60°C or above keeps it hot enough from a safety standpoint, but the center can continue cooking.

If Dinner Is Running Late

If dinner is slipping and the center is still well below your pull temperature, raising the oven moderately to 350°F (177°C) can help. Once the roast is getting close, stop chasing the clock and watch the thermometer.

Prime Rib Troubleshooting

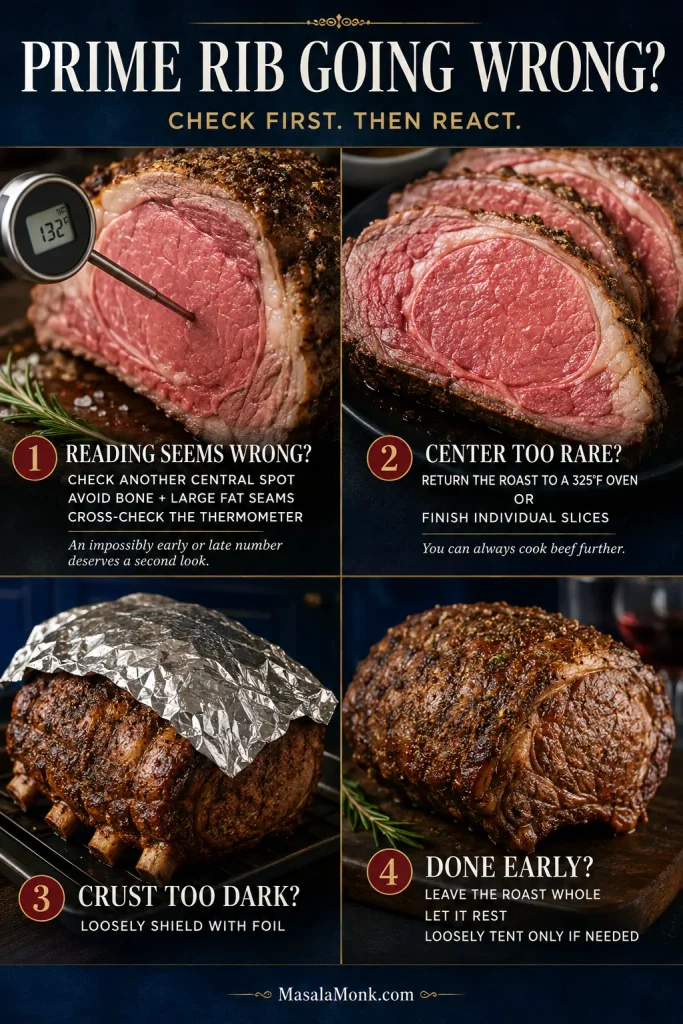
Prime rib rarely goes wrong because somebody forgot the rosemary. The bigger problems usually begin when the timing looks strange and the cook reacts before checking what is actually happening inside the meat.

Common Prime Rib Problems & Fixes

Four-part prime rib troubleshooting guide covering a questionable thermometer reading, an underdone center, an overly dark crust and a roast that finishes early.
Good prime rib troubleshooting uses the smallest correction that solves the real problem: first validate the measurement, then adjust the thermometer position, crust, doneness or timing—not the whole method at once.
ProblemLikely ReasonWhat to Do
Cooking much faster than expectedNormal variation or probe positionCheck 2–3 central spots. If they agree, trust the reading.
Taking much longer than expectedCool oven, thick roast, probe error or incompletely thawed centerCross-check the meat and oven temperatures before turning the heat up sharply.
Two thermometers disagreeDifferent locations or one inaccurate thermometerCheck several central spots and look for the lowest stable reading.
Center is too rare after carvingRoast was pulled early or a cooler section was missedReturn the roast briefly to a 325°F oven, or finish only the slices that need it.
Crust getting dark too quicklyStrong top heat or roast sitting too highMove the roast farther from the top element or loosely shield the darkest area.
Garlic or herbs are burningSurface heat is too aggressiveLoosely protect the crust and let the center continue cooking.
Rendered fat is smokingA deep pool has collected in the panRemove some with a heatproof baster or ladle without moving the hot pan.
Roast is more done than intendedLate pull or more carryover than expectedStop cooking. Slice and serve with jus; thinner slices can eat more tenderly.
One guest wants well-done beefDifferent preferenceOffer an end slice or cook that person’s slice further.
Two roasts are finishing differentlyDifferent thickness or shapeMonitor each roast separately and pull each when ready.

The Center Is Too Rare

Discovering this after the first cut is frustrating, but fixable. Return the roast briefly to a 325°F oven and keep checking.

When only a couple of people want their beef more done, leave the main roast alone and finish their slices separately.

Underdone beef can always go back for more heat. You cannot put pink back into an overcooked center.

Cooking Two Prime Ribs

Treat them as two separate roasts. Two 6 lb prime ribs do not cook like one 12 lb roast, and even two apparently identical roasts can finish at different times. Give both enough room for air to circulate and monitor them independently.

← Recipe Card·Carving →·↑ Back to top

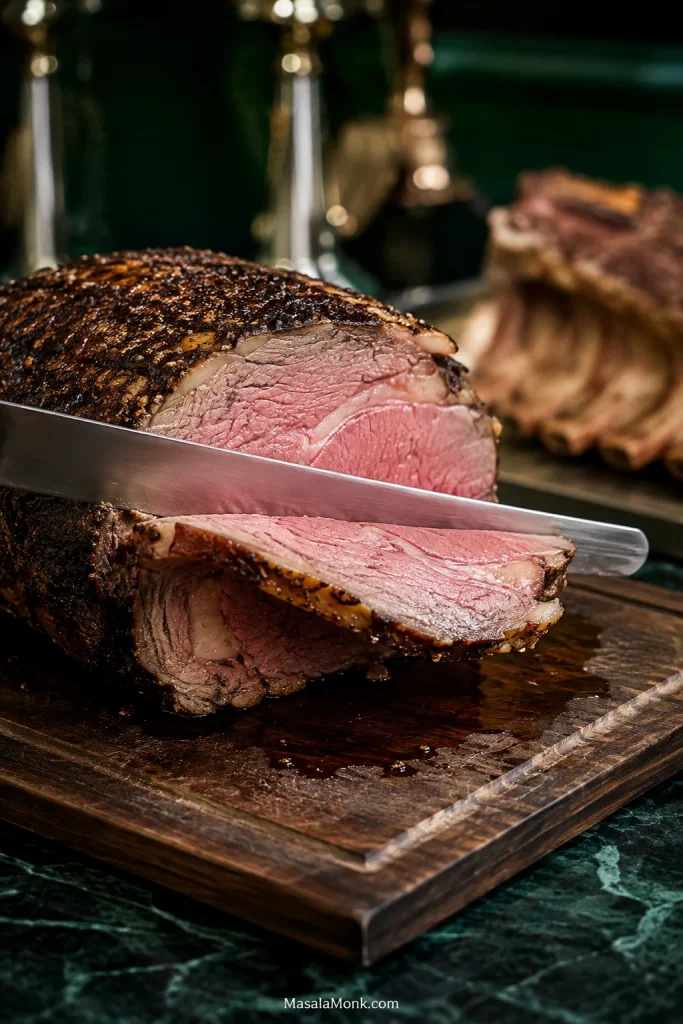
How to Carve Prime Rib

By the time the roast has finished resting, the stressful part is largely over.

  1. Remove the butcher’s twine.
  2. If the rib slab was cut and tied underneath, lift it away. Otherwise, follow the curve of the bones with the knife and remove them in one piece.
  3. Slice the boned roast across the grain with long, clean strokes.
  4. Cut around ½ inch / 1.25 cm thick for generous portions, a little thinner for a side-heavy meal, or thicker for steakhouse-style servings.
Long carving knife cutting the first slice from a rested prime rib across the grain, revealing a browned crust, more-done outer band and warm pink center.
Once the rib slab is out of the way, use long carving strokes rather than sawing. Cleaner cuts help the crust stay attached and show the roast’s doneness gradient clearly on each slice.

The first slice should show the method’s gradient clearly: browned crust, more-done outer beef, then the warm pink middle. End pieces are handy for anyone who prefers their beef a little further along.

Soft dinner rolls can be made earlier and warmed while the beef rests.

Prime Rib Au Jus (Simple Pan Jus)

The liquid in the roasting pan will usually be heavy on rendered beef fat. Pour most of that away and keep the deeply browned bits underneath.

  • Browned drippings left in the pan after pouring off excess fat
  • ½ cup (120 ml) dry red wine
  • 2 cups (480 ml) unsalted or low-sodium beef stock
  • 1 teaspoon Worcestershire sauce, optional
  • Black pepper, to taste
  1. Pour off most of the rendered fat, leaving about 1–2 tablespoons and the browned deposits.
  2. Set a stovetop-safe roasting pan over medium heat, or transfer the drippings to a saucepan.
  3. Add the wine and scrape up the browned bits.
  4. Reduce the wine by roughly half.
  5. Add the stock and Worcestershire.
  6. Simmer until you have roughly 1½ cups (360 ml) and the flavor tastes concentrated.
  7. Taste before adding salt; the drippings may already contain plenty.
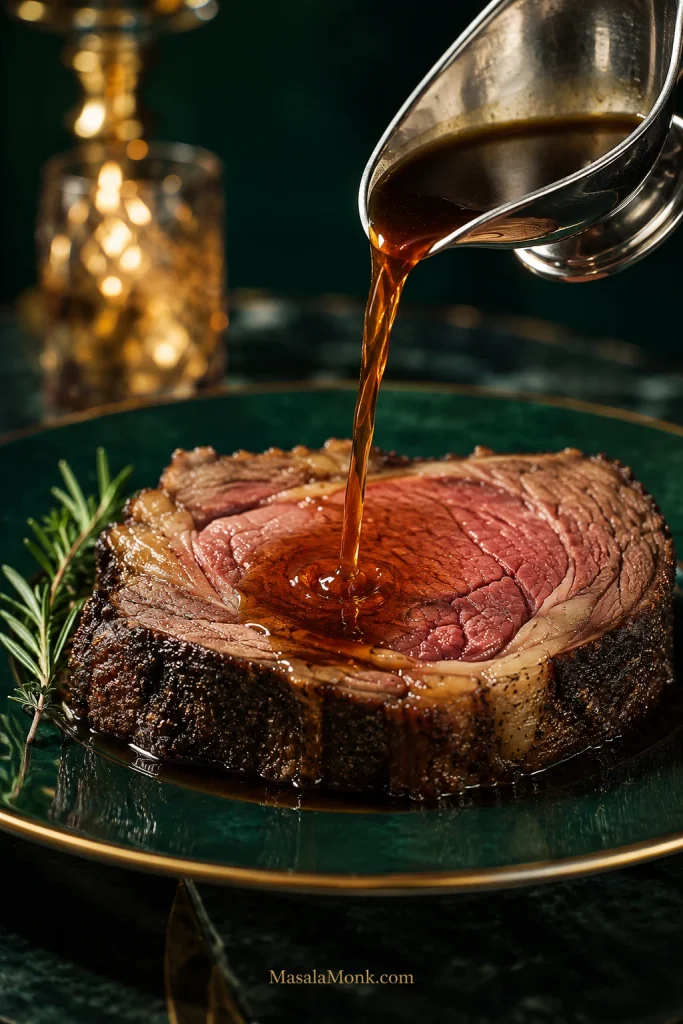
Thin stream of dark brown au jus pouring from a polished metal gravy boat over a thick pink slice of prime rib on a deep green plate.
The visual cue for prime rib au jus is movement: it should pour in a thin stream and pool around the beef. If it mounds or clings heavily, you’ve moved closer to gravy.

The finished au jus should taste beefy and concentrated rather than like thin stock. A spoonful over creamy mashed potatoes is about as classic as prime rib dinner gets.

What to Serve With Prime Rib

Prime rib is rich enough that the plate benefits from contrast. Potatoes catch the jus; something crisp, green or sharp keeps every bite from feeling equally heavy.

A cold steakhouse-style wedge salad works especially well beside hot beef. Roasted Brussels sprouts, carrots, Yorkshire pudding and creamed spinach all fit comfortably here too.

For a more traditional holiday table, green bean casserole can be largely assembled ahead. Crisp roasted vegetables can often take their final blast of heat during the roast’s 25–35 minute rest.

Prime rib dinner plate with mashed potatoes, bright green vegetables, au jus, horseradish sauce and a dinner roll in an elegant restaurant dining room.
Instead of counting side dishes, build the prime rib plate by function: one starch to catch the jus, something green or fresh for contrast, and a sharp or cool element to reset the palate.

Keep the roast whole until the rest of dinner is ready; sliced beef loses heat much faster.

How to Store, Freeze & Reheat Prime Rib

Refrigerate leftovers within 2 hours. Cut a large leftover roast into a few thick portions rather than refrigerating it whole or slicing everything thin. Cooked leftovers are generally best used within 3–4 days.

For longer storage, wrap the portions well and freeze them. Cooked meat leftovers are generally best used within roughly 2–6 months for quality.

For oven reheating, put only the portions you plan to eat in a small baking dish with a spoonful or two of jus or beef stock. Cover and reheat in an oven set to at least 325°F (163°C) until the center reaches 165°F / 74°C. Previously medium-rare prime rib will cook beyond its original doneness as it reheats.

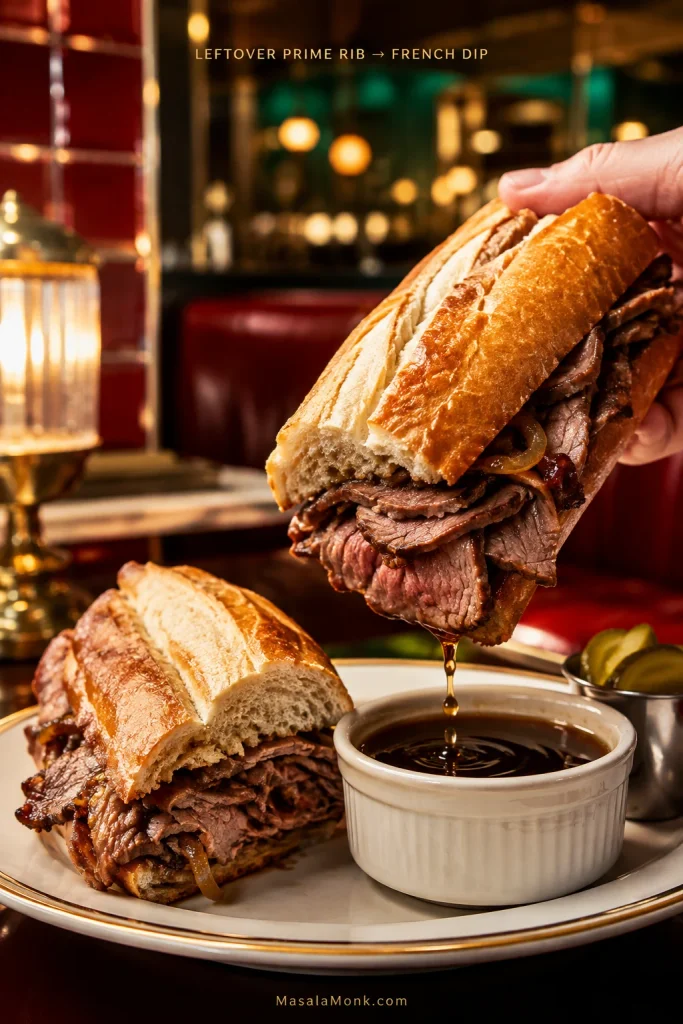
Any substantial leftovers have an excellent second life in a French dip sandwich with au jus.

Leftover prime rib French dip with thin beef and caramelized onions in a crusty roll, held over a cup of au jus with a drop of jus falling from the sandwich.
A leftover prime rib French dip works because it changes the eating experience instead of trying to recreate dinner: crisp bread, sliced beef, onions and dipping jus bring new texture to the leftovers.

A Few Last Prime Rib Questions

Should prime rib be covered while roasting?

Roast it uncovered so the exterior can brown. Rest it uncovered as well unless the room is unusually cold; in that case, use a loose foil tent rather than wrapping it tightly.

Can I make prime rib ahead?

Do the prep ahead rather than the roasting whenever possible. Dry-brine the beef 1–2 days ahead, make the horseradish sauce and prepare suitable sides in advance, then roast the prime rib on the day you plan to serve it. Fully cooking and reheating the roast makes it much harder to preserve its original doneness.

What about the 500-degree oven-off method?

It can work, but the result depends heavily on how your oven retains heat after it is switched off. Insulation, calibration and cooling fans can all change the outcome. The method above keeps the oven actively heated instead.


For a roast that can feel intimidating when you first unwrap it, that first warm pink slice is a satisfying moment.

After the rest, the crust is dark, the fat around the edges is glossy, and the kitchen smells unmistakably of roasted beef.

Then the knife goes through the crust and you finally get to see what all those temperatures were leading toward.

If you make it, leave the weight and rib count of your roast, whether you used a conventional or convection oven, your pull temperature, the actual cooking time, and how the center looked after resting in the comments. Changed the method or seasoning? Include that too. Those details can be genuinely useful to the next person cooking a similar roast.

↑ Back to top

Posted on — Leave a comment

Turkey Gravy Recipe: Easy Homemade Gravy From Turkey Drippings

Silver gravy boat pouring glossy brown gravy over carved roast turkey on a dark Thanksgiving table.

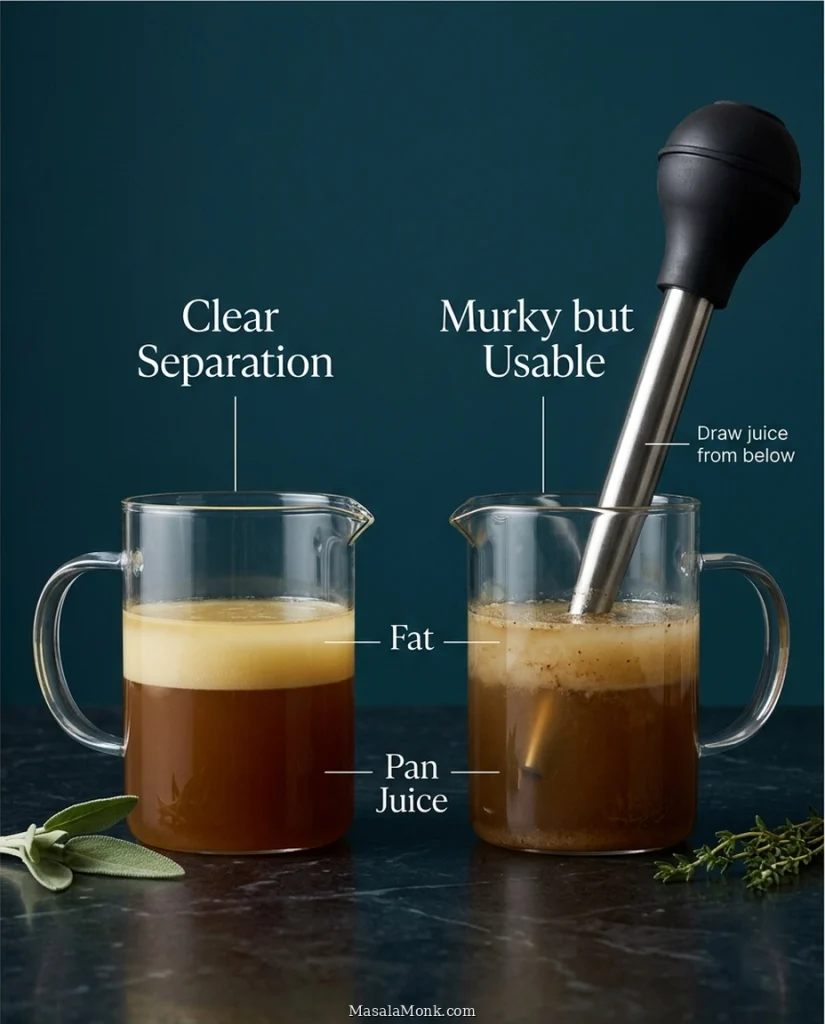
The turkey is out, it needs to rest, and the roasting pan is still holding the beginnings of excellent gravy: browned bits, dark pan juices, and rendered turkey fat. Before anyone cleans that pan, give yourself about 20–30 minutes.

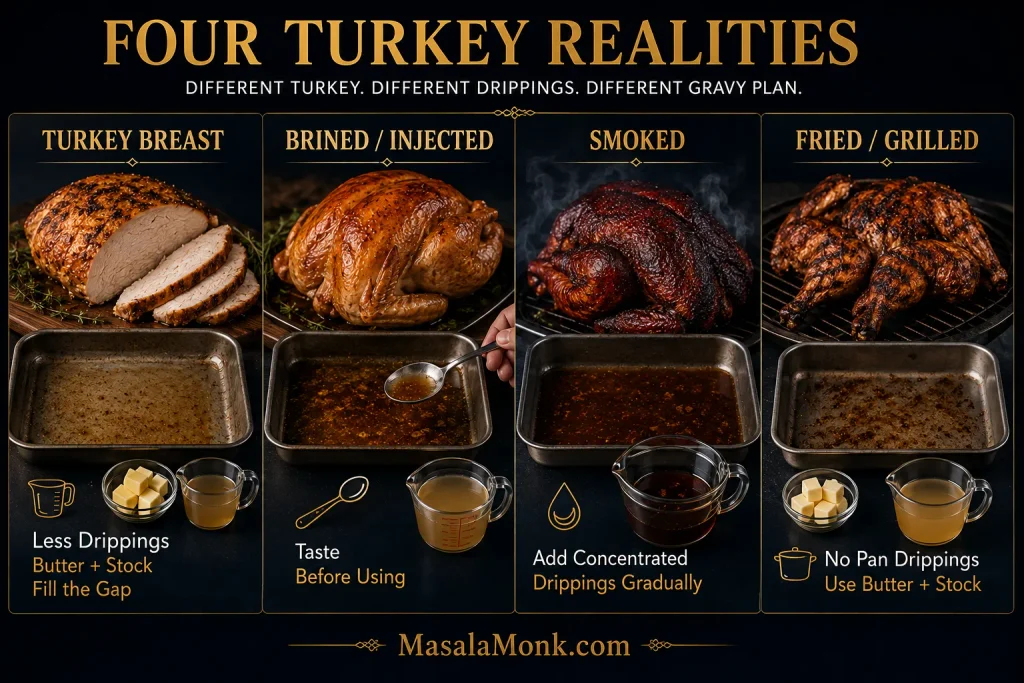
No two turkeys leave behind the same amount. A big bird may give you plenty of fat and juice; a turkey breast may leave surprisingly little. Your measuring cup does not need to look like the recipe photo. Separate the fat from the pan juices, measure what you have, and use butter or stock to fill the gaps.

The finished gravy should taste deeply of turkey, coat a spoon in a thin, smooth layer, and still pour easily over the bird, dressing, and mashed potatoes. Keep it slightly loose. It will thicken while it waits.

Quick Answer: Turkey Gravy From Drippings

For roughly 2 cups / 475 ml gravy, start with ¼ cup / 60 ml fat + ¼ cup / about 30 g all-purpose flour + 2 cups / 475 ml total liquid.

Total liquid means the pan juices you choose to use, any stock or water used to deglaze the roasting pan, and enough unsalted or low-sodium stock to reach 2 cups.

If the turkey was brined, injected, heavily seasoned, or smoked, let a spoonful of pan juice cool enough to taste before counting it toward those 2 cups. Use less if it is very salty or smoky, leave bitter or acrid liquid out, and let low-sodium stock make up the rest.

Cook the roux until lightly golden and no longer raw-smelling, add the liquid gradually, then simmer until the gravy lightly coats a spoon but still pours.

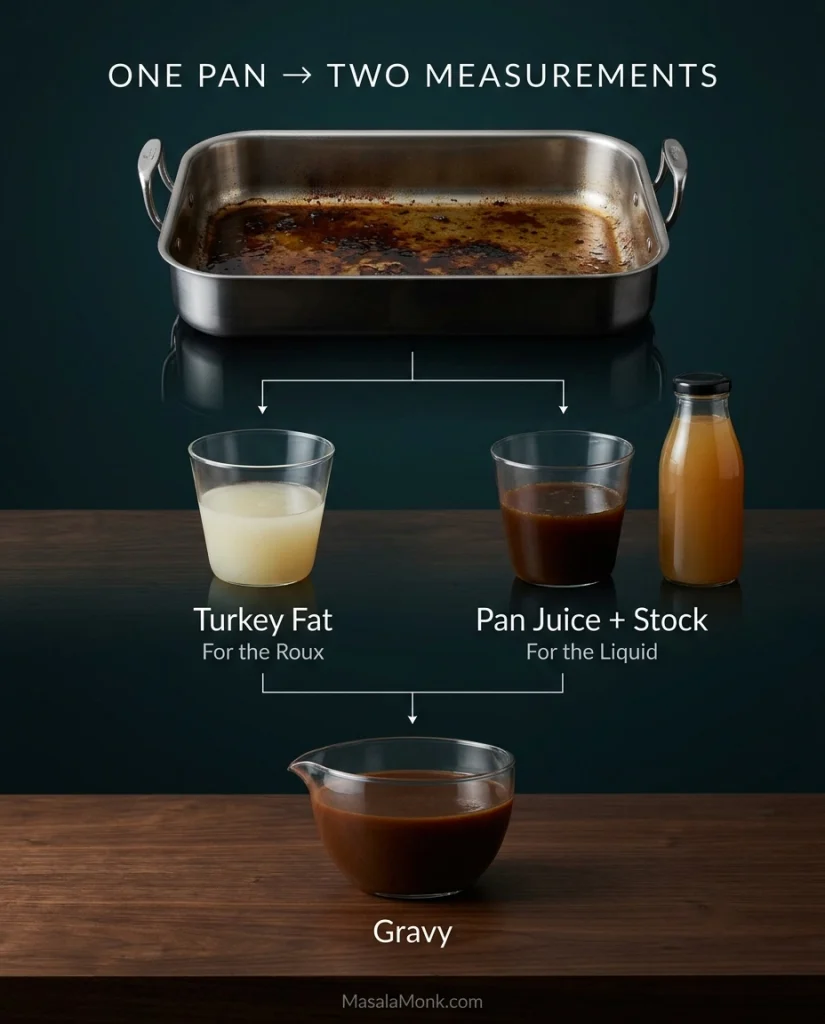
Roasting pan with turkey drippings separated into fat for roux and pan juice with stock for gravy liquid, leading to finished gravy.
Measure the fat and liquid separately; they control different parts of the gravy.

Make It Now: Turkey Gravy While the Bird Rests

Recipe at a Glance

Yield
Roughly 2 cups / 475 ml

Enough for
6 gravy-loving or 8 modest servings

Active time
15–20 minutes

Total time
20–30 minutes

Ingredients

  • Rendered turkey fat, up to ¼ cup / 60 ml
  • Unsalted butter, as needed to bring the total fat to ¼ cup / 60 ml
  • ¼ cup / about 30 g all-purpose flour
  • Defatted turkey pan juices, as available
  • Unsalted or low-sodium turkey or chicken stock, as needed to bring the total liquid to 2 cups / 475 ml; chicken broth works too
  • Freshly ground black pepper, to taste
  • Salt, only if needed at the end

Optional: 1 teaspoon finely chopped fresh thyme or ½ teaspoon finely chopped fresh sage. If using dried thyme or sage, start with ¼ teaspoon. Have ½–1 teaspoon Worcestershire sauce available if you want extra savory depth.

Useful equipment: medium saucepan, whisk, clear heatproof measuring jug, and preferably a fine-mesh strainer. A fat separator is handy, not essential.

1. Save the juices inside the turkey

Before moving the turkey to a board or platter, carefully tilt it over the roasting pan. Hot juices often collect inside the cavity and are easy to lose when the bird is lifted away. Move the turkey to its resting place, then turn back to the pan.

Roast turkey being carefully tilted over its roasting pan so juices drain from the cavity into the pan.
Those cavity juices belong in the pan-juice pool—save them before moving the turkey.

2. Deglaze the well-browned fond

Golden to deep-brown patches stuck to the roasting pan are fond, and they’re where a lot of the gravy’s roasted flavor comes from. Add a few tablespoons of stock or water if the pan needs loosening and scrape the browned patches free. A very dry pan may need a little more liquid.

Pour the deglazing liquid in with the pan juices; it will count toward the final gravy liquid. Leave behind anything black or acrid-smelling.

Liquid being added to a roasting pan as brown fond loosens, with a separate black scorched area left behind.
Deglaze only until the browned fond releases; leave black, acrid residue behind.

If you’re reading ahead before roasting: keep an eye on a pan that is becoming completely dry. Where the turkey recipe allows it, a splash of water can protect the fond before those useful brown deposits scorch.

3. Strain and separate the drippings

Pour everything through a fine-mesh strainer into a fat separator or clear heatproof measuring jug and let it stand for 5–10 minutes. The fat usually looks paler, clearer, and oily as it rises; underneath is the darker, thinner pan juice.
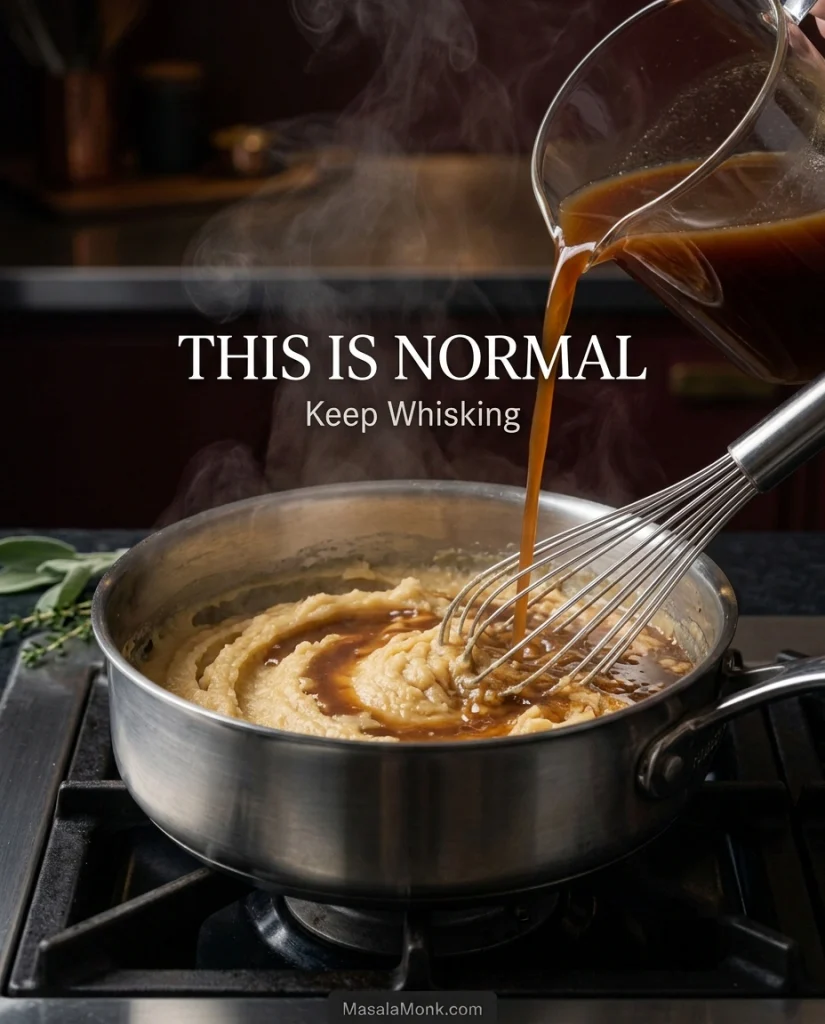
Some birds leave beautifully distinct layers. Others leave a murky jug that takes a few minutes to make sense of. Either is fine. You only need enough separation to measure the two parts.

No fat separator? Spoon the fat from the top of a clear jug, or use a turkey baster to draw the darker juice from underneath the fat layer.

Two clear containers compare well-separated and cloudy turkey drippings, with pale fat above darker pan juice and a baster drawing juice from below.
Cloudy drippings are fine. You only need to distinguish the oily fat from the darker pan juice.
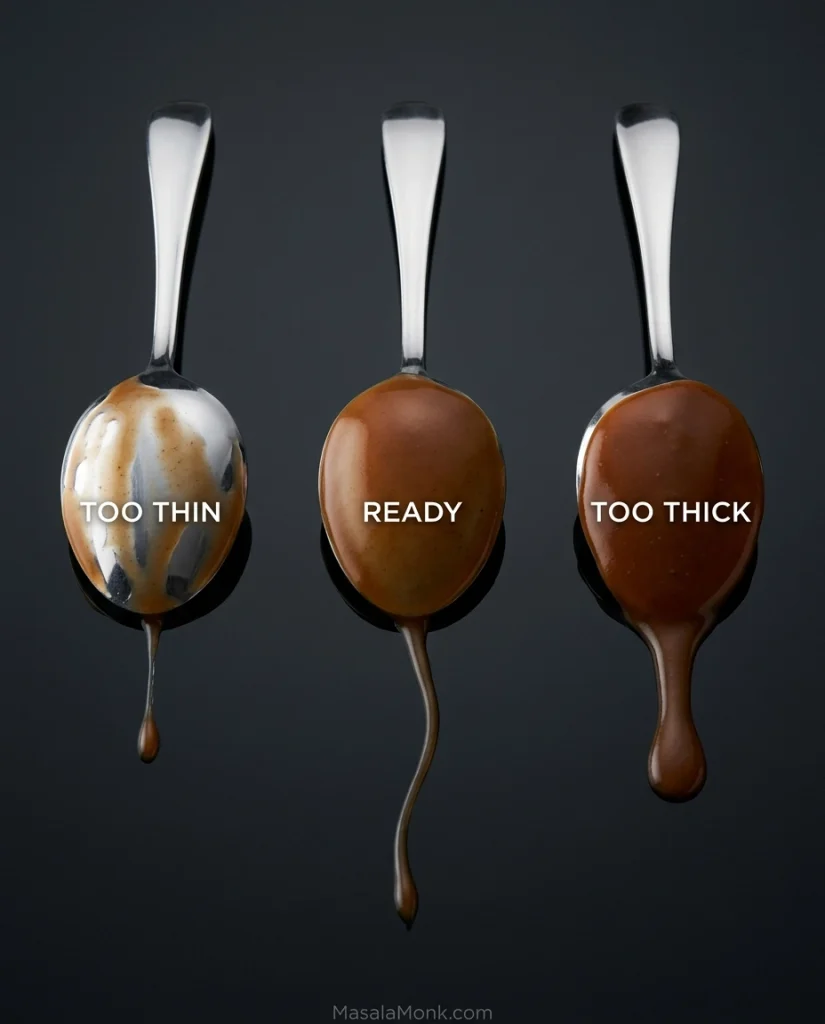
4. Taste first, then measure what your turkey gave you

Measure up to ¼ cup / 60 ml turkey fat. A lean bird may leave only a spoonful. Keep it, then add unsalted butter until you have ¼ cup total fat. Save any excess turkey fat for another use.

Let a teaspoon of the darker pan juice cool enough to taste. If it tastes concentrated but pleasantly turkey-rich, use it. Very salty or smoky juice is better added gradually, and genuinely bitter or acrid liquid should stay out. Measure however much pan juice you choose to use, including the deglazing liquid you want to keep, then add enough unsalted or low-sodium stock to reach 2 cups / 475 ml total liquid.

For example, if the pan gives you 3 tablespoons turkey fat and ¾ cup / 180 ml pleasantly seasoned pan juice, add 1 tablespoon butter to complete the fat and about 1¼ cups / 295 ml stock to complete the liquid. If that same ¾ cup tastes aggressively salty, use less of it and let unsalted stock make up more of the 2-cup total.

Dark turkey pan juice, tasting spoon, low-sodium stock and a final liquid mixture arranged to show tasting before completing the gravy liquid.
Treat pan juice like a concentrate: taste it first, then decide how much belongs in the gravy.

Using a brined, injected or smoked bird? See the turkey-specific gravy notes ↓

5. Cook a light-golden roux

Put the measured turkey fat and any needed butter in a medium saucepan over medium heat. Whisk in ¼ cup / about 30 g flour. The fat and flour form the roux, the paste that will thicken the gravy.

Cook for 2–4 minutes, whisking regularly. The roux should come together into a wet paste. As it cooks, the raw-flour smell will fade, the mixture will bubble, and the color will move toward pale gold.

If there is an obvious puddle of oil around the roux because too much fat went into the pan, spoon off the excess. Keep the roux light golden: you’ll get some toasted flavor without losing much thickening power.

Three saucepans show just-combined, light-golden and darker roux, with a small example of excess oil being spooned away.
Light golden is enough; darker roux brings more toastiness but less thickening power.

6. Add the liquid gradually

Whisk in a small splash of the measured liquid. The roux may suddenly tighten into something that looks almost like mashed potatoes. That’s normal.

Whisk it completely smooth, add another small portion, and repeat. Once the roux has loosened into a sauce, pour in the rest more steadily. Cold stock works; warming a large batch simply gets it back to a simmer faster.

Liquid being poured into roux while a whisk works through the very thick paste formed after the first addition.
The first splash can turn roux into a thick paste. Whisk it smooth before adding more.

7. Simmer until the gravy tells you it is ready

Bring the gravy briefly to a strong bubble, then lower the heat to a steady gentle simmer. Cook for 5–10 minutes, whisking now and then.

If you’re using dried thyme or sage, add it during this simmer. Give the flour time to work before judging the thickness. As the gravy cooks, the raw-flour smell should disappear and the pan should begin smelling much more like the turkey.

The Spoon Test

Dip in a spoon. The gravy should leave a thin, even film on the back while still running easily when the spoon is tilted.

  • Too thin: it runs off almost like broth.
  • Ready: it coats the spoon but still flows.
  • Too thick: it sits heavily and barely moves.

The finished gravy should be silky and easy to pour, without an oily film. Stop slightly loose; it will thicken further on its way to the table.

Three identical spoon backs compare gravy that is too thin, ready and too thick based on how heavily it coats and drips.
Judge consistency while hot: ready gravy coats the spoon lightly and still flows.

Taste the finished gravy. Add black pepper, then salt only if it needs it. Stir in fresh thyme or sage, or add Worcestershire gradually and taste.

If a piece of turkey is handy, taste the gravy with the meat before making the final seasoning call. Turkey is mild, and a gravy that seems slightly assertive on the spoon can land perfectly once the two meet.

If the gravy is smooth, savory, and pouring nicely, you’re done. When the pan was unusual—or the saucepan still isn’t quite right—go straight to Gravy ER troubleshooting.

Thanksgiving dinner plate with sliced turkey, mashed potatoes, stuffing, vegetables and glossy brown gravy.

More Help With Your Turkey Gravy

What Turkey Drippings Actually Contain

“Drippings” are really two liquids plus the browned material left in the pan. The pale oily layer is rendered turkey fat, which you use for the roux. Beneath it is the darker pan juice, carrying concentrated turkey flavor and the seasonings from the bird. Fond is the well-browned material stuck to the roasting pan; deglazing pulls it into the liquid. Stock makes up whatever liquid is missing.

Need to separate yours? Go to Step 3: Separate the drippings ↑

Not Enough Turkey Drippings? Here’s How to Adjust

A turkey breast, smaller bird, or lean roasting setup may leave very little behind. You can still make full-flavored gravy.

Suppose you have only 1 tablespoon turkey fat and ½ cup / 120 ml pan juices. Add enough unsalted butter to bring the fat to ¼ cup, then enough stock to bring the liquid to 2 cups.

The same adjustment works with smaller cuts such as turkey tenderloin. Use what the pan gave you, then let butter and stock provide the missing volume.

No usable drippings at all? Make the roux with butter. Use a flavorful low-sodium turkey stock for the liquid—especially one made with the neck or wings—or a good low-sodium chicken stock.

Photographic equations show turkey fat completed with butter and pan juice completed with low-sodium stock for making gravy.
Short on drippings? Keep the ratio and complete the missing fat with butter and liquid with stock.

Got the missing fat and liquid covered? Back to the recipe ↑

How Much Turkey Gravy Should You Make?

Plan on at least ¼ cup / 60 ml per person. For a holiday table where gravy is going over turkey, potatoes, and cornbread dressing, closer to ⅓ cup / about 80 ml per person is more comfortable.

Three increasingly large silver gravy boats represent gravy quantities for tables of about 6, 12 and 18 people.
When gravy serves turkey, potatoes and dressing, rounding up is usually safer than cutting it close.
Approximate batchFatFlourTotal liquid*
1 cup / 240 ml2 tbsp / 30 ml2 tbsp / about 15 g1 cup / 240 ml
2 cups / 475 ml¼ cup / 60 ml¼ cup / about 30 g2 cups / 475 ml
3 cups / 710 ml6 tbsp / 90 ml6 tbsp / about 45 g3 cups / 710 ml
4 cups / 950 ml½ cup / 120 ml½ cup / about 60 g4 cups / 950 ml
6 cups / 1.4 L¾ cup / 180 ml¾ cup / about 90 g6 cups / 1.4 L
*Total liquid includes the pan juices you choose to use, deglazing liquid, and enough stock to reach the listed amount. Finished volume varies somewhat with reduction.

A 4-cup batch may finish slightly above or below 4 cups because simmering changes the volume. Stocks vary too. Use the table to get close, then let the spoon decide.

Turkey Breast, Brined Turkey and Smoked Turkey

The basic method holds up across most kinds of turkey; the drippings are what change.

A turkey breast often leaves less fat and liquid, so butter and stock do more of the work. Brined, injected, and heavily pre-seasoned birds may leave plenty of juice, but it can be much saltier than expected. Taste it first and add the pan juices gradually.

With smoked turkey, add the drippings gradually. Smoke and salt become more concentrated as the pan cooks down. When a seasoned smoker pan has lost a lot of moisture, plain water can sometimes be more useful than another pour of broth. Water evaporates; salt does not.

A spatchcocked bird needs no special gravy treatment, and its removed backbone is useful for stock. Fried or grilled turkey usually leaves no roasting-pan drippings, so start with butter and a flavorful stock instead.

Four-panel comparison of gravy approaches for turkey breast, brined or injected turkey, smoked turkey, and fried or grilled turkey.
Turkey breast changes quantity; brining changes salt; smoking changes concentration; frying or grilling may remove drippings entirely.

Ready to use those drippings? Return to Step 4: Taste first, then measure ↑

Turkey Gravy Troubleshooting: Gravy ER

This is the point where it is tempting to throw in more flour and hope for the best. Don’t. First work out what is wrong with the gravy in front of you.

Six matching pans compare gravy that is thin, ready, thick, lumpy, greasy or split, and pale.
The graphic compares six visible gravy states: thin, ready, thick, lumpy, greasy or split, and pale.
ProblemDo this now
Too thinSimmer first. If it is still thin, reduce when the salt level allows or use a small cornstarch slurry (cornstarch mixed with cold water).
Too thickHeat it fully before judging, especially after refrigeration. Then whisk in warm unsalted stock 1–2 tablespoons at a time.
LumpyWhisk vigorously. Strain through a fine-mesh sieve if needed; stubborn lumps can be smoothed with a brief pass of an immersion blender.
Greasy or splitSkim visible oil, return the gravy to gentle heat, and whisk. If it still looks separated, a brief pass with an immersion blender can help.
Raw or flouryThe roux was probably undercooked. Continue gentle cooking if the gravy can tolerate it.
Bitter or burntStart again with clean fat and flour, leaving burnt pan residue and bitter liquid behind. Strongly acrid gravy rarely improves with extra seasoning.
Too saltyStop reducing. Add unsalted stock or water; a badly oversalted batch may need to be combined with some plain unsalted gravy.
Bland but thickThe problem is flavor, not starch. Improve the pan juices, stock, or seasoning instead of adding more flour.
Too smoky or herbyDilute with unsalted stock and taste again.
PaleIf it tastes good and the texture is right, leave the color alone.

If the gravy is still too thin

Give flour-thickened gravy a real chance to simmer before reaching for more starch. It can look loose immediately after the stock goes in and change considerably over the next several minutes.

Still thin and not too salty? Let it reduce. If the gravy is already salty, stir together 1 teaspoon cornstarch with 1 tablespoon cold water, whisk in part of that slurry, bring the gravy back to a bubble, and check again before adding more.

A tiny correction is easy to repeat. Turning the saucepan into wallpaper paste is harder to undo.

If the gravy is too salty

Stop reducing. A mild problem may need only unsalted stock or some water. For a badly oversalted batch, make a small amount of plain unsalted gravy and whisk the two together. You usually need only enough neutral gravy to bring the first batch back into balance.

Adjust the thickness after the seasoning is where you want it. Skip the old potato trick; a potato does not selectively remove enough salt from gravy to solve the problem.

Back to the recipe ↑

How to Make Turkey Gravy Taste Better

If the gravy is thick enough but still tastes flat, leave the flour alone. It needs stronger turkey flavor or better seasoning.

More Turkey Flavor

Start with concentrated pan juices and properly deglazed fond. Turkey stock adds more depth than chicken stock when you have it. If you’re planning ahead, the neck or roasted wings can strengthen ordinary stock while the bird cooks.

A concentrated turkey or chicken base can strengthen weak stock too. These concentrates are salty, so start with a small amount and taste before adding more.

Best Seasonings for Turkey Gravy

Black pepper is the easiest finishing seasoning. For a 2-cup batch, try 1 teaspoon finely chopped fresh thyme or ½ teaspoon finely chopped fresh sage. Dried herbs are stronger; start with ¼ teaspoon and give them a few minutes in the simmering gravy.

Worcestershire adds another layer of savoriness. Start with ½ teaspoon; 1 teaspoon total is usually plenty for this size batch. The pan juices may already carry herbs, garlic, citrus, or pepper from the turkey, so taste before adding more seasoning.

Wine, Brightness and Color

For white-wine gravy, add ¼ cup / 60 ml dry white wine or dry sherry after the roux is cooked. Cook until most of the wine has evaporated and the sharp alcoholic aroma has softened, then add the full measured pan-juice-and-stock mixture. Treat the wine as an extra flavoring rather than part of the 2 cups of gravy liquid.

A rich gravy that tastes flat may need only a few drops of sherry vinegar or lemon juice. Add some, taste, and stop as soon as the savory flavors seem brighter. If the gravy starts tasting lemony or vinegary, you’ve added too much.

When the flavor and texture are right, leave a pale gravy alone. Well-browned fond and a light-golden roux will give it natural color.

Flour vs. Cornstarch for Turkey Gravy

For classic turkey gravy, flour is the better default. A flour roux uses the rendered turkey fat and gives the sauce its familiar opaque, velvety body. It also reheats reliably, which matters on a holiday table.

Cornstarch is quicker and produces a glossier sauce. It is useful for small last-minute corrections and also gives you a straightforward gluten-free thickening method.

For roughly 2 cups / 475 ml gluten-free gravy, mix 2 tablespoons cornstarch with 2 tablespoons cold water until completely smooth. Bring the 2 cups of pan-juice-and-stock mixture to a simmer, whisk in most of the slurry, and bring the gravy to a gentle boil for about 1 minute while whisking. Judge the thickness before adding the rest. Cornstarch does not require a roux.

Cornstarch and cold water being combined into a milky slurry before the slurry is whisked into simmering brown gravy.
Mix cornstarch with cold water first so the starch disperses before it meets hot gravy.

To make a smaller correction to flour gravy, use the 1-teaspoon-cornstarch slurry described in Gravy ER above. When the whole gravy must be gluten-free, check labels on stock, bouillon, Worcestershire, and other packaged seasonings as well.

Making Ahead, Storing, Reheating and Keeping Turkey Gravy Warm

Make Turkey Gravy Ahead

For Thanksgiving, the most practical make-ahead option is a concentrated gravy base that leaves room for fresh drippings. Up to 3 days ahead, melt ¼ cup / 60 ml butter, whisk in ¼ cup / about 30 g flour, and cook the roux until light golden. Gradually whisk in about 1½ cups / 355 ml unsalted or low-sodium stock, simmer until smooth, then transfer the base to a shallow container and refrigerate promptly. The base will be thicker than finished gravy; that’s intentional because the fresh pan juice will loosen it on Thanksgiving.

On Thanksgiving, reheat the base while whisking. Let the fresh pan juice cool enough to taste, then whisk in up to about ½ cup / 120 ml of the defatted pan juice you actually want to use. If the turkey gives you less than that—or the juice is too salty or smoky to use freely—add less and use low-sodium stock for the rest. Simmer until the gravy reaches the spoon-test consistency.

Three stages show a thick make-ahead gravy base, defatted turkey pan juice being whisked in, and smooth pourable finished gravy.
Build the stock base ahead; add fresh pan juice on Thanksgiving for the turkey’s final flavor.

If you already have cooked turkey drippings available, fully finished gravy can also be made up to 3 days ahead, refrigerated promptly, and reheated before serving.

Refrigerating and Freezing Turkey Gravy

Transfer leftover gravy to a shallow container and refrigerate promptly; don’t leave it sitting out to cool completely. Use refrigerated gravy within 3–4 days. USDA leftovers guidance recommends refrigerating perishable leftovers within two hours.

For longer storage, freeze the gravy. USDA guidance for gravy gives a freezer window of about 4–6 months. For best quality, use it within that window.

Reheating and Keeping Gravy Warm

Flour-thickened gravy naturally firms as it chills, and gelatin-rich drippings or stock can make it set even more. Reheat it before deciding that it is too thick.

Warm refrigerated gravy gently in a saucepan while whisking. Add stock or water a tablespoon or two at a time if it has tightened in the fridge.

Side-by-side view of the same gravy set and gelatinous when cold, then smooth, glossy and fluid after reheating.
Cold gravy can look much thicker than it really is. Reheat before deciding whether it needs thinning.

Before serving, bring reheated gravy to a rolling boil. Reheated leftovers should reach at least 165°F / 74°C.

The microwave works too when every burner is occupied. Heat in short intervals, stirring or whisking between them so there are no cold pockets, until the gravy is bubbling throughout and reaches 165°F / 74°C.

Gravy often seems to thicken just when everything else needs your attention. If it has to wait, keep it at 140°F / 60°C or above, as recommended in USDA hot-holding guidance, and keep some stock nearby for loosening before serving.

While the gravy waits, finish anything that needs last-minute attention, including a pan of soft dinner rolls. Warming the gravy boat with hot water, then emptying and drying it before filling, also buys you a bit more time.

Left with turkey and gravy the next day? They are already most of the way toward a turkey pot pie, where leftover gravy can become part of the creamy filling.

Turkey Gravy FAQs

Can I use chicken broth instead of turkey stock?

Yes. Unsalted or low-sodium chicken broth or chicken stock works well. The pan juices and fond still give the gravy most of its turkey character.

How much flour do I use per cup of turkey gravy?

Use about 2 tablespoons flour + 2 tablespoons fat for each 1 cup / 240 ml total liquid. The scaling table above follows that same starting ratio.

Can I make turkey gravy directly in the roasting pan?

Yes, provided the roasting pan is safe for stovetop use. You capture the fond directly, but a saucepan usually gives more even heat and easier whisking, especially when a large roasting pan sits awkwardly across two burners.

Can I use the turkey neck and giblets without putting pieces in the gravy?

Yes. Simmer the neck, heart, and gizzard in the stock while the turkey roasts, then strain them out before making the gravy. Leave the liver out unless you specifically want its stronger flavor. This gives you a deeper turkey stock without pieces of giblet in the finished sauce.

For traditional giblet gravy, keep the cooked giblets, chop them, and stir them into the finished gravy.


By the time the gravy boat reaches the table, nobody can tell whether you started with a beautiful cup of drippings or a murky half cup that needed butter and stock.

The uneven fat layer and too-small puddle of juice have disappeared into silky gravy that tastes deeply of the turkey. Then everyone starts passing the gravy boat, and suddenly it doesn’t look quite so large.

Two diners pass a silver gravy boat filled with brown gravy across an elegant Thanksgiving table with roast turkey in the background.

If your pan came from an unusually salty brined bird, a tiny turkey breast, or a smoker that seemed to leave you almost nothing to work with, tell us what happened in the comments. Those odd roasting pans often produce the most useful gravy questions.

↑ Back to top · Recipe Card · Quick Answer

Posted on — Leave a comment

Roasted Cauliflower and Potatoes Recipe (Crispy, Golden & Easy)

Roasted cauliflower florets and smaller Yukon Gold potato chunks spread across a stainless-steel sheet pan with deep golden browning and visible space between pieces.

The best pieces on this tray are usually the ones touching the metal: potatoes with properly browned bottoms and cauliflower with deeply golden edges. Inside, the potatoes should be creamy and the cauliflower tender while still holding its shape.

The frustrating version is familiar: the cauliflower looks ready, you test a potato, and the middle is still firm. Cauliflower softens faster than a dense chunk of potato, so the two vegetables do not need to be cut the same size.

Keep the potato pieces noticeably smaller than the cauliflower florets and they can roast together on the same sheet pan at 425°F (220°C). That one difference lets both vegetables start raw and reach the right texture at about the same time.

Quick Answer: How to Roast Cauliflower and Potatoes Together

Heat the oven to 425°F (220°C). Cut the potatoes into ¾-inch (2 cm) pieces and keep the cauliflower florets larger, about 1½ inches (4 cm) across. At those sizes, both vegetables can start raw together—no boiling, soaking or parboiling is needed.

Toss with olive oil and seasonings, then spread the vegetables in a roomy single layer on a large rimmed sheet pan. Turn once after the undersides begin to brown.

Start checking at 25 minutes; typical total roasting time is 28–35 minutes. Test one of the largest potato pieces before you pull the pan. The center should be completely tender.

The Cut Sizes That Make This Work

That size difference is the timing trick: keep the dense potato chunks smaller than the cauliflower so both can go onto the pan raw and finish together.

Raw 2 cm Yukon Gold potato chunk beside a larger 4 cm cauliflower floret, showing the different cut sizes used so both vegetables can finish together.

Make It Now: Roasted Cauliflower and Potatoes

Allow 15–20 minutes for prep. Dry freshly washed cauliflower well. For roasting the whole batch on one pan, a sturdy rimmed metal half-sheet measuring about 13 × 18 inches (33 × 46 cm) is the minimum. Cauliflower varies a lot in bulk, so if the vegetables fill the pan edge to edge with almost no visible gaps, split them between two pans rather than crowding them.

The recipe makes 4 generous side servings and is vegan, dairy-free and naturally gluten-free as written.

Ingredients

  • 700 g (24–25 oz) cauliflower florets, weighed after trimming (about 1 large cauliflower)
  • 450 g (1 lb) Yukon Gold potatoes, scrubbed
  • 3 tablespoons (45 ml) olive oil
  • 7 g fine sea salt (about 1¼ teaspoons; volume varies somewhat by brand), plus more to taste
  • 1½ teaspoons garlic powder
  • 1½ teaspoons sweet paprika
  • ½ teaspoon freshly ground black pepper
  • 1 tablespoon (15 ml) fresh lemon juice, plus more to taste
  • 2 tablespoons chopped fresh parsley, optional

How to Roast Them

1. Heat the oven

Heat the oven to 425°F (220°C) with a rack near the middle. For a fan oven, use 200°C.

2. Cut the vegetables

Cut the potatoes into about ¾-inch (2 cm) pieces. Keep the cauliflower florets about 1½ inches (4 cm) across.

For better browning, make a flat side. Halve some of the larger florets through the stem. The broad cut surface sits flush against the pan and browns much better than a rounded floret.

Cauliflower floret cut lengthwise through the stem to create a flat side for direct contact with the roasting pan.
Keep the stem attached when halving a large floret; it helps the crown hold together while the flat face browns against the pan.

If your potato pieces are closer to 1 inch (2.5 cm), use the head-start method under Potato Size and Variety below.

3. Oil and season

Put the cauliflower and potatoes in a large bowl. Add the olive oil, salt, garlic powder, sweet paprika and black pepper. Toss until the potatoes are lightly glossy and the seasoning has worked its way into the cauliflower’s crags. There should not be a puddle of oil left at the bottom of the bowl.

Prefer fresh garlic? Finely chop 3 medium cloves and scatter them over the tray for the final 5–10 minutes. Skip the garlic powder for this version. Fresh garlic gives a sharper garlic flavor and can turn bitter if roasted for the full time.

4. Give everything room

Spread the vegetables into one open layer. Leave visible metal between many of the pieces and put some flat potato faces and cauliflower cut sides directly against the pan.

If the last handful only fits by closing those gaps and packing the pieces together, grab another tray or save it for later. A little empty metal does more for the roast than squeezing in one more floret.

Two trays of seasoned cauliflower and potatoes before roasting, one tightly crowded and one spaced apart with visible metal between the vegetables.

5. Let the first side brown

Roast undisturbed for 18–20 minutes. Use a spatula to lift one potato. You should see a proper golden-brown patch underneath. Completely pale bottoms need another couple of minutes before you turn the vegetables.

Two potato chunks shown cut-side up, one pale underneath and one deeply golden, demonstrating when the potatoes are ready to turn.
Use a potato cut face as the browning gauge; its flat underside gives a cleaner read on pan contact than cauliflower.

Turn once and continue roasting. Start checking at 25 minutes. Dark-colored pans and fan/convection ovens can brown the vegetables more quickly, so judge the food rather than waiting for minute 35.

Ready when: a thin knife slides through one of the largest potato pieces with very little resistance. The cauliflower stems should be tender and the florets should still hold together. Deeply browned tips are fine. A potato that looks done outside but remains firm in the middle needs more time.

If the vegetables are tender but still pale, see How to Get Crisp, Golden Edges. For a tray that has gone off track, jump to Fix My Tray.

6. Finish while the vegetables are hot

Add the lemon juice and parsley, if using, as soon as the pan comes out of the oven. You’ll smell the lemon immediately against the warm garlic and paprika. Taste a potato and a piece of cauliflower, then add more salt or another squeeze of lemon if needed.

Fresh lemon being squeezed over a hot sheet pan of deeply roasted cauliflower florets and golden potato chunks.

Serve straight away while the browned sides still have some crispness.


Potato Size and Variety

The ¾-inch (2 cm) potatoes in the main recipe are small enough to keep pace with the cauliflower. Bigger pieces need more time; smaller ones reach tenderness sooner.

Potato sizeBest approach
½ inch (1.25 cm)Start both vegetables together and begin checking sooner
¾ inch (2 cm)Both vegetables can start together
1 inch (2.5 cm)Give the potatoes an 8–10 minute head start
Larger than 1 inch (2.5 cm)Use a longer head start, parboil briefly or roast separately

For 1-inch (2.5 cm) potato pieces: toss the potatoes with half the oil and seasonings and roast for 8–10 minutes. Toss the cauliflower with the remaining oil and seasoning, add it to the hot pan, then continue with the main method.

Potato pieces shown at several sizes from about half an inch to larger than one inch, illustrating how larger cuts need more roasting time.
A small increase in width means much more potato to heat through, which is why 1-inch pieces need a head start.

Whatever size you use, check one of the biggest pieces before deciding the potatoes are done. The center should be creamy and tender, never chalky or crunchy.

Yukon Golds are the easiest all-round choice: creamy inside, sturdy enough to hold together and good at picking up color underneath. Red potatoes can be substituted 1:1 by weight at the same ¾-inch (2 cm) size. Russets work too, but their fluffier pieces become more delicate as they cook, so turn them gently. Yukon Gold and red potatoes can stay unpeeled after a good scrub.

Baby potatoes still need to be judged by their actual size; a larger one may need quartering. If potatoes are the main attraction, these ranch roasted potatoes take the browned-cut-side idea further.

How to Get Crisp, Golden Edges

What Good Browning Looks Like

Here, “crispy” means crisp edges and well-browned flat sides around tender centers. Expect good color where the vegetables meet the pan, not a crust over every surface.

Close-up of roasted cauliflower with golden edges and a dark brown tip beside a potato chunk with a browned contact face.
Look for the cues together: browned potato contact faces, golden cauliflower edges and tender stems.

Dry cauliflower and open space do most of the early work. Surface water has to evaporate before the florets can brown, while a crowded sheet pan traps steam around them. A thin film of oil helps the cauliflower’s uneven edges and the cut potato faces brown more evenly.

Bare Metal, Foil or Parchment?

Flat sides against the pan supply the strongest color, so give them time before turning. Bare, lightly oiled metal browns best; foil works well too, though the vegetables may stick. Parchment releases more easily and usually gives gentler color underneath. A side-by-side roasting comparison from Serious Eats found the same general pattern.

Roasted cauliflower and potato pieces on bare metal, aluminum foil and parchment, showing progressively gentler contact browning.
Bare metal gives the strongest direct contact; parchment softens that contact and usually gives gentler browning underneath.

If you use parchment, choose one rated for at least 425°F. For deeper color, you can also preheat an empty bare sheet pan before adding the vegetables, but the regular method does not depend on that extra step.

Fix My Tray

Once dinner is already in the oven, the clock is not always the best guide. Look at what the vegetables are doing and fix that problem.

Four trays showing common roasting problems: cauliflower done before potatoes, wet vegetables, tender but pale vegetables, and potatoes browned outside but firm inside.
Check tenderness first, moisture second and color third; those clues usually tell you whether to keep cooking, create space or push browning.

Common Roasting Problems and Quick Fixes

What you seeWhy it happenedWhat to do now
Cauliflower is ready but potatoes are hardThe two vegetables are no longer finishing togetherTake the cauliflower off the tray and roast the potatoes another 5–10 minutes. Dinner gets no bonus points because everything left the oven together.
Potatoes are deeply brown but still firm insideThe outside browned faster than the middle cookedTurn the darkest sides upward and keep roasting. If the edges are already close to scorching, lower the oven to about 400°F (200°C conventional; about 180°C fan) and continue until the centers are tender.
Everything is tender but paleThe vegetables cooked through before developing enough colorKeep roasting a little longer. If the vegetables are on a bare broiler-safe pan, 1–2 minutes under the broiler can help. Watch constantly. If you used parchment, stay with the regular oven instead.
Cauliflower is soft or falling apartThe florets were too small, crowded or overcookedRemove the cauliflower now. More heat will only soften it further.
The tray looks wet or steamyCrowding is trapping moisture around the vegetablesSplit the vegetables between two trays and keep roasting.
Potatoes are tender but the edges are softThey had poor pan contact or too much surrounding moisturePut the cut sides against the metal and give them a little longer.
Fresh garlic tastes bitterIt scorchedRemove badly blackened pieces; add fresh garlic later next time.
The vegetables are browned but taste flatThey need more salt or aciditySeason while hot and add another squeeze of lemon.

Deeply Browned or Actually Burned?

A few very dark cauliflower tips are normal. Acrid black garlic, dry scorched florets and smoke are much better signs that something has actually burned.

Ways to Change the Flavor

The garlic-paprika base can move in several directions without changing the roasting method.

Four versions of roasted cauliflower and potatoes finished as Garlic Parmesan, Indian-Spiced, Smoky and Spicy, and Lemon Herb.

Garlic Parmesan

Parmesan is especially good where it catches on the rough cauliflower edges and potato corners, melting into little browned patches. Use 5–6 g fine sea salt instead of the full 7 g, then scatter over 35 g (about ⅓ cup) finely grated Parmesan during the final 5–8 minutes. Taste before adding more salt.

Indian-Spiced

Skip the sweet paprika and use 1 teaspoon ground cumin, 1 teaspoon ground coriander and ½ teaspoon turmeric. For color and mild warmth, add ½ teaspoon Kashmiri chilli powder; for more heat, use up to ¼ teaspoon cayenne. Finish the hot vegetables with ½ teaspoon garam masala, cilantro and lemon or lime.

For cauliflower and potatoes cooked as the fuller Indian dish with onion, tomato and masala, use a classic aloo gobi recipe.

Smoky and Spicy

Replace the sweet paprika with 1½ teaspoons smoked paprika and add up to ¼ teaspoon cayenne or red pepper flakes. Finish generously with lemon so the smoky seasoning stays lively rather than heavy.

Lemon Herb

Add 1 teaspoon dried oregano or thyme with the garlic powder. Finish with 1 teaspoon finely grated lemon zest, lemon juice and parsley or dill for a brighter version.

Adding Other Vegetables

A small handful of onion or Brussels sprouts will not change the pan much. Once you’re adding cups of extra vegetables—or a full can of chickpeas—replace some of the cauliflower or potatoes or bring in a second pan. The base recipe already takes up most of one half-sheet while leaving enough room to brown.

Carrots, Brussels sprouts, onion and chickpeas grouped to roast from the start, with broccoli and bell peppers grouped to add later.
AdditionCut / prepWhen it goes in
CarrotsAbout ⅓ inch (8 mm) slicesFrom the beginning
Brussels sproutsHalve small sprouts; quarter large onesFrom the beginning
OnionThick wedges, with a little root end attached if possibleFrom the beginning
BroccoliMedium floretsFor the final 15–20 minutes
Chickpeas1 × 400 g (14–15 oz) can, about 240 g drained; rinse and dry thoroughlyFrom the beginning; reduce some of the base vegetables or use another pan
Bell peppersBroad 1-inch (2.5 cm) piecesFor the final 15–20 minutes

Making a Double Batch

To make eight side servings, use two half-sheet pans. Put them on separate racks; when you turn the vegetables, swap the upper and lower pans and rotate them front to back if your oven browns unevenly. Trying to fit a double batch onto one tray turns the central problem from roasting into steaming.

What to Serve With Them

For a vegetarian dinner, spoon the hot vegetables over extra-creamy hummus. The cool, smooth hummus works particularly well against the browned cauliflower and hot potatoes; chickpeas or lentils can make the plate more substantial.

Golden roasted potatoes and cauliflower florets served over creamy hummus in a deep red bowl with lemon and a small amount of herbs.
Spread the hummus underneath so the creamy contrast does not cover the crisp, browned surfaces.

As a side, baked chicken breast can share the same oven temperature. If the rest of dinner is rich, go the other way with something cold and acidic: a crisp cucumber salad cuts nicely through the potatoes and roasted edges.

Storage, Reheating and Leftovers

The vegetables keep well; the crisp edges do not. Refrigerate leftovers within 2 hours and use them within 3–4 days, in line with USDA leftovers guidance.

Best Way to Reheat Roasted Cauliflower and Potatoes

Four reheating options for roasted cauliflower and potatoes: oven, air fryer, skillet and microwave, with crisp and softer finished textures.
For crisp leftovers, keep dry-heat portions uncovered and spread out so they do not steam each other.
  • Oven or toaster oven: spread the vegetables in one layer and reheat at 375°F (190°C) until hot and the surfaces have dried again. Start checking after about 8 minutes.
  • Air fryer: reheat a loose single layer at 350°F (175°C). Start checking at about 3 minutes; a potato-heavy portion may need a few minutes more.
  • Skillet: warm over medium heat, turning occasionally and letting some potato cut sides sit against the pan again. A small portion usually heats through within a few minutes.
  • Microwave: heat one serving in short bursts until hot. It is the quickest option and gives the softest texture.

Freezing is possible, but it is hard on the texture of both vegetables. Refrigerating and reheating within a few days gives a better result.

Leftovers are good chopped into a breakfast hash, folded into a frittata, tucked into wraps or added to a grain bowl. A pot of fluffy rice turns the remaining vegetables into an easy lunch without asking them to become crisp all over again.

A Few Common Questions

Can I bake cauliflower and potatoes together?

Yes. Cut the potatoes smaller than the cauliflower so the two vegetables cook at similar rates. At the sizes used here, both can go onto the same sheet pan raw and roast together at 425°F (220°C).

Do I need to boil or soak the potatoes first?

No. Yukon Gold potatoes cut to ¾ inch (2 cm) can roast from raw alongside the larger cauliflower florets. Larger pieces are where a head start or brief parboil becomes worthwhile.

Is 400°F, 425°F or 450°F better?

All three can work. 425°F (220°C) works especially well here: it is hot enough for strong browning while still giving the potato centers time to soften. At 400°F (200°C), expect a longer roast and lighter color. Move up to 450°F (230°C), and you should begin checking sooner because cauliflower tips and dry spices can darken quickly.

Can I use frozen cauliflower?

Yes, although fresh cauliflower browns more easily. Do not thaw the frozen cauliflower first. Shake off any obvious loose ice before it goes onto the pan.

Toss the potatoes with half of the oil and seasonings and roast for 8–10 minutes. Meanwhile, toss the still-frozen cauliflower with the remaining oil and seasoning just before it goes onto the hot pan. Continue roasting until the potatoes are tender and the cauliflower has browned.

Frozen cauliflower florets being added to a tray of partially roasted potato chunks after the potatoes have begun cooking.
Scatter frozen cauliflower across the hot tray rather than mounding it, so moisture can escape faster.

Frozen cauliflower releases more water than fresh, so give it generous space. If liquid starts collecting around the vegetables, split them between two pans and keep roasting.


Serve while the potato bottoms still have their crust. One last squeeze of lemon is usually enough.

Back to the Quick Answer · Make It Now