

The turkey is out, it needs to rest, and the roasting pan is still holding the beginnings of excellent gravy: browned bits, dark pan juices, and rendered turkey fat. Before anyone cleans that pan, give yourself about 20–30 minutes.
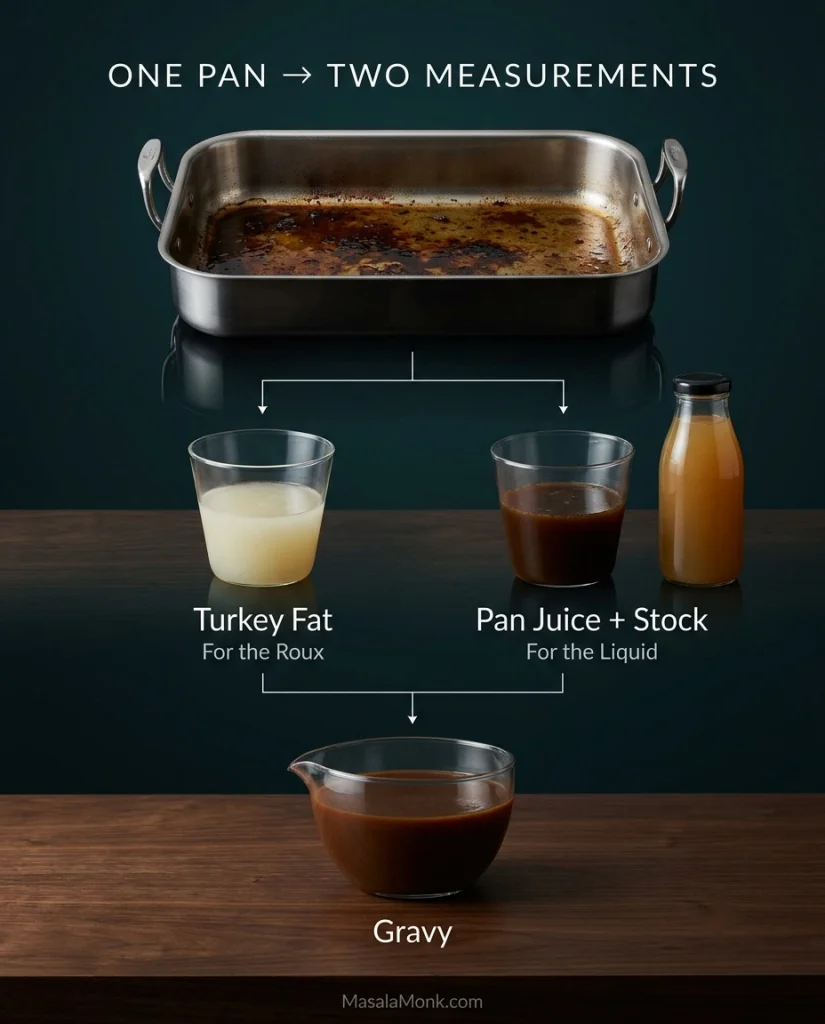
No two turkeys leave behind the same amount. A big bird may give you plenty of fat and juice; a turkey breast may leave surprisingly little. Your measuring cup does not need to look like the recipe photo. Separate the fat from the pan juices, measure what you have, and use butter or stock to fill the gaps.
The finished gravy should taste deeply of turkey, coat a spoon in a thin, smooth layer, and still pour easily over the bird, dressing, and mashed potatoes. Keep it slightly loose. It will thicken while it waits.
Quick Answer: Turkey Gravy From Drippings
For roughly 2 cups / 475 ml gravy, start with ¼ cup / 60 ml fat + ¼ cup / about 30 g all-purpose flour + 2 cups / 475 ml total liquid.
Total liquid means the pan juices you choose to use, any stock or water used to deglaze the roasting pan, and enough unsalted or low-sodium stock to reach 2 cups.
If the turkey was brined, injected, heavily seasoned, or smoked, let a spoonful of pan juice cool enough to taste before counting it toward those 2 cups. Use less if it is very salty or smoky, leave bitter or acrid liquid out, and let low-sodium stock make up the rest.
Cook the roux until lightly golden and no longer raw-smelling, add the liquid gradually, then simmer until the gravy lightly coats a spoon but still pours.
Make It Now: Turkey Gravy While the Bird Rests
Recipe at a Glance
Ingredients
- Rendered turkey fat, up to ¼ cup / 60 ml
- Unsalted butter, as needed to bring the total fat to ¼ cup / 60 ml
- ¼ cup / about 30 g all-purpose flour
- Defatted turkey pan juices, as available
- Unsalted or low-sodium turkey or chicken stock, as needed to bring the total liquid to 2 cups / 475 ml; chicken broth works too
- Freshly ground black pepper, to taste
- Salt, only if needed at the end
Optional: 1 teaspoon finely chopped fresh thyme or ½ teaspoon finely chopped fresh sage. If using dried thyme or sage, start with ¼ teaspoon. Have ½–1 teaspoon Worcestershire sauce available if you want extra savory depth.
Useful equipment: medium saucepan, whisk, clear heatproof measuring jug, and preferably a fine-mesh strainer. A fat separator is handy, not essential.
1. Save the juices inside the turkey
Before moving the turkey to a board or platter, carefully tilt it over the roasting pan. Hot juices often collect inside the cavity and are easy to lose when the bird is lifted away. Move the turkey to its resting place, then turn back to the pan.

2. Deglaze the well-browned fond
Golden to deep-brown patches stuck to the roasting pan are fond, and they’re where a lot of the gravy’s roasted flavor comes from. Add a few tablespoons of stock or water if the pan needs loosening and scrape the browned patches free. A very dry pan may need a little more liquid.
Pour the deglazing liquid in with the pan juices; it will count toward the final gravy liquid. Leave behind anything black or acrid-smelling.

If you’re reading ahead before roasting: keep an eye on a pan that is becoming completely dry. Where the turkey recipe allows it, a splash of water can protect the fond before those useful brown deposits scorch.
3. Strain and separate the drippings
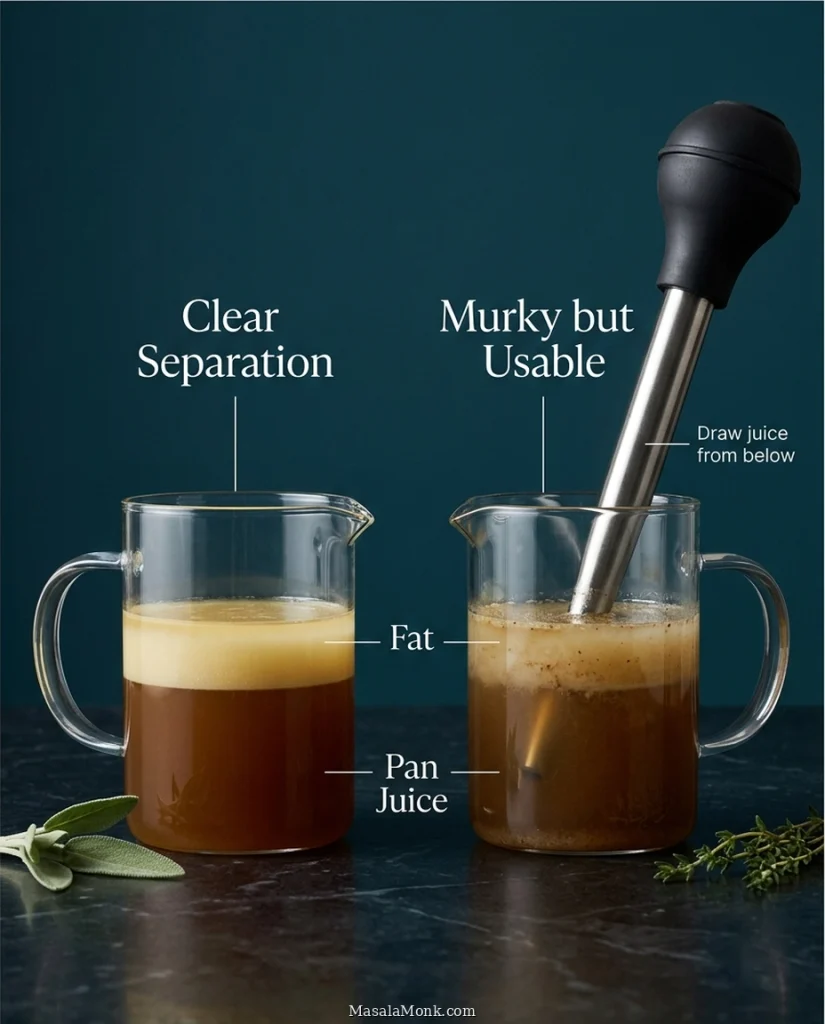
Pour everything through a fine-mesh strainer into a fat separator or clear heatproof measuring jug and let it stand for 5–10 minutes. The fat usually looks paler, clearer, and oily as it rises; underneath is the darker, thinner pan juice.
Some birds leave beautifully distinct layers. Others leave a murky jug that takes a few minutes to make sense of. Either is fine. You only need enough separation to measure the two parts.
No fat separator? Spoon the fat from the top of a clear jug, or use a turkey baster to draw the darker juice from underneath the fat layer.
4. Taste first, then measure what your turkey gave you
Measure up to ¼ cup / 60 ml turkey fat. A lean bird may leave only a spoonful. Keep it, then add unsalted butter until you have ¼ cup total fat. Save any excess turkey fat for another use.
Let a teaspoon of the darker pan juice cool enough to taste. If it tastes concentrated but pleasantly turkey-rich, use it. Very salty or smoky juice is better added gradually, and genuinely bitter or acrid liquid should stay out. Measure however much pan juice you choose to use, including the deglazing liquid you want to keep, then add enough unsalted or low-sodium stock to reach 2 cups / 475 ml total liquid.
For example, if the pan gives you 3 tablespoons turkey fat and ¾ cup / 180 ml pleasantly seasoned pan juice, add 1 tablespoon butter to complete the fat and about 1¼ cups / 295 ml stock to complete the liquid. If that same ¾ cup tastes aggressively salty, use less of it and let unsalted stock make up more of the 2-cup total.

Using a brined, injected or smoked bird? See the turkey-specific gravy notes ↓
5. Cook a light-golden roux
Put the measured turkey fat and any needed butter in a medium saucepan over medium heat. Whisk in ¼ cup / about 30 g flour. The fat and flour form the roux, the paste that will thicken the gravy.
Cook for 2–4 minutes, whisking regularly. The roux should come together into a wet paste. As it cooks, the raw-flour smell will fade, the mixture will bubble, and the color will move toward pale gold.
If there is an obvious puddle of oil around the roux because too much fat went into the pan, spoon off the excess. Keep the roux light golden: you’ll get some toasted flavor without losing much thickening power.

6. Add the liquid gradually
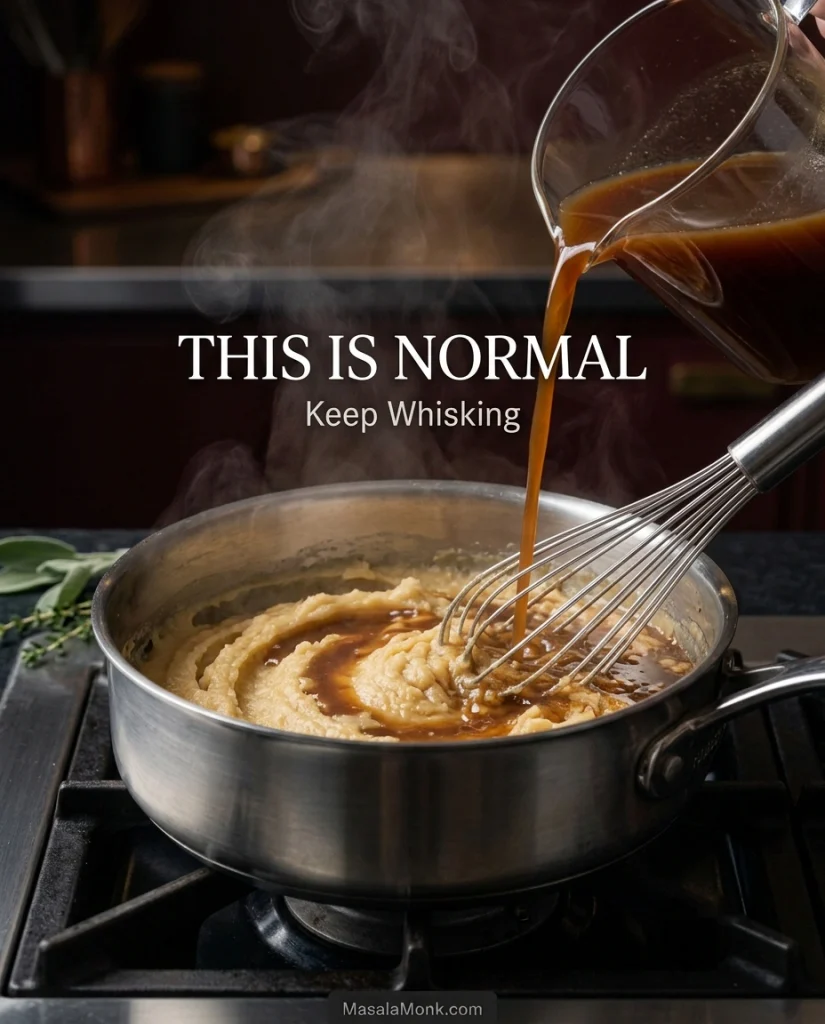
Whisk in a small splash of the measured liquid. The roux may suddenly tighten into something that looks almost like mashed potatoes. That’s normal.
Whisk it completely smooth, add another small portion, and repeat. Once the roux has loosened into a sauce, pour in the rest more steadily. Cold stock works; warming a large batch simply gets it back to a simmer faster.
7. Simmer until the gravy tells you it is ready
Bring the gravy briefly to a strong bubble, then lower the heat to a steady gentle simmer. Cook for 5–10 minutes, whisking now and then.
If you’re using dried thyme or sage, add it during this simmer. Give the flour time to work before judging the thickness. As the gravy cooks, the raw-flour smell should disappear and the pan should begin smelling much more like the turkey.
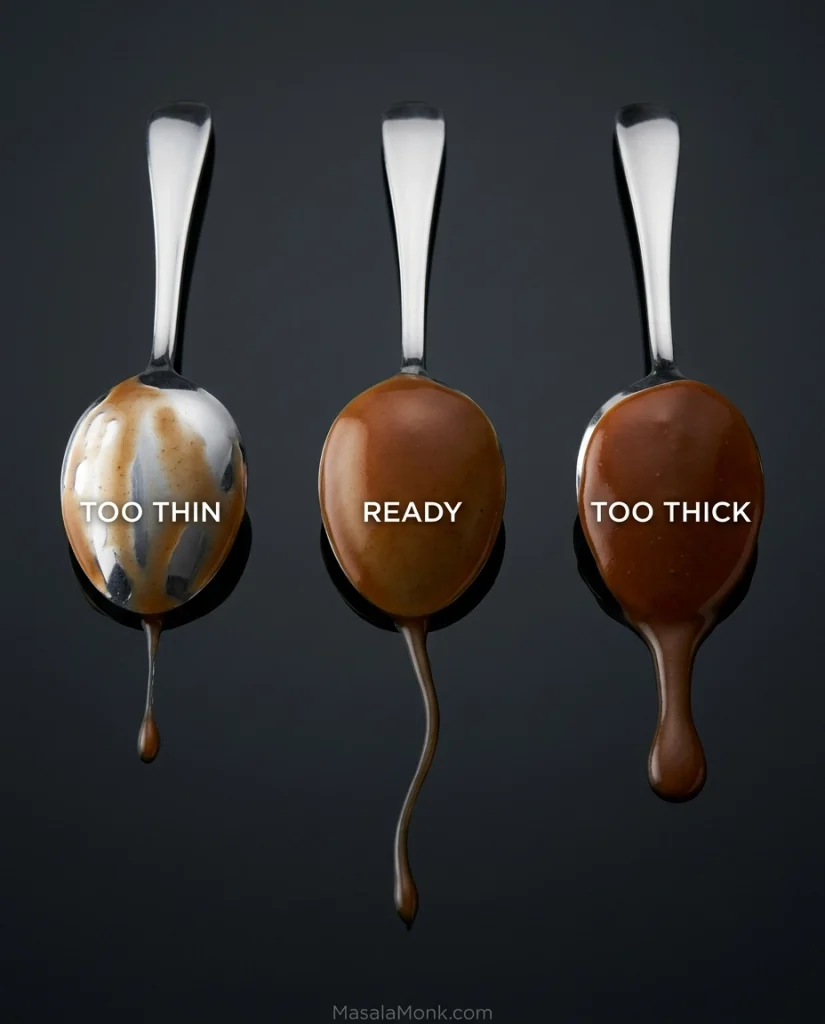
The Spoon Test
Dip in a spoon. The gravy should leave a thin, even film on the back while still running easily when the spoon is tilted.
- Too thin: it runs off almost like broth.
- Ready: it coats the spoon but still flows.
- Too thick: it sits heavily and barely moves.
The finished gravy should be silky and easy to pour, without an oily film. Stop slightly loose; it will thicken further on its way to the table.
Taste the finished gravy. Add black pepper, then salt only if it needs it. Stir in fresh thyme or sage, or add Worcestershire gradually and taste.
If a piece of turkey is handy, taste the gravy with the meat before making the final seasoning call. Turkey is mild, and a gravy that seems slightly assertive on the spoon can land perfectly once the two meet.
If the gravy is smooth, savory, and pouring nicely, you’re done. When the pan was unusual—or the saucepan still isn’t quite right—go straight to Gravy ER troubleshooting.

More Help With Your Turkey Gravy
Work With Your Drippings
- What Turkey Drippings Actually Contain
- Not Enough Drippings?
- How Much Gravy to Make
- Turkey Breast, Brined and Smoked Turkey
Fix or Improve It
Storage, Make Ahead & FAQs
What Turkey Drippings Actually Contain
“Drippings” are really two liquids plus the browned material left in the pan. The pale oily layer is rendered turkey fat, which you use for the roux. Beneath it is the darker pan juice, carrying concentrated turkey flavor and the seasonings from the bird. Fond is the well-browned material stuck to the roasting pan; deglazing pulls it into the liquid. Stock makes up whatever liquid is missing.
Need to separate yours? Go to Step 3: Separate the drippings ↑
Not Enough Turkey Drippings? Here’s How to Adjust
A turkey breast, smaller bird, or lean roasting setup may leave very little behind. You can still make full-flavored gravy.
Suppose you have only 1 tablespoon turkey fat and ½ cup / 120 ml pan juices. Add enough unsalted butter to bring the fat to ¼ cup, then enough stock to bring the liquid to 2 cups.
The same adjustment works with smaller cuts such as turkey tenderloin. Use what the pan gave you, then let butter and stock provide the missing volume.
No usable drippings at all? Make the roux with butter. Use a flavorful low-sodium turkey stock for the liquid—especially one made with the neck or wings—or a good low-sodium chicken stock.

Got the missing fat and liquid covered? Back to the recipe ↑
How Much Turkey Gravy Should You Make?
Plan on at least ¼ cup / 60 ml per person. For a holiday table where gravy is going over turkey, potatoes, and cornbread dressing, closer to ⅓ cup / about 80 ml per person is more comfortable.

| Approximate batch | Fat | Flour | Total liquid* |
|---|---|---|---|
| 1 cup / 240 ml | 2 tbsp / 30 ml | 2 tbsp / about 15 g | 1 cup / 240 ml |
| 2 cups / 475 ml | ¼ cup / 60 ml | ¼ cup / about 30 g | 2 cups / 475 ml |
| 3 cups / 710 ml | 6 tbsp / 90 ml | 6 tbsp / about 45 g | 3 cups / 710 ml |
| 4 cups / 950 ml | ½ cup / 120 ml | ½ cup / about 60 g | 4 cups / 950 ml |
| 6 cups / 1.4 L | ¾ cup / 180 ml | ¾ cup / about 90 g | 6 cups / 1.4 L |
A 4-cup batch may finish slightly above or below 4 cups because simmering changes the volume. Stocks vary too. Use the table to get close, then let the spoon decide.
Turkey Breast, Brined Turkey and Smoked Turkey
The basic method holds up across most kinds of turkey; the drippings are what change.
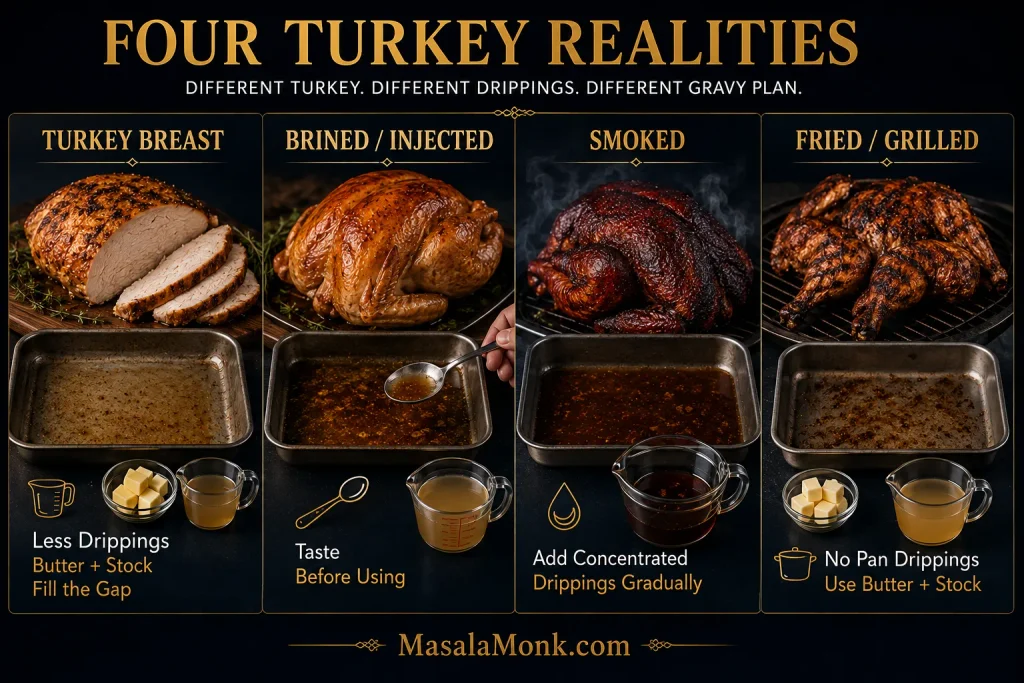
A turkey breast often leaves less fat and liquid, so butter and stock do more of the work. Brined, injected, and heavily pre-seasoned birds may leave plenty of juice, but it can be much saltier than expected. Taste it first and add the pan juices gradually.
With smoked turkey, add the drippings gradually. Smoke and salt become more concentrated as the pan cooks down. When a seasoned smoker pan has lost a lot of moisture, plain water can sometimes be more useful than another pour of broth. Water evaporates; salt does not.
A spatchcocked bird needs no special gravy treatment, and its removed backbone is useful for stock. Fried or grilled turkey usually leaves no roasting-pan drippings, so start with butter and a flavorful stock instead.
Ready to use those drippings? Return to Step 4: Taste first, then measure ↑
Turkey Gravy Troubleshooting: Gravy ER
This is the point where it is tempting to throw in more flour and hope for the best. Don’t. First work out what is wrong with the gravy in front of you.
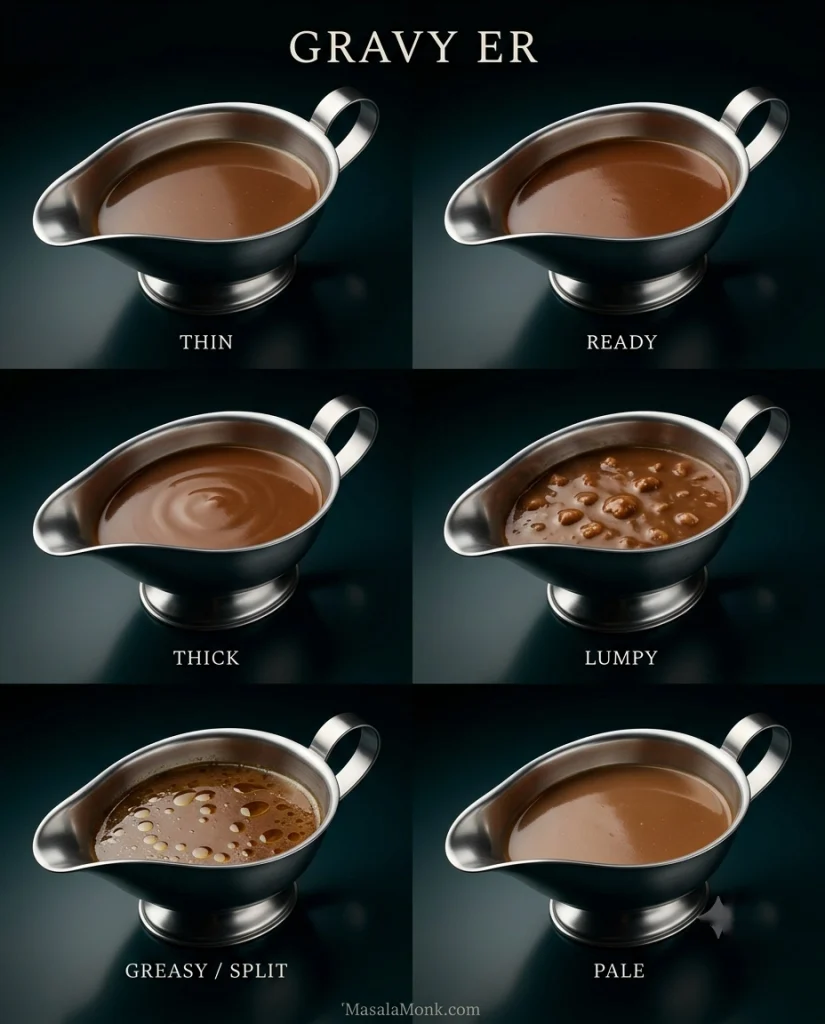
| Problem | Do this now |
|---|---|
| Too thin | Simmer first. If it is still thin, reduce when the salt level allows or use a small cornstarch slurry (cornstarch mixed with cold water). |
| Too thick | Heat it fully before judging, especially after refrigeration. Then whisk in warm unsalted stock 1–2 tablespoons at a time. |
| Lumpy | Whisk vigorously. Strain through a fine-mesh sieve if needed; stubborn lumps can be smoothed with a brief pass of an immersion blender. |
| Greasy or split | Skim visible oil, return the gravy to gentle heat, and whisk. If it still looks separated, a brief pass with an immersion blender can help. |
| Raw or floury | The roux was probably undercooked. Continue gentle cooking if the gravy can tolerate it. |
| Bitter or burnt | Start again with clean fat and flour, leaving burnt pan residue and bitter liquid behind. Strongly acrid gravy rarely improves with extra seasoning. |
| Too salty | Stop reducing. Add unsalted stock or water; a badly oversalted batch may need to be combined with some plain unsalted gravy. |
| Bland but thick | The problem is flavor, not starch. Improve the pan juices, stock, or seasoning instead of adding more flour. |
| Too smoky or herby | Dilute with unsalted stock and taste again. |
| Pale | If it tastes good and the texture is right, leave the color alone. |
If the gravy is still too thin
Give flour-thickened gravy a real chance to simmer before reaching for more starch. It can look loose immediately after the stock goes in and change considerably over the next several minutes.
Still thin and not too salty? Let it reduce. If the gravy is already salty, stir together 1 teaspoon cornstarch with 1 tablespoon cold water, whisk in part of that slurry, bring the gravy back to a bubble, and check again before adding more.
A tiny correction is easy to repeat. Turning the saucepan into wallpaper paste is harder to undo.
If the gravy is too salty
Stop reducing. A mild problem may need only unsalted stock or some water. For a badly oversalted batch, make a small amount of plain unsalted gravy and whisk the two together. You usually need only enough neutral gravy to bring the first batch back into balance.
Adjust the thickness after the seasoning is where you want it. Skip the old potato trick; a potato does not selectively remove enough salt from gravy to solve the problem.
How to Make Turkey Gravy Taste Better
If the gravy is thick enough but still tastes flat, leave the flour alone. It needs stronger turkey flavor or better seasoning.
More Turkey Flavor
Start with concentrated pan juices and properly deglazed fond. Turkey stock adds more depth than chicken stock when you have it. If you’re planning ahead, the neck or roasted wings can strengthen ordinary stock while the bird cooks.
A concentrated turkey or chicken base can strengthen weak stock too. These concentrates are salty, so start with a small amount and taste before adding more.
Best Seasonings for Turkey Gravy
Black pepper is the easiest finishing seasoning. For a 2-cup batch, try 1 teaspoon finely chopped fresh thyme or ½ teaspoon finely chopped fresh sage. Dried herbs are stronger; start with ¼ teaspoon and give them a few minutes in the simmering gravy.
Worcestershire adds another layer of savoriness. Start with ½ teaspoon; 1 teaspoon total is usually plenty for this size batch. The pan juices may already carry herbs, garlic, citrus, or pepper from the turkey, so taste before adding more seasoning.
Wine, Brightness and Color
For white-wine gravy, add ¼ cup / 60 ml dry white wine or dry sherry after the roux is cooked. Cook until most of the wine has evaporated and the sharp alcoholic aroma has softened, then add the full measured pan-juice-and-stock mixture. Treat the wine as an extra flavoring rather than part of the 2 cups of gravy liquid.
A rich gravy that tastes flat may need only a few drops of sherry vinegar or lemon juice. Add some, taste, and stop as soon as the savory flavors seem brighter. If the gravy starts tasting lemony or vinegary, you’ve added too much.
When the flavor and texture are right, leave a pale gravy alone. Well-browned fond and a light-golden roux will give it natural color.
Flour vs. Cornstarch for Turkey Gravy
For classic turkey gravy, flour is the better default. A flour roux uses the rendered turkey fat and gives the sauce its familiar opaque, velvety body. It also reheats reliably, which matters on a holiday table.
Cornstarch is quicker and produces a glossier sauce. It is useful for small last-minute corrections and also gives you a straightforward gluten-free thickening method.
For roughly 2 cups / 475 ml gluten-free gravy, mix 2 tablespoons cornstarch with 2 tablespoons cold water until completely smooth. Bring the 2 cups of pan-juice-and-stock mixture to a simmer, whisk in most of the slurry, and bring the gravy to a gentle boil for about 1 minute while whisking. Judge the thickness before adding the rest. Cornstarch does not require a roux.

To make a smaller correction to flour gravy, use the 1-teaspoon-cornstarch slurry described in Gravy ER above. When the whole gravy must be gluten-free, check labels on stock, bouillon, Worcestershire, and other packaged seasonings as well.
Making Ahead, Storing, Reheating and Keeping Turkey Gravy Warm
Make Turkey Gravy Ahead
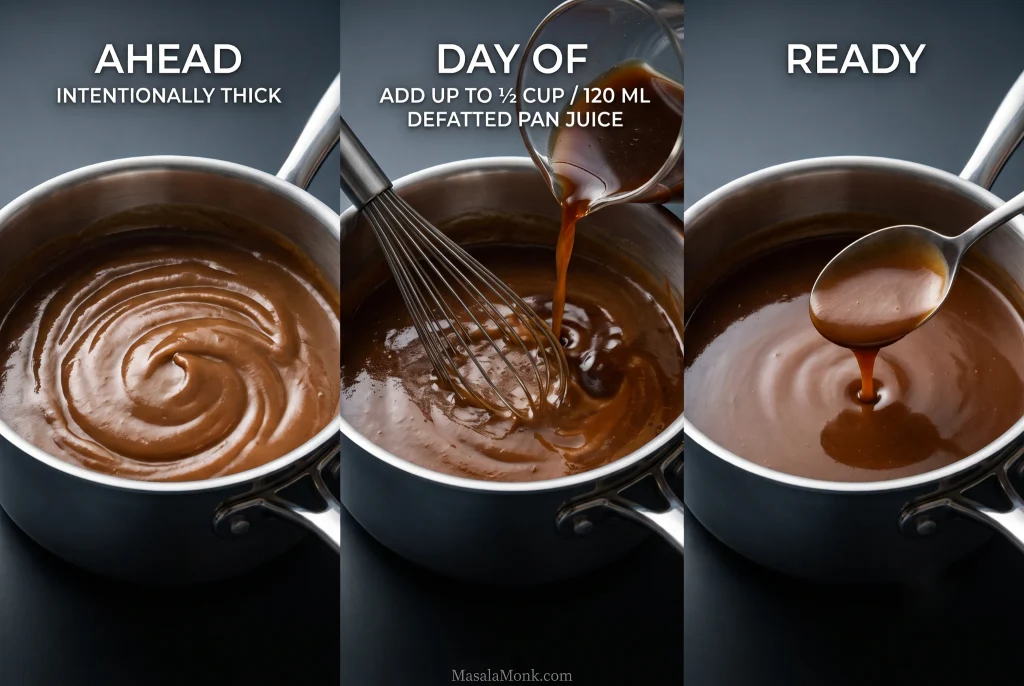
For Thanksgiving, the most practical make-ahead option is a concentrated gravy base that leaves room for fresh drippings. Up to 3 days ahead, melt ¼ cup / 60 ml butter, whisk in ¼ cup / about 30 g flour, and cook the roux until light golden. Gradually whisk in about 1½ cups / 355 ml unsalted or low-sodium stock, simmer until smooth, then transfer the base to a shallow container and refrigerate promptly. The base will be thicker than finished gravy; that’s intentional because the fresh pan juice will loosen it on Thanksgiving.
On Thanksgiving, reheat the base while whisking. Let the fresh pan juice cool enough to taste, then whisk in up to about ½ cup / 120 ml of the defatted pan juice you actually want to use. If the turkey gives you less than that—or the juice is too salty or smoky to use freely—add less and use low-sodium stock for the rest. Simmer until the gravy reaches the spoon-test consistency.
If you already have cooked turkey drippings available, fully finished gravy can also be made up to 3 days ahead, refrigerated promptly, and reheated before serving.
Refrigerating and Freezing Turkey Gravy
Transfer leftover gravy to a shallow container and refrigerate promptly; don’t leave it sitting out to cool completely. Use refrigerated gravy within 3–4 days. USDA leftovers guidance recommends refrigerating perishable leftovers within two hours.
For longer storage, freeze the gravy. USDA guidance for gravy gives a freezer window of about 4–6 months. For best quality, use it within that window.
Reheating and Keeping Gravy Warm
Flour-thickened gravy naturally firms as it chills, and gelatin-rich drippings or stock can make it set even more. Reheat it before deciding that it is too thick.
Warm refrigerated gravy gently in a saucepan while whisking. Add stock or water a tablespoon or two at a time if it has tightened in the fridge.
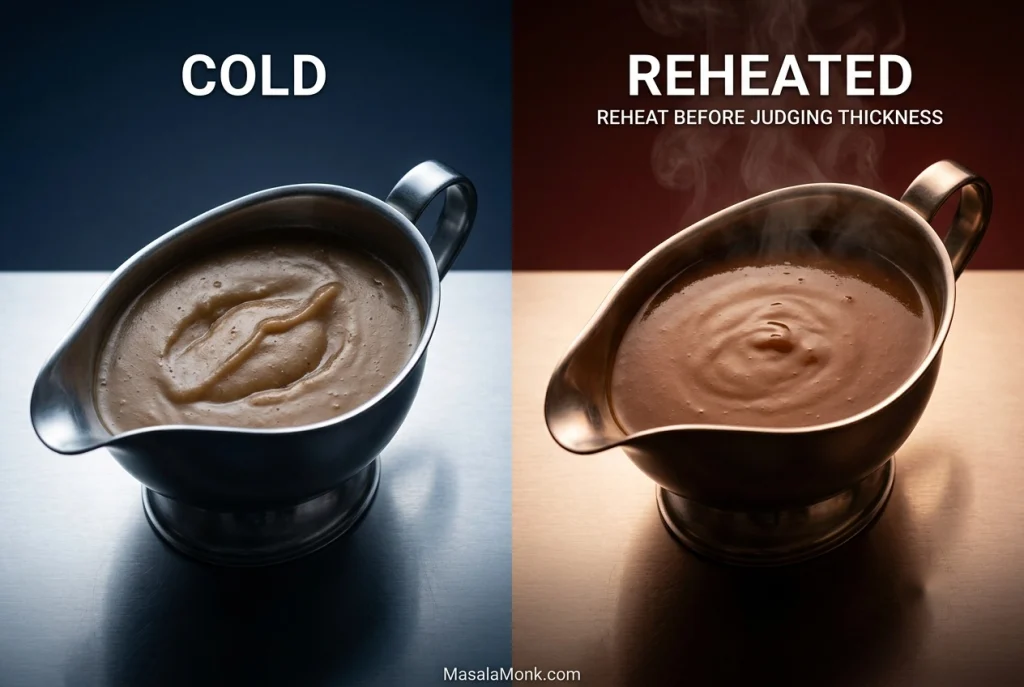
Before serving, bring reheated gravy to a rolling boil. Reheated leftovers should reach at least 165°F / 74°C.
The microwave works too when every burner is occupied. Heat in short intervals, stirring or whisking between them so there are no cold pockets, until the gravy is bubbling throughout and reaches 165°F / 74°C.
Gravy often seems to thicken just when everything else needs your attention. If it has to wait, keep it at 140°F / 60°C or above, as recommended in USDA hot-holding guidance, and keep some stock nearby for loosening before serving.
While the gravy waits, finish anything that needs last-minute attention, including a pan of soft dinner rolls. Warming the gravy boat with hot water, then emptying and drying it before filling, also buys you a bit more time.
Left with turkey and gravy the next day? They are already most of the way toward a turkey pot pie, where leftover gravy can become part of the creamy filling.
Turkey Gravy FAQs
Can I use chicken broth instead of turkey stock?
Yes. Unsalted or low-sodium chicken broth or chicken stock works well. The pan juices and fond still give the gravy most of its turkey character.
How much flour do I use per cup of turkey gravy?
Use about 2 tablespoons flour + 2 tablespoons fat for each 1 cup / 240 ml total liquid. The scaling table above follows that same starting ratio.
Can I make turkey gravy directly in the roasting pan?
Yes, provided the roasting pan is safe for stovetop use. You capture the fond directly, but a saucepan usually gives more even heat and easier whisking, especially when a large roasting pan sits awkwardly across two burners.
Can I use the turkey neck and giblets without putting pieces in the gravy?
Yes. Simmer the neck, heart, and gizzard in the stock while the turkey roasts, then strain them out before making the gravy. Leave the liver out unless you specifically want its stronger flavor. This gives you a deeper turkey stock without pieces of giblet in the finished sauce.
For traditional giblet gravy, keep the cooked giblets, chop them, and stir them into the finished gravy.
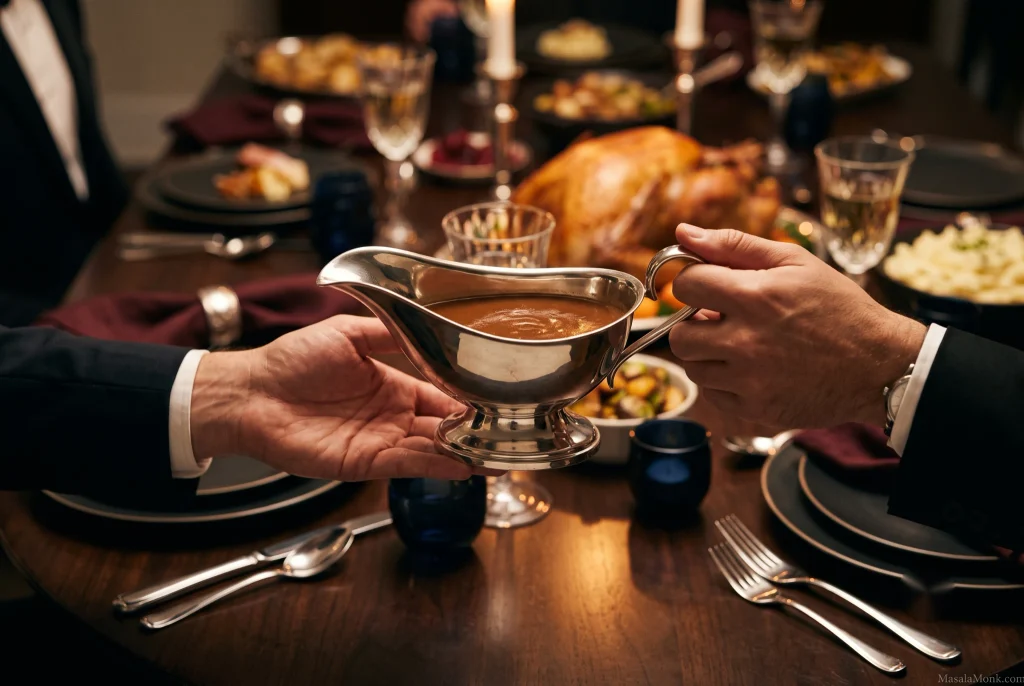
By the time the gravy boat reaches the table, nobody can tell whether you started with a beautiful cup of drippings or a murky half cup that needed butter and stock.
The uneven fat layer and too-small puddle of juice have disappeared into silky gravy that tastes deeply of the turkey. Then everyone starts passing the gravy boat, and suddenly it doesn’t look quite so large.
If your pan came from an unusually salty brined bird, a tiny turkey breast, or a smoker that seemed to leave you almost nothing to work with, tell us what happened in the comments. Those odd roasting pans often produce the most useful gravy questions.








