Posted on — Leave a comment

Maa Ki Dal Recipe (Punjabi Black Dal / Kali Dal)

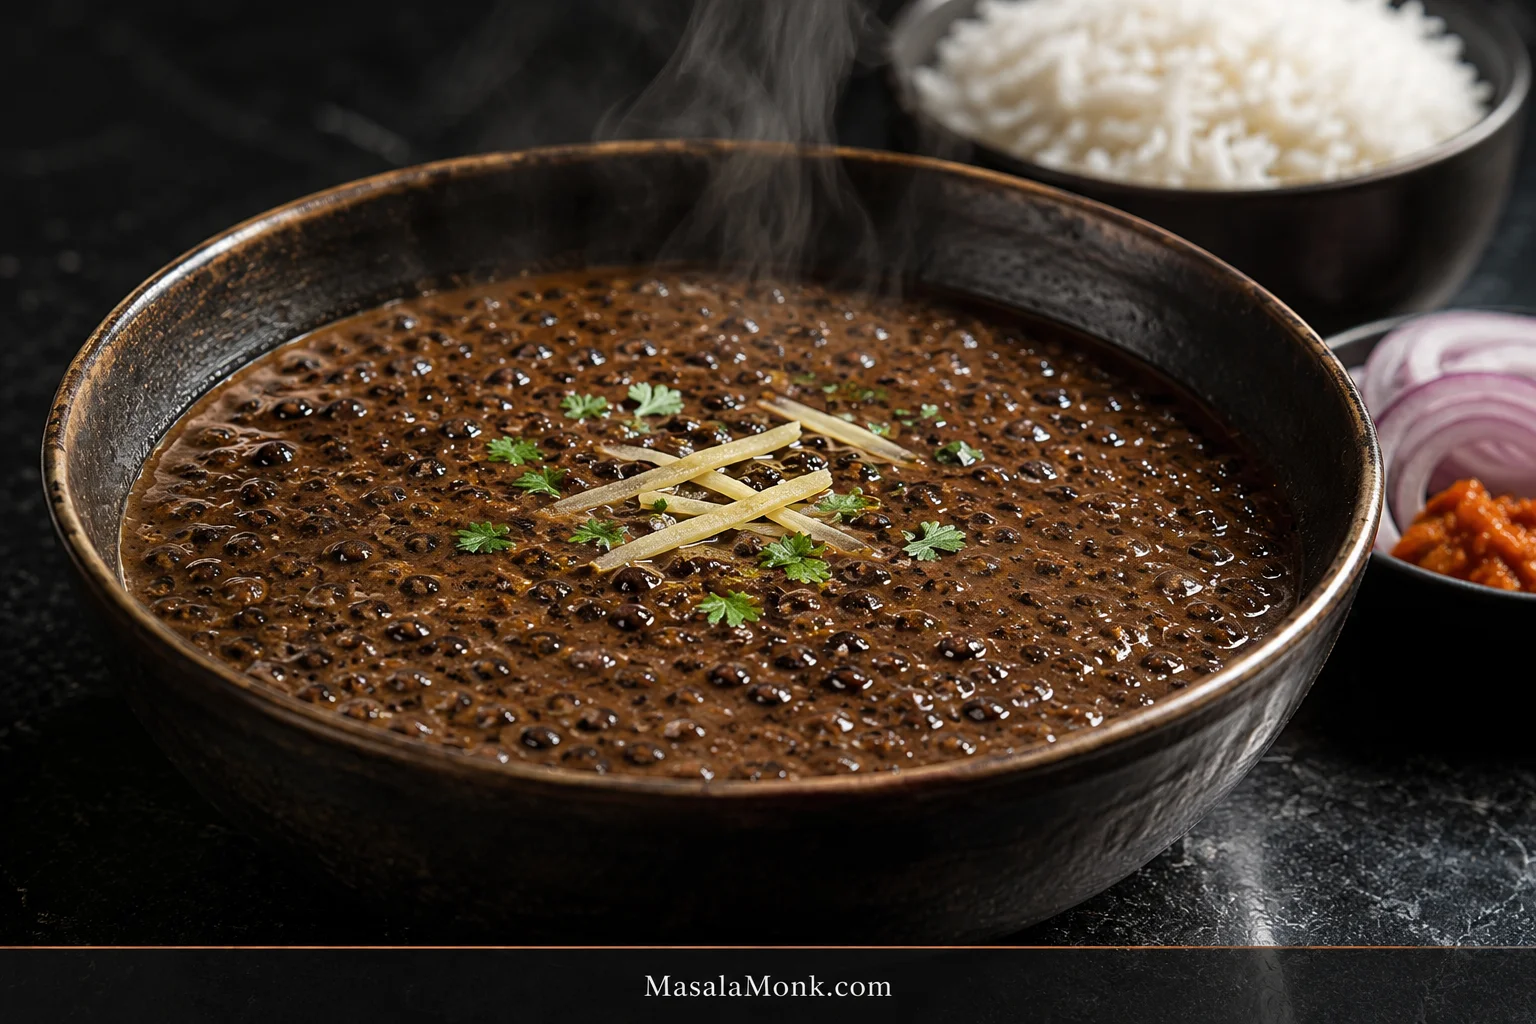
Bowl of Punjabi Maa Ki Dal made with whole black urad, showing many dark urad skins and whole grains in thick brown gravy, lightly garnished with ginger and coriander, with rice, red onion and pickle behind it.

Good Maa Ki Dal has a soft, almost lazy texture. The black skins are still visible, but the urad underneath gives easily under a spoon and the gravy clings to every grain. A cumin, ginger, garlic and tomato tadka brings warmth and savouriness, while the softened urad gives the bowl most of its body.

This version stays on the homestyle Punjabi side: whole black urad, no rajma in the base, and no cream. It stays well away from the heavier butter-and-cream territory of many modern Dal Makhani recipes. It is the kind of dal that can make hot rice, a little pickle and sliced onion feel like dinner.

Whole urad can also be annoyingly inconsistent from one packet to the next. One batch softens exactly when expected; another wants ten or fifteen minutes more. Start with the timings below, then test a grain. A firm centre means it needs longer.

Quick Answer: How to Make Maa Ki Dal

Soak 200 g (7 oz / about 1 US cup) whole black urad for 8–12 hours or overnight. Pressure-cook it with 720 ml (about 3 US cups) water until one grain crushes easily with no firm or chalky centre. In a 3–4 litre stovetop pressure cooker, begin with 20–25 minutes at pressure, followed by a natural release.

Make a separate onion-tomato tadka with cumin, ginger, garlic and spices. Add the cooked urad with its liquid, mash a small amount against the side of the pan, then simmer for 15–20 minutes until the liquid thickens around the grains.

The timer tells you when to check. The crush test tells you when the urad is ready.

Maa Ki Dal Recipe

Timing and Yield

Yield4 servings with rice or roti
Soaking8–12 hours or overnight
Chopping & prep15–20 minutes
Pressure cycle40–60 minutes including heating and natural release
Tadka + finishing30–40 minutes
From soaked dal to tableRoughly 75–100 minutes

Some prep can happen while the cooker heats or the pressure comes down. Chop the onion, tomato, ginger and garlic during that downtime.

The recipe is vegetarian as written. For a vegan version, use neutral oil throughout and skip the optional ghee or butter finish. If you need the dish to be gluten-free, check the label on compounded hing because some commercial blends contain flour.

Before You Start

Use whole black urad, also sold as sabut urad or whole black gram. Split or skinned urad cooks differently. The 200 g / 7 oz measurement is the dry weight before soaking.

A 3–4 litre stovetop pressure cooker works well for this quantity. Beans and pulses can foam as they cook, so leave generous headroom and follow the fill and release instructions for your cooker.

Ingredients

For the urad

  • 200 g (7 oz / about 1 US cup) whole black urad, dry weight
  • 720 ml (about 3 US cups) fresh water, plus more hot water if needed
  • ¾ teaspoon fine salt

For the tadka

  • 2 tablespoons ghee, or neutral oil
  • ½ teaspoon cumin seeds
  • Small pinch asafoetida (hing), optional
  • 1 medium onion, 100–120 g (3½–4¼ oz), finely chopped
  • 8–10 g fresh ginger, about 2 teaspoons finely grated
  • 12–15 g garlic, about 1 tablespoon finely minced or 4–5 medium cloves
  • 1 small green chilli, or to taste
  • 2 medium ripe tomatoes, 225–250 g (8–9 oz), finely chopped or blended; or 200 ml plain passata
  • 1 teaspoon ground coriander
  • ¼ teaspoon turmeric
  • ½–1 teaspoon Kashmiri red chilli powder, to taste

To finish

  • ¼ teaspoon garam masala
  • ½ teaspoon kasuri methi, optional
  • ¼ teaspoon fine salt, plus more if needed
  • 2–3 tablespoons chopped fresh coriander
  • Extra fresh ginger, cut into fine juliennes, optional
  • 1–2 teaspoons ghee or butter, optional at the table; omit for vegan dal

How to Make Maa Ki Dal

1. Sort, rinse and soak

Spread the dry urad out briefly and pick out any small stones, shrivelled grains or obvious debris. Rinse three or four times, then cover generously with cool water.

Soak for 8–12 hours or overnight. In a very warm kitchen, put the soaking bowl in the refrigerator overnight. Drain and rinse once more before cooking.

The grains should look slightly fuller and less hard-edged than they did straight from the packet. They do not need to double in size.

2. Pressure-cook the urad

Put the soaked urad in the pressure cooker with 720 ml (about 3 cups) fresh water and ¾ teaspoon salt.

Bring the cooker to full pressure, lower the heat enough to maintain steady pressure, and cook for 20–25 minutes at pressure. Turn off the heat and let the pressure fall naturally.

Whistle counts vary enormously between cooker designs and burners. Use them if that is how you know your own cooker, but test a grain before moving on.

3. Crush one grain

Lift out a grain, let it cool for a moment, and press it against the side of the cooker with the back of a spoon.

It should flatten and crush easily all the way through. A firm, chalky centre needs more time. Some dark skins may already be splitting away from the pale centres; that is expected.

Add 120 ml (½ cup) hot water if the cooker is running low, pressure-cook for 5–10 minutes more, then release naturally and test again.
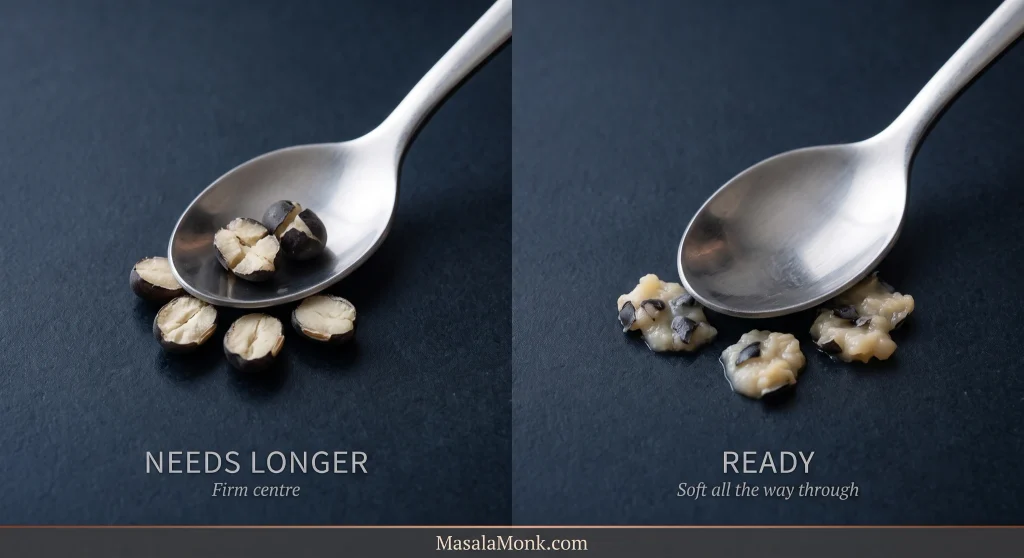
Side-by-side whole black urad tenderness test with a metal spoon: on the left, grains labelled ‘Needs Longer’ remain cracked but firm inside; on the right, grains labelled ‘Ready’ crush into soft creamy mash with pieces of black skin.
If the batch seems uneven, test two or three sabut urad grains. Several firm centres mean the urad needs longer; when the dal is otherwise creamy and only an isolated grain stays hard, pick it out rather than overcooking the whole pot.

Still finding firm grains? See why whole urad sometimes refuses to soften.

4. Make the tadka

Heat the ghee or oil in a wide saucepan or kadai over medium heat. Add the cumin. When the seeds start sizzling and smell nutty, add the optional hing.

Add the onion and cook until soft and translucent, with a little gold beginning around the edges.

Stir in the ginger, garlic and green chilli. Cook for 60–90 seconds, until the sharp raw smell softens. This is the point where the kitchen starts smelling like dinner.

Lower the heat. Add the ground coriander, turmeric and Kashmiri chilli and stir for 15–20 seconds. Add the tomatoes straight away.

Cook for 7–10 minutes. Fresh tomatoes should collapse into the onion and lose their watery, raw look; passata should reduce and lose its sharp raw smell. Either way, the masala should look thicker before the urad goes in.
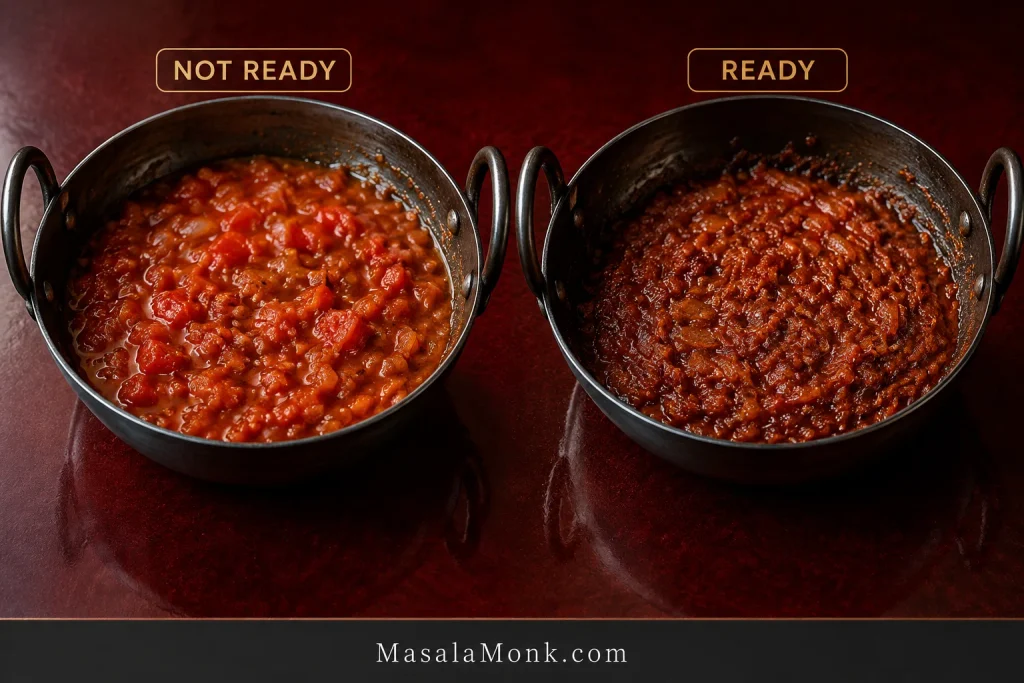
Two dark pans compare onion-tomato masala stages: the ‘Not Ready’ masala is bright red, wet and chunky, while the ‘Ready’ masala is darker, reduced, glossy and integrated.
Judge the tomato masala with your nose as well as your eyes. The sharp raw-tomato aroma should have softened, but do not push the pan so far that the garlic or ground spices begin to scorch.

5. Bring the dal together

Add the cooked urad with its cooking liquid and bring everything to a gentle simmer.

Mash one or two ladlefuls against the side of the pan, leaving most of the grains intact. Right after combining, the pot can look disappointingly loose. Give it a few minutes.

6. Let it thicken gently

Simmer for 15–20 minutes, uncovered or partly covered, stirring every few minutes.

The liquid should gradually begin clinging to the grains. Drag the ladle across the bottom of the pan. The trail should remain visible for a moment, then slowly fill in.
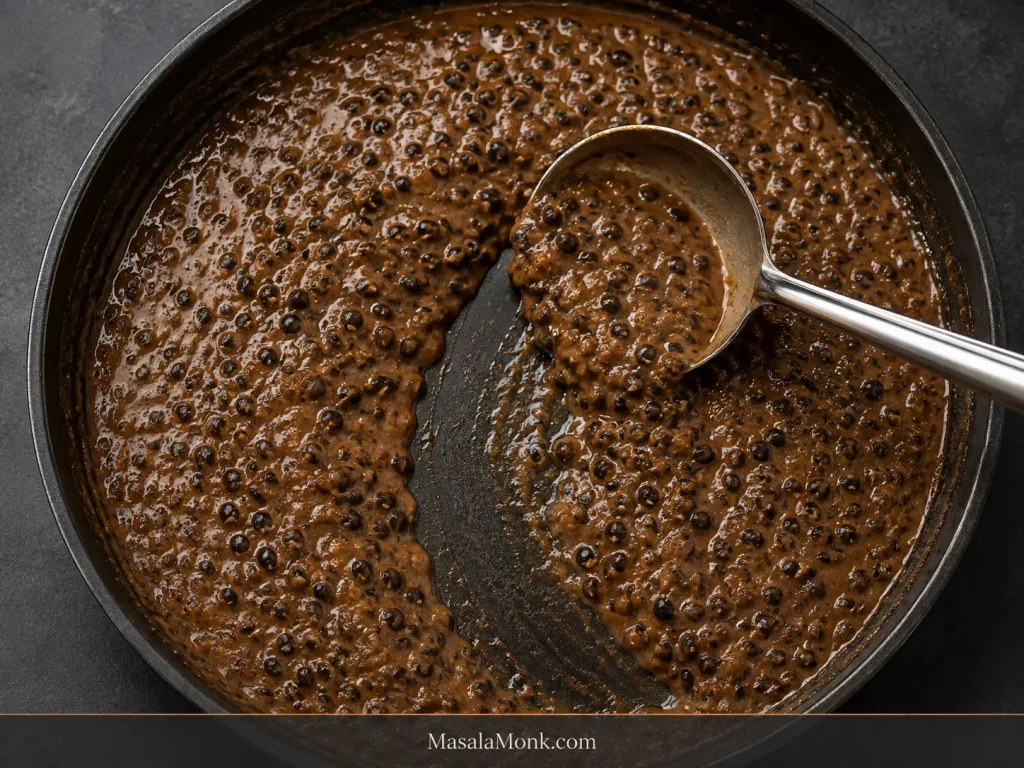
Overhead view of finished Maa Ki Dal in a dark pan with a metal ladle leaving a wide trail through the thick gravy; whole black urad grains and dark skins remain visible on both sides of the path.
Before judging Maa Ki Dal consistency, stir from the bottom and let vigorous bubbling settle for a few seconds. The centre of the pan then gives a truer reading than the edges, which can look thicker simply because they reduce faster.

Too thin, too thick or uneven? Jump to Maa Ki Dal troubleshooting.

By now the dark skins should look suspended through the gravy instead of floating in thin liquid. Spoon some up and it should fall slowly back into the pan.

A soupy pot needs 5 minutes more uncovered. If it has become heavier than you want, stir in 60 ml (¼ cup) hot water at a time.

Stop slightly earlier for rice. For roti or paratha, let the pot reduce further. It will thicken again while it sits.

7. Finish and taste

Stir in the garam masala and optional kasuri methi. Add the remaining ¼ teaspoon salt, taste, and adjust from there.

Scatter over the fresh coriander and extra ginger juliennes if using. A spoonful of ghee or butter can go over the hot bowl just before serving; skip it for a vegan version.


Cooking dinner now? You can stop here. If you want to understand the urad better, adapt the method or fix a stubborn batch, the deeper guide starts below.

More About Maa Ki Dal

Which Black Dal Should You Buy?

“Black lentils” is a useful English shortcut until you are standing in front of several different dark-coloured pulses. For this dish, look for whole black urad, sabut urad or whole black gram; some packages also say black matpe or black matpe beans.
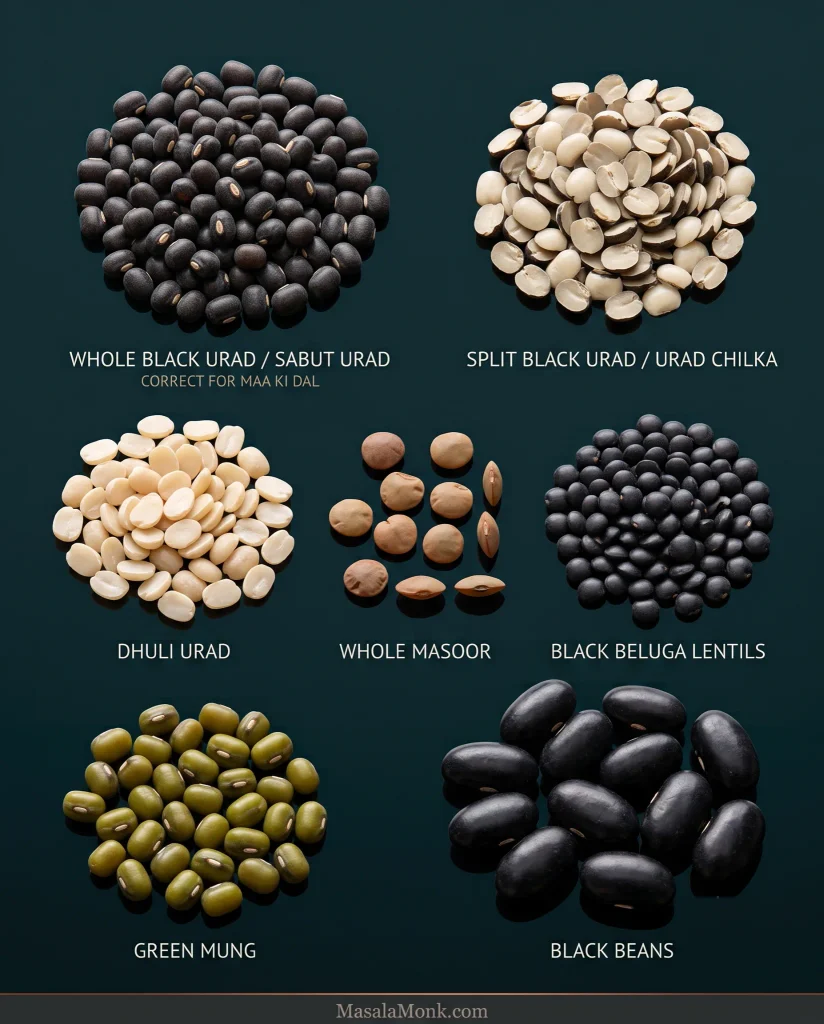
Seven labelled pulse types compared together: whole black urad or sabut urad marked correct for Maa Ki Dal, split black urad, dhuli urad, whole masoor, black beluga lentils, green mung and much larger black beans.
When buying whole black urad, use shape and scale before colour. Sabut urad is a small oval pulse with a pale seam; whole masoor and beluga are flatter lentils, while common black beans are dramatically larger.
Package or ingredientFor this recipe?What to expect
Sabut urad / whole black urad / whole black gram / black matpeYesThe ingredient used here
Urad chilka / split black uradCan be adaptedCooks much faster and breaks down more
Urad dhuli / skinned white uradNo direct swapPaler and much faster-cooking
Whole masoorNoA different lentil
Black beluga lentilsNoFirmer and quite different in the pot
Green mungNoA different pulse
Black beansNoNot urad

Have the right urad? Back to the recipe ingredients.

Soaking Whole Black Urad

Overnight is the dependable option. A shorter soak can work with fresher urad and a pressure cooker, but the final cooking time becomes harder to predict.

The soaking bowl is often your first clue about the packet. Most of the grains should look visibly plumper; urad that barely changes here is often the batch that asks for more patience later. Grains that remain conspicuously tiny and hard-looking while everything around them hydrates are worth picking out.
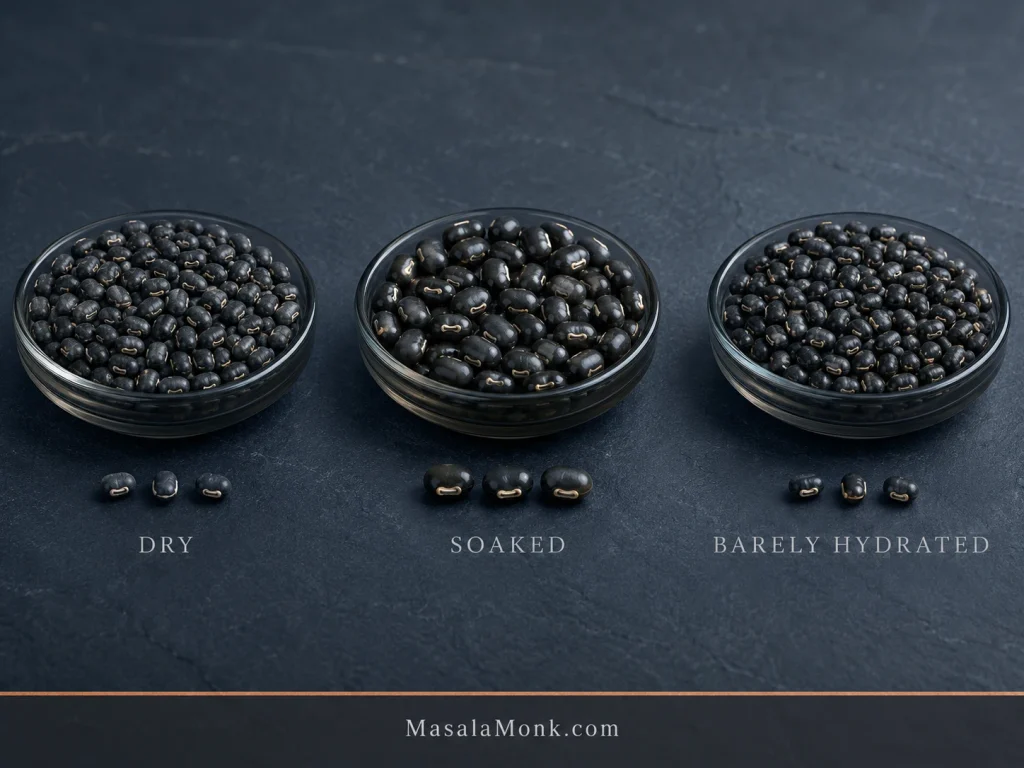
Three groups of whole black urad compare hydration: small dry grains, visibly larger and plumper soaked grains, and barely hydrated grains that remain closer to their original dry size.
After soaking whole black urad, compare the grains with one another rather than against a fixed colour chart. A mostly even increase in size tells you more about hydration than whether the wet skins happen to look black, olive, grey-green or brownish.

If the soaked urad looks green: hydrated skins can shift toward black-green, grey-green or brownish. Colour alone is not a useful spoilage test. A musty or rancid smell, mould, insects or visibly mixed-in grains are much better reasons to reject a packet.

Forgot to soak it? Cover the rinsed urad generously with fresh water, bring it to a boil and boil for 3 minutes. Turn off the heat, cover and leave it for 1 hour. Drain, rinse and continue with the pressure-cooker method. A quick-soaked batch may need a few extra minutes at pressure.

Why This Method Works

Cooking the urad until soft before adding tomato makes an inconsistent pulse much easier to manage. Tomato and other acidic ingredients can slow dried pulses from softening, which is why the tomato goes in later. Salt is different: it can go in from the start without preventing the urad from softening. Colorado State University Extension’s guide to cooking dried pulses explains these differences in more detail.

The creaminess comes mostly from the urad itself. Keep the cooking liquid, mash a small amount of the tender grains and give everything time to simmer together. Some of the urad breaks down into the gravy while plenty of black skins and whole grains remain visible.
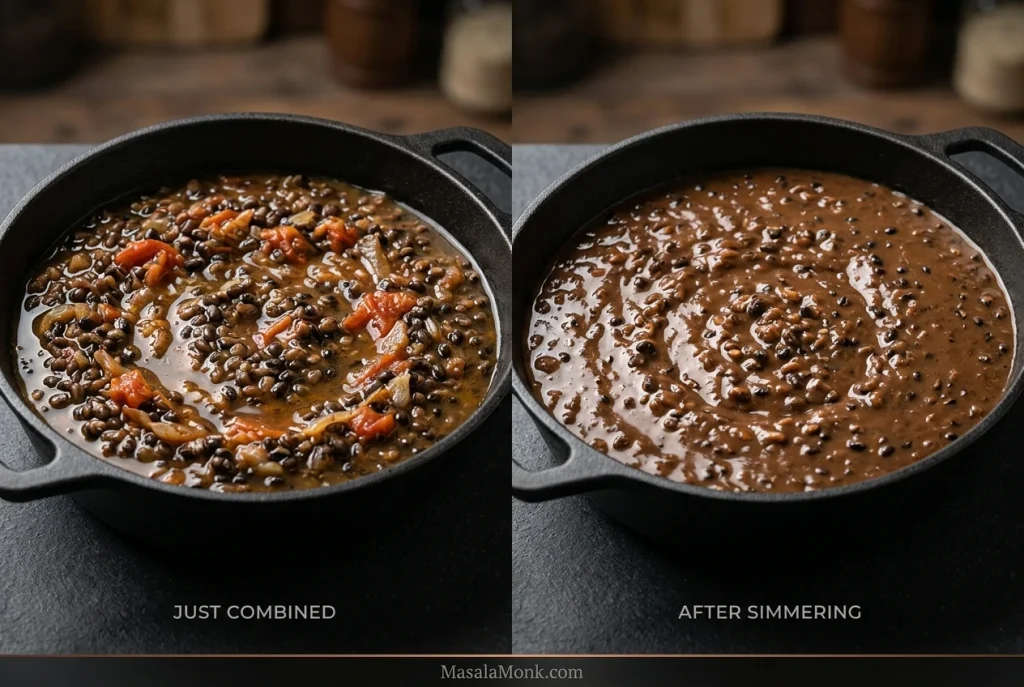
Two matching pans show Maa Ki Dal at different stages: just combined, the dal has more free liquid and separate tomato pieces; after simmering, it is thicker and cohesive with whole black urad grains suspended through the gravy.
The loose first stage is normal. As very soft whole urad simmers with its cooking liquid, some of the grain breaks down and the gravy gradually gains body without needing cream.

When it is right, the centres are completely soft but the bowl has not turned into a uniform purée. You can still pick out black skins and some whole grains beneath the creamy gravy. A blender takes the texture much further than it needs to go.

Maa Ki Dal Troubleshooting

Most problems become clearer once you look at the grains, liquid and tadka instead of the clock.

What happened?What to do
Most of the urad is hardCook it longer before adding the tomato tadka
Only a few grains are rock-hardPick out the isolated hard grains; do not keep cooking an otherwise finished pot for them
Dal is wateryMash some more urad and simmer uncovered
Dal is too thickAdd hot water ¼ cup at a time
Grains are soft but the gravy feels thinKeep simmering uncovered
Dal looks very paleConfirm whether you used split or skinned urad
Dal tastes bitterLook for scorched garlic or ground spices, too much kasuri methi, or urad that smelled stale before cooking
Tomato tastes raw or too sharpGive the dal more simmering time

Why Won’t My Urad Soften?

If the whole batch is firm, it usually needs more cooking. Add hot water if the cooker is running low and pressure-cook for 5–10 minutes more.

An older bag of urad may take noticeably longer, especially when the grains barely changed during soaking. Very hard tap water can slow things down too. When fresh packets repeatedly take much longer in your kitchen, try one batch with filtered water and compare. High elevation can stretch the timing as well.

If the whole pot is creamy and you still hit one or two little pebbles, pick them out. That usually points to a rogue old or poorly hydrating grain—or occasionally a tiny bit of debris—not a finished pot that needs another pressure cycle.

Back to the recipe · Back to guide

Maa Ki Dal vs Dal Makhani: What Is the Difference?

There isn’t one dividing line that every Punjabi household follows. Some Maa Ki Dal recipes contain only whole urad; others include rajma, and modern usage sometimes overlaps with Dal Makhani.

Maa Ki DalDal Makhani
Main pulseWhole black uradWhole black urad
RajmaUsed in some versions; absent in othersCommonly included
ButterOptional or modestOften more prominent
CreamNot requiredCommon in modern restaurant versions
Overall styleOften simpler and homestyleTypically richer
TextureCreamy with more obvious grains and skinsOften cooked longer until the grains and gravy feel more blended together

The recipe above stays on the simpler side: urad only in the base, restrained fat and no cream.

You may also see it written as Maa Di Dal, Mah Di Dal, Maah Di Dal, Kali Dal or Kaali Dal. “Kali Dal” is not a foolproof shopping name because some kitchens use it for other dark lentils. At the store, look for sabut urad.

For a quicker everyday yellow-lentil dal, try our Punjabi Dal Tadka instead.

How the Dish Changes From Kitchen to Kitchen

If the Maa Ki Dal you know looks different, that’s normal. Some versions include rajma or chana dal; others leave out the tomato or finish with more ghee.

If the version you know includes rajma, 25–50 g (1–1¾ oz) dry kidney beans is enough for this quantity without turning rajma into the main ingredient. Soak them thoroughly and cook until both pulses are soft; rajma may take longer. For a rajma-first meal, make this Punjabi Rajma Curry instead.

Urad is also paired with chana dal in related Punjabi dishes such as Maa Chole Ki Dal or Maa Choliyan Di Dal; those versions often use split black urad rather than whole. Chana makes the finished dal thicker, nuttier and lighter in colour.

Other Common Variations

If the version you know skips tomato, leave it out. The urad does not need tomato to become creamy. Build the tadka around cumin, ginger, garlic, chilli and hing, then add lemon juice or amchur at the end if the bowl needs some brightness.

For a stronger garlic finish, fry 2–3 thinly sliced cloves in 1–2 teaspoons ghee or neutral oil until pale gold. Add a pinch of cumin and Kashmiri chilli—or a broken dried red chilli—then spoon the sizzling tadka over the finished dal.

Using split black urad? It cooks much faster and breaks down more readily, so do not use the whole-urad pressure timing unchanged. The finished dal will also be softer, with fewer distinct grains. If split urad is what you have, treat it as an adaptation rather than simply swapping it into the timings above.

Cooking Without a Stovetop Pressure Cooker

Whichever method you use, cook the urad until it passes the same crush test. Once it does, make the tadka and finish the dal as in the main recipe.

Instant Pot

For 200 g soaked urad in a 6-quart Instant Pot, start with 600–650 ml (2½–2¾ cups) fresh water. An electric pressure cooker loses less water during cooking, so the starting quantity is slightly lower than on the stovetop.

Cook on High Pressure for 40 minutes, then let the pressure release naturally. Crush one grain when the cooker opens. A firm centre needs 5–10 minutes more at High Pressure.

Leave plenty of headroom for the expanding, starchy dal and follow your model’s bean or pulse fill limit. Keeping the tomato tadka separate also keeps thick masala away from the base of the insert during pressure cooking.

Regular Saucepan

Soak the urad overnight. Put it in a heavy saucepan with 1–1.2 litres (about 4–5 cups) fresh water, bring to a boil, then reduce to a gentle simmer.

Cook partly covered and add hot water when the level drops too far. Start checking after an hour. Some batches soften around 90 minutes; older urad can take much longer. Once a grain crushes easily all the way through, make the tadka and finish the dal as above.

Slow Cooker

For 200 g soaked whole urad, start with 720 ml (about 3 cups) fresh water. Slow cookers vary in how much moisture they lose, so check the level during cooking and add hot water if needed.

Cook on Low and begin checking after roughly 8 hours. A stubborn batch or gentler cooker may need considerably longer.

If you want dry rajma in a slow-cooker version, soak the kidney beans first, drain them, then boil them briskly in fresh water for 30 minutes before they go into the slow cooker. Undercooked kidney beans can contain unsafe levels of a natural lectin called phytohaemagglutinin; Illinois Extension explains the safety issue. Already cooked or canned rajma is the simpler option.

Back to recipe · Back to guide

Cooking a Bigger Batch

Scale the urad, onion, tomato, ginger and garlic roughly in proportion. With chilli and garam masala, hold back slightly at first and adjust the finished pot to taste.

Pressure time does not double with the quantity. A larger cooker takes longer to heat and depressurize, but once it reaches pressure, begin with the usual cooking window and test a grain.

Scale the water roughly with the dal, but stay within your cooker’s safe fill limit. For a much larger batch, use a bigger cooker or cook in two batches.

What to Serve With Maa Ki Dal

Maa Ki Dal does not need a crowded plate around it. Serve it over hot basmati or jeera rice, letting some of the gravy run into the spaces between the grains. If the rice is going on at the same time, our basmati rice guide covers stovetop, pressure-cooker and Instant Pot methods.

With roti or phulka, serve the dal thick enough for a torn piece of bread to scoop it cleanly. Add sliced onion or cucumber and something sharp from the pickle jar; a spoonful of homemade mango pickle is especially good against the soft, earthy urad.

For a fuller Punjabi-style meal, add cooling raita and either paratha or jeera rice. Keep the rest simple and let the dal do the heavier work.
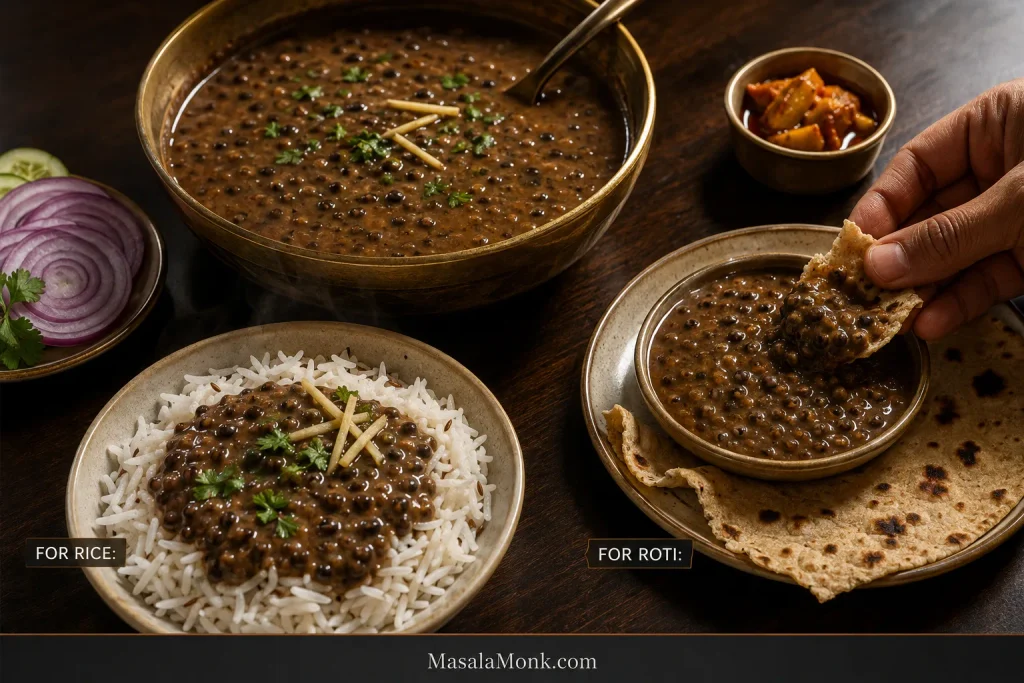
Maa Ki Dal served two ways on one dark wooden table: looser black urad dal spooned over basmati rice and slightly thicker dal being scooped with torn roti, with red onion, cucumber and mango pickle nearby.
One pot can serve both rice and roti without compromise. Ladle out the rice portions while the Maa Ki Dal is slightly looser, then let what remains simmer another minute or two for a thicker, more scoopable consistency with roti.

Storage, Freezing and Reheating

Cool leftovers promptly and refrigerate them in a covered container for 3–4 days. Freeze meal-size portions for up to about 3 months for best quality.

The bigger surprise comes the next morning: cold black-urad dal can look almost solid compared with the pot you served at dinner. Warm it gently and add ¼ cup water at a time until it becomes spoonable again.

Taste for salt after the dal has loosened back up.


Add fresh coriander, perhaps a few ginger slivers, and bring the pot to the table while the cumin and garlic are still fragrant.

Back to recipe · Back to guide · Back to start

Posted on — Leave a comment

Beef and Broccoli Recipe: Tender Beef, Crisp Broccoli & Chinese-Style Stir-Fry Sauce

Finished beef and broccoli stir-fry with browned beef strips and bright green broccoli coated in glossy brown sauce, served with white rice.

When beef and broccoli is right, the beef bends easily under your fork, the broccoli stays bright with some bite in the stalks, and the brown sauce catches along the edges before slipping into the hot rice underneath.

It can also look perfectly respectable and disappoint at the first bite. Pink beef can be chewy. Wet broccoli can loosen a sauce that seemed fine moments earlier. And a skillet set to “high” can cool so quickly under a pile of cold meat that searing quietly turns into steaming.

Only a few things really need your attention: thin slices across the grain, enough heat under the pan, dry broccoli and sauce that thickens before the final toss. This version of the Chinese-American takeout staple keeps the brown sauce savory rather than sweet, with oyster sauce, soy sauce and Shaoxing wine plus a brief tenderizing marinade for flank steak.

It is built for an ordinary home stove, whether you’re using a wok or a wide skillet. Keeping the pan hot matters more than trying to imitate a restaurant wok. The beef rests while you prepare everything else, so dinner can be on the table in about 30 minutes once the steak is ready to slice.

How to Make Beef and Broccoli Stir Fry

Serves4 with rice
DifficultyEasy, but fast-moving
PrepAbout 20 minutes
CookingAbout 10 minutes
Elapsed timeAbout 30 minutes once the steak is ready to slice
Best pan12-inch (30-cm) heavy skillet or well-heated wok

Beef and Marinade

  • 1 lb (450 g) flank steak
  • 1 tablespoon (15 ml) water
  • 1 teaspoon light or regular soy sauce
  • ¼ teaspoon (about 1 g) baking soda
  • 1 tablespoon (about 8 g) cornstarch
  • 1 teaspoon neutral cooking oil

Using sirloin or flat iron? Both are naturally tender, so you can reduce or omit the baking soda. Firmer cuts need more care; chuck steak can work, while round and stew meat are less forgiving.

Stir-Fry Sauce

  • ½ cup (120 ml) unsalted or low-sodium chicken stock, beef stock or water
  • 2 tablespoons (30 ml) oyster sauce
  • 1 tablespoon (15 ml) light or regular soy sauce
  • 1 tablespoon (15 ml) Shaoxing wine
  • 1 teaspoon dark soy sauce
  • 1½ teaspoons (about 6 g) sugar
  • ½ teaspoon toasted sesame oil
  • ⅛ teaspoon white pepper, or a small pinch

Cornstarch slurry: mix 2 teaspoons (about 6 g) cornstarch with 1 tablespoon (15 ml) cold water.

Broccoli, Aromatics and Oil

  • 1 lb (450 g) broccoli florets, weighed after trimming and cut into fairly even pieces
  • 2–3 tablespoons (30–45 ml) neutral high-heat cooking oil, divided as needed
  • 3 garlic cloves, finely chopped or minced
  • 2 teaspoons finely grated fresh ginger
  • Steamed rice, for serving

Before the pan gets hot: have the beef, broccoli, sauce, slurry, garlic and ginger beside you. Once stir-frying starts, there is very little waiting around.

1. Slice and Marinate the Beef

If the steak is already cold and easy to slice, go straight to the knife. Very soft steak is easier to cut after 15–30 minutes in the freezer, just until it firms up. That optional firming time is extra and is not included in the roughly 30-minute recipe time.

Find the long muscle fibers and cut across them into strips about ⅛–¼ inch (3–6 mm) thick. Keep the slices reasonably even so they cook at about the same rate.

Put the beef in a bowl. Add the water, soy sauce and baking soda and mix until the liquid coats the meat. Mix in the cornstarch, then work in the teaspoon of oil. Leave the beef for about 20 minutes while you prepare the sauce and broccoli.

Two-panel guide showing flank steak sliced perpendicular to its visible grain into thin strips, beside raw beef strips with a light glossy marinade coating in a stainless-steel bowl.
Across the grain shortens the long muscle fibers; after marinating, the strips should still separate easily with only a light sheen.

2. Mix the Sauce

Check your Shaoxing bottle first. Some bottles sold as cooking wine contain added salt; if yours does, use unsalted stock and be cautious with any extra soy later.

Combine the stock, oyster sauce, light soy sauce, Shaoxing wine, dark soy, sugar, sesame oil and white pepper.

Taste only to catch an obviously over-salty combination—the uncooked sauce should taste stronger than the finished dish. Don’t worry about the sharp edge of the Shaoxing; that softens as it cooks.

Give the slurry a quick stir and leave it beside the stove. The cornstarch will settle again before you use it. That’s normal.

3. Give the Broccoli a Head Start

Bring a large saucepan or pot of unsalted water to a strong boil. Add the broccoli and cook for about 30–60 seconds for small-to-medium florets. Larger pieces can need closer to 90 seconds.

Trust the stalk more than the clock. Take the broccoli out when it has turned vivid green and looks almost ready to eat, but the stalks still have some firmness.

Drain thoroughly and let the steam escape. If the florets still look wet, spread them over a clean kitchen towel or paper towels for a minute.

Two-panel comparison showing bright green broccoli just after blanching in a stainless strainer and drained broccoli resting on a rack with dry-looking surfaces.
Pull the broccoli while the stalks still resist slightly, then spread it out so steam and surface moisture can escape.

Water on the broccoli becomes water in the sauce.

4. Sear the Beef

Heat a 12-inch (30-cm) heavy skillet over medium-high to high heat until hot. A carbon-steel wok can go hotter; with nonstick cookware, stay within the manufacturer’s recommended heat range.

Add about 1 tablespoon oil and spread the beef into a mostly single layer. Your first batch will tell you a lot about the pan. If the beef keeps sizzling, carry on. When the sound dies and liquid gathers around the slices, cook less meat at once.

Side-by-side skillets showing crowded beef strips steaming in released liquid and spaced beef strips browning against a drier hot pan.
Use exposed pan as a batch-size check: if the beef would cover almost the whole skillet, split the batch. Open hot metal gives moisture somewhere to escape, helping the beef sear instead of steam.

Give the first side a moment of uninterrupted contact, then toss. Cook until the surfaces are browned and the meat is nearly done, usually about 2 minutes for thin slices.

Transfer the first batch to a plate. Wipe away blackened marinade residue, add fresh oil if the pan looks dry, then cook the remaining beef in another batch if needed.

5. Finish the Sauce

Turn the heat down slightly if the empty pan is fiercely hot. Add a splash of oil when needed, followed by the garlic and ginger. Stir for about 15 seconds. The kitchen should smell of garlic and ginger almost immediately. That’s enough.

Pour in the sauce and bring it to a lively simmer. As it bubbles, the color deepens and the sharp edge of the Shaoxing softens.

Stir the slurry again—cornstarch settles quickly—then pour in about three-quarters while stirring the bubbling sauce. Give it 20–30 seconds before deciding whether it needs the rest.

Glossy brown stir-fry sauce simmering in a black wok while a metal spoon moves through the thickening sauce.
A spoon trail should close again quickly. If the channel stays sharply open behind the spoon, stop adding slurry—the sauce is already heading toward too thick.

The sauce is ready when it leaves a light coating on a spatula and moves easily around the skillet. Don’t chase thickness after that point.

6. Bring Everything Together

Return the broccoli and beef, along with any small amount of juices on the plate, while the sauce is bubbling. If there is an unusually large watery puddle from the beef, leave most of it behind. Toss until the beef has just cooked through and everything is evenly coated, usually 30–60 seconds.

Thin beef strips and bright green broccoli being tossed above a hot wok with glossy brown sauce droplets and visible steam.

The sauce should catch along the edges of the broccoli and beef without burying them. Take the pan off the heat while it is slightly looser than you want on the plate; cornstarch sauces tighten as they cool.

Taste before adding more seasoning. A few drops of soy can fix a sauce that needs salt; a tablespoon of hot water or unsalted stock can loosen one that has become too intense or thick.

Serve Over Hot Rice

Spoon it over hot rice. The best bites have a strip of beef, a floret and enough sauce underneath to soak into the grains.

A spoonful of beef and broccoli held above white rice as glossy brown sauce flows from the spoon into the rice.
The finished sauce should slip between the rice grains rather than sit on top in a sticky mound.

How to Keep the Beef Tender

Velveting helps, but beef that stays chewy even with a pink center usually points to the cut, slicing direction or thickness. A thick strip cut with the grain won’t become tender just because it spent a few fewer seconds in the skillet.

What Is the Best Steak for Beef and Broccoli?

CutWhat to expectHow to use it
Flank steakLean, beefy, clearly grainedThe default here. Slice thinly across the grain and use the light marinade.
SirloinTender and forgivingAn easy substitute; little or no baking soda is needed.
Flat ironVery tenderExcellent for quick cooking; little or no baking soda is needed.
Skirt steakDeep flavor, strong visible grainSlice thinly and clearly across the grain.
Chuck steakBeefy and firmer than flank or sirloinSlice very thinly across the grain. It can work here, but expect a little more chew with this light marinade.
RoundLean and fairly firmSlice very thinly. Flank or sirloin is easier for this quick method.
Pre-cut stir-fry stripsConvenient, variable qualityChoose thin, even strips intended for fast cooking.
Chuck roast or stew beefUsually better suited to slower cookingSkip it for this quick stir-fry.
Beef grain guide showing flank and skirt with strong visible grain, sirloin and flat iron with finer grain, firmer chuck steak and round, and chuck roast or stew beef for slower cooking.
Use the label to identify the cut, then use the visible fibers to decide slicing direction. Grain direction matters more than the steak’s trimmed shape.

What the Beef Marinade Actually Does

This is a light velveting treatment, not an aggressive tenderizing soak. Soy seasons the surface, water gives the beef some moisture to absorb, and the modest amount of baking soda helps flank steak stay tender during fast cooking. Cornstarch forms a thin coating before the oil goes in.

Baking soda tenderizes. Cornstarch coats. That’s the useful distinction.

For flank steak, ¼ teaspoon baking soda for 1 lb (450 g) is deliberately modest. Sirloin or flat iron may not need it. Too much baking soda—or leaving the beef in it much longer than intended—can create an alkaline taste and an unnaturally soft texture.

Beef and Broccoli Sauce: Savory and Not Too Sweet

Oyster sauce does most of the heavy lifting here, giving the brown sauce its depth and body. Soy brings the salt, while the teaspoon of dark soy is mainly there for deeper color. Shaoxing adds its characteristic wine aroma, and the small amount of sugar rounds everything without turning the sauce sweet.

If you want a sweeter, more glaze-like sauce, that’s closer to homemade teriyaki sauce. Here, the sauce stays looser and less sweet so it can coat the beef, broccoli and rice without turning sticky.

How Thick Should the Sauce Be?

Think coating, not pudding. The sauce should cling lightly to the beef and broccoli, then flow back into the pan when you move a spatula through it. If it barely moves, loosen it before the final toss.

Three-panel comparison showing thin brown sauce running quickly from a spoon, correctly thickened sauce lightly coating and flowing, and overly thick sauce clinging in a slow heavy ribbon.
Thin sauce usually needs more simmering before more starch; overly thick sauce needs hot water or unsalted stock. The middle is the stopping point.

Want Extra Sauce for Rice?

Increase the stock to ¾ cup (180 ml) and the oyster sauce to 2½ tablespoons. Keep the light soy, Shaoxing wine, dark soy, sugar, sesame oil and white pepper at their original amounts.

This version is deliberately a little lighter rather than simply scaling every salty ingredient upward. You get more for the rice without making the whole bowl overly salty.

For the larger slurry, mix 1 tablespoon (about 8 g) cornstarch with 2 tablespoons (30 ml) cold water. Add it gradually; you may not need all of it. The consistency should still be glossy and coating, but you’ll have more left in the pan to spoon over the rice.

Fresh or Frozen Broccoli?

Frozen broccoli is useful here too. Skip the blanch. Heat it separately only until thawed and barely hot, then drain and blot away obvious moisture before it meets the sauce.

It won’t have the firmness of fresh broccoli, and that’s fine. The important part is keeping its extra water out of the skillet.

Side-by-side comparison of fresh broccoli after a brief blanch and thawed frozen broccoli with visible released water on a stainless-steel tray.
With frozen broccoli, moisture control matters more than extra cooking: thaw, drain and blot before the florets meet the sauce.

Wok or Skillet?

A carbon-steel wok shines over a strong gas flame. On many electric and induction stoves, a broad 12-inch (30-cm) skillet gives the beef a larger hot surface underneath it. If your burner is weaker, smaller batches matter more than pan shape.

Doubling the recipe means doubling the batches too. The skillet doesn’t get larger because the ingredient list did.

Side-by-side comparison of beef and broccoli cooking in a carbon-steel wok over a strong blue gas flame and in a broad skillet on a flat electric or induction cooktop.
Strong gas suits a wok; flat electric or induction heat often gives a broad skillet the more useful contact area.

Ingredient Substitutions

Some swaps barely change the dish; others can throw off the beef texture or the balance of the sauce.

Instead of…Try…What changes
Flank steakSirloin or flat ironUsually needs little or no baking soda.
Oyster sauceMushroom-style vegetarian oyster sauceThe closest easy substitute; use it in roughly the same way. Check labels if allergies matter.
Oyster sauceHoisinNot a direct substitute. If it is all you have, expect a sweeter, different sauce and reduce or omit the added sugar.
Soy sauceCoconut aminosSweeter and usually less salty. Reduce the sugar. Check the other condiments too if the entire dish needs to be soy-free.
Shaoxing wineDry sherryThe easiest close substitute.
Shaoxing wineMirinSweeter and less savory. Start with slightly less than the Shaoxing amount and omit the recipe sugar; adjust after tasting.
No cooking wine availableUnsalted stockThe sauce will be simpler and less aromatic.
Dark soyOmit itThe sauce will be lighter. Don’t replace it measure-for-measure with regular soy.

Don’t confuse rice wine with rice vinegar. Rice vinegar is much more acidic and is not a substitute for Shaoxing wine here.

For a gluten-free version: use gluten-free tamari, a gluten-free oyster-style sauce and gluten-free stock. Shaoxing wine is traditionally made with a wheat-based starter, so dry sherry is the simpler choice unless you know your bottle is gluten-free. Check the other packaged sauces too, since brands vary.

Variations

Mushrooms. After the beef comes out of the pan, brown sliced mushrooms until their released water has cooked away. Then continue with the garlic, ginger and sauce.

Carrots. Slice them thin and add them to the blanching water shortly before the broccoli so they get extra time to soften.

Bell peppers. After the beef comes out, stir-fry thinly sliced bell pepper briefly, then continue with the garlic and ginger; leave the pepper slightly crisp.

Spicy. Add crushed red pepper with the garlic and ginger, or finish individual bowls with chili oil or chili crisp.

What to Serve With Beef and Broccoli

Steamed jasmine rice or long-grain white rice is the easiest pairing. Brown rice works too. If you’d rather not guess at the rice, the guide to cooking rice has ratios and timings for the common varieties.

A cold cucumber salad gives the meal something completely different: crisp, cool and acidic against the warm brown sauce.

Complete beef and broccoli dinner with glossy beef strips and green broccoli on a dark serving plate, with white rice and a separate cucumber salad.

Storage, Reheating and Prep Ahead

This stir-fry is best straight from the pan. The next day it can taste very good, but the broccoli softens and the sauce loses some of its freshly cooked texture.

Refrigerate leftovers within 2 hours of cooking, or within 1 hour when the surrounding temperature is above 90°F / 32°C. Use refrigerated leftovers within 3–4 days.

The USDA leftovers guidance recommends reheating leftovers to 165°F / 74°C.

Warm only what you plan to eat. A skillet over moderate heat gives you good control, and a spoonful of water or unsalted stock can loosen sauce that tightened in the refrigerator.

You can cut the broccoli, slice the steak and mix the sauce earlier in the day and refrigerate them separately. Add the baking soda and the rest of the short beef marinade closer to cooking.

Freezing works, but it isn’t the best storage choice for this dish. The broccoli softens noticeably after thawing, which takes away much of the texture that makes the stir-fry good.

Troubleshooting Beef and Broccoli

Start with what changed. Did the sauce thin only after the broccoli went in? Did the beef turn gray as soon as it hit the pan? Is it chewy even though the center isn’t overcooked? Those clues tell you more than simply adding heat, starch or cooking time.

Beef Problems

What happenedWhat to do
The beef is chewy, even though it may still be pink inside.
A firmer cut, slices running with the grain or pieces that are too thick can all stay chewy before the beef looks obviously overcooked. Dry, gray beef may simply have cooked too long.
Now: If the beef is still underdone, finish cooking it only as much as needed; extra cooking won’t fix chewiness caused by the cut, grain or thickness. Keep it well coated with sauce and cut unusually large strips smaller before serving.
Next time: Choose a suitable cut, slice about 3–6 mm across the grain and remove the beef while it is still just shy of done.
Some pieces are tender and others are tough.
Uneven slicing is the usual reason.
This can’t really be evened out after cooking. Next time, keep the slices as consistent in thickness as practical.
The beef tastes alkaline or feels strangely soft.
Too much baking soda was used, or the beef sat in it for too long.
The texture can’t really be reversed. Extra unsalted sauce, vegetables and rice may soften an alkaline taste. Next time, measure the baking soda carefully and keep to the short marinade rest.
The beef is gray and sitting in liquid.
The pan lost too much heat.
Now: Stop adding beef, let the moisture cook away and finish the remaining meat separately.
Next time: Use smaller batches and let the pan recover between them.

Sauce Problems

Thickness and Texture Problems

What happenedWhat to do
The sauce won’t thicken.
The slurry may have settled, the sauce may not be simmering, or there may be too little starch for the liquid in the pan.
Now: Remove already-cooked beef and broccoli if necessary. Mix 1 teaspoon cornstarch with 2 teaspoons cold water and add it gradually to the bubbling sauce.
Next time: Re-stir the slurry immediately before pouring and give it a moment to cook.
The sauce was thick until the broccoli went in.
The vegetables probably carried water into the skillet.
Now: Remove finished beef and broccoli and reduce the sauce briefly before reaching for more starch.
Next time: Drain and dry the broccoli thoroughly.
The sauce is gummy.
Too much starch went in, or the sauce reduced too far.
Now: Add unsalted stock or water 1 tablespoon (15 ml) at a time until it flows again.
Next time: Add the slurry gradually.

Flavor Problems

What happenedWhat to do
The sauce is too salty.
Soy, oyster sauce, stock and sometimes salted Shaoxing cooking wine can add up.
Now: Slightly salty? Loosen it with unsalted stock or water. Badly oversalted? Spoon out some sauce first, then replace that volume with unsalted liquid. Plain rice or extra unseasoned broccoli can soften the overall saltiness.
Next time: Check condiment labels and taste the uncooked sauce only for an obviously over-salty combination.
The sauce is too sweet.
Too much sugar went in, or a sweeter substitute such as hoisin or mirin wasn’t accounted for.
Now: Add a splash of unsalted stock or water first. If the sauce then tastes flat, add oyster sauce or soy a few drops at a time.
Next time: Reduce the added sugar when using sweeter substitutes.
The sauce tastes bitter.
The garlic, ginger or dark residue in the pan probably scorched.
Now: Remove the burned pieces and taste. A few scorched flecks may not ruin the sauce. If the bitterness has spread through it, wipe the pan clean and remake the sauce mixture.
Next time: Lower the heat before adding the aromatics and move on as soon as they smell fragrant.
Broccoli and Pan Problems

What happenedWhat to do
The broccoli is hard.
The florets were large or needed more of a head start.
Now: Take the beef out, add a splash of water, cover the pan briefly and let the broccoli steam until the stalks begin to yield. Uncover, let excess water cook away, then return the beef.
Next time: Cut the florets more evenly and use stalk tenderness as the cue, not only the clock.
The broccoli is mushy.
It cooked too far before or during the final toss.
The texture can’t be restored once it becomes soft. Next time, take it out of the blanching water earlier and remember that it cooks again during the final toss.
The second beef batch tastes burned.
Marinade residue from the first batch scorched in the pan.
Now: Remove burned solids before continuing.
Next time: Wipe away blackened residue between batches and add fresh oil when needed.
A doubled recipe turns watery.
Twice the cold food went into the same-size skillet.
Now: Remove some of the food and finish it in batches.
Next time: Double the ingredients, not the amount your pan is expected to sear at once.

Once it looks right, stop fussing with it. Spoon everything over hot rice and eat it while the pan is still steaming.

Posted on — Leave a comment

Beer Cheese Recipe for Pretzels: Creamy Pub-Style Dip in 15 Minutes

A hand lifts a torn salted soft pretzel from a dark bowl of smooth golden beer cheese, with sauce coating the crust and exposed crumb.

A torn piece of warm soft pretzel should come out of the bowl carrying a generous coat of beer cheese: enough to settle into the salty browned grooves, but not so much that it slides straight back off before the first bite.

This dip takes about 15 minutes, but cheddar gives you very little warning before creamy turns grainy. Too much heat can push out oil, tighten the cheese, or split what should have been a smooth sauce.

Cook the base. Melt the cheese. Let the beer-and-milk mixture thicken first. Then take the saucepan off the heat and stir in the cheddar a little at a time.

The result is a warm, melted pub-style dip made for homemade soft pretzels and pretzel bites—not the cold, spreadable style usually associated with Kentucky beer cheese.

Quick Answer

Use 285 g / 10 oz sharp cheddar, 160 ml / ⅔ cup balanced lager, 180 ml / ¾ cup whole milk, and a light butter-and-flour roux.

Cook the beer-and-milk base until it lightly coats a spoon, then take the pan off the heat before adding the cheddar gradually.

Helles or a balanced pale lager is the easiest beer choice. An amber Märzen-style Oktoberfest lager is toastier and particularly good with salty pretzels. Use 0.0% beer if avoiding alcohol.

Beer Cheese Recipe for Pretzels

There’s no cream cheese in this version. A light roux gives the cheddar enough body to stay creamy while keeping the flavor firmly cheddar-forward.

Prep5 minutes
CookAbout 10 minutes
TotalAbout 15 minutes
YieldAbout 2½ cups / 600 ml; around 6–8 appetizer servings

You’ll need: a 2- to 3-quart / 2- to 3-liter saucepan, whisk and box grater. A kitchen scale is especially helpful for the cheddar. A small slow cooker is optional if you need to keep the finished dip warm.

Ingredients

  • 285 g / 10 oz sharp cheddar, freshly grated from a block
  • 28 g / 2 tbsp unsalted butter
  • 16 g / 2 tbsp all-purpose flour
  • 180 ml / ¾ cup whole milk
  • 160 ml / ⅔ cup balanced lager, such as Helles, pale lager, pilsner or Märzen
  • 1 tsp Dijon mustard
  • 1 tsp Worcestershire sauce
  • ½ tsp garlic powder
  • ¼ tsp smoked paprika
  • Pinch to ⅛ tsp cayenne, to taste
  • Freshly ground black pepper, to taste
  • Fine salt, only if needed after the cheese is melted

Instructions

  1. Grate and weigh the cheddar first. Have all 285 g / 10 oz ready beside the stove before you start.
  2. Make the light roux. Melt the butter over medium to medium-low heat. Whisk in the flour and cook for about 1 minute. Keep it pale and gently bubbly. Once the raw flour smell is gone, move on.
  3. Add the milk, then the beer. Whisk in the milk gradually so the roux stays smooth. Pour in the beer and keep whisking through the foam. It may puff up briefly; that’s normal.
  4. Thicken and season the base. Bring it to a gentle simmer and cook for roughly 1–3 minutes, whisking regularly. Stop when it lightly coats the back of a spoon but still pours readily. It’ll look thinner than finished cheese dip, and that’s where you want it—the cheddar is still coming. Whisk in the Dijon, Worcestershire, garlic powder, smoked paprika and cayenne.
Five beer cheese stages show a pale roux, a spoon-coating beer-and-milk base, the pan resting off heat, cheddar added gradually, and smooth finished sauce.
Ignore the beer foam and watch the liquid underneath. When the base lightly coats a spoon but still moves freely, it is ready for the off-heat cheese-melting stage.

Now Melt the Cheese

  1. Take the saucepan completely off the heat. Let the active bubbling settle before the cheese goes in.
  2. Add the cheddar in 4–6 handfuls. Let each addition mostly disappear before adding the next. Once the first couple of handfuls melt in smoothly, you’re on the right track—keep going at the same unhurried pace.
  3. If the last handful needs help, use the lowest heat. A few seconds is enough. Stir until it loosens, then pull the pan away again. Don’t let the finished sauce boil.
  4. Wait 1–2 minutes before judging the texture. Beer cheese thickens as it cools, so don’t rush to fix a sauce that may already be right.
  5. Taste, then season. The cheddar is what you want to notice first, with the beer still clearly there. Dijon, Worcestershire, paprika and cayenne should sit underneath rather than tasting like separate ingredients. Finish with salt and black pepper only as needed.

Recipe Notes

  • Weigh the cheddar if you can. A loose cup and a packed cup of grated cheese can hold very different amounts, so weight is more reliable.
  • Whole milk gives the best body. 2% works too, though the dip may finish slightly looser.
  • Sweet paprika can replace smoked paprika if you don’t want the faint smoky edge.
  • For a vegetarian version, use a vegetarian Worcestershire-style sauce; traditional Worcestershire commonly contains anchovies.

If the sauce is smooth and the pretzels are warm, you can stop here. The rest is for choosing a different beer or cheese, understanding what happened in the pan, fixing a troublesome batch, or keeping the bowl creamy for a crowd.

What Beer Works Best for Beer Cheese?

For the easiest first batch, choose Helles or a balanced pale lager. Märzen is the strongest match with a salty soft pretzel.

Six unbranded beers form a tasting flight from pale lager through amber and stout to IPA, grouped by how strongly they affect beer cheese flavor.
Choose by intensity: pale lager keeps cheddar forward; maltier or hoppier beers make the beer more assertive. If you dislike its bitterness beside cheddar, the saucepan won’t hide it.

How Different Beer Styles Change the Dip

Beer styleWhat it does in the dip
Pale lager / HellesClean, mild and gently malty. The easiest all-around choice.
PilsnerCrisper, with a slightly more noticeable hop edge.
Märzen / amber Oktoberfest-style lagerToastier and maltier; especially good against a browned, salty pretzel crust.
Amber / brown aleAdds deeper caramel and toasted-malt notes.
StoutDarkens the sauce and adds roasted, sometimes bitter notes that can compete with sharp cheddar.
IPAUse it when you genuinely want hop bitterness in the finished dip; aggressive hops can become more noticeable with heat.

You don’t need expensive or unusual craft beer here. A straightforward lager often makes a better dip than a beer with so much personality that the cheddar has nowhere to go.

With a pale lager, the cheddar stays firmly in front. Märzen adds enough toasted malt that it almost feels like an extension of the browned pretzel crust.
For stronger beer flavor, choose a maltier or more assertive style before increasing the quantity. Pouring in more beer also adds more liquid and can leave the sauce thinner than you wanted.
Does the alcohol cook out? Not completely during a short recipe like this. USDA nutrient-retention data account for alcohol that can remain after food preparation, so don’t rely on simmering to make regular beer alcohol-free. To avoid alcohol, choose beer labeled 0.0%. If you need to avoid alcohol completely, check the alcohol statement on the label.

Best Cheese for Beer Cheese

Build this around sharp cheddar. It keeps enough character after milk and beer soften it. Extra-sharp gives you more bite, though very dry aged cheddar is less forgiving in a smooth melted sauce.

Freshly grated block cheese is the easier route. Bagged cheddar may melt perfectly well, but block cheese gives you one less variable while you’re watching the heat.

For a nuttier, slightly rounder edge, replace about 55 g / 2 oz of the cheddar with Gruyère while keeping the total cheese at 285 g / 10 oz.

Whichever cheese you use, heat matters more than almost anything else.

Why Beer Cheese Breaks

Cheddar holds fat and water inside a protein network. Too much heat can tighten those proteins and push the fat and moisture apart instead of letting them stay together in a creamy sauce.

That’s why the roux-and-milk base gets cooked first and the cheese goes in later. Once the base is ready, the job changes from cooking to melting.

The cheese sauce guide goes further into roux ratios, cheese behavior and beer-free cheddar sauces if you want the deeper technique.

What the Right Consistency Looks Like

Two visual cues matter most. Before the cheddar, the base lightly coats a spoon. After it, the finished sauce coats a pretzel.

Split view of a pale beer-and-milk base coating a spoon before cheddar and finished golden beer cheese clinging to a torn salted pretzel.
A heavy ridge on the spoon means the base has gone too far; sauce that sheets off the pretzel is still too loose. Judge movement, not minutes.

Drag a torn pretzel through the bowl and lift it. The cheese should fill the grooves in the crust, stay attached on the way to your mouth, and slowly level itself again after the pretzel leaves a trail through it.

Give the dip that brief 1–2 minute rest before deciding something is wrong. If the texture still looks off, troubleshoot what you’re actually seeing.

Troubleshooting: What Went Wrong?

Smooth but too thick? Add warm milk. Smooth but too thin? Let it rest, then use low heat if needed. Grainy, oily or clumped? Stop heating it first.

Five beer cheese states compare smooth sauce that is too thin, ideal, too thick, grainy and oily, and severely seized into rubbery clumps.
Identify the failure before changing the pan. More cheese can make an already-tight dip heavier, and more heat can worsen separation. Diagnose first; adjust second.

The dip is too thin

If it’s still smooth but obviously runny after resting, return it to very low heat and stir until it tightens slightly. Pull it away again before it boils. A slightly loose dip still tastes good; a grainy one is much harder to fix.

The dip is too thick or pasty

Add warm milk 1 tbsp / 15 ml at a time. Stop when the spoon trail begins closing slowly behind the spoon. Cooling, reducing the base too far, excess flour or too much cheese can all make it tighten.

The sauce is grainy or oily

Stop heating it and let the pan cool for a moment. Stir or whisk gently. A splash of warm milk or cream may help a mildly separated sauce come back together.

For slight grit, a brief pass with an immersion blender can improve the texture. A badly broken sauce may never become completely smooth again, and turning the heat up usually makes things worse.

There’s a rubbery cheese lump in watery liquid

The cheddar seized instead of melting into the base, usually because it got too hot too quickly. Stop cooking. A severe break is difficult to recover completely.

The sauce is stringy

Try a splash of warm milk if the sauce is otherwise smooth. Too much cheese—especially when shredded cheese is estimated by volume instead of weighed—or a particularly stretchy cheese can push the sauce toward strings.

It tastes bland

Check the salt first. Then taste for Dijon, Worcestershire and cayenne. If the cheddar itself seems lost, choose a sharper cheese next time rather than adding more to an already-thick sauce.

It tastes bitter

A heavily hopped beer or beer that has reduced too far is the usual suspect. Extra dairy can soften the edge, but strong hop bitterness is difficult to erase completely.

It turns stiff as it cools

Some thickening is normal. Cheese fat firms as the temperature drops. Warm the dip gently and stir in a splash of milk if it needs loosening.

Making It for a Party

How Much Beer Cheese Per Person?

People eat very differently around a snack table, so these numbers are starting points rather than strict portions.

GuestsHow much to make
6–81 batch / about 2½ cups / 600 ml
9–121 batch with several substantial appetizers; 2 batches if pretzels and cheese are a major part of the spread
13–162 batches / about 5 cups / 1.2 L

A batch stretches farther when there’s something substantial and cold on the table too, such as 7 layer dip. When warm pretzels and beer cheese are the main attraction, make more.

Keeping the Dip Warm

Don’t worry about keeping it exactly as loose as it was when it left the stove. It just needs to stay hot, creamy and easy to scoop while people keep coming back for another pretzel.

Make the dip on the stove, then transfer it while hot. For longer service, keep the dip at 140°F / 60°C or warmer, following USDA hot-holding guidance.

Keep the heat gentle enough that the cheese isn’t bubbling steadily around the edges.

Slow-cooker WARM settings vary, so check the actual temperature if the dip will be sitting for a while. Stir occasionally and add warm milk when it begins to tighten.

If the dip needs to stay smooth for a long party, replace 30–55 g / 1–2 oz of the cheddar with American cheese. Its emulsifying salts make a long warm hold more forgiving—the same reason dips such as Rotel dip stay smooth and scoopable.

Reheat refrigerator-cold leftovers separately before transferring them to the slow cooker. Use the cooker to hold already-hot dip, not to slowly reheat a chilled batch.

Serving it without hot holding? Don’t leave the dip at room temperature for more than 2 hours, or more than 1 hour when the surrounding temperature is above 90°F / 32°C.

What to Serve With Beer Cheese

Soft pretzels are still the best answer. Their browned crust and salt cut through the richness, while the chewy middle is sturdy enough to scoop without falling apart.

Party spread with beer cheese and soft pretzels, plus sausage, potatoes, apple slices, broccoli, cauliflower and bread as a hand dips a pretzel.
Build contrast around the beer cheese: something chewy, something crisp or fresh, and something hearty. Pretzels, apples or vegetables, and sausage or potatoes make an easy mix.
  • Soft pretzels and pretzel bites
  • Pretzel rods or pretzel bread
  • Bratwurst or smoked sausage
  • Crusty bread
  • Apple slices
  • Broccoli or cauliflower
  • French fries or potato wedges
  • Jalapeño poppers for a hotter bite on the same table

For something crisp alongside the pretzels, crispy homemade fries work especially well; keep the cheese slightly looser so it coats rather than buries them. Baked jalapeño poppers add heat on the side without making the entire bowl spicy.

Make Ahead, Storage and Reheating

Fresh is silkiest, but you can make beer cheese a day ahead. Cool it promptly, refrigerate it in a covered container, then reheat gently with a splash of milk if it has tightened.

Use refrigerated leftovers within 3–4 days. Cold beer cheese will look much firmer because the cheese fat has set, so judge the texture only after it’s warm again.

Side-by-side beer cheese comparison showing firm, matte sauce straight from the refrigerator and smooth, glossy sauce after gentle reheating.
Reheat the beer cheese fully before judging its texture. Once it is hot and smooth, add milk only if it still needs loosening; it will tighten again as it cools.

USDA leftovers guidance recommends reheating refrigerated leftovers to 165°F / 74°C. Reheat gently on the stove or in short microwave intervals, stirring often.

If you’re holding the reheated dip for serving, keep it at 140°F / 60°C or warmer.

Freezing isn’t the best choice for texture. Dairy-and-cheese sauces can come back grainy or slightly separated after thawing, so refrigeration is much more reliable.

Variations and Dietary Options

Want it hotter? Add more cayenne, hot sauce or finely chopped jalapeño.

Need it flourless? Use a formula built around cornstarch or sodium citrate rather than simply leaving the flour out of this one. Sodium citrate is an emulsifying salt that helps melted cheese stay smooth, and those approaches need different ratios.

Need it gluten-free too? Use a flourless version or a gluten-free thickener, and make sure the beer is certified gluten-free.

What About Kentucky Beer Cheese?

It’s a different kind of beer cheese. This recipe is hot and flowing, built for dipping pretzels. Kentucky beer cheese is generally served cold or at room temperature, with a thicker spreadable texture and often a sharper, spicier flavor. Crackers and vegetables are common companions.


When the bowl is right, there isn’t much ceremony left: a pretzel still warm enough to smell buttery when you tear it open, a spoon trail that slowly disappears into the cheese, and enough sauce caught in the crust to make the next piece inevitable.

Cook the base. Melt the cheese. Then get the bowl to the table while the pretzels are still warm.

Posted on — Leave a comment

Horseradish Sauce for Prime Rib (Creamy Steakhouse-Style, 5 Minutes)

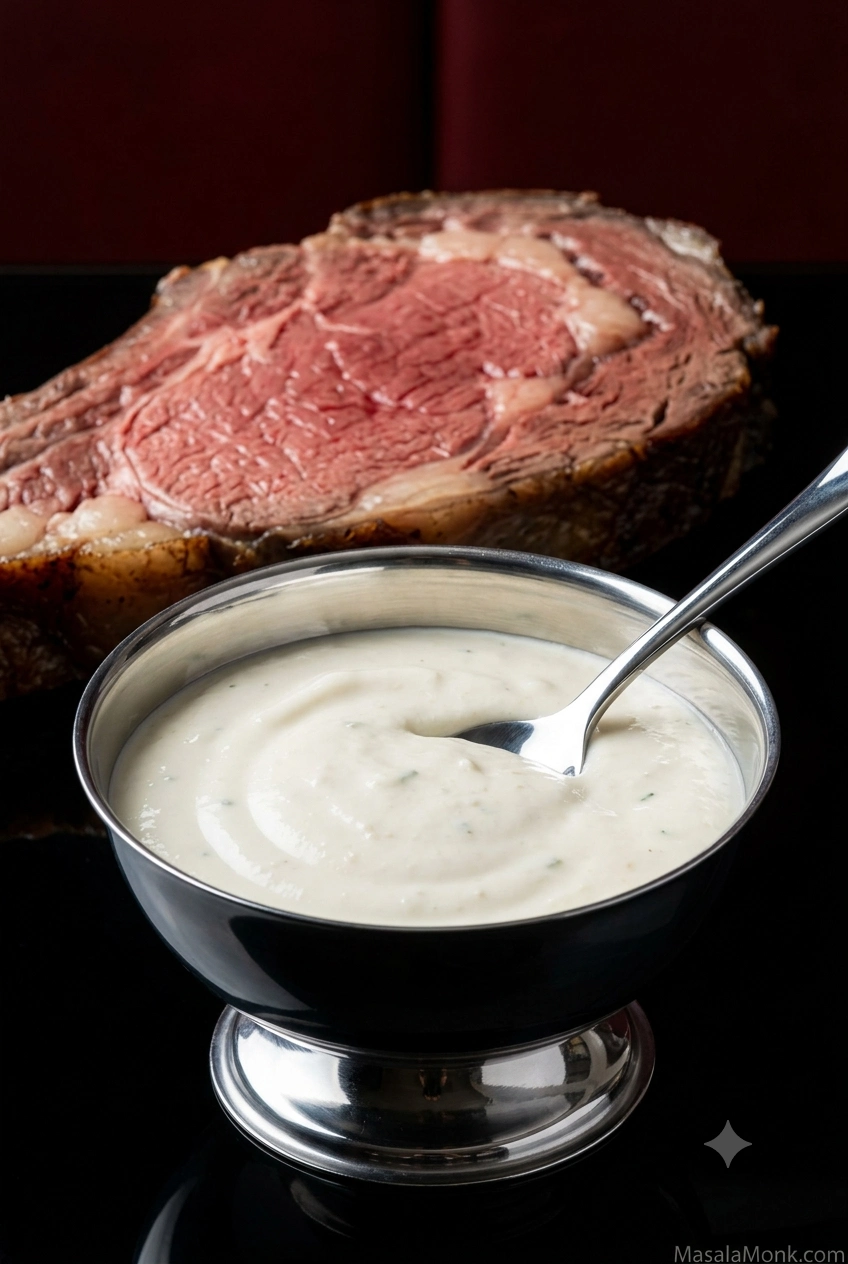
Bowl of creamy horseradish sauce in front of sliced medium-rare prime rib on a dark red and black table.

A spoonful of good horseradish sauce should wake up the next bite of prime rib without hiding it. It lands cold and creamy against the warm beef; then the horseradish rises briefly through the nose just as the richness starts to build.

The sauce itself is easy. Horseradish is less predictable. One jar can be polite and vinegary, while another hits behind the eyes with half the amount. So the horseradish goes in gradually: three tablespoons first, then more only after you taste it.

By the time a prime rib is resting, dinner already has enough moving parts. This should be the easy bowl: 5 minutes, one bowl, nothing to cook. Sour cream gives it body and coolness, a little mayonnaise smooths the texture, and the other flavors stay quiet enough that the beef and horseradish still lead.

Start here

Use prepared horseradish, usually grated or minced horseradish preserved with vinegar and salt. An already-creamy store-bought horseradish sauce is a finished condiment and behaves differently in this recipe.

If the jar has obvious free liquid, drain it before measuring. With ordinary prepared horseradish, start with 3 tablespoons / 45 mL and decide on the fourth after tasting. Using one marketed as extra hot? Start around 1–2 tablespoons / 15–30 mL and build from there.

Creamy Horseradish Sauce for Prime Rib

Cold, creamy and thick enough to cling to the beef, with enough horseradish to cut the richness without becoming mayo-heavy or mustardy.

Ready in5 minutes
CookingNone
Optional rest30 minutes
YieldAbout 1½ cups / 360 mL — about 12 servings at 2 Tbsp / 30 mL each

You need: a bowl and spoon or small whisk, plus a fine-mesh sieve if the horseradish is particularly wet.

Ingredients

  • 1 cup / 240 g full-fat sour cream
  • 2 tablespoons / about 30 g mayonnaise
  • 4 tablespoons / 60 mL prepared horseradish, divided, plus more to taste — start with 3 tablespoons
  • 1 teaspoon / 5 mL Dijon mustard
  • 1 teaspoon / 5 mL Worcestershire sauce
  • 1 teaspoon / 5 mL fresh lemon juice
  • 1 tablespoon finely sliced fresh chives
  • ¼ teaspoon fine sea salt, plus more to taste
  • ¼ teaspoon freshly ground black pepper
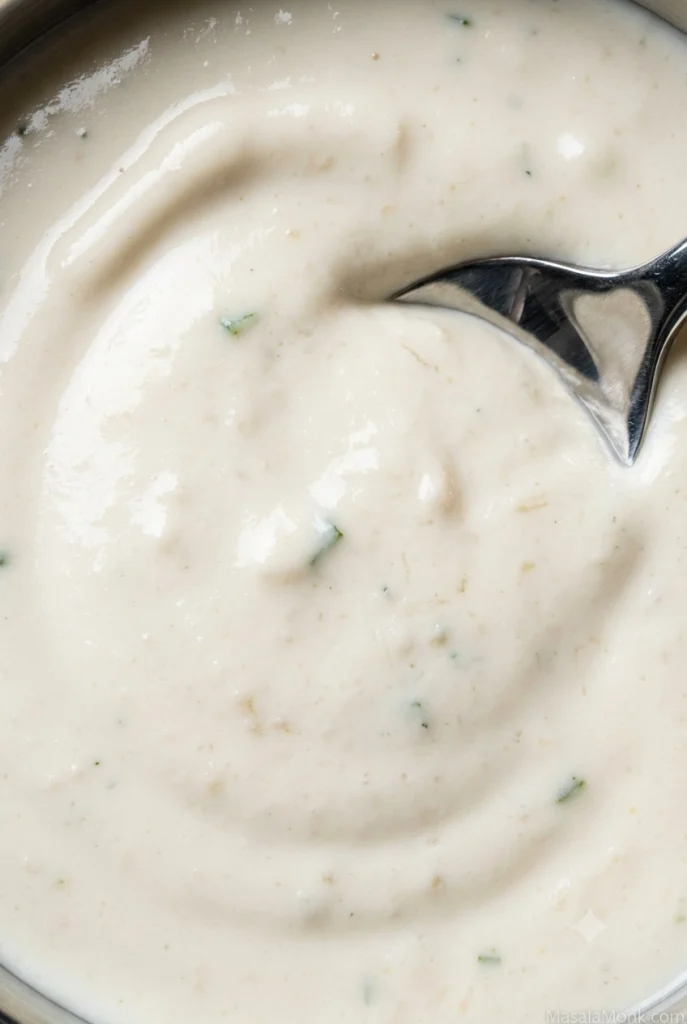
Close-up of thick creamy horseradish sauce with fine grated horseradish texture and small chive flecks.
The spoon trail should stay visible briefly; disappearing means too loose, while a rigid ridge means too stiff.

Method

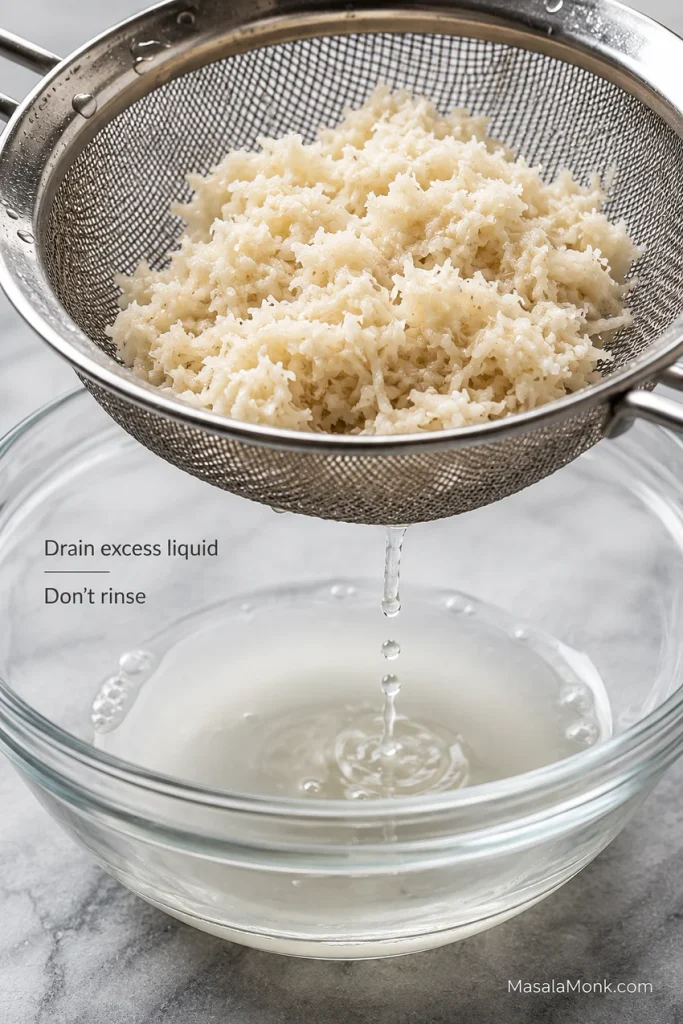
  1. Drain the horseradish if needed. If there is obvious liquid around the grated horseradish, let the excess run off through a fine-mesh sieve. Don’t rinse it, and don’t squeeze it bone-dry. You want it moist, just not carrying a lot of extra brine into the sauce.
  2. Start with most, not all, of the horseradish. Stir 3 tablespoons / 45 mL into the sour cream, mayonnaise, Dijon, Worcestershire, lemon juice, chives, salt and pepper. If the jar is labeled extra hot or tastes immediately fierce, begin with only 1–2 tablespoons / 15–30 mL.
  3. Taste it cold, as you’ll serve it. A lively jar may already give you enough bite. For a stronger sauce, add the reserved horseradish. If the jar is unusually mild, add another teaspoon or two at a time, draining off obvious free liquid first and tasting between additions.
  4. Serve now or chill briefly. The sauce is ready immediately, or you can refrigerate it for about 30 minutes before serving.
  5. Stir and taste again before serving. Horseradish can soften as it sits, so make the final horseradish and salt adjustment at the end.
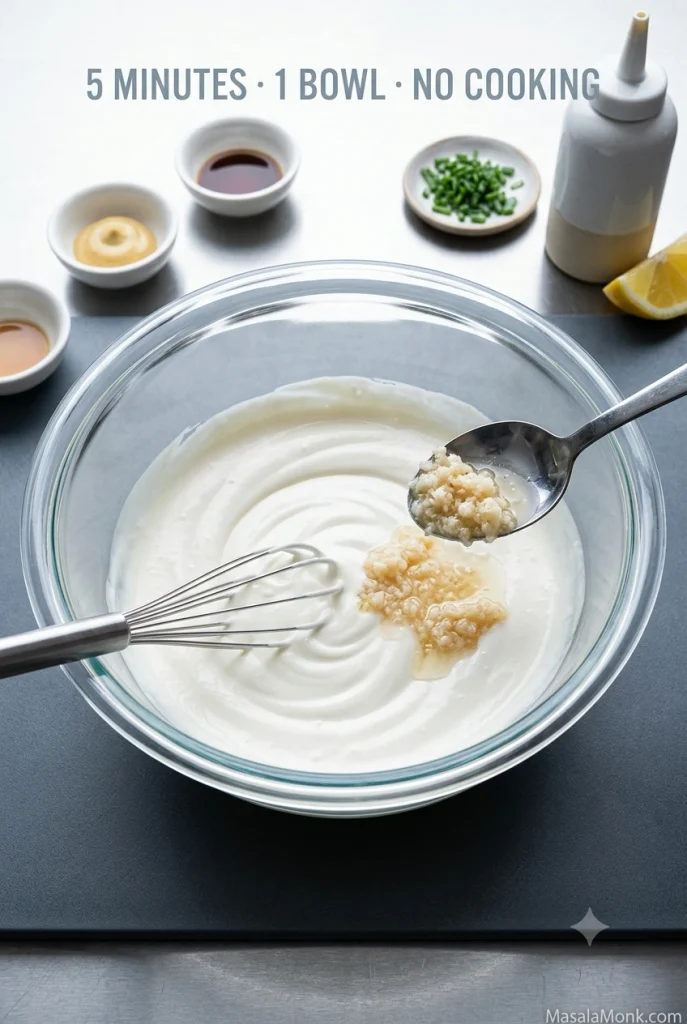
Prepared horseradish being mixed into a bowl of creamy sauce with a whisk on a stainless-steel work surface.
Stir until the horseradish is evenly distributed. A spoon or small whisk is enough; this sauce does not need whipping.

Check the Finished Consistency

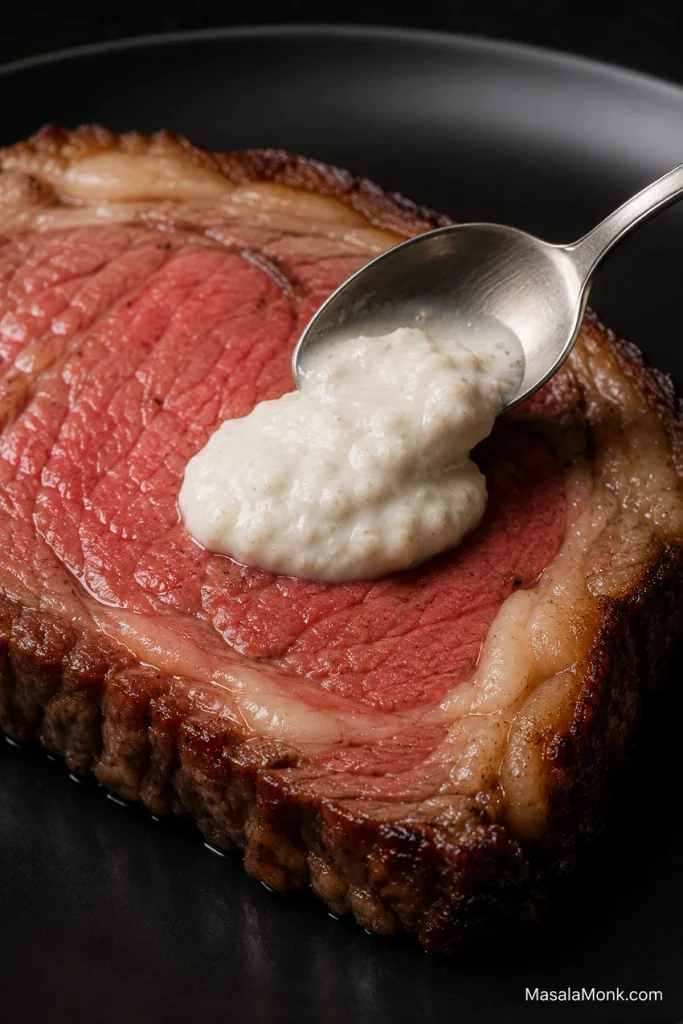
When it’s right: spoon some onto a slice of beef. It should hold in a soft mound instead of immediately puddling across the plate. Horseradish should be the flavor you notice; mustard, lemon and mayonnaise belong in the background. If one of those announces itself first, adjust the balance.

Spoonful of thick white horseradish sauce holding its shape on a slice of medium-rare prime rib.
On warm prime rib, the sauce should soften slightly but stay with the bite instead of sliding across the plate.

Need Help With Your Sauce?

If the bowl tastes good, you’re done—you don’t need the rest of this guide. If something is off, or you’re working with a different kind of horseradish, use the section that matches the problem in front of you.

How Hot Should Horseradish Sauce Be?

Horseradish heat rises quickly through the nose and then fades. It doesn’t sit on the tongue the way a chile or hot sauce does.

There’s no universal tablespoon count for “medium.” Brands vary, and something sold as extra hot may start far beyond a mild supermarket jar.

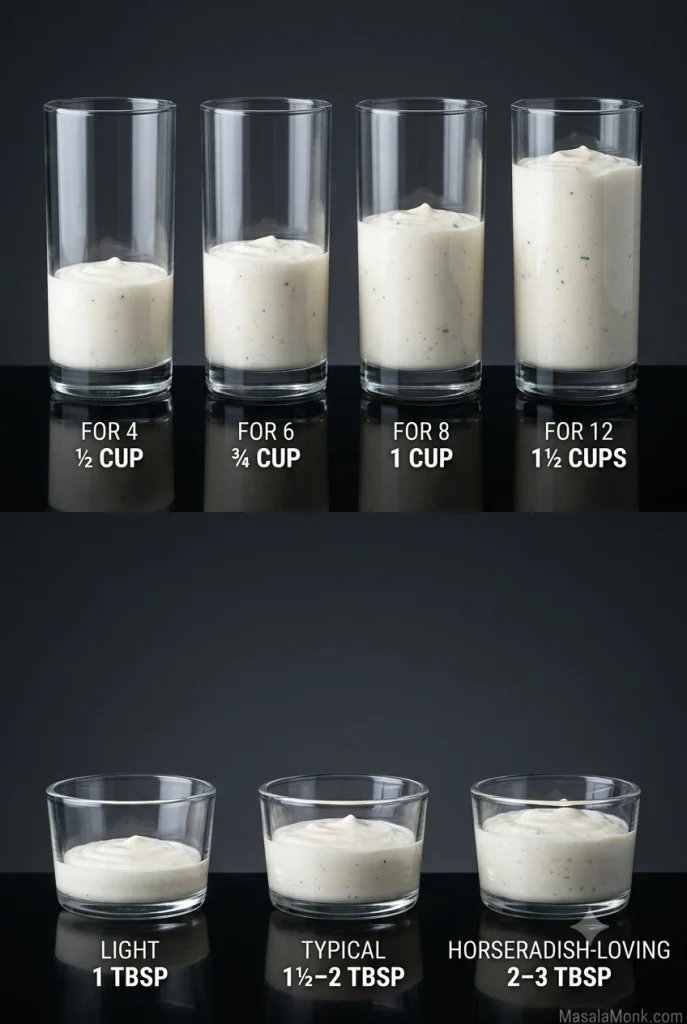
Treat the amounts below as starting points, not standardized heat ratings. The same 3 tablespoons can taste mild with one jar and assertive with another. These amounts are for the full batch above: 1 cup / 240 g sour cream plus 2 tablespoons mayonnaise.

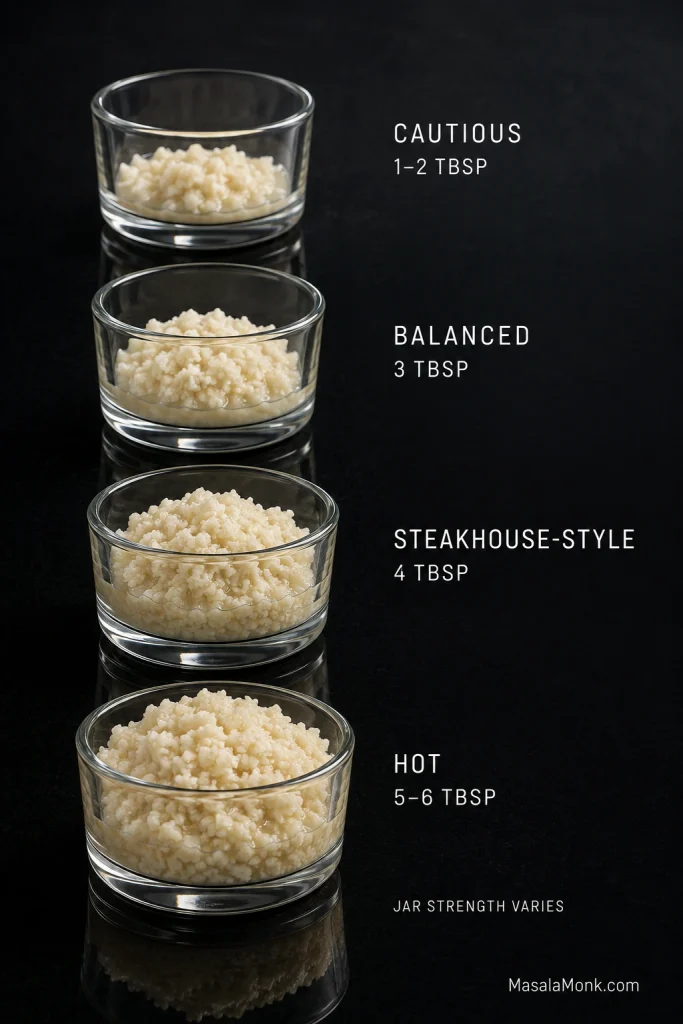
Heat levelPrepared horseradishWhat it feels like
Cautious start1–2 Tbsp / 15–30 mLCreamy first, with gentle horseradish behind it; also a sensible starting point for an unfamiliar extra-hot jar
Balanced3 Tbsp / 45 mLA clear horseradish lift without taking over the bite
Steakhouse-style4 Tbsp / 60 mLStrong enough to notice immediately, still comfortable beside rich beef
Hot5–6 Tbsp / 75–90 mLA nose-clearing bite for people who like their horseradish strong
Four identical glass cups show prepared horseradish amounts labeled cautious 1–2 tablespoons, balanced 3, steakhouse-style 4, and hot 5–6 tablespoons.
Use these amounts as starting landmarks, then adjust in smaller spoonfuls after tasting your particular jar.

Taste the Jar Before You Blame the Recipe

If the finished sauce still tastes mostly like sour cream, try a tiny amount of the prepared horseradish by itself.

A pungent jar will respond when you increase the amount. A weak, vinegar-heavy one can make the sauce wetter and wetter without bringing much more bite.

Opened horseradish gradually loses pungency too. If a sauce you’ve made before suddenly seems unusually mild, a fresher jar may give you a livelier result.

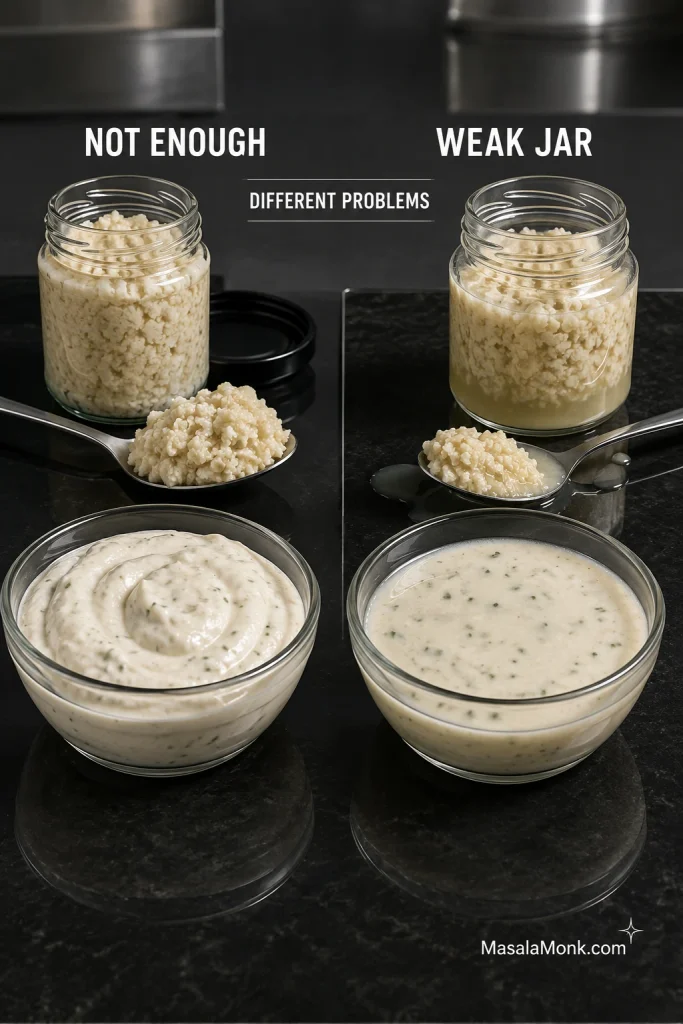
Not enough horseradish and weak horseradish are different problems.

Need more horseradish bite? Add horseradish. Dijon, lemon, black pepper and Worcestershire can all make the sauce taste stronger, but none gives you the same clean horseradish heat. If another spoonful barely changes anything, the jar itself is probably the limiting factor.

Side-by-side comparison of thick sauce needing more horseradish and thinner sauce made with a wetter, weaker jar of prepared horseradish.
If extra horseradish changes texture more than flavor, the jar—not the recipe—is probably the limiting factor.

Troubleshooting Horseradish Sauce

Don’t start over. Most problems here can be fixed without making another batch. Figure out what changed before adding more of everything.

Match the Problem to the Fix

What happened?Likely reasonFix it now
It tastes mostly like sour creamToo little horseradish for this jarAdd horseradish 1 teaspoon at a time
I added plenty and it is still weakThe horseradish itself may be mild or past its punchTaste the jar; a fresher or stronger one may work better than adding more liquid
It is too hotStrong horseradish or simply too muchStir in more sour cream, then taste for salt again
It is wateryWet horseradish or too much added liquidAdd thick sour cream and drain the next horseradish addition if visibly wet
It became watery overnightA little liquid separated while chillingStir thoroughly before changing anything
It is too thickVery thick sour creamAdd milk, cream or buttermilk 1 teaspoon at a time
It is too tangyToo much added acid, or unusually tart sour creamToo much lemon or vinegar? Dilute with sour cream. Very tart sour cream? Soften it with a little mayonnaise
It is too saltyToo much saltDilute with unsalted sour cream
It tastes too mayo-heavyToo much mayonnaise for your tasteAdd sour cream, then enough horseradish to bring the balance back
It tastes mustardyDijon is dominatingDilute with sour cream and horseradish; don’t chase it with more acid
It seems milder after sittingThe horseradish may have mellowedStir first, then add more prepared horseradish from a pungent jar if needed
Half the table wants more heatDifferent people, not a failed recipeSplit off a small portion and make only that part hotter

If More Horseradish Is Thinning the Sauce

Still getting thinner as you add horseradish? The packing liquid may be doing more damage than the grated horseradish. Drain the next addition so you’re increasing the horseradish itself without pouring another spoonful of vinegar-heavy liquid into the sauce.

Prepared horseradish in a fine-mesh sieve with excess clear liquid draining into a glass container below.
Drain pooled brine, not ordinary moisture. The prepared horseradish should still look damp when it reaches the bowl.

Recipe ↑ · Section Guide · Back to Top ↑

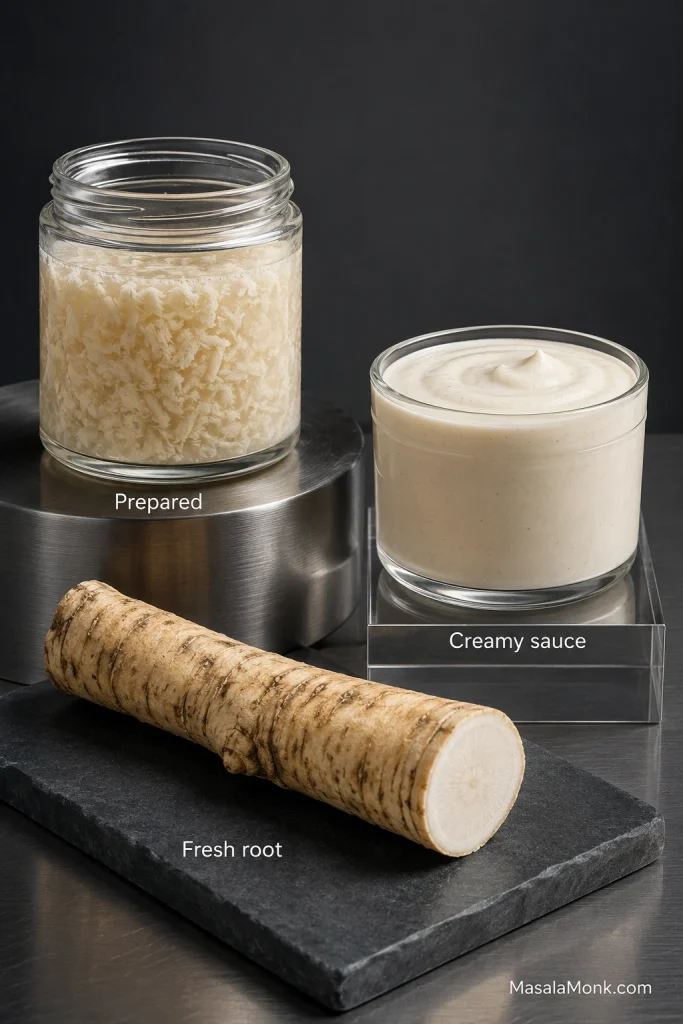
Prepared Horseradish vs Store-Bought Creamy Horseradish Sauce

Standing in front of two similar jars? Read the label. Texture alone won’t reliably tell you which one you have.

  • Prepared or grated horseradish: This is what you want for the main recipe.
  • Prepared horseradish marketed as extra hot: Fine to use, but start with less. The actual intensity still varies from product to product.
  • Store-bought creamy horseradish sauce: This is already a finished condiment. Serve or adjust it as its own sauce instead of folding it into this recipe.
  • Fresh horseradish root: Use the fresh-root method below; fresh root behaves differently and can vary dramatically in strength.
Prepared grated horseradish, creamy horseradish sauce, and a fresh horseradish root displayed side by side.
Trust the label: prepared horseradish is an ingredient; creamy horseradish sauce is already a finished condiment.

Shopping for it? Prepared horseradish is often refrigerated near the deli or specialty condiments, although some brands are stocked in the regular condiment aisle.

Why the Ratio Works

The dairy is the buffer, not the flavor we’re trying to maximize. Enough sour cream takes the edge off an aggressive jar without burying the horseradish; too much can turn a mild jar into something that tastes mostly like sour cream. That’s why the horseradish stays adjustable instead of being locked to one universal amount.

The small amount of mayonnaise rounds out the texture. Dijon and Worcestershire add quiet savory depth, while 1 teaspoon of lemon gives the sauce some brightness. Prepared horseradish already brings acidity of its own, so the lemon doesn’t need to do much.

Useful Substitutions and Variations

If nothing is actually wrong with the sauce and you’re simply missing an ingredient—or want to change the flavor or texture—these are the easiest swaps.

  • For a tangier sauce: Replace the sour cream 1:1 with full-fat Greek yogurt.
  • For a richer sauce: Replace the sour cream 1:1 with crème fraîche.
  • No mayonnaise? Use 2 tablespoons more sour cream.
  • No chives? Finely sliced scallion greens are the closest swap. Dill works too, but changes the herb flavor more noticeably.
  • No Dijon or Worcestershire? Either can simply be left out.
  • No lemon? Start with a small splash of cider, white-wine or champagne vinegar. The prepared horseradish already contributes some acidity.

Using Fresh Horseradish Root

Fresh root isn’t a tablespoon-for-tablespoon replacement for prepared horseradish. Its strength can vary dramatically, and how quickly you mix it into the sauce affects the pungency too.

For this batch, start with about 1 tablespoon of freshly grated horseradish, or less if it already seems fierce.

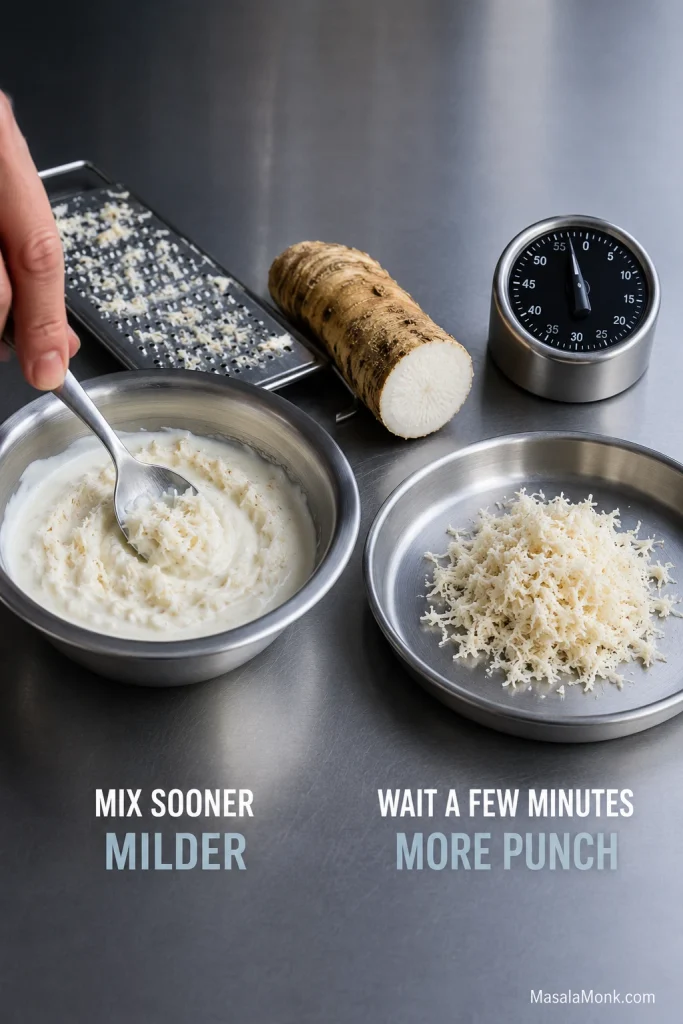
Want a milder result? Grate the horseradish and stir it into the sauce promptly. Want more punch? Grate it, let it stand for a few minutes, then mix it in. Taste before adding more.

Fresh horseradish root and grater beside sauce mixed immediately and grated horseradish resting near a timer to compare milder and stronger heat.
A short pause after grating lets more pungency develop before the fresh horseradish is mixed into the sauce.

Keep the root cold while you work and use good ventilation. Freshly cut horseradish can irritate your eyes and sinuses, so don’t lean over a food processor when you open it.

Once mixed, refrigerate the finished sauce. Missouri Extension has useful guidance on processing fresh horseradish and controlling its heat.

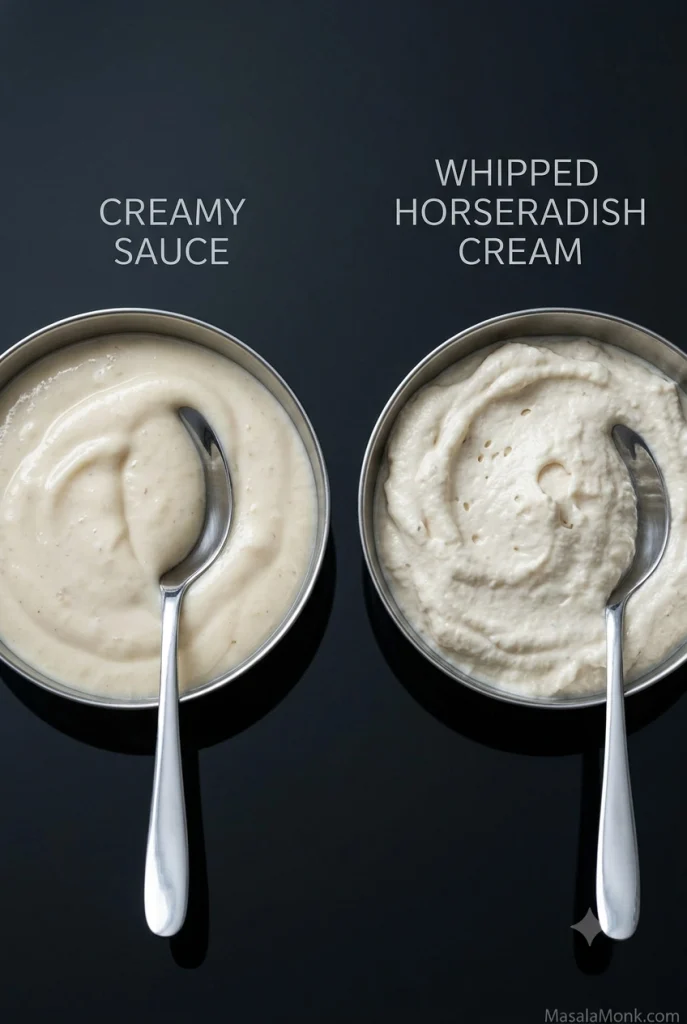
Alternative: Whipped Horseradish Cream

For a lighter, airier alternative, make whipped horseradish cream instead of the thicker sour-cream version.

Whip ½ cup / 120 mL cold heavy cream to soft peaks. Fold in 1–2 tablespoons / 15–30 mL prepared horseradish and a pinch of salt. Stop at soft peaks; it should stay loose enough to spoon over beef, not whipped as stiffly as dessert cream.

Two matching bowls compare dense creamy horseradish sauce with lighter, aerated whipped horseradish cream.
Creamy horseradish sauce clings; whipped horseradish cream gives the beef a lighter, airier finish.

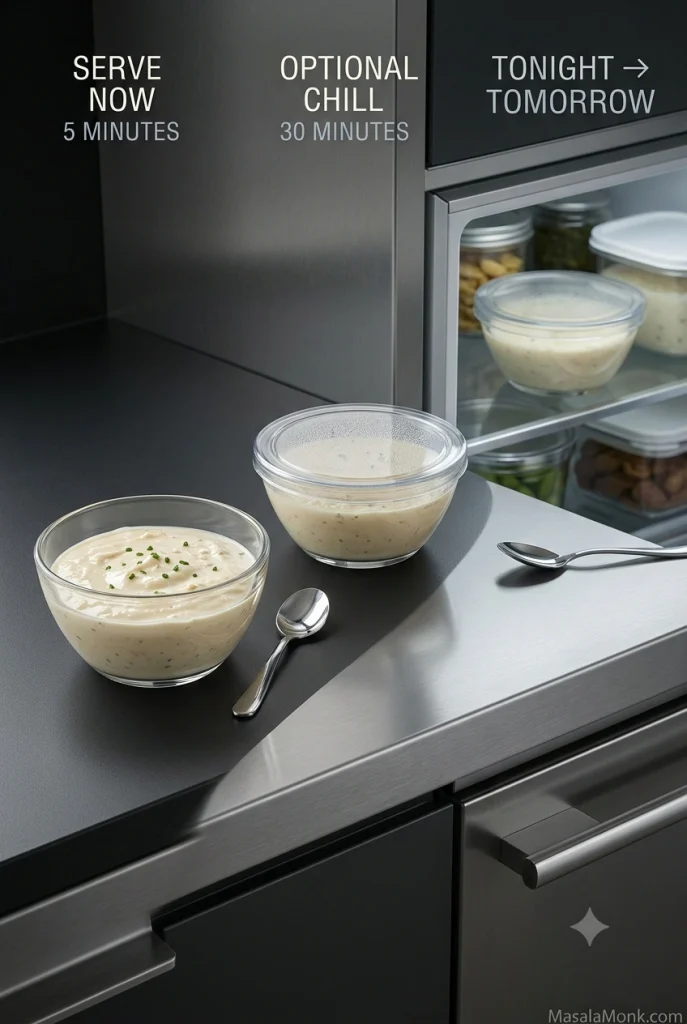
Make Ahead, Chill and Store Horseradish Sauce

Prime rib is already resting: make the sauce and serve it. There’s no mandatory chill time hiding behind the five-minute promise.

Got 30 minutes: put it in the refrigerator while the rest of dinner comes together. The 30-minute chill is optional, but it gives the sauce a little time to settle and takes one job off your list before carving.

Making it tonight for tomorrow: this is an easy Christmas Eve job. Mix the sauce, cover it and refrigerate it. Before the roast is carved:

  1. Stir the sauce thoroughly.
  2. Taste it while it’s cold.
  3. Add more prepared horseradish if the bite has softened.
  4. Adjust the salt only after the horseradish is where you want it.
Horseradish sauce shown ready to serve, chilled for 30 minutes, and refrigerated overnight for make-ahead preparation.
After an overnight chill, stir and taste before adjusting. The horseradish may have mellowed while it sat.

Doing some of the Christmas cooking ahead? Garlic mashed potatoes can be handled in advance too, buying you a little breathing room while the roast is finishing.

How Long Does It Keep?

Keep the sauce covered at 40°F / 4°C or colder and, as a conservative home-storage rule, use it within about 3–4 days. The texture and horseradish punch are usually best earlier in that window.

For a long buffet or holiday meal, put out a small bowl and replenish it from the refrigerator, or nest the bowl over ice. USDA food-safety guidance says perishable food should generally be refrigerated within 2 hours. When the surrounding temperature is above 90°F / 32°C, that window drops to 1 hour.

Freezing isn’t worth it here. Sour cream and mayonnaise can separate or turn grainy after thawing, and making a fresh batch takes five minutes.

Recipe ↑ · Section Guide · Back to Top ↑

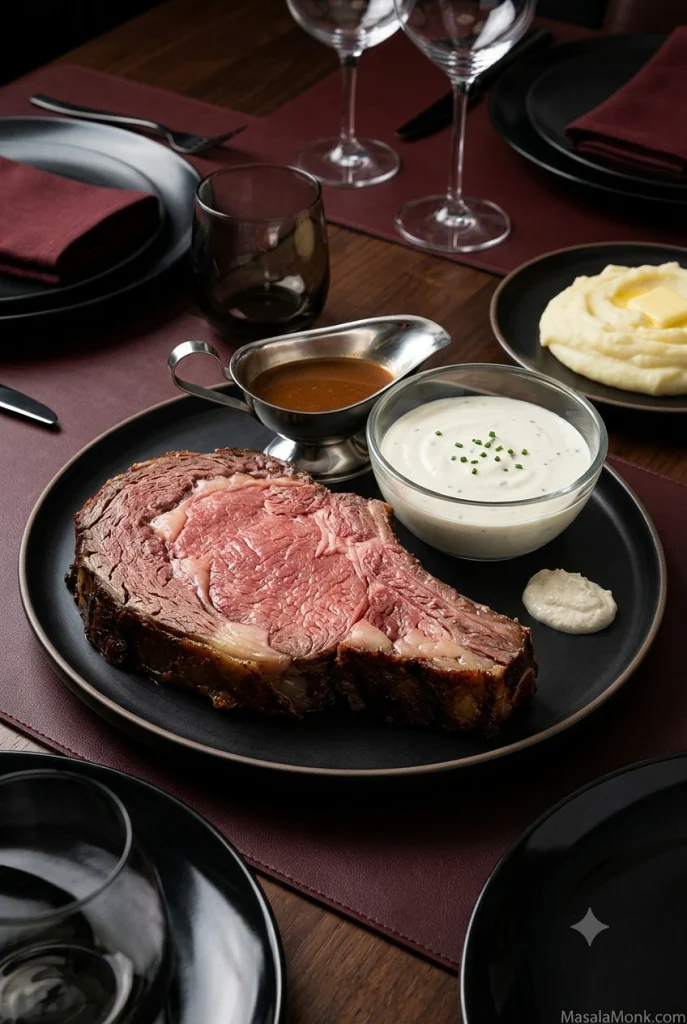
How to Serve Horseradish Sauce With Prime Rib

Bring it to the table cold, in a small bowl. Prime rib is expensive, and people have wildly different ideas about how much horseradish is enjoyable. Let everyone control the spoon.

Sliced medium-rare prime rib served with creamy horseradish sauce, au jus, and side dishes on a dark modern table.
Serve the horseradish sauce separately so everyone controls the heat on their own plate.

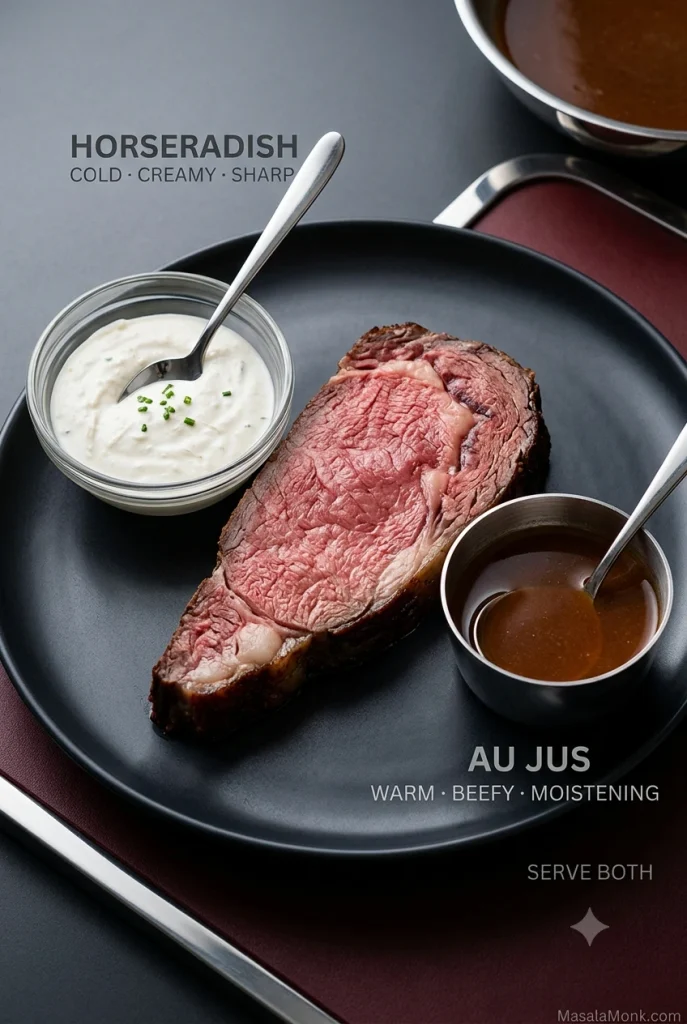
Horseradish Sauce or Au Jus?

Serve both when you can. They’re doing different jobs.

Au jus is warm and beefy. It adds moisture and reinforces the roast. Horseradish sauce is cold and sharp, cutting through fattier bites.

A little jus and a spoonful of horseradish sauce can happily share the same plate. Neither needs to drown the slice.

Slice of prime rib served with a bowl of creamy horseradish sauce and a small vessel of brown au jus.
Use au jus for moisture and horseradish sauce for sharp contrast; they work best as separate accents.

How Much Sauce Per Person?

How your crowd eats itPlan per person
LightAbout 1 Tbsp / 15 mL
TypicalAbout 1½–2 Tbsp / 22–30 mL
Horseradish-lovingAbout 2–3 Tbsp / 30–45 mL

Planning on 2 tablespoons / 30 mL per person? Make about ½ cup / 120 mL for four people or ¾ cup / 180 mL for six. For eight people, plan on 1 cup / 240 mL; for twelve, make the full 1½-cup / 360 mL batch.

Identical containers compare 1 to 3 tablespoon personal portions and ½, ¾, 1, and 1½ cup batches for 4, 6, 8, and 12 people.
For most tables, 1½–2 tablespoons per person is a useful planning middle ground.

Doubling or halving the recipe? Scale everything in the same proportion, but hold back roughly one-quarter of the horseradish. Taste the finished batch, then add only what it still needs.

If horseradish always disappears quickly at your prime rib dinners, make extra. Sauce left tomorrow is considerably less annoying than an empty bowl halfway through the meal.

Leftover Sauce? Start With a Roast Beef Sandwich

Cold prime rib or roast beef, crusty bread and creamy horseradish belong together for the same reason the sauce worked at dinner: the dairy softens the rich beef while the horseradish keeps the next mouthful lively.

When both beef and sauce survive dinner, tomorrow’s French dip sandwich practically plans itself.

Prime rib French dip sandwich with creamy horseradish sauce beside a small cup of au jus.
Spread horseradish sauce on the bread and keep the au jus beefy and clean for dipping.

The remaining sauce is also good with baked potatoes, burgers, steak sandwiches, roast pork, pork chops or smoked beef.


The best bowl is not the one with the most horseradish. It is the one where a cold spoonful wakes up a warm slice of beef, gives you that brief lift through the nose, and then gets out of the way before the next bite.

Start with the balanced version, then make a small side portion hotter for anyone who wants more bite. The roast has already done the difficult part of dinner; the sauce only needs to know when to stop.

Made it? Tell us which prepared horseradish you used, how much ended up in your final batch, and where you landed on the heat scale. Different jars behave so differently that your answer may help the next person making it.

Recipe ↑ · Section Guide · Back to Top ↑

Posted on — Leave a comment

Nanaimo Bars Recipe: Classic Canadian No-Bake Bars

Three Nanaimo bar squares on a cobalt surface, showing a dark textured base, pale custard middle, and thin chocolate topping.

A Nanaimo bar is one of those desserts where the first cut matters almost as much as the first bite. You can spend a couple of hours building three beautifully straight layers, only to hear the chocolate crack under the knife and watch the custard squeeze sideways.

When everything is right, the layers work together: a substantial dark cocoa-coconut base with chew and nutty crunch, a cool middle that actually tastes of vanilla custard, and a thin chocolate top with just enough snap. This version stays close to the City of Nanaimo’s classic blueprint, with one clear aim: the base, custard, and chocolate should all register in the same bite.

No-bake does not mean instant here. Nanaimo bars are not difficult, but they do ask for patience. Hands-on time is only about 35 minutes; most of the rest is the refrigerator doing its job.

Many of the most common problems are really temperature problems between one layer and the next: a base that is still too soft, custard that is too warm for chocolate, or a chocolate top that has become too cold to cut gracefully. Watch the state of each layer as well as the clock and the whole dessert becomes much more predictable.

What Are Nanaimo Bars?

Nanaimo bars are Canadian no-bake squares with a cocoa-graham-coconut base, vanilla-custard middle, and chocolate topping. The egg in the base cooks on the stovetop; the bars are then built by chilling each layer until it is ready for the next.

Jump to: Recipe & Ingredients · Step-by-Step · Custard Powder · Troubleshooting · Pan & Portions · Storage & Freezing

Classic Canadian Nanaimo Bars Recipe

Recipe at a Glance

Pan8 × 8-inch / 20 × 20-cm square pan
Yield16 generous squares, 25 smaller squares, or 36 small tray pieces
OvenNone; the base cooks on the stovetop
Active workAbout 35 minutes
Chilling / settingAbout 1¾–2½ hours
Total elapsed timeAbout 2¼–3 hours
Make aheadYes — particularly good made a day ahead
Freezer friendlyYes
Uncut Nanaimo bar slab in a square metal pan with parchment overhang and a smooth dark chocolate top.
An 8×8-inch batch should sit level from edge to edge before cutting; even pressing and spreading now make the final portions much neater.

Use the gram weights when you can. Graham crumbs, coconut, and chopped nuts can occupy very different amounts of space depending on brand, grind, shred, and how tightly they are packed into a cup.

Ingredients

Chocolate-Coconut Base

  • 113 g (1/2 cup / 4 oz) unsalted butter
  • 50 g (1/4 cup) granulated sugar
  • 25 g (5 tbsp) unsweetened cocoa powder, natural or Dutch-process
  • 1 large egg, beaten
  • 180 g finely ground graham cracker or graham wafer crumbs, roughly 1 1/2–1 3/4 cups depending on grind
  • 70 g finely shredded unsweetened coconut, about 1 cup depending on the shred
  • 65 g (about 1/2 cup) finely chopped almonds
  • 1/4 tsp fine salt

Vanilla-Custard Filling

  • 113 g (1/2 cup / 4 oz) unsalted butter, softened but not greasy or partially melted
  • 225 g (about 2 cups) confectioners’ / icing sugar, sifted if lumpy
  • 36 g (3 level tbsp) vanilla custard powder, preferably Bird’s
  • 30 ml (2 tbsp) heavy or whipping cream, plus more only if needed
  • 1 tsp vanilla extract
  • 1/4 tsp fine salt

Chocolate Topping

  • 115 g (4 oz) good-quality semisweet or dark chocolate, finely chopped
  • 28 g (2 tbsp / 1 oz) unsalted butter

Ingredient notes:

  • No graham crackers? Plain digestive biscuits work well. They absorb butter differently, so judge the mixed base by the cohesion cue in Step 3. Our no-bake lemon bars go deeper into how biscuit crumbs behave in chilled bases.
  • Using sweetened coconut? Use roughly the same cup volume, not the same gram weight. It packs differently and will make the base noticeably sweeter.
  • Choosing chocolate: Semisweet or dark chocolate around 55–70% cacao gives useful contrast to the sweet middle. Chopped bar chocolate usually melts more smoothly than chips.
  • Only have salted butter? Use it and omit the added salt from whichever layer contains it.

Equipment: You will need an 8 × 8-inch / 20 × 20-cm square pan, parchment paper, a saucepan and heatproof bowl for a double boiler, an electric mixer, a spatula, a flat-bottomed cup or glass for pressing the base, and a sharp knife. A kitchen scale is recommended; an instant-read thermometer is optional.

Step-by-Step: Make the Layers

Readiness guide comparing loose, cohesive and set base; soft, ridged and stable custard; and fluid, scoreable and brittle chocolate.
Before you start, keep three checkpoints in mind: the base should hold together, the custard should stay put, and the chocolate should be firm enough to score without cracking.

1. Line the Pan

Line the pan with parchment, leaving overhang on opposite sides so you can lift the finished slab out later. That bit of paper saves a lot of wrestling with a cold first square.

2. Cook the Cocoa and Egg Mixture

Bring a small amount of water to a gentle simmer in the saucepan. Set the heatproof bowl over it without letting the bottom touch the water.

Add the butter, sugar, cocoa, and salt. Stir until the butter melts and the cocoa darkens into a glossy mixture.

Pour in the beaten egg gradually while whisking continuously. Keep the bowl over gentle heat until the mixture gains body under the whisk, usually about 2–5 minutes.

A few minutes in, it should smell more deeply chocolatey and look clearly thicker than when you started. You should not see obvious pieces of cooked egg. If you’re using a thermometer, take the egg-containing mixture to 160°F / 71°C; FDA guidance uses 160°F for dishes containing eggs.

Thickened cocoa, butter, sugar and egg mixture in a bowl over a double boiler, with a whisk leaving a visible trail.
The whisk trail is the useful clue: it should linger briefly before easing back into the mixture. A thermometer confirms the egg has reached a safe endpoint; the trail shows that the cocoa mixture has also developed enough body for the crumbs.

3. Add the Crumbs, Coconut, and Almonds

Remove the bowl from the heat and stir in the graham crumbs, coconut, and almonds. The glossy cocoa mixture will quickly turn into a sticky, coconut-studded crumb.

Squeeze a spoonful in your hand. It should stay together. The mixture can look looser than you expect in the bowl, and that is fine; pressure tells you more than appearances here.

If you’re using a different biscuit and the mixture genuinely won’t hold, add melted butter 1 teaspoon at a time, mix, and test again. A teaspoon is easy to correct. A large splash is not.

4. Press and Chill the Base

Transfer the mixture to the lined pan and push it into the corners before compacting the surface with the flat bottom of a measuring cup or drinking glass. Once pressed, it should look compact and almost fudgy, especially around the edges and corners.

Chill until the surface stays put when you lightly drag the edge of a spatula across it — usually 20–30 minutes in the refrigerator or 10–15 minutes in the freezer. If crumbs still come away, give it another few minutes before adding the custard.

Three-step Nanaimo bar base guide showing the crumb mixture squeezed by hand, pressed into a square pan, and tested after chilling.
If a squeezed handful already holds together, press it firmly rather than adding more butter; extra fat at that point can make the base greasy instead of stronger.

Base still giving you trouble? Jump to base troubleshooting →

5. Beat the Custard Filling

Beat the softened butter until creamy. Add the custard powder, vanilla, and salt, then gradually beat in the icing sugar.

Beat in the 2 tablespoons of cream for another 2–3 minutes. The filling may look almost absurdly thick compared with ordinary cake frosting. You are probably closer than you think. A spatula should leave a ridge that stays in place while the custard still moves when you push it.

Too stiff? Add cream 1 teaspoon at a time. If it looks unexpectedly soft, check the butter before reaching for more sugar. Very soft butter can loosen an otherwise correct filling; a 10–15 minute chill may be all it needs.

6. Spread and Chill the Custard

Drop several spoonfuls of filling across the cold base, then connect them with a spatula. This is kinder to the crumb layer than pushing one heavy mound from the centre to every corner.

Chill until the pale layer resists a light fingertip without shifting underneath, usually about 45–60 minutes. This is one of the satisfying stages: the custard should now sit evenly over the dark base, without crumbs dragged up through it.

Three stages of Nanaimo custard filling: a thick ridge in a bowl, dollops spread over the dark base, and a chilled layer tested with a fingertip.
The ridge is the cue: Nanaimo custard should hold its shape yet still spread under gentle pressure; chilling then locks that texture in place.

Custard too stiff, soft, or pulling up crumbs? Jump to custard troubleshooting →

7. Melt the Chocolate

Melt the chopped chocolate and butter together over a double boiler or in short microwave intervals, stirring until smooth. Keep the bowl and utensils completely dry; steam or stray water droplets can make chocolate seize.

Give the melted chocolate a minute or two to cool. A perfectly smooth top is not worth melting the custard underneath. It is ready to pour when it still flows easily but no longer feels hot.

8. Pour the Chocolate

Pour it over the centre of the cold filling, then tilt the pan so the chocolate flows toward the edges. Use the spatula only where a corner needs help. A gentle tap of the pan can settle the surface and release small bubbles.

9. Let the Chocolate Partly Set, Then Score It

Chill until the wet shine disappears, a knife leaves a shallow line, and the chocolate still bends slightly instead of cracking — usually about 10–20 minutes.

Mark 4 × 4 for 16 larger pieces, 5 × 5 for 25 smaller squares, or finer portions for a dessert tray. Cut only through the chocolate at this stage.

Chocolate readiness sequence showing fluid chocolate, a knife scoring a partly set thin topping, and cracking after the topping becomes too cold.
Read the surface before reaching for the knife: wet gloss means wait, satin-to-matte means score, and fractures mean the topping has gone too cold.

Chocolate already cracking, smearing, or sliding? Jump to chocolate and cutting troubleshooting →

10. Chill Fully and Cut Nanaimo Bars Without Cracking the Chocolate

Return the pan to the refrigerator for at least another 30 minutes, or until the slab is thoroughly chilled.

Lift it out using the parchment. Run a long, sharp knife under hot water, dry the blade completely, line it up with a score mark, and press straight down.

Wipe, rewarm, and dry the knife between cuts. If you forgot to score the topping and the chocolate is already hard, leave the slab out for about 5–10 minutes first. You only need to take the brittle edge off the chocolate; do not wait until the custard starts softening.

Three-step cutting guide showing a knife warmed in hot water, dried with a towel, then pressed straight down through a scored Nanaimo bar slab.
A warm, completely dry knife helps the thin chocolate yield cleanly; rewarm and wipe between cuts, then press straight down instead of sawing.

Take a look at the first neat cut. You want a dark textured base, a smooth pale centre that stays where it belongs, and chocolate that follows the knife instead of breaking away in shards.

Cold from the refrigerator, the chocolate gives a small snap before the creamy custard and chewy coconut-and-almond base underneath. That’s the payoff for all the waiting between layers.


What Makes a Classic Nanaimo Bar?

That balance still sits inside the familiar Nanaimo blueprint. The City of Nanaimo’s official recipe uses an 8-inch pan, a stovetop cocoa-and-egg base with graham crumbs, coconut and almonds, a custard-powder middle, and chocolate melted with butter on top.

This version keeps that basic structure but makes a few deliberate balancing choices. Keep the chocolate thin. A thick lid fights the softer custard underneath. The cocoa-coconut base is a little more substantial than the custard layer, while 36 g / 3 level tablespoons of custard powder gives the middle a clearer vanilla-custard character.

Some bakery versions turn the custard into the main event. Here it stays generous enough to taste clearly without making the cocoa base disappear.

The pleasure is in the contrast — cocoa and coconut underneath, cool creamy custard through the centre, then chocolate across the top. None of them needs to erase the other two.

Labeled cross-section of one Nanaimo bar showing a thin chocolate top, pale vanilla-custard middle, and thick textured cocoa-coconut-almond base.
Substantial base, controlled custard, thin chocolate: the three layers are deliberately unequal so they register together in one bite.

Why is there egg in a no-bake bar? No-bake means the dessert never goes into the oven. The egg in the traditional-style base is still cooked gently in the warm cocoa mixture before the crumbs, coconut, and nuts go in.

Bird’s Custard Powder: What It Is and What to Use Instead

If you have never bought Bird’s before, the middle layer is probably where this very Canadian recipe starts looking slightly mysterious.

Custard powder goes into the filling dry. You are not making a bowl of custard first. Bird’s brings the familiar vanilla-custard flavour and colour, and its starch gives the middle a little extra body.

Dry pale-yellow custard powder in a bowl and spoon beside thick Nanaimo filling, with a note that the powder is used dry.
Custard powder is added dry here—you are not preparing custard first. Brands and pudding mixes vary, so judge substitutes by the finished filling rather than matching them blindly spoon for spoon.
What you haveUse it?What to expect
Bird’s custard powderPreferredClosest to the familiar flavour and colour
Dry instant vanilla pudding mixPossibleUse it dry; brands vary and the middle may taste sweeter
Cornstarch + vanillaOnly in an adapted fillingNot a direct 1:1 substitute for Bird’s; the filling needs to be balanced around the change
Prepared liquid custard or puddingNoAdds far too much moisture

Can you make Nanaimo bars without custard powder? Yes. Dry instant vanilla pudding mix is the simplest substitute. Cornstarch plus vanilla can work in a filling adjusted around it, but it should not be treated as a direct gram-for-gram swap for Bird’s.

Making the filling now? Back to Step 5: beat the custard filling →

How Sweet Should a Nanaimo Bar Be?

Nanaimo bars are very sweet and very buttery. That is part of what they are. But you should still taste more than sugar.

The base ought to taste unmistakably of cocoa and coconut, with almond in the background. Then comes the vanilla custard, followed by real chocolate bitterness on top to pull everything back into balance.

Unsweetened coconut, salt, and semisweet or dark chocolate all help. Smaller pieces help too. A Nanaimo bar is far richer than an ordinary brownie, and it does not need to be enormous to feel generous.

Why not cut the icing sugar in half? Because the sugar does more than sweeten the filling. It also helps the butter-based middle hold a neat slice. A dramatic reduction changes the texture too, so a genuinely lower-sugar middle needs other adjustments.

Nanaimo Bar Troubleshooting

If your bars do not look like the layers above, start with what you can actually see or feel. Most batches give you a clue about what happened.

When the Base Isn’t Behaving

  • Looks loose before pressing: Squeeze some first. If it stays together in your hand, press it into the pan and judge it after chilling before adding more butter.
  • Really won’t hold together: A substitute biscuit may be drier or more absorbent. Add melted butter 1 teaspoon at a time and test again.
  • Crumbles after chilling: Keep this batch very cold for cutting. Finer crumbs, smaller coconut and nut pieces, and firmer compaction will help next time.
  • Butter is pooling: A rich sheen is normal; a visible pool is not. Mix in 1–2 tablespoons of fine graham crumbs before pressing.
  • The egg visibly scrambled: A few tiny flecks will not wreck the base. If cooked egg is scattered throughout the cocoa mixture, restart that part with gentler heat and add the egg more gradually.
Troubleshooting comparison of Nanaimo bar base that is too loose, too oily, cohesive when squeezed, and firm after chilling in a square pan.
Loose-looking is not necessarily too dry; visible butter pooling is the opposite problem.

When the Custard Feels Wrong

Warm butter is behind a surprising number of apparent filling problems, so check the temperature before changing anything else.

  • Too stiff: Beat in cream 1 teaspoon at a time. Stop when the spatula moves through the filling comfortably.
  • Too soft: Chill the bowl for 10–15 minutes and beat briefly again before reaching for more icing sugar. The butter may just be too warm.
  • Dragging crumbs from the base: Stop spreading, chill both layers briefly, then continue with several smaller dollops and a lighter hand.
  • Grainy: Beat longer if the filling is still in the bowl. Once the layers are assembled, persistent grit is difficult to repair.
  • Never really sets: Too much liquid or several substitutions may have weakened it. Keep this batch well chilled. Freezing will firm it temporarily but will not correct the mixture.
Four custard-filling states showing too-stiff, too-soft, correctly thickened, and chilled stable Nanaimo filling.
Cool a soft filling before adding more sugar; loosen a stiff one with cream a teaspoon at a time.

Chocolate, Scoring, and Cutting

  • Chocolate cracks into shards: It is probably too cold. Let the slab stand for 5–10 minutes, then cut with a hot, completely dry knife and press straight down.
  • Forgot to score it: You have not ruined anything. Let the slab lose some refrigerator chill before cutting with a hot, dry blade.
  • The topping softened the custard: The chocolate went on too hot. Stop spreading and return the pan to the refrigerator until the layers settle again.
  • Cuts smear or the layers slide: The slab is warming. Rechill it, wipe and reheat the knife, then use a straight downward cut.
  • Chocolate turns thick while melting: If it merely cooled, warm it gently again. If water or steam turned it grainy and seized, starting the topping again is the most reliable route to a smooth finish.
Troubleshooting board showing chocolate too warm, ready to score, cracking when too cold, and Nanaimo layers smearing or sliding during cutting.
Cracking points to chocolate that is too cold; smearing or sliding points to a slab that is getting too warm.

← Back to the step-by-step recipe · ↑ Back to top

Nanaimo Bar Ingredient Substitutions

Flavour swaps are easy. Structural swaps aren’t. Nuts and chocolate can change with little fuss. Coconut supplies a large amount of dry bulk, the egg binds the base, and icing sugar does much of the work of giving the middle its firm, sliceable body.

  • Graham crackers: Plain digestive biscuits work well; check the mixed texture against the cue in Step 3 because absorption varies.
  • Almonds: Walnuts or pecans work well. For nut-free bars, replace the missing dry volume so the base does not become overly buttery.
  • Coconut: That cup of coconut contributes substantial dry bulk. A coconut-free version needs something else to take its place.
  • Egg: The egg helps bind the traditional base. Leaving it out makes this version more fragile, so use a recipe developed to be eggless.
  • Gluten-free crumbs: Gluten-free graham-style biscuits can work, but brands vary in fat and absorption. Let the mixed texture guide any small butter adjustment.
  • Vegan or dairy-free: Replacing butter, cream, egg, and possibly chocolate changes several parts at once. A recipe designed for those substitutions is much more dependable.

Pan Size, Scaling, and Serving

An 8-inch / 20-cm square pan gives the layers enough height to look distinct without turning the finished dessert into an enormous slab.

Portion planner showing separate 4-by-4, 5-by-5 and 6-by-6 cutting grids for an 8-inch pan, plus an 8-by-8 and 9-by-13 pan comparison.
A 9×13-inch pan has about 1.83 times the area of an 8×8, so doubling the recipe makes the layers only about 9% thicker. The 4×4, 5×5, and 6×6 grids then let portion size—not layer thickness—do the adjusting.

Can I Make Nanaimo Bars in a 9 × 13-Inch Pan?

Yes. A 9 × 13-inch pan is almost twice the area of an 8 × 8, so doubling the recipe is the easiest practical move. The layers end up only slightly thicker than the original and you avoid awkward quantities such as 1.8 eggs.

One regular batch also works in a 9 × 13 if you deliberately want much thinner pieces for a large dessert tray.

Serving size: Cut 16 squares for generous standalone portions, 25 for a more practical everyday size, or 36 small pieces for Christmas trays, parties, and mixed dessert platters.

On a crowded dessert tray, the smaller Nanaimo square is often the right one. It looks modest beside a cookie or brownie, then turns out to be far richer than its size suggests.

Serving temperature: For a softer, creamier bite, give an individual square about 5–10 minutes out of the refrigerator. The chocolate relaxes slightly and the custard becomes silkier. Serve them straight from the fridge when you want sharper-looking layers and more chocolate snap.

Small Nanaimo bar square beside a cup of black coffee on a dark red surface, with a few crumbs and the three layers clearly visible.
A small Nanaimo square is richer than it looks. Black coffee gives the buttery custard and chocolate a useful bitter counterpoint.

Make Ahead, Refrigerate, and Freeze Nanaimo Bars

Nanaimo bars are particularly convenient made a day ahead because chilling is already part of the recipe. For a holiday tray, finish and cut them while thoroughly cold, then pack them away. There is nothing left to assemble when guests arrive.

Do Nanaimo Bars Need to Be Refrigerated?

Yes. Keep them airtight in the refrigerator. For a conservative storage window, plan on 3–4 refrigerated days and freeze anything you’re keeping longer.

Airtight really matters with these. Butter-rich fillings pick up refrigerator aromas easily, so loosely covered bars can start tasting faintly of onions, garlic, strong cheese, or savoury leftovers sitting nearby.

For parties or dessert trays, keep them chilled until serving. FDA egg-safety guidance says egg-containing foods should not sit at room temperature for more than 2 hours, or more than 1 hour above 90°F / 32°C.

Can You Freeze Nanaimo Bars?

Yes. For best quality, freeze them for up to about 2 months. Cutting the slab first makes it easy to thaw only what you need.

  1. Chill and cut the bars completely.
  2. Pack them into an airtight freezer-safe container.
  3. Place parchment between stacked layers.
  4. Thaw in the refrigerator.

Freezing preserves a good batch; it does not repair a weak one. A filling that was too wet before freezing will soften again as it thaws.

Nanaimo bars packed in airtight refrigerator and freezer containers, with parchment separating stacked pieces.
For freezing, cut first, separate stacked pieces with parchment, and thaw in the refrigerator to protect the layers and chocolate surface.

Why Are They Called Nanaimo Bars?

Nanaimo — roughly pronounced “nah-NIGH-moh” — is a city on Vancouver Island in British Columbia, Canada. The bars take their name from the city, and you may also see them called Nanaimo squares or Nanaimo slices.

Published history is not completely settled, but there are useful landmarks in the record. In its 2025 Nanaimo Bar Day proclamation, the City of Nanaimo notes a “Chocolate Square” in the Women’s Auxiliary to the Nanaimo Hospital cookbook in 1952, followed by the name “Nanaimo Bar” in an Edith Adams cookbook in 1953. A 1986 city competition selected Joyce Hardcastle’s recipe from almost 100 entries.

Map locating Nanaimo on Vancouver Island beside a timeline marking the 1952 Chocolate Square, 1953 Nanaimo Bar name, 1986 competition and modern Nanaimo Bar Day.
This timeline shows when the bar’s form and name become visible in print; it documents published history without claiming one proven moment of invention.

Those dates trace the bar’s published history without giving us one neat moment of invention. What is easier to see is how recognizable the format became: the dark base, pale custard, and chocolate top look completely at home among Canadian holiday baking. The City now maintains an official recipe and has even proclaimed Nanaimo Bar Day — quite a cultural footprint for a dessert that never sees the inside of an oven.

Nanaimo Bar Variations

The layered idea is flexible once you understand the classic version. Mint and coffee sit naturally beside the chocolate. Cheesecake versions make the pale middle softer and tangier, while cookies and cakes take the cocoa-custard combination into completely different textures.

Gluten-free, coconut-free, custard-powder-free, eggless, and vegan versions need more deliberate changes because each removes something that affects how a layer behaves. Those are better handled with recipes built around the change from the beginning.

However you vary them later, the classic bar is still about the same small pleasure: distinctly different textures packed into one very rich square. First comes the chocolate snap, then cool vanilla custard, then cocoa, coconut, and almond underneath. When the knife comes down and everything stays exactly where it belongs, the refrigerator has done its job.

← Back to the step-by-step recipe · ↑ Back to top