
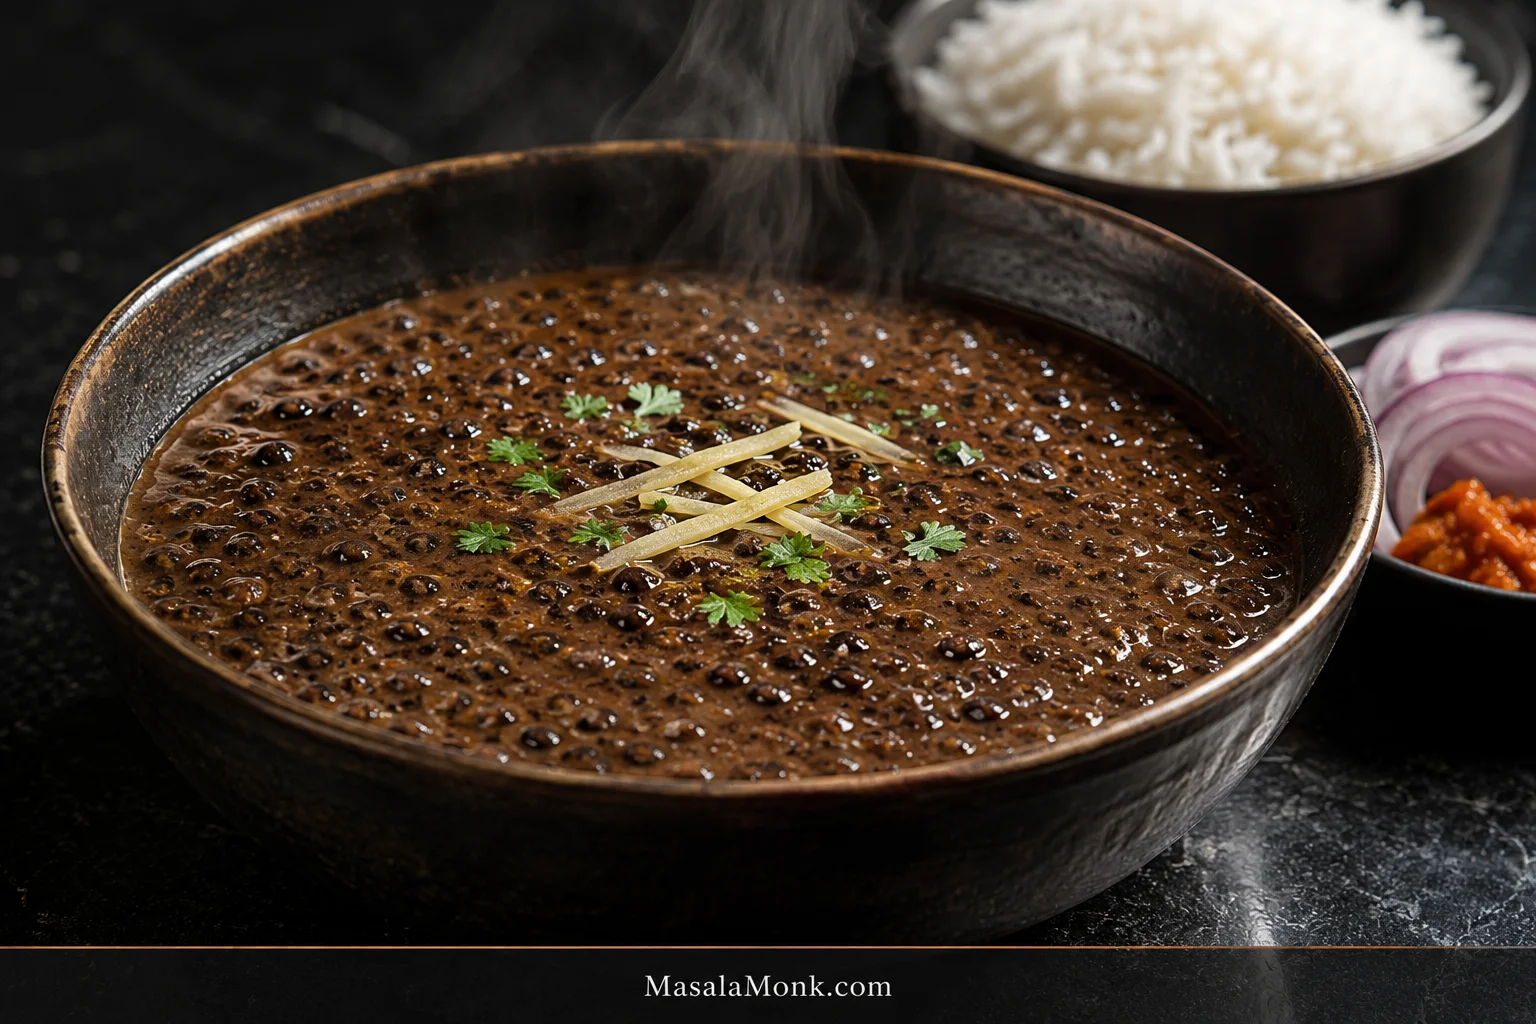
Good Maa Ki Dal has a soft, almost lazy texture. The black skins are still visible, but the urad underneath gives easily under a spoon and the gravy clings to every grain. A cumin, ginger, garlic and tomato tadka brings warmth and savouriness, while the softened urad gives the bowl most of its body.
This version stays on the homestyle Punjabi side: whole black urad, no rajma in the base, and no cream. It stays well away from the heavier butter-and-cream territory of many modern Dal Makhani recipes. It is the kind of dal that can make hot rice, a little pickle and sliced onion feel like dinner.
Whole urad can also be annoyingly inconsistent from one packet to the next. One batch softens exactly when expected; another wants ten or fifteen minutes more. Start with the timings below, then test a grain. A firm centre means it needs longer.
Quick Answer: How to Make Maa Ki Dal
Soak 200 g (7 oz / about 1 US cup) whole black urad for 8–12 hours or overnight. Pressure-cook it with 720 ml (about 3 US cups) water until one grain crushes easily with no firm or chalky centre. In a 3–4 litre stovetop pressure cooker, begin with 20–25 minutes at pressure, followed by a natural release.
Make a separate onion-tomato tadka with cumin, ginger, garlic and spices. Add the cooked urad with its liquid, mash a small amount against the side of the pan, then simmer for 15–20 minutes until the liquid thickens around the grains.
The timer tells you when to check. The crush test tells you when the urad is ready.
Maa Ki Dal Recipe
Timing and Yield
| Yield | 4 servings with rice or roti |
|---|---|
| Soaking | 8–12 hours or overnight |
| Chopping & prep | 15–20 minutes |
| Pressure cycle | 40–60 minutes including heating and natural release |
| Tadka + finishing | 30–40 minutes |
| From soaked dal to table | Roughly 75–100 minutes |
Some prep can happen while the cooker heats or the pressure comes down. Chop the onion, tomato, ginger and garlic during that downtime.
The recipe is vegetarian as written. For a vegan version, use neutral oil throughout and skip the optional ghee or butter finish. If you need the dish to be gluten-free, check the label on compounded hing because some commercial blends contain flour.
Before You Start
Use whole black urad, also sold as sabut urad or whole black gram. Split or skinned urad cooks differently. The 200 g / 7 oz measurement is the dry weight before soaking.
A 3–4 litre stovetop pressure cooker works well for this quantity. Beans and pulses can foam as they cook, so leave generous headroom and follow the fill and release instructions for your cooker.
Ingredients
For the urad
- 200 g (7 oz / about 1 US cup) whole black urad, dry weight
- 720 ml (about 3 US cups) fresh water, plus more hot water if needed
- ¾ teaspoon fine salt
For the tadka
- 2 tablespoons ghee, or neutral oil
- ½ teaspoon cumin seeds
- Small pinch asafoetida (hing), optional
- 1 medium onion, 100–120 g (3½–4¼ oz), finely chopped
- 8–10 g fresh ginger, about 2 teaspoons finely grated
- 12–15 g garlic, about 1 tablespoon finely minced or 4–5 medium cloves
- 1 small green chilli, or to taste
- 2 medium ripe tomatoes, 225–250 g (8–9 oz), finely chopped or blended; or 200 ml plain passata
- 1 teaspoon ground coriander
- ¼ teaspoon turmeric
- ½–1 teaspoon Kashmiri red chilli powder, to taste
To finish
- ¼ teaspoon garam masala
- ½ teaspoon kasuri methi, optional
- ¼ teaspoon fine salt, plus more if needed
- 2–3 tablespoons chopped fresh coriander
- Extra fresh ginger, cut into fine juliennes, optional
- 1–2 teaspoons ghee or butter, optional at the table; omit for vegan dal
How to Make Maa Ki Dal
1. Sort, rinse and soak
Spread the dry urad out briefly and pick out any small stones, shrivelled grains or obvious debris. Rinse three or four times, then cover generously with cool water.
Soak for 8–12 hours or overnight. In a very warm kitchen, put the soaking bowl in the refrigerator overnight. Drain and rinse once more before cooking.
The grains should look slightly fuller and less hard-edged than they did straight from the packet. They do not need to double in size.
2. Pressure-cook the urad
Put the soaked urad in the pressure cooker with 720 ml (about 3 cups) fresh water and ¾ teaspoon salt.
Bring the cooker to full pressure, lower the heat enough to maintain steady pressure, and cook for 20–25 minutes at pressure. Turn off the heat and let the pressure fall naturally.
Whistle counts vary enormously between cooker designs and burners. Use them if that is how you know your own cooker, but test a grain before moving on.
3. Crush one grain
Lift out a grain, let it cool for a moment, and press it against the side of the cooker with the back of a spoon.
It should flatten and crush easily all the way through. A firm, chalky centre needs more time. Some dark skins may already be splitting away from the pale centres; that is expected.
Add 120 ml (½ cup) hot water if the cooker is running low, pressure-cook for 5–10 minutes more, then release naturally and test again.
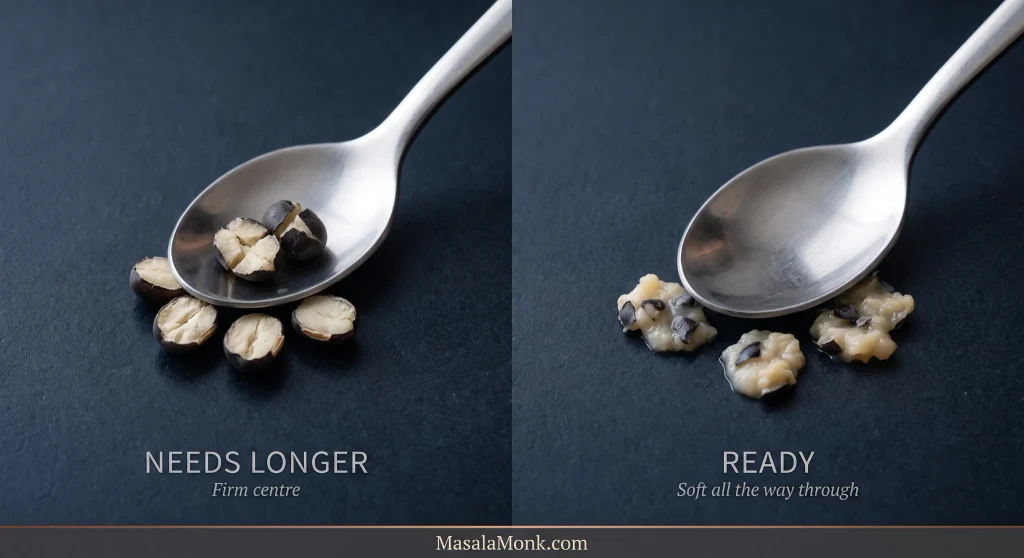
Still finding firm grains? See why whole urad sometimes refuses to soften.
4. Make the tadka
Heat the ghee or oil in a wide saucepan or kadai over medium heat. Add the cumin. When the seeds start sizzling and smell nutty, add the optional hing.
Add the onion and cook until soft and translucent, with a little gold beginning around the edges.
Stir in the ginger, garlic and green chilli. Cook for 60–90 seconds, until the sharp raw smell softens. This is the point where the kitchen starts smelling like dinner.
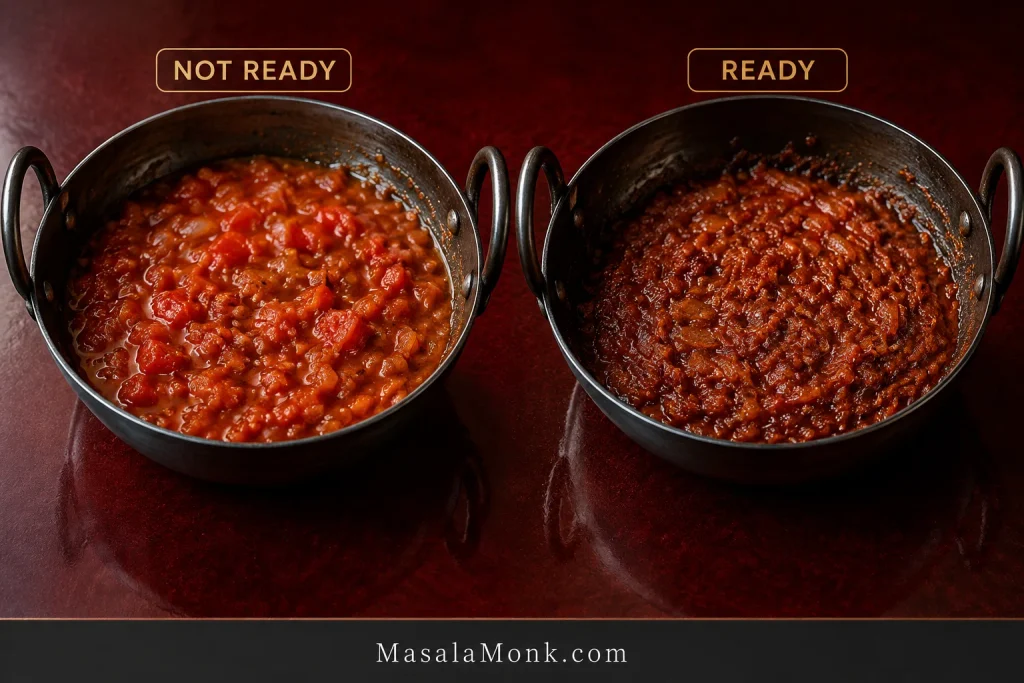
Lower the heat. Add the ground coriander, turmeric and Kashmiri chilli and stir for 15–20 seconds. Add the tomatoes straight away.
Cook for 7–10 minutes. Fresh tomatoes should collapse into the onion and lose their watery, raw look; passata should reduce and lose its sharp raw smell. Either way, the masala should look thicker before the urad goes in.
5. Bring the dal together
Add the cooked urad with its cooking liquid and bring everything to a gentle simmer.
Mash one or two ladlefuls against the side of the pan, leaving most of the grains intact. Right after combining, the pot can look disappointingly loose. Give it a few minutes.
6. Let it thicken gently
Simmer for 15–20 minutes, uncovered or partly covered, stirring every few minutes.
The liquid should gradually begin clinging to the grains. Drag the ladle across the bottom of the pan. The trail should remain visible for a moment, then slowly fill in.
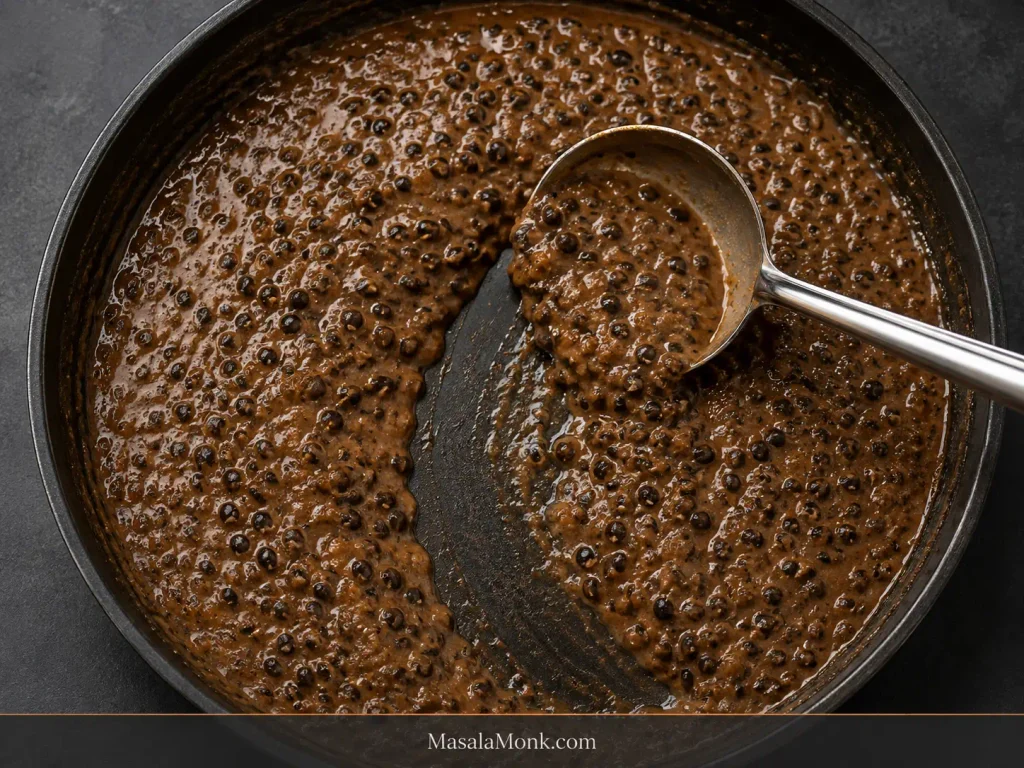
Too thin, too thick or uneven? Jump to Maa Ki Dal troubleshooting.
By now the dark skins should look suspended through the gravy instead of floating in thin liquid. Spoon some up and it should fall slowly back into the pan.
A soupy pot needs 5 minutes more uncovered. If it has become heavier than you want, stir in 60 ml (¼ cup) hot water at a time.
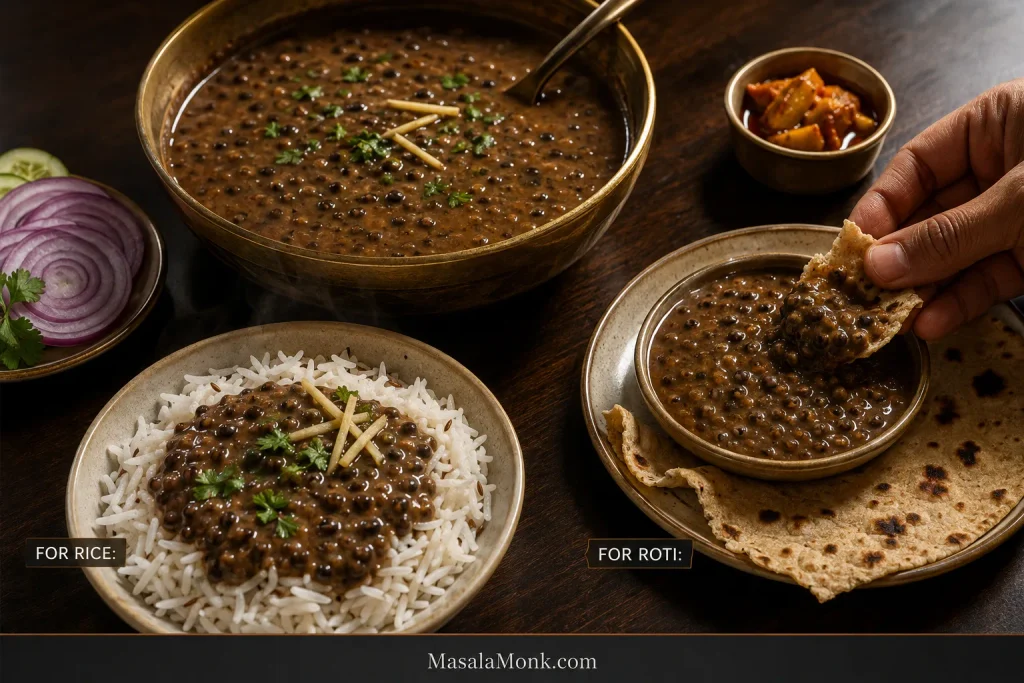
Stop slightly earlier for rice. For roti or paratha, let the pot reduce further. It will thicken again while it sits.
7. Finish and taste
Stir in the garam masala and optional kasuri methi. Add the remaining ¼ teaspoon salt, taste, and adjust from there.
Scatter over the fresh coriander and extra ginger juliennes if using. A spoonful of ghee or butter can go over the hot bowl just before serving; skip it for a vegan version.
Cooking dinner now? You can stop here. If you want to understand the urad better, adapt the method or fix a stubborn batch, the deeper guide starts below.
More About Maa Ki Dal
- Which black dal to buy
- Soaking whole black urad
- Why this method works
- Maa Ki Dal troubleshooting
- Maa Ki Dal vs Dal Makhani
- Common Maa Ki Dal variations
- Instant Pot, saucepan and slow cooker
- Cooking a bigger batch
- What to serve with Maa Ki Dal
- Storage, freezing and reheating
Which Black Dal Should You Buy?
“Black lentils” is a useful English shortcut until you are standing in front of several different dark-coloured pulses. For this dish, look for whole black urad, sabut urad or whole black gram; some packages also say black matpe or black matpe beans.
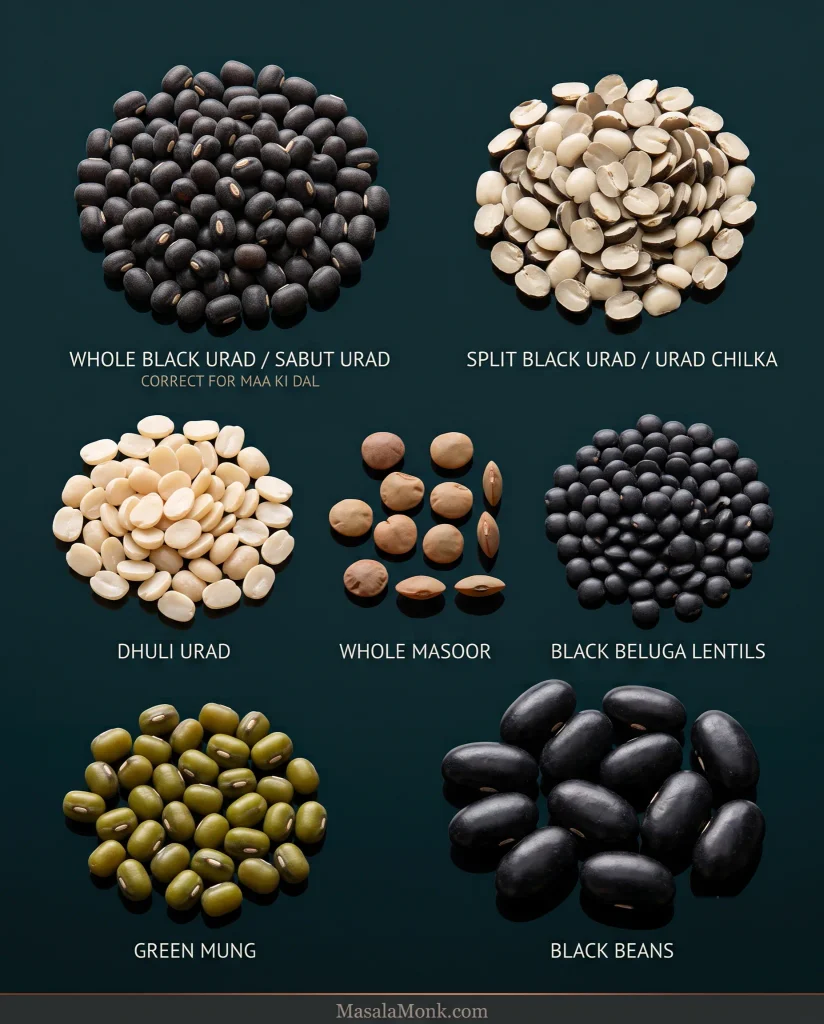
| Package or ingredient | For this recipe? | What to expect |
|---|---|---|
| Sabut urad / whole black urad / whole black gram / black matpe | Yes | The ingredient used here |
| Urad chilka / split black urad | Can be adapted | Cooks much faster and breaks down more |
| Urad dhuli / skinned white urad | No direct swap | Paler and much faster-cooking |
| Whole masoor | No | A different lentil |
| Black beluga lentils | No | Firmer and quite different in the pot |
| Green mung | No | A different pulse |
| Black beans | No | Not urad |
Have the right urad? Back to the recipe ingredients.
Soaking Whole Black Urad
Overnight is the dependable option. A shorter soak can work with fresher urad and a pressure cooker, but the final cooking time becomes harder to predict.
The soaking bowl is often your first clue about the packet. Most of the grains should look visibly plumper; urad that barely changes here is often the batch that asks for more patience later. Grains that remain conspicuously tiny and hard-looking while everything around them hydrates are worth picking out.
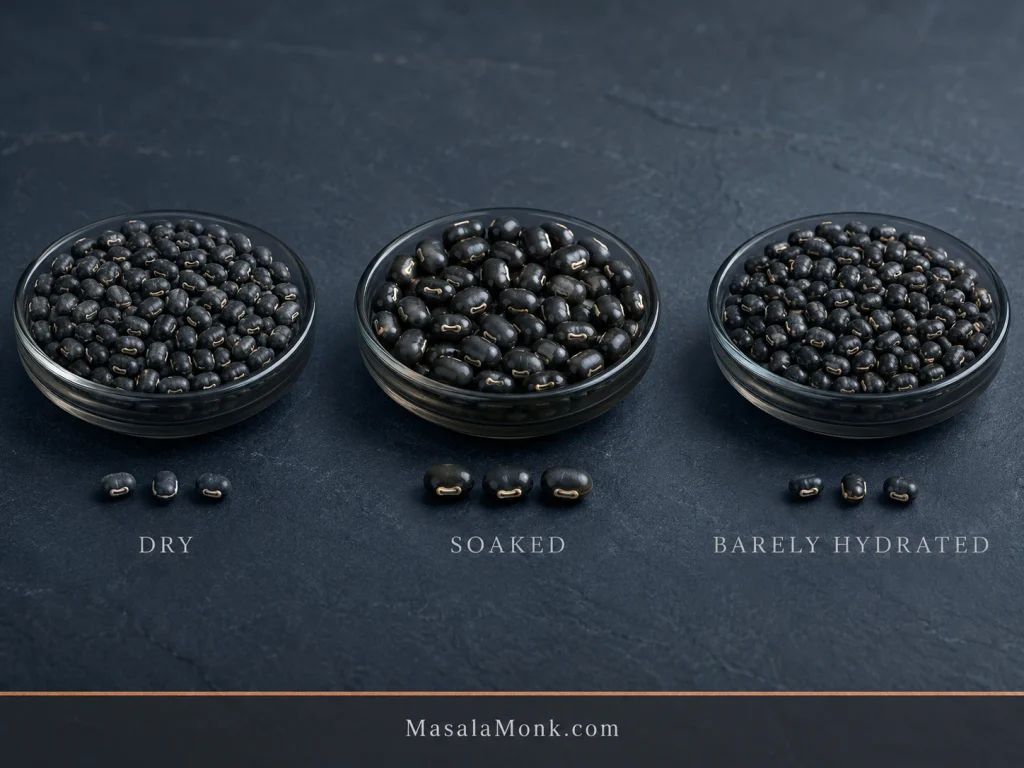
If the soaked urad looks green: hydrated skins can shift toward black-green, grey-green or brownish. Colour alone is not a useful spoilage test. A musty or rancid smell, mould, insects or visibly mixed-in grains are much better reasons to reject a packet.
Forgot to soak it? Cover the rinsed urad generously with fresh water, bring it to a boil and boil for 3 minutes. Turn off the heat, cover and leave it for 1 hour. Drain, rinse and continue with the pressure-cooker method. A quick-soaked batch may need a few extra minutes at pressure.
Why This Method Works
Cooking the urad until soft before adding tomato makes an inconsistent pulse much easier to manage. Tomato and other acidic ingredients can slow dried pulses from softening, which is why the tomato goes in later. Salt is different: it can go in from the start without preventing the urad from softening. Colorado State University Extension’s guide to cooking dried pulses explains these differences in more detail.
The creaminess comes mostly from the urad itself. Keep the cooking liquid, mash a small amount of the tender grains and give everything time to simmer together. Some of the urad breaks down into the gravy while plenty of black skins and whole grains remain visible.
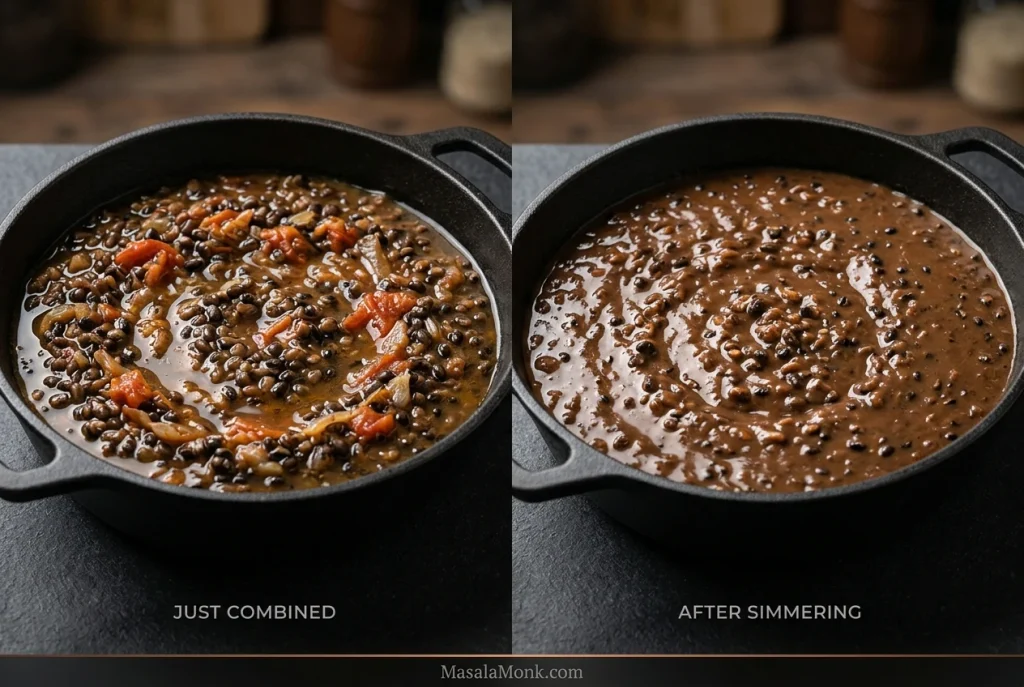
When it is right, the centres are completely soft but the bowl has not turned into a uniform purée. You can still pick out black skins and some whole grains beneath the creamy gravy. A blender takes the texture much further than it needs to go.
Maa Ki Dal Troubleshooting
Most problems become clearer once you look at the grains, liquid and tadka instead of the clock.
| What happened? | What to do |
|---|---|
| Most of the urad is hard | Cook it longer before adding the tomato tadka |
| Only a few grains are rock-hard | Pick out the isolated hard grains; do not keep cooking an otherwise finished pot for them |
| Dal is watery | Mash some more urad and simmer uncovered |
| Dal is too thick | Add hot water ¼ cup at a time |
| Grains are soft but the gravy feels thin | Keep simmering uncovered |
| Dal looks very pale | Confirm whether you used split or skinned urad |
| Dal tastes bitter | Look for scorched garlic or ground spices, too much kasuri methi, or urad that smelled stale before cooking |
| Tomato tastes raw or too sharp | Give the dal more simmering time |
Why Won’t My Urad Soften?
If the whole batch is firm, it usually needs more cooking. Add hot water if the cooker is running low and pressure-cook for 5–10 minutes more.
An older bag of urad may take noticeably longer, especially when the grains barely changed during soaking. Very hard tap water can slow things down too. When fresh packets repeatedly take much longer in your kitchen, try one batch with filtered water and compare. High elevation can stretch the timing as well.
If the whole pot is creamy and you still hit one or two little pebbles, pick them out. That usually points to a rogue old or poorly hydrating grain—or occasionally a tiny bit of debris—not a finished pot that needs another pressure cycle.
Back to the recipe · Back to guide
Maa Ki Dal vs Dal Makhani: What Is the Difference?
There isn’t one dividing line that every Punjabi household follows. Some Maa Ki Dal recipes contain only whole urad; others include rajma, and modern usage sometimes overlaps with Dal Makhani.
| Maa Ki Dal | Dal Makhani | |
|---|---|---|
| Main pulse | Whole black urad | Whole black urad |
| Rajma | Used in some versions; absent in others | Commonly included |
| Butter | Optional or modest | Often more prominent |
| Cream | Not required | Common in modern restaurant versions |
| Overall style | Often simpler and homestyle | Typically richer |
| Texture | Creamy with more obvious grains and skins | Often cooked longer until the grains and gravy feel more blended together |
The recipe above stays on the simpler side: urad only in the base, restrained fat and no cream.
You may also see it written as Maa Di Dal, Mah Di Dal, Maah Di Dal, Kali Dal or Kaali Dal. “Kali Dal” is not a foolproof shopping name because some kitchens use it for other dark lentils. At the store, look for sabut urad.
For a quicker everyday yellow-lentil dal, try our Punjabi Dal Tadka instead.
How the Dish Changes From Kitchen to Kitchen
If the Maa Ki Dal you know looks different, that’s normal. Some versions include rajma or chana dal; others leave out the tomato or finish with more ghee.
If the version you know includes rajma, 25–50 g (1–1¾ oz) dry kidney beans is enough for this quantity without turning rajma into the main ingredient. Soak them thoroughly and cook until both pulses are soft; rajma may take longer. For a rajma-first meal, make this Punjabi Rajma Curry instead.
Urad is also paired with chana dal in related Punjabi dishes such as Maa Chole Ki Dal or Maa Choliyan Di Dal; those versions often use split black urad rather than whole. Chana makes the finished dal thicker, nuttier and lighter in colour.
Other Common Variations
If the version you know skips tomato, leave it out. The urad does not need tomato to become creamy. Build the tadka around cumin, ginger, garlic, chilli and hing, then add lemon juice or amchur at the end if the bowl needs some brightness.
For a stronger garlic finish, fry 2–3 thinly sliced cloves in 1–2 teaspoons ghee or neutral oil until pale gold. Add a pinch of cumin and Kashmiri chilli—or a broken dried red chilli—then spoon the sizzling tadka over the finished dal.
Using split black urad? It cooks much faster and breaks down more readily, so do not use the whole-urad pressure timing unchanged. The finished dal will also be softer, with fewer distinct grains. If split urad is what you have, treat it as an adaptation rather than simply swapping it into the timings above.
Cooking Without a Stovetop Pressure Cooker
Whichever method you use, cook the urad until it passes the same crush test. Once it does, make the tadka and finish the dal as in the main recipe.
Instant Pot
For 200 g soaked urad in a 6-quart Instant Pot, start with 600–650 ml (2½–2¾ cups) fresh water. An electric pressure cooker loses less water during cooking, so the starting quantity is slightly lower than on the stovetop.
Cook on High Pressure for 40 minutes, then let the pressure release naturally. Crush one grain when the cooker opens. A firm centre needs 5–10 minutes more at High Pressure.
Leave plenty of headroom for the expanding, starchy dal and follow your model’s bean or pulse fill limit. Keeping the tomato tadka separate also keeps thick masala away from the base of the insert during pressure cooking.
Regular Saucepan
Soak the urad overnight. Put it in a heavy saucepan with 1–1.2 litres (about 4–5 cups) fresh water, bring to a boil, then reduce to a gentle simmer.
Cook partly covered and add hot water when the level drops too far. Start checking after an hour. Some batches soften around 90 minutes; older urad can take much longer. Once a grain crushes easily all the way through, make the tadka and finish the dal as above.
Slow Cooker
For 200 g soaked whole urad, start with 720 ml (about 3 cups) fresh water. Slow cookers vary in how much moisture they lose, so check the level during cooking and add hot water if needed.
Cook on Low and begin checking after roughly 8 hours. A stubborn batch or gentler cooker may need considerably longer.
If you want dry rajma in a slow-cooker version, soak the kidney beans first, drain them, then boil them briskly in fresh water for 30 minutes before they go into the slow cooker. Undercooked kidney beans can contain unsafe levels of a natural lectin called phytohaemagglutinin; Illinois Extension explains the safety issue. Already cooked or canned rajma is the simpler option.
Back to recipe · Back to guide
Cooking a Bigger Batch
Scale the urad, onion, tomato, ginger and garlic roughly in proportion. With chilli and garam masala, hold back slightly at first and adjust the finished pot to taste.
Pressure time does not double with the quantity. A larger cooker takes longer to heat and depressurize, but once it reaches pressure, begin with the usual cooking window and test a grain.
Scale the water roughly with the dal, but stay within your cooker’s safe fill limit. For a much larger batch, use a bigger cooker or cook in two batches.
What to Serve With Maa Ki Dal
Maa Ki Dal does not need a crowded plate around it. Serve it over hot basmati or jeera rice, letting some of the gravy run into the spaces between the grains. If the rice is going on at the same time, our basmati rice guide covers stovetop, pressure-cooker and Instant Pot methods.
With roti or phulka, serve the dal thick enough for a torn piece of bread to scoop it cleanly. Add sliced onion or cucumber and something sharp from the pickle jar; a spoonful of homemade mango pickle is especially good against the soft, earthy urad.
For a fuller Punjabi-style meal, add cooling raita and either paratha or jeera rice. Keep the rest simple and let the dal do the heavier work.
Storage, Freezing and Reheating
Cool leftovers promptly and refrigerate them in a covered container for 3–4 days. Freeze meal-size portions for up to about 3 months for best quality.
The bigger surprise comes the next morning: cold black-urad dal can look almost solid compared with the pot you served at dinner. Warm it gently and add ¼ cup water at a time until it becomes spoonable again.
Taste for salt after the dal has loosened back up.
Add fresh coriander, perhaps a few ginger slivers, and bring the pot to the table while the cumin and garlic are still fragrant.








