Posted on — Leave a comment

Sausage Stuffing Recipe: Easy Homemade Sausage Dressing

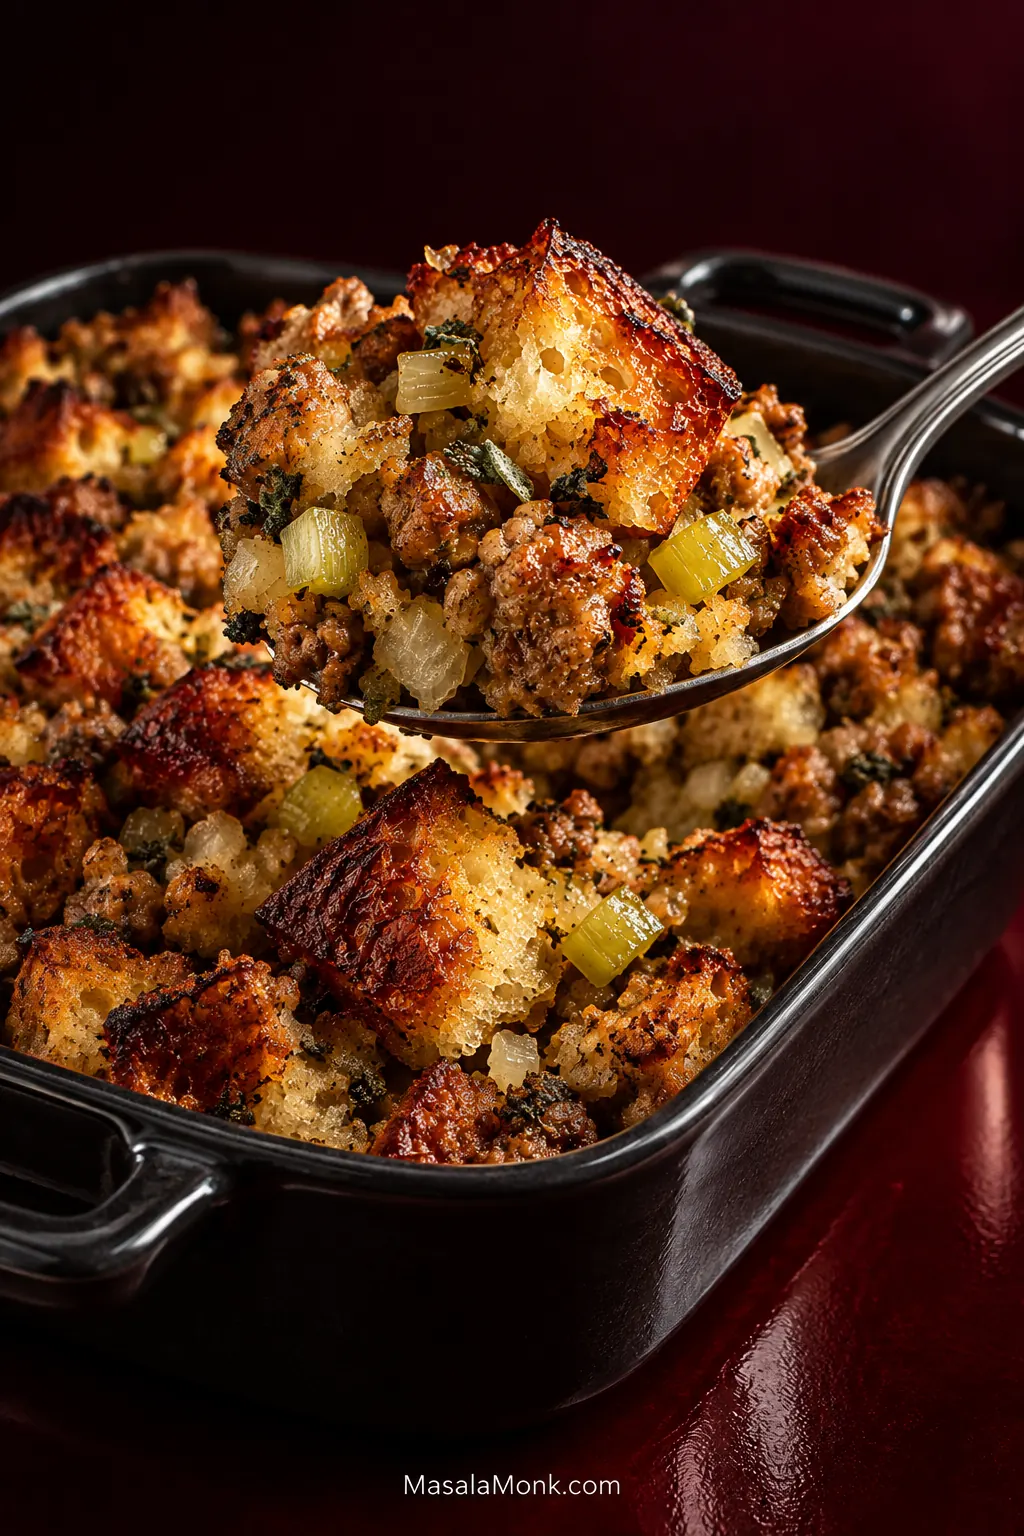
Dark casserole of golden sausage stuffing with a silver spoon lifting a crisp corner, revealing tender bread pieces, browned sausage, onion and celery.

The most important moment in this sausage stuffing recipe is deciding when the bread has absorbed enough stock.

Get that moment right and the middle stays buttery and tender while the rough top bakes deep gold, with browned sausage, onion, celery and sage running through every spoonful.

The uncertain part is the enormous bowl in front of you. The bread may still look suspiciously dry after a couple of cups of stock. Pour in everything at once and it can collapse into mush. Hold too much back and the middle may bake up dry and crumbly.

The measurement gives you a place to start; your bread tells you when to stop. A soft sandwich loaf, a French-style loaf and commercial stuffing cubes simply do not absorb stock at the same rate.

This casserole-baked version may also be called sausage dressing; the names overlap, although some families reserve “stuffing” for the mixture cooked inside poultry.

Classic Sausage Stuffing Recipe

Before You Pour All the Stock

Dry the bread first. Add most of the stock, not all of it. Toss, wait about five minutes, then add more only if the bread is still dry through the center.

You want a moist, loosely cohesive bowl—not bread sitting in a puddle of stock.

Oven: 350°F / 175°C   •   Pan: 9 × 13 in / 23 × 33 cm   •   Bake: about 50–60 minutes   •   Cook to: 165°F / 74°C in the center

Classic bread-and-sausage stuffing with sage, thyme, onion and celery, baked covered first for a tender center and uncovered at the end for crisp golden edges.

MakesOne 9 × 13-inch / 23 × 33-cm casserole
ServesAbout 10–12 as a generous holiday side; more when portions are smaller and the table has plenty of other sides
Active timeAbout 40 minutes
Total timeAbout 2 hours
Oven350°F / 175°C after drying the bread
BakeAbout 50–60 minutes
Cook to165°F / 74°C in the center

Equipment: 1–2 rimmed baking sheets, large skillet or Dutch oven, very large mixing bowl, 9 × 13-inch / 23 × 33-cm baking dish, foil, small bowl, whisk and instant-read thermometer.

Ingredients

  • 18 oz / 510 g country white or French-style bread with a fairly tight, even crumb, weighed before drying, cut into ¾–1-inch / 2–2.5-cm pieces; expect roughly 10–12 cups depending on the loaf
  • 1 lb / 454 g pork breakfast sausage or sage sausage, bulk or casings removed
  • 6 tbsp / 85 g unsalted butter, plus a little more for the baking dish
  • 2 medium yellow onions, about 10 oz / 285 g, cut into small dice
  • 4 medium celery stalks, about 6 oz / 170 g, cut into small dice
  • 4 garlic cloves, about 12 g, finely chopped
  • 1 tbsp finely chopped fresh sage, or about 1 tsp rubbed dried sage to start; if using finely ground sage, begin with about ½ tsp
  • 2 tsp fresh thyme leaves, or about ¾ tsp dried thyme
  • ¼ cup chopped flat-leaf parsley
  • ½ tsp freshly ground black pepper
  • ½ tsp fine salt / about 3 g, or to taste; start with less if the sausage, stock or bread is already salty
  • 2½ cups / 590 ml low-sodium chicken or turkey stock, plus up to ½ cup / 120 ml more if needed
  • 2 large eggs
  • Optional: ½ tsp poultry seasoning for a more old-fashioned Thanksgiving flavor

Method

1. Dry the Bread

Heat the oven to 300°F / 150°C. Spread the bread pieces over one or two rimmed baking sheets so they are not piled deeply. Bake for 30–40 minutes, tossing once or twice, until dry through the center but still pale rather than heavily toasted.

Break open a thick piece. If the middle still compresses like fresh bread, give it longer.
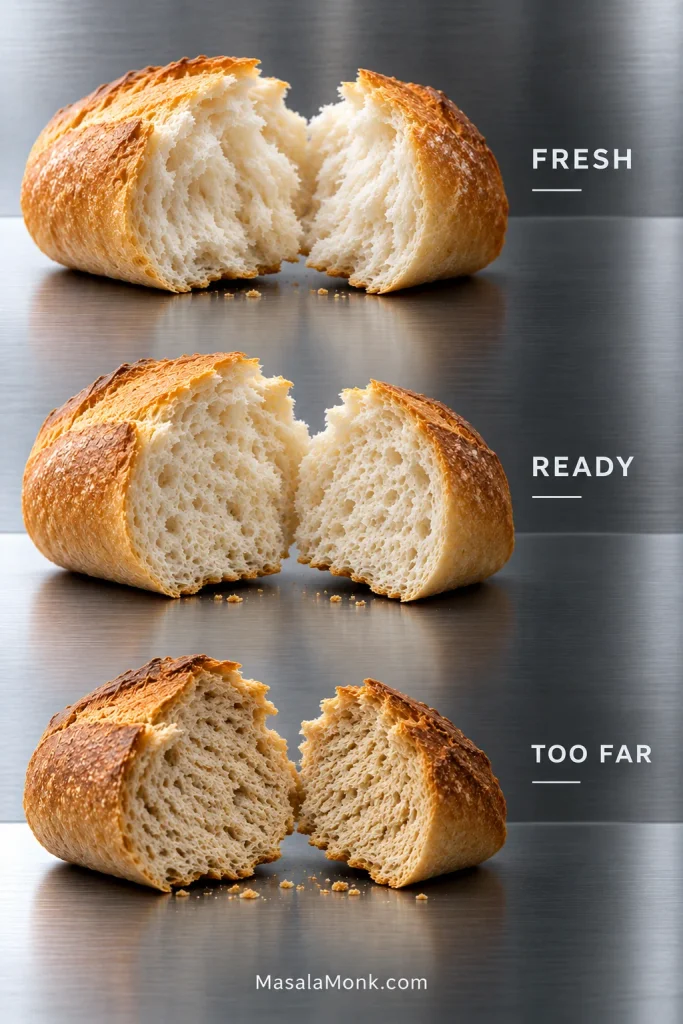
Comparison of broken bread pieces labeled Fresh, Ready and Too Far, showing soft fresh crumb, properly dried bread and overly hard dried bread.
Use the thickest bread piece as your drying checkpoint because it will be the last to lose its fresh softness. Meanwhile, pale color is perfectly fine—drying the center matters more than toasting the surface.

Use the drying time for prep: chop the onion, celery, garlic and herbs, measure the stock and seasonings, and butter the baking dish.

Remove the dried bread and increase the oven to 350°F / 175°C. Transfer the bread to a very large mixing bowl.

2. Brown the Sausage

Cook the sausage in a large skillet or Dutch oven over medium to medium-high heat, breaking it into small irregular crumbles. Brown it well, but stop before those small pieces become dry and hard.
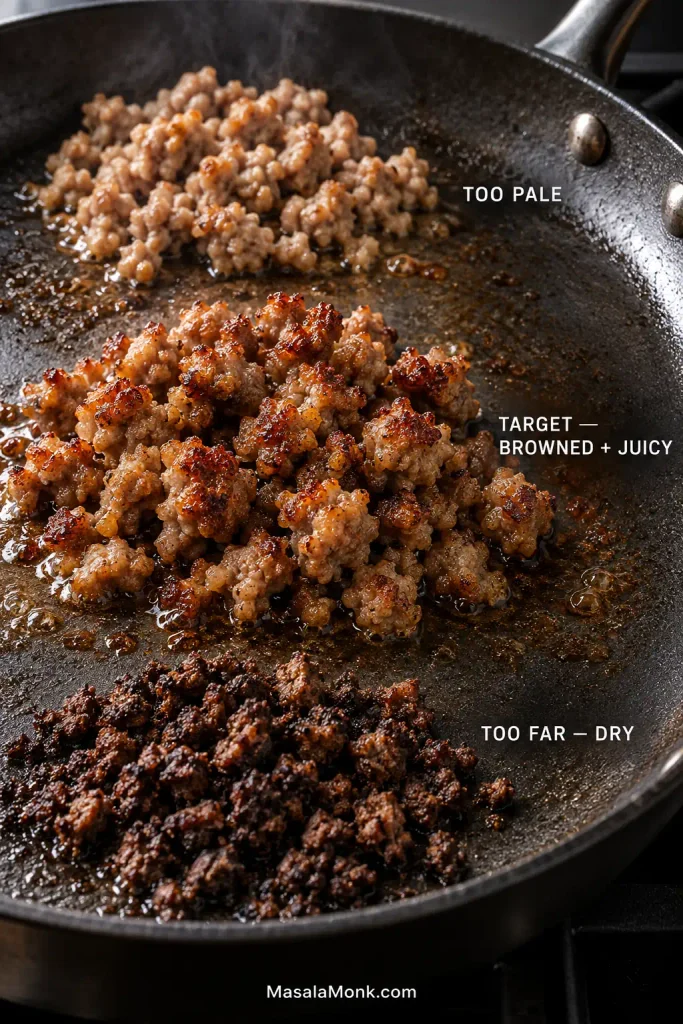
Three cooked sausage stages labeled Too Pale, Target and Too Far, comparing lightly browned, juicy browned and dark dry sausage crumbles.
Watch the smallest sausage crumbles first: they dry out before the larger pieces. Brown them enough to leave flavorful fond in the pan, but stop while the meat still looks juicy.

Cook until the sausage is cooked through, usually about 6–9 minutes. Before tasting a piece, make sure fresh pork sausage has reached 160°F / 71°C; fresh chicken or turkey sausage should reach 165°F / 74°C.

Taste one crumble. If the sausage is already salty or strongly sage-forward, use less added salt and start with only about half the additional sage.

Transfer the sausage to the bread, leaving some rendered fat in the pan. Drain only if there is a deep pool.

3. Cook the Aromatics

Add the butter to the sausage fat, followed by the onion and celery. Cook over medium heat for 8–10 minutes, until soft and beginning to turn golden around the edges.

Add the garlic, sage, thyme, black pepper and optional poultry seasoning. If the sausage was already strongly sage-seasoned, begin with less sage here. Cook for about 1 minute. Hold the parsley back for now.

The pan should now smell unmistakably like stuffing: browned pork, sweet onion, celery and warm sage.
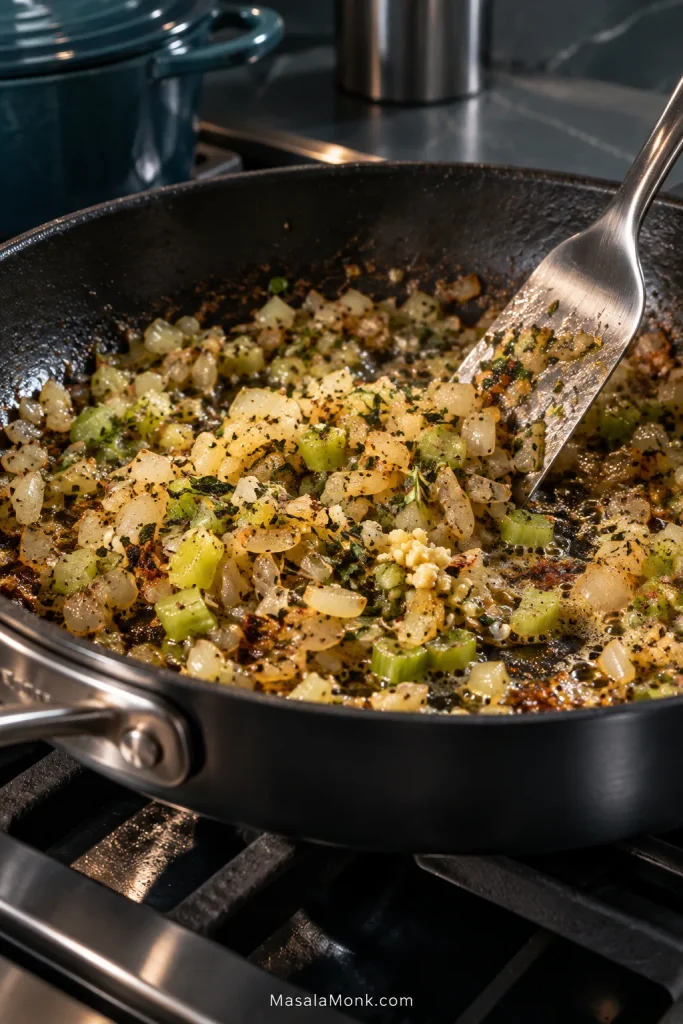
Onion, celery, garlic and herbs cooking in sausage fat in a dark skillet with browned bits visible across the pan.
Those browned bits on the skillet are useful, not something to clean away. Once stock hits the pan, they dissolve into the liquid that will season every piece of bread.

4. Add the Stock

Pour 2¼ cups / 530 ml stock into the pan and scrape up the browned bits. Keep the remaining ¼ cup / 60 ml plus the optional extra ½ cup / 120 ml warm nearby for final hydration adjustments. Bring the skillet mixture just to a simmer.

5. Hydrate, Check and Season Before the Eggs

Pour the hot stock-and-aromatic mixture over the bread and cooked sausage. Toss gently but thoroughly, then leave it alone for about 5 minutes. Some pieces may soften sooner than others, so wait before deciding the bowl needs more stock.

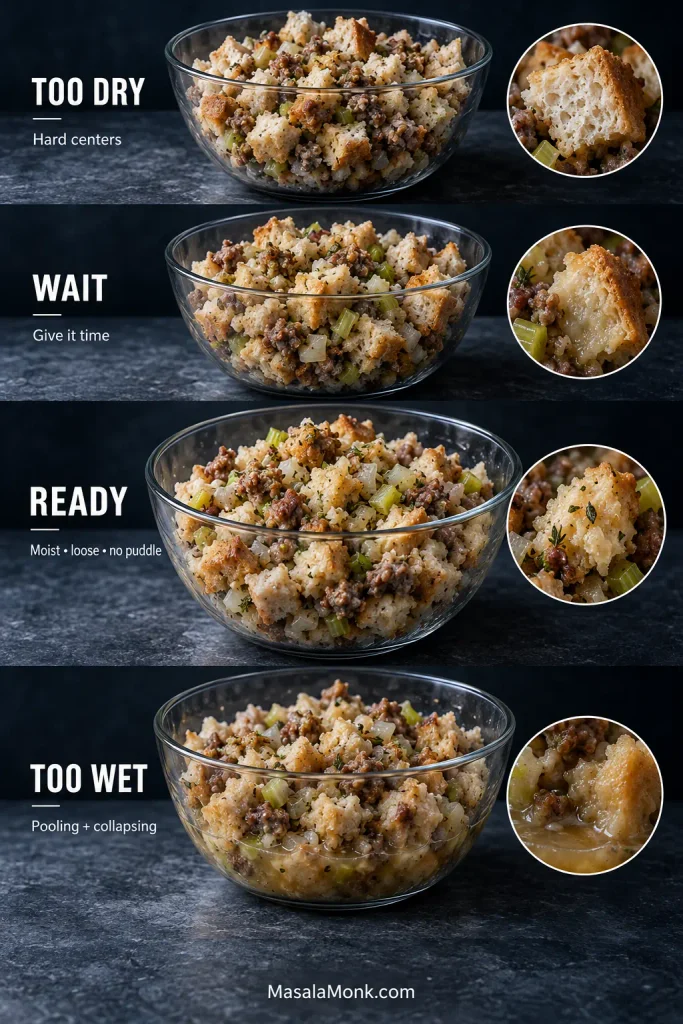
Now check the hydration while there is still no raw egg in the bowl. The full moisture guide below shows the same decision in more detail:

  • Center: break open a larger bread piece. The middle should be moist, not hard or chalky.
  • Handful: squeeze a small amount lightly. It should hold as a loose clump without dripping.
  • Bottom: move some bread aside. There should be no pool of stock underneath.
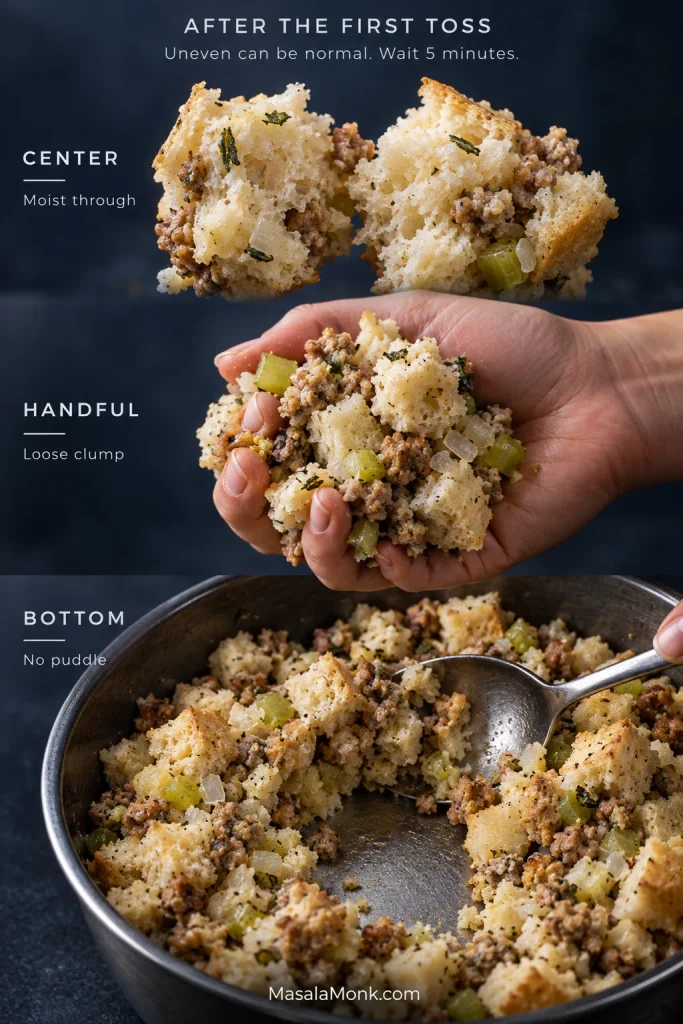
Three-part pre-egg stuffing check showing a moist bread center, a handful forming a loose clump and the bowl bottom without pooled stock.
Use all three cues together: surface moisture can hide a dry bread center, while liquid underneath reveals stock the bread has not absorbed.

If the centers are still dry, add the warm reserved stock ¼ cup / 60 ml at a time, tossing and waiting briefly between additions. Stop when the bread is moist through the center and the mixture holds loosely without free liquid.

Fold in the parsley. Then taste the complete stuffing while it is still egg-free. Adjust the salt, pepper or herbs if needed. Remember that the sausage, stock and seasoned bread may already contribute plenty of salt.

Once the hydration and seasoning are right, stop adjusting the mixture and move on to the eggs.

6. Fold in the Eggs

Whisk the 2 eggs in a small bowl. Once the stuffing is warm rather than steaming hot, pour them over the bread and fold gently until evenly distributed.

From this point forward, don’t taste the uncooked mixture. Judge it by sight and feel.

7. Fill the Pan

Spoon the stuffing into the prepared dish and spread it into an even layer without compressing it. Leave the surface rough. Those peaks and ragged edges are where the crisp pieces come from.
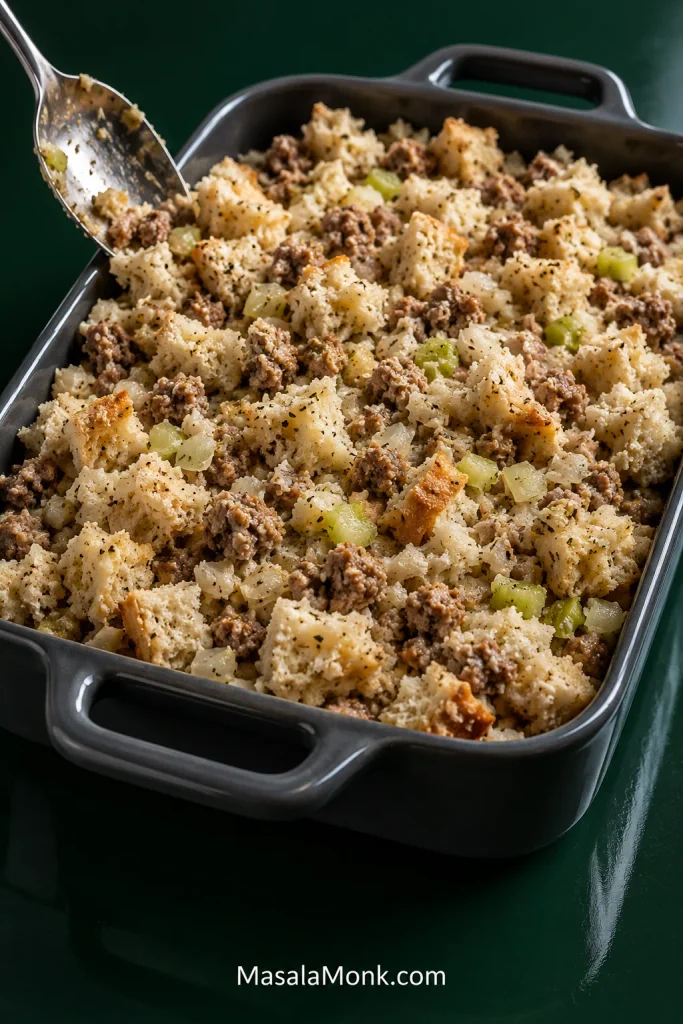
Unbaked sausage stuffing spread loosely in a dark casserole with irregular bread peaks, gaps, sausage, onion and celery rather than a compressed flat surface.
If the pan feels too full, do not solve that by pressing the stuffing down. Preserve the gaps and peaks—or use more surface area—so steam can escape around the exposed bread.

8. Bake Covered, Then Uncovered

Cover the dish snugly with foil and bake at 350°F / 175°C for about 30 minutes. The covered phase keeps the center tender while it heats.

Remove the foil. Steam should rise from the center, the casserole should smell deeply savory and the top will still look fairly pale. Continue baking uncovered for another 20–30 minutes, until the surface has a mix of deep-golden ridges and softer valleys and the center reaches 165°F / 74°C.

Let the stuffing rest for about 10 minutes before serving.
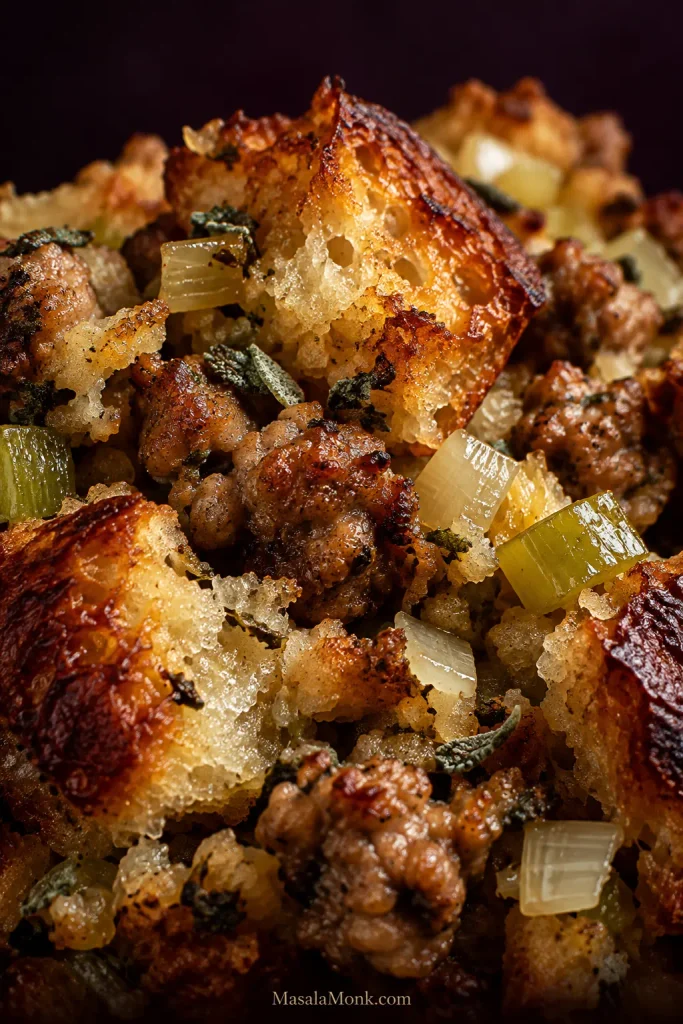
Extreme close-up of baked sausage stuffing showing browned crisp bread edges, tender interior pieces, sausage crumbles, onion and celery.
Useful irregularity is a good sign here: some bread catches more oven heat, some stays protected, and the sausage sits between both. Consequently, every spoonful has more texture than a uniformly soft dressing.

Bread for Stuffing: Choose a Loaf That Can Absorb

The best all-purpose bread for sausage stuffing is a white, French-style or country loaf with a fairly tight, even crumb. In ordinary terms, that means an interior without enormous irregular holes. It absorbs stock readily while leaving recognizable pieces in the casserole.

Soft sandwich bread is especially good for a softer, more old-fashioned dressing. Mild sourdough works when the crumb is reasonably close. Very open artisan bread with huge holes and a thick crust is less forgiving: one bite can be chewy while the crumb beside it collapses.

Keep the pieces around ¾–1 inch / 2–2.5 cm. Larger chunks create bread-only bites; tiny pieces knit together quickly and make a more uniform dressing.

Four bread cross-sections comparing soft sandwich bread, country or French-style bread, mild sourdough and a very open artisan loaf.
Choose bread by crumb more than by name. Two loaves sold as “French bread” can behave very differently if one has a close, even interior and the other is full of large holes.

How Dry the Bread Should Be

“Day-old” does not necessarily mean dry. Break open a thick piece: if the center still squashes like fresh bread, it needs more time. You want it dry through the middle, not hard and leathery.

Commercial dried cubes work too; just don’t assume they will absorb the same amount of stock as your loaf.

Best Sausage for Stuffing

Breakfast or sage pork sausage is the classic choice. It supplies much of the stuffing’s salt, fat and seasoning, so what happens in the skillet affects far more than the sausage pieces themselves.

Brown it well without cooking the small crumbles until dry. Leave some rendered fat in the skillet unless the pan is genuinely flooded, and cut the onion and celery fairly small so they soften into the bread instead of arriving as large vegetable bites.

Taste the cooked sausage before adding more seasoning. Sage sausage, poultry seasoning and commercial bread cubes can all bring herbs and salt of their own.

Read the Bowl: How Wet Should Sausage Stuffing Be?

Stock controls moisture. Eggs control how firmly the stuffing holds together. If the bread is dry, another egg is not the fix; it needs stock.

Before baking, sausage stuffing should be moist through the center of the bread, hold together loosely when squeezed, and have no puddle of stock underneath.

For 18 oz / 510 g bread, have about 2½ cups / 590 ml stock ready, plus another ½ cup / 120 ml in reserve. Many loaves land somewhere around 2½–3 cups, but the exact amount is not worth forcing.

Check Three Things

  • The center: break open a larger piece. It should be moist through the middle.
  • The handful: squeeze lightly. It should hold as a loose clump without dripping.
  • The bottom: move some bread aside. A little sheen is fine; a puddle is not.
What you seeWhat it meansWhat to do now
Hard centers + loose dry piecesThe bread needs more liquidAdd warm stock about ¼ cup / 60 ml at a time, toss, wait and check again
Soft pieces + loose clump + no puddleTargetStop adding stock
Soft bread + a little free liquidThe bread may still be catching upWait several minutes, toss once and reassess
Collapsing bread + stock pooling underneathToo much liquid has gone inIf the bread still has structure, fold in more dried bread before baking
Four pre-bake stuffing moisture states labeled Too Dry, Wait, Ready and Too Wet, showing dry centers, uneven absorption, proper hydration and excess pooled liquid.
WAIT is a real stage, not a failure. If the bowl looks patchy after stock goes in, give the bread time before correcting it; doing nothing for a few minutes may be the right move.

Choose the Sausage Stuffing Texture You Actually Want

Stuffing is one of those holiday foods where “better” can still feel wrong if it isn’t the texture people expect. A family used to soft, cohesive dressing may not want a pan of giant craggy bread cubes—and the reverse is just as true.

This recipe uses 2 eggs for moderate cohesion. For looser pieces, use 1 egg instead. For a softer, moister dressing, keep the full 2 eggs and let the bread absorb a little more stock while staying inside the same no-puddle boundary.

The target for the base recipe is the middle: moist and cohesive, with the bread pieces still visible. It should lift in a loose mound instead of scattering like dry croutons or slumping like bread pudding.

For a More Old-Fashioned Sausage Dressing

Use a fine-crumb white or sandwich loaf, dry it thoroughly, use the full 2 eggs and season with sage or poultry seasoning to taste. The finished dressing will be softer and more cohesive than a craggy country-bread stuffing.
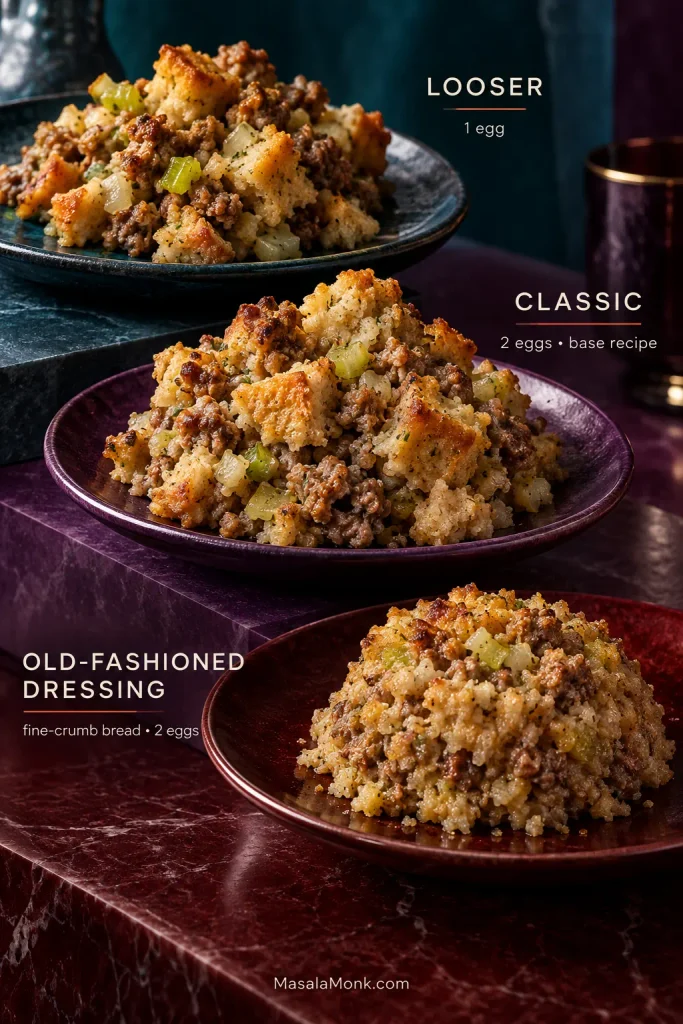
Three stuffing textures comparing loose bread pieces, classic moderately cohesive sausage stuffing and softer fine-crumb old-fashioned dressing.
Think about how you want the stuffing to leave the serving spoon: loose pieces fall apart readily, classic stuffing forms a soft mound, while old-fashioned sausage dressing holds together more closely.

If your family’s version starts with cornbread instead, our Southern cornbread dressing recipe follows that path from the beginning.

Covered First, Uncovered Second

Cover the stuffing first to keep the center moist; uncover it for the final 20–30 minutes to build the golden crust.

Under the foil, trapped steam keeps the bread tender while the center heats and the eggs set. Once the foil comes off, moisture escapes and the rough ridges begin to turn crisp and buttery.
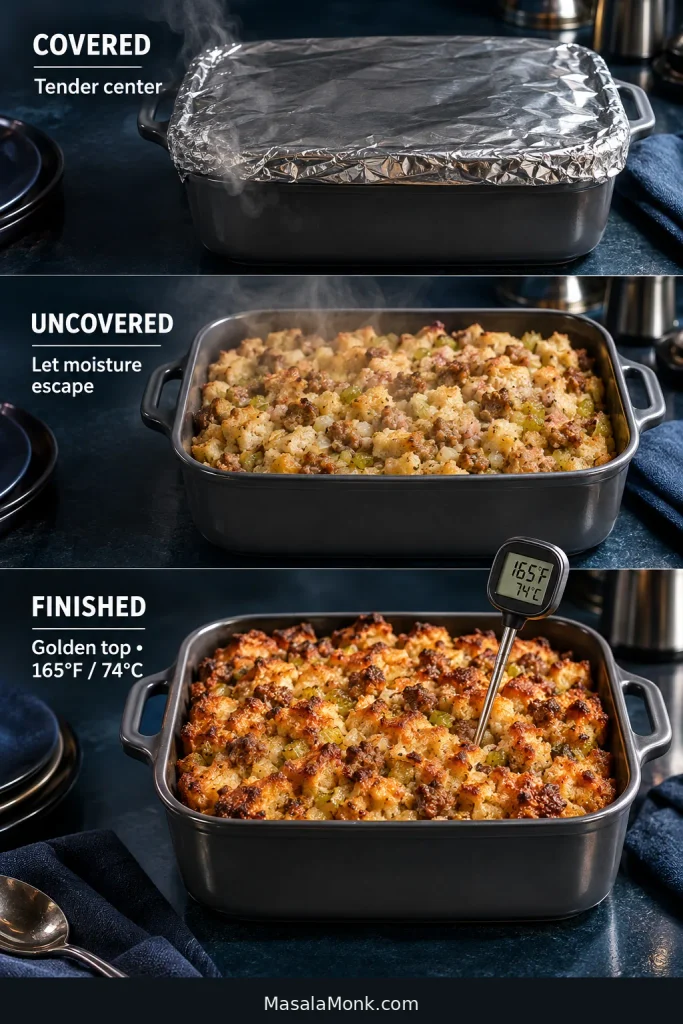
Three stages of one sausage stuffing casserole: covered with foil, uncovered and pale, then golden brown with a thermometer reading 165°F or 74°C.
A pale top is normal while the dish is covered, so do not chase color too early. Browning becomes useful only after the foil comes off; the center temperature still decides when the stuffing is done.

How Long to Bake Sausage Stuffing

In a 9 × 13-inch / 23 × 33-cm dish at 350°F / 175°C, expect roughly 50–60 minutes: about 30 minutes covered, followed by 20–30 minutes uncovered.

A deeper casserole takes longer. A cooked casserole reheated from the refrigerator takes longer too. Near the expected time, let the center temperature decide: 165°F / 74°C.

For More Crisp Edges, Use a Shallower Pan

Spread the same stuffing into a wider, shallower dish and there are simply more browned corners. Pile it deeper and the center stays softer and takes longer to heat.

Doubling the recipe? Use two pans. One enormous deep casserole changes the cooking far more than simply doubling the ingredient list.
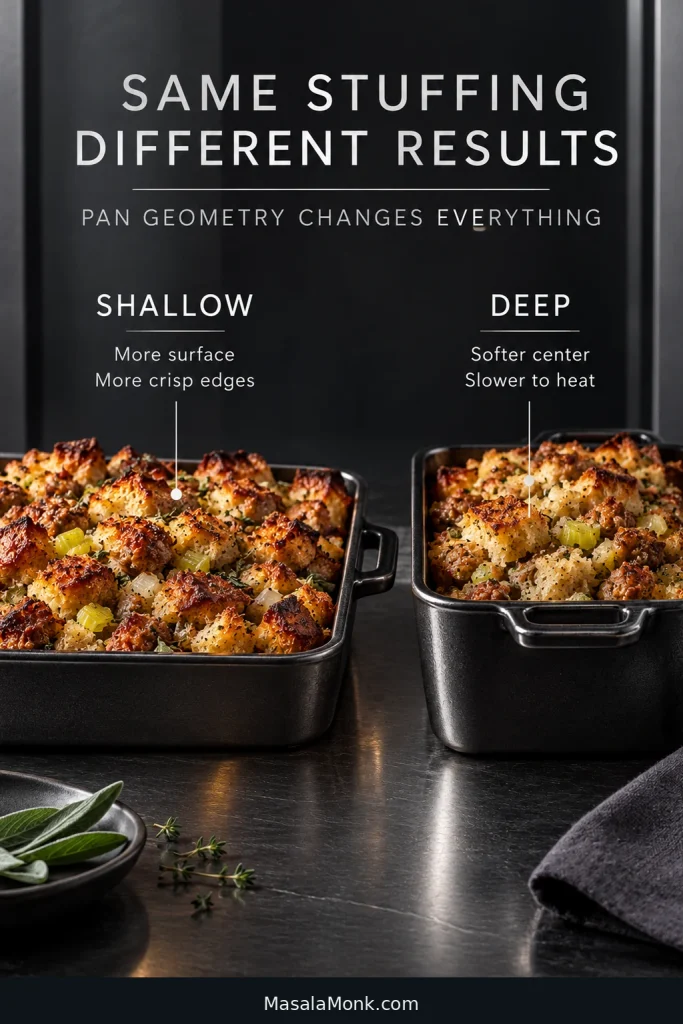
Side-by-side shallow and deep pans of the same sausage stuffing, showing more browned surface in the shallow pan and a thicker layer in the deep pan.
For more crisp edges, change the geometry before changing the recipe. A wider, shallower layer creates extra exposed surface without deliberately withholding stock from the tender center.

Fix My Sausage Stuffing: What to Do at Each Stage

The fix changes once the eggs go in and again once the stuffing reaches the oven.
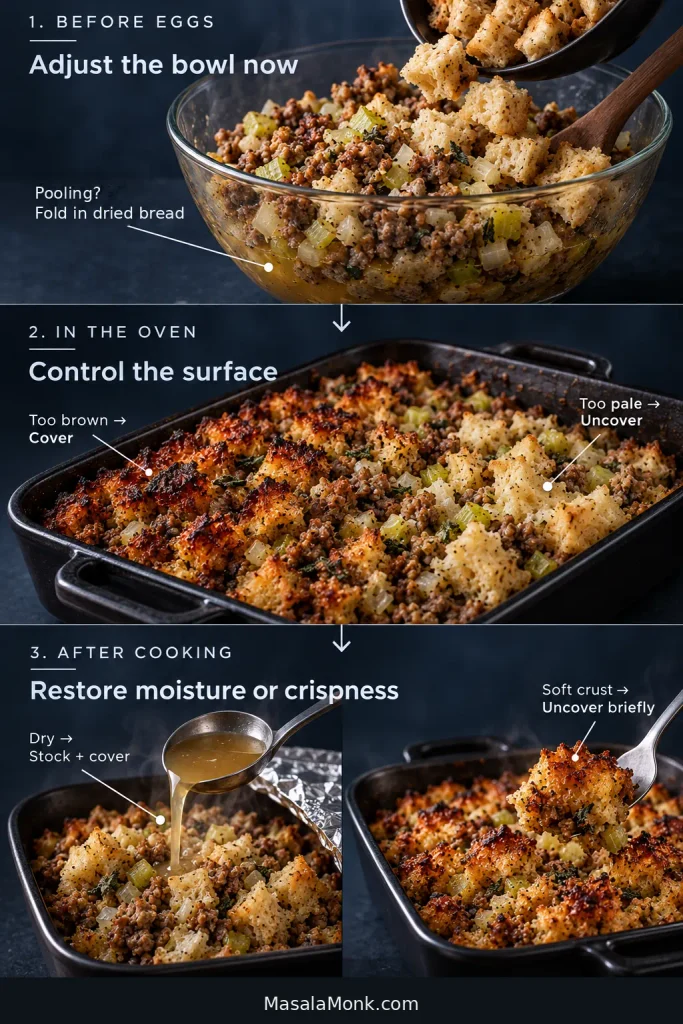
Three-stage sausage stuffing troubleshooting guide showing excess liquid corrected before eggs, browning adjusted in the oven and cooked stuffing restored after baking.
Fix the stuffing you have now, not the problem you imagine caused it. Before eggs you can still rebalance the bowl; later, the useful controls are mostly heat, foil, stock and time.

Before the Eggs Go In

Dry in the center? Add warm stock about ¼ cup / 60 ml at a time. Toss, wait, then break open another piece.

Stock pooling underneath? Give the bread several minutes first. If the puddle remains and the pieces still have structure, fold in more dried bread.

Already salty? Stop seasoning. Sausage, broth and seasoned bread cubes can contribute far more sodium together than the salt shaker.

Too much sage? If the imbalance is severe, dilute with dried bread and adjust the stock to match rather than adding more herb-heavy seasoning.

Already in the Oven

Top browning too quickly? Put the foil back on. The surface is ahead of the center.

Center softer than you wanted? Once it is fully hot, leave the dish uncovered and give moisture more time to escape. A deep casserole may need longer; see how pan depth changes the bake.

Top still pale? Keep it uncovered after the center is hot. A rough surface browns better than one smoothed flat.

If the bread had already collapsed into paste before the dish went into the oven, baking can make that paste drier. It cannot turn it back into intact bread pieces.

Already Cooked

Dry? Drizzle over a modest amount of warm stock, cover and reheat gently.

Top went soft while it waited? Give it a short uncovered finish before serving.

Hard sausage pieces? They were probably browned too aggressively at the start. Next time, stop while the small crumbles are still juicy.

Bland? Check the salt, stock, fat and sausage browning before adding more herbs. If the stuffing already tastes strongly herbal yet still seems flat, herbs are not what it is missing.

Starting With a Box or Bag of Stuffing?

The same moisture logic applies, but a fine seasoned mix does not behave exactly like a bowl of homemade dried bread. Start with its own liquid guidance rather than forcing the homemade ratio onto it.

What you are usingAdjustWatch for
Plain dried bread cubesUse them much like homemade dried breadVery dry cubes may need more stock
Seasoned cubes or mixStart with less added herb and salt; use low-sodium stock when the sausage is salty tooSage, poultry seasoning and sodium can stack up quickly
Fine boxed stuffing mixBegin with the package liquid guidanceSmall pieces can hydrate much faster

Fresh onion and celery cooked in the sausage drippings, stock instead of plain water and a casserole bake can give the shortcut version much more depth.

Sausage Stuffing Variations: Change the Flavor Without Losing the Texture

Simple Swaps

Italian sausage works without changing the basic method; expect more fennel and garlic. Turkey or chicken sausage may need a little more butter or olive oil because it is often leaner. Dried cranberries can be folded through for sweet-tart contrast, or you can keep that contrast on the plate with cranberry sauce with orange juice.

Mushrooms are best browned first so they don’t release all their water into the bread. Cooked chestnuts can simply be folded through.

These Need More Than a Simple Swap

Apple brings enough moisture to change how much stock the bread needs, so use the moisture checks rather than forcing a fixed final pour. Cornbread is more fragile than wheat bread and needs gentler handling and its own liquid balance; start with a savory Southern cornbread if that’s the direction you want to take.

Stuffing balls, British sausage-meat stuffing and slow-cooker stuffing need different ratios rather than a simple ingredient swap: the first two are much more sausage-heavy, while a slow cooker traps far more moisture than an oven casserole.
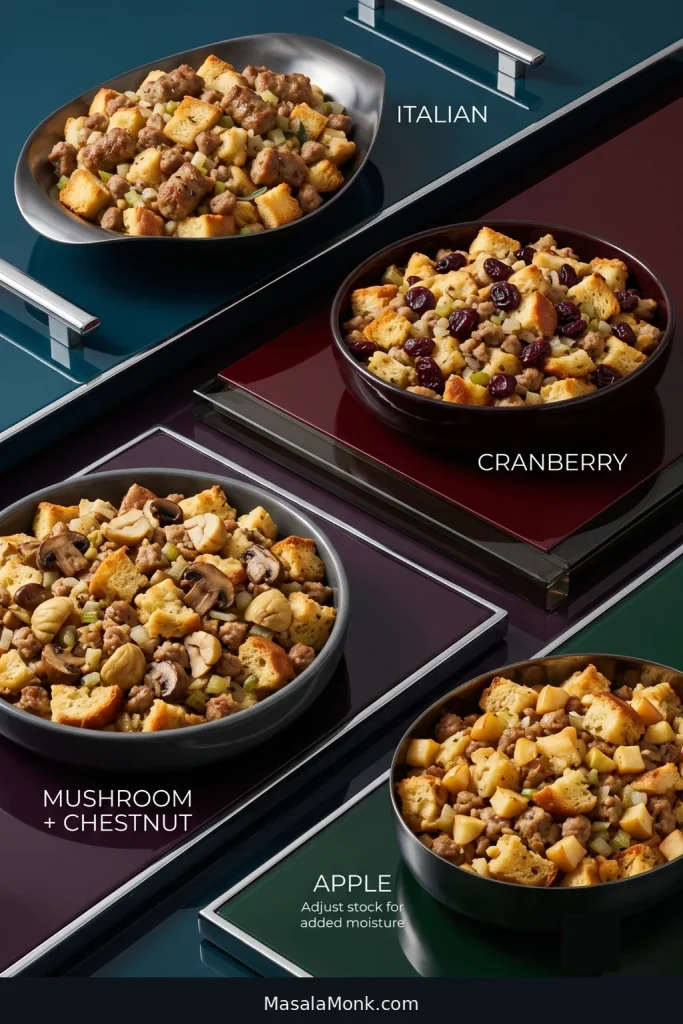
Four bread-based sausage stuffing variations labeled Italian, Cranberry, Mushroom plus Chestnut and Apple, with each addition mixed through visible bread and sausage.
A useful way to judge sausage stuffing variations is by the water they introduce. Dried fruit and chestnuts change flavor easily; mushrooms need browning first, while apple makes the final stock addition less predictable.

Egg-Free, Dairy-Free and Gluten-Free

Egg-free: leave out the eggs for a looser stuffing; extra stock won’t replace the missing cohesion. Dairy-free: use dairy-free butter or olive oil, and check the sausage and stock labels. Gluten-free: use a sturdy gluten-free loaf and verify the sausage, stock and seasonings too; add stock slowly because absorption varies enormously from one loaf to another.

Thanksgiving Sausage Stuffing Without the Last-Minute Scramble

Stuffing itself is easy enough. Stuffing while a turkey owns the oven, potatoes need attention, gravy is waiting and somebody is already asking when dinner will be ready is another matter.

Make-Ahead Sausage Stuffing: The Day Before

  • Cut and dry the bread completely.
  • Let the dried bread cool fully, then store it airtight at room temperature.
  • Cook the sausage, onion, celery, garlic, sage and thyme.
  • Cool the cooked sausage mixture in a shallow container and refrigerate it within 2 hours.

Keep the dried bread separate from the cooked sausage mixture and stock until you’re ready to cook. USDA guidance advises preparing stuffing components ahead separately and combining them immediately before cooking rather than refrigerating mixed uncooked stuffing for later.

See USDA Stuffing and Food Safety for the full guidance.
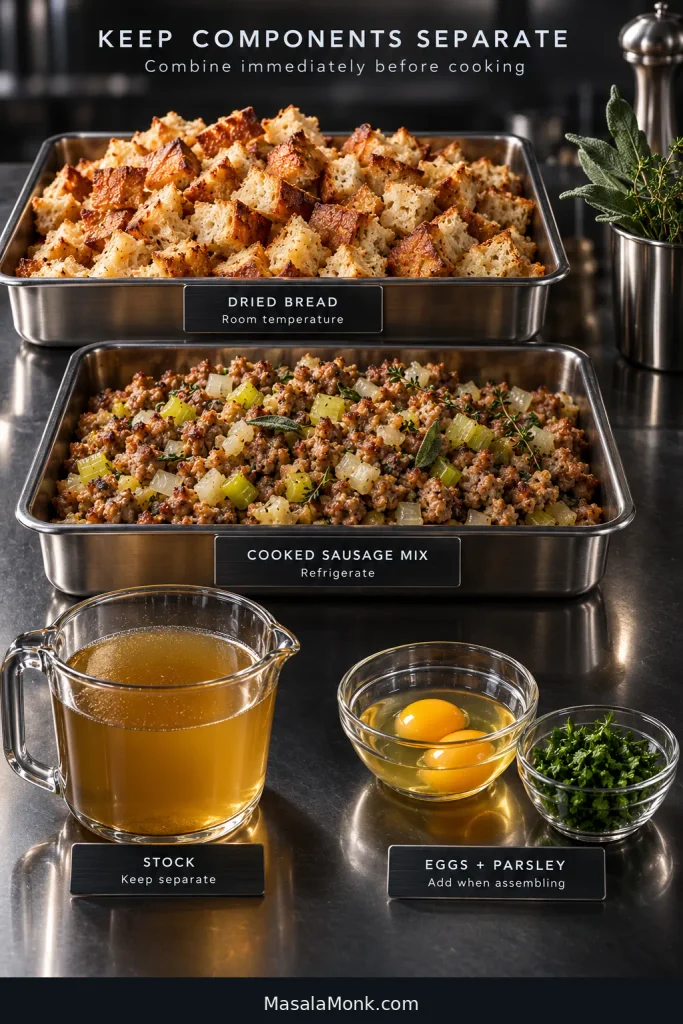
Separate make-ahead stuffing components on a metal counter: dried bread, cooked sausage and vegetables, stock, eggs and chopped parsley in individual containers.
Cool the dried bread completely before sealing it; otherwise trapped warmth can soften what you just dried. Meanwhile, chill the cooked sausage mixture separately and add the stock only when you assemble the stuffing.

When You Are Ready to Assemble

Warm the cooked sausage-and-aromatic mixture gently with the stock before pouring it over the dried bread. Wait five minutes, check the center, handful and bottom, adjust with warm stock if needed, fold in the parsley and taste the complete egg-free stuffing. Correct the seasoning, then fold in the eggs and bake.

On Thanksgiving Day, that’s essentially what remains: warm, mix, check and bake.

If You Have One Oven

Do not assume a refrigerator-cold casserole will reheat completely during the turkey’s rest. If oven space allows, begin reheating a fully cooked, covered stuffing casserole toward the end of the turkey roast. Once the turkey comes out, return the oven to 350°F / 175°C and finish heating the stuffing, uncovering near the end to restore the crust.

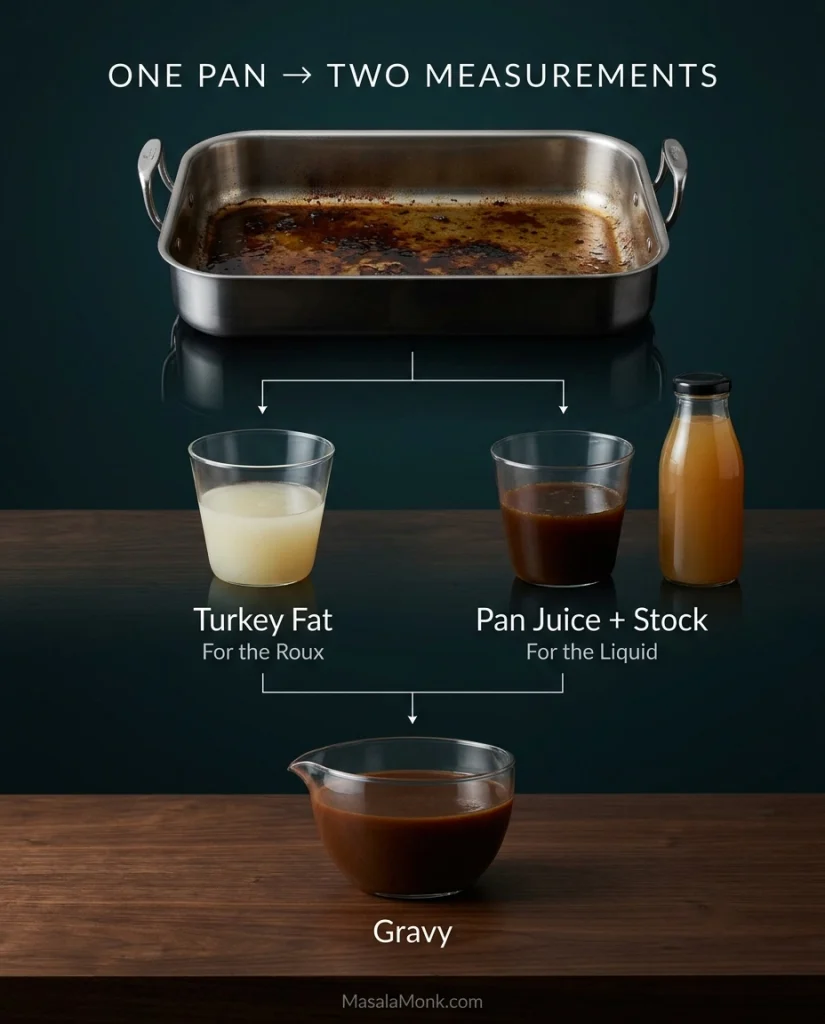
If there is no room beside the turkey, plan for the stuffing to need more time after the bird comes out rather than forcing it into a 20-minute rest window. Let the center temperature decide: reheated stuffing should reach 165°F / 74°C. Meanwhile, the roasting-pan juices can become turkey gravy from drippings.
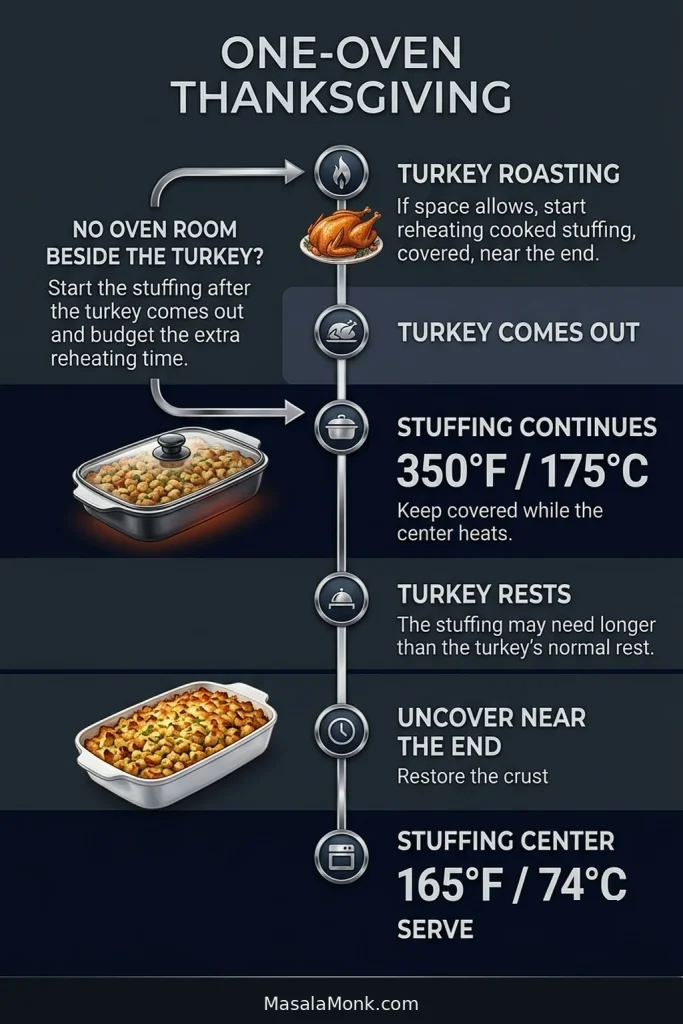
Vertical one-oven Thanksgiving timeline showing turkey roasting, cooked stuffing reheating at 350°F or 175°C, uncovering near the end and reaching 165°F or 74°C.
With one oven, the casserole’s starting temperature matters. A refrigerator-cold pan needs its own reheating window; therefore, keep heating until the center reaches 165°F / 74°C rather than relying on the clock.

Can You Put Sausage Stuffing Inside a Turkey?

You can, but baking sausage stuffing separately is the better default. It is easier to bring the stuffing safely to temperature, easier to keep the turkey from cooking longer than necessary, and much easier to get a tender center with plenty of crisp surface.

If your Thanksgiving tradition still calls for stuffing inside an oven-roasted turkey:

If You Stuff the Turkey, Follow These Safety Checks

  • Cook the sausage and any other raw meat ingredients first.
  • Keep the dried bread separate from the cooked sausage mixture and stock until immediately before filling the bird.
  • Combine the stuffing just before filling, and do not cool the freshly mixed stuffing first.
  • Keep the stuffing moist and fill the cavity loosely.
  • Allow roughly ¾ cup stuffing per pound of turkey.
  • Do not pack the cavity simply to use up the whole batch; bake any excess separately.
  • Roast immediately in an oven set no lower than 325°F / 165°C.
  • The center of the stuffing must reach 165°F / 74°C.
  • Check the turkey too: the breast and innermost parts of the thigh and wing should reach at least 165°F / 74°C.
  • Let the cooked turkey rest about 20 minutes before removing the stuffing.

Do not stuff a turkey that will be grilled, smoked, fried or microwaved.

For the full instructions, see the USDA guidance on stuffing turkey.
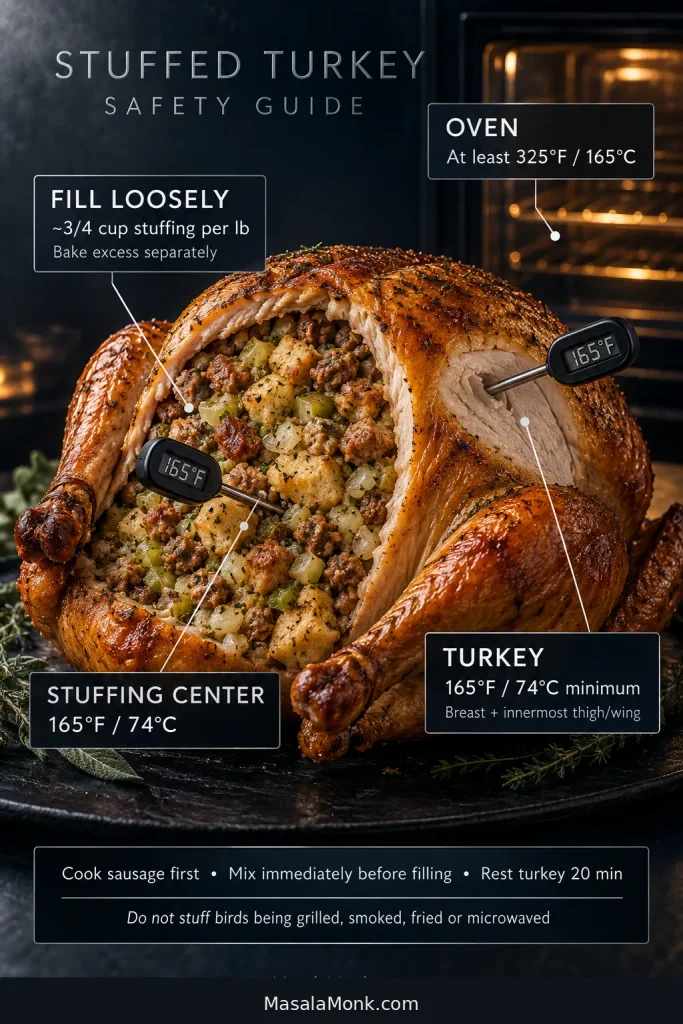
Cutaway roast turkey filled loosely with stuffing, with callouts for three-quarter cup per pound, a minimum 325°F oven and 165°F temperatures for turkey and stuffing.
Brown turkey skin does not tell you whether stuffing in the cavity is safe. Instead, measure the stuffing center itself and keep roasting until both the bird and stuffing have reached their required temperatures.

Want the Turkey Flavor Without Stuffing the Bird?

Use turkey stock, keep some of the rendered sausage fat and don’t skimp on the butter. Later, a little fully cooked turkey pan juice spooned over the casserole before reheating can bring in even more roast-turkey flavor without sacrificing the crisp top.

Scaling the Recipe and Planning Portions

Doubling the recipe? Use two 9 × 13-inch / 23 × 33-cm dishes. One very deep casserole traps more steam and takes much longer to heat through.

About ¾ cup cooked stuffing per person is a useful Thanksgiving planning starting point. That means roughly 6 cups for eight people, 9 cups for 12, or 12 cups for 16.

This recipe makes one full 9 × 13-inch casserole and is best thought of as about 10–12 generous side servings. Smaller portions naturally stretch farther when stuffing is one of many dishes on the table. If your family takes seconds before they’ve finished the turkey, plan more generously.

What to Serve With Sausage Stuffing

Roast turkey and gravy are the obvious partners. Add creamy mashed potatoes and you have two sides particularly good at catching the gravy that runs across the plate.

Something greener and sharper helps against all that soft bread, butter and potato. Roasted Brussels sprouts, green beans or tart cranberry sauce all work.
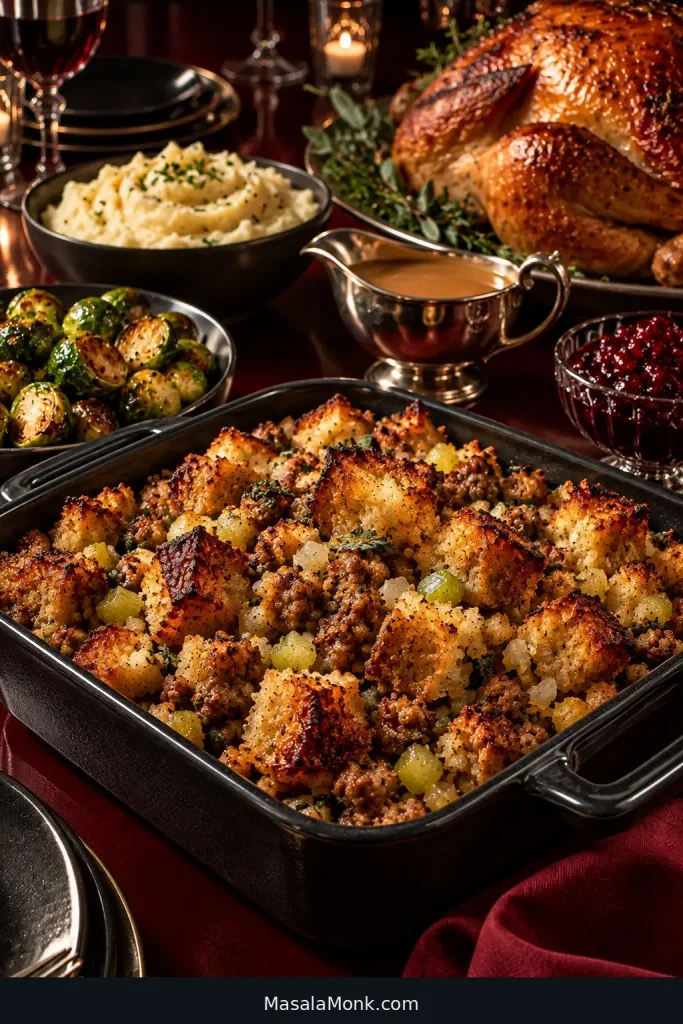
Thanksgiving table with sausage stuffing in the foreground beside roast turkey, gravy, mashed potatoes, Brussels sprouts and cranberry sauce.
When plating Thanksgiving stuffing, put gravy where you want softness rather than flooding every browned ridge. Then something green or tart can cut through the butter, sausage, potatoes and gravy.

This doesn’t have to be a once-a-year side either. A smaller batch is just as good beside roast chicken or pork on a cold weekend.

Leftovers, Storage and Reheating

If dinner is only slightly delayed, keep the hot casserole loosely covered. A tight seal traps steam and softens the top. A short uncovered return to the oven will bring some of the crust back.

Refrigerate cooked stuffing within 2 hours and use it within 3–4 days. Shallow containers help it cool more quickly.

Reheat leftovers to 165°F / 74°C. If the stuffing looks dry, add a splash of stock, cover while the center heats and uncover near the end to crisp the surface again.

Cooked stuffing freezes well in practical portions; for best quality, use it within about 1 month. Thaw overnight in the refrigerator when convenient, or reheat from frozen with extra time.

Sausage Stuffing FAQs

1. Does sausage need to be cooked before adding it to stuffing?

Yes. Cook the sausage first. Fresh pork sausage should reach 160°F / 71°C; poultry sausage should reach 165°F / 74°C.

2. Do you need eggs in sausage stuffing?

No. Eggs help the casserole hold together; they do not hydrate the bread. Leave them out for a looser stuffing, or use 1 egg instead of 2 for a middle ground.

3. How much broth or stock do you need for stuffing?

For 18 oz / 510 g bread, have about 2½ cups / 590 ml stock ready plus up to another ½ cup / 120 ml. Add the final amount only if the bread needs it.

4. Can you make sausage stuffing ahead?

Yes. Dry the bread and cook the sausage-and-aromatic mixture ahead, but keep them separate from the stock and combine everything immediately before cooking. A fully cooked casserole can also be chilled and reheated to 165°F / 74°C.

5. What temperature should sausage stuffing reach?

Cook the center of the stuffing to 165°F / 74°C, whether it is baked in a casserole or inside a turkey.

Save a Crisp Corner for Your Plate

Once you know what properly hydrated bread looks like, sausage stuffing stops feeling like a gamble. The middle can stay tender while the ragged pieces on top turn buttery and dark at the edges.
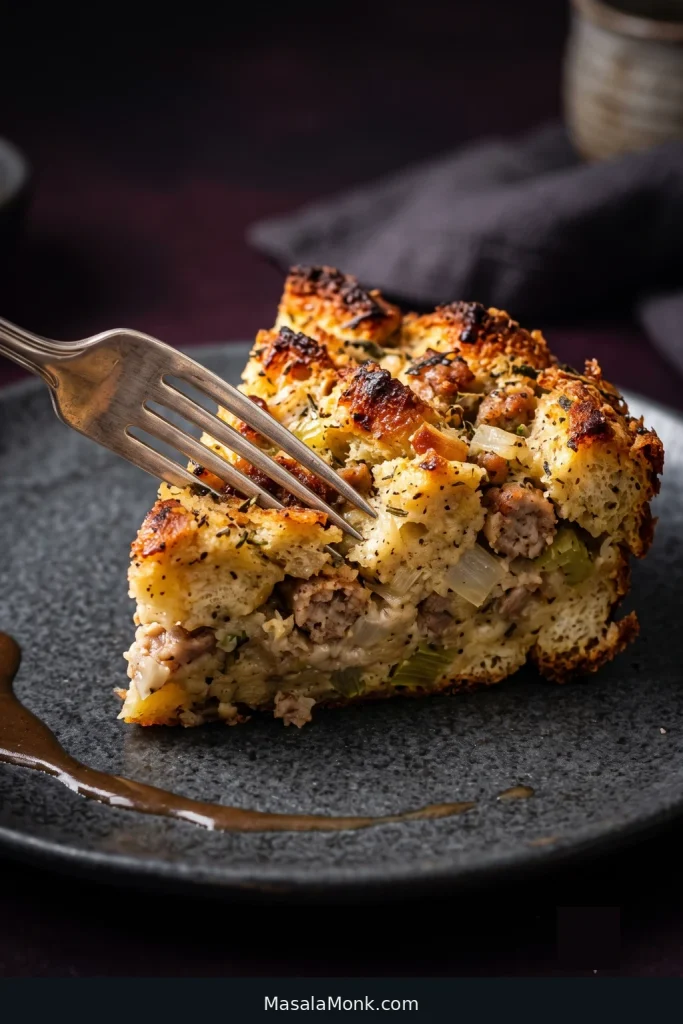
Side view of a crisp corner of sausage stuffing on a dark plate as a fork breaks through browned bread into the softer sausage, onion and celery-filled center.
Edge and center servings are effectively two textures from the same casserole. Choose the crisp corner when you want more browned bread—or dig toward the middle when softer sausage dressing is what you love.

When it reaches the table, dig the spoon through one of those crisp corners and catch some of the softer stuffing underneath with it. Browned sausage, sage, tender bread, crunchy edges and gravy running into the gaps—that is the part worth getting right.
Posted on — Leave a comment

H1: Corn Casserole Recipe: Creamy, Buttery Cornbread Casserole

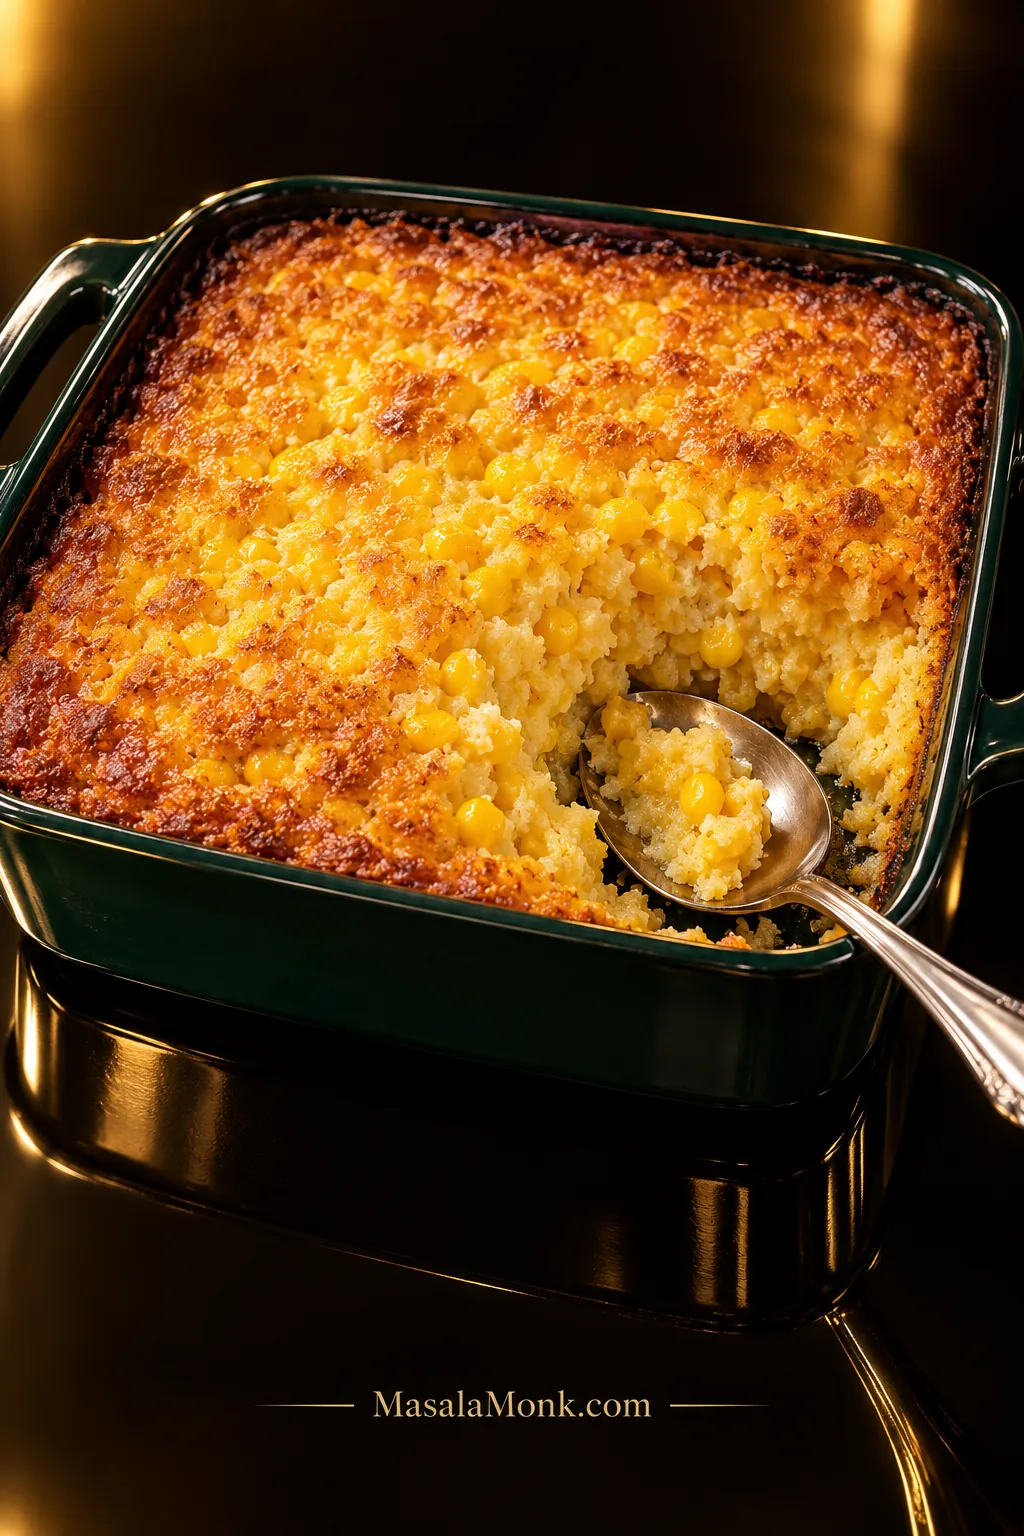
Golden corn casserole in a glossy deep-green baking dish with one serving removed, showing browned edges, visible corn kernels, and a moist, soft center beside a silver serving spoon.

A good corn casserole has browned, buttery edges and a middle soft enough for a serving spoon to sink straight through. Sweet kernels pop through the creamy base, while the top tastes closer to tender cornbread.

The tricky part is knowing when that softness is actually done. Pull it too soon and you have wet batter; leave it until it looks like ordinary cornbread and the part that makes the casserole special has disappeared.

This corn casserole recipe lands between those two extremes. Everything comes together in one mixing bowl in about 10 minutes—no stovetop step, no mixer, and no need to prepare the corn muffin mix separately.

The classic Jiffy corn casserole uses one 8.5-oz / 240-g package of mix, added dry. A from-scratch version is included farther down if you do not have Jiffy or prefer to skip the box.

Corn Casserole in 30 Seconds

Corn casserole is a soft, spoonable baked corn side that usually combines corn with a creamy base and cornmeal or cornbread mix. For this corn casserole recipe, heat the oven to 350°F / 175°C. Combine an 8.5-oz / 240-g package of dry corn muffin mix with one drained can of whole-kernel corn, one full can of cream-style corn, 1 cup sour cream, ½ cup melted butter, and 2 eggs. Bake in a 9×9-inch (23×23-cm) dish and begin checking around 45 minutes. Rest for 10 minutes before serving.

The middle should stay soft, but it should no longer behave like liquid. Soft is right. Sloshy is not.
Make It Now

Classic Creamy Corn Casserole

This corn casserole recipe gives you sweet corn in every scoop, buttery browned edges, and enough egg to hold everything together without turning the casserole cakey.

Prep: About 10 minutes

Bake: Usually 45–55 minutes in a 9×9 pan

Rest: 10 minutes

Oven: 350°F / 175°C

Pan: 9×9 in / 23×23 cm

Method: One mixing bowl

Yield: About 8 side servings

Before You Mix

Drain the whole-kernel corn.

Keep the cream-style corn and its thick liquid.

Add the corn muffin mix dry. Do not prepare muffins according to the box directions first.

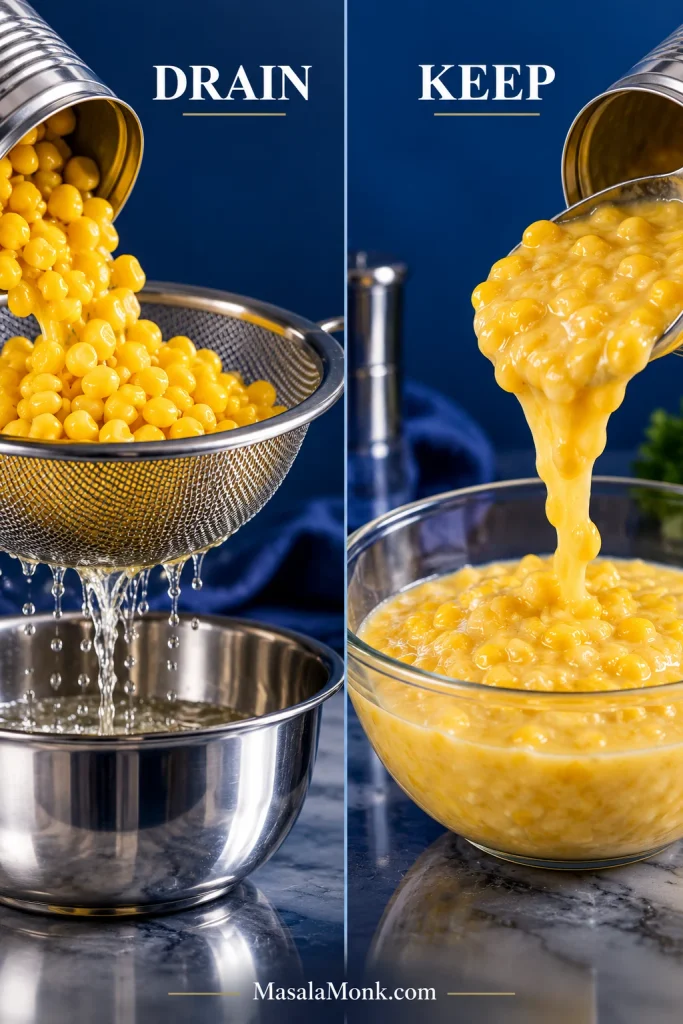
Whole-kernel corn draining in a metal sieve beside cream-style corn kept with its thick liquid.
Drain the whole-kernel corn, but keep the cream-style corn and its thick liquid. One removes excess water; the other supplies body.

Ingredients

  • 1 package corn muffin mix, 8.5 oz / 240 g
  • 1 can whole-kernel corn, about 15 oz / 425 g before draining, well drained
  • 1 can cream-style corn (often called creamed corn), 14.75–15 oz / 418–425 g, undrained
  • 1 cup full-fat sour cream, about 8 oz / 227 g
  • ½ cup unsalted butter, 4 oz / 113 g, melted and cooled slightly
  • 2 large eggs
  • ¼ teaspoon freshly ground black pepper, optional
  • Up to 1 cup shredded cheddar, about 4 oz / 113 g, optional

If you’re using a larger package of the same corn muffin mix, weigh out 240 g rather than using the whole package. The muffin mix and canned corn are already seasoned, so the base recipe does not automatically need extra salt.

Vegetarian cooks should check the package before buying. The original JIFFY Corn Muffin Mix contains lard, while its Vegetarian Corn Muffin Mix uses vegetable shortening.

Method

  1. Heat the oven. Set a conventional oven to 350°F / 175°C. Lightly grease a 9×9-inch (23×23-cm) baking dish.
  2. Mix the wet ingredients. Whisk the eggs and sour cream together. Once the melted butter has cooled from very hot to warm, whisk it in.
  3. Add the corn and muffin mix. Stir in the whole-kernel corn and cream-style corn. Fold in the dry muffin mix just until no obvious dry pockets remain. A few small lumps are fine; there is no need to keep stirring until the batter is perfectly smooth. Add cheddar now if you want cheese throughout.

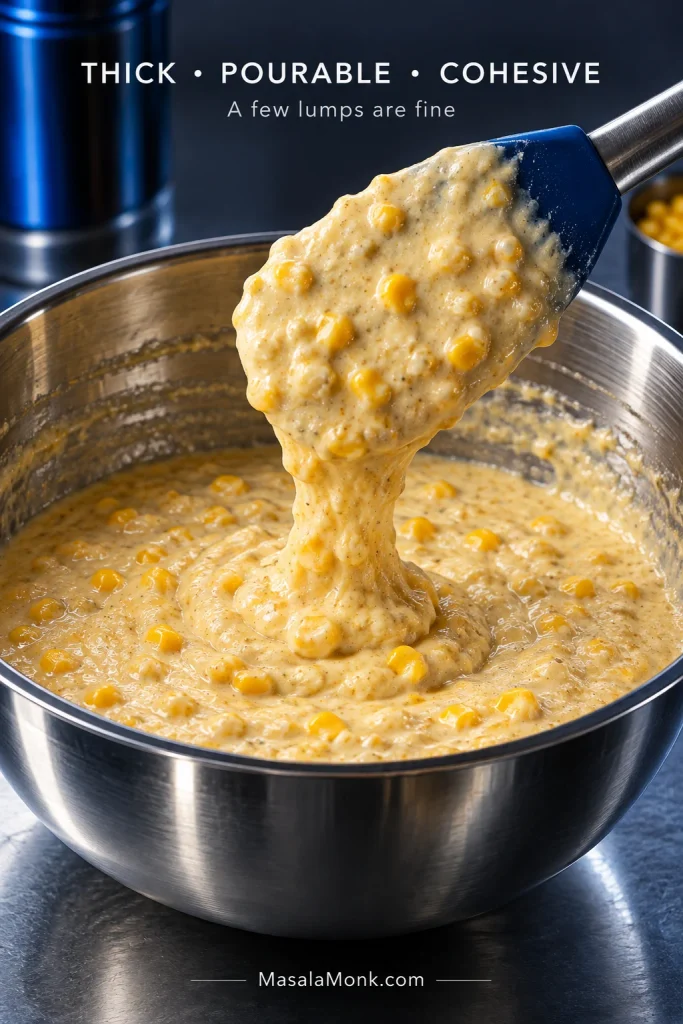
Check the batter before baking: it should be thick but still pourable or easily spoonable. It should look cohesive, not watery, with no loose liquid pooling around the corn.

Thick corn casserole batter with visible kernels falling from a spatula into a metal bowl.
The batter can stay slightly lumpy. What matters is that it looks cohesive, with no loose liquid separating around the corn.
  1. Bake. Pour or spoon the batter into the dish and bake uncovered. Begin checking around 45 minutes. The edges should be lightly golden and the surface should have lost its raw, glossy look. For an egg casserole, USDA guidance gives 160°F / 71°C as the minimum center temperature. If you want cheddar on top, add it for roughly the final 8–10 minutes.
  2. Rest. Leave the casserole in the pan for 10 minutes before scooping.

How to Tell When Corn Casserole Is Done

If you are staring through the oven door wondering whether the loose-looking middle is still raw, watch what happens when the pan moves. The top can brown before the inside is ready, so color alone is not enough.

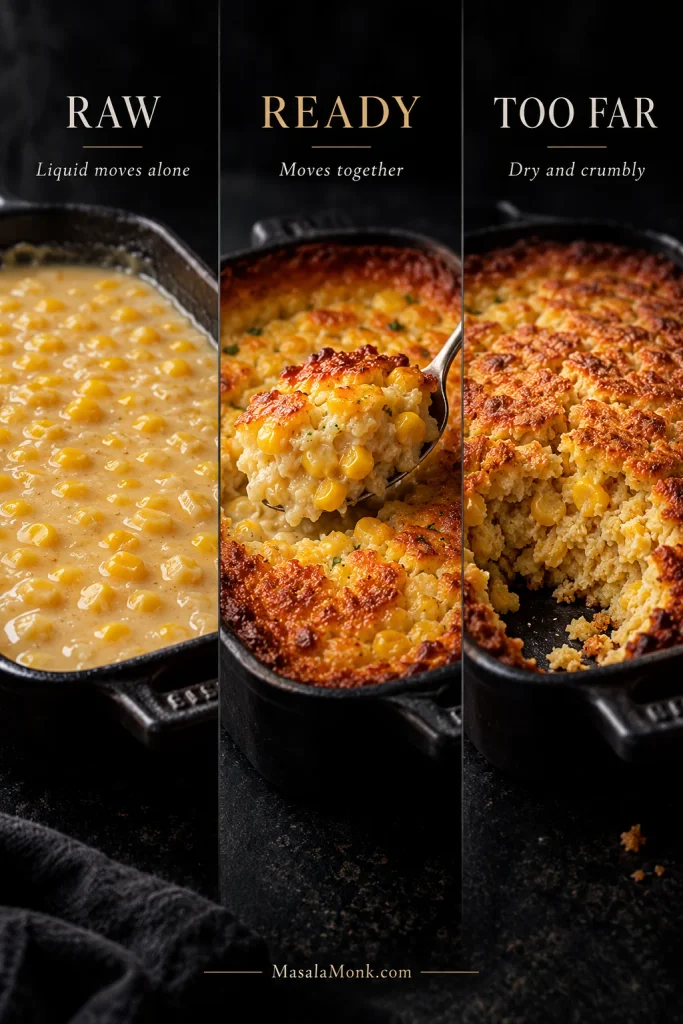
Still Raw

The center looks glossy and loose. Nudge the dish and liquid ripples through the middle on its own. A tester comes out coated in wet batter.

Ready

The perimeter is set and beginning to brown. The middle can move gently, but it moves with the rest of the casserole instead of sloshing independently. Moist crumbs on a tester are fine.

You may also notice a toasted butter-and-corn aroma around the edge. After the rest, a serving spoon should lift a cohesive scoop rather than leave wet batter behind.

Gone Too Far

The middle has become bread-like, the perimeter feels hard, and spoonfuls crumble instead of yielding. It will still taste good, but you have lost the contrast between the browned edge and tender center.

Raw, ready and overbaked corn casserole compared by center texture, from loose and glossy to moist-set to dry and crumbly.
Watch the center, not just the color. Ready casserole moves gently as one mass; sloshing means raw, while a dry crumb means overbaked.

Why Corn Casserole Recipes Disagree

Corn casserole recipes differ mainly because they aim for different textures, carry different amounts of moisture, and sit at different depths in the pan. That is why one recipe uses no eggs while another uses two, or why a broad shallow casserole can finish much sooner than a deeper one.

If dinner is already underway, the recipe above is enough.

Softer or Firmer? Egg vs No Egg

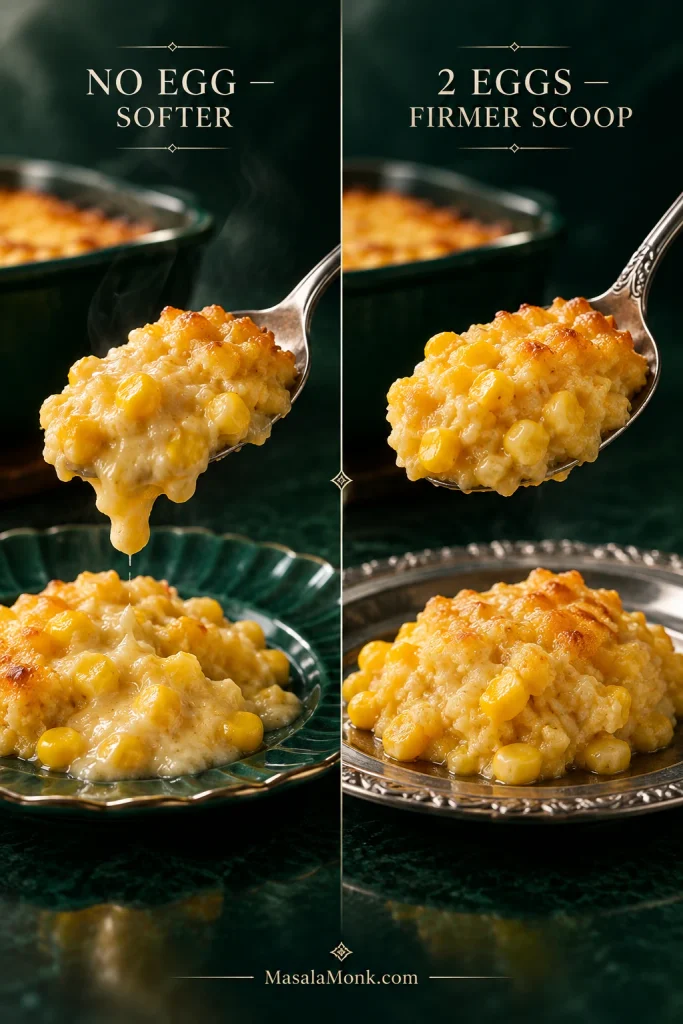
Using no eggs gives you a softer, more pudding-like casserole; two eggs make it firmer and easier to scoop.

For this recipe—and especially for a holiday table—two eggs are the better default. The casserole holds together on the spoon and stays where you put it on the plate. Sour cream and cream-style corn keep it tender.

Leave the eggs out for the familiar 5-ingredient corn casserole: corn muffin mix, whole-kernel corn, cream-style corn, sour cream, and butter. It is intentionally looser and more pudding-like. One egg lands somewhere between those two styles.

Side-by-side corn casserole servings showing a softer no-egg version and a firmer, moist two-egg version.
The 5-ingredient version stays softer without eggs. Two eggs give a cleaner scoop while the creamy base keeps the center tender.

Corn Casserole vs Corn Pudding: What’s the Difference?

Ask three families for corn casserole and you may get three noticeably different dishes. One is eggless and spoon-soft, another is firmer, and a third may be called corn pudding.

The names overlap, so texture is usually more useful than the label. Cornbread casserole is often another name for this same broad family of corn-and-cornbread-mix dishes. Spoonbread is another name you may encounter for this soft corn-casserole family.

Cornbread itself is firmer and sliceable. Corn pudding usually leans softer and more custard-like. A true corn soufflé is lighter and more egg-driven, often using whipped whites for lift. Scalloped corn overlaps too, although many versions use crackers or breadcrumbs and a different creamy base.

Canned, Frozen or Fresh Corn?

This recipe uses corn for two different jobs. One portion gives you whole kernels to bite into. The cream-style corn brings both corn solids and the thick liquid that keeps the casserole spoonable.

Part of the RecipeChoiceHow to Use ItResult
Whole-kernel portionCanned cornDrain wellClassic texture and the most straightforward option
Whole-kernel portionFrozen cornThaw, drain, blot if wetSimilar texture once the thawing water is removed
Whole-kernel portionFresh cornCut from the cob and measureBrighter corn flavor and more distinct kernels
Creamy corn portionCream-style cornUse the full canSupplies the thick corn-rich base

Fresh corn works at about 1½ cups / 220 g kernels in place of the drained canned whole corn. That is roughly 3 medium ears, though ear size varies enough that measuring the kernels is more dependable.

Frozen kernels work well too, but thaw them before they reach the bowl. Meltwater left clinging to the corn goes straight into the batter and can make an already-soft casserole noticeably wetter.

Why Cream-Style Corn Is Different

Another drained can of whole corn cannot replace cream-style corn by itself. You would be replacing the kernels but losing the thick corn liquid that helps produce the characteristic spoonable texture.

Canned, frozen, fresh and cream-style corn shown with their different preparation roles for corn casserole.
Canned, frozen and fresh kernels all work here. Dry thawed corn well, but keep the thick liquid that comes with cream-style corn.

Corn Casserole Without Jiffy

To make corn casserole without Jiffy, replace the 8.5-oz / 240-g boxed mix with flour, cornmeal, sugar, baking powder, salt, and a little neutral oil.

  • 80 g all-purpose flour, about ⅔ cup
  • 75–80 g yellow cornmeal, about ½ cup
  • 40 g granulated sugar, about 3 tablespoons
  • 12 g baking powder, about 1 tablespoon
  • ½ teaspoon fine salt

Whisk those ingredients together and use them in place of the boxed mix. Add 2 tablespoons / 30 ml neutral oil with the melted butter. The boxed mix already contains added fat, so the oil replaces some of what disappears when you make the mix from scratch.

Measured flour, cornmeal, sugar, baking powder, salt and oil arranged for homemade corn muffin mix.
For corn casserole without Jiffy, only the boxed muffin mix changes. The corn, sour cream, butter and eggs stay the same.

A more savory version needs only 20–25 g sugar. Cornmeal grind varies, so follow the same doneness cues as the main recipe rather than expecting the scratch version to finish at exactly the same minute.

If what you actually want is a firm slice with a bread-like crumb, use a dedicated Southern cornbread recipe instead.

Ingredient Changes That Work

ChangeWhat to DoWhat to Expect
Full-fat Greek yogurt for sour creamUse the same amountTangier flavor and a slightly firmer scoop
Frozen corn for canned whole cornThaw and remove the water firstWorks well once excess moisture is gone
More or fewer eggsChoose deliberatelyChanges how firmly the casserole sets
Milk or half-and-half for sour creamAvoid as a direct swapThins the batter much more than yogurt does
Different gluten-free cornbread mixUse a recipe built for that mixDifferent mixes absorb liquid differently

Full-fat Greek yogurt is the cleanest sour-cream replacement; use 1 cup / about 225–230 g. It is thick enough to keep the batter from turning runny. Milk or half-and-half loosens it much more, which can leave the edges browned before the middle is ready.

If You Do Not Have Cream-Style Corn

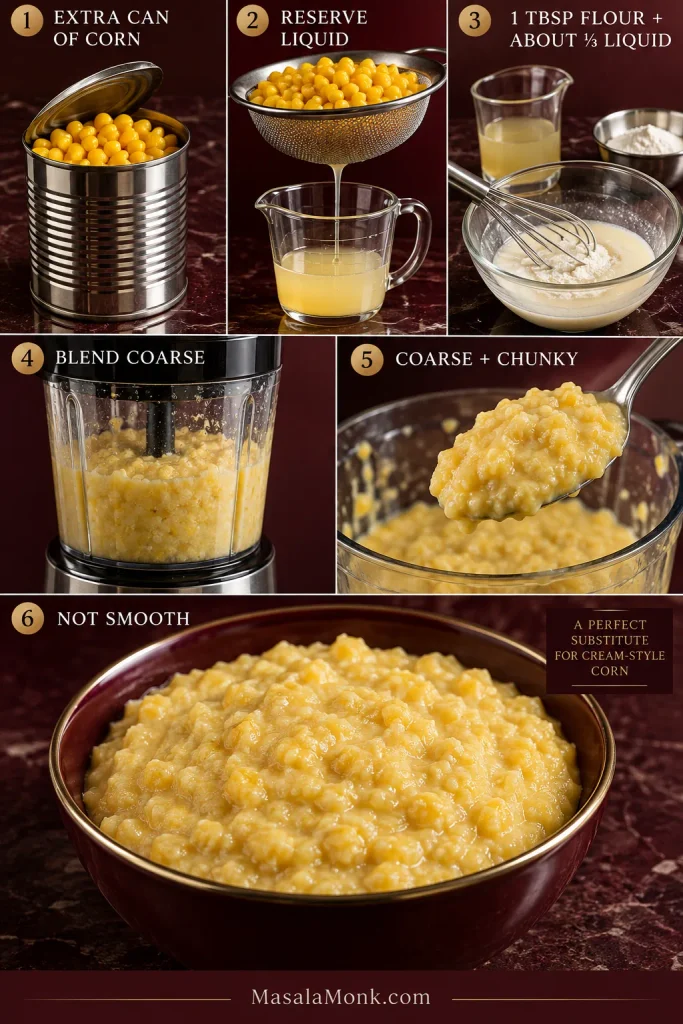
Use one additional 15-oz / 425-g can of whole-kernel corn, separate from the can used for the whole-kernel portion of the recipe. Reserve the liquid before draining it.

Blend all of those kernels with about one-third of the reserved canning liquid and 1 tablespoon all-purpose flour. Stop when no intact kernels remain but the mixture is still coarse and chunky, not smooth. If the blender needs help moving, add a little more of the reserved liquid. Use the entire mixture in place of the cream-style corn.

Cream-style corn substitute shown from whole kernels and reserved liquid to a coarse, chunky blended mixture.
The substitute needs to replace body as well as kernels, so stop blending while the mixture is still coarse and chunky.

Changing either the baking mix or the dairy is manageable. Change both at once, though, and you are better off starting with a gluten-free or dairy-free corn casserole recipe built for those ingredients.

Cheddar, Jalapeño and Other Add-Ins

For a cheesy corn casserole, add up to 1 cup / 4 oz / 113 g shredded cheddar. Fold it into the batter for cheese throughout, or add it near the end for a browned, salty layer on top.

Finely chopped jalapeño, well-drained green chiles, scallions, chives, and black pepper all work without substantially changing the batter. A cheddar-jalapeño version is especially good beside smoky food such as slow cooker pulled pork.

Extra sugar is rarely necessary with a sweet corn muffin mix. Add 1–2 tablespoons only when you deliberately want a sweeter casserole. Tart cranberry sauce with orange juice is particularly good against that buttery sweetness.

Cheddar jalapeño corn casserole with a browned cheesy top, visible corn kernels and sliced green jalapeño.
Cheddar makes the top richer and saltier; jalapeño keeps the sweetness in check. The base method stays the same.

Your Pan Is Part of the Recipe

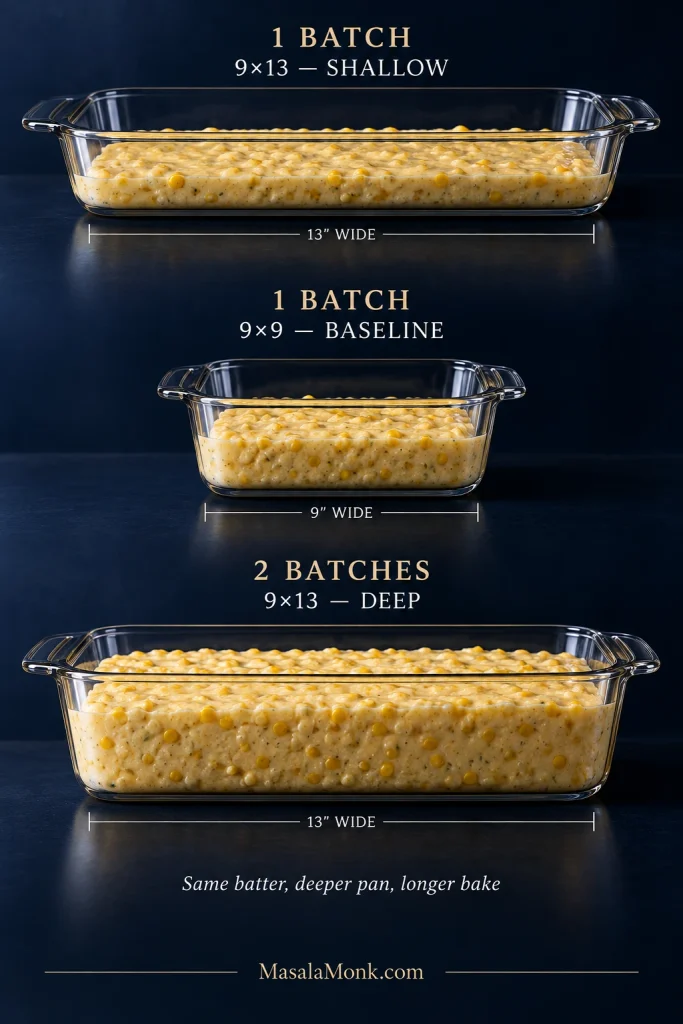
Bake time is not just about the dimensions printed on the pan. What matters is how deeply the batter sits inside it. Spread the same amount across more surface area and it heats through faster. Stack twice as much into the same footprint and the center has much farther to go.

Same batter, deeper pan, longer bake.

SetupWhat ChangesWhen to Begin Checking
1 batch in 9×9Baseline depthAbout 45 min
1 batch in 8×8Deeper than the baselineAround 45 min; it may run toward the longer end of the range
1 batch in 9×13Shallower, broader layerAround 35 min; judge by the same doneness cues
2 batches in one 9×13Much deeperAbout 55–60 min, then judge the center
2 batches in two standard pansDepth stays close to the originalAbout 45 min

Those are checkpoints, not guaranteed finish times. Pan material, starting temperature, and the behavior of your oven still matter.

Three pans compare corn casserole batter depth: shallow 9 by 13, baseline 9 by 9, and deep double-batch 9 by 13.
Pan size alone does not determine bake time. Batter depth does: a deeper center simply needs longer to heat through.

One Batch in a 9×13 Is Not the Same as Two

A single batch spread through a 9×13-inch (23×33-cm) pan is relatively shallow, so start looking at it around 35 minutes. Double the recipe in that same pan and you can end up staring at beautifully browned edges while a loose patch in the middle is still catching up.

That is why a statement such as “a 9×13 takes 30 minutes” tells you very little unless you also know how much batter was in it.

Doubling the Recipe

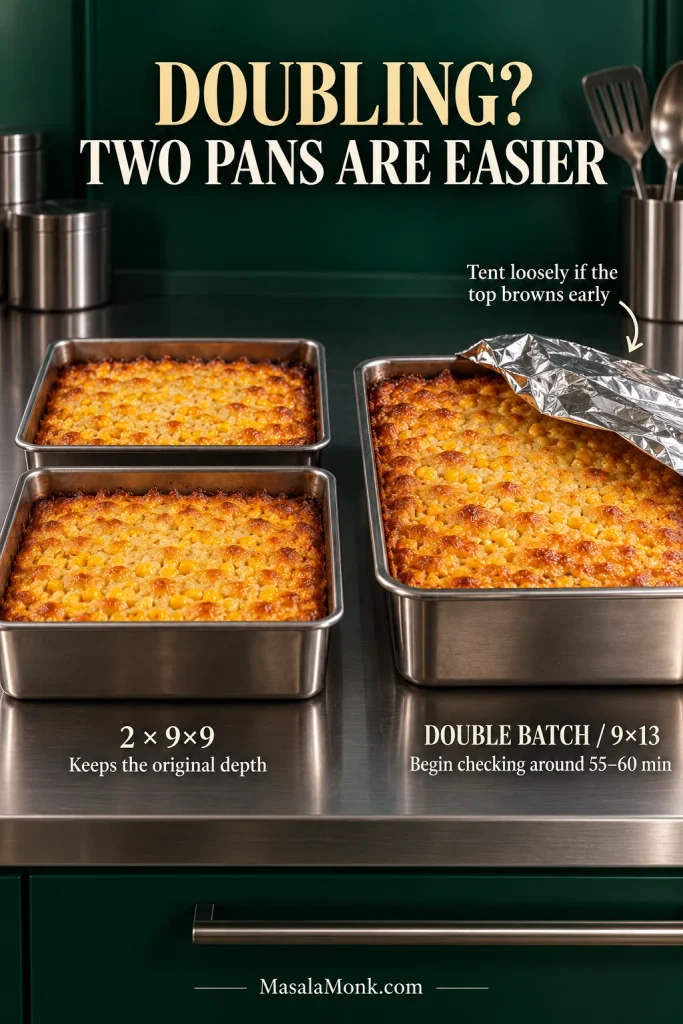
For a double batch, use two 9×9 pans if possible. One high-sided 9×13 works too; begin checking that deeper casserole around 55–60 minutes.

Keeping roughly the original batter depth makes the result easier to predict. With one deeper 9×13, leave some headroom above the batter. If the top and edges brown before the middle is ready, tent the dish loosely with foil and keep baking.

Two 9 by 9 pans beside a deeper double-batch 9 by 13 corn casserole with loose foil partly tenting the larger pan.
Two 9×9 pans keep a double batch close to the original depth. One deep 9×13 can brown before its center catches up.

One batch makes about 8 side servings. At a meal with several other sides, a double batch generally covers around 14–16 people. Two moderate pans are also easier to work around another 350°F dish such as sweet potato casserole.

Metal pans can brown the edges sooner. Heavy ceramic and glass take longer to warm but hold heat well once hot. With a fan-assisted oven, use your oven’s normal temperature conversion and start watching a little earlier.

Making Corn Casserole for Thanksgiving When the Oven Is Full

On a weeknight, the casserole can have the oven to itself. Thanksgiving is another story: the turkey is roasting, dressing needs a rack, rolls want a final blast of heat, and the door keeps opening.

The casserole does not know the recipe promised roughly 50 minutes. It only knows the oven keeps losing heat.

Crowded oven with turkey, corn casserole, another casserole, rolls and vegetables baking on several racks.
A crowded Thanksgiving oven slows heat recovery. Let the center decide when the casserole is done, not the clock alone.

Bake It Ahead

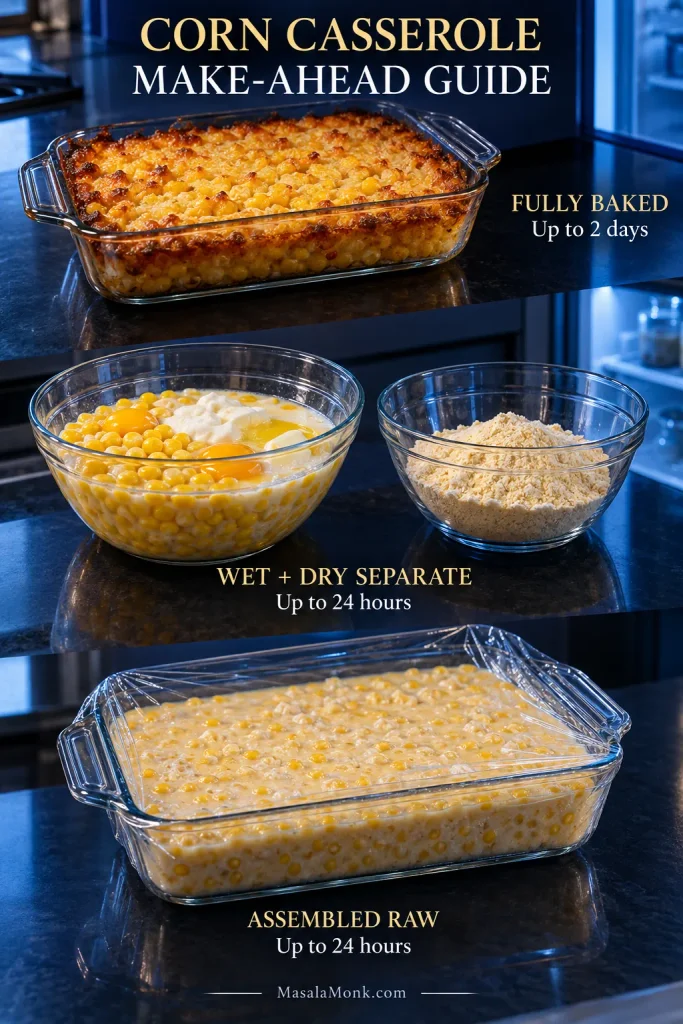
Yes—corn casserole can be fully baked up to 2 days ahead. Cool it promptly, cover, and refrigerate, then reheat before serving. This is the simplest way to remove the casserole from the holiday oven traffic jam.

If Southern cornbread dressing is also on the menu, baking the corn casserole ahead leaves valuable oven space available for the dressing closer to dinner.

If You Want to Bake It Fresh

The best texture comes from keeping the muffin mix dry until close to baking. Up to 24 hours ahead, combine the eggs, sour cream, butter, and corn, then cover and refrigerate promptly. When you are ready to bake, stir the chilled mixture well before folding in the dry mix.

You can also assemble the whole casserole the night before if convenience matters most. Cover it, refrigerate promptly, and bake it within about 24 hours. Cold batter normally needs more oven time, and batter that has sat overnight may rise a little differently from one mixed immediately before baking.

Make-ahead guide comparing fully baked casserole, separate wet and dry mixtures, and assembled raw casserole.
Want the freshest texture? Keep wet and dry separate. Want the easiest holiday? Bake the casserole ahead and reclaim oven space.

When the Oven Gets Crowded

Leave a little breathing room around the dish when possible. Adding another refrigerator-cold casserole—such as green bean casserole—at the same time slows the oven’s recovery.

The casserole can wait through its 10-minute rest, so there is no benefit in forcing every side to finish at exactly the same moment. If oven space disappears completely, use a slow-cooker corn casserole recipe built for that moist cooking environment rather than moving this exact batter straight into a slow cooker.

When Something Goes Wrong

A problem that looks mysterious in the oven is usually easier to diagnose once you separate excess moisture from insufficient baking and excessive batter depth.

What You SeeLikely CauseWhat to Do
Liquid centerNeeds more baking, too much moisture, or unusually deep batterContinue baking and review corn drainage or substitutions
Edges browned, center rawCenter is heating much more slowly than the perimeterTent loosely with foil and continue
Top browns too quicklyStrong top heat or a deep casseroleCover loosely with foil while the inside finishes
Dry or cakeyOverbaked, too much dry mix, or too much eggCheck package weight and pull the next batch sooner
Frozen-corn version is wateryThawing water went into the bowlThaw, drain, and blot before mixing
Dense or gummyDry-to-liquid ratio changedCheck the mix weight and any extra liquid or substitutions
OverflowPan is too small or too fullDivide the batter or use a larger, high-sided dish

Storage and Reheating

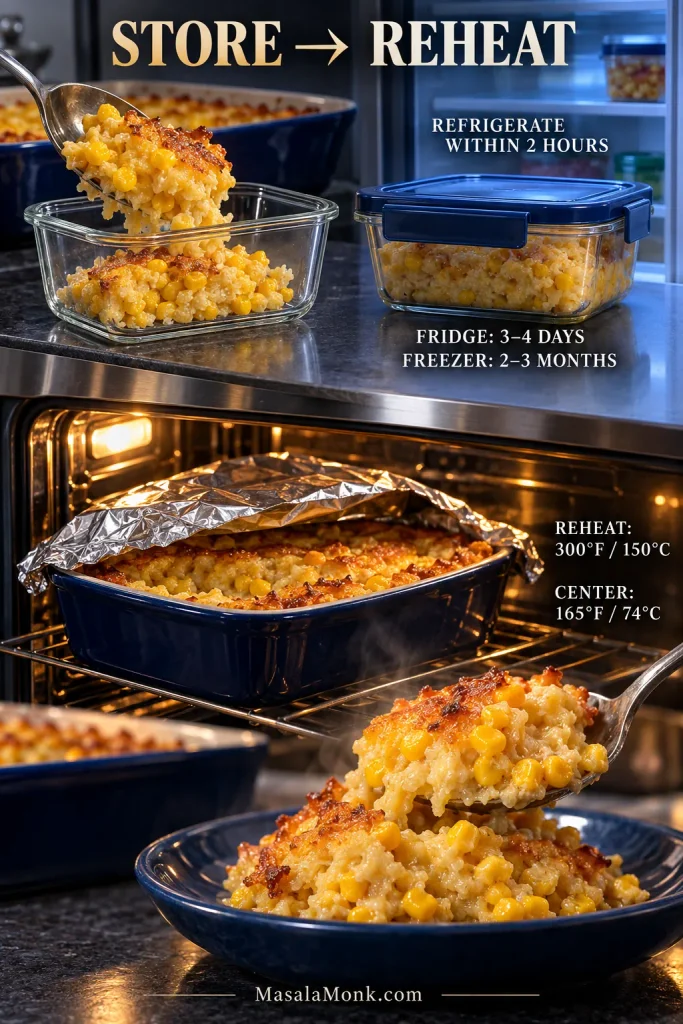
Cooked corn casserole keeps for 3–4 days in the refrigerator. Refrigerate leftovers within 2 hours of serving and keep them covered.

Reheat a larger portion covered at about 300°F / 150°C until hot through. A partially filled dish often warms in 15–20 minutes; a whole refrigerator-cold casserole takes longer. Uncover near the end if you want some color back on top. Reheated leftovers should reach 165°F / 74°C.

A single serving reheats well in short microwave bursts. The casserole will usually be a little softer after refrigeration and reheating than it was straight from the oven.

Freezing extends the useful storage window to about 2–3 months for best quality. Thaw overnight in the refrigerator before reheating.

Corn casserole leftovers shown in storage, reheating under loose foil, and served again with a moist center.
Reheat covered to protect the soft center. Uncover near the end only if you want a little browning back on top.

What to Serve With Corn Casserole

The casserole is rich, buttery, and naturally sweet. Salty gravy and tart cranberry sauce both work beautifully with it, while crisp green vegetables keep the plate fresh. Smoke and char keep the sweetness from dominating the savory side of the meal.

At Thanksgiving, it fits naturally beside turkey, dressing, green beans, cranberry sauce, and a spoonful of turkey gravy made from pan drippings. With a honey-glazed spiral ham, keep the casserole itself on the less-sweet side so the whole plate does not lean sugary.

Outside the holidays, serve it with chili, ribs, grilled chicken, pulled pork, or other smoky barbecue. Jalapeño, green chiles, or cheddar move the casserole even more comfortably in that direction.


Give the casserole its 10-minute rest, then go for a browned corner and a generous scoop. It is at its best hot, when the sweet corn, butter, tender center, and lightly crisp edge all land in the same bite.

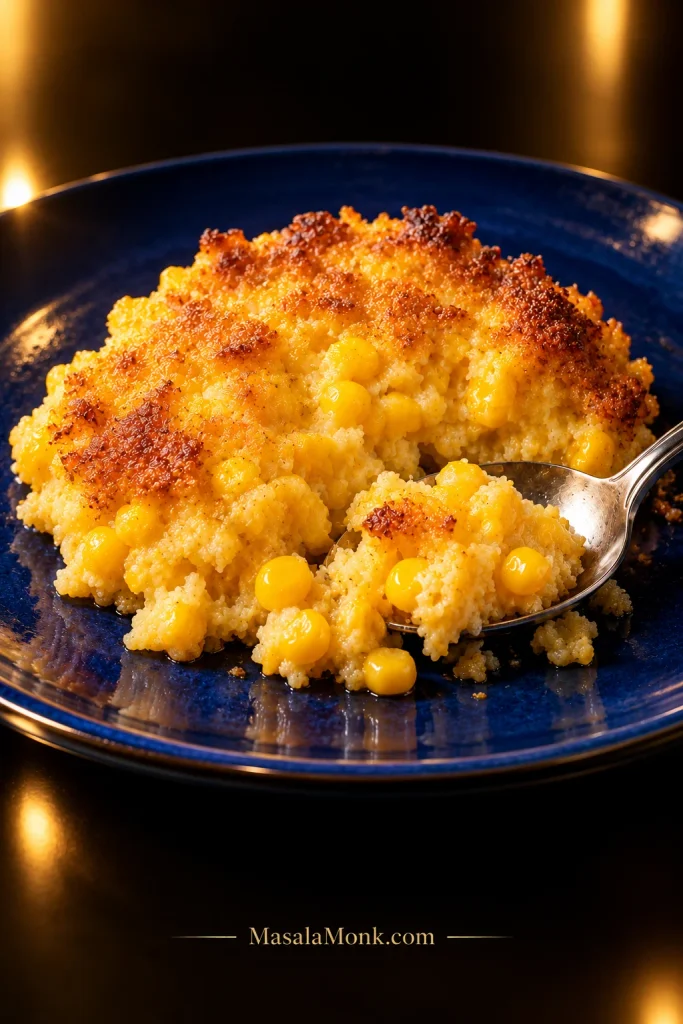
Golden corn casserole scoop on a cobalt-blue plate with browned edges, a moist center, visible kernels and a silver spoon.
Corners give you more browned crust; the center stays softer. A generous scoop can give you both in the same bite.
Posted on — Leave a comment

Moroccan Lamb Tagine Recipe With Apricots

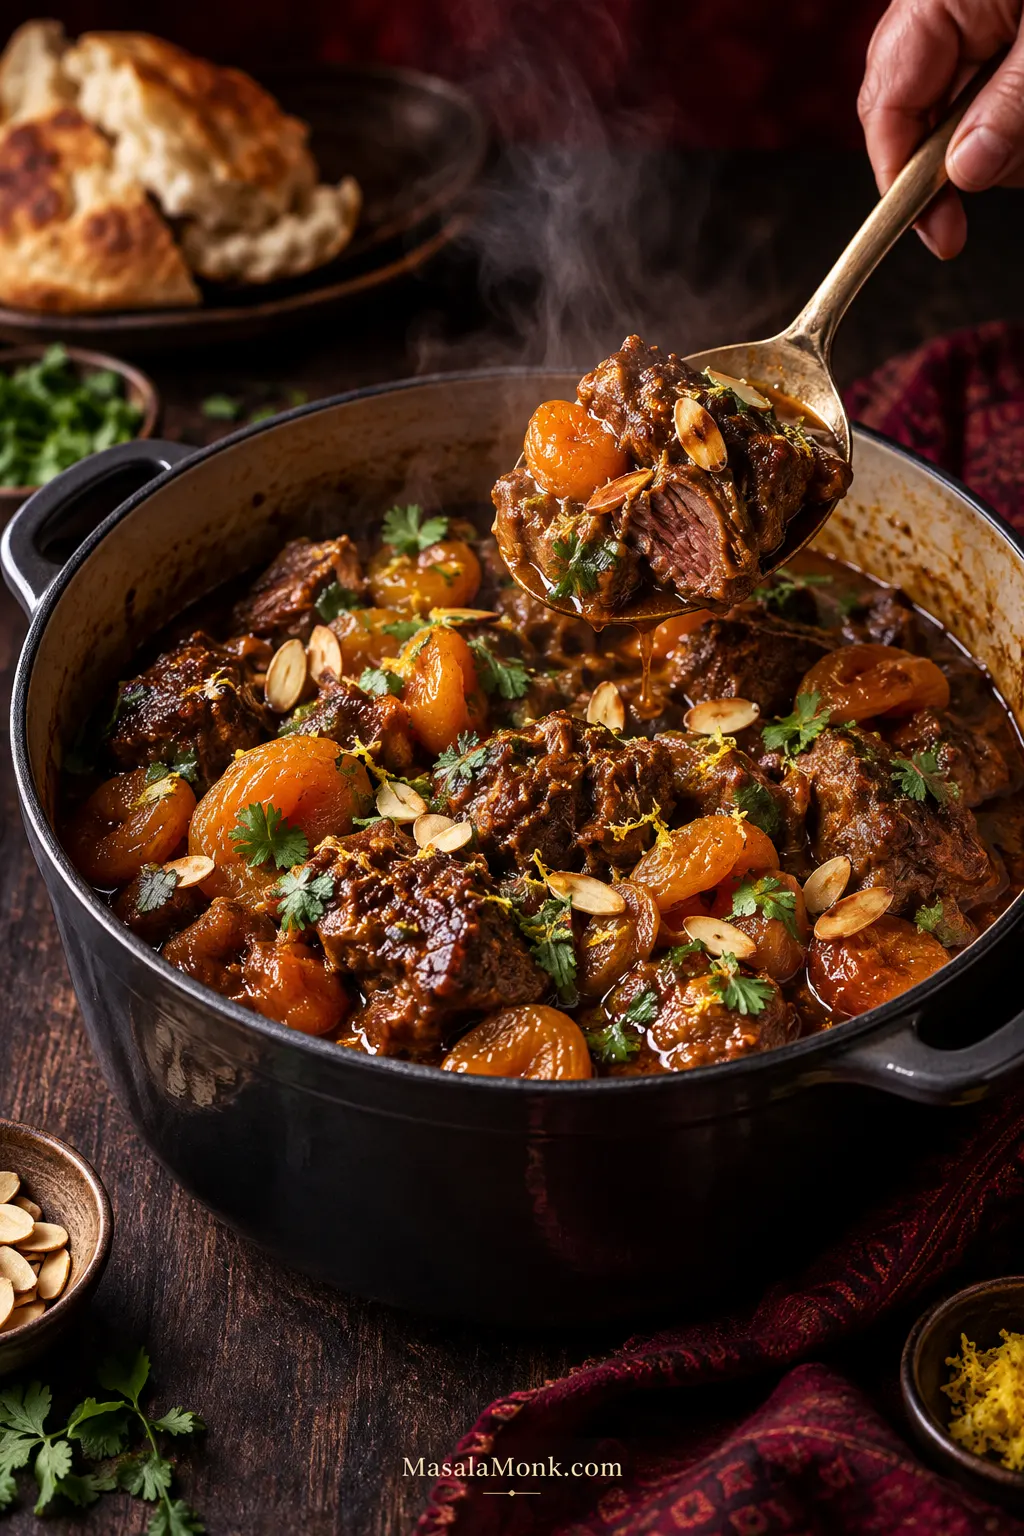
Finished Moroccan lamb tagine in a dark serving pot with braised lamb shoulder, plump dried apricots, toasted almonds, cilantro and glossy brown sauce.

A good lamb tagine announces itself before anyone takes a bite. Lift the lid and you get spice, lamb and fruit; press a fork into the meat and it gives without collapsing; spoon through the pot and the sauce clings instead of running like broth.

This Moroccan lamb tagine gets there with shoulder, onions, fragrant spices and a deliberately modest amount of braising liquid. The dried apricots wait until the lamb is almost tender, so they can soften in the sauce without spending hours dissolving into it.

Sweetness stays in the background. Most comes from the apricots, while lemon sharpens the sauce at the end. Honey is optional, and worth adding only after you taste the pot.

You don’t need a traditional tagine pot, either. A heavy Dutch oven or covered casserole handles the long braise beautifully, and the method leaves room for the reality that one shoulder, lid or oven rarely behaves exactly like another.

Quick Answer: How to Make Moroccan Lamb Tagine

Brown 1 kg / 2.2 lb lamb shoulder, soften the onions and briefly cook the spices. Add 350 ml / about 1½ cups stock or water and braise covered at 180°C / 160°C fan / 350°F until nearly tender. Add the dried apricots for about 25 minutes. Once the lamb is tender, reduce the sauce only if it needs it, then finish with lemon, toasted almonds and fresh cilantro.

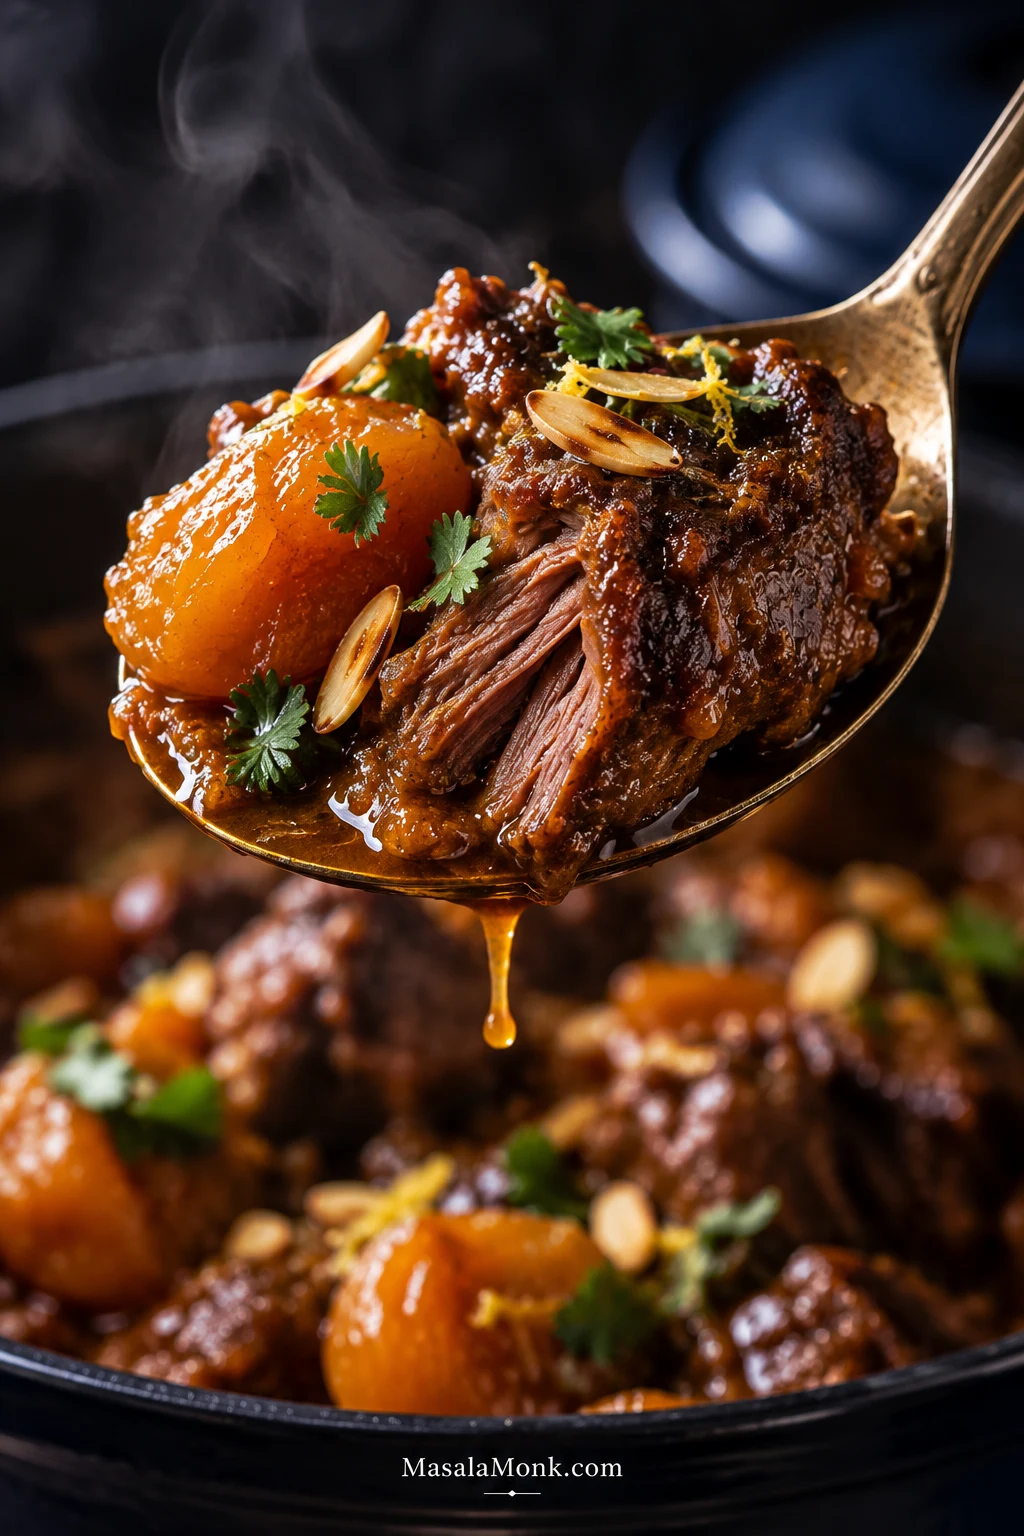
Close-up spoonful of tender braised lamb, softened apricot and glossy tagine sauce with almonds, herbs and a little lemon zest.
A finished bite should bring the lamb, apricot and sauce together at once: tender meat, soft fruit, a glossy coating and a little almond crunch. That is the texture and balance the recipe is working toward.

Moroccan Lamb Tagine Recipe With Apricots

Tender lamb shoulder braised with warm spices and dried apricots, brightened with lemon and finished with toasted almonds and fresh cilantro.

Jump to Ingredients · Jump to Instructions · Recipe at a Glance

Recipe at a Glance

Serves5 servings; up to 6 with generous bread, grain and sides
Prep time25 minutes
Cook timeUsually 2½–3¼ hours; particularly firm shoulder may take longer
Total timeAbout 3–3¾ hours, with extra time possible for firmer lamb
Oven180°C / 160°C fan / 350°F
Best potHeavy 24–26 cm / about 9½–10¼-inch Dutch oven or similar covered casserole
DonenessA fork enters the lamb easily and the meat yields while remaining in chunks

This is a patient recipe, not a complicated one. Most of the active work happens while you brown the lamb and build the onion-and-spice base; the oven handles the long middle. Keep a little extra hot water or stock nearby in case your pot loses moisture quickly.

No marinating is required. Seasoning before browning and the long braise give the lamb plenty of time with the spice base, so you can start this recipe the day you plan to eat it.

Ingredients

For the Lamb and Braise

  • 1 kg / 2.2 lb trimmed boneless lamb shoulder, cut into roughly 4 cm / 1½-inch pieces
  • 8 g fine salt (about 1¼ teaspoons; weighing is more reliable), plus more to taste
  • 2 tablespoons / 30 ml olive oil or neutral cooking oil
  • 350 g / 12 oz onions, thinly sliced
  • 5 garlic cloves, finely chopped
  • 25 g / about 1½ tablespoons tomato paste
  • 350 ml / about 1½ cups low-sodium chicken stock or water, plus more only if needed

Spices

  • 2 teaspoons ground cumin
  • 2 teaspoons ground coriander
  • 1 teaspoon ground ginger
  • 1 teaspoon ground turmeric
  • ½ teaspoon freshly ground black pepper
  • 1 teaspoon sweet paprika
  • ⅛–¼ teaspoon cayenne pepper, optional
  • 1 medium cinnamon stick
  • Small pinch saffron threads, optional; bloom for 10 minutes in 30 ml / 2 tablespoons taken from the measured stock or water

Apricots and Finishing Ingredients

  • 180 g / about 6¼ oz dried apricots; halve very large ones
  • 1 lemon, finely grated zest plus 1–2 tablespoons juice, to taste
  • 1–2 teaspoons honey, optional
  • 50 g / about 1¾ oz sliced or slivered almonds
  • Small handful fresh cilantro (coriander leaves), roughly chopped

Ingredient Notes

  • Water or stock: water works beautifully here. The lamb, onions and spices build plenty of flavor as they braise, so stock is optional rather than something you need to buy specially. With well-seasoned stock, reduce the initial salt to about 5–6 g and adjust near the end.
  • Ras el hanout: use about 1½–2 tablespoons in place of the cumin, coriander, ground ginger, turmeric, paprika, black pepper and cayenne. Begin at the lower end with a potent blend. Omit the cinnamon stick if the blend is already cinnamon-heavy, and account for any added salt.
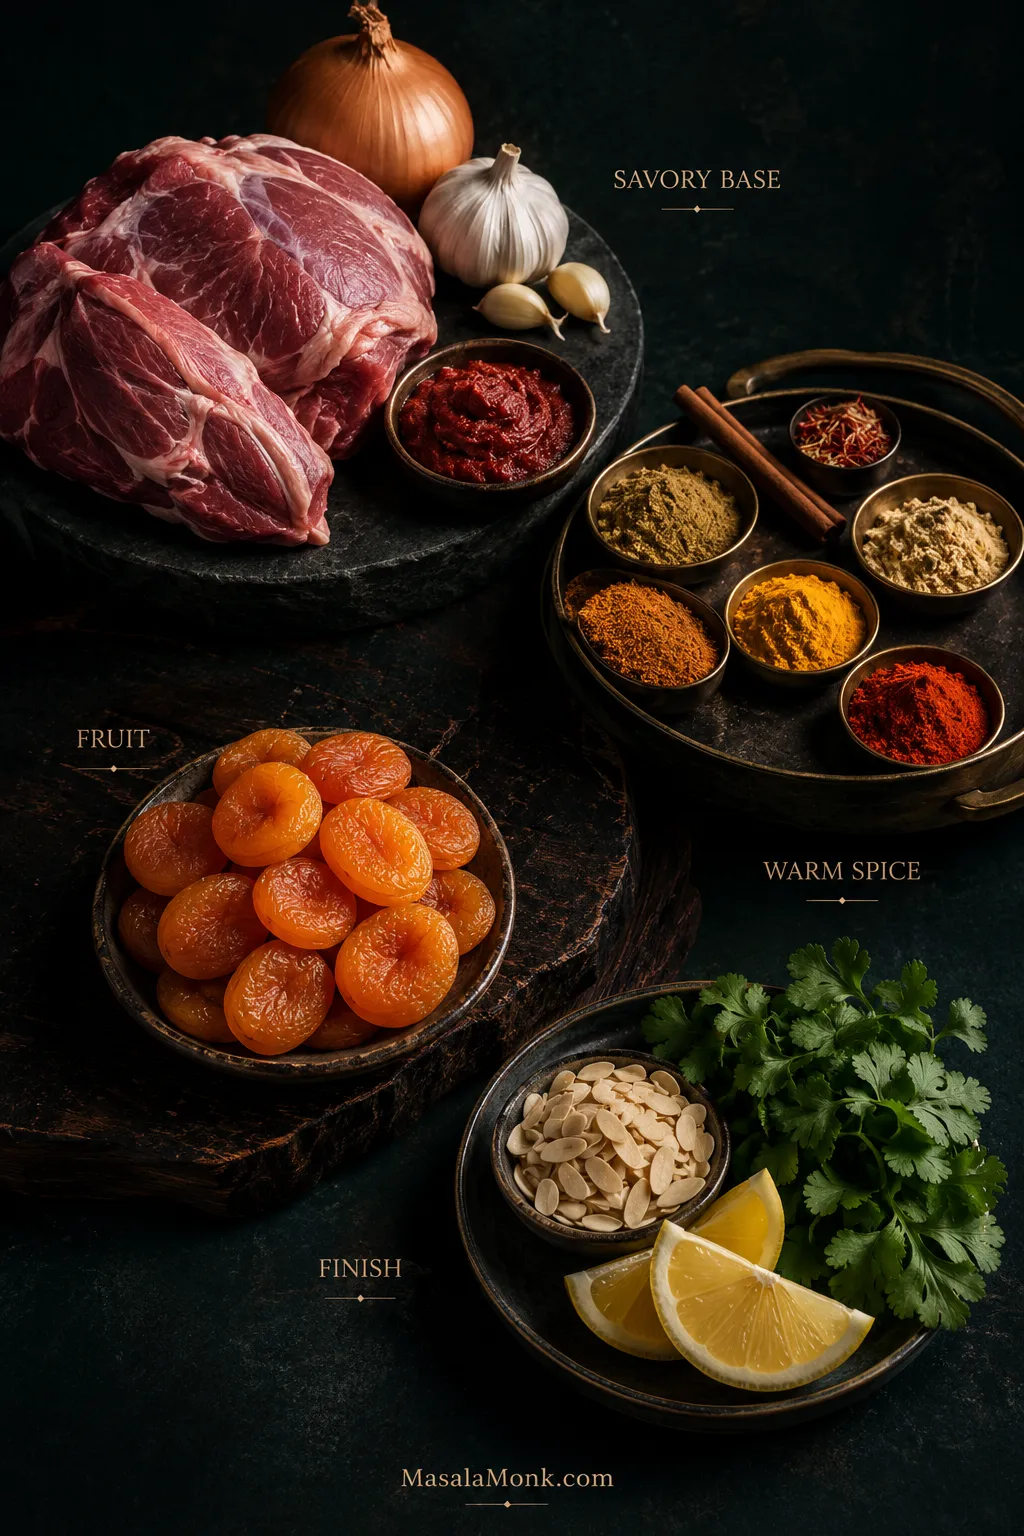
Dark editorial ingredient arrangement labeled savory base, warm spice, fruit and finish, showing the main flavor layers used in lamb tagine.
Instead of treating lamb tagine spices as one long list, think about what each layer contributes. The onion base creates savory depth, warm spices fill the aroma, dried fruit changes the middle of the bite, and the final lemon, herbs and almonds provide contrast. Complexity comes from those layers working in sequence, not from simply adding more spice.

Instructions

Prepare and Brown the Lamb

  1. Heat the oven. Heat to 180°C / 160°C fan / 350°F.
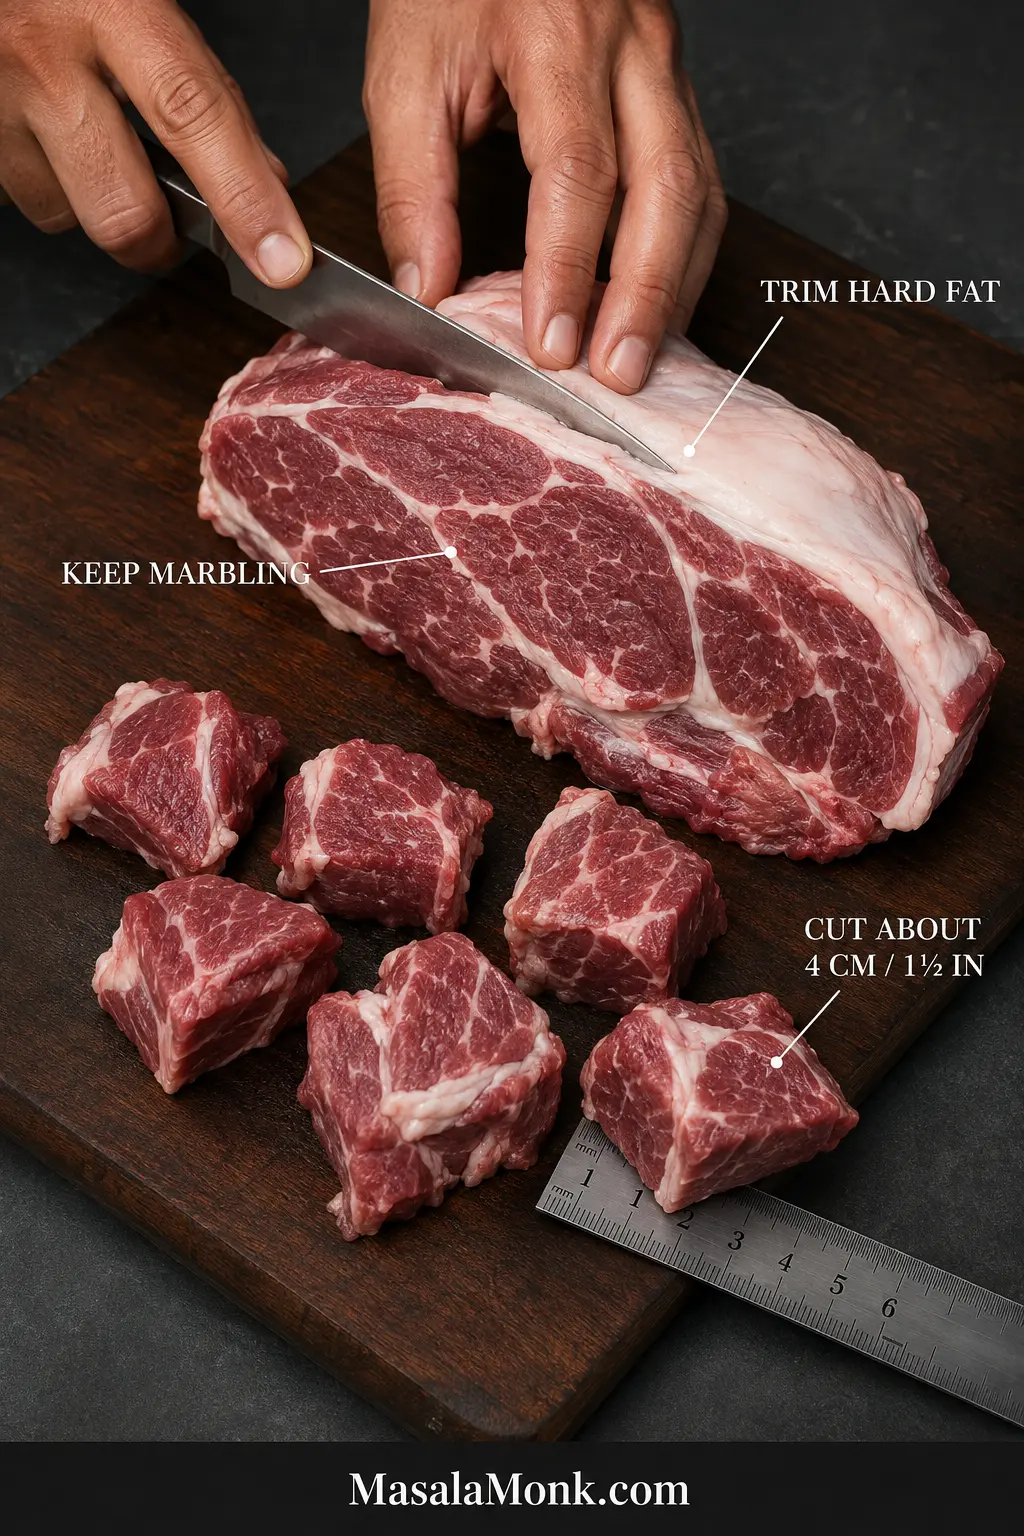
  2. Prepare the lamb. Trim away large hard deposits and seams of exterior fat, leaving the marbling within the shoulder. Cut into roughly 4 cm / 1½-inch pieces, pat dry and season with the measured salt.
Raw lamb shoulder being trimmed, with labels showing hard exterior fat to remove, marbling to keep and pieces cut to about 4 cm or 1½ inches.
With lamb shoulder for tagine, the biggest cubes effectively set the cooking clock. Keep the main pieces in roughly the same size family so one of the larger ones becomes a trustworthy tenderness benchmark later. Smaller scraps soften sooner and can make the pot appear ready before the substantial pieces have finished braising.
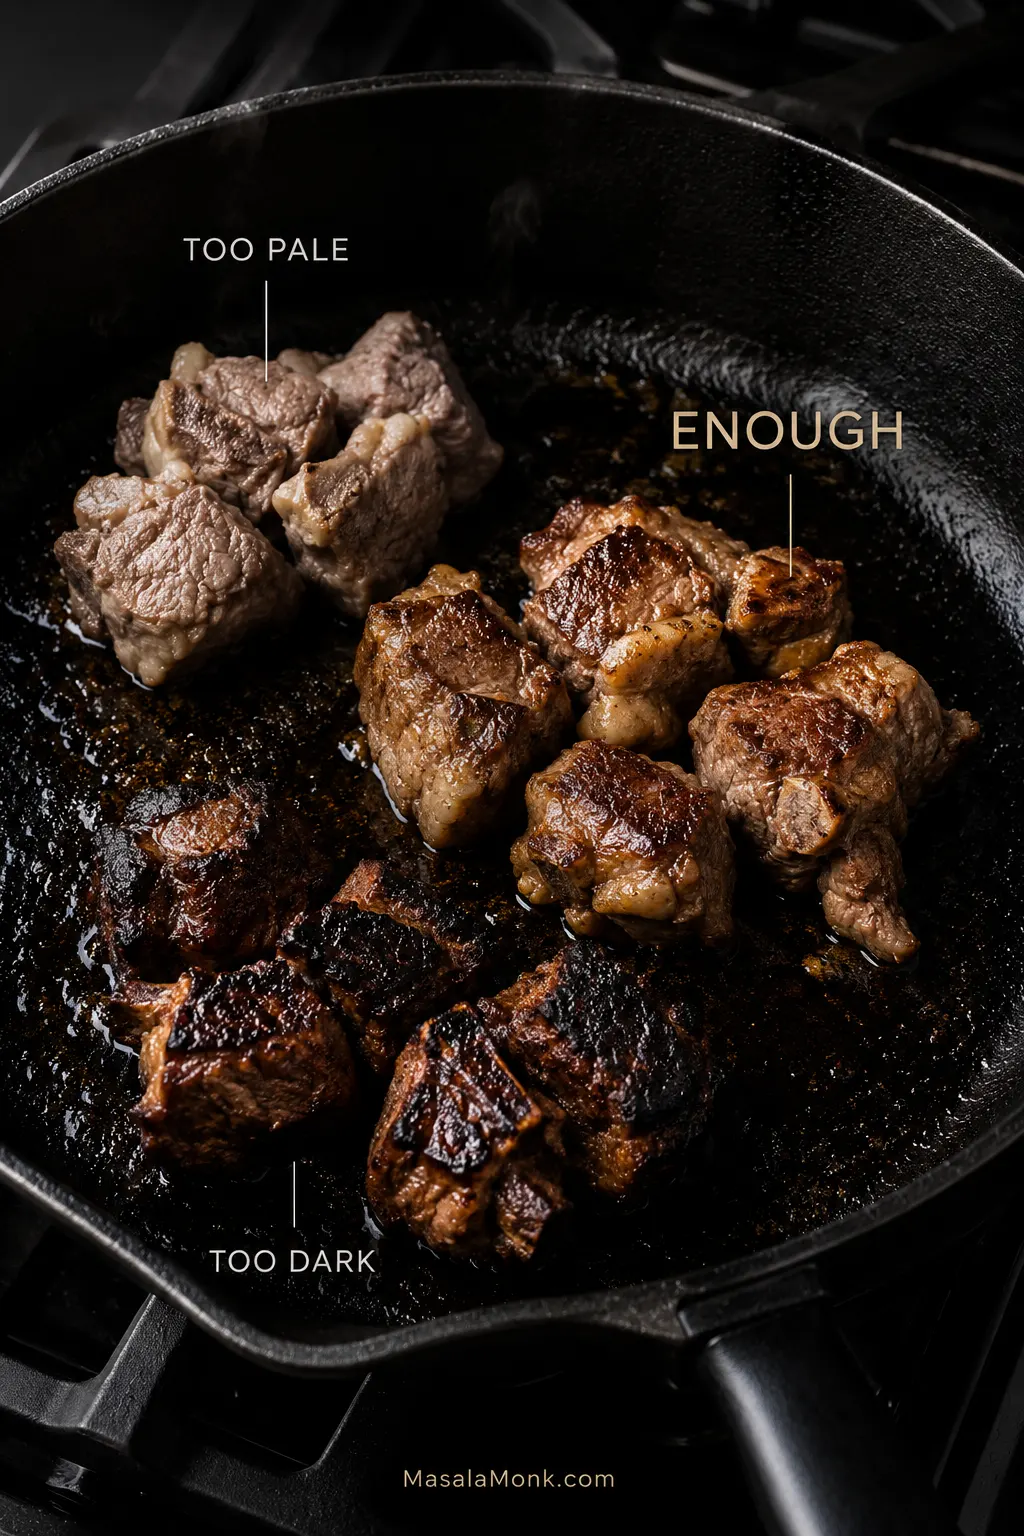
  1. Brown in batches. Heat the oil in the Dutch oven over medium-high heat. Brown the lamb in about three batches, roughly 3–4 minutes per batch. Give the pieces room to make good contact with the pot and turn them only once or twice. A few deep brown patches are enough; every surface does not need to be perfect. Transfer the lamb to a plate.
Three lamb pieces in a dark pan labeled too pale, enough and too dark, showing different levels of browning before braising.
When browning lamb for tagine, watch the bottom of the pot as well as the meat. Brown fond will loosen into the onions and eventually deepen the sauce; blackened residue brings bitterness instead. Between batches, meanwhile, give the pot a moment to recover its heat so the next pieces brown rather than release enough moisture to steam.

Build the Flavor Base

  1. Soften the onions. Reduce the heat to medium. Add the onions and cook for 7–8 minutes, scraping up the browned bits, until soft and beginning to turn golden. Deep caramelization isn’t necessary.
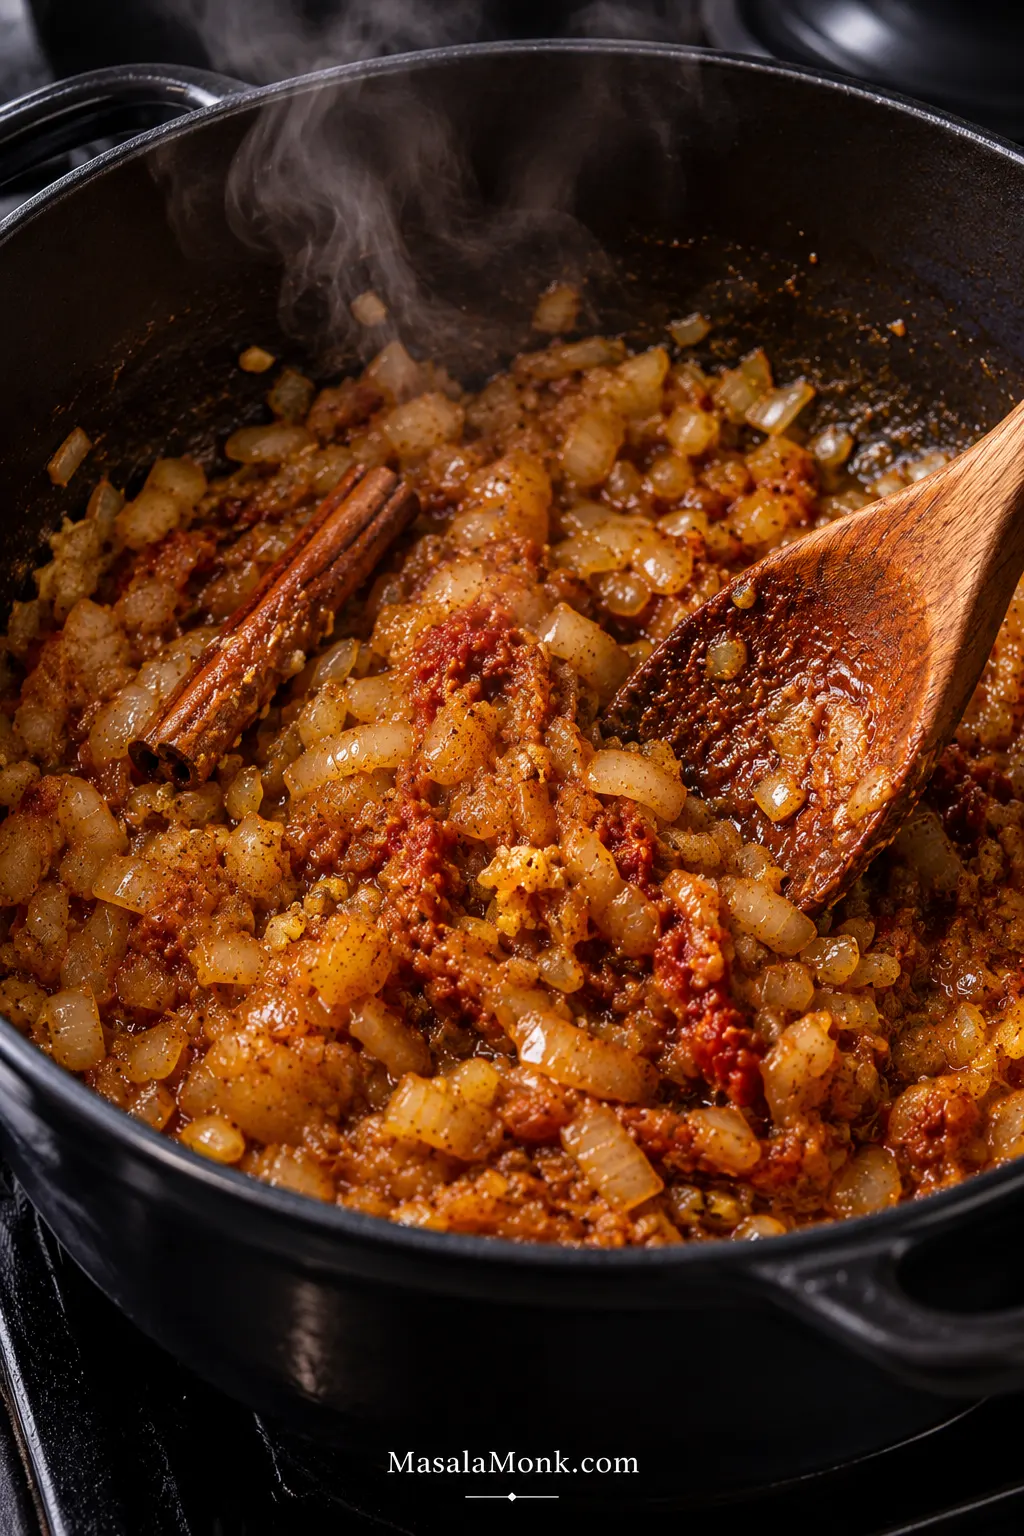
  2. Build the spice base. Add the garlic and cook for about 30 seconds. Stir in the cumin, coriander, ground ginger, turmeric, paprika, black pepper and cayenne, if using. Cook for 30–45 seconds, just until fragrant. Move on before the spices darken rapidly or smell acrid. Add the cinnamon stick and tomato paste and cook for another minute.
Soft onions, garlic, tomato paste, ground spices and a cinnamon stick cooking in a dark Dutch oven before the lamb and braising liquid are added.
A useful cue for the lamb tagine spice base is when it stops looking like separate ingredients. The ground spices lose their dusty appearance, the tomato paste blends into the onions, and the whole mixture becomes cohesive and glossy. Once that happens, add the liquid rather than extending the frying simply because the clock says you can.

Start the Braise

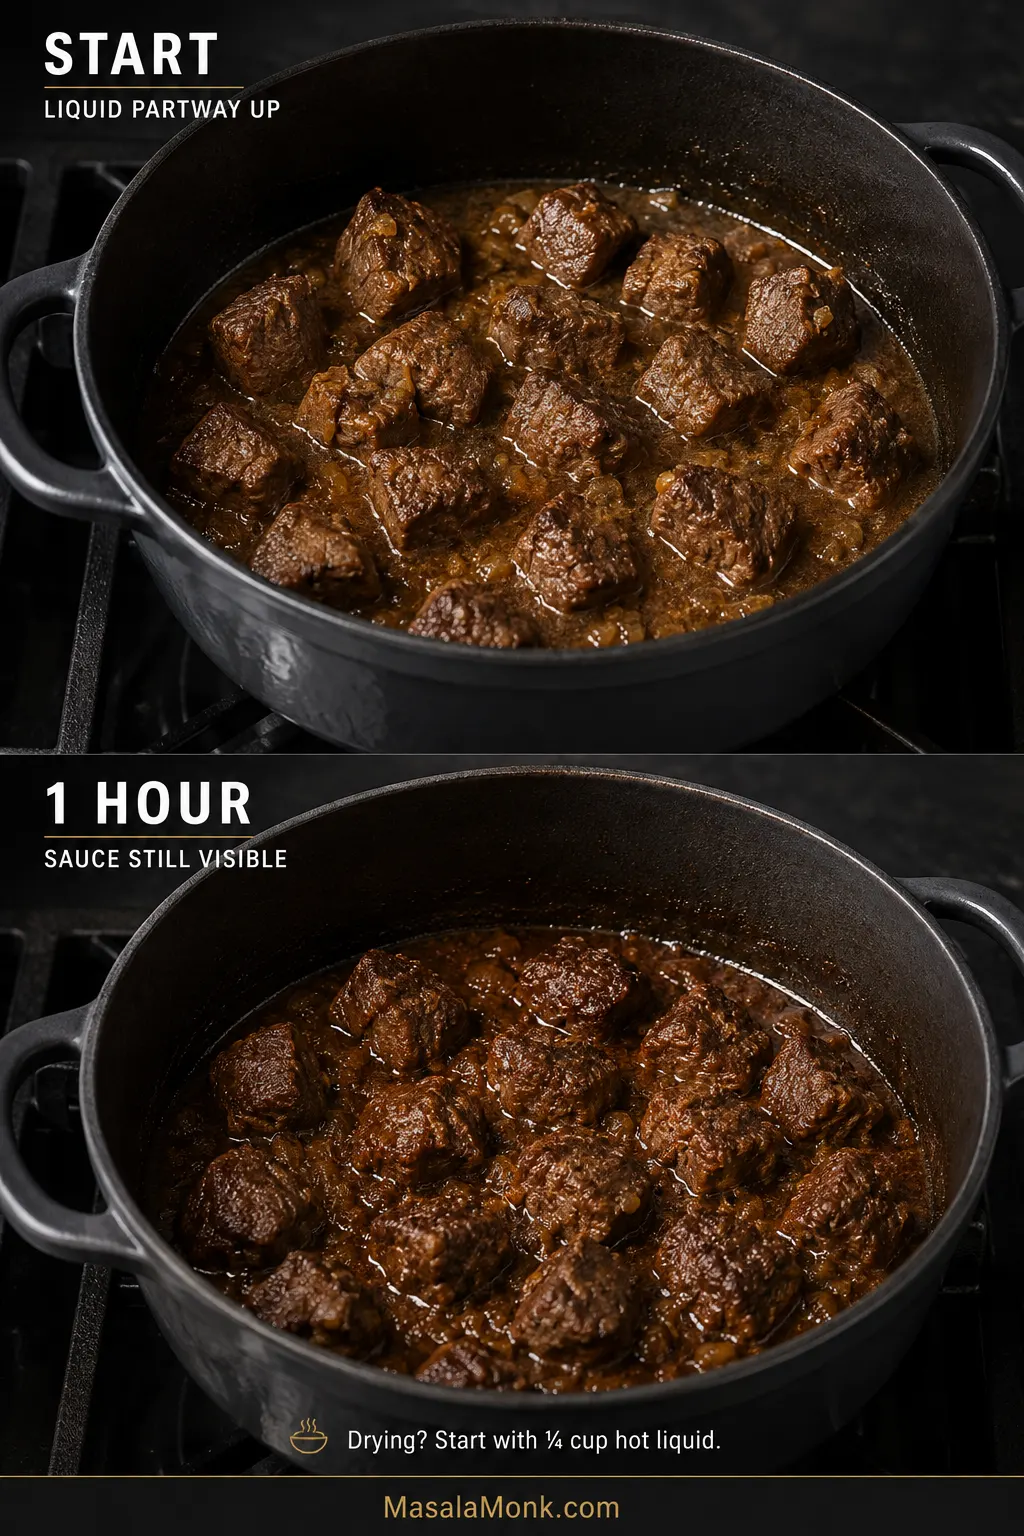
  1. Add the lamb and liquid. Return the lamb and any juices to the pot. Pour in the measured stock or water, including the saffron infusion if using, and bring to a gentle simmer. The liquid should sit around the meat and reach only partway up the pieces.
  2. Cover and braise for 60 minutes. Transfer the covered pot to the oven. The sauce will look loose at this stage. Leave it alone for now.
  3. Look at the moisture. Lift the lid after an hour. There should be sauce around the lamb and no dry, frying patches around the bottom edge. If the bottom is drying, add 60 ml / ¼ cup hot water or stock. Add up to another 60 ml / ¼ cup only if the pot still looks genuinely dry. Cover and cook for another 30 minutes.
Two braising stages showing lamb with liquid partway up the meat at the start and sauce still visible after cooking, with a note to add hot liquid only if drying.
For lamb tagine braising liquid, use the bottom edge of the pot as your warning zone. The upper surfaces of the meat can remain exposed; what matters is that the base stays moist rather than dry and frying. A broad casserole will reach that point faster than a snug Dutch oven, so pot geometry matters as much as the starting quantity.

Test Tenderness and Add the Apricots

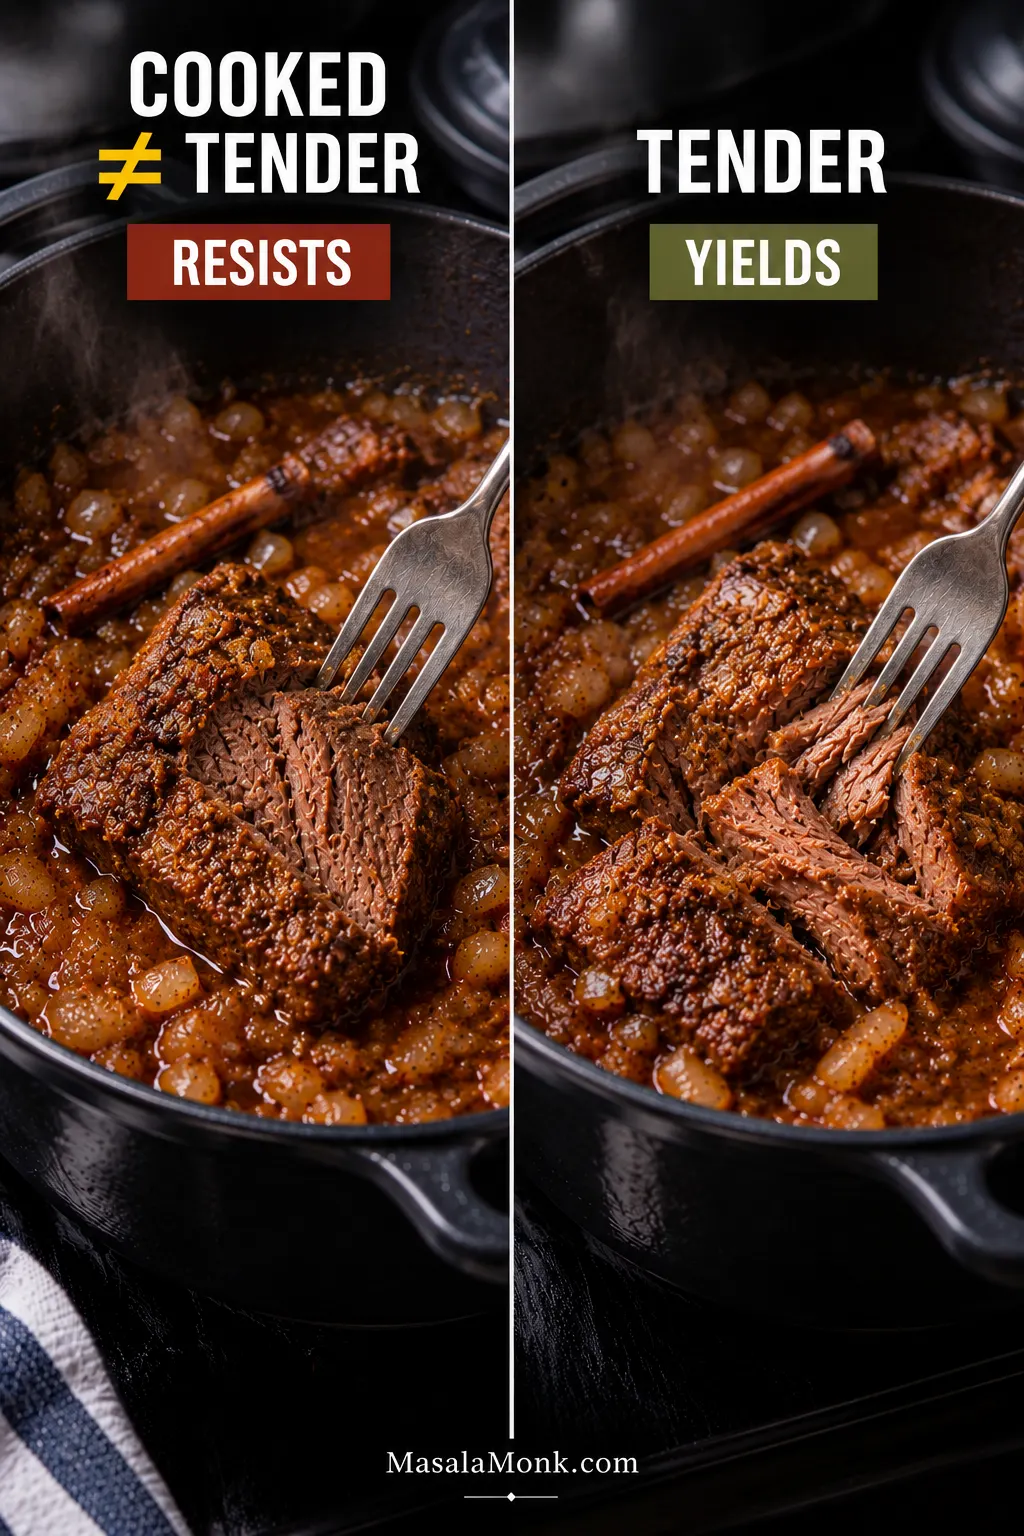
  1. Test the lamb. Push a fork into one of the largest pieces. Clear resistance means more covered cooking. Continue in 15-minute intervals until the fork enters fairly easily and the meat keeps its shape.
Side-by-side fork test of braised lamb labeled resists and yields, showing firm cooked meat compared with tender meat whose fibers open slightly while staying intact.
The target for braised lamb tenderness sits between two obvious extremes: no stubborn resistance, but no shredding on contact either. A fork should enter with little effort while the chunk keeps enough structure to reach the plate intact. Falling-apart meat can be delicious, but it is already beyond the texture this particular lamb tagine is aiming for.

Check the Finished Texture

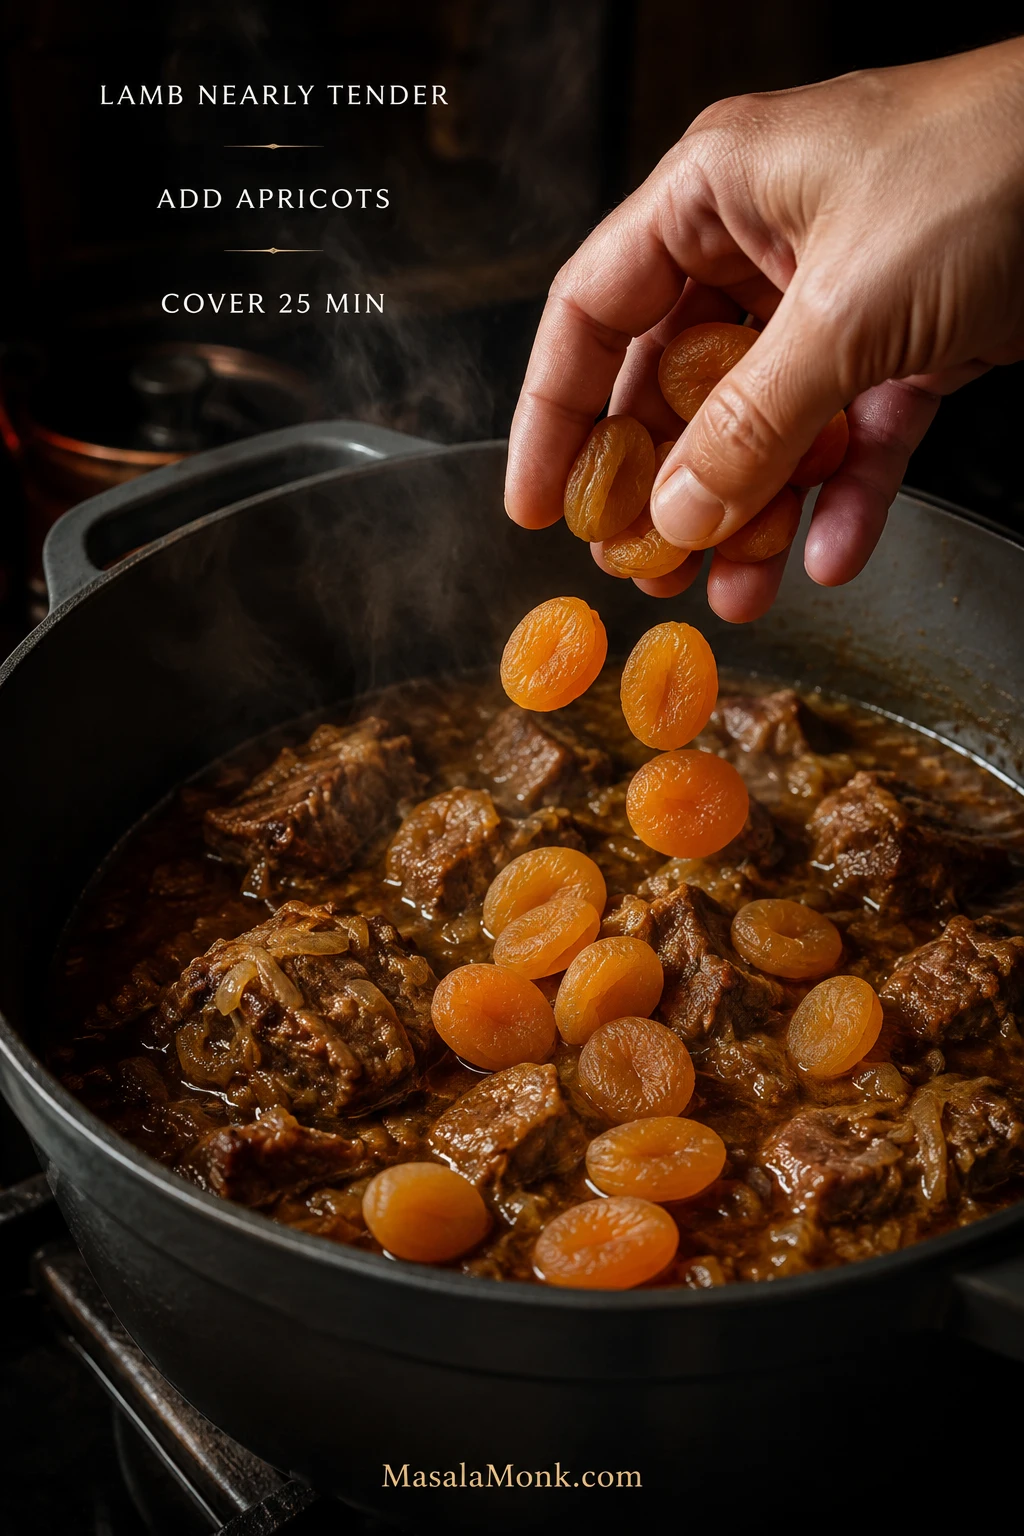
  1. Add the apricots. Stir in the dried apricots, cover and cook for 25 minutes. While they cook, toast the almonds in a dry frying pan over medium heat for 2–4 minutes, tossing often, until lightly golden and fragrant. Tip them onto a plate immediately.
A hand adding dried apricots to nearly tender braised lamb, with instructions to add the apricots near the end and cover the pot for 25 minutes.
Once dried apricots are softening in lamb tagine, handling becomes as important as timing. Stir only as much as necessary and move the fruit gently through the sauce; plumped apricots break much more easily than dry ones. Keeping them intact preserves little pockets of fruit rather than distributing all their sweetness through the entire pot.
  1. Know when to stop. Test one of the largest pieces of lamb and an apricot. The lamb should yield easily without collapsing; the apricots should be soft and full. If the lamb still resists, cover and continue in 10–15-minute intervals. If the apricots reach the texture you want before the lamb does, lift them onto a plate and return them later.
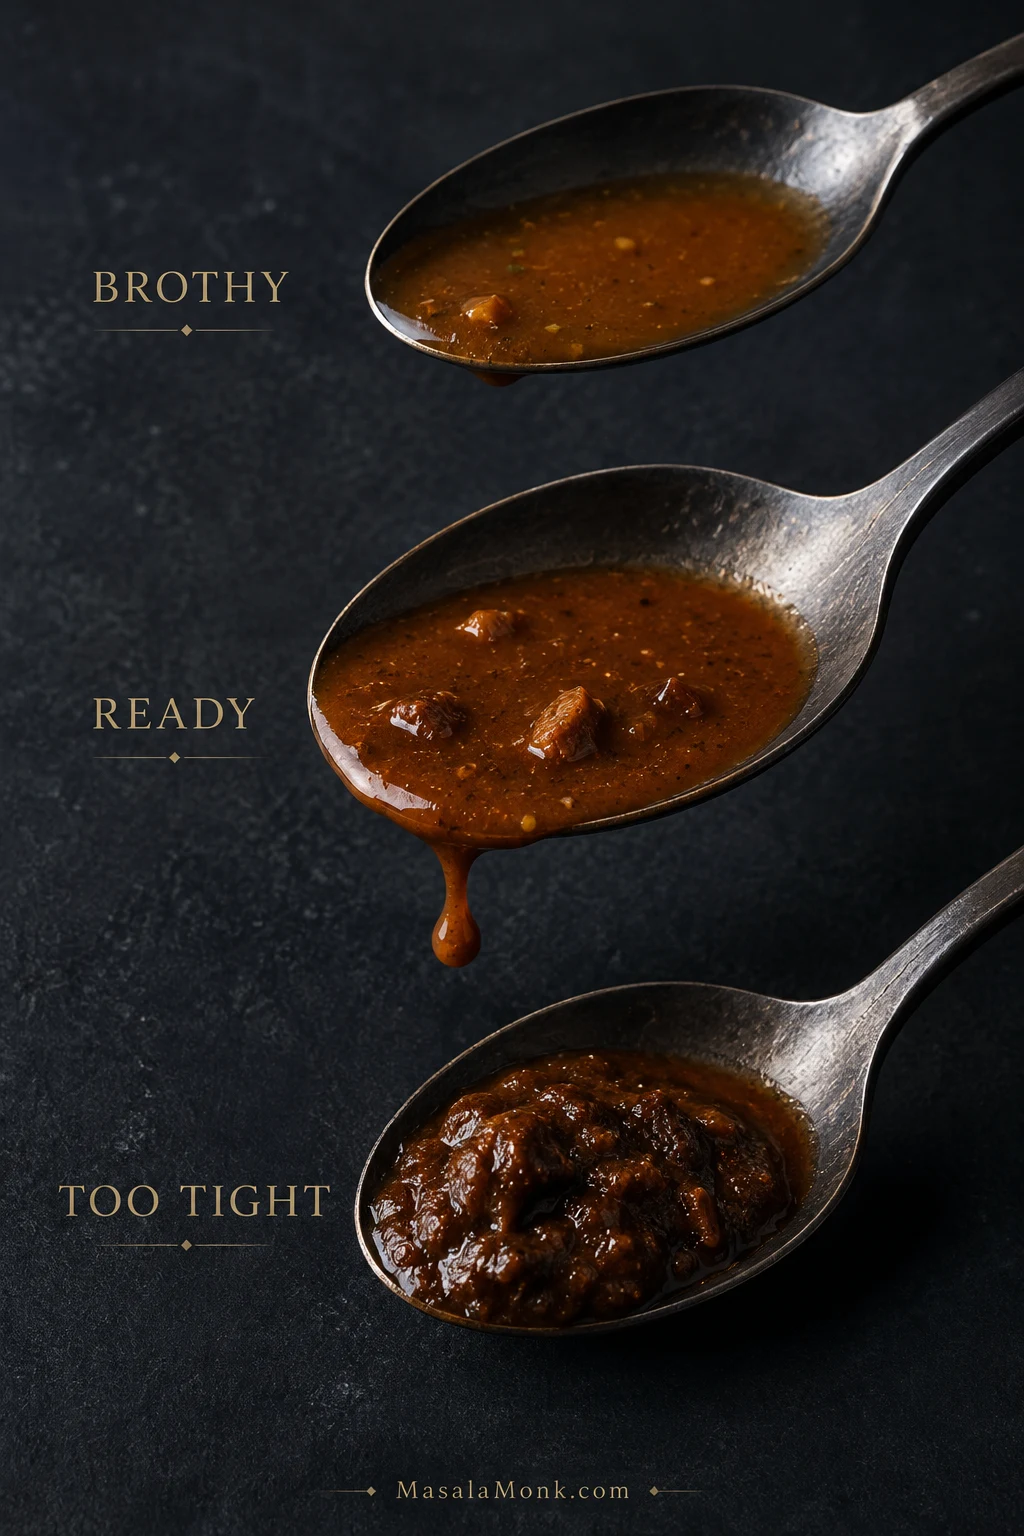
  2. Finish the sauce. If the lamb and apricots are ready and the sauce already lightly coats them, leave it alone. For a very brothy pot, lift the lamb and apricots onto a warm plate and reduce the sauce uncovered for 5–15 minutes, then return everything briefly to coat and heat through. Loosen an over-reduced sauce with hot water or stock, 30–60 ml / 2–4 tablespoons at a time. Mash two or three apricots into the sauce if you want it slightly thicker and fruitier.
Three spoonfuls of tagine sauce labeled brothy, ready and too tight, showing progressively thicker sauce textures.
The spoon gives a clearer lamb tagine sauce test than the busy surface of the pot. Brothy sauce runs off almost immediately; ready sauce leaves a thin glossy film before sliding away; over-reduced sauce sits heavily and starts to mound. That movement tells you more about concentration than color alone.

Season and Serve

  1. Season. Remove the cinnamon stick and skim excess surface fat. Check the salt first, then add lemon juice to taste. Taste before reaching for honey; the apricots may already have given you enough sweetness. Start with 1 teaspoon if you want more.
  2. Serve. Add the lemon zest, fresh cilantro and toasted almonds. Stir gently and serve hot.

Scaling up: use a larger pot as well as more ingredients. Let the liquid level around the lamb guide the extra stock or water; braising liquid rarely scales neatly with the meat.


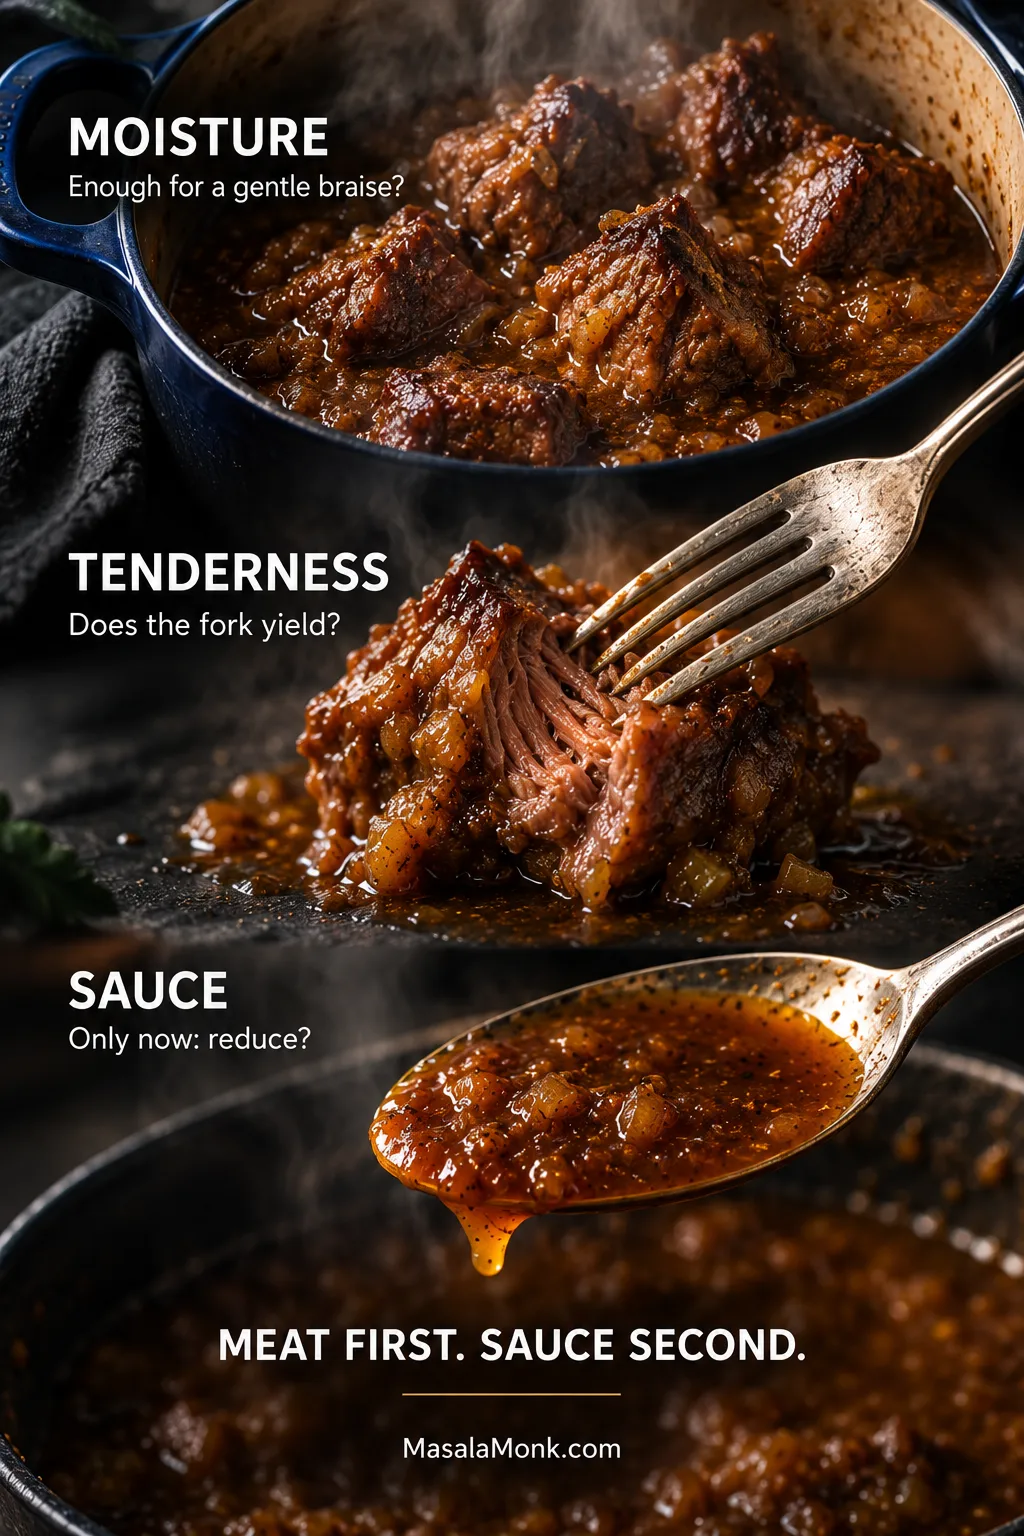
How to Read the Pot as It Cooks

The recipe gives you the timetable. The pot tells you when that timetable needs changing.

Cooking guide showing lamb braising moisture, a fork testing tenderness and sauce coating a spoon, labeled moisture, tenderness and sauce.
Think of moisture, tenderness and sauce as three separate dials on the same braise. A dry bottom is a moisture problem; a resistant fork is a tenderness problem; a spoon that will not hold a light coating is a sauce problem. Diagnose the right dial first, because fixing one automatically can make another worse.

The measured liquid is only a starting point. A broad casserole loses water faster than a snug Dutch oven with a heavy lid, while the lamb and onions contribute moisture of their own. Two cooks can start with the same amount and see very different pots an hour later.

The first hour is mostly about leaving the lamb alone. Keep enough moisture in the pot for a gentle braise while the shoulder is firm. A drying bottom is your cue for a splash of hot liquid. Starting with too much stock creates the opposite problem: plenty of water that eventually has to cook away.

Moisture buys the shoulder time. Eventually the useful question changes: has that time actually made the meat tender?

Lamb can be cooked through and still feel chewy because its connective tissue has not softened enough. Test one of the larger pieces. The fork should enter easily and gentle pressure should make the meat yield without collapsing.

If the fork still has to argue with the lamb, dinner needs more time.

Once the Lamb Is Tender, Judge the Sauce

Tender meat changes the job. A brothy pot can now spend some time uncovered; sauce that already coats the lamb lightly is close to where you want it.

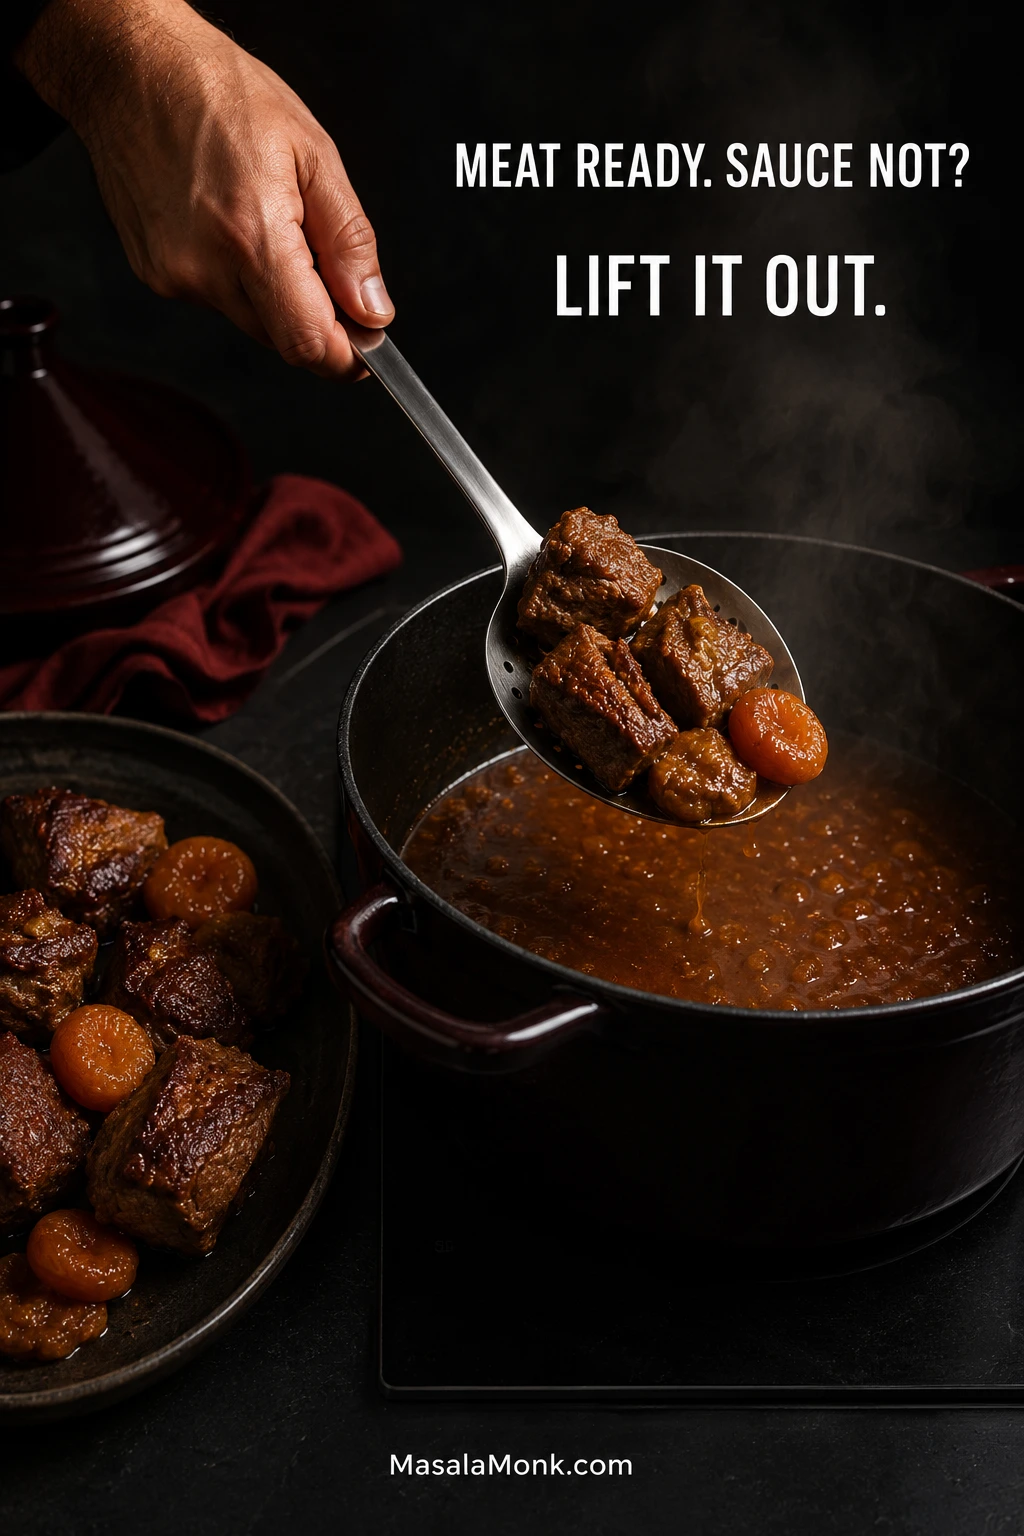
Perfect lamb and apricots in a pot with too much liquid is an easy fix. Lift the solids onto a warm plate, reduce the sauce on its own, then return everything briefly to coat and heat through.

Hand lifting tender lamb and softened apricots from a Dutch oven with a slotted spoon while loose brown sauce continues simmering in the pot.
Once the finished lamb and apricots are out of the pot, the sauce can reduce more actively without pushing either solid further. Return them only briefly when the liquid has reached the consistency you want, so the final coating stays concentrated without sacrificing tenderness.

At the table, aim for enough sauce to collect around the lamb and soak into bread or a spoonful of grain.

Fix My Lamb Tagine

Lamb Problems

ProblemWhat to do
Lamb is still toughCover and cook for another 15 minutes, then test one of the largest pieces again.
Lamb is dry and still chewyKeep it in the moist braise while a fork meets resistance. Very lean cuts and small pieces have less room for error.
Lamb is tender but dryStop cooking it and serve with plenty of sauce. Next time use shoulder or neck and keep the pieces larger.
Lamb is falling apartStir as little as possible and serve gently. Begin the tenderness checks earlier next time.

Sauce and Seasoning Problems

ProblemWhat to do
Sauce is wateryOnce the lamb is nearly tender, leave the lid off and let some water evaporate.
Lamb is ready but sauce is very wateryLift the lamb and apricots onto a warm plate, reduce the sauce separately, then return them briefly to coat and heat through.
Sauce is disappearingAdd hot water or stock 30–60 ml / 2–4 tablespoons at a time.
Tagine tastes too sweetCheck the salt first, then add lemon juice a little at a time. Leave out the honey.
Tagine tastes flatCorrect the salt, then add lemon before reaching for more ground spice.
Sauce tastes bitter or burntTransfer the unburnt upper portion to a clean pot without scraping the bottom, then reassess the seasoning.
Surface looks greasySkim the excess fat now, or chill the tagine and lift away the hardened fat before reheating.
Bottom is catchingLower the heat, add a small amount of hot liquid and leave the scorched material stuck to the pot.

Apricot Problems

ProblemWhat to do
Apricots have broken downThey’ve become part of the sauce. Add them later next time for more distinct pieces.
Apricots are still firmGive them another 10–15 minutes in the hot sauce.

The Best Lamb for Tagine

Lamb shoulder gives you the widest margin for error. It stays succulent through a long braise, while its collagen gives the sauce natural body as the shoulder softens. That also gives you some breathing room when the meat and sauce don’t reach their ideal point at exactly the same moment.

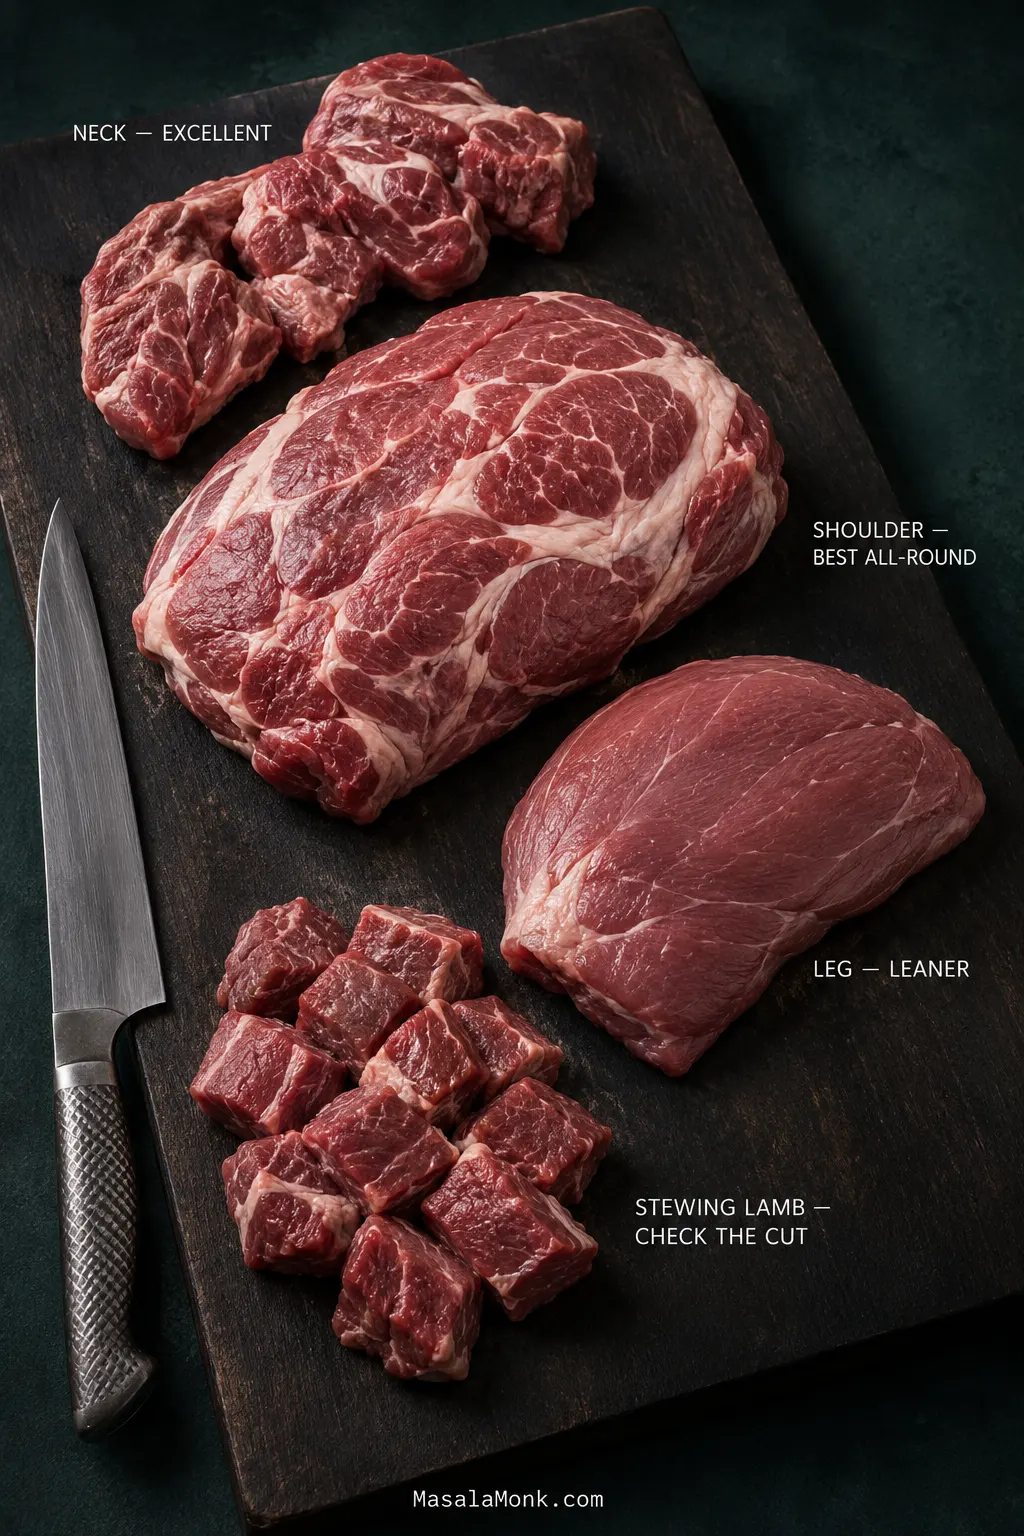
CutHow it behaves
ShoulderJuicy, well suited to a long braise and the best all-round choice.
NeckDeeply flavorful with plenty of connective tissue; allow extra time if necessary.
LegLeaner and more prone to drying during prolonged cooking.
Diced/stewing lambConvenient when the underlying cut is suitable for braising and the pieces are not too small.
Raw lamb shoulder, neck, leg and cubed stewing lamb arranged on a dark butcher board with labels describing each cut for braising.
At the butcher counter, the meat itself can tell you something the label cannot. Shoulder tends to look irregular and marbled; leg is cleaner and leaner; neck carries more compact connective tissue. Most importantly, “stewing lamb” describes how the meat has been cut, not which lamb cut it came from, so it is worth asking what is actually in the pack.

Already bought a whole leg and want to keep it intact? Our roast leg of lamb is built for browned edges, a juicy center and carving into slices.

Buying and Preparing Lamb Shoulder

The 1 kg / 2.2 lb in this recipe means shoulder after trimming. A heavy exterior fat cap means buying a little extra. Bone-in shoulder works too; allow extra purchase weight for the bone, then judge the cooking by tenderness rather than trying to match the boneless weight exactly.

Remove thick deposits and hard seams of exterior fat while keeping the marbling within the meat. Leave the chunks generous—around 4 cm / 1½ inches. Small pieces dry out more easily over a long braise.

Shanks need their own bone-in timing, while minced lamb belongs in a kefta-style tagine rather than this recipe.

Mutton and goat also suit these spices, although older meat may take longer to soften. For a completely different use of mutton—drier, darker and built around a reduced masala—see our Punjabi mutton bhuna.

Apricots, Spices and the Sweet-Savory Balance

Dried apricots soften in the sauce and pick up some of the lamb and spice around them. Their tart edge matters: the fruit tastes sweet, but the next forkful still tastes unmistakably like lamb.

For 1 kg / 2.2 lb lamb, 180 g / about 6¼ oz dried apricots gives the fruit a clear presence without dominating every bite. Adding them once the shoulder is nearly tender protects their texture if the meat takes longer than expected.

This recipe is formulated for dried apricots. Fresh apricots contain much more water and soften quickly, so add them only near the end and cook just until tender instead of making a direct gram-for-gram substitution. Drain canned apricots particularly well if they’re packed in syrup.

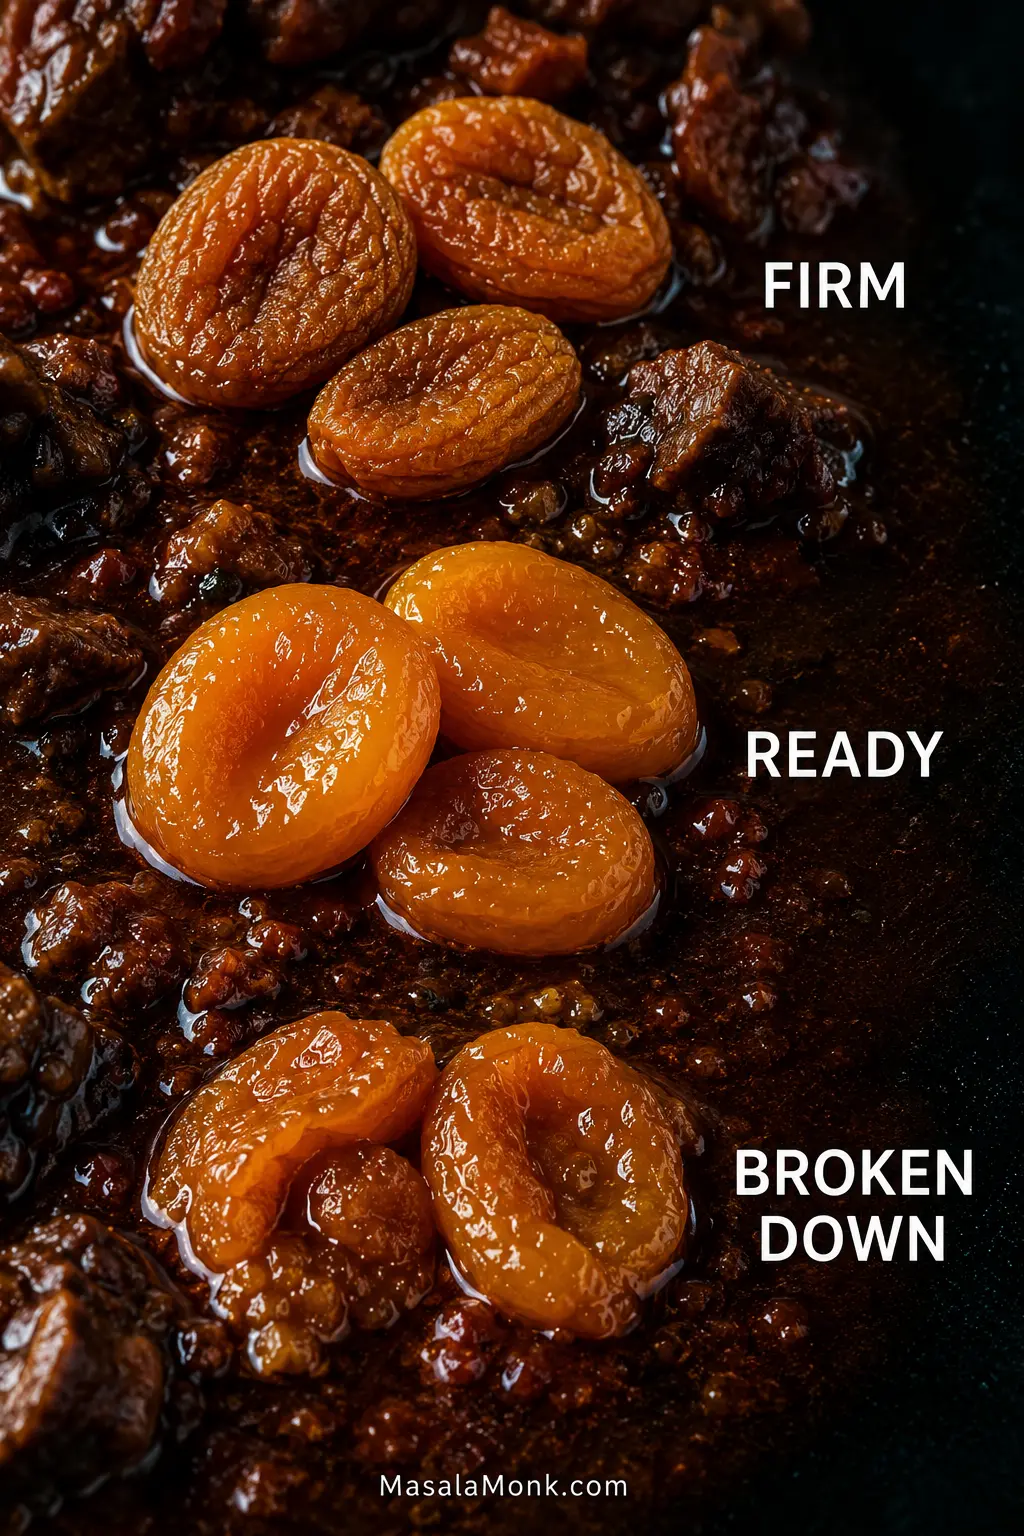
Dried apricots shown at three stages in dark sauce: firm and wrinkled, plump and ready, and partly broken down.
When judging dried apricot texture in tagine, look at shape as well as gloss. Firm fruit stays wrinkled and compact; ready fruit swells and rounds out while keeping clean edges; farther along, those edges begin feathering into the sauce. That last stage is not ruined fruit—it simply shifts more apricot flavor from distinct pieces into the braising liquid.

The Spice Blend

Cumin and coriander carry most of the earthy flavor, with ginger and black pepper adding warmth. Turmeric and paprika deepen the sauce. Cinnamon should remain a background note rather than make the lamb taste candied.

The blend is aromatic but mild rather than chile-hot. Cayenne controls the heat here, so you can leave it out for a gentler lamb tagine or increase it carefully if you prefer more warmth.

Ras el hanout can replace most of the individual ground spices, but blends vary enormously. Start around 1½ tablespoons and use up to 2 tablespoons with a milder blend, accounting for any salt, chili or cinnamon already present.

Saffron is optional. A small pinch adds a subtle floral note, but the tagine doesn’t depend on it. If that little jar rarely leaves the cupboard, our guide to saffron and how to use it explains where its flavor earns a place.

Salt and acidity become more pronounced as the sauce reduces, so make the important adjustments near the end. Check the salt first, then add lemon. Taste before reaching for honey; the apricots may already have given you enough sweetness.

What Is a Tagine—and Is There One Authentic Version?

The word tagine refers both to the distinctive lidded cooking vessel and to the family of dishes associated with it. In other words, “tagine” describes both the pot and a style of slow, gently cooked dishes. Moroccan tagine isn’t one fixed recipe: lamb may appear with prunes or apricots, while other versions feature preserved lemon and olives, vegetables, fish or kefta. For a wider look at the food tradition, the Moroccan National Tourist Office has a useful overview of tajine and other emblematic dishes.

This version is designed around a Dutch oven in a conventional home oven, with browned shoulder as its base. Those are deliberate choices for this recipe, not claims about how every Moroccan cook prepares tagine.

Do You Need a Tagine Pot?

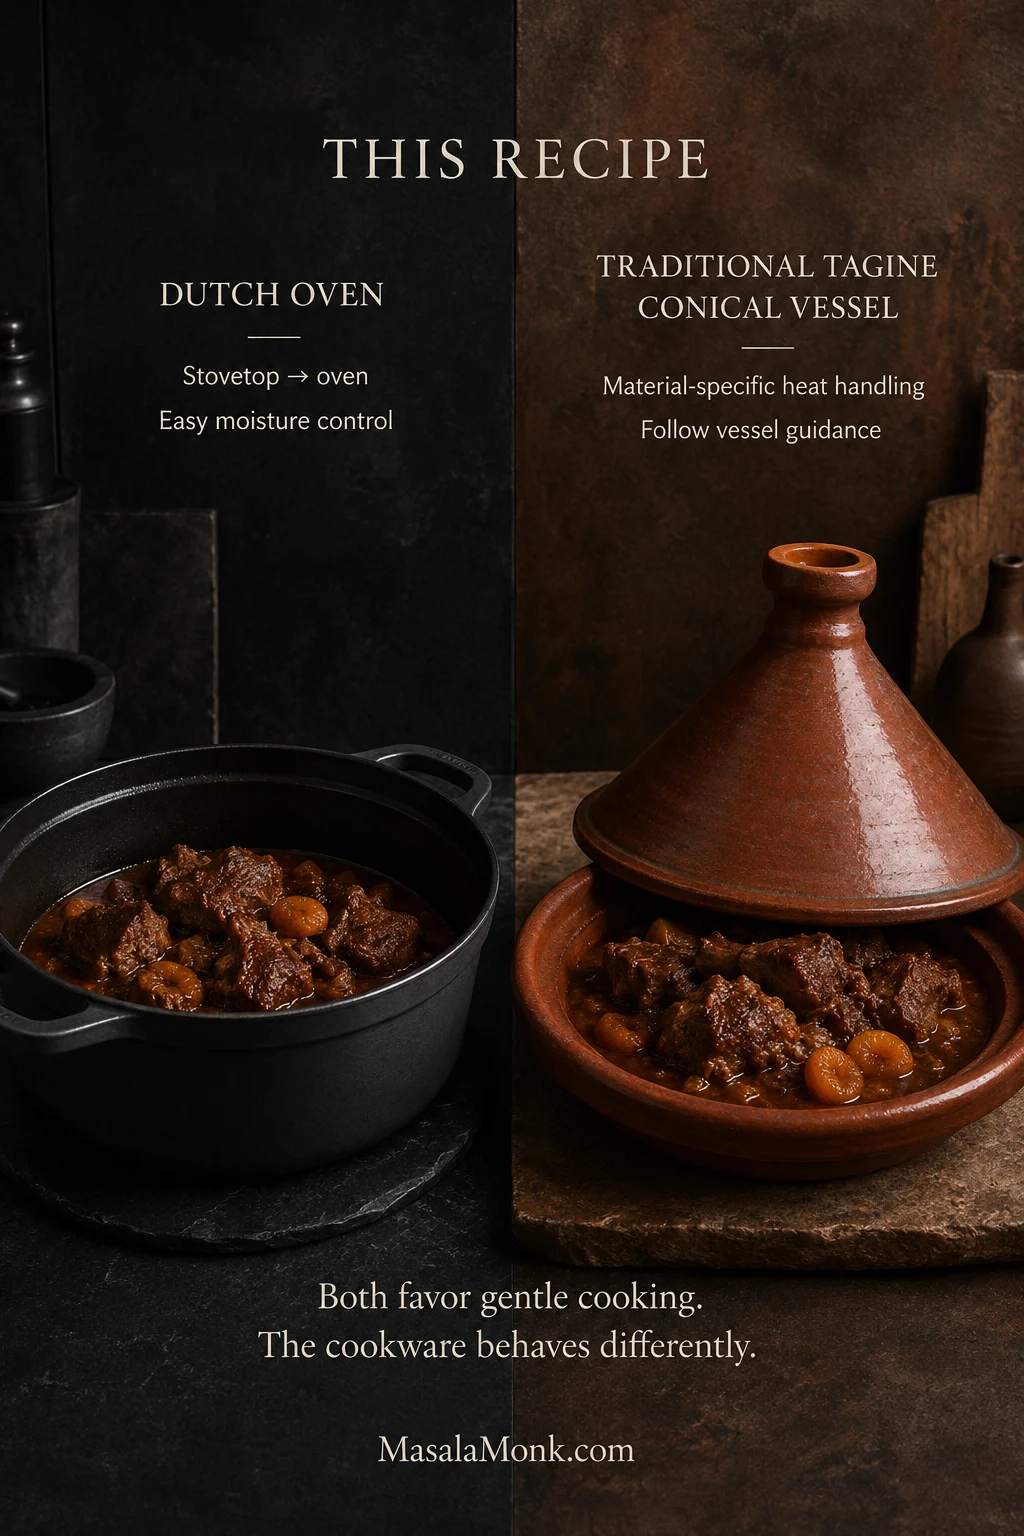
No. A heavy Dutch oven you already own can make an excellent tagine. It holds the steady, covered heat the shoulder needs and moves easily from stovetop to oven.

Black enameled Dutch oven beside a traditional conical clay tagine, both containing lamb and apricot braise, with text explaining that the cookware handles heat differently.
For a tagine pot vs Dutch oven comparison, carry over the flavor idea rather than automatically carrying over the same liquid and timing. Heavy cast iron and clay manage stored heat, direct heat and evaporation differently. Therefore, the vessel is part of the cooking method—not merely a different-looking container for exactly the same instructions.

This recipe also browns the lamb first. Some tagine methods skip that step; here, the dark patches on the shoulder and the fond left in the pot create a deeper roasted base.

Cooking in an actual tagine? Make sure the vessel is intended for cooking. Glazed ceramic, unglazed clay, flameproof ceramic and cast-iron versions behave differently, so follow the manufacturer’s instructions for seasoning, direct heat and thermal shock. Some clay vessels benefit from a heat diffuser over a concentrated gas flame.

For stovetop cooking in a heavy covered pot, maintain the gentlest simmer you can. Look at the bottom and liquid a little more often than you would in the oven because concentrated sauce can catch over direct heat. Let tenderness, not the clock, decide when the lamb is ready.

Slow cooker or pressure cooker: both retain far more moisture than this Dutch-oven method, so do not carry the 350 ml / about 1½ cups liquid quantity across unchanged. For a reliable conversion, use an appliance-specific lamb-tagine formula and add the dried apricots late enough to keep their shape rather than treating this recipe as a line-by-line conversion.

Prunes, Dates, Preserved Lemon and Other Variations

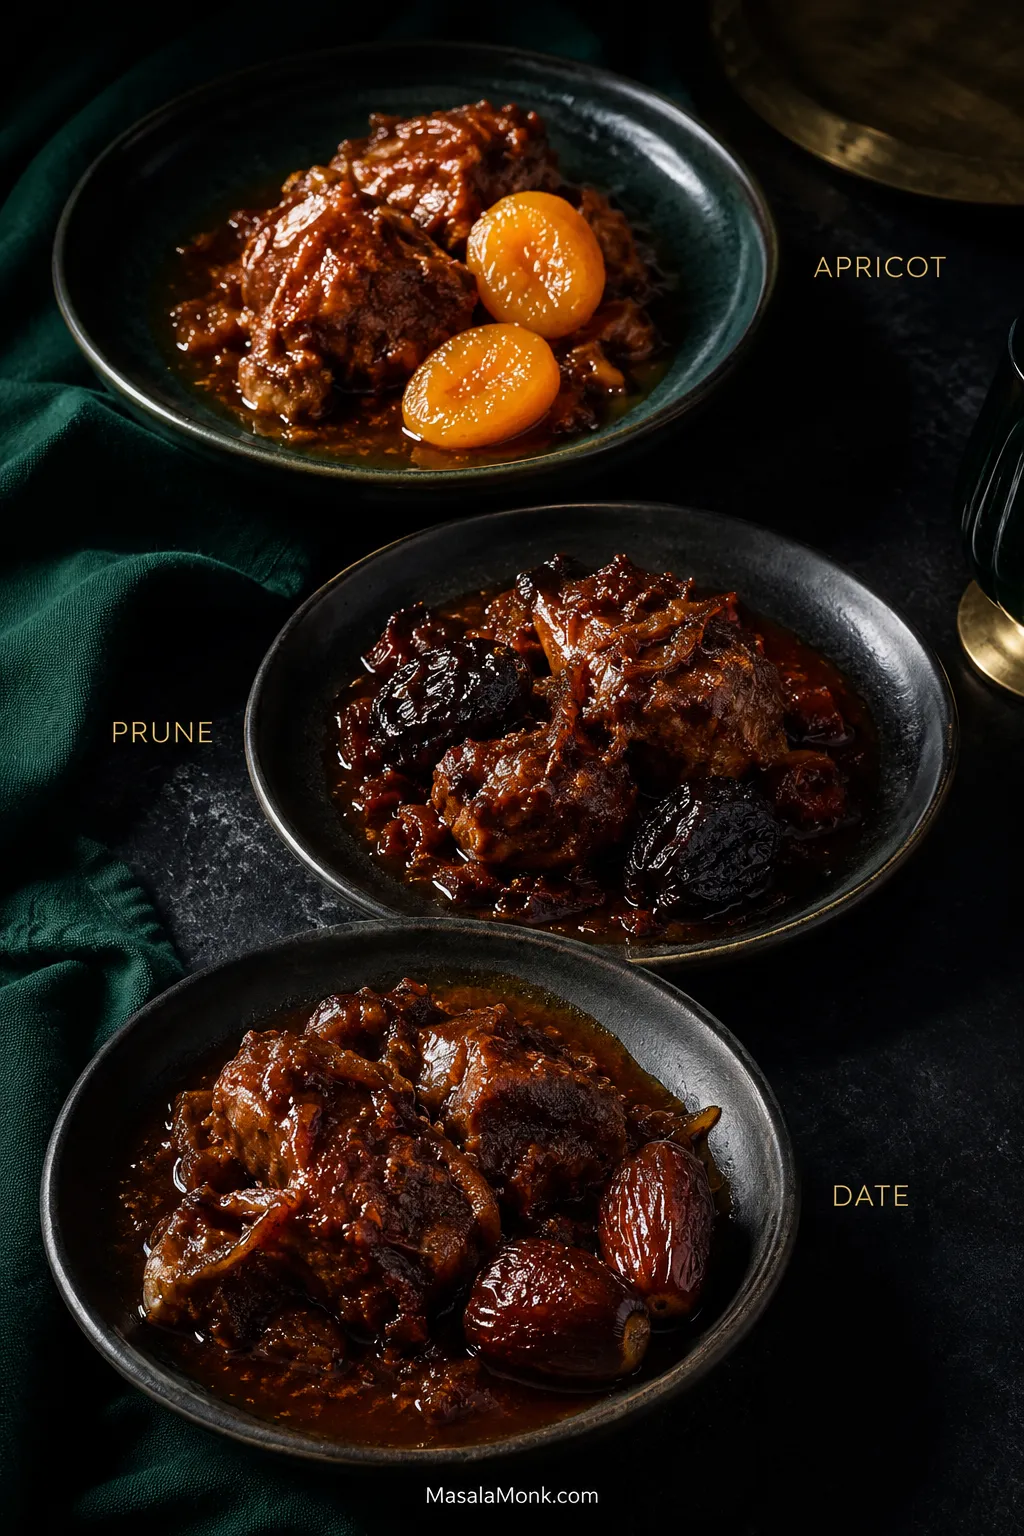
Prunes produce a darker, more jammy sauce and pair particularly well with almonds. They usually bring enough sweetness without much help from honey.

Dates are sweeter still, with more caramel depth. Use them more sparingly than apricots and keep enough lemon in the sauce to give the lamb some contrast.

Three finished lamb tagine portions made with apricots, prunes and dates, showing lighter amber, dark jammy and deep caramel fruit variations.
Switching dried fruit changes the finishing decisions as well as the flavor. Apricot keeps the sauce brighter, prune pushes it darker and jammier, and date brings deeper caramel sweetness. After changing the fruit, taste again before copying the apricot version’s honey or lemon adjustments, because the balance at the end may need to move with the substitution.

Preserved lemon and olives take the dish somewhere saltier and more intensely citrusy. Both bring seasoning of their own, so begin with less salt and use water or low-sodium stock.

Cooked chickpeas can stretch the pot; add them during the last 20–30 minutes. Carrots, squash and sweet potato in generous bite-size pieces need roughly 30–45 minutes and will absorb some of the braising liquid.

Mrouzia is a different preparation altogether, traditionally associated with lamb, honey, raisins and almonds. It deserves its own recipe.

What to Serve With Lamb Tagine

The tagine is soft, fragrant and deeply flavored, so its best partners are simple: something to catch the sauce and something fresh enough to sharpen the plate.

Hands tearing bread beside a large lamb and apricot tagine, with separate bowls of couscous, rice and cucumber-herb salad on a dark dining table.
When deciding what to serve with lamb tagine, organize the table around contrast. Keep bread closest for sweeping through the sauce, serve couscous or rice separately when you want a more substantial plate, and put something cool and crisp alongside. That arrangement lets each bite move between rich, absorbent and fresh instead of becoming uniformly soft.

Moroccan bread is the classic table partner. Tear it and use it to scoop the lamb and sweep through the sauce. If khobz isn’t available, homemade pita is a practical stand-in.

For a plated meal, couscous is light and excellent at absorbing the braising juices. For a gluten-free plate, choose rice; standard couscous is wheat-based. Our rice cooking guide will help if you want loose, separate grains.

A lemony salad, fresh herbs or cucumber gives the plate a cooler, sharper side. Our crisp cucumber salad works especially well against the warm lamb and fruit.

Make Ahead, Store, Freeze and Reheat

If people are coming over, this is the kind of make-ahead recipe that genuinely changes the evening. The lamb can already be tender, excess fat can be removed cleanly once chilled, and all that’s left is warming the sauce and adding the fresh garnish.

Cook the tagine completely, cool it promptly and refrigerate it. The USDA’s leftovers guidance recommends refrigerating cooked food within 2 hours and generally using refrigerated leftovers within 3–4 days.

How to Reheat and Freeze Lamb Tagine

Remove any hardened excess fat while the tagine is cold, then reheat gently with the lid on. Wait until it is hot before deciding whether the sauce needs loosening; add small splashes of water or low-sodium stock only if necessary.

Reheat until thoroughly hot throughout; if checking with a thermometer, leftovers should reach 74°C / 165°F. Add fresh cilantro, lemon zest and toasted almonds after reheating.

For freezing, cool the tagine and pack it into airtight meal-sized portions. Freeze for up to 3 months for best quality, thaw overnight in the refrigerator when possible, and reheat thoroughly.

One last thing: a refrigerated tagine can look almost dry because lamb gelatin has set and the fruit is holding moisture. Give it heat before you give it stock. Much of the sauce returns as it warms.

Same bowl of lamb and apricot tagine shown cold with thick set sauce and reheated with looser glossy sauce and visible steam.
When reheating lamb tagine, judge the sauce by movement rather than shine. Cold gelatin can still catch the light and look moist even though it will not flow; once thoroughly hot, the sauce should move freely around the lamb again. Only after seeing that hot state can you tell whether refrigeration or reheating actually cost enough moisture to require extra liquid.

The useful moment to remember is not when the timer beeps. It is when you lift the lid, press a fork into one of the larger pieces and feel the lamb finally give. Lemon lifts the darker sauce, while the toasted almonds add a little crackle against all that softness.

Scatter over the cilantro, put bread within reach, and leave the serving spoon near the pot. The sauce at the bottom is worth going back for.

Posted on — Leave a comment

Turkey Gravy Recipe: Easy Homemade Gravy From Turkey Drippings

Silver gravy boat pouring glossy brown gravy over carved roast turkey on a dark Thanksgiving table.

The turkey is out, it needs to rest, and the roasting pan is still holding the beginnings of excellent gravy: browned bits, dark pan juices, and rendered turkey fat. Before anyone cleans that pan, give yourself about 20–30 minutes.

No two turkeys leave behind the same amount. A big bird may give you plenty of fat and juice; a turkey breast may leave surprisingly little. Your measuring cup does not need to look like the recipe photo. Separate the fat from the pan juices, measure what you have, and use butter or stock to fill the gaps.

The finished gravy should taste deeply of turkey, coat a spoon in a thin, smooth layer, and still pour easily over the bird, dressing, and mashed potatoes. Keep it slightly loose. It will thicken while it waits.

Quick Answer: Turkey Gravy From Drippings

For roughly 2 cups / 475 ml gravy, start with ¼ cup / 60 ml fat + ¼ cup / about 30 g all-purpose flour + 2 cups / 475 ml total liquid.

Total liquid means the pan juices you choose to use, any stock or water used to deglaze the roasting pan, and enough unsalted or low-sodium stock to reach 2 cups.

If the turkey was brined, injected, heavily seasoned, or smoked, let a spoonful of pan juice cool enough to taste before counting it toward those 2 cups. Use less if it is very salty or smoky, leave bitter or acrid liquid out, and let low-sodium stock make up the rest.

Cook the roux until lightly golden and no longer raw-smelling, add the liquid gradually, then simmer until the gravy lightly coats a spoon but still pours.

Roasting pan with turkey drippings separated into fat for roux and pan juice with stock for gravy liquid, leading to finished gravy.
Measure the fat and liquid separately; they control different parts of the gravy.

Make It Now: Turkey Gravy While the Bird Rests

Recipe at a Glance

Yield
Roughly 2 cups / 475 ml

Enough for
6 gravy-loving or 8 modest servings

Active time
15–20 minutes

Total time
20–30 minutes

Ingredients

  • Rendered turkey fat, up to ¼ cup / 60 ml
  • Unsalted butter, as needed to bring the total fat to ¼ cup / 60 ml
  • ¼ cup / about 30 g all-purpose flour
  • Defatted turkey pan juices, as available
  • Unsalted or low-sodium turkey or chicken stock, as needed to bring the total liquid to 2 cups / 475 ml; chicken broth works too
  • Freshly ground black pepper, to taste
  • Salt, only if needed at the end

Optional: 1 teaspoon finely chopped fresh thyme or ½ teaspoon finely chopped fresh sage. If using dried thyme or sage, start with ¼ teaspoon. Have ½–1 teaspoon Worcestershire sauce available if you want extra savory depth.

Useful equipment: medium saucepan, whisk, clear heatproof measuring jug, and preferably a fine-mesh strainer. A fat separator is handy, not essential.

1. Save the juices inside the turkey

Before moving the turkey to a board or platter, carefully tilt it over the roasting pan. Hot juices often collect inside the cavity and are easy to lose when the bird is lifted away. Move the turkey to its resting place, then turn back to the pan.

Roast turkey being carefully tilted over its roasting pan so juices drain from the cavity into the pan.
Those cavity juices belong in the pan-juice pool—save them before moving the turkey.

2. Deglaze the well-browned fond

Golden to deep-brown patches stuck to the roasting pan are fond, and they’re where a lot of the gravy’s roasted flavor comes from. Add a few tablespoons of stock or water if the pan needs loosening and scrape the browned patches free. A very dry pan may need a little more liquid.

Pour the deglazing liquid in with the pan juices; it will count toward the final gravy liquid. Leave behind anything black or acrid-smelling.

Liquid being added to a roasting pan as brown fond loosens, with a separate black scorched area left behind.
Deglaze only until the browned fond releases; leave black, acrid residue behind.

If you’re reading ahead before roasting: keep an eye on a pan that is becoming completely dry. Where the turkey recipe allows it, a splash of water can protect the fond before those useful brown deposits scorch.

3. Strain and separate the drippings

Pour everything through a fine-mesh strainer into a fat separator or clear heatproof measuring jug and let it stand for 5–10 minutes. The fat usually looks paler, clearer, and oily as it rises; underneath is the darker, thinner pan juice.

Some birds leave beautifully distinct layers. Others leave a murky jug that takes a few minutes to make sense of. Either is fine. You only need enough separation to measure the two parts.

No fat separator? Spoon the fat from the top of a clear jug, or use a turkey baster to draw the darker juice from underneath the fat layer.

Two clear containers compare well-separated and cloudy turkey drippings, with pale fat above darker pan juice and a baster drawing juice from below.
Cloudy drippings are fine. You only need to distinguish the oily fat from the darker pan juice.

4. Taste first, then measure what your turkey gave you

Measure up to ¼ cup / 60 ml turkey fat. A lean bird may leave only a spoonful. Keep it, then add unsalted butter until you have ¼ cup total fat. Save any excess turkey fat for another use.

Let a teaspoon of the darker pan juice cool enough to taste. If it tastes concentrated but pleasantly turkey-rich, use it. Very salty or smoky juice is better added gradually, and genuinely bitter or acrid liquid should stay out. Measure however much pan juice you choose to use, including the deglazing liquid you want to keep, then add enough unsalted or low-sodium stock to reach 2 cups / 475 ml total liquid.

For example, if the pan gives you 3 tablespoons turkey fat and ¾ cup / 180 ml pleasantly seasoned pan juice, add 1 tablespoon butter to complete the fat and about 1¼ cups / 295 ml stock to complete the liquid. If that same ¾ cup tastes aggressively salty, use less of it and let unsalted stock make up more of the 2-cup total.

Dark turkey pan juice, tasting spoon, low-sodium stock and a final liquid mixture arranged to show tasting before completing the gravy liquid.
Treat pan juice like a concentrate: taste it first, then decide how much belongs in the gravy.

Using a brined, injected or smoked bird? See the turkey-specific gravy notes ↓

5. Cook a light-golden roux

Put the measured turkey fat and any needed butter in a medium saucepan over medium heat. Whisk in ¼ cup / about 30 g flour. The fat and flour form the roux, the paste that will thicken the gravy.

Cook for 2–4 minutes, whisking regularly. The roux should come together into a wet paste. As it cooks, the raw-flour smell will fade, the mixture will bubble, and the color will move toward pale gold.

If there is an obvious puddle of oil around the roux because too much fat went into the pan, spoon off the excess. Keep the roux light golden: you’ll get some toasted flavor without losing much thickening power.

Three saucepans show just-combined, light-golden and darker roux, with a small example of excess oil being spooned away.
Light golden is enough; darker roux brings more toastiness but less thickening power.

6. Add the liquid gradually

Whisk in a small splash of the measured liquid. The roux may suddenly tighten into something that looks almost like mashed potatoes. That’s normal.

Whisk it completely smooth, add another small portion, and repeat. Once the roux has loosened into a sauce, pour in the rest more steadily. Cold stock works; warming a large batch simply gets it back to a simmer faster.

Liquid being poured into roux while a whisk works through the very thick paste formed after the first addition.
The first splash can turn roux into a thick paste. Whisk it smooth before adding more.

7. Simmer until the gravy tells you it is ready

Bring the gravy briefly to a strong bubble, then lower the heat to a steady gentle simmer. Cook for 5–10 minutes, whisking now and then.

If you’re using dried thyme or sage, add it during this simmer. Give the flour time to work before judging the thickness. As the gravy cooks, the raw-flour smell should disappear and the pan should begin smelling much more like the turkey.

The Spoon Test

Dip in a spoon. The gravy should leave a thin, even film on the back while still running easily when the spoon is tilted.

  • Too thin: it runs off almost like broth.
  • Ready: it coats the spoon but still flows.
  • Too thick: it sits heavily and barely moves.

The finished gravy should be silky and easy to pour, without an oily film. Stop slightly loose; it will thicken further on its way to the table.

Three identical spoon backs compare gravy that is too thin, ready and too thick based on how heavily it coats and drips.
Judge consistency while hot: ready gravy coats the spoon lightly and still flows.

Taste the finished gravy. Add black pepper, then salt only if it needs it. Stir in fresh thyme or sage, or add Worcestershire gradually and taste.

If a piece of turkey is handy, taste the gravy with the meat before making the final seasoning call. Turkey is mild, and a gravy that seems slightly assertive on the spoon can land perfectly once the two meet.

If the gravy is smooth, savory, and pouring nicely, you’re done. When the pan was unusual—or the saucepan still isn’t quite right—go straight to Gravy ER troubleshooting.

Thanksgiving dinner plate with sliced turkey, mashed potatoes, stuffing, vegetables and glossy brown gravy.

More Help With Your Turkey Gravy

What Turkey Drippings Actually Contain

“Drippings” are really two liquids plus the browned material left in the pan. The pale oily layer is rendered turkey fat, which you use for the roux. Beneath it is the darker pan juice, carrying concentrated turkey flavor and the seasonings from the bird. Fond is the well-browned material stuck to the roasting pan; deglazing pulls it into the liquid. Stock makes up whatever liquid is missing.

Need to separate yours? Go to Step 3: Separate the drippings ↑

Not Enough Turkey Drippings? Here’s How to Adjust

A turkey breast, smaller bird, or lean roasting setup may leave very little behind. You can still make full-flavored gravy.

Suppose you have only 1 tablespoon turkey fat and ½ cup / 120 ml pan juices. Add enough unsalted butter to bring the fat to ¼ cup, then enough stock to bring the liquid to 2 cups.

The same adjustment works with smaller cuts such as turkey tenderloin. Use what the pan gave you, then let butter and stock provide the missing volume.

No usable drippings at all? Make the roux with butter. Use a flavorful low-sodium turkey stock for the liquid—especially one made with the neck or wings—or a good low-sodium chicken stock.

Photographic equations show turkey fat completed with butter and pan juice completed with low-sodium stock for making gravy.
Short on drippings? Keep the ratio and complete the missing fat with butter and liquid with stock.

Got the missing fat and liquid covered? Back to the recipe ↑

How Much Turkey Gravy Should You Make?

Plan on at least ¼ cup / 60 ml per person. For a holiday table where gravy is going over turkey, potatoes, and cornbread dressing, closer to ⅓ cup / about 80 ml per person is more comfortable.

Three increasingly large silver gravy boats represent gravy quantities for tables of about 6, 12 and 18 people.
When gravy serves turkey, potatoes and dressing, rounding up is usually safer than cutting it close.
Approximate batchFatFlourTotal liquid*
1 cup / 240 ml2 tbsp / 30 ml2 tbsp / about 15 g1 cup / 240 ml
2 cups / 475 ml¼ cup / 60 ml¼ cup / about 30 g2 cups / 475 ml
3 cups / 710 ml6 tbsp / 90 ml6 tbsp / about 45 g3 cups / 710 ml
4 cups / 950 ml½ cup / 120 ml½ cup / about 60 g4 cups / 950 ml
6 cups / 1.4 L¾ cup / 180 ml¾ cup / about 90 g6 cups / 1.4 L
*Total liquid includes the pan juices you choose to use, deglazing liquid, and enough stock to reach the listed amount. Finished volume varies somewhat with reduction.

A 4-cup batch may finish slightly above or below 4 cups because simmering changes the volume. Stocks vary too. Use the table to get close, then let the spoon decide.

Turkey Breast, Brined Turkey and Smoked Turkey

The basic method holds up across most kinds of turkey; the drippings are what change.

A turkey breast often leaves less fat and liquid, so butter and stock do more of the work. Brined, injected, and heavily pre-seasoned birds may leave plenty of juice, but it can be much saltier than expected. Taste it first and add the pan juices gradually.

With smoked turkey, add the drippings gradually. Smoke and salt become more concentrated as the pan cooks down. When a seasoned smoker pan has lost a lot of moisture, plain water can sometimes be more useful than another pour of broth. Water evaporates; salt does not.

A spatchcocked bird needs no special gravy treatment, and its removed backbone is useful for stock. Fried or grilled turkey usually leaves no roasting-pan drippings, so start with butter and a flavorful stock instead.

Four-panel comparison of gravy approaches for turkey breast, brined or injected turkey, smoked turkey, and fried or grilled turkey.
Turkey breast changes quantity; brining changes salt; smoking changes concentration; frying or grilling may remove drippings entirely.

Ready to use those drippings? Return to Step 4: Taste first, then measure ↑

Turkey Gravy Troubleshooting: Gravy ER

This is the point where it is tempting to throw in more flour and hope for the best. Don’t. First work out what is wrong with the gravy in front of you.

Six matching pans compare gravy that is thin, ready, thick, lumpy, greasy or split, and pale.
The graphic compares six visible gravy states: thin, ready, thick, lumpy, greasy or split, and pale.
ProblemDo this now
Too thinSimmer first. If it is still thin, reduce when the salt level allows or use a small cornstarch slurry (cornstarch mixed with cold water).
Too thickHeat it fully before judging, especially after refrigeration. Then whisk in warm unsalted stock 1–2 tablespoons at a time.
LumpyWhisk vigorously. Strain through a fine-mesh sieve if needed; stubborn lumps can be smoothed with a brief pass of an immersion blender.
Greasy or splitSkim visible oil, return the gravy to gentle heat, and whisk. If it still looks separated, a brief pass with an immersion blender can help.
Raw or flouryThe roux was probably undercooked. Continue gentle cooking if the gravy can tolerate it.
Bitter or burntStart again with clean fat and flour, leaving burnt pan residue and bitter liquid behind. Strongly acrid gravy rarely improves with extra seasoning.
Too saltyStop reducing. Add unsalted stock or water; a badly oversalted batch may need to be combined with some plain unsalted gravy.
Bland but thickThe problem is flavor, not starch. Improve the pan juices, stock, or seasoning instead of adding more flour.
Too smoky or herbyDilute with unsalted stock and taste again.
PaleIf it tastes good and the texture is right, leave the color alone.

If the gravy is still too thin

Give flour-thickened gravy a real chance to simmer before reaching for more starch. It can look loose immediately after the stock goes in and change considerably over the next several minutes.

Still thin and not too salty? Let it reduce. If the gravy is already salty, stir together 1 teaspoon cornstarch with 1 tablespoon cold water, whisk in part of that slurry, bring the gravy back to a bubble, and check again before adding more.

A tiny correction is easy to repeat. Turning the saucepan into wallpaper paste is harder to undo.

If the gravy is too salty

Stop reducing. A mild problem may need only unsalted stock or some water. For a badly oversalted batch, make a small amount of plain unsalted gravy and whisk the two together. You usually need only enough neutral gravy to bring the first batch back into balance.

Adjust the thickness after the seasoning is where you want it. Skip the old potato trick; a potato does not selectively remove enough salt from gravy to solve the problem.

Back to the recipe ↑

How to Make Turkey Gravy Taste Better

If the gravy is thick enough but still tastes flat, leave the flour alone. It needs stronger turkey flavor or better seasoning.

More Turkey Flavor

Start with concentrated pan juices and properly deglazed fond. Turkey stock adds more depth than chicken stock when you have it. If you’re planning ahead, the neck or roasted wings can strengthen ordinary stock while the bird cooks.

A concentrated turkey or chicken base can strengthen weak stock too. These concentrates are salty, so start with a small amount and taste before adding more.

Best Seasonings for Turkey Gravy

Black pepper is the easiest finishing seasoning. For a 2-cup batch, try 1 teaspoon finely chopped fresh thyme or ½ teaspoon finely chopped fresh sage. Dried herbs are stronger; start with ¼ teaspoon and give them a few minutes in the simmering gravy.

Worcestershire adds another layer of savoriness. Start with ½ teaspoon; 1 teaspoon total is usually plenty for this size batch. The pan juices may already carry herbs, garlic, citrus, or pepper from the turkey, so taste before adding more seasoning.

Wine, Brightness and Color

For white-wine gravy, add ¼ cup / 60 ml dry white wine or dry sherry after the roux is cooked. Cook until most of the wine has evaporated and the sharp alcoholic aroma has softened, then add the full measured pan-juice-and-stock mixture. Treat the wine as an extra flavoring rather than part of the 2 cups of gravy liquid.

A rich gravy that tastes flat may need only a few drops of sherry vinegar or lemon juice. Add some, taste, and stop as soon as the savory flavors seem brighter. If the gravy starts tasting lemony or vinegary, you’ve added too much.

When the flavor and texture are right, leave a pale gravy alone. Well-browned fond and a light-golden roux will give it natural color.

Flour vs. Cornstarch for Turkey Gravy

For classic turkey gravy, flour is the better default. A flour roux uses the rendered turkey fat and gives the sauce its familiar opaque, velvety body. It also reheats reliably, which matters on a holiday table.

Cornstarch is quicker and produces a glossier sauce. It is useful for small last-minute corrections and also gives you a straightforward gluten-free thickening method.

For roughly 2 cups / 475 ml gluten-free gravy, mix 2 tablespoons cornstarch with 2 tablespoons cold water until completely smooth. Bring the 2 cups of pan-juice-and-stock mixture to a simmer, whisk in most of the slurry, and bring the gravy to a gentle boil for about 1 minute while whisking. Judge the thickness before adding the rest. Cornstarch does not require a roux.

Cornstarch and cold water being combined into a milky slurry before the slurry is whisked into simmering brown gravy.
Mix cornstarch with cold water first so the starch disperses before it meets hot gravy.

To make a smaller correction to flour gravy, use the 1-teaspoon-cornstarch slurry described in Gravy ER above. When the whole gravy must be gluten-free, check labels on stock, bouillon, Worcestershire, and other packaged seasonings as well.

Making Ahead, Storing, Reheating and Keeping Turkey Gravy Warm

Make Turkey Gravy Ahead

For Thanksgiving, the most practical make-ahead option is a concentrated gravy base that leaves room for fresh drippings. Up to 3 days ahead, melt ¼ cup / 60 ml butter, whisk in ¼ cup / about 30 g flour, and cook the roux until light golden. Gradually whisk in about 1½ cups / 355 ml unsalted or low-sodium stock, simmer until smooth, then transfer the base to a shallow container and refrigerate promptly. The base will be thicker than finished gravy; that’s intentional because the fresh pan juice will loosen it on Thanksgiving.

On Thanksgiving, reheat the base while whisking. Let the fresh pan juice cool enough to taste, then whisk in up to about ½ cup / 120 ml of the defatted pan juice you actually want to use. If the turkey gives you less than that—or the juice is too salty or smoky to use freely—add less and use low-sodium stock for the rest. Simmer until the gravy reaches the spoon-test consistency.

Three stages show a thick make-ahead gravy base, defatted turkey pan juice being whisked in, and smooth pourable finished gravy.
Build the stock base ahead; add fresh pan juice on Thanksgiving for the turkey’s final flavor.

If you already have cooked turkey drippings available, fully finished gravy can also be made up to 3 days ahead, refrigerated promptly, and reheated before serving.

Refrigerating and Freezing Turkey Gravy

Transfer leftover gravy to a shallow container and refrigerate promptly; don’t leave it sitting out to cool completely. Use refrigerated gravy within 3–4 days. USDA leftovers guidance recommends refrigerating perishable leftovers within two hours.

For longer storage, freeze the gravy. USDA guidance for gravy gives a freezer window of about 4–6 months. For best quality, use it within that window.

Reheating and Keeping Gravy Warm

Flour-thickened gravy naturally firms as it chills, and gelatin-rich drippings or stock can make it set even more. Reheat it before deciding that it is too thick.

Warm refrigerated gravy gently in a saucepan while whisking. Add stock or water a tablespoon or two at a time if it has tightened in the fridge.

Side-by-side view of the same gravy set and gelatinous when cold, then smooth, glossy and fluid after reheating.
Cold gravy can look much thicker than it really is. Reheat before deciding whether it needs thinning.

Before serving, bring reheated gravy to a rolling boil. Reheated leftovers should reach at least 165°F / 74°C.

The microwave works too when every burner is occupied. Heat in short intervals, stirring or whisking between them so there are no cold pockets, until the gravy is bubbling throughout and reaches 165°F / 74°C.

Gravy often seems to thicken just when everything else needs your attention. If it has to wait, keep it at 140°F / 60°C or above, as recommended in USDA hot-holding guidance, and keep some stock nearby for loosening before serving.

While the gravy waits, finish anything that needs last-minute attention, including a pan of soft dinner rolls. Warming the gravy boat with hot water, then emptying and drying it before filling, also buys you a bit more time.

Left with turkey and gravy the next day? They are already most of the way toward a turkey pot pie, where leftover gravy can become part of the creamy filling.

Turkey Gravy FAQs

Can I use chicken broth instead of turkey stock?

Yes. Unsalted or low-sodium chicken broth or chicken stock works well. The pan juices and fond still give the gravy most of its turkey character.

How much flour do I use per cup of turkey gravy?

Use about 2 tablespoons flour + 2 tablespoons fat for each 1 cup / 240 ml total liquid. The scaling table above follows that same starting ratio.

Can I make turkey gravy directly in the roasting pan?

Yes, provided the roasting pan is safe for stovetop use. You capture the fond directly, but a saucepan usually gives more even heat and easier whisking, especially when a large roasting pan sits awkwardly across two burners.

Can I use the turkey neck and giblets without putting pieces in the gravy?

Yes. Simmer the neck, heart, and gizzard in the stock while the turkey roasts, then strain them out before making the gravy. Leave the liver out unless you specifically want its stronger flavor. This gives you a deeper turkey stock without pieces of giblet in the finished sauce.

For traditional giblet gravy, keep the cooked giblets, chop them, and stir them into the finished gravy.


By the time the gravy boat reaches the table, nobody can tell whether you started with a beautiful cup of drippings or a murky half cup that needed butter and stock.

The uneven fat layer and too-small puddle of juice have disappeared into silky gravy that tastes deeply of the turkey. Then everyone starts passing the gravy boat, and suddenly it doesn’t look quite so large.

Two diners pass a silver gravy boat filled with brown gravy across an elegant Thanksgiving table with roast turkey in the background.

If your pan came from an unusually salty brined bird, a tiny turkey breast, or a smoker that seemed to leave you almost nothing to work with, tell us what happened in the comments. Those odd roasting pans often produce the most useful gravy questions.

↑ Back to top · Recipe Card · Quick Answer

Posted on — Leave a comment

Horseradish Sauce for Prime Rib (Creamy Steakhouse-Style, 5 Minutes)

Bowl of creamy horseradish sauce in front of sliced medium-rare prime rib on a dark red and black table.

A spoonful of good horseradish sauce should wake up the next bite of prime rib without hiding it. It lands cold and creamy against the warm beef; then the horseradish rises briefly through the nose just as the richness starts to build.

The sauce itself is easy. Horseradish is less predictable. One jar can be polite and vinegary, while another hits behind the eyes with half the amount. So the horseradish goes in gradually: three tablespoons first, then more only after you taste it.

By the time a prime rib is resting, dinner already has enough moving parts. This should be the easy bowl: 5 minutes, one bowl, nothing to cook. Sour cream gives it body and coolness, a little mayonnaise smooths the texture, and the other flavors stay quiet enough that the beef and horseradish still lead.

Start here

Use prepared horseradish, usually grated or minced horseradish preserved with vinegar and salt. An already-creamy store-bought horseradish sauce is a finished condiment and behaves differently in this recipe.

If the jar has obvious free liquid, drain it before measuring. With ordinary prepared horseradish, start with 3 tablespoons / 45 mL and decide on the fourth after tasting. Using one marketed as extra hot? Start around 1–2 tablespoons / 15–30 mL and build from there.

Creamy Horseradish Sauce for Prime Rib

Cold, creamy and thick enough to cling to the beef, with enough horseradish to cut the richness without becoming mayo-heavy or mustardy.

Ready in5 minutes
CookingNone
Optional rest30 minutes
YieldAbout 1½ cups / 360 mL — about 12 servings at 2 Tbsp / 30 mL each

You need: a bowl and spoon or small whisk, plus a fine-mesh sieve if the horseradish is particularly wet.

Ingredients

  • 1 cup / 240 g full-fat sour cream
  • 2 tablespoons / about 30 g mayonnaise
  • 4 tablespoons / 60 mL prepared horseradish, divided, plus more to taste — start with 3 tablespoons
  • 1 teaspoon / 5 mL Dijon mustard
  • 1 teaspoon / 5 mL Worcestershire sauce
  • 1 teaspoon / 5 mL fresh lemon juice
  • 1 tablespoon finely sliced fresh chives
  • ¼ teaspoon fine sea salt, plus more to taste
  • ¼ teaspoon freshly ground black pepper
Close-up of thick creamy horseradish sauce with fine grated horseradish texture and small chive flecks.
The spoon trail should stay visible briefly; disappearing means too loose, while a rigid ridge means too stiff.

Method

  1. Drain the horseradish if needed. If there is obvious liquid around the grated horseradish, let the excess run off through a fine-mesh sieve. Don’t rinse it, and don’t squeeze it bone-dry. You want it moist, just not carrying a lot of extra brine into the sauce.
  2. Start with most, not all, of the horseradish. Stir 3 tablespoons / 45 mL into the sour cream, mayonnaise, Dijon, Worcestershire, lemon juice, chives, salt and pepper. If the jar is labeled extra hot or tastes immediately fierce, begin with only 1–2 tablespoons / 15–30 mL.
  3. Taste it cold, as you’ll serve it. A lively jar may already give you enough bite. For a stronger sauce, add the reserved horseradish. If the jar is unusually mild, add another teaspoon or two at a time, draining off obvious free liquid first and tasting between additions.
  4. Serve now or chill briefly. The sauce is ready immediately, or you can refrigerate it for about 30 minutes before serving.
  5. Stir and taste again before serving. Horseradish can soften as it sits, so make the final horseradish and salt adjustment at the end.
Prepared horseradish being mixed into a bowl of creamy sauce with a whisk on a stainless-steel work surface.
Stir until the horseradish is evenly distributed. A spoon or small whisk is enough; this sauce does not need whipping.

Check the Finished Consistency

When it’s right: spoon some onto a slice of beef. It should hold in a soft mound instead of immediately puddling across the plate. Horseradish should be the flavor you notice; mustard, lemon and mayonnaise belong in the background. If one of those announces itself first, adjust the balance.

Spoonful of thick white horseradish sauce holding its shape on a slice of medium-rare prime rib.
On warm prime rib, the sauce should soften slightly but stay with the bite instead of sliding across the plate.

Need Help With Your Sauce?

If the bowl tastes good, you’re done—you don’t need the rest of this guide. If something is off, or you’re working with a different kind of horseradish, use the section that matches the problem in front of you.

How Hot Should Horseradish Sauce Be?

Horseradish heat rises quickly through the nose and then fades. It doesn’t sit on the tongue the way a chile or hot sauce does.

There’s no universal tablespoon count for “medium.” Brands vary, and something sold as extra hot may start far beyond a mild supermarket jar.

Treat the amounts below as starting points, not standardized heat ratings. The same 3 tablespoons can taste mild with one jar and assertive with another. These amounts are for the full batch above: 1 cup / 240 g sour cream plus 2 tablespoons mayonnaise.

Heat levelPrepared horseradishWhat it feels like
Cautious start1–2 Tbsp / 15–30 mLCreamy first, with gentle horseradish behind it; also a sensible starting point for an unfamiliar extra-hot jar
Balanced3 Tbsp / 45 mLA clear horseradish lift without taking over the bite
Steakhouse-style4 Tbsp / 60 mLStrong enough to notice immediately, still comfortable beside rich beef
Hot5–6 Tbsp / 75–90 mLA nose-clearing bite for people who like their horseradish strong
Four identical glass cups show prepared horseradish amounts labeled cautious 1–2 tablespoons, balanced 3, steakhouse-style 4, and hot 5–6 tablespoons.
Use these amounts as starting landmarks, then adjust in smaller spoonfuls after tasting your particular jar.

Taste the Jar Before You Blame the Recipe

If the finished sauce still tastes mostly like sour cream, try a tiny amount of the prepared horseradish by itself.

A pungent jar will respond when you increase the amount. A weak, vinegar-heavy one can make the sauce wetter and wetter without bringing much more bite.

Opened horseradish gradually loses pungency too. If a sauce you’ve made before suddenly seems unusually mild, a fresher jar may give you a livelier result.

Not enough horseradish and weak horseradish are different problems.

Need more horseradish bite? Add horseradish. Dijon, lemon, black pepper and Worcestershire can all make the sauce taste stronger, but none gives you the same clean horseradish heat. If another spoonful barely changes anything, the jar itself is probably the limiting factor.

Side-by-side comparison of thick sauce needing more horseradish and thinner sauce made with a wetter, weaker jar of prepared horseradish.
If extra horseradish changes texture more than flavor, the jar—not the recipe—is probably the limiting factor.

Troubleshooting Horseradish Sauce

Don’t start over. Most problems here can be fixed without making another batch. Figure out what changed before adding more of everything.

Match the Problem to the Fix

What happened?Likely reasonFix it now
It tastes mostly like sour creamToo little horseradish for this jarAdd horseradish 1 teaspoon at a time
I added plenty and it is still weakThe horseradish itself may be mild or past its punchTaste the jar; a fresher or stronger one may work better than adding more liquid
It is too hotStrong horseradish or simply too muchStir in more sour cream, then taste for salt again
It is wateryWet horseradish or too much added liquidAdd thick sour cream and drain the next horseradish addition if visibly wet
It became watery overnightA little liquid separated while chillingStir thoroughly before changing anything
It is too thickVery thick sour creamAdd milk, cream or buttermilk 1 teaspoon at a time
It is too tangyToo much added acid, or unusually tart sour creamToo much lemon or vinegar? Dilute with sour cream. Very tart sour cream? Soften it with a little mayonnaise
It is too saltyToo much saltDilute with unsalted sour cream
It tastes too mayo-heavyToo much mayonnaise for your tasteAdd sour cream, then enough horseradish to bring the balance back
It tastes mustardyDijon is dominatingDilute with sour cream and horseradish; don’t chase it with more acid
It seems milder after sittingThe horseradish may have mellowedStir first, then add more prepared horseradish from a pungent jar if needed
Half the table wants more heatDifferent people, not a failed recipeSplit off a small portion and make only that part hotter

If More Horseradish Is Thinning the Sauce

Still getting thinner as you add horseradish? The packing liquid may be doing more damage than the grated horseradish. Drain the next addition so you’re increasing the horseradish itself without pouring another spoonful of vinegar-heavy liquid into the sauce.

Prepared horseradish in a fine-mesh sieve with excess clear liquid draining into a glass container below.
Drain pooled brine, not ordinary moisture. The prepared horseradish should still look damp when it reaches the bowl.

Recipe ↑ · Section Guide · Back to Top ↑

Prepared Horseradish vs Store-Bought Creamy Horseradish Sauce

Standing in front of two similar jars? Read the label. Texture alone won’t reliably tell you which one you have.

  • Prepared or grated horseradish: This is what you want for the main recipe.
  • Prepared horseradish marketed as extra hot: Fine to use, but start with less. The actual intensity still varies from product to product.
  • Store-bought creamy horseradish sauce: This is already a finished condiment. Serve or adjust it as its own sauce instead of folding it into this recipe.
  • Fresh horseradish root: Use the fresh-root method below; fresh root behaves differently and can vary dramatically in strength.
Prepared grated horseradish, creamy horseradish sauce, and a fresh horseradish root displayed side by side.
Trust the label: prepared horseradish is an ingredient; creamy horseradish sauce is already a finished condiment.

Shopping for it? Prepared horseradish is often refrigerated near the deli or specialty condiments, although some brands are stocked in the regular condiment aisle.

Why the Ratio Works

The dairy is the buffer, not the flavor we’re trying to maximize. Enough sour cream takes the edge off an aggressive jar without burying the horseradish; too much can turn a mild jar into something that tastes mostly like sour cream. That’s why the horseradish stays adjustable instead of being locked to one universal amount.

The small amount of mayonnaise rounds out the texture. Dijon and Worcestershire add quiet savory depth, while 1 teaspoon of lemon gives the sauce some brightness. Prepared horseradish already brings acidity of its own, so the lemon doesn’t need to do much.

Useful Substitutions and Variations

If nothing is actually wrong with the sauce and you’re simply missing an ingredient—or want to change the flavor or texture—these are the easiest swaps.

  • For a tangier sauce: Replace the sour cream 1:1 with full-fat Greek yogurt.
  • For a richer sauce: Replace the sour cream 1:1 with crème fraîche.
  • No mayonnaise? Use 2 tablespoons more sour cream.
  • No chives? Finely sliced scallion greens are the closest swap. Dill works too, but changes the herb flavor more noticeably.
  • No Dijon or Worcestershire? Either can simply be left out.
  • No lemon? Start with a small splash of cider, white-wine or champagne vinegar. The prepared horseradish already contributes some acidity.

Using Fresh Horseradish Root

Fresh root isn’t a tablespoon-for-tablespoon replacement for prepared horseradish. Its strength can vary dramatically, and how quickly you mix it into the sauce affects the pungency too.

For this batch, start with about 1 tablespoon of freshly grated horseradish, or less if it already seems fierce.

Want a milder result? Grate the horseradish and stir it into the sauce promptly. Want more punch? Grate it, let it stand for a few minutes, then mix it in. Taste before adding more.

Fresh horseradish root and grater beside sauce mixed immediately and grated horseradish resting near a timer to compare milder and stronger heat.
A short pause after grating lets more pungency develop before the fresh horseradish is mixed into the sauce.

Keep the root cold while you work and use good ventilation. Freshly cut horseradish can irritate your eyes and sinuses, so don’t lean over a food processor when you open it.

Once mixed, refrigerate the finished sauce. Missouri Extension has useful guidance on processing fresh horseradish and controlling its heat.

Alternative: Whipped Horseradish Cream

For a lighter, airier alternative, make whipped horseradish cream instead of the thicker sour-cream version.

Whip ½ cup / 120 mL cold heavy cream to soft peaks. Fold in 1–2 tablespoons / 15–30 mL prepared horseradish and a pinch of salt. Stop at soft peaks; it should stay loose enough to spoon over beef, not whipped as stiffly as dessert cream.

Two matching bowls compare dense creamy horseradish sauce with lighter, aerated whipped horseradish cream.
Creamy horseradish sauce clings; whipped horseradish cream gives the beef a lighter, airier finish.

Make Ahead, Chill and Store Horseradish Sauce

Prime rib is already resting: make the sauce and serve it. There’s no mandatory chill time hiding behind the five-minute promise.

Got 30 minutes: put it in the refrigerator while the rest of dinner comes together. The 30-minute chill is optional, but it gives the sauce a little time to settle and takes one job off your list before carving.

Making it tonight for tomorrow: this is an easy Christmas Eve job. Mix the sauce, cover it and refrigerate it. Before the roast is carved:

  1. Stir the sauce thoroughly.
  2. Taste it while it’s cold.
  3. Add more prepared horseradish if the bite has softened.
  4. Adjust the salt only after the horseradish is where you want it.
Horseradish sauce shown ready to serve, chilled for 30 minutes, and refrigerated overnight for make-ahead preparation.
After an overnight chill, stir and taste before adjusting. The horseradish may have mellowed while it sat.

Doing some of the Christmas cooking ahead? Garlic mashed potatoes can be handled in advance too, buying you a little breathing room while the roast is finishing.

How Long Does It Keep?

Keep the sauce covered at 40°F / 4°C or colder and, as a conservative home-storage rule, use it within about 3–4 days. The texture and horseradish punch are usually best earlier in that window.

For a long buffet or holiday meal, put out a small bowl and replenish it from the refrigerator, or nest the bowl over ice. USDA food-safety guidance says perishable food should generally be refrigerated within 2 hours. When the surrounding temperature is above 90°F / 32°C, that window drops to 1 hour.

Freezing isn’t worth it here. Sour cream and mayonnaise can separate or turn grainy after thawing, and making a fresh batch takes five minutes.

Recipe ↑ · Section Guide · Back to Top ↑

How to Serve Horseradish Sauce With Prime Rib

Bring it to the table cold, in a small bowl. Prime rib is expensive, and people have wildly different ideas about how much horseradish is enjoyable. Let everyone control the spoon.

Sliced medium-rare prime rib served with creamy horseradish sauce, au jus, and side dishes on a dark modern table.
Serve the horseradish sauce separately so everyone controls the heat on their own plate.

Horseradish Sauce or Au Jus?

Serve both when you can. They’re doing different jobs.

Au jus is warm and beefy. It adds moisture and reinforces the roast. Horseradish sauce is cold and sharp, cutting through fattier bites.

A little jus and a spoonful of horseradish sauce can happily share the same plate. Neither needs to drown the slice.

Slice of prime rib served with a bowl of creamy horseradish sauce and a small vessel of brown au jus.
Use au jus for moisture and horseradish sauce for sharp contrast; they work best as separate accents.

How Much Sauce Per Person?

How your crowd eats itPlan per person
LightAbout 1 Tbsp / 15 mL
TypicalAbout 1½–2 Tbsp / 22–30 mL
Horseradish-lovingAbout 2–3 Tbsp / 30–45 mL

Planning on 2 tablespoons / 30 mL per person? Make about ½ cup / 120 mL for four people or ¾ cup / 180 mL for six. For eight people, plan on 1 cup / 240 mL; for twelve, make the full 1½-cup / 360 mL batch.

Identical containers compare 1 to 3 tablespoon personal portions and ½, ¾, 1, and 1½ cup batches for 4, 6, 8, and 12 people.
For most tables, 1½–2 tablespoons per person is a useful planning middle ground.

Doubling or halving the recipe? Scale everything in the same proportion, but hold back roughly one-quarter of the horseradish. Taste the finished batch, then add only what it still needs.

If horseradish always disappears quickly at your prime rib dinners, make extra. Sauce left tomorrow is considerably less annoying than an empty bowl halfway through the meal.

Leftover Sauce? Start With a Roast Beef Sandwich

Cold prime rib or roast beef, crusty bread and creamy horseradish belong together for the same reason the sauce worked at dinner: the dairy softens the rich beef while the horseradish keeps the next mouthful lively.

When both beef and sauce survive dinner, tomorrow’s French dip sandwich practically plans itself.

Prime rib French dip sandwich with creamy horseradish sauce beside a small cup of au jus.
Spread horseradish sauce on the bread and keep the au jus beefy and clean for dipping.

The remaining sauce is also good with baked potatoes, burgers, steak sandwiches, roast pork, pork chops or smoked beef.


The best bowl is not the one with the most horseradish. It is the one where a cold spoonful wakes up a warm slice of beef, gives you that brief lift through the nose, and then gets out of the way before the next bite.

Start with the balanced version, then make a small side portion hotter for anyone who wants more bite. The roast has already done the difficult part of dinner; the sauce only needs to know when to stop.

Made it? Tell us which prepared horseradish you used, how much ended up in your final batch, and where you landed on the heat scale. Different jars behave so differently that your answer may help the next person making it.

Recipe ↑ · Section Guide · Back to Top ↑