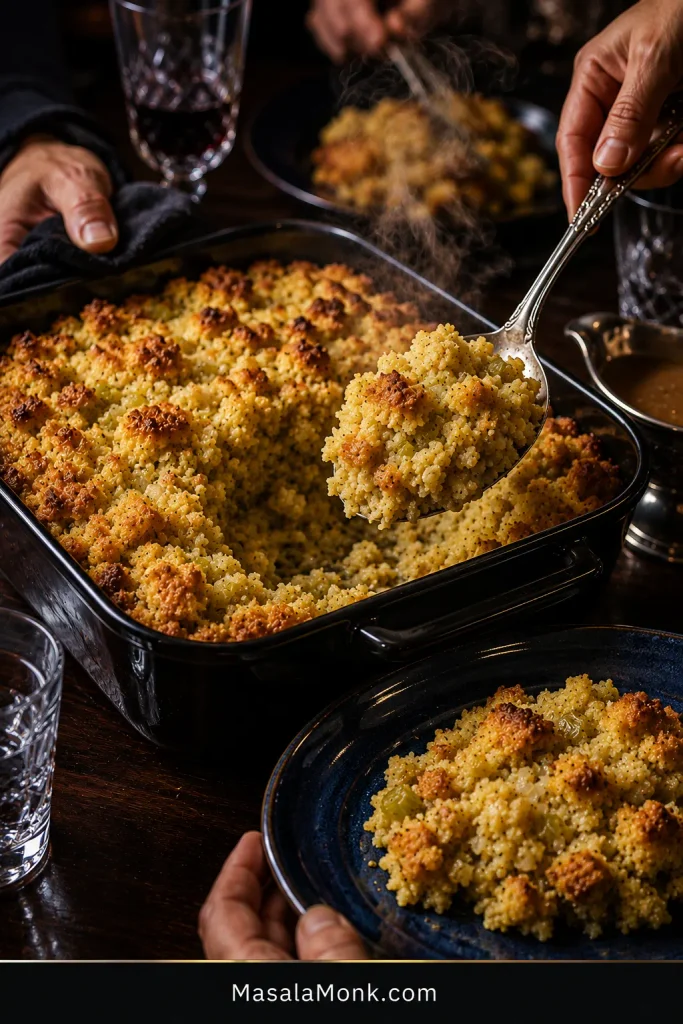
Posted on — Leave a comment

Sausage Stuffing Recipe: Easy Homemade Sausage Dressing

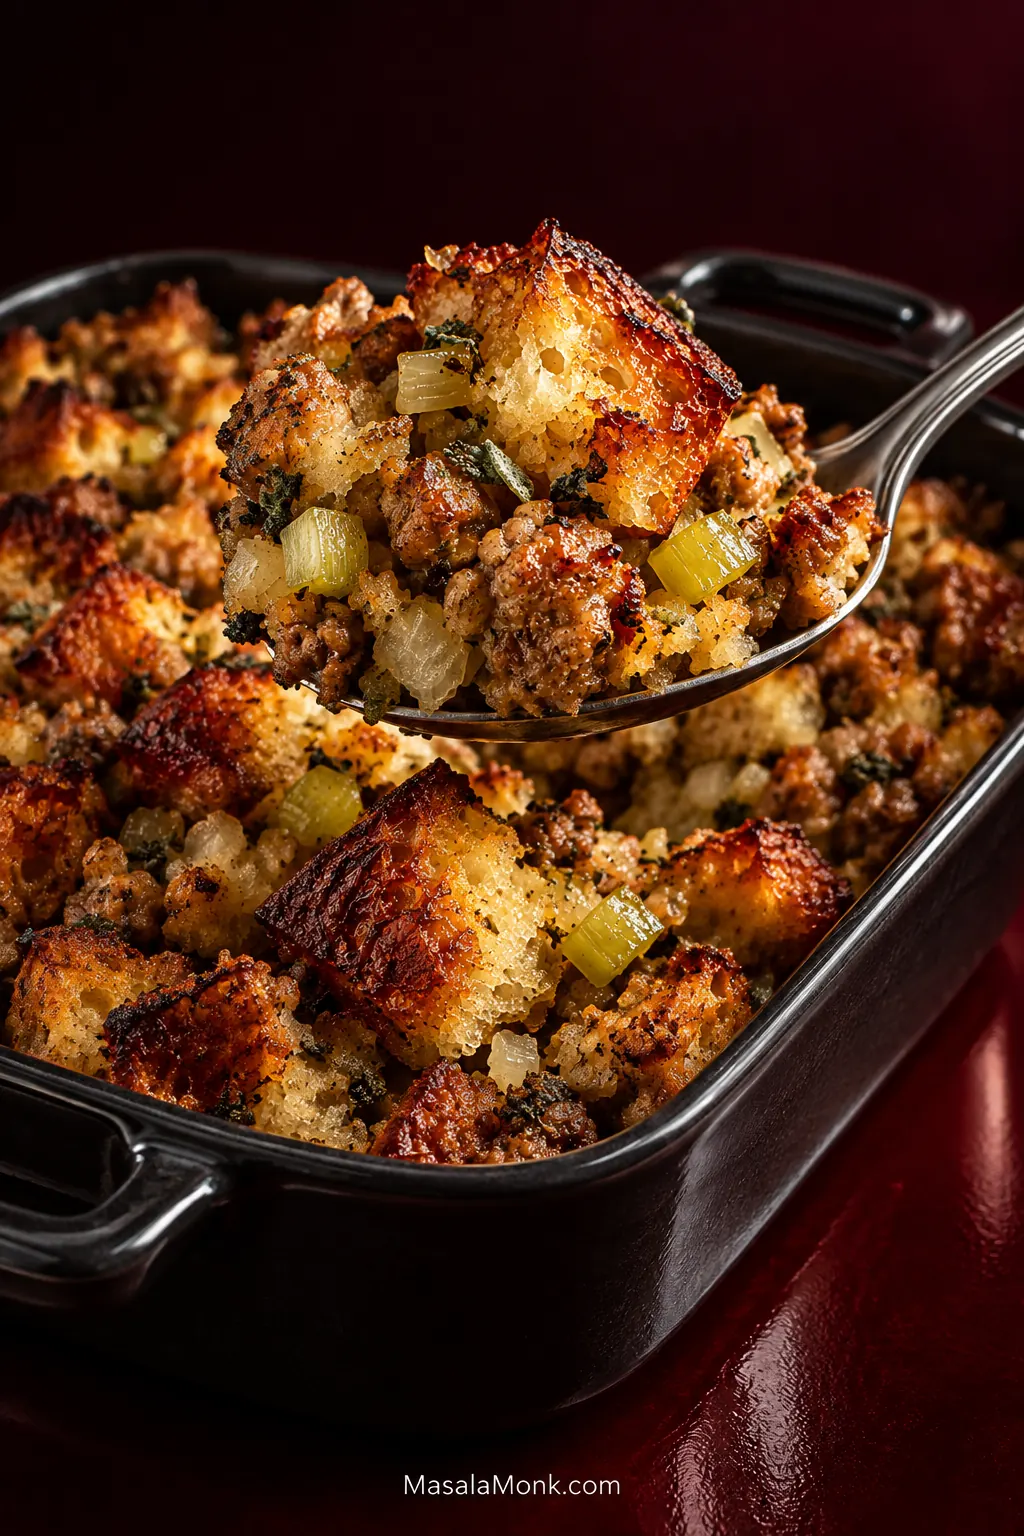
Dark casserole of golden sausage stuffing with a silver spoon lifting a crisp corner, revealing tender bread pieces, browned sausage, onion and celery.

The most important moment in this sausage stuffing recipe is deciding when the bread has absorbed enough stock.

Get that moment right and the middle stays buttery and tender while the rough top bakes deep gold, with browned sausage, onion, celery and sage running through every spoonful.

The uncertain part is the enormous bowl in front of you. The bread may still look suspiciously dry after a couple of cups of stock. Pour in everything at once and it can collapse into mush. Hold too much back and the middle may bake up dry and crumbly.

The measurement gives you a place to start; your bread tells you when to stop. A soft sandwich loaf, a French-style loaf and commercial stuffing cubes simply do not absorb stock at the same rate.

This casserole-baked version may also be called sausage dressing; the names overlap, although some families reserve “stuffing” for the mixture cooked inside poultry.

Classic Sausage Stuffing Recipe

Before You Pour All the Stock

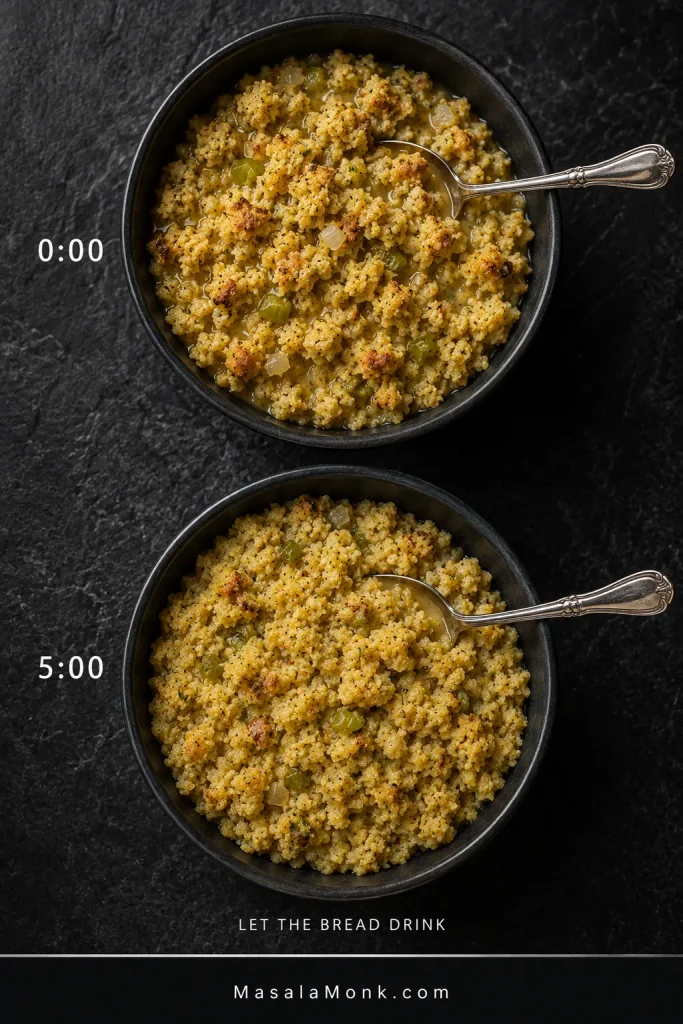
Dry the bread first. Add most of the stock, not all of it. Toss, wait about five minutes, then add more only if the bread is still dry through the center.

You want a moist, loosely cohesive bowl—not bread sitting in a puddle of stock.

Oven: 350°F / 175°C   •   Pan: 9 × 13 in / 23 × 33 cm   •   Bake: about 50–60 minutes   •   Cook to: 165°F / 74°C in the center

Classic bread-and-sausage stuffing with sage, thyme, onion and celery, baked covered first for a tender center and uncovered at the end for crisp golden edges.

MakesOne 9 × 13-inch / 23 × 33-cm casserole
ServesAbout 10–12 as a generous holiday side; more when portions are smaller and the table has plenty of other sides
Active timeAbout 40 minutes
Total timeAbout 2 hours
Oven350°F / 175°C after drying the bread
BakeAbout 50–60 minutes
Cook to165°F / 74°C in the center

Equipment: 1–2 rimmed baking sheets, large skillet or Dutch oven, very large mixing bowl, 9 × 13-inch / 23 × 33-cm baking dish, foil, small bowl, whisk and instant-read thermometer.

Ingredients

  • 18 oz / 510 g country white or French-style bread with a fairly tight, even crumb, weighed before drying, cut into ¾–1-inch / 2–2.5-cm pieces; expect roughly 10–12 cups depending on the loaf
  • 1 lb / 454 g pork breakfast sausage or sage sausage, bulk or casings removed
  • 6 tbsp / 85 g unsalted butter, plus a little more for the baking dish
  • 2 medium yellow onions, about 10 oz / 285 g, cut into small dice
  • 4 medium celery stalks, about 6 oz / 170 g, cut into small dice
  • 4 garlic cloves, about 12 g, finely chopped
  • 1 tbsp finely chopped fresh sage, or about 1 tsp rubbed dried sage to start; if using finely ground sage, begin with about ½ tsp
  • 2 tsp fresh thyme leaves, or about ¾ tsp dried thyme
  • ¼ cup chopped flat-leaf parsley
  • ½ tsp freshly ground black pepper
  • ½ tsp fine salt / about 3 g, or to taste; start with less if the sausage, stock or bread is already salty
  • 2½ cups / 590 ml low-sodium chicken or turkey stock, plus up to ½ cup / 120 ml more if needed
  • 2 large eggs
  • Optional: ½ tsp poultry seasoning for a more old-fashioned Thanksgiving flavor

Method

1. Dry the Bread

Heat the oven to 300°F / 150°C. Spread the bread pieces over one or two rimmed baking sheets so they are not piled deeply. Bake for 30–40 minutes, tossing once or twice, until dry through the center but still pale rather than heavily toasted.

Break open a thick piece. If the middle still compresses like fresh bread, give it longer.
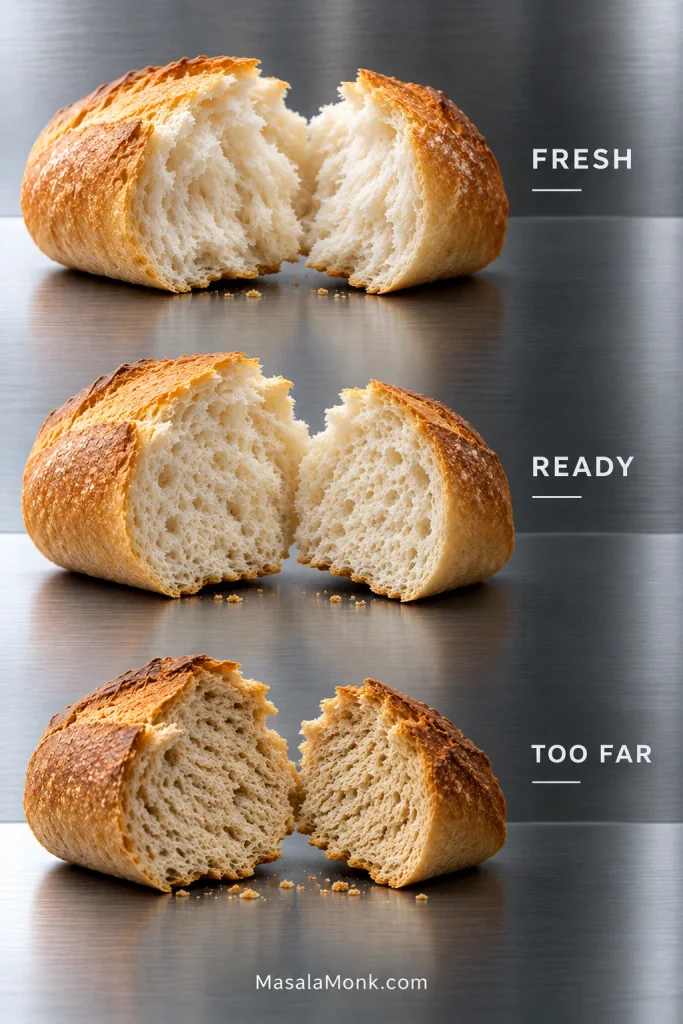
Comparison of broken bread pieces labeled Fresh, Ready and Too Far, showing soft fresh crumb, properly dried bread and overly hard dried bread.
Use the thickest bread piece as your drying checkpoint because it will be the last to lose its fresh softness. Meanwhile, pale color is perfectly fine—drying the center matters more than toasting the surface.

Use the drying time for prep: chop the onion, celery, garlic and herbs, measure the stock and seasonings, and butter the baking dish.

Remove the dried bread and increase the oven to 350°F / 175°C. Transfer the bread to a very large mixing bowl.

2. Brown the Sausage

Cook the sausage in a large skillet or Dutch oven over medium to medium-high heat, breaking it into small irregular crumbles. Brown it well, but stop before those small pieces become dry and hard.
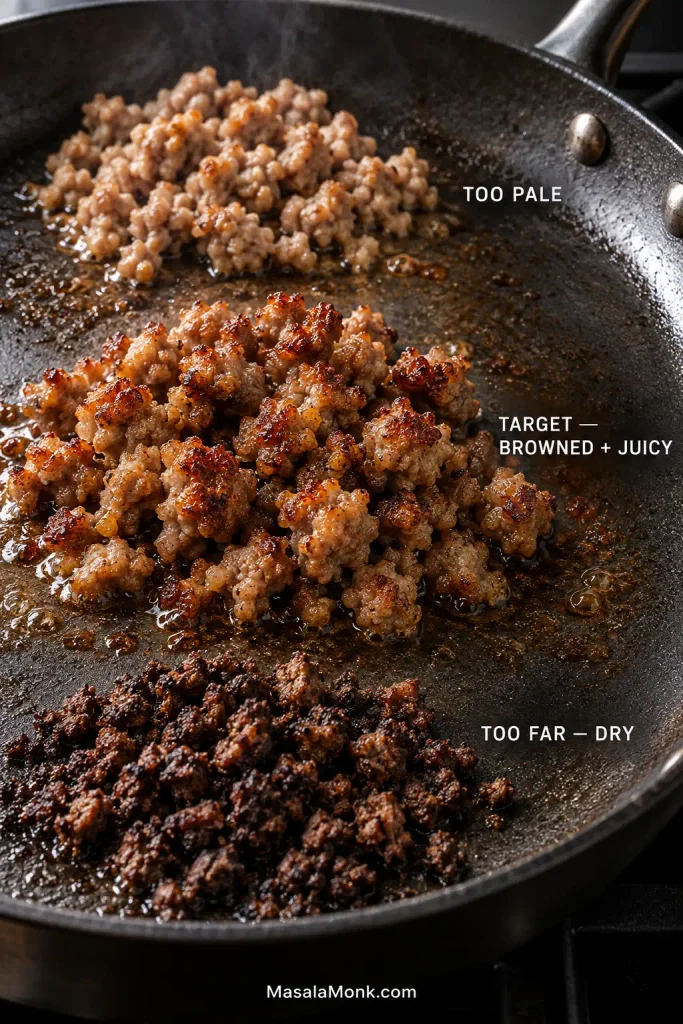
Three cooked sausage stages labeled Too Pale, Target and Too Far, comparing lightly browned, juicy browned and dark dry sausage crumbles.
Watch the smallest sausage crumbles first: they dry out before the larger pieces. Brown them enough to leave flavorful fond in the pan, but stop while the meat still looks juicy.

Cook until the sausage is cooked through, usually about 6–9 minutes. Before tasting a piece, make sure fresh pork sausage has reached 160°F / 71°C; fresh chicken or turkey sausage should reach 165°F / 74°C.

Taste one crumble. If the sausage is already salty or strongly sage-forward, use less added salt and start with only about half the additional sage.

Transfer the sausage to the bread, leaving some rendered fat in the pan. Drain only if there is a deep pool.

3. Cook the Aromatics

Add the butter to the sausage fat, followed by the onion and celery. Cook over medium heat for 8–10 minutes, until soft and beginning to turn golden around the edges.

Add the garlic, sage, thyme, black pepper and optional poultry seasoning. If the sausage was already strongly sage-seasoned, begin with less sage here. Cook for about 1 minute. Hold the parsley back for now.

The pan should now smell unmistakably like stuffing: browned pork, sweet onion, celery and warm sage.
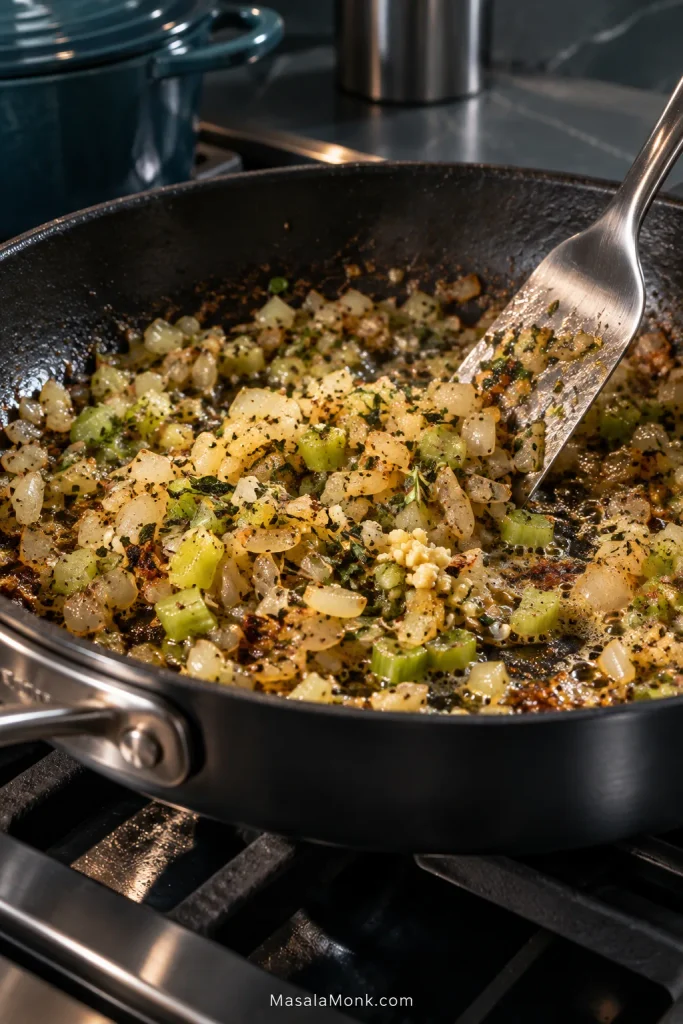
Onion, celery, garlic and herbs cooking in sausage fat in a dark skillet with browned bits visible across the pan.
Those browned bits on the skillet are useful, not something to clean away. Once stock hits the pan, they dissolve into the liquid that will season every piece of bread.

4. Add the Stock

Pour 2¼ cups / 530 ml stock into the pan and scrape up the browned bits. Keep the remaining ¼ cup / 60 ml plus the optional extra ½ cup / 120 ml warm nearby for final hydration adjustments. Bring the skillet mixture just to a simmer.

5. Hydrate, Check and Season Before the Eggs

Pour the hot stock-and-aromatic mixture over the bread and cooked sausage. Toss gently but thoroughly, then leave it alone for about 5 minutes. Some pieces may soften sooner than others, so wait before deciding the bowl needs more stock.

Now check the hydration while there is still no raw egg in the bowl. The full moisture guide below shows the same decision in more detail:

  • Center: break open a larger bread piece. The middle should be moist, not hard or chalky.
  • Handful: squeeze a small amount lightly. It should hold as a loose clump without dripping.
  • Bottom: move some bread aside. There should be no pool of stock underneath.
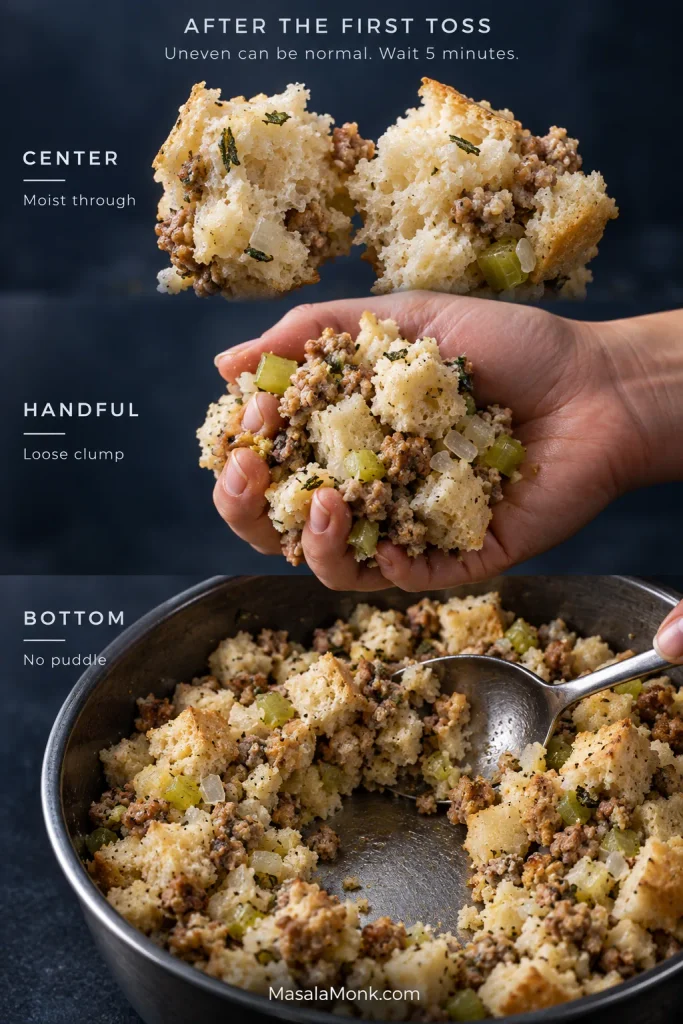
Three-part pre-egg stuffing check showing a moist bread center, a handful forming a loose clump and the bowl bottom without pooled stock.
Use all three cues together: surface moisture can hide a dry bread center, while liquid underneath reveals stock the bread has not absorbed.

If the centers are still dry, add the warm reserved stock ¼ cup / 60 ml at a time, tossing and waiting briefly between additions. Stop when the bread is moist through the center and the mixture holds loosely without free liquid.

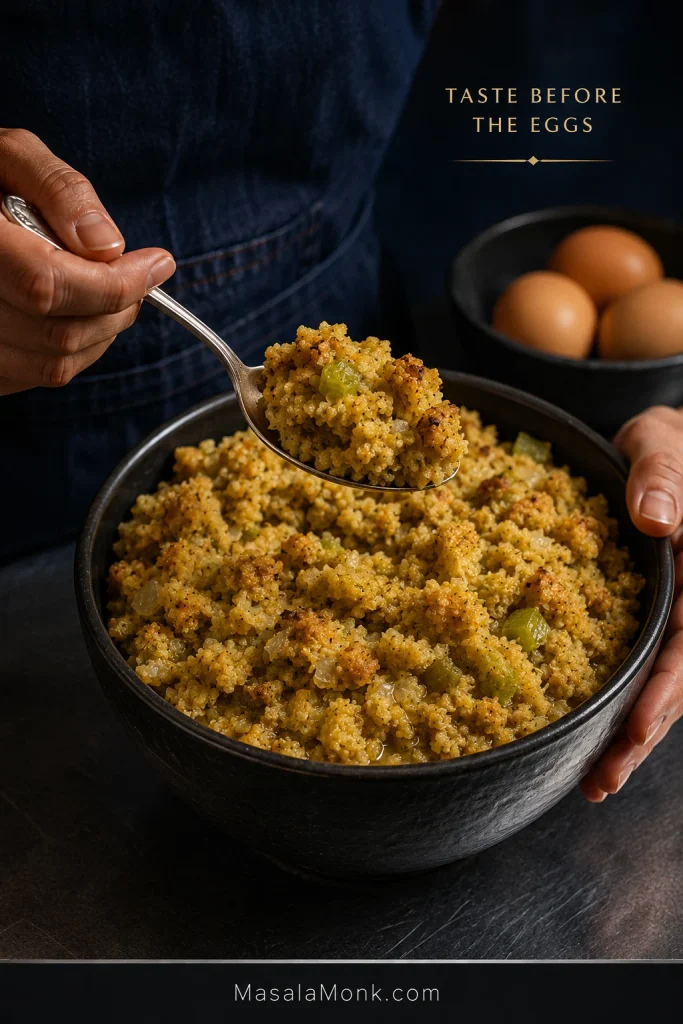
Fold in the parsley. Then taste the complete stuffing while it is still egg-free. Adjust the salt, pepper or herbs if needed. Remember that the sausage, stock and seasoned bread may already contribute plenty of salt.

Once the hydration and seasoning are right, stop adjusting the mixture and move on to the eggs.

6. Fold in the Eggs

Whisk the 2 eggs in a small bowl. Once the stuffing is warm rather than steaming hot, pour them over the bread and fold gently until evenly distributed.

From this point forward, don’t taste the uncooked mixture. Judge it by sight and feel.

7. Fill the Pan

Spoon the stuffing into the prepared dish and spread it into an even layer without compressing it. Leave the surface rough. Those peaks and ragged edges are where the crisp pieces come from.
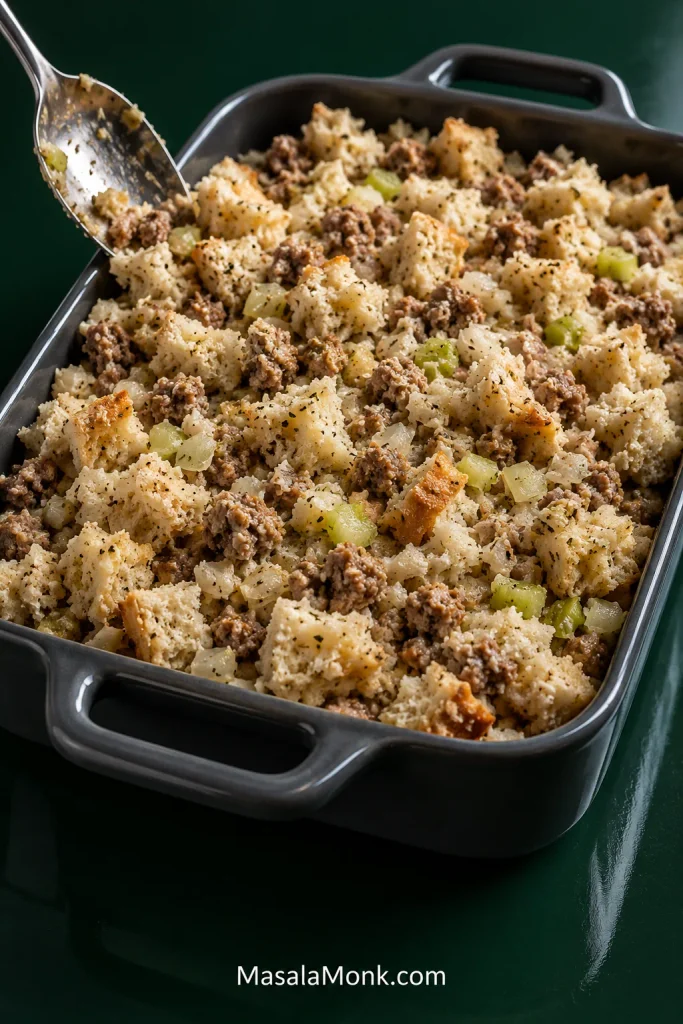
Unbaked sausage stuffing spread loosely in a dark casserole with irregular bread peaks, gaps, sausage, onion and celery rather than a compressed flat surface.
If the pan feels too full, do not solve that by pressing the stuffing down. Preserve the gaps and peaks—or use more surface area—so steam can escape around the exposed bread.

8. Bake Covered, Then Uncovered

Cover the dish snugly with foil and bake at 350°F / 175°C for about 30 minutes. The covered phase keeps the center tender while it heats.

Remove the foil. Steam should rise from the center, the casserole should smell deeply savory and the top will still look fairly pale. Continue baking uncovered for another 20–30 minutes, until the surface has a mix of deep-golden ridges and softer valleys and the center reaches 165°F / 74°C.

Let the stuffing rest for about 10 minutes before serving.
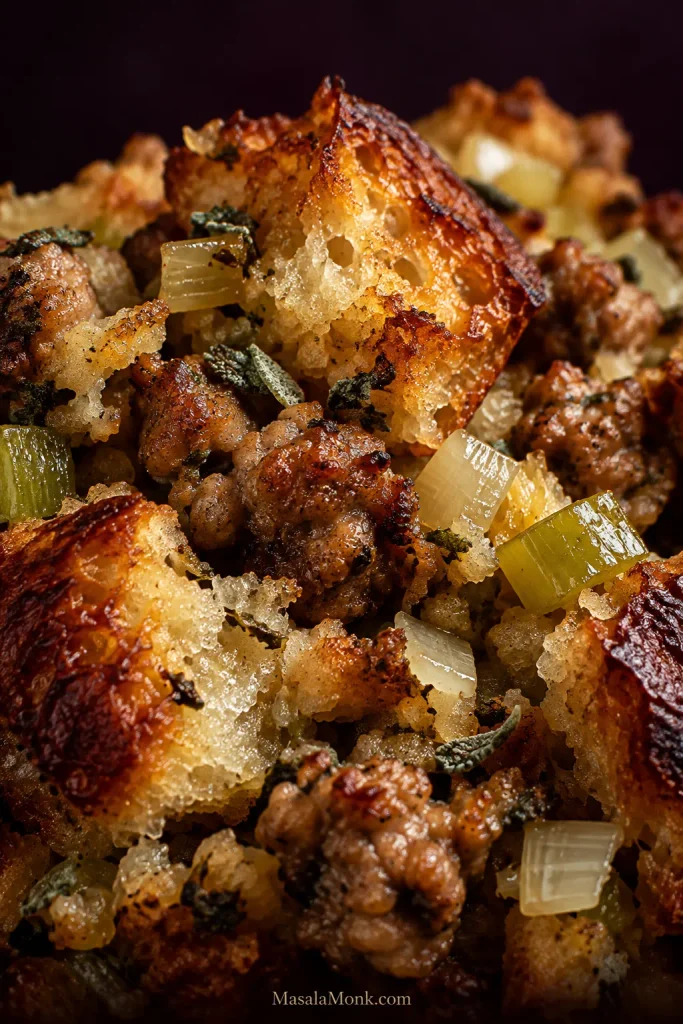
Extreme close-up of baked sausage stuffing showing browned crisp bread edges, tender interior pieces, sausage crumbles, onion and celery.
Useful irregularity is a good sign here: some bread catches more oven heat, some stays protected, and the sausage sits between both. Consequently, every spoonful has more texture than a uniformly soft dressing.

Bread for Stuffing: Choose a Loaf That Can Absorb

The best all-purpose bread for sausage stuffing is a white, French-style or country loaf with a fairly tight, even crumb. In ordinary terms, that means an interior without enormous irregular holes. It absorbs stock readily while leaving recognizable pieces in the casserole.

Soft sandwich bread is especially good for a softer, more old-fashioned dressing. Mild sourdough works when the crumb is reasonably close. Very open artisan bread with huge holes and a thick crust is less forgiving: one bite can be chewy while the crumb beside it collapses.

Keep the pieces around ¾–1 inch / 2–2.5 cm. Larger chunks create bread-only bites; tiny pieces knit together quickly and make a more uniform dressing.

Four bread cross-sections comparing soft sandwich bread, country or French-style bread, mild sourdough and a very open artisan loaf.
Choose bread by crumb more than by name. Two loaves sold as “French bread” can behave very differently if one has a close, even interior and the other is full of large holes.

How Dry the Bread Should Be

“Day-old” does not necessarily mean dry. Break open a thick piece: if the center still squashes like fresh bread, it needs more time. You want it dry through the middle, not hard and leathery.

Commercial dried cubes work too; just don’t assume they will absorb the same amount of stock as your loaf.

Best Sausage for Stuffing

Breakfast or sage pork sausage is the classic choice. It supplies much of the stuffing’s salt, fat and seasoning, so what happens in the skillet affects far more than the sausage pieces themselves.

Brown it well without cooking the small crumbles until dry. Leave some rendered fat in the skillet unless the pan is genuinely flooded, and cut the onion and celery fairly small so they soften into the bread instead of arriving as large vegetable bites.

Taste the cooked sausage before adding more seasoning. Sage sausage, poultry seasoning and commercial bread cubes can all bring herbs and salt of their own.

Read the Bowl: How Wet Should Sausage Stuffing Be?

Stock controls moisture. Eggs control how firmly the stuffing holds together. If the bread is dry, another egg is not the fix; it needs stock.

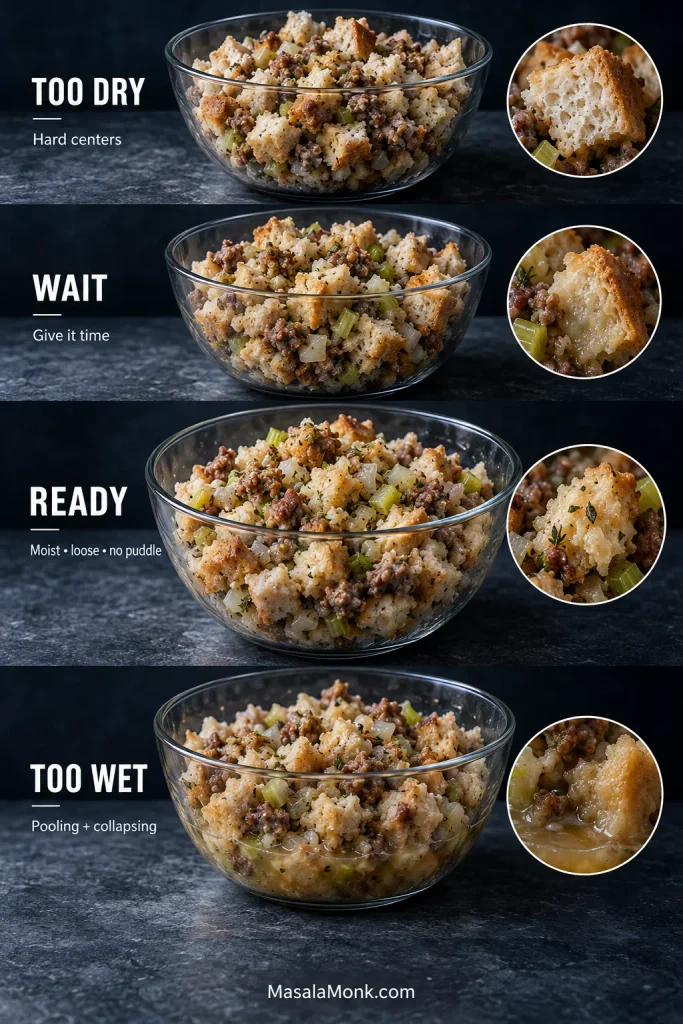
Before baking, sausage stuffing should be moist through the center of the bread, hold together loosely when squeezed, and have no puddle of stock underneath.

For 18 oz / 510 g bread, have about 2½ cups / 590 ml stock ready, plus another ½ cup / 120 ml in reserve. Many loaves land somewhere around 2½–3 cups, but the exact amount is not worth forcing.

Check Three Things

  • The center: break open a larger piece. It should be moist through the middle.
  • The handful: squeeze lightly. It should hold as a loose clump without dripping.
  • The bottom: move some bread aside. A little sheen is fine; a puddle is not.
What you seeWhat it meansWhat to do now
Hard centers + loose dry piecesThe bread needs more liquidAdd warm stock about ¼ cup / 60 ml at a time, toss, wait and check again
Soft pieces + loose clump + no puddleTargetStop adding stock
Soft bread + a little free liquidThe bread may still be catching upWait several minutes, toss once and reassess
Collapsing bread + stock pooling underneathToo much liquid has gone inIf the bread still has structure, fold in more dried bread before baking
Four pre-bake stuffing moisture states labeled Too Dry, Wait, Ready and Too Wet, showing dry centers, uneven absorption, proper hydration and excess pooled liquid.
WAIT is a real stage, not a failure. If the bowl looks patchy after stock goes in, give the bread time before correcting it; doing nothing for a few minutes may be the right move.

Choose the Sausage Stuffing Texture You Actually Want

Stuffing is one of those holiday foods where “better” can still feel wrong if it isn’t the texture people expect. A family used to soft, cohesive dressing may not want a pan of giant craggy bread cubes—and the reverse is just as true.

This recipe uses 2 eggs for moderate cohesion. For looser pieces, use 1 egg instead. For a softer, moister dressing, keep the full 2 eggs and let the bread absorb a little more stock while staying inside the same no-puddle boundary.

The target for the base recipe is the middle: moist and cohesive, with the bread pieces still visible. It should lift in a loose mound instead of scattering like dry croutons or slumping like bread pudding.

For a More Old-Fashioned Sausage Dressing

Use a fine-crumb white or sandwich loaf, dry it thoroughly, use the full 2 eggs and season with sage or poultry seasoning to taste. The finished dressing will be softer and more cohesive than a craggy country-bread stuffing.
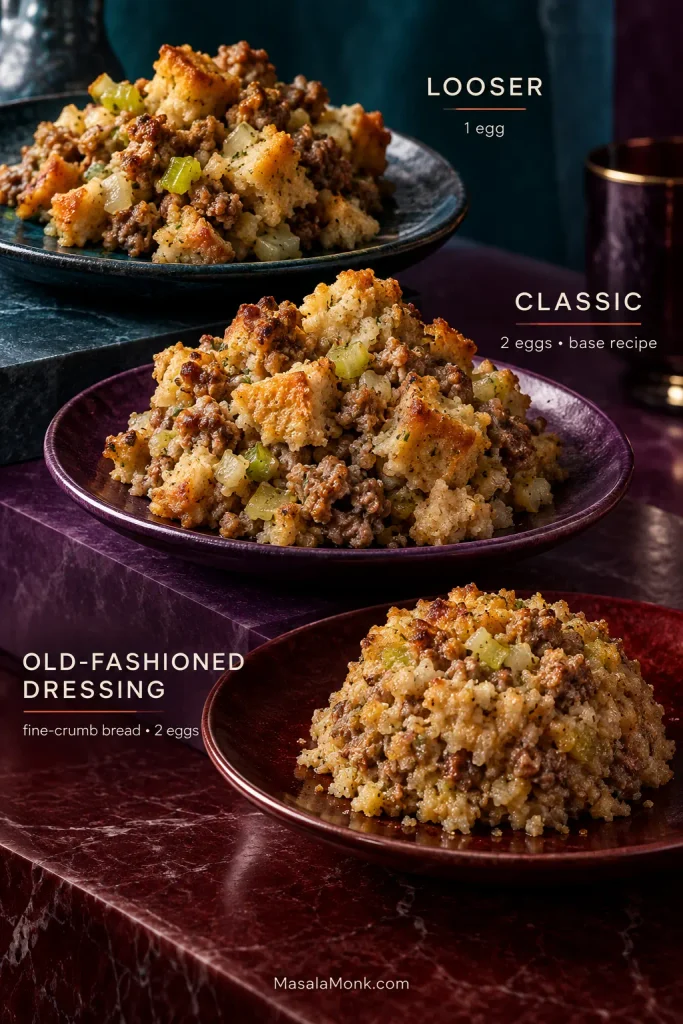
Three stuffing textures comparing loose bread pieces, classic moderately cohesive sausage stuffing and softer fine-crumb old-fashioned dressing.
Think about how you want the stuffing to leave the serving spoon: loose pieces fall apart readily, classic stuffing forms a soft mound, while old-fashioned sausage dressing holds together more closely.

If your family’s version starts with cornbread instead, our Southern cornbread dressing recipe follows that path from the beginning.

Covered First, Uncovered Second

Cover the stuffing first to keep the center moist; uncover it for the final 20–30 minutes to build the golden crust.

Under the foil, trapped steam keeps the bread tender while the center heats and the eggs set. Once the foil comes off, moisture escapes and the rough ridges begin to turn crisp and buttery.
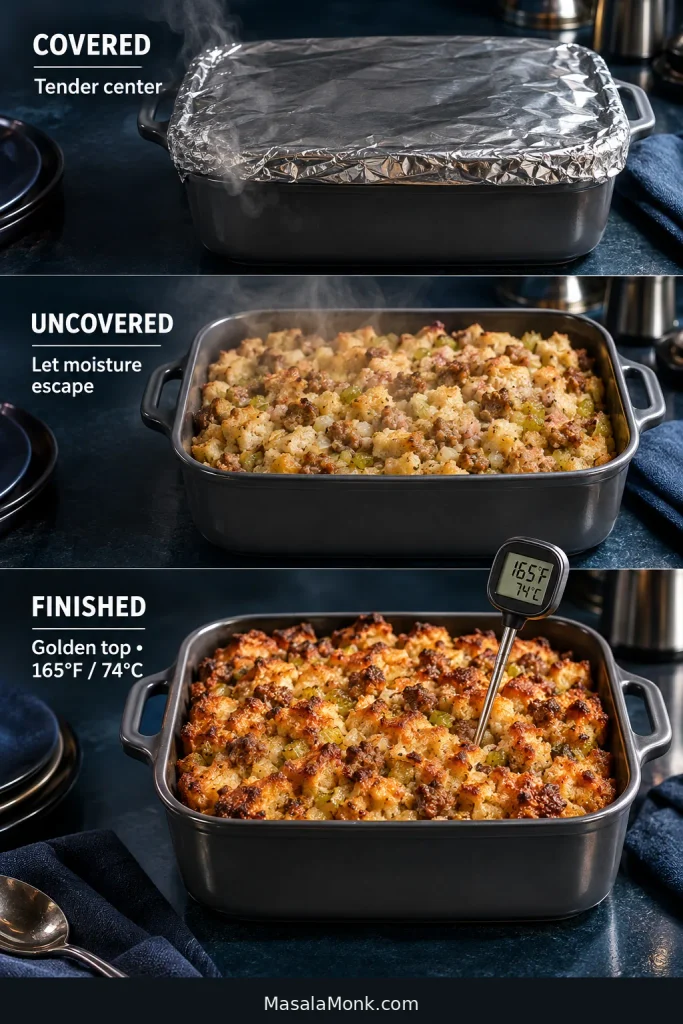
Three stages of one sausage stuffing casserole: covered with foil, uncovered and pale, then golden brown with a thermometer reading 165°F or 74°C.
A pale top is normal while the dish is covered, so do not chase color too early. Browning becomes useful only after the foil comes off; the center temperature still decides when the stuffing is done.

How Long to Bake Sausage Stuffing

In a 9 × 13-inch / 23 × 33-cm dish at 350°F / 175°C, expect roughly 50–60 minutes: about 30 minutes covered, followed by 20–30 minutes uncovered.

A deeper casserole takes longer. A cooked casserole reheated from the refrigerator takes longer too. Near the expected time, let the center temperature decide: 165°F / 74°C.

For More Crisp Edges, Use a Shallower Pan

Spread the same stuffing into a wider, shallower dish and there are simply more browned corners. Pile it deeper and the center stays softer and takes longer to heat.

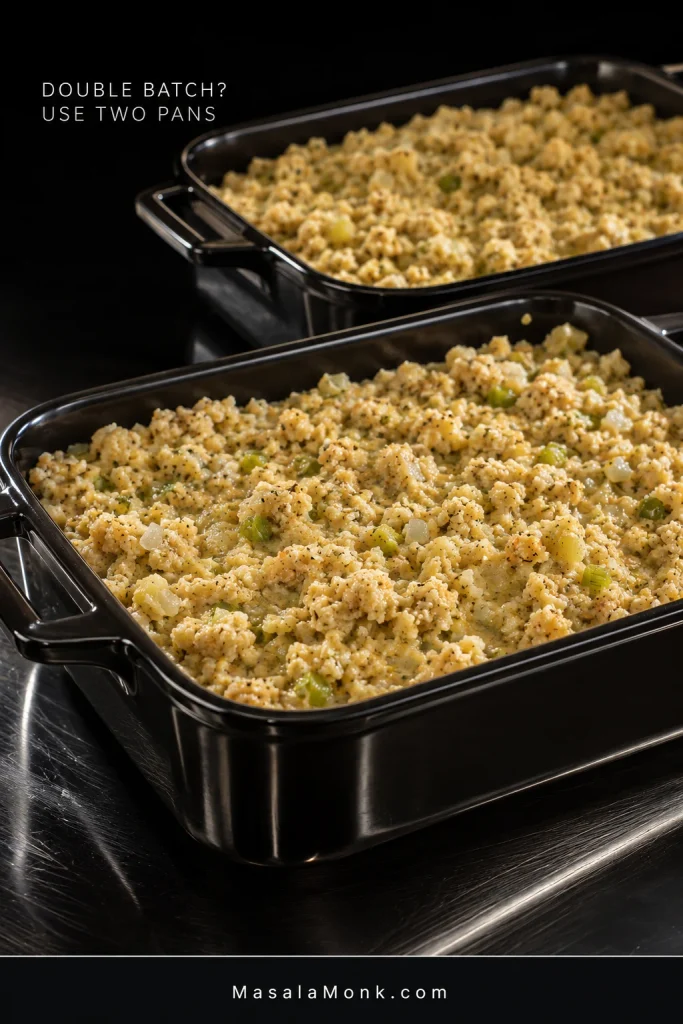
Doubling the recipe? Use two pans. One enormous deep casserole changes the cooking far more than simply doubling the ingredient list.
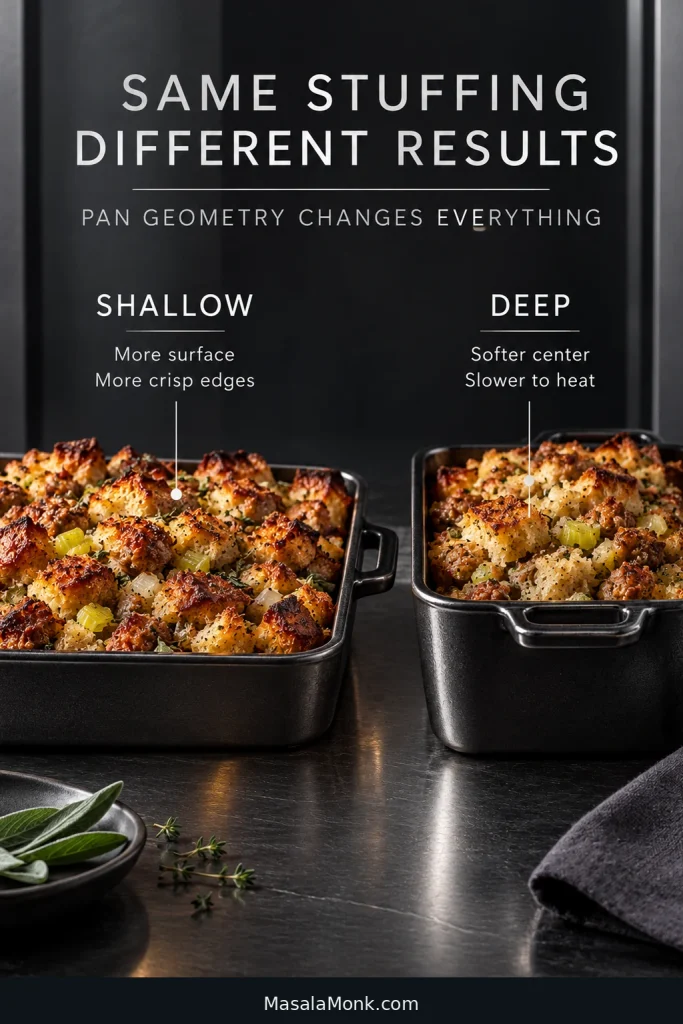
Side-by-side shallow and deep pans of the same sausage stuffing, showing more browned surface in the shallow pan and a thicker layer in the deep pan.
For more crisp edges, change the geometry before changing the recipe. A wider, shallower layer creates extra exposed surface without deliberately withholding stock from the tender center.

Fix My Sausage Stuffing: What to Do at Each Stage

The fix changes once the eggs go in and again once the stuffing reaches the oven.
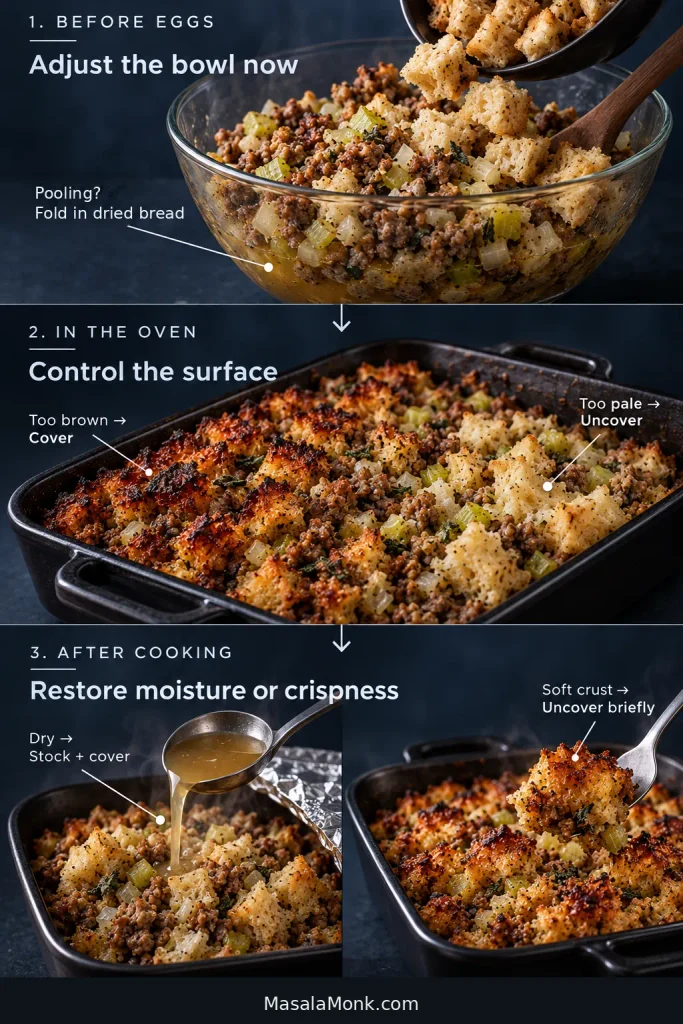
Three-stage sausage stuffing troubleshooting guide showing excess liquid corrected before eggs, browning adjusted in the oven and cooked stuffing restored after baking.
Fix the stuffing you have now, not the problem you imagine caused it. Before eggs you can still rebalance the bowl; later, the useful controls are mostly heat, foil, stock and time.

Before the Eggs Go In

Dry in the center? Add warm stock about ¼ cup / 60 ml at a time. Toss, wait, then break open another piece.

Stock pooling underneath? Give the bread several minutes first. If the puddle remains and the pieces still have structure, fold in more dried bread.

Already salty? Stop seasoning. Sausage, broth and seasoned bread cubes can contribute far more sodium together than the salt shaker.

Too much sage? If the imbalance is severe, dilute with dried bread and adjust the stock to match rather than adding more herb-heavy seasoning.

Already in the Oven

Top browning too quickly? Put the foil back on. The surface is ahead of the center.

Center softer than you wanted? Once it is fully hot, leave the dish uncovered and give moisture more time to escape. A deep casserole may need longer; see how pan depth changes the bake.

Top still pale? Keep it uncovered after the center is hot. A rough surface browns better than one smoothed flat.

If the bread had already collapsed into paste before the dish went into the oven, baking can make that paste drier. It cannot turn it back into intact bread pieces.

Already Cooked

Dry? Drizzle over a modest amount of warm stock, cover and reheat gently.

Top went soft while it waited? Give it a short uncovered finish before serving.

Hard sausage pieces? They were probably browned too aggressively at the start. Next time, stop while the small crumbles are still juicy.

Bland? Check the salt, stock, fat and sausage browning before adding more herbs. If the stuffing already tastes strongly herbal yet still seems flat, herbs are not what it is missing.

Starting With a Box or Bag of Stuffing?

The same moisture logic applies, but a fine seasoned mix does not behave exactly like a bowl of homemade dried bread. Start with its own liquid guidance rather than forcing the homemade ratio onto it.

What you are usingAdjustWatch for
Plain dried bread cubesUse them much like homemade dried breadVery dry cubes may need more stock
Seasoned cubes or mixStart with less added herb and salt; use low-sodium stock when the sausage is salty tooSage, poultry seasoning and sodium can stack up quickly
Fine boxed stuffing mixBegin with the package liquid guidanceSmall pieces can hydrate much faster

Fresh onion and celery cooked in the sausage drippings, stock instead of plain water and a casserole bake can give the shortcut version much more depth.

Sausage Stuffing Variations: Change the Flavor Without Losing the Texture

Simple Swaps

Italian sausage works without changing the basic method; expect more fennel and garlic. Turkey or chicken sausage may need a little more butter or olive oil because it is often leaner. Dried cranberries can be folded through for sweet-tart contrast, or you can keep that contrast on the plate with cranberry sauce with orange juice.

Mushrooms are best browned first so they don’t release all their water into the bread. Cooked chestnuts can simply be folded through.

These Need More Than a Simple Swap

Apple brings enough moisture to change how much stock the bread needs, so use the moisture checks rather than forcing a fixed final pour. Cornbread is more fragile than wheat bread and needs gentler handling and its own liquid balance; start with a savory Southern cornbread if that’s the direction you want to take.

Stuffing balls, British sausage-meat stuffing and slow-cooker stuffing need different ratios rather than a simple ingredient swap: the first two are much more sausage-heavy, while a slow cooker traps far more moisture than an oven casserole.
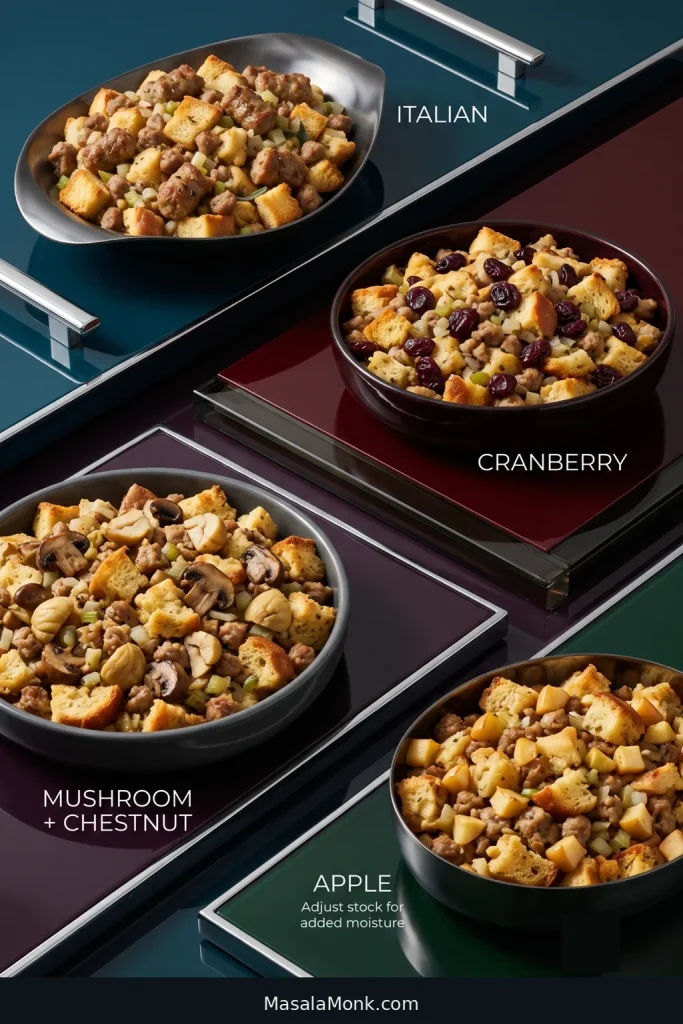
Four bread-based sausage stuffing variations labeled Italian, Cranberry, Mushroom plus Chestnut and Apple, with each addition mixed through visible bread and sausage.
A useful way to judge sausage stuffing variations is by the water they introduce. Dried fruit and chestnuts change flavor easily; mushrooms need browning first, while apple makes the final stock addition less predictable.

Egg-Free, Dairy-Free and Gluten-Free

Egg-free: leave out the eggs for a looser stuffing; extra stock won’t replace the missing cohesion. Dairy-free: use dairy-free butter or olive oil, and check the sausage and stock labels. Gluten-free: use a sturdy gluten-free loaf and verify the sausage, stock and seasonings too; add stock slowly because absorption varies enormously from one loaf to another.

Thanksgiving Sausage Stuffing Without the Last-Minute Scramble

Stuffing itself is easy enough. Stuffing while a turkey owns the oven, potatoes need attention, gravy is waiting and somebody is already asking when dinner will be ready is another matter.

Make-Ahead Sausage Stuffing: The Day Before

  • Cut and dry the bread completely.
  • Let the dried bread cool fully, then store it airtight at room temperature.
  • Cook the sausage, onion, celery, garlic, sage and thyme.
  • Cool the cooked sausage mixture in a shallow container and refrigerate it within 2 hours.

Keep the dried bread separate from the cooked sausage mixture and stock until you’re ready to cook. USDA guidance advises preparing stuffing components ahead separately and combining them immediately before cooking rather than refrigerating mixed uncooked stuffing for later.

See USDA Stuffing and Food Safety for the full guidance.
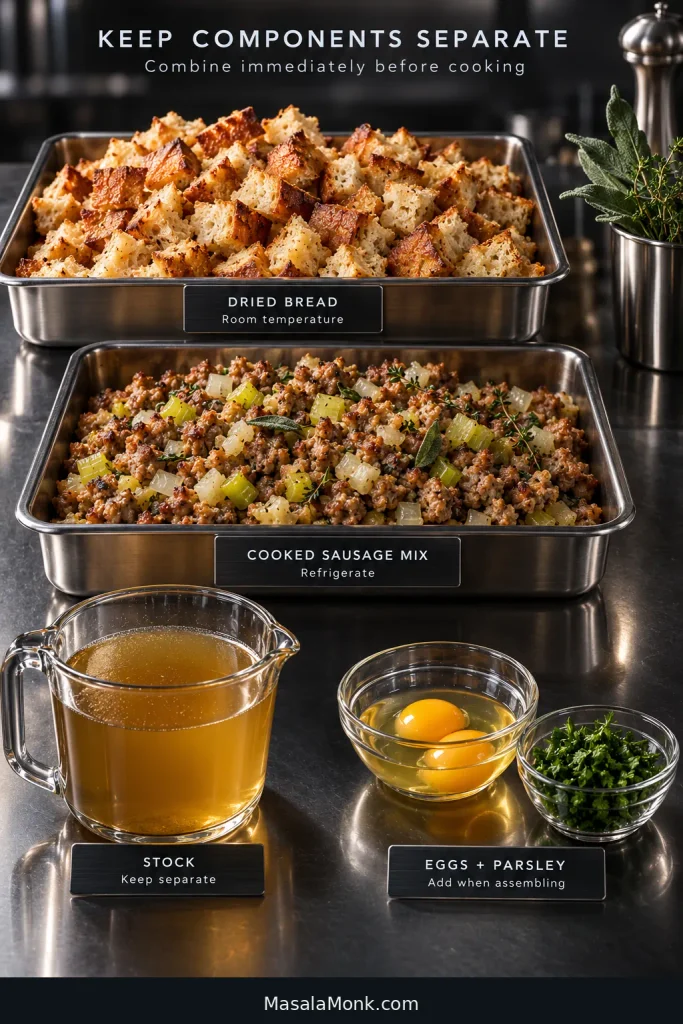
Separate make-ahead stuffing components on a metal counter: dried bread, cooked sausage and vegetables, stock, eggs and chopped parsley in individual containers.
Cool the dried bread completely before sealing it; otherwise trapped warmth can soften what you just dried. Meanwhile, chill the cooked sausage mixture separately and add the stock only when you assemble the stuffing.

When You Are Ready to Assemble

Warm the cooked sausage-and-aromatic mixture gently with the stock before pouring it over the dried bread. Wait five minutes, check the center, handful and bottom, adjust with warm stock if needed, fold in the parsley and taste the complete egg-free stuffing. Correct the seasoning, then fold in the eggs and bake.

On Thanksgiving Day, that’s essentially what remains: warm, mix, check and bake.

If You Have One Oven

Do not assume a refrigerator-cold casserole will reheat completely during the turkey’s rest. If oven space allows, begin reheating a fully cooked, covered stuffing casserole toward the end of the turkey roast. Once the turkey comes out, return the oven to 350°F / 175°C and finish heating the stuffing, uncovering near the end to restore the crust.

If there is no room beside the turkey, plan for the stuffing to need more time after the bird comes out rather than forcing it into a 20-minute rest window. Let the center temperature decide: reheated stuffing should reach 165°F / 74°C. Meanwhile, the roasting-pan juices can become turkey gravy from drippings.
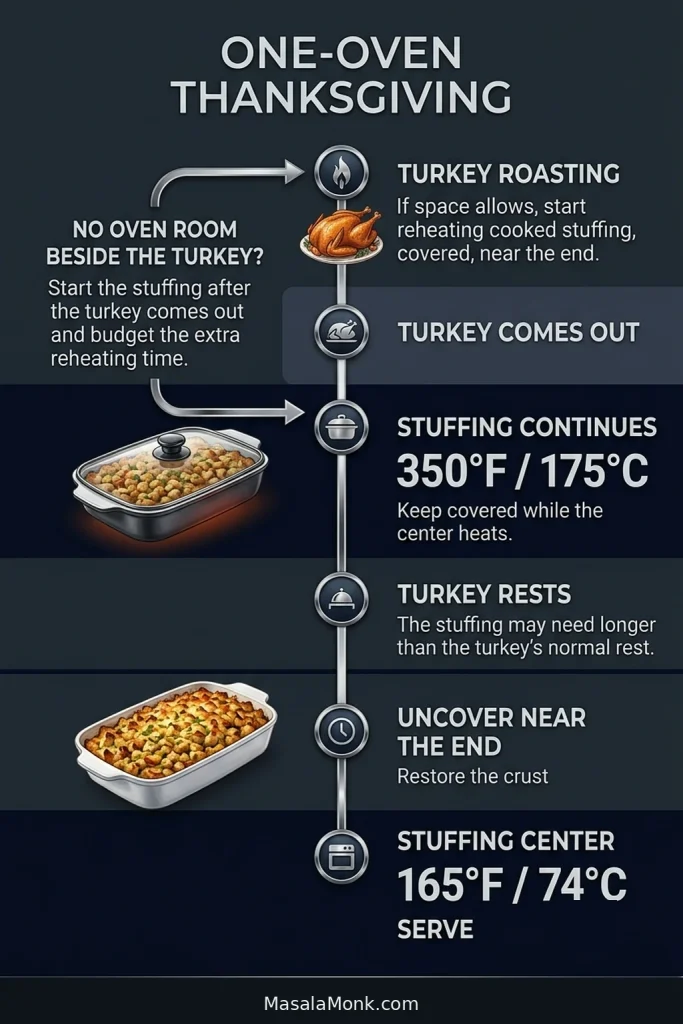
Vertical one-oven Thanksgiving timeline showing turkey roasting, cooked stuffing reheating at 350°F or 175°C, uncovering near the end and reaching 165°F or 74°C.
With one oven, the casserole’s starting temperature matters. A refrigerator-cold pan needs its own reheating window; therefore, keep heating until the center reaches 165°F / 74°C rather than relying on the clock.

Can You Put Sausage Stuffing Inside a Turkey?

You can, but baking sausage stuffing separately is the better default. It is easier to bring the stuffing safely to temperature, easier to keep the turkey from cooking longer than necessary, and much easier to get a tender center with plenty of crisp surface.

If your Thanksgiving tradition still calls for stuffing inside an oven-roasted turkey:

If You Stuff the Turkey, Follow These Safety Checks

  • Cook the sausage and any other raw meat ingredients first.
  • Keep the dried bread separate from the cooked sausage mixture and stock until immediately before filling the bird.
  • Combine the stuffing just before filling, and do not cool the freshly mixed stuffing first.
  • Keep the stuffing moist and fill the cavity loosely.
  • Allow roughly ¾ cup stuffing per pound of turkey.
  • Do not pack the cavity simply to use up the whole batch; bake any excess separately.
  • Roast immediately in an oven set no lower than 325°F / 165°C.
  • The center of the stuffing must reach 165°F / 74°C.
  • Check the turkey too: the breast and innermost parts of the thigh and wing should reach at least 165°F / 74°C.
  • Let the cooked turkey rest about 20 minutes before removing the stuffing.

Do not stuff a turkey that will be grilled, smoked, fried or microwaved.

For the full instructions, see the USDA guidance on stuffing turkey.
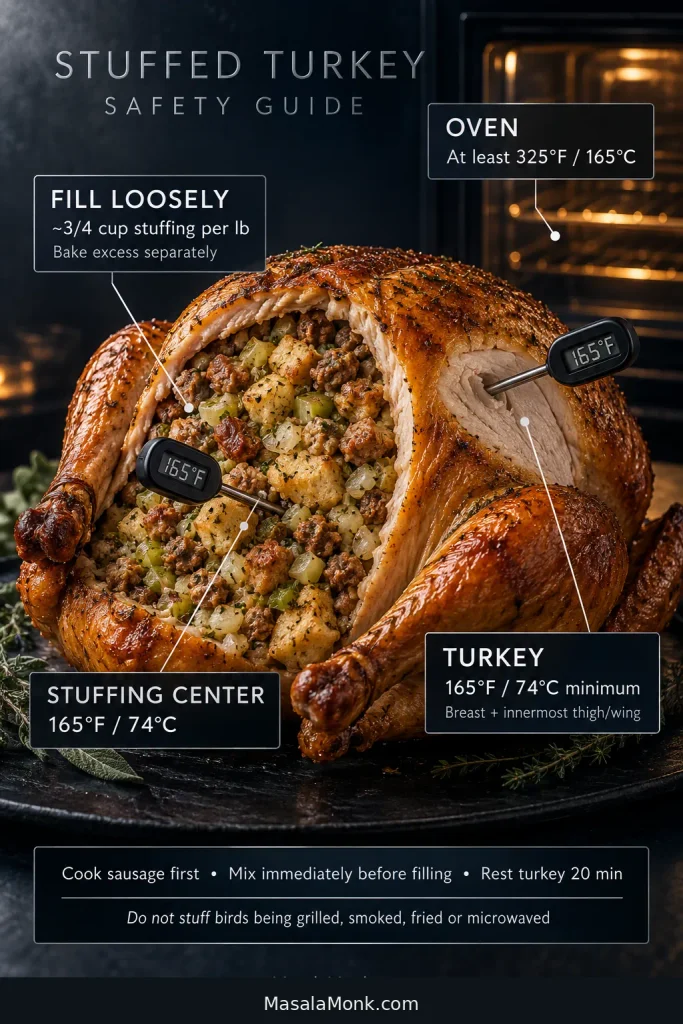
Cutaway roast turkey filled loosely with stuffing, with callouts for three-quarter cup per pound, a minimum 325°F oven and 165°F temperatures for turkey and stuffing.
Brown turkey skin does not tell you whether stuffing in the cavity is safe. Instead, measure the stuffing center itself and keep roasting until both the bird and stuffing have reached their required temperatures.

Want the Turkey Flavor Without Stuffing the Bird?

Use turkey stock, keep some of the rendered sausage fat and don’t skimp on the butter. Later, a little fully cooked turkey pan juice spooned over the casserole before reheating can bring in even more roast-turkey flavor without sacrificing the crisp top.

Scaling the Recipe and Planning Portions

Doubling the recipe? Use two 9 × 13-inch / 23 × 33-cm dishes. One very deep casserole traps more steam and takes much longer to heat through.

About ¾ cup cooked stuffing per person is a useful Thanksgiving planning starting point. That means roughly 6 cups for eight people, 9 cups for 12, or 12 cups for 16.

This recipe makes one full 9 × 13-inch casserole and is best thought of as about 10–12 generous side servings. Smaller portions naturally stretch farther when stuffing is one of many dishes on the table. If your family takes seconds before they’ve finished the turkey, plan more generously.

What to Serve With Sausage Stuffing

Roast turkey and gravy are the obvious partners. Add creamy mashed potatoes and you have two sides particularly good at catching the gravy that runs across the plate.

Something greener and sharper helps against all that soft bread, butter and potato. Roasted Brussels sprouts, green beans or tart cranberry sauce all work.
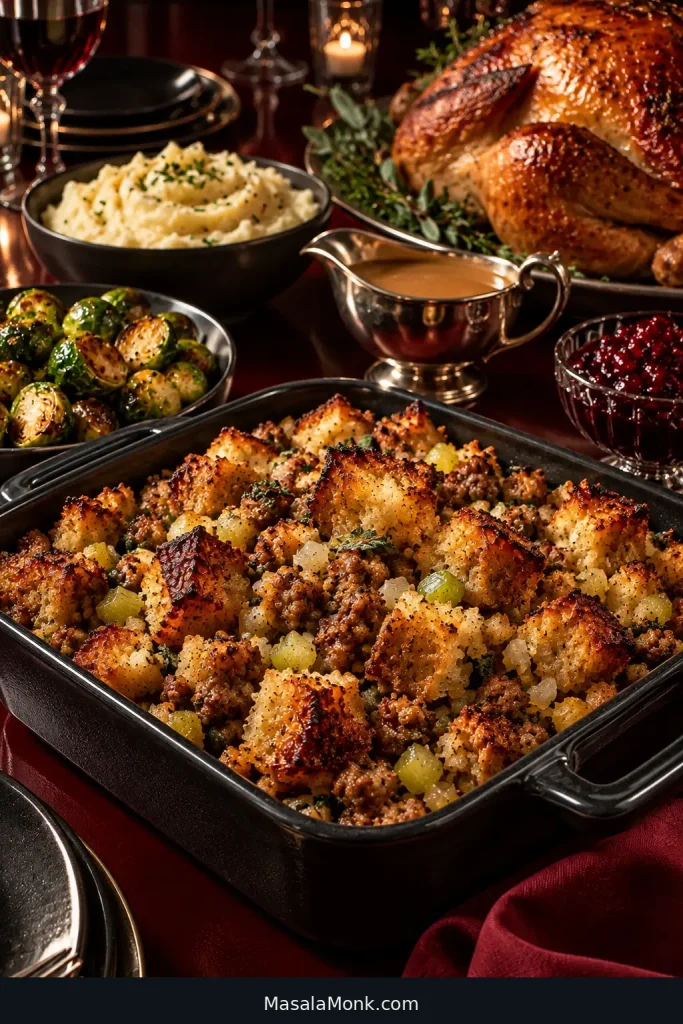
Thanksgiving table with sausage stuffing in the foreground beside roast turkey, gravy, mashed potatoes, Brussels sprouts and cranberry sauce.
When plating Thanksgiving stuffing, put gravy where you want softness rather than flooding every browned ridge. Then something green or tart can cut through the butter, sausage, potatoes and gravy.

This doesn’t have to be a once-a-year side either. A smaller batch is just as good beside roast chicken or pork on a cold weekend.

Leftovers, Storage and Reheating

If dinner is only slightly delayed, keep the hot casserole loosely covered. A tight seal traps steam and softens the top. A short uncovered return to the oven will bring some of the crust back.

Refrigerate cooked stuffing within 2 hours and use it within 3–4 days. Shallow containers help it cool more quickly.

Reheat leftovers to 165°F / 74°C. If the stuffing looks dry, add a splash of stock, cover while the center heats and uncover near the end to crisp the surface again.

Cooked stuffing freezes well in practical portions; for best quality, use it within about 1 month. Thaw overnight in the refrigerator when convenient, or reheat from frozen with extra time.

Sausage Stuffing FAQs

1. Does sausage need to be cooked before adding it to stuffing?

Yes. Cook the sausage first. Fresh pork sausage should reach 160°F / 71°C; poultry sausage should reach 165°F / 74°C.

2. Do you need eggs in sausage stuffing?

No. Eggs help the casserole hold together; they do not hydrate the bread. Leave them out for a looser stuffing, or use 1 egg instead of 2 for a middle ground.

3. How much broth or stock do you need for stuffing?

For 18 oz / 510 g bread, have about 2½ cups / 590 ml stock ready plus up to another ½ cup / 120 ml. Add the final amount only if the bread needs it.

4. Can you make sausage stuffing ahead?

Yes. Dry the bread and cook the sausage-and-aromatic mixture ahead, but keep them separate from the stock and combine everything immediately before cooking. A fully cooked casserole can also be chilled and reheated to 165°F / 74°C.

5. What temperature should sausage stuffing reach?

Cook the center of the stuffing to 165°F / 74°C, whether it is baked in a casserole or inside a turkey.

Save a Crisp Corner for Your Plate

Once you know what properly hydrated bread looks like, sausage stuffing stops feeling like a gamble. The middle can stay tender while the ragged pieces on top turn buttery and dark at the edges.
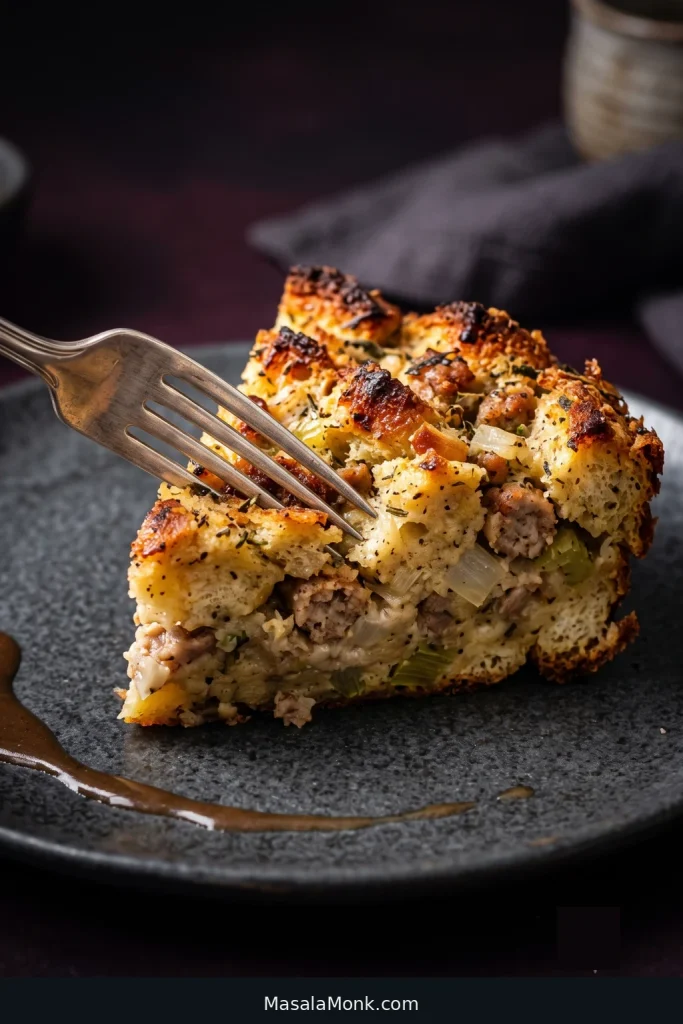
Side view of a crisp corner of sausage stuffing on a dark plate as a fork breaks through browned bread into the softer sausage, onion and celery-filled center.
Edge and center servings are effectively two textures from the same casserole. Choose the crisp corner when you want more browned bread—or dig toward the middle when softer sausage dressing is what you love.

When it reaches the table, dig the spoon through one of those crisp corners and catch some of the softer stuffing underneath with it. Browned sausage, sage, tender bread, crunchy edges and gravy running into the gaps—that is the part worth getting right.
Posted on — Leave a comment

Southern Cornbread Dressing Recipe: Old-Fashioned, Moist & Easy

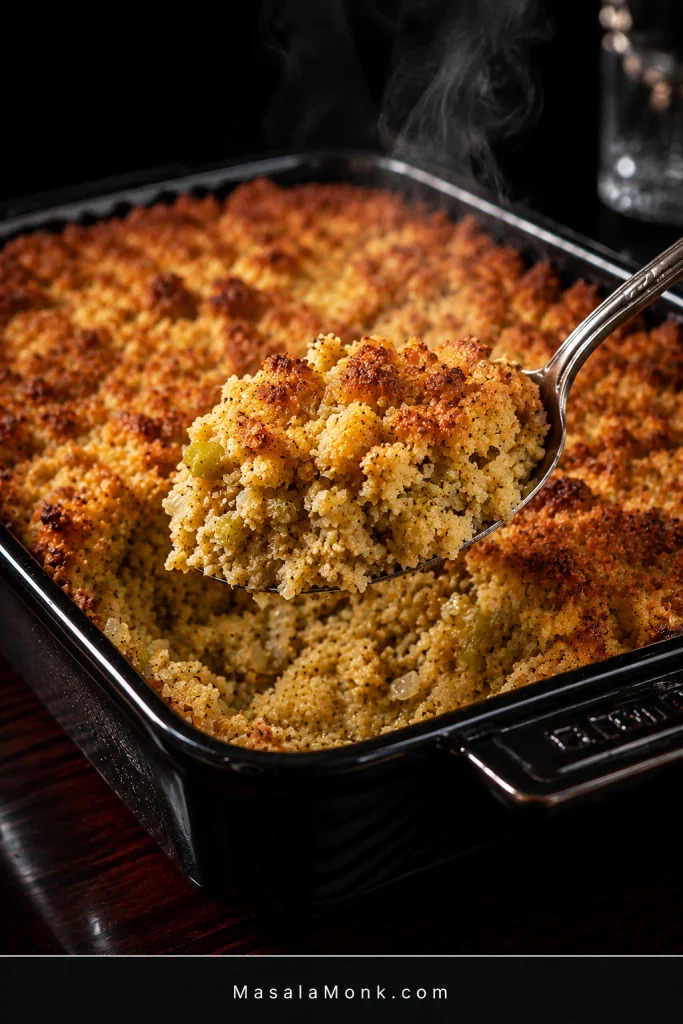
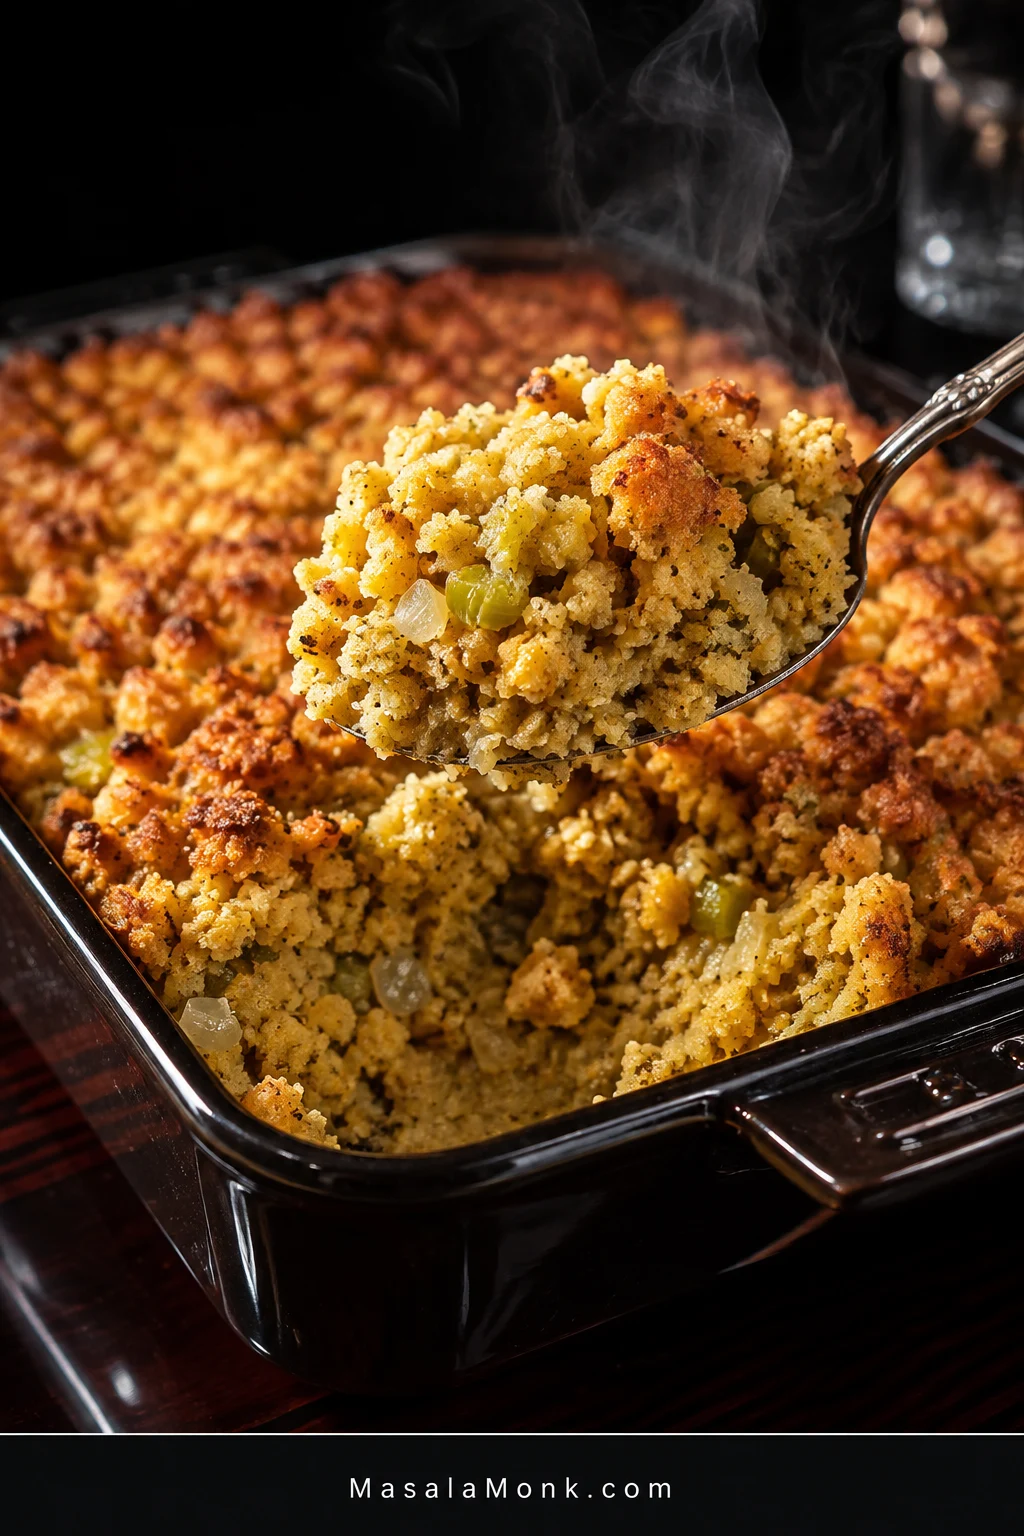
Southern cornbread dressing in a dark baking dish with a serving removed, showing a golden top and soft interior with onion, celery and herbs.

Southern cornbread dressing has a lightly golden top and a soft, moist center that gives easily to a serving spoon and holds together on the way to the plate.

It is also one of those dishes people may cook only once or twice a year, often for a table full of people who already know exactly how they think dressing should taste. That can make the bowl just before baking feel unusually important: Is it wet enough? Too wet? Did I add too much sage?

This one keeps things straightforward—savory homemade cornbread, a little plain bread, tender onion and celery, butter, broth, sage and eggs. Southern families disagree about plenty of the details; here, cornbread leads the flavor and the finished center stays soft, savory and spoonable.

Quick Answer

Cornbread dressing should look very moist before baking, with the broth soaked through the bread instead of pooling separately underneath it.

For the cornbread used in this recipe, start with 4 cups / 950 mL warm broth, fold gently and leave the bowl alone for 5 minutes. Dry crumbs or a stiff mound mean it needs more. When a spoonful slowly settles and the broth is absorbed throughout the bread, stop adding liquid. A persistent puddle beneath saturated crumbs means the bowl has gone too wet.

Taste and season before adding the raw eggs. Bake in a 9×13-inch / 23×33 cm dish at 375°F / 190°C until lightly golden, set through the middle and at least 165°F / 74°C.

Pan: 9×13 in / 23×33 cm   •   Serves: 10–12   •   Texture: soft, moist and spoonable

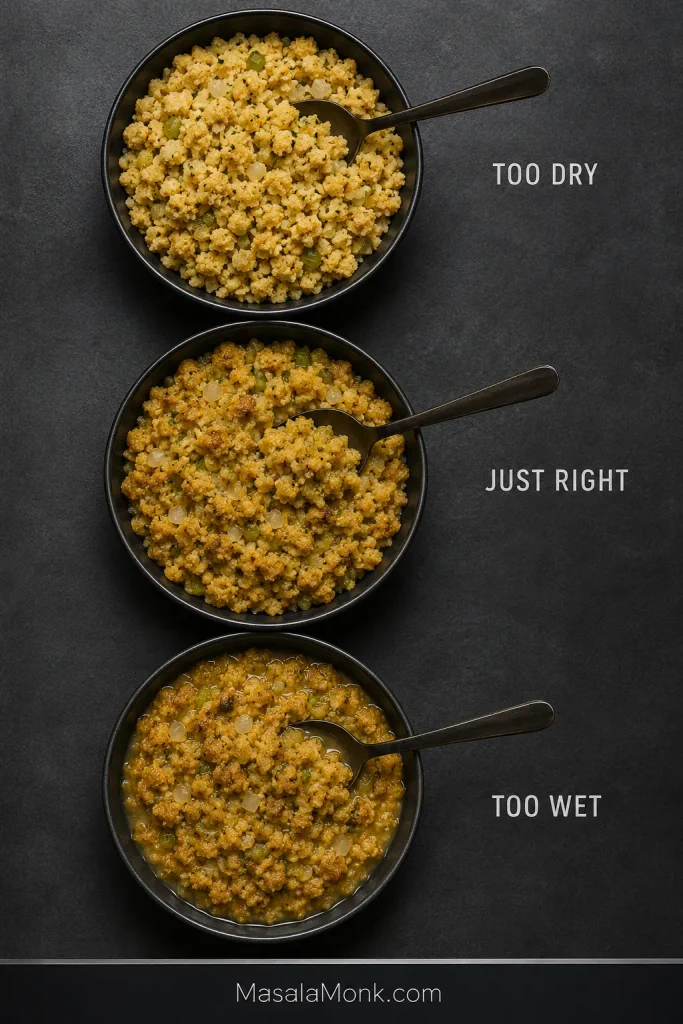
Three bowls compare cornbread dressing that is too dry, correctly moistened, and too wet with broth pooling around saturated crumbs.
After the five-minute rest, the middle bowl can move on to seasoning and eggs; the dry and pooled-liquid versions still need correction.

Southern Cornbread Dressing Recipe

Old-fashioned Southern cornbread dressing with tender onion and celery, sage and a soft, moist center with recognizable pieces of cornbread.

Active prep: about 25 minutes with prepared cornbread   •   Bake: 45–55 minutes   •   Rest: 10–15 minutes   •   Total with prepared cornbread: about 1 hour 20 minutes–1 hour 35 minutes

Starting with freshly baked cornbread? Allow extra time for it to cool and dry before the active prep begins.

Equipment

  • 9×13-inch / 23×33 cm baking dish
  • Large mixing bowl
  • Large skillet
  • Baking sheet if drying the breads the same day
  • Aluminum foil
  • Instant-read thermometer

Ingredients

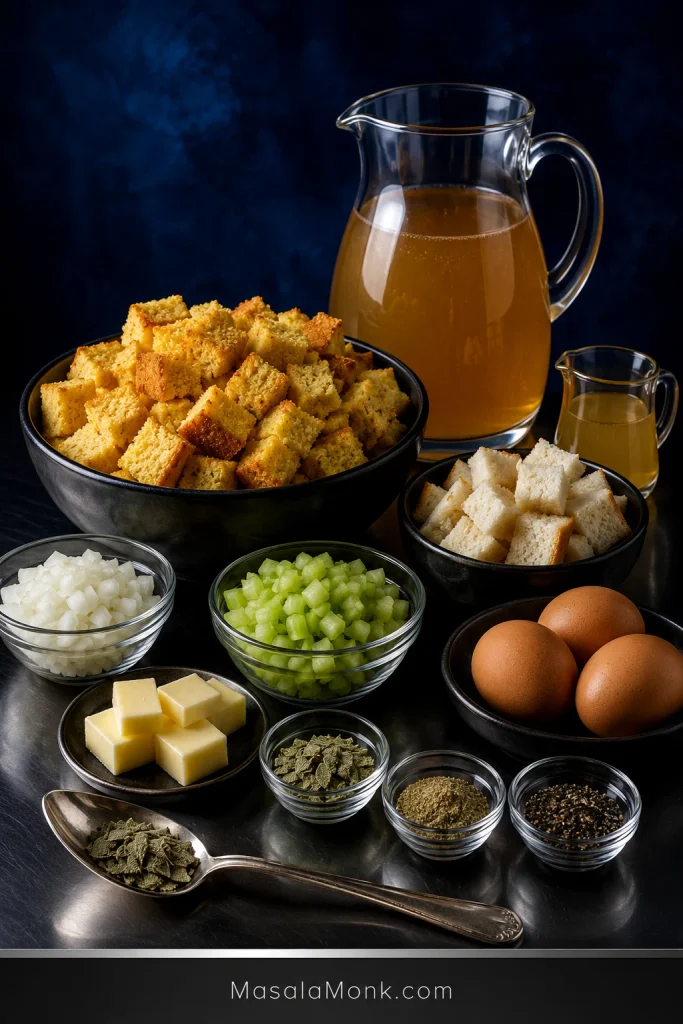
Ingredients for Southern cornbread dressing arranged on a dark blue set: cornbread, white bread, onion, celery, butter, sage, seasoning, eggs and broth.
Cornbread leads; the smaller amount of white bread supports the soft center without turning this into ordinary bread stuffing.

Bread

  • 1 full 10-inch / 25 cm skillet savory Southern cornbread, completely cooled and slightly dried
  • 4 oz / 115 g plain white sandwich bread, about 4–5 standard slices, dried and torn

For the closest match to the method below, use the savory version of MasalaMonk’s Southern Cornbread Recipe. Other homemade and boxed cornbreads can differ in size, sweetness and absorption, so the broth may need to be handled a little differently.

Butter, Onion and Celery

  • 8 tablespoons / 4 oz / 113 g unsalted butter, plus more for the baking dish
  • About 1½ cups / 7 oz / 200 g yellow onion, finely diced
  • About 1½ cups / 6.3 oz / 180 g celery, finely diced

Seasoning

  • 2 teaspoons rubbed sage
  • 1 teaspoon poultry seasoning
  • 1 teaspoon freshly ground black pepper
  • Fine salt, to taste after the first broth soak; broth and cornbread can vary considerably in saltiness

Broth and Eggs

  • Starting broth: 4 cups / 950 mL low-sodium chicken or turkey broth, warmed
  • Reserve broth: up to 1 cup / 240 mL, warmed
  • 3 large eggs

Good homemade turkey broth can replace the chicken broth. Strained juices or drippings from a fully cooked turkey can replace part of it too; use concentrated or salty drippings sparingly.

Think of the last cup of broth as insurance, not a target. Very dry bread may want most of it. Fresher bread may need little or none.

Instructions

1. Dry and Crumble the Breads

If possible, bake the cornbread a day ahead and cool it completely. Breaking it into large pieces gives some of the fresh-baked moisture a chance to escape.

For same-day dressing, spread the cooled cornbread pieces on a baking sheet and dry them at 250°F / 120°C, turning occasionally and beginning to check around 20 minutes. Add the torn white bread too, watching the thinner pieces because they may dry sooner.

The surface feels dry and the pieces break easily when they are ready. The middle no longer feels steamy or cake-soft. There is no need to turn the bread into hard croutons.

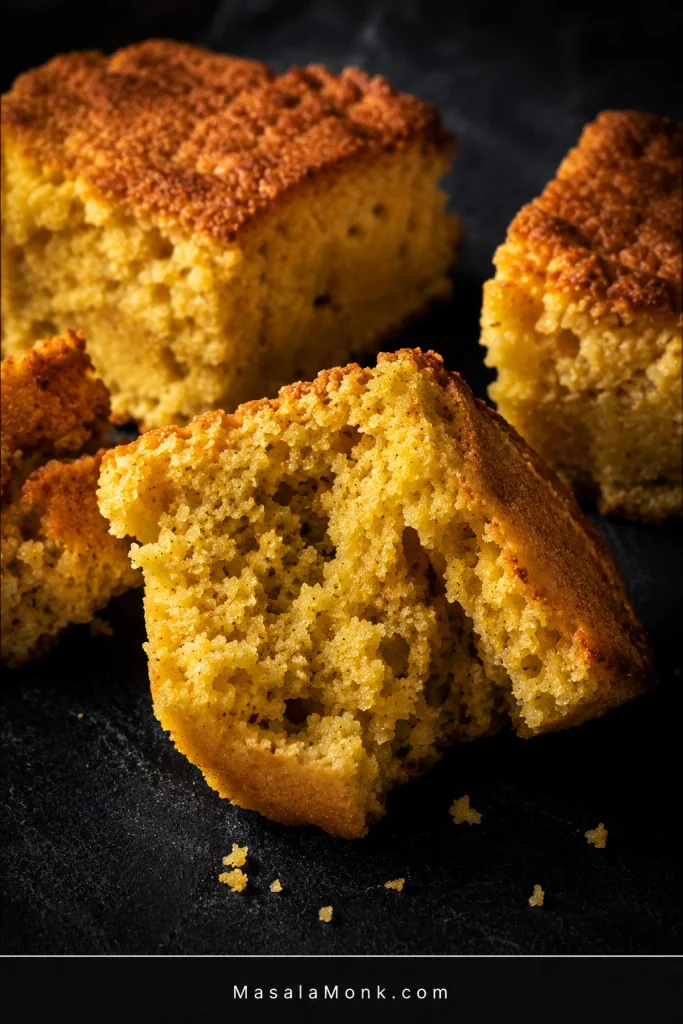
Broken pieces of slightly dried cornbread with a matte exterior and porous, still-tender interior crumb.
Slightly dried cornbread gives you more control over broth without becoming hard or crouton-like.

Crumble the cornbread into a large bowl. Most pieces can be small, with a scattering of irregular ½–1 inch / 1–2.5 cm pieces. Uneven crumbs are fine.

Hands crumble cornbread over a bowl, leaving mostly small irregular crumbs with some larger half-inch to one-inch pieces.
Small crumbs absorb and bind; a few larger pieces keep the finished dressing recognizably cornbread.

Raise the oven to 375°F / 190°C when the bread is ready. If you dried it ahead, simply preheat the oven before assembly.

2. Cook the Onion, Celery and Seasonings

Melt the butter in a large skillet over medium heat. Add the onion and celery and cook for 8–10 minutes, stirring occasionally, until tender and translucent. A little color around the edges is welcome.

Add the rubbed sage, poultry seasoning and black pepper for the final 30–60 seconds. When the herbs hit the warm butter, the skillet should smell unmistakably like dressing. Scrape the vegetables and all of that seasoned butter over the bread.

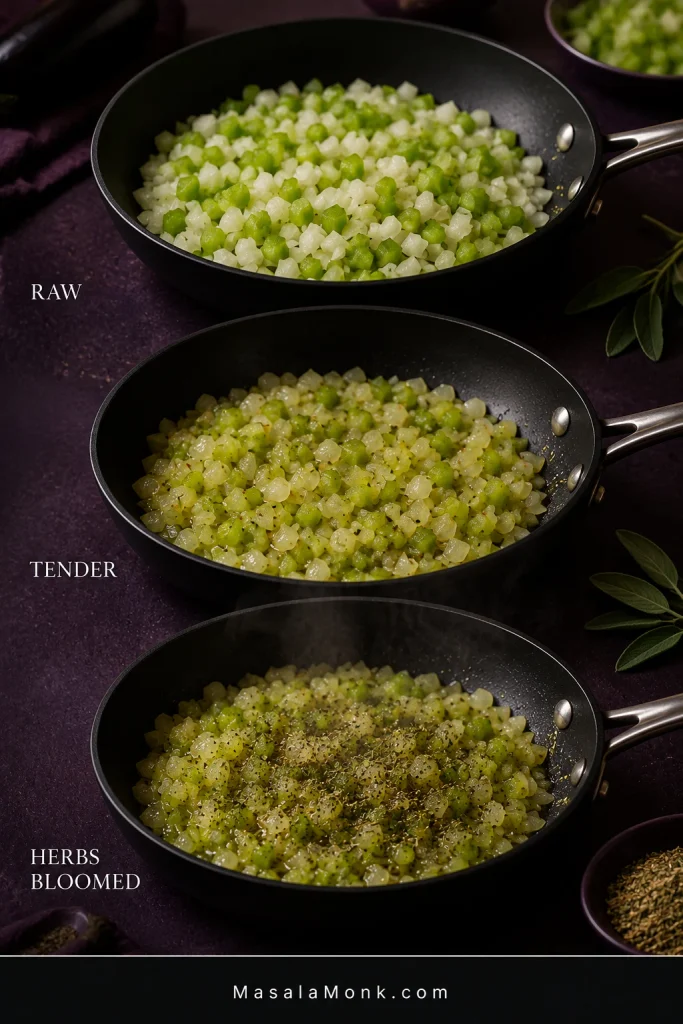
Three pans show diced onion and celery raw, softened and translucent, then cooked with sage and poultry seasoning in butter.
Tender vegetables will not need to cook inside wet bread, while the brief herb bloom seasons the butter.

3. Add the First Broth

Using the linked cornbread or another similarly sized homemade batch, pour 4 cups / 950 mL warm broth around the bowl and fold gently from the bottom.

Using a noticeably smaller or very different batch of cornbread? Start with less broth and work upward instead of automatically pouring in all 4 cups.

As the broth spreads through the bowl, the crumbs become glossy and heavy with moisture while their cornbread texture remains visible. Fold only enough to distribute the liquid.

4. Leave It Alone for 5 Minutes

This is the point where dressing often looks wrong even when it isn’t. Give the bread time to drink before changing anything.

After 5 minutes, fold once or twice. Pale dry crumbs or a spoonful that sits in a stiff mound mean the bowl wants more broth. Add the reserve ¼ cup / 60 mL at a time.

Two bowls compare cornbread dressing immediately after broth is added and after five minutes, when the bread has absorbed more liquid and thickened.
Five minutes changes the picture: give the bread time to absorb the first broth before deciding whether it needs more.

Stop when the bread is moist all the way through and a spoonful slowly settles back into the bowl. Saturated crumbs with a persistent pool of broth underneath have gone too far.

Trust what the bread is doing more than the amount left in the measuring cup.

5. Taste, Season, Then Add the Eggs

Taste the dressing before the raw eggs go in. Add salt as needed, then taste for pepper or another small pinch of rubbed sage.

A hand tastes moistened cornbread dressing from a spoon while three whole eggs wait separately in the background.
After hydration, salt and sage register more clearly—making this the best moment for the final seasoning adjustment.

Go carefully with the sage. Adding another pinch is easy; softening an overwhelmingly herbal pan is not.

Whisk the 3 eggs, pour them over the dressing and fold gently until evenly distributed. Stop tasting once the raw eggs are in.

6. Fill the Baking Dish

Butter a 9×13-inch / 23×33 cm baking dish. Spoon in the dressing and spread it evenly without packing it down.

Making a double batch? Use two 9×13 pans. Keeping the layer close to the original depth helps both pans cook evenly.

Two dark baking dishes filled with moist unbaked cornbread dressing, illustrating the use of two pans for a double batch.
Two pans keep a double batch close to the original depth, so the bake behaves more like the single recipe.

7. Bake Covered, Then Uncovered

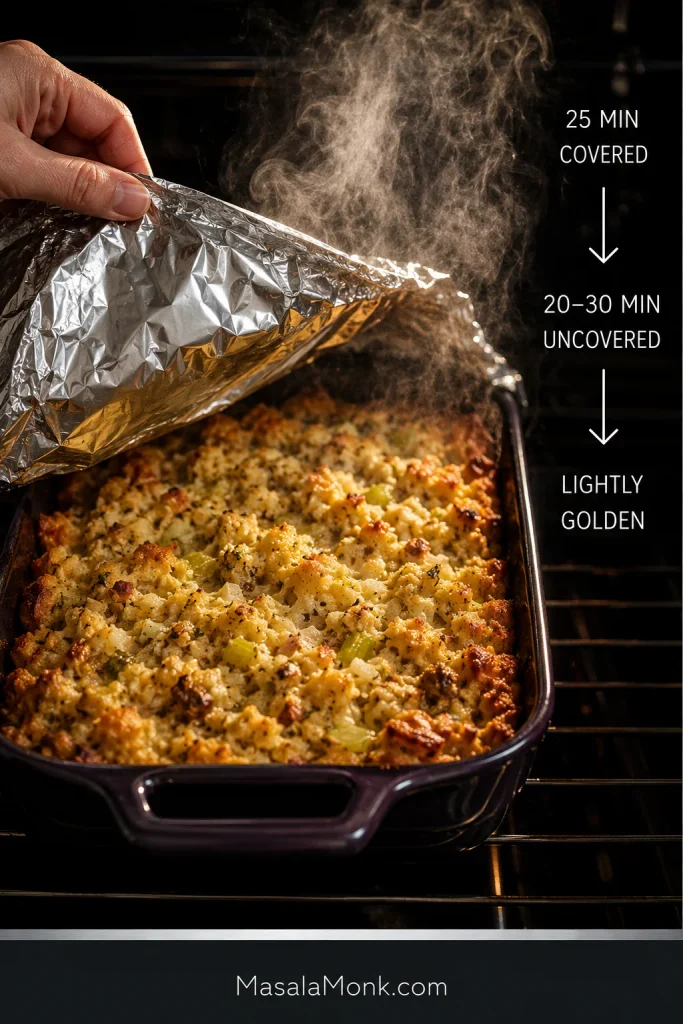
Cover loosely with foil and bake at 375°F / 190°C for 25 minutes. Remove the foil and bake another 20–30 minutes, beginning to look in on it around 20 minutes.

Foil being lifted from a steaming cornbread dressing casserole with instructions for 25 minutes covered, then 20 to 30 minutes uncovered until lightly golden.
Covered first protects the center; uncovering later shifts the oven’s job toward browning the surface.

The top turns lightly golden, with deeper toasted patches near some of the edges. Nudge the dish and the middle moves together gently instead of rippling or sloshing like loose batter. The center needs to reach at least 165°F / 74°C.

Take it out while the center still looks moist. The 10–15 minute rest will give it a little more structure.

8. Rest Before Serving

Leave the pan alone for 10–15 minutes. A serving spoon uncovers a moist interior beneath the lightly toasted surface, tender enough to yield and firm enough to reach the plate.

A silver serving spoon lifts rested Southern cornbread dressing from a dark casserole, revealing a soft moist interior beneath the browned top.
The 10–15 minute rest lets the moist center settle without baking away its tenderness.

Serve warm, while the top still has a little toastiness and the center is soft, savory and fragrant with sage and butter.

What Kind of Southern Cornbread Dressing Is This?

There isn’t one Southern dressing rulebook. One family may love a pan so soft it is almost spoon-pudding tender. Another may expect neat squares. Biscuits, white bread, chicken and condensed soup all appear in different family versions.

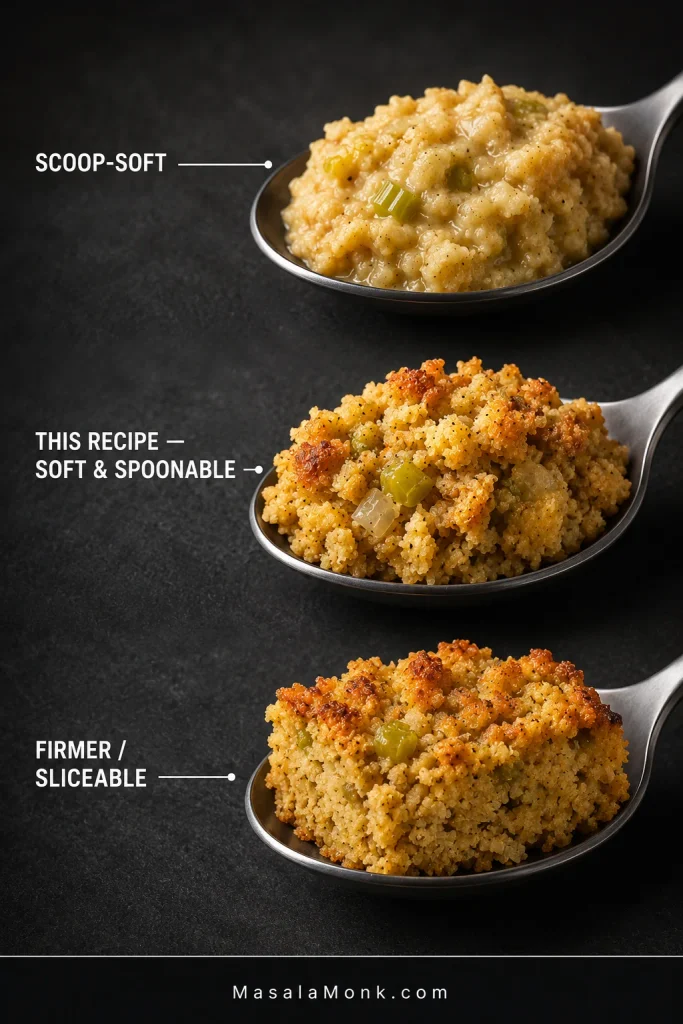
Three spoonfuls compare scoop-soft dressing, this recipe’s soft and spoonable texture, and a firmer sliceable style.
Two recipes can both be Southern cornbread dressing and land at very different points on this spectrum. Choose the texture you want before changing broth or bake time.

For a lot of cooks, the real reference point isn’t another written recipe at all. It is the pan they remember from Thanksgiving—the one somebody made largely by feel, adding broth until “it looked right.” The cues here are meant to make that judgment easier to recognize and repeat.

Here, cornbread leads the flavor. Onion and celery soften in butter first, sage stays clearly present, and raw eggs help the moist center set. Chicken, sausage and condensed soup can make excellent dressings too; they change the salt, fat and moisture enough to deserve their own balance.

Dressing vs Stuffing

The words overlap heavily in everyday use. A practical distinction is that dressing is commonly baked in its own casserole dish, while stuffing traditionally cooks inside poultry. This recipe is baked separately.

Which Cornbread Is Best for Dressing?

Slightly dried or day-old savory cornbread is easiest to work with because it has room to take on broth. Fresh cornbread works too; give it some time in the low oven first.

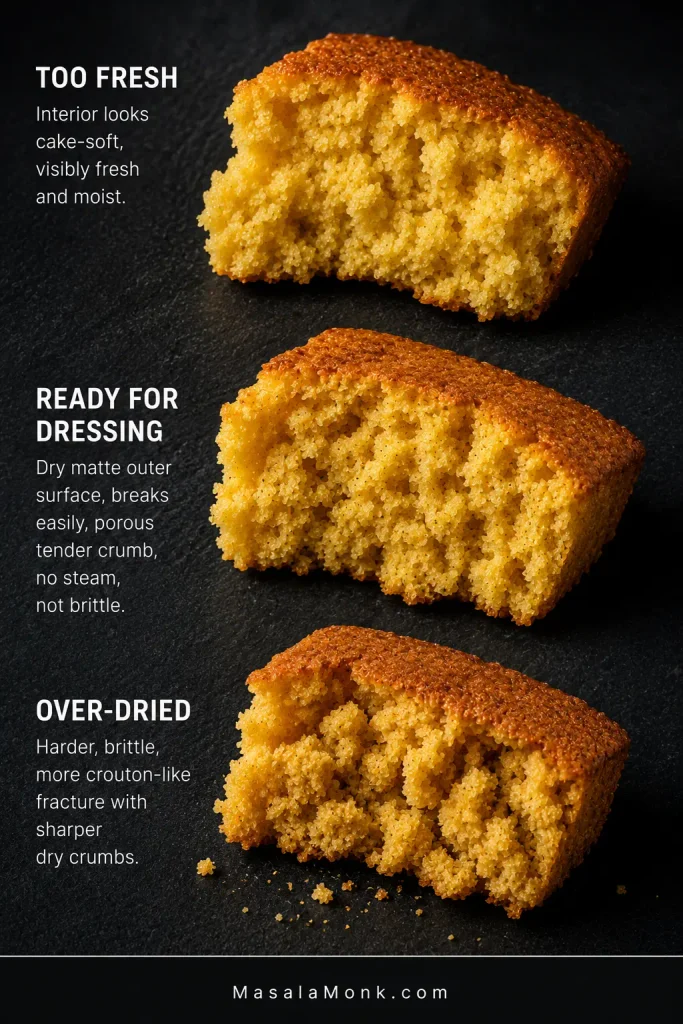
Good dressing bread feels dry at the surface and crumbles easily. It does not need to be brittle. Starting with a very moist, cake-soft pan simply makes the broth harder to control.

Three pieces of cornbread compare too-fresh cake-soft crumb, bread ready for dressing with a dry surface and tender crumb, and brittle over-dried bread.
The middle state gives you the most room to build moisture gradually without starting with cake-soft bread.

Why Add a Little White Bread?

The 4 oz / 115 g white bread is a small supporting part of the bowl. Cornbread supplies the flavor; the plain bread gives the tender center a little extra help holding together.

Some Southern dressings use biscuits for a similar reason. Plain sandwich bread stays deliberately quiet here.

Prefer all cornbread? Replace the white bread with 4 oz / 115 g additional dried cornbread. Let the first broth soak in before reaching for more, since an all-cornbread bowl may absorb differently.

Can I Use Jiffy or Another Corn Muffin Mix?

Yes, but expect a sweeter flavor and different absorption. Boxed mixes and other homemade recipes can also produce a smaller or larger amount of cornbread.

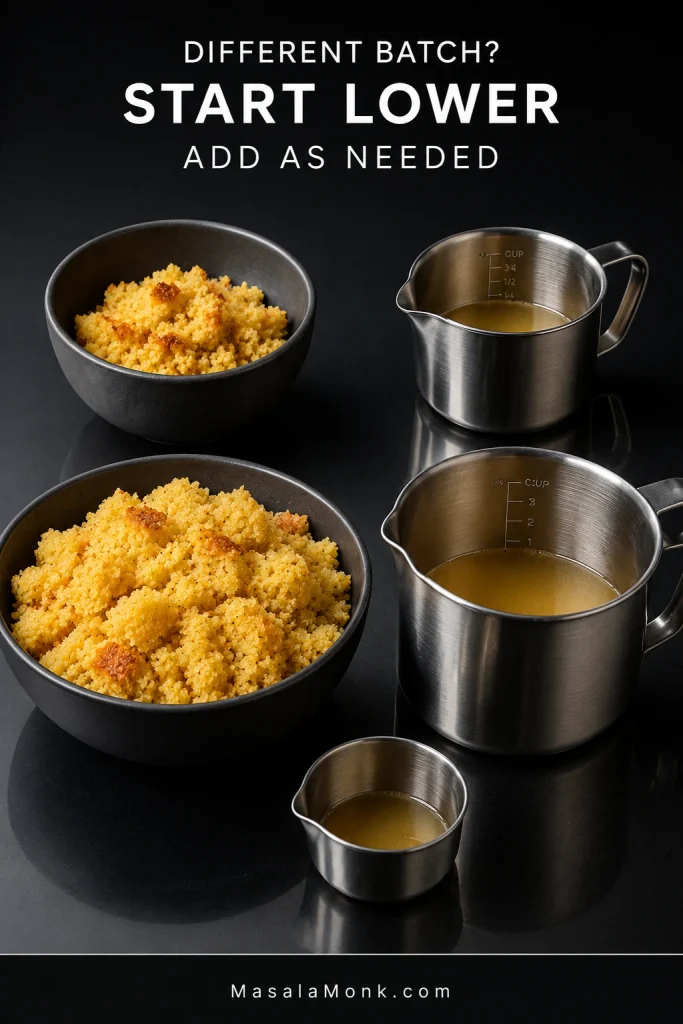
When the amount differs noticeably from the linked recipe, add the broth gradually. A smaller batch may need considerably less than 4 cups, while a larger or drier batch may take more.

Two bowls with different amounts of crumbled cornbread beside different starting amounts of broth, illustrating starting lower and adding broth as needed.
Batch size changes absorption capacity. A smaller boxed or homemade cornbread batch should not automatically receive the full broth amount.

How Much Sage—and What Do the Eggs Do?

Start with 2 teaspoons rubbed sage plus 1 teaspoon poultry seasoning. After the broth has soaked into the bread, taste and make any final adjustment before the eggs go in.

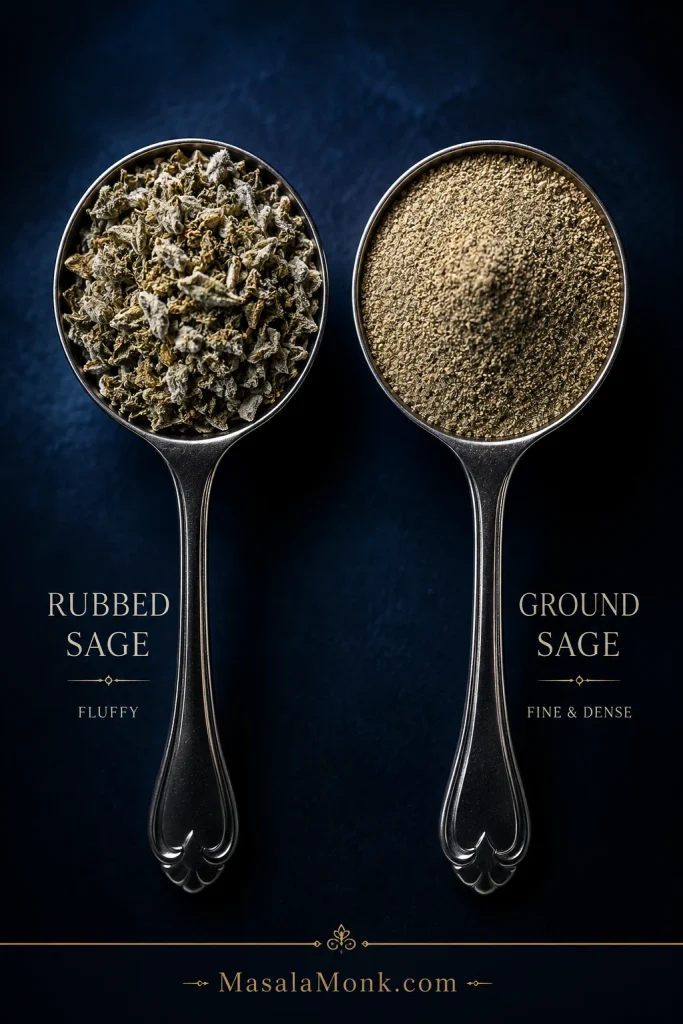
Rubbed Sage vs Ground Sage

Ground sage is much finer and packs more tightly into a measuring spoon than fluffy rubbed sage. A teaspoon-for-teaspoon swap can therefore taste considerably stronger.

Using ground sage? Begin cautiously. Poultry seasoning often contains sage as well, so check the label if you want a milder sage flavor or need to avoid it altogether.

Two measuring spoons compare fluffy leafy rubbed sage with fine, dense ground sage on a dark blue background.
Ground sage packs more densely than rubbed sage, so start conservatively and adjust after the broth soaks in.

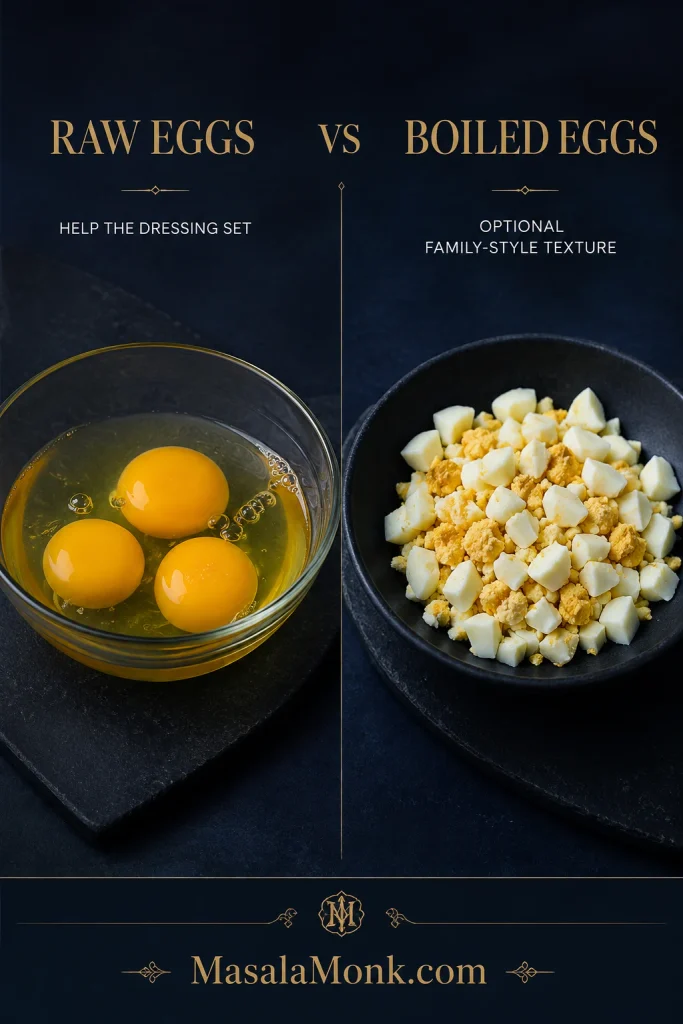
Do You Put Eggs in Cornbread Dressing?

Raw eggs help the very moist dressing set as it bakes. Chopped hard-boiled eggs are a separate family-style addition.

Raw eggs in a glass bowl are labeled as helping dressing set, while chopped hard-boiled eggs are shown as an optional family-style texture addition.
Think structure versus texture: raw eggs help the dressing set; chopped boiled eggs change the bites you encounter.

Using eggs—or not using them—is a family and regional choice, not a test of whether dressing is “really Southern.” Plenty of long-standing versions exist on both sides.

If the dressing you grew up with had chopped boiled eggs, keep them if that’s the version you love. They bring their own flavor and texture; they do not replace the raw eggs used here for structure.

Leaving the raw eggs out entirely changes how this formula sets, so an intentionally eggless dressing is better balanced from the start as its own version.

How Wet Should Cornbread Dressing Be Before Baking?

Very moist and slowly settling is the goal. The bread is moist all the way through, from top to bottom. There are no dry pockets and no free liquid underneath.

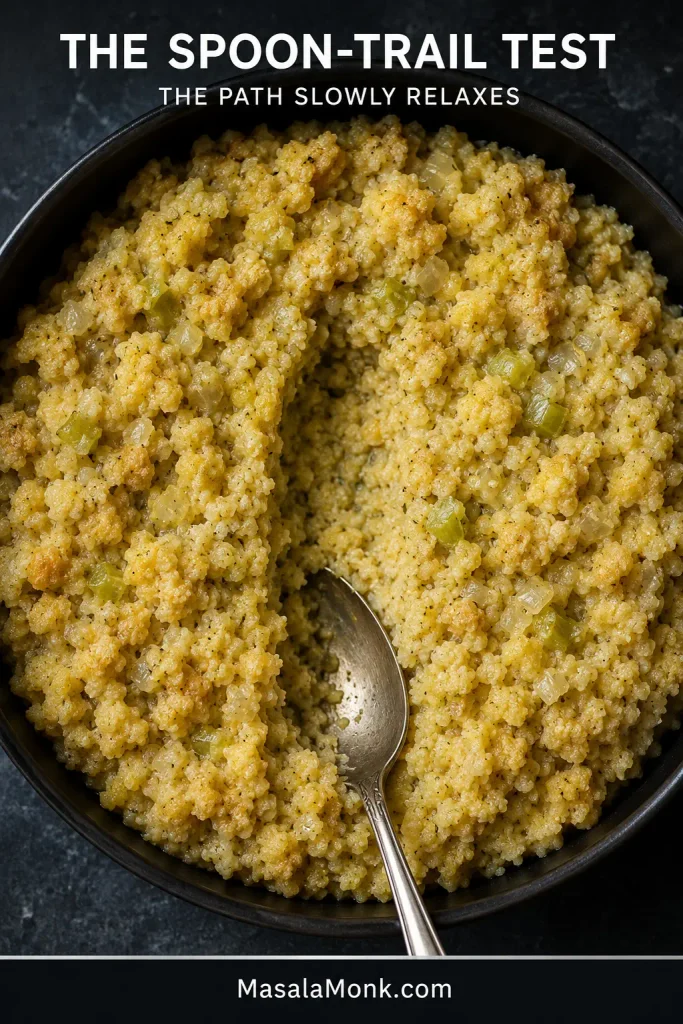
This soft Southern dressing looks considerably wetter than cubed bread stuffing. Draw a serving spoon through the bowl and the path gradually relaxes instead of staying sharply open.

A spoon creates a shallow channel through very moist unbaked cornbread dressing; the soft sides of the trail begin to relax inward without pooled broth.
The groove should be temporary. Correctly moistened dressing slowly relaxes toward the spoon trail; a stiff trench points dry, while liquid collecting in it points too wet.
StateWhat It Looks LikeWhat to Do
Too dryDry crumbs remain and the mixture sits stifflyAdd warm broth ¼ cup / 60 mL at a time
Just rightThe bread is moist through, crumb texture remains, and a spoonful slowly settlesStop adding broth
Too wetThe crumbs are saturated but broth still gathers separately after restingFold in additional dried bread before adding the eggs

Freshly added broth can look alarmingly loose for a few minutes. Let it soak in. What matters is whether free liquid remains after the bread has had a chance to absorb it.

Soft Is the Goal; Paste Is Not

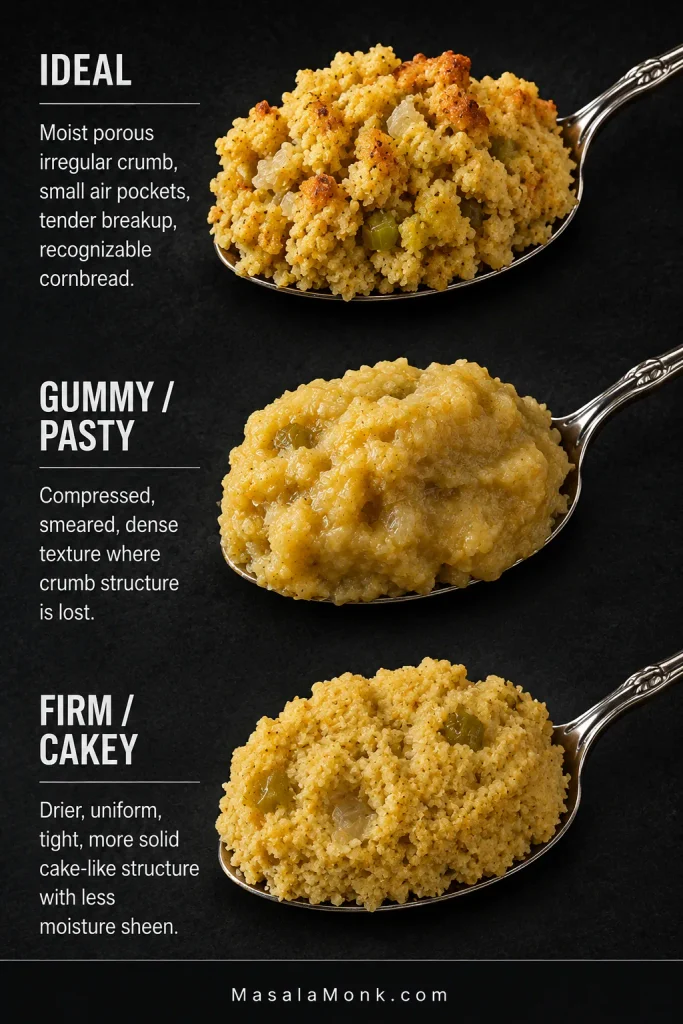
Soft dressing can be extremely tender and still show recognizable pieces of cornbread. Gummy dressing has lost that crumb and feels more like paste.

Very fresh bread, crumbs worked too fine, excess broth and aggressive mixing can all push the bowl in that direction. Extra oven time can remove moisture; it cannot rebuild crumb texture that has already broken down.

Bowl looks right? Back to the recipe. Still unsure? Go to troubleshooting.

Pan Size and Doneness for Cornbread Dressing

A standard 9×13-inch / 23×33 cm dish gives the dressing a comfortable depth for an even bake. Go deeper and the center needs more time; use a shallower dish and the surface browns and dries faster.

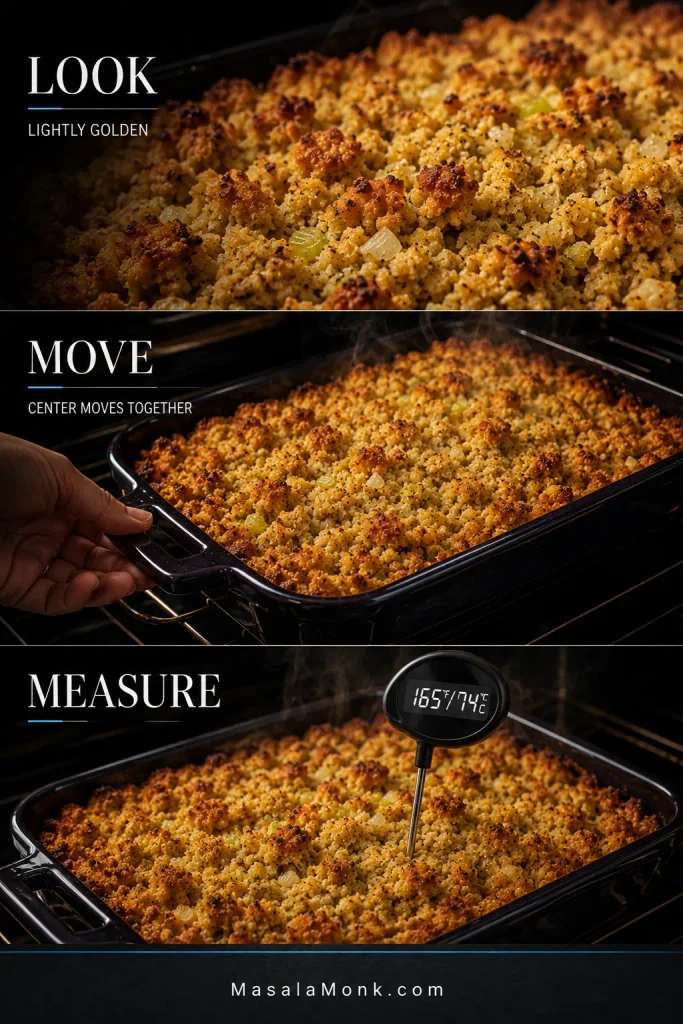
Look, Move, Measure

  • Look: the surface is lightly golden, with deeper toasted patches near some of the edges.
  • Move: the center shifts together gently when the dish is nudged; loose batter would ripple or slosh.
  • Measure: the middle reaches at least 165°F / 74°C.
Three-part doneness guide shows lightly golden cornbread dressing, a hand nudging the casserole, and a thermometer reading 165°F / 74°C in the center.
No single doneness cue is enough: browning can get ahead of the center, movement shows the set, and 165°F / 74°C confirms temperature.

Once the top looks right, the middle moves together and the thermometer says 165°F / 74°C, it is done. Don’t leave it in waiting for a firm center; the rest will take care of the final bit of setting.

For a moist dressing like this, gravy is an extra pleasure rather than the only thing keeping the serving from tasting dry.

Cornbread Dressing Troubleshooting

Your best rescue window is before the eggs. Broth, dry bread, salt and herbs are much easier to adjust then. Once the pan is baking, time and foil are your main tools.

Before Baking

Dry and stiff: Let the existing broth soak in first. If dry crumbs remain, add warm broth ¼ cup / 60 mL at a time.

Broth pooling underneath: Saturated bread plus persistent free liquid means the bowl is too wet. Fold in additional dried bread before adding the eggs.

Bland: Add salt, then reassess the pepper and herbs.

Too much sage: Dilute with unseasoned dried bread and enough broth to restore the soft, moist texture.

Crunchy onion or celery: Return the vegetables to the skillet and cook until tender before continuing.

During or After Baking

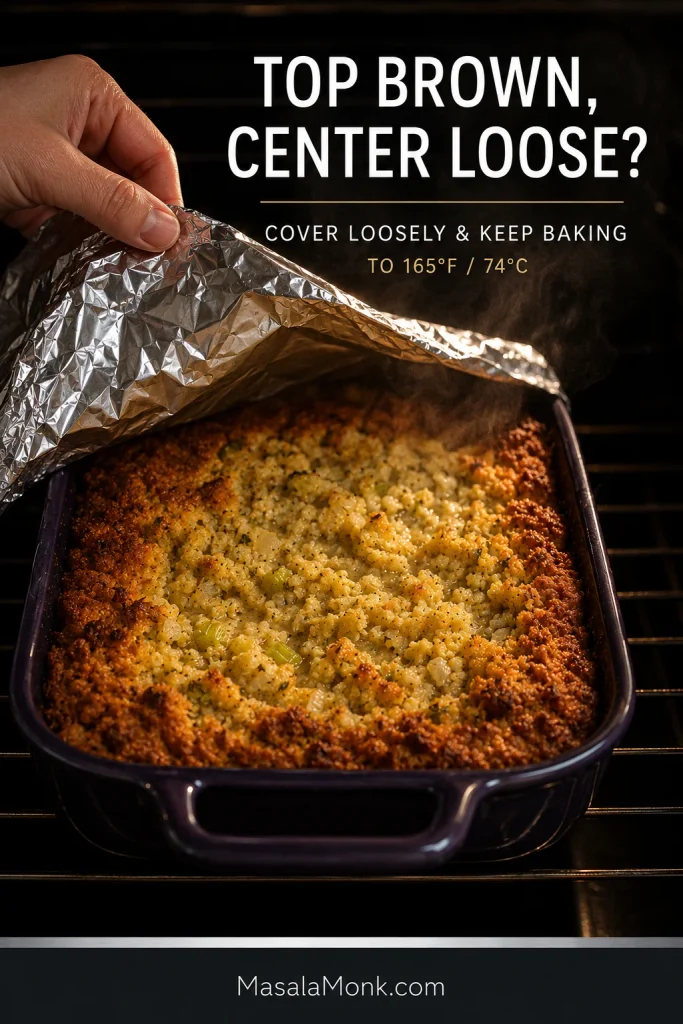
Center still wet or loose: Keep baking. If the top is already well browned, cover the dish loosely with foil. A deeper casserole may simply need longer through the middle.

A hand loosely covers browned cornbread dressing with foil because the center is still loose, with instructions to continue baking to 165°F / 74°C.
If the top browns first, loose foil protects it while the softer center finishes cooking.

Gummy or pasty: More baking may remove moisture, but it cannot fully restore crumb texture after the bread has been overworked or oversaturated.

Too firm or cakey: The bowl was probably too dry, or the pan stayed in the oven too long. Gravy helps at the table; next time leave the mixture wetter or pull it sooner.

Three spoonfuls compare ideal moist cornbread dressing, gummy pasty dressing with lost crumb structure, and firmer dry cakey dressing.
The crumb often reveals what went wrong: gummy dressing has lost its bread structure, while firm or cakey dressing usually points to a drier mixture or longer bake.

Falls apart: Give it the full 10–15 minute rest first. If it remains very crumbly, the mixture was likely too dry or the center needed more time.

Problem solved? Back to the recipe.

Simple Substitutions

A missing vegetable does not mean Thanksgiving is cancelled.

No celery or onion: Either can simply be left out. Omitting both gives you a plainer dressing, but the recipe still works.

No chicken broth: Turkey broth is the closest substitute. Vegetable broth works too, though it gives the dressing a different savory background.

All-cornbread dressing: Replace the 4 oz / 115 g white bread with the same amount of dried cornbread. Let the bread absorb the broth before adding more; an all-cornbread mixture may not need exactly the same amount.

How Much Cornbread Dressing Do You Need?

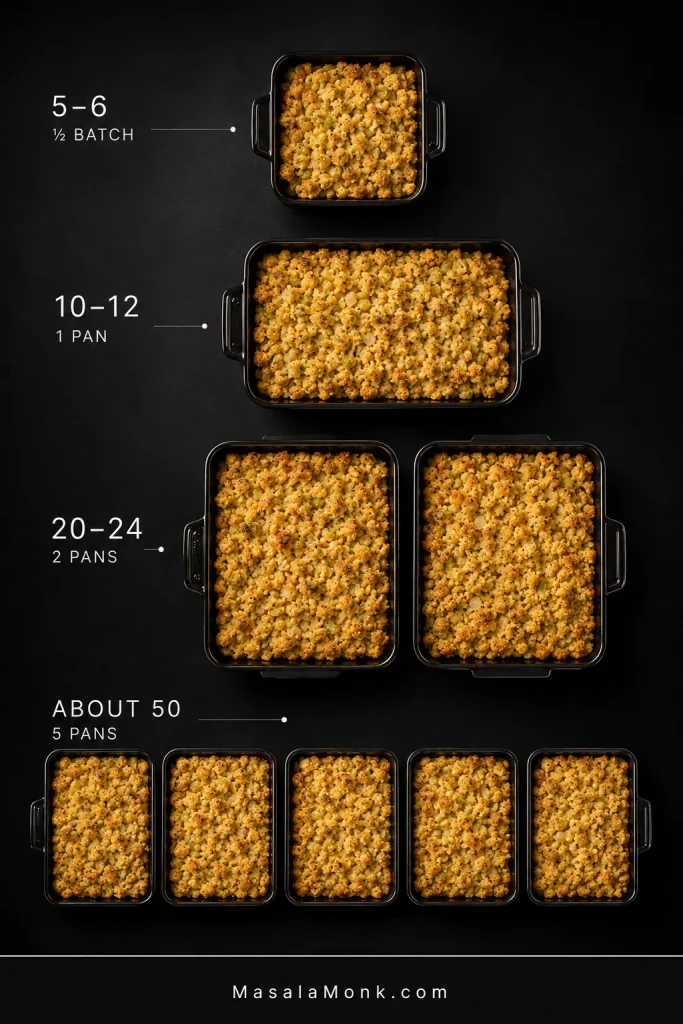
One 9×13 pan gives about 10–12 side servings. For a crowd, use more pans rather than building one unusually deep casserole.

Overhead serving guide shows a half batch for 5–6 people, one pan for 10–12, two pans for 20–24, and five pans for about 50 people.
Scale sideways rather than deeper: keeping similar pan depth preserves the recipe’s familiar center-to-edge bake.
PeopleAmountPan Setup
5–6½ batch8×8 in / 20×20 cm or similar; begin checking earlier
10–121 batchOne 9×13 pan
20–242 batchesTwo 9×13 pans
About 50About 5 batchesFive 9×13 pans when several other substantial sides are being served

For very generous servings or planned leftovers at a 50-person meal, make six pans.

Mix one or two batches at a time instead of wrestling with one giant bowl. It is easier to see how the bread is taking up the broth and easier to season evenly.

If you’re trying to match a particular family style before a big holiday, a half batch also gives you an easy way to dial in the moisture and seasoning for the version you remember.

Make-Ahead Southern Cornbread Dressing for Thanksgiving

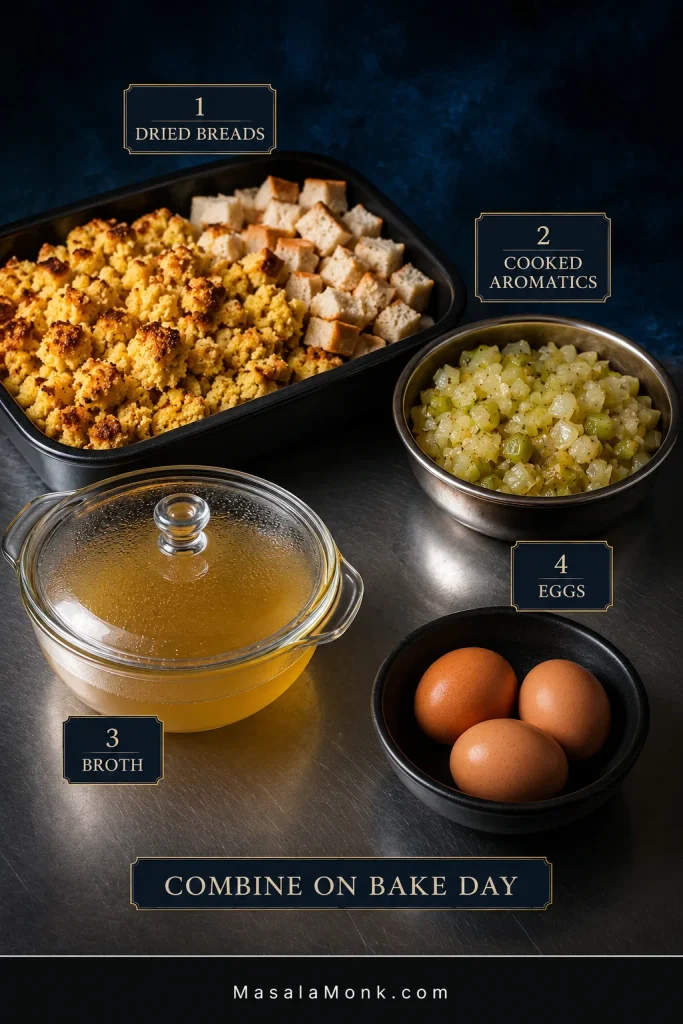
Yes. Bake and dry the breads and cook the onion and celery ahead, then bring everything together close to baking.

Don’t fully assemble the dressing with broth and raw eggs the night before. Keep the dried breads separate from the refrigerated ingredients, then combine them on bake day.

Make-ahead cornbread dressing components kept separate: dried cornbread and white bread, cooked onion and celery, broth, and three whole eggs, labeled to combine on bake day.
Make-ahead dressing works best when prep does not lock in the final moisture level. Keep the liquid separate so absorption can be judged on bake day.

If you’re responsible for the dressing this year, getting the bread and vegetables out of the way ahead of time takes a lot of pressure off Thanksgiving morning.

WhenWhat to Do
1–2 days aheadBake the cornbread, cool it completely and begin drying it
Day beforeFinish drying both breads. Once completely cool, keep them covered and dry. Cook the onion and celery and refrigerate them. Keep broth and eggs refrigerated separately.
Bake dayCombine bread, vegetables and broth; adjust the moisture and seasoning; add the eggs; bake
Serving timeLet the finished dressing rest 10–15 minutes before serving

This also follows USDA stuffing food-safety guidance, which recommends preparing wet and dry ingredients ahead separately and combining them close to cooking.

If oven space is the bigger Thanksgiving problem, MasalaMonk’s Sweet Potato Casserole is another side that can be largely prepared ahead.

Keeping Dressing Warm Without Drying It Out

Holding it hot for a delayed meal? Keep the dressing at 140°F / 60°C or warmer. Otherwise, refrigerate it within 2 hours.

For a short delay, leave the pan covered so the surface holds onto more of its moisture. That also gives you a little breathing room to finish something best served fresh, such as soft dinner rolls.

Storage, Freezing and Reheating

Refrigerate: Transfer leftovers to reasonably shallow containers and refrigerate within 2 hours. Use refrigerated dressing within 3–4 days.

Freeze: Freeze cooked dressing in practical meal-size or family-size portions. For best quality, use it within about 2–3 months.

Reheat: Cover the dressing so it holds onto steam. A dry-looking portion can take a small splash of broth before reheating. Heat the center to 165°F / 74°C, uncovering near the end if you want a little texture back on top.

For the storage guidance behind those refrigerator and freezer times, see the FoodSafety.gov Cold Food Storage Chart.

The Dressing We Are After

The most important moment arrives before the oven door closes.

The bread is thoroughly moist. You can still see pieces of cornbread. The onion and celery are tender, and the sage smells warm and savory in the butter.

Then the oven takes over. The edges toast, the middle sets softly, and the bowl that looked almost suspiciously wet becomes dressing that gives easily under the spoon.

That is what the measurements and checkpoints are really for: turning “add broth until it looks right” into something you can recognize for yourself.

Hands serve steaming Southern cornbread dressing from a dark casserole onto a blue plate, showing a golden top and soft moist interior with onion and celery.
The payoff: a generous serving holds together on the way to the plate, then gives easily under the fork.

Once you can look at the bowl and know it is ready, Southern cornbread dressing stops feeling like a once-a-year gamble.

Back to top ↑