
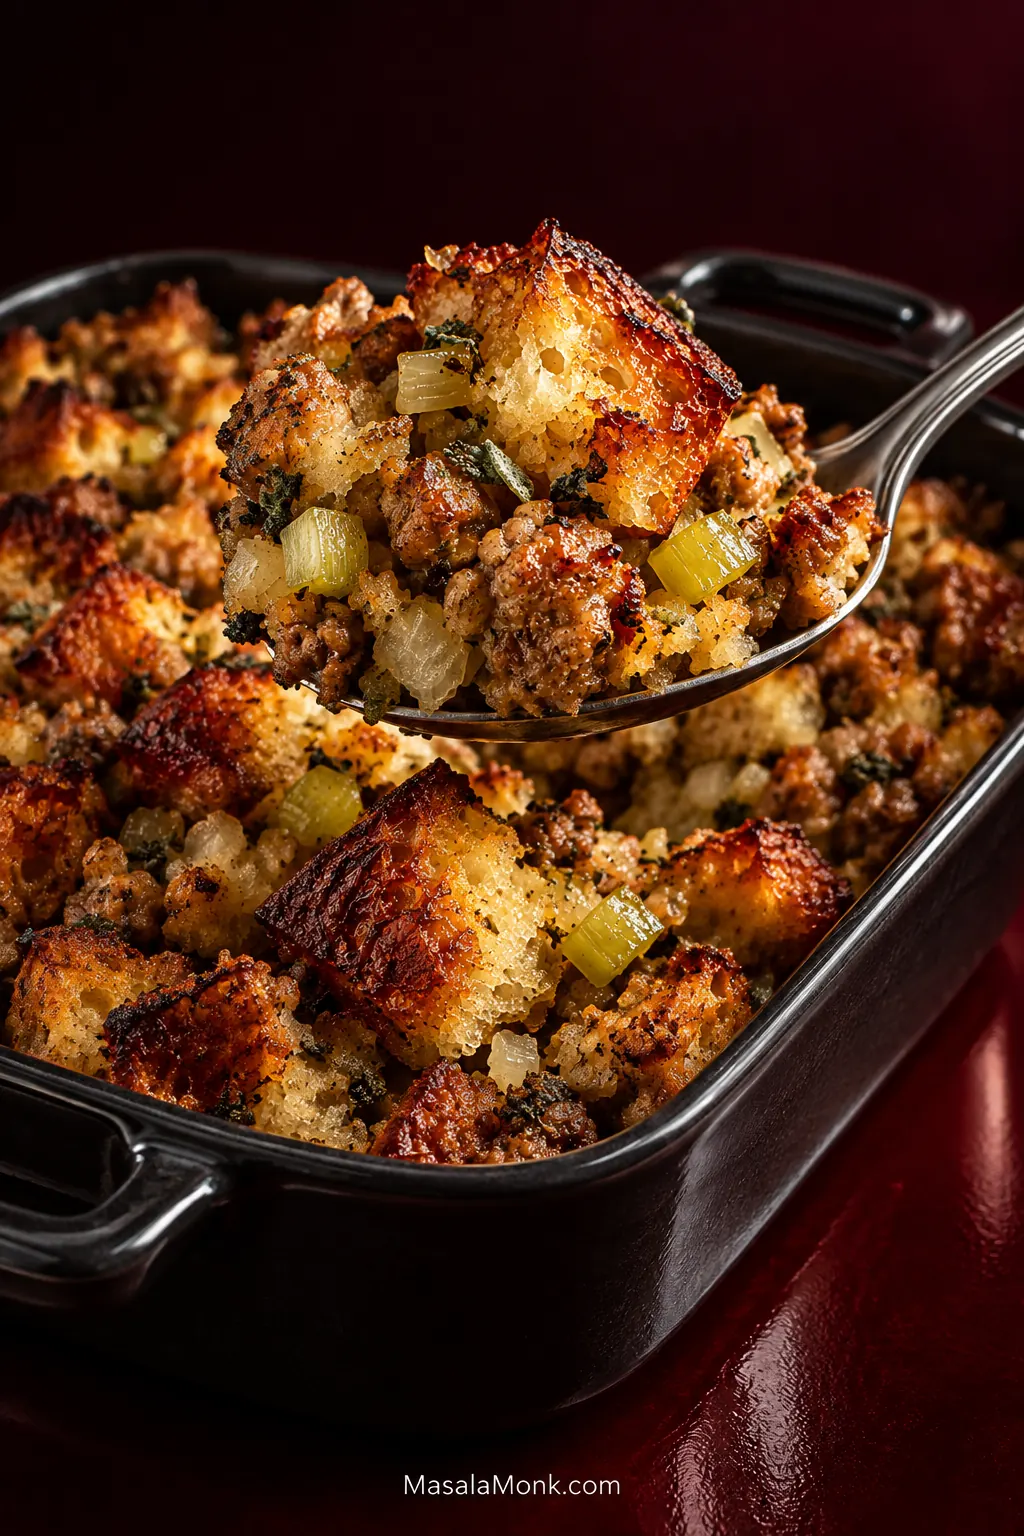
The most important moment in this sausage stuffing recipe is deciding when the bread has absorbed enough stock.
Get that moment right and the middle stays buttery and tender while the rough top bakes deep gold, with browned sausage, onion, celery and sage running through every spoonful.
The uncertain part is the enormous bowl in front of you. The bread may still look suspiciously dry after a couple of cups of stock. Pour in everything at once and it can collapse into mush. Hold too much back and the middle may bake up dry and crumbly.
The measurement gives you a place to start; your bread tells you when to stop. A soft sandwich loaf, a French-style loaf and commercial stuffing cubes simply do not absorb stock at the same rate.
This casserole-baked version may also be called sausage dressing; the names overlap, although some families reserve “stuffing” for the mixture cooked inside poultry.
Classic Sausage Stuffing Recipe
Before You Pour All the Stock
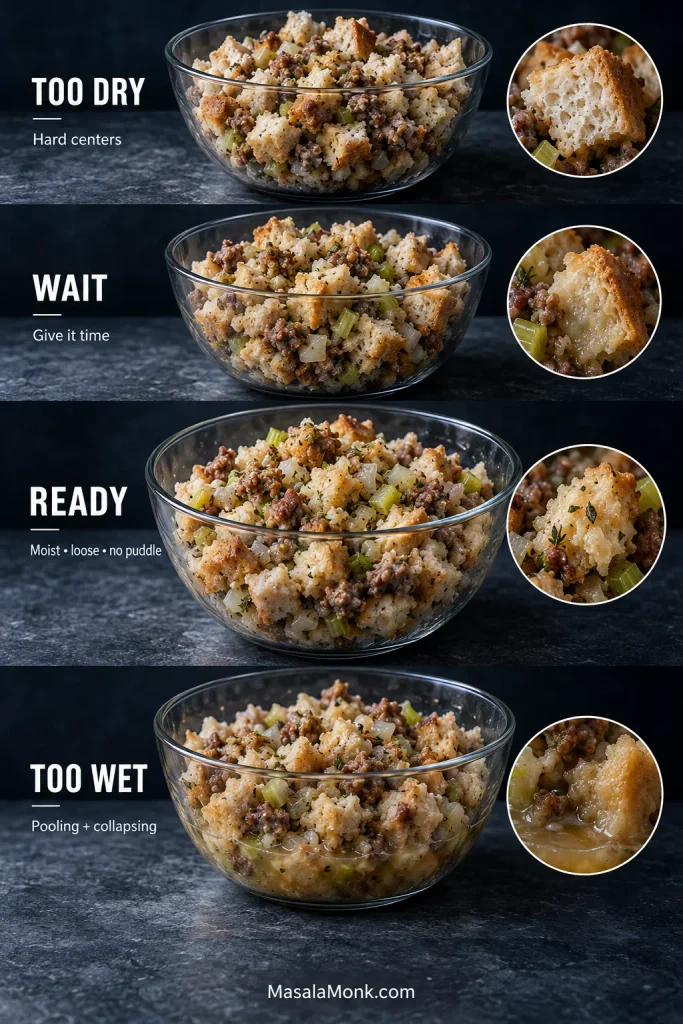
Dry the bread first. Add most of the stock, not all of it. Toss, wait about five minutes, then add more only if the bread is still dry through the center.
You want a moist, loosely cohesive bowl—not bread sitting in a puddle of stock.
Oven: 350°F / 175°C • Pan: 9 × 13 in / 23 × 33 cm • Bake: about 50–60 minutes • Cook to: 165°F / 74°C in the center
Classic bread-and-sausage stuffing with sage, thyme, onion and celery, baked covered first for a tender center and uncovered at the end for crisp golden edges.
Equipment: 1–2 rimmed baking sheets, large skillet or Dutch oven, very large mixing bowl, 9 × 13-inch / 23 × 33-cm baking dish, foil, small bowl, whisk and instant-read thermometer.
Ingredients
- 18 oz / 510 g country white or French-style bread with a fairly tight, even crumb, weighed before drying, cut into ¾–1-inch / 2–2.5-cm pieces; expect roughly 10–12 cups depending on the loaf
- 1 lb / 454 g pork breakfast sausage or sage sausage, bulk or casings removed
- 6 tbsp / 85 g unsalted butter, plus a little more for the baking dish
- 2 medium yellow onions, about 10 oz / 285 g, cut into small dice
- 4 medium celery stalks, about 6 oz / 170 g, cut into small dice
- 4 garlic cloves, about 12 g, finely chopped
- 1 tbsp finely chopped fresh sage, or about 1 tsp rubbed dried sage to start; if using finely ground sage, begin with about ½ tsp
- 2 tsp fresh thyme leaves, or about ¾ tsp dried thyme
- ¼ cup chopped flat-leaf parsley
- ½ tsp freshly ground black pepper
- ½ tsp fine salt / about 3 g, or to taste; start with less if the sausage, stock or bread is already salty
- 2½ cups / 590 ml low-sodium chicken or turkey stock, plus up to ½ cup / 120 ml more if needed
- 2 large eggs
- Optional: ½ tsp poultry seasoning for a more old-fashioned Thanksgiving flavor
Method
1. Dry the Bread
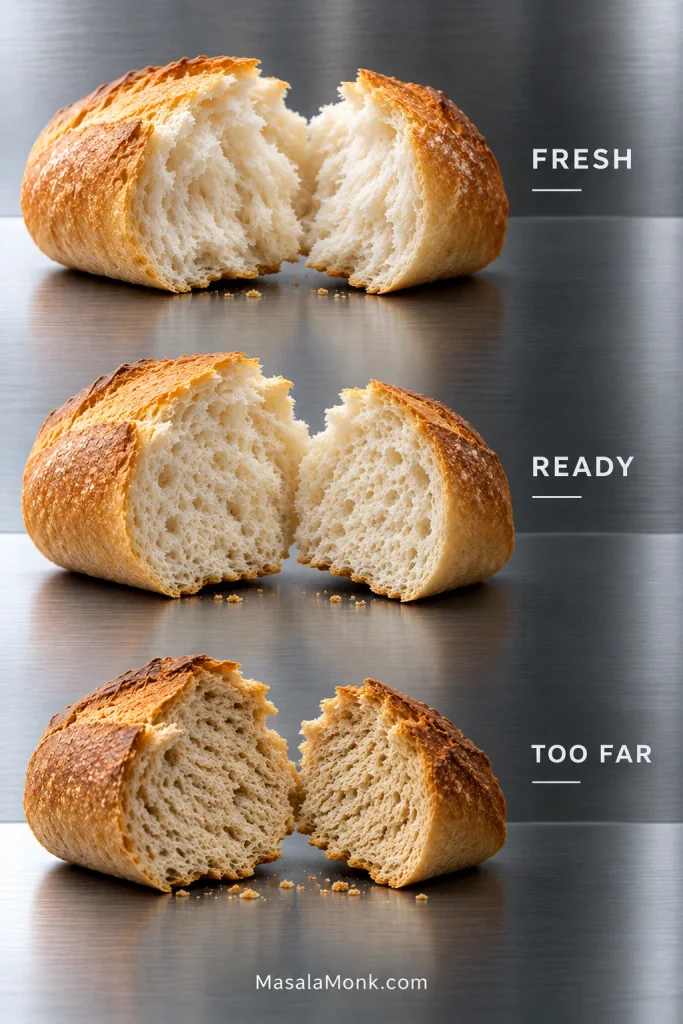
Heat the oven to 300°F / 150°C. Spread the bread pieces over one or two rimmed baking sheets so they are not piled deeply. Bake for 30–40 minutes, tossing once or twice, until dry through the center but still pale rather than heavily toasted.
Break open a thick piece. If the middle still compresses like fresh bread, give it longer.
Use the drying time for prep: chop the onion, celery, garlic and herbs, measure the stock and seasonings, and butter the baking dish.
Remove the dried bread and increase the oven to 350°F / 175°C. Transfer the bread to a very large mixing bowl.
2. Brown the Sausage
Cook the sausage in a large skillet or Dutch oven over medium to medium-high heat, breaking it into small irregular crumbles. Brown it well, but stop before those small pieces become dry and hard.
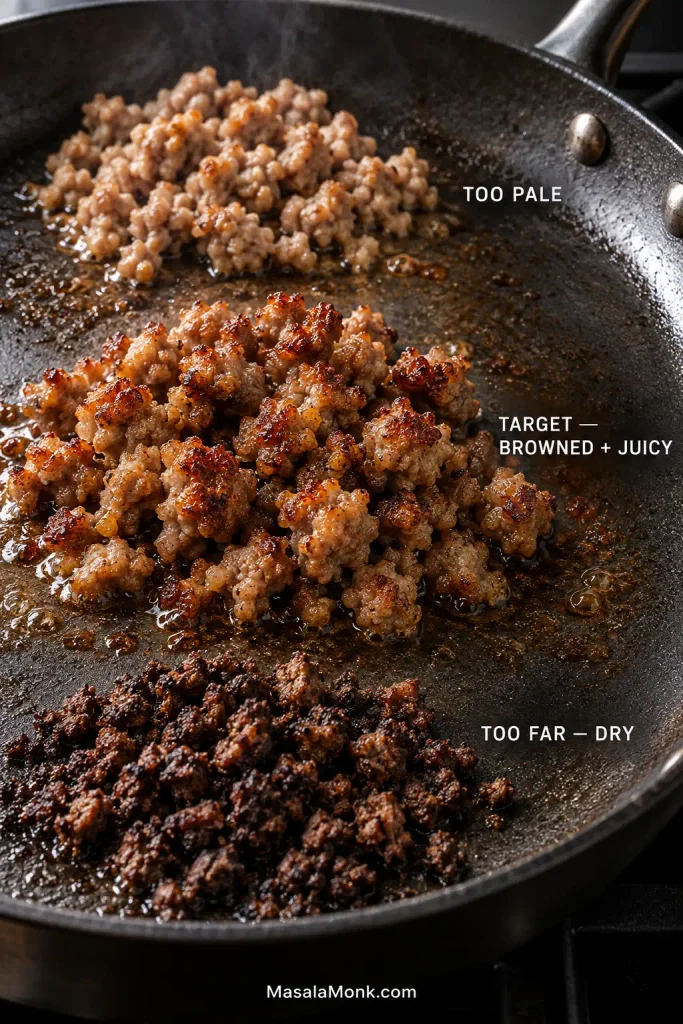
Cook until the sausage is cooked through, usually about 6–9 minutes. Before tasting a piece, make sure fresh pork sausage has reached 160°F / 71°C; fresh chicken or turkey sausage should reach 165°F / 74°C.
Taste one crumble. If the sausage is already salty or strongly sage-forward, use less added salt and start with only about half the additional sage.
Transfer the sausage to the bread, leaving some rendered fat in the pan. Drain only if there is a deep pool.
3. Cook the Aromatics
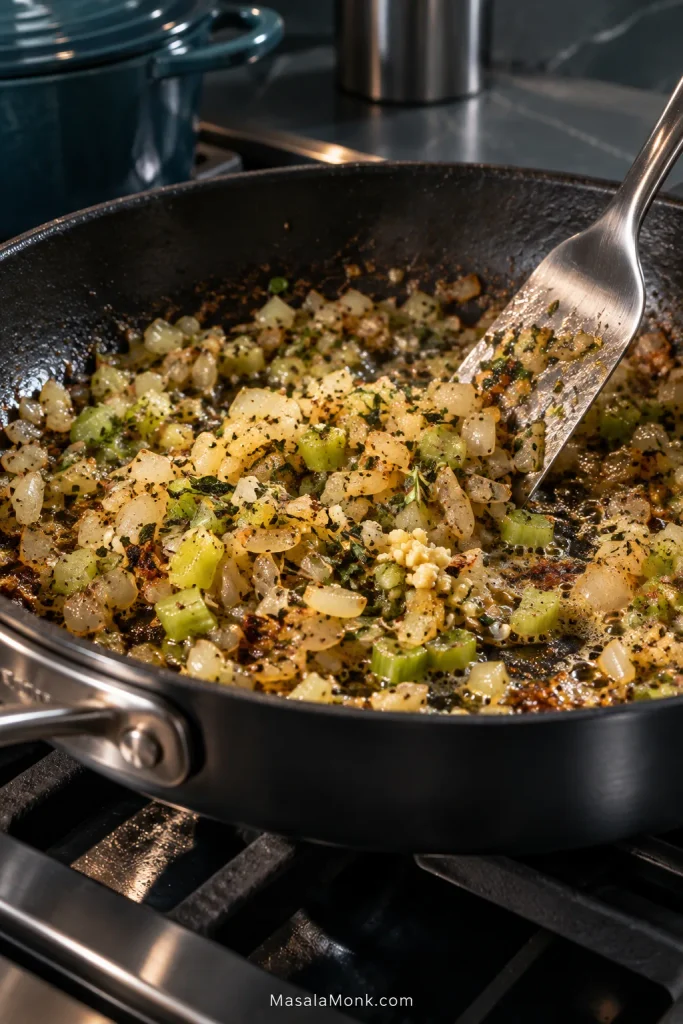
Add the butter to the sausage fat, followed by the onion and celery. Cook over medium heat for 8–10 minutes, until soft and beginning to turn golden around the edges.
Add the garlic, sage, thyme, black pepper and optional poultry seasoning. If the sausage was already strongly sage-seasoned, begin with less sage here. Cook for about 1 minute. Hold the parsley back for now.
The pan should now smell unmistakably like stuffing: browned pork, sweet onion, celery and warm sage.
4. Add the Stock
Pour 2¼ cups / 530 ml stock into the pan and scrape up the browned bits. Keep the remaining ¼ cup / 60 ml plus the optional extra ½ cup / 120 ml warm nearby for final hydration adjustments. Bring the skillet mixture just to a simmer.
5. Hydrate, Check and Season Before the Eggs
Pour the hot stock-and-aromatic mixture over the bread and cooked sausage. Toss gently but thoroughly, then leave it alone for about 5 minutes. Some pieces may soften sooner than others, so wait before deciding the bowl needs more stock.
Now check the hydration while there is still no raw egg in the bowl. The full moisture guide below shows the same decision in more detail:
- Center: break open a larger bread piece. The middle should be moist, not hard or chalky.
- Handful: squeeze a small amount lightly. It should hold as a loose clump without dripping.
- Bottom: move some bread aside. There should be no pool of stock underneath.
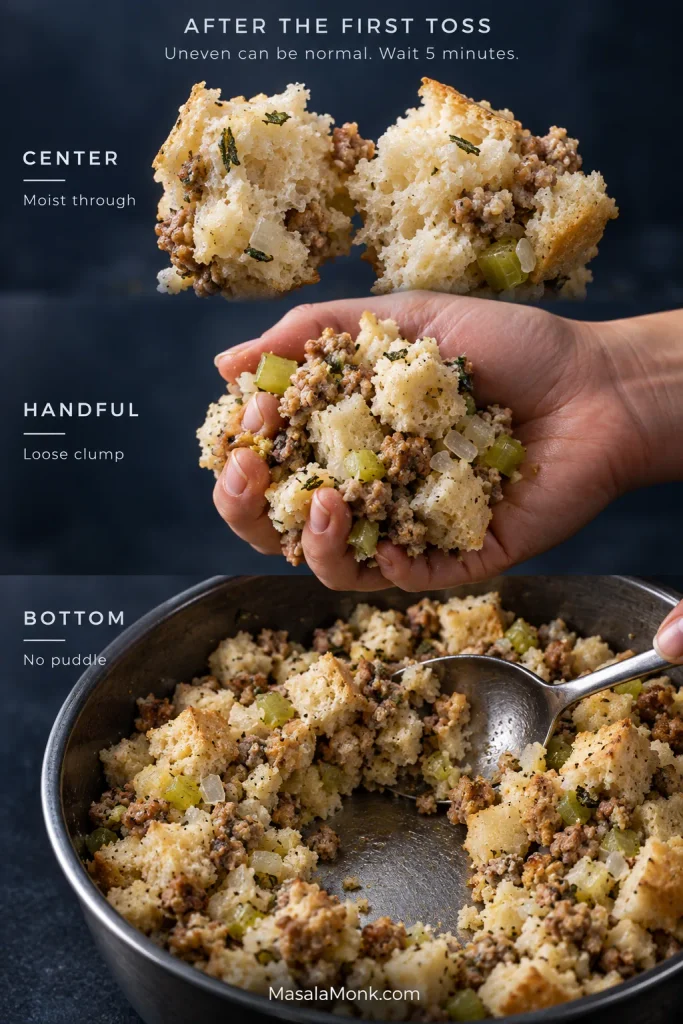
If the centers are still dry, add the warm reserved stock ¼ cup / 60 ml at a time, tossing and waiting briefly between additions. Stop when the bread is moist through the center and the mixture holds loosely without free liquid.
Fold in the parsley. Then taste the complete stuffing while it is still egg-free. Adjust the salt, pepper or herbs if needed. Remember that the sausage, stock and seasoned bread may already contribute plenty of salt.
Once the hydration and seasoning are right, stop adjusting the mixture and move on to the eggs.
6. Fold in the Eggs
Whisk the 2 eggs in a small bowl. Once the stuffing is warm rather than steaming hot, pour them over the bread and fold gently until evenly distributed.
From this point forward, don’t taste the uncooked mixture. Judge it by sight and feel.
7. Fill the Pan
Spoon the stuffing into the prepared dish and spread it into an even layer without compressing it. Leave the surface rough. Those peaks and ragged edges are where the crisp pieces come from.
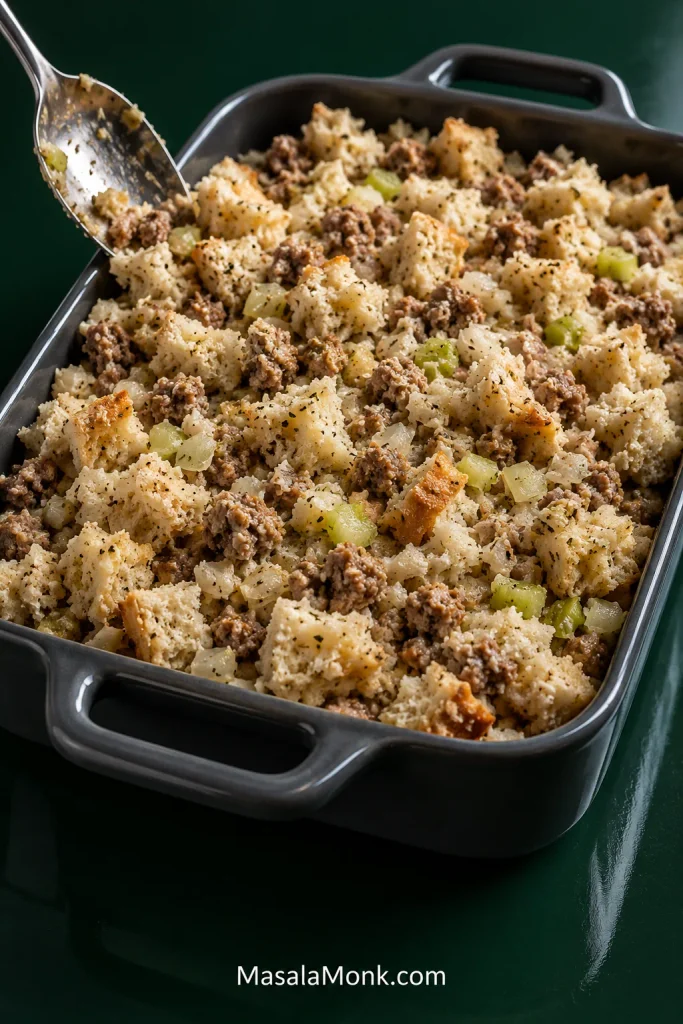
8. Bake Covered, Then Uncovered
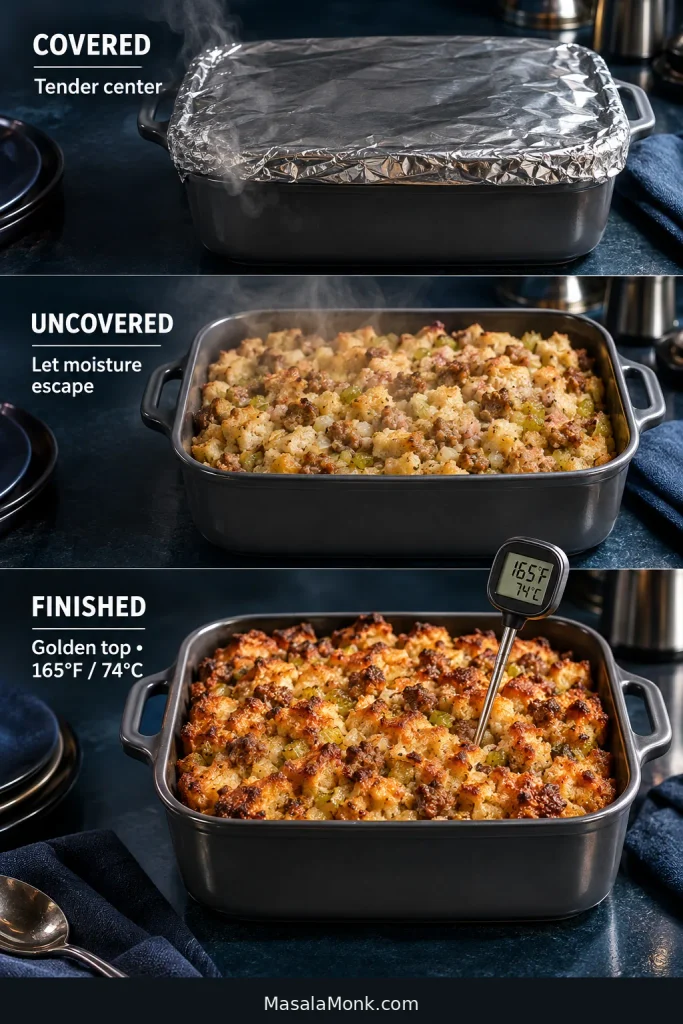
Cover the dish snugly with foil and bake at 350°F / 175°C for about 30 minutes. The covered phase keeps the center tender while it heats.
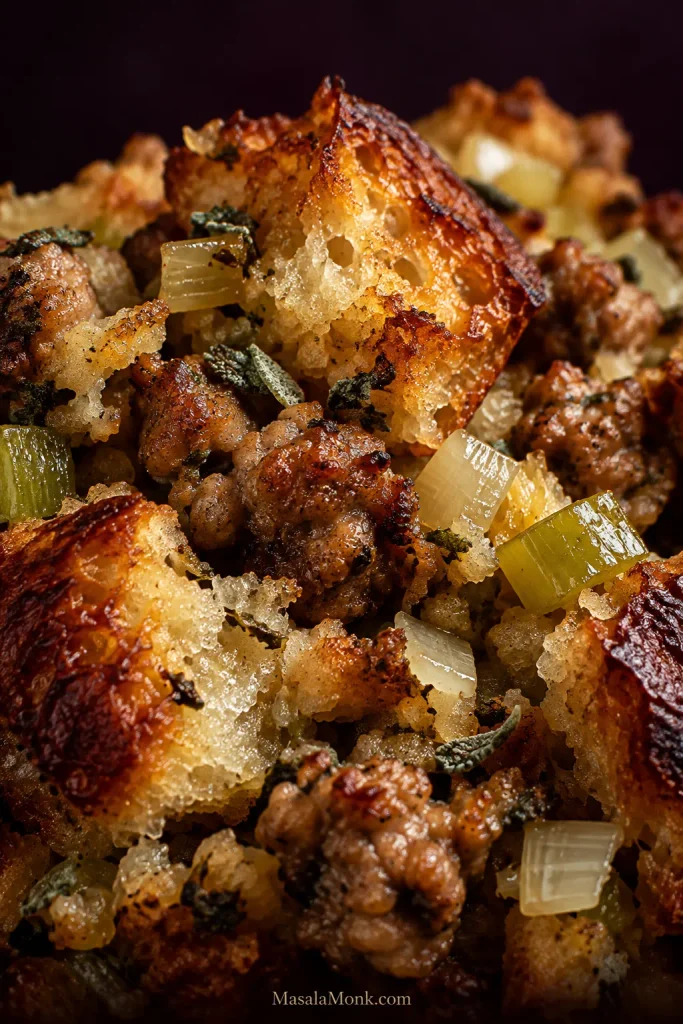
Remove the foil. Steam should rise from the center, the casserole should smell deeply savory and the top will still look fairly pale. Continue baking uncovered for another 20–30 minutes, until the surface has a mix of deep-golden ridges and softer valleys and the center reaches 165°F / 74°C.
Let the stuffing rest for about 10 minutes before serving.
Bread for Stuffing: Choose a Loaf That Can Absorb
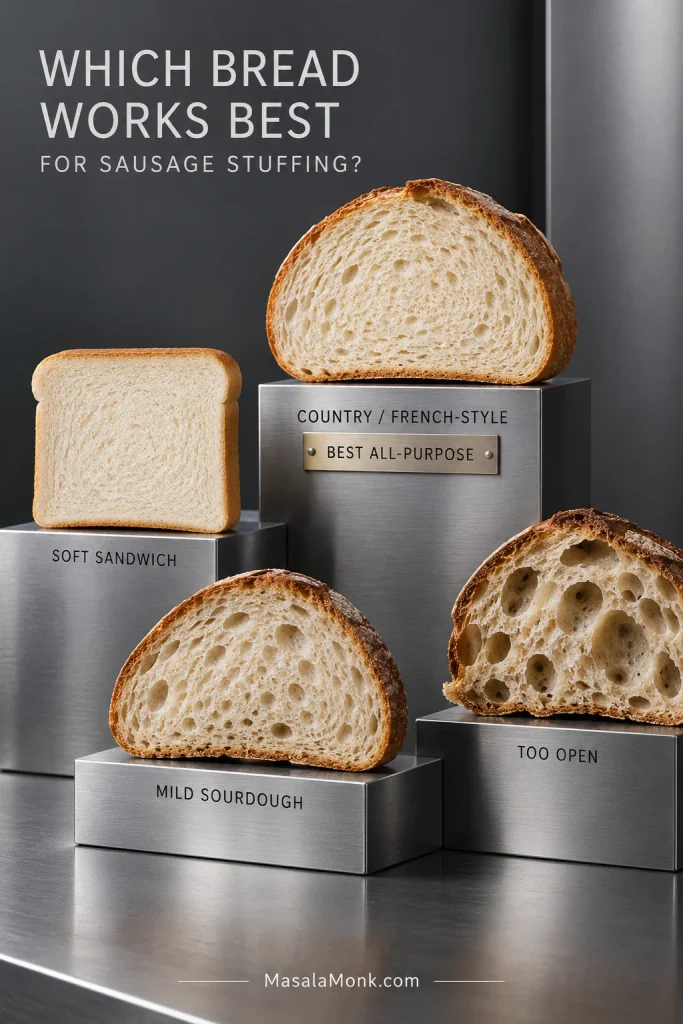
The best all-purpose bread for sausage stuffing is a white, French-style or country loaf with a fairly tight, even crumb. In ordinary terms, that means an interior without enormous irregular holes. It absorbs stock readily while leaving recognizable pieces in the casserole.
Soft sandwich bread is especially good for a softer, more old-fashioned dressing. Mild sourdough works when the crumb is reasonably close. Very open artisan bread with huge holes and a thick crust is less forgiving: one bite can be chewy while the crumb beside it collapses.
Keep the pieces around ¾–1 inch / 2–2.5 cm. Larger chunks create bread-only bites; tiny pieces knit together quickly and make a more uniform dressing.
How Dry the Bread Should Be
“Day-old” does not necessarily mean dry. Break open a thick piece: if the center still squashes like fresh bread, it needs more time. You want it dry through the middle, not hard and leathery.
Commercial dried cubes work too; just don’t assume they will absorb the same amount of stock as your loaf.
Best Sausage for Stuffing
Breakfast or sage pork sausage is the classic choice. It supplies much of the stuffing’s salt, fat and seasoning, so what happens in the skillet affects far more than the sausage pieces themselves.
Brown it well without cooking the small crumbles until dry. Leave some rendered fat in the skillet unless the pan is genuinely flooded, and cut the onion and celery fairly small so they soften into the bread instead of arriving as large vegetable bites.
Taste the cooked sausage before adding more seasoning. Sage sausage, poultry seasoning and commercial bread cubes can all bring herbs and salt of their own.
Read the Bowl: How Wet Should Sausage Stuffing Be?
Stock controls moisture. Eggs control how firmly the stuffing holds together. If the bread is dry, another egg is not the fix; it needs stock.
Before baking, sausage stuffing should be moist through the center of the bread, hold together loosely when squeezed, and have no puddle of stock underneath.
For 18 oz / 510 g bread, have about 2½ cups / 590 ml stock ready, plus another ½ cup / 120 ml in reserve. Many loaves land somewhere around 2½–3 cups, but the exact amount is not worth forcing.
Check Three Things
- The center: break open a larger piece. It should be moist through the middle.
- The handful: squeeze lightly. It should hold as a loose clump without dripping.
- The bottom: move some bread aside. A little sheen is fine; a puddle is not.
| What you see | What it means | What to do now |
|---|---|---|
| Hard centers + loose dry pieces | The bread needs more liquid | Add warm stock about ¼ cup / 60 ml at a time, toss, wait and check again |
| Soft pieces + loose clump + no puddle | Target | Stop adding stock |
| Soft bread + a little free liquid | The bread may still be catching up | Wait several minutes, toss once and reassess |
| Collapsing bread + stock pooling underneath | Too much liquid has gone in | If the bread still has structure, fold in more dried bread before baking |
Choose the Sausage Stuffing Texture You Actually Want
Stuffing is one of those holiday foods where “better” can still feel wrong if it isn’t the texture people expect. A family used to soft, cohesive dressing may not want a pan of giant craggy bread cubes—and the reverse is just as true.
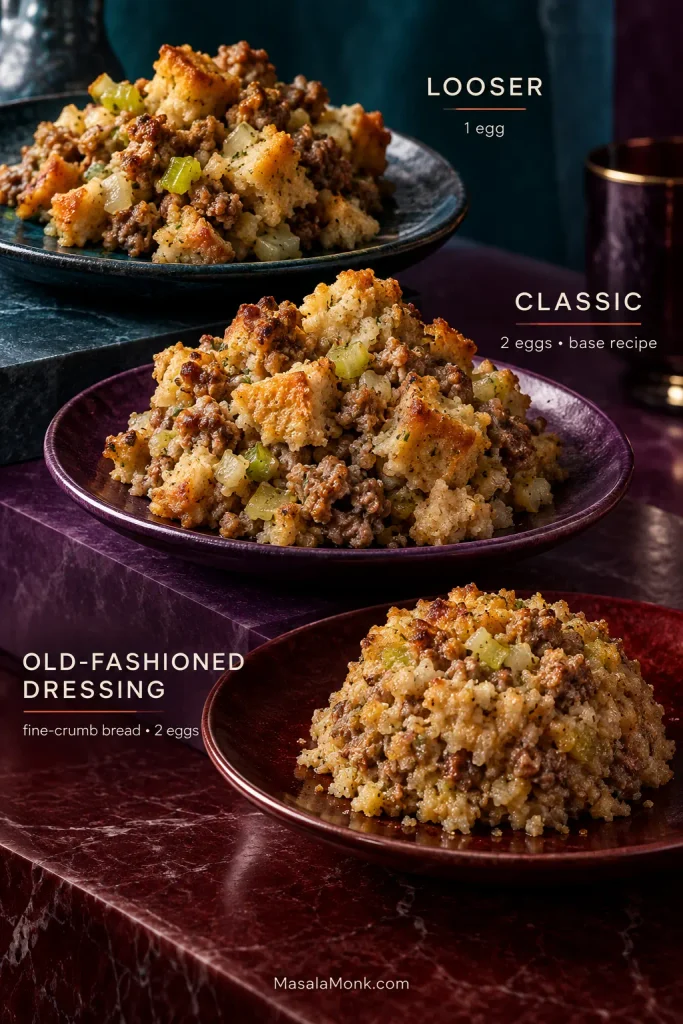
This recipe uses 2 eggs for moderate cohesion. For looser pieces, use 1 egg instead. For a softer, moister dressing, keep the full 2 eggs and let the bread absorb a little more stock while staying inside the same no-puddle boundary.
The target for the base recipe is the middle: moist and cohesive, with the bread pieces still visible. It should lift in a loose mound instead of scattering like dry croutons or slumping like bread pudding.
For a More Old-Fashioned Sausage Dressing
Use a fine-crumb white or sandwich loaf, dry it thoroughly, use the full 2 eggs and season with sage or poultry seasoning to taste. The finished dressing will be softer and more cohesive than a craggy country-bread stuffing.
If your family’s version starts with cornbread instead, our Southern cornbread dressing recipe follows that path from the beginning.
Covered First, Uncovered Second
Cover the stuffing first to keep the center moist; uncover it for the final 20–30 minutes to build the golden crust.
Under the foil, trapped steam keeps the bread tender while the center heats and the eggs set. Once the foil comes off, moisture escapes and the rough ridges begin to turn crisp and buttery.
How Long to Bake Sausage Stuffing
In a 9 × 13-inch / 23 × 33-cm dish at 350°F / 175°C, expect roughly 50–60 minutes: about 30 minutes covered, followed by 20–30 minutes uncovered.
A deeper casserole takes longer. A cooked casserole reheated from the refrigerator takes longer too. Near the expected time, let the center temperature decide: 165°F / 74°C.
For More Crisp Edges, Use a Shallower Pan
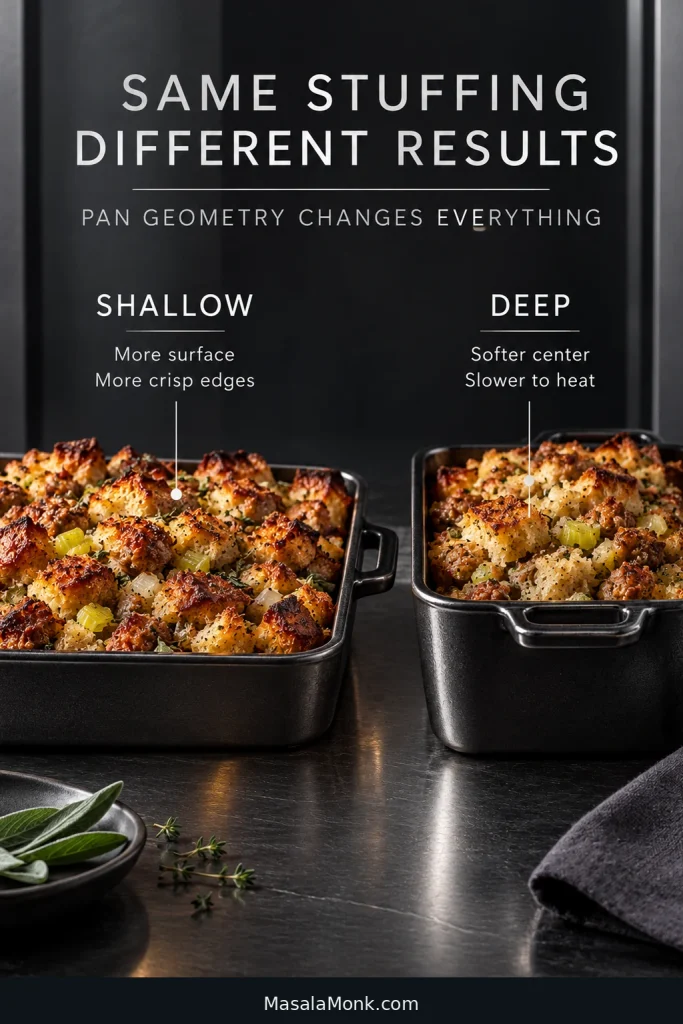
Spread the same stuffing into a wider, shallower dish and there are simply more browned corners. Pile it deeper and the center stays softer and takes longer to heat.
Doubling the recipe? Use two pans. One enormous deep casserole changes the cooking far more than simply doubling the ingredient list.
Fix My Sausage Stuffing: What to Do at Each Stage
The fix changes once the eggs go in and again once the stuffing reaches the oven.
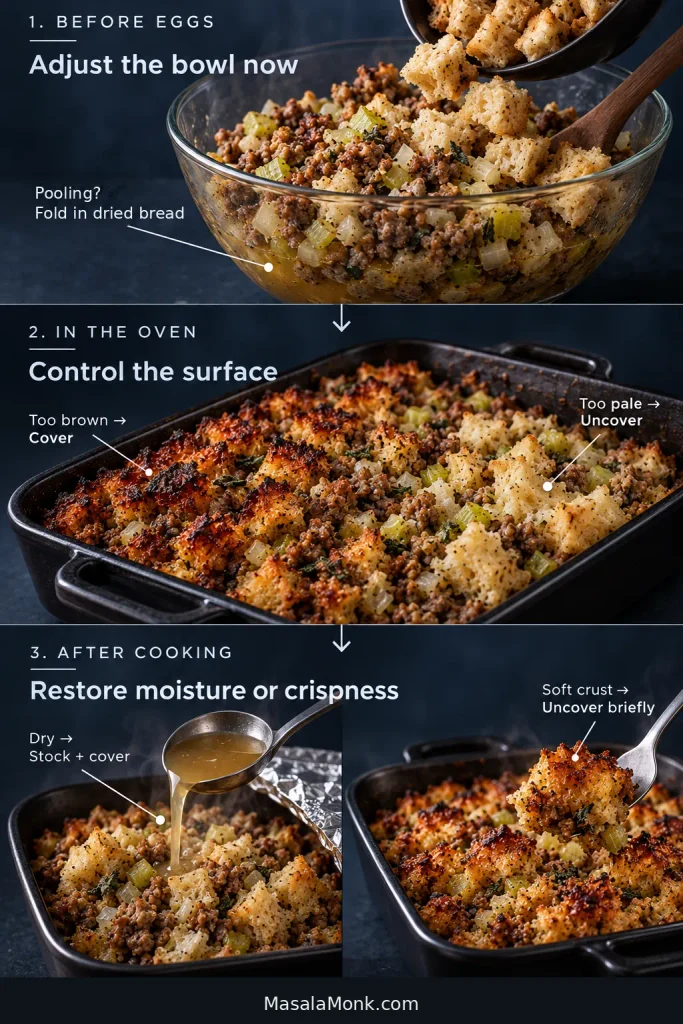
Before the Eggs Go In
Dry in the center? Add warm stock about ¼ cup / 60 ml at a time. Toss, wait, then break open another piece.
Stock pooling underneath? Give the bread several minutes first. If the puddle remains and the pieces still have structure, fold in more dried bread.
Already salty? Stop seasoning. Sausage, broth and seasoned bread cubes can contribute far more sodium together than the salt shaker.
Too much sage? If the imbalance is severe, dilute with dried bread and adjust the stock to match rather than adding more herb-heavy seasoning.
Already in the Oven
Top browning too quickly? Put the foil back on. The surface is ahead of the center.
Center softer than you wanted? Once it is fully hot, leave the dish uncovered and give moisture more time to escape. A deep casserole may need longer; see how pan depth changes the bake.
Top still pale? Keep it uncovered after the center is hot. A rough surface browns better than one smoothed flat.
If the bread had already collapsed into paste before the dish went into the oven, baking can make that paste drier. It cannot turn it back into intact bread pieces.
Already Cooked
Dry? Drizzle over a modest amount of warm stock, cover and reheat gently.
Top went soft while it waited? Give it a short uncovered finish before serving.
Hard sausage pieces? They were probably browned too aggressively at the start. Next time, stop while the small crumbles are still juicy.
Bland? Check the salt, stock, fat and sausage browning before adding more herbs. If the stuffing already tastes strongly herbal yet still seems flat, herbs are not what it is missing.
Starting With a Box or Bag of Stuffing?
The same moisture logic applies, but a fine seasoned mix does not behave exactly like a bowl of homemade dried bread. Start with its own liquid guidance rather than forcing the homemade ratio onto it.
| What you are using | Adjust | Watch for |
|---|---|---|
| Plain dried bread cubes | Use them much like homemade dried bread | Very dry cubes may need more stock |
| Seasoned cubes or mix | Start with less added herb and salt; use low-sodium stock when the sausage is salty too | Sage, poultry seasoning and sodium can stack up quickly |
| Fine boxed stuffing mix | Begin with the package liquid guidance | Small pieces can hydrate much faster |
Fresh onion and celery cooked in the sausage drippings, stock instead of plain water and a casserole bake can give the shortcut version much more depth.
Sausage Stuffing Variations: Change the Flavor Without Losing the Texture
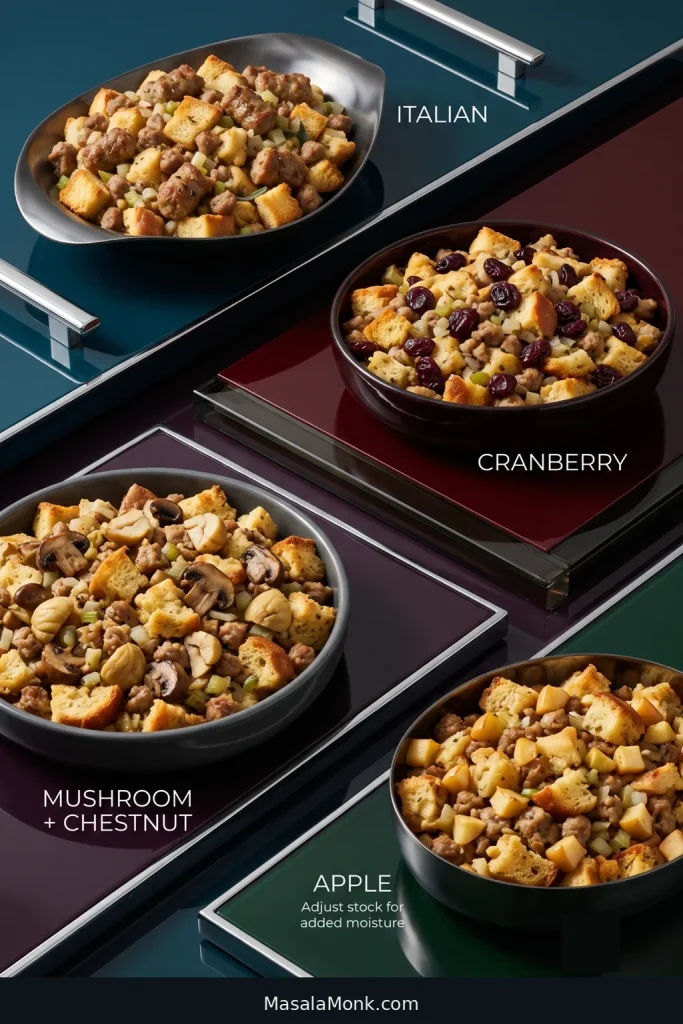
Simple Swaps
Italian sausage works without changing the basic method; expect more fennel and garlic. Turkey or chicken sausage may need a little more butter or olive oil because it is often leaner. Dried cranberries can be folded through for sweet-tart contrast, or you can keep that contrast on the plate with cranberry sauce with orange juice.
Mushrooms are best browned first so they don’t release all their water into the bread. Cooked chestnuts can simply be folded through.
These Need More Than a Simple Swap
Apple brings enough moisture to change how much stock the bread needs, so use the moisture checks rather than forcing a fixed final pour. Cornbread is more fragile than wheat bread and needs gentler handling and its own liquid balance; start with a savory Southern cornbread if that’s the direction you want to take.
Stuffing balls, British sausage-meat stuffing and slow-cooker stuffing need different ratios rather than a simple ingredient swap: the first two are much more sausage-heavy, while a slow cooker traps far more moisture than an oven casserole.
Egg-Free, Dairy-Free and Gluten-Free
Egg-free: leave out the eggs for a looser stuffing; extra stock won’t replace the missing cohesion. Dairy-free: use dairy-free butter or olive oil, and check the sausage and stock labels. Gluten-free: use a sturdy gluten-free loaf and verify the sausage, stock and seasonings too; add stock slowly because absorption varies enormously from one loaf to another.
Thanksgiving Sausage Stuffing Without the Last-Minute Scramble
Stuffing itself is easy enough. Stuffing while a turkey owns the oven, potatoes need attention, gravy is waiting and somebody is already asking when dinner will be ready is another matter.
Make-Ahead Sausage Stuffing: The Day Before
- Cut and dry the bread completely.
- Let the dried bread cool fully, then store it airtight at room temperature.
- Cook the sausage, onion, celery, garlic, sage and thyme.
- Cool the cooked sausage mixture in a shallow container and refrigerate it within 2 hours.
Keep the dried bread separate from the cooked sausage mixture and stock until you’re ready to cook. USDA guidance advises preparing stuffing components ahead separately and combining them immediately before cooking rather than refrigerating mixed uncooked stuffing for later.
See USDA Stuffing and Food Safety for the full guidance.
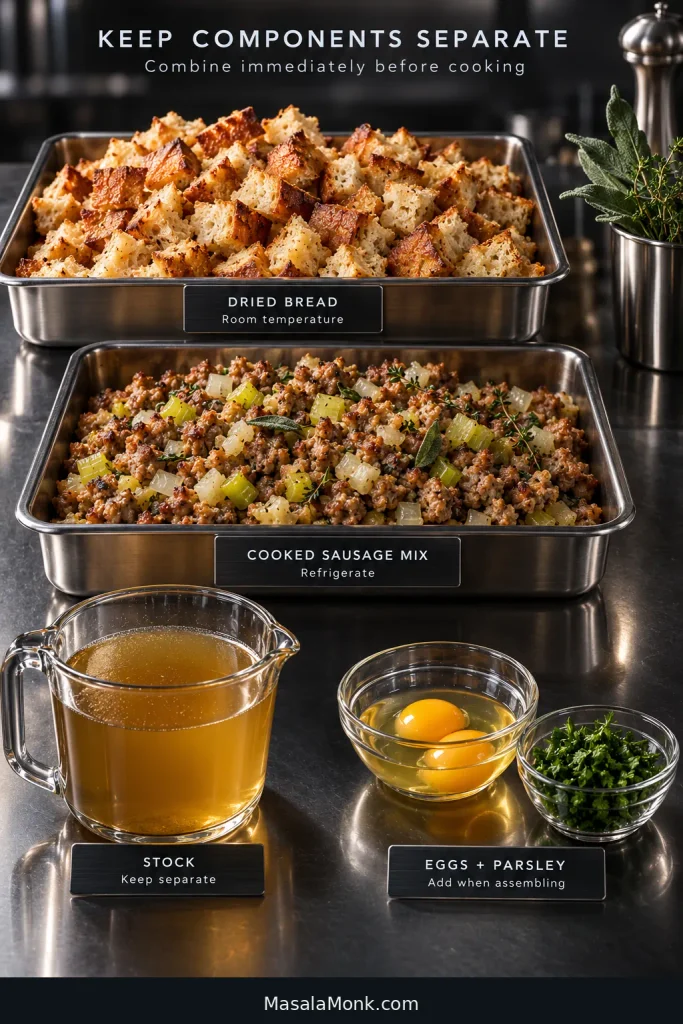
When You Are Ready to Assemble
Warm the cooked sausage-and-aromatic mixture gently with the stock before pouring it over the dried bread. Wait five minutes, check the center, handful and bottom, adjust with warm stock if needed, fold in the parsley and taste the complete egg-free stuffing. Correct the seasoning, then fold in the eggs and bake.
On Thanksgiving Day, that’s essentially what remains: warm, mix, check and bake.
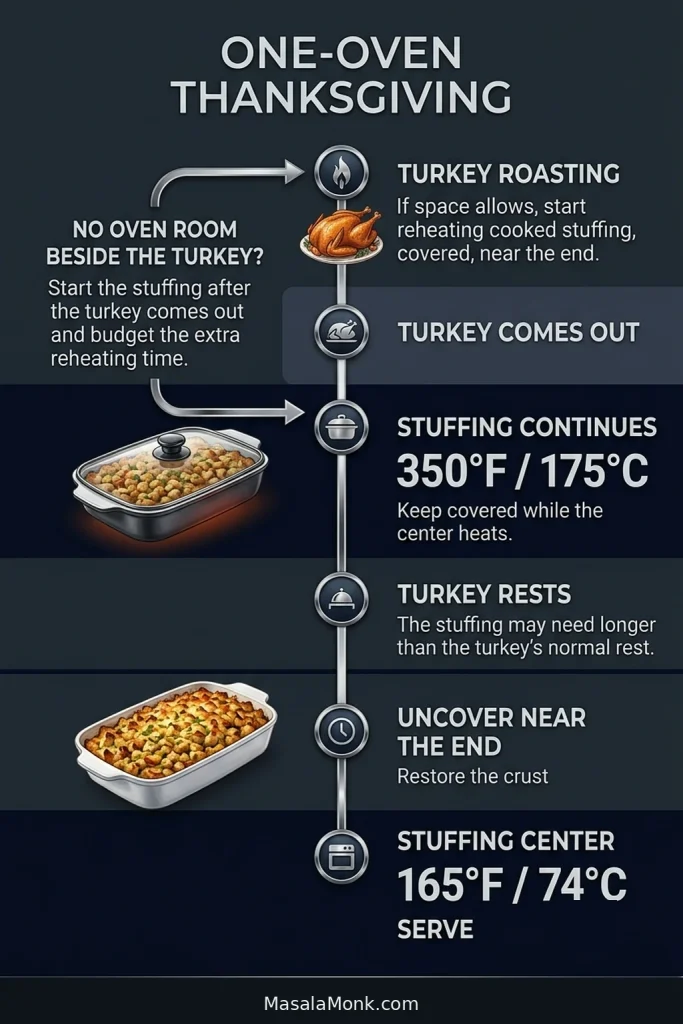
If You Have One Oven
Do not assume a refrigerator-cold casserole will reheat completely during the turkey’s rest. If oven space allows, begin reheating a fully cooked, covered stuffing casserole toward the end of the turkey roast. Once the turkey comes out, return the oven to 350°F / 175°C and finish heating the stuffing, uncovering near the end to restore the crust.
If there is no room beside the turkey, plan for the stuffing to need more time after the bird comes out rather than forcing it into a 20-minute rest window. Let the center temperature decide: reheated stuffing should reach 165°F / 74°C. Meanwhile, the roasting-pan juices can become turkey gravy from drippings.
Can You Put Sausage Stuffing Inside a Turkey?
You can, but baking sausage stuffing separately is the better default. It is easier to bring the stuffing safely to temperature, easier to keep the turkey from cooking longer than necessary, and much easier to get a tender center with plenty of crisp surface.
If your Thanksgiving tradition still calls for stuffing inside an oven-roasted turkey:
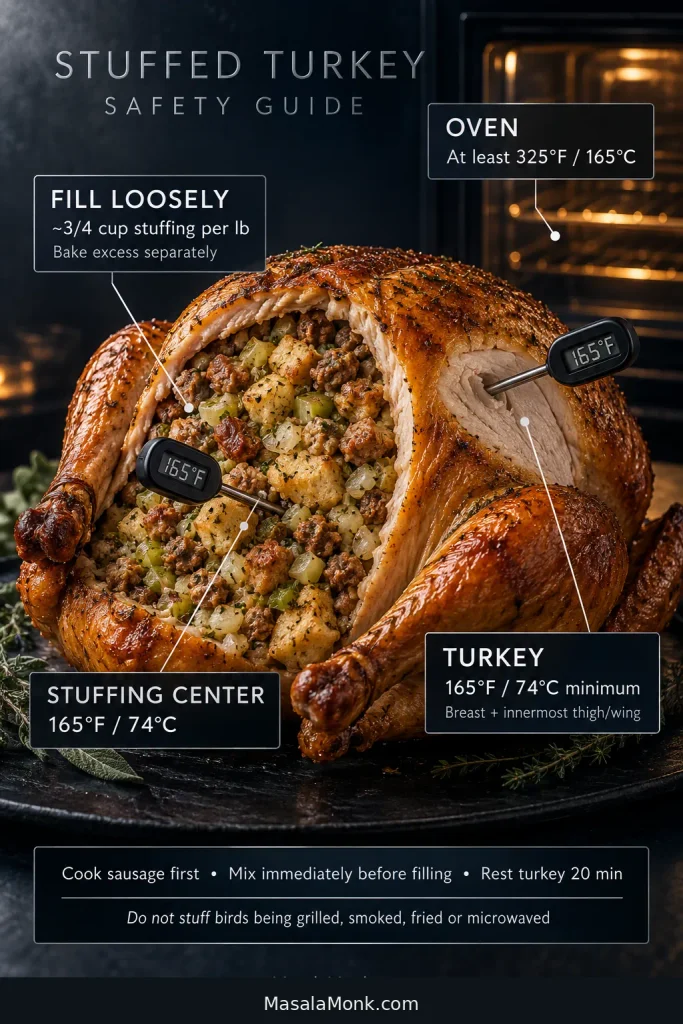
If You Stuff the Turkey, Follow These Safety Checks
- Cook the sausage and any other raw meat ingredients first.
- Keep the dried bread separate from the cooked sausage mixture and stock until immediately before filling the bird.
- Combine the stuffing just before filling, and do not cool the freshly mixed stuffing first.
- Keep the stuffing moist and fill the cavity loosely.
- Allow roughly ¾ cup stuffing per pound of turkey.
- Do not pack the cavity simply to use up the whole batch; bake any excess separately.
- Roast immediately in an oven set no lower than 325°F / 165°C.
- The center of the stuffing must reach 165°F / 74°C.
- Check the turkey too: the breast and innermost parts of the thigh and wing should reach at least 165°F / 74°C.
- Let the cooked turkey rest about 20 minutes before removing the stuffing.
Do not stuff a turkey that will be grilled, smoked, fried or microwaved.
For the full instructions, see the USDA guidance on stuffing turkey.
Want the Turkey Flavor Without Stuffing the Bird?
Use turkey stock, keep some of the rendered sausage fat and don’t skimp on the butter. Later, a little fully cooked turkey pan juice spooned over the casserole before reheating can bring in even more roast-turkey flavor without sacrificing the crisp top.
Scaling the Recipe and Planning Portions
Doubling the recipe? Use two 9 × 13-inch / 23 × 33-cm dishes. One very deep casserole traps more steam and takes much longer to heat through.
About ¾ cup cooked stuffing per person is a useful Thanksgiving planning starting point. That means roughly 6 cups for eight people, 9 cups for 12, or 12 cups for 16.
This recipe makes one full 9 × 13-inch casserole and is best thought of as about 10–12 generous side servings. Smaller portions naturally stretch farther when stuffing is one of many dishes on the table. If your family takes seconds before they’ve finished the turkey, plan more generously.
What to Serve With Sausage Stuffing
Roast turkey and gravy are the obvious partners. Add creamy mashed potatoes and you have two sides particularly good at catching the gravy that runs across the plate.
Something greener and sharper helps against all that soft bread, butter and potato. Roasted Brussels sprouts, green beans or tart cranberry sauce all work.
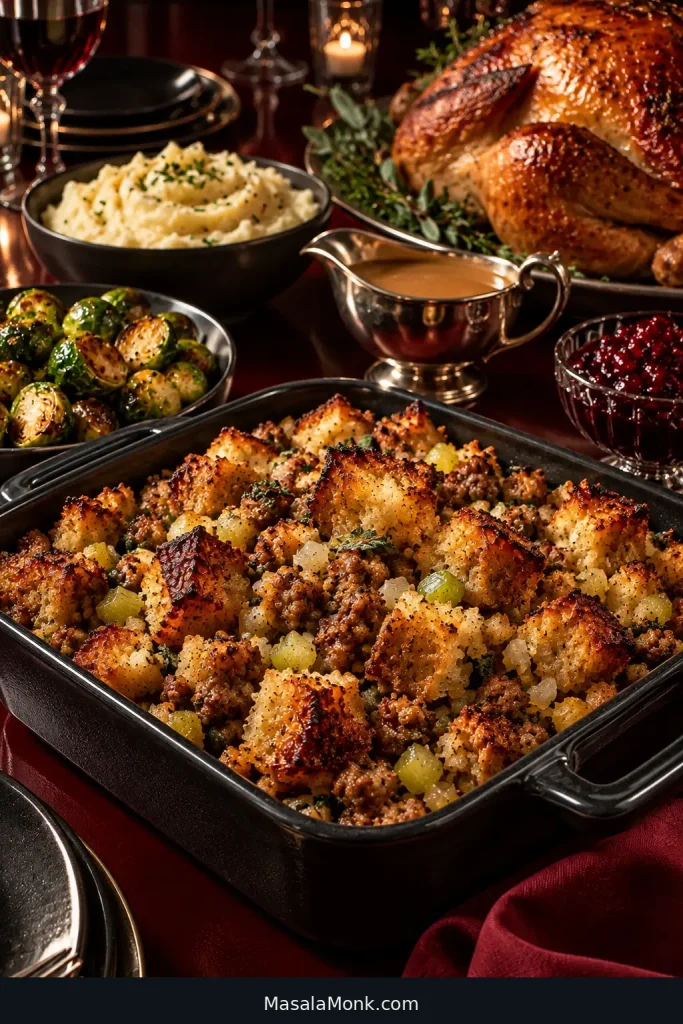
This doesn’t have to be a once-a-year side either. A smaller batch is just as good beside roast chicken or pork on a cold weekend.
Leftovers, Storage and Reheating
If dinner is only slightly delayed, keep the hot casserole loosely covered. A tight seal traps steam and softens the top. A short uncovered return to the oven will bring some of the crust back.
Refrigerate cooked stuffing within 2 hours and use it within 3–4 days. Shallow containers help it cool more quickly.
Reheat leftovers to 165°F / 74°C. If the stuffing looks dry, add a splash of stock, cover while the center heats and uncover near the end to crisp the surface again.
Cooked stuffing freezes well in practical portions; for best quality, use it within about 1 month. Thaw overnight in the refrigerator when convenient, or reheat from frozen with extra time.
Sausage Stuffing FAQs
1. Does sausage need to be cooked before adding it to stuffing?
Yes. Cook the sausage first. Fresh pork sausage should reach 160°F / 71°C; poultry sausage should reach 165°F / 74°C.
2. Do you need eggs in sausage stuffing?
No. Eggs help the casserole hold together; they do not hydrate the bread. Leave them out for a looser stuffing, or use 1 egg instead of 2 for a middle ground.
3. How much broth or stock do you need for stuffing?
For 18 oz / 510 g bread, have about 2½ cups / 590 ml stock ready plus up to another ½ cup / 120 ml. Add the final amount only if the bread needs it.
4. Can you make sausage stuffing ahead?
Yes. Dry the bread and cook the sausage-and-aromatic mixture ahead, but keep them separate from the stock and combine everything immediately before cooking. A fully cooked casserole can also be chilled and reheated to 165°F / 74°C.
5. What temperature should sausage stuffing reach?
Cook the center of the stuffing to 165°F / 74°C, whether it is baked in a casserole or inside a turkey.
Save a Crisp Corner for Your Plate
Once you know what properly hydrated bread looks like, sausage stuffing stops feeling like a gamble. The middle can stay tender while the ragged pieces on top turn buttery and dark at the edges.
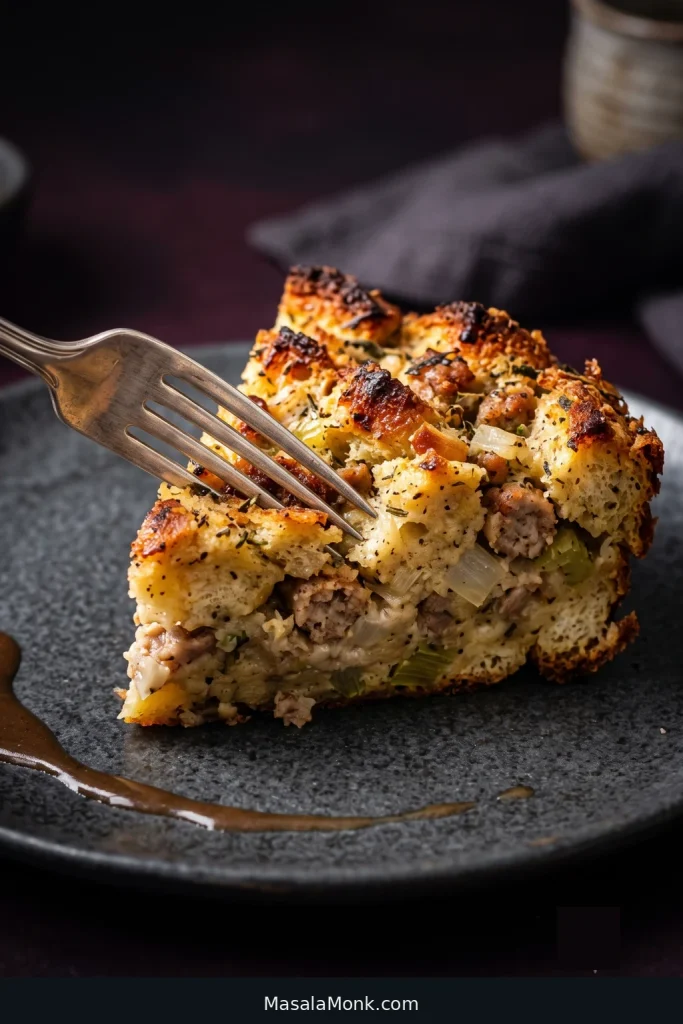
When it reaches the table, dig the spoon through one of those crisp corners and catch some of the softer stuffing underneath with it. Browned sausage, sage, tender bread, crunchy edges and gravy running into the gaps—that is the part worth getting right.








