Posted on Leave a comment

Crockpot Taco Meat Recipe: Easy Slow Cooker Ground Beef for Tacos

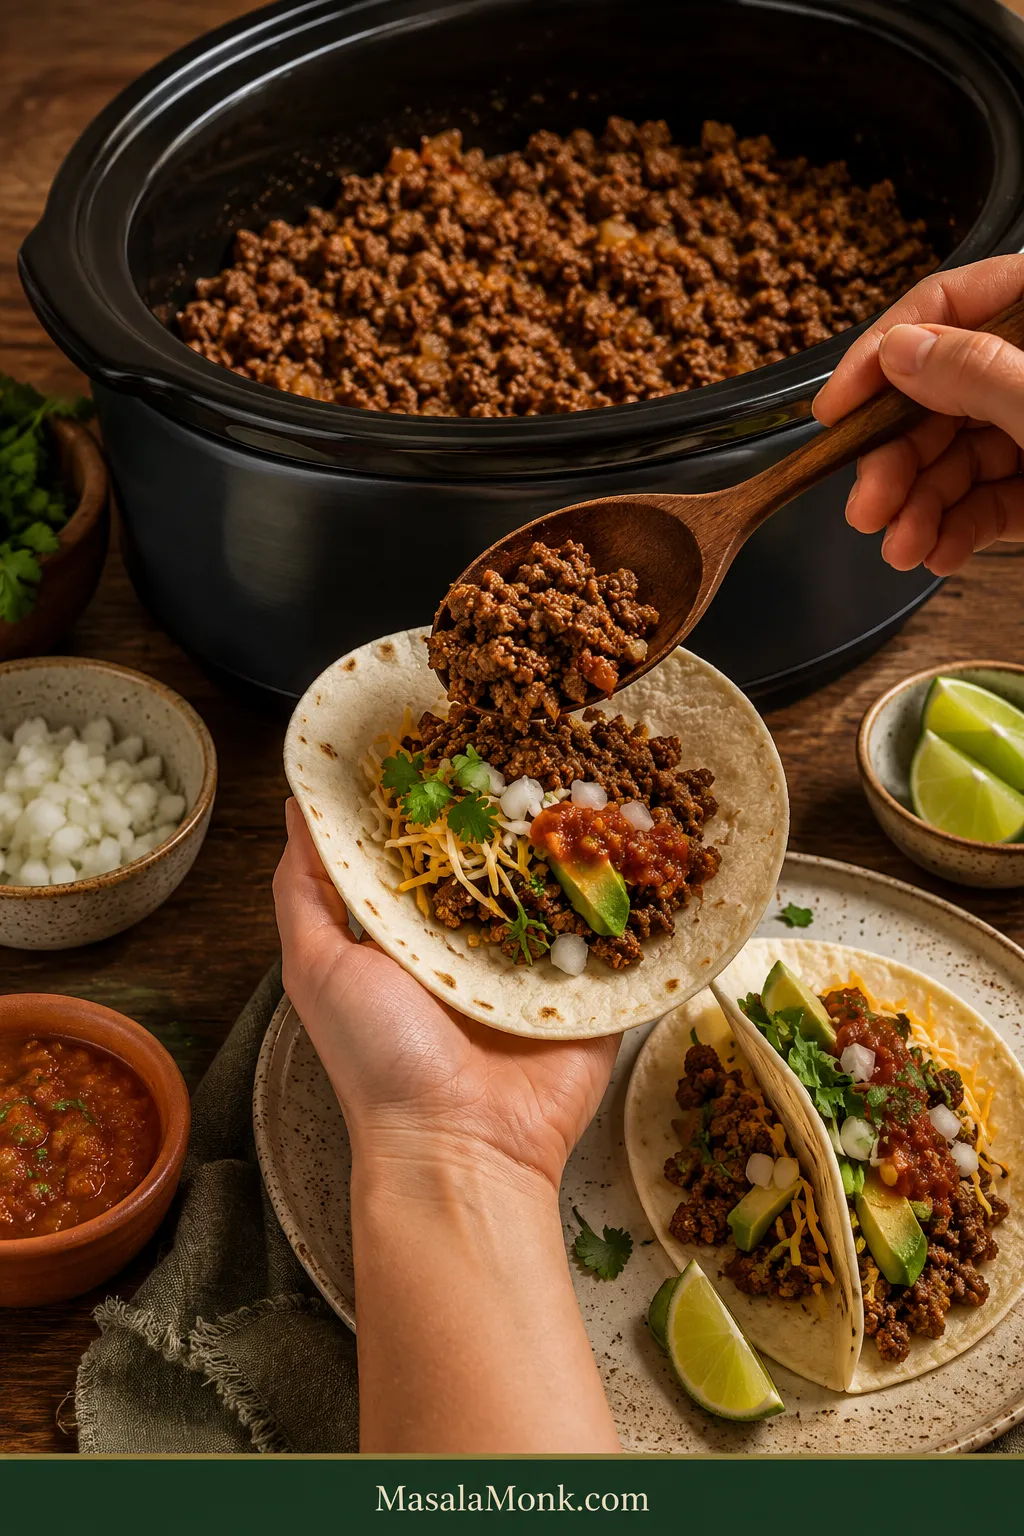
A hand spoons seasoned ground beef from a black slow cooker into a soft tortilla on a taco-night table with cheese, avocado, onion, lime and salsa nearby.

The best Crockpot taco meat has small, juicy beef crumbles coated in warm taco spices and tomato, ready to pile into soft tortillas while the cheese starts melting over the top.

And because the slow cooker does most of the work, the meat can be finished before everyone is ready to sit down. No standing over a skillet crumbling and stirring beef just as people start asking about dinner.

Ground beef has a few slow-cooker quirks. A dense block can stay clumpy, fatty beef can leave a slick of grease, thin salsa can make the filling watery, and extra hours do soft taco crumbles no favors. This method avoids most of those problems without turning an easy dinner into a project.

Quick Answer

No browning or chopping is needed. For a 2-pound batch, combine 2 lb / 907 g raw, fully thawed lean ground beef with 1¼ cups / 300 ml thick salsa and taco seasoning.

Loosen the beef before cooking, then break it into the final crumble once it begins to set. Cook on HIGH for about 2½–3 hours or LOW for about 4–5 hours, starting your checks at the early end.

The beef is ready when it reaches at least 160°F / 71°C throughout and has the texture you want. Look for juicy, lightly glossy crumbles with very little free liquid underneath.

Added water or broth: none. Thick salsa already gives the beef the moisture it needs.

Want a visual finish check? See the Taco Meat Test.

Crockpot Taco Meat Recipe

Prep: about 5 minutes with prepared taco seasoning or 10 minutes with homemade. Yield: about 8 dinner servings.

The 3-Ingredient Version

  • 2 lb / 907 g raw, fully thawed 90/10 ground beef
  • 1¼ cups / 300 ml thick salsa
  • Taco seasoning for 2 lb / 907 g beef

Using prepared taco seasoning? Use the amount your package recommends for 2 pounds of beef. If your brand’s packet is intended for 1 pound, that will usually mean two packets. Skip the packet’s stovetop water because the salsa supplies the cooking moisture here.
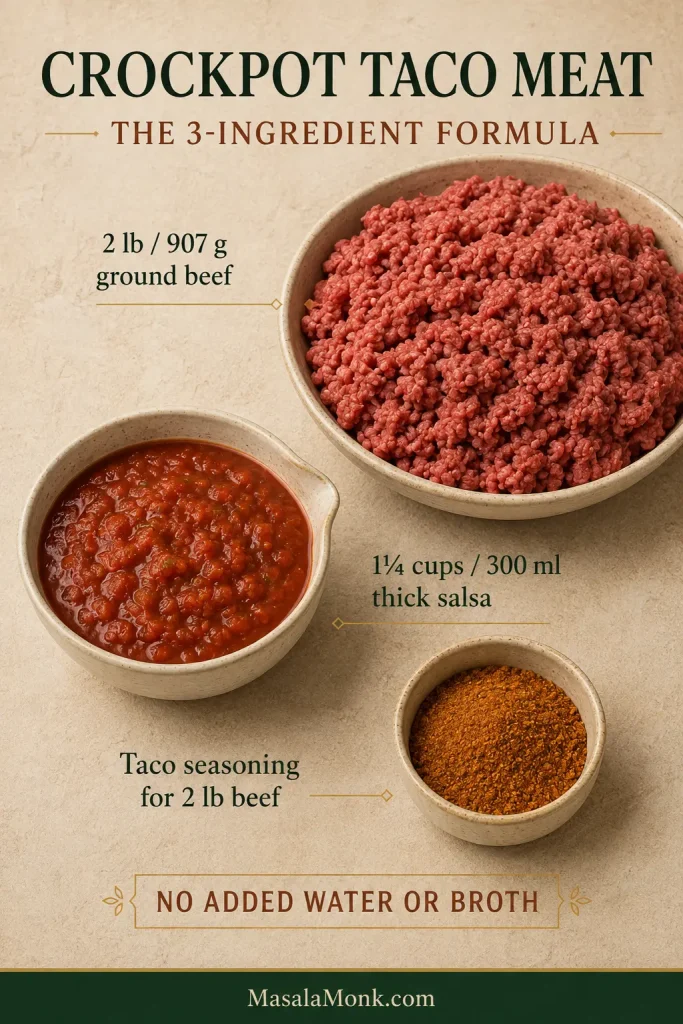
Ingredient guide showing 2 pounds of ground beef, 1¼ cups of thick salsa and taco seasoning, with a note that no added water or broth is needed.
Thick salsa does double duty as flavor and cooking liquid, so this three-ingredient version needs no broth or packet water.

Using prepared seasoning? Jump straight to Instructions.

Prefer Homemade Taco Seasoning?

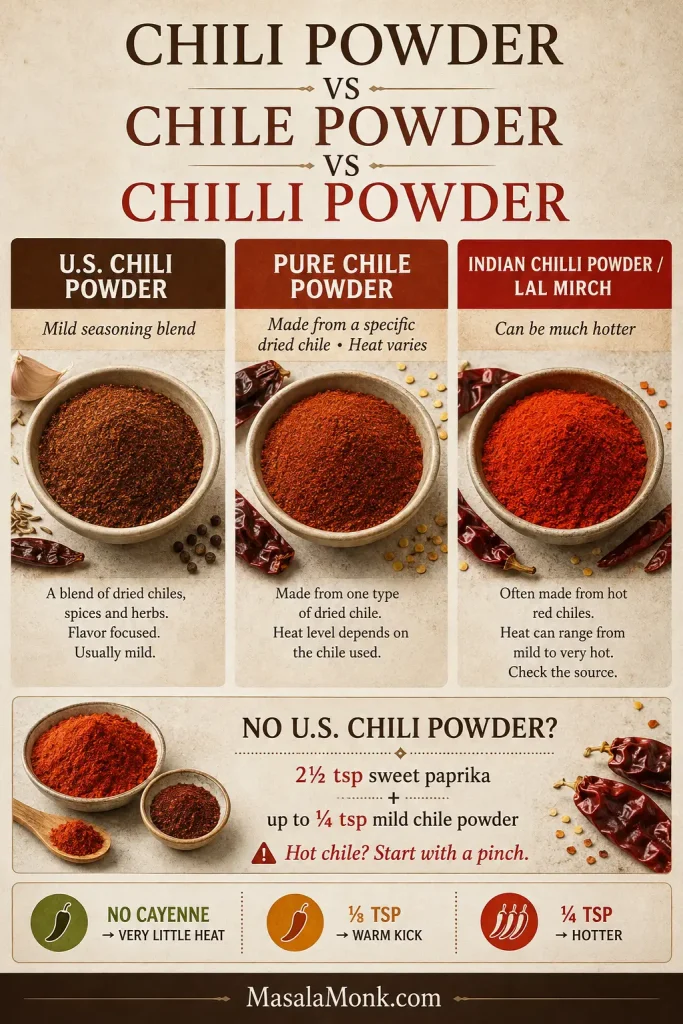
  • 4 teaspoons mild American-style chili powder (not pure cayenne or hot Indian red chilli powder)
  • 2 teaspoons ground cumin
  • 2 teaspoons paprika
  • 1 teaspoon garlic powder
  • 1 teaspoon onion powder
  • 2 teaspoons dried oregano
  • 1 teaspoon fine sea salt to start, plus more if needed
  • ½ teaspoon black pepper
  • ¼–½ teaspoon cayenne, optional

In American taco recipes, “chili powder” usually means a relatively mild seasoning blend. Pure cayenne or a hot Indian chilli powder can be dramatically hotter, so use those much more cautiously.

Salsa can contribute plenty of sodium too. Starting with less salt gives you room to taste the cooked beef and adjust without discovering too late that the combination is overly salty.
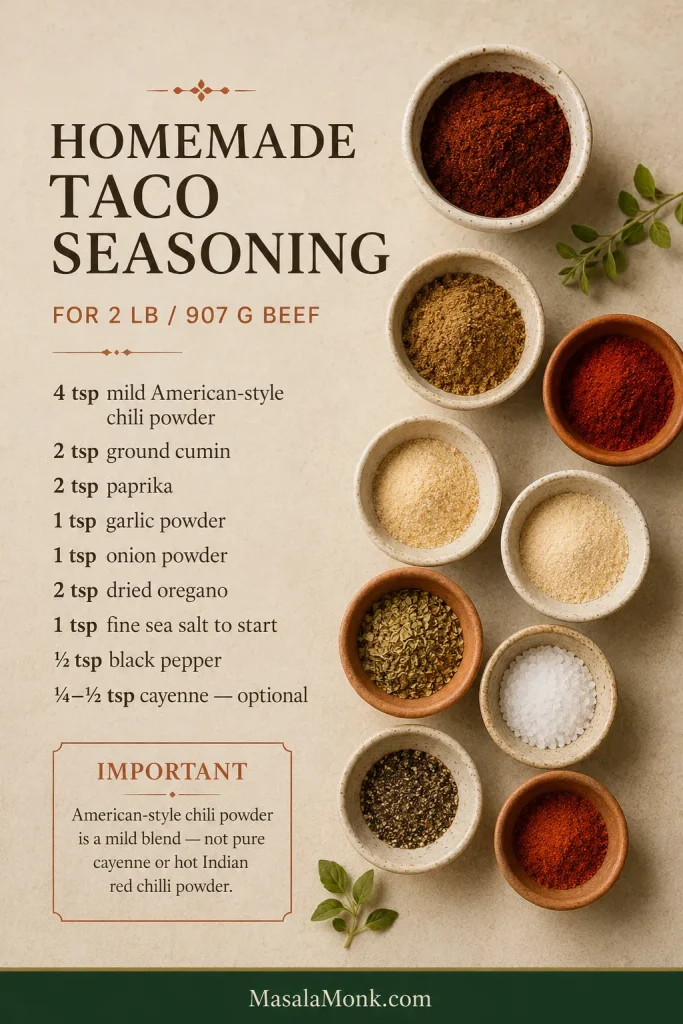
Homemade taco seasoning guide with measured spices for 2 pounds of beef and a warning that American-style chili powder is a mild blend rather than pure cayenne or hot Indian chilli powder.
Mix the spices before seasoning so cumin, paprika, oregano and salt distribute more evenly over the beef.

Instructions

  1. Loosen and season the beef. Put the thawed beef in the slow cooker and pull the dense block into loose chunks. Scatter the taco seasoning evenly over the meat.
  2. Add the salsa. Spoon the thick salsa over the beef and stir lightly. Cover the slow cooker.
  3. Cook. Cook on HIGH for about 2½–3 hours or LOW for about 4–5 hours. Begin checking at the early end because slow cookers vary, and deeper batches can take longer.
  4. Make the crumble. Around the middle of the cooking window, start checking the beef. When the chunks have started to set and separate easily, use a wooden spoon, meat chopper or potato masher to break them into the size you like. Replace the lid and continue cooking.
  5. Check doneness. Test several spots near the center. The beef should reach at least 160°F / 71°C throughout, with no dense raw pockets. Color alone is not a reliable doneness test.
  6. Finish and serve. Stir well. Skim obvious grease or remove excess thin liquid only if needed, then taste and correct the salt or seasoning. If you add more dry seasoning, give it another 5–10 minutes of heat. Spoon into warm flour tortillas or soft homemade corn tortillas with cheese, onion, avocado, salsa, cilantro, jalapeños or lime.

Before You Serve

Food-safety note: if a spoon, masher or chopper touches undercooked beef, wash it or switch to a clean utensil before using it again with the fully cooked meat.

Cook’s note: can’t be there for the mid-cook breakup? Loosen the raw beef especially well at the beginning, then crumble it thoroughly once it is safely cooked. The pieces may be less uniform, but dinner still works.

When the beef is glossy, well seasoned and easy to scoop without liquid running around the crumbles, you’re done. Warm the tortillas and eat.
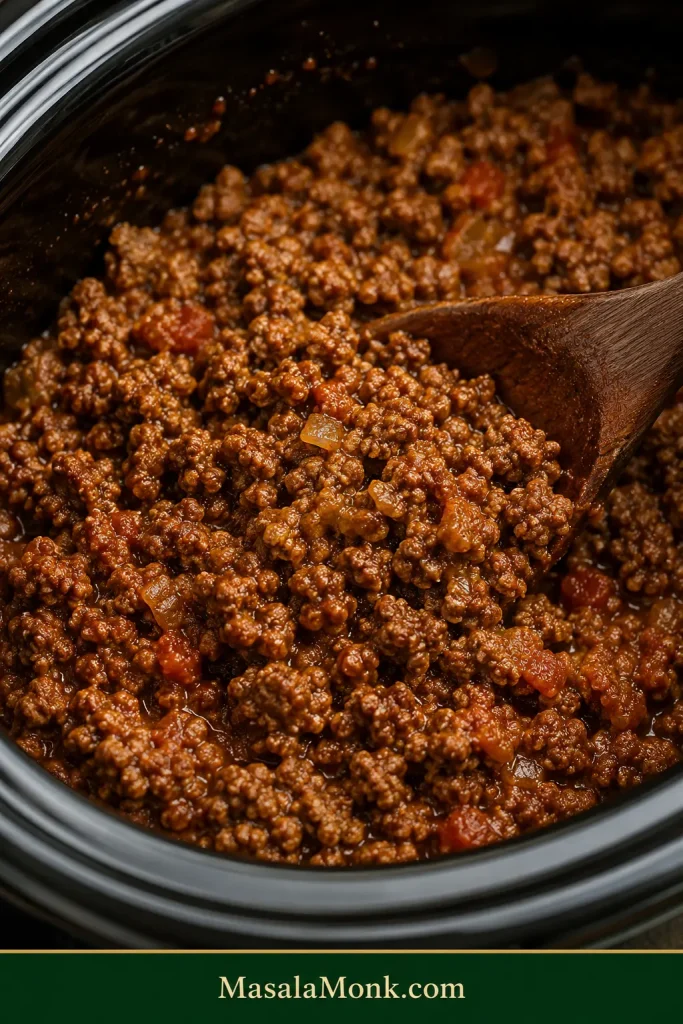
Close-up of finished slow cooker taco meat with distinct medium crumbles, small tomato and onion flecks, a light glossy coating and very little free liquid.

Want the process photos? See what to look for while the beef cooks. · Something looks off? Go straight to Troubleshooting.

When the Crockpot Works Best—and When to Brown First

The Crockpot’s advantage here is timing, not tenderness. Ground beef does not need hours of slow cooking to become tender. The Crockpot cuts down the stove work, lets the meat be ready before you need it, and keeps it hot until everyone is ready to eat.

If browned edges and a faster stovetop dinner matter more, the skillet wins.

Mostly Hands-Off

Thawed raw beef goes directly into the Crockpot with salsa and seasoning.

Best for: ordinary dinner batches, minimal cleanup and softer taco crumbles.

Browned & Firmer

Brown and drain the beef in a skillet. Stir in the seasoning and enough salsa to leave it juicy rather than saucy, then transfer it to the Crockpot to stay hot for serving.

Best for: firmer pieces, deeper browned flavor or higher-fat beef.

Big Taco Bar

Cook and drain the beef in batches, then use one or more Crockpots to keep it hot for serving.

Best for: larger quantities where even cooking and easy draining matter more than dump-and-go convenience.

Prefer firmer, deeply browned stovetop crumbles? Our Ground Beef Tacos Recipe is built around that skillet texture and a much faster cook.

Which Ground Beef Works Best?

With skillet taco meat, excess fat can be poured off before the seasoning goes in. With the raw slow-cooker method, everything released by the beef stays in the pot until the end.

For this recipe, 90/10 hits the sweet spot: plenty of beefy flavor without leaving a large slick of fat underneath.

Ground beefWhat to expectBest use
93/7Very little rendered fat; leaner, less rich resultMinimal draining
90/10Good beef flavor with some fat to skim if neededBest all-around choice
85/15Richer, with more fat collecting at the bottomFine if you don’t mind draining some
80/20Can leave a substantial grease layerBetter browned and drained first

Already have 85/15 in the refrigerator? Use it. Taco night does not require a special grocery run; just expect more fat at the end.
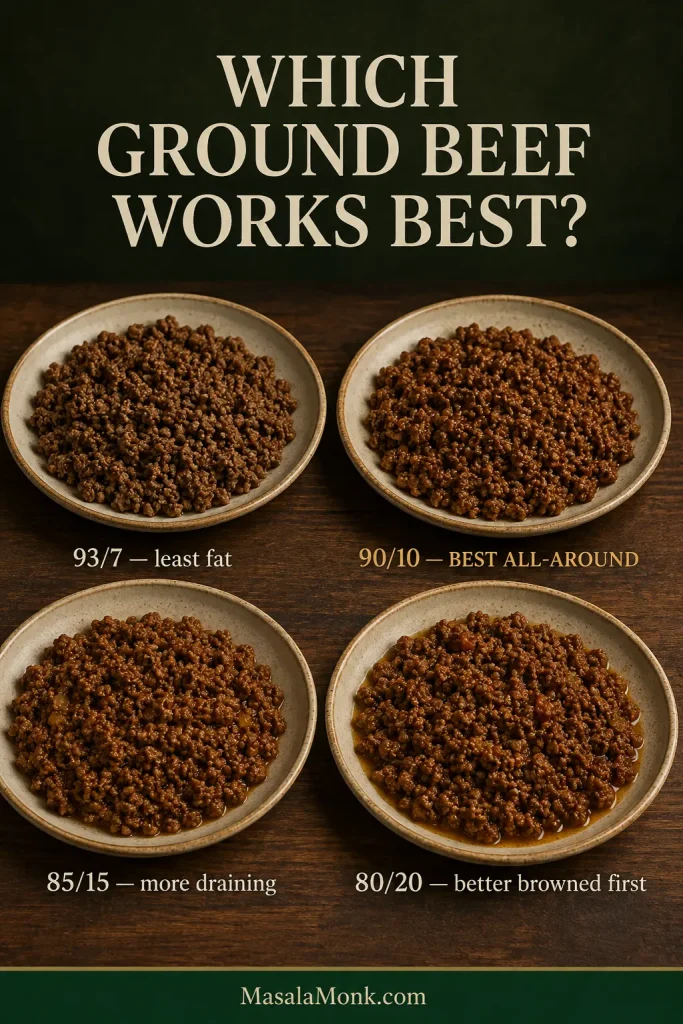
Four bowls of cooked taco meat labeled 93/7, 90/10, 85/15 and 80/20, showing progressively more visible rendered fat as the beef becomes fattier.

If your store labels it beef mince, use the same lean ratio and follow the recipe as written.

Why Salsa Consistency Matters

Salsa has a big say in how wet the taco meat becomes because it brings tomato, chile, aromatics, acidity, salt and moisture all at once.

To keep the beef juicy without leaving a puddle underneath, choose a thick salsa that sits on a spoon instead of immediately running off it. Thick salsa clings to the crumbles; very thin restaurant-style or watery fresh salsa is more likely to pool around them.
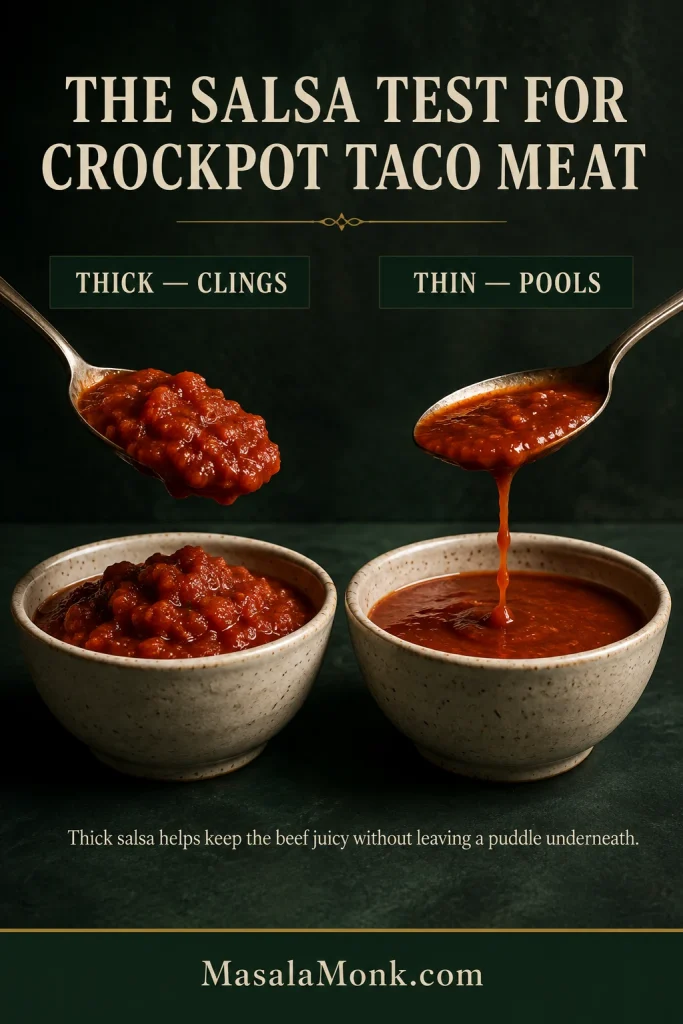
Two spoons compare salsa consistency: thick chunky salsa mounds and clings to one spoon, while thinner salsa runs off the other and pools in its bowl.
Use the spoon, not the label. If salsa runs off immediately, start with less; if it holds a mound, the recipe amount is a better fit.

Thin salsa can still taste excellent. Start with less and add another spoonful after cooking if the beef needs it.

Chunky or smooth? Chunky salsa leaves visible pieces of tomato, onion and chile. A smoother salsa blends more completely into the beef and gives the filling a more uniform look. Mild, medium or hot is your call; consistency matters more to the slow-cooker method than heat level does.

For something brighter at the table, keep the finishing salsa separate. A spoonful of roasted salsa verde adds fresh acidity without making the beef wetter in the Crockpot.

Can Raw Ground Beef Go Straight Into the Slow Cooker?

Yes. Use fully thawed beef, loosen the dense block before cooking and check doneness with a food thermometer instead of relying on color.

USDA slow-cooker guidance recommends thawing meat before it goes into a slow cooker. Thawed ground beef also separates more evenly and is much easier to crumble. Read the USDA slow-cooker guidance.
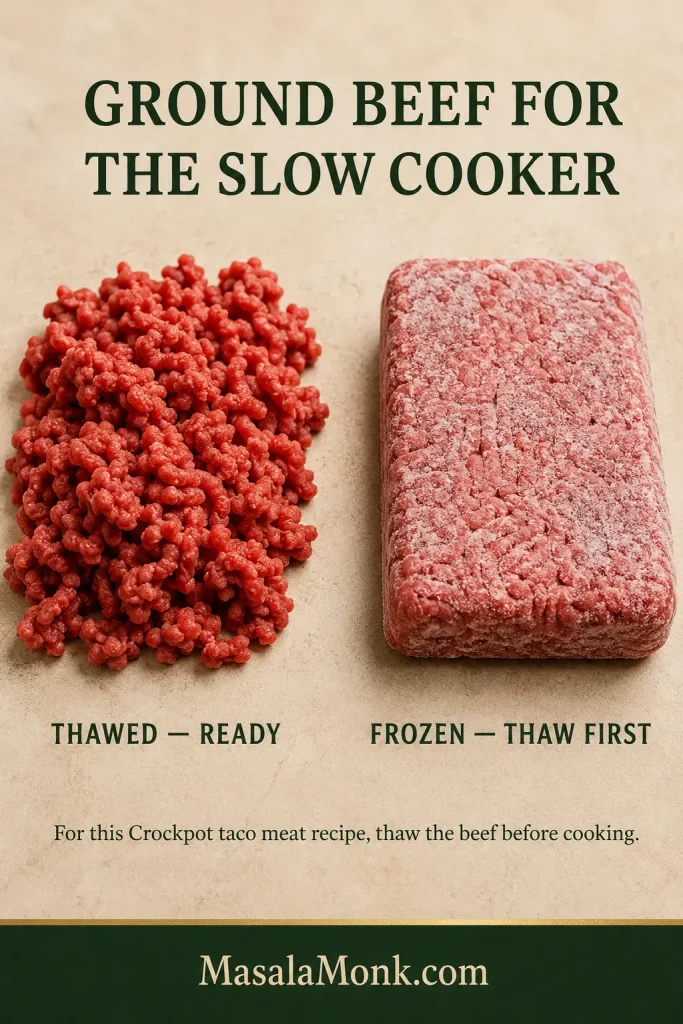
Loose thawed raw ground beef beside a solid frozen block of ground beef, showing the thawed meat ready for the slow cooker and the frozen block needing to be thawed first.

What to Look for While the Beef Cooks

Start loose. Pull the raw beef into handful-size chunks before the lid goes on. They do not need to be tiny; opening up the dense block is what matters.
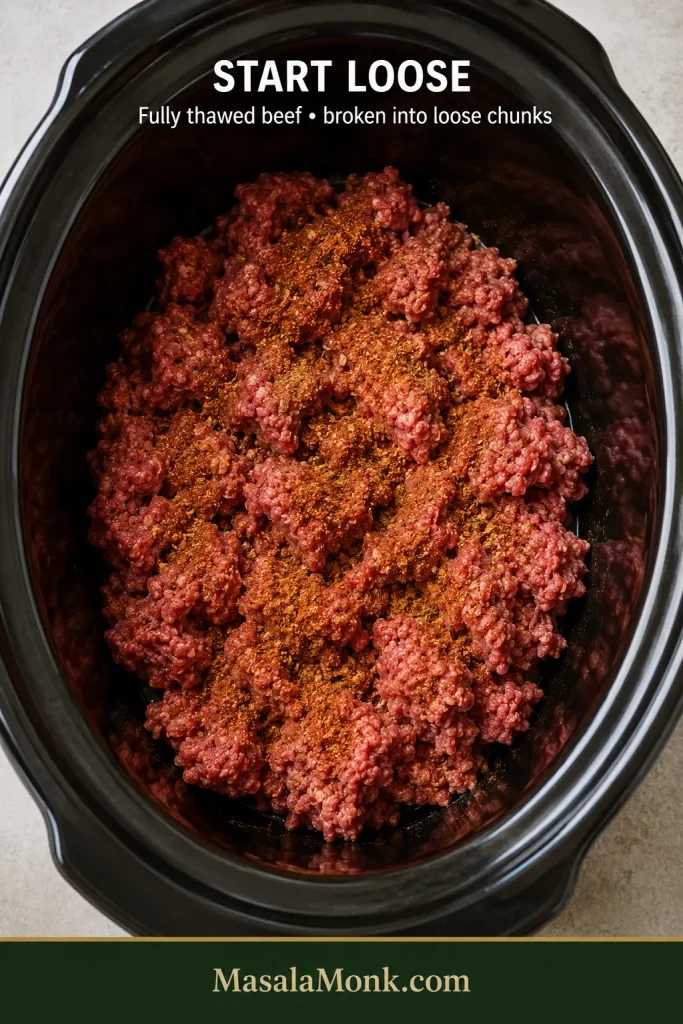
Thawed raw ground beef broken into several loose chunks inside a dark slow cooker, with taco seasoning scattered over the meat and no liquid added yet.

Expect moisture later. The pot may look surprisingly dry at first. Ground beef releases its own juices as it heats, and very little escapes from a covered slow cooker.

Break it when it yields easily. When the chunks separate with very little resistance, they are ready to crumble. Break them into the size you prefer and let the beef finish cooking.
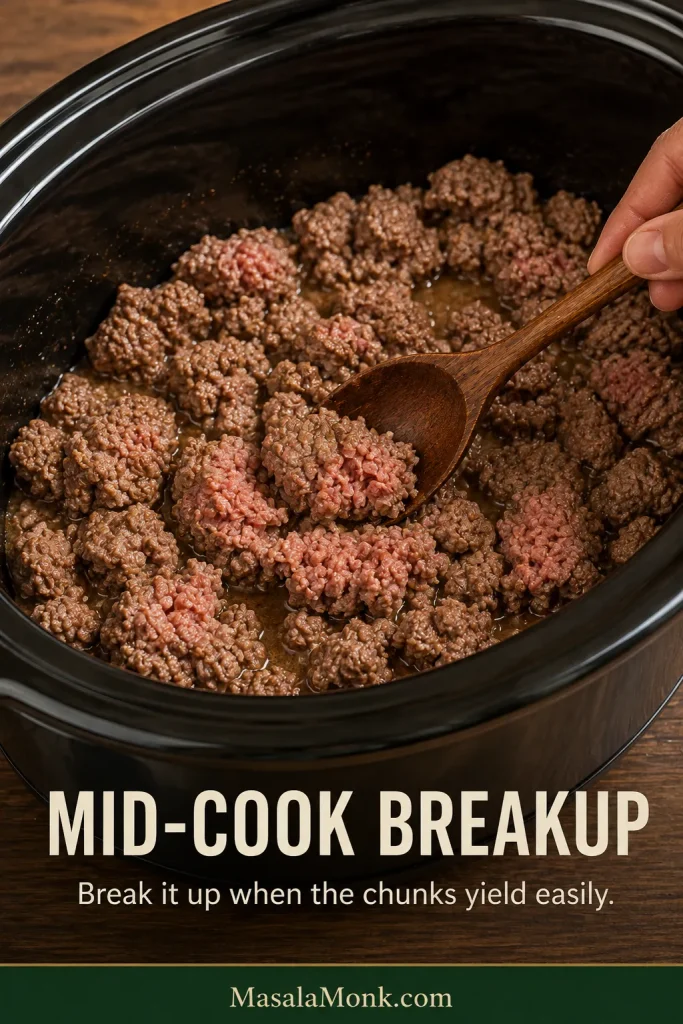
Partially cooked ground beef in a slow cooker with browned outer surfaces and some pink interior as a wooden spoon begins splitting one tender chunk apart.
Crush the chunks when they yield easily; if the spoon smears or drags through the meat, give them more time.

Don’t judge by color alone. Appearance can be misleading, so use the thermometer reading in the recipe as the final doneness check.
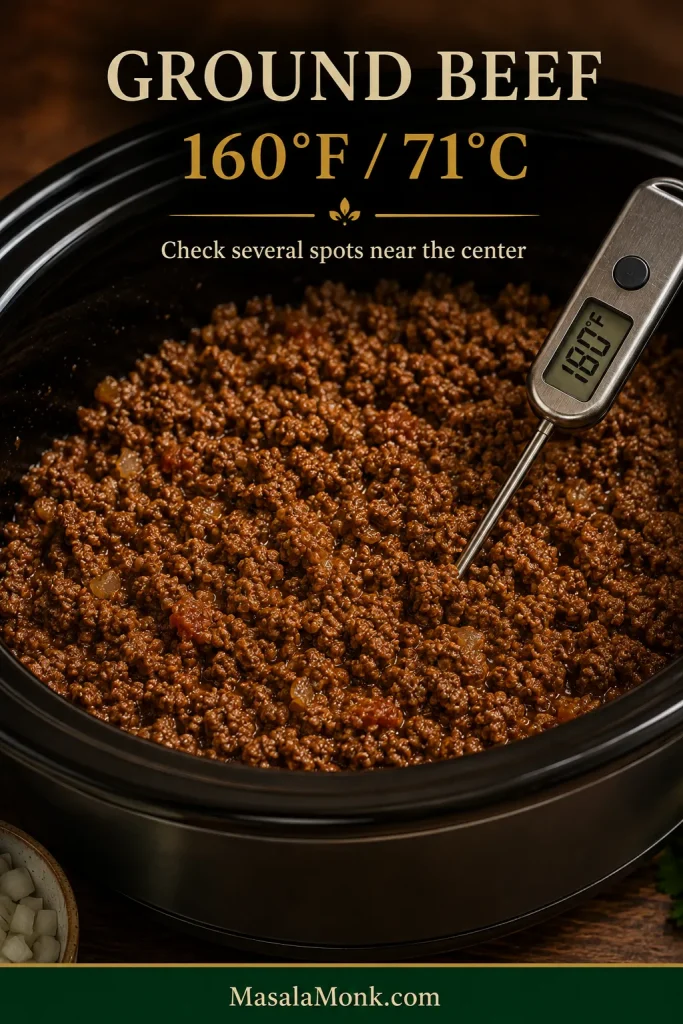
Digital food thermometer inserted into ground beef near the center of a slow cooker, reading 160 degrees Fahrenheit, with guidance to check several central areas.
Check several dense spots near the center. 160°F / 71°C throughout is the target, not color alone.

The Taco Meat Test: Too Wet, Just Right or Too Dry?

Drag a wooden spoon or spatula through the middle of the beef and watch what happens to the channel.
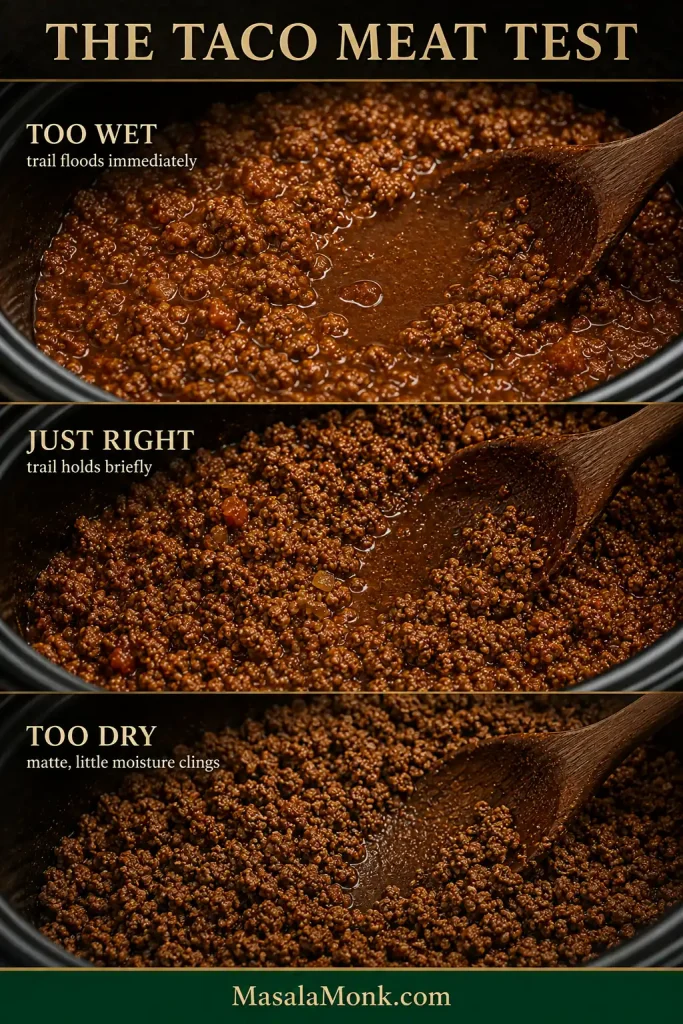
Three matched taco meat samples show too wet, just right and too dry states: the wet trail floods with liquid, the correct trail remains briefly visible, and the dry meat looks matte.
Use the trail after the finished taco meat has been stirred. A little juice is desirable—the speed at which the channel disappears tells you more than visible liquid alone.

Too Wet

Thin liquid immediately floods back in and the meat looks as though it is sitting in sauce.

What to do: spoon out excess liquid or leave the lid off briefly while the beef is hot.

Just Right

The crumbles look juicy and lightly glossy. The spoon trail stays visible for a moment before a thin sheen of flavorful cooking juice slowly settles back in.

Leave it alone. You’re there. A thin layer of juice at the bottom belongs with moist taco meat, and the filling should scoop neatly without soaking the tortilla underneath.

Too Dry

The beef looks matte and loose with very little moisture clinging to the crumbles.

What to do: stir in 1–2 tablespoons of salsa if the beef could use more flavor as well as moisture, or water if the seasoning is already where you want it. Heat briefly, then check again before adding more.

Is That Liquid Cooking Juice or Grease?

  • Oily slick or yellow-brown beads: mostly rendered beef fat. Skim or drain it.
  • Thin reddish-brown liquid: mostly beef juices and salsa moisture. Remove only what is excessive.
  • An oily layer over thinner liquid: remove the fat first, stir the beef, then decide whether the remaining juice actually needs reducing.

Draining every drop can leave good taco meat unnecessarily dry. Remove the fat you do not want, stir again and reassess.
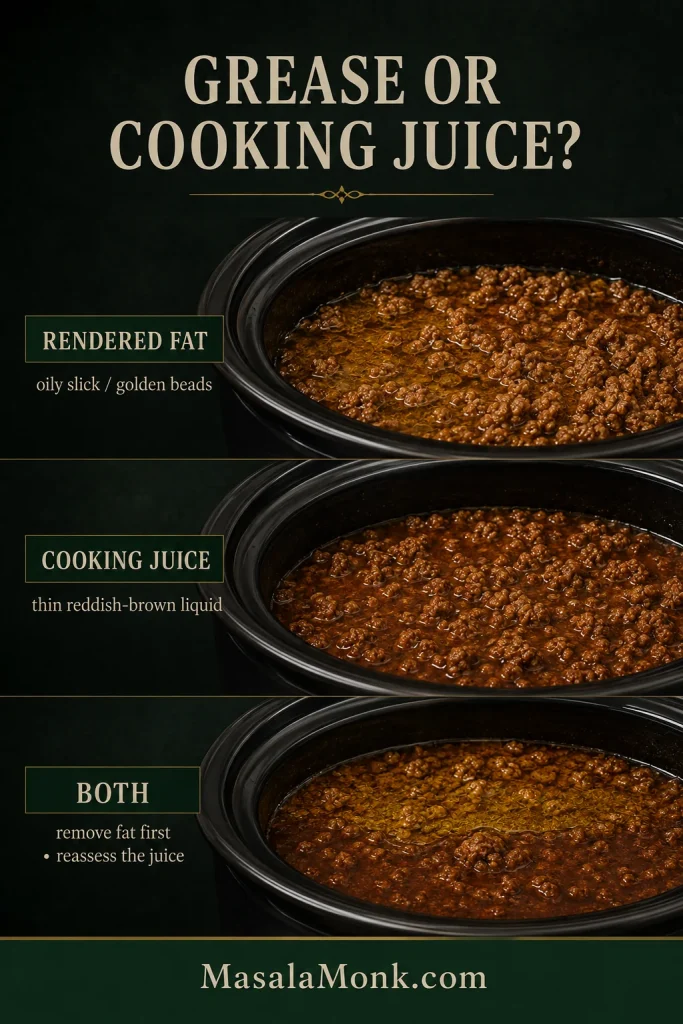
Three close-up taco meat samples compare oily golden rendered fat, thinner reddish-brown cooking juice, and a mixture where a shiny fat layer sits above darker juice.
If shiny oil floats over darker cooking juice, skim the top layer first, stir, then reassess. Draining everything can remove useful seasoned moisture with the fat.

Still not right? Match the symptom in Troubleshooting.

How Fine Should You Crumble Taco Meat?

The Crockpot works well for fine and medium crumbles; deeply browned beef still belongs in a hot skillet. Choose the texture that fits the tacos you want tonight.
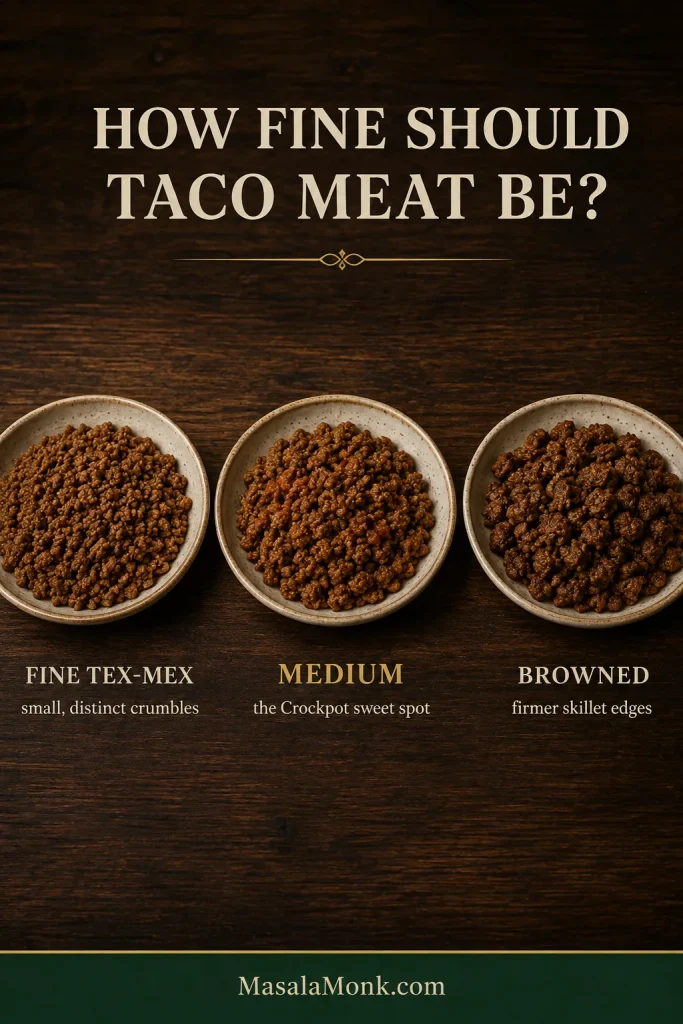
Three matching bowls compare fine Tex-Mex ground beef crumbles, medium slow-cooker taco meat crumbles and firmer skillet-browned pieces with darker edges.
Use the guide as a stopping-point check: medium crumbles should still look unmistakably like ground beef rather than a uniform paste.
  • Fine Tex-Mex-style crumbles: use a potato masher or meat chopper and work the beef fairly fine. Stop while distinct small pieces remain. The meat should feel tender and meaty, not pasty.
  • Medium everyday crumbles: use a wooden spoon or sturdy spatula and stop earlier. This is what the main recipe aims for—tender, juicy and easy to scoop while still clearly feeling like ground beef.
  • Firm, browned crumbles: use a hot skillet for browned edges and a firmer bite. The Crockpot can then keep the cooked meat hot until everyone is ready.

Easy Variations

No-Salsa Version

For an intentionally smoother, saucier version without salsa, keep the 2 lb / 907 g ground beef and the same amount of taco seasoning. Replace the 1¼ cups / 300 ml salsa with 1 can plain tomato sauce, about 15 oz / 425 g.

Tomato sauces vary in saltiness, so hold back any extra salt until the beef is cooked and tasted. This version will not finish exactly like the thick-salsa recipe. If more sauce collects around the beef than you want, spoon off the excess or let the meat sit briefly uncovered while hot.

This skips salsa, not tomato. A completely tomato-free version needs a different moisture balance, so simply omitting the tomato is not a direct substitute.

Rotel Version

Replace the 1¼ cups / 300 ml salsa with 1 undrained 10-oz / 283 g can of Rotel. Keep the same homemade spice blend—or use enough packet seasoning for 2 pounds of beef. No added water is needed.

Rotel is thinner than the salsa used in the main recipe, so let the beef cook before deciding whether it needs anything else.

Stretch It With Beans

Drain and rinse a 15-oz / 425 g can of black beans or pinto beans, then stir them into the cooked beef for the final 20–30 minutes.

Whole beans stretch the batch without turning it into a completely different filling. Want the beans to become the meal instead of an add-in? That’s closer to our Crockpot chili.
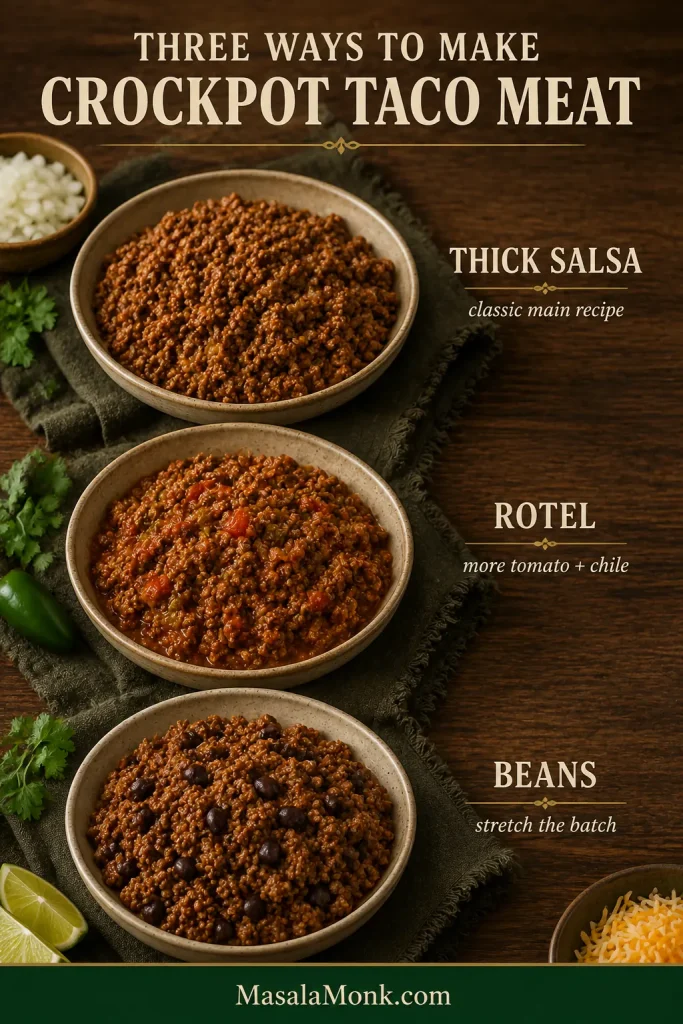
Three bowls compare Crockpot taco meat made with thick salsa, a Rotel version with visible diced tomato and chile, and taco meat mixed with whole black beans.

Scaling Crockpot Taco Meat: What Changes From 1 to 4 Pounds

Scale the taco seasoning with the amount of beef. Salsa is different: as the batch gets larger and sits deeper in the cooker, don’t increase the salsa in exact proportion to the beef. Start with less and add more after cooking if the meat needs it.
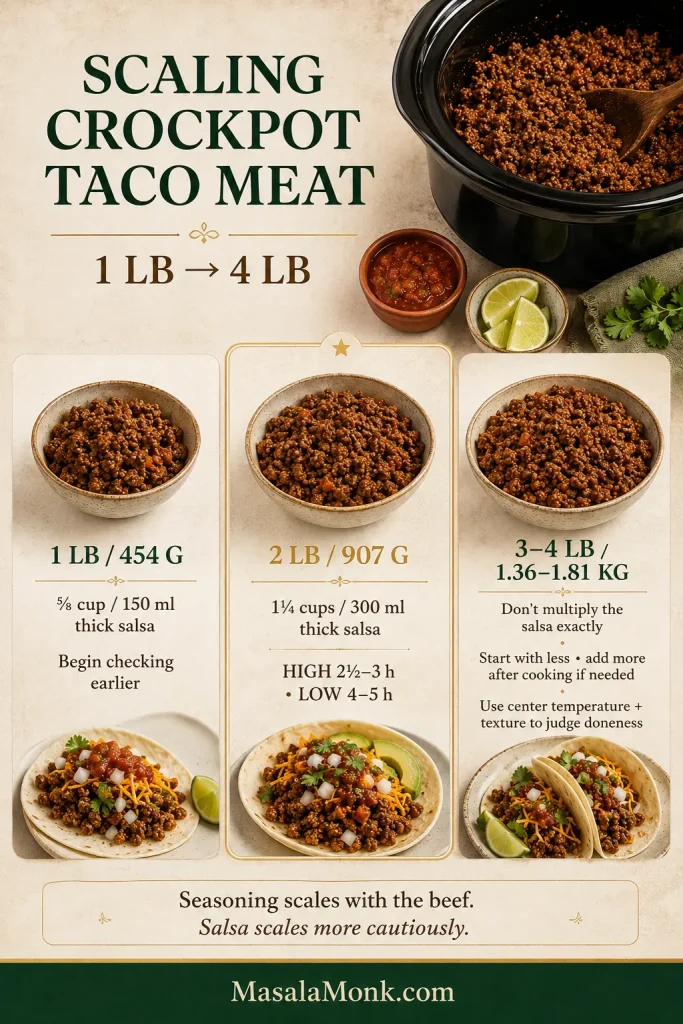
Scaling guide for 1, 2 and 3 to 4 pounds of ground beef, with exact salsa amounts for the smaller batches and more cautious salsa guidance for larger batches.
For 3–4 lb, leave room to correct upward: adding salsa later is easy; removing excess liquid is not.
BatchSalsa guidanceWhat changes
1 lb / 454 g⅝ cup / 150 ml thick salsaBegin checking earlier; a smaller cooker is useful if available
2 lb / 907 g1¼ cups / 300 ml thick salsaMain recipe: HIGH 2½–3 h or LOW 4–5 h
3–4 lb / 1.36–1.81 kgDon’t increase the salsa in exact proportion to the beef; start with less and add more after cooking if neededUse a roomy cooker and rely on center temperature and texture rather than adding a fixed amount of extra cooking time

When the Cooker Gets Too Full

If the beef is packed unusually deep in your cooker, split the batch rather than crowding it in. The beef cooks more evenly and is easier to crumble that way. And when your cooker manual specifies a maximum fill level, follow it rather than packing the batch too deeply.
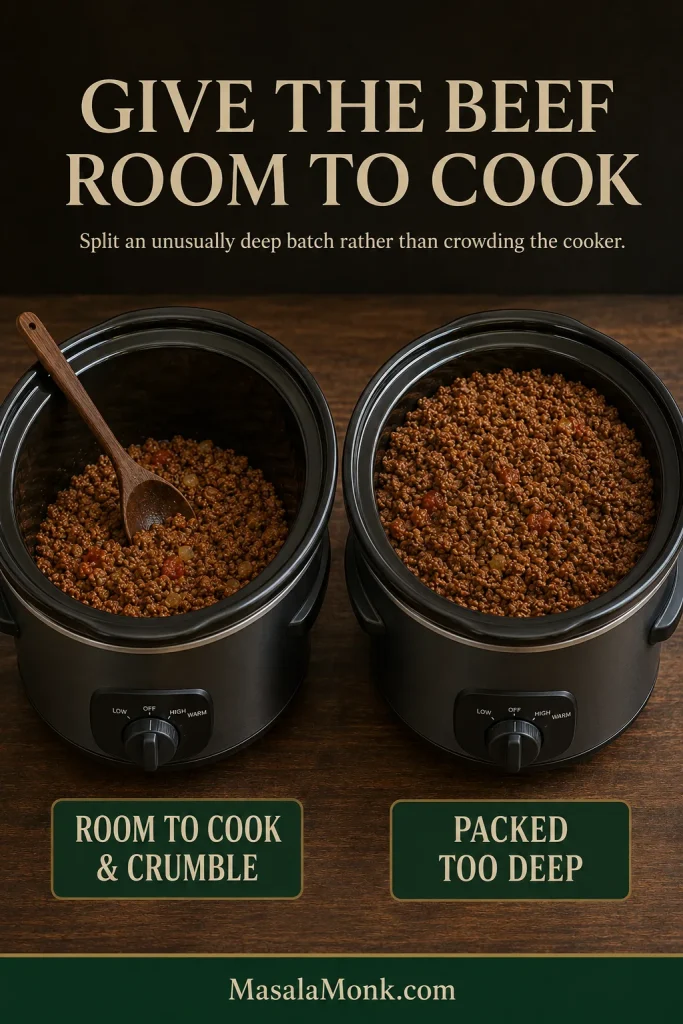
Two matching slow cookers compare a moderate layer of ground beef with exposed cooker sides against a much deeper, densely packed batch that is harder to stir and crumble.

Feeding more than a family batch? Jump to taco-bar quantities and the large-batch method.

Troubleshooting

ProblemWhat to do nowNext time
WateryRemove excess thin liquid or briefly cook uncoveredUse thicker salsa and avoid adding extra liquid
GreasySkim or drain the rendered fatUse 90/10 or 93/7 beef, or brown fattier beef first
Big clumpsBreak the hot beef apart while it separates easilyLoosen the raw block and give it one mid-cook breakup
MushyRemove excess liquid and stop working the meatCheck sooner and stop at a larger crumble
Dry but sitting in liquidRemove excess liquid first; taste the beef before adding any salsaCheck sooner and begin with thick salsa instead of extra liquid
BlandCorrect the salt and seasoning; if it is seasoned but still tastes flat, finish with lime for acidityScale the seasoning with the amount of beef
Too saltyDilute with unseasoned cooked beef or beansHold back extra salt until the meat has been tasted

If the table solved your problem, you’re done. Two problems are especially easy to misread.

Why Is the Beef Dry When There Is Liquid in the Crockpot?

A wet Crockpot doesn’t necessarily mean juicy beef. You can have plenty of liquid around the meat while the crumbles themselves still taste dry.

The meat can continue losing moisture while sitting in released juices, fat or sauce.

Remove obvious excess liquid first and taste the meat. When extra cooking time is the real problem, pouring in a cup of broth only gives you dry-feeling beef in a wetter pot. A spoonful or two of salsa is plenty if the crumbles still need help.
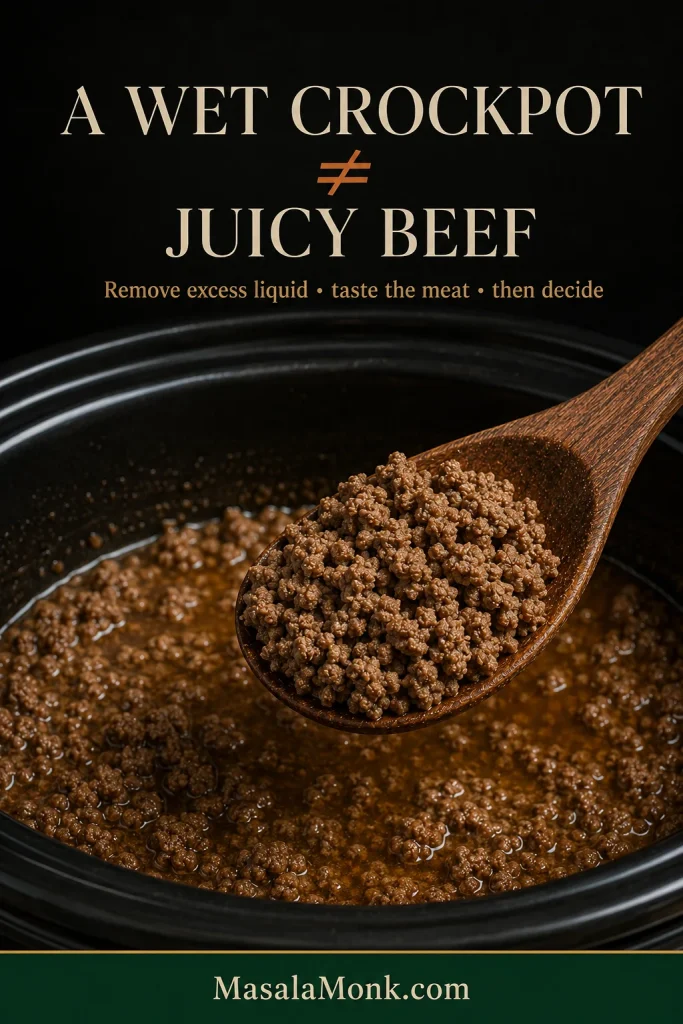
A wooden spoon lifts coarse, matte-looking taco meat above a slow cooker with visible reddish cooking liquid pooled around the remaining beef.
Drain first, then taste. More salsa or broth will not fix overcooked, dry-feeling crumbles that are already sitting in plenty of liquid.

Is It Mushy—or Just Soft?

Slow-cooker taco meat is naturally softer than beef browned hard in a skillet. Tender crumbles that still hold their shape are exactly what many people want.

When the pieces lose that structure and become paste-like or waterlogged, they have moved into mushy territory. Prefer a firmer bite every time? Brown the beef first and let the Crockpot keep it hot instead.
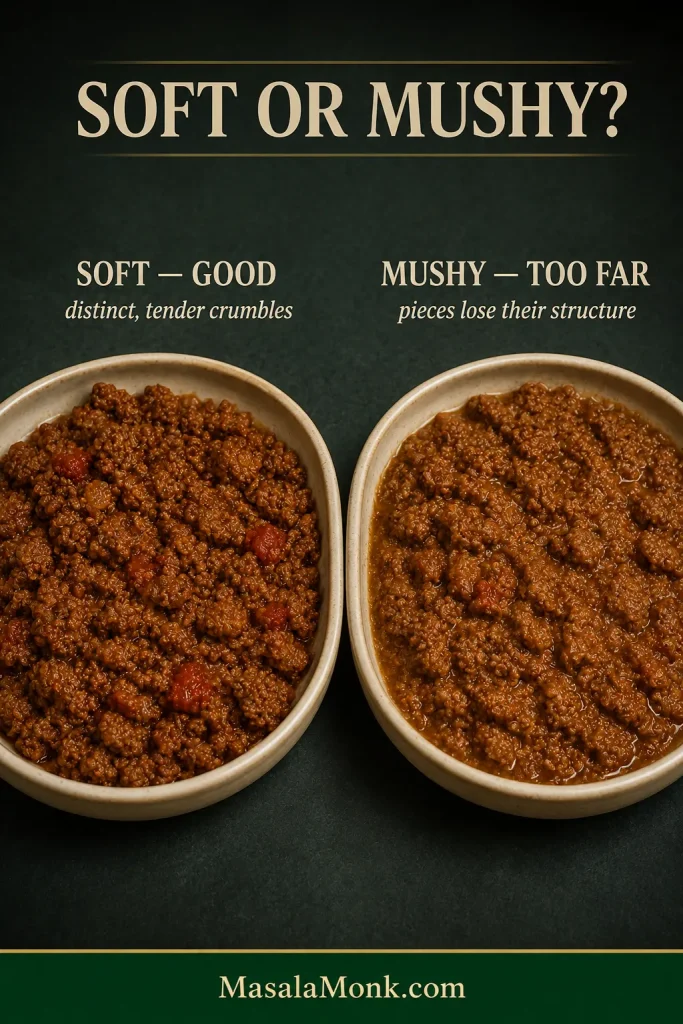
Two samples compare soft taco meat with distinct tender crumbles against mushier taco meat whose wet pieces are beginning to lose their individual shape.
Once the crumble size is right, stop working the meat aggressively; continued mashing can turn tender crumbles pasty.

For a family batch, that’s most of what can go wrong. Feeding a crowd changes the Crockpot’s job.

↑ Back to top · Jump to Recipe

For a Party or Taco Bar

How Much Taco Meat Per Person?

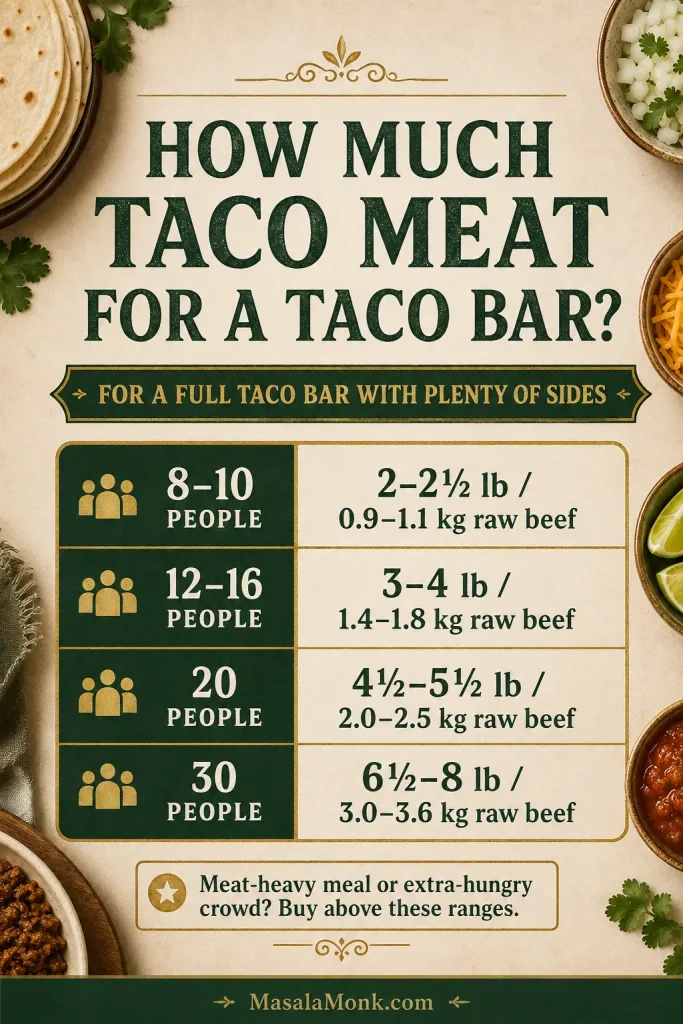
For a full taco bar with plenty of beans, cheese, vegetables, salsa and sides, plan roughly 2½–3 oz / 70–85 g cooked taco meat per person.

For a meat-heavy meal or an especially hungry crowd, move closer to 3½–4 oz / 100–115 g cooked meat per person.

The buying amounts here assume plenty of other fillings and sides. Buy above them when the meat is doing most of the work.

CrowdRaw beef to buyBest approach
8–10 peopleabout 2–2½ lb / 0.9–1.1 kgThe main slow-cooker method works well
12–16 peopleabout 3–4 lb / 1.4–1.8 kgUse a roomy cooker or split the batch
20 peopleabout 4½–5½ lb / 2.0–2.5 kgCook in batches, then keep hot for serving
30 peopleabout 6½–8 lb / 3.0–3.6 kgCook in batches; two Crockpots can make serving easier
Taco bar planning guide showing raw ground beef ranges for 8 to 10, 12 to 16, 20 and 30 people, with a note that the estimates assume plenty of other fillings and sides.

Why the Crockpot Works for a Taco Bar

A taco bar works because everyone builds exactly what they want while you only have one hot filling to keep track of. For a cold side that can be finished before people arrive, our 7 layer dip can be waiting in the refrigerator.
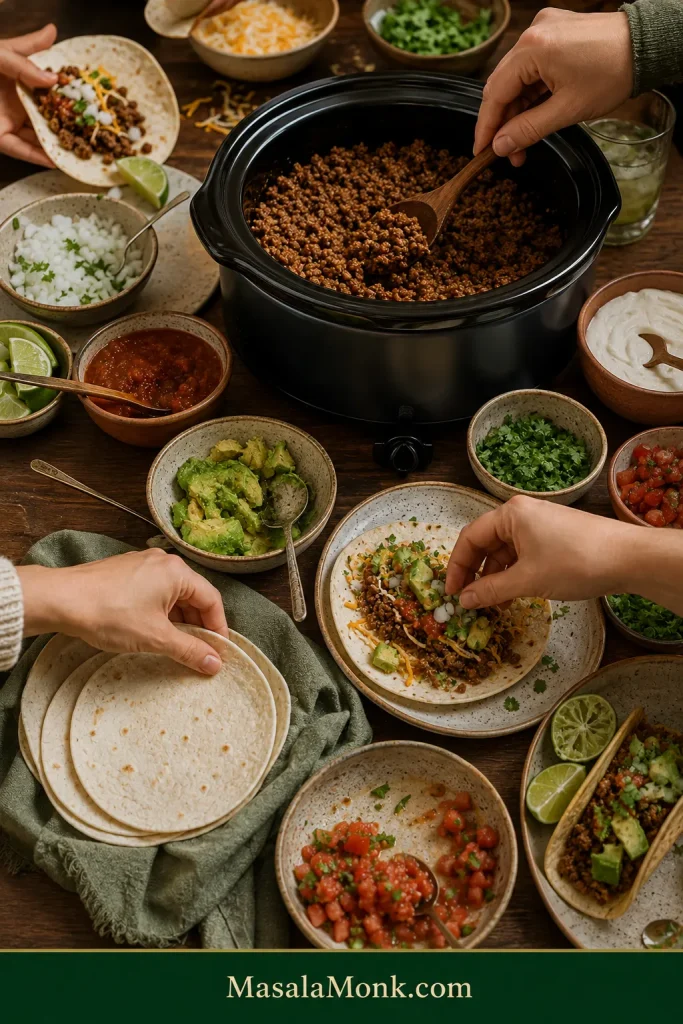
Several hands build tacos around an open black slow cooker filled with seasoned ground beef, surrounded by tortillas, cheese, salsa, avocado, onion and lime on a used taco-bar table.

For 5 Pounds or More, Change the Method

At about 5 lb / 2.3 kg and above, stop treating the meat as one giant raw slow-cooker batch. Brown the beef in batches that fit comfortably in the skillet, or divide the raw beef between multiple slow cookers. Drain excess rendered fat, season each batch, then combine the cooked meat in the Crockpot and keep it hot for serving.

Working in smaller batches keeps the crumbles distinct, makes excess fat easier to drain and helps the seasoning coat the beef evenly. For a big taco bar, the Crockpot becomes the serving station: the meat stays hot while you actually get to enjoy the gathering instead of playing line cook.
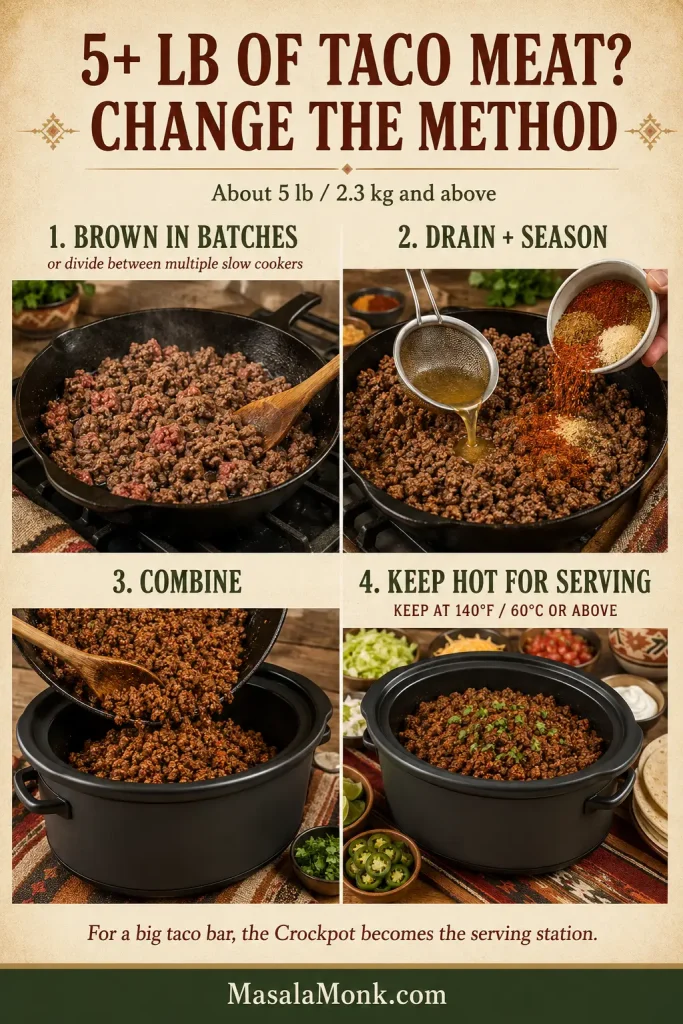
Four-step large-batch taco meat guide showing beef browned in batches, drained and seasoned, combined in an unbranded black slow cooker, then kept at 140 degrees Fahrenheit or above for serving.

Keeping Taco Meat Warm

Use WARM only after the meat is fully cooked and already hot. Keep hot food at 140°F / 60°C or above during serving and keep the lid on between rounds.

↑ Back to top · Jump to Recipe

Make Ahead, Store, Freeze and Reheat

Quick storage guide: refrigerate cooked taco meat for 3–4 days, freeze it for about 3 months for best quality, and reheat leftovers to 165°F / 74°C.

Make It the Day Before

Cook the taco meat completely and get the moisture where you want it before storing. Divide a large batch into smaller, shallow containers and refrigerate it within 2 hours. If food is sitting outdoors above 90°F / 32°C, that window drops to 1 hour.

When serving leftovers again, reheat the meat to 165°F / 74°C before transferring it to a slow cooker on WARM.

How to Freeze Taco Meat

Freeze the meat in amounts that match the way you actually eat it. A dinner-size package or larger family-size package is far more useful than one giant frozen block.

Flat freezer bags stack neatly and thaw faster. For the best eating quality, use the frozen taco meat within about 3 months.
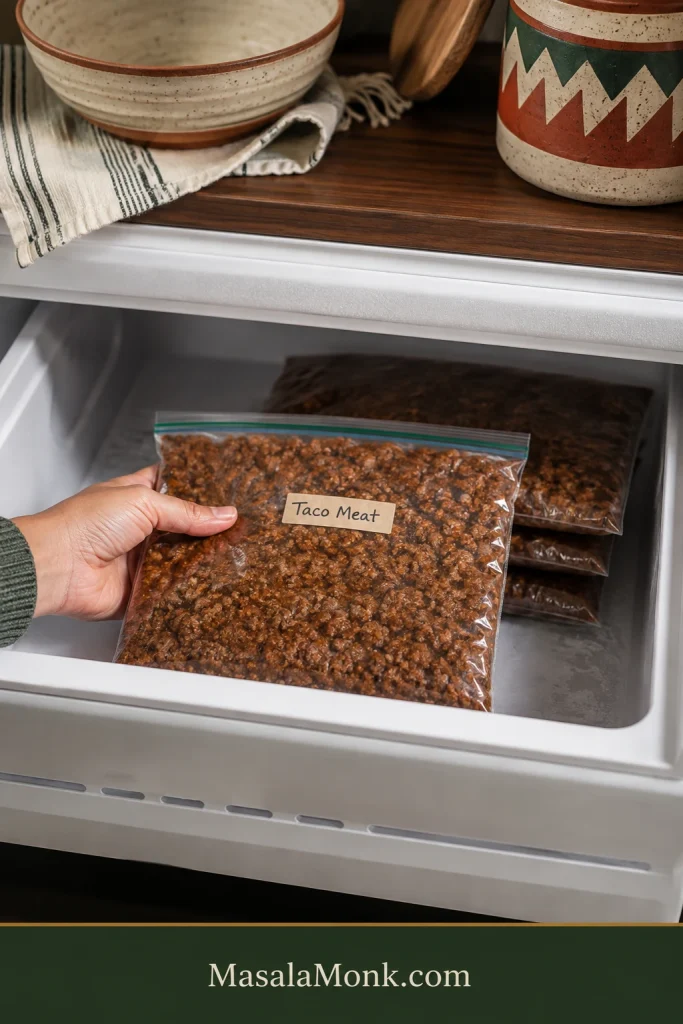
A hand places a thin, flat freezer bag labeled Taco Meat into a freezer drawer beside several other flat bags of cooked ground beef stacked behind it.
Flatten portions before they freeze solid so they stack neatly and thaw faster than one thick block.

Reheat Without Turning It Into Soup

Cold taco meat often looks firmer and drier than it really is. Heat it first, then decide whether it needs anything.

Add salsa 1–2 tablespoons at a time if the meat could use more flavor as well as moisture, or use water if the seasoning is already where you want it. Add slowly so the beef stays juicy without becoming soupy.
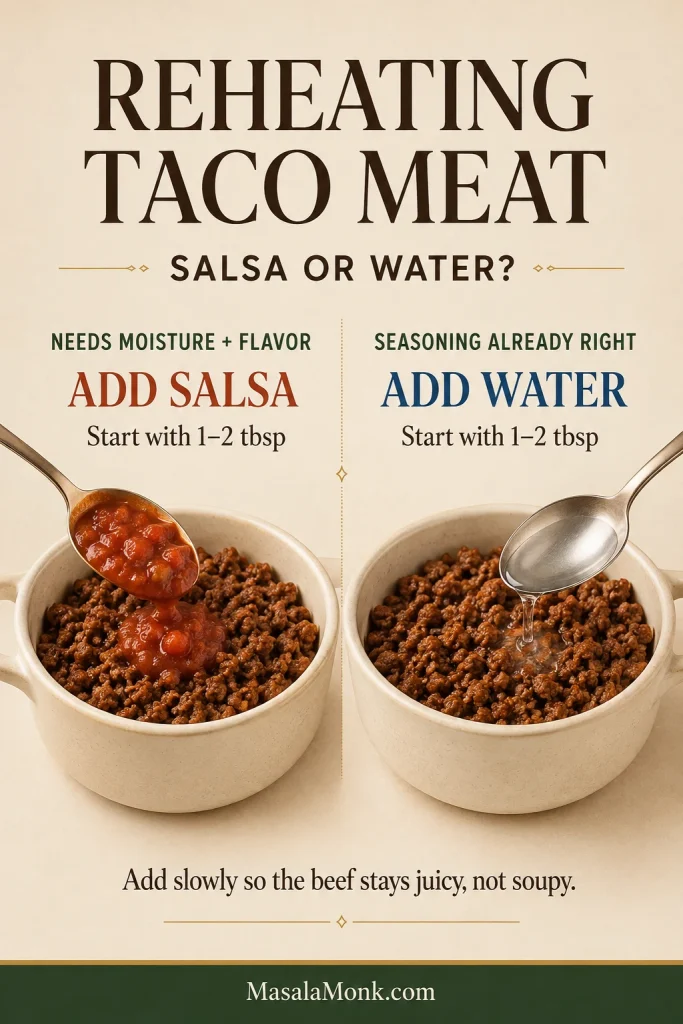
Two matching bowls of taco meat show thick salsa being added when more flavor and moisture are needed and plain water being added when the seasoning is already right.

Ways to Use the Leftovers

The nicest part of making 2 pounds is that tomorrow’s dinner is already halfway done.

Warm tabletop spread showing four uses for leftover taco meat: beef quesadillas, a taco salad bowl, enchiladas with visible ground beef filling, and breakfast tacos with eggs and taco meat.
Small leftovers disappear easily into breakfast tacos or quesadillas; larger portions are worth turning into enchiladas or taco bowls.
  • Need dinner fastest? Make quesadillas, another round of tacos or a tray of nachos.
  • Want something fresher? Spoon the beef over taco salad or build burrito bowls with crisp vegetables and salsa.
  • Want it to feel like a different dinner? Turn the meat into enchiladas or pile it onto loaded baked potatoes.
  • Saving a small portion for morning? Warm it for breakfast tacos with eggs, cheese or avocado.

Leftovers heading toward enchiladas? Pair the beef with our homemade red enchilada sauce and it feels like a completely different dinner.

Frequently Asked Questions

Can I Leave Taco Meat on LOW All Day?

This is not an 8–10 hour workday Crockpot recipe. Ground beef does not need the long tenderizing time of a tough roast. Start checking the standard batch around four hours on LOW; several extra hours can soften and dry the crumbles more than you want.

Can I Put Frozen Ground Beef in the Crockpot?

For this recipe, thaw it first. USDA slow-cooker guidance recommends thawing meat before slow cooking. Thawed beef separates much more easily, which makes it simpler to crumble and check for even doneness.

Can I Use Ground Turkey?

Yes. Expect a softer crumble, and don’t be surprised if the turkey releases more or less liquid depending on how lean it is. Because ground turkey is poultry, cook it to 165°F / 74°C, then drain excess liquid if needed.

How Long Can Taco Meat Stay on WARM?

For Crock-Pot-branded slow cookers, manufacturer guidance recommends no more than about 4 hours on WARM. Other brands may differ, so check your manual. Use WARM only for food that is already fully cooked and hot.

Taco Night Is Basically Handled

Once the beef has the crumble you like and just enough moisture to stay juicy, this is where the Crockpot earns its place: dinner can sit there ready while the tortillas warm and everyone finishes whatever they were doing.

Put out whatever cheese, onion, avocado, lettuce, salsa, jalapeños or lime you already have. Leave the Crockpot where everyone can reach it and let people build their tacos the way they want them.

The meat is hot, seasoned and waiting when everyone is finally ready to eat. That’s really the whole point.
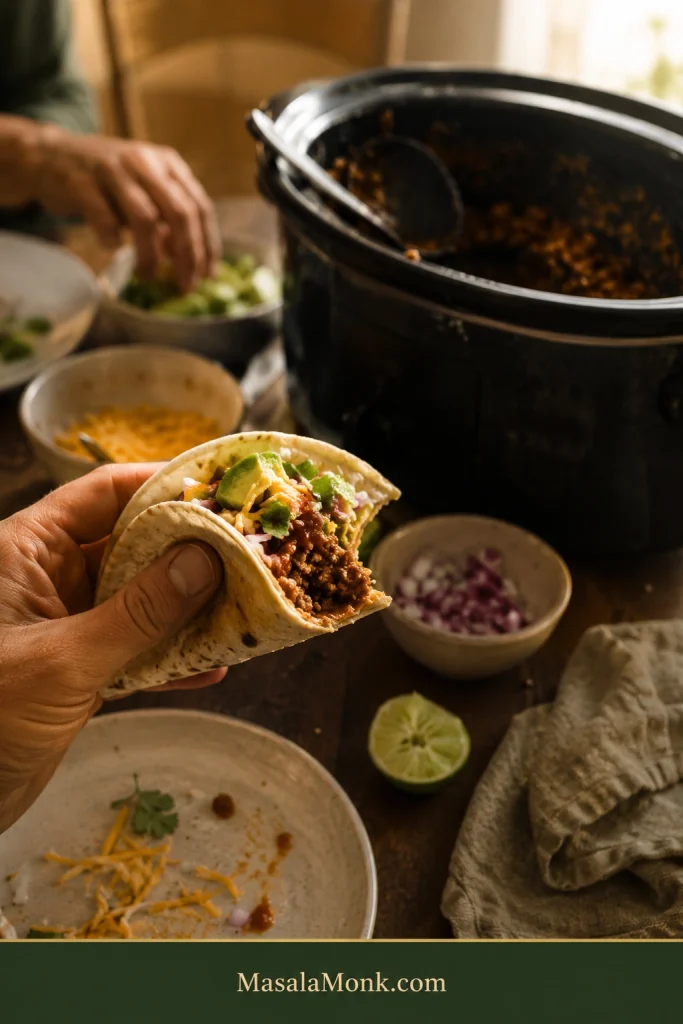
A hand holds a partly eaten soft taco filled with ground beef, avocado, cheese, onion and salsa, with a used black slow cooker, topping bowls, squeezed lime and a messy dinner plate softly visible behind it.

↑ Back to top · Jump to Recipe

Posted on Leave a comment

Sesame Ground Chicken Recipe: Easy 15-Minute High-Protein Dinner

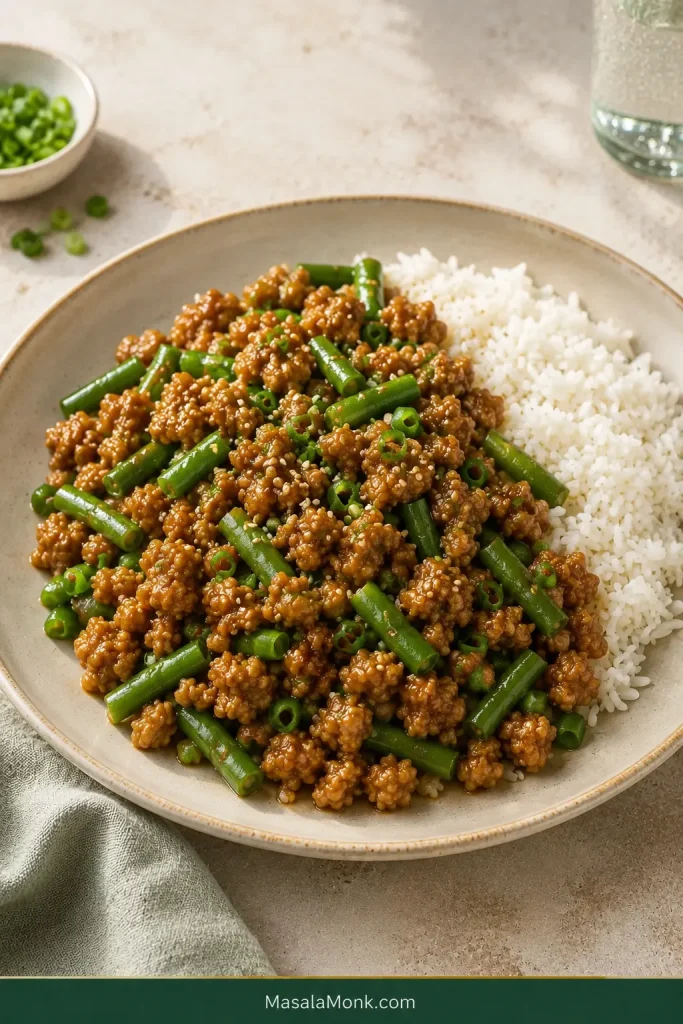
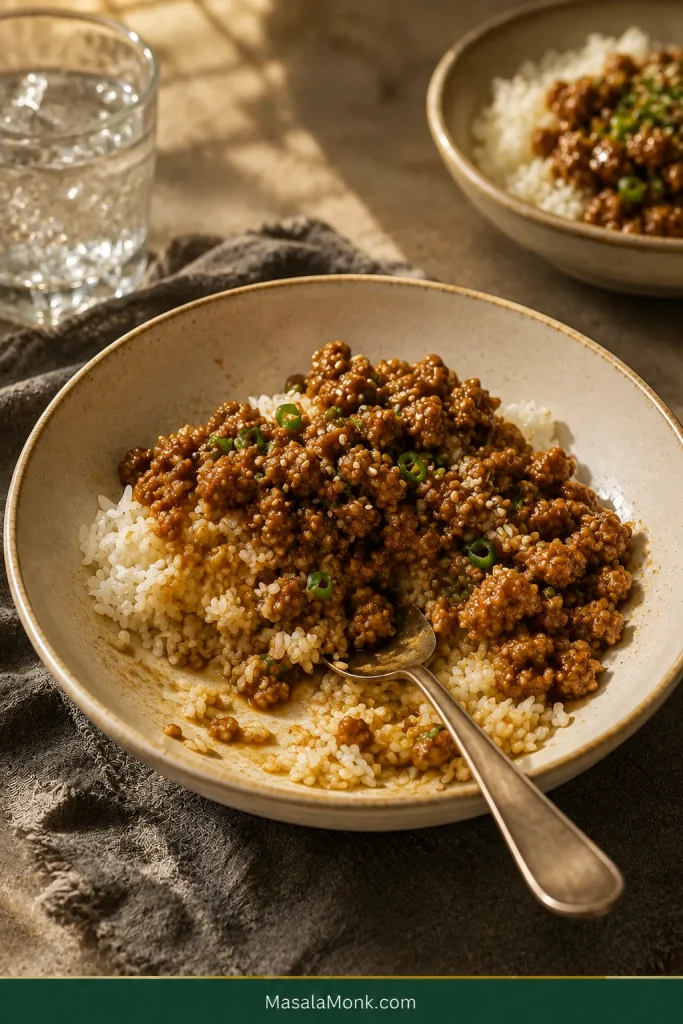
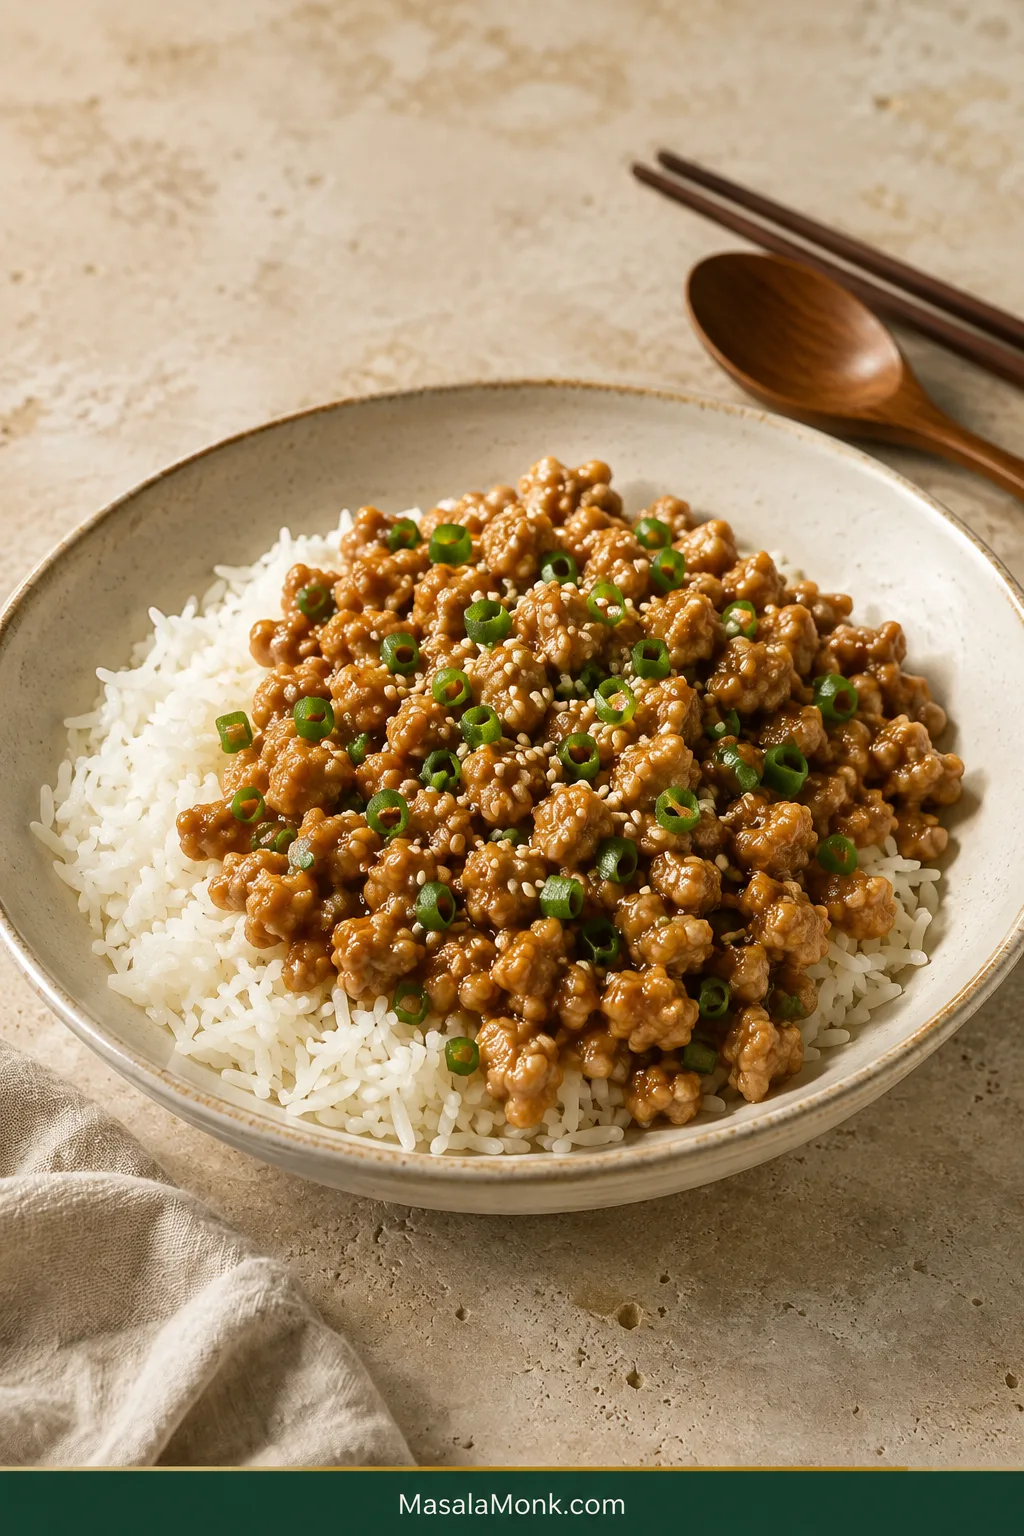
Bowl of jasmine rice topped with glossy sesame ground chicken, sliced scallions and toasted sesame seeds.

A pound of ground chicken is useful. Exciting is another matter. Give it a hot skillet and a gingery sesame sauce, though, and suddenly there are browned edges, juicy crumbles, toasted sesame, and a shiny sweet-savory glaze over hot rice.

This is the kind of dinner that makes an ordinary package of ground chicken feel like a plan instead of a problem. This version is built for 1 lb / 454 g ground chicken, and the chicken itself takes about 15 minutes. No breading, deep frying, or long stir-fry prep.

It takes the familiar savory-sweet direction of sesame chicken and turns it into a quick ground-chicken skillet dinner, sometimes called ground sesame chicken. Brown first. Crumble second. Then give the excess moisture time to leave before the sauce goes in. That short sequence gives the chicken a chance to pick up color without cooking it into tiny dry pieces.

Quick Answer: Sesame Ground Chicken in About 15 Minutes

For 1 lb / 454 g ground chicken: brown it untouched for 1½–2 minutes, then break it into irregular crumbles and keep cooking until the pan no longer looks watery.

Lower the heat to medium, stir in the ginger and garlic for about 30 seconds, then add the sesame sauce and cook for another 1–2 minutes. A 12-inch / 30-cm skillet gives the chicken enough room for moisture to escape. Ground poultry should reach 165°F / 74°C.

Serving it with rice? Start that first or use already-cooked or microwave rice. This guide to how to cook rice covers water ratios and timings for jasmine, basmati, brown, white, and other varieties. Very wet chicken or a crowded smaller skillet may need another minute or two.

Sesame Ground Chicken Recipe

Ground chicken with fresh ginger, garlic, and a sweet-savory toasted-sesame sauce, cooked until juicy, lightly browned, and coated in a thin glaze.

PrepAbout 5 minutes
CookAbout 10 minutes
TotalAbout 15 minutes
Yield3 hearty bowls or 4 standard servings
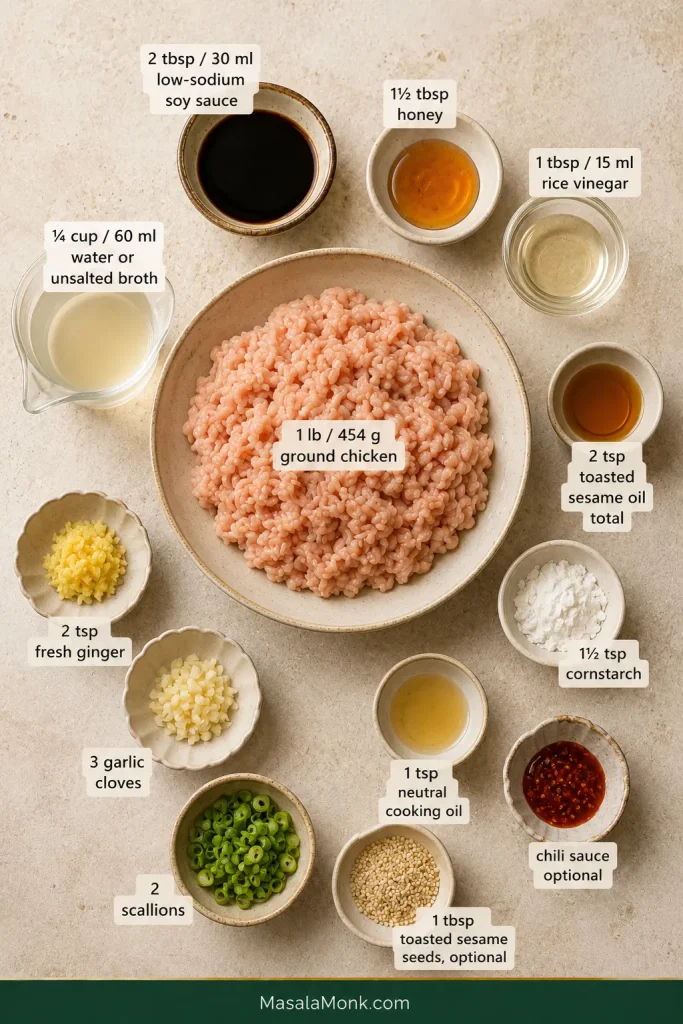
Ground chicken1 lb / 454 g
HeatMild as written; easy to increase
Safe temperature165°F / 74°C

Protein from the chicken alone: about 29 g per hearty bowl when divided 3 ways, or 22 g per standard serving when divided 4 ways. That estimate assumes your ground chicken provides about 22 g protein per 4 oz / 113 g; check the package because products vary.

Equipment: 12-inch / 30-cm skillet, sturdy spatula or wooden spoon, small bowl or measuring jug, and an instant-read thermometer.

For the Chicken

  • 1 lb / 454 g ground chicken; regular ground chicken is easier to keep juicy than extra-lean breast-only mince
  • 1 teaspoon / 5 ml neutral cooking oil, such as avocado, canola, or vegetable oil, if needed
  • 2 teaspoons finely grated fresh ginger, about 4–5 g
  • 3 garlic cloves, finely minced, about 9 g

For the Sesame Sauce

  • 2 tablespoons / 30 ml low-sodium soy sauce
  • 1½ tablespoons honey, about 30–32 g
  • 1 tablespoon / 15 ml rice vinegar
  • ¼ cup / 60 ml water or unsalted chicken broth
  • 1½ teaspoons toasted sesame oil
  • 1½ teaspoons cornstarch
  • ½ teaspoon chili garlic sauce or sriracha, optional; omit for a very mild version

To Finish

  • ½ teaspoon toasted sesame oil
  • 2 scallions, thinly sliced
  • 1 tablespoon toasted sesame seeds, optional
  • Chili crisp, sriracha, or extra chili garlic sauce, optional

Instructions

  1. Mix the sauce. Whisk the low-sodium soy sauce, honey, rice vinegar, water or broth, 1½ teaspoons toasted sesame oil, cornstarch, and optional chili sauce until smooth.
  2. Heat the skillet. Put a 12-inch / 30-cm skillet over medium-high heat and let it get hot. Add the neutral oil if the pan needs it.
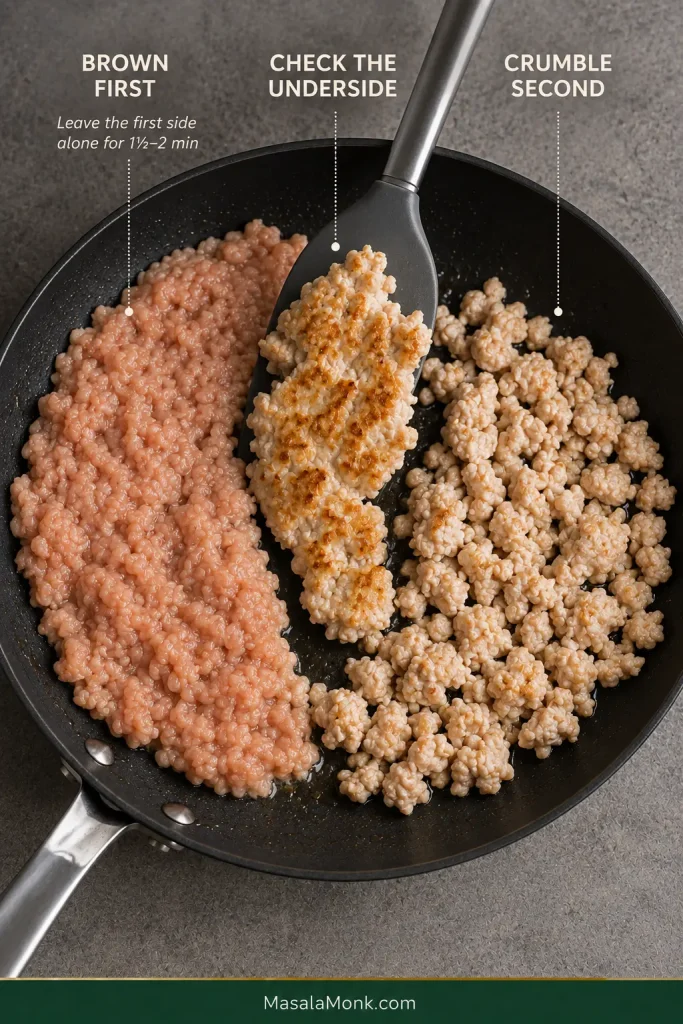
  3. Brown first. Add the ground chicken and press it into a fairly even layer. Leave it undisturbed for 1½–2 minutes so the underside can pick up color.
  4. Crumble second. Turn and divide the chicken with a firm spatula or wooden spoon. Break it into small, uneven pieces you can still see on the fork. Cook for another 2–4 minutes.
  5. Let the excess water cook away. Clear liquid gathering around the chicken is normal. Keep cooking until most of it evaporates. With fattier chicken, spoon off some of any obvious oily pool that remains after the watery liquid is gone.
  6. Lower the heat and add the aromatics. Reduce the heat to medium. Stir in the ginger and garlic; they should smell fragrant almost immediately. About 30 seconds is plenty.
  7. Add the sauce. Whisk it again, pour it into the skillet, and stir for 1–2 minutes. Stay close because the honey can catch as the liquid reduces. Stop when the sauce leaves a light coating on the chicken and slowly settles between the crumbles.
  8. Finish and serve. Check that the chicken has reached 165°F / 74°C, then take the skillet off the heat. Stir in the reserved ½ teaspoon toasted sesame oil and taste before adding salt. Scatter over the scallions and toasted sesame seeds, then spoon the chicken over hot rice while the glaze is still loose and shiny.
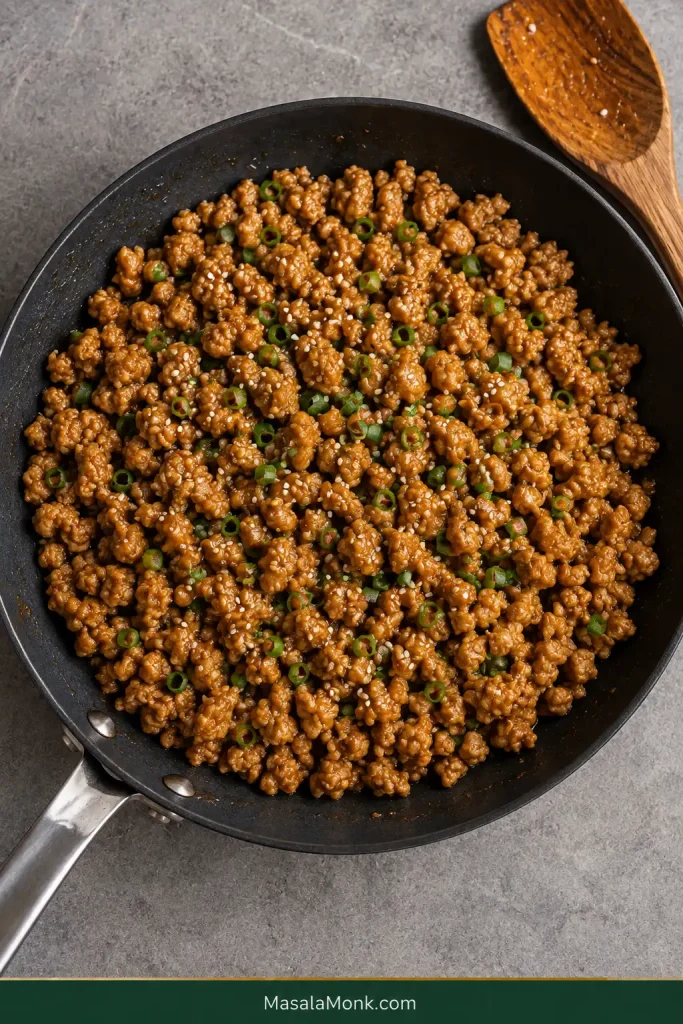
Overhead skillet of browned sesame ground chicken coated in a thin amber glaze with scallions and sesame seeds.
Ready means glossy chicken with almost no loose sauce left in the skillet.

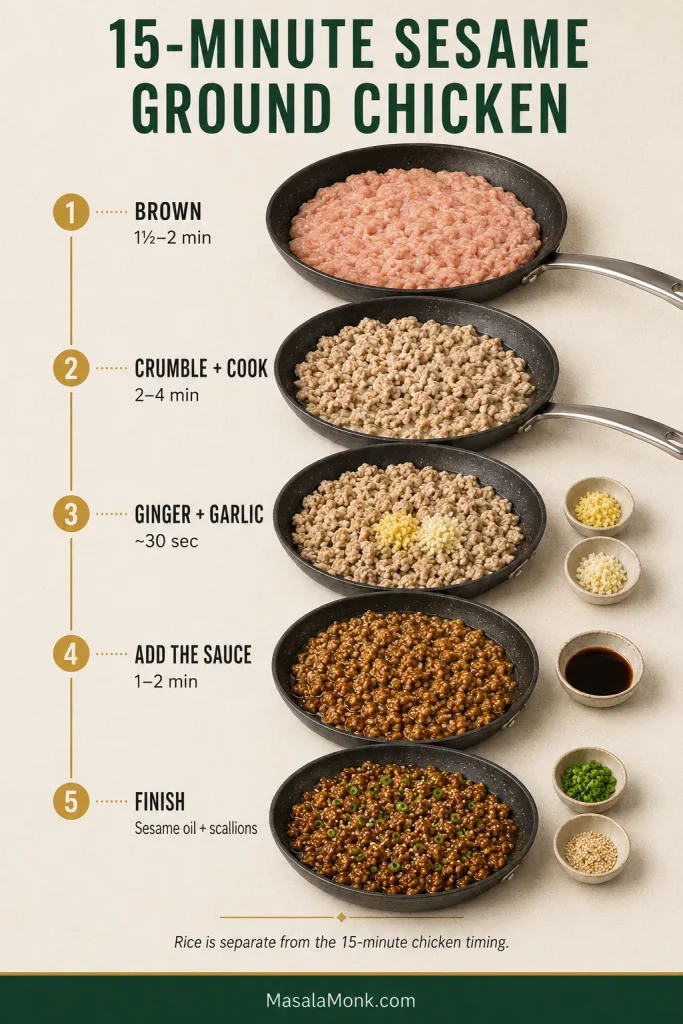
At a glance: the visual below maps the chicken from first sear to final glaze; use the deeper sections that follow when a pan cue needs more explanation.

Fifteen-minute sesame ground chicken timeline: brown for 1½–2 minutes, crumble and cook for 2–4 minutes, add ginger and garlic for about 30 seconds, add sauce for 1–2 minutes, then finish with sesame oil and scallions. Rice timing is separate.
Rice runs on a separate clock; the chicken itself stays on this 15-minute sequence.

What the Finished Chicken Should Look Like

The crumbles should stay irregular, with golden spots here and there and enough moisture inside to remain juicy. The sauce should form a thin coating around the meat, with no loose brown puddle at the bottom of the skillet.

Wet → Sizzling → Browned → Glossy

Pan StateWhat You See or HearWhat to Do
WetClear liquid collects around the chicken and the pan sounds like a simmer.Keep cooking. No sauce yet.
SizzlingMost water is gone and the sound becomes sharper.Let the meat pick up some color.
BrownedSome surfaces are golden instead of uniformly pale.Lower the heat and add the aromatics.
GlossyThe sauce lightly coats the crumbles without pooling.Finish and take the skillet off the heat.
Four ground chicken pan states: Wet with visible liquid and instruction to keep cooking; Sizzling after most moisture evaporates and instruction to let it brown; Browned with golden edges and instruction to lower the heat; and Glossy with a thin sauce coating and instruction to finish.
Listen as well as look. A wet simmer means moisture is still escaping; once the sound sharpens into a true sizzle, the skillet finally has the conditions needed for browning.

The whole batch doesn’t need to become crisp. A few browned edges and juicy crumbles are a better stopping point than continuing to fry lean chicken that is already cooked.

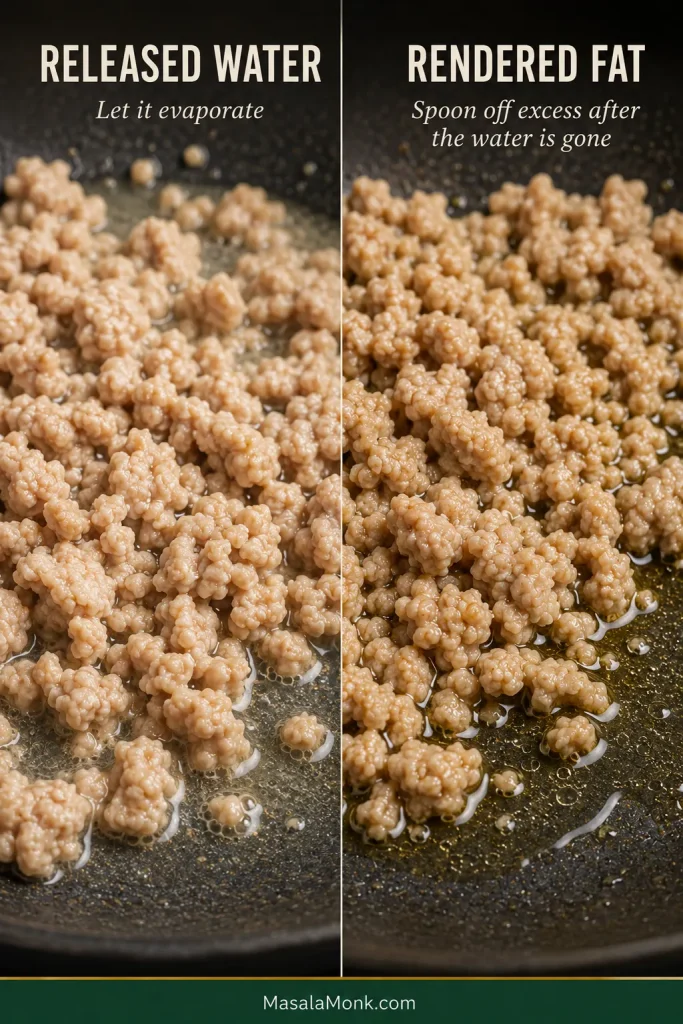
Water and rendered fat need different treatment too. Let clear cooking liquid evaporate. If an oily layer remains afterward because your chicken is fattier, spoon off only the excess.

Close comparison of ground chicken in thin released cooking water on one side and a clearer golden pool of rendered fat on the other.
Thin released water usually bubbles actively as it cooks away. Rendered fat behaves differently: after most watery moisture disappears, it tends to remain as a quieter, shiny oily layer around the chicken.

Browning tells you about surface moisture and flavor, not doneness. Ground chicken can be safely cooked even when it isn’t deeply browned, so use temperature—not color alone—to confirm 165°F / 74°C.

Chicken still turning pale or watery? Jump to the browning technique.

Ingredients That Matter

There isn’t a long ingredient list here, so a few choices do most of the work.

Raw ground chicken surrounded by measured low-sodium soy sauce, honey, rice vinegar, water or broth, toasted sesame oil, cornstarch, ginger, garlic, scallions, sesame seeds and optional chili sauce.
Measure the sauce ingredients before the skillet gets hot. Once ginger and garlic hit the pan, the remaining steps move quickly enough that stopping to measure can cost you both browning and sauce control.

Choose Ground Chicken You Can Keep Juicy

Regular ground chicken is usually more forgiving than extra-lean breast-only mince. When the package lists a lean percentage, something around 90–93% lean is a good fit, but chicken labeled simply “ground chicken” is perfectly fine.

Soy Sauce and Toasted Sesame Oil

Low-sodium soy sauce is easier to work with here. The sauce concentrates in the skillet, so starting slightly lower on salt leaves room to adjust once the chicken is finished.

Use dark, fragrant toasted sesame oil for the sesame flavor, not for frying the chicken. Most goes into the sauce; the final ½ teaspoon goes in off the heat, where its nutty aroma stays much fresher.

Ginger, Garlic, Honey, Vinegar and Cornstarch

Fresh ginger and garlic bring a sharp, fragrant edge. Honey adds gentle sweetness, rice vinegar keeps the sauce bright against the soy, and a small amount of cornstarch gives the chicken its thin, shiny coating.

How to Keep Ground Chicken Juicy and Browned

A broad layer of chicken gets uninterrupted contact with the hot skillet. Break it apart right away and lots of wet surfaces are exposed at once, making the pan more likely to steam before much color develops.

That initial untouched period isn’t about cooking the chicken through. It is there to build a browned underside before the meat is broken apart.

Ground chicken shown browning as a broad layer, a ragged section lifted to reveal a golden underside, and the seared meat being divided into irregular crumbles.
A firm spatula makes the sequence easier: lift a ragged section to check the underside, then divide the seared layer into pieces. Repeated scraping and mashing, by contrast, turns the chicken fine before it has a chance to brown.

Crumb Size Matters Too

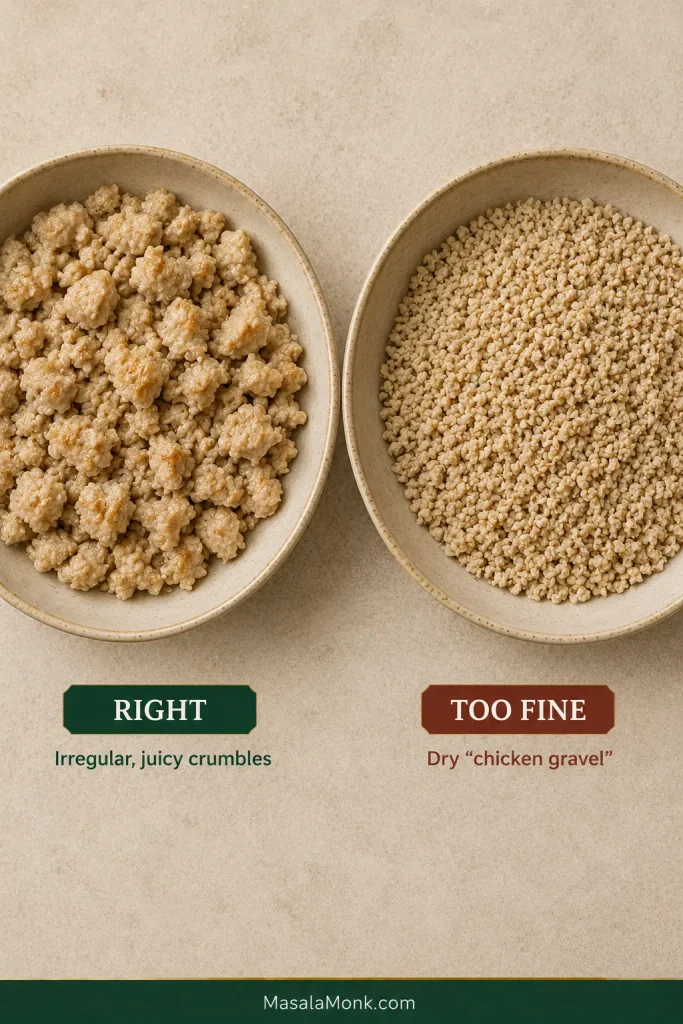
Small, uneven crumbles give the sauce plenty of edges to cling to while staying juicier than finely mashed meat. Don’t turn it into chicken gravel. Tiny pieces have very little room between cooked and dry.

Comparison of moist, irregular ground chicken crumbles labeled “Right” beside much finer, drier chicken labeled “Too Fine” and “Dry chicken gravel.”
A useful crumble-size test is whether you can still see distinct pieces on a fork or spoon. Once the chicken looks uniformly grainy, it has far less room between properly cooked and dry.

Once the chicken is broken up, use the Wet → Sizzling → Browned → Glossy cues to read the pan. Those cues matter more than forcing every stage into an exact number of seconds.

How to Get the Sesame Sauce Just Right

Aim for savory first, then a gentle sweetness, with ginger, garlic, toasted sesame, and enough acidity to keep things lively. From there, adjust the sauce to the bowl you’re actually making.

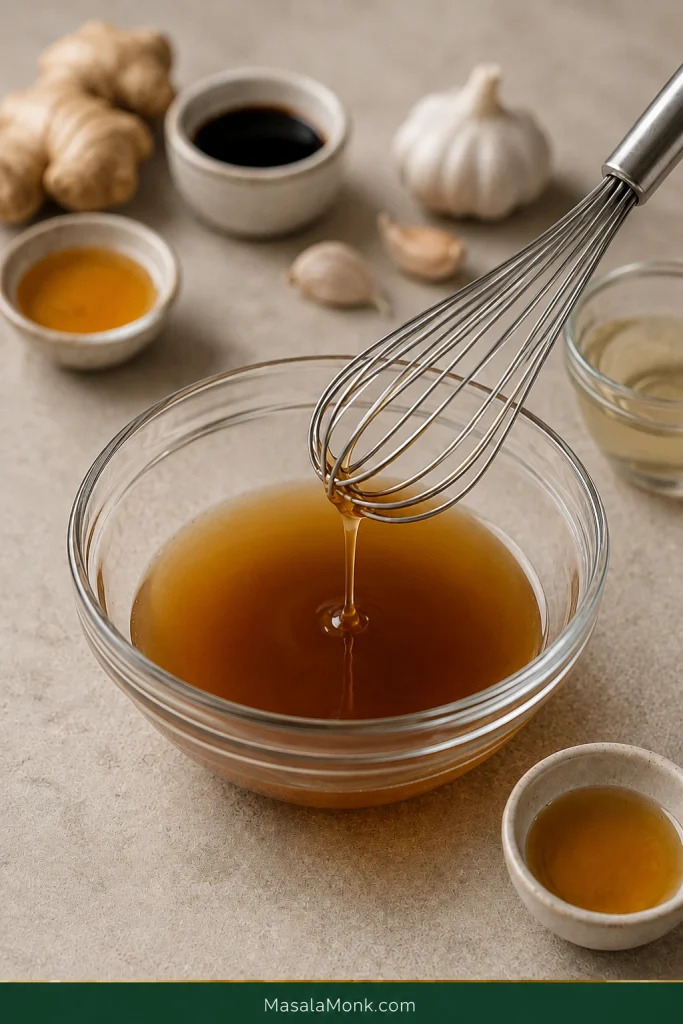
Thin amber-brown sesame sauce being whisked in a clear glass bowl beside ginger, garlic and small dishes of sauce ingredients.
The uncooked sesame sauce should still pour easily. Cornstarch does most of its thickening after the mixture reaches the hot skillet, so a sticky glaze texture in the mixing bowl would already be too thick.

The 1-Pound Sesame Sauce Formula

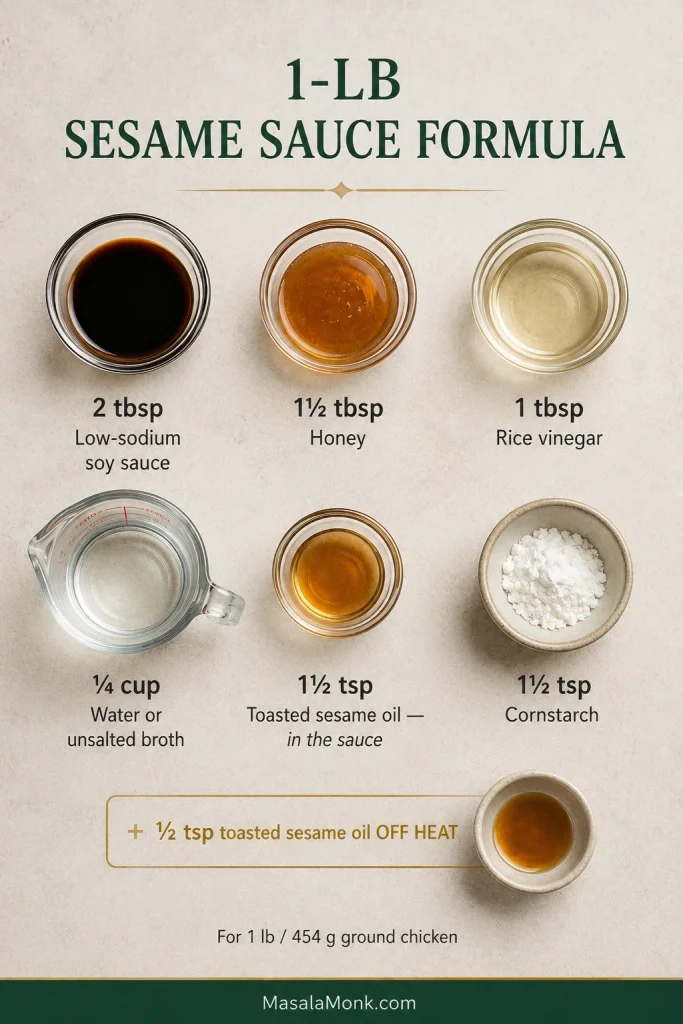
For 1 lb / 454 g ground chicken, use 2 tablespoons low-sodium soy sauce + 1½ tablespoons honey + 1 tablespoon rice vinegar + ¼ cup water or broth + 1½ teaspoons toasted sesame oil + 1½ teaspoons cornstarch, then reserve another ½ teaspoon toasted sesame oil for finishing.

One-pound sesame sauce formula with 2 tablespoons low-sodium soy sauce, 1½ tablespoons honey, 1 tablespoon rice vinegar, ¼ cup water or broth, 1½ teaspoons toasted sesame oil and 1½ teaspoons cornstarch, plus ½ teaspoon sesame oil added off heat.
Reserve the final ½ teaspoon of toasted sesame oil for off-heat finishing, where its aroma stays fresher.

For a more general-purpose version you can adapt to chicken pieces, beef, tofu, vegetables, or noodles, this stir fry sauce recipe goes deeper into balancing soy, sweetness, acidity, and thickness for different stir-fries.

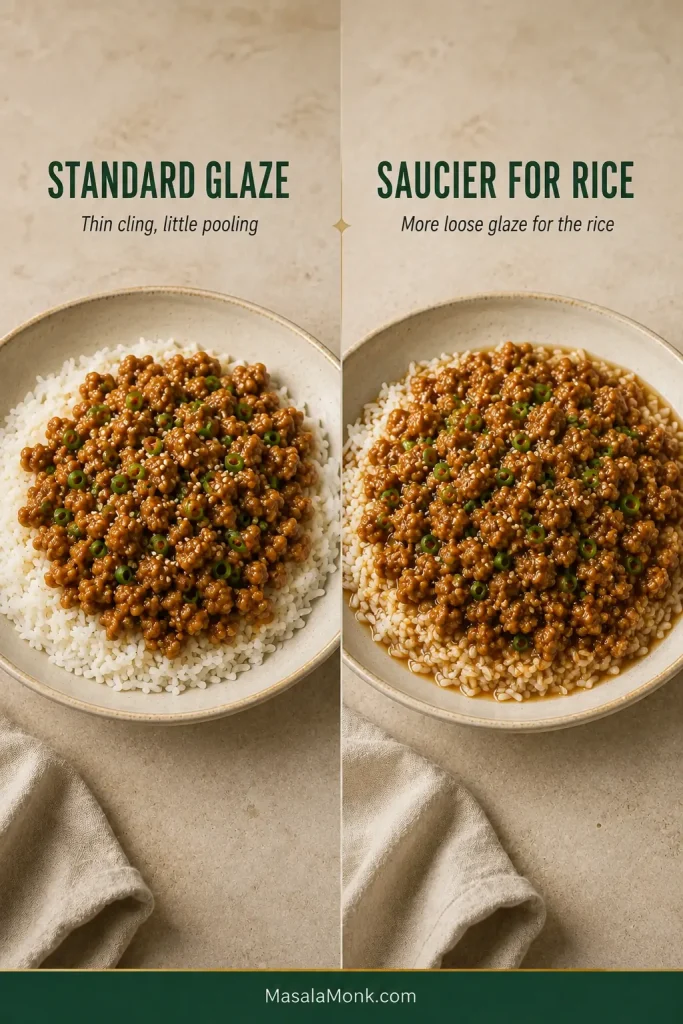
Want More Sauce for the Rice? Don’t Double Everything

A saucier rice bowl needs more liquid along with slightly more seasoning. Doubling the soy alone makes the mixture saltier much faster than it makes it better.

  • Water or unsalted broth: add ¼ cup / 60 ml
  • Low-sodium soy sauce: add 1 teaspoon / 5 ml
  • Honey: add 1 teaspoon
  • Rice vinegar: add ½ teaspoon
  • Cornstarch: add ½ teaspoon

Whisk those additions into the original sauce before it reaches the skillet. Honey can catch quickly once the mixture reduces. If it starts sticking hard, move the pan off the heat and loosen it with a tablespoon or two of water.

Two sesame ground chicken rice bowls compared side by side: standard glaze with little pooling and a saucier version with more loose glaze reaching the rice.
More sauce for rice should still look like glaze—not soup.

Taste and Finish the Sesame Glaze

Taste it the way you’re going to eat it. With a rice bowl, taste the chicken and rice together before making the final adjustment. Plain rice softens salt, sweetness, and heat, so the sauce can taste stronger on its own than it does in the finished bowl.

If It Tastes…Try This
Too saltyAdd water or unsalted broth first, then taste again.
Too sweetAdd a small splash of rice vinegar; if needed, follow with a little soy and water.
Flat or heavyTry a little rice vinegar before reaching for more salt.
Not savory enoughAdd low-sodium soy sauce ½ teaspoon at a time.
Needs more sesameAdd toasted sesame oil a few drops at a time after cooking.
Needs more heatAdd chili garlic sauce, sriracha, or chili crisp at the table.

When the glaze is right, it clings to the rough edges of the chicken while the ginger and toasted sesame still come through underneath the soy and honey.

Sauce not behaving? Jump to the sauce troubleshooting guide.

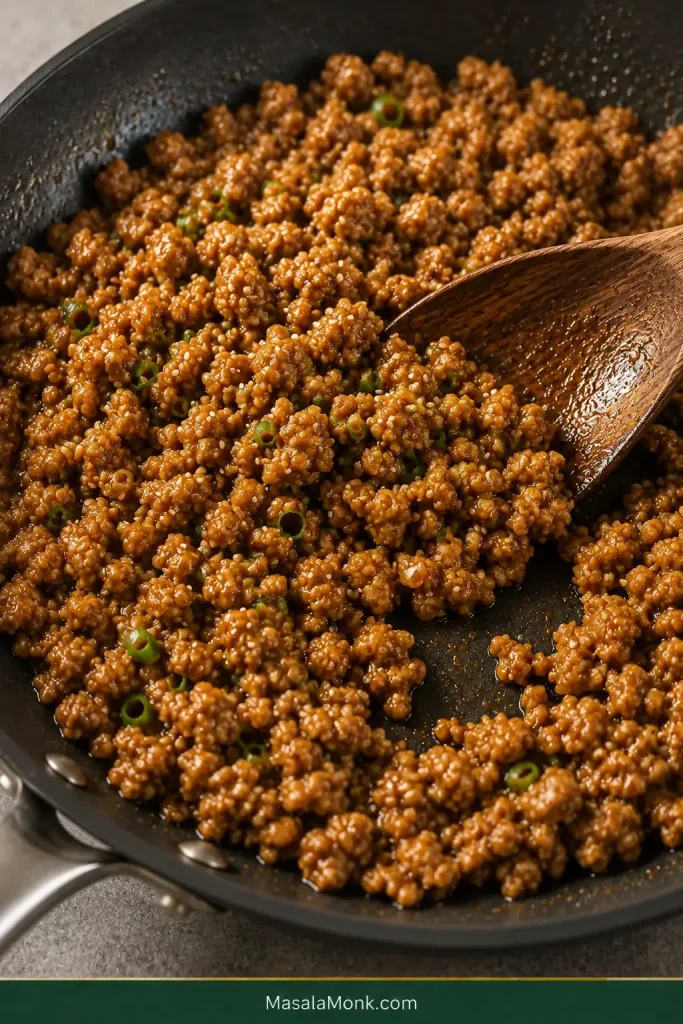
Close-up of irregular sesame ground chicken crumbles lightly coated in glossy amber sauce as a wooden spoon moves through the skillet.
Lift a spoonful before switching off the heat. The glaze should stay attached to the rough crumbles but should not stretch into strings or form a paste between them—thicker is not automatically better.

Make It a Complete Dinner

Pick one base, one vegetable, and something fresh or crunchy. A fast dinner doesn’t need to become a twelve-ingredient project.

Sesame Ground Chicken with Green Beans

Green beans are an especially good fit. Their crisp-tender bite breaks up the softness of chicken and rice, and they hold up well when leftovers are part of the plan.

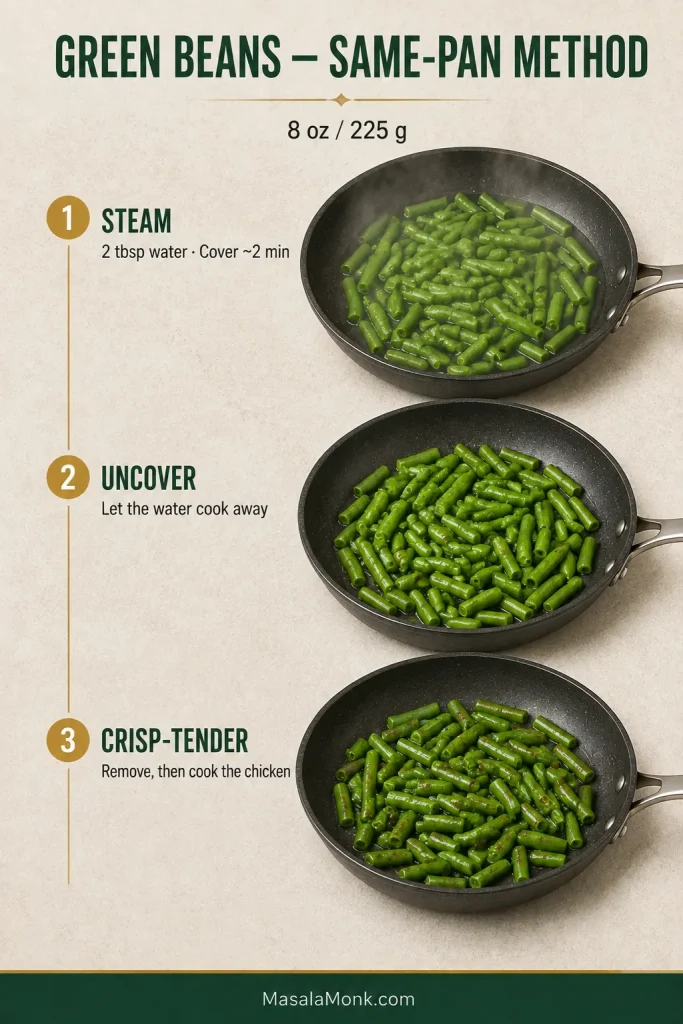
Use about 8 oz / 225 g green beans, trimmed and cut into roughly 1-inch / 2.5-cm pieces.

  1. Add the beans to the hot skillet with 2 tablespoons / 30 ml water.
  2. Cover and steam for about 2 minutes.
  3. Uncover and let the remaining water evaporate.
  4. Cook another minute if needed, until bright and crisp-tender.
  5. Transfer them to a plate, then cook the chicken in the same skillet.
  6. Return the beans when the sesame sauce goes in.
Three-stage green bean method: cut green beans steam with 2 tablespoons water for about 2 minutes, are uncovered so the water evaporates, then become bright and crisp-tender before being removed from the skillet.
Don’t rely only on the two-minute steam. Before removing the green beans, check that the skillet looks mostly dry; lingering water can follow the beans back into the pan later and loosen the sesame glaze.

The same-pan version adds a few minutes because the beans cook before the chicken. To stay closer to the original timing, microwave or steam them at the same time as the chicken, then fold them in with the sauce.

Sesame ground chicken mixed with bright crisp-tender green beans and served beside fluffy white rice.
Cutting green beans into roughly 1-inch pieces helps them cook evenly and makes the finished bowl easier to eat—chicken, rice and crisp vegetable can all land naturally in the same forkful.

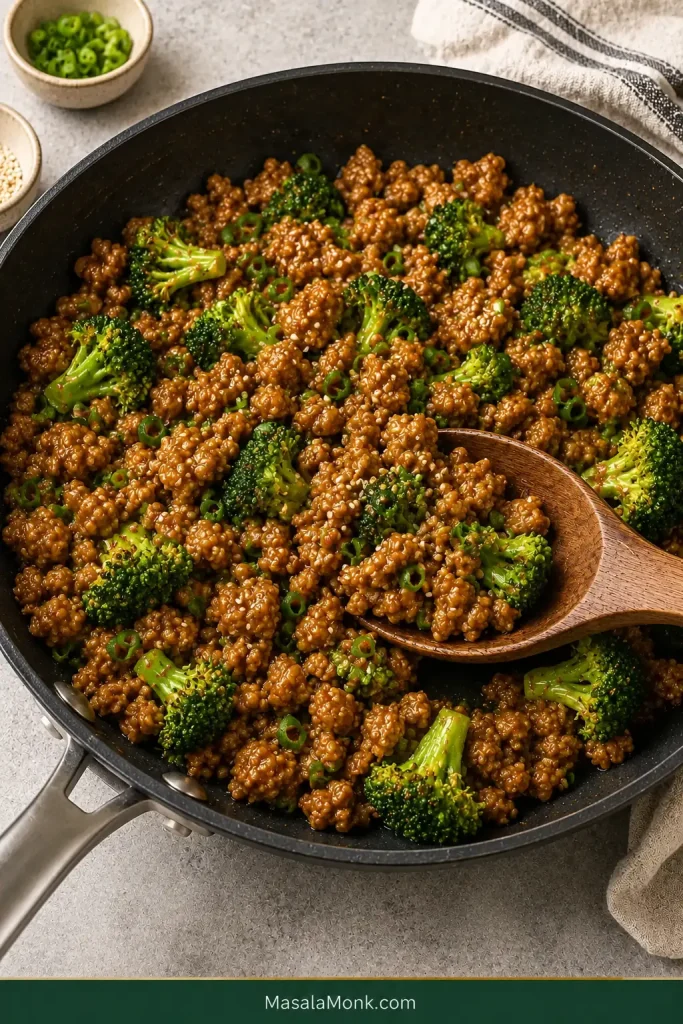
Sesame Ground Chicken Stir-Fry with Broccoli or Mixed Vegetables

Using broccoli instead? Start with about 8 oz / 225 g cut into small florets. Steam or microwave until crisp-tender, drain well, and add it when the sauce goes in.

Frozen broccoli, green beans, or a stir-fry mix work too. Cook away the water they release before adding the sauce so the glaze doesn’t become diluted.

Skillet of glossy sesame ground chicken mixed with bright green broccoli florets, with a wooden serving spoon lifting a portion.
The broccoli should stay bright and crisp-tender while the sesame ground chicken remains visibly glazed.

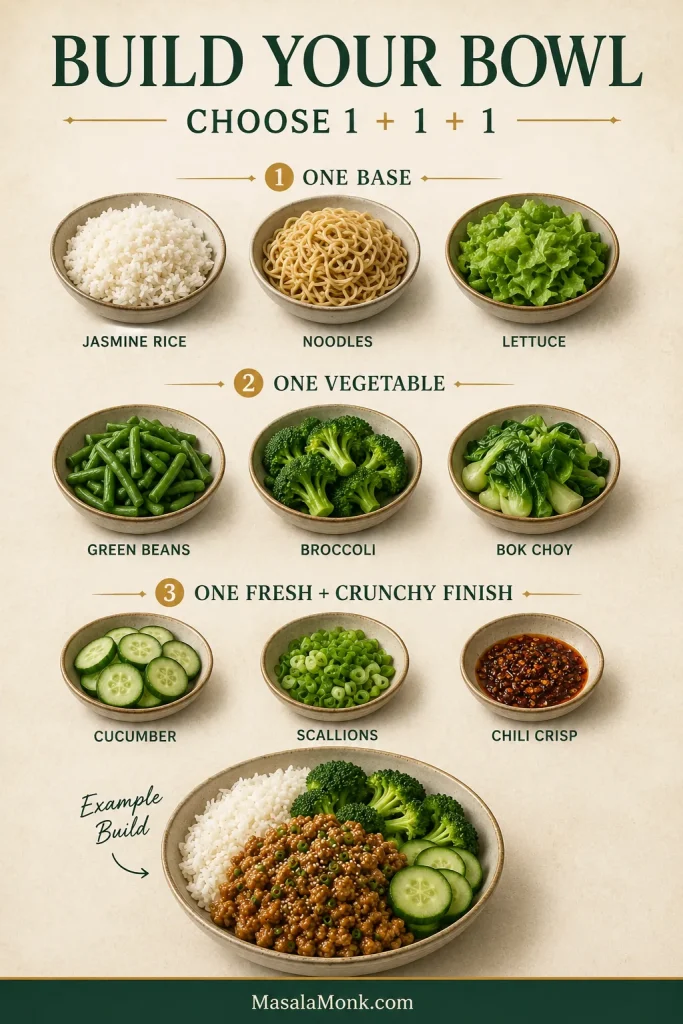
Build the Rest of the Bowl

Base

  • Jasmine rice
  • Brown rice
  • Noodles
  • Cauliflower rice
  • Sautéed cabbage
  • Lettuce cups

Vegetables

  • Green beans
  • Broccoli
  • Snap peas
  • Shredded carrots
  • Bok choy

Fresh & Crunchy

  • Scallions
  • Toasted sesame seeds
  • Cucumber
  • Cashews or peanuts
  • Chili crisp
Build-your-bowl guide offering jasmine rice, noodles or lettuce as bases; green beans, broccoli or bok choy as vegetables; cucumber, scallions or chili crisp as finishes; plus an example sesame ground chicken bowl with rice, broccoli and cucumber.
Think in textures as well as ingredients: a soft base, one cooked vegetable and one fresh or crunchy finish give the bowl contrast without turning a fast dinner into a long toppings project.

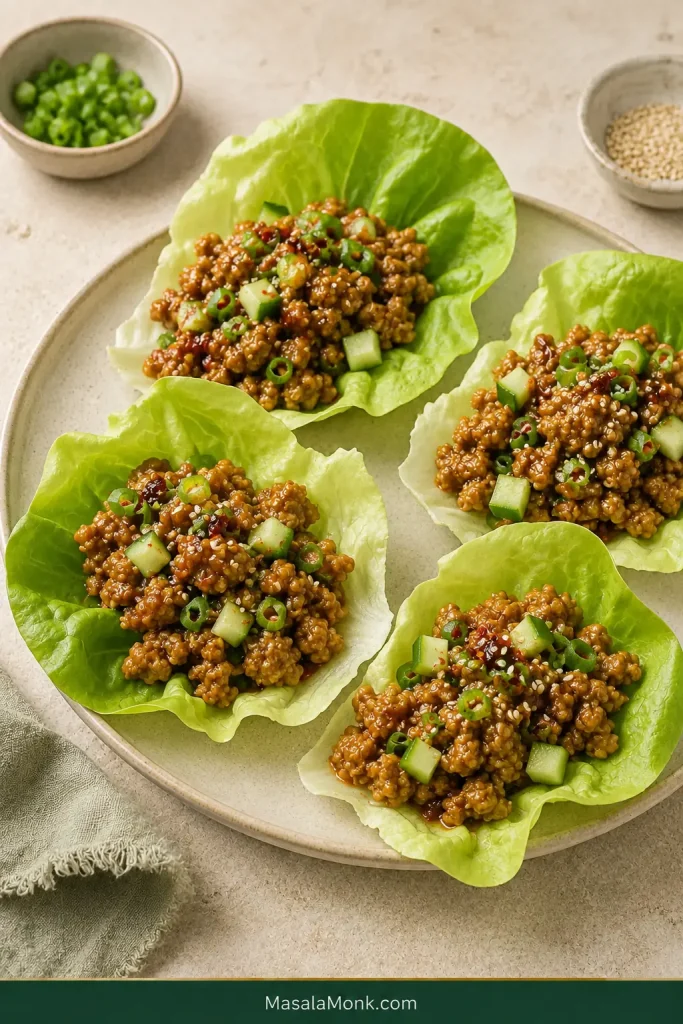
Cauliflower rice, sautéed cabbage, and lettuce cups are the lower-carb choices here. The sauce still contains honey, so keep that in mind if you’re counting carbs.

Four butter lettuce cups filled with sesame ground chicken, diced cucumber, sliced scallions and toasted sesame seeds.
Cool lettuce and cucumber do more than replace rice: their crispness cuts through the warm savory-sweet glaze, so sesame ground chicken lettuce cups still feel satisfying rather than sparse.

Noodles work beautifully as a base here too. If you’d rather make noodles the whole meal another night, these Peanut Noodles use many of the same ginger-soy-chili flavors with a creamy peanut sauce.

Easy Variations & Ingredient Swaps

Want more heat? Increase the chili sauce in the skillet or let everyone add sriracha or chili crisp at the table. Keeping the main batch mild makes it easy to adjust each bowl separately.

If crisp coated chicken with a sticky takeout-style glaze is the goal, try this General Tso Chicken recipe instead.

Ingredient Swaps That Work

If You Don’t Have…Use…How to Adjust
Ground chickenGround turkeyUse the same weight. Very lean turkey may need closer watching near the end.
Low-sodium soy sauceRegular soy sauce + waterUse 1–1½ tbsp soy, then add water to reach the original 2 tbsp volume.
Low-sodium soy sauceCertified gluten-free low-sodium tamariUse 1:1; sodium still varies by brand.
Fresh ginger or garlicRefrigerated ginger or garlic pasteUse the package’s stated fresh-equivalent amount.
Chili garlic sauceSrirachaUse the same starting amount, then adjust the heat at the table.

Making the whole dish gluten-free? Check the chili sauce and any other packaged condiments too, since certification can vary by brand.

Once you’ve settled on the version you want, scaling is mostly arithmetic—until the skillet gets crowded.

How to Scale Sesame Ground Chicken from ½ lb to 2 lb

Making 2 lb / 907 g? Scale the ingredients below, but brown the chicken in two batches unless your cooking surface is substantially larger. A double batch will take longer than 15 minutes because the chicken needs two rounds in the skillet.

Scaled Ingredients

Ingredient ½ lb / 227 g 1 lb / 454 g 1½ lb / 680 g 2 lb / 907 g
Low-sodium soy sauce1 tbsp / 15 ml2 tbsp / 30 ml3 tbsp / 45 ml¼ cup / 60 ml
Honey2¼ tsp / ~16 g1½ tbsp / ~32 g2¼ tbsp / ~48 g3 tbsp / ~64 g
Rice vinegarabout 8 ml / 1½ tsp15 ml / 1 tbspabout 22 ml / 1½ tbsp30 ml / 2 tbsp
Water or broth2 tbsp / 30 ml¼ cup / 60 ml6 tbsp / 90 ml½ cup / 120 ml
Toasted sesame oil, total1 tsp / 5 ml2 tsp / 10 ml1 tbsp / 15 ml4 tsp / 20 ml
Cornstarch¾ tsp1½ tsp2¼ tsp1 tbsp
Fresh ginger1 tsp2 tsp1 tbsp4 tsp
Garlic1–2 cloves3 cloves4–5 cloves6 cloves

Reserve about one-quarter of the toasted sesame oil for finishing and use the rest in the sauce. Neutral oil, scallions, and sesame seeds don’t need exact scaling. Scale the optional chili conservatively and adjust it at the end; taste before adding any final salt.

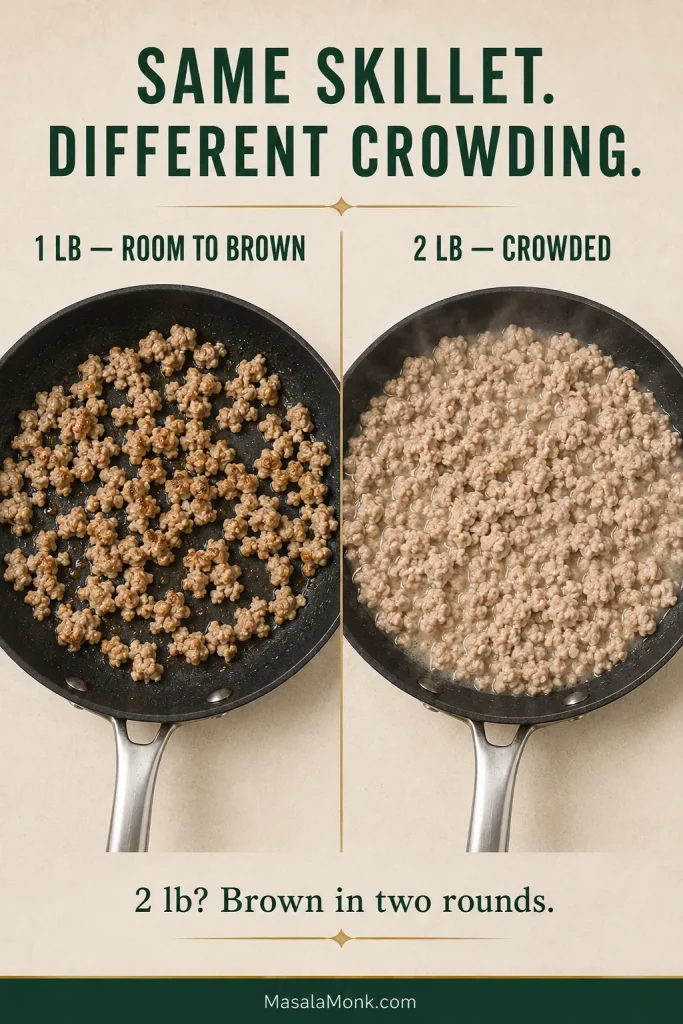
The sauce doubles. Your skillet capacity does not. Crowding two pounds of cold chicken into the same 12-inch pan traps much more moisture, so larger batches need room and an extra round of browning.

Same-size skillets comparing 1 pound of ground chicken spread out with bare pan visible against 2 pounds crowded together in released moisture; text advises browning 2 pounds in two rounds.
A simple crowding test is whether you can still see meaningful bare skillet between pieces. Once most of the hot surface disappears beneath chicken, released moisture has fewer places to escape and steaming takes over.

Troubleshooting: What Went Wrong?

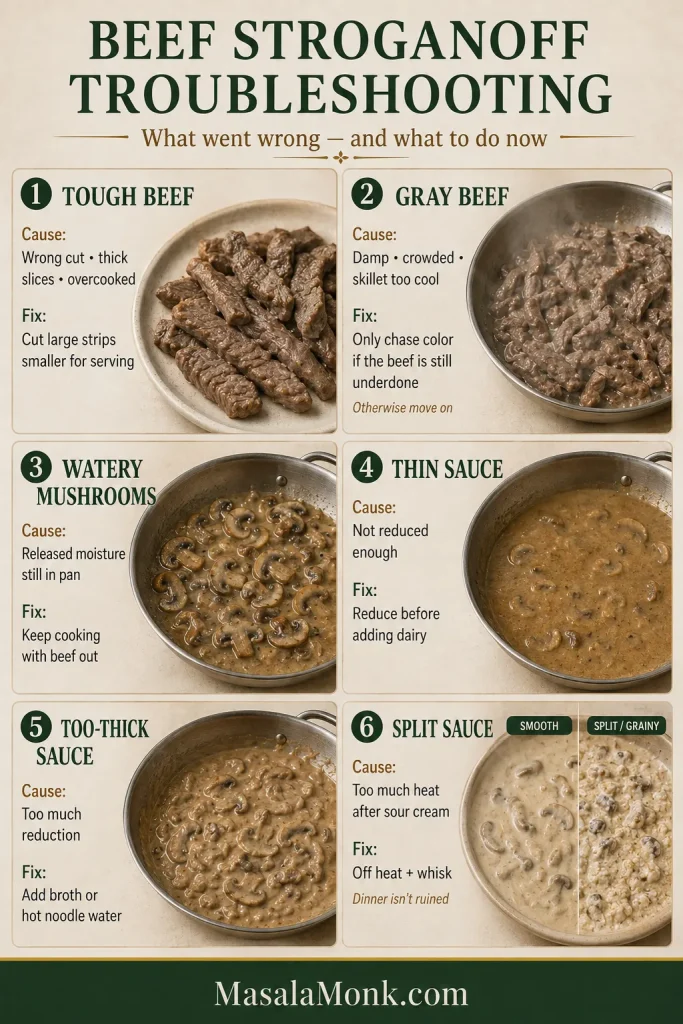
A watery skillet, pale chicken, or sauce that looks wrong doesn’t automatically mean dinner is ruined. First work out whether the problem is coming from the meat, the pan, the vegetables, or the sauce.

For a quick visual reset, revisit the Wet → Sizzling → Browned → Glossy guide or the sesame sauce guide.

Start with the Symptom

ProblemMost Likely CauseWhat to Do
Chicken is grey and wateryPan too cool or crowded; released water hasn’t evaporated.Keep cooking until the excess liquid disappears and the chicken can begin taking on color.
Pan looks greasyFattier chicken released more rendered fat than needed.Once the watery liquid is gone, spoon off part of any obvious oily pool.
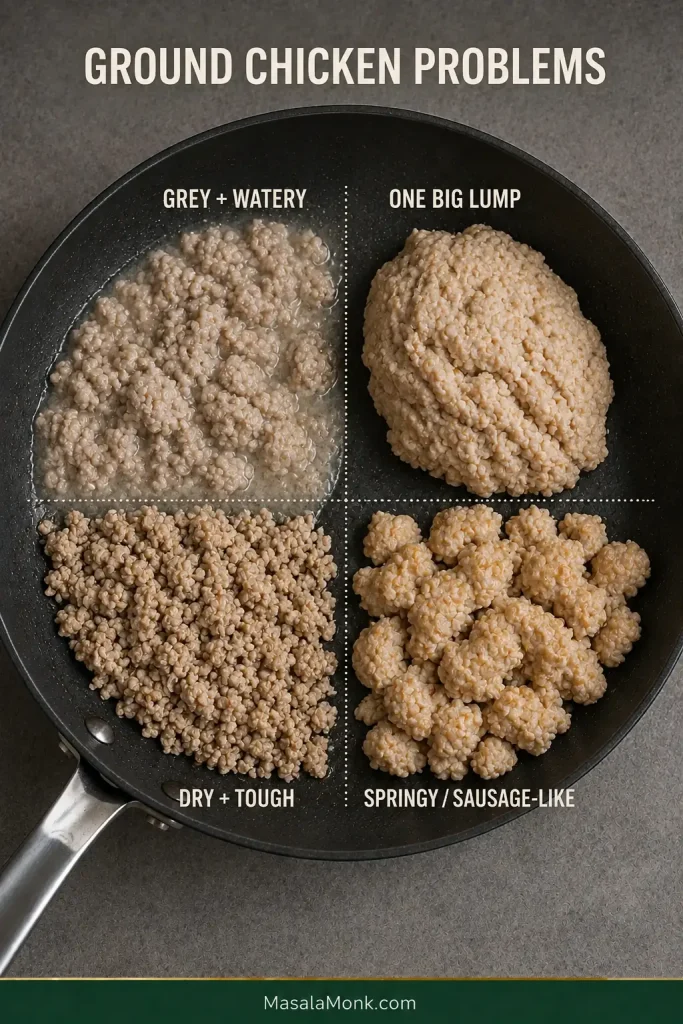
Chicken stays in one big lumpSticky raw chicken was worked too aggressively before it could sear.Let it brown briefly, divide it into several large sections, then break those into smaller crumbles.
Chicken is dry or toughVery lean meat, tiny crumbles, or continued cooking after doneness.Keep the pieces a little larger and stop once the chicken is safely cooked and sauced.
Chicken feels springy or sausage-likeRaw meat was overworked or homemade mince was processed into a sticky paste.Handle it lightly and pulse homemade mince only until coarse.
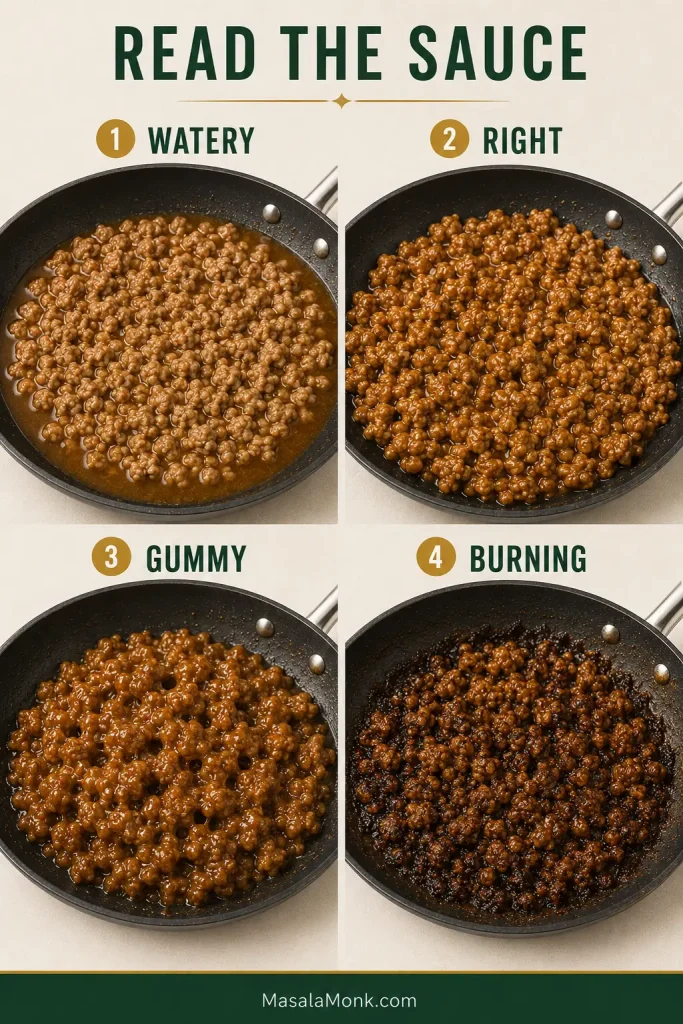
Sauce is wateryWater from chicken or vegetables, or too little finishing time.Cook away ingredient moisture first, then simmer the sauce briefly.
Sauce is gummyToo much starch or too much reduction.Add water or unsalted broth 1 tablespoon at a time.
Sauce is sticking or burningPan too hot or the honey-based sauce reduced too far.Move the skillet off the heat, add 1–2 tbsp water, and loosen it immediately.
Vegetables thin the sauceWet or frozen vegetables released water late in cooking.Cook off their moisture before adding the sauce.
Four ground chicken problem states: grey and watery chicken in released liquid, chicken stuck in one large lump, tiny dry and tough crumbles, and larger dense springy sausage-like pieces.
Don’t treat dry/tough and springy/sausage-like chicken as the same problem. Dry chicken looks small and crumbly; overworked chicken becomes denser and smoother, so identifying the texture points you toward the right fix.

Why Is the Chicken Grey Instead of Brown?

Browning struggles while the meat is surrounded by water. A small skillet, a cool pan, or constant stirring can keep the chicken steaming. Give it some uninterrupted contact with the hot surface and time for that excess liquid to leave.

Why Is the Chicken Springy or Sausage-Like?

Grinding chicken too finely or working it aggressively can turn the raw meat into a sticky paste that cooks with a noticeably springier texture. With homemade mince, pulse chilled chicken only until coarsely chopped. Ordinary dry or tough chicken is more often an overcooking problem.

Is Watery Sauce Always a Cornstarch Problem?

No. Clear water around the chicken or vegetables needs to evaporate before more starch enters the picture. Once the pan itself is no longer watery, give a thin sauce another 30–60 seconds before deciding it needs more thickener.

Four sesame ground chicken sauce states: watery with sauce pooling underneath, right with a thin coating and little pooling, gummy with an overly thick coating, and burning with dark over-reduced residue around the skillet.
Watery sauce does not automatically mean “add more cornstarch.” First look for loose moisture beneath the chicken; only after that water is under control can you judge whether the sauce itself is truly too thin.

Meal Prep, Storage & Reheating

Sesame ground chicken is easy to portion, and a thin coating of sauce helps the meat reheat without feeling dry. Divide the batch into three hearty bowls when you want chicken to carry more of the meal, or four standard servings when rice and vegetables make up a larger share.

Portion guide comparing three hearty sesame ground chicken bowls with larger chicken portions against four standard servings with proportionally more rice and vegetables.
Using chicken with about 22 g protein per 4 oz / 113 g, dividing the batch 3 ways gives roughly 29 g from chicken per bowl; 4 ways gives about 22 g.

Refrigerator & Freezer

Refrigerate cooked chicken promptly—generally within 2 hours, or within 1 hour when the surrounding temperature is above 90°F / 32°C—and use refrigerated leftovers within 3–4 days. USDA leftovers guidance covers safe cooling, storage, and reheating in more detail.

Prepping farther ahead? Put the later portions in the freezer instead of keeping the entire week’s batch refrigerated. For best quality, use frozen cooked leftovers within about 3–4 months.

Reheat the Chicken, Then Add the Fresh Parts

The sauce thickens in the refrigerator, so add a small splash of water before reheating and stir once hot. Sprinkle refrigerated rice with water and cover it while microwaving so the steam softens the grains again. Reheat leftovers thoroughly to 165°F / 74°C.

Add scallions, cucumber, sesame seeds, cashews, peanuts, lettuce, and chili crisp afterward. That cold crunch can make yesterday’s bowl feel like dinner again instead of another container from the fridge. A crisp Cucumber Salad works especially well when you want a full cold side.

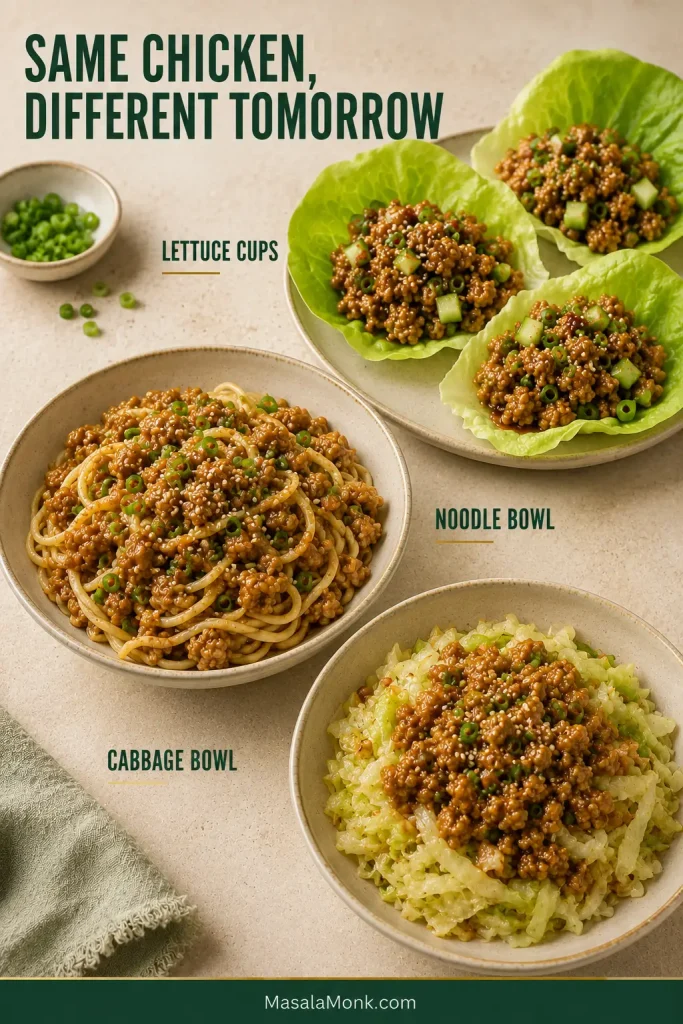
Turn Leftovers Into Something Different

  • Lettuce cups: warm the chicken, then spoon it into cold crisp lettuce with cucumber and scallions.
  • Noodle bowl: loosen the chicken with a splash of water and toss it through hot noodles.
  • Cabbage bowl: sauté shredded cabbage until just tender, then spoon the warm sesame chicken over the top.
Three leftover sesame ground chicken meals: lettuce cups with cucumber and scallions, a noodle bowl with warmed chicken, and sautéed cabbage topped with sesame ground chicken.
For sesame ground chicken meal prep, keep fresh components separate when practical. Adding crisp lettuce, cucumber or other cool finishes after reheating changes the texture far more effectively than packing four identical bowls.

Back to top · Back to recipe card

Meal prep is much easier to look forward to when one batch doesn’t have to become four identical boxes.

Partially eaten bowl of sesame ground chicken and white rice with a spoon resting inside, scattered scallions and sesame, a glass of water and a second bowl softly blurred behind it.

Green beans tomorrow. Noodles next time. Same pound of ground chicken, much better dinner.

Posted on Leave a comment

Beef Stroganoff Recipe: Tender Beef, Creamy Mushroom Sauce & Easy 30-Minute Dinner

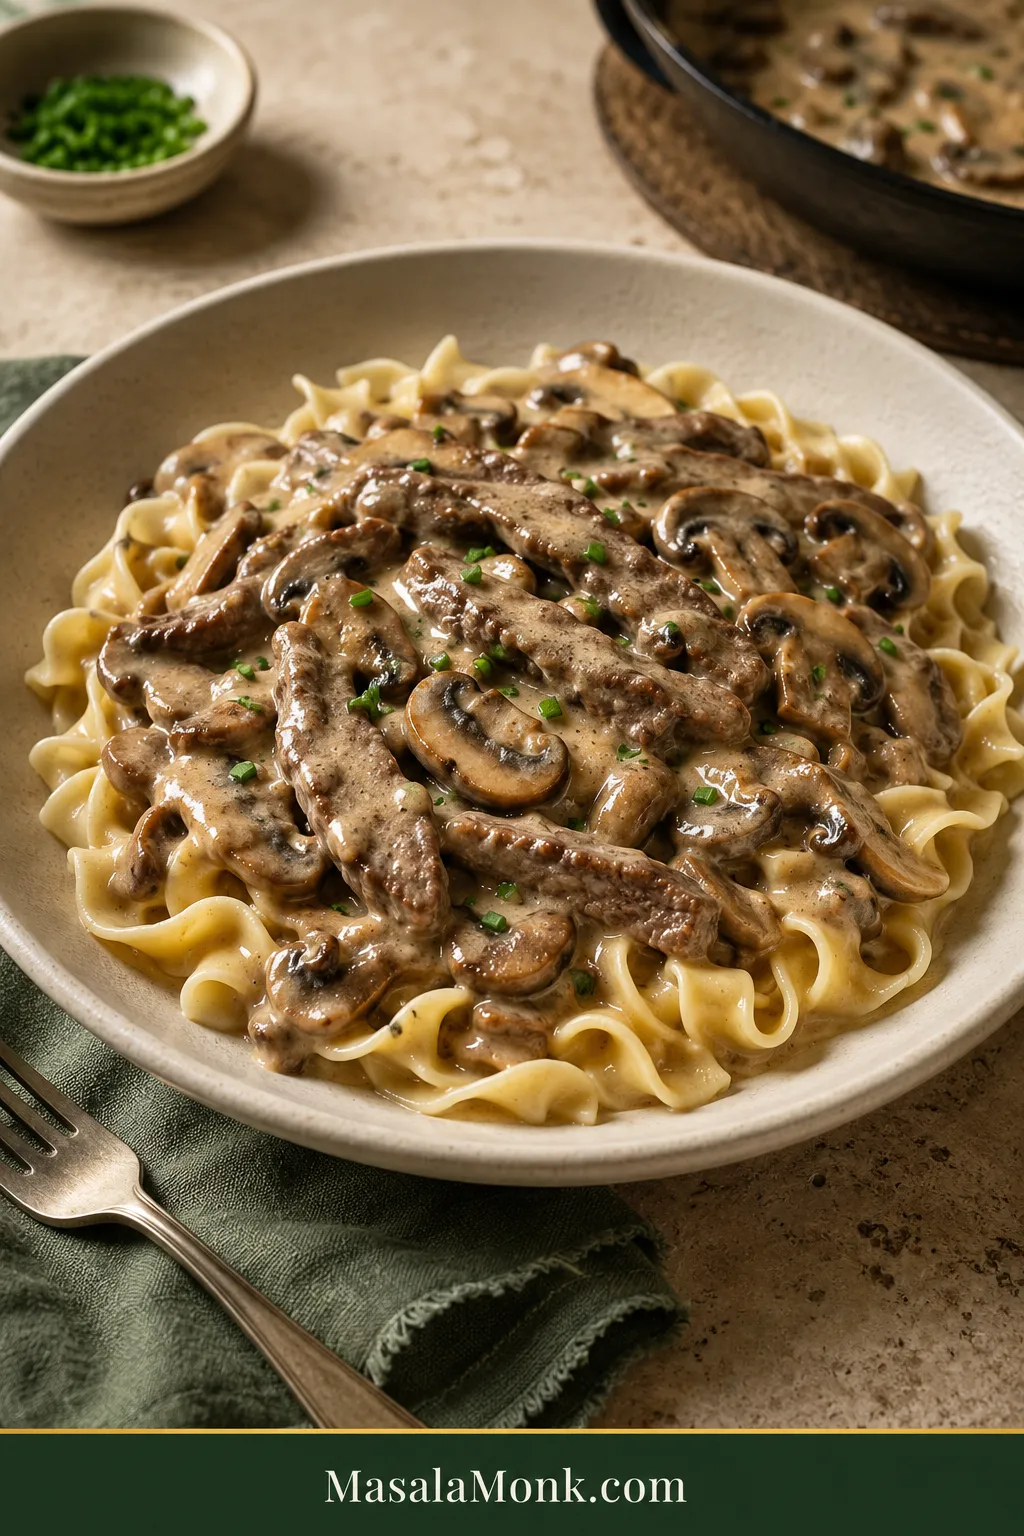
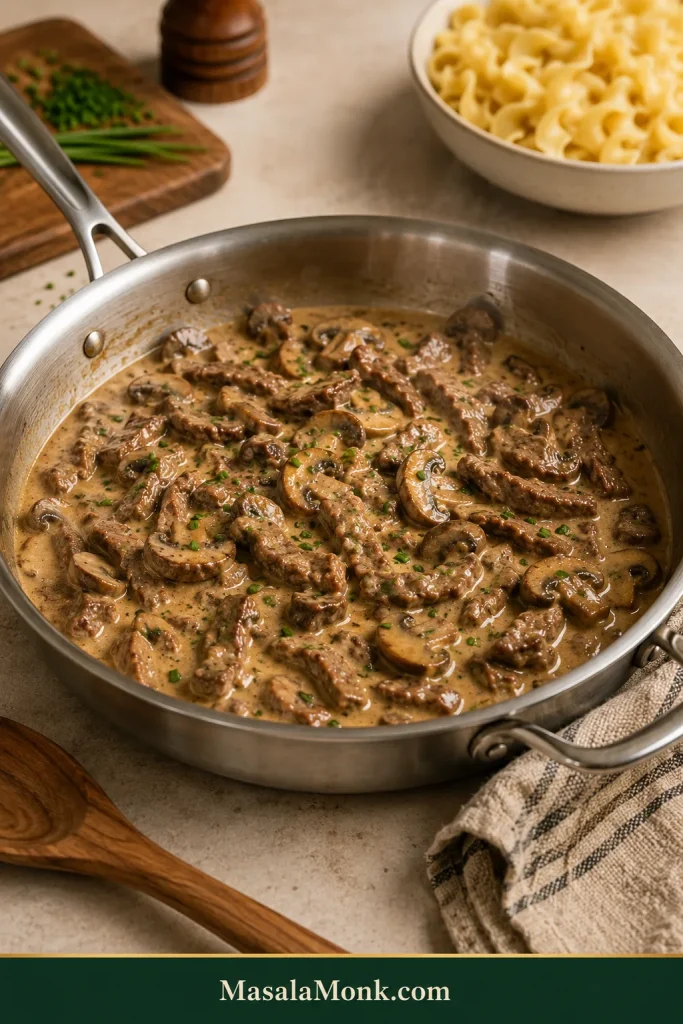
Beef Stroganoff over wide egg noodles with thin browned beef strips, sliced cremini mushrooms, glossy tan sauce and a small scattering of chopped chives.

A good skillet of Beef Stroganoff is all tender browned beef, mushrooms with real color, and a glossy sour-cream sauce that finds its way into the noodles.

It can also look right and still disappoint.
A creamy sauce can hide chewy beef. Mushrooms can soften without developing much flavor. And a sauce that looked generous in the skillet can all but disappear once it meets the noodles.

The fork tells you the truth.

Tender beef yields easily instead of making you chew through long fibers. Properly browned mushrooms taste developed, not merely cooked. The sauce clings in a smooth, savory coat—creamy enough to comfort, loose enough to flow.

This Beef Stroganoff comes together in about 30 minutes with top sirloin, fresh cremini mushrooms, beef broth, Dijon mustard, Worcestershire sauce and full-fat sour cream. There is no cream of mushroom soup, no heavy cream and no wine required.

The Beef Stroganoff Method in One Minute

Sear fast. Brown the mushrooms fully. Build the sauce. Keep the final heat low; return the beef last.

  • Sear fast: use tender steak, slice it thinly across the grain and brown it in uncrowded batches.
  • Brown the mushrooms fully: cook away the moisture they release before building the sauce.
  • Build the sauce: get the flavor and consistency where you want them while the beef rests.
  • Keep the final heat low: stir in the sour cream, then return the steak only long enough to finish cooking and heat through.

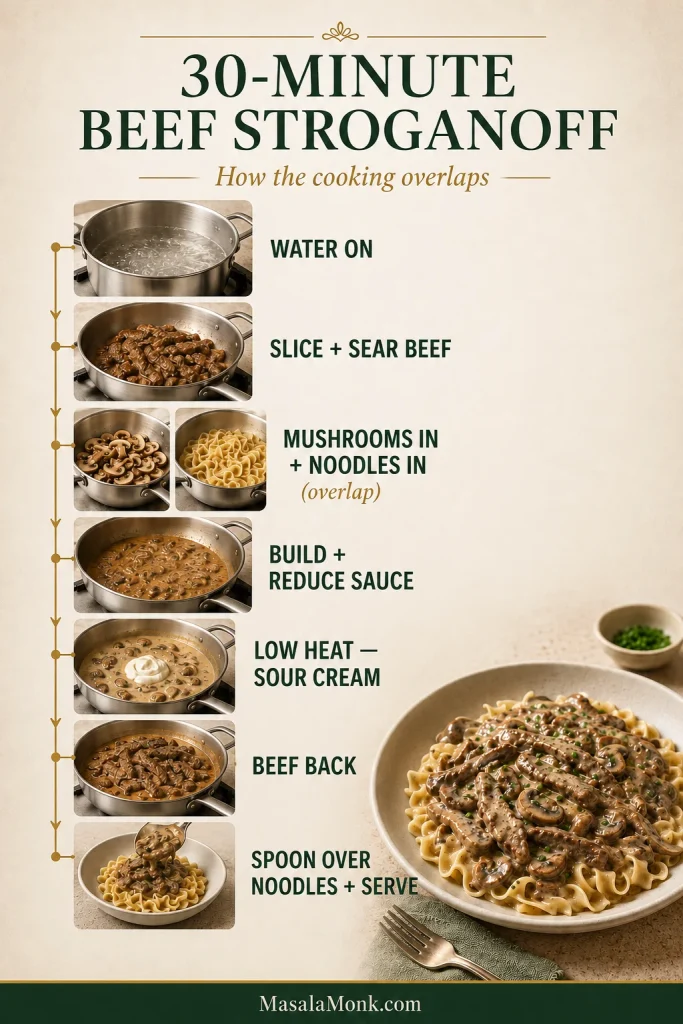
The timing works because several jobs overlap. Start the noodle water first; slice and sear the steak while it heats, drop the noodles when the mushrooms go into the skillet, and build the sauce while the beef rests. That overlap is what makes about 30 minutes of elapsed time realistic, although especially juicy mushrooms or slower knife work can add a few minutes.

Timeline showing overlapping Beef Stroganoff tasks: heating noodle water, preparing and searing beef, cooking mushrooms and noodles, building the sauce, adding sour cream and serving.
If timing slips, let the noodles wait; thin sirloin is less forgiving of extra heat than buttered pasta.

It is the sort of dinner that feels richer than the time it took to make.

Beef Stroganoff Recipe

Serves: 4 generously
Prep: about 10 minutes
Cooking: about 20 minutes
Total elapsed time: about 30 minutes, with some prep overlapping the cooking
Main equipment: 12-inch (30 cm) heavy skillet and a pot for the noodles

Ingredients

For the Stroganoff

  • 1¼ lb (570 g) top sirloin steak
  • ¾ tsp fine sea salt (about 4–5 g), divided, plus more to taste
  • ¾ tsp freshly ground black pepper, divided
  • 1½ tbsp (22 ml) neutral high-heat oil, divided
  • 12 oz (340 g) cremini or baby bella mushrooms, sliced
  • 1 medium-large yellow onion (about 160 g), thinly sliced
  • 2 tbsp (28 g) unsalted butter
  • 2 garlic cloves (about 6 g), finely minced
  • ½ tsp sweet paprika, optional — use sweet, not smoked
  • 2 tbsp (about 16 g) all-purpose flour
  • 1½ cups (360 ml) low-sodium beef broth, plus extra for loosening if needed
  • 2 tsp Dijon mustard
  • 2 tsp (10 ml) Worcestershire sauce
  • ⅔ cup full-fat sour cream (about 150 g), taken out of the refrigerator before cooking
  • 2 tbsp chopped fresh chives, for serving

For Serving

  • 10 oz (285 g) wide egg noodles
  • 1 tbsp (14 g) unsalted butter
  • Salt for the noodle water

Optional Wine Variation

Add ¼ cup (60 ml) dry white wine after the garlic. Scrape up the browned bits and reduce until only a thin layer of wine remains in the skillet, then continue with the regular 1½ cups (360 ml) beef broth. The wine adds brightness and complexity; it does not replace part of the broth in this version.

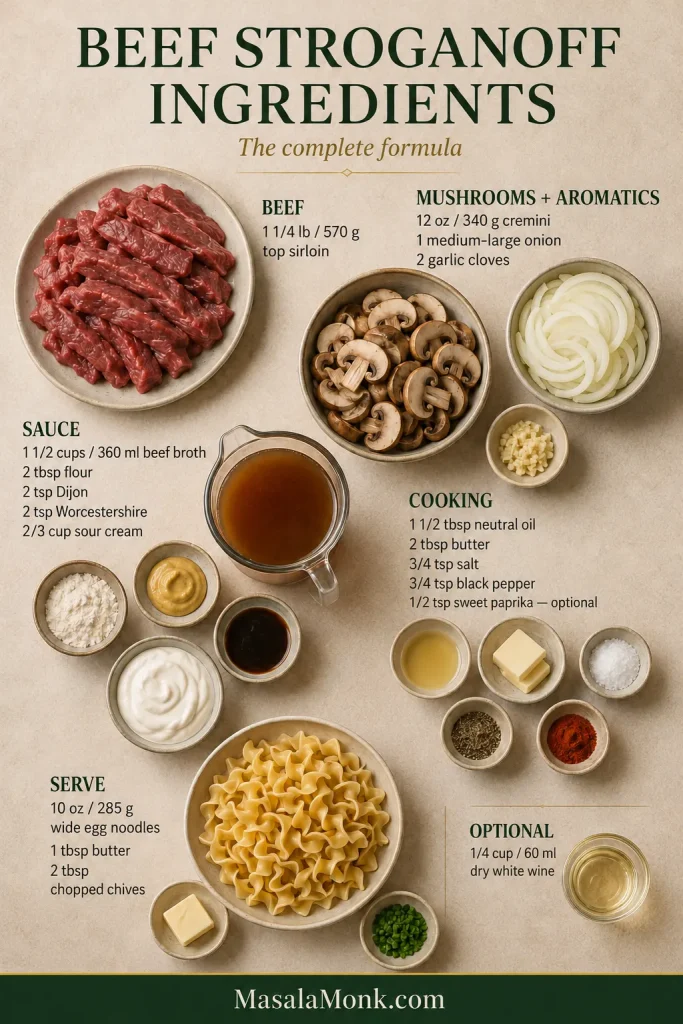
Overhead ingredient board with top sirloin, cremini mushrooms, onion, garlic, broth, flour, Dijon mustard, Worcestershire sauce, sour cream, egg noodles, butter, oil, chives and optional wine.
Measure the sauce ingredients first so the beef can leave the heat the moment it is ready.

Instructions

Start the Noodles and Sear the Beef

  1. Start the noodle water. Put a large pot of well-salted water over high heat, then move straight to the beef. Once the water boils, keep it ready while you sear the steak. When the mushrooms go into the skillet in Step 4, add the noodles to the boiling water. Cook according to the package directions, drain when just tender, toss with 1 tablespoon butter and keep warm. Keep the noodles separate from the Stroganoff unless every serving is going straight to the table.
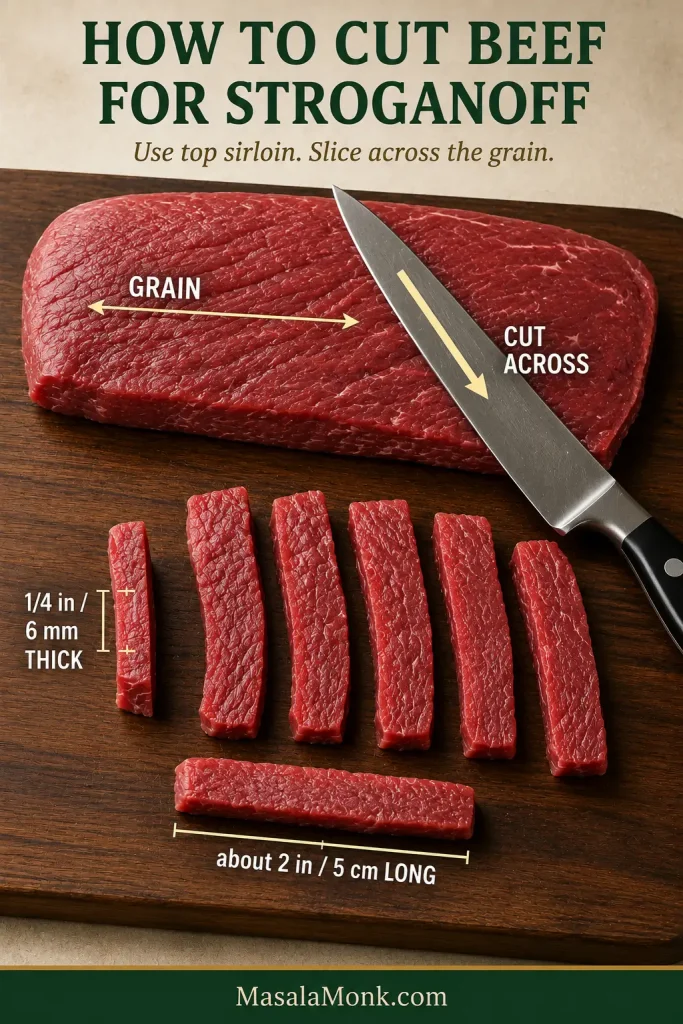
  2. Slice and season the beef. Trim thick exterior fat and obvious tough sinew. Cut the steak across the grain into strips about ¼ inch (6 mm) thick and roughly 2 inches (5 cm) long. Pat very dry, then season with ½ teaspoon salt and ½ teaspoon black pepper.
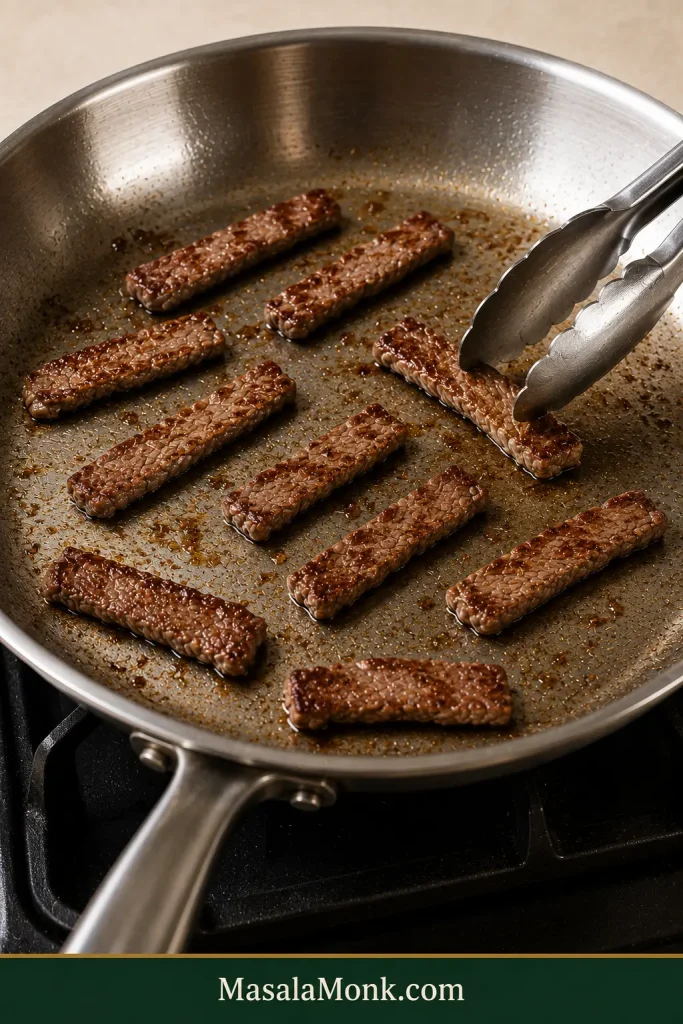
  3. Sear the beef in two batches. Heat a 12-inch (30 cm) heavy skillet over high heat until a strip of beef sizzles immediately on contact. Add about half the oil and half the beef in one uncrowded layer. Sear for roughly 30–45 seconds per side, just until browned patches develop. Transfer to a plate, let the skillet return to strong heat, then repeat with the remaining oil and beef. The centers may look underdone when the strips leave the pan. That’s intentional; they cook again at the end.

Brown the Mushrooms and Build the Sauce

  1. Brown the mushrooms and onion. Lower the heat to medium. Once the aggressive searing heat has settled, add 1 tablespoon butter and the mushrooms. Drop the noodles into their boiling water now. Cook the mushrooms for about 3 minutes, then add the onion and remaining tablespoon butter. Continue for roughly 5–8 minutes, until most of the released mushroom water has evaporated and browned edges begin to appear. Listen to the pan: the wet hiss eventually gives way to a sharper sizzle. Season with the remaining ¼ teaspoon salt and ¼ teaspoon pepper.
  2. Build the sauce. Stir in the garlic for about 30 seconds. For the wine variation, add the wine now, scrape up the browned bits and reduce until only a thin layer remains. Stir in the optional paprika, sprinkle the flour over the mushrooms and onion, and cook for about 1 minute. Add a small splash of broth and stir until smooth, scraping the browned bits from the bottom of the skillet. Gradually stir in the remaining broth, followed by the Dijon and Worcestershire.
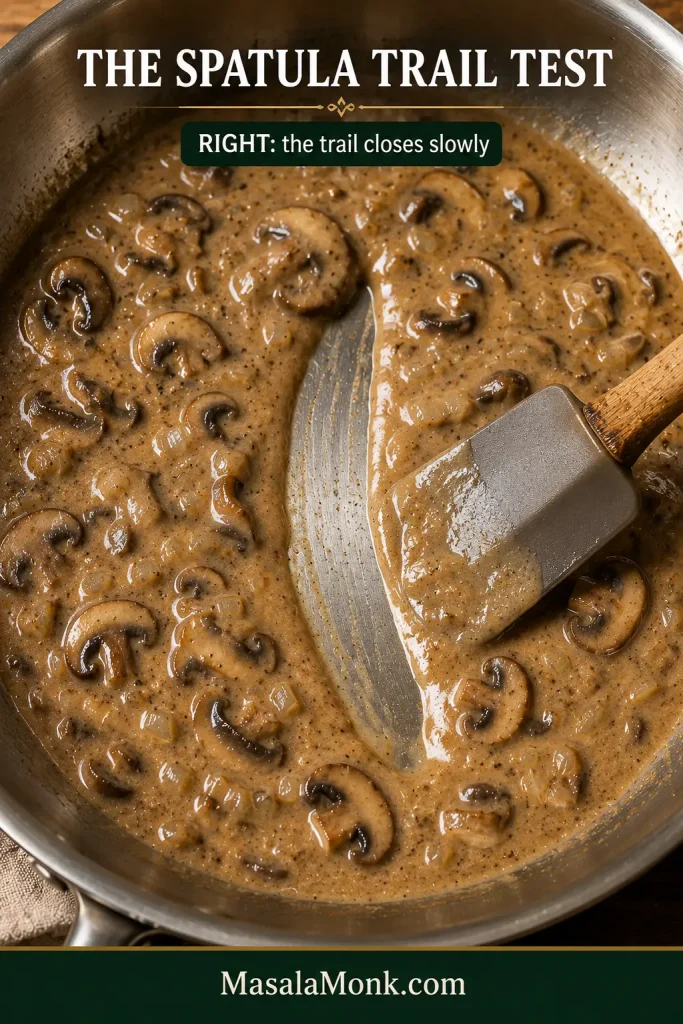
  3. Reduce to the right consistency. Simmer for roughly 3–5 minutes. Drag a spatula through the skillet; the trail should remain visible briefly before flowing closed. A loose sauce needs more reduction. A sauce that has become too thick can be loosened with broth or hot noodle water, one tablespoon at a time.

Finish Gently and Serve

  1. Add the sour cream over low heat. Put the sour cream in a small bowl and whisk in 2–3 tablespoons of hot sauce, one spoonful at a time. Lower the heat—or briefly take the skillet off the burner—then stir the warmed sour cream into the sauce until smooth and glossy.
  2. Taste and adjust. Check the salt first. A muted sauce may need another ¼ teaspoon Dijon. Taste before adding anything else. Another ¼–½ teaspoon Worcestershire can deepen the savory flavor without taking over.
  3. Return the beef. Fold in the steak and every drop of juice collected on the plate. Cook only long enough for the thin strips to finish cooking and heat through. Taste the sauce once more and adjust the salt if needed.
  4. Serve. Spoon the Stroganoff over the warm buttered noodles and scatter the chopped chives over the top.
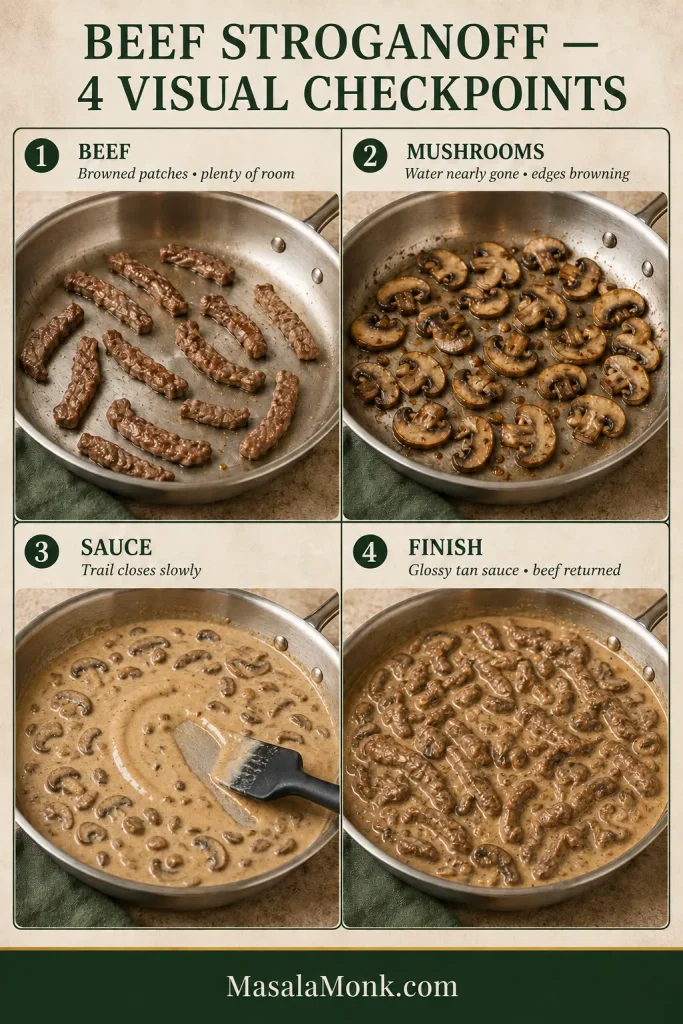
Four cooking checkpoints showing spaced browned beef, mushrooms after most moisture has evaporated, sauce leaving a slow-closing spatula trail, and finished creamy Stroganoff with beef returned.
Use the skillet, not the stopwatch: browning, evaporated mushroom moisture and a slow-closing sauce trail are the key checkpoints.

Food-safety note: USDA guidance for whole beef steaks, chops and roasts is 145°F (63°C) followed by a 3-minute rest. See the USDA safe minimum temperature chart for current guidance.

Doubling the recipe: pan surface area becomes the limiting factor. Keep the beef batches the same size, which usually means four batches instead of two, or work with two large skillets. Twice as many mushrooms also need more room and more time for their moisture to evaporate, so a double batch will take longer than 30 minutes.

Finished Beef Stroganoff in a stainless steel skillet with thin beef strips and browned mushrooms in glossy tan sauce; wide egg noodles are kept separately nearby.
The finished sauce should still move when the skillet tilts; if it sits stiffly, loosen it before serving.

Need a closer look at one technique? Keep the beef tender · Brown the mushrooms · Understand the sauce · Troubleshoot a problem

What Is the Best Beef for Beef Stroganoff?

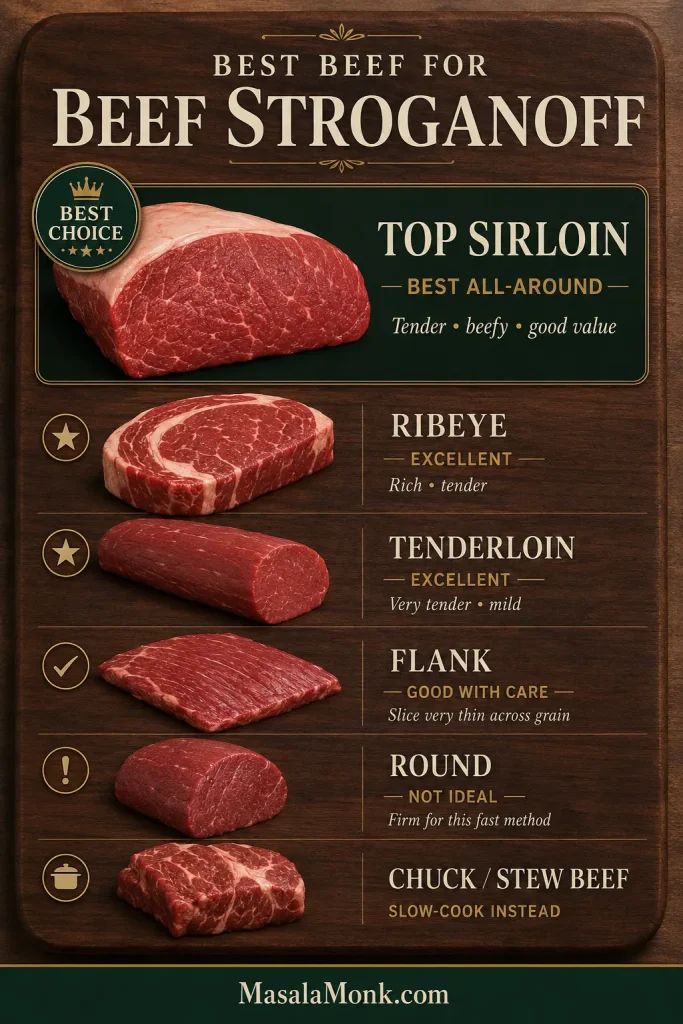
Top sirloin is the best all-around beef for this fast Beef Stroganoff. It is naturally tender enough for a short sear, has plenty of beef flavor, is easy to find and usually costs less than tenderloin or ribeye.

Price isn’t really the dividing line here. Cooking style is. Tender steaks suit this quick skillet method. Tougher cuts need a slower route; a few extra minutes in this skillet won’t suddenly make stew meat tender.

Comparison guide for Beef Stroganoff cuts, with top sirloin presented as the best all-around choice alongside ribeye, tenderloin, flank, round and chuck.
For quick Beef Stroganoff, fine marbling helps; thick fat seams and connective tissue do not have time to soften.

Chuck is much more at home in our slow cooker pot roast, where several hours of low, steady cooking give connective tissue time to soften.

Beef cutFor this fast method?What to expect
Top sirloinExcellent — best overallTender, beefy and good value
RibeyeExcellentRich, tender and more expensive
Tenderloin / filetExcellentVery tender, mild and expensive
Pre-cut steak stripsSometimesDepends on the original cut
Flank steakGood with careSlice very thinly across the grain
RoundNot idealOften lean and firm in a short cook
Chuck / stew meatNoBetter with long, slow cooking

If sirloin doesn’t fit the budget tonight, Stroganoff is not off the table—the beef and cooking method just need to suit each other.

What About Beef Labeled “Stroganoff Strips”?

Check whether the original cut is listed on the package. Some pre-sliced Stroganoff strips are sirloin and work beautifully; others are inexpensive beef cut into narrow pieces. The label tells you how the store expects the meat to be used, not whether it is naturally tender. Thickness matters too: even when the cut itself is suitable, slice unusually thick strips down toward the ¼-inch (6 mm) target before cooking.

How to Keep the Beef Tender

For tender Beef Stroganoff, slice a naturally tender cut thinly across the grain, dry it well, sear it quickly in batches and keep its final cooking time brief.

Slice Across the Grain

Look at the steak before cutting it and find the direction of the long muscle fibers. Cut across those fibers, not alongside them. Shorter fibers are easier to chew.

Aim for strips around ¼ inch (6 mm) thick and 2 inches (5 cm) long. They should be easy to eat in the same forkful as a mushroom and a few noodles, not long enough to turn dinner into a tug-of-war.

Top sirloin with muscle grain marked, a knife cutting across the grain, and Stroganoff strips shown about 6 millimeters thick and 5 centimeters long.
If the grain changes direction, rotate the sirloin as you cut so every strip stays across the fibers.

Trim what a fast sear cannot soften. Fine marbling is welcome. Thick bands of exterior fat and tough sinew are not. This recipe cooks too quickly for a large chewy seam to render or soften.

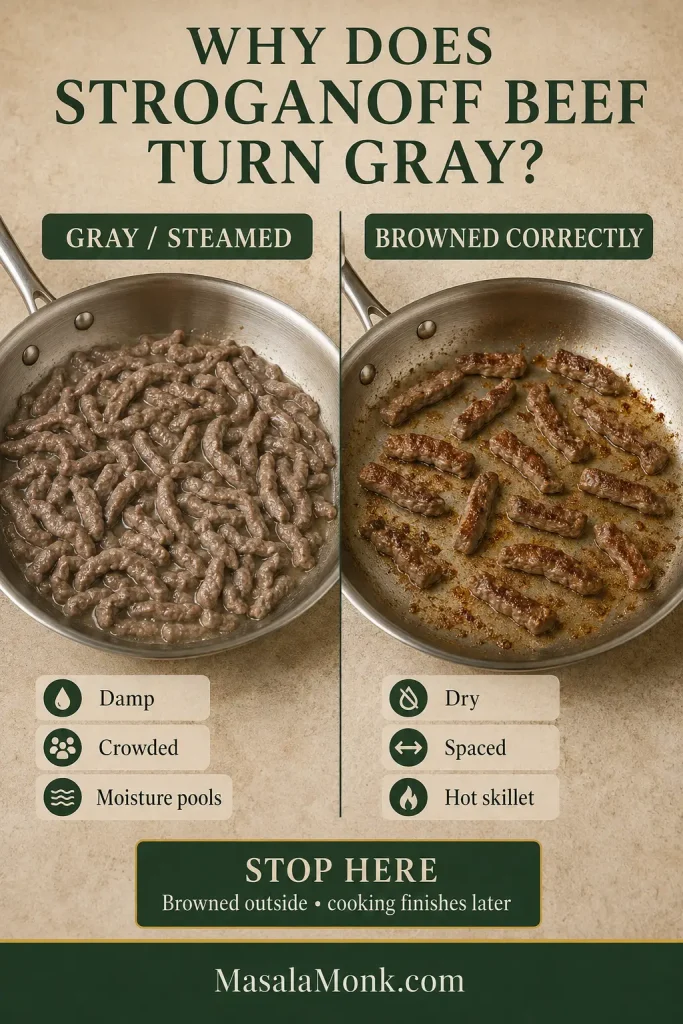
Dry beef browns better. Blot the strips thoroughly before they enter the skillet. Surface moisture has to evaporate before serious browning begins, and a pan crowded with damp beef cools quickly. With dry beef and strong heat, you get brown patches outside while those thin centers have cooking left for the return to the skillet. That’s the sweet spot.

Thin beef strips browning with clear space between them in a stainless steel skillet while metal tongs turn one browned strip.
If batch two stops sizzling on contact, let the skillet regain heat before adding more beef.

Keep the First Sear Short

Thin sirloin strips need only a brief head start. Once they have color, move them to a plate and let the mushrooms and sauce catch up. Extra simmering does not make sirloin more tender. It just keeps cooking it.

Side-by-side comparison of crowded gray beef surrounded by moisture and properly spaced browned beef in a hot stainless steel skillet.
Once gray beef is cooked, stop chasing color; extra heat cannot undo steaming, but it can toughen the meat.

With the beef out of the way, the mushrooms can have the skillet to themselves.

How to Get Deeply Browned Mushrooms

Cook the mushrooms until the water they release has evaporated and browned edges begin to appear. Soft mushrooms are not necessarily browned mushrooms.

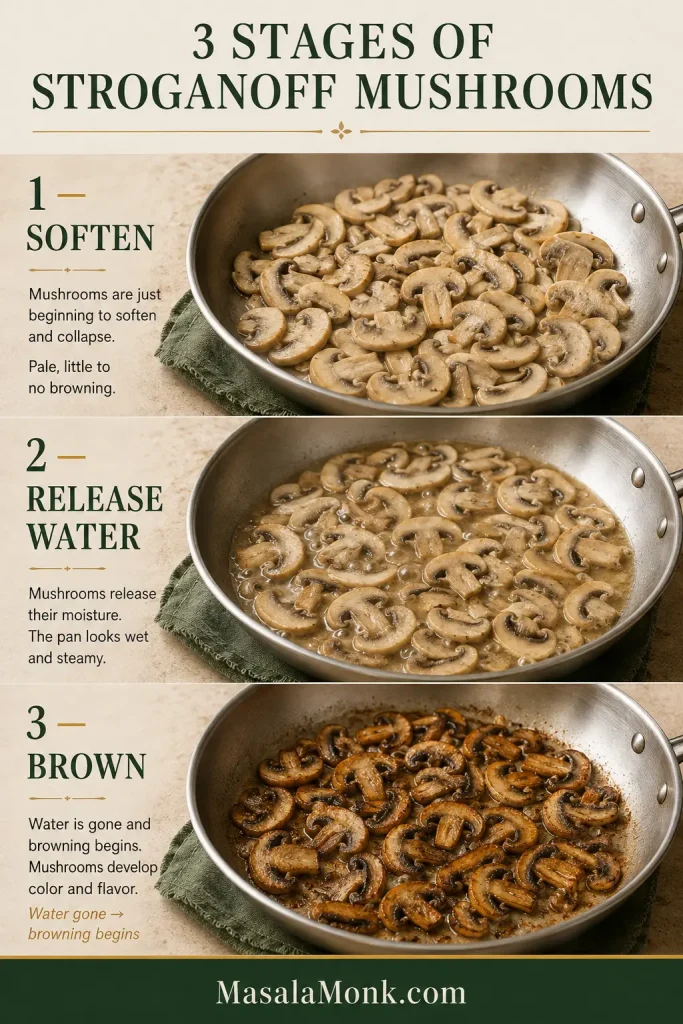
Fresh mushrooms usually move through three recognizable stages:

  1. They soften and absorb some of the fat.
  2. They release water. The skillet can suddenly look much wetter than expected.
  3. The water cooks away and browning begins.
Three stages of sliced cremini mushrooms in one skillet: initially softening, sitting in released liquid, and finally browned after the moisture has evaporated.
Let released mushroom liquid evaporate in the pan; meaningful browning begins only after the wet stage passes.

The wet middle stage is where cooks often think something has gone wrong. It hasn’t.

Keep cooking while liquid covers the bottom of the skillet. As it disappears, the pan moves from a wet hiss to a sharper sizzle, and brown patches show around the mushroom edges. The aroma deepens too. Suddenly the skillet smells much more like dinner.

That change in sound, aroma and color tells you more than the clock does.

Cremini, White Button or Shiitake?

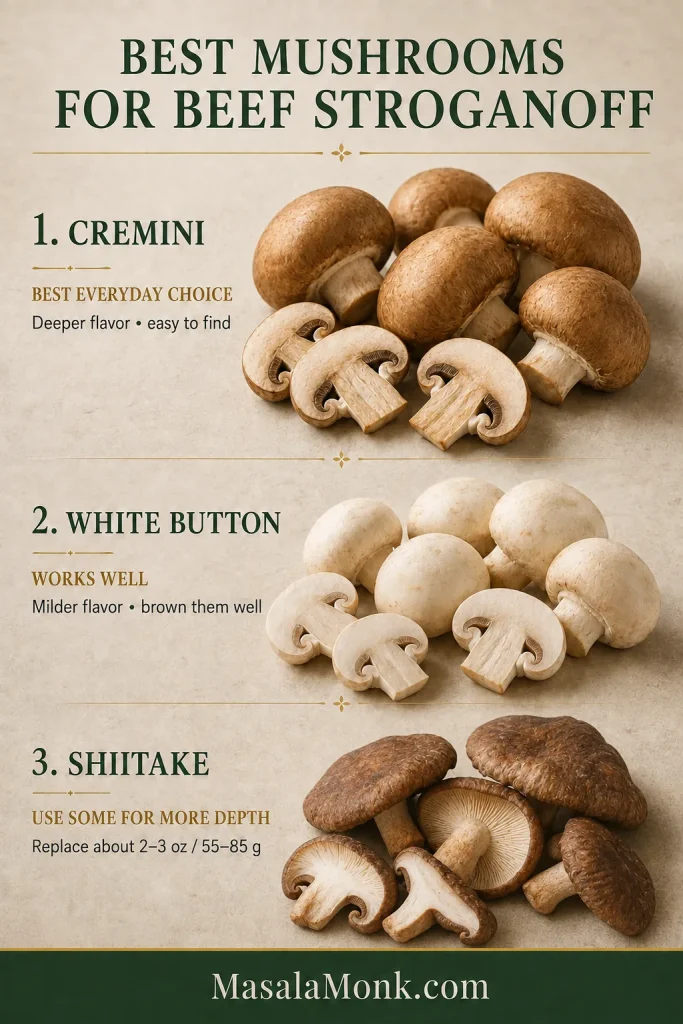
Cremini, also sold as baby bella mushrooms, are the everyday choice here. They bring more mushroom depth than white buttons while remaining easy to find.

White button mushrooms work well too. Good browning matters more than buying an expensive variety. For a deeper mushroom note, replace 2–3 oz (55–85 g) of the cremini with sliced shiitake caps.

Mushroom comparison showing brown cremini, white button and dark-capped shiitake mushrooms, with cremini identified as the everyday Stroganoff choice.
Similar slice thickness helps cremini, white buttons or shiitake lose moisture and brown more evenly.

Love that browned-mushroom flavor? Our creamy mushroom sauce takes the same idea in a direction designed for steak, chicken or pasta. Once the mushroom water is gone and the edges have color, the skillet is ready to become the sauce.

How Beef Stroganoff Sauce Works

The sauce should taste first of browned beef and mushrooms, with sour cream smoothing the edges—not like a bowl of sour cream with a little beef in it.

What Is Stroganoff Sauce Made Of?

Stroganoff sauce is a savory sour-cream sauce built from beef broth and browned mushrooms, with Dijon and Worcestershire for depth and flour to give it body.

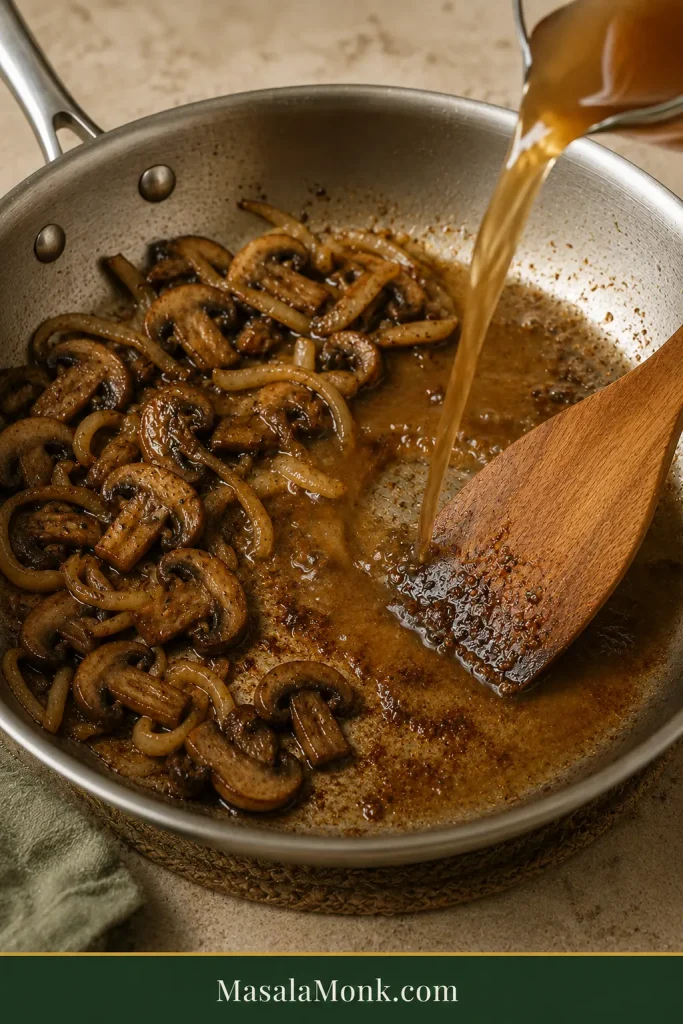
The broth pulls the browned bits from the skillet into the sauce, while Dijon adds brightness and Worcestershire deepens the beefy side. Flour gives the broth enough body to cling to the noodles; sour cream comes last with richness and tang.

Beef broth being poured into a stainless skillet with browned mushrooms and onions while a wooden spatula loosens browned fond from the pan.
Keep the deep-brown fond for flavor; remove any truly black, scorched residue before deglazing.

Finished Stroganoff sauce is glossy and pale brown to tan rather than stark white, with browned mushrooms visible through it.

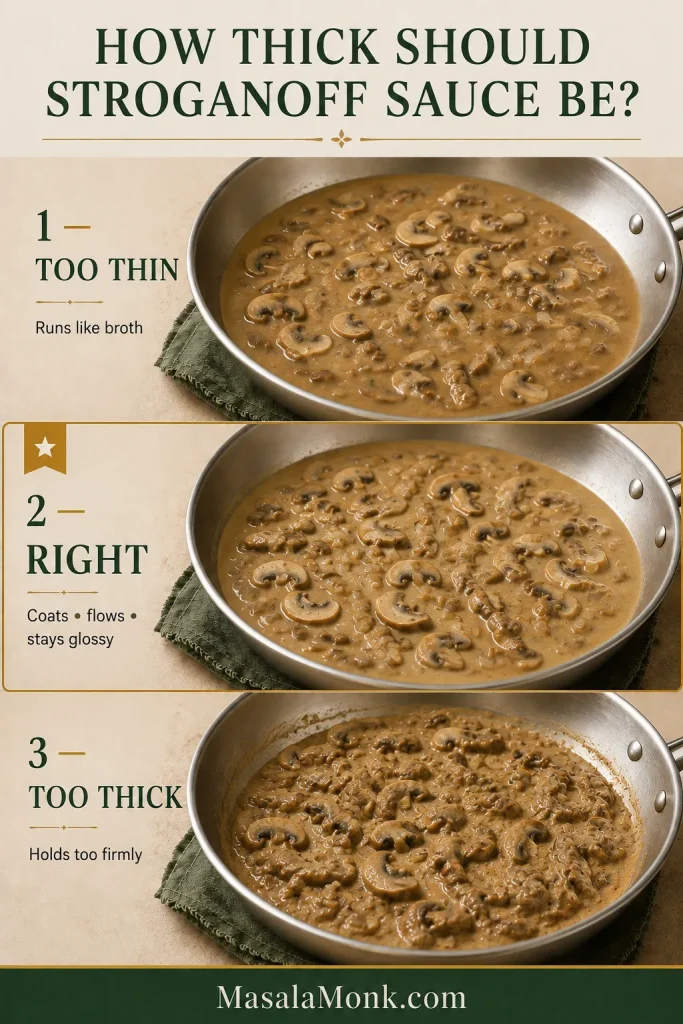
How Thick Should Stroganoff Sauce Be?

Think loose gravy rather than soup or paste: enough body to coat a noodle, but fluid enough to move around the plate.

Three skillets comparing thin, correct and overly thick mushroom sauce, with the correct sauce glossy and fluid around the mushroom slices.
Stop reducing slightly before perfect thickness; sour cream and a short rest will add more body.

On a spoon, the sauce leaves an opaque coating instead of running straight off. Drag a spatula through the skillet and the trail hangs around briefly before flowing closed. More reduction fixes most thin sauces at this stage; broth or hot noodle water loosens one that has gone too far.

Wooden spatula drawn through glossy mushroom sauce in a stainless skillet, creating a clear path that is beginning to flow closed.
Test an open patch of sauce—the liquid, not a pile of mushrooms, should make the spatula trail linger.

Sour Cream Is the Finish, Not the Fix

Before the sour cream goes in, the sauce should already be close to the thickness and flavor you want.
Up to this point, the skillet can simmer and reduce freely. Once the sour cream is in, keep the heat low. Tempering it with a few spoonfuls of hot sauce first makes that last stage more forgiving.

Three-stage guide showing reduced mushroom sauce, hot sauce mixed gradually into sour cream, and the resulting pale tan creamy sauce finished gently over low heat.
Cold sour cream benefits from tempering: a little hot sauce warms it gradually before the low-heat finish.
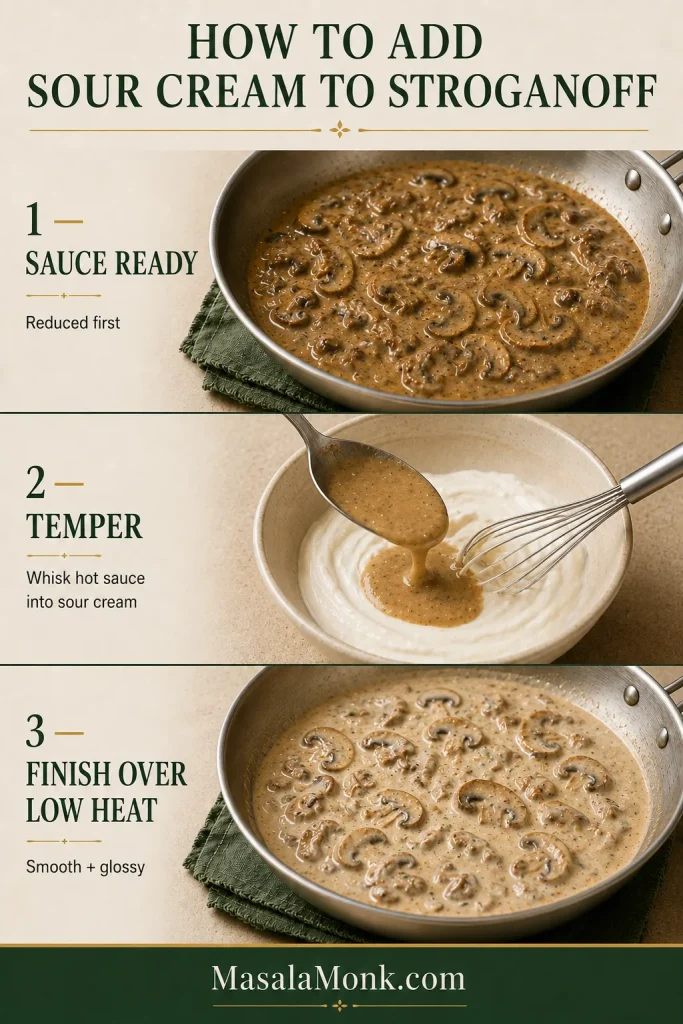
By then, the mushrooms have color, the sauce coats the spoon and the seasoning is nearly there. Stir in the sour cream and dinner is close.

Does Beef Stroganoff Need Heavy Cream?

No. Beef broth and flour provide the body in this version, while sour cream supplies the richness and tang. Heavy cream appears in many modern Stroganoff recipes and makes a richer, softer-tasting sauce, but it isn’t necessary here.

When the Sauce Looks Good but Tastes Flat

A beautiful skillet can still taste muted. More sour cream usually isn’t the answer.

Salt wakes up an underseasoned sauce. Dijon gives it lift, while Worcestershire adds deeper savoriness. Make small adjustments and taste between them; it is much easier to add another drop than to pull one back out.

Something still off in the skillet? Jump to troubleshooting · Back to the recipe

What to Serve With Beef Stroganoff

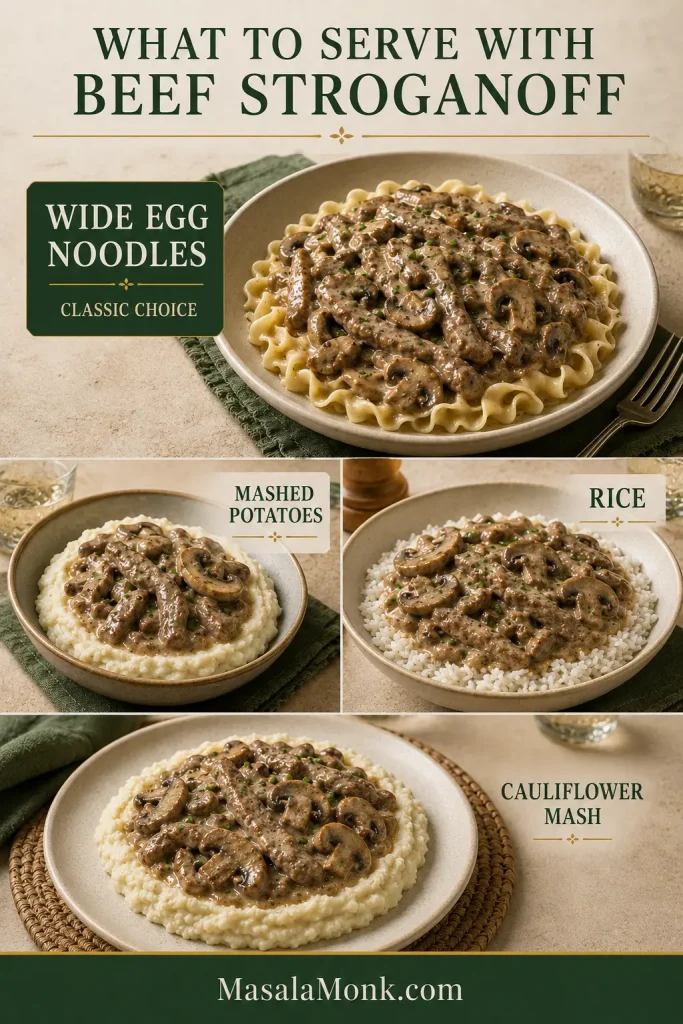
Wide egg noodles are the first choice here. Their broad surfaces catch the sauce without competing with the beef.

Mashed potatoes make the plate softer and richer; rice keeps things simple. Pappardelle or tagliatelle work when wide egg noodles are hard to find, while cauliflower mash gives you a lower-carb base that holds a creamy sauce well.

Serving comparison showing Beef Stroganoff paired with wide egg noodles, mashed potatoes, white rice and cauliflower mash.
Noodles catch sauce in folds, potatoes absorb it eagerly, and rice keeps more separation between bites.

If potatoes sound especially good tonight, these creamy mashed potatoes are soft and spoonable enough for the Stroganoff to settle right into them.

The rest of the plate does not need much. Stroganoff is already warm, soft and rich, so a crisp green salad or simply cooked green vegetable gives it contrast without turning an easy skillet dinner into a project.

Swaps and Variations That Work

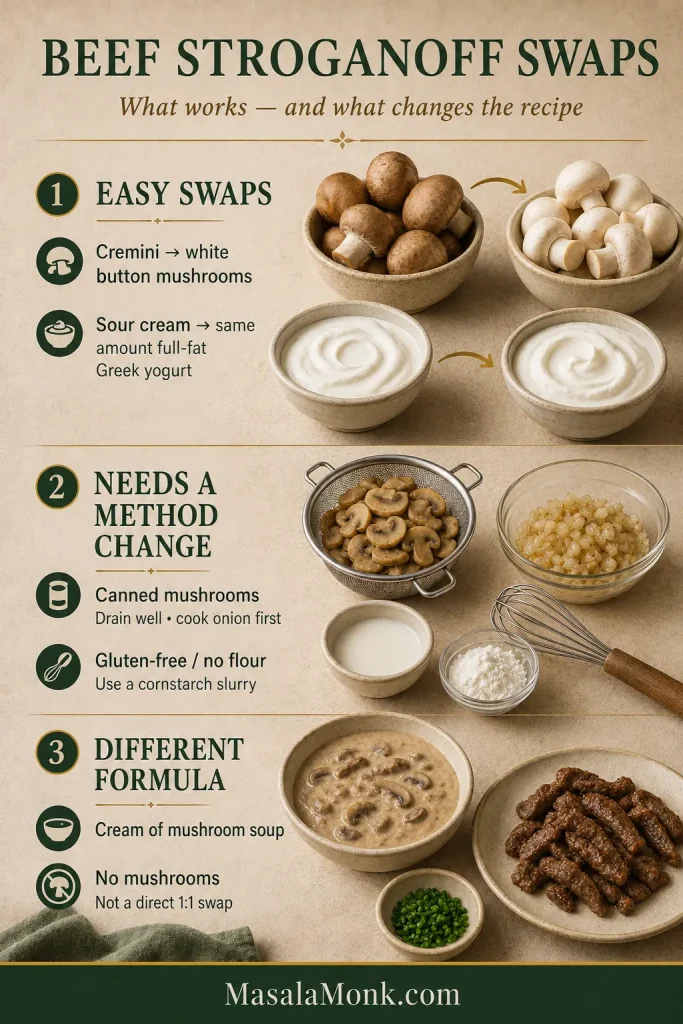
Missing an ingredient doesn’t always mean changing the whole recipe. These swaps fit the method without quietly turning it into a different Stroganoff.

SwapHow to make it work
White button mushroomsUse them 1:1 in place of cremini and cook them through the same moisture-release and browning stages.
Canned mushroomsDrain very well. Instead of the normal mushroom step, melt the full 2 tablespoons butter and cook the onion first until softened. Add the drained mushrooms for the final 2–3 minutes and cook off any remaining moisture. Season with the remaining ¼ teaspoon salt and ¼ teaspoon pepper, then continue with the garlic. They will not develop the same browned flavor as fresh mushrooms.
Full-fat Greek yogurtUse the same amount as the sour cream. Temper it the same way and keep the final heat low. Expect a slightly sharper finished sauce.
No WorcestershireLeave it out rather than forcing a substitute. Check the salt at the end. Extra Dijon can add brightness, but the finished sauce will have less savory depth.
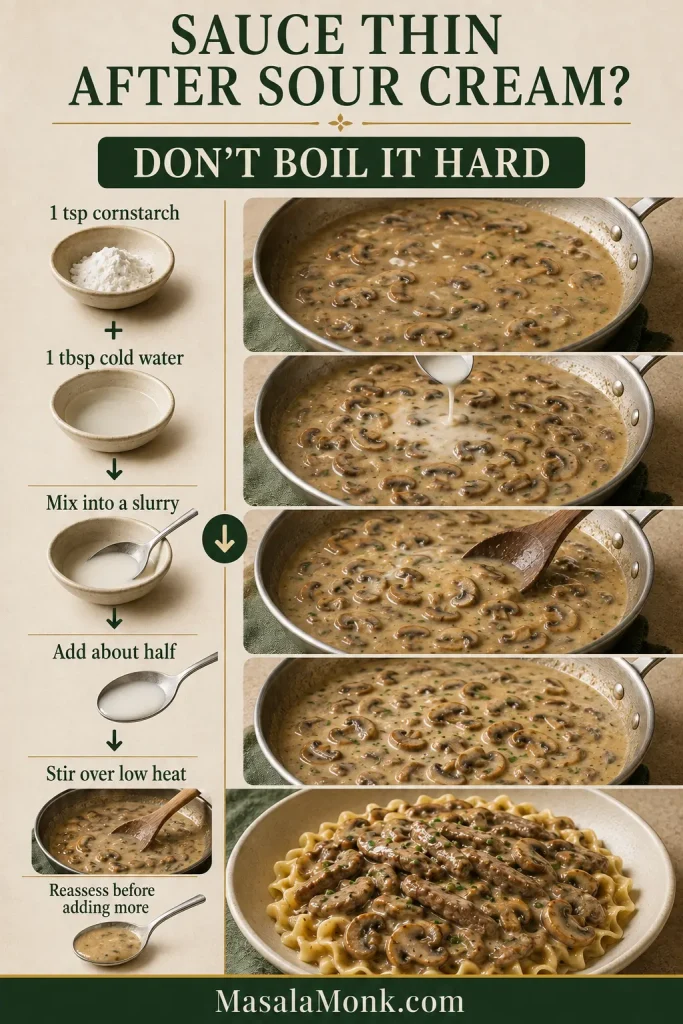
Gluten-freeUse gluten-free noodles and check the broth, Worcestershire and mustard labels. Omit the flour. After the broth reduces, mix 1 teaspoon cornstarch with 1 tablespoon cold water and stir the slurry in gradually. Repeat only when more thickening is needed.
No flourOmit the flour and let the broth reduce first. Mix 1 teaspoon cornstarch with 1 tablespoon cold water, add part of the slurry, and cook briefly before deciding whether the sauce needs the rest.
Beef Stroganoff substitution guide grouping white mushrooms and Greek yogurt as easier swaps, canned mushrooms and cornstarch as method changes, and condensed soup or removing mushrooms as larger formula changes.
Ask what the ingredient does: flavor-only swaps are simpler than changes to moisture, thickening or dairy behavior.

Can I Use Cream of Mushroom Soup?

Yes—but not as a direct 1:1 replacement for the broth and sour cream here. Condensed soup brings its own salt, starch, dairy and mushroom flavor, so swapping it in changes too much of this sauce to treat it like one ordinary ingredient substitution.

A soup-based Stroganoff works best when the recipe is built around the soup from the beginning. Adding a can halfway through this version and trying to correct everything afterward creates more problems than it solves.

Using Leftover Cooked Steak

Skip the searing completely. Slice the cooked steak thinly and fold it in at the very end, only long enough to heat through. Already-cooked steak does not need another full round of cooking.

What If I Don’t Want Mushrooms?

Leaving out all 12 ounces (340 g) of mushrooms isn’t a clean swap in this formula. They account for a large amount of the food in the skillet and contribute moisture and savory flavor as they cook. With all of that removed, too much else changes for “just leave them out” to be good advice. A mushroom-free Stroganoff needs its sauce built differently from the start.

A Note on “Authentic” Beef Stroganoff

There isn’t one frozen-in-time version everyone has to reproduce. Beef Stroganoff has changed as it has traveled through countries and home kitchens, with different approaches to mushrooms, seasoning and dairy, as well as different choices of noodles, rice or potatoes underneath.

The goal here is narrower: tender quickly seared steak, deeply browned mushrooms and a tangy sour-cream sauce that works on an ordinary weeknight.

Beef Stroganoff Troubleshooting

If dinner is already in the skillet and something looks wrong, start with the symptom you can see or taste. Most problems come back to the beef, the mushrooms, the sauce consistency or too much heat after the sour cream goes in.

Six-part Beef Stroganoff troubleshooting guide covering tough beef, gray beef, watery mushrooms, thin sauce, overly thick sauce and split sauce with causes and corrective actions.
Protect tenderness and sauce texture first; fixing color or thickness is not worth creating a worse problem.

Beef and Mushroom Problems

ProblemLikely causeWhat to do nowNext time
Beef is toughWrong cut, thick slices or too much cookingCut large strips smaller to make them easier to eatUse sirloin or another tender steak, slice across the grain and keep the cooking brief
Beef is grayDamp meat, cool skillet or overcrowdingIf still underdone, remove excess liquid and briefly restore strong heat. If already cooked, move on—don’t sacrifice tenderness chasing colorDry the beef, work in batches and let the skillet recover between them
Mushrooms are wateryReleased moisture has not evaporated yetKeep the beef out and continue cooking until the liquid is gone and browning beginsFollow the pan rather than relying only on the timer

Sauce, Noodle and Leftover Problems

ProblemLikely causeWhat to do nowNext time
Sauce is thinToo much moisture or insufficient reductionReduce before adding dairy or beef; use a small slurry when reduction is not enoughLet mushroom moisture evaporate before building the sauce
Sauce is too thickToo much reduction or thickenerAdd broth or hot noodle water one tablespoon at a timeStop reducing while the sauce is slightly looser than the texture you want on the plate
Flour is lumpyThe broth went in too quicklyWhisk or stir vigorously before adding sour creamStart with a small splash of broth and smooth it out before adding more
Sauce is grainy or splitThe sour cream met excessive heatTake the skillet off the heat and whisk. It may not regain perfect gloss, but dinner isn’t ruinedTemper the sour cream and keep the final heat low
Sauce tastes flatUnderseasoning or weak browningCheck salt first, then adjust Dijon or Worcestershire in small amountsDevelop color on the beef and mushrooms and scrape the browned bits into the sauce
Sauce disappeared into noodlesThe noodles sat in the sauce and absorbed itLoosen the remaining sauce with some brothKeep the main skillet and noodles separate until serving
Leftovers are dryNoodles absorbed sauce during storageReheat with a splash of brothStore the noodles separately

My Sauce Is Thin, but the Sour Cream Is Already In

Once the sour cream is in, boiling the sauce down hard creates a second problem while you’re trying to fix the first.

Mix 1 teaspoon cornstarch with 1 tablespoon cold water. Stir about half into the Stroganoff over low heat and give it a moment to thicken. Add more only when the sauce needs it. Next time, do most of the reducing before adding the sour cream.

Step-by-step sauce rescue showing cornstarch mixed with cold water into a slurry and added gradually to thin Stroganoff sauce over low heat.
Add slurry gradually and pause before adding more—cornstarch needs heat and a moment to show its full effect.

Dinner back on track? Back to the recipe · Back to top

Make It Ahead, Store It and Reheat It

For the best leftovers, keep the noodles separate, reheat the sauce gently and treat freezing as a texture decision rather than an all-or-nothing rule. The details below cover each route.

Storage guide showing Beef Stroganoff beef and sauce refrigerated separately from egg noodles, gentle skillet reheating with broth, and mushroom-broth sauce base frozen before sour cream.
Separate noodles give you control: loosen the sauce with broth without overcooking the pasta during reheating.

How Long Does Beef Stroganoff Keep?

Refrigerated Beef Stroganoff keeps for 3–4 days. Refrigerate leftovers within 2 hours of cooking. For reheating guidance, FoodSafety.gov recommends heating leftovers to 165°F (74°C).

Store the beef and sauce together and the noodles separately. That prevents tomorrow’s noodles from soaking up much of the sauce while everything sits in the refrigerator.

How to Reheat It Without Breaking the Sauce

Warm Stroganoff slowly, adding a splash of broth when the chilled sauce needs loosening. Stir often so the edges do not get much hotter than the center. Reheat the noodles separately.

Where to Stop If You’re Making It Ahead

Make the mushroom-broth sauce base ahead, but sear the steak fresh when you’re ready to eat. Stop once the sauce base reaches the consistency you want, before the sour cream goes in. Cool it promptly and refrigerate it. Keep the raw steak refrigerated separately.

At dinnertime, heat the skillet and sear the beef first. Transfer it to a plate, lower the heat and let the skillet settle for a moment, then add the prepared mushroom-broth base to the same pan. Warm it through, scraping in the fresh browned bits left by the steak. Temper and stir in the sour cream, then return the beef only long enough to finish cooking and heat through. Do not partially sear the beef, refrigerate it and plan to complete its cooking later.

Four-step make-ahead guide showing mushroom-broth sauce prepared without dairy, fresh beef seared separately, sauce base reheated in the skillet, then sour cream added and beef returned.
The chilled sauce base will thicken; loosen it gently with broth before adding sour cream and freshly seared beef.

Can You Freeze Beef Stroganoff?

Yes. Fully cooked Beef Stroganoff can be frozen, although the sour-cream sauce may look slightly separated after thawing. Thaw and reheat it slowly, adding broth as needed to loosen the sauce.

If you’re cooking specifically for the freezer, the smoother option is to freeze the mushroom-broth sauce base before adding the sour cream. Reheat the base and add fresh sour cream when you make the meal.

The Fork Should Tell You It Worked

A 30-minute dinner does not have to taste hurried.

The beef gets its short blast of high heat. The mushrooms stay in the skillet long enough to develop real color. Those browned bits make their way into the sauce, and the sour cream softens everything without burying the beef and mushrooms underneath it.

Spoon it over the warm noodles while the sauce is glossy and flowing. Add the fresh chives last.

Then take the first forkful: a tender strip of beef, a browned mushroom, a few noodles and enough tangy sauce to bring all three together.

Partially eaten plate of Beef Stroganoff as a fork lifts a bite with one thin beef strip, a browned mushroom slice, a fold of wide egg noodle and glossy tan sauce.
Posted on Leave a comment

Hot Honey Chicken Tenders Recipe: Crispy, Juicy & Sweet-Spicy

Deep-golden craggy fried chicken tenders with thin amber-red hot honey drizzled over the exposed crust.

The best hot honey chicken tenders crackle when you bite through the coating, then give way to juicy chicken, sticky honey and a little heat that arrives just after the sweetness. Those rough golden ridges matter—they give the honey somewhere to catch without covering every bit of crunch.

Homemade tenders usually go wrong in a few predictable places. The breading slips off, too much chicken cools the oil, a thick piece stays underdone while the outside darkens, or the hot honey goes on so heavily that a beautiful crust turns soft almost immediately.

This version keeps those trouble spots under control without turning fried chicken into a project. The chicken is seasoned before breading, the coating gets rough little flour flakes for extra crunch, and only a few similarly sized pieces go into the oil at a time. Once the tenders hit the rack, you can drizzle, brush or toss them depending on how much crunch you want to keep.

Quick Answer: How to Make Crispy Hot Honey Chicken Tenders

  • Marinate: Season 1½ lb (680 g) chicken tenders in buttermilk for at least 30 minutes; 2–4 hours gives the seasoning more time to work.
  • Bread: Press the chicken into a flour-cornstarch dredge with small damp flour flakes, then rest the breaded tenders for 10 minutes.
  • Fry: Start the oil at 360–365°F (182–185°C), keep it around 340–350°F (171–177°C) while the chicken cooks, and cook the thickest piece to 165°F (74°C).
  • Finish: Rest the fried chicken on a wire rack for 2–3 minutes, then add warm hot honey.

Build the crunch before frying, protect it afterward, and add the hot honey last.

Four-step guide showing chicken marinating, being breaded, frying in oil, and finished with hot honey.

Choose Your Hot Honey Finish

How you add the hot honey changes the bite. A drizzle leaves plenty of golden ridges exposed; a full toss fills almost every crevice with sauce.

You wantFinishWhat to expect
Maximum crunchDrizzleSweet heat with plenty of crisp breading still exposed. Recommended.
More even sauceBrushBroader coverage while much of the coating stays crisp.
Sticky glazed chickenTossMaximum sauce coverage; eat it right away.

The main recipe uses the drizzle method.

Three-panel comparison of fried chicken tenders with drizzled, brushed, and tossed hot honey, from least to most sauce coverage.

Hot Honey Chicken Tenders Recipe

Craggy, deeply golden chicken tenders with juicy centers and warm hot honey that catches in the ridges instead of soaking the whole crust.

  • Yield: 10–12 tenders
  • Serves: about 4
  • Hands-on time: about 50 minutes
  • Marinate: 30 minutes minimum; 2–4 hours preferred
  • Total time: about 1 hour 20 minutes with the 30-minute marinade
  • Doubling: double the ingredients, but keep the same small frying batches

Equipment

  • 5–6-quart heavy Dutch oven or similarly deep pot
  • Deep-fry thermometer or other clip-on oil thermometer
  • Instant-read thermometer for the chicken
  • Wire rack set over a rimmed tray

You will also need a parchment-lined tray or large plate for the raw breaded chicken, shallow bowls, a small saucepan and tongs or a spider/skimmer. Keep a clean utensil ready for transferring the cooked chicken.

For the Chicken

  • 1½ lb (680 g) chicken tenderloins, ideally 10–12 similarly sized pieces
  • 1 cup (240 ml) buttermilk
  • 1 tablespoon (15 ml) cayenne-style hot sauce
  • 6 g fine sea salt, about 1 teaspoon
  • 1 teaspoon garlic powder
  • ½ teaspoon freshly ground black pepper

No buttermilk? Put 1 tablespoon (15 ml) lemon juice or white vinegar in a measuring cup, then add enough whole milk to reach 1 cup (240 ml). Stir and let it stand for 5 minutes.

Three-step guide showing 15 ml acid in a measuring cup, milk added to 240 ml total, and slight thickening after five minutes.

Using chicken breast? Cut it into strips ¾–1 inch (2–2.5 cm) wide and ½–¾ inch (1.25–2 cm) thick. Aim for 2–2½ oz (55–70 g) per strip.

Raw chicken tenderloins beside similarly sized chicken breast strips labeled about 2 to 2½ ounces each.

For the Crispy Coating

  • 1½ cups (180 g) all-purpose flour
  • ½ cup (60–65 g) cornstarch
  • 1½ teaspoons baking powder
  • 8 g fine sea salt, about 1⅓ teaspoons
  • 1 teaspoon garlic powder
  • 1 teaspoon onion powder
  • 1 teaspoon sweet paprika
  • 1 teaspoon freshly ground black pepper
  • ¼ teaspoon cayenne pepper, optional
  • 3 tablespoons (45 ml) seasoned buttermilk mixture, removed before the raw chicken is added

If you use kosher salt, follow the gram weights rather than the teaspoon estimates because crystal size varies by brand.

For the Medium Hot Honey

  • ½ cup (170 g) honey
  • 1 tablespoon (15 ml) cayenne-style hot sauce
  • 1 teaspoon (5 ml) apple cider vinegar or fresh lemon juice
  • ¼ teaspoon crushed red pepper flakes
  • Small pinch fine salt
  • 1 tablespoon (14 g) unsalted butter, optional

Use a thin, vinegar-forward cayenne hot sauce here. Thick sriracha, chili crisp and highly concentrated pepper sauces behave differently and are not tablespoon-for-tablespoon substitutes.

Hot honey recipe guide with a saucepan and honey, cayenne hot sauce, acid, red pepper flakes, salt, and optional butter.

Want it milder, hotter or made with bottled hot honey? See the hot honey adjustment table and notes.

For Frying

  • 1½–2 quarts (1.4–1.9 L) neutral frying oil, or enough to reach 1¼–1½ inches (3–4 cm) deep in your pot while leaving plenty of empty space above the oil

Peanut, canola, sunflower or standard vegetable oil all work well. Let the depth in your pot determine the exact amount. Fresh oil—or clean, well-filtered oil that still smells neutral—gives the cleanest flavor.
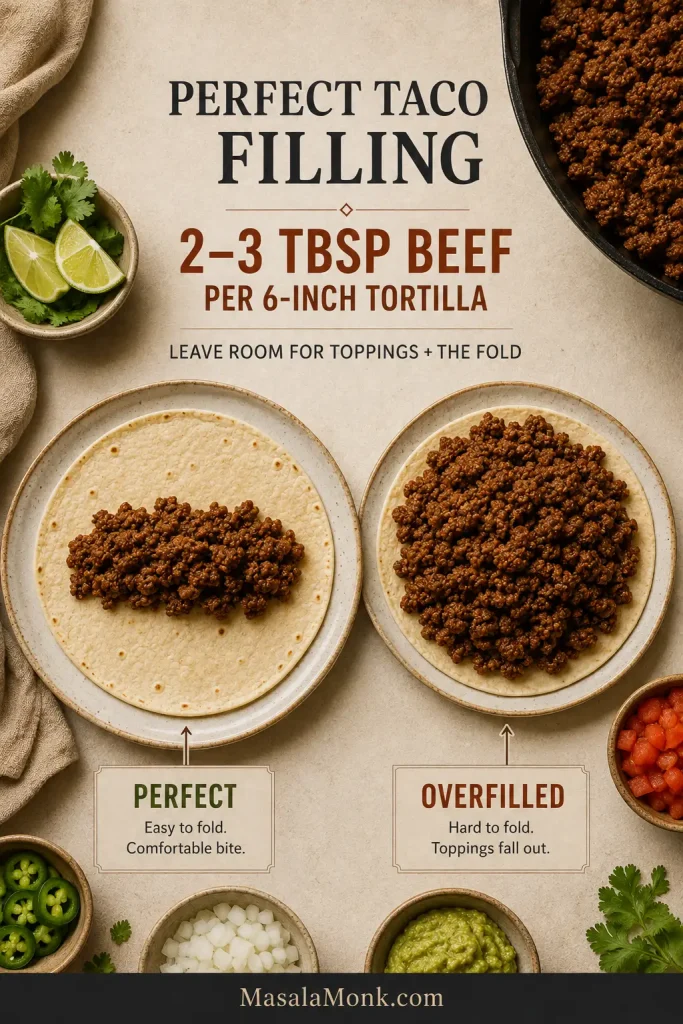
New to deep frying? The USDA deep-fat frying safety guide is worth reading before you heat the oil.

Instructions

Marinate, Make the Hot Honey and Bread

  1. Season and marinate the chicken. Whisk together the buttermilk, hot sauce, salt, garlic powder and black pepper. Before raw chicken enters the bowl, spoon 3 tablespoons (45 ml) into a separate clean bowl for the dredge. Add the chicken, turn to coat, cover and refrigerate for at least 30 minutes. Two to four hours is ideal; these thin pieces gain little from a much longer soak.
  2. While the chicken marinates, make the hot honey. Combine the honey, hot sauce, vinegar or lemon juice, red pepper flakes and salt in a small saucepan. Warm over low heat for 1–2 minutes, just until loose and fragrant. Do not boil. Stir in the butter if using, taste and set aside. Rewarm briefly before serving if the sauce thickens.
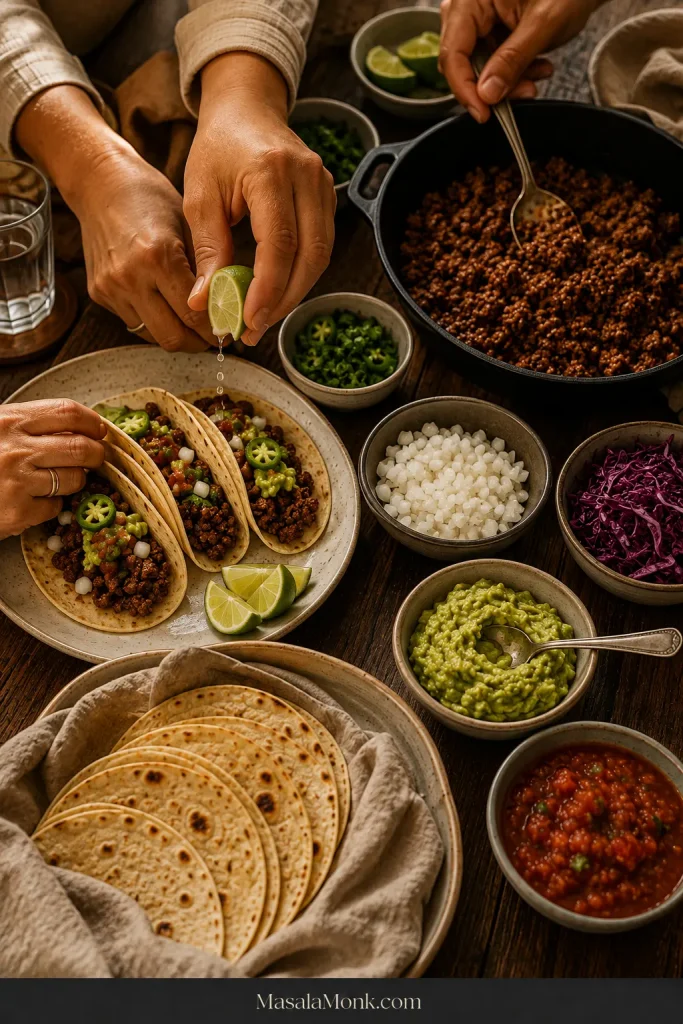
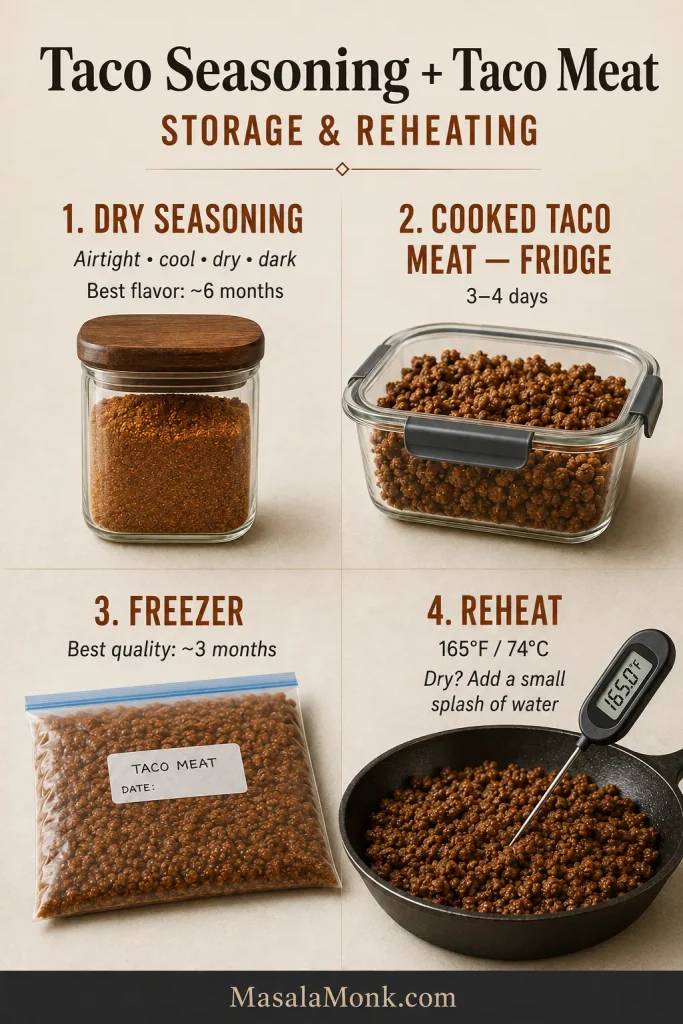
  3. Mix the dredge while the chicken finishes marinating. Whisk together the flour, cornstarch, baking powder, salt, garlic powder, onion powder, paprika, black pepper and cayenne. Drizzle the clean reserved buttermilk over the flour mixture and rub lightly with your fingertips until small damp flakes and pebbly pieces form. Break apart anything that resembles wet dough.
  4. Bread the chicken. Lift one tender from the marinade and let the excess drip back into the bowl. Do not pat it dry. The surface should stay tacky without dripping in streams. Press the chicken firmly into the dredge on every side, picking up some of the rough flour flakes, then place it on the parchment-lined tray. Repeat with the remaining pieces. Discard the remaining raw-chicken marinade and any dredge that touched raw chicken.

Fry the Chicken

  1. Rest the breading and start heating the oil. Begin heating the oil to 360–365°F (182–185°C). Let the breaded chicken rest for at least 10 minutes while the oil comes up to temperature. The coating should look shaggy and slightly hydrated in patches. If the oil needs another few minutes, the chicken can simply stay on the tray.
  2. Fry the first batch and let the coating set. Lower 3–4 tenders gently into the oil, leaving visible space between them. Do not keep nudging or turning them as soon as they land; give the crust time to set. Aim to keep the oil around 340–350°F (171–177°C).
  3. Cook until deep gold and 165°F. Pieces in the 2–2½ oz (55–70 g) range usually need 5–7 minutes total. Turn once when needed. The bubbling should stay energetic while the ridges move gradually from pale to deep gold. Start checking the largest piece near the early end of the range; poultry should reach 165°F (74°C) in the thickest part.

Once a batch comes out deep gold, crisp at the edges and 165°F (74°C) in the center, you have your pot figured out. The remaining batches are mostly repetition.

Deep-golden fried chicken tenders on a wire rack with a thermometer showing 165°F and 74°C.

Rack, Reset and Finish

  1. Move the cooked chicken to the rack. Transfer the tenders with clean tongs or a clean spider/skimmer and keep them in one layer so steam can escape underneath.
  2. Reset the oil between batches. Let it return to the starting range before adding more chicken. If recovery is slow, make the next batch smaller. Skim out loose breading once it turns dark so burnt crumbs do not make later batches bitter.
  3. Add the hot honey last. Give each fried batch 2–3 minutes on the rack, until the strongest steam has eased. Rewarm the sauce if needed, then drizzle it over only the tenders you expect to eat right away. The honey should fall in glossy ribbons and catch on the rough ridges. Keep the rest of the sauce at the table.

Give the steam somewhere to go: the rack keeps the bottom from softening while the crust settles before the hot honey goes on.

Unsauced fried chicken tenders resting in one layer on a raised wire rack with air space underneath.

For the first serving, drizzle a few tenders and listen for that first crunch before deciding whether the rest need more honey.

Pepper-flecked amber-red hot honey falling from a spoon in thin ribbons over craggy fried chicken tenders.

Break one open while it is still hot: the center should be moist white chicken beneath a closely attached craggy crust, not a thick hollow shell.

Fried chicken tender broken open to reveal moist white chicken inside a closely attached deep-golden craggy crust.

Need help with a particular part of the recipe? Jump to breading problems, oil temperature, air-fryer and oven methods, hot honey adjustments, troubleshooting or storage and reheating.

Chicken Tenderloins or Chicken Breast Strips?

Tenderloins are already close to the shape you want. Split or gently flatten any unusually thick ones so they finish alongside the rest.

The firm white tendon is harmless. Trim the exposed portion, or grip it with paper towel and gently pull it through the tines of a fork if you prefer to remove more. Stop if the tender begins tearing.

Two-panel guide showing a white tendon trimmed from a raw chicken tenderloin and pulled through fork tines with a paper towel.

Chicken breast is an easy substitute. Cut it to the size given in the recipe rather than making long, thick strips. Similar-size pieces are what keep the frying time predictable.

If you would rather cook the breasts whole, our baked chicken breast recipe goes deeper into thickness, timing and keeping lean chicken juicy.

Chicken fingers, strips and tenders are often used loosely for the finished dish. Here, size matters more than the label on the package.

The Ingredients That Actually Change the Result

Buttermilk

Buttermilk carries seasoning, adds mild tang and leaves a naturally tacky surface for the flour. The milk-and-acid substitute in the recipe is thinner than cultured buttermilk, but it still gives the coating something to grip.

Buttermilk-marinated chicken tender lifted from a bowl with a moist, tacky surface and no heavy streams of marinade.

If the recipe leaves most of a carton behind, save it for flaky Southern buttermilk biscuits. Fried chicken and warm biscuits rarely need much persuasion to share a plate.

Flour, Cornstarch and Baking Powder

Flour gives the coating enough structure to cling to the chicken, while cornstarch keeps the fried edges lighter and crisper. A little baking powder helps keep the surface rough instead of dense and smooth. When the clean reserved buttermilk is rubbed lightly through this mixture, the small damp flakes become the craggy pieces you want the chicken to pick up.

Four-step guide showing clean buttermilk reserved, drizzled into flour dredge, rubbed with fingertips, and forming small damp flour flakes.

What you are building toward: a fried crust with thin ridges, folds and blisters rather than one thick, smooth shell. Those irregular edges create more crisp surface without burying the chicken in breading.

Extreme close-up of fried chicken crust with irregular flour ridges, folds, small flakes, and dark-golden peaks.

Seasoning the Chicken and the Coating

Seasoning in the marinade reaches the meat itself; seasoning in the dredge flavors the crust. Once the honey goes on, that distinction matters. Sweet, spicy sauce should finish good fried chicken rather than cover a bland center.

Sweet paprika brings color and mild pepper flavor. Cayenne in the dredge is optional, especially when several people at the table have different ideas about what “hot” means.

How to Keep Breading on Chicken Tenders

Before frying, the coating can tell you a lot. Good breading looks rough and patchy, with some flour hydrated against the chicken and little shaggy ridges still standing up.

Six breaded chicken tenders labeled Dusty, Pasty, Wet knobs, Too thick, Sliding, and Right.
  • Still dusty almost everywhere after resting? A few floury spots are fine. On the next tender, let slightly less marinade drip away before dredging; do not try to wet an already breaded piece.
  • Smooth and pasty? Too much marinade followed the chicken into the flour. Let the next piece drip a little longer.
  • Huge wet knobs? Break the damp flour clumps smaller so they fry into crisp ridges rather than hard chunks.
  • A thick shell forming around the meat? The coating is too heavy. One well-pressed dredge is enough for this recipe.
  • Coating slides when you lift the tender? Press it on more firmly and give the breading its full resting time.
  • Rough, patchy and a little untidy? Good. Leave it alone.

Keeping one hand for wet chicken and the other for dry dredge also prevents the breading process from turning into a bowl full of floury fingerprints.

After the breading rests: the coating should still look rough and shaggy, with only a few slightly hydrated patches. It should not turn uniformly shiny, smooth or wet.

Three stages showing breading pressed onto chicken, a freshly coated tender, and the slightly hydrated coating after a 10-minute rest.

How to Control the Oil Temperature Between Batches

A thermometer makes home frying much less mysterious. The useful number is not only where the oil starts; it is what happens after cold chicken enters the pot.

StageTargetWhat you want to see
Before chicken enters360–365°F (182–185°C)Enough stored heat for the initial temperature drop
While frying340–350°F (171–177°C)Steady bubbling and gradual golden browning
Before the next batchBack near 360–365°F (182–185°C)Oil recovered before more cold chicken enters

Little flour peaks that darken almost immediately mean the oil is running too hot. Pale chicken sitting in weak bubbles points the other way. Small crumbs in the pot are normal, but remove them once they turn dark.

Three-panel frying comparison showing chicken in oil that is too hot, correctly heated, and too cool.

Use the first batch to learn your pot. Once the bubbling and browning settle into the right rhythm, the remaining batches become much easier to repeat.

A deep cast-iron skillet is another good option. A Dutch oven gives you higher sides and a little more protection from splatter. An electric fryer is fine too; resist filling the basket just because there is room.

Use the bubbling as a batch-size check: leave visible oil between the tenders, and if active bubbling weakens sharply after loading the pot, make the next batch smaller rather than squeezing in another piece.

Four breaded chicken tenders frying with visible oil between each piece and no utensil disturbing the coating.

Keep the whole frying cycle in view: start near 360–365°F (182–185°C), let the oil work around 340–350°F (171–177°C), then give it time to recover before the next batch.

Oil-temperature guide showing the start range, working fry range, recovery before the next batch, and dark crumbs being skimmed.

From here, choose your cooking path: use the air fryer or oven, or skip to the hot honey adjustments if you are frying.

Air Fryer and Oven Methods

The flour coating used for frying relies on hot oil to set those craggy edges. Dry heat does better with panko. Use the air fryer when you want to avoid a pot of oil; the oven is easier when you need more tenders at once.

Side-by-side chicken tenders comparing irregular fried flour crust with a coarser dry-heat panko coating.

For the cooking times below, use 10–12 similarly sized tenderloins or chicken breast strips around 2–2½ oz (55–70 g) each. Very thick pieces will need longer.

Prepare the same medium hot honey used for the fried version while the chicken marinates, or use the heat-adjustment section for a milder, hotter or bottled version.

Marinade for Air Fryer or Oven Tenders

For 1½ lb (680 g) chicken, use:

  • 1 cup (240 ml) buttermilk
  • 1 tablespoon (15 ml) cayenne hot sauce
  • 6 g fine sea salt, about 1 teaspoon
  • 1 teaspoon garlic powder
  • ½ teaspoon freshly ground black pepper

Marinate for at least 30 minutes; 2–4 hours is ideal. Unlike the fried version, you do not need to reserve any marinade for the coating.

If you are cooking with dry heat anyway, our honey mustard chicken tenders use a similar panko approach with a tangier finish.

Panko Coating

  • ½ cup (60 g) all-purpose flour
  • 2 large eggs
  • 1½ cups (95 g) panko breadcrumbs
  • 1 tablespoon (15 ml) neutral oil
  • Oil spray or a little extra neutral oil for the basket, rack and any dry crumb patches
  • 6 g fine sea salt, about 1 teaspoon
  • 1 teaspoon garlic powder
  • 1 teaspoon onion powder
  • 1 teaspoon sweet paprika
  • ½ teaspoon freshly ground black pepper
  • ⅛ teaspoon cayenne, optional

Mix the dry seasonings together. Stir roughly one-third into the flour and the rest into the panko, then work the tablespoon of oil through the crumbs.

Air Fryer

  1. Let excess marinade drip from the chicken.
  2. Coat lightly in seasoned flour, dip in beaten egg, then press firmly into the panko.
  3. Preheat the air fryer to 400°F (205°C) if your model benefits from preheating.
  4. Lightly oil the basket and arrange the tenders in one layer with space around them. Mist any visibly dry crumb patches.
  5. Air fry for 8–11 minutes, turning halfway, until golden and 165°F (74°C) in the thickest piece.
  6. Transfer the tenders to a wire rack and rest for 2–3 minutes, until the initial steam has eased. Drizzle with warm hot honey just before serving.
Three-stage air-fryer guide showing spaced panko chicken tenders, cooked tenders at 165°F, and hot honey added after cooking.

Later batches may finish a little sooner once the air fryer is thoroughly hot.

Oven

  1. Heat the oven to 425°F (220°C).
  2. Set a lightly greased wire rack over a rimmed baking sheet.
  3. Bread the chicken with the panko mixture and arrange the pieces in one layer. Mist any dry-looking crumb patches.
  4. Bake for 14–18 minutes, depending on thickness, until golden and 165°F (74°C) inside.
  5. Leave the tenders on the rack for 2–3 minutes, until the initial steam has eased, then drizzle with warm hot honey.
Golden panko-coated chicken tenders spaced on a raised wire rack over a rimmed baking sheet.

Adjust the Hot Honey: Mild, Medium or Hot

The recipe is medium as written. Keep the ½ cup (170 g) honey, teaspoon of acid and pinch of salt the same, then choose the heat level below.

Heat levelUse this
Mild2 teaspoons (10 ml) cayenne hot sauce; no pepper flakes
Medium — default1 tablespoon (15 ml) cayenne hot sauce + ¼ teaspoon red pepper flakes
Hot1½ tablespoons (22 ml) cayenne hot sauce + ½ teaspoon red pepper flakes + a small optional pinch of cayenne
Three bowls of hot honey labeled Mild, Medium default, and Hot with increasing hot sauce and pepper flakes.

Taste the sauce warm before adding more heat; hot sauces and pepper flakes vary quite a bit.

One batch can easily cover two heat preferences. Divide the warm honey between two bowls and increase the chili in only one; there is no need to make the fried chicken itself aggressively spicy.

Butter is optional. One tablespoon (14 g) makes the glaze richer and slightly softens the heat; keep the sauce over low heat so it stays smooth.

How Much Hot Honey Do You Need?

  • Drizzle: start with ¼ cup (60 ml)
  • Brush: use roughly ⅓ cup (80 ml)
  • Toss: use most or all of the basic sauce batch

Make 1½ batches when you want heavily glazed chicken and extra sauce at the table. The sauce should be warm enough to fall in ribbons, but not thin or watery.

Three spoons of hot honey labeled Too thin, Right, and Too thick, showing progressively thicker dripping consistencies.

Already have bottled hot honey? Start with ½ cup (120 ml). A few drops of vinegar or lemon juice can sharpen it if the sweetness feels flat.

For more variations on the sauce itself, see our hot honey sauce recipe.

What Went Wrong?

If a batch goes wrong, do not change five things at once. Start with what you can see; the crust, color and oil usually point toward the problem.

Breading and Frying Problems

What you seeWhat it means and what to change
Breading falls offToo much marinade, weak pressing or too little resting time. Let excess drip, press firmly and give the coating time to settle.
Breading is thick and hardThe wet flour pieces are too large or the dredge is too heavy. Use smaller flakes and one substantial coating.
Chicken is pale and greasyThe oil spent too much of the batch too cool. Fry fewer pieces and let it recover before reloading.
Outside is dark, center underdoneThe oil is too hot or the chicken is too thick. Lower the heat and make the pieces more even.
Chicken is dryIt cooked too long. Start checking the largest piece sooner.
Bottom turns softSteam is trapped underneath. Move cooked tenders to a wire rack in one layer.
Later batches taste bitterLoose breading has burned in the oil. Skim out dark crumbs between batches.

A pot that starts at 360°F but spends most of the batch near 300°F is still frying too cool. What the thermometer does after the chicken enters matters more than the starting number alone.

Hot Honey and Crispness Problems

What you seeWhat it means and what to change
Sauce softens the crust quicklyThe chicken was sauced too soon or too heavily. Give it a brief rack rest and start with a drizzle.
Hot honey is too sweet or too hotToo sweet: add a little acid, salt and measured heat. Too hot: stir in more honey; butter can soften the heat too.
Hot honey looks oily or splitButter-containing sauce may have overheated. Take it off the heat, whisk gently and rewarm only over low heat.
Sauce runs offIt is too hot or thin. Let it cool until it falls from the spoon in ribbons.

If buttered hot honey turns oily or streaky: take it off the heat, whisk gently and rewarm only over low heat. The finished sauce should look smooth and cohesive rather than separated.

Two-panel comparison of separated oily hot honey and smooth, cohesive pepper-flecked hot honey.

Correct one thing at a time while the sauce is warm: use a little acid, salt and measured heat when it is too sweet; add more honey when it is too hot. If someone at the table simply wants a gentler creamy option, our easy yum yum sauce gives them another path without changing the whole batch.

Two-panel troubleshooting guide showing acid, salt, and hot sauce for overly sweet hot honey and honey with optional butter for overly hot sauce.

Make Ahead, Store and Reheat

Hot honey: Make it up to 1 week ahead, refrigerate it in a covered container and warm it gently before serving. Low heat is especially important when butter is included.

Chicken: Marinate 2–4 hours ahead when convenient. Bread it close to frying; the short 10-minute rest helps the coating settle, while a long breaded hold works against that rough, crisp texture.

If coleslaw is part of dinner, this is a good moment to make it too. Our creamy coleslaw recipe can chill while the chicken marinates.

Holding fresh batches: Keep the tenders unsauced on their rack in a 200°F (95°C) oven for up to 30 minutes while you finish frying. A short hold works, but straight from frying is still best.

Leftovers: Refrigerate cooked chicken for 3–4 days, with extra hot honey stored separately whenever possible.

Freezing: Freeze cooked tenders unsauced. For best quality, use them within roughly 1–3 months, then re-crisp before adding fresh hot honey.

  • Air fryer: 350°F (175°C) for 4–6 minutes
  • Oven: 375°F (190°C) on a rack for 8–12 minutes
  • Microwave: quickest, but the coating will be softer

Whichever method you choose, reheat the center of the chicken to 165°F (74°C), then add fresh hot honey.

Four-part guide showing fried chicken held on a rack, refrigerated with sauce separate, frozen, and reheated in an air fryer.

What to Serve With Hot Honey Chicken Tenders

You do not need an elaborate plate. Something cold and crunchy, creamy, tart or pickled is usually enough to balance rich fried chicken and sticky sweet heat.

Plate of hot honey chicken tenders with fries, creamy coleslaw, pickle slices, and a small bowl of extra sauce.
  • Classic and crunchy: Add crispy homemade French fries, slaw and plenty of pickles.
  • Cold and sharp: A crisp cucumber salad with vinegar and dill cuts through both the frying oil and the honey beautifully.
  • Sandwich night: Add slaw, pickles and a little hot honey to a toasted bun. Our chicken sandwich recipes have more ideas for building around crisp chicken.
  • Sweet-savory: Pile the tenders onto waffles and drizzle the honey over both while leaving plenty of fried ridges exposed.
Hot honey chicken tenders beside a golden waffle with butter, thin hot-honey drizzle, and a small bowl of extra sauce.

The best plate of these still lets you see rough dark-gold ridges beneath thin glossy streaks of honey. The first bite should give you crunch and juicy chicken, then sweetness, then the chili catching up a moment later.

If you make them, tell us whether you used tenderloins or breast strips, how you cooked them, and whether you drizzled, brushed or tossed the hot honey. Your notes may help the next person standing over a batch of chicken wondering whether theirs looks right.

Posted on Leave a comment

Taco Seasoning for 1 lb Ground Beef: Exact Amount & How to Use It

Three soft tacos filled with browned seasoned ground beef, guacamole, salsa, diced onion and jalapeño, with lime wedges and a skillet of taco meat behind them.

Ground beef is ready for dinner, the tortillas are waiting, and the taco seasoning packet you thought you had is nowhere to be found. This recipe is for exactly that moment.

One batch seasons 1 lb / 16 oz / 454 g ground beef. Mix it and use the whole thing. The water amount is here too, so there is nothing else to work out once the beef hits the pan.

The finished beef should taste warmly spiced and savory, with browned edges and small crumbles that stay moist enough to scoop. Keep the base mild when several people are eating, then let salsa, jalapeños or hot sauce bring extra heat at the table.

Quick Answer: Taco Seasoning for 1 lb Ground Beef

For 1 lb / 454 g ground beef, use about 3 tablespoons / 24 g of this homemade taco seasoning plus ⅓ cup / 80 mL water to start. That is the full seasoning batch below.

Brown the beef first and spoon away only the excess pooled fat. Stir in the seasoning for 30–60 seconds, until it smells fragrant, then add the water and simmer uncovered for roughly 3–5 minutes.

Brown → remove excess fat → season → add water → cook until the loose puddle is gone.

The crumbles should stay moist and easy to scoop. Very lean beef may need another tablespoon of water. Beef, burners and pans vary. Watch the meat rather than chasing the minute exactly.

Reference graphic for 1 pound of ground beef showing 3 tablespoons or 24 grams taco seasoning, one-third cup or 80 milliliters water, and the brown-season-water-reduce sequence.
One pound of beef gets the full 3-tablespoon / 24 g blend plus ⅓ cup / 80 mL water; the water distributes the seasoning, then cooks away.

Using chilli powder outside the U.S.? This recipe means mild American-style chili powder, which is a seasoning blend. It does not mean pure cayenne, pure chile powder or a hot Indian red chilli powder. Read the chili powder note before measuring a full tablespoon.

Taco Seasoning for 1 lb Ground Beef Recipe

This batch is sized for one pound of beef. Mix it, use all of it, and get the skillet going.

Recipe at a Glance

Ground beef1 lb / 16 oz / 454 g
SeasoningAbout 3 Tbsp / 24 g
Water⅓ cup / 80 mL to start
Total timeAbout 20 minutes
YieldAbout 8–10 small tacos
Pan10–12 inch / 25–30 cm skillet

You’ll need: a 10–12 inch skillet, a wooden spoon or sturdy spatula, a small bowl and measuring spoons. An instant-read thermometer is useful for checking the beef by temperature.

Cooking more than one pound? Jump to the scaling guide before you start browning.

Ingredients

  • 1 tablespoon U.S.-style chili powder
  • 1½ teaspoons ground cumin
  • 1 teaspoon sweet or regular paprika
  • 1 teaspoon garlic powder
  • 1 teaspoon onion powder
  • ½ teaspoon dried oregano
  • ¾ teaspoon fine sea salt
  • ¼ teaspoon ground black pepper
  • ⅛ teaspoon cayenne, optional, for a noticeable warm kick
  • 1 lb / 454 g ground beef, preferably around 85/15
  • ⅓ cup / 80 mL water, plus more only as needed
  • 1–2 teaspoons neutral oil, optional for very lean beef or a pan that tends to stick

The dry blend comes to roughly 3 tablespoons / 24 g. Measure the individual spices by teaspoon; their weights shift between brands and grinds, so tiny gram conversions for each one suggest more precision than this recipe needs.

Taco seasoning recipe card for 1 pound of ground beef with chili powder, cumin, paprika, garlic powder, onion powder, oregano, salt, pepper, and optional cayenne.
Use the whole blend for one pound of beef. Different taco-seasoning recipes vary in concentration, so tablespoon totals are not directly comparable.

A Few Ingredient Notes

Regular paprika gives the most familiar flavor; smoked paprika makes the blend smokier. For a less cumin-forward batch, use 1 teaspoon cumin instead of 1½. Check the chili-powder label too. Some blends already contain salt, which may mean you need less added salt.

The ¾ teaspoon salt measurement is for fine sea salt. Coarser salts measure differently by volume, so adjust those to taste.

Give the cumin and chili powder a quick smell before mixing. If the aroma is faint when you open the jar, the finished seasoning will taste muted too.

Overhead arrangement of bowls and measuring spoons holding the spices used in the homemade taco seasoning blend.
Chili powder builds the base; cumin adds earthiness; paprika rounds the flavor; garlic, onion and oregano fill in the savory background. Cayenne controls heat.

80/20 ground beef works too; expect a little more pooled fat to spoon away before seasoning.

Comparison of cooked 80/20, 85/15, and 90/10 ground beef showing more rendered fat with fattier beef and less with leaner beef.
Fattier beef leaves more rendered fat to spoon away; leaner beef reaches the dry stage sooner and gives you less room before the crumbles dry out.

How to Make Taco Meat

  1. Mix the seasoning. Stir the chili powder, cumin, paprika, garlic powder, onion powder, oregano, salt, pepper and optional cayenne together in a small bowl.
  2. Heat the pan. Set the skillet over medium-high heat and let it get properly hot. Beef around 85/15 or 90/10 generally needs no extra oil. For very lean beef, add a teaspoon or two of oil if the pan tends to stick.
  3. Give the beef time to brown. Add the meat and spread it into a loose layer. Leave sections against the hot surface before breaking everything apart. Once browned edges begin to form, work the meat into small irregular crumbles and continue until it is mostly cooked through and browned in spots, about 5–7 minutes.
Instructional comparison showing ground beef browned in larger sections before being broken into smaller taco-size crumbles.
Leave the beef against the hot pan long enough to brown before breaking it into taco-size crumbles.
  1. Remove excess grease and cook off released water. Spoon out any obvious pool of fat, but leave a thin sheen around the beef. Let bubbling moisture cook away uncovered. When the bubbling settles and the stronger sizzle returns, the pan is ready for the seasoning.
Side-by-side skillet comparison of ground beef bubbling in released moisture and browned beef sizzling after the liquid evaporates.
Bubbling means moisture is still evaporating. The returning sizzle signals stronger contact between the beef, fat and hot skillet.

Season and Simmer

  1. Wake up the spices. Reduce the heat to medium and stir the seasoning into that thin film of rendered fat. After about 30 seconds, the raw dusty smell should shift toward warm cumin, chile and garlic. If the pan is completely dry, add about 1 teaspoon neutral oil before the seasoning. Add the water before the spices begin to darken.
Taco seasoning being stirred into browned ground beef in a thin sheen of rendered fat before water is added.
Bloom the spices only until fragrant. Once cumin, chile and garlic smell rounded, add the water before the powders darken or scorch.
  1. Add the water. Pour in ⅓ cup / 80 mL and scrape up the browned bits from the bottom of the pan.
  2. Cook until the loose water is gone. Simmer uncovered for roughly 3–5 minutes. Drag the spoon across the pan. Thin liquid rushing straight back into the track needs longer. When the track stays visible for a beat and the crumbles remain moist, take the pan off the heat.
Two taco meat states showing a spoon track filling quickly when the mixture is too loose and holding briefly when the meat is ready.
The spoon track checks free liquid, not whether the beef itself is moist. Ready taco meat can stay juicy while the pan has almost no loose water.

Taste, Check, and Serve

  1. Taste it the way you are going to eat it. Put a little beef on a piece of the tortilla you are serving, then decide whether the pan needs more salt or heat. A tortilla softens the seasoning, and salty cheese or salsa can change the final bite again.
Hand tasting cooked taco meat on a piece of soft tortilla beside the skillet and taco toppings.
Taste the beef with the tortilla, not by itself. The tortilla softens seasoning, while cheese, salsa and other toppings will change the final balance again.

Ground beef should reach 160°F / 71°C when checked with an instant-read thermometer. See the USDA ground-beef food-safety guidance.

The thermometer answers the safety question; the pan still answers the texture question. Before serving, use the finished crumbles as the final visual check.

Close-up of finished seasoned taco meat with irregular browned crumbles, a light moist sheen, and no loose liquid in the pan.
Look for sheen, not a moat. A light gloss means moist meat; a puddle needs more reduction, while a heavy sticky coating signals a thicker filling.

Warm the tortillas during those last few minutes. These soft homemade corn tortillas are especially useful when you want a small tortilla that bends around the beef without cracking.

If your pan looks different from the finished texture above, jump to Taco Meat Troubleshooting before adding anything else.

Need More Help With the Taco Meat?

The recipe above is all you need for one pound. The sections below cover scaling, ingredient swaps, troubleshooting and the small details that make the beef better.

How Much Taco Seasoning for 1 lb of Ground Beef?

For this blend, the answer is the same 3 tablespoons / 24 g per pound used in the recipe above. What changes from recipe to recipe is the blend itself.

Homemade taco seasonings are not interchangeable tablespoon for tablespoon. The amounts of chile, cumin, salt and other spices vary, and some mixes contain starch as well. That is why another recipe may call for 1½, 2 or 3 tablespoons and still be internally consistent.

Comparison graphic with taco seasoning blends labeled 1½, 2, and 3 tablespoons per pound to show that different blends have different concentrations.
Tablespoons measure volume, not potency. Compare blends by their proportions and intended use, not by assuming the larger spoonful is stronger.

Does This Replace One Taco Seasoning Packet?

Yes. For 1 pound of taco meat, use this whole batch in place of one seasoning packet. It replaces the packet by intended use, not gram-for-gram.

Commercial packets can weigh differently, contain thickeners and call for more liquid, so use this recipe’s water amount rather than the packet directions.

Taco Seasoning for ½ to 5 lb Ground Beef

Ground beefSeasoningApprox. seasoning weightWater to start
½ lb / 227 g½ batch / about 1½ Tbsp12 g2 Tbsp + 2 tsp / 40 mL
1 lb / 454 g1 batch / about 3 Tbsp24 g⅓ cup / 80 mL
1½ lb / 680 g1½ batches / about 4½ Tbsp36 gAbout ½ cup / 120 mL
2 lb / 907 g2 batches / about 6 Tbsp48 gAbout ⅔ cup / 160 mL
3 lb / 1.36 kg3 batches72 gAdd gradually after browning
4 lb / 1.81 kg4 batches96 gAdd gradually after browning
5 lb / 2.27 kg5 batches120 gAdd gradually after browning
Taco seasoning scaling chart for one-half to five pounds of ground beef, with seasoning amounts and guidance to add water gradually for larger batches.
The spice math scales linearly; skillet behavior does not. Brown larger quantities in batches so trapped moisture does not flatten the flavor.

Spice weights are approximate because brands and grinds vary. Measuring spoons are perfectly practical for one or two pounds. A scale becomes more useful when several batches need to taste the same.

Cooking for a crowd changes the pan more than it changes the spices. Brown several pounds of beef in batches, combine them, then add the scaled seasoning and enough water to distribute it through the meat.

For the most consistent large batches, scale the dry seasoning by weight; let the meat tell you how much liquid it needs.

Chili Powder, Heat and Salt

This is the familiar American/Tex-Mex ground-beef profile: chili, cumin, garlic, onion and oregano around browned beef. Tacos across Mexico use many different meats, chiles, marinades and cooking styles.

In this recipe, chili powder means the mild American seasoning blend. Chile powder means powder made primarily from a particular dried chile. Products labeled chilli powder or lal mirch in India and elsewhere can be far hotter than American chili powder.

Guide comparing U.S.-style chili powder, pure chile powder, and Indian chilli powder or lal mirch, emphasizing differences in composition and heat.
Check the label before measuring a tablespoon: U.S.-style chili powder, pure chile powder and hot chilli powder can behave very differently.

When American-style chili powder is unavailable, replace the tablespoon with about 2½ teaspoons sweet paprika plus up to ¼ teaspoon mild chile powder. The recipe already contains cumin, garlic, onion and oregano. With a genuinely hot chile, begin with a pinch.

Adjust the Heat and Salt

Leave out the cayenne for very little heat. About ⅛ teaspoon gives a noticeable warm kick. Want it hotter? Start with ¼ teaspoon, cook the beef and taste before adding more.

Keeping the pan fairly mild works well when several people are eating. A spoonful of roasted tomatillo salsa verde can bring chile, acidity and freshness to one taco without changing everyone else’s.

To reduce the salt, begin with ½ teaspoon fine sea salt rather than ¾ teaspoon and adjust after cooking. Cheese, salsa and other toppings may bring plenty of salt themselves.

Once the chili powder is sorted, the rest gets much simpler. Missing another spice? Jump to the substitution guide.

Why This Method Makes Better Taco Meat

Surface contact creates browning. Give larger pieces of beef some time against the hot skillet before breaking them smaller. Prefer very fine taco-shop-style meat? Keep crumbling once those browned surfaces have developed. Starting fine can cost you browning; finishing fine is completely okay.

Drain the puddle, not every trace of fat. A thin sheen of rendered fat helps the seasoning turn fragrant. Released water needs to evaporate first; the stronger sizzle tells you the pan is ready again.

Spoon removing pooled rendered fat from browned ground beef while leaving a thin sheen in the skillet.
Remove a movable pool of rendered fat, but keep the light sheen clinging around the beef for the seasoning.
One-third cup or 80 milliliters water being added to seasoned ground beef to distribute spices and loosen browned bits.
The water is temporary: it loosens browned bits and distributes seasoning, then evaporates. If liquid still gathers in the pan, keep reducing.

There is no prize for hitting the simmer time exactly. Once the loose water is gone, the spoon track holds briefly and the meat remains moist, you’re there.

Taco Meat Variations and Substitutions

For Packet-Style Taco Meat

Mix ½ teaspoon cornstarch into the dry seasoning and increase the water to ½ cup / 120 mL.

Simmer uncovered until the sauce lightly hugs the crumbles. Drag a spoon through the pan; the track should stay visible for a moment before slowly filling. Stop before the coating becomes gummy.

For Richer Taco Meat Without Starch

Stir 1 tablespoon / about 16 g tomato paste into the browned beef with the seasoning, then add the usual water. It makes the filling darker and richer without turning it into tomato sauce. A spoonful of extra water will loosen a pan that tightens too quickly.

Three taco meat examples comparing standard lightly coated crumbles, thicker packet-style meat, and a darker tomato-paste variation.
Choose the finish you want: loose standard crumbles, thicker packet-style meat, or richer tomato-paste meat without starch.

Missing a Spice?

This is pantry food. One empty spice jar usually does not need to stop dinner.

If you do not have…Try this
U.S.-style chili powderUse about 2½ tsp sweet paprika plus up to ¼ tsp mild chile powder
Regular paprikaUse 1 tsp smoked paprika for a smokier result
CuminLeave it out if necessary; the flavor will be less earthy
OreganoUse about ¼ tsp Italian seasoning or leave it out
Onion powderOmit it; fresh onion adds moisture and changes the browning
Garlic powderUse 1 small finely minced garlic clove during the final minute of browning
CayenneLeave it out and add heat at the table
CornstarchSkip it unless you want the packet-style version
Taco seasoning substitution guide with alternatives or omissions for missing chili powder, paprika, cumin, oregano, onion powder, garlic powder, cayenne, and cornstarch.
Replace a missing spice by function when possible. If an optional ingredient has no clean substitute, leaving it out is often the better choice.

Taco Meat Troubleshooting

Taco meat is forgiving. Most problems can still be fixed while the pan is warm. Start with what actually went wrong before adding more seasoning.

What happened?Likely reasonWhat to do
Gray instead of brownedCool or crowded pan; constant stirringLet released moisture evaporate, then give the beef more contact with the hot pan
BlandLow salt, excess liquid, stale spices or weak browningReduce loose liquid, taste for salt, then add a small amount of seasoning only if it remains flat
Hot but blandHeat without enough savory balanceCheck salt and overall seasoning before adding more cayenne
Too spicyToo much hot chile or the wrong chili powderDilute with unseasoned beef or another unsalted ingredient
Too saltyToo much salt or excessive reductionDilute with unsalted ingredients
WateryReleased meat moisture or too much added waterSimmer uncovered until the loose liquid reduces
DryOvercooked, very lean or over-drainedAdd water a tablespoon at a time
PowderySeasoning has not hydratedAdd a small splash of water and simmer briefly
GummyToo much starchAdd water 1 Tbsp at a time; if needed, dilute with more unseasoned meat
BitterSpices scorched in the panTake the pan off the heat and dilute if possible
Four taco meat examples showing watery, dry, powdery, and gummy textures with their corresponding fixes.
Watery, dry, powdery and gummy taco meat have different causes. Diagnose the texture before automatically adding more seasoning, water or cooking time.

When the Beef Will Not Brown

Liquid pooling before you add any water means the pan is struggling to evaporate what the beef is releasing. Stop stirring and leave it uncovered. When the bubbling quiets and the stronger sizzle comes back, the meat can begin picking up color.

Already cooked through? Do not keep frying the beef just to force darker browning. That opportunity has mostly passed. Season it well, finish the texture and move on to the tortillas.

Three-stage guide showing wet gray ground beef, moisture evaporating, and improved browning after the skillet returns to a sizzle.
Wet gray beef needs moisture control, not more seasoning. Let the pan recover its sizzle before chasing extra color.

When the Flavor Is Off

Judge bland meat after excess water has reduced. Still flat? Check the salt before reaching for more chile. Older spices and weak browning can dull the flavor too.

Hot but bland is different. Cayenne raises heat, not savory depth. More of it usually pushes the pan farther from what it needs.

Troubleshooting graphic stating that heat is not flavor, with more cayenne contrasted against checking salt, browning, and overall seasoning.
Salt lifts flavor, browning adds roasted depth, and chile adds heat. Fix the missing dimension instead of simply adding more cayenne.

A taco that is salty enough but feels heavy may simply need brightness. Try lime or a sharper salsa on one bite before changing the whole pan.

Too much salt or chile needs dilution. Add unseasoned beef, beans or another unsalted ingredient that belongs in the meal. At the table, sour cream, avocado or a spoonful of fresh guacamole can soften an overly hot bite.

A bitter edge usually means the powdered spices caught too much heat. Take the pan off the burner. Mild bitterness may soften with extra unseasoned beef or beans; more cooking will not help.

Turn the Pan Into Tacos

The beef already brings plenty of warmth and savory flavor. Give it some contrast.

Crisp cabbage and lime work beautifully. So does avocado with salsa verde. Cheese or sour cream takes the taco richer; fresh onion and jalapeño pull it brighter.

For something fruitier, fresh mango salsa gives the warm beef a sweet-sharp hit of mango, lime, onion and jalapeño.

Do not overfill the first tortilla. On a 6-inch tortilla, start with about 2–3 tablespoons cooked beef. That leaves room for toppings—and enough tortilla to fold without losing half your dinner on the first bite.

Two six-inch soft tortillas comparing a modest central strip of taco meat with an overfilled tortilla that is harder to fold.
Keep the beef in a compact center strip. That leaves room for toppings and a clean fold without pushing the filling out.

Packet-style meat is wetter, so give it a minute off the heat before filling soft tortillas. That short rest helps the sauce settle around the crumbles.

Hands assembling ground beef tacos around a table with seasoned taco meat, warm tortillas, guacamole, salsa, diced onion, cabbage, jalapeños, and lime.
Build each taco your way—bright, creamy, mild or hot.

Storage and Reheating: Taco Seasoning and Taco Meat

The dry seasoning can be mixed ahead and stored in an airtight container in a cool, dry, dark place. For the brightest flavor, use it within about 6 months, sooner when the spices you started with were already old.

Cool cooked taco meat promptly and refrigerate it in a covered container. USDA guidance generally recommends using cooked leftovers within 3–4 days. See the USDA leftovers and food-safety guidance.

Freeze cooled taco meat in meal-size portions. Flattened freezer bags freeze quickly, stack neatly and make it easy to thaw only what you need. For best flavor and texture, use frozen cooked taco meat within about 3 months.

Thaw overnight in the refrigerator when convenient. Reheat gently in a skillet or microwave. Dry-looking leftovers can be loosened with a tablespoon of water, adding more only as needed. Reheated leftovers should reach 165°F / 74°C when checked with a thermometer.

Four-part storage and reheating guide showing dry taco seasoning in an airtight jar, cooked taco meat in the refrigerator and freezer, and meat reheated to 165 degrees Fahrenheit or 74 degrees Celsius.
Store the dry blend airtight; chill or freeze cooked taco meat promptly and reheat leftovers thoroughly.

Leftovers do not have to mean another identical round of tacos. Once thoroughly cooled and well drained, the meat can make this easy 7 layer dip heartier without loosening the chilled layers underneath.

Dinner Is Back on Track

Dinner never needed that last-minute trip to the store after all.

Put the salsa and lime on the table and let everyone make the taco they actually want—mild for one person, extra jalapeños for another, guacamole for whoever gets there first.

By then, the packet you could not find is probably the least interesting thing about dinner.