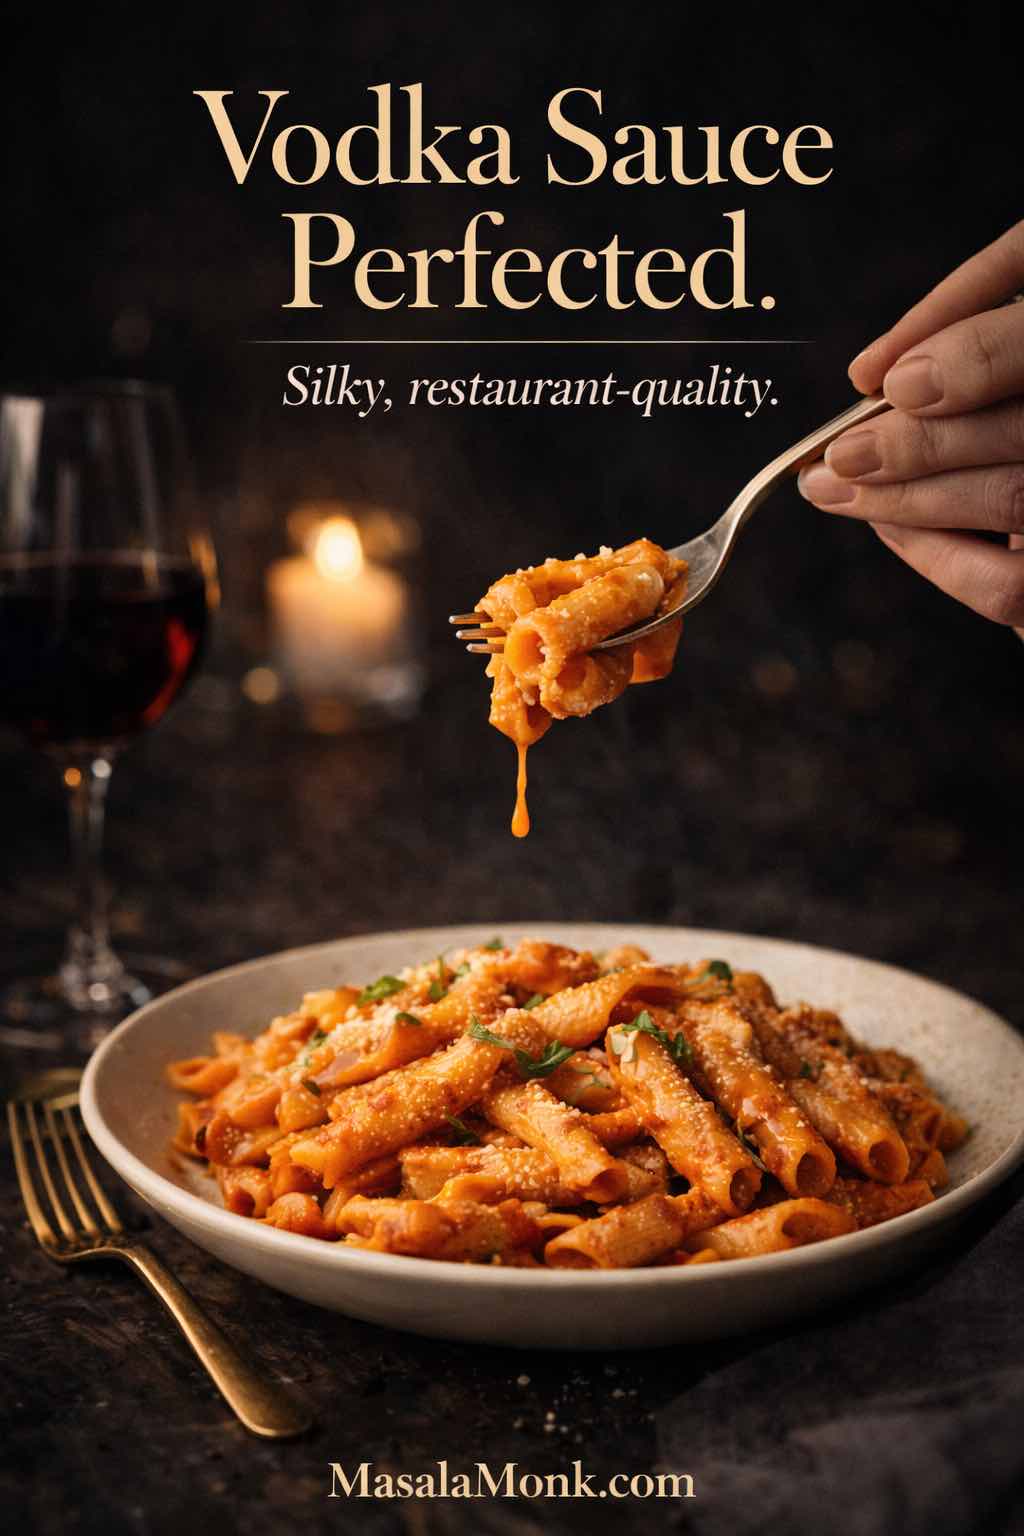
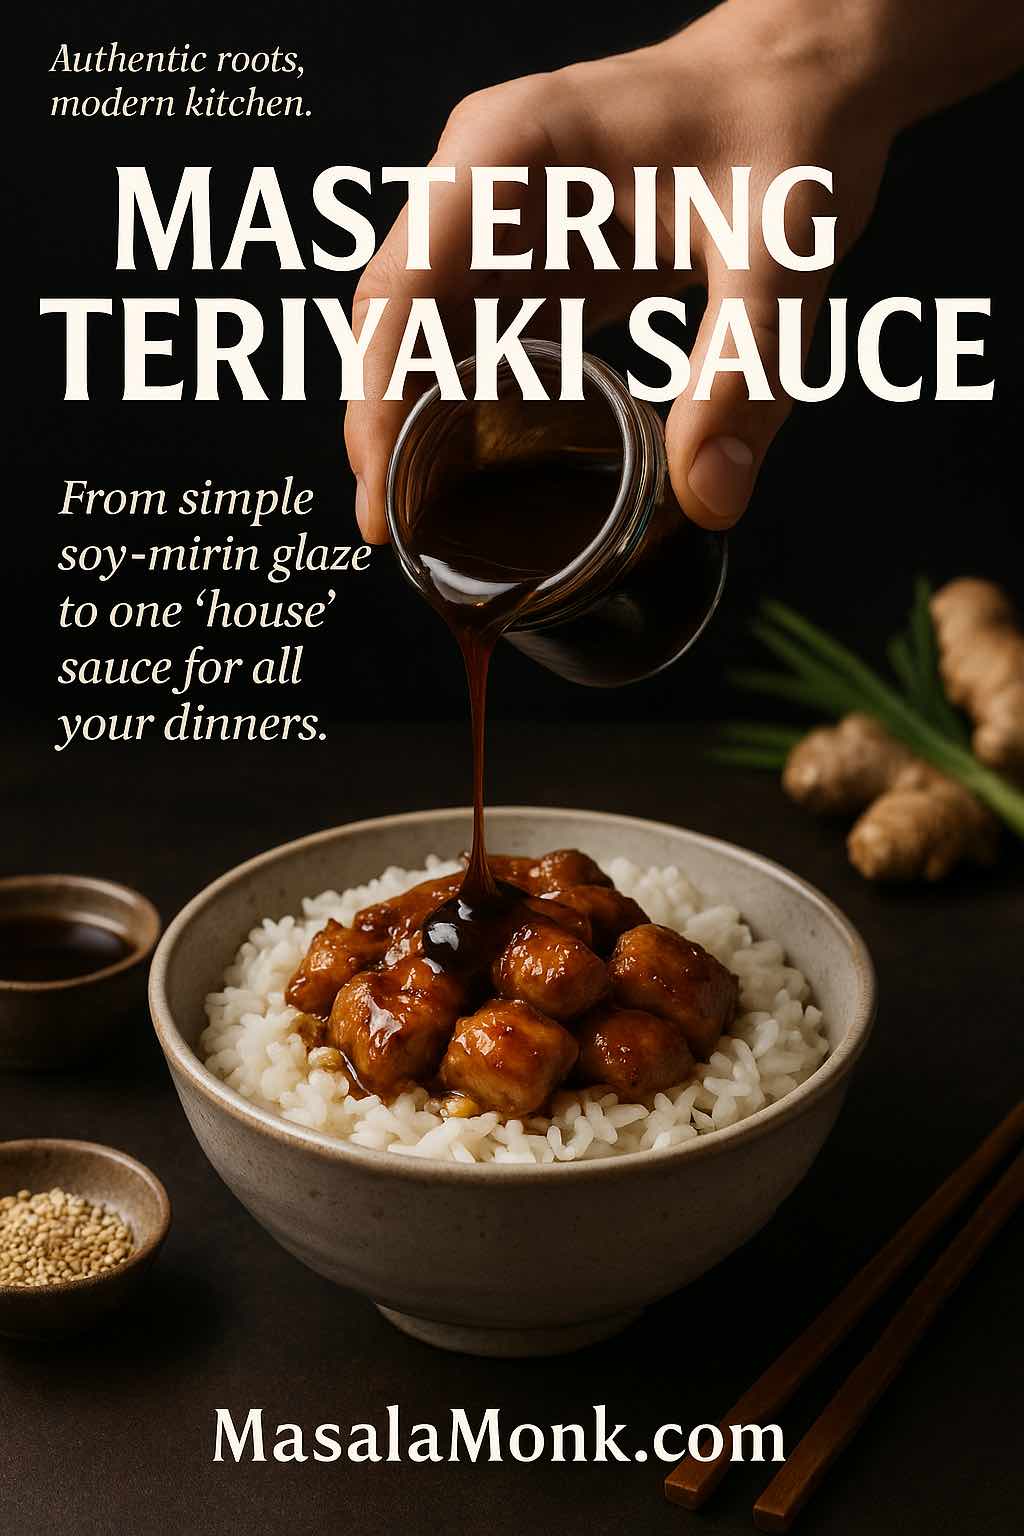
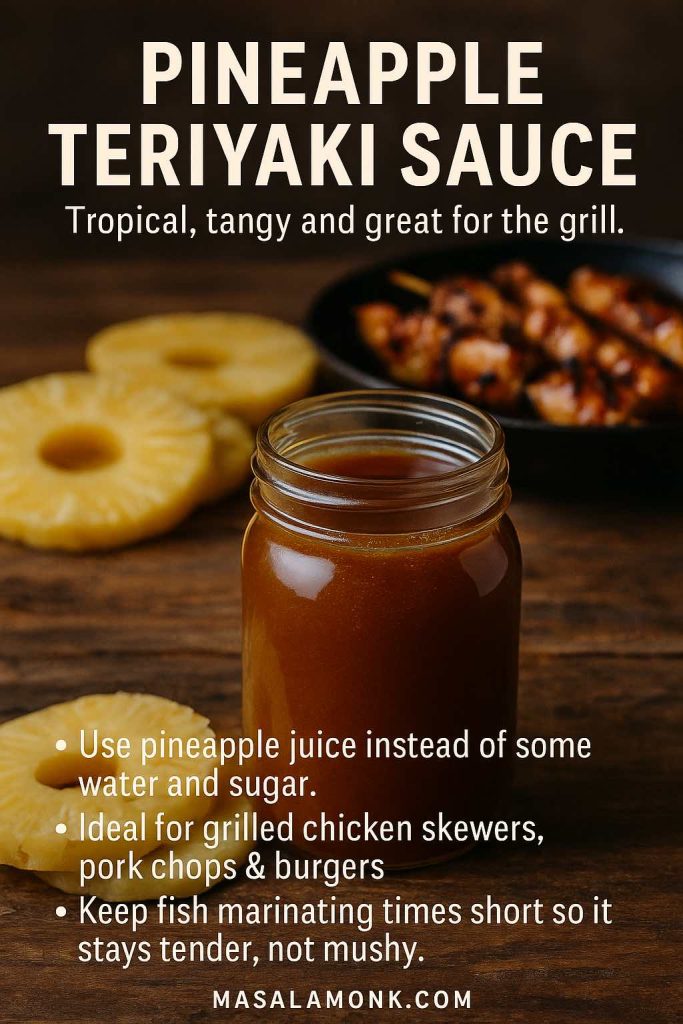
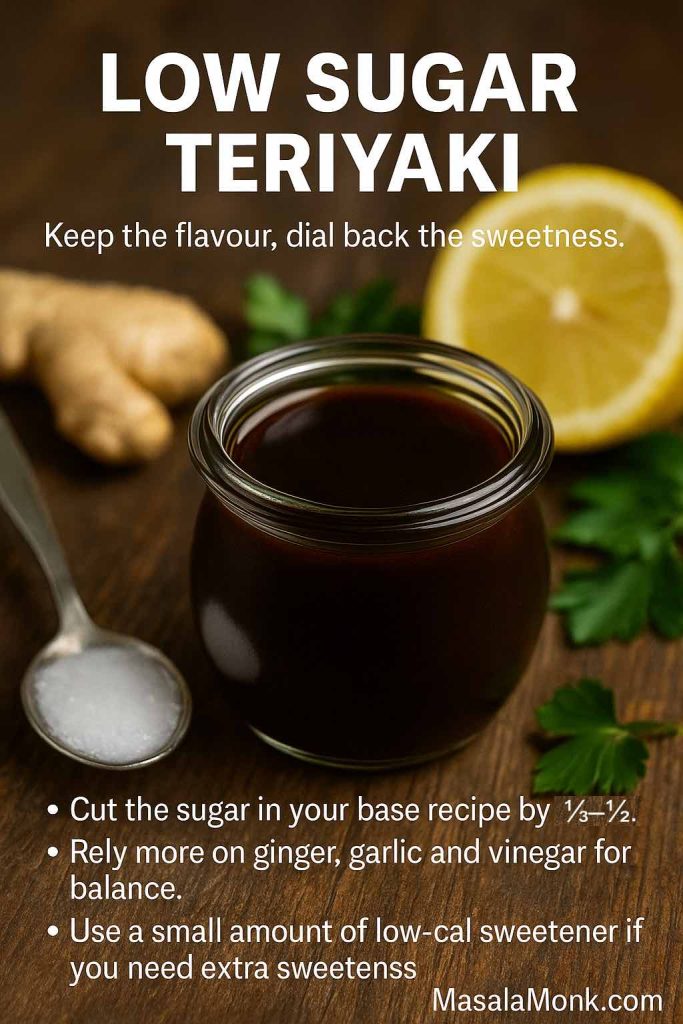
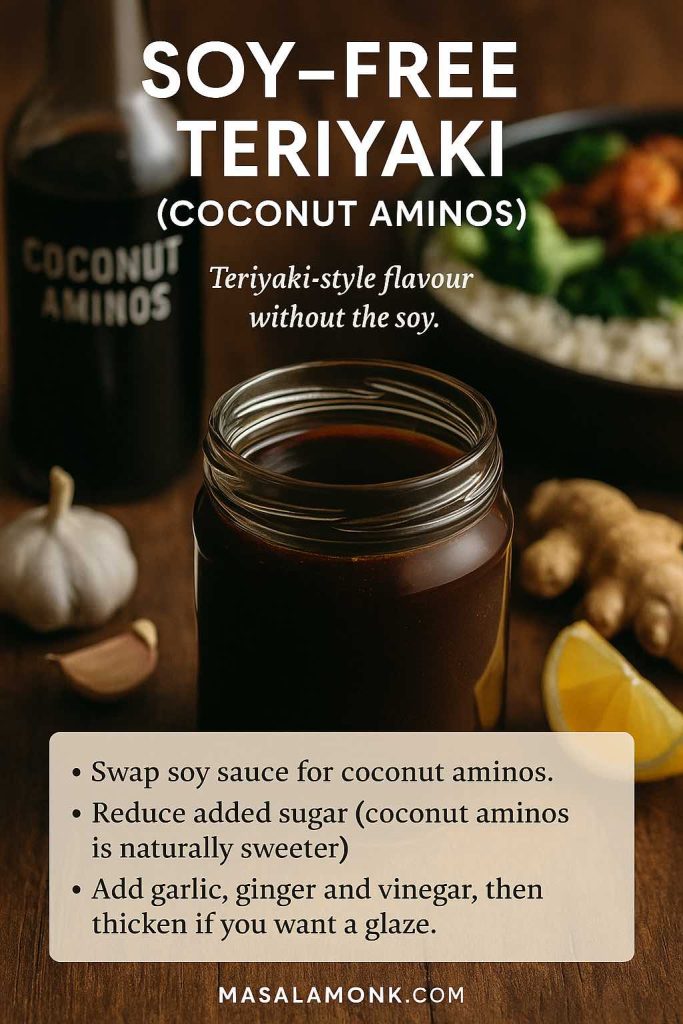
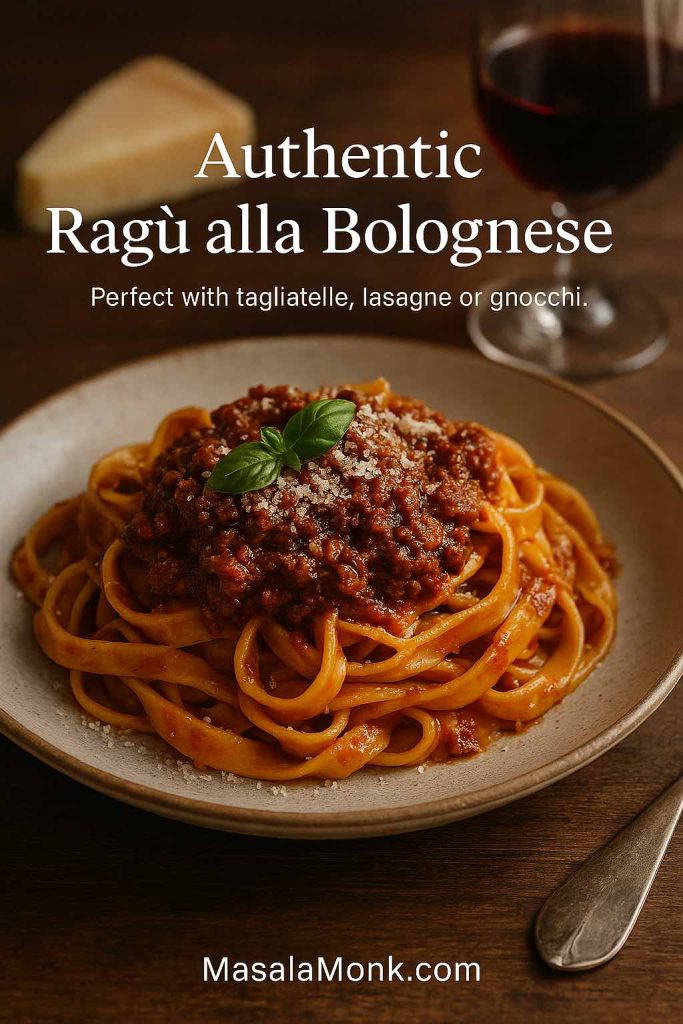
Vodka pasta is the kind of dinner that looks and tastes like you planned ahead—even when you absolutely didn’t. A good vodka pasta sauce is silky and tomato-forward, softened by cream, and finished in a way that makes it cling to the pasta instead of sliding off. Make it once and you’ll understand why penne alla vodka became a modern classic, why spicy rigatoni vodka is so hard to stop eating, and why chicken vodka pasta feels like a complete meal without extra fuss.
Vodka isn’t there to make anything taste boozy. Used correctly, it subtly lifts aroma and rounds the sauce into something that feels brighter and more “restaurant.” If you like reading the why behind the method, Serious Eats explains what vodka contributes (and what happens when you skip it). Does vodka sauce really need vodka?
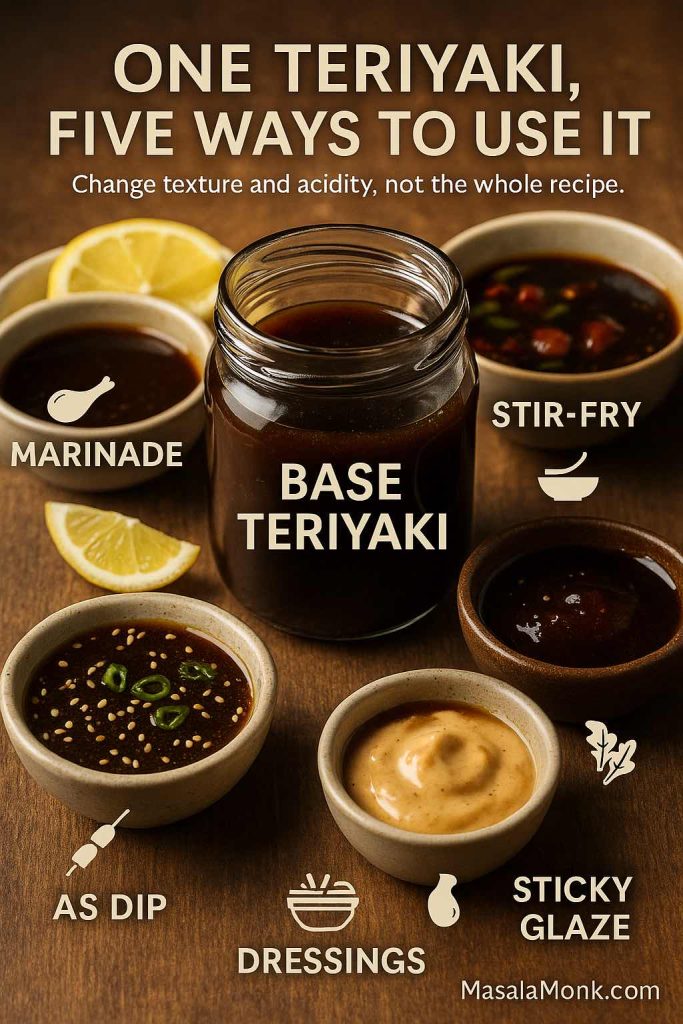
Now let’s cook a vodka sauce pasta that tastes like the one you crave, then turn it into the versions people actually make at home: rigatoni alla vodka, spaghetti vodka, linguine alla vodka, spicy vodka rigatoni, gigi pasta style, and chicken and vodka pasta.
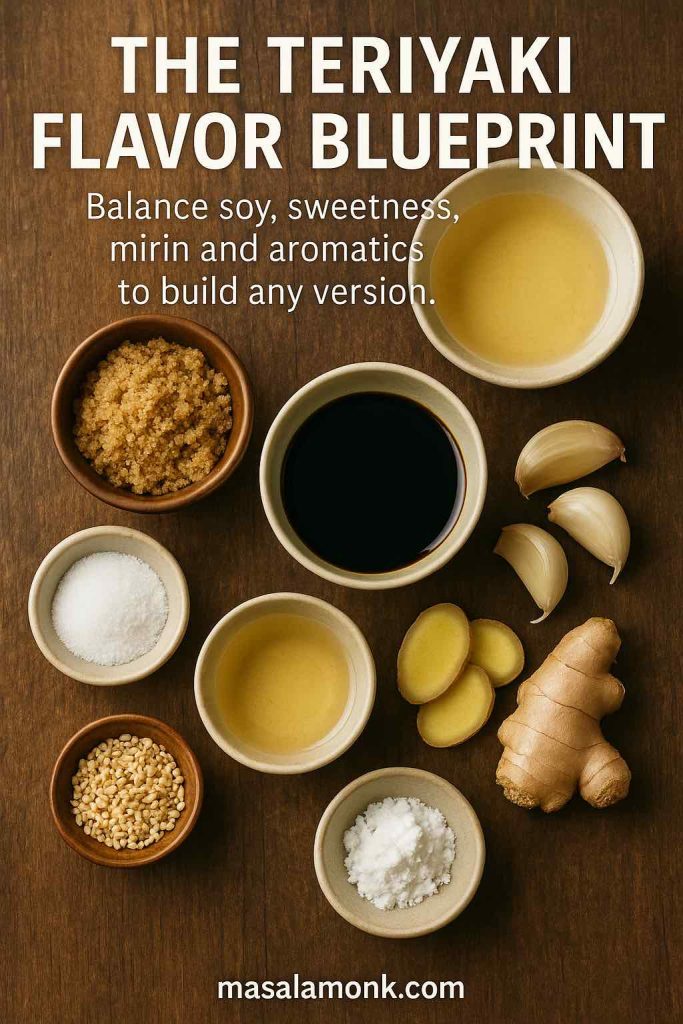
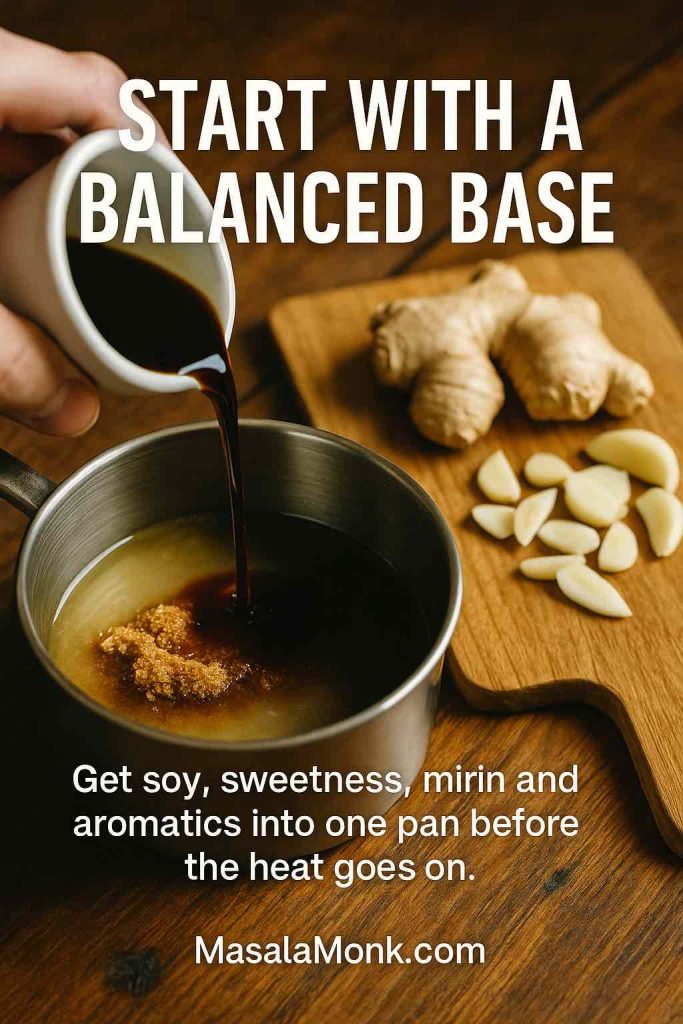
A proper vodka pasta sauce has a very particular balance:
Tomatoes taste deep, not raw because tomato paste is cooked until it smells rich and slightly sweet.
Cream softens edges so the sauce feels luxurious without turning heavy.
Vodka adds a subtle lift—not a vodka flavor, but a brighter finish and aroma.
Pasta water ties everything together so the sauce coats the noodles in a glossy layer.
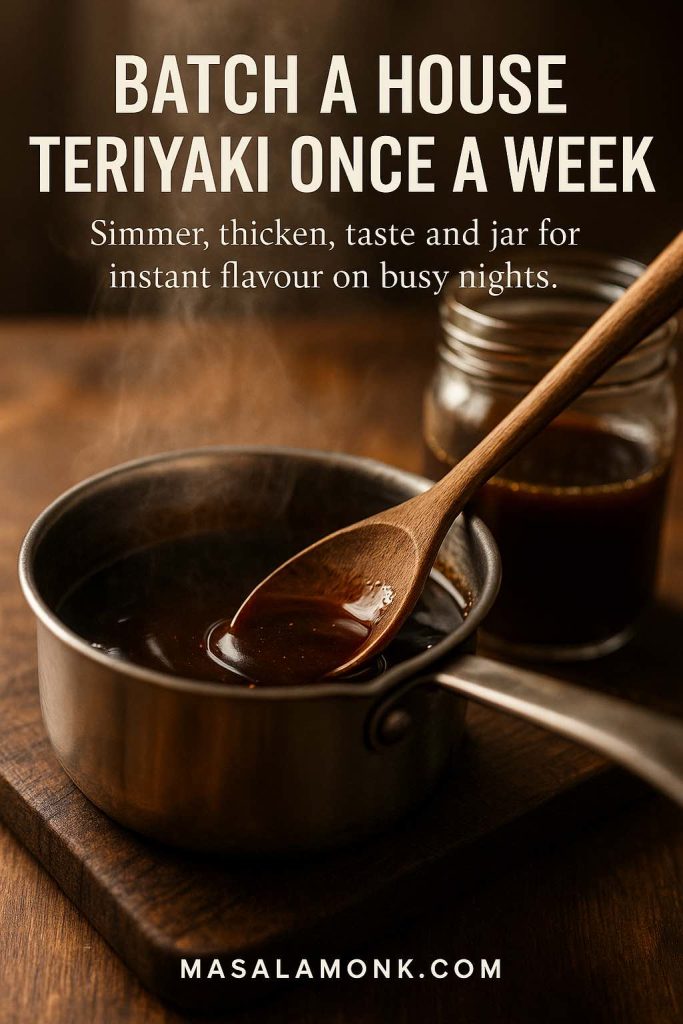
When it’s right, vodka sauce and pasta tastes cohesive—like every component was meant to be together. When it’s “almost right,” the sauce usually falls into one of these traps: the tomato paste wasn’t cooked enough, the cream was added over too-high heat, the sauce wasn’t seasoned in stages, or the pasta wasn’t finished in the pan with pasta water.
You don’t need fancy ingredients to fix any of that. You just need a steady method.
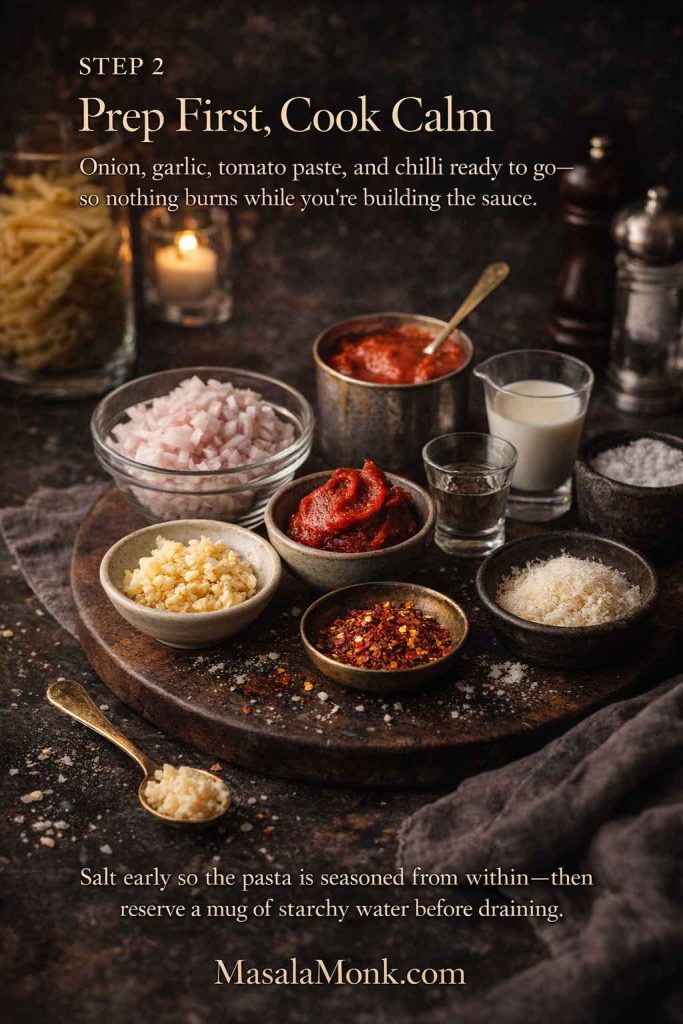
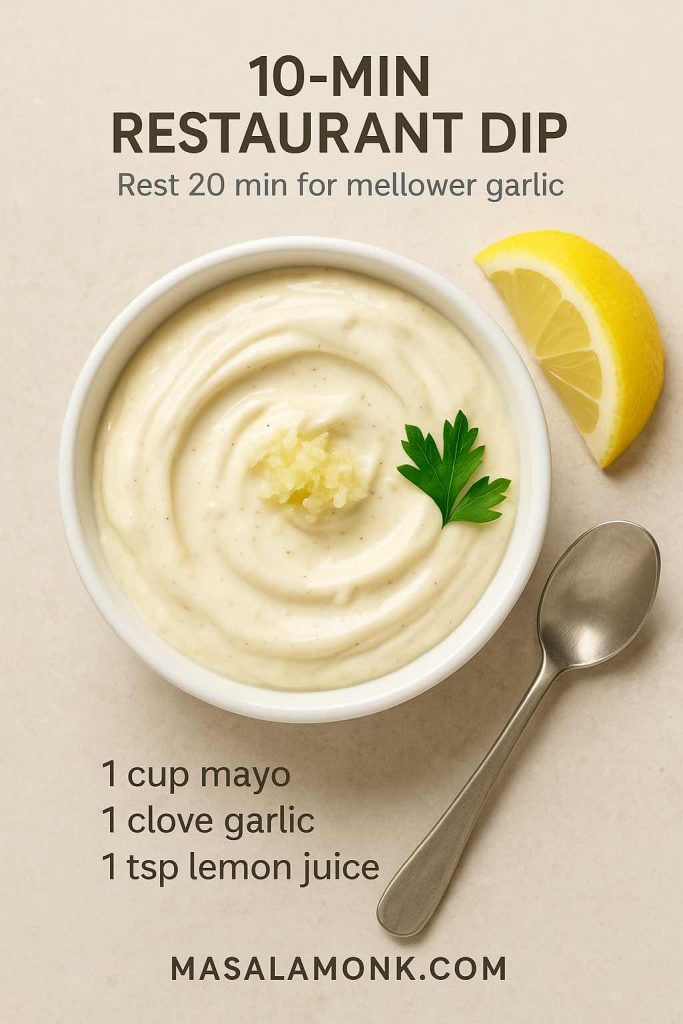
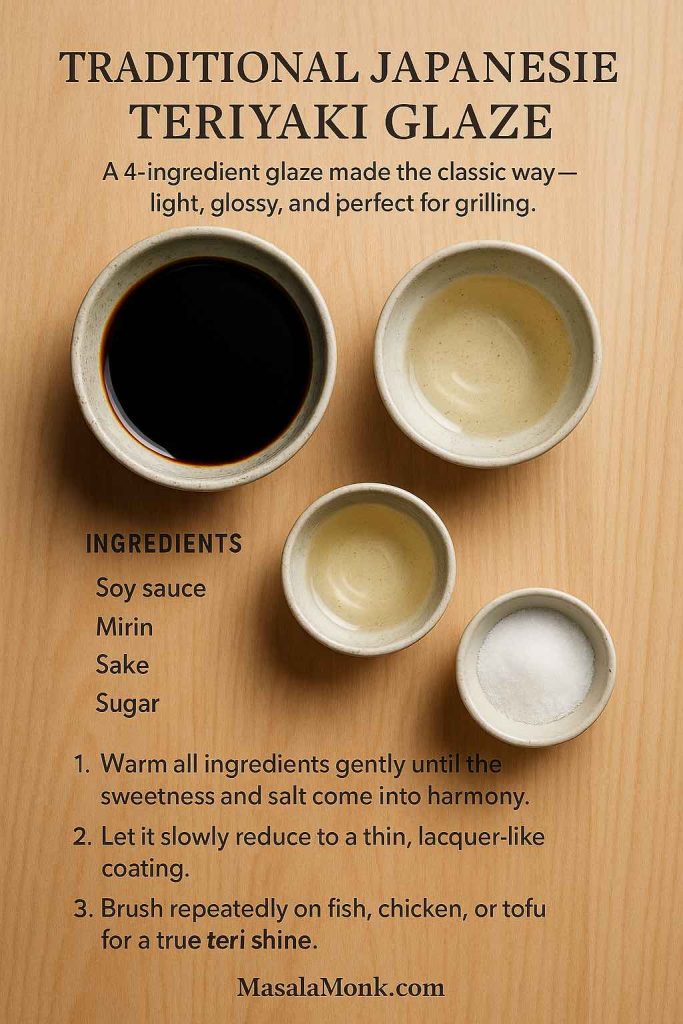
Penne alla Vodka Ingredients for Classic Vodka Pasta
This is written as penne alla vodka because it’s the classic, but the sauce is equally good for pasta penne alla vodka variations, penne and vodka nights, and even spaghetti and vodka sauce.
Pasta
350–400 g penne (or see the pasta-shape section for rigatoni/spaghetti/linguine swaps)
½ to 1 tsp chilli flakes (optional; you’ll adjust later for spicy vodka pasta)
½ cup (120 ml) vodka
1 can (400 g) crushed tomatoes or passata
½ cup (120 ml) cream (heavy cream or cooking cream)
½ cup grated Parmesan (plus extra to serve)
Salt and plenty of black pepper
To finish
1–2 cups reserved pasta water (hot)
If you like the idea of building your tomato foundation from scratch, a smooth homemade base makes the final sauce feel especially clean: Tomato sauce from fresh tomatoes And if you want a simple tomato sauce reference that’s useful across many dinners—not just vodka pasta—this is a strong baseline: Marinara sauce recipe
For cheese, a proper grating-style Parmesan melts smoothly and adds the savory depth vodka and cream sauces need. If you’ve ever wondered why some “Parmesan” behaves differently (melting well vs turning grainy), this internal guide is genuinely helpful: Parmesan cheese and its varieties
How to Make Vodka Pasta Step by Step
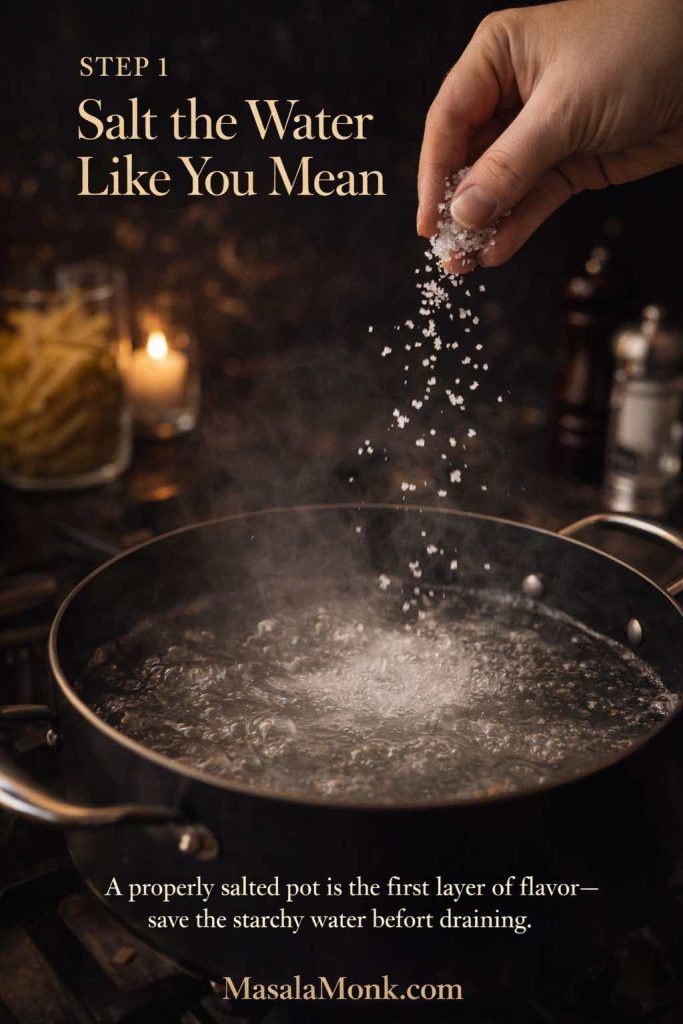
Start the pasta water for vodka sauce pasta
Bring a large pot of water to a boil. Once boiling, salt it well. Drop in the pasta and cook it until it’s just shy of al dente—because it’s going to finish in the sauce.
Salt early so the pasta is seasoned from within—then reserve a mug of starchy water to make the sauce cling later.
Before draining, reserve at least 1 cup of pasta water (2 cups is even better). This isn’t optional; it’s how vodka pasta becomes glossy and cohesive. Barilla’s explanation of why pasta water matters is one of the clearest practical references out there: How to use pasta water
Drain the pasta, but don’t rinse it. That surface starch helps the sauce cling.
Having everything measured and within reach prevents scorched garlic and overcooked tomato paste—two small mistakes that can dull the sauce.
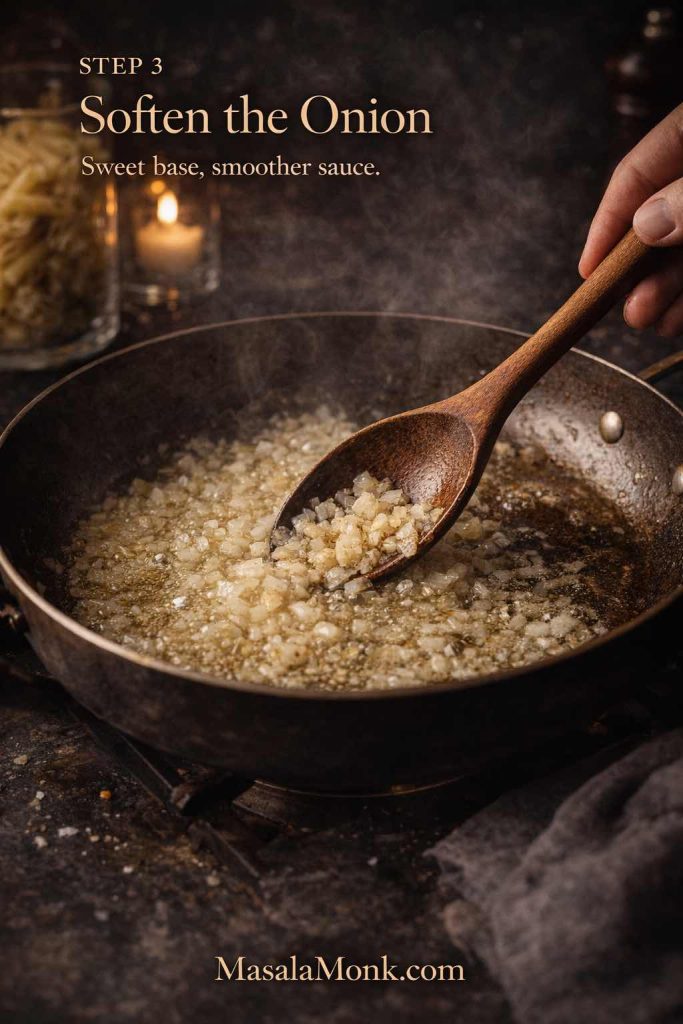
Build the base: onion, garlic, chilli
While the pasta cooks, warm olive oil (and butter if using) in a wide pan over medium heat.
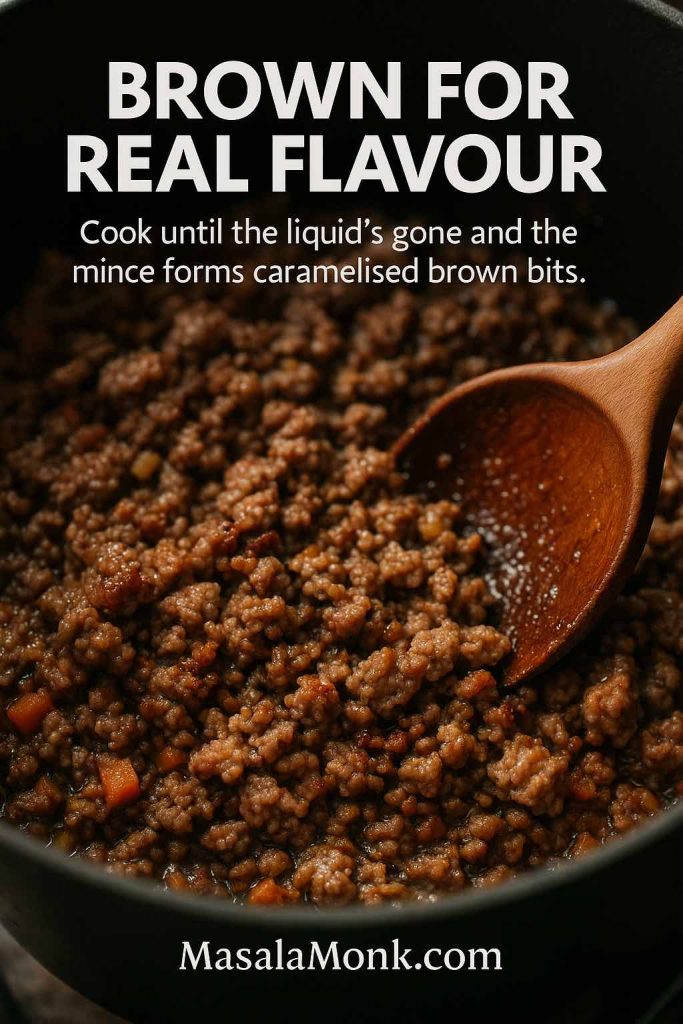
Add onion with a pinch of salt. Let it soften slowly until translucent and lightly golden. This step quietly shapes the entire sauce—rush it and the sauce can taste sharp; do it properly and the sauce tastes rounded.
Cook the onion until it turns translucent and smells sweet—this mellow base keeps the finished sauce smooth instead of sharp.
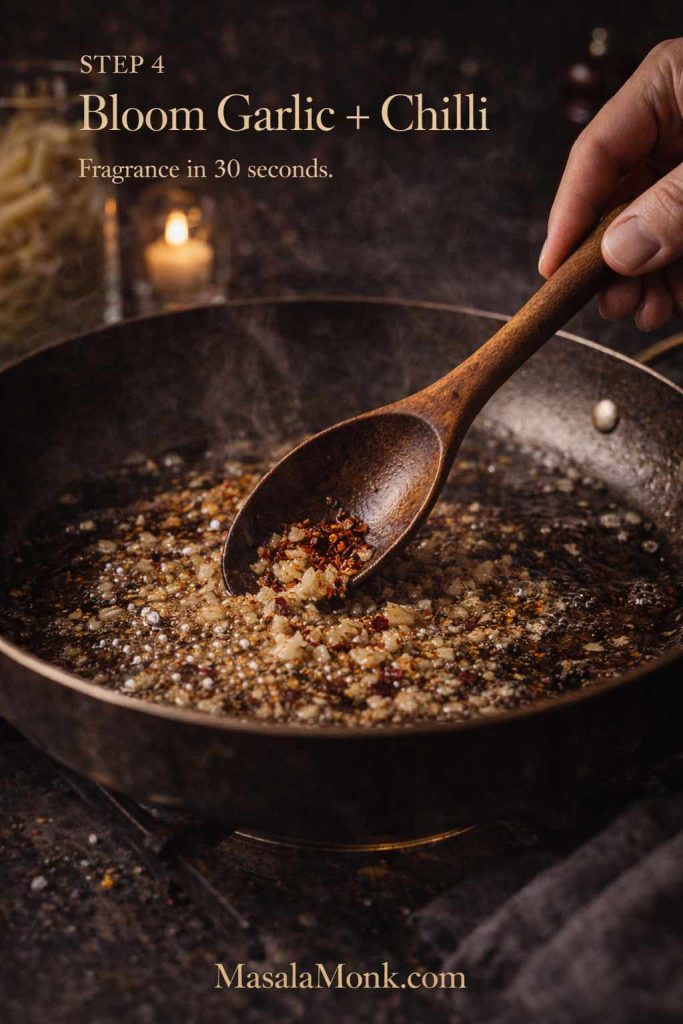
Stir in the garlic and cook until fragrant. Keep it moving and keep the heat moderate. Garlic should smell sweet and warm, not toasted.
If you want a gentle baseline heat, add chilli flakes now. If you’re aiming for a crowd-pleasing pot and a separate spicy rigatoni vodka variation, hold most of the heat until later.
Keep this step short—once the garlic turns fragrant, move on immediately so the flavor stays sweet instead of bitter.
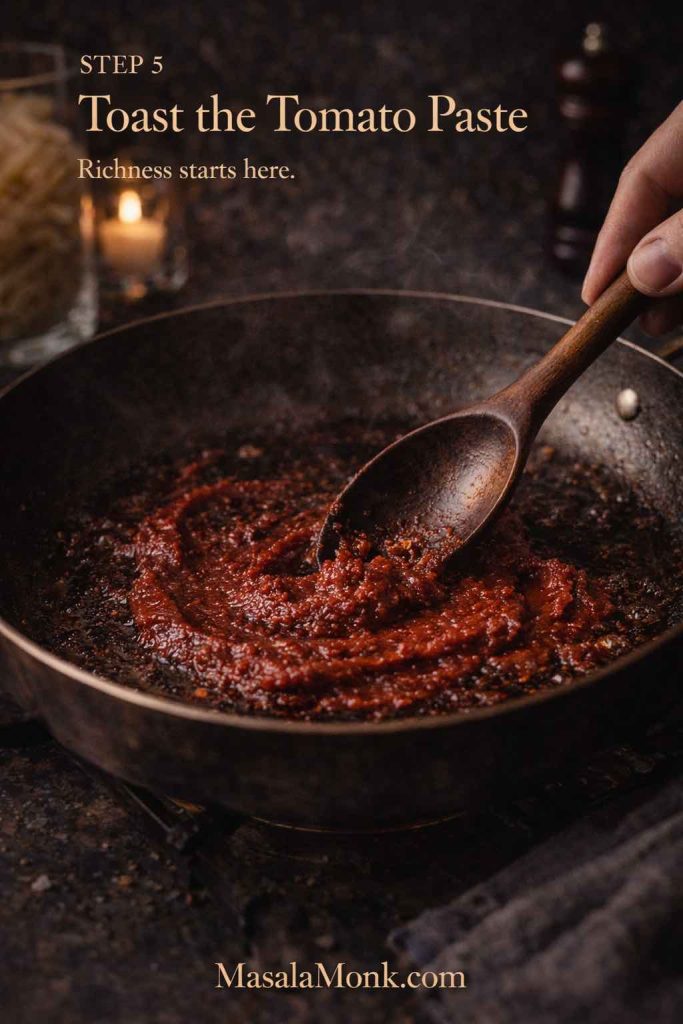
Toast the tomato paste for depth
Add tomato paste and cook it for 2–3 minutes, stirring frequently. This is where penne alla vodka gets its backbone. Tomato paste transforms as it cooks: the raw tang fades, the flavor deepens, and the aroma turns rich.
This “tomato paste first” approach is also common in well-tested vodka sauce methods, because it builds depth before the tomatoes and cream arrive.
Keep stirring until the paste turns deeper and smells caramelized—this is what makes the sauce taste slow-cooked, even on a weeknight.
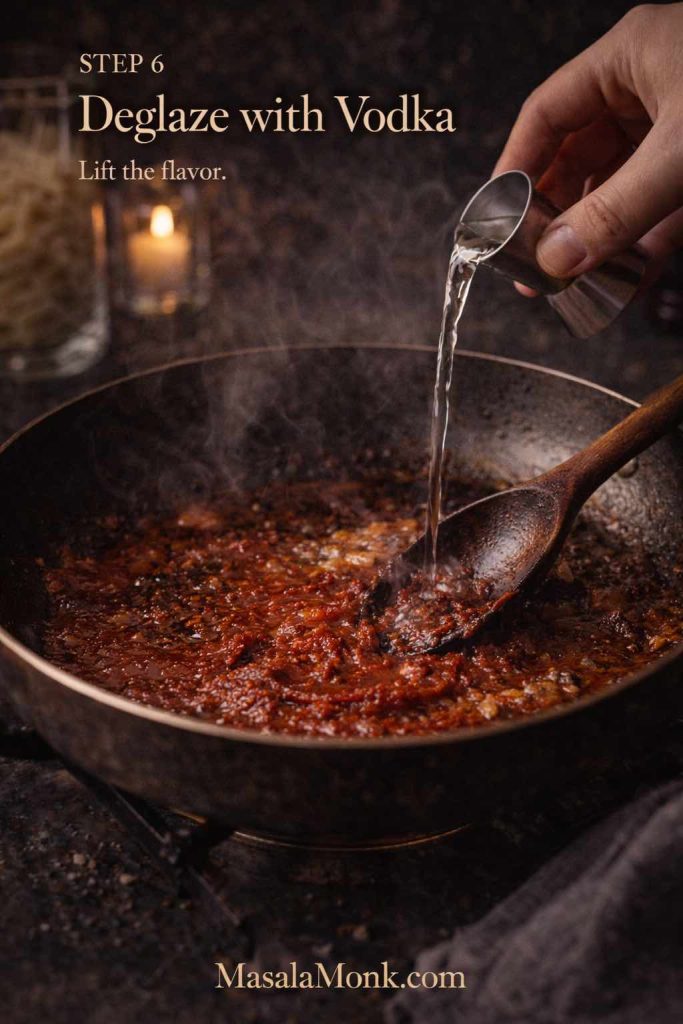
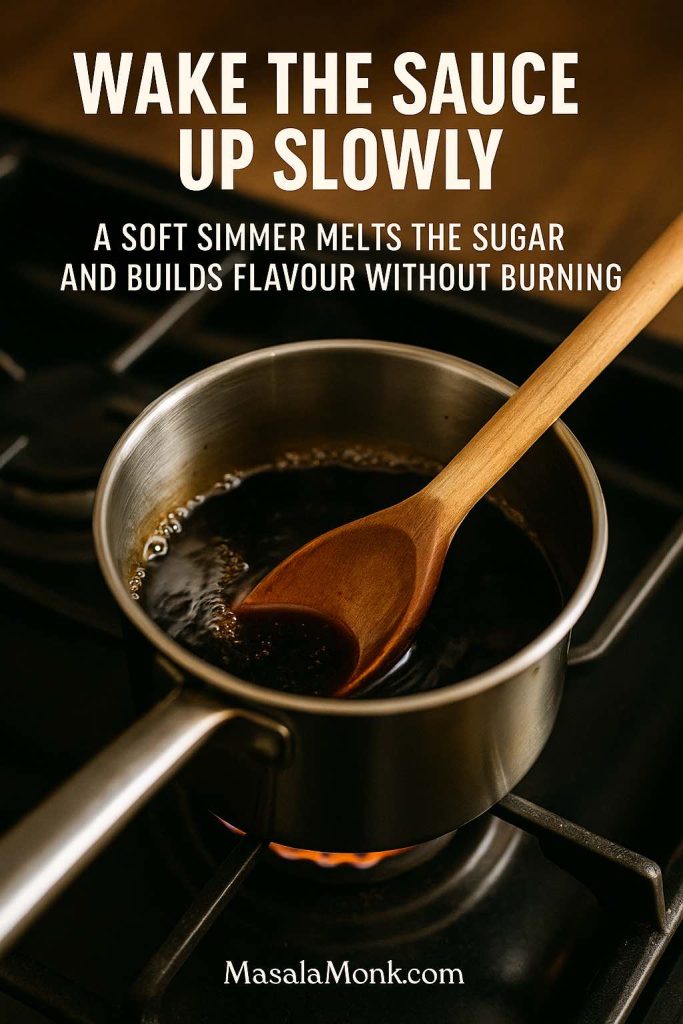
Add vodka, simmer briefly, and let it mellow
Pour in the vodka and stir immediately, scraping up any browned bits stuck to the bottom of the pan. Let it simmer for a couple of minutes so the initial sharpness softens.
If you want a well-tested reference for the classic order of operations—paste, vodka, tomatoes, cream—Serious Eats lays it out clearly: Pasta with vodka sauce
A quick real-world note: alcohol doesn’t always “cook off completely,” and retention varies by cooking method and time. If that’s important to you, these explain the nuance plainly.
Let the vodka simmer briefly while you scrape—those browned bits dissolve into the sauce and give the base a cleaner, brighter finish.
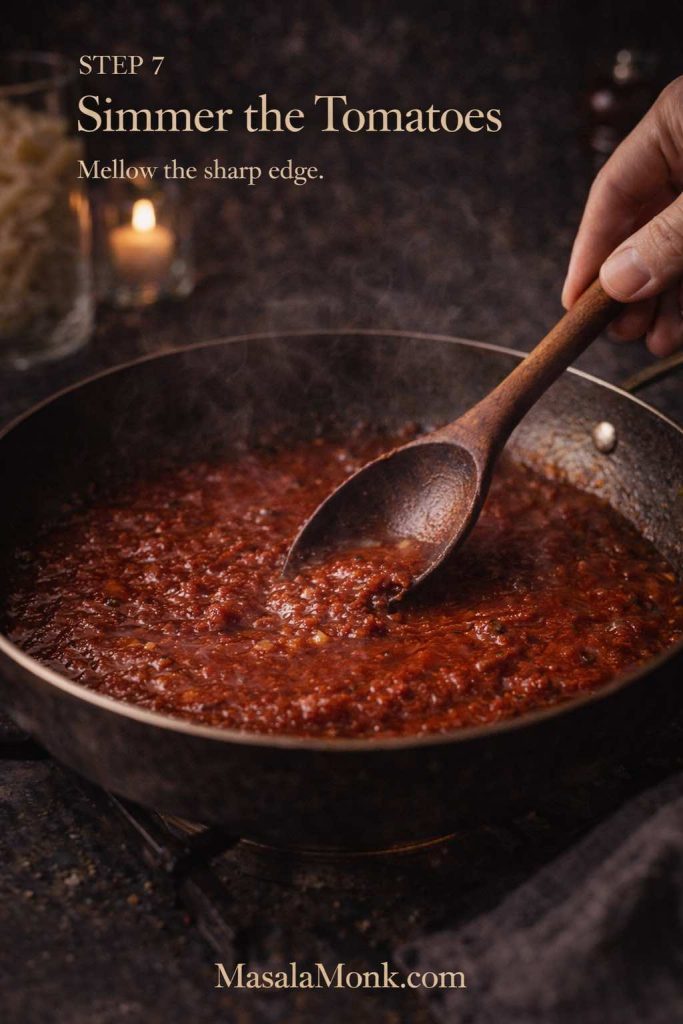
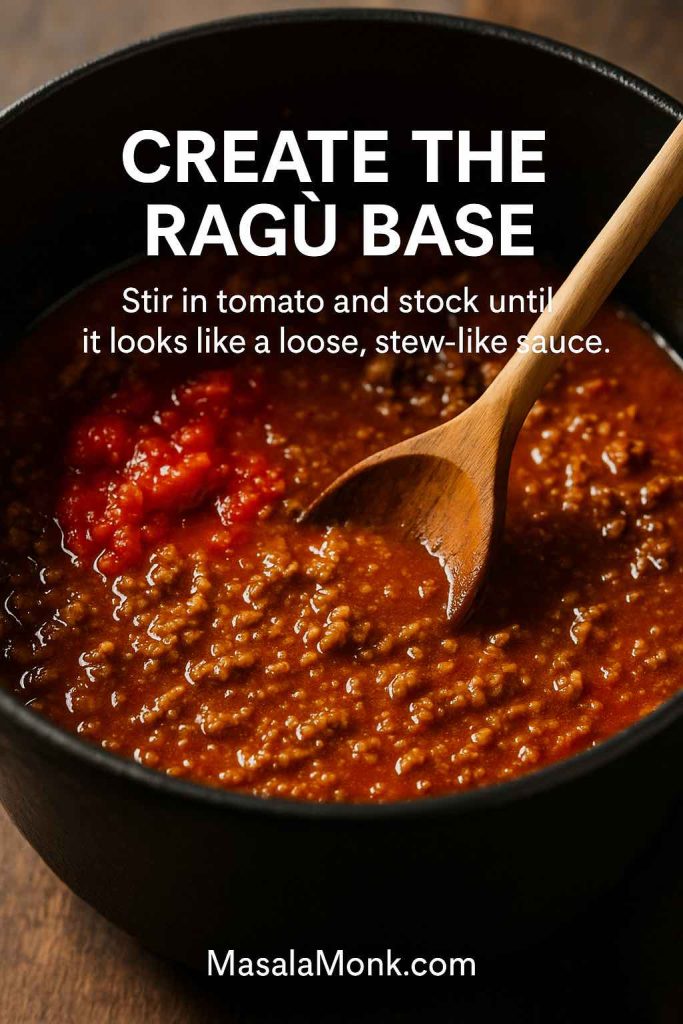
Add tomatoes and simmer until balanced
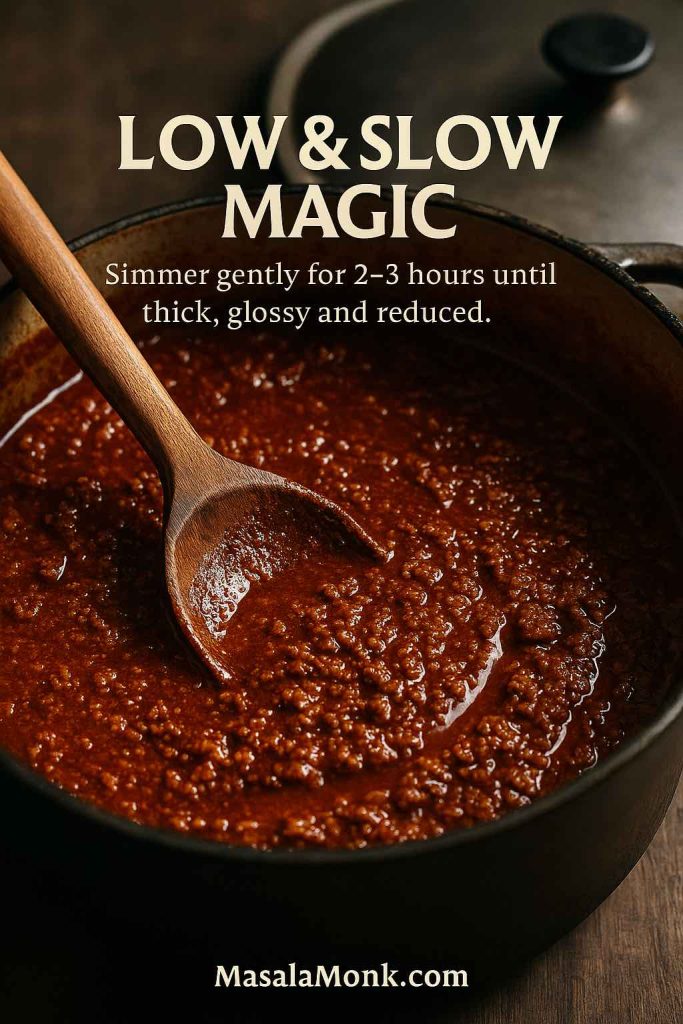
Stir in crushed tomatoes or passata. Bring the sauce to a gentle simmer and cook about 8–12 minutes.
During this simmer, taste and season. Tomatoes often taste flat until they’re salted properly. Add salt in small pinches, stir, and taste again. If the sauce still feels sharp, give it a few more minutes rather than trying to “fix” it with extra cream too soon.
Keep the simmer gentle—this short reduction softens acidity and concentrates flavor before the cream goes in.
If you’re using a homemade tomato base, the sauce can feel especially smooth and clean; this is a good internal reference for that foundation: Tomato sauce from fresh tomatoes
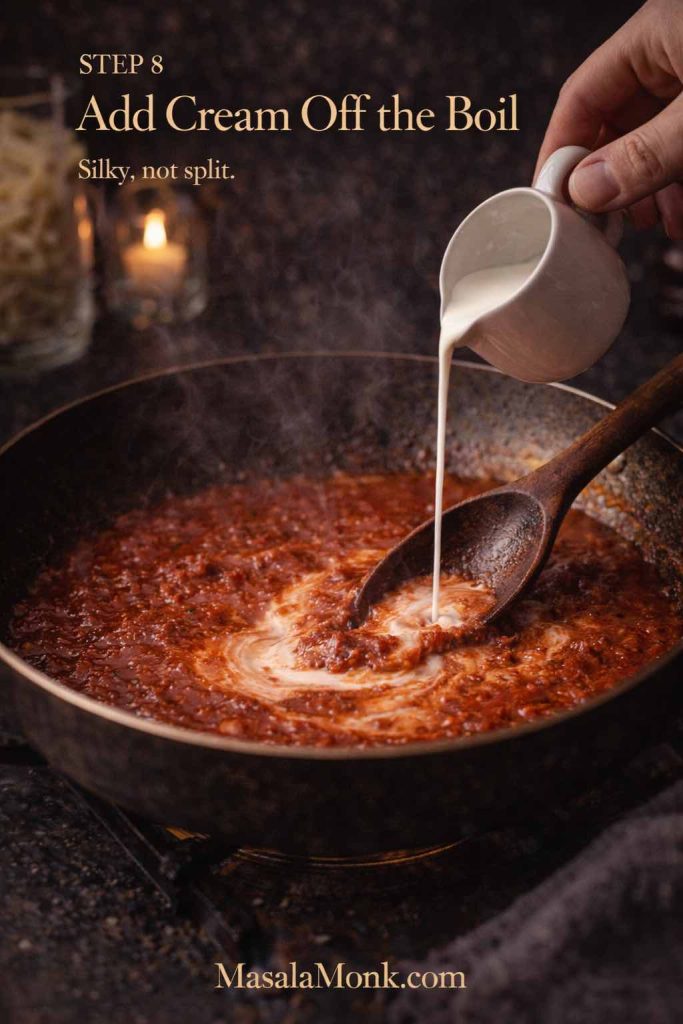
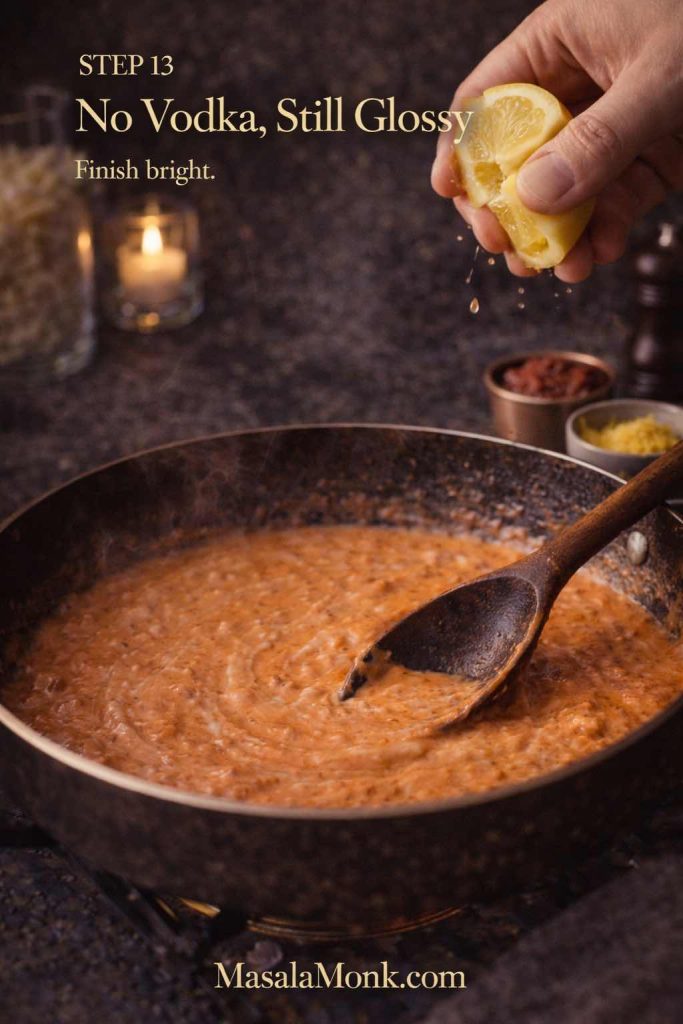
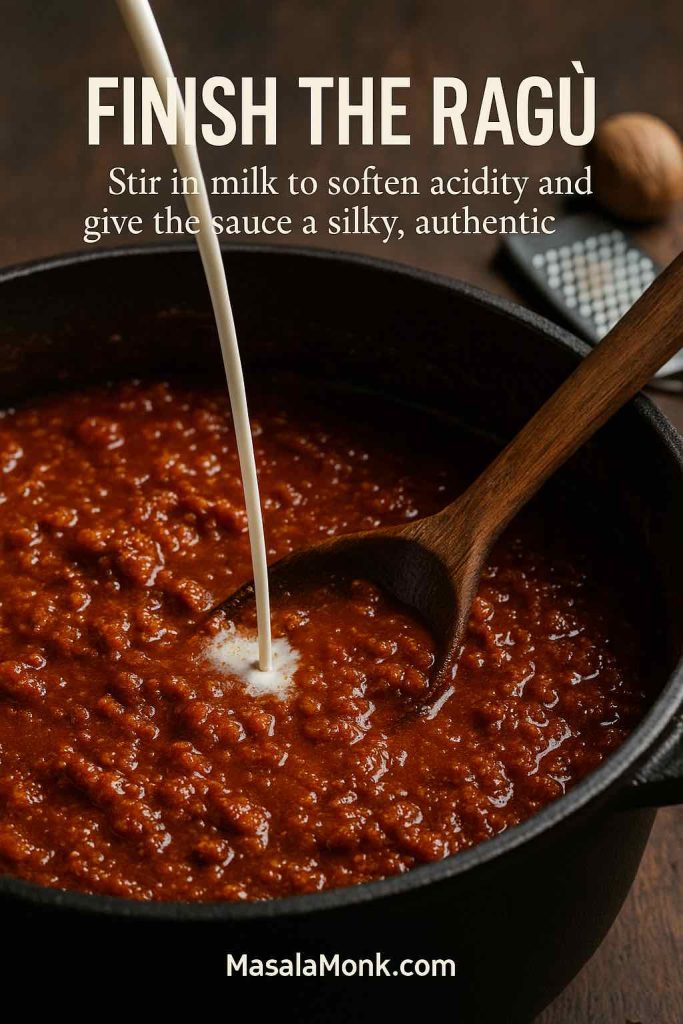
Add cream gently for vodka and cream sauce
Lower the heat before adding cream. Pour it in slowly while stirring. The sauce turns blush-pink and suddenly smells like vodka pasta.
Pour slowly over low heat and stir continuously—the gentle swirl is what keeps the sauce velvety instead of separating.
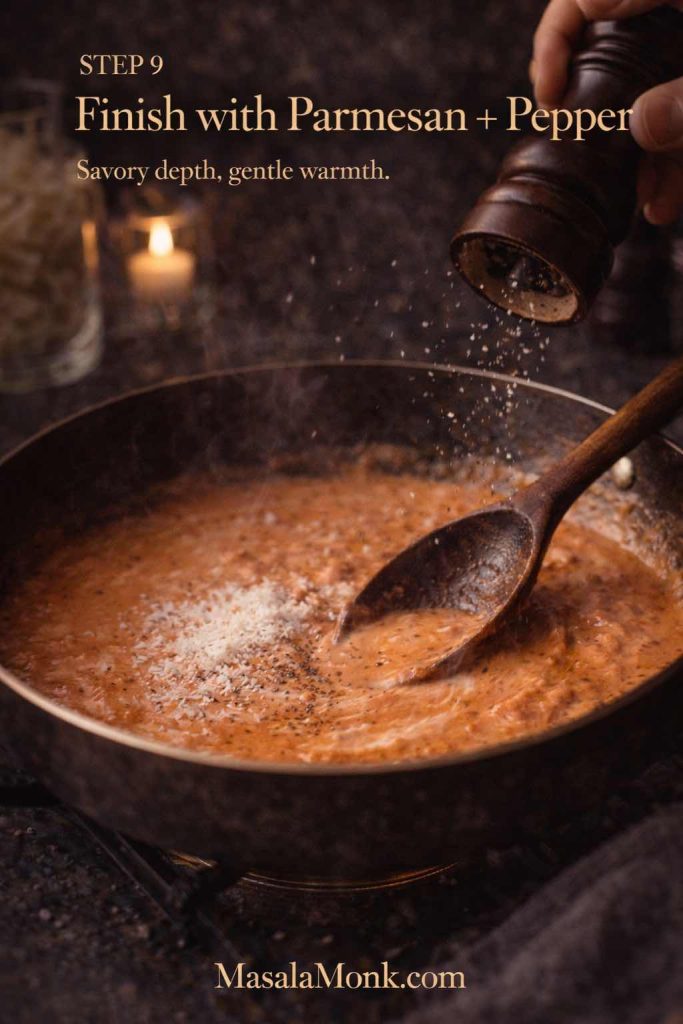
Now add black pepper generously—pepper matters here. It adds warmth that lifts the sauce differently than chilli heat.
Then stir in Parmesan a handful at a time until smooth. If you’ve ever had a creamy sauce turn grainy, it’s often heat plus cheese choice. This internal guide helps you understand your options: Parmesan cheese and its varieties
Add cheese in a light snowfall and stir until it disappears—this builds savory depth while keeping the sauce smooth.
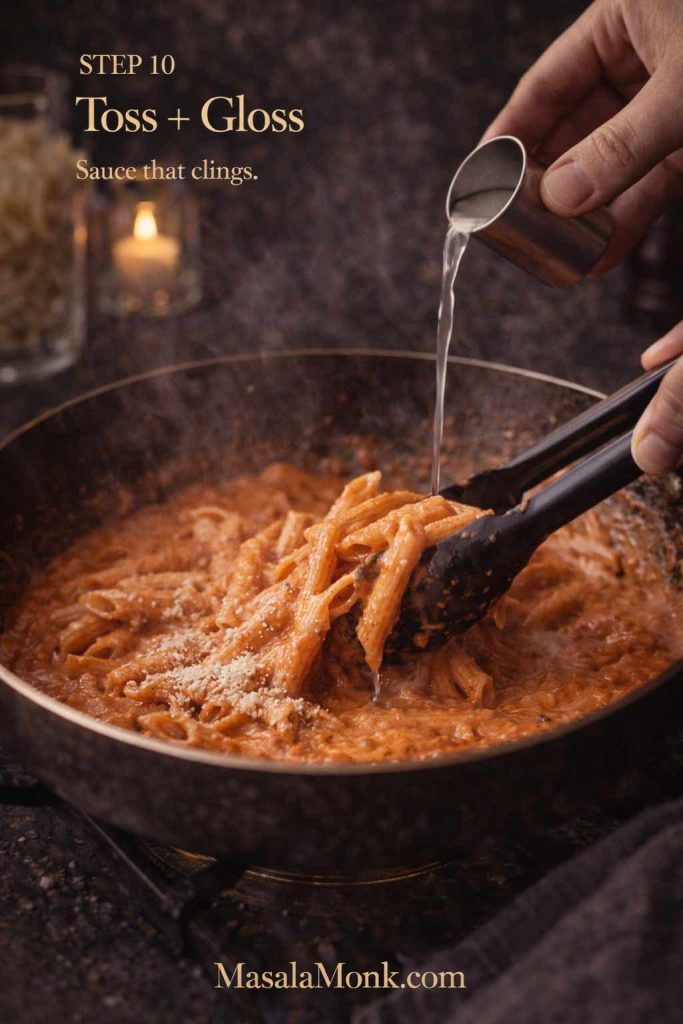
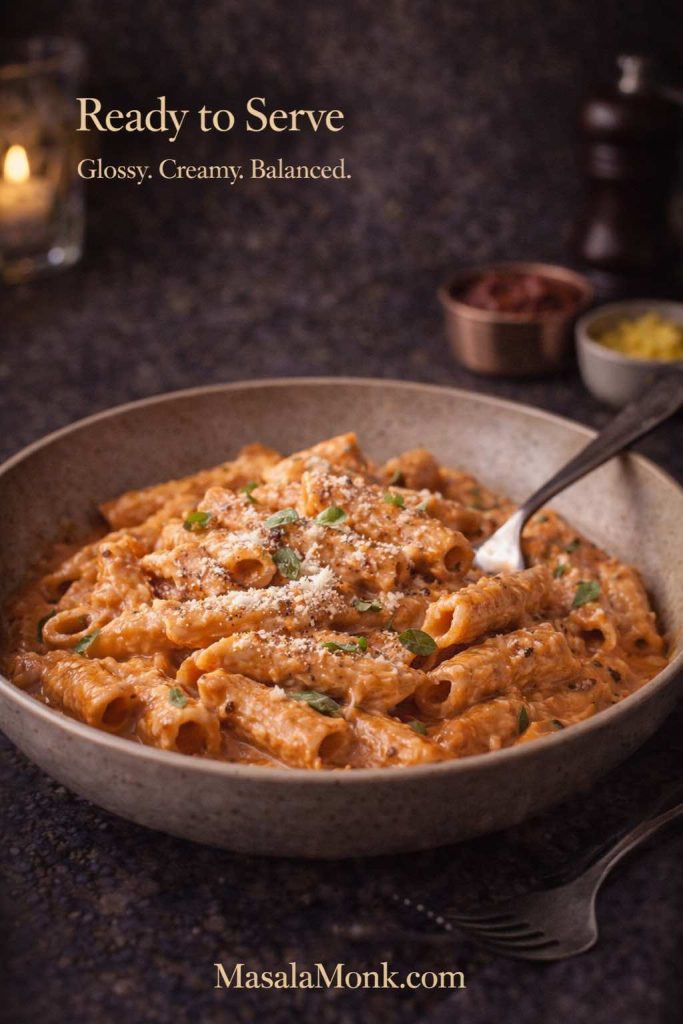
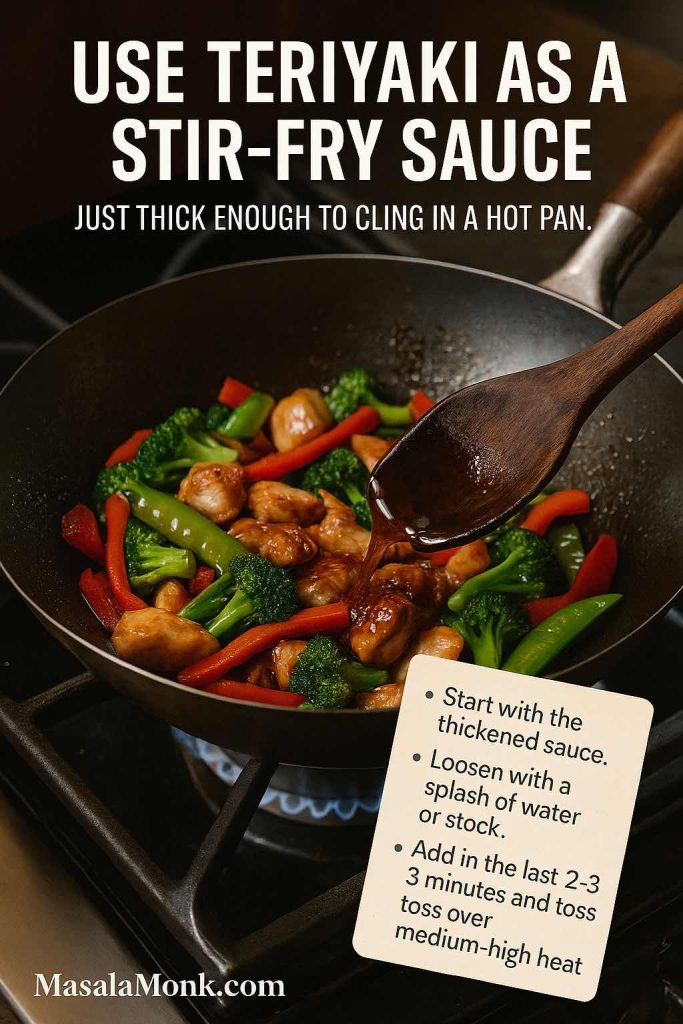
Finish the pasta in the pan for glossy vodka sauce and pasta
Add the drained pasta directly into the sauce. Toss well.
Now add reserved pasta water a splash at a time while tossing, until the sauce coats the pasta in a glossy layer. The sauce should look slightly loose in the pan and then tighten as it clings to the noodles.
Add pasta water in small splashes while tossing—this is the moment the sauce turns silky and starts clinging to every tube.
This is the difference between “vodka sauce poured over pasta” and vodka sauce pasta that tastes integrated.
Barilla’s pasta water guide is worth revisiting here because it explains what you’re doing in plain kitchen logic: How to use pasta water
Serve immediately with extra Parmesan and black pepper.
Vodka Pasta Finish: Why Pasta Water Makes It Restaurant-Glossy
If you’ve ever wondered why your home sauces sometimes feel separate—fat floating, liquid pooling, cheese clumping—the answer is often emulsification. Pasta water helps because it carries starch, salt, and heat. That starch encourages the sauce to bind into a cohesive coating rather than splitting into components.
This is especially important for vodka pasta because the sauce includes fat (oil, dairy, cheese) and liquid (tomatoes, vodka). Pasta water is the bridge that brings it together.
A reliable pattern helps:
Toss pasta with sauce first.
Add pasta water in small splashes.
Toss again and again until the sauce coats.
When it works, the sauce looks like it has been “whipped” into the pasta. When it doesn’t, it tends to sit heavy at the bottom. The fix, most of the time, is simply more tossing and a little more pasta water.
Pasta Shapes for Vodka Pasta Sauce: Penne, Rigatoni, Spaghetti, Linguine
The same vodka pasta sauce feels different on different pasta shapes. That’s not marketing—it’s texture.
Penne alla vodka
Penne is classic for a reason: the sauce fills the tubes and clings to the outside, so each bite feels saucy. If you’re making pasta penne alla vodka for the first time, penne is the most forgiving starting point.
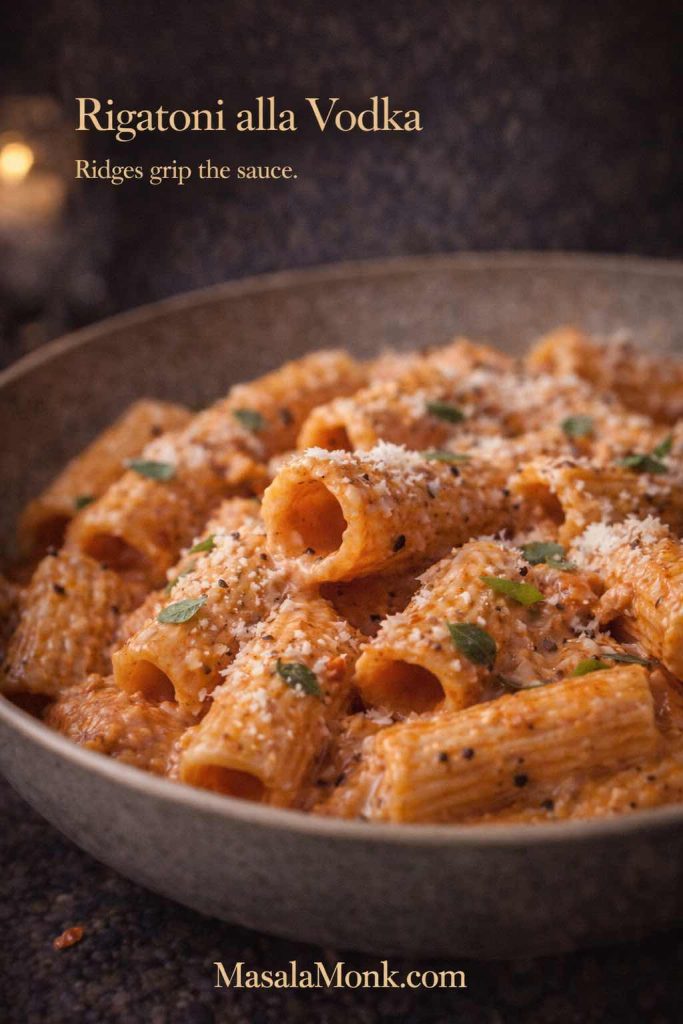
Rigatoni alla vodka
Rigatoni alla vodka is bolder. The ridges grip sauce and the hollow center becomes a reservoir. If you want the full comfort-food effect, rigatoni is hard to beat.
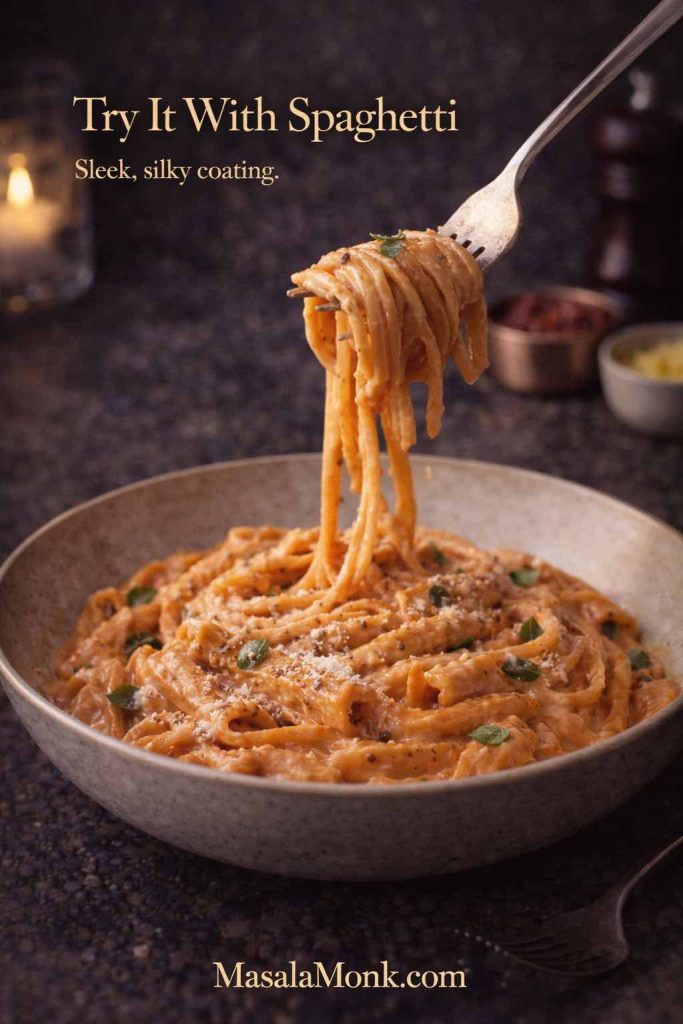
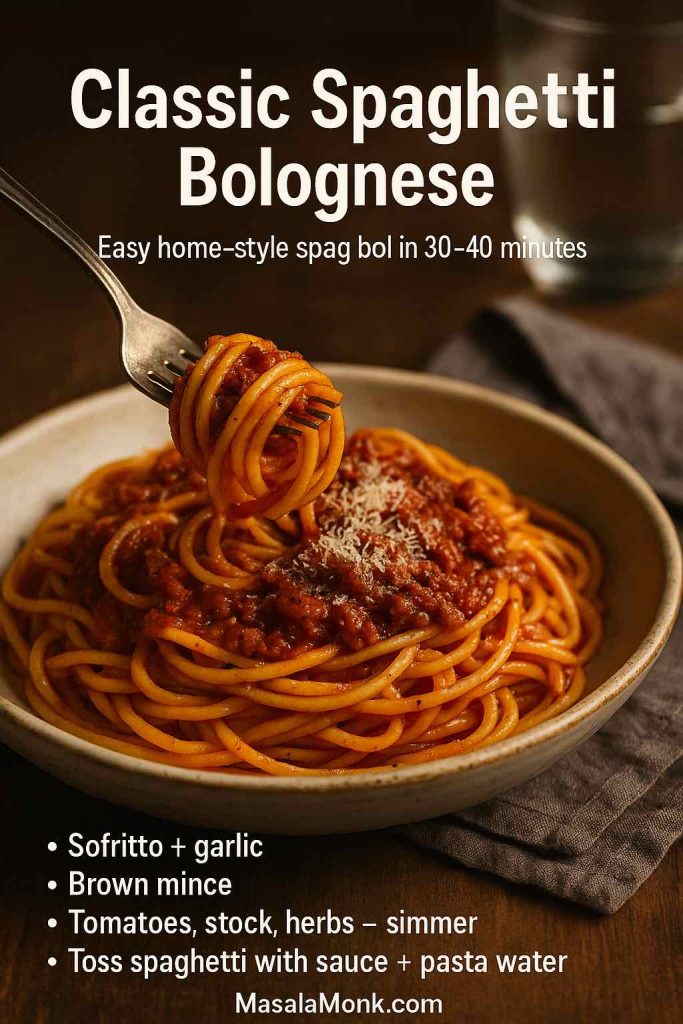
Spaghetti vodka
Spaghetti vodka feels sleeker and a little lighter. Because the sauce coats strands instead of pooling in tubes, the sauce should be slightly looser—so you’ll usually use an extra splash of pasta water during the toss.
Linguine alla vodka
Linguine alla vodka is a beautiful middle ground. The strands have enough width to carry a creamy sauce well, yet it still feels elegant.
If you’re feeding people with different preferences, you can keep the sauce constant and vary the pasta shape. The method stays the same, and the final vibe changes.
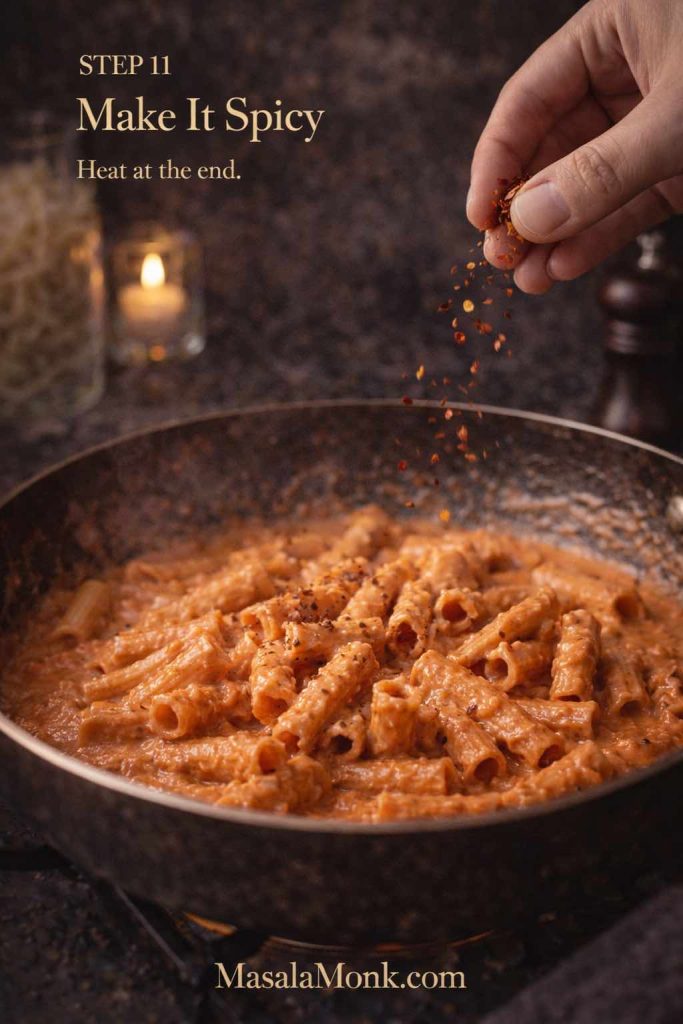
Spicy Rigatoni Vodka: Heat That Feels Rounded, Not Harsh
Spicy rigatoni vodka is popular because it hits comfort and heat at the same time. Done well, it tastes warm and addictive, not aggressively spicy or sharp.
Dial up the chilli after the sauce turns creamy—late heat tastes warmer and more balanced than spice cooked too early.
How to make spicy vodka rigatoni taste balanced
The key is when you add extra heat.
Start the base with a modest amount of chilli flakes, then taste again after the cream is added and the sauce has simmered. Add more chilli gradually near the end. That timing matters because the cream mellows spice, and the tomato base becomes more rounded after simmering.
Black pepper also matters more than you’d expect here. It brings a different kind of warmth that lifts the sauce rather than just increasing burn.
Adding deeper “pepper heat” without ruining the sauce
If you like experimenting with heat profiles—bright, smoky, vinegary, peppery—this internal guide is a good place to explore: Pepper sauce recipe
Instead of dumping extra heat into the whole pot, a pepper sauce at the table lets people customize their bowl. That’s especially helpful if you’re cooking for mixed spice tolerance.
Spicy vodka pasta with a cleaner finish
A small handful of extra Parmesan and a splash of pasta water during the final toss can make spicy vodka pasta feel smoother and more cohesive. When spice climbs, sauce can feel thicker and “stuck.” Pasta water fixes that by restoring glide.
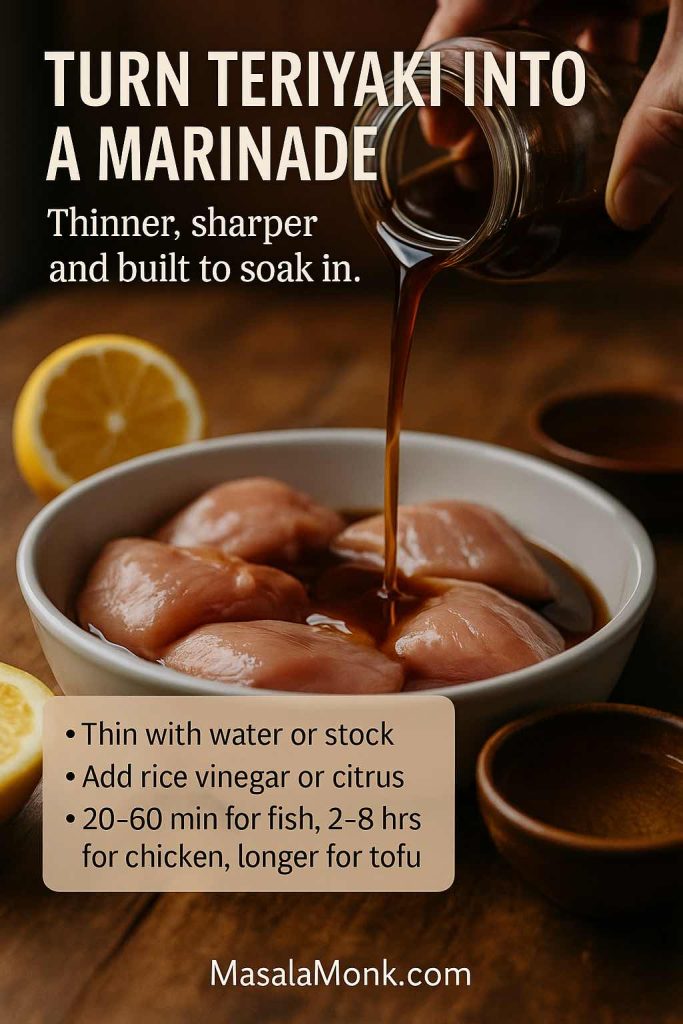
Chicken Vodka Pasta: The Creamy Protein Version That Still Feels Light
Chicken vodka pasta is what you make when you want vodka pasta comfort plus a full-meal feel. The goal is tender chicken that tastes integrated into the sauce—not dry chunks dropped on top.
Sear chicken until golden, then add it back only at the end—this keeps it juicy while the pan drippings deepen the sauce.
Chicken vodka pasta method that keeps chicken juicy
Slice chicken breast thin (or use boneless thighs for a more forgiving texture).
Season with salt and pepper.
Sear in oil over medium-high heat until cooked through.
Remove chicken to a plate.
Build the vodka pasta sauce in the same pan.
Add chicken back near the end, then toss pasta with sauce and pasta water.
This creates chicken and vodka pasta where everything tastes unified. It also works beautifully for chicken penne vodka pasta because penne holds sauce and chicken in the same bite.
If you want to compare another tested approach, Serious Eats has a dedicated recipe for chicken and penne in vodka cream sauce.
Chicken vodka pasta with penne vs rigatoni vs spaghetti
Chicken penne vodka pasta: classic, balanced, very satisfying.
Chicken rigatoni alla vodka: bolder, heartier, especially good if you’re going spicy.
Chicken spaghetti vodka: lighter, but easier to make messy—slice chicken smaller if you go this route.
If you love creamy chicken pasta nights in general, these internal posts fit naturally into your rotation:
Gigi Pasta Style: A Close Cousin of Vodka Pasta Sauce
Gigi pasta sits extremely close to vodka pasta in technique and comfort level. It’s still a tomato-cream sauce with spice and gloss; the difference is that many gigi pasta versions skip vodka, leaning more into a spicy tomato cream finish.
The method is familiar once you’ve mastered pasta alla vodka:
soften onion
warm garlic
toast tomato paste
simmer tomatoes
add cream gently
toss pasta with pasta water until glossy
Gigi pasta style with vodka
If you include vodka, you’re basically steering it toward vodka pasta sauce with a little extra heat. Keep the base spicy and finish with plenty of pepper and Parmesan.
Gigi pasta style without vodka
If you skip vodka, cook the tomato paste a touch longer and simmer the tomatoes a bit more before cream. That extra time gives you depth and mellowness. A tiny squeeze of lemon at the end can bring lift if you want a brighter finish.
If you’re curious what vodka specifically changes in the aroma and overall taste, Serious Eats’ explanation is still one of the clearest.
Vodka and Cream: Getting the Texture Right Every Time
Vodka and cream can sound heavy, yet the best vodka pasta doesn’t eat like a brick of richness. The sauce stays light enough to keep you reaching for another bite because pasta water and technique do the work that people often try to force with extra cream.
If vodka pasta sauce feels too thick
Add pasta water while tossing. Keep going until the sauce clings without feeling stodgy. A sauce that looks slightly loose in the pan often coats perfectly on the plate.
If the vodka sauce pasta feels too thin
Next time, simmer the tomato-vodka base a bit longer before adding cream. For the current pot, toss longer and add a touch more Parmesan; the starch plus cheese often builds body quickly.
If the sauce looks like it might split
Lower the heat immediately and stir gently. Add pasta water gradually. Often, it comes back together once the temperature drops and the emulsion stabilizes.
If you want deeper instincts for creamy sauce behavior, these internal guides help build confidence around heat control and smooth texture:
Vodka Pasta Without Vodka: A Delicious Tomato-Cream Alternative
Sometimes you want the penne alla vodka vibe but prefer not to cook with alcohol. You can still make a creamy tomato pasta that scratches the same itch.
When you skip vodka, a tiny citrus finish brings lift—use just enough to brighten the sauce without making it taste lemony.
The “bright finish” approach
Skip vodka. Build the sauce with onion, garlic, tomato paste, and tomatoes. Simmer until mellow, add cream gently, then toss with pasta water until glossy. Finish with a small squeeze of lemon to lift the sauce.
The “extra depth” approach
Skip vodka again, but cook the tomato paste slightly longer and simmer the tomato base a few extra minutes before adding cream. That extra time adds the depth people often associate with vodka pasta.
If alcohol content matters for your household, it’s worth knowing that cooking doesn’t always reduce alcohol to zero, and retention varies widely depending on method and time.
Look for a satin sheen on the pasta—when the sauce clings like this, you’ve nailed the finish and the bowl won’t taste heavy.
More Vodka Pasta Versions That Still Taste Like Vodka Pasta
Once you understand the base, vodka pasta becomes a flexible weeknight template rather than a one-off recipe.
Mushroom vodka pasta
Sauté mushrooms until browned before you start the onion. Then proceed with the vodka pasta sauce as written. The sauce becomes deeper and more savory without adding meat.
Shrimp vodka pasta
Cook shrimp separately and fold it in near the end so it stays tender. This version is especially good with linguine alla vodka because the strands carry a slightly looser sauce beautifully.
Spicy vodka pasta with greens
Add spinach or baby kale at the end of tossing. It wilts instantly and makes the dish feel fresher against the creaminess.
Baked vodka pasta
Toss cooked pasta with sauce, add mozzarella, and bake until bubbly. Keep the sauce slightly looser before baking so it doesn’t dry out.
If baked creamy pasta is your comfort lane, the internal sauce structure guides above (béchamel and mac & cheese) are genuinely useful for building intuition about how dairy behaves under heat.
Vodka pasta is rich enough that sides should either cut through the sauce or echo it simply.
Garlic bread with vodka sauce pasta
Garlic bread is the classic partner because it lets you scoop up extra sauce and makes the meal feel complete. If you want a homemade version, this internal recipe is a strong one: Homemade garlic bread loaf
A cool side for spicy rigatoni vodka
If you’re going spicy, a cool tangy side can be a lifesaver at the table. A cucumber-yogurt sauce works as a palate reset between bites: Greek tzatziki sauce recipes
A simple salad that keeps the meal feeling light
Even a basic salad with lemon and olive oil is enough to keep creamy vodka pasta from feeling heavy halfway through.
On spaghetti, the sauce feels lighter and silkier—use an extra splash of pasta water while tossing so it coats the strands instead of pooling.
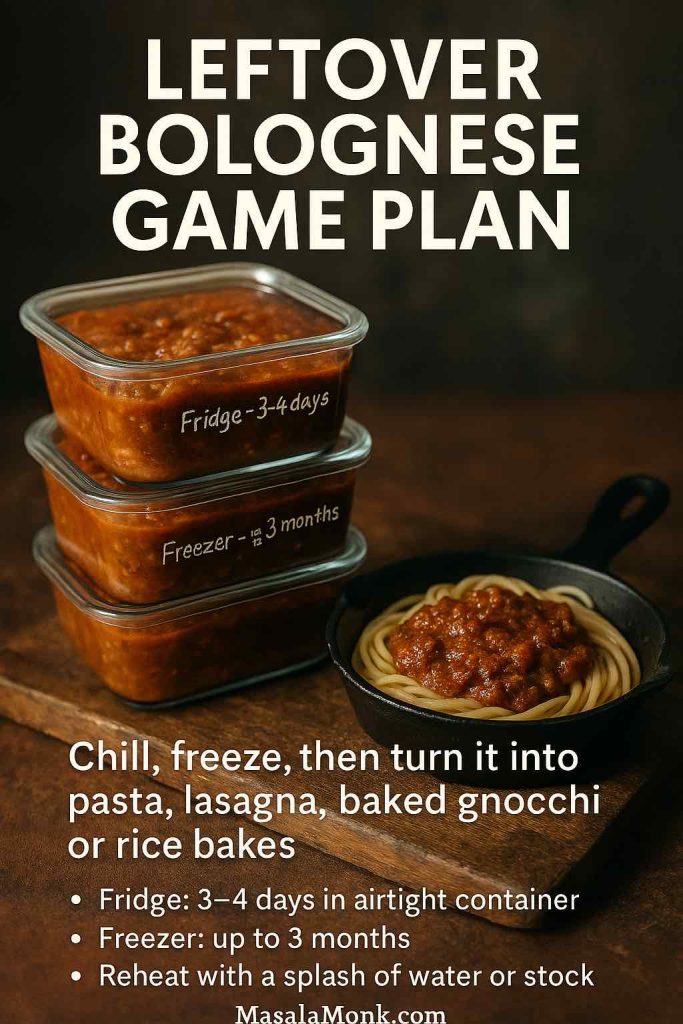
Storing and Reheating Vodka Pasta
Vodka pasta reheats well if you treat it gently. Cream sauces tighten in the fridge, so you’ll usually need a splash of water or milk to loosen the texture again.
Reheat over low heat on the stovetop with a splash of water or milk, stirring frequently. Finish with black pepper and a little Parmesan again. The sauce often tastes surprisingly close to the original once it’s loosened and re-seasoned.
Vodka pasta becomes a repeat dinner because it’s dependable and adaptable. Once you’ve cooked tomato paste until it turns rich, simmered tomatoes until they mellow, added cream gently, and finished everything with pasta water until glossy, you’ve learned the entire trick. From there, you can make penne alla vodka for classic comfort, swap to rigatoni alla vodka for a bigger bite, choose spaghetti vodka or linguine alla vodka for a sleeker feel, turn it into spicy rigatoni vodka when you want heat, fold in chicken for chicken vodka pasta, or pivot into a gigi pasta style sauce when you want the same tomato-cream comfort tuned differently.
It’s pasta tossed in a creamy tomato-vodka sauce made with tomato paste, tomatoes, vodka, and cream. The finished dish is meant to taste rich and balanced—never “boozy.”
2) Does penne alla vodka taste like vodka?
No. When the sauce is simmered and balanced with tomatoes and cream, the vodka doesn’t taste like a shot; instead, it adds a subtle lift to aroma and finish.
3) Can I make this without vodka?
Yes. Skip the spirit and build flavor by cooking the tomato paste until deeper in color, simmering the tomatoes until mellow, then finishing with cream and starchy pasta water for a smooth coating.
4) What can I substitute for vodka in pasta alla vodka?
For a similar brightness, use a small splash of pasta water earlier to loosen the tomato paste, then add a tiny squeeze of lemon at the end. As another option, a teaspoon of mild vinegar can add lift—use a light hand so it doesn’t turn tangy.
5) Does alcohol cook off completely in the sauce?
Not always. Alcohol retention depends on time and method. If you need to avoid alcohol entirely, choose the no-vodka approach rather than relying on simmering.
6) Which pasta shape is best for vodka sauce?
Penne is classic because the tubes catch sauce. Rigatoni feels heartier and holds more sauce per bite, while spaghetti and linguine give a sleeker, silkier coating.
7) Is rigatoni alla vodka different from penne alla vodka?
The sauce style is the same, but the texture changes. Rigatoni is larger with ridges, so it grabs more sauce and often tastes more “substantial” in each mouthful.
8) How do I make spicy rigatoni vodka without it tasting harsh?
Add extra chilli gradually after the cream goes in. That way, the heat feels rounded rather than sharp. Also, extra black pepper and Parmesan help keep the sauce balanced as spice increases.
9) What’s the difference between spicy vodka rigatoni and spicy vodka pasta?
Spicy vodka rigatoni refers to using rigatoni specifically. Spicy vodka pasta is broader and can include penne, rigatoni, spaghetti, or other shapes—so the sauce may be similar, but the eating experience changes.
10) How do I keep chicken tender in chicken vodka pasta?
Sear the chicken first, remove it, make the sauce in the same pan, then add the chicken back near the end. That sequence keeps it juicy and prevents overcooking.
11) Can I use rotisserie chicken for this?
Definitely. Shred it and stir it into the sauce during the final simmer, just long enough to warm through.
12) Why is my sauce too thick?
It can thicken from too much reduction, too much cheese added quickly, or cooling in the pan. To fix it, loosen with reserved pasta water a splash at a time until it turns glossy again.
13) Why is my sauce watery?
Usually the tomato base didn’t simmer long enough, or the pasta wasn’t finished in the sauce. Simmer until the tomatoes taste mellow, then toss pasta in the pan and use pasta water to help the sauce cling.
14) Why did my sauce split after adding cream?
Most often the heat was too high. Lower the heat right away, stir gently, and add a little pasta water to help it come back together.
15) How do I make a smoother vodka and cream sauce?
Add cream over low heat and stir in cheese gradually. Then finish the pasta in the sauce with pasta water so everything emulsifies into a silky coating.
16) Can I make it without cream?
Yes. You can use a plant-based cream alternative, or rely on pasta water plus grated cheese for body. Even so, it will taste less “lush” than the classic version.
17) Can I make a vegan version?
Yes—use a thick dairy-free cream (like cashew or oat-based) and a vegan Parmesan-style topping. Additionally, pasta water becomes even more important for texture.
18) Is gigi pasta the same as this?
They’re closely related. Gigi-style pasta is typically a spicy tomato cream pasta that may skip vodka, while the classic version uses vodka as part of the sauce method.
19) Can I make the sauce ahead of time?
Yes. Make it, cool it, refrigerate, then reheat gently and loosen with a splash of water or pasta water before tossing with freshly cooked pasta.
20) How long will leftovers keep?
Stored properly in the fridge, it’s best within 3–4 days for flavor and texture.
21) Can I freeze the sauce?
You can, though creamy sauces sometimes change texture after thawing. If you plan to freeze, freezing the sauce (without pasta) tends to work better.
22) What should I serve with penne alla vodka?
Garlic bread and a simple salad are classic. Alternatively, if you made it spicy, a cool side can be a refreshing contrast.
23) Why isn’t my sauce turning pink?
Either the sauce needs more cream, or the tomato base is too light. Let the tomatoes simmer briefly before adding cream, and the color usually turns that signature blush tone.
24) How do I make it taste more like a restaurant version?
Cook the tomato paste until rich, season in layers, keep heat gentle after adding cream, and finish the pasta in the sauce with pasta water until glossy and clingy.
Mayonnaise doesn’t shout for attention the way chilli oil or hot sauce does. It waits quietly in the background, then suddenly you notice your favourite dishes are all leaning on it: that glossy potato salad, the creamy coleslaw, the egg mayo sandwich, the burger that just feels right, the sushi with a mysterious spicy drizzle. Once you understand how a simple mayo recipe works, you realise that jar in the fridge is just the most basic version of something you can customise in dozens of directions.
In this guide, we’ll start with a classic homemade mayonnaise recipe, then use one simple mayo recipe to build a whole family of sauces:
Classic mayo
Japanese mayo
Eggless and “veg” mayo
Vegan mayo made with aquafaba and other plant-based bases
Spicy mayo in different flavours
Garlic mayo and herb mayo
Mayo–ketchup sauce (fry sauce / burger sauce)
We’ll also look at how to use these in real meals and link out to supporting recipes on MasalaMonk so this isn’t just theory – it’s a complete playbook you can actually cook from.
What Mayonnaise Actually Is
Before diving into any particular mayonnaise recipe, it helps to know what’s going on in the bowl.
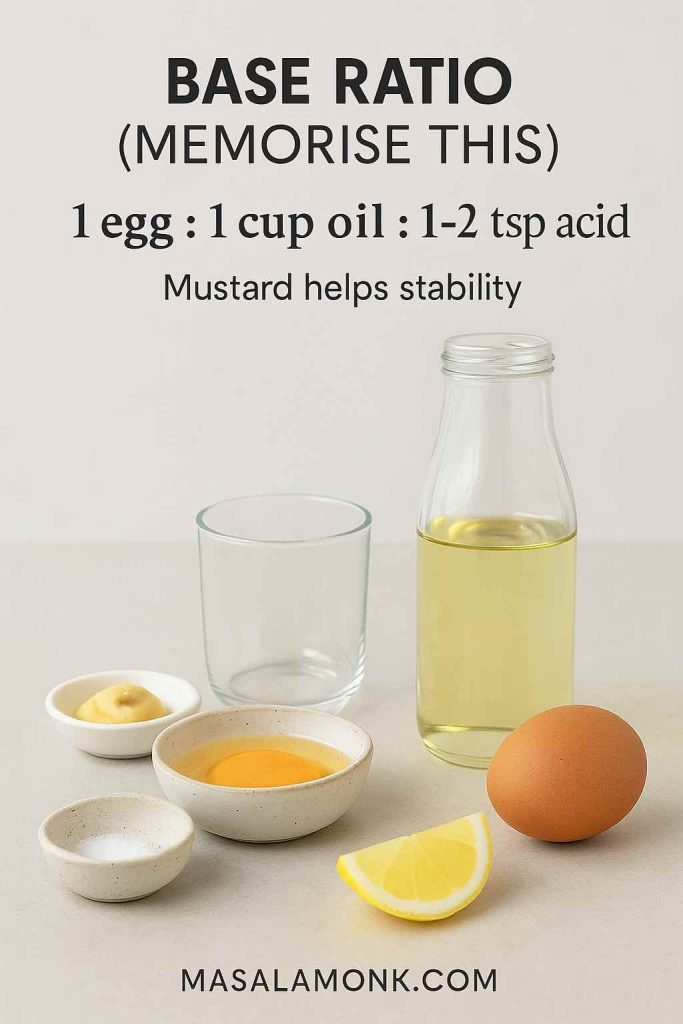
Mayonnaise is an emulsion – specifically, an oil-in-water emulsion:
The water phase is mostly egg plus something acidic like lemon juice or vinegar.
The fat phase is oil.
When you blend them with enough energy and the right emulsifiers (from egg yolk and mustard), you end up with millions of tiny oil droplets held in place inside the water phase instead of separating out.
Egg yolk brings lecithin and proteins that surround each droplet and stop them clumping together. Mustard quietly helps too, adding its own emulsifiers and a bit of heat. Oil provides body and richness; the acid sharpens flavour and helps keep things stable.
Quick check: lift a spoonful—if it falls in glossy ribbons and briefly sits on the surface before melting back, your emulsion is stable. If it looks grainy or oily, slow down and rebuild the base.
When a batch “splits”, those droplets have clumped back into visible oil, and the watery part has leaked out. That usually happens if:
Oil is added too quickly.
The mixture is too cold or too hot.
There isn’t enough yolk or mustard for the amount of oil.
The emulsion is crushed with too much liquid at the wrong time.
Once you see mayonnaise as a balance between oil, water, and emulsifier, everything about it becomes easier: making it, tweaking it, and rescuing it.
Because many mayo recipes use raw egg, the obvious question is: is homemade mayonnaise safe to eat?
Food safety agencies like the USDA are very clear that raw or undercooked eggs can carry Salmonella, particularly risky for pregnant people, young children, older adults, and anyone with a weakened immune system. Their Q&A on homemade mayonnaise safety and their broader guide on egg products and food safety both stress the same basics.
In practice, that means:
Use fresh eggs from a trusted source.
Keep eggs refrigerated and discard cracked or suspicious ones.
Work with clean utensils and equipment.
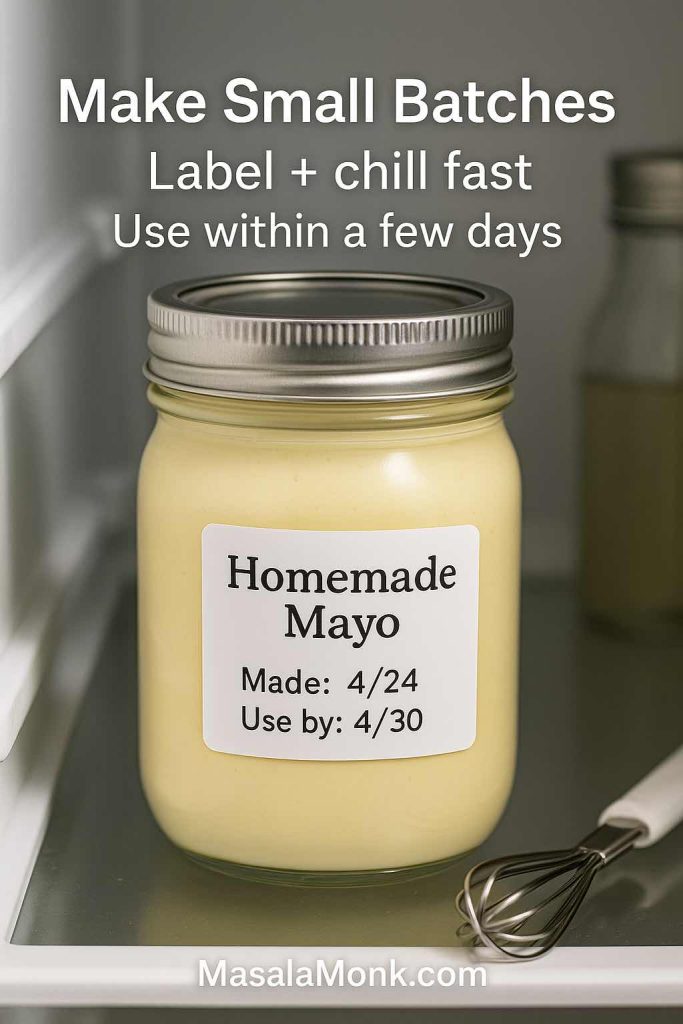
Get homemade mayo into the fridge quickly and keep it cold.
Make sensible batch sizes and use them within a few days.
If it smells wrong or looks wrong, don’t argue with it – throw it out.
Label your jar the moment you make it. Store it in the coldest part of the fridge (not the door), and always use a clean spoon—cross-contamination spoils mayo faster than time.
If you’d like extra reassurance, you can:
Use pasteurised eggs or pasteurised liquid egg products.
Choose an eggless mayonnaise recipe or a vegan mayo recipe that uses no egg at all.
Everything else in this guide grows from this one base. Once you’re comfortable making this classic mayo recipe, you can branch out into all the flavoured versions with tiny adjustments.
Ingredients for Classic Mayo Recipe
1 large egg, at room temperature
1 cup (240 ml) neutral oil (sunflower, canola, grapeseed, or light vegetable oil)
1–2 teaspoons fresh lemon juice or white wine vinegar
½ teaspoon Dijon or yellow mustard
¼ teaspoon fine salt, plus more to taste
A pinch of sugar (optional, just to round the acidity)
You can make this by hand with a whisk, but an immersion blender makes it almost effortless.
Immersion Blender Mayo Recipe Method
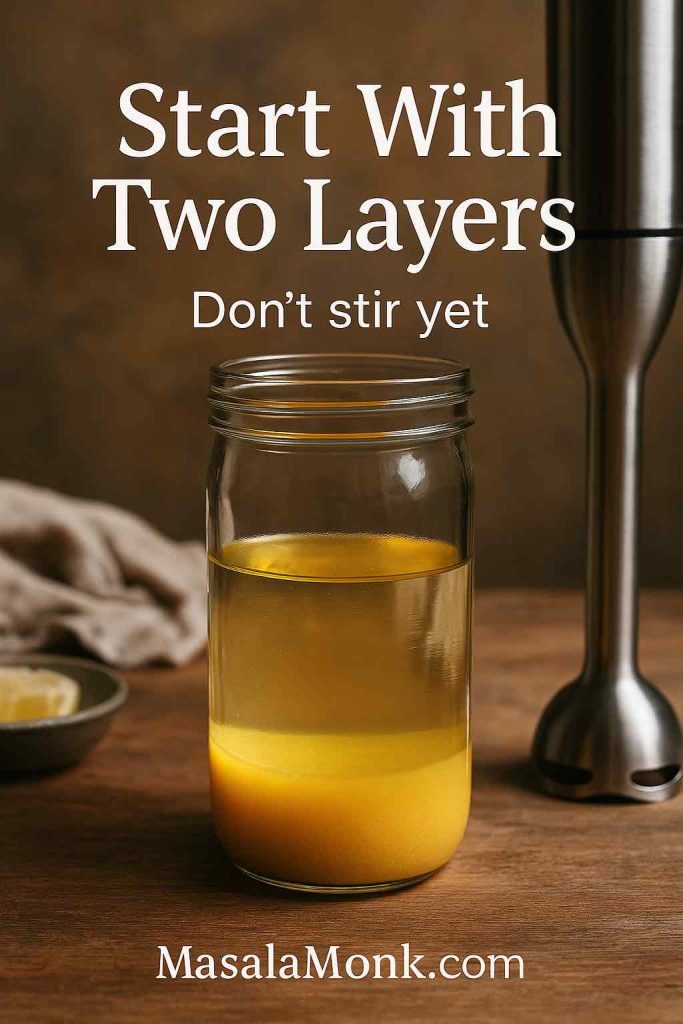
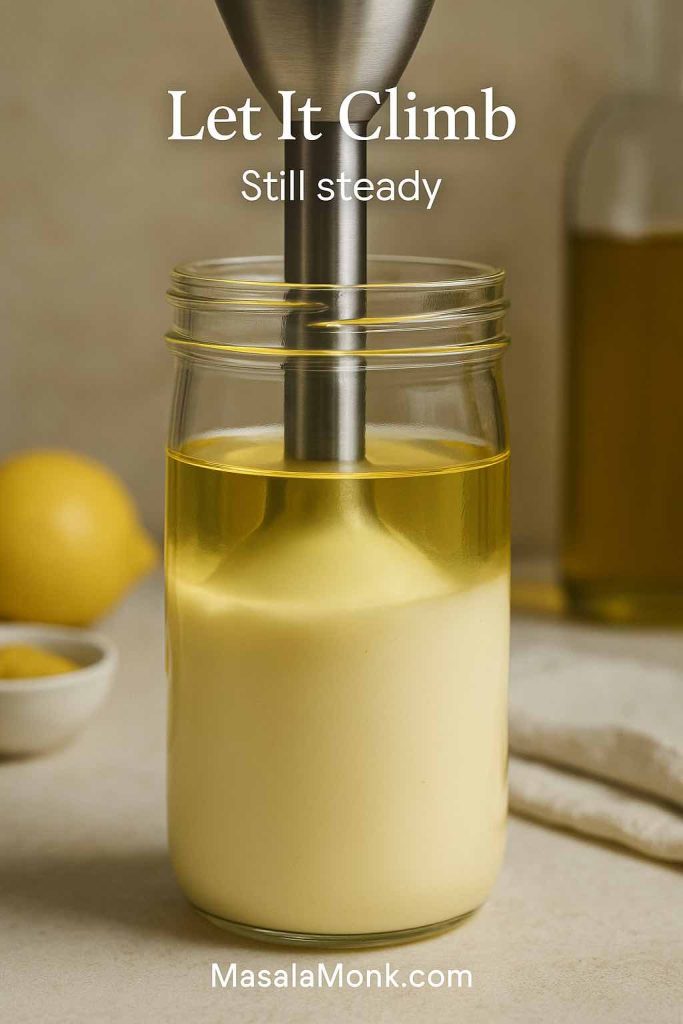
Step 1 – Pour the egg, mustard, salt, and lemon juice or vinegar into a tall, narrow jar.
This separation is intentional: the blender needs a calm oil layer to ‘grab’ and emulsify from the bottom. Stirring too early is a common reason mayo turns runny or splits.
Step 2 – Add the oil on top in one steady pour. Don’t stir; let it sit in two distinct layers.
Starting at the bottom creates a strong ‘anchor’ emulsion first. If you begin mid-jar or lift too early, the oil can stay loose and the mayo is more likely to split.
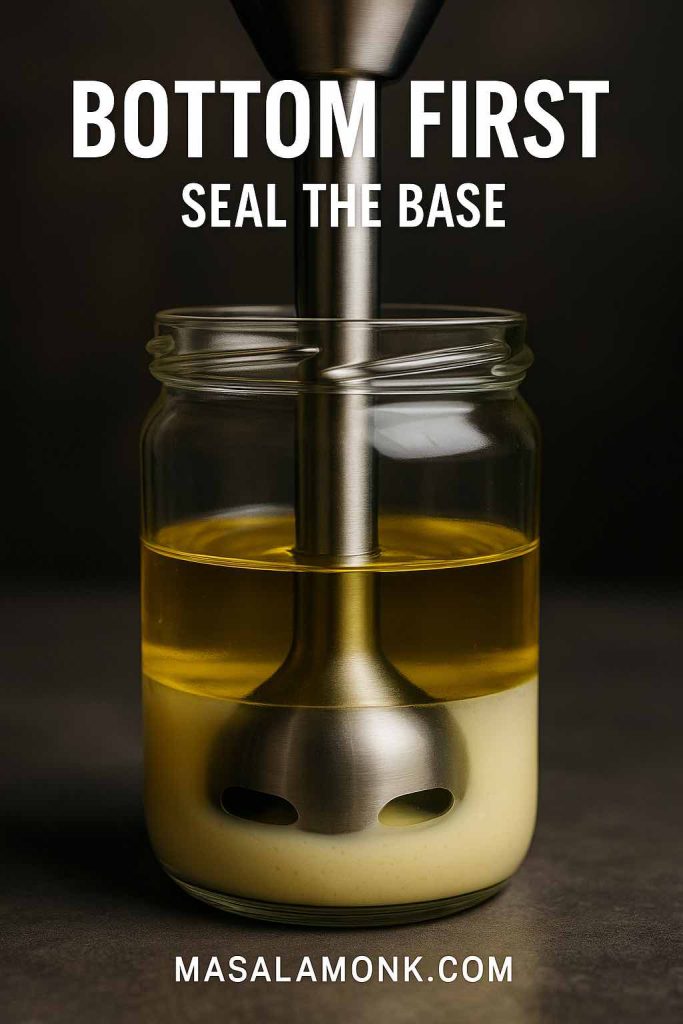
Step 3 – Place the blender head all the way at the bottom and switch it on.
This pale layer is your ‘anchor’ emulsion. Don’t lift the blender until you see it clearly forming—lifting too early leaves oil un-emulsified and increases the chance of splitting.
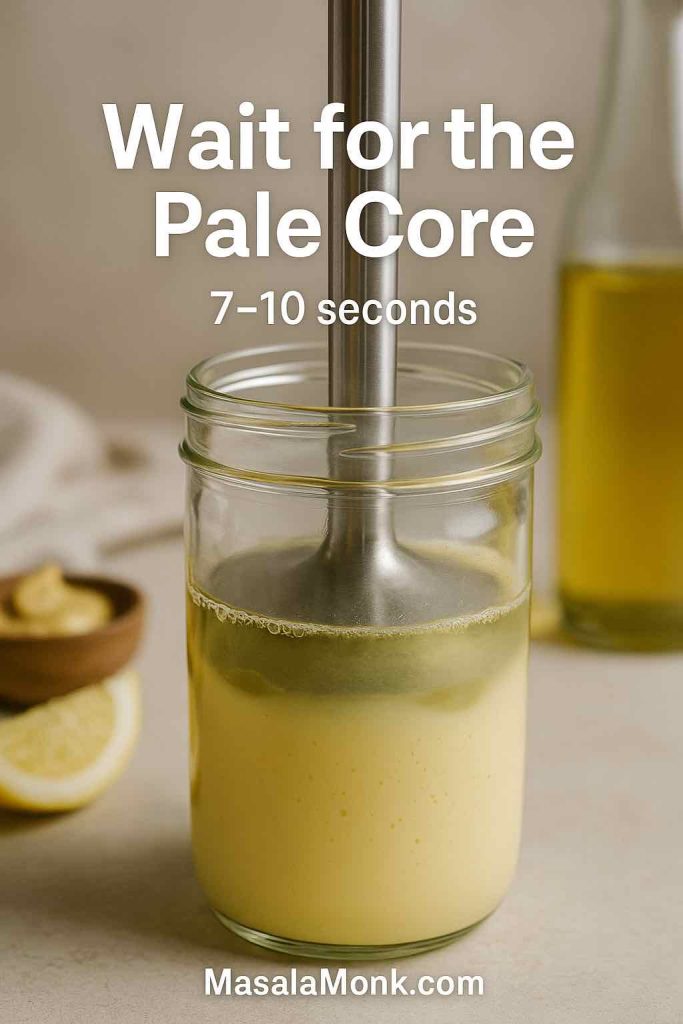
Step 4 – Hold it there, still, for 7–10 seconds. A thick, pale emulsion will start forming at the base.
When the creamy zone climbs to around halfway, the emulsion is strong enough to start moving the blender. If it hasn’t risen yet, hold steady a few seconds longer before lifting.
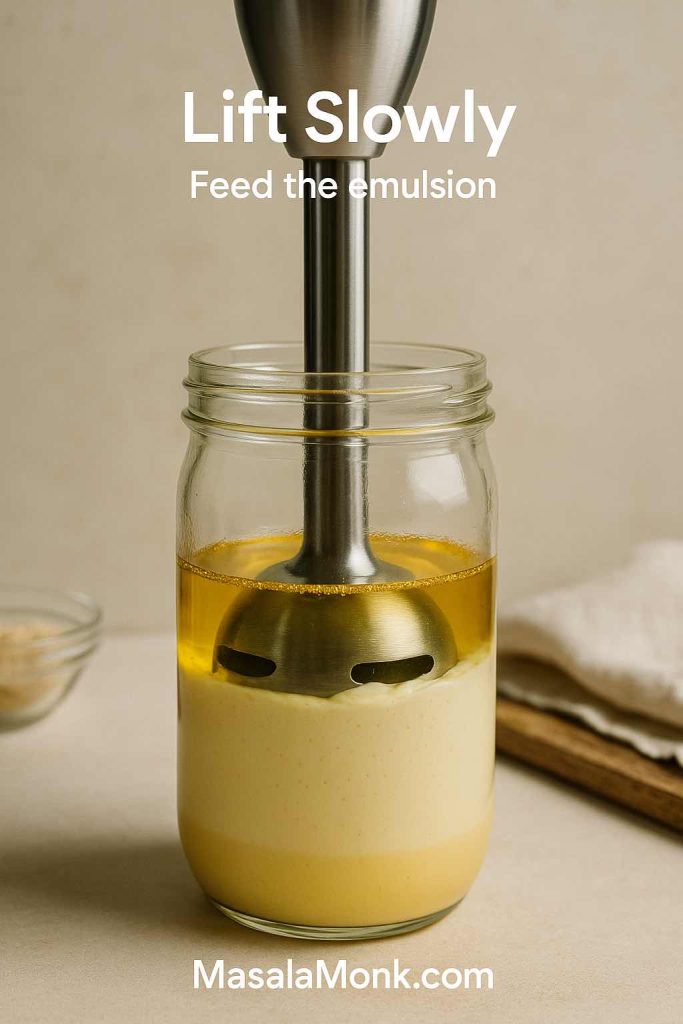
Step 5 – Once the bottom half looks creamy, slowly draw the blender up through the jar, tilting a little to pull more oil into the blades.
Lift in slow motion so the blades can ‘drink’ the oil. If you rush upward, you can trap a slick of oil on top and end up with runny mayo.
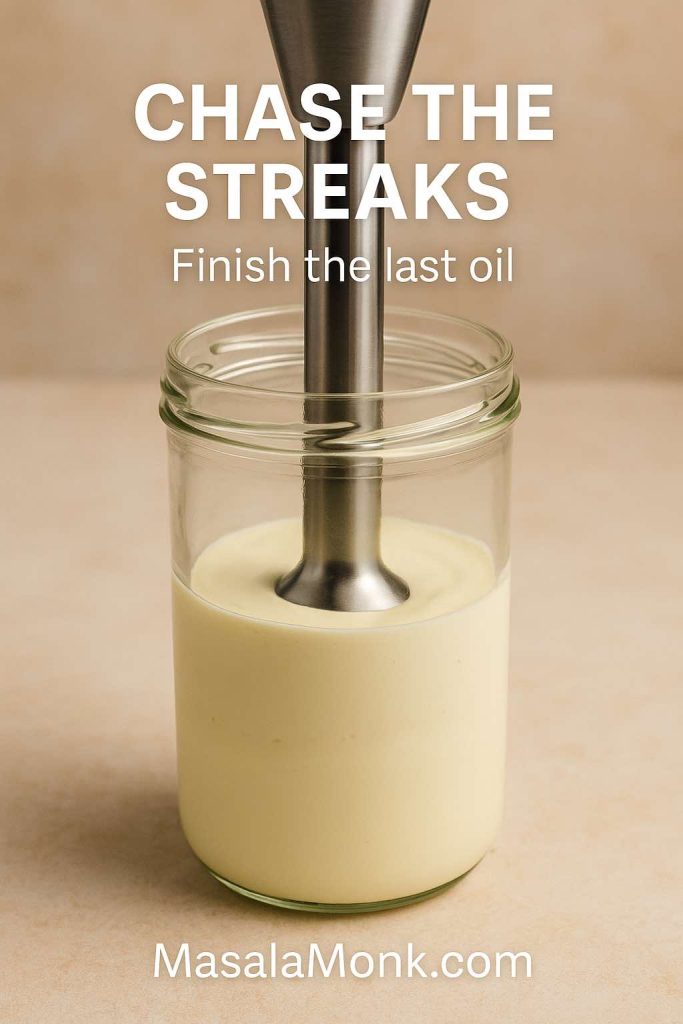
Step 6 – By the time you reach the top, you should have a thick, glossy mayonnaise.
At this stage, blend only until the last oily streaks disappear. Over-blending isn’t necessary—stop when the texture turns uniformly pale and glossy.
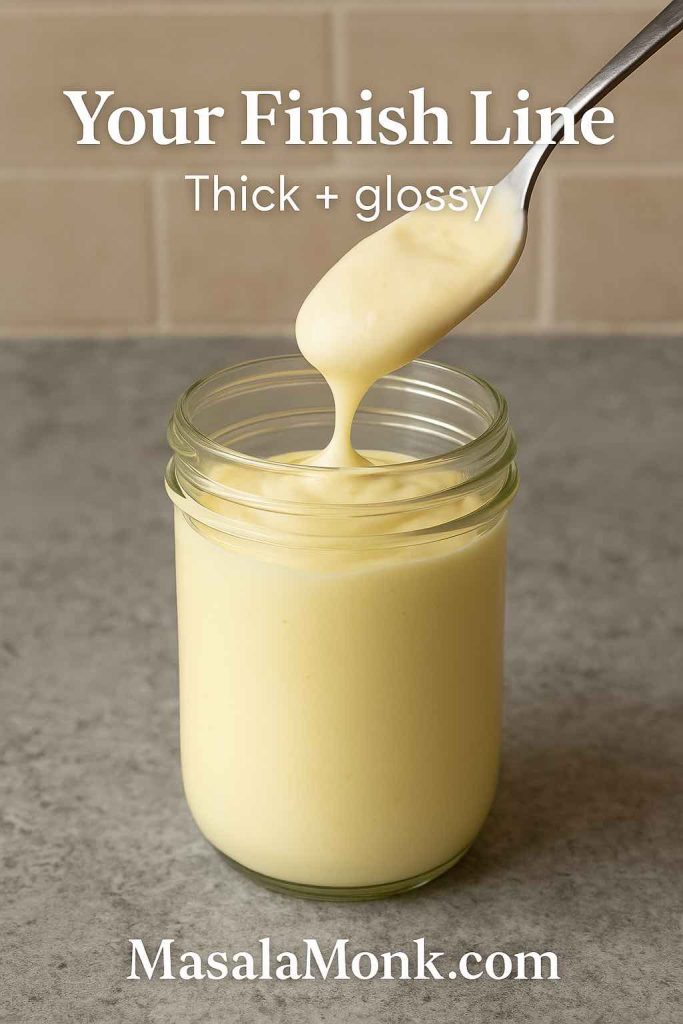
Step 7 – Taste and adjust with more salt or lemon juice if needed.
Finished mayo should fall in slow ribbons and look evenly pale with no oily sheen. Now taste and adjust: a tiny pinch of salt sharpens flavour, and a few drops of lemon/vinegar brighten it without thinning.
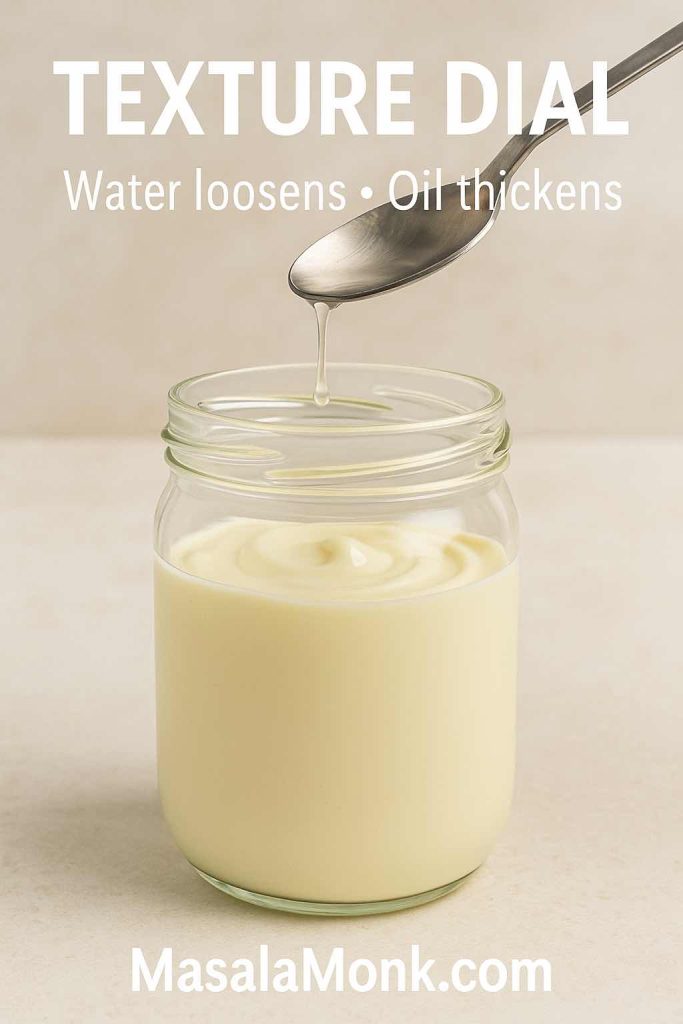
Step 8 – If the mayo feels too stiff, whisk in a teaspoon or two of water until the texture matches what you want.
To loosen stiff mayo, whisk in 1 teaspoon of water at a time until it turns spoonable. To make it thicker, emulsify a little more oil (slowly) once the base is already stable.
Hand-Whisk Mayo Recipe Method
If you prefer whisking:
In a medium bowl, whisk together the egg, mustard, salt, and acid until the mixture is completely smooth.
Begin adding oil drop by drop while whisking continuously. This slow start is what builds the initial emulsion.
Once it thickens and turns paler, switch to a thin, steady stream of oil, still whisking without stopping.
Continue until you’ve used all the oil and the mayo stands in soft peaks.
Taste and tweak the seasoning.
From here, you can spread this homemade mayonnaise on sandwiches, stir it into potato salad, or use it as the base for garlic mayo, spicy mayo, Japanese mayo, and more.
Instead of treating this base as the final product, treat it as a starting point. With a few changes to the oil, the acid, and the seasoning, you can turn one mayo recipe into many.
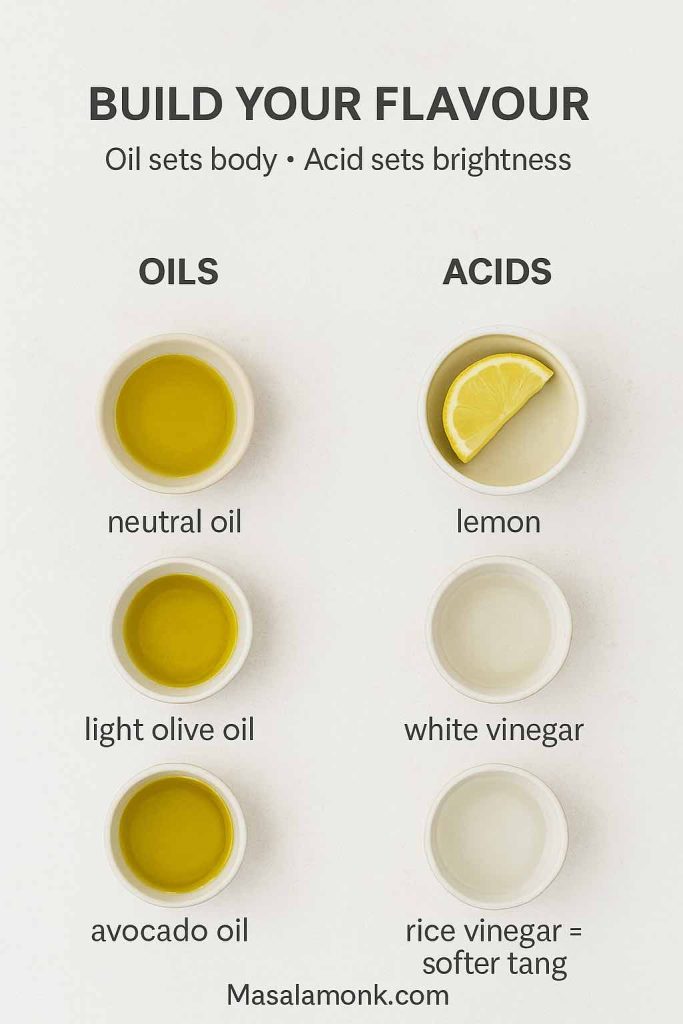
Choosing the Oil in Mayo Recipe
Different oils shape the flavour:
Neutral oils (sunflower, canola, grapeseed) keep the flavour clean and versatile.
Light olive oil adds some fruitiness without excessive bitterness.
Avocado oil gives a buttery, green note that works well in bowls and salads.
You can also blend oils: for example, half sunflower oil and half light olive oil makes a well-rounded base.
Fast rule: neutral oil + lemon = classic all-purpose mayo; avocado oil = buttery for bowls; light olive oil adds gentle fruitiness. For a softer tang (especially Japanese-style), swap in rice vinegar.
Choosing the Acid in Mayo Recipe
The acid doesn’t just brighten the taste; it affects the overall character:
Lemon juice gives a fresh, citrusy tang.
White wine vinegar is gentle and soft.
Apple cider vinegar adds a faint apple note.
Rice vinegar is slightly sweet and mild, perfect for a Japanese mayo recipe.
Combining acids gives you even more control. A tablespoon of lemon juice plus a teaspoon of rice vinegar, for instance, produces a balanced, rounded tang.
Adding Character: Salt, Sweetness, Heat and Umami
Once the base tastes good, you can layer on personality:
A pinch of sugar or honey softens sharp acidity.
A few drops of soy sauce, a spoonful of miso, or a touch of fish sauce give savoury depth.
Crushed garlic instantly steers you towards garlic mayo.
Hot sauce, chilli paste, or a spoonful of chilli sauce from the pepper sauce recipe guide transforms it into a spicy mayo recipe.
When you think of mayo as a blank canvas, all these variations become tiny, deliberate tweaks instead of separate, complicated recipes.
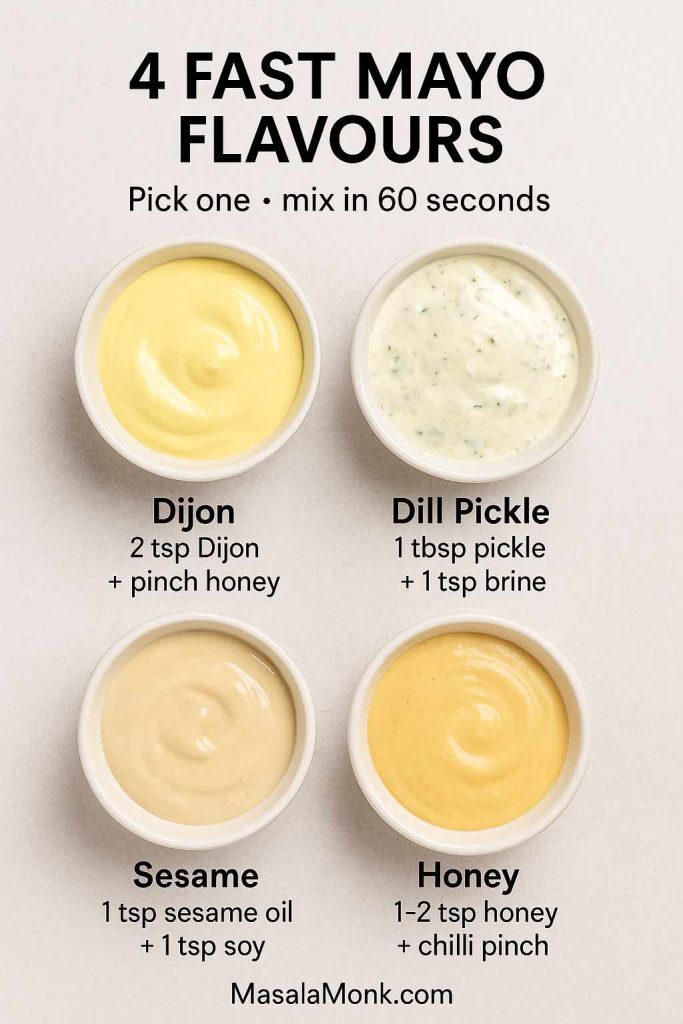
Use these as ‘base flavours’ and adjust to taste: add more Dijon for bite, more pickle brine for tang, more sesame oil for nuttiness, or a bigger chilli pinch for heat. Each works best on different foods—Dijon for sandwiches, pickle for burgers, sesame for bowls, honey for fried snacks.
Mayo Recipe Variations (Quick Mix-In Guide)
Use this cheat sheet with ½ cup mayo (classic, eggless or vegan). Stir, taste, and adjust salt/acidity.
Sriracha mayo: 1–2 tbsp sriracha + ½ tsp rice vinegar
Spicy mayo: 1–3 tsp hot sauce/chilli paste + ½ tsp lemon juice
Chipotle mayo: 1 tbsp chipotle in adobo + 1 tsp lime juice
Wasabi mayo: ½–1 tsp wasabi paste + ½ tsp lime juice
Mayonnaise with garlic: 1 grated garlic clove + 1 tsp lemon juice
Mayo and ketchup sauce: 3 tbsp ketchup + 1 tsp mustard
Honey mayo: 1–2 tsp honey + pinch of chilli flakes
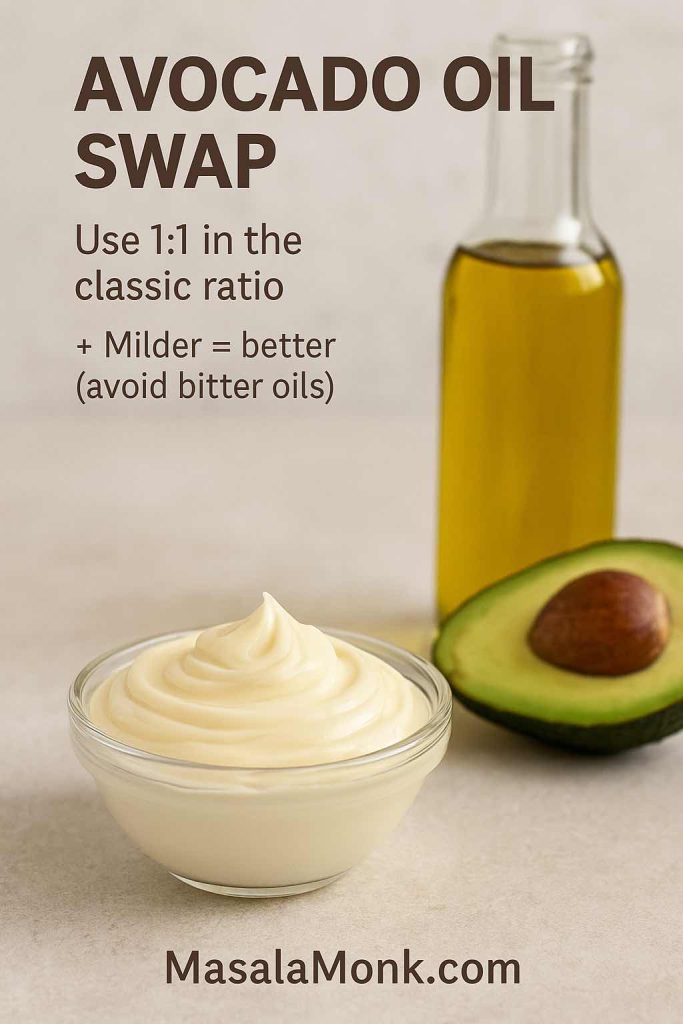
Mayo Made With Avocado Oil
If you want a cleaner, buttery mayo, make mayo with avocado oil exactly like the classic recipe. Use 1 cup avocado oil instead of neutral oil.
Avocado oil makes a clean, buttery mayo that works especially well in bowls and salads. Choose a mild avocado oil—strong/bitter oils can dominate the finished sauce.
The method stays identical; the flavour turns slightly greener and richer, great in bowls and salads.
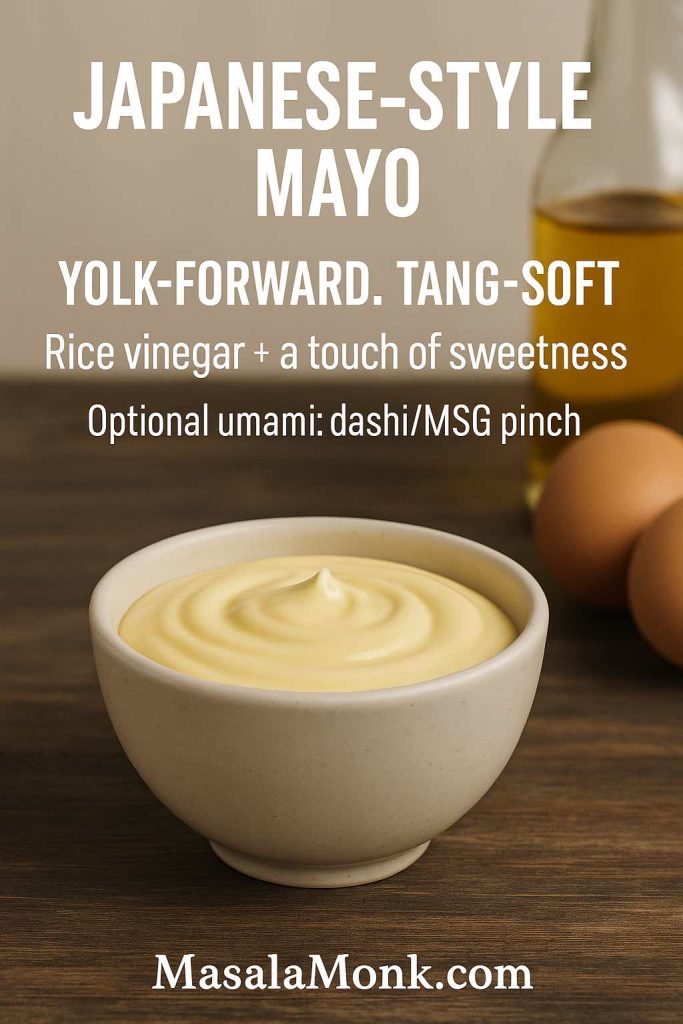
Japanese mayonnaise is richer and more savoury than standard Western mayo, with a slightly looser texture and a distinctive tang. Think about the creamy lines zig-zagged over okonomiyaki or drizzled on karaage – that’s the feeling you’re aiming for.
What Makes Japanese Mayo Different
Compared with the classic base you just made, Japanese mayonnaise:
Uses egg yolks only instead of whole eggs.
Relies on rice vinegar rather than stronger vinegars.
Is lightly sweetened.
Often includes a tiny amount of MSG or dashi for umami.
That combination gives it a custardy texture and savoury punch.
For the most ‘Japanese-style’ finish, use yolks only and rice vinegar, then add sweetness in tiny pinches. This mayo shines on fried foods and sandwiches because the softer tang doesn’t overpower the filling.
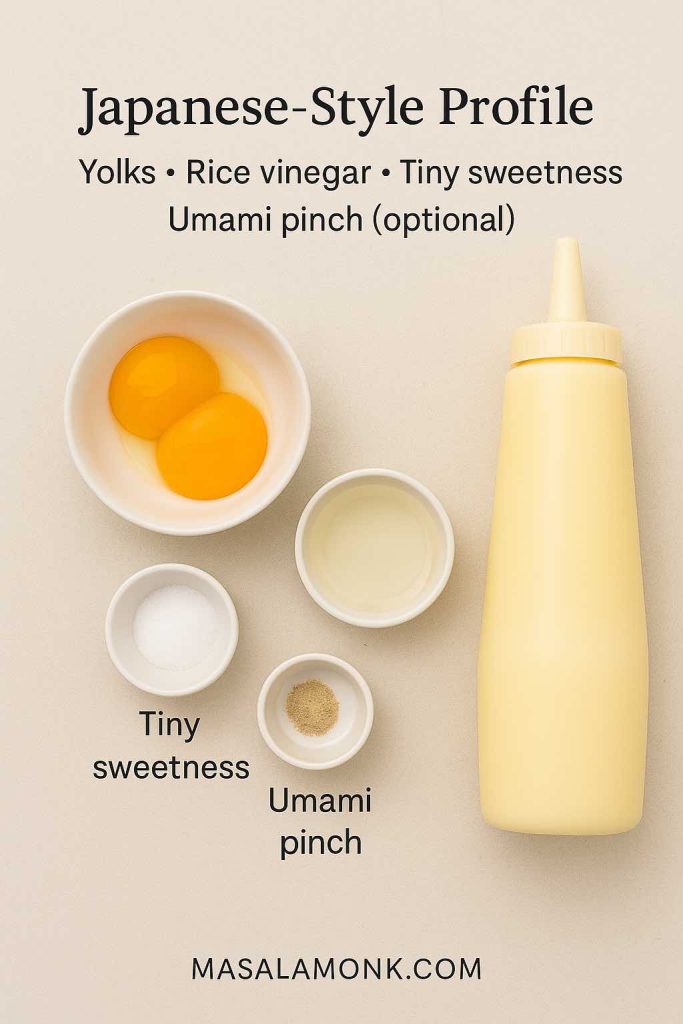
Homemade Japanese Mayonnaise Recipe
Ingredients
2 egg yolks, at room temperature
1 cup neutral oil
1½ tablespoons rice vinegar
1 teaspoon sugar
½ teaspoon salt
Optional: a pinch of MSG or a sprinkle of dashi powder
Method
Add yolks, rice vinegar, sugar, and salt to a tall jar.
Pour in the oil on top.
Blend from the bottom up with your immersion blender just as you did for classic mayo.
Taste, then adjust with more rice vinegar for extra tang or a touch more sugar if you prefer a softer profile.
Think of this as a flavour blueprint: yolks bring richness, rice vinegar keeps tang soft, a small sweetness rounds edges, and the optional umami pinch adds the ‘canteen’ savouriness that makes Japanese-style mayo addictive on fried foods.
Use this Japanese mayo in all the usual ways: drizzle it over okonomiyaki, serve it with fried chicken, or smear it in sandwiches. It’s especially good with umami-focused fillings like the mushrooms and cheese in this mushroom cheese sandwich, where the richness of the yolk-based mayo and the savoury mushrooms amplify each other.
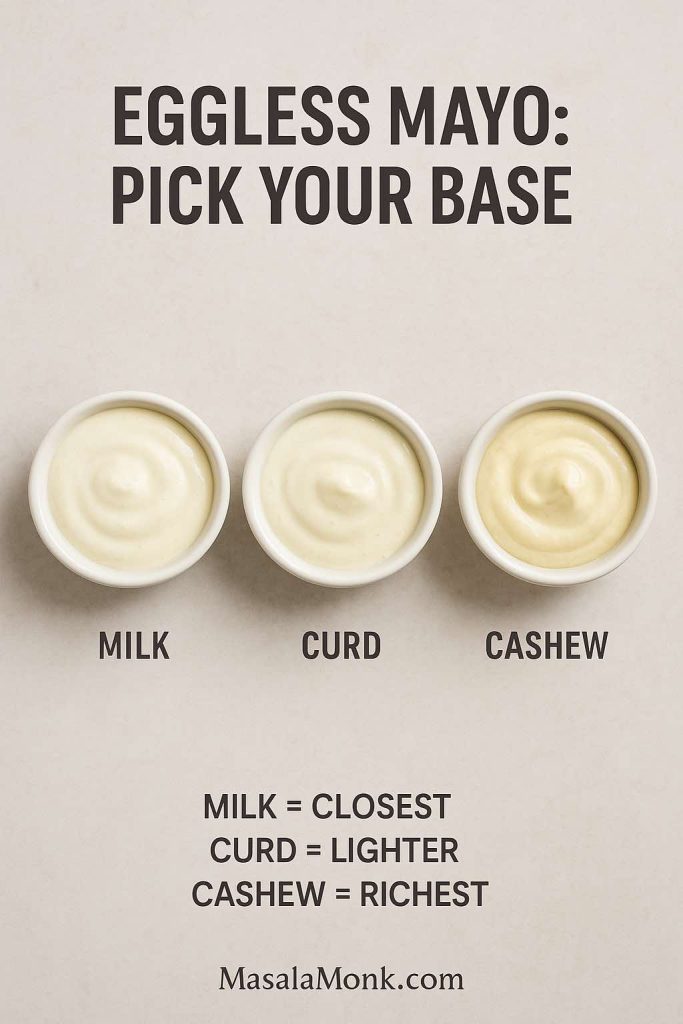
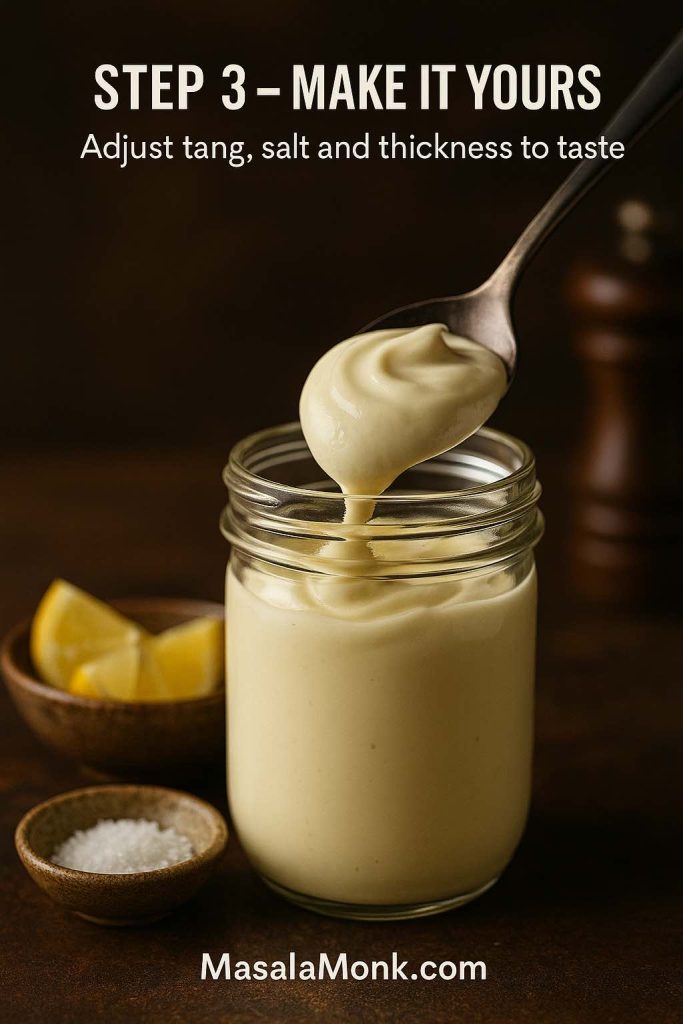
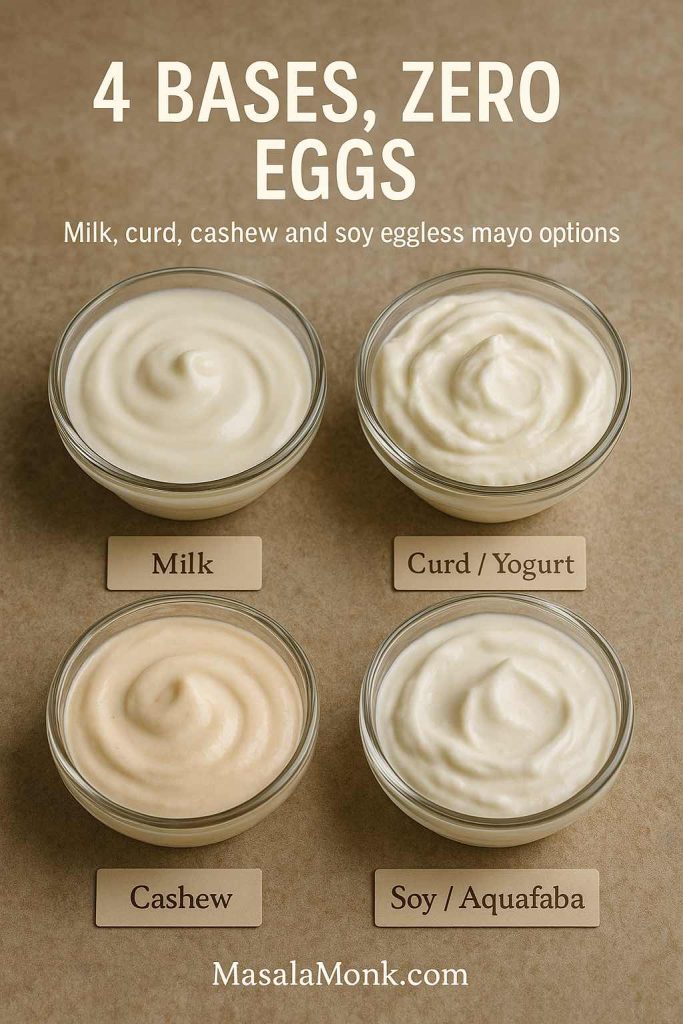
If you avoid eggs or just want an option you can serve to anyone without worrying about raw egg, eggless mayo and veg mayo are seriously useful.
MasalaMonk has a detailed guide on eggless mayonnaise that walks through several bases, including milk, curd, cashews and aquafaba. The core idea doesn’t change: you still need a water phase, a fat phase, and an emulsifier. The difference is simply that the emulsifier isn’t egg.
If you want the closest ‘store-style’ texture, start with milk. For a lighter, tangier spread, use thick curd. For the richest dip-like mayo (great with herbs/garlic), go cashew.
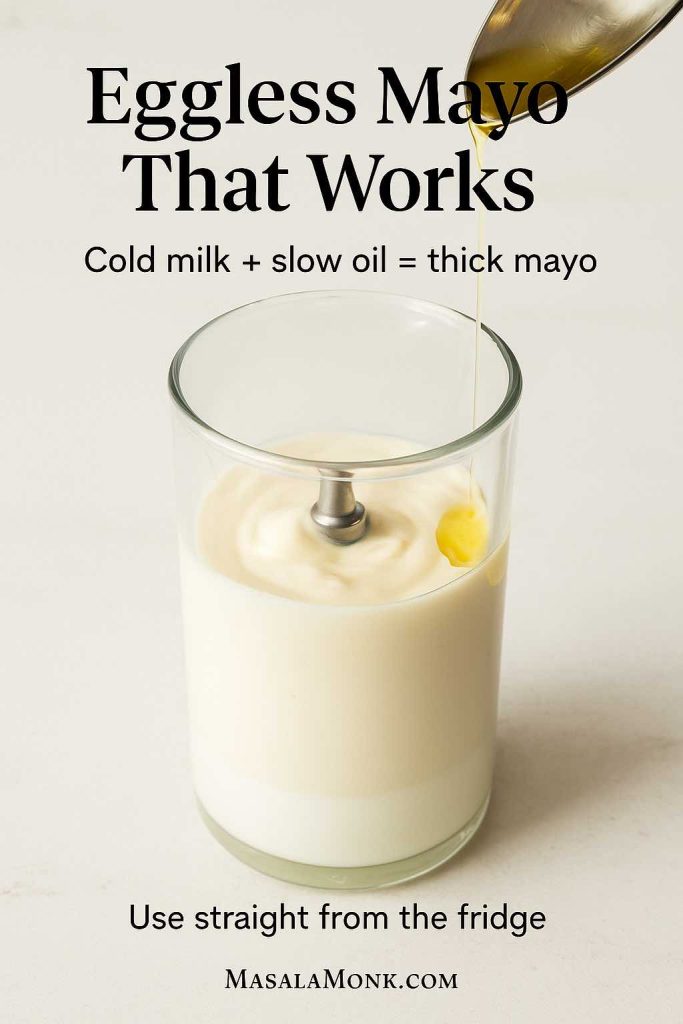
Milk-Based Eggless Mayonnaise
This version uses cold milk as the water phase.
A typical pattern:
½ cup cold milk
1 cup neutral oil
1–2 teaspoons vinegar or lemon juice
½ teaspoon mustard
Salt and a pinch of sugar
Cold milk is the difference-maker. If it doesn’t thicken within 20–30 seconds, stop and chill the jar + milk, then try again while adding oil more slowly.
Blend the milk, mustard, salt and acid first, then drizzle in the oil while blending until it thickens. The proteins in the milk help bind the oil into a creamy veg mayo that feels surprisingly close to the original.
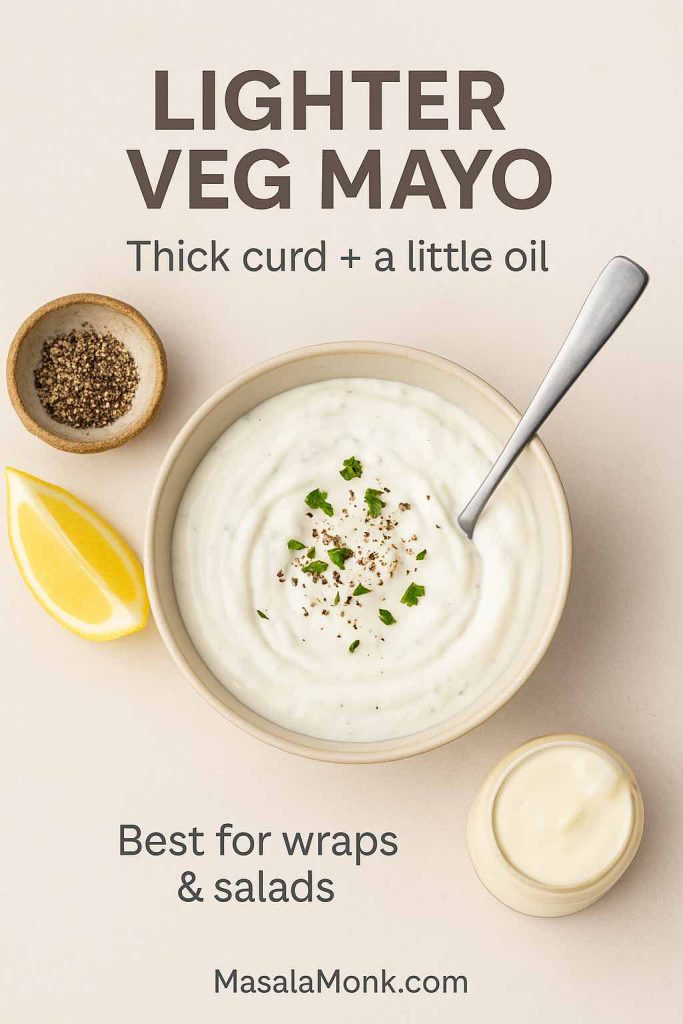
Curd- or Yogurt-Based Veg Mayo Recipe
Here, thick yogurt or hung curd does the heavy lifting.
A basic curd-based mayo might use:
½ cup thick curd (drained so it’s not watery)
2–4 tablespoons oil
Lemon juice or vinegar
Mustard, salt, pepper
Optional garlic or herbs
Use thick/hung curd so it doesn’t turn watery. If it tastes too tangy, balance with a tiny pinch of sugar or a drizzle of honey—then season with pepper and herbs.
Because curd is already thick, it needs much less oil. This style tastes tangier and lighter, which makes it ideal for salads, wraps and sandwiches when you don’t want heavy richness.
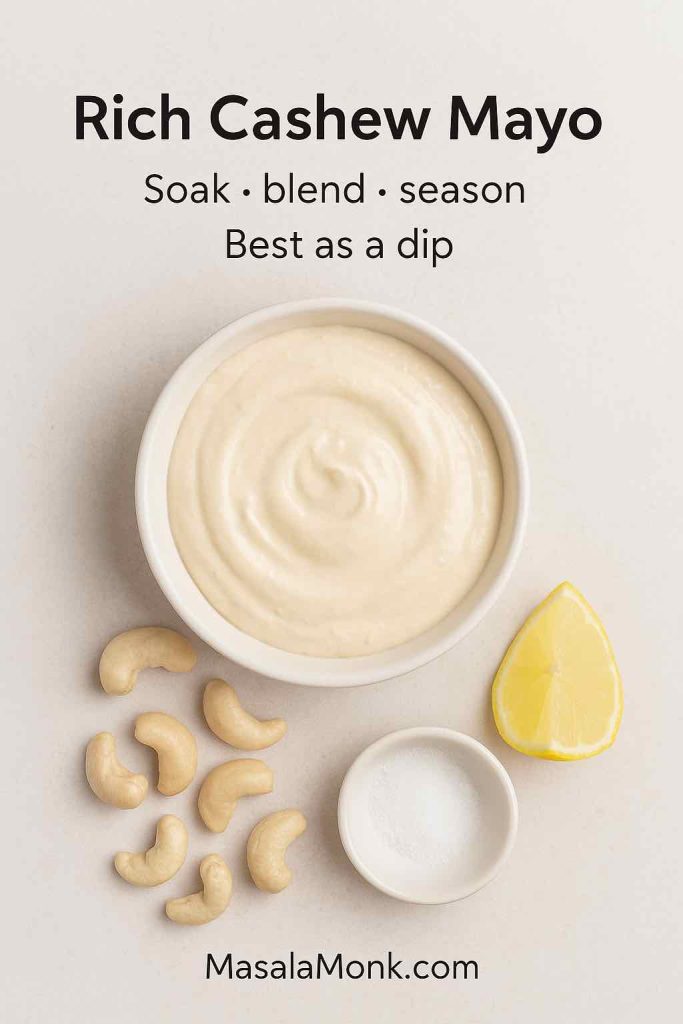
Cashew-Based Eggless Mayo Recipe
Soaked cashews can be blended with water, oil, acid, mustard and salt to make a rich, smooth veg mayo. It’s naturally slightly sweet and very creamy. Once you add garlic and herbs, you get a luxurious dip for grilled vegetables, chaats and snacks.
Those three styles – milk, curd and cashew – cover most situations where you want an eggless mayonnaise recipe that still feels indulgent. You can go deeper into the Cashew Based recipes in Vegan Mayo Recipe Guide: 5 Plant-Based Mayonnaise.
A vegan mayo recipe goes a step further by skipping eggs and dairy altogether. Fortunately, plants have more than one way to pull this off.
MasalaMonk’s vegan mayo recipe collection explores five different bases: soy milk, almond milk, aquafaba, cashews and even tofu. All of them rely on the same idea: you still need water, fat and an emulsifier, just from plant sources now.
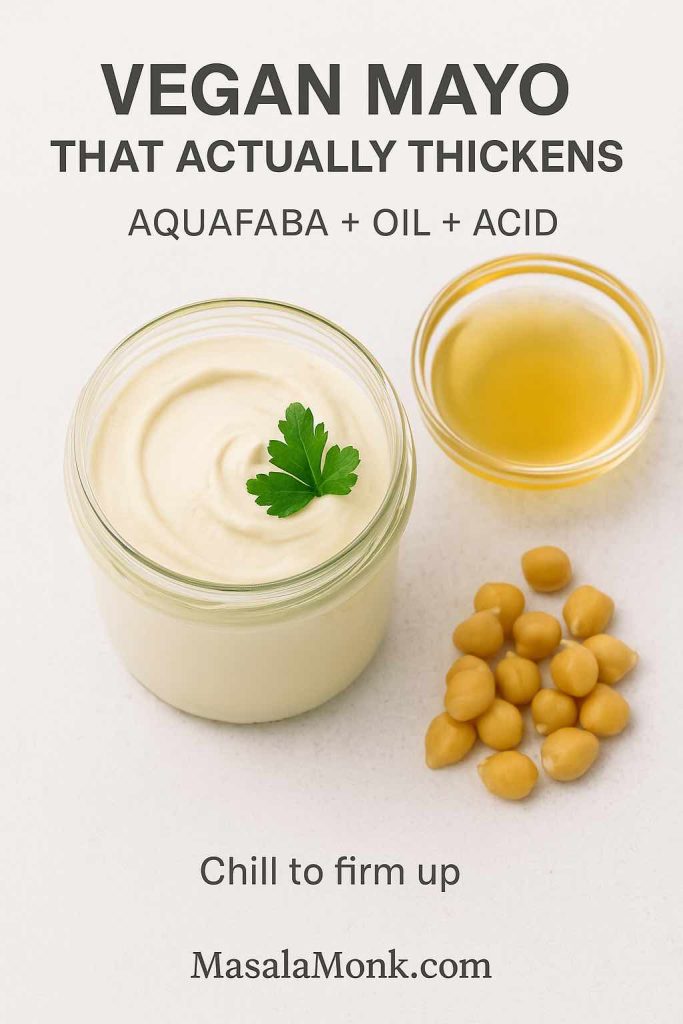
Recipe for Aquafaba Vegan Mayo
Aquafaba is the thick liquid from cooked or canned chickpeas. It happens to contain enough proteins and starches to whip and emulsify oil like a surprisingly good stand-in for egg white.
A basic aquafaba vegan mayo looks like this:
Ingredients
3 tablespoons aquafaba
1 cup neutral oil
1–2 teaspoons lemon juice or apple cider vinegar
½ teaspoon mustard
¼ teaspoon salt
Optional: 1–2 cooked chickpeas blended in for a thicker body
Aquafaba mayo often thickens even more after chilling. If yours stays loose, reduce watery aquafaba (use thicker chickpea liquid) and blend again—texture improves fast once the emulsion grabs.
Method
Combine aquafaba, mustard, salt and acid in a tall container.
Pour the oil on top.
Blend from the bottom up until the mixture thickens and turns creamy.
Chill before using; it will firm up slightly as it cools.
This vegan mayo recipe works anywhere you’d use regular mayo: in potato salad, as a sandwich spread, in creamy coleslaw, or mixed into chickpeas and vegetables for a plant-based “tuna” salad.
Blend with ¼–⅓ cup water, 2–3 tablespoons oil, lemon juice, mustard and salt.
For the smoothest cashew mayo, soak cashews until fully soft, then blend longer than you think. If it tastes heavy, brighten it with a squeeze of lemon and a pinch of salt—those two changes make it taste ‘lighter’ without thinning.
The result is a glossy cashew mayo that’s fantastic with roasted vegetables, sandwiches, grain bowls and wraps. It’s particularly good drizzled over something colourful and satisfying like the Thai-style vegan bowl with peanut butter dressing.
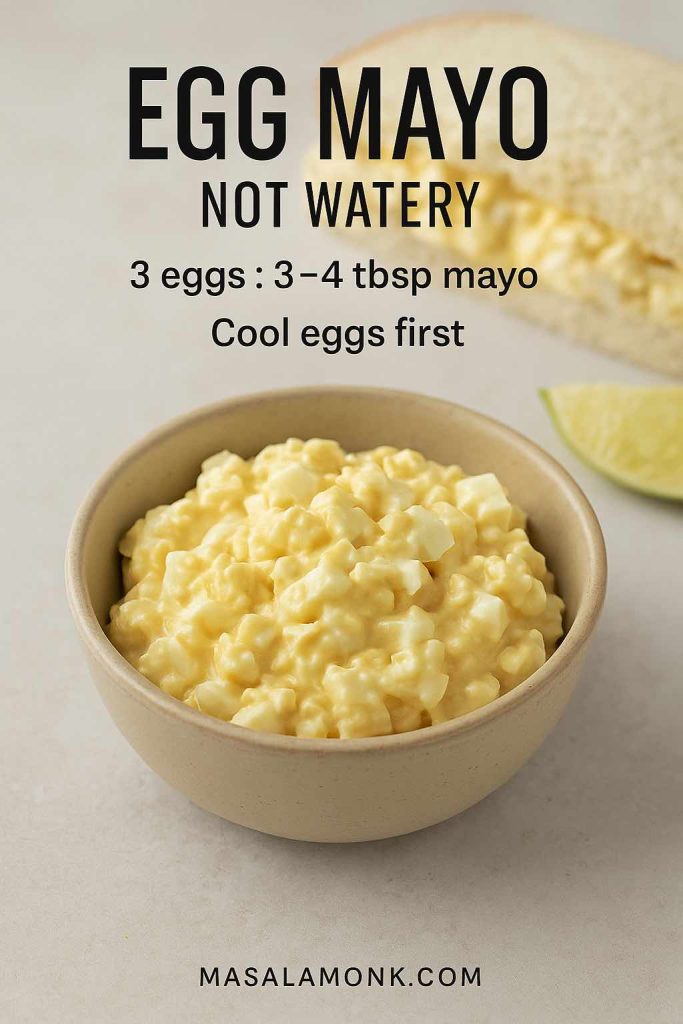
Sometimes, when people look for an egg mayonnaise recipe, what they really want is the filling for an egg mayo sandwich – chopped boiled eggs bound together with mayo and seasonings.
Here’s a straightforward version you can tweak endlessly:
Ingredients
3 hard-boiled eggs, peeled and cooled
3–4 tablespoons mayo (classic, eggless or vegan)
1 teaspoon mustard
1 tablespoon finely chopped onion or chives
1 tablespoon finely chopped celery, cucumber or bell pepper
Salt and freshly ground black pepper to taste
Optional: paprika, chilli flakes or herbs
Cool the eggs completely before mixing—warm eggs melt the mayo and turn the filling loose. For extra bite, keep some egg chunks; for a smoother spread, mash one egg and chop the rest.
Method to make Egg Mayo Sandwich Filling
Chop or mash the eggs in a bowl.
Stir in mayo, mustard and the chopped vegetables.
Season with salt, pepper and spices.
Adjust the mayo quantity until the mixture is creamy but still holds its shape.
Pile this egg mayo onto soft white bread, whole-grain slices, brioche buns or inside pita. It keeps well as a filling for lunchboxes, and it sits nicely alongside plant-forward options like the hummus veggie sandwich or the hung curd spinach cheese sandwich.
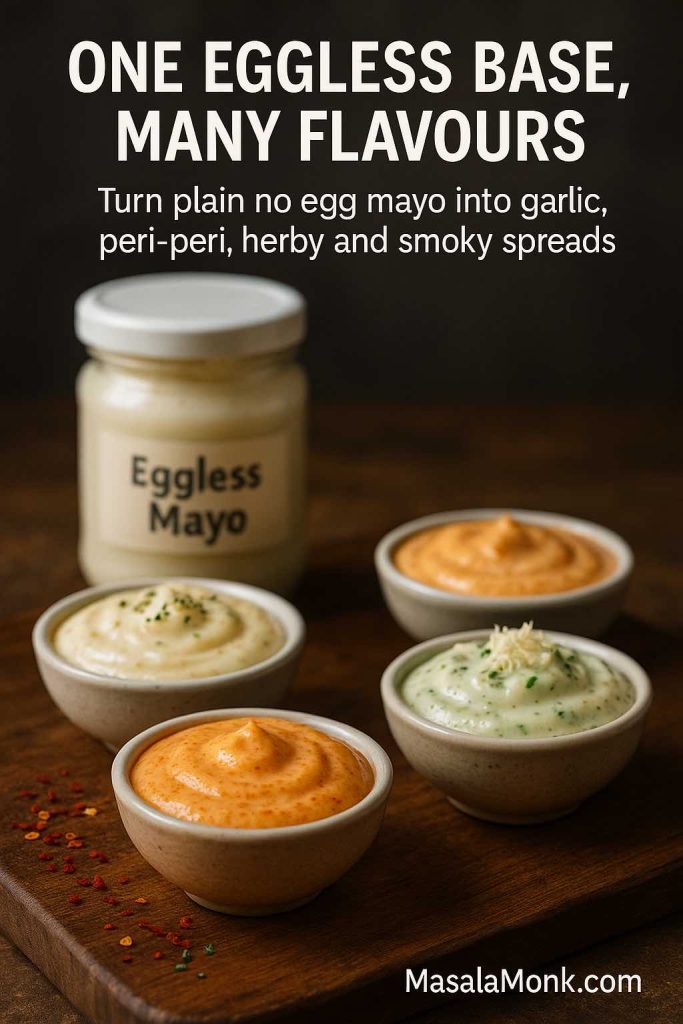
Once you have a jar of plain mayo – whether it’s classic, eggless or vegan – it takes almost no effort to turn it into spicy mayo. And because there are so many chilli sauces and pastes out there, you can build a whole collection of different spicy mayo recipes without ever getting bored.
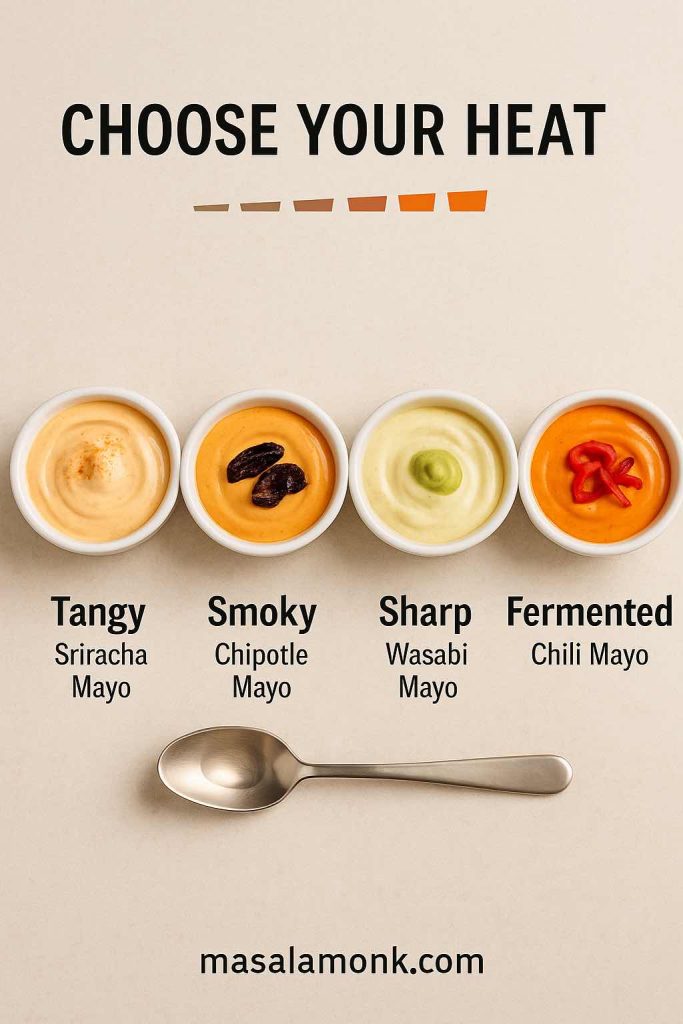
Pick by flavour, not just heat: sriracha mayo is tangy for sushi and fries, chipotle mayo is smoky for burgers and tacos, wasabi mayo is sharp for seafood and tempura, and fermented chilli mayo brings deeper funk for bowls and grilled meats.
Basic Spicy Mayo Formula & Recipe
Start with this, then improvise:
½ cup mayo
1–3 teaspoons hot sauce, chilli paste or finely chopped chilli
½ teaspoon lemon juice or rice vinegar
A pinch of salt and/or sugar, depending on your sauce
Stir it all together. Taste. Adjust the heat, acidity and salt until it feels right.
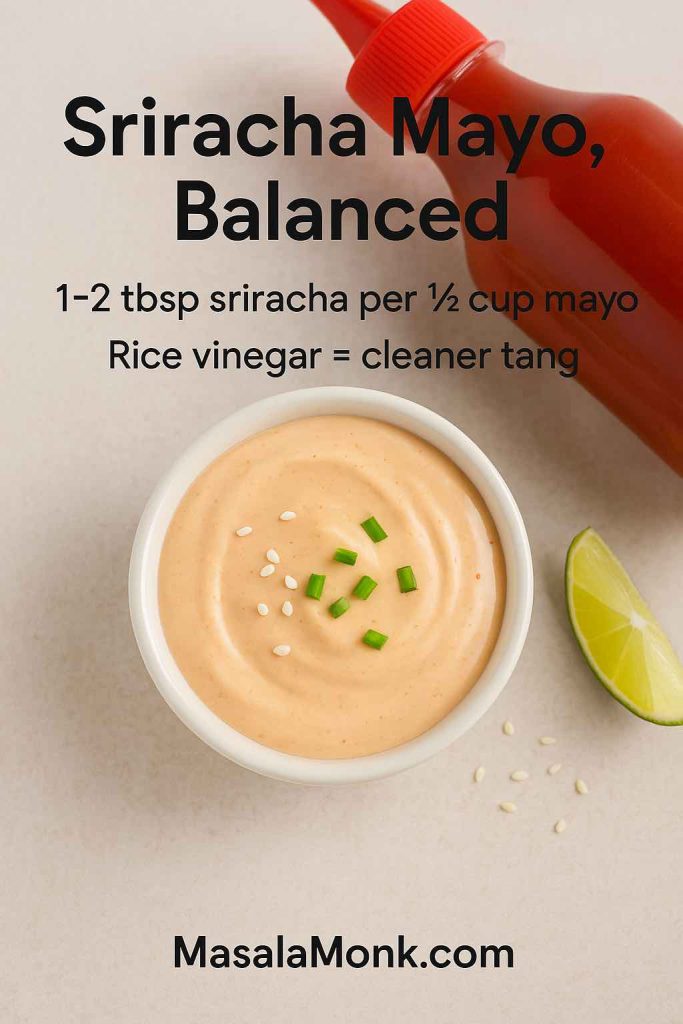
Sriracha Mayo Recipe (Sriracha Mayonnaise)
Use sriracha as your chilli element and rice vinegar as the acid. This version loves sushi rolls, poke bowls, fried tofu, tempura and loaded fries. It also works as a drizzle on top of crunchy, tangy salads like the vegan Som Tam raw papaya salad, where the creamy heat plays against the crisp vegetables.
Start mild, then build: add sriracha in small increments so the sauce stays creamy (not watery). If it tastes ‘flat’, a few drops of rice vinegar or lime instantly brightens it.
Ingredients:
½ cup mayo
1–2 tbsp sriracha (start small)
½ tsp rice vinegar or lemon juice
Pinch of salt (optional)
Method: Stir until smooth. This is the classic ‘mayo sriracha’ combo people want when they ask for ‘sriracha and mayo’. Use it on sushi, fries, burgers, bowls, tempura.
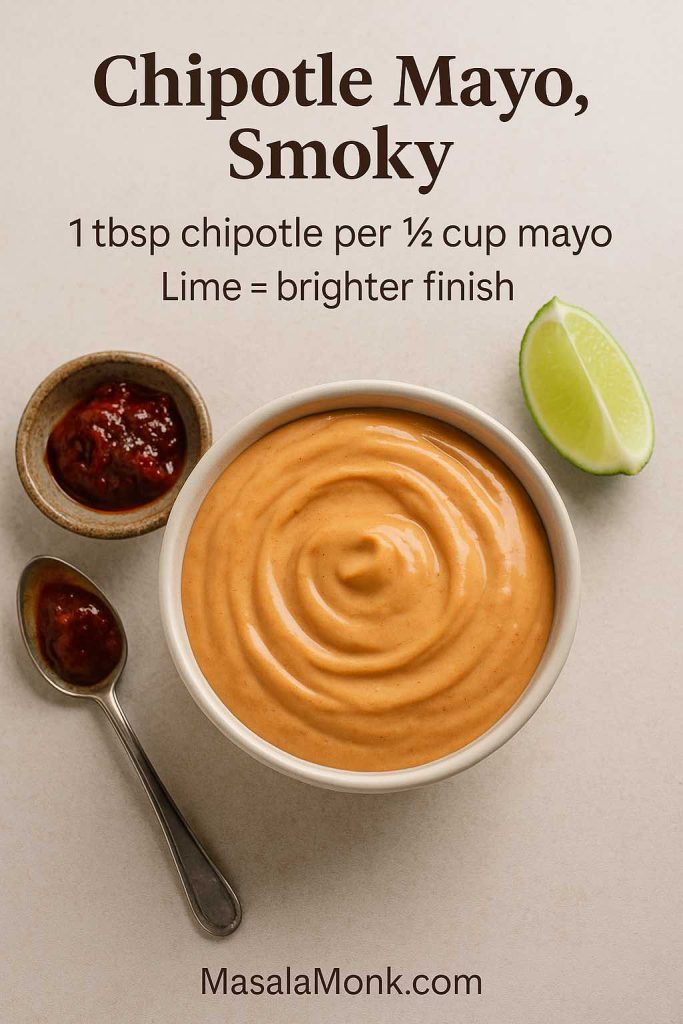
Chipotle Mayo
Chipotle mayo is one of the best friends tacos ever had. Combine mayo with canned chipotle peppers in adobo sauce and lime juice. The smoke and tang make it perfect for grilled corn, quesadillas, burritos, burgers and roasted potatoes.
Chipotle mayo loves anything grilled or crispy. If it tastes too smoky or heavy, add a squeeze of lime and a pinch of salt—acid + salt ‘lifts’ the flavour without thinning the sauce much.
If you feel like taking chipotle and other chillies even further, the recipes in the pepper sauce collection give you a whole menu of chilli bases to stir into mayo: jalapeño, habanero, mixed pepper sauces and more.
Peri-Peri Mayo
Peri-peri sauce plus mayo gives you a bright, lemony, garlicky burn. It’s ideal as a dip for fries and potato wedges, but also brilliant smeared on grilled chicken, paneer, and vegetable skewers.
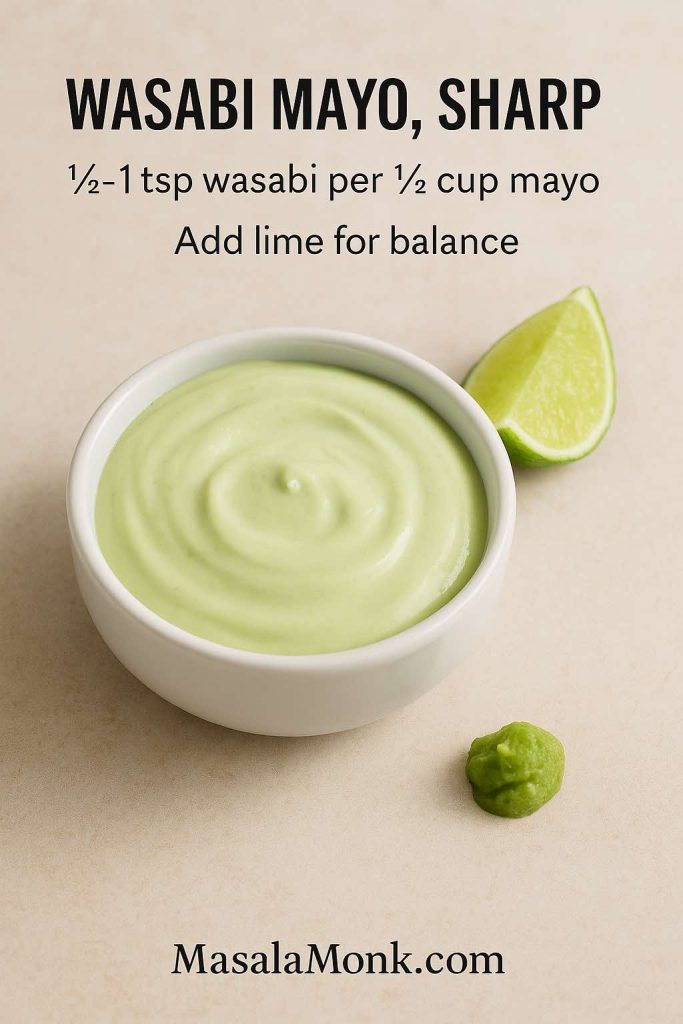
Gochujang and Wasabi Mayo Recipe
You can easily twist spicy mayo toward different cuisines:
Gochujang mayo: mix gochujang with mayo and a little rice vinegar for Korean-inspired sandwiches and grain bowls.
Wasabi mayo: stir wasabi paste into mayo with a squeeze of lime – this is unbeatable with sushi, tempura, or seared tuna.
Wasabi heat hits your nose fast, so start with ½ tsp and increase slowly. This sauce is best on sushi, tempura, and seafood—lime keeps the flavour sharp without making it feel heavy.
Because these spicy mayo recipes usually ride alongside rich or fried foods, it’s worth pairing them with something sharp and refreshing to drink. For burger nights or snack spreads, drinks from the margarita mocktail guide, the keto mocktails lineup, or the coconut water cocktails and mocktails keep things lively instead of heavy.
Garlic Mayo and Herb Mayo Recipe
If chilli isn’t your first love, garlic and herbs are another classic way to move away from plain mayo.
Pro tip: grate garlic (don’t chop) for a smoother sauce, then rest 20 minutes so the sharp bite mellows into a round, ‘restaurant’ flavour. For a lighter version, swap in 2–3 tbsp thick yogurt for part of the mayo.
How to make Garlic Mayo (Cheat’s Aioli)
Think of this as the everyday version of aioli – less traditional, but very effective.
Ingredients
½ cup mayonnaise
1–2 cloves garlic, finely grated or crushed
1 teaspoon lemon juice
Salt to taste
Optional: a spoonful of olive oil for flavour
Stir everything together and let it rest in the fridge for 20–30 minutes so the garlic has time to mellow and spread through the sauce.
Serve garlic mayo with roasted potatoes, sweet potato wedges, grilled vegetables, kebabs, or as a burger spread. When you’d like a lighter cousin, swap to a yogurt-based dip like the cucumber-and-garlic sauces in the Greek tzatziki recipes.
How to make Herb Mayo
Herb mayo is the green, fragrant sibling of garlic mayo.
Some combinations to play with:
Dill and chives with lemon for fish dishes and potato salad.
Coriander, mint and green chilli for tikkas, kebabs and chaats.
Basil and parsley for tomato-heavy sandwiches and roasted vegetables.
Cilantro and lime with a pinch of cumin for Mexican-leaning bowls and tacos.
A basil-forward herb mayo works particularly well in sandwiches like the avocado, basil and grilled tomato sandwich, where it echoes the fresh herbs and adds creaminess.
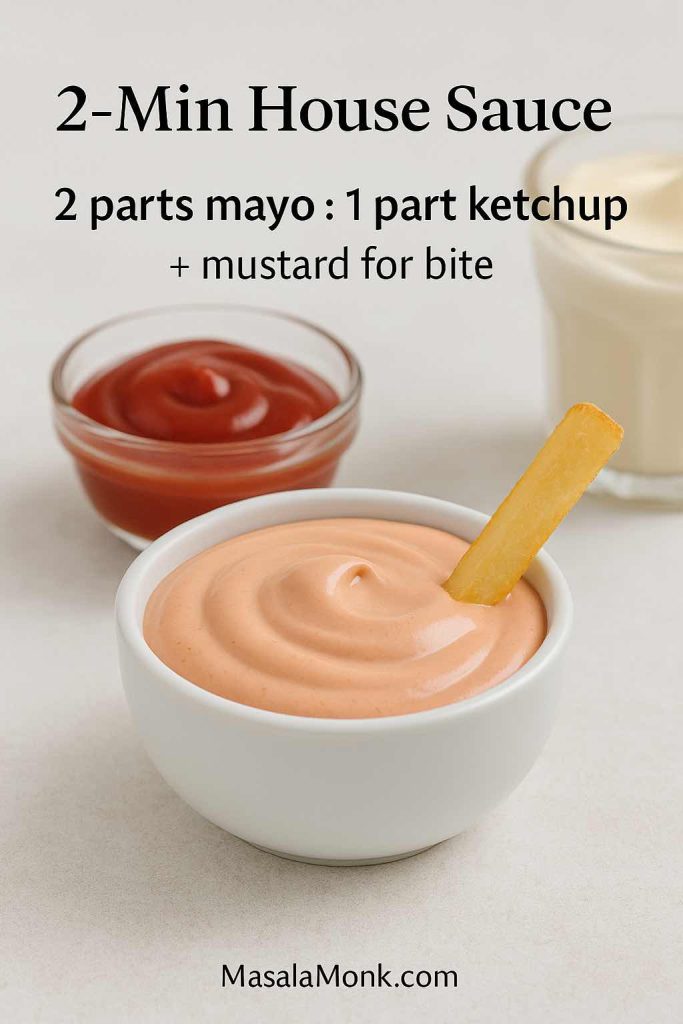
Take mayonnaise, add ketchup, and you have one of the fastest condiments on earth. In Utah and nearby regions, it’s called fry sauce. While in Argentina and Uruguay, a similar mixture goes by salsa golf. While in many burger shops, it appears as a “secret sauce” that’s secretly not that complicated.
Use the 2:1 ratio as your base. Want it more ‘burger-shop’? Add ½ tsp mustard and a splash of pickle brine (or finely chopped pickles) for tang and a more complex finish.
Basic Mayo–Ketchup Sauce Recipe
Ingredients
½ cup mayo
3 tablespoons ketchup
1 teaspoon mustard
Optional: a spoonful of relish or finely chopped pickles
Optional: a dash of vinegar or pickle brine
Optional: a pinch of smoked paprika or chilli
Mix until smooth and taste. Adjust the mayo–ketchup ratio to suit your mood. More mayo makes it richer and creamier; more ketchup makes it sweeter and more tomato-forward.
Use this sauce:
As a dip for fries, wedges and tater tots
Inside burgers and sliders as a “house sauce”
As a quick dressing for shredded cabbage and carrot slaw
If you feel like branching out from there, it’s only a short step to Thousand Island, Russian dressing and other mayo-plus-ketchup-plus-extras sauces that show up in salads and sandwiches.
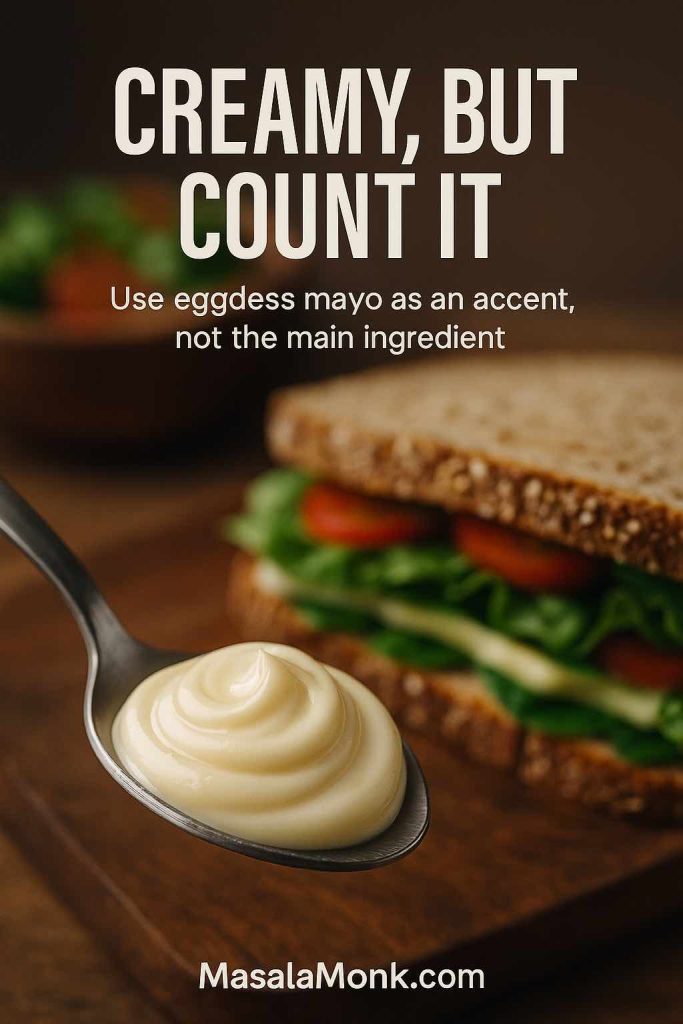
Because mayo is creamy, it makes salads feel like something you actually want to eat, rather than just ingredients you’re enduring. That doesn’t mean drowning everything in sauce; a few spoons often go further than you think.
Potato Salad
Potato salad is probably the most famous mayo-based salad of all. MasalaMonk’s potato salad recipes cover everything from traditional mayo-heavy versions to lighter, olive-oil-based and vegan takes.
You can:
Use classic mayo plus mustard, dill and gherkins for a deli-style potato salad.
Combine mayo and Greek yogurt for a lighter dressing.
Build a vegan potato salad with aquafaba mayo and beans for extra protein.
A similar approach works for pasta and grain salads: a small amount of mayo in the dressing adds body, while lemon juice and herbs keep the flavours bright.
Tuna and Legume Salads
Tuna salad is essentially a way to stretch a can of tuna into a full meal, and mayo is what helps it hold together.
MasalaMonk’s healthy tuna salad guide shows how to balance mayo with yogurt, avocado, olive oil and crunchy vegetables so the salad feels nourishing rather than heavy.
On the plant-based side, lentil and chickpea salads love a spoonful of vegan mayonnaise. Mix cooked lentils or chickpeas with chopped onion, celery, herbs, mustard, lemon juice and vegan mayo, and you get a high-protein spread that behaves a lot like tuna salad – perfect for sandwiches, wraps or lettuce cups – just like the ideas in that lentil meal prep guide.
Bowls
In bowls, mayo works best as a component, not the main event. You might:
Add a small dollop of spicy mayo on top of a rice and veg bowl.
Whisk mayo into a dressing for coleslaw that sits beside a grain bowl.
Stir garlic mayo through roasted vegetables and chickpeas for a warm salad.
Bowls like the Thai-style vegan peanut butter bowl already include a creamy element, but there’s nothing stopping you adding a little vegan mayo on the side for extra richness if that’s what you’re craving.
Swap generic burger mayo for homemade garlic mayo or Japanese mayo in the mushroom cheese sandwich.
Combine herb mayo and hummus with crunchy vegetables in the hummus veggie sandwich for an ultra-creamy, plant-based option.
If you’re thinking about nutrition as well as indulgence, the ideas in boosting your fibre intake with sandwiches show how to build gut-friendly sandwiches that lean on whole grains, legumes and vegetables, while using just enough mayo to keep everything moist and delicious.
On days when standing over a stove feels like punishment, mayo quietly steps in as a no-cook hero. You can build whole plates out of fresh, cold ingredients and a jar of something creamy.
MasalaMonk’s no-cook recipes for hot summer days include wraps, salads, chaas and other ideas that sit perfectly alongside mayo-based dips and dressings.
Think:
Wraps with veg mayo, grated vegetables, cucumber, lettuce and leftover grilled paneer or tofu.
Chickpea salads bound with vegan mayo, lemon juice and herbs.
Vegetable sticks with three different mayo dips: garlic, spicy and herby.
Because mayo-based dishes are rich and fatty, the right drink can make or break the experience. You want something that refreshes and cuts through, not something that weighs the meal down further.
Brunch-style: For egg mayo sandwiches, potato salad and other brunch dishes, tomato- and lemon-based drinks in the Bloody Mary recipe collection offer exactly the kind of bright acidity that plays well with mayo.
Kid-friendly: Lunchboxes with veg mayo sandwiches or rolls sit nicely next to the energy-boosting drink for kids with no sugar, which leans on dates and nuts instead of syrups.
Even with good technique, mayonnaise sometimes goes rogue. Instead of binning it straight away, it’s worth knowing how to fix the most common issues.
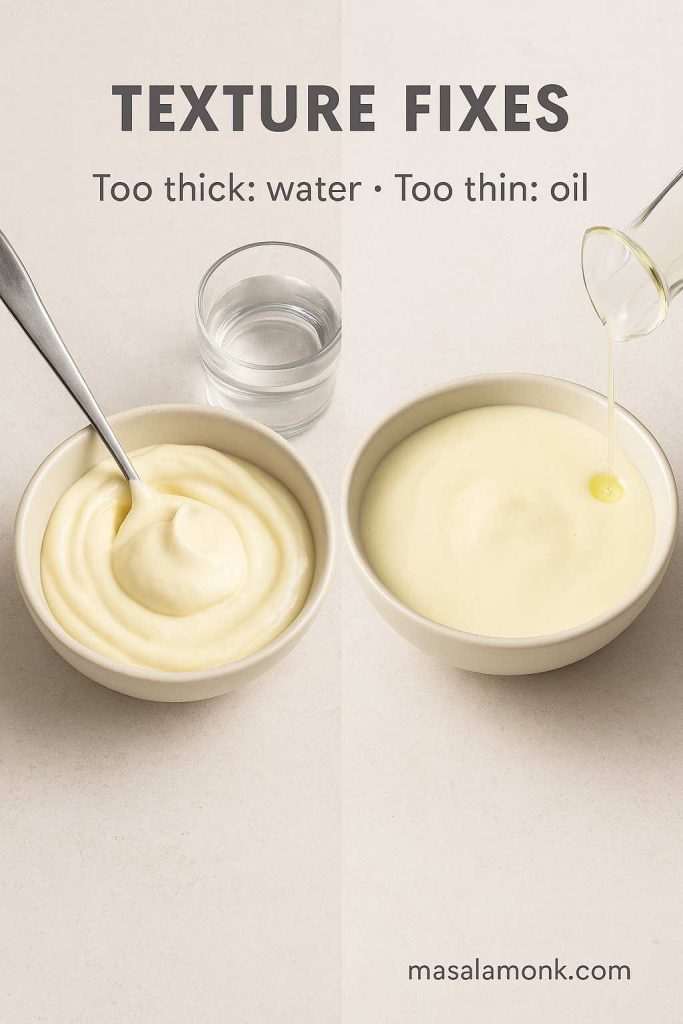
Mayo Too Thick
If your mayo has turned into something closer to putty:
Whisk in a teaspoon of water at a time until it loosens to your preferred consistency.
For dressing, add more acid plus water until it’s pourable.
Adjust in tiny steps: add water 1 teaspoon at a time to loosen stiff mayo. For runny mayo, add oil slowly (or start with a fresh yolk and whisk the runny batch into it) so the emulsion has something to hold onto.
Mayo Too Thin
Runny mayo usually means not enough oil or too much acid/water.
You can:
Slowly whisk in more oil, giving the emulsion a chance to thicken.
Chill it; some batches firm up once cold.
Repurpose very thin mayo as a salad dressing instead of fighting it.
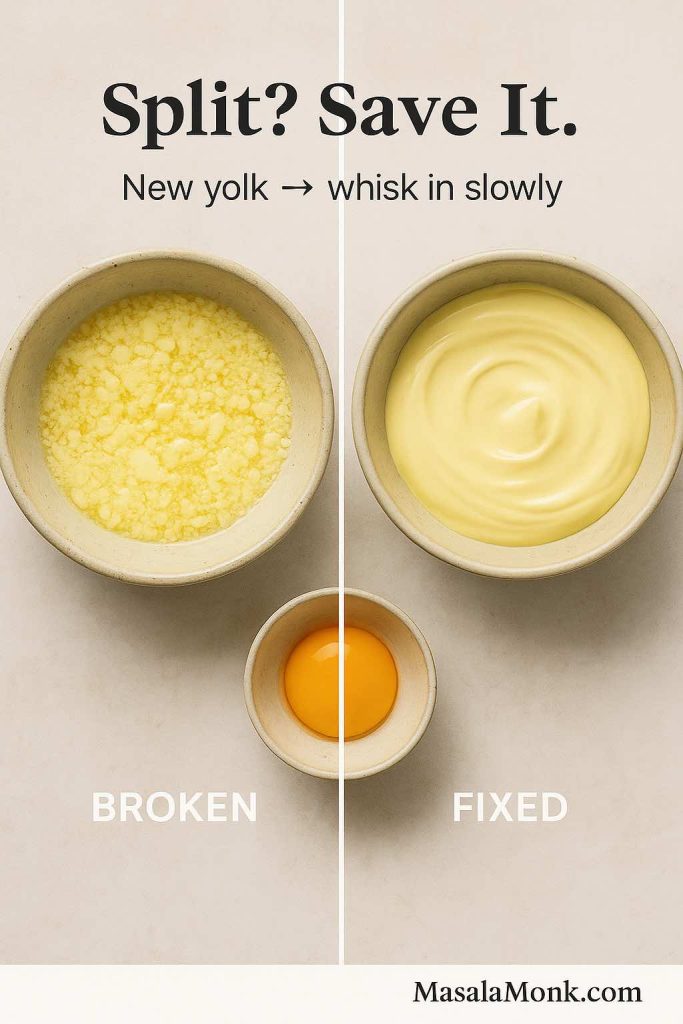
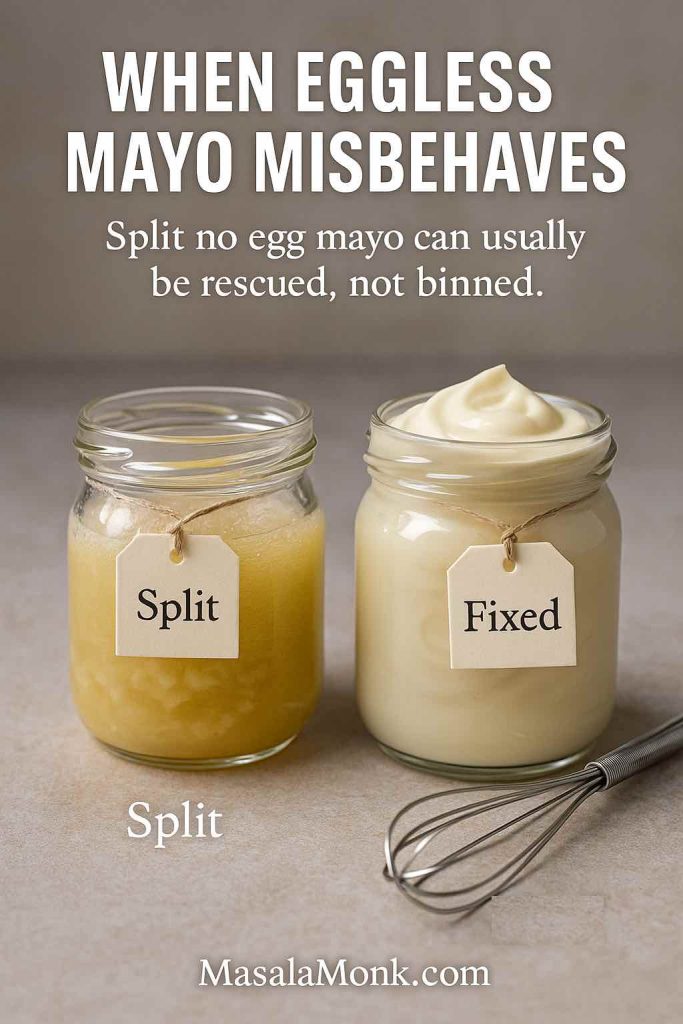
Mayo Split or Curdled
A broken mayo looks grainy and oily, with liquid weeping out. It feels like a disaster, but it’s usually fixable.
Rescue rule: treat the broken mayo like ‘oil’ in a new batch—start with a fresh yolk and whisk the broken mixture in teaspoon by teaspoon. Egg-free option: use 1 tbsp aquafaba instead of yolk as the reset.
To rescue it:
Put one fresh egg yolk (or a tablespoon of aquafaba) in a clean bowl.
Very slowly whisk in the broken mayo, a teaspoon at a time, treating it like the “oil” in a new batch.
Once things turn smooth and creamy again, you can add the rest of the broken mixture in a slightly faster stream.
To avoid splitting next time, keep your ingredients at similar temperatures, go slowly when building the emulsion at the start, and add extra liquid only once the base is robust.
Through no-cook summer plates from the no-cook recipes collection where mayo-based dips and dressings quietly hold everything together.
Once you understand that mayonnaise is just a technique for persuading oil and water to work together, it stops being a mystery and starts being a playground. From there, every new variation – whether it’s a Japanese mayo recipe, a vegan mayo recipe, a veg mayo, a garlic mayo or a spicy mayo – is just another small twist on a skill you already own.
Keep everything at a similar temperature (room-temp egg is easiest). If your emulsion struggles, add ½ tsp mustard or start the blend at the very bottom until a pale core forms.
FAQs about Homemade Mayonnaise or Mayo Recipe
1. What is the simplest mayo recipe for beginners?
A very basic mayo recipe uses just egg, oil, lemon juice or vinegar, salt, and a little mustard. You blend or whisk one egg with mustard, salt, and acid, then slowly emulsify in about a cup of neutral oil until it turns thick and creamy. Once that works for you consistently, you can start adjusting the seasoning and texture to match your taste.
2. How is a mayonnaise recipe different from a regular sauce?
Unlike most sauces that are just mixed or reduced, a mayonnaise recipe creates an emulsion: tiny droplets of oil trapped inside a water phase made from egg and acid. Because of that structure, it becomes thick, glossy, and spreadable without needing flour, starch, or cooking.
3. Which oil is best for homemade mayonnaise?
For most people, a neutral oil like sunflower, canola, or grapeseed gives the most versatile homemade mayonnaise. These oils stay in the background so the flavour of lemon, vinegar, garlic, or herbs can shine. If you enjoy more personality, you can blend in some light olive oil or avocado oil, but it’s better to avoid using only very strong extra-virgin olive oil, as it often turns the mayo bitter.
4. Why does my mayo recipe sometimes split or go runny?
Usually, a broken mayo recipe comes from adding the oil too fast, working with ingredients that are too cold, or not having enough egg yolk or mustard for the amount of oil. Once the emulsion fails, the mixture looks oily and grainy instead of smooth. Fortunately, you can rescue it by starting a fresh yolk in a clean bowl and slowly whisking the broken mixture into it like new “oil.”
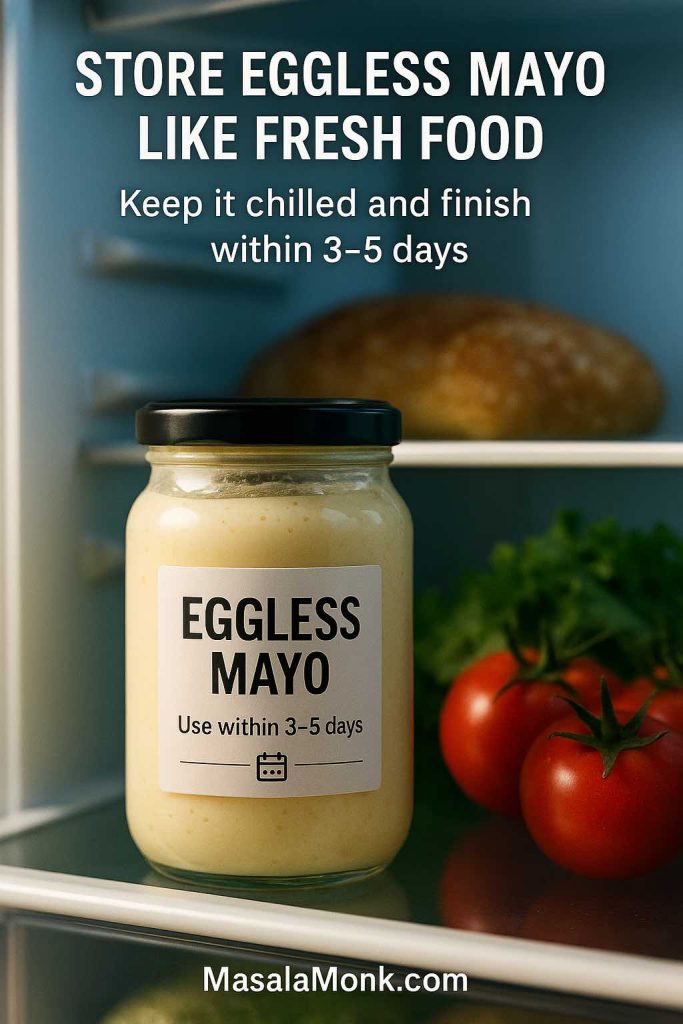
5. How long does homemade mayonnaise last in the fridge?
Typically, homemade mayonnaise lasts about three to five days in a well-sealed container in the coldest part of your fridge. Because it often uses raw egg, it’s safer to make small batches and finish them quickly. If the colour, smell, or texture changes in a strange way, it’s better to discard it and make a fresh mayo recipe rather than risk food poisoning.
6. Is mayonnaise healthy or unhealthy?
Mayonnaise is high in fat and calories, so it’s energy-dense. That said, it can still fit into a balanced diet if you treat it as a flavour booster instead of the main ingredient. When you choose oils rich in unsaturated fats, like sunflower or avocado, and use your mayo recipe sparingly in salads and sandwiches, it becomes more of a useful accent than a nutritional problem.
7. Can I make a mayo recipe without egg?
Yes, you can absolutely make a mayo recipe without egg. Eggless mayonnaise recipes often use milk, curd, cashews, or aquafaba (chickpea liquid) as the water phase and emulsifier. Once you blend those with oil, acid, and seasoning, you still get a thick, creamy veg mayo that behaves much like the traditional version.
8. What’s the difference between eggless mayonnaise and vegan mayo?
Eggless mayonnaise simply avoids eggs; it may still use milk, cream, or yogurt. Vegan mayo, on the other hand, is completely plant-based, so it contains no egg and no dairy at all. Because of that, a vegan mayo recipe usually relies on soy milk, aquafaba, cashews, or other plant milks to create the emulsion.
9. How do I make a vegan mayo recipe with aquafaba?
To make an aquafaba vegan mayo recipe, you start with a few tablespoons of chickpea cooking liquid in a tall jar. Then you add mustard, salt, and an acidic ingredient like lemon juice, before gradually emulsifying in a cup of neutral oil with a blender. In the end, you get a glossy, egg-free mayonnaise that works beautifully in sandwiches, salads, and bowls.
10. What makes Japanese mayo recipe versions taste different?
Japanese mayo recipes usually rely on egg yolks only, rice vinegar instead of harsh vinegars, a pinch of sugar, and sometimes a bit of MSG or dashi. Consequently, the result is richer, silkier, slightly sweeter, and more umami-packed than standard mayonnaise. That’s why it tastes so good on okonomiyaki, fried chicken, or sushi rolls.
11. Can I turn classic mayonnaise into Japanese-style mayo?
Yes, you can move your classic mayonnaise recipe in a Japanese direction by tweaking a few details. You can add extra yolk for richness, swap part of the usual acid for rice vinegar, stir in a tiny pinch of sugar, and optionally add a bit of MSG. With those changes, the flavour profile shifts noticeably closer to a Japanese mayo recipe without needing a complete overhaul.
12. How can I make a spicy mayo recipe for sushi or fries?
To create a spicy mayo recipe, you simply stir chilli into your base. Often, cooks mix mayonnaise with sriracha, gochujang, chipotle in adobo, peri-peri sauce, or finely minced fresh chillies. Then, a dash of lemon or rice vinegar brightens everything. Once you find the level of heat you like, you can spoon it over sushi, poke bowls, burgers, wraps, or loaded fries.
13. What is garlic mayo, and how is it different from aioli?
Garlic mayo is exactly what it sounds like: mayonnaise combined with fresh or roasted garlic, plus a little extra lemon juice or salt. Traditional aioli, by contrast, is made by emulsifying only garlic and olive oil with salt, often without egg. In everyday kitchens, though, people often use a garlic mayo recipe as a quick, reliable substitute for aioli because it delivers a similar flavour with much less effort.
14. Can I make a lighter or low-fat mayonnaise recipe?
You can make a lighter mayonnaise by replacing part of the oil with Greek yogurt, hung curd, or even silken tofu. Naturally, the texture and taste become tangier and less rich, but they remain creamy enough to coat salads or fill sandwiches. Another approach is to use a thinner dressing that blends a little mayo with plenty of lemon juice, vinegar, and water instead of trying to mimic full-fat mayo exactly.
15. Is mayonnaise gluten-free?
Most classic mayonnaise recipes are naturally gluten-free because they use egg, oil, acid, salt, and mustard. Even so, it’s wise to double-check labels on store-bought jars and to be careful with flavoured versions, because some brands add ingredients like malt vinegar, stabilisers, or flavourings that may contain gluten.
16. Does mayonnaise need to be refrigerated all the time?
Homemade mayo, and any mayonnaise recipe made from scratch, should always be kept in the fridge once it’s made, especially if it includes raw egg. While some commercial jars are shelf-stable until opened, even those belong in the refrigerator after you break the seal. Leaving mayo out too long at room temperature raises the risk of bacterial growth and food poisoning.
17. Can I freeze mayonnaise or a mayo-based sauce?
Freezing mayonnaise is usually not a good idea. The emulsion tends to break when it thaws, leaving you with a watery, grainy mess. Instead, it’s better to prepare small batches of homemade mayonnaise recipe as you need them and finish them within a few days, rather than trying to store a huge portion in the freezer.
18. What is mayo ketchup sauce or “fry sauce”?
Mayo ketchup sauce, often called fry sauce or burger sauce, is simply a mixture of mayonnaise and ketchup, sometimes with mustard, relish, vinegar, or spices added. This combination creates a creamy, tangy, slightly sweet dip that pairs beautifully with fries, wedges, burgers, hot dogs, and even simple veggie sticks. Because it’s so easy, many people treat it as their first “extra” mayo recipe beyond the basic.
19. How do I make a simple mayo and ketchup dip at home?
For a quick mayo and ketchup dip, you can start with about two parts mayonnaise to one part ketchup, then taste and adjust. If you like it sharper, stir in a touch of mustard or vinegar. When you prefer something more complex, mix in chopped pickles, onions, smoked paprika, or a little hot sauce. In only a minute, you’ve got a custom fry sauce made from your usual mayonnaise recipe.
20. What’s the difference between an egg mayonnaise recipe and plain mayo?
In everyday language, “egg mayonnaise recipe” often refers to a sandwich filling made from chopped boiled eggs mixed with mayonnaise, not the sauce itself. Regular mayo is the creamy emulsion of raw egg, oil, and acid; egg mayo uses that sauce to bind cooked eggs with seasonings like mustard, onion, herbs, and pepper into a spreadable mixture that goes inside bread, rolls, or wraps.
21. Can I use olive oil for a mayonez recipe?
You can use olive oil, but it’s best to choose a mild one or blend it with a neutral oil. Strong extra-virgin olive oil can make a mayonez recipe taste bitter and overly intense. Consequently, many people use half neutral oil and half light olive oil. That way, you still get some character from the olive oil without overwhelming the mayo.
22. Why does my homemade mayonnaise taste bitter?
A bitter mayonnaise recipe often comes from using an aggressive extra-virgin olive oil or over-processing the oil at high speed until it oxidises. To avoid that, you can pick a gentler oil, limit blending time, or blend only part of the oil and whisk the rest in by hand. If a batch already tastes bitter, balancing it with lemon juice and a pinch of sugar helps a little, but sometimes starting again is easier.
23. How can I make my mayonnaise thicker?
If your mayo feels too thin, you can gradually whisk in more oil, which may sound backwards but actually thickens the emulsion. Additionally, you can begin with an extra yolk at the start of your mayonnaise recipe to provide more emulsifiers. Sometimes chilling the mayo in the fridge helps firm it slightly, especially in vegan mayo recipes that use aquafaba or cashew cream.
24. How do I fix a mayo recipe that is too thick and stiff?
When a mayonnaise recipe comes out closer to putty than sauce, you can loosen it very gently with water, lemon juice, or vinegar. Add liquid just a teaspoon at a time while whisking, until it reaches a soft, spoonable consistency. From there, you can taste again and tweak the seasoning so it still matches the dish you’re serving it with.
25. Is a mayo recipe suitable for keto or low-carb diets?
Most traditional mayo recipes are naturally low in carbohydrates because they’re mainly made of fat and a small amount of egg and acid. Therefore, they usually fit well into keto or low-carb approaches, as long as you don’t use mayonnaise together with sugary sauces or carb-heavy sides. For people watching carbs closely, it’s still worth checking that any added mustard, ketchup, or flavourings aren’t loaded with hidden sugars.
26. Can I use homemade mayonnaise in hot dishes?
You can add mayonnaise to warm dishes, but it doesn’t love high, direct heat. If you boil or fry it, the emulsion may split and the sauce can look oily. Instead, it’s better to stir mayo into foods after they come off the heat, or use it under a breadcrumb topping for gentle baking. For example, you might mix a mayo recipe with cheese and herbs to top chicken, then bake until just browned.
27. What is veg mayo, and how is it used in Indian-style recipes?
Veg mayo usually means a mayo recipe without eggs, designed for vegetarian kitchens. Often, it includes milk or curd, plus oil and flavourings. It’s widely used in Indian-style sandwiches, tikkas, rolls, chaats, and fusion snacks. Because it’s mild and creamy, veg mayo blends easily with coriander chutney, green chillies, onions, and masala spices without fighting them.
28. How can I flavour a basic mayonnaise recipe for different cuisines?
Once you have a simple mayonnaise recipe, you can steer it toward many cuisines just by changing the flavourings. For a Mediterranean feel, you might use garlic, lemon, and herbs like oregano or basil. For a Japanese note, you could add rice vinegar, a pinch of sugar, and a little soy. To give it a Mexican twist, you may mix in lime, cumin, coriander, and chipotle. With each variation, the structure stays the same while the personality shifts.
29. What’s the best way to use leftover mayonnaise in meals?
Leftover mayonnaise turns into dressings, dips, and spreads very easily. You can thin it with lemon juice for a quick salad dressing, stir it into chopped herbs for a last-minute dip, or blend it with ketchup for a fast mayo ketchup sauce. Beyond that, you might fold it into egg salads, tuna salads, or roasted vegetable bowls to make them more satisfying without much extra work.
30. How do I choose between classic, eggless, and vegan mayo for a recipe?
The choice depends on who you’re serving, how you feel about raw egg, and what you want the final dish to be. Classic homemade mayonnaise gives the richest flavour and texture. Eggless mayonnaise recipes suit vegetarian households that still use dairy. Vegan mayo recipes are ideal when you need something fully plant-based or want to avoid eggs completely. Once you know how each type behaves, you can swap them into sandwiches, salads, dips, or burger sauces with confidence.
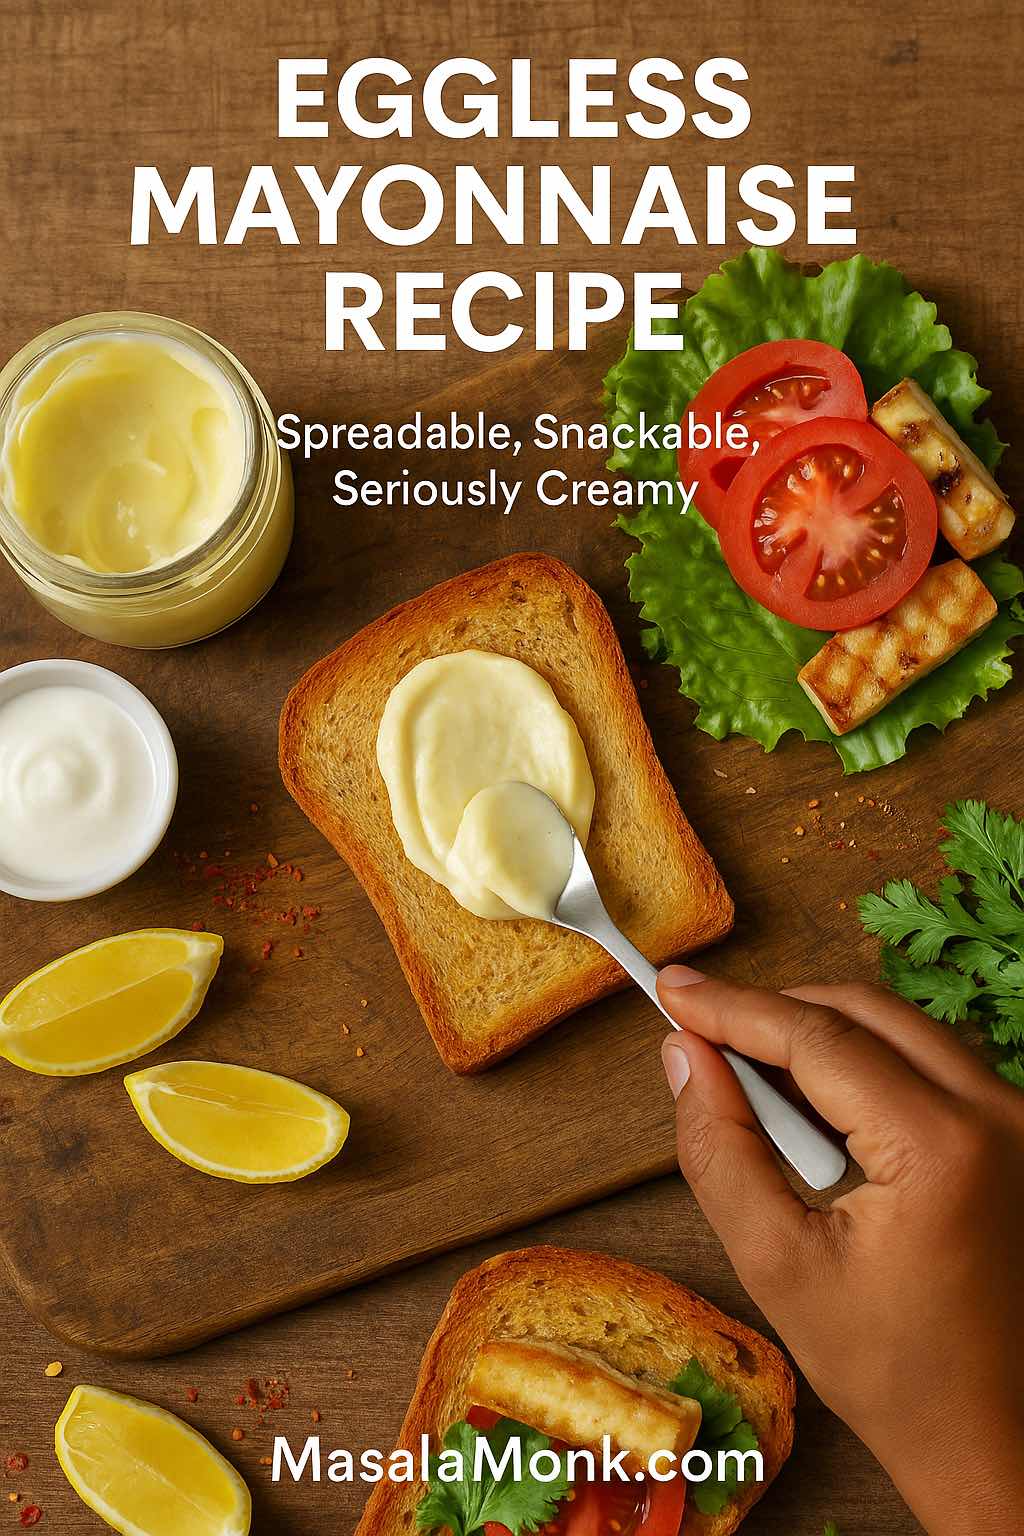
There’s a particular kind of satisfaction in dipping a spoon into a thick, glossy eggless mayonnaise you’ve just made yourself. When that eggless mayonnaise recipe is completely free from eggs, it suddenly becomes something you can share with almost everyone around the table – people with egg allergies, those who are pregnant and cautious about raw eggs, folks who simply don’t enjoy eggy flavours, and anyone who wants a little more control over what goes into their food.
In this guide, we’re going to explore mayonnaise without eggs from every angle. You’ll get a clear, step-by-step eggless mayonnaise recipe you can rely on every time, plus smart variations: egg free mayo, no egg mayo, and even fully vegan mayonnaise made without egg or dairy. We’ll also answer those “how to make mayonnaise without egg at home?” questions and show you how to use this eggless mayo in everyday meals without overthinking it.
As you read on, you’ll see how to put together a dependable base egg free mayo at home, how to switch between different types of mayonnaise without eggs (whether you prefer milk-based, yogurt-based or fully vegan), and how to build flavoured versions like garlic, peri-peri, herby, cheesy and more. Along the way, we’ll also look at lighter options that fit into gut-friendly, high-fibre, meal-prep-style eating, so you can figure out exactly where this simple eggless mayo belongs in your sandwiches, salads, and snack life.
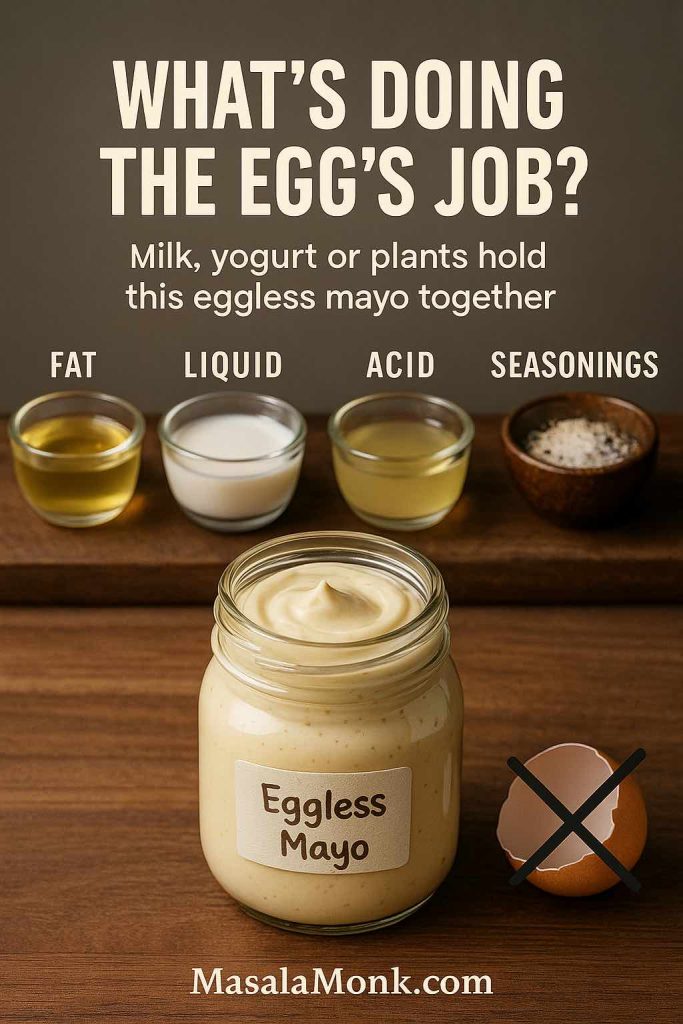
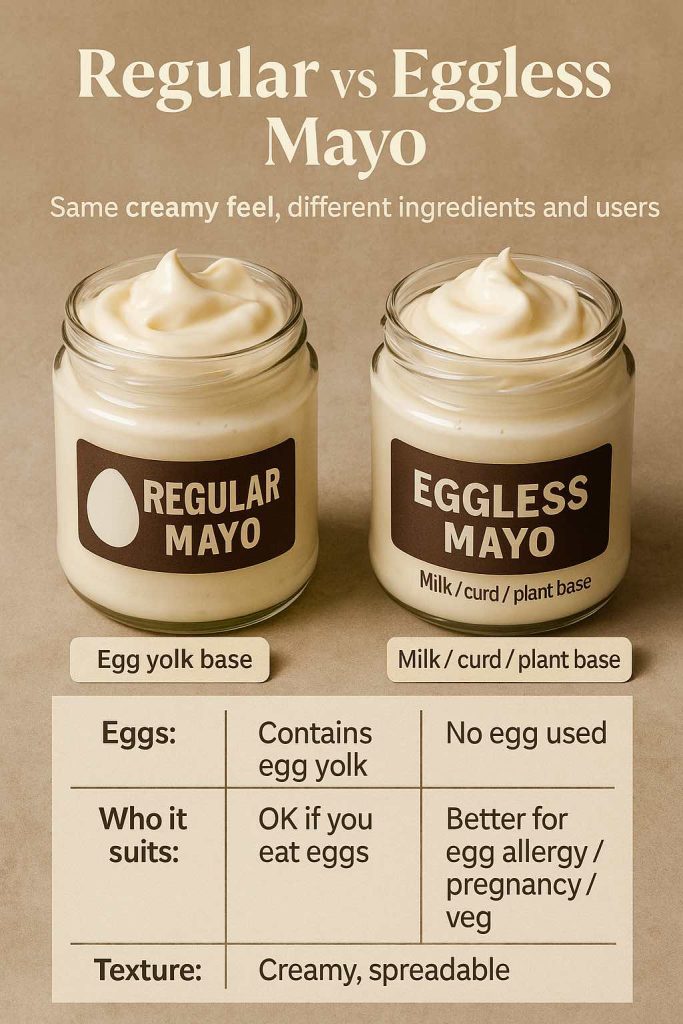
What Is Eggless Mayonnaise and Why This Eggless Mayonnaise Recipe Works
If you strip mayonnaise down to its basics, it’s an emulsion: fat, water, and flavourings held together by an emulsifier (traditionally egg yolk). When you remove eggs from the equation, you still need:
Fat – usually a neutral oil
Water-based liquid – milk, curd, plant milk, aquafaba, or even a cashew base
Acid – lemon juice or vinegar
Seasoning – salt, mustard, maybe a pinch of sugar
This visual breaks down an eggless mayonnaise recipe into its four building blocks—fat, liquid, acid and seasonings—so you can see exactly what’s doing the egg’s job in a mayonnaise without egg.
So an eggless mayo or egg free mayonnaise is simply a version where the emulsifier comes from something other than egg yolk. Milk proteins, yogurt, cashew cream, soy milk, or chickpea brine can all step in to do the job.
This is why you’ll often notice people use mayo without eggs or mayonnaise without eggs interchangeably with “veg mayo” or “eggless mayo recipe”. The core idea is the same: you still get that rich, spreadable, creamy texture, but without whole eggs.
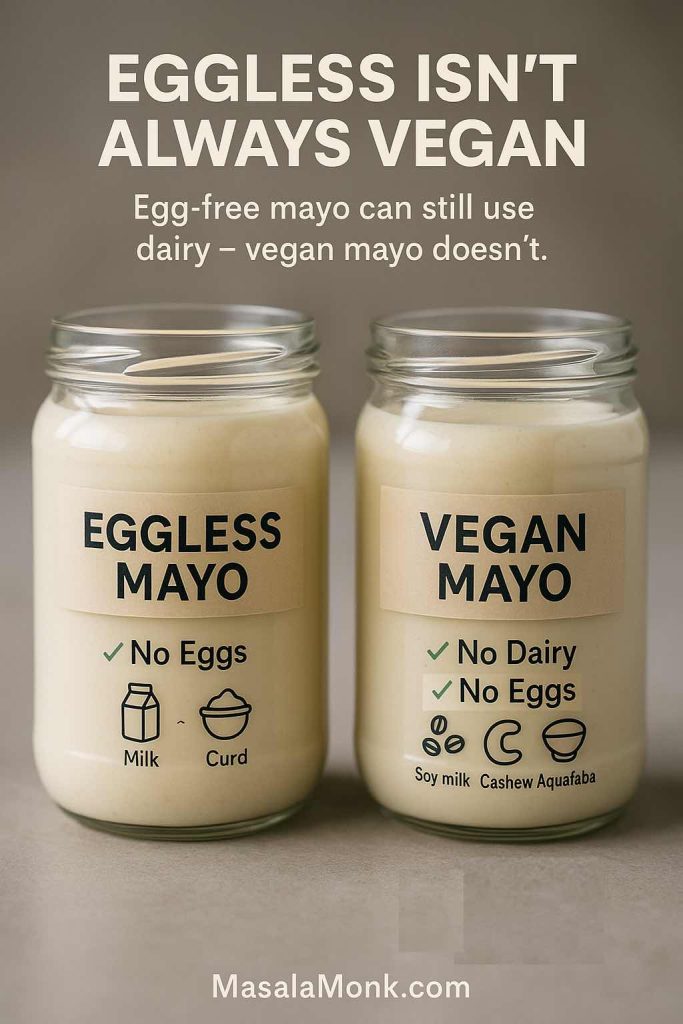
Eggless vs Vegan: Not Always the Same
It helps to clear up one common confusion early on:
Eggless mayonnaise – contains no egg, but might still use milk, cream, or yogurt.
Vegan mayonnaise – no egg and no dairy; usually built on plant milks, plant cream or aquafaba.
Eggless mayo simply skips eggs and can still be made with milk or curd, while vegan mayonnaise is built on soy milk, cashew or aquafaba and is completely egg free and dairy free. Use the first for vegetarian, non-veg diets that avoid eggs; save the vegan version for fully plant-based eating and dairy allergies.
A milk-based mayonnaise recipe without egg is perfect for non-veg eaters who just want to skip eggs; a cashew or soy-based version works better for vegans.
If you’re curious about nut-based versions, for instance, blogs like Veg Recipes of India share a cashew-based veg mayo that’s fully eggless. It’s a very different flavour and texture, but it proves how flexible the idea of eggless mayo can be.
Why So Many People look for Eggless Mayonnaise Recipe
When you start exploring ways to make mayo at home, it doesn’t take long before an eggless mayonnaise recipe feels essential. Maybe you want to know how to make eggless mayo for someone with an egg allergy, perhaps you’re hunting for an egg free mayo recipe that feels lighter, or you simply prefer a mayo recipe without egg because it fits your lifestyle better. Whatever the reason, the goal is the same: all the creaminess and versatility of classic mayonnaise, just without the eggs.
People switch to eggless mayo for more than just taste – it keeps creamy sandwiches and salads on the menu for those managing egg allergy, being careful about raw eggs in pregnancy, or simply following an egg-free, vegetarian lifestyle while still wanting that mayo texture.
1. Egg Allergies and Sensitivities
Eggs are among the most common food allergens in children, and they affect adults as well. Medical sources such as Mayo Clinic’s egg allergy overview explain that egg allergy can trigger symptoms ranging from hives and stomach upset to, in severe cases, anaphylaxis.
For families dealing with this, having a no egg mayonnaise recipe means:
Sandwiches and wraps stay in rotation
Party snacks like dips and potato salad become more inclusive
You’re in control of every ingredient going into the jar
2. Pregnancy and Raw Eggs
Traditional homemade mayo uses raw or barely cooked egg yolks. Food safety guidance for pregnant women consistently warns against raw-egg preparations because of the small but serious risk of salmonella. Agencies like the FDA’s “Food Safety for Moms-to-Be” specifically list homemade mayonnaise as something to avoid, while noting that commercial mayo is pasteurised and considered safe.
If that makes you nervous, using an egg free mayonnaise at home takes that particular worry off the table.
Regular mayo relies on egg yolk as the emulsifier and works fine if you’re happy eating eggs, while an eggless mayonnaise recipe uses milk, curd or plant-based liquids instead. The texture can stay just as creamy and spreadable, but eggless mayo is a better fit for egg allergies, pregnancy precautions and egg-free vegetarian diets.
3. Taste, Texture and Convenience
There’s also the straight-up flavour and convenience factor:
Some people dislike the distinct taste or smell of eggs.
Others don’t want to crack a raw egg every time they fancy a sandwich.
A quick blender-based eggless mayonnaise recipe can be assembled from pantry ingredients in just a few minutes.
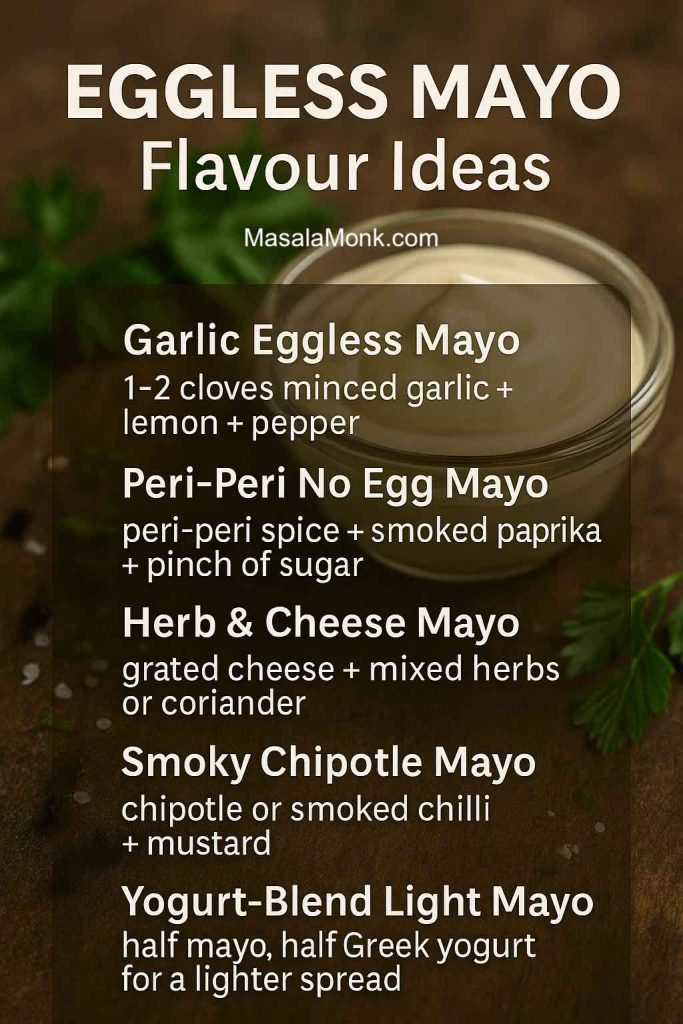
And because eggless mayo starts from a neutral base, it’s a gorgeous canvas for flavours like garlic, peri-peri, herbs, mustard or cheese.
Once that clicks, every egg free mayo recipe you see will suddenly make more sense.
The Oil: Your Main Fat
Oil is the backbone of any mayonnaise recipe without egg. Choosing the right one makes a huge difference.
Neutral oils like sunflower, rice bran, canola or light olive oil work best.
Very strong oils (unrefined mustard oil, very peppery extra-virgin olive oil) can make the mayo taste bitter or overpowering.
Nutrition-focused guides, such as Verywell Fit’s article on whether mayonnaise is healthy, point out that mayo is mostly fat and can be calorie-dense, but when it’s made with good-quality unsaturated oils, it also carries vitamin E, vitamin K and potentially some omega-3 fatty acids.
So, for a healthy eggless mayonnaise recipe, lean towards oils that are:
High in monounsaturated or polyunsaturated fats
Fresh (not repeatedly heated or reused)
The Liquid Base and Emulsifier in Eggless Mayonnaise Recipe
This is where eggless recipes get interesting. Instead of egg yolk, you use:
Milk – full-fat or toned; common in Indian-style eggless mayo
Curd or yogurt – Greek yogurt or thick hung curd for a tangy, high-protein base
Plant milks – soy milk, almond milk or oat milk for dairy-free versions
Cashew cream – soaked, blended cashews plus water for a rich vegan mayonnaise without eggs
Aquafaba – chickpea brine that whips and emulsifies like egg white
Milk-based eggless mayonnaise recipes are popular in Indian kitchens because you often have milk on hand, and it emulsifies beautifully with oil and acid. Yogurt bases are excellent if you also want lightness and probiotics, similar in spirit to the yogurt-based spreads in MasalaMonk’s healthy hung curd spinach cheese sandwich.
Nut and plant-based versions, on the other hand, are the go-to for vegans. A cashew-based eggless veg mayo is a great example of how cashew cream can replace both egg and dairy in a single stroke.
Acid, Salt and Extras for Eggless Mayonnaise Recipe
Finally, the flavour and balance:
Acid – lemon juice, lime, white vinegar or apple cider vinegar
Salt – brings everything to life rather than just tasting “oily”
Mustard – adds flavour and helps stabilise the emulsion
Pinch of sugar – rounds off sharpness, especially with extra lemon
You don’t have to add sugar, but a small pinch in your egg free mayonnaise recipe often makes it taste more “professional”, especially if you’re used to store-bought brands.
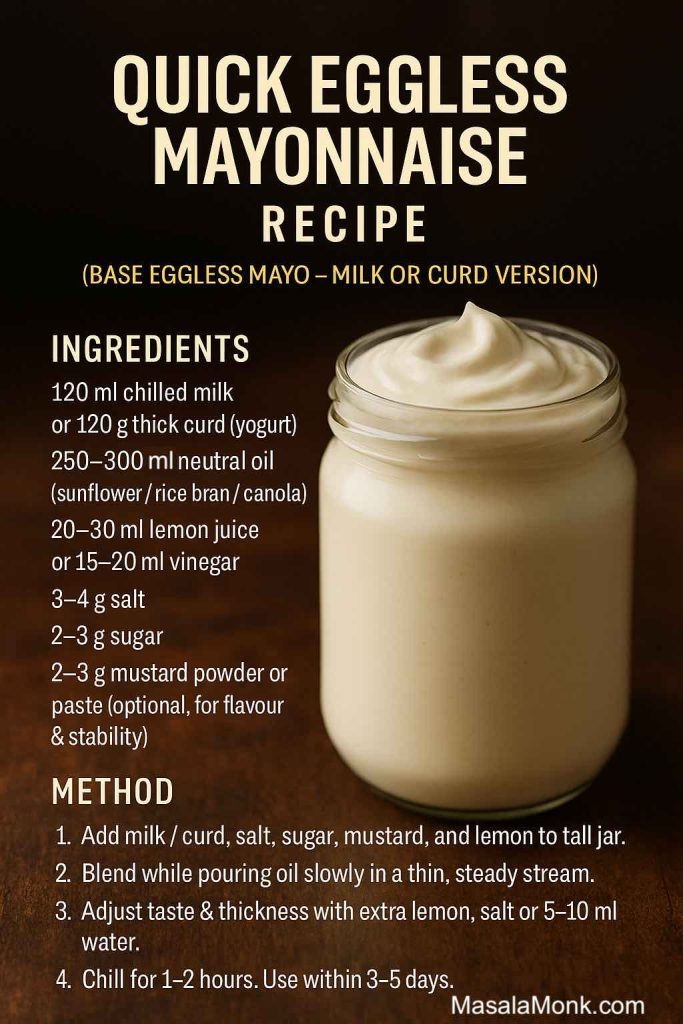
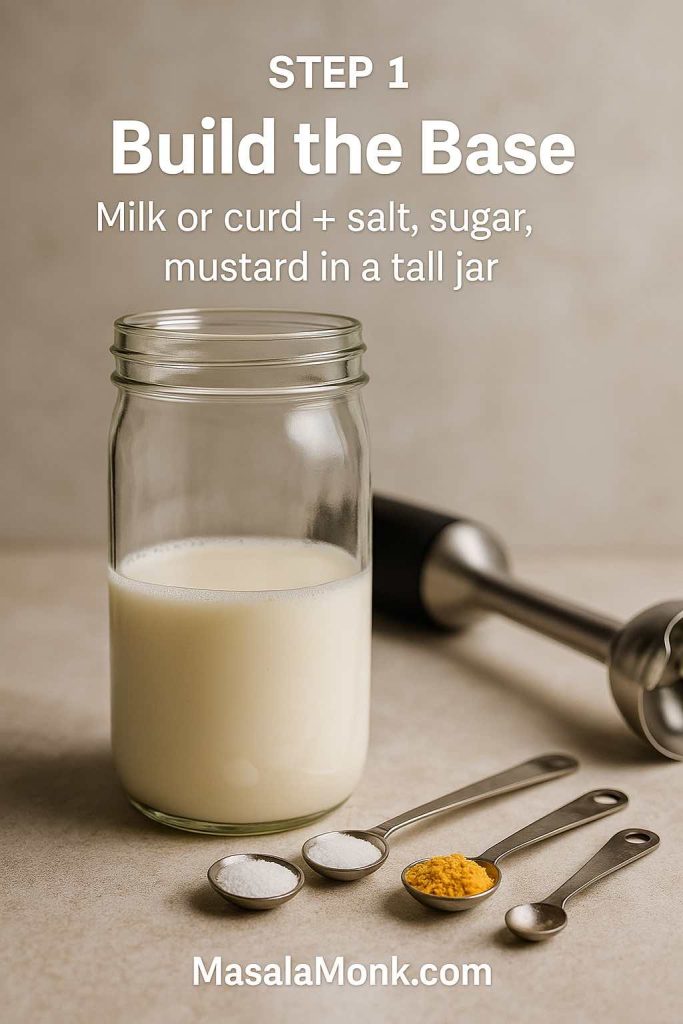
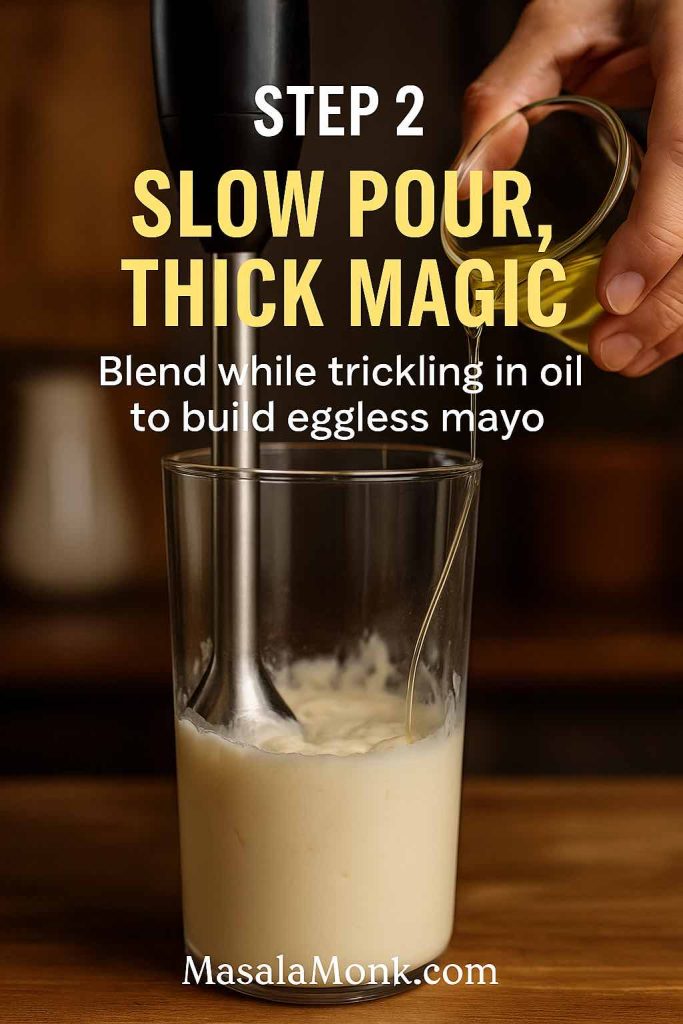
Base Eggless Mayonnaise Recipe (Milk or Curd Based Mayo)
Let’s walk through a practical base recipe for eggless mayonnaise, using ingredients you probably already have in the fridge. This method answers questions like:
“How to make mayonnaise without egg at home?”
“How do you make mayonnaise without eggs with a blender?”
“How is eggless mayonnaise made in Indian-style recipes?”
This quick-reference card pulls the whole eggless mayonnaise recipe into one place—exact ml and gram measurements plus four short steps—so you can glance at it while you blend and get a perfect jar of mayonnaise without egg every time.
Ingredients You Need for an Eggless Mayonnaise Recipe
½ cup chilled full-fat milk – or – ½ cup very thick curd / hung curd
1 to 1¼ cups neutral oil (sunflower, rice bran, or light olive oil)
1½–2 tablespoons lemon juice or white vinegar
½–¾ teaspoon salt (adjust to taste)
½ teaspoon mustard (paste or powder) – optional but helpful
½ teaspoon sugar – optional, but recommended
A pinch of black pepper
This gives you about 1½–2 cups of eggless mayo, enough for sandwiches, salads and a couple of flavour variations.
Method: Step-by-Step Recipe & How to Make Eggless Mayonnaise
This step-by-step process is the heart of any good mayonnaise recipe without egg. The quantities will vary between recipes, but the technique stays surprisingly consistent.
1. Prepare the Jar
Choose a narrow, tall jar or jug that fits your immersion blender head. The narrower the container, the easier it is for the mixture to emulsify quickly.
Step 1 of this eggless mayonnaise recipe is all about flavour and stability: starting with chilled milk or curd plus salt, a touch of sugar and mustard means your no egg mayo emulsifies more easily and tastes balanced from the very first blend.
Add:
Milk (or thick curd)
Salt
Sugar
Mustard
Half of the lemon juice/vinegar
Give it a quick stir with a spoon.
2. Blend and Stream in the Oil
Place the immersion blender at the bottom of the jar. Start blending on low speed. While the blades run, slowly pour in the oil in a thin, steady stream.
In Step 2, the thin stream of oil is what turns your seasoned milk or curd into a thick egg free mayonnaise. Keep the blender steady at the bottom and pour slowly—this is the difference between a silky eggless mayo and a split, oily sauce.
This is the crucial moment for any mayo recipe without egg: you’re encouraging the fat droplets to disperse and stay hanging in the water phase. Pour too fast, and it may split.
You’ll notice:
At first, the mixture looks thin and milky
Within a minute or so, it begins to thicken
By the time most of the oil has gone in, it should look glossy and spoon-coating
If you’re curious about other methods, you can compare your technique with the stepwise photos on Eggless Cooking’s easy homemade eggless mayonnaise, which follows a similar emulsion logic.
3. Adjust Thickness and Flavour
Now taste:
Add more lemon juice or vinegar if you like it sharper
Add a little more salt if you feel it’s flat
If it’s too thick, whisk in a teaspoon or two of cold water
If it’s too thin, blend in a bit more oil, very slowly
In Step 3, you tune the eggless mayonnaise recipe to your taste—more lemon for extra tang, a pinch of salt if it feels flat, or a teaspoon of cold water if your no egg mayo is a bit thicker than you like straight from the blender.
This is the part that really answers “how to make eggless mayonnaise at home”: you keep tasting and tweaking until the texture feels right to you, not just to a recipe card.
4. Chill to Set
Transfer your finished eggless mayo into a clean glass jar, cover and refrigerate. After an hour or two, it usually thickens slightly more and the flavours settle.
Chilling your eggless mayo for a few hours lets the emulsion firm up and the flavours round out. Treat this egg free mayonnaise like any fresh dairy-based spread—keep it refrigerated, use clean spoons, and aim to finish the jar within 3–5 days.
At this point, you’ve made a simple, classic no egg mayo that can be spread, whisked into dressings, or turned into flavoured versions.
One of the joys of mastering a base egg free mayo recipe is that you can shift the base to suit your diet and mood.
Milk-Based Eggless Mayo
This version is ideal if you’re searching for a milk-based eggless mayonnaise recipe that tastes like café mayo.
Tastes the closest to commercial mayo
Has a smooth, lightly creamy flavour
Works brilliantly for burgers, wraps and grilled toasties
If you like the idea of multiple flavours from a single batch, it’s worth browsing Hebbars Kitchen’s eggless mayonnaise recipe – 4 flavours, which uses milk as the base and spins off different variants like garlic and herb mayo.
Curd or Yogurt-Based Eggless Mayonnaise
Curd-based no egg mayo works well for people who want a slightly lighter spread. Using hung curd or Greek yogurt gives you:
A thicker, tangier eggless mayo recipe
Bonus protein and beneficial cultures
A lower fat profile compared to pure oil-based versions
This style is ideal for people who already like yogurt-based spreads. It slots effortlessly into sandwiches similar to MasalaMonk’s hung curd spinach cheese sandwich, where you might blend a spoon or two of egg free mayo into the curd filling for extra creaminess without losing the protein punch.
Once you understand the basic method, you can swap the base to match your diet—classic milk or curd for Indian-style veg mayo, or cashew and soy/aquafaba when you want a fully vegan eggless mayonnaise that’s both egg free and dairy free.
Cashew or Nut-Based Vegan Mayo
For vegan readers or anyone who is both egg- and dairy-free, a cashew base works beautifully:
Soak cashews, blend with water and oil, then season
The texture is rich, slightly sweet and very spreadable
It’s great with roasted vegetables, wraps, and grain bowls
You’ll see this approach in cashew-based veg mayonnaise recipes like those on Veg Recipes of India mentioned earlier.
Soy Milk and Aquafaba Egg Free Mayonnaise
Finally, there are the classic plant-based emulsifiers:
Soy milk – often used in blender mayo recipes; when combined with oil and acid, it emulsifies very much like egg yolk
Aquafaba – chickpea brine that whips up like egg white and can form the base for a very light, airy no egg mayonnaise
These versions are especially attractive to vegans and to those who love experimenting. They also double as a nice party trick: most people won’t guess chickpea water was involved.
Flavoured Egg Free Mayo Variations (Garlic, Peri-Peri, Herby & More)
Once you have your base egg free mayonnaise recipe, it’s time to play. Instead of making four separate batches, you can:
Prepare one large jar of plain eggless mayo
Divide it into smaller bowls
Stir in flavourings to create several variants at once
This is exactly the approach in many “4 flavours from 1 mayo” tutorials such as Hebbars Kitchen’s recipe referred earlier.
Here are some ideas you can easily replicate at home.
Garlic Eggless Mayonnaise Recipe
For garlic lovers, this variation is a staple.
Stir into ½ cup of base eggless mayo:
1–2 cloves of finely minced or roasted garlic
A squeeze of lemon
Freshly ground black pepper
Use this garlic mayo without eggs on:
Grilled sandwiches
Potato wedges
Veggie wraps
It pairs nicely with Mediterranean-style fillings: for example, you can drizzle a bit over a hummus veggie sandwich for an extra creamy, garlicky layer alongside the chickpea spread.
Start with one jar of plain eggless mayo, then split it into small bowls and stir in garlic, peri-peri spice, fresh herbs, cheese or smoked chilli. In minutes you’ve got café-style flavoured no egg mayonnaise ready for burgers, wraps, wedges and party snacks—without making four separate recipes.
Recipe of Spicy or Peri-Peri Eggless Mayonnaise
For something with a kick:
½ cup eggless mayo
½–1 teaspoon peri-peri spice blend or chilli flakes
½ teaspoon smoked paprika
A pinch of sugar to balance the heat
Use this spicy egg free mayo with:
Burgers and sliders
Roasted potatoes
Grilled corn or veggie skewers
It’s also a clever way to serve mayo in places where raw-egg-based mayonnaise has been considered a high-risk food and gradually replaced with safer alternatives.
Herb and Cheese Eggless Recipe of Mayonnaise
If you love café-style sandwiches, this version is for you.
Mix into ½ cup of base mayo:
1–2 tablespoons grated cheese
½ teaspoon Italian mixed herbs or fresh coriander
A little extra pepper
Spread this herby, cheesy no egg mayo inside grilled vegetable sandwiches, baked casseroles, or as a base layer in snacky toasts.
Keep this eggless mayo flavour cheat sheet handy whenever you have a jar of plain no egg mayonnaise in the fridge—just add garlic, peri-peri spice, herbs, cheese, smoked chilli or Greek yogurt to spin it into café-style spreads in minutes.
Smoky Mustard or Chipotle Style
If you lean towards smoky flavours:
½ cup eggless mayo
1 teaspoon mustard (Dijon or grainy)
½ teaspoon smoked paprika or chipotle powder
Optional: a few drops of liquid smoke
It’s excellent with potato wedges, grilled chicken, or veggie burgers.
Whether you’re swirling a classic egg-based mayo or an eggless mayonnaise recipe, the big picture is similar: it’s mostly oil, so it’s calorie-dense, but can still fit into a balanced way of eating.
According to nutrition analysis like Verywell Fit’s breakdown of mayonnaise, one tablespoon of mayo typically contains around 90–100 calories, most of it from fat.
On the other hand, mayo can bring some nutritional positives:
It often contains vitamin E, which supports heart health
It provides vitamin K, involved in blood clotting
When made with good oils, it can offer unsaturated fats that support brain and heart function
Indian-focused resources, such as Netmeds’ article on whether mayonnaise is good or bad for health, highlight many of the same themes: mayo isn’t “poison”, but it’s easy to overuse.
So how do you keep your healthy eggless mayonnaise recipe genuinely “healthy” in day-to-day life?
A small spoonful of eggless mayo is usually enough when the rest of the plate is doing the work—wholegrain bread, salad greens and protein. Used like this, egg free mayonnaise becomes a creamy accent instead of turning every sandwich into a calorie bomb.
Smarter Ways to Use Eggless Mayo
Prioritise good oils Use oils that are high in unsaturated fats and avoid repeatedly reheated or rancid oils.
Watch portion size Spread a thin layer on sandwiches rather than piling it on. A tablespoon or two can be plenty.
Pair with fibre and protein Combine mayo-heavy spreads with high-fibre breads and fillings – an approach you can see in MasalaMonk’s high-fibre sandwich ideas for gut health, where the focus is on whole grains, legumes and vegetables.
Mix with yogurt or hummus In fillings like tuna salad or chickpea mash, you can combine a little egg free mayo with Greek yogurt or hummus for a lighter, tangier blend. MasalaMonk’s healthy tuna salad guide leans into this kind of balance with yogurt + a spoon of mayo instead of all-mayo bowls.
Used thoughtfully, eggless mayonnaise can sit comfortably alongside salads, sandwiches and wraps instead of overwhelming them.
Eggless Mayonnaise in Pregnancy and for Egg Allergies
Because so many people want to know how to make mayonnaise without egg, in relation to pregnancy and allergies, it’s worth pulling those strands together clearly.
Commercial mayonnaise is generally safe because it’s made with pasteurised eggs and processed under controlled conditions.
An egg free mayonnaise removes eggs from the recipe entirely, which can be especially reassuring for:
Home cooks who make mayo in small batches regularly
People hosting pregnant guests and wanting a safe default
Those living in regions where raw-egg mayonnaise has been officially flagged as high-risk in food safety inspections
If there are any specific concerns, it’s always best to talk to a healthcare professional, but from a cooking perspective, eggless mayo gives you a comfortable, practical option.
In homes navigating pregnancy or egg allergies, switching to a trusted eggless mayonnaise recipe removes raw eggs from the picture while keeping creamy sandwiches and lunchbox snacks on the menu. You still store it chilled and use small batches, but the “is this safe with eggs?” question disappears.
Egg Allergy
For families dealing with egg allergies, eggless mayo can be more than just a taste preference; it’s a way to make everyday food feel normal and inclusive.
Trusted sources such as Mayo Clinic and Cleveland Clinic describe egg allergy as an immune reaction to proteins in egg white and yolk, with symptoms ranging from hives and stomach upset to, in rare cases, anaphylaxis.
In that context, having a reliable no egg mayonnaise recipe allows you to:
Pack egg-free sandwiches that still feel “creamy and indulgent”
Make potato salads, coleslaw and creamy dips without relying on eggs
Avoid the anxiety of wondering whether a store-bought jar is truly egg-free
Eggless mayo isn’t a substitute for medical advice, of course, but it’s a useful everyday tool for making food feel less restrictive.
Once you’ve mastered a base eggless mayonnaise recipe, the big question is: what now? Luckily, eggless mayo behaves almost exactly like regular mayo in most dishes. Anywhere you’d normally use regular mayo in sandwiches, you can comfortably swap in egg free mayonnaise.
Sandwiches and Toasties
This is where eggless mayo shines.
Spread a thin layer inside an authentic grilled Bombay sandwich before adding chutney, vegetables and masala. The mayo cushions the fillings and adds richness under the classic green chutney.
Swap the burger mayo in MasalaMonk’s mushroom cheese sandwich for your egg free mayonnaise; the layers of mushroom, cheese and mayo are an ideal playground for an eggless spread.
Combine a spoonful of eggless mayo with the hung curd filling in the healthy spinach cheese sandwich to make the texture slightly richer without losing the high-protein yogurt base.
For brunch, pair a swipe of mayo with the avocado topping in MasalaMonk’s avocado, basil and grilled tomato sandwich, especially if you like a café-style breakfast toast with a bit more indulgence.
On leftover nights, bind the stuffing inside the paneer sabji sandwich with a spoon of no egg mayonnaise so the filling holds together when grilled.
Because your mayo is eggless, you can serve these sandwiches confidently at mixed gatherings where not everyone eats eggs. This mayonnaise without eggs behaves almost exactly like classic mayo in potato salad, coleslaw and creamy dips.
Salads and Bowls
Creamy salads get upgraded immediately with a homemade egg free mayo recipe.
A single jar of eggless mayo can work hard across your day—spread inside toasted sandwiches, folded into potato or chickpea salad, or turned into a quick dip for veggie sticks. Anywhere you’d usually reach for regular mayo, this no egg mayonnaise can quietly step in.
Use it to dress boiled potatoes, herbs and crunchy vegetables in a potato salad inspired by MasalaMonk’s potato salad guide, which covers classic, Russian, German and vegan-leaning combinations. Just swap in your mayonnaise without eggs wherever regular mayo is called for.
Stir a spoon or two into one of the builds in the healthy tuna salad collection if you’re not strictly no-mayo, but still want the focus to be on lean protein and yogurt.
Mix eggless mayo with a splash of water or lemon juice and whisk it into shredded cabbage and carrots for a quick slaw to serve alongside grilled food.
If you’re building high-fibre, gut-friendly plates using ideas from MasalaMonk’s high-fibre sandwich article or our probiotic-rich sandwich guide, a thin layer of eggless mayo can complement the fermented and fibre-rich ingredients rather than overwhelm them.
For kids’ tiffins, eggless mayo sandwiches keep the creamy factor without relying on eggs, especially useful in schools where some children have egg allergies. Pack them with raw veggie sticks and a small pot of no egg mayonnaise for dipping to make the lunchbox feel fun as well as filling.
Dips and Dressings
Eggless mayo also transforms easily into dips and dressings:
Whisk together mayo, lemon juice, chopped herbs and a bit of garlic for a quick dip for raw vegetables or roasted potatoes.
Blend a spoonful of mayo into fruity dressings – for instance, you could adapt MasalaMonk’s sweet and spicy mango salad dressing by adding a little egg free mayonnaise when you want it to cling more luxuriously to salad leaves.
Because your base is neutral, you can go in whichever direction your pantry and mood suggest—Mediterranean, desi, smoky, tangy, spicy or even a mix.
Troubleshooting Recipe of Eggless Mayonnaise
Even if you follow every step, a mayonnaise recipe without egg can occasionally misbehave. Fortunately, most issues are fixable.
Why Did My Eggless Mayo Split?
A split mayo looks grainy or watery, with oil separating from the base. Common culprits:
Oil poured too quickly
Base and oil at very different temperatures
Not enough emulsifier (milk/curd/aquafaba) for the amount of oil
To rescue it:
Start with a fresh 2–3 tablespoons of milk or curd in a clean jar.
Blend on low speed, then slowly trickle in the split mayo as if it were the oil.
The mixture often comes together into a smoother emulsion.
If your eggless mayonnaise looks like the jar on the left—oily and grainy—it usually means the emulsion broke. To get back to the smooth no egg mayo on the right, start with a few tablespoons of fresh milk or curd in a clean jar and slowly blend the split mayo into it until it thickens again.
My Egg Free Mayonnaise Is Too Thin
If your eggless mayo looks more like salad dressing than spread, try:
Blending in a little more oil, just a teaspoon at a time, until it thickens
Using slightly thicker curd or chilling the batch to help it firm up
Checking that you didn’t add too much acid or water up front
Eggless Mayonnaise Recipe is Too Thick and Won’t Spread
This one is easy to fix:
Whisk in a teaspoon of cold water or extra lemon juice at a time
Stop as soon as it becomes spreadable again
Remember, it’s perfectly normal for home-style eggless mayonnaise to be thicker when chilled and looser when left out at room temperature for a few minutes.
Storage and Food Safety for Eggless Mayonnaise / Egg Free Mayo
Even though a no egg mayonnaise recipe avoids raw eggs, you still need to treat it as a fresh, perishable food.
Homemade eggless mayo still behaves like a fresh, perishable spread—keep it in the fridge door or on a cold shelf, use clean spoons every time and aim to finish it within 3–5 days rather than treating it like a long-life commercial jar of mayo.
Always refrigerate eggless mayo in a clean, airtight jar.
Use a clean spoon each time to avoid contamination.
As a rule of thumb, most homemade egg free mayo is best within 3–5 days, especially if it contains dairy.
Discard it if you notice an off smell, mould, or severe separation that doesn’t fix with whisking.
The same principles that apply to any creamy, oil-rich condiment apply here as well: keep it cold, keep it clean, and don’t stretch it for weeks “just because it looks okay”.
Pulling It All Together
Making your own eggless mayonnaise is one of those small kitchen skills that pay off in many directions at once. Once you’ve mastered a base eggless mayonnaise recipe, you can:
Answer those “how to make mayonnaise without egg” and “how do you make mayonnaise without eggs” questions with confidence
Whip up flexible, flavourful spreads and dips in minutes
Create lighter or dairy-free versions when you want a healthy eggless mayonnaise recipe
Make sandwiches, salads and snacks friendlier for people who avoid eggs because of allergies, preferences or pregnancy
From veggie-stuffed toasties to high-fibre, gut-friendly lunches and creamy picnic salads, a good egg free mayo quietly unlocks a lot of meals. Once a jar is sitting in your fridge, it becomes as natural to reach for as chutney or yogurt – and that’s exactly the kind of everyday usefulness that makes a recipe worth learning by heart.
This eggless mayo FAQ snapshot pulls together the answers readers search for most often—what eggless mayo is, when it counts as vegan, how long homemade egg free mayonnaise lasts in the fridge and why it’s often chosen as a safer option in pregnancy.
FAQs about Eggless Mayonnaise Recipe
1. What is eggless mayonnaise and how is it different from regular mayo?
Eggless mayonnaise is a creamy spread made without eggs, usually using milk, yogurt, cashew cream or plant milk as the emulsifier instead of egg yolks. Regular mayo relies on raw or lightly cooked eggs to hold the oil and water together. As a result, an eggless mayonnaise recipe is often more inclusive for people with egg allergies, pregnancy concerns or those who simply don’t eat eggs, while still giving that familiar rich, smooth texture.
2. How do you make mayonnaise without eggs at home?
To make mayonnaise without eggs at home, you blend a liquid base like chilled milk, thick curd or soy milk with lemon juice or vinegar, salt and a bit of mustard, then slowly drizzle in neutral oil while blending until it thickens. The gradual addition of oil is crucial, because that’s what creates the emulsion in any mayonnaise recipe without egg. Once it looks glossy and spoon-coating, you can chill it to set and season it further if you like.
3. What is the basic eggless mayonnaise recipe?
A simple eggless mayonnaise recipe usually starts with about half a cup of chilled milk or thick yogurt, one to two tablespoons of lemon juice or vinegar, salt, a pinch of sugar and a teaspoon of mustard. While blending that mixture, you gradually add around one to one-and-a-quarter cups of neutral oil until the texture becomes thick and creamy. After that, you taste and adjust the seasoning, then refrigerate the eggless mayo so the flavours and consistency stabilise.
4. Can I make eggless mayo without a blender?
You can make eggless mayo without a blender, although it takes more patience. In that case, you whisk the liquid base, acid and seasoning together in a bowl, then pour in the oil drop by drop at first, whisking constantly until you see it start to thicken. Once the emulsion forms, you can add the oil a little faster; however, the result may be slightly less fluffy than a blender-based egg free mayo recipe.
5. Is eggless mayonnaise vegan?
Not always. Many eggless mayonnaise recipes still use milk, cream or yogurt, which makes them vegetarian but not vegan. If you want vegan egg free mayonnaise, choose a base like cashew cream, soy milk or aquafaba and skip any dairy, using only plant-based ingredients from start to finish.
6. What is the best oil to use for egg free mayo?
Generally, neutral-tasting oils are best for egg free mayo, because they let the tangy, savoury flavours shine without bitterness. Sunflower, rice bran, canola and light olive oil are all popular options in an egg free mayo recipe. Stronger oils like raw mustard oil or very peppery extra-virgin olive oil can overpower the taste and sometimes make the mayonnaise without eggs taste harsh.
7. Why did my eggless mayo split or become watery?
When eggless mayo splits, it usually means the emulsion didn’t form properly. This can happen if you poured the oil in too quickly, used very warm ingredients or didn’t have enough emulsifier in the base. To rescue it, start with a small amount of fresh milk or curd in a clean jar and slowly blend the broken mixture into it, essentially treating the split mayo like you would treat the oil in a new no egg mayonnaise recipe.
8. How can I thicken a runny egg free mayonnaise recipe?
If your egg free mayonnaise is too thin, there are a few things you can try. First, blend in a bit more oil, but do this gradually so the emulsion has time to strengthen. Alternatively, you can whisk in a spoonful of thick yogurt or hung curd if you’re not aiming for a vegan version; this changes the flavour slightly, yet often saves an otherwise runny eggless mayo recipe.
9. How can I make my eggless mayonnaise recipe lighter and healthier?
To create a healthier eggless mayonnaise recipe, you can use oils higher in unsaturated fats, such as sunflower or rice bran, and then replace part of the oil with Greek yogurt or hung curd. On top of that, you can keep portions modest and pair the spread with whole grains, vegetables and lean proteins. In this way, eggless mayo becomes a flavourful accent instead of the main source of calories in a meal.
10. Is it safe to eat egg free mayonnaise during pregnancy?
Yes, egg free mayonnaise is generally safe in pregnancy because it contains no raw eggs at all. That said, it still needs to be made and stored hygienically, kept chilled and consumed within a few days. Because food safety in pregnancy can be more sensitive, many people find an egg free mayo recipe reassuring compared to homemade raw-egg mayo.
11. Is eggless mayo good for people with egg allergies?
Eggless mayo is often a helpful option for people with egg allergies, since it removes egg proteins from the recipe entirely. However, someone with severe allergies should still check every ingredient on the label or recipe, as cross-contamination is always a possibility. For families dealing with allergy issues, learning a dependable eggless mayonnaise recipe can make everyday sandwiches and salads feel much more inclusive.
12. What is the difference between eggless mayo and egg free mayonnaise?
In everyday use, eggless mayo and egg free mayonnaise usually mean the same thing: mayonnaise without eggs. Some brands or recipes might use “eggless” to signal a vegetarian-friendly product, while “egg free” highlights the absence of egg due to allergies or dietary preferences. In practice, both phrases point to a mayonnaise recipe without egg yolks or whites.
13. How long does homemade mayonnaise without eggs last in the fridge?
Homemade mayonnaise without eggs generally keeps well for about three to five days in the refrigerator, assuming you store it in a clean, airtight container. Because many eggless mayo recipes still use dairy or fresh plant ingredients, they can spoil if kept too long. Therefore, it’s better to make smaller batches regularly rather than one huge jar that sits for weeks.
14. Can I freeze eggless mayonnaise?
Freezing eggless mayonnaise is not usually recommended. Once thawed, the emulsion often breaks, turning grainy or watery, and it can be difficult to bring it back to the original texture. Rather than freezing, it’s more practical to prepare a modest quantity of eggless mayo recipe that you know you’ll finish within a few days.
15. How can I make a spicy egg free mayo at home?
To make spicy egg free mayo, you start with a plain eggless mayonnaise base and stir in spices like chilli flakes, peri-peri powder, smoked paprika or finely chopped green chillies. A touch of lemon juice and a pinch of sugar help balance the heat. This approach lets you customise the spice level while still relying on the same basic egg free mayonnaise recipe.
16. Can I make garlic eggless mayo from the same base recipe?
Absolutely. Once you’ve prepared a batch of plain mayo without eggs, you can take a portion and mix in finely minced garlic or roasted garlic, plus extra lemon juice and black pepper. This turns your original eggless mayo recipe into a robust garlic spread that works beautifully in sandwiches, wraps and as a dip for fries or roasted vegetables.
17. How do I prepare mayonnaise without egg that is also dairy-free?
To prepare mayonnaise without egg that is also free from dairy, you can use a plant-based base like soy milk, almond milk or aquafaba, then blend it with oil, acid and seasoning. Cashew cream is another popular choice: you soak cashews, blend them smooth with water, and then emulsify that mixture with oil and lemon or vinegar. With these methods, your no egg mayo becomes fully vegan as well.
18. Can I use olive oil in an eggless mayo recipe?
You can use olive oil in an eggless mayo recipe, but it’s better to choose a light or refined olive oil, or mix a small amount of extra-virgin with a more neutral oil. Strong, peppery olive oil can make the flavour quite intense, which some people enjoy and others find overwhelming. Starting with a half-and-half blend is a reasonable way to gauge your own taste.
19. Why does my egg free mayonnaise taste bitter?
Bitterness in egg free mayonnaise usually comes from the oil, the mustard, or from blending too aggressively with a very strong oil. Extra-virgin olive oil and some mustard oils can turn bitter when overprocessed, even in a no egg mayonnaise recipe. Switching to a milder oil, reducing mustard, and blending only as long as necessary to emulsify often solves this problem.
20. Can I make an eggless mayo recipe with curd or yogurt?
Yes, curd or yogurt works extremely well in an eggless mayo recipe. Thick curd or hung curd acts as both the liquid base and part of the emulsifier, giving you a tangy, creamy texture. You still add oil slowly while whisking or blending, along with lemon juice, salt and other seasonings, but the result is slightly lighter and more refreshing than a purely milk-and-oil version.
21. How do I make a healthy eggless mayonnaise recipe for weight-conscious eating?
For a healthier eggless mayonnaise recipe, you can reduce the oil and mix in more Greek yogurt or hung curd, then focus on using heart-friendly oils like sunflower or rice bran. In addition, you can treat the mayo as a condiment rather than a main ingredient—so you use a thin layer on high-fibre sandwiches or dilute it into dressings for large salad bowls. This way, you still enjoy the flavour of eggless mayo without letting it dominate the calorie count.
22. Can I make eggless mayo without mustard?
Yes, you can leave out mustard in an eggless mayo recipe, although it does slightly help with emulsification and adds a subtle sharpness. If you omit it, you may need to blend a bit longer and rely more on the acid and salt to keep the flavour interesting. You might also experiment with alternatives like a pinch of hing or finely grated garlic for a different kind of kick.
23. What is the difference between eggless mayo and no egg mayo?
In practical terms, “eggless mayo” and “no egg mayo” are just two ways of saying the same thing: a mayonnaise recipe without egg. Some people lean toward “eggless” in vegetarian contexts, while “no egg mayo” often shows up in allergy or food-safety conversations. Regardless of wording, both refer to an egg free mayo recipe that uses some other emulsifier instead of egg yolk.
24. How can I use eggless mayonnaise in salads?
Eggless mayonnaise is excellent in salads because it coats ingredients smoothly and brings a creamy richness. You can toss it with boiled potatoes, peas and herbs for a potato salad, mix it into chickpeas and veggies for a protein-rich bowl, or thin it slightly with lemon juice to create a dressing for crunchy slaw. When you base your salads on whole grains and vegetables, egg free mayonnaise becomes a flavour accent rather than the main component.
25. How do I make an eggless mayo recipe suitable for kids’ lunchboxes?
To make an eggless mayo recipe child-friendly, keep the flavours mild and the texture smooth. You can skip strong garlic or very spicy ingredients, focus on gentle seasonings like a little pepper and lemon, and then combine the mayonnaise without eggs with familiar fillings such as paneer, potatoes or grated carrots. Because there are no eggs, it may also feel more comfortable for school days in warm weather, provided the lunchbox is insulated and the time gap isn’t too long.
26. Can I turn my egg free mayonnaise into a dip for snacks?
Very easily. Once you have a batch of egg free mayonnaise, you can stir in chopped herbs, garlic, spring onions, chilli flakes or even a spoon of ketchup or hot sauce to create customised dips. Adjust the thickness with a few drops of water or lemon juice so it clings nicely to chips, wedges or vegetable sticks. In doing so, one basic eggless mayo recipe becomes the base for several different party-style snacks.
27. How do I make eggless mayonnaise without vinegar?
If you don’t want to use vinegar, you can rely on lemon or lime juice as the acidic component in your eggless mayonnaise recipe. The process stays the same: blend the milk or yogurt with lemon juice, salt and other seasonings, then drizzle in oil slowly while blending. Lemon provides a fresher, more citrusy tang, which many people find especially suitable for sandwiches and salads.
28. Can I use eggless mayo in baked dishes?
Yes, eggless mayo can be used in baked dishes as a creamy layer or mix-in. You can spread a thin coat over bread before topping it with vegetables and cheese for baked open sandwiches, or combine it with boiled potatoes and veggies for a gratin-style bake. Since an eggless mayonnaise recipe doesn’t rely on egg for structure, it behaves more like a rich sauce than a binding agent in the oven.
29. How can I flavour a basic eggless mayo recipe with herbs and spices?
Once your basic eggless mayo is ready, you can divide it into smaller bowls and flavour each one differently. For instance, stir dried Italian herbs into one portion, coriander and green chilli into another, and smoked paprika into a third. By doing that, a single mayonnaise recipe without egg transforms into an assortment of herby, spicy and smoky spreads, all tailored to whatever you plan to cook that week.
30. Which is better, eggless mayo or regular mayonnaise?
Whether eggless mayo or regular mayonnaise is “better” depends entirely on what you need. If you have no issues with eggs and love the classic flavour, regular mayo is perfectly fine in moderation. On the other hand, if you’re dealing with allergies, pregnancy, or simply want a vegetarian or vegan-friendly condiment, an eggless mayonnaise recipe offers the same creamy satisfaction with ingredients that match your situation. In the end, the best choice is the one that fits your health, ethics and taste buds.
Teriyaki is one of those flavours that makes plain food feel like an actual meal. A bowl of rice and vegetables is nothing special; spoon a glossy, sweet–savory teriyaki sauce over the top and suddenly it looks like something from a Japanese grill. The same happens to chicken thighs, salmon fillets, tofu cubes, even roasted potatoes. A teriyaki sauce recipe is simple at its core, but endlessly flexible in practice.
The confusion starts when you realise “teriyaki sauce” means very different things to different people. In Japan, it began as a simple glaze made with soy sauce, mirin and sugar, brushed repeatedly onto grilled fish or chicken. Outside Japan, it grew thicker, sweeter and more garlicky, eventually showing up in bottles, takeout shops and fusion recipes ranging from teriyaki pizza to teriyaki burgers. Then the health-conscious crowd arrived and the questions multiplied: low sugar teriyaki, low sodium teriyaki, keto teriyaki, vegan teriyaki, soy-free teriyaki… are those even still “teriyaki”?
This post is meant to be your one-stop answer. We’ll walk through what teriyaki actually is, how to make a reliable homemade teriyaki sauce, how to cook a more traditional Japanese-style version, and how to spin that base into marinades, stir-fry sauces, glazes, dips and dressings. After that, we’ll look at the most useful flavour variations and finish with ways to make teriyaki lighter and friendlier for everyday eating, without turning it into a completely different sauce.
Throughout, think of teriyaki as joining the same “core sauce” family as pesto, béchamel and tzatziki—sauces that MasalaMonk has already taken deep dives into in posts like the basil-packed pesto variations, classic béchamel for lasagna and refreshing Greek tzatziki recipes. Once you know the base, you can bend it in all sorts of directions.
What “Teriyaki” Really Means
The word comes from two Japanese elements: teri, which refers to shine or luster, and yaki, meaning grilling or broiling. If you look at the description on Wikipedia’s teriyaki page, you’ll see that originally it wasn’t a bottled sauce at all, but a method of cooking: fish or meat was grilled while being brushed with a mixture of soy sauce, mirin and sugar, sometimes sake as well. The sugar and mirin helped the glaze caramelise and created that characteristic glossy coat.
In that setting:
the focus was on the technique of basting and grilling
the glaze was a simple blend of soy, mirin, sugar and maybe sake
the sauce itself stayed fairly thin and syrupy, not thick like gravy
Classic examples include teriyaki yellowtail, teriyaki mackerel and teriyaki chicken. The glaze was cooked directly onto the surface of the food. It wasn’t something served in a ramekin on the side.
In classic Japanese cooking, teriyaki isn’t a bottled sauce but a technique: fish or chicken is grilled while being brushed over and over with a light soy–mirin glaze until it turns glossy and caramelised.
As Japanese cooks migrated and Japanese flavours spread, teriyaki began to adapt. In Hawaii, cooks folded in brown sugar and pineapple juice. In the US, garlic and ginger started appearing in the mix. Bottled teriyaki sauces appeared on shelves, often thickened with starch and stabilisers so they’d hold up over time. Restaurant dishes like chicken teriyaki bowls, beef teriyaki skewers and salmon teriyaki became staples.
So when someone says “teriyaki sauce” today, they might be thinking of:
a light, traditional soy–mirin glaze
a thick, sweet, garlicky bottled sauce
or a homemade version that tries to be healthier, spicier or fruitier
Instead of treating those as completely separate things, it’s more helpful to see them as points on a spectrum, all built from the same core ingredients.
Every teriyaki sauce—whether it calls itself authentic, homemade, healthy, or “just like your favourite restaurant”—is some combination of a few key elements. Once you understand what each one does, creating your own version becomes much easier.
Soy Sauce: The Savoury Backbone of Any Teriyaki Sauce Recipe
The foundation of teriyaki is soy sauce. It brings salt, umami (that deep savoury dimension), and the dark, rich colour most people associate with the sauce.
The Wikipedia entry for soy sauce gives a good overview of how it’s traditionally brewed from soybeans, grain, water and salt. For our purposes, what matters is:
regular soy sauce is intensely salty and savoury
you can use low-sodium soy to make more forgiving sauces
tamari, made mostly from soy without wheat, is a good choice when you need a gluten-free teriyaki base
Because soy sauce is so salty, it’s very easy for teriyaki to become sodium-heavy—especially when you reduce it into a sticky glaze. That’s why a lot of people look for lower sodium approaches, which we’ll come back to later.
Mirin and Sake: Shine and Sweetness
If soy sauce is the backbone, mirin is the soul of a traditional teriyaki. Mirin is a sweet rice wine used in Japanese cooking, described in more depth on pages like this mirin overview. It brings:
natural sweetness
a mild, wine-like aroma
a helping hand with that glossy “teri” shine when it reduces with soy and sugar
Sake, another rice wine, sometimes joins the party, adding aroma and dimension. Put together, soy, mirin, sake and sugar form the base of the classic Japanese teriyaki glaze. No cornstarch, no garlic, no ginger—just those four building blocks simmered until they slightly thicken.
If you don’t have mirin, you can approximate it by combining a splash of sake or white wine with sugar, or by using sugar and rice vinegar together for a similar sweet-acid balance. It won’t be exact, but the overall character of the sauce will still lean toward teriyaki.
Sweeteners: Balance and Caramelisation in a Teriyaki Sauce Recipe
Teriyaki has a sweet side. That sweetness balances the saltiness of soy sauce and encourages the surface of the sauce to caramelise under high heat.
You can use:
white sugar, for neutral sweetness
brown sugar, for a deeper, caramel-like note
honey, for a rounder, floral sweetness
Other sweeteners—maple syrup, coconut sugar, jaggery, date syrup—can slide in comfortably as well, depending on what you have and what kind of flavour you’re chasing.
The main thing is to remember that sugar is acting as a seasoning. It’s there to keep the sauce from tasting harsh and salty and to give it that repeat-able, “lick the spoon” quality. Take it too far and you end up with something that feels like dessert on your chicken; dial it in well and you get that classic sweet–savory balance.
Every teriyaki recipe is built from the same core pieces: soy for salt and colour, mirin or sake for shine, sugar or honey for sweetness, plus garlic and ginger for aroma. Once you understand this “flavour blueprint”, tweaking the sauce for chicken, salmon, noodles or low-sugar versions becomes simple.
Garlic and Ginger: Aromatic Extras
In strictly traditional teriyaki, you can absolutely skip garlic and ginger. Many traditional Japanese teriyaki sauce recipes don’t include them. But they’ve become so common in global teriyaki that a lot of people instinctively expect that flavour.
Garlic adds a warm, pungent note; ginger brings a slightly spicy freshness. Together, they make the sauce:
punchier and more aromatic
better suited to stir-fries and noodle dishes
closer to what most “teriyaki chicken” takeout tastes like
If you love ginger, you can double down and let the sauce lean into a ginger-forward profile. If you want something mellow, you can keep both garlic and ginger fairly subtle.
Thickening: Reduction, Starch or Syrup
Finally, there’s the question of texture. A teriyaki sauce recipe can be:
thin and brushable
thick and clingy
or sticky and syrupy
There are three easy ways to get the texture you want.
Reduction If you simmer a soy–mirin–sugar mixture gently, water evaporates and the sauce naturally thickens. This is how traditional teriyaki glaze is usually made: no extra thickener, just time and evaporation.
Starch slurry Mix a spoonful of cornstarch with an equal or slightly larger amount of cold water until smooth, then stir that into a gently simmering sauce. As it heats, the starch thickens the liquid, giving you a glossy, reliable coating. This is what a lot of quick “homemade teriyaki sauce” recipes use.
Thicker sweeteners Honey and syrupy sweeteners naturally give body. If your sauce includes them and you reduce it a bit, they help you get that sticky, almost lacquered consistency without needing much starch.
Once you’re familiar with these three levers, adjusting a sauce from “light glaze” to “thick stir-fry sauce” to “sticky wing glaze” becomes a simple question of preference.
With the fundamentals in place, let’s actually make a sauce you can use on weeknights. This version keeps the ingredient list small, uses garlic and ginger, and relies on a cornstarch slurry so you get a consistent result even if you’re new to this.
It’s exactly the kind of thing you can batch once and then keep in the fridge, the way you might keep a jar of pesto or a homemade salad dressing.
Cooking one small pan of teriyaki and jarring it for the fridge turns the sauce into a “house staple” you can grab for quick dinners—brush it over chicken, drizzle on salmon, toss with vegetables or turn it into a stir-fry sauce without starting from scratch each time.
Ingredients for Teriyaki Sauce Recipe
½ cup soy sauce (regular or low-sodium)
½ cup water
¼ cup mirin (or 2 tablespoons mirin + 2 tablespoons sake if that’s what you have)
¼ cup brown sugar (you can replace part with honey for extra stickiness)
1–2 cloves garlic, very finely minced
1–2 teaspoons fresh ginger, grated
1 tablespoon rice vinegar (optional, for brightness)
1 tablespoon cornstarch
2 tablespoons cold water (for the slurry)
Step-by-Step Teriyaki Sauce Recipe
Step 1: Combine the base ingredients
Pour the soy sauce, water, mirin, brown sugar, garlic, ginger and rice vinegar into a small saucepan. Stir everything together so the sugar starts to dissolve and the garlic and ginger are evenly dispersed.
Layering soy, mirin, sugar, garlic and ginger in a cold pan lets the flavours blend before the heat hits, so your teriyaki sauce reduces evenly instead of tasting sharply salty in some spoonfuls and flat in others.
Step 2: Bring to a gentle simmer
Set the saucepan over medium heat. As it warms up, keep an eye on it and give it an occasional stir. Aim for a gentle simmer, not a furious boil. After a few minutes, the sugar will be fully dissolved and the kitchen will start to smell like teriyaki night.
If the surface is jumping like a vigorous boil, turn the heat down. A quiet simmer gives you gloss and depth; too much heat can make the sauce taste harsh or slightly burnt before it ever reaches the right thickness.
Step 3: Make the cornstarch slurry
While the sauce is heating, mix the cornstarch and cold water in a small bowl until completely smooth. Any lumps now will turn into lumps in the sauce later, so it’s worth taking ten extra seconds to get this right.
If the slurry looks chalky or grainy, keep whisking until it turns glossy and perfectly smooth. A well-made slurry disappears into the teriyaki and thickens it gently; a rushed one leaves tiny gummy blobs you’ll never quite strain out.
Step 4: Thicken the sauce
Once the sauce is gently simmering, turn the heat down just a notch and slowly pour in the cornstarch slurry while stirring continuously. The liquid will look cloudy at first, then begin to clear and thicken. After a minute or two, it should coat the back of a spoon and fall in a slow, steady ribbon.
Add the slurry gradually and give the sauce a minute or two to come back to a gentle simmer. It should go from thin and shiny to a glaze that coats the back of a spoon and falls in a slow ribbon—ideal for brushing, tossing and drizzling.
Step 5: Taste and adjust
Now taste the sauce. If the sauce feels too salty, add a splash of water or a teaspoon more sugar. If it tastes too sweet, add a dash more soy sauce or a little extra rice vinegar. And if it seems a bit flat, another pinch of ginger often wakes everything up.
Always adjust the sauce while it’s warm, when the flavours are most open and easy to correct. A sauce that tastes slightly too intense in the spoon will usually be perfect once it’s spread over rice, noodles or grilled meat, so keep your tweaks small and deliberate.
Step 6: Cool and store
When you’re happy with the flavour and texture, take the pan off the heat and let the sauce cool for a few minutes. It will thicken slightly as it stands. Pour it into a clean glass jar, let it come completely to room temperature, and then move it to the fridge.
Leaving the teriyaki uncovered for a few minutes before sealing the jar lets excess steam escape so condensation doesn’t water the sauce down. Once it’s at room temperature, close the lid and you’ve got a ready-to-use teriyaki glaze for the next several meals.
Step 7: Use your house teriyaki sauce
Your house teriyaki sauce is ready. Brush it on grilled chicken, spoon it over salmon before baking, toss it with stir-fried vegetables and noodles, or reduce it a little further into a sticky glaze for wings or meatballs.
The same jar of teriyaki can do weeknight meal prep and entertaining: whisk it into a quick marinade for chicken thighs, brush it over salmon before baking, toss it through veggie noodles, or reduce it further for ultra-sticky wings, meatballs and party skewers.
A More Traditional Japanese-Style Teriyaki Glaze Recipe
If you’re in the mood for something closer to what you might find in Japan—lighter, simpler, and without that cornstarch gloss—there’s an even more minimal version.
Here we go back to the roots: soy sauce, mirin, sake and sugar, simmered until glossy.
Ingredients
½ cup soy sauce
½ cup mirin
¼ cup sake
3–4 tablespoons sugar
Combine these in a small saucepan and stir until the sugar starts dissolving. Set the pan over medium heat and bring the mixture to a gentle simmer.
Keep it on that soft simmer for around 8–10 minutes, stirring occasionally, until the liquid has reduced by about a third. You don’t need to be exact here; what you’re looking for is a sauce that coats the back of a spoon in a thin, shiny layer, rather than running off like plain soy sauce.
This minimalist glaze is the “old-school” version of teriyaki—just soy, mirin, sake and sugar gently reduced until it can be brushed in thin layers over grilled fish, chicken skewers or tofu for a clean, restaurant-style shine.
Take the pan off the heat and let it cool slightly. This is now your traditional-leaning teriyaki glaze.
Use it to brush repeatedly over pieces of chicken, fish or tofu while they grill or broil. The sugar and mirin will take on a deeper colour and the surface will go from matte to glossy. Each pass builds another layer of flavour.
This version is especially good on salmon and on chicken skewers, where you want the glaze to complement the grilled flavour rather than smother it.
How One Sauce Becomes Many: Marinade, Stir-Fry, Glaze, Dip, Dressing
You don’t need completely different recipes for “teriyaki marinade”, “teriyaki glaze” and “teriyaki stir-fry sauce”. You just change the texture, strength and acidity in the original teriyaki sauce recipe.
Once you have a basic teriyaki in a jar, you don’t need five different recipes—just thin it for marinades, loosen it slightly for stir-fries, reduce it to a sticky glaze, brighten it into a dipping sauce, or whisk it with oil or mayo for dressings and burger sauces.
Turning It Into a Marinade
For marinating, you want the sauce thinner and usually a bit sharper. That way it coats the food easily and adds flavour without forming a heavy layer.
Take the everyday teriyaki (before thickening, or thinned slightly with water if it’s already thick) and add:
a little extra rice vinegar, or
a squeeze of lemon or lime
A good teriyaki marinade should feel looser and a bit brighter than your table sauce. Thinning it with water or stock helps it coat evenly, while extra vinegar or citrus keeps richer meats like chicken thighs or pork tasting fresh even after a long soak.
Pour this over chicken pieces, pork, tofu or sturdy vegetables and marinate in the fridge. Chicken thighs and drumsticks are happy with anywhere from half an hour to overnight. Fish does better with a shorter bath—twenty minutes to an hour—so it doesn’t go mushy. Tofu can handle long soaks, and often gets better with time.
If you want, you can boil the leftover marinade after you’ve removed the raw meat or fish and use it as a finishing sauce; just make sure it gets a good hard boil so it’s safe.
Using It as a Stir-Fry Sauce
In a stir-fry, you want the sauce to cling but still move. The cornstarch-thickened everyday teriyaki is perfect once you adjust its thickness.
If it’s too thick to pour smoothly, add a splash of water or unsalted stock. Then:
Stir-fry your vegetables and protein over high heat.
When everything is nearly done, reduce the heat slightly.
Pour the teriyaki into the pan and toss quickly so it coats everything.
The best teriyaki stir-fries start dry and finish wet: sear your protein and vegetables first, then pour in a slightly loosened sauce in the last few minutes so it thickens just enough to cling without burning on the bottom of the pan.
In a minute or two, the sauce will cling and glisten around the ingredients. Spoon this over hot rice, noodles or even quinoa. Set it next to other sharable sides—potato salads, dips, grilled vegetables—and it suddenly looks like a generous spread rather than “just a stir-fry”.
Reducing It to a Sticky Glaze
For wings, ribs, thick salmon fillets and roasted tofu cubes, you want a sauce that’s more like a glaze: sticky, intense and slightly caramelised.
You can either start with the everyday teriyaki and simmer it longer (with an extra spoonful of sugar or honey for extra sheen), or you can use the traditional soy–mirin–sake glaze and reduce it further.
For that restaurant-style lacquer, let your teriyaki bubble gently until it looks almost syrupy, then brush it on near the end of cooking. The sugars caramelise in the heat, giving wings, salmon or tofu a shiny crust without burning or drying them out.
Brush thickened sauce onto food in the last stretch of cooking and let the oven or grill finish the job. If you want extra charring, give it a last-minute blast under a very hot broiler or grill, watching it closely so the sugar doesn’t burn.
Turning It Into a Dipping Sauce
Sometimes it’s nicer to dip than to coat. If you want teriyaki as a dip for dumplings, skewers, crispy tofu, roasted vegetables or even fries, you want a sauce that’s strong in flavour but thin enough to flow easily.
Take a portion of your homemade teriyaki and thin it with a little water or light stock. Add a bit more vinegar or citrus juice to brighten things and cut the sweetness. Pour into a small bowl and top with sesame seeds and chopped spring onion.
Turning teriyaki into a dip is all about contrast: a looser texture and brighter acidity so it cuts through fried dumplings, grilled skewers and roasted vegetables instead of weighing them down. A splash of stock and vinegar goes a long way.
Put that on a table alongside other dips—spinach-based ones, creamy spreads, spicy options—and suddenly teriyaki is playing in the same space as buffalo sauce and ranch, not just “stir-fry sauce”.
Using It as a Dressing or Mayo
Teriyaki also works beautifully off the heat.
For a simple dressing, whisk equal parts teriyaki sauce and neutral oil together, then add a spoon of rice vinegar or lemon juice. You get a punchy salad dressing that loves green salads, grain bowls and noodle salads. Shake it in a jar until lightly emulsified, then toss or drizzle as you like.
A spoonful of teriyaki goes a long way off the heat: whisk it with neutral oil and a splash of vinegar for a punchy salad or grain-bowl dressing, or fold it into mayo to turn simple chicken sandwiches and burgers into full-blown “teriyaki” meals.
For a sandwich or burger sauce, stir a spoonful or two of teriyaki into mayonnaise and taste as you go. That simple mix is surprisingly good on chicken sandwiches, burgers, sliders and teriyaki-style rice bowls. If you like building stacked sandwiches with layers of texture and flavour, you can borrow structure ideas from MasalaMonk’s own chicken sandwich recipe collection and simply swap their sauce element for your teriyaki mayo.
Playing with Flavours: Honey, Citrus, Pineapple, Miso, Spice
Once the base is second nature, you can adjust it to suit your mood or the rest of the menu. Most “special” teriyaki sauce recipes are just small nudges away from that everyday sauce.
Honey Teriyaki Sauce Recipe
Replacing some or all of the brown sugar with honey gives you a honey-teriyaki hybrid. Honey makes the sauce silkier and helps it cling to food in a particularly satisfying way.
Honey doesn’t just sweeten teriyaki, it changes the texture—giving you a thicker, more elastic glaze that clings beautifully to wings, drumsticks, tofu and meatballs. Just keep the heat moderate, because honey-based sauces can go from caramelised to burnt much faster than sugar-only versions.
This version is perfect for:
chicken wings and drumsticks
sticky meatballs
glossy tofu bites
Just remember that honey browns faster than regular sugar, so keep an eye on oven and grill temperatures to avoid scorching.
Recipe for Ginger-Sesame Teriyaki Sauce
If ginger is your favourite part, double the amount you add and keep the garlic modest in the original teriyaki sauce recipe. When the cooking is done, stir in a teaspoon of toasted sesame oil and a spoonful of toasted sesame seeds.
Turning your base teriyaki into a ginger–sesame version is one of the easiest ways to make noodle bowls and tofu stir-fries taste “restaurant-level” – all you do is lean harder on fresh ginger, stir in toasted sesame oil off the heat and shower everything with sesame seeds right before serving.
What you get is a sesame–ginger teriyaki that’s ideal for:
tofu and vegetable stir-fries
soba and udon noodle bowls
roasted or steamed greens
It’s also a great way to make cold noodle salads feel complete without loading them up with mayonnaise.
Orange Teriyaki Sauce Recipe
To bring citrus into the picture, swap part of the water in the base recipe for fresh orange juice and add grated orange zest at the end. Taste the result and adjust with extra soy or vinegar if it leans too sweet.
Swapping part of the water for fresh orange juice gives teriyaki a lighter, brighter profile that’s perfect when you want something fresher than a straight soy glaze. It’s especially good on chicken-and-bell-pepper stir-fries, prawn skewers and fun fusion ideas like teriyaki chicken pizza.
Orange teriyaki sits beautifully on:
chicken stir-fries with bell peppers
shrimp or prawn skewers
fusion dishes like teriyaki chicken pizza
It’s especially useful when you want something that feels lighter and fresher than a straight soy-based glaze.
Recipe of Pineapple Teriyaki Sauce
For a more tropical character, use pineapple juice in place of some of the water and sugar. Pineapple’s natural enzymes can help tenderise meat, which is why pineapple-based marinades are so common in grill cultures.
Pineapple teriyaki pulls double duty as both flavour and tenderiser, which is why it shines on grilled chicken skewers, pork chops and burgers. Because the enzymes are so active, it’s best to keep marinating times short for delicate fish and seafood so they stay juicy, not mushy.
Use homemade pineapple teriyaki sauce on:
grilled chicken skewers
pork chops and pork tenderloin
burgers topped with grilled pineapple rings
Just go easy with marinating delicate fish in pineapple heavy mixtures for long periods; shorter times work better to preserve texture.
Apple-Lifted Teriyaki Sauce Recipe
Apple juice and a spoon of applesauce can soften teriyaki’s edges and give it a mild, autumnal feel. A pinch of cinnamon or nutmeg can tilt it gently toward “warm spice” without turning it into dessert.
Apple teriyaki is a smart way to make salty soy-based glazes feel rounder and more comforting. A little apple juice and applesauce softens the edges, while a pinch of warm spice lets the sauce sit naturally alongside roast pork, tray-bake chicken and caramelised root vegetables.
This style of sauce suits roast pork, sheet-pan chicken dinners with onions and apples, and roasted carrots or squash.
Miso Teriyaki Sauce & Its Recipe
Miso is another fermentation star in Japanese cooking, and adding a spoon of miso paste to warm teriyaki sauce deepens its savoury side.
Take the pan off the heat, whisk in a spoon of white or red miso, and taste. You might not need more soy after that; miso is salty as well.
White miso gives a gentler, slightly sweeter teriyaki, while red miso makes the sauce deeper and more intense. Either way, add the paste off the heat and taste before you reach for extra soy—miso itself brings plenty of salt and umami.
Miso teriyaki is particularly good on:
salmon or trout
eggplant, mushrooms and other umami-friendly vegetables
tofu steaks and skewers
It feels simple but layered, which is exactly what you want when the sauce is doing most of the work.
Spicy Teriyaki Sauce Recipe
For those nights when you want a little heat, add sriracha, gochujang or your favourite chilli paste to the simmering sauce. Start with a teaspoon or two, taste, and adjust. You can also finish with a squeeze of lime juice if you like spice plus tang.
Spicy teriyaki is ideal when you want the comfort of sweet–savory sauce with proper heat. Stir in chilli paste gradually, then finish with lime to keep the flavour bright—perfect for party wings, sticky tofu cubes, veg-packed stir-fries and big noodle bowls.
Spicy teriyaki is ideal for:
hot wings
sticky tofu cubes
vegetable stir-fries
noodle dishes with a bit of a kick
It sits comfortably on a table with buffalo wings, creamy dips and crisp salads, especially if you like building mixed, “everyone grabs what they like” spreads.
Making Teriyaki Friendlier: Less Sugar, Less Salt, Keto, Vegan, Soy-Free
Because teriyaki is built on soy sauce and sugar, it doesn’t automatically fit every eating style. But once you’re making it at home instead of relying solely on bottled versions, you have a lot more control.
Instead of treating teriyaki as something you have to give up, think of it as a base you can tune: cut the sugar, dilute the soy, switch to keto sweeteners or coconut aminos and lean harder on ginger, garlic and citrus to keep the flavour big while the numbers stay friendly.
Cutting Back on Sugar in the Recipe for Teriyaki Sauce
You can usually cut the sugar in a teriyaki recipe by a third or even half without destroying the balance, especially if you:
keep mirin in the mix
lean more on ginger and garlic
let a bit more acidity (vinegar or citrus) balance the salt
Most teriyaki recipes can lose a third to half their added sugar without breaking; the trick is to let ginger, garlic and a bit of acid do more of the balancing work, and only bring in low-cal sweeteners if you still miss a touch of sweetness.
For more aggressive sugar reduction, you can substitute part of the sugar with low-calorie sweeteners. Just be careful with reductions: without sugar to round things out, very reduced sauces can taste sharply salty.
Making It More Keto-Friendly
For a keto-leaning teriyaki sauce recipe, you want lower net carbs:
use low-sodium soy or tamari, diluted with water
sweeten with a keto-compatible sweetener
thicken with a tiny pinch of xanthan gum if you need a glaze, or leave it thinner
Keto-style teriyaki keeps things bold without the sugar spike—tamari, ginger and garlic build the savoury base, a touch of keto sweetener rounds the edges, and a tiny pinch of xanthan gum creates that classic glossy cling without carbs.
In practice, you’ll probably use less sauce per serving and let the grilled meat, fish or tofu do more of the talking.
Lowering the Sodium Load in Teriyaki Sauce Recipe
Salt is the other big issue. It doesn’t take much teriyaki sauce to push your sodium intake up for the day, and most health guidelines suggest keeping sodium on the conservative side for heart and kidney health.
A simple way to make teriyaki easier on your daily sodium is to treat soy like a concentrate: start with reduced-sodium soy, cut it with water or stock and let ginger, garlic and citrus rebuild the flavour instead of just pouring in more soy sauce.
Instead of just accepting that, you can:
base your sauce on reduced-sodium soy sauce
dilute soy with water or unsalted stock
build flavour with ginger, garlic, chilli and acid instead of extra soy
You’ll still get plenty of teriyaki character, but with a much softer impact on your daily salt tally.
Keeping Your Teriyaki Sauce Recipe Vegan
Most homemade teriyaki sauces are almost vegan by default. As long as you skip honey and stick to sugar or maple syrup, the standard soy–mirin–garlic–ginger mixture is plant-based.
Most classic teriyaki formulas are just one swap away from being vegan—use sugar or maple syrup instead of honey, then pair the sauce with tofu, tempeh, mushrooms and veggie bowls for the same sweet–savory comfort in a fully plant-based meal.
Combine that with tofu, tempeh, mushrooms, seitan or beans and you have endless vegan teriyaki bowls and plates. You can structure them the way you’d structure high-protein salads or spreads—like the ones in MasalaMonk’s healthy tuna salad ideas—but swap the tuna for chickpeas or lentils and the mayo for teriyaki.
Going Soy-Free with Coconut Aminos
If you need to avoid soy, coconut aminos is your friend. It’s made from fermented coconut sap and salt, and while it tastes different from soy sauce, it still brings a dark, savoury note. It’s also generally lower in sodium and naturally gluten- and soy-free.
Coconut aminos already bring sweetness and savoury depth, so a good soy-free teriyaki is more about restraint than addition—use less extra sugar, lean on garlic, ginger and vinegar for balance, and reduce gently until it behaves just like your usual glaze.
To modify the recipe and make a soy-free teriyaki-style sauce:
use coconut aminos instead of soy sauce
reduce or omit extra sugar (coconut aminos is sweeter than soy)
add garlic, ginger and vinegar
reduce or lightly thicken with starch if you want a glaze
It won’t taste exactly like traditional teriyaki, but it’s recognisably in the same family and plays the same role on the plate.
Bottled teriyaki has one unbeatable strength: convenience. You finish work, you’re tired, you don’t feel like measuring anything, and that bottle is right there. Pour some over chicken or vegetables, and you’re halfway to dinner.
The tradeoffs are just as clear:
you don’t control how salty or sweet it is
you’re stuck with the brand’s idea of texture and flavour balance
you often get stabilisers and preservatives you probably don’t need in a fresh sauce
Store-bought teriyaki wins on speed and predictability, but a homemade batch gives you full control over salt, sugar and thickness—and you can still use bottled sauce as a shortcut base, then upgrade it with fresh garlic, ginger, citrus, honey or miso.
A homemade teriyaki sauce recipe asks for a little more effort once, then repays you many times. There’s no single “best teriyaki sauce recipe” for everyone, but when you make it yourself you can dial in your own best version. You:
decide how salty, sweet and thick it should be
can tune it to your household’s tastes (more ginger, less garlic, citrusy, smoky, etc.)
can adapt it to different needs (lighter one night, sticky the next)
That does not mean you don’t have to throw away bottled sauce forever. You can also treat it as a base ingredient. Sauté garlic and ginger, add bottled teriyaki and cook it for a few minutes; thin or reduce as needed; finish with citrus, honey, chilli or miso. That’s the same philosophy MasalaMonk uses in things like their homemade coffee creamer flavour guide: start with something simple, then bend it to your will.
But if you take one thing away from this post, let it be this: the jump from “I buy teriyaki” to “I make teriyaki” is smaller than it looks.
If you only make one dish with this teriyaki sauce recipe, let it be simple chicken teriyaki – the kind of easy teriyaki chicken recipe (stovetop, air fryer or oven) you can throw together on a weeknight. It’s the kind of weeknight meal that tastes like takeout, uses just one pan, and works with chicken thighs or breast.
Ingredients
500–700 g chicken thighs or breast, cut into bite-sized pieces
2 tablespoons neutral oil
Salt and pepper (just a pinch; the sauce is salty)
½ to ¾ cup homemade teriyaki sauce (from the everyday teriyaki sauce recipe above)
Cooked white rice or brown rice, to serve
Steamed or stir-fried vegetables (broccoli, carrots, peppers, beans), to serve
This is the “entry level” way to use your house teriyaki: one hot pan, a handful of chicken, a scoop of sauce and you’ve got a takeout-style bowl in under half an hour—perfect for testing new flavour tweaks like honey, orange or spicy teriyaki without changing the method.
How to Cook Teriyaki Chicken
Prep the chicken. Pat the chicken dry and season very lightly with salt and pepper.
Sear. Heat the oil in a wide pan over medium-high heat. Add the chicken in a single layer and cook until lightly browned on both sides and just cooked through.
Add the teriyaki sauce. Reduce the heat to medium, pour in the teriyaki sauce and toss so every piece is coated.
Glaze. Let the sauce bubble gently for a few minutes, stirring, until it thickens into a shiny glaze and clings to the chicken. If it gets too thick, add a splash of water; if it’s too thin, simmer for another minute.
Serve. Spoon the chicken teriyaki over hot rice with plenty of vegetables on the side. Drizzle over any extra sauce from the pan.
This basic chicken teriyaki recipe is easy to spin into variations. Toss cooked noodles through the pan for chicken teriyaki noodle stir fry, or pile the glazed pieces into a bun with crunchy salad for teriyaki chicken burgers.
For salmon teriyaki, the oven does most of the work. This is a simple teriyaki salmon recipe that uses the same everyday sauce.
Heat the oven to 200°C. Line a baking tray with parchment.
Place 4 salmon fillets on the tray, skin-side down. Pat dry and season very lightly with salt and pepper.
Spoon a generous layer of teriyaki sauce over each fillet.
Bake for 10–12 minutes, depending on thickness, until the salmon is just cooked through.
For a more caramelised finish, brush with a little more sauce and give the fillets 1–2 minutes under a hot grill or broiler.
Baking the salmon with teriyaki already on top does two jobs at once—the fish gently steams underneath while the sauce reduces on the surface, so you get juicy flesh, a shiny glaze and tray juices you can spoon straight over rice or noodles.
Serve the baked teriyaki salmon with rice and vegetables, or flake it over warm noodle bowls. The same method works for other firm fish fillets if you’re in the mood for fish teriyaki beyond salmon.
½ cup teriyaki sauce, thinned with a splash of water if very thick
Cooked rice or noodles, to serve
Because the beef is sliced thin and cooked hot and fast, this stir-fry is the perfect place to test how thick you like your teriyaki—keep it slightly looser if you’re serving over rice, or reduce it a little more if you want the sauce to cling tightly to noodles.
Stir-fry the beef. Heat 1 tablespoon oil in a hot pan or wok. Add the beef and stir-fry just until browned; remove to a plate.
Cook the vegetables. Add the remaining oil and the vegetables. Stir-fry over high heat until crisp-tender.
Combine with sauce. Return the beef to the pan, pour in the teriyaki sauce and toss everything together. Cook for 1–2 minutes until the sauce bubbles and coats the beef and vegetables.
Serve. Spoon your beef teriyaki stir-fry over rice, or toss with cooked noodles for beef teriyaki noodles.
This one pan teriyaki beef and rice or noodle dinner is an easy way to turn the same teriyaki sauce recipe into a new meal.
Theory is nice, but you’re going to remember teriyaki by what you put on the table.
You might start by whisking up that everyday teriyaki sauce, then:
marinate chicken thighs in a thinner, more acidic version and roast them on a tray with onions and peppers, brushing with a thicker glaze in the last ten minutes
spoon the traditional soy–mirin–sake glaze over salmon fillets as they grill, letting it build up into a shiny layer, then serve them with rice and a crisp side from the potato salad recipes you’ve bookmarked
throw together a fridge-cleanout stir-fry with vegetables, tofu and a ladle of teriyaki, knowing you can adjust sweetness and salt right there in the pan
build warm or cold noodle bowls with soba, plenty of vegetables and a ginger-sesame teriyaki dressing
glaze pork chops or pork tenderloin with pineapple teriyaki and serve with a simple salad and grilled pineapple slices
spread pineapple-lifted teriyaki over a pizza base, add leftover chicken teriyaki and bake for an easy teriyaki chicken pizza night.
One base teriyaki sauce can turn into a whole table of food—bowls, salmon, stir-fries, wings and veggie plates—so once you’ve dialled in your “house” version, you’re only a few tweaks away from an easy teriyaki night with friends.
If you’re hosting, you can lean harder into variety. Make a platter of wings: some in honey teriyaki, some in spicy teriyaki. Put out bowls of dips—spinach dip, buffalo chicken dip, hummus—along with raw vegetables, bread and crackers. Pour drinks, maybe even something fun and fizzy from a set of mimosa ideas, and suddenly your weeknight sauce has turned into a party.
Over time, you’ll find your own sweet spot: maybe a slightly less sweet, more gingery version for everyday cooking; a fruit-heavy pineapple or orange teriyaki for grilling; a miso-enriched glaze for salmon; and a low-sugar, low-sodium version when you want to keep things light but flavourful.
And at that point, “teriyaki sauce” isn’t a mysterious thing in a bottle anymore. It’s just one of your house sauces—like pesto, like chimichurri, like tzatziki—waiting in the fridge or on the stove, ready to make simple food feel like something worth sitting down for.
FAQs on Teriyaki Sauce and its Recipe
1. What is teriyaki sauce, exactly?
Teriyaki sauce is a sweet–savory Japanese-style sauce built on soy sauce, a sweetener (usually sugar or honey), and mirin or another mild cooking wine. Traditionally, it began as a glaze brushed over grilled fish or chicken, giving the surface a shiny, caramelised coating. Over time, it has evolved into a multi-use sauce for marinating, stir-frying, glazing, dipping, and even dressing salads and noodle bowls.
2. How do you make a simple homemade teriyaki sauce from scratch?
To begin with, you only need a few pantry staples. Combine soy sauce, water, mirin (or a mix of mild wine and sugar), brown sugar, minced garlic, grated ginger, and a splash of rice vinegar in a saucepan. Simmer gently until the sugar dissolves and the flavours mingle. Then, if you want it thicker, stir in a cornstarch-and-water slurry and cook for a minute or two until glossy. Taste, adjust sweetness and salt, cool it, and your homemade teriyaki sauce is ready to use or store for quick teriyaki chicken, salmon, beef or veggie stir-fries.
3. What’s the difference between authentic Japanese teriyaki and the thicker takeout-style sauce?
In authentic Japanese teriyaki, the sauce is usually just soy sauce, mirin, sake, and sugar simmered until slightly syrupy, with no garlic, no ginger, and no cornstarch. It stays light and clean, meant mainly for brushing over grilled fish or chicken. By contrast, many takeout-style or bottled teriyaki sauces are thicker, sweeter, and heavily scented with garlic and ginger, often relying on starch for that shiny, clingy texture. Both are delicious, but they serve slightly different purposes in cooking.
4. What ingredients do I really need for teriyaki sauce if my pantry is basic?
Even with a minimal pantry, you can still make a good teriyaki-style sauce. At the very least, you need soy sauce for salt and umami, sugar (or honey) for sweetness, and water to keep it from being overpowering. Whenever possible, adding something mirin-like (or a mild wine plus sugar), along with a little garlic and ginger, makes the flavour much more rounded. From there, extras like rice vinegar, sesame oil, or chilli are optional upgrades, not requirements.
5. How can I make my teriyaki sauce thicker and stickier?
If your teriyaki sauce feels too thin, there are several ways to change that. The most straightforward method is to simmer it for longer so water evaporates and the sauce naturally reduces and thickens. Alternatively, you can whisk a small amount of cornstarch into cold water, then stir this slurry into gently simmering sauce until it becomes glossy and coats the back of a spoon. For an even stickier glaze, increasing honey or another syrupy sweetener and cooking for a little longer works beautifully on wings, drumsticks, salmon and tofu.
6. Can I make teriyaki sauce without mirin or sake?
Yes, you absolutely can. When mirin or sake isn’t available, you can still get very close to that classic taste. One approach is to use a mild white wine with a little extra sugar. Another option is to mix sugar with a bit of rice vinegar and water to mimic some of mirin’s sweet–tangy balance. It won’t be perfectly traditional, yet the resulting sauce will still taste recognisably like teriyaki and work well in marinades, stir-fries and glazes.
7. Is teriyaki sauce healthy, and how can I make it lighter?
On its own, teriyaki sauce tends to be high in sodium and contains added sugar, so it’s more of a “use thoughtfully” ingredient than a neutral one. However, it can absolutely fit into a balanced way of eating. To make it lighter, you can switch to low-sodium soy sauce, dilute the soy with water, and reduce the sugar by a third to half. In addition, leaning more on ginger, garlic and a touch of vinegar keeps the flavour big while toning down the salt and sweetness. Using less sauce per serving and pairing it with plenty of vegetables also helps.
8. How do I turn teriyaki sauce into a marinade, stir-fry sauce, or dipping sauce?
Interestingly, you don’t need separate recipes for each use. For a teriyaki marinade, simply keep the sauce thinner and slightly more acidic by adding a bit more water and vinegar or citrus. Then for a stir-fry sauce, aim for medium thickness so it coats ingredients without turning gloopy—your cornstarch-thickened version is ideal here. And for a dipping sauce, thin a small amount with water or light stock, then brighten it with extra vinegar or lime so it’s punchy, pourable and perfect alongside dumplings, skewers, tofu or roasted vegetables.
9. How long does homemade teriyaki sauce last in the fridge?
Generally, homemade teriyaki sauce keeps well in a sealed jar in the refrigerator for about one week, sometimes a bit longer if it’s cooked, cooled and stored cleanly. Because it contains soy and sugar, it has some built-in preservative qualities, but it still counts as a fresh sauce. Before using leftovers, give it a sniff, a quick look and a small taste. If anything seems off—odd smell, separation that doesn’t mix back, or mould—discard it and make a fresh batch.
10. Can I freeze teriyaki sauce for later?
Absolutely. Moreover, freezing is a smart way to batch-prep. Once your teriyaki sauce has cooled completely, pour it into freezer-safe containers or small portions in ice cube trays. When frozen, you can pop the cubes into a bag for easy storage. On busy days, just thaw a few cubes in a saucepan or microwave and use them as a glaze, marinade base or stir-fry sauce. This trick also lets you make different versions—honey, ginger-heavy, spicy—and keep them ready to go.
11. How do I make a low sugar or keto-friendly teriyaki sauce?
For a lower sugar teriyaki, start by cutting the sugar in your favourite recipe in half and letting mirin, ginger, garlic and vinegar do more of the flavour work. If you’d like to go further and keep the sauce very low in carbohydrates, you can use a sugar substitute that behaves well in cooking, then taste and adjust carefully to avoid an artificial aftertaste. In addition, keeping the sauce slightly thinner and using less per serving is often enough to get that teriyaki flavour without loading up on sugar.
12. Is it possible to make vegan or soy-free teriyaki sauce?
Yes, both are quite achievable. To keep your teriyaki sauce recipe vegan, avoid honey and use plant-based sweeteners such as sugar or maple syrup, along with soy sauce, mirin, garlic and ginger. For a soy-free teriyaki-style sauce, you can swap soy sauce for coconut aminos or a similar savoury seasoning, then adjust the sweetness down a bit because those alternatives are often naturally sweeter. Finally, add garlic, ginger and a touch of vinegar, then reduce or lightly thicken the mixture until it has the shine and consistency you want.
13. Can I use bottled teriyaki sauce in these recipes?
Yes. If you already have a bottle of teriyaki sauce at home, you can absolutely use it in place of the homemade teriyaki sauce recipe here. For a quick teriyaki chicken recipe using bottled sauce, brown the chicken in a pan, pour in enough sauce to coat, and let it simmer until the chicken is cooked through and the sauce thickens slightly. If the bottled sauce is very strong or salty, thin it with a little water or stock and add fresh garlic, ginger or a squeeze of citrus to brighten it. The same approach works for slow cooker teriyaki chicken with bottled sauce or a very quick teriyaki chicken with bottled sauce on the stovetop: add the chicken and sauce, cook until tender, then thicken the juices at the end if you want a stickier finish.
14. How do I make teriyaki chicken in the air fryer?
Air fryer teriyaki chicken is basically your quick-pan recipe adapted to hot circulating air. Pat chicken thighs or breast pieces dry, toss them in a thin layer of teriyaki sauce (or marinate briefly), then arrange them in a single layer in the basket. Air fry at around 190–200°C for 10–15 minutes, turning once, until cooked through. In the last 2–3 minutes, brush with a little more teriyaki to create a sticky glaze. Serve over rice or tuck into wraps and bowls with vegetables for an easy, lower-oil version of classic teriyaki chicken.
15. What’s an easy slow cooker or crockpot teriyaki chicken recipe?
For slow cooker teriyaki chicken, the main trick is to keep the sauce thin at the start and thicken it at the end. Place boneless chicken thighs or breasts in the crockpot, pour over enough teriyaki sauce (homemade or bottled) to mostly cover, and cook on LOW for 4–6 hours or HIGH for 2–3 hours until tender. Remove the chicken and shred or slice it. Then simmer the cooking liquid in a saucepan with a cornstarch slurry until it turns into a glossy teriyaki glaze. Toss the chicken back in the thickened sauce and serve over rice, noodles or in lettuce wraps.
16. How can I use teriyaki sauce for baked chicken or salmon?
Baked teriyaki chicken and baked teriyaki salmon are both “hands-off” ways to use the same sauce. For chicken, arrange thighs or drumsticks on a lined tray, brush with teriyaki sauce and bake at 190–200°C until cooked through, brushing once or twice more during baking for extra gloss. For salmon, spoon teriyaki over fillets and bake for 10–12 minutes, then finish with a quick blast under the grill to caramelise the top. In both cases, you can reduce extra sauce on the stovetop into a thicker glaze for drizzling when you serve.
17. What are some easy teriyaki noodle and fried rice ideas?
Teriyaki sauce turns simple noodles and leftover rice into full meals. For teriyaki noodles, stir-fry vegetables and a protein of your choice, add cooked noodles (soba, udon, ramen or regular stir-fry noodles), then pour in enough teriyaki to coat everything. Toss over high heat until glossy. For teriyaki fried rice, stir-fry cold cooked rice with vegetables, scrambled egg and any leftover meat or tofu, then add a thinner teriyaki sauce and let it sizzle into the rice. Both are great ways to use up fridge odds and ends while still delivering that sweet–savory teriyaki flavour.
18. How do I make a good teriyaki chicken and broccoli or veggie bowl?
For chicken teriyaki with broccoli and other vegetables, think in three parts: base, veg and protein. Start with rice or noodles in the bowl. Stir-fry or steam broccoli, carrots, peppers and snap peas until just tender, then toss them with a little teriyaki sauce so they’re lightly coated. Cook chicken pieces in a pan until browned, add more teriyaki and let it reduce to a shiny glaze. Pile the glazed chicken and vegetables over the base, drizzle over any remaining sauce, and sprinkle with sesame seeds. It’s an easy template for healthy chicken teriyaki bowls you can repeat all week.
19. Can I use teriyaki sauce for cod, shrimp or other seafood?
Definitely. Teriyaki cod and teriyaki shrimp are both fast, flavourful options. For cod or other white fish, keep the sauce a bit lighter and don’t marinate for too long; brush or spoon teriyaki over fillets just before baking or grilling. For shrimp, a 10–15 minute marinade is usually enough before a quick stir-fry or grill, then you can finish with extra sauce in the pan. Because seafood cooks quickly, teriyaki works best as a glaze and finishing sauce rather than a long marinade that might break down the texture.
20. What are some fun, non-traditional ways to use teriyaki sauce?
Once you have a reliable teriyaki sauce recipe, you can take it far beyond the usual rice bowls. Use it as the base for teriyaki chicken pizza (spread a thicker glaze on the crust, add cooked chicken, onions and peppers, then bake with cheese), or brush burgers and meatballs with teriyaki as they grill for a sweet–savory crust. Toss roasted potatoes or sweet potatoes in a reduced teriyaki glaze for a sticky side dish, or drizzle a thinner sesame–ginger version over grain bowls and chopped salads. The same core sauce can anchor everything from party snacks to weeknight comfort food.
Some recipes are just dinner. A really good bolognese sauce recipe becomes a whole system.
Once you’ve got a pot of slow-cooked ragù on the stove, you can spin it into classic spaghetti bolognese, tagliatelle al ragù that feels straight out of Emilia-Romagna, cosy lasagna bolognese, baked bolognese pasta, gnocchi bolognese on a chilly night, or even lighter veggie spaghetti bolognese and lentil bolognese bowls for busy weekdays.
This guide goes deep into bolognese in all its forms:
The authentic Italian ragù alla bolognese from Bologna
Home-style spag bol and traditional spaghetti bolognese
Quick, weeknight bolognese shortcuts and jar-sauce hacks
Vegetarian bolognese, vegan bolognese sauce, and mushroom bolognese
Ideas for lasagne ragu bolognese, baked bolognese pasta, and every pasta shape from rigatoni to tagliatelle
By the end, “bolognese” won’t be one recipe in your head—it’ll be a whole category you can play with.
What Bolognese Actually Is (and Why Italians Side-Eye Spag Bol)
If you’ve ever had an Italian tell you that “spaghetti bolognese doesn’t exist,” they’re not (entirely) being dramatic.
In Bologna, ragù alla bolognese is a very specific thing. The Accademia Italiana della Cucina even filed an official ragù recipe with the Chamber of Commerce, with coarsely ground beef, pancetta, onion, carrot, celery, wine, tomato, stock, and milk, cooked for hours until thick and glossy. It’s a meat sauce first, not a tomato sauce with mince floating in it, and it’s meant for fresh egg pasta like tagliatelle, not dry spaghetti.
Authentic ragù alla bolognese vs spaghetti bolognese: in Italy, bolognese is a slow-cooked, meat-first ragù served with fresh egg tagliatelle, while the global “spag bol” is a brighter, tomato-rich meat sauce on dry spaghetti.
That “real bolognese” has a few defining features:
The sauce is meat-forward, with tomato playing a supporting role
Milk or cream is added later to soften the acidity and give a subtle creamy bolognese texture
It’s traditionally served as tagliatelle al ragù or used as bolognese for lasagna, not piled on spaghetti
Outside Italy, the story twists. In the UK, Australia and beyond, “bolognese” usually means something closer to a rich tomato meat sauce. Classic spaghetti bolognese, basic spag bol recipe versions, healthy spag bol with hidden veg, easy spaghetti bolognese sauce made with a jar—all of those grew from the same idea, but in a different direction.
Instead of choosing between “authentic” and “comfort,” you can have both. Start with a traditional bolognese recipe that respects its roots, then build outwards into weeknight bolognese, veggie hack bolognese, and everything else you actually want to eat during the week.
Traditional Ingredients for Bolognese Sauce Recipe
Every variation starts with a few simple, powerful building blocks. If you understand those, you can improvise comfortably, whether you’re aiming for an authentic bolognese recipe, a healthier spag bol, or a vegetarian bolognese sauce.
Aromatic Sofritto
At the base of almost every traditional bolognese sauce recipe sits soffritto: finely chopped onion, carrot and celery gently cooked in fat until sweet and soft. This mixture is what gives depth and sweetness to both traditional spaghetti bolognese and more modern bolognese pasta recipes.
For four to six servings, a classic soffritto might be:
1 small onion
1 small carrot
1 celery stalk
If you’re making a big pot for bolognese for lasagna, baked bolognese pasta or bolognese lasagne, you can easily double that.
Traditional bolognese in four parts: soffritto for sweetness, beef and pork (plus lentils and mushrooms if you’re going veggie), a little tomato with wine and stock, and milk or cream to round the sauce into a classic ragù.
The Meat (or Meat Alternatives)
Traditional bolognese ingredients usually include:
Minced beef (often from a flavourful cut like chuck)
Sometimes pork mince or pancetta for sweetness and fat
That’s the foundation of beef bolognese, beef bolognese sauce and the best bolognese meat sauce recipes. However, the same structure works brilliantly with:
Pork mince for a softer bolognese with pork mince
A mix of beef and pork in classic spaghetti bolognese recipe variations
Turkey mince bolognese for a leaner, healthy spaghetti bolognese
Lamb mince for a slightly gamey, richer bolognese meat
Short ribs or even wagyu in special-occasion bolognese with short ribs or wagyu bolognese
Quorn bolognese with soya or mycoprotein mince for a vegetarian spaghetti bolognese
And beyond meat, lentils, mushrooms and walnuts can create a surprisingly convincing plant based bolognese, which we’ll get to in detail later.
Tomato, Wine and Stock
Authentic Italian bolognese sauce ingredients keep tomatoes modest. Instead of drowning the meat, tomato supports it:
A spoonful of tomato paste for colour and savoury depth
A cup or so of passata or crushed tomatoes
A good splash of red or white wine
Enough stock to give the sauce room to simmer and reduce
In more modern bolognese spaghetti bolognese recipes, you might see more tomato, especially in quick spag bol recipe easy variants or easy bolognese pasta that lean towards marinara. That’s still fine, as long as you keep the flavours balanced and let it cook down until rich rather than watery.
Dairy: Milk and Cream
One of the most surprising traditional bolognese sauce ingredients is milk. Many home cooks first meet this idea via Marcella Hazan’s bolognese, a justly famous recipe that finishes the ragù with warm milk to soften acidity and add silkiness.
Whether you’re following Marcella Hazan bolognese, a Serious Eats style authentic bolognese ragu recipe or your own family version, adding milk or a splash of cream at the end turns a basic meat and tomato sauce into something closer to classic bolognese sauce.
Authentic Bolognese Sauce (Traditional Ragù alla Bolognese Recipe)
Let’s start with an authentic bolognese sauce recipe you’d be happy to serve to an Italian. It’s a little closer to the official Bologna versions and to classic recipes from cooks like Marcella Hazan, but written for a home kitchen.
Think of this as your traditional bolognese recipe: deep, savoury, and patient. It’s perfect for bolognese lasagne, bolognese rigatoni or bolognese tagliatelle, and can still double up as a killer spaghetti bolognese sauce if that’s what the table expects.
Authentic bolognese sauce in the pot: after two to three hours of gentle simmering, the ragù should be thick, glossy and meat-first, leaving a trail when you drag a spoon through it—ready for that final splash of milk and a pinch of nutmeg.
Ingredients for Traditional Bolognese
For about 6–8 portions of classic bolognese sauce:
2 tbsp olive oil or a mix of oil and butter
75–100 g finely diced pancetta or streaky bacon
1 small onion, finely chopped
1 small carrot, finely chopped
1 small celery stalk, finely chopped
500 g beef mince (20% fat works well)
150–200 g pork mince or extra beef (for bolognese with pork mince, just split 50/50)
150 ml dry red or white wine
350–400 g tomato passata or crushed tomatoes
1–2 tbsp tomato paste
400–500 ml light stock (beef, chicken or vegetable)
200 ml whole milk (for that silky, creamy bolognese sauce finish)
Salt, black pepper
Pinch of nutmeg (classic in authentic bolognese sauce)
Those same ingredients work as the core bolognese ingredients list whether you’re doing tagliatelle bolognese, bolognese lasagne, or a big pan of bolognese rigatoni. You’ll notice how close this is to the Bologna and Accademia versions – same structure, just rounded in home-cook language.
Step-by-Step Method of Authentic Bolognese Sauce Recipe
Step 1 – Start with the pancetta and soffritto
Pour the olive oil into a heavy-bottomed pot (a Dutch oven is ideal) and set it over low–medium heat. Add the diced pancetta to the cold oil so the fat has time to slowly render rather than seize up and burn.
Step 1 – Build the base flavour: cook onion, carrot, celery and pancetta slowly until they’re soft, glossy and sweet. If the soffritto browns, the whole bolognese will taste harsher.
As the pancetta turns lightly golden and the fat melts out, stir in the finely chopped onion, carrot and celery. Keep the heat gentle; you’re sweating the vegetables, not frying them.
Stir every few minutes so nothing catches.
If the edges start to brown too fast, lower the heat.
After 10–15 minutes, the soffritto should be soft, glossy and smell sweet rather than sharp.
You’re building the foundation of flavour here. A patient soffritto is what makes the sauce taste like bolognese, not just “mince in tomato.”
Step 2 – Brown the mince properly
Once the vegetables are silky and fragrant, add the beef and pork mince to the pot along with a generous pinch of salt. Use a wooden spoon to break the mince up into small pieces, mixing it thoroughly through the soffritto.
Step 2 – Brown for real flavour: keep cooking after the mince turns grey; wait until the liquid evaporates and you see deep brown, caramelised bits. That’s what gives bolognese its savoury backbone.
Raise the heat slightly so the meat sizzles rather than steams.
At first, the mince will release liquid and look grey. Keep going.
Continue cooking, stirring occasionally and scraping the bottom, until that liquid evaporates.
You’re aiming for the meat to lose its raw colour and start taking on little browned, caramelised spots.
This is the point where the mince moves from “cooked” to “tasty.” The browning reactions happening here are what give a real bolognese ragù its deep savoury backbone. Don’t rush this step; it’s often the difference between an average sauce and a great one.
Step 3 – Deglaze with wine
When the mince is evenly browned and you can see some browned bits stuck to the bottom of the pot, pour in the wine. You should hear a lively hiss as the liquid hits the hot surface.
Step 3 – Deglaze the pot: add wine and scrape the bottom so every browned bit dissolves into the sauce. That’s how you turn caramelised scraps into deep bolognese flavour instead of burnt residue.
With your spoon, scrape along the base of the pot to loosen those caramelised bits into the wine. That’s pure flavour dissolving back into the sauce.
Let the wine bubble briskly for a few minutes.
You’ll see the steam change from sharp and alcoholic to softer and winey.
Stop when the pot looks mostly dry again and the meat smells rich, not boozy.
Deglazing does two things at once: it cleans the bottom of the pot and pulls all that stuck-on goodness into the sauce, while the acidity of the wine brightens the eventual richness of the ragù.
Step 4 – Add tomato and stock
Now stir in the tomato paste and cook it for a minute or so, letting it darken slightly. This cooks off any raw acidity and boosts the tomato flavour.
Step 4 – Create the ragù base: once the wine has reduced, stir in tomato and stock until the meat is just submerged and the mixture looks like a loose stew. It will thicken and concentrate later as it simmers.
Next, add the passata or crushed tomatoes and pour in enough stock to loosen everything into a thick, stew-like mixture. The meat should be fully submerged but the sauce should still feel substantial, not watery.
Give everything a good stir so the tomato, stock and mince are evenly mixed.
At this stage, the sauce will look looser than a finished bolognese—that’s exactly how it should be.
You’ve assembled all the players. The rest of the magic comes from low, slow cooking.
Step 5 – Simmer low and slow
Bring the pot just up to a simmer. As soon as you see steady bubbles, lower the heat to the point where you only see the occasional lazy blip on the surface.
Step 5 – Low & slow magic: keep the heat just high enough for lazy bubbles and let the ragù gently reduce for a couple of hours. When it’s thick, glossy and clinging to the spoon, you’re ready for the final finish.
Set the lid slightly ajar so steam can escape and the sauce can reduce. Now let time do its work.
Stir every 20–30 minutes, making sure nothing is sticking at the bottom.
If the sauce looks too thick or starts to catch, add a small splash of stock or water.
If it still looks quite liquid after an hour, don’t worry—flavour is concentrating as it reduces.
Over two to three hours, the ragù will gradually transform:
The sauce thickens and clings to the spoon.
The fat and liquid emulsify rather than separating into layers.
The vegetables almost disappear into the sauce, leaving sweetness behind.
You’ll know it’s close when a spoon dragged across the bottom leaves a faint trail before the sauce slowly flows back.
Step 6 – Finish with milk and nutmeg
When the ragù is thick, unified and deeply fragrant, pour in the milk (or milk and cream mixture). Stir it through and keep the heat low so it barely simmers.
Step 6 – Finish the ragù: stirring in milk at the end softens the acidity of the wine and tomato and gives the bolognese a mellow, silky texture that tastes unmistakably “Italian” rather than just mince in tomato sauce.
Let it cook gently for another 20–30 minutes. The dairy will:
Soften any remaining sharpness from the wine and tomato
Give the sauce a subtle, velvety richness
Add that characteristic mellow note you notice in authentic bolognese
Taste and adjust the seasoning with salt and pepper. If you like, grate in a small pinch of nutmeg—a traditional touch that adds warmth without making the sauce taste “spiced.”
Result
At this point, the ragù should be:
Thick but still spoonable
Glossy, with no oily layer sitting on top
Savoury, gently sweet, and in no way overtly tomatoey
That’s your “real bolognese sauce”—the sort of ragù you’d happily ladle over fresh tagliatelle or fold into a lasagne ragu bolognese with béchamel, cuddle with gnocchi, or be portioned into containers for future pasta nights.. If you want to compare ratios and methods, Marcella Hazan’s bolognese sauce is still one of the most respected versions in English, and you’ll see how similar the bones really are.
Authentic ragù alla bolognese: thick, meat-first sauce clinging to fresh tagliatelle, the way it’s actually served in Bologna – and just as happy layered into lasagne or spooned over gnocchi.
This traditional bolognese sauce recipe is your workhorse. Use it for:
Tagliatelle with bolognese sauce or linguine with bolognese sauce
Bolognese for lasagna (with béchamel or cottage cheese layers)
Baked gnocchi bolognese or baked bolognese spaghetti in one pot
Classic Spaghetti Bolognese (Easy, Traditional Spag Bol)
Now for the dish most people actually cook every week: spaghetti bolognese. It may not be canonical in Bologna, where they prefer egg pasta, spaghetti bolognese is a classic in countless homes isn’t going anywhere – so let’s make it as good as it can be.
Here’s a straightforward spaghetti bolognese recipe that gives you that cosy, slightly tomato-richer flavour a lot of families love:
Ingredients for Classic Spaghetti Bolognese
2 tablespoons olive oil
1 onion, finely diced
1 carrot and 1 celery stalk, finely diced
2 cloves garlic, minced
500 g beef mince (or a mix of beef and pork)
150 ml red wine (optional but nice)
400 g can chopped tomatoes
1 tablespoon tomato paste
250–300 ml beef or vegetable stock
1–2 teaspoons dried mixed Italian herbs
Salt, pepper, pinch of sugar if needed
400–500 g dried spaghetti
Classic spaghetti bolognese: a cosy, tomato-rich spag bol you can cook in 30–40 minutes. Build a quick soffritto, brown the mince, simmer with tomatoes, stock and herbs, then toss the spaghetti with the sauce and a little pasta water so it clings instead of sliding off.
How to Make Classic Spaghetti Bolognese
Sauté onion, carrot, and celery in olive oil until soft and lightly golden.
Add the garlic and cook for a minute.
Stir in the mince with salt and pepper, then cook until browned.
Mix in the tomato paste and let it toast slightly.
Pour in the wine and let it simmer down.
Add chopped tomatoes, stock, and dried herbs.
Let everything simmer for 30–40 minutes, stirring occasionally, until thick.
Meanwhile, cook the spaghetti until al dente. Instead of dumping sauce on top of plain pasta, toss the spaghetti into a pan with the sauce and a ladle of pasta water. Stir over the heat for a minute so the starch, water, and sauce form a light coating that clings, the way every good spaghetti bolognese sauce should.
From that basic structure, you can riff endlessly:
Make a traditional spaghetti bolognese by adding a splash of milk near the end.
Turn it into healthy spaghetti bolognese by swapping some of the mince for mushrooms and grated carrot.
Use pork mince spaghetti bolognese for a slightly softer, milder profile.
Make a simple bolognese recipe with no wine by just using extra stock and tomato.
The ingredients to make spaghetti bolognese are also forgiving. A handful of chopped mushrooms or zucchini can disappear into the pot and give you a subtle bolognese with veggies effect without making it feel like a health compromise.
Quick Bolognese, Weeknight Bolognese and Jar Hacks
On a Wednesday night, you may not feel like simmering a sauce for hours. That’s when easy bolognese recipes and jar-sauce upgrades get you out of trouble.
Easy Bolognese Sauce Recipe with Jarred Sauce
Think of this as “weeknight bolognese” rather than “perfect ragu”, a quick weeknight bolognese or easy spaghetti bolognese sauce can still be serious:
Soften a chopped onion and a small amount of carrot and celery in olive oil.
Brown 400–500 g mince (beef, turkey, or a mix) in the same pan.
Pour in a jar of decent tomato sauce or plain passata.
Rinse the jar with a little stock or water and add that too.
Season with bay leaf, oregano, thyme, salt, and pepper.
Simmer for 15–20 minutes while you cook the pasta.
Stir in a dash of milk or cream at the end to give it that almost creamy bolognese sauce feel.
To make a bolognese mix like this taste homemade, spices for spag bol really matter. You don’t need anything exotic—just use fresh dried herbs, grind your pepper, and let the sauce cook for at least a bit so flavours meld instead of tasting raw.
Weeknight bolognese from a jar: soften a little soffritto, brown the mince, then let a decent jar of sauce simmer with stock, herbs and a dash of milk or cream. In 20 minutes you get a bolognese that tastes far more “homemade” than its ingredients suggest.
You can then:
Toss through penne for a quick penne bolognese
Turn it into baked bolognese pasta by mixing with rigatoni, topping with cheese and baking
Layer it with lasagna sheets and béchamel for a very speedy lasagna bolognese
If you want more inspiration for turning jarred sauces into satisfying meals, the cottage cheese lasagna recipe on MasalaMonk is a good example of how a few simple tweaks can upgrade convenience ingredients into something that feels handmade.
One-Pot Bolognese Sauce Recipe and Baked Variations
Once you’ve accepted that weeknight bolognese can be quick, it opens up other possibilities:
One pot pasta bolognese: toast the pasta briefly in the pot, then add sauce and water and cook until everything is done at once.
Baked bolognese spaghetti: parboil spaghetti, mix with a thick sauce, scatter mozzarella and Parmesan, and bake until bubbling.
Baked gnocchi bolognese: toss gnocchi with sauce in a baking dish, top with cheese, and cook until the top is crisp and the inside is soft and saucy.
For a soupier, spoonable take on these flavours, MasalaMonk’s crock pot lasagna soup shows how to translate a thick meat sauce into a brothy, noodle-filled bowl. You can absolutely use leftover bolognese for that.
Meat Variations: Beef, Pork, Turkey, Lamb & Short Ribs
Once your basic bolognese sauce recipe is under control, changing the meat is an easy way to keep things interesting.
Everyday Mince: Beef, Pork, Turkey
The classic is beef bolognese sauce: all beef, cooked slowly until deep-flavoured. For a slightly sweeter, softer ragu, bolognese with pork mince or a half-and-half beef and pork mixture works beautifully.
Everyday bolognese meats: beef gives that classic, deep flavour; pork adds softness and a gentle sweetness; turkey or chicken makes a lighter, leaner sauce that still clings beautifully to pasta if you support it with good soffritto and stock.
When you want something lighter, turkey bolognese and turkey mince bolognese can be surprisingly satisfying. Turkey needs a bit more help from olive oil, soffritto and stock, but if you give it time, you still get a rich, clingy sauce that pairs nicely with penne, rigatoni or spaghetti.
Chicken mince behaves in a similar way. Combined with white wine, plenty of herbs and maybe a little cream, it leads toward a lighter bolognese cream sauce that feels somewhere between ragù and a rustic chicken pasta.
Rich Cuts and Slow Braises
Then there are the “event” versions:
Lamb bolognese: fantastic with rosemary, red wine, and pappardelle.
Wagyu bolognese: intensely rich, so best with sturdier pasta and smaller portions.
Beef short rib bolognese or bolognese with short ribs: braise the ribs in the sauce, shred the meat, and fold it back in.
Rich cuts for “event” bolognese: lamb loves rosemary and red wine, beef short ribs turn melting and silky when braised then shredded into the sauce, and wagyu brings so much richness that a little goes a long way in a luxurious ragù.
These richer versions shine in bolognese bechamel lasagna or in a big tray of rigatoni bolognese baked under a blanket of cheese. Once you’ve put in that kind of effort, it’s also worth stretching the leftovers: spooning some of the sauce over rice, polenta, or even into a bolognese and rice bake for a second dinner.
A vegetarian bolognese recipe shouldn’t feel like a consolation prize. The best versions still lean on soffritto, browning, deglazing and long simmering; they just use a different “mince.”
Lentil & mushroom vegan bolognese: proof that a plant-based ragù can still feel like proper comfort food—high in protein and fibre, rich with umami from lentils and mushrooms, and perfect over wholegrain spaghetti or tagliatelle.
Lentil Bolognese Sauce: The Classic Plant-Based Recipe
For a basic lentil bolognese recipe, you can follow almost exactly the same steps as the meat version:
Cook onion, carrot, and celery slowly in olive oil.
Add a cup of rinsed green or brown lentils and toast them briefly.
Stir in tomato paste, chopped tomatoes, herbs and stock.
Simmer until the lentils are tender and the sauce is thick.
The result is a lentil bolognese sauce that’s earthy, robust, and surprisingly “meaty” over spaghetti or tagliatelle. For a stripped-back, pantry-friendly version, this red lentil bolognese from Rainbow Plant Life is a brilliant reference: just a handful of ingredients, but a lot of depth thanks to wine, nuts and long simmering.
If you’re curious about using lentils instead of meat more broadly, MasalaMonk’s lentil meal prep ideas show how lentil bolognese slots into a week of plant-based high-protein meals alongside curries, stews and salads.
Mushroom Bolognese Sauce and Veggie Hack Bolognese Recipe
When you want something closer in appearance to mince, mushroom bolognese is your friend:
Finely chop mushrooms (a food processor helps)
Dry-fry them until they release their water and start browning
Build the rest of the sauce around them as usual
This style of mushroom bolognese works nicely in traditional spaghetti bolognese recipes, but it really shines with rigatoni, macaroni or other short pasta shapes where the mushroom pieces can tuck into the hollow spaces.
For a seriously convincing plant based bolognese, combining mushrooms and lentils gives you both chew and richness. The lentil and mushroom bolognese at Lazy Cat Kitchen is a textbook example: a deep, umami-packed ragù that just happens to be vegan.
Plant-based bolognese swaps: lentils give you a hearty base, mushrooms add umami and chew, walnuts bring richness and bite, and plant mince works as an easy 1:1 swap for meat in vegan or vegetarian ragù.
Fully Vegan Recipe of Bolognese Sauce
A good vegan bolognese recipe still relies on:
Soffritto for sweetness
Mushrooms for savoury depth
Lentils, textured soy, or plant mince for protein
Wine, stock and tomato for structure
If you swap dairy milk for oat, soy or cashew milk at the end, and use olive oil plus nutritional yeast instead of butter and Parmesan, you end up with a vegan bolognese sauce that behaves almost exactly like the traditional ragù.
For a glimpse at how hearty that can be, Lazy Cat Kitchen’s protein-rich vegan bolognese pairs wholemeal pasta with lentils and walnuts in a way that feels like a post-gym meal more than a “diet dish”.
And if you like building whole weeks of plant-based meals around pasta, sauce, and high-protein ingredients, MasalaMonk’s high-protein pasta dishes are full of ideas that sit comfortably next to a veggie bolognese on your rotation.
Pasta for Bolognese: Tagliatelle, Rigatoni, Penne, Gnocchi & More
Once the sauce is ready, the shape of the pasta changes everything. Each shape has its own vibe, and bolognese plays differently with each.
Tagliatelle, Pappardelle and “Proper” Pairings
In Bologna, the canonical order is tagliatelle al ragù: fresh egg pasta ribbons with a slightly rough surface that cling to the sauce. When you see tagliatelle with bolognese sauce on a menu in Italy, that’s usually what you’re getting.
You can extend that logic to:
Bolognese tagliatelle for Sunday lunch
Bolognese with pappardelle when you’ve got a richer, chunkier sauce
Lasagne ragu bolognese, where sheets of pasta alternate with ragù and béchamel
These pairings make the most sense when you’re using a more traditional bolognese sauce recipe—meat-forward, modest tomato, a long simmer.
Best pasta shapes for bolognese: tagliatelle is classic with authentic ragù, rigatoni and penne shine with chunkier or baked bolognese, spaghetti carries the global “spag bol” favourite, while gnocchi and lasagne turn the same sauce into cosy oven bakes.
In real life, you’re often cooking with whatever’s in the cupboard. Happily, bolognese is democratic:
Spaghetti bolognese: the iconic spag bol, easy to twirl and kid-friendly.
Rigatoni bolognese: hollow tubes that hold little pockets of sauce, perfect for chunkier ragù.
Penne with bolognese sauce: easy to eat with just a fork, brilliant in lunchboxes.
Bolognese macaroni: a comfort classic that feels like a halfway point between ragù and mac and cheese.
As long as you cook the pasta to al dente and finish it in the sauce with a bit of pasta water, nearly any shape will work. If you want to switch things up entirely, you can even step into low-carb territory and turn a thick sauce into spaghetti squash bolognese or spoon it over roasted vegetables.
If you’re in a pasta-sauce mood generally, and not just in a bolognese one, MasalaMonk’s pesto recipes are a nice counterpoint: classic basil pesto, vegan pesto, and even Indian-twist pesto for the days when you want something fresh and herb-forward rather than slow-cooked and meaty.
Lasagna, Gnocchi and Other Vehicles for Bolognese
Bolognese doesn’t have to live only on pasta shapes. It’s just as happy:
Layered in a lasagna bolognese with béchamel and Parmesan
Stirred through gnocchi and baked under a cheesy crust
Spread on toasted bread as a kind of Italian sloppy joe
Spoon-ladled over polenta or mashed potatoes on a cold night
Lasagna bolognese: the smartest way to use leftover ragù—just layer it with lasagne sheets, béchamel and cheese, then bake until the top is blistered and golden.
If you’re in a lasagna mood, the béchamel sauce for lasagna guide on MasalaMonk walks through not only classic white sauce but also cottage-cheese-based and vegan versions, so you can tune your lasagna bolognese recipe to your crowd.
Seasoning, Spices and That “Secret” Bolognese Depth
A lot of people look for bolognese seasoning or spices for spag bol as if there’s a magic sachet that turns mince and tomato into a traditional bolognese sauce. In reality, the “secret” is more about technique than ingredients.
What Really Makes a Bolognese Taste Deep
Three habits matter more than any spice mix:
Browning Let the meat and vegetables brown slowly. Colour equals flavour, especially on the bottom of the pan.
Deglazing and reducing Use wine or stock to dissolve those browned bits, then reduce until the sauce tastes concentrated instead of watery.
Time Whether you’re using a slow cooker bolognese recipe, a stovetop pot, or even a pressure cooker, it takes time for everything to meld into a unified ragù instead of feeling like separate components.
The real “secret” to bolognese depth: it isn’t a magic spice mix, it’s taking time to brown the meat and soffritto properly, deglaze with wine to capture all the flavour, and let the sauce slowly reduce until it tastes rich before you even reach for herbs.
For herbs and spices in a proper bolognese recipe:
Keep it classic: bay leaf, oregano, thyme, black pepper
Go easy on strong dried herbs so the meat shines
Use a pinch of nutmeg in the milk phase for warmth
Once you’ve built that base, you can safely adjust heat (chilli flakes), sweetness (a tiny pinch of sugar if tomatoes are sharp) or richness (extra olive oil or butter at the end).
Because bolognese is rich, people often look for healthy spaghetti bolognese, healthy pasta bolognese, or lighter spag bol ideas that don’t feel like punishment.
Healthy spaghetti bolognese: swap in wholegrain pasta, add extra veg like mushrooms, carrot and zucchini, and use leaner mince or part-lentils so you keep the cosy bolognese feel without the heavy aftermath.
Here are a few ways to nudge your bolognese in that direction without losing what makes it comforting:
Swap part of the mince for finely chopped mushrooms and grated carrot: this instantly turns it into a quiet bolognese with veggies.
Use lentils in place of half (or all) of the meat for a lentil bolognese recipe that’s high in fibre and protein.
Choose wholegrain pasta, legume pasta, or even serve the sauce over roasted vegetables or spaghetti squash.
Skim excess fat from the surface of the sauce after it cools; the flavour stays, but the heaviness goes down.
It also helps to think of bolognese as one rich meal among many. If you combine bowls of classic spaghetti bolognese or lasagna bolognese with days built around high-protein salads and lighter pasta dishes—like the healthy tuna salad bowls or plant-based pasta ideas on MasalaMonk—you get the comfort without feeling weighed down by it.
Pulling It All Together
By now, bolognese should feel less like a single fixed recipe and more like a whole family of dishes:
Authentic bolognese ragu for long, lazy cooking days
Classic spaghetti bolognese and traditional spag bol for weeknight comfort
Easy bolognese sauce recipe variations with jarred sauce when time is tight
Rich bolognese with pork mince, turkey bolognese, lamb ragù or short rib bolognese depending on your mood
Vegetarian bolognese sauce, vegan bolognese, lentil bolognese and mushroom bolognese when you want plant-based days
Lasagna bolognese, baked bolognese pasta, and gnocchi bolognese for oven-baked cosiness
The Bolognese Playbook: start with one good ragù, then decide whether tonight is for slow-cooked authentic tagliatelle, quick family spag bol, a jar-hack weeknight pan, or a lentil-and-mushroom vegan version.
Once you’ve made this kind of bolognese sauce recipe a few times, you stop worrying about exact amounts and start cooking by feel: a little more stock here, a little longer on the simmer there, maybe an extra splash of milk at the end. The sauce tells you what it needs.
And the best part? Leftovers never feel like leftovers. They feel like a head start on the next meal—whether that’s a quick bowl of pasta bolognese, a slice of lasagne ragu bolognese, or a new experiment you haven’t named yet.
Leftover bolognese game plan: cool the sauce, stash portions in the fridge for 3–4 days or freeze for up to 3 months, then reheat with a splash of water or stock and turn it into quick pasta bowls, lasagna, baked gnocchi or rice bakes.
FAQs About Bolognese Sauce & Its Recipe
1. What makes an authentic bolognese sauce recipe different from regular meat sauce?
An authentic bolognese sauce recipe is built around slowly cooked meat and soffritto rather than a big hit of tomato. The sauce is thick, savoury and almost stew-like, with wine, stock and milk creating depth and balance. By contrast, a basic meat sauce or quick spag bol is usually more tomato-led, brighter, and cooked in a fraction of the time.
2. Is spaghetti bolognese actually Italian?
Spaghetti bolognese as most people know it is more of an international classic than a dish you’ll find in traditional trattorias in Bologna. In Italy, ragù alla bolognese is normally served with fresh tagliatelle or tucked into lasagne. Even so, spaghetti bolognese has become a beloved comfort food in many countries, so you can still enjoy it without feeling “wrong.”
3. Which pasta shape really works best for bolognese sauce?
For a truly authentic feel, fresh tagliatelle is considered the ideal partner for ragù alla bolognese because its broad, slightly rough ribbons capture the sauce so well. Nevertheless, rigatoni, penne, pappardelle and even macaroni bolognese all carry a hearty meat sauce beautifully. Spaghetti bolognese remains popular too, especially for everyday family dinners.
4. How is ragù alla bolognese different from a simple spag bol recipe?
Ragù alla bolognese is traditionally cooked for hours with a modest amount of tomato, plenty of soffritto, wine, stock and milk, resulting in a dense, clingy sauce. A simple spag bol recipe tends to be quicker, more tomato-heavy and often uses more dried herbs and garlic. Both are tasty, but the ragù is usually deeper and more rounded in flavour.
5. How long should I simmer an authentic bolognese sauce?
For a traditional bolognese sauce recipe, you’ll usually want at least two hours of gentle simmering, and three is even better if you have the time. During that period, the liquid reduces, the flavours concentrate and the meat softens into the sauce. Once the ragù is thick, glossy and no longer tastes sharply of tomato or wine, it’s ready.
6. Can I still make a good easy bolognese recipe on a weeknight?
You can absolutely create a satisfying easy bolognese recipe without devoting your whole evening to it. If you brown the mince properly, use a quick soffritto, add a decent tomato base and let it simmer even for 20–30 minutes, you’ll get far better flavour than a five-minute fry-up. A dash of milk or cream at the end nudges it closer to classic ragù.
7. Why does my bolognese sauce sometimes turn out watery?
A watery bolognese usually means too much liquid and not enough reduction time. If the sauce still looks thin, keep simmering with the lid off so steam can escape and the ragù can thicken naturally. Reducing slowly allows the flavours to concentrate instead of leaving you with a diluted, soupy bolognese.
8. What role does milk or cream play in bolognese sauce?
Milk or cream softens the acidity of the tomatoes and wine while giving the sauce a subtle silkiness. It also helps the fat and liquids emulsify so the ragù looks unified rather than split. Traditionally, dairy is added near the end of cooking so it gently transforms the sauce without curdling.
9. How can I make a healthier spaghetti bolognese without losing flavour?
For a healthier spaghetti bolognese, you can replace some of the mince with finely chopped mushrooms, lentils or extra vegetables like grated carrot and zucchini. You might also use leaner turkey or chicken mince and pair the sauce with wholegrain or legume pasta. With good browning and patient simmering, you’ll still get plenty of flavour even with these lighter tweaks.
10. What meat mixture works best in a classic bolognese meat sauce?
A blend of beef and pork mince is often considered the sweet spot for a classic bolognese meat sauce. The beef brings a deep, robust flavour, while the pork adds tenderness and a faint sweetness. You can adjust the ratio either way depending on whether you prefer something richer or more straightforward.
11. Can I use turkey or chicken mince for bolognese instead of beef?
Turkey mince bolognese and chicken versions are perfectly workable and can be lighter in fat. Because these meats are lean, it helps to use a generous soffritto, enough olive oil and a good stock to keep the sauce moist and flavourful. With a bit of extra patience, you’ll end up with a comforting but less heavy bolognese.
12. How is beef short rib bolognese different from regular mince bolognese?
Beef short rib bolognese starts with whole ribs slowly braised in the sauce until the meat falls off the bone. Once shredded, the beef has a luxurious, silky texture and a deeper flavour than standard mince. This style of ragù is particularly suited to pappardelle or lasagna bolognese for special occasions.
13. Which spices and herbs are best for spag bol seasoning?
Simple, classic flavours tend to work best for spag bol seasoning: bay leaf, oregano, thyme, black pepper and a hint of nutmeg. When you brown the meat properly and deglaze the pan with wine, you often need only modest amounts of dried herbs. Heavy-handed seasoning can overwhelm the slow-cooked taste that makes bolognese special.
14. Can vegetarian bolognese really feel as satisfying as the meat version?
A well-made vegetarian bolognese can be every bit as comforting as a traditional one if you treat it with the same care. Lentils, mushrooms, or plant-based mince can be browned, deglazed and simmered with soffritto, tomato and stock just like meat. The result is a sauce with real body and depth rather than a thin vegetable stew.
15. How do I turn a regular bolognese into a vegan bolognese sauce?
To make a vegan bolognese sauce, simply replace the meat with lentils, mushrooms or plant mince and use vegetable stock instead of meat stock. Later on, swap dairy milk for a plant milk such as oat or soy, or skip the milk entirely and finish with olive oil and nutritional yeast. The method stays the same, so you keep the comforting ragù texture.
16. Is lentil bolognese a good option for spaghetti or just for other shapes?
Lentil bolognese works very well with spaghetti because the lentils cling nicely to the long strands. Green or brown lentils give a pleasantly firm texture, while red lentils melt into a softer, creamier sauce. Either way, you get a high-protein, high-fibre bowl that still tastes like a proper pasta bolognese.
17. What exactly is mushroom bolognese and how should I use it?
Mushroom bolognese relies on finely chopped mushrooms browned until they mimic the texture and flavour of mince. Once they’re deeply golden, you add the usual soffritto, tomato and herbs so the sauce develops that familiar bolognese profile. It’s fantastic with tagliatelle, rigatoni or even layered into a vegetarian lasagne.
18. Can I use bolognese sauce directly for lasagna ragu bolognese?
Yes, bolognese sauce is the classic base for lasagna ragu bolognese, as long as it’s thick enough to hold its shape between layers. You simply combine it with sheets of pasta and a béchamel or white sauce before baking. If your sauce is a bit thin, simmer it a little longer until it becomes more concentrated.
19. Is bolognese good for pasta bakes like baked gnocchi bolognese?
Bolognese is ideal for pasta bakes because it already has the rich, clingy texture you want. You can mix it with cooked gnocchi, penne or rigatoni, add cheese on top and bake until bubbling. The oven time adds a new layer of flavour, turning leftover ragù into an entirely fresh meal.
20. How much bolognese sauce should I use per portion of pasta?
As a rough guide, many cooks aim for enough bolognese to generously coat the pasta without creating a soup. Typically, that means pairing 80–100 grams of dry pasta with about one good ladle or two large spoonfuls of sauce. If the pasta looks pale or dry after tossing, you can always add a little more.
21. Can I cook bolognese in a slow cooker or crock pot?
Bolognese adapts very well to slow cookers because it thrives on long, gentle heat. It’s still worth browning the soffritto and mince in a pan first, then transferring everything to the slow cooker with tomato, stock and seasoning. Several hours on low will give you a mellow, deeply flavoured slow-cooker bolognese.
22. Is it acceptable to use jarred sauce in an easy bolognese recipe?
Using jarred sauce is perfectly practical when you’re short on time. If you first build flavour with soffritto and browned mince, then pour in a jar of tomato sauce, you can still achieve a robust weeknight bolognese. Allowing it to simmer briefly and finishing with milk or cream makes it taste far more homemade.
23. How long can homemade bolognese sauce be kept in the fridge?
Homemade bolognese usually keeps well in the fridge for about three to four days if stored in an airtight container. It often tastes even better the next day after the flavours settle. Just be sure to reheat it thoroughly and add a splash of water or stock if it has thickened too much.
24. Can I freeze bolognese sauce, and if so, how should I do it?
Bolognese freezes extremely well, which makes it perfect for batch cooking. Once the sauce has cooled completely, portion it into containers or freezer bags and store it for up to three months. Later, you can thaw it gently in the fridge and reheat on the hob, adjusting the thickness with a little liquid if needed.
25. Why does my bolognese sometimes taste bland even after a long cook?
If your bolognese tastes flat, it often means something was missing at the browning stage or the sauce wasn’t reduced enough. Thoroughly caramelising the meat and vegetables at the start and letting the ragù cook down until concentrated usually solves this. A final check for salt, pepper and a tiny splash of acid (like extra wine or tomato) can bring it to life.
26. Can I make a bolognese sauce recipe without wine?
You can absolutely skip wine if you prefer not to cook with alcohol. In that case, you can use extra stock and perhaps a little tomato juice or vinegar to bring some brightness. As long as you still brown the meat properly and simmer the sauce long enough, you’ll end up with a satisfying bolognese.
27. What’s the best way to reheat leftover spaghetti bolognese?
For the best texture, it’s ideal to reheat the bolognese sauce separately and toss it with freshly cooked pasta. However, if everything is already mixed, warm it in a pan with a splash of water, stirring gently so the spaghetti doesn’t break too much. Once heated through, you can finish with a little fresh cheese or olive oil.
28. How do I turn regular bolognese into a richer, creamy bolognese sauce?
To create a creamier bolognese, you can stir in some milk, cream or mascarpone near the end of cooking and let it simmer briefly. This technique softens the sauce and adds a luscious texture without turning it into a full cream pasta. It works beautifully over tagliatelle or as a base for bolognese lasagne.
29. Is it a good idea to add extra vegetables to my bolognese?
Adding extra vegetables is a great way to build a veggie bolognese without losing the essence of the dish. Finely chopped mushrooms, carrots, celery, peppers or spinach can all melt into the sauce and boost nutrition. When they’re cooked down properly, you still taste “bolognese” rather than a random vegetable stew.
30. What can I do with leftover bolognese sauce apart from serving it with pasta?
Leftover bolognese is incredibly versatile, so it rarely needs to go back on spaghetti unless you want it to. You can spoon it over baked potatoes, tuck it into stuffed peppers, layer it into a small lasagne or bake it with gnocchi and cheese. It also makes a fantastic filling for toasted sandwiches, pies or even a bolognese and rice bake.