Posted on 7 Comments

Steel Cut Oats vs Rolled Oats: Nutrition, Taste, Cooking & More

STEEL CUT OATS VS ROLLED OATS

Oats are one of the healthiest, most versatile whole grains you can buy, but the options—steel cut oats and rolled oats especially—can leave even experienced cooks scratching their heads. What actually makes them different? Does one have a real advantage for health, flavor, or recipes? Here’s a practical, detailed breakdown that will make you an oats expert, with links only where you truly need more detail.


What Sets Steel Cut Oats Apart?

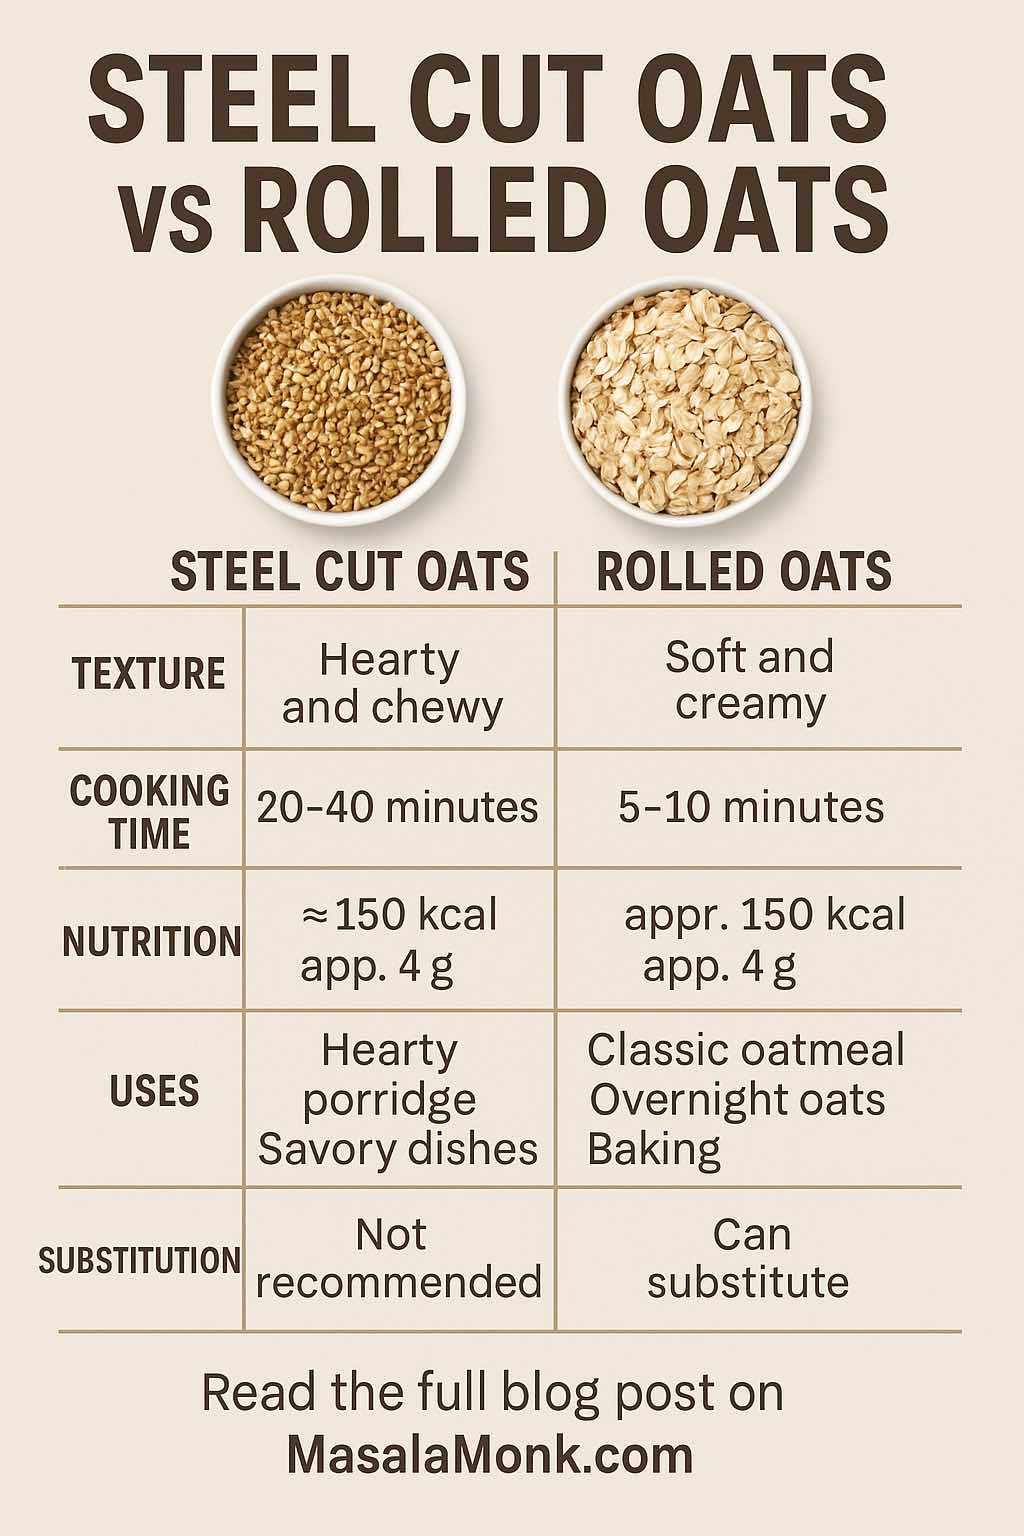
Steel cut oats (sometimes called Irish oats or pinhead oats) are made by chopping the whole oat groat into coarse pieces with steel blades. That’s almost all the processing they get—no flattening, rolling, or steaming. What does this mean for you?

  • Texture: Extremely hearty and chewy, with a distinct, nubby bite
  • Cooking time: 20–40 minutes on the stovetop, unless you soak or use a pressure cooker
  • Flavor: Robust, nutty, and full-bodied

Practical tip:
Steel cut oats are perfect for those who want their breakfast to feel substantial and filling. They keep their shape well, making them ideal for meal prep—just cook a batch and reheat through the week. For those who love savory breakfast bowls (think sautéed veggies, a runny egg, spices), steel cut oats give you the structure to carry those flavors.


Why Choose Rolled Oats?

Rolled oats—also known as old-fashioned oats—start the same way, but get steamed and then flattened into thin flakes by heavy rollers. That bit of extra processing changes everything:

  • Texture: Creamy and soft, with just enough chew to stay interesting
  • Cooking time: Super quick—just 5–10 minutes on the stovetop, or no cooking at all for overnight oats
  • Flavor: Mild, sweet, and easy to pair with fruits, spices, or honey

When to use rolled oats:
Rolled oats are the MVP of breakfast for busy mornings and for anyone who loves classic oatmeal. They also star in overnight oats, muesli, granola, pancakes, muffins, and cookies—offering just enough bite without any toughness. If you want to know more about substituting old-fashioned oats and rolled oats, check out this post on swapping the two in recipes.


Nutrition: Is There a Winner?

Steel cut oats and rolled oats are almost identical nutritionally. Both are whole grains, rich in fiber (especially beta-glucan, which is great for heart health), protein, and slow-digesting carbs. Here’s how they compare per 40g (about 1/2 cup dry):

TypeCaloriesFiberProteinFatGlycemic Index
Steel Cut~150~4g~5g~2.5g52
Rolled~150~4g~5g~2.5g59
  • Steel cut oats: Slightly lower glycemic index, digest more slowly, so you feel fuller longer.
  • Rolled oats: Slightly higher GI, but still a slow carb compared to most grains.

Bottom line: If you want oats for blood sugar management, weight loss, or heart health, both options are equally smart. The biggest difference is in texture and cooking time, not nutrition.


Taste & Texture: What’s Best for You?

Steel cut oats deliver a truly hearty, chewy, and substantial experience—like a rice or barley porridge. Each spoonful holds its shape and soaks up flavor slowly.
Rolled oats create the classic, creamy oatmeal you might remember from childhood, and take on the flavor of whatever you add: cinnamon, cardamom, apple, banana, or berries.

Use steel cut oats if:

  • You want a breakfast that sticks with you
  • You meal-prep porridge or like making savory oat bowls
  • You love a chewy, substantial bite

Use rolled oats if:

  • You want something quick and creamy
  • You love overnight oats or make granola/muffins often
  • You want oats to absorb flavors fast (great for sweet or spiced bowls)

Cooking, Prep, and Everyday Tips

Steel Cut Oats:

  • Stovetop: Simmer 1 part oats to 3–4 parts liquid for 20–40 minutes
  • Pressure Cooker: 10–12 minutes, natural release
  • Soak overnight to cut cook time in half
  • Batch-cook for the week; they reheat beautifully with a little milk

Rolled Oats:

  • Stovetop: 1 part oats to 2 parts liquid, ready in 5–10 minutes
  • Overnight Oats: Soak in equal parts milk/yogurt and oats overnight in the fridge—no cooking!
  • Microwave: 2–3 minutes for a creamy bowl on busy mornings
  • Bake into cookies, bars, or granola for added fiber and texture

Pro tip:
If you bake with oats, always use rolled/old-fashioned oats—steel cut are too tough for most baked recipes. Rolled oats give you the best of both worlds: nutrition, speed, and a little bite.


Can You Substitute One for the Other?

Not really, except for simple porridge. Steel cut oats are just too dense and require too much liquid for most recipes that call for rolled oats—especially baking and overnight oats. If a recipe calls for steel cut oats, using rolled oats will make the result much softer and creamier. For traditional oatmeal bowls, you can swap in a pinch (just adjust cook time), but for baking or muesli, stick to rolled.

If you want a full breakdown on oat types and swaps (including quick and instant oats), you’ll love our complete oat guide.

Substitution Guide

Use/RecipeSteel Cut → RolledRolled → Steel Cut
Hot PorridgeNot recommended*Yes, but creamier
Overnight OatsOnly if pre-cookedYes
Cookies/GranolaNoYes (but more chewy)
Savory BowlsYesYes

*Steel cut oats won’t soften enough without long cooking—don’t use them raw for overnight oats or in quick bakes.


Practical Uses & Ideas

  • Steel Cut Oats:
    • Make a big batch, store in the fridge, and enjoy all week
    • Use in savory bowls with veggies, sautéed greens, and eggs
    • Try oat risotto: cook steel cut oats in broth and finish with Parmesan
  • Rolled Oats:
    • Prep overnight oats in jars for grab-and-go breakfasts
    • Bake into cookies or granola for easy snacks
    • Blend into smoothies for a creamy, fiber-rich boost
    • Add to pancake or muffin batter for extra nutrition

Conclusion

There’s no wrong answer in the steel cut vs rolled oats debate—just what fits your taste, lifestyle, and recipes.

  • Want chewy and hearty? Steel cut is for you.
  • Want quick and versatile? Rolled oats win.

Both will fill you up, boost your health, and make breakfast better.
Hungry for more oat insights? Read our Ultimate Guide to Oats for a deep dive on every oat type, nutrition, and the best ways to use them in your kitchen.

Related Reading

10 FAQs – Steel Cut Oats vs Rolled Oats

1. Which is healthier, steel cut oats or rolled oats?

Both are equally healthy; they have nearly identical nutrition. Steel cut oats have a slightly lower glycemic index, which means slower digestion.


2. Do steel cut oats and rolled oats taste the same?

No. Steel cut oats are chewier and nuttier, while rolled oats are softer and creamier.


3. Can I use steel cut oats in recipes that call for rolled oats?

Usually not. Steel cut oats take much longer to cook and won’t soften properly in most baking or overnight oats recipes.


4. Are steel cut oats better for weight loss?

Not necessarily. Both types support weight management due to high fiber content; steel cut oats may keep you full slightly longer.


5. Are rolled oats and old-fashioned oats the same?

Yes, they are exactly the same. The terms are used interchangeably.


6. Can I make overnight oats with steel cut oats?

Only if you cook them first, or soak them for at least 24 hours. Otherwise, they will remain too hard.


7. Which cooks faster: steel cut oats or rolled oats?

Rolled oats cook much faster—5 to 10 minutes. Steel cut oats require 20 to 40 minutes unless soaked or pressure cooked.


8. Are there any nutritional differences between steel cut and rolled oats?

Macros (protein, fiber, calories) are nearly identical. The main difference is in texture and cooking time, not nutrition.


9. Can I use rolled oats instead of steel cut oats in porridge?

Yes, but your porridge will be creamier and softer, with less chew.


10. Do both types of oats help lower cholesterol?

Yes, both are high in beta-glucan fiber, which is known to help lower cholesterol levels.

Posted on 1 Comment

Coconut/Thengai Dosa- Karnataka Style Spongy Dosa

Karnataka style coconut dosa (Thengai dosai in Tamil) is a flavorful, yummy dosa variety. It is prepared with rice, poha and coconut as the main ingredients.

This dosa is so delicious. The texture is spongy, super soft and totally melt in mouth. Coconut adds a very refreshing taste to this dosa and takes the regular dosa to a whole new level. This is a healthy and a filling breakfast dish which takes only minutes to cook. Adding flattened rice, poha as we call it, makes it fluffier and softer than traditional dosas.

This is my child’s favourite breakfast meal. The first time I made this dosa some 3 years back, my child literally gobbled 4 of these. I made extra batter to last me 2-3 days and in those 3 days all he took was coconut dosa in his school lunch box too. 😄 Even today whenever I make this for breakfast, I see the same excitement on his face.

Traditionally, this is made without adding urad dal, but I added some to add more protein. You can skip it if you like. The softness in this dosa comes from natural fermentation. There is no need to add any leavening agents to it. Fermented dosa offers a wealth of nutritional value, thanks to the fermentation process. When the batter undergoes fermentation, all the beneficial micro-organisms convert sugar and carbohydrates from rice and dal to lactic acid. One of the significant benefits of fermentation is the increased bioavailability of nutrients. Also, the final product becomes easy to digest, making it an ideal choice for those with sensitive stomach or digestive issues.

Batter consistency is the key to the success of this recipe. It should be pouring consistency batter, neither too runny nor thick like idli batter.

Recipe:

Prep time: 10 minutes Cook time: 3 minutes 
Fermentation time: 8-10 hoursServing: makes 10-12 dosas

Ingredients:

  • 1 cup raw Rice
  • 1/2 cup thin Poha/Flattened Rice
  • 1 tbsp Methi/Fenugreek seeds
  • 1/4th cup white split Urad dal
  • 3/4th cup grated fresh Coconut
  • 1 tsp Rock Salt or Himalayan Pink Salt
  • Table Salt to taste
  • Oil or Ghee to cook dosa

Instructions

  • Wash and soak all the ingredients mentioned above except coconut for 5 hours.
  • Now, drain all the water. Add grated coconut and blend the batter to a smooth consistency. Add a little water at a time. Do not make too thin or a thick batter. Make sure everything is well combined.
  • Transfer the batter to a large bowl. Make sure there is some room in the bowl because the batter will rise during fermentation. Add a tsp of rock salt and mix well. Cover and leave the batter for fermentation in a warm place for 8 to 9 hours.
  • After the fermentation the batter will become very frothy. Add salt to taste. Now you can add regular table salt. Mix it very gently till it is well combined. Do not over mix the batter.
  • Heat dosa tawa on a medium heat. Add a ladle full of batter. Spread slightly. Drizzle some ghee or oil around the edges and cover it with a lid for 2 to 3 minutes.
  • Steam the dosa till top has set and the edges have browned.
  • Take it out on a plate and serve it with coconut chutney or sambar.

Fermentation Tips

  • Add rock salt to the batter before fermenting. Rock salt or Himalayan pink salt helps in fermentation. Do not use table salt.
  • Do not skip fenugreek or methi seeds. It is the main ingredient that helps in fermentation.
  • Do not add water in one go. Keep adding little by little to get right batter consistency.
  • Mix the final batter with your hands for 2 to 3 minutes and keep it in a warm place. The warmth of your hand will help in fermentation.
  • If you stay in a dry or cold place, fermentation may take more than 9 hours. You can place the batter in a pre-heated oven.

Storage

Securely seal the container and store the leftover batter in the refrigerator. The lower temperature will slow down the fermentation process, allowing you to use the batter for several days. While fresh batter tastes the best, but you store the batter for 2 to 3 days without compromising on the taste. Beyond that I do not recommend storing the batter. Freezing idli or dosa batter is not recommended. Freezing will lead to change in the texture and taste. Before using refrigerated batter give it a gentle stir to redistribute the ingredients.

Posted on Leave a comment

Why OATBARS are Amazing as a Snack or Breakfast!

oat bars on a tray

Hello, food lovers! 🍽️💕 Today, we’re diving into a delightful snack or breakfast recipe that’s sure to impress everyone at your next gathering. We’re talking about Oatbars, a snack that’s not only incredibly flavorful but also easy to make and packed with protein! This fantastic recipe comes from the YouTube channel Felu – Fit by Cooking, a wonderful resource for anyone looking for simple yet tasty meal ideas.

🍫 The Magic of Oatbars 🍽️

Oatbars are a snack that combines the wholesome goodness of oats with the creamy richness of peanut butter and the sweet, chocolaty flavor of cocoa. The result is a snack that’s not only delicious but also packed with nutrients. Plus, it’s a versatile snack that can be enjoyed at any time of the day, from a quick breakfast to a mid-afternoon pick-me-up.

🍽️ The Recipe: How to Make Oatbars 🍫

The recipe starts with 150g of rolled oats, which are preferred for their thicker and chewy texture. However, quick oats, which are softer and smaller, can also be used and will work perfectly fine.

Next, 30g of cocoa powder is added. You can use natural or Dutch cocoa, also known as baking cocoa. Dutch cocoa is a more processed version that removes the acidity and makes it sweeter and mild.

Then, 50g of creamy peanut butter is added. If you want to add more protein, you can also use the same amount of powdered peanuts, which has double the amount of protein.

Next, 60g of casein vanilla protein powder is added. If you don’t have casein, you can use a blend or pure whey protein. Just keep in mind that with whey protein, baked goods always get a bit drier than with casein or blends.

The last ingredient is a pinch of salt. Then, 150g of skimmed milk is added as a sweetener instead of sugar. The lactose in milk is quite sweet, so it’s perfect for this recipe.

The ingredients are mixed together until smooth and then cooked on low heat until thickened. The mixture is then transferred into a baking tin and baked in a preheated oven at 200 degrees Celsius or 400 F for 25 minutes.

🍴 Enjoying Oatbars: Tips and Suggestions 🍽️

When enjoying Oatbars, here are a few tips and suggestions:

  • Feel free to adjust the amount of sugar to suit your taste. If you prefer a less sweet dessert, you can reduce the amount of sugar.
  • This snack is best served chilled, so consider making it a day ahead and storing it in the refrigerator overnight.
  • Oatbars make a great snack for any time of the day. Serve it with a cup of coffee or tea for a delightful afternoon treat.

🎉 Join the Foodie Community! 🍽️

If you try this recipe or have other delicious recipes to share, join the vibrant and engaging food lovers community on Facebook. It’s a place where you can share your culinary experiments, discover new recipes, and connect with fellow food enthusiasts.

🙏 Credits 🙏

A big thank you to Felu – Fit by cooking for sharing this fantastic Oatbars recipe. Their channel is a treasure trove of delicious recipes that are easy to follow and absolutely delightful to taste : Felu – Fit by cooking on youtube.com

Posted on Leave a comment

4 Simple and Delicious Toast Recipes!

bread on plate beside glas

Hello, food lovers! 🍽️💕 Today, we’re diving into the world of quick and easy breakfast recipes with a focus on a staple food item: toast. But this isn’t just any toast. We’re talking about four unique and delicious toast recipes that will revolutionize your breakfast routine. These recipes come from the YouTube channel Cooking Everyday, a fantastic resource for anyone looking for simple yet tasty meal ideas.

🍞 The Magic of Toast 🍳

Toast is a breakfast staple in many households. It’s quick, easy, and can be customized in countless ways. But if you’re tired of the same old butter and jam, these four toast recipes are sure to shake things up. From egg-filled bread to honey toast, these recipes take toast to a whole new level.

🍽️ The Recipes: How to Make Delicious Toast 🍞

Recipe 1: Egg in a Hole Toast 🍳

This recipe starts with a slice of bread and a glass. The glass is used to cut a hole in the middle of the bread. The bread is then fried in butter on medium heat. An egg is cracked into the hole, seasoned with salt and black pepper, and topped with green onions and cheddar cheese. The inside of the bread is placed on top, and the whole thing is flipped over and fried until golden brown.

Recipe 2: Scrambled Egg Toast 🍳

This recipe begins with three eggs, which are seasoned with salt, black pepper, and paprika, and mixed well. Parsley, green onions, and mozzarella cheese are added to the egg mixture. The bread is dipped in the egg mix and fried in butter for 2-3 minutes on each side.

Recipe 3: Stuffed Egg Toast 🍳

This recipe involves one egg, chopped green onion, chopped bell pepper, salt, and black pepper. The mixture is poured inside a hole cut in a slice of bread, topped with cheddar cheese, and fried for 3-5 minutes on each side.

Recipe 4: Tomato and Cheese Toast 🍞

This recipe uses stale bread, eggs, salt, black pepper, tomato sauce, mozzarella cheese, grape tomatoes, parsley, and olive oil. The bread is cut into pieces, dipped in the egg mixture, and fried. Tomato sauce and cheese are added on top, along with grape tomatoes and parsley. The toast is fried for an additional 3-5 minutes.

🍴 Enjoying Your Delicious Toast: Tips and Suggestions 🍽️

When enjoying these toast recipes, here are a few tips and suggestions:

  • Feel free to adjust the ingredients to suit your taste. If you prefer a different type of cheese or want to add more vegetables, go for it!
  • These toast recipes are best enjoyed hot from the pan. They make a great breakfast or snack, and are sure to impress your family and friends.
  • Don’t be afraid to get creative with your toast. These recipes are just a starting point. The possibilities are endless!

🎉 Join the Foodie Community! 🍽️

If you try these recipes or have other delicious recipes to share, join the vibrant and engaging food lovers community on Facebook. It’s a place where you can share your culinary experiments, discover new recipes, and connect with fellow food enthusiasts

So, are you ready to bring a taste of these delicious toast recipes into your kitchen? With these recipes, you can enjoy a delicious and unique breakfast right at home. Happy cooking! 🍽️🎉

Remember to check out more amazing recipes on Cooking Everyday‘s YouTube channel. Enjoy the delicious day! 🌞🍡🌭