Posted on Leave a comment

4 Health Benefits of Ginger for PCOS

4 Surprising Ways Ginger Helps PCOS

Polycystic Ovary Syndrome (PCOS) affects up to one in ten women of reproductive age worldwide. If you’ve been diagnosed, you know how complex and frustrating the condition can be—irregular cycles, hormonal swings, acne, stubborn weight gain, and, for many, insulin resistance.

But what if your kitchen spice rack held some powerful allies? Enter: ginger.

For centuries, ginger has been used for everything from nausea to colds. But did you know that modern research and thousands of women with PCOS are uncovering real, tangible benefits from adding ginger to your daily routine? Let’s explore the science, the stories, and exactly how you can use ginger as part of a holistic PCOS strategy.


Why Ginger? The Science

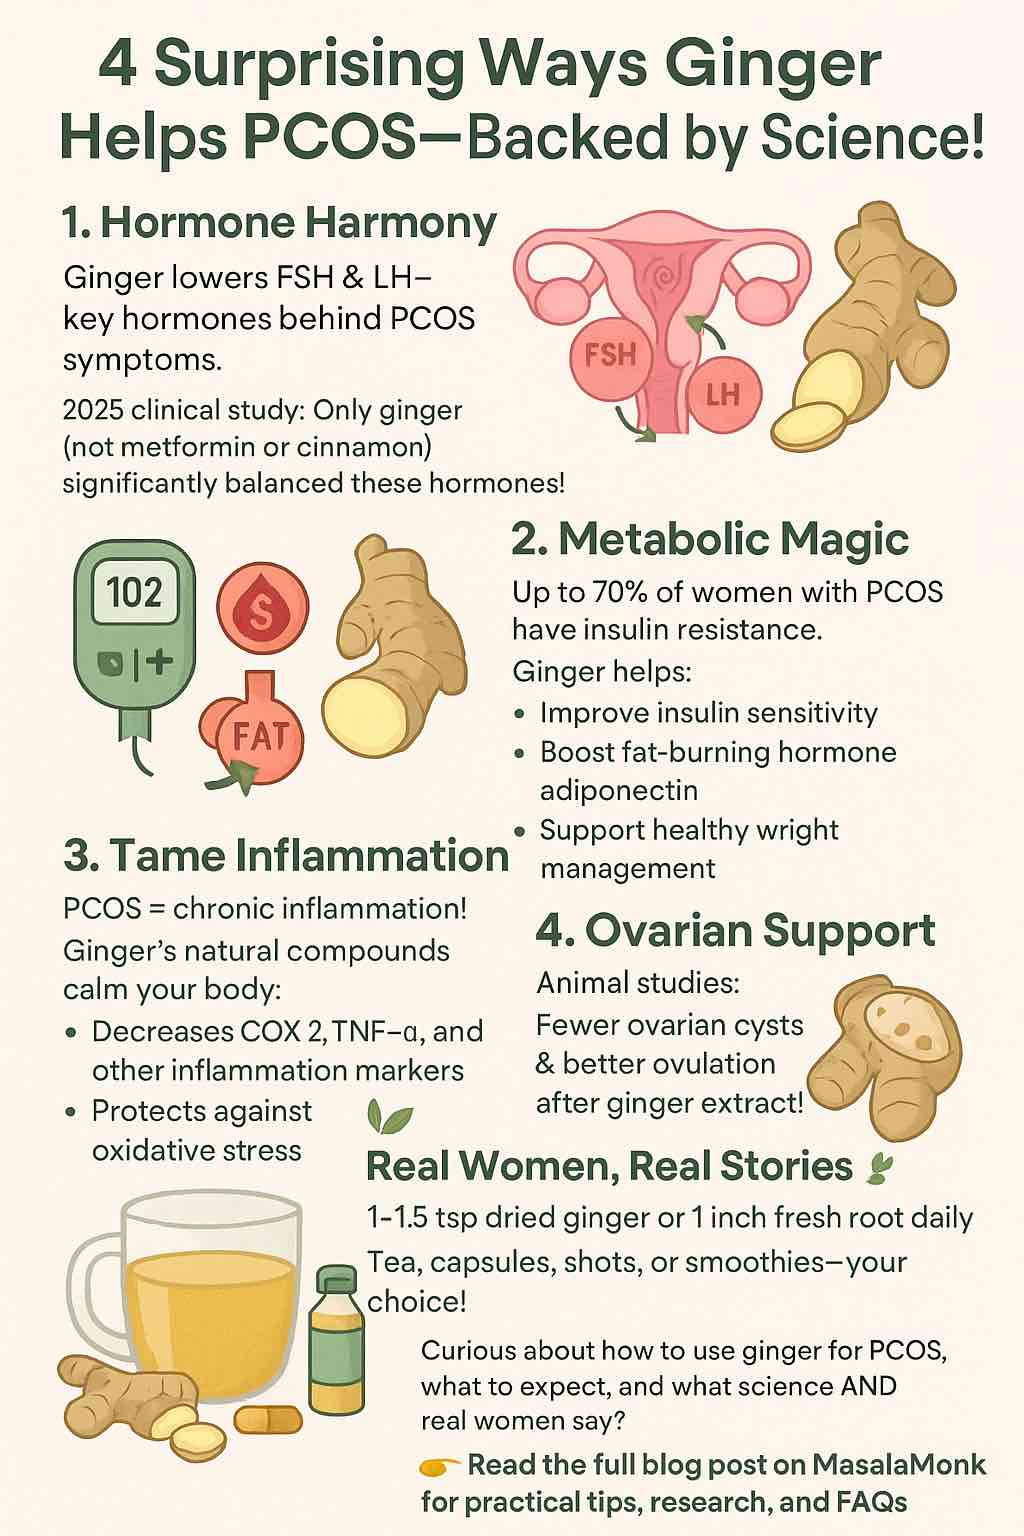
1. Hormone Harmony: How Ginger May Balance PCOS Hormones

PCOS is fundamentally a hormonal condition—characterized by imbalances like elevated androgens (testosterone), and disruptions to LH and FSH, two key pituitary hormones.

What research says:
A 2025 randomized controlled trial compared ginger, cinnamon, and metformin for PCOS. Remarkably, ginger was the only supplement that significantly reduced FSH, LH, and SHBG levels—all pivotal for cycle regulation. Metformin and cinnamon, by contrast, mainly improved insulin resistance and testosterone levels, but did not impact these cycle-driving hormones to the same extent.

Translation: Ginger may help “reset” your hormonal signaling—potentially supporting more regular cycles and ovulation.


2. Metabolic Magic: Improving Insulin Sensitivity and Blood Sugar

Up to 70% of women with PCOS struggle with insulin resistance. Ginger shines here, too.

In animal studies, ginger extract improved insulin sensitivity and raised levels of adiponectin, a hormone that boosts fat burning and lowers inflammation. Human trials echo these results, with many women reporting improved fasting glucose, weight management, and even reductions in BMI after regular ginger supplementation.

How does it work?
Ginger’s bioactive compounds—gingerols, shogaols—help your cells respond better to insulin and may slow down the absorption of glucose from your gut.


3. Inflammation & Oxidative Stress: Ginger’s Antioxidant Arsenal

Chronic inflammation is both a cause and consequence of PCOS, fueling everything from insulin resistance to acne and fatigue.

Ginger has been called an “anti-inflammatory powerhouse.” Its bioactive ingredients help lower key markers like COX-2, TNF-α, and CRP. Multiple reviews (including a sweeping 2024 systematic review of 65 studies) highlight ginger’s ability to lower oxidative stress and improve inflammation in PCOS.


4. Ovarian Support: Fewer Cysts, Better Ovulation

Animal studies are especially compelling: rats with PCOS given ginger extract showed fewer ovarian cysts and more healthy follicles, pointing to improved ovulation and ovarian function.


Real Women, Real Results: What the PCOS Community Says

Science is powerful, but sometimes what matters most is what real women experience in the day-to-day. Here are some highlights from women in the PCOS community:

  • Cycle “Kickstarts”: Many report that ginger shots or tea helped bring back their periods—sometimes after weeks or months without a cycle. Most saw results within two weeks of consistent use.
  • Blood Sugar Wins: Several shared that regular ginger helped curb cravings and support weight loss, especially when combined with a lower-carb or anti-inflammatory diet.
  • Inflammation Relief: A cup of fresh ginger tea (or a daily ginger-turmeric shot) is a comforting, soothing ritual for many—and some say it helps with pain and bloating, too.
  • Mild Side Effects: A small number experienced mild discomfort (e.g., leg aches with capsules), but side effects were rare.

“I boil fresh ginger root for a strong tea and sip it multiple times a day for several days. Always seems to do the trick…”
– Reddit user, r/PCOS

“Ginger and cinnamon 3x a day, and I lost weight and got my sugar down…”
– Reddit user, r/PCOS


How To Use Ginger for PCOS: Practical Tips

What Form?

  • Fresh Ginger Root: Grated in tea, smoothies, or recipes.
  • Powdered Ginger: Add to oatmeal, curries, or “golden milk” lattes.
  • Ginger Capsules: For a standardized dose—great if you don’t love the taste.
  • Ginger Shots: Home-made or store-bought (look for those with no added sugar).

How Much?

  • Most clinical studies use the equivalent of 2–3 grams of dried ginger per day (about 1–1.5 teaspoons), or one-inch piece of fresh ginger root daily.
  • For capsules, check labels—500 mg, 2–3x/day is common.

When & How Often?

  • For hormonal and metabolic benefits, consistency matters: daily use for at least 8–12 weeks is recommended in studies.
  • Some prefer ginger tea before meals to aid digestion and blood sugar control.

Combining Ginger with Other Approaches

  • Many women see the best results when ginger is part of a broader PCOS plan—including regular movement, lower-carb or anti-inflammatory eating, and if prescribed, medications like metformin.
  • Ginger pairs well with cinnamon, turmeric, and lemon—both for taste and for synergistic health benefits.

Are There Any Risks?

  • Ginger is generally very safe, but high doses can cause mild GI upset, heartburn, or interact with blood-thinning medication.
  • Always talk to your healthcare provider before starting a new supplement, especially if you’re on medication or pregnant.

Takeaway: Is Ginger Right for You?

If you’re looking for a natural, research-backed way to support your hormones, metabolism, and overall wellbeing with PCOS, ginger is a powerful (and tasty) ally. The latest research highlights unique hormonal effects you won’t get from metformin or cinnamon alone. And the lived experiences of real women suggest that, when used consistently and as part of a bigger plan, ginger might just help you feel a little more in control.

Try it for a few weeks: Brew a spicy-sweet tea, blend it into a morning smoothie, or add a daily capsule. Pay attention to how your body responds—and remember, PCOS is a marathon, not a sprint.


Have you tried ginger for PCOS? What’s worked for you? Share your experiences and let’s learn together.


References:

  1. Frontiers in Nutrition, 2025: Ginger vs Cinnamon vs Metformin for PCOS
  2. Antioxidants, 2024: Systematic Review on Ginger & Cinnamon in PCOS
  3. Reddit, r/PCOS Community Experiences
  4. ScienceDirect, 2023: Ginger in Letrozole-Induced PCOS Models

If you have more questions or want tailored guidance for your PCOS journey, leave a comment for the community!

Frequently Asked Questions (FAQs)

1. How much ginger should I take daily for PCOS benefits?

Answer: Most studies use 2–3 grams of dried ginger per day (about 1–1.5 teaspoons of powdered ginger or a one-inch piece of fresh root). If using capsules, 500 mg two to three times daily is common. Always start with a lower dose to assess your tolerance.


2. How soon can I expect results from ginger for PCOS?

Answer: Many people report improvements in cycle regularity or inflammation within 2–4 weeks, but most clinical studies show benefits after 8–12 weeks of consistent daily use.


3. What is the best way to consume ginger for PCOS—tea, powder, or capsules?

Answer: All forms can be effective. Fresh or powdered ginger is great for teas, smoothies, or food. Capsules are convenient and offer standardized dosing, but choose high-quality, third-party tested supplements.


4. Are there any side effects or risks with ginger?

Answer: Ginger is generally safe for most people, but high doses can cause mild stomach upset, heartburn, or diarrhea. It may also interact with blood thinners. Consult your doctor if you’re pregnant, breastfeeding, or on medication.


5. Can ginger help with PCOS-related weight gain?

Answer: Research and user reports suggest ginger may support weight management by improving insulin sensitivity and reducing inflammation, which can indirectly help with weight loss as part of a healthy lifestyle.


6. Will ginger alone regulate my periods or fix my hormones?

Answer: Ginger can help support hormonal balance, but results are best when combined with a balanced diet, regular exercise, stress management, and any prescribed medications.


7. Is it safe to combine ginger with metformin or other medications?

Answer: In most cases, yes, but always check with your healthcare provider to avoid potential interactions or side effects, especially if you’re on blood-thinning or diabetes medications.


8. Can men or people without PCOS benefit from ginger’s hormonal effects?

Answer: Ginger offers general anti-inflammatory and metabolic benefits for everyone, but most hormone-balancing research is specific to women with PCOS.


9. Can I take ginger if I’m trying to conceive or undergoing fertility treatments?

Answer: Ginger may support ovulation and hormonal balance, but consult your fertility specialist before adding new supplements during preconception or fertility treatments.


10. Are there any foods or supplements that work well with ginger for PCOS?

Answer: Yes—ginger pairs well with cinnamon, turmeric, inositol, and anti-inflammatory diets (rich in veggies, healthy fats, lean proteins). Many women see the best results when ginger is one part of a comprehensive wellness plan.

Posted on Leave a comment

Irresistible Glazed Carrots with Honey: A Sweet and Savory Delight

Glazed Carrots with Honey

Carrots are often unsung heroes on the dinner table, but with the right glaze, they transform into a dish that’s both comforting and elegant. If you’ve never made honey-glazed carrots before, get ready for a side that’s more than just a bit player—these carrots are truly irresistible. This post covers everything you need: recipe, science, feedback from real cooks, time-saving hacks, and creative twists to make it your own.


🥕 Why Glazed Carrots with Honey?

Carrots have a natural sweetness, which is brought to life by roasting or simmering. When you add honey and butter, you get a glossy, caramelized glaze that balances sweet and savory in every bite. The addition of a touch of citrus or warm spice can take the flavor to another level, cutting the richness and creating complexity.

But it’s not just about taste. Glazed carrots are:

  • Quick to prep: Minimal chopping and hands-on time.
  • Budget-friendly: Carrots are inexpensive, and the rest are pantry staples.
  • Visually appealing: Especially with rainbow carrots, they bring color to the plate.
  • Loved by kids and adults alike: Even picky eaters have been known to sneak seconds.

⭐ What Makes a Great Glazed Carrot?

Based on feedback from hundreds of home cooks, here’s what separates a good glazed carrot from a showstopper:

  • Caramelization: Roasting at high heat or finishing under the broiler gives carrots those irresistible golden edges.
  • Balance: The glaze needs both sweetness (honey) and brightness (lemon or orange juice). A little salt and pepper, plus optional spices, round it out.
  • Texture: Tender, not mushy. Uniform slicing helps.
  • Visual pop: Rainbow or heirloom carrots make it special, but classic orange carrots work beautifully too.

📋 The Best Honey-Glazed Carrots Recipe (Oven & Stovetop)

Adapted from Chef Dennis and top-rated home cook tips (2025)

Ingredients

  • 1½ lb (≈ 680 g) carrots (rainbow or classic), peeled and sliced on a bias, ½-inch thick
  • 2 Tbsp unsalted butter (or vegan substitute)
  • 2 Tbsp honey (or maple syrup for vegan)
  • 1 Tbsp fresh lemon juice (or orange juice for more warmth)
  • 1–2 cloves garlic, minced
  • 1 tsp kosher salt
  • ½ tsp black pepper
  • Optional: ¼ tsp ground cinnamon, ½ tsp ground ginger, pinch of chili flakes
  • Fresh parsley, thyme, or chives for garnish

Kitchen Equipment

  • Sheet pan lined with parchment (for oven method)
  • Skillet (for stovetop)
  • Medium saucepan (to make glaze)

Step-by-Step: Oven-Roasted Glazed Carrots

  1. Prep the Carrots:
    Peel and slice carrots to about ½-inch thick, cutting on a diagonal for more surface area. Uniformity = even cooking.
  2. Preheat & Arrange:
    Set oven to 400°F (200°C). Arrange carrots in a single layer on a parchment-lined sheet pan.
  3. Make the Glaze:
    In a small saucepan over medium heat, melt butter. Add honey and garlic; stir until fragrant (about 1 minute). Whisk in lemon juice, salt, pepper, and any spices.
  4. Coat & Roast:
    Pour glaze over carrots, toss well to coat, and spread carrots out again. Roast for 20 minutes. Toss/flip, then roast another 10–15 minutes, until fork-tender and caramelized at edges.
  5. Finish & Garnish:
    For extra caramelization, broil for 2–3 minutes at the end. Transfer to serving dish, top with fresh herbs, and serve immediately.

Quick Stovetop Glazed Carrots (Ready in 15 Minutes)

  1. Simmer:
    Add carrots to a large skillet with ½ cup water. Cover and simmer over medium-high heat until almost tender, about 5–7 minutes. Drain any excess water.
  2. Glaze:
    Add butter, honey, garlic, lemon juice, salt, pepper, and spices. Toss over medium heat until carrots are fully coated and glaze is sticky and reduced (another 3–5 minutes).
  3. Serve:
    Garnish and serve!

🧑‍🍳 Real User Feedback: What Works, What Doesn’t

  • “This is my favorite way to eat carrots now. The glaze is amazing and rainbow carrots make it a showstopper for guests.”
  • “Good basic recipe—needed more flavor. I added ginger and a little cinnamon, and broiled at the end for extra char.”
  • “Steaming then glazing on the stovetop saved time for a weeknight. Kids loved it!”
  • “I tried with maple syrup instead of honey for a vegan friend—delicious!”

🔬 Why Does This Recipe Work?

Carrots’ sugars caramelize at high heat, creating those sweet, nutty flavors and golden color.
Honey and butter help this along by browning and thickening into a glossy, clingy glaze.
Citrus juice (lemon or orange) provides acidity, keeping the dish from tasting cloying.
Salt and a pinch of spice (ginger, cinnamon, chili) balance the sweetness and add subtle warmth.


🛠️ Practical Tips & Variations

  • Uniform slicing: Helps all carrots cook evenly—no raw bits or mushy ends.
  • Double-glazing: Toss carrots halfway through roasting with a little extra glaze for extra stickiness.
  • Make ahead: Glaze can be made in advance. Toss with carrots just before roasting.
  • Vegan? Use olive oil or vegan butter, and swap honey for maple syrup or agave.
  • Extra flavor: Try adding za’atar, cumin, or chopped rosemary for a more complex profile.
  • Add-ins: Top with feta, toasted nuts, or pomegranate seeds for color and crunch.
  • Leftovers: Glazed carrots taste great cold in salads, grain bowls, or as lunchbox snacks.

🍽️ Perfect Pairings

Honey-glazed carrots are as versatile as they are delicious. Try them with:

  • Roast chicken, turkey, or ham
  • Baked salmon or white fish
  • Lentil or grain bowls (for a hearty vegetarian meal)
  • As part of a vibrant holiday spread
  • Chilled, as a colorful addition to salads

🌟 Final Thoughts: Your New Go-To Side Dish

Whether it’s a holiday meal or a weeknight dinner, Irresistible Glazed Carrots with Honey will brighten your table and win over even the vegetable skeptics. They’re quick, adaptable, crowd-pleasing, and just as tasty as they are pretty.


Have you tried this recipe?

Drop your tweaks, tips, or winning pairings in the comments below. Let’s make glazed carrots everyone’s favorite side!

🥕 10 Frequently Asked Questions (FAQs) for Irresistible Glazed Carrots with Honey

1. Can I make glazed carrots ahead of time?
Yes! You can prep and glaze the carrots a day in advance. Store them in an airtight container and reheat in a 350°F (175°C) oven or on the stovetop until warmed through. Add a splash of water or extra glaze if needed to keep them moist.

2. What’s the best way to cut carrots for glazing?
Cut carrots on a diagonal (bias) into ½-inch thick slices for maximum surface area and even cooking. Baby carrots can be left whole or halved lengthwise.

3. Can I use maple syrup instead of honey?
Absolutely! Maple syrup is a great vegan alternative and gives a slightly different, richer flavor.

4. How do I prevent my carrots from becoming mushy?
Avoid overcooking and slice your carrots evenly. Check doneness with a fork at the minimum cooking time and roast in a single layer for even heat.

5. Are glazed carrots gluten-free?
Yes—if you use pure honey or maple syrup and no added sauces with gluten. Always check your ingredient labels if cooking for someone with celiac disease.

6. Can I add other vegetables to this recipe?
Definitely! Parsnips, sweet potatoes, and beets all work well. Cut all vegetables to similar sizes so they cook evenly.

7. What herbs and spices work best with honey-glazed carrots?
Parsley, thyme, rosemary, cinnamon, ginger, or even a little cumin or za’atar add great flavor.

8. Can I use frozen carrots?
Yes, but thaw and dry them first. Frozen carrots may cook faster and can be softer, so watch the roasting time.

9. How do I get extra caramelization?
For deeper caramelization, broil the carrots for 2–3 minutes at the end of roasting. Watch closely to avoid burning.

10. What dishes pair well with honey-glazed carrots?
They’re perfect with roast meats (chicken, turkey, ham), salmon, grain bowls, or as part of a holiday meal.

Posted on 4 Comments

How to Make Pineapple Chia Pudding: A Refreshing Low-Carb Breakfast Option

LOW-CARB PINEAPPLE CHIA PUDDING

Are you tired of the same old eggs or overnight oats for breakfast? Do you crave something light, refreshing, and tropical, but still want to keep your carbs in check? Look no further—pineapple chia pudding is about to become your new favorite!


Why Pineapple Chia Pudding?

Chia pudding is a superstar in the world of healthy breakfasts. With just a handful of ingredients, you get a creamy, satisfying dish that’s loaded with fiber, healthy fats, and protein. When you add pineapple into the mix, you get a burst of sunshine in every bite—tart, sweet, and absolutely invigorating.

But here’s the kicker: most tropical puddings are loaded with sugar or carb-heavy ingredients. This version keeps carbs to a minimum while maximizing flavor, texture, and satiety.


What Makes This Breakfast Low-Carb and Healthy?

  • Chia Seeds: Nearly all carbs in chia seeds are fiber, which doesn’t spike blood sugar and helps you stay full longer. Chia is also a source of omega-3 fats and plant-based protein.
  • Pineapple: Used sparingly for flavor and nutrition—just enough for a sweet, tangy pop without going overboard on sugar.
  • Unsweetened Non-Dairy Milk: Almond or coconut milk keeps things creamy and super low in carbs compared to dairy milk or fruit juice.
  • Natural Sweeteners: Swap out honey or maple syrup for monk fruit, erythritol, or stevia for a guilt-free treat.

Ingredients: What You’ll Need

Let’s break down everything you’ll need to whip up a perfect low-carb pineapple chia pudding:

IngredientWhy Use It?Carb Impact
Chia seeds (3 tbsp)Thickens, fiber, protein, omega-3s~2-3g net per serving
Unsweetened almond/coconut milk (3/4 cup)Creamy, low-cal, low-carb~1g net per serving
Fresh/frozen pineapple (2-3 tbsp)Tangy, tropical flavor~3-4g net per serving
Monk fruit/stevia/erythritolAdds sweetness, no sugar0g
Lime juice (optional)Brightness, balances flavorsNegligible
Vanilla extract (optional)Depth, classic pudding flavorNegligible
Unsweetened coconut flakes (optional)Texture, more tropical vibesMinimal
Greek yogurt (optional, topping)Creaminess, protein boostCheck label for carbs

PINEAPPLE CHIA
PUDDING
PINEAPPLE CHIA PUDDING

Step-by-Step Guide: From Ingredients to Bowl

1. Prep the Pineapple

  • Use fresh or frozen pineapple, but keep the serving to about 2–3 tablespoons per portion. Dice it small, or better yet, blend it with a little of your chosen milk for a smooth “pineapple milk.” This gives every bite a burst of flavor without overloading on carbs.

2. Mix the Chia Pudding

  • In a jar or bowl, add:
    • 3 tablespoons chia seeds
    • 3/4 cup unsweetened almond or coconut milk
    • 1/2 teaspoon vanilla extract
    • 1–2 teaspoons low-carb sweetener (to taste)
    • Optional: juice from half a lime for zing
  • Stir vigorously. Wait 5 minutes, stir again to break up clumps.

3. Let It Set

  • Cover the container and refrigerate for at least 2 hours (overnight is best). Chia seeds absorb the liquid and become thick, creating a pudding texture.
  • Pro Tip: For an ultra-smooth, quick version, blend everything (including chia) before chilling. This gives a silky “Dole Whip” vibe, as seen in new 2025 recipe trends.

4. Assemble and Top

  • Before serving, give your pudding a stir.
  • Top with your diced/blended pineapple and sprinkle with unsweetened coconut flakes. A dollop of Greek yogurt makes it extra creamy and satisfying.
  • Want to get fancy? Garnish with a mint leaf or a wedge of lime!

How to Keep It Low-Carb (And Delicious!)

  • Watch your pineapple portion. Pineapple is higher in sugar than berries, so moderation is key.
  • Always use unsweetened milks and yogurts. Sweetened versions can double or triple your carb count.
  • Sweeten smartly. A few drops of monk fruit or stevia goes a long way!
  • Protein boost: Add a scoop of your favorite low-carb protein powder, or swirl in Greek yogurt for extra staying power.
  • Make it your own: Add a hint of cinnamon, lime zest, or even a few toasted pumpkin seeds for crunch.

Meal Prep & Storage Tips

  • Batch-friendly: Make a few jars at once; pudding keeps in the fridge for up to 4 days.
  • Travel-ready: Perfect for grab-and-go breakfasts or snacks.
  • Add fruit just before eating to keep it fresh and vibrant.
  • Texture: If pudding is too thick after chilling, just stir in a splash more milk.

Nutrition Facts (Approximate per serving)

  • Calories: 120–160
  • Net carbs: 6–8g (with 3 Tbsp pineapple and low-carb sweetener)
  • Protein: 3–5g
  • Fiber: 5–7g
  • Fat: 5–7g

(Exact numbers will depend on your ingredients and serving sizes—always check labels if you’re carb counting strictly.)


Why Pineapple Chia Pudding Works—And Why You’ll Love It

  • Hydrating and filling: Chia seeds soak up liquid, so you get a sense of fullness that lasts.
  • Gut-friendly: The fiber helps keep your digestion on track.
  • Vegan, dairy-free, and gluten-free: Works for most diets!
  • Versatile: Easily swap in strawberries, mango, or kiwi for variety—or try a coconut‑lime version for a twist.

Common Questions & Troubleshooting

Q: My pudding isn’t thick! What happened?
A: You may need to add a bit more chia, or let it chill longer. Sometimes different brands of chia absorb liquid differently.

Q: Can I use canned pineapple?
A: Fresh or frozen is best—canned often has added sugar. If using canned, look for “in juice, not syrup” and rinse well.

Q: Is this really filling?
A: Yes! The combination of fiber, fat, and a little protein will keep you satisfied for hours.


Variations to Try

  1. Piña Colada Chia Pudding: Use coconut milk, pineapple, and a drop of coconut extract.
  2. Green Power: Add a handful of baby spinach to the blender for a boost (you won’t taste it!).
  3. Berry-Pineapple Swirl: Mix in a tablespoon of chopped strawberries or raspberries.
  4. Spicy Tropic: Add a pinch of cayenne for a fun kick!

Final Thoughts: Your Low-Carb Breakfast Upgrade

With just a few minutes of prep and a handful of pantry staples, you can wake up to a breakfast that’s bright, satisfying, and actually good for you. Pineapple chia pudding is endlessly adaptable—try it for a week, and you’ll never get bored.

Ready to try it? Let me know your favorite twists—or if you need help adapting this for keto, vegan, or nut-free diets! And don’t forget to tag your pudding pics #TropicalChia on Instagram so we can cheer you on.


Printable Recipe Card

Pineapple Chia Pudding (Low-Carb)

  • 3 tbsp chia seeds
  • 3/4 cup unsweetened almond or coconut milk
  • 2–3 tbsp diced pineapple
  • Sweetener (monk fruit/stevia), to taste
  • 1/2 tsp vanilla extract (optional)
  • 1 tsp lime juice (optional)

Directions:

  1. Blend or stir all ingredients except chia, then mix in chia seeds.
  2. Stir well, chill 2+ hours or overnight.
  3. Top with pineapple & coconut before serving. Enjoy!

Try this once, and you’ll see why pineapple chia pudding is the low-carb breakfast that delivers on taste, nutrition, and pure tropical joy—all in one bowl!

10 FAQs for Pineapple Chia Pudding (Low-Carb)

1. Can I use canned pineapple instead of fresh or frozen?
Yes, but choose pineapple canned in its own juice (not syrup) and drain/rinse well. Be aware canned pineapple is often slightly higher in sugar than fresh or frozen.


2. How can I make my chia pudding creamier?
Use full-fat coconut milk or a spoonful of Greek yogurt. Blending the pudding before chilling also results in a smoother, silkier texture.


3. Is this recipe suitable for keto diets?
With careful portioning (1-2 tablespoons pineapple) and zero-carb sweetener, you can keep net carbs low enough for most keto plans. Substitute even lower-carb berries if stricter keto compliance is needed.


4. How long does chia pudding keep in the fridge?
It keeps well for up to 4 days. Store in an airtight container and add fresh toppings just before serving for the best texture and flavor.


5. Why isn’t my chia pudding thickening properly?
Either not enough chia seeds were used, the milk ratio was off, or the pudding needs more time. Stir well after the first 10 minutes, and if it’s still runny after several hours, add an extra teaspoon of chia and let it sit longer.


6. Can I meal-prep pineapple chia pudding for the week?
Yes! Portion individual servings into jars for grab-and-go breakfasts. Add pineapple and toppings the day you plan to eat them for maximum freshness.


7. Are there nut-free options for the milk?
Absolutely. Use unsweetened coconut milk (carton or canned) or oat milk (if carbs are not a concern). Hemp milk is also a low-carb, nut-free alternative.


8. Is pineapple chia pudding suitable for kids?
Yes! It’s a fun, nutritious, and naturally sweet breakfast or snack for children. Consider using less sweetener if your child already enjoys fruit as-is.


9. Can I freeze chia pudding?
You can, but the texture may change upon thawing (it can get a bit watery). Freezing in popsicle molds is a great summer treat option!


10. How do I add more protein to this recipe?
Stir in a scoop of protein powder, use Greek yogurt, or add a layer of cottage cheese. You can also top with chopped nuts or seeds for a protein boost.

Posted on Leave a comment

Innovate Your Keto Breakfast: 5 Pine Nut, Pomegranate Seed, and Pea Protein Shake Recipes for Meal Replacement

INNOVATE YOUR KETO BREAKFAST Pine Nut, Pomegranate Seed, and Pea Protein Shake Recipes for Meal Replacement

Are you tired of the same bacon and eggs every morning on keto? Looking for something plant-forward, fresh, and truly energizing—but still low in carbs and high in satiety? Let’s break the mold with keto meal-replacement shakes that bring together three powerhouse ingredients: pine nuts, pomegranate seeds, and pea protein.

These shakes aren’t just novel—they’re delicious, nutrient-dense, portable, and can be precisely customized to fit your macros. This post will walk you through why these ingredients are perfect for keto, how to combine them, and then give you five inventive, tested recipes (with pro tips and macro guides!) to make your mornings as satisfying as they are healthy.


Why These Ingredients?

Pine Nuts

Small but mighty, pine nuts are rich in healthy monounsaturated fats, vitamin E, magnesium, and plant sterols. Their creamy texture and subtly buttery taste add luxury to your morning, while their fat content supports ketosis and long-lasting fullness.

Pomegranate Seeds

While pomegranate isn’t typically “keto,” a tablespoon or two of the seeds offers a pop of color, antioxidants, and tart-sweet flavor with only a minor carb contribution. When used judiciously, they brighten your shake without breaking ketosis.

Pea Protein

Unlike dairy-based proteins, pea protein is plant-based, low in carbs, and suitable for most allergies. It has a neutral flavor, blends smoothly, and provides complete protein to keep you energized all morning.


The Art of Building a Keto Shake

  • Base: Start with 1–1.5 cups unsweetened nut or seed milk (almond, coconut, macadamia, or even hemp milk).
  • Protein: Add 1 scoop pea protein isolate (usually 18–22g protein, <2g net carbs per scoop).
  • Fats: Include 1–2 tablespoons of pine nuts (or pine nut butter for extra creaminess).
  • Flavor and Antioxidants: 1–2 tablespoons of pomegranate seeds—just enough for tang, color, and health benefits.
  • Extras: Add spices, nut butter, avocado, or coconut cream for variety. Sweeten only if needed with monk fruit, stevia, or allulose.

Pro Tip: For a meal replacement, aim for ~20g protein, 20g fat, and <8g net carbs per serving.


5 Innovative Shake Recipes

Each recipe below is formulated for one generous serving, perfect as a stand-alone breakfast.


1. Ultra-Creamy Pine Nut & Pomegranate Morning Shake

Ingredients:

  • 1.25 cups unsweetened almond milk
  • 1 scoop vanilla pea protein
  • 1 Tbsp pine nuts, finely ground
  • 1 Tbsp pomegranate seeds
  • 1 Tbsp chia seeds (optional, for fiber and texture)
  • Ice cubes (to desired thickness)
  • 1–2 tsp allulose or monk fruit sweetener (optional)

Directions:

  1. Add all ingredients except pomegranate to a blender.
  2. Blend until creamy and smooth.
  3. Stir in or sprinkle the pomegranate seeds on top before serving.

Macros: ~6g net carbs, 21g protein, 17g fat

Why you’ll love it: Silky and slightly tangy with bursts of juicy pomegranate—perfect for a refreshing start!


2. Pine Nut Butter & Citrus Protein Shake

Ingredients:

  • 1 cup unsweetened vanilla almond milk
  • 1 scoop unflavored or vanilla pea protein
  • 1 Tbsp pine nut butter
  • Zest of ½ lemon or lime
  • 1 Tbsp pomegranate seeds (garnish)
  • Sweetener to taste
  • Ice

Directions:

  1. Blend all ingredients except pomegranate seeds.
  2. Pour into a glass and top with pomegranate seeds for color.

Macros: ~5g net carbs, 20g protein, 16g fat

Pro Tip: Pine nut butter adds a unique richness that’s both creamy and luxurious—try swapping the citrus zest for orange if you like a softer note.


3. Green Keto Power Shake with Pine Nuts & Pomegranate

Ingredients:

  • 1.25 cups unsweetened nut milk
  • 1 scoop pea protein
  • ½ cup baby spinach or kale
  • 1 Tbsp pine nuts, ground
  • 1 Tbsp pomegranate seeds
  • 1 tsp vanilla extract
  • 1–2 tsp sweetener (optional)
  • Ice

Directions:

  1. Blend all except pomegranate until smooth.
  2. Stir or layer in the seeds for a beautiful visual effect.

Macros: ~7g net carbs, 20g protein, 15g fat

Why you’ll love it: The greens add nutrients and color, but the pine nut and pomegranate balance the flavor beautifully.


4. Avocado & Pine Nut Keto Meal Replacement Shake

Ingredients:

  • 1 cup unsweetened almond milk
  • ¼ cup coconut cream or 2 Tbsp heavy cream
  • ½ avocado
  • 1 scoop pea protein
  • 1 Tbsp ground pine nuts
  • 1 Tbsp pomegranate seeds
  • Sweetener to taste
  • Ice

Directions:

  1. Combine everything but pomegranate in the blender and blend until creamy.
  2. Top with pomegranate seeds.

Macros: ~8g net carbs, 22g protein, 23g fat

Pro Tip: This is the most satiating shake on the list—great for days when you need to stay full for hours.


5. Spiced Pomegranate Keto Breakfast Shake

Ingredients:

  • 1.25 cups nut milk (almond or coconut)
  • 1 scoop pea protein
  • 1 Tbsp pine nut butter or chopped pine nuts
  • 1 Tbsp coconut cream
  • Pinch of cinnamon and ginger
  • 1 Tbsp pomegranate seeds (stirred in after blending)
  • Ice
  • Sweetener to taste

Directions:

  1. Blend everything except pomegranate.
  2. Stir seeds in or sprinkle on top.

Macros: ~6g net carbs, 20g protein, 18g fat

Why you’ll love it: Warm spices make this shake feel cozy and comforting—perfect for cool mornings.


Practical Tips for Shake Success

  • Prep ahead: Pre-portion your dry ingredients in jars. Add milk and blend in the morning.
  • Go portable: Use a shaker bottle if you don’t have time to blend—just shake extra hard and use pine nut butter instead of whole nuts.
  • Customize: Adjust fat and protein to your needs by changing the amounts of pine nuts/cream and pea protein.
  • Carb count: Pomegranate is the main carb contributor. Stick to 1–2 Tbsp seeds per shake for best results.

Conclusion: The Future of Keto Breakfast Is Here

Don’t settle for boring mornings! With these five shakes, you can start each day with something creamy, colorful, and deeply nourishing—while still supporting your keto goals. The combination of pine nuts, pomegranate, and pea protein is not only innovative but also easy to fit into any meal-prep plan.

Try one tomorrow—then make it your own!
Got a tweak, a favorite spice, or a new add-in? Share your version in the comments and let’s innovate together!


Ready to shake up your keto breakfast? Let’s make mornings exciting again—one pine nut, pomegranate, and pea protein shake at a time!

10 FAQs and Answers

1. Can I have these shakes every day on keto?
Yes. As long as you manage the carb content (mainly from pomegranate seeds and milk), these shakes can be enjoyed daily. They provide balanced macros for a meal replacement and keep you in ketosis if you stick to the portion sizes.


2. How can I further lower the carbs in these shakes?
Reduce or omit the pomegranate seeds, use unsweetened nut milks, and double-check your protein powder for hidden carbs. Adding more fat (like coconut cream or avocado) also improves satiety without raising carbs.


3. What are the benefits of using pea protein instead of whey or collagen?
Pea protein is plant-based, hypoallergenic, and low in carbs. It’s a great choice for vegans, those with dairy allergies, or anyone looking to avoid animal-based ingredients while still getting a complete amino acid profile.


4. Do pine nuts have any health concerns I should be aware of?
Pine nuts are generally healthy, but they are calorie-dense and contain moderate oxalates, so people with nut allergies or oxalate sensitivities should limit their intake or substitute with macadamia nuts or sunflower seeds.


5. Is it okay to prepare these shakes in advance?
Absolutely. Prepare and refrigerate them up to 24 hours ahead for best texture. For longer storage, keep the dry ingredients separate and blend with fresh liquid in the morning.


6. Can I swap out the pomegranate seeds for another keto-friendly fruit?
Yes. Use berries like raspberries or blackberries, which are lower in carbs. You can also try freeze-dried berry powder for flavor without extra carbs.


7. How do I make these shakes creamier?
Add avocado, coconut cream, or use nut butters. Blending longer and using ice also creates a thick, creamy texture. For extra smoothness, grind pine nuts before blending.


8. What sweeteners work best for these shakes?
Monk fruit, allulose, and stevia are all keto-friendly and won’t impact blood sugar. Taste and adjust, since some protein powders are already sweetened.


9. Are these shakes good for intermittent fasting?
Yes, if used as your “break-fast” meal. They provide balanced nutrition and are easy on the stomach, making them ideal for breaking a fast while staying low-carb.


10. Can I use these shakes for weight loss?
Definitely. These shakes are high in protein and healthy fats, which help control hunger and support muscle maintenance while reducing calories. Track your portions to align with your weight loss goals.

Posted on Leave a comment

5 Vitamin-Boosting Pregnancy Smoothies: Berries and Coconut Milk for Antioxidant Power

Vitamin-Boosting Pregnancy Smoothies: Berries and Coconut Milk

Pregnancy is a magical journey, but let’s be honest—it comes with its own set of challenges: fatigue, cravings, nausea, and the constant worry about getting all the right nutrients for you and your growing baby. That’s where pregnancy smoothies can be a true game changer!

If you’re looking for a delicious, refreshing, and actually beneficial way to nourish your body, smoothies starring berries and coconut milk are your new best friends. Here’s why, plus five recipes, science-backed benefits, and real user feedback—so you can sip with confidence (and maybe a little joy, too!).


Why Berries & Coconut Milk? The Science and the Practicality

Berries: Tiny Powerhouses

Berries—blueberries, raspberries, strawberries, blackberries—aren’t just tasty. They’re loaded with:

  • Vitamin C: Immune support, better iron absorption, cell repair.
  • Antioxidants: Protect baby’s growing cells from oxidative stress.
  • Folate: Vital for your baby’s brain and spinal cord development.
  • Fiber: Natural relief for pregnancy constipation and supports gut health.

Coconut Milk: Creamy Goodness

Coconut milk is rich, dairy-free, and packed with:

  • Healthy Fats: Essential for your baby’s developing brain and nervous system.
  • Iron, Magnesium, Potassium: Key minerals for muscle and nerve function.
  • Gentle on the Tummy: Often easier to digest than dairy, especially if lactose makes you queasy.

Real-Life Feedback: What Pregnant Women Are Saying

  • “Berries and coconut milk are the only things I craved in my first trimester. Add some banana or spinach, and it’s the only way I could sneak in veggies.”
  • “Smoothies got me through days when the thought of eating solids was a no-go. Adding flax seeds made me feel full, and the fiber helped with digestion.”
  • “I loved blending frozen berries with coconut milk and protein powder for a quick breakfast—kept me full and gave me energy for my walks.”

(From Reddit threads, blog comments, and nutrition forums.)


5 Pregnancy-Perfect Berry & Coconut Milk Smoothie Recipes

Ready to blend? These recipes are crafted to deliver major nutrients, satisfy cravings, and work with whatever your stomach (and schedule) can handle. Each one comes with bonus tips for customization.


1. Blueberry-Coconut Glow Smoothie

Ingredients:

  • 1 cup blueberries (fresh or frozen)
  • 1 cup coconut milk
  • 1 small banana
  • 1 tbsp chia seeds
  • ½ tsp vanilla extract

Why it’s great:
Blueberries are antioxidant superstars. Chia seeds add plant-based omega-3s for baby’s brain. Banana gives natural sweetness and potassium for leg cramp relief.

User tip: If you have morning sickness, freeze the banana first—it makes the smoothie extra cold and soothing.


2. Strawberry Mango Sunshine Smoothie

Ingredients:

  • 1 cup strawberries
  • ½ cup mango chunks
  • 1 cup coconut milk
  • ½ cup Greek yogurt (optional; use dairy-free for vegan)
  • 1 tbsp ground flaxseed

Why it’s great:
Strawberries and mango are loaded with vitamin C and folate. Greek yogurt gives protein for lasting energy.

Pro tip: Don’t like yogurt? Swap for avocado—extra creamy, extra healthy fats.


3. Raspberry Beet Antioxidant Power Smoothie

Ingredients:

  • 1 cup raspberries
  • ½ small cooked beet (peeled)
  • 1 cup coconut milk
  • 1 small apple (sliced)
  • Squeeze of lemon

Why it’s great:
Beets are packed with folate and iron, helping prevent anemia. Lemon boosts vitamin C and brightens the flavor.

Feedback from users: “Never thought I’d crave beets, but blended with berries and apple, you can’t even taste them—just vibrant color and sweet-tart flavor!”


4. Mixed Berry Spinach Boost

Ingredients:

  • 1 cup mixed berries
  • 1 handful baby spinach
  • 1 cup coconut milk
  • 1 tbsp hemp seeds
  • 1 tsp honey (optional)

Why it’s great:
Spinach sneaks in extra iron and folate. Hemp seeds add protein and omega-3s.

Pregnancy tip: Blend spinach and milk first before adding fruit—no leafy bits, super smooth!


5. Blackberry Oatmeal Breakfast Smoothie

Ingredients:

  • 1 cup blackberries
  • ¼ cup rolled oats (soaked for 10 minutes)
  • 1 cup coconut milk
  • 1 tbsp almond butter
  • ½ tsp cinnamon

Why it’s great:
Oats provide fiber and B vitamins. Almond butter keeps you satisfied, while cinnamon helps balance blood sugar.

User favorite: “This one kept me full through my morning meetings, and my midwife loved the fiber content!”


How to Make Your Smoothie Work for You

Every pregnancy is different. Here’s how to personalize:

  • Nausea: Keep it cold. Freeze fruits. Add a little ginger.
  • Constipation: Up the fiber—flaxseed, chia, soaked oats.
  • Protein boost: Add Greek yogurt, protein powder (pregnancy-safe), or nut butters.
  • Iron intake: Add spinach or cooked beets, and pair with vitamin C fruits.
  • Gestational diabetes: Use more greens, lower-glycemic fruits (berries over bananas/mango), add avocado.

Ingredient Swaps & Pro Tips

If you want to…Try this
Go dairy-freeUse coconut or almond yogurt
Add plant-based proteinTry pea, hemp, or soy protein powder
Avoid bananaUse mango, pear, or extra berries
Make it more fillingAdd soaked oats or avocado
Sweeten naturallyUse dates or a drizzle of honey (optional)

Nutrition & Safety Notes

  • Choose pasteurized dairy/yogurt for safety.
  • Wash all produce thoroughly.
  • Limit added sweeteners—fruits often provide enough.
  • Check with your healthcare provider if adding protein powders or supplements.

Real Moms’ Pro Tips

  • “If you’re short on time, frozen fruit is your best friend—no washing or chopping needed.”
  • “A little lemon or ginger goes a long way when you’re fighting nausea.”
  • “Invest in a powerful blender. Trust me, it makes a difference with greens and seeds!”
  • “Double your batch and freeze smoothie ice pops for summer cravings!”

Final Thoughts: Blend, Sip, Enjoy (And Grow!)

Pregnancy is about nourishing yourself and your baby—without sacrificing flavor or sanity. With these berry and coconut milk smoothie recipes, you can get a rainbow of vitamins, antioxidants, healthy fats, and fiber in every glass. Play around, try new combos, and find what works for you. Every sip is a small act of self-care for you and your little one.

Got a favorite combo or pro tip? Share it in the comments! Happy blending, mama. 🫐🥥💪

FAQs: Vitamin-Boosting Pregnancy Smoothies

1. Can I use frozen berries in pregnancy smoothies?
Absolutely. Frozen berries are just as nutritious as fresh ones, and often even more convenient. They help keep your smoothie cold and thick, plus they’re already washed and prepped—just be sure they’re from a trusted source.


2. Is coconut milk safe for pregnancy smoothies?
Yes, coconut milk is safe and provides healthy fats that are important for your baby’s brain development. Choose unsweetened, BPA-free canned or carton coconut milk, and check the ingredients for additives if you have sensitivities.


3. How can I add more protein to my smoothie?
Boost protein with Greek yogurt, cottage cheese, nut butters, chia seeds, hemp seeds, tofu, or pregnancy-safe protein powders. Dairy-free yogurts made from coconut, almond, or soy can also add protein.


4. What if I have gestational diabetes—can I still have fruit smoothies?
Yes, but use more low-glycemic fruits like berries, and balance your smoothie with protein, fiber (chia/flaxseed, oats), and healthy fats (nut butters, seeds) to help stabilize blood sugar. Limit high-sugar fruits like bananas or mangoes.


5. Are there any smoothie ingredients I should avoid during pregnancy?
Avoid unpasteurized dairy products, raw eggs, certain herbal supplements, excess added sugars, and protein powders not verified as pregnancy-safe. Always wash produce thoroughly and check with your healthcare provider about any new supplements.


6. Can I prep pregnancy smoothies in advance?
Yes! You can pre-portion ingredients in freezer bags for quick blending. Prepared smoothies last in the fridge up to 24 hours—shake or stir before drinking. For longer storage, freeze in ice cube trays and blend as needed.


7. How can I make smoothies more filling?
Add fiber-rich ingredients like oats, chia seeds, avocado, nut butters, and Greek yogurt. These help with satiety and sustained energy, plus support digestion during pregnancy.


8. What’s the best way to include leafy greens without tasting them?
Blend greens like spinach or kale with your liquid first, before adding other ingredients. Use a handful at a time—berries and banana mask the flavor well. Baby spinach is mild and virtually undetectable in most smoothies.


9. How do I reduce morning sickness with smoothies?
Use cold, simple blends with ginger or lemon, and avoid strong-smelling ingredients. Frozen fruits and a splash of citrus can make smoothies more palatable during nausea. Sip slowly and stick with small servings if your stomach is sensitive.


10. Is it okay to drink smoothies every day during pregnancy?
Yes, as long as you vary ingredients and balance your diet with other whole foods. Smoothies are a great way to get vitamins, minerals, and fluids, but aim for variety to cover all nutrient needs. Always consult your doctor with any dietary concerns.