Posted on — Leave a comment

Bulgogi Sauce Recipe: Sweet, Savory & Easy

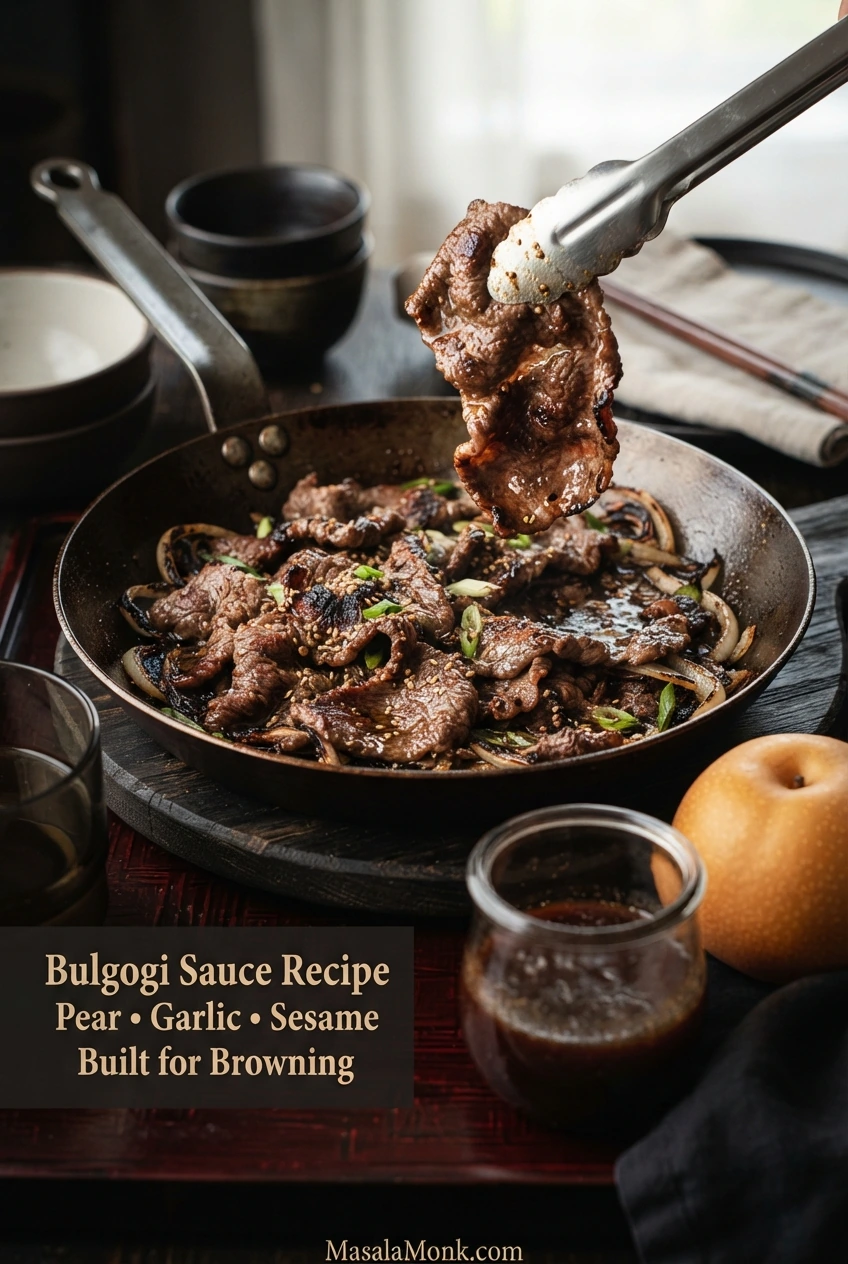
Thin browned bulgogi beef with onions, scallions and sesame in a skillet, beside a jar of dark sauce and a round Asian pear.

Pour bulgogi sauce over very thinly sliced beef and several things start happening at once. Soy seasons the meat. Pear and onion bring moisture and mild sweetness. Sugar waits for the hot pan, where it can help brown the edges beautifully—or scorch if too much wet marinade follows the beef into the skillet.

Bulgogi sauce is a thin soy-based Korean barbecue marinade flavored with garlic, toasted sesame and fruit. This version uses Asian pear, plenty of garlic and enough sugar to help the beef develop deeply browned edges once moisture can escape. Cooked well, the meat comes off glossy and garlicky, with toasted-sesame aroma rising from the pan.

Bulgogi Sauce Recipe

A soy-based bulgogi marinade with Asian pear, garlic, mirin and toasted sesame oil for thinly sliced beef.

Sauce Prep
10 minutes

Makes
About 1⅓–1½ cups / 320–360 ml before straining

Covers
About 2 lb / 900 g thinly sliced meat

Texture
Thin & pourable

Yield varies with the pear and onion. Straining reduces the final volume, so a heavily strained batch will leave less extra sauce after marinating.

Ingredients

  • ⅓ cup / 80 ml regular soy sauce
  • 90 g finely grated Asian pear
  • 60 g finely grated onion
  • 3 tablespoons / about 40 g packed light brown sugar
  • 2 tablespoons / 30 ml mirin
  • 2 tablespoons / 30 ml toasted sesame oil
  • 18 g garlic, about 4–6 cloves depending on size, finely grated or minced
  • 2 teaspoons / about 5 g finely grated fresh ginger
  • 2 scallions, thinly sliced
  • ½ teaspoon freshly ground black pepper
  • 1 teaspoon toasted sesame seeds, optional
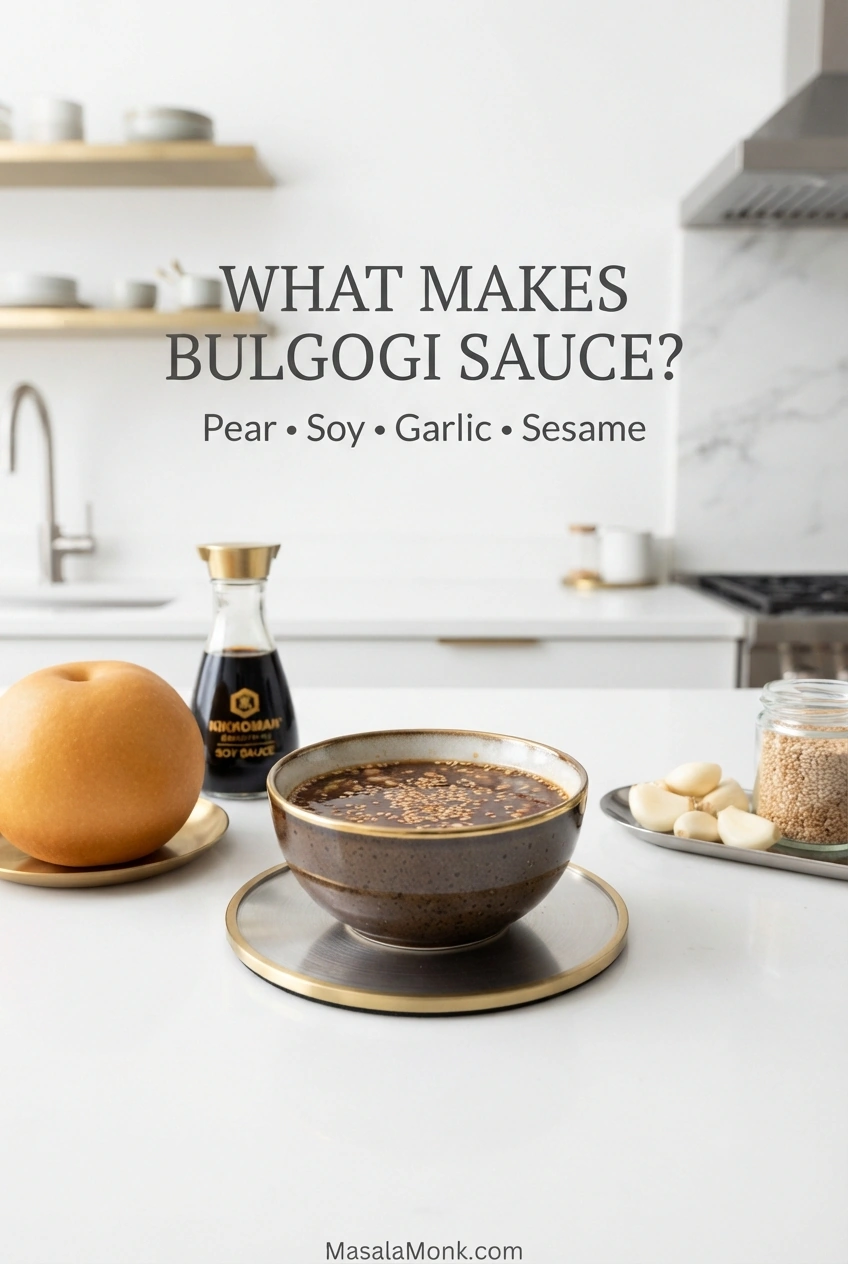
Dark bulgogi marinade in a bowl surrounded by Asian pear, soy sauce, garlic, sesame and other marinade ingredients on a white surface.
Although bulgogi sauce has several aromatic ingredients, soy remains the liquid backbone; pear and onion add moisture and light body, while garlic and sesame build the aroma without making the marinade thick.

Before You Start

  • Use regular or all-purpose soy sauce. Low-sodium soy and tamari can work too, though saltiness varies by brand. Korean soup soy is much saltier, while kecap manis is much sweeter, so neither is a direct substitute. If you are comparing soy styles, our soy sauce guide explains the differences.
  • No mirin? Use 2 tablespoons / 30 ml unsweetened apple juice for an alcohol-free option. Rice vinegar is much sharper and is not a 1:1 replacement.
  • Want clean sauce for dipping or glazing later? Set that portion aside before raw meat goes into the bowl.

Make the Sauce

  1. Grate the pear and aromatics. Finely grate the Asian pear, onion, garlic and ginger into a medium bowl. For a smoother sauce, put them directly into a blender instead.
  2. Mix the sauce. Add the soy sauce, brown sugar, mirin, toasted sesame oil and black pepper. Whisk until the sugar dissolves. If using a blender, blend until smooth.
  3. Finish and taste. Stir in the scallions and sesame seeds, if using. The sauce should run easily from a spoon. Taste it as a marinade rather than a finished dipping sauce: soy should lead, garlic and sesame should be clear, and sweetness should sit behind them.

To Use on Beef

  1. Marinate. For 1 lb / 450 g finely sliced meat, start with about ½ cup / 120 ml. Toss and separate the slices so the sauce reaches them evenly. Add another spoonful only if some pieces still look barely coated. Cover and refrigerate for 30 minutes to 4 hours; overnight is optional when using pear, apple or no strong enzyme tenderizer.
  2. Cook for browned bulgogi. Lift the thin beef from the marinade and let obvious excess drip away. Cook in batches on a well-preheated skillet or griddle so the beef sizzles as soon as it lands. Turn as needed and cook until the thin slices are cooked through with browned edges.

Recipe Notes

  • Less sweet: reduce the brown sugar to 2 tablespoons / about 25 g.
  • No Asian pear: use the same weight of ripe regular pear or sweet apple.
  • Spicy variation: add 1 tablespoon gochujang; use gochugaru for more heat.

About this recipe: This formula follows established Korean bulgogi methods and has not been independently kitchen-tested by MasalaMonk. Because soy sauces, pears and stovetops vary, use the taste and pan cues alongside the measurements.

How Bulgogi Sauce Should Taste

Bulgogi marinade should taste savory first, gently sweet, garlicky and nutty with sesame. It should taste stronger from the spoon than a finished dipping sauce because that seasoning still has to spread across the meat.

Soy gives the marinade its savory backbone. Pear and brown sugar soften the salt, mirin brings sweetness and aroma, toasted sesame oil announces itself quickly, and garlic can be bolder. If sweetness is the first thing you notice and the soy and garlic disappear behind it, the balance has gone too far toward sugar.

Taste a clean spoonful before the sauce touches raw meat. An assertive marinade is normal; harsh saltiness is not. If it still tastes overwhelmingly salty after allowing for its job as a marinade, add water a tablespoon at a time. When sweetness is the problem, reduce the brown sugar in the next batch instead of automatically adding more soy.
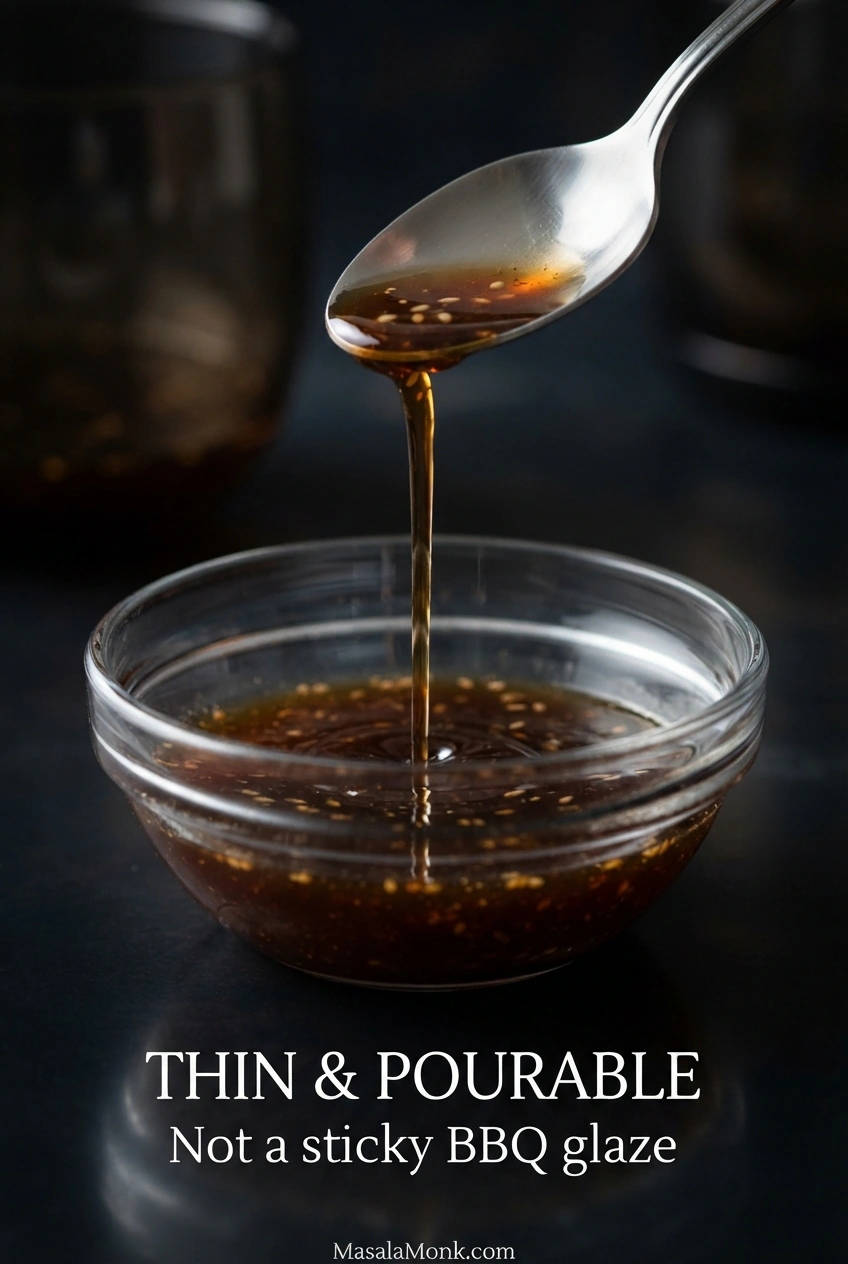
Dark brown bulgogi sauce pouring in a narrow stream from a spoon into a clear glass bowl.
Because the marinade stays loose, it can slip between newly separated beef slices instead of clinging in thick patches; therefore, thorough tossing matters more than simply pouring in extra sauce.

Asian Pear, Apple—or No Fruit?

No Asian pear? Ripe regular pear or sweet apple both work, and naturally tender beef cut very thinly can also be marinated without fruit.

Asian pear brings plenty of moisture, mild sweetness and gentle tenderizing without making the marinade taste obviously fruity.
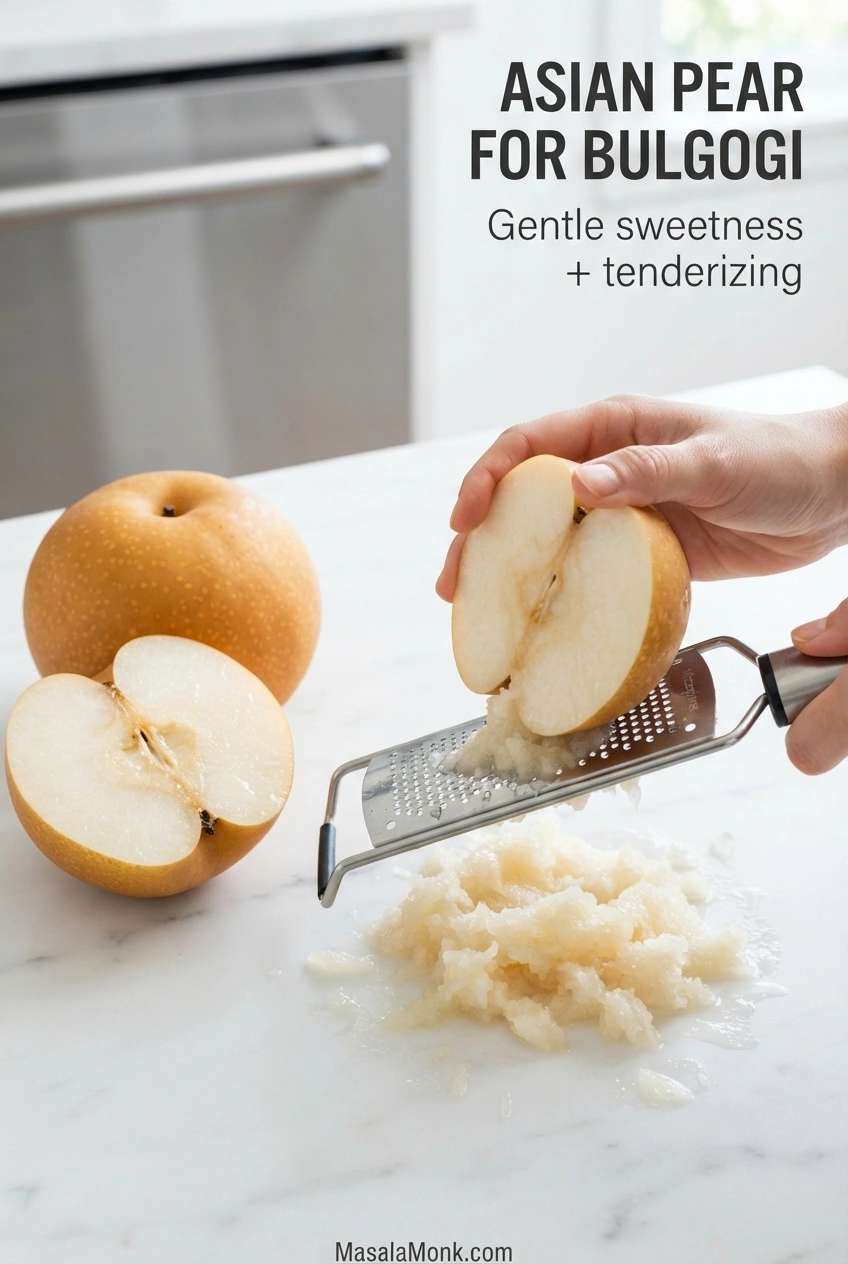
Whole and halved round Asian pears beside a metal grater and a mound of finely grated, juicy pale pear.
Finely grated Asian pear should resemble wet, juicy pulp rather than diced fruit; as a result, the pear disperses through the marinade instead of leaving concentrated sweet pockets.
ChoiceWhat to know
Asian or Korean pearJuicy, mildly sweet and gently tenderizing; the best all-round choice when available.
Ripe regular pearSimilar moisture and mild sweetness, with a familiar pear flavor.
Sweet appleGood for moisture and sweetness and can help with tenderizing, although it does not behave exactly like Asian pear.
No fruitStill workable with naturally tender beef cut very thinly, especially when the meat itself does not need much tenderizing help.

How Much Bulgogi Sauce Should You Use?

For 1 lb / 450 g meat, start with about ½ cup / 120 ml. Toss. Separate the slices. Look at them before adding more.

Every piece should have a glossy coating. A few spoonfuls of marinade in the bottom of the bowl are fine; the beef does not need to swim.
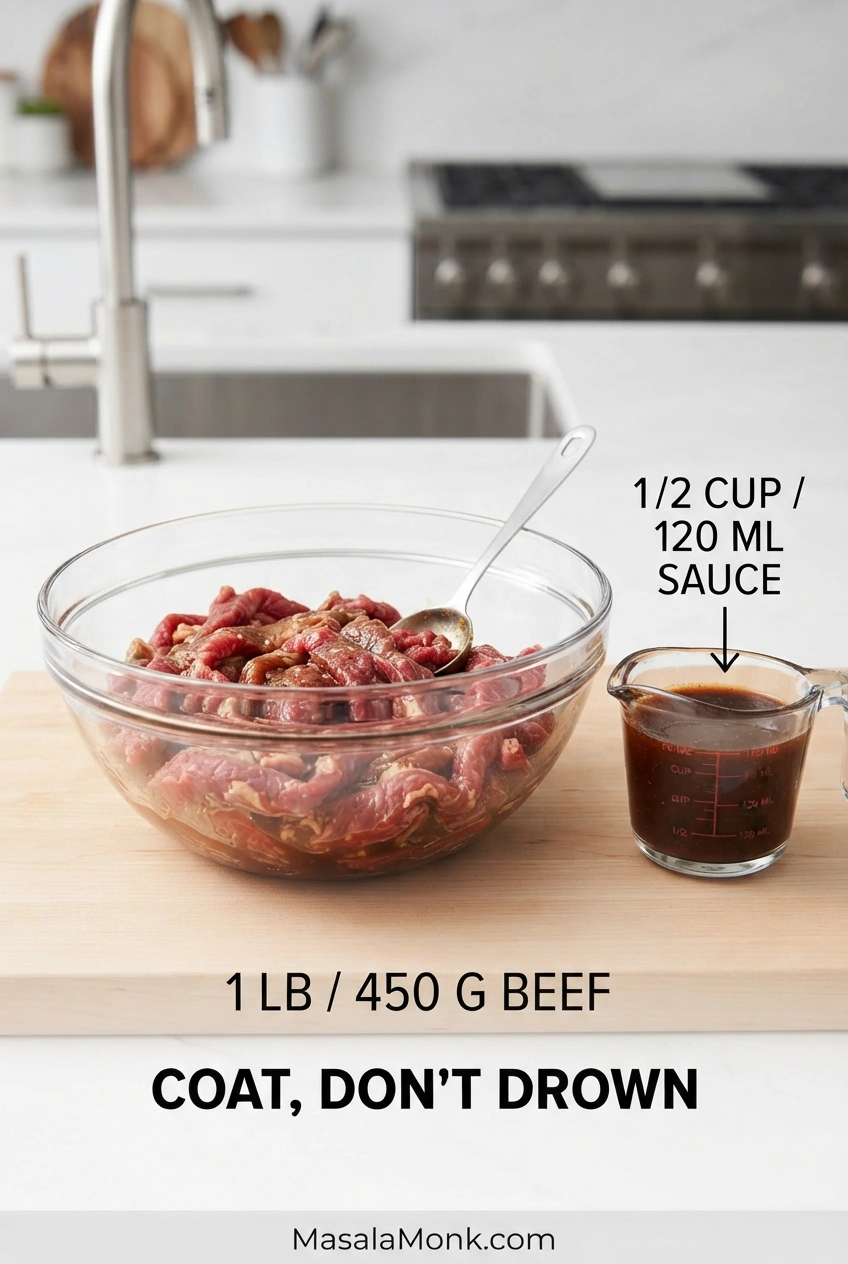
Thin raw beef coated with dark bulgogi marinade in a glass bowl beside a measuring cup of sauce.
Before adding more bulgogi sauce, pull apart any folded or clumped slices: the outside of a bundle can look glossy while the hidden surfaces inside are still barely coated.

For 2 lb / 900 g, begin with about 1 cup / 240 ml and add more only if the meat needs it.

Using bottled sauce? Follow its label; “Korean BBQ sauce” can describe products much thicker or more concentrated than this homemade marinade.

Planning on browned edges? Lift the beef with tongs or a slotted utensil and let obvious excess marinade drip away before it hits the skillet.

If the skillet still fills with bubbling liquid, see Read the Pan troubleshooting before changing the sauce itself.

How Long Should Bulgogi Marinate?

Thirty minutes is enough for thin beef; 1–4 hours gives deeper seasoning, and overnight is optional. Those timings assume Asian pear, regular pear, apple or no strong enzyme tenderizer—not kiwi or fresh pineapple.

Stronger Fruit Tenderizers Need Less Time

Kiwi and fresh pineapple are different tools. They tenderize much more aggressively than pear or apple, so do not use the same amount and then follow the longer timing above. Thin beef can move from tender to oddly soft surprisingly quickly.
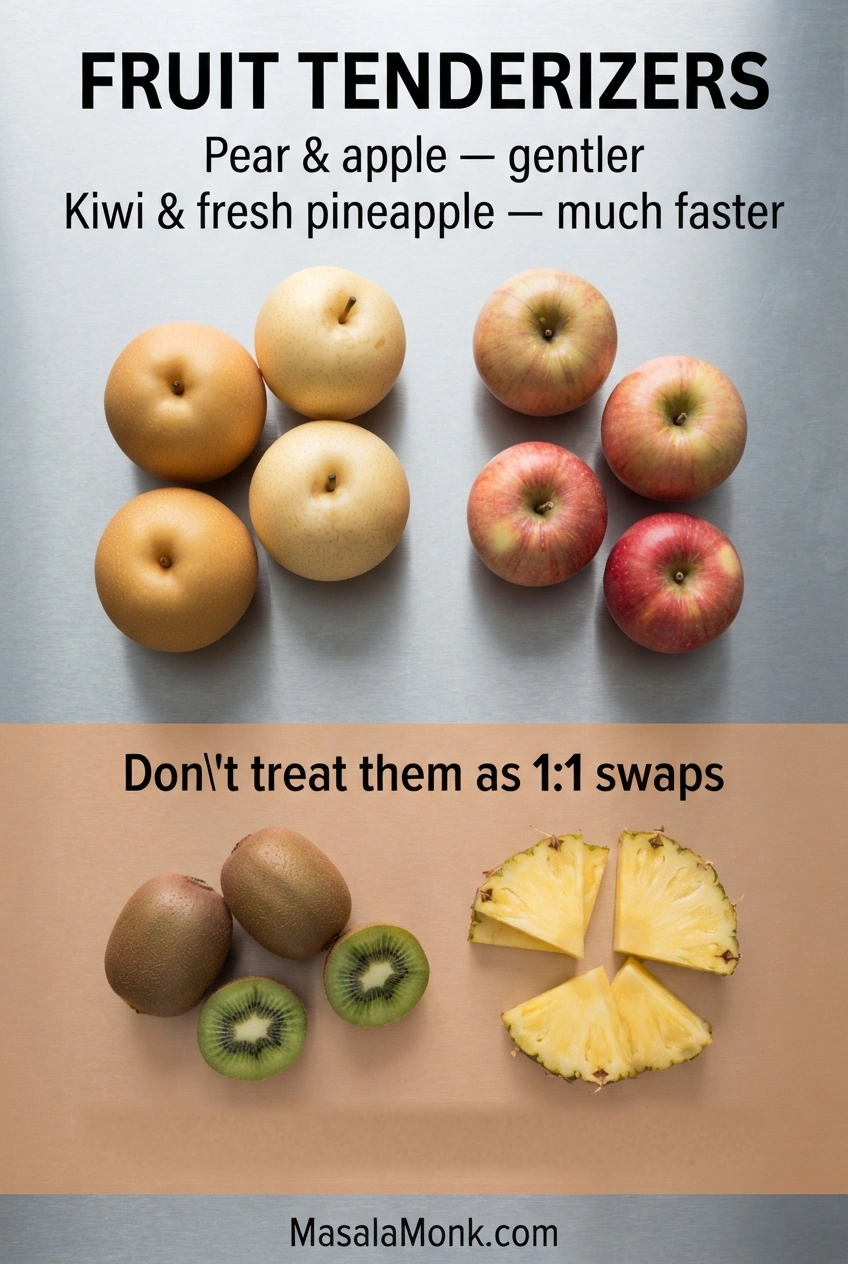
Asian pear and apple shown as gentler fruit tenderizers, compared with kiwi and fresh pineapple shown as faster tenderizers.
Very thin slices expose more meat surface to fruit enzymes, so the gap between gentler pear or apple and faster kiwi or pineapple matters more here than it would on a thick cut.

Keep raw meat cold while it marinates. The FDA recommends marinating food in the refrigerator, not on the counter.

Chewy beef is not automatically asking for stronger tenderizer. Ribeye and sirloin are easy choices for beef bulgogi, but whichever cut you use, slicing matters: aim for about 2–3 mm thick, around ⅛ inch or a little thinner, and cut across the grain. The slicing guide in our Beef and Broccoli recipe shows how to identify the grain for fast, hot cooking.
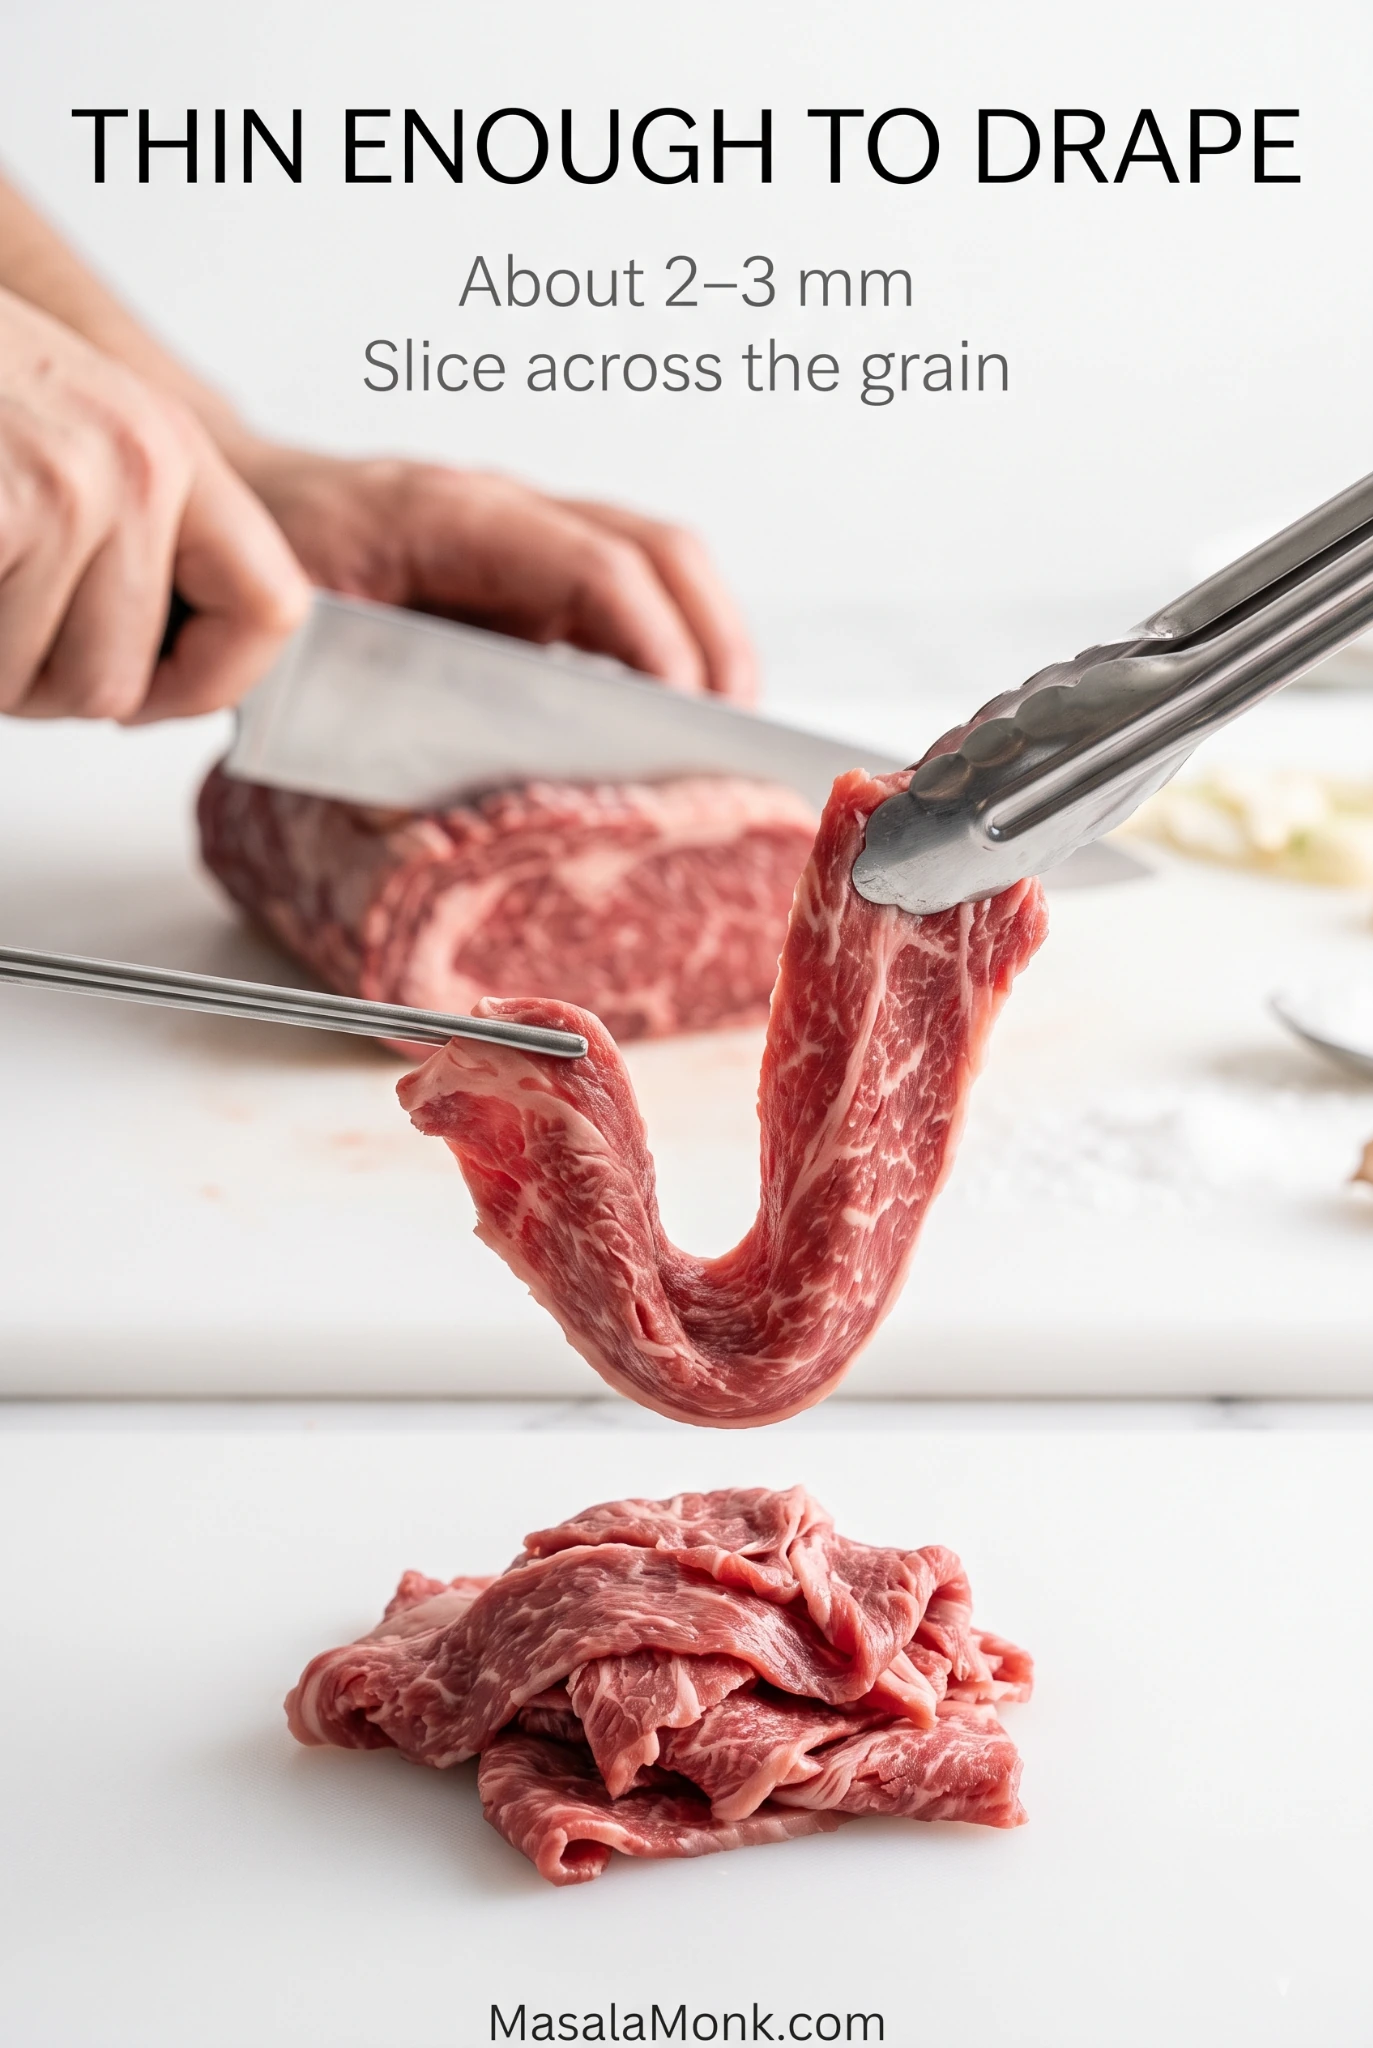
Very thin raw beef slice hanging in a soft U-shaped drape from metal tongs, with more thin slices and a knife cutting beef in the background.
In practice, correctly sliced bulgogi beef should bend and drape easily; that flexibility is a faster kitchen check than stopping to measure every slice at roughly 2–3 mm.

Grated, Blended or Strained?

Grating is the simplest route and leaves a little texture. Blending gives you a more uniform sauce. Straining is most useful when you want fewer pear, onion and garlic solids hitting a very hot pan or grill.

Those solids carry flavor, and there is no need to strain them out for most skillet cooking. At very high heat, though, removing most of them leaves fewer sugary fruit and onion bits sitting directly against hot metal while the beef is still trying to brown.

Bulgogi marinade stays thin even when blended. If you actually want a sauce that thickens around the food, that is a different job; our Stir Fry Sauce Recipe uses that approach. For bulgogi itself, grated or blended sauce works well—strain only when the smoother texture or very high heat makes it useful.
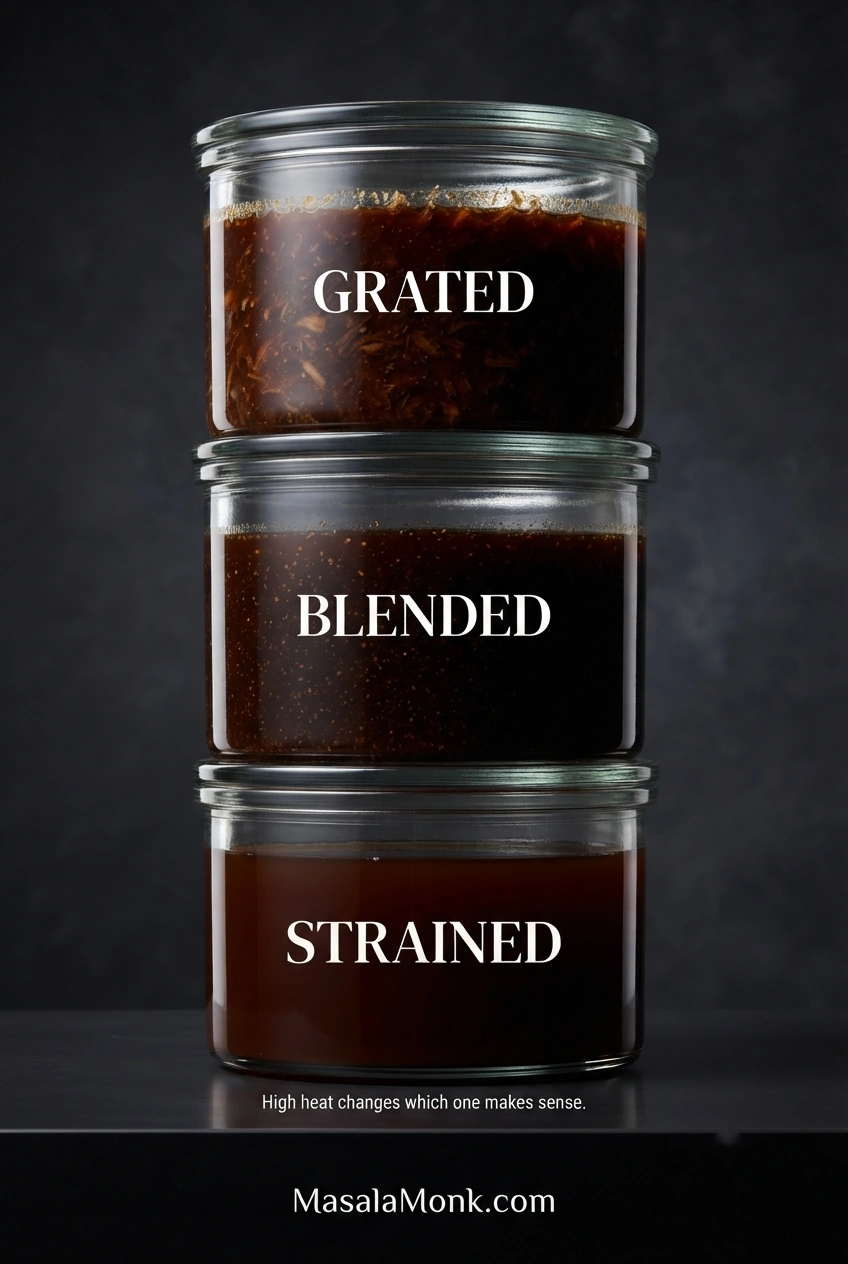
Three glass containers of bulgogi sauce showing grated, blended and strained textures with progressively fewer visible solids.
Straining removes pear, onion and garlic solids, but dissolved salt and sugar remain; therefore, strained bulgogi sauce becomes cleaner and smoother—not automatically milder.

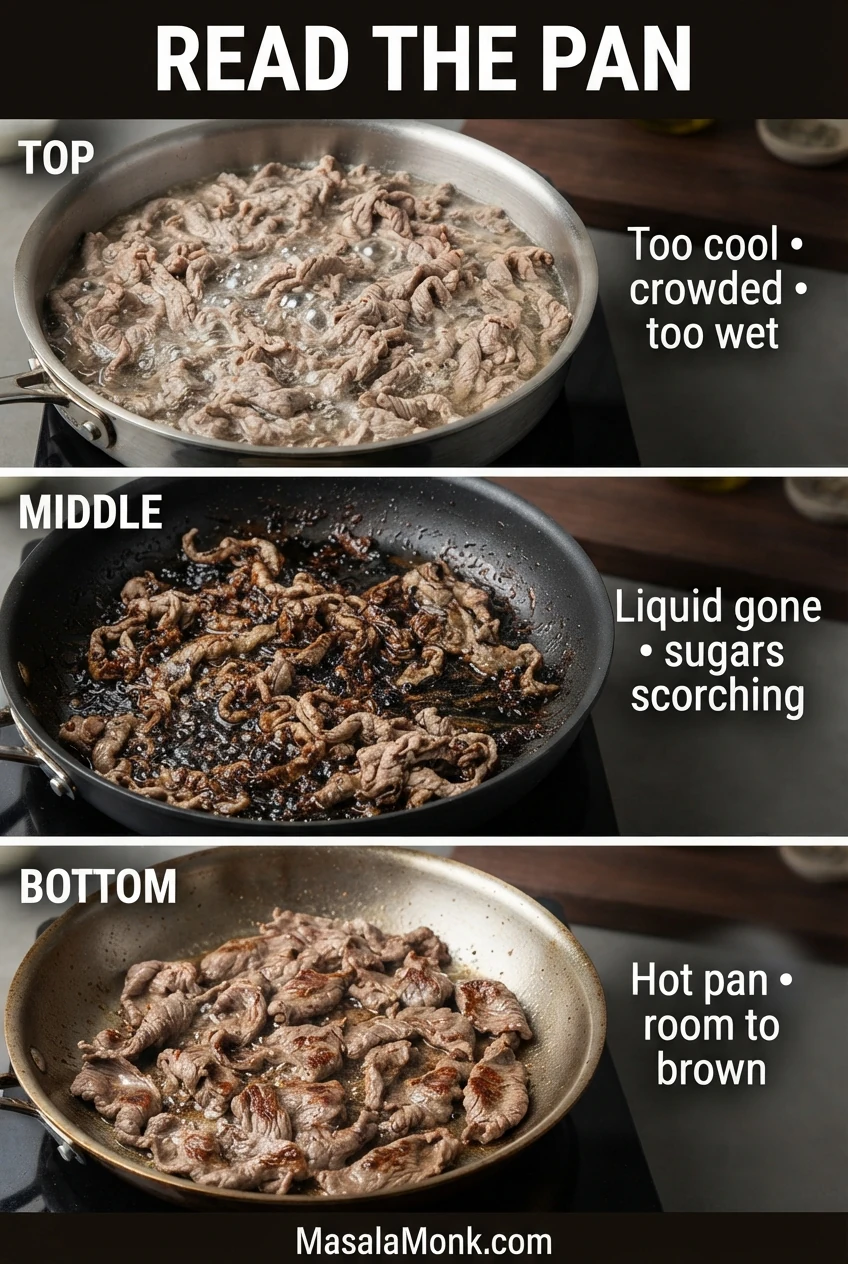
Read the Pan: Bulgogi Sauce Troubleshooting

The same marinade can give one cook browned edges and another a skillet full of pale beef, bubbling liquid or blackened sugary residue. Usually the pan is telling you exactly what changed.

When it is working, you hear a sizzle instead of a simmer. The sauce clings instead of pooling, the edges begin to brown, and the pan smells of garlic and toasted sesame rather than burnt sugar.
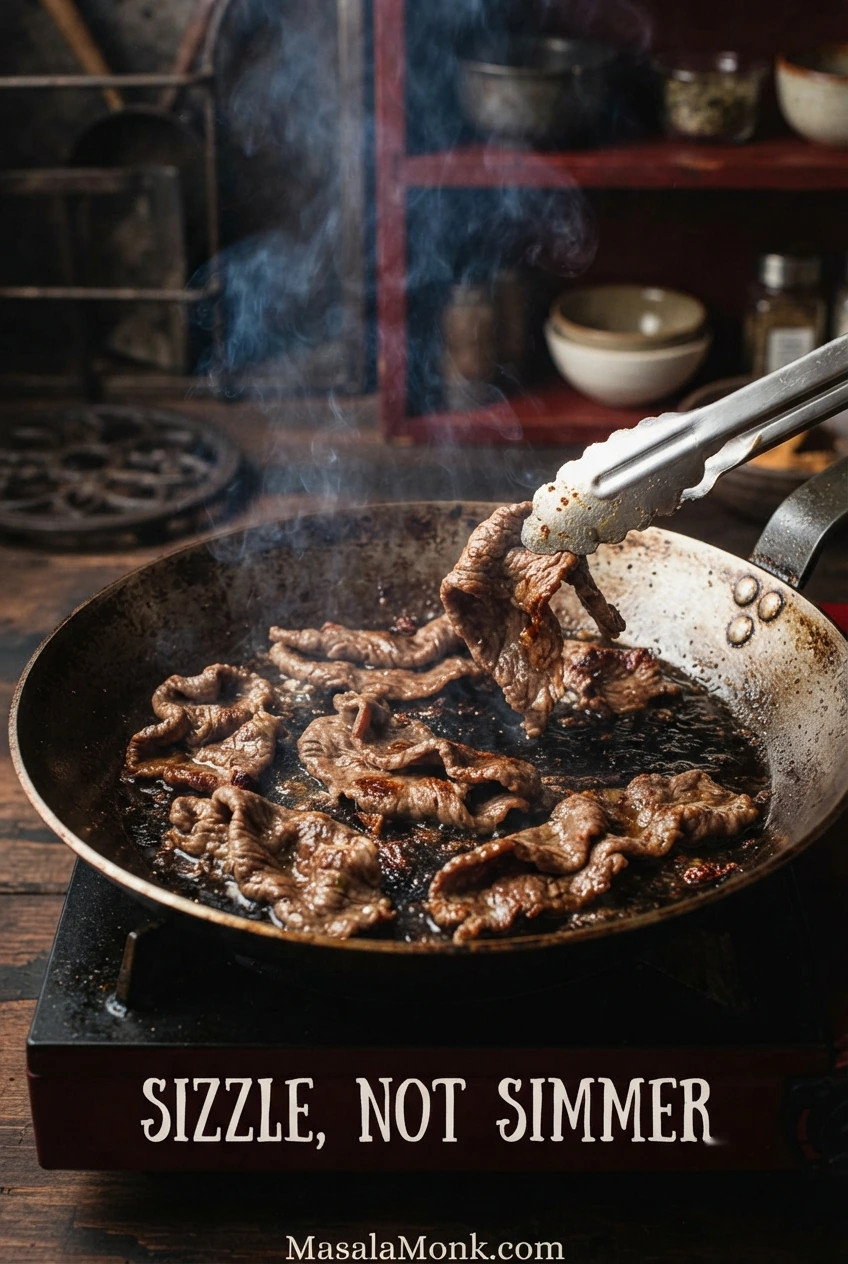
Thin slices of bulgogi beef browning in a hot skillet with exposed pan between the pieces, steam and very little pooled liquid.
Listen to the pan as each batch goes in: if a sharp sizzle fades into steady bubbling, the skillet has lost heat, so wait for it to recover before adding more beef.

Match the Pan to the Fix

What you seeWhy it happens & how to fix it
Pale or grey beef in bubbling liquidThe pan may not have been hot enough, or too much meat or wet marinade cooled it. Preheat well, let excess sauce drip away and cook smaller batches.
Black sticky residue with grey meatThe pooled liquid evaporated before the beef browned, leaving concentrated sugar and fruit solids to scorch. Transfer less marinade, give the beef more room and ease the heat as browning develops.
Brown edges with little liquid around themMoisture is leaving fast enough for the meat to sear. Keep working in similarly sized batches.
Beef stays toughThe meat may be too thick, cut with the grain, naturally tough or simply cooked too long. Fix the slicing and cut before reaching for stronger tenderizer.
Meat turns strangely soft or mushyA strong fruit tenderizer or excessive marinating has broken down the surface too far. Use pear or apple for gentler tenderizing and shorten the marinating time.
Three skillet states showing pale beef in bubbling liquid, beef with dark sticky scorched residue, and properly browned bulgogi with little liquid.
These pan states can happen in sequence: crowded beef may begin pale and wet; then, once that liquid boils away, concentrated sugars can scorch before the meat develops proper browning.

Browned vs Saucy Bulgogi

The troubleshooting above assumes you are aiming for browned skillet-style bulgogi. A deliberately juicier style is different.

That means a wet pan is not always a failed pan. Some bulgogi is meant to leave you with savory juices to spoon over rice.

Deeper browning starts with a drier trip to the pan. Let excess marinade drip away, heat the cooking surface properly and give the beef enough room for moisture to escape.

A juicier style goes the other direction. Let more marinade and vegetables cook with the meat, trading some deeply browned surface for flavorful cooking juices.
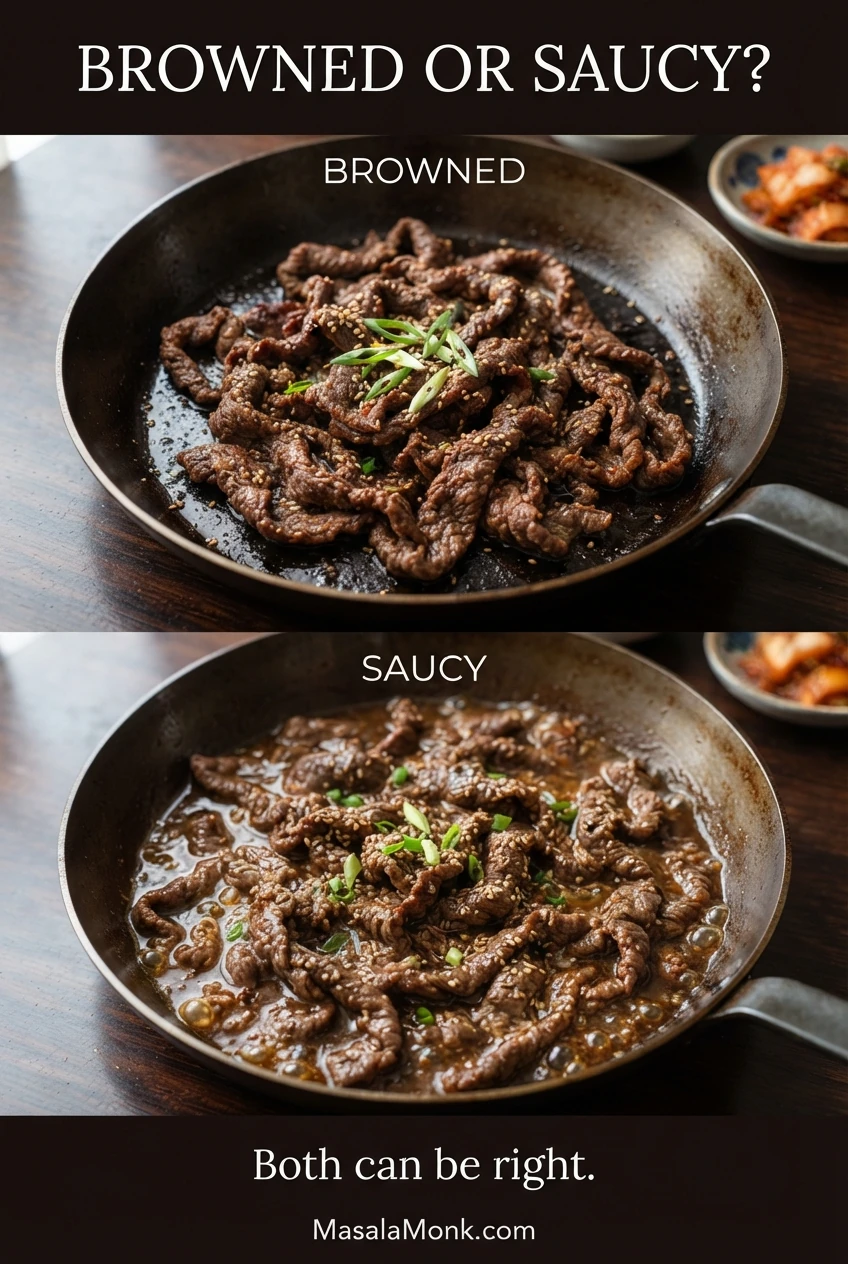
Comparison of browned bulgogi with little pan liquid and saucy bulgogi surrounded by visible cooking juices.
Use the pan bottom as the clue: exposed hot metal and dry sizzling edges point toward browned bulgogi, whereas free savory liquid between the slices signals an intentionally saucier finish.

Serve either style over hot rice. If rice is the unreliable part of dinner, our guide to cooking rice can help.
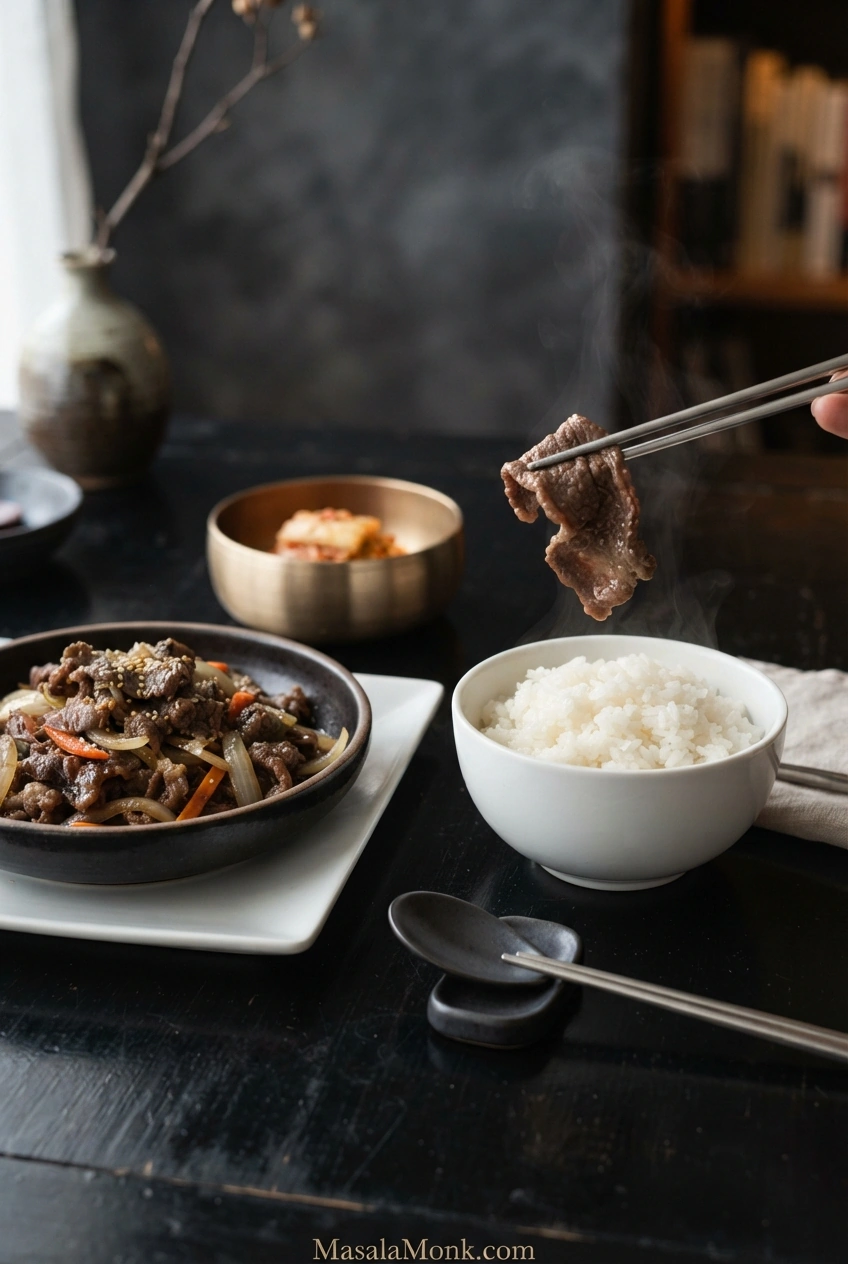
Finished thin-sliced bulgogi served with steaming white rice and a few Korean-style accompaniments on a dark table.
Serve bulgogi with rice while both are hot: the rice catches the savory pan juices, while the thin beef stays tender before it cools and firms.

Want Spicy Bulgogi Sauce?

Classic beef bulgogi is sweet-savory rather than chile-hot. One tablespoon of gochujang in this full batch gives mild warmth, fermented chile flavor and a little extra body.

For noticeably hotter bulgogi, build the heat with gochugaru. It raises the chile level without adding as much extra sweetness, salt and thickness as several more spoonfuls of gochujang would.

Can You Use Bulgogi Sauce as a Dip or Glaze?

Bulgogi sauce is a marinade first. Reserve some before the raw meat goes in; leave that clean portion thin for dipping, or simmer it gently until it lightly coats a spoon for a glaze.

As the sauce reduces, both salt and sweetness become stronger. A thick, glossy sweet-soy sauce from the start is closer to our Teriyaki Sauce Recipe.

Marinade that has already touched raw meat should not be served uncooked; the USDA advises bringing used marinade to a boil before reusing it.
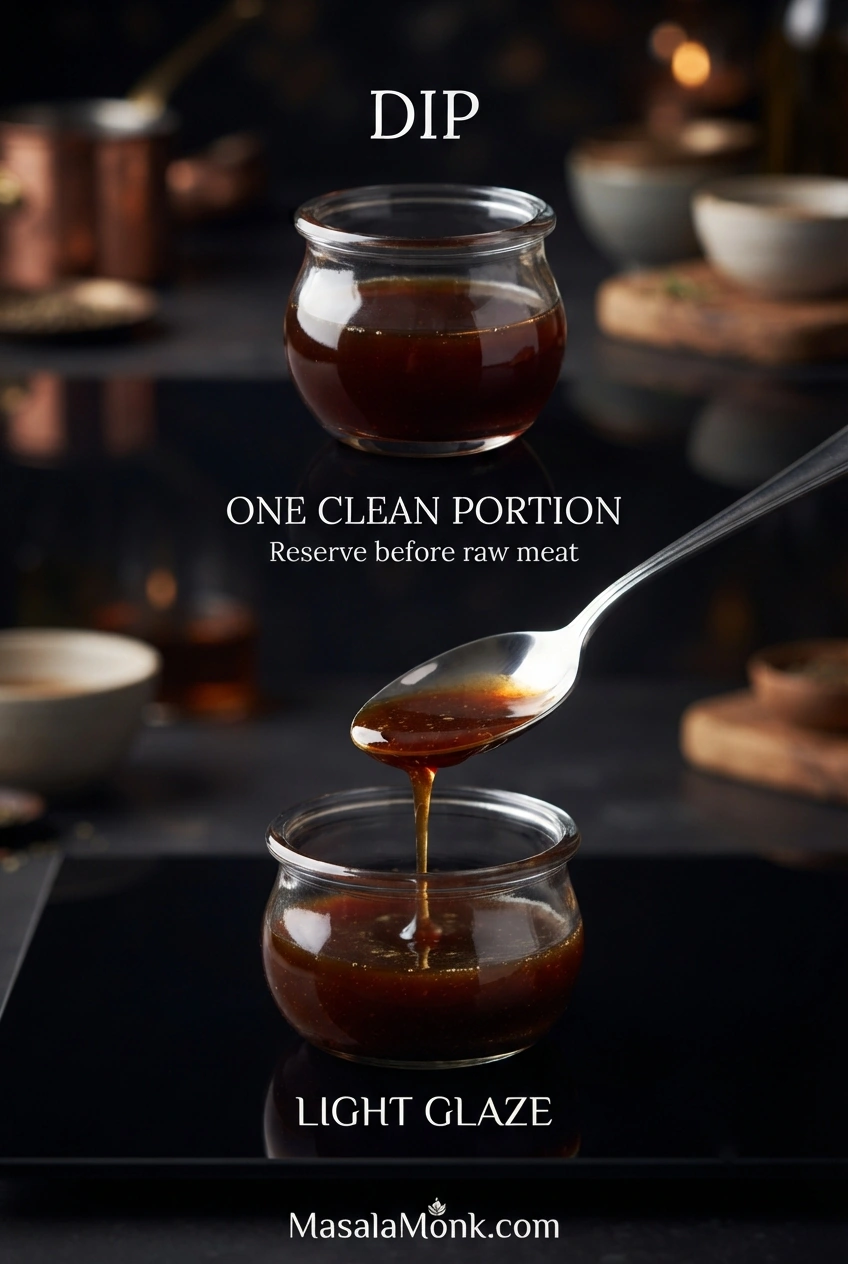
Dark bulgogi sauce shown as a thin dipping sauce and as a slightly reduced glaze lightly coating a spoon.
A light bulgogi glaze is ready when it coats the spoon but still slides off; if it forms a slow, sticky ribbon, the reduction has moved beyond a light glaze.

What Else Can You Use Bulgogi Sauce On?

Chicken and thinly sliced pork both take this marinade well. Cooking time depends on the cut, so do not borrow the timing for very thin beef.

Tofu needs flavor rather than tenderizing, so a long fruit soak adds little. Brown it first if you want firmer edges, then add sauce. Mushrooms only need a coating; cook them until browned and juicy.

How to Store and Freeze Bulgogi Sauce

Refrigerate unused sauce that has not touched raw meat in an airtight container for up to 4 days. This fresh homemade sauce does not have the long refrigerator life you might expect from a commercially bottled sauce.

Freeze anything you will not use within that window in small airtight portions. For best quality, use it within about 2 months, then thaw it in the refrigerator and stir before using.

Once you know how the sauce should taste and how the pan should sound, the next batch gets much easier to judge by sight, smell and instinct.
Posted on — Leave a comment

Fried Rice Recipe: Easy, Better Than Takeout & Ready in 20 Minutes

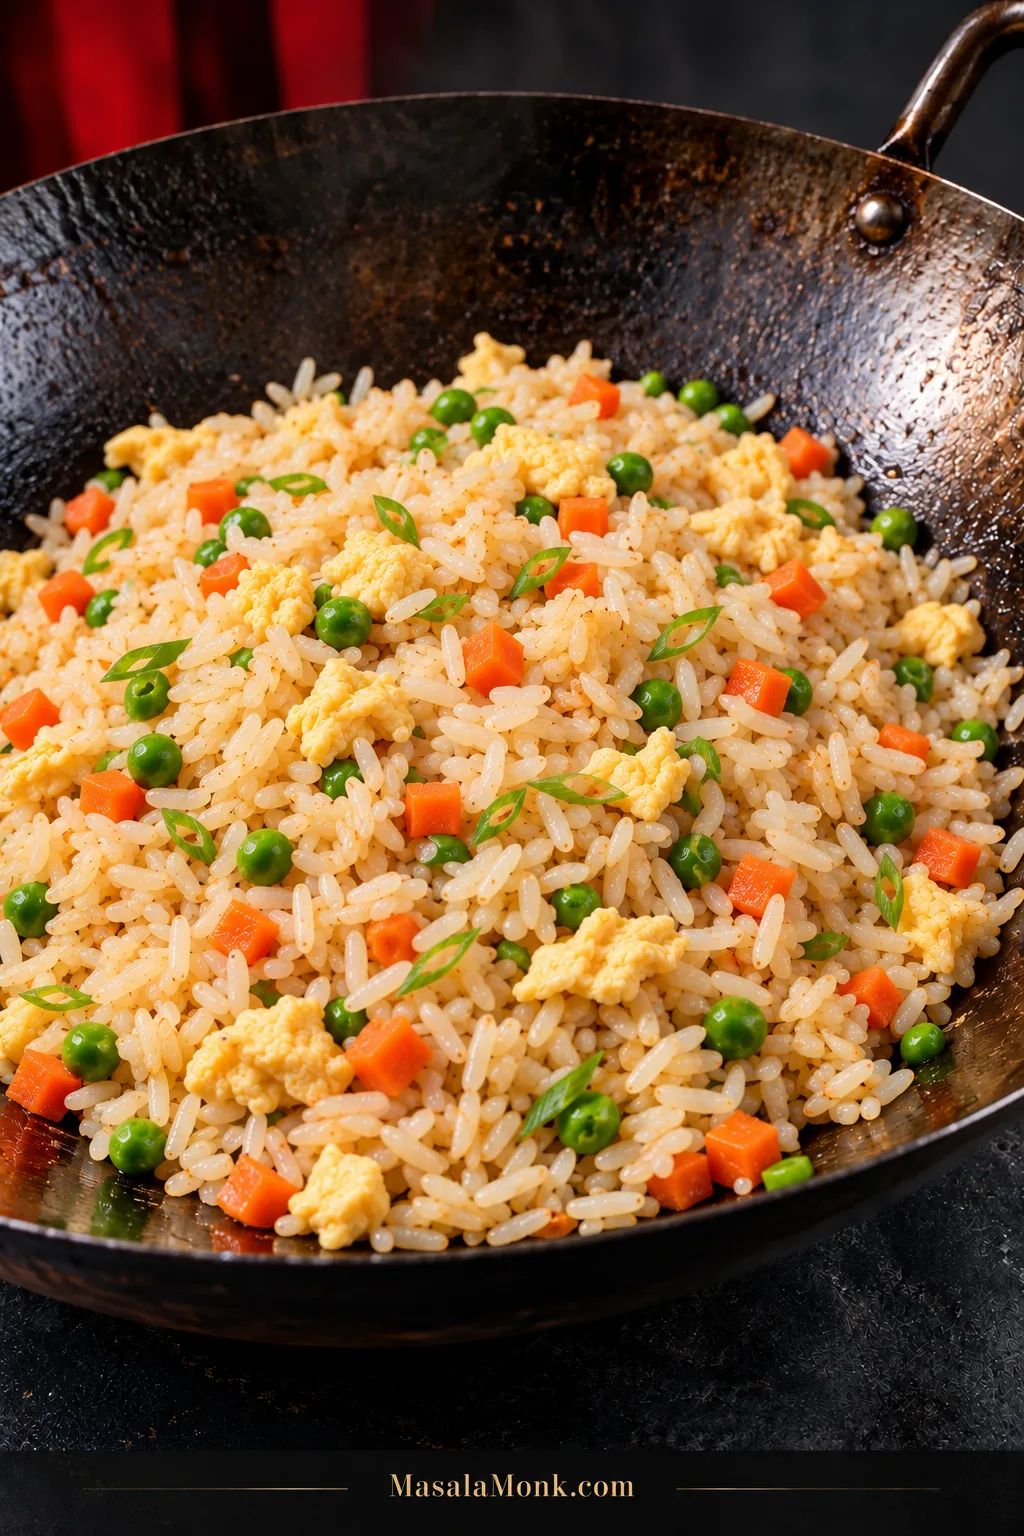
Finished fried rice in a seasoned carbon-steel wok with pale golden rice, small pieces of scrambled egg, diced carrots, green peas and sliced scallions.

This fried rice recipe gives you hot, separate grains, tender egg, crisp-tender vegetables and savory takeout-style flavor. With cooked rice ready to go, dinner can be on the table in about 20 minutes.

Leftover rice is convenient, but it isn’t a requirement. Freshly cooked rice can work too once its steam has somewhere to escape. That’s part of the appeal of fried rice: a few ordinary ingredients from the refrigerator can stop feeling like leftovers at all.
The result we’re aiming for is familiar Chinese-American takeout-style fried rice: loose grains, lightly toasted edges, fresh scallion and deeply savory flavor with just enough sauce to coat everything lightly. Here, the seasoning supports the rice, egg and vegetables without stealing the whole bite.

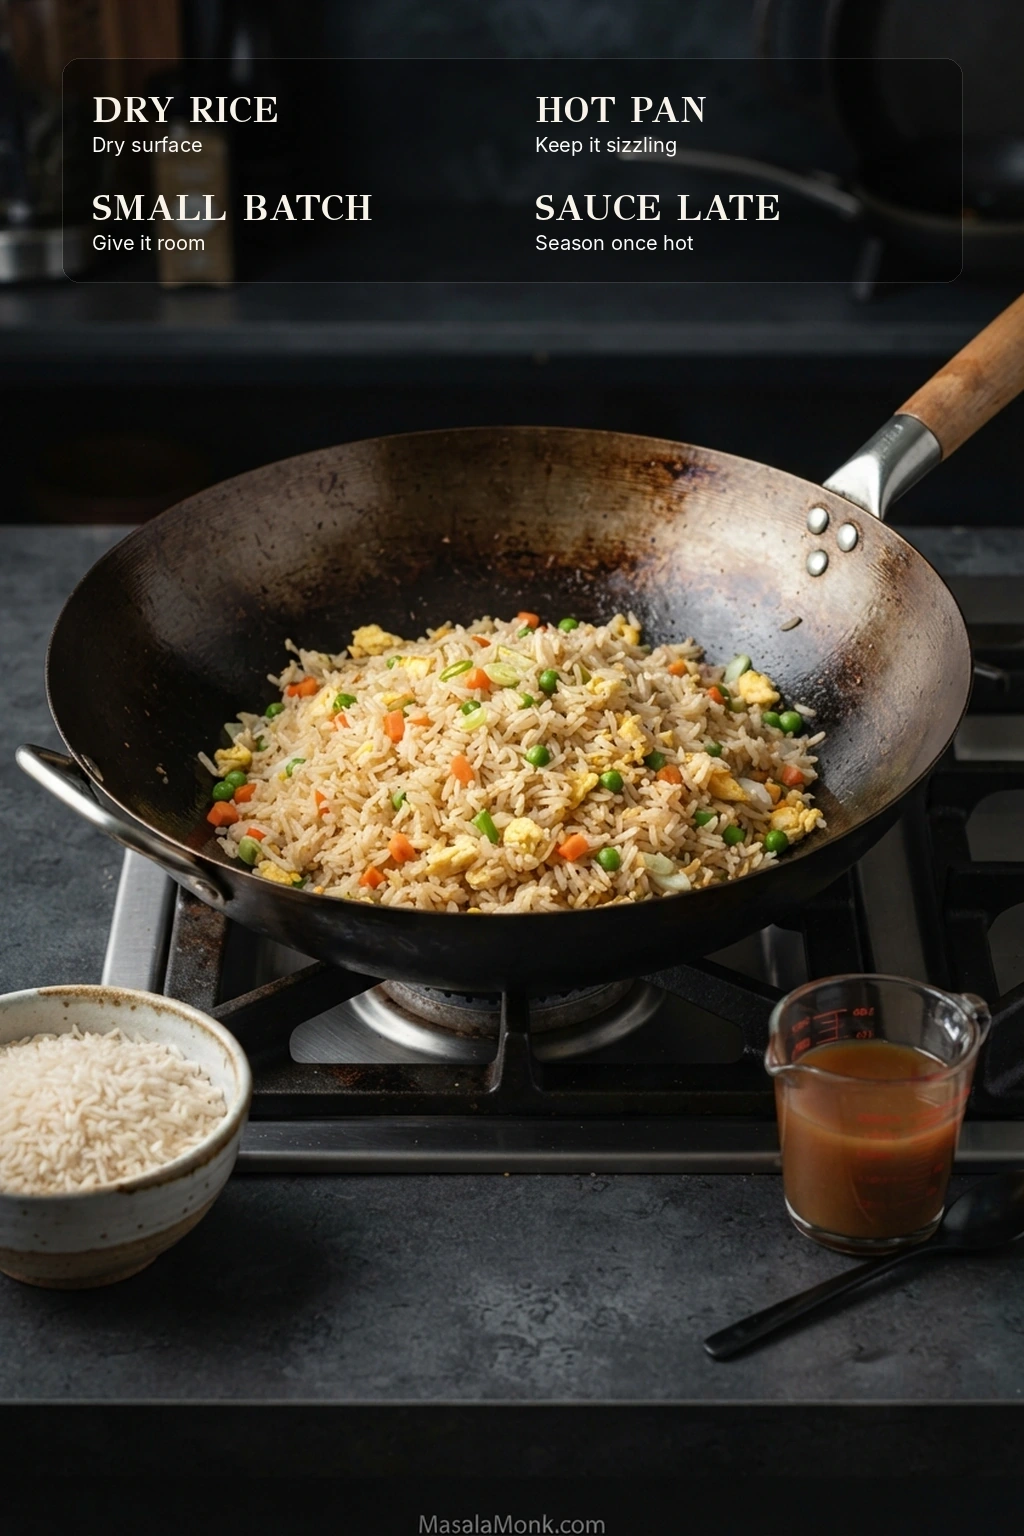
Dry Rice. Hot Pan. Small Batch. Sauce Late.

Dry rice: start with firm grains that separate instead of squashing together.

Hot pan: the rice should still sizzle when it lands.

Small batch: once that sizzle disappears under a cloud of steam, the pan is carrying too much food.

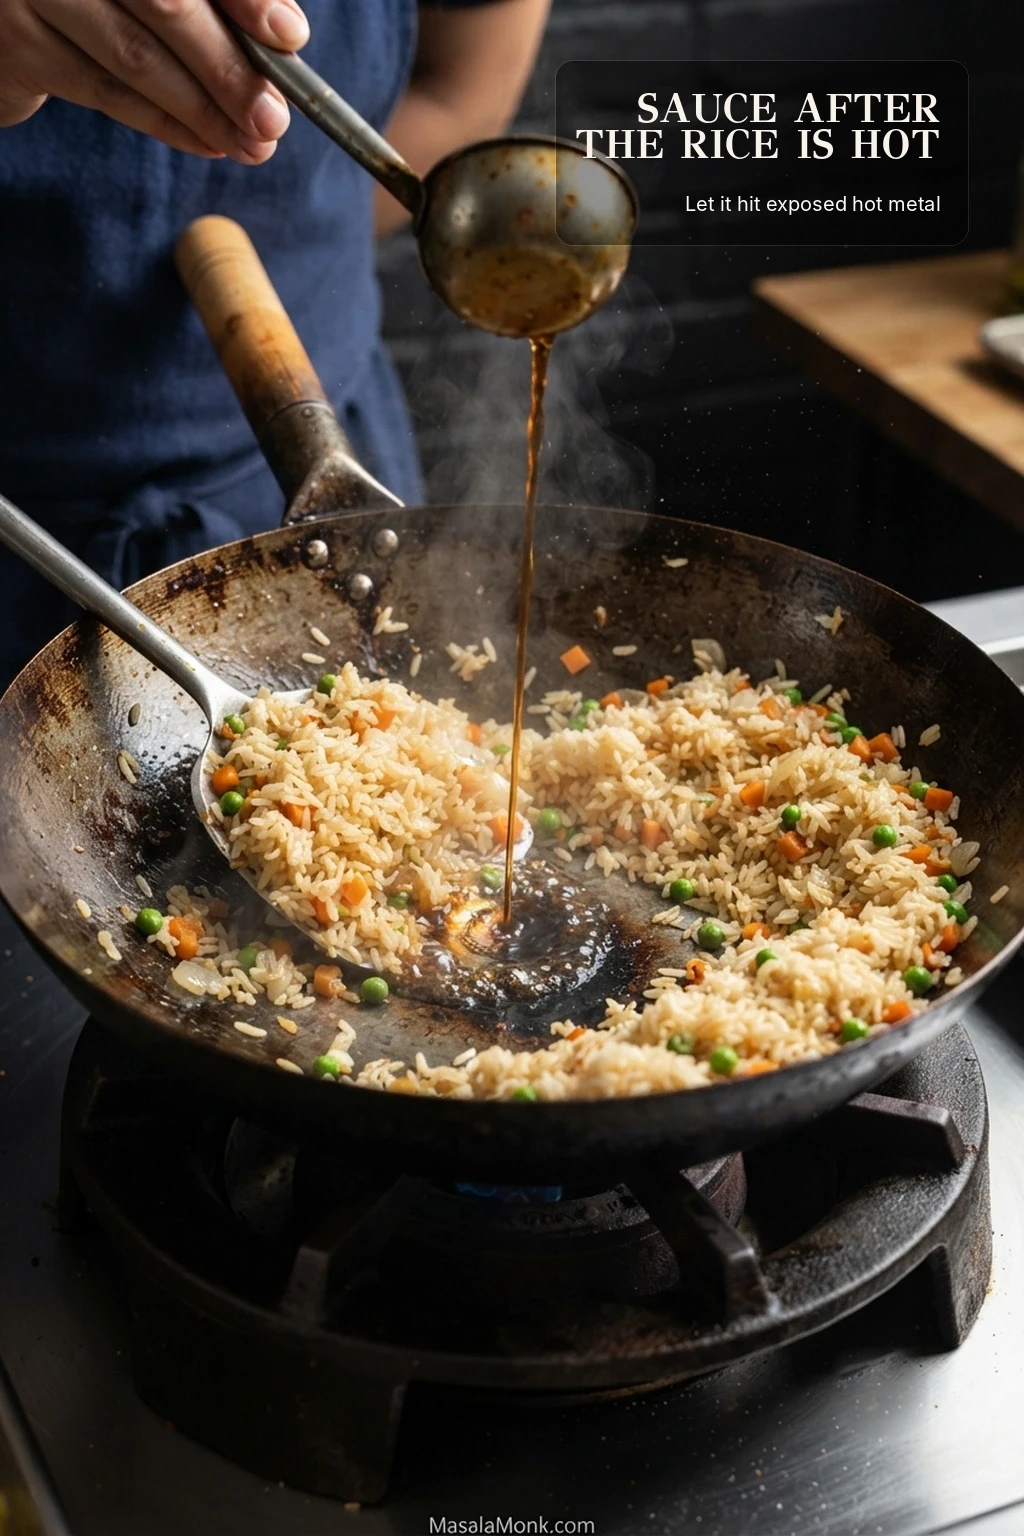
Sauce late: season only after the rice is hot, so the liquid can hiss, reduce and coat the grains quickly.

Fried rice cooking in a wok with four highlighted principles: dry rice, hot pan, small batch and sauce added late.
Measure everything before the pan gets hot; fried rice moves too quickly to pause for soy sauce, chopped scallions or a missing bowl.

Fried Rice Recipe

This method works in either a wok or a large skillet. The seasoning is measured for a savory finish that coats the grains lightly.

Prep
10 minutes

Cook
8–10 minutes

Total
About 20 minutes*

Serves
3 as a main, 4 as a side

*The 20-minute total assumes the cooked rice is already prepared.

Fried Rice Ingredients

  • 3 cups cooked jasmine or long-grain white rice, measured without packing, about 475 g, firm and surface-dry
  • 2 large eggs, lightly beaten
  • 2½ tablespoons (about 37 ml) neutral high-heat oil, such as canola, avocado, grapeseed or vegetable oil, divided
  • ½ medium yellow onion, finely diced, about 60 g
  • 1 small-to-medium carrot, cut into roughly ¼-inch (6 mm) dice, about ½ cup (65 g)
  • ½ cup frozen peas, about 70 g
  • 2 garlic cloves, finely minced
  • 3 scallions, thinly sliced, white and green parts separated

For the Seasoning

  • 1 tablespoon + 1 teaspoon (20 ml) Chinese light soy sauce or all-purpose soy sauce
  • 2 teaspoons (10 ml) oyster sauce
  • 2 teaspoons (10 ml) Shaoxing wine
  • ¼ teaspoon ground white pepper
  • ¼ teaspoon MSG, optional
  • Up to ¼ teaspoon dark soy sauce, optional, for deeper color
  • ½ teaspoon (2.5 ml) toasted sesame oil, for finishing
  • Fine salt, only if needed after tasting

How to Make Fried Rice

  1. Get everything ready first. Break the cooked rice into loose grains with your fingers or a fork. Mix the light soy sauce, oyster sauce, Shaoxing wine, white pepper, optional MSG and optional dark soy in a small bowl. Keep the toasted sesame oil separate for the finish.
  2. Soft-scramble the eggs. Heat a large wok or 12-inch skillet over medium-high to high heat, as hot as your cookware safely allows. If you are using nonstick, follow the manufacturer’s heat guidance and don’t heat the pan to smoking. Add about 1 teaspoon oil, pour in the eggs and stir for 30–45 seconds, just until softly set. Transfer them to a plate before they turn dry.
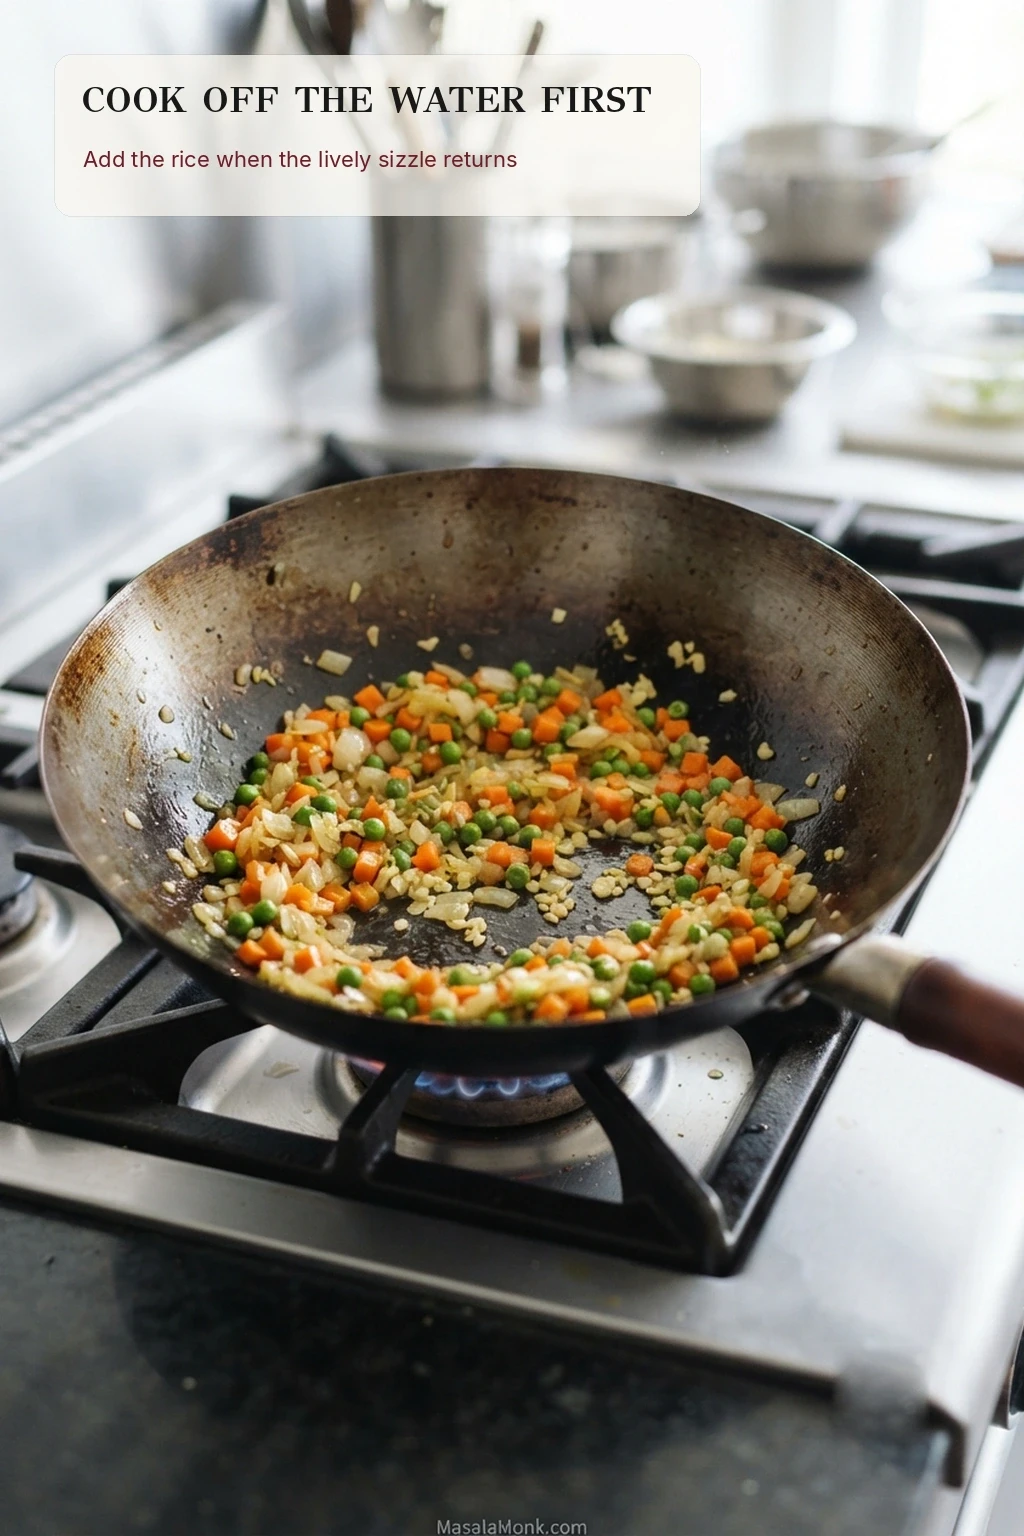
  3. Cook the vegetables in stages. Pour in about 1 tablespoon oil, followed by the onion and carrot. Stir-fry for around 2 minutes, until the onion begins to soften and the carrot loses its raw edge. Cook the peas until hot and any released water has evaporated. Finish with garlic and scallion whites, stirring for 15–20 seconds until fragrant.
Diced carrots, peas, onion and aromatics sautéing in a wide wok with mostly dry exposed metal and no rice yet added.
Frozen peas can briefly turn a stir-fry into a simmer. Wait for the lively sizzle to return before the rice goes in.
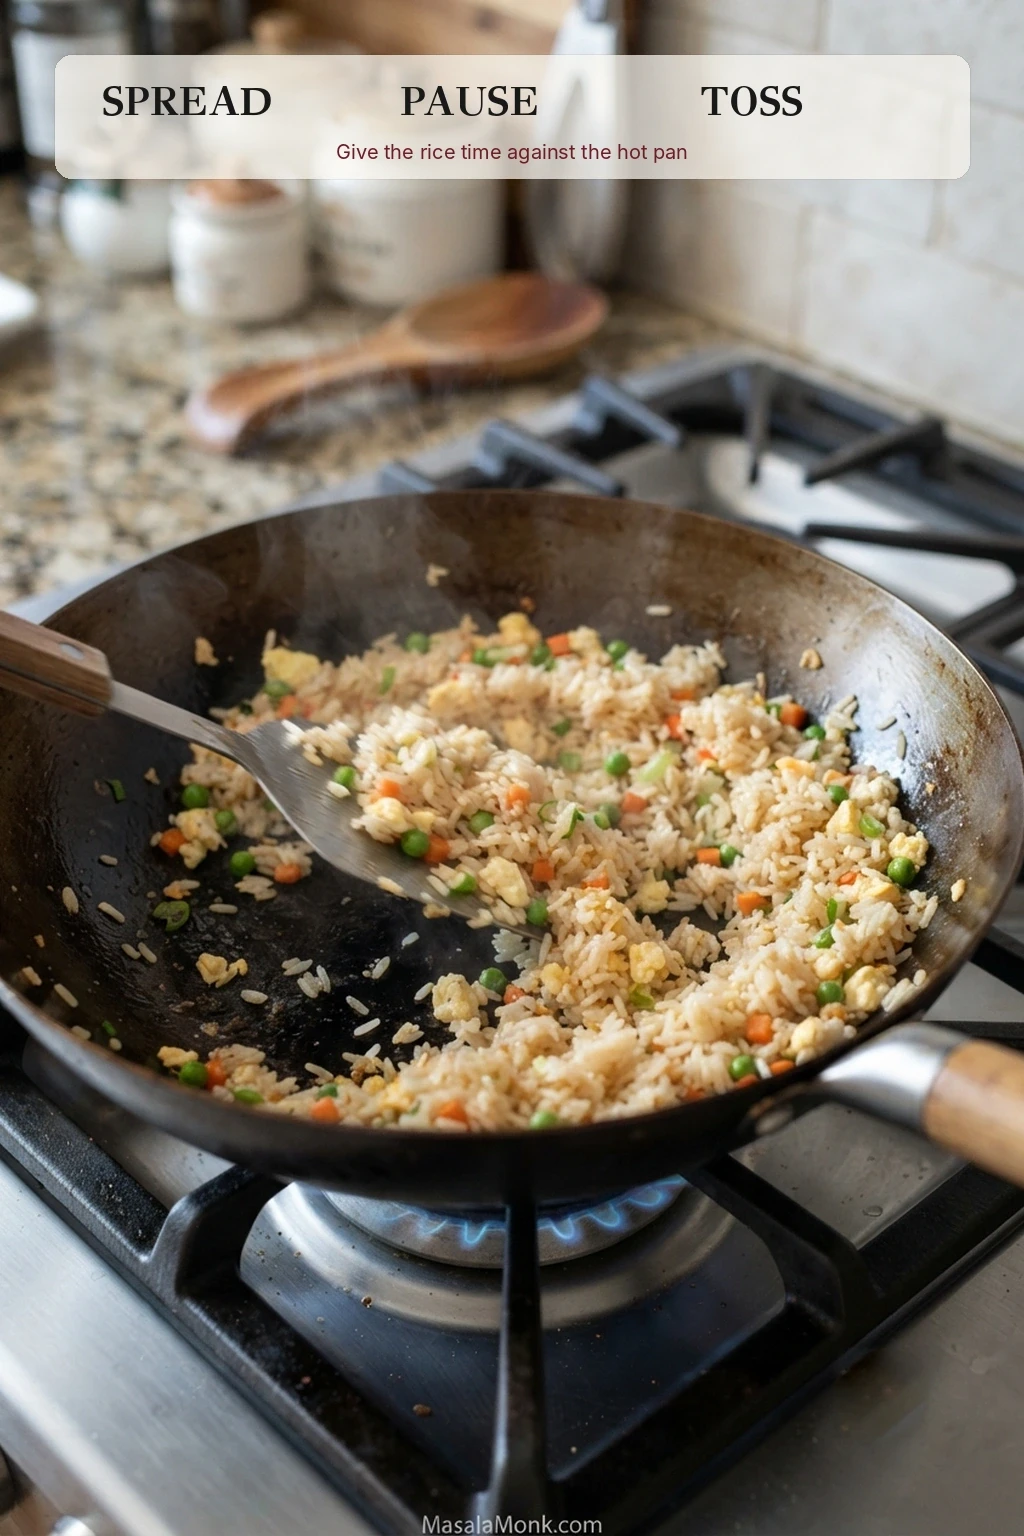
  1. Add the rice right away. Pour in the remaining oil, then add the rice before the garlic has time to darken. Toss, spread the grains over the hot surface and give them brief 15–30 second stretches of contact before tossing again. Fry for about 2–4 minutes, until the rice is hot, loose and beginning to crackle faintly. A pan that turns quiet and steamy is overloaded; split the batch.
  2. Season the hot rice. Clear a small area of the pan, or use the hot perimeter of a wok. Pour the seasoning mixture onto the exposed hot pan surface so it hisses almost immediately, then toss it through the rice. Cook for another 30–60 seconds, until the seasoning has coated the grains and no liquid is pooling underneath.
  3. Bring it together. Return the egg to the pan and break it into bite-size pieces as you toss. Add the scallion greens and cook for about 30 seconds. Take the pan off the heat, stir in the toasted sesame oil and taste. Add salt or a very small splash of extra soy only if the rice needs it.

When It’s Ready

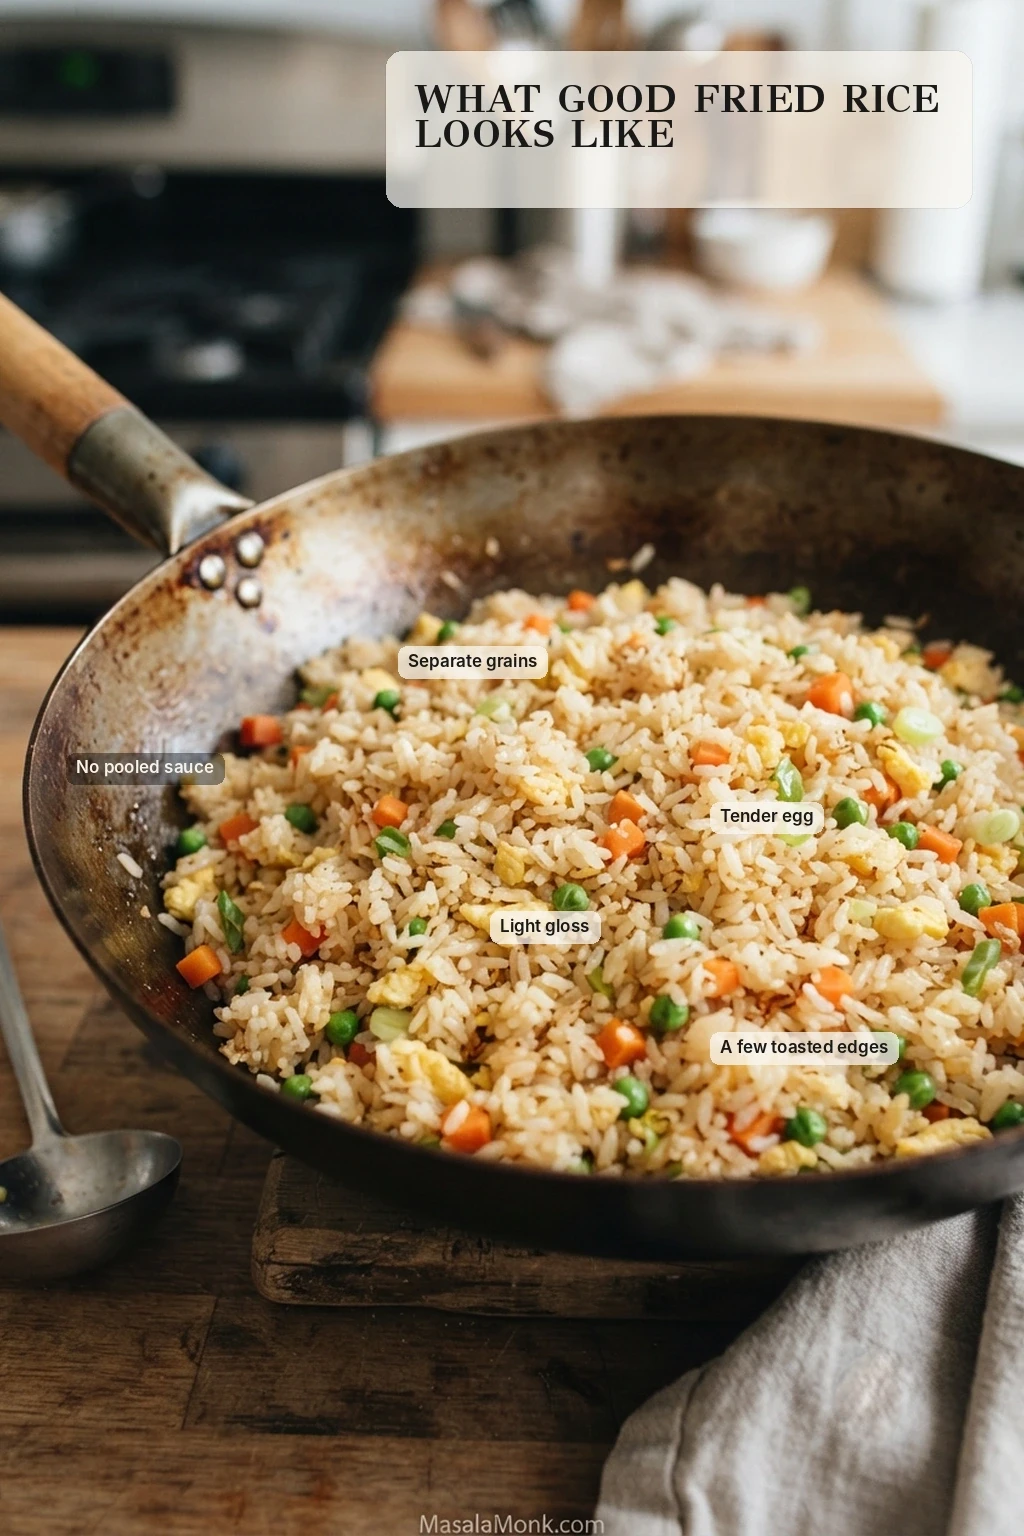
The grains should be hot and distinct, with a light gloss and no wet sheen. The vegetables should still have some texture, the egg should remain tender, and no sauce should pool underneath. A few lightly toasted edges are welcome; uniform dark browning is unnecessary.

Close view of finished fried rice with labels identifying separate grains, tender egg, light gloss, a few toasted edges and no pooled sauce.
Lift a spoonful: properly fried grains tumble apart instead of rising in sticky slabs. Pale fried rice can still be beautifully fried.

The Ideal Bite

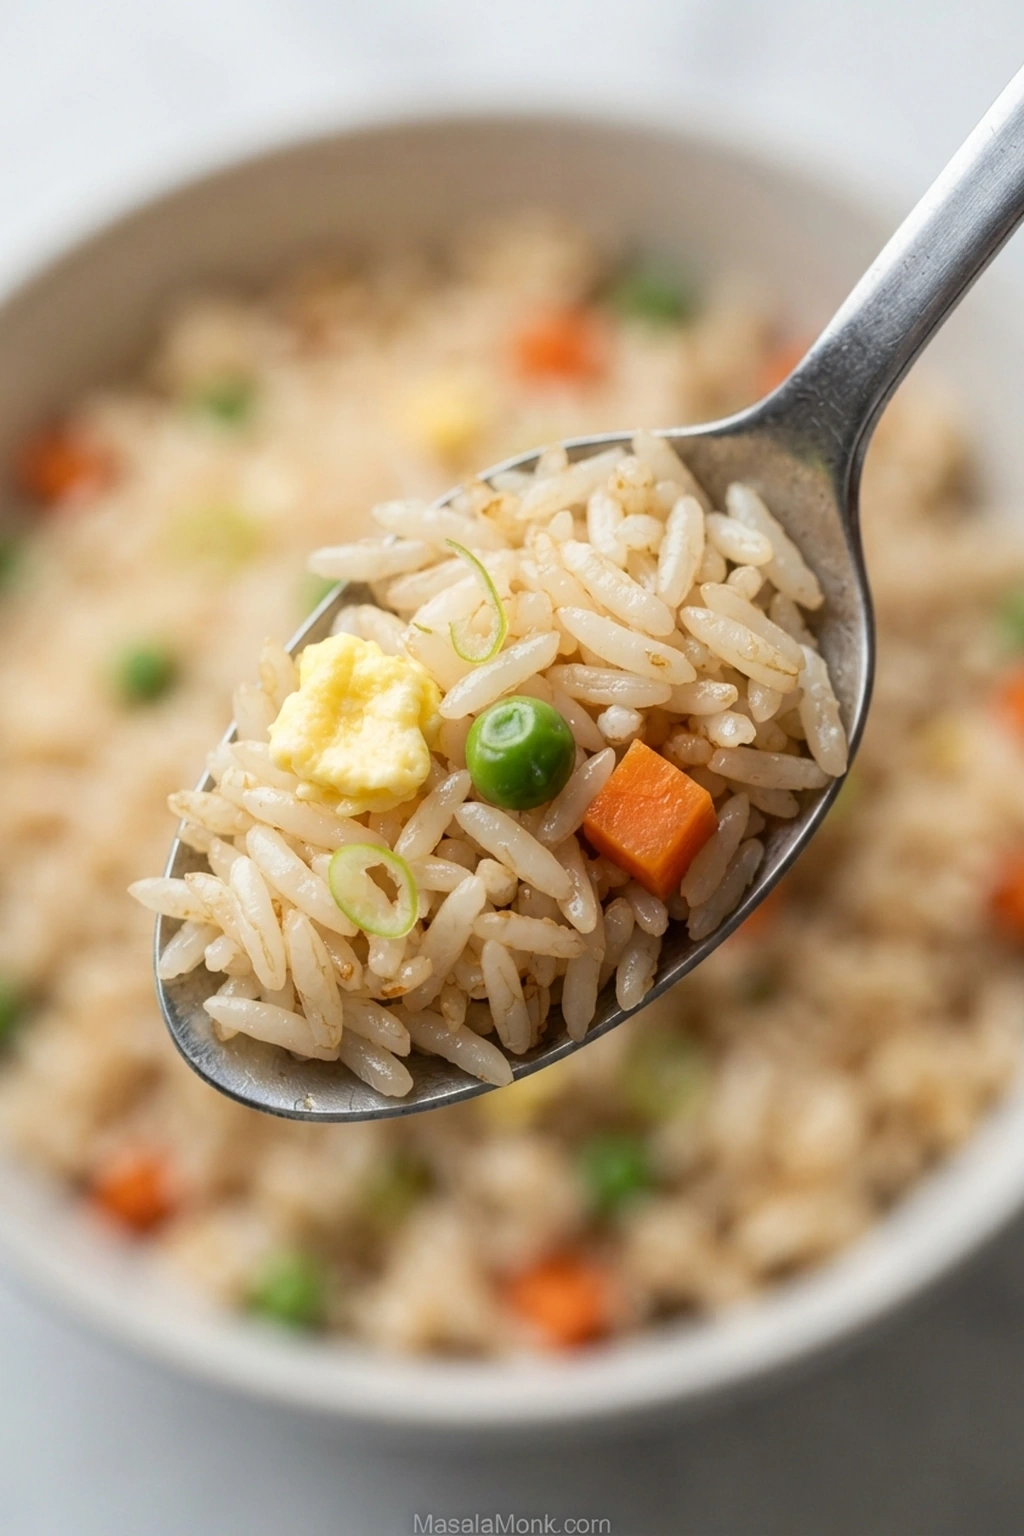
The best bite should give you a little of everything at once: savory rice, soft egg, a sweet pea or bit of carrot, fresh scallion and now and then a toasted edge from the pan.

Close-up spoonful of pale golden fried rice with separate grains, a small egg piece, diced carrot, one green pea and thin scallion slices.
Small carrot dice, modest egg pieces and thin scallions distribute through the rice, so several textures can meet in one spoonful.

Quick Recipe Notes

  • No day-old rice? The same-day method below works well.
  • Rock-hard refrigerator rice? Warm it very briefly—only enough to loosen the clumps—then let visible steam escape before frying.
  • Prefer more egg? Use 3 large eggs instead of 2.

Starting with fresh rice, choosing soy sauce, or trying to rescue a soggy batch? The guide below tackles those problems directly.

Best Rice for Fried Rice

For this recipe, jasmine or another long-grain white rice is the easiest choice: the grains separate readily and hold their shape through tossing. Short-grain rice gives a softer, chewier result. Starting from uncooked rice? Our guide to cooking rice goes deeper into jasmine, long-grain and other common methods.

The grains should be firm enough to hold their shape and dry enough on the surface to fry. Cooking rice today? Follow the same-day cooling method before it reaches the pan.

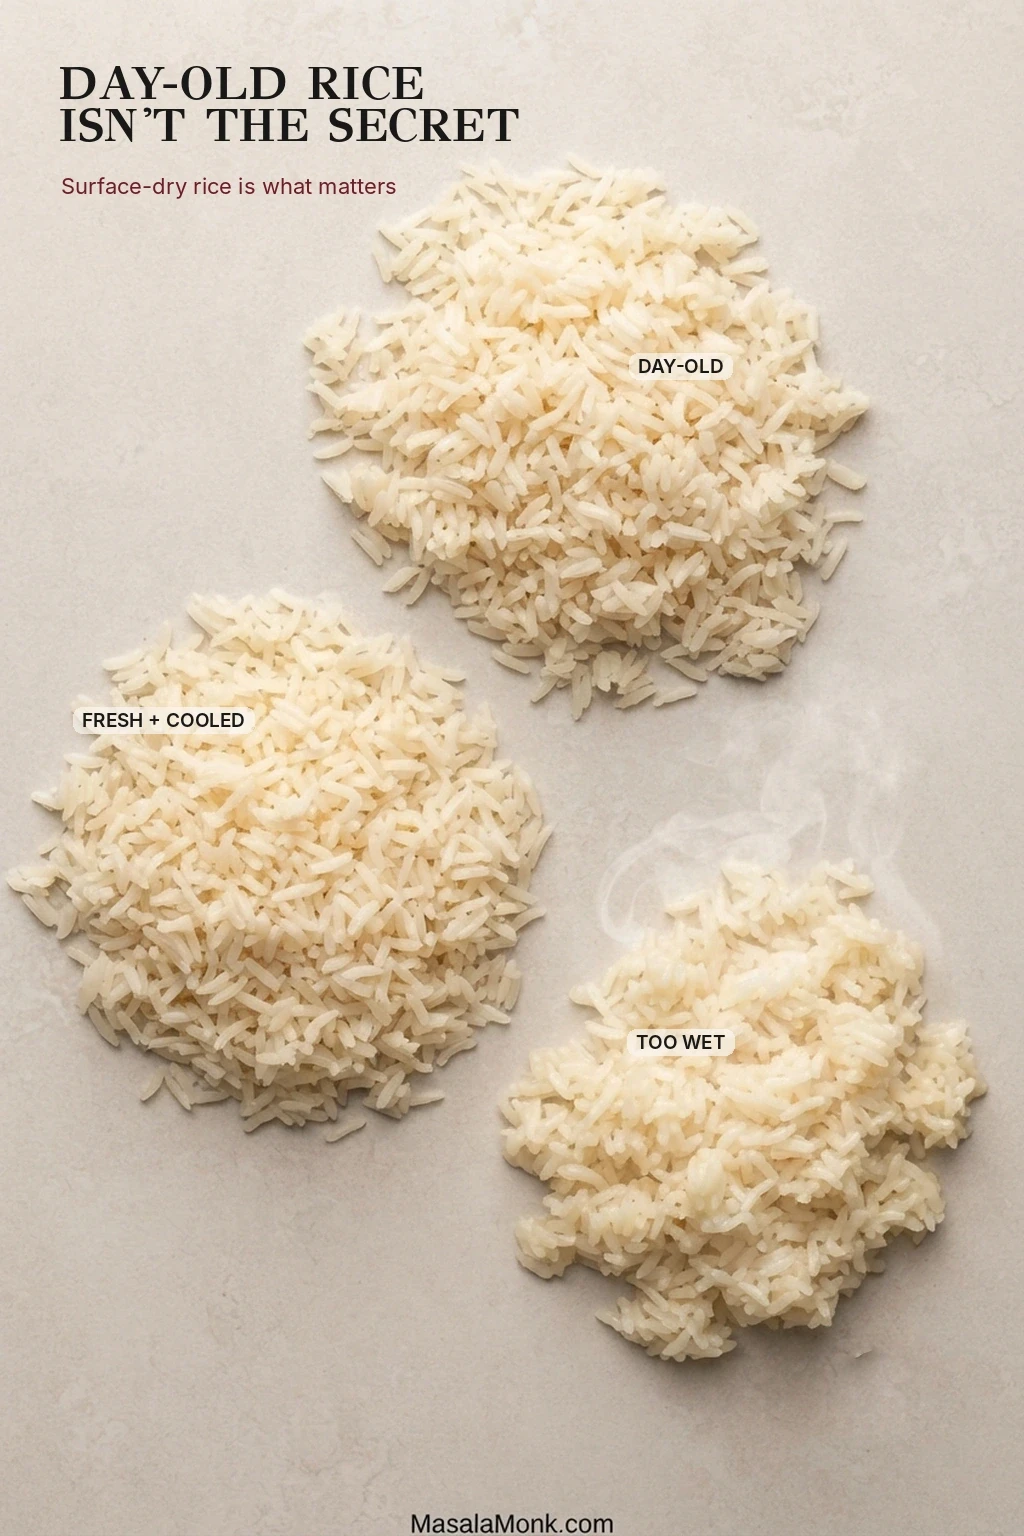
Why Day-Old Rice Helps

Refrigeration usually makes cooked rice firmer and drier on the surface. Rice that was cooked very soft or with too much water may still turn mushy; chilling cannot undo that.

Three portions of cooked rice showing dry day-old rice, freshly cooked and cooled rice, and rice that is still wet, clumped and steamy.
Break up a clump: useful fried-rice grains separate cleanly instead of smearing into a tacky layer. That handling test matters more than the calendar.

Cold Rice Can Be Too Cold

Refrigerated rice sometimes hardens into a compact block. Break it apart while you prepare the vegetables. When stubborn clumps refuse to loosen, a brief gentle warming can help; stop as soon as the grains separate and let any new steam escape before the rice reaches the pan.

No Leftovers? Make Fried Rice with Fresh Rice Tonight

You do not need to decide yesterday that you want fried rice today. Fresh rice works as long as it gets a chance to shed its steam.

Starting with uncooked rice adds cooking and cooling time. The 20-minute recipe clock assumes your cooked rice is ready.

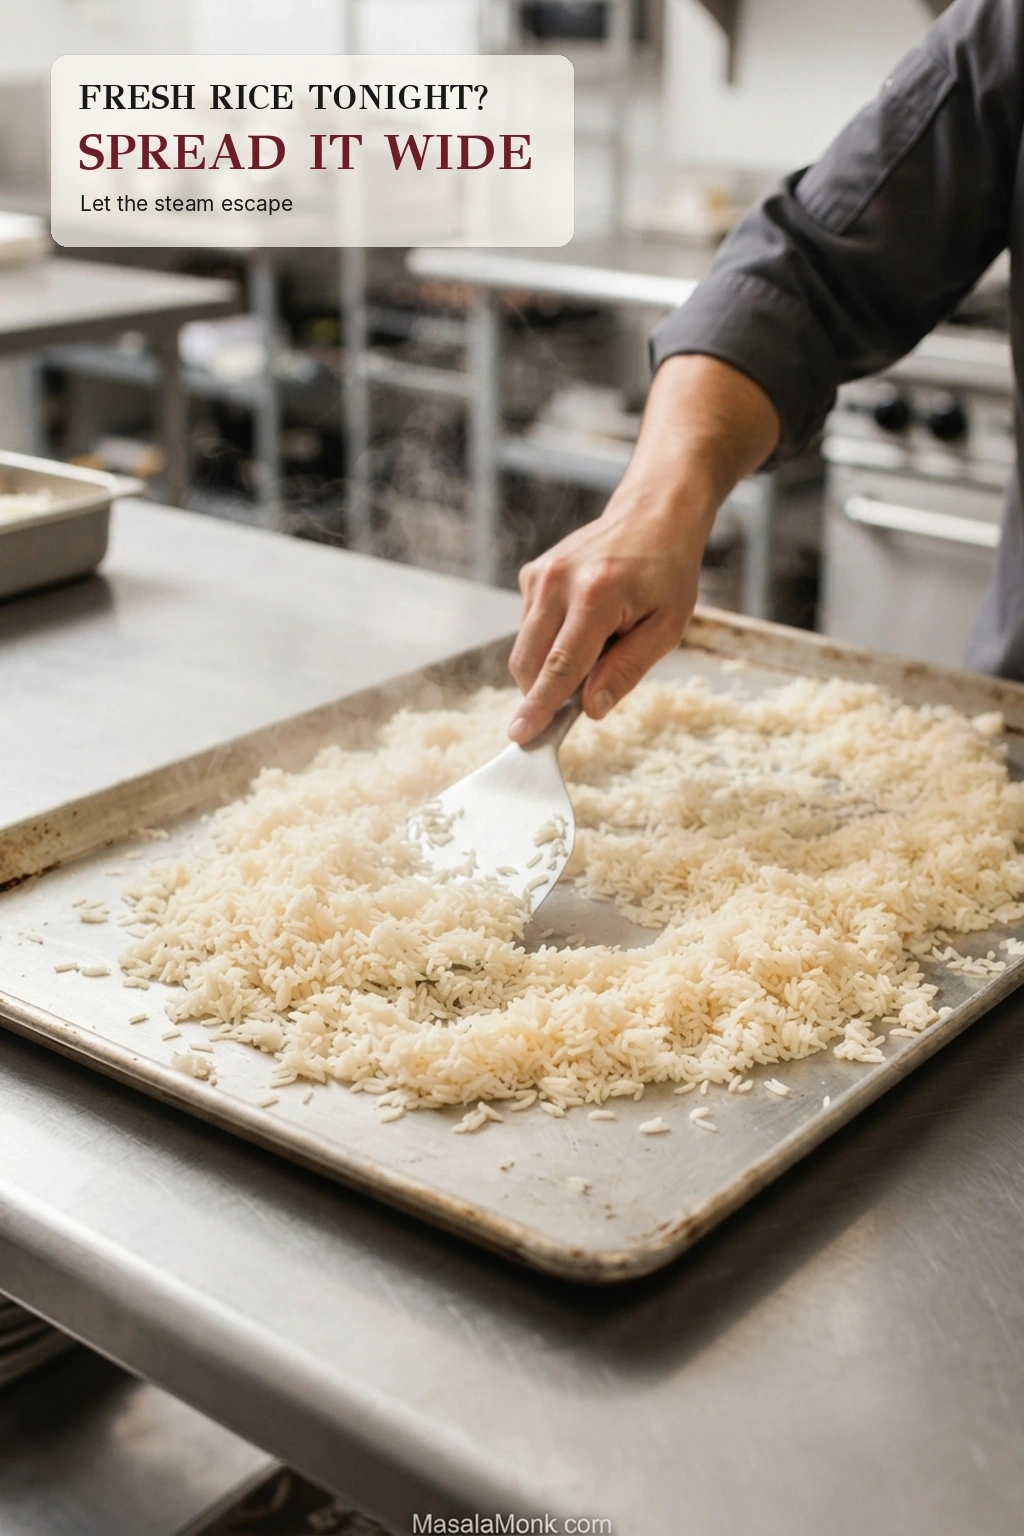
Spread Fresh Rice to Cool It Evenly

Freshly cooked rice being spread into a thin layer across a large metal tray with a rice paddle.
Spread fresh rice loosely enough for steam to escape. If one tray creates a deep layer, divide the batch between two.
  1. Rinse and drain well. For jasmine or long-grain rice that is meant to be rinsed, wash away loose surface starch and drain thoroughly. If the package specifically says not to rinse, follow those directions.
  2. Aim for firm, fully cooked rice. Start with the method that normally works for your rice and cooker. If your usual ratio consistently gives you very soft rice, use a little less water next time.
  3. Fluff immediately. Open up the grains so trapped steam can escape.
  4. Spread the rice out. A wide tray, sheet pan or large plate releases steam much faster than a deep bowl.
  5. Look at the rice, not only the clock. It is ready for frying when visible steam has stopped, the surface no longer feels wet or tacky, and the grains loosen without smearing. This often takes around 10–15 minutes. If the rice is still warm and soft, give it a short chill in the refrigerator.

Different rice and different cookers need different amounts of water, so your usual successful method is the best place to start.

Don’t dry cooked rice on the counter overnight. Cool it efficiently and refrigerate it promptly when you are not using it soon. The USDA advises refrigerating perishable leftovers within 2 hours, or within 1 hour when the surrounding temperature is above 90°F / 32°C.

Your Pan Has a Capacity

You do not need a wok to make good fried rice. What matters is enough cooking surface and enough heat to keep the rice sizzling after it goes in.

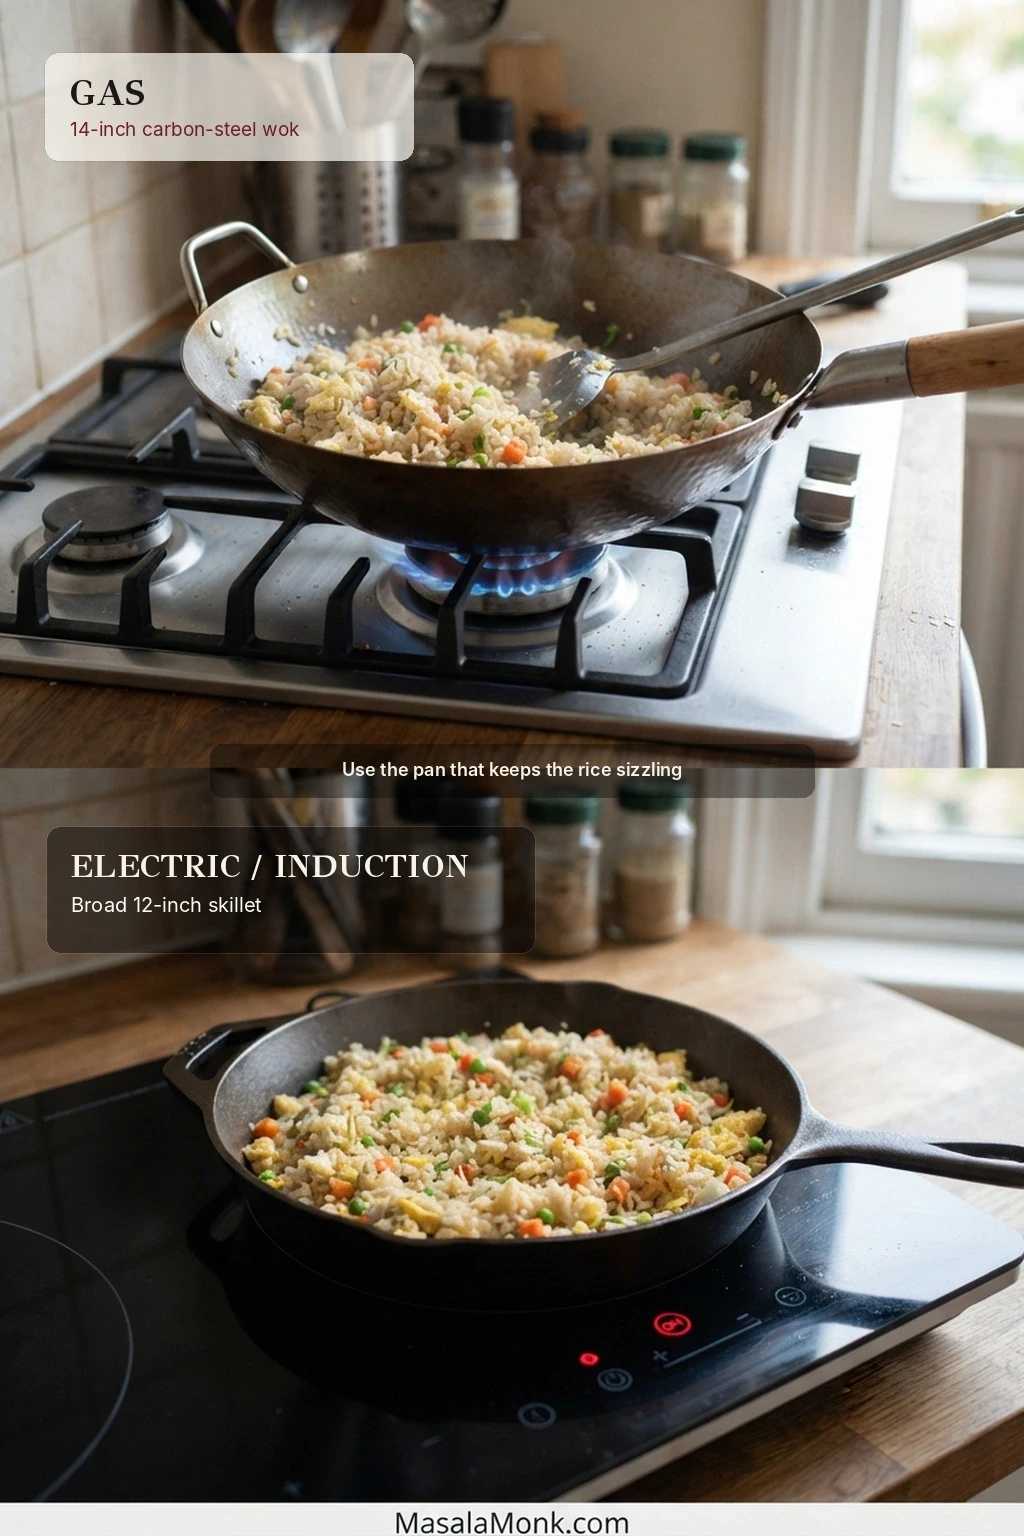
Wok or Skillet?

On gas, a 14-inch carbon-steel wok is ideal. With electric or induction, a broad 12-inch skillet is often easier to manage.

Split comparison showing fried rice in a carbon-steel wok over a blue gas flame and in a broad skillet on a smooth electric or induction cooktop.
Gas can heat more of a wok’s curved surface; electric and induction often reward the broad, flat contact of a skillet.

Listen When the Rice Hits the Pan

The pan should still sound alive after the rice goes in. Strong sizzling that suddenly becomes quiet bubbling and visible steam tells you the temperature has crashed.

Fried rice spread in a shallow layer across a hot wok with a spatula and the words spread, pause and toss above the pan.
A pause helps only while the pan is still sizzling. Once the sound collapses into steaming, reduce the load instead of waiting longer.

That is a batch-size problem before it is an oil problem.

On an ordinary home burner, spread the rice out and give it short periods of contact with the pan. Powerful wok heat needs quicker, more frequent movement. Let the stove dictate the rhythm.

Ingredient quantities scale. Cooking surface does not. A double recipe will usually fry better in two rounds than in one overloaded pan.

A Note on Nonstick

Nonstick cookware can make good fried rice. Keep it within the manufacturer’s heat guidance and rely on dry rice, enough surface area and a manageable batch instead of extreme heat. If the pan goes quiet and the rice turns steamy, the troubleshooting guide helps distinguish crowding from excess moisture.

Fried Rice Sauce: How Much and When to Add It

Wait until the rice is hot before adding the liquid seasoning. Pour it onto an exposed hot pan surface so it hisses, reduces quickly and coats the grains.

The sauce should season the rice without turning it into saucy rice.

Hot rice and vegetables pushed aside in a wok while a small stream of brown seasoning sauce is poured onto exposed hot metal.
A quick hiss is the cue: the seasoning should reduce on hot metal rather than sit underneath the rice as a puddle.
SeasoningWhat it brings
Light or all-purpose soy sauceSalt and a savory fermented flavor. This is the main liquid seasoning, so it is easy to overdo.
Oyster sauceRounded savory sweetness and a little body.
Shaoxing wineFragrant fermented aroma that blooms when it hits the hot pan.
White pepperWarm, earthy pepper heat.
Toasted sesame oilToasted finishing aroma. A little goes a long way.
Dark soy sauceDeeper color with a mild sweetness.
MSGExtra umami without adding more liquid.

Which Soy Sauce Is Best for Fried Rice?

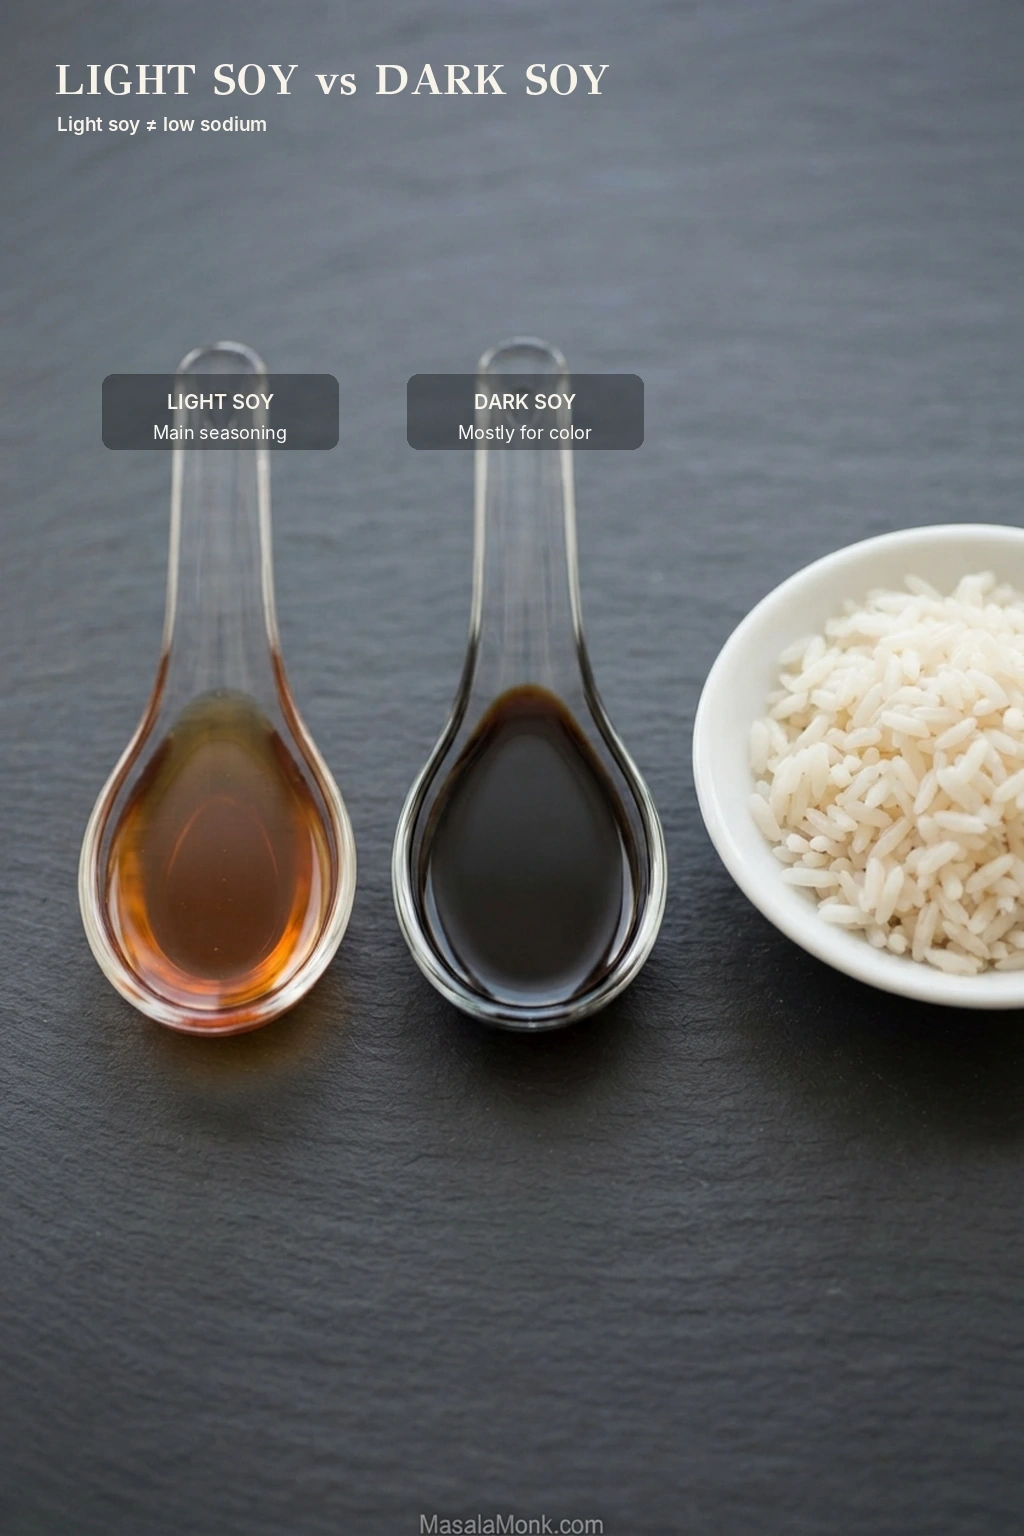
Use Chinese light soy sauce or a regular all-purpose soy sauce as the main seasoning. Dark soy is optional and is used mainly for color.

In this context, light soy sauce does not mean low-sodium soy sauce; it is the thinner everyday Chinese seasoning soy. Reduced-sodium soy is fine if that is what you use at home, though you may want to adjust after tasting.

Two clear dishes comparing translucent amber Chinese light soy sauce with much darker soy sauce beside plain cooked rice.
Light soy does the seasoning; dark soy mainly adjusts color. Add the darker sauce sparingly because a few drops can change the rice quickly.

Brands vary in saltiness, especially soy sauce, oyster sauce and Shaoxing cooking wine. Taste first. Extra salt can wait.

Bland but Already Salty?

If the rice is already salty but still tastes flat, don’t reach for more soy. Build aroma instead with scallion and garlic, white pepper, Shaoxing wine, toasted sesame oil or a small pinch of MSG, if using.

A little extra contact with the hot pan can help too. That familiar flavor comes from several small things working together. There usually isn’t one secret bottle hiding behind it. If the batch is actually too salty, use the dilution fix below instead.

Troubleshooting Fried Rice

Mushy rice, rice stuck to the pan and hard, chewy rice may all feel like “bad fried rice,” but they are different problems. Usually, the trouble comes down to too much moisture, too little heat for the amount of food in the pan, or seasoning that’s out of balance.

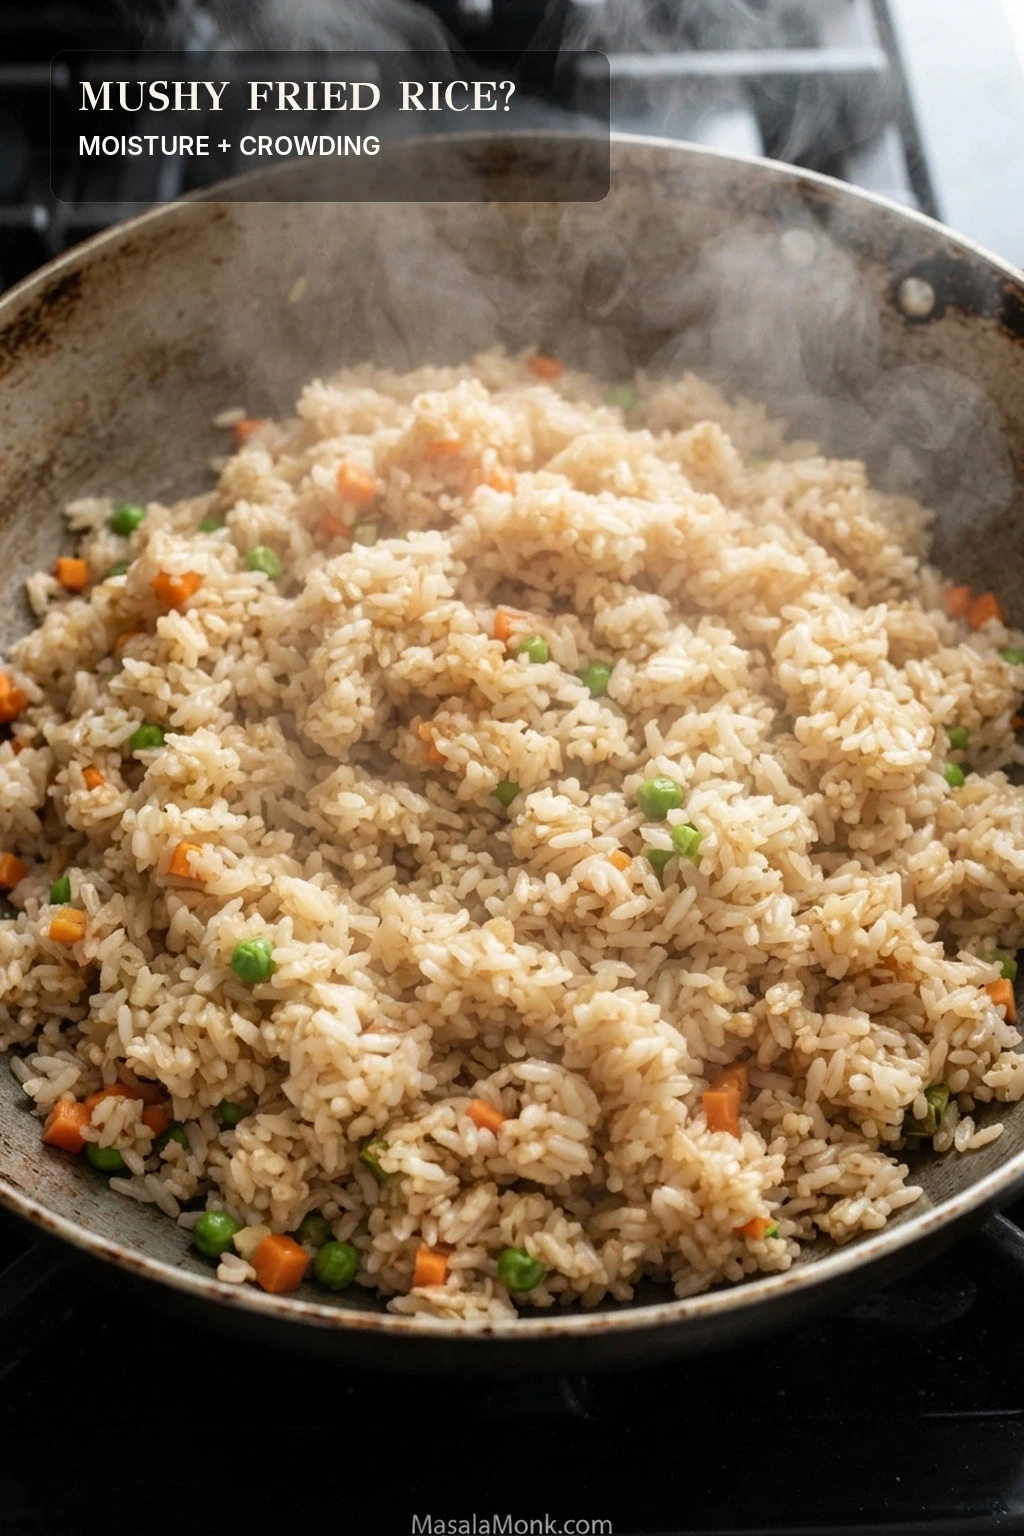
Mushy Fried Rice: Moisture and Crowding

A deep, crowded mound of fried rice in a wok with visible steam, clumped grains and very little exposed cooking surface.
Steam that appears only after the rice hits the pan points toward crowding or heat loss; tacky grains beforehand point toward starting moisture.

Match the Symptom to the Cause

Moisture, Heat and Sticking

What you seeWhat it usually means—and what to do
Soft, mushy fried riceThe rice started too wet, the pan was crowded, the vegetables released too much water or too much sauce went in. Spread a slightly wet batch across the hot surface and let moisture escape. Skip any additional sauce.
Day-old rice that still turns mushyThe original rice was probably cooked too soft. Refrigeration firms rice, but it cannot fully undo rice that was cooked with too much water. Start with firmer rice next time.
The pan stops sizzlingThere was too much food in the pan for the burner to keep up. Reduce the batch and give the pan time to recover.
Rice sticks immediatelyCheck moisture, preheating, oil and batch size before blaming the cookware. Wet rice in a crowded pan can stick even to well-maintained carbon steel.
Greasy rice that still sticksMore oil is masking another problem. Restore the heat, reduce the batch and check how wet the rice is.
Hard or chewy riceThe grains may be over-dried or fried too long. A teaspoon or two of hot water can soften rice that has become too dry; toss until the water disappears before adding any more.

Seasoning and Other Cooking Problems

What you seeWhat it usually means—and what to do
Rice tastes mostly of soy sauceOne ingredient is doing too much of the work. Next time use less soy and build flavor with aromatics, white pepper, Shaoxing, toasted sesame oil, MSG if using, and better frying.
Rice turns wet as soon as sauce is addedThe rice was not hot enough, too much sauce went in or the liquid landed on one cool pile. Season only once the rice is fully hot.
Vegetables make the rice wateryThe vegetables released more water than the pan could evaporate. Next time, keep cooking until the moisture is gone and the pan is sizzling again before adding the rice.
Egg turns rubberyIt stayed in the pan too long. Soft-set it first, remove it and return it near the end.
A double batch suddenly failsDoubling the ingredients doesn’t double your pan or burner. Fry the rice in two rounds.

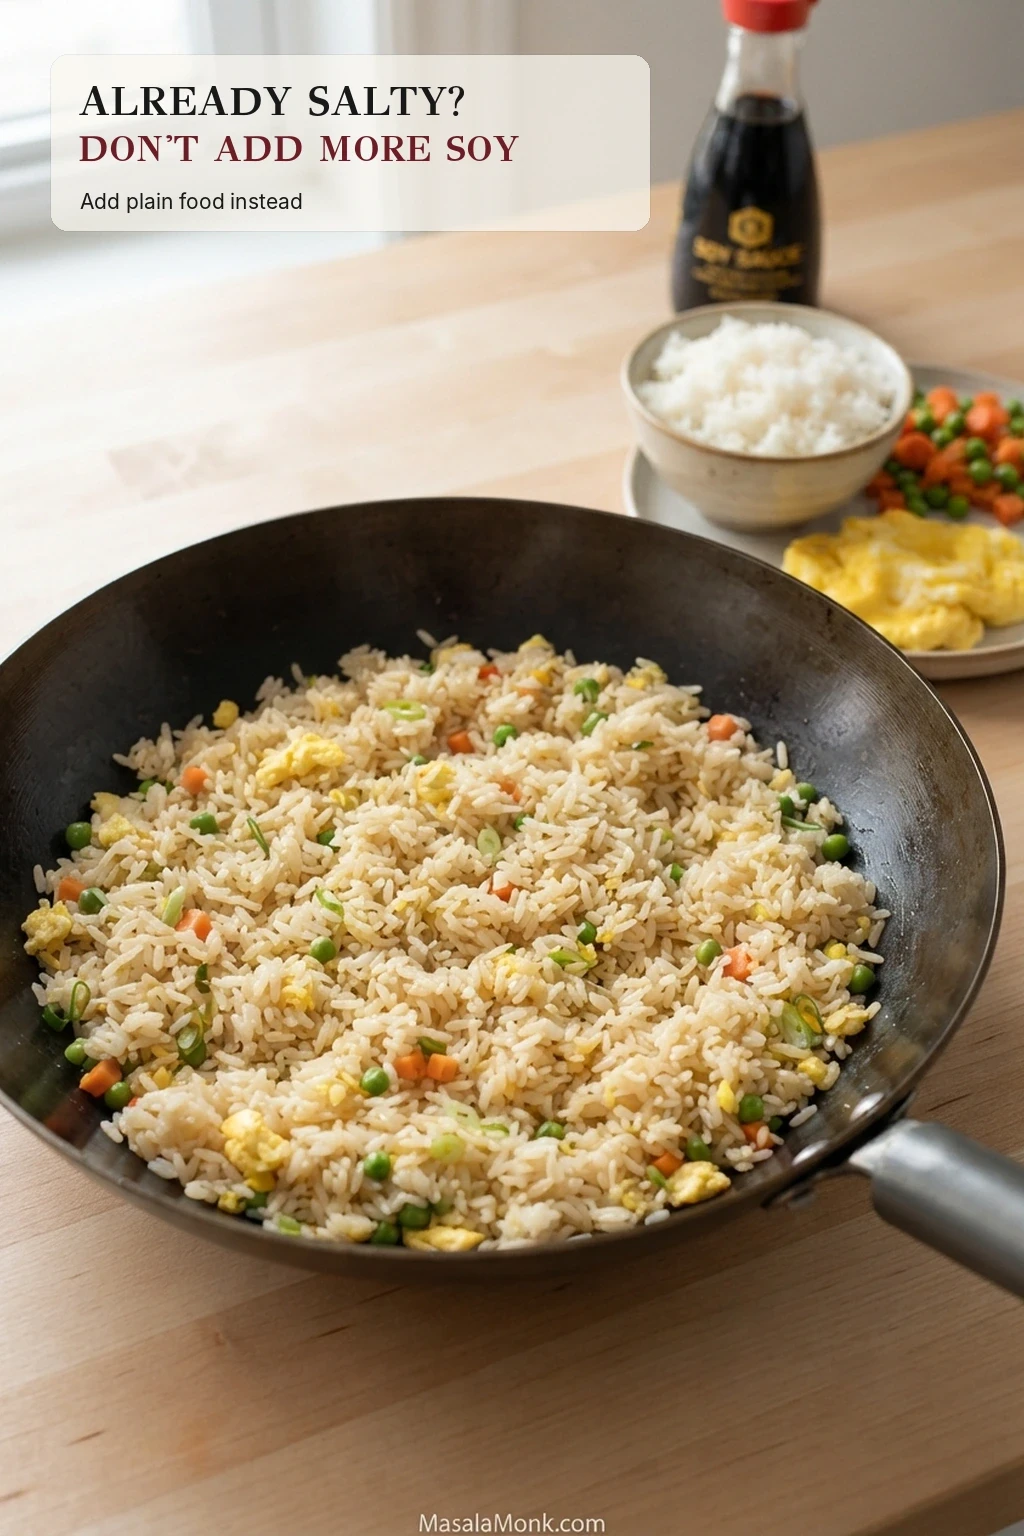
Too Salty? Dilute, Don’t Add More Sauce

If the fried rice is genuinely too salty, add plain rice, unseasoned egg or unsalted vegetables if you have them. Toss, taste and repeat in small amounts. Vinegar or another strong sauce may change the flavor, but it cannot remove the salt already in the pan.

Finished fried rice with separate bowls of plain rice, cooked egg and vegetables nearby while a soy sauce bottle sits away from the pan.
Dilute an oversalted batch gradually with plain food, tossing and tasting between additions so the correction does not leave the whole pan bland.

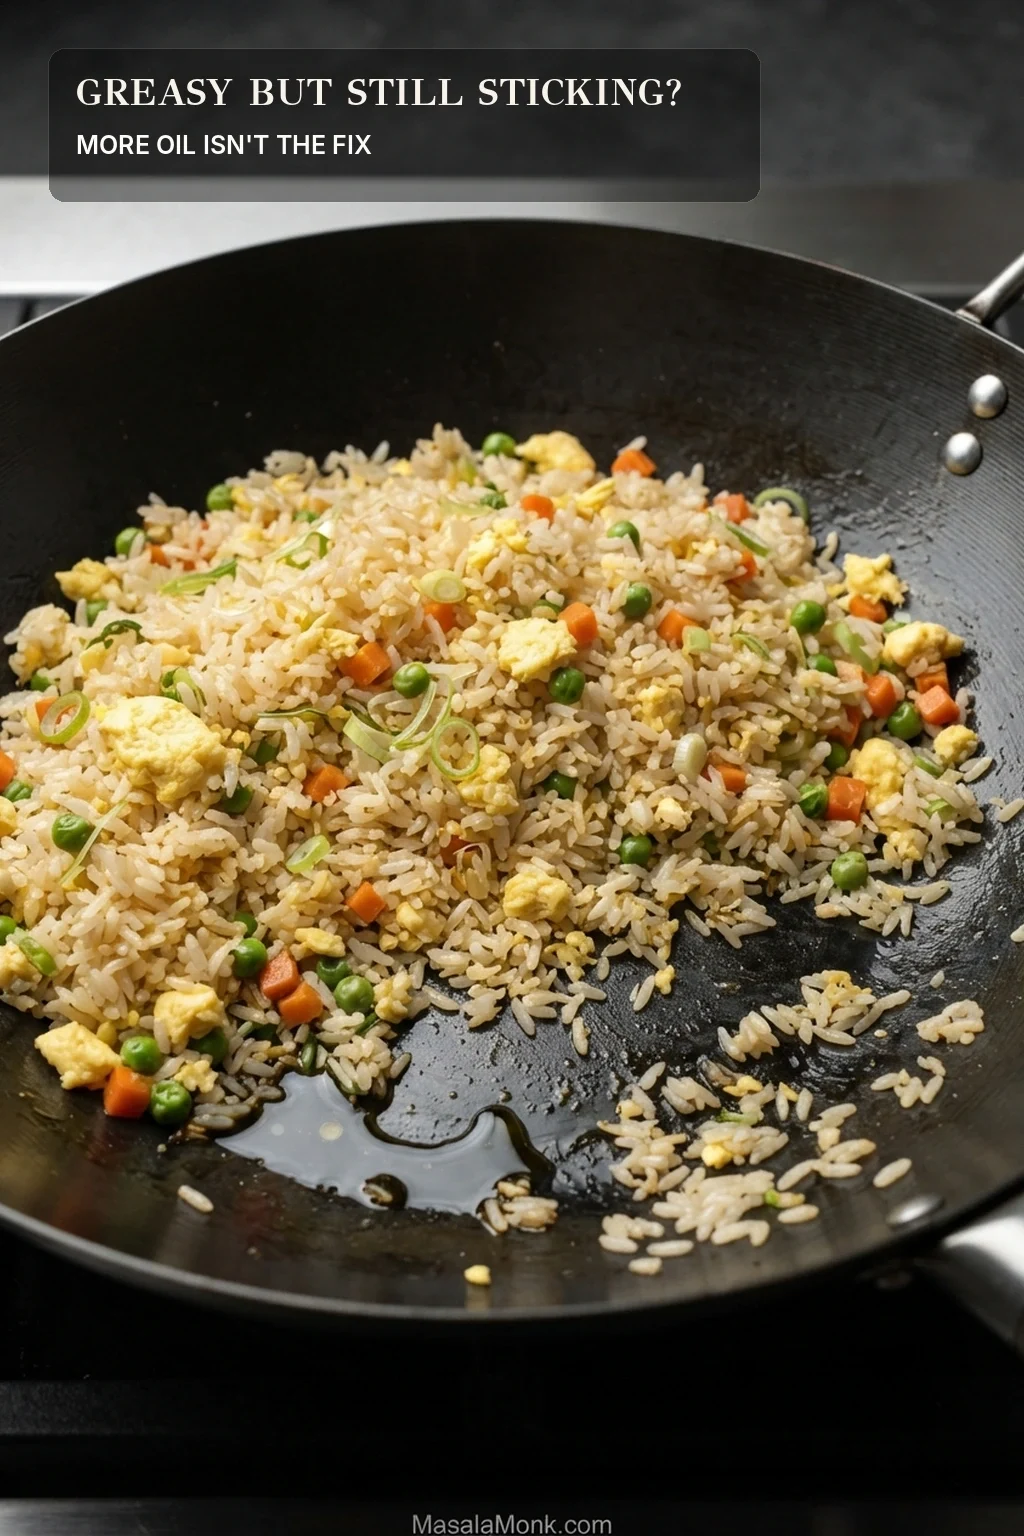
Greasy but Still Sticking?

Fried rice in a wok with visible excess oil on exposed metal while patches of rice remain stuck to the cooking surface.
Oil at the edge does not prove the pan needs more fat. Check rice moisture, preheating and batch size before adding another splash.

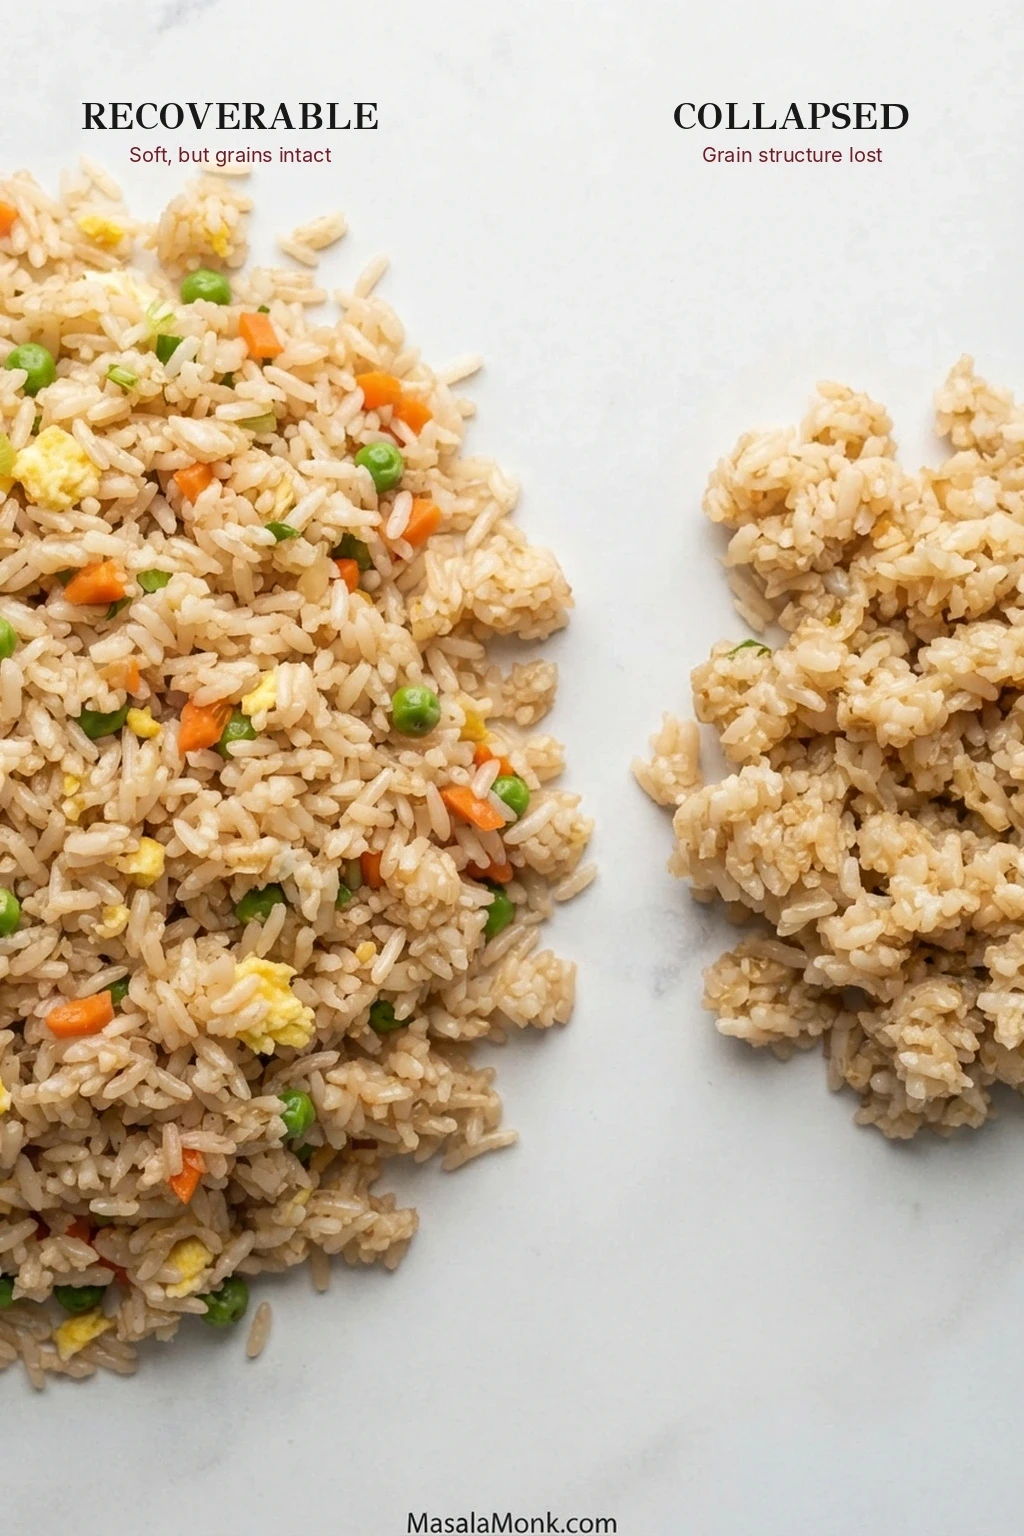
Can Soft Fried Rice Be Recovered?

What heat can’t fix: once severely overcooked grains have collapsed into a soft mass, more heat can evaporate some water, but it cannot rebuild their structure.

Side-by-side comparison of soft fried rice with visible intact grains and collapsed rice that is swollen, broken down and heavily clumped.
If soft grains still separate without smearing, drying can help. Once they mash into paste under light pressure, the structure is already gone.

Adding Chicken, Shrimp, Vegetables and Other Extras

Keep the extras moderate so the rice still gets plenty of contact with the hot pan.

Chicken, Pork or Shrimp

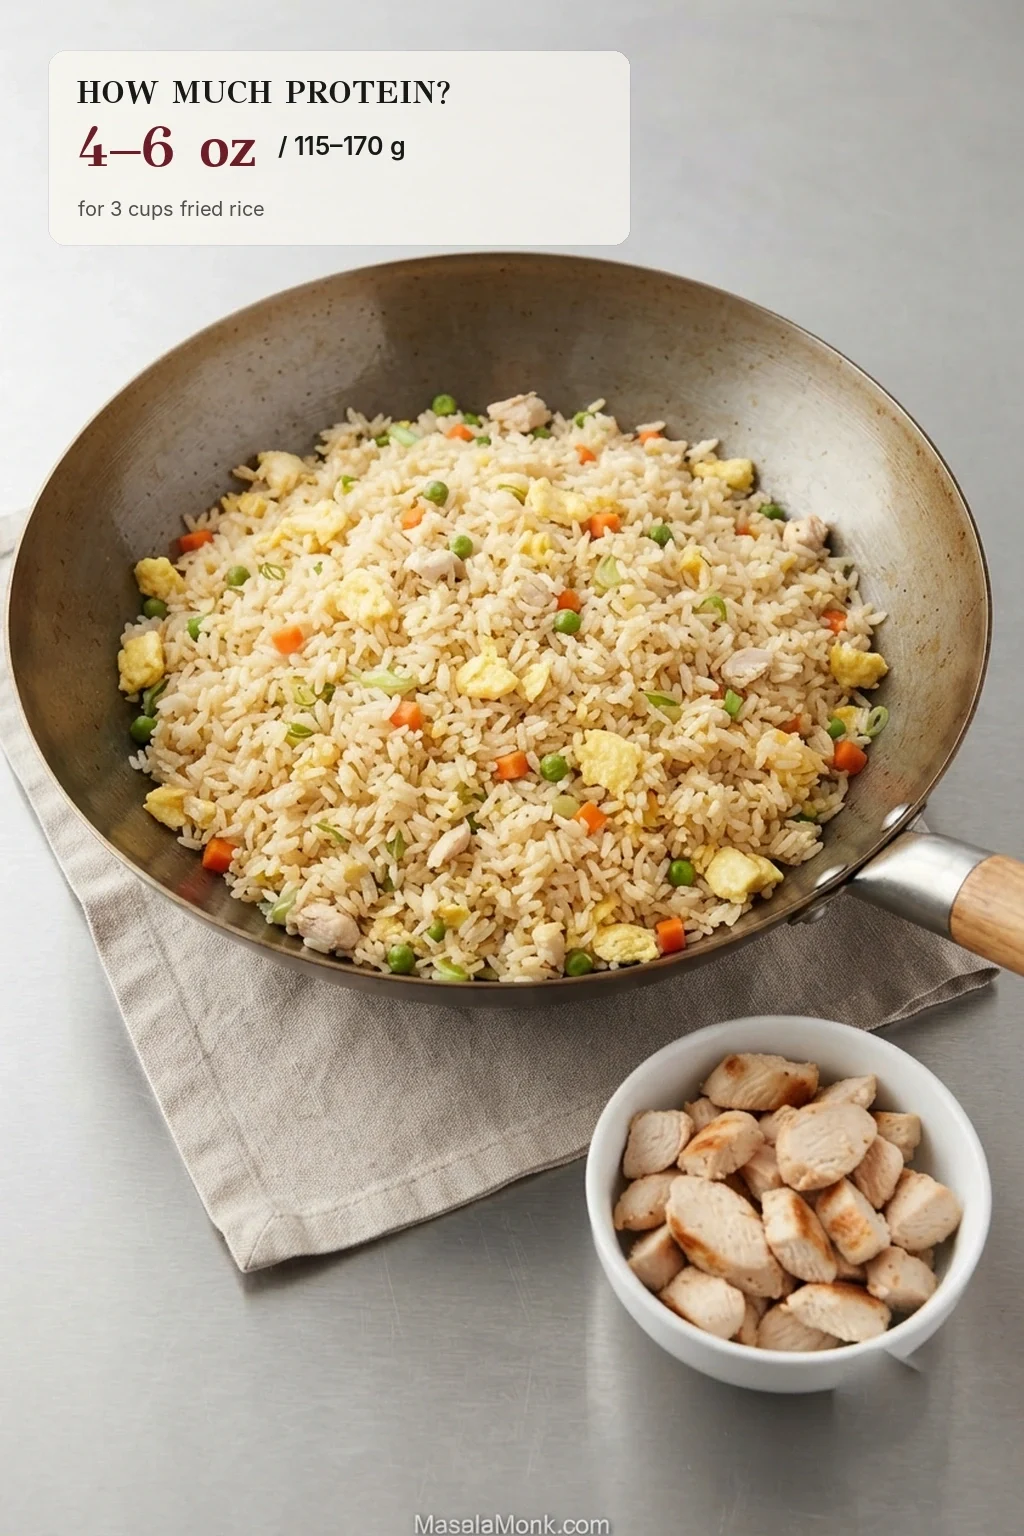
For an add-in, about 4–6 oz (115–170 g) cooked chicken, pork or shrimp is a comfortable amount for this three-cup batch. Cut it into small pieces and return it near the end, just long enough to heat through. If you are starting with raw protein, cook it through separately first, remove it from the pan, then return it after the rice is seasoned.

Pan of fried rice beside a small bowl of sliced cooked chicken, with text showing 4 to 6 ounces or 115 to 170 grams for 3 cups of rice.
Extra protein also consumes pan capacity. Protein-heavy versions fry better when the meat or shrimp is cooked separately and returned near the end.

Making chicken the main event? Our Chicken Fried Rice Recipe handles the chicken and rice timing as one complete recipe.

Planning on shrimp? Our Shrimp Fried Rice Recipe cooks the shrimp separately so it stays tender while the rice still gets the hot pan space it needs.

For a saltier, richer variation, Spam Fried Rice starts by browning the Spam so its crisp edges survive once the egg and rice enter the pan.

More Vegetables

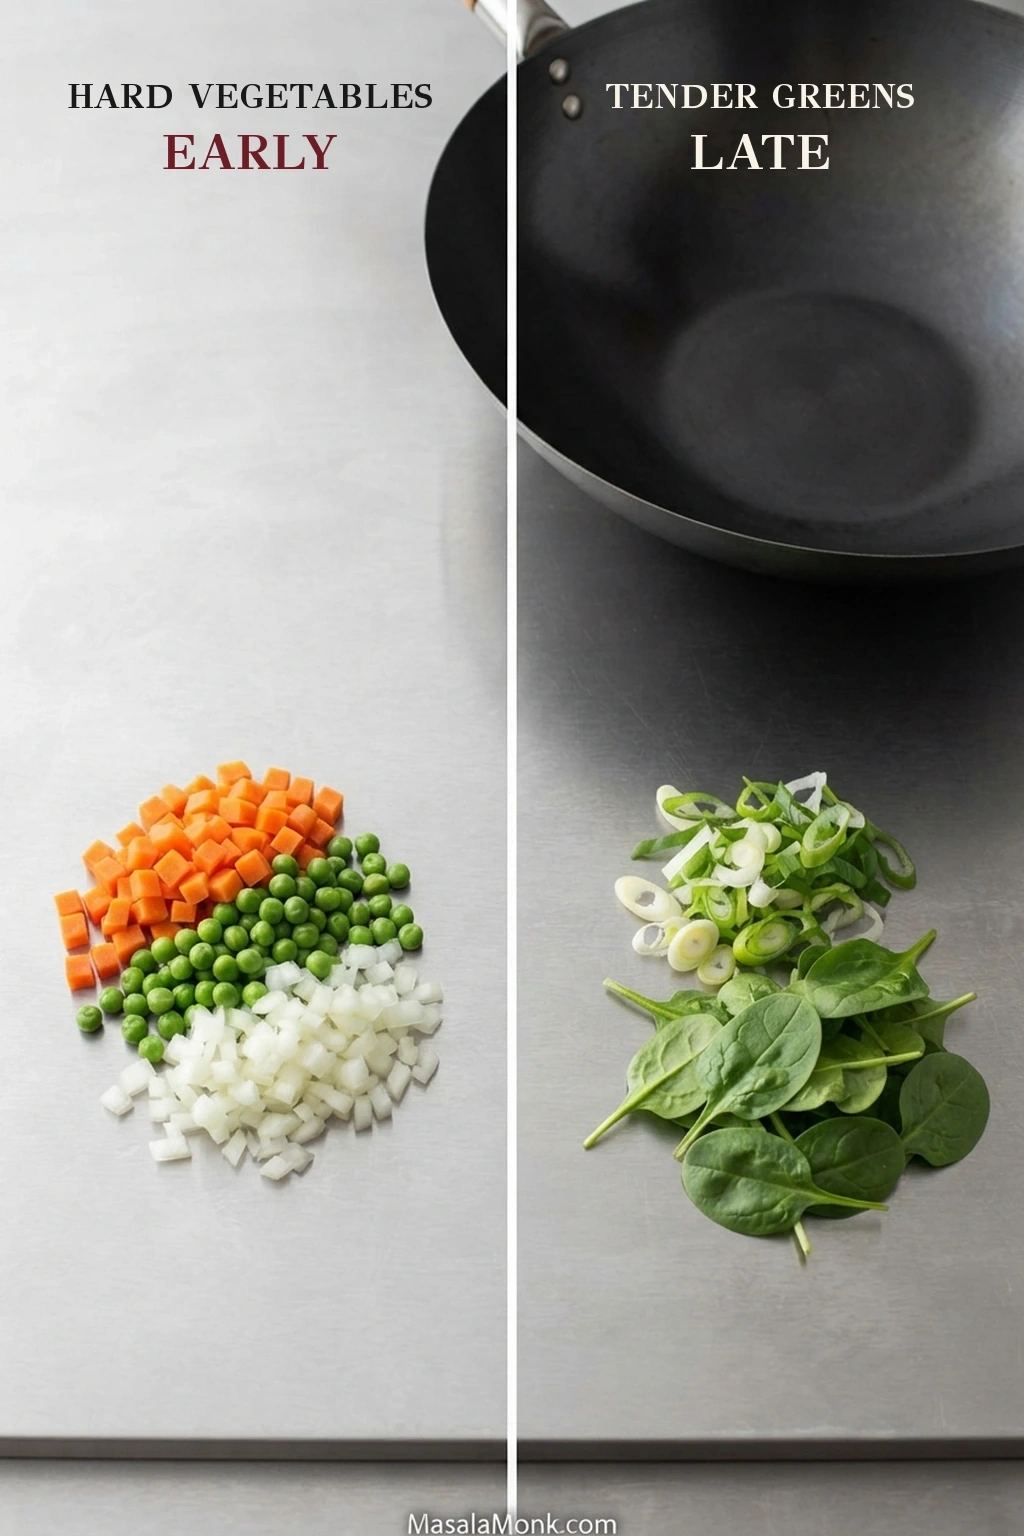
Firm vegetables such as carrot need a head start. Bell pepper, mushrooms or small broccoli pieces can go in early with the carrot; frozen corn or mixed vegetables can follow once the firmer vegetables have softened. Bean sprouts or leafy greens belong near the end. Watery ingredients may need extra time—or separate cooking—before the rice joins them.

Firm vegetables including diced carrots, peas and onion shown separately from tender spinach and sliced scallion greens.
Watery vegetables need evaporation time before the rice arrives; tender greens need the opposite treatment and belong close to the finish.

Useful Substitutions

  • Out of oyster sauce: simply leave it out. Don’t replace the full amount with extra soy sauce.
  • Missing Shaoxing wine: dry sherry is a useful substitute, or you can leave it out.
  • If you skip toasted sesame oil: you will lose some toasted finishing aroma, but the fried rice will still come together well.
  • Soy-free: coconut aminos are sweeter and less salty than soy sauce, so add a little at first and adjust to taste. Use a soy-free oyster-style sauce too.
  • Gluten-free: use gluten-free soy sauce or a tamari labeled gluten-free, and check the oyster sauce, Shaoxing wine and other bottled seasonings too.
  • Vegetarian: use a mushroom-based vegetarian oyster sauce.
  • Brown rice: expect a nuttier flavor and firmer texture.
  • Frozen mixed vegetables: perfectly useful; let the moisture they release cook away before adding the rice.
  • Making it without egg: leave it out and continue with the same sequence.

How to Store and Reheat Fried Rice

Finished fried rice should be cooled and refrigerated promptly. Once chilled, use it within about 3–4 days; that matches the general cooked-leftover guidance in the FoodSafety.gov cold-storage chart.

For longer storage, cooled fried rice can be frozen in an airtight container or freezer bag. To maintain quality, use frozen leftovers within about 3–4 months. When planning to reheat it in a skillet, thaw the rice overnight in the refrigerator.

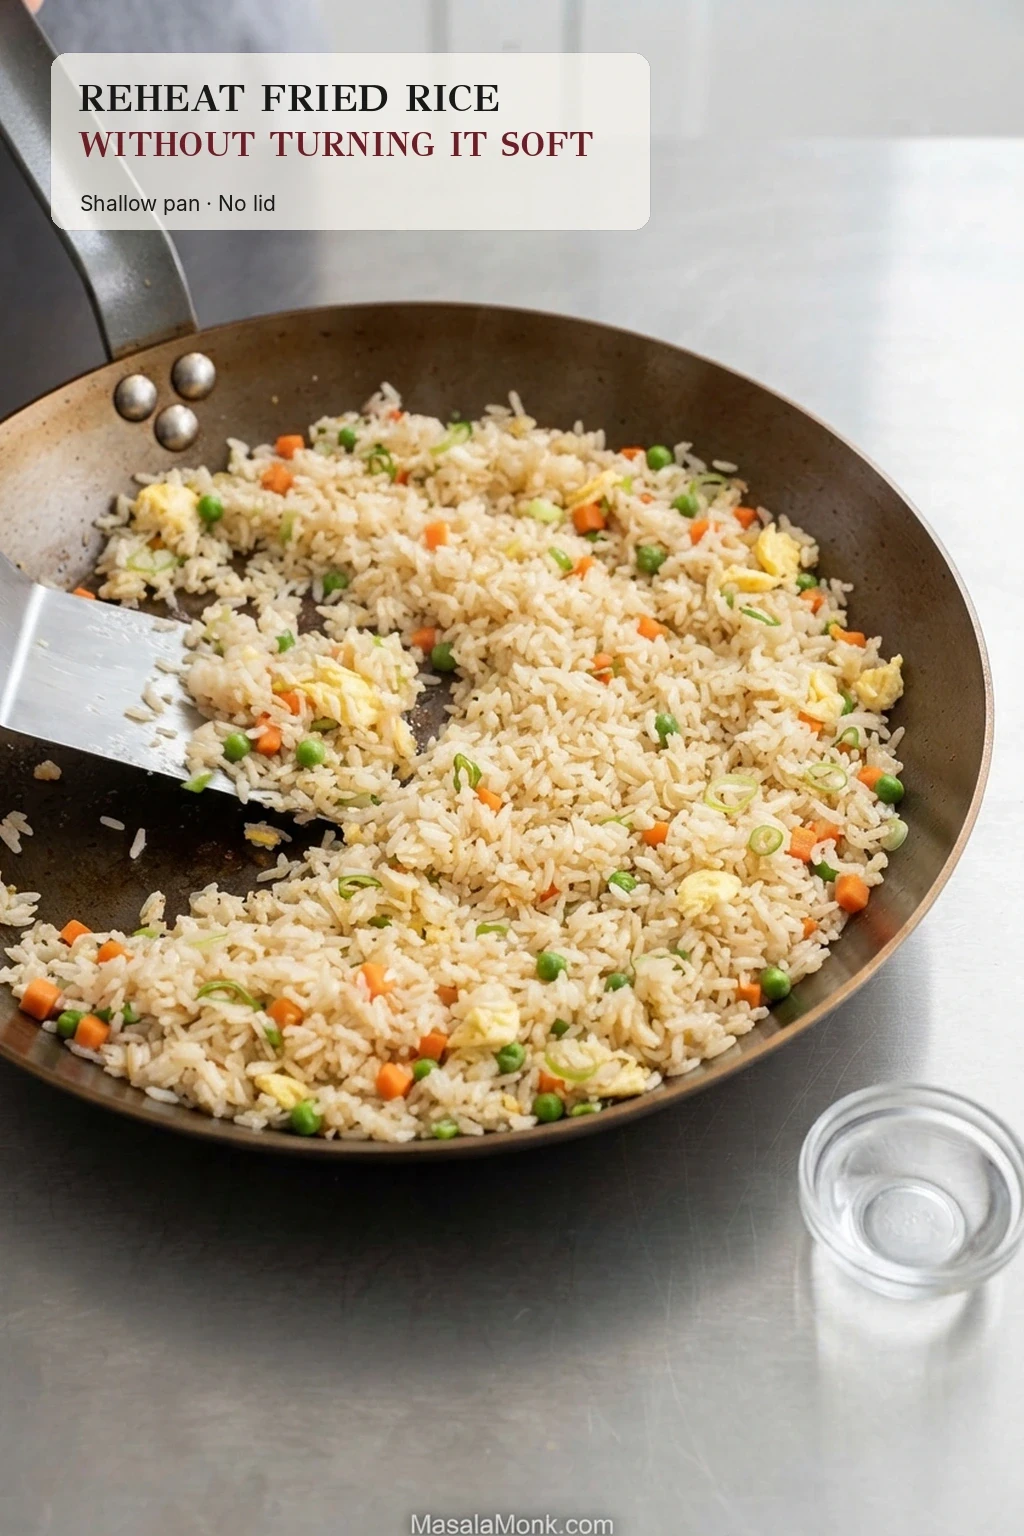
Leftover fried rice reheating in a shallow uncovered skillet with a spatula and a small cup of water nearby.
If the edges dry before the center is hot, toss and redistribute the rice first. Add water only when the grains are genuinely dry.

For the best texture, reheat fried rice in a wok or skillet over medium-high heat, tossing so the grains warm evenly. Reheated leftovers should reach 165°F / 74°C. Rice that has become unusually dry may benefit from a teaspoon or two of water—just enough steam to loosen the grains again without turning them soft.

Posted on — 1 Comment

Chicken Hibachi Recipe: Juicy, Buttery & Restaurant-Style at Home

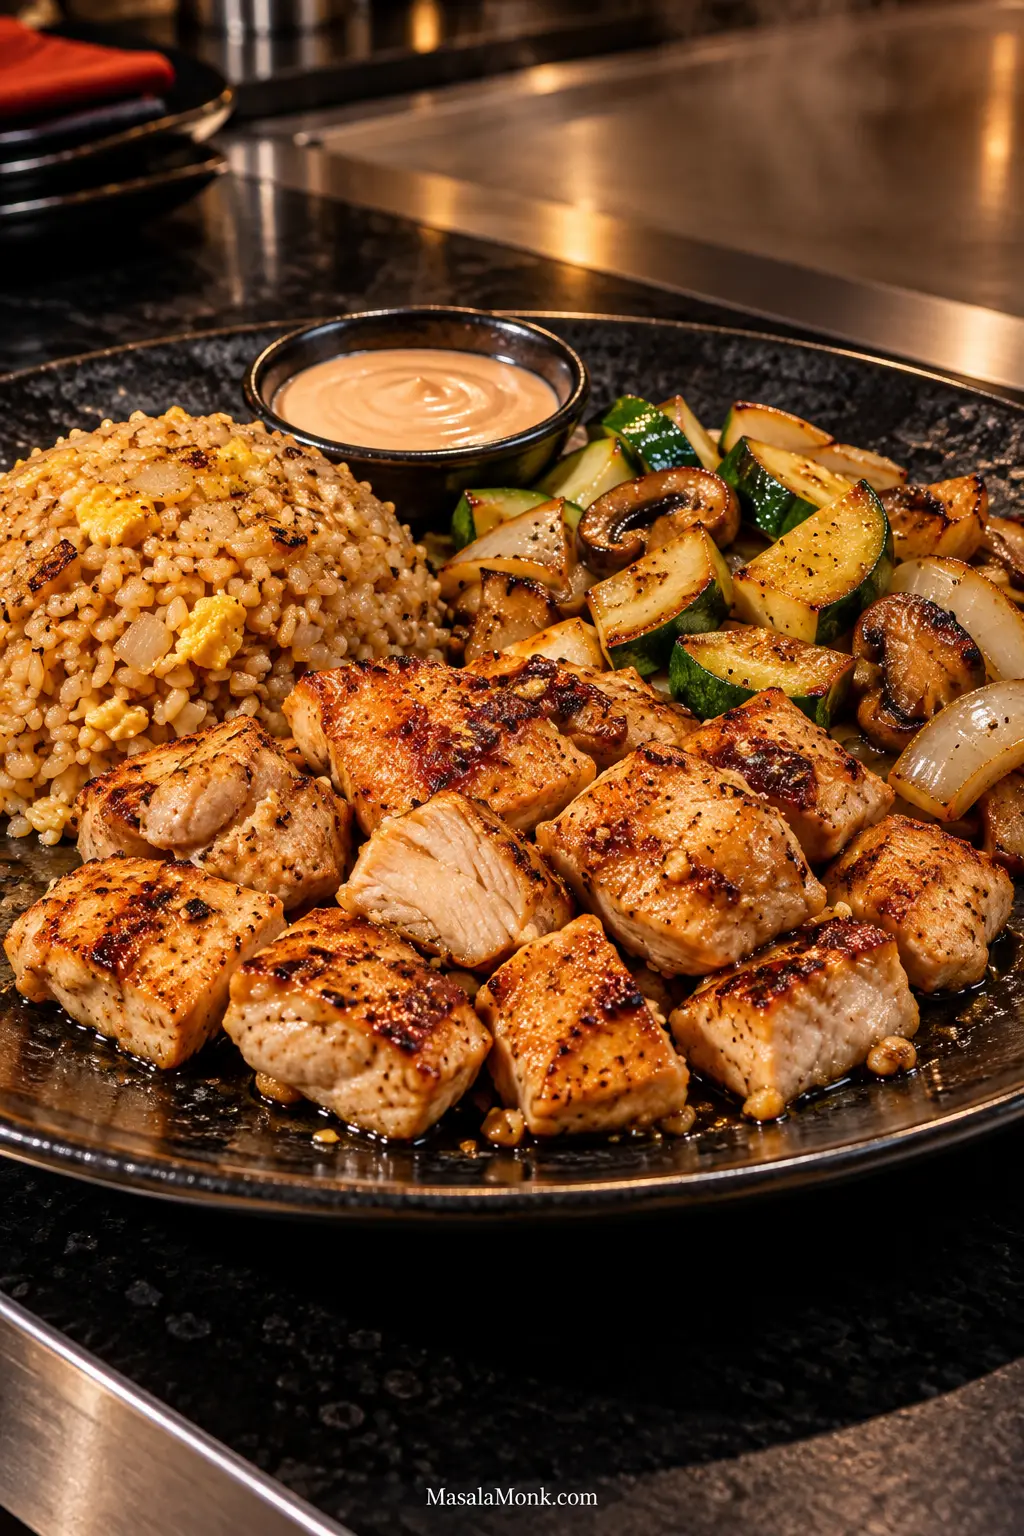
Finished chicken hibachi dinner with browned chicken pieces, fried rice, sautéed zucchini, mushrooms and onion, plus a small bowl of pale pink Yum Yum Sauce.

Good hibachi chicken should reach the table with browned edges, a juicy middle, buttery savory flavor, and enough garlic, black pepper, and lemon to keep every bite lively.

The smell is part of the appeal: chicken hitting hot metal, butter melting around garlic, and soy catching the heat for just a moment. You hear that lively sizzle before the plate ever reaches the table.

At home, the main challenge is not finding a secret marinade. It is giving the chicken enough hot surface to brown before anything wet reaches the skillet. A packed 12-inch pan does not have the open cooking area of the flat-top Japanese-steakhouse style most U.S. diners call hibachi—more technically, teppanyaki—so this recipe keeps the chicken in larger pieces for the initial sear and cooks it in sensible batches.

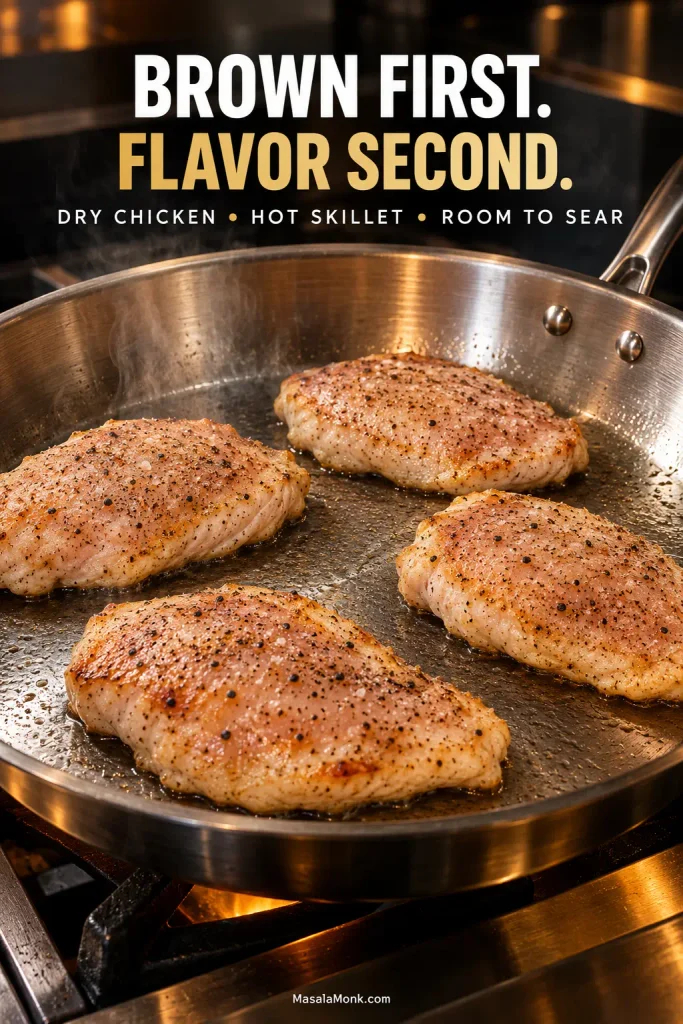
Brown First. Flavor Second.

Three things matter most here: dry chicken, a properly hot skillet, and enough room for the pieces to sear. Get those right and the rest becomes much easier.

Start with neutral oil, salt, and black pepper. Let the chicken develop real color before soy sauce or garlic butter reaches the skillet. The wet, flavorful ingredients come later, once the browning is already there.

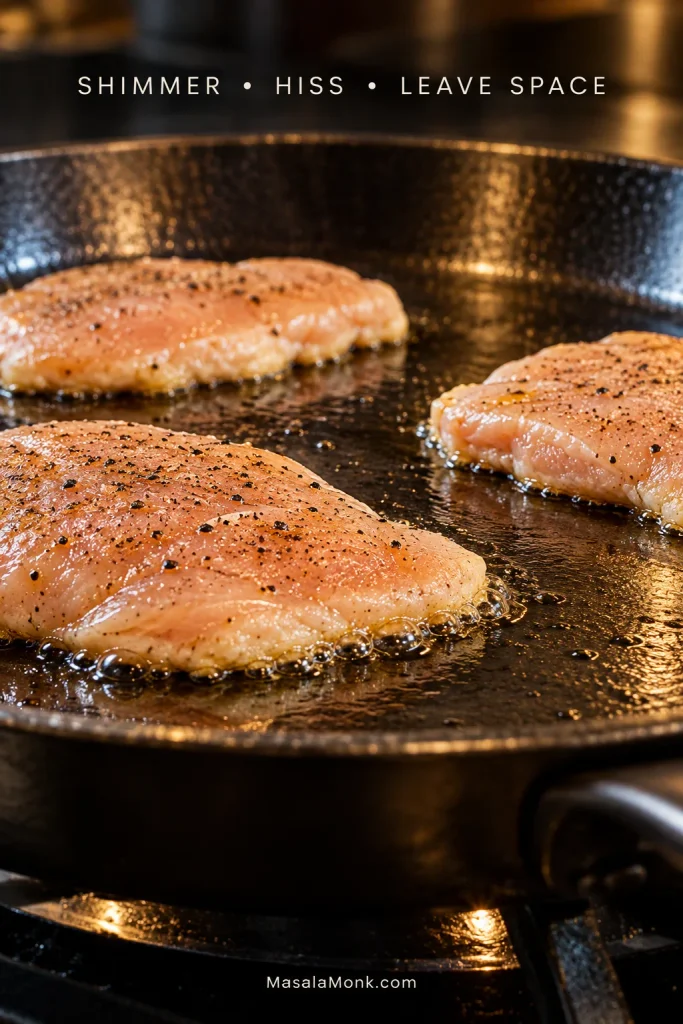
Broad chicken breast cutlets spaced apart in a hot skillet with bare metal visible between them, illustrating dry chicken, high heat and room for searing.
Neutral oil handles the hardest sear; butter comes later, once its milk solids can brown aromatically instead of scorch.

Listen to the pan. The chicken should hiss loudly when it touches the skillet. If that sound fades into wet bubbling and liquid gathers around the pieces, give the pan more space and heat before moving on.

Before the Pan Gets Hot

Four servings, one skillet, and no marinade required.

DecisionBest Default Here
ChickenBoneless, skinless breast for the closest steakhouse-style result
MarinadeNone required
PanWide 12-inch / 30 cm heavy skillet
Batch sizeHalf the chicken at a time in a typical 12-inch skillet
Flavor timingNeutral oil first; soy + garlic butter after browning
Doneness165°F / 74°C

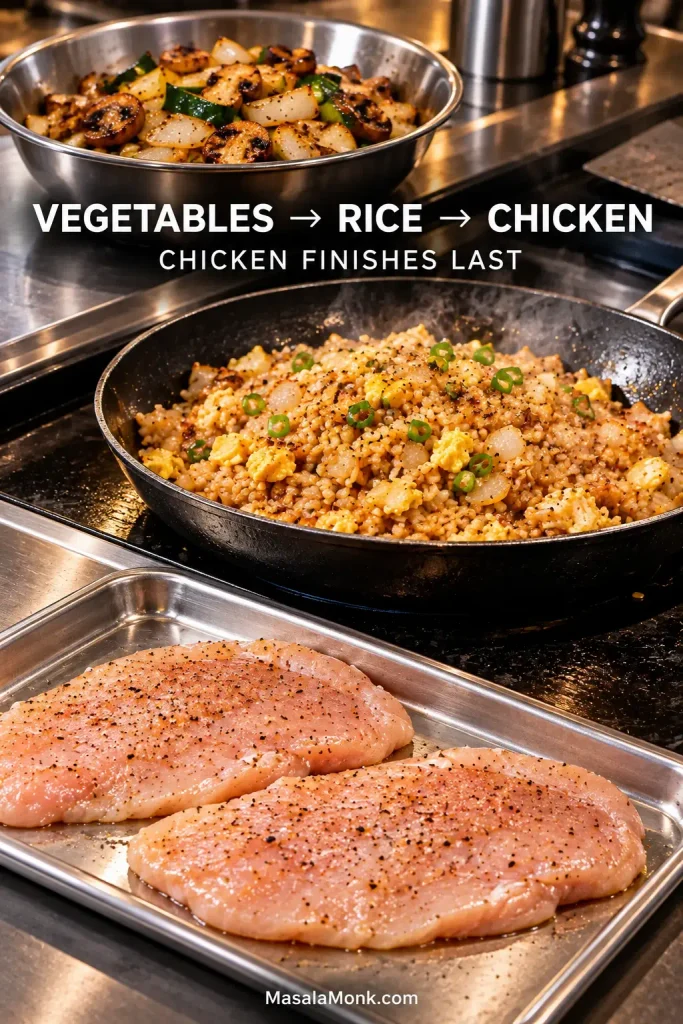
Making fried rice and vegetables too? Cook the vegetables first, rice second, and chicken last. Rice and vegetables tolerate a short, loosely covered hold much better than chicken breast does, so the chicken can reach the table while its browned edges are still hot and the center is juicy.

Chicken Hibachi Recipe

Yield4 servings
Prep Time15 minutes
Cook Time15–18 minutes
Total Time30–35 minutes
Chicken1½ lb / 680 g
Pan12-inch / 30 cm heavy skillet
Doneness165°F / 74°C

What you’re after is juicy chicken with browned edges, savory garlic-soy butter, and enough fresh lemon to keep the finish from feeling heavy.

Equipment

  • 12-inch / 30 cm cast-iron, carbon-steel, or heavy stainless-steel skillet
  • Instant-read food thermometer
  • Tongs or a thin spatula
  • Sharp knife and cutting board
  • Small bowl for the garlic-soy butter

For the Chicken

  • 1½ lb / 680 g boneless, skinless chicken breasts
  • 1½ to 2 tablespoons / 22 to 30 ml neutral high-heat oil, divided
  • ½ teaspoon / about 3 g fine sea salt (use ¼ teaspoon / about 1.5 g with regular soy sauce)
  • ¾ teaspoon / about 1.5 g finely ground black pepper

For the Garlic-Soy Butter

  • 3 tablespoons / 42 g unsalted butter, softened
  • 3 medium garlic cloves / about 9 g, finely grated or mashed
  • 1 tablespoon / 15 ml low-sodium soy sauce

For Finishing

  • 1 tablespoon / 15 ml low-sodium soy sauce
  • 1 tablespoon / 15 ml fresh lemon juice
  • ½ teaspoon / 2.5 ml toasted sesame oil, optional
  • 1 tablespoon / about 9 g sesame seeds, preferably toasted, optional

1. Mix the Garlic-Soy Butter

Before you heat the skillet, mix the softened butter, garlic, and 1 tablespoon / 15 ml soy sauce in a small bowl. Measure the finishing soy, juice the lemon, and have the thermometer and a clean plate nearby. Once cooking begins, things move quickly.

2. Thin, Dry and Season the Chicken

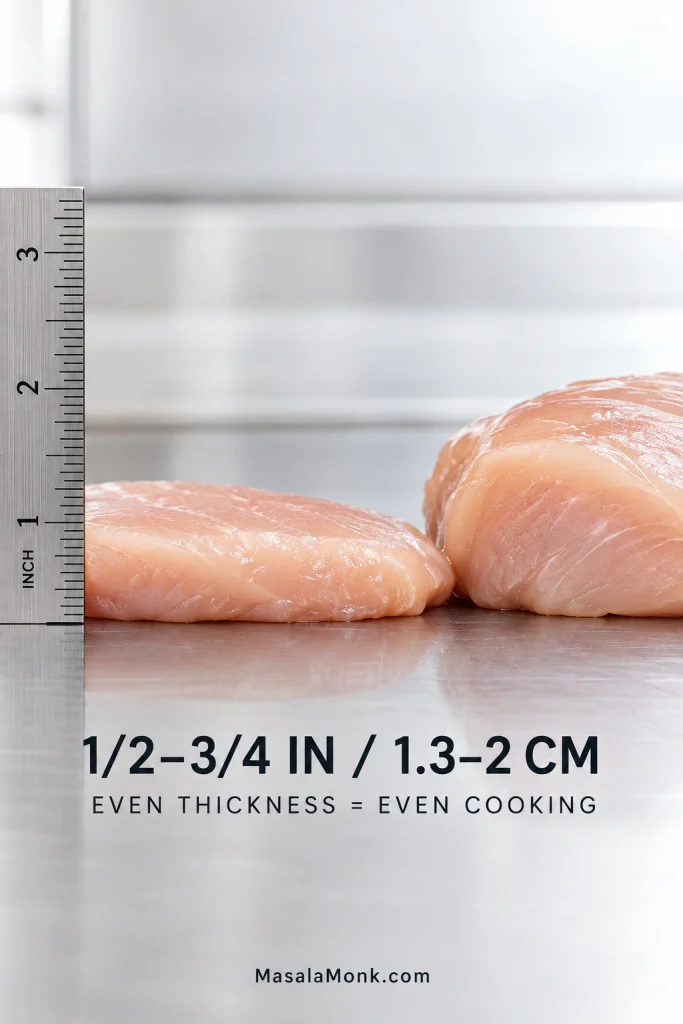
Slice very thick breasts horizontally into thinner cutlets or butterfly them. Aim for pieces ½ to ¾ inch / 1.3 to 2 cm thick across most of their surface. Lightly pound any much thicker areas.

Side-by-side chicken breast thickness comparison: a broad cutlet about one-half to three-quarters inch thick beside a much thicker whole breast section, shown with a ruler.
A ½–¾-inch cutlet gives you more flat contact with the skillet and less distance for heat to travel to the center.

Pat every surface thoroughly dry, then season both sides with salt and black pepper. Pick up a piece: the surface should feel dry, not slick.

Food-safety note: Wash your hands and thoroughly clean the knife and board that touched raw chicken, or switch to a clean set. The cooked chicken will be cut later.

3. Preheat the Skillet

Heat a heavy 12-inch / 30 cm skillet over medium-high until it is hot all the way across. Cast iron and heavy stainless steel usually need several minutes.

Add about half the oil, or enough to leave a thin film across the skillet. The oil should move easily and shimmer. Touch one edge of a chicken piece to the surface; an immediate lively hiss means the skillet is ready.

Thin chicken breast cutlets searing with open skillet space between them and small bubbles forming around the contact edges in a thin film of hot oil.
On a wide skillet, test more than the center. Every cutlet needs genuinely hot metal underneath it.

4. Sear the First Batch

Add half the chicken, leaving visible space between the pieces.

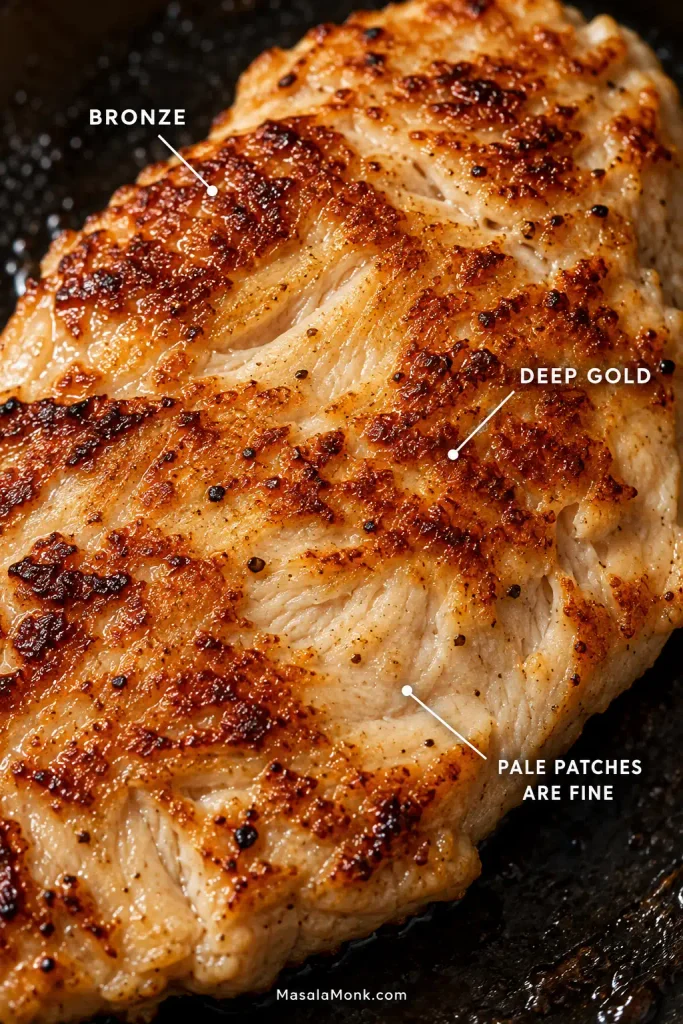
Leave the first side alone for 2½ to 3½ minutes. When you turn it, the underside should have patches of bronze and deep gold. Do not chase perfectly even color; those darker patches are exactly what you want.

Extreme close-up of skillet-seared chicken showing irregular bronze, deep-gold and lighter cooked patches, with labels identifying the different browning levels.
Pale ridges are normal. Judge the cutlet by its deepest contact browning and internal temperature, not by whether every bump turns uniformly golden.

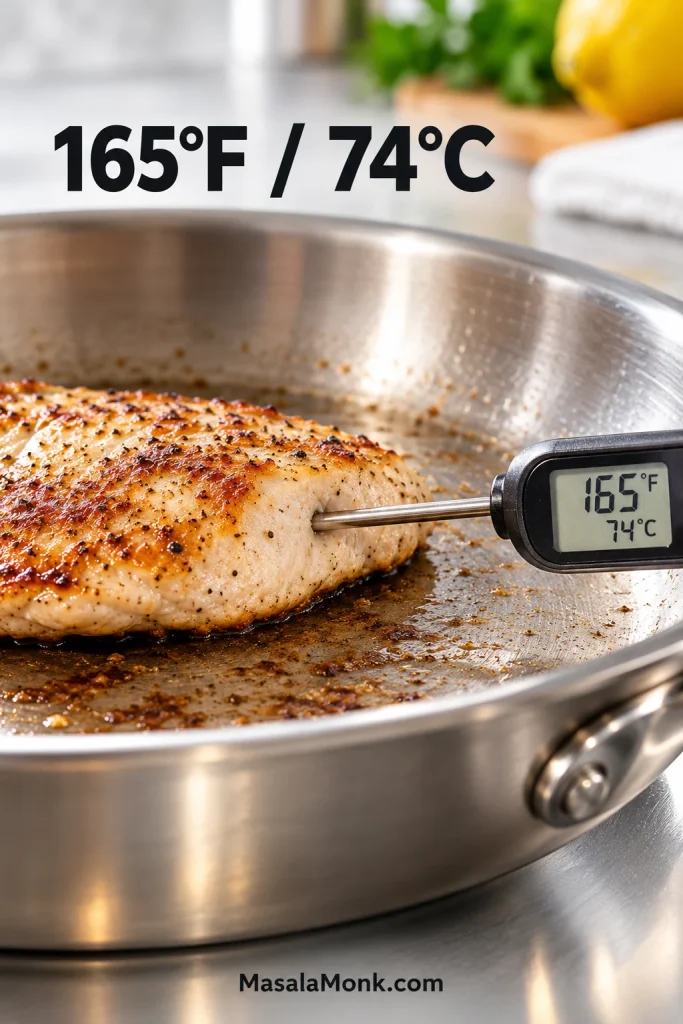
Flip and start checking after 1½ to 2 minutes. Insert the thermometer from the side so the probe reaches the center without touching the skillet; chicken breasts vary, so let the thermometer—not the clock—decide. Cook to 165°F / 74°C, the USDA safe minimum for poultry, then transfer the chicken to a clean plate.

Digital instant-read thermometer inserted horizontally into the side of a cooked chicken breast cutlet, with the display showing 165°F and 74°C.
For thin cutlets, slide the thermometer in from the side so the sensing tip stays centered without touching the skillet.

Leave it uncovered while the second batch cooks. A tight cover traps steam and softens the browned surface.

If liquid starts collecting around the chicken: stop thinking about sauce. Give the pieces more room and let that moisture evaporate until the loud sizzle comes back.

5. Cook the Second Batch

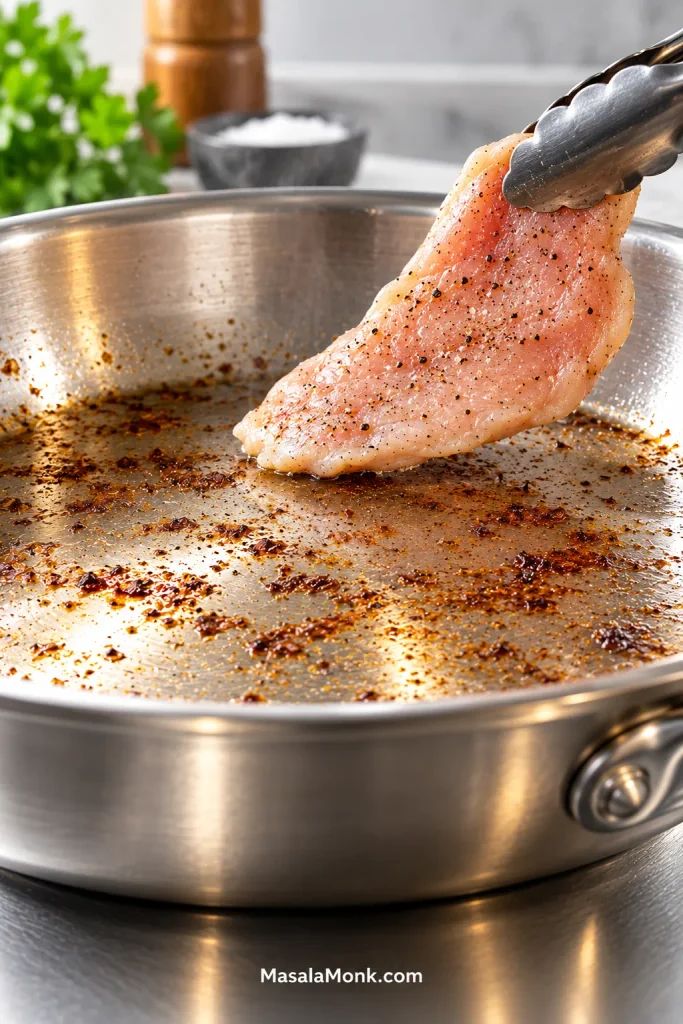
Before the remaining chicken goes in, give the skillet a moment to recover. Add a little more oil if the surface looks dry. You’ll know the heat has come back when the chicken hits the skillet with that same sharp sizzle.

Thin raw chicken breast cutlet held with tongs just above a mostly empty skillet containing browned fond and a thin hot oil film from the previous batch.
If batch one cooled the skillet, more oil will not fix it. Give the empty pan a moment to recover; when a test edge hisses sharply again, restore only the thin oil film and start the next batch.

Repeat with the remaining chicken, again cooking it to 165°F / 74°C, then move it to the clean plate.

6. Make the Garlic-Soy Finish

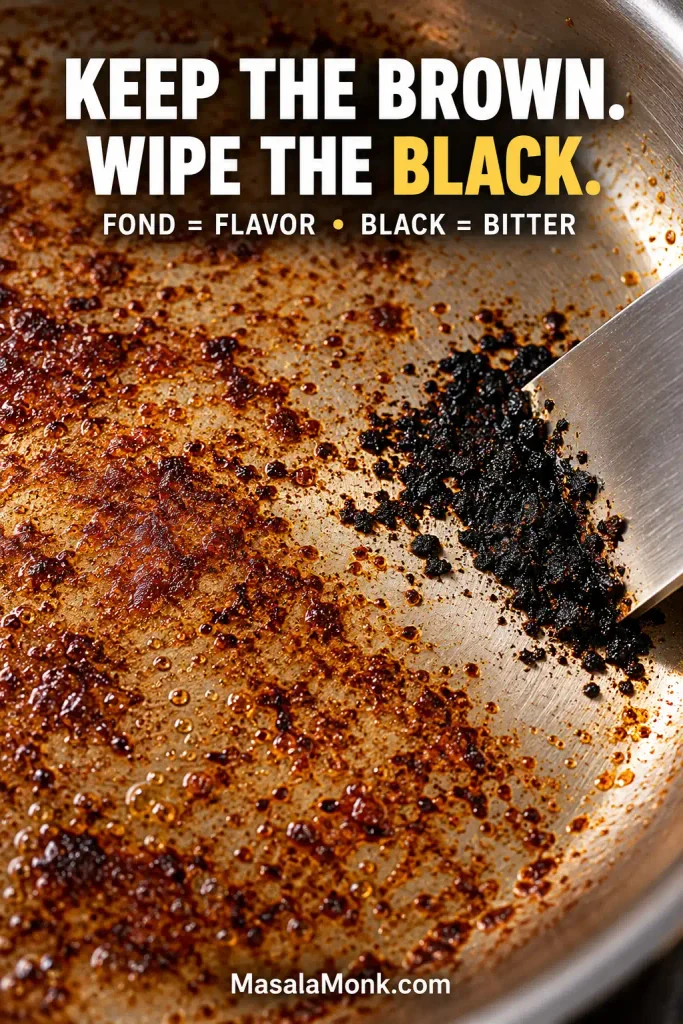
Lower the heat. Wipe out any blackened bits; leave the brown fond.

Add the garlic-soy butter and stir for 20 to 30 seconds, until the sharp raw-garlic smell softens. Now it starts smelling like hibachi.

Stir in the remaining soy sauce, then turn the burner off.

7. Cut and Toss Off Heat

While the second batch finishes resting, cut the first into bite-size pieces, about 1 inch / 2.5 cm. Once the second batch has rested for about 3 minutes in total, cut it too.

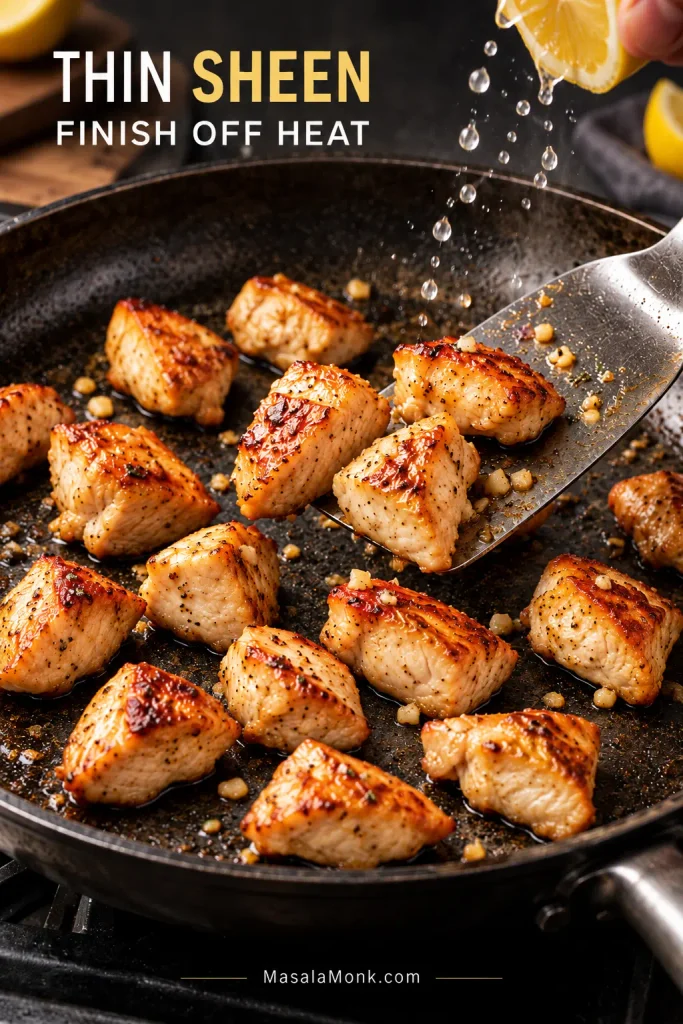
Return both batches and any juices on the plate to the skillet. Toss briefly, just until the garlic butter clings to the chicken in a thin sheen. With the burner off, the skillet is still hot enough to coat and warm the chicken without drying it out.

Bite-size browned hibachi chicken in a mostly dry skillet as lemon juice is squeezed over the pieces and a metal spatula lifts several from the pan.
Drag the spatula through the skillet: bare metal should stay visible behind it. If liquid floods the trail, the finish is turning into sauce.

8. Finish with Lemon and Sesame

Add the lemon juice and optional sesame oil, toss, then taste for salt. The lemon should sharpen the buttery soy flavor without taking over.

Scatter over the sesame seeds, if using, and get the chicken onto the plate while the garlic butter still clings to those browned edges.

What Good Hibachi Chicken Looks Like

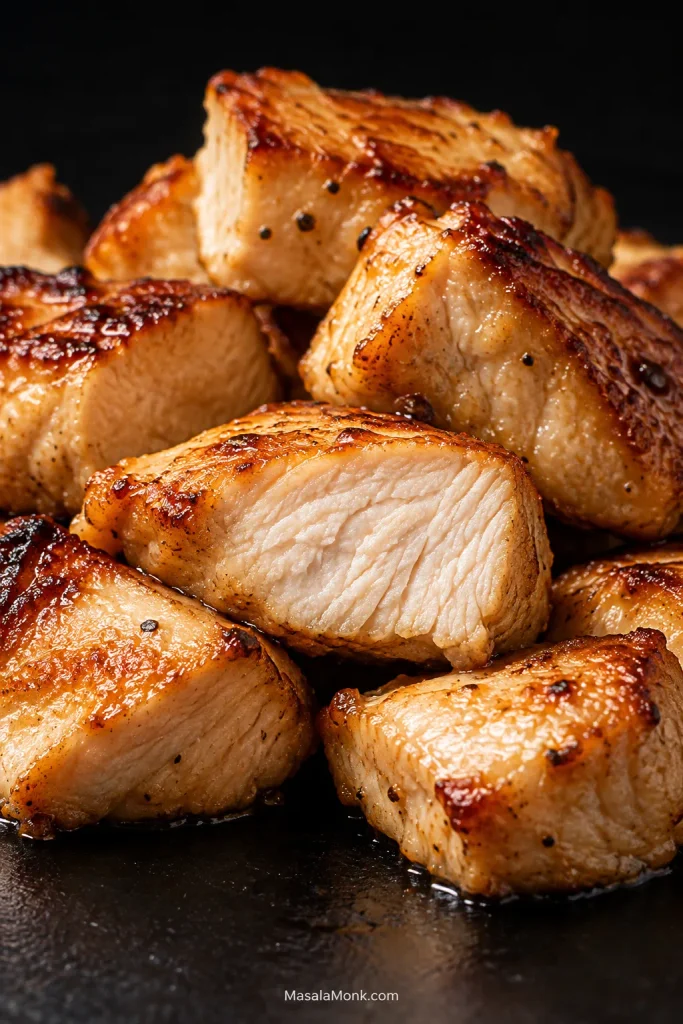
Look for irregular patches of bronze and deep gold directly on the chicken. Cut into a piece and the center should still look juicy, while the outside carries a thin buttery sheen.

Close-up of browned hibachi chicken breast pieces, including one cut open to show a moist pale interior with visible cooked meat fibers.
Moist, distinct breast fibers are the proof; a chalky, tight interior usually means the chicken went too far.

The garlic should smell sweet and savory, with black pepper quietly in the background. Lemon keeps the butter from feeling heavy.

Most of all, the first flavor should still be browned chicken—not soy sauce.

Why Home Hibachi Chicken Turns Watery

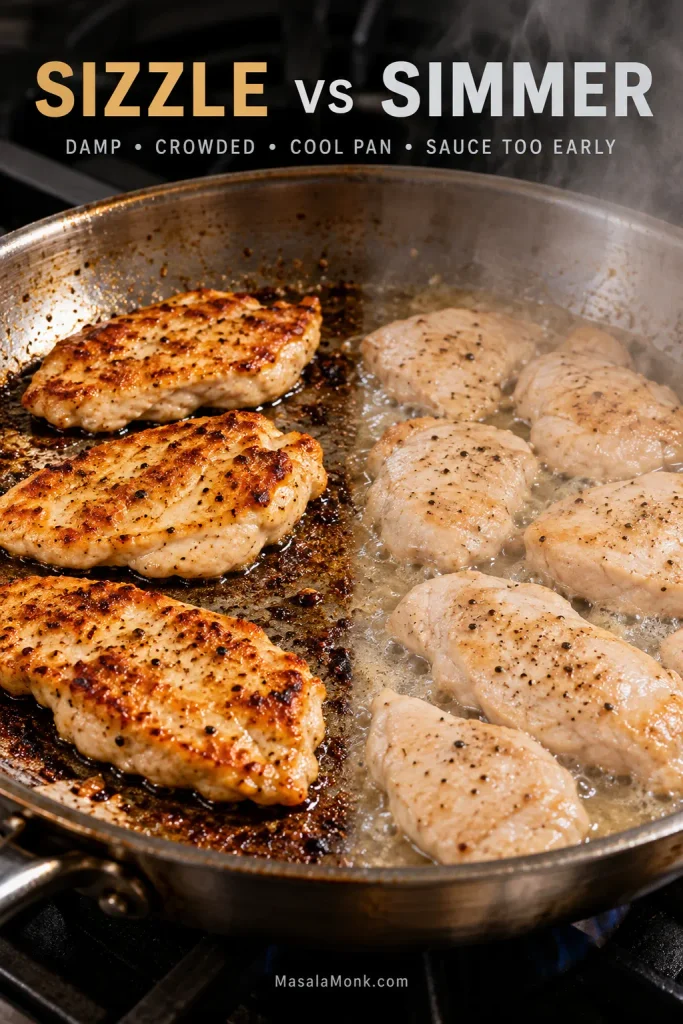
Hibachi chicken turns watery when moisture reaches the skillet faster than the heat can drive it away. Damp chicken, crowding, a pan that has cooled, partially frozen meat, and sauce added too early can all push the skillet from searing into steaming.

You can hear it happening. The sharp sizzle softens into wet bubbling, liquid appears between the pieces, and the chicken starts simmering. Meanwhile, the breast keeps cooking inside while the surface struggles to brown.

Comparison in one skillet: spaced chicken browning on a relatively dry surface beside crowded, paler chicken surrounded by bubbling released liquid.
Watch the bubbles. A good sear keeps tight activity close to the chicken where it meets the oil; broad bubbling through a visible pool means moisture is overwhelming the skillet and the chicken is simmering instead.

That is when another splash of soy can seem tempting. It brings more water and salt when the thing you actually need is heat and evaporation.

What to Do When You See the Puddle

Create more space. Let the liquid cook away. Increase the heat if your cookware permits. You’ll know the skillet is back on track when the sharp sizzle returns and the exposed chicken starts taking on color.

Save the soy and butter for later.

Butter, Soy, Garlic & Lemon: How the Flavor Comes Together

The familiar hibachi flavor comes from browned chicken, garlic butter, measured soy sauce, black pepper, and fresh lemon, added at different stages rather than all at once.

IngredientWhen It Goes InJob
Neutral oilBeginningHandles the high-heat sear
Black pepperBefore searingWarm background bite
Soy sauceAfter browningSalt + umami
Garlic butterAfter the searRichness + aroma
Fresh lemonOff heatBrightness
Toasted sesame oilOptional finishSesame aroma

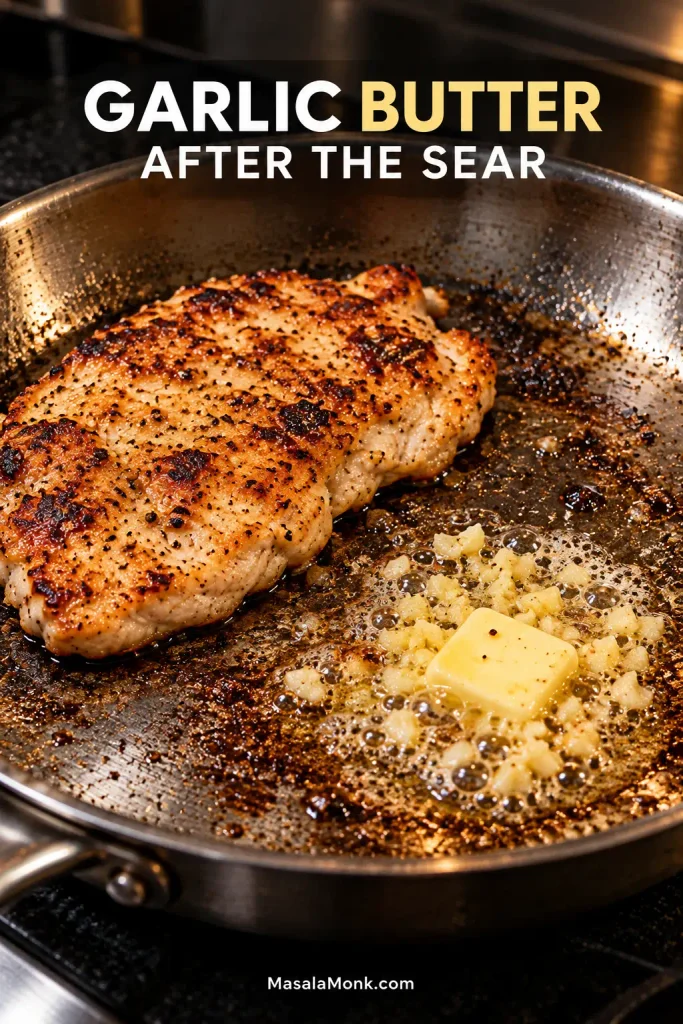
Timing matters. Neutral oil can handle the hard sear. Butter and garlic arrive later, once the intense browning stage is over. Soy follows the color instead of getting in its way, while lemon stays fresh because it goes in at the end.

Browned chicken cutlet on one side of a skillet while a small amount of butter and minced garlic melts and bubbles over brown fond on the exposed pan surface.
The butter should foam over the brown fond while the garlic softens. If the garlic starts darkening, the pan is still too hot.

Taste before adjusting the seasoning. Saltiness and savory depth are not the same thing.

Toasted sesame oil needs restraint. Half a teaspoon / 2.5 ml is enough to perfume the whole batch. Use it as a finishing aroma; frying the chicken in it makes sesame dominate.

What Is Hibachi Seasoning?

There is no single universal dry “hibachi seasoning” blend. In this chicken recipe, salt and black pepper season the meat first, while butter, garlic and soy build the familiar savory steakhouse flavor during cooking.

Ginger appears in some hibachi-style chicken recipes and dipping sauces, and commercial hibachi seasoning blends can include it too. It is not essential to the garlic-butter profile used here.

Keeping the seasoning simple also makes problems easier to diagnose. Browning, garlic, acidity, and salt each do a different job.

Cut Before or After Cooking? Match the Method to the Pan

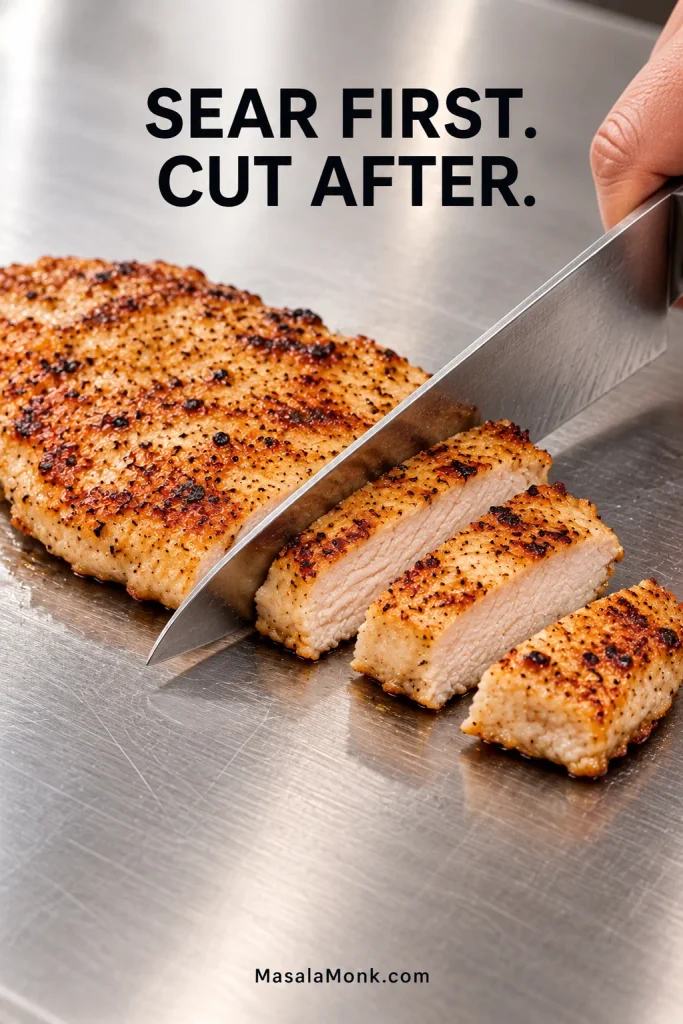
For a home skillet, sear larger thin pieces and cut them afterward. On a roomy Blackstone or flat top, raw bite-size pieces are much easier to spread out and brown without steaming.

Broad cooked chicken breast cutlet being sliced with a chef's knife into bite-size pieces on a stainless surface, with moist cut interiors visible.
Let the cutlet rest briefly before slicing so less juice runs straight onto the board.
MethodBest Place to Use ItMain Trade-Off
Raw cubes firstBlackstone or very large flat topCan steam quickly in a small skillet
Thin pieces, then cutHome skilletLess like the restaurant chopping show
Sear, partly cook, chop, finishFlat top / experienced griddle cookingMore awkward handling of partly cooked poultry at home

Keeping the breasts larger gives them more uninterrupted contact with the skillet. That extra contact time helps the meat pick up color before released moisture cools the surface.

Does Hibachi Chicken Need a Marinade?

No. You do not need a wet marinade for this steakhouse-style method. Most of the flavor is built through seasoning, browning, garlic-soy butter, black pepper, and lemon.

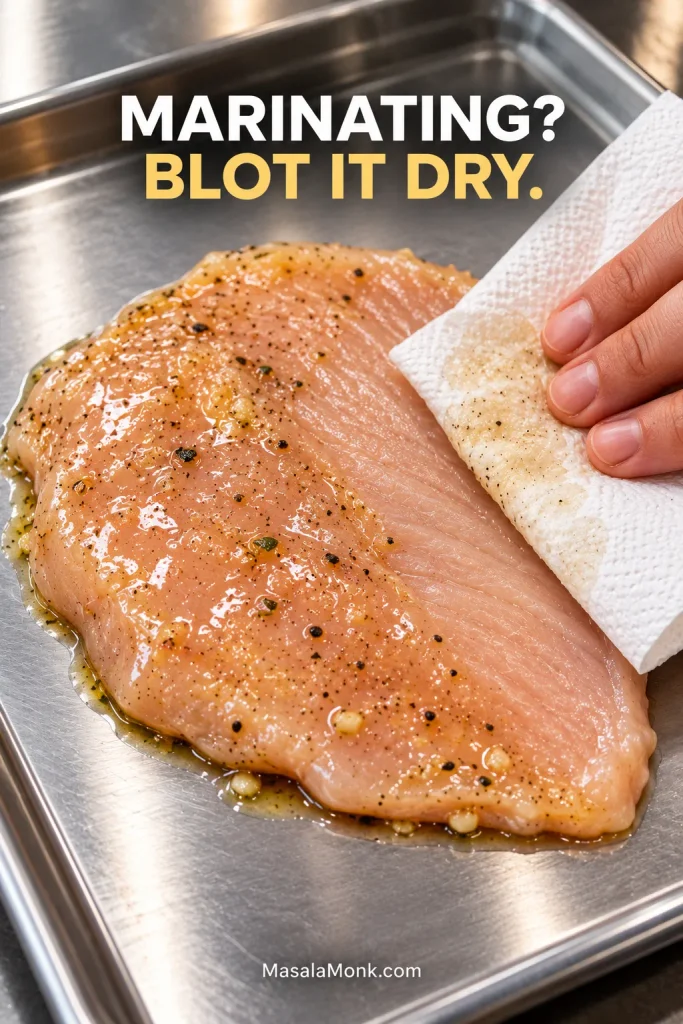
A wet marinade can make browning harder because the chicken carries more surface moisture into the skillet. Prefer marinated chicken anyway? Drain it well and blot it thoroughly before cooking.

Raw marinated chicken breast cutlet on a stainless tray as a white paper towel blots part of the wet surface, leaving the blotted area visibly drier.
Blot marinated chicken until the surface looks matte, not slick. You are removing free liquid, not undoing the seasoning.

Be especially careful with honey, sugar, or sweet bottled sauces. They can darken quickly on a hot skillet while the chicken underneath is still pale.

Chicken Breast or Thighs?

Use breast for the firmer, leaner Japanese-steakhouse-style bite in this recipe. Choose boneless thighs when you want richer meat and a little more forgiveness if the timing runs long.

Benihana currently describes its Hibachi Chicken as chicken breast with mushrooms and sesame seeds, so breast is a useful reference point for the style we are recreating here.

Thighs are especially forgiving on a Blackstone or when cooking larger batches. The same brown-first approach still applies.

Hibachi Sauces & Yum Yum Sauce

Choose the sauce by the kind of contrast you want beside the chicken. The chicken itself already has its soy-and-garlic-butter finish; these are dipping sauces or alternate flavor directions.

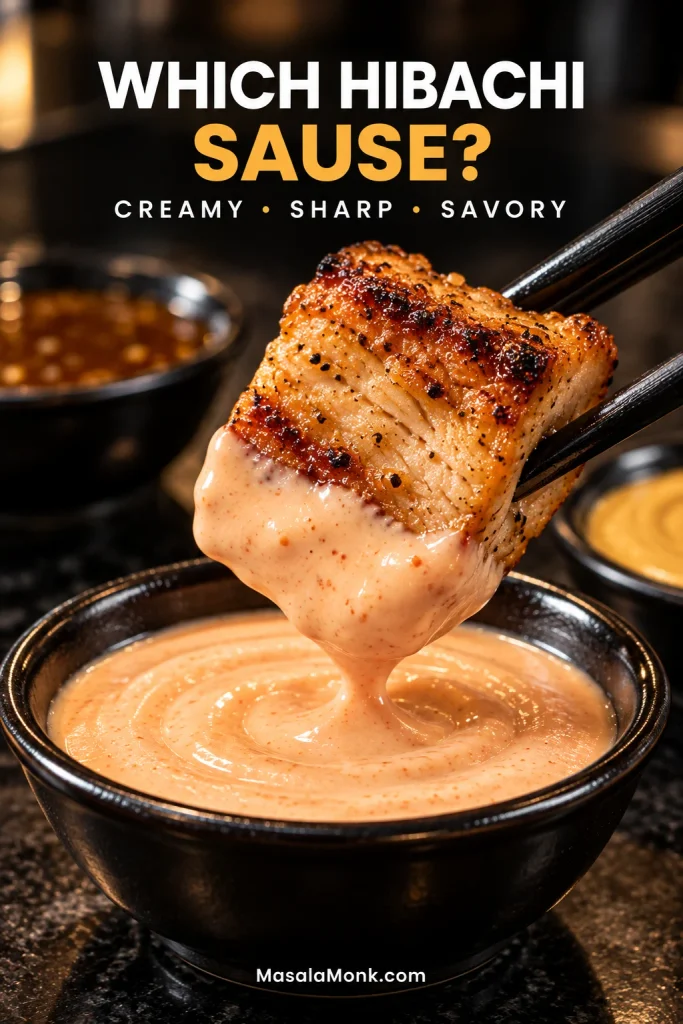
Creamy and cool: our Yum Yum Sauce gives you the familiar pale pink, mildly sweet steakhouse dip. That cold creamy sauce is particularly good beside chicken that has just come hot from the skillet.

Browned hibachi chicken bite held with dark chopsticks and dipped partway into pale pink Yum Yum Sauce, with the upper browned portion still visible.
Keep Yum Yum Sauce on the side so every browned bite gets as much—or as little—as you want.

Sharp and fresh: ginger dipping sauce is thinner and more acidic, so it cuts through buttery chicken without adding more richness.

Savory and punchier: mustard-style steakhouse sauce works especially well when you want a stronger companion for chicken or steak.

Sweet and glossy: use our homemade teriyaki sauce when you want the chicken to move in a sweeter, glaze-heavy direction.

If what you really want is sticky, sauce-forward chicken rather than a butter-led steakhouse finish, our Sesame Chicken recipe is the better direction.

Making Hibachi Chicken on a Blackstone

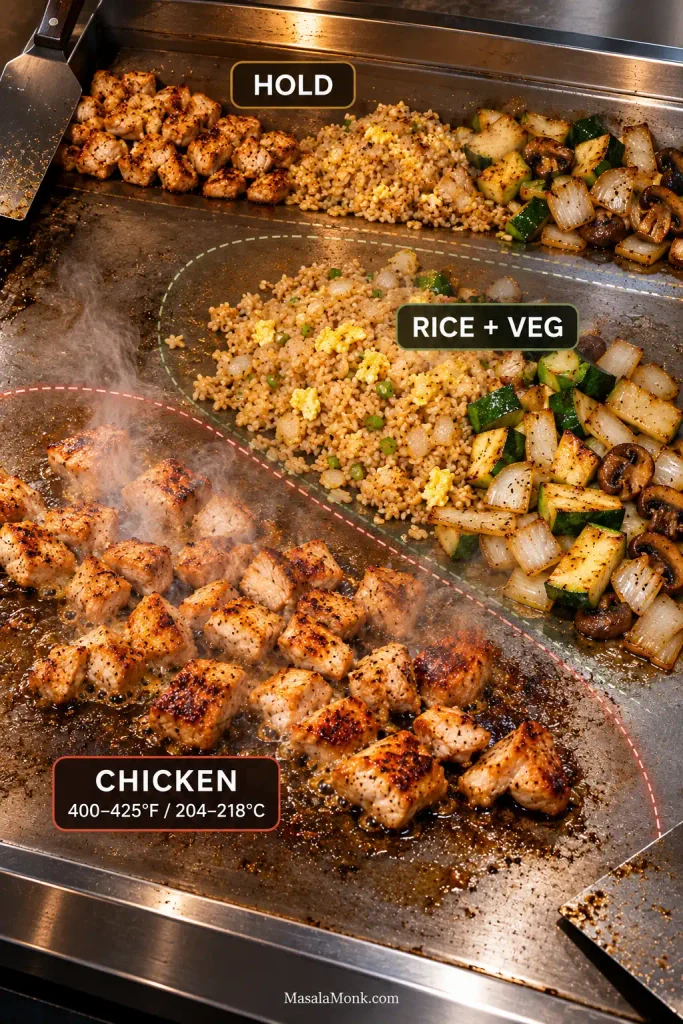
For Blackstone hibachi chicken, preheat the chicken zone to about 400–425°F / 204–218°C and keep separate areas for hard searing, vegetables or rice, and holding finished food.

The large griddle changes the main constraint. You have far more hot surface than a 12-inch skillet, so raw bite-size chicken can brown well as long as you actually spread it out. Larger breast pieces still work too.

Use the hotter area for the chicken. Keep vegetables and rice on their own medium-hot sections, with a cooler edge available for anything that finishes early.

Overhead Blackstone-style flat-top showing separate working areas for chicken at 400–425°F, rice and vegetables, and a cooler holding zone for finished food.
Treat the zones as working temperatures, not painted boundaries. Chicken should hiss immediately in the hot zone; rice and vegetables need their own working space, while finished food stays warm at the edge without continuing to brown aggressively.

A wide field of sizzling chicken is what you want. By contrast, a steaming mound in the middle of the griddle is not.

Brown the chicken before adding the garlic butter and soy. Once it reaches 165°F / 74°C, move it away from the strongest heat, coat it briefly, and finish with lemon.

That extra surface area is the advantage of the Blackstone: chicken, vegetables, and rice can occupy different zones instead of competing for the same patch of hot metal.

Hibachi Fried Rice & Vegetables: The Best Cooking Order

For a one-skillet hibachi dinner, cook the vegetables first, fried rice second, and chicken last. Keep the first two components loosely covered while the chicken cooks; they tolerate the short wait far better than chicken breast.

Cooked zucchini, mushrooms and onion held separately behind a skillet of fried rice, with thin raw chicken breast cutlets waiting on their own stainless tray for the final stage.
After the vegetables leave, let the pan dry before frying the rice; restore strong heat again before the chicken goes in.

Have everything cut and the cooked rice ready before the skillet gets hot. Once the first component starts cooking, this meal moves quickly.

Vegetables First

For four servings, start with 1 medium onion, 2 small zucchini, and 8 oz / 225 g mushrooms. Cook the onion and mushrooms first, then add the zucchini later so it keeps some structure.

Move the vegetables to a bowl and cover loosely. Cook mushrooms here, not beside the chicken during its initial sear; they release enough moisture to make chicken browning harder.

Fried Rice Second

Cold cooked rice works well because the surface is drier and the grains are firmer. “Day-old” is not magic, though. Rice that started undercooked can become unpleasantly hard after refrigeration and another round of high heat.

Fry the rice in a reasonably thin layer, season it lightly, then move it to a loosely covered bowl while the chicken cooks. Starting with uncooked rice? Our guide to cooking rice covers stovetop and rice-cooker methods before you move on to cooling and frying.

You want savory grains, not rice soaked in soy sauce.

Chicken Last

Finish with the chicken using the recipe above. By the time it is tossed through the garlic butter, the vegetables and rice should already be waiting.

The payoff is a plate with contrast: juicy browned chicken, buttery fried rice, mushrooms with real color, zucchini that still has some bite, and something cool and creamy on the side if you are serving Yum Yum Sauce.

Adding Shrimp or Steak

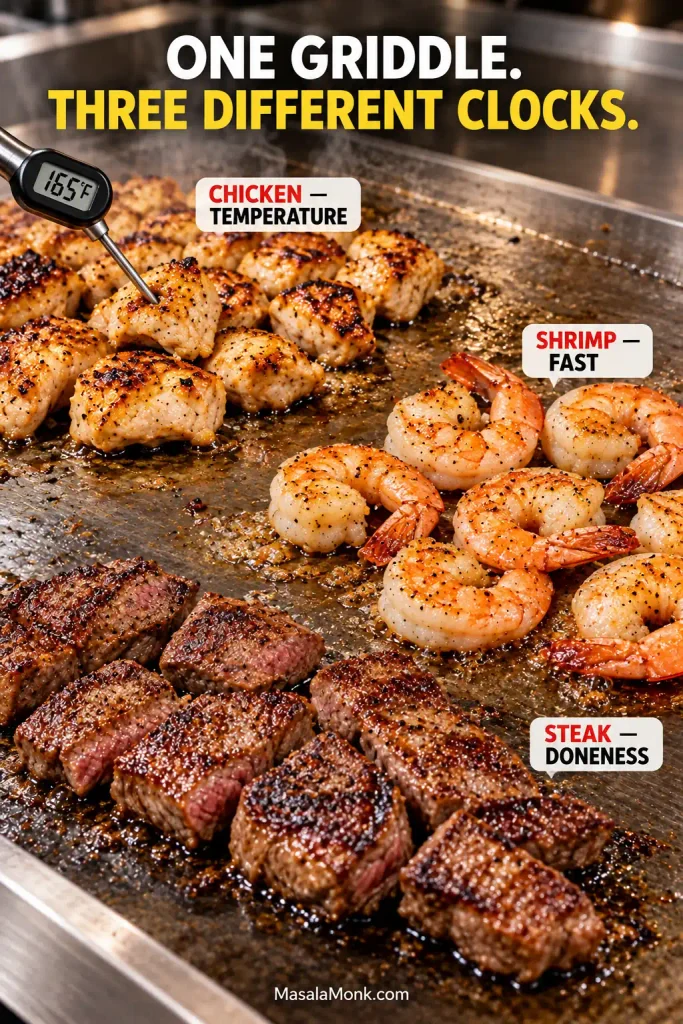
Cook each protein on its own clock. Shrimp, steak, and chicken have different doneness windows, so forcing them onto one timer is the easiest way to overcook something.

Keep juices and utensils that touched raw chicken away from shrimp, steak, and cooked food; switch to clean utensils once the chicken is cooked.

Flat-top griddle with separate areas of browned chicken and a thermometer, just-cooked pink shrimp, and browned steak pieces with pink centers.
Different proteins finish on different clocks. Separate zones let chicken, shrimp and steak reach their own doneness instead of forcing them onto one timer.

Chicken and Shrimp

Large shrimp on a properly heated griddle often need only 1 to 2 minutes per side. Watch for the flesh to turn opaque and curl loosely.

Finish most of the chicken cooking first, then cook the shrimp separately or add it much later on a griddle.

If shrimp becomes the main event rather than an add-on, our Shrimp Fried Rice gives it its own cooking window while using the same useful habits: dry surfaces, a properly heated pan, cold rice, and restrained sauce.

Chicken and Steak

Steak may be ready well before the chicken, depending on thickness and preferred doneness. Give it its own section of the griddle or cook it separately, then judge the beef and chicken independently.

Read the Pan: Hibachi Chicken Troubleshooting

When hibachi chicken goes wrong, the skillet usually tells you before the finished plate does. Listen to the sound, look at the surface of the chicken, and pay attention to what is collecting around it.

Close-up of a skillet with widespread brown fond beside a distinct black burned patch being scraped away while the brown residue remains.
Use both sight and smell. Brown fond is roasted and savory; truly burned residue turns sharp, acrid or smoky. Keep the brown, remove the black, and do it before butter can dissolve that bitterness into the pan.
What You See or HearWhat It Usually MeansWhat to Do
Pale chicken sitting in liquidWet chicken, cool skillet, crowding, or liquid added earlyCreate space and let the strong sizzle return
No sharp sizzle when batch two landsThe skillet has not recovered its heatWait before adding more chicken
Brown outside but dry insidePieces too small, uneven thickness, or too much cookingUse even cutlets and a thermometer
Dark sticky surface, pale chicken underneathSugar or sauce browned before the meatSear the chicken before adding sweet sauces
Salty but still flatSoy is replacing browning, garlic, pepper, or acidityStop adding soy and fix the missing layer
Bitter garlicGarlic hit high heat too earlyAdd it with the finishing butter
Blackened bits smokingBurned fond or garlicWipe them out before adding the butter
Sesame dominatesToo much toasted sesame oilUse it sparingly at the end
Everything finishes at different timesToo many components started togetherCook sequentially indoors or use separate griddle zones

Brown but Dry

Very small raw cubes can cook through before much crust develops. Thick uneven breasts create the opposite problem: the thin parts wait while the center catches up. Even thickness and a thermometer give you far more control.

Salty but Still Not Right

Do not add more soy. If the chicken is already salty, soy is not the missing ingredient. Check the sear, garlic butter, black pepper, and lemon.

If you already cook with MSG, a small optional pinch can deepen the savory flavor. It still cannot replace browning or rescue burnt garlic.

Dark Does Not Always Mean Seared

Honey, brown sugar, teriyaki sauce, hoisin, and sweet Japanese barbecue sauces can darken quickly on a hot skillet. A proper initial sear leaves dry bronze or deep-golden patches directly on the chicken. Sticky dark sauce over pale meat is a different result.

Storage & Reheating

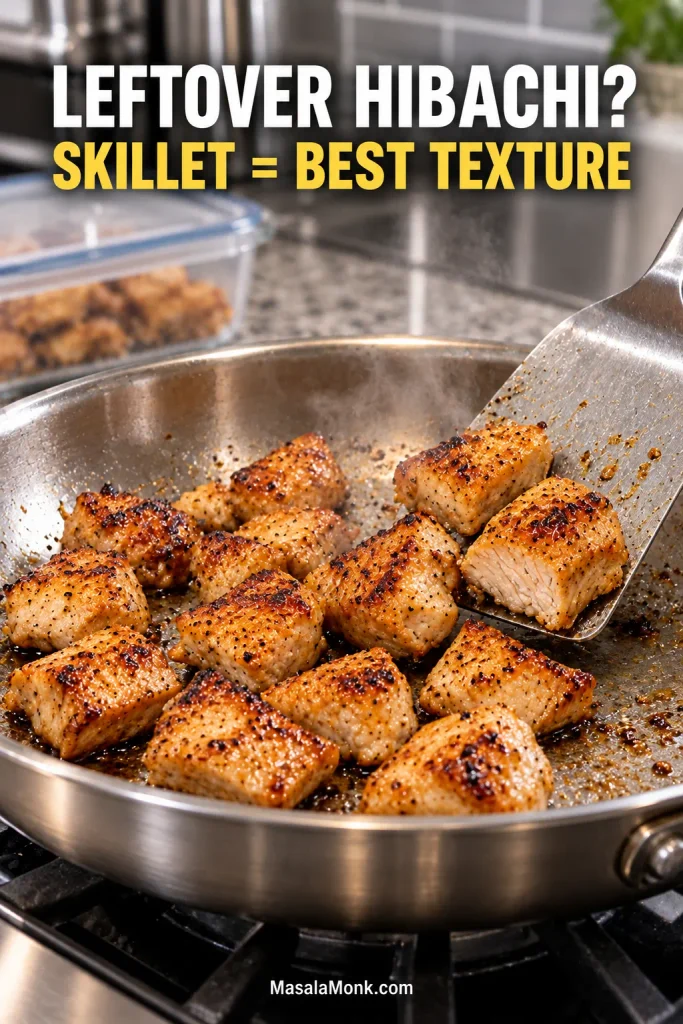
For the best texture, reheat hibachi chicken gently in a skillet; the microwave works too when speed matters.

Following USDA food-safety guidance, refrigerate cooked chicken within 2 hours, or within 1 hour when the surrounding temperature is above 90°F / 32°C. Store it in a shallow airtight container and use it within 3 to 4 days.

For skillet reheating, use medium-low heat with a teaspoon of water or a small amount of butter if the chicken looks dry. Cover briefly if needed and reheat the leftovers to 165°F / 74°C.

Leftover browned hibachi chicken pieces being gently reheated and turned with a metal spatula in a stainless skillet, with a storage container blurred behind them.
Reheat in one layer and stop as soon as the center is hot; chasing a new crust only dries cooked breast meat.

For the microwave, use short covered intervals and stir between them. Stop as soon as the chicken is hot through so the smaller edge pieces do not spend several minutes drying out.

If you stored a full hibachi dinner, keeping dipping sauce separate makes reheating much easier. Rice and vegetables can be warmed alongside the chicken, while cold Yum Yum or ginger sauce stays cold.

Practical Hibachi Chicken FAQs

1. Can I double the recipe?

Yes, but keep roughly the same amount of chicken in each batch. Doubling the recipe should not mean doubling the amount crowded into the skillet.

2. Can I make it in a nonstick skillet?

Yes. Follow the manufacturer’s heat limits and preheat more moderately. The crust may be lighter than it would be in cast iron, carbon steel, or stainless steel, but the larger-piece method still works.

3. Can I cook the chicken from frozen?

Not for this method. Thaw it completely first. Partially frozen chicken releases extra water as it cooks and makes browning much harder to control.

4. What oil is best for hibachi chicken?

Use a neutral oil that handles fairly high heat, such as avocado, canola, grapeseed, or another neutral cooking oil you normally use for searing. Save strongly flavored oils and toasted sesame oil for lower-heat cooking or the finish.

5. Can I use tamari instead of soy sauce?

Yes. If you are avoiding gluten, choose a tamari specifically marked gluten-free because products vary. Sodium levels vary too, so keep the measured amount modest and adjust after tasting.

The Difference Is in the Order

Dry chicken. Hot skillet. Enough room for the pieces to sear. Get those three things right before you worry about sauce.

Then the payoff comes quickly: garlic butter hits the browned fond, soy brings the savory edge, and lemon wakes everything up at the end.

When it all comes together, the chicken reaches the plate bronzed around the edges, glossy with garlic butter, juicy through the middle, and bright enough that the richness never feels heavy.

That is the whole idea behind this chicken hibachi recipe: brown first, flavor second.

Posted on — Leave a comment

Chicken Lo Mein Recipe: Easy, Saucy Takeout-Style Noodles

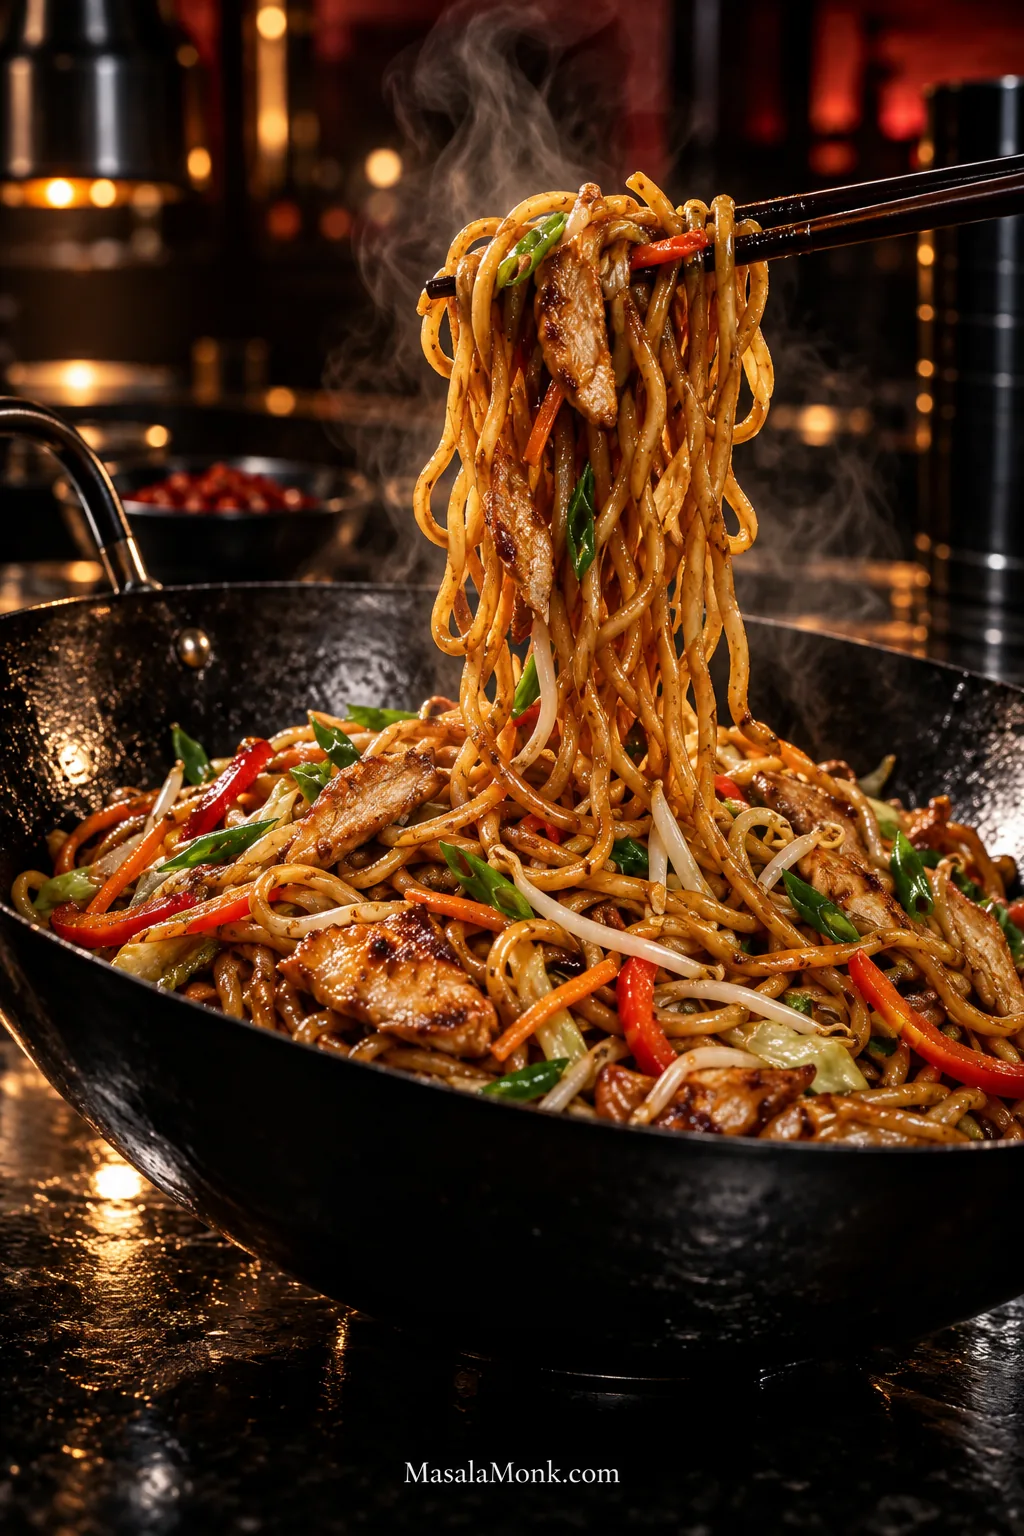
Dark chopsticks lift steaming chicken lo mein noodles from a black wok with thin sliced chicken, red bell pepper, carrots, bean sprouts and scallions.

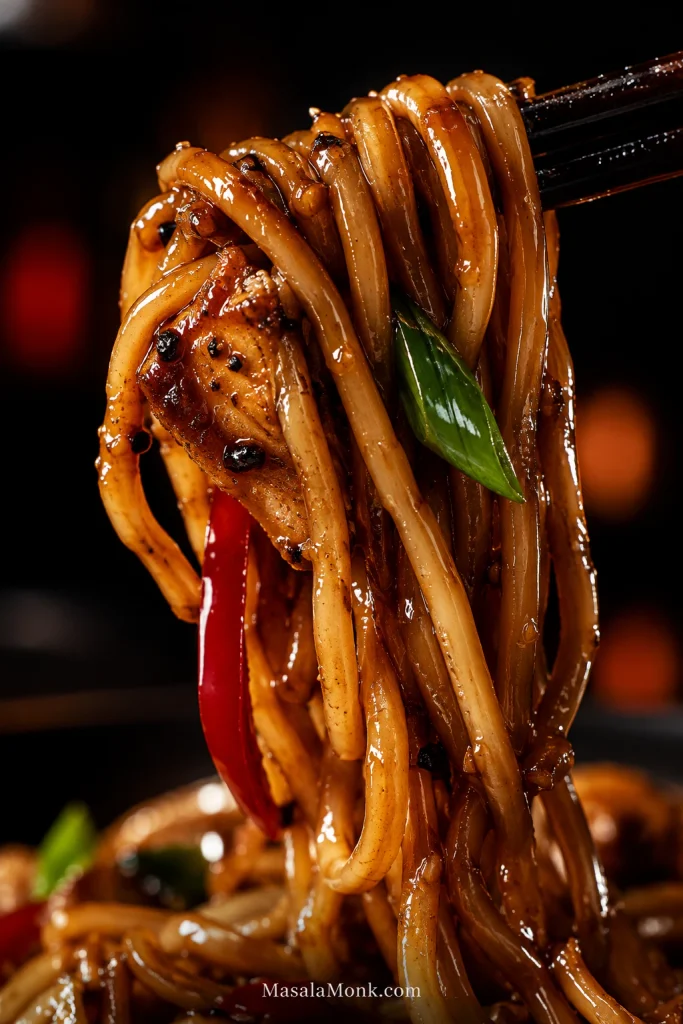
Lift a tangle of chicken lo mein from the bowl and the strands should separate as they rise, carrying their brown sauce with them instead of dragging up one sticky mass. The noodles bend easily but still push back when you bite, the chicken stays tender, and the vegetables keep enough snap to break up all that soft, slippery noodle texture.

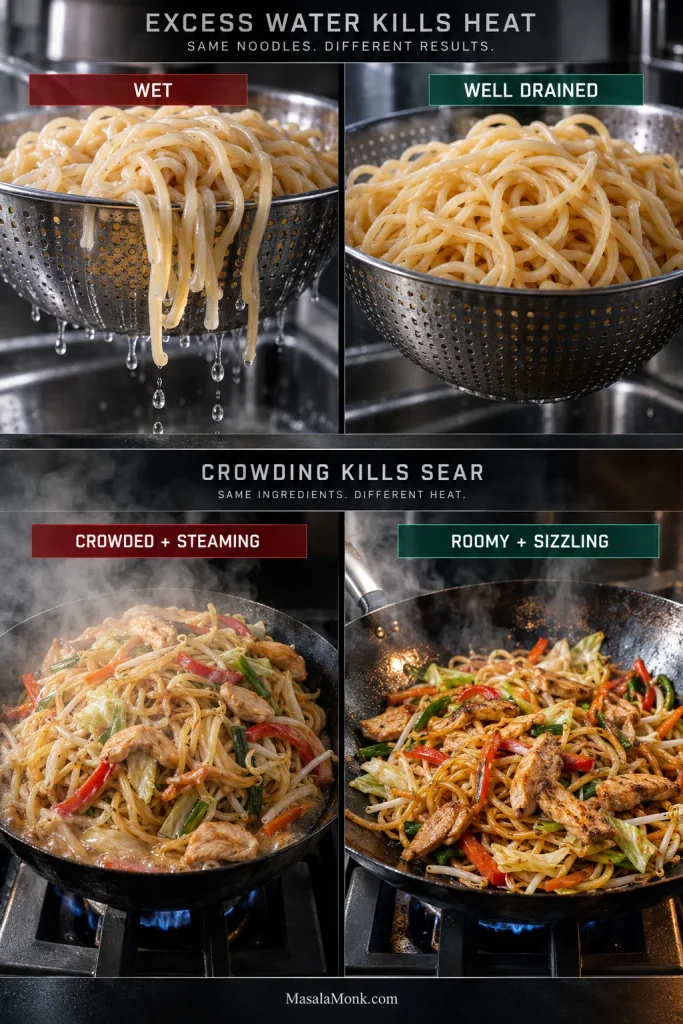
Homemade lo mein can miss that mark in several directions at once. Noodles cooked until completely tender can soften too far during the final toss. Adding regular soy sauce just to make the pan darker can leave dinner overwhelmingly salty. Wet noodles and an overcrowded skillet cool everything down just when the sauce should be tightening around the strands.

This version takes about 30–35 minutes and gives you the saucier Chinese-American takeout-style lo mein many people are trying to recreate at home. A wide skillet works; you do not need a restaurant wok burner. What matters most is the state of the noodles you bought, how much water reaches the pan, and how much sauce you want those strands to carry.

Before You Start

Stop the noodles while they still have some chew, drain them exceptionally well, and do not create a saucier bowl by pouring in extra soy. Those three decisions matter more than owning a wok.

The chicken’s 10–15 minute marinade happens while you cut the vegetables and get the noodle water ready, so it does not add another quarter-hour to dinner. Fresh and dried noodles are not a gram-for-gram swap; the recipe gives separate quantities for each.

Chicken Lo Mein Recipe

The ingredient list looks longer than the actual cooking. Most of it gets mixed or chopped before the skillet is hot; once cooking starts, you are mostly adding prepared things in order.

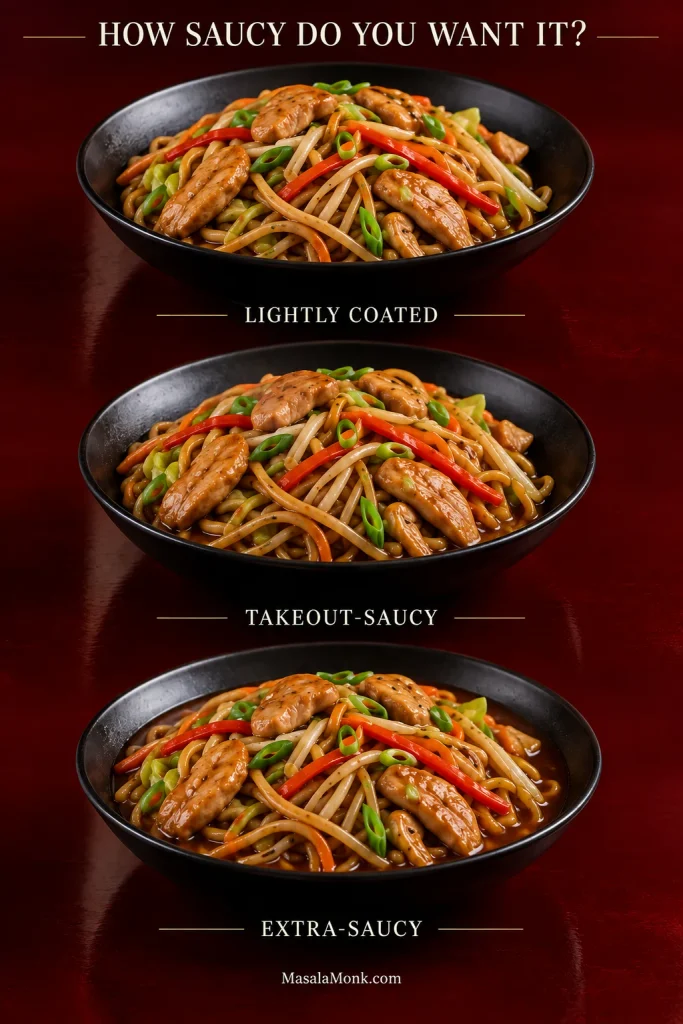
The base recipe lands in the takeout-saucy middle of the range. Cook it this way the first time. The variations farther down are for anyone who already knows they prefer the noodles more lightly coated or noticeably wetter.

Easy Chicken Lo Mein

Yield4 main-dish servings
PrepAbout 20 minutes
CookAbout 10–12 minutes
TotalAbout 30–35 minutes
Pan13–14 inches / 33–36 cm preferred; a 12-inch / 30-cm skillet is workable but gives you less tossing room

Equipment

  • Wide skillet or wok
  • Pot and colander for the noodles
  • Tongs, chopsticks or two spatulas

For the Chicken

  • 12 oz / 340 g boneless skinless chicken breast or thighs
  • 2 teaspoons / 10 ml low-sodium soy sauce
  • 1 tablespoon / 15 ml Shaoxing wine or dry sherry
  • 2 teaspoons / about 5 g cornstarch
  • 1 tablespoon / 15 ml water
  • 1 teaspoon / 5 ml neutral cooking oil
  • ¼ teaspoon ground white pepper

For the Lo Mein Sauce

  • 2 tablespoons / 30 ml low-sodium soy sauce
  • 2 teaspoons / 10 ml dark soy sauce
  • 2 tablespoons / 30 ml oyster sauce
  • 2 tablespoons / 30 ml Shaoxing wine or dry sherry
  • ¼ cup / 60 ml unsalted or low-sodium chicken stock or water
  • 2 teaspoons / about 8 g sugar
  • 1½ teaspoons / about 4 g cornstarch
  • 1 teaspoon / 5 ml toasted sesame oil
  • ¼ teaspoon ground white pepper
  • ¼ teaspoon MSG, optional

For the Noodles and Vegetables

  • 12 oz / 340 g fresh Chinese lo mein or egg noodles or 7 oz / 200 g dried Chinese wheat or egg noodles
  • 2 tablespoons / 30 ml neutral high-heat cooking oil, divided, plus another teaspoon only if needed
  • 2 cups / about 140 g thinly shredded green or napa cabbage
  • 1 medium carrot, about 3½ oz / 100 g, cut into fine matchsticks
  • 1 medium bell pepper, about 5 oz / 140–150 g, thinly sliced
  • 1 cup / about 3½ oz / 100 g bean sprouts
  • 3 scallions, sliced, white and green parts separated
  • 3 garlic cloves, about 9 g, finely chopped
  • 2 teaspoons / about 4 g finely grated or minced fresh ginger

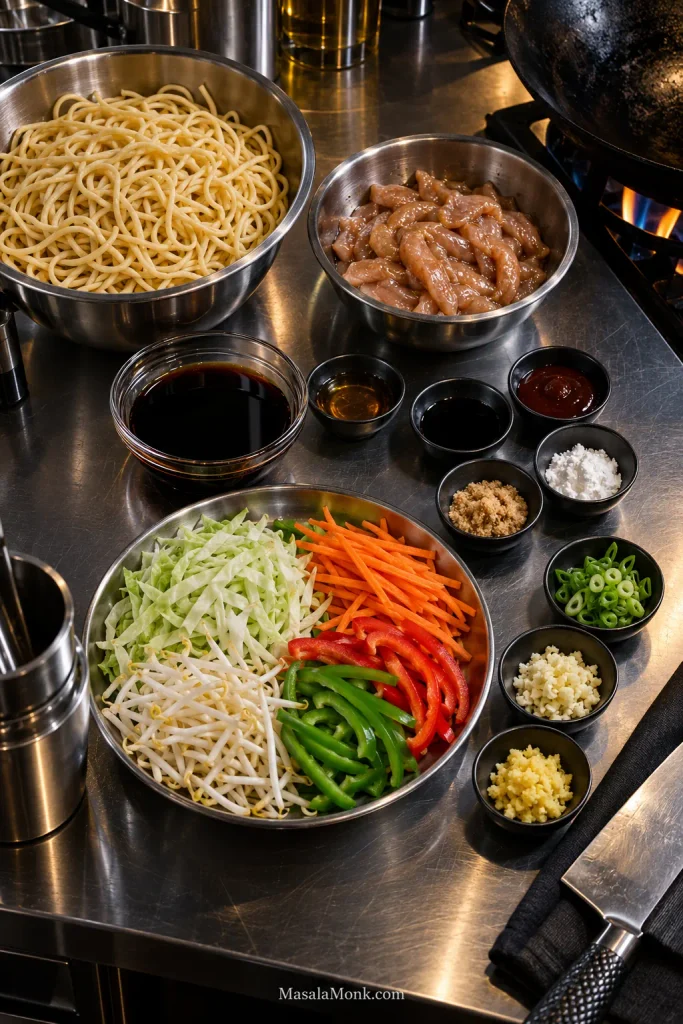
Set yourself up before the skillet gets hot. Mix the sauce, start the chicken marinating and cut the vegetables first. Prepare and drain the noodles as your final prep job so they spend as little time as possible sitting around warm.

Professional stainless-steel prep station with separate bowls of lo mein noodles, sliced marinated chicken, sauce ingredients, cabbage, carrots, bell pepper, bean sprouts, scallions, garlic and ginger.
For chicken lo mein, group ingredients by when they enter the pan—not just by type. Once cooking starts, that simple setup keeps you moving without stopping to measure, chop or untangle noodles.

How to Make Chicken Lo Mein

1. Mix the Sauce

Whisk together all of the sauce ingredients. Stir again just before using because the cornstarch settles as it sits.

2. Marinate the Chicken

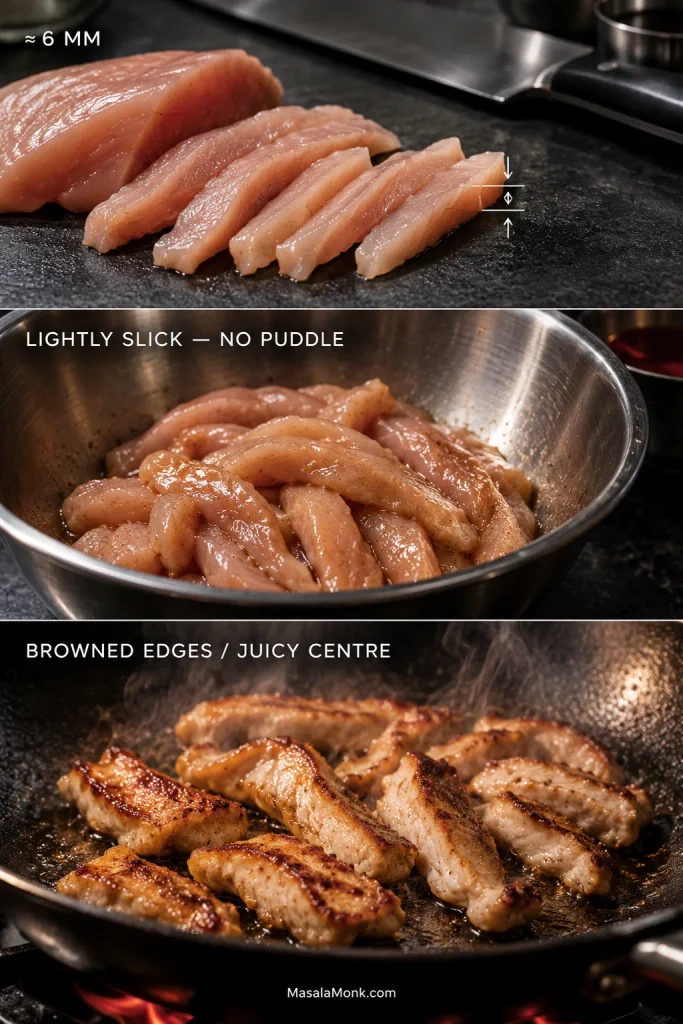
Slice the chicken across the grain about ¼ inch / 6 mm thick. Mix with the soy sauce, Shaoxing wine, cornstarch, water, oil and white pepper. Stir until the pieces look lightly slick and there is no puddle of thin marinade. Rest 10–15 minutes while you prepare the vegetables.

3. Prepare the Vegetables

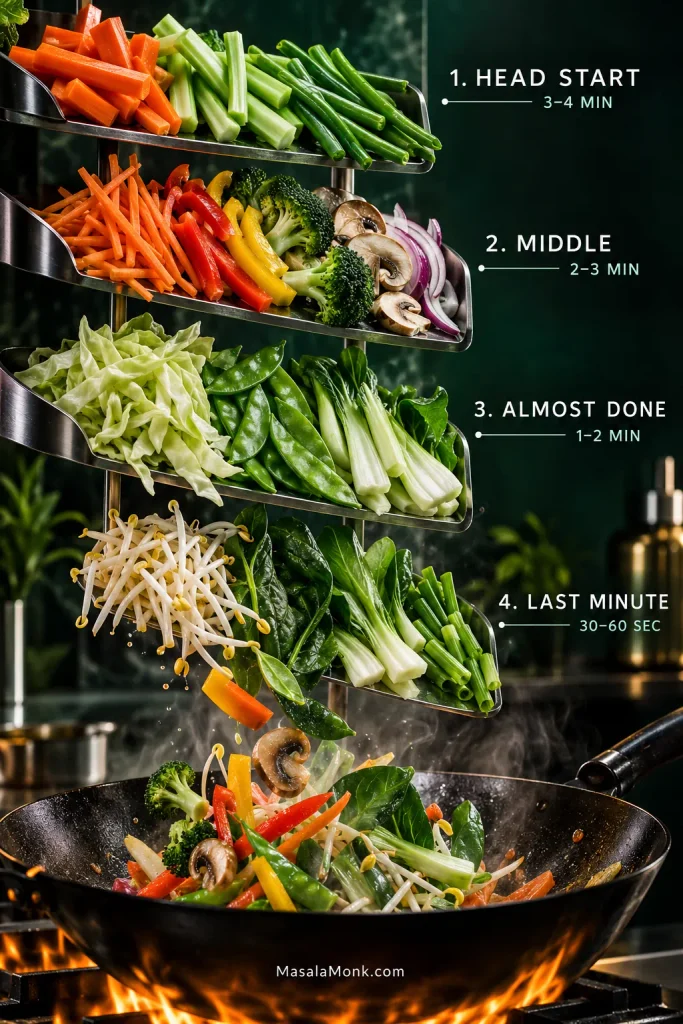
Shred the cabbage, cut the carrot into fine matchsticks and slice the bell pepper. Keep the bean sprouts and scallion greens aside for the end.

4. Prepare the Noodles Last

Cook dried noodles until just shy of tender. Raw fresh noodles usually need much less time; already cooked or oily noodles may need only loosening or a brief hot-water treatment.

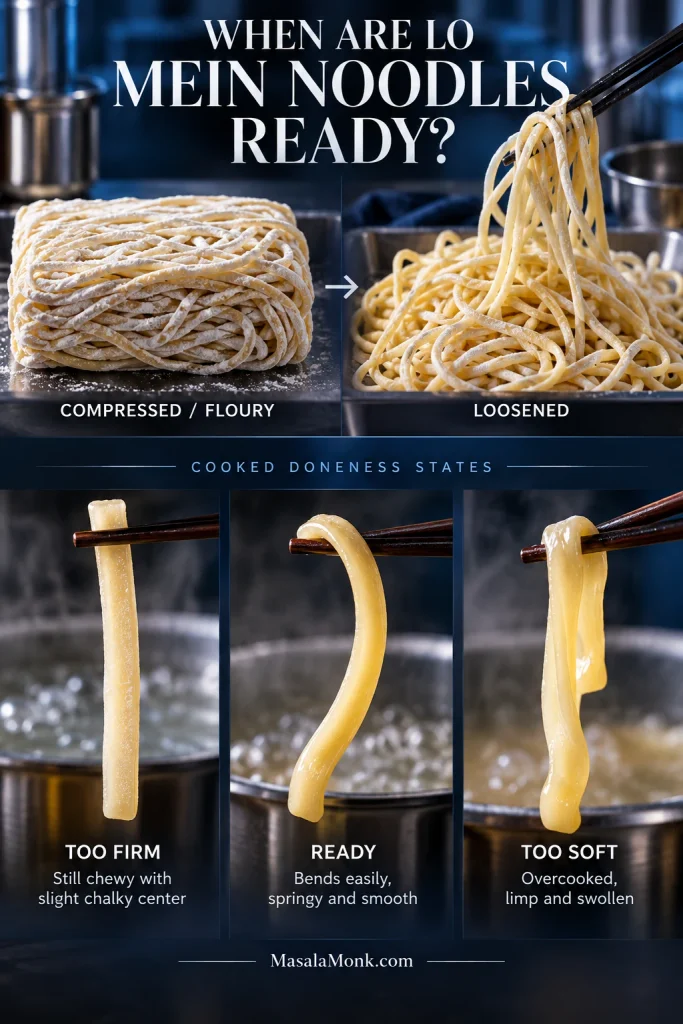
Floury fresh noodles often arrive pressed into a stubborn block. Loosen the bundle gently before boiling, then tease the strands apart as soon as they hit the water.

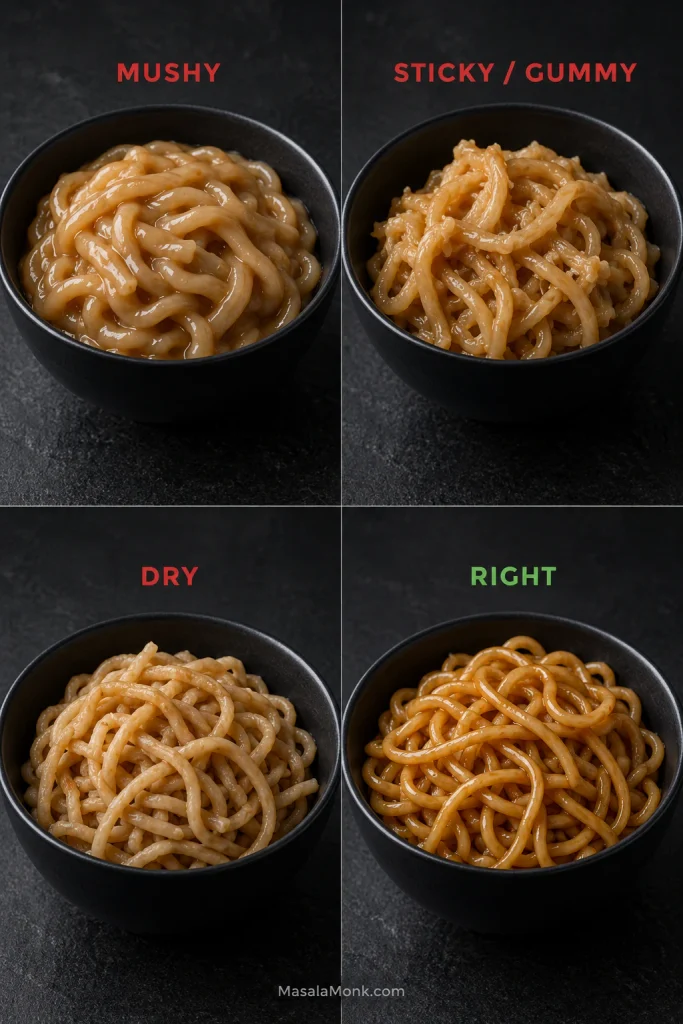
Drain extremely well and keep the strands loose in the colander. They should be a little firmer than you ultimately want. Move on to the skillet without leaving them packed together while warm.

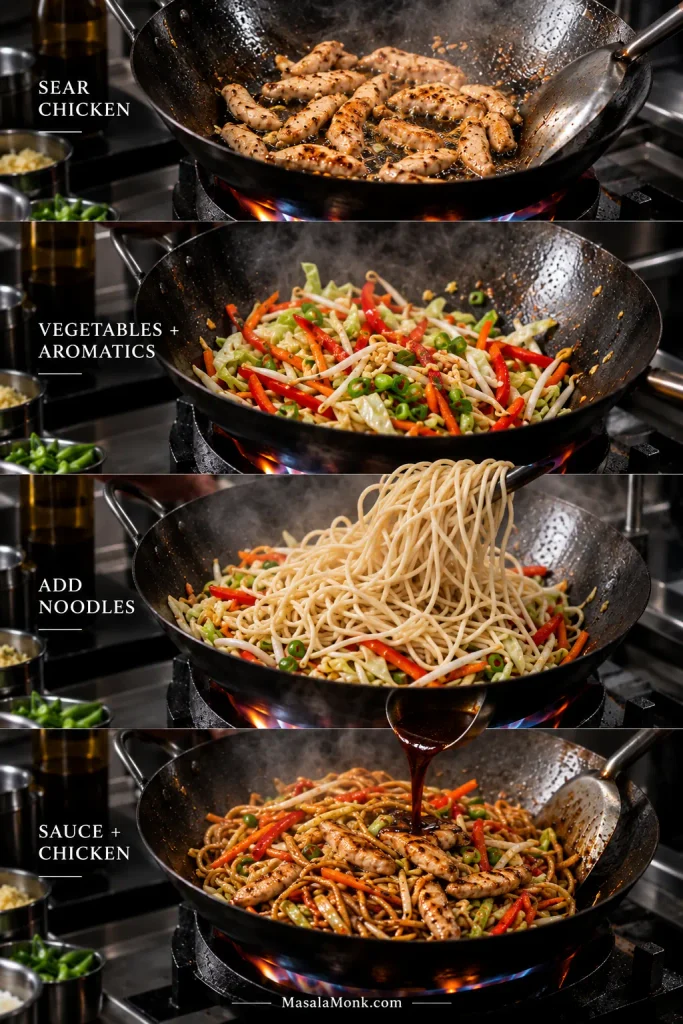
Four-stage wok sequence showing sliced chicken searing, vegetables and aromatics cooking, pale drained noodles being added, then sauce and chicken tossed through the noodles.
Notice that the sauce waits until the drained noodles are already in the pan. Adding it later lets the hot skillet turn thin liquid into a coating instead of making the vegetables and noodles simmer in it.

5. Sear the Chicken

Heat the skillet or wok over medium-high to high heat. Add 1 tablespoon / 15 ml oil. When it shimmers, add the chicken in a loose layer. Let it sit about 30 seconds, then stir-fry another 1½–2 minutes, until mostly opaque with some browning at the edges.

Transfer to a clean plate. Heavy overlap means two quick batches.

6. Cook the Vegetables and Aromatics

Add the remaining tablespoon / 15 ml oil, carrot, bell pepper and cabbage. Stir-fry about 2 minutes. The cabbage should begin to soften while the pepper stays bright and the carrot keeps some bite.

Add the scallion whites, garlic and ginger. Twenty or thirty seconds is enough. The aroma should sharpen almost immediately.

Visible water in the pan needs another moment to cook away.

7. Add the Noodles

Add the drained noodles and toss for about 30 seconds. Lift and turn them so the strands start slipping past one another instead of sitting in one dense mound.

8. Add the Sauce and Return the Chicken

Stir the sauce again, pour it into the pan, and return the chicken. Toss for 1–2 minutes. The noodles should deepen in color and the thin liquid should turn into a coating that moves with the strands.

9. Finish With Bean Sprouts and Scallion Greens

Add the bean sprouts and scallion greens and toss for 30–60 seconds, until heated through while the sprouts retain some crunch. Chicken should reach at least 165°F / 74°C; see the USDA safe minimum temperature chart for food-safety guidance.

Bean sprout safety: for anyone at higher risk of serious foodborne illness, cook the sprouts thoroughly until steaming hot or leave them out instead of serving them lightly cooked.

10. Taste, Then Stop When the Sauce Coats

Taste a noodle before changing anything. Flat flavor needs a little more seasoning; start with low-sodium soy a teaspoon at a time. A sauce that tastes good but feels too concentrated needs liquid instead—add 1 tablespoon / 15 ml stock or water.

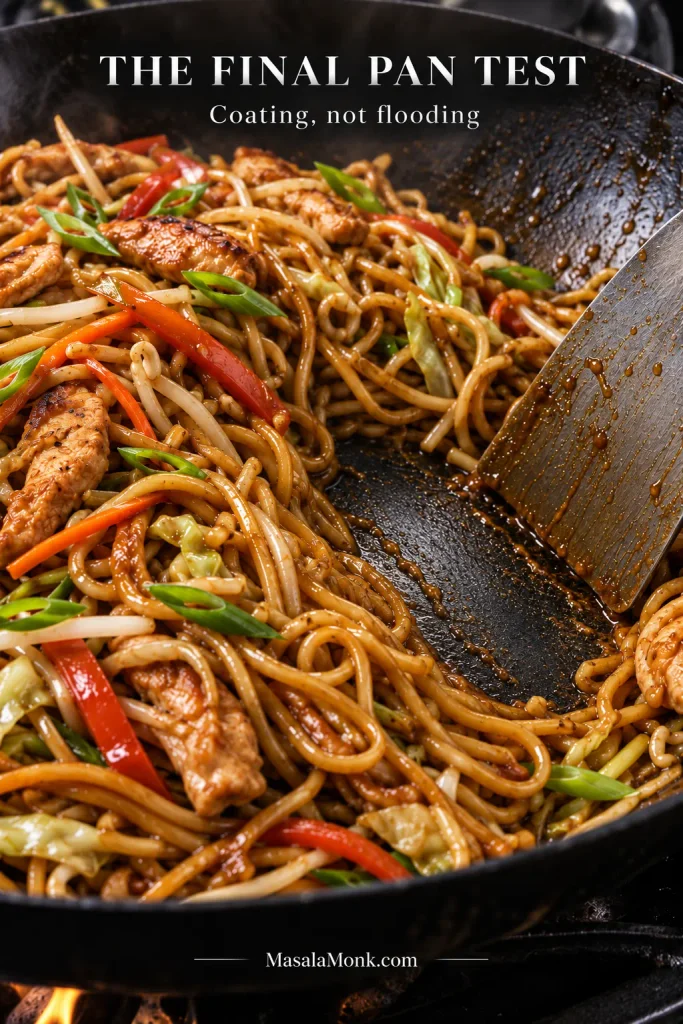
Lift a few strands. They should separate easily and still push back a little when you bite. Drag a spatula through the bottom of the pan: a little sauce may slowly creep back into the gap, but watery liquid should not flood it.

Close-up of chicken lo mein in a dark wok with a metal spatula clearing a channel through the noodles and exposing a thin layer of glossy sauce on the pan.
Judge the speed of the sauce, not its color. A channel that closes slowly suggests coating; one that floods immediately tells you free liquid is still sitting in the pan.

That’s the finish you’re looking for.

Serve immediately.

Doubling the recipe? Cook two batches unless you have an unusually large pan and powerful burner. A skillet can physically hold all the food and still be too crowded to cook it well.

Chicken Lo Mein or Chicken Chow Mein?

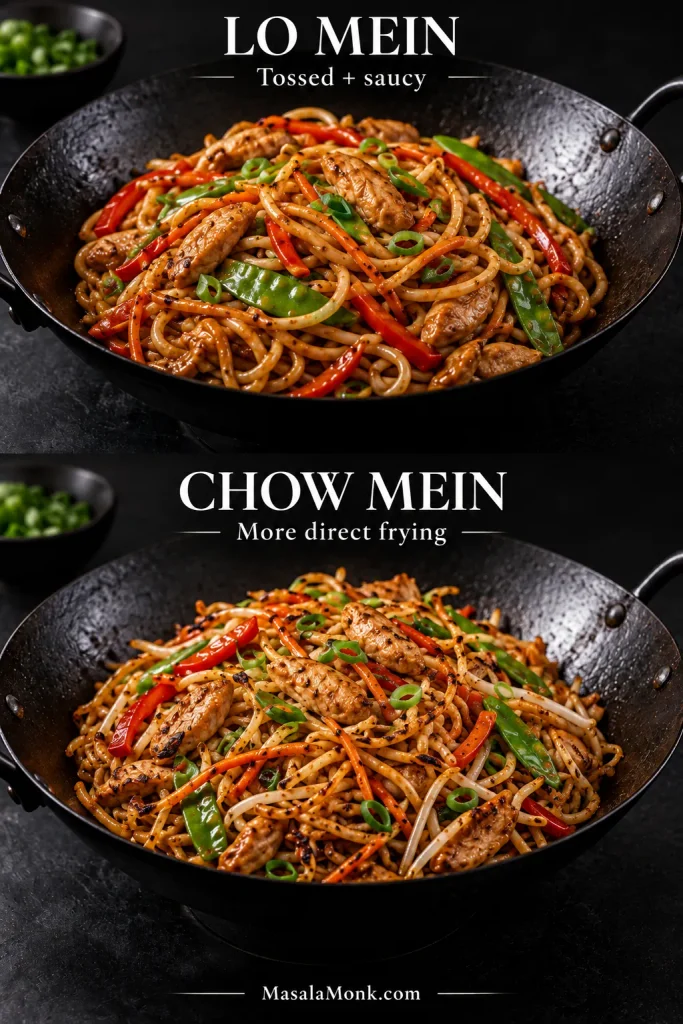
Chicken lo mein is tossed with sauce; chicken chow mein gets more direct frying.

In the Chinese-American takeout context we’re using here, lo mein starts with cooked or softened wheat or egg noodles that are tossed with chicken, vegetables and sauce. The strands stay springy, slippery and sauce-forward.

Chow mein generally gives the noodles more contact with the hot pan, producing a drier, toastier texture that can turn crisp around the edges. The terminology varies across regions and traditions, but that practical difference is useful when deciding which bowl you actually want.

Two matched wok photos compare glossy chicken lo mein with drier chicken chow mein showing more browned and toasted areas on the noodles.
The noodle surface gives another clue in the lo mein vs. chow mein comparison: lo mein looks more uniformly coated, while chow mein tends to show more irregular toasted spots where strands have contacted the hot pan.

For the fried, toastier version, use the Chicken Chow Mein Recipe.

Which Noodles Should You Use for Chicken Lo Mein?

Fresh Chinese wheat or egg noodles are the best fit for takeout-style chicken lo mein. Look for them in the refrigerated or freezer section of an Asian grocery. Dried Chinese wheat or egg noodles are the easiest shelf-stable substitute and work very well.

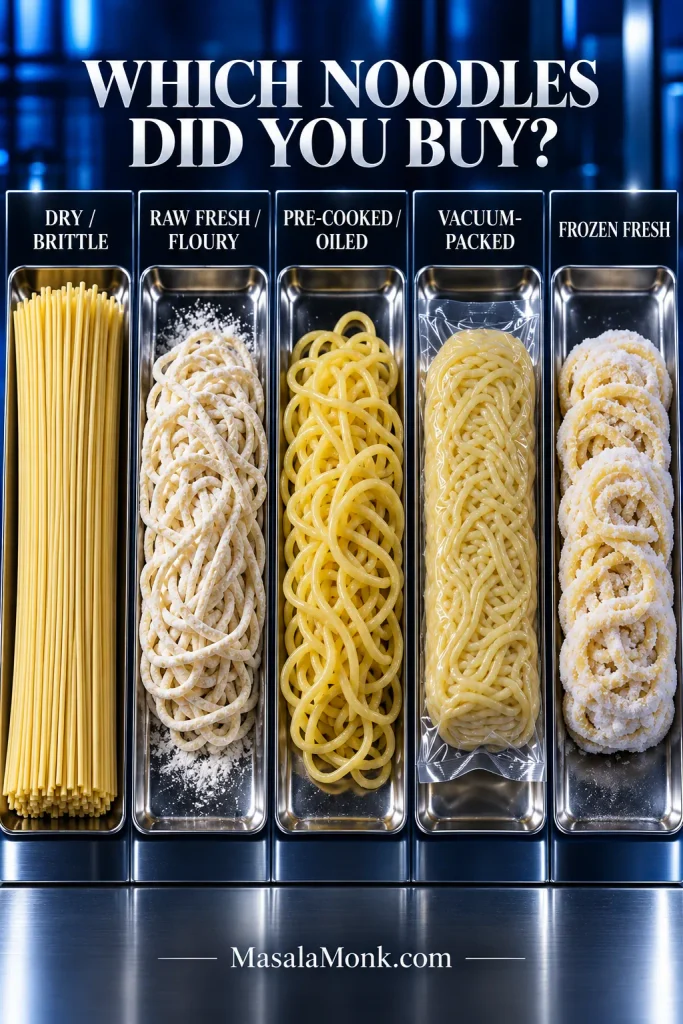
Noodle packages are frustratingly inconsistent. Some tell you exactly what you’ve bought; others barely tell you whether the noodles are raw.

Five noodle types displayed in metal trays and labeled dry and brittle, raw fresh and floury, pre-cooked and oiled, vacuum-packed, and frozen fresh.
When a noodle package tells you very little, check three things first: dry or hydrated, raw or pre-cooked, loose or compressed. Those clues usually tell you more about handling than the product name does.
What you seeWhat you probably haveBest way to handle it
Dry, brittle strandsDried Chinese wheat or egg noodlesBoil until just shy of fully tender
Soft but dusty or flouryRaw fresh noodlesLoosen first; cook briefly and check early
Soft, shiny or lightly oilyPre-cooked or oil noodlesUsually need loosening or a short hot-water treatment
Compressed vacuum-packed noodlesPartially cooked shelf-stable noodlesFollow the package and separate gently
Frozen noodle bundleFrozen fresh noodlesUse the package directions instead of dried-noodle timing

Raw fresh noodles deserve the most attention. A floury, compressed bundle can move from pleasantly chewy to doughy very quickly, so loosen it first and start checking early.

Fresh and Dried Noodles Are Not a Gram-for-Gram Swap

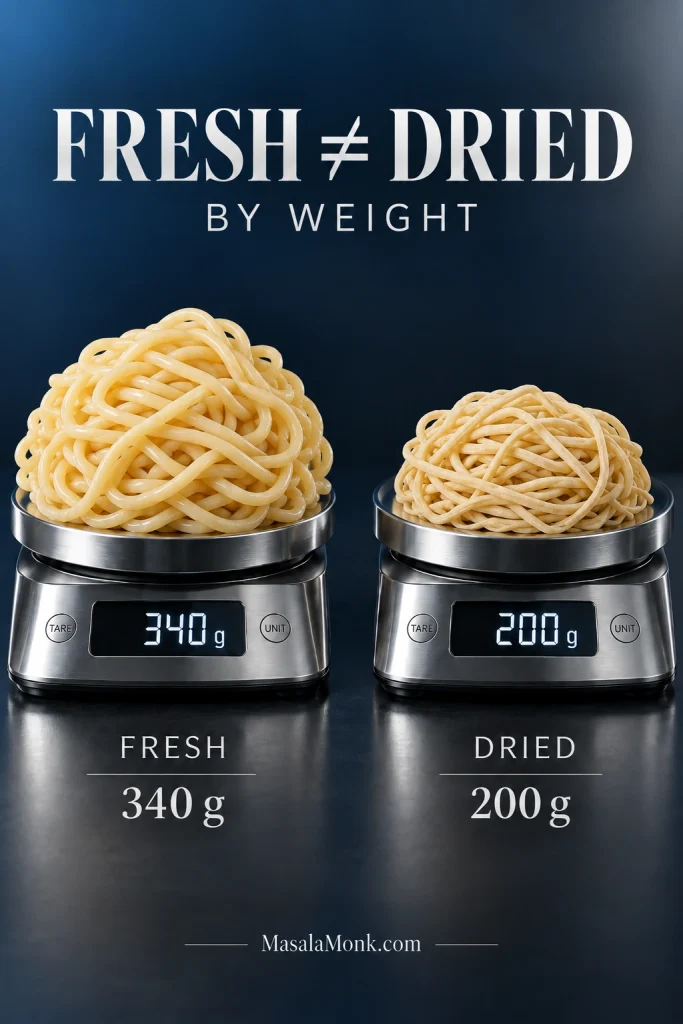
Fresh noodles already contain much more water. For this recipe, use about 12 oz / 340 g fresh noodles or 7 oz / 200 g dried noodles. Using the same dry weight as fresh would produce far more cooked noodle than this sauce and pan are designed to handle.

Fresh lo mein noodles weighing 340 grams and dried noodles weighing 200 grams on matching stainless-steel digital scales.
Treat 340 g fresh and 200 g dried as two separate starting points, not a conversion formula. Once either noodle is cooking, texture—not the number on the packet—still decides when it leaves the water.

Thin or Thick Lo Mein Noodles?

There is no single correct width. Medium Chinese wheat or egg noodles are an easy takeout-style choice. Thin strands soften quickly; thicker noodles need longer and can carry a little more sauce.

Cook the noodle in front of you.

No Lo Mein Noodles? Use What You Can Find

NoodleHow well it worksWhat to expect
Fresh Chinese wheat or egg noodlesBest fitSpringy, chewy and closest to familiar takeout texture
Dried Chinese wheat or egg noodlesExcellentFirm, dependable and easy to store
Yakisoba or Hokkien-style noodlesVery goodConvenient; check whether they are already cooked
RamenGoodUsually thinner and springier; discard the seasoning packet
Spaghetti or linguineUseful supermarket fallbackDifferent chew but still makes a satisfying lo mein-style dinner
Rice noodlesPossibleThe sauce works, but the finished texture is distinctly different

Spaghetti is a perfectly sensible supermarket fallback when that’s what you can actually buy. The chew is different, but cooking it firm and finishing it in the skillet gets you much closer than abandoning dinner because the specialty noodles aren’t there.

For another noodle dinner built around flexibility, Peanut Noodles can work with spaghetti, ramen, udon and several other noodles.

What the Noodles Should Feel Like Before the Skillet

Forget another universal minute count. Bite one strand.

Too firm: the middle still feels chalky or distinctly raw.

Ready: the noodle bends easily and is already edible, but the center has some chew left. Drain it here.

Too soft: there is almost no resistance left before the noodle even reaches the skillet.

Fresh noodle guide showing a compressed floury noodle block, loosened strands, and cooked noodles labeled too firm, ready and too soft.
Drain at the ready stage because the skillet is part of the cooking process too. A noodle that feels perfectly soft in the pot has little room left for the final toss with hot sauce.

Shake the colander firmly. Water dripping freely from the noodles is water that would otherwise land in the skillet and thin the sauce.

Extreme close-up of glossy brown-sauced lo mein noodles lifted with dark chopsticks beside a browned chicken slice, red pepper and scallion.

Chicken Lo Mein Sauce: How Saucy Do You Want It?

Chicken lo mein sauce is a savory brown sauce built from soy sauce, oyster sauce, Shaoxing wine, stock and sesame oil; dark soy deepens the color while cornstarch helps the sauce stay on the noodles.

Some people want the noodles lightly coated with almost nothing underneath. Others want the last forkful dragging a little sauce up from the bottom of the bowl.

Three matching black bowls compare lightly coated, takeout-saucy and extra-saucy chicken lo mein against a dark red background.
A saucier chicken lo mein needs more volume, not simply more seasoning. Stock, oyster sauce and a little extra body can increase the coating while keeping soy from doing all the work.
StyleWhat it looks likeAdjustment
Lightly CoatedEvery strand coated; almost no loose sauceUse 2 tbsp / 30 ml stock instead of ¼ cup / 60 ml and reduce sauce cornstarch to 1 tsp
Takeout-SaucyGenerous coating with a little sauce moving between the noodlesUse the recipe exactly as written
Extra-SaucyNoticeably wetter but still clearly a noodle dishAdd the extra-sauce mixture below

For Extra-Saucy Lo Mein

  • ¼ cup / 60 ml additional unsalted or low-sodium chicken stock or water
  • 1 tablespoon / 15 ml additional oyster sauce
  • 1 teaspoon / 5 ml additional low-sodium soy sauce
  • ½ teaspoon / about 1.5 g additional cornstarch

This gives you more sauce without simply doubling the concentrated seasonings. A loose-looking pan often needs another 20–30 seconds of heat before it needs more starch.

What Actually Changes the Sauce

Stock is the easiest lever for sauce volume: more makes the noodles wetter, less gives you a tighter coating. Cornstarch controls how readily that liquid clings once it gets hot. Toasted sesame oil is there for fragrance, so adding more will not make the sauce richer in the same way that oyster sauce or stock will.

Hoisin isn’t required in this version. Some takeout-style recipes use it for extra sweetness and body. Oyster sauce plus a little sugar keeps this one more savory.

For other combinations of meat, tofu and vegetables, the Stir Fry Sauce Recipe goes further into adjusting sauce around whatever is actually in the pan.

Keep the Salt and Color in Balance

Don’t sacrifice a properly seasoned bowl just to make it browner. A small amount of dark soy gives the noodles much deeper color, so regular soy does not need to carry that job.

Light soy does not mean low-sodium soy. In Chinese cooking, “light soy sauce” generally distinguishes the thinner everyday seasoning soy from dark soy; it does not mean reduced sodium. A full-sodium Chinese light soy may need a smaller starting quantity than the low-sodium soy used here. This guide to Chinese soy sauces is useful when the labels in the store are confusing.

Shaoxing cooking wine deserves a label check too because some bottles contain added salt. Leave the noodle water unsalted or only very lightly salted; plenty of seasoning arrives later.

About MSG: the ¼ teaspoon in the recipe is optional. A small amount can deepen the savory flavor without requiring another splash of soy sauce.

Keep the Chicken Tender While the Noodles Finish

Thin slicing, a short cornstarch marinade and removing the chicken before the final toss keep lo mein chicken tender. Slice it about ¼ inch / 6 mm thick, marinate for 10–15 minutes, then sear it quickly and take it out before it finishes cooking.

Three-stage chicken preparation showing thin raw slices measured at about six millimeters, lightly marinated glossy chicken and browned strips searing in a dark skillet.
Uniform thickness is the hidden advantage here. When the chicken strips are close to the same size, the thin pieces do not dry out while thicker ones are still waiting to brown.

Thighs stay juicy a little longer when the timing runs over. Breast works beautifully too; it simply has less patience for an extra few minutes in the skillet.

Look for browned edges while the center is still juicy. The chicken comes back with the sauce, so the first sear is not the moment to chase complete doneness.

The same broad technique works in Chicken Fried Rice, where the chicken also leaves the pan while the rest of dinner catches up.

Baking soda isn’t necessary here. Carefully measured baking soda can tenderize meat, but excess leaves an alkaline or soapy taste. Thin slicing and the short cornstarch marinade are more forgiving.

Best Vegetables for Chicken Lo Mein: Add Them by Cooking Speed

Cabbage, carrot, bell pepper and bean sprouts make a balanced default. Half a bell pepper left in the fridge, a handful of broccoli, mushrooms or snow peas can all join in. The order matters more than matching one prescribed vegetable list.

When it goes inGood choicesTypical time
Needs a head startThicker carrot slices, broccoli stems, firm green beansAbout 3–4 minutes depending on size
MiddleFine carrot matchsticks, broccoli florets, mushrooms, bell peppers, onionAbout 2–3 minutes
Almost doneCabbage, snow peas, bok choy stemsAbout 1–2 minutes
Last minuteBean sprouts, spinach, bok choy leaves, scallion greensAbout 30–60 seconds

A good bowl has contrast: cabbage softened around the edges, peppers still lively, sprouts with enough snap to be noticed against the noodles.

Four descending metal trays group stir-fry vegetables by cooking time, from thick carrots and firm green vegetables to cabbage, bean sprouts, leafy greens and scallions above a hot wok.
Cut size changes timing too: fine carrot matchsticks can cook with peppers, while thicker pieces need the earlier head start.

Broccoli works especially well. Keep the florets fairly small and give them a head start so the stems become crisp-tender before the noodles are finished.

For a dinner where broccoli really is the point, Beef and Broccoli goes deeper into keeping stalks and florets crisp-tender while the brown sauce stays concentrated.

Adding another couple of cups of vegetables? Mix up to 25% extra sauce and keep it beside the stove. Add only as much as the finished noodles need; mushrooms, spinach, cabbage and broccoli all change the pan differently.

Frozen Vegetables and Mushrooms

Frozen stir-fry vegetables are completely workable, but they release more water. Give that water time to disappear before adding the noodles and sauce.

Mushrooms are worth watching. They can dump enough liquid into the skillet to undo otherwise good work. Let them cook until the pan looks lively again and their flavor has deepened.

Why Doesn’t Homemade Chicken Lo Mein Taste Like Takeout?

Homemade lo mein often tastes flatter than takeout because the home skillet gets wetter and cooler: wet noodles, crowded ingredients and weak heat recovery dilute the sauce before it can properly coat the strands.

Water Dilutes More Than the Sauce

Water clinging to noodles or released by vegetables cools the skillet before it ever weakens the seasoning. A pan can contain all the right ingredients and still taste flat because the heat is busy boiling off water.

Give the Pan Room to Recover

A 12-inch skillet can make good lo mein; it just gives you less room than a 13- or 14-inch pan.

Listen to the pan. The active sizzle should return as you cook. A skillet buried under too much cold food stays quiet and steamy.

Four-panel comparison showing wet dripping noodles beside well-drained noodles, then a crowded steaming pan beside a wider, roomier sizzling pan of chicken lo mein.
A burst of steam is normal; steam replacing the sizzle is the warning sign. When excess water and crowding keep the pan quiet, browning and sauce concentration both slow down.

A Pale Batch Isn’t Necessarily Underseasoned

A pale pan that already tastes properly seasoned does not need another pour of regular soy. Use a small amount of dark soy next time if you want deeper color—or let the noodles stay a little paler.

High Heat Helps; Smoke Is Not the Goal

A very hot wok can add toasted aroma, but convincing lo mein does not require a smoke-filled kitchen. Properly drained noodles, enough cooking surface and fast tossing matter far more on an ordinary home stove.

When the sauce hits a properly hot pan, the smell should become richer almost at once—soy, ginger, scallion and toasted sesame carried by the steam coming off the noodles.

Fix Your Lo Mein

Find the problem that looks like yours and make the smallest correction first.

Mushy, Sticky or Gummy Noodles

Mushy: get them off the heat and serve. Next time, stop cooking the noodles earlier.

Sticking together: loosen them gently with tongs or chopsticks. A very starchy noodle may benefit from a brief rinse next time, followed by thorough draining.

Gummy after the sauce went in: toss with a tablespoon or two of hot stock or water. Noodles that were tacky before the skillet were already too soft or starchy.

Dry Noodles

Add 1–2 tablespoons / 15–30 ml unsalted stock or water and toss over heat. Strands that immediately loosen and shine again simply needed more free liquid.

Prefer that wetter finish? Start with the extra-saucy formula next time.

Four matching black bowls compare mushy noodles, sticky or gummy noodles, dry noodles and properly cooked loose glossy lo mein noodles.
Do not treat every clump as overcooked noodles. Mushy strands lose structure, gummy strands can still hold their shape but stick through tackiness, while dry noodles look tight and dull rather than sticky.

Too Salty—or Pale but Already Salty

Too salty: add a little unsalted stock or water and extra plain noodles or vegetables when available.

Pale but already salty: stop adding seasoning soy. Color and seasoning are separate problems.

Sauce Too Thin, Too Thick or Pooling

Too thin: keep the pan hot and uncovered for another 20–30 seconds. A tiny cornstarch slurry can help after obvious excess water is gone.

Too thick: add stock or water 1 tablespoon / 15 ml at a time while tossing.

Pooling underneath: toss briefly over heat. A puddle that quickly becomes a coating needed another moment; persistent watery liquid points to excess moisture in the pan.

The Noodles Taste Plain or the Whole Pan Is Watery

Thick sauce sitting unevenly on the noodles: add 1 tablespoon / 15 ml stock or water and toss again.

Sauce moves freely but tastes flat: add a teaspoon of low-sodium soy or a small spoonful of reserved sauce.

Watery and bland: evaporate first. Keep the skillet uncovered and hot for 30–60 seconds, then taste again.

Four matching bowls compare chicken lo mein with watery pooled sauce, overly thick pasty sauce, uneven patchy coating and an evenly coated glossy finish.
Look at where the sauce is, not only how dark the noodles are. Pooling points to free liquid, a pasty film points to excessive thickness, and pale patches reveal coating that never distributed evenly.

Dry Chicken or Limp Vegetables

Dry chicken: use the tender-chicken technique: slice it about ¼ inch / 6 mm thick, shorten the first sear, and get it out of the skillet earlier.

Limp vegetables: return to the vegetable cooking-order guide: give firm vegetables their head start and keep sprouts, leafy greens and scallion tops for the end.

Baking Soda Taste or an Oily Finish

Alkaline or soapy chicken: skip the baking soda next time and rely on thin slicing plus the cornstarch marinade.

Greasy noodles: use less neutral cooking oil. Toasted sesame oil is there for aroma, not as the main frying fat.

Practical Ingredient Swaps

If you don’t have…Use…What changes
Shaoxing wineDry sherry or plain sake; unsalted stock/water for alcohol-freeSherry is the closest easy substitute; stock loses some aromatic depth
Oyster sauceMushroom-based vegetarian oyster-style sauceClosest swap for savory body; hoisin is sweeter and changes the profile more
Dark soy sauceLeave it out instead of replacing all of it with regular soyThe noodles will be paler but easier to keep properly seasoned
Toasted sesame oilOmit itThe recipe still works, with less nutty aroma at the finish
Bean sproutsExtra cabbage, snow peas or bok choyYou lose some juicy crunch but not the structure of the dish

Missing bean sprouts or one specialty bottle shouldn’t stop dinner. These swaps change the edges of the dish, not its basic shape.

Making It Gluten-Free

Use gluten-free noodles, tamari or another certified gluten-free soy sauce, plus verified gluten-free dark soy and oyster-style sauces. Many Shaoxing wines contain wheat, so replace the bottle with a verified gluten-free dry sherry or another gluten-free cooking wine.

Gluten-free noodles vary enormously in how quickly they soften. Their texture gets the final vote on timing.

For a sweeter, stickier direction: changing the sauce makes more sense than adding extra sugar to this one. Homemade Teriyaki Sauce deliberately moves toward a sweeter, shinier glaze.

Adding shrimp: cook it separately until just shy of done, remove it, then return it near the end. Shrimp spends far less time in the pan than chicken.

Make Ahead, Store and Reheat

The easiest make-ahead wins are the sauce and vegetables. Mix the sauce and refrigerate it covered, then stir or shake it before cooking because the cornstarch settles. Slice the vegetables ahead and keep them chilled. The chicken can be cut in advance too; its marinade only needs 10–15 minutes.

Cooking the noodles ahead: possible, but not ideal. Stop them while they are still firm, cool them promptly and keep the strands loose instead of pressing them into one warm mound. If you are unsure where to stop, use the noodle doneness guide. A very small amount of neutral oil can help a particularly sticky batch.

Store and Reheat

Refrigerate leftovers promptly—within 2 hours—in an airtight container and use them within 3–4 days.

The next-day skillet version can be excellent. Add 1–2 tablespoons / 15–30 ml water or unsalted stock, cover briefly to loosen the cold noodles, then uncover and toss until everything is steaming hot. Reheated leftovers should reach 165°F / 74°C.

Split image showing cold chicken lo mein in a glass refrigerator container and the same noodles steaming in a wok while a small amount of water is added.
When reheating chicken lo mein, the goal is separation rather than more sauce. A little steam loosens chilled starch so the original coating can move with the noodles again.

For the microwave, add a small splash of water, cover loosely and heat in short intervals, stirring between them, until the food reaches 165°F / 74°C throughout.

Freezing: possible, though not preferred. Noodles soften further after thawing and crisp vegetables lose much of their bite. Refrigeration gives you a much better second bowl.

What to Serve With It

Chicken lo mein already brings noodles, meat and plenty of vegetables to the bowl. It doesn’t need a parade of sides.

For something cold and crisp, Cucumber Salad makes a refreshing contrast. Its rice-vinegar, sesame, ginger and scallion variation sits especially well beside the warm savory noodles.

A small bowl of Egg Drop Soup takes the meal in the other direction: warm broth, soft egg ribbons and no extra heavy starch.


Finished chicken lo mein in a dark bowl on polished black stone, gently steaming in front of a wok and stainless-steel equipment in a dim professional kitchen.

Serve the lo mein straight from the pan while the strands are loose and shining, the vegetables still have bite and the bean sprouts still crunch. Once you recognize that finish—the sauce riding with the noodles, the center still springy—you do not need a restaurant burner or one perfect brand of noodle to find your way back to it.

Posted on — Leave a comment

Sesame Chicken Recipe: Crispy Chicken With Sticky Sesame Sauce

Bowl of crispy sesame chicken coated in thin amber-brown glaze, lightly topped with sesame seeds and scallions, with rice and broccoli behind.

A good sesame chicken recipe has one awkward problem to solve: the chicken should still have crisp edges after it meets the sticky sauce. Get the timing right and the glaze catches on the fried surface instead of pooling underneath it. The chicken stays juicy inside, toasted sesame smells nutty and warm, and every bite keeps some contrast between crisp crust and glossy sauce.

This is the takeout-style version—the kind with real texture under the sauce, not simply diced chicken simmered in a sweet skillet glaze. Thighs give you the widest margin for juicy meat, although breast works too. You do not need restaurant equipment or a roaring wok burner. Steady oil temperature and a finished glaze waiting for the chicken matter much more.

The second fry earns its place because home cooking gives you one advantage takeout cannot: the chicken can go from hot oil to glaze to plate almost immediately.

This sesame chicken recipe makes Chinese-American fried chicken coated in a sweet-savory sesame glaze. For the crispest version, fry once at 350°F / 175°C, rest on a wire rack while the sauce thickens, then fry again at 375°F / 190°C. Toss only after the glaze is ready and serve straight away. The largest pieces should reach at least 165°F / 74°C.

Sesame Chicken Recipe

Allow about 50–60 minutes, depending on your pot, burner and batch size. Much of the work overlaps. Think of it as three phases: fry the chicken, finish the sauce during the rest, then crisp and glaze just before serving.

Chicken
24 oz / 680 g

Cut
1–1¼ in / 2.5–3.2 cm

First Fry
350°F / 175°C

Second Fry
375°F / 190°C

Serves
4 generously; up to 6 with sides

Prep
About 25 minutes

Cook
About 25–35 minutes

Total
About 50–60 minutes

For the Chicken

  • 24 oz / 680 g boneless skinless chicken thighs, cut into roughly 1–1¼ in / 2.5–3.2 cm pieces
  • 1 tablespoon / 15 ml reduced-sodium soy sauce
  • 1 tablespoon / 15 ml Shaoxing wine or dry sherry
  • 1 large egg white, about 1 oz / 30 g
  • 1 teaspoon / about 2 g finely grated fresh ginger
  • 1 teaspoon / 5 ml toasted sesame oil
  • ¼ teaspoon white pepper

Chicken breast: Use the same weight and cut it to the same size. It has less margin for overcooking, so watch the center temperature closely.

No Shaoxing wine? Dry sherry is the closest easy substitute. For an alcohol-free version, use 1 tablespoon / 15 ml unsalted or low-sodium chicken stock or water. Rice vinegar supplies acidity, so it is not a Shaoxing substitute.

For the Crisp Coating

  • ¾ cup / about 90 g cornstarch
  • ½ cup / about 60 g all-purpose flour
  • 1½ teaspoons / about 6 g baking powder
  • ½ teaspoon fine salt
  • ¼ teaspoon white pepper

For Frying

  • Neutral high-heat oil such as canola or vegetable oil, enough to reach about 2 in / 5 cm deep in your pot; peanut oil is another option

For the Sticky Sesame Sauce

  • 3 tablespoons / 45 ml reduced-sodium soy sauce
  • 3 tablespoons / about 63 g honey
  • 1 tablespoon / about 13 g packed brown sugar
  • 2 tablespoons / 30 ml unseasoned rice vinegar
  • 2 tablespoons / about 30 g ketchup
  • 1 tablespoon / 15 ml oyster sauce, or vegetarian mushroom stir-fry sauce
  • 2 tablespoons / 30 ml water
  • 2 teaspoons / about 4 g finely grated fresh ginger
  • 2 teaspoons / about 6 g finely minced garlic
  • 1 teaspoon / 5 ml neutral oil
  • 1 teaspoon / 5 ml toasted sesame oil
  • ¼ teaspoon MSG, optional
  • ¼ teaspoon crushed red pepper flakes, optional

Soy sauce varies: Chinese light soy works, but some brands are saltier than reduced-sodium all-purpose soy. Start with 2 tablespoons / 30 ml in the sauce if yours is especially assertive and add more after tasting. Dark soy should not replace the full amount one-for-one.

No oyster sauce? Use 1 tablespoon / 15 ml vegetarian mushroom stir-fry sauce. Brands differ in saltiness, so taste before adding extra soy.

For the Cornstarch Slurry

  • 2 teaspoons / about 5 g cornstarch
  • 1 tablespoon / 15 ml cool water

To Finish

  • 2 tablespoons / about 18 g toasted sesame seeds
  • 2 scallions, thinly sliced, optional

Raw sesame seeds need only a few minutes in a dry skillet over medium-low heat. Stir often and remove them when they smell nutty and turn lightly golden.

Allergen note: With conventional oyster sauce, the recipe contains sesame, soy, wheat, egg and shellfish. Peanut oil adds a peanut-allergy consideration if you use it. A vegetarian mushroom stir-fry sauce removes the oyster, but check individual labels whenever you are cooking for a food allergy.

Equipment

  • Frying: deep heavy-bottomed pot or wok, deep-fry thermometer, spider or skimmer, and a wire rack set over a sheet pan
  • Doneness: instant-read food thermometer
  • Sauce: wide skillet or wok

Before the oil gets hot: mix the soy sauce, honey, brown sugar, rice vinegar, ketchup, oyster or mushroom sauce, water and optional MSG. Keep the cornstarch slurry separate. Put the rack, skimmer and thermometers within reach, and have the sesame seeds, scallions and serving dishes ready. If you’re serving rice, start it before heating the frying oil.

Instructions

Four-step sesame chicken guide showing lightly glossy seasoned chicken, rough dry coating, pale first fry, crisp second fry, and a 165°F / 74°C temperature check.
Use these as batch markers, not a color target. The first fry can stay pale; later batches darkening faster are a sign your oil is running hotter.

Season, Coat and First Fry

  1. Season the chicken. Mix the chicken with soy sauce, Shaoxing wine, egg white, toasted sesame oil, ginger and white pepper. The pieces should look lightly glossy, with very little loose liquid underneath. Rest for 10–15 minutes while you mix the coating and finish the remaining prep.
  2. Coat the chicken. Whisk the cornstarch, flour, baking powder, salt and white pepper in a wide bowl. Let obvious excess seasoning drip from each handful of chicken, then toss through the dredge. Press and turn until the wet surface disappears under a rough, irregular coating. A few uneven edges are exactly what you want. Rest for about 5–8 minutes while the oil heats. Discard any dredge left in the bowl after it has contacted raw chicken.
  3. Heat the oil. Add enough neutral oil to reach about 2 in / 5 cm deep in a deep pot with plenty of empty space above it. Heat to 350°F / 175°C. Keep water away from hot oil, never overfill the pot and never leave it unattended.
  4. Fry the first round. Lower in enough chicken to form a loose layer. Give the coating a moment to set before moving the pieces much. Fry for about 2½–3½ minutes. The surface should change from soft and chalky-looking to firm and pale golden. Pale is fine; deeper color comes later. If the oil stays much below 325°F / 163°C, make the next batch smaller. Transfer to the rack and let the oil recover.

Make the Glaze

  1. Cook the sauce while the chicken rests. Heat 1 teaspoon neutral oil in a wide skillet or wok over medium heat. Add the garlic, ginger and optional chile flakes. After 15–30 seconds they should smell fragrant but not browned. Pour in the prepared sauce mixture and bring it to a lively simmer. This is still the sauce mixture; once it thickens enough to ribbon from a spoon and cling to the chicken, think of it as the glaze.
  2. Thicken the glaze. Stir the slurry again and add about two-thirds. Let it bubble briefly. The bubbles become slower and shinier as it thickens. When the glaze coats the back of a spoon and falls into the pan in a ribbon, turn off the heat and stir in the toasted sesame oil. If it looks right before all the slurry is used, stop there.

Second Fry, Glaze and Serve

  1. Fry a second time. Raise the oil to 375°F / 190°C. Starting with the chicken that came out first, fry in batches for another 45–75 seconds. The crust should tighten, deepen slightly and look drier. Check one of the largest pieces by inserting an instant-read thermometer through the side so the tip reaches the center.
    If it is under 165°F / 74°C: return those pieces briefly and check again.
    If the crust is already deeply browned: let the oil settle closer to 350°F / 175°C before finishing them.
  2. Glaze. Warm the glaze briefly over low heat if it has tightened, then switch off the heat. Add the chicken and turn the pieces only long enough for the fried surface to shine with a thin coating.
  3. Serve. Add the toasted sesame seeds and scallions and move the chicken straight to the table.

Chicken temperature: Time is only a guide. Poultry should reach 165°F / 74°C. See the safe minimum internal temperature chart for official guidance.

How to Keep Sesame Chicken Crispy

Crispness is a chain. The coating has to grip the chicken, the first fry has to set it, the rack has to let steam escape, and the finished glaze has to cling without soaking the crust.

Extreme close-up of a cut sesame chicken piece showing moist cooked chicken, craggy fried crust, thin amber glaze, sesame seeds and scallion.
Use the cross-section to judge coating thickness. The crisp shell should be much thinner than the chicken inside; if crust and meat look nearly equal, too much wet mixture or dredge probably built up before frying.

Chicken Choice and Cut Size

If you have no strong preference, use thighs. They stay juicy across a wider cooking window and make batch frying more forgiving. Breast gives a leaner, firmer bite and works well too.

Aim for pieces around 1–1¼ inches / 2.5–3.2 cm. They do not need to be identical; they just need to be close enough in size that the smallest pieces are not drying out while the largest are still cooking.

Build a Coating That Holds

The seasoned chicken should feel tacky and lightly slick, with very little liquid pooled underneath. The egg white gives the dry coating something to grip. Carry a puddle of marinade into the dredge and the flour and starch can turn into heavy patches of paste.

Cornstarch brings brittle crunch, flour gives the crust structure, and baking powder makes the surface lighter and more irregular. Smooth is not the goal. You should still feel like you are eating chicken first, not a thick shell of breading.

Potato starch works too. Swap 90 g for the 90 g cornstarch, then add a little more only where wet patches remain.

Before frying, look for an opaque, rough surface with small irregular bits of coating clinging to the chicken. Wet shiny patches need another turn through the dredge. Loose white powder needs pressing in. Thick paste is too much.

Four coating examples for sesame chicken: too wet, too powdery, too pasty, and ready with rough opaque coating clinging to the chicken.
Craggy is useful only when those crags are firmly attached. Loose flour breaks away in hot oil, while attached rough edges create more crisp surface for the glaze to catch later.

For this flour-and-starch coating, a short 5–8 minute rest lets the damp spots settle. Pure starch coatings behave differently.

First Fry, Rest, Then Fry Again

The first batch tells you what your pot, burner and quantity of oil can actually handle. Watch how quickly the temperature recovers after the chicken goes in; that is more useful than an arbitrary piece count.

Oil Depth and Batch Size

About 2 inches / 5 cm of oil gives the chicken heat around several sides at once and keeps damp coating from sitting against the metal for too long.

If the thermometer recovers quickly and the pieces separate easily, the batch size is working. If loose coating crumbs begin to darken, skim them out before the next batch.

Let the Crust Set

Fresh dredge is fragile when it first hits the oil. Leave the chicken mostly alone until the exterior firms up. Then a skimmer can move the pieces without scraping away the crust.

Two pieces touching is not a disaster. Ease them apart once the coating has set.

Rest, Then Finish With a Second Fry

Spread the first-fried pieces across a rack in one layer so steam can escape underneath. By the end of the rest, the surface should feel dry, not steamy.

The second fry is the finish, not a rescue. The hotter oil tightens and dries a crust that has already set. This is when the chicken starts looking like the dish you came for: deeper gold, drier edges and a coating that feels crisp against the skimmer.

If the first fry left a batch pale and oily, correct the oil temperature and batch size before continuing. A longer second fry will not rebuild a crust that never formed properly.

Three-stage sesame chicken frying guide showing a pale first fry at 350°F / 175°C, rack rest to dry the crust, and crisp second fry at 375°F / 190°C.
A wire rack works better than paper towels between fries because air can move underneath the chicken. Trapped steam has an easier escape route, so the second fry starts with a drier crust.

Sesame Chicken Sauce: From Sauce to Glaze

Sesame chicken sauce is a sweet-savory glaze made with soy sauce, honey, brown sugar, rice vinegar, ketchup, oyster or mushroom stir-fry sauce, garlic, ginger and toasted sesame oil. Before thickening, it is the sauce mixture. Once it ribbons from the spoon and clings instead of running off, it has become the glaze you need for fried chicken.

Honey gives the glaze rounded sweetness and shine, while brown sugar adds a slightly darker caramel note. Rice vinegar keeps the sweetness in check. Ketchup adds body, tang and the reddish-brown color familiar in Chinese-American sesame chicken sauces.

When the garlic and ginger hit the warm oil, the pan finally starts smelling like sesame chicken instead of a bowl of measured ingredients. Toasted sesame oil goes in after thickening so its aroma stays brighter.

Finely minced garlic and grated ginger sizzling briefly in a thin film of oil in a dark wok over a blue gas flame.
Have the mixed sesame chicken sauce beside the stove before the aromatics hit the wok. This fragrant stage lasts only seconds.

Know When the Glaze Is Thick Enough

What It DoesWhat It MeansNext Move
Runs straight off the spoonToo thinSimmer another 20–30 seconds and check again. Add more slurry only if needed.
Coats the spoon and falls in a ribbonReadyStop thickening.
Falls in heavy ropes or looks jelly-likeToo thickLoosen with water 1 teaspoon / 5 ml at a time.

Stir the slurry just before pouring because cornstarch settles quickly. Start with about two-thirds. The bubbles become slower and shinier as the glaze thickens.

It will tighten further as it cools. Stop while it still moves easily from the spoon. If you go a little too far, a teaspoon or two of water usually brings it back.

Three spoon tests for sesame chicken glaze showing sauce that is too thin and runny, ready and ribboning, and too thick and rope-like.
Let each slurry addition heat through before adding more. Cornstarch thickens with heat, so rushing the next spoonful can take a loose sesame chicken glaze past ribboning and into a gummy texture.

Fix the Glaze Before Adding the Chicken

  • Slightly too sweet: add unseasoned rice vinegar 1 teaspoon / 5 ml at a time.
  • Clearly too sweet: start with 1 tablespoon / 15 ml water, 1 teaspoon / 5 ml soy sauce and 1 teaspoon / 5 ml rice vinegar. Simmer briefly and taste again.
  • Too salty: add water 1 teaspoon / 5 ml at a time. If the glaze becomes too thin, add 1 teaspoon of the prepared slurry, simmer briefly and reassess before adding more.
  • Too sour: add honey 1 teaspoon / about 7 g at a time.
  • Needs thinning: add water 1 teaspoon / 5 ml at a time.
  • Still too thin: simmer another 20–30 seconds first. If it still runs straight off the spoon, add prepared slurry 1 teaspoon at a time.
  • Sesame flavor feels quiet: add more toasted seeds first, then a small splash of toasted sesame oil if needed.

Want It Sweeter or Need Extra Glaze?

For sweeter honey sesame chicken, add another tablespoon / about 21 g honey. For a deliberately less-sweet batch, omit the brown sugar first. If you want to pull it back further, reduce the honey by 1 teaspoon / about 7 g at a time.

If you want more sauce, make more—but reserve it separately. Scale the sauce and slurry to 1½ times the listed amounts, thicken it, then move roughly one-third to a bowl. Extra glaze belongs with the rice or broccoli, not poured over the finished crust.

For a looser sauce that works across chicken, tofu, vegetables and noodles, see our stir fry sauce recipe. The glaze here is intentionally more concentrated because it has a different job: coating fried chicken quickly.

How to Sauce Sesame Chicken: The Toss Is the Timer

Have the glaze completely finished before the chicken goes in. Warm it only if it has become stiff, switch off the heat, then turn the chicken through the pan just long enough to coat it.

You should still be able to see the crust underneath the shine. A few streaks of glaze at the bottom of the pan are normal. A puddle means the chicken has more sauce than it needs.

Sesame chicken pieces being tossed in a dark wok with thin amber glaze clinging to the craggy fried crust and no pool of sauce underneath.
Turn off the heat and coat quickly. A thin film needs fewer turns, which gives the fried edges less time to absorb moisture.

This is where the extra effort pays off. The chicken can go from its second fry to glaze to plate in under a minute, before a takeout box has the chance to steam the crust.

Sauced fried chicken will eventually soften. What you want is crunch when it reaches the table and through those first bites—not a promise that glazed chicken somehow stays crackly forever.

What to Serve With Sesame Chicken

Pile the chicken beside hot steamed rice and something green while the glaze is still shining and the crust still has some snap. Broccoli is an easy choice: the rice catches extra sauce, while the broccoli keeps the plate from becoming too sweet.

Plate of glazed sesame chicken served with steamed white rice and bright green broccoli on a dark green ceramic plate.
Keep the green vegetable simply seasoned. Hot rice catches extra glaze, while a clean green side keeps the next sesame chicken bite from feeling too sweet.

If you’re making plain rice, our guide to cooking rice covers jasmine, long-grain, basmati and other methods.

For a fuller takeout-style dinner, Chicken Fried Rice gives you a seasoned rice option. If you would rather serve noodles, Chicken Chow Mein fits the same kind of meal. Bok choy, green beans or a cold cucumber salad work well too.

Sesame Chicken Troubleshooting

Find the moment when it changed. Chicken that was already soft before the glaze arrived points toward the coating or fryer. Chicken that stayed crisp until glazing points toward glaze thickness, amount or timing.

Coating and Frying Problems

ProblemLikely CauseWhat to Change
Coating falls off in the oilToo much surface liquid, weak contact with the dredge or rough handling at the startDrain obvious excess seasoning, press on the coating and give the crust time to set.
Crust slides off when bittenThe coating is too thick or poorly bondedUse a thinner layer and carry less loose marinade into the dredge.
Pieces fuse togetherThe fryer is crowded, or pieces were lowered against one another before the crust setLeave more room between pieces. If two touch, wait until the coating firms before easing them apart.
Crust is hardToo much dry coatingKeep the layer irregular but relatively thin and knock away heavy excess.
Chicken is pale and greasyThe oil stayed too coolLet it recover fully and reduce the next batch size.
Chicken darkens too quicklyThe oil is too hot or the pieces are unusually smallCheck the thermometer and lower the heat before continuing.
Coating sticks to the potToo little oil or the crust stayed against the metal before settingUse roughly 2 in / 5 cm of oil and wait until the coating firms before moving the pieces.
Second fry does not make it crispThe first fry left the crust greasy, wet or damagedCorrect the first-fry conditions; do not simply extend the hotter fry.
Five sesame chicken frying problems shown together: coating falling off, pale greasy crust, hard coating, fused pieces, and chicken stuck to the pot.
For a failed batch, keep one piece unsauced. Comparing it with a glazed piece quickly tells you whether the texture problem began in the fryer or appeared during finishing.

Glaze and Finishing Problems

ProblemLikely CauseWhat to Change
Chicken was crisp until glazedThe glaze was too thin, too abundant or left around the chicken too longFinish the glaze first and use only enough to coat the surface.
Chicken softens after several minutesMoisture from the glaze is working into the crust, especially if the chicken is heavily sauced or coveredServe promptly and keep extra glaze separate.
Glaze flavor or texture is offThe balance or thickness needs adjustmentFix it before adding chicken using the recovery guide above.
Sesame flavor tastes bitterBurned seeds or overheated toasted sesame oilToast seeds gently and add sesame oil after thickening.
Glaze troubleshooting board showing correct thin lacquer, puddled glaze, glaze that is too thin, softened chicken after saucing, and bitter scorched sesame.
When the glaze looks uncertain, test one piece before adding the whole batch. Visible crust means continue; pooling, running or heavy ropes mean fix the glaze first.

Sesame Chicken vs General Tso’s Chicken vs Orange Chicken

The main difference is the glaze. Sesame chicken is usually mild and sesame-forward. General Tso’s chicken is generally darker, tangier and more chile-forward, while orange chicken is defined by citrus.

Restaurant versions vary, but sesame chicken should taste meaningfully of toasted sesame—not like a generic sweet sauce with seeds scattered over it. For a chicken stir-fry built around dried chiles, peanuts and a tangier sauce, see our Kung Pao Chicken.

Three plated chicken dishes compared vertically: amber sesame chicken with sesame, dark General Tso's chicken with dried chiles, and brighter orange chicken with citrus.
Look past color: toasted sesame, chile and citrus are the flavors that distinguish sesame chicken, General Tso’s chicken and orange chicken.

Make Ahead, Store and Reheat

If you know you will save some chicken, keep that portion unsauced. Fried coating has a much better chance of crisping again when it has not spent the night absorbing glaze.

What You Can Prepare Ahead

  • Sauce base: mix the soy sauce, honey, brown sugar, rice vinegar, ketchup, oyster or mushroom sauce, water and optional MSG up to 3 days ahead. Refrigerate in a covered container.
  • Chicken: cut it up to 1 day ahead, keep it covered and refrigerated at 40°F / 4°C or below, and do not add the egg-white seasoning until you are closer to cooking.
  • Dry dredge: combine the cornstarch, flour, baking powder, salt and white pepper several days ahead and keep it airtight and dry.
  • Slurry: mix it close to cooking. Cornstarch settles quickly, so stir again immediately before using.

Cooked Chicken for Another Day

Do not deliberately partly cook chicken, chill it and finish it later. Cook it fully to 165°F / 74°C, cool promptly and store safely.

Re-crisp fully cooked unsauced pieces in a hot oven, air fryer or briefly in hot oil before adding warm glaze. The result will not be identical to a fresh batch, but keeping chicken and glaze separate gives you the best chance.

Leftovers and Freezing

Refrigerate leftovers within about 2 hours and use refrigerated cooked chicken within about 3–4 days. Reheat thoroughly to 165°F / 74°C.

Unsauced chicken responds best to dry heat from an oven or air fryer. Already-glazed chicken is easier to warm in a skillet or wok; add a teaspoon or two of water if the glaze has tightened too much. The microwave is fastest and gives you the softest crust.

To freeze: cool fully cooked unsauced chicken, freeze the pieces in a single layer until firm, then transfer them to an airtight freezer container or bag. Freeze the glaze separately. USDA lists about 4 months as the best-quality freezer window for cooked or fried chicken, although the crust will still be at its best when freshly cooked. See the USDA chicken storage guidance.

Let frying oil cool completely before straining it for reuse or transferring it for disposal. Never pour cooking oil down the sink.

Five-step sesame chicken storage guide showing sauce base, cut raw chicken, unsauced leftovers, dry-heat re-crisping, and cooked chicken frozen separately from glaze.
For better leftovers, separate is better: dry chicken re-crisps more easily, while the glaze can be warmed and added just before eating.

Sesame Chicken Questions

1. What is sesame chicken made of?

A Chinese-American sesame chicken recipe usually combines bite-size chicken, a crisp fried coating and a sweet-savory sesame glaze made with soy sauce, honey or sugar, vinegar, garlic, ginger and sesame.

2. Is sesame chicken spicy?

Usually it is mild. The optional ¼ teaspoon crushed red pepper gives this sauce a little background warmth. Leave it out for a mild batch or increase it gradually for more heat.

3. Can I use chicken breast instead of thighs?

Yes. Keep the pieces the same size and use 165°F / 74°C at the center as your doneness check. Breast has less margin for overcooking than thigh.

4. Is sesame chicken gluten-free?

Not as written. The flour, conventional soy sauce, many oyster or mushroom sauces, some Shaoxing wines and some packaged baking powders can contain gluten or require label checking. Use certified gluten-free tamari, certified gluten-free sauces and baking powder, plus dry sherry or stock unless your Shaoxing wine is confirmed gluten-free.

For the coating, a pure cornstarch or potato-starch version can provide a gluten-free route, but it behaves differently from the flour-and-starch dredge above. Coat the chicken close to frying and expect a more brittle crust.

5. Can I make sesame chicken without honey?

You can replace the 3 tablespoons / about 63 g honey with 4 tablespoons / about 50 g packed brown sugar plus 1 tablespoon / 15 ml water as a starting point. Honey adds body as well as sweetness, so judge the finished glaze by taste and the spoon-coating cue.

6. Can I use potato starch instead of cornstarch?

Potato starch works well in the same amount: start with 90 g in place of the 90 g cornstarch. Add a little more only if wet patches remain on the chicken.

7. Can I make sesame chicken in an air fryer or oven?

An air fryer or oven can work, but not by moving this exact deep-fry dredge unchanged into dry circulating heat and expecting the same crust. Those methods work better with coatings designed for them. If you mainly want sesame chicken flavor without breading or a pot of oil, our Sesame Ground Chicken is the easier skillet route.


When the chicken is freshly glazed and the crust still has some snap, get it to the table.

Dark chopsticks lifting two glossy sesame chicken pieces above a bowl, with visible crisp ridges, sesame seeds, scallion and a small glaze droplet.
Thin glossy glaze, craggy fried edges, and enough crunch left for the first bites.

Extra sauce can wait for the rice. The chicken shouldn’t.